Embed Size (px)
Citation preview
46” Tsunami Pro Instruction Manual 2012 Sport Version
It is vitally important that you read this manual thoroughly to obtain the
correct setup and the safest, most rewarding operation of your Arrow Shark
RC Boat. Please study the manual carefully before attempting to work on or
operate your boat.
Safety Precautions * This is a high performance radio controlled boat it is not a toy. Adult supervision is required for children who should be warned about the dangers of playing with gas engines, fast spinning propellers and of being in close proximity to water. * This boat is controlled by radio signals which are susceptible to possible interference from other transmitters, paging systems and other sources of electrical noise. Before turning on your radio transmitter and receiver, make sure that no one else in the area is operating a radio on the same frequency (channel). * After turning on your radio, watch it carefully to ensure that it is operating correctly and not being affected by interference. Carry out a range check as advised by the radio manufacturer to ensure you will be able to maintain control of your boat at your planned maximum operating distance. * Always fit a "Fail Safe" device so that your engine is stopped should the radio encounter interference, go out of range or have its battery go flat. Some radios have inbuilt Fail Safe systems, but others do not. They can be purchased separately at any good hobby shop. * When the engine is running, the propeller can spin at high speed. Never touch the propeller anytime the engine is running. Be very careful that any item such as loose clothing, shirtsleeves, ties, scarves, long hair or anything else does not get anywhere close to the propeller, even when it is stationery. If the clutch engages, the propeller can

start to spin without warning and loose clothing etc can become entangled and cause injury.
* The speed and mass of this boat can inflict property damage and severe personal injury if a collision occurs. Never run this boat in the presence of swimmers or where the possibility of collision with people or property exists. * Model engines generate considerable heat. Do not touch any part of your engine until it has cooled. Touching the cylinder head or any part of the exhaust system may result in a serious burn. * Gasoline is poisonous. Do not allow it to come into contact with the eyes or mouth. Always store fuel in a clearly marked container and out of the reach of children. * Gasoline is extremely volatile. Never allow naked flame or any possible source of ignition near your boat. Be very careful when refuelling your boat. * This boat is set up to racing standards. If you are starting from scratch at driving a fast boat, get a more experienced driver to take your boat out for the first few times. When you are initially going faster, do so on clear waters away from other boats and with your more experienced driver close by to give advice and support. If you don't know an experienced driver, find an RC Boat Club in your area and join up. Most clubs welcome new members and nearly always have experienced drivers who will help you. It's more fun running your boats with others too.
Step 1: Accessories Check

#1: Arrow SharkAluminum Boat Stand #2: AS6717/3 Mod Prop #3: RudderAssembly
#4: Flexible Shaft & Drive Dog #5: Antenna & Mount
#6: Prop Nut
Tools Required
You will need the following tools and items to complete the installation: #1: Phillips Screwdriver
#2: Scissors #3: Wire Cutter
#4: Hex Wrench (1.5mm, 2mm, 4mm) #5: Spanner (7mm, 8mm, 16mmx2)
#6: Spark Plug Spanner #7: Loctite
#8: Shaft Grease #9: Lubricating Oil
#10: Zip Ties
Step 2: Arrow Shark Aluminum Display Stand Assembly
Package Contents
Parts Quantity
460mmAluminum Tube 2 170 mmAluminum Tube 4 90mmAluminum Tube 2 70mmAluminum Tube 4
Tee Join 4 90 Degree Join 8
Bottom Protection Foam 2

Note: Using epoxy glue or similar to connect all joins and tubes together as shown in the picture below.
Finish Picture
Step 3: Rudder Assembly
* Take the rudder assembly out of the accessory bag along with its installation bolts. * Using a 4mm hex wrench, secure the rudder arm with the two bolts to the mounting bracket that has been preinstalled on the transom (ie on the back of the boat). Apply a little Loctite to the bolts before screwing them into the bracket.

* Use the pushrod connectors supplied in the accessory bag to join the sections of pushrods that came with the rudder to the ends of the pushrods projecting through the transom via the black rubber pushrod seals in the sides of the rudder bracket. Note: You might still need to adjust the length of the pushrods after you install the steering servo (we'll do that late) in order to center the rudder for proper control when running your boat. * Connect the water cooling tube that projects through the transom to the nipple on the top of the rudder blade.
Step 5: Flexible Shaft Installation
* The flexible shaft that comes with the package has been precut to the right length to fit your boat. Please grease the shaft with lightweight marine grease before you insert it into the Stinger drive unit that has been preinstalled on the back of the boat. * Slide the top end of the flex shaft through the Stinger drive unit on the transom of the boat and ease it up through the stuffing tube until it emerges just behind the clutch on your engine. * As the end of the shaft comes into view, use a rag to wipe off any grease so that the shaft is clean as you slip it into the drive collet on the clutch. * Ensure the end of the shaft is securely inside the collet, then check the propeller end of the shaft for correct clearance from the Stinger as explained in the following important tip. * With the correct clearance set between the Strut and the thrust washer, use two 16mm spanners to tighten the collet on the clutch and so secure the top end of the flex shaft. When running your boat, frequently check that the collet is tight to avoid your flex shaft becoming loose and possibly being lost in the water.
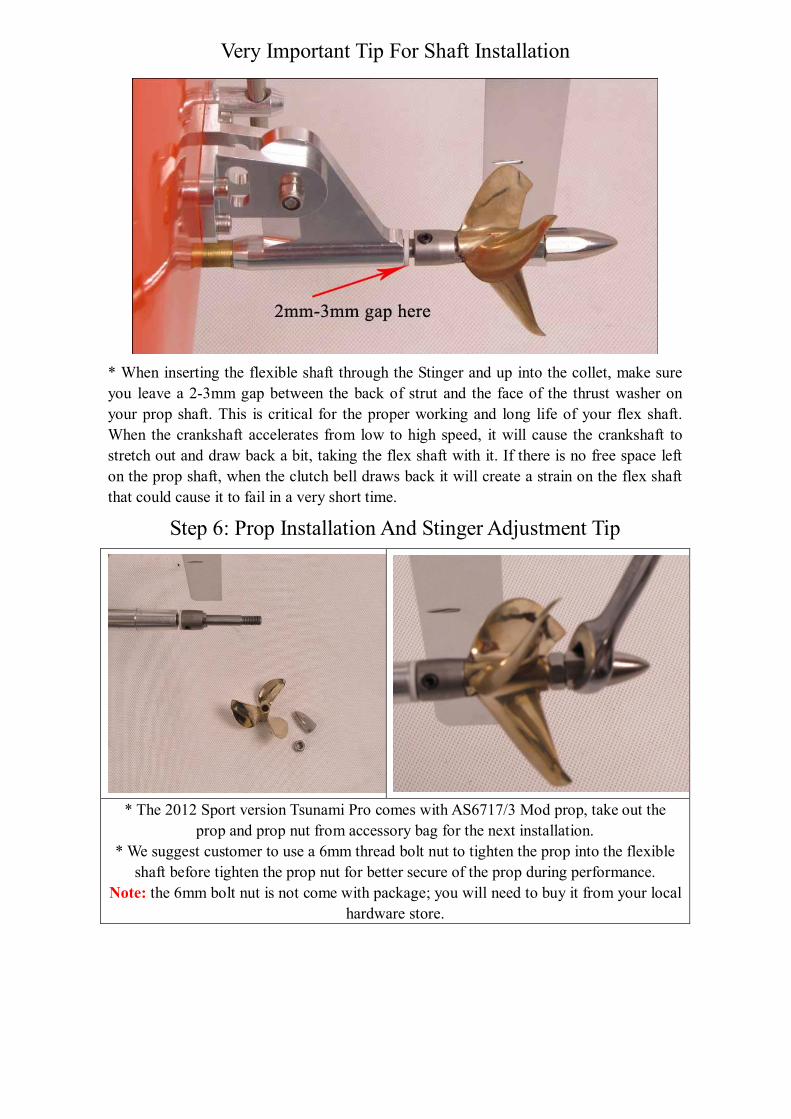
Very Important Tip For Shaft Installation
* When inserting the flexible shaft through the Stinger and up into the collet, make sure you leave a 23mm gap between the back of strut and the face of the thrust washer on your prop shaft. This is critical for the proper working and long life of your flex shaft. When the crankshaft accelerates from low to high speed, it will cause the crankshaft to stretch out and draw back a bit, taking the flex shaft with it. If there is no free space left on the prop shaft, when the clutch bell draws back it will create a strain on the flex shaft that could cause it to fail in a very short time.
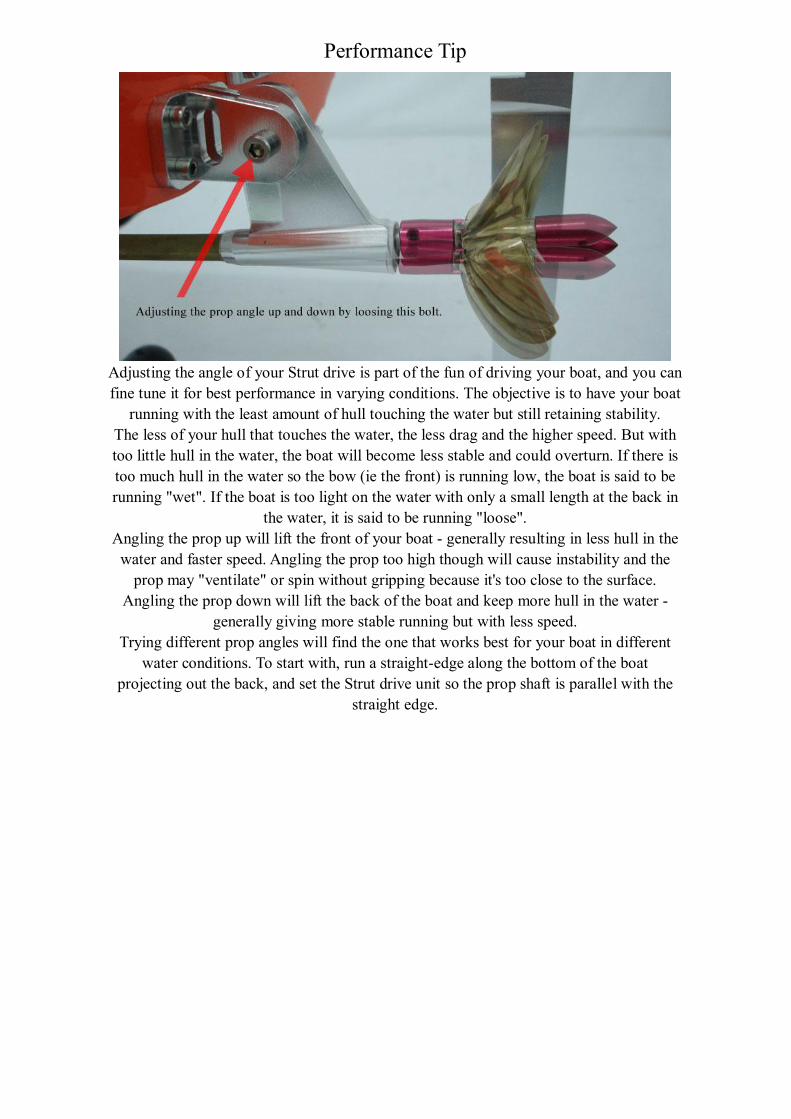
Step 6: Prop Installation And Stinger Adjustment Tip
* The 2012 Sport version Tsunami Pro comes with AS6717/3 Mod prop, take out the prop and prop nut from accessory bag for the next installation.
* We suggest customer to use a 6mm thread bolt nut to tighten the prop into the flexible shaft before tighten the prop nut for better secure of the prop during performance.
Note: the 6mm bolt nut is not come with package; you will need to buy it from your local hardware store.
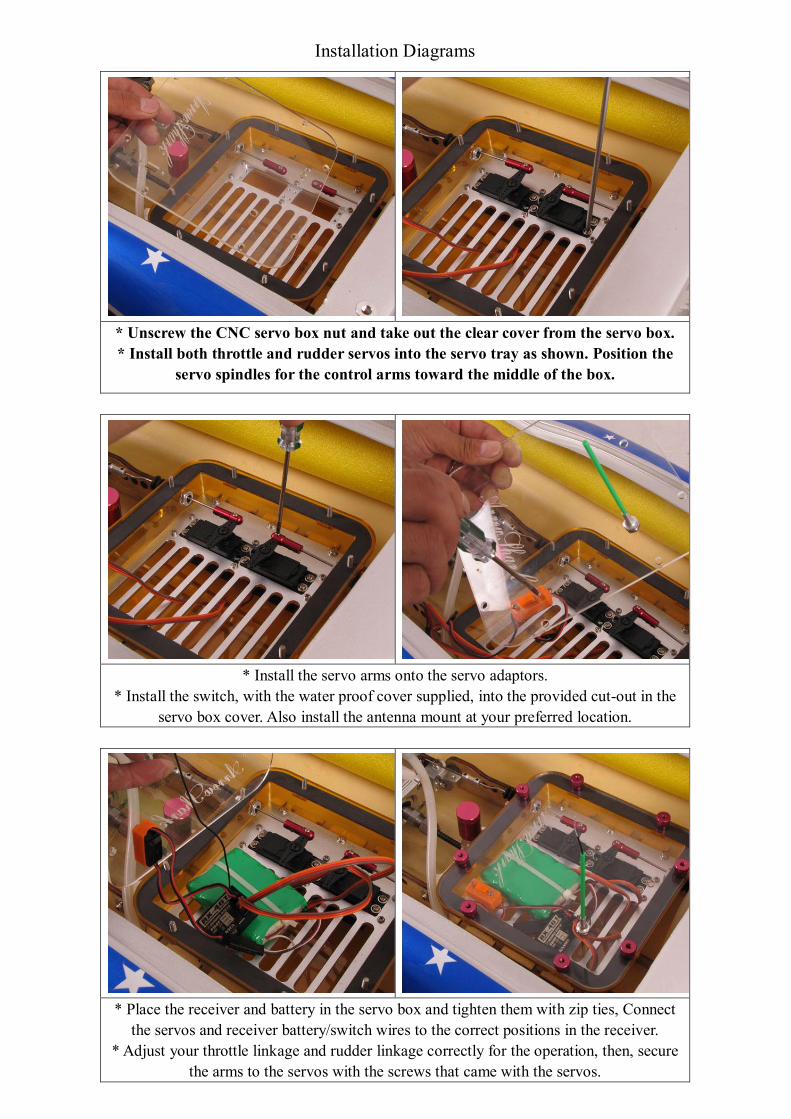
Performance Tip
Adjusting the angle of your Strut drive is part of the fun of driving your boat, and you can fine tune it for best performance in varying conditions. The objective is to have your boat
running with the least amount of hull touching the water but still retaining stability. The less of your hull that touches the water, the less drag and the higher speed. But with too little hull in the water, the boat will become less stable and could overturn. If there is too much hull in the water so the bow (ie the front) is running low, the boat is said to be running "wet". If the boat is too light on the water with only a small length at the back in
the water, it is said to be running "loose". Angling the prop up will lift the front of your boat generally resulting in less hull in the water and faster speed. Angling the prop too high though will cause instability and the prop may "ventilate" or spin without gripping because it's too close to the surface.
Angling the prop down will lift the back of the boat and keep more hull in the water generally giving more stable running but with less speed.
Trying different prop angles will find the one that works best for your boat in different water conditions. To start with, run a straightedge along the bottom of the boat
projecting out the back, and set the Strut drive unit so the prop shaft is parallel with the straight edge.

Step 8: Servo Installation Please note that we do not include radio systems in our RTR boats as most modelers
already have their own preferred RC system. This approach also saves the extra cost that the radio would incur. However, we do recommend customer to equip well quality of 2.4GHz type RC system with our RTR boats to avoid the boat out of control during lost
signal, and set the fail safe function with your RC system.
You will need to provide the following items to complete this installation.
#1: Good Quality 2.4GHz transmitter (such as Futaba, Sanwa etc) #2: 15kg Metal Gear HiTorque Servox2 (one for throttle and one for steering)
#3: 2.4GHz Receivers #4: Receiver Switch
#5: 6Volt Receiver Battery (Rechargeable) #6: Antenna & Mount (Come with package)
Note: For 2012 version RTR boats, we don’t install the antenna to the boats as we used to do before, so, customers can set the antenna position at any location
preferred. Note: Not shown in the above photo but strongly recommended is a "Fail Safe" unit that
will close the throttle and stop the engine in the case of a radio failure. Some radio control systems have a builtin failsafe, but others do not. Ask an experienced driver for
advice if you are not sure on this point. Note: Before proceeding to install the servos into the boat, connect them to your receiver along with a battery and switch. Turn on your radio and check for correct operation of
your servos. Have the servos centered and turn off your receiver before you turn off your transmitter. This will leave the servos at the correct position for connecting the servo
arms and pushrods in your boat. Note: When operating your radio, always turn on your transmitter before you turn on the receiver, and always turn off the receiver before turning off the transmitter. If the receiver
is on when the transmitter is not, it can operate with unpredictable results
Installation Diagrams
* Unscrew the CNC servo box nut and take out the clear cover from the servo box. * Install both throttle and rudder servos into the servo tray as shown. Position the
servo spindles for the control arms toward the middle of the box.
* Install the servo arms onto the servo adaptors. * Install the switch, with the water proof cover supplied, into the provided cutout in the
servo box cover. Also install the antenna mount at your preferred location.
* Place the receiver and battery in the servo box and tighten them with zip ties, Connect the servos and receiver battery/switch wires to the correct positions in the receiver.
* Adjust your throttle linkage and rudder linkage correctly for the operation, then, secure the arms to the servos with the screws that came with the servos.
Trimming Your Throttle Function
* Adjust the pushrod so that the carburetor is fully open at full throttle and at a reliable idle when the throttle is at neutral. You can adjust your throttle linkage with the pushrod connector or, if necessary, cut the pushrod shorter. You may need to adjust this linkage
when you first start your engine. Note: It may take some trial and error with both the pushrod and your radio trim and
"EPA" (End Point Adjustment) functions, but you need to end up with the throttle linkage set so that:
1. The engine idles reliably, but not too fast, when the transmitter trigger is at its neutral position.
2. When you pull the trigger fully open for high speed, the servo movement should fully open the carburetor barrel hole.
3. When you push the trigger fully closed, the engine must stop. Note: For your first runs we recommend that you set the throttle barrel to open no more than about 3/4 of the way rather than fully open even when your transmitter trigger is at
its full speed position. This will help you correctly runin your high performance XP254M engine. After having set up the throttle linkage as described above, use the
"EPA" function in your transmitter to restrict the throttle from opening more than 3/4 of its full movement. After the engine has been fully runin, you can reset the "EPA" for the
throttle butterfly to fully open for top speed.
Trimming Your Steering Function Similarly, you need to adjust your steering linkage via the pushrod connector to obtain the correct rudder operation. First make sure your steering servo is in its neutral position, then adjust the length of the pushrod so that the rudder is centered. If necessary, cut the
pushrod shorter. Note: We recommend using the "EPA" function on your radio to set the rudder so that it
turns about 2025 degrees either way for both left and right turning. This will give reliable and stable turns at high speed.
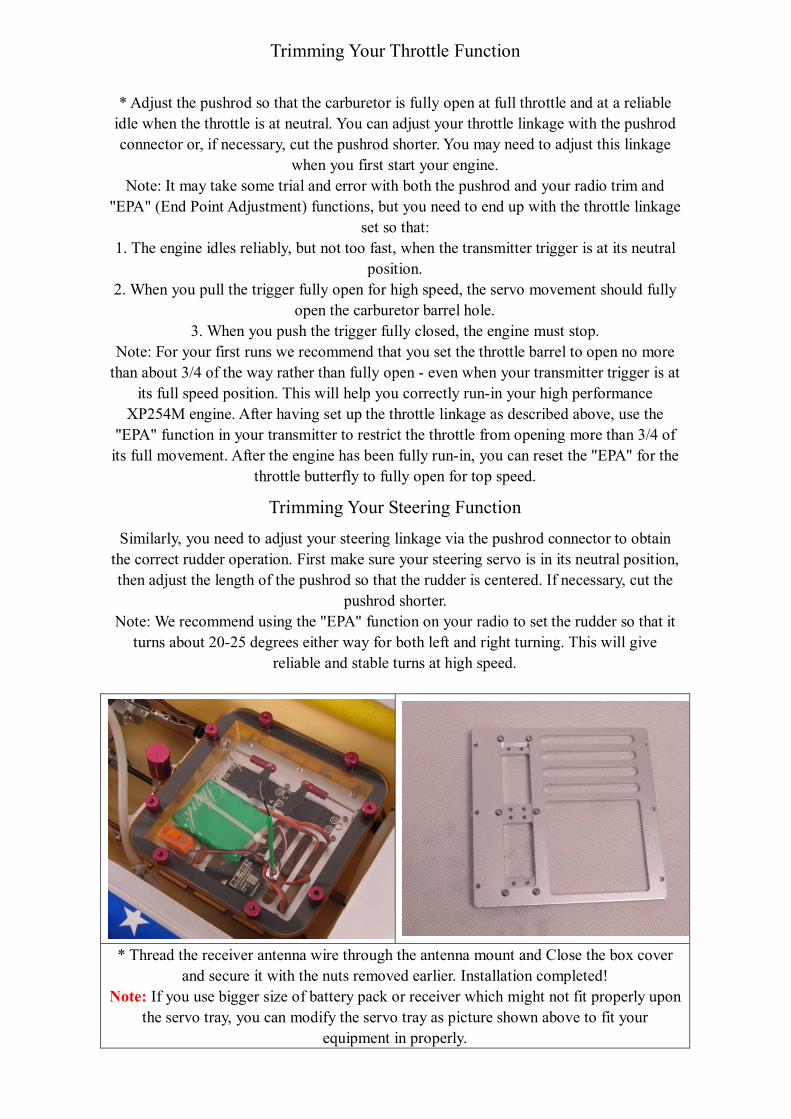
* Thread the receiver antenna wire through the antenna mount and Close the box cover and secure it with the nuts removed earlier. Installation completed!
Note: If you use bigger size of battery pack or receiver which might not fit properly upon the servo tray, you can modify the servo tray as picture shown above to fit your
equipment in properly.
Step 9: Before Operating Your Boat
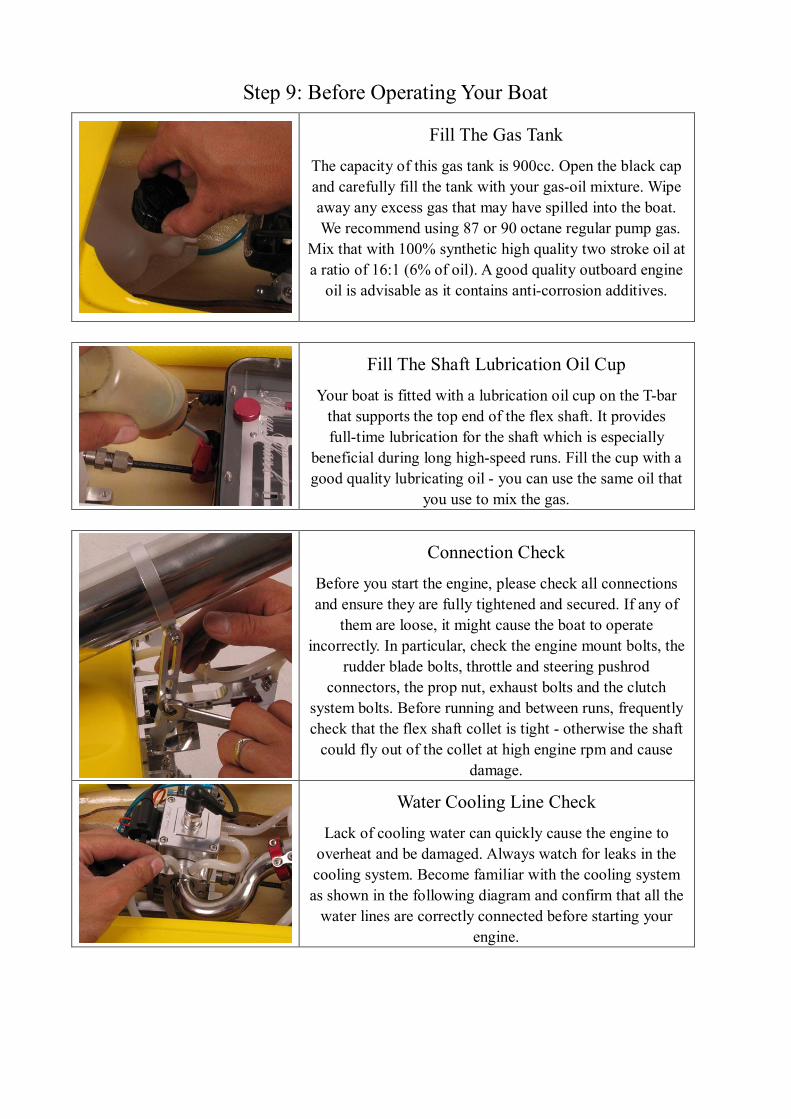
Fill The Gas Tank The capacity of this gas tank is 900cc. Open the black cap and carefully fill the tank with your gasoil mixture. Wipe away any excess gas that may have spilled into the boat. We recommend using 87 or 90 octane regular pump gas.
Mix that with 100% synthetic high quality two stroke oil at a ratio of 16:1 (6% of oil). A good quality outboard engine oil is advisable as it contains anticorrosion additives.
Fill The Shaft Lubrication Oil Cup Your boat is fitted with a lubrication oil cup on the Tbar that supports the top end of the flex shaft. It provides fulltime lubrication for the shaft which is especially
beneficial during long highspeed runs. Fill the cup with a good quality lubricating oil you can use the same oil that
you use to mix the gas.
Connection Check Before you start the engine, please check all connections and ensure they are fully tightened and secured. If any of
them are loose, it might cause the boat to operate incorrectly. In particular, check the engine mount bolts, the
rudder blade bolts, throttle and steering pushrod connectors, the prop nut, exhaust bolts and the clutch
system bolts. Before running and between runs, frequently check that the flex shaft collet is tight otherwise the shaft could fly out of the collet at high engine rpm and cause
damage.
Water Cooling Line Check Lack of cooling water can quickly cause the engine to overheat and be damaged. Always watch for leaks in the cooling system. Become familiar with the cooling system as shown in the following diagram and confirm that all the water lines are correctly connected before starting your
engine.
Step 10: Starting the Engine
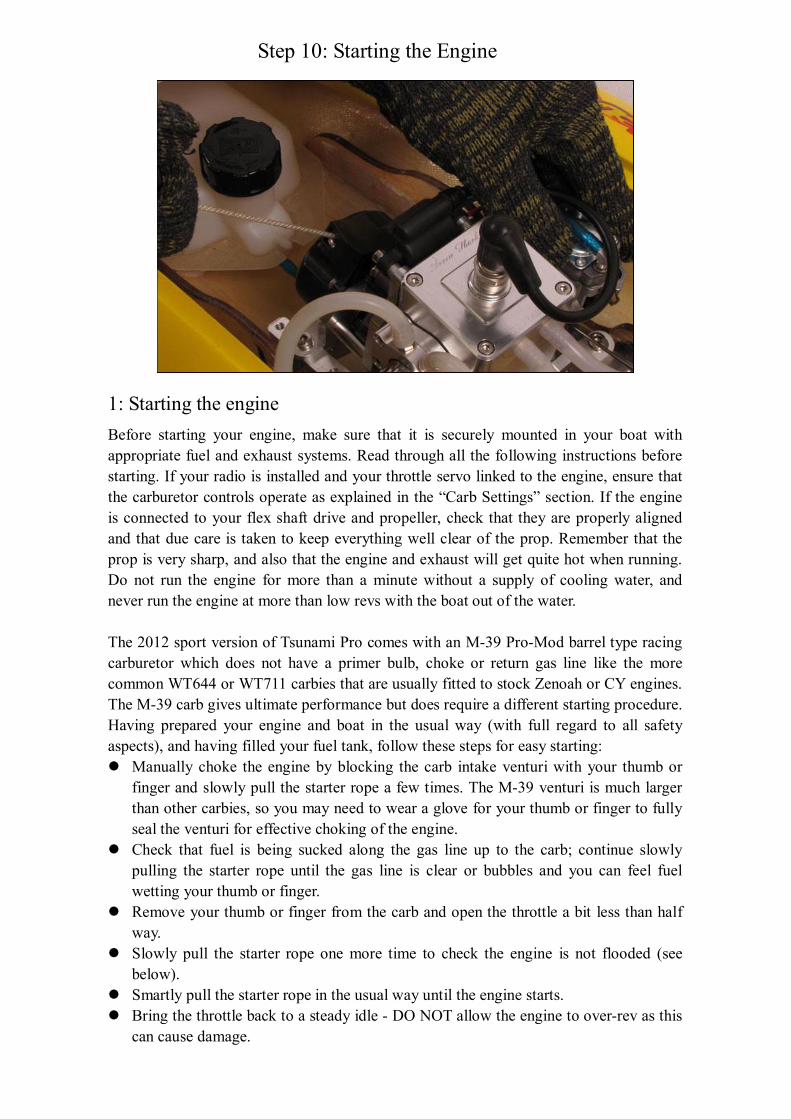
1: Starting the engine Before starting your engine, make sure that it is securely mounted in your boat with appropriate fuel and exhaust systems. Read through all the following instructions before starting. If your radio is installed and your throttle servo linked to the engine, ensure that the carburetor controls operate as explained in the “Carb Settings” section. If the engine is connected to your flex shaft drive and propeller, check that they are properly aligned and that due care is taken to keep everything well clear of the prop. Remember that the prop is very sharp, and also that the engine and exhaust will get quite hot when running. Do not run the engine for more than a minute without a supply of cooling water, and never run the engine at more than low revs with the boat out of the water.
The 2012 sport version of Tsunami Pro comes with an M39 ProMod barrel type racing carburetor which does not have a primer bulb, choke or return gas line like the more common WT644 or WT711 carbies that are usually fitted to stock Zenoah or CY engines. The M39 carb gives ultimate performance but does require a different starting procedure. Having prepared your engine and boat in the usual way (with full regard to all safety aspects), and having filled your fuel tank, follow these steps for easy starting: l Manually choke the engine by blocking the carb intake venturi with your thumb or
finger and slowly pull the starter rope a few times. The M39 venturi is much larger than other carbies, so you may need to wear a glove for your thumb or finger to fully seal the venturi for effective choking of the engine.
l Check that fuel is being sucked along the gas line up to the carb; continue slowly pulling the starter rope until the gas line is clear or bubbles and you can feel fuel wetting your thumb or finger.
l Remove your thumb or finger from the carb and open the throttle a bit less than half way.
l Slowly pull the starter rope one more time to check the engine is not flooded (see below).
l Smartly pull the starter rope in the usual way until the engine starts. l Bring the throttle back to a steady idle DO NOT allow the engine to overrev as this
can cause damage.
If too much fuel is sucked into the engine as you choke it, the engine will be flooded and will not start. It may be harder to pull over on the starter as the excess fuel increases compression. If this happens:
1. Remove the spark plug and carefully wipe dry the electrodes with a clean rag before setting the plug safely aside.
2. Hold the clean rag just above the plug hole and pull the starter rope smartly a few times to clear the excess fuel.
3. Reinstall the spark plug and open the throttle a big less than half way. 4. Slowly pull the starter rope to check that compression is back to normal. 5. Smartly pull the starter rope in the usual way until the engine starts. 6. Bring the throttle back to a steady idle.
For “hot restarts” you may not need to choke the engine. Check that the fuel line is full of gas without any bubbles and smartly pull the starter rope. If the engine doesn’t start after a few pulls, then manually choke the engine as above and slowly pull the starter rope until you can feel fuel wetting your thumb or finger before removing it from the carb venturi. Slowly pull the starter one more time to check the engine is clear, and then pull smartly until the engine starts.
2: Breakingin the engine To ensure long life and good performance from your engine, you MUST break it in properly. To obtain the optimum fuel for your engine, mix 87 or 90 Octane regular pump gas with 100% Synthetic Quality oil at a ratio of 16:1 (6% oil). Another choice for oil is quality marine outboard engine oil. Operate your engine at about 1/2 to 3/4 maximum throttle opening during the breakin process. DO NOT run at full throttle while breaking in your engine. Patience is very important here; the boat will run more slowly during the breakin process and the engine’s output power will increase gradually over the first 34 tanks of fuel. Once the engine is broken in, the power will increase substantially.
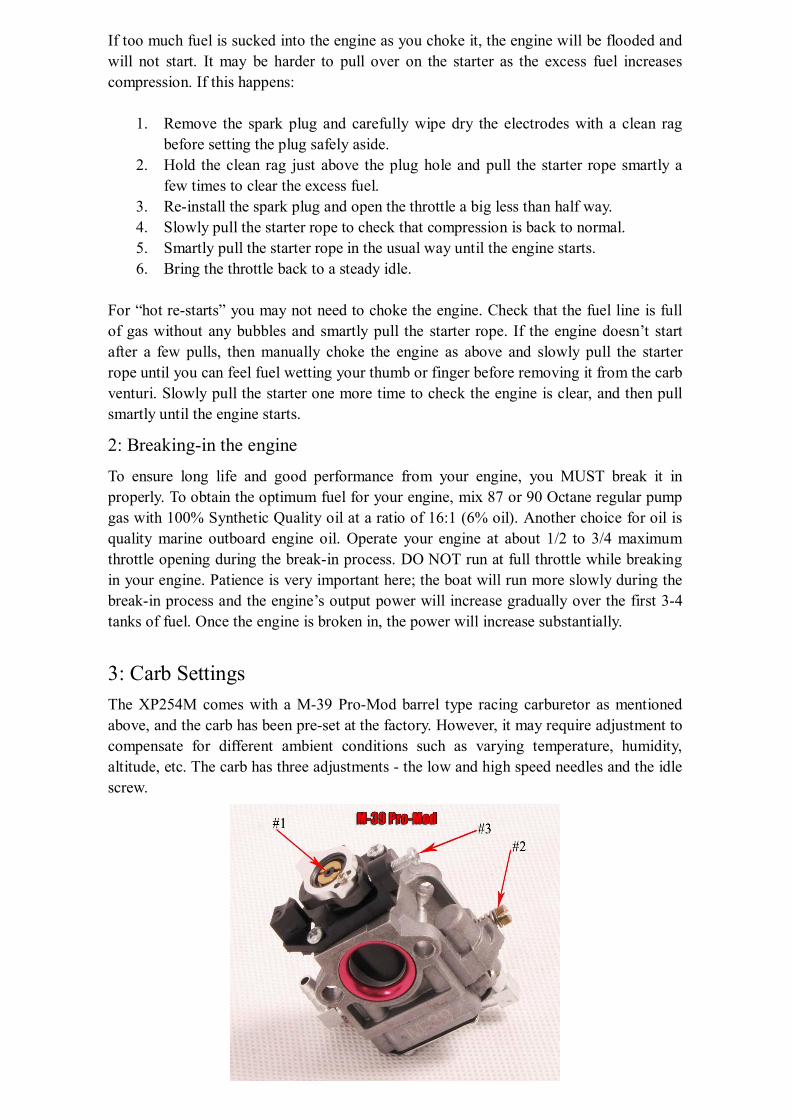
3: Carb Settings The XP254M comes with a M39 ProMod barrel type racing carburetor as mentioned above, and the carb has been preset at the factory. However, it may require adjustment to compensate for different ambient conditions such as varying temperature, humidity, altitude, etc. The carb has three adjustments the low and high speed needles and the idle screw.

#1: The LowSpeed Needle: The low speed needle of the M39 carburetor is hidden in the center of the carburetor barrel. You need to use a small precision flat blade screwdriver to adjust it. When adjusting the LowSpeed Needle, apply Loctite#222 on the needle thread in order to hold the needle in position during operation. The LowSpeed Needle is set at 66 1/2 turns out from fully closed (or fully screwed in). Note: when the M39 carb is installed rotated in your boat, it is not easily to adjust the low speed needle when you plan to make small adjustment to the low speed needle, you will either need to take out your engine from your boat or uninstall the carb from the engine to do the little adjustable, however, once you set the low speed needle correctly, you will never need to adjust it again, from our timeless testing on our Promod M39 carb, the low speed needle set to 66 1/2 turn out will work well on both stock or mod motor. And the carb was Preset at 6 turn out from our factory.
#2: HighSpeed Needle: The HighSpeed Needle is set approximately 2 plus 1/2 turns out from fully closed.
#3: Idle Screw: Set this at the lowest RPM where the engine idles reliable without stopping. Screwing the idle screw in will make your engine rev faster. Note: Please take out the idle screw from the carb after you complete your radio setting.
4: Carburetor Adjustment Tips When adjusting the needles from their standard settings, move them only 1/8 of a turn a time. Check the results then adjust further as needed. Never attempt to tune the highspeed needle by running the engine at full throttle out of the water! This is very dangerous and damages the engine. The following tips may assist in setting your carb for optimum engine performance.
A: LowSpeed Needle If the engine is easy to start, and idles a little rough (rich), and responds well when you open the throttle with a brief show of smoke through the exhaust, then the low speed needle is close to being correct. If the engine tends to hesitate or bog down when you open the throttle quickly (especially when the engine is cold), or if the idle speed is too high even with the throttle barrel nearly closed, the low speed needle is probably to lean and you need to screw it out (1/8 of a turn at a time). If the engine floods easily and is hard to start, the low speed needle is probably set to rich and you need to screw it in slightly.
B: HighSpeed Needle When this needle is correctly set, the engine will run cleanly, accelerate well from half throttle without hesitation, and will not lose RPMs during turns. It is tempting to lean the high speed needle to optimize the mixture for peak power and onwater RPM, but going too lean can be risky as the engine will suffer from overheating and reduced lubrication. This can lead to damage or shorter life for your engine. If the engine stops or loses RPMs when your boat is running on the water, the high speed needle is probably set too lean and you need to screw it out slightly. If the engine is not running cleanly and seems to hesitate or not reach peak RPMs, then the high speed needle is probably set too rich and you need to screw it in slightly. Running with a slightly rich mixture may cause a small drop in top speed, but it will allow your engine to run cooler and with good lubrication for reliability and long life.
Step 11: Launching And Running Your Boat * Before the first run each day: a) Carefully check over the boat as explained in previous steps to ensure nothing is loose and that all the cooling lines are correctly attached. b) If there are other radio control models in the vicinity, check with the operators that your radio is not on the same frequency. If it is, make arrangements to run your models at different times. This step does not apply if your radio is on the 2.4GHz band as this automatically selects an available frequency. c) Turn on your radio and check that it is operating correctly; carry out a range check as explained in your radio instruction manual. d) Check that your Fail Safe is working correctly. e) Look around and ensure that the area where you will be operating the boat is clear and there are no people, other boats (models or full size) or debris in the water. f) Study the area where you plan to put the boat in the water and check that there are no obstructions or weed, and that the water is deep enough. g) If other RC boats are running, especially if it is an RC Boat Club area, find out any rules about in which direction the boats run. In most cases, boats run in a clockwise circuit (ie turning to the right). Do not run your boat in a different direction to the others, and keep to any defined circuit. h) If other people are close by where you are starting your engine, make sure they keep clear of the boat especially keep them well away from the prop. i) Review all the safety procedures mentioned at the start of this Manual. j) Make sure you have some method of retrieving your boat should it stop on the water for any reason. Never swim out to retrieve a boat. Some people have a small inflatable dinghy they use as a "rescue boat". If your lake or pond is not too big, you can use a tennis ball on a long length of light line. Throw the ball over the stalled boat and gently pull on the line to bring back the boat. If in doubt about rescue methods, check with your local RC Boat Club. * Fill the gas tank and start the engine as explained earlier. Wait a few seconds to ensure the engine is running correctly. Momentarily advance the throttle and check that the clutch engages to spin the prop. * Fit the engine hatch to the boat, ensuring the latches are secure. * Whilst you can launch the boat yourself, it is best to have a friend take the boat to the water while you hold the transmitter. If you do launch yourself, practice first without the engine running so you can safely put the boat in the water. It may be best to first put the transmitter in a safe spot near the water's edge before putting the boat in the water, rather than risk dropping it while carrying both it and the boat. * When carrying the boat, always watch that nothing is close to the prop and that you keep clear of other people. * Gently place the boat in the water with the front pointing out into a clear area. * If other RC boats are running, make sure they are well clear before slowly pulling the transmitter trigger and accelerating your boat away from the shore. * Allow the boat to rise on plane but keep to around half throttle and check the steering by operating the rudder. * As soon as you can, whilst allowing for any other boats or circuitkeeping requirements, bring your boat back past where you are standing and check that water is flowing through both outlets. Get into the habit of checking for water flow every time the boat goes past. Weed or debris in the water can block pickups at any time and quickly cause overheating and damage to your engine. * Enjoy running your boat, gradually increasing speeds (but remembering to properly breakin the engine) and becoming familiar with how your boat turns and handles in different water conditions. * When you are ready, prepare to bring your boat back to the shore. Do this before your engine runs
out of fuel. The gas tank should give you about 20 minutes running time. * Check that other boats are clear before you leave the running circuit, then steer into toward the bank and bring the engine back toward an idle. If the clutch disengages, just open the throttle a bit again until the boat moves toward you but keep at a low speed so that you can ease the boat safely near the bank before allowing it to drift to a stop before it hits the shore. * Stop the engine by pushing the trigger. * Have your friend pick up the boat and bring it back to the stand. If you do this yourself, first put your transmitter down in a safe place. Remember that the engine and exhaust will be hot, so be careful not to touch them as the boat is picked up. * Place the boat back on its stand, remove the engine hatch and turn off the radio. * Allow the engine and exhaust to cool before getting close to them. * Check the interior of your boat to see if any water has come onboard; if so, carefully clear it away. If there is a lot of water onboard, find out where it is coming from and correct the problem. Some water will usually get on board, especially when running in choppy conditions. * Generally check over the boat to see that nothing has come loose.
Step 12: Procedure Should Your Boat Flip Over * Sooner or later, all high speed RC boats will flip over. You should drive to suit the conditions to minimise the chances of this happening, but it's almost inevitable that circumstances one day will result in the boat turning over despite your best efforts to avoid it. * Retrieve the boat with your rescue method (inflatable dinghy, tennis ball on a line or other method). Note: Be aware that a flipped boat could be full of water and consequently be very heavy. Be careful when lifting it out of the water, and allow all the water to drain out as soon as possible. * Hold the boat vertically with the bow up so that any water drains out of the exhaust pipe. Then put the boat back on its stand. * Remove the engine hatch and gently try to pull the starter cord. It's quite likely that water will have entered the engine and it will not pull over. Do not force it. Doing so could cause damage. If the engine does pull over easily, see if it will restart. If it does, allow it to run for 30 seconds or so, then resume running your boat normally. * If the engine is hard to pull over or will not start, remove the spark plug and dry the electrode. * With the spark plug still out, hold your boat upside down and pull the starter cord 10 or so times. This will expel most of the water from inside the engine. (Note: You may need a friend to help with this although you can do it by yourself with practice.) * Put the boat back on its stand, reinstall the spark plug, and gently pull the starter rope. * If the engine is still hard to pull over, or will not start, repeat the above 3 steps. * Once the engine starts, allow it to idle for 30 seconds or so to check it is okay, then stop it. * Check your servo box to ensure that water did not get inside, If it did, stop running the boat for the day. Clean up the boat as usual (see the next Step) and take it home. Remove all the electronics from the servo box and check them for correct operation. If there is any problem, have it fixed by an expert. * If the servo box is dry, restart the engine and relaunch the boat. Run it for 3 to 5 minutes at half throttle to clear any remaining water out of the bearings, then resume normal running.
Step 13: After Running Your Boat * At the end of the day's running, wash all over the boat with fresh water. Wash the hardware on the back of the boat. Dry everything, and then spray all the hardware generously with WD40 or a similar water displacing and lubricating product. * If you have been running in salt water, you must flush the cooling system with fresh water. you can adapt a garden hose to provide a supply of fresh water while you idle the engine for 3 to 5 minutes.
* Hold the boat vertically with the bow up and allow any water or excess oil to drain out of the exhaust system. * Remove the flex shaft from the boat, dry it off and spray with WD40 or similar. Keep the shaft out of the boat until you next run it this allows the inside of the stuffing tube to dry out. Remember to regrease the shaft when preparing to next run the boat. * Spray all over and around the engine and the exhaust system with WD40 or a similar product, then carefully wipe everything down inside and outside the boat with a clean rag or towel. * Remove the cover from the servo box and check that the inside is dry. Leave the cover off until you next run the boat to avoid condensation forming and possibly damaging the electronics. * Every couple of months, it is worth removing the engine and clutch from the boat and thoroughly cleaning the interior of your hull as well as underneath the engine. * The hull of your boat is finished with the highest quality automobile paints and the most advanced painting technology available. In order to keep the clear coat shining and durable, you should apply an automotive wax polish every time after you use the boat. This will also protect against damage caused by fuel or other harmful chemicals.
Enjoy Your Arrow Shark RC Boat!