Embed Size (px)
Citation preview
49IN. ALUMINUM CARGO CARRIER
OWNER’S MANUAL
WARNING:
Read carefully and understand all ASSEMBLY AND OPERATION
INSTRUCTIONS before operating. Failure to follow the safety rules and other
basic safety precautions may result in serious personal injury.
Item# 28679

Page of 7 2
Thank you very much for choosing a Ultra-Tow product! For future reference, please complete
the owner’s record below:
Model: _______________ Purchase Date: _______________
Save the receipt, warranty and these instructions. It is important that you read the entire manual
to become familiar with this product before you begin using it.
This cargo carrier is designed for certain applications only. The distributor cannot be responsible for issues arising from modification. We strongly recommend this cargo carrier not be modified and/or used for any application other than that for which it was designed. If you have any questions relative to a particular application, DO NOT use the cargo carrier until you have first contacted the distributor to determine if it can or should be performed on the product.
For technical questions please call 1-800-222-5381.
INTENDED USE
This cargo carrier fits in a 2in. receiver and can carry up to a 500-lb. load. It is ideal for use as a
mobility carrier, a transporter for lawn equipment or to provide additional cargo space.
TECHNICAL SPECIFICATIONS
Item Description Capacity 500 lbs. Receiver size Fits standard 2in. receivers Oervall Dimensions 49in.L x 22 1/2in.W x 8in.H Inside Height 7in.
NOTE: Any load over 320 lbs. (145kg) requires a Class III hitch on towing vehicle.
Class II Hitch capacity = 350 lbs. (159kg) maximum tongue weight; to determine capacity, add
Carrier weight of about 30 lbs. (14kg)
Class III Hitch capacity = 500 lbs. (227kg) maximum tongue weight
GENERAL SAFETY RULES
WARNING: Read and understand all instructions. Failure to follow all instructions listed
below may result in serious injury.
CAUTION: Do not allow persons to operate or assemble this aluminum cargo carrier
until they have read this manual and have developed a thorough understanding of how the
hand truck works.
WARNING: The warnings, cautions, and instructions discussed in this instruction
manual cannot cover all possible conditions or situations that could occur. It must be
understood by the operator that common sense and caution are factors which cannot be built into
this product, but must be supplied by the operator.
SAVE THESE INSTRUCTIONS
Page of 7 3
IMPORTANT SAFETY CONSIDERATIONS
CARGO CARRIER USE AND CARE
� Do not modify the cargo carrier in any way. Unauthorized modification may impair the
function and/or safety and could affect the life of the equipment. There are specific
applications for which the cargo carrier was designed.
� Always check of damaged or worn out parts before using the cargo carrier. Broken
parts will affect the cargo carrier operation. Replace or repair damaged or worn parts
immediately.
� Store idle cargo carrier. When the cargo carrier is not in use, store it in a secure place out
of the reach of children. Inspect it for good working condition prior to storage and before
re-use.
� Do not exceed the limit weight of 500 lbs. (227kg)
Tools Needed for Assembly
Open Wrench (1 pc.) Open Wrench (1 pc.) Open Wrench (2 pc.) Hex Key (1 pc.) Hex Key(1 pc.)
Size=16mm Size=13mm Size=7mm Size=6mm Size=5mm
ASSEMBLY
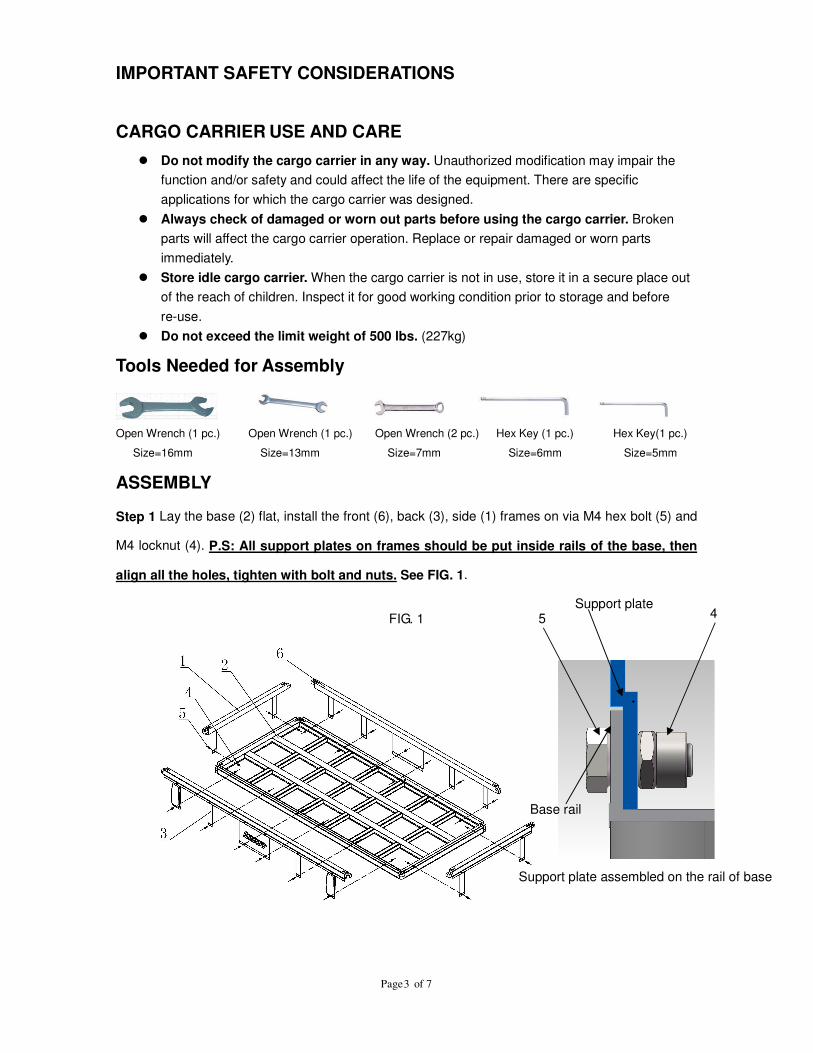
Step 1 Lay the base (2) flat, install the front (6), back (3), side (1) frames on via M4 hex bolt (5) and
M4 locknut (4). P.S: All support plates on frames should be put inside rails of the base, then
align all the holes, tighten with bolt and nuts. See FIG. 1.
FIG. 1
Support plate assembled on the rail of base
Base rail
Support plate 5 4
Page of 7 4
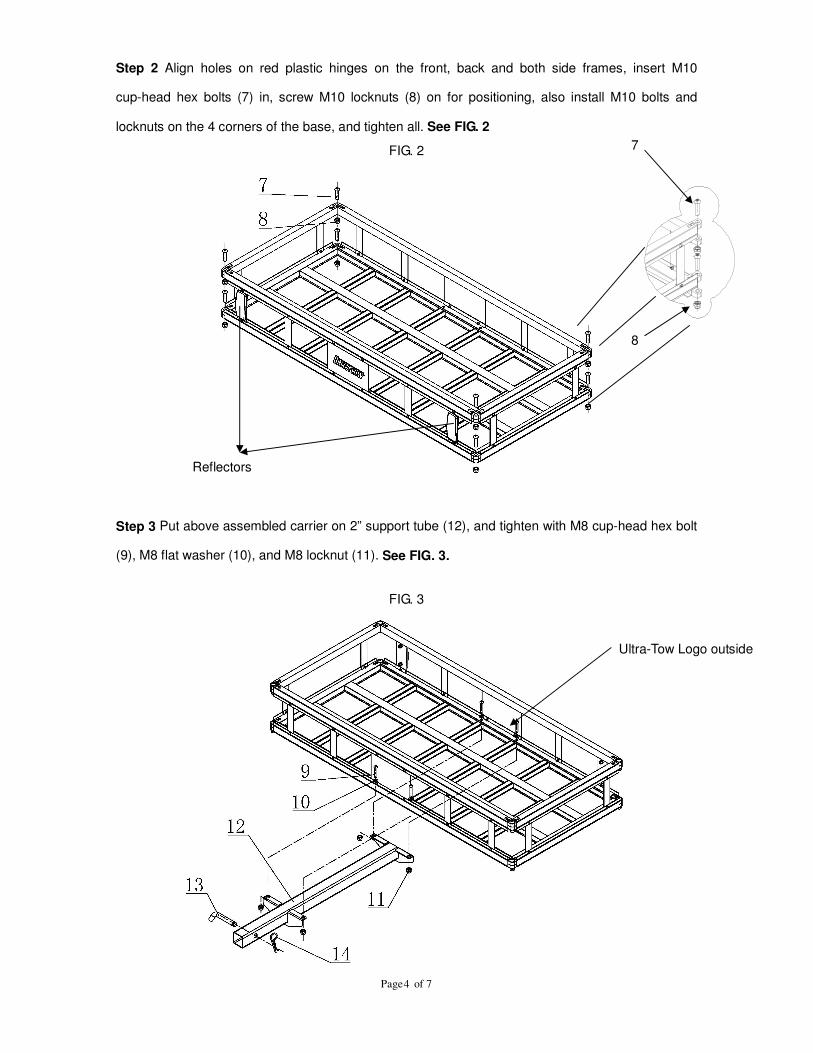
Step 2 Align holes on red plastic hinges on the front, back and both side frames, insert M10
cup-head hex bolts (7) in, screw M10 locknuts (8) on for positioning, also install M10 bolts and
locknuts on the 4 corners of the base, and tighten all. See FIG. 2
FIG. 2
Step 3 Put above assembled carrier on 2” support tube (12), and tighten with M8 cup-head hex bolt
(9), M8 flat washer (10), and M8 locknut (11). See FIG. 3.
FIG. 3
Ultra-Tow Logo outside
Reflectors
8
7
Page of 7 5
OPERATION
IMPORTANT: 2 adjustments are recommended for attaching the cargo carrier to the towing vehicle.
Lift the Cargo Carrier and place the support tube into the towing vehicle’s 2in. hitch receiver. Line up
the holes in the support tube with the hole in your receiver hitch. Then slide Hitch Pin through the
holes and insert clip to secure the Hitch Pin.
MAINTENANCE
• Maintain your cargo carrier. It is recommended that the general condition of any cargo carrier
be examined before it is used. Keep your cargo carrier in good repair by adopting a program of
conscientious repair and maintenance. Have necessary repairs made by qualified service
personnel.
Page of 7 6
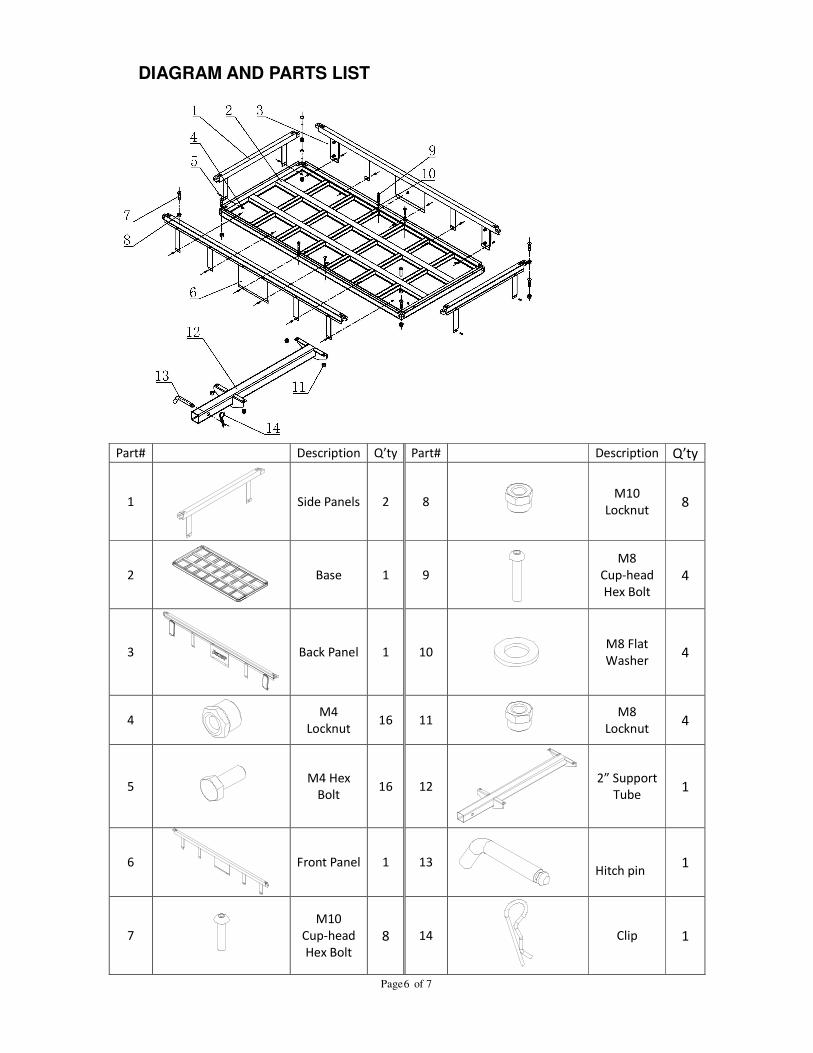
DIAGRAM AND PARTS LIST
Part# Description Q’ty Part# Description Q’ty
1
Side Panels 2 8
M10
Locknut 8
2
Base 1 9
M8
Cup-head
Hex Bolt
4
3
Back Panel 1 10
M8 Flat
Washer 4
4
M4
Locknut 16 11
M8
Locknut 4
5
M4 Hex
Bolt 16 12
2” Support
Tube 1
6
Front Panel 1 13
Hitch pin 1
7
M10
Cup-head
Hex Bolt
8 14
Clip 1

Page of 7 7
For replacement parts and technical questions, please call 1-800-222-5381.
WARRANTY
One-year limited warranty
Distributed by
Northern Tool + Equipment Co., Inc.
Burnsville, Minnesota 55306
NorthernTool.com
Made in China