Embed Size (px)
Citation preview
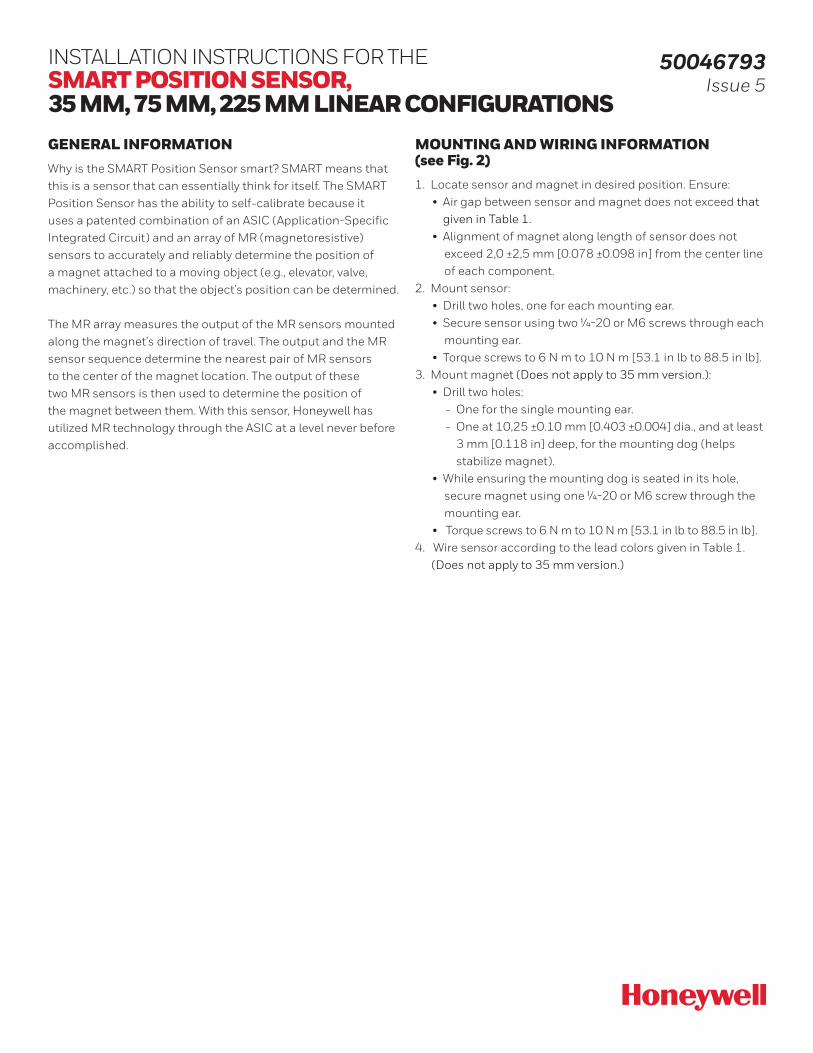
INSTALLATION INSTRUCTIONS FOR THESMART POSITION SENSOR, 35 MM, 75 MM, 225 MM LINEAR CONFIGURATIONS
50046793Issue 5
GENERAL INFORMATIONWhy is the SMART Position Sensor smart? SMART means that this is a sensor that can essentially think for itself. The SMART Position Sensor has the ability to self-calibrate because it uses a patented combination of an ASIC (Application-Specific Integrated Circuit) and an array of MR (magnetoresistive) sensors to accurately and reliably determine the position of a magnet attached to a moving object (e.g., elevator, valve, machinery, etc.) so that the object’s position can be determined.
The MR array measures the output of the MR sensors mounted along the magnet’s direction of travel. The output and the MR sensor sequence determine the nearest pair of MR sensors to the center of the magnet location. The output of these two MR sensors is then used to determine the position of the magnet between them. With this sensor, Honeywell has utilized MR technology through the ASIC at a level never before accomplished.
MOUNTING AND WIRING INFORMATION (see Fig. 2)1. Locate sensor and magnet in desired position. Ensure:
• Air gap between sensor and magnet does not exceed that given in Table 1.
• Alignment of magnet along length of sensor does not exceed 2,0 ±2,5 mm [0.078 ±0.098 in] from the center line of each component.
2. Mount sensor:• Drill two holes, one for each mounting ear.• Secure sensor using two ¼-20 or M6 screws through each
mounting ear.• Torque screws to 6 N m to 10 N m [53.1 in lb to 88.5 in lb].
3. Mount magnet (Does not apply to 35 mm version.):• Drill two holes:
- One for the single mounting ear.- One at 10,25 ±0.10 mm [0.403 ±0.004] dia., and at least
3 mm [0.118 in] deep, for the mounting dog (helps stabilize magnet).
• While ensuring the mounting dog is seated in its hole, secure magnet using one ¼-20 or M6 screw through the mounting ear.
• Torque screws to 6 N m to 10 N m [53.1 in lb to 88.5 in lb].4. Wire sensor according to the lead colors given in Table 1. (Does not apply to 35 mm version.)

SMART POSITION SENSOR, 35 MM, 75 MM, 225 MM LINEAR CONFIGURATIONS
Issue 550046793
SMART 35mm, 75mm, 225mm Installation Instructions | sps.honeywell.com/ast | 2
TABLE 1. SPECIFICATIONS
CHARACTERISTIC COMPONENT
PARAMETER
35 mm 75 mm 225 mmSPS-L035-LATS
(analog)SPS-L075-HALS
(analog)SPS-L225-HALS
(analog)SPS-L225-HDLS
(digital)
Sensing range
sensoronly
0 mm to 35 mm[0 in to 1.38 in]
0 mm to 75 mm[0 in to 2.95 in]
0 mm to 225 mm[0 in to 8.86 in]
Resolution 0,04 mm [0.0016 in]
0,05 mm [0.002 in]
0,14 mm [0.0055 in]
0,0035 mm [0.000137 in]
Supply voltage 4.75 Vdc to 5.25 Vdc 6 Vdc to 24 VdcOutput 0.55 Vdc to 4.15 Vdc 0 Vdc to 5 Vdc RS 232-type digitalSupply current 20 mA max. 32 mA max. 34 mA max. 88 mA max.Linearity1 ±1.0% full scale output ±0.4% full scale outputReverse polarity -5 V 26.4 V at 125°C [257°F]Sensitivity 103 mV/mm typ. 50 mV/mm typ. 17.78 mV/mm typ. 282.16 counts/mm typ.Update rate 476 µs 400 µs 3200 µsBaud rate – 57.6 kbits/sInitial startup time 5 ms 30 ms
TerminationTYCO Super Seal
282087-1 integral connector
flying leads
Cable bend radius – 40 mm [1.6 in] min.Operating temperature
sensorand
magnet actuator
-40°C to 125°C [-40°F to 257°F]Storage temperature -40°C to 150°C [-40°F to 302°F]
Air gap 8,5 ±1,0 mm [0.334 ±0.039 in]
3,0 ±2,5 mm [0.118 ±0.098 in]
Sealing IP67, IP69K
Radiated immunity 100 V/m per ISO 11452-2 –
Conducted immunity 100 mA BCI per ISO 11452-4 –
Shock 50 G half sine wave with 11 ms durationVibration 20 G from 10 Hz to 2000 Hz 10 G from 10 Hz to 2000 HzHousing material thermoplasticApprovals CE, UKCAMounting: screws recommended torque
¼-20 or M66 N m to 10 N m [53.1 in-lb to 88.5 in-lb]
Material magnet actuator only
neodymium iron boronStrength 13,500 Gauss 10,000 Gauss
1 Percent linearity is the quotient of the measured output deviation from the best fit line at the measured temperature to the full scale output span.
NOTICE• Ferrous metal within a 100 mm [3.9 in] radius of the magnet actuator may affect sensor performance.
• Always use fresh, non-magnetic stainless steel washers when mounting the sensor.

SMART POSITION SENSOR, 35 MM, 75 MM, 225 MM LINEAR CONFIGURATIONS
Issue 550046793
SMART 35mm, 75mm, 225mm Installation Instructions | sps.honeywell.com/ast | 3
Sensor
Length = 0 Length = 35,0
Magnetactuator
Mounting ear
Sensor seating surface
Magnet seating surface
FIGURE 1. SPS-L035-LATS MOUNTING DIMENSIONS (FOR REFERENCE ONLY: MM) AND SENSOR OUTPUT PERFORMANCE GRAPH
2.0
3.0
4.0
4.8 5.0
4.54.15
0.55
0
1.0
Reference point B
Reference Point A
Out
put S
ign
al (V
)
Nominal signal output curve(Through reference points A and B)
0 mm 35 mmMeasurement Difference (mm)
Linearity 1.0%of full scale
Length
Pinout1 = Vcc2 = GND3 = Output

SMART POSITION SENSOR, 35 MM, 75 MM, 225 MM LINEAR CONFIGURATIONS
Issue 550046793
SMART 35mm, 75mm, 225mm Installation Instructions | sps.honeywell.com/ast | 4
Sensor
Length
Magnetactuator
Mountingear
Mountingear
Mountingear
Mountingear
WiringRed = VccBlack = GNDGreen = Output
75 mm0 mm
0
1.0
2.0
3.0
4.04.310
5.0Linearity 0.4%of Full Scale
Measurement Difference (mm)
Out
put S
igna
l (V
)
Reference point A
Nominal signal output curve(Through reference points A and B)
Length
Reference point B
0.561
FIGURE 2. SPS-L075-HALS MOUNTING DIMENSIONS (FOR REFERENCE ONLY: MM) AND SENSOR OUTPUT PERFORMANCE GRAPH

SMART POSITION SENSOR, 35 MM, 75 MM, 225 MM LINEAR CONFIGURATIONS
Issue 550046793
SMART 35mm, 75mm, 225mm Installation Instructions | sps.honeywell.com/ast | 5
FIGURE 3. SPS-L225-HALS MOUNTING DIMENSIONS (FOR REFERENCE ONLY: MM) AND SENSOR OUTPUT PERFORMANCE GRAPH
Sensor
Magnetactuator
Mountingear
Mountingear
Mountingear
Length
Mountingdog
0
0.5
1.0
2.0
3.0
4.0
4.5
5.0
0 mmMeasurement Difference (mm)
Ou
tpu
t Sig
nal
(V)
Reference point B
Nominal signal output curve(Through reference points A and B)
Linearity 0.4%of full scale
Length 225 mm
Reference point A
WiringRed = VccBlack = GNDGreen = Output

SMART POSITION SENSOR, 35 MM, 75 MM, 225 MM LINEAR CONFIGURATIONS
Issue 550046793
SMART 35mm, 75mm, 225mm Installation Instructions | sps.honeywell.com/ast | 6
FIGURE 4. SPS-L225-HDLS MOUNTING DIMENSIONS (FOR REFERENCE ONLY: MM) AND SENSOR OUTPUT PERFORMANCE GRAPH
Sensor
Magnetactuator
Mountingear
Mountingear
Length
Mountingdog
Mountingear
WiringRed = VccBlack = GNDGreen = Output
0
0 mm 225 mmMeasurement Difference (mm)
65535
63487
Out
put S
igna
l (C
ount
s)
Linearity 0.4%of full scale
Nominal signal output curve(Through reference points A and B)
Reference point B
Length
Reference point A

WARRANTY/REMEDY
Honeywell warrants goods of its
manufacture as being free of defective
materials and faulty workmanship
during the applicable warranty period.
Honeywell’s standard product warranty
applies unless agreed to otherwise by
Honeywell in writing; please refer to your
order acknowledgment or consult your
local sales office for specific warranty
details. If warranted goods are returned
to Honeywell during the period of
coverage, Honeywell will repair or replace,
at its option, without charge those items
that Honeywell, in its sole discretion,
finds defective. The foregoing is buyer’s sole remedy and is in lieu of all other warranties, expressed or implied, including those of merchantability and fitness for a particular purpose. In no event shall Honeywell be liable for consequential, special, or indirect damages.
While Honeywell may provide application
assistance personally, through our
literature and the Honeywell web site, it
is buyer’s sole responsibility to determine
the suitability of the product in the
application.
Specifications may change without
notice. The information we supply is
believed to be accurate and reliable as of
this writing. However, Honeywell assumes
no responsibility for its use.
m WARNINGPERSONAL INJURYDO NOT USE these products as safety or emergency stop devices or in any other application where failure of the product could result in personal injury.
Failure to comply with these instructions could result in death or serious injury.
m WARNINGMISUSE OF DOCUMENTATION• The information presented in this
product sheet is for reference only. Do not use this document as a product installation guide.
• Complete installation, operation, and maintenance information is provided in the instructions supplied with each product.
Failure to comply with these instructions could result in death or serious injury.
FOR MORE INFORMATIONHoneywell Advanced Sensing
Technologies services its customers
through a worldwide network of sales
offices and distributors. For application
assistance, current specifications, pricing
or the nearest Authorized Distributor,
visit our website or call:
USA/Canada +1 302 613 4491
Latin America +1 305 805 8188
Europe +44 1344 238258
Japan +81 (0) 3-6730-7152
Singapore +65 6355 2828
Greater China +86 4006396841
Honeywell Advanced Sensing Technologies830 East Arapaho Road Richardson, TX 75081 sps.honeywell.com/ast
32305127-B-EN | B | 12/12© 2021 Honeywell International Inc. All rights reserved.