Embed Size (px)
Citation preview

FKS 2200 B1®
Electric Chainsaw Translation of original operation manual
656393_flo_Kettensaege_Cover_LB6.indd 20 06.12.10 16:58

GB / IE Translation of original operation manual Page
Before reading, unfold the page containing the illustrations and familiarise yourself with all functions of the device.
56393_�o_Kettensaege_Cover_LB6.indd 21 06.12.10 16:58
5
G
C
F
1 2 3 5 6 7
J
I
H
E
A 10 1198
13141718 19
20
22
B 2
4
1216
D
15
3 8 88 3 3
1314
38
17
1110
15
14
14
22
2324
1525
21
4
5

R
N
S
Q
PO
M
LK
1
2
1 2
3
5
GB IE
Technical Data .................................... 24CE Declaration of Conformity ........... 26Exploded Drawing .............................. 28Grizzly Service-Center ........................29
Beforefirstusingthemachine,pleasereadthisinstructionmanualcarefully,foryourownsafetyandforthesafetyofothers.Keepthemanualinasafeplaceandpassitontoanysubsequentownertoensurethattheinformationcon-tainedthereinisavailableatalltimes.Failuretoadheretothesafetyinstructionsanddirectionsmayresultinelectricshock,fire,and/orseriousinjury.
Intended purposeTheelectricchainsawisconstructedforsawingwoodonly.Thesawisnotde-signedforanyothertypesofapplication(e.g.cuttingofbrickwork,plasticorfood).Thechainsawisdesignedforemploymentinthedo-it-yourselfersector.Itwasnotdesignedforcontinuousemploymentinthecommercialsector.Thedeviceisdesignedforusebyadults.Youngpeopleover16yearsoldmayusethechainsawundersupervisiononly.Themanufacturerisnotliablefordamages,whichwerecausedthroughuseinappli-cationsforwhichitwasnotdesigned,orincorrectoperation.
Notes on safetyThissectiondealswiththebasicsafetyregulationswhileworkingwiththeelectricchainsaw.
ContentIntended purpose ..................................5Notes on safety ......................................5
Symbolsusedintheinstructions.......6Symbolsusedonthesaw.................6Generalnotesonsafety....................7Causesandoperatorpreventionofkickback......................................10
General description .............................11Functiondescription........................11Overview.........................................11Safetyfunctions...............................11
Operation startup ................................12Tensioningthesawchain................12Chainlubrication.............................12
Operating the chainsaw ......................13Switchingon....................................13Checkingthechainbrake...............13Checkingtheoilautomaticsystem..14Changingthesawbar.....................14Fittingthesawchain.......................14
Sawing techniques ..............................15General...........................................15Bucking...........................................15Limbing...........................................16Fellingtrees.....................................16
Maintenance and cleaning ...................18Cleaning..........................................18MaintenanceIntervalTable.............18Maintenanceintervals.....................19Oilingthesawchain........................19Sharpeningthesawchain................19Adjustingthechaintension.............20
Trouble shooting .................................21Maintainingthechainbar................22Startingupanewsawchain...........22
Waste disposal and environmental protection .............................................22Guarantee .............................................23Spare parts ...........................................24

6
GB IE
Anelectricchainsawisadanger-ousdevice,whichcancauseseriousorevenfatalinjurieswithincorrectorcarelessuse.Thus,foryourownsafetyandthesafetyofothers,youshouldalwaystakenoteoftheinstructionsonsafetyand,incaseofdifficulties,consultaspecialistforadvice.
Symbols used in the instruc-tions
Hazard symbols with informa-tion on prevention of personal injury and property damage.
Precautionsymbol(explanationofprecautioninsteadofexclamationmark)withinformationonpreven-tionofharm/damage.
Noticesymbolwithinformationonhowtohandlethedeviceproperly.
Symbols used on the saw
Makeyourselffamiliarwithallcontrolelementsbeforeanywork.Practicehandlingthesawandhaveexplainedthefunctions,operatingmethodsandsawingtechniquesbyapracticeduserorspecialist.
Readandtakenoteoftheoperat-ingmanualbelongingtothema-chine!
Wearpersonalprotectiveequip-ment.Basically,wearprotectivegogglesor,evenbetter,faceprotection,earprotection,safetyhelmet,cut-protectionworkingclothes,cut-protectiongloves,andcut-protectionsafetybootswithanti-slipsoles.
Caution!Spring-back-Becarefulofspring-backofthemachinedur-ingwork.
Donotexposetheunittorain.Thedevicemustnotbewet,norshoulditbeoperatedinamoistenviron-ment.
Caution!Removetheplugimmedi-atelyfromtheplugsocketincaseofdamageorcuttingthroughofthemainscable
InformationoftheacousticpowerlevelLWAindB.
te
460 mm
Lengthofthechainbar
SafetyclassII
Machinesdonotbelongwithdo-mesticwaste.

7
GB IE
General notes on safety
Beforeyoudoanyworkwiththeelectricchainsaw,makeyourselffamiliarwithalloperatingparts.Practiseusingthesaw(sawinglogsonasawhorse)andgetanexperi-enceduseroraspecialisttoexplaintoyouthefunctionofthesaw,thewayofworking,thetechniquesofsawingandthepersonalprotectionequipment.
Readthesafetyinstructionsinordertoavoidinjuriesandmaterialdam-age.
General safety instructions for power tools
WARNING! Read all safety direc-tions and instructions. Omis-sions in the compliance with safety directions and instructions can cause electrical shock, fire and/or severe injuries.
Retain all safety directions and instruc-tions for future use.
The term “Power Tools” used in the safety instructions refers to mains-operated power tools (with power cord) and to bat-tery-operated power tools (without power cord).
Work area safety
• Keep work area clean and well lit.Clutteredordarkareasinviteacci-dents.
• Do not operate power tools in ex-plosive atmospheres, such as in the presence of flammable Iiquids, gases or dust.Powertoolscreatesparkswhichmayignitethedustorfumes.
• Keep children and bystanders away while operating a power tool.Dis-tractionscancauseyoutolosecon-trol.
Electrical safety
• Power tool plugs must match the outlet. Never modify the plug in any way. Do not use any adapter plugs with earthed (grounded) power tools.Unmodifiedplugsandmatch-ingoutletswillreduceriskofelectricshock
• Avoid body contact with earthed or grounded surfaces, such as pipes, radiators, ranges and refrigerators.Thereisanincreasedriskofelec-tricshockifyourbodyisearthedorgrounded.
• Do not expose power tools to rain or wet conditions.Waterenteringapowertoolwillincreasetheriskofelectricshock.
• Ifthepowercableforthisequipmentisdamaged,itmustbereplacedbythemanufacturer,acustomerserviceagentofthesameorasimilarlyqualifiedper-soninordertopreventhazards.
• Laytheextensioncableinsuchawaythatitwillnotbecaughtbybranchesorsimilarduringsawing.
• Do not abuse the cord. Never use the cord for carrying, pulling or un-plugging the power tool. Keep cord away from heat, oil, sharp edges or moving parts.Damagedorentan-
8
GB IE
tachedtoarotatingpartofthepowertoolmayresultinpersonalinjury.
• Do not overreach. Keep proper footing and balance at all times. Thisenablesbettercontrolofthepowertoolinunexpectedsituations.
• Dress properly. Do not wear loose clothing or jewellery. Keep your hair, clothing and gloves away from moving parts. Looseclothes,jewel-leryorlonghaircanbecaughtinmov-ingparts.
• If devices are provided for the con-nection of dust extraction and col-lection facilities, ensure these are connected and properly used.Useofdustcollectioncanreducedust-relatedhazards.
Power tool use and care
• Do not force the power tool. Use the correct power tool for your ap-plication.Thecorrectpowertoolwilldothejobbetterandsaferattherateforwhichitwasdesigned.
• Do not use the power tool if the switch does not turn it on and off.Anypowertoolthatcannotbecontrol-ledwiththeswitchisdangerousandmustberepaired.
• Disconnect the plug from the pow-er source and/or the battery pack from the power tool before making any adjustments, changing acces-sories, or storing power tools.Suchpreventivesafetymeasuresreducetheriskofstartingthepowertoolac-cidentaIly.
• Store idle power tools out of the reach of children and do not allow persons unfamiliar with the power tool or these instructions to oper-
gledcordsincreasetheriskofelectricshock.
• When operating a power tool out-doors, use an extension cord suit-able for outdoor use.Useofacordsuitableforoutdoorusereducestheriskofelectricshock.
• If operating a power tool in a damp location is unavoidable, use a residual current device (RCD) protected supply.UseofanRCDreducestheriskofelectricshock.Useasurgeprotectorwithareleasecurrentof30mAorless.
Personal safety
• Stay alert, watch what you are do-ing and use common sense when operating a power tool. Do not use a power tool while you are tired or under the influence of drugs, alco-hol or medication.Amomentofinat-tentionwhiteoperatingpowertoolsmayresultinseriouspersonalinjury.
• Use personal protective equipment. Always wear eye protection.Protec-tiveequipmentsuchasdustmask,non-skidsafetyshoes,hardhat,orhearingprotectionusedforappropriateconditionswillreducepersonalinju-ries.
• Prevent unintentional starting. Ensure the switch is in the off-po-sition before connecting to power source and/or battery pack, picking up or carrying the tool.Carryingpowertoolswithyourfingerontheswitchorenergisingpowertoolsthathavetheswitchoninvitesaccidents.
• Remove any adjusting key or wrench before turning the power tool on.Awrenchorakeyleftat-

9
GB IE
ate the power tool.Powertoolsaredangerousinthehandsofuntrainedusers.
• Maintain power tools. Check for misalignment or binding of moving parts, breakage of parts and any other condition that may affect the power tool’s operation. If damaged, have the power tool repaired before use.Manyaccidentsarecausedbypoorlymaintainedpowertools.
• Keep cutting tools sharp and clean.ProperlymaintainedcuttingtoolswithsharpcuttingedgesarelessIikelytobindandareeasiertocontrol.
• Use the power tool, accessories and tool bits etc. in accordance with these instructions, taking into account the working conditions and the work to be performed. Useofthepowertoolforoperationsdiffer-entfromthoseintendedcouldresultinahazardoussituation.
Service
• Have your power tool serviced by a qualified repair person using only identical replacement parts.Thiswillensurethatthesafetyofthepowertoolismaintained.
Chain saw safety warnings:
• Keep ail parts of the body away from the saw chain wh en the chain saw is operating. Before you start the chain saw, make sure the saw chain is not contacting anything.Amomentofinattentionwhiteoperatingchainsawsmaycauseentanglementofyourclothingorbodywiththesawchain.
• Always hold the chain saw with your right hand on the rear handle and your left hand on the front handle.Holdingthechainsawwithareversedhandconfigurationincreasestheriskofpersonalinjuryandshouldneverbedone.
• Wear safety glasses and hear-ing protection. Further protective equipment for head, hands, legs and feet is recommended.Adequateprotectiveclothingwillreduceperson-alinjurybyflyingdebrisoraccidentaIcontactwiththesawchain.
• Do not operate a chain saw in a tree.Operationofachainsawwhiteupinatreemayresultinpersonalinjury.
• Always keep proper footing and operate the chain saw only when standing on fixed, secure and level surface.Slipperyorunstablesurfacessuchasladdersmaycausealossofbalanceorcontrolofthechainsaw.
• When cutting a Iimb that is under tension be alert for spring back.WhenthetensioninthewoodfibresisreleasedthespringloadedIimbmaystriketheoperatorand/orthrowthechainsawoutofcontrol.
• Use extreme caution when cutting brush and saplings.Theslendermaterialmaycatchthesawchainandbewhippedtowardyouorpullyouoffbalance.
• Carry the chain saw by the front handle with the chain saw switched off and away from your body. When transporting or storing the chain saw always fit the guide bar cover.ProperhandlingofthechainsawwillreducetheIikelihoodofaccidentaIcontactwiththemovingsawchain.
10
GB IE
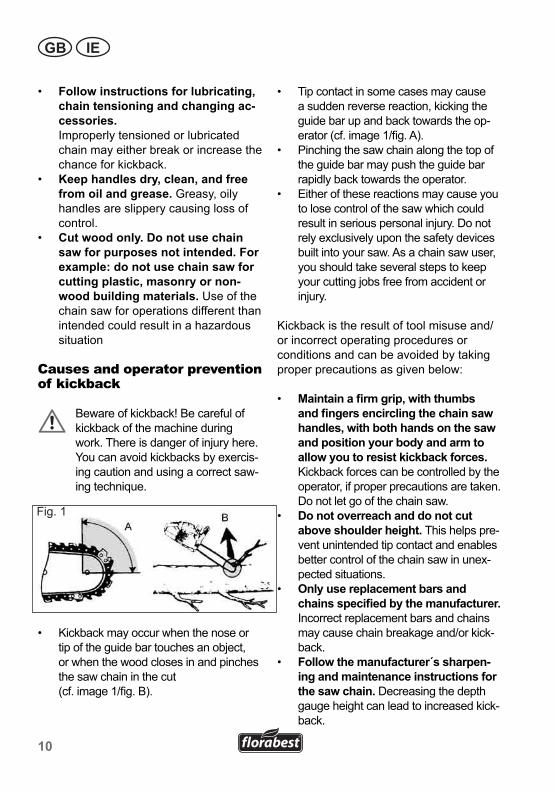
• Tipcontactinsomecasesmaycauseasuddenreversereaction,kickingtheguidebarupandbacktowardstheop-erator(cf.image1/fig.A).
• Pinchingthesawchainalongthetopoftheguidebarmaypushtheguidebarrapidlybacktowardstheoperator.
• Eitherofthesereactionsmaycauseyoutolosecontrolofthesawwhichcouldresultinseriouspersonalinjury.Donotrelyexclusivelyuponthesafetydevicesbuiltintoyoursaw.Asachainsawuser,youshouldtakeseveralstepstokeepyourcuttingjobsfreefromaccidentorinjury.
Kickbackistheresultoftoolmisuseand/orincorrectoperatingproceduresorconditionsandcanbeavoidedbytakingproperprecautionsasgivenbelow:
• Maintain a firm grip, with thumbs and fingers encircling the chain saw handles, with both hands on the saw and position your body and arm to allow you to resist kickback forces.Kickbackforcescanbecontrolledbytheoperator,ifproperprecautionsaretaken.Donotletgoofthechainsaw.
• Do not overreach and do not cut above shoulder height. Thishelpspre-ventunintendedtipcontactandenablesbettercontrolofthechainsawinunex-pectedsituations.
• Only use replacement bars and chains specified by the manufacturer. Incorrectreplacementbarsandchainsmaycausechainbreakageand/orkick-back.
• Follow the manufacturer´s sharpen-ing and maintenance instructions for the saw chain. Decreasingthedepthgaugeheightcanleadtoincreasedkick-back.
• Follow instructions for lubricating, chain tensioning and changing ac-cessories.
Improperlytensionedorlubricatedchainmayeitherbreakorincreasethechanceforkickback.
• Keep handles dry, clean, and free from oil and grease.Greasy,oilyhandlesareslipperycausinglossofcontrol.
• Cut wood only. Do not use chain saw for purposes not intended. For example: do not use chain saw for cutting plastic, masonry or non-wood building materials.Useofthechainsawforoperationsdifferentthanintendedcouldresultinahazardoussituation
Causes and operator prevention of kickback
Bewareofkickback!Becarefulofkickbackofthemachineduringwork.Thereisdangerofinjuryhere.Youcanavoidkickbacksbyexercis-ingcautionandusingacorrectsaw-ingtechnique.
• Kickbackmayoccurwhenthenoseortipoftheguidebartouchesanobject,orwhenthewoodclosesinandpinchesthesawchaininthecut
(cf.image1/fig.B).
Fig.1

11
GB IE
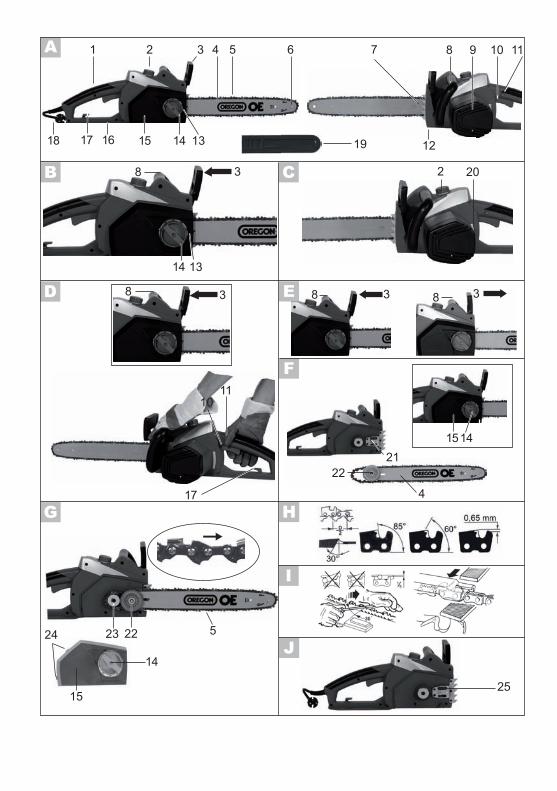
General descriptionFunction description
Thechainsawisdrivenbyanelectricmo-tor.Thecirculatingchainisledaroundasawbar(guiderail)Thetoolisfittedwitharapid-actionchain-tensioningsystemandafast-actingchainbrake.Anautomaticoildosingregulatorensurescontinuouschainlubrication.Thechainsawisequippedwithvariousprotectionfittingsfortheprotectionoftheuser.Refertothefollowingdescriptionsforthefunctionofcontrolelements.
Thediagramscanbefoundonthefrontold-outpages.
Overview
A 1 Rearhandle 2 Oilfillercap 3 Chainbrakehandle,fronthand
guard 4 Chainbar 5 Sawchain 6 Nosesprocket 7 Bumper 8 Fronthandle 9 Electricmotor 10 On/offswitch 11 Safetylock 12 Chaincatcher 13 Chainadjustmentring 14 Fasteningboltforsprocketchain
wheelcovering 15 Safetybolt 16 Sprocketchainwheelcovering 17 Rearhandguard 18 Cableholder 19 Mainscable 20 Sawbarprotectionsheath
Safety functions
A 1 Rear grip with hand guard (17) Protectsthehandagainst
branchesandboughsinthecaseofspringingawaybythechain.
3 Chain braking lever/hand guard Controlsystem,whichstopsthesawchainimmediatelyincaseofaspring-back;levercanalsobeactivatedmanually;protectsthelefthandoftheoperatorifitslidesfromthefrontgrip.
5 Saw chain with small spring-back
Helpsyoutocatchspring-backswithspeciallydevelopedcontrolsystems.
7 Metal stop claw Reinforcesthestabilitywhen
verticalcutsarecarriedoutandfacilitatessawing.
9 Electric motor Doubleinsulatedforsafetyrea-
sons. 10 On-off switch with safety
chain brake OnreleasingtheOn/Offswitch,
thedeviceimmediatelyswitchesoff.
11 Switch-on block Theswitch-onblockmustbe
releasedforswitchingonthede-vice.
12 Chain catcherDecreasesthedangerofinjuriesifthechainbreaksorifitcomesoff.

12
GB IE
Operation startup Alwayswearprotectivegloveswhenworkingwiththechainsawandemployonlyoriginalparts.Pulloutthepowerplugbeforedoinganyworkonthechainsawitself-–injuryhazard!
Thetooliscompletelyassembledondelivery.Beforeyoustartuptheelectricchainsaw,adjustthechain,fillupwithchainoilandchecktheautomaticlubrica-tionandchainbrakefunction.
Tensioning the saw chain
Withacorrectlytensionedchainyougetgoodcuttingperformanceandalongerlife.
Anincorrectlytensionedchainmaybreakorspringoff,lead-ingtodangerofinjury.Testtheelectricsawbeforeeverystartandthechaintensionaftereveryhourofsawing.
Thechainiscorrectlytensionedifitdoesnotsagattherailundersideandcanberotatedcompletelyaroundwiththeglovedhand.Whenthesawchainistensionedwith9N(approx.1kg),thegapbetweenthesawchainandtheguiderailmaynotbemorethan2mm.
B 1. Ensurethatthechainbrakehasbeenreleased,thatis,thatthechainbrakeleverispulledupagainstthefrontgrip(8).
2. Unscrewthefasteningbolt(14). 3. Totightenthesaw,turnthechain
adjustmentring(13)clockwise.Toloosenthetension,turnthechainadjustmentringanti-clock-wise.
4. Tightenupthefasteningbolt(14)again.
Withanewsawchain,youmustreadjustthechaintensionafteratleast5cuttingoperations.
Chain lubrication
Therailandchainmustneverbewithoutoil.Ifyouoperatetheelec-tricchainsawwithtoolittleoil,thecuttingperformanceandthelife-timeofthesawchainisreduced,sincethechainbecomesbluntfaster.Youcanidentifyacaseoftoolittleoilwheresmokedevelop-mentordiscolorationoftherailoc-curs.
Thepowersawisequippedwithanoilautomaticsystem.Assoonasthemotorisspeededup,theoilalsoflowsfastertothechainbar.
• Checktheoilfilllevelandregularlytopupwithoil( C 21).Theoiltankholds270mloil.
• UseParksidebio-oil;thisproductcon-tainsadditivesthatreducewearandtearanddoesnotdamagethepumpsystem.bio-oilisavailablefromourService-Center(seeP.109forthead-dress).
13
GB IE
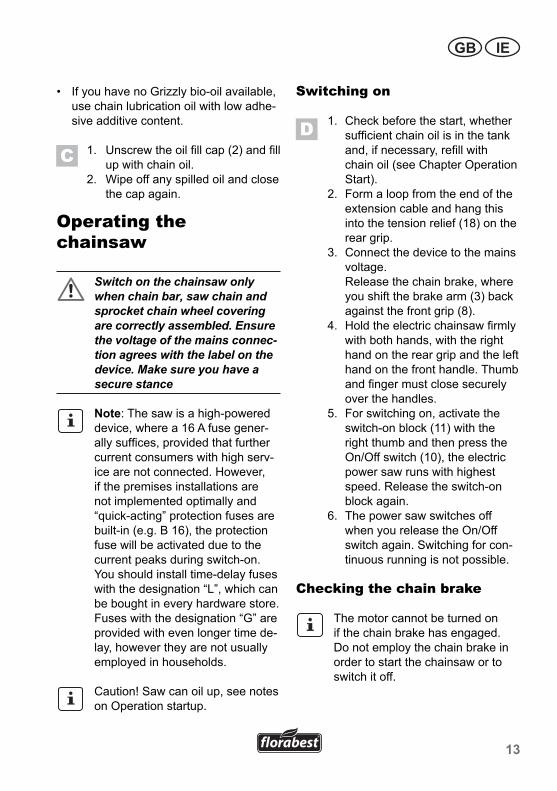
• IfyouhavenoGrizzlybio-oilavailable,usechainlubricationoilwithlowadhe-siveadditivecontent.
C 1. Unscrewtheoilfillcap(2)andfillupwithchainoil.
2. Wipeoffanyspilledoilandclosethecapagain.
Operating the chainsaw
Switchonthechainsawonlywhenchainbar,sawchainandsprocketchainwheelcoveringarecorrectlyassembled.Ensurethevoltageofthemainsconnec-tionagreeswiththelabelonthedevice.Makesureyouhaveasecurestance
Note:Thesawisahigh-powereddevice,wherea16Afusegener-allysuffices,providedthatfurthercurrentconsumerswithhighserv-icearenotconnected.However,ifthepremisesinstallationsarenotimplementedoptimallyand“quick-acting”protectionfusesarebuilt-in(e.g.B16),theprotectionfusewillbeactivatedduetothecurrentpeaksduringswitch-on.Youshouldinstalltime-delayfuseswiththedesignation“L”,whichcanbeboughtineveryhardwarestore.Fuseswiththedesignation“G”areprovidedwithevenlongertimede-lay,howevertheyarenotusuallyemployedinhouseholds.
Caution!Sawcanoilup,seenotesonOperationstartup.
Switching on
D 1. Checkbeforethestart,whethersufficientchainoilisinthetankand,ifnecessary,refillwithchainoil(seeChapterOperationStart).
2. Formaloopfromtheendoftheextensioncableandhangthisintothetensionrelief(18)onthereargrip.
3. Connectthedevicetothemainsvoltage.
Releasethechainbrake,whereyoushiftthebrakearm(3)backagainstthefrontgrip(8).
4. Holdtheelectricchainsawfirmlywithbothhands,withtherighthandonthereargripandthelefthandonthefronthandle.Thumbandfingermustclosesecurelyoverthehandles.
5. Forswitchingon,activatetheswitch-onblock(11)withtherightthumbandthenpresstheOn/Offswitch(10),theelectricpowersawrunswithhighestspeed.Releasetheswitch-onblockagain.
6. ThepowersawswitchesoffwhenyoureleasetheOn/Offswitchagain.Switchingforcon-tinuousrunningisnotpossible.
Checking the chain brake
Themotorcannotbeturnedonifthechainbrakehasengaged.Donotemploythechainbrakeinordertostartthechainsawortoswitchitoff.

14
GB IE
E 1. Releasethechainbrakebyshift-ingthebrakearmoveragainstthefrontgrip(8).
2. Placetheelectricchainsawontoasolid,flatsurface.Itmustnotcontactanyobjects.
3. Connectthedevicetothemainsvoltage.
4. Holdtheelectricchainsawfirmlywithbothhands,withtherighthandonthereargripandthelefthandonthefronthandle.Thumbandfingermustclosesecurelyoverthehandles.
5. Turnontheelectricchainsaw. 6. Activatethechainbrakinglever
(3),withrunningmotor,withthelefthand.Chainshouldstopabruptly.
7. Oncethechainbrakeiswork-ingproperly,releasetheon/offswitchandthechainbrake.
Ifthechainbrakedoesnotfunc-tioncorrectly,youmustnotusetheelectricchainsaw.Aslacksawchainleadstodangerofin-jury.ReturntheelectricchainsawtoourService-Centerforrepair(seeP.29forouraddress).
Checking the oil automatic system
Checktheoillevelandtheoilautomaticsystembeforecommencementofwork.• Switchonthechainsawandholdit
aboveabrightbackground.Thesawmustnottouchtheground.
Ifanoiltracecanbeseen,thechainsawisworkingtrouble-free.Selecttheoilregu-latortopreventoildropletsforming,butalsotopreventthechainfromeverrun-ningdry.Whenthechainsawisputawayinstorage,settheoilregulatortozero.
J 4. Cleantheoilpassagesofthechainbar( J 26),inordertoguaranteeatrouble-free,auto-maticoilingofthesawchaindur-ingoperation.
Changing the saw bar
F 1. Switchthesawoffandunplugitfromthemains.
2. Laythesawonaflatsurface. 3. Loosenthesafetybolt(15)un-
derneaththetensioningunit. Turnthefasteningbolt(14)anti-
clockwisetoremovethesprock-etchainwheelcovering(16).
4. Removethesawbarandsawchain.Toremovetheguidebar(4),raiseittoanangleofap-prox.45degrees.Thiswillmakeiteasiertotakethesawchain(5)offthesprocket(23).
5. Tofitthenewbar,placethebarontothebarboltwiththeten-sioningplatepointingoutwards(23).
Fitting the saw chain
G 1. Switchthesawoffandunplugitfromthemains.
2. Spreadthechain(5)outintoaloopwiththecuttingedgesrun-ningclockwise.
15
GB IE
3. Slidethesawchain(5)intothebarguidegroove.Tomounttheguidebar(4),raiseittoanangleofapprox.45degrees.Thiswillmakeiteasiertoreplacethesawchain(5)ontothesprocket(23).Itisnormalthatthesawchain(5)isslack.Sagginginthechainisnormal.
4. Pre-tightenthechain(5)byturningthetensioningplate(23)clockwise.
5. Positionthesprocketchainwheelcovering(16).Firstplacethetab(25)onthecoverintothecorrespondingnotchontheplate(16).Onlylightlytightenthefas-teningbolt(14),asyouwillstillhavetotensionthesaw.
Refertothestart-upsectiononhowtotensionthesawchain.
Sawing techniquesGeneral
• Youhavebettercontrolwhenyousawwiththebottomsideofthechainbar(withpullingsawchain)andnottowiththetopsideofthechainbar(withpushingsawchain).
• Thesawchainmustnotcontacteitherthegroundoranotherobjectduringsawingthroughoraftersawingcom-pletion.
• Makesurethatthesawchaindoesnotbecomejammedinthewood.Donotletthetreetrunkbreakorsplitoff.
• Consideralsotheprecautionsagainstspring-back(seenotesonsafety).
Ifthesawchainjams,youdonotattempttopullouttheelectricchainsawusingpower.Thereisadangerofinjuryhere.Switchoffthemotorandusealeverorwedgetofreetheelectricchain-saw.
Bucking
Thisreferstosawingupafelledtreetrunkintosmallersections.
• Ensurethatthesawchaindoesnotcomeincontactwiththegroundduringsawing.
• Makesureyouhaveasecurestanceand,inthecaseofslopingground,standabovethelog.
K 1. Log is lying on the ground: Sawthroughthelogcompletely
fromaboveandensureattheendofthecutnottocontacttheground.
Ifyoucanturnthetreetrunk,sawtwo-thirdsofthewaythroughit.Thenturnthetrunkaroundandsawtherestofthewaythroughfromabove.
L 2. Log is supported at one end: Startsawingfromthebottomand
workyourwayup(withtheupperedgeofthebar)athirdofthewayintothediameterofthetrunktopreventsplitting.Thensawfromthetopdownwardswiththeloweredgeofthebartowardsthefirstcuttopreventthebarfrombe-comingjammedinthewood.
16
GB IE
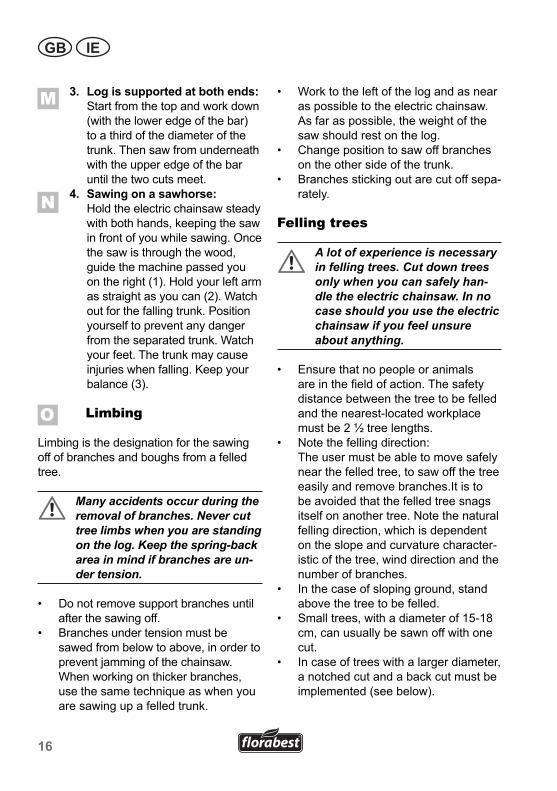
M 3. Log is supported at both ends: Startfromthetopandworkdown
(withtheloweredgeofthebar)toathirdofthediameterofthetrunk.Thensawfromunderneathwiththeupperedgeofthebaruntilthetwocutsmeet.
N 4. Sawing on a sawhorse: Holdtheelectricchainsawsteady
withbothhands,keepingthesawinfrontofyouwhilesawing.Oncethesawisthroughthewood,guidethemachinepassedyouontheright(1).Holdyourleftarmasstraightasyoucan(2).Watchoutforthefallingtrunk.Positionyourselftopreventanydangerfromtheseparatedtrunk.Watchyourfeet.Thetrunkmaycauseinjurieswhenfalling.Keepyourbalance(3).
O Limbing
Limbingisthedesignationforthesawingoffofbranchesandboughsfromafelledtree.
Manyaccidentsoccurduringtheremovalofbranches.Nevercuttreelimbswhenyouarestandingonthelog.Keepthespring-backareainmindifbranchesareun-dertension.
• Donotremovesupportbranchesuntilafterthesawingoff.
• Branchesundertensionmustbesawedfrombelowtoabove,inordertopreventjammingofthechainsaw.
Whenworkingonthickerbranches,usethesametechniqueaswhenyouaresawingupafelledtrunk.
• Worktotheleftofthelogandasnearaspossibletotheelectricchainsaw.Asfaraspossible,theweightofthesawshouldrestonthelog.
• Changepositiontosawoffbranchesontheothersideofthetrunk.
• Branchesstickingoutarecutoffsepa-rately.
Felling trees
Alotofexperienceisnecessaryinfellingtrees.Cutdowntreesonlywhenyoucansafelyhan-dletheelectricchainsaw.Innocaseshouldyouusetheelectricchainsawifyoufeelunsureaboutanything.
• Ensurethatnopeopleoranimalsareinthefieldofaction.Thesafetydistancebetweenthetreetobefelledandthenearest-locatedworkplacemustbe2½treelengths.
• Notethefellingdirection: Theusermustbeabletomovesafely
nearthefelledtree,tosawoffthetreeeasilyandremovebranches.Itistobeavoidedthatthefelledtreesnagsitselfonanothertree.Notethenaturalfellingdirection,whichisdependentontheslopeandcurvaturecharacter-isticofthetree,winddirectionandthenumberofbranches.
• Inthecaseofslopingground,standabovethetreetobefelled.
• Smalltrees,withadiameterof15-18cm,canusuallybesawnoffwithonecut.
• Incaseoftreeswithalargerdiameter,anotchedcutandabackcutmustbeimplemented(seebelow).

17
GB IE
Donotfellanytreeswhenastrongorchangingwindisblow-ing,ifthedangerofpropertydamageexistsorifthetreecouldfallonelectricwires.
Immediatelyafterterminationofthesawingprocedure,removetheearprotectionsothatyoucanhearhooterandalarmsignals.
O 1. Removal of branches: Removehangingbranchesby
positioningthecutfromabovethebranch.Withremovalofbranches,neverworkhigherthanshoulderlevel.
P 2. Escape area: Removetheundergrowtharound
thetreetoensureaneasyescape.Theescapearea(1)shouldbearound45°eithersidebehindtheplannedfellingdirec-tion(2).
Q 3. Cutting notch (A): Makeafellingnotchinthedirec-
tioninwhichyouwishthetreetofall.Startwithanuppersawingcut. Nowmakeasawcutbelow,whichrunshori-zontallyandencounterstheup-persawcutexactly.
Thedepthofcutofthenotchshouldbeapprox.¼ofthetrunkdiameterandthecuttingangleatleast45°.
Neverstepinfrontofatreewhichisnotched.
Q 4. Felling back cut (B): Makethebackcutfromtheother
sideofthelog,whereyoustandtotheleftofthelogandsawwiththechainsawpulling.Thebackcutmustrunhorizontallyabout3-5cmabovethehorizontalnotchedcut.
Thebackcutshouldbesodeepthattheseparationdistancebetweenthebackcutandthenotchcuttinglineisatleast1/10ofthetrunkdiameter.Thepartofthelognotsawedthroughisdesignatedasabreakdimen-sion.
R Insertafellingwedgeoracrow-barintothebackcut,assoonasthedepthofcutpermitsthis,inordertopreventajammingofthechainbar.
S 5. Ifthetrunkdiameterislargerthanthelengthofthechainbar,maketwocuts.
Forsafetyreasons,weadviseinexperiencedusersnottofellanylogswitharaillengthwhichissmallerthanthetrunkdiam-eter.
6. Aftercarryingoutofthebackcut,thetreefallsbyitselforwiththeaidofthefellingwedgeorcrowbar.
Assoonasthetreebeginstofall,pulloutthesawfromthesection,stopthemotor,placetheelectricchainsawdownandleavetheworkplaceusingthewith-drawalpath.
18
GB IE
Maintenance and cleaning
Basically,carryoutmainte-nanceandcleaningworkswithswitched-offmotorandpowerplugremoved.Dangerofinjury!LeaveanymaintenanceandservicingworknotcoveredbythismanualtoourService-Cent-er(seeP.29fortheaddress).Useonlyoriginalspareparts.Allowthemachinetocooldownbeforeallmaintenanceandcleaningworks.Dangerofburninjuries!
Cleaning
• Cleanthemachinethoroughlyaftereveryuse.Inthisway,youextendthelifeofthemachineandavoidac-cidents.
• Keepthegrippinghandlesfreeofgas,oilorgrease.Cleanthegrippinghan-dles,whereappropriate,withamoistclothsoakedinsoap.Usenosolventsorgasforcleaning!
• Cleanthesawchainaftereveryuse.Useapaintbrushorwhiskforthat.Donotuseanyliquidstocleanthechain.Aftercleaning,oilthechainlightlywithchainoil.
• Cleantheventilationslotsandthesurfacesofthemachinewithapaintbrush,whiskordrycloth.Donotuseanyliquidsforcleaning.
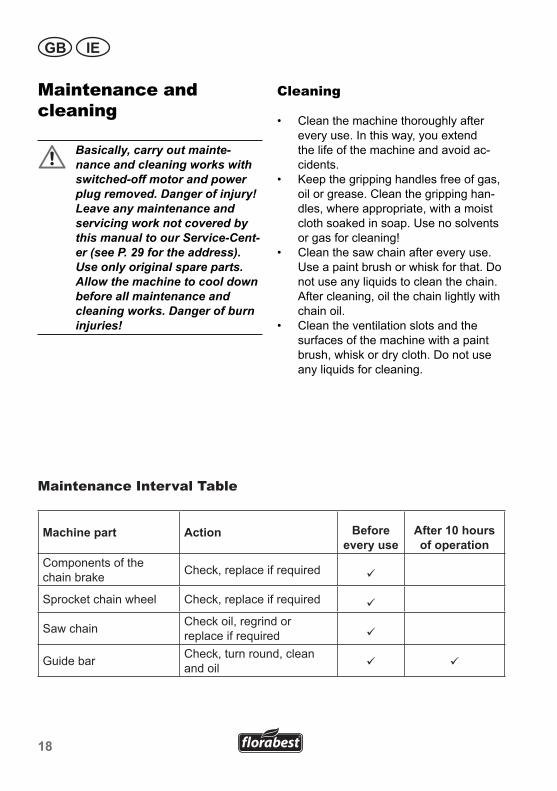
Maintenance Interval Table
Machine part Action Before every use
After 10 hours of operation
Componentsofthechainbrake Check,replaceifrequired
Sprocketchainwheel Check,replaceifrequired
Sawchain Checkoil,regrindorreplaceifrequired
Guidebar Check,turnround,cleanandoil
19
GB IE
Maintenance intervals
Regularlycarryoutthemaintenanceopera-tionslistedinthefollowingtable.Thelifeofthesawisextendedbyregularmaintenanceofyourchainsaw.Furthermore,yougetoptimumcuttingperformanceandavoidac-cidents.
Oiling the saw chain
Cleanandoilthechainregu-larly.Inthisway,youkeepthechainsharpandgetoptimummachineperformance.Incaseofdamageduetoinadequatemaintenanceofthesawchain,theguaranteeclaimisinvalid.Removethepowerplugandusecut-protectiongloveswhenyouarehandlingthechainorthechainbar.
• Oilthechainaftercleaning,after10hoursofuseoratleastonceweekly,dependingonwhichcomesfirst.
• Beforeoiling,thechainbarmustbecleanedthoroughly,inparticulartheteethoftherail.Useawhiskandadryclothforthat.
• Oiltheindividualchainlinkswiththeaidofanoilsuctiongunwithpinpointtip(availableinthespecialisttrade).Placeindividualoildropsontothear-ticulatedlinksandontothetoothtipsoftheindividualchainlinks.
Sharpening the saw chain
Anincorrectlysharpenedsawchainincreasesthedangerofspring-back!Usecut-protectiongloveswhenyouarehandlingthechainorthechainbar.
Asharpchainguaranteesanop-timalcuttingperformance.Iteatseffortlesslythroughthewoodandleaveslarge,longwoodenchips.Asawchainisbluntifyouhavetopressthecuttingequipmentthroughthewoodandthewoodenchipsareverysmall.Inthecaseofaverybluntsawchain,nochipcuttingsresultatall,onlysawdust.
• Thesawingpartsofthechainarethecuttingelements,whichconsistofacuttingtoothandadepthlimitingprojection.Theverticalseparationdis-tancebetweenthesetwodeterminesthesharpnessdepth.
• Thefollowingvaluesmustbenotedinsharpeningthecuttingteeth:
H - Sharpedgeangle(30°) - Breastangle(85°) - Sharpnessdepth(0.65mm) - Roundfilediameter(4.0mm)
20
GB IE
Deviationsfromthemeasure-mentdataofthecuttinggeom-etrycanleadtoanincreaseofthespring-backslopeofthemachine.Increaseddangerofaccident!
Specialtoolsarenecessaryforsharpen-ingthechain,whichguaranteethatthecuttingedgesaresharpenedatthecor-rectangleandtothecorrectdepth.Fortheinexperienceduserofchainsaws,werecommendtohavethesawchainsharpenedbyaspecialistoraspecialistworkshop.Ifyouthinkyourselfcapableofsharpeningthechain,youcanacquirethespecialtoolsinthespecialisttrade.
I 1. Switchthesawoffandunplugitfromthemains.
2. Removethesawchain(refertothesectiononoperatingthesaw).Thechainshouldbewell-tensionedtoensurepropersharpening.
3. Forthesharpening,aroundfilewith4.0mmdiameterisneces-sary.
Otherdiametersdamagethechainandcanleadtodangerduringwork!
4. Sharpenonlyfromtheinsidetotheoutside.Guidethefilefromtheinnersideofthecuttingteethtotheouterside.Liftthefilewhenyouarewithdrawingit.
5. Sharpenfirsttheteethononeside.Turnthesawaroundandsharpentheteethoftheotherside.
6. Thechainiswornandmustbereplacedbyanewsawchainifonlyapprox.4mmofthecuttingteethisremaining.
7. Afterthesharpening,allcuttingelementsmustnowbeequalinlengthandwidth.
8. Aftereverythirdsharpening,thesharpnessdepth(depthlimita-tion)mustbecheckedandtheheightfiledwiththeaidofaflatfile.Thedepthlimitationshouldbesetbackabout0.65mmfromthecuttingtooth.Afterthesettingbackofdepthlimitation,rounditoffalittleatthefront.
Adjusting the chain tension
Theadjustmentofthechaintensionisde-scribedinthechapter:Startingoperation,tensioningchainsaw.
• Switchoffthesawandpulloutthepowerplug.
• Checkthechaintensionregularlyandre-adjustthisasoftenaspossible,sothatthechainfitscloselytotherail,how-everisstillslackenoughtobepulledwiththehand.
21
GB IE
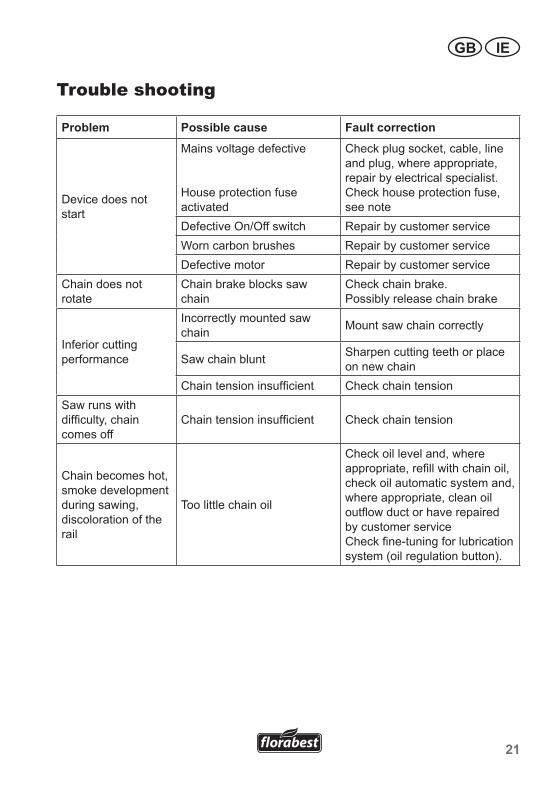
Trouble shooting
Problem Possible cause Fault correction
Devicedoesnotstart
Mainsvoltagedefective
Houseprotectionfuseactivated
Checkplugsocket,cable,lineandplug,whereappropriate,repairbyelectricalspecialist.Checkhouseprotectionfuse,seenote
DefectiveOn/Offswitch RepairbycustomerserviceWorncarbonbrushes RepairbycustomerserviceDefectivemotor Repairbycustomerservice
Chaindoesnotrotate
Chainbrakeblockssawchain
Checkchainbrake.Possiblyreleasechainbrake
Inferiorcuttingperformance
Incorrectlymountedsawchain Mountsawchaincorrectly
Sawchainblunt Sharpencuttingteethorplaceonnewchain
Chaintensioninsufficient CheckchaintensionSawrunswithdifficulty,chaincomesoff
Chaintensioninsufficient Checkchaintension
Chainbecomeshot,smokedevelopmentduringsawing,discolorationoftherail
Toolittlechainoil
Checkoilleveland,whereappropriate,refillwithchainoil,checkoilautomaticsystemand,whereappropriate,cleanoiloutflowductorhaverepairedbycustomerserviceCheckfine-tuningforlubricationsystem(oilregulationbutton).

22
GB IE
Starting up a new saw chain
Inthecaseofanewchain,thetensioningforcedecreasesaftersometime.There-foreyoumustre-tensionthechainafterthefirst5cutsandatlongerintervalsafterthis.
Neverattachanewchaintoaworndrivepinionorplaceontoadamagedorwornchainbar.Thechaincouldspringbackorbreak,potentiallyleadingtose-riousinjury.
Waste disposal and environmental protectionDonotdisposeofusedoilinthesewagesystemordrains.Disposeofusedoilinanenvironmentallycorrectmanner-bringittoawastedisposalcenter.Beenvironmentallyfriendly.Returnthetool,accessoriesandpackagingtoarecy-clingcentrewhenyouhavefinishedwiththem.
Machinesdonotbelongwithdo-mesticwaste.
Emptytheoiltankcarefullyandhandinyourelectricchainsawatadisposalcent-er.Theplasticandmetalpartsemployedcanbeseparatedoutandthusrecycledusecanbeimplemented.AskourService-Centerfordetails(seeP.29forthead-dress).
Maintaining the chain bar
Usecut-protectiongloveswhenhandlingthechainorthechainbar.
Thechainbarmustbeturnedroundevery10workinghours,inordertoguaranteeuniformwear.Toensureconsistentwearoneitherside,thebar(4)shouldbeturnedovereveryabout10hoursofoperation.Turningoverthebar(4)requiresyoutomovethetensioningscrew(22)totheoth-ersideofthebar.Unscrewtheretainingboltattachingthebar(4)tothetensioningscrew(22).Movethetensioningscrew(22)overtotheothersideofthebarandscrewtheretainingboltbackin.
1. Switchoffthesawandpulloutthepowerplug.
2. Removethesprocketchainwheelcovering,thesawchainandthechainbar.
3. Checkthechainbarforwear.Removeburrsandstraightentheguidesur-faceswithaflatfile.
4. Cleantheoilpassagesofthechainbar( J 26),inordertoguaranteeatrouble-free,automaticoilingofthesawchainduringoperation.
5. Mountchainbar,chainsawandsprocketchainwheelcoveringandtightenthechainsaw.
Withtheoilnozzlesingoodconditionandtheoilregulatorsetcorrectly,thesawchainwillsprayalittleoiloffafterstarting.

23
GB IE
postagepaid.Youcanavoidpayingextraforbulkpost-ageorincreasedshippingcostsbydis-mantlingthebarandchain,andpackingthemtogetherwiththemotorblockintherearpartoftheoriginalbox.Cutoffthethinnerfrontpart,makingsurethattheboxkeepsitsrectangularform,andcare-fullysealuptheboxonthisside.Thesendercarriesthecostsofpostageandpacking.Caution:Please,innocase,senddefec-tivedeviceswithfilledoiltank.Completelyemptythetank.Possiblematerialdam-ages(oilrunsoutifdeviceisplacedonitssideorupsidedown!)and/orfiredamagesduringtransportareborneattheexpenseofthesender.Devices sent in with freight collect - by bulk freight, express or with other spe-cial freight - are not accepted.Ifyouhaveajustifiedguaranteeclaim,pleasecontactourservicecentrebytele-phone,whichwillthenadviseyouonhowtheclaimwillbeprocessed.Wewilldisposeoftoolsfreeofcharge.
GuaranteeThisunithasaguaranteeperiodof36months,or12monthsforunitsusedonacommercialbasisorforreplacementunitsaccordingtothestatutoryregulations.Damages,whichcanbeattributedtonaturalwear,overloadingorinappropriateuse,areexcludedfromtheguarantee.Certaincomponentpartsaresubjecttoanormalwearandareexcludedfromtheguarantee.Inparticular,theseinclude:Sawchain,chainbar,sprocketchainwheelandcarbonbrushes,providedthatthecomplaintscannotbeattributedtoflawsinthematerialsthemselves.Also,alldamagetothemachine,thesawchainandthechainbar,whichcanbeattributedtoinadequatelubrication,areexcludedfromtheguarantee.Furthermore,aconditionoftheguaranteeservicesisthatthemaintenanceintervals,indicatedintheoperatinginstruction,havebeenadheredtoandtheinstructionsonthecleaning,careandmaintenancehavebeenfollowed.Damages,whichoriginateduetomaterialormanufacturerfaults,willberepairedfreeofchargebyreplace-mentdeliveryorrepair.Thisisconditionalonthesawbeingreturnedtothedealercompletewithpurchasereceiptandproofofguarantee.Unqualifiedattemptsatre-pairingtheunitordismantling/openingthemotorcasingresultinlossofguarantee.Thisisconditionaluponthedevicebeingreturnedinonepiececompletewithproofofpurchaseandguaranteetoourservicecentre(seeaddressonp.29).OurService-Centerwillalsocarryoutanynon-guaranteerepairworkforacharge.Wewillbehappytogiveyouaquote.Wewillonlyworkonunitsthathavebeensentinwiththeappropriatepackaging,

24
GB IE
Spare partsThefollowingsparesareavailablefromGrizzlyService-Center(seeP.29fortheaddress).Pleaseindicatethemachinetypeandthenumberofthesparepartwithyourorder.
Sawchain................................ 30091570Chainbar................................. 30100420Biochainoil1liter................... 30230001Biochainoil5liter................... 30230002Iffurthersparepartsshouldbenecessary,pleasefindthepartnumberontheexplodeddrawings.
Technical DataElectrical chainsaw ...........FKS 2200 B1Ratedinputvoltage..............230V~,50HzInputpower................................... 2200WSafetyclass....................................... /IIChainspeed................................13,6m/sWeight(withoutguiderailandchain)...........4,7kgWeight(withguiderailandchain)...5,4kgOiltank............................................270mlChain............91POregon3/8“LoPro.050...........Chromecuttingteeth,low-kickbackChainbar.OregonTypOE,160SDEA041Chainlinkseparation......................10mmChainwidth....................................1,3mmTeethofthesprocketchainwheel...........7Lengthofthechainbar.................460mmSawinglength...............................395mmAcousticpressurelevel(LpA)........96dB(A);KpA=3,0dB(A)soundpowerlevel(LWA)........................... 108dB(A);KWA=3,0dB(A)Guaranteedsoundpowerlevel....112dB(A)Vibration(an)...........6,97m/s2;K=1,5m/s2
Thestatedvibrationemissionvaluewasmeasuredinaccordancewithastandardtestingprocedureandmaybeusedtocompareonepowertooltoanother.Thestatedvibrationemissionvaluemayalsobeusedforapreliminaryexposureassessment.
Warning: Thevibrationemissionvaluemay
differduringactualuseofthepowertoolfromthestatedvaluedependingonthemannerinwhichthepowertoolisused.
Safetyprecautionsaimedatpro-tectingtheusershouldbebasedonestimatedexposureunderactualusageconditions(allpartsoftheoperatingcyclearetobeconsidered,including,forexample,timesduringwhichthepowertoolisturnedoffandtimeswhenthetoolisturnedonbutisrunningidle).
Noiseandvibrationvaluesweredeter-minedaccordingtothestandardsandstipulationsmentionedinthedeclarationofconformity.Technicalandopticalchangescanbecar-riedoutinthecourseoffurtherdevelop-mentwithoutnotice.Alldimensions,refer-encesandinformationofthisinstructionmanualarethereforewithoutguarantee.Legalclaims,whicharemadeontheba-sisoftheinstructionmanual,cannotthusbeconsideredasvalid.

25
GB IE

26
EU declaration of conformity
WeherebyconfirmthattheElectric Chainsaw Design Series FKS 2200 B1Serialnumber20101200001-20101258000
conformswiththefollowingapplicablerelevantversionoftheEUguidelinesasofmodelyear2010:
2006/42/EC • 2004/108/EC • 2000/14/EC
Inordertoguaranteeconsistency,thefollowingharmonisedstandardsaswellasnationalstandardsandstipulationshavebeenapplied:
EN 60745-1:2009 • EN 60745-2-13:2009 • EN 61000-3-3:2008EN 55014-1:2006 • EN 55014-2/A2:2008
EN 61000-3-2:2006
Weadditionallyconfirmthefollowinginaccordancewiththe2000/14/ECemissionsguideline:Guaranteedsoundpowerlevel:112,0dB(A)Measuredsoundpowerlevel:108,0dB(A)ComplianceevaluationprocesscarriedoutinaccordancewithAppendixV,2000/14/EC
RegisteredOffice:IntertekDeutschlandGmbH,ProductCertificationDesignTypeCertificateNo.:10SHW3128-01
GrizzlyGartengeräteGmbH&Co.KGAmGewerbepark2D-64823Groß-Umstadt/30.12.2010 (AndreasGröschl,TechnicalDirector
andDocumentationRepresentative)
GBIE

27
GB IE

28
GB IE
Exploded Drawing
BB
4
10
5
78
12
3
12
6
14151617
13
20 19
21222324
52
5756
50
54
31
3332
30
36
35
4746
38
37
44
4342
41
49
48
45
34
40
5153
55
646362
61
65
80
78
67
71
7574
7372
68767779
6970
5859
60
26272829
25
93
94
95
8990
92
9182
84
83
85868788
18
66
9
39
81
11
informative

29
GB IE
Grizzly Service-Center
DES UK Ltd.UnitB7OxfordStreetIndustrialParkVulcanRoadBilston,WestMidlandsWV147LFTel: 08707876177TelfromIreland: 00448707876177Fax: 08707876168FaxfromIreland:00448707876168Email: [email protected]
GB
2010-12-17-rev02-op

IAN 56393 Grizzly Gartengeräte GmbH & Co. KG Am Gewerbepark 2 D-64823 Groß-Umstadt Last Information Update: 12 / 2010 Ident.-No.: 75018086122010 - 6 6
56393_flo_Kettensaege_Cover_LB6.indd 19 06.12.10 16:58