Embed Size (px)
Citation preview

8/10/2019 6-67370-03_SN42101_UserGuide_RevAB
http://slidepdf.com/reader/full/6-67370-03sn42101userguiderevab 1/511
User’s Guide
StorNext 4.2.1.0.1
6-67370-03 Rev A

8/10/2019 6-67370-03_SN42101_UserGuide_RevAB
http://slidepdf.com/reader/full/6-67370-03sn42101userguiderevab 2/511
ii Quantum StorNext User’s Guide
Quantum StorNext 4.2.1.0.1 User’s Guide, 6-67370-03 Rev A, February 2012, Product of USA.
Quantum Corporation provides this publication “as is” without warranty of any kind, either express orimplied, including but not limited to the implied warranties of merchantability or fitness for a particularpurpose. Quantum Corporation may revise this publication from time to time without notice.
COPYRIGHT STATEMENT
Copyright 2012 by Quantum Corporation. All rights reserved.
Your right to copy this manual is limited by copyright law. Making copies or adaptations without prior
written authorization of Quantum Corporation is prohibited by law and constitutes a punishableviolation of the law.
TRADEMARK STATEMENT
Quantum, the Quantum logo, DLT, DLTtape, the DLTtape logo, Scalar, StorNext, the DLT logo, DXi,GoVault, SDLT, StorageCare, Super DLTtape, and SuperLoader are registered trademarks of QuantumCorporation in the U.S. and other countries. Protected by Pending and Issued U.S. and Foreign Patents,
including U.S. Patent No. 5,990,810.LTO and Ultrium are trademarks of HP, IBM, and Quantum in the U.S. and other countries. All othertrademarks are the property of their respective companies.
Specifications are subject to change without notice.

8/10/2019 6-67370-03_SN42101_UserGuide_RevAB
http://slidepdf.com/reader/full/6-67370-03sn42101userguiderevab 3/511
Quantum StorNext User’s Guide iii
Contents
Chapter 1 Introduction 1About StorNext File System. . . . . . . . . . . . . . . . . . . . . . . . . . . . 1About StorNext Storage Manager. . . . . . . . . . . . . . . . . . . . . . . 2About Distributed LAN Clients . . . . . . . . . . . . . . . . . . . . . . . . . 2About Licensing . . . . . . . . . . . . . . . . . . . . . . . . . . . . . . . . . . . . 3
Purpose of This Guide . . . . . . . . . . . . . . . . . . . . . . . . . . . . . . . . . . . . . . 3
How This Guide is Organized. . . . . . . . . . . . . . . . . . . . . . . . . . . . . . . . . 3Notes, Cautions, and Warnings . . . . . . . . . . . . . . . . . . . . . . . . . . . . . . . 4
Document Conventions . . . . . . . . . . . . . . . . . . . . . . . . . . . . . . . . . . . . . 5
Chapter 2 StorNext GUI Overview 7
Accessing the StorNext GUI . . . . . . . . . . . . . . . . . . . . . . . . . . . . . . . . . . 7The StorNext Home Page. . . . . . . . . . . . . . . . . . . . . . . . . . . . . . . . . . . 10
StorNext Monitors. . . . . . . . . . . . . . . . . . . . . . . . . . . . . . . . . .11StorNext Home Page Dropdown Menus . . . . . . . . . . . . . . . . . 14
Chapter 3 The Configuration Wizard 19
High Availability Systems . . . . . . . . . . . . . . . . . . . . . . . . . . . . 20Step 1: Welcome . . . . . . . . . . . . . . . . . . . . . . . . . . . . . . . . . . . . . . . . . 20

8/10/2019 6-67370-03_SN42101_UserGuide_RevAB
http://slidepdf.com/reader/full/6-67370-03sn42101userguiderevab 4/511

8/10/2019 6-67370-03_SN42101_UserGuide_RevAB
http://slidepdf.com/reader/full/6-67370-03sn42101userguiderevab 5/511
Contents
Quantum StorNext User’s Guide v
Step 9: Done . . . . . . . . . . . . . . . . . . . . . . . . . . . . . . . . . . . . . . . . . . . . 62
Chapter 4 File System Tasks 63
Label Disks. . . . . . . . . . . . . . . . . . . . . . . . . . . . . . . . . . . . . . . . . . . . . . 64Labeling a Device . . . . . . . . . . . . . . . . . . . . . . . . . . . . . . . . . . 64Unlabeling a Device . . . . . . . . . . . . . . . . . . . . . . . . . . . . . . . . 66
Understanding Resource Allocation. . . . . . . . . . . . . . . . . . . . . . . . . . . 66
About File System Expansion . . . . . . . . . . . . . . . . . . . . . . . . . 66About Stripe Group Movement. . . . . . . . . . . . . . . . . . . . . . . . 67Expansion and Movement Steps . . . . . . . . . . . . . . . . . . . . . . . 68
Using Resource Allocation From the Command Line . . . . . . . . . . . . . . 68Checking the File System. . . . . . . . . . . . . . . . . . . . . . . . . . . . .69Adding a Stripe Group Without Moving . . . . . . . . . . . . . . . . . 69Adding and Moving a Data Stripe Group . . . . . . . . . . . . . . . . 70Moving a Metadata/Journal Stripe Group. . . . . . . . . . . . . . . . 71
Check File System . . . . . . . . . . . . . . . . . . . . . . . . . . . . . . . . . . . . . . . . 73Viewing and Deleting a Check Report. . . . . . . . . . . . . . . . . . . 75File System Check Output Files . . . . . . . . . . . . . . . . . . . . . . . . 76
Affinities . . . . . . . . . . . . . . . . . . . . . . . . . . . . . . . . . . . . . . . . . . . . . . . 76Allocation Strategy . . . . . . . . . . . . . . . . . . . . . . . . . . . . . . . . . 77Example Use Cases . . . . . . . . . . . . . . . . . . . . . . . . . . . . . . . . . 77
Adding a New Affinity . . . . . . . . . . . . . . . . . . . . . . . . . . . . . . 78Deleting an Affinity. . . . . . . . . . . . . . . . . . . . . . . . . . . . . . . . . 80
Migrate Data . . . . . . . . . . . . . . . . . . . . . . . . . . . . . . . . . . . . . . . . . . . . 80
Truncation Parameters. . . . . . . . . . . . . . . . . . . . . . . . . . . . . . . . . . . . . 82
Chapter 5 Storage Manager Tasks 85
Storage Components. . . . . . . . . . . . . . . . . . . . . . . . . . . . . . . . . . . . . . 86Setting Devices Online and Offline . . . . . . . . . . . . . . . . . . . . . 87Additional Options for Tape Drives . . . . . . . . . . . . . . . . . . . . . 87
Drive Pools. . . . . . . . . . . . . . . . . . . . . . . . . . . . . . . . . . . . . . . . . . . . . . 87Viewing Drive Pool Information . . . . . . . . . . . . . . . . . . . . . . . 88Adding a Drive Pool . . . . . . . . . . . . . . . . . . . . . . . . . . . . . . . . 89Editing a Drive Pool. . . . . . . . . . . . . . . . . . . . . . . . . . . . . . . . . 90
Deleting a Drive Pool. . . . . . . . . . . . . . . . . . . . . . . . . . . . . . . . 90

8/10/2019 6-67370-03_SN42101_UserGuide_RevAB
http://slidepdf.com/reader/full/6-67370-03sn42101userguiderevab 6/511
Contents
vi Quantum StorNext User’s Guide
Media Actions . . . . . . . . . . . . . . . . . . . . . . . . . . . . . . . . . . . . . . . . . . . 91Viewing Media Information . . . . . . . . . . . . . . . . . . . . . . . . . . 91
Filtering Media . . . . . . . . . . . . . . . . . . . . . . . . . . . . . . . . . . . . 92Performing Media Actions . . . . . . . . . . . . . . . . . . . . . . . . . . . 92
Storage Exclusions. . . . . . . . . . . . . . . . . . . . . . . . . . . . . . . . . . . . . . . 100Accessing Storage Exclusions . . . . . . . . . . . . . . . . . . . . . . . . 101Adding an Exclusion Pattern . . . . . . . . . . . . . . . . . . . . . . . . . 102
Truncation Exclusions . . . . . . . . . . . . . . . . . . . . . . . . . . . . . . . . . . . . 104Accessing Truncation Exclusions . . . . . . . . . . . . . . . . . . . . . . 105Adding an Exclusion Pattern . . . . . . . . . . . . . . . . . . . . . . . . . 105
Tape Consolidation . . . . . . . . . . . . . . . . . . . . . . . . . . . . . . . . . . . . . . 108Setting Tape Consolidation Parameters. . . . . . . . . . . . . . . . . 108Scheduling Tape Cleaning and Defragmentation . . . . . . . . . 110
Library Operator Interface . . . . . . . . . . . . . . . . . . . . . . . . . . . . . . . . . 111
Software Requests. . . . . . . . . . . . . . . . . . . . . . . . . . . . . . . . . . . . . . . 113
Scheduler . . . . . . . . . . . . . . . . . . . . . . . . . . . . . . . . . . . . . . . . . . . . . 114Viewing a Schedule. . . . . . . . . . . . . . . . . . . . . . . . . . . . . . . . 115Adding a Schedule . . . . . . . . . . . . . . . . . . . . . . . . . . . . . . . . 116Editing an Existing Schedule . . . . . . . . . . . . . . . . . . . . . . . . . 118Deleting an Existing Schedule . . . . . . . . . . . . . . . . . . . . . . . . 118
Alternate Retrieval Location. . . . . . . . . . . . . . . . . . . . . . . . . . . . . . . . 119
Distributed Data Mover (DDM) . . . . . . . . . . . . . . . . . . . . . . . . . . . . . 121Distributed Data Mover Overview . . . . . . . . . . . . . . . . . . . . . 121Installing the DDM Feature on Clients. . . . . . . . . . . . . . . . . . 125Accessing Distributed Data Mover . . . . . . . . . . . . . . . . . . . . 125Enabling DDM. . . . . . . . . . . . . . . . . . . . . . . . . . . . . . . . . . . . 126Managing DDM Hosts. . . . . . . . . . . . . . . . . . . . . . . . . . . . . . 127Host Priority . . . . . . . . . . . . . . . . . . . . . . . . . . . . . . . . . . . . . 130Distributed Data Mover Reporting . . . . . . . . . . . . . . . . . . . . 130
Chapter 6 Replication and Deduplication 131
Replication Overview . . . . . . . . . . . . . . . . . . . . . . . . . . . . . . . . . . . . . 132Replication Configuration Overview . . . . . . . . . . . . . . . . . . . 132Replication Process Overview . . . . . . . . . . . . . . . . . . . . . . . . 133Files Excluded From Replication . . . . . . . . . . . . . . . . . . . . . . 134
Replication Terms and Concepts . . . . . . . . . . . . . . . . . . . . . . . . . . . . 135Namespace Realization . . . . . . . . . . . . . . . . . . . . . . . . . . . . . 135

8/10/2019 6-67370-03_SN42101_UserGuide_RevAB
http://slidepdf.com/reader/full/6-67370-03sn42101userguiderevab 7/511
Contents
Quantum StorNext User’s Guide vii
Blockpool . . . . . . . . . . . . . . . . . . . . . . . . . . . . . . . . . . . . . . . 136Blackout Period. . . . . . . . . . . . . . . . . . . . . . . . . . . . . . . . . . . 136
Replication Source Policy and Replication Source Directory . 136Replication Target Directory . . . . . . . . . . . . . . . . . . . . . . . . . 136Replication Schedule. . . . . . . . . . . . . . . . . . . . . . . . . . . . . . . 137Replication Copies. . . . . . . . . . . . . . . . . . . . . . . . . . . . . . . . . 137Bandwidth Throttling . . . . . . . . . . . . . . . . . . . . . . . . . . . . . . 137Multilink . . . . . . . . . . . . . . . . . . . . . . . . . . . . . . . . . . . . . . . . 137Virtual IP (vIP) . . . . . . . . . . . . . . . . . . . . . . . . . . . . . . . . . . . . 138
Some Replication Scenarios. . . . . . . . . . . . . . . . . . . . . . . . . . . . . . . . 138Scenario 1: Simplest Replication . . . . . . . . . . . . . . . . . . . . . . 139Scenario 2: Replicating Multiple Copies in the Same Target FileSystem . . . . . . . . . . . . . . . . . . . . . . . . . . . . . . . . . . . . . . . . . 139Scenario 3: Replicating to Multiple Target Hosts / File Systems . .141Additional Replication Possibilities . . . . . . . . . . . . . . . . . . . . 142Non-Supported Replication Between Source and Target. . . . 145
“Chained” Replication. . . . . . . . . . . . . . . . . . . . . . . . . . . . . . 145
Configuring Replication. . . . . . . . . . . . . . . . . . . . . . . . . . . . . . . . . . . 146Step 1: Create Source and Target File Systems . . . . . . . . . . . 146Step 2: Setting up the Blockpool. . . . . . . . . . . . . . . . . . . . . .149Step 3: Creating Replication Targets . . . . . . . . . . . . . . . . . . . 151Step 4: Create a Replication Storage Policy . . . . . . . . . . . . . . 152Configuration Steps Summary . . . . . . . . . . . . . . . . . . . . . . . 158
Scheduling Replication Blackouts (Optional) . . . . . . . . . . . . . 159Optional HA and Multilink Configuration . . . . . . . . . . . . . . . 161
Running Replication Manually (Optional) . . . . . . . . . . . . . . . . . . . . . 165
Replication Statuses and Reporting . . . . . . . . . . . . . . . . . . . . . . . . . . 166Replication Reports . . . . . . . . . . . . . . . . . . . . . . . . . . . . . . . . 166Replication Administration . . . . . . . . . . . . . . . . . . . . . . . . . . 166StorNext Jobs . . . . . . . . . . . . . . . . . . . . . . . . . . . . . . . . . . . . 167
Troubleshooting Replication . . . . . . . . . . . . . . . . . . . . . . . . . . . . . . . 168
Data Deduplication Overview . . . . . . . . . . . . . . . . . . . . . . . . . . . . . . 168How Deduplication Works . . . . . . . . . . . . . . . . . . . . . . . . . . 169Deduplication and Replication . . . . . . . . . . . . . . . . . . . . . . . 169
Setting Up Deduplication . . . . . . . . . . . . . . . . . . . . . . . . . . . . . . . . . 170Step 1: Creating a Deduplication-Enabled File System . . . . . 170Step 2: Specifying the Blockpool. . . . . . . . . . . . . . . . . . . . . . 171
Step 3: Creating a Deduplication-Enabled Storage Policy . . . 171

8/10/2019 6-67370-03_SN42101_UserGuide_RevAB
http://slidepdf.com/reader/full/6-67370-03sn42101userguiderevab 8/511
Contents
viii Quantum StorNext User’s Guide
Data Deduplication Functions . . . . . . . . . . . . . . . . . . . . . . . . . . . . . . 173Deduplication Administration . . . . . . . . . . . . . . . . . . . . . . . . 173
Deduplication Reports. . . . . . . . . . . . . . . . . . . . . . . . . . . . . . 173
Chapter 7 Tools Menu Functions 175
User Accounts . . . . . . . . . . . . . . . . . . . . . . . . . . . . . . . . . . . . . . . . . . 177Adding a New User. . . . . . . . . . . . . . . . . . . . . . . . . . . . . . . . 177Viewing an Existing User Profile . . . . . . . . . . . . . . . . . . . . . . 179Modifying an Existing User . . . . . . . . . . . . . . . . . . . . . . . . . . 180Deleting an Existing User . . . . . . . . . . . . . . . . . . . . . . . . . . . 181
Client Download . . . . . . . . . . . . . . . . . . . . . . . . . . . . . . . . . . . . . . . . 182
System Control . . . . . . . . . . . . . . . . . . . . . . . . . . . . . . . . . . . . . . . . . 184Starting or Stopping StorNext File System . . . . . . . . . . . . . . 185Starting or Stopping StorNext Storage Manager. . . . . . . . . . 185Refreshing System Status . . . . . . . . . . . . . . . . . . . . . . . . . . . 185Specifying Boot Options . . . . . . . . . . . . . . . . . . . . . . . . . . . . 185
File and Directory Actions . . . . . . . . . . . . . . . . . . . . . . . . . . . . . . . . . 185Store Files . . . . . . . . . . . . . . . . . . . . . . . . . . . . . . . . . . . . . . . 186Change File Version . . . . . . . . . . . . . . . . . . . . . . . . . . . . . . . 188Recover Files . . . . . . . . . . . . . . . . . . . . . . . . . . . . . . . . . . . . . 189Recover Directories . . . . . . . . . . . . . . . . . . . . . . . . . . . . . . . . 190Retrieve Files . . . . . . . . . . . . . . . . . . . . . . . . . . . . . . . . . . . . . 193
Retrieve Directory . . . . . . . . . . . . . . . . . . . . . . . . . . . . . . . . . 194Truncate Files . . . . . . . . . . . . . . . . . . . . . . . . . . . . . . . . . . . . 194Move Files . . . . . . . . . . . . . . . . . . . . . . . . . . . . . . . . . . . . . . . 195Modify File Attributes . . . . . . . . . . . . . . . . . . . . . . . . . . . . . . 196View File Information . . . . . . . . . . . . . . . . . . . . . . . . . . . . . . 198
File Systems . . . . . . . . . . . . . . . . . . . . . . . . . . . . . . . . . . . . . . . . . . . . 199
Storage Manager. . . . . . . . . . . . . . . . . . . . . . . . . . . . . . . . . . . . . . . . 199
Replication and Deduplication. . . . . . . . . . . . . . . . . . . . . . . . . . . . . . 200
HA . . . . . . . . . . . . . . . . . . . . . . . . . . . . . . . . . . . . . . . . . . . . . . . . . . . 201
Chapter 8 Service Menu Functions 203
The Health Check Function . . . . . . . . . . . . . . . . . . . . . . . . . . . . . . . . 203
Running a Health Check . . . . . . . . . . . . . . . . . . . . . . . . . . . . 204Viewing the Health Check Results . . . . . . . . . . . . . . . . . . . . . 205
8/10/2019 6-67370-03_SN42101_UserGuide_RevAB
http://slidepdf.com/reader/full/6-67370-03sn42101userguiderevab 9/511
Contents
Quantum StorNext User’s Guide ix
Viewing Health Check Histories. . . . . . . . . . . . . . . . . . . . . . . 206
The Capture State Function . . . . . . . . . . . . . . . . . . . . . . . . . . . . . . . . 206Creating a Capture State Log . . . . . . . . . . . . . . . . . . . . . . . . 207Deleting a Previous System State Capture. . . . . . . . . . . . . . . 208Creating a Capture State for an HA Secondary Node . . . . . . 208
The System Backup Function . . . . . . . . . . . . . . . . . . . . . . . . . . . . . . . 208
The Admin Alerts Function . . . . . . . . . . . . . . . . . . . . . . . . . . . . . . . . 209
The Tickets Function . . . . . . . . . . . . . . . . . . . . . . . . . . . . . . . . . . . . . 211Viewing Ticket Information. . . . . . . . . . . . . . . . . . . . . . . . . . 211Editing Ticket Information . . . . . . . . . . . . . . . . . . . . . . . . . . 213Closing Tickets . . . . . . . . . . . . . . . . . . . . . . . . . . . . . . . . . . . 214
Logging . . . . . . . . . . . . . . . . . . . . . . . . . . . . . . . . . . . . . . . . . . . . . . . 214Enabling Logging . . . . . . . . . . . . . . . . . . . . . . . . . . . . . . . . . 215
Chapter 9 Converting to HA 217
HA Overview . . . . . . . . . . . . . . . . . . . . . . . . . . . . . . . . . . . . . . . . . . . 217
HA Terms and Concepts . . . . . . . . . . . . . . . . . . . . . . . . . . . . . . . . . . 218Failover . . . . . . . . . . . . . . . . . . . . . . . . . . . . . . . . . . . . . . . . . 218Primary Node . . . . . . . . . . . . . . . . . . . . . . . . . . . . . . . . . . . . 218Secondary Node . . . . . . . . . . . . . . . . . . . . . . . . . . . . . . . . . . 218Virtual IP (vIP) . . . . . . . . . . . . . . . . . . . . . . . . . . . . . . . . . . . . 219Virtual Netmask . . . . . . . . . . . . . . . . . . . . . . . . . . . . . . . . . . 219HA Reset . . . . . . . . . . . . . . . . . . . . . . . . . . . . . . . . . . . . . . . . 219
Preparing for HA Conversion . . . . . . . . . . . . . . . . . . . . . . . . . . . . . . . 220Pre-Conversion Steps . . . . . . . . . . . . . . . . . . . . . . . . . . . . . . 220HA and Distributed LAN Clients . . . . . . . . . . . . . . . . . . . . . . 221
Converting to HA. . . . . . . . . . . . . . . . . . . . . . . . . . . . . . . . . . . . . . . . 221
HA Conversion Procedure . . . . . . . . . . . . . . . . . . . . . . . . . . . 222Managing HA . . . . . . . . . . . . . . . . . . . . . . . . . . . . . . . . . . . . . . . . . . 224
HA Statuses and Reporting . . . . . . . . . . . . . . . . . . . . . . . . . . . . . . . . 226
Troubleshooting HA . . . . . . . . . . . . . . . . . . . . . . . . . . . . . . . . . . . . . 226
Chapter 10 StorNext Reports 227Report Navigation Controls. . . . . . . . . . . . . . . . . . . . . . . . . . 228

8/10/2019 6-67370-03_SN42101_UserGuide_RevAB
http://slidepdf.com/reader/full/6-67370-03sn42101userguiderevab 10/511
Contents
x Quantum StorNext User’s Guide
StorNext Logs . . . . . . . . . . . . . . . . . . . . . . . . . . . . . . . . . . . . . . . . . . 229
The Jobs Report . . . . . . . . . . . . . . . . . . . . . . . . . . . . . . . . . . . . . . . . . 230Viewing Detailed Job Information. . . . . . . . . . . . . . . . . . . . . 231Exiting the Jobs Report screen. . . . . . . . . . . . . . . . . . . . . . . . 233
The Files Report . . . . . . . . . . . . . . . . . . . . . . . . . . . . . . . . . . . . . . . . . 233
The Drives Reports. . . . . . . . . . . . . . . . . . . . . . . . . . . . . . . . . . . . . . . 236
The Media Report . . . . . . . . . . . . . . . . . . . . . . . . . . . . . . . . . . . . . . . 238
The Relations Report . . . . . . . . . . . . . . . . . . . . . . . . . . . . . . . . . . . . . 241The File Systems Report . . . . . . . . . . . . . . . . . . . . . . . . . . . . . . . . . . . 242
The SAN Devices Report. . . . . . . . . . . . . . . . . . . . . . . . . . . . . . . . . . . 243
The Tape Consolidation Report . . . . . . . . . . . . . . . . . . . . . . . . . . . . . 245
The SAN and LAN Clients Report . . . . . . . . . . . . . . . . . . . . . . . . . . . . 246
The LAN Client Performance Report. . . . . . . . . . . . . . . . . . . . . . . . . . 248
Replication Deduplication Reports. . . . . . . . . . . . . . . . . . . . . . . . . . . 250Policy Activity Report . . . . . . . . . . . . . . . . . . . . . . . . . . . . . . 250Policy Summary Report . . . . . . . . . . . . . . . . . . . . . . . . . . . . . 252
The Distributed Data Mover Report . . . . . . . . . . . . . . . . . . . . . . . . . . 255
The Gateway Metrics Report . . . . . . . . . . . . . . . . . . . . . . . . . . . . . . . 257Changing the Graph Display . . . . . . . . . . . . . . . . . . . . . . . . . 259
Changing to Detail Mode . . . . . . . . . . . . . . . . . . . . . . . . . . . 260Changing Displayed Columns . . . . . . . . . . . . . . . . . . . . . . . . 264Viewing and Changing Gateway Metrics Settings. . . . . . . . . 265
Chapter 11 Customer Assistance 267
Quantum Technical Assistance Center . . . . . . . . . . . . . . . . . . . . . . . . 267
Appendix A Operating Guidelines 269
The Reserved Space Parameter . . . . . . . . . . . . . . . . . . . . . . . . . . . . . 269Linux Configuration File Format . . . . . . . . . . . . . . . . . . . . . . 270
Distributed LAN Server/Client Network and Memory Tuning . . . . . . . 271
Distributed LAN Server and Client Network Tuning. . . . . . . .271Distributed LAN Server Memory Tuning . . . . . . . . . . . . . . . . 273

8/10/2019 6-67370-03_SN42101_UserGuide_RevAB
http://slidepdf.com/reader/full/6-67370-03sn42101userguiderevab 11/511
Contents
Quantum StorNext User’s Guide xi
Configuring LDAP . . . . . . . . . . . . . . . . . . . . . . . . . . . . . . . . . . . . . . . 274Using LDAP . . . . . . . . . . . . . . . . . . . . . . . . . . . . . . . . . . . . . . 274
UNIX File and Directory Modes . . . . . . . . . . . . . . . . . . . . . . . 275LDAP Refresh Timeout. . . . . . . . . . . . . . . . . . . . . . . . . . . . . . 275
Setting Up Restrictive ACLs . . . . . . . . . . . . . . . . . . . . . . . . . . . . . . . . 276
Default Single-Path I/O Retry Behavior. . . . . . . . . . . . . . . . . . . . . . . . 276
Event Handles for fsm.exe on a Windows Metadata Server. . . . . . . . 276
FSBlockSize, Metadata Disk Size, and JournalSize Settings . . . . . . . . 277
Disk Naming Requirements . . . . . . . . . . . . . . . . . . . . . . . . . . . . . . . . 279
Changing StorNext’s Default Session Timeout Interval . . . . . . . . . . .280
General Operating Guidelines and Limitations . . . . . . . . . . . . . . . . . 281
Appendix B Additional Replication and Deduplication Information 301
Replication Configuration File . . . . . . . . . . . . . . . . . . . . . . . . . . . . . .301
Replication Terminology and Conventions. . . . . . . . . . . . . . . . . . . . . 302
Copies and Versions . . . . . . . . . . . . . . . . . . . . . . . . . . . . . . . . . . . . . 302
Replication Target Directories . . . . . . . . . . . . . . . . . . . . . . . . . . . . . . 303Number of Replication Copies. . . . . . . . . . . . . . . . . . . . . . . . 304Isolating a Replication Target Directory. . . . . . . . . . . . . . . . . 305Final Recommendation For Target Directories. . . . . . . . . . . .306
StorNext snpolicyd Policies . . . . . . . . . . . . . . . . . . . . . . . . . . . . . . . . 307
Replication Copies = 2 (Detail) . . . . . . . . . . . . . . . . . . . . . . . . . . . . . 310
More About Replication Target Directories . . . . . . . . . . . . . . . . . . . . 313
Deduplication Overview. . . . . . . . . . . . . . . . . . . . . . . . . . . . . . . . . . . 315
Enabling Deduplication. . . . . . . . . . . . . . . . . . . . . . . . . . . . . 317Deduplication Modification Time . . . . . . . . . . . . . . . . . . . . . 317Deduplication and Blockpools. . . . . . . . . . . . . . . . . . . . . . . . 318
Deduplication and Truncation . . . . . . . . . . . . . . . . . . . . . . . . . . . . . . 318Enabling Deduplication and Truncation . . . . . . . . . . . . . . . .319Storage Manager Truncation . . . . . . . . . . . . . . . . . . . . . . . . 319
Replication, Deduplication and Truncation . . . . . . . . . . . . . . . . . . . . 320
Replication, Deduplication and Storage Manager . . . . . . . . . . . . . . . 321Replicating into a Storage Manager Relation Point. . . . . . . . 321

8/10/2019 6-67370-03_SN42101_UserGuide_RevAB
http://slidepdf.com/reader/full/6-67370-03sn42101userguiderevab 12/511
Contents
xii Quantum StorNext User’s Guide
Truncation and Deduplication / Replication (with and withoutSM) . . . . . . . . . . . . . . . . . . . . . . . . . . . . . . . . . . . . . . . . . . . . 323
The snpolicyd Debug Log . . . . . . . . . . . . . . . . . . . . . . . . . . . . . . . . . 330
Appendix C High Availability Systems 333
High Availability Overview. . . . . . . . . . . . . . . . . . . . . . . . . . . . . . . . . 334
HA Internals: HAmon Timers and the ARB Protocol . . . . . . . . . . . . . . 336
Primary and Secondary Server Status . . . . . . . . . . . . . . . . . . 340File System Types . . . . . . . . . . . . . . . . . . . . . . . . . . . . . . . . . 340The ha_peer and fsnameservers File. . . . . . . . . . . . . . . . 342HA Manager . . . . . . . . . . . . . . . . . . . . . . . . . . . . . . . . . . . . . 342
Configuration and Conversion to HA. . . . . . . . . . . . . . . . . . . . . . . . . 347Conversion to HA . . . . . . . . . . . . . . . . . . . . . . . . . . . . . . . . . 348SyncHA process. . . . . . . . . . . . . . . . . . . . . . . . . . . . . . . . . . . 350
Managing High Availability in the StorNext GUI . . . . . . . . . . . . . . . . 351
Configuring Multiple NICs . . . . . . . . . . . . . . . . . . . . . . . . . . . . . . . . . 354LAN Configuration . . . . . . . . . . . . . . . . . . . . . . . . . . . . . . . . 354
High Availability Operation. . . . . . . . . . . . . . . . . . . . . . . . . . . . . . . . 355Windows and Linux SNFS Installations Without the HaShared FileSystem . . . . . . . . . . . . . . . . . . . . . . . . . . . . . . . . . . . . . . . . . 356Linux SNMS and SNFS Installations with the HaShared File System357
HA Resets . . . . . . . . . . . . . . . . . . . . . . . . . . . . . . . . . . . . . . . . . . . . . 362HA Resets of the First Kind . . . . . . . . . . . . . . . . . . . . . . . . . . 362HA Resets of the Second Kind. . . . . . . . . . . . . . . . . . . . . . . . 363HA Resets of the Third Kind . . . . . . . . . . . . . . . . . . . . . . . . . 364Using HA Manager Modes . . . . . . . . . . . . . . . . . . . . . . . . . . 364
HA Tracing and Log Files . . . . . . . . . . . . . . . . . . . . . . . . . . . . . . . . . . 364Single (Singleton) Mode . . . . . . . . . . . . . . . . . . . . . . . . . . . . . . . . . . 365
FSM failover in HA Environments . . . . . . . . . . . . . . . . . . . . . . . . . . . 366Failover Timing . . . . . . . . . . . . . . . . . . . . . . . . . . . . . . . . . . . 367
Replacing an HA System . . . . . . . . . . . . . . . . . . . . . . . . . . . . . . . . . . 371
Appendix D Web Services API 375

8/10/2019 6-67370-03_SN42101_UserGuide_RevAB
http://slidepdf.com/reader/full/6-67370-03sn42101userguiderevab 13/511
Contents
Quantum StorNext User’s Guide xiii
Using the APIs . . . . . . . . . . . . . . . . . . . . . . . . . . . . . . . . . . . . . . . . . . 376Using APIs With the High Availability MDC Feature. . . . . . . . 377
WS-API APIs . . . . . . . . . . . . . . . . . . . . . . . . . . . . . . . . . . . . . . . . . . . . 378The doCancel API . . . . . . . . . . . . . . . . . . . . . . . . . . . . . . . . . 378The doMediaMove API . . . . . . . . . . . . . . . . . . . . . . . . . . . . . 378The doRetrieve API . . . . . . . . . . . . . . . . . . . . . . . . . . . . . . . . 379The doStore API . . . . . . . . . . . . . . . . . . . . . . . . . . . . . . . . . . 379The doTruncate API. . . . . . . . . . . . . . . . . . . . . . . . . . . . . . . . 379The getDriveReport API . . . . . . . . . . . . . . . . . . . . . . . . . . . . . 379
The getFileLocation API. . . . . . . . . . . . . . . . . . . . . . . . . . . . . 379The getMediaInfo API . . . . . . . . . . . . . . . . . . . . . . . . . . . . . . 379The getMediaReport API . . . . . . . . . . . . . . . . . . . . . . . . . . . . 379The getSMQueue API . . . . . . . . . . . . . . . . . . . . . . . . . . . . . . 380
Examples . . . . . . . . . . . . . . . . . . . . . . . . . . . . . . . . . . . . . . . . . . . . . . 380Example: WS-API URLs . . . . . . . . . . . . . . . . . . . . . . . . . . . . . 380Sample XML Output . . . . . . . . . . . . . . . . . . . . . . . . . . . . . . . 381Sample JSON Output . . . . . . . . . . . . . . . . . . . . . . . . . . . . . . 383Sample Text Output . . . . . . . . . . . . . . . . . . . . . . . . . . . . . . . 385
Appendix E Storage Manager Truncation 387
Truncation Overview . . . . . . . . . . . . . . . . . . . . . . . . . . . . . . . . . . . . . 387Normal Truncation . . . . . . . . . . . . . . . . . . . . . . . . . . . . . . . . 388Immediate Truncation. . . . . . . . . . . . . . . . . . . . . . . . . . . . . . 388Daily Truncation . . . . . . . . . . . . . . . . . . . . . . . . . . . . . . . . . . 388
Space Management. . . . . . . . . . . . . . . . . . . . . . . . . . . . . . . . . . . . . . 389LOSPACE Cycle . . . . . . . . . . . . . . . . . . . . . . . . . . . . . . . . . . . 389Emergency Cycle . . . . . . . . . . . . . . . . . . . . . . . . . . . . . . . . . . 390
Disabling Truncation . . . . . . . . . . . . . . . . . . . . . . . . . . . . . . . . . . . . . 391Truncation Feature Locking. . . . . . . . . . . . . . . . . . . . . . . . . . 391Disable Truncation Commands . . . . . . . . . . . . . . . . . . . . . . . 392
Common Problems . . . . . . . . . . . . . . . . . . . . . . . . . . . . . . . . . . . . . . 392Files Are Not Truncated as Expected . . . . . . . . . . . . . . . . . . . 392"Old" Files Not Truncating According to Policy Class . . . . . . . 393Small Files Not Truncating . . . . . . . . . . . . . . . . . . . . . . . . . . 393
Miscellaneous Usage Notes . . . . . . . . . . . . . . . . . . . . . . . . . . . . . . . . 393
Scheduling Truncation Manually . . . . . . . . . . . . . . . . . . . . . . . . . . . . 394
Setting Trunction . . . . . . . . . . . . . . . . . . . . . . . . . . . . . . . . . 394Setting Up the cron Job . . . . . . . . . . . . . . . . . . . . . . . . . . . . 395

8/10/2019 6-67370-03_SN42101_UserGuide_RevAB
http://slidepdf.com/reader/full/6-67370-03sn42101userguiderevab 14/511
Contents
xiv Quantum StorNext User’s Guide
Considerations When Scheduling Truncation and RelocationPolicies . . . . . . . . . . . . . . . . . . . . . . . . . . . . . . . . . . . . . . . . . 397
Appendix F Security 399
StorNext Security. . . . . . . . . . . . . . . . . . . . . . . . . . . . . . . . . . . . . . . . 399ACLs on Windows. . . . . . . . . . . . . . . . . . . . . . . . . . . . . . . . . 400ACLs on Mac OS X . . . . . . . . . . . . . . . . . . . . . . . . . . . . . . . . 404“Central Control” . . . . . . . . . . . . . . . . . . . . . . . . . . . . . . . . . 407
Limitations . . . . . . . . . . . . . . . . . . . . . . . . . . . . . . . . . . . . . . 409Example . . . . . . . . . . . . . . . . . . . . . . . . . . . . . . . . . . . . . . . . 409Cross-Platform Permissions. . . . . . . . . . . . . . . . . . . . . . . . . . 410Config (.cfg) File Options . . . . . . . . . . . . . . . . . . . . . . . . . . . 411
Appendix G Troubleshooting 413
Troubleshooting StorNext File System. . . . . . . . . . . . . . . . . . 414Troubleshooting StorNext Storage Manager. . . . . . . . . . . . . 421Troubleshooting OS Issues . . . . . . . . . . . . . . . . . . . . . . . . . . 423Troubleshooting Replication . . . . . . . . . . . . . . . . . . . . . . . . . 426Troubleshooting HA . . . . . . . . . . . . . . . . . . . . . . . . . . . . . . . 427Troubleshooting StorNext Installation and Upgrade Issues. . 431Troubleshooting Other Issues . . . . . . . . . . . . . . . . . . . . . . . . 432
Appendix H StorNextOffline Notification 437
StorNext Offline Notification Overview . . . . . . . . . . . . . . . . . . . . . . . 438What is a StorNext Offline File? . . . . . . . . . . . . . . . . . . . . . . 438Why Block Access to Offline Files? . . . . . . . . . . . . . . . . . . . . 438Offline Notification Configuration Options . . . . . . . . . . . . . . 439
How the Notification Feature Operates. . . . . . . . . . . . . . . . . 439
Installing the Notification Application. . . . . . . . . . . . . . . . . . . . . . . . 441Installing onto a Standalone Machine. . . . . . . . . . . . . . . . . . 441
Starting the Notification Application. . . . . . . . . . . . . . . . . . . . . . . . . 447
Configuring the Notification Application. . . . . . . . . . . . . . . . . . . . . . 448Setting Application Options . . . . . . . . . . . . . . . . . . . . . . . . . 448
Viewing Access Denied Files . . . . . . . . . . . . . . . . . . . . . . . . . 450Viewing the Application Log. . . . . . . . . . . . . . . . . . . . . . . . . 451

8/10/2019 6-67370-03_SN42101_UserGuide_RevAB
http://slidepdf.com/reader/full/6-67370-03sn42101userguiderevab 15/511
Contents
Quantum StorNext User’s Guide xv
Exiting Application Preferences. . . . . . . . . . . . . . . . . . . . . . . 451
Uninstalling the Notification Application . . . . . . . . . . . . . . . . . . . . . 452
Appendix I RAS Messages 453
Media and Drive RAS Messages. . . . . . . . . . . . . . . . . . . . . . . . . . . . . 454
SNFS RAS Messages. . . . . . . . . . . . . . . . . . . . . . . . . . . . . . . . . . . . . . 463
Other RAS Messages . . . . . . . . . . . . . . . . . . . . . . . . . . . . . . . . . . . . . 476

8/10/2019 6-67370-03_SN42101_UserGuide_RevAB
http://slidepdf.com/reader/full/6-67370-03sn42101userguiderevab 16/511
Contents
xvi Quantum StorNext User’s Guide
8/10/2019 6-67370-03_SN42101_UserGuide_RevAB
http://slidepdf.com/reader/full/6-67370-03sn42101userguiderevab 17/511
Quantum StorNext User’s Guide xvii
Figures
Figure 1 StorNext Login Window . . . . . . . . . . . . . . . . . . . . . . . . . . . 9
Figure 2 System Control . . . . . . . . . . . . . . . . . . . . . . . . . . . . . . . . . . 9
Figure 3 StorNext Home Page. . . . . . . . . . . . . . . . . . . . . . . . . . . . . 11
Figure 4 Configuration > Configuration Wizard Welcome Screen . 21
Figure 5 Configuration > Licenses Screen . . . . . . . . . . . . . . . . . . . 22
Figure 6 StorNext Foreign Servers. . . . . . . . . . . . . . . . . . . . . . . . . . 27
Figure 7 Name Servers Screen . . . . . . . . . . . . . . . . . . . . . . . . . . . . 28
Figure 8 Configuration > File System Screen . . . . . . . . . . . . . . . . . 29
Figure 9 Configuration > File System > New Screen . . . . . . . . . . . 30
Figure 10 Configuration > File System > New Screen 2. . . . . . . . . . 31
Figure 11 Configuration > File System > New Screen 3. . . . . . . . . . 32
Figure 12 Configuration > File System > New Screen 3. . . . . . . . . . 33Figure 13 Storage Destinations > Library Screen . . . . . . . . . . . . . . . 35
Figure 14 Storage Destinations > Library > New Screen. . . . . . . . . 36
Figure 15 Library Details Screen . . . . . . . . . . . . . . . . . . . . . . . . . . . . 37
Figure 16 Edit Library Screen . . . . . . . . . . . . . . . . . . . . . . . . . . . . . .38
Figure 17 Configuration > Storage Destinations > Storage Disk Screen41

8/10/2019 6-67370-03_SN42101_UserGuide_RevAB
http://slidepdf.com/reader/full/6-67370-03sn42101userguiderevab 18/511
Figures
xviii Quantum StorNext User’s Guide
Figure 18 Storage Destinations > Storage Disk > New Screen. . . . . 42
Figure 19 View Storage Disk Screen . . . . . . . . . . . . . . . . . . . . . . . . . 43Figure 20 Configuration > Storage Destinations > Replication /
Deduplication Screen45
Figure 21 Configuration > Storage Destinations > Replication /Deduplication Screen (Blockpool)47
Figure 22 Configuration > Storage Policies Screen . . . . . . . . . . . . . 49
Figure 23 Storage Policies > New Screen . . . . . . . . . . . . . . . . . . . . . 50Figure 24 Storage Policies > New > General Tab. . . . . . . . . . . . . . . 51
Figure 25 Storage Policies > New > Relocation Tab. . . . . . . . . . . . . 52
Figure 26 Storage Policies > New > Steering Tab . . . . . . . . . . . . . . 53
Figure 27 Storage Policies > New > Schedule Tab. . . . . . . . . . . . . . 54
Figure 28 Storage Policies > New > Associated Directories Tab. . . . 55
Figure 29 View Storage Policies Screen . . . . . . . . . . . . . . . . . . . . . . 56
Figure 30 Configuration > Email Server Screen . . . . . . . . . . . . . . . . 58
Figure 31 Configuration > Email Notifications Screen . . . . . . . . . . . 59
Figure 32 Configuration > Email Notifications New Screen . . . . . . . 60
Figure 33 Configuration > Configuration Wizard Done Screen . . . . 62
Figure 34 Label Disks Screen . . . . . . . . . . . . . . . . . . . . . . . . . . . . . .65
Figure 35 Check File System Screen . . . . . . . . . . . . . . . . . . . . . . . . . 74
Figure 36 Check File System Report . . . . . . . . . . . . . . . . . . . . . . . . . 75
Figure 37 Affinities Screen . . . . . . . . . . . . . . . . . . . . . . . . . . . . . . . . 79
Figure 38 New Affinity Screen . . . . . . . . . . . . . . . . . . . . . . . . . . . . . 79
Figure 39 Migrate Screen . . . . . . . . . . . . . . . . . . . . . . . . . . . . . . . . .81
Figure 40 Truncation Parameters Screen . . . . . . . . . . . . . . . . . . . . .83
Figure 41 Storage Components Screen. . . . . . . . . . . . . . . . . . . . . . .86
Figure 42 Drive Pools Screen . . . . . . . . . . . . . . . . . . . . . . . . . . . . . .88
Figure 43 New Drive Pool Screen . . . . . . . . . . . . . . . . . . . . . . . . . . .89
Figure 44 Media Actions Screen . . . . . . . . . . . . . . . . . . . . . . . . . . . . 91Figure 45 Storage Exclusions Screen. . . . . . . . . . . . . . . . . . . . . . . . 101
Fi

8/10/2019 6-67370-03_SN42101_UserGuide_RevAB
http://slidepdf.com/reader/full/6-67370-03sn42101userguiderevab 19/511
Figures
Quantum StorNext User’s Guide xix
Figure 46 Exclusion Screen . . . . . . . . . . . . . . . . . . . . . . . . . . . . . . . 102
Figure 47 Truncation Exclusions Screen . . . . . . . . . . . . . . . . . . . . .105Figure 48 Exclusion Screen . . . . . . . . . . . . . . . . . . . . . . . . . . . . . . . 106
Figure 49 Tape Consolidation Screen . . . . . . . . . . . . . . . . . . . . . . . 109
Figure 50 Library Operator Interface Screen . . . . . . . . . . . . . . . . . .112
Figure 51 Software Requests Screen. . . . . . . . . . . . . . . . . . . . . . . .114
Figure 52 Scheduler Screen . . . . . . . . . . . . . . . . . . . . . . . . . . . . . .116
Figure 53 Scheduler > New Screen . . . . . . . . . . . . . . . . . . . . . . . . 117
Figure 54 Alternate Retrieval Location Screen . . . . . . . . . . . . . . . . 120
Figure 55 Configuration > Distributed Data Mover Screen . . . . . . 126
Figure 56 DDM Screen New Host . . . . . . . . . . . . . . . . . . . . . . . . . . 128
Figure 57 Replication Process . . . . . . . . . . . . . . . . . . . . . . . . . . . . . 134
Figure 58 Replication scenario 1. . . . . . . . . . . . . . . . . . . . . . . . . . . 139
Figure 59 Replication Scenario 2 . . . . . . . . . . . . . . . . . . . . . . . . . . 140
Figure 60 Replication Scenario 3 . . . . . . . . . . . . . . . . . . . . . . . . . . 142
Figure 61 Replicating From One Source to Multiple Targets. . . . . . 143
Figure 62 Replicating From Multiple Sources to One Target. . . . . . 144
Figure 63 Non-Supported Replication From Source to Target. . . . .145Figure 64 Configuration > File System > New Screen . . . . . . . . . . 147
Figure 65 Configuration > File System > New Screen 2. . . . . . . . . 148
Figure 66 Configuration > File System > New Screen 3. . . . . . . . . 149
Figure 67 Configuration > Storage Destinations > DeduplicationScreen (Blockpool)150
Figure 68 Storage Destinations > Replication Targets Screen . . . . 151
Figure 69 Configuration > Storage Policies > New Screen. . . . . . . 153
Figure 70 Configuration > Storage Policies > New / Source DirectoriesScreen154
Figure 71 Storage Policies > New > Outbound Replication Tab . . 155
Figure 72 Outbound Replication Tab > Replication Schedule. . . . . 156
Figure 73 Configuration > Storage Policies Screen (Select “target”) . .
Figures

8/10/2019 6-67370-03_SN42101_UserGuide_RevAB
http://slidepdf.com/reader/full/6-67370-03sn42101userguiderevab 20/511
Figures
xx Quantum StorNext User’s Guide
157
Figure 74 Storage Policies > Edit > target > Inbound Replication Tab158
Figure 75 Configuration > Storage Policies (Run Policy). . . . . . . . .159
Figure 76 Storage Policies > New > Blackout Tab . . . . . . . . . . . . . 160
Figure 77 Tools > HA Convert Screen. . . . . . . . . . . . . . . . . . . . . . .162
Figure 78 Tools > Replication > Bandwidth Screen . . . . . . . . . . . . 164
Figure 79 Tools > Replication/Deduplication > Administration Screen167
Figure 80 Deduplication . . . . . . . . . . . . . . . . . . . . . . . . . . . . . . . . .169
Figure 81 Replication/Deduplication Policy Screen . . . . . . . . . . . . . 172
Figure 82 User Accounts Screen . . . . . . . . . . . . . . . . . . . . . . . . . . .177
Figure 83 New User Screen. . . . . . . . . . . . . . . . . . . . . . . . . . . . . . .178
Figure 84 View User Screen . . . . . . . . . . . . . . . . . . . . . . . . . . . . . .180
Figure 85 Edit User Screen . . . . . . . . . . . . . . . . . . . . . . . . . . . . . . . 181
Figure 86 Client Download Screen . . . . . . . . . . . . . . . . . . . . . . . . . 183
Figure 87 Client Download Link . . . . . . . . . . . . . . . . . . . . . . . . . . . 183
Figure 88 System Control Screen . . . . . . . . . . . . . . . . . . . . . . . . . . 184
Figure 89 File and Directory Action Screen . . . . . . . . . . . . . . . . . . . 187
Figure 90 Change File Version Screen. . . . . . . . . . . . . . . . . . . . . . . 188
Figure 91 Recover Files Browse Screen . . . . . . . . . . . . . . . . . . . . . . 189
Figure 92 Recover Directories Browse Screen . . . . . . . . . . . . . . . . . 191
Figure 93 Retrieve Files Screen . . . . . . . . . . . . . . . . . . . . . . . . . . . . 193
Figure 94 Retrieve Directory Screen . . . . . . . . . . . . . . . . . . . . . . . . 194
Figure 95 Truncate Files Screen . . . . . . . . . . . . . . . . . . . . . . . . . . .195
Figure 96 Move Files Screen . . . . . . . . . . . . . . . . . . . . . . . . . . . . . .196
Figure 97 Modify File Attributes Screen . . . . . . . . . . . . . . . . . . . . .197
Figure 98 View File Info Screen . . . . . . . . . . . . . . . . . . . . . . . . . . .198
Figure 99 Health Check Screen . . . . . . . . . . . . . . . . . . . . . . . . . . . . 204
Figure 100 Health Check > View Selected Screen . . . . . . . . . . . . . . 205
Figures

8/10/2019 6-67370-03_SN42101_UserGuide_RevAB
http://slidepdf.com/reader/full/6-67370-03sn42101userguiderevab 21/511
Figures
Quantum StorNext User’s Guide xxi
Figure 101 Health Check > View History Screen. . . . . . . . . . . . . . . .206
Figure 102 Capture State Screen . . . . . . . . . . . . . . . . . . . . . . . . . . .207
Figure 103 Backup Screen . . . . . . . . . . . . . . . . . . . . . . . . . . . . . . . . 209
Figure 104 Admin Alerts Screen . . . . . . . . . . . . . . . . . . . . . . . . . . . .210
Figure 105 Tickets Screen . . . . . . . . . . . . . . . . . . . . . . . . . . . . . . . . .211
Figure 106 Tickets > View Ticket Screen . . . . . . . . . . . . . . . . . . . . . 212
Figure 107 Tickets > Edit Ticket Screen . . . . . . . . . . . . . . . . . . . . . .214
Figure 108 Logging Screen. . . . . . . . . . . . . . . . . . . . . . . . . . . . . . . . 215
Figure 109 Tools > HA Screen . . . . . . . . . . . . . . . . . . . . . . . . . . . . . 223
Figure 110 Manage HA Screen . . . . . . . . . . . . . . . . . . . . . . . . . . . . . 225
Figure 111 Reports > Logs Screen . . . . . . . . . . . . . . . . . . . . . . . . . . 230
Figure 112 Jobs Report. . . . . . . . . . . . . . . . . . . . . . . . . . . . . . . . . . . 231
Figure 113 Files Report. . . . . . . . . . . . . . . . . . . . . . . . . . . . . . . . . . .234
Figure 114 StorNext File Browser . . . . . . . . . . . . . . . . . . . . . . . . . . .235
Figure 115 File Info Screen . . . . . . . . . . . . . . . . . . . . . . . . . . . . . . . . 236
Figure 116 Drives Report . . . . . . . . . . . . . . . . . . . . . . . . . . . . . . . . .237
Figure 117 Drive Information Report . . . . . . . . . . . . . . . . . . . . . . . . 238
Figure 118 Media Report . . . . . . . . . . . . . . . . . . . . . . . . . . . . . . . . .239Figure 119 Media Information Report . . . . . . . . . . . . . . . . . . . . . . . 241
Figure 120 Relations Report . . . . . . . . . . . . . . . . . . . . . . . . . . . . . . . 242
Figure 121 File Systems Report. . . . . . . . . . . . . . . . . . . . . . . . . . . . . 243
Figure 122 SAN Devices Report . . . . . . . . . . . . . . . . . . . . . . . . . . . .244
Figure 123 Tape Consolidation Report . . . . . . . . . . . . . . . . . . . . . . . 245
Figure 124 SAN and LAN Clients Report . . . . . . . . . . . . . . . . . . . . . .247
Figure 125 LAN Client Performance Report . . . . . . . . . . . . . . . . . . . 249
Figure 126 Replication/Deduplication Policy Activity Report . . . . . . . 251
Figure 127 Replication/Deduplication Policy Summary Report. . . . .253
Figure 128 Replication/Deduplication Policy Details Report . . . . . . . 254
Figure 129 Replication/Deduplication Policy Completion Report . . . 255
Figures
8/10/2019 6-67370-03_SN42101_UserGuide_RevAB
http://slidepdf.com/reader/full/6-67370-03sn42101userguiderevab 22/511
Figures
xxii Quantum StorNext User’s Guide
Figure 130 Distributed Data Mover Report. . . . . . . . . . . . . . . . . . . .256
Figure 131 Gateway Metrics Report (Summary) . . . . . . . . . . . . . . . . 258
Figure 132 Gateway Metrics Report (Detail) . . . . . . . . . . . . . . . . . . . 261
Figure 133 Gateway Metrics Report (Client Detail) . . . . . . . . . . . . . . 263
Figure 134 Gateway Metrics Report (File System Detail). . . . . . . . . . 264
Figure 135 Gateway Metrics Settings . . . . . . . . . . . . . . . . . . . . . . . . 266
Figure 136 High Availability Manage Screen. . . . . . . . . . . . . . . . . . . 352
Figure 137 FSM Failover in an HA Cluster . . . . . . . . . . . . . . . . . . . . . 367
Figure 138 Run as Administrator . . . . . . . . . . . . . . . . . . . . . . . . . . . 442
Figure 139 Logging in to the Administrator Account . . . . . . . . . . . .442
Figure 140 Installing the .NET Framework . . . . . . . . . . . . . . . . . . . . 443
Figure 141 Offline Notification Setup Wizard. . . . . . . . . . . . . . . . . . 444
Figure 142 Quantum End User License Agreement . . . . . . . . . . . . . 444
Figure 143 Select Installation Folder . . . . . . . . . . . . . . . . . . . . . . . .445
Figure 144 Confirm Installation . . . . . . . . . . . . . . . . . . . . . . . . . . . .446
Figure 145 Installation Complete . . . . . . . . . . . . . . . . . . . . . . . . . . . 446
Figure 146 Manual Start. . . . . . . . . . . . . . . . . . . . . . . . . . . . . . . . . . 447
Figure 147 Application Options . . . . . . . . . . . . . . . . . . . . . . . . . . . . 449Figure 148 Access Denied List. . . . . . . . . . . . . . . . . . . . . . . . . . . . . .450
Figure 149 Application log . . . . . . . . . . . . . . . . . . . . . . . . . . . . . . . . 451
Figure 150 Removing the Application . . . . . . . . . . . . . . . . . . . . . . . 452
Figure 151 Possible Drive/Media Mount Discrepancy RAS . . . . . . . . 454
Figure 152 Tape Drive Alerts RAS part 1. . . . . . . . . . . . . . . . . . . . . .455
Figure 153 Tape Drive Alerts RAS part 2. . . . . . . . . . . . . . . . . . . . . .456
Figure 154 Tape Drive Alerts RAS part 3. . . . . . . . . . . . . . . . . . . . . .457
Figure 155 Drive Reported Drive Error RAS. . . . . . . . . . . . . . . . . . . . 458
Figure 156 Cleaning of Drive Failed RAS. . . . . . . . . . . . . . . . . . . . . .459
Figure 157 Wrong Firmware Level/Invalid Drive Type RAS . . . . . . . . 460
Figure 158 Tape Drive - Reported Media Error RAS . . . . . . . . . . . . . 461
Figures

8/10/2019 6-67370-03_SN42101_UserGuide_RevAB
http://slidepdf.com/reader/full/6-67370-03sn42101userguiderevab 23/511
g
Quantum StorNext User’s Guide xxiii
Figure 159 Cleaning Media Expired RAS. . . . . . . . . . . . . . . . . . . . . .462
Figure 160 Duplicate Physical Media Found RAS . . . . . . . . . . . . . . . 462
Figure 161 Storage Disk Taken Offline RAS . . . . . . . . . . . . . . . . . . . 463
Figure 162 Configuration Not Supported RAS . . . . . . . . . . . . . . . . .464
Figure 163 Label Validation Failure RAS . . . . . . . . . . . . . . . . . . . . . .464
Figure 164 Connection Rejected RAS . . . . . . . . . . . . . . . . . . . . . . . . 465
Figure 165 File System Failover RAS . . . . . . . . . . . . . . . . . . . . . . . . . 465
Figure 166 I/O Error RAS. . . . . . . . . . . . . . . . . . . . . . . . . . . . . . . . . .466
Figure 167 Journaling Error Detected RAS . . . . . . . . . . . . . . . . . . . . 466
Figure 168 SNFS License Required RAS. . . . . . . . . . . . . . . . . . . . . . . 467
Figure 169 SNFS License Failure RAS. . . . . . . . . . . . . . . . . . . . . . . . . 467
Figure 170 LUN Mapping Changed RAS . . . . . . . . . . . . . . . . . . . . . .468
Figure 171 Communication Failure RAS . . . . . . . . . . . . . . . . . . . . . . 468
Figure 172 Metadata Inconsistency Detected RAS . . . . . . . . . . . . . .469
Figure 173 Bad File System Metadata Dump RAS. . . . . . . . . . . . . . . 469
Figure 174 Metadata Dump Failure RAS. . . . . . . . . . . . . . . . . . . . . . 470
Figure 175 File System or Metadata Capacity Warning RAS . . . . . . . 470
Figure 176 File Processing Failure RAS . . . . . . . . . . . . . . . . . . . . . . . 471Figure 177 Missing LUNs RAS. . . . . . . . . . . . . . . . . . . . . . . . . . . . . . 471
Figure 178 Disk Space Allocation Failure RAS. . . . . . . . . . . . . . . . . . 472
Figure 179 System Resource Failure RAS . . . . . . . . . . . . . . . . . . . . . 472
Figure 180 Affinity Configuration Violations RAS . . . . . . . . . . . . . . . 473
Figure 181 Quota Limit or Fragmentation Warnings RAS. . . . . . . . .474
Figure 182 Shutdown Error RAS. . . . . . . . . . . . . . . . . . . . . . . . . . . .474
Figure 183 Initialization Failure RAS . . . . . . . . . . . . . . . . . . . . . . . . . 475
Figure 184 SNFS I/O Error RAS . . . . . . . . . . . . . . . . . . . . . . . . . . . . . 475
Figure 185 Port Failure . . . . . . . . . . . . . . . . . . . . . . . . . . . . . . . . . . . 476
Figure 186 Checksum Error RAS . . . . . . . . . . . . . . . . . . . . . . . . . . . .477
Figure 187 Troubleshooting the StorNext Software RAS . . . . . . . . . 478
Figures

8/10/2019 6-67370-03_SN42101_UserGuide_RevAB
http://slidepdf.com/reader/full/6-67370-03sn42101userguiderevab 24/511
xxiv Quantum StorNext User’s Guide
Figure 188 Software Resource Violations RAS . . . . . . . . . . . . . . . . . 479
Figure 189 Vault Failure RAS . . . . . . . . . . . . . . . . . . . . . . . . . . . . . . 480
Figure 190 Robotics - Not Ready RAS . . . . . . . . . . . . . . . . . . . . . . . . 480
Figure 191 Robotics - Move Failure RAS . . . . . . . . . . . . . . . . . . . . . .481
Figure 192 Robotics - Wrong Firmware Level/Invalid Library Type RAS . .482
Figure 193 Backup Errors RAS . . . . . . . . . . . . . . . . . . . . . . . . . . . . . 483
Figure 194 Invalid Configuration RAS part 1 . . . . . . . . . . . . . . . . . .484
Figure 195 Invalid Configuration RAS part 2 . . . . . . . . . . . . . . . . . .485

8/10/2019 6-67370-03_SN42101_UserGuide_RevAB
http://slidepdf.com/reader/full/6-67370-03sn42101userguiderevab 25/511
Quantum StorNext User’s Guide 1
Chapter 1
Introduction
StorNext is data management software that enables customers to
complete projects faster and confidently store more data at a lowercost. Used in the world's most demanding environments, StorNext is thestandard for high performance shared workflow operations andmultitier archives. StorNext consists of two components: StorNext FileSystem (SNFS), a high performance data sharing software, and StorNextStorage Manager (SNSM), the intelligent, policy-based data mover.
Licensing For the purposes of this document, we will use the followingterminology:
StorNext G30x Gateway Appliance Terminology Description
Historical Customer-configured GatewayEquivalent Terminology
StorNext Gateway License* A ‘per gateway’ license for StorNextsoftware that enables LAN-basedclient connectivity to a StorNextSAN
N/A
N/A An individual ‘per client’ license forStorNext software that enablesLAN-based client connectivity to aStorNext SAN
Proxy License; Distributed LANClient License; DLC License; LANCLient License
Chapter 1: Introduction

8/10/2019 6-67370-03_SN42101_UserGuide_RevAB
http://slidepdf.com/reader/full/6-67370-03sn42101userguiderevab 26/511
2 Quantum StorNext User’s Guide
How the StorNext G300 Gateway Appliance license is enabled dependson the current configuration:
• The StorNext G300 Gateway Appliance has a “per Gateway” DLClicense model. This license allows you to add clients without havingto purchase additional individual licenses.
• For new customers with no existing StorNext components, the
license comes from the factory pre-installed and enabled for usewith either a new customer-configured MDC or StorNext M330.
• For customers with an existing M330 or customer-configured MDC,if you choose to install the StorNext G300 Gateway Appliance in thesame StorNext configuration as a customer-configured DLCgateway, you will be limited to the existing client DLC license count.
Note: Unlike with other appliances where the license is populated inthe appliance’s license.dat file, for the StorNext G300 GatewayAppliance, the license is populated on the gateway server. Also,to determine whether existing StorNext Gateway licenses areenabled, click the Connected License Gateways link at thebottom of the associated MDC StorNext license screen.
StorNext Gateway Server Combined StorNext software andhardware device with both FibreChannel and Ethernet that enablesLAN-based client connectivity to aStorNext SAN
Distributed LAN server; Server; LANserver, LAN-based server; DLCGateway server; ClusteredGateway; DLC Gateway; DLS
StorNext Gateway Client A LAN-connected computerattached to a StorNext G30xGateway Appliance that has sharedaccess to a StorNext SAN
StorNext DLC; StorNext DistributedLAN Client; StorNext LAN Client
StorNext Gateway Metrics A performance reporting andmonitoring software module forthe StorNext G30x GatewayAppliance
N/A, newly created for StorNextG30x Gateway Appliances
StorNext G30x Gateway Appliance Terminology Description
Historical Customer-
configured GatewayEquivalent Terminology
Chapter 1: Introduction

8/10/2019 6-67370-03_SN42101_UserGuide_RevAB
http://slidepdf.com/reader/full/6-67370-03sn42101userguiderevab 27/511
Quantum StorNext User’s Guide 3
About StorNext File
System
StorNext File System streamlines processes and facilitates faster jobcompletion by enabling multiple business applications to work from asingle, consolidated data set. Using SNFS, applications running ondifferent operating systems (Windows, Linux, Solaris, HP-UX, AIX, andMac OS X) can simultaneously access and modify files on a common,high-speed SAN storage pool.
This centralized storage solution eliminates slow LAN-based filetransfers between workstations and dramatically reduces delays causedby single-server failures. In high availability (HA) configurations, a
redundant server is available to access files and pick up processingrequirements of a failed system, and carry on processing.
Chapter 1: Introduction

8/10/2019 6-67370-03_SN42101_UserGuide_RevAB
http://slidepdf.com/reader/full/6-67370-03sn42101userguiderevab 28/511
4 Quantum StorNext User’s Guide
About StorNext Storage
Manager
StorNext Storage Manager enhances the StorNext solution byreducing the cost of long term data retention, without sacrificingaccessibility. SNSM sits on top of SNFS and utilizes intelligent datamovers to transparently locate data on multiple tiers of storage. Thisenables customers to store more files at a lower cost, without having toreconfigure applications to retrieve data from disparate locations.Instead, applications continue to access files normally and SNSMautomatically handles data access – regardless of where the file resides.As data movement occurs, SNSM also performs a variety of data
protection services to guarantee that data is safeguarded both on siteand off site.
About Distributed LANClients
In addition to supporting StorNext clients attached via fibre channel,StorNext also supports iQuanQtma SorNeoxUQ sau. Unlike a direct-attachedStorNext client, a distributed LAN client connects across a LAN througha gateway system called a SQuanQtma SorNeou n’ n. The distributed LANserver is itself a directly connected StorNext client, but it processesrequests from distributed LAN clients in addition to runningapplications.
Any number of distributed LAN clients can connect to multipledistributed LAN servers. StorNext File System supports Distributed LANclient environments in excess of 1000 clients.
Besides the obvious cost-savings benefit of using distributed LANclients, there will be performance improvements as well.
Distributed LAN clients must be licensed in the same way as StorNextSAN clients. When you request your permanent StorNext license, youwill need to specify the number of distributed LAN clients you plan touse. Naturally, you can always purchase additional distributed LAN clientlicenses as your needs expand. For more information about StorNextlicensing, see Step 2: Licenses on page 21
StorNext provides distributed LAN client information via the statusmonitors on the StorNext home page. More detailed information isavailable through the Clients Report and Distributed LAN ClientPerformance Report. For more information about StorNext reports, seeChapter 10, StorNext Reports.
Before you can fully use distributed LAN clients, you must first configurea distributed LAN server and distributed LAN clients as described in the
Gadne 4ao.sua2UU2aQdso1mQS.
Chapter 1: IntroductionPurpose of This Guide

8/10/2019 6-67370-03_SN42101_UserGuide_RevAB
http://slidepdf.com/reader/full/6-67370-03sn42101userguiderevab 29/511
p
Quantum StorNext User’s Guide 5
About Licensing Separate licenses are required for various StorNext features, as well as toperform an upgrade to a new release. If you add new StorNext features,you must enter license information for those new features as describedin the section Step 2: Licenses on page 21.
Purpose of This Guide
This guide is intended to assist StorNext users perform day-to-day taskswith the software. This guide also describes how to generate reports.Quantum recommends using the graphical user interface to accomplishtasks, but an appendix provides alternative procedures for users whowish to perform those tasks via the command line interface.
How This Guide is Organized
This guide contains the following chapters:
• Chapter 1, Introduction• Chapter 2, StorNext GUI Overview
• Chapter 3, The Configuration Wizard
• Chapter 4, File System Tasks
• Chapter 5, Storage Manager Tasks
• Chapter 6, Replication and Deduplication
• Chapter 7, Tools Menu Functions
• Chapter 8, Service Menu Functions
• Chapter 9, Converting to HA
• Chapter 10, StorNext Reports
• Chapter 11, Customer Assistance
• Appendix A, Operating Guidelines
Chapter 1: IntroductionNotes, Cautions, and Warnings

8/10/2019 6-67370-03_SN42101_UserGuide_RevAB
http://slidepdf.com/reader/full/6-67370-03sn42101userguiderevab 30/511
g
6 Quantum StorNext User’s Guide
• Appendix B, Additional Replication and Deduplication Information
• Appendix C, High Availability Systems
• Appendix D, Web Services API
• Appendix E, Storage Manager Truncation
• Appendix F, Security
• Appendix G, Troubleshooting
• Appendix H, StorNext Offline Notification
• Appendix I, RAS Messages
Notes, Cautions, and Warnings
The following table describes important information about Notes,Cautions, and Warnings used throughout this guide.
Description Definition Consequences
Note: Indicates importantinformation that helpsyou make better use ofthe software.
No hazardous ordamagingconsequences.
Caution: Advises you to take oravoid a specified action.
Failure to take or avoidthis action could resultin loss of data.
Warning: Advises you to take oravoid a specified action.
Failure to take or avoidthis action could result
in physical harm to theuser or hardware.
Chapter 1: IntroductionDocument Conventions

8/10/2019 6-67370-03_SN42101_UserGuide_RevAB
http://slidepdf.com/reader/full/6-67370-03sn42101userguiderevab 31/511
Quantum StorNext User’s Guide 7
Document Conventions
This guide uses the following document conventions to help yourecognize different types of information.
Conventions Examples
For all UNIX-based
commands, the # prompt isimplied, although it is notshown.
TSM_control stop
is the same as# TSM_control stop
For all UNIX-basedcommands, words in italicare variables and should bereplaced with user-definedvalues.
cvaffinity <aONHDspH>
where <filename> is avariable and should bereplaced with a user-defined
value.
Chapter 1: IntroductionDocument Conventions

8/10/2019 6-67370-03_SN42101_UserGuide_RevAB
http://slidepdf.com/reader/full/6-67370-03sn42101userguiderevab 32/511
8 Quantum StorNext User’s Guide

8/10/2019 6-67370-03_SN42101_UserGuide_RevAB
http://slidepdf.com/reader/full/6-67370-03sn42101userguiderevab 33/511
Quantum StorNext User’s Guide 7
Chapter 2
StorNext GUI Overview
This section describes how to access and navigate through the StorNext
GUI.This chapter includes the following topics:
• Accessing the StorNext GUI
• The StorNext Home Page
Note: StorNext supports internationalization for the name space ofthe file system. This support is fully UTF-8 compliant. It is up tothe individual client to set the proper UTF-8 locale.
Accessing the StorNext GUI
The StorNext GUI is browser-based and can be remotely accessed fromany machine with access to the StorNext server.
Use this procedure to access the StorNext GUI.
1 Open a Web browser.
Chapter 2: StorNext GUI OverviewAccessing the StorNext GUI

8/10/2019 6-67370-03_SN42101_UserGuide_RevAB
http://slidepdf.com/reader/full/6-67370-03sn42101userguiderevab 34/511
8 Quantum StorNext User’s Guide
Note: The following browsers have been tested to work withStorNext. Browsers not listed may work but are notrecommended.
• Internet Explorer 7.x, 8.x and 9.x
• FireFox 3.x
To ensure proper browser operation, all monitors must be set todisplay at a minimum resolution of 1024 x 768. If you use apopup blocker, be sure to disable pop-ups in order to ensure
that StorNext displays properly.
2 If you are using Internet Explorer 9, you must verify one settingbefore accessing StorNext:
a Launch Internet Explorer 9.
b Choose Internet Options from the Tools menu.
c Click the Advanced tab.d Under the Security heading, make sure the option Do not save
encrypted pages to disk is not checked.
e Click OK.
f Close Internet Explorer 9 and then open it again to continue.
3 In the browser’s Address field, type the full address of the machine
and its port number, and then press Enter. For example: http://<machine name>:<port number>. Use the name of the machine andport number you copied when you installed the StorNext software.
Note: Typically, the port number is 81. If port 81 is in use, use the nextunused port number. (I.e., 82, 83, etc.)
After you enter the machine name and port number, the following
window appears:
Chapter 2: StorNext GUI OverviewAccessing the StorNext GUI

8/10/2019 6-67370-03_SN42101_UserGuide_RevAB
http://slidepdf.com/reader/full/6-67370-03sn42101userguiderevab 35/511
Quantum StorNext User’s Guide 9
Figure 1 StorNext LoginWindow
4 In the User ID field, type admin.
5 In the Password field, type password.
6 Click Login. The initial StorNext System Control screen appears.
Figure 2 System Control
7 On this screen you can determine if the StorNext File System andStorage Manager components are currently started. If not, clickStart for each component to start them.
8 Click the home (house) icon in the upper right corner to go to the
StorNext Home Page.
Chapter 2: StorNext GUI OverviewThe StorNext Home Page

8/10/2019 6-67370-03_SN42101_UserGuide_RevAB
http://slidepdf.com/reader/full/6-67370-03sn42101userguiderevab 36/511
10 Quantum StorNext User’s Guide
Note: When you log into StorNext for the first time, you might see amessage warning you about a security certificate. Refer to theQuantum Knowledge Base for a permanent workaround to thisissue. For a temporary solution, create a certificate exceptionthat will allow you to log into StorNext without seeing thewarning message during subsequent logins.
The StorNext Home Page
On the home page you will find the following:
• Status and Capacity Monitors for file systems, libraries, storagedisks, and tape drives
• Dropdown Menus: Configuration, Tools, Service, Reports and Help
• Current status indicators for the file system and Storage Manager
• A link to the tickets page (if tickets exist)
• A link to admin alerts (if they exist)
• A link to the Library Operator Actions Required page if actions exist
• A link to blockpool status if the blockpool is in the process ofstarting up
From any page you can return to the StorNext home page by clickingthe Home (house) icon in the upper right corner of the screen.
Beside the Home icon is a question mark icon. Clicking this icon displaysa list of StorNext online help topics.
Displayed in the upper right corner beneath the home and help icons isthe user name or IP address of the StorNext user currently logged in.
Chapter 2: StorNext GUI OverviewThe StorNext Home Page

8/10/2019 6-67370-03_SN42101_UserGuide_RevAB
http://slidepdf.com/reader/full/6-67370-03sn42101userguiderevab 37/511
Quantum StorNext User’s Guide 11
Figure 3 StorNext Home Page
StorNext Monitors The StorNext Home Page displays the following status and capacitymonitors which are used to show the current state of the StorNextsystem:
• File Systems Capacity Monitor
• Libraries Capacity Monitor
• Storage Disks Capacity Monitor
• Tape Drive Status
• Policy Capacity Monitor
Use these monitors to view current statistics of managed or unmanaged
file systems and configured libraries and/or drives, including file system,library, and drive information. Each of the status monitors provides anat-a-glance view of the total number of components (file systems,libraries, storage disks, or tape drives) and the current state of the filesystem: green for normal, yellow for warning, and red for error.
Chapter 2: StorNext GUI OverviewThe StorNext Home Page

8/10/2019 6-67370-03_SN42101_UserGuide_RevAB
http://slidepdf.com/reader/full/6-67370-03sn42101userguiderevab 38/511
12 Quantum StorNext User’s Guide
The information shown in the monitors is refreshed periodically. You canspecify the refresh rate by choosing the desired interval from the
Refresh Rate list:• No Refresh
• 30 seconds
• 1 minute
• 2 minutes
• 5 minutes
• 10 minutes
File Systems Capacity Monitor
The File Systems Capacity Monitor provides the following information:
• Total space (in GB) for the file system
• A graphical representation of the free and used space amount
• The number of active StorNext SAN clients (connected via fibrechannel or iSCSI) for which you are licensed
• The number of StorNext distributed LAN clients for which you arelicensed. For more information about distributed LAN clients, seeAbout Distributed LAN Clients on page 2.
• The number of store candidates, which are files selected for storageto secondary media.
• The number of files that have been stored and meet the criteria tobecome a truncation candidate.
• Current status (Error, Warning or Normal)
Libraries Capacity MonitorThe Libraries Capacity Monitor provides the following information:
• Total space (in GB) for the library. (This amount is an approximationif the library contains unformatted media.)
• A graphical representation of the library's free and used spaceamount
• The number of mounted and unmounted media
Chapter 2: StorNext GUI OverviewThe StorNext Home Page
8/10/2019 6-67370-03_SN42101_UserGuide_RevAB
http://slidepdf.com/reader/full/6-67370-03sn42101userguiderevab 39/511
Quantum StorNext User’s Guide 13
• The number of used slots
• The total number of slots
• Current status (Error, Warning or Normal)
Storage Disks Capacity Monitor
The Storage Disks Capacity Monitor provides the following information:
• Total number of storage disks
• A graphical representation of the free and used space amount
• Current status (Error, Warning or Normal)
Tape Drive Status
The Tape Drive Status Monitor provides the following information:
• Total number of tape drives• A graphical representation of the free and used space amount
• Current status (Error, Warning or Normal)
Policy Capacity Monitor
The Policy Capacity Monitor provides the following information:
• Total space (in GB) for policy
• A graphical representation of the free and used space amount
Note: The home page status and capacity monitors are intended togive you an approximate at-a-glance view of all the filesystems, libraries, storage disks etc. on your system.
For a detailed, more accurate summary of your system'scomponents, click inside one of the Status or Capacity boxes toview all file system, libraries, storage disks, and so on. (Forexample, click inside either the File Systems Status or Capacitybox to view all file systems.)
Chapter 2: StorNext GUI OverviewThe StorNext Home Page

8/10/2019 6-67370-03_SN42101_UserGuide_RevAB
http://slidepdf.com/reader/full/6-67370-03sn42101userguiderevab 40/511
14 Quantum StorNext User’s Guide
StorNext Home PageDropdown Menus
The dropdown menu options located in the bar at the top of every pageallow you to access StorNext setup, tools, service, and reporting
options.
The StorNext home page contains these drop-down menus and menuoptions:
The Configuration Menu
Use these menu options to launch the Configuration Wizard orcomplete individual configuration tasks.
• Configuration Wizard: Launches the StorNext ConfigurationWizard
• License: Enter or view license information for StorNext features
• Name Servers: Enter and set order for servers used for StorNext filesystems
• File Systems: Add a file system to your environment
• Storage Destinations: Add a library or storage disk, or set up datareplication and deduplication
• Storage Policies: Add a storage policy to a file system
• Email Server: Configure the email server to use for notifications
• Email Notifications: Configure email notifications for ServiceTickets, Admin Alerts, StorNext Backups, and Policy Class Alerts
The Tools Menu
Use these options to control day-to-day operations of StorNext.
• User Accounts: Control user access to StorNext tasks
• Client Download: Download StorNext client software
• System Control: Stop or start the file system or StorNext StorageManager, and specify whether to automatically start StorNext atsystem startup
• File and Directory Actions: Perform file-related and directory-related tasks such as storing and moving files, recovering andretrieving files and directories, and modifying file attributes.
Chapter 2: StorNext GUI OverviewThe StorNext Home Page

8/10/2019 6-67370-03_SN42101_UserGuide_RevAB
http://slidepdf.com/reader/full/6-67370-03sn42101userguiderevab 41/511
Quantum StorNext User’s Guide 15
• File Systems
• Label Disks: Label disk drives
• Check File System: Run a check on your file system beforeexpanding the file system or migrating a stripe group.
• Affinities: Add affinities to the file system.
• Migrate Data: Migrate the file system's stripe group(s)
• Truncation Parameters: Manage the file system's truncationparameters
• Storage Manager
• Storage Components: View current status for libraries, storagedisks, and tape drives; place one or more of these componentsonline or offline
• Drive Pools: Add, modify, or delete drive pools
• Media Actions: Remove media from a library or move media
from one library to another
• Storage Exclusions: Specify file types to exclude from StorNextprocessing
• Truncation Exclusions: Specify files to exclude from thetruncation process
• Tape Consolidation: Consolidate tape volumes which contain
unused space
• Library Operator Interface: Enter or eject media from theLibrary Operator Interface
• Software Requests: View or cancel pending software requests
• Scheduler: Schedule file system events including Clean Info,Clean Versions, Full Backup, Partial Backup, and Rebuild Policy
• Alternate Retrieval Location: Specify a remote retrievallocation to use in situations where files stored on tape or astorage disk cannot be accessed.
• Distributed Data Mover: Distribute data movement operationsfrom the metadata controller to client machines.
• Replication/Deduplication
• Administration: View current progress for data replication,data deduplication, and truncation operations
Chapter 2: StorNext GUI OverviewThe StorNext Home Page
8/10/2019 6-67370-03_SN42101_UserGuide_RevAB
http://slidepdf.com/reader/full/6-67370-03sn42101userguiderevab 42/511
16 Quantum StorNext User’s Guide
• Replication Targets: Add replication hosts and mount points toyour replication targets, and edit properties for existing hosts
and mount points• Replication Bandwidth: Monitor bandwidth usage for ongoing
data replication processes
• High Availability
• Convert: Convert to a High Availability (HA) configuration
• Manage: Manage an HA configuration
• Advanced Reporting: If you have installed StorNext AdvancedReporting, this menu option allows you to access that feature. Thismenu option does not appear if you have not installed AdvancedReporting.
The Service Menu
Use these options to monitor and capture system status information.• Health Check: Perform one or more health checks on StorNext and
view recent health check results
• Capture State: Obtain and preserve detailed information about thecurrent StorNext system state
• System Backup: Run a backup of StorNext software
• Admin Alerts: View informational messages about system activities• Tickets: View, edit, or close service tickets generated for the system
• Logging: Enables robust debugging mode for advanced tracing
The Reports Menu
Use these options to view StorNext reports.
• Logs: Access logs of StorNext operations
• Jobs: View a list of pending and completed jobs on the system
• Files: View information about specific files, such as the owner,group, policy class, permissions, and copy information
• Drives: View information about the drives in your libraries,including the serial number and current state and status
Chapter 2: StorNext GUI OverviewThe StorNext Home Page

8/10/2019 6-67370-03_SN42101_UserGuide_RevAB
http://slidepdf.com/reader/full/6-67370-03sn42101userguiderevab 43/511
Quantum StorNext User’s Guide 17
• Media: View information pertaining to the media in selectedlibraries or all libraries, including the media ID, type and class, as
well as the number of files and the last access date and time• Relations: View the name of the policy class which corresponds to
the managed directories in your system
• File Systems: View file system statistics including active clients,space, size, disks, and stripe groups
• SAN Devices: View information about devices currently attached toyour SAN, including disks/LUNs, libraries, and tape drives
• Tape Consolidation: View statistics on the tape consolidation(defragmenting) process
• SAN and LAN Clients: View statistics for StorNext clients, includingthe number of connected clients and distributed LAN clients, andclient performance
• LAN Client Performance: View information about distributed LAN
clients and servers, including read and write speed• Replication/Deduplication
• Policy Activity: View replication and deduplication performancestatistics
• Policy Summary: View replication and deduplicationinformation for each policy
• Distributed Data Mover: View activity related to the DistributedData Mover feature
• Gateway Metrics: View performance statistics for gateways, clientsand file systems
The Help Menu
Use these options to access StorNext documentation, find Quantumcontact information, or detailed information about this version ofStorNext.
• Documentation: Access the StorNext documentation
• Support: Access Quantum Technical Support information
• About: Access detailed information about your version ofStorNext and the system on which it is running. Also showsStorNext patent information. The Gateways tab provides
Chapter 2: StorNext GUI OverviewThe StorNext Home Page

8/10/2019 6-67370-03_SN42101_UserGuide_RevAB
http://slidepdf.com/reader/full/6-67370-03sn42101userguiderevab 44/511
18 Quantum StorNext User’s Guide
information about your gateway(s), including server name,serial number, version and gateway license number.

8/10/2019 6-67370-03_SN42101_UserGuide_RevAB
http://slidepdf.com/reader/full/6-67370-03sn42101userguiderevab 45/511
Quantum StorNext User’s Guide 19
Chapter 3
The Configuration Wizard
StorNext includes a Configuration Wizard that guides you through the
process of setting up your StorNext system. The wizard includes tasksyou would typically perform when you are first configuring your system.
The Configuration Wizard appears automatically when you launchStorNext for the first time. As you complete tasks, click Next to proceedto the next configuration task, or click Back to return to the previoustask. Some tasks allow you to skip the task for configuration at a latertime. These tasks have a Next/Skip button instead of a Next button.
You can display the Configuration Wizard at any time by selectingConfiguration Wizard from the StorNext Configuration menu. If youhave completed all of the tasks, each task will be marked as Complete. Ifyou have not completed all tasks, the ones you finished will be markedComplete and the wizard will be ready for you to begin the nextuncompleted task.
You can perform any of the Configuration Wizard’s tasks separatelyrather than through the wizard. Each of these tasks is selectable fromthe StorNext Configuration menu.
Following are the setup and configuration tasks the ConfigurationWizard allows you to complete:
• Step 1: Welcome: View disks and libraries currently available forStorNext usage
• Step 2: Licenses: Enter license information for StorNext features and
components
Chapter 3: The Configuration WizardStep 1: Welcome
St 3 N S S if d d th hi ti

8/10/2019 6-67370-03_SN42101_UserGuide_RevAB
http://slidepdf.com/reader/full/6-67370-03sn42101userguiderevab 46/511
20 Quantum StorNext User’s Guide
• Step 3: Name Servers: Specify and order the machines acting asStorNext name servers
• Step 4: File Systems: Add a StorNext file system
• Step 5: Storage Destinations: Add a library, storage disks, and otherstorage destinations
• Step 6: Storage Policies: Add a Storage Manager or replicationstorage policy
• Step 7: Email Server: Specify an email server to handle StorNext
notifications• Step 8: Email Notification: Add email notifications recipients
• Step 9: Done: Signify that you are finished using the ConfigurationWizard. You can also convert to a high availability (HA) system.
This chapter provides an overview of the steps necessary to completeeach of the Configuration Wizard’s tasks.
High AvailabilitySystems
This chapter contains some instructions that pertain to high availability(HA) systems, but if you plan to convert to HA you should readChapter 9, Converting to HA . In particular, be sure to read and followthe Pre-Conversion Steps on page 220.
Step 1: Welcome
The first screen in the Configuration Wizard is the Welcome screen. Thisscreen shows disks and libraries that are currently available for StorNextusage. As you add new disks and libraries, the information on thisscreen is updated.
If desired, you can manually update the screen by clicking Refresh.When you are ready to proceed to the next step, click Next in the leftcolumn.
Chapter 3: The Configuration WizardStep 2: Licenses

8/10/2019 6-67370-03_SN42101_UserGuide_RevAB
http://slidepdf.com/reader/full/6-67370-03sn42101userguiderevab 47/511
Quantum StorNext User’s Guide 21
Figure 4 Configuration >Configuration Wizard
Welcome Screen
Step 2: Licenses
The StorNext Licenses screen enables you to view your current licensesand enter new licenses (or update expired licenses) for StorNextfeatures.
Chapter 3: The Configuration WizardStep 3: Name Servers

8/10/2019 6-67370-03_SN42101_UserGuide_RevAB
http://slidepdf.com/reader/full/6-67370-03sn42101userguiderevab 48/511
22 Quantum StorNext User’s Guide
Figure 5 Configuration >Licenses Screen
For information about how to enter or update licenses, refer to theStorNext online help or the Gadne 4aorQ6 suQs-o1mQS.
Step 3: Name Servers
This screen enables you to manage machines acting as File System name
servers. You may specify either a hostname or an IP addresses, but an IPaddress is preferable because it avoids problems associated with thelookup system (e.g., DNS or NIS).
The hostnames or IP addresses are copied into the StorNextfsnameservers file. This specifies both the machines serving as FileSystem Name Server coordinator(s) and defines the metadatanetwork(s) used to reach them. The File System Name Server
Chapter 3: The Configuration WizardStep 3: Name Servers
coordinator is a critical component of the StorNext File System Services

8/10/2019 6-67370-03_SN42101_UserGuide_RevAB
http://slidepdf.com/reader/full/6-67370-03sn42101userguiderevab 49/511
Quantum StorNext User’s Guide 23
coordinator is a critical component of the StorNext File System Services(FSS).
A principal function of the coordinator is to manage failover voting in ahigh-availability configuration. Therefore, it is critical to select highlyreliable systems as coordinators. Redundancy is provided by listing theIP addresses of multiple machines in the fsnameservers file, one entryper line. The first IP address listed defines the path to the primarycoordinator. A redundant path to this coordinator may then bespecified. Any subsequent IP addresses listed serve as paths to backupcoordinators. To create redundancy, Quantum recommends that you
select two machines to act as coordinators. Typically, the selectedsystems are also configured for FSM services (MDC), but this is not arequirement.
If the fsnameservers file does not exist, is empty or contains thelocalhost IP address (127.0.0.1), the file system operates as a local filesystem requiring both a client and a server. The file system will notcommunicate with any other StorNext File System product on the
network, thus eliminating sharing the FSS over the SAN.The addresses in the fsnameservers file define the metadata networksand therefore the addresses used to access file system services. When anMDC sends a heartbeat to a nameserver, the nameserver records thesource IP address from the UDP packet and uses that as the address toadvertise for FSMs local to that MDC.
If a nameserver receives multiple heartbeats on redundant metadata
network interfaces, there will be a different source address for the sameFSM and host. The name server will select only one of the metadatanetwork addresses to use as the address of the FSM advertised to allhosts in the cluster. Thus all metadata traffic will use only one of the twoor more redundant metadata networks.
If the network being advertised for file system services fails, a backupnetwork will be selected for FSM services. Clients will not necessarilyreconnect using the new address. If a client maintains TCP connectivityusing the old address, no reconnect will be necessary. If the client needsto connect or re-connect, it will use the currently advertised IP addressof the file system services.
Chapter 3: The Configuration WizardStep 3: Name Servers
l i l f
8/10/2019 6-67370-03_SN42101_UserGuide_RevAB
http://slidepdf.com/reader/full/6-67370-03sn42101userguiderevab 50/511
24 Quantum StorNext User’s Guide
Multiple fsnameserverHosts and Redundant
Metadata Networks
The addition of name server hosts to the configuration will increase theamount of name server traffic on the metadata network. Using a
redundant metadata network with multi-homed name servers furtherincreases the load.
To help you weigh the benefits versus disadvantages of having multiplename server hosts and redundant meta-data networks, here are somepoints to consider:
• Metadata controllers needn’t be name servers.
• Name servers needn’t be MDCs.• Each additional fsnameserver entry adds additional heartbeats
from every file system host.
• If multiple metadata networks service an individual file system, eachnetwork must have an fsnameserver interface. Each fsnameserver host must have network interface(s) on every metadata network,and each interface must be listed in the fsnameserver file.
• At maximum heartbeat rate, a host sends a heartbeat message toevery fsnameserver entry twice per second. The maximum rate is ineffect on a given host when StorNext services are first started, andduring transition periods when an FSM is starting or failing over.Thirty seconds after services are started and when a cluster is stable,non-MDC hosts reduce their heartbeat rate to once every 5 seconds.
• Each heartbeat results in a heartbeat reply back to the sender.
• The size of the heartbeat and reply message depends on thenumber of file systems in the cluster.
Calculating Network Requirements
The following section may help you understand how to calculatecomputing requirements for name server traffic in a cluster. This
example assumes a transition period when all hosts are sendingheartbeat messages at twice a second.
1 Every host sends a heartbeat packet to every name server address,twice per second. If the host is an MDC, the heartbeat packetcontains a list of FSMs running locally.
2 Each name server maintains the master list of FSMs in the cluster.The heartbeat reply contains the list of all FSMs in the cluster.

8/10/2019 6-67370-03_SN42101_UserGuide_RevAB
http://slidepdf.com/reader/full/6-67370-03sn42101userguiderevab 51/511
Chapter 3: The Configuration WizardStep 3: Name Servers
Configuring a Foreign The StorNext name service supports the concept of a foreign server

8/10/2019 6-67370-03_SN42101_UserGuide_RevAB
http://slidepdf.com/reader/full/6-67370-03sn42101userguiderevab 52/511
26 Quantum StorNext User’s Guide
Configuring a ForeignServer
The StorNext name service supports the concept of a foreign server.StorNext client nodes can mount file systems that are not local to the
client's home cluster. Additionally, a client may belong to no StorNextcluster by having an empty or non-existent fsnameservers file.
Clusters serving foreign clients address some scalability and topologyissues present in the traditional client model. Depending on your needs,traditional clients, foreign clients or a mixture may result in the bestperformance and functionality.
Configuring foreign servers requires creating the fsforeignservers file
on client nodes. (Configuring foreign servers through the StorNext GUIis not currently supported.) The fsforeignservers file must be editedusing a program appropriate for the platform, such as vi on Linux orWordpad on Windows.
Configuring foreign servers allows customers to better scale largenumbers of clients. Since foreign clients do not participate in FSMelections, a lot of complexity and message exchange in the voting
process is eliminated. In a typical StorNext HA environment, clients haveequal access to both MDC candidates, making the choice of active FSMmore of a load balancing decision rather than one of access.
Another benefit of foreign servers is that certain topology environmentsprevent all clients from having equal access to all file system MDCs andassociated primary storage. By selecting the set of file system servicesfor each client through the foreign servers configuration, the client seesonly the relevant set of file systems.
The format for the fsforeignservers file is similar to thefsnameservers file in that it contains a list of IP addresses orhostnames, preferably IP addresses. One difference is that the addressesin the fsforeignservers file are MDC addresses, addresses of hoststhat are running the FSM services. This is in contrast to thefsnameservers file, where the name server coordinators specified mayor may not also be acting as MDCs.
In the case that HA is present, you would specify both the active and thestandby MDCs that are hosting FSMs for the file system in thefsforeignservers file.
No additional configuration is needed on the MDCs which act as foreignservers. Foreign clients send heartbeat messages to the addresses in thefsforeignservers file. The heartbeat rate is once every 5 seconds. TheMDC nodes reply to these heartbeat with a list of local, active FSMs and
the address by which they may be reached.
Chapter 3: The Configuration WizardStep 3: Name Servers
After the fsforeignservers file has been created, services can bed d h fil il bl h h hi i b
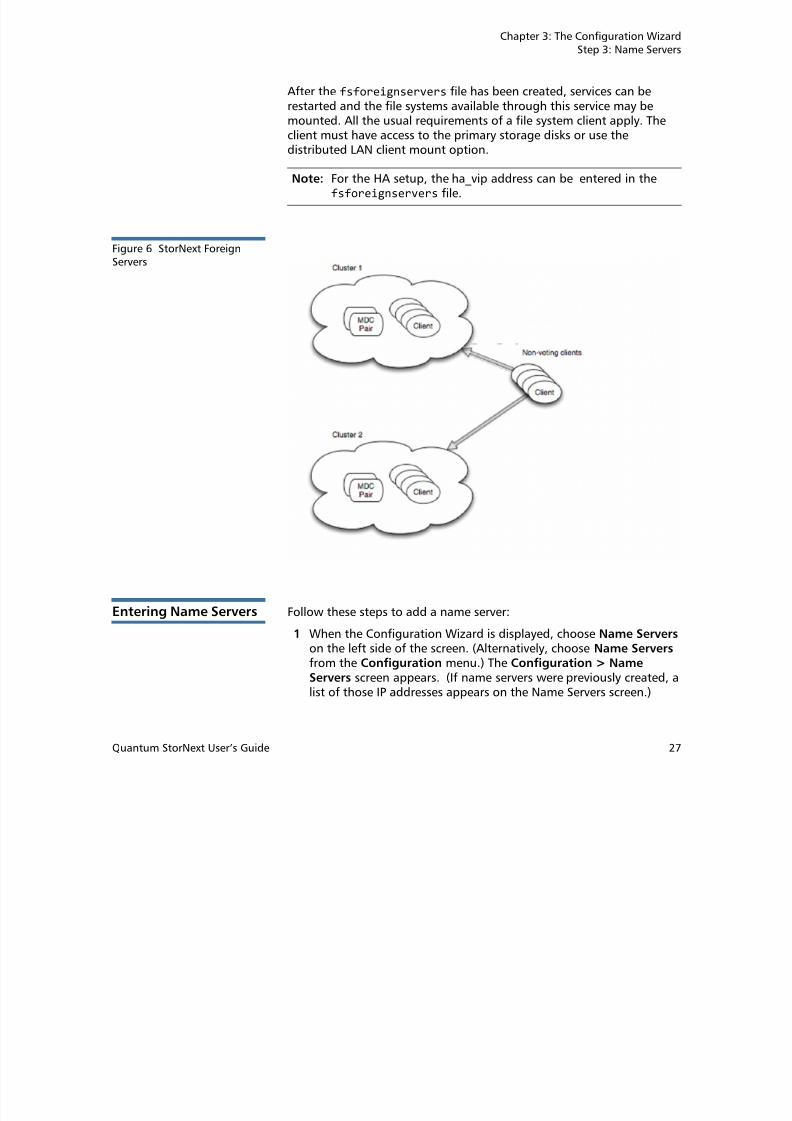
8/10/2019 6-67370-03_SN42101_UserGuide_RevAB
http://slidepdf.com/reader/full/6-67370-03sn42101userguiderevab 53/511
Quantum StorNext User’s Guide 27
restarted and the file systems available through this service may bemounted. All the usual requirements of a file system client apply. Theclient must have access to the primary storage disks or use thedistributed LAN client mount option.
Note: For the HA setup, the ha_vip address can be entered in thefsforeignservers file.
Figure 6 StorNext ForeignServers
Entering Name Servers Follow these steps to add a name server:
1 When the Configuration Wizard is displayed, choose Name Servers on the left side of the screen. (Alternatively, choose Name Servers from the Configuration menu.) The Configuration > NameServers screen appears. (If name servers were previously created, alist of those IP addresses appears on the Name Servers screen.)
Chapter 3: The Configuration WizardStep 3: Name Servers
Figure 7 Name Servers Screen

8/10/2019 6-67370-03_SN42101_UserGuide_RevAB
http://slidepdf.com/reader/full/6-67370-03sn42101userguiderevab 54/511
28 Quantum StorNext User’s Guide
g
2 To add a new name server, enter the IP address in the field to the leftof the Add button. The new name server appears in the list ofavailable name servers.
3 Click Apply to use the name server specified.
4 When the confirmation message warns you that changing the nameserver is a cluster-wide event, click Yes to continue or No to abort.
5 After you click Yes, a message informs you that Name Servers hasbeen updated. Click OK to continue.
6 If there are previously configured name servers, you can specify theorder in which name servers are used. To set the order, select aserver and then click Move Up or Move Down until the selectedserver is in the correct order.
A green check mark icon under the Enabled column heading indicatesthat the server is currently enabled as a name server. A red X iconindicates that the server is not currently enabled.
Deleting a Name Server To delete a name server, select the name server you want to delete andthen click Delete. Finalize the deletion by clicking Apply.
Chapter 3: The Configuration WizardStep 4: File Systems
Step 4: File Systems
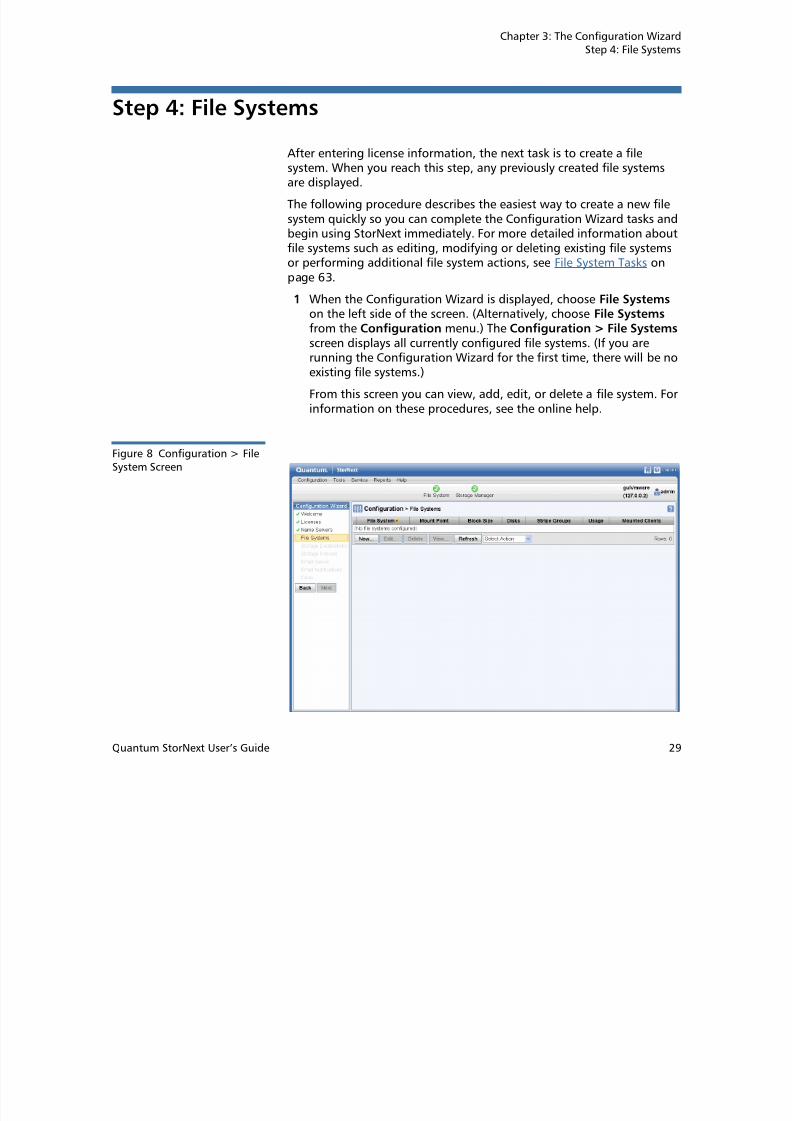
8/10/2019 6-67370-03_SN42101_UserGuide_RevAB
http://slidepdf.com/reader/full/6-67370-03sn42101userguiderevab 55/511
Quantum StorNext User’s Guide 29
Step 4: File Systems
After entering license information, the next task is to create a filesystem. When you reach this step, any previously created file systemsare displayed.
The following procedure describes the easiest way to create a new filesystem quickly so you can complete the Configuration Wizard tasks andbegin using StorNext immediately. For more detailed information about
file systems such as editing, modifying or deleting existing file systemsor performing additional file system actions, see File System Tasks onpage 63.
1 When the Configuration Wizard is displayed, choose File Systems on the left side of the screen. (Alternatively, choose File Systems from the Configuration menu.) The Configuration > File Systems screen displays all currently configured file systems. (If you are
running the Configuration Wizard for the first time, there will be noexisting file systems.)
From this screen you can view, add, edit, or delete a file system. Forinformation on these procedures, see the online help.
Figure 8 Configuration > FileSystem Screen
Chapter 3: The Configuration WizardStep 4: File Systems
2 Click New to add a new file system. The Configuration > File Systems
> New Screen appears

8/10/2019 6-67370-03_SN42101_UserGuide_RevAB
http://slidepdf.com/reader/full/6-67370-03sn42101userguiderevab 56/511
30 Quantum StorNext User’s Guide
> New Screen appears.
Figure 9 Configuration > FileSystem > New Screen
3 Enter the following fields:
• File System Name
• Mount Point• Storage Manager
• Replication/Deduplication
• Stripe Group Configuration: Generated or Manual
(For detailed information about what to enter on this screen, seethe online help.)
If you chose Manual Configuration, skip to Manual Configuration.
4 Click Continue to proceed to the second configuration screen.
Chapter 3: The Configuration WizardStep 4: File Systems
Figure 10 Configuration > FileS N S 2

8/10/2019 6-67370-03_SN42101_UserGuide_RevAB
http://slidepdf.com/reader/full/6-67370-03sn42101userguiderevab 57/511
Quantum StorNext User’s Guide 31
System > New Screen 2
5 At the Avg Files/Directory field, select one of the options toindicate the approximate average number of files per directory youanticipate the new file system will contain. Options range fromfewer than 10 files to more than 1000 files.
This value helps StorNext calculate capacity. You should select theoption that most closely corresponds to your projected usage. Youare not limited by the option you select. For example, if you indicatethat there will typically be fewer than 10 files per directory, there isnothing to prevent the directory from containing more than 10 files.
6 At the RAID Type field, select the type of RAID the file system uses.(If you are using a StorNext G300 Appliance, the default value isQuantum Disk.)
7 Select one or more disks to assign to the file system.
8 After selecting one or more disks, click the Metadata checkbox todesignate the disk(s) as used for metadata, or click the Journal checkbox to use the disk(s) for journaling. A disk can be used forboth metadata and journaling.
9 At the field to the left of the Label button, enter a disk label name.Click Label to apply the label name to the selected disks. (ClickingUnlabel removes label names from selected disks.) When asked to
Chapter 3: The Configuration WizardStep 4: File Systems
confirm the action (either Label or Unlabel), click OK to continue orCancel to abort.

8/10/2019 6-67370-03_SN42101_UserGuide_RevAB
http://slidepdf.com/reader/full/6-67370-03sn42101userguiderevab 58/511
32 Quantum StorNext User’s Guide
10 After you are finished entering label information, click Assign toassign the disk(s) to the file system. (Clicking Unassign removes anyexisting associations between disks and the file system. For example,if you assign disks erroneously, clicking Unassign is an easy way toremove associations and reassign disks.)
11 Click Continue.
Figure 11 Configuration > FileSystem > New Screen 3
12 Click the arrows beside the headings Advanced Parameters andStripe Group/Disk Management to display that information. Ifdesired, make any changes in these areas.
13 When you are satisfied with the file system parameters, click Apply.StorNext automatically configures and mounts the file system basedon the information you entered.
Manual Configuration
If you chose Manual Configuration, you must enter the fields on the Advanced Parameters tabs and the Stripe Group/Disk Management fields. (Click the arrow to the left of these headings to display the tabsand fields.)
Chapter 3: The Configuration WizardStep 4: File Systems
Figure 12 Configuration > FileSystem > New Screen 3

8/10/2019 6-67370-03_SN42101_UserGuide_RevAB
http://slidepdf.com/reader/full/6-67370-03sn42101userguiderevab 59/511
Quantum StorNext User’s Guide 33
System > New Screen 3
For information about entering these tabs and fields, see the onlinehelp.
1 When you are finished entering Advanced Parameter and StripeGroup/Disk Management information for the manually configuredfile system, click Apply to save your changes and create the filesystem.
2 When a message informs you that the file system was successfullycreated, click OK .
Allocation SessionReservation
The Advanced Parameters section of this screen contains a field called Allocation Session Reservation Size. The Allocation SessionReservation feature optimizes on-disk allocation behavior. Allocation
requests occur whenever a file is written to an area that has no actualdisk space allocated, and these requests are grouped into sessions. Theamount you specify at this field determines the size of the chunk ofspace reserved for a session.
For more information about the Allocation Session Reservation feature,refer to the StorNext File System Tuning Guide.
Chapter 3: The Configuration WizardStep 5: Storage Destinations
Editing a File Systemand Performing Other
Once you have created a file system, you have the option of editing thefile system or performing one of the following actions:

8/10/2019 6-67370-03_SN42101_UserGuide_RevAB
http://slidepdf.com/reader/full/6-67370-03sn42101userguiderevab 60/511
34 Quantum StorNext User’s Guide
and Performing Other
Actions
file system or performing one of the following actions:
Stop or start the file system Update the file system
Start and activate the file system Perform a metadata dump for the file system
Start and mount the file system Check the file system
Activate the file system Expand the file system
Note: StorNext does not support expansion onstripe groups containing mixed-sizedLUNs. For example, if you create a filesystem that has two different-sized disksin a userdata only stripe group and thenattempt to add a new disk to that stripegroup and expand it, the expansion will
fail.Mount or unmount the file system Migrate the file system
Make the file system
Refer to the StorNext online help for instruction on editing a file systemor performing one of the available actions.
Step 5: Storage Destinations
After you have created at least one file system, the Configuration
menu's Storage Destinations option allows you to add, edit, or deletelibraries and storage disks. You can also enter or edit targets for datareplication, and specify a blockpool host file system for datadeduplication.
Chapter 3: The Configuration WizardStep 5: Storage Destinations
Adding a New Library Follow this procedure to add a new library:

8/10/2019 6-67370-03_SN42101_UserGuide_RevAB
http://slidepdf.com/reader/full/6-67370-03sn42101userguiderevab 61/511
Quantum StorNext User’s Guide 35
1 When the Configuration Wizard is displayed, choose StorageDestinations on the left side of the screen. (Alternatively, choose Storage Destinations from the Configuration menu.)
2 If necessary, click the Library tab. The Configuration > Storage
Destinations > Library Screen appears.
Figure 13 Storage Destinations
> Library Screen
Chapter 3: The Configuration WizardStep 5: Storage Destinations
3 Click New. The Configuration > Storage Destinations > Library > New
Screen appears.

8/10/2019 6-67370-03_SN42101_UserGuide_RevAB
http://slidepdf.com/reader/full/6-67370-03sn42101userguiderevab 62/511
36 Quantum StorNext User’s Guide
Figure 14 Storage Destinations> Library > New Screen
4 Enter the fields at the top of the screen. (For detailed informationabout what to enter on this screen, see the online help.)
5 Click Scan to have StorNext discover available drives and media.
6 Select a tape drive or drives to add to your new library.
7 In the Media section, view media available for use.
8 Click Apply.
9 After a message informs you that the library was successfullycreated, click OK .
10 Repeat steps 3- 9 to add additional tape drives and media to thenew library.
Viewing an ExistingLibrary
Follow this procedure to view details for a previously created library:
1 Choose Storage Destinations from the Configuration menu. Ifnecessary, click the Library tab. The Configuration > Storage
Destinations > Library screen appears. (See Figure 13.)
Chapter 3: The Configuration WizardStep 5: Storage Destinations
2 Select the library whose information you want to view.
3 Click View, or choose View from the actions dropdown list. The
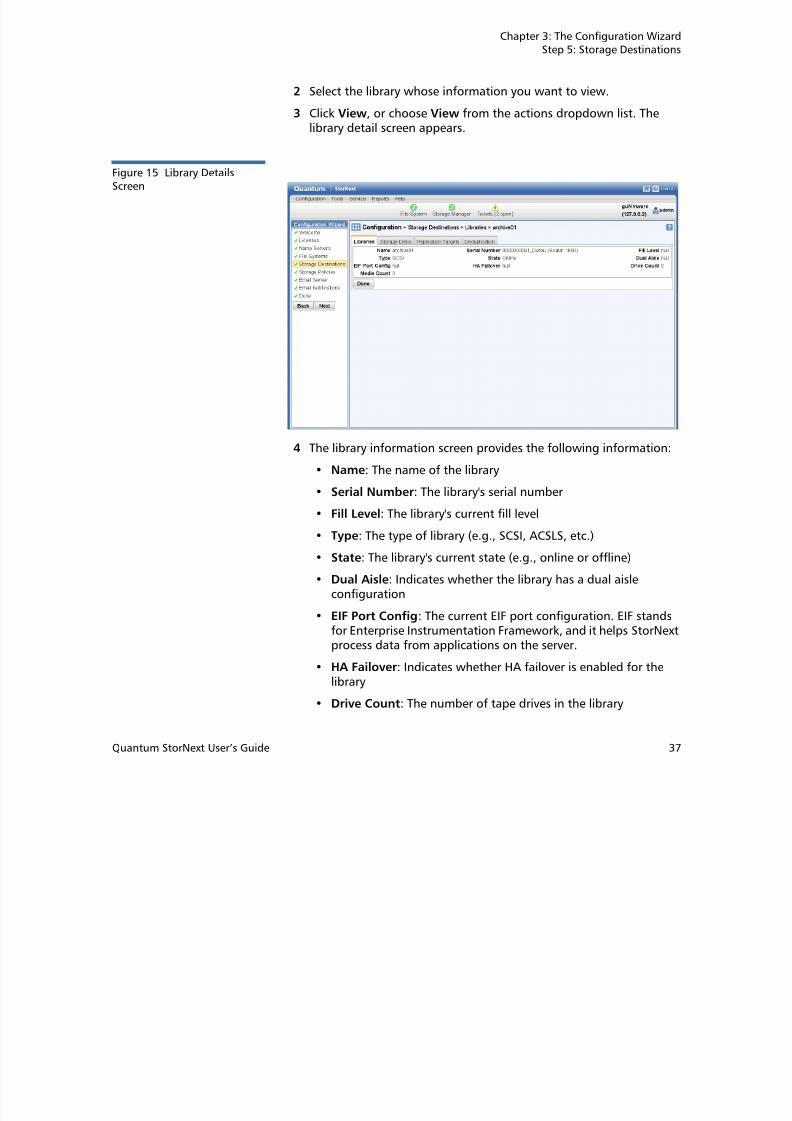
8/10/2019 6-67370-03_SN42101_UserGuide_RevAB
http://slidepdf.com/reader/full/6-67370-03sn42101userguiderevab 63/511
Quantum StorNext User’s Guide 37
library detail screen appears.
Figure 15 Library DetailsScreen
4 The library information screen provides the following information:
• Name: The name of the library
• Serial Number: The library's serial number
• Fill Level: The library's current fill level
• Type: The type of library (e.g., SCSI, ACSLS, etc.)
• State: The library's current state (e.g., online or offline)
• Dual Aisle: Indicates whether the library has a dual aisle
configuration
• EIF Port Config: The current EIF port configuration. EIF standsfor Enterprise Instrumentation Framework, and it helps StorNextprocess data from applications on the server.
• HA Failover: Indicates whether HA failover is enabled for thelibrary
• Drive Count: The number of tape drives in the library
Chapter 3: The Configuration WizardStep 5: Storage Destinations
• Media Count: The number of media in the library
5 When you are finished viewing library information, click Done.
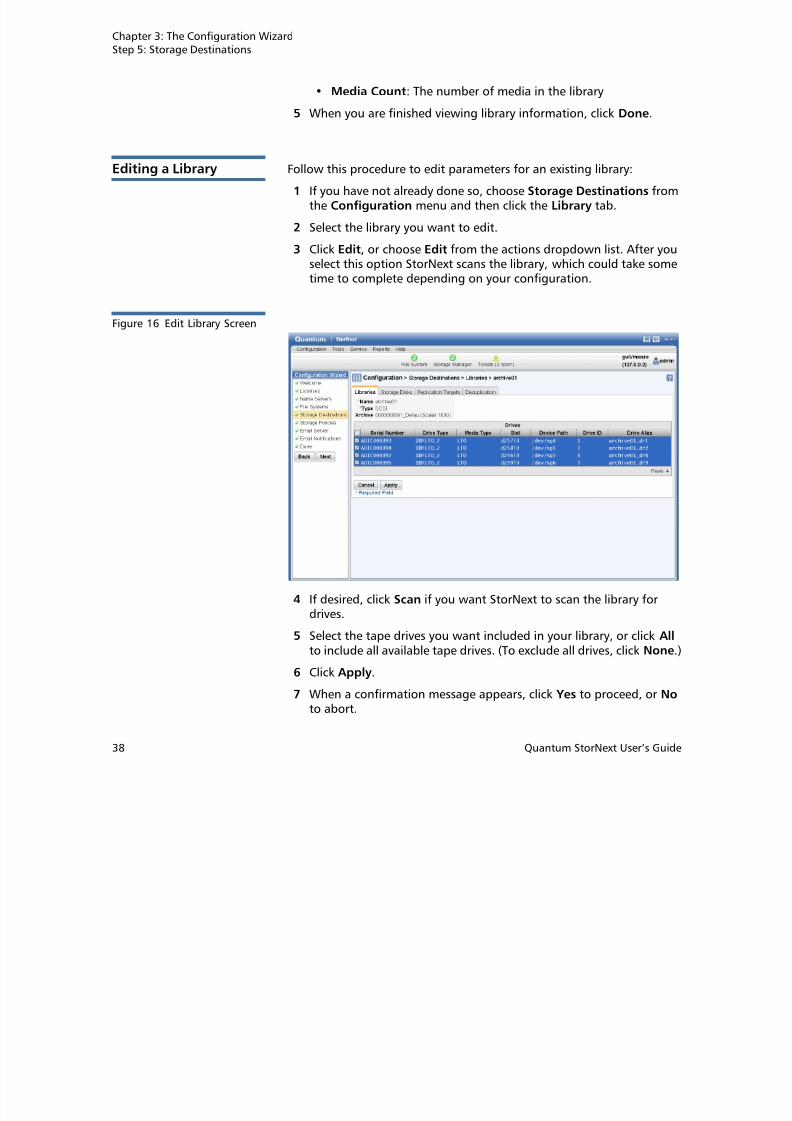
8/10/2019 6-67370-03_SN42101_UserGuide_RevAB
http://slidepdf.com/reader/full/6-67370-03sn42101userguiderevab 64/511
38 Quantum StorNext User’s Guide
Editing a Library Follow this procedure to edit parameters for an existing library:
1 If you have not already done so, choose Storage Destinations fromthe Configuration menu and then click the Library tab.
2 Select the library you want to edit.
3 Click Edit, or choose Edit from the actions dropdown list. After youselect this option StorNext scans the library, which could take sometime to complete depending on your configuration.
Figure 16 Edit Library Screen
4 If desired, click Scan if you want StorNext to scan the library fordrives.
5 Select the tape drives you want included in your library, or click All to include all available tape drives. (To exclude all drives, click None.)
6 Click Apply.
7 When a confirmation message appears, click Yes to proceed, or No
to abort.
Chapter 3: The Configuration WizardStep 5: Storage Destinations
8 After a message informs you that the library was successfullymodified, click OK .

8/10/2019 6-67370-03_SN42101_UserGuide_RevAB
http://slidepdf.com/reader/full/6-67370-03sn42101userguiderevab 65/511
Quantum StorNext User’s Guide 39
Deleting a Library Follow this procedure to delete an existing library:
1 If you have not already done so, choose Storage Destinations fromthe Configuration menu and then click the Library tab.
2 Select the library you want to delete.
3 Click Delete, or choose Delete from the actions dropdown list.4 When a confirmation message appears, click Yes to proceed with
the deletion or No to abort.
5 After a message informs you that the library was successfullydeleted, click OK .
Performing OtherLibrary Actions
Towards the middle of the Configuration > Storage Destinations >Library screen is a dropdown list of actions you can perform forlibraries.
Select the library for which you want to perform the action, and thenchoose one of these options from the Select Action dropdown list:
• Audit: Select this option to perform an audit on the selected library.
An audit is a physical check of each library component to verify itsintegrity and make sure the database and library are synchronized.Quantum recommends periodic audits on the library to ensuresynchronization.
• Remap-Audit: This option synchronizes the StorNext databaseswith the library databases.
• Online: Select this option to set the library online.
• Offline: Select this option to take the library offline.
• Drives Online: Select this option to place the drives in the libraryonline.
• Drives Offline: Select this option to take the drives in the libraryoffline.
• Add Media Bulkload: Select this option to add media to the library
via the bulk loading method.
Chapter 3: The Configuration WizardStep 5: Storage Destinations
• Add Media Mailbox: Select this option to add media to the librarythrough the library's mailbox.

8/10/2019 6-67370-03_SN42101_UserGuide_RevAB
http://slidepdf.com/reader/full/6-67370-03sn42101userguiderevab 66/511
40 Quantum StorNext User’s Guide
Storage Disk Overview Storage disks are external devices on UNIX-based file systems that canbe used for long term data storage. Storage disks function and operatethe same way as physical tape media. You can add up to 16 storagedisks.
When a storage disk is configured, the StorNext Storage Managermoves data to storage disks for long-term retention in addition to orinstead of tape. This enables users to leverage the specialized third-partyfunctionality of appliances or store small files that might take longer toretrieve from tape. Many users will still use tape for long-term storageand vaulting, but storage disk can be used to create tape-free archives.
Here are a few differences storage disks have over tape media:
• A storage disk either belongs to no policy class, or belongs to a
single policy class• A storage disk can store file copies only with the same copy ID.
Note: Before you create a storage disk, the disks you plan to use mustreside in an existing, mounted file system.
After you create a storage disk, observe the following usagerecommendations:
• If your file system includes storage disks, avoid using that file systemfor any data other than storage disk stored data.
• Use complete and physically dedicated file systems (snfs, local, NFS,or other) for storage disk data, not shared file systems or filesystems with linked directories.
The following procedures describe how to view, edit and delete storage
disks. The procedure for adding a storage disk is identical to enteringone through the StorNext Configuration Wizard as described in Addinga New Storage Disk on page 41.)
Caution: Storage disks can be an important and integral part of yoursystem, but you should NEVER rely solely on storage disksas your only backup location.
Chapter 3: The Configuration WizardStep 5: Storage Destinations
Adding a New StorageDisk
Follow this procedure to add a new storage disk.
1 Click the Storage Disk tab. The Configuration > Storage

8/10/2019 6-67370-03_SN42101_UserGuide_RevAB
http://slidepdf.com/reader/full/6-67370-03sn42101userguiderevab 67/511
Quantum StorNext User’s Guide 41
Destinations > Storage Disk Screen appears.
Figure 17 Configuration >Storage Destinations >Storage Disk Screen
Chapter 3: The Configuration WizardStep 5: Storage Destinations
2 Click New. The Storage Destinations > Storage Disk > New Screen appears.

8/10/2019 6-67370-03_SN42101_UserGuide_RevAB
http://slidepdf.com/reader/full/6-67370-03sn42101userguiderevab 68/511
42 Quantum StorNext User’s Guide
Figure 18 Storage Destinations> Storage Disk > New Screen
3 Enter the fields on the screen. (For detailed information about whatto enter on this screen, see the online help.)
4 Click Apply.
5 Repeat steps 2 - 4 to add additional storage disks.
Viewing an ExistingStorage Disks
Follow this procedure to view a list of previously configured storagedisks.
1 Choose Storage Destinations from the Configuration menu.
2 Click the Storage Disk tab. Any previously configured storage disksare displayed. (See Figure 17 on page 41.)
3 Select the storage disk whose information you want to view.
Chapter 3: The Configuration WizardStep 5: Storage Destinations
4 Click View.

8/10/2019 6-67370-03_SN42101_UserGuide_RevAB
http://slidepdf.com/reader/full/6-67370-03sn42101userguiderevab 69/511
Quantum StorNext User’s Guide 43
Figure 19 View Storage DiskScreen
5 When you are finished viewing library information, click Done.
Editing a Storage Disk Follow this procedure to edit a currently configured storage disk.
1 If you have not already done so, choose Storage Destinations fromthe Configuration menu and then click the Storage Disk tab.
2 Select the storage disk whose information you want to edit.
3 Click Edit.
4 Modify any of the fields you entered when creating the storage disk.(For field information, see the online help or the descriptions in
Adding a New Storage Disk on page 41.)5 Click Apply.
6 When a confirmation message appears, click Yes to proceed, or No to abort.
7 After a message informs you that the storage disk was successfullymodified, click OK .
Chapter 3: The Configuration WizardStep 5: Storage Destinations
Deleting a Storage Disk Follow this procedure to delete a currently configured storage disk.
1 If you have not already done so, choose Storage Destinations from
h fi i d h li k h i k b
8/10/2019 6-67370-03_SN42101_UserGuide_RevAB
http://slidepdf.com/reader/full/6-67370-03sn42101userguiderevab 70/511
44 Quantum StorNext User’s Guide
the Configuration menu and then click the Storage Disk tab.
2 Select the storage disk you want to delete.
3 Click Delete.
4 When a confirmation message appears, click Yes to proceed withthe deletion or No to abort.
5 After a message informs you that the storage disk was successfully
deleted, click OK .
Caution: Before deleting a storage disk, make sure the policies thatrefer to the storage disk (as well as the file systems that usethe storage disk for backup storage) have been safelybacked up and configured or updated to not use thestorage disk you want to delete.
Adding a New DataReplication Target
The following procedure describes how to add a new replication targethost. (For more information about the replication feature, seeChapter 6, Replication and Deduplication and Appendix B, AdditionalReplication and Deduplication Information.)
1 Click the Replication Targets tab. The Configuration > StorageDestinations > Replication / Deduplication Screen appears.
Chapter 3: The Configuration WizardStep 5: Storage Destinations
Figure 20 Configuration >Storage Destinations >Replication / DeduplicationS

8/10/2019 6-67370-03_SN42101_UserGuide_RevAB
http://slidepdf.com/reader/full/6-67370-03sn42101userguiderevab 71/511
Quantum StorNext User’s Guide 45
Screen
2 Click Add Host.
3 Enter the fields in the New Target section. (For detailed informationabout what to enter on this screen, see the online help.)
4 Click Add to add the new replication target, or Cancel to abortwithout saving.
5 Click Apply to save your changes.6 Repeat steps 3 - 6 to add more targets.
7 After a message informs you that the target was successfully added,click OK .
Editing a DataReplication Host Follow this procedure to edit an existing data replication target.1 If you have not already done so, click the Replication Targets tab.
2 If necessary, click the plus sign (+) beside the Replication Targets heading in the box titled Replication Target Configuration.
3 Select the replication target you want to edit.
4 Click Edit.
Chapter 3: The Configuration WizardStep 5: Storage Destinations
5 At the Hostname or IP field, modify either the host name or IPaddress for the replication target.
6 Click Update to save your changes, or Cancel to abort.

8/10/2019 6-67370-03_SN42101_UserGuide_RevAB
http://slidepdf.com/reader/full/6-67370-03sn42101userguiderevab 72/511
46 Quantum StorNext User’s Guide
Deleting a DataReplication Target
Follow this procedure to delete a replication target.
1 If you have not already done so, choose click the ReplicationTargets tab.
2 If necessary, click the plus sign (+) beside the Replication Targets heading in the box titled Replication Target Configuration.
3 Select the replication target you want to delete.
4 Click Delete.
Caution: There is no confirmation message for this delete function,so make absolutely certain you want to delete the
replication target before you click Delete.
Adding a New MountPoint
Follow this procedure to add a new mount point to a replication target.
1 If you have not already done so, choose Storage Destinations onthe left side of the screen. (Alternatively, choose Storage
Destinations from the Configuration menu.)
2 Click the Replication Targets tab.
3 Select the replication target (host) to which you would like to add amount point. (You might need to click the dash to the left of theReplication Targets heading to display the available hosts.)
4 Click Add Mount Point.
5 Click Scan Host to identify available mount points on the selectedhost.
6 At the Mount Point field, select a mount point and then click Add.
7 Repeat steps 3 - 6 to add additional mount points.
8 Click Apply to save the changes.
Chapter 3: The Configuration WizardStep 5: Storage Destinations
9 After a message informs you that changes were successfullyincorporated click OK .

8/10/2019 6-67370-03_SN42101_UserGuide_RevAB
http://slidepdf.com/reader/full/6-67370-03sn42101userguiderevab 73/511
Quantum StorNext User’s Guide 47
Enabling DataDeduplication
The Deduplication tab enables you to create a blockpool on a specifiedfile system. (For more information about the deduplication feature, seeChapter 6, Replication and Deduplication and Appendix B, AdditionalReplication and Deduplication Information.)
To create the blockpool, select the desired file system from thedropdown list next to the Blockpool File System label, and then click
Apply.
Note: The blockpool should not be placed on a file system that will beused as the HA shared file system. This is a requirement even ifyou do not plan to use the StorNext Deduplication feature.
Figure 21 Configuration >Storage Destinations >Replication / DeduplicationScreen (Blockpool)
Chapter 3: The Configuration WizardStep 6: Storage Policies
Step 6: Storage Policies

8/10/2019 6-67370-03_SN42101_UserGuide_RevAB
http://slidepdf.com/reader/full/6-67370-03sn42101userguiderevab 74/511
48 Quantum StorNext User’s Guide
There are two kinds of storage policies: Storage Manager storagepolices and Replication/Deduplication storage policies. Replication/ Deduplication storage policies control the way StorNext’s replicationand deduplication features behave. (For more information about thereplication and deduplication features, see Chapter 6, Replication andDeduplication and Appendix B, Additional Replication andDeduplication Information.)
A Storage Manager storage policy defines how files will be managed ina directory and subdirectories. Specifically, these are the availableStorage Manager storage policy settings:
• Number of copies to create
• Media type to use when storing data
• Amount of time to store data after data is modified
• If disk-to-disk relocation is enabled, the amount of time (in days)before relocating a file
• Amount of time before truncating a file after a file is modified
Storage policies can be related to one or more directories. In thissituation, all files in that directory and sub-directories are governed bythe storage policy.
Note: The connection between a storage policy and a directory iscalled the relation point.
Here are some examples of storage policy usage:
• A directory in which to store backups every night is created. Thisdirectory is seldom accessed after the files are copied over. A storage
policy could be set up to create two tape copies of the files, storeone copy of the files to LTO media after residing on disk for 10minutes, and then truncate the other set of files immediately afterstoring the other set to tape in order to free up disk space. Thispolicy can be associated with a directory such as: /sandsm/dsm1/ backup.
• A directory has been created to store all documents that areaccessed frequently, and if truncated, need to be retrieved quickly.
Chapter 3: The Configuration WizardStep 6: Storage Policies
The in this case could be set up to create a single tape copy, storethe files to LTO media 15 minutes after being on disk, and thentruncate after 60 days of non-use. This policy can be associated with
a directory such as: /sandsm/dsm1/docs.
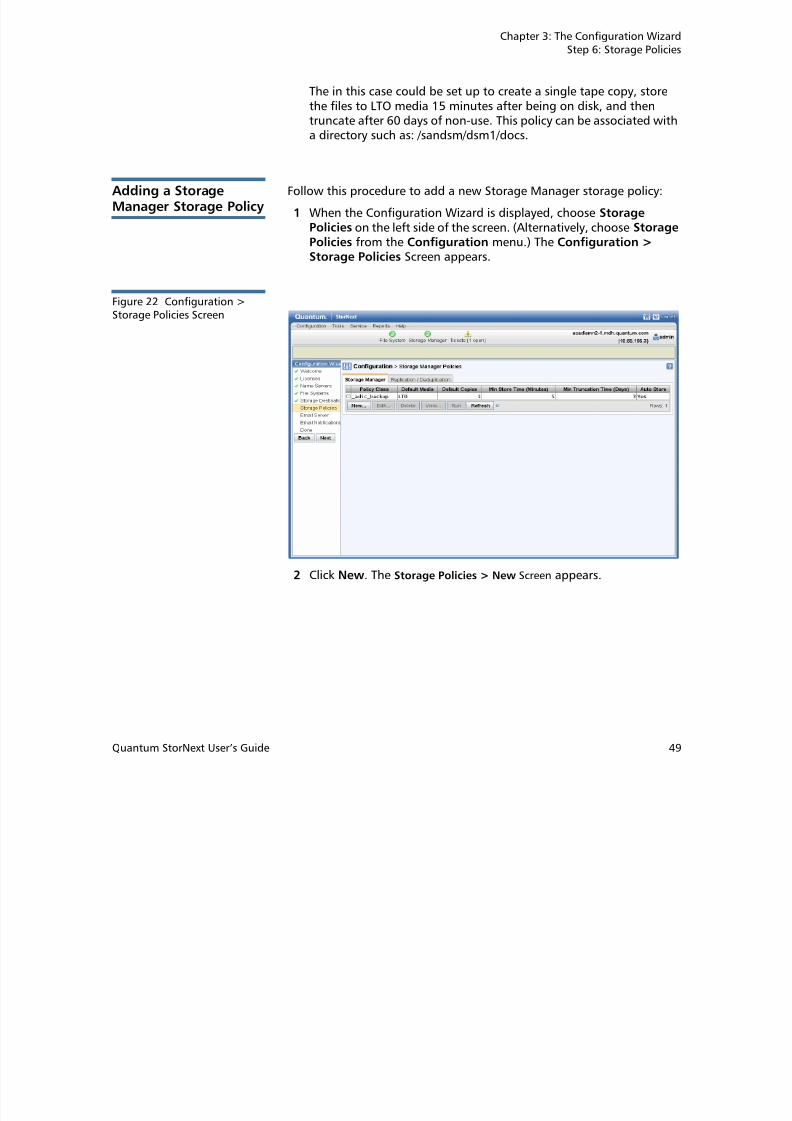
8/10/2019 6-67370-03_SN42101_UserGuide_RevAB
http://slidepdf.com/reader/full/6-67370-03sn42101userguiderevab 75/511
Quantum StorNext User’s Guide 49
a directory such as: /sandsm/dsm1/docs.
Adding a StorageManager Storage Policy
Follow this procedure to add a new Storage Manager storage policy:
1 When the Configuration Wizard is displayed, choose StoragePolicies on the left side of the screen. (Alternatively, choose StoragePolicies from the Configuration menu.) The Configuration >Storage Policies Screen appears.
Figure 22 Configuration >Storage Policies Screen
2 Click New. The Storage Policies > New Screen appears.
Chapter 3: The Configuration WizardStep 6: Storage Policies
Figure 23 Storage Policies >New Screen

8/10/2019 6-67370-03_SN42101_UserGuide_RevAB
http://slidepdf.com/reader/full/6-67370-03sn42101userguiderevab 76/511
50 Quantum StorNext User’s Guide
3 Enter the following fields:
• Policy Class: The name of the new policy you are creating.
Note: The policy class name must be unique. You cannot enterthe name of an existing policy class.
Also, if you use upper-class characters when entering the
policy class name, the name will be converted to lower-case characters when the policy class is created.
• Policy Type: click the Storage Manager tab to create a policyfor StorNext Storage Manager
• Click Configure to continue.
4 Enter information on the General, Relocation, Steering, Schedule
and Associated Directories tabs. (See the sections following formore information about these tabs.)
5 When you are finished entering information about the new policy,click Apply, or click Cancel to exit without saving.
6 After the Status screen informs you that the policy was createdsuccessfully, click OK .
Chapter 3: The Configuration WizardStep 6: Storage Policies
The General Tab
The General tab contains parameters that apply to all storage policies.
Fields marked with an asterisk are required. Enter additional fields asdesired or accept the displayed default values

8/10/2019 6-67370-03_SN42101_UserGuide_RevAB
http://slidepdf.com/reader/full/6-67370-03sn42101userguiderevab 77/511
Quantum StorNext User’s Guide 51
desired, or accept the displayed default values.
Figure 24 Storage Policies >New > General Tab
For instructions on what to enter on this screen, see the online help.
The Relocation Tab
The Relocation tab enables you to configure the Disk-to-Disk relocationfeature.
Disk-to-Disk relocation allows you to move data from one set of disks(disk stripe group) to another without affecting the file name space. In
order to use this feature you must have a managed file system with atleast two affinities configured.
Chapter 3: The Configuration WizardStep 6: Storage Policies
Figure 25 Storage Policies >New > Relocation Tab

8/10/2019 6-67370-03_SN42101_UserGuide_RevAB
http://slidepdf.com/reader/full/6-67370-03sn42101userguiderevab 78/511
52 Quantum StorNext User’s Guide
For instructions on what to enter on this screen, see the online help.
The Steering Tab
The Steering tab enables you to configure file steering, which allows youto direct a copy of a file to a designated drive pool. This is normallyused when you want to direct two or more copies of a file to different
archives by putting the tape drive in separate pools and then setting thecopy number of the file to go to that pool. You can also use this featureto route your copies of the file to different media types, includingstorage disks.
Chapter 3: The Configuration WizardStep 6: Storage Policies
Figure 26 Storage Policies >New > Steering Tab

8/10/2019 6-67370-03_SN42101_UserGuide_RevAB
http://slidepdf.com/reader/full/6-67370-03sn42101userguiderevab 79/511
Quantum StorNext User’s Guide 53
For instructions on what to enter on this screen, see the online help.
The Schedule Tab
The Schedule tab allows you to enable or disable the Store FilesAutomatically feature.
When this feature is enabled, StorNext automatically stores files for thecurrent storage policy. If this feature is disabled, Quantum recommendsthat the files for the policy class be stored by scheduled events.(Scheduled events are certain activities which you can set up to run atspecified times using StorNext’s schedule. For more information, seeScheduler on page 114.)
Chapter 3: The Configuration WizardStep 6: Storage Policies
Figure 27 Storage Policies >New > Schedule Tab

8/10/2019 6-67370-03_SN42101_UserGuide_RevAB
http://slidepdf.com/reader/full/6-67370-03sn42101userguiderevab 80/511
54 Quantum StorNext User’s Guide
For instructions on what to enter on this screen, see the online help.
The Associated Directories Tab
The Associated Directories tab enables you to view or delete any existingassociated directories in the file system for the policy, and to add newdirectories.
Chapter 3: The Configuration WizardStep 6: Storage Policies
Figure 28 Storage Policies >New > Associated DirectoriesTab

8/10/2019 6-67370-03_SN42101_UserGuide_RevAB
http://slidepdf.com/reader/full/6-67370-03sn42101userguiderevab 81/511
Quantum StorNext User’s Guide 55
For instructions on what to enter on this screen, see the online help.
Adding a ReplicationStorage Policy
The steps for creating a replication storage policy are described in Step4: Create a Replication Storage Policy on page 152.
Viewing a StoragePolicy
To view storage policy details To view storage policy details for a StorageManager or Replication policy, do the following:
1 From the Configuration > Storage Policies screen, select thestorage policy you wish to view.
2 Click View.
Chapter 3: The Configuration WizardStep 6: Storage Policies
Figure 29 View StoragePolicies Screen

8/10/2019 6-67370-03_SN42101_UserGuide_RevAB
http://slidepdf.com/reader/full/6-67370-03sn42101userguiderevab 82/511
56 Quantum StorNext User’s Guide
3 Click Done to return to the Configuration > Storage Policies screen.
Running a StoragePolicy
Follow this procedure to run an existing storage policy.
1 If you have not already done so, choose Storage Policies from theConfiguration menu.
2 Select the policy you want to run, and then click Run.
3 When a message informs you that the job was successfully initiated,click OK to continue.
4 To view job progress, select Jobs from the Reports menu.
Editing a Storage Policy To edit an existing storage policy:
1 From the Configuration > Storage Policies screen, select thepolicy you wish to edit.
2 Click Edit.
3 Modify policy information as desired by clicking the tabs and editingor adding information. The process is the same as when you firstcreated the policy.
Chapter 3: The Configuration WizardStep 7: Email Server
If you are editing a Storage Manager policy, you can edit fields onthe General, Relocation, Steering, Schedule and AssociatedDirectories tabs. For more information about fields on these tabs,
see the online help.If you are editing a Replication global policy, you can edit fields on

8/10/2019 6-67370-03_SN42101_UserGuide_RevAB
http://slidepdf.com/reader/full/6-67370-03sn42101userguiderevab 83/511
Quantum StorNext User’s Guide 57
y g p g p y, yDeduplication, Truncation, Outbound Replication, InboundReplication, and Blackout tabs. If you are editing a Replicationtarget policy, you can modify field on only the Inbound Replication tab. For more information about fields on these tabs, see the onlinehelp.
4 Click Apply to save changes and return to the Configuration >Storage Policies screen, or Cancel to abort.
Deleting a StoragePolicy
To delete an existing storage policy:
1 From the Configuration > Storage Policies screen, select thepolicy you wish to delete.
2 Click Delete.
3 Click Yes to confirm the deletion, or No to cancel.
Step 7: Email ServerThe Email Server option allows you to specify the email server used forprocessing StorNext notification email messages. On this screen you willenter basic information such as the email server name and sendingentity. You also have the option of sending a test message so you canverify that StorNext recognizes the email server whose information you
entered.
Note: The Email Server option does not configure your email server.Instead, it allows you to specify a previously configured emailserver so StorNext knows which server is responsible forprocessing notification messages. Before you use the EmailServer option, make sure your email SMTP server is alreadyconfigured.
Chapter 3: The Configuration WizardStep 8: Email Notification
Adding an Email Server Follow this procedure to add a new email server.
1 When the Configuration Wizard is displayed, choose Email on the
left side of the screen. (Alternatively, choose Email Server from theConfiguration menu.) The Configuration > Email Server Screen

8/10/2019 6-67370-03_SN42101_UserGuide_RevAB
http://slidepdf.com/reader/full/6-67370-03sn42101userguiderevab 84/511
58 Quantum StorNext User’s Guide
appears.
Figure 30 Configuration >Email Server Screen
2 Complete the fields related to your email system configuration onthe Configuration > Email Server screen. (For detailed informationabout what to enter on this screen, see the online help.)
3 Click Apply to save your changes.
Step 8: Email Notification
The Email Notification feature allows you to specify parties who shouldreceive StorNext email messages about backup statuses, service tickets,admin alerts, and policy class messages.
Chapter 3: The Configuration WizardStep 8: Email Notification
Note: In order for this feature to work properly, make sure you havespecified a configured email server as described in Adding anEmail Server on page 58.

8/10/2019 6-67370-03_SN42101_UserGuide_RevAB
http://slidepdf.com/reader/full/6-67370-03sn42101userguiderevab 85/511
Quantum StorNext User’s Guide 59
Adding an EmailRecipient
Follow this procedure to add a new email recipient.
1 Choose Email Notifications from the Configuration menu.
2 When the Configuration Wizard is displayed, choose Email
Notifications on the left side of the screen. (Alternatively, choose Email Notifications from the Configuration menu.) TheConfiguration > Email Notifications Screen appears.
Figure 31 Configuration >Email Notifications Screen
Chapter 3: The Configuration WizardStep 8: Email Notification
3 Click New. The Configuration > Email Notifications > New screenappears.
Figure 32 Configuration >Email Notifications New Screen

8/10/2019 6-67370-03_SN42101_UserGuide_RevAB
http://slidepdf.com/reader/full/6-67370-03sn42101userguiderevab 86/511
60 Quantum StorNext User’s Guide
Email Notifications New Screen
4 Complete the fields for the new email recipient. (For detailedinformation about what to enter on this screen, see the onlinehelp.)
5 Click Apply to save your changes.
6 When the confirmation message appears, click Yes to proceed or No to abort.
7 When a message informs you that the email notification recipientwas successfully added, click OK to return to the Configuration >Email Notifications screen.
Viewing Email RecipientInformation
Follow this procedure to view details for an existing email recipient.
1 If you have not already done so, when the Configuration Wizard isdisplayed, choose Email Notifications on the left side of the screen.(Alternatively, choose Email Notifications from the Configurationmenu.)
Chapter 3: The Configuration WizardStep 8: Email Notification
2 On the Configuration > Email Notifications screen, review the listof current email recipients.
3 Select the recipient whose information you want to view, and then
click View.
4 When you are finished viewing recipient information, click Cancel to

8/10/2019 6-67370-03_SN42101_UserGuide_RevAB
http://slidepdf.com/reader/full/6-67370-03sn42101userguiderevab 87/511
Quantum StorNext User’s Guide 61
y g p ,return to the Configuration > Email Notifications screen.
Editing an Email
Recipient
Follow this procedure to edit information for a previously entered email
recipient.1 If you have not already done so, when the Configuration Wizard is
displayed, choose Email Notifications on the left side of the screen.(Alternatively, choose Email Notifications from the Configurationmenu.)
2 On the Configuration > Email Notifications screen, select therecipient whose information you want to edit and then click Edit.
3 Modify any of the fields on the screen. (For detailed informationabout what to enter on this screen, see the online help.)
4 When you are finished making modifications, click Apply to saveyour changes and return to the Configuration > EmailNotifications screen. (To exit without saving, click Cancel.)
Deleting an EmailRecipient
Follow this procedure to delete a previously entered email recipient.
1 If you have not already done so, when the Configuration Wizard isdisplayed, choose Email Notifications on the left side of the screen.(Alternatively, choose Email Notifications from the Configurationmenu.)
2 On the Configuration > Email Notifications screen, review the list
of current email recipients.3 Select the recipient you want to delete and then click Delete.
4 When the confirmation message appears, click Yes to proceed or No to abort the deletion.
5 When a message informs you that the email notification recipientwas successfully deleted, click OK return to the Configuration >Email Notifications screen.
Chapter 3: The Configuration WizardStep 9: Done
Step 9: Done
The last step in the Configuration Wizard is to click Done to indicatethat you have completed all configuration steps.

8/10/2019 6-67370-03_SN42101_UserGuide_RevAB
http://slidepdf.com/reader/full/6-67370-03sn42101userguiderevab 88/511
62 Quantum StorNext User’s Guide
that you have completed all configuration steps.
On this screen you can also convert to a high availability (HA)configuration by clicking Convert to HA . Clicking this button is thesame as choosing High Availability > Convert from the Tools menu.For information about entering the fields on this screen and convertingto an HA system, see Converting to HA on page 221.
Figure 33 Configuration >Configuration Wizard DoneScreen
Chapter 4
8/10/2019 6-67370-03_SN42101_UserGuide_RevAB
http://slidepdf.com/reader/full/6-67370-03sn42101userguiderevab 89/511
Quantum StorNext User’s Guide 63
p
File System Tasks
In addition to the basic file system tasks described for the ConfigurationWizard in Step 4: File Systems on page 29, the Tools > File Systems
menu contains additional options that enable you to perform thefollowing file system-related tasks:
• Label Disks: Apply EFI or VTOC label names for disk devices in yourStorNext libraries
• Check File System: Run a check on StorNext files systems prior toexpanding or migrating the file system
• Affinities: Allocate additional storage to a file system by creating anew stripe group in the file system configuration file, and assigningnew disks to the stripe group
• Migrate Data: Move data files from a source file system to adestination stripe group, freeing stripe groups so they can beremoved from an existing StorNext file system
• Truncation Parameters: Enter truncation parameters for your filesystems in order to free up file storage that isn’t being actively used
Chapter 4: File System TasksLabel Disks
Label Disks
Each drive used by StorNext must be labeled. (A new drive must belabeled only one time.) You can label a drive from any StorNext server or

8/10/2019 6-67370-03_SN42101_UserGuide_RevAB
http://slidepdf.com/reader/full/6-67370-03sn42101userguiderevab 90/511
64 Quantum StorNext User’s Guide
client that has a fibre channel (FC) connection to the drive.
There are two types of label:
• EFI labels are required if you plan to create LUNs that are larger than2TB. (For Solaris, EFI labels are also required for LUNs with a raw
capacity greater than 1TB.)
• VTOC labels were used for all operating systems in previousStorNext and Xsan releases, and are still required for Solaris releasesprior to Solaris 10 Update 2, and LUNs less than 1TB.
Labeling a Device Follow this procedure to label any new or unused devices, or relabel adevice that has been unlabeled.
Caution: Labeling a disk device may result in a complete loss of dataon that disk device.
1 Choose Label Disks from the Tools > File Systems menu. The Tools> Label Disks screen appears.
Chapter 4: File System TasksLabel Disks
Figure 34 Label Disks Screen

8/10/2019 6-67370-03_SN42101_UserGuide_RevAB
http://slidepdf.com/reader/full/6-67370-03sn42101userguiderevab 91/511
Quantum StorNext User’s Guide 65
2 Select the disk devices to which you want to apply labels. (Click All to select all available disks.) If a disk device already has a label,continuing with this procedure overwrites the existing label.
Caution: Overwriting or renaming a disk device label may resultin a complete loss of data on that disk device.
3 Specify the label type by choosing EFI or VTOC.
4 Enter a label name in the text field to the right of the EFI and VTOC buttons.
5 Click Label.
6 When the confirmation message appears, verify that the disk youare labeling is empty, and then click OK to proceed. (Click Cancel toabort without labelling the disk.)
Note: If you later unlabel a device and then decide to make theunlabeled device usable by the StorNext File System, you mustfirst relabel the device. The relabeling process is identical tolabeling initially.
Chapter 4: File System TasksUnderstanding Resource Allocation
Unlabeling a Device Follow this procedure to remove a label from a previously labeleddevice. If you unlabel a device and then decide later to make theunlabeled device usable by the StorNext File System, you must first
relabel the device. The relabeling process is identical to labeling initiallyas described in Labeling a Device.

8/10/2019 6-67370-03_SN42101_UserGuide_RevAB
http://slidepdf.com/reader/full/6-67370-03sn42101userguiderevab 92/511
66 Quantum StorNext User’s Guide
Note: You cannot remove the label from a disk device that has beenpreviously assigned to a file system. You can identify thesedevices by the file system name under the Filesystem heading.
1 If you have not already done so, choose Label Disks from the Tools> File Systems menu.
2 Select the disk devices from which you want to remove labels. (Click All to select all available disks.)
3 Click Unlabel.
4 When the confirmation message appears, click OK to verify that youwant to unlabel the selected disk(s). (Click Cancel to abort without
unlabelling the disk.)
Caution: When you unlabel a device, all data on that device will belost. Additionally, the unlabeled device will no longer beused by the file system until it is relabeled.
Understanding Resource Allocation
StorNext provides two Resource Allocation tools that allow you to makechanges to your file system: 7QU oG3ua ,oR4v2suQds, and GanQv o1ndmvo
Ad’ , sa .
About File SystemExpansion
StorNext’s File System Expansion feature enables you to dynamically addLUNs to a selected file system without interrupting that file system’soperation.
Chapter 4: File System TasksUnderstanding Resource Allocation
The only disruption that occurs during File System Expansion is a shortpause of new metadata requests as StorNext updates its internal systemand clients to be aware of the new overall capacity and physical disk
resources that are used.File System Expansion is often done in conjunction with the StripeGroup Movement feature. That is, you might want to add new stripe
k ll h f

8/10/2019 6-67370-03_SN42101_UserGuide_RevAB
http://slidepdf.com/reader/full/6-67370-03sn42101userguiderevab 93/511
Quantum StorNext User’s Guide 67
groups knowing you’ll want to use those stripe groups for Stripe GroupMovement.
Note: After expansion you must perform a metadata dump. StorNextprovides an option that will do this for you automatically, but
the process can take longer than if you do the metadumpmanually. If you do not create a new metadump, subsequentStorNext backups will not succeed and a RAS message will begenerated at backup time.
About Stripe GroupMovementStripe Group Movement moves data files off one or more data stripegroups onto the remaining data stripe groups in a file system, whichfrees data LUNS so they can be decommissioned or reused. In a similarway, the metadata on a single LUN can be moved to a new LUN.StorNext provides a Movement Wizard to simplify these processes,which is launched when you select Migrate Data from the Tools menu.
During data stripe-group movement, you indicate one or more sourcestripe groups from which to move data. StorNext automatically movesall data from the source stripe groups to the remaining stripe groups inthe file system. All other data stripe groups are targets, allowing aneven distribution of data across remaining disk resources. Duringmovement, the file system is online and read/write operations occurnormally, but the source data stripe group(s) are in read-only mode(write disabled).
After all data has been removed from the source stripe group, you must
mark the stripe group as “read-only,” which prevents new data frombeing written to the source stripe group. At this point the source LUNsare empty and read-only, so there will be no access to them.
Although stripe group and LUN configuration line items must never bedeleted from a configuration once its corresponding file system hasbeen created, marking a stripe group as read-only allows its LUNs to berelabeled and reused. The names of the LUNs in the configuration file
Chapter 4: File System TasksUsing Resource Allocation From the Command Line
can also be changed to free up the old names for reuse. StorNext cansupport up to 512 stripe groups.
When moving metadata off one LUN onto a new LUN, the file system
must be stopped. The Movement Wizard allows you to select one sourceand one destination LUN. On completion, the old LUN is relabeled witha suffix of .old, and the new LUN is relabeled with the old LUN’s name.Th ld LUN th b l b l d d d

8/10/2019 6-67370-03_SN42101_UserGuide_RevAB
http://slidepdf.com/reader/full/6-67370-03sn42101userguiderevab 94/511
68 Quantum StorNext User’s Guide
The old LUN can then be relabeled and reused.
Expansion and
Movement Steps
Here are the steps required for expanding a file system and moving
stripe groups:
1 Check the file system before you begin. (See Check File System onpage 73.)
2 Expand the file system. (See Step 4: File Systems on page 29.)
3 Move data stripe groups or metadata/journal stripe groups. (SeeMigrate Data on page 80.)
4 Mark source stripe groups as read-only.
5 Reboot all clients after the expansion.
Using Resource Allocation From the Command Line
Quantum recommends that you perform resource allocation using theStorNext GUI. However, if your operating system does not support usingthe GUI for this feature (or if you are operating in a failoverenvironment,) you can accomplish the following tasks from thecommand line interface (CLI):
• Adding a Stripe Group Without Moving
• Adding and Moving a Data Stripe Group
• Moving a Metadata/Journal Stripe Group
Chapter 4: File System TasksUsing Resource Allocation From the Command Line
Caution: When you add a new disk or stripe group to your SAN,often an OS-dependent operation must be run to make theadded device recognizable by a host. Some of these utilitiescan disrupt access to existing disks, causing access hangsor failures. To avoid this, stop all file system operations onthe affected host t 0dn rescanning for the new device.

8/10/2019 6-67370-03_SN42101_UserGuide_RevAB
http://slidepdf.com/reader/full/6-67370-03sn42101userguiderevab 95/511
Quantum StorNext User’s Guide 69
Checking the File
System
Before you use the Resource Allocation feature, Quantum strongly
recommends running the cvfsck command on the file system you will beusing. This step could take a considerable amount of time to complete,but your file system should be in good condition before you attempt toexpand it or move stripe groups.
Caution: If you do not run the cvfsck command to check your filesystem before attempting file system expansion,irreparable file system damage could occur.
Adding a Stripe GroupWithout Moving
Use the following procedure to expand the file system by adding astripe group, and not migrating.
1 Label disks for the new stripe groups you want to add to the file
system.2 If your StorNext configuration includes a failover environment, you
must first shut down any standby FSMs that would start when youshut down the primary FSM. The movement procedure will notcomplete successfully unless all FSMs are shut down.
Caution: If you do not shut down standby FSMs, file system
corruption or data loss could occur.
3 (Optional) Run the cvfsck command on the file system. SeeChecking the File System.
4 Add the new stripe groups to the file system.
5 Stop the File System Manager (FSM).
6 Run the cvupdatefs command.
Chapter 4: File System TasksUsing Resource Allocation From the Command Line
7 Restart the FSM.
Adding and Moving aData Stripe Group
New functionality has been added to the snfsdefrag utility to supportoperations on multiple stripe groups.
N t D i St i G M t ffi iti d h

8/10/2019 6-67370-03_SN42101_UserGuide_RevAB
http://slidepdf.com/reader/full/6-67370-03sn42101userguiderevab 96/511
70 Quantum StorNext User’s Guide
Note: During Stripe Group Movement, affinities are preserved whenfiles are moved from one stripe group to another. When youcreate a new stripe group to use with the Stripe GroupMovement feature, the new stripe group must includesufficient space for its affinities. (You must add any affinitiesfrom the source stripe group to the new stripe group.)
Use the following procedure to add new stripe groups, and then movedata off of the old stripe group.
1 Label disks for the new stripe groups you want to add to the filesystem.
2 If your StorNext configuration includes a failover environment, youmust first shut down any standby FSMs that would start when youshut down the primary FSM. The move procedure will not completesuccessfully unless all FSMs are shut down.
Caution: If you do not shut down standby FSMs, file systemcorruption or data loss could occur.
3 (Optional) Run the cvfsck command on the file system. SeeChecking the File System.
4 Add the new stripe groups to the file system configuration andmark the old stripe groups as read-only. (Make sure the old stripegroup is write disabled.)
5 Stop the File System Manager (FSM) for the desired file system.
6 Run cvupdatefs.
7 Restart the FSM.
8 Run snfsdefrag -G <n> -m 0 -r /filesystemroot
where <n> is the zero-based number of the source stripe groupfrom which the move starts, and filesystemroot is the file name ofthe file system tree’s root. You can specify multiple -G options to
use multiple source stripe groups.
Chapter 4: File System TasksUsing Resource Allocation From the Command Line
9 Verify that no data remains on the original stripe groups.
10 Edit the file system configuration to mark the old stripe groups as“Down.”
11 Stop the FSM.
12 Restart the FSM.
8/10/2019 6-67370-03_SN42101_UserGuide_RevAB
http://slidepdf.com/reader/full/6-67370-03sn42101userguiderevab 97/511
Quantum StorNext User’s Guide 71
Note: The old stripe groups marked “Down/Readonly” must beleft in the file system configuration file.
Moving a Metadata/ Journal Stripe Group
Metadata movement is performed on a LUN level, meaning you mustspecify the source LUN and the destination LUN. The new sndiskmove command that accomplishes metadata movement has two arguments:a source and destination LUN.
After movement is complete, the physical source disk can be removed.
Note: Although a stripe group can consist of multiple disks or LUNs,the sndiskmove command moves only a single disk or LUN.Consequently, references to “stripe group” in this section referto a single disk or LUN when migrating metadata withsndiskmove.
Caution: The metadata/journal stripe group you want to move
cannot contain data.
Sndiskmove treats metadata and journal stripe groups thesame way, so it doesn’t matter whether the stripe groupyou want to move is a metadata stripe group, a journalstripe group, or a combined metadata and journal stripegroup. The only caveat is that stripe groups used formovement cannot contain data.
If you attempt to move a metadata/journal stripe groupthat contains data, data loss could occur.
Use the following procedure to move a metadata/journal stripe groupfrom a source LUN to a destination LUN.
1 Stop the File System Manager (FSM) for the file system.
Chapter 4: File System TasksUsing Resource Allocation From the Command Line
2 If your StorNext configuration includes a failover environment, youmust shut down any standby FSMs that would start when you shutdown the primary FSM. The movement procedure will not completesuccessfully unless all FSMs are shut down.
Caution: If you do not shut down standby FSMs, file systemcorruption or data loss could occur.

8/10/2019 6-67370-03_SN42101_UserGuide_RevAB
http://slidepdf.com/reader/full/6-67370-03sn42101userguiderevab 98/511
72 Quantum StorNext User’s Guide
3 (Optional) Run the cvfsck command on the file system. SeeChecking the File System.
4 Run sndiskmove <source-LUN-label-name> <destination-LUN-label-name>
where <source-LUN-label-name> is the source stripe group fromwhich the move starts, and destination-LUN-label-name is thedestination stripe group to which you want to move data.
During the move process StorNext appends “.old” to the sourcestripe group name. This is to avoid confusion because the
destination stripe group is given the same name as the originalstripe group. Both stripe group names remain in the configurationfile.
For example:
source-LUN-label-name (the original stripe group name) becomessource-LUN-label-name.old
destination-LUN-label-name (the new stripe group name) becomes
source-LUN-label-name (the same name as the original stripegroup)
Note: When you run sndiskmove, it could take a considerableamount of time to copy the data between disks, dependingon disk size and performance.
5 Only if your system includes a standby FSM: After you runsndiskmove, rescan the disks on the standby FSM’s host by runningcvadmin -e ‘disks refresh’. You must run cvadmin -e ‘disks refresh’ onall systems on which you have a configured FSM for the file systeminvolved in the move.
6 Restart the FSM.
Chapter 4: File System TasksCheck File System
7 Only if your system includes a standby FSM: Restart the standbyFSM.
Check File System

8/10/2019 6-67370-03_SN42101_UserGuide_RevAB
http://slidepdf.com/reader/full/6-67370-03sn42101userguiderevab 99/511
Quantum StorNext User’s Guide 73
Before you perform either File System Expansion or Migration, you mustfirst perform a check on the file system you plan to use for these
features. This operation could take a significant amount of timedepending on the size of the file system, so plan accordingly.
Also, this operation could consume a significant amount of space on thelocal file system. For example, for large file systems you should allow atleast 20GB of free space on the local file system for temporary files.
For more information about file system expansion, refer to the StorNextonline help.
There are two ways to check file systems:
• Checking while the file system is offline
• Checking while the file system is active
When the file system is offline, you can run the check in eithertraditional mode or read-only mode. Read-only mode typicallycompletes faster, but is not as thorough.
When the file system is active, you must run the check in read-onlymode. The advantage of this method is that you don’t have to take thefile system offline to run the check.
Note: Running a check on an active file system could result in falseerrors which occur because you are running the check whilethe file system is still running.
Whenever you run the check in read-only mode, Quantum stronglyrecommends also running the Recover Journal step before you check thefile system. Running Recover Journal ensures that all operations havebeen committed to disk, and that the metadata state is up to date.
Regardless of which method you choose to check the file system, youshould plan carefully when to run a file system check and planaccordingly.
Chapter 4: File System TasksCheck File System
Use the following procedure to perform a file system check.
Note: If you plan to run the check while the file system is offline,before you begin the following procedure you should first stopthat file system as described in the StorNext online help.
1 Choose Check File System from the Tools > File Systems menu.The Tools > Check > [file system name] screen appears

8/10/2019 6-67370-03_SN42101_UserGuide_RevAB
http://slidepdf.com/reader/full/6-67370-03sn42101userguiderevab 100/511
74 Quantum StorNext User’s Guide
The Tools > Check > [file system name] screen appears.
Figure 35 Check File System
Screen
2 At the Temp File Directory field, enter a new directory if thespecified directory does not have enough space to perform thecheck. (The checking process on large file systems can takehundreds of megabytes or more of local system disk space forworking files.)
3 Select the file system you want to check.
4 If you plan to run the check in read-only mode, Quantumrecommends running Recover Journal by clicking Recover Journal.When a message asks you to confirm that you want to run RecoverJournal, click Yes to proceed or No to abort.
5 Do one of the following:
a If the file system you want to check is active, click Check Read-Only to check the file system in read-only mode.

8/10/2019 6-67370-03_SN42101_UserGuide_RevAB
http://slidepdf.com/reader/full/6-67370-03sn42101userguiderevab 101/511
Chapter 4: File System TasksAffinities
File System CheckOutput Files
If you do not want to use StorNext to view output from the file systemcheck, you can view output in two files:
• /usr/cvfs/data/<fsname>/trace/cvfsck-<timestamp>For example: /usr/cvfs/data/snfs1/trace/cvfsck-02_22_2010-12_15_19
• /usr/adic/gui/logs/jobs/CHECK FS-<timestamp>-<jobid>

8/10/2019 6-67370-03_SN42101_UserGuide_RevAB
http://slidepdf.com/reader/full/6-67370-03sn42101userguiderevab 102/511
76 Quantum StorNext User’s Guide
• /usr/adic/gui/logs/jobs/CHECK_FS-<timestamp>-<jobid>
For example: /usr/adic/gui/logs/jobs/CHECK_FS-20100222_121519-77
Affinities
This section describes StorNext’s “stripe group affinity” feature, and also
provides some common use cases.A stripe group is a collection of LUNs (typically disks or arrays) acrosswhich data is striped. Each stripe group also has a number of associatedattributes, including affinity and exclusivity.
An affinity is used to steer the allocation of a file’s data onto a set ofstripe groups. Affinities are referenced by their name, which may be upto eight characters long. An affinity may be assigned to a set of stripe
groups, representing a named pool of space, and to a file or directory,representing the logical point in the file system and directing thestorage to use the designated pool.
Exclusivity means a stripe group has both an affinity and the exclusiveattribute, and can have its space allocated only by files with that affinity.Files without a matching affinity cannot allocate space from an exclusivestripe group. Files with an affinity that is exclusive cannot be stored onother stripe groups without that affinity. If the exclusive stripe group(s)become filled, no more files with that affinity can be stored.
Chapter 4: File System TasksAffinities
Affinities for stripe groups are defined in the file system configurationfile. A stripe group may have multiple affinities, and an affinity may beassigned to multiple stripe groups.
Note: A managed file system can have only two affinities, but a non-managed file system can have multiple affinities.
8/10/2019 6-67370-03_SN42101_UserGuide_RevAB
http://slidepdf.com/reader/full/6-67370-03sn42101userguiderevab 103/511
Quantum StorNext User’s Guide 77
Allocation Strategy • StorNext has multiple allocation strategies which can be set at thefile system level. These strategies control where a new file’s first
blocks will be allocated. Affinities modify this behavior in two ways:
• A file with an affinity will be allocated only on a stripe group withmatching affinity.
• A stripe group with an affinity and the exclusive attribute will beused only for allocations by files with matching affinity.
Once a file has been created, StorNext attempts to keep all of its data on
the same stripe group. If there is no more space on that stripe group,data may be allocated from another stripe group. If the file has anaffinity, only stripe groups with that affinity will be considered; if allstripe groups with that affinity are full, new space may not be allocatedfor the file, even if other stripe groups are available.
Example Use Cases Affinities can be used to segregate audio and video files onto their ownstripe groups. For example:
• Create one or more stripe groups with an AUDIO affinity and theexclusive attribute.
• Create one or more stripe groups with a VIDEO affinity and theexclusive attribute.
• Create one or more stripe groups with no affinity (for non-audio,
non-video files).
• Create a directory for audio using ‘cvmkdir -k AUDIO audio’.
• Create a directory for video using ‘cvmkdir -k VIDEO video’.
Files created within the audio directory will reside only on the AUDIOstripe group. (If this stripe group fills, no more audio files can becreated.)
Chapter 4: File System TasksAffinities
Files created within the video directory will reside only on the VIDEOstripe group. (If this stripe group fills, no more video files can becreated.)
To reserve high-speed disk for critical files:• Create a stripe group with a FAST affinity and the exclusive
attribute.
• Label the critical files or directories with the FAST affinity

8/10/2019 6-67370-03_SN42101_UserGuide_RevAB
http://slidepdf.com/reader/full/6-67370-03sn42101userguiderevab 104/511
78 Quantum StorNext User’s Guide
Label the critical files or directories with the FAST affinity.
The disadvantage here is that the critical files are restricted to only usingthe fast disk. If the fast disk fills up, the files will not have spaceallocated on slow disks.
To reserve high-speed disk for critical files, but allow them to grow ontoslow disks:
• Create a stripe group with a FAST affinity and the exclusiveattribute.
• Create all of the critical files, pre allocating at least one block ofspace, with the FAST affinity. (Or move them using snfsdefrag, after
ensuring they are non-empty.)
• Remove the FAST affinity from the critical files.
Because files will allocate from their existing stripe group, even if theyno longer have a matching affinity, the critical files will continue togrow on the FAST stripe group. Once this stripe group is full, they canallocate space from other stripe groups, since they do not have anaffinity.
This will not work if critical files may be created later, unless there is aprocess to move them to the FAST stripe group, or an affinity is set onthe critical files by inheritance but removed after their first allocation (toallow them to grow onto non-FAST groups).
Adding a New Affinity Follow this procedure to add affinities:1 Choose Affinities from the Tools > File Systems menu. The Tools >
File Systems > Affinities screen appears.
Chapter 4: File System TasksAffinities
Figure 37 Affinities Screen

8/10/2019 6-67370-03_SN42101_UserGuide_RevAB
http://slidepdf.com/reader/full/6-67370-03sn42101userguiderevab 105/511
Quantum StorNext User’s Guide 79
2 Click New. The New Affinity screen appears.
Figure 38 New Affinity Screen
3 At the Affinity field, enter the name of the new affinity.
Chapter 4: File System TasksMigrate Data
4 At the File Systems field, select the file system to which you want toassociate the new affinity.
5 Click Apply to create the affinity.
6 When a message notifies you that the affinity was successfullycreated, click OK to continue.

8/10/2019 6-67370-03_SN42101_UserGuide_RevAB
http://slidepdf.com/reader/full/6-67370-03sn42101userguiderevab 106/511
80 Quantum StorNext User’s Guide
Deleting an Affinity Follow this procedure to delete affinities:
1 If you have not already done so, choose Affinities from the Tools >
File Systems menu. The Tools > File Systems > Affinities screenappears.
2 Select the affinity you want to delete.
3 Click Delete.
4 When asked to confirm the deletion, click Yes to proceed or No toabort.
5 When a message notifies you that the affinity was successfullydeleted, click OK to continue.
Migrate Data
Migrating file system data refers to moving data files from a filesystem’s source stripe group to all the other stripe groups on the samefile system, and then freeing the source stripe group so it can beremoved from the file system. You can select the source stripe grouponly, not the destination stripe group(s). Files will be moved randomlyto new stripe groups while respecting their affinity rules (if any). Whenmigrating, make sure the source stripe group is completely empty when
the process completes, because source files that are updated while thefile system is running may be left behind, requiring a second iteration ofthe migration.
During file system migration, you indicate a file system from which tomove data. This operation can be performed only on data-only stripegroups. Stripe groups which contain metadata and/or journal files
Chapter 4: File System TasksMigrate Data
cannot be migrated by this operation. During movement the file systemis left online and read/write operations occur normally.
The time it takes to complete the migration process depends on the
amount of data being moved between source file system anddestination stripe groups. When moving a data stripe group, the filesystem continues to run during the move. StorNext does not block anynew read/write requests, or block updates to existing files on the sourcefile system. All operations (including metadata operations) are handled

8/10/2019 6-67370-03_SN42101_UserGuide_RevAB
http://slidepdf.com/reader/full/6-67370-03sn42101userguiderevab 107/511
Quantum StorNext User’s Guide 81
normally, but no new writes are allowed to the source stripe group,which will be marked read-only.
Use the following procedure to perform file system migration.
1 Choose Migrate Data from the Tools > File Systems menu. TheTools > File systems > Migrate screen appears.
Figure 39 Migrate Screen
2 Select the file system from which files will be migrated.
3 Select the stripe group to which files will be migrated.
4 Click Migrate.
Chapter 4: File System TasksTruncation Parameters
Caution: This particular function does not provide a confirmationmessage, so be absolutely sure you want to migrate datafrom the selected file system to the selected stripe group
before you click Migrate.

8/10/2019 6-67370-03_SN42101_UserGuide_RevAB
http://slidepdf.com/reader/full/6-67370-03sn42101userguiderevab 108/511
82 Quantum StorNext User’s Guide
Truncation Parameters
The Truncation Parameters screen enables you to view or change thefollowing information pertinent to the truncation feature as it pertainsto StorNext Storage Manager:
• Run: Indicates the current status of the truncation feature: Online ofOffline.
• Mount: Indicates whether the file system is currently mounted.
• File System: Displays the name of the truncation-enabled filesystem.
• Mount Point: Shows the mount point for the truncation-enabledfile system
• Truncation Parameters: Shows the current truncation setting, suchas Time-based 75%.
Note: This screen pertains ONLY to truncation for StorNext StorageManager users. It does not apply to deduplication or otherStorNext features.

8/10/2019 6-67370-03_SN42101_UserGuide_RevAB
http://slidepdf.com/reader/full/6-67370-03sn42101userguiderevab 109/511
Chapter 4: File System TasksTruncation Parameters
5 Click Done when you are finished viewing or changing truncationparameters.

8/10/2019 6-67370-03_SN42101_UserGuide_RevAB
http://slidepdf.com/reader/full/6-67370-03sn42101userguiderevab 110/511
84 Quantum StorNext User’s Guide
Chapter 5
Storage Manager Tasks
8/10/2019 6-67370-03_SN42101_UserGuide_RevAB
http://slidepdf.com/reader/full/6-67370-03sn42101userguiderevab 111/511
Quantum StorNext User’s Guide 85
The Tools > Storage Manager menu contains options that enable youto perform the following Storage Manager-related tasks:
• Storage Components: View your system's libraries, storage disks,and tape drives, and place those devices online or offline
• Drive Pools: View, add, edit, or delete drive pools (groups of tapedrives allocated for various administrator-defined storage tasks)
• Media Actions: Perform various actions on the storage media inyour library
• Storage Exclusions: Specify types of file names to exclude fromStorNext Storage Manager
• Truncation Exclusions: Specify files or directories to exclude from thetruncation process
• Tape Consolidation: Enter parameters for automaticallyconsolidating space on tape media
• Library Operator Interface: The StorNext Library Operator Interface
allows you to perform media-related actions remotely from thelibrary
• Software Requests: View current software requests in progress orcancel a request
• Scheduler: Schedule tasks to run automatically based on a specifiedschedule
Chapter 5: Storage Manager TasksStorage Components
• Alternate Retrieval Location: Specify a remote retrieval location touse in situations where files stored on tape or a storage disk cannotbe accessed.
• Distributed Data Mover (DDM): Spread the distribution of dataacross several machines rather than the primary server.
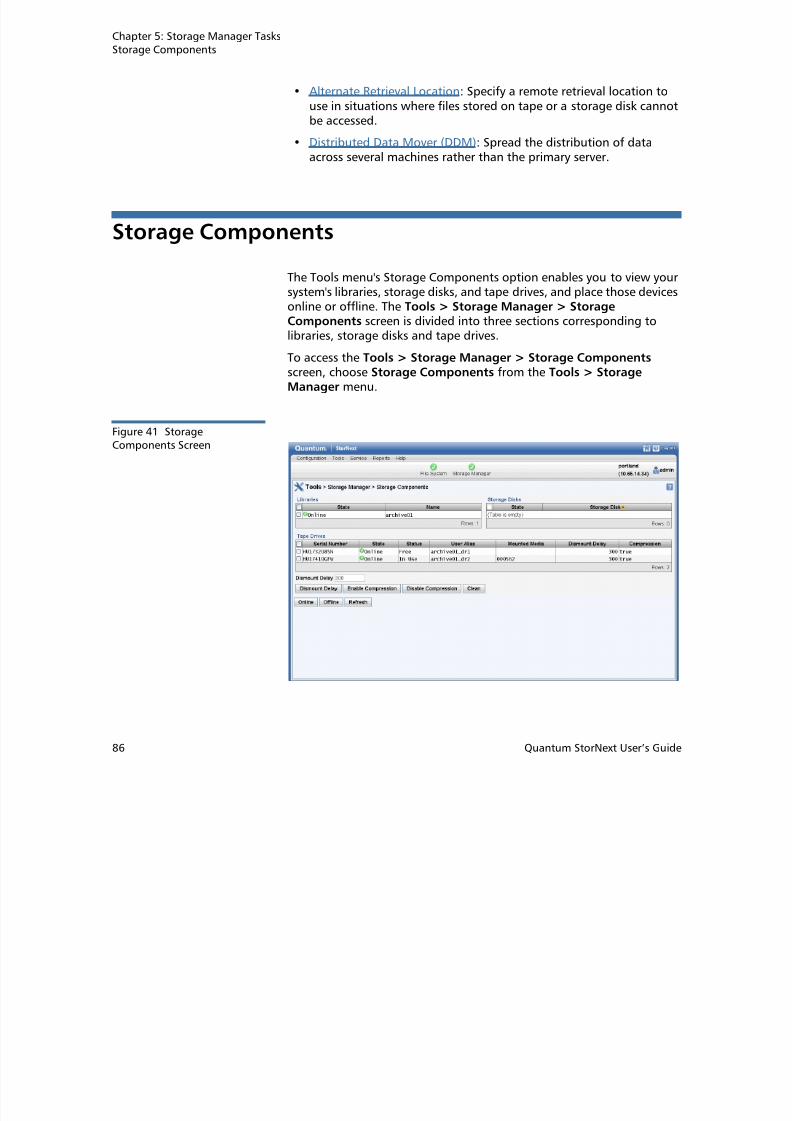
8/10/2019 6-67370-03_SN42101_UserGuide_RevAB
http://slidepdf.com/reader/full/6-67370-03sn42101userguiderevab 112/511
86 Quantum StorNext User’s Guide
Storage Components
The Tools menu's Storage Components option enables you to view yoursystem's libraries, storage disks, and tape drives, and place those devicesonline or offline. The Tools > Storage Manager > StorageComponents screen is divided into three sections corresponding tolibraries, storage disks and tape drives.
To access the Tools > Storage Manager > Storage Components
screen, choose Storage Components from the Tools > StorageManager menu.
Figure 41 StorageComponents Screen
Chapter 5: Storage Manager TasksDrive Pools
Setting Devices Onlineand Offline
The process for setting devices online or offline is identical regardless ofdevice type. Select the library, storage disk or tape drive you want toplace online or offline. You can select multiple devices in each category,
or select all available devices in each category by clicking All. After youare satisfied with your selections, click either Online to place selecteddevices online, or Offline to take selected devices offline.

8/10/2019 6-67370-03_SN42101_UserGuide_RevAB
http://slidepdf.com/reader/full/6-67370-03sn42101userguiderevab 113/511
Quantum StorNext User’s Guide 87
Additional Options forTape Drives
There are four additional options available for tape drives:
• Dismount Delay: This option enables you to specify the time, in
seconds, that a tape drive remains idle before the media in thatdrive is dismounted. Select the tape drives for which you want thedelay, enter the desired time interval at the Dismount Delay field,and then click Dismount Delay.
• Enable Compression: Compression is a feature supported by sometape drives which maximizes the amount of available storage space.To enable compression, select the tape drives for which you want to
enable compression and then click Enable Compression.• Disable Compression: If compression was previously enabled and
you want to disable it, select the tape drives for which you want todisable compression and then click Disable Compression.
• Clean: This option allows you to request that a drive be cleaned.Before choosing this option, make sure the library contains acleaning cartridge. When you are ready to proceed, click Clean.
Note: Although not recommended, if your library does notcontain any cleaning cartridges you can disable drivecleaning. Refer to parameter FS_CLEAN_DRIVES in /usr/adic/TSM/config/fs_sysparm.README to disable drivecleaning.
Drive Pools
Drive pools are groups of tape drives allocated for various administrator-defined storage tasks, and enable you to delimit storage processes
Chapter 5: Storage Manager TasksDrive Pools
based on data type, performance, security, location, or all of thesevariables. Drive pools can reside in a single tape library or span multipletape libraries.
Viewing Drive PoolInformation
Follow this procedure to view drive pool information.
1 Choose Storage Manager > Drive Pools from the Tools menu. TheDrive Pools screen appears.

8/10/2019 6-67370-03_SN42101_UserGuide_RevAB
http://slidepdf.com/reader/full/6-67370-03sn42101userguiderevab 114/511
88 Quantum StorNext User’s Guide
Figure 42 Drive Pools Screen
2 Select the drive pool whose information you want to see, and thenclick View.
3 The following information appears:
• Serial Number: The serial numbers of all tape drives in the drivepool
• Drive Alias: The corresponding alias number for each drive
• Media Type: The type of tape drive media for each drive (e.g.,LTO)
• Library: The name of the library to which each drive belongs
• Pool Name: The name of the drive pool to which each drivebelongs
Chapter 5: Storage Manager TasksDrive Pools
4 When you are finished viewing drive pool information, click Done.
Adding a Drive Pool Follow this procedure to add a drive pool.
Note: This procedure requires restarting the StorNext StorageManager component.
1 If you have not already done so choose Storage Manager > Drive

8/10/2019 6-67370-03_SN42101_UserGuide_RevAB
http://slidepdf.com/reader/full/6-67370-03sn42101userguiderevab 115/511
Quantum StorNext User’s Guide 89
1 If you have not already done so, choose Storage Manager > DrivePools from the Tools menu.
2 Click New to add a new drive pool. The Drive Pools > New screenappears.
Figure 43 New Drive PoolScreen
3 Enter the following fields. (For information about what to enter at
each field, see the online help.)
• Drive Pool Name
• Available Drives
4 Click Apply.
Chapter 5: Storage Manager TasksDrive Pools
5 When the confirmation message appears, click Yes to proceed or No to abort. If you click Yes, StorNext Storage Manager will be restartedas part of the creation process.
6 After a message informs you that the drive pool was successfullycreated, click OK to continue.
Editing a Drive Pool Follow this procedure to edit a drive pool.

8/10/2019 6-67370-03_SN42101_UserGuide_RevAB
http://slidepdf.com/reader/full/6-67370-03sn42101userguiderevab 116/511
90 Quantum StorNext User’s Guide
Note: This procedure requires restarting the StorNext StorageManager component.
1 If you have not already done so, choose Storage Manager > DrivePools from the Tools menu.
2 Select the drive pool you want to modify, and then click Edit.
3 Select or deselect available drives for the drive pool. (You cannotchange the drive pool name.)
4 Click Apply.
5 When the confirmation message appears, click Yes to proceed or No to abort.
6 After a message informs you that the drive pool was successfullymodified, click OK to continue.
Deleting a Drive Pool Follow this procedure to delete a drive pool. Before you begin, you mustfirst remove all drives in the pool you want to delete.
Caution: At least one drive pool must be configured at all times. Donot delete the default drive pool.
1 If you have not already done so, choose Storage Manager > DrivePools from the Tools menu.
2 Select the drive pool you want to delete, and then click Delete.
3 When a confirmation message appears, click Yes to proceed withthe deletion or No to abort.
Chapter 5: Storage Manager TasksMedia Actions
4 After a message informs you that the drive pool was successfullydeleted, click OK .
Media Actions
The Tools menu's Media Actions option enables you to perform various

8/10/2019 6-67370-03_SN42101_UserGuide_RevAB
http://slidepdf.com/reader/full/6-67370-03sn42101userguiderevab 117/511
Quantum StorNext User’s Guide 91
The Tools menu s Media Actions option enables you to perform variousactions on the storage media in your library.
To access the Tools > Storage Manager > Media Actions screen,choose Media Actions from the Tools > Storage Manager menu.
Figure 44 Media ActionsScreen
Viewing MediaInformation
After you choose the Media Actions option, the following informationabout all of the storage media appears:
• Media ID: The unique identifier for the media.
• Library: The name of the library in which the media resides.
• Media Type and Class: The media type and class of media. (Forexample, LTO, F0_LTO_DATA)
Chapter 5: Storage Manager TasksMedia Actions
• Policy Class: The name of the policy class, if any, associated withthe media.
• Suspect: Indicates whether the media is “suspect” or potentially
defective.• Write Protected: Indicates whether write protection is enabled on
the media.
• File Count: The current number of files currently on the media.
• % Used: Indicates the percentage of the media which is currently

8/10/2019 6-67370-03_SN42101_UserGuide_RevAB
http://slidepdf.com/reader/full/6-67370-03sn42101userguiderevab 118/511
92 Quantum StorNext User’s Guide
used.
• Copy: Indicates the policy class copy number on the media.• Mounted in Drive: Indicates whether the media is mounted.
• Last Accessed: The time the media was last accessed.
Filtering Media Most Media Actions screens contain a filtering feature that allows you
to restrict the available media to those whose media ID contains thestring you specify. Follow these steps to filter media:
1 At the Media ID Filter field, enter the string you want all availablemedia IDs to include.
2 Click Set Filter.
3 Click Refresh to update the list of available media. Only mediawhose IDs contain the string you entered will be shown.
4 To reset the filter string, click Clear Filter. If desired, repeat steps 1 -3 to use a new filter string.
Performing Media Actions
At the top of the screen is a dropdown list of actions you can performfor selected media. Select the media for which you want to perform the
action, and then choose one of these options from the Available Actionslist:
Mount Media
Select this option to mount the storage media.
Chapter 5: Storage Manager TasksMedia Actions
1 After you select this option, select from the Library dropdown listthe library containing the media you want to mount.
2 Select the media to mount.
3 At the Mount Media Parameters > Drive field, select the drive onwhich to mount the media.
4 Click Apply.
5 When the confirmation message appears, click Yes to mount themedia, or No to abort.

8/10/2019 6-67370-03_SN42101_UserGuide_RevAB
http://slidepdf.com/reader/full/6-67370-03sn42101userguiderevab 119/511
Quantum StorNext User’s Guide 93
Dismount Media
Select this option to dismount previously mounted media.
1 After you select this option. a list of mounted media appears.
2 Select the media you want to dismount, and then click Apply.
3 When the confirmation message appears, click Yes to dismount themedia, or No to abort.
Move Media
Select this option to move media from one library to another. Thismedia action will retain all information about the data contained on themedia being moved.
1 After you select this option, select from the Library dropdown list
the library containing the media you want to move.
2 Select one or more media to move, or check the box to the left ofthe Media ID heading to select all media.
3 At the Move Media Parameters > Destination Library field, selectthe destination library to which you want to move the selectedmedia.
4 Click Apply.5 When the confirmation message appears, click Yes to move the
selected media, or No to abort.
6 Use the Library Operator Interface feature to complete the actualphysical move of the media. (See Library Operator Interface onpage 111 for more information.)
Chapter 5: Storage Manager TasksMedia Actions
Manual Move Media
Select this option to manually move media from one library to another.This media action is typically used to move media to a new archive from
a dead or offline archive.1 After you select this option, select from the Library dropdown list
the library containing the media you want to move.
2 Select one or more media to move, or check the box to the left ofthe Media ID heading to select all media.

8/10/2019 6-67370-03_SN42101_UserGuide_RevAB
http://slidepdf.com/reader/full/6-67370-03sn42101userguiderevab 120/511
94 Quantum StorNext User’s Guide
3 At the Move Media Parameters > Destination Library field, selectthe destination library to which you want to manually move theselected media.
4 Click Apply.
5 Complete the process by manually moving the media you specifiedto the destination library.
Remove Media
Select this option to remove media from the StorNext Storage Manager.Only media with no active files on a media can be selected for removal.The media is removed from the system and is physically ejected from thelibrary.
1 After you select this option, select from the Library dropdown listthe library containing the media you want to remove.
2 Select one or more media to remove, or check the box to the left ofthe Media ID heading to select all media.
3 Click Apply.
4 When the confirmation message appears, click Yes to remove theselected media, or No to abort.
Purge Media
Select this option to purge media from the StorNext Storage Manager.All files are removed from the selected media, and then the media isremoved from the StorNext Storage Manager and is physically ejectedfrom the library.
Chapter 5: Storage Manager TasksMedia Actions
1 After you select this option, select from the Library dropdown listthe library containing the media you want to purge.
2 Select one or more media to purge, or check the box to the left ofthe Media ID heading to select all media.
3 Click Apply.
4 When the confirmation message appears, click Yes to purge theselected media, or No to abort.
Reclassif Media

8/10/2019 6-67370-03_SN42101_UserGuide_RevAB
http://slidepdf.com/reader/full/6-67370-03sn42101userguiderevab 121/511
Quantum StorNext User’s Guide 95
Reclassify Media
Select this option to change the media type classification for selectedmedia.
1 After you select this option, select from the Media Class dropdownlist the current media class designation you want to change.
2 Select one or more media to reclassify, or check the box to the leftof the Media ID heading to select all media.
3 At the Reclassify Media Parameters > Destination Media Class field, select the new media type designation for the selected media.Select one of these options:
• DATA : This media class means that media are candidates forread/write operations. Most media residing in the library havethis classification unless they are full.
• ADDBLANK : This is the default class with which media are
associated when they are added to StorNext MSM. (Running theFsmedin command pulls media from this class and changes theclassification to DATA.)
• IMPORT: Before running the fsmedin command on TSM-exported media, the classification should be changed toIMPORT.
• CHECKIN: This classification is used for re-entering media
which have been checked out. Media must be reclassified withCHECKIN prior to TSM performing fsmedin with the checkinoption.
• MIGRATE: TSM reclassifies media to this classification when themedia becomes full according to the FS_PERCENT_FULL systemparameter. Media with this classification can still be read.
Chapter 5: Storage Manager TasksMedia Actions
• CLEAN: Media in the class are cleaning media. If the barcode ofa media ends with CLN, MSM imports the media into this classinstead of ADDBLANK.
• REMOVE: Media get reclassified to REMOVE when fsmedout isused.
• BACKUP: Media with this classification were used for backupsbefore backups were managed by StorNext storage polices.Consequently, this classification is rarely used.
4 Click Apply.

8/10/2019 6-67370-03_SN42101_UserGuide_RevAB
http://slidepdf.com/reader/full/6-67370-03sn42101userguiderevab 122/511
96 Quantum StorNext User’s Guide
5 When the confirmation message appears, click Yes to reclassify the
selected media, or No to abort.
Assign Media to Policy Class
Select this option to assign media to a previously created policy class.
1 Select one or more media to assign, or check the box to the left ofthe Media ID heading to assign all media.
2 At the Assign Media to Policy Class Parameters > DestinationPolicy Class field, select the policy class to which you want to assignselected media.
3 Click Apply.
4 When the confirmation message appears, click Yes to assign theselected media, or No to abort.
Transcribe Media
Transcribe (copy) the contents of one media type to another media type,or reclaim (defragment) media. During the transcription or reclamationprocess, StorNext uses two drives to transcribe one media to anothermedia, file by file.
Caution: For StorNext to successfully transcribe one media toanother media, two drives must be online. If only one driveis online, the transcription or reclamation process fails.
1 Select one or more media to transcribe, or check the box to the leftof the Media ID heading to select all media.
Chapter 5: Storage Manager TasksMedia Actions
2 Click Apply.
3 When the confirmation message appears, click Yes to dismount themedia, or No to abort.
4 Repeat steps 1 - 3 to transcribe additional media.
If transcription or reclamation starts and all the drives are in use,StorNext prioritizes and queues the job. When two drives becomeavailable, the queued job starts and all active files are transcribed. Whentranscription is complete, StorNext updates the database to reflect thenew location of the files.

8/10/2019 6-67370-03_SN42101_UserGuide_RevAB
http://slidepdf.com/reader/full/6-67370-03sn42101userguiderevab 123/511
Quantum StorNext User’s Guide 97
If the transcription or reclamation process encounters a file that spans
multiple media, only the portion of the file that exists on the old mediais transcribed.
When the transcription or reclamation process is complete, only deletedfiles remain on the source media. To remove the source copy of thedeleted files, you must clean the media. After the cleaning process iscomplete and the source copy of the deleted files are removed, themedia is available for reuse as blank media.
Media Attributes
Select this option to view the attributes currently assigned to yourmedia, or to change attributes.
1 If desired, filter the displayed list of media by selecting one or moreof the following media attribute filters: Suspect, Marked, Full,
Unavailable, or Write Protected. The list refreshes each time youselect a media attribute filter.
"Suspect" means the media might not be physically sound, andcould be in a potentially damaged or unusable condition.
"Marked" means the media should be made inaccessible.
"Full" means the media has reached capacity and should not beavailable for further writing.
"Unavailable" means the media is not available for writing orreading.
"Write Protected" means the media is protected against furtherwriting and cannot be overwritten or have data added.
Chapter 5: Storage Manager TasksMedia Actions
2 Select from the list one or more media whose attributes you want tochange, or check the box to the left of the Media ID heading toselect all media.
3 At the Media Attributes Parameters > New Media State field,select the new attribute you want to apply to the selected media.
4 Click Apply.
5 When the confirmation message appears, click Yes to move theselected media, or No to abort.
6 Repeat steps 3 - 5 to apply additional attributes to the selected

8/10/2019 6-67370-03_SN42101_UserGuide_RevAB
http://slidepdf.com/reader/full/6-67370-03sn42101userguiderevab 124/511
98 Quantum StorNext User’s Guide
p p pp ymedia.
Clean Media by Media ID
Select this option if you want to select media for cleaning based onmedia ID. Periodic cleaning helps prevent inactive information fromgrowing to an unmanageable size. When you run this function, theStorNext Storage Manager removes inactive files that have not been
accessed since the specified endtime. This process does not affectcurrent file versions on the media.
Caution: Inactive file versions cleaned from the media cannot berecovered or used again.
1 Select one or more media you want to clean, or check the box to theleft of the Media ID heading to select all media.
2 At the Clean Media by Media ID Parameters > End Time field,enter the time when you want the cleaning process to stop. (Youcan also use the displayed default end time.)
3 Use the format yyyy:MM:dd:HH:mm:ss when entering an end time.
4 Click Apply.
5 When the confirmation message appears, click Yes to begincleaning media, or No to abort.
Clean Media by File System
Select this option if you want to select media for cleaning based on thefile system with which media are associated. Periodic cleaning helpsprevent inactive information from growing to an unmanageable size.
Chapter 5: Storage Manager TasksMedia Actions
When you select this option all media on the selected file system arecleaned. When you run this function, the StorNext Storage Managerremoves inactive files that have not been accessed since the specifiedendtime. This process does not affect current file versions on the media.
Caution: Inactive file versions cleaned from the media cannot berecovered or used again.
1 At the Clean Media by File System Parameters > Managed andMounted File Systems field, select the file system whose media youwant to clean

8/10/2019 6-67370-03_SN42101_UserGuide_RevAB
http://slidepdf.com/reader/full/6-67370-03sn42101userguiderevab 125/511
Quantum StorNext User’s Guide 99
want to clean.
2 At the Clean Media by File System Parameters > End Time field,enter the time when you want the cleaning process to stop. (Youcan also use the displayed default end time.) Use the formatyyyy:MM:dd:HH:mm:ss when entering an end time.
3 Click Apply.
4 When the confirmation message appears, click Yes to begincleaning media, or No to abort.
Clean Media by Policy Class
Select this option if you want to select media for cleaning based on thepolicy class with which media are associated. When you select thisoption all media associated with the selected policy class are cleaned.Periodic cleaning helps prevent inactive information from growing to an
unmanageable size. When you select this option all media on theselected file system are cleaned. When you run this function, theStorNext Storage Manager removes inactive files that have not beenaccessed since the specified endtime. This process does not affectcurrent file versions on the media.
Caution: Inactive file versions cleaned from the media cannot berecovered or used again.
1 At the Clean Media by Policy Class Parameters > Policy Classes field, select the policy class whose media you want to clean.
2 At the Clean Media by Policy Class Parameters > End Time field,enter the time when you want the cleaning process to stop. (Youcan also use the displayed default end time.) Use the formatyyyy:MM:dd:HH:mm:ss when entering an end time.
Chapter 5: Storage Manager TasksStorage Exclusions
3 Click Apply.
4 When the confirmation message appears, click Yes to begincleaning media, or No to abort.
Add Media Mailbox
Select this option to add media through a library mailbox.
1 At the Add Media Mailbox Parameters > Library field, select thelibrary with the mailbox through which you want to add media.
2 Cli k A l

8/10/2019 6-67370-03_SN42101_UserGuide_RevAB
http://slidepdf.com/reader/full/6-67370-03sn42101userguiderevab 126/511
100 Quantum StorNext User’s Guide
2 Click Apply.
3 When the confirmation message appears, click Yes to proceed, orNo to abort.
4 When a message informs you that the operation was successful,click OK . After you see this message you are ready to load mediathrough the library mailbox.
Add Media Bulk LoadSelect this option to add media to a library via bulk loading.
1 At the Add Media Bulk Load Parameters > Library field, select thelibrary into which you want to bulk load media.
2 Click Apply.
3 When the confirmation message appears, click Yes to proceed, or
No to abort.
4 When a message informs you that the operation was successful,click OK . After you see this message you are ready to bulk loadmedia into the library.
Storage Exclusions
The Tools menu's Storage Exclusions option enables you to specifytypes of files you want excluded from storage and StorNext processing.For example, you may want to exclude certain confidential files or filescontaining sensitive material.
Chapter 5: Storage Manager TasksStorage Exclusions
The process involves specifying file names, as well as criteria so StorNextknows how to identify the files to exclude. You can create as manyexclusion patterns as you like, and as your needs change you can deleteunwanted exclusion patterns. These exclusions are stored in a file which
StorNext checks before executing store operations.
Note: If you exclude a file and then later rename that file, therenamed file will not be excluded from store operations unless:
• there is an existing exclusion that covers the renamed file
OR

8/10/2019 6-67370-03_SN42101_UserGuide_RevAB
http://slidepdf.com/reader/full/6-67370-03sn42101userguiderevab 127/511
Quantum StorNext User’s Guide 101
• you create a new exclusion for the renamed file.
Accessing StorageExclusions
To access the Tools > Storage Manager > Storage Exclusions screen,choose Storage Exclusions from the Tools > Storage Manager menu.Any previously saved exclusions are displayed.
Figure 45 Storage ExclusionsScreen
Chapter 5: Storage Manager TasksStorage Exclusions
Adding an ExclusionPattern
To add a new exclusion:
1 Click Add Exclusion. The Exclusion screen appears.
Figure 46 Exclusion Screen

8/10/2019 6-67370-03_SN42101_UserGuide_RevAB
http://slidepdf.com/reader/full/6-67370-03sn42101userguiderevab 128/511
102 Quantum StorNext User’s Guide
2 Choose from the Type pulldown list one of the following types ofexclusions:
• Unknown: This type appears until you select a different type,and remains if you select no type.
• Match: Files which match the string in the Pattern field areexcluded. Wildcards can be used for this type.
• Match Path: Files in the path which match the string in thePattern field are excluded. Wildcards can be used for this type.
The difference between Match and Match Path is that slashesmust be explicitly entered for the Match Path type. When using
Match Path you cannot substitute a wildcard for a slash.However, for storage exclusions only file names can be specified(no paths) so these two types have the same effect.
• Begins With: Files beginning with the string in the Pattern fieldare excluded.
• Ends With: Files ending with the string in the Pattern field areexcluded.
Chapter 5: Storage Manager TasksStorage Exclusions
• Contains: File names containing the string in the Pattern fieldare excluded.
• Exact: Only files that 426aU3match the string in the Pattern fieldare excluded.
3 At the Pattern field, enter the search string for the file name.Depending on the exclusion type you selected, this could be a wholeor partial file name, or a string.
If you selected the Match or Match Path type, you can use thefollowing wildcards at the Pattern field:
• ? (question mark): Substitute any single character For example

8/10/2019 6-67370-03_SN42101_UserGuide_RevAB
http://slidepdf.com/reader/full/6-67370-03sn42101userguiderevab 129/511
Quantum StorNext User’s Guide 103
• ? (question mark): Substitute any single character. For example,
if you enter t?p, it will match “top” “tip” and “tap”.
• * (asterisk): Substitute one or more characters. For example, ifyou enter f*l, it will match “ful” “fail” “foil” “fall” and “frail”.
• [ ] (brackets): When you use this wildcard, it allows a set ofcharacters to be specified. For example, if you enter [abc]*, anystring beginning with the letters “a” “b” or “c” will be matched.When using brackets you can also specify a range by using the -
(dash) character. For example, if you enter file[1-4], the strings“file1” “file2” “file3” and “file4” are matched. You can alsospecify a complement of characters to not match. For example,if you enter [!abc]*, any string that does not begin with theletters “a”, “b” or “c” will be matched.
Examples
To give you an example how exclusions work with wildcards,following are some exclusion examples, including the Typeselected and the string entered in the Pattern field to create theexclusion:
•To exclude files that have “confidential” in their name:Type=Contains or Exact; Pattern=confidential
•To exclude files beginning with the letter x or y: Type=Match;
Pattern=[xy]*4 Once saved, exclusions are applied automatically, and all saved
exclusions apply at the same time. To save and apply the exclusion,click Apply. When asked to confirm updating the exclusions list,click Yes.
5 To delete an exclusion, click the Delete button to the right of theexclusion you want to delete.
Chapter 5: Storage Manager TasksTruncation Exclusions
Note: This particular delete function does not have aconfirmation message, so be sure you want to delete anexclusion before you click the Delete button.
6 When you are finished, click Done to return to the StorNext homepage.
Truncation Exclusions

8/10/2019 6-67370-03_SN42101_UserGuide_RevAB
http://slidepdf.com/reader/full/6-67370-03sn42101userguiderevab 130/511
104 Quantum StorNext User’s Guide
Truncation Exclusions
The Tools menu's Truncation Exclusions option enables you to specifyfiles you want to exclude from the truncation process. The file pathmust be included when specifying the exclusion criteria.
Since paths are included in the criteria, this allows you to specify criteriawhich will affect all files within a directory. This basically allows an
exclusion to be specified for a directory.For example, you may want to exclude directories containing systemfiles or files used during system login. When you create an exclusion fora directory, none of the files in that directory are truncated.
The process involves specifying directory paths as part of the criteria soStorNext knows how to locate and identify the files to exclude. You cancreate as many exclusion patterns as you like, and as your needs change
you can delete unwanted exclusion patterns. These exclusions are storedin a file which StorNext checks when storing but before truncating.
Note: If you exclude a file and then later rename that file after it hasbeen stored, the renamed file will continue to be excludedfrom truncation unless:
• the renamed file does not match exclusion criteria and ismodified so that it gets stored again
OR
• you use the fschfiat –t c command to remove theexclusion from the file
Chapter 5: Storage Manager TasksTruncation Exclusions
Accessing TruncationExclusions
To access the Tools > Storage Manager > Truncation Exclusions screen, choose Truncation Exclusions from the Tools > StorageManager menu. Any previously saved exclusions are displayed.
Figure 47 TruncationExclusions Screen

8/10/2019 6-67370-03_SN42101_UserGuide_RevAB
http://slidepdf.com/reader/full/6-67370-03sn42101userguiderevab 131/511
Quantum StorNext User’s Guide 105
Adding an ExclusionPattern
To add a new exclusion:
1 Click Add Exclusion. The Exclusion screen appears.
Chapter 5: Storage Manager TasksTruncation Exclusions
Figure 48 Exclusion Screen

8/10/2019 6-67370-03_SN42101_UserGuide_RevAB
http://slidepdf.com/reader/full/6-67370-03sn42101userguiderevab 132/511
106 Quantum StorNext User’s Guide
2 Choose from the Type pulldown list one of the following types of
exclusions:• Unknown: This type appears until you select a different type,
and remains if you select no type.
• Match: File paths which match the string in the Pattern field areexcluded. Wildcards can be used for this type. To enter anexclusion which includes all files in a directory, the directoryname and a wildcard must be specified. For example, enter /sn/
foodir/* to exclude all files in the directory /sn/foodir.• Match Path: File paths which match the string in the Pattern
field are excluded. Wildcards can be used for this type.
The difference between Match and Match Path is that slashesmust be explicitly entered for the Match Path type. When usingMatch Path you cannot substitute a wildcard for a slash.
• Begins With: File paths beginning with the string in the Patternfield are excluded.
• Ends With: File paths ending with the string in the Pattern fieldare excluded.
• Contains: File paths containing the string in the Pattern field areexcluded.
Chapter 5: Storage Manager TasksTruncation Exclusions
• Exact: Only file paths that exactly match the string in thePattern field are excluded.
3 At the Pattern field, enter the search string for the file path.Depending on the exclusion type you selected, this could be a whole
or partial path name for a file.
If you selected the Match or Match Path type, you can use thefollowing wildcards at the Pattern field:
• ? (question mark): Substitute any single character. For example,if you enter t?p, it will match “top” “tip” and “tap”.
• * (asterisk): Substitute one or more characters. For example, if

8/10/2019 6-67370-03_SN42101_UserGuide_RevAB
http://slidepdf.com/reader/full/6-67370-03sn42101userguiderevab 133/511
Quantum StorNext User’s Guide 107
you enter f*l, it will match “ful” “fail” “foil” “fall” and “frail”.• [ ] (brackets): When you use this wildcard, it allows a set of
characters to be specified. For example, if you enter [abc]*, anystring beginning with the letters “a” “b” or “c” will be matched.When using brackets you can also specify a range by using the - (dash) character. For example, if you enter file[1-4], the strings“file1” “file2” “file3” and “file4” are matched. You can alsospecify a complement of characters to not match. For example,if you enter [!abc]*, any string that does not begin with theletters “a”, “b” or “c” will be matched.
Examples
To give you an example how exclusions work with wildcards,following are some exclusion examples, including the Typeselected and the string entered in the Pattern field to create the
exclusion:
•Exclude files in directories that have “confidential” in theirname: Type=Contains or Exact; Pattern=*confidential*/*
•Exclude files in directories beginning with the letter x or y:Type=Match; Pattern=*/[xy]*/*
•Exclude the files in a directory named “/private/confidential”:
Type=Match Path; Pattern= /private/confidential/*4 Once saved, exclusions are applied automatically, and all saved
exclusions apply at the same time. To save and apply the exclusion,click Apply. When asked to confirm updating the exclusions list,click Yes.
5 To delete an exclusion, click the Delete button to the right of theexclusion you want to delete.
Chapter 5: Storage Manager TasksTape Consolidation
Note: This particular delete function does not have aconfirmation message, so be sure you want to delete anexclusion before you click the Delete button.
6 When you are finished, click Done to return to the StorNext homepage.
Tape Consolidation

8/10/2019 6-67370-03_SN42101_UserGuide_RevAB
http://slidepdf.com/reader/full/6-67370-03sn42101userguiderevab 134/511
108 Quantum StorNext User’s Guide
p
The Tape Consolidation feature provides a way to automaticallyconsolidate tape volumes which contain unused space that is no longertracked in the Storage Manager database.
Releases prior to StorNext 4.1 permitted you to consolidate tape spaceonly by manually running the fsdefrag (defragment tape media)
command, but this functionality can now be scheduled to runautomatically at specified times.
The Tape Consolidation process consists of three steps:
1 Setting configuration parameters by specifying criteria fordetermining which tapes are fragmented
2 Creating a schedule to clean old inactive versions of files on tapes
3 Creating a schedule for tape defragmentation
Setting TapeConsolidationParameters
The first step in the tape consolidation process is to configure thefeature so StorNext knows which tapes in your system qualify forconsolidation.
1 Choose Tape Consolidation from the Tools > Storage Manager
menu. The Tape Consolidation screen appears.
Chapter 5: Storage Manager TasksTape Consolidation
Figure 49 Tape ConsolidationScreen

8/10/2019 6-67370-03_SN42101_UserGuide_RevAB
http://slidepdf.com/reader/full/6-67370-03sn42101userguiderevab 135/511
Quantum StorNext User’s Guide 109
2 Enter the following fields:
• Tape Full Threshold: Specify the percentage at which tapesbecome candidates for consolidation. For example, enter 85 ifyou want tapes flagged for consolidation when they are 85%full.
• Fragmentation Threshold: Specify the percentage offragmentation at which tapes become candidates forconsolidation. For example, enter 15 if you want tapes flagged
for consolidation when 15% of the tape becomes fragmented.
Note: This percentage indicates the amount of data writtento the tape, not overall tape capacity. For example,suppose a tape has been written to the halfway point.Of that amount, only half the data is still tracked byStorage Manager. Therefore that tape has afragmentation percentage of 50%, not 25%.
• Clean Versions Expiration: Specify the number of Days,Weeks, Months or Years after which you want to clean upversions for deleted or modified files.
• Max Active Tape Copy Operations: Specify the number ofallowable concurrent active tape copy operations. Fragmented
Chapter 5: Storage Manager TasksTape Consolidation
media are defragmented by copying the media to new media.Therefore, each copy operation uses two tape drives.
• Max Medcopy Attempts: Specify the maximum number ofattempts before StorNext stops trying to copy a media
experiencing copy failures.
• Max Media to Consolidate: Specify the maximum number oftape media which will be consolidated during one fsdefragprocess.
• Ignore Vaulted Media: Enter True to ignore tape media in thevault, or False to include media in the vault.

8/10/2019 6-67370-03_SN42101_UserGuide_RevAB
http://slidepdf.com/reader/full/6-67370-03sn42101userguiderevab 136/511
110 Quantum StorNext User’s Guide
Note: To be candidates for defragmentation, media must passboth the Tape Full Threshold AND Fragmentation Thresholdpercentages. If a media passes only one or the otherthreshold it will be ignored for consolidation.
3 Click Apply to save and apply the parameters you just entered.
4 When asked to confirm, click Yes to proceed or No to abort and
return to the Tape Consolidation screen.
5 If you clicked Yes, a message informs you that the TapeConsolidation configuration was updated. Click OK to continue.
6 When you are finished configuring Tape Consolidation, click Done to return to the StorNext home page.
Scheduling TapeCleaning andDefragmentation
The next steps in the Tape Consolidation process are to schedule versioncleaning and defragmentation. The process for scheduling theseoperations is identical to scheduling any other process.
The defragmentation schedule item should normally be scheduled a fewhours after the versions cleaning item. The two schedule items worktogether in managing out-o- date media contents. The clean versions
item cleans up the database information for old inactive file segments,and the defragmentation item is used to replace media which havebecome fragmented due to these segments being cleaned.
Chapter 5: Storage Manager TasksLibrary Operator Interface
Note: There is no default schedule for defragmentation, and thefeature is off unless manually scheduled.
For more information about scheduling, see Scheduler on page 114.
Library Operator Interface

8/10/2019 6-67370-03_SN42101_UserGuide_RevAB
http://slidepdf.com/reader/full/6-67370-03sn42101userguiderevab 137/511
Quantum StorNext User’s Guide 111
The StorNext Library Operator Interface allows you to perform media-related actions remotely from the library.
On the Tools > Storage Manager > Library Operator Interface screenyou can view the following information about media in the library:
• Media ID: The unique identifier for each piece of media
• Current Library: The name of the library where media currently
reside• Pending Library: The name of the destination library to which the
media action will be carried out
• Reason: The reason for performing the media action
• Media Location: The current physical location of the media
• Action Required: The action to be performed on selected media
Chapter 5: Storage Manager TasksLibrary Operator Interface
1 Choose Library Operator Interface from the Tools > StorageManager menu. The Library Operator Interface Screen appears.
Figure 50 Library OperatorInterface Screen

8/10/2019 6-67370-03_SN42101_UserGuide_RevAB
http://slidepdf.com/reader/full/6-67370-03sn42101userguiderevab 138/511
112 Quantum StorNext User’s Guide
2 Select one or more media on which to perform the action indicatedin the Action Required column, or click All to select all media.
3 Select from the Port dropdown list the mailbox port ID for thelibrary on which the action will be performed.
• If the action is to enter media into a SCSI-attached library, openthe mailbox and enter the media at this time.
4 Click Perform Action to initiate the action shown in the ActionRequired column, or click Cancel Action to cancel the action on themedia.
• If the action is to enter media into an ACSLS attached library,open the cap and enter the media at this time.
• If the action is to eject media from an ACSLS or SCSI-attachedlibrary, open the cap/mailbox and remove the media at thistime.
5 When the confirmation message appears, click Yes to proceed or No to abort.
Chapter 5: Storage Manager TasksSoftware Requests
Note: If you do not agree that a required action is necessary, you canselect the line containing the media action and click Cancel
Action.
Software Requests
The Software Requests menu option enables you to view softwaret tl i d t l t
8/10/2019 6-67370-03_SN42101_UserGuide_RevAB
http://slidepdf.com/reader/full/6-67370-03sn42101userguiderevab 139/511
Quantum StorNext User’s Guide 113
requests currently in process, and to cancel requests.
On the Tools > Software Requests screen you can view the followinginformation about pending and currently running software requests:
• ID: The software request’s identifier
• Type: The type of software request currently running
• State: The current state of the request
• Time: The time the software request was initiated
• Priority: The priority assigned to the software request
1 Choose Software Requests from the Tools > Storage Manager menu. The Software Requests Screen appears.
Chapter 5: Storage Manager TasksScheduler
Figure 51 Software RequestsScreen

8/10/2019 6-67370-03_SN42101_UserGuide_RevAB
http://slidepdf.com/reader/full/6-67370-03sn42101userguiderevab 140/511
114 Quantum StorNext User’s Guide
2 If desired, click Refresh to update the list of software requests.
3 To cancel a software request, select the request you want to canceland then click Cancel Request.
4 When the confirmation message appears, click Yes to proceed or No to abort.
Scheduler
StorNext events are tasks that are scheduled to run automatically basedon a specified schedule. The following events can be scheduled:
• Clean Versions: This scheduled event cleans old inactive versions of
files.
• Clean Info: This scheduled background operation removes fromStorNext knowledge of media.
• Rebuild Policy: This scheduled event rebuilds the internal candidatelists (for storing, truncation, and relocation) by scanning the filesystem for files that need to be stored.
Chapter 5: Storage Manager TasksScheduler
• Partial Backup: By default, a partial backup is run on all days of theweek the full backup is not run. Partial backups include database
journals, configuration files, and file system journal files.
• Full Backup: By default, a full backup is run once a week to back up
the entire database, configuration files, and the file systemmetadata dump file.
• Health Check: By default, health checks are set up to run every dayof the week, starting at 7:00 a.m.
• Tape Defragmentation: This scheduled event defragments tapes toconsolidate and free up space. You should schedule the cleanversions event before the defragmentation event. Only tapes that
meet the parameters entered on the Tools > Storage Manager >

8/10/2019 6-67370-03_SN42101_UserGuide_RevAB
http://slidepdf.com/reader/full/6-67370-03sn42101userguiderevab 141/511
Quantum StorNext User’s Guide 115
meet the parameters entered on the Tools > Storage Manager >Tape Consolidation screen are included in the defragmentationprocess. (For more information, see Tape Consolidation onpage 108.)
Each of these events (with the exception of Tape Consolidation) has adefault schedule, but you can configure the schedules to suit yoursystem needs. To change the schedule or add Tape Consolidation, see
Adding a Schedule or Editing an Existing Schedule.
Note: To ensure that scheduled StorNext tasks are started at thecorrect time, StorNext servers should be rebooted wheneverchanges are made to the system time.
Viewing a Schedule The procedure for viewing an event's existing schedule is the sameregardless of the event type.
1 Choose Scheduler from the Tools > Storage Manager menu. A listof currently scheduled events appears.
Chapter 5: Storage Manager TasksScheduler
Figure 52 Scheduler Screen

8/10/2019 6-67370-03_SN42101_UserGuide_RevAB
http://slidepdf.com/reader/full/6-67370-03sn42101userguiderevab 142/511
116 Quantum StorNext User’s Guide
2 Select the event you want to view, and then click View.
3 When you are finished viewing event details, click Done.
4 Repeat steps 2 - 3 to view additional events.
Adding a Schedule Follow this procedure to add a new schedule.
1 If you have not already done so, choose Scheduler from the Tools >Storage Manager menu.
2 Click New. The Scheduler > New screen appears.
Chapter 5: Storage Manager TasksScheduler
Figure 53 Scheduler > NewScreen

8/10/2019 6-67370-03_SN42101_UserGuide_RevAB
http://slidepdf.com/reader/full/6-67370-03sn42101userguiderevab 143/511
Quantum StorNext User’s Guide 117
3 At the Name field, enter the name you want to assign to the new
schedule.
4 Select one of the following schedulable event types from theFeature dropdown list:
• Clean Versions
• Clean Info
• Rebuild Policy
• Partial Backup
• Full Backup
• Health Check
• Tape Defragmentation
5 At the Period field, select the execution interval for the new
schedule: Daily, Weekly or Monthly. You can also select multipledays by holding down the Control key as you click the day.
6 At the Run Time field, specify when you want the schedule to start.Enter the hour, minute, and a.m. or p.m.
7 At the Start Window field, specify the window in which you wantthe StorNext Scheduler to start the event. The Scheduler attempts to
Chapter 5: Storage Manager TasksScheduler
begin the event within the specified Start Window time (e.g., 30minutes). If the event cannot begin at that time, the Scheduler triesagain during the next cycle.
8 Click Apply to save the new schedule, or Cancel to exit without
saving.
9 When a message informs you that the new schedule wassuccessfully created, click OK to continue.
Editing an Existing
Schedule
Follow this procedure to edit an existing schedule. The procedure formodifying an existing schedule is the same regardless of the event type.
1 If h t l d d h S h d l f th T l >
8/10/2019 6-67370-03_SN42101_UserGuide_RevAB
http://slidepdf.com/reader/full/6-67370-03sn42101userguiderevab 144/511
118 Quantum StorNext User’s Guide
1 If you have not already done so, choose Scheduler from the Tools >Storage Manager menu.
2 Select the schedule you want to modify, and then click Edit.
3 Change the schedule Period interval, Run Time, or Start Window as desired. You cannot change the schedule name or select adifferent feature (schedule type).
4 Click Apply to save your changes, or Cancel to exit without saving.
5 When the confirmation message appears, click Yes to proceed or No to abort.
6 When a message informs you that the new schedule wassuccessfully modified, click OK to continue.
Deleting an ExistingSchedule
Follow this procedure to delete an existing schedule. The procedure fordeleting an existing schedule for an event is the same regardless of theevent type. Each event type has a default schedule. You must have atleast one schedule, so you will not be allowed to delete a solitaryschedule.
1 If you have not already done so, choose Scheduler from the Tools >
Storage Manager menu.
2 Select the schedule you want to delete, and then click Delete.
3 When the confirmation message appears, click Yes to proceed or No to abort.
4 When a message informs you that the new schedule wassuccessfully deleted, click OK to continue
Chapter 5: Storage Manager TasksAlternate Retrieval Location
Alternate Retrieval Location
In situations where file retrieval fails because the normal file copiescannot be retrieved from the machine on which StorNext StorageManager resides, this feature enables you to retrieve a copy of thetruncated file from a different machine. (Both machines must be usingthe same operating system.)
For example, if StorNext creates two copies of each file, when retrievinga truncated file StorNext tries to retrieve Copy One and then Copy Two.If neither of these copies can be retrieved and this feature is notenabled, the retrieval fails. However, if this feature is enabled for the file

8/10/2019 6-67370-03_SN42101_UserGuide_RevAB
http://slidepdf.com/reader/full/6-67370-03sn42101userguiderevab 145/511
Quantum StorNext User’s Guide 119
system, after retrieving Copy Two fails Storage Manger tries to retrievethe file from the alternate machine you specified during feature setup.Because the file already exists in the StorNext file system, it retains thepermissions it already has. No permssions are changed based on the fileon the alternate machine.
This feature applies only to managed file systems that have at least one
configured policy class.
For this feature to work correctly, it is your responsibility to make sure allfiles you might want to retrieve are copied to the alternate machine.Otherwise retrieval will fail when StorNext attempts to retrieve the filefrom the alternate location and cannot find the file.
Follow this procedure to configure an alternate retrieval location.
1 Choose Alternate Retrieval Location from the Tools > StorageManager menu. The Alternate Retrieval Location screen appears.
Chapter 5: Storage Manager TasksAlternate Retrieval Location
Figure 54 Alternate RetrievalLocation Screen

8/10/2019 6-67370-03_SN42101_UserGuide_RevAB
http://slidepdf.com/reader/full/6-67370-03sn42101userguiderevab 146/511
120 Quantum StorNext User’s Guide
2 At the Remote Node IP / Host Name field, enter either the IPaddress or the host name of the remote server from which youwould like to retrieve data.
3 Select Enable to activate the Alternate Retrieval Location feature.
4 At the field under the Remote Path heading, enter the directorypath for the remote node (server). This directory is the path thatcorresponds to the mount point. The remainder of the file pathfrom the mount point downwards must be identical on thealternate host. In other words, you don't assign a relocation policyto a directory; it is enabled for the entire file system.
5 Click Apply to save your changes, or Cancel to exit without saving.
6 When the confirmation message appears, click Yes to proceed or No to abort.
7 After a message informs you that the alternate retrieval locationwas successfully added, click OK .
Chapter 5: Storage Manager TasksDistributed Data Mover (DDM)
Distributed Data Mover (DDM)
StorNext contains support for a feature called Storage ManagerDistributed Data Mover (DDM).
This section contains the following main topics related to DDM:
• Distributed Data Mover Overview
• Installing the DDM Feature on Clients
• Accessing Distributed Data Mover
• Enabling DDM

8/10/2019 6-67370-03_SN42101_UserGuide_RevAB
http://slidepdf.com/reader/full/6-67370-03sn42101userguiderevab 147/511
Quantum StorNext User’s Guide 121
• Managing DDM Hosts
• Host Priority
• Distributed Data Mover Reporting
Distributed Data MoverOverview
Quantum developed the Distributed Data Mover feature to enhance thedata movement scalability of its StorNext Storage Manager software.With this feature the data movement operations are distributed to clientmachines from the metadata controller, which can improve the overallthroughput of data movement to archive tiers of storage.
Previously, the data mover process, fs_fmover, ran only on themetadata controller (MDC), allowing up to one fs_fmover process pertape drive or storage disk (SDisk) stream to run at one time.
Note: The DDM feature supports only storage disks on StorNext filesystems, not on NFS.
The new feature expands data moving flexibility by transferring themover process to clients that have access to the drives and managed file
systems. The actual data moving process remains the same, with theadded benefit that the load on the metadata controller is alleviated bymoving those processes to clients.
The following diagram illustrates the data moving process when theDistributed Data Mover feature is enabled:
Chapter 5: Storage Manager TasksDistributed Data Mover (DDM)

8/10/2019 6-67370-03_SN42101_UserGuide_RevAB
http://slidepdf.com/reader/full/6-67370-03sn42101userguiderevab 148/511
122 Quantum StorNext User’s Guide
Legend:
• fs_fcopyman: Manages copy requests and invokes a mover proxywhen copy resources have become available
• fs_fmover: The process that performs copy operations, either onthe MDC or a client
• fs_fmoverp: The proxy for a mover that always runs on the MDC.This proxy kicks off and waits for an fs_fmover process, and thenmakes any needed database updates etc. when the movercompletes.
Note: Proxies are used even in local-only operations.
Feature Highlights
The Distributed Data Mover feature provides the following benefits:
• Concurrent utilization of shared StorNext tape and disk tierresources by multiple Distributed Data Mover hosts
• Scalable data streaming
• Flexible, centralized configuration of data movement
• Dynamic Distributed Data Mover host reconfiguration
• Support for StorNext File System storage disks (SDisks)
• Works on HA systems without additional configuration
Chapter 5: Storage Manager TasksDistributed Data Mover (DDM)
Distributed Data Mover Terms
Following are definitions for some terms as they pertain to theDistributed Data Mover feature:
• Mover: A process that copies data from one device/file to another.The process can run locally on the metadata controller or on aremote client. (See definitions for these terms below.)
• Host: Any server/client on the SAN. Any host can serve as a locationfor a mover to run as long as it meets the specifications listed in theSupported Operating Systems section below.
• Metadata Controller (MDC): The server on which the StorNext
Storage Manager software is running. (The metadata controllerhost.) Also known as the local host, or the primary server on HA

8/10/2019 6-67370-03_SN42101_UserGuide_RevAB
http://slidepdf.com/reader/full/6-67370-03sn42101userguiderevab 149/511
Quantum StorNext User’s Guide 123
systems.
• Remote Client: A host other than the MDC.
Tape Devices and Persistent SCSI Reserve
The Distributed Data Mover feature uses persistent SCSI reserve, so alltape devices used with this feature must support the PERSISTENTRESERVE IN/OUT functionality as described in SCSI Primary Commands-3standard (SPC-3). One implication is that LTO-1 drives cannot be usedwith the DDM feature.
SCSI-3 persistent reservation commands attempt to prevent unintendedaccess to tape drives that are connected by using a shared-accesstechnology such as Fibre Channel. Access to a tape drive is grantedbased on the host system that reserved the device. SCSI-3 persistentreservation enables access for multiple nodes to a tape device andsimultaneously blocks access for other nodes. (StorNext support forSCSI-3 persistent reservations for tape devices was incorporated in the4.1.1 release.)
Quantum recommends enabling SCSI-3 persistent reservations. Refer toparameter FS_SCSI_RESERVE in /usr/adic/TSM/config/
fs_sysparm.README to direct the StorNext Manger to use SCSI-3persistent reservations.
One implication of using SCSI-3 reservations is that all tape devices usedmust support the PERSISTENT RESERVE IN/OUT functionality asdescribed in SCSI Primary Commands-3 standard (SPC-3).
Chapter 5: Storage Manager TasksDistributed Data Mover (DDM)
The StorNext Distributed Data Mover feature requires that SCSI-3persistent reservations be used.
Verifying SCSI 3 Tape Drive Compatibility
A third-party utility is available to help you determine whether your tapedevices are or are not compatible with SCSI-3 persistent reservations.This utility is called sg3_utils, and is available for download from manysites. This package contains low level utilities for devices that use a SCSIcommand set. The package targets the Linux SCSI subsystem.
You must download and install the sg3_utils package before runningthe following commands. In the following example, there are two SAN-attached Linux systems (sfx13 and sfx14 in this example) zoned to see atape drive

8/10/2019 6-67370-03_SN42101_UserGuide_RevAB
http://slidepdf.com/reader/full/6-67370-03sn42101userguiderevab 150/511
124 Quantum StorNext User’s Guide
tape drive.
• Step 1. Register the reservation keys by running these commands:
[root@sfx13]# sg_persist -n -d /dev/sg81 -o -I -S0x123456
[root@sfx14]# sg_persist -n -d /dev/sg78 -o -I -S
0xabcdef
• Step 2: List the reservation key by running this command:
[root@sfx13]# sg_persist -n -k /dev/sg81
• Step 3. Create reservation by running this command:
[root@sfx13]# sg_persist -n -d /dev/sg81 -o -R -T 3 -K 0x123456
• Step 4. Read reservation by running this command:
[root@sfx14]# sg_persist -n -d /dev/sg78 -r
• Step 5. Preempt reservation by running this command:
[root@sfx14]# sg_persist -n -d /dev/sg78 -o -P -T 3 -S 0x123456 -K 0xabcdef
• Step 6. Release reservation by running this command:
[root@sfx14]# sg_persist -n -d /dev/sg78 -o -L -T 3 -K 0xabcdef
Chapter 5: Storage Manager TasksDistributed Data Mover (DDM)
• Step 7. Delete key by running these commands:
[root@sfx13]# sg_persist -n -d /dev/sg81 -o -o -K0x123456
[root@sfx14]# sg_persist -n -d /dev/sg78 -o -o -K0xabcdef
Limitations
Quantum does not currently support using multiple paths to tapedrives. Also, VTL does not support SCSI-3 persistent reservations.
lli h

8/10/2019 6-67370-03_SN42101_UserGuide_RevAB
http://slidepdf.com/reader/full/6-67370-03sn42101userguiderevab 151/511
Quantum StorNext User’s Guide 125
Installing the DDMFeature on Clients
You must install the snfs-mover rpm on each client you want to act as adistributed data mover. Follow these installation steps for each client:
1 Log in as root.
2 Install the appropriate client with DDM package from the MDC.
3 Install the rpms in the .tar archive.• For a new client installation, run either the command rpm -ivh
*.rpm or rpm -Uvh *.rpm
• For a client upgrade, run the command rpm -Uvh *.rpm
Accessing DistributedData Mover To enter DDM settings and manage hosts and devices, chooseDistributed Data Mover from the Tools > Storage Manager menu.The Configuration > Distributed Data Movers screen appears. Thisscreen shows any previously configured DDM-enabled hosts, managedfile systems, tape drives and storage disks, as well as the current status:Enabled, Not Configured, Not Enabled or Internally Disabled.
Chapter 5: Storage Manager TasksDistributed Data Mover (DDM)
Figure 55 Configuration >Distributed Data Mover Screen

8/10/2019 6-67370-03_SN42101_UserGuide_RevAB
http://slidepdf.com/reader/full/6-67370-03sn42101userguiderevab 152/511
126 Quantum StorNext User’s Guide
“Configured” versus “Enabled”
“Configured” means a host or device has been added to the list of hostsand devices to be used for DDM operations. DDM does not recognize ahost or device until it has been configured.
“Enabled” means a host or device has been configured and is ready tobe used for DDM operations. A host or device cannot be enabled until itis first configured, but a configured host or device may be either
enabled or disabled.
Enabling DDM The DDM screen’s Use Distributed Movers field allows you to enable ordisable the DDM feature, or to enable a mode called “Threshold.”
When DDM is disabled, data moving responsibilities rest solely on theprimary server. When DDM is enabled, data moving responsibilities are
distributed among the hosts you specify as described in Managing DDMHosts on page 127.
When you select the Threshold option, the local host (i.e., the metadatacontroller) is given a preference over the remote clients. Thecharacteristics of this option are:
Chapter 5: Storage Manager TasksDistributed Data Mover (DDM)
• Mover processes will not be assigned to a remote client until athreshold of local movers are already running.
• After reaching the threshold of local running movers, the “all”option is used for allocating new mover requests.
• If not specified, the default value for the threshold is zero. Thismeans if a value is not set for the threshold via fsddmconfig thesystem will effectively run in “all” mode.
You should use the Threshold option only if you want most data movingoperations to run locally on the MDC.
After you choose Disabled, Enabled, or Threshold, click Update tosave your selection.

8/10/2019 6-67370-03_SN42101_UserGuide_RevAB
http://slidepdf.com/reader/full/6-67370-03sn42101userguiderevab 153/511
Quantum StorNext User’s Guide 127
Managing DDM Hosts The Distributed Data Mover screen enables you to add and configure anew host for DDM, or change settings for a previously configured host.
You can also delete a host from the list of DDM-enabled hosts.
Adding a Host
1 If you have not already done so, choose Distributed Data Mover from the Tools > Storage Manager menu.
Chapter 5: Storage Manager TasksDistributed Data Mover (DDM)
2 Click New. Fields appear where you can enter host information
Figure 56 DDM Screen NewHost

8/10/2019 6-67370-03_SN42101_UserGuide_RevAB
http://slidepdf.com/reader/full/6-67370-03sn42101userguiderevab 154/511
128 Quantum StorNext User’s Guide
3 At the Host field, enter the name or IP address of the host you areadding.
Note: If you use the IP address instead of the host name you mustcontinue using the IP address and cannot switch betweenusing IP addresses and host names. For example, you can’tconfigure a host using the IP address and then try andconfigure a device on the host using the host name.
4 Enter the remaining fields in the upper portion section of thescreen:
• Enabled
• MDC Mover Threshold
• Max Movers (active MDC)
• Max Movers (client or standby MDC)
For information about what to enter at these fields, see the onlinehelp.
Chapter 5: Storage Manager TasksDistributed Data Mover (DDM)
5 Under the corresponding headings, select Configure and/or Enable for the Managed File Systems, Tape Drives and Storage Disks youwant to include in DDM processing.
6 To add your selections to the new host, click Apply. (To exit without
saving, click Cancel. To remain on the screen but clear your entries,click Reset.)
7 When the confirmation message appears, click Yes to proceed or No to abort.
8 After a message informs you that your changes were successfullysaved, click OK to continue.
Editing a Host or Devices
f h l d d h f h l

8/10/2019 6-67370-03_SN42101_UserGuide_RevAB
http://slidepdf.com/reader/full/6-67370-03sn42101userguiderevab 155/511
Quantum StorNext User’s Guide 129
1 If you have not already done so, choose DDM from the Tools >Storage Manager menu.
2 Select from the Hosts list the host you want to edit.
3 Click Edit.
4 Modify the host configuration as desired.
5 If desired, select or remove managed file systems, tape drives andstorage disks.
6 Click Apply to save your changes.
7 When the confirmation message appears, click Yes to proceed or No to abort.
8 After a message informs you that your changes were successfullysaved, click OK to continue.
Deleting a Host
1 If you have not already done so, choose DDM from the Tools >Storage Manager menu.
2 Select from the Hosts list the host you want to delete.
3 Click Delete to exclude the host from DDM operation. (ClickingDelete does not actually delete the host from your system, butrather excludes it from the list of DDM hosts.)
4 When the confirmation message appears, click Yes to proceed or No to abort.
Chapter 5: Storage Manager TasksDistributed Data Mover (DDM)
5 After a message informs you that the host was successfully deleted,click OK to continue.
Host Priority When all hosts are chosen, no special preference is given to the localhost. Following are the operating characteristics when all hosts arechosen:
• Internally within the StorNext Copy Manager (fs_fcopyman) therewill be a list of hosts to use (that is, the local host and the remoteclients). At this time there is no way to specify the order in whichhosts appear in the list.
• For each host in the list, the following information is tracked:
• The number of movers currently running on the host

8/10/2019 6-67370-03_SN42101_UserGuide_RevAB
http://slidepdf.com/reader/full/6-67370-03sn42101userguiderevab 156/511
130 Quantum StorNext User’s Guide
y g
• The time of the last assignment
• Whether the host is currently disabled
Note: If a host has fewer drives and all other hosts have multiple
drives (for example, two drives versus ten,) the host with thefewer drives will almost always be chosen for operations onthose two drives because it is likely to have the fewest runningmovers.
Distributed Data MoverReporting
A DDM Report which shows current configuration information andactivity is available from the Reports menu. For more information aboutthe DDM report, see The Distributed Data Mover Report on page 255.
Chapter 6Replication and Deduplication

8/10/2019 6-67370-03_SN42101_UserGuide_RevAB
http://slidepdf.com/reader/full/6-67370-03sn42101userguiderevab 157/511
Quantum StorNext User’s Guide 131
StorNext incorporates replication and deduplication technologies whichcan dramatically improve storage efficiency and streamline processing.
This chapter provides the following topics pertaining to these twotechnologies:
• Replication Overview
• Replication Terms and Concepts
• Some Replication Scenarios
• Configuring Replication
• Running Replication Manually (Optional)
• Replication Statuses and Reporting
• Troubleshooting Replication
• Data Deduplication Overview
• Setting Up Deduplication
• Data Deduplication Functions
Chapter 6: Replication and Deduplication
Replication Overview
Replication Overview
This section provides some background information that will help youunderstand how replication is configured and how processing occurs.
ReplicationConfiguration Overview
StorNext Replication makes a copy of a source directory and sends theinformation to one or more target directories. The target directoriesmay be on other host machines, or may be on the same host as thesource directory.
Replication behavior is defined by aoF vUQ62aQdsbi SmvUQ62aQdsoydUQ63.(The other type of StorNext policy is a Gadn2- oA2s2- noydUQ63, which
8/10/2019 6-67370-03_SN42101_UserGuide_RevAB
http://slidepdf.com/reader/full/6-67370-03sn42101userguiderevab 158/511
132 Quantum StorNext User’s Guide
governs how StorNext Storage Manager works).
Here are some important facts about StorNext Replication/Deduplicationpolicies.
• A replication/deduplication policy exists on only one SNFS file
system. For example, a policy in a file system called /stornext/sn1 can be used only to replicate directories in that file system. Aseparate policy would be needed to replicate directories from filesystem /stornext/sn2.
• If a replication/deduplication policy will be used in any file systemon a machine, you must configure a blockpool for that machine.The blockpool for a machine contains data (called blocklets) if the
Deduplication feature is used, but the blockpool must be configuredfor replication use even if you do not use deduplication.
• A policy may be applied to one directory or more than one directoryin the file system.
• A single policy can define behavior for replication sources andtargets, as well as for deduplication. This single policy can alsodefine the directories affected by the policy.
• However, it is often convenient to configure a policy that doesprimarily one thing. For example, you could create a policy thatcontrols replication source behavior. Such a policy might be called a"replication source policy" or a "source policy," even though thepolicy could be configured to define other actions.
Chapter 6: Replication and Deduplication
Replication Overview
When configuring replication you must configure a policy for thereplication source, and another policy for the replication target. Youtypically configure the replication source by creating a new policy forthat file system. You typically configure the replication target by editingthe policy named "target" for the file system on the target host machine.
This is an important distinction:
• Configure the replication source by creating a new policy
• Configure the replication target by editing the “target” policy
Note: When the replication source is on a different machine than thereplication target (which is a typical situation,) you must use
two instances of the StorNext GUI: one instance connected tothe source machine, and another instance connected to thetarget machine.

8/10/2019 6-67370-03_SN42101_UserGuide_RevAB
http://slidepdf.com/reader/full/6-67370-03sn42101userguiderevab 159/511
Quantum StorNext User’s Guide 133
Configuring replication is discussed in more detail in the sectionConfiguring Replication on page 146.
Replication ProcessOverview
The actual replication process occurs in two stages:
1 Data Movement Stage: In this stage StorNext moves the data forfiles from the source file system to the target file system. Datamovement occurs continuously as files are created or modified in asource directory.
Note: A configuration option allows this "continuous" datamovement to be disabled during periods when the hostmachine or the network may be busy.
Data movement occurs in one of the following two ways.
• Deduplicated Data: If deduplication has been enabled for thepolicy that controls the source directory, deduplicated datamoves from the source host machine to the target host. Withdeduplication enabled there may be less data moved than if theentire file were copied. This is because for deduplicatedreplication, only the unique deduplicated segments need to becopied.
• Non-deduplicated Data: If deduplication is not enabled for thepolicy that controls the source directory, the entire file is copied
Chapter 6: Replication and Deduplication
Replication Overview
from the source directory to the target host. The entire file iscopied whenever a file is created or modified.
When data movement is in progress or even after it has justcompleted, the replicated files may not be visible yet in the target
file system’s directories. Replicated files become visible in stage 2.2 File System Namespace Realization Stage: In this stage StorNext
enumerates all the files in the source directory and recreates the filename and subdirectory structure (the namespace) on the target filesystem. Unlike in the Data Movement Stage, this stage happens onlyat scheduled times, or when namespace realization is manuallyinitiated by the administrator.
The following illustration shows in simple terms how replicated dataflows from the one replication source to one replication target.

8/10/2019 6-67370-03_SN42101_UserGuide_RevAB
http://slidepdf.com/reader/full/6-67370-03sn42101userguiderevab 160/511
134 Quantum StorNext User’s Guide
Figure 57 Replication Process
Files Excluded FromReplication
Certain files may not be included in the replication process for variousreasons. For example, a file that is open for read-only would bereplicated, but a file that is open for write (including all of the variousvarieties of “write”), would not be replicated.
To determine which specific files were not included in the replication
process, see the Replication/Deduplication Completion Report, whichis accessible from the Replication/Deduplication Policy SummaryReport. For more information about Replication reports, seeReplication Deduplication Reports on page 250.
Here are some situations in which a file may be excluded from thereplication process:
Chapter 6: Replication and Deduplication
Replication Terms and Concepts
• Files that were truncated by Storage Manager before a replicationpolicy was set up on a directory are not replicated. If you have anexisting directory on which Storage Manger has been running andfiles are truncated, the files will not replicate from the truncatedstate. They must be retrieved from tape first. Once they are retrieved
they will become candidates for replication and will not betruncated again until they have been either deduplicated orreplicated (in the case of non-deduplication replication).
• Named pipes and device special files are not replicated.
• In both deduplication and non-deduplication replication, thecompletion report would mention if the file contents changedduring namespace replication. This means that the replicated file on
the target may represent an intermediate state taken duringreplication.

8/10/2019 6-67370-03_SN42101_UserGuide_RevAB
http://slidepdf.com/reader/full/6-67370-03sn42101userguiderevab 161/511
Quantum StorNext User’s Guide 135
Replication Terms and Concepts
This section contains terms and concepts related to replication. Someterms have already been mentioned in the context of explainingreplication and how it works. For these terms that have already beenmentioned, this section contains a more complete, expanded definition.
Namespace Realization Namespace refers to the directory structure which contains replicateddata. Replicated data is always transferred separately from namespacedata (although some small file data is transferred along with thenamespace).
Namespace realization refers to the process in which the replicateddirectory structure (the namespace) appears on the replication target.
Because file data and namespace data is transferred separately, in somesituations it might take longer for replicated data to completetransferring than for the namespace realization to complete. This isespecially likely to happen if there is a backlog of file data waiting to betransferred at the time when namespace is either scheduled to run or ismanually initiated.
Chapter 6: Replication and Deduplication
Replication Terms and Concepts
Blockpool The Blockpool is a data repository on the target. A blockpool is requiredon each machine used for replication or deduplication. If you use onlyreplication, the blockpool file system can be small. If you configurededuplication as well as replication, the blockpool file system must be
larger: at least large enough to hold the pool of deduplicated datasegments.
When you configure StorNext for the first time, the ConfigurationWizard enables you to specify the name of the file system you want touse for the blockpool.
Note: Once you specify the file system on which the blockpoolresides, you cannot later choose a different blockpool filesystem. Use care when specifying the blockpool file system.

8/10/2019 6-67370-03_SN42101_UserGuide_RevAB
http://slidepdf.com/reader/full/6-67370-03sn42101userguiderevab 162/511
136 Quantum StorNext User’s Guide
Blackout Period A Blackout is a period during which replication does not occur. You mayschedule replication blackouts for periods in which you do not wantreplication data transfers to occur on a busy network. For example, an
administrator may create a blackout during periods when WAN usageand traffic is the heaviest. In this situation replication might run afterhours when WAN usage and traffic would be much lower.
Replication SourcePolicy and Replication
Source Directory
A replication source policy is a replication/deduplication policy that has"Outbound Replication" turned On via the policy's Outbound Replication
tab.
The policy also has a Source Directories tab. The directories specified onthis tab will be replicated, and these directories are called replicationsource directories.
Replication TargetDirectory
A replication target directory is the location to which replicated data issent. The replication target may be a directory on a separate hostmachine, or it may be a directory on the source host machine.Regardless of where the target directory resides, it is very important thatyou use the replication target directory only for replicated data. Also, donot allows users to modify the files in the replication target directories.
Chapter 6: Replication and Deduplication
Replication Terms and Concepts
When creating replication target directories, remember that the targetdirectory must be at least as large as the sum of all replication sourcedirectories from which replicated data is sent. For example, if you havetwo source directories that are both 100GB, your replication targetdirectory must be at least 200GB.
Replication Schedule You can specify a replication schedule to define when the file systemnamespace realization should occur for an outbound replicationschedule. For example, you might specify that you want namespacerealization to occur at 6am and 6pm every day.
If you do not specify a replication schedule, you must manually run thereplication policy whenever you want the realization to occur.

8/10/2019 6-67370-03_SN42101_UserGuide_RevAB
http://slidepdf.com/reader/full/6-67370-03sn42101userguiderevab 163/511
Quantum StorNext User’s Guide 137
Replication Copies Replication Copies is the number of copies of replicated data saved onthe target. StorNext currently supports 1 to 16 replication copies pertarget. The number of replication copies is entered or modified inreplication policies.
Bandwidth Throttling Bandwidth Throttling refers to limiting the receive rate and transmit ratefor replicated data (Replication Stage 1). This StorNext feature allowsnetwork administrators to specify (in bytes per second) a ceiling forincoming and outgoing replicated data. When bandwidth throttling isenabled, replicated data will not be transmitted or received at a ratehigher than the specified maximum. Bandwidth throttling is a usefultool for controlling network traffic.
Multilink StorNext provides support for Multilink configurations, which meansyou can have multiple connections on one network interface card (NIC),or even multiple connections on multiple NICs. StorNext provides a toolthat shows you the NICs on your system, and allows you to specify thenumber of channels per NIC. On this same screen you can specify theNICs you want enabled for replication.
One advantage of using multiple NICs (or multiple channels on one NIC)is higher aggregate bandwidth because you can have multiple parallelpaths. For this reason, multilink is valuable for load balancing.
Chapter 6: Replication and Deduplication
Some Replication Scenarios
When configuring multilink, be aware that the routing table of the hostoperating system determines the interface used for a connection to aspecific endpoint. If there are multiple NICs in the same subnet as thedestination IP endpoint, the host OS selects what it considers the bestroute and uses the interface associated with that route.
Note: An alternative to StorNext Multilink is to use the Linux bondingdriver to enslave multiple Ethernet interfaces into a single bondinterface. This is a Linux feature, not a StorNext feature, but issupported by the StorNext software.
Virtual IP (vIP) Virtual IP or vIP is similar to an alias machine name. StorNext uses virtualIP addresses to communicate with machines rather than using thephysical machine name. Virtual IPs are required in HA (high availability)

8/10/2019 6-67370-03_SN42101_UserGuide_RevAB
http://slidepdf.com/reader/full/6-67370-03sn42101userguiderevab 164/511
138 Quantum StorNext User’s Guide
p y q ( g y)environments, and are also used for multilink NICs.
Your network administrator can provide you with the virtual IPaddresses and virtual netmasks you need for your system.
Note: If your replication source policy or target policy is an HAsystem, you must specify the vIP address in the field labeled“Address for Replication and Deduplication” on the OutboundReplication tab for the policy named "global" on each filesystem for which you will use replication. The default value forthis field is "localhost".
Remember that each StorNext file system will have a policynamed “global,” and you should edit this field for each ofthose policies named “global.”
Some Replication ScenariosStorNext provides replication support to meet a variety of needs. Thissection describes some common replication scenarios.
Chapter 6: Replication and Deduplication
Some Replication Scenarios
Scenario 1: SimplestReplication
In this simple replication scenario, the host machine host1 contains a
StorNext file system called /stornext/fs1/. Host machine host2 has
a StorNext file system called /stornext/fs2.
In this scenario we can replicate directory /stornext/fs1/video on
host1 to file system /stornext/fs2 on host2. Replicated files will
appear in the directory /stornext/fs2/video, which is the default
location on host2.
The following graphic illustrates replication scenario 1.
Figure 58 Replication scenario
1

8/10/2019 6-67370-03_SN42101_UserGuide_RevAB
http://slidepdf.com/reader/full/6-67370-03sn42101userguiderevab 165/511
Quantum StorNext User’s Guide 139
Scenario 2: ReplicatingMultiple Copies in theSame Target File System
In this scenario the directory /stornext/fs1/video on host1 is again
replicated to file system /stornext/fs2 on host2. However, when thenamespace realization occurs we want to retain the previous replicatedtarget directories.
For this scenario assume that we want to keep four copies of thereplication target directory. So, in file system /stornext/fs2 on host2we will find these four directories:
• /stornext/fs2/video (Contains the most recent realization)
• /stornext/fs2/video.1 (Contains the second-most recentrealization)
Chapter 6: Replication and Deduplication
Some Replication Scenarios
• /stornext/fs2/video.2 (Contains the third-most recentrealization)
• /stornext/fs2/video.3 (Contains the fourth-most recentrealization)
When using replication according to this scenario, in the StorNext GUIuse the "Copies to Keep on Target" box on the Outbound Replication tab to enable multiple copies.
The following graphic illustrates replication scenario 2.
Figure 59 Replication Scenario
2

8/10/2019 6-67370-03_SN42101_UserGuide_RevAB
http://slidepdf.com/reader/full/6-67370-03sn42101userguiderevab 166/511
140 Quantum StorNext User’s Guide
Question: Why would we want to keep multiple directories containingreplicated data?
Answer: To save previous versions of the replicated directory. If youmaintain only a single directory, the directory is overwritten each timereplication occurs. For example, if replications happen daily at midnight,each of the replicated target directories will contain the contents of the
source directory from that day's midnight replication. You may keep from 1 to 16 copies on the target for each sourcedirectory.
Question: Will keeping extra copies use a lot of extra disk space on thetarget?
Chapter 6: Replication and Deduplication
Some Replication Scenarios
Answer: Not necessarily. For example, if file video/ myTVshow.mov has not changed for the last 4 replications, then the four files would be:
• /stornext/fs2/video/myTVshow.mov
• /stornext/fs2/video.1/myTVshow.mov
• /stornext/fs2/video.2/myTVshow.mov
• /stornext/fs2/video.3/myTVshow.mov
All of these files share the same data extents in the file system. An evengreater space saving can be realized by enabling deduplication forreplication, but using this feature is outside of the scope of the currentscenario discussion.
Scenario 3: Replicatingt M lti l T t H t
In this scenario we replicate directory /stornext/fs1/video on
h fil / /f h d fil /

8/10/2019 6-67370-03_SN42101_UserGuide_RevAB
http://slidepdf.com/reader/full/6-67370-03sn42101userguiderevab 167/511
Quantum StorNext User’s Guide 141
to Multiple Target Hosts / File Systems
host1 to file system /stornext/fs2 on host2 and to file system /
stornext/fs3 on machine host3. Replicated files will appear in the
target directories /stornext/fs2/video on host2 and in /stornext/fs3/video on host3.
In this scenario we can also use the "Copies to Keep on Target" option.When "Copies to Keep on Target" is specified in a replication sourcepolicy, multiple copies are retained in each of the target file systems.
A replication source policy may specify up to three target hosts.
A target host may received replicated data from up to 5 source hosts.
The following graphic illustrates replication scenario 3.
Chapter 6: Replication and Deduplication
Some Replication Scenarios
Figure 60 Replication Scenario3

8/10/2019 6-67370-03_SN42101_UserGuide_RevAB
http://slidepdf.com/reader/full/6-67370-03sn42101userguiderevab 168/511
142 Quantum StorNext User’s Guide
Additional ReplicationPossibilities
Here are some other possible replication combinations StorNextsupports:
• Replication of a directory from one source host to multiple targethosts and/or multiple target file systems.
Chapter 6: Replication and Deduplication
Some Replication Scenarios
Figure 61 Replicating FromOne Source to Multiple Targets

8/10/2019 6-67370-03_SN42101_UserGuide_RevAB
http://slidepdf.com/reader/full/6-67370-03sn42101userguiderevab 169/511
Quantum StorNext User’s Guide 143
• Replication from multiple sources hosts or file systems to a singletarget host and file system.
Chapter 6: Replication and Deduplication
Some Replication Scenarios
Figure 62 Replicating FromMultiple Sources to One Target
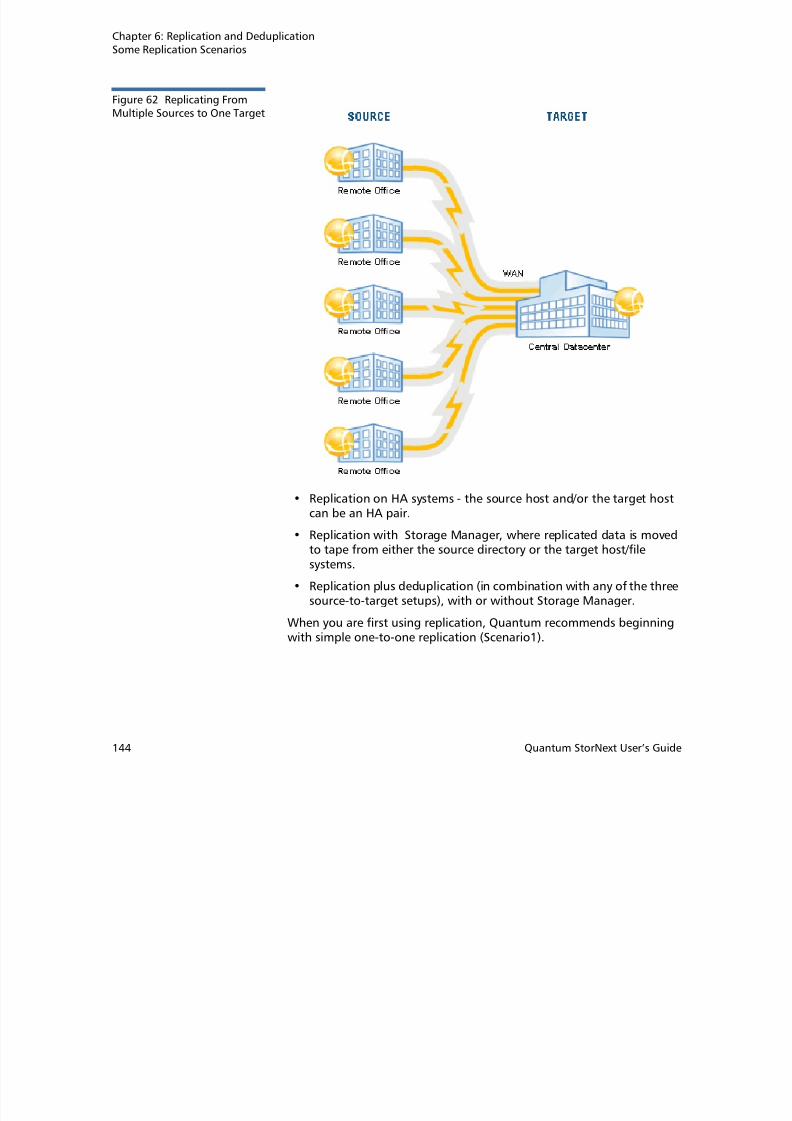
8/10/2019 6-67370-03_SN42101_UserGuide_RevAB
http://slidepdf.com/reader/full/6-67370-03sn42101userguiderevab 170/511
144 Quantum StorNext User’s Guide
• Replication on HA systems - the source host and/or the target host
can be an HA pair.
• Replication with Storage Manager, where replicated data is movedto tape from either the source directory or the target host/filesystems.
• Replication plus deduplication (in combination with any of the threesource-to-target setups), with or without Storage Manager.
When you are first using replication, Quantum recommends beginningwith simple one-to-one replication (Scenario1).
Chapter 6: Replication and Deduplication
Some Replication Scenarios
Non-SupportedReplication BetweenSource and Target
Replicating simultaneously between a replication source and target isnot currently supported by StorNext. When configuring replication, besure to avoid this particular scenario.
Example
In this non-supported configuration, Machine host1, file system fs1,
directory video1 replicates to Machine host2 , file system fs2,
directory video2
While at the same time
Machine host2, file system fs2, directory video2 replicates to
Machine host1, file system fs1, directory video1
Figure 63 Non Supported

8/10/2019 6-67370-03_SN42101_UserGuide_RevAB
http://slidepdf.com/reader/full/6-67370-03sn42101userguiderevab 171/511
Quantum StorNext User’s Guide 145
Figure 63 Non-SupportedReplication From Source toTarget
“Chained” Replication “Chained replication” is replicating from source to a target and then toanother target, and then to another target, and so on. This type ofreplication is not currently supported by StorNext. For example, youcannot replicate from A to B to C. When configuring replication, be sureto avoid this particular scenario.
Chapter 6: Replication and Deduplication
Configuring Replication
Chained replication should not be confused with replicating from onesource to multiple targets, which is supported. (See AdditionalReplication Possibilities on page 142.)
Configuring Replication
This section describes how to configure simple one-to-one replicationfrom one source directory on one file system to one target file system.The source and target StorNext server computers can be the same
machine, standalone servers, or High Availability (HA) redundantservers. When replication-target file systems are on an HA Cluster, it isbest to convert the cluster to HA before configuring replication sourcepolicies that point to them. This allows the use of the virtual IP (vIP),
hi h i i d f HA fi i

8/10/2019 6-67370-03_SN42101_UserGuide_RevAB
http://slidepdf.com/reader/full/6-67370-03sn42101userguiderevab 172/511
146 Quantum StorNext User’s Guide
which is required for HA configurations.
Additional configuration options for StorNext features such as HA orReplication with Storage Manager are also covered.
Before you begin configuring, make sure you have the Replication and/ or Deduplication licenses required for these features. If you are using anHA configuration, basic StorNext single-server or HA Clusters shouldalready be set up. (For more information, see Chapter 3, TheConfiguration Wizard).
These instructions assume you are using the StorNext ConfigurationWizard and have already completed the first three steps: Welcome,
Licenses, and Name Servers.
Note: To ensure that the policy is created properly, you MUST performthe following steps in the order indicated. For example, if youcreate the file systems without also creating the blockpool andthen load data, the policy will not be created and applied.
Step 1: Create Sourceand Target File Systems
After you complete the first three Configuration Wizard steps, the firstreplication step is to create file systems: the blockpool file system(s), andthe source and target file systems you plan to use.
Chapter 6: Replication and Deduplication
Configuring Replication
Note: Although StorNext supports replicating from multiple sourcehosts and file systems to multiple target hosts and file systems,for simplicity this procedure describes how to replicatebetween one source and one target file system on the same
host.
1 If you have not already done so, launch the StorNext ConfigurationWizard and proceed through Welcome, License and Name Servers steps to the File System step.
2 The Configuration > File System screen appears.
3 On the Configuration > File System screen, click New. The
Configuration > File System > New Screen appears.
Figure 64 Configuration > FileSystem > New Screen

8/10/2019 6-67370-03_SN42101_UserGuide_RevAB
http://slidepdf.com/reader/full/6-67370-03sn42101userguiderevab 173/511
Quantum StorNext User’s Guide 147
System > New Screen
4 At the File System Name field enter the name of a file system to beused as a replication source. A default mount-point pathautomatically appears but you can change this mount point if youwish.
5 Choose the Replication/Deduplication option. A warning messagealerts you that “A blockpool has not been created.” Disregard thismessage for now because you will create the blockpool file systemin the Step 2: Setting up the Blockpool.
Chapter 6: Replication and Deduplication
Configuring Replication
6 Make sure the Generate option is selected, and then click Continue to proceed.
Figure 65 Configuration > File
System > New Screen 2

8/10/2019 6-67370-03_SN42101_UserGuide_RevAB
http://slidepdf.com/reader/full/6-67370-03sn42101userguiderevab 174/511
148 Quantum StorNext User’s Guide
7 Select a set of LUNs for the file system, and then click Assign.
8 Click Continue.
Chapter 6: Replication and Deduplication
Configuring Replication
Figure 66 Configuration > FileSystem > New Screen 3

8/10/2019 6-67370-03_SN42101_UserGuide_RevAB
http://slidepdf.com/reader/full/6-67370-03sn42101userguiderevab 175/511
Quantum StorNext User’s Guide 149
9 If desired, click the arrows beside the Advanced Parameters andStripe Group/Disk Management headings to view information.
10 Click Apply to save the new file system. (For more informationabout creating file systems, see Step 4: File Systems on page 29.)
Creating a Target File System and Blockpool File System
1 Repeat the process (steps 1 - 8) and create the file system youintend to use as a target for replication on this same server.
2 Configure another file system for the Blockpool that has neitherData Migration nor Replication/Deduplication enabled.
Step 2: Setting up theBlockpool
In this step you will set up the blockpool on the blockpool file systemyou just created in the previous step.
Chapter 6: Replication and Deduplication
Configuring Replication
1 Choose the StorNext Configuration Wizard’s Storage Destinations task. The Configuration > Storage Destinations screen appears.
There are four tabs on this screen: Library, Storage Disk,Replication Targets, and Deduplication. When configuringreplication we are concerned with the Replication Targets andDeduplication tabs. (The deduplication infrastructure is used tohandle the transfer of file data for the replication feature, so it mustbe configured even when the deduplication feature is not used.)
2 Click the Deduplication tab. The Configuration > StorageDestinations > Deduplication Screen appears.
Figure 67 Configuration >Storage Destinations >Deduplication Screen(Blockpool)

8/10/2019 6-67370-03_SN42101_UserGuide_RevAB
http://slidepdf.com/reader/full/6-67370-03sn42101userguiderevab 176/511
150 Quantum StorNext User’s Guide
3 Click the Deduplication tab. This tab has only one field calledBlockpool Host File System. At this field select from the dropdownlist the file system to use for the blockpool. (This is the file systemyou created in the previous step.)
Note: Once applied, the blockpool location cannot be moved toanother file system. Be certain of the blockpool locationbefore you continue.
Chapter 6: Replication and Deduplication
Configuring Replication
4 After you select the blockpool file system, click Apply. Abackground job is started to create the blockpool.
Step 3: CreatingReplication Targets In this step you will specify the actual targets to which you wantreplicated data sent. (Namespace realization will also occur on thesetargets.)
1 Click the Replication Targets tab. The Configuration > StorageDestinations > Replication Targets Screen appears.
2 Click Add Host.
Figure 68 Storage Destinations> Replication Targets Screen

8/10/2019 6-67370-03_SN42101_UserGuide_RevAB
http://slidepdf.com/reader/full/6-67370-03sn42101userguiderevab 177/511
Quantum StorNext User’s Guide 151
3 At the Hostname or IP field, enter the host name or its IP address. Ifthe target is an HA cluster, the address should be the vIP for thatcluster.
4 Click Scan Host to populate the Mount Point box with appropriate
file systems which are configured for replication/deduplication.
5 Select the file system you created for use as the target in Step 1:Create Source and Target File Systems, and then click Add.
6 Click Apply. At this point you should see your file system listed as areplication target.
Chapter 6: Replication and Deduplication
Configuring Replication
Note: If you were adding additional replication targets, you wouldrepeat steps 3 - 6 to add additional hosts and file systems.
(Optional) Configuring Replication for an HA System
If you are planning to use replication on a high availability (HA) system,this is the point in the configuration process when you should configureHA. If you do not configure HA here, misconfiguration could result andyou could be prevented from using replication on your HA system.
If you are using replication on an HA system, proceed to Optional HAand Multilink Configuration on page 161, and then return to Step 4:Create a Replication Storage Policy.
If you are not using replication on an HA system, proceed to Step 4:Create a Replication Storage Policy.

8/10/2019 6-67370-03_SN42101_UserGuide_RevAB
http://slidepdf.com/reader/full/6-67370-03sn42101userguiderevab 178/511
152 Quantum StorNext User’s Guide
Step 4: Create a
Replication StoragePolicy
The next step in configuring replication is to create a replication storage
policy. This policy contains the replication "rules" specific to yourreplication source and target file systems. You must create a replicationpolicy for the source directory and enable inbound replication for thetarget file system.
Creating the Source Directory Replication Policy
1 Choose the StorNext Configuration Wizard’s Storage Policies task.The Configuration > Storage Policies Screen appears.
Chapter 6: Replication and Deduplication
Configuring Replication
2 Click New. The Configuration > Storage Policies > New Screenappears.
Figure 69 Configuration >
Storage Policies > New Screen

8/10/2019 6-67370-03_SN42101_UserGuide_RevAB
http://slidepdf.com/reader/full/6-67370-03sn42101userguiderevab 179/511
Quantum StorNext User’s Guide 153
3 Enter the following fields:
• Policy Class: The name of the new policy you are creating
• Policy Type: Click the Replication/Deduplication tab to createa replication storage policy.
Note: The Replication/Deduplication tab remains unavailable
(grayed out) until the blockpool directory has beencompletely created. Creating the blockpool directory isstarted on the Storage Destinations page’sDeduplication tab, and proceeds asynchronously as abackground job. This tab becomes enabled once thatbackground job completes.
If there is no deduplication license (for example, if youintend to use replication but not deduplication,) creatingthe blockpool is still required but the background job willfinish within a few seconds.
• File System: Choose the source file system from the dropdownlist.
Chapter 6: Replication and Deduplication
Configuring Replication
• Click Configure.
Choose the Source File System
1 After you click Configure, the screen for configuring a replication/
deduplication storage policy appears.
2 Click the Source Directories tab.
Figure 70 Configuration >Storage Policies > New /Source Directories Screen

8/10/2019 6-67370-03_SN42101_UserGuide_RevAB
http://slidepdf.com/reader/full/6-67370-03sn42101userguiderevab 180/511
154 Quantum StorNext User’s Guide
3 At the Directory field, select from the pulldown list an existing
directory you want to use for the policy.
4 To create a new directory, enter a directory location at the field tothe left of the Create Directory button, and then click CreateDirectory to create the specified directory.
5 After either selecting a directory from the pulldown list or creating anew directory, click Add to add the directory as the one used by thestorage policy.
Chapter 6: Replication and Deduplication
Configuring Replication
Enter OutBound Replication Information
1 Click the Outbound Replication tab.
Figure 71 Storage Policies >New > Outbound ReplicationTab

8/10/2019 6-67370-03_SN42101_UserGuide_RevAB
http://slidepdf.com/reader/full/6-67370-03sn42101userguiderevab 181/511
Quantum StorNext User’s Guide 155
2 At the Outbound Replication field, enable outbound replication(going out from the source) by clicking the area to the right of thefield so that On is displayed.
3 For each of the outbound replication parameters, either accept thedefault value by checking the box to the right of the parameter
name, or uncheck the box to manually enter the value. (See theonline help for more information about parameter definitions.)
4 (Optional) To create a new replication schedule, in the ReplicationSchedules box, click New. Additional fields appear where you cancreate a replication schedule.
Chapter 6: Replication and Deduplication
Configuring Replication
Figure 72 OutboundReplication Tab > ReplicationSchedule
d h h di l il bl l h fil

8/10/2019 6-67370-03_SN42101_UserGuide_RevAB
http://slidepdf.com/reader/full/6-67370-03sn42101userguiderevab 182/511
156 Quantum StorNext User’s Guide
5 Under the heading Select Available Targets, select the target filesystem on the target server.
6 Create a schedule by making a selection in every column. If youselect none of the schedule columns, this creates an unscheduledpolicy that must be run manually. The schedule shown in Figure 72 will run at midnight every day. (See the online help for moreinformation about how to enter the fields on this screen.)
7 Click Continue to complete the schedule and target selections.
8 Click Apply to finish creating the policy with the options from all of
the tabs.
9 After a message informs you that the policy was createdsuccessfully, click OK .
Chapter 6: Replication and Deduplication
Configuring Replication
Enter Inbound Replication Information
1 On the Configuration > Storage Policies screen, select thereplication/deduplication policy named “target” for the replicationtarget file system, and then click Edit.
Figure 73 Configuration >Storage Policies Screen (Select“target”)

8/10/2019 6-67370-03_SN42101_UserGuide_RevAB
http://slidepdf.com/reader/full/6-67370-03sn42101userguiderevab 183/511
Quantum StorNext User’s Guide 157
2 When the Configuration > Storage Policies > Edit > target screen appears, Click the Inbound Replication tab.
Chapter 6: Replication and Deduplication
Configuring Replication
Figure 74 Storage Policies >Edit > target > InboundReplication Tab
3 At the Inbound Replication field select On

8/10/2019 6-67370-03_SN42101_UserGuide_RevAB
http://slidepdf.com/reader/full/6-67370-03sn42101userguiderevab 184/511
158 Quantum StorNext User’s Guide
3 At the Inbound Replication field, select On.
Note: If you do not turn on replication, the process will fail andyou will receive an error message saying, “Replicationdisabled on target.” It is VERY IMPORTANT that you enablereplication by setting Inbound Replication to On.
4 Click Apply to finish editing the policy with your selected options.
Configuration StepsSummary
The preceding four configuration steps accomplished the following:
• Created a source replication policy and associated a source directorywith it
• Selected a target file system on a target host machine and left thetarget directory unspecified, which uses the directory name of thesource
• Set a replication schedule that runs every day at midnight
• Enabled inbound in the target policy
• Enabled outbound replication in the source policy
The contents of the source directory (additions and deletions) will nowbe replicated to the target directory every night. You can test this by
Chapter 6: Replication and Deduplication
Configuring Replication
running the policy manually at any time on the Configuration >Storage Policies screen. (Select the policy you want to test and thenclick Run.)
Figure 75 Configuration >Storage Policies (Run Policy)

8/10/2019 6-67370-03_SN42101_UserGuide_RevAB
http://slidepdf.com/reader/full/6-67370-03sn42101userguiderevab 185/511
Quantum StorNext User’s Guide 159
Scheduling ReplicationBlackouts (Optional)
The Replication Blackout feature provides bandwidth management byallowing you to select of a time period when you do not wantreplication to run. When a blackout is not in effect, replication datatransfer occurs automatically in the background as data changes in thesource directories, but the replicated files do not appear in the targetdirectory until the replication policy is run.
You can set a blackout period on the source or target file system (orboth) in the file systems’ global policy. During the blackout period, bothreplication data transfer and the realization of file copies on the targetare prevented from starting.
A blackout period for a source file system prevents automatic startingnew data transfers or scheduled policies. However, manually startedpolicies do run, and perform the necessary data transfers.
A blackout period for a target file system prevents all inbound datatransfers from starting, which blocks both manually and automaticallystarted source policies.
Chapter 6: Replication and Deduplication
Configuring Replication
However, note the following caveats about blackouts:
• Any replication attempt (whether scheduled or initiated from thecommand line) which starts during the blackout on the source willnot be started unless the force option is used. Replications startedbefore the blackout should complete.
• Any replication request which arrives at the target during itsblackout will be rejected by the target. The source will retryreplication until the process succeeds. Replications started beforethe blackout will complete.
Follow these steps to set up a blackout:
1 Choose the StorNext Configuration Wizard’s Storage Policies task.
2 On the Storage Policies screen, select the “global” policy for thedesired source or target file system, and then click Edit. TheConfiguration > Storage Policies > Edit screen appears.
3 Click the Blackout tab.

8/10/2019 6-67370-03_SN42101_UserGuide_RevAB
http://slidepdf.com/reader/full/6-67370-03sn42101userguiderevab 186/511
160 Quantum StorNext User’s Guide
Figure 76 Storage Policies >
New > Blackout Tab
4 Click the box to the right of the Replication Blackout Window heading to display scheduling fields.
Chapter 6: Replication and Deduplication
Configuring Replication
5 Specify the weekday(s), month(s), day(s), hour(s) and minute(s)when you would like to block replication from startingautomatically.
6 Click Apply to save the changes in the replication/deduplicationstorage policy.
Optional HA andMultilink Configuration
When the High Availability (HA) feature is used with replication, a virtualIP (vIP) address must be configured to allow a replication source to use asingle IP address to access whichever server is currently performing thePrimary function in the target HA cluster.
The vIP is automatically moved to the correct server as part of thefailover process for the HaShared file system. (See Virtual IP (vIP) onpage 138 for an expanded definition.)
It is easiest to set up the vIP during the initial HA conversion. The vIPconfiguration items appear automatically at this time if a license existsfor replication. It is not necessary to have a replication policy
fi d

8/10/2019 6-67370-03_SN42101_UserGuide_RevAB
http://slidepdf.com/reader/full/6-67370-03sn42101userguiderevab 187/511
Quantum StorNext User’s Guide 161
configured.
The IP address used for the vIP must be statically allocated and routableto the physical network interface of both servers in the HA cluster.Please request this IP address and netmask information from yournetwork administrator before starting the HA conversion.
Note: This step describes only the tasks necessary for configuringreplication on an HA system. For general instructions aboutconfiguring HA, see Converting to HA on page 217.
Chapter 6: Replication and Deduplication
Configuring Replication
1 Choose High Availability > Convert from the Tools menu. The HA(Convert) screen appears.
Figure 77 Tools > HA
Convert Screen
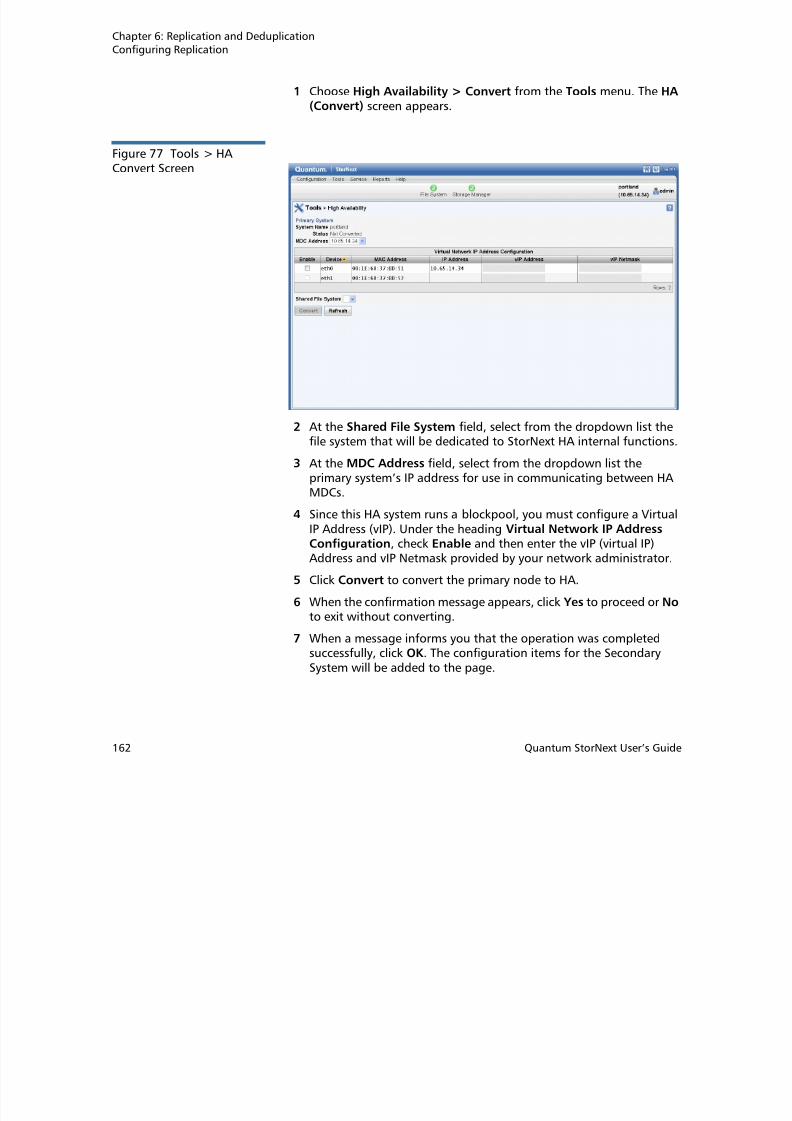
8/10/2019 6-67370-03_SN42101_UserGuide_RevAB
http://slidepdf.com/reader/full/6-67370-03sn42101userguiderevab 188/511
162 Quantum StorNext User’s Guide
2 At the Shared File System field, select from the dropdown list thefile system that will be dedicated to StorNext HA internal functions.
3 At the MDC Address field, select from the dropdown list theprimary system’s IP address for use in communicating between HAMDCs.
4 Since this HA system runs a blockpool, you must configure a VirtualIP Address (vIP). Under the heading Virtual Network IP AddressConfiguration, check Enable and then enter the vIP (virtual IP)Address and vIP Netmask provided by your network administrator.
5 Click Convert to convert the primary node to HA.
6 When the confirmation message appears, click Yes to proceed or No to exit without converting.
7 When a message informs you that the operation was completedsuccessfully, click OK . The configuration items for the SecondarySystem will be added to the page.
Chapter 6: Replication and Deduplication
Configuring Replication
8 At the System Name field, enter the IP address of the SecondarySystem to use for communications between HA MDCs, and thenclick Scan Host.
9 Select the IP address of the physical interface to associate with thevIP, and then click Convert.
10 When the confirmation message appears, click Yes to proceed or No to exit without converting.
11 When a message informs you that the conversion was completedsuccessfully, click OK to continue.
Setting the IP Address of the Blockpool Server in HA Clusters
The default location of the blockpool server process is localhost. Thisis not sufficient for HA Clusters where the blockpool server moves withthe Primary status to the redundant server in a failover of the HA Sharedfile system.
1 Return to the StorNext Configuration Wizard’s Storage Policies t k

8/10/2019 6-67370-03_SN42101_UserGuide_RevAB
http://slidepdf.com/reader/full/6-67370-03sn42101userguiderevab 189/511
Quantum StorNext User’s Guide 163
task.
2 Locate the Deduplication/Replication file system, select its globalpolicy, and then click Edit. (This step must be repeated for eachDeduplication/Replication enabled file system.)
3 Click the Deduplication tab.
4 At the Address for Replication and Deduplication field, click theInherit button.
5 Replace the localhost value with the vIP address in the Override box. (Override appears after you click Inherit.)
6 Click Apply.
7 When the confirmation message appears, click Yes to proceed or No to exit. (In this case you can safely ignore the warning aboutassociated directories.)
8 When a message informs you that the operation was completed
successfully, click OK to continue.
9 Repeat steps 2 thru 8 for each file system.
Chapter 6: Replication and Deduplication
Configuring Replication
Configuring Multilink
Virtual IPs are also used in an HA environment if the multilink feature isconfigured. A virtual IP address is required for each NIC card you use forreplication.
1 Choose Replication/Deduplication > Replication Bandwidth fromthe Tools menu. The Tools > Replication > Bandwidth screenappears.
Figure 78 Tools >Replication > BandwidthScreen

8/10/2019 6-67370-03_SN42101_UserGuide_RevAB
http://slidepdf.com/reader/full/6-67370-03sn42101userguiderevab 190/511
164 Quantum StorNext User’s Guide
2 The Replication Bandwidth screen displays a list of NIC cardsavailable for replication. Select Enable for each NIC card you wantto include in the replication process.
3 Enter the following fields:
• VIP: Enter the virtual IP address for the NIC. (Ask your networkadministrator for this address as well as the virtual netmask.)
• VIP Netmask: Enter the virtual netmask for the NIC
• Receive Rate: Enter the maximum data reception rate(expressed in bits per second) for the replication target. Whenreplication data is received on the target, it will not exceed thisspeed. (For more information, see Bandwidth Throttling.)
Chapter 6: Replication and Deduplication
Running Replication Manually (Optional)
• Transmit Rate: Enter the maximum data transmission rate(expressed in bits per second) for the replication source. Whenreplication data is transmitted to the target it will not exceedthis speed. (For more information, see Bandwidth Throttling.)
• Channels: Enter the number of channels you want enabled on
the NIC.
4 Click Apply to save your changes.
Running Replication Manually (Optional)
If you did not specify a schedule in the replication source policy, thesource directory will be replicated only if you manually run the policy. Ifyou did specify a schedule, you can also replicate the source directory atany time by running the policy manually.
F ll th t t ll li ti f li ti /

8/10/2019 6-67370-03_SN42101_UserGuide_RevAB
http://slidepdf.com/reader/full/6-67370-03sn42101userguiderevab 191/511
Quantum StorNext User’s Guide 165
Follow these steps to manually run replication for any replication/ deduplication policy (whether it was scheduled or not):
1 Choose the StorNext Configuration Wizard’s Storage Policies task.(Alternatively, choose Storage Policies from the Configurationmenu.) The Configuration > Storage Policies screen appears. (SeeFigure 75.)
2 Select the policy you want to run, and then click Run.
3 When a message informs you that the job was successfully initiated,
click OK to continue.
4 To view job progress, select Jobs from the Reports menu.
Chapter 6: Replication and Deduplication
Replication Statuses and Reporting
Replication Statuses and Reporting
StorNext provides three ways to monitor replication status:
• Replication Reports: View reports showing information pertainingto storage policies and replication targets.
• Replication Administration: View the current replication status.
• StorNext Jobs: View currently running StorNext jobs, includingreplication.
Replication Reports There are two reports for replication: Policy Activity and PolicySummary.
• The Policy Activity report shows replication performance statistics.
• The Policy Summary report shows replication-related informationfor each policy

8/10/2019 6-67370-03_SN42101_UserGuide_RevAB
http://slidepdf.com/reader/full/6-67370-03sn42101userguiderevab 192/511
166 Quantum StorNext User’s Guide
for each policy.
Both of these reports also show information related to deduplication.Access these replication reports by choosing Replication/Deduplication from the Reports menu.
For more information about replication reports, see ReplicationDeduplication Reports on page 250.
Replication Administration
The Administration option available under the Tools > Replication/ Deduplication menu allows you to view current replication process, orpause, resume, or stop replication.
After you choose Administration from the Tools > Replication/ Deduplication menu, the Tools > Replication/Deduplication >
Administration screen appears.
Chapter 6: Replication and Deduplication
Replication Statuses and Reporting
Figure 79 Tools >Replication/Deduplication >Administration Screen
The Tools > Replication/Deduplication > Administration screensho s the n mber of pending files and b tes remaining to replicate (or

8/10/2019 6-67370-03_SN42101_UserGuide_RevAB
http://slidepdf.com/reader/full/6-67370-03sn42101userguiderevab 193/511
Quantum StorNext User’s Guide 167
shows the number of pending files and bytes remaining to replicate (or
deduplicate or truncate).
Pausing and Resuming Replication
Near the bottom of the Administration screen are two buttons, Pause and Resume, which enable you to temporarily pause or resumereplication (or deduplication or truncation) respectively. Before youpause or refresh, first select the process you want to pause or refresh:
Replication, Deduplication or Truncation.
If you pause or resume replication, clicking the Refresh button updatesthe statuses shown on the Administration screen.
StorNext Jobs At any time you can view currently running StorNext jobs, including
replication. The Reports > Jobs screen shows the job ID and type of job, the start and end times, and the current status.
To view jobs, choose Jobs from the Reports menu. The Reports > Jobs report appears.
Chapter 6: Replication and Deduplication
Troubleshooting Replication
For more information about StorNext jobs, see The Jobs Report onpage 230.
Troubleshooting Replication
The Troubleshooting appendix in this guide contains simpletroubleshooting procedures related to replication. For moreinformation, see Troubleshooting Replication on page 426.
For issues not covered in that section of the appendix, contact theQuantum Technical Support
Data Deduplication Overview

8/10/2019 6-67370-03_SN42101_UserGuide_RevAB
http://slidepdf.com/reader/full/6-67370-03sn42101userguiderevab 194/511
168 Quantum StorNext User’s Guide
StorNext data deduplication refers to a specific approach to datareduction built on a methodology that systematically substitutesreference pointers for redundant variable-length blocks (or datasegments) in a specific dataset. The purpose of data deduplication is toincrease the amount of information that can be stored on disk arraysand to increase the effective amount of data that can be transmittedover networks.
For example, if the same 1 terabyte of file data appears in severaldifferent files, only one instance of that 1 terabyte needs to be retained.Each of those several files can use the same data bytes from a commonstorage source when the data is needed.
Quantum's deduplication not only recognizes duplicate data in theentire file, but also recognizes duplicate data ranges within files. Forexample, if two 1TByte files share the same data from byte 10,000,000
through byte 500,000,000, those duplicate byte ranges can beidentified and stored only once. Several files may contain the same dataor some of the same data, and these files can all benefit fromdeduplication.
Chapter 6: Replication and DeduplicationData Deduplication Overview
How DeduplicationWorks
When a file is initially created in a directory managed by StorNextdeduplication, all of the application data is created in that file. Later, thefile may be ingested by StorNext. During the ingest process the file willbe split (logically) into segments called blobs, which is short for “binarylarge objects.”
Each blob is stored in the machine's blockpool, and has a unique blobtag associated with it. From the list of a file’s blob tags, StorNext canreconstitute the file with data from the blockpool.
If several files contain the same blob, only one copy is stored in theblockpool.
If StorNext file truncation is enabled for the deduplication policy, the
original file can be "truncated." (This means that the space for theoriginal file is released and can be re-used.) When part or all of theoriginal file data is needed by an application, the data is retrieved fromthe blockpool. This concept of file truncation is similar to the filetruncation available with StorNext Storage Manager.
The following graphic illustrates how deduplication works.

8/10/2019 6-67370-03_SN42101_UserGuide_RevAB
http://slidepdf.com/reader/full/6-67370-03sn42101userguiderevab 195/511
Quantum StorNext User’s Guide 169
Figure 80 Deduplication
Deduplication andReplication
If StorNext deduplication is enabled in a replication source directory, it isthe blobs that get replicated from the source machine to the targetmachine. This happens continuously during the first stage of replication,
Chapter 6: Replication and DeduplicationSetting Up Deduplication
which is data movement. If a blob is shared by more than one file, lessdata is transferred than when replication occurs without deduplication.
Replicated data moves from the source machine's blockpool to thetarget machine's blockpool. If the source and target machine are thesame, then no data needs to move for replication Stage 1.
When the replication namespace realization occurs in replication Stage2, the replicated files appear in the target directory as truncated files.The blob tags needed to reconstitute the file are replicated along withother file metadata during Stage 2. When replication is complete, anapplication can access the replicated file and data will be retrieved fromthe blockpool as needed.
Setting Up Deduplication
This section describes the steps necessary to configure datadeduplication The easiest way to configure your system for

8/10/2019 6-67370-03_SN42101_UserGuide_RevAB
http://slidepdf.com/reader/full/6-67370-03sn42101userguiderevab 196/511
170 Quantum StorNext User’s Guide
deduplication. The easiest way to configure your system for
deduplication is to use the StorNext Configuration Wizard, but you canalso use the Configuration menu's options to accomplish the sametasks.
Complete these tasks to set up and enable deduplication:
• Step 1: Enable replication/deduplication when you create (or edit) asource file system.
• Step 2: Specify the file system to use for the blockpool (this is doneonly once per machine.)
• Step 3: Create (or edit) a replication/deduplication storage policywith deduplication enabled on the Deduplication tab.
Step 1: Creating a
Deduplication-EnabledFile System
Create a file system as you normally would, or edit an existing file
system.
1 In the Configuration Wizard, choose the File Systems task.(Alternatively, choose File Systems from the Configuration menu.)
2 On the Options tab, enable replication by selecting Replication/ Deduplication.
Chapter 6: Replication and DeduplicationSetting Up Deduplication
3 Continue creating the file system as your normally would. (If you areediting an existing file system, click Apply to save your changes.) Formore information about creating a file system, see Step 4: FileSystems on page 29.
Step 2: Specifying theBlockpool
To use deduplication you must specify the file system on which theblockpool resides. If you have already enabled replication and ablockpool already exists, you can skip this step.
The process for specifying a blockpool for deduplication is identical tospecifying a blockpool for replication. For more information, see Step 2:Setting up the Blockpool on page 149 in the Configuring Replication
section.
Step 3: Creating aDeduplication-EnabledStorage Policy
To enable deduplication you must either create a new replication/ deduplication storage policy or edit an existing policy.
1 Choose the StorNext Configuration Wizard’s Storage Policies task.(Th C fi ti St P li i S
8/10/2019 6-67370-03_SN42101_UserGuide_RevAB
http://slidepdf.com/reader/full/6-67370-03sn42101userguiderevab 197/511
Quantum StorNext User’s Guide 171
(The Configuration > Storage Policies Screen appears.
2 If you are creating a new policy, click New. The Storage Policies >New Screen appears. (See Figure 69.)
If you are editing an existing replication policy, select the policy youwant to edit and then click Edit. Skip to Step 5.
3 Enter the following fields:
• Policy Class: The name of the new policy you are creating
• Policy Type: choose Replication /Deduplication to create adeduplication storage policy.
4 Click Configure. The Replication /Deduplication Policy screenappears.
Chapter 6: Replication and DeduplicationSetting Up Deduplication
Figure 81 Replication/ Deduplication Policy Screen
5 On the Deduplication tab, enable deduplication by clicking the fieldto the right of the Deduplication heading so that it says On.

8/10/2019 6-67370-03_SN42101_UserGuide_RevAB
http://slidepdf.com/reader/full/6-67370-03sn42101userguiderevab 198/511
172 Quantum StorNext User’s Guide
6 Accept the displayed default values for other fields, or click theInherit button beside the desired field to enter your own values.(For information about what to enter at each field, see the onlinehelp.)
Here are some especially important Deduplication parameters:
• Minimum File Idle Time before Deduplication: This parameterdetermines the interval of time for a file to remain idle before
deduplication begins. The default value is 1 minute.
• Minimum File Size to Deduplicate: This parameter determinesthe minimum size a file must be in order to be eligible fordeduplication. The default value is 4KB.
Chapter 6: Replication and DeduplicationData Deduplication Functions
Data Deduplication Functions
This section describes the deduplication options on the Setup and Tools
menus, which enable you to setup, administer, and manage datadeduplication on your StorNext system.
Deduplication Administration
The Tools > Replication/Deduplication > Administration screenallows you to view the number of pending files and bytes remaining tobe deduplicated (or replicated or truncate). (See Figure 79.)
On this screen you can also pause or resume deduplication. The processfor pausing or resuming deduplication is identical to pausing orresuming replications. (For more information, see P
ausing andResuming Replication on page 167.)
Deduplication Reports There are two reports for deduplication: Policy Activity and Policy

8/10/2019 6-67370-03_SN42101_UserGuide_RevAB
http://slidepdf.com/reader/full/6-67370-03sn42101userguiderevab 199/511
Quantum StorNext User’s Guide 173
Deduplication Reports There are two reports for deduplication: Policy Activity and Policy
Summary.
• The Policy Activity report shows deduplication performancestatistics.
• The Policy Summary report shows deduplication-relatedinformation for each policy.
Both of these reports also show information related to replication.
Access these deduplication reports by choosing Replication/ Deduplication from the Reports menu.
For more information about deduplication reports, see ReplicationDeduplication Reports on page 250.
Chapter 6: Replication and DeduplicationData Deduplication Functions

8/10/2019 6-67370-03_SN42101_UserGuide_RevAB
http://slidepdf.com/reader/full/6-67370-03sn42101userguiderevab 200/511
174 Quantum StorNext User’s Guide

8/10/2019 6-67370-03_SN42101_UserGuide_RevAB
http://slidepdf.com/reader/full/6-67370-03sn42101userguiderevab 201/511
Chapter 7: Tools Menu Functions
• Storage Manager
• Storage Components: View current status for libraries, storagedisks, and tape drives; place one or more of these componentsonline or offline
• Drive Pool: Add, modify, or delete drive pools
• Media Actions: Remove media from a library or move mediafrom one library to another
• Storage Exclusions: Specify file names to exclude fromStorNext Storage Manager
• Truncation Exclusions: Specify file paths to exclude from thetruncation process
• Tape Consolidation: Enter parameters for automaticallyconsolidating space on tape media
• Library Operator: Enter or eject media from the LibraryOperator Interface
• Software Requests: View or cancel pending software requests
• Scheduler: Schedule file system events including Clean Info,

8/10/2019 6-67370-03_SN42101_UserGuide_RevAB
http://slidepdf.com/reader/full/6-67370-03sn42101userguiderevab 202/511
176 Quantum StorNext User’s Guide
Clean Versions, Full Backup, Partial Backup, and Rebuild Policy
• Alternate Retrieval Location: Specify a remote retrievallocation to use in situations where files stored on tape or astorage disk.
• Distributed Data Mover (DDM): Spread the distribution ofdata across several machines rather than the primary server.
• Replication and Deduplication• Administration: View current replication process, or pause,
resume, or stop replication
• Replication Targets: Add a host or directory for datereplication, or edit existing replication targets
• Replication Bandwidth: Configure replication bandwidth limitsand multilink
• HA
• Convert: Convert to a high availability configuration
• Manage: Manage HA system parameters
Chapter 7: Tools Menu FunctionsUser Accounts
User Accounts
The Tools Menu's User Accounts option allows you to add new StorNext
users and modify permissions for existing users. User Accounts is alsowhere you change the admin's password.
Adding a New User Follow this procedure to add a new StorNext user.
1 Choose User Accounts from the Tools menu. The User Accounts screen appears. All existing users and the admin are shown.
Figure 82 User AccountsScreen

8/10/2019 6-67370-03_SN42101_UserGuide_RevAB
http://slidepdf.com/reader/full/6-67370-03sn42101userguiderevab 203/511
Quantum StorNext User’s Guide 177
Chapter 7: Tools Menu FunctionsUser Accounts
2 Click New. The User Accounts > New screen appears.
Figure 83 New User Screen

8/10/2019 6-67370-03_SN42101_UserGuide_RevAB
http://slidepdf.com/reader/full/6-67370-03sn42101userguiderevab 204/511
178 Quantum StorNext User’s Guide
3 In the User Name field, type the name the new user will enter at theUser ID field when he or she logs on to StorNext.
4 In the Password field, type the password the new user will enterwhen logging on to StorNext.
5 Roles are grouped according to Admin Functions, OperatorFunctions and General User Functions. You can automatically pre-select all the functions for one of these three roles by clicking at the
Access Control field Admin Defaults, Operator Defaults orGeneral User Defaults. Selecting one of these roles for the newuser makes it easy for you to add or remove functions by selectingor deselecting.
6 Select all the different roles you want the new user to have:
Chapter 7: Tools Menu FunctionsUser Accounts
Admin Functions
Download Client Software Manage Licenses
Manage Email Notifications Manage Logging
Manage Email Server Manage Replication/Deduplication
Manage File Systems Manage Users
Manage HA Stop/Start System Components
Operator Functions
Cancel Software Requests Manage Tickets
Manage Admin Alerts Perform File Actions
Manage Backups Perform Library Operator Actions
Manage Drive Pools Perform Media Actions
Manage Libraries Perform Storage Component Actions

8/10/2019 6-67370-03_SN42101_UserGuide_RevAB
http://slidepdf.com/reader/full/6-67370-03sn42101userguiderevab 205/511
Quantum StorNext User’s Guide 179
Manage Storage Disks Run Capture State
Manage Storage Manager Run Health Checks
General User Functions
Run Reports
7 When you are satisfied with the permissions you have assigned,click Apply to save your changes. (To exit without saving, clickCancel.)
8 When a message informs you that the new user was successfullyadded, click OK .
Viewing an ExistingUser Profile
Follow this procedure to view an existing user’s profile.
Chapter 7: Tools Menu FunctionsUser Accounts
1 From the User Accounts screen, select the user whose informationyou want to view, and then click View. A screen shows theparameters for the selected user.
Figure 84 View User Screen

8/10/2019 6-67370-03_SN42101_UserGuide_RevAB
http://slidepdf.com/reader/full/6-67370-03sn42101userguiderevab 206/511
180 Quantum StorNext User’s Guide
2 When you are finished viewing user profile information, click Back to return to the User Accounts screen.
Modifying an ExistingUser
Follow this procedure to modify an existing user’s permission.
1 From the User Accounts screen, select the user whose informationyou want to modify, and then click Edit. A screen similar to the onewhere you added the user appears.
Chapter 7: Tools Menu FunctionsUser Accounts
Figure 85 Edit User Screen
2 If you are editing the admin’s information you will be asked to

8/10/2019 6-67370-03_SN42101_UserGuide_RevAB
http://slidepdf.com/reader/full/6-67370-03sn42101userguiderevab 207/511
Quantum StorNext User’s Guide 181
2 If you are editing the admin’s information, you will be asked toenter and confirm the current password, and confirm that you wantto modify the information for the admin. When prompted, click Yes to proceed.
3 As necessary, change the user’s password and then modifypermissions by selecting or deselecting roles.
Note: Only an admin user can change the admin password.
4 When you are satisfied with the changes you have made, click Apply to save your changes. (To exit without saving, click Cancel.)
5 When a message informs you that the new user was successfullymodified, click OK .
Deleting an ExistingUser
Follow this procedure to delete an existing StorNext user.
1 From the User Accounts screen, select the user you want to delete,and then click Delete. (See Figure 82.)
Chapter 7: Tools Menu FunctionsClient Download
2 When the confirmation message appears, click Yes to proceed, orNo to return to the User Accounts > [admin name] screen withoutsaving.
Note: You cannot delete the admin.
3 When a message informs you that the new user was successfullydeleted, click OK .
Client Download
The StorNext client software lets you mount and work with StorNext filesystems. Note that Distributed LAN Client (DLC) client and DLC gatewaysare included with the standard client software packages. For moreinformation about DCL, see About Distributed LAN Clients on page 2 and Distributed LAN Server and Client Network Tuning on page 271.
In addition to StorNext client software, Distributed Data Mover is alsodownloadable here For more information about installing and using

8/10/2019 6-67370-03_SN42101_UserGuide_RevAB
http://slidepdf.com/reader/full/6-67370-03sn42101userguiderevab 208/511
182 Quantum StorNext User’s Guide
downloadable here. For more information about installing and usingDistributed Data Mover, see Distributed Data Mover (DDM) onpage 121.
To ensure successful operation, before you install the client softwareverify that the client system meets all operating system and hardwarerequirements listed below.
To install the StorNext client software, first download the client softwarefrom the metadata controller (MDC) as described in Downloading ClientSoftware.
After downloading the client software, install and configure it using theappropriate method for your operating system. For more informationabout installing and configuring client software, see the instructions inthe StorNext Installation Guide.
To download client software:1 Choose Client Download from the Tools menu. The Tools > Client
Download screen appears.
Chapter 7: Tools Menu FunctionsClient Download
Figure 86 Client DownloadScreen
2 Select from the Platform list the desired operating system.
3 Select from the OS Version list the desired operating system version
corresponding to the platform you selected

8/10/2019 6-67370-03_SN42101_UserGuide_RevAB
http://slidepdf.com/reader/full/6-67370-03sn42101userguiderevab 209/511
Quantum StorNext User’s Guide 183
corresponding to the platform you selected.
4 When a window appears containing a link to the client softwaredownload location, click the link to begin downloading.
Figure 87 Client DownloadLink
5 Click Download to begin the process.
6 When prompted, choose the Save to Disk option, and then clickOK .
7 Browse to the location where you want to save the file, and thenclick Save.
8 After the client package has been saved, click Done.
Chapter 7: Tools Menu FunctionsSystem Control
9 Continue with the installation procedure for your operating systemas described in the Gadne 4ao.sua2UU2aQdso1mQSor the online help.
System Control
The System Control screen enables you to tell at a glance whetherStorNext File System and StorNext Storage Manager are currentlystarted. In the case of Storage Manager, you can also see whichindividual components are currently started or stopped. From this
screen you can start or stop File System and Storage Manager, and alsospecify whether you want StorNext to start automatically whenever yoursystem is rebooted.
To access the System Control screen, choose System Control from theTools menu. The Tools > System Control screen appears.
Figure 88 System Control
Screen

8/10/2019 6-67370-03_SN42101_UserGuide_RevAB
http://slidepdf.com/reader/full/6-67370-03sn42101userguiderevab 210/511
184 Quantum StorNext User’s Guide
Screen
Chapter 7: Tools Menu FunctionsFile and Directory Actions
Starting or StoppingStorNext File System
Most StorNext operations require that the StorNext File System bestarted, although there may be times when you need to stop the FileSystem.
Click Start to start the File System, or Stop to stop the File System.
Starting or StoppingStorNext StorageManager
StorNext Storage Manager includes the following components:
• Database
• Library Manager
• Policy Manager
• Ticket System
• Notification System
There are conditions which could cause one or more component tostop. If this happens, starting the Storage Manager restarts thesestopped components.
Click Start to start the Storage Manager, or Stop to stop the Storage
Manager.

8/10/2019 6-67370-03_SN42101_UserGuide_RevAB
http://slidepdf.com/reader/full/6-67370-03sn42101userguiderevab 211/511
Quantum StorNext User’s Guide 185
g
Refreshing SystemStatus
When there is a change in system status, sometimes there is a delay inupdating the status. Click Refresh to immediately update the GUIsystem status.
Specifying BootOptions
If you would like StorNext to automatically start File System and StorageManager whenever your system starts, select the option Automaticallystart StorNext software at boot time? and then click Apply.
File and Directory Actions
The Tools menu's File and Directory Actions option enables you toperform various actions on the files and directories in your library.
Chapter 7: Tools Menu FunctionsFile and Directory Actions
(Storage Manager is required to perform all of the file and directoryactions described in this section.)
To access the Tools > File and Directory Actions screen, choose Fileand Directory Actions from the Tools menu. The following informationis displayed for the available files:
• Name: The name of the file
• Owner: The file owner
• Group: The group to which the file belongs
• Size: The size (in bytes) of the file
• Last Modified: The date and time when the file was last modified
At the top of the screen is a dropdown list of Available Actions you canperform for files. Select the file for which you want to perf om theaction, and then choose one of these options from the Available Actionslist:
• Store Files
• Change File Version
• Recover Files
• Recover Directories

8/10/2019 6-67370-03_SN42101_UserGuide_RevAB
http://slidepdf.com/reader/full/6-67370-03sn42101userguiderevab 212/511
186 Quantum StorNext User’s Guide
• Recover Directories
• Retrieve Files
• Retrieve Directory
• Truncate Files
• Move Files
• Modify File Attributes
• View File Information
Store Files Choose this option to store files by policy or custom parameters.
1 Choose File and Directory Actions from the Tools menu. The Tools> File and Directory Actions screen appears.
Chapter 7: Tools Menu FunctionsFile and Directory Actions
Figure 89 File and DirectoryAction Screen
2 Select the file you want to store. If necessary, click Browse and thenclick All Managed Directories to view a list of the managed
directories. Select the directory containing the files to be stored.Mark the files of interest and then click Continue to select them

8/10/2019 6-67370-03_SN42101_UserGuide_RevAB
http://slidepdf.com/reader/full/6-67370-03sn42101userguiderevab 213/511
Quantum StorNext User’s Guide 187
Mark the files of interest and then click Continue to select them.
3 To store the selected file according to policy, at the StoreParameters field, select By Policy.
c Click Apply.
d When the confirmation message appears, click Yes to store thefile, or No to abort.
4 To store the selected file according to custom parameters, at theStore Parameters field, select Custom.
a Enter the following fields:
• Number of Copies: Indicate the number of copies to store
• Truncate Files Immediately: Select this option to truncate
files immediately after storing• Tape Drive Pool: Select the tape drive pool for the selected
file
• Minimum File Size: Specify the minimum file size
• Media Type: Specify the tape drive media type
Chapter 7: Tools Menu FunctionsFile and Directory Actions
b Click Apply.
When the confirmation message appears, click Yes to mount the storethe file, or No to abort.
Change File Version Choose this option to change the file version to a new version.
1 If you have not already done so, choose File and Directory Actions from the Tools menu. The Tools > File and Directory Actions screen appears. (See Figure 89.)
2 Choose Change File Version from the Available Actions dropdownmenu.
Figure 90 Change File VersionScreen

8/10/2019 6-67370-03_SN42101_UserGuide_RevAB
http://slidepdf.com/reader/full/6-67370-03sn42101userguiderevab 214/511
188 Quantum StorNext User’s Guide
3 Select the file whose version want to change. If necessary, clickBrowse to navigate to the file location and then select the file.
4 At the New File Version field, select the new version to which youwant to change for the selected file.
5 Click Apply.
6 When the confirmation message appears, click Yes to dismount themedia, or No to abort.
7 Repeat steps 2 - 6 to change versions for additional files.
Chapter 7: Tools Menu FunctionsFile and Directory Actions
Recover Files Choose this option to recover previously deleted files.
1 If you have not already done so, choose File and Directory Actions from the Tools menu. The Tools > File and Directory Actions screen appears. (See Figure 89.)
2 Choose Recover Files from the Available Actions dropdown menu.3 Click Browse. The Tools > File and Directory Actions > Recover
Files > Browse screen appears.
The Browse screen shows a list of managed directories whichcontain files eligible for recovering.
Figure 91 Recover Files BrowseScreen

8/10/2019 6-67370-03_SN42101_UserGuide_RevAB
http://slidepdf.com/reader/full/6-67370-03sn42101userguiderevab 215/511
Quantum StorNext User’s Guide 189
4 To select files to recover, click the name of the desired directory.
5 When that directory’s files are displayed, select the file(s) you wantto recover by clicking the square checkbox to the left of the file’sname. You can also select all files by clicking the checkbox next tothe Name heading.
6 If desired, you can use one or both filters to restrict the number offiles displayed:
• File Filter: This filter enables you to restrict the search to fileswhose names contain any part of the string you enter at this
Chapter 7: Tools Menu FunctionsFile and Directory Actions
field. For example, if you enter p, only files which include theletter “p” in their file names are shown.
To use the File Filter, enter a letter or string in the File Filter field, and then click Filter.
• Deleted Between: When you enter a beginning and ending
date range, only files which were deleted between those dates(inclusive) are included in search results.
To use the Deleted Between filter:
a Position the cursor in the first field, and then click thecalendar icon.
b Select the desired date and time, and then click the blue X
icon to close the calendar.c Repeat steps a and b at the second date field.
d Click the Filter button to the right of the Deleted Between field to apply the filtering criteria you entered.
7 When you are ready to recover the selected files, click Continue. You are returned to the Tools > File and Directory Actions screen,and the selected files are shown.
8 Click Apply to start a job to recover the selected files, or click Cancel

8/10/2019 6-67370-03_SN42101_UserGuide_RevAB
http://slidepdf.com/reader/full/6-67370-03sn42101userguiderevab 216/511
190 Quantum StorNext User’s Guide
to abort the recovery process.
9 If you clicked Apply, a message informs you that the recovery jobhas started. Click OK to continue.
10 Choose Reports > Jobs to view the results of the file recoveryoperation.
Recover Directories Choose this option to recover previously deleted directories.
1 If you have not already done so, choose File and Directory Actions from the Tools menu. The Tools > File and Directory Actions screen appears. (See Figure 89.)
2 Choose Recover Directories from the Available Actions dropdownmenu.
3 Click Browse. The Tools > File and Directory Actions > RecoverDirectories > Browse screen appears.
Chapter 7: Tools Menu FunctionsFile and Directory Actions
The Browse screen shows a list of managed directories which areeligible for recovering.
Figure 92 Recover DirectoriesBrowse Screen
4 To select directories to recover, click the square checkbox to the leftof the directory’s name You can also select all directories by clicking
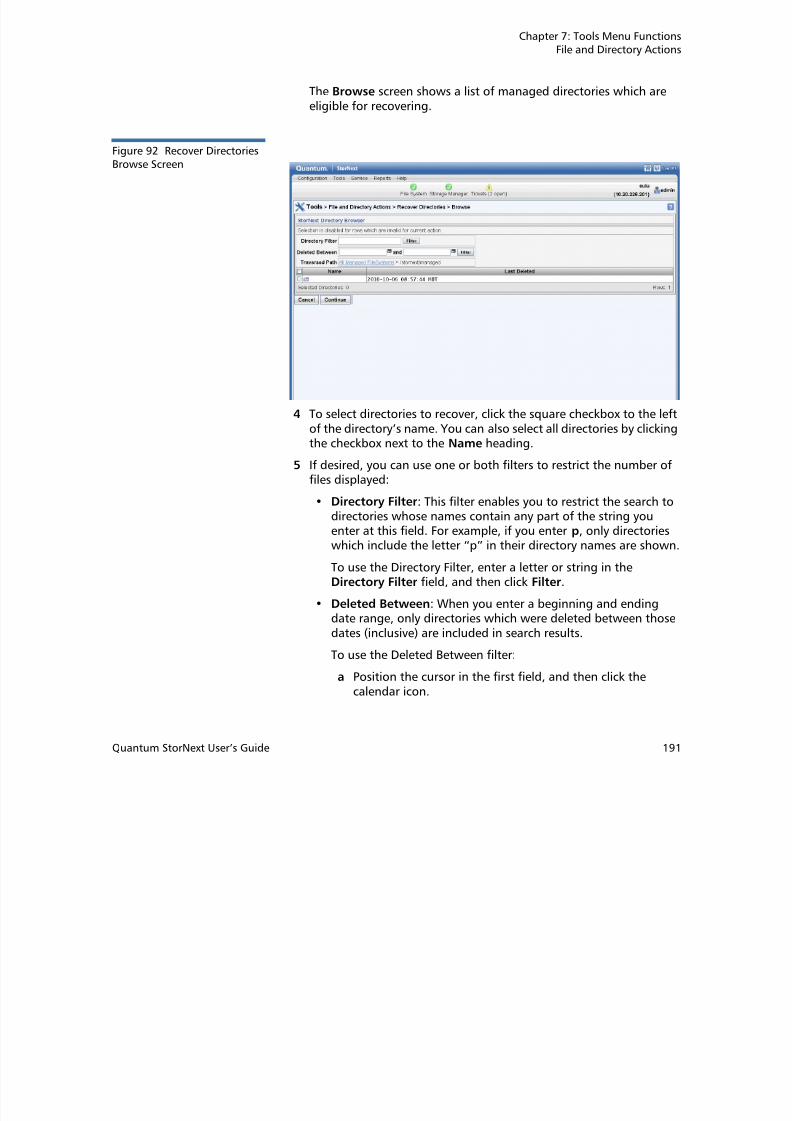
8/10/2019 6-67370-03_SN42101_UserGuide_RevAB
http://slidepdf.com/reader/full/6-67370-03sn42101userguiderevab 217/511
Quantum StorNext User’s Guide 191
of the directory s name. You can also select all directories by clickingthe checkbox next to the Name heading.
5 If desired, you can use one or both filters to restrict the number offiles displayed:
• Directory Filter: This filter enables you to restrict the search todirectories whose names contain any part of the string youenter at this field. For example, if you enter p, only directorieswhich include the letter “p” in their directory names are shown.
To use the Directory Filter, enter a letter or string in theDirectory Filter field, and then click Filter.
• Deleted Between: When you enter a beginning and endingdate range, only directories which were deleted between those
dates (inclusive) are included in search results.To use the Deleted Between filter:
a Position the cursor in the first field, and then click thecalendar icon.
Chapter 7: Tools Menu FunctionsFile and Directory Actions
b Select the desired date and time, and then click the blue Xicon to close the calendar.
c Repeat steps a and b at the second date field.
d Click the Filter button to the right of the Deleted Between field to apply the filtering criteria you entered.
6 When you are ready to recover the selected directories, clickContinue. You are returned to the Tools > File and Directory
Actions screen, and the selected directories are shown.
7 If desired, enter one or both of the Advanced Options:
• Destination Directory: Specify an alternative path name for thedirectory to which you want to save the recovered directory.
• Files Active At: Click the calendar icon and specify a date andtime to include only the files inside the recovered directorywhich were active (not deleted) on or before the specified date.Click the blue X icon to close the calendar.
The ‘Destination Directory’ and ‘Files Active At’ options are validonly when recovering a past instance of a directory. (The normalfunctionality of a recover operation is to recover files or directories
that have been removed.) When recovering an instance of adirectory, the directory may still exist (along with its contents,) buth t i d i d i ‘ h t’ f hi h fil ti i th

8/10/2019 6-67370-03_SN42101_UserGuide_RevAB
http://slidepdf.com/reader/full/6-67370-03sn42101userguiderevab 218/511
192 Quantum StorNext User’s Guide
what is desired is a ‘snapshot’ of which files were active in thedirectory at a point in time.
Consequently, when recovering a directory instance you must usethe ‘Destination Directory’ option to specify a new destinationbecause the source directory may already exist and you do not wantto recover over that directory.
Note: After recovering an instance you end up with an entirelynew managed directory with no relation to the source.
Also when recovering an instance of a directory, the time of thesnapshot is needed. The ‘Files Active At’ option allows you to specifya specific time for the snapshot.
8 Click Apply to start a job to recover the selected directories, or clickCancel to abort the recovery process.
9 If you clicked Apply, a message informs you that the recovery jobhas started. Click OK to continue.
Chapter 7: Tools Menu FunctionsFile and Directory Actions
10 Choose Reports > Jobs to view the results of the directory recoveryoperation.
Retrieve Files Choose this option to retrieve files which have been truncated but not
deleted.1 If you have not already done so, choose File and Directory Actions
from the Tools menu. The Tools > File and Directory Actions screen appears. (See Figure 89.)
2 Choose Retrieve Files from the Available Actions dropdown menu.
Figure 93 Retrieve Files Screen
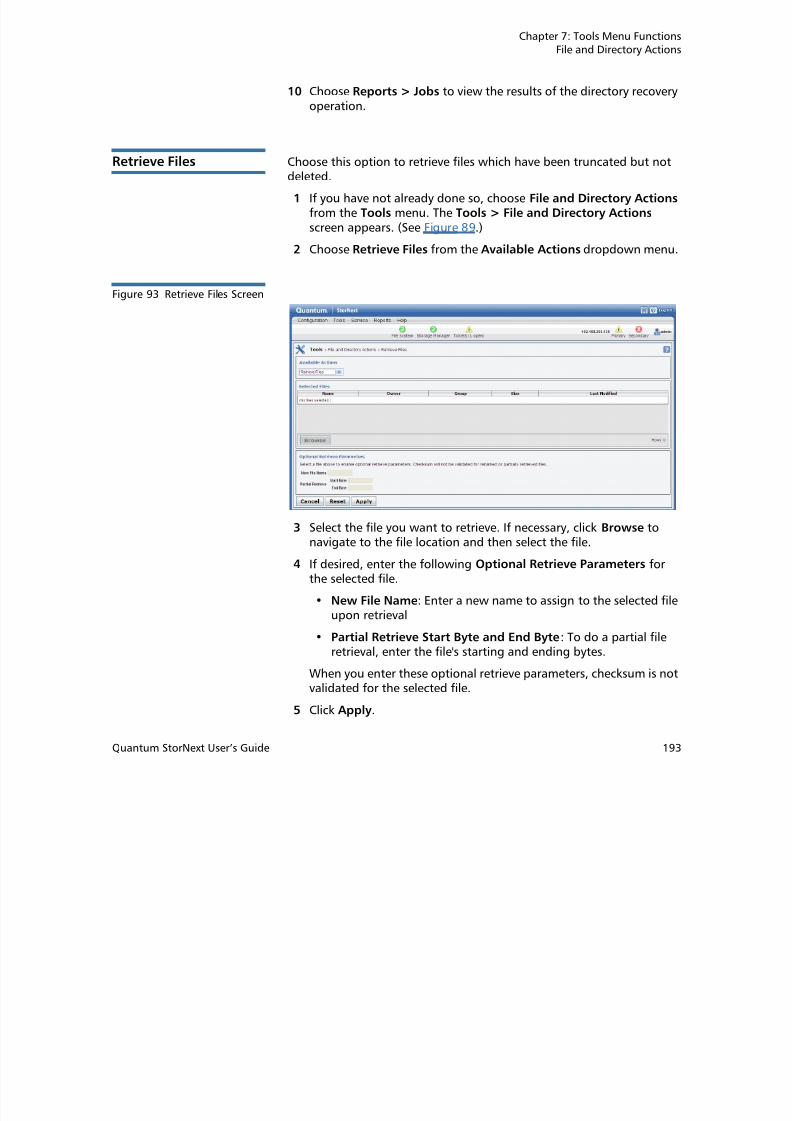
8/10/2019 6-67370-03_SN42101_UserGuide_RevAB
http://slidepdf.com/reader/full/6-67370-03sn42101userguiderevab 219/511
Quantum StorNext User’s Guide 193
3 Select the file you want to retrieve. If necessary, click Browse tonavigate to the file location and then select the file.
4 If desired, enter the following Optional Retrieve Parameters forthe selected file.
• New File Name: Enter a new name to assign to the selected fileupon retrieval
• Partial Retrieve Start Byte and End Byte: To do a partial fileretrieval, enter the file's starting and ending bytes.
When you enter these optional retrieve parameters, checksum is notvalidated for the selected file.
5 Click Apply.
Chapter 7: Tools Menu FunctionsFile and Directory Actions
6 When the confirmation message appears, click Yes to proceed, orNo to abort.
7 Repeat steps 2 - 6 to retrieve additional files.
Retrieve Directory Choose this option to retrieve directories.
1 If you have not already done so, choose File and Directory Actions from the Tools menu. The Tools > File and Directory Actions screen appears. (See Figure 89.)
2 Choose Retrieve Directory from the Available Actions dropdownmenu.
Figure 94 Retrieve DirectoryScreen

8/10/2019 6-67370-03_SN42101_UserGuide_RevAB
http://slidepdf.com/reader/full/6-67370-03sn42101userguiderevab 220/511
194 Quantum StorNext User’s Guide
3 Select the directory you want to retrieve. If necessary, click Browse to navigate to the directory location and then select the directory.
4 Click Apply.
5 When the confirmation message appears, click Yes to proceed, orNo to abort.
6 Repeat steps 2 - 5 to retrieve additional directories.
Truncate Files Choose this option to truncate files.
Chapter 7: Tools Menu FunctionsFile and Directory Actions
1 If you have not already done so, choose File and Directory Actions from the Tools menu. The Tools > File and Directory Actions screen appears. (See Figure 89.)
2 Choose Truncate Files from the Available Actions dropdownmenu.
Figure 95 Truncate Files Screen
3 Select the file you want to truncate. If necessary, click Browse toi t t th fil l ti d th l t th fil

8/10/2019 6-67370-03_SN42101_UserGuide_RevAB
http://slidepdf.com/reader/full/6-67370-03sn42101userguiderevab 221/511
Quantum StorNext User’s Guide 195
navigate to the file location and then select the file.
4 Click Apply.
5 When the confirmation message appears, click Yes to proceed, orNo to abort.
6 Repeat steps 2 - 5 to truncate additional files.
Move Files Choose this option to move files.
1 If you have not already done so, choose File and Directory Actions from the Tools menu. The Tools > File and Directory Actions screen appears. (See Figure 89.)
Chapter 7: Tools Menu FunctionsFile and Directory Actions
2 Choose Move Files from the Available Actions dropdown menu.
Figure 96 Move Files Screen
3 Select the file you want to move. If necessary, click Browse tonavigate to the file location and then select the file.
4 At the New Media field, select one of these options for the file:
• Media ID: Specify the unique identifier for the media to whichyou are moving the selected file

8/10/2019 6-67370-03_SN42101_UserGuide_RevAB
http://slidepdf.com/reader/full/6-67370-03sn42101userguiderevab 222/511
196 Quantum StorNext User’s Guide
y g
• Media Type: Specify the media type for the media to which youare moving the selected file
• Blank Media: Select this option if you are moving the selectedfile to blank media
5 Click Apply.
6 When the confirmation message appears, click Yes to proceed, orNo to abort.
7 Repeat steps 2 - 6 to move additional files.
Modify File Attributes Choose this option to modify attributes for the selected file.
1 If you have not already done so, choose File and Directory Actions from the Tools menu. The Tools > File and Directory Actions screen appears. (See Figure 89.)
Chapter 7: Tools Menu FunctionsFile and Directory Actions
2 Choose Modify File Attributes from the Available Actions dropdown menu.
Figure 97 Modify FileAttributes Screen
3 Select the file whose attributes you want to change. If necessary,

8/10/2019 6-67370-03_SN42101_UserGuide_RevAB
http://slidepdf.com/reader/full/6-67370-03sn42101userguiderevab 223/511
Quantum StorNext User’s Guide 197
click Browse to navigate to the file location and then select the file.
4 At the File Attributes field, enter these options. Required fields aremarked with an asterisk. (For information about what to enter ateach field, see the online help.)
• Number of Copies• Store
• Relocate
• Truncate
• Stub File Size
5 Click Apply.
6 When the confirmation message appears, click Yes to proceed, orNo to abort.
7 Repeat steps 2 - 6 to apply attributes to additional files.
Chapter 7: Tools Menu FunctionsFile and Directory Actions
View File Information Choose this option to view detailed information about the selected file.
1 If you have not already done so, choose File and Directory Actions from the Tools menu. The Tools > File and Directory Actions screen appears. (See Figure 89.)
2 Choose View File Info from the Available Actions dropdownmenu.
Figure 98 View File Info Screen

8/10/2019 6-67370-03_SN42101_UserGuide_RevAB
http://slidepdf.com/reader/full/6-67370-03sn42101userguiderevab 224/511
198 Quantum StorNext User’s Guide
3 Select the files whose attributes you want to view. If necessary, clickBrowse to navigate to the file location and then select the file.
4 Click File Info to view information.
5 Click Done when you are finished viewing file information.
Chapter 7: Tools Menu FunctionsFile Systems
File Systems
The Tools > File Systems menu contains options that enable you toperform the following file system-related tasks:
• Label Disks: Apply EFI or VTOC label names for disk devices in yourStorNext libraries
• Check File System: Run a check on StorNext files systems prior toexpanding or migrating the file system
• Affinities: Allocate additional storage to a file system by creating anew stripe group in the file system configuration file, and assigning
new disks to the stripe group• Migrate File System: Move data files from a source file system to a
destination stripe group, freeing stripe groups so they can beremoved from an existing StorNext file system
• Truncation Parameters: Enter truncation parameters for your filesystems in order to free up file storage that isn’t being actively used
These tasks are described in Chapter
4, File System Tasks

8/10/2019 6-67370-03_SN42101_UserGuide_RevAB
http://slidepdf.com/reader/full/6-67370-03sn42101userguiderevab 225/511
Quantum StorNext User’s Guide 199
Storage Manager
The Tools > Storage Manager menu contains options that enable youto perform the following Storage Manager-related tasks:
• Storage Components: View your system's libraries, storage disks,and tape drives, and place those devices online or offline
• Drive Pool: View, add, edit, or delete drive pools (groups of tapedrives allocated for various administrator-defined storage tasks)
• Media Actions: Perform various actions on the storage media in
your library
• Storage Exclusions: Specify file names to exclude from StorNextStorage Manager
Chapter 7: Tools Menu FunctionsReplication and Deduplication
• Truncation Exclusions: Specify file paths to exclude from thetruncation process
• Tape Consolidation: Enter parameters for automaticallyconsolidating space on tape media
• Library Operator Interface: The StorNext Library Operator Interface
allows you to perform media-related actions remotely from thelibrary
• Software Requests: View current software requests in progress orcancel a request. (A software request is a StorNext GUI request tothe command line interface to perform an action.)
• Scheduler: Schedule tasks to run automatically based on a specifiedschedule
• Alternate Retrieval Location: Specify a remote retrieval location touse in situations where files stored on tape or a storage disk.
• Distributed Data Mover: Spread the distribution of data acrossseveral machines rather than the primary server.
These tasks are described in Chapter
5, Storage Manager Tasks
R li ti d D d li ti

8/10/2019 6-67370-03_SN42101_UserGuide_RevAB
http://slidepdf.com/reader/full/6-67370-03sn42101userguiderevab 226/511
200 Quantum StorNext User’s Guide
Replication and Deduplication
The Tools > Replication/Deduplication menu options enable you toperform the following tasks related to replication:
• Administration: View current progress for replication, datadeduplication, and truncation operations. Also pause or resumereplication, deduplication and truncation.
• Replication Targets: Add replication hosts and mount points toyour replication targets, and edit properties for existing hosts andmount points. Also delete unwanted replication targets.
• Replication Bandwidth: Configure multilinks and bandwidth limitsfor replication.
Replication and deduplication tasks are described in Chapter 6,Replication and Deduplication
Chapter 7: Tools Menu FunctionsHA
HA
The Tools > HA menu options enable you to perform the following HA-related tasks:
• Convert: Convert a shared file system to high availabilityconfiguration
• Manage: View the current status of the file systems on your HAsystem and perform various HA-related functions such as starting orstopping nodes on the HA cluster
These tasks are described in Chapter 9,
Converting to HA

8/10/2019 6-67370-03_SN42101_UserGuide_RevAB
http://slidepdf.com/reader/full/6-67370-03sn42101userguiderevab 227/511
Quantum StorNext User’s Guide 201
Chapter 7: Tools Menu FunctionsHA

8/10/2019 6-67370-03_SN42101_UserGuide_RevAB
http://slidepdf.com/reader/full/6-67370-03sn42101userguiderevab 228/511
202 Quantum StorNext User’s Guide
Chapter 8
Service Menu Functions
The StorNext Service Menu contains the following options:
• Health Check: Perform one or more health checks on StorNext andview recent health check results
• Capture State: Obtain and preserve detailed information about the
current StorNext system state
• System Backup: Run a backup of StorNext software
Ad i Al t Vi i f ti l b t t ti iti

8/10/2019 6-67370-03_SN42101_UserGuide_RevAB
http://slidepdf.com/reader/full/6-67370-03sn42101userguiderevab 229/511
Quantum StorNext User’s Guide 203
• Admin Alerts: View informational messages about system activities
• Tickets: View, edit, or close service tickets generated for the system
• Logging: Enables robust debugging mode for advanced tracing
The Health Check Function
The Health Check feature enables you to run various diagnostic checkson your StorNext system. This screen shows the available tests, as wellas the start time, finish time, and status for the last time each test ran.
Here are the diagnostic tests available:
• Archive: Verify that all configured archives are online
Chapter 8: Service Menu FunctionsThe Health Check Function
• Config: Verify that affinities are configured correctly in SNSM formanaged file systems, and that SNSM-managed file systems areidentified and configured correctly
• Database: Verify database integrity.
• Disk Space: Verify that enough disk space exists for the SNSM
database tables, logging, and other functions• Drive: Verify that all configured drives are online
• Media: Verify that there are enough media available for all policiesto store all file copies, and that SNSM media are configuredcorrectly
• Policies: Verify that SNSM is keeping up with file system events andstore candidate processing
Running a Health Check Use this procedure to run a health check.
1 Choose Health Check from the Service menu. The Service >Health Check screen appears.
Figure 99 Health Check Screen

8/10/2019 6-67370-03_SN42101_UserGuide_RevAB
http://slidepdf.com/reader/full/6-67370-03sn42101userguiderevab 230/511
204 Quantum StorNext User’s Guide
Chapter 8: Service Menu FunctionsThe Health Check Function
2 Select one or more tests to run by clicking the desired check. (Thereis no need to hold down the Control key while clicking.) To deselecta test, click it again.
3 Click Run Selected to run the tests you selected. Or, to run all tests,click Run All.
Viewing the HealthCheck Results
After a test has been run successfully (as indicated by “Success” in theStatus column), you can view test results.
1 To view results for one or more tests, select the desired tests andthen click View Selected.
2 To view results for all successfully completed tests, click View All.
3 When you are finished viewing, click Done.
Regardless of which View option you choose, test results are shown forthe last successful tests completed regardless of the date on which theyran. For example, if you select two tests and then click View Selected,there might be an interval as long as a week or more between the finishdates for the two tests.
Figure 100 Health Check >View Selected Screen
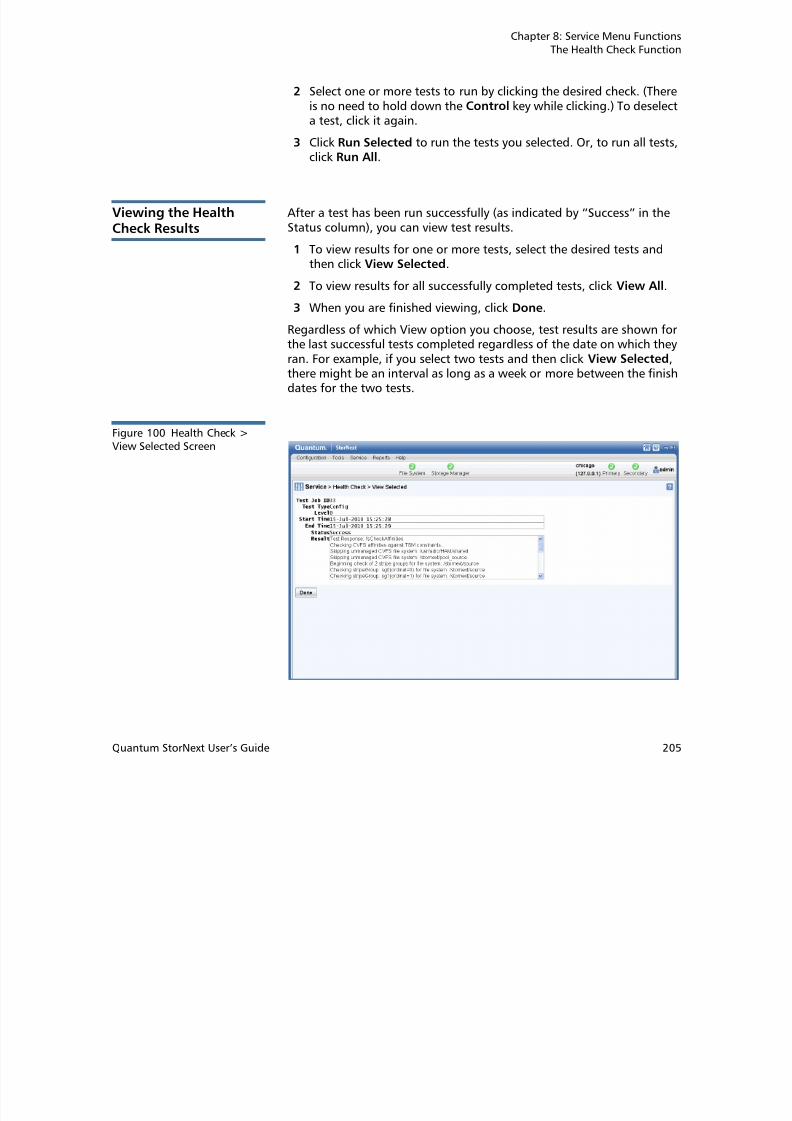
8/10/2019 6-67370-03_SN42101_UserGuide_RevAB
http://slidepdf.com/reader/full/6-67370-03sn42101userguiderevab 231/511
Quantum StorNext User’s Guide 205
Chapter 8: Service Menu FunctionsThe Capture State Function
Viewing Health CheckHistories
You can also view a history (up to five runs) of each health check testthat has been run. This can be useful for comparing results over a timespan.
1 Select the tests whose history you want to view.
2 Click History. The Service > Health Check > View History screenappears.
Figure 101 Health Check >View History Screen

8/10/2019 6-67370-03_SN42101_UserGuide_RevAB
http://slidepdf.com/reader/full/6-67370-03sn42101userguiderevab 232/511
206 Quantum StorNext User’s Guide
3 When you are finished viewing history information, click Done toreturn to the Service > Health Check screen.
The Capture State Function
The StorNext Capture State feature enables you to create a log that
captures the current state of your system. This log assists Quantumsupport personnel analyze and debug some problems in the storagesystem.
Running Capture State creates a log file named using the format“snapshot-machinehostname-YYYYMMDDHHMMSS.tar.gz..”

8/10/2019 6-67370-03_SN42101_UserGuide_RevAB
http://slidepdf.com/reader/full/6-67370-03sn42101userguiderevab 233/511
Chapter 8: Service Menu FunctionsThe System Backup Function
Deleting a PreviousSystem State Capture
Follow this procedure to delete an unwanted Capture State file.
1 If you have not already done so, choose Capture State from theService menu. The Service > Capture State screen appears. (SeeFigure 102 on page 207.) All previously captured snapshots areshown.
2 Select the file you want to delete, and then click Delete.
3 When a confirmation screen prompts you to confirm that you wantto delete the file, click Yes to continue or No to abort.
4 After the status screen informs you that the file was successfullydeleted, click OK .
Creating a CaptureState for an HASecondary Node
When you use the Capture State feature on an HA system, systeminformation for the primary node is captured by default.
To create a Capture State file for the secondary node, click CaptureSecondary. Information about your secondary node is captured andsaved to a file on the primary node. After the capture processcompletes, this file appears in the list of Capture State files.
As with Capture State files for the primary node, you can download ordelete Capture State files for the secondary node. The processes fordownloading or deleting Capture State files for the secondary node isidentical to downloading or deleting a Capture State file for the primary
8/10/2019 6-67370-03_SN42101_UserGuide_RevAB
http://slidepdf.com/reader/full/6-67370-03sn42101userguiderevab 234/511
208 Quantum StorNext User’s Guide
identical to downloading or deleting a Capture State file for the primarynode.
Note: The Capture Secondary function applies only to HA systems.
The System Backup Function
The Service menu's Backup option allows you to perform a full or partialbackup.
1 Choose Backups from the Service menu. The Service > Backup screen appears.
Chapter 8: Service Menu FunctionsThe Admin Alerts Function
Figure 103 Backup Screen
2 Click Full Backup to perform a full backup, or click Partial Backup to perform a partial backup.
3 After a message informs you that the backup was initiated
successfully, click OK .

8/10/2019 6-67370-03_SN42101_UserGuide_RevAB
http://slidepdf.com/reader/full/6-67370-03sn42101userguiderevab 235/511
Quantum StorNext User’s Guide 209
The Admin Alerts Function
Admin alerts are informational messages about system activities youmight want to be aware of, but are not necessarily an error condition.For example, issues related to the Distributed Data Mover featuregenerate admin alerts. Admin alerts typically do not require any actionfrom StorNext users.
There are different types of admin alerts. Here are some conditions thatcould produce an admin alert:
• TSM Health Checks disk space warning
• TSM Intrusive Health Checks when drives are mounted
• MSM media console errors
Chapter 8: Service Menu FunctionsThe Admin Alerts Function
• MSM drive dismount request when drive is already dismounted
• MSM media audit failures
1 To view admin alerts, select Admin Alerts from the Service menu.The Service > Admin Alerts screen appears.
Figure 104 Admin AlertsScreen
2 O h S i d i l d f h

8/10/2019 6-67370-03_SN42101_UserGuide_RevAB
http://slidepdf.com/reader/full/6-67370-03sn42101userguiderevab 236/511
210 Quantum StorNext User’s Guide
2 On the Service > Admin Alerts screen you can do any of thefollowing:
• View a specific alert by scrolling to the right of the screen (if thealert is longer than can be displayed on one screen)
• Refresh (update) the list by clicking the Refresh button
• Delete an individual alert by selecting the desired alert and thenclicking the Delete button
• Delete all alerts by clicking the Delete All button
Chapter 8: Service Menu FunctionsThe Tickets Function
The Tickets Function
The Service menu's Tickets option allows you to view a list of RAS ticketsthat relate to system faults or errors. Ticket details provide a summary of
the system fault, an area for Analysis notes, and contains aRecommended Actions link to help you correct the fault. On this screenyou can view the ticket number, current status, priority, date and timethe ticket was last updated, and a brief summary of the error condition.
By default, tickets are listed with the most recently opened ticketsdisplayed first. If desired, you can click the column headers to changethe sorting. For example, click the Ticket heading to display tickets inascending or descending numerical order.
Viewing TicketInformation
1 From the StorNext home page, choose Tickets from the Service menu. The Service > Tickets screen appears.
Figure 105 Tickets Screen

8/10/2019 6-67370-03_SN42101_UserGuide_RevAB
http://slidepdf.com/reader/full/6-67370-03sn42101userguiderevab 237/511
Quantum StorNext User’s Guide 211
The Service > Tickets screen provides the following information:
Chapter 8: Service Menu FunctionsThe Tickets Function
• Ticket: The RAS ticket number, displayed in the order in which itwas created
• Status: The ticket’s current status: OPEN or CLOSED
• Priority: The ticket’s priority based on system impact: HIGH,MEDIUM, or LOW
• Last Update: The date of the last system status update
• Summary: A short summary of the fault that triggered creatingthe RAS ticket
2 If desired, change the display by choosing Show All Tickets, ShowClosed Tickets, or Show Open Tickets in the dropdown list at thebottom of the screen.
3 Highlight the ticket you wish to view, and then click View. TheService > Tickets > View Ticket > [number] screen appears.
Figure 106 Tickets > ViewTicket Screen

8/10/2019 6-67370-03_SN42101_UserGuide_RevAB
http://slidepdf.com/reader/full/6-67370-03sn42101userguiderevab 238/511
212 Quantum StorNext User’s Guide
This screen provides the following information:
• Ticket Number: The number of the ticket in the displayed ticketlist
• Date Opened: The date and time the ticket was created
• Status: The current status of the ticket: OPEN or CLOSED
Chapter 8: Service Menu FunctionsThe Tickets Function
• Priority: The ticket’s priority based on system impact: HIGH,MEDIUM, and LOW
• Summaries: A brief description of the ticket.
• Event Details: Detailed information about event that triggeredthe ticket, including a link that allows you to View
Recommended Actions which will help you correct the fault orcondition
• Analysis: Any user-entered comments pertaining to the fault orcondition, such as a recommended action
4 To see recommended actions for the ticket, click the ViewRecommended Actions link. The Recommended Actions screenappears provides information and steps to correct the condition or
fault that generated the RAS ticket. Follow the instructions on thescreen to correct the condition or fault. When you are finishedviewing the recommended actions, close the window.
5 When you are finished viewing ticket information, click Done toreturn to the Service > Tickets screen.
Editing TicketInformation
Follow this procedure to add comments or notes to the ticket in the Analysis field:
1 Select the desired ticket and then click Edit. The Service > Tickets>Edit Ticket > [number] screen appears.
8/10/2019 6-67370-03_SN42101_UserGuide_RevAB
http://slidepdf.com/reader/full/6-67370-03sn42101userguiderevab 239/511
Quantum StorNext User’s Guide 213
[ ] pp
Chapter 8: Service Menu FunctionsLogging
Figure 107 Tickets > EditTicket Screen
2 Make your comments or notes in the Analysis field.
3 Click Apply to save your changes. When you are ready to return tothe previous screen, click Close. (To return to the previous screenwithout saving your changes, click Cancel.)
Cl i Ti k t Wh l d t t i ti k t i f ti l

8/10/2019 6-67370-03_SN42101_UserGuide_RevAB
http://slidepdf.com/reader/full/6-67370-03sn42101userguiderevab 240/511
214 Quantum StorNext User’s Guide
Closing Tickets When you no longer need to retain ticket information, you can close(delete) selected tickets or all tickets by following this procedure:
1 To close a specific ticket, select the desired ticket and then click
Close.2 To delete all tickets, click Close All.
Logging
The Service menu’s Logging option is a robust debugging tool whichenables you to turn on tracing for various system components. Thefeature is useful if you have been asked by Quantum Service personnel
Chapter 8: Service Menu FunctionsLogging
to enable debugging for one or more components in order to help themidentify and diagnose a particular error.
When logging (debugging) is enabled, information is copied to thesame location as regular log files. (For more information about logs, seeStorNext Logs on page 229.)
Note: The default value for the four system components for whichyou can enable logging is “disabled.” Enabling logging canhave a minor impact on overall system performance, so youshould not enable logging for a component unless you havebeen instructed to do so by a Quantum Support representative.
Enabling Logging Follow these steps to enable logging:
1 From the StorNext home page, choose Logging from the Service menu. The Service > Logging screen appears.
Figure 108 Logging Screen

8/10/2019 6-67370-03_SN42101_UserGuide_RevAB
http://slidepdf.com/reader/full/6-67370-03sn42101userguiderevab 241/511
Quantum StorNext User’s Guide 215
2 As necessary, enable logging for any of the following system
components:
• Application Debug Logging: This option enables debuggingfor StorNext.

8/10/2019 6-67370-03_SN42101_UserGuide_RevAB
http://slidepdf.com/reader/full/6-67370-03sn42101userguiderevab 242/511
Chapter 9
Converting to HA
The StorNext High Availability (HA) feature allows you to operate aredundant server that can quickly assume control of the primary server’soperations in the event of software, hardware and network failures.
This chapter describes how to configure HA for StorNext. For a muchmore detailed discussion about how HA works, see Appendix C,
High
Availability Systems.

8/10/2019 6-67370-03_SN42101_UserGuide_RevAB
http://slidepdf.com/reader/full/6-67370-03sn42101userguiderevab 243/511
Quantum StorNext User’s Guide 217
HA Overview
The StorNext HA feature is a special StorNext configuration withimproved availability and reliability. The configuration consists of twosimilar servers, shared disks and possibly tape libraries. StorNext isinstalled on both servers. One of the servers is dedicated as the initialprimary server and the other the initial standby server.
StorNext File System and Storage Manager run on the primary server.The standby server runs StorNext File System and special HA supporting
software.
The StorNext failover mechanism allows the StorNext services to beautomatically transferred from the current active primary server to thestandby server in the event of the primary server failure. The roles of theservers are reversed after a failover event. Only one of the two servers is
Chapter 9: Converting to HA HA Terms and Concepts
allowed to control and update StorNext metadata and databases at anygiven time. The HA feature enforces this rule by monitoring forconditions that might allow conflicts of control that could lead to datacorruption.
StorNext provides two main HA functions: Convert (to) HA andManage HA .
HA Terms and Concepts
This section defines key terms and concepts you should become familiarwith before converting to an HA system.
Failover 72QUd’ nis the process of passing control of a file system from an FSM onone MDC to a standby FSM on a redundant MDC. When that FSM is forthe HaShared file system, Primary status transfers to the redundantMDC along with all the processing that occurs only on the Primary MDC.
This includes all the HaManaged FSMs, the Storage Manager processes,and the blockpool server. When an FSM does not relinquish controlcleanly, an HA Reset can occur to protect against possible corruption offile system metadata and Storage Manager databases. (See PrimaryNode and Secondary Node.)

8/10/2019 6-67370-03_SN42101_UserGuide_RevAB
http://slidepdf.com/reader/full/6-67370-03sn42101userguiderevab 244/511
218 Quantum StorNext User’s Guide
Node and Secondary Node.)
Primary Node The primary node is the main server in your configuration. Processingoccurs on this server until system failure makes it necessary to switch toanother server. Also known as the local node. The primary status istransient and dynamic, not fixed to a specific machine.
Secondary Node The secondary node is the redundant or secondary server in your
configuration. If your primary server fails or shuts down, processingautomatically moves to this secondary server so there is no interruptionin processing. Like primary status, the secondary status is transient anddynamic, not fixed to a specific machine. Also known as the peer node.
Chapter 9: Converting to HA HA Terms and Concepts
Virtual IP (vIP) Virtual IP or vIP is a fixed IP address that is automatically associated withthe Primary MDC to provide a static IP address for replication anddeduplication access to the target server in an HA cluster, and for accessto the blockpool.
Following are some general requirements for vIP addresses as they apply
to HA:1 The vIP should be static (currently StorNext supports only static IP
for HA).
2 The NIC should have a physical IP address assigned.
3 The vIP should be a real and unique IP address.
4 The vIP should be reachable by other nodes, and you should also be
able to reach other nodes from the vIP address. For this reason,Quantum recommends that the vIP address be on the same subnetof the physical IP address of the same NIC.
When the NIC is also involved in multilink communication, the followingadditional requirement applies:
• The grouping address (taking the first configured maskbits of the IPaddress) of the physical and vip IPs on the same NIC should be the
same, and unique on the node. Your local Network Administrator should provide a reserved IP addressand netmask for this purpose.
For more information about multiple-NIC configurations, seeC fi i M lti l NIC 354

8/10/2019 6-67370-03_SN42101_UserGuide_RevAB
http://slidepdf.com/reader/full/6-67370-03sn42101userguiderevab 245/511
Quantum StorNext User’s Guide 219
Configuring Multiple NICs on page 354.
Virtual Netmask This is a 32-bit mask used to divide a virtual IP address into subnets andspecify the network’s available hosts.
HA Reset This is the HA mechanism introduced in StorNext 4.0 to replace theprevious STONITH mechanism. Like STONITH, HA Reset also has two
nodes with one operating as primary or active node, and the otheroperating as the secondary or standby node. The primary node can resetitself on the hardware level. This new HA feature does not require apower brick to reset a node.
Chapter 9: Converting to HA Preparing for HA Conversion
Preparing for HA Conversion
Before you convert to an HA system, you should assess your needs andcurrent configuration. At a minimum, both the primary and secondary
node should meet the minimum configuration requirements outlined inthe StorNext Installation Guide.
You will also need to reserve an IP address in your local domain for useas the virtual IP address for using the HA cluster as a replication/ deduplication target, so obtain an IP address and netmask from yournetwork administrator.
Caution: Before you attempt this or any other major systemconfiguration change, you should make a complete backupbefore proceeding.
Pre-Conversion Steps Before converting to HA, you should perform the following steps:
1 Identify two servers, which must have similar hardware running thesame version of Linux, and have identical LAN and SAN connectivity.For example, on multiple Ethernet port connections, both systemsmust be connected to the same Ethernet ports (eth0 on System Aand System B going LAN1, eth1 on System A and System B going toLAN2 etc )
8/10/2019 6-67370-03_SN42101_UserGuide_RevAB
http://slidepdf.com/reader/full/6-67370-03sn42101userguiderevab 246/511
220 Quantum StorNext User’s Guide
LAN2, etc.)
2 Synchronize the clocks on both systems.
3 Install StorNext on both servers.
4 Enter StorNext license information on both server nodes.
Note: Although licenses must be entered on both HA MDCs,StorNext must be run only on the secondary for thispurpose.
Also, if you manually edit the license.dat file, you mustrestart StorNext after making changes.
5 Launch StorNext on one server.

8/10/2019 6-67370-03_SN42101_UserGuide_RevAB
http://slidepdf.com/reader/full/6-67370-03sn42101userguiderevab 247/511
Chapter 9: Converting to HA Converting to HA
• The conversion process converts one node at a time. The secondnode should be converted as soon as possible after the first node.
• StorNext operating files will be moved to the HaShared file system,and this move cannot easily be reversed.
• Following conversion, the Primary node is identified by the vIP forReplication/Deduplication.
• Replication/Deduplication policies must be changed to use the vIP:
• The global policy for each file system must use it as the “Addressfor Replication and Deduplication”
• Replication policies must use it as the Target for ReplicationSchedules
• If multilink is configured, the vIP address should be used.• Prior to the conversion you MUST verify that users and groups
created by StorNext on both MDCs have the same (numeric)uid/gid. If they do not have the same uid/gid, permissionproblems will occur after converting to HA.
HA ConversionProcedure
Follow these steps to configure HA:
1 Choose High Availability > Convert from the Tools menu. TheTools >High Availability screen appears.

8/10/2019 6-67370-03_SN42101_UserGuide_RevAB
http://slidepdf.com/reader/full/6-67370-03sn42101userguiderevab 248/511
222 Quantum StorNext User’s Guide
Chapter 9: Converting to HA Converting to HA
Figure 109 Tools > HA Screen
2 At the Shared File System field, select the shared file system youwant to convert to HA.
Caution: Once you convert a file system to HA you cannot undothe operation, so choose carefully when selecting thefile system.
3 At the MDC Address field select one IP address to be placed in the

8/10/2019 6-67370-03_SN42101_UserGuide_RevAB
http://slidepdf.com/reader/full/6-67370-03sn42101userguiderevab 249/511
Quantum StorNext User’s Guide 223
3 At the MDC Address field, select one IP address to be placed in the
ha_peer file for use in administrative operations between the MDCsin the HA Cluster.
4 If your HA cluster also runs the blockpool, select Enable and thenenter the virtual IP address and virtual netmask. (Ask your networkadministrator for the vIP address and netmask.)
5 Click Convert to convert the primary node to HA.
6 Enter the IP address of the secondary system on the same LAN, andthen click Scan. If you do not already have licenses for the
secondary system in the license file, you will be required to switch tothe license page to import them before continuing. (Theinformation comes from the individual license.dat files on bothMDCs. StorNext merges the two into one file before converting thesecondary.)
Chapter 9: Converting to HA Managing HA
Note: Until you have performed the scan, you cannot import thelicense file for the secondary system using StorNext’simport function. After you have performed the scan youcan import licenses for the secondary. Following theconversion to HA, the license file will contain both primaryand secondary licenses and will be present on both servers.
7 Click Convert to convert the secondary system.
Managing HA
The StorNext Manage HA screen is used to monitor the current statusesof your primary and secondary servers.
The screen includes Enter Config Mode and Exit Config Mode buttonsto place the HA Cluster in a state that allows the Primary MDC to restartCVFS and individual FSMs without incurring an HA Reset, failover of anyfile systems, or transfer of Primary status to the peer MDC. This is
required for making configuration changes to the HaShared file systemthrough the GUI.
Follow these steps to lock the HA cluster and enter Config mode, andsubsequently to exit Config mode:
1 Choose High Availability > Manage from the Tools menu The

8/10/2019 6-67370-03_SN42101_UserGuide_RevAB
http://slidepdf.com/reader/full/6-67370-03sn42101userguiderevab 250/511
224 Quantum StorNext User’s Guide
1 Choose High Availability > Manage from the Tools menu. TheManage High Availability screen appears.
Chapter 9: Converting to HA Managing HA
Figure 110 Manage HA Screen
2 Click Enter Config Mode.
3 When the confirmation message appears, click Yes to proceed or No to abort.
4 Click OK when a message informs you that the HA cluster wassuccessfully locked.
5 When you are ready to unlock the cluster and exit Config mode,click Exit Config Mode. All file systems will be stopped on theprimary MDC and then restarted on both MDCs.
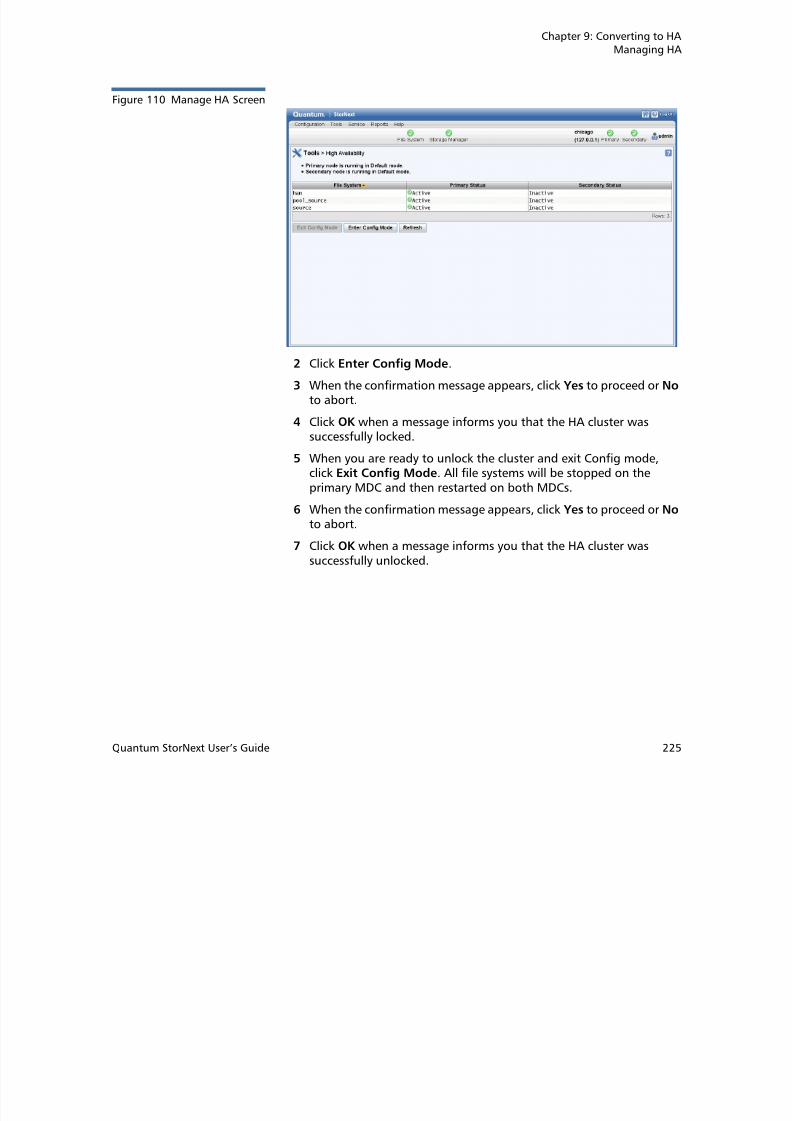
8/10/2019 6-67370-03_SN42101_UserGuide_RevAB
http://slidepdf.com/reader/full/6-67370-03sn42101userguiderevab 251/511
Quantum StorNext User’s Guide 225
6 When the confirmation message appears, click Yes to proceed or No to abort.
7 Click OK when a message informs you that the HA cluster wassuccessfully unlocked.
Chapter 9: Converting to HA HA Statuses and Reporting
HA Statuses and Reporting
StorNext does not currently have an HA report, but you can use the HAlog to track activity related to the nodes in your HA system, such as
whether a node is currently active, whether synchronization hascompleted, and so on.
Troubleshooting HA
The Troubleshooting appendix in this guide contains simpletroubleshooting procedures pertaining to HA. For more information, seeTroubleshooting.

8/10/2019 6-67370-03_SN42101_UserGuide_RevAB
http://slidepdf.com/reader/full/6-67370-03sn42101userguiderevab 252/511
226 Quantum StorNext User’s Guide
Chapter 10
StorNext Reports
The Reports Menu contains the following options:
• StorNext Logs: Access logs of StorNext operations
• The Jobs Report: View a list of pending and completed jobs on thesystem
• The Files Report: View information about specific files, such as theowner, group, policy class, permissions, and copy information
• The Drives Reports: View information about the drives in yourlibraries, including the serial number and current state and status
• The Tape Consolidation Report: View information pertaining to the

8/10/2019 6-67370-03_SN42101_UserGuide_RevAB
http://slidepdf.com/reader/full/6-67370-03sn42101userguiderevab 253/511
Quantum StorNext User’s Guide 227
media in selected libraries or all libraries, including the media ID,type and class, as well as the number of files and the last access
date and time
• The Relations Report: View the names of the policy classes whichcorrespond to the managed directories in your system
• The File Systems Report: View file system statistics including activeclients, space, size, disks, and stripe groups
• The SAN Devices Report: View information about devices currently
attached to your SAN, including disks/LUNs, libraries, and tapedrives
• The Tape Consolidation Report: View statistics on the tapeconsolidation (defragmenting) process
Chapter 10: StorNext Reports
• The SAN and LAN Clients Report: View statistics for StorNext clients,including the number of connected clients and distributed LANclients, and client performance
• The LAN Client Performance Report: View information aboutdistributed LAN clients and servers, including read and write speed
• Replication Deduplication Reports
• Policy Activity Report: View replication and deduplicationperformance statistics
• Policy Summary Report: View replication and deduplicationinformation for each policy
• The Distributed Data Mover Report: View activity related to theDistributed Data Mover feature
• The Gateway Metrics Report: View information and activity relatedto your gateways, clients, and file systems
Report NavigationControls
If a log or report spans more than one screen, navigation controls at thebottom of the screen allow you to select a page by number, or to viewone of these pages.
8/10/2019 6-67370-03_SN42101_UserGuide_RevAB
http://slidepdf.com/reader/full/6-67370-03sn42101userguiderevab 254/511
228 Quantum StorNext User’s Guide
Chapter 10: StorNext ReportsStorNext Logs
StorNext Logs
Report menu options enable you to access and view any of thefollowing types of logs:
• StorNext Logs: Logs about each configured file system.
• File Manager Logs: Logs that track storage errors, etc. of theStorage Manager.
• Library Manager Logs: Logs that track library events and status
• Server Logs: Logs that record system messages.
• StorNext Web Server Logs: Various logs related to the web server.
• StorNext Database Logs: Logs that track changes to the internaldatabase.
• Replication/Deduplication Logs: Logs that track the progress andstatus of data replication or data deduplication operations.
• HA Logs: Logs that track activity related to the nodes in your HAsystem, such as whether a node is currently active, whether
synchronization has completed, and so on.Use the following procedure to access the StorNext log files. The processis the same regardless of the type of log you are viewing.
1 Select Logs from the Reports menu. The Reports > Logs screenappears.

8/10/2019 6-67370-03_SN42101_UserGuide_RevAB
http://slidepdf.com/reader/full/6-67370-03sn42101userguiderevab 255/511
Quantum StorNext User’s Guide 229
Chapter 10: StorNext ReportsThe Jobs Report
Figure 111 Reports > LogsScreen
2 On the left side of the screen, select the type of log you wish toview.
3 If desired, select a file system different from the default one shownbeneath the log categories.
The log you selected automatically appears. (If the log does notappear, click Refresh.) If the log spans more than one screen, usethe navigation controls at the bottom of the screen as described inReport Navigation Controls on page 228

8/10/2019 6-67370-03_SN42101_UserGuide_RevAB
http://slidepdf.com/reader/full/6-67370-03sn42101userguiderevab 256/511
230 Quantum StorNext User’s Guide
Report Navigation Controls on page 228.
The Jobs Report
The Jobs Report provides information about previously run jobs on yourfile systems. Jobs include all actions performed for file systems, such as
make, stop, start, check, and so on. Use the navigation controls at thebottom of the screen if there are multiple screens of jobs.
Use the following procedure to run the Jobs Report.
Chapter 10: StorNext ReportsThe Jobs Report
1 Choose Jobs from the Reports menu. The Reports > Jobs reportappears.
Figure 112 Jobs Report
The Jobs Report includes the following information:• ID: The job ID number.
• Job: The job name assigned by StorNext for the type of actionperformed (for example, “FileSystem Make”).
• Attributes: The name of the related file system, mount point,li t hi h th j b f d F l if th
8/10/2019 6-67370-03_SN42101_UserGuide_RevAB
http://slidepdf.com/reader/full/6-67370-03sn42101userguiderevab 257/511
Quantum StorNext User’s Guide 231
policy, etc. on which the job was performed. For example, if the job was to start the file system, the name of that file systemappears in the Attributes column.
• User: The logged in user who initiated the job.
• Start and End Time: The times the job was started and ended.
• Status: The job's final or current status, such as Success orFailure.
Viewing Detailed JobInformation
To view detailed information about a specific job, select the desired joband then click View to see the information on a new screen. When youare finished viewing that job's information, click Done.
Chapter 10: StorNext ReportsThe Jobs Report
Filter Options
The Status Filter allows you to refine the displayed list of jobs accordingto Success, Failure, Warning, Working, Unknown, or All. Choose one ofthese criteria to restrict the displayed list of jobs to your selection. Afteryou select a Status Filter option, click Refresh to resort and view the
jobs list with your selected criteria.
The Type Filter works either together or separately from the StatusFilter. The Type Filter allows you to refine the displayed list of jobsaccording to a specific job action:
All Tape DriveModify
File System Start File SystemMetadump
Unknown Media Add File System Stop Cancel Request
Policy Add Media Delete File SystemCheck
System ServiceStart
Policy Delete Media Modify File SystemRename
System ServiceStop
Policy Modify Media Move File System
Expand
Convert to HA
Run Store Policy Media Remove File System ScanFor New Storage
Store Files
Schedule Add Media Eject RAS Ticket Close Change FileVersion
Schedule Delete Media Purge RAS Ticket Close Recover Files

8/10/2019 6-67370-03_SN42101_UserGuide_RevAB
http://slidepdf.com/reader/full/6-67370-03sn42101userguiderevab 258/511
232 Quantum StorNext User’s Guide
Schedule Delete Media Purge RAS Ticket CloseAll
Recover Files
Schedule Modify Media Mount RAS TicketAnalysis Update
RecoverDirectory
Schedule Reset Media Dismount Email ServerAdd
Retrieve Files
Storage DiskAdd
Media Reclassify Email ServerDelete
RetrieveDirectory
Storage DiskDelete
Media Assign toPolicy Class
Email ServerModify
Truncate Files
Storage DiskModify
MediaTranscribe
EmailNotification Add
Move Files
Chapter 10: StorNext ReportsThe Files Report
Exiting the Jobs Report When you finished viewing the Jobs Report, click Done.
File System Add Media StateChange
EmailNotificationDelete
Modify FileAttributes
File SystemDelete
Media Clean byMedia ID
EmailNotificationModify
Health Check
File SystemModify
Media Clean byFile System
NAS Share Add Capture State
File SystemMove StripeGroups
Media Clean byPolicy Class
NAS ShareDelete
Add Drive Pool
Library Add Media ImportMailbox
CIFS SharesDelete All
Delete DrivePool
Library Delete Media ImportBulk Load
CIFS WindowsDomain Join
Add EmailContact
Library Modify File SystemMake
CIFS WindowsDomain Leave
Modify EmailContact
Tape Drive Add File SystemMount
CIFS WorkgroupUser Add
Delete EmailContact
Tape DriveDelete
File SystemUnmount
System Date/ Time Modify
System Backup

8/10/2019 6-67370-03_SN42101_UserGuide_RevAB
http://slidepdf.com/reader/full/6-67370-03sn42101userguiderevab 259/511
Quantum StorNext User’s Guide 233
screen.
The Files Report
The Files Report provides general information about selected files, aswell as specific details if you require more granular information.
Use the following procedure to run the Files Report.
Chapter 10: StorNext ReportsThe Files Report
1 Choose Files from the Reports menu. The Reports > Files reportappears.
Figure 113 Files Report
The Report > Files screen shows the following information aboutthe files in your system:
• Name: The name of the file
• Size: The current size of the file
• Last Modified: The date when the file’s contents were lastmodified

8/10/2019 6-67370-03_SN42101_UserGuide_RevAB
http://slidepdf.com/reader/full/6-67370-03sn42101userguiderevab 260/511
234 Quantum StorNext User’s Guide
modified
2 To locate another file, click Browse to display the StorNext FileBrowser.
Chapter 10: StorNext ReportsThe Files Report
Figure 114 StorNext FileBrowser
3 Do one of the following:
• Check the box to the left of the desired folder (directory) toselect all files in the folder
• Click the folder name and then select files individually. (Holddown the Shift key and click to select contiguous files, or holddown the Control key and click to select multiple non-contiguous files.)
4 Click Continue to proceed and return to the Reports > Files screen.
5 Click File Info to view detailed information for the files you selected

8/10/2019 6-67370-03_SN42101_UserGuide_RevAB
http://slidepdf.com/reader/full/6-67370-03sn42101userguiderevab 261/511
Quantum StorNext User’s Guide 235
5 Click File Info to view detailed information for the files you selected.
The File Info screen appears.
Chapter 10: StorNext ReportsThe Drives Reports
Figure 115 File Info Screen
6 To download the report, click Download.
7 When you finished viewing report information, click Done.
The Drives Reports
The Drives Report provides a list of drives in your system and enables

8/10/2019 6-67370-03_SN42101_UserGuide_RevAB
http://slidepdf.com/reader/full/6-67370-03sn42101userguiderevab 262/511
236 Quantum StorNext User’s Guide
p p y yyou to view details about selected drives.
Use the following procedure to run the Drives Report.
1 Choose Drives from the Reports menu. The Reports > Drivesreport appears.
Chapter 10: StorNext ReportsThe Drives Reports
Figure 116 Drives Report
The Report > Drives screen shows the following information aboutyour drives:
• Serial Number: The drive’s serial number
• State: The current state of the drive, such as Online or Offline
• Status: The drive’s current status, such as Free or Mounted
• User Alias: The user identifier for the drive
• Mounted Media: The mounted media number
• Dismount Delay: The interval of time before the drive is

8/10/2019 6-67370-03_SN42101_UserGuide_RevAB
http://slidepdf.com/reader/full/6-67370-03sn42101userguiderevab 263/511
Quantum StorNext User’s Guide 237
Dismount Delay: The interval of time before the drive is
dismounted• Compression: Specifies whether compression is enabled (True)
or disabled (False)
2 To view information for one or more specific drives, select thedesired drive and then click View Drive Information Report. TheDrives > Drive Information Report appears.
Chapter 10: StorNext ReportsThe Media Report
Figure 117 Drive InformationReport
3 To download the report, click Download.
4 When you finished viewing report information, click Done.
The Media Report
The Media Report shows a list of details for all media in a selected

8/10/2019 6-67370-03_SN42101_UserGuide_RevAB
http://slidepdf.com/reader/full/6-67370-03sn42101userguiderevab 264/511
238 Quantum StorNext User’s Guide
library or all libraries.
Use the following procedure to run the Media Report.
1 Choose Media from the Reports menu. The Reports > Media report appears.
Chapter 10: StorNext ReportsThe Media Report
Figure 118 Media Report
2 Select from the Library pulldown list one of these options:
• All Libraries: Select this to view information for all media in all
libraries• A selected library: Select a specific library whose media
information you want to view
3 Select from the Media Class pulldown list one of these options:
• Show All Media Classes: Display information for all media in allclasses

8/10/2019 6-67370-03_SN42101_UserGuide_RevAB
http://slidepdf.com/reader/full/6-67370-03sn42101userguiderevab 265/511
Quantum StorNext User’s Guide 239
• Show Data Media Class: Display only information for mediaavailable to be used for data migration that are not consideredfull
• Show Migrate Media Class: Display only information for mediaused for data migration which are considered full
• Show Blank Media Class: Display only information for blankmedia
• Show Clean Media Class: Display only information for cleaningmedia
• Show Backup Media Class: Display only information for mediaused for backup purposes
Chapter 10: StorNext ReportsThe Media Report
4 If desired, enter one or more characters at the Media ID field torestrict the list of media to those whose IDs contain the character(s).
5 Click Filter to apply the filtering options.
6 To update the information displayed, you can click Refresh at anytime.
The Media Report provides the following information for each pieceof media that meets the criteria you selected from the Library,Media Class and Media ID fields:
• Media ID: The unique identifier for the media
• Library: The name of the library in which the media currentlyresides
• Media Type: The type of media
• Media Class: The media class to which the media belongs
• Policy Class: The policy class to which the media belongs
• Suspect: Indicates whether the media is considered suspect(possibly unreliable or defective)
• Write Protected: Indicates whether the media is writeprotected
• File Count: The number of files saved on the media
• % Used: Indicates the percentage of the media which iscurrently used
• Copy: Indicates the policy class copy number on the media
• Mounted in Drive: Indicates whether the media is currentlyt d i d i

8/10/2019 6-67370-03_SN42101_UserGuide_RevAB
http://slidepdf.com/reader/full/6-67370-03sn42101userguiderevab 266/511
240 Quantum StorNext User’s Guide
mounted in a drive
• Last Accessed: Indicates the date and time when the media waslast accessed
7 To view a report for a particular piece of media, select the desiredmedia from the list. To select multiple media, hold down the Controlkey while you click additional media. To select all media, click thecheckbox to the left of the Name heading.
After you have selected media, click View Media InformationReport. This report allows you to see all files on the selected media.The report looks similar to the one shown in Figure 119.
Chapter 10: StorNext ReportsThe Relations Report
Figure 119 Media InformationReport
8 If desired, you can save the report output as a CSV file (MicrosoftExcel format) by clicking Download.
9 When you are finished viewing the information report, click Done.
The Relations Report

8/10/2019 6-67370-03_SN42101_UserGuide_RevAB
http://slidepdf.com/reader/full/6-67370-03sn42101userguiderevab 267/511
Quantum StorNext User’s Guide 241
The Relations Report shows the pathname of the managed file system’sdirectory and the corresponding policy class name.
Use the following procedure to run the Relations Report.
1 Choose Relations from the Reports menu. The Reports >Relations report appears.
Chapter 10: StorNext ReportsThe File Systems Report
Figure 120 Relations Report
2 When you are finished reviewing the report output, click Done.
The File Systems Report
The File Systems Report provides a list of parameters and statistics aboutconfigured StorNext file systems.
Use the following procedure to run the File System Report

8/10/2019 6-67370-03_SN42101_UserGuide_RevAB
http://slidepdf.com/reader/full/6-67370-03sn42101userguiderevab 268/511
242 Quantum StorNext User’s Guide
Use the following procedure to run the File System Report.
1 Choose File Systems from the Reports menu. The Reports > FileSystems report appears.
Chapter 10: StorNext ReportsThe SAN Devices Report
Figure 121 File Systems Report
The File Systems Report provides the following information aboutyour file systems:
• File System Name: The name of the file system
• Mount Point (“Mounted on”): The file system's mount pointlocation
• Status: The file system’s current status, indicated a green checkmark icon (Active), a yellow exclamation mark icon (Warning),or a red X icon (Stopped).
2 When you finished viewing report information, click Done.

8/10/2019 6-67370-03_SN42101_UserGuide_RevAB
http://slidepdf.com/reader/full/6-67370-03sn42101userguiderevab 269/511
Quantum StorNext User’s Guide 243
The SAN Devices Report
The SAN Devices Report shows a list of details for all currentlyconfigured devices attached to your SAN.
Use the following procedure to run the SAN Devices Report.
1 Choose SAN Devices from the Reports menu. The Reports > SANDevices report appears.
Chapter 10: StorNext ReportsThe SAN Devices Report
Figure 122 SAN Devices Report
The SAN Devices Report provides the following information:
• Disks and LUNs
• Serial Number: The disk's or LUN's serial number or path
name.
• Type: The device type.
• Label: The label, if any, assigned to the device.
• Size: The total capacity for the device.
• Status: The device's current status. Statuses include:
• Used: Indicates whether the device is currently in use (true
8/10/2019 6-67370-03_SN42101_UserGuide_RevAB
http://slidepdf.com/reader/full/6-67370-03sn42101userguiderevab 270/511
244 Quantum StorNext User’s Guide
Used: Indicates whether the device is currently in use (trueor false).
• File System: The name of the file system with which thedevice is associated.
• Libraries and Tapes Drives
• Serial Number: The serial number of the library or tapedrive.
• Product ID: The model number or product name of thelibrary or tape drive.
• Device Type: The type of device: Tape Library or Tape Drive.
Chapter 10: StorNext ReportsThe Tape Consolidation Report
• Device Path: The path name for the device.
2 If desired, click Refresh to manually update (refresh) the reportdata.
The Tape Consolidation Report
The Tape Consolidation Report shows information about the tapeconsolidation process, also known as defragmentation.
Use the following procedure to run the Tape Consolidation Report.
1 Choose Tape Consolidation from the Reports menu. The Reports> Tape Consolidation report appears.
Figure 123 Tape ConsolidationReport

8/10/2019 6-67370-03_SN42101_UserGuide_RevAB
http://slidepdf.com/reader/full/6-67370-03sn42101userguiderevab 271/511
Quantum StorNext User’s Guide 245
2 Enter the following fields which determine report parameters:
• Max Media to Report: The maximum number of mediaincluded in the consolidation process
• No Maximum for Reported Media: Indicate that there is nolimit for the number of media included in the report
Chapter 10: StorNext ReportsThe SAN and LAN Clients Report
• Include Unavailable Media: Specify whether to includecurrently unavailable media in the report
• Fragmentation Summary Only: Specify whether to provideonly a high-level summary of consolidation results
3 Click Apply to save and apply the report parameters you justentered.
4 When you are finished, click Done to generate the report.
5 The report is generated as a job. To view the report output, chooseJobs from the Reports menu and then select a Tape ConsolidationReport job.
6 When you are finished reviewing the report output, click Done.
The SAN and LAN Clients Report
The SAN and LAN Clients Report provides statistics for StorNext clients,including the number of StorNext SAN clients and distributed LAN
clients, and client performance.
Use the following procedure to run the SAN and LAN Clients Report.
1 Choose SAN and LAN Clients from the Reports menu. The Reports> SAN and LAN Clients report appears.

8/10/2019 6-67370-03_SN42101_UserGuide_RevAB
http://slidepdf.com/reader/full/6-67370-03sn42101userguiderevab 272/511
246 Quantum StorNext User’s Guide
Chapter 10: StorNext ReportsThe SAN and LAN Clients Report
Figure 124 SAN and LANClients Report
The SAN and LAN Client Report provides the following information:
• File System: The name of the file system supporting the clients.
• Mounted on: The name of the file system mount point.
• Status: The file system's current status (Normal, Error, orWarning)
• SAN Clients: The total number of physically connected StorNextSAN clients, and the IP address of the current client.
• Distributed LAN Clients: The total number of StorNextdistributed LAN clients.
b d h l b f d b d

8/10/2019 6-67370-03_SN42101_UserGuide_RevAB
http://slidepdf.com/reader/full/6-67370-03sn42101userguiderevab 273/511
Quantum StorNext User’s Guide 247
• Distributed LAN Servers: The total number of distributed LANservers for the file system.
• Server: The names of the distributed LAN servers.
• Distributed LAN Clients: The names of distributed LAN clients.
• Listening Interface (IP:Port): The IP address and portnumber through which the distributed LAN server
communicates with StorNext.• TCP Window Size: The TCP window size (in KB) used by the
distributed LAN server. (Default: 64)
Chapter 10: StorNext ReportsThe LAN Client Performance Report
• Transfer Buffer Size: The transfer buffer size (in KB) used bythe distributed LAN server. A larger buffer may increaseperformance for larger files. (Default: 256)
• Transfer Buffer Count: The number of transfer buffers usedby the distributed LAN server. This parameter is used only byWindows servers and clients. Linux servers pass the value ofthis parameter to Windows clients. (Default: 16)
• Server Buffer Count:
• Daemon Threads: The maximum number of daemonthreads used by the distributed LAN server. (Default: 8)
2 If desired, click Refresh to manually update (refresh) the reportdata.
3 Click Done when you are finished viewing the report.
The LAN Client Performance Report
The LAN Client Performance Report provides information aboutdistributed LAN clients, including read and write speed.
Use the following procedure to run the LAN Client Performance Report.
1 Choose LAN Client Performance from the Reports menu. TheReports > LAN Client Performance report appears.
8/10/2019 6-67370-03_SN42101_UserGuide_RevAB
http://slidepdf.com/reader/full/6-67370-03sn42101userguiderevab 274/511
248 Quantum StorNext User’s Guide
Chapter 10: StorNext ReportsThe LAN Client Performance Report
Figure 125 LAN ClientPerformance Report
The LAN Client Performance Report provides the followinginformation:
• File System: The name of the file system supporting the clients.
• Server: The name of the distributed LAN server on the indicatedfile system.
• Client: The IP address for the corresponding client interfacelisted in the Client Interface column.
• Client Interface: The name of the distributed LAN client for theindicated file system and distributed LAN server.
• Read Bytes: The number of bytes read by the distributed LANclient

8/10/2019 6-67370-03_SN42101_UserGuide_RevAB
http://slidepdf.com/reader/full/6-67370-03sn42101userguiderevab 275/511
Quantum StorNext User’s Guide 249
client.
• Write Bytes: The number of bytes written by the distributedLAN client.
2 If desired, click Refresh to manually update (refresh) the reportdata.
3 Click Done when you are finished viewing the report.
Chapter 10: StorNext ReportsReplication Deduplication Reports
Replication Deduplication Reports
StorNext provides these reports that contain information pertaining toreplication and deduplication:
• Policy Activity: This report shows statistics related to replicationand deduplication. This report also provides statistics such assavings realized by replication, and the current progress of ongoingreplications.
• Policy Summary: This report shows information about replicationstorage policies created to support the data replication anddeduplication processes. This report also provides statistics such assavings realized by replication, and the current progress of ongoing
replications.
Policy Activity Report Use the following procedure to run the Replication/ Deduplication PolicyReport.
1 Choose Replication/ Deduplication > Policy Activity from the
Reports menu. The Reports > Replication/ Deduplication >Policy Activity report appears.

8/10/2019 6-67370-03_SN42101_UserGuide_RevAB
http://slidepdf.com/reader/full/6-67370-03sn42101userguiderevab 276/511
250 Quantum StorNext User’s Guide
Chapter 10: StorNext ReportsReplication Deduplication Reports
Figure 126 Replication/ Deduplication Policy ActivityReport
The Replication/ Deduplication Policy Activity Report provides thefollowing information:
• Total Managed Data
• Source Directories: The number of source directories fromwhich StorNext checked for data to replicate.
• Replicated Bytes: The number of bytes of data replicated.
• Replicated Tags: The number of replication tags applied to files.
• Skipped Files: The number of files not included in thereplication process.
• Last Replication Complete: The date and time the last

8/10/2019 6-67370-03_SN42101_UserGuide_RevAB
http://slidepdf.com/reader/full/6-67370-03sn42101userguiderevab 277/511
Quantum StorNext User’s Guide 251
Last Replication Complete: The date and time the lastreplication was finished.
• Deduplication Activity
• Deduplicated Files: The number of files deduplicated.
• Deduplicated Bytes: The number of bytes of datadeduplicated.
• Size on Disk: The size (in bytes) of deduplicated data on disk.
• Network Sent: The number of bytes of deduplicated data sentover the network.
Chapter 10: StorNext ReportsReplication Deduplication Reports
• Unique Files: The number of unique files included in thededuplication process.
• Unique Bytes: The number of unique bytes included in thededuplication process.
• Reclaimable Space: The amount of reclaimable space realizedby data deduplication.
• Network Received: The number of bytes of deduplicated datareceived over the network.
• Data Savings: The percentage of data savings realized by datadeduplication.
2 If desired, click Refresh to manually update (refresh) the reportdata.
3 To view a report showing replication policy summary information,click Policy Summary.
Policy Summary Report Use the following procedure to run the Replication/ Deduplication PolicySummary Report.
1 Choose Replication/ Deduplication > Policy Summary from theReports menu. The Reports > Replication/ Deduplication >Policy Summary report appears.

8/10/2019 6-67370-03_SN42101_UserGuide_RevAB
http://slidepdf.com/reader/full/6-67370-03sn42101userguiderevab 278/511
252 Quantum StorNext User’s Guide
Chapter 10: StorNext ReportsReplication Deduplication Reports
Figure 127 Replication/ Deduplication Policy SummaryReport
The Replication/ Deduplication Policy Summary Report provides thefollowing information:
• Policy: The name of the replication storage policy.
• File System: The name of the file system for which replication isenabled.
• Source Directory: The name of the source directory from whichinformation is replicated.
• Replicated
• Directories: The number of replicated directories to date.
• Files: The number of replicated files to date.
• Skipped: The number of files skipped by the replication process.

8/10/2019 6-67370-03_SN42101_UserGuide_RevAB
http://slidepdf.com/reader/full/6-67370-03sn42101userguiderevab 279/511
Quantum StorNext User’s Guide 253
pp pp y p p
• Bytes: The total number of data bytes replicated to date.
• Replication
• Average Rate: The approximate rate at which data wasreplicated from the source to the target.
• Estimated Completion: The estimated time replication is
currently scheduled to complete.
• Last Completed: The date and time the last replication wasfinished.
Chapter 10: StorNext ReportsReplication Deduplication Reports
• Network
• Sent: The amount of replicated data sent from the source.
• Received: The amount of replicated data received on the target.
2 To update report information, click Refresh.
3 To view details for a particular policy, select the desired policy and
then click Details.
Figure 128 Replication/ Deduplication Policy DetailsReport
4 To view a report showing completed replication, click CompletionReport.
5 When you are finished viewing this report, click Done.

8/10/2019 6-67370-03_SN42101_UserGuide_RevAB
http://slidepdf.com/reader/full/6-67370-03sn42101userguiderevab 280/511
254 Quantum StorNext User’s Guide
Chapter 10: StorNext ReportsThe Distributed Data Mover Report
Figure 129 Replication/ Deduplication PolicyCompletion Report
6 To view the Policy Activity report, click Policy Activity.
The Distributed Data Mover Report
The Distributed Data Mover Report shows a list of details pertaining tothe Distributed Data Mover feature.
Use the following procedure to run the Distributed Data Mover Report.
1 Choose Distributed Data Mover from the Reports menu. The

8/10/2019 6-67370-03_SN42101_UserGuide_RevAB
http://slidepdf.com/reader/full/6-67370-03sn42101userguiderevab 281/511
Quantum StorNext User’s Guide 255
Distributed Data Mover Report appears.
Chapter 10: StorNext ReportsThe Distributed Data Mover Report
Figure 130 Distributed DataMover Report
The Distributed Data Mover Report provides the followinginformation:
• Host: The name of the machine on which the source dataresides.
• Request ID: The identification number for the move-datarequest.
• Device Alias: The alias of the destination device to which data ismoved.
• Run Time: The time the data movement occurred.
• Total Files: The total number of files moved.
• Files Copied: The total number of files copied in the move-data
8/10/2019 6-67370-03_SN42101_UserGuide_RevAB
http://slidepdf.com/reader/full/6-67370-03sn42101userguiderevab 282/511
256 Quantum StorNext User’s Guide
Files Copied: The total number of files copied in the move dataprocess.
• Files Failed: The number of files that were not moved duringthe move-data process
2 If desired, click Refresh to manually update (refresh) the reportdata.
3 When you are finished viewing report information, click Done.
Chapter 10: StorNext ReportsThe Gateway Metrics Report
The Gateway Metrics Report
The Gateway Metrics Report helps you monitor performance andthroughput on your gateways, clients and file systems. Because you cansee at a glance which gateways, clients or file systems are currently
under or over-utilized, the Gateway Metrics Report is a useful tool forload balancing.
The Gateway Metrics Report consists of five main sections:
• Two graphs at the top of the screen which show at-a-glanceinformation for your gateways, clients and file systems. Thesegraphs change according to your selection. A large banner abovethe graphs provides a summary of total read and writer throughput
for all gateways.
• A Gateway Summary section which shows a list of all gatewaysand statistics for each one.
• A Client Summary section which shows a list of all clients andstatistics for each one.
• A File System Summary section which shows a list of all file
systems and statistics for each one.• A Settings section where you can enable or disable metrics tracking
for one or more gateways.
By default, the summary sections show the average overall throughput,average read throughput and average write throughput for eachspecific gateway, client or file system listed. You can customize theinformation displayed by choosing additional columns or removing
currently displayed columns as described in Changing DisplayedColumns on page 264.

8/10/2019 6-67370-03_SN42101_UserGuide_RevAB
http://slidepdf.com/reader/full/6-67370-03sn42101userguiderevab 283/511
Quantum StorNext User’s Guide 257
p g
Note: You can collapse or expand any section by clicking the doublearrow icon at the right side of the section title bar.
Use the following procedure to run the Gateway Metrics Report.
1 Choose Gateway Metrics from the Reports menu. The GatewayMetrics Report appears. By default, the initial view is in Summarymode and displays the Last Hour of aggregate throughput of allgateways. For information about viewing the report in Detail mode,see Changing to Detail Mode on page 260.
Chapter 10: StorNext ReportsThe Gateway Metrics Report
Figure 131 Gateway MetricsReport (Summary)

8/10/2019 6-67370-03_SN42101_UserGuide_RevAB
http://slidepdf.com/reader/full/6-67370-03sn42101userguiderevab 284/511
258 Quantum StorNext User’s Guide
Chapter 10: StorNext ReportsThe Gateway Metrics Report
Note: The screen in Figure 131 does not show all columns availableon this report. See
Changing Displayed Columns on page 264 for information on adding or removing columns from thereport.
2 If desired, click Refresh to manually update (refresh) the report
data.3 You can change the information displayed in the graphs or view
detailed information rather than a summary as described in thefollowing sections.
Changing the Graph
Display
You can use the radio buttons above the charts to change the level of
detail shown on the graphs to display information from the Day, Last30 Days, Last 24 Hours, or Last Hour.
You can also specify the time period for the graphs by using the SelectTime Period field at the left of the radio buttons.
To change the time intervals used in the graphs displays, at the Zoom field click one of the following:
• 10m: Displays graph information in ten minute increments. Forexample, from 7:00, 7:10, 7:20, 7:30 and so on.
• 2h: Displays graph information in two hour increments. Forexample, from 1:00, 3:00, 5:00, 7:00 and so on.
• 6h: Displays graph information in two hour increments. Forexample, from 12:00 (midnight), 6:00 a.m, 12:00 (noon), 6:00 p.m.and so on.
• 1d: Displays graph information in two hour increments. Forexample from 12:00 (midnight) 6:00 a m 12:00 (noon) 6:00 p m
8/10/2019 6-67370-03_SN42101_UserGuide_RevAB
http://slidepdf.com/reader/full/6-67370-03sn42101userguiderevab 285/511
Quantum StorNext User’s Guide 259
example, from 12:00 (midnight), 6:00 a.m, 12:00 (noon), 6:00 p.m.and so on.
You can also manually compress or expand the displayed graphinformation by grabbing and dragging one of the handles at the far leftand rights ends of the scroll bar below the graphs.
Note: On particularly large systems that generate a lot of metricinformation, if you choose the Last 30 Days option your systemcould reach the row limit for the Gateway Metrics report beforethe full 30 days can be displayed.
Chapter 10: StorNext ReportsThe Gateway Metrics Report
When you hover the mouse pointer over the graphs, an information boxshows you the date and time at which a data point was captured for thedisplayed gateway, client or file system. You can view other data pointsby repositioning the mouse pointer over the graphs.
Changing to DetailModeIf desired, you can view the Gateway Metric report in Detail mode ratherthan Summary mode. To switch to Detail mode, double-click anygateway, client or file system name.
When you are in Detail mode, single-clicking the name of a specificgateway, client or file system updates the graphs to show detail for onlythe selected gateway, client or file system.
When you are viewing the Gateway Metrics Report in Detail mode you
can return to Summary mode at any time by clicking the Summary button.
The Gateway Metrics Report in Detail mode view looks similar to the oneshown in Figure 132 (after double-clicking on a gateway name).

8/10/2019 6-67370-03_SN42101_UserGuide_RevAB
http://slidepdf.com/reader/full/6-67370-03sn42101userguiderevab 286/511
260 Quantum StorNext User’s Guide
Chapter 10: StorNext ReportsThe Gateway Metrics Report
Figure 132 Gateway MetricsReport (Detail)

8/10/2019 6-67370-03_SN42101_UserGuide_RevAB
http://slidepdf.com/reader/full/6-67370-03sn42101userguiderevab 287/511
Quantum StorNext User’s Guide 261
Chapter 10: StorNext ReportsThe Gateway Metrics Report
Note: The screen in Figure 132 does not show all columns availableon this report. See
Changing Displayed Columns on page 264 for information on adding or removing columns from thereport.
Viewing a Client or File System on a GatewayAnother Detail mode display option is to first select a gateway bydouble-clicking the desired gateway name, and then doing one of thefollowing:
• Single-click an individual client or file system name. The graphsupdate to show the selected client or file system on the selectedgateway only.
• Single-click the heading Total Shown Clients or Total ShownFilesystems. The graphs update to show all clients or all file systemson the selected gateway.
Note: The graphs display a maximum of 20 clients or 20 file systemsper gateway. If your gateway has more than 20 clients or 20file systems, only the first 20 are shown in the graphs.

8/10/2019 6-67370-03_SN42101_UserGuide_RevAB
http://slidepdf.com/reader/full/6-67370-03sn42101userguiderevab 288/511
262 Quantum StorNext User’s Guide
Chapter 10: StorNext ReportsThe Gateway Metrics Report
The graphs for a specific client on the gateway look similar to this (aftersingle-clicking the client name in Detail mode):
Figure 133 Gateway MetricsReport (Client Detail)

8/10/2019 6-67370-03_SN42101_UserGuide_RevAB
http://slidepdf.com/reader/full/6-67370-03sn42101userguiderevab 289/511
Quantum StorNext User’s Guide 263
Chapter 10: StorNext ReportsThe Gateway Metrics Report
The graphs for a specific file system on the gateway look similar to this(after single-clicking the file system name in Detail mode):
Figure 134 Gateway MetricsReport (File System Detail)
Changing DisplayedColumns
In either summary or detail display mode, you can show fewer or morecolumns by clicking the down-arrow icon to the right of a column
heading and then moving your mouse over the Columns heading in thedropdown.
C tl di l d l i di t d b i id th

8/10/2019 6-67370-03_SN42101_UserGuide_RevAB
http://slidepdf.com/reader/full/6-67370-03sn42101userguiderevab 290/511
264 Quantum StorNext User’s Guide
Currently displayed columns are indicated by a green arrow inside thecheckbox to the left of the column name. Check any additional columnsyou want to show, or deselect any currently displayed columns youwant to hide.
Following are the available columns for the gateway, clients and file
system sections:• Gateway (in Gateway section): The name of the gateway.
• Client (in Client section): The name of the client.
Chapter 10: StorNext ReportsThe Gateway Metrics Report
• File System (in File System section): The name of the file system.
• Average Overall Throughput: The average overall data throughputincluding reading and writing per second.
• Read Count: The total number of read (I/O) operations.
• Read Rate: The number of reads (I/O) per second.
• Read Bytes: The number of bytes read.
• Average Read Throughput: The average read throughput persecond.
• Read Distribution: The percentage of data read by the specificgateway, client or file system.
• Write Count: The total number of write operations.
• Write Rate: The number of writes per second.
• Write Bytes: The total number of bytes written.
• Average Write Throughput: The average write throughput persecond.
• Write Distribution: The percentage of data written by the specificgateway, client or file system.
• Utilization: The currently selected Gateway Network InterfaceCard’s maximum aggregate throughput.
Viewing and ChangingGateway MetricsSettings
The Gateway Metrics Settings section allows you to enable or disablegateway metric tracking for a single gateway, mutiple gateways or allgateways. This section of the Gateway Metrics screen shows thefollowing settings for all gateways:
• Gateway: The name of the gateway.
• Metrics Enabled: Shows whether metrics tracking is enabled (True)or disabled (False).
• Sample Interval (Secs): The interval in seconds during which

8/10/2019 6-67370-03_SN42101_UserGuide_RevAB
http://slidepdf.com/reader/full/6-67370-03sn42101userguiderevab 291/511
Quantum StorNext User’s Guide 265
p gmetrics are captured. For example, if the sample interval is 60seconds (the default value), metrics will be sampled every minute.
The Sample Interval value interacts with the currently selected timeperiod (Day, Last 30 Days, and so on). The report data returned isbased on the default sample interview of 60 seconds, so if you
change the default sample interval to a value less than 60 seconds(effectively creating more sampled data), you could end up with lesstotal data. For example, if the time period is set at Last 30 days and
Chapter 10: StorNext ReportsThe Gateway Metrics Report
you change the sample interval to 30 seconds, the reports would fillin 15 days rather than 30 days.
• Last Connect: The date and time when the last connection wasestablished with the gateway.
• Last Update: The date and time when the statistics and graphs onthe Gateway Metrics screen were last updated. Gateway metricsmust be enabled (True) for a particular gateway to be included inthe update.
Note: You can hide or show columns in the Gateway Metrics Setupsection just as you can in the other sections.
Figure 135 Gateway Metrics
Settings
Follow this procedure to enable or disable metrics:
1 Double-click the gateway whose metrics you want to enable ordisable.
2 To enable metrics, click the checkbox to the right of the gatewayname. To disable metrics, remove the checkmark.
3 If desired, specify a sample interval by either clicking the up or downarrows or typing a value in the field to the right of the checkbox.The valid range is between 10 seconds and 3600 seconds.
4 Save your changes by clicking Update, or click Cancel to abort.

8/10/2019 6-67370-03_SN42101_UserGuide_RevAB
http://slidepdf.com/reader/full/6-67370-03sn42101userguiderevab 292/511
266 Quantum StorNext User’s Guide
Chapter 11
Customer Assistance
More information about this product is available on the QuantumService and Support website at www.quantum.com/ServiceandSupport.The Quantum Service and Support website contains a collection ofinformation, including answers to frequently asked questions (FAQs).
You can also access software, firmware, and drivers through this site.
Quantum Technical Assistance Center
For further assistance, or if training is desired, contact the QuantumTechnical Assistance Center:
North America 1+800-284-5101 Option 5
EMEA 00800 999 3822

8/10/2019 6-67370-03_SN42101_UserGuide_RevAB
http://slidepdf.com/reader/full/6-67370-03sn42101userguiderevab 293/511
Quantum StorNext User’s Guide 267
EMEA 00800 999 3822
Online Service andSupport
www.quantum.com/OSR
Worldwide Web www.quantum.com/ServiceandSupport
(Local numbers for specific countries are listed on the Quantum Serviceand Support Website.)
Chapter 11: Customer AssistanceQuantum Technical Assistance Center

8/10/2019 6-67370-03_SN42101_UserGuide_RevAB
http://slidepdf.com/reader/full/6-67370-03sn42101userguiderevab 294/511
268 Quantum StorNext User’s Guide
Appendix A
Operating Guidelines
This appendix contains information pertinent to operating StorNext, aswell as some operating guidelines and limitations you should consider.
The Reserved Space Parameter
As of StorNext 3.0, the method of accounting for reserved space haschanged. The MaxMBPerClientReserve parameter from the StorNextfile system configuration file (/usr/cvfs/config/*.cfg) has beendeprecated. All values except 0 are ignored for this parameter. Inaddition, there is a new parameter, ReservedSpace.
The ReservedSpace parameter lets the administrator control the useof delayed allocations on clients. ReservedSpace is a performancefeature that lets clients perform buffered writes on a file without first

8/10/2019 6-67370-03_SN42101_UserGuide_RevAB
http://slidepdf.com/reader/full/6-67370-03sn42101userguiderevab 295/511
Quantum StorNext User’s Guide 269
feature that lets clients perform buffered writes on a file without firstobtaining real allocations from the metadata controller (MDC).
The ReservedSpace parameter can be set to Yes or No:
• Yes - (Default) The MDC reserves enough disk space so that delayed
allocations can be converted to real allocations (even when the MDCis restarted and the client is not). The MDC reserves a minimum ofabout 4GB for each stripe group and up to 280MBs per activelywriting client for each stripe group.
Appendix A: Operating GuidelinesThe Reserved Space Parameter
Note: The amount of reserved space is usually less than 280MB perclient. Reserved space is calculated as 110% of the buffer cachesize of each particular client. For example, a client with a 64MBbuffer cache is allocated 70MBs of reserved space by the MDC.If the client closes all files that are open for write, the 70MBs ofspace is no longer accounted for. It is important to rememberthat reserved space is per stripe group.
• No - More disk space is available for use, but buffer cacheperformance is affected, and fragmentation may occur.
If the MaxMBPerClientReserve parameter exists in the configurationfile and has a value of 0, ReservedSpace is set to No. Otherwise,ReservedSpace defaults to Yes.
Note: In prior releases of StorNext, MaxMBPerClientReserve defaulted to 100MBs, and reserved space was the product ofMaxMBPerClientReserve multiplied by MaxConnections –1. In StorNext 3.0, the MDC tracks the actual amount ofreserved space that clients use but caps the value to about280MBs per client.
In addition, the MDC maintains a “minimum level” of reserved
space. As a result, in some cases, more reserved space may bevisible. Reserved space appears as allocated disk space per datastripe group.
The minimum reserved space is enough to accommodate 15clients or MaxConnections – 1, whichever is lower. Forexample, if a cluster has a MaxConnections of 3, the reservedspace total can be under 1GB.

8/10/2019 6-67370-03_SN42101_UserGuide_RevAB
http://slidepdf.com/reader/full/6-67370-03sn42101userguiderevab 296/511
270 Quantum StorNext User’s Guide
Linux Configuration FileFormat
Beginning with StorNext 4.0, the configuration file for Linux is now inXML format. The Linux configuration file is now identified by a .cfgxextension rather than .cfg for Windows systems.
There are some differences between the XML and .cfg formats.Specifically, the Reserved Space parameter is called reservedSpace inthe XML format, and its value must be either true or false.
Appendix A: Operating GuidelinesDistributed LAN Server/Client Network and Memory Tuning
For additional information and examples of both configuration fileformats, see the Gadne 4ao.sua2UU2aQdso1mQS.
Distributed LAN Server/Client Network and Memory
Tuning
Using the Distributed LAN Server and Client feature places significantadditional demands on network capacity and system memory. Beforecreating and using a Distributed LAN Server and Client, review thefollowing information:
• Distributed LAN Server and Client Network Tuning
• Distributed LAN Server Memory Tuning
Note: For additional information about Distributed LAN Client andserver performance tuning, see the Gadne 4ao7QU oG3ua ,oPmsQs-oGuide.
Distributed LAN Serverand Client NetworkTuning
Due to significant demands placed on the network, the followingnetwork issues can occur when using Distributed LAN Servers andclients:
• Configuring Dual NICs. On Linux systems, multiple Ethernetinterfaces may be configured as a single bond interface using the
Linux bonding driver. The bond interface may be then be configuredfor use by the StorNext Distributed LAN server. In this case aDistributed LAN client may have only a single Ethernet interface.LAN clients running Linux may also be configured to use a bond
8/10/2019 6-67370-03_SN42101_UserGuide_RevAB
http://slidepdf.com/reader/full/6-67370-03sn42101userguiderevab 297/511
Quantum StorNext User’s Guide 271
LAN clients running Linux may also be configured to use a bondinterface. To take advantage of a second NIC in a Distributed LANServer, the Distributed LAN Clients must also have a secondconnected network interface.
• Dropped Packets. Some Ethernet switches may be unable toaccommodate the increased throughput demands required by theDistributed LAN Server and client feature, and will drop packets.This causes TCP retransmissions, resulting in a significantperformance loss. On Linux, this can be observed as an increase in
Appendix A: Operating GuidelinesDistributed LAN Server/Client Network and Memory Tuning
the Segments Retransmitted count in netstat -s output duringDistributed LAN Client write operations and Distributed LAN Serverread operations.
To address this issue, edit the /usr/cvfs/config/dpserver configurationfile and reduce the Distributed LAN Server TCP window size from thedefault value. (Remount the file system after making changes.) Thismay reduce the amount of packet loss. However, some Ethernet
switches are unable to accommodate true GigE bandwidth,especially when multiple ports are transmitting data at the sametime.
• Linux Network Drivers. For best performance and compatibility,update Intel e1000 drivers to the latest version.
In some cases, enabling TCP offload can cause issues. (Identify theseissues by examining netstat -s output for bad segments.) If
necessary, use ethtool -K to disable the offload of checksumcalculations.
On some Linux 2.6 versions running on x86 64-bit systems, aconsole message regarding noirq handler may appear followedby a hard system hang. This is due to a bug in the kernel. To avoidthis error, disable the irqbalance service.
• Mismatched Server Configuration. Introducing a slower server onto
the network reduces overall throughput. This is because the slowerserver receives some traffic from all clients. For example, adding aserver with one NIC in a network where other servers have two NICs,or adding a server with less disk bandwidth or a bad networkconnection, reduces throughput for the entire network.
Note: On Linux, use ping and the cvadmin latency test tools toidentify network connectivity or reliability problems. In
addition, use the netperf tool to identify bandwidthlimitations or problems.
O Wi d h b f

8/10/2019 6-67370-03_SN42101_UserGuide_RevAB
http://slidepdf.com/reader/full/6-67370-03sn42101userguiderevab 298/511
272 Quantum StorNext User’s Guide
On Windows, use the Networking tab of Windows Task Manager to view network utilization.
Appendix A: Operating GuidelinesDistributed LAN Server/Client Network and Memory Tuning
Distributed LAN ServerMemory Tuning
The minimum amount of memory required for a Distributed LAN Serverdepends on the configuration.
• Windows. For a Windows Distributed LAN Server, use the followingformula:
Required memory = 1GB +
(# of file systems served* # of NICs per Distributed LAN Client
* # of Distributed LAN Clients
* transfer buffer count
* transfer buffer size)
For example, suppose a Windows Distributed LAN Server is serving
four file systems to 64 clients each using two NICs for data traffic.Also assume the server uses the defaults of sixteen transfer buffersand 256K per buffer. (On Windows, you can view and adjust thetransfer buffer settings using the Client Configuration tool’sDistributed LAN tab.) Given this configuration, here is the result:
Required memory = 1GB + (4 * 2 * 64 * 16 * 256K) = 3GB
Note: This example assumes that a 64-bit version of Windows isbeing used on the Server. 32-bit Windows Distributed LANServers are restricted to small configurations using 16 or fewerconnections.
If not all clients mount all of the file systems, the memoryrequirement is reduced accordingly. For example, suppose in theprevious example that half of the 64 LAN clients mount three of the
four file systems, and the other half of the LAN clients mount theremaining file system. Given this configuration, here is the result:
Required memory = 1GB + (3 * 2 * 32 * 16 * 256K) + (1 * 2 * 32 *

8/10/2019 6-67370-03_SN42101_UserGuide_RevAB
http://slidepdf.com/reader/full/6-67370-03sn42101userguiderevab 299/511
Quantum StorNext User’s Guide 273
16 * 256K) = 1GB + 768MB + 256MB = 2GB
The calculation also changes when the number of NICs used fordata traffic varies across clients. For example, in the previousexample if the clients that mount only one file system each use
three NICs for data instead of two, here is the result:
Required memory = 1GB + (3 * 2 * 32 * 16 * 256K) + (1 * 3 * 32 *16 * 256K) = 1GB + 768MB + 384K = 2176MB

8/10/2019 6-67370-03_SN42101_UserGuide_RevAB
http://slidepdf.com/reader/full/6-67370-03sn42101userguiderevab 300/511

8/10/2019 6-67370-03_SN42101_UserGuide_RevAB
http://slidepdf.com/reader/full/6-67370-03sn42101userguiderevab 301/511
Appendix A: Operating GuidelinesSetting Up Restrictive ACLs
Setting Up Restrictive ACLs
When setting up restrictive ACLs on a SNFS file system, it is important tounderstand how SNFS system services are run, especially the accountunder which the services are run. The Windows default account is the
local administrator account, but this can be changed on the Propertiestab of each system service.
When sharing restricted file systems, the account under which SNFSsystem services are run must be included in the ACL for the root of thefile system and all other shares associated with the SNFS file system.Doing this allows the shares to be re-shared upon reboot.
Default Single-Path I/O Retry Behavior
The I/O retry behavior has changed as of StorNext 3.1.2. In priorreleases, when only a single path to the storage existed and an I/O error
was returned by the disk device driver, StorNext failed the I/O operation.Beginning with version 3.1.2, by default StorNext continuously retries I/ O operations until they succeed, regardless of the number of I/O paths.If desired, you can override this new behavior by using the new I/O RetryTime feature. For additional information about I/O Retry Time, consultthe mount_cvfs man page or the Windows help file.
Event Handles for fsm.exe on a Windows MetadataServer

8/10/2019 6-67370-03_SN42101_UserGuide_RevAB
http://slidepdf.com/reader/full/6-67370-03sn42101userguiderevab 302/511
276 Quantum StorNext User’s Guide
Server
The metadata server (FSM) has many data structures that are used
internally. Each of the data structures has some locks(pthread_mutex_lock). Each lock is initialized as “uninitialized.”
The first time the lock is used, a small amount of memory and an event(i.e., handle) are allocated. The memory and event/handle are retained
Appendix A: Operating GuidelinesFSBlockSize, Metadata Disk Size, and JournalSize Settings
by the system until the data structure is destroyed. Some locks that arepart of structures are seldom used, and exist for rare conditions. If thelock is not used, the memory/event for that structure will never beallocated.
Some data structures are not destroyed during the life of the FSM. Theseinclude in-memory inodes and buffers and others.
When the system starts, handle use is minimal. After the FSM has beenup for a while, the handle count increases as the inode and buffer cacheare used. After a while, the system stabilizes at some number ofhandles. This occurs after all inodes and buffers have been used.
The maximum number of used handles can be reduced by shrinking theinode and/or buffer cache. However, changing these variables couldsignificantly reduce system performance.
FSBlockSize, Metadata Disk Size, and JournalSizeSettings
The FsBlockSize (FSB), metadata disk size, and JournalSize settings all work together. For example, the FsBlockSize must be setcorrectly in order for the metadata sizing to be correct. JournalSizeis also dependent on the FsBlockSize.
Note: In the Windows XML format configuration file, the FS blocksize parameter is called fsBlockSize. Regardless of the
difference in parameter names (fsBlockSize and
FSBlockSize) used in the Windows and UNIX configurationfiles, the requirements are identical for Windows and UNIXsystems.
8/10/2019 6-67370-03_SN42101_UserGuide_RevAB
http://slidepdf.com/reader/full/6-67370-03sn42101userguiderevab 303/511
Quantum StorNext User’s Guide 277
For FsBlockSize the optimal settings for both performance and spaceutilization are in the range of 16K or 64K.
Settings greater than 64K are not recommended because performance
will be adversely impacted due to inefficient metadata I/O operations.Values less than 16K are not recommended in most scenarios becausestartup and failover time may be adversely impacted. Setting
Appendix A: Operating GuidelinesFSBlockSize, Metadata Disk Size, and JournalSize Settings
FsBlockSize (FSB) to higher values is important for multi terabyte filesystems for optimal startup and failover time.
Note: This is particularly true for slow CPU clock speed metadataservers such as Sparc. However, values greater than 16K canseverely consume metadata space in cases where the file-to-directory ratio is low (e.g., less than 100 to 1).
For metadata disk size, you must have a minimum of 25 GB, with morespace allocated depending on the number of files per directory and thesize of your file system.
The following table shows suggested FsBlockSize (FSB) settings andmetadata disk space based on the average number of files per directoryand file system size. The amount of disk space listed for metadata is inaddition to the 25 GB minimum amount. Use this table to determine the
setting for your configuration.
Average No.of Files PerDirectory
File System Size: LessThan 10TB
File System Size: 10TBor Larger
Less than 10 FSB: 16KB
Metadata: 32 GB per 1M
files
FSB: 64KB
Metadata: 128 GB per
1M files
10-100 FSB: 16KB
Metadata: 8 GB per 1Mfiles
FSB: 64KB
Metadata: 32 GB per 1Mfiles
100-1000 FSB: 64KB
Metadata: 8 GB per 1M
files
FSB: 64KB
Metadata: 8 GB per 1M
files
1000 + FSB: 64KB
Metadata: 4 GB per 1Mfil
FSB: 64KB
Metadata: 4 GB per 1Mfil

8/10/2019 6-67370-03_SN42101_UserGuide_RevAB
http://slidepdf.com/reader/full/6-67370-03sn42101userguiderevab 304/511
278 Quantum StorNext User’s Guide
files files
The best rule of thumb is to use a 16K FsBlockSize unless otherrequirements such as directory ratio dictate otherwise.
This setting is not adjustable after initial file system creation, so it is veryimportant to give it careful consideration during initial configuration.
Example: FsBlockSize 16K
Appendix A: Operating GuidelinesDisk Naming Requirements
JournalSize Setting
The optimal settings for JournalSize are in the range between 16Mand 64M, depending on the FsBlockSize. Avoid values greater than64M due to potentially severe impacts on startup and failover times.Values at the higher end of the 16M-64M range may improveperformance of metadata operations in some cases, although at thecost of slower startup and failover time. Existing file systems managed
by StorNext Storage Manager MUST have a journal size of at least 64M.The TSM portion of SNSM may not start if the journal size for amanaged file system is less than 64M.
Note: In the Windows XML format configuration file, the journal sizeparameter is called journalSize. Regardless of the difference
in parameter names (journalSize and JournalSize) used inthe Windows and UNIX configuration files, the requirements
are identical for Windows and UNIX systems.
The following table shows recommended settings. Choose the settingthat corresponds to your configuration.
FsBlockSize JournalSize
16KB 16MB
64KB 64MB
This setting is adjustable using the cvupdatefs utility. For moreinformation, see the cvupdatefs man page.
Example: JournalSize 16M
Disk Naming Requirements

8/10/2019 6-67370-03_SN42101_UserGuide_RevAB
http://slidepdf.com/reader/full/6-67370-03sn42101userguiderevab 305/511
Quantum StorNext User’s Guide 279
When naming disks, names should be unique across all SANs. If a clientconnects to more than one SAN, a conflict will arise if the client sees
two disks with the same name.
Appendix A: Operating GuidelinesChanging StorNext’s Default Session Timeout Interval
Changing StorNext’s Default Session Timeout Interval
By default, StorNext automatically logs out the current user after thirtyminutes of inactivity. Follow the procedure below to change the timeoutinterval. (All steps must be performed from the command line.)
1 Stop StorNext by entering the following:
service stornext_web stop
2 Edit the config file /usr/adic/tomcat/webapps/ROOT/WEB-INF/web.xml by entering the following:
<!-- Set session timeout to 30 minutes -->
<session-config>
<session-timeout>30</session-timeout
</session-config>
3 Restart the StorNext GUI by entering the following:
service stornext_web start
For HA, these steps must be performed on both servers.
Caution: These changes alter the StorNext configuration file, so youshould exercise caution. If you have any doubts about yourability to manually change the configuration file asdescribed, do not attempt this procedure unless you haveassistance from Quantum Technical Support.

8/10/2019 6-67370-03_SN42101_UserGuide_RevAB
http://slidepdf.com/reader/full/6-67370-03sn42101userguiderevab 306/511
280 Quantum StorNext User’s Guide
Appendix A: Operating GuidelinesGeneral Operating Guidelines and Limitations
General Operating Guidelines and Limitations
Table 1 lists updated information and guidelines for running StorNext,as well as known limitations.
Table 1 Operating Guidelinesand Limitations
Operating System Feature or Category Description
Solaris StorNext labels Solaris hosts may need to rescan disk devices afterStorNext labels have been applied.
In particular, when a StorNext label is put on a LUN less
than 1TB in size, Solaris hosts will not be able to usethat LUN until they have done a device rescan. A devicerescan is accomplished with a boot flag:
reboot -- -r
This issue will be addressed in a future StorNextrelease.
In the meantime, work around this issue by rescanning
devices using the boot flag reboot -- -r
If the labeling operation was performed on a Solarishost, that host does not need to do the rescan.However, some intermediate versions of the Solaris 10Kernel Jumbo Patch break the necessary functionalityto support this; please be sure you have applied thelatest Solaris 10 Kernel Jumbo Patch before labelingany StorNext LUNs.
Linux Linux MultipathSupport (therr_min_io setting inth Li DM
Current versions of the Linux DM Multipath driverassign a default value of 1000 for rr_min_io which istoo high for most configurations having multiple
ti th t t U i ll l h

8/10/2019 6-67370-03_SN42101_UserGuide_RevAB
http://slidepdf.com/reader/full/6-67370-03sn42101userguiderevab 307/511
Quantum StorNext User’s Guide 281
the Linux DMMultipath Driver)
active paths to storage. Using a smaller value such as32 will typically result in significantly improvedperformance. Refer to the RedHat or SuSEdocumentation provided with your version of Linux for
details on how to apply this setting.
Note: Experimentation may be required to determinethe optimal value.
Appendix A: Operating GuidelinesGeneral Operating Guidelines and Limitations
Linux StorNext File System StorNext File System does not support the Linux
sendfile() system call.
This issue causes Apache web servers to deliver blankpages when content resides on StorNext file systems.
This issue also affects Samba servers running on Linux.
The workaround is to disable sendfile usage byadding the following entry into the Apacheconfiguration file httpd.conf:
EnableSendfile off
The workaround for Samba servers is to add thefollowing line into the configuration file:
sendfile=no
System logs Due to the way Linux handles errors, the appearance ofSCSI “No Sense” messages in system logs can indicatepossible data corruption on disk devices.
This affects StorNext users on Red Hat 4, Red Hat 5,Red Hat 6, SuSe 10 and SuSe 11.
This issue is not caused by StorNext, and is described in
detail in StorNext Product Alert 20.For additional information, see Red Hat 5 CR 468088and SuSE 10 CR 10440734121.
Migrating metadatacontrollers
StorNext users migrating their metadata controllersfrom Apple Xsan to Linux should be aware of thefollowing upgrade considerations:
• If the file system is running Xsan 2.1.1 or earlier, it
should be a simple upgrade: just replace the MDC.• If the file system is running Xsan 2.2 or later with
“NamedStreams No” (which is the default for Xsan2.2,) it should also be a simple upgrade: just replaceth MDC
Operating System Feature or Category Description

8/10/2019 6-67370-03_SN42101_UserGuide_RevAB
http://slidepdf.com/reader/full/6-67370-03sn42101userguiderevab 308/511
282 Quantum StorNext User’s Guide
the MDC.
• If the file system is running Xsan 2.2 or later with“NamedStreams Yes,” you must completely remake
(reformat) the file system. For obvious reasons, youshould do a complete backup before migrating.
Appendix A: Operating GuidelinesGeneral Operating Guidelines and Limitations
Linux HA Changing the haFsType parameter in a file systemconfiguration file to one of the HA types, and then(re)starting its FSM enables HA-specific features thatchange the functionality of StorNext.
When the HaShared or HaManaged types are
configured, other changes must be completed bysuccessfully running the cnvt2ha.sh script, which isindicated by the creation of the
/usr/adic/install/.snsm_ha_configured touch
file ($SNSM_HA_CONFIGURED environment variable).No conversion is done or necessary for SNFS only
(HaUnmanaged) configurations.If the conversion is not successfully completed, theHaManaged FSMs will not start, and the HaShared FSMwill cause an HA Reset when it is stopped.
To remedy this situation, edit every FSM configurationfile to set its haFsType parameter to HaUnmonitored,then run the following commands to avoid the HAReset in this special case only:
touch /usr/cvfs/install/.vip_down_hint
service cvfs stop
Subtree Checkoption
Subtree Check Option in NFS No Longer Supported
Although supported in previous StorNext releases, thesubtree_check option (which controls NFS checks on afile handle being within an exported subdirectory of a
file system) is no longer supported as of StorNext 4.0.
FQDN SuSe Linux distributions automatically associate theFQDN of the local machine with the address 127.0.0.2in the /etc/hosts file. There is no benefit from doinghi h h hi i d k h
Operating System Feature or Category Description

8/10/2019 6-67370-03_SN42101_UserGuide_RevAB
http://slidepdf.com/reader/full/6-67370-03sn42101userguiderevab 309/511
Quantum StorNext User’s Guide 283
this when the machine is connected to a network thatcan resolve its name to an IP address.
However, the existence of this entry can sometimes
cause a failure of configuration synchronizationwithin and between the server computers in an HAconfiguration. For this reason, the 127.0.0.2 entryshould be deleted from the /etc/hosts file.
Appendix A: Operating GuidelinesGeneral Operating Guidelines and Limitations
Linux Software Firewalls Software firewalls such as “iptables” on Linux andWindows Firewall can interfere with the properfunctioning of StorNext and result in unexpected errorsunless specifically configured for use with StorNext.
Quantum strongly recommends that all software
firewalls be disabled on systems used as StorNextclients and servers. If required, StorNext can beconfigured for use with hardware firewalls.
For more information, refer to the fsports man-pageor help file and the “Ports Used By StorNext” section inthe StorNext Tuning Guide.
cpuspeed Service cpuspeed, an external Linux service on recent Intel
processors, is not correctly tuned to allow StorNext totake advantage of processor speed. Suse systems mayalso be impacted, as may AMD processors with similarcapabilities.
On processors with a variable clockspeed (turboboost),the cpuspeed service on Redhat controls the actualrunning speed of the processors based on system load.
A workload such as a heavily used FSM and probablyStorage Manager does not register as somethingwhich needs a faster cpu. Turning off the cpuspeedservice has been shown to double metadataperformance on affected hardware.
Looking at the reported CPU clock speed by doingcat /proc/ cpuinfo while the system is under loadshows if a system is impacted by this issue.
Operating System Feature or Category Description

8/10/2019 6-67370-03_SN42101_UserGuide_RevAB
http://slidepdf.com/reader/full/6-67370-03sn42101userguiderevab 310/511
284 Quantum StorNext User’s Guide
Appendix A: Operating GuidelinesGeneral Operating Guidelines and Limitations
Linux Power-onDiagnostics
During testing a Quantum PX502 library running RedHat 6.1 did not finish power-on diagnostics. When thesame test was run on a PX502 library running eitherRed Hat 5.X or SuSE 10 / 11, power-on diagnosticscompleted and the system initialized without any
issues.The workaround for this issue is to disconnect the SANfrom the library running Red Hat 6.1. If the librarypowers on while the SAN is disconnected from thelibrary controller, the library finishes its power-ondiagnostics and performs an audit of the library.Subsequently reconnecting the Red Hat 6.1 server tothe SAN (library ready) causes the library to perform a
new physical audit of the library.Note: Testing was performed on the Red Hat 6.1
system which did not have StorNext loaded orrunning.
Windows and Linux Symbolic links toStorNext directories
If you create a symbolic (soft) link in Linux to adirectory on a StorNext file system, the link cannot beused by Windows. Windows also cannot process a
symbolic link which contains a path to a file in anotherfile system.
Windows Window backuputility
When a StorNext file system is mounted to a driveletter or a directory, configure the Windows backuputility to NOT include the StorNext file system.
Operating System Feature or Category Description

8/10/2019 6-67370-03_SN42101_UserGuide_RevAB
http://slidepdf.com/reader/full/6-67370-03sn42101userguiderevab 311/511
Quantum StorNext User’s Guide 285

8/10/2019 6-67370-03_SN42101_UserGuide_RevAB
http://slidepdf.com/reader/full/6-67370-03sn42101userguiderevab 312/511
Appendix A: Operating GuidelinesGeneral Operating Guidelines and Limitations
Windows Recycle bin If you are using the StorNext client software withWindows Server 2003, Windows Server 2008,Windows XP, Windows Vista or Windows 7, turn offthe Recycle Bin in the StorNext file systems mapped onthe Windows machine.
You must disable the Recycle Bin for the drive on whicha StorNext file system is mounted. Also, eachoccurrence of file system remapping (unmounting/ mounting) will require disabling the Recycle Bin. Forexample, if you mount a file system on E: (and disablethe Recycle Bin for that drive) and then remap the filesystem to F:, you must then disable the Recycle Bin onthe F: drive.
As of release 3.5, StorNext supports mounting filesystems to a directory. For Windows Server 2003 andWindows XP you must disable the Recycle Bin for theroot drive letter of the directory-mounted file system.(For example: For C:\MOUNT\File_System you woulddisable the Recycle Bin for the C: drive.)
For Windows Server 2003 or Windows XP:
1 On the Windows client machine, right-click theRecycle Bin iconon the desktop and then click Properties.
2 Click Global.
3 Click Configure drives independently.
4 Click the Local Disk tab that corresponds to themapped or directory-mounted file system.
5 Click the checkbox Do not move files to the RecycleBin. Remove files immediately when deleted.
6 Click Apply, and then click OK.
Operating System Feature or Category Description

8/10/2019 6-67370-03_SN42101_UserGuide_RevAB
http://slidepdf.com/reader/full/6-67370-03sn42101userguiderevab 313/511
Quantum StorNext User’s Guide 287
Appendix A: Operating GuidelinesGeneral Operating Guidelines and Limitations
Windows Recycle bin (cont.) (Disabling the Recycle Bin, Continued)
For Windows Server 2008, Windows Vista andWindows 7 systems, you must disable the Recycle Binon C: and the File system name:
1 On the Windows client machine, right-click the
Recycle Bin iconon the desktop and then click Properties.
2 Click the General tab.
3 Select the mapped drive that corresponds to theStorNext mapped file system. For directory-mountedfile systems, select the file system from the list.
4 Choose the option Do not move files to the Recycle
Bin. Remove files immediately when deleted.5 Click Apply.
6 Repeat steps 3-5 for each remaining directory-mounted file system.
7 When finished, click OK.
Operating System Feature or Category Description

8/10/2019 6-67370-03_SN42101_UserGuide_RevAB
http://slidepdf.com/reader/full/6-67370-03sn42101userguiderevab 314/511
288 Quantum StorNext User’s Guide
Appendix A: Operating GuidelinesGeneral Operating Guidelines and Limitations
All File systems andstripe groups
Be aware of the following limitations regarding filesystems and stripe groups:
• The maximum number of disks per file system is 512
• The maximum number of disks per data stripe groupis 128
• The maximum number of stripe groups per filesystem is 256
• The maximum number of tape drives is 256
Managed filesystems
For managed file systems only, the maximumrecommended directory capacity is 50,000 files persingle directory. (This recommendation does not applyto unmanaged file systems.)
Internet Explorer 8and 9
When using StorNext with Internet Explorer 8 or 9,warnings about insecure and secure items may begenerated. These warnings can be ignored and requireno response. As a workaround, follow these steps toprevent the warning messages from appearing:
1 Launch Internet Explorer 8 or 9.
2 Choose Internet Options from the Tools menu.3 Click the Advanced tab.
4 Under the Security heading, make sure the optionDisplay mixed content is checked.
5 Click OK.
StorNext Licensing After you purchase or update a feature license andthen enter license information through the StorNext
GUI, you should restart StorNext services to ensure thatyour new license is recognized. Certain StorNextfeatures such as replication may not recognize yourlicense until services are restarted.
Operating System Feature or Category Description
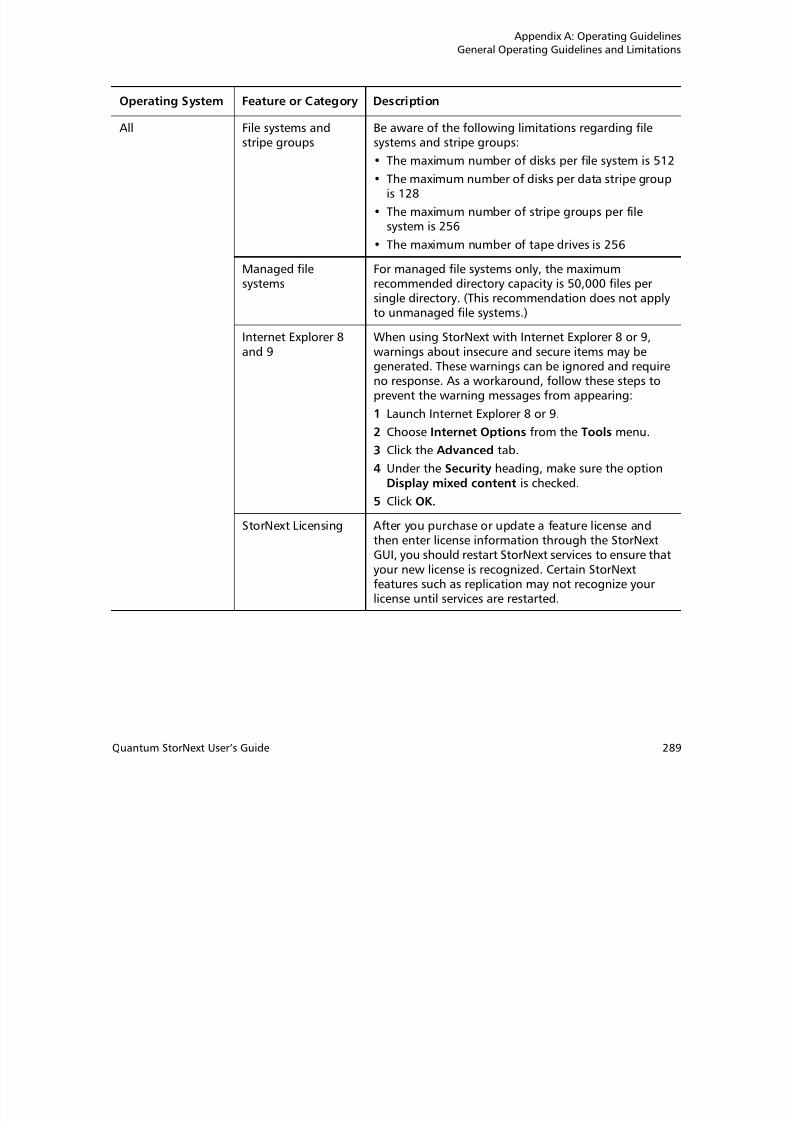
8/10/2019 6-67370-03_SN42101_UserGuide_RevAB
http://slidepdf.com/reader/full/6-67370-03sn42101userguiderevab 315/511
Quantum StorNext User’s Guide 289
Appendix A: Operating GuidelinesGeneral Operating Guidelines and Limitations
All Upgrade Before attempting to upgrade from a previousStorNext release, make sure you have free space on thefile system. If the file system is nearly full when youbegin the upgrade, serious errors may occur or theupgrade could fail. Best practice is to maintain an area
on the file system which is not used for data or systemfiles, but is reserved as an empty buffer to ensure thatupgrades and other operations complete successfully.
StorNext home page The capacity indicators on the StorNext home pageprovide approximations and may not accuratelysummarize the actual current capacity.
If you require accurate, up-to-the-minute capacity
information, click the Capacity areas of the home pageto view current capacity.
Backups Quantum recommends making two or more backupcopies to minimize vulnerability to data loss in theevent of hardware failure.
Tape drives StorNext does not support hot-swapping tape drives.When replacing or adding new tape drives you must
first stop StorNext before installing the new drive.
Cluster-Wide CentralControl
The StorNext Cluster-Wide Central Control file(nss_cctl.xml) is used to enforce the cluster-widesecurity control on StorNext nodes (client nodes, fsmnodes, and nodes running cvadmin). This file is placedon an nss coordinator server.
Currently the nss coordinator server capable of parsing
this xml file must be on the Linux platform.
Xsan It is not possible to delete data within a StorNext policyrelation point from an Xsan client via the Finder.Rather, data must be deleted using the shell.
Operating System Feature or Category Description

8/10/2019 6-67370-03_SN42101_UserGuide_RevAB
http://slidepdf.com/reader/full/6-67370-03sn42101userguiderevab 316/511
290 Quantum StorNext User’s Guide
Appendix A: Operating GuidelinesGeneral Operating Guidelines and Limitations
All Labels Disks with existing non-StorNext labels may not showup in the StorNext GUI in order to protect non-StorNext disks from being accidentally overwritten. Ifyou need to label a disk that is not visible in theStorNext GUI, use the cvlabel command to label the
disk or use cvlabel -U to remove the existing labelfrom the disks. (Refer to the cvlabel man pages forinstructions on labeling and unlabeling drives.)
Caution: Modifying the label on an active non-StorNext disk can make the disk unusable.Proceed with caution.
Replication When creating or editing a replication storage policy,
there is a field on the Outbound Replication tab called“Filenames Excluded from Replication.” This fieldallows you to exclude specific files from the replicationprocess.
This field works the same way as a UNIX shell whichlets you pattern match names. For example, entering
*.0 core would exclude all .o files and also filesnamed “core.” You could also skip all core files by
entering rep_skip=core*.
Replication/ Deduplication
If you are using the Deduplication or Replicationfeature, part of the installation process is to update theon-disk index. The time required to complete this partof the installation process times may vary dependingon the size of your licensed blockpool, driveperformance, and other factors. As a general guideline,
allow approximately five minutes for a 10TB blockpool.
Operating System Feature or Category Description

8/10/2019 6-67370-03_SN42101_UserGuide_RevAB
http://slidepdf.com/reader/full/6-67370-03sn42101userguiderevab 317/511
Quantum StorNext User’s Guide 291
Appendix A: Operating GuidelinesGeneral Operating Guidelines and Limitations
All Replication/ Deduplication
When either the StorNext GUI or the snpolicy command are used to create or modify a replication/ deduplication policy, a policy text file is written to thefile system.
Example: Suppose that /stornext/photos/ is the
mount point for file system named photos. If a policynamed pol_replicate_1 is created in that file
system, a text copy of the policy information called /stornext/photos/.rep_private/config/pol_replicate_1 is created.
If the file system is damaged and has to be recreated,the policy must also be recreated. This is simpler to dobeginning with the StorNext 4.1 release because abackup copy of the policy text file is saved whenever apolicy is created or updated. (The backup copy issaved as a file named /usr/cvfs/data/fsname/policy_history/policyname.date_time .)
In the previous example, the file system name(fsname) is photos and the policy name is
pol_replicate_1. So, the backup copy would have a
name like this:/usr/cvfs/data/photos/policy_history/pol_replicate_1.2010-10-29_14-07-13
Note: The backup copy directory is not in the samefile system is photos.
If Storage Manager is used on the machine, all thepolicy backup files will be backed up along with the
regular Storage Manager backups.Quantum suggests that after upgrading to StorNext4.2.1.0.1 you run the command snpolicy_gather –b > “some_file”
This will save a copy of your current configuration. The
b ti ill l t f li i f ti
Operating System Feature or Category Description

8/10/2019 6-67370-03_SN42101_UserGuide_RevAB
http://slidepdf.com/reader/full/6-67370-03sn42101userguiderevab 318/511
292 Quantum StorNext User’s Guide
–b option will also create a copy of policy informationin the
usr/cvfs/data/fsname/policy_history directory.

8/10/2019 6-67370-03_SN42101_UserGuide_RevAB
http://slidepdf.com/reader/full/6-67370-03sn42101userguiderevab 319/511
Appendix A: Operating GuidelinesGeneral Operating Guidelines and Limitations
All HA On HA systems only:
The /usr/cvfs/config/ha_peer file supports someessential HA features by providing an address for HAadministrative communications between the MDCs inan HA Cluster. If CVFS is started without this file having
correct information, the probability of an HA Resetincreases. To correct this condition, restore the
ha_peer file to the IP address of the peer MDC, andrestart StorNext by running the following command:
service cvfs restart
Note: The peer will be Primary after running thiscommand.
If the ha_peer file is removed for any length of timewhile StorNext is running, the snhamgr(1) HA Managersubsystem could stop functioning, which impacts theGUI HA Manage status page and the starting andstopping of CVFS, as well as any command line use ofsnhamgr itself. If this occurs, restore the ha_peer fileto the IP address of the peer MDC, and then restart theHA Manager service by running the following
command: service snhamgr restart
Operating System Feature or Category Description

8/10/2019 6-67370-03_SN42101_UserGuide_RevAB
http://slidepdf.com/reader/full/6-67370-03sn42101userguiderevab 320/511
294 Quantum StorNext User’s Guide
Appendix A: Operating GuidelinesGeneral Operating Guidelines and Limitations
All HA On HA systems only:
You may receive the following incorrect error messagewhen scanning for a secondary MDC from the StorNextConvert to HA page:
WARN com.quantum.qutosgui.jsf.ha.HaMBean -
doScanHost: Secondary system cannot be same asthe primary system.
This message is generated if /usr/adic/util/cnvt2ha.sh fails for any reason (for example, if the filesystem exists on the secondary, if a shared file systemcan't mount, etc). Upon secondary conversion failures,StorNext resets the ha_peer file to 255.255.255.255on the secondary. Since the conversion fails, the
primary ha_peer file is not updated and faultycomparison logic causes the erroneous error message(255.255.255.255 == 255.255.255.255).
The workaround consists of two steps:
1 Remove the /usr/cvfs/config/ha_peer file from thesecondary system.
2 Reset the StorNext processes on the secondary
system by running/etc/init.d/stornext_web restart.
Operating System Feature or Category Description

8/10/2019 6-67370-03_SN42101_UserGuide_RevAB
http://slidepdf.com/reader/full/6-67370-03sn42101userguiderevab 321/511
Quantum StorNext User’s Guide 295
Appendix A: Operating GuidelinesGeneral Operating Guidelines and Limitations
All HA On HA systems only:
When a non-managed file system is converted to amanaged file system in an HA pair, it is possible for theFSMPM on the secondary MDC to continue to operatethis FSM as non-managed, which incorrectly allows the
FSM to start on the secondary MDC.Restarting the CVFS service corrects the problem.Quantum recommends taking the following steps as atemporary workaround after converting any non-managed file systems to managed file systems:
1 Complete the configuration changes
2 Make sure that CVFS is running on the secondary
MDC, and wait 120 seconds to be sure that theconfiguration-file changes have been synchronizedto the secondary MDC
3 Restart CVFS on the secondary by issuing "servicecvfs restart"
4 Issue the command "cvadmin -e fsmlist" on thesecondary MDC, and make sure that the outputshows the FSM as "State: Blocked (waiting for MDC
to become HA primary)"
HA Use caution when configuring the netmask for the HAVirtual Interface (VIP).
The VIP is an alias IP address that is associated with areal interface. For example, if the VIP is based on eth0,eth0:ha will be created as the VIP.
The netmask you associate with the VIP shouldgenerally be the same as that of the base interface, butin no case should it be more specific. For example, ifthe netmask on eth0 is 255.255.224.0 (a /19), thenconfiguring the VIP netmask as anything more than a / 19, such as a /24 (255.255.255.0) would be incorrect.
Using the same /19 mask on both eth0 and eth0:ha is
Operating System Feature or Category Description

8/10/2019 6-67370-03_SN42101_UserGuide_RevAB
http://slidepdf.com/reader/full/6-67370-03sn42101userguiderevab 322/511
296 Quantum StorNext User’s Guide
Using the same /19 mask on both eth0 and eth0:ha isthe correct approach.
Note: The above applies only when the IP address ofthe VIP falls into the subnet defined by the baseinterface’s IP address and mask.
Appendix A: Operating GuidelinesGeneral Operating Guidelines and Limitations
All HA Understanding the performance of FSM failover inStorNext High Availability installations:
When a failover of any file system occurs, the new FSMnotices if any clients had a file exclusively opened forwrites, and waits up to 35 seconds for those clients to
reconnect. In the case of an HA Reset of the PrimaryMDC, that MDC is not going to reconnect, so thefailover to FSMs on the Secondary MDC and thepromotion of that MDC to Primary status can bedelayed by 35 seconds.
The StorNext system exclusively opens files on theHaShared file system, but assumes that only thePrimary MDC does this and waives the delay for that
one file system. Quantum advises against running userprocesses other than StorNext processes on HA MDCsfor performance, reliability and availability reasons. Inthe event that processes running on the Primary MDChave files exclusively open for writes on other filesystems, the availability of those file systems to allclients will be delayed by 35 seconds following an HAReset event.
Quotas When you enable or disable quotas using the CLIcvadmin command, the change does not persist afterrebooting. In order to permanently enable or disablequotas, you must modify the Quotas parameter of thefile system config file.
fsretrieve If you run multiple fsretrieve commands
simultaneously to find files (for example, find -type -f | xargs fsretrieve), you might receive errormessages because doing this taxes system resources.
Instead, use the recursive retrieve command. Whenyou use this command the files under a directory areretrieved in batches, and more sorting is done to putfiles in tape order for increased performance Run
Operating System Feature or Category Description

8/10/2019 6-67370-03_SN42101_UserGuide_RevAB
http://slidepdf.com/reader/full/6-67370-03sn42101userguiderevab 323/511
Quantum StorNext User’s Guide 297
files in tape order for increased performance. Runrecursive retrieve by entering
% fsretrieve -R .
Appendix A: Operating GuidelinesGeneral Operating Guidelines and Limitations
All Distributed LAN Distributed LAN Clients in HA Environments:
Each HA node must have its own dpserver filesdetailing the NICs on that node. The dpserver files arenot synchronized between HA pairs. If the DistributedLAN Server is configured after converting to HA, the
file system(s) running as Distributed LAN servers mustbe unmounted and mounted again to service DLCrequests.
When deduplication/replication is enabled, one ormore Virtual IP Addresses (VIPs) provides access to thePrimary MDC (where the blockpool server is running).In StorNext startup and failover situations, the VIP isdynamically associated with a physical address on the
Primary server. Do not use VIP interfaces when settingup the dpserver configuration file, or it will not beavailable when the node is running as Secondary. Thephysical interface and IP address should be used in thissituation.
Stripe groupexpansion
StorNext does not support expansion on stripe groupscontaining mixed-sized LUNs. For example, if you
create a file system that has two different-sized disks ina userdata only stripe group and then attempt to add anew disk to that stripe group and expand it, theexpansion will fail.
dpserver In some cases the physical IP address must be includedin the dpserver file in addition to the interface name.Note these conditions:
• When there is one IP address associated with a NICinterface, the interface name alone is a sufficientidentifier
• If there are multiple IP addresses associated with aNIC interface, one IP address is required in additionto the interface name
Operating System Feature or Category Description

8/10/2019 6-67370-03_SN42101_UserGuide_RevAB
http://slidepdf.com/reader/full/6-67370-03sn42101userguiderevab 324/511
298 Quantum StorNext User’s Guide
• On HA systems, the physical IP address is required ifvirtual IP is configured for the NIC interface. (Seealso the following entry, “Distributed LAN Clients inHA Environment.”)
Appendix A: Operating GuidelinesGeneral Operating Guidelines and Limitations
All Truncation By design, replication or deduplication must becompleted before data files can be truncated if thesefiles are associated with both a replication/deduppolicy and a Storage Manager policy. Even if theStorage Manager policy is configured with the“Truncate Immediately” option, the truncation maynot occur at store time unless the file has beenreplicated or deduplicated.
DXi Virtual TapeLibrary Compatibility
Note the following recommendations and limitationsfor using DXi as a virtual tape library for StorNext:
• Recommended library emulation: “ADIC Scalari2000”
• Recommended tape drive emulation: “IBM LTO-x” or“HP LTO-x”
• DDM (Distributed Data Mover): This feature iscurrently not supported due to lack of full SCSI3support in DXi.
Affinities When a file system with two affinities is to bemanaged by the Storage Manager, the GUI forces
those affinities to be named tier1 and tier2. This willcause an issue if a site has an existing unmanaged filesystem with two affinities with different names andwants to change that file system to be managed. Thereis a process for converting a file system so it can bemanaged but it is non-trivial and time consuming.Please contact Quantum Support if this is desired.
Note: The restriction is in the StorNext GUI because of
a current system limitation where affinitynames must match between one managed filesystem and another. If a site was upgradedfrom a pre-4.0 version to post-4.0, the affinitynames get passed along during the upgrade.For example, if prior to StorNext 4.0 the affinitynames were aff1 and aff2 the GUI would
Operating System Feature or Category Description

8/10/2019 6-67370-03_SN42101_UserGuide_RevAB
http://slidepdf.com/reader/full/6-67370-03sn42101userguiderevab 325/511
Quantum StorNext User’s Guide 299
names were aff1 and aff2, the GUI wouldrestrict any new file systems to have those
affinity names as opposed to tier1 and tier2.
Appendix A: Operating GuidelinesGeneral Operating Guidelines and Limitations
All Converting filesystems
StorNext does not currently support converting from amanaged file system to an unmanaged file system.
JournalSize Setting The optimal settings for JournalSize are in therange between 16M and 64M, depending on theFsBlockSize. Avoid values greater than 64M due to
potentially severe impacts on startup and failovertimes. Values at the higher end of the 16M-64M rangemay improve performance of metadata operations insome cases, although at the cost of slower startup andfailover time. Existing file systems managed byStorNext Storage Manager MUST have a journal size ofat least 64M. The TSM portion of SNSM may not start ifthe journal size for a managed file system is less than
64M.
For more information about JournalSize, refer to“FSBlockSize, Metadata Disk Size, and JournalSizeSettings” in Appendix A of the StorNext User’s Guide.
Operating System Feature or Category Description

8/10/2019 6-67370-03_SN42101_UserGuide_RevAB
http://slidepdf.com/reader/full/6-67370-03sn42101userguiderevab 326/511
300 Quantum StorNext User’s Guide
Appendix B
Additional Replication andDeduplication Information
This appendix contains detailed information about how replication anddeduplication work, and about the underlying processes.
Replication Configuration File
StorNext includes a configuration file called snpolicyd.conf located
at /usr/cvfs/config/snpolicyd.conf .
The snpolicyd.conf file provides a way to configure the snpolicyd process, which handles most aspects of StorNext replication anddeduplication.
The man page for snpolicyd.conf contains detailed syntax, examplesand instructions for modifying this file.
The remaining sections in this appendix also make reference to this file.

8/10/2019 6-67370-03_SN42101_UserGuide_RevAB
http://slidepdf.com/reader/full/6-67370-03sn42101userguiderevab 327/511
Quantum StorNext User’s Guide 301
Appendix B: Additional Replication and Deduplication InformationReplication Terminology and Conventions
Replication Terminology and Conventions
StorNext has two kinds of policy:
• Storage Manager (SM) policies
• Replication/Deduplication policies.
For the sake of simplicity, in this appendix Replication/Deduplicationpolicies will be called "snpolicyd" policies. Snpolicyd is the name of theLinux daemon that interprets and acts upon the policies.
StorNext users often talk about Storage Manager storing files to tape orretrieving files from tape, but Storage Manager can also use storagedisk (called SDISK in SM) for storing files. In this appendix when wemention writing to or reading from tape, it includes using SDISK.
Copies and Versions
It’s important to understand what "copies of a file or directory" means.There are several meanings, and this section attempts to clarify whereStorNext supports additional copies and versions of a file or directory.
Context 1: "Number of copies to keep on target" is one property of ansnpolicyd policy. This parameter specifies the number of replicateddirectories to keep on the target file system for a source directory.Remember, the replication process involves replicating a sourcedirectory and all of files and subdirectories that it contains. You can
create from 1 to 16 target directories, depending on the "Number ofcopies to keep on target". Number of copies in this context means thenumber of target directory instances. By default, the differentdirectories are differentiated by names like dir, dir.1, dir.2, and soon.
Context 2: Number of target files systems for an snpolicyd replicationli Wh fi i li ti if t th

8/10/2019 6-67370-03_SN42101_UserGuide_RevAB
http://slidepdf.com/reader/full/6-67370-03sn42101userguiderevab 328/511
302 Quantum StorNext User’s Guide
source policy. When configuring replication, you can specify up to three
target file systems. For example, you could specify file system /stornext/bk on machine hist1, and file systems /snfs/backup and
/snfs/dr on machine host2. Each of these directories can be a targetof a replication source directory. The replication process is not complete
Appendix B: Additional Replication and Deduplication InformationReplication Target Directories
until each of the three target file system targets have been completelymade.
If a replication source policy specified 10 for the "Number of copies tokeep on target" and specified 3 target file systems, you would eventuallyhave 30 replication directories: 3 after the first replication, 6 after thesecond replication, etc.
Context 3: Storage Manager number of copies. Storage Manager stores
1 through 4 copies of a file. The number of files is configured under theSteering tab when editing or creating a Storage Manager storage policy.(Actually, 4 is the default maximum number of copies. The number canbe larger than 4.) Each of these copies is a copy of the same filecontents.
Context 4: Storage Manager version. Versions refer to changedcontents of the same file. By default, Storage Manager keeps tenversions of a file. Unlike Storage Manager copies, Storage Managerversions refers to different file contents. If there is a file called "log" that
changes every day, and Storage Manager stores "log" every day, after
ten days there would be ten versions of "log". The fsversion command is used to examine and change the Storage Manager versionsof a file.
Context 5: Storage Manager File Recovery. When a file is removed froma Storage Manager relation point, the previous copies stored by Storage
Manager are still on media and in the SM database. These previousversions may be recovered using the fsrecover command. There is noa limit to the number of SM instances which can be recovered in thismanner. Eventually the administrator may use the fsclean command
to clean up older versions of SM media. After running fsclean, filesthat used to reside on the media can no longer be recovered with the
fsrecover command.
Replication Target Directories
Replication results in a directory on the target that represents the files

8/10/2019 6-67370-03_SN42101_UserGuide_RevAB
http://slidepdf.com/reader/full/6-67370-03sn42101userguiderevab 329/511
Quantum StorNext User’s Guide 303
Replication results in a directory on the target that represents the files
that were in the source directory at the time of the replication. Thesource and target directories could be on the same machine (node) ordifferent machines. Also, StorNext can replicate either deduplicateddata or non-deduplicated data.
Appendix B: Additional Replication and Deduplication InformationReplication Target Directories
Number of ReplicationCopies
When a source directory is replicated to a target there can be from 1through 16 replicated target directories that reflect replications of thesource at different times. The number of copies is specified by the"Copies to Keep on Target" parameter on the Inbound Replication tab orOutbound Replication tab. You enter parameters on these tabs whenconfiguring a snpolicyd storage policy.
The "Copies to Keep on Target" selection allows values of 1 through 16,
and also a special case called in-place. We will not discuss the in-placeselection in this section.
First, let’s consider the case where "Copies to Keep on Target" is 2. Eachtime a replication occurs a new target directory is created. This targetdirectory might have the same name as the previous target directory,but it is actually a new directory. The new directory reflects files added,deleted, and changed since the previous replication.
It is important to understand that in this example the target is a s cdirectory. This has implications that might not be immediately obvious.For one thing, it means we cannot use the target directory in exactly thesame way as we might use the source directory. Following is anexplanation and examples.
Example: Copies on Target = 2
In this example, we replicate source directory /stornext/snfs1/photos, a directory in file system /stornext/snfs1, to a target
directory /stornext/backup/photos in file system /stornext/backup. (For this example it doesn’t matter whether the two filesystems are on the same node machine or on different machines.) Sincewe are keeping two copies on the target, we will usually have twodirectories on the target:
• /stornext/backup/photos - ,duaon 6 saon vUQ62aQds
• /stornext/backup/photos.1 - previous replication
When the next replication occurs, the following directory changes Takeplace:
• The previous replication /stornext/backup/photos.1 is removed

8/10/2019 6-67370-03_SN42101_UserGuide_RevAB
http://slidepdf.com/reader/full/6-67370-03sn42101userguiderevab 330/511
304 Quantum StorNext User’s Guide
• The most recent replication /stornext/backup/photos isrenamed /stornext/backup/photos.1
• The new replication appears in /stornext/backup/photos
Appendix B: Additional Replication and Deduplication InformationReplication Target Directories
Now consider a Linux shell process that is executing inside directory /stornext/backup/photos. When the next replication occurs, the
directory still exists but is named /stornext/backup/photos.1. If the
Linux shell executes the command ls -l, the ls command lists the
previous contents of photos - the directory now named photos.1.
When the replication after that occurs, the original directory is removed.When the shell executes ls -l, the command shows no files since the
original directory and its contents have been removed.Thus, a process executing inside a replication directory may see files inthe directory at one time and see no files a while later. This is differentbehavior than we would expect to see when a process is executinginside the original source directory.
Similar surprising behavior occurs if the replicated directory is NFSexported or Samba/CIFS shared. Suppose directory /stornext/
backup/photos is NFS exported on the target machine. The directorycan be NFS mounted on another Linux or Unix machine. The mountedNFS file system can generate errors (input/output error, stale NFS filehandle) on the client when the original directory changes due toreplication.
The bottom line is that you must be aware that changes occur with thereplicated directory. The replicated directory should not be used as asubstitute for the original source directory unless you take precautionsto isolate the application from unexpected changes.
Isolating a ReplicationTarget Directory
To isolate a replication target directory, use the snpolicy command’s
-exportrepcopy option. This operation is available only from thecommand line, not from the StorNext GUI.
First, use the -listrepcopies option on the target node to determinethe association between the target copy number and the targetdirectory to use. The -listrepcopies output provides the "key" valuefor the policy used to implement this replication. For example, if thetarget file system is /snfs/rep, use the command:
/usr/cvfs/bin/snpolicy -listrepcopies=/snfs/rep
H i th l t t f th d t t

8/10/2019 6-67370-03_SN42101_UserGuide_RevAB
http://slidepdf.com/reader/full/6-67370-03sn42101userguiderevab 331/511
Quantum StorNext User’s Guide 305
Here is the relevant part of the command output:
source://snfs/[email protected]:/project?key=402 ->
target://snfs/rep@node2:?key=406
Appendix B: Additional Replication and Deduplication InformationReplication Target Directories
0 -> /snfs/rep/project 1 -> /snfs/rep/project.1
2 -> /snfs/rep/project.2
3 -> /snfs/rep/project.3
The copy number appears in the left column, and the realizationdirectory for that copy number is shown after the "->".
There are two "keys" shown in the sample output. The first key (402) isthe key value for the source policy controlling the replication. Thesecond key value (406) controls the replication realization of the target.
Let's say you want to copy files back from /snfs/rep/project.2. To
isolate /snfs/rep/project.2 you would use this command:
/usr/cvfs/bin/snpolicy -exportrepcopy=/snfs/rep/ --
key=406 -copy=2 --path /snfs/rep/project_tempThis command renames the directory /snfs/rep/project.2 to /snfs/rep/project_temp and prevents the policy daemon fromaffecting this directory, in case replications for this target policy becomeactivated again during the recovery process.
The -path argument is optional: you can do only the exportrepcopy
operation and use the directory name /snfs/rep/project.2 when
recovering replicated files.
The point of this is that using the -exportrepcopy option allows youto use the directory without having to worry about it changing, or filesdisappearing as you do your work.
Once a directory has been isolated in this manner, it can then betransformed into a replication source directory for rereplication toanother file system and/or machine.
Final RecommendationFor Target Directories
You should not change the contents of a replication target directory. Itshould be treated as a "read-only" replica, even though StorNext doesnot enforce a read-only restriction.
If you change a file in a replication target directory you may be

8/10/2019 6-67370-03_SN42101_UserGuide_RevAB
http://slidepdf.com/reader/full/6-67370-03sn42101userguiderevab 332/511
306 Quantum StorNext User’s Guide
y g p g y y y
changing the file contents in other target directories due to the "hard-link" usage in replication. Furthermore, if you change or add files in adirectory, that directory may disappear due to subsequent replications.(Using exportrepcopy avoids this second issue.)
Appendix B: Additional Replication and Deduplication InformationStorNext snpolicyd Policies
What if you want to change an existing source directory into a targetdirectory? This can be done, but without special configuration care theoriginal source policy assignment will be lost. A directory can have onlyone snpolicyd policy assigned to it (and all of the files and subdirectoriesit contains.) If you change the policy assignment, the characteristicsspecified in the previous policy are forgotten.
StorNext snpolicyd Policies
You can create and edit StorNext snpolicyd policies from the StorNextGUI or with the snpolicy command. These snpolicyd policies differfrom StorNext Storage Manager (SM) policies in several respects.
Following is a summary of some of the similarities and differencesbetween these two kinds of policies.
Storage Policy Option Storage Manager Policy snpolicyd Policy
Configurable via the StorNExtGUI?
Yes. Select the StoragePolicies menu’s StorageManager option.
Yes. Select the StoragePolicies menu’s Replication /Deduplication option.
Configurable via the commandline?
Yes. Use fs commands such as
fsaddclass and fsmodclass Yes. Use the snpolicy command.
Where are policy internalsstored?
In Storage Manager Database.One database per machine.
In the managed file system, ina private directory.
Is the policy used across filesystems?
Yes. One policy can be used inmultiple directories and
multiple file systems.
No. Policies apply to one filesystem, but can be applied to
multiple directories.
Functions? Store (to tape or SDISK),retrieve, truncate files.
Deduplicate, replicate,truncate files.
How are truncated filesretrieved?
The entire file must beretrieved.
Only portions of the filecontaining needed regionsmay be retrieved.

8/10/2019 6-67370-03_SN42101_UserGuide_RevAB
http://slidepdf.com/reader/full/6-67370-03sn42101userguiderevab 333/511
Quantum StorNext User’s Guide 307
Schedules? fspolicy / schedules stored inDatabase.
Linux crontab scheduling.
Appendix B: Additional Replication and Deduplication InformationStorNext snpolicyd Policies
Example
You create an snpolicyd policy with the StorNext GUI or with the
snpolicy command. The snpolicy command is in directory /usr/cvfs/bin. Command line configuration must be done by the Linux rootuser.
Suppose you create directory /stornext/snfs1/photos in file system
/stornext/snfs1 on machine host1. You then use the StorNext GUI
to create a replication policy named photo_rep to replicate this
directory to file system /stornext/backup on machine host2. (As inthe previous example, the policy was configured to keep two copies onthe target.)
Now use the snpolicy command to see more internal details about the
policy called photo_rep.
Use this command:
/usr/cvfs/config/snpolicy -dumppol/stornext/snfs1/photos
The command's output looks like this:
inherit=photo_rep
key=1720399
root=/stornext/snfs1/photosdedup=off
dedup_filter=off
max_seg_size=1G
max_seg_age=5m
dedup_age=1m
dedup min size=4K
Management daemon? multiple fs_... processes snpolicyd
Previous file versionsrecoverable?
Yes. Recover previous tapeversion with the fsrecover command. Up to 10 tapeversions.
Yes. Previous replicated copiescan be kept in previousreplication directories. Up to16.
Storage Policy Option Storage Manager Policy snpolicyd Policy

8/10/2019 6-67370-03_SN42101_UserGuide_RevAB
http://slidepdf.com/reader/full/6-67370-03sn42101userguiderevab 334/511
308 Quantum StorNext User’s Guide
dedup_min_size=4K
dedup_seg_size=1Gdedup_min_round=8M
dedup_max_round=256M
Appendix B: Additional Replication and Deduplication InformationStorNext snpolicyd Policies
dedup_bfst="localhost"fencepost_gap=16M
trunc=off
trunc_age=365d
trunc_low_water=0
trunc_high_water=0
rep_output=true
rep_report=truerep_target="target://stornext/backup@host2:"
rep_copies=2
There is a lot of output, most of which we don’t have to consider now.Some of the important values are:
• inherit=photo_rep: This means the policy controlling this
directory receives its parameters from the policy named photo_rep.
Remember, when you create a policy you give it a name, and thepolicy name belongs to the file system. There could be a differentpolicy named photo_rep in a different file system, and there would
be no connection between the two photo_rep policies.
• rep_output=true: This means the policy is a source of replication.
• rep_copies=2: This means you want to keep two copies(instances) of the replicated directory on the target file system.
• rep_target="target://stornext/backup@host2:" : This tellsyou the replication target directory is a directory in file system
/stornext/backup on machine host2. But which directory namewill be used in that file system? Since you did not specify anythingelse, the source directory name will be used. In this case the sourcedirectory name in the source file system is photos, so the target
directory names will be /stornext/backup/photos and
/stornext/backup/photos.1.
• dedup=off: This means the files in this directory are notdeduplicated before being replicated. Deduplication and replicationare discussed in another section.
One comment about a field not in the command output. Since there isno line for rep_input=true, this means this directory is not areplication target directory This is not surprising While it is true that a

8/10/2019 6-67370-03_SN42101_UserGuide_RevAB
http://slidepdf.com/reader/full/6-67370-03sn42101userguiderevab 335/511
Quantum StorNext User’s Guide 309
replication target directory. This is not surprising. While it is true that areplication target can also be a replication source, that is an advancedcase not covered here.
Appendix B: Additional Replication and Deduplication InformationReplication Copies = 2 (Detail)
Replication Copies = 2 (Detail)
In this section we’ll examine in more detail what two copies on thetarget (rep_copies=2) means.
Assume that we begin with files file1, file2, and file3 in the sourcedirectory. After the first replication, we expect to see three files in thetarget directory /stornext/ backup/photos.
After running the command: ls -l /stornext/backup/photos, theoutput looks like this:
total 4144
-rwxr-xr-x 2 testuser root 1388936 Jan 26 10:11 file1
-rw-r--r-- 2 testuser root 1430896 Jan 26 10:11 file2
-rw-r--r-- 2 testuser root 1397888 Jan 26 10:12 file3
Notice the "link count" of 2 in front of the user name for each file. Thismeans that each of these files has two links - two names. One name isthe entry in directory /stornext/backup/photos. The other name is a
name in a subdirectory of /stornext/backup/.rep_private. As its
name suggests, directory .rep_private in the root of a managed filesystem contains internal information used to manage replication and
deduplication.
Digression
Following is some additional detail which you may want to skip the firsttime you read this section.
Below is output from the command ls -l /stornext/backup/
.rep_private:total 144
drwx------ 19 root root 2057 Jan 26 10:1200047DA110919C87
drwx------ 3 root root 2054 Jan 26 10:12 config
drwx------ 3 root root 2056 Jan 25 14:11 oldest
drwx------ 3 root root 2116 Jan 26 10:13 pending

8/10/2019 6-67370-03_SN42101_UserGuide_RevAB
http://slidepdf.com/reader/full/6-67370-03sn42101userguiderevab 336/511
310 Quantum StorNext User’s Guide
p g
drwx------ 3 root root 2132 Jan 26 10:13 queueddrwx------ 2 root root 2048 Jan 21 16:56 source_state
drwx------ 3 root root 2048 Jan 20 17:13 target
Appendix B: Additional Replication and Deduplication InformationReplication Copies = 2 (Detail)
drwx------ 2 root root 2116 Jan 26 10:13 target_statedrwx------ 2 root root 2255 Jan 26 10:13 tmp
This output shows a list of directories underneath .rep_private. The
directory we are interested in now is 00047DA110919C87. Where did
the directory name 00047DA110919C87 come from? It is the file systemID of the source file system, a unique string which can be used toidentify that file system.
If you execute the command ls -l /stornext/backup/.rep_private/00047DA110919C87
you would see one or more directories similar to this:
drwx------ 3 root root 2052 Jan 26 09:30 1720408
drwx------ 3 root root 2063 Jan 26 10:13 1720418
drwx------ 3 root root 2048 Jan 21 12:12 475
Here the directory names are 1720408, 1720418, and 475. Those namesactually reflect the inode number of the directories on the source filesystem. In this case the directory we want is 1720418.
If you execute the command ls -l /stornext/backup/.rep_private/00047DA110919C87/1720418
you would see the following:
total 4160lrwxrwxrwx 1 root root 72 Jan 26 10:130x1a4062.0 -> /snfs/sn2/__CVFS_Handle.00047DA10CB84CF8000E00000000000000000000001A412B
-rwxr-xr-x 2 testuser root 1388936 Jan 26 10:110x1a4065.0
-rw-r--r-- 2 testuser root 1430896 Jan 26 10:110x1a4066.0
-rw-r--r-- 2 testuser root 1397888 Jan 26 10:120x1a4067.0
drwx------ 2 root root 2051 Jan 26 10:13 copies
The important files are the three in the middle named 0x1a4065.0,
0x1a4066.0, and 0x1a4067.0. As you can see from the file owner
(testuser) and file lengths these three files are the other three names
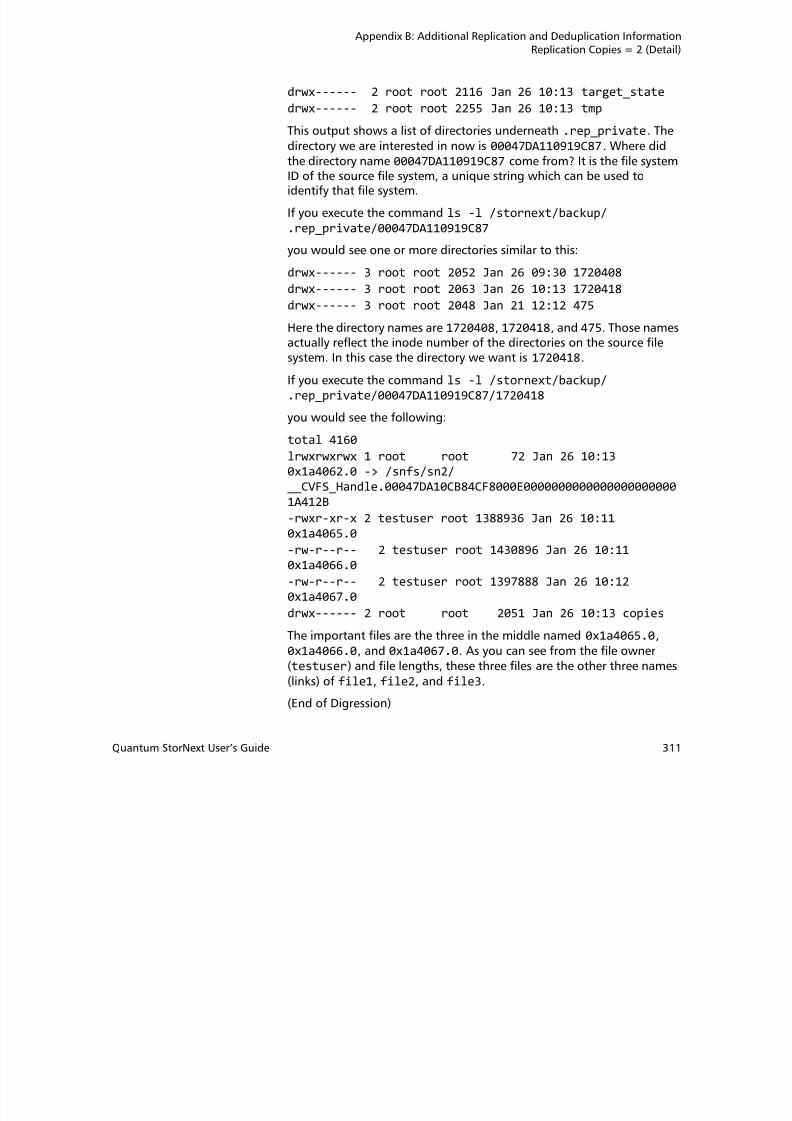
8/10/2019 6-67370-03_SN42101_UserGuide_RevAB
http://slidepdf.com/reader/full/6-67370-03sn42101userguiderevab 337/511
Quantum StorNext User’s Guide 311
(testuser) and file lengths, these three files are the other three names
(links) of file1, file2, and file3.
(End of Digression)
Appendix B: Additional Replication and Deduplication InformationReplication Copies = 2 (Detail)
Second ReplicationThe "standard" case - when we have replicated files once - is that the linkcount for the target file will be two.
Now let's say that we add file4 and file5 to the source directory andreplicate again. After the second replication, target directory
/stornext/backup/photos contains the following:
total 6864-rwxr-xr-x 3 testuser root 1388936 Jan 26 10:11 file1
-rw-r--r-- 3 testuser root 1430896 Jan 26 10:11 file2
-rw-r--r-- 3 testuser root 1397888 Jan 26 10:12 file3
-rwxr-xr-x 2 testuser root 1388994 Jan 26 11:02 file4
-rwxr-xr-x 2 testuser root 1388965 Jan 26 11:03 file5
Target directory /stornext/backup/photos.1 contains the previous
replication:
total 4144
-rwxr-xr-x 3 testuser root 1388936 Jan 26 10:11 file1
-rw-r--r-- 3 testuser root 1430896 Jan 26 10:11 file2
-rw-r--r-- 3 testuser root 1397888 Jan 26 10:12 file3
Notice that file1, file2, and file3 each have a link count of 3. One
link (name) is in directory photos, another link is in directory photos.1,
and the third is the snpolicyd "internal" link in the .rep_private
directory. The two new files, file4 and file5, appear only in the new
directory and in the .rep_private directory. They have a link count of2.
Since file1, file2, and file3 are really the same file in directories
photos and photos.1, no extra disk storage is needed for these fileswhen replicating again. In general, when you use replication with more
than one copy retained on the target, no additional storage is neededfor unchanged files. If a file is changed, both the old and the newversion are retained, so additional storage is needed in this case.(Unless deduplication is also used, which is discussed later.)
Now let's make two changes. Say we remove file4 in the source
directory and modify file2. After the next replication, target directory
photos contains the following:
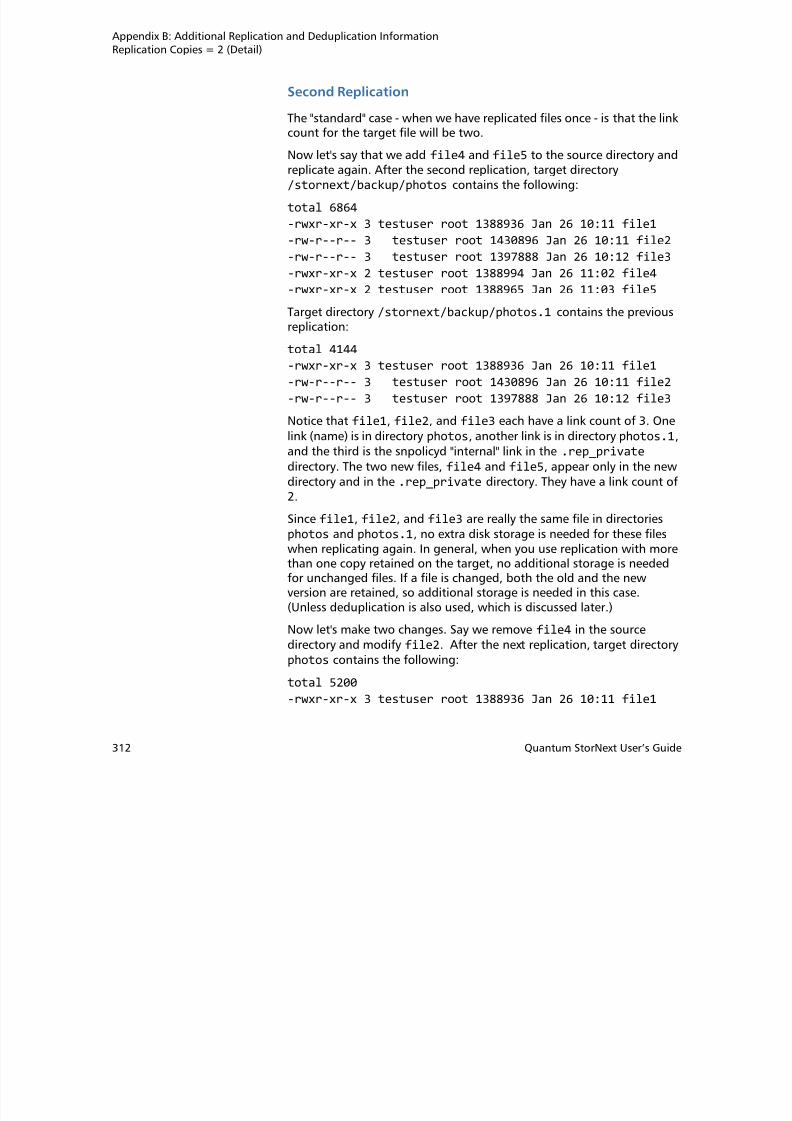
8/10/2019 6-67370-03_SN42101_UserGuide_RevAB
http://slidepdf.com/reader/full/6-67370-03sn42101userguiderevab 338/511
312 Quantum StorNext User’s Guide
total 5200
-rwxr-xr-x 3 testuser root 1388936 Jan 26 10:11 file1
Appendix B: Additional Replication and Deduplication InformationMore About Replication Target Directories
-rw-r--r-- 2 testuser root 1123155 Jan 26 11:20 file2-rw-r--r-- 3 testuser root 1397888 Jan 26 10:12 file3
-rwxr-xr-x 3 testuser root 1388965 Jan 26 11:03 file5
Target directory photos.1 contains:
total 6864
-rwxr-xr-x 3 testuser root 1388936 Jan 26 10:11 file1
-rw-r--r-- 1 testuser root 1430896 Jan 26 10:11 file2
-rw-r--r-- 3 testuser root 1397888 Jan 26 10:12 file3-rwxr-xr-x 2 testuser root 1388994 Jan 26 11:02 file4
-rwxr-xr-x 3 testuser root 1388965 Jan 26 11:03 file5
The three files, file1, file3 and file5, were unchanged, so they have
the expected link count of 3. One name occurs in photos, one in
photos.1, and the third in a subdirectory of .rep_private. Since
file2 was changed in directory photos, it has a link count of 2: one
link in photos and one in .rep_private.The file named file2 in photos.1 now has a link count of 1. It is not
the same file as the current file2 (notice the different length). The
file2 in photos.1 is there for "historical" or recovery purposes only. Itrepresents the previous replication of the directory.
Notice also that file4 in photos.1 has a link count of 2: one for the
photos.1 copy and one for the .rep_private copy. There is no file
named file4 in the current replication directory named photos.
File1, file3 and file5 share the same disk storage. The storage for
file4 is only shared with the .rep_private copy, and this storage will
be freed when the next replication occurs. The older version of file2
exists only in photos.1, and its storage will be removed in the nextreplication.
More About Replication Target Directories
In the previous replication example, source directory /stornext/snfs1/photos on host1 was replicated to target directory /

8/10/2019 6-67370-03_SN42101_UserGuide_RevAB
http://slidepdf.com/reader/full/6-67370-03sn42101userguiderevab 339/511
Quantum StorNext User’s Guide 313
stornext/backup/photos on host2. If the number of copies to keepis more than 1, the previous replication directories are named
/stornext/backup/photos.1, /stornext/backup/photos.2, etc.
Appendix B: Additional Replication and Deduplication InformationMore About Replication Target Directories
The default name on the target is the same pathname relative to the filesystem mount point as the source directory name is relative to thesource file system mount point.
Examples
Suppose you apply a replication policy to directory /stornext/snfs1/a/b/c/d/photos in file system /stornext/snfs1, and replicate to file
system /stornext/backup. The default target replication directoryname would be /stornext/backup/a/b/c/d/photos, and previous
replication directories would be stornext/backup/a/b/c/d/photos.1, etc.
There are other options that can be specified on either the source policyor on the target policy. Since we have been concentrating on the sourcepolicy, following are examples of changes there.
When creating or editing a policy, specify the alternative path names inthe area of the screen labeled Pathname on Target on the OutboundReplication tab. When you click the Override label, a field appearswhere you can type some text. Some hints appear above that field,showing special entry values such as %P and %D.
In all of the following examples, assume that the replication sourcedirectory is /stornext/snfs/photos/ocean in directory photos/
ocean relative to the source file system /stornext/snfs1. For thisexample we will replicate to file system /stornext/backup. We know
that if we do not override the "Pathname on Target" value, the
replication target directory name will be /stornext/backup/photos/ocean.
• If you enter a string without any of the "%" formatting characters,the replication directory will be the name you specify. For example,
if you specify open/sesame for Pathname on Target, the replicationdirectory would be /stornext/backup/open/sesame.
• %P means source pathname relative to the source file system. For
example, if you specify open/sesame/%P for Pathname on Target,
the replication directory would be /stornext/backup/open/sesame/photos/ocean
• %D means today’s date. %T means the replication time. For

8/10/2019 6-67370-03_SN42101_UserGuide_RevAB
http://slidepdf.com/reader/full/6-67370-03sn42101userguiderevab 340/511
314 Quantum StorNext User’s Guide
example, if you specify %D/%T/%P for Pathname on Target, thereplication directory would be /stornext/backup/2010-02-02/16_30_22/photos/ocean (on February 2, 2010).
Appendix B: Additional Replication and Deduplication InformationDeduplication Overview
•%H
means source hostname. This would be a good value to usewhen more than one source machine is replicating files to the sametarget machine and target file system.
There are a lot of ways the "%" characters, and name specifications canbe combined.
Note two important facts:
• It is possible to generate target name collisions by specifying the
same Pathname on Target for more than one policy. For example,you might choose "daily" for Pathname on Target in two sourcereplication policies. In that case the first policy to replicate wouldsucceed, and the second would fail due to the name collision. Using
%H, %P, etc. can help you avoid these collisions.
• Specifying a Pathname on Target is required if you want to replicateinto a Storage Manager relation point. This will be discussed further
in another section.
Deduplication Overview
Here is the view from 100,000 feet. When StorNext deduplication isenabled, a file is examined and logically split into data segments calledBLOBs (binary large objects). Each BLOB has a 128-bit BLOB tag. A filecan be reconstructed from the list of BLOBs that make up a file. The datafor each BLOB is stored in the blockpool for a machine. We can use thecommand snpolicy -report file_pathname to see the list of BLOBtags for a deduplicated file.
When a deduplicated file is replicated, the BLOBs are replicated from theblockpool on the source machine to the blockpool on the targetmachine. If the source file system and the target file system are bothhosted on the same machine, no data movement is needed. If the sameBLOB tag occurs several times (in one file or in many files) only one copyof the data BLOB exists in the blockpool. During replication that onecopy must be copied to the target blockpool only once.
This is why deduplicated replication can be more efficient than non-

8/10/2019 6-67370-03_SN42101_UserGuide_RevAB
http://slidepdf.com/reader/full/6-67370-03sn42101userguiderevab 341/511
Quantum StorNext User’s Guide 315
deduplicated replication. With non-deduplicated replication, anychange in a file requires that the entire file be recopied from the sourceto the target. And, if the data is mostly the same in several files (or
Appendix B: Additional Replication and Deduplication InformationDeduplication Overview
exactly the same), non-deduplicated replication still copies each entirefile from the source file system to the target.
The following example uses these three files and their correspondingsizes:
f.2m - 2 MB
f.4m - 4 MB
g.4m - 4 MBThe maximum segment size in this example is 1 MB. (That size isartificially low for this example only.)
If we look at the "snpolicy -report" output for the directorycontaining these files, we see the following:
./f.2m
policy: 1720449 inode: 1720468
flags: TAG
mtime: 2010-01-26 14:20:03.590665672 CST
ingest: 2010-01-26 14:20:03.590665672 CST
size: 2097152 disk blocks: 4096
seqno: 4 blk seqno: 2
offset: 0 length: 1048576 tag:D03281B0629858844F20BB791A60BD67
offset: 1048576 length: 1048576 tag:12665A8E440FC4EF2B0C28B5D5B28159
./f.4m
policy: 1720449 inode: 1720470
flags: TAG
mtime: 2010-01-26 14:22:56.798334104 CST
ingest: 2010-01-26 14:22:56.798334104 CST
size: 4194304 disk blocks: 8192 seqno: 4 blk seqno: 4
offset: 0 length: 1048576 tag:D03281B0629858844F20BB791A60BD67
offset: 1048576 length: 1048576 tag:12665A8E440FC4EF2B0C28B5D5B28159
offset: 2097152 length: 1048576 tag:
7F02E08B3D8C35541E80613142552316

8/10/2019 6-67370-03_SN42101_UserGuide_RevAB
http://slidepdf.com/reader/full/6-67370-03sn42101userguiderevab 342/511
316 Quantum StorNext User’s Guide
7F02E08B3D8C35541E80613142552316 offset: 3145728 length: 1048576 tag:1FEC787120BEFA7E6685DF18110DF212
Appendix B: Additional Replication and Deduplication InformationDeduplication Overview
./g.4m
policy: 1720449 inode: 1720471
flags: TAG
mtime: 2010-01-26 14:23:28.957445176 CST
ingest: 2010-01-26 14:23:28.957445176 CST
size: 4194304 disk blocks: 8192
seqno: 5 blk seqno: 4
offset: 0 length: 1048576 tag:D03281B0629858844F20BB791A60BD67
offset: 1048576 length: 1048576 tag:DF54D6B832121A80FCB91EC0322CD5D3
offset: 2097152 length: 1048576 tag:7F02E08B3D8C35541E80613142552316
offset: 3145728 length: 1048576 tag:1FEC787120BEFA7E6685DF18110DF212
All three files have the same contents in the first megabyte starting atoffset 0. The tag for that BLOB is
D03281B0629858844F20BB791A60BD67, and that BLOB is stored only
once in the blockpool. The second megabyte is the same for files f.2m
and f.4m (tag 12665A8E440FC4EF2B0C28B5D5B28159) but file g.4m
has a different BLOB in those bytes. The final 2 megabytes of files f.4m
and g.4m are the same.
Remember that the above is an artificial example. In actual practiceBLOBs do not line up on 1 MByte boundaries and are not all the samelength.
Enabling Deduplication When creating or editing a policy through the StorNext GUI, select theDeduplication tab and make sure deduplication is enabled (On). If youuse the snpolicy dumppol option, you will see dedup=on in the outputwhen the policy has deduplication enabled.
DeduplicationModification Time
Note that in the "snpolicy -dumppol" output shown earlier we alsosaw dedup_age=1m. This means the file may be deduplicated after ithas not changed for at least one minute. If a file is being written its filemodification time (mtime) will be updated as the file is being written

8/10/2019 6-67370-03_SN42101_UserGuide_RevAB
http://slidepdf.com/reader/full/6-67370-03sn42101userguiderevab 343/511
Quantum StorNext User’s Guide 317
modification time (mtime) will be updated as the file is being written.Deduplication age specifies how far in the past the modification timemust be before a file can be considered for deduplication.
Appendix B: Additional Replication and Deduplication InformationDeduplication and Truncation
Deduplication andBlockpools
If replication is used, a blockpool is required even if deduplication is notused in any policy on a machine. However, in this situation theblockpool does not store any BLOBs from any file system and cantherefore be small: several megabytes is all that is needed.
If you enable deduplication on any policy in the machine, StorNextstores BLOBs in the blockpool and additional space is required. Makesure you have enough space to store file system data if you enable
deduplication. You also need space for BLOBs in the blockpool if themachine contains replication target directories for deduplicatedreplication source directories on other machines.
The current StorNext release supports only one blockpool per machine.Any file system on the machine that needs a blockpool will use that oneand only blockpool.
Deduplication and Truncation
Let's look again at the directory in the previous section that has thethree files f.2m, f.4m, and g.4m. Using the Linux command ls
-ls shows this in the directory:total 10240
2048 -rw-r--r-- 1 root root 2097152 Jan 26 14:22 f.2m
4096 -rw-r--r-- 1 root root 4194304 Jan 26 14:22 f.4m
4096 -rw-r--r-- 1 root root 4194304 Jan 26 14:23 g.4m
The first column on the left shows the total number of blocks (1024bytes per block) contained in each file. The column before the date
shows the file size in bytes.
StorNext can truncate files that have been deduplicated. By “truncate”we mean that the disk blocks for the file have been freed. If thededuplicated files shown above are truncated, the "ls -ls" commandshows this:
total 0
0 -rw-r--r-- 1 root root 2097152 Jan 26 14:22 f.2m
0 1 t t 4194304 J 26 14 22 f 4

8/10/2019 6-67370-03_SN42101_UserGuide_RevAB
http://slidepdf.com/reader/full/6-67370-03sn42101userguiderevab 344/511
318 Quantum StorNext User’s Guide
0 -rw-r--r-- 1 root root 4194304 Jan 26 14:22 f.4m
0 -rw-r--r-- 1 root root 4194304 Jan 26 14:23 g.4m
Appendix B: Additional Replication and Deduplication InformationDeduplication and Truncation
There are no blocks in any of the three files, although each file retains itscorrect size.
(As an exercise, in the previous "ls -l" and "ls -ls" examples, what
does the line that says "total some_number" tell us?)
When an application or command accesses any of the data in atruncated file, StorNext retrieves the data it needs from the blockpool.This may be the entire file for a small file. For a larger file, a portion of
the file would be retrieved: a portion at least large enough to containthe file region required. If you read the entire file, the entire file will beretrieved.
Truncation provides the mechanism by which file system storage spacemay be reduced. When a file is truncated it takes no space in its filesystem, but space for its BLOBs is required in the blockpool. If we receivededuplication benefit (that is, if the same BLOB data occurs in morethan one place,) then we have less space used in the blockpool than
would be in the original file system.
Enabling Deduplicationand Truncation
In order to enable truncation, both deduplication and truncation mustbe enabled in the storage policy. The StorNext GUI contains tabs forboth deduplication and truncation which allow you to enablededuplication and truncation respectively.
Before a file is truncated it must pass a "Minimum Idle Time BeforeTruncation" test. If this minimum age is ten minutes, then ten minutesmust elapse after the last file modification or file read before truncationcan occur. The default value for the minimum idle time is 365 days.
In the output from "snpolicy -dumppol" the parameters we havebeen discussing are displayed like this:
trunc=ontrunc_age=365d
Storage ManagerTruncation
Storage Manager also truncates files. Storage Manager truncation issimilar to but not identical with the deduplication-based truncation wehave been discussing. Storage Manager truncation will be discussed
again when we consider deduplication / replication with Storage

8/10/2019 6-67370-03_SN42101_UserGuide_RevAB
http://slidepdf.com/reader/full/6-67370-03sn42101userguiderevab 345/511
Quantum StorNext User’s Guide 319
again when we consider deduplication / replication with StorageManager.
Appendix B: Additional Replication and Deduplication InformationReplication, Deduplication and Truncation
Replication, Deduplication and Truncation
Consider a directory which is being deduplicated and replicated. Wementioned earlier that in this case data BLOBs move from the blockpoolon the source machine to the blockpool on the target machine. Whenreplication happens (the replication namespace realization,) the files
appear in the target directory as truncated files. This is true regardless ofwhether or not the files were truncated in the source directory atreplication time.
Let’s look again at the example target directories photos and photos.1 after the last replication. If the replication source directory haddeduplication enabled, then "ls -ls" in target directory photos showsthe following:
total 00 -rwxr-xr-x 3 testuser root 1388936 Jan 26 10:11 file10 -rw-r--r-- 2 testuser root 1123155 Jan 27 11:20 file2
0 -rw-r--r-- 3 testuser root 1397888 Jan 26 10:12 file3
0 -rwxr-xr-x 3 testuser root 1388965 Jan 26 11:03 file5
Target directory photos.1 contains the following:
total 0
0 -rwxr-xr-x 3 testuser root 1388936 Jan 26 10:11 file10 -rw-r--r-- 1 testuser root 1430896 Jan 26 10:11 file2
0 -rw-r--r-- 3 testuser root 1397888 Jan 26 10:12 file3
0 -rwxr-xr-x 2 testuser root 1388994 Jan 26 11:02 file4
0 -rwxr-xr-x 3 testuser root 1388965 Jan 26 11:03 file5
The file link counts (3, 2, or 1) are the same as in the earlier replicationexample. The principle is the same: file1 in photos has 3 links. The
other two instances are file1 in photos.1 and a file underneath the.rep_private directory. All the links are to a truncated file: a filewhose length is 1388936 bytes, but which contains no blocks. If weread any of the three links, the file would be partially or fully retrieved.
The replicated files appear as truncated files even if deduplication is notexplicitly enabled in any policy on the target machine. Remember thatthis means there must be blockpool space for the replicated BLOBs if adeduplicated directory is replicated onto the machine.

8/10/2019 6-67370-03_SN42101_UserGuide_RevAB
http://slidepdf.com/reader/full/6-67370-03sn42101userguiderevab 346/511
320 Quantum StorNext User’s Guide
Appendix B: Additional Replication and Deduplication InformationReplication, Deduplication and Storage Manager
Replication, Deduplication and Storage Manager
Both StorNext replication and StorNext deduplication can be used withStorage Manager. The following discussion assumes you are alreadyfamiliar with replication and deduplication, and also with StorageManager.
Here are some interesting possibilities:
1 Replicate from a source directory into a target directory where thetarget directory is within a Storage Manager relation point. Then thereplicated files will be stored to tape by Storage Manager. This canbe done with deduplicated or non-deduplicated replication.
2 Replicate from a source directory that is managed by StorageManager. This can be done with deduplicated or non-deduplicated
replication. It doesn’t matter for the source if the target directory isalso managed by Storage Manager.
3 Use deduplication within a Storage Manager relation point. Thismeans the files will be deduplicated, and the deduplicated data willbe stored in the blockpool. In addition, Storage Manager will maketape copies of the files.
Let’s consider replicating into a Storage Manager relation point.
Replicating into aStorage ManagerRelation Point
To replicate into a relation point, specify a target directory underneath aStorage Manager relation point. Do this with the parameter "Pathnameon Target" in the StorNext GUI, or with rep_realize=… whenconfiguring a policy with the snpolicy command.
Example
Suppose we are replicating to file system /stornext/backups on a
target machine, and /stornext/backups/sm1 is a Storage Managerrelation point in that file system.
Some possible choices for "Pathname on Target" would be
• sm1/%P

8/10/2019 6-67370-03_SN42101_UserGuide_RevAB
http://slidepdf.com/reader/full/6-67370-03sn42101userguiderevab 347/511
Quantum StorNext User’s Guide 321
/
• sm1/mystuff
Appendix B: Additional Replication and Deduplication InformationReplication, Deduplication and Storage Manager
• sm1/%H/%P
You shouldn’t specify something like /stornext/backups/sm1/mystuff because "Pathname on Target" is relative to the target file
system mount point, which in this case is /stornext/backups.
If "Copies to Keep on Target" is more than 1, the rules discussed earlierdetermine the names for the directories in subsequent replications.
Example
If we replicate the source directory named photos into a relation point
using the "Pathname on Target" sm1/%P, we end up with directories like
/stornext/backups/sm1/photos, /stornext/backups/sm1/photos.1 and so on for the replicated directories when we are keepingmore than one copy on the target.
The directories photos and photos.1 are in the SM relation point. Let'ssay we have the two directories photos and photos.1 with thecontents that we discussed earlier.
Target directory /stornext/backups/sm1/photos contains thefollowing:
-rwxr-xr-x 3 testuser root 1388936 Jan 26 10:11 file1
-rw-r--r-- 2 testuser root 1123155 Jan 27 11:20 file2
-rw-r--r-- 3 testuser root 1397888 Jan 26 10:12 file3-rwxr-xr-x 3 testuser root 1388965 Jan 26 11:03 file5
Target directory /stornext/backups/sm1/photos.1 contains thefollowing:
-rwxr-xr-x 3 testuser root 1388936 Jan 26 10:11 file1
-rw-r--r-- 1 testuser root 1430896 Jan 26 10:11 file2
-rw-r--r-- 3 testuser root 1397888 Jan 26 10:12 file3-rwxr-xr-x 2 testuser root 1388994 Jan 26 11:02 file4
-rwxr-xr-x 3 testuser root 1388965 Jan 26 11:03 file5
Question: Will Storage Manager store all the files in photos after themost recent replication? The answer is no. In this example, file2 is a
file that was modified since the previous replication. Thus file2 is theonly file that will be stored by Storage Manager after the most recent
replication.

8/10/2019 6-67370-03_SN42101_UserGuide_RevAB
http://slidepdf.com/reader/full/6-67370-03sn42101userguiderevab 348/511
322 Quantum StorNext User’s Guide
When replication occurs we create store candidates for the new orchanged files that were included in the most recent replication within a
Appendix B: Additional Replication and Deduplication InformationReplication, Deduplication and Storage Manager
relation point. In this example, only file2 will be a store candidate
after the latest replication. You can use the showc command to see thenew Storage Manager store candidates after a replication.
Note: Even if you created a store candidate for every file in thereplicated target directory, only the new or changed files wouldbe stored by SM. This is because the other files are links to filesthat have already been stored by Storage Manager, or at leastfiles that were already on the Storage Manager storecandidates list.
Truncation andDeduplication /Replication (with andwithout SM)
We have already mentioned how deduplication allows files to betruncated. “Truncated” in this case means that the extents have beenpartially or completely removed from disk, and that the snpolicyd
daemon must reconstitute the missing extents when a process wants toaccess them.
We also discussed how we can use the "ls -ls" command to identifytruncated files. We looked for files with "0" in the first column of theoutput of "ls -ls". The 0 means there are no blocks associated with
the file. The file size field in the "ls -l" or "ls -ls" output reflects thereal size of the file, and is not changed when the file is truncated.
Example
In the earlier example we this saw this output (for a truncated file) afterrunning "ls -ls":
0 -rwxr-xr-x 3 testuser root 1388936 Jan 26 10:11 file1
For an untruncated file, the "ls -ls" output might look something likethis:
1360 -rwxr-xr-x 3 testuser root 1388936 Jan 26 10:11 file1
The 1360 blocks in this file are enough to contain a file of size 1388936(since 1360 * 1024 = 1392640). However, we might also see a blocksvalue that was non-zero but not enough to contain the entire file size.This might indicate the following:
• A sparse file (this will not be discussed here)A fil i h b l f h di k

8/10/2019 6-67370-03_SN42101_UserGuide_RevAB
http://slidepdf.com/reader/full/6-67370-03sn42101userguiderevab 349/511
Quantum StorNext User’s Guide 323
• A file with a stub left on the disk
Appendix B: Additional Replication and Deduplication InformationReplication, Deduplication and Storage Manager
• A file that had been partially retrieved
Both Storage Manager and snpolicyd (replication / deduplication) cantruncate files and can retrieve truncated files.
Both Storage Manager and snpolicyd can be configured to leave a stubfile on disk when a file is truncated. Using the StorNext GUI you canconfigure the deduplication stub size on the Deduplication tab whencreating or editing a replication / deduplication policy. A non-zero stubsize must be a multiple of the file system block size.
Both Storage Manager and snpolicyd will retrieve a file when a portionof the file is read that is not already on disk. For Storage Manager thereare really three different possibilities for a file’s truncation state:
• File is totally truncated. The file has no block in the file system.Reading any byte of the file causes Storage Manager to retrieve theentire file.
• File is truncated, but there is a stub. Reading within the stub causesno retrieval. Reading anything not in the stub causes StorageManager to retrieve the entire file.
• File is completely on disk.
For a truncated file that was deduplicated by snpolicyd, there can bepartial file retrieval from the blockpool. In this situation there is onemore possibility in addition to the three previous possibilities:
• Partially retrieved. The file has some data on disk (besides the stub)but the entire file is not on disk.
Example
Suppose you have a 100 GB file that is truncated. If a process reads afew bytes (at the front or even in the middle of the file), several
megabytes of file data are retrieved from the blockpool and the processcontinues. There is no need for the entire file to be retrieved. If more ofthe file is read, even larger chunks of the file are retrieved.
You can see the snpolicyd state of a file by using the command"snpolicy -report".
Example
R i th d li t / t t/ 1/dd1/
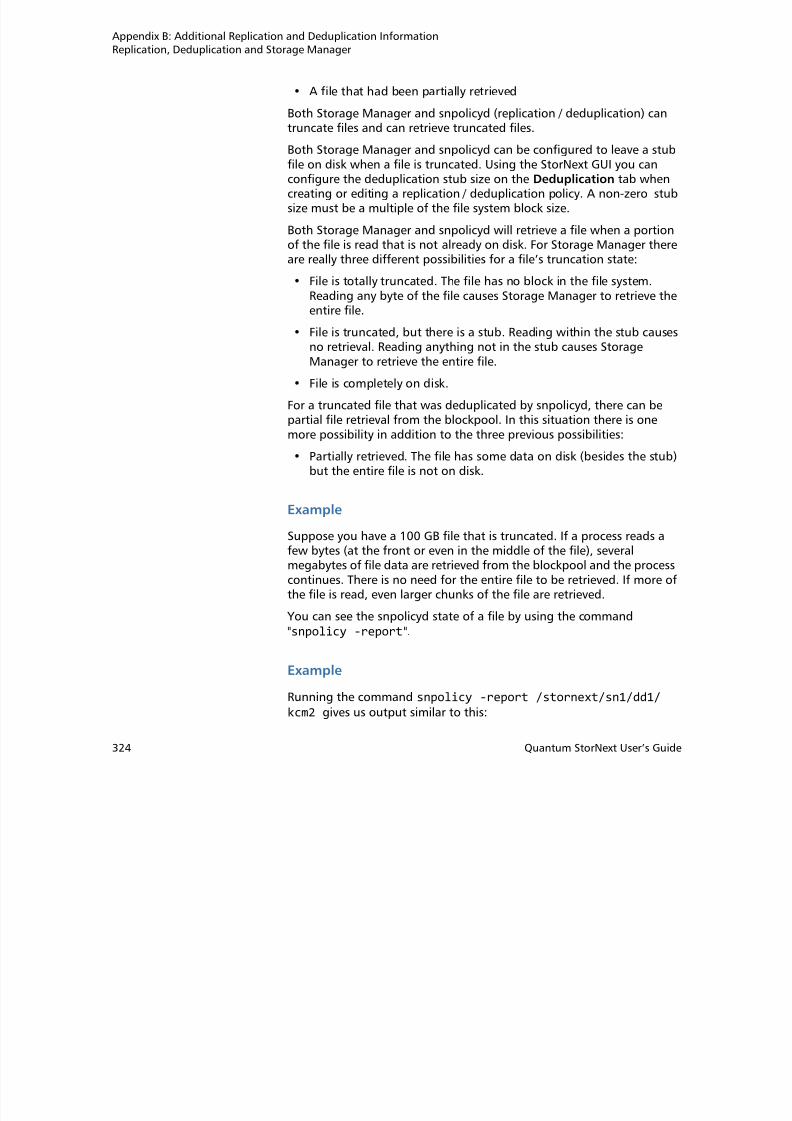
8/10/2019 6-67370-03_SN42101_UserGuide_RevAB
http://slidepdf.com/reader/full/6-67370-03sn42101userguiderevab 350/511
324 Quantum StorNext User’s Guide
Running the command snpolicy -report /stornext/sn1/dd1/kcm2 gives us output similar to this:

8/10/2019 6-67370-03_SN42101_UserGuide_RevAB
http://slidepdf.com/reader/full/6-67370-03sn42101userguiderevab 351/511
Appendix B: Additional Replication and Deduplication InformationReplication, Deduplication and Storage Manager
The table below summarizes some of the possibilities for snpolicyd
managed directories and when truncation is allowed.
Snpolocyd State of theDirectory
Directory is in an SM RelationPoint
Directory is EnY in an SMRelation Point
Non-deduplicationReplication Source
SM can truncate when replica-tions are complete
No truncation
Deduplication ReplicationSource
SM can truncate when dedu-plication has happened - evenbefore replication
snpolicyd can truncate afterdeduplication
Deduplication WithoutReplication
SM can truncate when dedu-plication has happened
snpolicyd can truncate afterdeduplication
Target of DeduplicationSource
Files are replicated as trun-
cated (0 blocks). However, SMwill eventually store each repli-cated file, causing it to beretrieved by snpolicyd on thetarget. Retrieved files must betruncated by SM and can onlybe truncated after all SM cop-ies are made.
Files are replicated as trun-
cated (0 blocks)
Target of DeduplicationSource with "ReplicateDeduplicated Content" Off
Files are replicated untrun-cated and are not tagged(deduplicated). Files can betruncated by SM after all SMcopies are made (normal SMrules).
Files are replicated untrun-cated and are not tagged(deduplicated). Not truncat-able.
Target of Dedup source with"Replicate DeduplicatedContent" off butdeduplication is on in thetarget policy.
Files are replicated untrun-
cated and are not tagged(deduplicated). Files can betruncated by SM when dedu-plicated by snpolicyd andstored by SM.
Files are replicated untrun-
cated and are not tagged(deduplicated). Files can betruncated by snpolicyd afterdeduplication.
The following sections summarize some of the facts above (and addsome more information) in a "usage case" or “scenario” format.

8/10/2019 6-67370-03_SN42101_UserGuide_RevAB
http://slidepdf.com/reader/full/6-67370-03sn42101userguiderevab 352/511
326 Quantum StorNext User’s Guide
Appendix B: Additional Replication and Deduplication InformationReplication, Deduplication and Storage Manager
Replicating From an SM Relation Point and/or Deduplicatingthe Relation Point
For a new configuration, create the relation point first. Then make it areplication source by applying an snpolicyd policy with outboundreplication enabled.
From the command line, you could use the following commands.
Note: These commands assume that the Storage Manager relationpoint and replication policy have already been configured.
faddrelation directory_path -c sm_policy_name
spolicy -assignpolicy directory_path -inheritreplication_policy_name
Remember that the directory should be empty before using
fsaddrelation, or else the command will try to unmount the filesystem (which is often hard to do).
When a file is both an SM relation point and a replication source, thefiles cannot be truncated by SM until:
1 Either all replications have been completed (non-deduplicatedreplication)
OR2 All files in the directory have been deduplicated (deduplicated
replication)
If a truncated file is both deduplicated and stored by SM, it can beretrieved by either service. By default we retrieve using snpolicyd (fromthe blockpool) and only use the SM copy if there is an error retrievingfrom the blockpool.
You can use the fsretrieve command to force retrieval from StorageManager instead of from snpolicyd.
Adding Source Replication or Deduplication to an Existing SMRelation Point
The following table summarizes the key points you should consider:

8/10/2019 6-67370-03_SN42101_UserGuide_RevAB
http://slidepdf.com/reader/full/6-67370-03sn42101userguiderevab 353/511
Quantum StorNext User’s Guide 327
When You Are Making aDirectory with Existing SMManaged Files Into This: Then Expect This:
Snpolicyd deduplication policy(no replication)
• Untruncated files arededuplicated per snpolicydpolicy.
• SM truncated files will not be
deduplicated until SM retrievaloccurs. (snpolicyd will notretrieve the files from SM.)
• Once retrieved from SM, filescannot be re-truncated by SMuntil deduplication iscomplete.
Therefore files may not all bededuplicated.
Snpolicyd deduplication policythat is also a replication source
About the same as above. SMtruncated files are notdeduplicated or replicated untilsomething causes SM retrieval ofthe file.
Thus there may be some files notdeduplicated and not replicated.
Snpolicyd policy that is areplication source with nodeduplication
Similar to above. Files are notreplicated until something causesSM retrieval. Once retrieved SMwill not truncate the file againuntil each target of thereplication policy has its copy.
Not all files will be deduplicatedunless retrieved.
Appendix B: Additional Replication and Deduplication InformationReplication, Deduplication and Storage Manager
Adding Target Replication to an SM Relation Point (New orExisting)
When adding targets within an existing SM relation point, the conceptsare a little simpler because a new directory is created each time a

8/10/2019 6-67370-03_SN42101_UserGuide_RevAB
http://slidepdf.com/reader/full/6-67370-03sn42101userguiderevab 354/511
328 Quantum StorNext User’s Guide
Appendix B: Additional Replication and Deduplication InformationReplication, Deduplication and Storage Manager
replication occurs. There are no existing files other than previously
replicated files.
Remember that you must specify a directory within a Storage Managerrelation point when you want replicated files to be stored by StorageManager.
When replication occurs into a directory in a Storage Manager relationpoint, the replicated files become SM store candidates (unless they arelinks to previously replicated files). Storage Manager can then store thefiles based on age and size. Age is determined by the file's modificationtime in the source directory because the access and modification timesare replicated when a file is replicated.
Storage Manager can store replicated files after they have passed theminimum time, regardless of whether or not they have been truncatedby snpolicyd. Storage Manager retrieves a truncated file from snpolicydin order to store it to SM tape. Deduplicated replicated files are
replicated as truncated files, but they are retrieved by snpolicyd whenthe replication is into a Storage Manager relation point.
Note the following implications:
1 This means that more file system space will be used whenreplicating deduplicated files into an SM relation point than is usedwhen replicating deduplicated files into a directory that is not arelation point. In the latter case there is no StorNext process that
will cause the file to be retrieved from the blockpool.
2 When the file is retrieved it can be re-truncated after all SM copieshave been made. Storage Manager will do the truncation. You canconfigure the SM policy so that it truncates the file immediatelyafter all SM copies have been made.
3 This behavior is different than in the case where we add replication /deduplication to a SM relation point. Truncated files are not
automatically retrieved from SM tape so that they can be replicatedor deduplicated, but deduplicated files from the blockpool areretrieved so that they can be stored by SM.
Adding Storage Manager to an Existing snpolicyd Directory
You cannot add a Storage Manager relation point to an existing
replication target directory. You would have to create a new directory,add the SM relation point to that directory, and then create or edit a

8/10/2019 6-67370-03_SN42101_UserGuide_RevAB
http://slidepdf.com/reader/full/6-67370-03sn42101userguiderevab 355/511
Quantum StorNext User’s Guide 329
Appendix B: Additional Replication and Deduplication InformationThe snpolicyd Debug Log
snpolicyd policy to realize to a directory or a set of directories inside that
relation point.
When adding a Storage Manager relation point to any existing directory,one of the following must be true:
1 The directory must be empty.
2 You must be able to temporarily unmount the file system. (It getsremounted as part of the add relation point process.)
If the directory is empty there is nothing to worry about. If it is notempty you must make sure no process is working in the directory andno files are open. The directory should not be NFS exported or Sambashared.
Once the relation point has been added, Storage Manager makes copiesof the files according to the Storage Manager policy settings. Asmentioned earlier, Storage Manager retrieves a file from the blockpool if
it needs to in order to store the file.
The snpolicyd Debug Log
A log of snpolicyd actions and errors is maintained in directory /usr/cvfs/debug. The log file is named snpolicy.out. Previous versions of
the log file are called snpolicyd.out.1, snpolicyd.out.2, and soon.
Various debugging options can be enabled with the snpolicy command.For example, the command snpolicy -debug=/stornext/sn1 -dflags=events,replicate
turns on debug messages for events processed by snpolicyd and forreplication related activity. The -debug= option specifies any file systemmanaged by snpolicyd (any file system with replication / deduplicationenabled).
You can find the list of possible dflags options by using the followingcommand:
snpolicy -helpdebugflags

8/10/2019 6-67370-03_SN42101_UserGuide_RevAB
http://slidepdf.com/reader/full/6-67370-03sn42101userguiderevab 356/511
330 Quantum StorNext User’s Guide
Appendix B: Additional Replication and Deduplication InformationThe snpolicyd Debug Log
Here is some sample snpolicyd.out log for an ongoing replication:
(D) [0209 17:22:20.903918 3398] Sending rep_realize %H/%P
(D) [0209 17:22:20.934098 3398] release_pending_rep_locked@11090x14f86e0 ref 1 state started
(D) [0209 17:22:20.934552 18275] release_rep_target_locked126540130333 ref 0 state sending metadata
(D) [0209 17:22:20.934582 18275] release_rep_target_locked@8270x14f86e0 ref 1 state started
(D) [0209 17:22:20.934597 18275] process successful replication,cnt 9/9 space 1996232
(D) [0209 17:22:20.937694 18276] /stornext/sn3: replication replyfor key 1704023 stream 126540130333
(D) [0209 17:22:20.937720 18276] /stornext/sn3: metadata for '/stornext/sn3/rep5' accepted by target://stornext/sn4@kcm-rhel5464:
(D) [0209 17:22:20.938490 18276] update_rep_target_file126540130333 0 => 3
(I) [0209 17:22:23] /stornext/sn3: data replication for '/snfs/sn3/rep5'
completed to target://stornext/sn4@kcm-rhel5464: in 2.276911 secs
9/9 files (Data/Meta) updated
1949 Kbytes in 1.741705 secs 1952/1 Kbytes sent/received
(D) [0209 17:22:23.252035 18276] post_process_pending_replication
for stream 126540130332(D) [0209 17:22:23.321761 18276] update_rep_target_file126540130333 3 => 4
(D) [0209 17:22:23.328021 18276] release_rep_target_locked126540130333 ref 0 state completed
(D) [0209 17:22:23.328088 18276] release_rep_target_locked@8270x14f86e0 ref 1 state started
(D) [0209 17:22:23.328109 18276] Freed target stream 126540130333

8/10/2019 6-67370-03_SN42101_UserGuide_RevAB
http://slidepdf.com/reader/full/6-67370-03sn42101userguiderevab 357/511
Quantum StorNext User’s Guide 331
Appendix B: Additional Replication and Deduplication InformationThe snpolicyd Debug Log

8/10/2019 6-67370-03_SN42101_UserGuide_RevAB
http://slidepdf.com/reader/full/6-67370-03sn42101userguiderevab 358/511
332 Quantum StorNext User’s Guide
Appendix C
High Availability Systems
The StorNext High Availability (HA) feature allows you to configure andoperate a redundant server that can quickly assume control of theStorNext file systems and management data in the event of certainsoftware, hardware and network failures on the primary server.
This appendix contains the following topics which provide an in-depthlook at HA systems and operation:
• High Availability Overview
• HA Internals: HAmon Timers and the ARB Protocol
• Configuration and Conversion to HA
• Managing High Availability in the StorNext GUI
• Configuring Multiple NICs
• High Availability Operation
• HA Resets
• HA Tracing and Log Files
• FSM failover in HA Environments
• Replacing an HA System

8/10/2019 6-67370-03_SN42101_UserGuide_RevAB
http://slidepdf.com/reader/full/6-67370-03sn42101userguiderevab 359/511
Quantum StorNext User’s Guide 333
Appendix C: High Availability SystemsHigh Availability Overview
High Availability Overview
The primary advantage of an HA system is file system availability,because an HA configuration has redundant servers. During operation,if one server fails, failover occurs automatically and operations areresumed on its peer server.
At any point in time, only one of the two servers is allowed to controland update StorNext metadata and databases. The HA feature enforcesthis rule by monitoring for conditions that might allow conflicts ofcontrol that could lead to data corruption.
Before this so-called Split Brain Scenario would occur, the failing serveris reset at the hardware level, which causes it to immediately relinquishall control. The redundant server is able to take control without any risk
of split-brain data corruption. The HA feature provides this protectionwithout requiring special hardware, and HA resets occur only whennecessary according to HA protection rules.
Arbitration block (ARB) updates by the controlling server for a filesystem provide the most basic level of communication between the HAservers. If updates stop, the controlling server must relinquish controlwithin a fixed amount of time. The server is reset automatically if controlhas not been released within that time limit.
Starting after the last-observed update of the ARB, the redundant servercan assume control safely by waiting the prescribed amount of time. Inaddition, the ARB has a protocol that ensures that only one server takescontrol, and the updates of the ARB are the method of keeping control.So, the ARB method of control and the HA method of ensuring releaseof control combine to protect file system metadata from uncontrolledupdates.
Management data protection builds on the same basic HA mechanismthrough the functions of the special shared file system, which containsall the management data needing protection. To avoid an HA resetwhen relinquishing control, the shared file system must be unmountedwithin the fixed-time window after the last update of the ARB.Management data is protected against control conflicts because itcannot be accessed after the file system is unmounted. When the filesystem is not unmounted within the time window, the automatic HAreset relinquishes all control immediately.

8/10/2019 6-67370-03_SN42101_UserGuide_RevAB
http://slidepdf.com/reader/full/6-67370-03sn42101userguiderevab 360/511
334 Quantum StorNext User’s Guide
Appendix C: High Availability SystemsHigh Availability Overview
The HA system monitors each file system separately. Individual file
systems can be controlled by either server. However, StorNext StorageManager (SNSM) requires that all managed file systems be collocatedwith the management processes. So, the shared file system and allmanaged file systems are run together on one server. Unmanaged filesystems can run on either server, and they can fail over to the otherserver as long as they perform failover according to the HA time rulesdescribed above.
When it is necessary to make configuration changes or performadministrative functions that might otherwise trigger an HA reset,snhamgr, the HA Manager Subsystem (patent pending), provides thenecessary controls for shutting down one server and operating theother server with HA monitoring turned off. Snhamgr allows theindividual servers to be placed in one of several modes that regulatestarting StorNext software on each server. The restricted pairing ofserver modes into allowed cluster states provides the control for
preventing Split Brain Scenario. The HA Manager Subsystem usescommunicating daemons on each server to collect the status of thecluster at every decision point in the operation of the cluster. This isanother one of the levels of communication used in the HA feature.
An occasional delay in accessing the SAN or its disks might trigger an HAreset while the server and File System Manager (FSM) are otherwisefunctioning correctly. A LAN communication protocol between theservers’ File System Portmapper (FSMPM) processes reduces the chanceof a server reset by negotiating the reset of HA timers (patent pending)outside of the ARB-update timer-reset system.
When SAN delays are causing undesirable HA resets, the causes of thedelays must be investigated and resolved. Quantum support staff canincrease the timer duration as a temporary workaround, but this cannegatively impact availability by increasing the time required for somefailover instances.
The set of features comprising StorNext HA provides a highly automatedsystem that is easy to set up and operate. The system actsautonomously at each server to continue protection in the event of LAN,SAN, disk and software failures.
The timer mechanism operates at a very basic level of the host operatingsystem kernel, and is highly reliable. Protection against Split BrainScenario is the primary requirement for HA, and this requires the
possibility of some unnecessary system resets. But, whencommunication channels are working, steps are taken to reduce the
8/10/2019 6-67370-03_SN42101_UserGuide_RevAB
http://slidepdf.com/reader/full/6-67370-03sn42101userguiderevab 361/511
Quantum StorNext User’s Guide 335
Appendix C: High Availability SystemsHA Internals: HAmon Timers and the ARB Protocol
number of unnecessary resets and to eliminate them during
administrative procedures.
HA Internals: HAmon Timers and the ARB Protocol
Control of StorNext file system metadata is regulated through the ARBdedicated disk block. The protocol for getting and keeping control ofthe ARB is meant to prevent simultaneous updates from more than oneFSM. The protocol depends on timed updates of the ARB, which is called“branding”.
Loss of control of the timing of branding opens the possibility ofmetadata corruption through split-brain scenario. The extra protection
provided by HAmon timers puts an upper limit on the range of timingfor ARB brand updates. Brand updates and HAmon timer resets aresynchronized. When branding stops, the timer can run out and triggeran HA reset.
When taking control, an FSM uses the same timer value plus a smallamount starting from the last time it read a unique brand. Thiscombination of behaviors provides a fail-safe mechanism for preventing
split-brain scenario metadata corruption.
FSM Election, Usurpation and Activation
When a client computer needs to initiate or restore access to a filesystem, it contacts the nameserver-coordinator system to get a LAN portfor the controlling FSM. The nameserver-coordinator system willconduct an election if there is no active FSM or the active FSM is no
longer healthy.
This measures the connectivity between the possible server computersand the clients. The nameserver-coordinator system uniquely choosesone standby FSM to take control, and sends an activation command toit. At this point, the cvadmin command will display an asterisk next tothe FSM to show that the FSM has been given an activation command.
The elected FSM begins a usurpation process for taking control of the
file system metadata. It reads the ARB to learn about the last FSM tocontrol the file system. It then watches to see if the brand is being

8/10/2019 6-67370-03_SN42101_UserGuide_RevAB
http://slidepdf.com/reader/full/6-67370-03sn42101userguiderevab 362/511
336 Quantum StorNext User’s Guide
Appendix C: High Availability SystemsHA Internals: HAmon Timers and the ARB Protocol
updated. If the brand is not being updated or if the usurping FSM has
more votes than the current controlling FSM has connections, theusurper writes its own brand in the ARB. The FSM then watches thebrand for a period of time to see if another FSM overwrites it. Thecurrently active FSM being usurped, if any, will exit if it reads a brandother than its own (checked before write). If the brand stays, the FSMbegins a thread to maintain the brand on a regular period, and then theFSM continues the process of activation.
At this point the usurping FSM has not modified any metadata otherthan the ARB. This is where the HAmon timer interval has its effect. TheFSM waits until the interval period plus a small delta expires. The periodbegan when the FSM branded the ARB. The FSM continues to maintainthe brand during the delay so that another FSM cannot usurp beforeactivation has completed. The connection count in the ARB is set to avery high value to block a competing usurpation during the activationprocess.
When an FSM stops, it attempts to quiesce metadata writes. Whensuccessful, it includes an indicator in its final ARB brand that tells thenext activating FSM that the file system stopped safely so the wait forthe HA timer interval can be skipped.
LAN Connectivity Interruptions
When one MDC loses LAN connectivity, clients lose access to that MDC'sactive FSMs, which triggers elections to find other FSMs to serve thosefile systems. StorNext attempts to determine which node should havecontrol, based on connectivity, but this effort results in a tie for theHaShared file system because each node gets one vote from itself as aclient. In a tie, the activated shared FSM keeps control so long as itkeeps branding its ARB.
Managed FSMs are not redundant, so having clients on those filesystems does not break the tie. Similarly, unmanaged FSMs can fail overwithout an HA reset, so clients on those file systems will not break thetie for the shared file system either.
Therefore, a third client that has the shared file system mounted isnecessary to break the tie that occurs between the two nodes. The thirdclient makes it possible to determine which of the MDCs has the bestconnectivity to the LAN.

8/10/2019 6-67370-03_SN42101_UserGuide_RevAB
http://slidepdf.com/reader/full/6-67370-03sn42101userguiderevab 363/511
Quantum StorNext User’s Guide 337
Appendix C: High Availability SystemsHA Internals: HAmon Timers and the ARB Protocol
Note: The third-party client is not necessary for preventing metadatacorruption from split brain syndrome. The ARB plus the HAmontimer to back it up does the whole job of protecting themetadata. For more information about HAmon timer, see thefollowing section.
Autonomous Monitoring and HA Resets
When an HA reset is necessary, it occurs before usurpation couldcomplete. This is true because the start of the timer is based on the lastupdate of the ARB brand for both the active and activating FSMs. Brandupdating is the only communication between server computers that isnecessary for HA protection against split-brain scenario.
Note that there is no communication from an activating FSM to force an
HA reset at its peer server computer. The two servers act autonomouslywhen the ARB branding communication stops. The combination of anHA reset when the brand cannot be maintained and the usurpation-branding protocol guarantees protection from split-brain scenario.
Note: There could be a delay between the autonomous HA reset bythe active FSM’s server and the election of another FSM to takecontrol. These are not synchronized except by the election
protocol.
In the original method of HA resets, known as STONITH, a usurping FSMsynchronously reset the peer server at the end of usurpation beforemodifying any metadata. There was no method for the failing FSM'sserver to reset itself, so the reset would not happen if the usurping FSMfailed to brand the ARB. However, the STONITH method always reset itspeer the first time any FSM activated on a server regardless of whether it
was needed or not.
Both of these strategies result in some unnecessary system resets wherean omniscient system would not reset, but the current HA system hasfewer of these resets.
Setting the Timer Value
The HAmon timer interval can be changed to work around delays in theaccess to ARB because of known behavior of a particular SANdeployment. The feature is meant for temporary use only by Quantum

8/10/2019 6-67370-03_SN42101_UserGuide_RevAB
http://slidepdf.com/reader/full/6-67370-03sn42101userguiderevab 364/511
338 Quantum StorNext User’s Guide
Appendix C: High Availability SystemsHA Internals: HAmon Timers and the ARB Protocol
staff. It affects all the monitored FSMs and could add a significant delay
to the activation process. Quantum Software Engineering would like tobe notified of any long-term need for a non-default timer interval.
For very long HAmon interval values, there are likely to be re-electionswhile an activating FSM waits for the time to pass before completingactivation. An additional usurpation attempt would fail because the ARBbrand is being maintained and the connection count is set to a valuethat blocks additional usurpation attempts.
The optional configuration of this feature is in the following file:
<cvfs root>/config/ha_smith_interval
The information at the start of the file is as follows:
ha_smith_interval=<integer>
The file is read once when StorNext starts. The integer value for theHAmon timer interval is expressed in seconds. The value can range from
3 to 1000, and the default is 5 seconds. The timer must be set identicallyon both servers. This rule is checked on a server that has standby FSMswhen a server that has active FSMs communicates its timer value. Whenthere is a discrepancy, all the FSMs on the receiving end of thatcommunication are stopped and prevented from starting until StorNexthas been restarted. This status can be observed with the cvadmin tool inthe output of its FSMlist command.
In almost all cases of misconfigured timers, the mistake will be obviousshortly after starting the HA cluster’s second server. The first server tostart StorNext will activate all of its FSMs. The second server should haveonly standby FSMs. Once the second server detects the error, all of itsFSMs will stop. After this, there will be no standby FSMs, so the clusteris protected against split-brain scenario. In the event that a server withactive FSMs resets for any reason, that server will have to reboot andrestart StorNext to provide started FSMs to serve the file systems.
Negotiated Timer Resets
When an FSM is healthy but cannot maintain its brand of the ARBbecause of delays in the SAN or LUN, there is the possibility of anundesirable HA reset. To address this problem there is a LAN-basednegotiation protocol between FSMPM processes on the two servers for
requesting permission to reset HAmon Timers.The negotiation is initiated by an FSMPM on a server computer withactivated FSMs. Every two seconds it sends a list of active FSMs to its

8/10/2019 6-67370-03_SN42101_UserGuide_RevAB
http://slidepdf.com/reader/full/6-67370-03sn42101userguiderevab 365/511
Quantum StorNext User’s Guide 339
Appendix C: High Availability SystemsHA Internals: HAmon Timers and the ARB Protocol
peer FSMPM on the other server to ask which of these standby FSMs are
not being activated. Implicit in the response is a promise not to activatethe FSMs for two seconds. When the response is received within onesecond, the first FSMPM resets the timers for those FSMs for whichusurpation is not in progress. Obviously, both server computers must beup and running StorNext for this to function.
This can postpone the impending HA reset for a while, but an electioncould occur if this goes on too long. It is important to quickly
investigate the root cause of SAN or LUN delays and then engineer themout of the system as soon as possible.
Primary and SecondaryServer Status
Databases and management data for StorNext Storage Manager or theLinux GUI must also be protected against split-brain scenariocorruption. Protection is accomplished by tieing the startup of processesthat modify this data with the activation of the shared file system.
Activating the shared file system leads to setting a Primary status in thelocal FSMPM, which is read and displayed by the snhamgr command.Primary status and the implicit Secondary status of the peer server aredistinct from the Active and Standby status of the individual FSMs onthe servers.
Unmanaged file systems can be active on either server. When an HA
Cluster has no managed file systems and no shared file system, neitherserver computer has Primary status-they are equals.
File System Types HA is turned on by default for all StorNext distributions, but has noeffect unless FSMs request to be monitored. File system monitoring iscontrolled by a file-system configuration item named HaFsType. Each
file system is one of three types: HaUnmanaged, HaManaged orHaShared. The HaFsType value is read by FSMs to direct them to set upappropriate HAmon behaviors, and it is read by the FSMPM to controlhow it starts FSMs.
HaUnmanaged
Each unmanaged-file-system FSM starts an instance of the HAmon timer
for itself when it first brands the ARB. Before it changes any metadata,an activating FSM waits for the timer interval plus a small amount of

8/10/2019 6-67370-03_SN42101_UserGuide_RevAB
http://slidepdf.com/reader/full/6-67370-03sn42101userguiderevab 366/511
340 Quantum StorNext User’s Guide
Appendix C: High Availability SystemsHA Internals: HAmon Timers and the ARB Protocol
time to elapse. The interval for a usurping FSM begins with the last time
the FSM reads new data in the ARB from a previously active FSM.
Unmanaged FSMs can be active on either server in the HA Cluster. Theycan be usurped and fail over without a system reset if they exit beforethe timer expires. The timer interval for an active FSM restarts with eachupdate of the ARB.
HaManaged
Managed-file-system FSMs do not start HAmon timers, and they do notwait the HAmon interval when usurping. The FSMPMs only startManaged FSMs on the Primary server, so there is no risk of split-brainscenario. In the event that a Managed FSM exits without having beenstopped by the FSMPM, it is automatically restarted after a ten-seconddelay and activated. The cvadmin tool's FSMlist command displays theblocked FSMs on non-Primary servers. There can be zero or more
HaManaged file systems configured.
HaShared
The shared file system is an unmanaged StorNext file system that plays acontrolling role in protecting shared resources. It has the same HAbehavior as other unmanaged FSMs, but it also sets a flag that triggers
an HA reset when the cvfsioctl device is closed. This happens when theprocess exits for any reason. However, if the shared file system has beenunmounted from the active server before the FSM exits, the reset-on-close flag gets turned off. This allows ordinary shutdown of CVFS andLinux without resetting the server.
When the HaShared FSM finishes activation, it sets the Primary status inits FSMPM process.
Protected shared data resides on the shared file system. Since only oneFSM can activate at one time, the Primary status is able to limit thestarting of management processes to a single server, which protects thedata against split-brain scenario.
The starting of HaManaged FSMs is also tied to Primary status, whichguarantees collocation of the managed file-system FSMs and themanagement processes. The GUI's data is also shared, and the GUI mustbe able to manipulate configuration and operational data, whichrequires that it be collocated with the management processes.

8/10/2019 6-67370-03_SN42101_UserGuide_RevAB
http://slidepdf.com/reader/full/6-67370-03sn42101userguiderevab 367/511
Quantum StorNext User’s Guide 341
Appendix C: High Availability SystemsHA Internals: HAmon Timers and the ARB Protocol
The ha_peer andfsnameservers File StorNext HA server software uses peer-to-peer communication betweenservers and needs to know the peer's IP address. The fsnameservers configuration file is not a good source for the address because someinstallations configure the nameservers outside of the metadata servers.Instead, the following file provides that information:
<cvfs root>/config/ha_peer
Following are the uses of the peer IP address:
• Negotiating timer resets
• Comparing the HAmon timer value between servers
• HA Manager communications (only on StorNext Storage Managerfor Linux)
It is very important to have correct information in the ha_peer file, butit is not a requirement that the peer be available for communication.
Basic HA functionality operates correctly without IP communicationbetween peers. The file's contents can be changed without restartingStorNext. The new value will be read and used moments after it haschanged.
Here are some other points to consider about fsnameservers:
• For best practice, the fsnameservers file should contain IPaddresses, not names.
• All the addresses in the file must be reachable by all members of theStorNext cluster. That is, servers, clients and distributed LAN clients.
• All members of the cluster should have the same nameserversconfiguration.
• Both or neither of an HA Cluster’s MDCs must be included so that acoordinator is always available when either server is running.
• Multiple StorNext Clusters can share coordinators, but every filesystem name configured on any of the clusters must be uniqueacross all of the clusters.
HA Manager The HA Manager subsystem collects and reports the operating status ofan HA cluster and uses that to control operations. It is part of a Storage
Manager installation that has been converted to HA with thecnvt2ha.sh script. For manually-configured HA clusters where the

8/10/2019 6-67370-03_SN42101_UserGuide_RevAB
http://slidepdf.com/reader/full/6-67370-03sn42101userguiderevab 368/511
342 Quantum StorNext User’s Guide
Appendix C: High Availability SystemsHA Internals: HAmon Timers and the ARB Protocol
cnvt2ha.sh script has not been run, the command-line interface
(snhamgr) reports a default state that allows non-HA and File SystemOnly HA configurations to operate.
The HA Manager supports non-default HA Cluster functionality such assuspending HA monitoring during administrative tasks. It attempts tocommunicate with its peer at every decision point, so it is mostlystateless and functions correctly regardless of what transpires betweendecision points. Following every command, the snhamgr command line
interface reports the modes and statuses of both servers in the cluster,which provide necessary information for the StorNext control scripts.
HA Manager Modes and Statuses
The HA Manager relies on a set of administrator-setable modes tooverride the default behaviors of HA. Modes persist across reboots.Following are the modes and descriptions of their purpose:
1 default: HA monitoring is turned on. When the peer server is notavailable for communication, it is assumed to be in default mode.
2 single: HA monitoring is turned off. The peer server must becommunicating and in locked mode, or not communicating andcertified as peerdown (recommended). This mode is meant forextended production operations without a redundant server such aswhen one server is being repaired or replaced. When the peer server
is about to be restored to service, the operating server can betransitioned from single to default mode without stoppingStorNext.
3 config: HA monitoring is turned off. The peer server must becommunicating and in locked mode (recommended), or notcommunicating and certified as peerdown. The config mode ismeant for re-configuration and other non-production service
operations. When returning to production service and the defaultmode, StorNext must be stopped. This ensures that all StorNextprocesses are started correctly upon returning to default mode.
4 locked: StorNext is stopped and prevented from starting on thelocal server. This mode allows the HA Manager to actively query thepeer server to ensure that it is stopped when the local peer isoperating in single or config mode. Communication with the lockednode must continue, so this mode is effective when StorNext isstopped for a short period and the node will not be rebooted. If

8/10/2019 6-67370-03_SN42101_UserGuide_RevAB
http://slidepdf.com/reader/full/6-67370-03sn42101userguiderevab 369/511
Quantum StorNext User’s Guide 343
Appendix C: High Availability SystemsHA Internals: HAmon Timers and the ARB Protocol
communication is lost, the peer node assumes this node is in default
mode, which is necessary for avoiding split-brain scenario.
5 peerdown: The peer server is turned off and must not becommunicating with the local server's HA Manager subsystem, sothis mode is effective when the server is powered down.
The mode is declared by the peerdown command on a workingserver to give information about the non-working peer server. Bysetting this mode, the administrator certifies the off status of the
peer, which the HA Manager cannot verify by itself. This allows thelocal peer to be in single or config mode. If the peer startscommunicating while this mode is set, the setting is immediatelyerased, the local mode is set to default to restore HA Monitoring,and StorNext is shut down, which can trigger an HA reset.
The peerdown mode is changed to default mode with the peerupcommand. The peerdown and peerup commands must never be
automated because they require external knowledge about the peerserver's condition and operator awareness of a requirement to keepthe peer server turned off.
6 ha_idle_failed_startup: A previous attempt to start StorNext with'service cvfs start' has failed before completion. Attempts tostart StorNext are blocked until this status has been cleared byrunning 'snhamgr clear'.
The HA Manager subsystem collects server statuses along with theserver modes to fully measure the operating condition of the HA Cluster.The possible statuses are as follows:
• stopped: Running the 'DSM_control status' command has returneda false code.
• running: Running the 'DSM_control status' command has returneda true code.
• primary: The server's status is running and the FSMPM is in theprimary state, which indicates that the HaShared FSM has beenactivated.
The HA Manager allows the cluster to be in one of the followingrestricted set of operating states. When a server is in default mode, HAmonitoring is turned on.
• default-default
• default-locked

8/10/2019 6-67370-03_SN42101_UserGuide_RevAB
http://slidepdf.com/reader/full/6-67370-03sn42101userguiderevab 370/511
344 Quantum StorNext User’s Guide
Appendix C: High Availability SystemsHA Internals: HAmon Timers and the ARB Protocol
• default-peerdown
• single-peerdown
• single-locked
• config-peerdown
• config-locked
• locked-*
The following states are prohibited and prevented from occurring by theHA Manager, unless there is improper tampering. For example, the laststate listed below (peerdown-*), is the case when a node that isdesignated as peerdown begins communicating with its peer. If any ofthese is discovered by the HA Manager, it will take action to move thecluster to a valid state, which may trigger an HA reset.
• single-default
• single-single
• single-config
• config-default
• config-single
• config-config
• peerdown-*
HA Manager Components
The following files and processes are some of the components of the HAManager Subsystem:
• snhamgr_daemon: If the cnvt2ha.sh script has been run, this
daemon is started after system boot and before StorNext, andimmediately attempts to communicate with its peer. It is stoppedafter StorNext when Linux is shutting down. Otherwise, it shouldalways be running. A watcher process attempts to restart it when itstops abnormally. Its status can be checked with 'service snhamgrstatus'. It can be restarted with 'service snhamgr start' or 'servicesnhamgr restart' if it is malfunctioning.
• snhamgr: CLI that communicates with the daemon to delivercommands and report status, or to report a default status when the

8/10/2019 6-67370-03_SN42101_UserGuide_RevAB
http://slidepdf.com/reader/full/6-67370-03sn42101userguiderevab 371/511
Quantum StorNext User’s Guide 345
Appendix C: High Availability SystemsHA Internals: HAmon Timers and the ARB Protocol
cnvt2ha.sh script has not been run. This is the interface for
StorNext control scripts to regulate component starts.
• /usr/cvfs/install/.ha_mgr: Stored mode value, which allowsthe single, config, locked, and peerdown modes to persist acrossreboots.
• SNSM_HA_CONFIGURED: Environment variable that points to a touch
file to indicate that cnvt2ha.sh has been run.
• /etc/init.d/snhamgr: Service control script for starting thesnhamgr_daemon.
• HA_IDLE_FAILED_STARTUP: Environment variable that points to a
touch file to indicate that a previous run of 'service cvfs start'failed before completion. This blocks startup attempts to preventinfinitely looping startup attempts.
• /usr/cvfs/debug/smithlog: When an HA Reset is imminent, a
descriptive line is added to the end of this file and the file is fsync'din an attempt to ensure that the information is available fordebugging the root cause of the reset. For example, when there isless than one second remaining on the HA Monitor timer, a notice iswritten in this file. It is likely that all other log files will lose some ofthe newest information at the time of the reset because it is inbuffers that have not been written to disk. The fsmpm processwrites the file, so the file may not have any diagnostic information
in cases where the fsmpm itself fails and causes an HA reset.
HA Manager Operation
In addition to the setting of modes, there are some commands providedby the HA Manager to simplify and automate the operation of an HACluster.
1 status: Report cluster status. All commands report cluster statuson completion. This command does nothing else unless an invalidcluster state is detected, in which case it will take steps to correctthe cluster state.
2 stop: Transition the non-Primary server to locked mode, which willstop StorNext if it is running. Then transition the Primary server toconfig mode, which will turn off HA monitoring. Stop StorNext on
the Primary server. Finally, transition both servers to default mode.
8/10/2019 6-67370-03_SN42101_UserGuide_RevAB
http://slidepdf.com/reader/full/6-67370-03sn42101userguiderevab 372/511
346 Quantum StorNext User’s Guide
Appendix C: High Availability SystemsConfiguration and Conversion to HA
3 start: If either MDC is in config or single mode, transition it to
default mode (CVFS stops when transitioning from config mode). Ifeither MDC is in locked mode, transition it to default mode. If theremote MDC is in peerdown mode, then run peerup. If the localMDC is stopped, run 'service cvfs start'. If the remote MDC is
accessible and in stopped status, run 'service cvfs start' on theremote MDC.
Note: Running service cvfs start is the preferred method of
starting, so Quantum recommends using this commandrather than using other methods. Likewise, use servicecvfs stop to stop StorNext.
4 config: Transition the peer server to locked mode, then transitionthe local server to config mode. This command must be run on thePrimary server or either server when both servers are stopped.
5 clear: Erase the HA_IDLE_FAILED_STARTUP touch file. This shouldbe used after correcting the condition that caused the failure of the'service cvfs start' command.
6 --primary: Set the Primary status in the FSMPM on the local server.This is exclusively for use by system scripts. Improper use of thiscommand will violate HA protection rules and could result in split-brain scenario.
7 force smith: Trigger an immediate HA reset. This is primarily foruse by system scripts.
Configuration and Conversion to HA
The following types of StorNext configurations can be run as HA Clusterservers:
1 Windows
The StorNext GUI has a menu item for configuring HA: Tools > High Availability > Convert. It automatically inserts the haFsType
HaUnmanaged configuration item in every file system configuration,and restarts the FSMs to enable HA. This menu item must beselected separately on each server. It is the operator’s responsibility

8/10/2019 6-67370-03_SN42101_UserGuide_RevAB
http://slidepdf.com/reader/full/6-67370-03sn42101userguiderevab 373/511
Quantum StorNext User’s Guide 347
Appendix C: High Availability SystemsConfiguration and Conversion to HA
to ensure that HA is running on both servers; there are no built-in
tests to ensure that this has been done. The ha_peer file must becreated manually to contain the IP address of the peer MDC, whichis used for negotiated restarts of HA timers to avoid unnecessary HAresets.
For more information about using the Convert menu option, see theStorNext online helpf
2 Linux SNFS without GUI support
Each FSM configuration file must be given the haFsTypeHaUnmanaged configuration item, and the ha_peer file must begiven the numerical IP address of its peer, which is used fornegotiated restarts of HA timers to avoid unnecessary HA resets.
The FSM configuration files and fsnameservers files must beidentical on both servers. When these things are done correctly, HAMonitoring is protecting the metadata against split-brain scenario.
It is on by default; there is no means for turning it off other thanremoving the haFsType item from the FSM configuration files.
3 Linux Storage Manager with only unmanaged file systems
See Conversion to HA for more information.
4 Linux Storage Manager with managed and unmanaged filesystems
See Conversion to HA for more information.
Conversion to HA This section describes what happens in the conversion script.
When a StorNext Storage Manager single-server configuration has beencompleted, the node is converted to HA by running the /usr/adic/
util/cnvt2ha.sh script.Before running the script, add the haFsType configuration item to eachfile system according to its type (HaUnmanaged, HaManaged orHaShared), and enter the peer MDC's IP address in the /usr/cvfs/config/ha_peer file.
This script expects there to be one and only one unmanaged file systemthat is configured with the haFsType HaShared configuration item. It
also expects the /usr/cvfs/config/license.dat file to includelicenses for both the configured server and its unconfigured redundant

8/10/2019 6-67370-03_SN42101_UserGuide_RevAB
http://slidepdf.com/reader/full/6-67370-03sn42101userguiderevab 374/511
348 Quantum StorNext User’s Guide
Appendix C: High Availability SystemsConfiguration and Conversion to HA
Q S N U ’ G id 349
peer. The configured server is running StorNext when the cnvt2ha.sh
script is run, so it becomes the Primary on completion of the script. (TheStorNext GUI, if used to drive the conversion to HA, creates themergedfile before converting the secondary.)
The following command is invoked to start the conversion process:
/usr/adic/util/cnvt2ha.sh primary
Output for the operation is displayed to the screen and saved to the
/ usr/adic/HA/cnvt2ha.sh.log
file.The script automatically finds the shared file system by its haFsType
configuration item and moves its mount point to /usr/adic/HAM/shared. It relocates several hundred configuration and database files
for Storage Manager to the /usr/adic/HAM/shared directory. SNFSconfiguration items are copied from the /usr/cvfs/config directory to themirror subdirectory of the shared file system. Finally, it creates thefollowing touch file to indicate that conversion has completed:
/usr/adic/install/.snsm_ha_configured
The existence of that file enables the running of the snhamgr service,which starts the HA Manager daemon.
Before the conversion script is run on the secondary, the following filemust be copied from the Primary:
/usr/cvfs/config/fsnameservers
The arguments to the conversion command for the secondary server areas follows:
/usr/adic/util/cnvt2ha.sh secondary <sharedfs name><peer IP address>
This gives the redundant peer server enough information to access theshared file system as a client. It then copies the mirrored configuration
files into its own configuration directory and sets up the ha_peer file.The database and management-components configuration files arererouted to the /usr/adic/HAM/shared shared file system mount
point. Finally, the .snsm_ha_configured touch file is created, andStorNext is restarted.

8/10/2019 6-67370-03_SN42101_UserGuide_RevAB
http://slidepdf.com/reader/full/6-67370-03sn42101userguiderevab 375/511
Quantum StorNext User’s Guide 349
Appendix C: High Availability SystemsConfiguration and Conversion to HA
350 Q ant m Sto Ne t U e ’ G ide
SyncHA process Before the shared file system is up, some configuration files must beavailable. These are initially “mirrored” to the secondary server by the
cnvt2ha.sh script, and then maintained across the two servercomputers by the syncHA process, which is run once per minute fromcron.
On the Primary, the command stat's the mirrored files to see what has
changed, and copies these out to the /usr/adic/HAM/shared/mirror folder. On the secondary server, the files that have changed are
copied in. The list of mirrored files is defined in the /usr/cvfs/config/filelist and /usr/adic/gui/config/filelist tables asfollows.
In the /usr/cvfs/config directory:
• license.dat
• fsmlist
• fsnameservers
• fsroutes
• fsports
• *.cfg
• *.cfgx
• *.opt
• nss_cctl.xml
• snpolicyd.conf
• blockpool_settings.txt
• blockpool_root
• blockpool_config.tmpl
• blockpool_config.txt
• bp_settings
In the usr/adic/gui directory:
• database/derby_backup.tar
• logs/jobs/*• config/host_port.conf

8/10/2019 6-67370-03_SN42101_UserGuide_RevAB
http://slidepdf.com/reader/full/6-67370-03sn42101userguiderevab 376/511
350 Quantum StorNext User’s Guide
Appendix C: High Availability SystemsManaging High Availability in the StorNext GUI
Quantum StorNext User’s Guide 351
Note: By default, the syncha process backs up the internal state ofthe StorNext GUI every minute, which may cause aperformance impact to some GUI operations. The file /usr/adic/gui/config/syncha_interval.conf can be used toreduce the frequency of the GUI state backups. The contents ofthe file, if present, should contain an integer value thatspecifies the minimum number of seconds between GUI statebackups. This file is host dependant and applies only to syncha
when it is run in cron mode on the primary system.
Managing High Availability in the StorNext GUI
The StorNext Tools menu’s High Availability > Manage option enablesyou to view the current status of the file systems on your HighAvailability (HA) system. Specifically, you can view the primary andsecondary node FSM statuses: Active, Standby, or Unknown.
The Manage option is accessible by choosing High Availability >Manage from the Tools menu. The High Availability Manage screenappears.

8/10/2019 6-67370-03_SN42101_UserGuide_RevAB
http://slidepdf.com/reader/full/6-67370-03sn42101userguiderevab 377/511
Quantum StorNext User s Guide 351
Appendix C: High Availability SystemsManaging High Availability in the StorNext GUI
352 Quantum StorNext User’s Guide
Figure 136 High Availability
Manage Screen

8/10/2019 6-67370-03_SN42101_UserGuide_RevAB
http://slidepdf.com/reader/full/6-67370-03sn42101userguiderevab 378/511
352 Quantum StorNext User s Guide
Appendix C: High Availability SystemsManaging High Availability in the StorNext GUI
Quantum StorNext User’s Guide 353
The Manage option also enables you to perform the following HA-
related actions:
Enter Config Mode: Sets the peer (secondary)node to locked mode and sets the local (primary)node to config mode for administration purposes.The locked mode stops CVFS on the peer, and isdesigned for automated short-duration stops ofthe secondary server to make configurationchanges and other modifications. This allows theHA Manager to prevent HA resets while makingconfiguration changes or stopping the primaryserver.
Note: In the event that TCP communication tothe secondary server is lost for any reason,the primary server assumes the secondary
server is in default mode and transitionsthe local server out of config mode. Forthis reason, the locked mode is notappropriate to use for extended secondary-server outages, activities that mightinclude reboots of the secondary server,etc. Best practice is to use Peerdown modewhen a server is turned off for an extended
period, or to simply keep the primaryserver in default mode while the secondaryserver is brought in and out of service inshort durations.
1 Click Enter Config Mode.
2 When the confirmation message appears, click Yes to proceed or No to abort.
3 Click OK when a message informs you that thecluster was locked.
Exit Config Mode: Starts both nodes of the HAcluster in default mode.
1 Click Exit Config Mode.
2 When the confirmation message appears,click Yes to proceed or No to abort.
3 Click OK when a message informs you thatthe cluster was unlocked.

8/10/2019 6-67370-03_SN42101_UserGuide_RevAB
http://slidepdf.com/reader/full/6-67370-03sn42101userguiderevab 379/511
Q
Appendix C: High Availability SystemsConfiguring Multiple NICs
354 Quantum StorNext User’s Guide
Configuring Multiple NICs
StorNext supports using a multiple NIC (multihomed) configuration as asolution for adding metadata network redundancy. This sectiondescribes this configuration and provides an example.
LAN Configuration The metadata network connects all StorNext nodes in a StorNext cluster.This critical network infrastructure can be configured for redundancy toenhance the availability of the cluster.
Two or more network segments may be used to transport metadata. Inan HA environment two redundant MDCs are configured. Each MDC isconnected to each of the metadata networks over a separate interface.
The MDCs run the File System Managers (FSMs) for the cluster. A clusteralso needs to designate nodes to serve as the name servers.
These nodes may be an HA MDC pair, but may be separate dedicatednodes.
In the case that there are two name servers and each name server isreachable via two networks, the fsnameservers file would contain thefour addresses through which the two name servers can be reached.
The StorNext NSS protocol is used by nodes with the cluster to discoverthe locations of the file system servers and the metadata networkaddress used to reach the service.
Even through an FSM may be reached over multiple addresses, only oneFSM address is advertised to the clients for a given file system.
This means that the redundant addresses for an FSM service are used for
availability but not load sharing.In the event that the network containing the address being advertisedfor the FSM service fails, the backup network address will start beingadvertised as the location of the FSM for that file system.
Clients which have the file system mounted will automaticallyreconnect, if their TCP connection was terminated. Note that dependingon the nature of the failure, it is possible that existing TCP connections
will be maintained. The client TCP mount connection to the FSM willonly be re-tried if it is disconnected, not simply because the FSM servicebegins advertising at a new address.

8/10/2019 6-67370-03_SN42101_UserGuide_RevAB
http://slidepdf.com/reader/full/6-67370-03sn42101userguiderevab 380/511
Appendix C: High Availability SystemsHigh Availability Operation
Quantum StorNext User’s Guide 355
Example Configuration
Node A Node B
====== ======
| | Netw 1 | |
| -------------- |
---------------------
Netw 2
Node A:
eth0: 192.168.100.1
eth1: 192.168.200.1
Node B:
eth0: 192.168.100.2
eth1: 192.168.200.2
fsnameservers file on both nodes:
192.168.100.1
192.168.100.2
192.168.200.1
192.168.200.2
High Availability Operation
Most of the information in this section is in regard to GUI-supportedconfigurations of StorNext on Linux servers; that is, those installations
having an HaShared FSM. There is very little difference for File System-only installations on Windows or Linux in administrating redundant HAversus non-HA servers.

8/10/2019 6-67370-03_SN42101_UserGuide_RevAB
http://slidepdf.com/reader/full/6-67370-03sn42101userguiderevab 381/511
Appendix C: High Availability SystemsHigh Availability Operation
356 Quantum StorNext User’s Guide
The supported method for starting StorNext on Linux is the 'service
cvfs start' command. This is the method used automatically by Linuxwhen the system enters multi-user mode. The script sets up a failure-detection method that prevents looping starts as described in HAManager Components on page 345.
StorNext is automatically started as a service on Windows. If StorNext isstarted more than once in a three-minute period, StorNext operation isdelayed for three minutes. This would allow an administrator to loginand stop an infinite cycle of HA resets at startup.
StorNext Server for Windows includes the Advanced File SystemConfiguration tool that automates the configuration of the HaFsTypeparameter. Ensure that both servers have HA enabled when redundantservers are operating. The ha_peer file must be manually configured.
Note: The spelling is haFsType for XML configuration, and HaFsTypefor the old .cfg configuration methods. Windows uses the .cfg
method exclusively. Linux uses XML exclusively for the StorNextGUI, but the .cfg method is still supported for by-handconfiguration.
Windows and Linux
SNFS InstallationsWithout the HaSharedFile System
HA monitoring is turned on by default when FSM configurations include
the HaFsType configuration parameter. There is no need to disable HAin almost all cases. The only mechanism for turning it off is to removethe configuration parameter, but this should be done only after theredundant server has been turned off.
Note: Instances of redundant StorNext servers without HA are notsupported.
The ha_peer and optional ha_smith_interval files are the onlyadditional configuration items for instances of HA without an HaSharedfile system. These items must be manually configured. FSM-configuration and FSMlist files must be identical on both servers.
When stopping StorNext on one of these servers, all FSMs will stop.Standby FSMs on the redundant server will activate and resume servingtheir file systems. No HA reset will occur if every stopping FSM exits
before their HAmon timer expires (after the final ARB brand update).

8/10/2019 6-67370-03_SN42101_UserGuide_RevAB
http://slidepdf.com/reader/full/6-67370-03sn42101userguiderevab 382/511
Appendix C: High Availability SystemsHigh Availability Operation
Quantum StorNext User’s Guide 357
During operation, individual file systems could potentially fail over
between servers as the result of a hardware or software failure orbecause an operator has directed it by the fail command in the
cvadmin tool. The fail command can be used for load balancing afterthe HA cluster has completed startup.
When making file system configuration changes, one of the serversshould be stopped and its FSM configurations deleted. This eliminatesthe possible mistake of asymmetric configurations. After making all theconfiguration changes on one server and updating the file systems withthose new configurations, the configuration files must be copied to theredundant server. Then, the cluster can be operated with redundantservers again.
When updating StorNext software, refer to the release notes and theStorNext Upgrade Guide for current update instructions. Thesedocuments address any special considerations for HA according to thescope of the changes in the software release.
Linux SNMS and SNFSInstallations with theHaShared File System
The HaShared file system is required for SNMS and GUI-supportedinstallations. The shared file system holds operational information forthose components, which must be protected against split-braincorruption. The additional complexity this entails is simplified andautomated by the HA Manager Subsystem.
Touch Files that Control StorNext and HA
Environment variables defined in the /usr/adic/.profile and
/usr/adic/.cshrc files reference touch files that are used in StorNextto track state transitions. Some of these are unique to HAconfigurations. The variables and their values are as follows:
1 ACTIVE_SNFS_SERVER=/usr/adic/install/.active_snfs_server
The file is created following activation of the HaShared file systemto designate the local node as the Primary server.
2 HA_STARTING_UP=/usr/cvfs/install/.ha_starting_up
The file is created at the start of the 'service cvfs start' script,
and removed at the end of the activation script for the HaShared filesystem. If it is found before it is created, that causes the creation ofthe HA_IDLE_FAILED_STARTUP file as described in the next item.

8/10/2019 6-67370-03_SN42101_UserGuide_RevAB
http://slidepdf.com/reader/full/6-67370-03sn42101userguiderevab 383/511
Appendix C: High Availability SystemsHigh Availability Operation
358 Quantum StorNext User’s Guide
3 HA_IDLE_FAILED_STARTUP=/usr/cvfs/install/
.ha_idle_failed_startupWhen the HA_STARTING_UP file exists as the 'service cvfsstart' starts, it is assumed that the previous attempt to start failedbefore completing, possibly because an HA reset occurred. The
HA_IDLE_FAILED_STARTUP file is created to block future attemptsto start, and the current script exits. This avoids an infinitely loopingseries of startup attempts, and allows an administrator to log in andcorrect problems. The HA Manager reports the existence of this fileas a mode, and offers the clear command for removing the file.
4 SNSM_HA_CONFIGURED=/usr/adic/install/.snsm_ha_configured
The file is created by the cnvt2ha.sh script to indicate that thesystem has been converted to HA. Its existence allows thesnhamgr_daemon to run.
5 START_SNFS_ONLY=/usr/adic/install/.start_snfs_only
The file is created by running one of the following commands: '/usr/adic/bin/adic_control startonly snfs' or '/usr/cvfs/bin/DSM_control startonly'.
Its existence indicates to the snactivated script that StorageManager components are not to be started. The file is removed byusing any of the following commands: 'DSM_control stop',
'service cvfs stop', or 'adic_control stop snfs'.
Starting a Single StorNext HA Server for Production
The 'service cvfs start' command sets in motion a sequence ofevents that result in the starting of all the Storage Managercomponents.
Note: The individual Storage Manager component scripts should notbe run by hand. There are safeguards in the control scripts topreserve the HA protections against split-brain scenario in anycase, but StorNext can get into certain states that are tricky toreconcile if component scripts are used in the wrong sequence.The shared file system can make that reconciliation moredifficult.

8/10/2019 6-67370-03_SN42101_UserGuide_RevAB
http://slidepdf.com/reader/full/6-67370-03sn42101userguiderevab 384/511
Appendix C: High Availability SystemsHigh Availability Operation
Quantum StorNext User’s Guide 359
The cvfs script (indirectly) starts the DSM_control script, which starts the
FSMPM, waits for it, and then repeatedly attempts to mount all of thecvfs type file systems. The FSMPM reads the FSM configuration files andthe fsmlist file. It starts the HaShared and HaUnmanaged FSMs in thefsmlist, but delays starting the HaManaged FSMs. The sub state of thedelayed FSMs can be displayed with the fsmlist command in thecvadmin tool. Meanwhile, the mounts taking place because of theaction of DSM_control are triggering elections that are activating thelocally started FSMs if they are not already being serviced by active FSMs
on the peer server.When an FSM completes activation, it runs the snactivated script. The
script for the HaShared file system creates the ACTIVE_SNFS_SERVER
file, and then calls 'snhamgr --primary' to set the Primary status forthis server. That induces the FSMPM to start the HaManaged FSMs. TheHaShared activation script waits a limited time for all of the managedfile systems to be mounted, and then it calls 'adic control start' to startthe other Storage Manager components. Finally, the HaSharedactivation script removes the startup-failure-detection touch file.
While all this is happening, the DSM_control script is monitoringprogress and reporting statuses of the mounts and the componentstartups. It will wait a limited time for completion. When it finishes andexits all the nested scripts and returns to the user, all of the StorageManager components should be up. But if it times out before that, thebackground activities should continue bringing up Storage Manager.
The results of this can be observed a few moments later.
Starting and Stopping the StorNext HA Cluster
When starting or stopping StorNext HA, it is always helpful to first getthe cluster state from the HA Manager as follows:
snhamgr status
The status output indicates whether one or both servers are stopped, ifthey are in non-default modes, and if either server has Primary status.The typical first step in stopping an HA cluster is to stop the secondaryserver and to lock it. This allows the other server to be put in config orsingle mode to operate with HA monitoring turned off. Then, that servercan be stopped without incurring an HA reset. These steps areautomated in the following cluster command:
snhamgr stop
8/10/2019 6-67370-03_SN42101_UserGuide_RevAB
http://slidepdf.com/reader/full/6-67370-03sn42101userguiderevab 385/511
Appendix C: High Availability SystemsHigh Availability Operation
360 Quantum StorNext User’s Guide
When starting the cluster into production, both servers must be in
default mode. The first server to start is likely to have its HaShared FSMactivated, which will result in that server becoming Primary. Theredundant server becomes Secondary when it starts operation, and itsFSM processes wait in Standby until they are elected to usurp control oftheir file systems. These steps are automated in the following clustercommand, which starts the local server, if necessary, to become Primary,followed by starting the Secondary server:
snhamgr start
StorNext HA also has the ability to stop a Primary server while it is indefault mode without incurring an HA reset in most cases. It does this asfollows:
1 Stop Storage Manager processes, including the database
2 Unmount all CVFS file systems on the local server other than theHaShared file system
3 Stop all FSMs on the local server other than the HaShared FSM
4 Unmount the HaShared file system
5 Stop the FSMPM
6 Stop the HaShared FSM
FSMs are elected and activate on the peer server as they are stopped onthe local server.
An HA reset can occur if step 4 fails. (That is, if the HaShared file systemcannot be unmounted for any reason.) This is the method for protectingStorage Manager management data against split-brain-scenariocorruption. All of the at-risk data is contained on the shared file system,so the unmount operation ensures that the local server cannot modifythe data.
Upgrading and Changing Configuration
Whenever configuration or software changes are made, a StorNext HAcluster may need to be downgraded to one server with HA disabled.This avoids the possibility of an HA reset being induced by the arbitrarystarts and stops of FSMs and other components as changes are made.
After changes have been made on one server, mirrored configuration
items must be copied to the peer server. Examples include the followingfiles:

8/10/2019 6-67370-03_SN42101_UserGuide_RevAB
http://slidepdf.com/reader/full/6-67370-03sn42101userguiderevab 386/511
Appendix C: High Availability SystemsHigh Availability Operation
Quantum StorNext User’s Guide 361
• /usr/cvfs/config/*.cfgx
• /usr/cvfs/config/FSMlist
• /usr/cvfs/config/fsnameservers
• /etc/fstab
Production Single-Server Operation
During extended outages of one server, it might not be productive toincur an HA reset since there is no standby FSM to fail over to. However,reconfiguring the remaining server to non-HA mode is not practical. Thesingle mode solves this dilemma.
Single mode can be entered from default mode, and default mode canbe entered from single mode without stopping StorNext. This makes iteasy to decommission and replace a failed server. Here are the steps fordoing this:
1 Power down the decommissioning server (if necessary)
2 On the working server, run the following two commands in order:
snhamgr peerdown
snhamgr mode=single
3 Replace the decommissioned server
4 Acquire licenses for the new server
5 Replace those license file entries on the working server
6 Install StorNext on the new server, but do not configure it except forcopying in the /usr/cvfs/config/fsnameservers file from theworking server
7 On the working server, run the following two commands in order:
snhamgr mode=default
snhamgr peerup
8 Run the conversion script on the new server as follows:
/usr/adic/util/cnvt2ha.sh secondary <shared fs><peer IP addr>

8/10/2019 6-67370-03_SN42101_UserGuide_RevAB
http://slidepdf.com/reader/full/6-67370-03sn42101userguiderevab 387/511
Appendix C: High Availability SystemsHA Resets
362 Quantum StorNext User’s Guide
Non-production Operation
There is a method for starting the SNFS file systems without starting theStorage Manager management components in the rare case that this isneeded. The following two commands accomplish the same goal:
• adic_control startonly snfs
• DSM_control startonly
These commands create the /usr/adic/install/start_snfs_only
touch file, which signals to the snactivated.pl script not to start themanagement components. The file exists until StorNext is stopped, andhas its effect whenever the FSMs activate.
HA ResetsAfter a suspected HA Reset, the first place to look is the /usr/cvfs/debug/smithlog file, which contains one-line time-stampeddescriptions of probable causes for the reset.
There are three methods for producing an HA Reset:
1 Expiration of an HA Monitor timer2 Exit of the active HaShared FSM while the shared file system is
mounted on the active MDC
3 Invocation of the 'snhamgr force smith' command by a script ormanually by an administrator. The smithlog file is written by thefsmpm process, so there would not be an entry in the file when anfsmpm exit results in an HA Reset.
HA Resets of the FirstKind
The first method of an HA Reset is explained by the followingdescription of the FSM monitoring algorithm (patent pending). Theterms usurp and usurpation refer to the process of taking control of afile system, either with or without contention. It involves the brandingof the arbitration block on the metadata disk to take control, and then
the timed rebranding of the block to maintain control. The HA Monitoralgorithm places an upper bound on the timing of the ARB branding

8/10/2019 6-67370-03_SN42101_UserGuide_RevAB
http://slidepdf.com/reader/full/6-67370-03sn42101userguiderevab 388/511

8/10/2019 6-67370-03_SN42101_UserGuide_RevAB
http://slidepdf.com/reader/full/6-67370-03sn42101userguiderevab 389/511
Appendix C: High Availability SystemsHA Tracing and Log Files
364 Quantum StorNext User’s Guide
HA Resets of the Third
Kind
The third method of HA Reset is the most common. It occurs when the
snactivated script for the HaShared FSM experiences an error duringstartup. The current implementation invokes the 'snhamgr forcesmith' command to allow the peer MDC an opportunity to start upStorNext if it can. A similar strategy was used in previous releases. In thisrelease, the failure to start will cause the /usr/cvfs/install/.ha_idle_failed_startup touch file to be created, and this willprevent startup of CVFS on this MDC until the file is erased with the'snhamgr clear' command.
Using HA ManagerModes
The snhamgr rules for mode pairings are easier to understand byfollowing a BAAB strategy for transitioning into and out of config orsingle mode. In this strategy, B stands for the redundant node, and Astands for the node to be placed into config or single mode. Enter thedesired cluster state by transitioning B's mode first, then A's. Reverse thiswhen exiting the cluster state by transitioning A's mode, then B's.
For the configuration-session example, place B in locked mode, thenplace A in config mode to start a configuration session. At the end ofthe session, place A in default mode, then place B in default mode.
For the single-server cluster example, shut down Linux and power off B,then designate it peerdown with the 'snhamgr peerdown' command onA, then place A in single mode. At the end of the session, place A indefault mode, then designate B as up with the 'snhamgr peerup'command on A, then power on B.
HA Tracing and Log Files
The following log files contain HA related debugging information:
• /usr/cvfs/debug/ha_mgr.out
Log messages from the snhamgr_daemon
• /usr/cvfs/debug/hamgr_cmds_trace

8/10/2019 6-67370-03_SN42101_UserGuide_RevAB
http://slidepdf.com/reader/full/6-67370-03sn42101userguiderevab 390/511
Appendix C: High Availability SystemsSingle (Singleton) Mode
Quantum StorNext User’s Guide 365
Output from commands run by the snhamgr_daemon. Typically,
several commands are run simultaneously. Their output becomesintertwined. This is normal.
• /usr/cvfs/debug/snactivated.<fs name>.log
Output from the snactivated.pl command per file system.
• /usr/cvfs/debug/nssdbg.out
Log messages from the FSMPM daemon. HA related messages
include: the HAmon timer interval, anomalies in negotiations for theresetting of HAmon timers, setting of Primary status, activations ofFSMs etc.
• /usr/cvfs/data/<fs name>/log/cvlog
Log messages from FSM processes. HA related messages include:the last write of the ARB after quiescing the metadata writes,waiting the HA interval after branding the ARB, launching of the
snactivated script etc.
• /usr/adic/HA/cnvt2ha.sh.log
Output of the cnvt2ha.sh script.
• /var/log/messages
Mounts of cvfs file systems.
• /usr/cvfs/debug/smithlogWhen an HA Reset is imminent, a descriptive line is added to theend of this file and the file is sync'd to ensure that the information isavailable for debugging the root cause of the reset. For example,when there is less than one second remaining on the HA Monitortimer, a notice is written in this file. It is likely that all other log fileswill lose some of the newest information at the time of the resetbecause it is in buffers that have not been written to disk.
Single (Singleton) Mode
Single mode (also known as Singleton mode) allows for extendedoperation without the risk of incurring an HA Reset. In this state HA isdisabled, but with the possibility of reduced availability because the

8/10/2019 6-67370-03_SN42101_UserGuide_RevAB
http://slidepdf.com/reader/full/6-67370-03sn42101userguiderevab 391/511
Appendix C: High Availability SystemsFSM failover in HA Environments
366 Quantum StorNext User’s Guide
redundant server is missing. Use of the “snhamgr force smith”
command produces an error message, and the server continues to run.This and other instances where an HA reset would have occurred underDefault mode are still logged in the /usr/cvfs/debug/smithlogdiagnostic file.
In Single mode the Secondary must be either “Offline” (peerdown) or“Locked”. When in peerdown mode, the Secondary is trulyincommunicado. When locked, Web services are still running on theSecondary.
There is no way in the StorNext GUI to go directly from Singleton/Lockedto Default/Default, but it is possible to “Enter Config Mode” and then“Exit Config Mode” to get to Default/Default.
When in Singleton/Peerdown, the “Enter Config Mode” and “Exit ConfigMode” sequence transitions the cluster as follows: Single/Peerdown ->Config/Peerdown -> Single/Peerdown.
Between the initial conversions of the Primary and Secondary servers,the GUI sets the cluster to Single/Peerdown. Quantum recommendsthat conversions be done one right after the other; there is no benefit toremaining in this half-converted state for any length of time. If theSecondary must be replaced (or when it is uninstalled during anupgrade), the StorNext GUI leaves the cluster in Default/Default(Unknown) state.
When leaving Config or Single mode to return to the Default/Defaultstate, it is a best practice to have the same server be the Primary beforeand after the transition. This allows any configuration changes to betransferred to the Secondary before it activates any FSMs.
FSM failover in HA Environments
When a failover of any file system occurs, the new FSM notices if anyclients had a file exclusively opened for writes, and waits up to 35seconds for those clients to reconnect. In the case of an HA Reset of thePrimary MDC, that MDC is not going to reconnect, so the failover toFSMs on the Secondary MDC and the promotion of that MDC to Primary
status can be delayed by 35 seconds.

8/10/2019 6-67370-03_SN42101_UserGuide_RevAB
http://slidepdf.com/reader/full/6-67370-03sn42101userguiderevab 392/511
Appendix C: High Availability SystemsFSM failover in HA Environments
Quantum StorNext User’s Guide 367
The StorNext system exclusively opens files on the HaShared file system,but assumes that only the Primary MDC does this and waives the delayfor that one file system. Quantum advises against running userprocesses other than StorNext processes on HA MDCs for performance,reliability and availability reasons. In the event that processes runningon the Primary MDC have files exclusively open for writes on other filesystems, the availability of those file systems to all clients will be delayedby 35 seconds following an HA Reset event.
Failover Timing The following illustration shows approximate timings of the FSMfailover in an HA cluster. The numbers in the notes correspond to thenumbers in the illustration.
In this description, both MDCs in an HA Cluster are fully started and theSecondary MDC is ready to assume the Primary role if needed. At timeT0, an HA Reset of the Primary occurs.
Figure 137 FSM Failover in anHA Cluster
0Not shown in this diagram are the state transitions of the peer MDCwhen it incurs an HA Reset. The HA Reset is not directly tied to the
failover of control to a standby FSM, but rather the detection of aloss of services triggers failovers. The HA Reset may come before orafter the loss of services, or not at all. It is only important to know

8/10/2019 6-67370-03_SN42101_UserGuide_RevAB
http://slidepdf.com/reader/full/6-67370-03sn42101userguiderevab 393/511
Appendix C: High Availability SystemsFSM failover in HA Environments
368 Quantum StorNext User’s Guide
that by the end of state 8, no FSM on the peer MDC is controllingthe arbitration block (ARB). The HA Reset mechanism guaranteesthat to be true.
The example failures shown here (System Crash, Fabric Outage,Network Outage) can result in a failover. Typically, the loss ofheartbeat from the peer MDC's FSMPM is the first indication that anHA Reset has occurred.
1 Triggering Event: The loss of heartbeat is detected and triggers an
election at approximate time T3.5 seconds. Note that failover of asingle unmanaged file system could also be forced with the cvadmincommand without causing an HA Reset.
2 Vote Initiation: A quorum-vote election is started where the clientsof the file system identify the best-connected MDC having a standbyFSM for the file system.
3 Connectivity Tests: Each live client runs a connectivity test
sequence to each server. Connections are tested in less than .5seconds per server, when successful, and can be repeated up to fourtimes (two seconds) when unsuccessful. At completion of theelection, the time is approximately T5.5.
4 Election and Start Activation: The election is completed, and anactivation message is sent to one server’s standby FSM.
5 Delayed Activation: When a server has active FSMs, its FSMPM
process sends a request to the FSMPM of its peer server to ask if thecorresponding Standby FSMs are being activated. If not, the localFSMPM can reset the HA timer of that file system's active FSM,which reduces the chance of an unnecessary HA Reset. When thepeer FSMPM gives permission, it is constrained from activating thestandby FSM for two seconds. Step 5 is for that delay of up to twoseconds. The delay completes at approximately T6.5.
6 Usurpation Attempts: To prevent false takeovers, the ARB is polledto determine whether another FSM is active and must be "usurped".Usurpation is averted if the activating FSM detects activity in theARB and its vote count does not exceed the active FSM's client-connection count. A typical successful poll after an HA Reset laststwo seconds. When the previously active FSM exits gracefully, theusurpation takes one second.
The activating FSM then performs a sequence of I/Os to "brand" the
arbitration block to signal takeover to the peer FSM. An active FSMis required to exit when it sees that its brand has been overwritten.

8/10/2019 6-67370-03_SN42101_UserGuide_RevAB
http://slidepdf.com/reader/full/6-67370-03sn42101userguiderevab 394/511
Appendix C: High Availability SystemsFSM failover in HA Environments
Quantum StorNext User’s Guide 369
These operations take two seconds. The HAmon timer is started atthis point if the HaFsType is HaShared or HaUnmanaged. This stepcompletes at approximately T9.5.
7 FSM Restart: After five failed attempts to usurp control, anactivating FSM exits. The fsmpm restarts a standby FSM ten secondslater.
8 Wait for HA Delay: When an active FSM is configured for HAMonitoring (HaShared or HaUnmanaged), and the ARB brand is notmaintained for more than the HA Timer Interval (five seconds bydefault), the FSM's server computer is reset. After an activating FSMwrites its brand, it waits one second longer than the HA Timer whilemonitoring its brand (HA Delay = six seconds by default), to becertain that the formerly active FSM has not resumed control of theARB. The delay completes at approximately T13.5.
9 Journal Replay: Any outstanding journal entries are replayed inorder to achieve consistent metadata state. The time required for
this step can vary due to several factors, but typically completeswithin seconds. A possible time for completion of this step is T18.5.
10 Accept Connection Requests: The FSM begins to listen for client(re)connects. It waits up to 35 seconds for reconnections from anyclients that have files open exclusively for writing, but this delaydoes not apply to the formerly active FSM's server computer.Approximate time at completion of this step is T20.5.
11 Client Reconnects: The FSM begins servicing reconnects from thelive clients. The clients perform a sequence of attribute statesynchronization to ensure consistency with the server. Approximatetime at completion of this step is T22.5.
12 Start Managed FSMs: When the HaShared FSM reaches this step, itsets the Primary status for the server, which signals the FSMPM tostart the HaManaged FSMs. Those FSMs then proceed through steps
1 through 14, but without the initial 3.5 second delay in step 1, andwithout the delay in step 8, since they are not HA Monitored.Activation of the HaManaged file systems can complete in seconds,completing at approximately T27.5.
13 Client Service Restored: The clients reinitiate any outstanding RPCsto the server and restore full service to the applications. This runs inparallel with starting HaManaged FSMs.
14 Done: At this point, processes on clients can create, read, write etc.files in StorNext file systems unless Storage Manager Services are

8/10/2019 6-67370-03_SN42101_UserGuide_RevAB
http://slidepdf.com/reader/full/6-67370-03sn42101userguiderevab 395/511
Appendix C: High Availability SystemsFSM failover in HA Environments
370 Quantum StorNext User’s Guide
needed. In that case there can be a delay of several minutes as thoseservices are restarted before certain file system operations can becompleted.
15 The approximate time of 27.5 seconds to complete a failover isvariable and could take less or significantly more time.
It is important to note that an HA Reset is possible on the Secondaryserver if an HaUnmanaged FSM is active there and fails to maintain itsbrand on the ARB within the timing constraints of the HA system.
The following table presents common timing estimates for failover of allfile systems following an HA Reset of the Primary server. Actualperformance will vary according to: differences in configurations; filesystem activities in progress at the time of failover; CPU, SAN and LANloads, latency and health; and the nature of the conditions that causedthe failover. The optimal estimates are for a forced failover at thecommand line of a single unmanaged file system without an HA Reset.

8/10/2019 6-67370-03_SN42101_UserGuide_RevAB
http://slidepdf.com/reader/full/6-67370-03sn42101userguiderevab 396/511
Appendix C: High Availability SystemsReplacing an HA System
Quantum StorNext User’s Guide 371
Replacing an HA SystemThis section describes how to replace an HA server. Before beginningthis procedure make sure you have obtained the proper licensesrequired for the new HA MDC.
Note: This procedure requires a certain level of technical expertise. Do
not attempt performing this procedure unless you areconfident you can complete the steps successfully.
If you are unsure about your ability to complete these steps,contact the Quantum Technical Assistance Center for help.
Pre-Conversion Steps
1 If both HA MDCs are currently up and running, make sure thesystem you want to replace is designated as the secondary MDC.This can be accomplished by running “service cvfs stop” on thedesignated machine.
2 Run a manual backup to tape from the StorNext GUI.
3 Make sure all store/retrieve requests have finished.
4 If you are using the Distributed Data Mover (DDM) feature, note thevalue of the DISTRIBUTED_MOVING parameter (either All or
Threshold) in /usr/adic/TSM/config/fs_sysparm (or
fs_sysparm_override).
Use a text editor to set the DISTRIBUTED_MOVING value to None.
Use the adic_control restart TSM command to put this changeinto effect.
5 Unmount all file systems from all clients, and then stop the SNFSprocesses on each client machine. (On the Linux platform, do this byrunning service cvfs stop).
6 Uninstall StorNext from the secondary server, but retain the log files.Do this by running the command install.stornext -remove.
7 Power down the uninstalled secondary server.
8/10/2019 6-67370-03_SN42101_UserGuide_RevAB
http://slidepdf.com/reader/full/6-67370-03sn42101userguiderevab 397/511
Appendix C: High Availability SystemsReplacing an HA System
372 Quantum StorNext User’s Guide
Conversion Steps
1 Set the primary node to “Config” mode and the peer node to“Peerdown” mode by running the following commands:
snhamgr peerdown
snhamgr mode=config
2 Check the StorNext HA Manager (snhamgr) status by running thecommand snhamgr status. The status should look similar to this:
LocalMode=config
LocalStatus=primary
RemoteMode=peerdown
RemoteStatus=unknown
3 Change the /usr/cvfs/config/ha_peer file on the primary MDC
to the new MDC IP address.4 If the /usr/cvfs/config/fsnameserver file includes the old
MDC IP address, replace it with the new MDC IP address on theprimary MDC and all the clients.
5 In the primary MDC’s /usr/cvfs/config/license.dat file,remove all the old MDC licenses by commenting out the lines youwant removed. Keep only the primary MDC licenses.
6 Push those changes to the synchronization mirror directory byrunning this command: /usr/adic/util/syncha.sh -primary
7 Install StorNext 4.2.1 build on the NEW secondary server by runningthis command: install.stornext
8 Put the new licenses on the NEW secondary servers into /usr/cvfs/config/license.dat. The StorNext GUI can be run on the
secondary to enter the licenses.
Note: You must restart the StorNext GUI after you create or editthe license.dat file.
9 In the StorNext GUI, go to the Tools> High Availability > Convert screen and convert the secondary MDC to HA.

8/10/2019 6-67370-03_SN42101_UserGuide_RevAB
http://slidepdf.com/reader/full/6-67370-03sn42101userguiderevab 398/511
Appendix C: High Availability SystemsReplacing an HA System
Quantum StorNext User’s Guide 373
Post-Conversion Steps
1 After the conversion is complete, check the snhamgr status on bothMDCs. Run the cvadmin command to verify that all file systems arelisted correctly.
2 Perform a system backup by running the snbackup command. Thisprocess may take substantial time depending on the number ofmanaged files in the system.
3 Start and mount StorNext file systems on the clients, and then verifythat all clients have full access
4 Conduct a failover to confirm that the secondary MDC hasconverted correctly. Confirm this by testing access to all file systems,moving files to/from tapes, and reviewing GUI configurationinformation.
5 If you conducted a failover to the secondary server, fail back to theoriginal primary server.
6 Verify that all clients still have full access.
7 If you are using the DDM feature and if you use the secondary serveras a DDM mover, make sure the file systems are mounted.
8 If you are using DDM, edit fs_sysparm or fs_sysparm_override
to use your preferred DDM mode, (All or Threshold).
Use the command adic_control restart TSM to put this changeinto effect.

8/10/2019 6-67370-03_SN42101_UserGuide_RevAB
http://slidepdf.com/reader/full/6-67370-03sn42101userguiderevab 399/511
Appendix C: High Availability SystemsReplacing an HA System
374 Quantum StorNext User’s Guide

8/10/2019 6-67370-03_SN42101_UserGuide_RevAB
http://slidepdf.com/reader/full/6-67370-03sn42101userguiderevab 400/511
Quantum StorNext User’s Guide 375
Appendix D
Web Services API
The Web Services Application Programming Interface feature (WS-API)provides an HTTP-based interface to a subset of the StorNext StorageManager User Commands. WS-API provides basic control over StorNextStorage Manager systems to track media and drives, and to store/ truncate/retrieve files from any computer capable of creating a WebServices connection, which includes Windows, Macintosh, and Linux-based systems, among others.
When first released in StorNext 4.0, WS-API returned the text-format
output of the commands. The most recent WS-API release changes tencommands (listed below) to add structured Extensible MarkupLanguage (XML) or JavaScript Object Notation (JSON) optional outputformats.
The following subset of Storage Manager Commands supports the -Fparameter to select XML, JSON or text output, and their associated WS-API interfaces (in parentheses):
• fscancel (doCancel)
• fsfileinfo (getFileLocation)
• fsmedinfo (getMediaReport)
• fsmedlist (getMediaInfo)
• fsqueue (getSMQueue)
• fsretrieve (doRetrieve)

8/10/2019 6-67370-03_SN42101_UserGuide_RevAB
http://slidepdf.com/reader/full/6-67370-03sn42101userguiderevab 401/511
Appendix D: Web Services APIUsing the APIs
376 Quantum StorNext User’s Guide
• fsrmcopy (n/a)
• fsrmdiskcopy (doTruncate)
• fsstate (getDriveReport)
• fsstore (doStore)
• vsmove (doMediaMove)
The new fsxsd and vsxsd commands provides access to XML schemasdescribing the output of those commands.
Using the APIs
Accessing commands through WS-API can be done through a Webbrowser, by constructing an appropriate URL, or programmaticallythrough a machine-generated library that supports the SOAP HTTPClient Protocol. Examples of these are provided in the notes listed belowand in an example client application written in C# that is included in theStorNext installation package.
The available WS-API commands and the structure of their argumentsand parameters are defined in the Web Service Definition Language file
(WSDL) for StorNext, which is available from the StorNext MetadataController (MDC). The StorNext WSDL file can be displayed by enteringthe following URL in the address window of a web browser:
http://<MDC>:81/axis2/services/stornext?wsdl
Microsoft Visual Studio provides a menu selection for adding a "ServiceReference" to the WSDL, which gleans the interfaces from the WSDL toaid programmers. Visual Studio also provides a wsdl.exe command that
can generate source code in supported programming languages forcompiling into a dynamic-link library (DLL) that supports the SOAP HTTPClient Protocol. Instructions for doing this are included in the exampleclient code provided with StorNext. The sample WS-API client-application code, written in C# for Visual Studio on Windows, isincluded in StorNext distributions for MDCs. The following pathnameshows a typical location for the file:
/tmp/stornext/phdist/RedHat50AS_26x86_64/examples/SNAPITest.zip
8/10/2019 6-67370-03_SN42101_UserGuide_RevAB
http://slidepdf.com/reader/full/6-67370-03sn42101userguiderevab 402/511
Appendix D: Web Services APIUsing the APIs
Quantum StorNext User’s Guide 377
In order to perform any command on the remote server (except for thegetSNAPIVersion call), a matching password must be specified with the
call. The server verifies this password against the one stored in the/usr/adic/.snapipassword file on the server.
Make sure this file is the same on all metadata controllers (MDCs) youwill be accessing. This is especially important if you are using virtual IP(vIP) addresses, because you can be communicating to differentmachines across different API calls or even retries of the same call.
The .snapipassword file is stored as clear text, and it should be set to bereadable only by root. If this file does not exist, no calls other thangetSNAPIVersion will succeed.
Using APIs With theHigh Availability MDCFeature
The StorNext High Availability MDC Feature (HA) uses a pair ofredundant MDCs to maximize the availability of StorNext file systems.Under normal operation, one of the MDCs is the Primary server for all
Storage Manager processing, and the Secondary server is ready to takeover operations if the Primary server stops. This is called an HA Failover.
The Virtual IP Address (vIP) is a feature of StorNext HA which allowsusing a single IP address to automatically connect with whichever MDCis currently Primary. Using the vIP for WS-API calls simplifiesdevelopment of client code. However, a client application must handlesome transitional behaviors that occur during an HA Failover.
During an HA Failover, there is typically a delay of one to two minutesbetween the stop of the original Primary MDC and the transition of theSecondary MDC to full Primary MDC status. The former Primary MDCcan stop abruptly without closing TCP/IP connections. For a period oftime after that, attempts to make new connections to the vIP will failuntil the new Primary brings up the vIP interface. Next is a period oftime when the Linter database has not fully started. Finally, there is aperiod when TSM has not fully started. Each of these periods presents adifferent type of error to the client application.
When using WS-API with a StorNext High Availability (HA) cluster, thefollowing notes apply:
1 Configure a Virtual IP Address (vIP). The vIP is a static IP address thatis automatically configured as a virtual interface on the PrimaryMDC. The vIP allows a client application to use a single IP address to
locate the WS-API server.

8/10/2019 6-67370-03_SN42101_UserGuide_RevAB
http://slidepdf.com/reader/full/6-67370-03sn42101userguiderevab 403/511
Appendix D: Web Services APIWS-API APIs
378 Quantum StorNext User’s Guide
2 Set a timeout that allows a client application to recover if it wasconnected to a server that stopped abruptly. (Since the client
software is responsible for setting a timeout, the actual method ofspecifying a timeout value on each Web service request varies.Check with your client documentation for specific instructons.)
Stores and retrieves to tape may take longer than the timeout, butthey will continue to run to completion if they can. Store andretrieve requests can also be submitted multiple times withoutimpacting in-process transfers. When the transfer completes, all the
identical requests will complete and return status if there is still aconnection to the requestor.
3 When a request fails because the vIP server is not available, Linter isnot running, or TSM is not fully started, wait a few moments andretry the request.
The WS-API Server does not time-out until the target commandcompletes with either success or failure. The Client application's
Microsoft .NET SoapHttpClientProtocol class has a Timeout propertywith a default of 100 seconds. This is more than enough for status-typerequests, but it is too short for tape-transfer-type requests, which aredependent on file size, system configuration and contention forresources. For example, a 100 GB file transferring at 100 MB/s will takeabout twenty minutes to complete. Setting the SoapHttpClientProtocolTimeout property to -1 is equivalent to infinity.
WS-API APIs
This section provides descriptions for the APIs included with WS-API.
The doCancel API Given a requestID (which can be retrieved by running the getSMQueue
API), running the doCancel API aborts an operation in progress.
Running this API is equivalent to running the fscancel command.
The doMediaMove API Use the doMediaMove API to move media from one archive to another.Running this API is equivalent to running the vsmove command.

8/10/2019 6-67370-03_SN42101_UserGuide_RevAB
http://slidepdf.com/reader/full/6-67370-03sn42101userguiderevab 404/511
Appendix D: Web Services APIWS-API APIs
Quantum StorNext User’s Guide 379
The doRetrieve API Use the doRetrieve API to retrieve the data in files that have been
stored and then truncated. Running this API is equivalent to running thefsretrieve command.
The doStore API Use the doStore API to store files as specified by its respective policy.
Running this API is equivalent to running the fsstore command.
The doTruncate API Use the doTruncate API to truncate files that have been stored, thusfreeing their allocated space on disk for reuse. Running this API isequivalent to running the fstruncate command.
The getDriveReport API Use the getDriveReport API to generate a report about the state of allstorage subsystem drive components. Running this API is equivalent torunning the fsstate command.
The getFileLocation API Use the getFileLocation API to generate a report about files known
to TSM. Running this API is equivalent to running the fsfileinfo
command.
The getMediaInfo API Use the getMediaInfo API to produce a list of media in a data and/or
storage area. Running this API is equivalent to running the fsmedlist command.
The getMediaReport API
Use the getMediaReport API to generate a report on media based onits current status. Running this API is equivalent to running the
fsmedinfo and vsmedqry commands.

8/10/2019 6-67370-03_SN42101_UserGuide_RevAB
http://slidepdf.com/reader/full/6-67370-03sn42101userguiderevab 405/511
Appendix D: Web Services APIExamples
380 Quantum StorNext User’s Guide
The getSMQueue API Use the getSMQueue API to produce a list of currently executing Storage
Manager commands (retreives, stores, etc.). Running this API isequivalent to running the fsqueue command.
Examples
This section contains examples for WS-API URLs, sample XML output,sample JSON output, and sample text output.
Example: WS-API URLs Following are example URLs which demonstrate how to use the outputformat parameter.
Note: Two fields in the URL must be modified for local use:MDC_address (or vIP) and Password.
1 Run the fsfileinfo command (getFileLocation API) for three files,and return output in structured XML format:
http://<MDC_address>:81/axis2/services/stornext/
getFileLocation?password=<Password>&files=/stornext/dir/fileA&files=/stornext/dir/fileB&files=/stornext/dir/fileC&format=xml
2 Run the fsstore command (doStore API) for one file, with the "-f i"option, and return output in structured XML format:
http://<MDC_address>:81/axis2/services/stornext/doStore?password=<Password>&files=/stornext/dir/fileA&retention=i&format=xml
3 Run the fsrmdiskcopy command (doTruncate API) for one file, andreturn output in JSON format:
http://<MDC_address>:81/axis2/services/stornext/doTruncate?password=<Password>&files=/stornext/fileA&format=json

8/10/2019 6-67370-03_SN42101_UserGuide_RevAB
http://slidepdf.com/reader/full/6-67370-03sn42101userguiderevab 406/511

8/10/2019 6-67370-03_SN42101_UserGuide_RevAB
http://slidepdf.com/reader/full/6-67370-03sn42101userguiderevab 407/511
Appendix D: Web Services APIExamples
382 Quantum StorNext User’s Guide

8/10/2019 6-67370-03_SN42101_UserGuide_RevAB
http://slidepdf.com/reader/full/6-67370-03sn42101userguiderevab 408/511
Appendix D: Web Services APIExamples
Quantum StorNext User’s Guide 383
Sample JSON Output

8/10/2019 6-67370-03_SN42101_UserGuide_RevAB
http://slidepdf.com/reader/full/6-67370-03sn42101userguiderevab 409/511
Appendix D: Web Services APIExamples
384 Quantum StorNext User’s Guide

8/10/2019 6-67370-03_SN42101_UserGuide_RevAB
http://slidepdf.com/reader/full/6-67370-03sn42101userguiderevab 410/511
Appendix D: Web Services APIExamples
Quantum StorNext User’s Guide 385
Sample Text Output

8/10/2019 6-67370-03_SN42101_UserGuide_RevAB
http://slidepdf.com/reader/full/6-67370-03sn42101userguiderevab 411/511
Appendix D: Web Services APIExamples
386 Quantum StorNext User’s Guide

8/10/2019 6-67370-03_SN42101_UserGuide_RevAB
http://slidepdf.com/reader/full/6-67370-03sn42101userguiderevab 412/511
Quantum StorNext User’s Guide 387
Appendix E
Storage ManagerTruncation
Truncation is a StorNext feature that results in removing data blocks
from disk. This process frees up space for additional files to be stored onthe disk. This appendix contains an overview of how Storage Managertruncation works, and how to perform simple troubleshooting.
Truncation OverviewTruncation operations fall into two categories. The first category is thetruncation that is performed as part of the normal StorNext processing.The second category is the “space management” truncation policiesthat are run only when the disk usage reaches certain key points.
For each file system defined on the MDC, there must be an entry in the
/usr/adic/TSM/config/filesystems file.
There are five variables specified for each file system:
1 Low-water mark (default value is 75%)
2 High-water mark (default value is 85%)
3 Min-Use mark (default value is 75%)
4 Min-Use enable (default is true)
d

8/10/2019 6-67370-03_SN42101_UserGuide_RevAB
http://slidepdf.com/reader/full/6-67370-03sn42101userguiderevab 413/511
Appendix E: Storage Manager TruncationTruncation Overview
388 Quantum StorNext User’s Guide
5 Truncation enable (default is true)
If truncation is not enabled on a file system, no files residing within thatfile system will ever be truncated.
If truncation is enabled on a file system, as files are stored to media theyautomatically become truncation candidates unless they are marked forimmediate truncation. (See below for more details).
Thus, a file can be truncated during one these operations:
1 Immediately after store (only if policy class is configured)
2 Daily truncation
3 LoSpace truncation
4 Emergency truncation
Normal Truncation These truncations are performed as part of the normal processing doneby StorNext.
Immediate Truncation This refers to truncation performed immediately after all copies of a fileare stored to media. This is enabled on a policy class basis and can beenabled with this command:
fsmodclass <classname> -f iThe default is that a stored file becomes a truncation candidate. The filewill be dealt with through normal truncation processing.
Immediate Truncation can also be enabled on a file-by-file basis by usingthe fschfiat command: fschfiat -t i filename...
Daily Truncation The fs_tierman TSM daemon kicks off policy-based truncations eachday after midnight.
In this case the call is: fspolicy -t -c <class> -m <class-trunc-min-time> -z 1
This processes each defined policy class within StorNext until all policyclasses have been completed. After the fspolicy has been run against
all policy classes, the daemon waits until the next day to run themagain.
A di E St M T ti

8/10/2019 6-67370-03_SN42101_UserGuide_RevAB
http://slidepdf.com/reader/full/6-67370-03sn42101userguiderevab 414/511
Appendix E: Storage Manager TruncationSpace Management
Quantum StorNext User’s Guide 389
Each of these class-based truncation policies truncates eligiblecandidates until either the min-use mark, if enabled, or the low-water
mark is reached or it runs out of truncation candidates. At that time itterminates execution.
An eligible truncation candidate is a file that has not been accessedduring the truncation mintime interval.
Space Management
The two main space management cycles are described below. They willcontinue to run as long as one of the conditions for a particular cycle ismet. Both the LOSPACE and "Emergency Space" conditions are handledby the fs_space TSM daemon.
LOSPACE Cycle This cycle is activated when the disk usage of one or more file systemsexceeds the percentage full defined by the high-water value. Whenreached, LOSPACE policies are executed in an attempt to reach the low-water mark on each affected file system.
By default, the policies are executed once in this order on all affected filesystems:
• relocation policy
• truncation policy
The high-water and low-water values are displayed by the GUI FileSystem Monitor and can be modified via the StorNext GUI. By default,these values are set to 85% and 75%, respectively.
In contrast to the Emergency policies described in the next section,what's different in the behavior of the LOSPACE policies is that
MINTRUNCTIME and MINRELOCTIME are not ignored. Only files that canbe truly relocated and truncated are affected.
First, the relocation policy is executed and it continues until there are nomore relocation candidates available at which time it terminates.
The call made to perform the LOSPACE relocation is:
Appendix E: Storage Manager Truncation

8/10/2019 6-67370-03_SN42101_UserGuide_RevAB
http://slidepdf.com/reader/full/6-67370-03sn42101userguiderevab 415/511
Appendix E: Storage Manager TruncationSpace Management
390 Quantum StorNext User’s Guide
fspolicy -r -y <mountpoint> -a <affinity>
If the file system usage still exceeds the high-water mark, the truncationpolicy is executed and it truncates all candidates until no furthercandidates are available, at which time it terminates.
The call made to perform the LOSPACE truncation is:
fspolicy -t -y <mountpoint> -z <mintruncsize>
At this time the LOSPACE Space Cycle is complete for this file system. Allother affected file systems are then processed in the same manner, first
by running the relocation policy and then the truncation policy, ifneeded.
After all file systems have been processed, if any of them still exceed thehigh-water mark, a new LOSPACE cycle is started after a one-minutewait.
Thus, the low-water percentage may or may not be reached on anygiven file system. It depends solely on whether there are enough
candidates available for relocation and/or truncation for that file system.
Emergency Cycle Emergency policies are executed when either of the followingconditions is met for a file system:
1 When a file system encounters the NOSPACE event, i.e. a file write
has failed because of lack of space.2 When the file system usage is greater than 99%.
By default, the policies are executed once in this order:
1 emergency truncation policy
2 emergency relocation policy
3 emergency store policy
The emergency truncation policy finds up to the 3000 largest files thatcan be truncated, ignoring MINTRUNCTIME, and performs thetruncation. This is executed once each time the NOSPACE condition isreached.
The call made to perform this emergency truncation is:
fspolicy -t -y <mountpoint> -e
Appendix E: Storage Manager Truncation

8/10/2019 6-67370-03_SN42101_UserGuide_RevAB
http://slidepdf.com/reader/full/6-67370-03sn42101userguiderevab 416/511
Appendix E: Storage Manager TruncationDisabling Truncation
Quantum StorNext User’s Guide 391
If the file system usage has not dropped below 100% after theemergency truncation, the emergency relocation policy is now run.
When the emergency relocation policy is run, it finds all files that can berelocated, ignoring MINRELOCTIME, and performs the relocation. Aswith the emergency truncation policy, this is executed once each timethe EMERGENCY condition is reached.
The call made to perform the emergency truncation is:
fspolicy -r -y <mountpoint> -e
If the file system usage is still not below 100% after the emergencyrelocation, an emergency store policy on the file system is performed.
An emergency store means that the request is placed first in the queue,and that any files in the file system which can be stored will be storedregardless of policy. As with the other emergency policies, it is run onlyonce.
The call made to perform the emergency store is:
fspolicy -s -y <mountpoint> -e
At this point the Emergency Space Cycle is complete.
Disabling TruncationThere are two ways to disable truncation: by using truncation featurelocking, and by running commands that disable truncation.
Truncation FeatureLocking Truncation operations can be locked, i.e. prevented from running, byusing the fsschedlock command.
The feature name for each truncation operation is:
• mintime: Daily truncation
• lospace: LoSpace Cycle
Appendix E: Storage Manager Truncation

8/10/2019 6-67370-03_SN42101_UserGuide_RevAB
http://slidepdf.com/reader/full/6-67370-03sn42101userguiderevab 417/511
Appendix E: Storage Manager TruncationCommon Problems
392 Quantum StorNext User’s Guide
Disable Truncation
Commands
Truncation can be disabled for files by using one of the following
commands:fschfiat -t e <filename>
fschdiat -t e <directory name>
Running fschfiat sets an attribute on the file which will prevent it
from ever being truncated. Likewise, running fschdiat causes theattribute to be set on files when they are created in the directory, butwill not have any effect on files that already exist in the directory.
Common Problems
This section describes some common truncation problems and how toaddress them.
Files Are Not Truncatedas Expected
Even if the truncation mintime requirement is met, files may not betruncated. Files are truncated only to keep the file system below thelow-water mark (by default 75% of the capacity). When the daily
truncation policies run, the oldest files are truncated first in an effort tobring the file system usage below the low-water mark. Thus, files mayremain on disk even though their truncation mintime requirement hasbeen met if the disk space is not required.
You can use the StorNext GUI to adjust the low-water and high-watermarks on each file system if more free disk space is desired. A temporaryoption to free up disk space is to run the following command:
fspolicy -t -c <policyclass> -o <goal>The goal argument is a disk usage percentage. For example specifying"-o 65" will truncate files until the disk usage either reaches 65% orthere are no more valid truncation candidates, i.e. the mintimerequirement has been satisfied.
8/10/2019 6-67370-03_SN42101_UserGuide_RevAB
http://slidepdf.com/reader/full/6-67370-03sn42101userguiderevab 418/511
Appendix E: Storage Manager Truncation

8/10/2019 6-67370-03_SN42101_UserGuide_RevAB
http://slidepdf.com/reader/full/6-67370-03sn42101userguiderevab 419/511
Scheduling Truncation Manually
394 Quantum StorNext User’s Guide
Scheduling Truncation Manually
Although Quantum recommends scheduling truncation and relocationthrough the StorNext GUI, you can schedule these policies manually.
Truncation and relocation policies are run automatically only once a dayat midnight. (There are also policies that run as file system fill levelswarrant, but the time when these occur is not scheduled. See the
filesystems(4) man page for more information on the space-basedpolicies.)
If there is a real need to have file data truncated at a specific time afterlast access, then two steps are necessary: setting the class time andscheduling the policy commands.
As an example, assume you want to truncate class data for class1 after ithas remained unaccessed after one hour. The first step would be to set
the mintrunctime to 1h (or 60m). Next, you must schedule via cron atruncation policy to run every half hour.
(Note that even with policies running every half hour a file may wait upuntil the time between policies beyond the trunctime before truncationoccurs. For example, if policies run on the half hour, a file is created at01:00:01am, and it will not be truncated until 2:30am, because at2:00am it is 1 second short of being an hour old.)
Setting Trunction Following are the steps required to set truncation manually:
1 Create a new data class and set the truncation time as desired:
% fsaddclass -c 1h class1
or
% fsaddclass -c 60m class1
2 Create a directory and add a class relationship.
% mkdir /stornext/snfs1/relation1
# fsaddrelation -c class1 /stornext/snfs1/relation1
3 If a class and relation point had already existed you will just need tomodify the truncation time if not correct
% fsmodclass -c 60m class1
Appendix E: Storage Manager TruncationS h d li T i M ll

8/10/2019 6-67370-03_SN42101_UserGuide_RevAB
http://slidepdf.com/reader/full/6-67370-03sn42101userguiderevab 420/511
Scheduling Truncation Manually
Quantum StorNext User’s Guide 395
4 If you want the files for class1 to be truncated after an hour (orclose to it,) set up truncation policies to be run by cron as described
in Setting Up the cron Job on page 395.
Setting Up the cron Job When setting up the policy cron job it is probably easiest to set up asimple shell script to wrap the policy so that the processing environmentis set up correctly. For example, set up a script under TSM: /usr/adic/TSM/util/truncPolicy
The contents of the script may look like:#!/bin/sh
#
. /usr/adic/.profile
/usr/adic/TSM/exec/fspolicy -t -c class1 -o 0
Note: The last argument to the policy command '-o 0'. This tells thepolicy to keep truncating files until it runs out of candidates orthe file system reaches 0% full. The filesystems(4) man pageindicates the automatic nightly policy only truncates to the MinUse percentage and then quits even if more valid candidatesare present. If the desire is to truncate all candidates, the '-o 0'is needed. Truncating all files for a class should be donecarefully as there will be an expense to retrieving those filesback if needed.
StorNext allows running only one truncation policy at a time. This is dueto potential conflicts in candidate management between policies, andalso for performance reasons. If you want to run multiple policies “atthe same time,” put multiple policies in the truncate script and havethem run sequentially.
Be sure to avoid placing an ampersand after the commands, as somewill fail because they are locked out by the currently running policy. Also
be sure when setting up the cron jobs not to have the scheduled scriptsrun too closely together. (See Considerations When SchedulingTruncation and Relocation Policies on page 397 for more considerationson scheduling truncation policies.)
Following is an example of a script with multiple scheduled policies:
#!/bin/sh
#
. /usr/adic/.profile
Appendix E: Storage Manager TruncationS hed ling Tr n ation Man all

8/10/2019 6-67370-03_SN42101_UserGuide_RevAB
http://slidepdf.com/reader/full/6-67370-03sn42101userguiderevab 421/511
Scheduling Truncation Manually
396 Quantum StorNext User’s Guide
/usr/adic/TSM/exec/fspolicy -t -c class1 -o 0
/usr/adic/TSM/exec/fspolicy -t -c class2 -o 0
/usr/adic/TSM/exec/fspolicy -t -c class3 -o 0
The next step is to create the actual cron entry. Run crontab -e and setthe entry to look something like this:
00,30 * * * * /usr/adic/TSM/util/truncPolicy
One last thing to note on scheduling 'extra' truncation or relocationpolicies: There is an expense to running these commands as they getand check their candidate lists, even if no files are actually truncated or
relocated. This is especially true for sites where millions of files areresident on disk at one time.
What Happens If the Old Script is Still Running?
The fspolicy commands placed in the script have code internally thatchecks for truncation policies which are already running. If a second
truncation policy runs while one is active, that fact will be recognized bythe new policy and it will abort reporting a truncation policy is alreadyin progress.
This is true regardless of whether the policy was started by hand, cron job, etc. So in summary, the new script will exit immediately withoutdoing anything.
Note: For this reason, if you want to run multiple truncation policies
‘at the same time,’ Quantum recommends creating one scriptwith the desired policies running sequentially and then addingthat script to cron.
How Can I Tell How Long the Script Has Taken to Run?
Each TSM command logs output to the history log located at/usr/adic/TSM/logs/history/hist_01 as it runs. This includes timestamps of when the command started and completed. It is possible byparsing this log to determine how much time the truncation policies areusing.
Appendix E: Storage Manager TruncationScheduling Truncation Manually
8/10/2019 6-67370-03_SN42101_UserGuide_RevAB
http://slidepdf.com/reader/full/6-67370-03sn42101userguiderevab 422/511
Scheduling Truncation Manually
Quantum StorNext User’s Guide 397
Considerations When
Scheduling Truncationand Relocation Policies
Because StorNext allows you to set the minimum truncation andrelocation times for a class in hours or minutes (as well as days), it maybe desirable for sites to schedule policies to run more frequently. Bydefault when StorNext is first installed, a class truncation policy is runfor each installed class starting at midnight. Relocation policies are alsorun at this time for classes with relocation enabled.
Note: These policies are not visible in the output from fsschedule,but are run automatically by the daemons that monitor fill
levels in managed file systems. If desired, these policies can belocked out by using the fsschedlock command.
If there is a need to run these policies more frequently because youcannot wait until midnight to have files truncated (and you do not wantto truncate the files immediately upon storing them) then you will needto schedule more of these policies at the desired times. That willcurrently have to be done by setting up cron jobs to invoke the fspolicy
commands. (Note the section above on creating the policy scripts andscheduling the cron jobs.)
When scheduling the extra policies take these considerations intoaccount. Mainly these considerations are the time required to run andthe affect they have on other processing on the machine. Note that thetest machine where these metrics were gathered had 8 CPUs (3 GHz)and 16 GB memory. Also note that the number of candidates referred tobelow are for files whose blocks are disk resident and do not includefiles that are already truncated.
• A truncation policy that scans 1 million candidates looking for filesto truncate can take over 25 minutes even when no files are actuallytruncated. The process uses 15% of a CPU and .3 GB of memory.(These numbers will be the same for a relocation policy in that thecandidate processing is done in the same way.)
• To scan and truncate these same 1 million files takes 45 minutes,uses 15% of a CPU and use .4 GB of memory. (For relocation thetime to relocate is totally dependent on the file sizes as data isactually copied from one location to another.)
• While truncation was being running on a file system writes to thatfile system were observed to be up to 70% slower and reads were5% slower.
• The storing of other managed files was observed to be up to 25%slower than normal while truncation was running.
Appendix E: Storage Manager TruncationScheduling Truncation Manually

8/10/2019 6-67370-03_SN42101_UserGuide_RevAB
http://slidepdf.com/reader/full/6-67370-03sn42101userguiderevab 423/511
Scheduling Truncation Manually
398 Quantum StorNext User’s Guide
Because of the impacts of candidate processing and truncation only onetruncation process is allowed to run simultaneously. Note again the
section on cron setup that mentions how to run these policiessequentially. It is easy to see as well that there is an expense to runningthese policies even if nothing is actually truncated. Care should be takento only run the policies as often as is absolutely needed so unnecessaryimpact on other system activity can be avoided. If you have a system inwhich it is desired that truncation run every 5 minutes then there can'tbe any more than 111,000 files to truncate every 5 minutes or thesystem will not keep up. Note that this is assuming no other activity so
the real number is probably going to be lower. If the desire is totruncate hourly then the files to truncate maxes out at around 1.33million files. The recommendation here is to run these policies asinfrequently as possible to meet your space requirements.

8/10/2019 6-67370-03_SN42101_UserGuide_RevAB
http://slidepdf.com/reader/full/6-67370-03sn42101userguiderevab 424/511
Quantum StorNext User’s Guide 399
Appendix F
Security
This appendix contains an in-depth overview security in general.
StorNext Security
There are two predominate security models in modern file systems:
POSIX and Access Control Lists (ACLs). ACLs are actually “Lists”composed of Access Control Entries. These lists may be quite simple orquite complicated, depending on the user's requirements.
The POSIX model is the older and less flexible of the two, having justthree main security groups: “User,” “Group” and “Other,” and threeoperation categories: “Read,” “Write,” and “Execute”. For a directory,“Execute” translates to the ability to change into that directory, while
“Read” and “Write” control directory listings and file creation anddeletion.
POSIX permissions are kept in the file's inode information and are readfrom the file system on Unix/Linux systems by calls to stat().
In order to know what kind of restriction to place on a file or directory,the OS first has to be able to track users and groups so it can later bematched up with its associated information in files and directories. On
Windows, all users have two unique Security Identifiers (SIDs): one fortheir user identification and one for the groups they belong to. On Unix/
Appendix F: SecurityStorNext Security

8/10/2019 6-67370-03_SN42101_UserGuide_RevAB
http://slidepdf.com/reader/full/6-67370-03sn42101userguiderevab 425/511
400 Quantum StorNext User’s Guide
Linux and Mac OS X, every user has a User IDentifier (UID) and that useris assigned to a group which has its own Group IDentifier (GID).
This is the model that's built into StorNext and used by all StorNextclients on all operating systems unless it's overridden by the use of ACLs.
ACLs are currently supported only on Windows and Mac OS X. ACLs givefine-grained control over file access and do things POSIX permissionscan't, such as allow for writes to a file while not allowing the file to bedeleted. ACLs also offer the benefit of “inheritance”, which allows adirectory to specify the default set of ACLs for all files created inside of
it.
ACLs are kept in the Extended Attributes for a file, which is an internaldata structure attached to the file's first inode that contains additionalinformation associated with the file. Only operating systems that knowto ask for the extended information with the proper key will understandthese ACLs. Currently, only Mac OS X and Windows know to use thisinformation.
The StorNext File System implements both the Unix POSIX model, andon its Windows clients it implements the Windows Security ReferenceModel (SRM) to a level compatible with Microsoft's NTFS file system.Quantum attempts to marry the two models in a very simplistic way toallow a common user to bridge file objects between Unix and Windows.
StorNext does not implement any of the Unix ACLs models or the NFSv4ACLs model.
ACLs on Windows Each mapped drive, file, or folder on Windows contains a WindowsSecurity Descriptor. This descriptor contains the owner, primary group,DACLs, and SACLs. Windows uses the Security Descriptor to controlaccess to each object. Windows Administrators and Users typically useWindows Explorer to view, change, and create ACLs on files. This is donein Explorer by first selecting the file or folder, displaying its properties,and then clicking on the Security tab.
Each file/folder can have zero or more ACLs that specify how a user orgroup can access or not access the file or folder. The possible controls ineach ACE are:
Appendix F: SecurityStorNext Security

8/10/2019 6-67370-03_SN42101_UserGuide_RevAB
http://slidepdf.com/reader/full/6-67370-03sn42101userguiderevab 426/511
Folders Files
Full control (all of the following) Full control (all of the following)
Traverse Folder Execute File
List Folder Read Data
Read Attributes Read Attributes
Read Extended Attributes Read Extended Attributes
Create Files Write Data
Create Folders Append Data
Write Attributes Write Attributes
Write Extended Attributes Write Extended Attributes
Delete Subfolders and Files
Delete Delete
Read Permissions Read Permissions
Change Permissions Change Permissions
Take Ownership Take Ownership
Quantum StorNext User’s Guide 401
Each Item can be selected as: Allow, Deny, or not selected. If Full Controlis selected as Allow or Deny, all the other attributes are set to eitherAllow or Deny.
In addition, each ACE on Windows is indicated to apply as follows:
• Folder
• This folder only
• This folder, subfolders, and files
• This folder and subfolders
• This folder and files
• Subfolder and files only
• Subfolder only
Appendix F: SecurityStorNext Security

8/10/2019 6-67370-03_SN42101_UserGuide_RevAB
http://slidepdf.com/reader/full/6-67370-03sn42101userguiderevab 427/511
402 Quantum StorNext User’s Guide
• Files only
• File
• This object only
An individual object can also be set to disallow or allow inheritable ACLsfrom a parent, parent's parent, etc.
A folder can be created and it can be marked such that all of its ACLswill pass to any children. This process is called vndv2-2aQds. IndividualACLs on a folder can be propagated as indicated in the above list. File
and sub-folders of a folder can have all or some of the “inherited” ACLsremoved.
The propagation/inheritance information is contained in the WindowsSecurity Descriptor. Users and administrators on Windows platforms usethis capability extensively.
ACEs are ordered in an ACL. Explicit ACEs come first. An explicit ACE isone that is not inherited. Explicit ACEs which deny come before explicit
ACEs which allow. Inherited ACEs are ordered such that the closer theparent, the sooner they appear. Each level of inherited ACEs containdeny before allow.
All file and folder access is determined by matching a user and group tothe DACL of the object being accessed. The SACL is not used to performthe access check. The ACEs in the DACL are compared in order with theaccessing user and group for the requesting access mode. If a “deny
ACE” matches, access is denied. If an “allow ACE” matches all requestedaccess bits, access is allowed. It is possible to have a “deny ACE”inherited after an “allow ACE” which will not take effect. This canhappen because explicit ACEs take precedence as do inherited ACEsfrom a closer parent. See the examples in the Microsoft document “HowSecurity Descriptors and Access Control Lists Work .”
There is an “everyone ACL” that can be added to objects such that allusers are granted certain privileges if they do not match any other ACE.
When a Windows user creates a file on SNFS the Security Descriptor (SD)is kept as an attribute of the file object. The SD contains a primary SID, agroup SID and a list of discrete ACLS (also know as the DACL). The SNFSfile object also contains the Unix UID, GID and permissions fields. Bydefault SNFS inserts user identifier “nobody” into both UID and GIDcontainers. Then it modifies the Unix mode (permissions) containerbased on the following two rules.
Appendix F: SecurityStorNext Security

8/10/2019 6-67370-03_SN42101_UserGuide_RevAB
http://slidepdf.com/reader/full/6-67370-03sn42101userguiderevab 428/511
Quantum StorNext User’s Guide 403
1 If the file object contains the Windows access control entry (ACE) forthe everyone SID (which equals S-1-1-0, equivalent to “world” or
“all others” on Unix), then it will apply specific permissions usingthe following guidelines. If the object is a container object(directory) and the FILE_LIST_DIRECTORY access bit is set, modeO+R (4) is set, else it is clear.
a If the object is a container object and the FILE_TRAVERSE access bit is set, mode O+X (1); otherwise it is clear.
b If the object is a container object and the DELETE bit is set,
mode O+W (2) is set; otherwise it is clear.
c If the object is a file and the FILE_READ_DATA bit is set, modeO+R (4) is set; otherwise it is clear.
d If the object is a file and the FILE_WRITE_DATA bit is set, modeO+W (2) is set; otherwise it is clear.
e If the object is a file and the FILE_EXECUTE bit is set, mode
O+X (1) is set; otherwise it is clear.2 If there is no everyone ACE, the Unix permissions for the file object
will be NONE (---------).
If it is an existing file, when a user changes the Security Descriptor on afile or directory, the change can affect Posix Permissions as well:
If the owner of the file or directory is not being changed, then SNFSchecks for a missing DACL or Everyone ACE within the DACL.
If there is no DACL, set the new mode to allow the owner to read/write/ execute.
If there is a DACL, scan the ACEs for the “Everyone” SID, either in theAllow or Deny state:
1 Check the ACE mask to see if READ_DATA/WRITE_DATA/EXECUTE_FILE is set, and adjust the Other mode of the Posix
permissions accordingly.
2 The User and Group mode bits are left untouched.
3 The Unix*FileCreationOnWindows configuration options areignored for the Everyone SID
If the owner is changing:
1 map the SID owner to unix User/Group ownership via active
directory - store this for later application
Appendix F: SecurityStorNext Security

8/10/2019 6-67370-03_SN42101_UserGuide_RevAB
http://slidepdf.com/reader/full/6-67370-03sn42101userguiderevab 429/511
404 Quantum StorNext User’s Guide
• If the SID does not have a UID associated with it, map the UID tothe value of the MDCs configuration option,
UnixNobodyUidOnWindows.• If the SID does not have a GID associated with it, map the GID
to the value of the MDCs configuration option,
UnixNobodyGidOnWindows.
2 Convert the mode bits for the Group and User - apply the
Unix*CreationModeOnWindows config option masks to these.
3 Apply the Everyone bits per step 1.2 above - again note that theEveryone ACE conversion to Posix Permissions ignores the
Unix*CreationModeOnWindows configuration options
4 Check to see if the DOSMODE READONLY flag is set, and mask out theUser/Group/Owner write bits if it is.
5 If the UID is different from what is currently stored, change it (it ispossible to have multiple SIDs mapped to the same UID)
6 If the GID is different from what is currently stored, change it (it ispossible to have multiple SIDs mapped to the same GID)
Note: The Standard Posix Permissions Other bits get set via theEveryone ACE regardless of the
UnixFileCreationModeOnWindows and
UnixDirectoryCreationModeOnWindows settings.
ACLs on Mac OS X With Mac OS X 10.3 (Tiger), ACLs were introduced. This ACLimplementation is very close to the Windows ACLs implementation.
The chmod(1) and ls(1) commands have been modified to handle ACLs.There is also a library API for applications, acl(3) that allows programs tooperate on ACLs.
For a detailed description of Mac OS X ACLs, see “Security Overview:Permissions” from Apples web sites and click on ACLs.
ACLs take precedence over regular UNIX permissions. If no ACE match isfound for a user's requested access, UNIX permissions are checked.Therefore, a user may not match any ACE but still have access if UNIXpermissions allow.
Appendix F: SecurityStorNext Security

8/10/2019 6-67370-03_SN42101_UserGuide_RevAB
http://slidepdf.com/reader/full/6-67370-03sn42101userguiderevab 430/511
Quantum StorNext User’s Guide 405
Each ACE on Mac OS X has the same 13 possible permission bits as aWindows ACE:
Directories Files
Search Through Execute File
List Contents Read Data
Read Attributes Read Attributes
Read Extended (named)Attributes
Read Extended (named)Attributes
Create Files Write Data
Create Subdirectories Append Data
Write Attributes Write Attributes
Delete Subdirectories and Files
Delete this Directory Delete this Directory
Read Permissions (ACL) Read Permissions (ACL)
Change Permissions (ACL) Change Permissions (ACL)
Take Ownership Take Ownership
Inheritance on Mac OS X is similar but does vary from Windowspropagation and inheritance. Each ACE applied to a directory can be“propagated” by indicating one of 4 tags:
1 file_inherit: Propagate this ACE to files created in this directory.
2 directory_inherit: Propagate this ACE to subdirectories created
in this directory.3 limit_inherit: After propagating this ACE to a new subdirectory,
do not let its subdirectories inherit this ACE.
4 only_inherit: Do not apply this ACE to this directory, just to filesand/or directories created below it.
The “limit_inherit” exists in Windows as a check box when creatingan ACE on a folder that propagates. The mapping of the 3 remaining
Appendix F: SecurityStorNext Security

8/10/2019 6-67370-03_SN42101_UserGuide_RevAB
http://slidepdf.com/reader/full/6-67370-03sn42101userguiderevab 431/511
406 Quantum StorNext User’s Guide
tags to the 7 Windows propagation pull down menu options are asfollows:
Windows Mac OS X
This folder only (none)
This folder, subfolders, and files directory_inherit,files_inherit
This folder and subfolders directory_inherit
Subfolders and files only files_inherit
Subfolders and files only files_inherit,directory_inherit,only_inherit
Subfolders only directory_inherit, only_inherit
Files only files_inherit,only_inherit
On Mac OS X, propagation/inheritance is typically applied only when afile or directory is created. That is, when an object is created, its parent's
list of ACEs is checked and any that apply are “inherited.” When an ACEis added to a parent directory, it is not “automatically” propagated toany existing files or directories. Window's has a check box to cause someof this action when creating an ACE. On Mac OS X, the “chmod”
command with the “+ai” option can be used to cause children to
inherit an ACE. This can be done for large sub-trees with the chmod -R option.
Order of ACE entries is important because some ACEs might explicitlydeny while others allow. Local ACEs are entries which are not inheritedand by default are inserted before inherited ACEs. ACEs are checked inorder for the requesting user/group and the requested access. The firstACE that denies or allows all the requested access stops permissiondetermination. If there is a subsequent opposing deny or allow ACE, itwill be ignored.
Appendix F: SecurityStorNext Security

8/10/2019 6-67370-03_SN42101_UserGuide_RevAB
http://slidepdf.com/reader/full/6-67370-03sn42101userguiderevab 432/511
Quantum StorNext User’s Guide 407
ACLs can be explicitly ordered with the chmod command which can leadto “non-canonical” ordering of ACLs. See Apple documentation for
more details.
“Central Control” StorNext supports cluster-wide central control to restrict the behavior ofSNFS cluster nodes (fsm server, file system client and cvadmin client)from a central place. A central control file, nss_cctl.xml, is used tospecify the desired controls on the cluster nodes. This file resides under
/usr/cvfs/config on an nss coordinator server.This control file is in xml format and has a hierarchical structure. The top
level element is “snfsControl”. It contains the control element
“securityControl” for certain file systems. If you have differentcontrols for different file systems, each file system should have its own
control definition. A special virtual file system “#SNFS_ALL#” is used asthe default control for file systems not defined in this control file. It isalso used to define the cvadmin related controls on clients.
Note: You cannot have a real file system named “#SNFS_ALL#”.
Each file system related control element (i.e., securityControl) has a
list of “controlEntry” entries. Each “controlEntry” defines the
client and the intended controls. A client can be of type “host” or
“netgrp”. For the “host” type, “hostName” can be either an IP
address or a host name. Both IP V4 and IP V6 are supported.The “netgrp” entry specifies a group of consecutive IP addresses.
“netgrp” has two sub-elements: “network” defines the IP address
(either V4 or V6) of the network group, and “maskbits” defines thenetwork mask bits.
Overlap is possible between the IP addresses in the “host” section and
the “netgrp” section, and the “host” entries should be defined before
“netgrp” entries. In this case, the netgrp control is considered to be ageneric case, while the controls for individual hosts are considered to bea special case. A special case takes precedence.
(Support for cluster-wide central control debuted in StorNext 4.0.)
Controls
Currently seven controls are supported. Each control has this format:
Appendix F: SecurityStorNext Security

8/10/2019 6-67370-03_SN42101_UserGuide_RevAB
http://slidepdf.com/reader/full/6-67370-03sn42101userguiderevab 433/511
408 Quantum StorNext User’s Guide
<control value="true|false"/>
The “value” can be either “true” or “false”. The control is one of the
following controls:
mountReadOnly
Controls whether the client should mount the given file system as readonly. Value “true” means the file system is mounted as read only. Value
“false” means the file system is mounted as read/write. If this controlis not specified, the default is read/write.
mountDlanClientControls whether the client can mount the given file system via proxyclient. Value “true” means the file system is allowed to mount via proxyclient. Value “false” means the file system is not allowed to mount viaproxy client. The default is “mount via proxy client not allowed”.
takeOwnership
Controls whether users on a Windows client are allowed to takeownership of files or directories of the file system. Value “true” meansWindows clients are allowed to take ownership of files or directories.Value “false” means Windows clients are not allowed to take ownershipof files or directories. The default is that “take ownership is notallowed”.
Note: This control only applies to the clients running on Windows
platforms.
snfsAdmin
Controls whether cvadmin running on a host is allowed to have superadmin privilege to run privileged commands such as starting orstopping a file system. Value “true” means the host is allowed to runprivileged commands. Value “false” means the host is not allowed torun privileged commands. If this control is not specified, the default isthat super admin privilege is not honored.
snfsAdminConnect
Controls whether cvadmin running on a client is allowed to connect toanother fsm host via “-H” option. Value “true” means the client isallowed to connect to another fsm host. Value “false” means the clientis not allowed to connect to another fsm host. The default is that “-H” is
not allowed.
Appendix F: SecurityStorNext Security

8/10/2019 6-67370-03_SN42101_UserGuide_RevAB
http://slidepdf.com/reader/full/6-67370-03sn42101userguiderevab 434/511
Quantum StorNext User’s Guide 409
exec
Controls whether binary files on the file system are allowed to be
executed. Value “true” means their execution is allowed. Value “false”means their execution is not allowed. The default is that their executionis allowed.
suid
Controls whether set-user-identifier bit is allowed to take effect. Value“true” means the set-user-identifier bit is honored. Value “false” meansthe set-user-identifier bit is not honored. The default is that suid bit is
honored.
Note: If no match is found for a given client's IP address, then theclient has no privilege to access a SNFS cluster. If a file systemhas been defined, but the client is not defined in that filesystem's control (securityControl), then the client has noaccess privilege to the specified file system.
Limitations Currently only the Linux platform is supported to be a nss coordinatorserver capable of parsing this xml file. If you have a non-Linux machineas the fsm server, in order to enforce this cluster-wide central control,you must use a Linux machine as your nss coordinator with this centralcontrol file in place. The nss coordinator typically can be a very low-end
machine as it is not stressed heavily.
Example Following is an example of a nss_cctl.xml file. In the example this filedefines control of file system “snfs1,” and also the special virtual filesystem “#SNFS_ALL#”.
<snfsControl xmlns=”http://www.quantum.com/snfs/
cctl/v1.0”> <securityControl fileSystem=”snfs1”>
<controlEntry>
<client type=”host”>
<hostName value=”192.168.230.132”/>
</client>
<controls>
<mountReadOnly value=”true”/>
Appendix F: SecurityStorNext Security

8/10/2019 6-67370-03_SN42101_UserGuide_RevAB
http://slidepdf.com/reader/full/6-67370-03sn42101userguiderevab 435/511
410 Quantum StorNext User’s Guide
<mountDlanClient value=”true”/>
<takeOwnership value=”false”/>
<exec value=”true”/> <suid value=”false”/>
</controls>
</controlEntry>
<controlEntry>
<client type=”netgrp”>
<network value=”192.168.1.0”/>
<maskbits value=”24”/> </client>
<controls>
<takeOwnership value=”true”/>
<mountReadOnly value=”true”/>
</controls>
</controlEntry>
</securityControl> <securityControl fileSystem=”#SNFS_ALL#”>
<controlEntry>
<client type=”host”>
<hostName value=”linux_ludev”/>
</client>
<controls>
<snfsAdmin value=”true”/> <snfsAdminConnect value=”true”/>
</controls>
</controlEntry>
</securityControl>
</snfsControl>
Cross-PlatformPermissions
In a homogenous environment permissions aren't a problem becausethey are either all POSIX, all Windows ACLs, or all Mac OS X POSIX/ACLs.However, when moving to a heterogeneous environment with, say,Macs and Linux, or Windows and Macs, the interaction between POSIXand ACLs can become complicated.
Appendix F: SecurityStorNext Security

8/10/2019 6-67370-03_SN42101_UserGuide_RevAB
http://slidepdf.com/reader/full/6-67370-03sn42101userguiderevab 436/511
Quantum StorNext User’s Guide 411
Config (.cfg) FileOptions
The StorNext config file has the following options that relate directly orindirectly to security or permissions:
• GlobalSuperUser
• Quotas
• UnixDirectoryCreationModeOnWindows
• UnixFileCreationModeOnWindows
• UnixIdFabricationOnWindows
• UnixNobodyGidOnWindows
• UnixNobodyUidOnWindows
• WindowsSecurity
GlobalSuperUser defines whether or not the global super user (root)privileges on the file system. It allows the administrator to decide if anyuser with super-user privileges may use those privileges on the file
system. When this variable is set to “Yes”, any super-user has globalaccess rights on the file system. This may be equated to the maproot=0directive in NFS. When the GlobalSuperUser variable is set to “No”, asuper-user may modify files only where he has access rights as a normaluser. This value may be modified for existing file systems.
Quotas has an indirect relationship with security in that it requires aWindows Security Descriptor (SD) to track the owner of a file to
correctly maintain their quota allotment. Currently quotas in StorNextFile System-only systems work correctly in either all-Windows or all-non-Windows environments. This is because of the way quotas are tracked;when the meta-data server is deciding how an allocation should becharged, it uses either the SD, if one exists, or the UID/GID.
Files created on Windows with WindowsSecurity ON always have anSD. Files created on non-Windows never have an SD. If a file that was
created and allocated on a non-Windows platform is simply viewed onWindows, it gets assigned an SD as described above. At that point thequota will be wrong. Subsequent allocations of that file will be chargedto the SD and not the UID/GID.
To fix this problem, the UID/GID “space” and SD “space” must beconsolidated into one “space”.
Appendix F: SecurityStorNext Security

8/10/2019 6-67370-03_SN42101_UserGuide_RevAB
http://slidepdf.com/reader/full/6-67370-03sn42101userguiderevab 437/511
412 Quantum StorNext User’s Guide
Note: When you enable or disable quotas using the CLI cvadmincommand, the change does not persist after rebooting. In
order to permanently enable or disable quotas, you mustmodify the Quotas parameter of the file system config file.
UnixDirectoryCreationModeOnWindows controls which initialpermissions directories have. Typically this is set to 755, but might be setto 700 to prevent access by anyone other than the owner on Unixsystems, and on Windows require the use of ACLs to allow the directory
to be accessed by anyone other than the owner.UnixFileCreationModeOnWindows controls which initial permissionsfiles have. Typically this is set to 644, but might be set to 600 to preventaccess by anyone other than the owner on Unix systems, and onWindows require the use of ACLs to allow the file to be accessed byanyone other than the owner.
UnixIdFabricationOnWindows prevents (when set to “no,”) or
allows (when set to “yes”) fabricating a UID/GID for a GUID returnedfrom a Microsoft Active Directory Server. When set to “yes”, the clientoverrides any UID/GID for that user, and instead fabricates its own UID/ GID. Typically this setting is only set to “yes” if you have a Mac OS MDC.
UnixNobodyGidOnWindows/UnixNobodyUidOnWindows instructs theclient to use this ID on Windows if an ID can't be found using MicrosoftActive Directory.
WindowsSecurity enables or disables using Windows ACLs onWindows clients. Once turned on (provide a Windows securitydescriptor is created), it is always on, even if the .cfg is changed to“off”. In a Unix/Windows environment, if there isn't a specificWindows- User-to-Unix-User mapping, files created on Windows will beowned by “nobody” on Unix clients.

8/10/2019 6-67370-03_SN42101_UserGuide_RevAB
http://slidepdf.com/reader/full/6-67370-03sn42101userguiderevab 438/511
Quantum StorNext User’s Guide 413
Appendix G
Troubleshooting
This appendix contains some basic troubleshooting remedies for
common error conditions that may occur. Please see if your particularissue is listed, and then try the recommended solution before calling theQuantum Technical Assistance Center.
Another good troubleshooting resource is the Quantum KnowledgeBase, which contains articles about issues pertaining to StorNext. Accessthe Knowledge Base from Quantum.com.
This appendix contains the following troubleshooting topics:
• Troubleshooting StorNext File System
• Troubleshooting StorNext Storage Manager
• Troubleshooting OS Issues
• Troubleshooting Replication
• Troubleshooting HA
• Troubleshooting StorNext Installation and Upgrade Issues• Troubleshooting Other Issues
Appendix G: Troubleshooting

8/10/2019 6-67370-03_SN42101_UserGuide_RevAB
http://slidepdf.com/reader/full/6-67370-03sn42101userguiderevab 439/511
414 Quantum StorNext User’s Guide
TroubleshootingStorNext File System
This section contains troubleshooting suggestions for issues whichpertain to StorNext File System.
Question: How do I rename a standalone (unmanaged) StorNext filesystem?
Answer: Use the following procedure to change the name of a StorNextfile system:
Note: This procedure is only for StorNext file systems that do not
have the Tertiary Storage Manager (TSM) component installed.
1 Unmount the file system from all the client systems using it.
2 Stop the file system in cvadmin.
3 Run cvfsck with the following parameters:
cvfsck -j file_system_name
cvfsck -n file_system_name
where file_system_name is the actual name of your file system.
Make sure that cvfsck says that the file system is clean.
4 Do one of the following:
* If cvfsck detects no file system errors, go to the next step.
* If cvfsck detects file system errors, run it in a "fix" modecvfsck file_system_name
5 Rename the file_system_name.cfgx file and edit the fsmlist file toreflect the new file system name.
By default, these files reside in the /usr/cvfs/config directory on
UNIX systems and in the C:\SNFS\config folder on Windowssystems.
6 Update the .cfgx file with the new file system name.
7 Run cvfsck in interactive mode to remake icb by typing cvfsckwithout double quotation marks. You will be asked which filesystem to check.
Appendix G: Troubleshooting

8/10/2019 6-67370-03_SN42101_UserGuide_RevAB
http://slidepdf.com/reader/full/6-67370-03sn42101userguiderevab 440/511
Quantum StorNext User’s Guide 415
Here is a command example:
[root@testbox]# cvfsck
StorNext File System File Systems on host testbox: 1) *snfs1 2) *snfs2 The asterisk (*) denotes the file system is active. Choose a file system by number (1-2) or zero (0) toexit
Run the command against the file system that has a new name.
8 During its run, cvfsck senses that there is an icb mismatch and asksif you want to fix the mismatch. Type yes.
9 Make adjustments to the /etc/vstab and /etc/fstab files, aswell as in the Windows StorNext User Interface to reflect the newfile system name on all the systems involved.
10 Start the file system and make it active (cvadmin).
11 Mount the file system.
Question: What can I do when a StorNext File System client fails tomount a StorNext file system? I receive the following error:
'install path'\debug\mount..outmount.cvfs: Can't mount filesystem 'FILESYSTEMNAME'.Check system log for details. Invalid argument
Answer: This condition occurs when the system cannot resolve the IP
address or hostname defined in the fsnameservers file.
Use the following procedure to troubleshoot this problem.1 Find the failure reported in the file install_path/debug/
nssdbg.out.
ERR NSS: Establish Coordinator failed GetHostByNameof '[HOST01]'No such file or directory)
INFO NSS: Primary Name Server is 'HOST01' (unknownIP)ERR NSS: Establish Coordinator failed GetHostByNameof '[HOST02]'(No such file or directory)INFO NSS: Secondary #1 Name Server is '[HOST02]'(unknown IP)
Appendix G: Troubleshooting
2 If it i i il t th t t d b l h k th fil

8/10/2019 6-67370-03_SN42101_UserGuide_RevAB
http://slidepdf.com/reader/full/6-67370-03sn42101userguiderevab 441/511
416 Quantum StorNext User’s Guide
2 If it is similar to the events reported above, please check the file
fsnameservers for proper setup.
The file is located in the following directory, depending upon theproduct and operating system:
* For Windows StorNext File System 2.x: C:\SNFS\config
* For Windows StorNext File System 3.x: C:\ProgramFiles\Stornext\config
* For Linux or UNIX 3.x and higher: /usr/cvfs/config
For this example, the hostname definition line was set upincorrectly:
# Primary FS Name Sserver is rock # HOST01## Secondary FS Name Server#1 is crag# [HOST02]
The format for the fsnameservers file should contain the name of
the IP address or hostname to use as either a primary or a secondarycoordinator. Using the IP addresses is preferred to avoid problemsassociated with lookup system (DNS or NIS) failures. The format ofan fsnameservers file line is either:
IP_address or HOSTNAME
3 Correct the fsnameservers file so that it looks like this:
10.65.160.42 10.65.160.78
4 If the same error reoccurs, contact Quantum Technical Support.
Question: I have trouble with StorNext clients connecting to theStorNext metadata controller. What can I do?
Answer: One of the common issues in working with StorNext clients isthe inability to connect to the StorNext metadata controllers (MDCs).Usually you can show this problem either by running cvadmin on aUNIX-based client or by clicking Device Mappings>StorNext File SystemClient Properties for a Windows-based client, and not being able to seethe file systems from the StorNext MDC(s). If file systems are not visibleat this level, the client is not connected to the MDC(s).
As described in the StorNext documentation, the MDC(s) and all clientsshould be on a dedicated and isolated metadata network. The
dedicated metadata network should be open to all ports for UDP and
Appendix G: Troubleshooting
TCP traffic In addition the metadata controller(s) and network switches

8/10/2019 6-67370-03_SN42101_UserGuide_RevAB
http://slidepdf.com/reader/full/6-67370-03sn42101userguiderevab 442/511
Quantum StorNext User’s Guide 417
TCP traffic. In addition, the metadata controller(s) and network switchesshould not have firewalling enabled for the dedicated metadatanetwork.
If the client is still not able to connect to the MDCs through thededicated metadata network, check for the following:
• Is the hostname or IP address of the correct MDC(s) listed in thefsnameservers file (found in /user/cvfs/config for UNIX-based
clients and c:\SNFS\config for Windows-based clients)?
• If the hostname (rather than the IP address) is listed in
fsnameservers, can the client resolve the hostname (usingnslookup at the UNIX prompt or at the command prompt on aWindows-based client)?
If the client cannot resolve the hostname, do one of the following:
• Resolve either the DNS setup or hosts file setup
• Enter the IP address of the MDC(s) in the fsnameservers file
instead of the hostname.• Can the client ping the metadata controller?
If the client cannot ping the metadata controller, resolve thenetworking issue to make sure the client is on the same dedicatedmetadata network and can ping the MDC(s).
• If the client can ping the MDC(s), can the client either telnet, ftp, orssh from the client to the MDC(s)?
If the client cannot run telnet, ftp or ssh from the client to theMDC(s), it is likely that there is some manner of firewalling set upbetween the client and the MDC(s). If possible, disable thisfirewalling.
• If firewalling is set up on the dedicated metadata network and it isnot possible to disable it due to some internal policy (the metadata
network should be a dedicated and isolated network), the client canspecify a range of ports to be used for metadata traffic.
By creating an fsports file (located in /user/cvfs/config for
UNIX-based clients and c:\SNFS\config for Windows-basedclients), you can specify a range of ports, both UDP and TCP, thatcan be allowed to pass through the firewall between the client andthe MDC(s).
Appendix G: Troubleshooting
If other clients are having problems connecting to the MDC(s) they

8/10/2019 6-67370-03_SN42101_UserGuide_RevAB
http://slidepdf.com/reader/full/6-67370-03sn42101userguiderevab 443/511
418 Quantum StorNext User’s Guide
If other clients are having problems connecting to the MDC(s), theymust also use their own copy of the fsports file.
Sample fsports File## File System Port Restriction File## The fsports file provides a way to constrain the TCP# and UDP ports used by the SNFS server processes.# This is usually only necessary when the SNFS# control network configuration must pass through# a firewall. Use of the fsports file permits# firewall 'pin-holing' for improved security.# If no fsports file is used, then port assignment# is operating system dependent.## If an fsports file exists in the SNFS 'config'directory it
# restricts the TCP and UDP port bindings to the userspecified# window. The format of the fsports file consists of twolines.# Comments starting with pound-sign (#) in column one# are skipped.## MinPort VALUE
# MaxPort VALUE## where VALUE is a number. The MinPort to MaxPort valuesdefine# a range of ports that the SNFS server processes canuse.#
## Example:## Restrict SNFS server processes to port range 22,000 to22,100:## MinPort 22000# MaxPort 22100
#
Appendix G: Troubleshooting
Question: How much data is reserved for StorNext disk labels and what

8/10/2019 6-67370-03_SN42101_UserGuide_RevAB
http://slidepdf.com/reader/full/6-67370-03sn42101userguiderevab 444/511
Quantum StorNext User’s Guide 419
Question: How much data is reserved for StorNext disk labels, and whatis the process for recovering damaged labels?
Answer: StorNext reserves the first 1 MB of the disk for the label.
• For VTOC disk labels, the critical area of the label is the first 1,536bytes (three 512-byte sectors).
VTOC is the only label type used by StorNext Version 2.6 and earlier,and is the default type used for LUNs with less than 2GB sectors byStorNext Version 2.7.
• For EFI disk labels, the critical area of the label varies with the disksector size:
• For 512-byte sectors it is the first 18,432 bytes (36 sectors).
• EFI is used by StorNext 2.7 for LUNs larger than 2GB sectors.
If a StorNext disk label is ever inadvertently overwritten or otherwisedamaged, the only method of recovery is to run the cvlabel utilitywith the original parameters used when the disk was initially labeled.
The nssdbg.out log file for the system often proves useful indetermining what label each disk device on the system had before theproblem occurred.
Contact Quantum technical support for assistance recovering damageddisk labels.
Question: Umount hangs or fails for StorNext File Systems even though
the fuser shows nothing. What’s going on?
Answer: If a process opens a UNIX domain socket in a StorNext FileSystem and does not close it, umount hangs or fails even though fuser does not show anyone using the file system.
Use the "lsof -U" command to show the UNIX domain socket. Theprocess can be killed with the socket open.
Question: How do I resolve invalid inode errors
Answer: You may receive the error File System FSS 'File SystemName[0]': Invalid inode lookup: 0x2a5b9f markers 0x0/0x0gen 0x0 nextiel 0x0
Deleting an old file system while an NFS client is still mounted leaveslegacy data about inodes that no longer exist on that client. The client isout of sync with the file system and calls for inodes that no longer exist.
This leaves StorNext users with the concern that they have lost files that
Appendix G: Troubleshooting
can't be recovered. Because of this issue, the MDC generates alarming

8/10/2019 6-67370-03_SN42101_UserGuide_RevAB
http://slidepdf.com/reader/full/6-67370-03sn42101userguiderevab 445/511
420 Quantum StorNext User’s Guide
, g gmessages about metadata corruption.
Checking the "epoch" field of the NFS request and the file system willshow that these inodes are all zeros and thus invalid. Code can bechanged in the NFS handles so they include a unique identifier such asthe “epoch” (microsecond creation time) for the file system.
Question: What happens when a file is moved from one manageddirectory to another?
Answer: Here are three possible scenarios, which assume that the filedata is no longer on disk and only exists on tape:
• Scenario 1: If the managed directories are on the same file systemand have the same policy class, then tape is not accessed.
• Scenario 2: If the managed directories are on different file systemsand have the same policy class, the data is retrieved from tape so itcan be moved to the new file system, but it does not get stored
again.• Scenario 3: If the managed directories have different policy classes,
then the data is retrieved, moved, and then gets stored to mediaassociated with the new policy class.
You might receive the following error message if a StorNext file systemclient system continuously reports restarting the file system and fills upthe nssdbg.out file (excerpted from logfile </usr/cvfs/debug/
nssdbg.out>)::[0327 14:40:59] 0x40305960 NOTICE PortMapper: RESTARTFSS service 'stornext-fs1[0]' on host stornext-client.[0327 14:40:59] 0x40305960 NOTICE PortMapper: StartingFSS service 'stornext-fs1[0]' on stornext-client.[0327 14:40:59] 0x40305960 (debug) Portmapper: FSS'stornext-fs1' (pid 8666) exited with status 2 (unknown)
[0327 14:40:59] 0x40305960 (debug) FSS 'stornext-fs1'LAUNCHED -> RELAUNCH, next event in 60s[0327 14:41:59] 0x40305960 (debug) FSS 'stornext-fs1'RELAUNCH -> LAUNCHED, next event in 60s[0327 14:41:59] 0x40305960 NOTICE PortMapper: RESTARTFSS service 'stornext-fs1[0]' on host stornext-client.[0327 14:41:59] 0x40305960 NOTICE PortMapper: Starting
FSS service 'stornext-fs1[0]' on stornext-client.
Appendix G: Troubleshooting
[0327 14:41:59] 0x40305960 (debug) Portmapper: FSS

8/10/2019 6-67370-03_SN42101_UserGuide_RevAB
http://slidepdf.com/reader/full/6-67370-03sn42101userguiderevab 446/511
Quantum StorNext User’s Guide 421
[ ] ( g) pp'stornext-fs1' (pid 8667) exited with status 2 (unknown)[0327 14:41:59] 0x40305960 (debug) FSS 'stornext-fs1'LAUNCHED -> RELAUNCH, next event in 60s[0327 14:42:59] 0x40305960 (debug) FSS 'stornext-fs1'RELAUNCH -> LAUNCHED, next event in 60s
:
This error occurs because on the StorNext client system the file /usr/cvfs/ config/fsmlist was set up and configured. However, the 'fsmlist' file
belongs to the server components of StorNext and is set up on the MDConly.
Verify this by running the command <ls-l/usr/cvfs/config/fsmlist> on the client: stornext-fs1
On the StorNext client, only the client portion of the StorNext productsuite is installed. Verify this by running the command # cvversions.The following output appears:
Server not installed.
File System Client:
Built in /scmbld/phxbld/cvfs
Created on Wed Jun 4 23:11:32 MDT 2008
Built for Linux 2.6.9-67.ELsmp x86_64 -- RHEL 4.6
Client Revision 3.1.2 Build 10
To resolve this issue, delete /usr/cvfs/config/fsmlist and thenrestart the StorNext services.
Before you restart the StorNext services, verify the size of the /usr/cvfs/debug/nssdbg.out.
If the output file is considerably large, delete or rename the file and
then restart StorNext.
If the problem persists, contact Quantum Technical Support.
TroubleshootingStorNext Storage
Manager
This section contains troubleshooting suggestions for issues whichpertain to StorNext Storage Manager.
Appendix G: Troubleshooting
Question: What should I do if StorNext fails to write to a tape drive and

8/10/2019 6-67370-03_SN42101_UserGuide_RevAB
http://slidepdf.com/reader/full/6-67370-03sn42101userguiderevab 447/511
422 Quantum StorNext User’s Guide
varies it to 'off-line' after the drive has been replaced?
Answer: In this situation you might receive the following error messageafter the write fails and the replaced drive has been placed off-line:
fs_resource[6609]: E1004(4)<00000>:{3}: Drive 2SN:1310012345 has invalid device path and is beingtaken off-line.
The message indicates that the device configuration was not updatedand the replacement tape drive has a different serial number. Compare
the serial numbers of the configured tape drives against which tapedrives are seen by the operating system.
In this example, the system has two tape drives configured. Run the -fsconfig command and check the command output. It should looksimilar to the following:
Component ID: V0,1--------------------------------------------------------
----------------------- Device pathname: /dev/sg6 Compression: On User Alias: scsi_archive1_dr1 Component Type: DRIVE Device serial #: 1310999999 Drive Type: LTO Drive ID: 1
Component ID: V0,2 <--- this is Drive 2------------------------------------------------------------------------------- Device pathname: /dev/sg2 Compression: On User Alias: scsi_archive1_dr2
Component Type: DRIVE Device serial #: 1310012345 <--- the serial number nolonger matches with the new tape drive Drive Type: LTO Drive ID: 2 <--- this is Drive 2
Appendix G: Troubleshooting
Compare the results with the output of the 'fs_scsi -p' command.

8/10/2019 6-67370-03_SN42101_UserGuide_RevAB
http://slidepdf.com/reader/full/6-67370-03sn42101userguiderevab 448/511
Quantum StorNext User’s Guide 423
ADICA0C012345_LLA | Scalar i500 | medium changer | /
dev/sg51310999999 | ULTRIUM-TD4 | sequential access | /dev/sg6 <--- scsi_archive_dr1
1310888888 | ULTRIUM-TD4 | sequential access | /dev/sg4 <--- device path and serial number is notknown.
A new tape drive has a new serial number. If a drive is replaced, thespecial device file (/dev/sg2) is no longer valid.
To resolve the issue, follow these steps:
• Delete the original removed tape drive using the StorNext GUI. (Seethe StorNext User Guide for more information about thisprocedure.)
• Add the replacement tape drive using the StorNext GUI. (Again,consult the StorNext User Guide for more information about thisprocedure.)
If the issue persists, contact Quantum Technical Support. Refer to theWorldwide Service and Support page for more information.
Troubleshooting OSIssues
This section contains troubleshooting suggestions for issues pertainingto the operating system on which StorNext runs.
Question: When I updated the OS, all connected LUNs werereformatted and data lost. Is there anything I can do to prevent thisfrom happening?
Answer: If you are not careful when performing an operating systemupdate or reload, all attached LUNs can be reformatted and data onthose LUNs will be removed. If the updated system includes StorNext,this could cause StorNext to no longer function.
When performing an operating system update or reload, disconnect anyfibre-attached media from the system and have only local operatingsystem-required LUNs visible. This will make sure only the required LUNsare affected.
Appendix G: Troubleshooting
Question: I’ve discovered that StorNext cannot see all disks wheni R d H t Li Wh t h ld I d ?

8/10/2019 6-67370-03_SN42101_UserGuide_RevAB
http://slidepdf.com/reader/full/6-67370-03sn42101userguiderevab 449/511
424 Quantum StorNext User’s Guide
running Red Hat Linux. What should I do?
Answer: StorNext File System cannot see all the drives you want toconfigure in Red Hat Linux. When Linux is installed, it defaults to only 40disk devices when it boots up.
To address this limitation, modify the CONFIG_SD_EXTRA_DEVS setting
in your Linux config file (or use xconfig under the SCSI Support tab).Then, rebuild the kernel and reboot the system.
If you require assistance rebuilding a Linux kernel, contact the Linux
support resources for your installation.
Question: What does the 'heartbeat lost' message from a Solaris clientmean?
Answer: On a Solaris client, you may see the following error:
fsmpm[3866]: [ID 702911 daemon.warning] NSS: Name Server'StorNext hostname' (xxx.xxx.xxx.xxx) heartbeat lost,
unable to send message.
In StorNext, the metadata controller and clients use an Ethernetnetwork to exchange file system metadata. The fsmpm is a portmapperdaemon residing on each StorNext File System client and servercomputer. Its purpose is to register an RPC identifier to the system'sportmap daemon. The fsmpm publishes a well-known port where thefile system (fsm) daemons register their file system name and port
access number. All clients then talk to their local fsmpm to discoveraccess information for their associated service.
Because of the importance of maintaining this connection, a heartbeatis performed over the metadata network, so if this connection is lost, amessage is sent indicating a network communication problem to the
fsnameserver (xxx.xxx.xxx.xxx).
Portmapper messages are logged in the nssdbg.out log file located in
/usr/cvfs/debug.
System administrators should monitor the log files to make sure thatconnectivity is maintained.
Question: Why does StorNext fail to write to an LTO-4 tape drive andvaries media to suspect on my Red Hat 5 and SuSE 10 system?
Answer: StorNext Storage Manager fails to write to a tape drive and
marks the medium as 'suspect'.
Appendix G: Troubleshooting
Note: This is applicable only to Red Hat RHEL 5 and SuSE SLES 10

8/10/2019 6-67370-03_SN42101_UserGuide_RevAB
http://slidepdf.com/reader/full/6-67370-03sn42101userguiderevab 450/511
Quantum StorNext User’s Guide 425
Note: This is applicable only to Red Hat RHEL 5 and SuSE SLES 10operating systems and StorNext 3.1.x (not to 3.5.0).
When a medium is marked as 'suspect,' check if the below messages arereported in the TSM log files:
Received check condition with no error data. op=0AFlush residue write to destination failed: errno 0Unable flush all of residue buffer to destination.Write error occurred - marking media suspect.
Medium XXXXXX was marked as suspect.If you receive this error message, the default settings of the SCSI genericdriver of RHEL 5 and SLES 10 must be adjusted. (For more informationabout the default settings, visit the following web site: http:// www.linux.org/ .)
Following is a description of the parameters in question:
allow_dio: 0 indicates direct I/O disable, 1 indicates enabled
def_reserved_size: This is the default buffer size reserved for eachfile descriptor. Values between 0 and 1048576 are supported.
allow_dio: Quantum recommends setting this parameter to 1.
def_reserved_size: Quantum recommends setting this parameter to524288 (= 512kB)
To verify, run these commands:
cat /proc/scsi/sg/allow_diocat /sys/module/sg/parameters/allow_dio
If the above commands return a value of '0', this means direct I/O isdisabled. Run these commands:
cat /proc/scsi/sg/def_reserved_sizecat /sys/module/sg/parameters/def_reserved_size
If the above commands return a value less than '524288', this means thebuffer size is not appropriate for LTO-4 tape drives.
Verify if the TSM startup file /usr/adic/TSM/bin/TSM_control defines any of the above parameters.
Appendix G: Troubleshooting
Substitute the settings as seen below or add them to the startup scriptafter the shell declaration ( #!/bin/sh) and the initial comments

8/10/2019 6-67370-03_SN42101_UserGuide_RevAB
http://slidepdf.com/reader/full/6-67370-03sn42101userguiderevab 451/511
426 Quantum StorNext User’s Guide
after the shell declaration ( #!/bin/sh) and the initial comments.
if echo RedHat50AS_26x86 | egrep "RedHat5|SuSE10" > /dev/null; then echo 1 > /proc/scsi/sg/allow_dio echo 524288 > /proc/scsi/sg/def_reserved_size echo 1 > /sys/module/sg/parameters/allow_dio echo 524288 > /sys/module/sg/parameters/def_reserved_sizefi
If the issue persists after making the above changes, contact QuantumTechnical Support from the Worldwide Service and Support page.
TroubleshootingReplication
This section contains troubleshooting suggestions for issues whichpertain to replication.
Question: After completing the steps to set up replication, I receivedthis message: “Replication disabled on target.” What went wrong?
Answer: You will receive this message if you fail to turn on inboundreplication. To do this, edit the replication policy named “target” andthen click the Inbound Replication tab. At the Inbound Replicationfield, select On from the pulldown list of options.
Question: What should I do if something happens to my replication
source, such as if the source directory or its contents becomesdamaged?
Answer: If there is a failure on the source, the system administratormust reconfigure both the replication source and target hosts.Specifically, the administrator must turn the former replication targetinto a replication source, and then reconfigure the former source (onceit is repaired) as a replication target.
Question: I upgraded to StorNext 4.x from a previous release. How do Ireplicate files that were previously truncated by Storage Manager in thatprevious release?
Answer: One solution would be to retrieve the files from the originalmanaged source location, and then replicate and truncate the files.
Appendix G: Troubleshooting
Troubleshooting HA This section contains troubleshooting suggestions for issues which

8/10/2019 6-67370-03_SN42101_UserGuide_RevAB
http://slidepdf.com/reader/full/6-67370-03sn42101userguiderevab 452/511
Quantum StorNext User’s Guide 427
pertain to StorNext HA (high availability) systems.
Question: How can I restart a file system without causing an HAfailover?
Answer: To be clear, individual file-system failover must bedistinguished from HA Reset of an entire MDC. When redundant FSMsare running on both MDCs in an HA Cluster, the active FSM can be oneither MDC. In the case of managed file systems, the FSMs are startedonly on the Primary MDC, so these can be stopped and started at willwithout causing an HA Reset. Unmanaged file-system FSMs are startedon both MDCs, so stopping an active unmanaged FSM will result in asingle file system failover to the standby FSM on the peer MDC. An HAReset occurs only when the failover is putting the file system in dangerof data corruption from simultaneous write access to StorNextmetadata and databases. This is typically the case for the HaShared filesystem, so take extra care with its FSM.
The recommended way for making configuration changes andrestarting FSMs is to use the 'config' mode, which stops CVFS on oneMDC and disables HA Reset on the other. CVFS will be restarted whenreturning to 'default' mode with both MDCs operating redundantly. Usethe following steps to do this at the CLI:
snhamgr config
<make configuration changes>
snhamgr startIf you are only restarting FSMs without making configuration changes,the following steps will restart an FSM:
To restart an HaManaged FSM, use this cvadmin command:
fail <file system name>
To restart an HaUnmanaged FSM or the HaShared FSM:
snhamgr mode=locked # on the secondarysnhamgr mode=single # on the primary
cvadmin # on the primary
fail <file system name>
select # repeat until you observe the FSM has started andactivated
snhamgr start # on the primary
Appendix G: Troubleshooting
Question: What Conditions Trigger a Failover in StorNext (File Systemonly)

8/10/2019 6-67370-03_SN42101_UserGuide_RevAB
http://slidepdf.com/reader/full/6-67370-03sn42101userguiderevab 453/511
428 Quantum StorNext User’s Guide
y)
Answer: There could be several reasons why a failover is triggered. SeeHA Resets on page 362 in the HA appendix.
Question: What conditions trigger the voting process for StorNext filesystem failover?
Answer: Either a StorNext File System client or a Node Status Service(NSS) coordinator (the systems listed in the fsnameservers file) caninitiate a vote.
An SNFS client triggers a vote when its TCP connection to a File SystemManager (FSM) is disconnected. In many failure scenarios this loss ofTCP connectivity is immediate, so it is often the primary initiator of avote.
On Windows systems, StorNext provides a configuration option called72uao72QUd’ nthat triggers a vote as a result of a 3 second FSM heartbeatloss. Occasionally, this is necessary because TCP disconnects can bedelayed. There is also an NSS heartbeat between members andcoordinators every half second. The NSS coordinator triggers a vote ifthe NSS heartbeat is absent for an FSM server for three seconds.Because the client triggers usually occur first, the coordinator trigger isnot commonly seen.
Question: Why does the Primary MDC keep running without the
HaShared file system failing over and without an HA Reset when I pullits only Ethernet cable? The HA Cluster appears to be hung.
In this situation the lab configuration is as follows
MDC 1:Hostname Shasta10.35.1.110
MDC 2:Hostname Tahoe10.35.1.12
Two File Systems:HaShared type: HAFSHaManaged type: Reno3
There are no other client computers.
Appendix G: Troubleshooting
Shasta is the Primary MDC before the Ethernet cable is pulled.

8/10/2019 6-67370-03_SN42101_UserGuide_RevAB
http://slidepdf.com/reader/full/6-67370-03sn42101userguiderevab 454/511
Quantum StorNext User’s Guide 429
At one point after the Ethernet was pulled, cvadmin on Tahoeshowed:
Tahoe:/usr/cvfs/config # cvadminStorNext AdministratorEnter command(s)For command help, enter "help" or "?".
List FSS
File System Services (* indicates service is in control of FS):1>*HAFS[0] located on tahoe:50139 (pid 13326)
snadmin> select FSM "HAFS"Admin Tap Connection to FSM failed: [errno 104]: Connection resetby peerFSM may have too many connections active.Cannot select FSS "HAFS"
snadmin> start reno3Start FSS "reno3"Cannot start FSS 'reno3' - failed (FSM cannot start on non-Primaryserver)
snadmin> activate reno3Activate FSM "reno3"Could not find File System Manager for "reno3" on Tahoe.
Cannot activate FSS reno3
Answer: The reason the failover and HA Reset did not occur is becausethe HaShared FSM on Shasta continues to be active, and this wasdetected in the ARB block through the SAN by the FSM on Tahoe.
Here's why. When the LAN connection is lost on Shasta, its activeHaShared FSM continues to have one client: the Shasta MDC itself. On
Tahoe, an election is held when the LAN heartbeats from Shasta's HAFSFSM stop, and Tahoe's FSM gets one vote from the client on Tahoe. TheTahoe FSM is told to activate, but cannot usurp the ARB with a 1-to-1tie. So, it tries five times, then exits, and a new FSM is started in itsplace. You can observe this by running the cvadmin command andwatching the FSM's PID change every 20 seconds or so.
With the StorNext 3.5.1 and earlier STONITH HA implementation, other
FSMs (not the HaShared FSM) would get tie-breaking votes from the
Appendix G: Troubleshooting
non-MDC clients and activate, and the first of these to activate wouldtrigger the STONITH reset of the disconnected MDC. In StorNext 4.x HA
f f

8/10/2019 6-67370-03_SN42101_UserGuide_RevAB
http://slidepdf.com/reader/full/6-67370-03sn42101userguiderevab 455/511
430 Quantum StorNext User’s Guide
allows HaUnmanaged FSMs to failover without resetting the MDC if
possible, and HaManaged FSMs do not fail over because they are onlystarted on the primary MDC.
Starting with StorNext 4.x, HA requires configuring at least one moreclient (other than the MDCs) of the HaShared file system to break thetie. This allows StorNext to determine which MDC has LAN connectivity,and to elect its HaShared FSM with enough votes to usurp control.When an HA Cluster is configured this way, the disconnected MDC
(Shasta) will reset because of the usurpation of the HaShared ARB.
After the reboot, CVFS will restart and attempt to elect its HaSharedFSM because it is not getting heartbeats from its peer. However, theseactivation attempts fail to cause a second reset because the HaSharedFSM never has enough votes to have a successful usurpation. (You canwatch it repeatedly fail to usurp if you can get on the console and runthe cvadmin command).
But what about the HaManaged Reno3 FSM? HaManaged FSMs are notstarted until the HaShared FSM activates and puts the MDC in Primarystatus. You can observe these blocked HaManaged FSMs with thecvadmin 'fsmlist' command, which displays the local FSMPM's internalFSM and process table. A remote FSMPM's table can also be viewed with'fsmlist on <MDC name or address>'.
Finally, the message: 'Admin Tap Connection to FSM failed', is an
intermittent response that occurred because the timing of the cvadminselect command was during the period after the FSM failed the fifthusurpation attempt and before the FSM was restarted (a ten-seconddelay). At other times, the response will show an activating FSM. Notethat the cvadmin-displayed asterisk simply indicates that the FSM hasbeen told to activate, not that is has been successful at usurpation and
activation.
Question: Using the same configuration above (Shasta and Tahoe), anHA Reset occurs if I pull the fibre connection from Shasta when it is thePrimary MDC, but it takes 30-40 seconds. Why does it take so long?
Answer: When the fibre connection is lost, Shasta's FSMs cannotmaintain their brands on their ARB blocks, so the HA timers do not getrestarted in the read, write, restart-timer ARB branding loop. After five
Appendix G: Troubleshooting
seconds the timers would expire and reset the MDC. However, there is asecond method for resetting the timers that uses the LAN.

8/10/2019 6-67370-03_SN42101_UserGuide_RevAB
http://slidepdf.com/reader/full/6-67370-03sn42101userguiderevab 456/511
Quantum StorNext User’s Guide 431
Every two seconds, the FSMPM on an MDC with active HA monitoredFSMs sends a request to its peer FSMPM with the list of locally activeFSMs. The peer gives permission to reset those FSMs' HA timers if it isnot activating them, and promises not to activate them for twoseconds. When the reply returns within one second of the request, thetimers are reset by the FSMPM. This allows the cluster to ride throughbrief periods when LUNs are too busy to maintain the ARB brand, butotherwise are operating correctly.
So why does the reset occur after 30-40 seconds? After this delay, theHBA returns errors to the FSM, and the FSM quits. When the HaSharedFSM quits with the file system mounted locally, an HA Reset occurs toprotect databases for the Storage Manager etc.
Question: How do I resolve a StorNext GUI login issue in my highavailability environment?
Answer: When CVFS is running on only one MDC of an HA Cluster,attempting to connect a browser to the down MDC’s GUI produces asingle page with a URL to the running MDC. Simply click the URL andlogin again.
When CVFS is down on both MDCs, the GUIs on both MDCs present aset of four troubleshooting pages. You can start CVFS from the CLI byrunning the following command: service cvfs start
Or, you can use the StorNext GUI’s Manage HA page and click the EnterConfig Mode button, and then click the Exit Config Mode button.When the second step has completed, the HA Cluster will be running inDefault-Default mode with MDC redundancy.
TroubleshootingStorNext Installationand Upgrade Issues
This section contains troubleshooting suggestions for issues whichpertain to installing or upgrading StorNext.
Question: Does a StorNext installation only support a single ACSLSserver?
Answer: If there are multiple libraries that will be accessed by aStorNext instance, they are not controlled by the same ACSLS server.StorNext supports multiple ACSLS servers, but only one library on each
server.
Appendix G: Troubleshooting
Troubleshooting OtherIssues
This section contains troubleshooting suggestions for general StorNextissues and other issues which do not fall into another category.

8/10/2019 6-67370-03_SN42101_UserGuide_RevAB
http://slidepdf.com/reader/full/6-67370-03sn42101userguiderevab 457/511
432 Quantum StorNext User’s Guide
Issues issues and other issues which do not fall into another category.
Question: How can I find the Product Serial Number?
Answer: The serial number for StorNext Storage Manager is physicallylocated on the front side of the media kit box. In addition, theadministrator initially responsible for the software may have receivedthe serial number through email when either he or she requested licenseinformation.
Both StorNext Storage Manager and StorNext File System have serialnumbers in the format S/N SN000123 (for example, SN02728).
Note: The serial number is not available through the StorNextapplication.
Question: A system panic caused connectivity loss to metadata. Is thereanything I can do to prevent this from happening?
Answer: Quantum testing has determined that there is an extremelysmall chance of the metadata controller causing a system failure ifmetadata or journal activity is interrupted by the loss of connectivity tothe metadata LUN (one occurrence during a week of testing byunplugging disk devices from the metadata controller every fiveminutes).
If a metadata write exceeds the space allocated (due to loss of disk),StorNext may stop all kernel activity on the metadata controller to avoidpotential data corruption. This is a timing issue when metadata IOactivity is attempted during a tear-down of internal data structures as aresult of losing disk space.
You can avoid downtime from this system failure by configuring aredundant metadata controller with the High Availability (HA) feature.
You should recover from this particular failure by bringing the metadatacontroller back online and running the cvfsck command to repair themetadata before allowing clients to remount the file system.
Question: My backups failed with database errors. What caused thefailure?
Answer: Check the error logs for possible causes of backup failure.Errors in logs might look similar to this:
*
Appendix G: Troubleshooting
Error while executing select statement; code: 1069,message: HY000 ERR# 1069 : [Relex][Linter ODBC Driver]SQLExecDirect: native error #1069 STMT: select

8/10/2019 6-67370-03_SN42101_UserGuide_RevAB
http://slidepdf.com/reader/full/6-67370-03sn42101userguiderevab 458/511
Quantum StorNext User’s Guide 433
SQLExecDirect: native error #1069, STMT: select
count(*). * 2008-10-25-23:00:24: ERR: /usr/adic/DSM/bin/snmetadump error at line 1490 of snmetadump.c: Systemcall failed (1): File exists (17): Failed to acquiresnmetadump lock. *
ERR: snmetadump returned exit status 2.To remedy the situation, remove all the lock files under “/usr/adic/TSM/internal/locks/”. .
Question: What should I do after a database (Linter) crash?
Answer: After a planned or unplanned sudden stoppage of the Linterdatabase (due to a system crash, power outage, etc.), the database is
left in an inconsistent state. This is due to an uncompleted recoverybased on the Incomplete Transaction Log. Thus, tools such as testdb willreturn an errant or misleading error status.
The database recovery process is automatically initiated the next timethe Linter Database starts up. Linter must replay the incompletetransactions, after which the database can be gracefully stopped andchecked via testdb if desired.
Note: After replaying the Incomplete Transaction Log, the databaseSHOULD be in a consistent state, eliminating the need fortestdb to be initiated.
Question: snbackup is failing with the log message 'Manual cleanuprequired'. How do I do manual cleanup? The full log message is similarto this:
File /usr/adic/database/metadumps/metadump.<FS Name>.gz exists.
This means that journals were in the process of being applied.
Manual cleanup required for file system: <FS Name>
Answer: The metadump.<FS Name>.gz file referenced in the logmessage is created at the start of backup processing to provide anopportunity to restart the backup processing if it does not complete.Failure to complete could happen because of a power outage, hardware
Appendix G: Troubleshooting
failure or unknown software bug. After successfully completing backupprocessing, the .gz file is removed.

8/10/2019 6-67370-03_SN42101_UserGuide_RevAB
http://slidepdf.com/reader/full/6-67370-03sn42101userguiderevab 459/511
434 Quantum StorNext User’s Guide
Normal backup processing of the metadump file involves three steps:1 'Roll' the restore journal to a new sequence number by closing the
current restore_journal-<FS Name>.<Seq Number> file,
renaming it to restore_journal-<FS Name>.<SeqNumber>.completed, and creating a new restore_journal-<FSName>.<Seq Number> file.
2 Apply the 'completed' restore journals to the metadump to bring it
up to date with the time of the last rolling of the restore journal,and rename each restore_journal-<FS Name>.<SeqNumber>.completed file to restore_journal-<FS Name>.<SeqNumber>.applied as it finishes being applied.
3 Save the metadump and applied restore journals to a StorageManager relation-point directory that exists to save these files ontape or sdisk.
When a '.gz' file exists, it prevents running the three steps listed abovefor its related file system to allow the following corrective steps to betaken:
1 Change directory to /usr/adic/database/metadumps
2 Save copies of the metadump file, the .gz file and anyrestore_journal files for the file system
3 Take steps to resolve the root cause of the problem if known4 Remove the metadump.<FS Name> file, and ungzip the
metadump.<FS Name>.gz file; this should remove the .gz file in theprocess of unpacking it
5 Rename any restore_journal-<FS Name>.<SeqNumber>.applied files to restore_journal-<FS Name>.<SeqNumber>.completed
6 Run snbackup
If the preceding steps fail again and leave another .gz file, send the filessaved in step 1 to Quantum for analysis. The following steps will thenrestore normal backup processing:
1 Stop the file system
2 Run cvfsck on the file system to check for possible metadata
inconsistency
Appendix G: Troubleshooting
3 Remove the metadump.<FS Name>.gz file
4 Run 'snmetadump -c -d' to create a new metadump

8/10/2019 6-67370-03_SN42101_UserGuide_RevAB
http://slidepdf.com/reader/full/6-67370-03sn42101userguiderevab 460/511
Quantum StorNext User’s Guide 435
5 Start the file system
Note: The preceding steps may take a long time to complete, duringwhich time the file system is not available to clients.
Appendix G: Troubleshooting

8/10/2019 6-67370-03_SN42101_UserGuide_RevAB
http://slidepdf.com/reader/full/6-67370-03sn42101userguiderevab 461/511
436 Quantum StorNext User’s Guide

8/10/2019 6-67370-03_SN42101_UserGuide_RevAB
http://slidepdf.com/reader/full/6-67370-03sn42101userguiderevab 462/511
Quantum StorNext User’s Guide 437
Appendix HStorNext
Offline Notification
StorNext supports a Windows feature called StorNext OfflineNotification. This feature should be installed only at sites which are
using StorNext Storage Manager.
This appendix provides an overview of the feature and describes how toinstall the application, configure and uninstall the feature. The followingtopics are addressed:
• StorNext Offline Notification Overview
• Installing the Notification Application
• Starting the Notification Application
• Configuring the Notification Application
• Uninstalling the Notification Application
Appendix H: StorNext Offline NotificationStorNext Offline Notification Overview
StorNext Offline Notification Overview

8/10/2019 6-67370-03_SN42101_UserGuide_RevAB
http://slidepdf.com/reader/full/6-67370-03sn42101userguiderevab 463/511
438 Quantum StorNext User’s Guide
The StorNext Offline Notification feature is a Windows only applicationwhich helps users from accidently retrieving offline StorNext files.Retrieving an offline (i.e., truncated) file often takes several minutes,and the user’s application is “blocked” while the retrieval is in progress.This feature prevents unintentional access and the subsequent retrievalof offline files by asking the user if the retrieval is desired beforecontinuing.
What is a StorNextOffline File?
A StorNext d00UQs o0QUis a file in the StorNext file system which has beenmoved from primary storage (such as a disk) to secondary storage bythe Storage Manager. Usually this involves a storage device such as tape,which is slower than disk. Files are moved to secondary storageaccording to administrative policies (see Appendix E: Storage Manager
Truncation).
Once this has occurred, the StorNext Storage Manager truncates the fileand adds the Windows offline attribute to the file. You can identify anoffline file in Windows Explorer by the square black box with a clockicon or X icon. Although the offline file is visible and you can view itsproperties, the data in the file is not physically present on primarystorage (although stub files have some data present). The offline
attribute should not be confused with Microsoft Windows® CIFS-relatedoffline files.
Why Block Access toOffline Files?
Moving files from secondary storage to primary storage is often alengthy process. The application causing the retrieval will be blockeduntil the file is restored. The file is usually on a tape, which contributes
to the length of the delay. Users may wish to avoid these delays for fileswhich are accidently accessed. Generating a warning not only helpsusers understand they are accessing an offline StorNext file, but alsowhy accessing the data in the file is taking so long.
Appendix H: StorNext Offline NotificationStorNext Offline Notification Overview
Offline NotificationConfiguration Options
The StorNext Offline Notification application can be configured to workin one of the following three modes (see configuration instructions):

8/10/2019 6-67370-03_SN42101_UserGuide_RevAB
http://slidepdf.com/reader/full/6-67370-03sn42101userguiderevab 464/511
Quantum StorNext User’s Guide 439
1 Notify the user via a pop-up dialog
2 Deny access to all offline files
3 Allow access to all offline files
The first mode, notify the user, should be used when the user is allowedto decide whether the file should be retrieved.
The second mode should be used if the workstation user never wants to
retrieve offline files. In this case the user's application will fail if it tries toaccess data in an offline file.
The last mode should be used if unrestricted access to offline files isdesired.
How the NotificationFeature Operates If your StorNext Offline Notification feature is set to configuration mode#1, you will see a pop-up any time any application on the Windowssystem tries to read or write an offline StorNext file. Your applicationwill be blocked until either you respond to this pop-up or the pop-uptimes out after two minutes. If the pop-up times out, the I/O requestwill be allowed. The pop-up can occur only with files on a StorNext filesystem. Offline files on other file systems will not be blocked.
Note: Metadata file operations such as looking at a file’s propertiesor renaming a file will not be blocked.
When a user responds to a pop-up, the response is stored in an internalcache. The cache is 1024 entries long. This cache is used for both“allow” and “deny” entries. The cache is checked before generating apop-up. If a matching entry is found, the previous answer is used. If thecache is full and a new entry is needed, the oldest entry is removed. Files
marked as “deny” will eventually time-out. “Allow” entries do not time-out.
If configuration mode #2 is selected, no pop-up will appear; access tothe file will automatically be denied. The application immediatelyreceives the error “Access Denied.”
Appendix H: StorNext Offline NotificationStorNext Offline Notification Overview
If configuration mode #3 is selected, no pop-up will appear; access tothe file is automatically allowed. However, the application's I/O requestwill be blocked by StorNext until the file is retrieved.

8/10/2019 6-67370-03_SN42101_UserGuide_RevAB
http://slidepdf.com/reader/full/6-67370-03sn42101userguiderevab 465/511
440 Quantum StorNext User’s Guide
For configuration mode #1: If multiple applications are trying to accessthe same file at the same time, all applications are blocked, but only onepop-up will appear. If the user wants to allow access to the file, heshould select the “Yes” button. All blocked applications will continue tobe blocked until the file is retrieved to primary storage. If anotherapplication tries to access the file before it is retrieved, it will not cause anew pop-up (unless the file has been removed from the Offline
Notification's cache.)If, on the other hand, the user wants to deny access to the file, the usershould select the “No” button. All blocked applications will be deniedaccess and all future requests will be denied access until the file isremoved from the Offline Notification's cache.
Note: Responding “Yes” or “No” to any new pop-up will not affectprevious responses.
In summary, for configuration mode #1 only, one pop-up dialog willappear for each accessed offline StorNext file. The file is no longeroffline when the file is restored to primary storage.
In configuration mode #2, access to an offline file is always immediatelydenied.
In configuration mode #3, access to an offline file is always allowed.The user will experience a delay while the file is being retrieved, and shewill not see a popup.
Appendix H: StorNext Offline NotificationInstalling the Notification Application
Installing the Notification Application

8/10/2019 6-67370-03_SN42101_UserGuide_RevAB
http://slidepdf.com/reader/full/6-67370-03sn42101userguiderevab 466/511
Quantum StorNext User’s Guide 441
The Quantum Offline Notification feature can be installed on thefollowing platforms:
• Windows XP (x86)
• Windows 2003 SP1 (x86)
• Windows 2003 SP1 (x64)
• Windows Vista (x86)
• Windows Vista (x64)
• Windows 2008 Server (x64)
• Windows 2008 R2 Server (x64)
• Windows 7 (x86)
• Windows 7 (x64)
Caution: Do not install this feature on a Windows CIFS server ormulti-user machines. This feature should be installed onlyon single user machines.
Installing onto aStandalone Machine
Locate the appropriate installation package for the machine onto whichyou want to install. Use SnfsOfflineNotifyInstall32.zip for 32-
bit machines and SnfsOfflineNotifyInstall64.zip for 64-bitmachines.
Move the appropriate installation package to the destination machineand unzip it. You will find two files: SnfsOfflineSetup.exe and
SnfsOfflineSetup.msi. Use the following steps to install:1 Log onto the machine as a Local or Domain Administrator. In
Windows Explorer start the install by double clicking on
SnfsOfflineSetup.exe.
On Windows XP platforms and higher Windows versions, analternate method to start the installation is to right-click on
SnfsOfflineSetup.exe and select “Run as ..." as shown in
Figure 138.
Appendix H: StorNext Offline NotificationInstalling the Notification Application
If you select this option, you must log in with the credentials for theAdministrator account as shown in Figure 139.

8/10/2019 6-67370-03_SN42101_UserGuide_RevAB
http://slidepdf.com/reader/full/6-67370-03sn42101userguiderevab 467/511
442 Quantum StorNext User’s Guide
Figure 138 Run asAdministrator
Figure 139 Logging in tothe Administrator Account
Appendix H: StorNext Offline NotificationInstalling the Notification Application
2 The application installer requires .NET updates to function correctly.If you are installing onto a machine without any of the .NETupdates, you will be prompted to update to .NET Framework 3.5 as
shown in Figure 140

8/10/2019 6-67370-03_SN42101_UserGuide_RevAB
http://slidepdf.com/reader/full/6-67370-03sn42101userguiderevab 468/511
Quantum StorNext User’s Guide 443
shown in Figure 140.
Figure 140 Installing the.NET Framework
3 Read the end user license agreement, and then click Accept tocontinue.
Appendix H: StorNext Offline NotificationInstalling the Notification Application
4 Wait for the .NET updates to be downloaded and installed. Afterthis process is complete, the Offline Notification Setup Wizardlaunches.

8/10/2019 6-67370-03_SN42101_UserGuide_RevAB
http://slidepdf.com/reader/full/6-67370-03sn42101userguiderevab 469/511
444 Quantum StorNext User’s Guide
Figure 141 OfflineNotification Setup Wizard
5 Click Next to continue. The Quantum End User License Agreementwindow appears.
Figure 142 Quantum EndUser License Agreement
Appendix H: StorNext Offline NotificationInstalling the Notification Application
6 Read the end user license agreement. If you accept the terms of theagreement, select I Agree and click Next to continue. The SelectInstallation Folder window appears. (If you do not accept the
terms of the agreement, click Cancel to stop the installation.)

8/10/2019 6-67370-03_SN42101_UserGuide_RevAB
http://slidepdf.com/reader/full/6-67370-03sn42101userguiderevab 470/511
Quantum StorNext User’s Guide 445
terms of the agreement, click Cancel to stop the installation.)
Figure 143 SelectInstallation Folder
7 On the Select Installation Folder window, you can do thefollowing:
• Change the location where the installation resides by clickingBrowse and navigating to the desired location
• Specify whether to install Offline Notification for yourself only,or for everyone who users the computer
Appendix H: StorNext Offline NotificationInstalling the Notification Application
8 Click Next to continue. The Confirm Installation window appears.
Figure 144 Confirm

8/10/2019 6-67370-03_SN42101_UserGuide_RevAB
http://slidepdf.com/reader/full/6-67370-03sn42101userguiderevab 471/511
446 Quantum StorNext User’s Guide
gInstallation
9 Before you proceed, make sure you have enough disk space toinstall the binaries. A minimum of 10MB is required.
10 Click Next to begin the installation.
Note: This is the last opportunity you will have to cancel theinstallation, so be certain you want to install before youclick Next.
After the application is installed, the Installation Complete window appears.
Figure 145 InstallationComplete
11 Click Close to exit the installation .
Appendix H: StorNext Offline NotificationStarting the Notification Application
The next time you start your computer, the notification applicationautomatically starts on login.
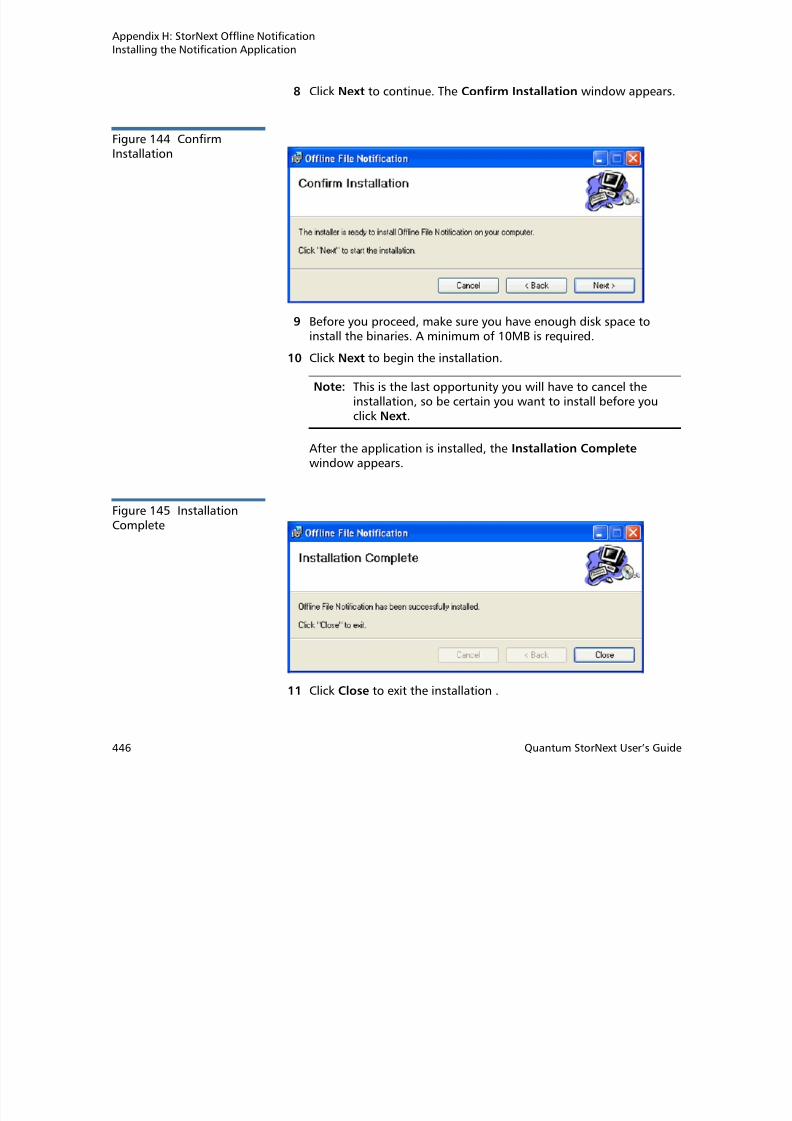
8/10/2019 6-67370-03_SN42101_UserGuide_RevAB
http://slidepdf.com/reader/full/6-67370-03sn42101userguiderevab 472/511
Quantum StorNext User’s Guide 447
Starting the Notification Application
The StorNext Offline Notification application starts automatically afteryou log in, but if necessary you can start it manually.
From the Windows Start menu, choose All Programs > Quantum >StorNext Offline Notification. The application starts.
Figure 146 Manual Start
Appendix H: StorNext Offline NotificationConfiguring the Notification Application
Configuring the Notification Application
When the application is already running the gold StorNext icon appears

8/10/2019 6-67370-03_SN42101_UserGuide_RevAB
http://slidepdf.com/reader/full/6-67370-03sn42101userguiderevab 473/511
448 Quantum StorNext User’s Guide
When the application is already running, the gold StorNext icon appearsin the Windows System Tray (generally found at the lower right cornerof the screen).
When you hover the mouse over the gold StorNext icon and right click,three options appear:
• Preferences: View and enter application options, view a blocked file
list, and view the application log
• About: View the StorNext Offline Notification application’s currentversion number and copyright date
• Exit: Terminate the application
Setting ApplicationOptions
Follow these steps to set preferences for the StorNext OfflineNotification application:
1 If you have not already done so, move the mouse over the goldStorNext icon in the Windows system tray and right-click. SelectPreferences. (Alternatively, you can double-click the StorNext icon.)
Appendix H: StorNext Offline NotificationConfiguring the Notification Application
Figure 147 ApplicationOptions

8/10/2019 6-67370-03_SN42101_UserGuide_RevAB
http://slidepdf.com/reader/full/6-67370-03sn42101userguiderevab 474/511
Quantum StorNext User’s Guide 449
2 View or adjust the following fields on the Application Options tab:• Cache Timeout: The value in the Cache Timeout field
determines how many minutes a file remains in the “AccessDenied” list. The range is 1 to 499,999 minutes, and the defaultis 5 minutes. However, the cache can hold only 1024 entriestotal for both allowed and denied entries. If the total entriesexceeds 1024, the oldest entry is deleted even if the timeout hasnot been reached.
• Default Action: This drop down list provides three options:
• Prompt User: When this option is selected, users are alwaysprompted with a dialog box whether to open an offline file,which means retrieving the file from offline storage such astape, or from near-line disk storage. Users also have theoption of preventing the file from being retrieved.
• Always Deny Access: When this option is selected, accessto offline files is always denied, preventing files from beingretrieved from offline storage.
• Always Allow Access: When this option is selected files arealways allowed to be retrieved from offline storage withoutprompting the user.
Appendix H: StorNext Offline NotificationConfiguring the Notification Application
Viewing Access DeniedFiles
The Access Denied List tab displays a list of files that have beenprevented from being retrieved from offline storage. (See Figure 148.)The files listed are automatically prevented from being retrieved as longas they remain in the Access Denied list.

8/10/2019 6-67370-03_SN42101_UserGuide_RevAB
http://slidepdf.com/reader/full/6-67370-03sn42101userguiderevab 475/511
450 Quantum StorNext User’s Guide
These files are automatically removed from this list after they have notbeen accessed for a period of time (see the Cache Timeout field on the
Application Options tab to determine the timeout period.) If you needto access any file in this list before the timeout period has expired, youmust remove it from the list.
To remove files from the list, select the check box next to the desiredfiles and then click Remove Files. Only the files selected will be removedfrom the access denied list.
Note: The Remove Files button is disabled when there are no files inthe list.
Figure 148 Access DeniedList
Appendix H: StorNext Offline NotificationConfiguring the Notification Application
When you select the Prompt User option from the Default Action dropdown list, files are added to the access denied list after an attemptis made to open an offline file and you prevent the file from being
retrieved.Files are also added to the blocked files list whenever the Default

8/10/2019 6-67370-03_SN42101_UserGuide_RevAB
http://slidepdf.com/reader/full/6-67370-03sn42101userguiderevab 476/511
Quantum StorNext User’s Guide 451
Files are also added to the blocked files list whenever the Default Action of Always Deny Access is selected. This means that every offlinefile opened is added to the list and no notification is presented to theuser.
Viewing the Application Log
The Application Log tab displays any events that have occurred in thesystem.
Figure 149 Application log
Exiting ApplicationPreferences
When you are finished viewing or setting preferences for the StorNextOffline Notification application, click OK to close the Preferenceswindow.
Appendix H: StorNext Offline NotificationUninstalling the Notification Application
Uninstalling the Notification Application
Follow these steps to uninstall the StorNext Offline Notification

8/10/2019 6-67370-03_SN42101_UserGuide_RevAB
http://slidepdf.com/reader/full/6-67370-03sn42101userguiderevab 477/511
452 Quantum StorNext User’s Guide
papplication:
1 Access the Control Panel by choosing Control Panel from theWindows Start menu.
2 When the Control Panel launches, open Add or Remove Programs (on Windows XP) or Programs and Features (on Windows Vista
and later platforms).
3 When the Add or Remove Programs window appears click Changeor Remove Programs if it isn’t already selected.
Figure 150 Removing theApplication
4 Locate and select the StorNext Offline Notification application.Programs are typically listed alphabetically.
5 Click Remove to uninstall the application.
Appendix I

8/10/2019 6-67370-03_SN42101_UserGuide_RevAB
http://slidepdf.com/reader/full/6-67370-03sn42101userguiderevab 478/511
Quantum StorNext User’s Guide 453
Appendix I
RAS Messages
RAS messages appear when StorNext encounters an error condition. TheRAS window shows symptoms of the condition, plus workarounds you
can try to resolve the condition before calling the Quantum TechnicalAssistance Center.
This appendix shows the different RAS messages you might see.Messages are separated into the following categories:
• Media and Drive RAS Messages
• SNFS RAS Messages
• Other RAS Messages
Note: This appendix shows only the actual RAS messages you mightreceive. A list of the events or error conditions which mighttrigger generating a RAS is not provided. For information abouttriggering events, refer to the SNFS_RAS man page.
Appendix I: RAS MessagesMedia and Drive RAS Messages
Media and Drive RAS Messages
This section describes RAS messages that might appear as a result of adi l d di i h di d d di

8/10/2019 6-67370-03_SN42101_UserGuide_RevAB
http://slidepdf.com/reader/full/6-67370-03sn42101userguiderevab 479/511
454 Quantum StorNext User’s Guide
media-related error condition, such as no media detected or mediaformat failure.
Figure 151 Possible Drive/ Media Mount Discrepancy RAS
Appendix I: RAS MessagesMedia and Drive RAS Messages
Figure 152 Tape Drive AlertsRAS part 1

8/10/2019 6-67370-03_SN42101_UserGuide_RevAB
http://slidepdf.com/reader/full/6-67370-03sn42101userguiderevab 480/511
Quantum StorNext User’s Guide 455
Appendix I: RAS MessagesMedia and Drive RAS Messages
Figure 153 Tape Drive AlertsRAS part 2

8/10/2019 6-67370-03_SN42101_UserGuide_RevAB
http://slidepdf.com/reader/full/6-67370-03sn42101userguiderevab 481/511
456 Quantum StorNext User’s Guide
Appendix I: RAS MessagesMedia and Drive RAS Messages
Figure 154 Tape Drive AlertsRAS part 3

8/10/2019 6-67370-03_SN42101_UserGuide_RevAB
http://slidepdf.com/reader/full/6-67370-03sn42101userguiderevab 482/511
Quantum StorNext User’s Guide 457
Appendix I: RAS MessagesMedia and Drive RAS Messages
Figure 155 Drive ReportedDrive Error RAS

8/10/2019 6-67370-03_SN42101_UserGuide_RevAB
http://slidepdf.com/reader/full/6-67370-03sn42101userguiderevab 483/511
458 Quantum StorNext User’s Guide
Appendix I: RAS MessagesMedia and Drive RAS Messages
Figure 156 Cleaning of DriveFailed RAS

8/10/2019 6-67370-03_SN42101_UserGuide_RevAB
http://slidepdf.com/reader/full/6-67370-03sn42101userguiderevab 484/511
Quantum StorNext User’s Guide 459
Appendix I: RAS MessagesMedia and Drive RAS Messages
Figure 157 Wrong FirmwareLevel/Invalid Drive Type RAS

8/10/2019 6-67370-03_SN42101_UserGuide_RevAB
http://slidepdf.com/reader/full/6-67370-03sn42101userguiderevab 485/511
460 Quantum StorNext User’s Guide
Appendix I: RAS MessagesMedia and Drive RAS Messages
Figure 158 Tape Drive -Reported Media Error RAS

8/10/2019 6-67370-03_SN42101_UserGuide_RevAB
http://slidepdf.com/reader/full/6-67370-03sn42101userguiderevab 486/511
Quantum StorNext User’s Guide 461
Appendix I: RAS MessagesMedia and Drive RAS Messages
Figure 159 Cleaning MediaExpired RAS

8/10/2019 6-67370-03_SN42101_UserGuide_RevAB
http://slidepdf.com/reader/full/6-67370-03sn42101userguiderevab 487/511
462 Quantum StorNext User’s Guide
Figure 160 Duplicate PhysicalMedia Found RAS
Appendix I: RAS MessagesSNFS RAS Messages
Figure 161 Storage Disk TakenOffline RAS

8/10/2019 6-67370-03_SN42101_UserGuide_RevAB
http://slidepdf.com/reader/full/6-67370-03sn42101userguiderevab 488/511
Quantum StorNext User’s Guide 463
SNFS RAS Messages
This section describes RAS messages that might appear as a result of afile system-related error condition, such as an I/O error or a missing LUN.
Appendix I: RAS MessagesSNFS RAS Messages
Figure 162 Configuration NotSupported RAS
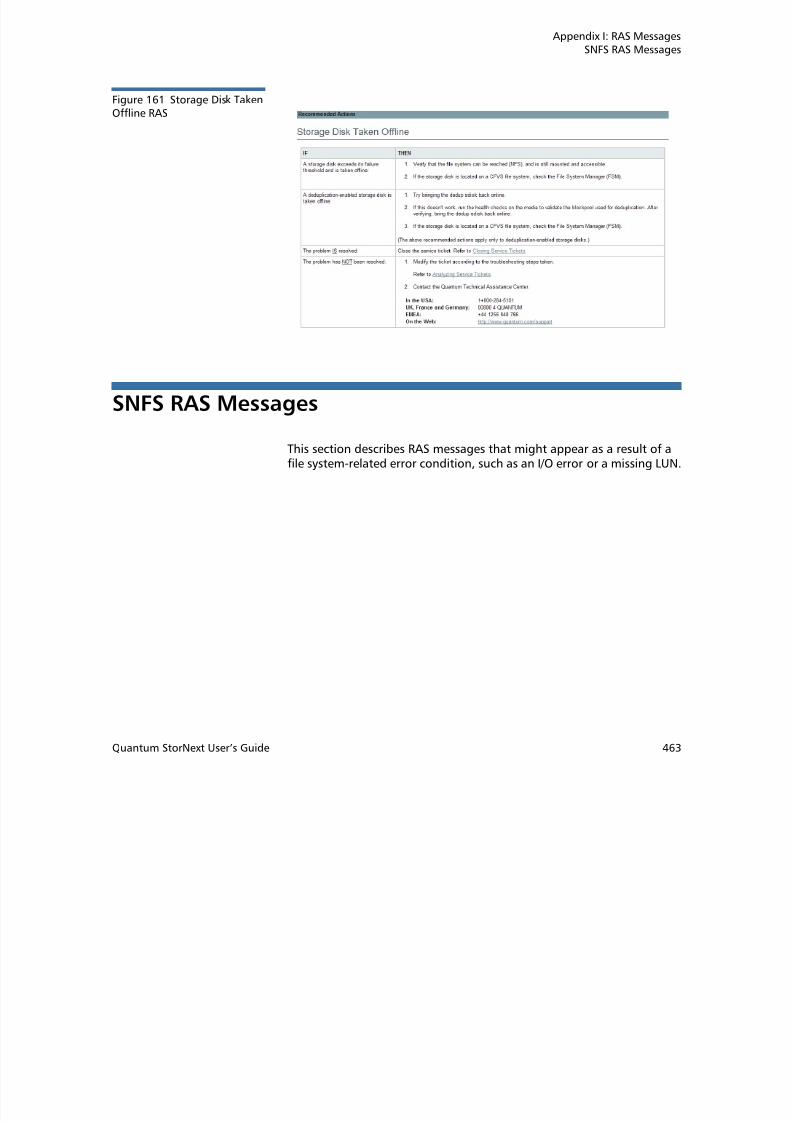
8/10/2019 6-67370-03_SN42101_UserGuide_RevAB
http://slidepdf.com/reader/full/6-67370-03sn42101userguiderevab 489/511
464 Quantum StorNext User’s Guide
Figure 163 Label ValidationFailure RAS
Appendix I: RAS MessagesSNFS RAS Messages
Figure 164 ConnectionRejected RAS

8/10/2019 6-67370-03_SN42101_UserGuide_RevAB
http://slidepdf.com/reader/full/6-67370-03sn42101userguiderevab 490/511
Quantum StorNext User’s Guide 465
Figure 165 File System FailoverRAS
Appendix I: RAS MessagesSNFS RAS Messages
Figure 166 I/O Error RAS

8/10/2019 6-67370-03_SN42101_UserGuide_RevAB
http://slidepdf.com/reader/full/6-67370-03sn42101userguiderevab 491/511
466 Quantum StorNext User’s Guide
Figure 167 Journaling ErrorDetected RAS
Appendix I: RAS MessagesSNFS RAS Messages
Figure 168 SNFS LicenseRequired RAS
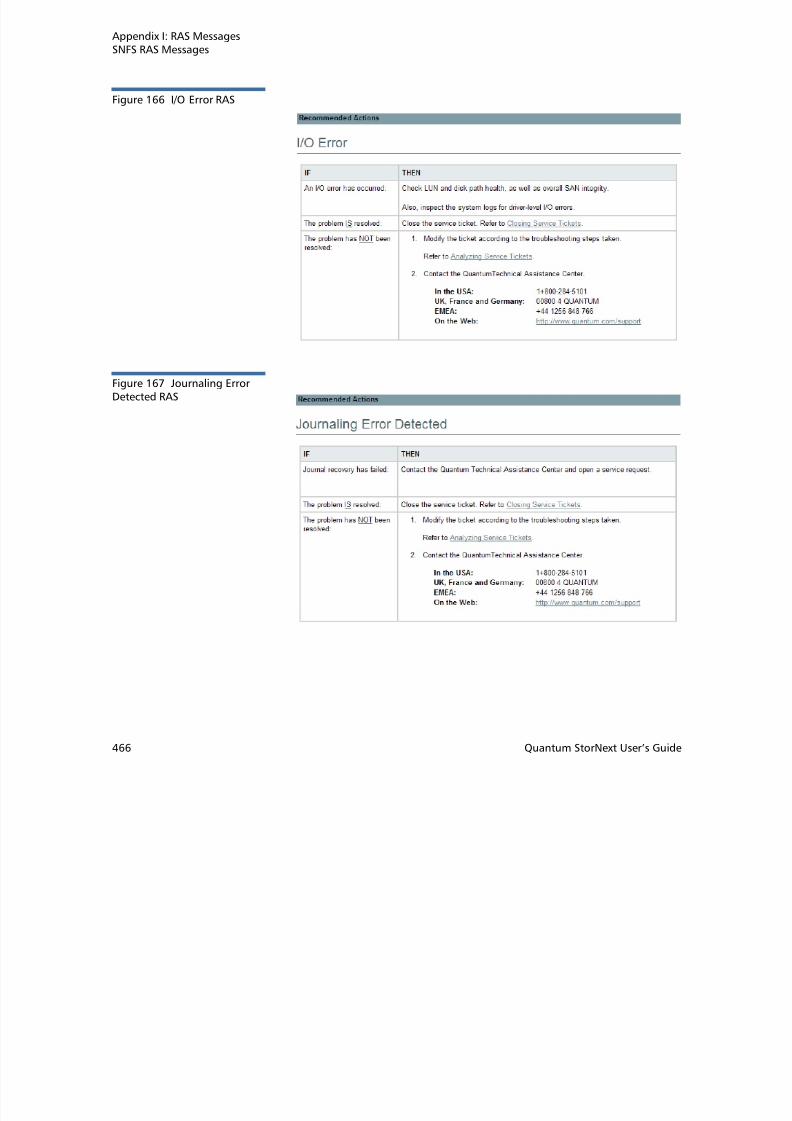
8/10/2019 6-67370-03_SN42101_UserGuide_RevAB
http://slidepdf.com/reader/full/6-67370-03sn42101userguiderevab 492/511
Quantum StorNext User’s Guide 467
Figure 169 SNFS LicenseFailure RAS
Appendix I: RAS MessagesSNFS RAS Messages
Figure 170 LUN MappingChanged RAS

8/10/2019 6-67370-03_SN42101_UserGuide_RevAB
http://slidepdf.com/reader/full/6-67370-03sn42101userguiderevab 493/511
468 Quantum StorNext User’s Guide
Figure 171 CommunicationFailure RAS
Appendix I: RAS MessagesSNFS RAS Messages
Figure 172 MetadataInconsistency Detected RAS

8/10/2019 6-67370-03_SN42101_UserGuide_RevAB
http://slidepdf.com/reader/full/6-67370-03sn42101userguiderevab 494/511
Quantum StorNext User’s Guide 469
Figure 173 Bad File SystemMetadata Dump RAS
Appendix I: RAS MessagesSNFS RAS Messages
Figure 174 Metadata DumpFailure RAS

8/10/2019 6-67370-03_SN42101_UserGuide_RevAB
http://slidepdf.com/reader/full/6-67370-03sn42101userguiderevab 495/511
470 Quantum StorNext User’s Guide
Figure 175 File System orMetadata Capacity WarningRAS
Appendix I: RAS MessagesSNFS RAS Messages
Figure 176 File ProcessingFailure RAS

8/10/2019 6-67370-03_SN42101_UserGuide_RevAB
http://slidepdf.com/reader/full/6-67370-03sn42101userguiderevab 496/511
Quantum StorNext User’s Guide 471
Figure 177 Missing LUNs RAS
Appendix I: RAS MessagesSNFS RAS Messages
Figure 178 Disk SpaceAllocation Failure RAS

8/10/2019 6-67370-03_SN42101_UserGuide_RevAB
http://slidepdf.com/reader/full/6-67370-03sn42101userguiderevab 497/511
472 Quantum StorNext User’s Guide
Figure 179 System ResourceFailure RAS
Appendix I: RAS MessagesSNFS RAS Messages
Figure 180 AffinityConfiguration Violations RAS

8/10/2019 6-67370-03_SN42101_UserGuide_RevAB
http://slidepdf.com/reader/full/6-67370-03sn42101userguiderevab 498/511
Quantum StorNext User’s Guide 473
Appendix I: RAS MessagesSNFS RAS Messages
Figure 181 Quota Limit orFragmentation Warnings RAS

8/10/2019 6-67370-03_SN42101_UserGuide_RevAB
http://slidepdf.com/reader/full/6-67370-03sn42101userguiderevab 499/511
474 Quantum StorNext User’s Guide
Figure 182 Shutdown Error
RAS
Appendix I: RAS MessagesSNFS RAS Messages
Figure 183 Initialization FailureRAS

8/10/2019 6-67370-03_SN42101_UserGuide_RevAB
http://slidepdf.com/reader/full/6-67370-03sn42101userguiderevab 500/511
Quantum StorNext User’s Guide 475
Figure 184 SNFS I/O Error RAS
Appendix I: RAS MessagesOther RAS Messages
Figure 185 Port Failure

8/10/2019 6-67370-03_SN42101_UserGuide_RevAB
http://slidepdf.com/reader/full/6-67370-03sn42101userguiderevab 501/511
476 Quantum StorNext User’s Guide
Other RAS Messages
This section describes RAS messages that might appear as a result of anerror condition that is not related to media or the file system.
Appendix I: RAS MessagesOther RAS Messages
Figure 186 Checksum ErrorRAS

8/10/2019 6-67370-03_SN42101_UserGuide_RevAB
http://slidepdf.com/reader/full/6-67370-03sn42101userguiderevab 502/511
Quantum StorNext User’s Guide 477
Appendix I: RAS MessagesOther RAS Messages
Figure 187 Troubleshootingthe StorNext Software RAS

8/10/2019 6-67370-03_SN42101_UserGuide_RevAB
http://slidepdf.com/reader/full/6-67370-03sn42101userguiderevab 503/511
478 Quantum StorNext User’s Guide
Appendix I: RAS MessagesOther RAS Messages
Figure 188 Software ResourceViolations RAS

8/10/2019 6-67370-03_SN42101_UserGuide_RevAB
http://slidepdf.com/reader/full/6-67370-03sn42101userguiderevab 504/511
Quantum StorNext User’s Guide 479
Appendix I: RAS MessagesOther RAS Messages
Figure 189 Vault Failure RAS

8/10/2019 6-67370-03_SN42101_UserGuide_RevAB
http://slidepdf.com/reader/full/6-67370-03sn42101userguiderevab 505/511
480 Quantum StorNext User’s Guide
Figure 190 Robotics - NotReady RAS
Appendix I: RAS MessagesOther RAS Messages
Figure 191 Robotics - MoveFailure RAS
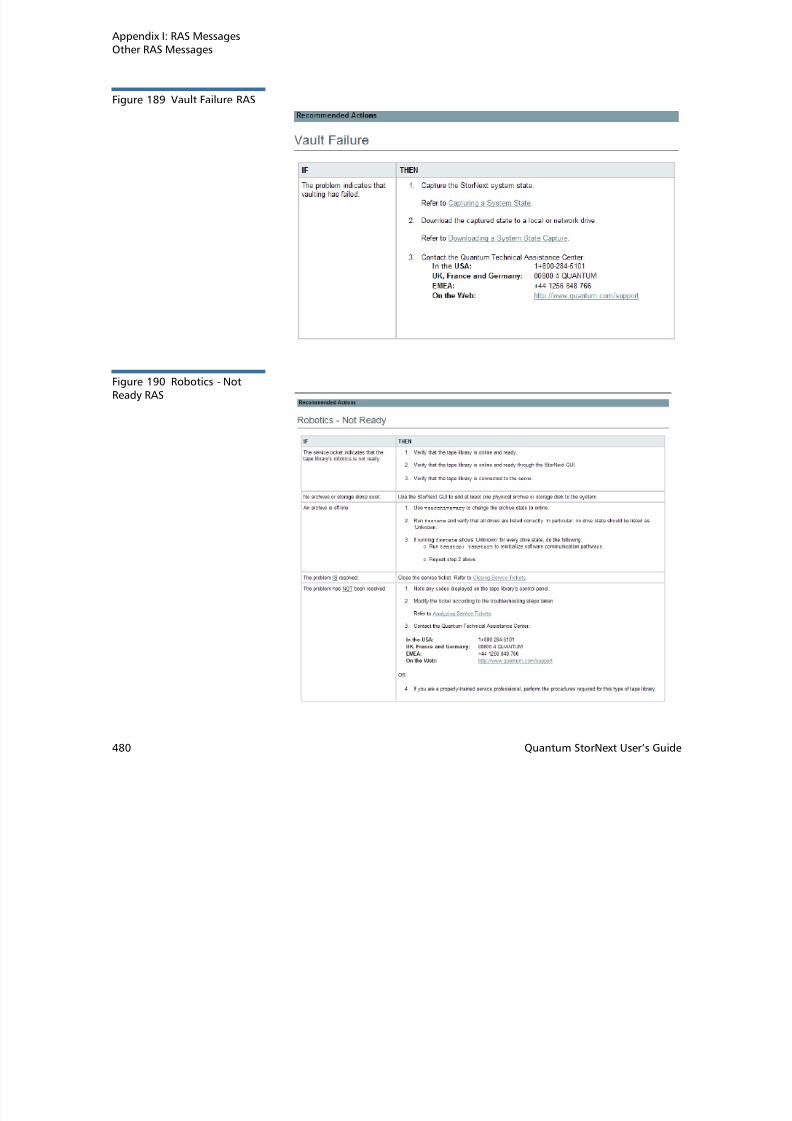
8/10/2019 6-67370-03_SN42101_UserGuide_RevAB
http://slidepdf.com/reader/full/6-67370-03sn42101userguiderevab 506/511
Quantum StorNext User’s Guide 481
Appendix I: RAS MessagesOther RAS Messages
Figure 192 Robotics - WrongFirmware Level/Invalid LibraryType RAS

8/10/2019 6-67370-03_SN42101_UserGuide_RevAB
http://slidepdf.com/reader/full/6-67370-03sn42101userguiderevab 507/511
482 Quantum StorNext User’s Guide
Appendix I: RAS MessagesOther RAS Messages
Figure 193 Backup Errors RAS

8/10/2019 6-67370-03_SN42101_UserGuide_RevAB
http://slidepdf.com/reader/full/6-67370-03sn42101userguiderevab 508/511
Quantum StorNext User’s Guide 483
Appendix I: RAS MessagesOther RAS Messages
Figure 194 InvalidConfiguration RAS part 1

8/10/2019 6-67370-03_SN42101_UserGuide_RevAB
http://slidepdf.com/reader/full/6-67370-03sn42101userguiderevab 509/511
484 Quantum StorNext User’s Guide
Appendix I: RAS MessagesOther RAS Messages
Figure 195 InvalidConfiguration RAS part 2
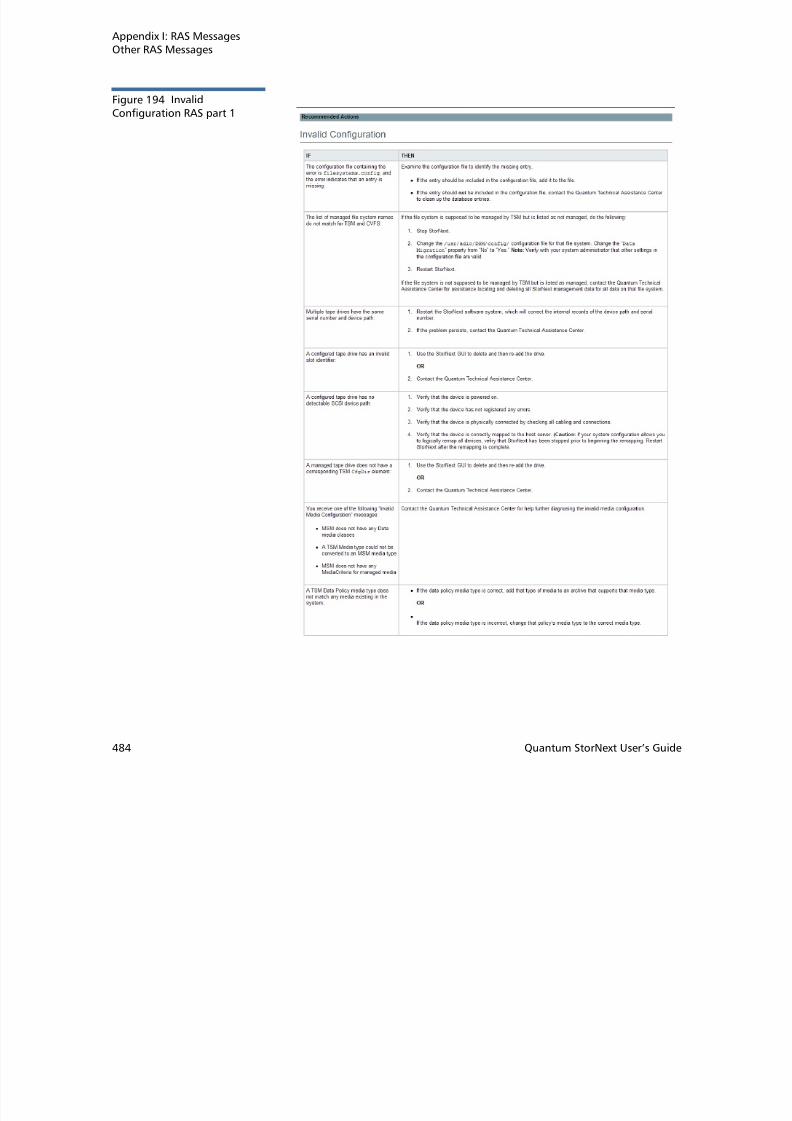
8/10/2019 6-67370-03_SN42101_UserGuide_RevAB
http://slidepdf.com/reader/full/6-67370-03sn42101userguiderevab 510/511
Quantum StorNext User’s Guide 485
Appendix I: RAS MessagesOther RAS Messages

8/10/2019 6-67370-03_SN42101_UserGuide_RevAB
http://slidepdf.com/reader/full/6-67370-03sn42101userguiderevab 511/511
486 Quantum StorNext User’s Guide