Embed Size (px)
Citation preview
Diffuse and Specular Convolution http://gl.ict.usc.edu/HDRShop/tutorial/tutorial6.html
1 of 1 06/11/2007 20:53
Return to the tutorials
Diffuse and Specular Convolution
HDRshop can perform a diffuse or specular convolution on a high-dynamic range 360 degree panoramic
image (also called a light probe). This is useful if you need to pre-compute a diffuse or rough specular texture
map; for example, to light an object using a light probe in real time applications. The light probe must be in
latitude/longitude format; see this tutorial
on how to convert between various panoramic formats. Each pixel is replaced with the cosine-weighted
integral of the corresponding hemisphere of incident illumination. In non-mathematical terms, the diffuse
convolution is the image you'd want to use as an environment-map (indexed by the surface normal) to light a
diffuse object in order to show it lit by a light probe. The specular convolution is the image you’d want to use
as an environment map (indexed by the reflection vector) to light a rough but shiny object. It may be good to
downsample the environment image first since the convolution calculations can take quite a long time. For a
little more info see the reflection mapping web page: http://www.debevec.org/ReflectionMapping/
Load a light probe in latitude/longitude format into HDRshop. You can use this sample light probe to
get started.
1.
Resize the image. Click on Image in the menu bar, then Size from the Image menu then Half Size from
the Size menu. Repeat this several times until the image has been resized to a point where HDRshop can
calculate the convolution in a reasonable amount if time. In this example the image has been resized to
128x64 and the convolution calculation takes about 96 seconds.
2.
The diffuse convolution will act on the currently selected window so click on your light probe image to
make sure it’s selected.
3.
Choose Diffuse Blur by clicking on Image on the menu bar, then Panorama on the Image menu, and
finally Diffuse/Specular Convolution on the Panorama menu.
4.
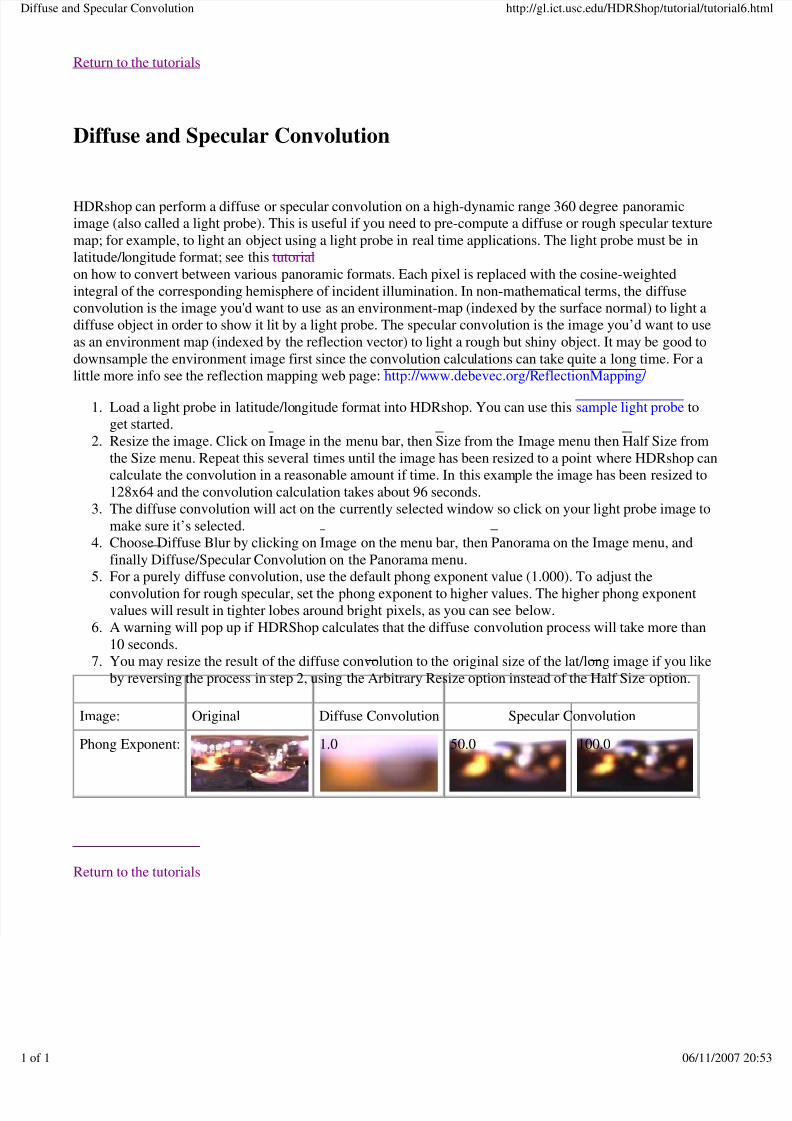
For a purely diffuse convolution, use the default phong exponent value (1.000). To adjust the
convolution for rough specular, set the phong exponent to higher values. The higher phong exponent
values will result in tighter lobes around bright pixels, as you can see below.
5.
A warning will pop up if HDRShop calculates that the diffuse convolution process will take more than
10 seconds.
6.
You may resize the result of the diffuse convolution to the original size of the lat/long image if you like
by reversing the process in step 2, using the Arbitrary Resize option instead of the Half Size option.
7.
Image: Original Diffuse Convolution Specular Convolution
Phong Exponent: 1.0 50.0 100.0
Return to the tutorials


![Realistic Soft Shadows by Penumbra-Wedges Blending · Penumbra-wedges X + Specular & diffuse Visibility buffer Modulated spec+diff Ambient Final image. Penumbra-wedges [3/4] Penumbra-wedges](https://img.pdfslide.net/doc/110x75/5f543a4c0135c76e2b226697/realistic-soft-shadows-by-penumbra-wedges-penumbra-wedges-x-specular-diffuse.jpg)