Embed Size (px)
Citation preview
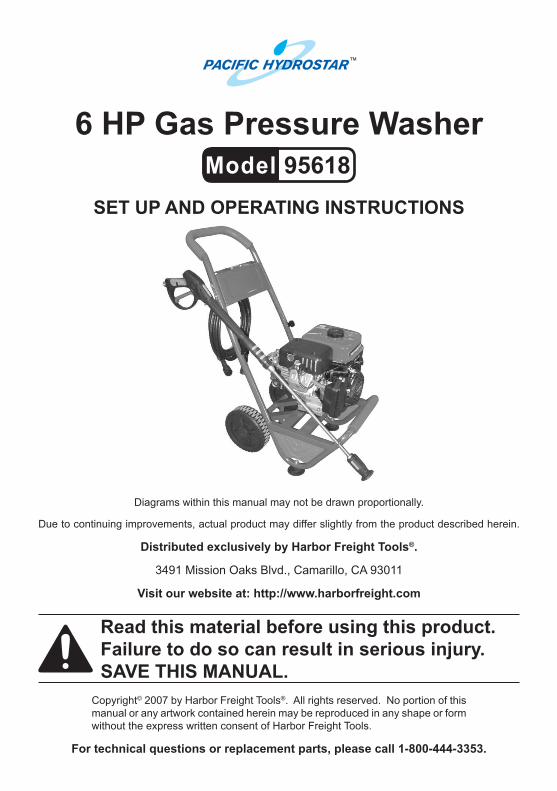
6 HP Gas Pressure WasherModel 95618
Set uP And OPerAtinG inStructiOnS
Diagrams within this manual may not be drawn proportionally.
Due to continuing improvements, actual product may differ slightly from the product described herein.
distributed exclusively by Harbor Freight tools®.
3491 Mission Oaks Blvd., Camarillo, CA 93011
Visit our website at: http://www.harborfreight.com
read this material before using this product. Failure to do so can result in serious injury. SAVe tHiS MAnuAl.
Copyright© 2007 by Harbor Freight Tools®. All rights reserved. No portion of this manual or any artwork contained herein may be reproduced in any shape or form without the express written consent of Harbor Freight Tools.
For technical questions or replacement parts, please call 1-800-444-3353.
SKU 95618 For technical questions please call 1-800-444-3353 Page 2
Specifications
Gas Engine 6HP OHV Mitsubishi Engine, 3600 RPM, Recoil Start, Uses Unleaded Fuel, 20 Oz. Engine Oil Capacity, 8.3 Gal. Fuel Capacity (3.8L).
Environmental Approved by EPA (Environmental Protection Agency)Approved by CARB (California Air Resources Board)
Pressure Washer 2800 PSI Rated, Cast Iron Cylinder Sleeve, Brass Axial PumpPump Dimensions 23-5/8”L x 19-½”W x 36-¾”TWasher Gun Safety Trigger Activated; for cold water use only.Water Output 2.5 Gallons per MinuteHigh Pressure Hose 27 Foot Long High Pressure HoseCart and Wheels Built in Cart with 8”D x 2” Wheels
Features Standard Garden Hose Connector for Water SupplyThermal Overload Protection and Unloader Valve on Pressure Washer
Save this ManualYou will need the manual for the safety warnings and precautions, assembly in-structions, operating and maintenance procedures, parts list and diagram. Keep your invoice with this manual. Write the invoice number on the inside of the front cover. Keep the manual and invoice in a safe and dry place for future reference.
Safety Warnings and PrecautionsWArninG: When using tool, basic safety precautions should always be fol-lowed to reduce the risk of personal injury and damage to equipment. read and adhere to all warnings and safety precautions before use.
Read all instructions before using this tool!
1. carbon Monoxide Hazard. Operate pressure washer in well ventilated area only. Carbon Monoxide is created when engine is running and is a DEADLY gas when inhaled. Carbon Monoxide is a colorless, odorless gas. Early signs of Carbon Monoxide poisoning
resemble Flu symptoms such as headache, dizziness or nausea. If you notice these signs, turn off engine and immediately move to a well ventilated area.
2. Fire Hazard. Do not fill gas tank when engine is running or hot. Do not operate engine near spilled gasoline. Clean spilled gasoline before starting engine. Do not store or handle gasoline near pilot light, electrical equipment or open flame. Do not smoke near
gasoline. Gasoline fuel and fumes are flammable and potentially explosive. Use proper fuel handling procedures. Always have multiple ABC class fire extinguishers in the area when handling fuel.
reV 07c
SKU 95618 For technical questions please call 1-800-444-3353 Page 3
3. injection Hazard. The high pressure water jet produced by this tool can cut skin or cause injury to hands or eyes. Do not allow spray to strike you and do not spray toward people or animals. Do not spray the tool itself or any electrical source.
4. Burn Hazard. The engine and high pressure pump become hot during operation. Do not touch the engine or pump until they have cooled down after use.
Keep work area clean5. . Cluttered areas invite injuries.
Observe work area conditions6. . Do not use machines or power tools in unsafe locations. Don’t expose to rain. Keep work area well lit.
Keep children away7. . Children must never be allowed in the work area. Do not let them handle machines, tools, gasoline or oil.
Store idle equipment8. . When not in use, tools must be stored in a dry loca-tion to inhibit rust. Always lock up tools and keep out of reach of children.
use the right tool for the job9. . Do not attempt to force a small tool or attach-ment to do the work of a larger industrial tool. There are certain applications for which this tool was designed. It will do the job better and more safely at the rate for which it was intended. Do not modify this tool and do not use this tool for a purpose for which it was not intended.
dress properly10. . Do not wear loose clothing or jewelry as they can be caught in moving parts. Protective, electrically non-conductive clothes and non-skid footwear are recommended when working. Wear restrictive hair covering to contain long hair.
use eye and ear protection11. . Always wear ANSI approved impact safety goggles, heavy rubber boots, work gloves and hearing protection during use. During pressure washing debris can fly back in your face, or into other prop-erty, people or animals. Use extreme caution to prevent unintended spray injury.
do not overreach12. . Keep proper footing and balance at all times. Do not reach over or across running machines.
Maintain tools with care13. . Keep tools maintained and clean for better and safer performance. Follow instructions for lubricating and changing accesso-ries. Inspect tool hoses periodically and, if damaged, have them repaired by an qualified technician. The handles must be kept clean, dry, and free from oil and grease at all times.
turn OFF power14. . Turn OFF engine and water supply when not in use.

SKU 95618 For technical questions please call 1-800-444-3353 Page 4
remove adjusting keys and wrenches15. . Check that keys and adjusting wrenches are removed from the tool or machine work surface before turning engine on.
Avoid unintentional starting16. . Be sure the water supply is in the Off posi-tion when not in use. Do not carry the spray handle with your finger on the trigger, whether or not engine is operating.
Stay alert17. . Watch what you are doing, use common sense. Do not operate any tool when you are tired.
take caution as some woods contain preservatives such as copper 18. chromium arsenate (ccA) which can be toxic. When high pressure spraying extra care should be taken to avoid inhalation and minimize skin contact.
check for damaged parts19. . Before using any tool, any part that appears damaged should be carefully checked to determine that it will operate prop-erly and perform its intended function. Check for alignment and binding of moving parts; any broken parts or mounting fixtures; and any other condition that may affect proper operation. Any part that is damaged should be prop-erly repaired or replaced by a qualified technician. Do not use the tool if any switch does not turn On and Off properly.
Guard against electric shock20. . Prevent water spray into any electrical source such as a power outlet or extension cord.
replacement parts and accessories21. . When servicing, use only identical replacement parts. Use of any other parts will void the warranty. Only use accessories intended for use with this tool. Approved accessories are avail-able from Harbor Freight Tools.
Do not operate tool if under the influence of alcohol or drugs22. . Read warning labels on prescriptions to determine if your judgment or reflexes are impaired while taking drugs. If there is any doubt, do not operate the tool.
Maintenance23. . For your safety, service and maintenance should be per-formed regularly by a qualified technician.
use only cold Water and/or pressure washer detergent as the active 24. propellant in this tool. Do not use detergents not designed for pressure washers, caustic materials, solvents or any flammable materials in this machine. Use of any such material can cause injury, or damage this tool or personal property.
during use, do not allow the high pressure hose to come in contact 25. with any hot part of the engine or pump. Damage to the hose may occur possibly causing the hose to burst or leak under high pressure.
SKU 95618 For technical questions please call 1-800-444-3353 Page 5
in case of emergency during use, immediately release the trigger on 26. the spray handle, then turn the engine off. Do not set the spray handle down without turning off the engine. Then shut off gas supply to engine. (Re-fer to engine manufacturer’s manual for fuel shut off procedures.)
Avoid tipping over the pressure washer.27. Only use on a level solid and stable surface.
never leave the engine running for more than 3 minutes without spraying.28. Do not leave the pressure washer unattended while the engine is running.
use tools with both hands when required.29. This tool requires the use of two hands to maintain tool stability and keeps hands away from operating parts of the tool.
People with pacemakers should consult their physician(s) before use.30. Electromagnetic fields in close proximity to heart pacemaker could cause pacemaker interference or pacemaker failure. Caution is necessary when near engine’s magneto or recoil starter.
never touch the water jet.31. Never touch the water jet or point it at people or animals. Injury may result.
clean up fuel spills immediately.32. Dispose of fluids and cleaning materi-als in accordance with local, state or federal regulations. Store oily rags in a metal container. Store gasoline in a well ventilated, secure locker.
Do not smoke and do not allow fire flame or electrical ignition sources 33. near the pressure washer or any fuel or flammable materials.
Keep grounded electrically conductive tools and appliances away from 34. any source of flammable materials. Electrical items can cause ignition of flammable fumes and materials.
Do not refill the fuel tank on the pressure washer while the engine is 35. running or hot. Do not operate the pressure washer if there are any leaks in the fuel system.
use only the types and grades of fuel, oil and other lubricants recom-36. mended by the engine manufacturer.
WArninG:37. The brass components of this product contain lead, a chemical known to the State of California to cause birth defects or other reproductive harm. (California Health and Safety Code § 25249.5, et. seq.)
The warnings, cautions, and instructions discussed in this instruction manual 38. cannot cover all possible conditions and situations that may occur. It must be understood by the operator that common sense and caution are factors which cannot be built into this product, but must be supplied by the operator.
SKU 95618 For technical questions please call 1-800-444-3353 Page 6
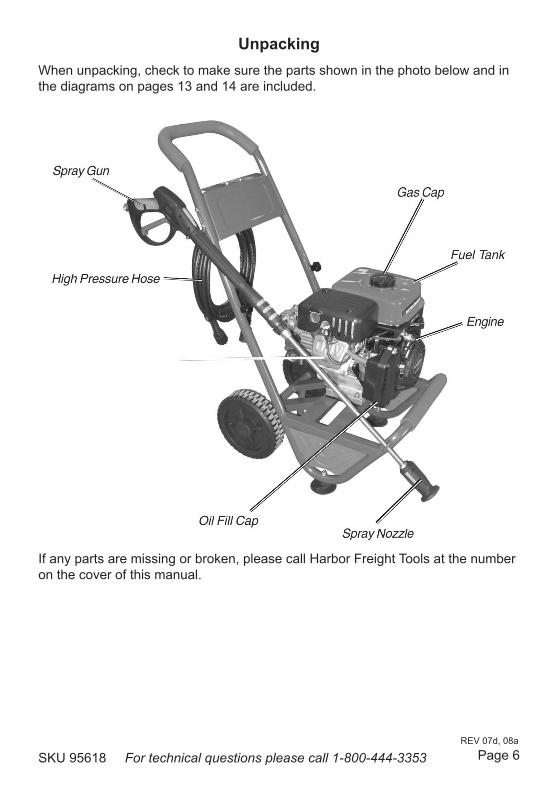
unpackingWhen unpacking, check to make sure the parts shown in the photo below and in the diagrams on pages 13 and 14 are included.
If any parts are missing or broken, please call Harbor Freight Tools at the number on the cover of this manual.
REV 07d, 08a

SKU 95618 For technical questions please call 1-800-444-3353 Page 7
checking Pump’s Oil level
The Oil pump is filled with 80 ml of SAE 75W/90 oil at the factory. Under 1. normal conditions there is no reason to add any oil or change the oil. It is however recommended that the customer verify the pump’s oil level before the initial use.
Remove the temporary white plastic Oil Plug by turning it counterclockwise. 2. Use a measuring device, like a thin wooden stick (not included), as a dipstick. Place the stick all the way in until it touches the bottom of the Pump’s Oil reservoir. See Figure A below.
Remove the stick and measure the amount of oil at the end of the stick. 3. There should be about one inch of oil covering the end of the stick as shown in Figure B. Add SAE 75W/90 oil if needed.
Do not put the same oil plug into the High Pressure Pump (24). There 4. is a yellow plastic oil plug (included) that has a small breather hole in it. That breather plug must be used whenever the Pressure Washer is used. The white plastic plug (without the breather hole) should be used when transporting only.
1 Inch
Figure BFigure A
High Pressure Pump (24)
REV 08a
measuring stick
SKU 95618 For technical questions please call 1-800-444-3353 Page 8
Assembly
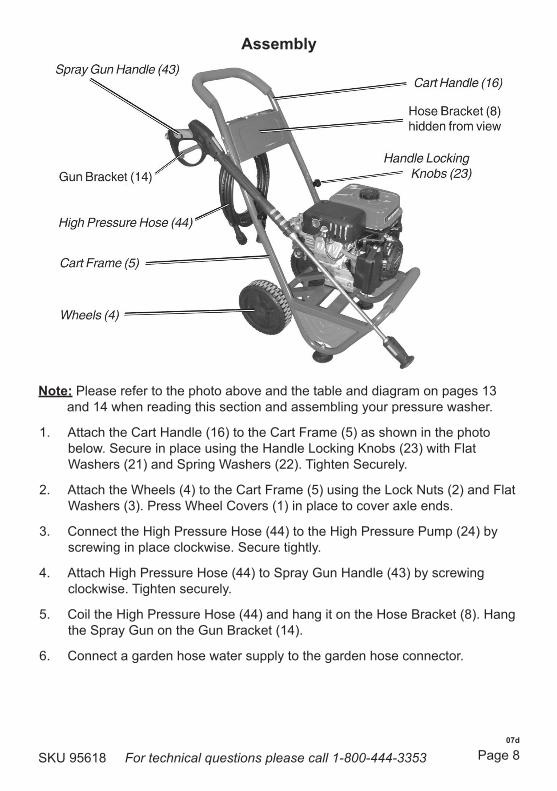
note: Please refer to the photo above and the table and diagram on pages 13 and 14 when reading this section and assembling your pressure washer.
1. Attach the Cart Handle (16) to the Cart Frame (5) as shown in the photo below. Secure in place using the Handle Locking Knobs (23) with Flat Washers (21) and Spring Washers (22). Tighten Securely.
2. Attach the Wheels (4) to the Cart Frame (5) using the Lock Nuts (2) and Flat Washers (3). Press Wheel Covers (1) in place to cover axle ends.
3. Connect the High Pressure Hose (44) to the High Pressure Pump (24) by screwing in place clockwise. Secure tightly.
4. Attach High Pressure Hose (44) to Spray Gun Handle (43) by screwing clockwise. Tighten securely.
5. Coil the High Pressure Hose (44) and hang it on the Hose Bracket (8). Hang the Spray Gun on the Gun Bracket (14).
6. Connect a garden hose water supply to the garden hose connector.
07d
SKU 95618 For technical questions please call 1-800-444-3353 Page 9
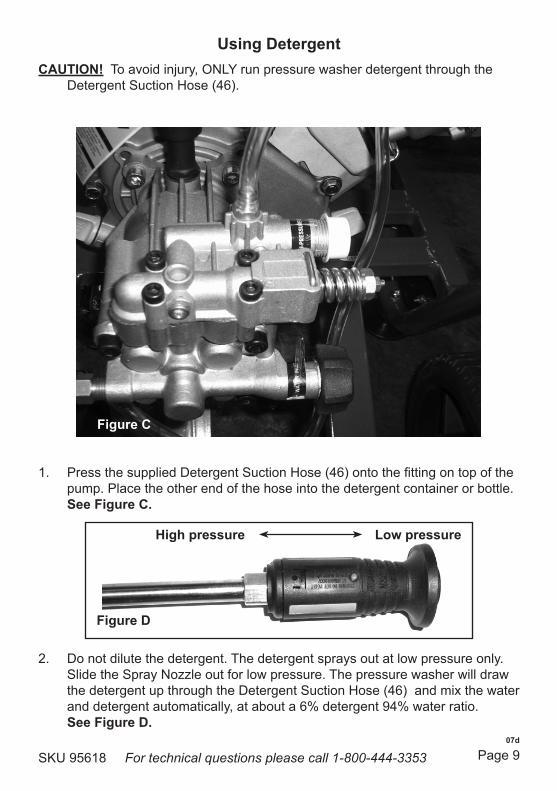
using detergentcAutiOn! To avoid injury, ONLY run pressure washer detergent through the
Detergent Suction Hose (46).
Figure A
1. Press the supplied Detergent Suction Hose (46) onto the fitting on top of the pump. Place the other end of the hose into the detergent container or bottle. See Figure c.
High pressure low pressure
Figure d
2. Do not dilute the detergent. The detergent sprays out at low pressure only. Slide the Spray Nozzle out for low pressure. The pressure washer will draw the detergent up through the Detergent Suction Hose (46) and mix the water and detergent automatically, at about a 6% detergent 94% water ratio. See Figure d.
07d
Figure c
SKU 95618 For technical questions please call 1-800-444-3353 Page 10
important Guidelines for Water Supply1. do not leave engine running without spraying water. If engine is left
running for more than three (3) minutes without discharging water, excess pressure can cause damage to the pump seals and / or high pressure hose.
2. the water supply provided through the garden hose must be at least 3 gallons per minute for this pressure washer to operate at maximum level. Use only a standard 3/4” diameter garden hose for water supply, smaller hoses may not provide enough water flow. Test your water supply before operation by measuring the time required to fill a gallon bucket.
3. Only use clean water supply. Dirty or recycled “grey” water may contain impurities which can damage the pump or seals. Never use corrosive or flammable fluids.
engine SetupRefer to the engine manufacturer’s manual for complete directions on proper engine setup, operation and maintenance.
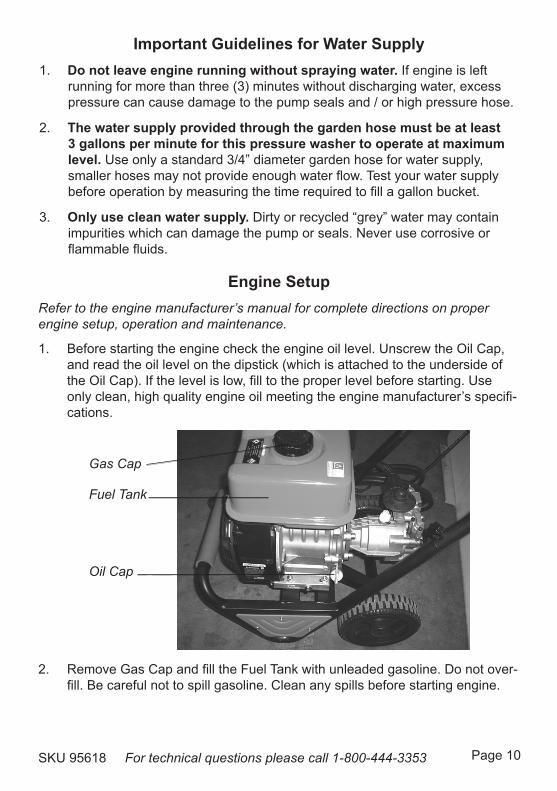
Before starting the engine check the engine oil level. Unscrew the Oil Cap, 1. and read the oil level on the dipstick (which is attached to the underside of the Oil Cap). If the level is low, fill to the proper level before starting. Use only clean, high quality engine oil meeting the engine manufacturer’s specifi-cations.
Gas Cap
Fuel Tank
Oil Cap
2. Remove Gas Cap and fill the Fuel Tank with unleaded gasoline. Do not over-fill. Be careful not to spill gasoline. Clean any spills before starting engine.
SKU 95618 For technical questions please call 1-800-444-3353 Page 11
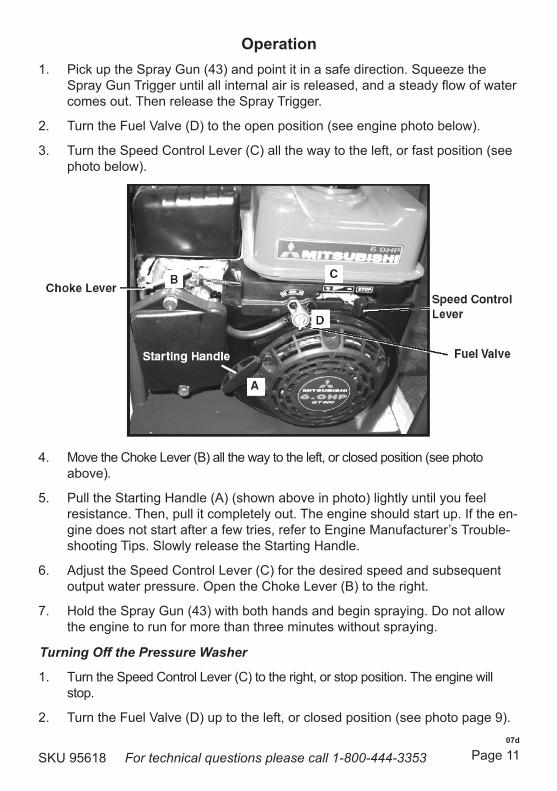
OperationPick up the Spray Gun (43) and point it in a safe direction. Squeeze the 1. Spray Gun Trigger until all internal air is released, and a steady flow of water comes out. Then release the Spray Trigger.
Turn the Fuel Valve (D) to the open position (see engine photo below).2.
Turn the Speed Control Lever (C) all the way to the left, or fast position (see 3. photo below).
4. Move the Choke Lever (B) all the way to the left, or closed position (see photo above).
Pull the Starting Handle (A) (shown above in photo) lightly until you feel 5. resistance. Then, pull it completely out. The engine should start up. If the en-gine does not start after a few tries, refer to Engine Manufacturer’s Trouble-shooting Tips. Slowly release the Starting Handle.
Adjust the Speed Control Lever (C) for the desired speed and subsequent 6. output water pressure. Open the Choke Lever (B) to the right.
Hold the Spray Gun (43) with both hands and begin spraying. Do not allow 7. the engine to run for more than three minutes without spraying.
Turning Off the Pressure Washer
Turn the Speed Control Lever (C) to the right, or stop position. The engine will 1. stop.
Turn the Fuel Valve (D) up to the left, or closed position (see photo page 9).2. 07d
SKU 95618 For technical questions please call 1-800-444-3353
Page 10
Page 12
Turn off the water supply faucet.3.
Point the nozzle in a safe direction, then press the Spray Gun Trigger Handle 4. to release water and pressure.
Disconnect the water supply hose from the Water Inlet Connector. (See 5. photo page 9).
cleaning recommendationsClean an inconspicuous test area first to avoid damaging the surface: Always begin with the fan spray at a distance of about 3-5 feet from the surface being cleaned to avoid damaging the surface of the object. Make sure that the test area is clear of people and water prone/delicate objects. If a pres-sure washing detergent is to be used, apply the detergent to this area as well. After cleaning this area, switch off the pressure washer and inspect the area carefully for any damage or discoloration. If any damage is noted from the pressure setting, use a lighter setting when cleaning the rest of the area. If damage or discoloration is noted from the detergent, do not use it when cleaning.First, pass over the area with a light cleaning, and then more thoroughly clean it.
For a vertical or sloped surface:Wash from the top down.a. If possible, direct the stream in the same direction as the slope towards b. a draining area. This will enable better drainage and therefore better cleaning.
For a flat surface:If a thin layer of water accumulates on the surface, periodically use the a. stream to direct this water towards the drainage.After the major cleaning is done, sweep the surface with the stream to b. help direct loose debris toward the drainage.
Hold the Spray Gun (43) at about a 45° angle and steadily sweep the stream back and forth. Do not point the spray directly at the surface to be cleaned. If a head-on angle is used, dirt may be embedded in the surface being cleaned. Follow a steady, consistent pace during cleaning; this will help prevent stripes or discoloration afterwards. If streaking or uneven cleaning is noted at the end of a project, go over the edges of the streaks with a wide fan pattern to help blend these lighter areas in. If several different surfaces are to be cleaned, be careful not to damage any of the less solid surfaces while trying to clean the harder ones. This is espe-
Operation (continued)
SKU 95618 For technical questions please call 1-800-444-3353 Page 13
cially a concern when cleaning tile and grout, bricks and mortar, or stones and mortar.If wood is being cleaned, be careful not to damage it. Wood will usually require resurfacing (sanding) and re-coat with a surface protectant (wood, stain, varnish) after it has dried again. Try to avoid leaving water on a wooden surface; doing so can harm the surface.
MaintenanceAfter each use, wipe down the entire unit with a clean cloth. Do not use solvents.1.
Store the pressure washer in a clean and dry location, away from anything 2. flammable.
If water is leaking from any connections during operation, shut down the 3. Pressure Washer and retighten all connections.
Maintain the engine regularly according to the maintenance instruc-4. tions provided in the engine’s manual.
Check the High Pressure Pump’s oil level whenever it is serviced. If needed, 5. add SAE 75W/90 oil (80ml when full). See page 7 for instructions.
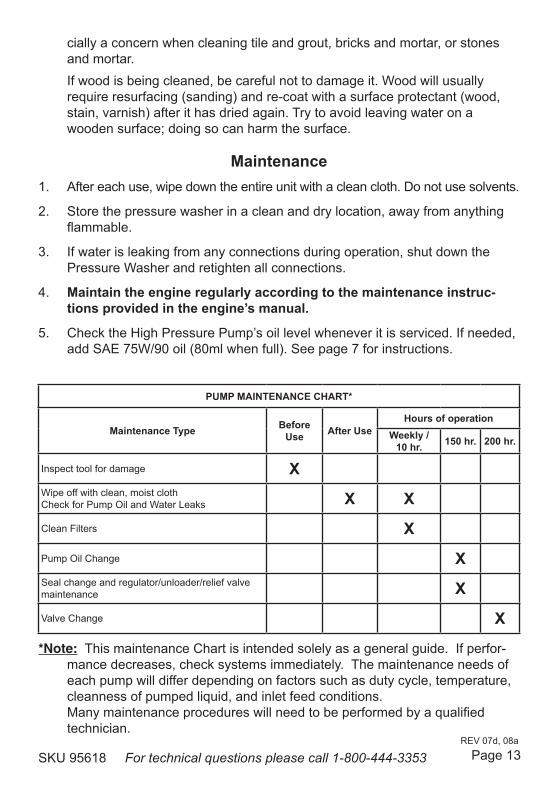
PuMP MAintenAnce cHArt*
Maintenance type Before use After use
Hours of operationWeekly /
10 hr. 150 hr. 200 hr.
Inspect tool for damage XWipe off with clean, moist clothCheck for Pump Oil and Water Leaks X X
Clean Filters X
Pump Oil Change XSeal change and regulator/unloader/relief valve maintenance X
Valve Change X
*Note: This maintenance Chart is intended solely as a general guide. If perfor-mance decreases, check systems immediately. The maintenance needs of each pump will differ depending on factors such as duty cycle, temperature, cleanness of pumped liquid, and inlet feed conditions. Many maintenance procedures will need to be performed by a qualified technician.
REV 07d, 08a

SKU 95618 For technical questions please call 1-800-444-3353 Page 14
troubleshootingSymptom Possible cause Solution
Engine will not start
Gas tank empty1. Low oil level2. Choke is not in correct position3. Engine throttle set too low4. Pressure build up in pump5.
Fill gas tank1. Add oil2. Close choke3. Increase throttle setting4. Squeeze trigger to release pressure5.
Does not produce high pressure
Diameter of water supply hose too 1. smallWater supply is restricted2. Not enough water supply3.
Replace garden hose with a ¾ inch hose1. Check water supply hose for kinks, leaks, 2. or blockageOpen water faucet all the way3.
Output pressure varies
Not enough water supply1. Water inlet screen is clogged2. Nozzle is clogged3. Nozzle has mineral build up4.
Check water supply hose for kinks, leaks, 1. or blockage. Open faucet all the wayRemove inlet screen and rinse out2. Remove nozzle and clean3. Remove nozzle and clean with vinegar4.
SKU 95618 For technical questions please call 1-800-444-3353 Page 14
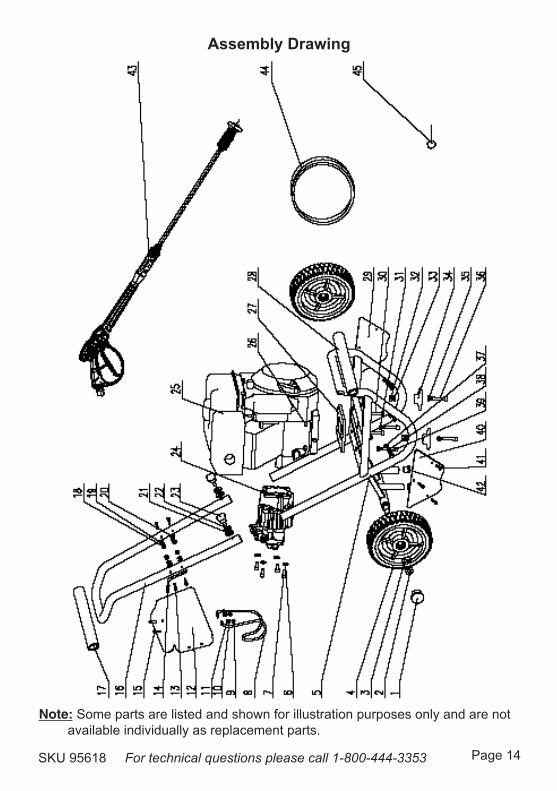
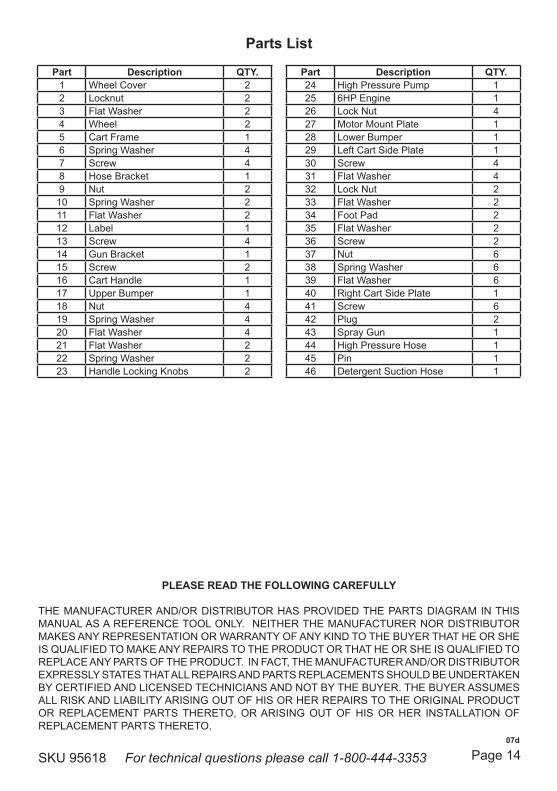
Note: Some parts are listed and shown for illustration purposes only and are not available individually as replacement parts.
Assembly drawing
SKU 95618 For technical questions please call 1-800-444-3353 Page 14
PleASe reAd tHe FOllOWinG cAreFullY
THE MANUFACTURER AND/OR DISTRIBUTOR HAS PROVIDED THE PARTS DIAGRAM IN THIS MANUAL AS A REFERENCE TOOL ONLY. NEITHER THE MANUFACTURER NOR DISTRIBUTOR MAKES ANY REPRESENTATION OR WARRANTY OF ANY KIND TO THE BUYER THAT HE OR SHE IS QUALIFIED TO MAKE ANY REPAIRS TO THE PRODUCT OR THAT HE OR SHE IS QUALIFIED TO REPLACE ANY PARTS OF THE PRODUCT. IN FACT, THE MANUFACTURER AND/OR DISTRIBUTOR EXPRESSLY STATES THAT ALL REPAIRS AND PARTS REPLACEMENTS SHOULD BE UNDERTAKEN BY CERTIFIED AND LICENSED TECHNICIANS AND NOT BY THE BUYER. THE BUYER ASSUMES ALL RISK AND LIABILITY ARISING OUT OF HIS OR HER REPAIRS TO THE ORIGINAL PRODUCT OR REPLACEMENT PARTS THERETO, OR ARISING OUT OF HIS OR HER INSTALLATION OF REPLACEMENT PARTS THERETO.
Part description QtY.1 Wheel Cover 22 Locknut 23 Flat Washer 24 Wheel 25 Cart Frame 16 Spring Washer 47 Screw 48 Hose Bracket 19 Nut 2
10 Spring Washer 211 Flat Washer 212 Label 113 Screw 414 Gun Bracket 115 Screw 216 Cart Handle 117 Upper Bumper 118 Nut 419 Spring Washer 420 Flat Washer 421 Flat Washer 222 Spring Washer 223 Handle Locking Knobs 2
Part description QtY.24 High Pressure Pump 125 6HP Engine 126 Lock Nut 427 Motor Mount Plate 128 Lower Bumper 129 Left Cart Side Plate 130 Screw 431 Flat Washer 432 Lock Nut 233 Flat Washer 234 Foot Pad 235 Flat Washer 236 Screw 237 Nut 638 Spring Washer 639 Flat Washer 640 Right Cart Side Plate 141 Screw 642 Plug 243 Spray Gun 144 High Pressure Hose 145 Pin 146 Detergent Suction Hose 1
Parts list
07d
SKU 95618 For technical questions please call 1-800-444-3353 Page 15
liMited 1 YeAr WArrAntYHarbor Freight Tools Co. makes every effort to assure that its products
meet high quality and durability standards, and warrants to the original purchaser that this product is free from defects in materials and workmanship for the period of one year from the date of purchase (90 days if used by a professional contrac-tor or if used as rental equipment). See engine manufacturer’s warranty which covers engine. This warranty does not apply to damage due directly or indirectly, to misuse, abuse, negligence or accidents, repairs or alterations outside our facilities, normal wear and tear, or to lack of maintenance. We shall in no event be liable for death, injuries to persons or property, or for incidental, contingent, spe-cial or consequential damages arising from the use of our product. Some states do not allow the exclusion or limitation of incidental or consequential damages, so the above limitation of exclusion may not apply to you. THIS WARRANTY IS EXPRESSLY IN LIEU OF ALL OTHER WARRANTIES, EXPRESS OR IMPLIED, INCLUDING THE WARRANTIES OF MERCHANTABILITY AND FITNESS.
To take advantage of this warranty, the product or part must be returned to us with transportation charges prepaid. Proof of purchase date and an explana-tion of the complaint must accompany the merchandise. If our inspection verifies the defect, we will either repair or replace the product at our election or we may elect to refund the purchase price if we cannot readily and quickly provide you with a replacement. We will return repaired products at our expense, but if we determine there is no defect, or that the defect resulted from causes not within the scope of our warranty, then you must bear the cost of returning the product.
This warranty gives you specific legal rights and you may also have other rights which vary from state to state.
3491 Mission Oaks Blvd. • PO Box 6009 • Camarillo, CA 93011 • (800) 444-3353