Embed Size (px)
Citation preview
7043-i
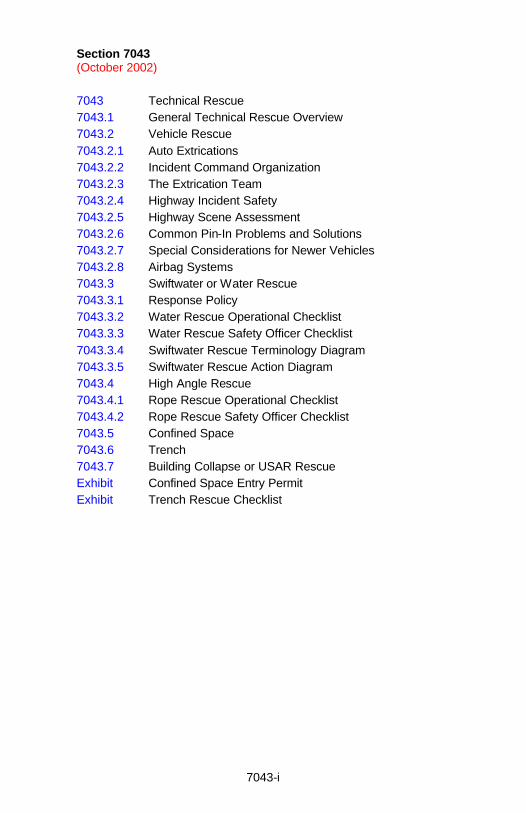
Section 7043 (October 2002) 7043 Technical Rescue 7043.1 General Technical Rescue Overview 7043.2 Vehicle Rescue 7043.2.1 Auto Extrications 7043.2.2 Incident Command Organization 7043.2.3 The Extrication Team 7043.2.4 Highway Incident Safety 7043.2.5 Highway Scene Assessment 7043.2.6 Common Pin-In Problems and Solutions 7043.2.7 Special Considerations for Newer Vehicles 7043.2.8 Airbag Systems 7043.3 Swiftwater or Water Rescue 7043.3.1 Response Policy 7043.3.2 Water Rescue Operational Checklist 7043.3.3 Water Rescue Safety Officer Checklist 7043.3.4 Swiftwater Rescue Terminology Diagram 7043.3.5 Swiftwater Rescue Action Diagram 7043.4 High Angle Rescue 7043.4.1 Rope Rescue Operational Checklist 7043.4.2 Rope Rescue Safety Officer Checklist 7043.5 Confined Space 7043.6 Trench 7043.7 Building Collapse or USAR Rescue Exhibit Confined Space Entry Permit Exhibit Trench Rescue Checklist
7043-1
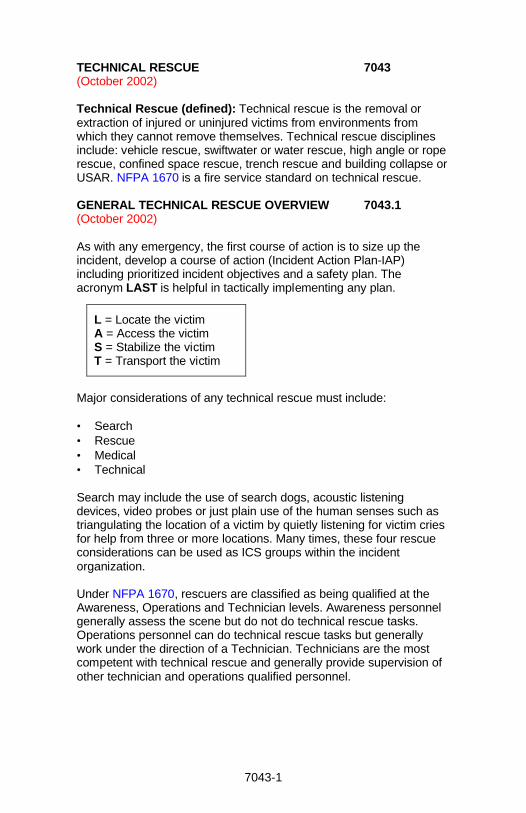
TECHNICAL RESCUE 7043 (October 2002) Technical Rescue (defined): Technical rescue is the removal or extraction of injured or uninjured victims from environments from which they cannot remove themselves. Technical rescue disciplines include: vehicle rescue, swiftwater or water rescue, high angle or rope rescue, confined space rescue, trench rescue and building collapse or USAR. NFPA 1670 is a fire service standard on technical rescue. GENERAL TECHNICAL RESCUE OVERVIEW 7043.1 (October 2002) As with any emergency, the first course of action is to size up the incident, develop a course of action (Incident Action Plan-IAP) including prioritized incident objectives and a safety plan. The acronym LAST is helpful in tactically implementing any plan.
Major considerations of any technical rescue must include: • Search • Rescue • Medical • Technical Search may include the use of search dogs, acoustic listening devices, video probes or just plain use of the human senses such as triangulating the location of a victim by quietly listening for victim cries for help from three or more locations. Many times, these four rescue considerations can be used as ICS groups within the incident organization. Under NFPA 1670 , rescuers are classified as being qualified at the Awareness, Operations and Technician levels. Awareness personnel generally assess the scene but do not do technical rescue tasks. Operations personnel can do technical rescue tasks but generally work under the direction of a Technician. Technicians are the most competent with technical rescue and generally provide supervision of other technician and operations qualified personnel.
L = Locate the victim A = Access the victim S = Stabilize the victim T = Transport the victim
7043-2
As an example, an awareness trained rescuer would arrive at the scene, determine that a technical rescue incident exists, barricade the scene to prevent additional entrapments, provide the ECC a situation and resource status update and order additional resources including rescue operations and technicians. When operations and technician trained personnel arrive, the incident commander might establish groups such as medical, search and rescue and configure crews to work within those groups.
NOTE: No responder should perform beyond his or her training and experience levels. This applies to every responder including technicians who might be inclined to take an unnecessary chance. The ICS Field Operations Guide provides resource information as to kind and type of rescue resources. Generally, a Rescue Crew is a team leader and five rescue technicians. A Rescue Company is a Rescue Crew plus a rescue vehicle of the same ICS type as the crew. No rescue operation should start without a thorough briefing of all participants. The briefing must include both operational and safety activities and precautions. The Incident Commander must ensure that rescue operational activities include due consideration to hazard identification and risk mitigation as is most practically possible. The briefing should be conducted at the command post or near the rescue site. VEHICLE RESCUE 7043.2 (October 2002) AUTO EXTRICATION 7043.2.1 (October 2002) INCIDENT COMMAND ORGANIZATION 7043.2.2 (October 2002) Almost every highway emergency requires coordination between law enforcement, fire and emergency medical services agencies. In rare circumstances highway emergencies will require the establishment of a full ICS system Command and General staff organization. Most highway incidents, however, will require an ICS structure involving minimal Finance, Logistics and Planning staff, and the focus will be on organizing a functional Operations Section working under the Incident Commander: Most jurisdictions have written pre-incident plans and procedures, interagency agreements and mass casualty protocols that outline highway incident management in their area. Get familiar with these issues as part of your local orientation training. Like other ICS incidents, the command and control organization on highway incidents expands or contracts as needed. Considerations in establishing highway incident command include:
7043-3
• A law enforcement representative is normally Incident Commander Ø I.C. may be fire or EMS until law enforcement arrives
• Some Law Enforcement agencies use SEMS (Standardized
Emergency Management System) Ø I.C. may therefore be called “Scene Manager”
• If I.C. is EMS or law enforcement, I.C. may not know/understand
rescue needs/times.
• The Operations Sections is typically branched or groups are assigned; Law, Medical, Fire/Rescue Ø Law Branch or LE Group: Investigation, Coroner, and Traffic
Control Ø Medical Branch or Medical Group: Triage, Treatment, and
Transport Ø Fire/Rescue Branch or Fire/Rescue Group: Fire, Extrication,
and HazMat
• Fire Officers should refrain from using title “I.C.” after arrival of law enforcement. Ø Doing so creates confusion on large incidents, and can have
legal implications during later litigation. Ø Best to use functional titles such as “Operations”, or
“Fire/Rescue Branch or Fire/Rescue Group”. THE EXTRICATION TEAM 7043.2.3 (October 2002) Definition: A group of rescue personnel, ideally consisting of at least ten persons, who physically perform the tasks necessary for the safe extraction of motorists trapped in vehicles following a traffic collision. Like any other ICS organization, some positions may be left unfilled, and tasks assigned those positions completed by other members of the team. This group does not specifically include EMS personnel, but must coordinate efforts with them. Team Leader • In early stages may be Operations Section Chief (OSC),
Fire/Rescue Branch Director or even I.C. You do not always need an OSC; in fact, only the most complex extrication issues will require the assignment of an OSC.
Safety Officer • Separate from IC/Team Leader as soon as possible • May serve as Personnel Accountability Officer

7043-4
Nozzle Person • Must be a separate person – single role • Should not also be the Safety Officer
Tool Operator • Generally the most experienced tool operator for live rescues • Allow opportunity for less experienced person to run tools on
body recoveries
Operator backup person • Immediate safety officer for tool operator and victim(s) • Watches victim and remainder of vehicle for reaction, while
operator focuses on tool
Tool/Personnel staging manager • Can be dual role for Team Leader or Safety Officer Team Assistants (recommend four persons) • Tool Set-up persons • Cribbing persons • Traffic control Good extrication requires teamwork. Like a hospital surgical team, no person is more important than another. Regardless of roles, EVERYONE on the team contributes to the team’s success! Major incidents may require establishment of multiple extrication teams. HIGHWAY INCIDENT SAFETY 7043.2.4 (October 2002) Safety priorities #1 - you and your crew! #2 - other rescuers! #3 - the community; good samaritans, passersby, neighbors, rubber-
neckers #4 - the victim(s) It is critical to keep priorities straight – don’t put #1 ahead of #4. Failure to maintain these priorities will jeopardize the entire operation. Use accountability/staging • First available person should establish staging • Rescuers must “check-in” upon arrival • Rescuers report to staging when not assigned • Stage in safe area clear of oncoming traffic • Use access control points (ACP) to control accountability
7043-5
Establish a tool staging area • A clear area • Sufficient distance from work to avoid tripping or falling over • Visible from work area • Keep tools on staging tarp when not in use Inform others of hazards • They may not recognize danger. • They may not have turnout gear. • EMS or others may need to back out until situation is stabilized. • Be firm but polite with warnings. • Don’t go to “fist city” on scene. • If they elect to ignore you, turn to higher authority for help. Protective clothing • If possible, wear full structural protective clothing: • Turnout pants and coat, helmet, eye protection, leather gloves,
respiratory protection • SCBA will be appropriate in flammable or toxic areas. • Dust masks appropriate when cutting metal, glass, plastics or
other vehicle components • Commanding officers may adapt to conditions: • Hot weather/heat illness potential • Confined interior work/inability to move, etc. Latex gloves alone should only be worn during initial patient assessment and at times when dexterity while in contact with patient is required. Examples include while checking pulses or starting IV’s. In general, NFPA approved leather structural firefighting gloves should provide sufficient barrier protection, but they can also be worn over latex. Potential for injury from glass, sharp metal, pinching or crushing should be weighed in determining appropriate gloves. HIGHWAY SCENE ASSESSMENT 7043.2.5 (October 2002) Hazardous materials, Downed power lines, Oncoming traffic and Possibility of fire should be assessed at every highway incident scene. List below are key points to address each situation. Hazardous materials • Look for placards • Consider vehicle type Ø Ryder or Uhaul = meth lab? Ø Walmart/UPS/Fedex = no placards, mixed loads Ø Farm trucks = home brew of chemicals
7043-6
• Look for spills: liquid, powder, solid, gas - isolate, identify, deny
entry! • Are people running away? Downed power lines • Do not approach until power confirmed off – dead and grounded!
Let utility move it. • Provide barriers to prevent contact Ø Flag hazard area
• Alert all incoming/on-scene units with radio broadcast Ø Include specific location of lines
• Use caution in working or parking around damaged lines or poles Ø Consider distance lines may whip if they fall
• Consider that fences may become energized Oncoming traffic • To protect rescuers traffic control must take priority over initial
patient assessment and care. Ø Protect personal safety before you approach and care for
victim safety. • Consider resource needs - request additional traffic control
assistance early Ø Barricades, signs, lighted boards
• Use road flares, signs, flag persons, etc. • Use your vehicle as a barrier Ø Park for a “bank shot” – at an angle Ø Pump panel away from oncoming traffic Ø Will make apparatus and emergency lights more visible Ø Vehicle will move less if struck in side Ø Struck from behind will lift and roll on front (unbraked) wheels Ø Bounce approaching vehicle away from your work area
Maintain the 50’ danger zone • Avoid parking anything within 50’ of accident • Provides adequate protection from oncoming traffic • Allows hose lines to be positioned away from vehicle • Protects rescuers from hose streams if must be used • Allows rescuers escape path under cover of water fog • Allows hose streams to be moved freely around vehicle to fight
fire • Protects emergency vehicles from sudden eruption of fire • Allows adequate room for personnel and tool staging • Allows clear running room in event of fire or secondary collision
7043-7
Pull protective hoselines • One 1-1/2" (minimum) houseline, charged and staffed • Large incidents may require multiple lines • Consider pulling hoselines when no "pin-in" • Position nozzle near edge of danger zone, not close to extrication
team • If fire erupts, protect rescuers with water fog, allow them to
escape • Consider having fire extinguishers ready – staged near nozzle Eliminate ignition sources • Consider disconnecting battery Ø Weigh fire hazard risk against power need Ø Avoid cutting battery cables! Ø May need to reconnect to move power seats, unlock doors,
or move vehicle • Use caution when placing power units and portable generators • Use caution when placing road flares • Do not spot apparatus in fuel spill area – park outside 50’ danger zone Stabilize involved vehicles • Assess for points of contact • Stabilize before making entry • Chock at least two wheels • Turn off ignition switch • Put vehicle in gear • Crib body, frame, or bumper - to ground • Use ropes, other devices as needed • Remember...cribbing may loosen as victims or vehicle parts are
removed!!! Provide for total scene safety • Establish inner work circle-minimum of 10’ around vehicle • Establish outer work circle – minimum of 50’ around vehicle COMMON PIN-IN PROBLEMS 7043.2.6 AND SUGGESTED SOLUTIONS (October 2002) 1) Jammed door 2) Trapped by seat and steering wheel 3) Trapped by seat and dashboard 4) Trapped by body panel
• Side, Top, Floorboard Or Other Area Crushed 5) Feet or legs trapped by pedals 6) Vehicle position prevents access 7) Victim is impaled 8) Window or windshield must be removed
7043-8
Stand back, take a deep breath, and attempt to handle these situations in the simplest way possible. Power tools should not be used until more simple solutions have been considered. Here are suggestions for handling pin-in situations starting with the simple solutions first: Jammed door • Unlock the door! • Access through another door • Access & operate/disable lock/latch • Access & cut latch pin/loop • Force latch with power tool • Access & cut/unbolt/force hinges • Skin & gut door Seat & steering wheel • Tilt wheel! • Slide seat backward – use manual/electric controls • Recline seat • Remove back of seat • Lift wheel - manually/light tools • Force seat backward • Remove seat • Cut wheel/column • Roll dashboard Seat & dashboard • Slide seat back – use manual/electric controls • Recline seat • Remove back of seat • Force seat backward • Remove seat • Roll dashboard Trapped by body panel • Cut/remove sheet metal/other parts • Take advantage of skeleton breaks or cut skeleton Ø Push/pull weak/cut areas
• Take advantage of skeleton strength Ø Use to anchor push/pull operations
Trapped by pedals • Manually move pedal • Remove shoe? • Use simple tools to pull (strap & lever?) • Use power tool to push/pull/cut Ø Because of limited space, tools can quickly injure victim(s) –
a second set of eyes is needed.
7043-9
• Lift column/dash • Cut/push floorboard • Roll dash
Vehicle position • Stabilize vehicle/other object • Develop access point, if possible Ø Doors, windows, roof, floor, trunk
• Raise/lower vehicle(s)/other object Ø May require special equipment
• Move vehicle(s)/other object Ø May require special equipment
Victim impaled • Must stabilize vehicle, object and victim • Cut/free object, leave in patient • Consider removing patient from object Ø If in extremity, or no life threat area of body
• If object cannot be moved/cut may present unique needs: Ø Special tools/unusual transport vehicle Ø On-scene surgical/technical assistance
Windows/windshields • Must protect rescuers/victims • Take control - minimize sudden breakage
roll down windows and break glass in door • Remove glass before prying, pushing, pulling, etc. Ø Use methods/tools that minimize fragments Ø Use methods/tools that minimize movement
• Use modern methods of windshield removal requiring no sawing or chopping of glass Ø Chopping or sawing unnecessarily exposes rescuers and
victims to fine glass bits SPECIAL CONSIDERATIONS 7043.2.7 FOR NEWER VEHICLES (October 2002) 1. Compression bumpers 2. Hood/tailgate pistons 3. Battery systems 4. Fuel systems 5. Suspension systems 6. Passive roll bars 7. New glass 8. Seatbelt pretensioners
7043-10
Compression Bumpers • Involved in fire can be explosive • May get compressed and held • May release suddenly in extrication • Use extreme caution around them • Release tensioned bumpers if needed • Consider chaining to avoid release Hood & Tailgate Pistons • Known to explode and launch ram substantial distance when
subjected to fire. • Avoid approaching vehicle from front or rear, especially during
fire. • Piston has potential to fail if damaged during collision. The Battery • Battery is commonly located in other than engine compartment of
vehicle Ø Front wheel wells Ø Trunk Ø Under back seat Ø Under floor of cargo deck in vans and SUVs
• Locate vehicle owners manual to assist in determining battery location
• Disable only after assessing power need - seats, windows, door locks, interior lighting.
• Do not cut battery cables! • Unhook negative cable first - then positive - then touch together. Fuel System Watch-0uts! • Modern fuel systems are pressurized • Lines may run through sill…watch cutting. • Electric fuel pumps may run freely if ignition switch is on Suspension Systems • Known as “air” or “active” suspensions • Air cushion common on buses • Fluid on upscale passenger cars • May drop suddenly during rescue • Crib, crib, crib Passive Roll Bar Systems • On new convertibles, deploy on roll-over, or upon airbag
activation • Most are deployed by hydraulic, spring or pyrotechnic devices • Generally triggered by loss of weight on wheels or tilting of
vehicle
7043-11
• Generally deploy upward from behind rear seat • Avoid laying over or cutting into such areas • May, or may not, deactivate if battery disconnected Theft Deterrent Side and Rear Glass • Primarily BMW, but available as option or aftermarket on other
vehicles. • New 7-layer glass cannot be broken by normal means. Ø May impede access to patients.
• Not necessary to remove before doing rescue work. Seatbelt Pretensioners • Activate in collision to tighten seat belts and lock down front
and/or rear seat occupants • Keeps proper airbag distance, and/or keeps occupant’s head in
vehicle • Generally activate with front airbags • May be attached to either buckle or spool end of seat belt system • Some use pyrotechnic device, some are mechanical • Can deploy after accident • Can cause fire • Can injure occupants or rescuers if deployed accidentally during
rescue • Be certain to unbelt vehicle occupants as soon as practical • Avoid cutting into hidden seat belt components AIRBAG SYSTEMS 7043.2.8 (October 2002) Special information about supplemental restraint (SRSS) Late model passenger vehicles are equipped with a growing number of unique supplemental restraint (SRS) airbag systems. Although the majority of SRS airbag systems now use yellow or orange wiring and unique wiring connectors, there is no standardization, and a mixture of pyrotechnic (typically sodium azide), mechanical, and pressurized gas cylinder powered systems are common. SRS airbag systems have been known to injure rescuers when deployed accidentally in the course of a rescue. Inadvertently cutting into or applying pressure to the SRS control module can deploy all airbags in the vehicle at once. Even with the vehicle battery disconnected some electrically operated airbag systems may still deploy for up to 30 minutes, other systems within the vehicle, such as lithium batteries in a car stereo memory system, for example, may also contain sufficient energy to deploy airbags if wires are shorted or crossed with airbag system components. Some airbags systems are mechanical, and require no electricity at all to activate. Airbags may also deploy suddenly as a result of fire, friction, static electricity or rescue operations.
7043-12
Common SRS airbag and airbag system component locations • Steering wheels and columns • Dashboards • Outboard edges of front or rear seat backs • Interior door panels • Under seats and in consoles – main SRS control modules • Lower middle and back corner of doors • Above base of “a” & “b” pillars Rescuer and victim protection • Disconnect battery cables Ø Don’t cut Ø Touch positive and negative cable ends together.
• Avoid sodium azide residue Ø Utilize dust masks and eye protection as necessary Ø Wash powder residue from skin at earliest convenience
• Avoid physical activation Ø Be cautious of cutting or forcing areas that often contain
airbag components. Ø Remove interior covering from all pillars and roof edges and
look for SRS components before cutting. • Coordinate extrication with EMS personnel! Ø Don’t cut, push, or pull anywhere on vehicle until rescuers
are out of vehicle! • Create working space around victim: Ø Tilt steering wheel up Ø Move seat backward Ø Recline seat
• Ensure rescuers maintain a safe distance from any potential hidden airbag location Ø Stay 10” away from any undeployed steering wheel, door or
seat mounted airbag! Ø Stay 18” away from any undeployed dash or pillar mounted
airbag! • Always expect sudden airbag deployment Note: Remember… keep #1 ahead of #4 at all times!!! Reference: (CDF HB 4330.1 - HB 4330.5) SWIFTWATER OR WATER RESCUE 7043.3 (PROPOSED CDF HB 7700 SUPPLEMENT) (October 2002) The department, by virtue of its “First Response Role” within California, and through various state and local fire protection cooperative agreements, the California Emergency Services Act, and the California Master Mutual Aid Agreement, often becomes involved in both flood and water rescue operations. The request for CDF personnel and equipment can range from a single resource, or only a
7043-13
few resources, responding to a life and health emergency, all the way to the commitment of one or more of CDF’s Incident Command Teams being tasked to provide the command and control structure for a widespread flooding event. RESPONSE POLICY 7043.3.1 (October 2002) Within State Responsibility Areas (SRA) when resources are available, in areas protected by CDF under cooperative agreements with local government, or for an incident where the request comes from another local or state agency, CDF employees will respond to requests for assistance in flood and water rescue incidents. To that end, and to ensure that employees are properly trained and equipped, CDF has developed certain levels of flood fighting and water rescue training and equipment standards. All responding personnel will adhere to these standards. Water safety equipment will be available on responding apparatus. Wherever possible, CDF will adopt state operational training and equipment standards for flood fighting and water rescue response. CDF personnel may face two types of water environments. They are: (1) responses to flood related events and (2) water rescues.
Water rescues present themselves in three basic forms, which include static rescues in still water conditions, dynamic rescues in swift or moving water and blue water incidents in ocean waters. Most water rescues will be short-lived, lasting less than 12 hours. Water rescues may involve numerous resources from many agencies. Dynamic water rescues can cross many jurisdictional boundaries. Responses to water rescues will generally be with first alarm resources from the immediate area and will typically be coordinated by the local law enforcement jurisdiction. Helicopter responses must be requested and coordinated with the local county sheriff’s office or Emergency Operations Center (EOC). In some cases, water rescues may result because of a flood event. All of the above may apply with the addition of a more complex command and control structure. Widespread flooding usually will involve local, state and federal agencies. In almost every situation CDF personnel will be assisting another agency. While CDF resources may include an Incident Command Team, the team will be working at the direction of the agency (or agencies) having jurisdictional authority. It is important for CDF personnel to determine the agency (or agencies) having jurisdiction, what type of command structure is in effect and what is expected from department resources and personnel. All department policies and practices still govern CDF employees on these types of incidents.

7043-14
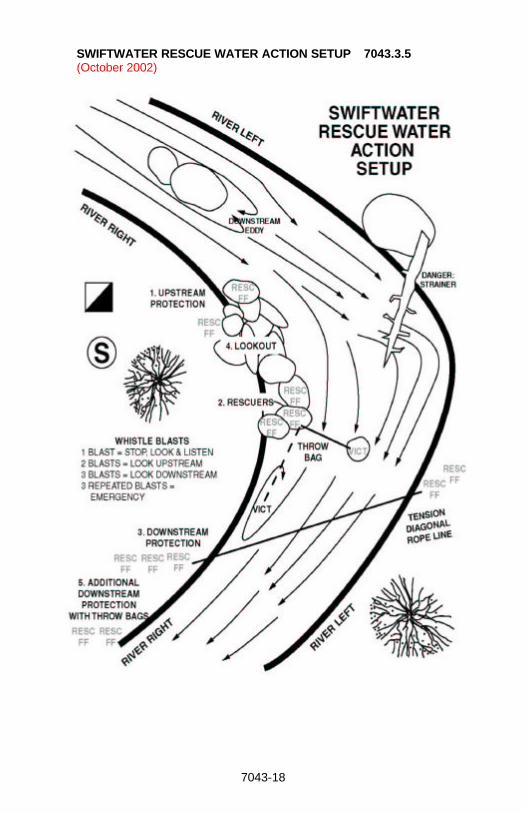
At all dynamic water rescues, assign an upstream protection observer who watches for floating debris that might impact the victim and/or the rescuers. Also, assign downstream protection rescuers with throw bags to intercept the victim and/or rescuers who might be dislodged and float downstream. Consider more than one point of downstream protection. One method of water rescue includes throwing a rope or throw bag to the victim. Another involves stretching a rope across the water at an angle, having the victim grab the rope upon contact and slide to the shore along the tensioned diagonal line. If the victim should become trapped in the “V” apex of a rope, instruct the victim to hold the rope while rescuers release one side of the tensioned diagonal line allowing the victim to pendulum to the shore. Other techniques include using floating fire hose or rescue boats including boards, kayaks, spider boats and personal watercraft to access the victim. WATER RESCUE OPERATIONAL CHECKLIST 7043.3.2 (October 2002) • Primary Assessment-Establish Command
q Secure witness or RP q Determine location, number and conditions of victim(s) q Estimate intercept points at bridges, crossings, etc. q Send water rescue resources to intercept points q Determine rescue-recovery needs q Implement Single-Unified Command q Develop incident action plan (IAP) with prioritized incident
objectives q Develop Incident organization (branches, divisions, groups,
teams) q Determine and report current and projected situation and
resource status (report on conditions) q Establish incident command post (ICP) q Order needed additional equipment q Implement Command Staff (information, liaison and safety
officers) q Evaluate IAP accomplishment (progress, duration/time,
day/night, weather, water releases) q Have backup plan q Implement EMS (triage, treatment, transport)
Rescue Operations (Technical) • Primary safety considerations Ø Protect self Ø Protect team Ø Protect victim and/or civilians
7043-15
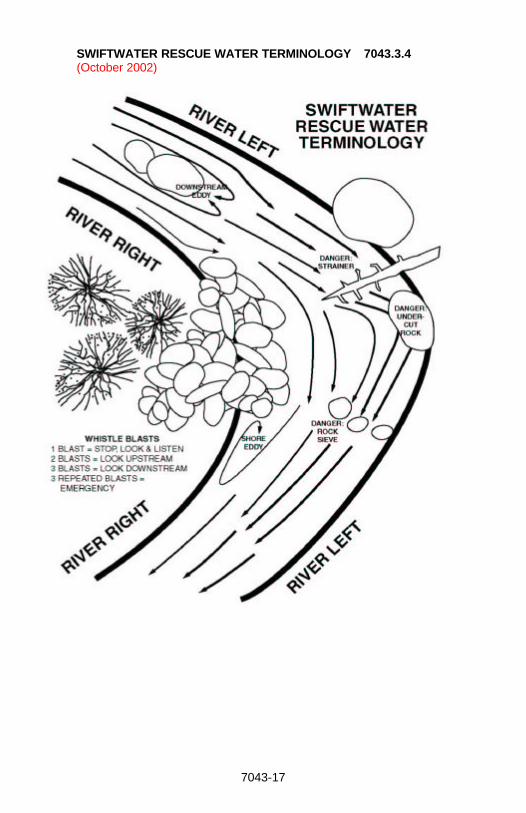
• Moving water descriptions Ø River Right-Right side of water when looking downstream Ø River Left-Left side of water when looking downstream Ø Strainer-Obstruction in water such as submerged or partially
submerged tree that allows water to pass but will entrap a victim
Ø Hole, hydraulic, keeper-Location where water flows into that can entrap a victim
• Water safety whistle commands Ø One whistle blast: Stop all activities, look and listen Ø Two whistle blasts: Look upstream Ø Three whistle blasts: Look downstream Ø Three repeated whistle blasts: EMERGENCY
• Hand signals Ø Hand held on head: rescuer okay Ø Hand held aloft: rescuer needs help Ø Arm pointed in one direction: check that direction for need
• Enable safest water rescue method (based on risk) Ø Talk victim to safety-low risk Ø Reach to victim-low risk (pike pole, stick) Ø Throw to victim-low risk (throw bag, life ring on rope) Ø Row to victim-moderate risk (boat, board) Ø Go to victim-high risk (wet contact rescue) Ø Copter to victim-moderate to high risk (short haul, could be
best & safest choice) • Use of ropes Ø Use throw bags to secure victim, hold rope and allow victim
to pendulum to shore Ø Do not stretch ropes straight across channels. Ø If rope is stretched across channel: § Place rope at approximate 45° angle to allow victim to
slide rope to shore. § If victim will not slide rope, instruct victim to hold on to
rope and rescuers release one side of rope to allow victim to pendulum to shore
Ø Rope is only attached to rescuers who are trained and are wearing approved contact type rescue PFDs that have releasing mechanisms
• Evacuation method • Copter operations • Victim removal equipment • Transfer to ALS Termination Of Incident • Ensure personnel accountability • Ensure equipment removal and accountability • Enact CISD, if needed
7043-16
WATER RESCUE SAFETY OFFICER 7043.3.3 CHECKLIST (October 2002) q Consider safety priorities (1-self, 2-team, 3-civilians) q Establish safety officer q Affect scene control q Make general area safe q Establish upstream protection-lookouts at each intercept point q Establish downstream protection-lookouts and rescuers at each
intercept point q Use least risky type of rescue method q Do not allow structural turnouts within 10’ of water q Require wearing of full PPE (PFD & helmet within 10’ of water) q Wear suit for cold water incidents q No ropes tied around rescuers in water q Avoid wet, contact rescues, if possible q Work in teams of two rescuers q Decontaminate swimmers, if necessary q Conduct CISD, if necessary q Periodically check with incident commander q Provide for personnel rehab
7043-17
SWIFTWATER RESCUE WATER TERMINOLOGY 7043.3.4 (October 2002)
7043-18
SWIFTWATER RESCUE WATER ACTION SETUP 7043.3.5 (October 2002)
7043-19
HIGH ANGLE RESCUE 7043.4 (October 2002) Rope rescues may occur in urban or wilderness settings. High angle rope rescue is generally defined as being steeper than a person can walk on the slope. Low angle rope rescue is a slope that allows a rescuer to walk without the aid of a rope. ROPE RESCUE OPERATIONAL 7043.4.1 CHECKLIST (October 2002) • Primary Assessment-Establish Command
q Secure witness or RP for information q Determine location, number and conditions of victim(s) q Determine rescue-recovery needs q Implement Single-Unified Command q Develop incident action plan (IAP) q Develop incident organization (branches, divisions, groups,
teams) q Determine and report current and projected situation and
resource status (report on conditions) q Establish incident command post (ICP) q Order needed additional equipment q Implement Command Staff (information, liaison and safety
officers) q Evaluate IAP accomplishment (progress, duration/time,
day/night, weather) • Secondary Assessment
q Evaluate type of environment q Evaluate hazards and risks to rescuers q Reassess need for additional personnel and equipment q Affect scene control
• Rescue Operations q Make general area safe (traffic/crowd control, hazards
identified/mitigated) q Make specific rescue area safe q Use safe insertion method for rescuers q Use safe evacuation method for rescuers and victims
(choose the best and safest route) q Ensure total use of PPE q Transfer victim to ALS
• Termination Of Incident q Ensure personnel accountability q Ensure equipment removal and accountability q Enact CISD, if needed
7043-20
ROPE RESCUE SAFETY OFFICER 7043.4.2 CHECKLIST (October 2002) q Maintain record of incident (ICS Form 214, Unit Log) q Get briefing from incident commander q Assess safety hazards and risks q Brief personnel on safety hazards and risks particularly special
circumstances. q Mitigate safety hazards § Control edge § PPE § Control traffic § Check rigging § Provide lighting
q Stop unsafe actions q Periodically check with incident commander CONFINED SPACE RESCUE 7043.5 (October 2002) Confined Space definition: • Is large enough for an employee to bodily enter and perform
work; and • Has limited or restricted means of entry or exit; and • Is not designed for continuous human occupancy;
A permit-required confined space is defined as a confined space that has one or more of the following:
• Contains, or has a known potential to contain, a hazardous
atmosphere; • Contains material with the potential for engulfment; • Has an internal configuration such that an entrant could be
trapped or asphyxiated by inwardly converging walls, or a floor which slopes and tapers to a smaller cross-section; or
• Contains any other recognized serious safety or health hazard. Rescuers must complete an entry permit prior to making entry into a permit required confined space (29 CFR 1910 et al). Examples of confined spaces include but are not limited to: Storage tanks Underground vaults Open topped water tanks Pump wet wells Boilers Water towers Degreasers Silos Enclosures w/bottom access Sewers Vessels Railcar tanks Person holes Grain elevators Tunnels Mixers
7043-21
Major confined space considerations include: • Conduct an ASSESSMENT or SIZE-UP • Develop a PLAN, ORGANIZATION and STAFFING and DIRECT,
CONTROL and EVALUATE the plan. • Ensure proper EQUIPMENT is present • Ensure rescuers are TRAINED • Ensure rescuer and victim SAFETY •• Provide for general area safety •• Establish a SAFETY OFFICER •• Ensure use of PERSONAL PROTECTIVE EQUIPMENT (PPE) •• Affect Lockout, Tagout and Blockout energy sources • Provide AIR MONITORING and VENTILATION • Select and direct ENTRY GROUP SUPERVISOR, ENTRANT,
ATTENDANT and BACKUPS, AIR MONITOR • Provide COMMUNICATIONS and LIGHTING • Provide SUPPLIED AIR • Provide RETRIEVAL SYSTEM • REMOVE VICTIM • TRANSFER victim to TREATMENT • CLOSE OUT INCIDENT TRENCH RESCUE 7043.6 (October 2002) Trench rescue is very dynamically dangerous. It is essential that all rescuers clearly understand the IAP and follow all established safety precautions. Trench rescues occur when a volume of earth or materials collapses onto a victim. Often, the rescues occur at construction sites where earth is being removed and non-stabilized earth shifts to an open void. Trench collapses are more common in sandy or muddy soil sites and where the soil is not virgin in position. If a trench is dug adjacent to soil that has been previously disturbed and the trench removes sufficient natural shoring material, a collapse may occur. OSHA regulations generally require that trenches deeper than five (5) feet be shored while any construction is occurring. Federal OSHA requires any trench greater than 20’ deep have an engineer designed stabilization system. Trench accidents occur where some or all of the following conditions are present: • Intersecting trenches • Little room for spoil material storage • Disturbed soil • Ground vibrations created by equipment
7043-22
• Water seepage into ditches • Drying of trench walls leading to collapse • Tilting layers of soil During trench rescue operations, it is critical that activities are closely planned and executed with adequate shoring to protect the victim and rescuers, that dirt spoil piles not be immediately adjacent to nor impact the trench operations, that the area around the trench be covered with plywood to protect from edge collapses and that confined space requirements be properly followed. Major trench rescue considerations include: • Conduct an ASSESSMENT or SIZE-UP including obtaining
information from witnesses as to victim location, time of accident, approximate depth of material covering victim and last contact with victim.
• Develop a PLAN, ORGANIZATION and STAFFING and DIRECT, CONTROL and EVALUATE the plan.
• Ensure proper EQUIPMENT is present • Ensure rescuers are TRAINED • Ensure support operations are ready Ø Staging Ø Supply Ø Crowd control Ø Family support
• Establish a SAFETY OFFICER Ø Immediately SECURE SCENE SAFETY & BARRICADE
SCENE Ø Ensure rescuer and victim SAFETY Ø Ensure use of PERSONAL PROTECTIVE EQUIPMENT
(PPE) Ø Affect Lockout, Tagout and Blockout energy sources Ø Ensure NO HEAVY EQUIPMENT VIBRATIONS (Keep
apparatus and heavy equipment back at least 100’) • Operations Ø Designate equipment cache and shoring area including
cutting area Ø Provide AIR MONITORING and VENTILATION Ø Select and direct ENTRY GROUP SUPERVISOR,
ENTRANT, ATTENDANT and BACKUPS, AIR MONITOR Ø Provide COMMUNICATIONS and LIGHTING Ø Provide SUPPLIED AIR Ø Provide RETRIEVAL SYSTEM Ø Implement SHORING SYSTEM Ø LOCATE VICTIM Ø ACCESS VICTIM Ø STABILIZE VICTIM including victim position
7043-23
Ø PACKAGE VICTIM Ø REMOVE VICTIM
• TRANSFER victim to TREATMENT Ø CLOSE OUT INCIDENT
BUILDING COLLAPSE OR USAR RESCUE 7043.7 (October 2002) Buildings collapse for many reasons and heavy materials fall on victims for many reasons. Types of building collapses include lean-to-floor collapses, pancake floor collapses and V floor collapses. Often each of these types of collapses will include void areas where victims may be trapped in voids in addition to under fallen building components. As with all other types of emergencies, the first order is to do an assessment including the collapse environment and an estimate of number of victims, develop an IAP and incident organization, staff the organization, direct the workers, control the activities in line with the IAP and constantly re-evaluate the IAP for applicability. Victims will generally be found as follows: injured–not trapped (50%), non–structural entrapment (30%), void space and non–structural entrapment (15%) and entombed (5%). The priority order of accessing victims is: (1) immediately talk those victims to safety that can safely move away from the collapse area, (2) locate victims in voids and use tunneling and shoring techniques to reach and remove them, (3) remove those victims that are possible by removing selected surface debris and (4) reach victims by removing general debris. Building collapse incidents are very labor intensive and require considerable numbers of rescuers. USAR Type 1 rescue teams include 63 personnel assigned to the four major areas of search, rescue, medical and technical. Depending on the search medium used, search teams will typically work in teams of two. Rescue teams should be organized with one team leader for every five technical rescuers. Hand crews may be needed to provide logistical support to rescue teams. Medical teams should include a mixture of paramedics and emergency medical technicians. A medical doctor should be present to regularly evaluate workers for critical incident stress syndrome, which will occur when rescuers are exposed to numerous fatalities and seriously injured. Technical experts include building engineers, hazardous materials technical specialists, heavy equipment riggers, etc.
7043-24
Equipment needed at building collapses will be varied and extensive and range from hand tools to very heavy mechanized cranes and loaders. Equipment staging and advanced tool areas should be established in the rescue zone. A. USAR Primary Assessment–Establish Command & IAP
• Secure witness or RP information • Secure briefing from first responders-rescuers • Determine approximate location, number, and condition of
victim(s) • Determine and report current and projected situation status
(Report on conditions) • Determine rescue–recovery resource needs • Implement Single–Unified Command • Develop Incident Action Plan (IAP) with prioritized incident
objectives • Develop organization (branches, divisions, groups, task
forces, teams) • Implement staging area(s) • Establish Incident Command Post (ICP) • Implement Command Staff (information, liaison and safety
officers) • Implement tactical plan • Consider LAST (Locate, Assess, Stabilize & Transport victim) • Consider length of & implement operational period • Frequently refer to FEMA USAR Field Operations Guide • Evaluate IAP accomplishment (progress, duration/time,
day/night, weather, water releases) B. Secondary Re-Assessment
• Rescue environment • Overall structure stability & rescuer safety • Need for additional personnel & USAR Task Force
C. Safety Considerations
• Evaluate hazards to rescuers • Is further collapse possible? • Ensure all personnel are wearing proper PPE • Implement scene control (traffic/crowd control, hazards
identified) • Make rescue area as safe as possible • Secure utilities (gas, electric and water) • Create safety zones • Establish perimeter control lines and work areas • Establish restricted air space over incident (FAR 91.135 or
91.137) • Clear area of personnel not directly involved in rescue
7043-25
• Implement RIT (Rapid Intervention Team) • Establish Access Control Point(s) • Establish accountability system • Determine presence & control hazard; gases, chemicals,
sewage, etc. • Provide for atmospheric monitoring • No smoking on site • Use technical specialists (engineering, building engineers,
etc.) D. Rescue Operations
• Implement communications plan • Command net • Tactical net(s) • Type of building collapse • V – collapse • Lean-To collapse • Unsupported lean-to collapse • Cantilever • Pancake collapse • Structure size • Number of stories • Size/Length, width, height • Ensure adequate structural stability • Technical specialist • Shoring techniques • Braces & secondary safety systems • Conduct SEARCH • Secure building floor plan and/or pre-plan • Develop search plan • Identify victim location(s) • Document victim locations • Mark areas searched • Initiate RESCUE • Building recon (victim hailing system) • Instruct walking wounded to move away from building • Immediate rescue of surface victims • Rescue of victims from void spaces • Rescue of victims via selected debris removal • Rescue of victims via general debris removal • Initiate MEDICAL (Medical Group Supervisor) • Initiate Triage (Triage Leader) • Initiate Treatment (Transportation Leader) • Initiate patient Transport (Patient Transportation Leader) • Initiate morgue area • Initiate TECHNICAL (Technical Specialist)
7043-26
• Building (engineer) Technical Specialist • HazMat Technical Specialist • Determine extrication method • Determine rescuer insertion technique • Enable EMS (triage, treatment and transport) • Consider need for & implement copter operations • Control spread of fire • Establish sufficient lighting • Establish sufficient ventilation • Coordinate activity when there is more than one operation • Avoid unnecessary movement of loose debris • Do not remove natural shoring & support such as doors &
beams which are fallen or support debris • Do not cut timbers which support debris • Work around heavy obstructions when possible instead of
cutting through them • When working around a victim, remove debris by hand to
avoid further injury • Keep victim count, identity & location found information • Victim removal equipment • Transfer to Advanced Life Support (ALS)
E. Termination Of Operations
• Ensure rescuer accountability • Provide for equipment removal & accountability • Clean up debris associated with rescue operations • Affect Critical Incident Stress Disorder Debriefing (CISD) • Conduct post-incident analysis • Prepare post incident analysis report
F. USAR Safety Considerations Checklist
q Review exposure of rescue personnel to dangerous risks and hazards.
q Review logistical and operational activities to ensure associated risks are identified and addressed.
• Safety issues are highlighted during operational briefing including.
• Rescue site signaling and escape routes. • Additional safety officers (assistant safety officers) are
implemented. • Command position identifiers are used.
q Rescue site collapse/hazard and operational work risk assessments are conducted.
q Safety considerations are a part of every work plan. q All work is monitored for safe work actions. q Hazards are clearly and properly marked. q Radio communications are constantly monitored.
7043-27
q Personnel accountability is constantly maintained. q Personnel are monitored for stress and fatigue. q Personnel are rotated to a personnel rehab area. q Personnel attend to personal hygiene requirements. q Injury/accident investigations and reports are completed. q Post-Incident
• Personnel identify and document critical issues. • Information is consolidated as soon as possible after the
incident. • Operational procedures. • Equipment requirements. • Training and field exercises. • CISD is implemented, if needed. • LCES is implemented.
(see next section) (see HB Table of Contents) (see Forms or Forms Samples)