Embed Size (px)
Citation preview
TEACHERSEDITION
24 pt
20 pt
22
I have spent my entire life sharing my passion for guitar with others; both as a musician and instructor. For more than 30 years the Rock House Method has been proven to work. I have personally taught thousands of students one-on-one, authored more than 40 books and DVDs and produced over 100 instructional products coaching guitar greats to teach in their own instructional programs. Now for the first time ever, I am sharing all of my knowledge of how I get results for the people who trust and rely on me to deliver a successful learning experience. If you follow my method, I truly believe that your students will enjoy the same level of success that mine have. Your business will become more profitable and your students will attain their dream of playing guitar. I have designed and carefully designed this curriculum to help you effectively utilize my learning system, a modern method based on today’s guitar player’s needs. Whether you are a seasoned instructor like me or someone who is just thinking about starting an instructional business, you will be able to effectively teach each lesson to your students. Below are the sections that will correspond with each lesson.
Lesson Quick Tips – These are great to review before each lesson to insure the important topics are covered in the lesson. There are many new and creative ideas on ways to present each lesson.
Teacher Notes – Features full descriptions of how to present each lesson. If you are new to teaching, it will give you a blueprint to effectively teach each lesson. For experienced teachers, this is a good review to help spark new ideas.
Teacher Play Along – One of the most effective ways to help students learn is to play along with them. I have included examples that will allow you to easily interact with each student. This interaction also benefits the student by preparing them to play with other musicians.
Music Assignment – The Rock House Method is based upon a system of applied learning. These assignments will give your student the opportunity to apply what you have taught them in a musical manner.
As a teacher you have the gift of showing people how to be creative and speak the language of music. Be mindful you are running a business, so it is important for the continued success of that business that your students reach their goals. The following pages contain helpful information that will assist you in creating a positive educational experience for your students. You will learn more about teacher etiquette, how to set up a great teaching environment, interacting with parents and tips on how to build a student base. I am honored to share the Rock House Method with you.
John McCarthy
Words From the Author

24 pt
20 pt
6
We Three Kings …………………………………..Double Down ………………………….....………Jolly Old Saint Nick ……….……………………..Fifth & Sixth String Notes ……………….………5th & 6th String Etude …………………………..12 Bar Blues ……………………………………..Reading Chord Charts ………………………….Your First Chords …………………….………….Strumming Chords ………………………………Eighth Notes ……………………………………..Two for One ………………………………………My Melody ………………………………………..The Arkansas Traveler …………………………..C Blues …………………………………………….Beethoven’s 5th …………………………………..The Notes in the First Position ………………….Hitting All Six ………………………………………The C Major Scale ……………………………….C Major Scale Pattern ……………………….….C Major Scale Study in 3rds ……………………Full Form Chords ………………………………..Rhythm Notation Chord Strum Slashes ……….............................Song Chord Progressions ………………………Canon/Rehearsal Marks ………………………...Bass Note Strum Studies ………………………..Dynamics in Music/This Land is Your Land ………………………….Dotted Quarter Notes/Kum-Ba-Ya ………………The New Years Song ……………………………Using the Metronome to Practice/Finger Flexing #1 …………………………………Ode to Joy …………………………………………My Country tis of Thee …………………………..Triplet Timing ……………………………………..6 String Triplet Pattern …………………..………Intervals/Sharps & Flats ………………………….The G Major Scale - Two Octaves …………..…G Major Lead Pattern - Eighth Notes & Triplets…….…….............................................
The Staff …………………………………………...The Musical Alphabet ……………………………Staff Symbols ………………………………….…Names of the Open Strings & Tuning …….……Picking Symbols ……………………….…….…..Counting Beats ………………………….……….Music Notes …………………………….………..First String Notes …………………....….……….Whole Notes ………………………….….……….Half Notes …………………………….…………..Quarter Notes ………………………….…………Rests ………………………………….…………..1st String Etude ……………………….…………Second String Notes ………………….…………2nd String Etude ………………………………...Hot Cross Buns …………………………….…….By the Sil’very Moonlight ………………………..Amanda Lynn …………………………………….Good King Wenceslas …………………………..Go Tell Aunt Rudy ………………….…………….Two String Combo ………………………………..Pick Up Notes ………………….………….……..A Tisket, A Tasket …………………………………Dotted Half Notes / 3/4 Timing …………………….I Saw Three Ships …………………….…………Runaway Train …………………….………….….Third & Fourth String Notes …………….………3rd & 4th String Etude ………………….……….Aura Lee ………………………………….………Mystic Haze …………………………….…….…..Johnny Blues ………………………….….………Rockin the Bells ……………………….…………The Tie ……………………………………………..Oh When the Saints ……………………..………The High A Note ……………………………..…..Bottoms Up ……………………………….………Amazing Grace ……………………………..……Playing More than One Note at a Time ……….......................................Surprise Symphony …………………..........……
Table of Contents899
11111213141414141616171718191919202020212122222324242525262627282829
2930
313132333434353637383939404142434445454646
47484951
535455
56575858596061
62

24 pt
20 pt
7
Chords of G Major/Alternate Strumming ……….G Major Lead Pattern - Triplets ….……………..Minuet in G ………………………………………..Minuet in G - Rhythm Solo ………………………G Boogie Blues ………………………………..…G Major Bass Note Strum ……………......……..The Star Spangled Banner /The Fermata ………Finger Flexing #2 ………………………………..Relative Minor Theory …………………………..The A Minor Scale ……………………………….Minor Scale Pattern in A ……………...…………Solo Guitar in A Minor …………………...………Home on the Range ……………………..………I - IV - V Progression ……………………………..First & Second Endings ………………………….Greensleeves …………………………………….
House of the Rising Sun ………………………..The A Minor Pentatonic ScaleOpen Position ……........................................…Pentatonic Lead Pattern :Eighth Notes/Triplets ……..................................Pentatonic Lead Melody ………………………..12 Bar Blues in A ………………………….……..Lead Techniques Bending …………….………..Pentatonic Lead Riffs …………………………….The Chromatic Scale …………………………….The Major Scale Formula ……………………….
Student Worksheets ……………………………..Blank Papers ……………………………………..About the Author …………………….…………
63656667686970717273737475767778
79
80
81838384858687
89107112
24 pt
20 pt
10
Treble Clef Time Signature11
21
31
41
51
61
71
44& ∑ ∑ ∑ ∑ ∑ ∑ ∑ ∑ ∑ ∑
& ∑ ∑ ∑ ∑ ∑ ∑ ∑ ∑ ∑ ∑
& ∑ ∑ ∑ ∑ ∑ ∑ ∑ ∑ ∑ ∑
& ∑ ∑ ∑ ∑ ∑ ∑ ∑ ∑ ∑ ∑
& ∑ ∑ ∑ ∑ ∑ ∑ ∑ ∑ ∑ ∑
& ∑ ∑ ∑ ∑ ∑ ∑ ∑ ∑ ∑ ∑
& ∑ ∑ ∑ ∑ ∑ ∑ ∑ ∑ ∑ ∑
& ∑ ∑ ∑ ∑ ∑ ∑ ∑ ∑ ∑ ∑
11
21
31
41
51
61
71
44& ∑ ∑ ∑ ∑ ∑ ∑ ∑ ∑ ∑ ∑
& ∑ ∑ ∑ ∑ ∑ ∑ ∑ ∑ ∑ ∑
& ∑ ∑ ∑ ∑ ∑ ∑ ∑ ∑ ∑ ∑
& ∑ ∑ ∑ ∑ ∑ ∑ ∑ ∑ ∑ ∑
& ∑ ∑ ∑ ∑ ∑ ∑ ∑ ∑ ∑ ∑
& ∑ ∑ ∑ ∑ ∑ ∑ ∑ ∑ ∑ ∑
& ∑ ∑ ∑ ∑ ∑ ∑ ∑ ∑ ∑ ∑
& ∑ ∑ ∑ ∑ ∑ ∑ ∑ ∑ ∑ ∑
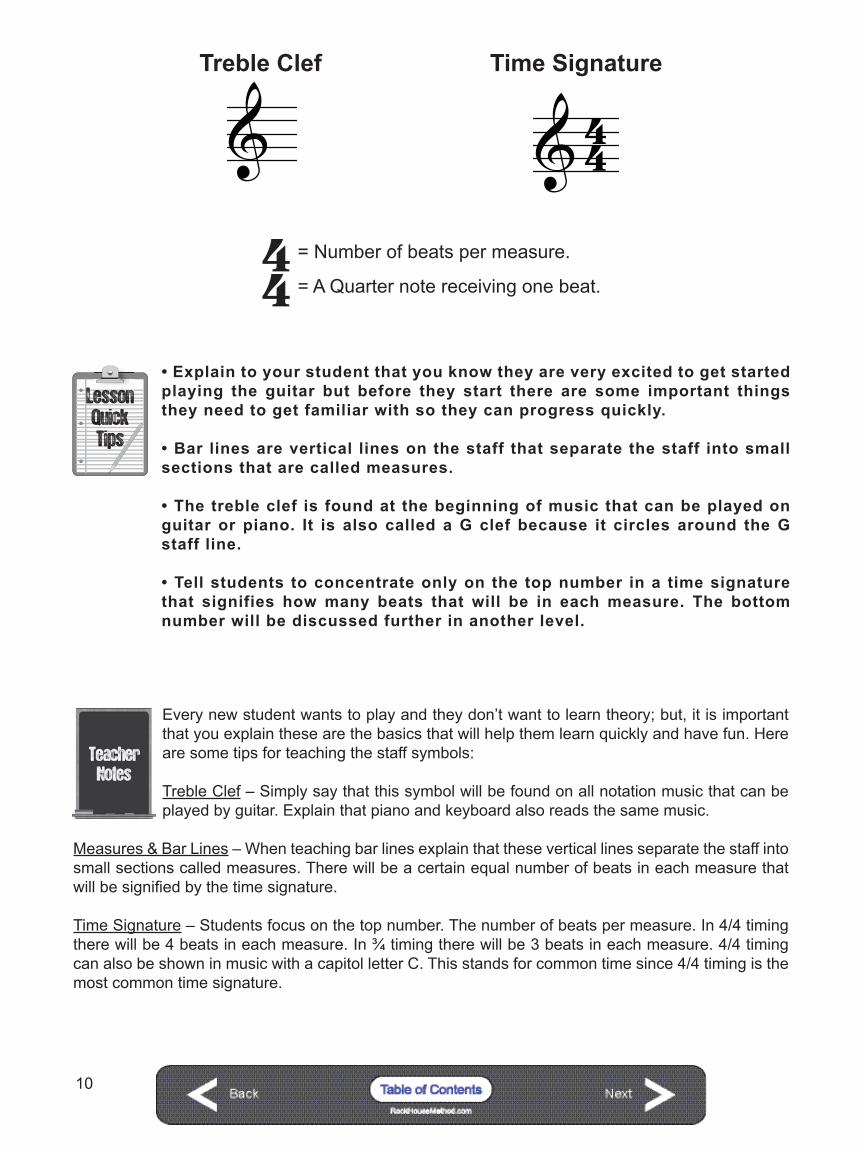
Every new student wants to play and they don’t want to learn theory; but, it is important that you explain these are the basics that will help them learn quickly and have fun. Here are some tips for teaching the staff symbols:
Treble Clef – Simply say that this symbol will be found on all notation music that can be played by guitar. Explain that piano and keyboard also reads the same music.
Measures & Bar Lines – When teaching bar lines explain that these vertical lines separate the staff into small sections called measures. There will be a certain equal number of beats in each measure that will be signified by the time signature.
Time Signature – Students focus on the top number. The number of beats per measure. In 4/4 timing there will be 4 beats in each measure. In ¾ timing there will be 3 beats in each measure. 4/4 timing can also be shown in music with a capitol letter C. This stands for common time since 4/4 timing is the most common time signature.
LessonQuickTips
• Explain to your student that you know they are very excited to get started playing the guitar but before they start there are some important things they need to get familiar with so they can progress quickly.
• Bar lines are vertical lines on the staff that separate the staff into small sections that are called measures.
• The treble clef is found at the beginning of music that can be played on guitar or piano. It is also called a G clef because it circles around the G staff line.
• Tell students to concentrate only on the top number in a time signature that signifies how many beats that will be in each measure. The bottom number will be discussed further in another level.
= Number of beats per measure.
= A Quarter note receiving one beat.
Four beats per measure.Also known as “common time.”
Indicates four beatsper measure.
24 pt
20 pt
17
LessonQuickTips
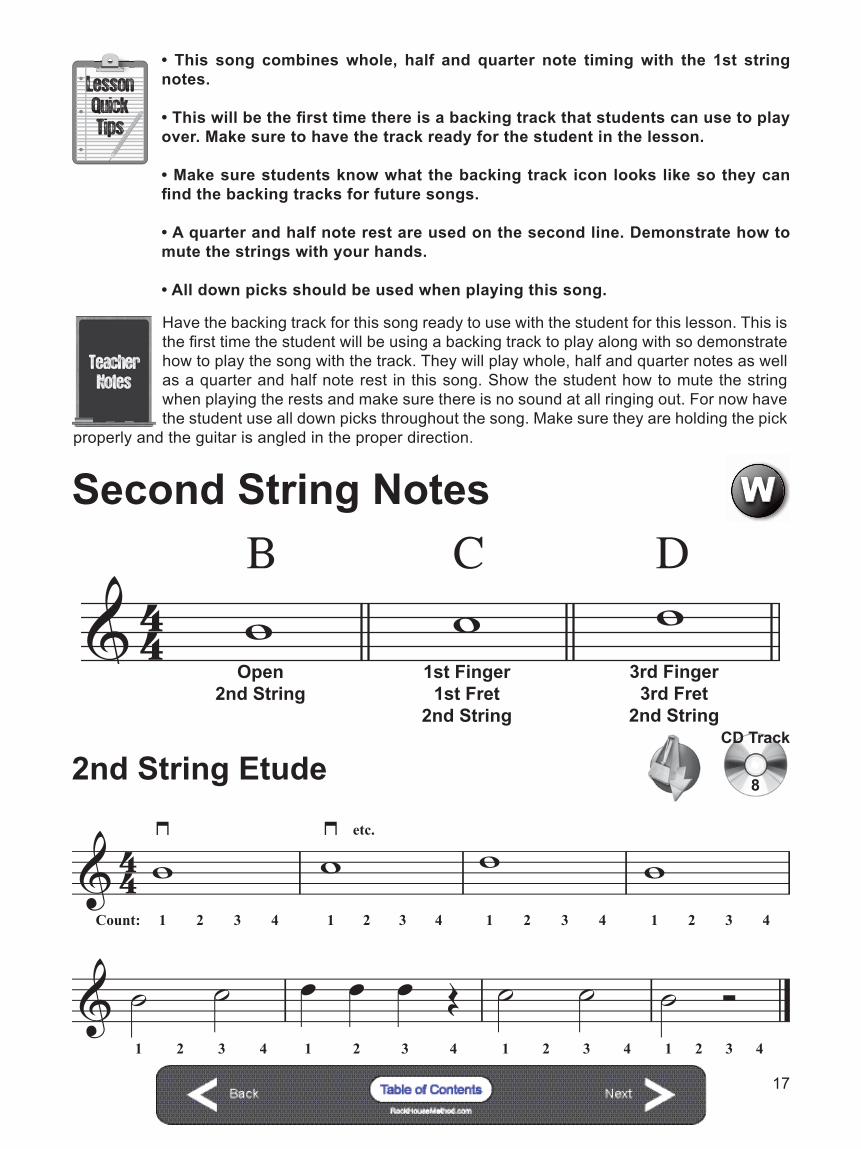
• This song combines whole, half and quarter note timing with the 1st string notes.
• This will be the first time there is a backing track that students can use to play over. Make sure to have the track ready for the student in the lesson.
• Make sure students know what the backing track icon looks like so they can find the backing tracks for future songs.
• A quarter and half note rest are used on the second line. Demonstrate how to mute the strings with your hands.
• All down picks should be used when playing this song.
Second String Notes
Count: 1 2 3 4 1 2
etc.
3 4 1 2 3 4 1 2 3 4
1 2 3 4 1 2 3 4 1 2 3 4 1 2 3 4
2nd String Etude
B
C
D
Open2nd String
1st Finger1st Fret
2nd String
3rd Finger3rd Fret
2nd String
Have the backing track for this song ready to use with the student for this lesson. This is the first time the student will be using a backing track to play along with so demonstrate how to play the song with the track. They will play whole, half and quarter notes as well as a quarter and half note rest in this song. Show the student how to mute the string when playing the rests and make sure there is no sound at all ringing out. For now have the student use all down picks throughout the song. Make sure they are holding the pick
properly and the guitar is angled in the proper direction.
8
CD Track
W
24 pt
20 pt
18
LessonQuickTips
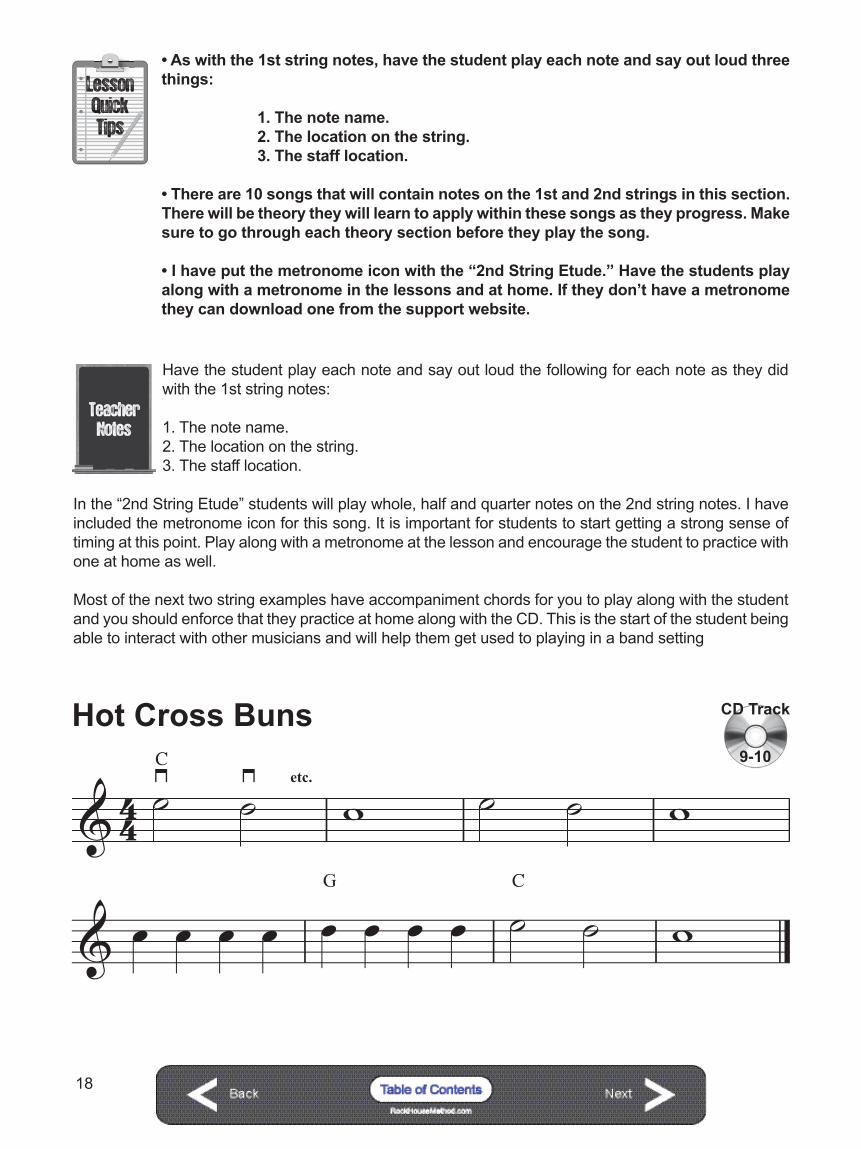
• As with the 1st string notes, have the student play each note and say out loud three things:
1. The note name. 2. The location on the string. 3. The staff location.
• There are 10 songs that will contain notes on the 1st and 2nd strings in this section. There will be theory they will learn to apply within these songs as they progress. Make sure to go through each theory section before they play the song.
• I have put the metronome icon with the “2nd String Etude.” Have the students play along with a metronome in the lessons and at home. If they don’t have a metronome they can download one from the support website.
Have the student play each note and say out loud the following for each note as they did with the 1st string notes:
1. The note name.2. The location on the string.3. The staff location.
In the “2nd String Etude” students will play whole, half and quarter notes on the 2nd string notes. I have included the metronome icon for this song. It is important for students to start getting a strong sense of timing at this point. Play along with a metronome at the lesson and encourage the student to practice with one at home as well.
Most of the next two string examples have accompaniment chords for you to play along with the student and you should enforce that they practice at home along with the CD. This is the start of the student being able to interact with other musicians and will help them get used to playing in a band setting
C
Hot Cross Buns9-10
CD Track
24 pt
20 pt
23
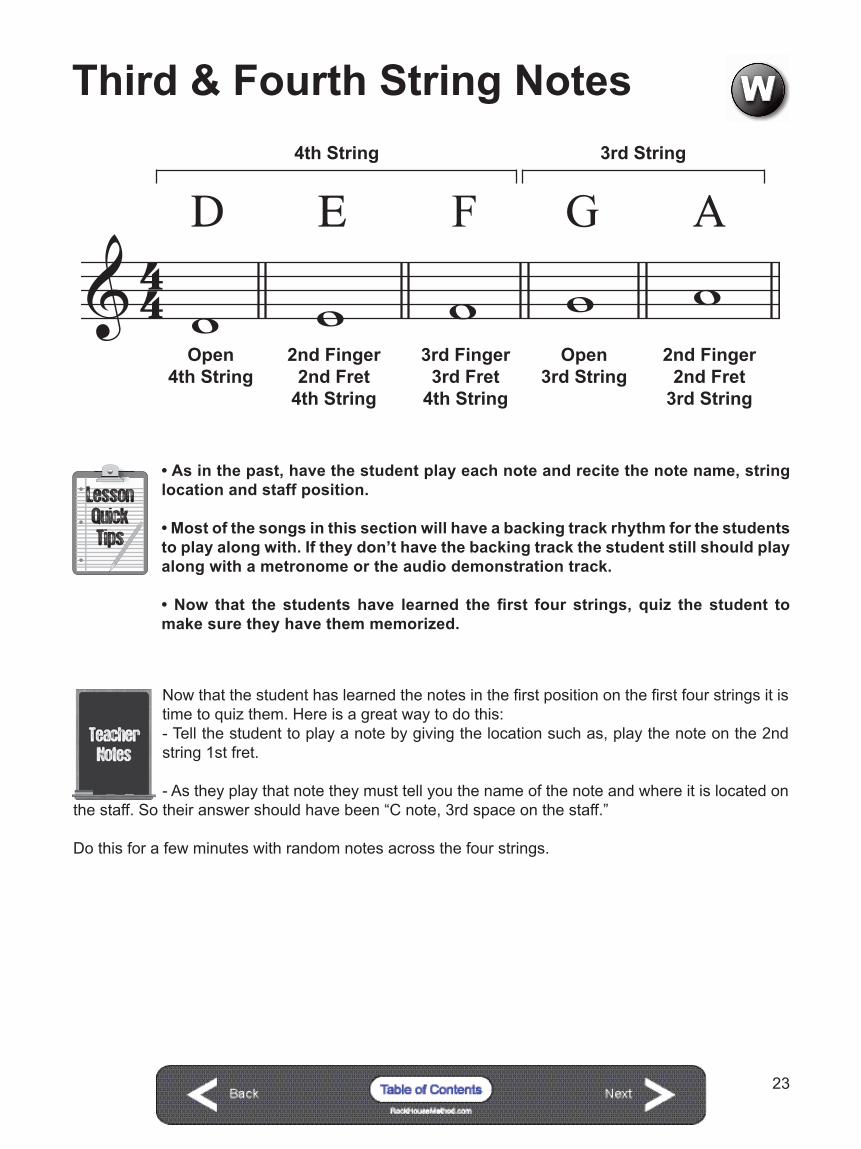
Now that the student has learned the notes in the first position on the first four strings it is time to quiz them. Here is a great way to do this:- Tell the student to play a note by giving the location such as, play the note on the 2nd string 1st fret.
- As they play that note they must tell you the name of the note and where it is located on the staff. So their answer should have been “C note, 3rd space on the staff.”
Do this for a few minutes with random notes across the four strings.
Third & Fourth String Notes
D
E
F
G
A
4th String 3rd String
Open 4th String
Second Finger2nd Fret
4th String
Third Finger3rd Fret
4th String
Open3rd String
Second Finger2nd Fret
3rd String
D
E
F
G
A
Open4th String
Open3rd String
2nd Finger2nd Fret
4th String
2nd Finger2nd Fret
3rd String
3rd Finger3rd Fret
4th String
LessonQuickTips
• As in the past, have the student play each note and recite the note name, string location and staff position.
• Most of the songs in this section will have a backing track rhythm for the students to play along with. If they don’t have the backing track the student still should play along with a metronome or the audio demonstration track.
• Now that the students have learned the first four strings, quiz the student to make sure they have them memorized.
W
24 pt
20 pt
25
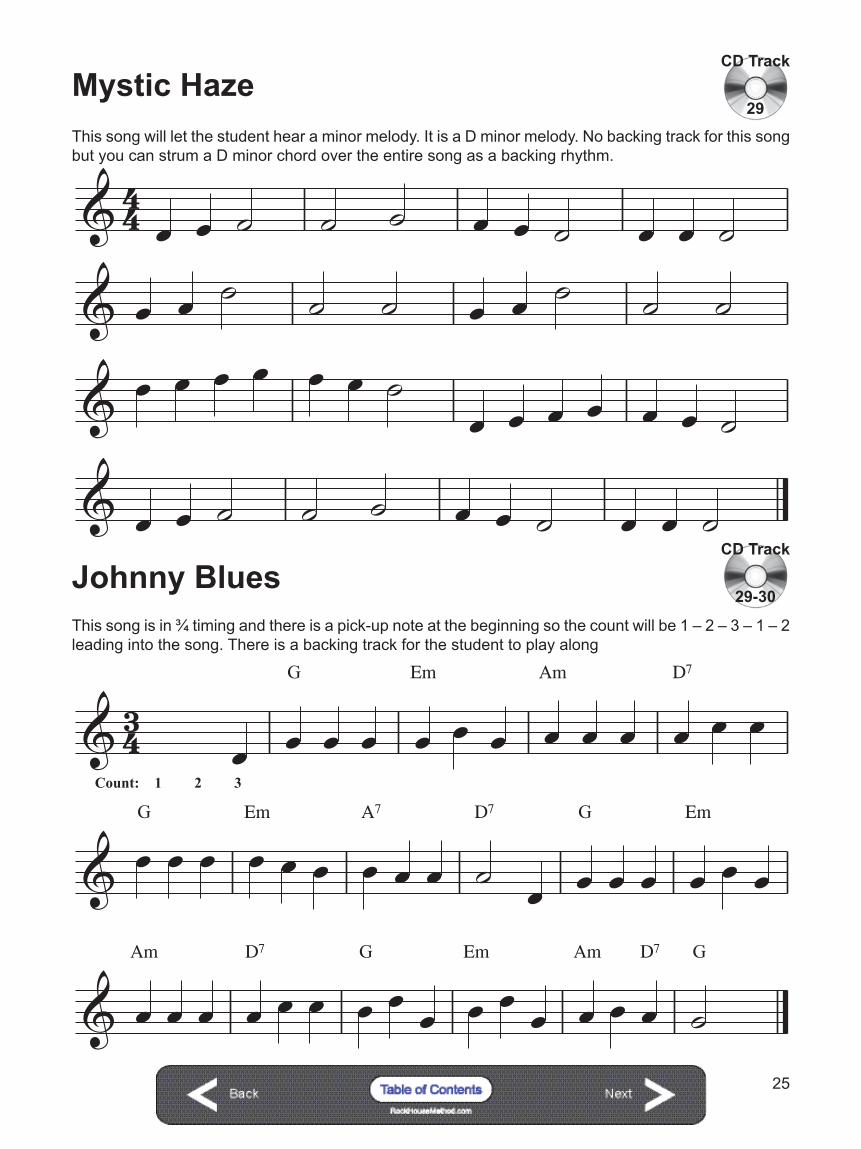
Count: 1 2 3
G
Em
Am
D7
G
Em
A7
D7
G
Em
Am
D7
G
Em
Am
D7
G
Johnny Blues29-30
CD Track
This song is in ¾ timing and there is a pick-up note at the beginning so the count will be 1 – 2 – 3 – 1 – 2 leading into the song. There is a backing track for the student to play along
Mystic Haze29
CD Track
This song will let the student hear a minor melody. It is a D minor melody. No backing track for this song but you can strum a D minor chord over the entire song as a backing rhythm.
24 pt
20 pt
29
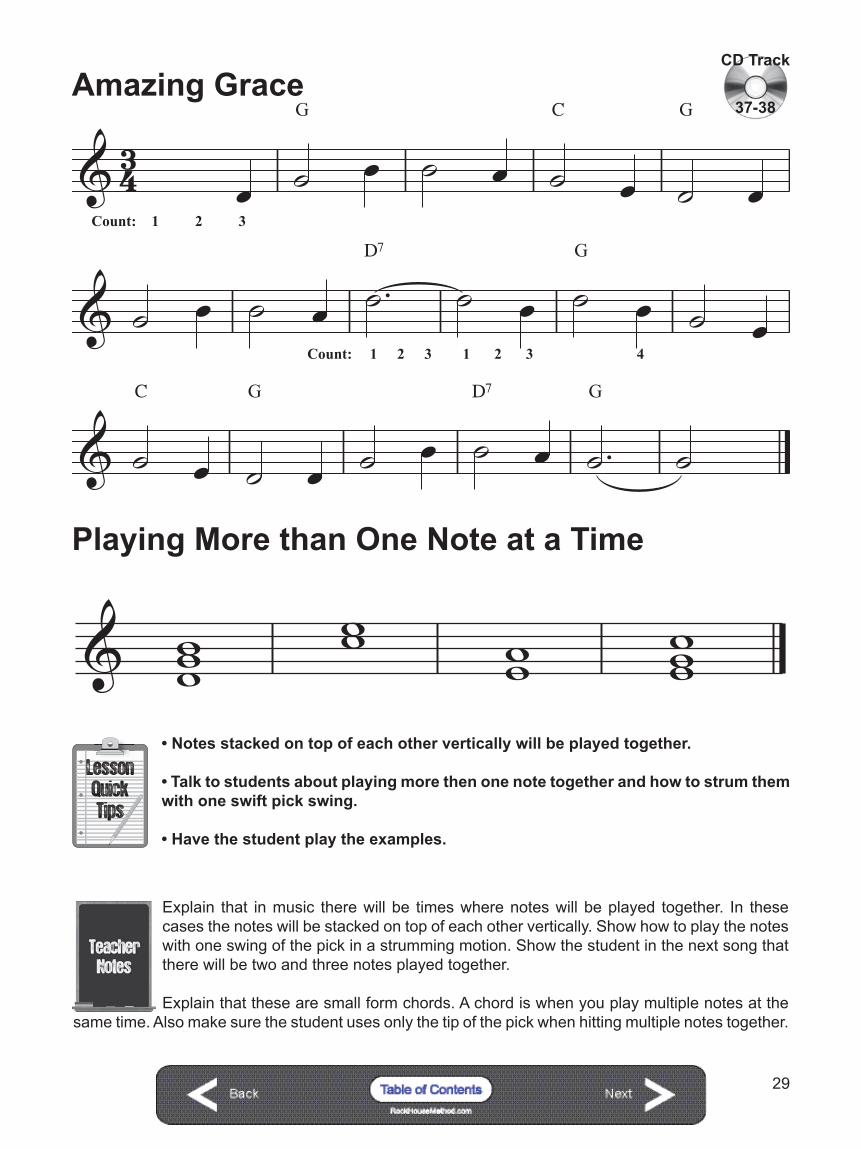
Playing More than One Note at a Time
Count: 1 2 3
G
C
G
D7
G
C
G
D7
G
Count: 1 2 3 1 2 3 4
Amazing Grace37-38
CD Track
Explain that in music there will be times where notes will be played together. In these cases the notes will be stacked on top of each other vertically. Show how to play the notes with one swing of the pick in a strumming motion. Show the student in the next song that there will be two and three notes played together.
Explain that these are small form chords. A chord is when you play multiple notes at the same time. Also make sure the student uses only the tip of the pick when hitting multiple notes together.
LessonQuickTips
• Notes stacked on top of each other vertically will be played together.
• Talk to students about playing more then one note together and how to strum them with one swift pick swing.
• Have the student play the examples.
24 pt
20 pt
30
C
G7
C
G7
C
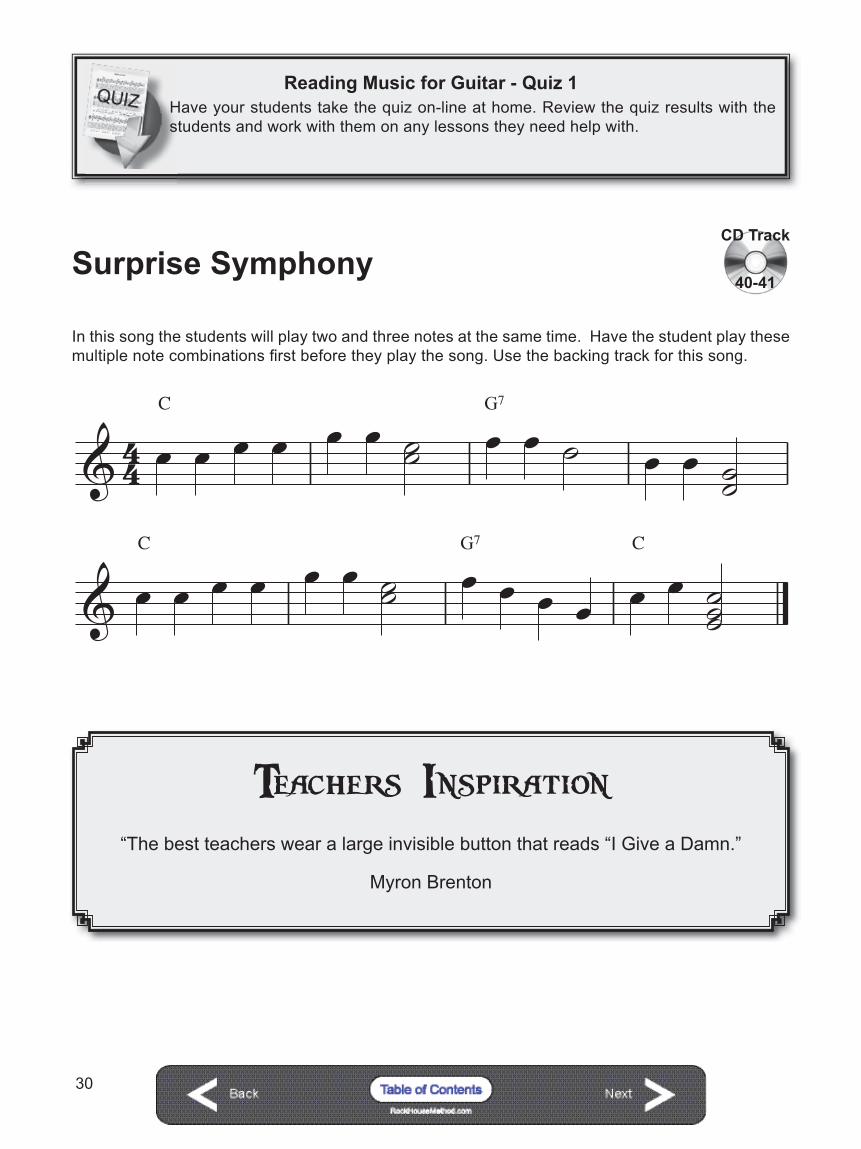
Surprise Symphony40-41
CD Track
Have your students take the quiz on-line at home. Review the quiz results with the students and work with them on any lessons they need help with.
Reading Music for Guitar - Quiz 1
In this song the students will play two and three notes at the same time. Have the student play these multiple note combinations first before they play the song. Use the backing track for this song.
Teachers Inspiration“The best teachers wear a large invisible button that reads “I Give a Damn.”
Myron Brenton

24 pt
20 pt
34
5th & 6th String Etude47
CD Track
Here students play only the notes on these two strings to get familiar with them. Have the student use a metronome to play along with to help keep a steady time. I like to have students call out the name of each note after they can play it steady from beginning to end without mistakes.
12 Bar Blues
Before the student plays this song have a discussion about blues music with them. Here are a few things to cover:
1. Blues music has influenced almost every genre of music from rock to pop and from country to metal. 2. Having a good understanding of the blues will make them a better overall player.3. Many hit songs have been written using the 12 bar blues progression structure.
This is a simple basic single note blues progression; get the student started by playing only the first measure. When they can play the first measure, have them go through the entire progression. Be sure to demonstrate playing the progression over the bass and drum backing track for the student.
You may find mixed reactions to this lesson. I say this because if you have a student in front of you whose favorite bands are heavy metal or who loves classical music, they may shake their head a bit when they hear the term “The Blues.” Have no fear; this is normal if you have not encountered it before. It is your job to pump up the excitement about studying a variety of styles of music. In this case you can explain to the student how other music is derived from the blues, etc. It is an advantage as a guitar player to have a firm base in the blues for almost every genre of music. You will find that a majority of your adult students like the blues and blues influenced music. This is an essential genre of music to bring to your students.
48-49
CD Track
24 pt
20 pt
35
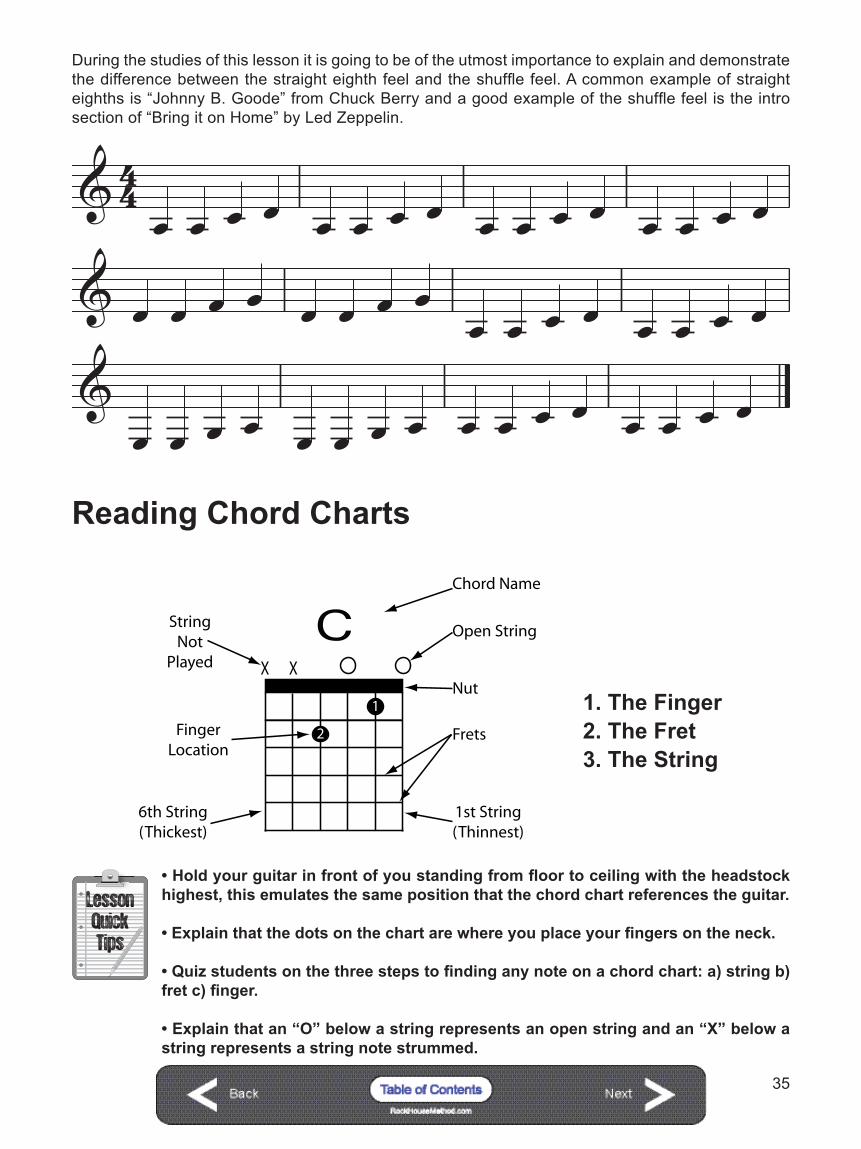
During the studies of this lesson it is going to be of the utmost importance to explain and demonstrate the difference between the straight eighth feel and the shuffle feel. A common example of straight eighths is “Johnny B. Goode” from Chuck Berry and a good example of the shuffle feel is the intro section of “Bring it on Home” by Led Zeppelin.
Reading Chord Charts
2
1
X X
FingerLocation
StringNot
Played
Open String
Chord Name
6th String(Thickest)
Frets
Nut
1st String(Thinnest)
C 1
2
X X
1. The Finger 2. The Fret 3. The String
LessonQuickTips
• Hold your guitar in front of you standing from floor to ceiling with the headstock highest, this emulates the same position that the chord chart references the guitar.
• Explain that the dots on the chart are where you place your fingers on the neck.
• Quiz students on the three steps to finding any note on a chord chart: a) string b) fret c) finger.
• Explain that an “O” below a string represents an open string and an “X” below a string represents a string note strummed.
24 pt
20 pt
41
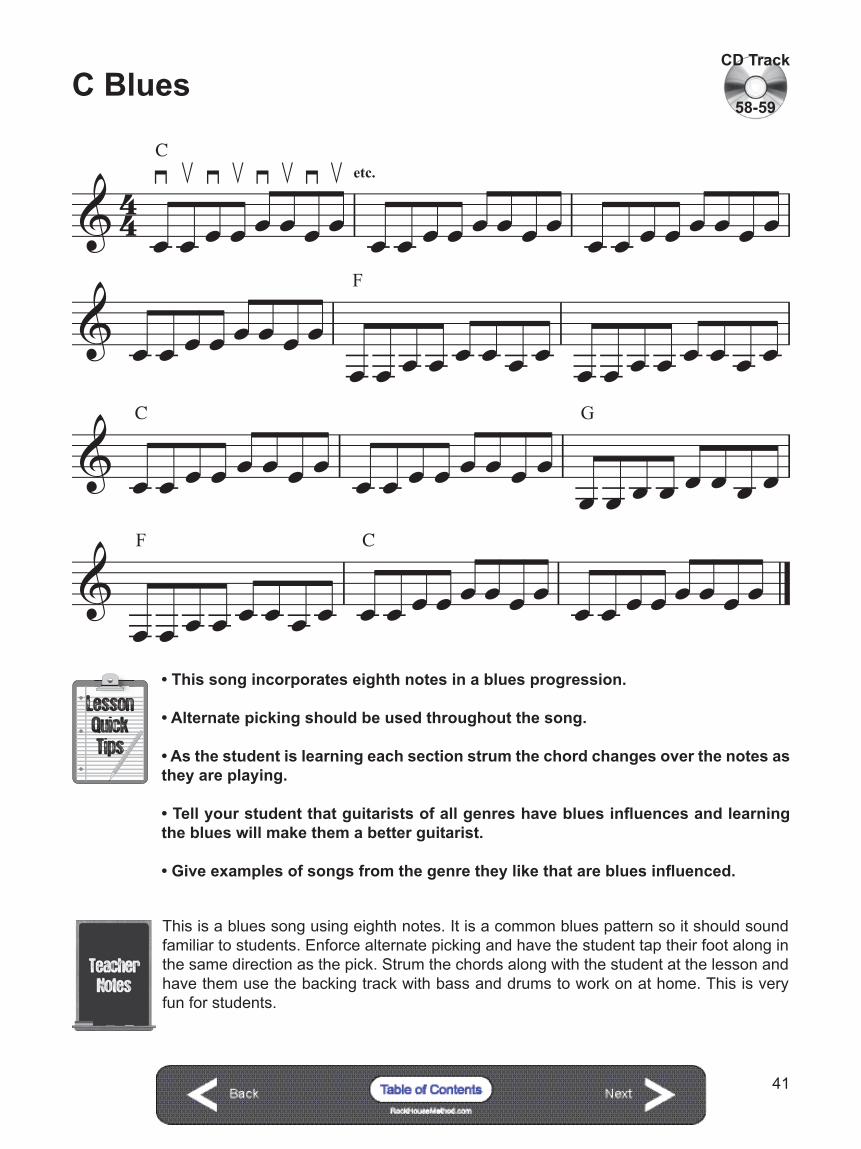
C Blues58-59
CD Track
LessonQuickTips
• This song incorporates eighth notes in a blues progression.
• Alternate picking should be used throughout the song.
• As the student is learning each section strum the chord changes over the notes as they are playing.
• Tell your student that guitarists of all genres have blues influences and learning the blues will make them a better guitarist.
• Give examples of songs from the genre they like that are blues influenced.
This is a blues song using eighth notes. It is a common blues pattern so it should sound familiar to students. Enforce alternate picking and have the student tap their foot along in the same direction as the pick. Strum the chords along with the student at the lesson and have them use the backing track with bass and drums to work on at home. This is very fun for students.
24 pt
20 pt
43
E
F
G
A
B
C
D
E
F
G
A
B
C
D
E
F
G
A
6th 5th 4th 3rd 2nd 1st
Frets:String:
0 1 3 0 2 3 0 2 3 0 2 0 1 3 0 1 3 5
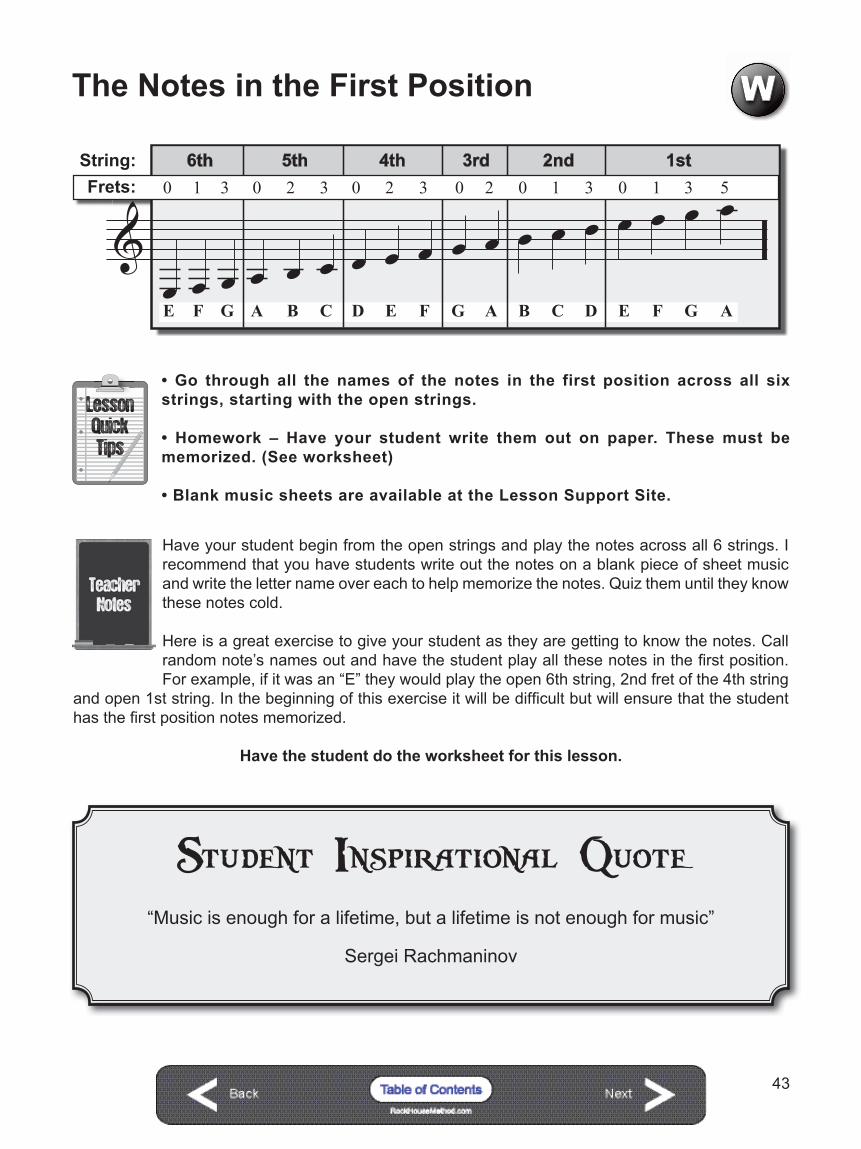
The Notes in the First Position
LessonQuickTips
• Go through all the names of the notes in the first position across all six strings, starting with the open strings.
• Homework – Have your student write them out on paper. These must be memorized. (See worksheet)
• Blank music sheets are available at the Lesson Support Site.
W
Have your student begin from the open strings and play the notes across all 6 strings. I recommend that you have students write out the notes on a blank piece of sheet music and write the letter name over each to help memorize the notes. Quiz them until they know these notes cold.
Here is a great exercise to give your student as they are getting to know the notes. Call random note’s names out and have the student play all these notes in the first position. For example, if it was an “E” they would play the open 6th string, 2nd fret of the 4th string
and open 1st string. In the beginning of this exercise it will be difficult but will ensure that the student has the first position notes memorized.
Have the student do the worksheet for this lesson.
Student Inspirational Quote“Music is enough for a lifetime, but a lifetime is not enough for music”
Sergei Rachmaninov

24 pt
20 pt
45
This is the first time a student will play a scale. You must explain that a scale is a group of notes that come from the same family. They sound good when played together and will be used to create melodies and to write songs. Although they have not learned sharps or flats yet you can start to plant the seed and talk about them and explain that the key of “C” major will be the only natural key that has no sharps or flats. Tell them that they will learn the theory behind making major scales at the end of this book.
LessonQuickTips
• Explain that scales are a group of notes that all come from the same family and they are used to make songs and melodies.
• Tell students that the key of “C” major is the only natural key that doesn’t have sharps or flats.
• Let students that they will go through the theory of the major scale at the end of this book.
• Have students call out the name of each note as they play it.
C Major Scale Pattern62
CD Track
Now students will apply the C major scale in a pattern. This scale pattern goes up in four note intervals through the scale. This is important because it helps students see scales as a creative tool rather then just a group of notes played in a row. At this point you should give a demonstration of how to improvise using the scale. Play a series of simple melodies nothing too fast or flashy. Explain that they will eventually be able to use scales to write their own, melodies, leads and complete songs.
Teachers Inspiration“The mediocre teacher tells. The good teacher explains. The superior teacher
demonstrates. The great teacher inspires.”
William Arthur Ward

24 pt
20 pt
46
C Major Scale Study in 3rds63
CD Track
This song is a series of 3rds up the C major scale. It is all eighth notes. Alternate picking should be used. Explain how this pattern goes up in 3rds the following way: the first note is C the second note is E, if they look at the C major scale note they just learned C is the first note E is the 3rd note. The E is three scale degrees up from C. It continues this pattern with D to F, F is three scale degrees up from D. The pattern continues throughout this exercise.
Full Form Chords
C 1
2
3
XAm
1
2 3
XG7
1
2
3
2 3
64
CD Track
LessonQuickTips
• Go through each chord note by note with the student.
• Explain that these chords all are in the key of “C” major and can be used together to create songs in this key.
• Talk about the relationship each chord fingering has to the others. For instance: Am to C they just move the 3rd finger up to the 5th string 3rd fret.
• Make sure the student has all four chords memorized for the next week’s lesson. Quiz them by calling the chord names out randomly and they should fret the chord as quickly as possible.
• Demonstrate the three progressions over the backing track so the student can see and hear them.
24 pt
20 pt
50
A
C
G
Am
Em
F
C
F
G
B
C
G
Am
Em
F
C
F
G
C
C
G
Am
Em
F
C
F
G
2
3 4 3
34
2
3
LessonQuickTips
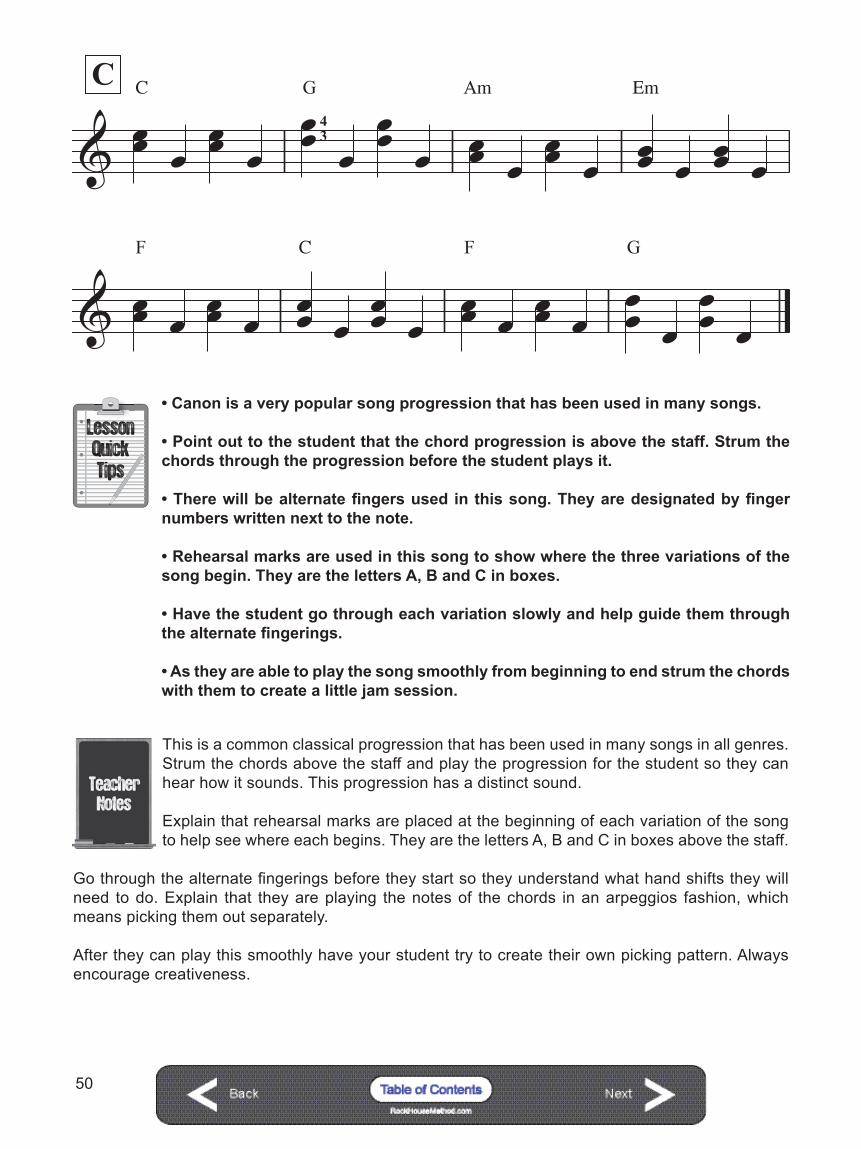
• Canon is a very popular song progression that has been used in many songs.
• Point out to the student that the chord progression is above the staff. Strum the chords through the progression before the student plays it.
• There will be alternate fingers used in this song. They are designated by finger numbers written next to the note.
• Rehearsal marks are used in this song to show where the three variations of the song begin. They are the letters A, B and C in boxes.
• Have the student go through each variation slowly and help guide them through the alternate fingerings.
• As they are able to play the song smoothly from beginning to end strum the chords with them to create a little jam session.
This is a common classical progression that has been used in many songs in all genres. Strum the chords above the staff and play the progression for the student so they can hear how it sounds. This progression has a distinct sound.
Explain that rehearsal marks are placed at the beginning of each variation of the song to help see where each begins. They are the letters A, B and C in boxes above the staff.
Go through the alternate fingerings before they start so they understand what hand shifts they will need to do. Explain that they are playing the notes of the chords in an arpeggios fashion, which means picking them out separately.
After they can play this smoothly have your student try to create their own picking pattern. Always encourage creativeness.
24 pt
20 pt
56
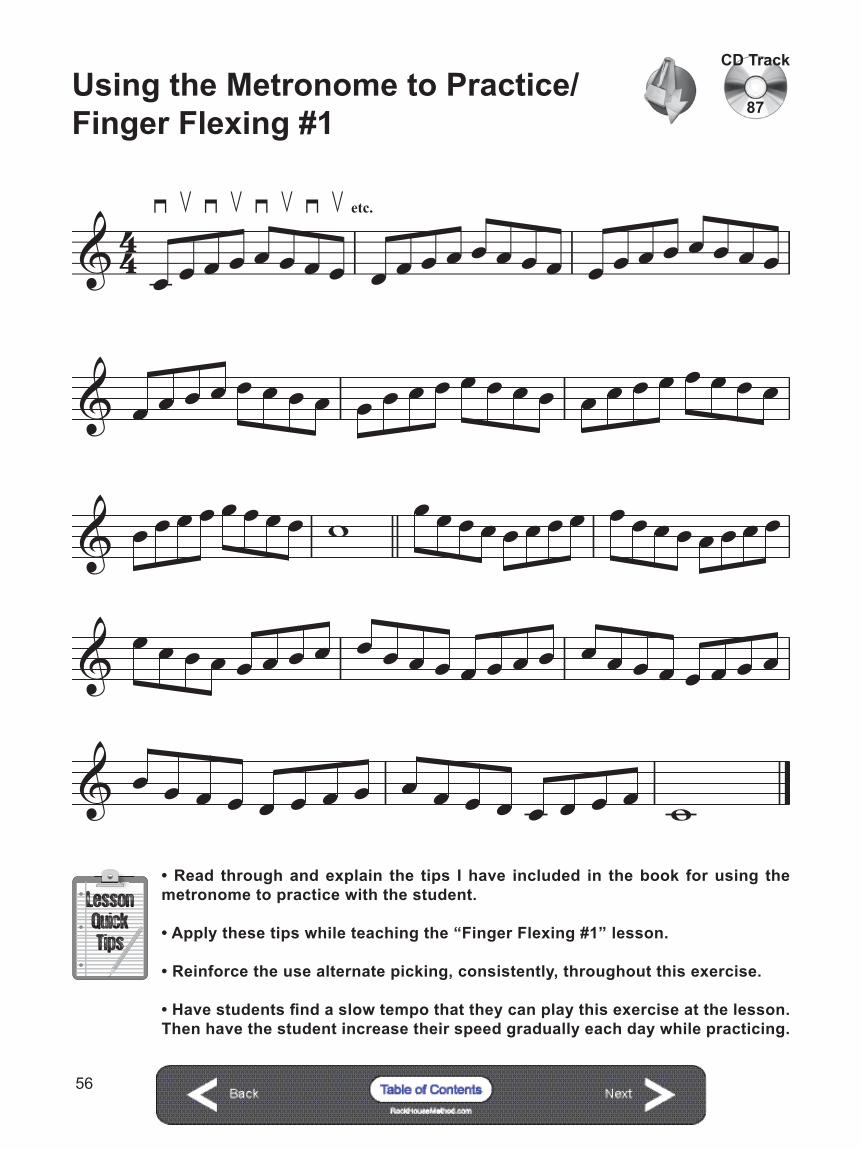
Using the Metronome to Practice/Finger Flexing #1
87
CD Track
LessonQuickTips
• Read through and explain the tips I have included in the book for using the metronome to practice with the student.
• Apply these tips while teaching the “Finger Flexing #1” lesson.
• Reinforce the use alternate picking, consistently, throughout this exercise.
• Have students find a slow tempo that they can play this exercise at the lesson. Then have the student increase their speed gradually each day while practicing.
24 pt
20 pt
60
LessonQuickTips
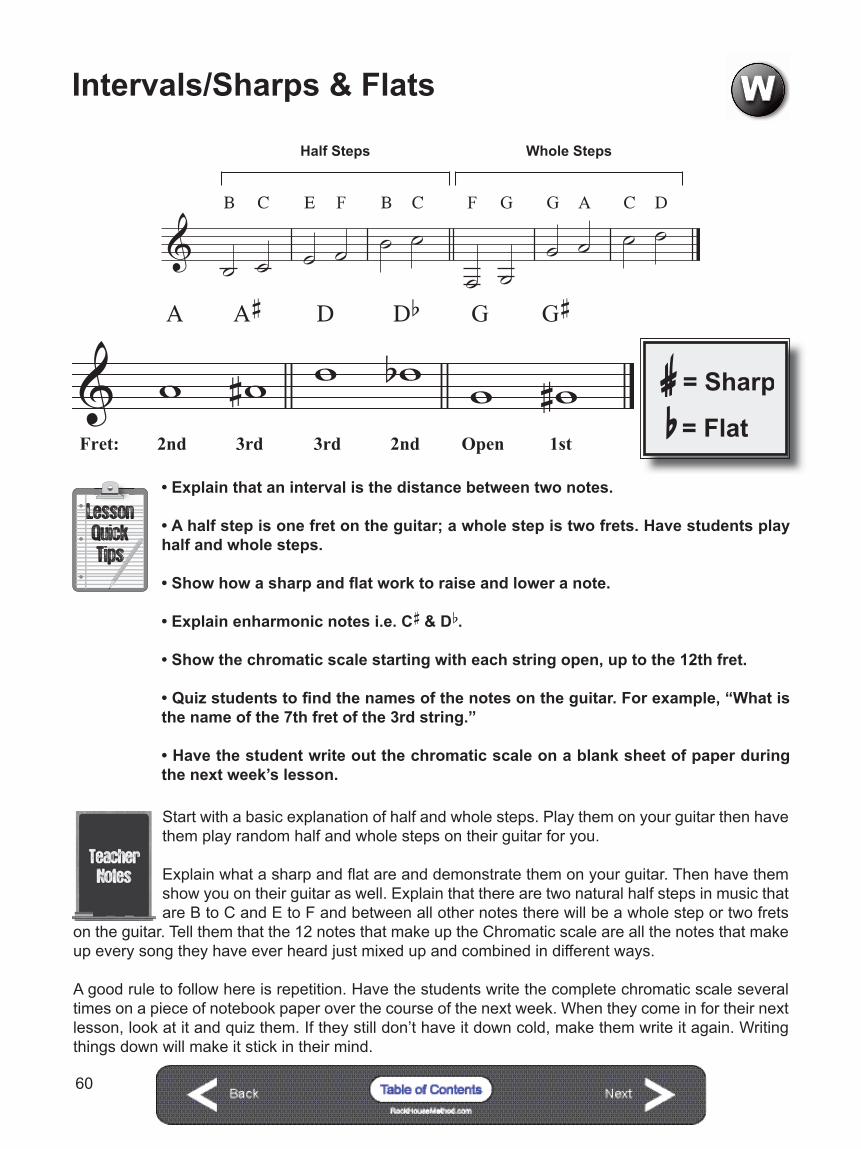
• Explain that an interval is the distance between two notes.
• A half step is one fret on the guitar; a whole step is two frets. Have students play half and whole steps.
• Show how a sharp and flat work to raise and lower a note.
• Explain enharmonic notes i.e. C# & Db.
• Show the chromatic scale starting with each string open, up to the 12th fret.
• Quiz students to find the names of the notes on the guitar. For example, “What is the name of the 7th fret of the 3rd string.”
• Have the student write out the chromatic scale on a blank sheet of paper during the next week’s lesson.
Start with a basic explanation of half and whole steps. Play them on your guitar then have them play random half and whole steps on their guitar for you.
Explain what a sharp and flat are and demonstrate them on your guitar. Then have them show you on their guitar as well. Explain that there are two natural half steps in music that are B to C and E to F and between all other notes there will be a whole step or two frets
on the guitar. Tell them that the 12 notes that make up the Chromatic scale are all the notes that make up every song they have ever heard just mixed up and combined in different ways.
A good rule to follow here is repetition. Have the students write the complete chromatic scale several times on a piece of notebook paper over the course of the next week. When they come in for their next lesson, look at it and quiz them. If they still don’t have it down cold, make them write it again. Writing things down will make it stick in their mind.
Intervals/Sharps & Flats
A A#/Bb B C C#/Db D D#/Eb E F AGF#/Gb G#/Ab
= Flatb = Sharp#A A#/Bb B C C#/Db D D#/Eb E F AGF#/Gb G#/Ab
= Flatb = Sharp#
B
C
E
F
B
C
F
G
G
A
C
D
Half Steps Whole Steps
Fret:
A
2nd
Db
2nd
G
Open
G#
1st
A#
3rd
D
3rd
Fret:
A
2nd
Db
2nd
G
Open
G#
1st
A#
3rd
D
3rd
Fret:
A
2nd
Db
2nd
G
Open
G#
1st
A#
3rd
D
3rd
Fret:
A
2nd
Db
2nd
G
Open
G#
1st
A#
3rd
D
3rd
Fret:
A
2nd
Db
2nd
G
Open
G#
1st
A#
3rd
D
3rd
Fret:
A
2nd
Db
2nd
G
Open
G#
1st
A#
3rd
D
3rd
Fret:
A
2nd
Db
2nd
G
Open
G#
1st
A#
3rd
D
3rd
W

24 pt
20 pt
66
Minuet in G
G
C
G
D7
G
D7
G
D7
G
C
G
D7
G
D7
G
mp
Andante99-100
CD Track
This is a very popular classical song written by J.S. Bach. Play the same for the student so they can hear how it sounds and see the fingering. There are a few F# notes within the song, you should point out where all these are and have the student play each before they begin. Make sure the students use the backing track to play along with. During the lesson you should strum the accompaniment chords under as they play the melody. This will create a full sound and a solid base for the student to play over.
LessonQuickTips
• This is a popular classical piece written by Bach.
• Play the song for the student so they can hear the song and see how to play it.
• Make sure to point out the F# notes that they will be playing.
• Students should play along with the backing track.
24 pt
20 pt
72
etc.
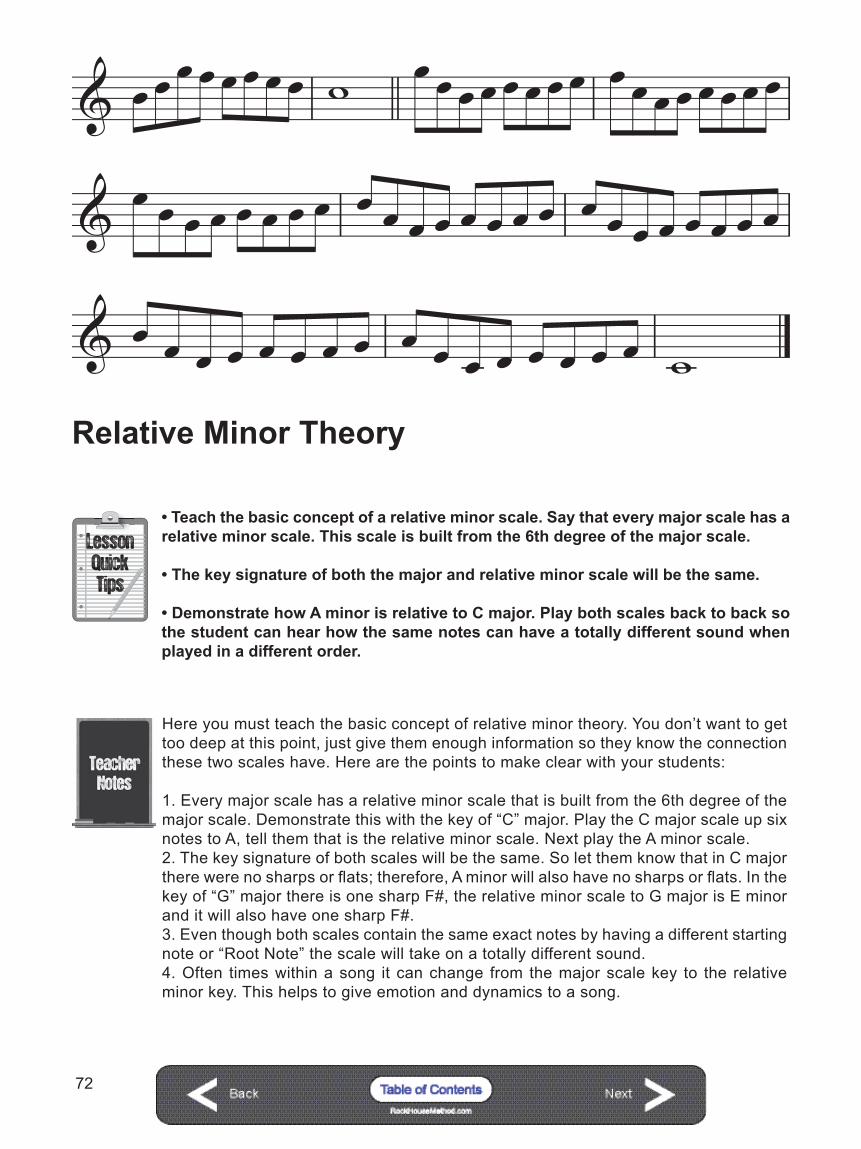
Relative Minor Theory
LessonQuickTips
• Teach the basic concept of a relative minor scale. Say that every major scale has a relative minor scale. This scale is built from the 6th degree of the major scale.
• The key signature of both the major and relative minor scale will be the same.
• Demonstrate how A minor is relative to C major. Play both scales back to back so the student can hear how the same notes can have a totally different sound when played in a different order.
Here you must teach the basic concept of relative minor theory. You don’t want to get too deep at this point, just give them enough information so they know the connection these two scales have. Here are the points to make clear with your students:
1. Every major scale has a relative minor scale that is built from the 6th degree of the major scale. Demonstrate this with the key of “C” major. Play the C major scale up six notes to A, tell them that is the relative minor scale. Next play the A minor scale.2. The key signature of both scales will be the same. So let them know that in C major there were no sharps or flats; therefore, A minor will also have no sharps or flats. In the key of “G” major there is one sharp F#, the relative minor scale to G major is E minor and it will also have one sharp F#.3. Even though both scales contain the same exact notes by having a different starting note or “Root Note” the scale will take on a totally different sound.4. Often times within a song it can change from the major scale key to the relative minor key. This helps to give emotion and dynamics to a song.
24 pt
20 pt
73
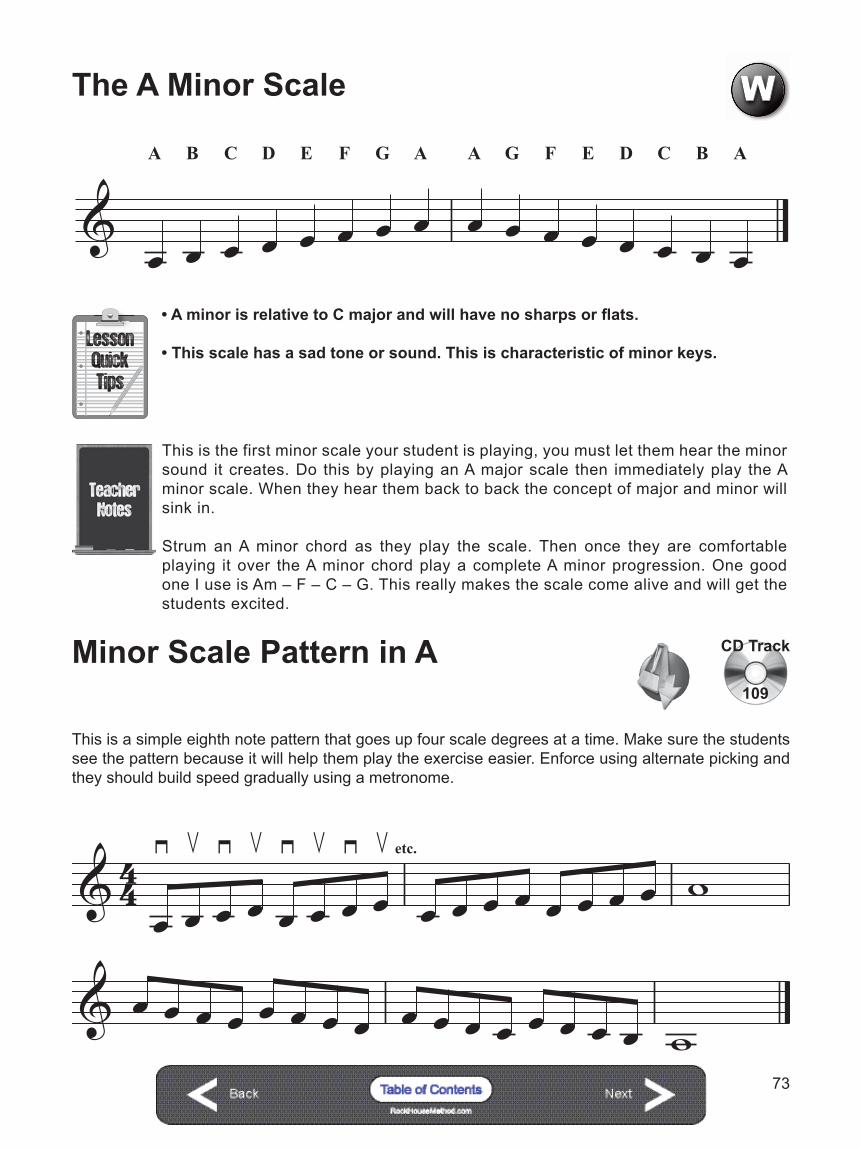
The A Minor Scale
A
B
C
D
E
F
G
A
A
G
F
E
D
C
B
A
W
This is a simple eighth note pattern that goes up four scale degrees at a time. Make sure the students see the pattern because it will help them play the exercise easier. Enforce using alternate picking and they should build speed gradually using a metronome.
Minor Scale Pattern in A
109
CD Track
LessonQuickTips
• A minor is relative to C major and will have no sharps or flats.
• This scale has a sad tone or sound. This is characteristic of minor keys.
This is the first minor scale your student is playing, you must let them hear the minor sound it creates. Do this by playing an A major scale then immediately play the A minor scale. When they hear them back to back the concept of major and minor will sink in.
Strum an A minor chord as they play the scale. Then once they are comfortable playing it over the A minor chord play a complete A minor progression. One good one I use is Am – F – C – G. This really makes the scale come alive and will get the students excited.

24 pt
20 pt
76
This is a difficult song and will require your guidance through the first few times. There is some alternate fingering needed. On the 2nd staff 3rd measure, the D and B notes will be played with the 1st and 2nd fingers. The B note will be on the 3rd string 4th fret. All the student has to do is slide the C and A notes they are playing before that up two frets.
LessonQuickTips
• This is a difficult song to play. Guide the student through the song a few measures at a time.
• Point out that on the 2nd staff 3rd measure the D and B notes played together have a different fingering. The B note is not open 2nd string; it is played on the 3rd string 4th fret.
I - IV - V Progression
Strum:C
112-113
CD Track
LessonQuickTips
• The I – IV – V progression is one of the most common progressions.
• Explain how these chords are built from the 1st, 4th and 5th degrees of a major scale.
• Play a few examples of songs using the I – IV – V chord progression. A good example is Johnny B Goode. Also many Ramones or Greenday songs are simple I – IV – V progressions.
The I – IV – V chord progression is a common progression that many songs use. It’s important to expose your student to its structure and sound. Although they have not learned the major scale formula yet you can begin to explain how these chords are built from the major scale. Get the student first to see the relationship of each chord to the next. Count up C-D-E-F and C-D-E-F-G to show that the F is four scale degrees and G is five scale degrees up from C. There are many songs that use this progression, find a song from the student’s favorite band
to give them an example. You can also use standards like Johnny B. Goode or Wild Thing. Greenday and The Ramones have many songs using the I – IV – V progression as well.

24 pt
20 pt
80
Am
C
D
F
3
3
3
3
3
3
3
3
Am
C
E
3
3
3
3
3
3
3
3
Am
C
D
F
3
3
3
3
3
3
3
3
Am
E
Am
E
3
3
3
3
3
3
3
3
LessonQuickTips
• Explain that this song is triplets played in an arpeggio-picking pattern.
• The chord changes above the staff must be fretted and held down.
• Strum the song progression before the student plays it so they can get the sound and feel of the song.
• Once the student can play the song through you can play the melody over it or improvise using the A minor scales.
When teaching this song you must explain that it has a triplet arpeggio pattern. Explain that an arpeggio is a chord played one note at a time. In this song they must hold down each chord and pick the notes out of them.
This song gives a great opportunity for you to interact with your student. As they play the song you can either play the songs melody or improvise using the A minor scale. It
is important for students to learn how to interact with other musicians.
The A Minor Pentatonic Scale - Open Position
A
C
D
E
G
A
C
D
E
G
A
A
G
E
D
C
A
G
E
D
C
A
24 pt
20 pt
81
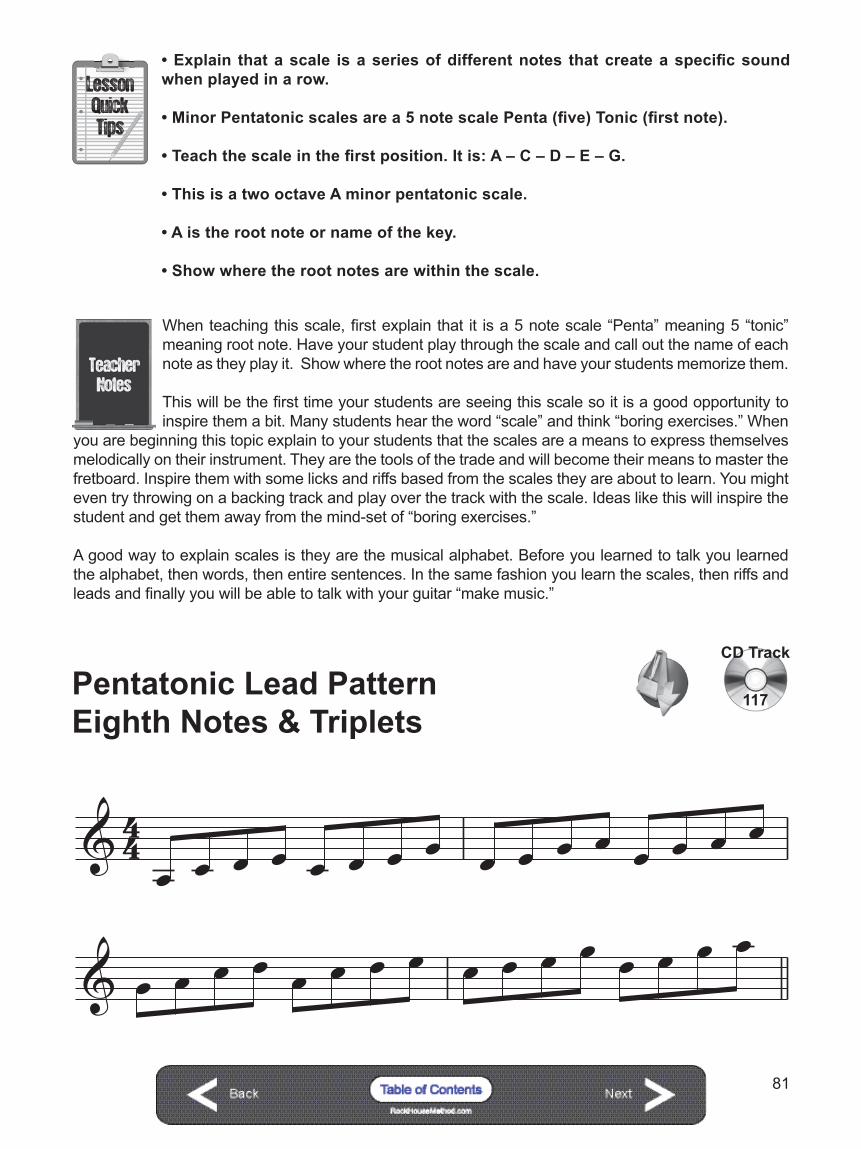
LessonQuickTips
• Explain that a scale is a series of different notes that create a specific sound when played in a row.
• Minor Pentatonic scales are a 5 note scale Penta (five) Tonic (first note).
• Teach the scale in the first position. It is: A – C – D – E – G.
• This is a two octave A minor pentatonic scale.
• A is the root note or name of the key.
• Show where the root notes are within the scale.
When teaching this scale, first explain that it is a 5 note scale “Penta” meaning 5 “tonic” meaning root note. Have your student play through the scale and call out the name of each note as they play it. Show where the root notes are and have your students memorize them.
This will be the first time your students are seeing this scale so it is a good opportunity to inspire them a bit. Many students hear the word “scale” and think “boring exercises.” When
you are beginning this topic explain to your students that the scales are a means to express themselves melodically on their instrument. They are the tools of the trade and will become their means to master the fretboard. Inspire them with some licks and riffs based from the scales they are about to learn. You might even try throwing on a backing track and play over the track with the scale. Ideas like this will inspire the student and get them away from the mind-set of “boring exercises.”
A good way to explain scales is they are the musical alphabet. Before you learned to talk you learned the alphabet, then words, then entire sentences. In the same fashion you learn the scales, then riffs and leads and finally you will be able to talk with your guitar “make music.”
Pentatonic Lead Pattern Eighth Notes & Triplets
117
CD Track
24 pt
20 pt
82
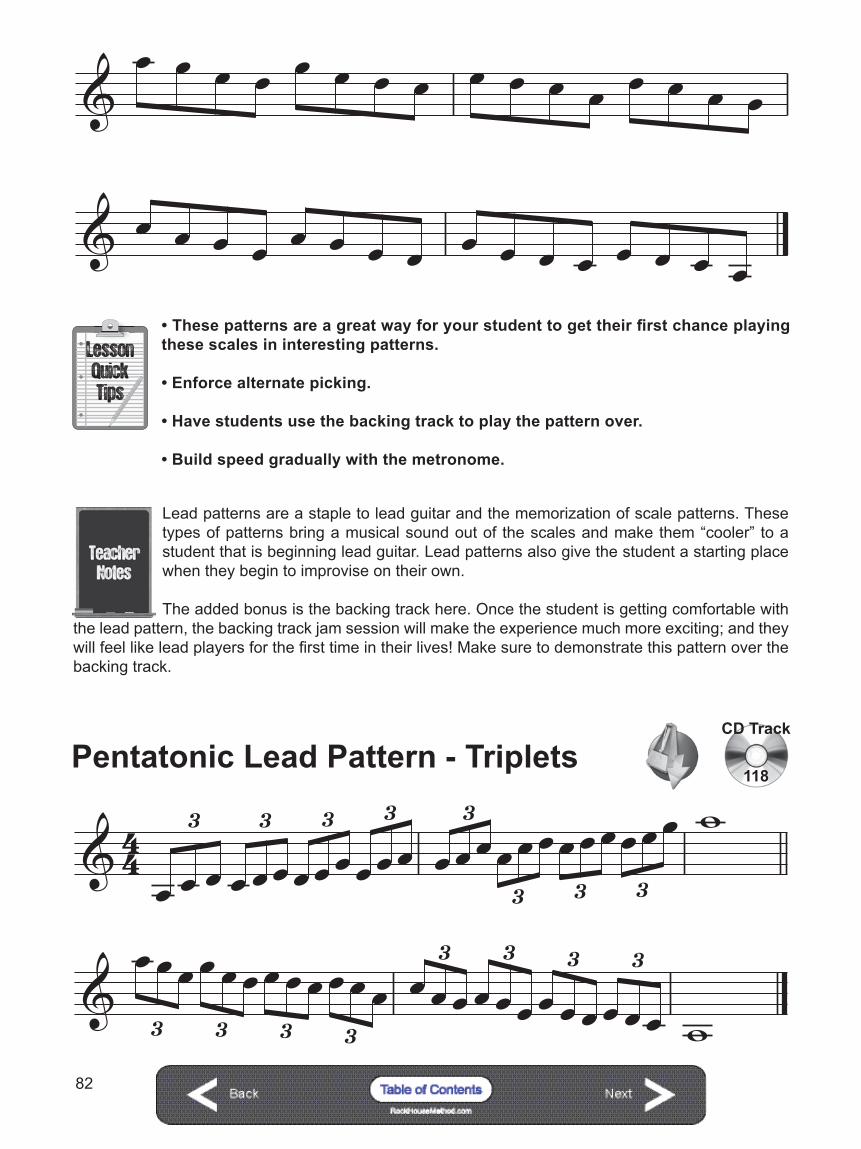
LessonQuickTips
• These patterns are a great way for your student to get their first chance playing these scales in interesting patterns.
• Enforce alternate picking.
• Have students use the backing track to play the pattern over.
• Build speed gradually with the metronome.
Lead patterns are a staple to lead guitar and the memorization of scale patterns. These types of patterns bring a musical sound out of the scales and make them “cooler” to a student that is beginning lead guitar. Lead patterns also give the student a starting place when they begin to improvise on their own.
The added bonus is the backing track here. Once the student is getting comfortable with the lead pattern, the backing track jam session will make the experience much more exciting; and they will feel like lead players for the first time in their lives! Make sure to demonstrate this pattern over the backing track.
3 3 3 3 3
3 3 3
3 3 3 3
3 3 3 3
Pentatonic Lead Pattern - Triplets118
CD Track
24 pt
20 pt
83
K iq = q e
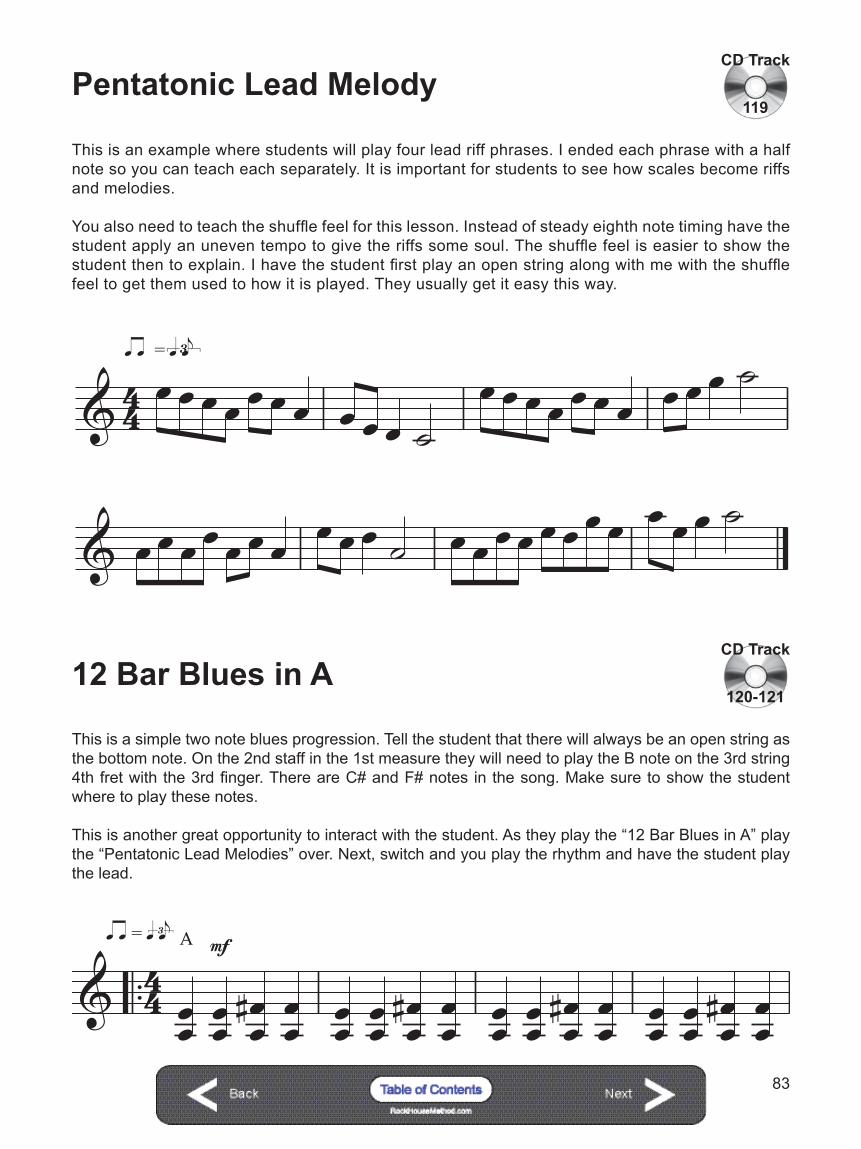
Pentatonic Lead Melody119
CD Track
This is an example where students will play four lead riff phrases. I ended each phrase with a half note so you can teach each separately. It is important for students to see how scales become riffs and melodies.
You also need to teach the shuffle feel for this lesson. Instead of steady eighth note timing have the student apply an uneven tempo to give the riffs some soul. The shuffle feel is easier to show the student then to explain. I have the student first play an open string along with me with the shuffle feel to get them used to how it is played. They usually get it easy this way.
This is a simple two note blues progression. Tell the student that there will always be an open string as the bottom note. On the 2nd staff in the 1st measure they will need to play the B note on the 3rd string 4th fret with the 3rd finger. There are C# and F# notes in the song. Make sure to show the student where to play these notes.
This is another great opportunity to interact with the student. As they play the “12 Bar Blues in A” play the “Pentatonic Lead Melodies” over. Next, switch and you play the rhythm and have the student play the lead.
12 Bar Blues in A
iq = q eK
A
D
A
E
A
3
mf
120-121
CD Track
24 pt
20 pt
85
Student Inspirational Quote“A person does not hear sound only through the ears;
he hears sound through every pore of his body. It permeates the entire being,
and according to its particular influence either slows or quickens the rhythm of the blood circulation;it either wakens or soothes the nervous system.
It arouses a person to greater passions or it calms him by bringing him peace.
According to the sound and its influence a certain effect is produced.
Sound becomes visible in the form of radiance. This shows that the same energy which goes into the form of sound
before being visible is absorbed by the physical body. In that way the physical body recuperates
and becomes charged with new magnetism.”
From: “Mysticism of Sound”Hazrat Inayat Khan
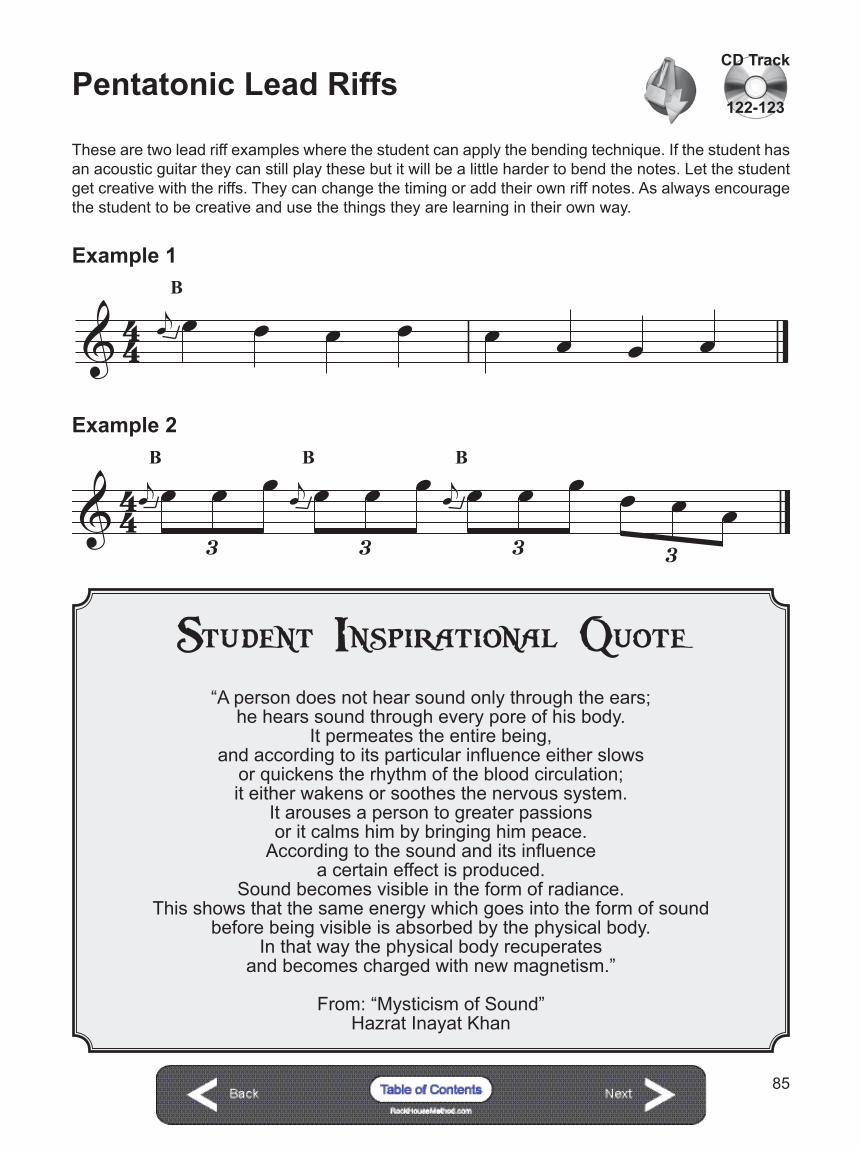
Pentatonic Lead Riffs
B
Example 1
B
B
B
3 3 3 3
Example 2
122-123
CD Track
These are two lead riff examples where the student can apply the bending technique. If the student has an acoustic guitar they can still play these but it will be a little harder to bend the notes. Let the student get creative with the riffs. They can change the timing or add their own riff notes. As always encourage the student to be creative and use the things they are learning in their own way.
24 pt
20 pt
89
StudentWorksheets
24 pt
20 pt
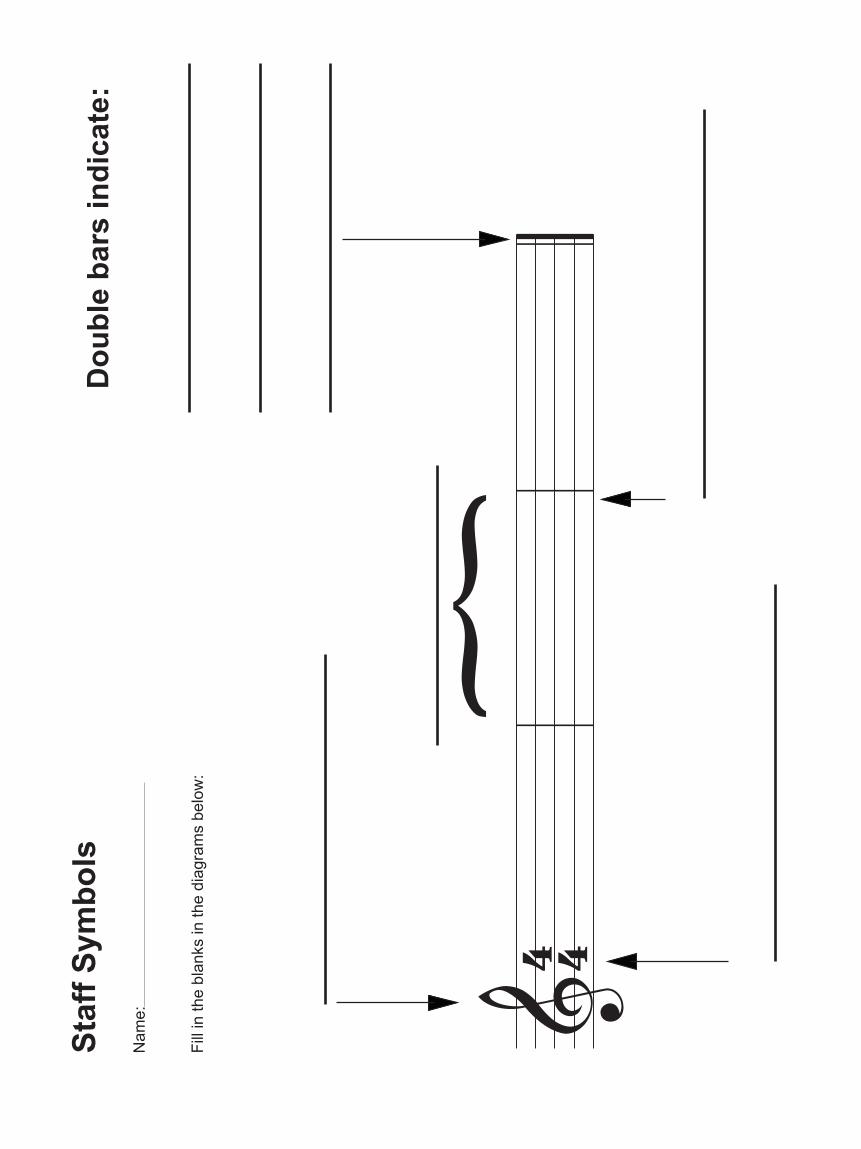
90
}
Dou
ble
bars
indi
cate
:
Nam
e:
Fill
in th
e bl
anks
in th
e di
agra
ms
belo
w:
Staf
f Sym
bols

24 pt
20 pt
91
Nam
e:
Fill in the blanks for the diagrams below
:
Timing Explanations – N
ote Values Worksheet
= Beats
= Beats
= Beats
= B
eats
The Parts of a Note
Whole
Note
Half
Note
QuarterN
oteE
ighthN
ote
The Types of Notes
Note
Note
Note
Note
The HE
AD
The STE
M
The FLAG

24 pt
20 pt
92 RockHouseMethod.com
Nam
e:
Fill
in th
e bl
anks
in th
e di
agra
ms:
Firs
t Str
ing
Not
es
24 pt
20 pt
98
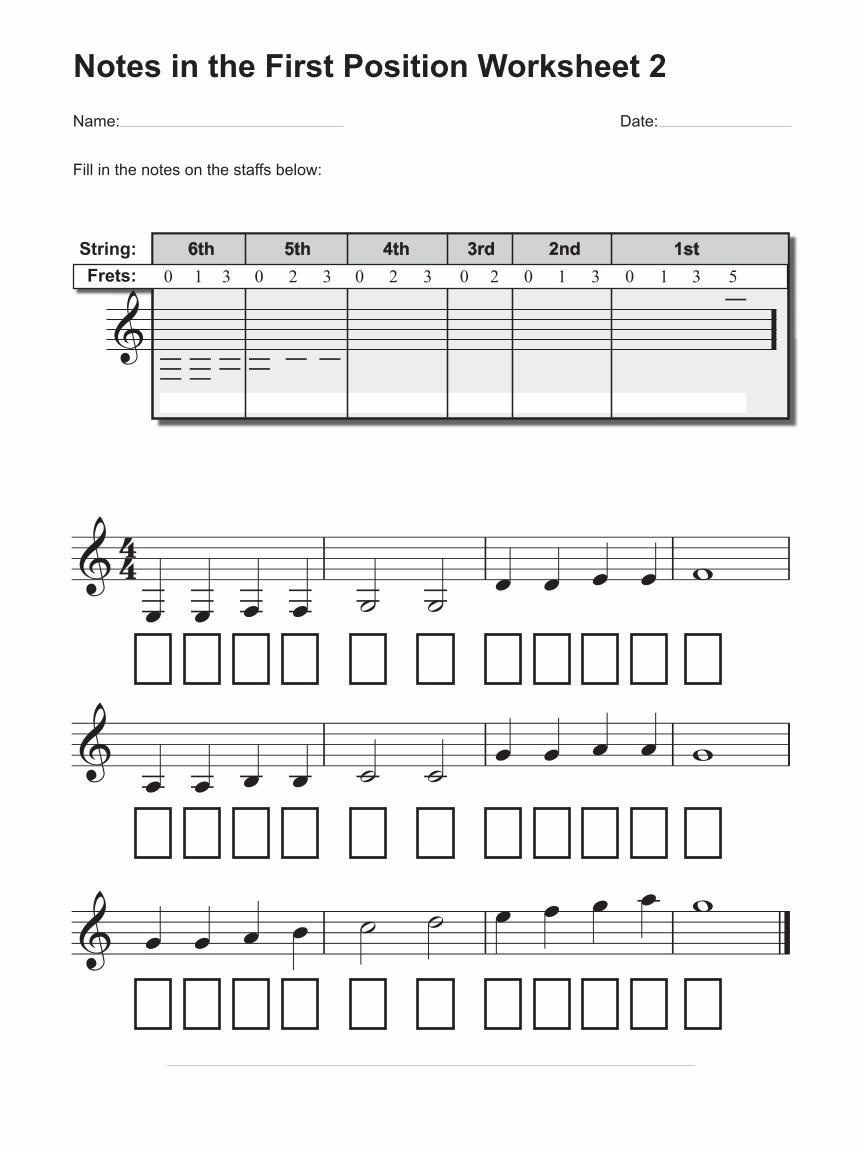
Name: Date:
Notes in the First Position Worksheet 2
Fill in the notes on the staffs below:
6th 5th 4th 3rd 2nd 1stFrets:
String:0 1 3 0 2 3 0 2 3 0 2 0 1 3 0 1 3 5

24 pt
20 pt
111
Name:
Day 1Task Day 2 Day 3 Day 4 Day 5 Day 6 Day 7E Blues Scalesw/ Metronome 60bpm 60bpm 65bpm 70bpm 85bpm 90bpm 95bpm
Student Practice Chart
Reading Music for
GUITAR
24 pt
20 pt
112
John is the creator of The Rock House Method®, the world’s leading musical instruction system. Over his 20 plus year career, he has produced and/or appeared in more than 100 instructional products. Millions of people around the world have learned to play music using John’s easy-to-follow, accelerated program.
John is a virtuoso guitarist who has worked with some of the industry’s most legendary entertainers. He has the ability to break down, teach and communicate music in a manner that motivates and inspires others to achieve their dreams of playing an instrument.
As a guitarist and songwriter, John blends together a unique style of rock, metal, funk and blues in a collage of melodic compositions that are jam-packed with masterful guitar techniques. His sound has been described as a combination of vintage guitar rock with a progressive, gritty edge that is perfectly suited for today’s audiences.
Throughout his career, John has recorded and performed with renowned musicians like Doug Wimbish (who’s worked with Joe Satriani, Living Colour, The Rolling Stones, Madonna, Annie Lennox and many more top flight artists), Grammy Winner Leo Nocentelli, Rock & Roll Hall of Fame inductees Bernie Worrell and Jerome “Big Foot” Brailey, Freekbass, Gary Hoey, Bobby Kimball, David Ellefson (founding member of seven time Grammy nominee Megadeth), Will Calhoun (who’s worked with B.B. King, Mick Jagger and Paul Simon), Jordan Giangreco from the acclaimed band The Breakfast, and solo artist Alex Bach. John has also shared the stage with Blue Oyster Cult, Randy Bachman, Marc Rizzo, Jerry Donahue, Bernard Fowler, Stevie Salas, Brian Tichy, Kansas, Al Dimeola and Dee Snyder.
For more information on John, his music and instructional products visit RockHouseSchool.com.
John McCarthyCreator of
The Rock House Method
About the Author


![updated Educational 2018 - sposanet.com 2018.pdf · ,:3$ ,17(51$7,21$/ :('',1* 3/$11(56 $662&,$7,21 zzz lzsd hx lqir#lzsd hx lqir#lzsd lw 9ld 0rqwh %uxvdud $ ² 5dyhoor 6$ ,wdo\ 5hjlvwud]lrqh](https://img.pdfslide.net/doc/110x75/5c6a62b109d3f21a048c9ca5/updated-educational-2018-2018pdf-3-1751721-1-31156-662721.jpg)