Embed Size (px)
Citation preview
7/15/2019 7858198 Solution Manager SAP NW2004S Monitoring Setup Guide SP12
http://slidepdf.com/reader/full/7858198-solution-manager-sap-nw2004s-monitoring-setup-guide-sp12 1/92
SAP NetWeaver Guides
Monitoring Setup Guide
for SAP NetWeaver 7.0
(2004s) SPS 12
July 2007
7/15/2019 7858198 Solution Manager SAP NW2004S Monitoring Setup Guide SP12
http://slidepdf.com/reader/full/7858198-solution-manager-sap-nw2004s-monitoring-setup-guide-sp12 2/92
© Copyright 2007 SAP AG. All rights reserved.
No part of this publication may be reproduced or transmitted in any
form or for any purpose without the express permission of SAP AG.
The information contained herein may be changed without prior
notice.
Some software products marketed by SAP AG and its distributors
contain proprietary software components of other software vendors.
Microsoft®, WINDOWS®, NT®, EXCEL®, Word ®, PowerPoint® and
SQL Server ® are registered trademarks of Microsoft Corporation.
IBM®, DB2®, DB2 Universal Database, OS/2®, Parallel Sysplex®,
MVS/ESA, AIX®, S/390®, AS/400®, OS/390®, OS/400®, iSeries,
pSeries, xSeries, zSeries, z/OS, AFP, Intelligent Miner, WebSphere®
, Netfinity®, Tivoli®, Informix and Informix® Dynamic Server
TM
are
trademarks of IBM Corp. in USA and/or other countries.
ORACLE® is a registered trademark of ORACLE Corporation.
UNIX®, X/Open®, OSF/1®, and Motif ® are registered trademarks of
the Open Group.
LINUX is a registered trademark of Linus Torvalds and others.
Citrix®, the Citrix logo, ICA®, Program Neighborhood ®, MetaFrame®,
WinFrame®, VideoFrame®, MultiWin® and other Citrix product names
referenced herein are trademarks of Citrix Systems, Inc.
HTML, DHTML, XML, XHTML are trademarks or registered
trademarks of W3C®, World Wide Web Consortium, Massachusetts
Institute of Technology.
JAVA® is a registered trademark of Sun Microsystems, Inc.
J2EE™ is a registered trademark of Sun Microsystems, Inc.
JAVASCRIPT® is a registered trademark of Sun Microsystems, Inc.,
used under license for technology invented and implemented by
Netscape.
MarketSet and Enterprise Buyer are jointly owned trademarks of SAP
AG and Commerce One.
SAP, SAP Logo, R/2, R/3, mySAP, mySAP.com, xApps, mySAP
Business Suite, and other SAP products and services mentioned herein
as well as their respective logos are trademarks or registered
trademarks of SAP AG in Germany and in several other countries all
over the world. All other product and service names mentioned are thetrademarks of their respective companies.
Disclaimer
Some components of this product are based on Java™. Any code
change in these components may cause unpredictable and severe
malfunctions and is therefore expressively prohibited, as is any
decompilation of these components.
Any Java™ Source Code delivered with this product is only to be used
by SAP’s Support Services and may not be modified or altered in any
way.
Documentation in the SAP Service Marketplace
You can find this documentation at the following Internet address:service.sap.com/instguides
SAP AG Neurottstraße 1669190 Walldorf GermanyT +49/18 05/34 34 24F +49/18 05/34 34 20www.sap.com
7/15/2019 7858198 Solution Manager SAP NW2004S Monitoring Setup Guide SP12
http://slidepdf.com/reader/full/7858198-solution-manager-sap-nw2004s-monitoring-setup-guide-sp12 3/92
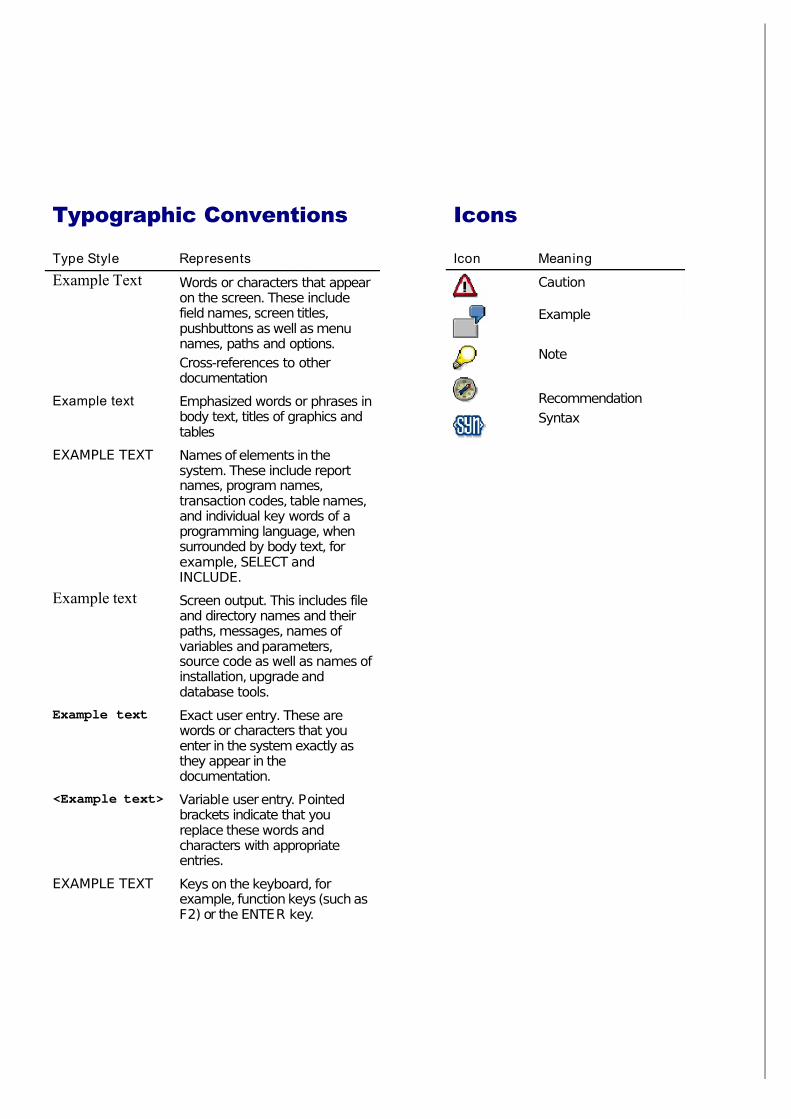
Typographic Conventions
Type Style Represents
Example Text Words or characters that appearon the screen. These includefield names, screen titles,pushbuttons as well as menunames, paths and options.
Cross-references to otherdocumentation
Example text Emphasized words or phrases inbody text, titles of graphics andtables
EXAMPLE TEXT Names of elements in thesystem. These include reportnames, program names,transaction codes, table names,and individual key words of aprogramming language, whensurrounded by body text, forexample, SELECT andINCLUDE.
Example text Screen output. This includes fileand directory names and theirpaths, messages, names of variables and parameters,source code as well as names of installation, upgrade anddatabase tools.
Example text Exact user entry. These arewords or characters that youenter in the system exactly asthey appear in thedocumentation.
<Example text> Variable user entry. Pointedbrackets indicate that youreplace these words andcharacters with appropriateentries.
EXAMPLE TEXT Keys on the keyboard, forexample, function keys (such asF2) or the ENTER key.
Icons
Icon Meaning
Caution
Example
Note
Recommendation
Syntax
7/15/2019 7858198 Solution Manager SAP NW2004S Monitoring Setup Guide SP12
http://slidepdf.com/reader/full/7858198-solution-manager-sap-nw2004s-monitoring-setup-guide-sp12 4/92
Monitoring Setup Guide for SAP NetWeaver 7.0 SP Stack 12
July 2007 4
Table of Contents
1. USING THIS DOCUMENT 8
1.1. Required Files 8
2. INTRODUCTION 9
2.1. Motivation 9
2.2. Technology 92.2.1. Availability Monitoring 92.2.2. Monitoring Log Files 102.2.3. Distributed Statistics Records (DSR) 10
2.3. Components of Monitoring 112.3.1. Alert Monitor 112.3.2. Visual Administrator 112.3.3. System Landscape Directory 11
2.3.4. SAP NetWeaver Administrator 122.3.5. CCMS Agents 12
2.3.6. Operating System Collector SAPOSCOL 132.3.7. Standalone Log Viewer 132.3.8. Global Workload Monitor 13
3. OVERVIEW OF THE CONFIGURATION STEPS 15
4. CONFIGURATION STEPS IN DETAIL 18
4.1. Adjusting the Central Monitoring System (CEN) 184.1.1. Activating Background and Central System Dispatching 184.1.2. Creating the CSMREG User 184.1.3. Creating the CSMCONF Start File for CCMS Agents 19
4.1.4. Entering Monitored ABAP Systems in CEN 194.1.5. Entering Monitored ABAP Systems in ST03G 214.1.6. Creating RFC Destinations for Displaying Components in ST03G 22
4.1.7. Setting Up Availability Monitoring with CCMSPING 23
4.2. Monitoring ABAP Instances 234.2.1. Registering a CCMS Agent SAPCCM4X 24
4.3. Monitoring Java Instances 254.3.1. Registering a CCMS Agent SAPCCMSR (Java Standalone) 264.3.2. Registering a CCMS Agent SAPCCMSR (Double-Stack) 28
4.3.3. Displaying DSRs for the Java Instance in CEN 304.3.4. Configuring Availability Monitoring with the GRMG 32
4.4. Monitoring the Portal Infrastructure 334.4.1. Configuring Availability Monitoring with the GRMG 34
4.5. Monitoring TREX 36
7/15/2019 7858198 Solution Manager SAP NW2004S Monitoring Setup Guide SP12
http://slidepdf.com/reader/full/7858198-solution-manager-sap-nw2004s-monitoring-setup-guide-sp12 5/92
Monitoring Setup Guide for SAP NetWeaver 7.0 SP Stack 12
July 2007 5
4.5.1. Registering SAPCCMSR 364.5.2. Activating TREX Monitoring 38
4.5.3. Displaying the DSRs for the TREX Instance in CEN 38
4.6. Monitoring the Adobe Document Services 394.6.1. Configuring Availability Monitoring with the GRMG 39
4.7. Monitoring the Exchange Infrastructure 404.7.1. Making Adjustments in CEN 414.7.2. Configuring Availability Monitoring with the GRMG 41
4.8. Monitoring a Standalone Database 434.8.1. Installing SAPCCMSR and SAPOSCOL 434.8.2. Configuring Process Monitoring for the Database 45
4.9. Monitoring the SAP Business Information Warehouse 46
4.9.1. Configuring Availability Monitoring with the GRMG 46
4.10. Monitoring the SAP Mobile Infrastructure 48
5. MONITORING SAP NETWEAVER 7.1 SYSTEMS 49
5.1. Monitoring SAP NetWeaver Composition Environment (CE) 7.1 495.1.1. Registering CCMS Agent SAPCCMSR 495.1.2. Creating a Customizing Destination 505.1.3. Display the DSRs from the CE System in CEN 525.1.4. Configuring Availability Monitoring with GRMG 52
5.1.5. Activating Availability Monitoring for a CE System 53
5.2. Monitoring ABAP Systems with Release SAP NetWeaver 7.1 54
6. CONFIGURATION STEPS FOR SAP NETWEAVER ADMINISTRATOR 55
6.1. Overview 55
6.2. Prerequisites 56
6.3. Setting Up Using the Configuration wizard 56
6.3.1. Configure and Activate the Administrative SLD 586.3.2. Make Connection Settings Between CEN and SLD 58
6.3.3. Make Connection Settings between NWA and SLD 596.3.4. Configure the Connections Between the ABAP and Java Stacks of CEN 60
6.3.5. Configure the Connections from the NWA to the Administered Java Systems 616.3.6. Connect a Monitored ABAP System to the Administrative SLD 616.3.7. Connect a Monitored Java System to the Administrative SLD 62
6.4. Setting Up the Administrative SLD 636.4.1. Making Settings in the SLD 646.4.2. Making Settings in the Monitored Systems 65
6.5. Manual Setup of the NWA 676.5.1. Configuring User Administration 67
7/15/2019 7858198 Solution Manager SAP NW2004S Monitoring Setup Guide SP12
http://slidepdf.com/reader/full/7858198-solution-manager-sap-nw2004s-monitoring-setup-guide-sp12 6/92
Monitoring Setup Guide for SAP NetWeaver 7.0 SP Stack 12
July 2007 6
6.5.2. Configuring the Connection Between CEN and the SLD 686.5.3. Configuring a Connection Between the ABAP and Java Stacks of CEN 70
6.5.4. Storing Access Data for the Java Systems to Be Administered 71
6.6. Monitoring SAP NetWeaver Composition Environment (CE) 7.1 with NWA
726.6.1. Connecting the CE System to the Administrative SLD 726.6.2. Creating the Required Associations for the CE System in the SLD 736.6.3. Configuring the Connections from the NWA to CE Systems 73
6.7. Problem Analysis Scenario for the Setup of the NWA 74
7. MOVING A CENTRAL MONITORING SYSTEM 79
7.1. Preparatory Steps in CEN2 807.1.1. Release and Patch of the New Central Monitoring System CEN2 80
7.1.2. Create Dispatching and CSMREG in CEN2 80
7.2. Steps for Moving the NWA 807.2.1. Initial Configuration of and Data Provision for the New Administrative SLD 807.2.2. Configuring the NWA 81
7.3. Deregistering/Registering CCMS Agents 81
7.4. Availability Monitoring (CCMSPING/GRMG) 827.4.1. Deregister/Register CCMSPING 827.4.2. Other Settings for Availability Monitoring with CCMSPING 82
7.4.3. Availability Monitoring with GRMG/GRMGLite 83
7.5. Settings for Monitored Systems 847.5.1. Entering Monitored ABAP Systems 84
7.5.2. System Groups 847.5.3. Central Display of Statistics Data with Transaction ST03G 84
7.6. Checking the Dataset of the Administrative SLD 85
7.7. Central Performance History 85
7.8. Properties and Methods 85
7.8.1. Method Definitions and Releases 857.8.2. Properties and Method Assignments 877.8.3. Central Auto-Reactions 87
7.9. Monitor Definitions and Monitor Sets 88
7.10. Other Points 887.10.1. Monitoring Infrastructure Alerts 88
7.10.2. Special Monitoring Tasks 88
8. ADDITIONAL INFORMATION 90
8.1. Known Problems 90

7/15/2019 7858198 Solution Manager SAP NW2004S Monitoring Setup Guide SP12
http://slidepdf.com/reader/full/7858198-solution-manager-sap-nw2004s-monitoring-setup-guide-sp12 7/92
Monitoring Setup Guide for SAP NetWeaver 7.0 SP Stack 12
July 2007 7
8.1.1. Error when Generating the CSMCONF Start File 908.1.2. Agent registration not possible with Visual Administrator 90
8.1.3. Tab Page CCMS Agent Configuration in VA is missing 908.1.4. Agent registration fails due to wrong password 90
8.2. SAP Service Marketplace 90
8.3. Useful SAP Notes 91
7/15/2019 7858198 Solution Manager SAP NW2004S Monitoring Setup Guide SP12
http://slidepdf.com/reader/full/7858198-solution-manager-sap-nw2004s-monitoring-setup-guide-sp12 8/92
Monitoring Setup Guide for SAP NetWeaver 7.0 SP Stack 12
July 2007 8
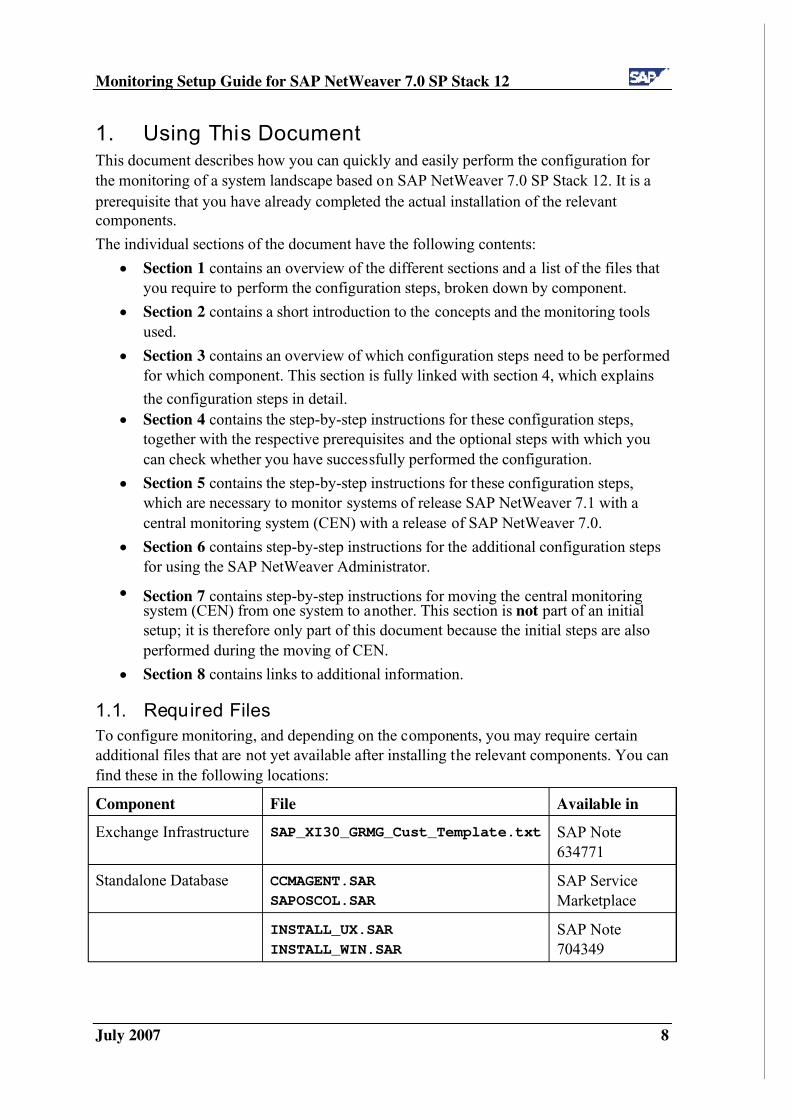
1. Using This DocumentThis document describes how you can quickly and easily perform the configuration for
the monitoring of a system landscape based on SAP NetWeaver 7.0 SP Stack 12. It is a
prerequisite that you have already completed the actual installation of the relevant
components.
The individual sections of the document have the following contents:
Section 1 contains an overview of the different sections and a list of the files that
you require to perform the configuration steps, broken down by component.
Section 2 contains a short introduction to the concepts and the monitoring tools
used.
Section 3 contains an overview of which configuration steps need to be performed
for which component. This section is fully linked with section 4, which explains
the configuration steps in detail.
Section 4 contains the step-by-step instructions for these configuration steps,
together with the respective prerequisites and the optional steps with which you
can check whether you have successfully performed the configuration.
Section 5 contains the step-by-step instructions for these configuration steps,
which are necessary to monitor systems of release SAP NetWeaver 7.1 with a
central monitoring system (CEN) with a release of SAP NetWeaver 7.0.
Section 6 contains step-by-step instructions for the additional configuration steps
for using the SAP NetWeaver Administrator.
Section 7 contains step-by-step instructions for moving the central monitoringsystem (CEN) from one system to another. This section is not part of an initial
setup; it is therefore only part of this document because the initial steps are also
performed during the moving of CEN.
Section 8 contains links to additional information.
1.1. Required Files
To configure monitoring, and depending on the components, you may require certain
additional files that are not yet available after installing the relevant components. You can
find these in the following locations:
Component File Available in
Exchange Infrastructure SAP_XI30_GRMG_Cust_Template.txt SAP Note
634771
Standalone Database CCMAGENT.SAR
SAPOSCOL.SAR
SAP Service
Marketplace
INSTALL_UX.SAR
INSTALL_WIN.SAR
SAP Note
704349
7/15/2019 7858198 Solution Manager SAP NW2004S Monitoring Setup Guide SP12
http://slidepdf.com/reader/full/7858198-solution-manager-sap-nw2004s-monitoring-setup-guide-sp12 9/92
Monitoring Setup Guide for SAP NetWeaver 7.0 SP Stack 12
July 2007 9
2. Introduction
2.1. Motivation
Monitoring a system landscape is a complex task of significant importance for every
company that operates one or more SAP systems. The complexity increases with every
additional system, component, or extension.
With the monitoring architecture of the CCMS (Computing Center Management System),
SAP provides a flexible and universally-usable infrastructure with which you can monitor
your entire IT landscape centrally, and which reports problems quickly and reliably.
The monitoring architecture is delivered free-of-charge with every SAP NetWeaver
Application Server. The architecture runs on every SAP NetWeaver Application Server
and can be easily extended to include additional SAP and non-SAP components.
The concept of the monitoring architecture is to make all required information availablein a central monitoring system (CEN), and therefore to make the administrators’ work
easier. Problems are displayed as soon as they occur; the log files can also be accessed
from one location, which reduces the time required for error identification and correction.
In this way, the monitoring architecture allows you to achieve greater efficiency with
lower costs.
Additional configuration steps allow advanced technologies, such as notifications,
meaning that administrators no longer have to actively check the systems for alerts.
These instructions combine the configuration steps required for monitoring a system
landscape based on SAP NetWeaver 7.0 SP Stack 12. SAP Support can only provide
optimal support for landscapes for which these configuration steps have been performed.
2.2. Technology
2.2.1. Availability Monitoring
It is not possible to uniquely define availability with regard to IT components. In this
way, “availability” can mean the existence of a process at operating system level. Other
definitions of availability could include, for example, the provision of a service within a
certain time or the average time for performing a user action between 08:00 and 18:00.
SAP provides different mechanisms for availability monitoring. The mechanisms havethe following in common:
The availability information is usually technical.
The availability check is performed – once it has been set up – periodically and
without user interaction.
The result of the check is reported in the central CCMS and therefore also in the
Solution Manager. This means that an availability monitor can be set up centrally
that displays the status of the individual components. It is also possible to
implement automatisms and notifications using auto-reactions.
Availability is checked at application-level with the Generic Request and Message
Generator (GRMG).
7/15/2019 7858198 Solution Manager SAP NW2004S Monitoring Setup Guide SP12
http://slidepdf.com/reader/full/7858198-solution-manager-sap-nw2004s-monitoring-setup-guide-sp12 10/92
Monitoring Setup Guide for SAP NetWeaver 7.0 SP Stack 12
July 2007 10
With the GRMG, the central system periodically calls a GRMG application using a URL.
The GRMG application performs component-specific checks and returns the result of the
checks to the central system.
If a GRMG check is not possible or not meaningful for a component, it is possible at least
to prove the existence of the corresponding process at operating system level. A check of
this type provides defines the required (but not sufficient) prerequisite for the component
availability. The check is performed by the SAP program SAPOSCOL and the
SAPCCMSR agent.
For more detailed information about the GRMG, see [GRMG].
2.2.2. Monitoring Log Files
JAVA-based applications write messages to log files. In complex applications, important
messages can be distributed across significantly more than 100 log files. To ensure stable
operation, To ensure stable operation, these log files should be regularly checked for error messages.
SAP provides a mechanism for automatically analyzing log files. With this mechanism,
the CCMS agent SAPCCMSR checks the log files every minute for predefined search
patterns. If the agent find the pattern, it reports an alert in the central monitoring system.
The administrator can be informed from there on the basis of the alert.
As an administrator, you can see all checked log files in the alert monitor (transaction
RZ20) of the central monitoring system. If an error occurs, you can expand the
corresponding subtree in the Logfile Monitoring monitor, and find the name and path of
the log file in which an error was logged from the Complete Name node.
Advantages of central log file monitoring and alerting:
Regular checks of the large number of log files are performed automatically.
The administrator can be automatically notified if problems occur.
The standalone log viewer provides you central access to all log files in your
NetWeaver landscape (even if the corresponding J2EE Engine is no longer
running).
The standalone log viewer can also display ASCII-based logs for other
applications, such as the database.
2.2.3. Distr ibuted Statist ics Records (DSR)Statistics records are generated so that you can monitor the performance of an ABAP
system and its components. You can use these statistics records to determine what
workload is generated and which resources are used when an action is performed in the
system. This means that you obtain
An exact picture of the general performance of a system
If problems occur, information about their cause
Distributed Statistics Records (DSRs) extend this concept to non-ABAP components,
such as the J2EE Engine.

7/15/2019 7858198 Solution Manager SAP NW2004S Monitoring Setup Guide SP12
http://slidepdf.com/reader/full/7858198-solution-manager-sap-nw2004s-monitoring-setup-guide-sp12 11/92
Monitoring Setup Guide for SAP NetWeaver 7.0 SP Stack 12
July 2007 11
No separate configuration steps are required for the writing of DSRs, you
only need to activate the display of the corresponding component in the
Global Workload Monitor of CEN.For general information about DSRs, see the SAP NetWeaver Library under SAP
NetWeaver Application Platform Java Technology in SAP Web Application Server
Administration Manual Server Administration Monitoring Statistics
Distributed Statistics Records (DSRs).
2.3. Components of Monitor ing
2.3.1. Alert Moni tor
The alert monitor is the central tool with which you can efficiently administer and
monitor distributed SAP solutions or client-server systems. The alert monitor displays problems quickly and reliably. The alert monitor has, among other things, the following
properties:
You can use the alert monitor to monitor all SAP and non-SAP systems, the host
systems and the database completely and in detail.
All errors generate alerts that are displayed in a tree structure; the most significant
error is reported upward in the display hierarchy.
You can assign analysis and auto-reaction methods to the individual nodes. These
methods contribute to quicker processing of the error.
You can adjust all settings individually and configure your own monitors.For general information about the alert monitor, see the SAP NetWeaver Library under
SAP NetWeaver Solution Life Cycle Management Solution Monitoring
Monitoring in CCMS Alert Monitor .
2.3.2. Visual Administrator
The J2EE Engine Visual Administrator is a graphical user interface for administering
entire clusters, all cluster elements, and all modules that are running on the J2EE Engine.
Among other things, it includes the following functions in a single user interface:
Obtaining general information about a service, a manager, and interface, or a
library
Administration and changing of the properties for services and managers
Configuration of global properties
Administration and monitoring at runtime
Performing deployments of applications
2.3.3. System Landscape Director y
The SAP System Landscape Directory (SLD) is the central information provider in a
system landscape. The SLD contains two types of information:

7/15/2019 7858198 Solution Manager SAP NW2004S Monitoring Setup Guide SP12
http://slidepdf.com/reader/full/7858198-solution-manager-sap-nw2004s-monitoring-setup-guide-sp12 12/92
Monitoring Setup Guide for SAP NetWeaver 7.0 SP Stack 12
July 2007 12
Component information: all available SAP products and components and their
versions. If appropriate, external products are also registered here.
Landscape description: all installed systems in a system landscape.
2.3.4. SAP NetWeaver Administrator The SAP NetWeaver Administrator (NWA) unifies the most important administration and
monitoring tools both for Java and for ABAP systems in a new, browser-based user
interface. The most important advantages of the NWA are:
You no longer need to switch between different tools for administration,
troubleshooting, and problem analysis of your entire SAP NetWeaver system
landscape.
There is now a central administration tool available to you landscape-wide for
both Java and ABAP systems for starting and stopping instances, checking
configuration settings and logs, and monitoring error-free functioning of components.
The interface follows the current guidelines for interface design, is easy-to-use,
task-oriented, and complete. By using Web Dynpro, it runs in a normal browser.
The interface allows seamless navigation to other SAP NetWeaver administration
tools (User Management Engine, in the future also System Landscape Directory,
Adaptive Computing).
For Java, the NWA represents the crossover from various expert tools to an
integrated, simple, and clear solution. The NWA also completes the integration of
the data sources for monitoring. For ABAP, the NWA represents the crossover from many different expert
transactions, some of which are difficult to use, to integrated, centrally available
information.
The NWA is delivered for the first time for SAP NetWeaver 04 SP Stack 12. A more
advanced version is delivered with SAP NetWeaver 7.0. It is intended to deliver an
advanced version with SAP NetWeaver 7.1. The NWA will also be continually further
developed in later releases, and extended with additional administration and monitoring
functions.
2.3.5. CCMS AgentsCCMS agents are independent processes with an interface using RFC to a central
monitoring system and an interface to the shared memory. These agents have the
following properties:
A connection to CEN using RFC, to ensure greater downtime security and general
availability
Use of the push technology to optimize performance when reading and writing
monitoring attributes and alerts
Inclusion of the operating system collector SAPOSCOL to monitor processes at
operating system level. Connection to systems with no SAP NetWeaver Application Server
7/15/2019 7858198 Solution Manager SAP NW2004S Monitoring Setup Guide SP12
http://slidepdf.com/reader/full/7858198-solution-manager-sap-nw2004s-monitoring-setup-guide-sp12 13/92
Monitoring Setup Guide for SAP NetWeaver 7.0 SP Stack 12
July 2007 13
Monitoring of any log files
There are various CCMS agents, including:
Agent Task
SAPCCMSR Monitoring of components on which no SAP ABAP instance is
active, such as the J2EE Engine or SAP IPC
SAPCCM4X Monitoring of SAP ABAP systems as of SAP Basis 4.X
For detailed information about CCMS agents, see [Agents].
2.3.6. Operating System Collector SAPOSCOL
The operating system collector SAPOSCOL is an independent program that runs in the
operating system background. It functions independently of the SAP instances, exactly
once per monitored host. SAPOSCOL collects data about operating system resources,
including:
Usage of virtual and physical memory
CPU utilization
Utilization of physical hard disks and file systems
Resource usage of running processes
For more detailed information about SAPOSCOL, see [SAPOSCOL].
2.3.7. Standalone Log Viewer
With the standalone log viewer, you can monitor any J2EE Engine or Java application log
files, even if the J2EE Engine is not functioning correctly, cannot be started, or is not
available on the system to be monitored. The standalone log viewer contains any number
of servers and one client:
The server of the standalone log viewer monitors log files that are registered with
this server. It must be installed on every host of the J2EE system landscape. The
various servers function independently of each other.
The client of the standalone log viewer connects to one or more servers of the
standalone log viewer and displays the contents of the log files. You only need to
install the client once in the J2EE system landscape.
For general information about the standalone log viewer, see the SAP NetWeaver Libraryunder SAP NetWeaver SAP NetWeaver by Key Capability Application Platform by
Key Capability Java Technology in SAP Web Application Server Administration
Manual Supportability and Performance Management Logging Log Viewer
Standalone Log Viewer .
2.3.8. Global Workload Monitor
The Global Workload Monitor (transaction ST03G) displays statistical records for entire
landscapes and therefore allows the analysis of statistical data from ABAP and non-
ABAP systems. You can use this data to analyze the workload of the monitored
components in great detail.
7/15/2019 7858198 Solution Manager SAP NW2004S Monitoring Setup Guide SP12
http://slidepdf.com/reader/full/7858198-solution-manager-sap-nw2004s-monitoring-setup-guide-sp12 14/92
Monitoring Setup Guide for SAP NetWeaver 7.0 SP Stack 12
July 2007 14
While statistics records for an ABAP system can only trace actions that are processed by
ABAP components, you can use Distributed Statistics Records (DSRs) to trace actions
that are processed by, for example, the J2EE Engine, ITS, and TREX. You can even do so
across component boundaries.
7/15/2019 7858198 Solution Manager SAP NW2004S Monitoring Setup Guide SP12
http://slidepdf.com/reader/full/7858198-solution-manager-sap-nw2004s-monitoring-setup-guide-sp12 15/92
Monitoring Setup Guide for SAP NetWeaver 7.0 SP Stack 12
July 2007 15
3. Overview of the Configuration StepsThis section lists the configuration steps required for the different SAP NetWeaver
components. Together with the detailed description of the installation steps in section 0,
the tables provide a template for the configuration of your IT landscape.
Print this section and perform the specified steps for each component. A link is provided
below to a step-by-step description for the areas in which manual steps are required.
First perform the following steps in any case:
In CEN:
Adjusting the Central Monitoring System (CEN) [page 18]
For every instance of a J2EE Engine:
Registering a CCMS Agent SAPCCMSR [page 26]
Configuring Availability Monitoring with the GRMG [page 32]For every ABAP instance:
Registering a CCMS Agent SAPCCM4X [page 24]
If you want to use the SAP NetWeaver Administrator, perform the following steps
landscape-wide:
Setting Up Using the [page 56]
Setting Up the Administrative SLD [page 63]
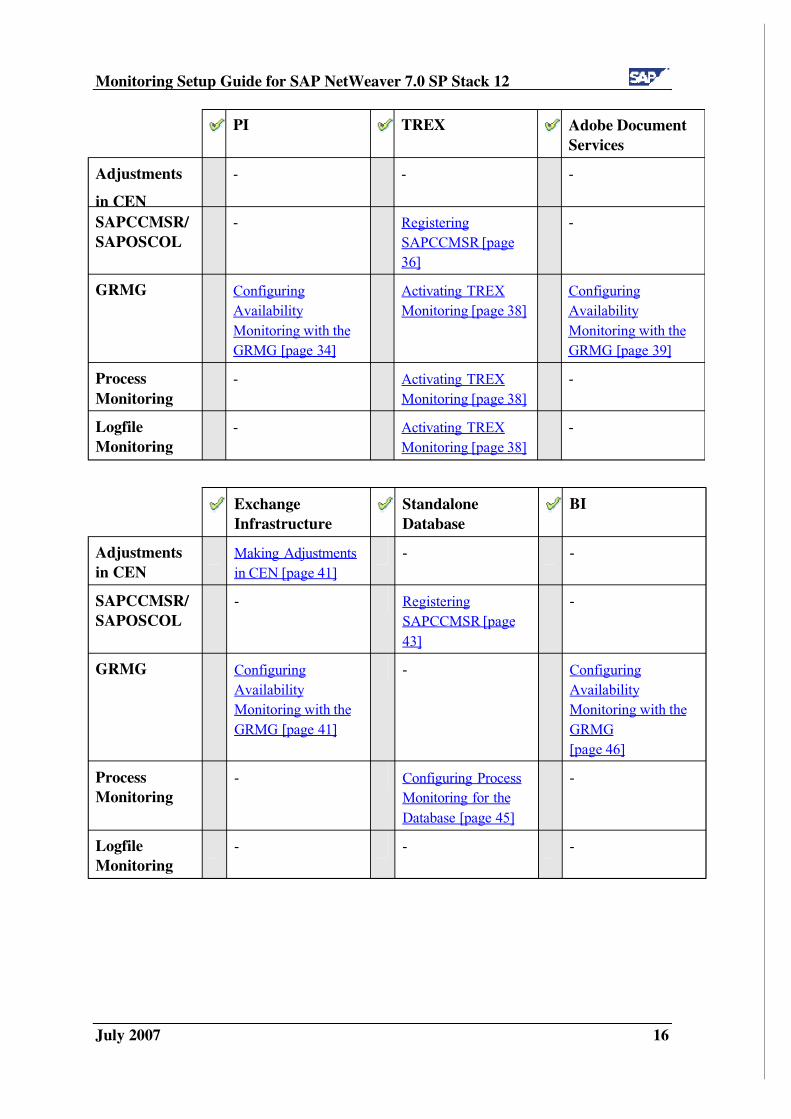
Now perform the appropriate configuration steps from the table below, depending on the
components in use in your system landscape. The table contains a corresponding link for
each area in which manual steps are required, as well as an empty column ( ), whichyou can use for marking off the steps that you have already performed.
A special case occurs, if you want to monitor components based on SAP
NetWeaver 7.1 centrally. Until the general shipment of SAP NetWeaver
7.1, still use a central monitoring system with release SAP NetWeaver 7.0
(see Monitoring SAP NetWeaver 7.1 Systems [page 49]).
7/15/2019 7858198 Solution Manager SAP NW2004S Monitoring Setup Guide SP12
http://slidepdf.com/reader/full/7858198-solution-manager-sap-nw2004s-monitoring-setup-guide-sp12 16/92
Monitoring Setup Guide for SAP NetWeaver 7.0 SP Stack 12
July 2007 16
PI TREX Adobe Document
Services
Adjustments
in CEN
- - -
SAPCCMSR/
SAPOSCOL
- Registering
SAPCCMSR [page
36]
-
GRMG Configuring
Availability
Monitoring with the
GRMG [page 34]
Activating TREX
Monitoring [page 38]
Configuring
Availability
Monitoring with the
GRMG [page 39]
Process
Monitoring
- Activating TREX
Monitoring [page 38]
-
Logfile
Monitoring
- Activating TREX
Monitoring [page 38]
-
Exchange
Infrastructure
Standalone
Database
BI
Adjustments
in CEN
Making Adjustments
in CEN [page 41]
- -
SAPCCMSR/
SAPOSCOL
- Registering
SAPCCMSR [page
43]
-
GRMG Configuring
Availability
Monitoring with the
GRMG [page 41]
- Configuring
Availability
Monitoring with the
GRMG
[page 46]
Process
Monitoring
- Configuring Process
Monitoring for the
Database [page 45]
-
Logfile
Monitoring
- - -

7/15/2019 7858198 Solution Manager SAP NW2004S Monitoring Setup Guide SP12
http://slidepdf.com/reader/full/7858198-solution-manager-sap-nw2004s-monitoring-setup-guide-sp12 17/92
Monitoring Setup Guide for SAP NetWeaver 7.0 SP Stack 12
July 2007 17
Mobile
Infrastructure
Adjustments
in CEN
Monitoring the SAP
Mobile Infrastructure[page 48]
SAPCCMSR/
SAPOSCOL
-
GRMG Monitoring the SAP
Mobile Infrastructure
[page 48]
Process
Monitoring
-
Logfile
Monitoring
-
7/15/2019 7858198 Solution Manager SAP NW2004S Monitoring Setup Guide SP12
http://slidepdf.com/reader/full/7858198-solution-manager-sap-nw2004s-monitoring-setup-guide-sp12 18/92
Monitoring Setup Guide for SAP NetWeaver 7.0 SP Stack 12
July 2007 18
4. Configuration Steps in Detail
4.1. Adjusting the Central Monitoring System (CEN)
Prerequisites:
CEN has the NW 7.0 release and Support Package level discussed
in this document.
You have a user with administrator authorization in CEN.
4.1.1. Activating Background and Central System Dispatching
For all data collection methods in the monitoring architecture to be correctly started,
background dispatching needs to be activated. It starts all data collection methods that are
executed periodically in the background process (as jobs).
To execute an auto-reaction in CEN for alerts from remote systems, central systemdispatching needs to be activated.
Activate background dispatching in CEN and in all monitored ABAP
systems in client 000.
Step-by-Step
1. Call transaction RZ21. The Monitoring: Properties and Methods screen appears.
2. Choose Technical Infrastructure Local Method Execution Activate Background Dispatching.
Background dispatching is performed by the job
SAP_CCMS_MONI_BATCH_DP, which runs once an hour. Note that not only
this job, but also the data collection methods started by this job, run under
your user name. You should therefore ensure that your user has the
authorizations required for this.
Activate central system dispatching in CEN:
Step-by-Step
3. Call transaction RZ21. The Monitoring: Properties and Methods screen appears.
4. Choose Technical Infrastructure Configure Central System Activate CentralSystem Dispatching.
Central system dispatching is performed by the job
SAP_CCMS_CENSYS_DISPATCHER .
4.1.2. Creating the CSMREG User
You require a user with specific, greatly restricted authorizations for communication
between monitored systems and CEN.
7/15/2019 7858198 Solution Manager SAP NW2004S Monitoring Setup Guide SP12
http://slidepdf.com/reader/full/7858198-solution-manager-sap-nw2004s-monitoring-setup-guide-sp12 19/92
Monitoring Setup Guide for SAP NetWeaver 7.0 SP Stack 12
July 2007 19
You must create this user in CEN and all monitored ABAP systems
yourself.
You need to use a backward-compatible password, if you are monitoring
systems with a release of SAP Web AS 6.20 or lower. A password is
backward-compatible if it does not contain any lower-case letters and is a
maximum of 8 characters long (see also SAP Note 807895 and Agent
registration fails due to wrong password [page 90]).
Step-by-Step
5. Call transaction RZ21 in the relevant systems.
6. Choose Technical Infrastructure Configure Central System Create
CSMREG User .7. Specify any password for this user. You require it during the installation and
registration of the CCMS agents and when creating RFC destinations in monitored
systems, among other things.
4.1.3. Creating the CSMCONF Start File for CCMS Agents
During the registration of CCMS agents, you specify information about the CEN and
about the users used for communication between the agent and CEN. Create a
CSMCONF start file in CEN; you will require this file later, during the registration of theCCMS agents. In this case, the current user is used as the required user with
administration authorization.Step-by-Step
1. In CEN, call transaction RZ21.
2. Choose Technical Infrastructure Configure Central System Create
CSMCONF Start File for Agents.
3. Define the storage location. When doing so, ensure that you will be able to access
this file when setting up the various components.
If an error message appears when saving the file, this can be due to the fact
that you do not have the current version of SPA GUI. In this case, save the
CSMCONF file as a text file and then delete the . t x t file extension.
4. You should keep a CEN window open for the rest of the setup process, so that you
can easily check that the other steps have been successful.
4.1.4. Entering Monitored ABAP Systems in CEN
To monitor remote ABAP systems in CEN, create a corresponding entry in the alert
monitor. To do this, first set up two RFC destinations for the monitored system in CEN;
these RFC destinations each serve one of the following purposes:
o Data collection (transferring monitoring data to CEN)o Analysis (calling analysis methods in the monitored system from CEN)
7/15/2019 7858198 Solution Manager SAP NW2004S Monitoring Setup Guide SP12
http://slidepdf.com/reader/full/7858198-solution-manager-sap-nw2004s-monitoring-setup-guide-sp12 20/92
Monitoring Setup Guide for SAP NetWeaver 7.0 SP Stack 12
July 2007 20
Step-by-Step
1. Call transaction RZ21 in CEN.
2. Choose Technical Infrastructure Configure Central System Create Entry for
Remote System.3. The Monitoring: Create New Entry screen appears. Choose Goto RFC
Connections.
4. If no suitable RFC destination exists for the system that you want to monitor,
choose Create.
5. Make the following specifications on the definition screen:
o RFC Destination: Enter a name for the RFC destination; we recommend the
following naming convention:
<SID of the monitored system>_RZ20_COLLECT or
<SID of the monitored system>_RZ20_ANALYZE
o Connection Type: Enter 3.
o Description: Enter a description for the RFC destination.
Choose the Logon/Security tab page, and, depending on the RFC destination to
be created, enter the data for the appropriate user in the Logon group box:
o RFC Destination for Data Collection <SID>_RZ20_COLLECT: Enter the
CSMREG user that you created in the relevant system in accordance with
Creating the CSMREG User [page 18].
o RFC Destination for the Execution of the Analysis Method
<SID>_RZ20_ANALYZE: Either choose the Current User option, or enter any
user of your choice (in both cases, the user must have authorization for the
alert monitor and for system administration in the target system).
6. Choose the Technical Settings tab page, and make the required entries. We
recommend that you choose the option Yes for load distribution, and select the
radio button Hostname for Save to database as.
7. Save your entries and set up the second RFC destination in the same way.
8. To return to the Monitoring: Create New Entry screen, choose the Back button.
9. Create the entry for monitoring a remote ABAP system here. Make the following
entries when doing so:
o Target System ID: System ID of the monitored system
o RFC Destination of the Target System for Data Collection and RFC
Destination of the Target System for Executing Analysis Methods are the
names of the RFC connections to the monitored system that you have just
created.
10. Save your entries, and enter all other ABAP systems to be monitored in the same
way.
7/15/2019 7858198 Solution Manager SAP NW2004S Monitoring Setup Guide SP12
http://slidepdf.com/reader/full/7858198-solution-manager-sap-nw2004s-monitoring-setup-guide-sp12 21/92
Monitoring Setup Guide for SAP NetWeaver 7.0 SP Stack 12
July 2007 21
Checking the Entries (Optional)
11. To check the entries for the monitored systems, call transaction RZ21, select the
radio button System Overview in the Topology group box, and choose the button
Display Overview.
12. The system displays a list of the monitored systems. To test the connection, select
the desired row and choose the Test Single Connection button.
4.1.5. Entering Moni tored ABAP Systems in ST03G
If you want to monitor the statistical data for the monitored ABAP systems in CEN, use
the Global Workload monitor to do so, and enter an RFC destination for the monitored
system in this transaction.
Prerequisites
For you to be able to display statistics data of a remote ABAP system in CEN, the job
SAP_COLLECTOR_FOR_PERFMONITOR must be scheduled in the correspondingmonitored ABAP system. To schedule the job, proceed as follows:
13. Start transaction SM36 in the monitored ABAP system.
14. Choose Standard Jobs.
15. In the SAP Component input field, select the BC Basis using the possible entries
help.
16. In the Job Name input field, select the entry
SAP_COLLECTOR_FOR_PERFMONITOR using the possible entries help.
17. For the Start Time, choose the radio button Immed., and for the Period , select the
Hourly radio button.
18. Save your settings.
Step-by-Step
1. In CEN, call transaction ST03G.
2. In the navigation bar, expand the subtree Settings & Log, and double-click the
System Selection entry.
3. To also view the desired ABAP system in the list of the monitored components,
first display a system list by choosing the button Systems <desired list>.
4. Add an additional row to the list by choosing the button (Append Row). Enter
the following data in this row:
Column Entry
Activated Check the checkbox (together with the other components that
you want to monitor)
Component Name under which the monitored system is displayed; enter
<SysID> or <SYSID> on <Host>
Comp. Type SAP R/3
Mon. Sys. System ID of CEN

7/15/2019 7858198 Solution Manager SAP NW2004S Monitoring Setup Guide SP12
http://slidepdf.com/reader/full/7858198-solution-manager-sap-nw2004s-monitoring-setup-guide-sp12 22/92
Monitoring Setup Guide for SAP NetWeaver 7.0 SP Stack 12
July 2007 22
Column Entry
Mon. Sys. Dest. RFC destination of the monitored system; if a suitable
destination does not yet exist, create it using transaction SM59
(see also Creating RFC Destinations for Displaying Componentsin ST03G [page 22])
5. Choose the Apply button.
6. To save this list of monitored components in one of the five predefined storage
locations, choose the button (Save) <desired list>, and specify a name
there.
Checking the Entries (Optional)
7. To view the statistical data for one of the activated components, expand the path
Workload <component name> in the navigation bar.
4.1.6. Creating RFC Destinations for Displaying Components inST03G
To be able to display statistics data for remote ABAP or double-stack systems with the
Global Workload Monitor in a CEN, you need to create the required RFC destinations
yourself. The ABAP or DSR statistics data is read from the remote system using this
destination.
After you have created the RFC destinations in transaction SM59, you still need to inform
the Global Workload Monitor of the RFC destination and activate the monitored
component. For a description of the steps required to do this, see the following sections:
Entering Monitored ABAP Systems in ST03G [page 21]
Displaying DSRs for the Java Instance in CEN [page 30]
This section contains information about creating the required RFC destination.
Prerequisites
You can enter a user name and password when creating the RFC destination to the
monitored system. You have the following options when doing so:
If you do not specify a user and especially a password when creating the RFC
destination, you need to explicitly log on to the relevant system again before
displaying the statistical data in transaction ST03G. If you specify a user and password when creating the RFC destination (or there is
a trusted system relationship between the systems), you can display the statistical
data for this system from transaction ST03G without explicitly logging on to the
monitored system. To avoid a security gap arising from this, this user should only
have authorization to read statistics data in the remote system (if security is not
ensured in another way). To do this, the user requires a profile that contains the
following authorizations:
Component type Authorization
Object
Field Value
ABAP System S_RFC RFC_FUGR FUGR

7/15/2019 7858198 Solution Manager SAP NW2004S Monitoring Setup Guide SP12
http://slidepdf.com/reader/full/7858198-solution-manager-sap-nw2004s-monitoring-setup-guide-sp12 23/92
Monitoring Setup Guide for SAP NetWeaver 7.0 SP Stack 12
July 2007 23
RFC_NAME SCSM_NW_WORKLOAD
SWNC_GLOB_SYSTEM
SCSM_GLOB_STAT
SAPWL_GLOB_STAT
ACTVT 16
RFC_FUGR FUGR
RFC_NAME SAPWLN3_COLLECTOR
SAPWLN3_UTILITIES
DSR component S_RFC
ACTVT 16
Depending on the release status of the monitored system, it is possible that
not all of the specified function groups exist in this system.
Activities
To create the RFC destination, start transaction SM59 in CEN and create an RFC
destination of type 3 with any name.
On the Logon/Security tab page, specify a user under whose name the logon to the remote
system is performed, and save the RFC destination.
4.1.7. Sett ing Up Availabil ity Monitoring with CCMSPING
You can use the CCMSPING availability agent to check whether remote systems and
their instances are available for work. It also collects important performance attributes for the dialog system on ABAP instances.
For a detailed description of availability monitoring, see the see the SAP
Help Portal under SAP NetWeaver SAP NetWeaver by KeyCapabiliy
Solution Life Cycle Management by Key Capability Solution
Monitoring Monitoring in the CCMS The Alert Monitor Special
Monitoring Functions of the Alert Monitor Availability Monitoring with
CCMSPING, or follow the link below:
http://help.sap.com/saphelp_nw70/helpdata/en/38/9e3337d7840ffee100000
09b3810a5/frameset.htm.
Back to the Overview
4.2. Monitoring ABAP Instances
Prerequisites:
The monitored system has the NW 7.0 release and Support Package
level discussed in this document.
You have a user at operating system level on the ABAP instance
host (<SID>adm ).
You have an administration user for the system.
7/15/2019 7858198 Solution Manager SAP NW2004S Monitoring Setup Guide SP12
http://slidepdf.com/reader/full/7858198-solution-manager-sap-nw2004s-monitoring-setup-guide-sp12 24/92
Monitoring Setup Guide for SAP NetWeaver 7.0 SP Stack 12
July 2007 24
You have performed the preparatory steps in CEN, as described in
Adjusting the Central Monitoring System (CEN) [page 18].
4.2.1. Registering a CCMS Agent SAPCCM4X
To monitor an ABAP instance of an SAP system, use the CCMS agent SAPCCM4X.This agent creates an alternative connection route between the monitored instance and the
central monitoring system (CEN). Since this alternative connection method no longer
requires a free work process, the access route is independent of error states of the ABAP
instance and is therefore more robust.
You have to register the agent SAPCCM4X for every ABAP instance of the monitored
system.
We recommend that you always use as current as possible a version of
your CCMS agent SAPCCM4X. You can check the version using thecommand sapccms4x –v. Check SAP Notes 809007, 914721, and
1013331 for information about changes to agents, and download a new
agent if these changes are relevant to you and your agent does not yet
provide the applicable improvements.
For more information about downloading agents, see the SAP Help Portal
under SAP NetWeaver SAP NetWeaver by KeyCapabiliy Solution
Life Cycle Management by Key Capability Solution Monitoring
Monitoring in the CCMS CCMS Agents Installing/Registering the
CCMS Agents for Experts Downloading CCMS Agents, or follow the
link below:
http://help.sap.com/saphelp_nw2004s/helpdata/en/ca/118110ff542640b7c8
6b570cc61ae3/frameset.htm.
Step-by-Step
1. Log on to the host of the ABAP instance as <SID>adm (UNIX) or
SAPService<SID> (Microsoft Windows), to ensure that the agent can access the
shared memory.
2. Copy the CSMCONF start file to the working directory of SAPCCM4X. This is in
the following location:
MS Windows: [drive]:\usr\sap\<SysID>\<inst.dir.>\log\sapccm4x
UNIX: /usr/sap/<SysID>/<inst.dir.>/log/sapccm4x
If the directory does not exist, create it.
3. The executable SAPCCM4X is located in the following directory:
MS Windows: [drive]:\usr\sap\<SysID>\SYS\exe\run
UNIX: /usr/sap/<SysID>/SYS/exe/run
4. In the directory of the executable, enter the command
sapccm4x –R pf=<profile path>.
7/15/2019 7858198 Solution Manager SAP NW2004S Monitoring Setup Guide SP12
http://slidepdf.com/reader/full/7858198-solution-manager-sap-nw2004s-monitoring-setup-guide-sp12 25/92
Monitoring Setup Guide for SAP NetWeaver 7.0 SP Stack 12
July 2007 25
<Profile path> specifies the start profile of the monitored instance. By
default, this is:
MS Windows: [drive]:\usr\sap\<SysID>\SYS\profile\<SysID>_<Name instance directory>_<Host>
UNIX: /usr/sap/<SysID>/SYS/profile/
<SysID>_<Name instance directory>_<Host>
5. During the registration, the system displays specifications from the CSMCONF
file to you again for confirmation. Confirm the specification by pressing the
ENTER key in each case. You only need to enter two parameters yourself:
o The password for the administration user in CEN, under which you created the
CSMCONF file
o The password for the CSMREG user 6. Under UNIX, you must ensure yourself that SAPCCM4X is automatically started
again when the host is restarted. To do this, enter the following command in the
inittab (/etc/inittab):
/usr/sap/<SysID>/SYS/exe/run/sapccm4x -DCCMS pf=<profile
path>
Checking the Agent Registration (Optional)
7. To check whether the agent was successfully registered with CEN, call transaction
RZ21 in CEN, select the radio button Agents for Remote Systems, and choose the
Display Overview button. The agent that you have just registered appears in thelist in the row SAPCCM4X. <host name>. <i nst . no. >.
4.3. Monitoring Java Instances
Prerequisites:
The J2EE Engine has the NW 7.0 release and Support Package
level discussed in this document.
You have a user at operating system level on the J2EE Engine host
(<SID>adm ).
You have an administration user for the J2EE Engine.
You have performed the preparatory steps in CEN, as described in
Adjusting the Central Monitoring System (CEN) [page 18].
If you’re facing problems with registering the agent, consider SAP note
817714 (see Agent registration not possible with Visual Administrator
[page 90]) and 929635 (see Tab Page CCMS Agent Configuration in VA is
missing [page 90]).
7/15/2019 7858198 Solution Manager SAP NW2004S Monitoring Setup Guide SP12
http://slidepdf.com/reader/full/7858198-solution-manager-sap-nw2004s-monitoring-setup-guide-sp12 26/92
Monitoring Setup Guide for SAP NetWeaver 7.0 SP Stack 12
July 2007 26
4.3.1. Registering a CCMS Agent SAPCCMSR (Java Standalone)
If you want to register the agent with a J2EE Engine of a double-stack
system, follow the procedure described in Registering a CCMS AgentSAPCCMSR (Double-Stack) [page 28].
The monitoring data for the J2EE Engine is transferred to central monitoring system
(CEN) using the CCMS agent SAPCCMSR. The agent is part of the installation package
of the Engine. You only need to register the agent once for each Java system with CEN
and to start the agent.
Step-by-Step
1. Log on to the host of a J2EE Engine of the system as <SID>adm .
2. Copy the start file CSMCONF (see Creating the CSMCONF Start File for CCMS
[page 19]) in the following directory:Windows: [drive]:\usr\sap\ccms\<SysID>_<Inst. No.>\sapccmsr
UNIX: /usr/sap/ccms/<SysID>_<Inst. No.>/sapccmsr
You can also save the start file to any directory that you can access from
your local host. In this case, however, you need to specify, during the
registration of the agent, where you saved the file. To do this, choose the
Change … button in the Monitoring service of the Visual Administrator
(see below), and specify the path of the start file. The file is then
automatically copied to the above directory.3. On the J2EE Engine’s host, switch to the following directory:
Windows: <J2EE home directory>\JC<Inst. No.>\j2ee\admin\
UNIX: <J2EE home directory>/JC<Inst. No.>/j2ee/admin/
If you have installed the J2EE Engine together with an ABAP Engine, the
letter combination in the name of the directory JC<Inst. No.> may
vary.
4. Start the Visual Administrator by calling the start script go (UNIX) or go.bat
(Microsoft Windows), and log on with your user as the J2EE Engine
administrator.
5. In the navigation bar, choose Cluster <SysID> Dispatcher Services
Monitoring, and choose the CCMS Agent Configuration tab page.
6. If you want to monitor multiple systems with the same system ID, select the Long
SID indicator, and enter an identifier for the system in this input field that is
unique within your system landscape. This “long system ID” must fulfill the
following conditions:
o The first three characters must be the system ID.
o The name can consist of a maximum of eight characters.
7/15/2019 7858198 Solution Manager SAP NW2004S Monitoring Setup Guide SP12
http://slidepdf.com/reader/full/7858198-solution-manager-sap-nw2004s-monitoring-setup-guide-sp12 27/92
Monitoring Setup Guide for SAP NetWeaver 7.0 SP Stack 12
July 2007 27
o The name must not contain an underscore ( _ ).
7. The access data for both users required in CEN is determined from the start file
and displayed in the corresponding fields. If necessary, you can change the names
of the users or the client.
8. Enter the passwords of the CEN Administration User and the CEN CSMREG User
in the Password column. The CEN Administration User is the user with
administrator authorization with which you created the CSMCONF start file; the
CEN CSMREG User is the user in CEN that you created under Creating the
CSMREG User [page 18].
If necessary, you can use the Information button to answer the following
questions:
Is the instance profile of the instance to be monitored valid?
Is the CSMCONF start file to be used valid?
What is the version of the CCMS agent SAPCCMSR?
9. Choose the Register button. The system displays the registration log; errors are
highlighted in red.
10. Under UNIX, the agent is automatically started by the startsap script when you
start the J2EE Engine. Under Microsoft Windows, you need to start the associated
service (which was created during the installation of the J2EE Engine) yourself.
To do this, on the Microsoft Windows host on which the agent is running, choose
Start
Settings
Control Panel
Administrative Tools
Services, and choose the service SAPCCMSR.<Instance No.> by double-clicking it. Set the
Start Type to Automatic, and choose Start .
Checking the Agent Registration (Optional)
11. To check whether the agent was successfully registered with CEN, call transaction
RZ21 in CEN, select the radio button Agents for Remote Systems, and choose the
Display Overview button. The agent that you have just registered appears in the
list in the row SAPCCMSR. <host name>. <i nst . no. >.
12. To check whether the J2EE Engine has been included in the system group
J2EE_Systems, call transaction RZ21, and choose Technical Infrastructure
Configure Central System Maintain System Groups. The system ID of the
J2EE Engine must be in the tree System Groups for the Alert Monitor
J2EE_Systems.
13. To check whether data has been transferred to CEN, call transaction RZ20, and
choose the Engines monitor from the SAP J2EE Monitor Templates monitor set.
There must be a <SI D>subtree in the monitor.
14. Check whether you can change the threshold values of any performance node for
the Java system from CEN (only if you have left the enable CCMS Customizing
checkbox selected).
7/15/2019 7858198 Solution Manager SAP NW2004S Monitoring Setup Guide SP12
http://slidepdf.com/reader/full/7858198-solution-manager-sap-nw2004s-monitoring-setup-guide-sp12 28/92
Monitoring Setup Guide for SAP NetWeaver 7.0 SP Stack 12
July 2007 28
4.3.2. Registering a CCMS Agent SAPCCMSR (Double-Stack)
In the case of a double-stack system, you need to register the agent with
two systems: primarily with the local ABAP system and secondarily withCEN. You only need to register and start the agent once per system.
If the J2EE Engine to be monitored is part of a double-stack system with both ABAP and
Java instances, follow the procedure below to register a CCMS agent:
1. Log on the host of a J2EE Engine of the system as <SID>adm .
2. Copy the CSMCONF start file (see Creating the CSMCONF Start File for CCMS
Agents [page 19]) to the following directory:
Windows: [drive]:\usr\sap\ccms\<SysID>_<Inst. No.>\sapccmsr
Unix: /usr/sap/ccms/<SysID>_<Inst. No.>/sapccmsr
You can also save the start file to any directory that you can access from
your local host. In this case, however, you need to specify, during the
registration of the agent, where you saved the file. To do this, choose the
Change … button in the Monitoring service of the Visual Administrator
(see below), and specify the path of the start file. The file is then
automatically copied to the above directory.
3. On the J2EE Engine’s host, switch to the following directory:
Windows: <J2EE home directory>\JC<Inst. No.>\j2ee\admin\
UNIX: <J2EE home directory>/JC<Inst. No.>/j2ee/admin/
If you have installed the J2EE Engine together with an ABAP Engine, the
letter combination in the name of the directory JC<Inst. No.> may
vary.
4. Start the Visual Administrator by calling the start script go (UNIX) or go.bat
(Microsoft Windows), and log on with your user as the J2EE Engine
Administrator.
5. In the navigation bar, choose Cluster <SysID> Dispatcher Services
Monitoring, and choose the CCMS Agent Configuration tab page.
6. If you want to monitor multiple systems with identical system IDs, select the Long
SID indicator, and enter an identifier for the system in this input field that is
unique within your system landscape. This “long system ID” must fulfill the
following conditions:
o The first three characters must be the system ID.
o The name can consist of a maximum of eight characters.
o The name must not contain an underscore ( _ ).
7/15/2019 7858198 Solution Manager SAP NW2004S Monitoring Setup Guide SP12
http://slidepdf.com/reader/full/7858198-solution-manager-sap-nw2004s-monitoring-setup-guide-sp12 29/92
Monitoring Setup Guide for SAP NetWeaver 7.0 SP Stack 12
July 2007 29
7. Since you want to register the agent with two systems, you require the access data
for two users for each of these systems, one of which is an administration user,
and the other being the communication user CSMREG.
8. Specify the access data of these users for the local ABAP system by making all of
the entries for the Local Administration User and Local CSMREG User rows. If
necessary, you can overwrite the predefined values.
9. Specify the access data of these users for CEN by making all of the entries for the
CEN Administration User and CEN CSMREG User rows. If necessary, you can
overwrite the predefined values. The CEN Administration User is the user with
administrator authorization with which you created the CSMCONF start file; the
CEN CSMREG User is the user in CEN that you created under Creating the
CSMREG User [page 18].
If you want to monitor the Java instances of your CEN, then the local ABAP
system and and the CEN are identical. In this case, you only see the entry for thelocal ABAP system.
If necessary, you can use the Information button to answer the following
questions:
Is the instance profile of the instance to be monitored valid?
Is the CSMCONF start file to be used valid?
What is the version of the CCMS agent SAPCCMSR?
10. Choose the Register button. The system displays the registration log; errors are
highlighted in red.
11. Under UNIX, the agent is automatically started by the startsap script when you
start the J2EE Engine. Under Microsoft Windows, you need to start the associated
service (which was created during the installation of the J2EE Engine) yourself.
To do this, on the Microsoft Windows host on which the agent is running, choose
Start Settings Control Panel Administrative Tools Services, and
choose the service SAPCCMSR.<Instance No.> by double-clicking it. Set the
Start Type to Automatic, and choose Start .
Checking the Agent Registration (Optional)
12. To check whether the agent was successfully registered with CEN, call transaction
RZ21 in CEN, select the Agents for Remote Systems radio button, and choose
Display Overview. The agent that you have just registered is displayed in the list
in the line SAPCCMSR. <host name>. <i nst . no. >.
13. To check whether the agent was successfully registered with the local ABAP
system, call transaction RZ21 in the local ABAP system, select the Agents for
Local System radio button, and choose Display Overview. The agent that you
have just registered is displayed in the list, in the line SAPCCMSR. <host
name>. <i nst . no. >.
14. To check whether the J2EE Engine was included in the system group J2EE_Systems, call transaction RZ21, and choose Techn. Infrastructure

7/15/2019 7858198 Solution Manager SAP NW2004S Monitoring Setup Guide SP12
http://slidepdf.com/reader/full/7858198-solution-manager-sap-nw2004s-monitoring-setup-guide-sp12 30/92
Monitoring Setup Guide for SAP NetWeaver 7.0 SP Stack 12
July 2007 30
Configure Central System Maintain System Groups. The system ID of the
J2EE Engine should be displayed in the tree System Groups for the Alert Monitor
J2EE_Systems.
15. To check whether data is being transferred to the CEN, call transaction RZ20, and
choose the Engines monitor from the SAP J2EE Monitor Templates monitor set. If
data is being transferred, there will be a subtree <SI D>in the monitor.
16. Check whether you can change the threshold values of any performance node for
the Java system from CEN (only if you have left the enable CCMS Customizing
checkbox selected).
4.3.3. Displaying DSRs for the Java Instance in CEN
You can use the Global Workload Monitor to display statistical data for any components
that write Distributed Statistics Records (DSRs). Components of this type are connected
to the CEN using the CCMS agent SAPCCMSR. Here, there are two possible cases: If the CEN was defined as the primary system of the agent during registration, the
monitored DSR component is automatically entered into the System Component
Repository (SCR) of CEN. To display the DSRs of this component in the Global
Workload Monitor (transaction ST03G), you only need to activate the component.
If the was only defined as a secondary system during registration, you need to
manually create an RFC connection between the secondary system and the
primary system to be able to display the DSR statistics data for this component in
CEN.
The case in which the CEN is defined as a secondary system of the agent
occurs in particular in a monitored ABAP+Java system (double-stack). In
this case, the SAPCCMSR CCMS agent that monitors a Java instance
should be registered primarily with the local ABAP system and
secondarily with CEN (see Registering a CCMS Agent SAPCCMSR
(Double-Stack) [page 28]).
If you have problems displaying DSRs, call up SAP note 926590.
PrerequisitesFor you to be able to display DSR statistics data in CEN, the job
SAP_COLLECTOR_FOR_NONE_R3_STAT must be scheduled in CEN. To schedule the
job, proceed as follows:
1. Start transaction SM36.
2. Choose Standard Jobs.
3. In the SAP Component input field, select the BC Basis using the possible entries
help.
4. In the Job Name input field, select the entry
SAP_COLLECTOR_FOR_NONE_R3_STAT using the possible entries help.
7/15/2019 7858198 Solution Manager SAP NW2004S Monitoring Setup Guide SP12
http://slidepdf.com/reader/full/7858198-solution-manager-sap-nw2004s-monitoring-setup-guide-sp12 31/92
Monitoring Setup Guide for SAP NetWeaver 7.0 SP Stack 12
July 2007 31
5. For the Start Time, choose the radio button Immed., and for the Period , select the
Hourly radio button.
6. Save your settings.
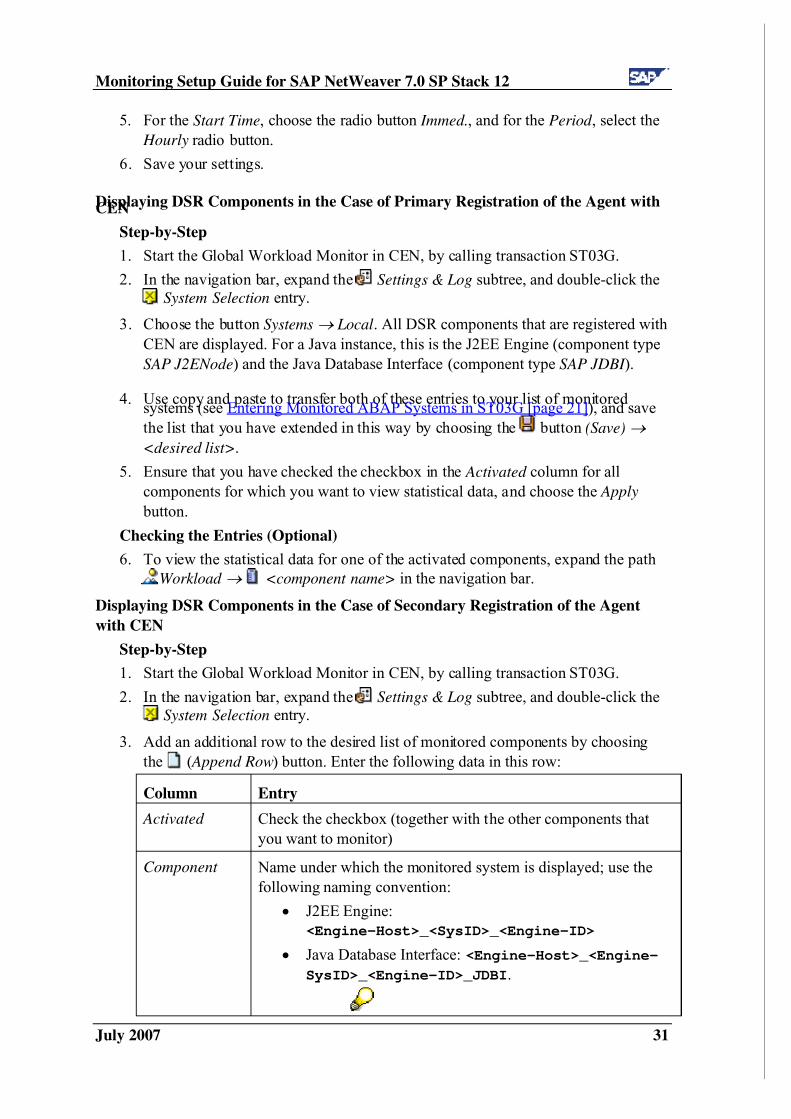
Displaying DSR Components in the Case of Primary Registration of the Agent withCEN
Step-by-Step
1. Start the Global Workload Monitor in CEN, by calling transaction ST03G.
2. In the navigation bar, expand the Settings & Log subtree, and double-click the
System Selection entry.
3. Choose the button Systems Local. All DSR components that are registered with
CEN are displayed. For a Java instance, this is the J2EE Engine (component type
SAP J2ENode) and the Java Database Interface (component type SAP JDBI ).
4. Use copy and paste to transfer both of these entries to your list of monitored systems (see Entering Monitored ABAP Systems in ST03G [page 21]), and save
the list that you have extended in this way by choosing the button (Save)
<desired list>.
5. Ensure that you have checked the checkbox in the Activated column for all
components for which you want to view statistical data, and choose the Apply
button.
Checking the Entries (Optional)
6. To view the statistical data for one of the activated components, expand the path
Workload <component name> in the navigation bar.
Displaying DSR Components in the Case of Secondary Registration of the Agent
with CEN
Step-by-Step
1. Start the Global Workload Monitor in CEN, by calling transaction ST03G.
2. In the navigation bar, expand the Settings & Log subtree, and double-click the
System Selection entry.
3. Add an additional row to the desired list of monitored components by choosing
the ( Append Row) button. Enter the following data in this row:
Column Entry
Activated Check the checkbox (together with the other components that
you want to monitor)
Component Name under which the monitored system is displayed; use the
following naming convention:
J2EE Engine:
<Engine-Host>_<SysID>_<Engine-ID>
Java Database Interface: <Engine-Host>_<Engine-
SysID>_<Engine-ID>_JDBI.
7/15/2019 7858198 Solution Manager SAP NW2004S Monitoring Setup Guide SP12
http://slidepdf.com/reader/full/7858198-solution-manager-sap-nw2004s-monitoring-setup-guide-sp12 32/92
Monitoring Setup Guide for SAP NetWeaver 7.0 SP Stack 12
July 2007 32
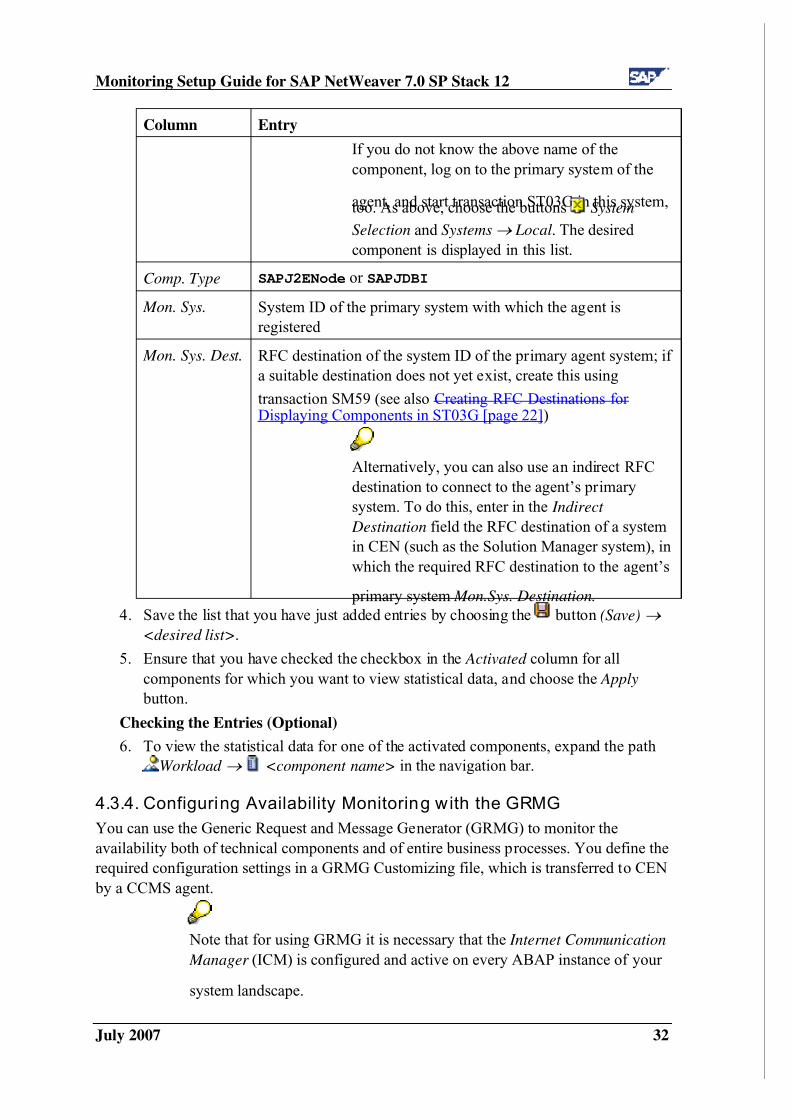
Column Entry
If you do not know the above name of the
component, log on to the primary system of the
agent, and start transaction ST03G in this system,too. As above, choose the buttons System
Selection and Systems Local. The desired
component is displayed in this list.
Comp. Type SAPJ2ENode or SAPJDBI
Mon. Sys. System ID of the primary system with which the agent is
registered
Mon. Sys. Dest. RFC destination of the system ID of the primary agent system; if
a suitable destination does not yet exist, create this using
transaction SM59 (see also Creating RFC Destinations for Displaying Components in ST03G [page 22])
Alternatively, you can also use an indirect RFC
destination to connect to the agent’s primary
system. To do this, enter in the Indirect
Destination field the RFC destination of a system
in CEN (such as the Solution Manager system), in
which the required RFC destination to the agent’s
primary system Mon.Sys. Destination.
4. Save the list that you have just added entries by choosing the button (Save)
<desired list>.
5. Ensure that you have checked the checkbox in the Activated column for all
components for which you want to view statistical data, and choose the Apply
button.
Checking the Entries (Optional)
6. To view the statistical data for one of the activated components, expand the path
Workload <component name> in the navigation bar.
4.3.4. Configuring Availability Monitoring with the GRMG
You can use the Generic Request and Message Generator (GRMG) to monitor the
availability both of technical components and of entire business processes. You define the
required configuration settings in a GRMG Customizing file, which is transferred to CEN
by a CCMS agent.
Note that for using GRMG it is necessary that the Internet Communication
Manager (ICM) is configured and active on every ABAP instance of your
system landscape.
7/15/2019 7858198 Solution Manager SAP NW2004S Monitoring Setup Guide SP12
http://slidepdf.com/reader/full/7858198-solution-manager-sap-nw2004s-monitoring-setup-guide-sp12 33/92
Monitoring Setup Guide for SAP NetWeaver 7.0 SP Stack 12
July 2007 33
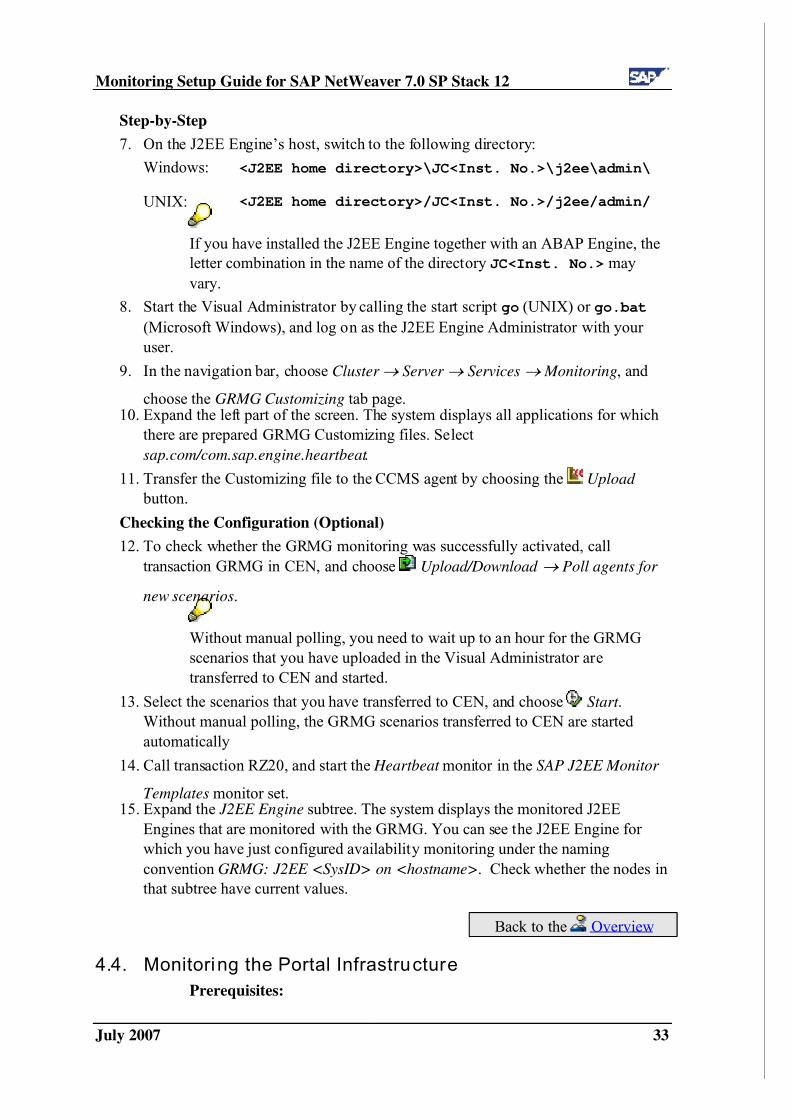
Step-by-Step
7. On the J2EE Engine’s host, switch to the following directory:
Windows: <J2EE home directory>\JC<Inst. No.>\j2ee\admin\
UNIX: <J2EE home directory>/JC<Inst. No.>/j2ee/admin/
If you have installed the J2EE Engine together with an ABAP Engine, the
letter combination in the name of the directory JC<Inst. No.> may
vary.
8. Start the Visual Administrator by calling the start script go (UNIX) or go.bat
(Microsoft Windows), and log on as the J2EE Engine Administrator with your
user.
9. In the navigation bar, choose Cluster Server Services Monitoring, and
choose the GRMG Customizing tab page.10. Expand the left part of the screen. The system displays all applications for which
there are prepared GRMG Customizing files. Select
sap.com/com.sap.engine.heartbeat .
11. Transfer the Customizing file to the CCMS agent by choosing the Upload
button.
Checking the Configuration (Optional)
12. To check whether the GRMG monitoring was successfully activated, call
transaction GRMG in CEN, and choose Upload/Download Poll agents for
new scenarios.
Without manual polling, you need to wait up to an hour for the GRMG
scenarios that you have uploaded in the Visual Administrator are
transferred to CEN and started.
13. Select the scenarios that you have transferred to CEN, and choose Start .
Without manual polling, the GRMG scenarios transferred to CEN are started
automatically
14. Call transaction RZ20, and start the Heartbeat monitor in the SAP J2EE Monitor
Templates monitor set.15. Expand the J2EE Engine subtree. The system displays the monitored J2EE
Engines that are monitored with the GRMG. You can see the J2EE Engine for
which you have just configured availability monitoring under the naming
convention GRMG: J2EE <SysID> on <hostname>. Check whether the nodes in
that subtree have current values.
Back to the Overview
4.4. Monitoring the Portal Infrastructure
Prerequisites:
7/15/2019 7858198 Solution Manager SAP NW2004S Monitoring Setup Guide SP12
http://slidepdf.com/reader/full/7858198-solution-manager-sap-nw2004s-monitoring-setup-guide-sp12 34/92
Monitoring Setup Guide for SAP NetWeaver 7.0 SP Stack 12
July 2007 34
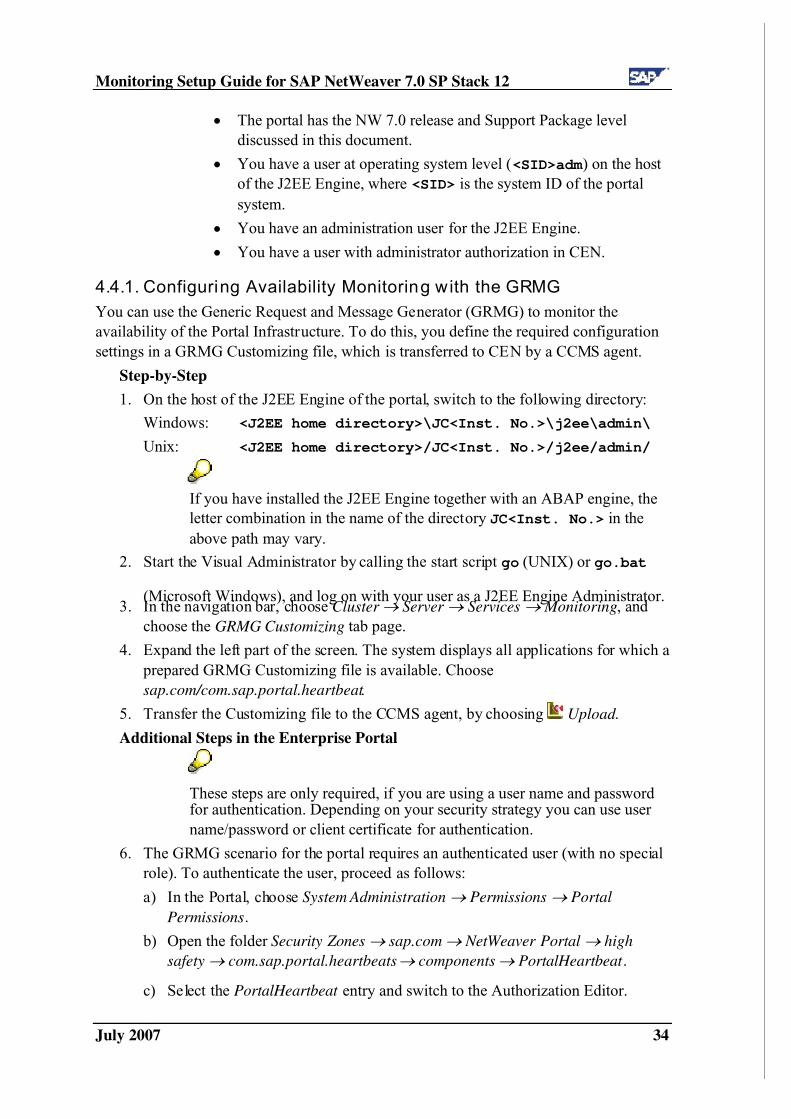
The portal has the NW 7.0 release and Support Package level
discussed in this document.
You have a user at operating system level (<SID>adm ) on the host
of the J2EE Engine, where <SID> is the system ID of the portal
system.
You have an administration user for the J2EE Engine.
You have a user with administrator authorization in CEN.
4.4.1. Configuring Availability Monitoring with the GRMG
You can use the Generic Request and Message Generator (GRMG) to monitor the
availability of the Portal Infrastructure. To do this, you define the required configuration
settings in a GRMG Customizing file, which is transferred to CEN by a CCMS agent.
Step-by-Step
1. On the host of the J2EE Engine of the portal, switch to the following directory:
Windows: <J2EE home directory>\JC<Inst. No.>\j2ee\admin\
Unix: <J2EE home directory>/JC<Inst. No.>/j2ee/admin/
If you have installed the J2EE Engine together with an ABAP engine, the
letter combination in the name of the directory JC<Inst. No.> in the
above path may vary.
2. Start the Visual Administrator by calling the start script go (UNIX) or go.bat
(Microsoft Windows), and log on with your user as a J2EE Engine Administrator.3. In the navigation bar, choose Cluster Server Services Monitoring, and
choose the GRMG Customizing tab page.
4. Expand the left part of the screen. The system displays all applications for which a
prepared GRMG Customizing file is available. Choose
sap.com/com.sap.portal.heartbeat .
5. Transfer the Customizing file to the CCMS agent, by choosing Upload .
Additional Steps in the Enterprise Portal
These steps are only required, if you are using a user name and password for authentication. Depending on your security strategy you can use user
name/password or client certificate for authentication.
6. The GRMG scenario for the portal requires an authenticated user (with no special
role). To authenticate the user, proceed as follows:
a) In the Portal, choose System Administration Permissions Portal
Permissions.
b) Open the folder Security Zones sap.com NetWeaver Portal high
safety com.sap.portal.heartbeats components PortalHeartbeat .
c) Select the PortalHeartbeat entry and switch to the Authorization Editor.
7/15/2019 7858198 Solution Manager SAP NW2004S Monitoring Setup Guide SP12
http://slidepdf.com/reader/full/7858198-solution-manager-sap-nw2004s-monitoring-setup-guide-sp12 35/92
Monitoring Setup Guide for SAP NetWeaver 7.0 SP Stack 12
July 2007 35
d) Add the desired user, assign the authorization Administrator=Read to the user,
and check the User checkbox.
e) Save your entries.
For more information, see the SAP Help Portal under SAP NetWeaver
SAP NetWeaver by KeyCapabiliy People Integration by Key Capability
Portal Administration Guide User Administration Role
Assignment Assigning Roles to Users and Groups, or follow the link
below:
http://help.sap.com/saphelp_nw04s/helpdata/en/ED/845890B89711D5993
900508B6B8B11/frameset.htm.
Additional Steps in CEN
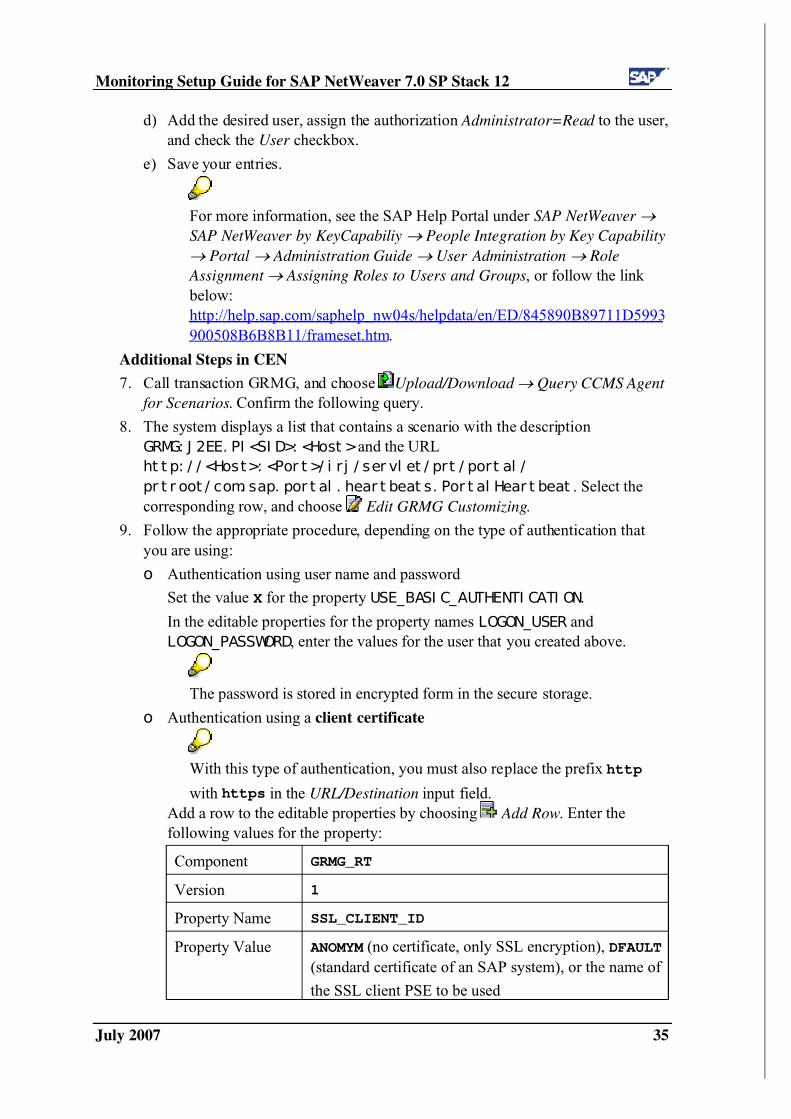
7. Call transaction GRMG, and choose Upload/Download Query CCMS Agent
for Scenarios. Confirm the following query.
8. The system displays a list that contains a scenario with the description
GRMG: J 2EE. PI <SI D>: <Host >and the URL
ht t p: / / <Host>: <Por t >/ i r j / ser vl et / prt / port al /
pr t r oot / com. sap. por t al . hear t beat s. Por t al Hear t beat . Select the
corresponding row, and choose Edit GRMG Customizing.
9. Follow the appropriate procedure, depending on the type of authentication that
you are using:
o Authentication using user name and password
Set the value X for the property USE_BASI C_AUTHENTI CATI ON.
In the editable properties for the property names LOGON_USER and
LOGON_PASSWORD, enter the values for the user that you created above.
The password is stored in encrypted form in the secure storage.
o Authentication using a client certificate
With this type of authentication, you must also replace the prefix http
with https in the URL/Destination input field.
Add a row to the editable properties by choosing Add Row. Enter the
following values for the property:
Component GRMG_RT
Version 1
Property Name SSL_CLIENT_ID
Property Value ANOMYM (no certificate, only SSL encryption), DFAULT
(standard certificate of an SAP system), or the name of
the SSL client PSE to be used
7/15/2019 7858198 Solution Manager SAP NW2004S Monitoring Setup Guide SP12
http://slidepdf.com/reader/full/7858198-solution-manager-sap-nw2004s-monitoring-setup-guide-sp12 36/92
Monitoring Setup Guide for SAP NetWeaver 7.0 SP Stack 12
July 2007 36
For more information about client certificates, see the Help Portal under
SAP NetWeaver SAP NetWeaver by KeyCapabiliy Security
System Security
System Security for SAP Web AS ABAP Only
Trust Manager The PSE Types SSL Client PSEs, or follow the link below:
http://help.sap.com/saphelp_nw04s/helpdata/en/61/76893A9B323778E100
00000A11402F/frameset.htm.
10. Save your changes.
11. Select the row for the scenario, and choose Start .
Checking the Configuration (Optional)
12. In CEN, call transaction RZ20.
13. Expand the monitor set SAP CCMS Monitor Templates, and start the monitor
Availability and Performance Overview. The system displays the availability of the activated scenarios in the subtree GRMG-Tested Availability (Web
Components).
Back to the Overview
4.5. Monitoring TREX
Prerequisites:
You have an operating system user with administration
authorization on the host where the TREX server is running.
On a UNIX system, you require the root user on the host.
4.5.1. Registering SAPCCMSR
After completion of the TREX installation, a CCMS agent is already
entered in the TREX start profile and automatically started using a stand-
alone option. With the stand-alone option, the agent runs so that the TREX
tree is displayed only in your local SAP Management Console,
communication with the central CCMS system is not possible until you
have registered.Step-by-Step (UNIX)
1. Log on to the TREX host as the root user.
2. Switch to the followingdirectory:
/usr/sap/<SysID>/TRX<instance number>
This is your installation directory for TREX <TREX_DIR>.
3. Set the environment variables required by TREX by executing the appropriate
command for your UNIX shell:
Shell Command
Bourne Shell (sh) . TREXSettings.sh
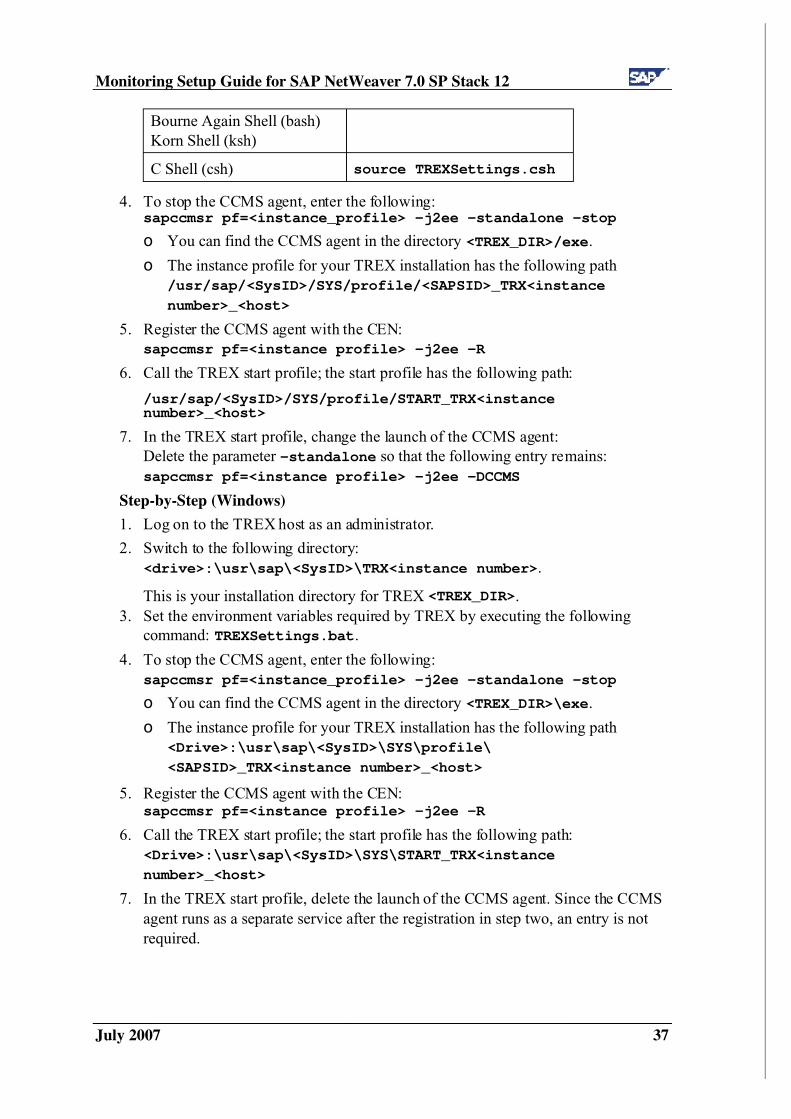
7/15/2019 7858198 Solution Manager SAP NW2004S Monitoring Setup Guide SP12
http://slidepdf.com/reader/full/7858198-solution-manager-sap-nw2004s-monitoring-setup-guide-sp12 37/92
Monitoring Setup Guide for SAP NetWeaver 7.0 SP Stack 12
July 2007 37
Bourne Again Shell (bash)
Korn Shell (ksh)
C Shell (csh) source TREXSettings.csh
4. To stop the CCMS agent, enter the following:sapccmsr pf=<instance_profile> -j2ee -standalone –stop
o You can find the CCMS agent in the directory <TREX_DIR>/exe.
o The instance profile for your TREX installation has the following path
/usr/sap/<SysID>/SYS/profile/<SAPSID>_TRX<instance
number>_<host>
5. Register the CCMS agent with the CEN:
sapccmsr pf=<instance profile> -j2ee -R
6. Call the TREX start profile; the start profile has the following path:
/usr/sap/<SysID>/SYS/profile/START_TRX<instancenumber>_<host>
7. In the TREX start profile, change the launch of the CCMS agent:
Delete the parameter -standalone so that the following entry remains:
sapccmsr pf=<instance profile> -j2ee –DCCMS
Step-by-Step (Windows)
1. Log on to the TREX host as an administrator.
2. Switch to the following directory:
<drive>:\usr\sap\<SysID>\TRX<instance number>.
This is your installation directory for TREX <TREX_DIR>.
3. Set the environment variables required by TREX by executing the following
command: TREXSettings.bat.
4. To stop the CCMS agent, enter the following:
sapccmsr pf=<instance_profile> -j2ee -standalone –stop
o You can find the CCMS agent in the directory <TREX_DIR>\exe.
o The instance profile for your TREX installation has the following path
<Drive>:\usr\sap\<SysID>\SYS\profile\
<SAPSID>_TRX<instance number>_<host>
5. Register the CCMS agent with the CEN:sapccmsr pf=<instance profile> -j2ee -R
6. Call the TREX start profile; the start profile has the following path:
<Drive>:\usr\sap\<SysID>\SYS\START_TRX<instance
number>_<host>
7. In the TREX start profile, delete the launch of the CCMS agent. Since the CCMS
agent runs as a separate service after the registration in step two, an entry is not
required.
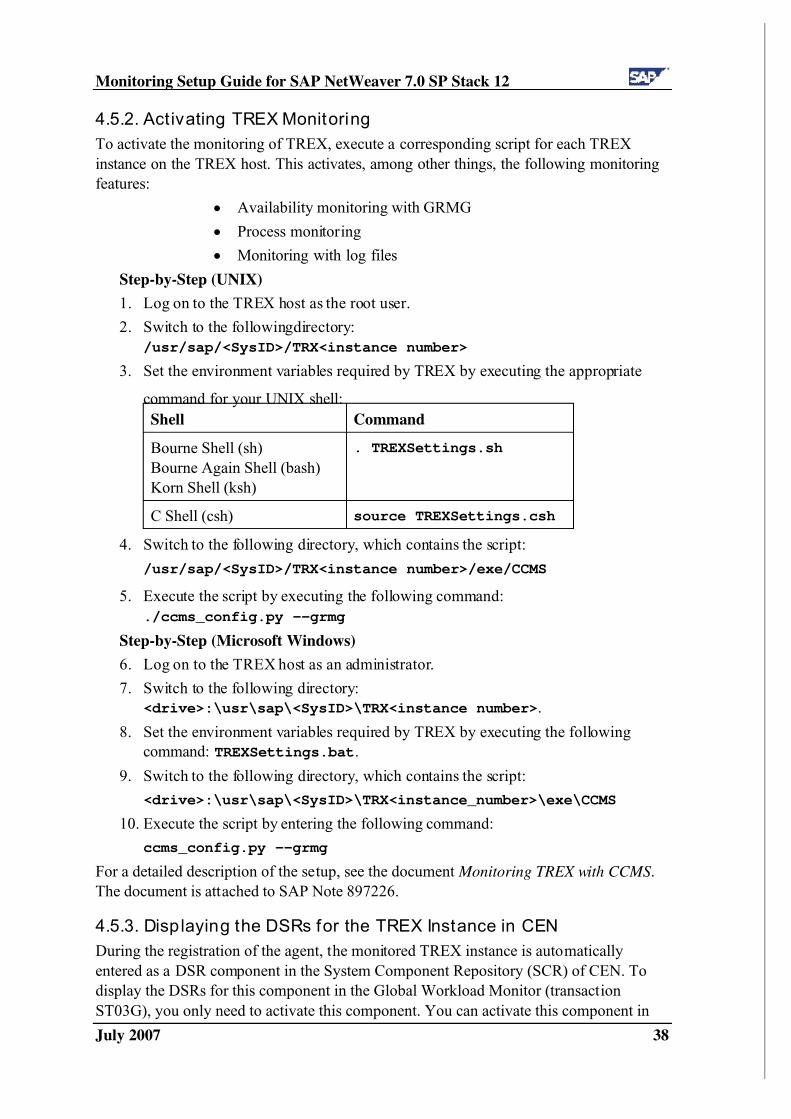
7/15/2019 7858198 Solution Manager SAP NW2004S Monitoring Setup Guide SP12
http://slidepdf.com/reader/full/7858198-solution-manager-sap-nw2004s-monitoring-setup-guide-sp12 38/92
Monitoring Setup Guide for SAP NetWeaver 7.0 SP Stack 12
July 2007 38
4.5.2. Activating TREX Monitoring
To activate the monitoring of TREX, execute a corresponding script for each TREX
instance on the TREX host. This activates, among other things, the following monitoring
features:
Availability monitoring with GRMG
Process monitoring
Monitoring with log files
Step-by-Step (UNIX)
1. Log on to the TREX host as the root user.
2. Switch to the followingdirectory:
/usr/sap/<SysID>/TRX<instance number>
3. Set the environment variables required by TREX by executing the appropriate
command for your UNIX shell:
Shell Command
Bourne Shell (sh)
Bourne Again Shell (bash)
Korn Shell (ksh)
. TREXSettings.sh
C Shell (csh) source TREXSettings.csh
4. Switch to the following directory, which contains the script:
/usr/sap/<SysID>/TRX<instance number>/exe/CCMS
5. Execute the script by executing the following command:
./ccms_config.py --grmg
Step-by-Step (Microsoft Windows)
6. Log on to the TREX host as an administrator.
7. Switch to the following directory:
<drive>:\usr\sap\<SysID>\TRX<instance number>.
8. Set the environment variables required by TREX by executing the following
command: TREXSettings.bat.
9. Switch to the following directory, which contains the script:
<drive>:\usr\sap\<SysID>\TRX<instance_number>\exe\CCMS
10. Execute the script by entering the following command:
ccms_config.py --grmg
For a detailed description of the setup, see the document Monitoring TREX with CCMS .
The document is attached to SAP Note 897226.
4.5.3. Displaying the DSRs for the TREX Instance in CEN
During the registration of the agent, the monitored TREX instance is automatically
entered as a DSR component in the System Component Repository (SCR) of CEN. To
display the DSRs for this component in the Global Workload Monitor (transaction
ST03G), you only need to activate this component. You can activate this component in
7/15/2019 7858198 Solution Manager SAP NW2004S Monitoring Setup Guide SP12
http://slidepdf.com/reader/full/7858198-solution-manager-sap-nw2004s-monitoring-setup-guide-sp12 39/92
Monitoring Setup Guide for SAP NetWeaver 7.0 SP Stack 12
July 2007 39
the same way as the J2EE Engine (see Displaying DSRs for the Java Instance in CEN
[page 30]). The component type for TREX is ST&TM .
Back to the Overview
4.6. Monitoring the Adobe Document Services
The Adobe Document Services are used to create and process PDF-based forms. These
are used both in mass printing in backend systems and in interactive business processes.
Prerequisites:
You have installed a J2EE Engine on the host of the services. The
J2EE Engine has the NW 7.0 release and Support Package level
discussed in this document.
You have registered the SAPCCMSR agent in accordance with
Registering a CCMS Agent SAPCCMSR [page 26] on the host of the services.
You have installed the Adobe Document Services.
4.6.1. Configuring Availability Monitoring with the GRMG
You can use the GRMG to monitor the availability of the following components:
Web Service interface
XML Form module
PDF Manipulation module
Prerequisites
A prerequisite for being able to activate the GRMG scenario is that the Web Dynpro PDF
object is configured appropriately on the Adobe Document Services host. Make the exact
settings, depending on the Web Service authentication procedure you are using, in
accordance with the section Configuring the Web Services of the document Configuration
Guide - Adobe Document Services.
You can find the above document under the Quick Link adobe in the SAP Service
Marketplace (http://service.sap.com/adobe). Choose Media Library Documentation
Adobe Document Services - Configuration Guide NW 2004S .
Step-by-Step1. On the host of the J2EE Engine, switch to the following directory:
Windows: <J2EE Home directory>\JC<Inst. No.>\j2ee\admin\
UNIX: <J2EE Home directory>/JC<Inst. No.>/j2ee/admin/
If you installed the J2EE Engine together with an ABAP Engine, the
character combination in the name of the JC<Inst. No.> directory in the
above path may vary.
2. Start the Visual Administrator by calling the start script go (UNIX) or go.bat
(Windows), and log on with your user as the J2EE Engine administrator.
7/15/2019 7858198 Solution Manager SAP NW2004S Monitoring Setup Guide SP12
http://slidepdf.com/reader/full/7858198-solution-manager-sap-nw2004s-monitoring-setup-guide-sp12 40/92
Monitoring Setup Guide for SAP NetWeaver 7.0 SP Stack 12
July 2007 40
3. In the navigation bar, choose Cluster <SysID> Server <x> Services
Monitoring, and choose the tab page GRMG Customizing.
4. Expand the left half of the screen. All applications that have a prepared GRMG
Customizing file are displayed. Choose sap. com/ t c~ads~gr mg.
The GRMG scenario is displayed in the Alert Monitor of the central
monitoring system (CEN) in the subtree GRMG: ADS <Sys I D>: <Host >.
To change the name of this subtree, select the entry customizing
scenarios scenario scentexts scentext scendesc
GRMG:ADS… on the subscreen Customizing tree for application, choose
the Edit button, and enter the desired name.
5. Transfer the Customizing file to the CCMS agent by choosing the Upload
button.
Checking the Configuration (Optional)
6. To check whether the GRMG monitoring was successfully activated, call
transaction GRMG in CEN, and choose Upload/Download Query CCMS
Agent for Scenarios.
Without manual polling, you would have to wait up to an hour for the
GRMG scenarios that you have uploaded in the Visual Administrator to be
transferred to CEN and started.
7. The scenario that you have just activated is displayed with its URL (scenstarturl)and description (scendesc).
8. Call transaction RZ20 and start the monitor Adobe Document Services from the
SAP J2EE Monitor Templates monitor set.
9. Expand the Heartbeat subtree. You can find availability information for the
Adobe Document Services there.
Back to the Overview
4.7. Monitoring the Exchange Infrastructure
Prerequisites:
You have installed an XI Java Component for which you want to
monitor the availability with the GRMG.
You have registered and started the CCMS agent SAPCCMSR on
the host of this component in accordance with Registering a CCMS
Agent SAPCCMSR [page 26].
You have entered all systems of your XI infrastructure in CEN as
monitored systems, in accordance with Entering Monitored ABAP
Systems in CEN [page 19].
7/15/2019 7858198 Solution Manager SAP NW2004S Monitoring Setup Guide SP12
http://slidepdf.com/reader/full/7858198-solution-manager-sap-nw2004s-monitoring-setup-guide-sp12 41/92
Monitoring Setup Guide for SAP NetWeaver 7.0 SP Stack 12
July 2007 41
4.7.1. Making Adjustments in CEN
You must create the system group ExchangeInfrastructure_Systems so that all of
the data for the XI infrastructure is displayed in the alert monitor. This system group must
contain all of the systems of your XI infrastructure.
Step-by-Step
1. In CEN, call transaction RZ21.
2. Choose Technical Infrastructure Configure Central System Maintain
System Groups.
3. Choose the button Maintain Groups Create System Group, and enter
ExchangeInfrastructure_Systems as the group name.
4. Expand the tree structure System Groups for the Alert Monitor , and select the
system group that you have just created.
5. Choose the button Maintain Systems
Create System, and enter the system ID of one of the systems of your XI infrastructure.
6. Repeat the last step for all other systems in your XI infrastructure.
Checking the Adjustments (Optional)
7. In CEN, call transaction RZ20.
8. Expand the monitor set SAP CCMS Monitor Templates, and start the Exchange
Infrastructure monitor.
9. This monitor displays data for all systems of the
ExchangeInfrastructure_Systems system group.
4.7.2. Configuring Availability Monitoring with the GRMG
To monitor XI Java components with the GRMG, you must edit a corresponding template
for a GRMG Customizing file and upload it to CEN.
Step-by-Step
1. Call up SAP Note 634771, and download the file
SAP_XI30_GRMG_Cust_Template.txt from the attachment to the SAP Note.
The template consists of six scenarios (enclosed by <scenario> …
</scenario>); each scenario represents a component that can be monitored with
the GRMG:
Component <scenname> Path Prefix
Integration Repository XI_REP1 rep/rtc
Integration Directory XI_DIR1 dir/rtc
Runtime Workbench XI_RWB1 rwb/rtc
System Landscape Directory XI_SLD1 sld/rtc
J2SE Adapter Engine XI_ADP1 rtc
J2EE Adapter Engine XI_AF1 AdapterFramework/rtc
2. Delete from the template the scenarios that you do not want to monitor.
7/15/2019 7858198 Solution Manager SAP NW2004S Monitoring Setup Guide SP12
http://slidepdf.com/reader/full/7858198-solution-manager-sap-nw2004s-monitoring-setup-guide-sp12 42/92
Monitoring Setup Guide for SAP NetWeaver 7.0 SP Stack 12
July 2007 42
3. If you want to monitor multiple J2EE/J2SE Adapter Engines, copy the section for
the relevant scenario in the template, insert the copied text between any two
scenarios in the template, and change the value of the tag <scenversion> in the
newly inserted scenario.
4. Log on to CEN, and create an RFC destination of type HTTP for each scenario in
transaction SM59:
a) If the component is running on a J2EE Engine, enter G as the type of the RFC
destination; otherwise enter H as the type. By default:
Component Type
Integration Repository G
Integration Directory G
Runtime Workbench G
System Landscape Directory G
J2SE Adapter Engine H
J2EE Adapter Engine G
b) On the Technical Settings tab page, enter:
Field Entry
Target Host Name of the host on which the component is running
Service
Number
Port number of the component; this are assigned during
their installation and can also be determined in the SLD
Path Prefix One of the value from the above table, depending on the
monitored component
c) On the Logon/Security tab page, enter:
Field Entry
User Name of the user; we recommend that you use the user
XIRWBUSER , which should be available on all components
Password User password; XIRWBUSER has the (case-sensitive) initial password XIPASS
Note that the logon tickets generated in each
case could be intercepted with HTTP
connections. You should therefore always
ensure that Secure Socket Layer (SSL)
encryption is used or that both systems are in
a protected environment.
SecurityOptions
In the case of an RFC destination of type G, choose the Basic Authentication button.
7/15/2019 7858198 Solution Manager SAP NW2004S Monitoring Setup Guide SP12
http://slidepdf.com/reader/full/7858198-solution-manager-sap-nw2004s-monitoring-setup-guide-sp12 43/92
Monitoring Setup Guide for SAP NetWeaver 7.0 SP Stack 12
July 2007 43
d) Save your entries.
5. In the template, replace the value of the <scenstarturl>tag in the scenarios
with the relevant name of the RFC destination of type HTTP that you created
above.
6. Save the GRMG Customizing file.
7. In CEN, call transaction GRMG.
8. To upload the GRMG Customizing file to CEN, choose Upload , and specify
the above file.
9. Select the scenarios that you have just uploaded, and start them by choosing the
Start button.
Checking the Configuration (Optional)
10. In CEN, call transaction RZ20.
11. Expand the monitor set SAP CCMS Monitor Templates, and start the Exchange Infrastructure monitor. The system displays the availability of the activated
scenarios.
Back to the Overview
4.8. Monitoring a Standalone Database
Prerequisites:
You have an operating system user with administrator authorization
on the host of the standalone database.
In the case of a UNIX system, you also require the root user on the
host.
4.8.1. Install ing SAPCCMSR and SAPOSCOL
SAPCCMSR and SAPOSCOL must be installed on every host of your monitored system
landscape.
In the case of the individual components of SAP NetWeaver, the installation is performed
at least semi-automatically; in the case of a standalone database, perform the following
steps manually.
Step-by-Step1. Log on to the relevant host as an administrator and create a separate directory for
the installation (such as install_mon).
2. Copy the package CCMAGENT.SAR for your platform from the SAP Service
Marketplace to the install_mon directory. Depending on your platform, use
either the 32-bit version or the 64-bit version for SAP NetWeaver 2004s.
You can find the package in the area SAP Support Packages and Patches
(http://service.sap.com/swdc) under Download Support Packages and Patches
Entry by Application Group SAP NetWeaver SAP NETWAEVER SAP
NETWEAVER 04
Entry by Component
Application Server ABAP
SAPKERNEL 7.00 32/64-BIT <Platform> Database Independent .
7/15/2019 7858198 Solution Manager SAP NW2004S Monitoring Setup Guide SP12
http://slidepdf.com/reader/full/7858198-solution-manager-sap-nw2004s-monitoring-setup-guide-sp12 44/92
Monitoring Setup Guide for SAP NetWeaver 7.0 SP Stack 12
July 2007 44
If you can’t find the package for your platform, use the corresponding
package for SAP NetWeaver 04 or, if not available, SAP R/3 4.6D.
For more information anout the correct release of the agent, see the SAPHelp Portal under SAP NetWeaver SAP NetWeaver by KeyCapabiliy
Solution Life Cycle Management by Key Capability Solution
Monitoring Monitoring in the CCMS CCMS Agents
Installing/Registering the CCMS Agents for Experts Downloading
CCMS Agents, or follow the link below:
http://help.sap.com/saphelp_nw70/helpdata/en/ca/118110ff542640b7c86b5
70cc61ae3/frameset.htm.
3. Copy the package SAPOSCOL.SAR for your platform from the SAP Service
Marketplace to the install_mon directory. Depending on your platform, use
either the 32-bit version or the 64-bit version for SAP NetWeaver 2004s. You canfind the package in the same way as above.
4. Unpack the packages CCMAGENT.SAR and SAPOSCOL.SAR with the program
SAPCAR . If you do not have the tool, download it from the same folder as the
above packages. Use the following command for unpacking:
sapcar -xvf <package>
The install_mon directory now contains, among other things, the files
SAPOSCOL and SAPCCMSR (name extensions depending on the platform).
5. Depending on your platform, download either the package INSTALL_UX.SAR or
INSTALL_WIN.SAR from the attachment to SAP Note 704349 to theinstall_mon directory and unpack the archive.
6. Depending on your platform, proceed as follows:
o UNIX:
Log on as the root user and start install_root.sh.
Switch back to the original user and start install_user.sh.
o Microsoft Windows:
Execute the script install.cmd .
7. Copy the start file CSMCONF, which you created in accordance with Creating the
CSMCONF Start File for CCMS [page 19], to the appropriate directory,
depending on your platform:
o Windows: \\<hostname>\saploc\prfclog\sapccmsr
o UNIX: /usr/sap/tmp/sapccmsr
8. You must still register the CCMS agent with CEN and start it. Use the following
command to do this:
o UNIX: /usr/sap/ccms/bin/sapccmsr -R
o Windows: \\<hostname>\saploc\prfclog\sapccmsr.exe -R
During the registration, enter the passwords of the users to be used for communication with CEN, and confirm the other specifications.
7/15/2019 7858198 Solution Manager SAP NW2004S Monitoring Setup Guide SP12
http://slidepdf.com/reader/full/7858198-solution-manager-sap-nw2004s-monitoring-setup-guide-sp12 45/92
Monitoring Setup Guide for SAP NetWeaver 7.0 SP Stack 12
July 2007 45
9. Under UNIX, you must ensure yourself that SAPCCMSR and SAPOSCOL are
automatically started again when the host is restarted. To do this, enter the
following command in the inittab (/etc/inittab):
/usr/sap/ccms/bin/saposcol
/usr/sap/ccms/bin/sapccmsr –DCCMS
Checking the Configuration (Optional)
10. To check whether the agent was successfully registered with CEN, call transaction
RZ21 in CEN, select the radio button Agents for the Local System, and choose
Display Overview. The agent that you have just registered appears in the list in the
row SAPCCMSR. <host name>. 99.
11. To check whether data is being transferred to CEN, call transaction RZ20, and
start the Operating System monitor from the SAP CCMS Monitor Templates
monitor set. There should be a subtree <host name> in the monitor, where
<hostname> is the name of the host on which you have just installed SAPCCMSR and SAPOSCOL.
Back to the Overview
4.8.2. Configuring Process Monitor ing for the Database
The availability monitoring of the database is currently restricted to monitoring the
processes at operating system level. Process monitoring requires the operating system
collector SAPOSCOL and the CCMS agent SAPCCMSR.
Step-by-Step
1. Switch to the working directory of SAPOSCOL. This is
\\<host>\saploc\prfclog (Microsoft Windows) or /usr/sap/tmp
(UNIX).
2. Edit or create the file dev_proc. Ensure that the file begins with $PROC and ends
with $. Depending on your platform and database, insert the following new line(s)
between the start marker $PROC and the end marker $:
MSSQL ORACLE
UNIX *ora_arc*
*ora_reco**ora_smon*
*ora_ckpt*
*ora_lgwr*
*ora_dbw*
*ora_pmon*
Microsoft
Windows
*sqlservr.exe* *oracle.exe*
3. Save your entries.
4. Under Microsoft Windows, open the Windows Service Manager and stop and restart the service SAPOsCol.
7/15/2019 7858198 Solution Manager SAP NW2004S Monitoring Setup Guide SP12
http://slidepdf.com/reader/full/7858198-solution-manager-sap-nw2004s-monitoring-setup-guide-sp12 46/92
Monitoring Setup Guide for SAP NetWeaver 7.0 SP Stack 12
July 2007 46
5. Under UNIX restart SAPOsCol manually; to do this, switch to
/usr/sap/ccms/bin and enter the following commands:
saposcol –k (stops the process)
saposcol –l (starts the process)
Checking the Configuration (Optional)
6. Start transaction RZ20 in CEN, and open the Operating System monitor in the
SAP CCMS Monitor Templates monitor set. The information about process
monitoring is in the subtree <host name> Monitored Processes.
Back to the Overview
4.9. Monitoring the SAP Business Information Warehouse
Prerequisites:
You have installed a BI Java component for which you want tomonitor the availability with the GRMG.
You have registered and started the CCMS agent SAPCCMSR on
the host of this component in accordance with Registering a CCMS
Agent SAPCCMSR [page 26].
4.9.1. Configuring Availability Monitoring with the GRMG
You can use the GRMG to monitor the following BW components for their availability
(for more information, see SAP Note 706290):
UDC Enterprise Beans SAP BI Java connectors
Metamodel Repository
RFC destination for the BW system
Step-by-Step
1. The UD Connect Bean file bi_sdk_grmg.ear contains a template for the GRMG
Customizing file. The name of this file is grmg-customizing.xml. Copy this file
to a location that can be accessed from your front end.
2. Call transaction GRMG in CEN.
3. Choose the Upload button, and choose the above file grmg-customizing.xml.
4. Select the row with the name BI UDC , and choose the button Edit GRMG
Customizing.
5. Edit the input field URL/Destination. Replace hostname and port number with
the corresponding values for your J2EE server on which you performed the
deployment of UD Connect.
6. For the component CONNECT0, enter the value of the property name
JNDI_Name. This is the JNDI name of a connector for which you have performed
a deployment.
You can see the corresponding connectors in the Visual Administrator; to do this,choose Cluster Server Services Connector Container in the navigation
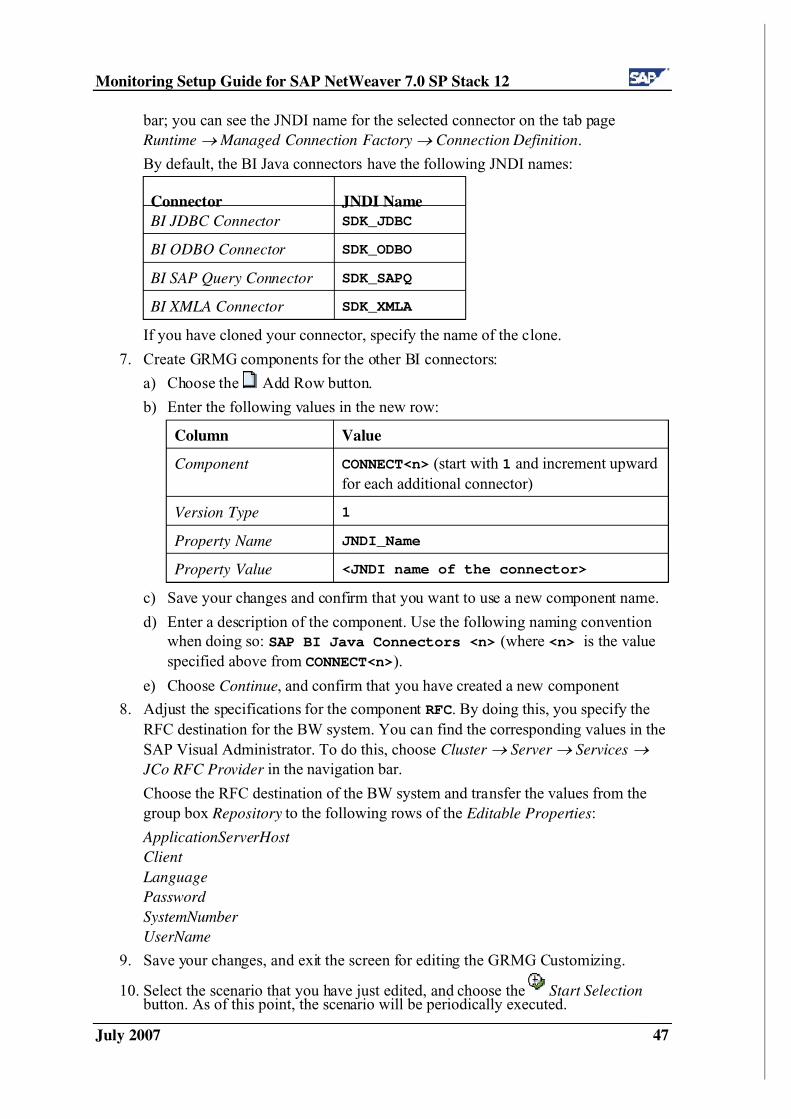
7/15/2019 7858198 Solution Manager SAP NW2004S Monitoring Setup Guide SP12
http://slidepdf.com/reader/full/7858198-solution-manager-sap-nw2004s-monitoring-setup-guide-sp12 47/92
Monitoring Setup Guide for SAP NetWeaver 7.0 SP Stack 12
July 2007 47
bar; you can see the JNDI name for the selected connector on the tab page
Runtime Managed Connection Factory Connection Definition.
By default, the BI Java connectors have the following JNDI names:
Connector JNDI Name
BI JDBC Connector SDK_JDBC
BI ODBO Connector SDK_ODBO
BI SAP Query Connector SDK_SAPQ
BI XMLA Connector SDK_XMLA
If you have cloned your connector, specify the name of the clone.
7. Create GRMG components for the other BI connectors:
a) Choose the Add Row button.
b) Enter the following values in the new row:
Column Value
Component CONNECT<n> (start with 1 and increment upward
for each additional connector)
Version Type 1
Property Name JNDI_Name
Property Value <JNDI name of the connector>
c) Save your changes and confirm that you want to use a new component name.
d) Enter a description of the component. Use the following naming convention
when doing so: SAP BI Java Connectors <n> (where <n> is the value
specified above from CONNECT<n>).
e) Choose Continue, and confirm that you have created a new component
8. Adjust the specifications for the component RFC. By doing this, you specify the
RFC destination for the BW system. You can find the corresponding values in the
SAP Visual Administrator. To do this, choose Cluster Server Services
JCo RFC Provider in the navigation bar.
Choose the RFC destination of the BW system and transfer the values from the
group box Repository to the following rows of the Editable Properties:
ApplicationServerHost
Client
Language
Password
SystemNumber
UserName
9. Save your changes, and exit the screen for editing the GRMG Customizing.
10. Select the scenario that you have just edited, and choose the Start Selection button. As of this point, the scenario will be periodically executed.
7/15/2019 7858198 Solution Manager SAP NW2004S Monitoring Setup Guide SP12
http://slidepdf.com/reader/full/7858198-solution-manager-sap-nw2004s-monitoring-setup-guide-sp12 48/92
Monitoring Setup Guide for SAP NetWeaver 7.0 SP Stack 12
July 2007 48
Checking the Configuration (Optional)
11. After you have started the scenario, you can identify from the Scenario Execution
Status whether the scenario was correctly executed. After the scenario is executed,
there should be a green check mark here ( ).
12. To view the availability data for the monitored components, call transaction RZ20
in CEN, and start the Heartbeat monitor in the SAP J2EE Monitor Templates
monitor set. Expand the subtree BI UDC GRMG: SAP BI UD Connect on
<host name>.
Back to the Overview
4.10. Monitoring the SAP Mobi le Infrastructure
For a detailed description, see the document Installation of the SAP Mobile Infrastructure
2.5, section Configuration of the Computing Center Management System.You can find this document in the SAP Service Marketplace in the SAP NetWeaver 04
Installation Information area (http://service.sap.com/nw04installation). Choose the
document Installation Guide – SAP Mobile Infrastructure 2.5 from the list (direct link ).
Back to the Overview
7/15/2019 7858198 Solution Manager SAP NW2004S Monitoring Setup Guide SP12
http://slidepdf.com/reader/full/7858198-solution-manager-sap-nw2004s-monitoring-setup-guide-sp12 49/92
Monitoring Setup Guide for SAP NetWeaver 7.0 SP Stack 12
July 2007 49
5. Monitoring SAP NetWeaver 7.1 SystemsUntil SAP NetWeaver 7.1 is generally available, you have to monitor components based
on SAP NetWeaver 7.1 centrally using a CEN with release SAP NetWeaver 7.0. At the
moment, this is true for the following products: SAP NetWeaver Composition Environment 7.1
SAP NetWeaver Mobile 7.1
5.1. Monitoring SAP NetWeaver Composit ion Environment (CE)7.1
Prerequisites:
You have a user at operating system level on the host of the CE
system (<SID>adm ).
You have an administration user for the CE system. You have performed the preparatory steps in CEN, as described in
Adjusting the Central Monitoring System (CEN) [page 18].
5.1.1. Registering CCMS Agent SAPCCMSR
The monitoring data from the CE system is transferred to CEN using the CCMS agent
SAPCCMSR. This agent is part of the system’s installation package. Register the
SAPCCMSR CCMS agent manually. To do this, perform the registration steps for all
instances of the system.
Step-by-Step
1. Ensure that you have a CSMCONF start file created in CEN available (see
Creating the CSMCONF Start File for CCMS [page 19].)
2. Log on to the host of the CE system as <SID>adm .
3. I fit does not yet exist, create a sapccmsr directory in $DIR_LOGGING of the
monitored instance. $DIR_LOGGING has the following path:
Microsoft Windows:[drive]:\usr\sap\<SID>\<instance
directory>\log
Unix: /usr/sap/<SID>/<instance directory>/log
The instance directory has the name J<InstNumber>.
4. Save the CSMCONF file to the sapccmsr working directory that you have just
created for the agent.
5. Switch to the directory that contains the agent’s executable, sapccmsr or
sapccmsr.exe. Depending on your platform, this is:
Microsoft Windows: [drive]:\usr\sap\<SID>\<instance
directory>\exe
UNIX: /usr/sap/<SID>/<instance directory>/exe
If the executable is not there, it is in the following directory:Windows: [drive]:\usr\sap\<SysID>\SYS\exe\uc\<platform>
7/15/2019 7858198 Solution Manager SAP NW2004S Monitoring Setup Guide SP12
http://slidepdf.com/reader/full/7858198-solution-manager-sap-nw2004s-monitoring-setup-guide-sp12 50/92
Monitoring Setup Guide for SAP NetWeaver 7.0 SP Stack 12
July 2007 50
UNIX: /usr/sap/<SID>/SYS/exe/uc/<platform>
6. Start the agent with the following command:
sapccmsr -j2ee -r pf=<path of the instance profile>
By default, the complete path of the instance profile is:Microsoft Windows:
c:\usr\sap\<SID>\SYS\profile\<SID>_J<InstNumber>_<Host>
UNIX: /usr/sap/<SID>/SYS/profile/<SID>_J<InstNumber>_<Host>
7. The agent reads the connection data for CEN from the CSMCONF start file,
meaning that you only need to confirm it by pressing the ENTER key. You also
need to enter the passwords for the two required users (CSMREG and the
administrative user with which you created the CSMCONF start file).
8. Confirm other details, such as system groups to which the monitored system
belongs or details for setting up the service by pressing the ENTER key.9. Under Microsoft Windows, the agent is entered as a service during registration,
and is automatically started when the host is restarted. Note that the user with
which you register the agent must be a local administrator. Under UNIX, the agent
is automatically started by the startsap script when you start the CE engine.
Checking the Agent Registration (Optional)
10. To check whether the agent was successfully registered with CEN, call transaction
RZ21 in CEN, select the Agents for Remote Systems radio button, and choose
Display Overview. If the agent was successfully registered, the list contains a line
SAPCCMSR. <host name>. <I nst . Number >for the agent that you have just
registered.
11. To check whether the CE system has been added to the J2EE_Systems system
group, call transaction RZ21, and choose Technical Infrastructure Configure
Central System Maintain System Groups. If the CE system has been added to
the system group, the system ID of the J2EE Engine is contained in the tree
System Groups for Alert Monitor J2EE_Systems.
12. To check if data is transferred to CEN, call transaction RZ20, and select the
Engines monitor from the SAP J2EE Monitor Templates monitor set. If data has
been transferred to CEN, there is a subtree <SI D>in the monitor.
5.1.2. Creating a Customizing Destination
The Customizing destination allows you to change threshold values for the monitoring
data for a Java instance in the Alert Monitor, too. With manual registration, you need to
create the Customizing destination yourself by performing the following steps.
You need to create the Customizing destination in the NWA of the CE
system in the work center Configuration Management Infrastructure
Management of the Jco RFC Destination plug-in. If this does not exist,
perform a deployment as follows:

7/15/2019 7858198 Solution Manager SAP NW2004S Monitoring Setup Guide SP12
http://slidepdf.com/reader/full/7858198-solution-manager-sap-nw2004s-monitoring-setup-guide-sp12 51/92
Monitoring Setup Guide for SAP NetWeaver 7.0 SP Stack 12
July 2007 51
1. Call the Internet address http://service.sap.com/monitoring, and, in
the navigation bar, choose Download Area EAR files for
centrally monitoring CE 1.0 system.
2. Download the archive JCo RFC Destination Plug-In, and
decompress the archive. The archive consists of three EAR files:
sap.com~tc~je~trace~app.ear
sap.com~tc~lm~itsam~ui~services~jco~wd.ear
sap.com~tc~lm~itsam~ui~contentmodel~ear.ear
3. Perform a deployment with these three files in the order specified
above. To do this, start the Eclipse SDK by executing the
appropriate file for your platform:
[drive]:\usr\sap\<SysID>\J<InstNumber>\j2ee\
deployView\DV_<platform>.
4. In the Deploy view, add the above files and then perform the
deployment in the sequence above.
1. Create an RFC destination in the NWA of the CE system:
a) In the NetWeaver Administrator of the monitored CE system, choose
Configuration Management Infrastructure Management JCo RFC
Destinations.
b) Create a new RFC destination by choosing the Create… button.
c) Enter SAP.CCMS.J2EE.<JSID> as the name of the destination (where
<JSID> is the system ID of the monitored CE system). Choose the Next
button.
d) Enter the gateway connection data for the central monitoring system. Choose
the Next button.
The Gateway Service has the naming convention sapgw<InstanceNo.>.
e) Enter the connection data for CEN. Choose the Next button.
If you do not have this data, you can find it in the CSMCONF start file in
the agent’s working directory.
f) Enter the name and password of an administrative user in CEN. Choose the
Next button.
g) Continue through the remaining steps and create the destination by choosing
the Finish button.
2. Create an RFC destination in CEN:
a) To create an RFC destination, call transaction SM59, and choose (Create).
b) In the RFC Destination input field, enter the name of the destination. Use the
naming convention SAP.CCMS.J2EE.<JSID>, where <JSID> is the system
ID of the monitored CE system.
7/15/2019 7858198 Solution Manager SAP NW2004S Monitoring Setup Guide SP12
http://slidepdf.com/reader/full/7858198-solution-manager-sap-nw2004s-monitoring-setup-guide-sp12 52/92
Monitoring Setup Guide for SAP NetWeaver 7.0 SP Stack 12
July 2007 52
c) Enter T as the connection type, and enter a description of the destination.
Confirm your entries by choosing (Continue).
d) Switch to the Technical Settings tab page. In the Activation Type group box,
select the Registered Server Program radio button, and in the Program ID
input field, enter SAP.CCMS.J2EE.<JSID>.
e) In the Gateway Options group box, enter the gateway information for CEN,
You have already used this information in the NWA when creating the RFC
destination.
f) Save your entries.
3. Make this destination known to the monitoring infrastructure:
a) Call transaction RZ21.
b) In the Topology group box, select Agents for Remote Systems, and choose
Display Overview.
c) Switch to change mode by choosing the ( Display Change) button, and
enter the name of the RFC destination SAP.CCMS.J2EE.<JSID> that you
have just created for the agent in the J2EE Customizing Destination column.
d) Save your entries.
Checking the Customizing Destination (Optional)
4. Check whether you can change the threshold values for any performance node of
the Java system from CEN.
5.1.3. Display the DSRs from the CE System in CEN
You can use the Global Workload Monitor to display statistical data for any components
that write Distributed Statistics Records (DSR). Components of this type are connected to
CEN using the CCMS agent SAPCCMSR.
Since the agent is always primarily registered with CEN in the case of a CE system, the
monitored DSR component is automatically registered in the System Component
Repository (SCR) of CEN. To display the DSRs for this component in the Global
Workload Monitor (transaction ST03G), you only need to activate this component.
The procedure corresponds to the one of a Java only system with release SAP NetWeaver
7.0 (see Displaying DSRs for the Java Instance in CEN [page 30]).
5.1.4. Configuring Availability Monitoring with GRMG
You can use the Generic Request and Message Generator (GRMG) to monitor the
availability of technical components and entire business processes. To do this, you
specify the required configuration settings in a GRMG Customizing file, which is
transferred to CEN by a CCMS agent.
Note that GRMG requires a configured and active Internet Communication
Manager (ICM) on every ABAP instance of your CEN.
7/15/2019 7858198 Solution Manager SAP NW2004S Monitoring Setup Guide SP12
http://slidepdf.com/reader/full/7858198-solution-manager-sap-nw2004s-monitoring-setup-guide-sp12 53/92
Monitoring Setup Guide for SAP NetWeaver 7.0 SP Stack 12
July 2007 53
Step-by-Step
1. Call the Internet address http://service.sap.com/monitoring, and in the navigation
bar, choose Download Area GRMG Customizing files Application Server
Java.
Download the template AS Java GRMG Monitoring Template by right-clicking
the button.
2. Edit the downloaded file with a suitable XML editor. Change the values of the
following tags:
o <scenstarturl>: replace [host] with the host and [port] with the port
of the monitored CE system
o <scendesc>: replace [SysID] with the system ID and [host] with the host
of the monitored CE system
Save the file.
3. In CEN, call transaction GRMG, choose Upload , and specify the file that you
have just downloaded.
4. Select the scenario that you have just uploaded, and choose ( Edit GRMG
Customizing).
5. To start the availability monitoring, select the row for the scenario and choose the
Start button.
Checking the Configuration (Optional)
6. Call transaction RZ20, and start the Heartbeat monitor from the SAP J2EE
Monitor Templates monitor set.7. Expand the J2EE Engine subtree. The system displays the monitored Java Engines
that are monitored with GRMG. The Java Engine of the CE system is displayed
with the naming convention GRMG: J2EE <SysID> on <host name>. Check
whether the nodes in this subtree have current values.
5.1.5. Activating Availabili ty Monitoring for a CE System
To monitor the availability of a CE system using CCMSPING, you need to create an
entry for the system in the list of monitored systems.
Step-by-Step
1. In CEN, start transaction RZ21, and choose the menu path Technical
Infrastructure Availability Monitoring Configure CCMSPING Availability
Mon..
2. Choose Monitoring Create System.
3. Specify the system ID of the CE system that you want to monitor, and choose the
Continue button. The Connection Data and Monitoring Options screen appears.
4. In the Connection Data: Java Message Server group box, fill out the Message
Server Host Name and Message Server HTTP Port input fields.
5. If you want to set monitoring options, make the appropriate entries.
6. Choose the Copy Connection Data and Options button.

7/15/2019 7858198 Solution Manager SAP NW2004S Monitoring Setup Guide SP12
http://slidepdf.com/reader/full/7858198-solution-manager-sap-nw2004s-monitoring-setup-guide-sp12 54/92
Monitoring Setup Guide for SAP NetWeaver 7.0 SP Stack 12
July 2007 54
7. Save your changes.
Back to Overview
5.2. Monitoring ABAP Systems with Release SAP NetWeaver 7.1
Monitoring these systems correspond to monitoring ABAP systems with release SAP
NetWeaver 7.0. So proceed as described in the following procedures:
Entering Monitored ABAP Systems in CEN [page 19]
Entering Monitored ABAP Systems in ST03G [page 21]
Registering a CCMS Agent SAPCCM4X [page 24]
Back to Overview

7/15/2019 7858198 Solution Manager SAP NW2004S Monitoring Setup Guide SP12
http://slidepdf.com/reader/full/7858198-solution-manager-sap-nw2004s-monitoring-setup-guide-sp12 55/92
Monitoring Setup Guide for SAP NetWeaver 7.0 SP Stack 12
July 2007 55
6. Configuration Steps for SAP NetWeaver Administrator
6.1. Overview
As of SAP NetWeaver 04 SP Stack 12, the SAP NetWeaver Administrator (NWA) is also
available to you for landscape-wide administration and central monitoring. For current
information about this, see the SAP Service Marketplace under the Quick Link nwa
(http://service.sap.com/nwa).
The NWA runs as an application on the J2EE Engine and is called using
the URL http://<host>:<port>/nwa.
To use the NWA for central monitoring, install a Java Add-In for your CEN, if it does not
already have one. Since you can use the NWA not only for central monitoring, but alsofor central administration, the corresponding double-stack system is referred to as the
central administration and monitoring system. This system is also abbreviated to CEN
here.
Since the monitoring of the NWA is based on the monitoring
infrastructure, you need to have performed the configuration steps to set up
central monitoring, as described in section 4 (see Prerequisites [page 56]).
If you want to use the NWA to monitor your system landscape, you need a System
Landscape Directory (SLD), since information about the monitored systems is stored in
the SLD for this application. We recommend that you set up an SLD on the J2EE Engine
of CEN for this purpose. This SLD is known as the administrative SLD.
In total, you need to perform the following configuration steps to use the NWA:
You need to configure and start the administrative SLD; you also need to enter all
ABAP and Java systems in your system landscape into this SLD (see Setting Up
the Administrative SLD [page 63]).
CEN must be able to write data about the agents of the monitored systems to the
administrative SLD. You need to create special connections and authorizations for
this (see Configuring the Connection Between CEN and the SLD [page 68]).
You also need to set up a special RFC connection between the ABAP and the Java
stacks of CEN (see Configuring a Connection Between the ABAP and Java Stacks
of CEN [page 70]).
If you want to use the NWA to administer multiple Java systems, we recommend
that you store the corresponding logon data in the NWA's J2EE Engine, so that
you do not need to log on with a user name and password every time (see Storing
Access Data for the Java Systems to Be Administered [page 71]).
To simplify this step, the Configuration wizard is available in the NWA.
You can use it to perform the above configuration steps more easily (see
Setting Up Using the [page 56]).
7/15/2019 7858198 Solution Manager SAP NW2004S Monitoring Setup Guide SP12
http://slidepdf.com/reader/full/7858198-solution-manager-sap-nw2004s-monitoring-setup-guide-sp12 56/92
Monitoring Setup Guide for SAP NetWeaver 7.0 SP Stack 12
July 2007 56
6.2. Prerequisites
The following prerequisites need to be fulfilled to set up the NWA:
Since the monitoring in the NWA is based on the monitoring infrastructure, you
need to have performed the configuration steps for setting up central monitoringdescribed in section 4. In particular, the following sections require that you have
performed the following configuration steps:
Monitored ABAP systems must be entered in transaction RZ21; see
Entering Monitored ABAP Systems in CEN [page 19].
A CCMSPING availability agent must be installed and registered with
CEN; see Setting Up Availability Monitoring with CCMSPING [page 23].
Monitored Java systems must be registered with CEN using the CCMS
agent SAPCCMSR; see Registering a CCMS Agent SAPCCMSR (Java
Standalone) [page 26].
We also recommend that you register the monitored ABAP instances with
CEN using the CCMS agent SAPCCM4X; see Registering a CCMS Agent
SAPCCM4X [page 24].
You have activated the integrated Internet Transaction Server in the ABAP stack
of CEN. This means that you can start analysis methods in the monitored ABAP
systems from the NWA.
For more information, see the SAP Help Portal under SAP NetWeaver SAP
NetWeaver by Key Capability Application Platform by Key Capability
ABAP Technology UI Technology Web UI Technology ITS / SAP@Web
Studio SAP ITS in the SAP Web Application Server Installation and Activation, or click the link below:
http://help.sap.com/saphelp_nw04s/helpdata/en/3d/b5f9c2ea65c242957ee504ca4a
37a9/frameset.htm.
6.3. Setting Up Using the Configuration wizard
You can use the Configuration wizard to perform the configuration steps required to
configure the SLD and the NWA more quickly and easily. With this method, the system
requests the required specifications from you step-by-step, and then automatically
performs the configuration steps.
Note that the setup using the Configuration wizard may only be used for
the initial setup after installation. After upgrade use the manual setup of the
NWA.
A particular advantage of this method is that you can perform all configuration steps in
one central location (especially, if the SLD is running in CEN).
The configuration of the NWA is performed in multiple configuration tasks; to execute
any one of these tasks, you first need to switch to the corresponding area of the NWA:
7/15/2019 7858198 Solution Manager SAP NW2004S Monitoring Setup Guide SP12
http://slidepdf.com/reader/full/7858198-solution-manager-sap-nw2004s-monitoring-setup-guide-sp12 57/92
Monitoring Setup Guide for SAP NetWeaver 7.0 SP Stack 12
July 2007 57
Note that, to execute a configuration task in the NWA, you must have
activated Local System Administration in the System Landscape Selection.
Step-by-Step1. Call the start page of the NWA using the URL http://<host>:<port>/nwa;
<Host> and <Port> are the values for CEN’s J2EE Engine, and log on as the
J2EE Engine Administrator with your user.
2. In the top-level navigation, choose Deploy and Change Configuration wizard .
3. Choose the All Configuration Tasks entry from the Show Configuration Views
dropdown list, and enter NWA in the filter field. The following configuration tasks
are available to you to configure the NWA:
Name of the Configuration Task Description
NWA_01_This wizard will executeconfiguration for local SLD
Configure and Activate theAdministrative SLD [page 58]
NWA_02_SLD system: Connect SLD to
CEN (if CEN present)
Make Connection Settings Between
CEN and SLD [page 58]
NWA_03_Creating a connection to the
SLD and Setting required
authorizations for SLD (CIM client
settings)
Make Connection Settings between
NWA and SLD [page 59]
NWA_04_Creating a connection to the
ABAP stack of CEN and starting
heartbeat monitoring
Configure the Connections Between the
ABAP and Java Stacks of CEN [page
60]
NWA_05_NWA system: Store access
data per each managed Java system
(optional)
Configure the Connections from the
NWA to the Administered Java Systems
[page 61]
NWA_06_NWA system: Register each
managed ABAP system to SLD
Connect a Monitored ABAP System to
the Administrative SLD [page 61]
NWA_07_creates Destination for Data
Supplier Bridge
Connect a Monitored Java System to the
Administrative SLD [page 62]
4. Execute the configuration tasks in the order specified by the numbering above.
The same data (for example, access data for the administrative
SLD) is sometimes required in different tasks. In this case, the
input fields already contain the corresponding input values from the
previous task.
When you execute a task, you can see a progress bar showing the
status of the task. You can switch between the steps using the
Previous and Next buttons. Enter the required data in each of thesesteps.
7/15/2019 7858198 Solution Manager SAP NW2004S Monitoring Setup Guide SP12
http://slidepdf.com/reader/full/7858198-solution-manager-sap-nw2004s-monitoring-setup-guide-sp12 58/92
Monitoring Setup Guide for SAP NetWeaver 7.0 SP Stack 12
July 2007 58
After you have finished a task, choose the Return to task list button
for executing more tasks.
If you want to execute a task more than once in succession, choose
the Retry button.
6.3.1. Configure and Activate the Administrative SLD
In this task, you perform the basic configuration of the administrative SLD. This includes
the configuring and starting of both the Object Server and the Data Supplier Bridge. The
task therefore corresponds largely to the manual steps in the section Making Settings in
the SLD [page 64]; however, without the two following steps:
Setting the Object Manager – BufferInstances parameter
Importing the CIM model data
Execute this task on the SLD host. We recommend that you run the
administrative SLD on CEN; in this case, you can, of course, execute the
task on CEN. If the SLD used is already configured and activated, you do
not need to execute this task.
Step-by-Step
1. You are in the NWA on the SLD host, in the top-level navigation Deploy and
Change Configuration Wizard (see Setting Up Using the Configuration wizard
[page 56])
2. Select the following entry from the task list:
NWA_01_This wizard will execute configuration for local SLD.3. Choose the Start button.
4. When SLD data is displayed, enter the connection data for the administrativeSLD:
Input Field Description
SLD Host
SLD Port
Access data for the SLD (host and port)
SLD Administration User
Password
Name/password of an administrator in the SLD
Java System ID System ID of CEN
SLD Gateway Service Service of a gateway (sapgw<System No.>).
Use the CEN gateway.
5. Choose the Return to task list button.
6.3.2. Make Connection Sett ings Between CEN and SLD
In this task, you create the required connections between the ABAP Engine of CEN and
the administrative SLD. These are:
The RFC connection SAPSLDAPI; an appropriate connection is also created in
the SLD’s J2EE Engine for this
7/15/2019 7858198 Solution Manager SAP NW2004S Monitoring Setup Guide SP12
http://slidepdf.com/reader/full/7858198-solution-manager-sap-nw2004s-monitoring-setup-guide-sp12 59/92
Monitoring Setup Guide for SAP NetWeaver 7.0 SP Stack 12
July 2007 59
The access data for the SLD in transaction SLDAPICUST in the ABAP stack of
CEN
The task therefore corresponds to the steps in Configuring the Connection Between CEN
and the SLD [page 68], however without the connection from CEN’s J2EE Engine to the
administrative SLD using CIM Client Generation Settings. This is set in the task Make
Connection Settings between NWA and SLD [page 59].
Execute this task on the SLD host. We recommend that you run the
administrative SLD on CEN; in this case, you can, of course, execute the
task on CEN.
Step-by-Step
1. You are in the NWA on the SLD host, in the top-level navigation Deploy and
Change Configuration Wizard (see Setting Up Using the Configuration wizard
[page 56])
2. Select the following entry from the task list:
NWA_02_SLD system: Connect SLD to CEN (if CEN present).
3. Choose the Start button.
4. When ABAP connection data is displayed, enter the connection data for CEN’sABAP Engine:
Input Field Description
ABAP User
Password
Name/password of an ABAP user in CEN
Application Server Host
System Number
Client
Access data for the ABAP Engine (application
server, system number, and client)
5. Choose the Next button.
6. When SLD connection data is displayed, enter the connection data for the
administrative SLD (see Configure and Activate the Administrative SLD [page
58]).
7. Choose the Return to task list button.
6.3.3. Make Connection Settings between NWA and SLD
With this task, you create the connection from CEN’s J2EE Engine to the administrative
SLD using CIM Client Generation Settings (see Configuring the Connection Between
CEN and the SLD [page 68]).
Step-by-Step
1. You are in the NWA of CEN, in the top-level navigation Deploy and Change
Configuration Wizard (see Setting Up Using the Configuration wizard [page 56])
2. Select the following entry from the task list:
NWA_03_Creating a connection to the SLD and Setting required authorizations
for SLD (CIM client settings).3. Choose the Start button.
7/15/2019 7858198 Solution Manager SAP NW2004S Monitoring Setup Guide SP12
http://slidepdf.com/reader/full/7858198-solution-manager-sap-nw2004s-monitoring-setup-guide-sp12 60/92
Monitoring Setup Guide for SAP NetWeaver 7.0 SP Stack 12
July 2007 60
4. When Connection data (Java) is displayed, enter the connection data for the J2EEEngine of the NWA:
Input Field Description
Java System ID Java Host & Port
Access data for the J2EE Engine (System ID, host,and port)
Java User
Password
Name/password of a user in the J2EE Engine
5. Choose the Next button.
6. When SLD connection data is displayed, enter the connection data for the
administrative SLD (see Configure and Activate the Administrative SLD [page58]).
7. Choose the Return to task list button.
6.3.4. Configure the Connections Between the ABAP and Java Stacksof CEN
This task consists of the following steps:
Creating a JCo RFC connection from CEN's J2EE Engine to the ABAP stack of
CEN (see Configure the Connections Between the ABAP and Java Stacks of CEN
[page 70]).
Activating the GRMG availability monitoring of the J2EE Engine (see
Configuring Availability Monitoring with the GRMG [page 41]).
Step-by-Step
1. You are in the NWA of CEN, in the top-level navigation Deploy and Change
Configuration Wizard (see Setting Up Using the Configuration wizard [page 56])
2. Select the following entry from the task list:
NWA_04_Creating a connection to the ABAP stack of CEN and starting heartbeat
monitoring.
3. Choose the Start button.
4. When Connection data (ABAP) is displayed, enter the connection data of theABAP Engine of CEN:
Input Field Description
Name of RFC Destination RFC destination for communiation between ABAP
and J2EE Engine of the CEN
(naming convention SAP.CCMS.CEN.<SysID>)
ABAP User
Password
Name/password of an ABAP user in CEN
Application Server Host
System Number
Client
Access data of the ABAP Engine (application server,
system number, and client)
5. Choose the Return to task list button.

7/15/2019 7858198 Solution Manager SAP NW2004S Monitoring Setup Guide SP12
http://slidepdf.com/reader/full/7858198-solution-manager-sap-nw2004s-monitoring-setup-guide-sp12 61/92
Monitoring Setup Guide for SAP NetWeaver 7.0 SP Stack 12
July 2007 61
6.3.5. Configure the Connections from the NWA to the AdministeredJava Systems
You can use this task to store logon data for remote Java systems in the NWA. If you
want to administer multiple Java systems with the NWA, you do not then need to log on
with a user name and password every time (see Storing Access Data for the Java Systems
to Be Administered [page 71]).
Execute the task once for each remote Java system that you want to
administer.
Step-by-Step
1. You are in the NWA of CEN, in the top-level navigation Deploy and Change
Configuration Wizard (see Setting Up Using the Configuration wizard [page 56])
2. Select the following entry from the task list: NWA_05_NWA system: Store access data per each managed Java system
(optional).
3. Choose the Start button.
4. When Connection data (Java) is displayed, enter the connection data of a remoteJava system that you want to administer.
5. Choose the Return to task list button.
6. Repeat the previous steps until you have executed the task for all Java systems to
be administered.
6.3.6. Connect a Monitored ABAP System to the Administrative SLDYou can use this task to connect a monitored ABAP system to the administrative SLD, so
that data for this ABAP system is available in the SLD. This task therefore corresponds to
transaction RZ70 in the monitored ABAP system (see Making Settings in the Monitored
Systems [page 65]).
Step-by-Step
1. You are in the NWA of CEN, in the top-level navigation Deploy and Change
Configuration Wizard (see Setting Up Using the Configuration wizard [page 56])
2. Select the following entry from the task list: NWA_06_NWA system: Register each managed ABAP system to SLD.
3. Choose the Start button.
4. When Register ABAP System to SLD is displayed, enter the connection data for aremote ABAP system for which data is to be available in the SLD.
5. Choose the Next button.
6. When SLD Bridge Gateway Data is displayed, enter the connection data for theadministrative SLD (see Configure and Activate the Administrative SLD [page
58]).
7. Choose the Return to task list button.
8. Repeat the previous steps until you have executed the task for all remote ABAP
systems that you want to monitor centrally.
7/15/2019 7858198 Solution Manager SAP NW2004S Monitoring Setup Guide SP12
http://slidepdf.com/reader/full/7858198-solution-manager-sap-nw2004s-monitoring-setup-guide-sp12 62/92
Monitoring Setup Guide for SAP NetWeaver 7.0 SP Stack 12
July 2007 62
Note that you also need to enter the ABAP Engine of CEN itself in this
way.
6.3.7. Connect a Monitored Java System to the Administrative SLD
You can use this task to connect a monitored Java system to the administrative SLD so
that data for the Java system is available in the SLD. This task therefore corresponds to
the SLD Data Supplier service in the monitored Java system (see Making Settings in the
Monitored Systems [page 65]).
This is the only task that you do not execute in the NWA of CEN, but
rather in the NWA of the monitored system. If the monitored Java system
does not have the required release status, you need to perform this step
manually (see Making Settings in the Monitored Systems [page 65]).
If you want to monitor a CE system (see Monitoring SAP NetWeaver
Composition Environment (CE) 7.1 [page 49]), you can not use this task.
In this case, proceed as described in Monitoring SAP NetWeaver
Composition Environment (CE) 7.1 with NWA [page 72].
Step-by-Step
1. You are in the NWA of a monitored system, in the top-level navigation Deploy
and Change Configuration Wizard (see Setting Up Using the Configuration
wizard [page 56])
2. Select the following entry from the task list: NWA_07_creates Destination for Data Supplier Bridge.
3. Choose the Start button.
4. When Create Destination for SLD Data Supplier is displayed, enter the following
data:
Input Field Description
J2EE Host
P4 Port
J2EE User
J2EE Password
Connection data of the local Java system, for which
data is to be entered in the SLD; note that fort he P4
Port applies:
P4 Port = HTTP Port + 4
SLD Host
SLD Port
SLD Administration User
SLD Password
Connection data of the SLD in which the above
monitored Java system is to be entered
5. Choose the Return to task list button.
6. Repeat the previous steps until you have executed the task in all remote Javasystems that you want to monitor centrally.
7/15/2019 7858198 Solution Manager SAP NW2004S Monitoring Setup Guide SP12
http://slidepdf.com/reader/full/7858198-solution-manager-sap-nw2004s-monitoring-setup-guide-sp12 63/92
Monitoring Setup Guide for SAP NetWeaver 7.0 SP Stack 12
July 2007 63
Note that you also need to enter the J2EE Engine of CEN itself in the SLD
in this way.
6.4. Setting Up the Administrative SLD
You require the SLD to monitor your system landscape if you want to use the SAP
NetWeaver Administrator, since the information about the monitored systems is held in
the SLD for this application. To be able to use the SLD, you need to configure and start
the SLD itself, and also enter the ABAP and Java systems in your system landscape in
this SLD.
For a summary of the steps necessary to do this, see also the document System Landscape
Directory 6.40: Getting Started – Checklist . You can obtain this document from the SAP
Service Marketplace, in the System Landscape Directory area (http://service.sap.com/sld ).
Choose Media Library, and then choose the document SLD Getting Started - Check List from the list (direct link ).
Note also the notes about the SLD in the Master Guide – SAP
NetWeaver 2004s, section 4.2.3.4. You can obtain the Master
Guide from the Installation Information - SAP NetWeaver 2004s
area (http://service.sap.com/installnw2004s), by opening the
Planning area (direct link ).
We recommend that you set up the administrative SLD on the J2EE
Engine of CEN.
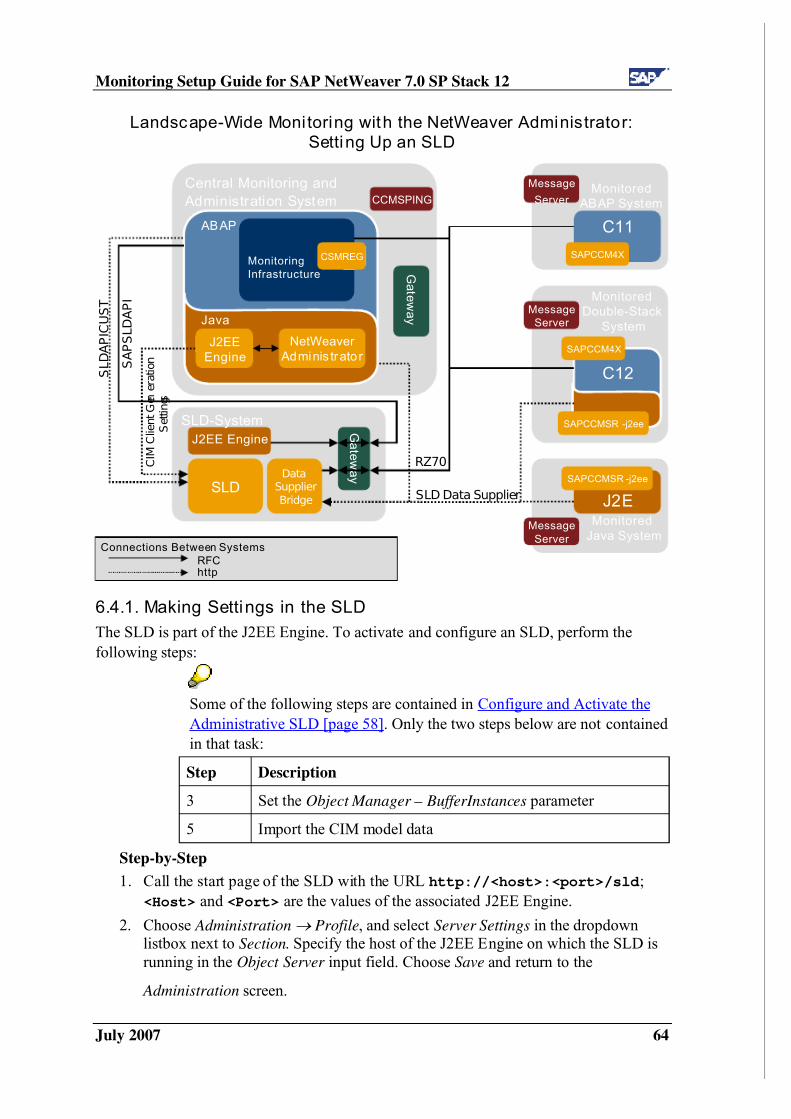
7/15/2019 7858198 Solution Manager SAP NW2004S Monitoring Setup Guide SP12
http://slidepdf.com/reader/full/7858198-solution-manager-sap-nw2004s-monitoring-setup-guide-sp12 64/92
Monitoring Setup Guide for SAP NetWeaver 7.0 SP Stack 12
July 2007 64
Central Monitoring and
Administration System
ABAP
Java
Monitoring
Infrastructure
CSMREG
NetWeaver
Adminis trator
SLD-System
Landscape-Wide Monitoring with the NetWeaver Administrator:
Setting Up an SLD
Monitored
ABAP System
C11
SAPCCM4X
Monitored
Java System
J2E
SAPCCMSR -j2ee
J2EE Engine
SLDData
Supplier
Bridge
J2EE
Engine
C12
Monitored
Double-Stack
System
Message
Server
Message
Server
Message
Server
CCMSPING
SAPCCMSR -j2ee
SAPCCM4X
G a t ew a y
G a t ew a y
S A P S L D A P I
C I M C
l i e n t G e n e r a t i o n
S e t t i n g s
S L D A P I C U S T
RZ70
SLD Data Supplier
Connections Between Systems
RFChttp
6.4.1. Making Settings in the SLD
The SLD is part of the J2EE Engine. To activate and configure an SLD, perform the
following steps:
Some of the following steps are contained in Configure and Activate the
Administrative SLD [page 58]. Only the two steps below are not contained
in that task:
Step Description
3 Set the Object Manager – BufferInstances parameter
5 Import the CIM model data
Step-by-Step
1. Call the start page of the SLD with the URL http://<host>:<port>/sld ;
<Host> and <Port> are the values of the associated J2EE Engine.
2. Choose Administration Profile, and select Server Settings in the dropdown
listbox next to Section. Specify the host of the J2EE Engine on which the SLD is
running in the Object Server input field. Choose Save and return to the
Administration screen.
7/15/2019 7858198 Solution Manager SAP NW2004S Monitoring Setup Guide SP12
http://slidepdf.com/reader/full/7858198-solution-manager-sap-nw2004s-monitoring-setup-guide-sp12 65/92
Monitoring Setup Guide for SAP NetWeaver 7.0 SP Stack 12
July 2007 65
Note the parameter help for the Object Server input field ( button).
3. If the Java system has multiple server nodes, choose the ObjectManager section,
and set the parameter BufferInstances to the value False. Choose Save, and returnto the Administration screen.
4. Start the server by choosing the Start Server button.
5. Start the import of the CIM model data about SAP components by choosing the
Import button in the Content area; choose the document <SAP Inst
Dir.>\<SysID>\SYS\global\sld\model\CR_Content.zip. Choose the
Import Selected File … button, and return to the Administration screen.
This import takes a few minutes.
The CIM model must have at least the status 1.4.26. To check thestatus, choose Details, and choose the Data tab page. The version is
displayed in the Model Version column of the table.
6. To be able to transfer information about the monitored systems to the SLD, you
need to enter the connection data for an SAP Gateway in Profile, Section
datasupplier . Enter the GatewayHost and the GatewayService (by default,
sapgw<System No.>) to do this. Choose Save, and return to the Administration
screen.
Use the SAP Gateway of the SLD system. If your SLD is running on astandalone Java system, install additionally a standalone SAP Gateway.
6.4.2. Making Settings in the Monitored Systems
So that the systems in your system landscape can deliver data to the SLD, you need to
perform the following steps in all systems that you want to monitor centrally with the
SAP NetWeaver Administrator (including in CEN itself):
Step-by-Step
1. To configure the SLD Data Supplier in an ABAP system, start transaction RZ70
in this system, and enter the data for the gateway service of the SLD that you set
in the Data Supplier Bridge. Leave the other proposed values unchanged, and thenchoose the button (Start Data Collection and Job Scheduling).
For data from the monitored systems to be displayed in NWA, the
following conditions need to be fulfilled, depending on the release of the
monitored system:
Release Condition
Up to 4.6D System registered with CEN using CCMS agent
SAPCCM4X (Patch Collection as of 2003/7) (seeRegistering a CCMS Agent SAPCCM4X [page 24])
7/15/2019 7858198 Solution Manager SAP NW2004S Monitoring Setup Guide SP12
http://slidepdf.com/reader/full/7858198-solution-manager-sap-nw2004s-monitoring-setup-guide-sp12 66/92
Monitoring Setup Guide for SAP NetWeaver 7.0 SP Stack 12
July 2007 66
Release Condition
SAP Web AS 6.10 At least SP 37 and Kernel Patch Level 1157 (or
alternatively, connection using the above agent
SAPCCM4X)
SAP Web AS 6.20 At least SP 29 and Kernel Patch Level 1157 (or
alternatively, connection using the above agent
SAPCCM4X)
2. To configure the SLD Data Supplier in a Java system, start the corresponding
Visual Administrator, and log on as the J2EE Engine Administrator with your user.
In the navigation bar, choose Cluster Server Services SLD Data Supplier
Runtime, and enter the connection data for the SLD on the HTTP Settings tab
page. Save these settings by choosing the Save button, and start the data transfer by choosing the button.
In the case of double-stack systems, you need to perform this step in both
the ABAP and Java stacks.
Checking the Configuration (optional)
3. Call the start page of the SLD again, and choose the Technical Landscape button.
The systems in which you have performed the above configuration steps nowappear in the SLD.
Note:If there is already a productive SLD in your system landscape (for example, for XI), we
recommend that you do not use this SLD as the administrative SLD for the NWA.
Instead, configure a separate SLD in CEN for the NWA. To do this, proceed as follows:
1. Leave the connections between the monitored systems and the existing SLD (as
stated above, either through transaction RZ70 or using SLD Data Supplier )
unchanged.
2. Instead, define a forwarding of the registration data in the productive SLD in
Administration Data Supplier Bridge by choosing the Add SLD… button, and
entering the connection data for the administrative SLD in the New SLD Client
group box. Save your entries.
With the default settings, the monitored systems appear in the
administrative SLD after a maximum of 720 minutes. To see the monitored
systems there immediately, you need to manually restart the data transfer
in these systems (transaction RZ70 or SLD Data Supplier ).
3. Create the connections from CEN to the administrative SLD in the usual way, in
accordance with Configuring the Connection Between CEN and the SLD [page
68].
7/15/2019 7858198 Solution Manager SAP NW2004S Monitoring Setup Guide SP12
http://slidepdf.com/reader/full/7858198-solution-manager-sap-nw2004s-monitoring-setup-guide-sp12 67/92
Monitoring Setup Guide for SAP NetWeaver 7.0 SP Stack 12
July 2007 67
6.5. Manual Setup of the NWA
This section describes the individual steps that are required to set up the
NWA. You can, however, have the Configuration wizard perform thesesteps; and we recommend that you do so, by following the instructions in
the section Setting Up Using the Configuration wizard [page 56].
Performing these steps manually is included here only for reasons of
completeness.
Note that before the manual setup of the NWA, you have to execute the
process Setting Up the Administrative SLD [page 63].
6.5.1. Configuring User Administration
There are four special roles available for the use of the NWA:
SAP_JAVA_NWADMIN_CENTRAL
SAP_JAVA_NWADMIN_CENTRAL_READONLY
SAP_JAVA_NWADMIN_LOCAL
SAP_JAVA_NWADMIN_LOCAL_READONLY
With these, you can either perform administration tasks only for the local system
( LOCAL) or for all connected systems (CENTRAL), and can restrict the authorizations
purely to display functions ( READONLY ).
Step-by-Step1. Start the NWA, by calling the http://<Host>:<Port>/nwa; <Host> and
<Port> are the values for the associated J2EE Engine.
2. In the top-level navigation, choose System Administration Administration, and then, in Detailed Navigation, choose the Identity-Management entry.
3. To create a new user for operating the NWA, choose Create User , and enter the
required data for the user.
If the data source of your identity management is an ABAP system, you
may depending on the connection settings only be able to create new usersin the ABAP engine.
4. To assign a specific role to a user, first enter the user name in the input field
Search Criteria, and choose the Go button. Select the desired user in the list.
5. Choose the Modify button in the subscreen Details of User… Now choose the tab
Assigned Roles, and enter the desired role in the input field Search Criteria of the
subscreen Available Roles. Choose the Go button.
6. Select the role you want to assign to the user, and choose the Add button. When
you have assigned all desired roles to the user, save your changes.
7/15/2019 7858198 Solution Manager SAP NW2004S Monitoring Setup Guide SP12
http://slidepdf.com/reader/full/7858198-solution-manager-sap-nw2004s-monitoring-setup-guide-sp12 68/92
Monitoring Setup Guide for SAP NetWeaver 7.0 SP Stack 12
July 2007 68
6.5.2. Configuring the Connect ion Between CEN and the SLD
For the operation of the NWA, the SLD needs to contain not only data about the
monitored systems, which it contains through transaction RZ70 (ABAP systems) or the
SLD Data Supplier service (Java systems), but also data about the agents that are
monitoring these systems. To send this data to the SLD, you require special connectionsand authorizations in CEN:
In the ABAP stack of CEN, the RFC connection SAPSLDAPI must be
maintained; this RFC connection must also be maintained in the J2EE Engine of
the SLD in the service JCo RFC Provider .
The connection data for the SLD must exist in transaction SLDAPICUST in the
ABAP stack of CEN.
You also need to create a special connection with associated authorizations in the
J2EE Engine of CEN (CIM Client Generation Settings).
In Make Connection Settings Between CEN and SLD [page 58] and Make
Connection Settings between NWA and SLD [page 59], you can have
these steps performed automatically. The system requests the data
necessary to do so.
Step-by-Step
1. You need the connection data for the SLD in the ABAP stack of CEN. Therefore
perform the following steps in the ABAP stack of CEN:
a) Start transaction SLDAPICUST.
b) Switch to change mode by choosing ( Display Change).
c) If there is not yet a corresponding connection to the desired SLD, create a new
row by choosing ( Append Row).
d) Enter any Alias Name, the connection data for the SLD ( Host Name, Port ),
and the name and password of an administration user on this SLD in the
corresponding column of your new row.
e) Activate the Prim. Indicator for this connection.
f) Save your entries.
2. You need the RFC connection SAPSLDAPI in the ABAP stack of CEN.
Therefore perform the following steps in the ABAP stack of CEN:
a) Create an RFC destination with the name SAPSLDAPI. Start transaction
SM59, and choose the Create button. The RFC Destination screen appears.
b) In the RFC Destination input field, enter SAPSLDAPI as the name of the
destination.
c) Enter T (Start external program using TCP/IP) as the connection type, and
enter a description of the destination. Confirm your entries by choosing
( Enter ).
d) Switch to the Technical Settings tab page. In the Activation Type group box,
choose the Registered Server Program radio button, and enter any name in the
7/15/2019 7858198 Solution Manager SAP NW2004S Monitoring Setup Guide SP12
http://slidepdf.com/reader/full/7858198-solution-manager-sap-nw2004s-monitoring-setup-guide-sp12 69/92
Monitoring Setup Guide for SAP NetWeaver 7.0 SP Stack 12
July 2007 69
Program ID input name. Note that you need to create a JCo RFC Connection
with the same name in the J2EE Engine of the SLD (see point 3).
e) In the Gateway Options group box, enter the gateway information for the data
supplier bridge of your SLD (see Making Settings in the SLD [page 64] ).
f) Save your entries.
3. To complete the RFC connection SAPSLDAPI, you also need to define an RFC
connection in the J2EE Engine of the SLD. Therefore perform the following steps:
a) Start the Visual Administrator and log on with your user as a J2EE Engine
administrator.
b) In the navigation bar, choose Cluster Server Services JCo RFC
Provider Runtime, and create a new RFC destination with the following
connection data:
Input Field DescriptionProgram ID Enter the name that you entered as the Registered
Server Program under the SAPSLDAPI RFC
connection in CEN (see point 2).
Gateway host
Gateway service
Enter the connection data for the gateway for the
data supplier bridge of the SLD (see Making
Settings in the SLD [page 64]); by default, the
gateway service uses the naming convention
sapgw<System No.>.
Number of processes Enter 3 here.
Application server host
System number
Enter the connection data for a CEN application
server here.
Client
Language
User
Password
Enter the logon data for an administrator in CEN
here.
c) To create the connection, choose the Set button.
Checking the Configuration (Optional)d) In CEN, start transaction SLDCHECK. This also checks the RFC destination
LCRSAPRFC, which you do not require for the NWA. You can therefore
ignore this part of the test.
4. You need a special connection in the J2EE Engine to the SLD (CIM
ClientGeneration Settings). Therefore, perform the following steps in the J2EE
Engine of CEN:
a) Start the Visual Administrator, and log on with your user as a J2EE Engine
administrator.
b) You require (as in all monitored Java systems) a connection to the SLD. In thenavigation bar, choose Cluster Server Services SLD Data Supplier
7/15/2019 7858198 Solution Manager SAP NW2004S Monitoring Setup Guide SP12
http://slidepdf.com/reader/full/7858198-solution-manager-sap-nw2004s-monitoring-setup-guide-sp12 70/92
Monitoring Setup Guide for SAP NetWeaver 7.0 SP Stack 12
July 2007 70
Runtime, and enter the connection data for the SLD on the HTTP Settings tab
page.
c) To set the required authorizations for the NWA, now choose the CIM Client
Generation Settings tab page, and activate the following entries in the list:
sap.com/tc~lm~webadmin~mainframe~wd/webdynpro/public/lib/app.jar
sap.com/tc~lm~webadmin~sld~wd/webdynpro/public/lib/app.jar
d) Ensure that the SLD connection data is entered on this tab page, and save your
entries by choosing Save.
e) Activate the data transfer to the SLD by choosing .
Checking the Configuration (optional)
f) If you have correctly configured the connection, the Central Administration
mode is now available to you in the NWA. Start the NWA, and choose the
Define System Selection in System Landscape Selection.
If the connection to the SLD is functioning correctly, you can now display
remote systems. In the Landscape Type input field, choose the All Available
Systems entry, and choose Start . The system displays a list of the systems in
the SLD. To switch to Central Administration, select the desired systems and
choose OK .
6.5.3. Configuring a Connection Between the ABAP and Java Stacksof CEN
You need to create a Jco RFC connection to the ABAP stack of CEN in the J2EE Engine
with the naming convention SAP.CCMS.CEN.<SID>.
In Configure the Connections Between the ABAP and Java Stacks of CEN
[page 60], you can have this step performed automatically. The system
requests the information it requires when doing so.
Step-by-Step
1. Start the Visual Administrator for the J2EE Engine of CEN, and log on with your
user as a J2EE Engine administrator.
2. In the navigation bar, choose Cluster Server Services JCo RFC
Provider Runtime, and create a new RFC destination with the followingconnection data:
Input Field Description
Program ID Enter the following program ID:
SAP.CCMS.CEN.<SID>, where <SID> is the system
ID of CEN.
Gateway host
Gateway service
Enter the connection data for the CEN gateway here;
by default, the gateway service has the naming
convention sapgw<System No.>.
Number of processes Enter 1 here.
7/15/2019 7858198 Solution Manager SAP NW2004S Monitoring Setup Guide SP12
http://slidepdf.com/reader/full/7858198-solution-manager-sap-nw2004s-monitoring-setup-guide-sp12 71/92
Monitoring Setup Guide for SAP NetWeaver 7.0 SP Stack 12
July 2007 71
Input Field Description
Application server host
System number
Enter the connection data for a CEN application server
here.
Client
Language
User
Password
Enter the logon data for a user in CEN here. The user
requires authorizations to call transaction RZ20 (Alert
Monitor).
3. To create the connection to the ABAP stack of CEN, choose the Set button.
Checking the configuration (Optional)
4. Start the NWA, and choose System Management Monitoring in the top-level
navigation. In Detailed Navigation, choose the Central Reports entry.
5. If you have created the connection to the ABAP stack of CEN correctly, you can
display a monitor set and a monitor from CEN in the dropdown lists for the input
fields View Set and View. If the connection is not functioning correctly, the
dropdown lists remain empty.
6.5.4. Storing Access Data for the Java Systems to Be Administered
In Make Connection Settings between NWA and SLD [page 59], you can
have these steps performed automatically. The system requests the
information it requires when doing so.
If you want to administer multiple Java systems with the NWA, we recommend that youstore the relevant logon data in the J2EE Engine of CEN, so that you do not need to log
on with a user name and password every time.
1. Start the Visual Administrator for the J2EE Engine of CEN, and log on with your
user as a J2EE Engine administrator.
2. In the navigation bar, choose Cluster Server Services Destinations Runtime, and select the HTTP in the destination tree. Choose the New button.
3. Enter the following name:
sap.com/tc~je~jmx~wsconnector~sp/<SysID>/<DB Host>
<SysID> is the system ID of the Java system to be administered; <DB Host> isthe host on which the database of this system is running.
Note that <DB-Host> is case-sensitive.
In a central system, the database host is simply the host on which
the Java system itself is running.
In the case of named MSSQL instances, enter the following name:
sap.com/tc~je~jmx~wsconnector~sp/
<SysID>/<DB Host>/<DB Instance>
4. On the next screen, enter the following URL:
7/15/2019 7858198 Solution Manager SAP NW2004S Monitoring Setup Guide SP12
http://slidepdf.com/reader/full/7858198-solution-manager-sap-nw2004s-monitoring-setup-guide-sp12 72/92
Monitoring Setup Guide for SAP NetWeaver 7.0 SP Stack 12
July 2007 72
http://<j2eehost>:<port>/WSConnector/Config1?style=document
<j2eehost> is the host of the central instance of the Java system to be
administered; <port> is the HTTP port of the J2EE Engine.
5. In the Authentication input field, choose the BASIC entry from the dropdown list.
6. In the User Name and Password fields, enter the corresponding data for a user with administrator authorization in the Java system to be administered.
7. Save your entries by choosing the Save button.
Checking the Configuration (Optional)
8. Start the NWA and choose System Management Administration in the top-levelnavigation. In the Detailed Navigation, choose the Systems entry.
9. A list of the Java systems to be administered appears. If you expand the tree for a
system for which you stored access data above, you do not need to make any
additional entries to log on to this system.
6.6. Monitoring SAP NetWeaver Composit ion Environment (CE)7.1 with NWA
It is a prerequisite for this chapter that an NWA is already configured for central
monitoring in CEN. Only the steps required to monitor a CE system from the NWA are
described here.
6.6.1. Connecting the CE System to the Administ rative SLD
To monitor the CE system from NWA, you need to register the system in the
administrative SLD.
Step-by-Step
1. In the NetWeaver Administrator of the monitored CE system, choose
Configuration Management Security Management Destinations.
2. If it does not yet exist, create an HTTP destination with the name
SLD_DataSupplier. If the connection exists already, change it by choosing the
Edit button.
3. In the Connection and Transport area, enter the http://<host>:<port> in the
URL input field, where <host> and <port> are the host name and port number
of the administrative SLD.
4. Switch to the Logon Data area. In the Authentication input field, select the
Username and Password entry, and specify the user name and password of an
SLD user.
5. Save your changes.
6. If it does not yet exist, create an HTTP destination with the name SLD_Client. If
the connection already exists, change it by choosing the Edit button.
7. In the Connection and Transport area, enter http://<host>:<port> in the
URL input field, where <host> and <port> are the host name and port number
of the administrative SLD.

7/15/2019 7858198 Solution Manager SAP NW2004S Monitoring Setup Guide SP12
http://slidepdf.com/reader/full/7858198-solution-manager-sap-nw2004s-monitoring-setup-guide-sp12 73/92
Monitoring Setup Guide for SAP NetWeaver 7.0 SP Stack 12
July 2007 73
8. Switch to the Logon Data area. In the Authentication input field, select the
Username and Password entry, and specify the user name and password of an
SLD user.
9. Save your changes.
10. In the NetWeaver Administrator of the monitored CE system, choose
Configuration Management Infrastructure Management SLD Data Supplier
Configuration.
11. To transfer the system data to the SLD, choose the Collect and Send Data button.
Checking the Transfer (Optional)
12. The system displays the result of the transfer.
6.6.2. Creating the Required Associations for the CE System in theSLD
Immediately after you have connected the CE system to the administrative SLD, this
system is missing the association Centrally Monitored Application System in the SLD.
This association specifies that the system is monitored by CEN.
Step-by-Step
1. Reset the central instance of CEN to WARMUP status:
a) In CEN, call transaction RZ21, and choose Technical Infrastructure
Display Topology.
b) Choose the Local Segments (<System-ID>) tab page, and switch to change
mode by choosing the Display Change ( ) button.
c) Select the segment for the central instance (SAP_CCMS_<host
name>_<system ID>_<instance number>), and choose the button Reset
Segment in WARMUP Status. In the messages that follow, confirm that you
want to start the startup methods again.
2. Restart the NWA.
Checking the Transfer (Optional)
3. To determine whether the association exists, call the administrative SLD and
choose the Administration button.
4. Display the associations of the CE system. To do this, choose the Content
Maintenance button, choose the All with Classes entry from the Subset drop-down
list, and choose the SAP J2EE Engine Cluster entry from the Classes drop-down
list. The CE system is displayed in the list of systems. Choose the corresponding
entry in the Assoc’s column.
5. The Centrally Monitored Application System association exists, and CEN is
specified as Dependent .
6.6.3. Configuring the Connections from the NWA to CE Systems
If you want to monitor multiple CE systems with the NWA, we recommend that you store
the corresponding logon data in the Java Engine of CEN so that you do not need to log on
with a user name and password every time.
7/15/2019 7858198 Solution Manager SAP NW2004S Monitoring Setup Guide SP12
http://slidepdf.com/reader/full/7858198-solution-manager-sap-nw2004s-monitoring-setup-guide-sp12 74/92
Monitoring Setup Guide for SAP NetWeaver 7.0 SP Stack 12
July 2007 74
1. Start the Visual Administrator for the CEN’s Java Engine, and log on as the Java
Engine administrator with your user.
2. In the navigation bar, choose Cluster Server Services Destinations
Runtime, and select the HTTP entry in the destination tree. Choose the New
button.
3. Enter the following name:
sap.com/tc~je~jmx~wsconnector~sp/<SysID>/<DB Host>
<SysID> is the system ID of the CE system to be administered; <DB Host> is
the host on which the data for this system is running.
Note that <DB Host> is case-sensitive.
In the case of a central system, the database host is simply the host
on which the CE system itself is running. In the case of specified MSSQL instances, enter the following
name: sap.com/tc~je~jmx~wsconnector~sp/
<SysID>/<DB Host>/<DB Instance>
4. On the next screen, enter the following URL:
http://<cehost>:<port>/WSConnector/Config1?style=document
<cehost> is the host of the central instance of the CE system to be administered;
<port> is the HTTP port of this system.
5. In the Authentication input field, select the entry BASIC from the drop-down list.
6. In the Username and Password input fields, enter the corresponding data for a
user with administrator authorizations for the CE system to be administered.
7. Save your entries by choosing the Save button.
Checking the Configuration (Optional)
8. Start the NWA, and in the top-level navigation, choose System Administration
Administration. In the Fine Navigation, choose the Systems entry.
9. The system displays a list of the Java systems to be administered. If you expand
the tree for a system for which you stored the access data above, you do not need
to make additional entries to log on to that system.
6.7. Problem Analysis Scenario for the Setup of the NWA
The possible error situations that can occur when calling monitoring in the NWA are
described in this section, together with their causes and solutions:
Symptom When calling the NWA, you receive the following error message:
Ser ver f or Syst em Landscape Di r ect ory was not
st ar t ed.
Onl y l ocal syst em management can be used.
Cause 1 The object server of the SLD is not running.
7/15/2019 7858198 Solution Manager SAP NW2004S Monitoring Setup Guide SP12
http://slidepdf.com/reader/full/7858198-solution-manager-sap-nw2004s-monitoring-setup-guide-sp12 75/92
Monitoring Setup Guide for SAP NetWeaver 7.0 SP Stack 12
July 2007 75
Solution 1 Start the object server as described in Making Settings in the
SLD [page 64].
or
Cause 2 The access data for the SLD is not maintained in the CIM Client Generation Settings of the J2EE Engine of CEN.
Solution 2 Enter the access data as described in Configuring a
Connection Between the ABAP and Java Stacks of CEN
[page 70].
Symptom When calling the NWA, you receive the following error message:
No access possi bl e to t he Syst em Landscape Di r ect or y.
Onl y l ocal syst em management can be used.
Cause The authorizations in the SLD are not maintained in the CIM
Client Generation Settings of the J2EE Engine of CEN.
Solution Enter authorizations as described in Configuring a Connection
Between the ABAP and Java Stacks of CEN [page 70].
Symptom You cannot display any monitor sets or monitors in the Monitoring
Central Reports work center of the NWA.
Cause The RFC connection SAP.CCMS.CEN.<SID> from the Java
stack to the ABAP stack of CEN has not been created or was
created incorrectly.
Solution Create the above RFC connection as described in Configuring
a Connection Between the ABAP and Java Stacks of CEN
[page 70].
Symptom You want to monitor a particular system. However, it is not shown in the
System Landscape Selection.
Cause The relevant system does not exist in the SLD.
Solution Use transaction RZ70 (ABAP systems) or the SLD Data
Supplier (Java systems) to enter the relevant system in the
SLD (see Making Settings in the Monitored Systems [page
65]).
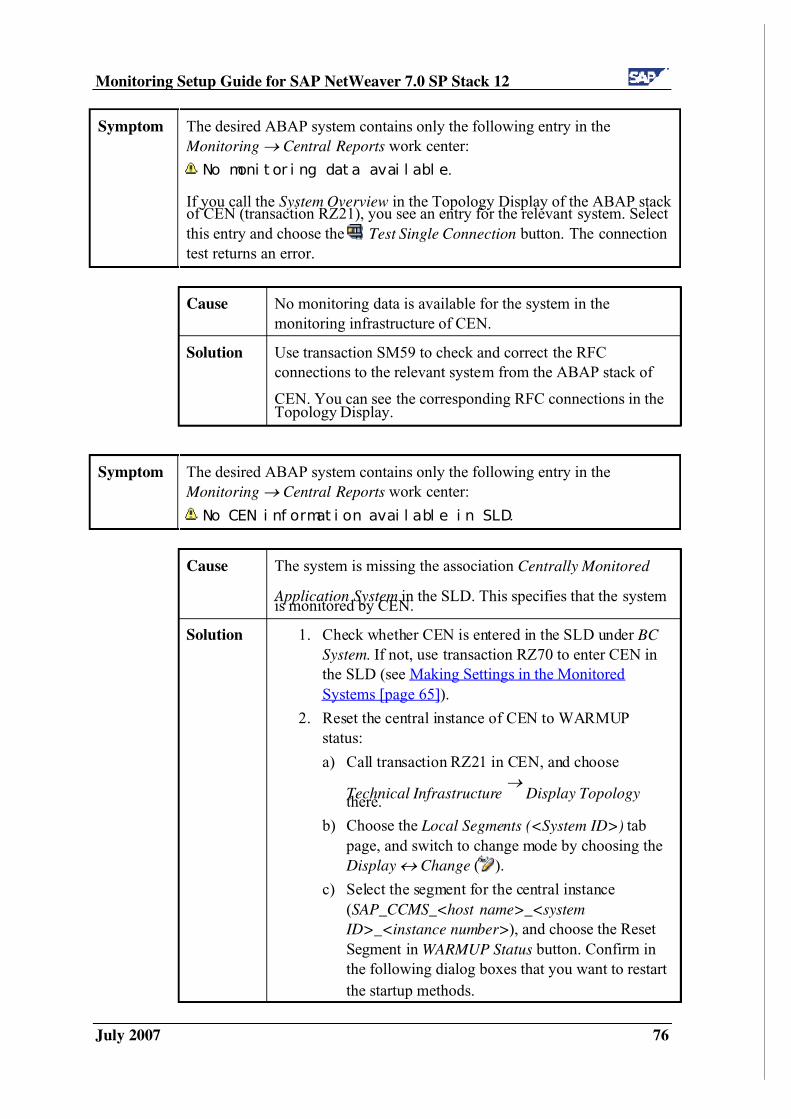
7/15/2019 7858198 Solution Manager SAP NW2004S Monitoring Setup Guide SP12
http://slidepdf.com/reader/full/7858198-solution-manager-sap-nw2004s-monitoring-setup-guide-sp12 76/92
Monitoring Setup Guide for SAP NetWeaver 7.0 SP Stack 12
July 2007 76
Symptom The desired ABAP system contains only the following entry in the
Monitoring Central Reports work center:
No moni t or i ng dat a avai l abl e.
If you call the System Overview in the Topology Display of the ABAP stack of CEN (transaction RZ21), you see an entry for the relevant system. Select
this entry and choose the Test Single Connection button. The connection
test returns an error.
Cause No monitoring data is available for the system in the
monitoring infrastructure of CEN.
Solution Use transaction SM59 to check and correct the RFC
connections to the relevant system from the ABAP stack of
CEN. You can see the corresponding RFC connections in theTopology Display.
Symptom The desired ABAP system contains only the following entry in the
Monitoring Central Reports work center:
No CEN i nf ormat i on avai l abl e i n SLD.
Cause The system is missing the association Centrally Monitored
Application System in the SLD. This specifies that the systemis monitored by CEN.
Solution 1. Check whether CEN is entered in the SLD under BC
System. If not, use transaction RZ70 to enter CEN in
the SLD (see Making Settings in the Monitored
Systems [page 65]).
2. Reset the central instance of CEN to WARMUP
status:
a) Call transaction RZ21 in CEN, and choose
Technical Infrastructure
Display Topologythere.
b) Choose the Local Segments (<System ID>) tab
page, and switch to change mode by choosing the
Display Change ( ).
c) Select the segment for the central instance
(SAP_CCMS_<host name>_<system
ID>_<instance number>), and choose the Reset
Segment in WARMUP Status button. Confirm in
the following dialog boxes that you want to restart
the startup methods.
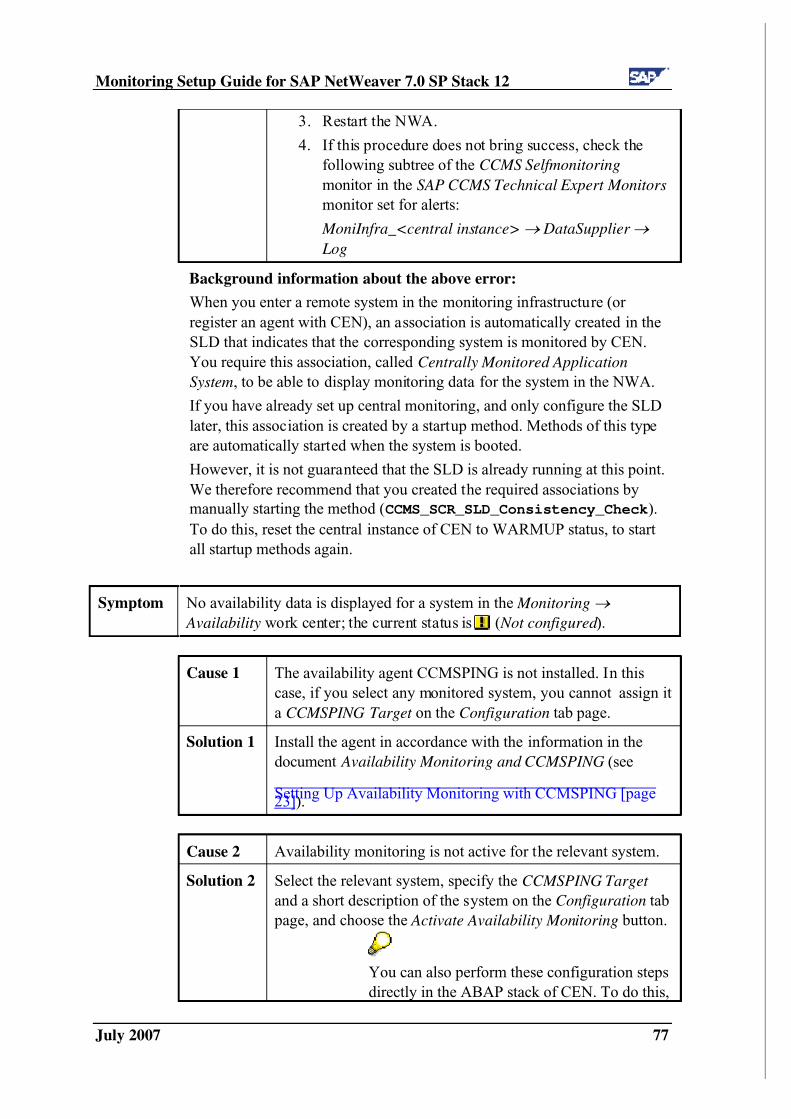
7/15/2019 7858198 Solution Manager SAP NW2004S Monitoring Setup Guide SP12
http://slidepdf.com/reader/full/7858198-solution-manager-sap-nw2004s-monitoring-setup-guide-sp12 77/92
Monitoring Setup Guide for SAP NetWeaver 7.0 SP Stack 12
July 2007 77
3. Restart the NWA.
4. If this procedure does not bring success, check the
following subtree of the CCMS Selfmonitoring
monitor in the SAP CCMS Technical Expert Monitors
monitor set for alerts:
MoniInfra_<central instance> DataSupplier
Log
Background information about the above error:
When you enter a remote system in the monitoring infrastructure (or
register an agent with CEN), an association is automatically created in the
SLD that indicates that the corresponding system is monitored by CEN.
You require this association, called Centrally Monitored Application
System, to be able to display monitoring data for the system in the NWA.
If you have already set up central monitoring, and only configure the SLD
later, this association is created by a startup method. Methods of this type
are automatically started when the system is booted.
However, it is not guaranteed that the SLD is already running at this point.
We therefore recommend that you created the required associations by
manually starting the method (CCMS_SCR_SLD_Consistency_Check).
To do this, reset the central instance of CEN to WARMUP status, to start
all startup methods again.
Symptom No availability data is displayed for a system in the Monitoring
Availability work center; the current status is ( Not configured ).
Cause 1 The availability agent CCMSPING is not installed. In this
case, if you select any monitored system, you cannot assign it
a CCMSPING Target on the Configuration tab page.
Solution 1 Install the agent in accordance with the information in the
document Availability Monitoring and CCMSPING (see
Setting Up Availability Monitoring with CCMSPING [page23]).
Cause 2 Availability monitoring is not active for the relevant system.
Solution 2 Select the relevant system, specify the CCMSPING Target
and a short description of the system on the Configuration tab
page, and choose the Activate Availability Monitoring button.
You can also perform these configuration steps
directly in the ABAP stack of CEN. To do this,

7/15/2019 7858198 Solution Manager SAP NW2004S Monitoring Setup Guide SP12
http://slidepdf.com/reader/full/7858198-solution-manager-sap-nw2004s-monitoring-setup-guide-sp12 78/92
Monitoring Setup Guide for SAP NetWeaver 7.0 SP Stack 12
July 2007 78
start transaction RZ21, and choose Technical
Infrastructure Availability Monitoring
Configure CCMSPING Monitoring.
7/15/2019 7858198 Solution Manager SAP NW2004S Monitoring Setup Guide SP12
http://slidepdf.com/reader/full/7858198-solution-manager-sap-nw2004s-monitoring-setup-guide-sp12 79/92
Monitoring Setup Guide for SAP NetWeaver 7.0 SP Stack 12
July 2007 79
7. Moving a Central Monitoring System
This section describes how you can transfer the settings of a central monitoring system
CEN1, and if necessary of an SAP NetWeaver Administrator (NWA) to another system,
CEN2. There is not currently an automated way of moving the central monitoring settings
and the manual steps are therefore listed in the following.
This section is not part of an initial setup; it is only part of the Monitoring
Setup Guide, because the initial steps are also performed when moving of
CEN.
A move of this type could be required in the context of an upgrade, or also if the central
CCMS monitoring system and the Solution Manager are to run on one system.
Moving a central monitoring system means, on the one hand, that you need to transfer the
Customizing settings that are stored in CEN1 to the new system, CEN2. On the other
hand, you need to register CCMS agents, which have stored local connection data to the
central monitoring system, with the CEN2 system.
You only need to perform some of the steps if you are using the NWA in
the context of your landscape-wide monitoring (these are correspondingly
indicated by a note). In this case, you need to clarify if you also want to
move the administrative SLD (which contains the data for the monitored
systems) during the move. When making this decision, you need to decide
between two possible scenarios:
The administrative SLD remains in the previous system, and
therefore is not included in the move. This is primarily the case if
you are using a central SLD that is not running in system CEN1.
You want to set up a new administrative SLD in the context of the
move; that is, it is involved in the move. This is primarily the case
if the previous administrative SLD is running in system CEN1. In
this case, you need to adjust the connection data of all monitored
systems to the SLD.
PrerequisitesIn the context of these steps, you repeatedly need to transport table contents or other data
from the original monitoring system CEN1 to the new monitoring system CEN2. It is
therefore a prerequisite of this section that you are familiar with the Change and
Transport System. You must be able to create a transport request, and to import a
transport request into the target system.
For more information, see the SAP Help Portal under SAP NetWeaver
SAP NetWeaver by Key Capability Solution Life Cycle Management by
Key Capability Software Life Cycle Management Software Logistic Change and Transport System, or follow the link below:
7/15/2019 7858198 Solution Manager SAP NW2004S Monitoring Setup Guide SP12
http://slidepdf.com/reader/full/7858198-solution-manager-sap-nw2004s-monitoring-setup-guide-sp12 80/92
Monitoring Setup Guide for SAP NetWeaver 7.0 SP Stack 12
July 2007 80
http://help.sap.com/saphelp_nw04s/helpdata/en/14/94fc3f8fc2c542e10000
000a1550b0/frameset.htm.
The steps in detail:
You only need to perform the steps in any particular section if you have
made configuration settings in this area in CEN1.
7.1. Preparatory Steps in CEN2
7.1.1. Release and Patch of the New Central Monitoring System CEN2
CEN2 should have a SAP NetWeaver release with current Support Package Stack, that is,
depending on the release:
NW 2004 SPS 19
NW 7.0 SPS 12
Ensure that the kernel of CEN2 is at least at the Patch Level specified in SAP Note
827872 (for SAP NetWeaver 04 (6.40), this is at least Kernel Patch 81).
7.1.2. Create Dispatching and CSMREG in CEN2
You need to perform the following steps manually in CEN2:
You need to follow the instructions for Activating Background and Central
System Dispatching[page 18] for CEN2.
You need to follow the instructions for Creating the CSMREG User [page 18] in
CEN2.
7.2. Steps for Moving the NWA
7.2.1. Initial Configuration of and Data Provision for the New Adminis trative SLD
You only need to perform this step if you use the NWA in the context of
your landscape-wide monitoring and are setting up a new administrative
SLD in the context of the move.
Perform the following steps for the new SLD:
Set the corresponding host name and start the object server.
Set the corresponding host name and start the data supplier bridge.
Perform the initial import of the CIM model data.
For a detailed description of these steps, see Making Settings in the SLD
[page 64].
You then need to enter the connection data for the new SLD in all monitored
systems, either in transaction RZ70 (ABAP), or in the SLD Data Supplier service
7/15/2019 7858198 Solution Manager SAP NW2004S Monitoring Setup Guide SP12
http://slidepdf.com/reader/full/7858198-solution-manager-sap-nw2004s-monitoring-setup-guide-sp12 81/92
Monitoring Setup Guide for SAP NetWeaver 7.0 SP Stack 12
July 2007 81
(Java), and start the data transfer (see Making Settings in the Monitored Systems
[page 65]).
7.2.2. Configuring the NWA
You only need to perform this step if you use the NWA in the context of
your landscape-wide monitoring.
Perform the steps as described in the Manual Setup of the NWA [page 67] section or
Setting Up Using the [page 56]. When doing so, enter the connection data for the
administrative SLD that you want to use for CEN2.
7.3. Deregistering/Registering CCMS Agents
You need to deregister all CCMS agents that are registered with CEN1, and register them
with CEN2. There is no system support for doing this, that is, you need to perform thesteps manually in accordance with the usual instructions:
Registering a CCMS Agent SAPCCM4X [page 24]
Registering a CCMS Agent SAPCCMSR (Java Standalone) [page 26]
Registering a CCMS Agent SAPCCMSR (Double-Stack) [page 28]
You perform the deregistration in the same way as registration. You only need to note the
following points:
For manual deregistration (SAPCCM4X), replace the parameter –R for
registration with –U (Unregister ).
For deregistration using the Visual Administrator (SAPCCMSR), instead of
choosing the Register button, choose the Unregister button. For deregistration,
you only need to enter the password for the Administration User .
Take this opportunity to check that you are using the current
version of the agent (currently Patch Collection 2005/6).
For a better overview in CEN1, check the entries for the agents in
the Topology Browser in transaction RZ21 to determine which
agents are registered with CEN1.
During the (de)registration, delete files with the naming convention
GRMG_* from the GRMG directories on the hosts of your agents.
This means that you can continue to work with the scenarios that
you have configured in CEN1, without the agents uploading the
starting set of scenarios again. By default, the GRMG directory has
the path \\saploc\prfclog\grmg (Microsoft Windows).
7/15/2019 7858198 Solution Manager SAP NW2004S Monitoring Setup Guide SP12
http://slidepdf.com/reader/full/7858198-solution-manager-sap-nw2004s-monitoring-setup-guide-sp12 82/92
Monitoring Setup Guide for SAP NetWeaver 7.0 SP Stack 12
July 2007 82
7.4. Availabili ty Monitoring (CCMSPING/GRMG)
7.4.1. Deregis ter/Register CCMSPING
You need to deregister all CCMSPING agents that are registered with CEN1 and register
them with CEN2. There is no system support for this, that is, you need to perform the
steps manually in accordance with the usual instructions:
Setting Up Availability Monitoring with CCMSPING [page 23]
You perform the deregistration in the same way as registration, you simply need to ensure
that you replace the parameter –R for registration with –U.
Take this opportunity to ensure that you are using the current
version of the agent (currently Patch Collection 2005/6).
You can obtain a list of the CCMSPING agents registered withCEN1 from the Selfmonitoring CCMS Agents monitor of the SAP
CCMS Technical Expert Monitors monitor set, for example.
If you are installing CCMSPING on a different host, ensure that
there is also a services file on this host that contains the port
numbers of the message servers of the monitorable systems.
7.4.2. Other Settings for Availability Monitoring with CCMSPING
You can transfer other settings for availability monitoring from CEN1 to CEN2 by
transporting the corresponding table contents.
To transport all of the contents of a table, start transaction SE16, enter the
name of the table, and confirm your entry with ENTER. On the selection
screen that then appears, choose ( Execute), select all entries by
choosing (Select All), and choose Table Entry Transport Entries.
You can transfer the following availability settings to CEN2 by transporting the
corresponding tables from CEN1 to CEN2:
Setting Table Special Features/Restrictions
Monitored systems
CSMNSDICThe table contains a list of the monitorable systemswith their monitoring settings.
If CCMSPING has a new RFC
destination after the move (this is the
case, if the host or instance number of
CCMSPING change), you also need to
adjust the responsible CCMSPING on
the configuration interface for moni-
tored systems (transaction RZ21) after
you have transported the table contents.
7/15/2019 7858198 Solution Manager SAP NW2004S Monitoring Setup Guide SP12
http://slidepdf.com/reader/full/7858198-solution-manager-sap-nw2004s-monitoring-setup-guide-sp12 83/92
Monitoring Setup Guide for SAP NetWeaver 7.0 SP Stack 12
July 2007 83
Setting Table Special Features/Restrictions
Monitored
application
servers
CSMSYSAS You only need to transport the contents of this table if
you have chosen the monitoring setting Only Selected
Application Servers or Selected and New ApplicationServers in the configuration program for CCMSPING
in transaction RZ21.
Monitored
logon groups
ALAVLPING You only need to transport the contents of this table if
you have chosen the monitoring setting Only Selected
Logon Groups or Selected and new Logon Groups in
the configuration program for CCMSPING in
transaction RZ21.
Monitoring
pauses
ALDWNTIME You only need to transport the contents of this table if
you have created monitoring pauses.
CCMSPING
groups
ALAVLAGENT
Monitoring
frequencies
AVAVLCNTRL
You can only transport the contents of these tables if
the RFC destinations of the CCMSPING agents do not
change during the move. Otherwise, you need to
recreate these settings manually.
7.4.3. Availabilit y Monitoring with GRMG/GRMGLite
To transfer monitoring settings for GRMG and GRMGLite from CEN1 to CEN2, proceed
as follows:
1. Download all GRMG/GRMGLite scenarios from CEN1 to a directory, for
example on your front end PC:
a) Start transaction GRMG.
b) Select all scenarios.
c) Choose Upload/Download Download Scenario.
2. Then manually upload these scenarios to CEN2 and start the scenarios:
a) Start transaction GRMG.
b) Choose the Upload button, and choose one of the scenarios downloaded
above.
c) Repeat the last step until you have uploaded all scenarios.
d) Start the scenarios by selecting all scenarios and choosing the Start button.
You can always upload only one scenario per step. If you need to
upload a large number of scenarios, you can also do this in one step
by copying the files to the GRMG directory of any CCMS agent
that is registered with CEN2, so that the files are automatically
uploaded. Note that you need to assign the prefix GRMG_ to the files
for the scenarios to be automatically uploaded. Scenarios that areautomatically uploaded are started at the next system start.
7/15/2019 7858198 Solution Manager SAP NW2004S Monitoring Setup Guide SP12
http://slidepdf.com/reader/full/7858198-solution-manager-sap-nw2004s-monitoring-setup-guide-sp12 84/92
Monitoring Setup Guide for SAP NetWeaver 7.0 SP Stack 12
July 2007 84
If scenarios contain encrypted passwords, these are not transferred
when you download the scenarios. In this case, you need to reenter
the passwords in transaction GRMG in CEN2.
7.5. Settings for Monitored Systems
7.5.1. Entering Monitored ABAP Systems
To transfer the entries for monitored ABAP systems from CEN1 to CEN2, proceed as
follows:
1. You need to manually create the RFC connections for data collection and analysis
from CEN2 to the monitored ABAP systems (see Entering Monitored ABAP
Systems in CEN [page 19]).
To obtain a better overview, you can display the entries for the monitored systems
in CEN1 in the Topology Browser. To do this, start transaction RZ21, select theSystem Overview radio button in the Topology group box, and choose Display
Overview. The corresponding RFC destinations are always shown in the Read
Destination Data and Destination Analysis columns for monitored ABAP
systems.
2. You also need to make the monitoring infrastructure in CEN2 aware of the
monitored systems manually (see Entering Monitored ABAP Systems in CEN
[page 19]).
Only if the RFC destinations to the monitored systems have the same
names in CEN1 and CEN2 can you create the list of monitored systems in
CEN2 by transporting the corresponding entries in the ALSYSTEMS table.
To do this, transport the entries that have real RFC destinations in the
DESTINAT and DESTINAT_2 columns of the above table (non-ABAP
systems have the entry <<SYSID>_no_ABAP_Destination> in the
DESTINAT column).
7.5.2. System Groups
To transfer the system groups of the monitoring infrastructure from CEN1 to CEN2,
transport the entries of the ALSYSGRPS table.
Some system groups are automatically filled. Before transporting the table
entries, you should check the system groups for CEN1 entries. To do this,
start transaction RZ21, and choose Technical Infrastructure Configure
Central System Maintain System Groups.
7.5.3. Central Display of Statist ics Data wi th Transaction ST03G
If you want to display statistics data for monitored systems in CEN2, you need to
manually create in CEN2 corresponding RFC connections to the monitored systems that
exist in CEN1, and make the corresponding entries in transaction ST03G (see Entering
7/15/2019 7858198 Solution Manager SAP NW2004S Monitoring Setup Guide SP12
http://slidepdf.com/reader/full/7858198-solution-manager-sap-nw2004s-monitoring-setup-guide-sp12 85/92
Monitoring Setup Guide for SAP NetWeaver 7.0 SP Stack 12
July 2007 85
Monitored ABAP Systems in ST03G [page 21] and Displaying DSRs for the Java
Instance in CEN [page 30]).
7.6. Checking the Dataset of the Administrative SLD
You only need to perform this step if you use the NWA in the context of
your landscape-wide monitoring.
Check in the administrative SLD that you are using for CEN2 whether there are still
associations for CEN1. To do this, proceed as follows:
1. Log on to the administrative SLD and choose Administration Content
Maintenance.
2. In the Subset dropdown list, choose Associations, and then choose Centrally
Monitored Application System in the Class dropdown list.
3. Delete any entries that point to CEN1 in the Dependent column.
7.7. Central Performance History
The system ID of CEN is contained at various points in the CPH tables (for example, for
GRMG and CCMSPING availability values). Manual conversion is therefore very
complicated and not practical. This applies both for the dataset of the CPH and for the
configuration settings.
If you want to save monitoring data in the CPH in CEN2, perform a corresponding new
configuration manually in CEN2. Data collected in CEN1 is lost during the move.
For more information, see the SAP Help Portal under SAP NetWeaver
SAP NetWeaver by Key Capability Solution Life Cycle Management by
Key Capability Solution Monitoring Monitoring in the CCMS The
Alert Monitor Central Performance History of the Monitoring
Architecture Configuring the Central Performance History, or follow
the link below:
http://help.sap.com/saphelp_nw04s/helpdata/en/19/4c773dd1210968e1000
0000a114084/frameset.htm.
7.8. Propert ies and Methods
7.8.1. Method Defin itions and Releases
To transfer the method definitions and releases from CEN1 to CEN2, proceed as follows:
1. In CEN1, start transaction RZ21, select the Method Definitions radio button in the
Methods group box, and choose Display Overview.
2. Change the current layout so that the Changed by field is shown. To do this,
choose Settings Layouts Current…, select the Changed by entry in the
Hidden Fields group box, and choose (display selected field). Apply your
changes.
7/15/2019 7858198 Solution Manager SAP NW2004S Monitoring Setup Guide SP12
http://slidepdf.com/reader/full/7858198-solution-manager-sap-nw2004s-monitoring-setup-guide-sp12 86/92
Monitoring Setup Guide for SAP NetWeaver 7.0 SP Stack 12
July 2007 86
3. You should transport all method definitions that you have modified. These are the
definitions for which the Changed by field does not show SAP. Choose acorresponding method by double-clicking it, and choose (Transport ).
If you have created your own method definitions that link to your own
reports (which in this case are usually in the customer namespace, that is,
they begin with Z), you also need to transport these reports.
4. You need to perform more advanced configuration steps in CEN2 for someindividual method definitions:
In the case of sending a mail if an alert occurs (CCMS_OnAlert_Email and related
methods) you need to configure SAPconnect (transaction SCOT).
For more information, see the SAP Help Portal under SAP NetWeaver
SAP NetWeaver by Key Capability Application Platform by Key
Capability Platform-Wide Services Connectivity Communication
Interfaces for Mail and Telephony SAPconnect (BC-SRV-COM), or
follow the link below:
http://help.sap.com/saphelp_nw04s/helpdata/en/2b/d925bf4b8a11d1894c0
000e8323c4f/frameset.htm.
In the case of the execution of an operating system command as an auto-reaction
method (CCMS_AUTO_REACT_OP_COMMAND), you need to define the
desired commands in transaction SM69.
For more information, see the SAP Help Portal under SAP NetWeaver
SAP NetWeaver by Key Capability Solution Life Cycle Management by
Key Capability System Management Configuration External
Operating System Commands: Contents, or follow the link below:
http://help.sap.com/saphelp_nw04s/helpdata/en/c4/3a6047505211d189550
000e829fbbd/frameset.htm.
In the case of the forwarding of an alert to ALM (CCMS_Send_Alert_to_ALM ),
you need to configure alert management.
For more information, see the SAP Help Portal under SAP NetWeaver
SAP NetWeaver by Key Capability Solution Life Cycle Management by
Key Capability Solution Monitoring Monitoring in the CCMS The
Alert Monitor Select Alert Monitor Methods Forwarding Alerts to
Alert Management (ALM), or follow the link below:
http://help.sap.com/saphelp_nw04s/helpdata/en/3f/567ddea69d3d4c93a6ae
dabd08899e/frameset.htm.

7/15/2019 7858198 Solution Manager SAP NW2004S Monitoring Setup Guide SP12
http://slidepdf.com/reader/full/7858198-solution-manager-sap-nw2004s-monitoring-setup-guide-sp12 87/92
Monitoring Setup Guide for SAP NetWeaver 7.0 SP Stack 12
July 2007 87
7.8.2. Properties and Method Assignments
Method assignments and properties of MTE classes and attribute groups are grouped into
properties variants. You therefore only need to transport these variants from CEN1 to
CEN2. To transfer the properties and method assignments of the monitoring infrastructure
from CEN1 to CEN2, proceed as follows:
Most properties and method assignments are stored in the monitored
systems. Only the properties and method assignments of nodes for CEN
itself and nodes for availability monitoring by CCMSPING und GRMG
are stored in CEN.
1. Start transaction RZ21 in CEN1, select the Properties Variants radio button in the
Properties group box, and choose Display Overview.
2. Choose Variant Transport , and specify the desired properties variant in the
Variant input field. Transport all properties variants other than the default
properties variant SAP_DEFAULT*. You do not need to transport these variants,
since they are automatically created.
3. Repeat the last step until you have transported all variants.
4. If you have assigned properties methods to different operation modes in CEN1,
make this assignment in CEN2. To do this, start transaction RZ04, and choose
Operation Mode Create.
You cannot transfer the properties from CEN1 to CEN2 as described for
the following nodes; you need to manually adjust the properties in CEN2for these nodes:
Nodes for which the properties are assigned to the node itself (and
not through the MTE class or attribute group). To determine which
MTEs have individual properties, start transaction RZ21, select the
MTE-specific properties radio button in the Properties group box,
and choose Display Overview.
Nodes that contain the system ID as part of the name of the MTE
class or attribute group. These are nodes for database monitoring
(MaxDB) and nodes for PMI self-monitoring (Process MonitoringInfrastructure).
7.8.3. Central Auto-React ions
If you have configured central auto-reactions in CEN1, transfer these to CEN2 by
transporting the contents of the CSMTOOLASG table from CEN1 to CEN2.
You can only transport central auto-reactions by transporting the
CSMTOOLASG table from CEN1 to CEN2, if method definitions
corresponding to those in CEN1 also exist in CEN2 with the same names
(see Method Definitions and Releases [page 85]).
7/15/2019 7858198 Solution Manager SAP NW2004S Monitoring Setup Guide SP12
http://slidepdf.com/reader/full/7858198-solution-manager-sap-nw2004s-monitoring-setup-guide-sp12 88/92
Monitoring Setup Guide for SAP NetWeaver 7.0 SP Stack 12
July 2007 88
7.9. Monitor Definitions and Monitor Sets
To transfer the monitor definitions and monitor sets of the monitoring infrastructure from
CEN1 to CEN2, proceed as follows:
1. Start transaction RZ20 in CEN1, and choose Extras
Activate MaintenanceFunction.
2. Transport all monitor sets that do not have names starting with SAP. To do this,
select the relevant monitor set, and choose (Transport Monitor Set ).
3. Repeat the last step until you have transported all monitor sets.
7.10. Other Poin ts
7.10.1. Moni toring Infrastructure Aler ts
The open and completed alerts are lost during a move of CEN.
7.10.2. Spec ial Monitoring Tasks
The following points are only mentioned for the sake of completeness. They relate to
configuration steps that you need to perform in a monitored system. They are therefore
only relevant if the corresponding monitoring function is active in CEN itself, which is
not normally the case:
Transaction-Specific Monitoring
The configuration settings for transaction-specific monitoring (transaction RZ20,
monitor Transaction-Specific Dialog Monitor ) are in the table ALTRAMONI.
Transport the contents of this table from CEN1 to CEN2.
Monitoring Jobs
The configuration settings for job monitoring are in the table ALBTCMON.
Transport the contents of this table from CEN1 to CEN2.
You can only transfer the monitoring of jobs in this way if the jobs to be
monitored in CEN1 and CEN2 have the same names. Otherwise, you need
to make a new configuration in CEN2.
You also need to define the method CCMS_BATCH_MONITORING as a
startup method. However, if you have transported all changed method definitions to CEN2 (see Method Definitions and Releases [page 85]), this
is already the case in CEN2.
qRFC Monitoring
You can transport the configuration settings for qRFC monitoring using the view
cluster maintenance. To do this, start transaction SM34, and enter
QRFC_MONITORING_E in the View cluster input field. Choose (Transport).
After the prompt for the request, you can include the Setting Owner in the request
(include dependent entries in the request, too).

7/15/2019 7858198 Solution Manager SAP NW2004S Monitoring Setup Guide SP12
http://slidepdf.com/reader/full/7858198-solution-manager-sap-nw2004s-monitoring-setup-guide-sp12 89/92
Monitoring Setup Guide for SAP NetWeaver 7.0 SP Stack 12
July 2007 89
For more information, see the SAP Help Portal under SAP NetWeaver
SAP NetWeaver by Key Capability Solution Life Cycle Management by
Key Capability
Solution Monitoring
Monitoring in the CCMS
The Alert Monitor Special Monitoring Functions of the Alert Monitor
Monitoring qRFC and tRFC Calls Set Up Monitoring of qRFC Calls, or
follow the link below:
http://help.sap.com/saphelp_nw04s/helpdata/en/52/12f73b7803b009e1000
0000a114084/frameset.htm
7/15/2019 7858198 Solution Manager SAP NW2004S Monitoring Setup Guide SP12
http://slidepdf.com/reader/full/7858198-solution-manager-sap-nw2004s-monitoring-setup-guide-sp12 90/92
Monitoring Setup Guide for SAP NetWeaver 7.0 SP Stack 12
July 2007 90
8. Additional Information
8.1. Known Problems
8.1.1. Error when Generating the CSMCONF Start File
If you want to create the CSMCONF start file for the registration of a CCMS agent (see
Creating the CSMCONF Start File for CCMS Agents [page 19]), an error with the
message Er r or when cal l i ng dat a pr ovi der can occur. This is the case if you are
using SAP GUI for Windows 6.40 with a Patch Level of up to 4.
Solution:
Use at least SAP GUI for Windows 6.40 Patch Level 5. For information about
downloading and installing patches, see SAP Notes 563161, 330793, and 535308.
8.1.2. Agent registration not poss ible with Visual Administrator The agent registration on Windows platforms in the Visual Administrator terminates with
the following message:
OpenSCManager f ai l ed. . . ERROR: ser vi ce r egi st r at i on f ai l ed
Solution:
Register the CCMS SAPCCMSR agent manually in accordance with SAP note 817714.
8.1.3. Tab Page CCMS Agent Configuration in VA is missing
The automatic agent registration in the Visual Administrator is not possible, because the
tab page CCMS Agent Configuration in the service Monitoring of the dispatcher is notdisplayed. This problem can occur in SAP NetWeaver 7.0 up to SP Stack 07.
Solution:
Follow the correction instructions as described in SAP note 929635.
8.1.4. Agent registration fails due to wrong password
Registrations of CCMS agents at the central monitoring system fail, if you specify a
CSMREG password that contains lowercase letters. You will see agent registration errors
such as the following:
ERROR: RFC er r or dur i ng l ogon: 104 Name or password i s notcor r ect . Repeat t he regi st r at i on.
WARNI NG: RFC cl i ent f unct i onal i t y conf i gur ed, but l ogon f ai l ed
f or [ P05: 000: CSMREG] ==> pushi ng dat a i nt o CCMS cache di sabl ed.
Solution:
Follow the correction instructions as described in SAP note 884715 or specify a password
for CSMREG that contains only upper case
8.2. SAP Service Marketplace
[Agents] Documentation for the CCMS Agents
7/15/2019 7858198 Solution Manager SAP NW2004S Monitoring Setup Guide SP12
http://slidepdf.com/reader/full/7858198-solution-manager-sap-nw2004s-monitoring-setup-guide-sp12 91/92
Monitoring Setup Guide for SAP NetWeaver 7.0 SP Stack 12
July 2007 91
Start the SAP Service Marketplace, and go to the System Monitoring
and Alert Management area (http://service.sap.com/monitoring).
Choose Monitoring in Detail, and choose the document CCMS Agents:
Features, Installation, and Usage from the list (direct link ).
There is also a SAP Tutor that describes working with CCMS agents
using examples. Start the SAP Service Marketplace, and go to the
System Monitoring and Alert Management area
(http://service.sap.com/monitoring). Choose Education & Workshops,
and then choose the document Installation, Registration, and
Customizing of CCMS Agents from the list (direct link ).
[SAPOSCOL] SAPOSCOL: Properties, Installation, and Operation
Start the SAP Service Marketplace, and go to the System Monitoring
and Alert Management area (http://service.sap.com/monitoring).
Choose Monitoring in Detail, and then choose the documentSAPOSCOL: Properties, Installation, and Operation from the list
(direct link ).
[CCMSPING] Availability Monitoring and CCMSPING
Start the SAP Service Marketplace, and go to the System Monitoring
and Alert Management area (http://service.sap.com/monitoring).
Choose Monitoring in Detail, and then choose the document
Availability Monitoring and CCMSPING from the list (direct link ).
[GRMG] Instrumenting Components for Monitoring with the GRMG
Start the SAP Service Marketplace, and go to the System Monitoringand Alert Management area (http://service.sap.com/monitoring).
Choose Developers’ Zone, and choose the document Instrumenting
Components for Monitoring with the GRMG from the list (direct link ).
8.3. Useful SAP Notes
734247 CCMS Agents: Java Interfaces for Registration
During the registration of the agent, you must enter a large quantity of
data about CEN, the connection to it, and possibly the monitored J2EE
instance. This Java tool is provided to simplify the registration.
634771 GRMG Customizing File for XI CCMS Heartbeat Monitoring
The Configuration Guide for the Exchange Infrastructure describes
how you can include Java components in the CCMS monitoring. To
activate “heartbeat monitoring” for the individual Java components,
you require a GRMG Customizing file. This SAP Note contains a
template for this file as an attachment. It also contains instructions
about how you need to adjust the file.
897226 TREX 7.0: Monitoring TREX with CCMS
Attached to this note you will find the document Monitoring TREX
with CCMS . This document describes both how to configure the TREX
7/15/2019 7858198 Solution Manager SAP NW2004S Monitoring Setup Guide SP12
http://slidepdf.com/reader/full/7858198-solution-manager-sap-nw2004s-monitoring-setup-guide-sp12 92/92
Monitoring Setup Guide for SAP NetWeaver 7.0 SP Stack 12
monitoring in CCMS and how to monitor TREX with the help of
CCMS.
706290 GRMG Configuration for BI UD Connect
This SAP Note describes the configuration of the availabilitymonitoring of DU Connect with the GRMG. The configuration
involves adjusting the template of the GRMG Customizing file and
loading it into the central monitoring system.
535199 CCMS Agents: Monitoring Log Files
In the context of monitoring systems and system landscapes, it is
possible to use CCMS agents to monitor log files; that is, to search
specific files for one or more word patterns. If a search pattern is
found, the monitoring architecture generates a message or an alert from
it. This SAP Note describes the configuration required for this.


![NW2004S Single Sign-On Between EP and BI for Siemens Canada v1[1].0](https://img.pdfslide.net/doc/110x75/545fae13b1af9f0e598b4e9b/nw2004s-single-sign-on-between-ep-and-bi-for-siemens-canada-v110.jpg)