Embed Size (px)
Citation preview
User Instructions
8300A

Page 1
Protect the power cord from being walked on or pinched particularly at the plugs, convenience receptacles, and at the point where they exit from the apparatus.
Use only with the cart, stand, tripod, bracket, or table specified by the manufacturer, or sold with the apparatus. When a cart or rack is used, use caution when moving the cart/apparatus combination to avoid injury from tip-over.
Unplug this apparatus during lightning storms or when unused for long periods of time.
Refer all servicing to qualified service personnel. Servicing is required when the apparatus has been damaged in any way, such as power supply cord or plug is damaged, liquid has been spilled or objects have fallen into the apparatus, the apparatus has been exposed to rain or moisture, does not operate normally, or has been dropped.
Mains Supply: The mains operating voltage of Audiolab 8300 series units is shown on the rear panel. If this voltage does not match the mains voltage in your area, consult your Audiolab dealer about converting the unit.
The mains supply fuse on the rear panel is accessible when the IEC mains plug has been removed. In the rare event that it has broken, check for any obvious cause before replacing the fuse with one of the correct rating and type.
The fuse values are:
220 – 240V (UK, China, etc.) T2.5AL 250V Slow Blow
100 – 120V (UK, China, etc.) T4.0AL 250V Slow Blow
WARNING: Only use attachments/accessories specified or provided by the manufacturer (such as the exclusive supply adapter, battery etc.).
WARNING: The mains plug/appliance coupler/direct plug-in adapter is used as disconnection device; the disconnection device shall remain readily operable.
CAUTION: These servicing instructions are for use by qualified service personnel only. To reduce the risk of electric shock, do not perform any servicing other than that contained in the operating instructions unless you are qualified to do so.
Do not install this equipment in a confined or built-in space such as a bookcase or similar unit, and keep well ventilated in open space. The ventilation should not be impeded by covering the ventilation openings with items such as newspaper, table-cloths, curtains etc.
WARNING: To reduce the risk of fire or electric shock, do not expose this apparatus to rain or moisture. The apparatus shall not be exposed to dripping or splashing and ensure that objects filled with liquids, such as vases, shall not be placed on the apparatus. No naked flame sources, such as lighted candles, should be placed on the apparatus.
This equipment is a Class II or double insulated electrical appliance. It has been designed in such a way that it does not require a safety connection to electrical earth.
1: Important Safety Information
AVIS: RISQUE DE CHOC ELECTRIQUE-NE PAS OUVRIR WARNING: SHOCK HAZARD-DO NOT OPEN
IMPORTANT SAFETY INFORMATION
Read these instructions.
Keep these instructions.
Heed all warnings.
Follow all instructions.
Do not use this apparatus near water.
Clean only with dry cloth.
Do not block any venti lat ion openings. Instal l in accordance with the manufacturer’s instructions.
Do not install near any heat sources such as radiators, heat registers, stoves, or other apparatus (including amplifiers) that produce heat.
Do not defeat the safety purpose of the polarized or grounding plug. A grounding plug has two blades and a third grounding prong. The wide blade or the third prong is provided for your safety. If the provided plug does not fit into your outlet, consult an electrician for replacement of the obsolete outlet.
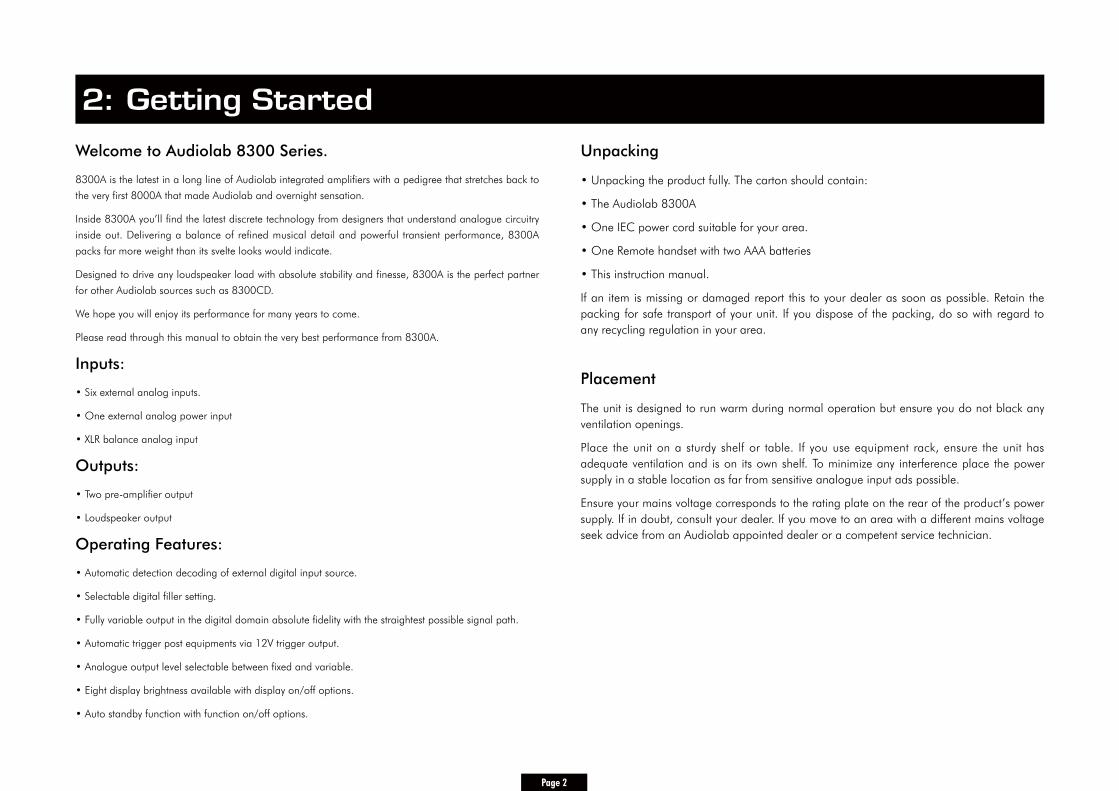
Unpacking
• Unpacking the product fully. The carton should contain:
• The Audiolab 8300A
• One IEC power cord suitable for your area.
• One Remote handset with two AAA batteries
• This instruction manual.
If an item is missing or damaged report this to your dealer as soon as possible. Retain the packing for safe transport of your unit. If you dispose of the packing, do so with regard to any recycling regulation in your area.
Placement
The unit is designed to run warm during normal operation but ensure you do not black any ventilation openings.
Place the unit on a sturdy shelf or table. If you use equipment rack, ensure the unit has adequate ventilation and is on its own shelf. To minimize any interference place the power supply in a stable location as far from sensitive analogue input ads possible.
Ensure your mains voltage corresponds to the rating plate on the rear of the product’s power supply. If in doubt, consult your dealer. If you move to an area with a different mains voltage seek advice from an Audiolab appointed dealer or a competent service technician.
2: Getting Started
Welcome to Audiolab 8300 Series.
8300A is the latest in a long line of Audiolab integrated amplifiers with a pedigree that stretches back to
the very first 8000A that made Audiolab and overnight sensation.
Inside 8300A you’ll find the latest discrete technology from designers that understand analogue circuitry
inside out. Delivering a balance of refined musical detail and powerful transient performance, 8300A
packs far more weight than its svelte looks would indicate.
Designed to drive any loudspeaker load with absolute stability and finesse, 8300A is the perfect partner
for other Audiolab sources such as 8300CD.
We hope you will enjoy its performance for many years to come.
Please read through this manual to obtain the very best performance from 8300A.
Inputs:
• Six external analog inputs.
• One external analog power input
• XLR balance analog input
Outputs:
• Two pre-amplifier output
• Loudspeaker output
Operating Features:
• Automatic detection decoding of external digital input source.
• Selectable digital filler setting.
• Fully variable output in the digital domain absolute fidelity with the straightest possible signal path.
• Automatic trigger post equipments via 12V trigger output.
• Analogue output level selectable between fixed and variable.
• Eight display brightness available with display on/off options.
• Auto standby function with function on/off options.
Page 2
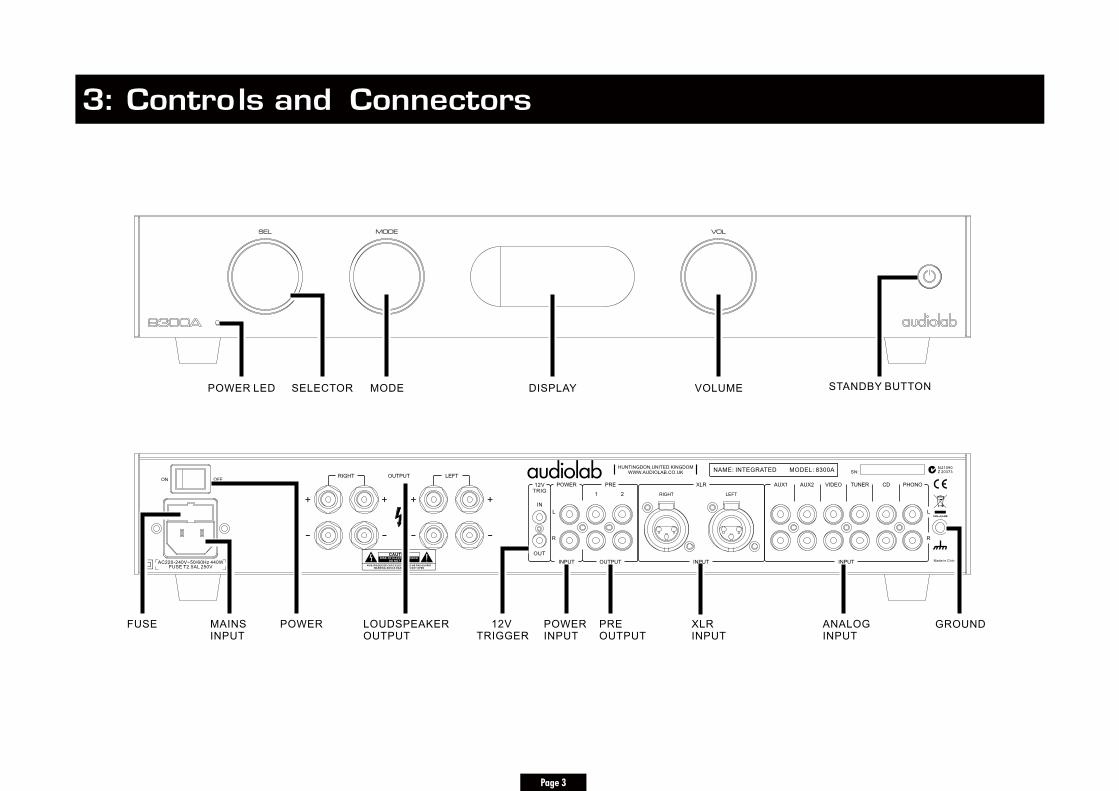
3: Controls and Connectors
Page 3

4: Remote Handset
Page 4
NOTE : the handset buttons shown crossed out are for use with other 8300CDAudiolab units and are not operational when used with the 8300A
1 STANDBY Press to bring the unit in/out of Standby
2 MENU Press to enter menu mode
3 Move to next menu page or setting
4 VOL– Press to decrease Volume
5 XLR Press to select XLR input
6 PHONO Press to select Phono input
7 VIDEO Press to select Video input
8 TUNER Press to select Tuner input
9 DISPLAY Press to toggle the display on/off
Press and hold to select display brightness levels
10 MM/MC Press to toggle Phono MM/MC mode
11 AUX2 Press to select Aux2 input
12 AUX1 Press to toggle different digital input
13 CD Press to select CD input
14 Press to select menu page or setting
15 Move to last menu page or setting
16 MUTE Press to mute and unmute the sound
Fitting Batteries
Open the cover, unwrap the supplied AAA batteries and
place them in the battery compartment with the polarity as
shown, replace the cover.
Always use AAA batteries and always replace them in sets.
Never mix old and new batteries. Very weak batteries can
leak and damage the handset. Replace them in good time!
There is a risk of fire and burns if a battery is handled
improperly. Do not disassemble, crush, puncture, short
external contacts, or dispose of in fire or water.
Do not attempt to open or service a battery. Discard used
batteries in full accordance with recycling regulations in
force in your area.
Handset Operation
The handset operates several Audiolab components. The
handset buttons shown crossed out are for use with other
Audiolab units and are not operational when used with the
8300A.
Point the handset at the remote receiver and press the
relevant key. The handset should be within 15 meters of the
player and there must be a clear line of sight between the
two units.
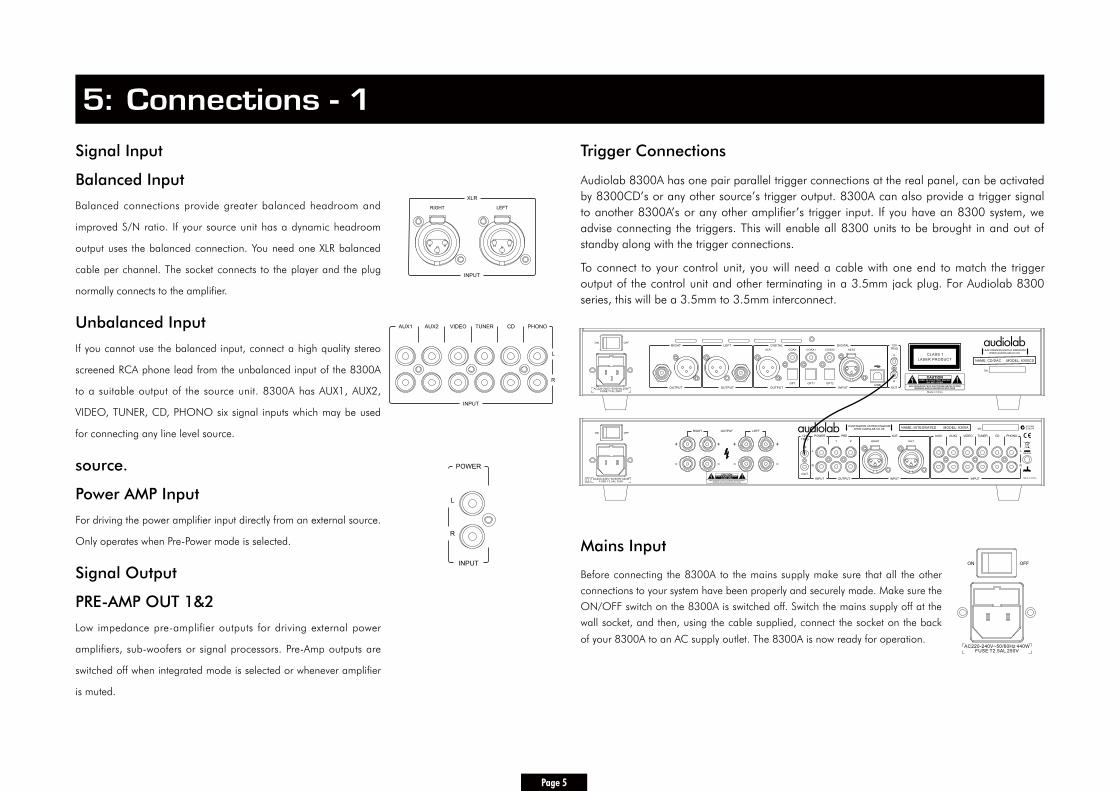
Trigger Connections
Audiolab 8300A has one pair parallel trigger connections at the real panel, can be activated by 8300CD’s or any other source’s trigger output. 8300A can also provide a trigger signal to another 8300A’s or any other amplifier’s trigger input. If you have an 8300 system, we advise connecting the triggers. This will enable all 8300 units to be brought in and out of standby along with the trigger connections.
To connect to your control unit, you will need a cable with one end to match the trigger output of the control unit and other terminating in a 3.5mm jack plug. For Audiolab 8300 series, this will be a 3.5mm to 3.5mm interconnect.
Signal Input
Balanced Input
Balanced connections provide greater balanced headroom and
improved S/N ratio. If your source unit has a dynamic headroom
output uses the balanced connection. You need one XLR balanced
cable per channel. The socket connects to the player and the plug
normally connects to the amplifier.
Unbalanced Input
If you cannot use the balanced input, connect a high quality stereo
screened RCA phone lead from the unbalanced input of the 8300A
to a suitable output of the source unit. 8300A has AUX1, AUX2,
VIDEO, TUNER, CD, PHONO six signal inputs which may be used
for connecting any line level source.
source.
Power AMP Input
For driving the power amplifier input directly from an external source.
Only operates when Pre-Power mode is selected.
Signal Output
PRE-AMP OUT 1&2
Low impedance pre-amplifier outputs for driving external power
amplifiers, sub-woofers or signal processors. Pre-Amp outputs are
switched off when integrated mode is selected or whenever amplifier
is muted.
Page 5
5: Connections - 1 –
Mains Input
Before connecting the 8300A to the mains supply make sure that all the other
connections to your system have been properly and securely made. Make sure the
ON/OFF switch on the 8300A is switched off. Switch the mains supply off at the
wall socket, and then, using the cable supplied, connect the socket on the back
of your 8300A to an AC supply outlet. The 8300A is now ready for operation.
6: Operation - 1
Page 6
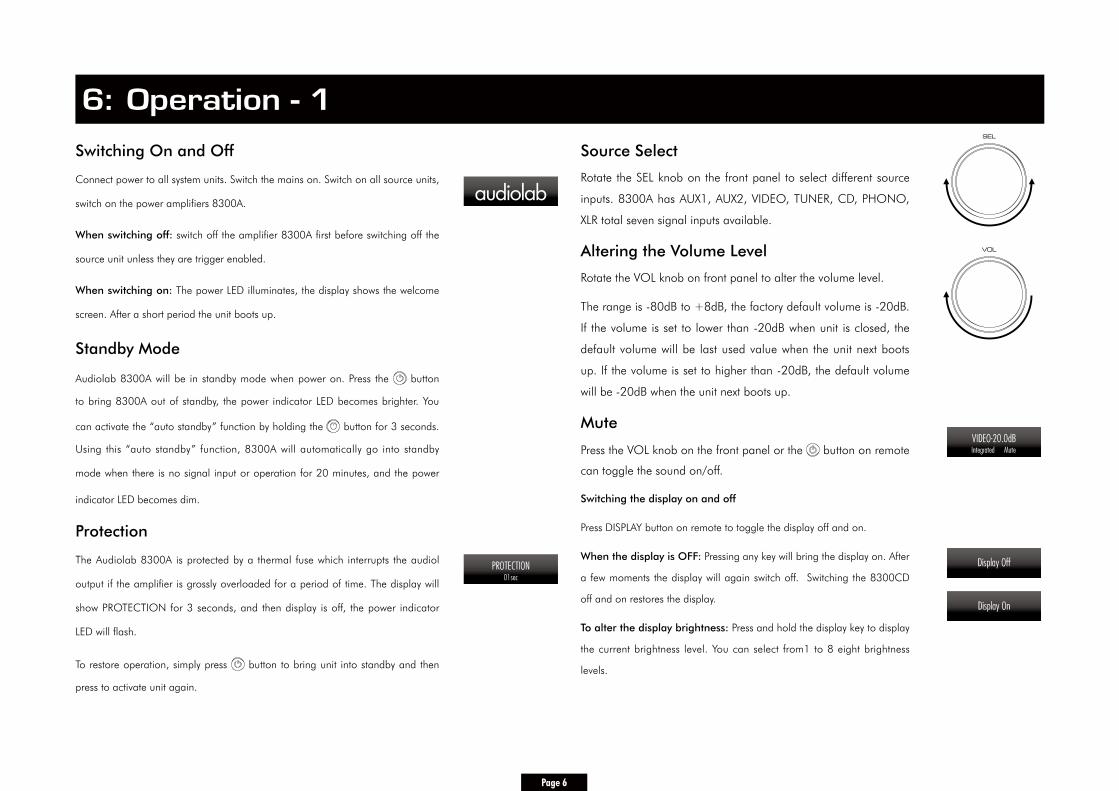
Source Select
Rotate the SEL knob on the front panel to select different source
inputs. 8300A has AUX1, AUX2, VIDEO, TUNER, CD, PHONO,
XLR total seven signal inputs available.
Altering the Volume Level
Rotate the VOL knob on front panel to alter the volume level.
The range is -80dB to +8dB, the factory default volume is -20dB.
If the volume is set to lower than -20dB when unit is closed, the
default volume will be last used value when the unit next boots
up. If the volume is set to higher than -20dB, the default volume
will be -20dB when the unit next boots up.
Mute
Press the VOL knob on the front panel or the button on remote
can toggle the sound on/off.
Switching the display on and off
Press DISPLAY button on remote to toggle the display off and on.
When the display is OFF: Pressing any key will bring the display on. After
a few moments the display will again switch off. Switching the 8300CD
off and on restores the display.
To alter the display brightness: Press and hold the display key to display
the current brightness level. You can select from1 to 8 eight brightness
levels.
Switching On and Off
Connect power to all system units. Switch the mains on. Switch on all source units,
switch on the power amplifiers 8300A.
When switching off: switch off the amplifier 8300A first before switching off the
source unit unless they are trigger enabled.
When switching on: The power LED illuminates, the display shows the welcome
screen. After a short period the unit boots up.
Standby Mode
Audiolab 8300A will be in standby mode when power on. Press the button
to bring 8300A out of standby, the power indicator LED becomes brighter. You
can activate the “auto standby” function by holding the button for 3 seconds.
Using this “auto standby” function, 8300A will automatically go into standby
mode when there is no signal input or operation for 20 minutes, and the power
indicator LED becomes dim.
Protection
The Audiolab 8300A is protected by a thermal fuse which interrupts the audiol
output if the amplifier is grossly overloaded for a period of time. The display will
show PROTECTION for 3 seconds, and then display is off, the power indicator
LED will flash.
To restore operation, simply press button to bring unit into standby and then
press to activate unit again.
PROTECTION01sec
VIDEO-20.0dBIntegrated Mute
Display Off
Display On
Page 7
6: Operation - 2
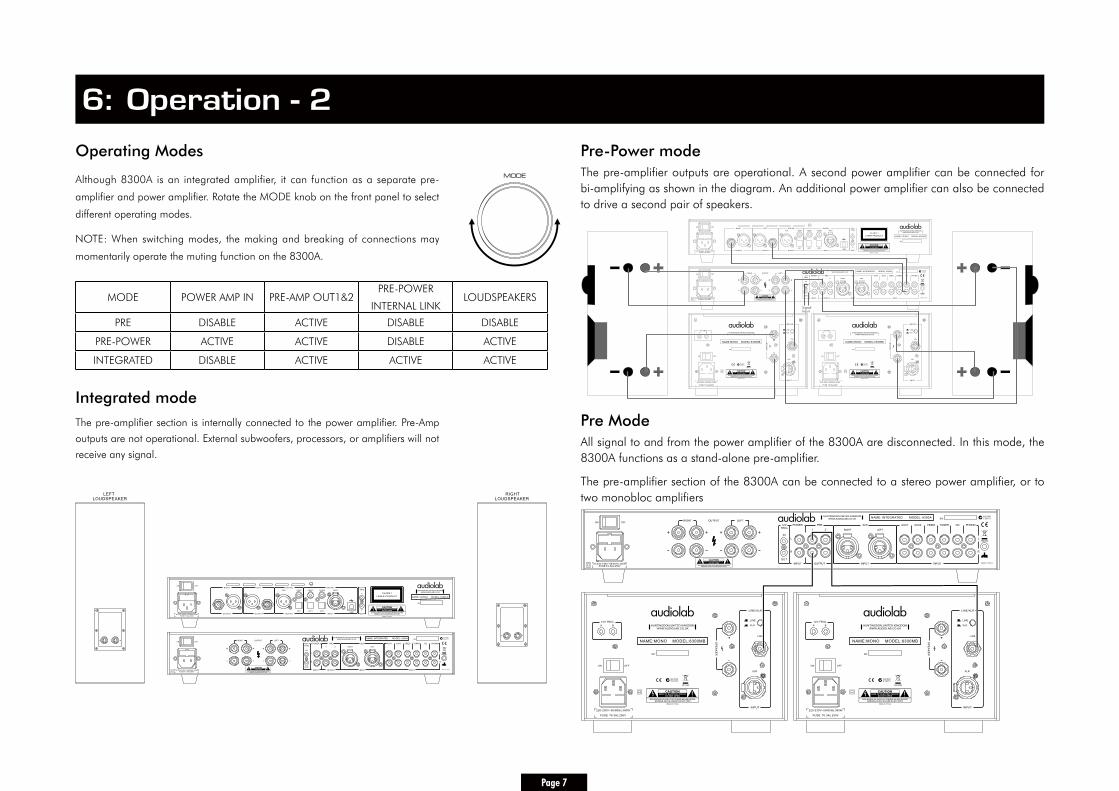
Pre-Power mode The pre-amplifier outputs are operational. A second power amplifier can be connected for bi-amplifying as shown in the diagram. An additional power amplifier can also be connected to drive a second pair of speakers.
Operating Modes
Although 8300A is an integrated amplifier, it can function as a separate pre-
amplifier and power amplifier. Rotate the MODE knob on the front panel to select
different operating modes.
NOTE: When switching modes, the making and breaking of connections may
momentarily operate the muting function on the 8300A.
Integrated modeThe pre-amplifier section is internally connected to the power amplifier. Pre-Amp
outputs are not operational. External subwoofers, processors, or amplifiers will not
receive any signal.
MODE POWER AMP IN PRE-AMP OUT1&2PRE-POWER
INTERNAL LINK LOUDSPEAKERS
PRE DISABLE ACTIVE DISABLE DISABLE
PRE-POWER ACTIVE ACTIVE DISABLE ACTIVE
INTEGRATED DISABLE ACTIVE ACTIVE ACTIVE
Pre Mode All signal to and from the power amplifier of the 8300A are disconnected. In this mode, the 8300A functions as a stand-alone pre-amplifier.
The pre-amplifier section of the 8300A can be connected to a stereo power amplifier, or to two monobloc amplifiers
Page 8
7: The Menu
The menu enables you to customize the unit and optimize the interface with other equipment in your system.
8300A has 9 different menu pages. Press MENU key on remote to enter menu mode, and then press or to turn to different menu pages, press to enter any menu page, press or again to select
different setting, press again to confirm chosen setting and exit the menu mode. Press MODE knob on front panel also can enter menu mode, rotate the knob can turn to different menu pages, press MODE knob
again can enter any menu page, rotate knob again can surf the setting , press MODE knob again to select different setting. No operation for 5 seconds will also exit menu mode. The Setting will not take effect if or
MODE knob is not pressed.
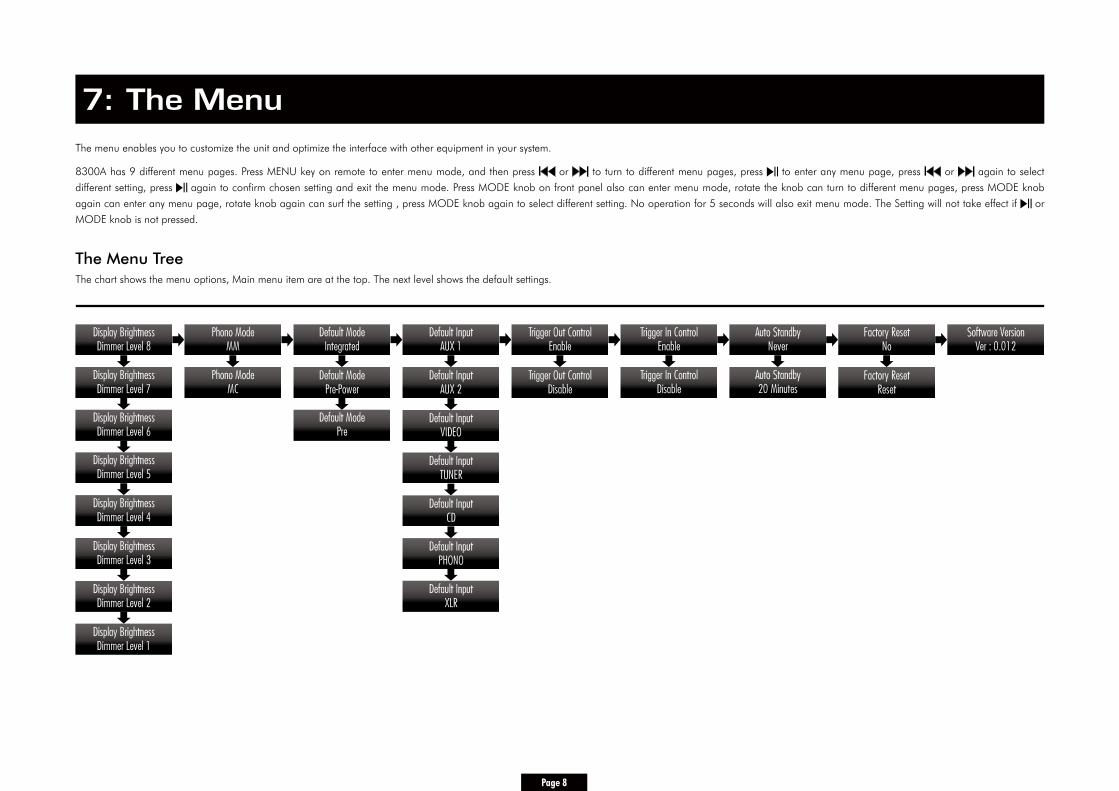
The Menu TreeThe chart shows the menu options, Main menu item are at the top. The next level shows the default settings.
Display BrightnessDimmer Level 8
Phono ModeMM
Default ModeIntegrated
Default InputAUX 1
Trigger Out ControlEnable
Trigger In ControlEnable
Auto StandbyNever
Auto Standby20 Minutes
Factory ResetNo
Software VersionVer : 0.012
Display Brightness
Display Brightness
Display Brightness
Display Brightness
Display Brightness
Display BrightnessDimmer Level 2
Dimmer Level 3
Display BrightnessDimmer Level 1
Dimmer Level 4
Dimmer Level 5
Dimmer Level 6
Dimmer Level 7Phono Mode
MCDefault Mode
Pre-Power
Default ModePre
Default InputAUX 2
Default InputVIDEO
Default InputTUNER
Default InputCD
Default InputPHONO
Default InputXLR
Trigger Out ControlDisable
Trigger In ControlDisable
Factory ResetReset
Page 9
8: Warranty
Audiolab Ltd. warrants this product, subject to the terms and conditions below, to be free from defects
in materials and workmanship. During the warranty period Audiolab will repair or replace (at Audiolab’
s option) this product, or any defective part in this product, if it is found to be defective due to faulty
materials, workmanship or function. The warranty period may vary from country to country.
Terms and conditions
The warranty starts on the date of purchase (or the date of delivery if this is later).
You must provide proof of purchase/delivery before work can be carried out. Without this proof, any
work carried out will be chargeable to you.
All work will be carried out by Audiolab or its authorized agents or distributors.
Any unauthorized repair or modification will void this warranty.
If any part is no longer available it will replaced with a functional replacement part.
Any parts that are replaced will become the property of Audiolab.
Any repair or replacement under this warranty will not extend the period of warranty.
This warranty is valid only in the county of purchase, applies only to the first purchaser and is not
transferable.
The following are not covered:
1. Products which the serial number have been removed, altered or otherwise made illegible.
2. Normal wear tear and cosmetic damage.
3. Transportation or installation of the product.
Accidental damage, fault caused by commercial use, acts of God, incorrect installation, connection or
packing, misuse, neglect or careless operation or handling of the product which is not in accordance
with Audiolab’s user instructions.
1. Repairs or alterations carried out by parties other than Audiolab or its authorized agents or
distributors.
2. Products not purchased from an Audiolab authorized dealer.
3. Products that were not new at the time of original purchase.
4. Products sold ‘as is’, ‘as seen’ or ‘with all faults’.
Repairs or replacements as provided under this warranty are the exclusive remedy of the consumer.
Audiolab shall not be liable for any incidental or consequential damages for breach of any express or
implied warranty in this product. Except to the extent prohibited by law, this warranty is exclusive and in
lieu of all other warranties whatsoever, both express and implied, including, but not limit to, the warranty
of merchantability and fitness for a practical purpose.
This warranty provides benefits that are additional to and do not affect your statutory rights as a
consumer.
Some countries and U.S. states do not allow the exclusion or limitation of incidental or consequential
damages or implied warranties so the exclusions in the paragraph above may not apply to you. This
warranty gives you specific legal rights, and you may have other statutory rights, which vary from state to
state or county to county.
How to claim:
To obtain warranty service contact the Audiolab authorized dealer from which you purchased this
product. Do not dispatch goods without the prior agreement of the dealer, Audiolab or their authorized
distributors.
If asked to return products for inspection and/or repair, pack carefully, preferably in the original cartons
or packing affording an equal degree of protection, and return prepaid. If unsuitable packaging is used,
Audiolab may make a charge for the supply of new packaging.
Insurance is recommended and goods are returned at owner’s risk. Audiolab or their authorized
distributors cannot be held liable for loss or damage in transit.
Page 10
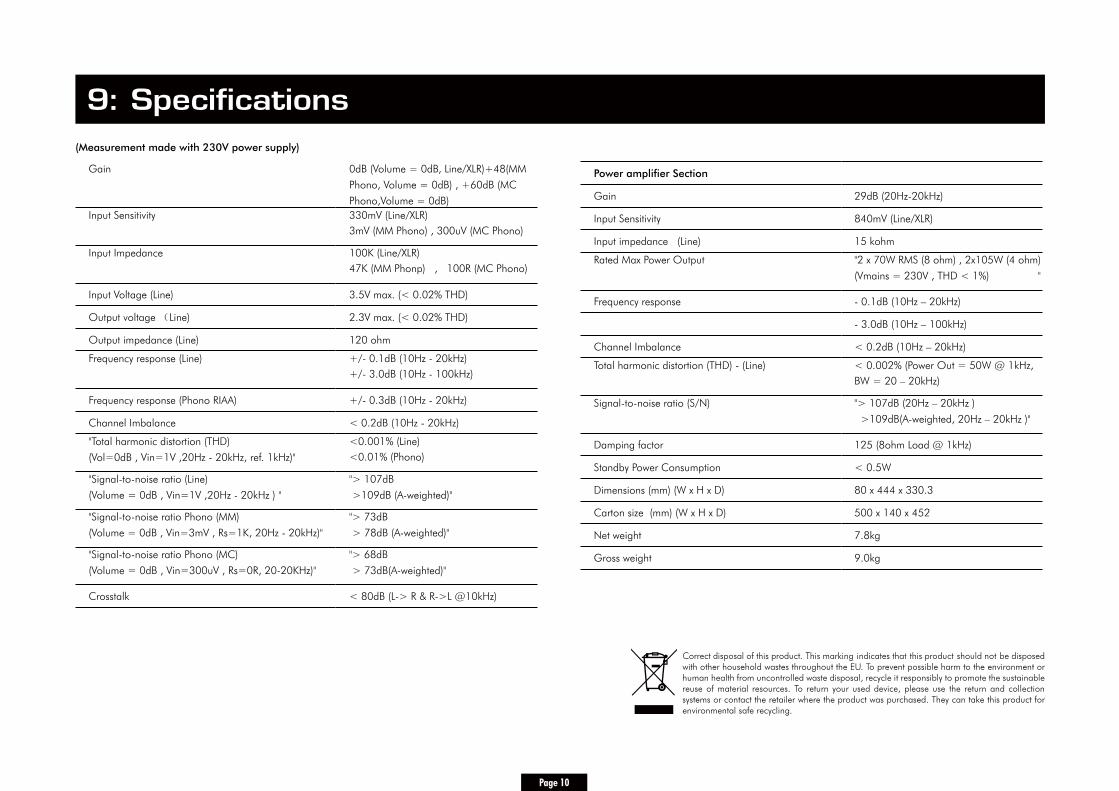
9: Specifications
Gain 0dB (Volume = 0dB, Line/XLR)+48(MM
Phono, Volume = 0dB) , +60dB (MC
Phono,Volume = 0dB)Input Sensitivity 330mV (Line/XLR)
3mV (MM Phono) , 300uV (MC Phono)
Input Impedance 100K (Line/XLR)47K (MM Phonp) , 100R (MC Phono)
Input Voltage (Line) 3.5V max. (< 0.02% THD)
Output voltage (Line) 2.3V max. (< 0.02% THD)
Output impedance (Line) 120 ohm
Frequency response (Line) +/- 0.1dB (10Hz - 20kHz)+/- 3.0dB (10Hz - 100kHz)
Frequency response (Phono RIAA) +/- 0.3dB (10Hz - 20kHz)
Channel Imbalance < 0.2dB (10Hz - 20kHz)
"Total harmonic distortion (THD)
(Vol=0dB , Vin=1V ,20Hz - 20kHz, ref. 1kHz)"
<0.001% (Line)<0.01% (Phono)
"Signal-to-noise ratio (Line)
(Volume = 0dB , Vin=1V ,20Hz - 20kHz ) "
"> 107dB
>109dB (A-weighted)"
"Signal-to-noise ratio Phono (MM)
(Volume = 0dB , Vin=3mV , Rs=1K, 20Hz - 20kHz)"
"> 73dB
> 78dB (A-weighted)"
"Signal-to-noise ratio Phono (MC)
(Volume = 0dB , Vin=300uV , Rs=0R, 20-20KHz)"
"> 68dB
> 73dB(A-weighted)"
Crosstalk < 80dB (L-> R & R->L @10kHz)
(Measurement made with 230V power supply)
Power amplifier Section
Gain 29dB (20Hz-20kHz)
Input Sensitivity 840mV (Line/XLR)
Input impedance (Line) 15 kohm
Rated Max Power Output "2 x 70W RMS (8 ohm) , 2x10⁵W (4 ohm)
(Vmains = 230V , THD < 1%) "
Frequency response - 0.1dB (10Hz – 20kHz)
- 3.0dB (10Hz – 100kHz)
Channel Imbalance < 0.2dB (10Hz – 20kHz)
Total harmonic distortion (THD) - (Line) < 0.002% (Power Out = 50W @ 1kHz, BW = 20 – 20kHz)
Signal-to-noise ratio (S/N) "> 107dB (20Hz – 20kHz )
>109dB(A-weighted, 20Hz – 20kHz )"
Damping factor 125 (8ohm Load @ 1kHz)
Standby Power Consumption < 0.5W
Dimensions (mm) (W x H x D) 80 x 444 x 330.3
Carton size (mm) (W x H x D) 500 x 140 x 452
Net weight 7.8kg
Gross weight 9.0kg

Audiolab
IAG House,
13/14 Glebe Road,
Huntingdon,
Cambridgeshire,
PE29 7DL,
UK
Tel: +44(0)1480 452561
Fax: +44(0)1480 413403
http://www.audiolab.co.uk
CODE: AH14-MNL0004a