Embed Size (px)
Citation preview
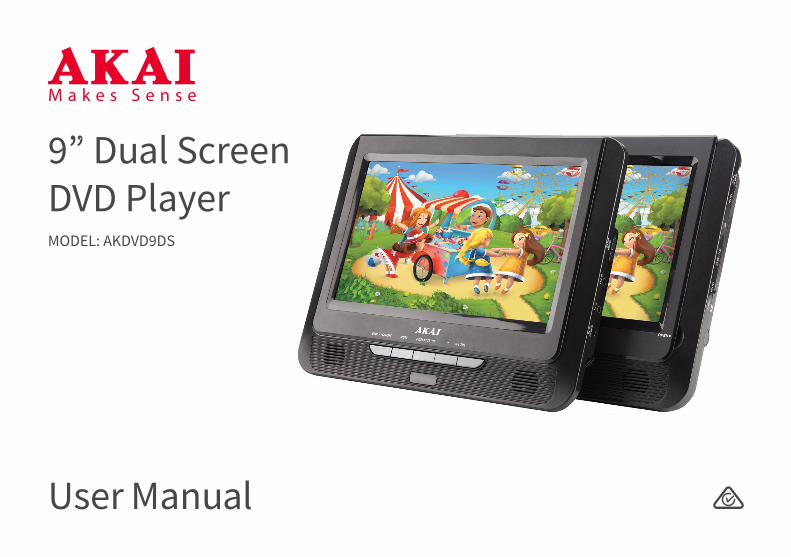
9” Dual ScreenDVD Player
User Manual
MODEL: AKDVD9DS
2
Welcome
Welcome to AKAI. This user manual tells you all you need to know about setting up your new product. Please take special note of any important safety and usage information presented with the symbol.All products brought to you by AKAI are manufactured to the highest standards of performance and safety and, as part of our philosophy of customer service and satisfaction, are backed by a comprehensive 1 Year Warranty.
3
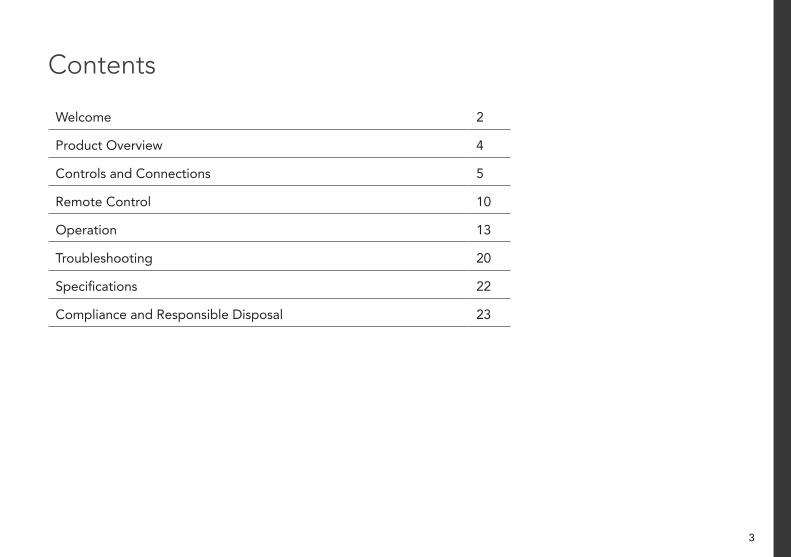
Welcome 2
Product Overview 4
Controls and Connections 5
Remote Control 10
Operation 13
Troubleshooting 20
Specifications 22
Compliance and Responsible Disposal 23
Contents

4 | PRODUCT OVERVIEW
Product Overview
A. 9” Dual Screen DVD Player (2 x Screens)
B. Straps (to Attach to Car Headrest)
C. Remote Control
D. AAA Batteries
E. Two Pairs of Earphones
F. Car Adaptor
G. AC Adaptor
H. AV Cable
I. DC Cable
J. User Manual
K. Warranty Certificate
L. General Safety Warnings
What’s in the box:
x 2
x 2
L
CONTROLS AND CONNECTIONS | 5
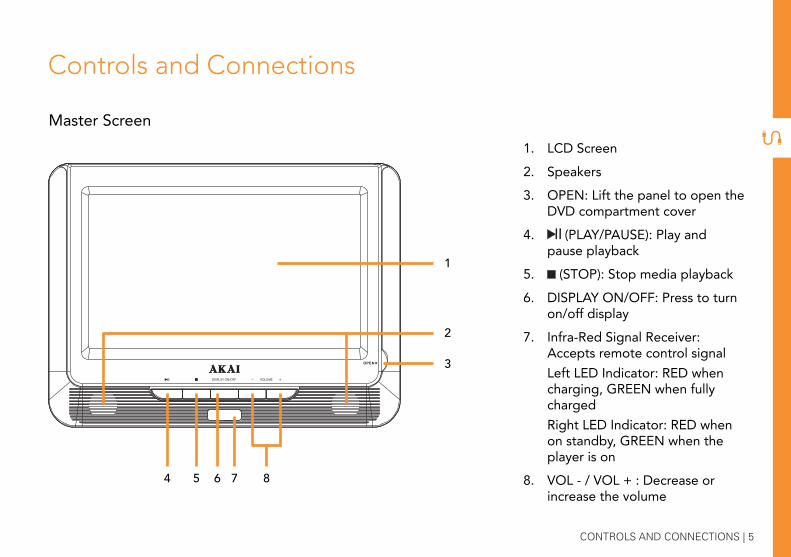
Controls and Connections
1. LCD Screen2. Speakers3. OPEN: Lift the panel to open the
DVD compartment cover4. (PLAY/PAUSE): Play and
pause playback5. (STOP): Stop media playback6. DISPLAY ON/OFF: Press to turn
on/off display7. Infra-Red Signal Receiver:
Accepts remote control signal Left LED Indicator: RED when charging, GREEN when fully charged Right LED Indicator: RED when on standby, GREEN when the player is on
8. VOL - / VOL + : Decrease or increase the volume
Master Screen
1
4 5 6 7 8
2
3
6 | CONTROLS AND CONNECTIONS
9
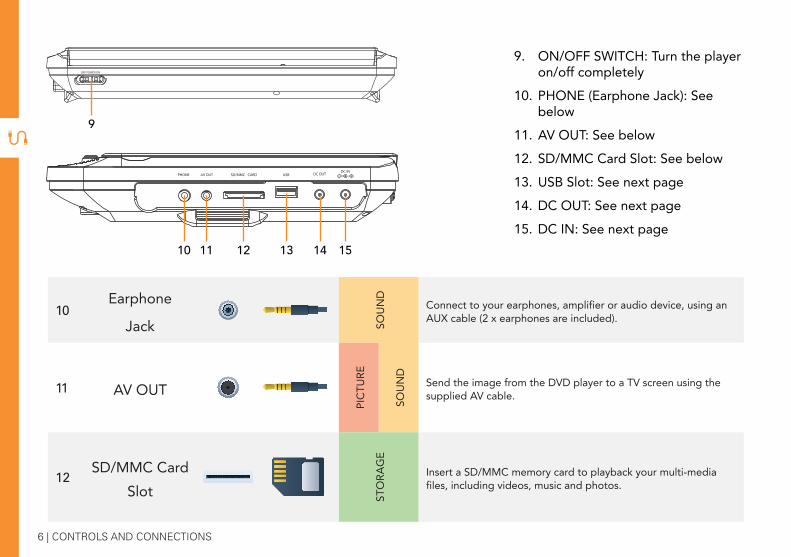
9. ON/OFF SWITCH: Turn the player on/off completely
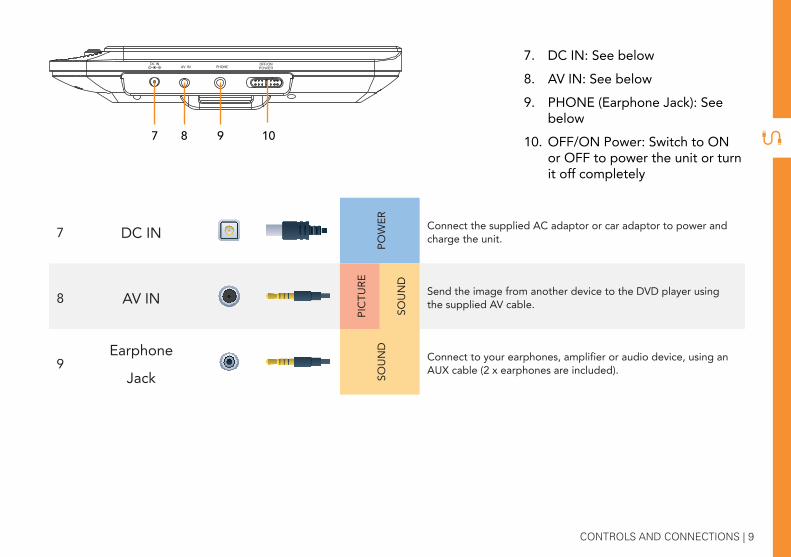
10. PHONE (Earphone Jack): See below
11. AV OUT: See below12. SD/MMC Card Slot: See below13. USB Slot: See next page14. DC OUT: See next page15. DC IN: See next page
10Earphone
Jack SOUN
D
Connect to your earphones, amplifier or audio device, using an AUX cable (2 x earphones are included).
11 AV OUT
PICT
URE
SOUN
DSend the image from the DVD player to a TV screen using the supplied AV cable.
12SD/MMC Card
Slot STO
RAG
E
Insert a SD/MMC memory card to playback your multi-media files, including videos, music and photos.
10 11 12 13 14 15

CONTROLS AND CONNECTIONS | 7
13 USB
STO
RAG
E
Playback your multi-media files, including videos, music and photos.
14 DC OUT
POW
ER Use the supplied DC cable to connect the Master Screen to the DC IN port of the Slave Screen.
15 DC IN
POW
ER Connect the supplied AC adaptor or car adaptor to power and charge the unit.
Note: The Slave screen must be connected to the Master screen; it can not be operated independently.
Master Screen
DC Cable (included)
AV Cable (included)
Slave Screen
8 | CONTROLS AND CONNECTIONS
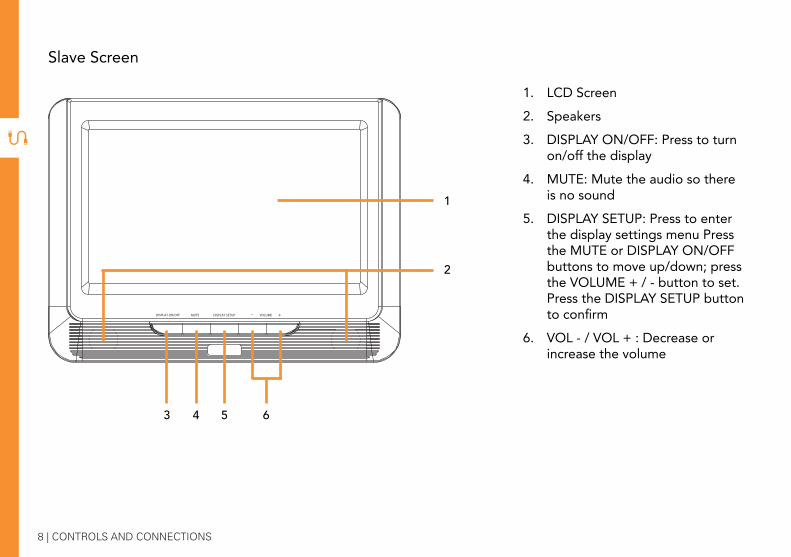
1. LCD Screen2. Speakers3. DISPLAY ON/OFF: Press to turn
on/off the display4. MUTE: Mute the audio so there
is no sound5. DISPLAY SETUP: Press to enter
the display settings menu Press the MUTE or DISPLAY ON/OFF buttons to move up/down; press the VOLUME + / - button to set. Press the DISPLAY SETUP button to confirm
6. VOL - / VOL + : Decrease or increase the volume
Slave Screen
1
3 4 5 6
2
CONTROLS AND CONNECTIONS | 9
7 8 9 10
7 DC IN
POW
ER Connect the supplied AC adaptor or car adaptor to power and charge the unit.
8 AV IN
PICT
URE
SOUN
D
Send the image from another device to the DVD player using the supplied AV cable.
9Earphone
Jack SOUN
D
Connect to your earphones, amplifier or audio device, using an AUX cable (2 x earphones are included).
7. DC IN: See below8. AV IN: See below9. PHONE (Earphone Jack): See
below10. OFF/ON Power: Switch to ON
or OFF to power the unit or turn it off completely
10 | REMOTE CONTROL
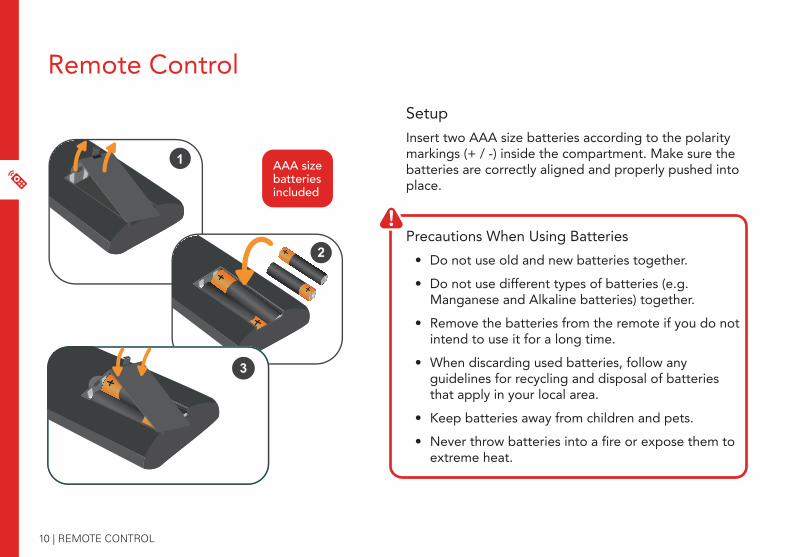
SetupInsert two AAA size batteries according to the polarity markings (+ / -) inside the compartment. Make sure the batteries are correctly aligned and properly pushed into place.
Precautions When Using Batteries• Do not use old and new batteries together.• Do not use different types of batteries (e.g.
Manganese and Alkaline batteries) together.• Remove the batteries from the remote if you do not
intend to use it for a long time.• When discarding used batteries, follow any
guidelines for recycling and disposal of batteries that apply in your local area.
• Keep batteries away from children and pets. • Never throw batteries into a fire or expose them to
extreme heat.
Remote Control
AAA size batteries included
1
2
3
REMOTE CONTROL | 11
POWER
VOLUME
1 2 3 +
-4 5 6
7 8 9
0/10 10+
MUTE
MENUSETUP
OK
OSD
SUBTITLE STEP STOP TITLE
ANGLE ZOOM GOTO AUDIO
PROG A-B SLOW REPEAT
DVD/USB/SD
LCD ON/OFF
POWER
VOLUME
1 2 3 +
-4 5 6
7 8 9
0/10 10+
MUTE
MENUSETUP
OK
OSD
SUBTITLE STEP STOP TITLE
ANGLE ZOOM GOTO AUDIO
PROG A-B SLOW REPEAT
DVD/USB/SD
LCD ON/OFF
Remote Control
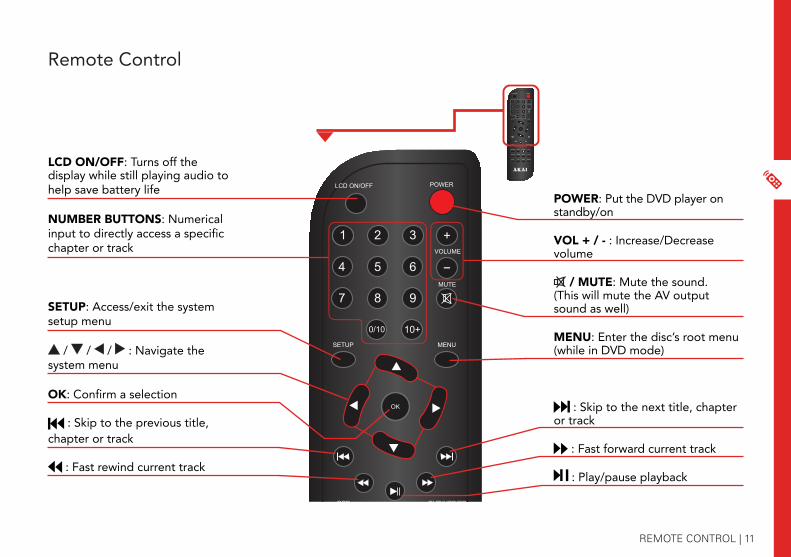
LCD ON/OFF: Turns off the display while still playing audio to help save battery life
NUMBER BUTTONS: Numerical input to directly access a specific chapter or track
SETUP: Access/exit the system setup menu
/ / / : Navigate the system menu
OK: Confirm a selection
: Skip to the previous title, chapter or track
: Fast rewind current track
POWER: Put the DVD player on standby/on
VOL + / - : Increase/Decrease volume
/ MUTE: Mute the sound. (This will mute the AV output sound as well)
MENU: Enter the disc’s root menu (while in DVD mode)
: Skip to the next title, chapter or track
: Fast forward current track
: Play/pause playback
12 | REMOTE CONTROL
POWER
VOLUME
1 2 3 +
-4 5 6
7 8 9
0/10 10+
MUTE
MENUSETUP
OK
OSD
SUBTITLE STEP STOP TITLE
ANGLE ZOOM GOTO AUDIO
PROG A-B SLOW REPEAT
DVD/USB/SD
LCD ON/OFF
POWER
VOLUME
1 2 3 +
-4 5 6
7 8 9
0/10 10+
MUTE
MENUSETUP
OK
OSD
SUBTITLE STEP STOP TITLE
ANGLE ZOOM GOTO AUDIO
PROG A-B SLOW REPEAT
DVD/USB/SD
LCD ON/OFF
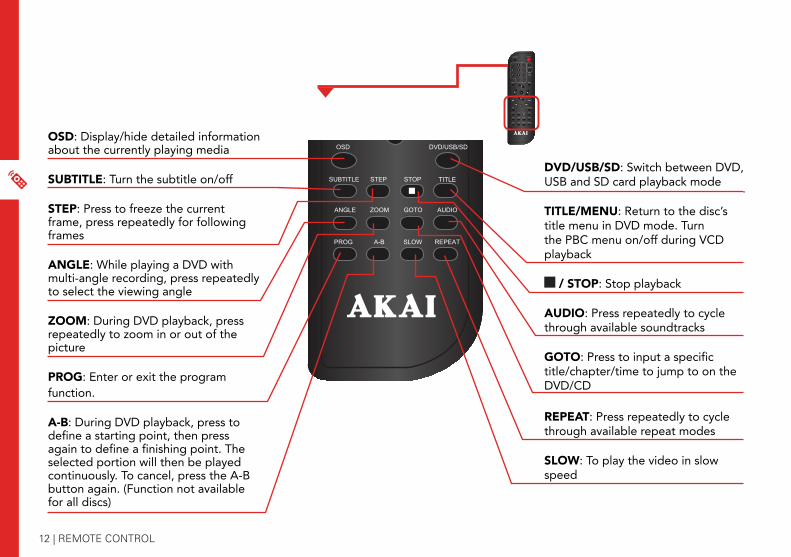
OSD: Display/hide detailed information about the currently playing media
SUBTITLE: Turn the subtitle on/off
STEP: Press to freeze the current frame, press repeatedly for following frames
ANGLE: While playing a DVD with multi-angle recording, press repeatedly to select the viewing angle
ZOOM: During DVD playback, press repeatedly to zoom in or out of the picture
PROG: Enter or exit the program function.
A-B: During DVD playback, press to define a starting point, then press again to define a finishing point. The selected portion will then be played continuously. To cancel, press the A-B button again. (Function not available for all discs)
DVD/USB/SD: Switch between DVD, USB and SD card playback mode
TITLE/MENU: Return to the disc’s title menu in DVD mode. Turn the PBC menu on/off during VCD playback
/ STOP: Stop playback
AUDIO: Press repeatedly to cycle through available soundtracks
GOTO: Press to input a specific title/chapter/time to jump to on the DVD/CD
REPEAT: Press repeatedly to cycle through available repeat modes
SLOW: To play the video in slow speed
OPERATION | 13
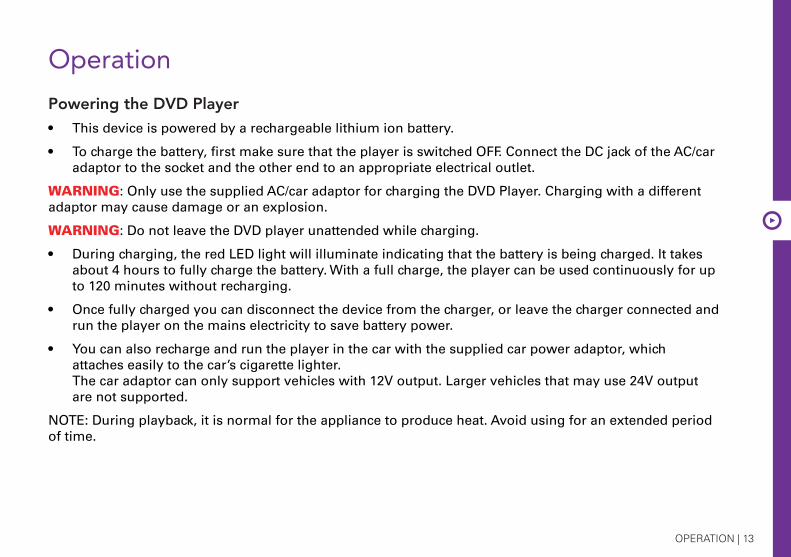
OperationPowering the DVD Player• This device is powered by a rechargeable lithium ion battery.
• To charge the battery, first make sure that the player is switched OFF. Connect the DC jack of the AC/car adaptor to the socket and the other end to an appropriate electrical outlet.
WARNING: Only use the supplied AC/car adaptor for charging the DVD Player. Charging with a different adaptor may cause damage or an explosion.
WARNING: Do not leave the DVD player unattended while charging.
• During charging, the red LED light will illuminate indicating that the battery is being charged. It takes about 4 hours to fully charge the battery. With a full charge, the player can be used continuously for up to 120 minutes without recharging.
• Once fully charged you can disconnect the device from the charger, or leave the charger connected and run the player on the mains electricity to save battery power.
• You can also recharge and run the player in the car with the supplied car power adaptor, which attaches easily to the car’s cigarette lighter. The car adaptor can only support vehicles with 12V output. Larger vehicles that may use 24V output are not supported.
NOTE: During playback, it is normal for the appliance to produce heat. Avoid using for an extended period of time.
14 | OPERATION
Turning the Player ON/OFFOnce the player is fully charged, or connected to an electrical outlet via the AC/DC power adaptor, slide the POWER switch to turn the player on. The indicator light will glow green. Slide the power switch again to turn it off.
DVD/CD Playback• Lift the panel on the master unit to open the DVD compartment. Remove protective sheeting from under
the disc cover before first use.
• Place a disc with the playback side facing down and the label facing up and gently push on the center of the disc to fix it to the spindle. The player will not recognise the disc if it is not inserted correctly.
• Close the disc cover. The disc will begin to play automatically. If this does not occur, press button.
• Pause: Press the button to pause playback. Press again to resume playing.
• Stop: Press the button to stop playback.
• Forward/Rewind: Press the / buttons to fast forward/rewind. Repeat this motion to increase the speed. Press to resume playing.
• Previous/Next track: Press the / buttons for the previous/next track.
• GOTO: Press the GOTO button and enter a title, chapter, track or time, then press OK.
• PROGRAM: Press to access the programming menu. Use the numeric and navigation buttons to enter the desired title, chapter or track. Select START at the bottom of the screen to play the programmed sequence. Select EXIT to cancel programming.
• Other functions such as angle, audio language and subtitles are available depending on the disc format and content.
OPERATION | 15
NOTE: If the unit is connected to an external screen such as a TV, ensure that the TV is switched to the correct input mode (such as AV mode).
• To remove the disc, lift up the panel on the main unit and remove the disc by lifting from beneath while gently pressing down on its centre.
Adjusting the Volume Use the VOL - and VOL + buttons on the main unit (or on the remote control) to adjust the volume of the speaker or earphones.
NOTE: If the unit is connected to an external screen such as a TV, muting the DVD player’s volume will mute the TV sound as well. For all other sound controls, use the TV controls.
Using EarphonesTo listen to audio using earphones, plug them into the PHONE socket on the right side of the player. The speakers will automatically disable the sounds output when earphones are connected.
• Turn off the player before connecting/disconnecting the earphone cable as movements from moving the plug may cause disc damage.
CAUTION: To prevent permanent hearing damage, keep the volume at a moderate level when using earphones. Before connecting, turn down the volume and then re-adjust it when playback starts.
16 | OPERATION
USB/Multimedia PlaybackNOTE: • This unit only supports USB devices with a FAT32 file system and a maximum of 32GB.
• This unit supports playback of AVI, MP3 and JPEG files. However, due to other variations in file formats, some files may not play even though they are supported devices.
• DO NOT use external Hard Disk Drives as they are generally not suitable for use with this unit. We suggest using USB flash drives up to 32GB and formatted in the FAT32 file system.
• Only use USB2.0 USB media.
Playing Content From a USB Drive or SD/MMC CardThis unit supports playback of AVI, MP3 and JPEG files.
• Insert a USB drive into the USB port (and/or a SD/MMC memory card into the card slot) on the right side of the player.
• Press the DVD/USB/SD button on the remote to set the source.
• Use the / / / navigation buttons to select and highlight the desired source, then press the OK button twice to confirm.
• Use the / / / navigation buttons to select the desired file and press the OK button to play it.
OPERATION | 17
System Setup OptionsMenu Operation• Press the SETUP button on the remote to display the system setup menu.
• Use the / navigation buttons to select the setup page.
• Use the / navigation buttons to select and press the OK button to confirm.
• Press the SETUP button again to save or exit the system setup menu.
General SetupTV Screen Aspect Ratio• Normal/PS: when connected to an ordinary TV, a wide screen picture will display on the entire TV screen,
but sections of the right and left of the picture are cut off.
• Normal/LB: when connected to an ordinary TV, a wide screen picture will display on the entire screen, but with black stripes above and beneath the picture.
• Wide/16:9: when connected to a wide screen TV, you can select this option. The wide screen image will be displayed across the full screen, stretched horizontally.
Angle Mark
Use this setting when multiple scene angles are available on a DVD.
OSD Lang
Use this setting to change the language on the on screen display menu.
18 | OPERATION
Screen SaverTurn on and a screen saver will appear after 10 minutes when no video has been playing or when there has been no activity.
Last Memory
When turned on the player will remember where you stopped the DVD and resume from this point.
Audio Setup MenuDownmix
Use this setting to combine 5.1 channel digital audio with 2.0 channel stereo audio.
• Lt/Rt: Both speakers will play both the rear left and right channel.
• Stereo: Left speaker will only play the rear left channel. Right speaker will only play the rear right channel.
Video Setup MenuPicture
Brightness, Contrast, Hue, Saturation and Sharpness can be adjusted for the LCD screen on the player.
Video Out Quality
Brightness, Contrast, Gamma, Hue, Saturation and Sharpness can be adjusted for the picture quality.
OPERATION | 19
Preference Setup MenuThis menu can only be accessed when there is no disc loaded, or the unit is completely in stop mode.
TV TypeSet to PAL, AUTO or NTSC according to your location.
Audio/Subtitle/Disc MenuIf Audio, Subtitle or Disc Menu is selected, use the / / / navigation buttons or the OK button to set the default language.
DefaultReturn the unit to its original factory settings.
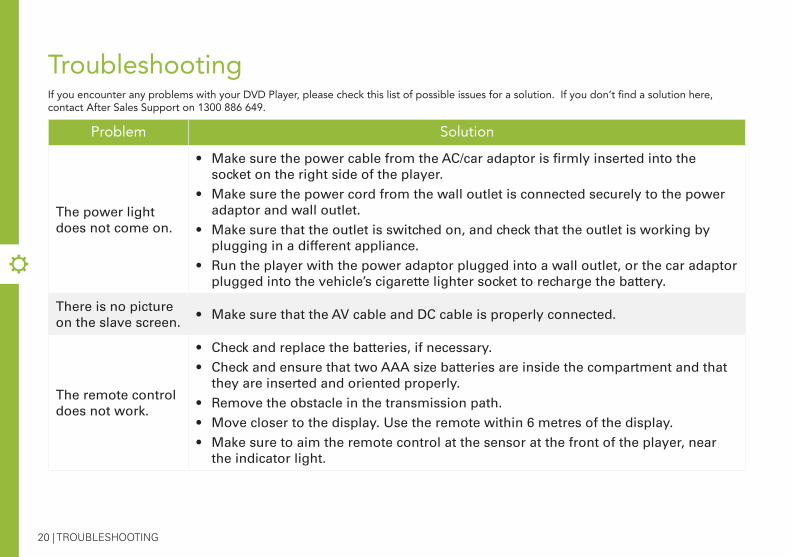
20 | TROUBLESHOOTING
If you encounter any problems with your DVD Player, please check this list of possible issues for a solution. If you don’t find a solution here, contact After Sales Support on 1300 886 649.
Troubleshooting
Problem Solution
The power light does not come on.
• Make sure the power cable from the AC/car adaptor is firmly inserted into the socket on the right side of the player.
• Make sure the power cord from the wall outlet is connected securely to the power adaptor and wall outlet.
• Make sure that the outlet is switched on, and check that the outlet is working by plugging in a different appliance.
• Run the player with the power adaptor plugged into a wall outlet, or the car adaptor plugged into the vehicle’s cigarette lighter socket to recharge the battery.
There is no picture on the slave screen.
• Make sure that the AV cable and DC cable is properly connected.
The remote control does not work.
• Check and replace the batteries, if necessary.• Check and ensure that two AAA size batteries are inside the compartment and that
they are inserted and oriented properly.• Remove the obstacle in the transmission path.• Move closer to the display. Use the remote within 6 metres of the display.• Make sure to aim the remote control at the sensor at the front of the player, near
the indicator light.

TROUBLESHOOTING | 21
For Technical and Warranty Support 1300 886 649 www.tempo.org [email protected] Distributed by Tempo (Aust) Pty Ltd, PO Box 6056, Frenchs Forest DC 2086
Problem Solution
No Sound
• Press the VOL + button to increase the volume level.• Unplug the earphones to enable sound from the speaker.• Press the PLAY/PAUSE button to restore normal playback and sound.• Press the MUTE button to restore sound.
The disc cannot be played.
• Make sure to place the disc label-side up into the disc compartment.• Close the disc cover.• Ensure the disc is not scratched or dirty. Clean and reinsert the disc if necessary.• Ensure that the disc has a format which is compatible with the player.
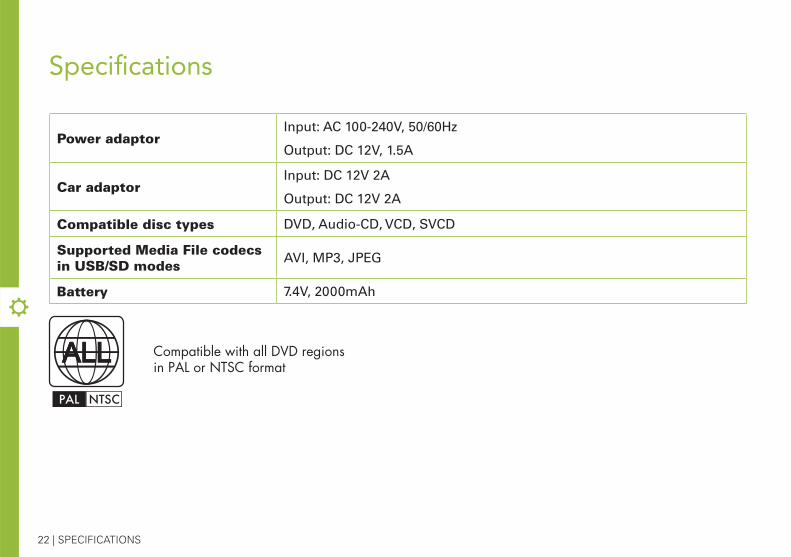
22 | SPECIFICATIONS
Specifications
Power adaptorInput: AC 100-240V, 50/60Hz
Output: DC 12V, 1.5A
Car adaptorInput: DC 12V 2A
Output: DC 12V 2A
Compatible disc types DVD, Audio-CD, VCD, SVCD
Supported Media File codecs in USB/SD modes
AVI, MP3, JPEG
Battery 7.4V, 2000mAh
Compatible with all DVD regions in PAL or NTSC format
PAL NTSC
SPECIFICATIONS | 23
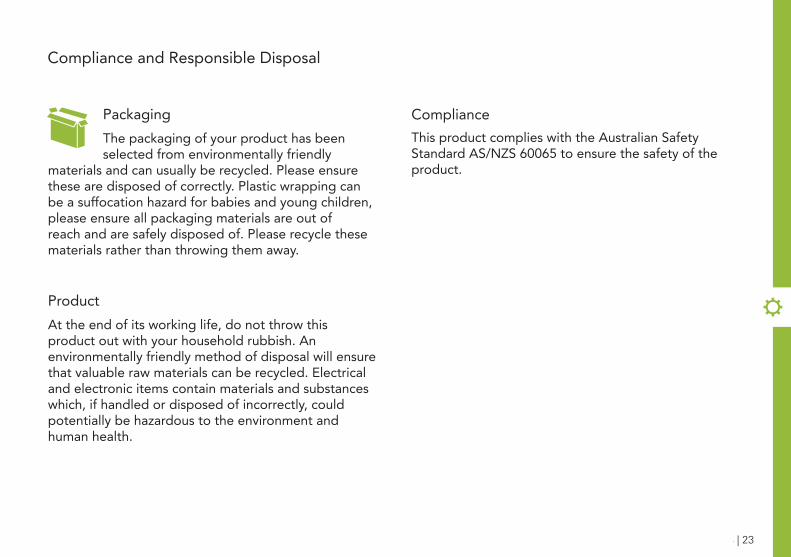
Compliance and Responsible Disposal
ComplianceThis product complies with the Australian Safety Standard AS/NZS 60065 to ensure the safety of the product.
PackagingThe packaging of your product has been selected from environmentally friendly
materials and can usually be recycled. Please ensure these are disposed of correctly. Plastic wrapping can be a suffocation hazard for babies and young children, please ensure all packaging materials are out of reach and are safely disposed of. Please recycle these materials rather than throwing them away.
ProductAt the end of its working life, do not throw this product out with your household rubbish. An environmentally friendly method of disposal will ensure that valuable raw materials can be recycled. Electrical and electronic items contain materials and substances which, if handled or disposed of incorrectly, could potentially be hazardous to the environment and human health.
For Technical and Warranty Support
1300 886 649
www.tempo.org
Distributed by Tempo (Aust) Pty Ltd,
PO Box 6056, Frenchs Forest DC 2086