Embed Size (px)
Citation preview

VTLab Acoustic Pharyngometry ® (APh) Protocol©
a
Data Collection (Part I)
Eccovision ® Acoustic Pharyngometer®(APh)Sleep Group Solutions, formerly Hood Laboratories
Vocal Tract Development Laboratory (VTLab) Protocol: Last updated January 2015University of Wisconsin-Madison, Waisman Center
Principal Investigator: Houri K. Vorperian, Ph.D., CCC-SLP
Shannon Theis, Ph. D., CCC-SLP,Erin Henigan-Douglas, M.S., CCC-SLP,Sara Kurtzweil, B.S.,Reid Durtschi, M.S.,
Katelyn Kassulke-Tillman, B.S.,Allison Carolan, B.S.,Carlyn Burris, M.S., CF-SLP,Ekaterini Derdemezis, B.S.,
Erin Nelson, B.A.,Katie Lester, B.S.,Allison Petska, B.S.,Alyssa Wild
Acoustic Pharyngometry Protocol by Vocal Tract Development Lab is licensed under a Creative Commons Attribution-NonCommercial-ShareAlike 4.0 International License.

Table of Contents
Part I. Data Collection Protocol
Preface………………………………………………………………..…………..3
Chapter 1: Basic Operating Instructions ………………..…..….4
Chapter 2: Setting Up Wavetube ………………......................8
Chapter 3: Running Participants – General Procedures …12
Chapter 4: Slow Exhale Trials…………………………………………15
Chapter 5: Nasal Exhale Trials ……………………………………….18
Chapter 6: Modified Valsalva Maneuver………………………..21
Chapter 7: Supine Breathing Trials…………………………………24
Chapter 8: Formatting and Saving Data ….….....................25
Chapter 9: Clean-Up ………………………………………………………28
Appendix……………………….……………………..……………………….30
References……………………………………………………………..........42

Preface• The purpose of this protocol is to share in detail the
protocol we follow in our VTLab. It is based on the procedures outlined in the Eccovision manual.
• Acoustic Pharyngometry ® (APh) is a non-invasive, objective assessment of the vocal tract, which provides the cross-sectional area and volume of the upper airway.
• APh requires the participant to exhale slowly into a wave tube. The wave tube has a mouth piece that keeps the participant’s tongue in position (not blocking the airway) and ensures that all exhaled air passes through it.
• Sound waves are emitted and the system’s microphone captures the acoustic reflections of the airway. Then the system measures the amplitude of the reflections and time of arrival at the microphone.
• The APh constructs a plot showing airway area and distance from the lips/teeth (0 point on x-axis) to the glottis (Xue & Hao, 2006).
• Although APh has been available for about two decades (Fredberg et al, 1980; Hoffstein & Fredberg, 1991), only a limited number of studies have examined the actual anatomic correlates of APh. Of those studies, only select APh measurements have been studied and those are reported to match with anatomic measurements obtained through MRI (Tameem &
Mehta, 2004) and CT scans (D'Urzo et al, 1987; D'Urzo et al, 1988).
VTLab APh Protocol: Part I – Data Collection3

Chapter 1: Basic Operating Instructions
Start-up:
• Turn on the monitor by pressing the power button.
• Turn on the central processing unit (CPU) by flipping the green switch on the back of the unit.
*NOTE*
The last exam performed on the Aphwill be displayed when you turn it on.
VTLab APh Protocol: Part I - Data Collection 4

Chapter 1: Basic Operating Instructions
• Graphs from the last participant that was run
• A line of text along the bottom that reads: “Acquire Save Read Print Reset Patient”• You can move across this line
using the left and right arrow keys.
What you will see when you first turn on the machine:
VTLab APh Protocol: Part I - Data Collection 5

Chapter 1: Basic Operating Instructions
Functions:• Acquire + Enter
– Allows you to take new measurements.– Toggle between trials by using the up and down arrows.
• Save + Enter– Allows you to save the data.– Press Y if you wish to edit or review patient data.– Type in the filename and strike Enter.
• Read + Enter– Allows you to enter a file name and look at those measurements.
• Print + Enter– Allows you to print the readings.
• Reset + Enter— Allows you to reset the graphs.
• Patient + Enter– Allows you to enter patient data and titles for trial windows (e.g. “slow exhale”, “slow exhale”, “nose”, “valsalva”)
VTLab APh Protocol: Part I - Data Collection 6

1: shows 1st trial
2: shows 2nd trial
3: shows 3rd trial
4: shows 4th trial
#, #: shows two graphs together, giving the second graph priority
Up/down arrow: toggles between slow exhale, nose, and valsalva trials
Left/right arrow: toggles between acquire, save, print, etc.
F6: shows directory on APh (holds up to 300 files or 5 pages)
F8: shows directory on floppy disk (holds 60 files or you will see the message “unable to open”)
“M” key: toggles between triangle cursors on graphs
Esc: ONLY used in directory and patient information windows, otherwise, ends program without saving your data
Ctrl + left/right arrow: scrolls along the graph
Spacebar: highlights specific entries yellow
Ins: saves data to floppy disk
F1: Moves left side of analysis segment to the left
F2: Moves left side of analysis segment to the right
F3: Moves right side of analysis segment to the left
F4: Moves right side of analysis segment to the right
F5: Edits analysis segment min & max
Del: Deletes yellow highlighted entries
Keyboard Commands:
Chapter 1: Basic Operating Instructions
VTLab APh Protocol: Part I - Data Collection 7

Chapter 2: Setting Up Wave Tube
Supplies you will need:
A. Electronic platform which connects to computer
B. Filter strip
C. Wave tube which attaches to the mouthpiece
D. Mouthpiece
VTLab APh Protocol: Part I - Data Collection 8

Chapter 2: Setting Up Wave Tube
1. Place a filter strip in the wave tube. Slide it towards the mouthpiece end.
2. Fit the back of the electronic platform into the wave tube.
3. Screw the electronic platform into the wave tube.
4. Attach the mouthpiece to the wave tube with tongue bar facing down.
5. Wave tube setup is now complete.
VTLab APh Protocol: Part I - Data Collection
9

Chapter 2: Setting Up Wave Tube
• Choosing a mouthpiece:
– For typically developing adults and older children, the regular mouthpiece should fit comfortably.
– For young children and individuals with developmental disabilities, the mouthpiece may be too big and need to be cut down (so that it is narrower).
Adult Mouthpiece
Adult Mouthpiece with tongue
and side-bars trimmed
VTLab APh Protocol: Part I - Data Collection 10

Chapter 2: Setting Up Wave Tube
• For typically developing adults,
secure the wave tube to the APh
stand, using weight bag as necessary.
• For young children and individuals with
developmental disabilities, it’s best that
the wave tube is held in a steady
position by the examiner.
VTLab APh Protocol: Part I - Data Collection11
Chapter 3: Running Participants – General Procedures
VTLab APh Protocol: Part I - Data Collection12
Examiner 1:• Explaining/modeling each task to the participant • Making sure mouthpiece is placed correctly• Monitoring participant’s breathing technique• Using button on wavetube to activate and deactivate APh signal
in time with participant’s breathing
Examiner 2:• Monitoring APh waveforms for correct/consistent patterns• Transitioning to subsequent attempts within same breathing
technique (i.e. graph #1-4)• Saving APh data between different breathing trials

Chapter 3: General Procedures
For ALL upright breathing trials:
1. Have the participant sit upright in a straight back chair.
2. Feet are flat on the floor or foot stool.
3. Neck is in neutral position with chin parallel to the floor.
4. Mouthpiece must be properly placed with tongue relaxed under tongue bar and teeth pressed against the front (like a mouth guard).
5. Lips must create full seal around mouthpiece
6. Demonstrate proper positioning of the mouthpiece (tongue under, teeth touching, lips around) and proper execution of breathing trials (slow exhale, nose, and Valsalva).
7. Check participant’s positioning of mouthpiece while taking practice breaths for each trial
• Use pediatric mouthpiece for children and individuals with developmental disability.
See pages 39-41 for general tips!
VTLab APh Protocol: Part I - Data Collection13

Distance (cm)-5 0 5 10 15 20 25
Are
a (
cm
2)
0
2
4
6
8
10
Chapter 3: General Procedures
What are our objectives when running a participant?:1) Production of superimposable/reproducible graphs that best display the
vocal tract in a neutral position
o Slow Exhale Trials
2) Production of superimposable/reproducible graphs that best display the location of the oral-pharyngeal junction
o Nasal Trials
3) Production of superimposable/reproducible graphs that best display the location of the glottis (only for TD participants)
o Valsalva Trials
VTLab APh Protocol: Part I - Data Collection
14
Distance (cm)-5 0 5 10 15 20 25
Are
a (
cm
2)
0
2
4
6
8
10
Chapter 4: Slow Exhale Trials
VTLab APh Protocol: Part I - Data Collection15
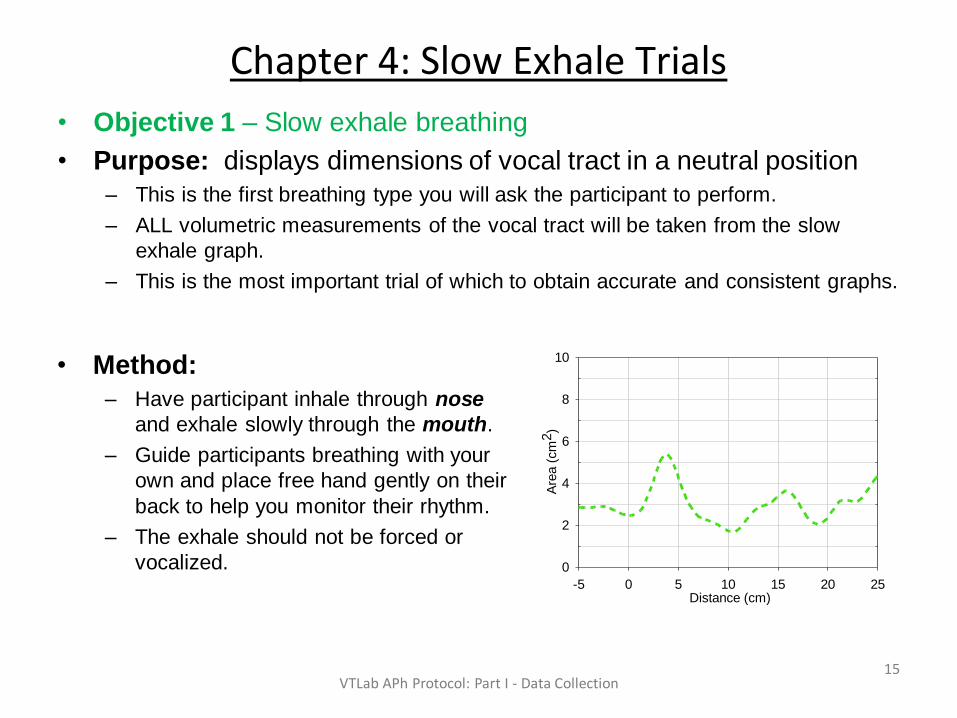
• Objective 1 – Slow exhale breathing
• Purpose: displays dimensions of vocal tract in a neutral position
– This is the first breathing type you will ask the participant to perform.
– ALL volumetric measurements of the vocal tract will be taken from the slow
exhale graph.
– This is the most important trial of which to obtain accurate and consistent graphs.
Distance (cm)-5 0 5 10 15 20 25
Are
a (
cm
2)
0
2
4
6
8
10• Method:
– Have participant inhale through nose
and exhale slowly through the mouth.
– Guide participants breathing with your
own and place free hand gently on their
back to help you monitor their rhythm.
– The exhale should not be forced or
vocalized.

Chapter 4: Slow Exhale Trials
VTLab APh Protocol: Part I - Data Collection16
• Common problems with slow exhale trials
• If output graphs show extremely large volumes:
– Check to make sure participants lips are fully sealed around the mouthpiece.
– Encourage participant to exhale easily and not to force their breathing.
– Be sure participant is exhaling entirely through their mouth and no air is escaping
through the nasal cavity (if they are willing, you can help by gently pinching their
nose).
• If output graphs show extremely small volumes:
– Check to make sure tongue is properly placed beneath tongue bar, and tongue is
in a relaxed position (not scrunched or forced backward).
– Encourage participant to sit up tall and keep chin parallel to the floor.
• See Appendix F1 and F2 for more tips
Chapter 4: Slow Exhale Trials
VTLab APh Protocol: Part I - Data Collection17
• The APh system can hold up to four trials at once. Do
your best to get four similar looking slow exhale graphs
with very little scatter.
• Use the #keys 1-4 to compare the four trial attempts and see %
similarity (refer to appendix A3 for more detailed instruction)
• If you were able to obtain an accurate slow exhale graph
and if the participant is willing, you can move on to the
nasal trial.
• Be sure to save the slow exhale trials under the correct
alpha-numeric code before moving on to the nasal trials.
• While you are with the participant, use an abbreviated file name
to speed things along (ex. F1234-SlEx-UP-nmsrd). After you
have finished running the participant and return to make your
measurements, you can refer to the proper file naming format.

Chapter 5: Nasal Exhale Trials
VTLab APh Protocol: Part I - Data Collection18
• Objective 2 – Nasal trials
• Purpose: display dimensions of vocal tract with velum fully lowered
– The sole purpose of this trial is to locate the oral-pharyngeal junction and mark
the end of the oral cavity on the slow exhale graph.
– No volumetric measurements will be made from these graphs.
• Method:
– Have participant inhale through nose and
exhale slowly back through the nose.
– Guide participants breathing with your own
and place free hand gently on their back to
help you monitor their rhythm.
– The goal is to obtain a graph where the trace
falls almost to 0 cm2 after the initial peak
(usually around 5-8 cm).
– The primary focus is to make sure the
participant is exhaling only through their
nose.

Chapter 5: Nasal Exhale Trials
VTLab APh Protocol: Part I - Data Collection19
• Common problems with nasal trials
• If output graphs don’t show obvious reduction in volume at OPJ
level:
– Be sure participant is exhaling exclusively through nose and no air is escaping
though mouth (it is sometimes beneficial to practice again without the wave tube,
having the participant exhale through their nose with mouth closed).
– Encourage participant to exhale easily and not to force an exhale
• The red trace reflects
correct nasal breathing
• The green trace is
indicative of exhaling
through the mouth rather
than the nose.
• See Appendix F1 and F2
for more tips

Chapter 5: Nasal Exhale Trials
VTLab APh Protocol: Part I - Data Collection20
• The APh system can hold up to four trials at once. Do
your best to get four similar looking nasal trial graphs
with very little scatter.
• Use the #keys 1-4 to compare the four trial attempts and see %
similarity (refer to appendix A3 for more detailed instruction)
• For DS participants, no more trials are required.
• TD participants may attempt the Valsalva trials, if willing.
• Be sure to save the nasal trials under the correct alpha-
numeric code before turning off the machine or before
moving on to the valsalva trials.
• While you are with the participant, use an abbreviated file name
to speed things along (ex. F1234-nose-UP-nmsrd). After you
have finished running the participant and return to make your
measurements, you can refer to the proper file naming format.

Chapter 6: Modified Valsalva Maneuver
VTLab APh Protocol: Part I - Data Collection21
• Objective 3 – Valsalva Trial
• Purpose: displays dimensions of vocal tract during vocal fold
constriction
– The sole purpose of this trial is to approximate the location of the glottis and
mark the end of the vocal tract on the slow exhale graph.
– No volumetric measures will be made from these graphs
• Method:
– Have participant inhale through nose and
exhale forcefully through the mouth against a
semi-constricted glottis.
– Guide participants breathing with your own and
place free hand gently on their back to help
you monitor their rhythm.
– The goal is to create a graph with an obvious
depression around the 13-18cm mark (will vary
widely depending on participant age, height,
and diagnosis)
– The exhale should not be vocalized.
Distance (cm)-5 0 5 10 15 20 25
Are
a (
cm
2)
0
2
4
6
8
10

Chapter 6: Modified Valsalva Maneuver
VTLab APh Protocol: Part I - Data Collection22
• Common problems with Valsalva trials
• This is the most difficult trial and often requires several trials to achieve the most accurate results. It is not uncommon for the participant to be unable to perform this maneuver.
• If the graphs shows no obvious depression, or it is clear the participant is having difficulty understanding the method:
– Imagine lifting a heavy box/weights or pushing down on the table
– Trying to breath out, but only letting out a tiny amount of air
– “Darth Vader” breathing
– Have them lift weights (bicep curl in upright/bench press in supine) while breathing out
– Have them push up on the table in upright and push down on cot in supine while breathing out
– Try all of these out if the participant is very compliant
• See Appendix F1 and F2 for more tips

Chapter 6: Modified Valsalva Maneuver
VTLab APh Protocol: Part I - Data Collection23
• The APh system can hold up to four trials at once. Do your best
to get four similar looking Valsalva trial graphs with very little
scatter.
• Use the #keys 1-4 to compare the four trial attempts and see %
similarity (refer to appendix A3 for more detailed instruction)
• For participants without previous imaging studies, no more trials
are required.
• Participants with available imaging may attempt the slow exhale,
nasal, and Valsalva trials in the supine body position, if willing.
• Be sure to save the Valsalva trials under the correct alpha-
numeric code before turning off the machine or before moving on
to the supine trials.
• While you are with the participant, use an abbreviated file name to
speed things along (ex. F1234-SlEx-UP-nmsrd). After you have
finished running the participant and return to make your
measurements, you can refer to the proper file naming format.

Chapter 7: Supine Breathing Trials
• Tell participant to raise his/her hand if she is uncomfortable or needs a break.
• Provide a rolled-up blanket for under the knees if participant is having back discomfort.
• For young children, a neck pillow should not be used because it puts the head/neck in an awkward position (We do not want the participant’s chin turned down towards their chest).
• When completed, remind participant to sit before standing up to prevent lightheadedness.
• See Appendix E1 and E2 for more tips
Supine Considerations: This position is not necessary unless APh data will be compared to measurements from medical imaging studies such as MRI & CT.
• Communicating when adjusting the stand:• Thumbs up = move stand up
• Because of too much pressure on teeth• Thumbs down = move stand down
• Because participant cannot reach mouthpiece
• Two thumbs up = stand is positioned well
VTLab APh Protocol: Part I - Data Collection24

Chapter 8: Formatting and Saving Data
VTLab APh Protocol: Part I - Data Collection 25
• All file names must follow this format:
• File Name: AN Code – Years old – Months old – Type of
Breathing Trial – Orientation
• Abbreviations:
o SlEx – Slow Exhale
o Nose – Nasal
o Vals – Valsalva
o UP – Upright
o SU - Supine
• Example: F0000-10-03-SlEx-UP
Chapter 8: Formatting and Saving Data
VTLab APh Protocol: Part I - Data Collection 26
• Under “Patient” tab, fill out:
– Name: AN Code
– Age: CA (in months)
– Examiners: Initials of all lab members present
– Trial 1 – type of breathing trial 1
– Trail 2 – type of breathing trial 2
– Trail 3 – type of breathing trial 3
– Trial 4 – type of breathing trial 4
– Comments:
• Date of test
• Orientation (Upright or Supine)
• Trial # used for measurements (if Nose or Valsalva, which trial used for location of OPJ or glottis)
• For slow exhale trials, include measures of oral cavity volume and pharyngeal cavity volume (format:
OCV= #, PCV= #)
• For nasal trials include measure of oral cavity length/location of OPJ (format: OCL=#)
• For Valsalva trials, include measure of total vocal tract length/location of glottis; (format: VTL=#)
• If no Valsalva trial, include which slow exhale trial # was used to determine location of glottis and
include VTL measurement

Chapter 8: Formatting and Saving Data
• Insert a floppy disk into the CPU (may need to buy a floppy disk adaptor).
• Highlight the file you wish to save by pressing the space bar (now file is displayed in yellow). Repeat this individually for every file that needs to be backed up.
• After every file that you intend to back up is highlighted in yellow, press the Insert (Ins) key to back up and save the data.
• After the back up is complete, press F8 to check that files have been saved on the floppy disk (F8 displays the directory of the floppy disk).
– One floppy disk can hold approximately 200 ART files.
After you are done with upright and supine trials and all trials are properly saved, back up the data!
VTLab APh Protocol: Part I - Data Collection 27

Chapter 9: Clean-up
Supplies used during APh must be sanitized. Cidex® is the recommended solution for sanitization.
1. Put on gloves and pour contents of small bottle into large container.
2. Put top on large container and shake well.
3. Check condition of liquid. Cidex® is ready when it turns green.
4. Pour contents of large container into designated container.
5. Mark date of activation and expiration date on large Cidex® container (Cidex® is good for 1 month).
6. Rinse out small bottle and throw away.
*NOTE* Expired Cidex® can be disposed of down the drain.
VTLab APh Protocol: Part I - Data Collection 28
Chapter 9: Clean-Up
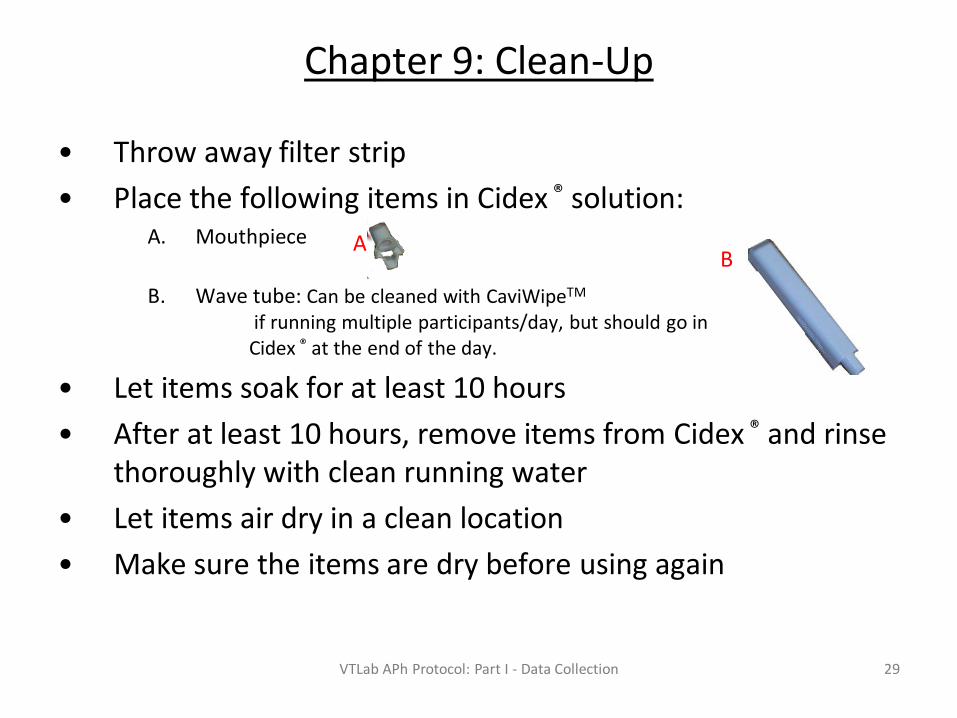
• Throw away filter strip
• Place the following items in Cidex ® solution:A. Mouthpiece
B. Wave tube: Can be cleaned with CaviWipeTM
if running multiple participants/day, but should go in Cidex ® at the end of the day.
• Let items soak for at least 10 hours
• After at least 10 hours, remove items from Cidex ® and rinse thoroughly with clean running water
• Let items air dry in a clean location
• Make sure the items are dry before using again
AB
VTLab APh Protocol: Part I - Data Collection 29

Appendix A1
A1) General Guide – No Stand
Upright—no stand Supine—no stand
Set-up wave tube Lips around mouthpieceVTLab APh Protocol: Part I - Data Collection
30

Appendix A2
A2) General Guide – With Stand
Upright—with stand Supine—with stand
Set-up wave tube in stand Lips around mouthpiece
VTLab APh Protocol: Part I - Data Collection
31

Appendix A3
• Check the % value in the Volume section. Must be +/-6% of 100%.
• If it is within 6%, proceed to the next trials
• If it is not within 6%, it could be because of poor orientation of the head and neck or the participant’s inability to reproduce tongue position.
– May need to take a few trials and remind the participant of proper placement (tongue under, teeth touching, lips all the way around).
– Helpful to instruct the participant to exhale slowly and steadily
– Can be challenging to get reliability with young children and special populations
A3) Determining percent similarity of slow exhale trialsMake sure that the analysis segments are in the same place (0.0-15.0) on both graphs (see
Chapter 1, pg. 8 for how to move analysis segments).
Analysis Segment –measures distance
along the x-axis
VTLab APh Protocol: Part I - Data Collection32

Appendix B1
B1) Slow exhale breathing trials (2)
VTLab APh Protocol: Part I - Data Collection33

Appendix B2
B2) Nose Trial (1)
VTLab APh Protocol: Part I - Data Collection34

Appendix B3
B3) Valsalva Trial (1)
VTLab APh Protocol: Part I - Data Collection 35

Appendix C
C) Oral Mechanism Observations• Choose either a diagram or checklist format to
note any observations.
• For typically developing participants, we found the checklist to be sufficient. For individuals with developmental disabilities, the diagram may be easier to use.
VTLab APh Protocol: Part I - Data Collection36

Appendix D-Visual ScheduleAAccttiivviittiieess SShheeeett
Measuring You
Rufus’s Word game sitting
Breathing Game sitting
Rufus’s Word game laying
down
Breathing Game laying down
Measuring you
Rufus’ Word game sitting
Breathing game sitting
Rufus’ Word game laying down
Breathing game laying down
1)
2)
3)
4)
5)
VTLab APh Protocol: Part I - Data Collection
37

Appendix E1 - Tips By Age Group:
• Tailor your feedback and prompts to a particular child’s interests.
• Use play to engage the participants (e.g. have the toy elephant blow into the wave tube or say the sound).
• Use tangible reinforcement during task if needed.
• E.g. child can earn pieces of a larger toy to play with when the task is completed (puzzle pieces, felt board characters, etc).
• Be concrete with directions.
• Show instead of instructing (use less language). If a participant persists on an incorrect breathing task, give him/her a break and return to the task later.
• Foreshadow transitions (see Appendix D -visual schedule, pg. 32).
• For supine trials, ask the child to look up at the ceiling and not at the examiner.
• For children who are hesitant to lie down:
• Put butcher paper on the cot and trace their body.
• For teaching the nose trial:
• Have the child use his/her own finger, a mirror, or a feather for feedback when exhaling
• Tell them to sniff a flower or pretend to be a dragon and blow air out like fire.
• For all breathing trials if the graphs are not looking accurate, the examiner should take the mouthpiece and wave tube out of the participant’s mouth and re-position it in his/her mouth.
• Many times the child’s tongue has slipped above the tongue bar, instead of being correctly situated beneath the tongue bar.
• Make it fun! Give lots of positive feedback!
VTLab APh Protocol: Part I - Data Collection
38
Young children and individuals with special needs:

Appendix E2 - Tips By Age Group:
• Young adults:
– For instances when they use a silly voice, just remind them to use their “high school voice” or “adult voice”.
– For teaching the nose breathing:• Have participant use his/her own finger or a feather for feedback
when exhaling.
VTLab APh Protocol: Part I - Data Collection 39

Appendix F1 - Tips By Trial:
• All Trials:– Remind participant to have tongue under, teeth touching, and lips
around– Say “show me a yawn” or “open wide like a yawn” – For young children and special populations, it works best to be
flexible. For example, if the first time they give you a nose (which you can see by the graph dipping to near zero) then rename that trial “nose” when you are saving the data. You will save time, which is essential.
– For participants who have had any oral surgery and/or have sensory issues, time must be dedicated to desensitizing (let them be in control - i.e. put the mouth piece in their own mouth, hold the wave tube at first, and give them choices along the way).
– For all participants, it is helpful for them to perceive they are in control. Find as many ways for them to manipulate the wavetubeas possible.
VTLab APh Protocol: Part I - Data Collection40
Appendix F2 - Tips By Trial:• Slow Exhale:
– Take a deep breath in and a long and steady breath out– Don’t breathe out all the air at once, try to make it last– Nice and easy
• Nose:– Finger placed under the nose for feedback– Smelling the flower and then blowing out the smell/pollen/petals– Blowing out fire like a dragon– Hold a hand mirror under their nose and have them “fog it up” when breathing out– Feather can be placed under the nose to give visual feedback
• Valsalva:– Imagine lifting a heavy box/weights or pushing down on the table– Trying to breath out, but only letting out a tiny amount of air– Darth Vader breathing– Have them lift weights (bicep curl in upright/bench press in supine) while
breathing out– Have them push up on the table in upright and push down on cot in supine while
breathing out– Try all of these out if the participant is very compliant
VTLab APh Protocol: Part I - Data Collection41

Acknowledgments
• This work was supported by NIH Research Grant R01-DC 006282
from the National Institute of Deafness and other Communicative
Disorders, and Core Grant P-30 HD03352 from the National Institute
of Child Health and Human Development.
• Special thanks to the Biomedical Engineering team at the University
of Wisconsin-Madison: Ryan Carroll, Ben Engel, Jeremy Glynn,
Andrew Bremer, and their supervisor Dr. Willis Tompkins for helping
develop and create the stand for the acoustic pharyngometry wave
tube.
VTLab APh Protocol: Part I - Data Collection 42

References
• D’Urzo, A.D., Lawson, V.G., Vassal, K.P., Rebuck, A.S., Slutsky, A.S., & Hoffstein, V. (1987). Airway Area by Acoustic Response Measurements and Computerized Tomography. American Review of Respiratory Disease, 135, 392-395.
• D’Urzo, A.D., Rubinstein, I., Lawson, V.G., Vassal, K.P., Rebuck, A.S., Slutsky, A.S., et al. (1988). Comparison of Glottic Areas Measured by Acoustic Reflections vs. Computerized Tomography. Journal of Applied Physiology, 64, 367-370.
• Fredberg, J.J., Wohl, M.E., Glass, G.M., & Dorkin, H.L. (1980). Airway area by acoustic reflections measured at the mouth. Journal of Applied Physiology, 48, 749-758.
• Hoffstein, V., & Fredberg, J.J. (1991). The Acoustic Reflection Technique for Non-Invasive Assessment of Upper Airway Area. European Respiratory Journal, 4, 602-611.
• Sleep Group Solutions. (2009). Acoustic Pharyngometer Operator Manual., 1-26.
• Sleep Group Solutions. (2009). Acoustic Pharyngometer Quick Setup Guide., 1-8.
• Tameem, H.Z., & Mehta, B.V. (2004). Solid modeling of human vocal tract using magnetic resonance imaging and acoustic pharyngometer. Conference Proceeding of the IEEE EMBS, San Francisco, CA, USA, 7, 5115-5118.
• Xue, S.A., & Hao, J.G. (2006). Normative standards for vocal tract dimensions by race as measured by acoustic pharyngometry. Journal of Voice, 20, 391-400.
VTLab APh Protocol: Part I - Data Collection 43