Embed Size (px)
Citation preview
A Gentle Introduction to ROS
Jason M. O’Kane

Jason M. O’Kane
University of South Carolina
Department of Computer Science and Engineering
315 Main Street
Columbia, SC 29208
http://www.cse.sc.edu/~jokane
©2014, Jason Matthew O’Kane. All rights reserved.
This is version 2.1.6(ab984b3), generated on April 24, 2018.
Typeset by the author using LATEX and memoir.cls.
ISBN 978-14-92143-23-9

Contents in Brief
Contents in Brief iii
Contents v
1 Introduction 1
In which we introduce ROS, describe how it can be useful, and pre-
view the remainder of the book.
2 Getting started 11
In which we install ROS, introduce some basic ROS concepts, and in-
teract with a working ROS system.
3 Writing ROS programs 39
In which we write ROS programs to publish and subscribe to mes-
sages.
4 Log messages 61
In which we generate and view log messages.
5 Graph resource names 77
In which we learn how ROS resolves the names of nodes, topics, pa-
rameters, and services.
iii
CONTENTS IN BRIEF
6 Launch files 83
In which we configure and run many nodes at once using launch files.
7 Parameters 105
In which we configure nodes using parameters.
8 Services 117
In which we call services and respond to service requests.
9 Recording and replaying messages 133
In which we use bag files to record and replay messages.
10 Conclusion 141
In which we preview some additional topics.
Index 145
iv
Contents
Contents in Brief iii
Contents v
1 Introduction 1
1.1 Why ROS? . . . . . . . . . . . . . . . . . . . . . . . . . . . . . . . . . . . . . . 1
Distributed computation . . . . . . . . . . . . . . . . . . . . 2
Software reuse . . . . . . . . . . . . . . . . . . . . . . . . . . 2
Rapid testing . . . . . . . . . . . . . . . . . . . . . . . . . . . 3
ROS is not . . . . . . . . . . . . . . . . . . . . . . . . . . . . . . 4
1.2 What to expect . . . . . . . . . . . . . . . . . . . . . . . . . . . . . . . . . . . 4
Chapters and dependencies . . . . . . . . . . . . . . . . . . 5
Intended audience . . . . . . . . . . . . . . . . . . . . . . . 5
1.3 Conventions . . . . . . . . . . . . . . . . . . . . . . . . . . . . . . . . . . . . 7
1.4 Getting more information . . . . . . . . . . . . . . . . . . . . . . . . . . . . 7
Distributions . . . . . . . . . . . . . . . . . . . . . . . . . . . 8
Build systems . . . . . . . . . . . . . . . . . . . . . . . . . . . 9
1.5 Looking forward . . . . . . . . . . . . . . . . . . . . . . . . . . . . . . . . . . 9
2 Getting started 11
2.1 Installing ROS . . . . . . . . . . . . . . . . . . . . . . . . . . . . . . . . . . . 11
v
CONTENTS
Adding the ROS repository . . . . . . . . . . . . . . . . . . . 11
Installing the package authentication key . . . . . . . . . . 12
Downloading the package lists . . . . . . . . . . . . . . . . 12
Installing the ROS packages . . . . . . . . . . . . . . . . . . 13
Installing turtlesim . . . . . . . . . . . . . . . . . . . . . . . 13
Setting up rosdep systemwide . . . . . . . . . . . . . . . . . 13
2.2 Configuring your account . . . . . . . . . . . . . . . . . . . . . . . . . . . . 14
Setting up rosdep in a user account . . . . . . . . . . . . . 14
Setting environment variables . . . . . . . . . . . . . . . . . 14
2.3 A minimal example using turtlesim . . . . . . . . . . . . . . . . . . . . . . . 15
Starting turtlesim . . . . . . . . . . . . . . . . . . . . . . . . 16
2.4 Packages . . . . . . . . . . . . . . . . . . . . . . . . . . . . . . . . . . . . . . 17
Listing and locating packages . . . . . . . . . . . . . . . . . 17
Inspecting a package . . . . . . . . . . . . . . . . . . . . . . 18
2.5 The master . . . . . . . . . . . . . . . . . . . . . . . . . . . . . . . . . . . . . 20
2.6 Nodes . . . . . . . . . . . . . . . . . . . . . . . . . . . . . . . . . . . . . . . . 21
Starting nodes . . . . . . . . . . . . . . . . . . . . . . . . . . 21
Listing nodes . . . . . . . . . . . . . . . . . . . . . . . . . . . 22
Inspecting a node . . . . . . . . . . . . . . . . . . . . . . . . 23
Killing a node . . . . . . . . . . . . . . . . . . . . . . . . . . . 23
2.7 Topics and messages . . . . . . . . . . . . . . . . . . . . . . . . . . . . . . . 24
2.7.1 Viewing the graph . . . . . . . . . . . . . . . . . . . . . . . . . . . . 24
2.7.2 Messages and message types . . . . . . . . . . . . . . . . . . . . . . 27
Listing topics . . . . . . . . . . . . . . . . . . . . . . . . . . . 27
Echoing messages . . . . . . . . . . . . . . . . . . . . . . . . 28
Measuring publication rates . . . . . . . . . . . . . . . . . . 28
Inspecting a topic . . . . . . . . . . . . . . . . . . . . . . . . 28
Inspecting a message type . . . . . . . . . . . . . . . . . . . 30
Publishing messages from the command line . . . . . . . . 31
Understanding message type names . . . . . . . . . . . . . 33
2.8 A larger example . . . . . . . . . . . . . . . . . . . . . . . . . . . . . . . . . . 34
2.8.1 Communication via topics is many-to-many. . . . . . . . . . . . . 35
2.8.2 Nodes are loosely coupled. . . . . . . . . . . . . . . . . . . . . . . . 36
2.9 Checking for problems . . . . . . . . . . . . . . . . . . . . . . . . . . . . . . 37
2.10 Looking forward . . . . . . . . . . . . . . . . . . . . . . . . . . . . . . . . . . 37
3 Writing ROS programs 39
3.1 Creating a workspace and a package . . . . . . . . . . . . . . . . . . . . . . 39
vi
Contents
Creating a workspace . . . . . . . . . . . . . . . . . . . . . . 39
Creating a package . . . . . . . . . . . . . . . . . . . . . . . 40
Editing the manifest . . . . . . . . . . . . . . . . . . . . . . . 41
3.2 Hello, ROS! . . . . . . . . . . . . . . . . . . . . . . . . . . . . . . . . . . . . . 41
3.2.1 A simple program . . . . . . . . . . . . . . . . . . . . . . . . . . . . 41
3.2.2 Compiling the Hello program . . . . . . . . . . . . . . . . . . . . . 44
Declaring dependencies . . . . . . . . . . . . . . . . . . . . 44
Declaring an executable . . . . . . . . . . . . . . . . . . . . 45
Building the workspace . . . . . . . . . . . . . . . . . . . . . 45
Sourcing setup.bash . . . . . . . . . . . . . . . . . . . . . . 46
3.2.3 Executing the hello program . . . . . . . . . . . . . . . . . . . . . . 47
3.3 A publisher program . . . . . . . . . . . . . . . . . . . . . . . . . . . . . . . 47
3.3.1 Publishing messages . . . . . . . . . . . . . . . . . . . . . . . . . . . 49
Including the message type declaration . . . . . . . . . . . 49
Creating a publisher object . . . . . . . . . . . . . . . . . . 49
Creating and filling in the message object . . . . . . . . . . 51
Publishing the message . . . . . . . . . . . . . . . . . . . . . 51
Formatting the output . . . . . . . . . . . . . . . . . . . . . 52
3.3.2 The publishing loop . . . . . . . . . . . . . . . . . . . . . . . . . . . 52
Checking for node shutdown . . . . . . . . . . . . . . . . . 52
Controlling the publishing rate . . . . . . . . . . . . . . . . 53
3.3.3 Compiling pubvel . . . . . . . . . . . . . . . . . . . . . . . . . . . . 54
Declaring message type dependencies . . . . . . . . . . . . 54
3.3.4 Executing pubvel . . . . . . . . . . . . . . . . . . . . . . . . . . . . . 54
3.4 A subscriber program . . . . . . . . . . . . . . . . . . . . . . . . . . . . . . . 55
Writing a callback function . . . . . . . . . . . . . . . . . . . 55
Creating a subscriber object . . . . . . . . . . . . . . . . . . 57
Giving ROS control . . . . . . . . . . . . . . . . . . . . . . . 59
3.4.1 Compiling and executing subpose . . . . . . . . . . . . . . . . . . . 60
3.5 Looking forward . . . . . . . . . . . . . . . . . . . . . . . . . . . . . . . . . . 60
4 Log messages 61
4.1 Severity levels . . . . . . . . . . . . . . . . . . . . . . . . . . . . . . . . . . . 61
4.2 An example program . . . . . . . . . . . . . . . . . . . . . . . . . . . . . . . 62
4.3 Generating log messages . . . . . . . . . . . . . . . . . . . . . . . . . . . . . 62
Generating simple log messages . . . . . . . . . . . . . . . 62
Generating one-time log messages . . . . . . . . . . . . . . 65
Generating throttled log messages . . . . . . . . . . . . . . 65
vii
CONTENTS
4.4 Viewing log messages . . . . . . . . . . . . . . . . . . . . . . . . . . . . . . . 67
4.4.1 Console . . . . . . . . . . . . . . . . . . . . . . . . . . . . . . . . . . 68
Formatting console messages . . . . . . . . . . . . . . . . . 68
4.4.2 Messages on rosout . . . . . . . . . . . . . . . . . . . . . . . . . . . 69
4.4.3 Log files . . . . . . . . . . . . . . . . . . . . . . . . . . . . . . . . . . 72
Finding the run id . . . . . . . . . . . . . . . . . . . . . . . . 72
Checking and purging log files . . . . . . . . . . . . . . . . . 72
4.5 Enabling and disabling log messages . . . . . . . . . . . . . . . . . . . . . . 73
Setting the logger level from the command line . . . . . . 74
Setting the logger level from a GUI . . . . . . . . . . . . . . 75
Setting the logger level from C++ code . . . . . . . . . . . . 75
4.6 Looking forward . . . . . . . . . . . . . . . . . . . . . . . . . . . . . . . . . . 76
5 Graph resource names 77
5.1 Global names . . . . . . . . . . . . . . . . . . . . . . . . . . . . . . . . . . . . 77
5.2 Relative names . . . . . . . . . . . . . . . . . . . . . . . . . . . . . . . . . . . 78
Resolving relative names . . . . . . . . . . . . . . . . . . . . 79
Setting the default namespace . . . . . . . . . . . . . . . . . 79
Understanding the purpose of relative names . . . . . . . 80
5.3 Private names . . . . . . . . . . . . . . . . . . . . . . . . . . . . . . . . . . . 80
5.4 Anonymous names . . . . . . . . . . . . . . . . . . . . . . . . . . . . . . . . 81
5.5 Looking forward . . . . . . . . . . . . . . . . . . . . . . . . . . . . . . . . . . 82
6 Launch files 83
6.1 Using launch files . . . . . . . . . . . . . . . . . . . . . . . . . . . . . . . . . 83
Executing launch files . . . . . . . . . . . . . . . . . . . . . . 83
Requesting verbosity . . . . . . . . . . . . . . . . . . . . . . 85
Ending a launched session . . . . . . . . . . . . . . . . . . . 85
6.2 Creating launch files . . . . . . . . . . . . . . . . . . . . . . . . . . . . . . . 86
6.2.1 Where to place launch files . . . . . . . . . . . . . . . . . . . . . . . 86
6.2.2 Basic ingredients . . . . . . . . . . . . . . . . . . . . . . . . . . . . . 86
Inserting the root element . . . . . . . . . . . . . . . . . . . 86
Launching nodes . . . . . . . . . . . . . . . . . . . . . . . . 87
Finding node log files . . . . . . . . . . . . . . . . . . . . . . 88
Directing output to the console . . . . . . . . . . . . . . . . 88
Requesting respawning . . . . . . . . . . . . . . . . . . . . . 89
Requiring nodes . . . . . . . . . . . . . . . . . . . . . . . . . 89
Launching nodes in their own windows . . . . . . . . . . . 90
viii
Contents
6.3 Launching nodes inside a namespace . . . . . . . . . . . . . . . . . . . . . 91
6.4 Remapping names . . . . . . . . . . . . . . . . . . . . . . . . . . . . . . . . . 93
6.4.1 Creating remappings . . . . . . . . . . . . . . . . . . . . . . . . . . 93
6.4.2 Reversing a turtle . . . . . . . . . . . . . . . . . . . . . . . . . . . . . 95
6.5 Other launch file elements . . . . . . . . . . . . . . . . . . . . . . . . . . . . 97
6.5.1 Including other files . . . . . . . . . . . . . . . . . . . . . . . . . . . 97
6.5.2 Launch arguments . . . . . . . . . . . . . . . . . . . . . . . . . . . . 99
Declaring arguments . . . . . . . . . . . . . . . . . . . . . . 100
Assigning argument values . . . . . . . . . . . . . . . . . . . 101
Accessing argument values . . . . . . . . . . . . . . . . . . . 101
Sending argument values to included launch files . . . . . 101
6.5.3 Creating groups . . . . . . . . . . . . . . . . . . . . . . . . . . . . . . 102
6.6 Looking forward . . . . . . . . . . . . . . . . . . . . . . . . . . . . . . . . . . 104
7 Parameters 105
7.1 Accessing parameters from the command line . . . . . . . . . . . . . . . . 105
Listing parameters . . . . . . . . . . . . . . . . . . . . . . . . 105
Querying parameters . . . . . . . . . . . . . . . . . . . . . . 106
Setting parameters . . . . . . . . . . . . . . . . . . . . . . . 107
Creating and loading parameter files . . . . . . . . . . . . . 107
7.2 Example: Parameters in turtlesim . . . . . . . . . . . . . . . . . . . . . . . . 108
Reading the background color . . . . . . . . . . . . . . . . . 109
Setting the background color . . . . . . . . . . . . . . . . . 109
7.3 Accessing parameters from C++ . . . . . . . . . . . . . . . . . . . . . . . . . 110
7.4 Setting parameters in launch files . . . . . . . . . . . . . . . . . . . . . . . . 113
Setting parameters . . . . . . . . . . . . . . . . . . . . . . . 113
Setting private parameters . . . . . . . . . . . . . . . . . . . 113
Reading parameters from a file . . . . . . . . . . . . . . . . 114
7.5 Looking forward . . . . . . . . . . . . . . . . . . . . . . . . . . . . . . . . . . 115
8 Services 117
8.1 Terminology for services . . . . . . . . . . . . . . . . . . . . . . . . . . . . . 117
8.2 Finding and calling services from the command line . . . . . . . . . . . . 118
Listing all services . . . . . . . . . . . . . . . . . . . . . . . . 118
Listing services by node . . . . . . . . . . . . . . . . . . . . 119
Finding the node offering a service . . . . . . . . . . . . . . 120
Finding the data type of a service . . . . . . . . . . . . . . . 120
Inspecting service data types . . . . . . . . . . . . . . . . . 121
ix

CONTENTS
Calling services from the command line . . . . . . . . . . . 122
8.3 A client program . . . . . . . . . . . . . . . . . . . . . . . . . . . . . . . . . . 123
Declaring the request and response types . . . . . . . . . . 123
Creating a client object . . . . . . . . . . . . . . . . . . . . . 123
Creating request and response objects . . . . . . . . . . . . 125
Calling the service . . . . . . . . . . . . . . . . . . . . . . . . 125
Declaring a dependency . . . . . . . . . . . . . . . . . . . . 127
8.4 A server program . . . . . . . . . . . . . . . . . . . . . . . . . . . . . . . . . . 127
Writing a service callback . . . . . . . . . . . . . . . . . . . 127
Creating a server object . . . . . . . . . . . . . . . . . . . . . 129
Giving ROS control . . . . . . . . . . . . . . . . . . . . . . . 130
8.4.1 Running and improving the server program . . . . . . . . . . . . . 130
8.5 Looking ahead . . . . . . . . . . . . . . . . . . . . . . . . . . . . . . . . . . . 131
9 Recording and replaying messages 133
9.1 Recording and replaying bag files . . . . . . . . . . . . . . . . . . . . . . . . 133
Recording bag files . . . . . . . . . . . . . . . . . . . . . . . 133
Replaying bag files . . . . . . . . . . . . . . . . . . . . . . . . 134
Inspecting bag files . . . . . . . . . . . . . . . . . . . . . . . 134
9.2 Example: A bag of squares . . . . . . . . . . . . . . . . . . . . . . . . . . . . 135
Drawing squares . . . . . . . . . . . . . . . . . . . . . . . . . 135
Recording a bag of squares . . . . . . . . . . . . . . . . . . . 135
Replaying the bag of squares . . . . . . . . . . . . . . . . . . 136
9.3 Bags in launch files . . . . . . . . . . . . . . . . . . . . . . . . . . . . . . . . 139
9.4 Looking forward . . . . . . . . . . . . . . . . . . . . . . . . . . . . . . . . . . 140
10 Conclusion 141
10.1 What next? . . . . . . . . . . . . . . . . . . . . . . . . . . . . . . . . . . . . . 141
Running ROS over a network . . . . . . . . . . . . . . . . . 141
Writing cleaner programs . . . . . . . . . . . . . . . . . . . 142
Visualizing data with rviz . . . . . . . . . . . . . . . . . . . 142
Creating message and service types . . . . . . . . . . . . . 142
Managing coordinate frames with tf . . . . . . . . . . . . . 142
Simulating with Gazebo . . . . . . . . . . . . . . . . . . . . 143
10.2 Looking forward . . . . . . . . . . . . . . . . . . . . . . . . . . . . . . . . . . 143
Index 145
x

Chapter 1
IntroductionIn which we introduce ROS, describe how it can be useful, and preview the re-
mainder of the book.
1.1 Why ROS?
The robotics community has made impressive progress in recent years. Reliable and in-
expensive robot hardware—from land-based mobile robots, to quadrotor helicopters, to
humanoids—is more widely available than ever before. Perhaps even more impressively,
the community has also developed algorithms that help those robots run with increasing
levels of autonomy.
In spite of (or, some might argue, because of) this rapid progress, robots do still present
some significant challenges for software developers. This book introduces a software plat-
form called Robot Operating System, or ROS,1 that is intended to ease some of these dif-
ficulties. The official description of ROS is:
ROS is an open-source, meta-operating system for your robot. It provides the
services you would expect from an operating system, including hardware ab-
straction, low-level device control, implementation of commonly-used func-
tionality, message-passing between processes, and package management. It
also provides tools and libraries for obtaining, building, writing, and running
code across multiple computers.Í1
1When spoken aloud, the name “ROS” is nearly always pronounced as a single word that rhymes with
“moss,” and almost never spelled out “arrr-oh-ess.”
Í1http://wiki.ros.org/ROS/Introduction
1

1. INTRODUCTION
This description is accurate—and it correctly emphasizes that ROS does not replace, but
instead works alongside a traditional operating system—but it may leave you wondering
what the real advantages are for software that uses ROS. After all, learning to use a new
framework, particularly one as complex and diverse as ROS, can take quite a lot of time
and mental energy, so one should be certain that the investment will be worthwhile. Here
are a few specific issues in the development of software for robots that ROS can help to
resolve.
Distributed computation Many modern robot systems rely on software that spans many
different processes and runs across several different computers. For example:
R Some robots carry multiple computers, each of which controls a subset of the robot’s
sensors or actuators.
R Even within a single computer, it’s often a good idea to divide the robot’s software
into small, stand-alone parts that cooperate to achieve the overall goal. This ap-
proach is sometimes called “complexity via composition.”
R When multiple robots attempt to cooperate on a shared task, they often need to
communicate with one another to coordinate their efforts.
R Human users often send commands to a robot from a laptop, a desktop computer,
or mobile device. We can think of this human interface as an extension of the robot’s
software.
The common thread through all of these cases is a need for communication between mul-
tiple processes that may or may not live on the same computer. ROS provides two relatively
simple, seamless mechanisms for this kind of communication. We’ll discuss the details in
Chapters 3 and 8.
Software reuse The rapid progress of robotics research has resulted in a growing collec-
tion of good algorithms for common tasks such as navigation, motion planning, mapping,
and many others. Of course, the existence of these algorithms is only truly useful if there is
a way to apply them in new contexts, without the need to reimplement each algorithm for
each new system. ROS can help to prevent this kind of pain in at least two important ways.
R ROS’s standard packages provide stable, debugged implementations of many impor-
tant robotics algorithms.
2

1.1. Why ROS?
R ROS’s message passing interface is becoming a de facto standard for robot software
interoperability, which means that ROS interfaces to both the latest hardware and to
implementations of cutting edge algorithms are quite often available. For example,
the ROS website lists hundreds of publicly-available ROS packages.Í2 This sort of
uniform interface greatly reduces the need to write “glue” code to connect existing
parts.
As a result, developers that use ROS can expect—after, of course, climbing ROS’s initial
learning curve—to focus more time on experimenting with new ideas, and less time rein-
venting wheels.
Rapid testing One of the reasons that software development for robots is often more
challenging than other kinds of development is that testing can be time consuming and
error-prone. Physical robots may not always be available to work with, and when they
are, the process is sometimes slow and finicky. Working with ROS provides two effective
workarounds to this problem.
R Well-designed ROS systems separate the low-level direct control of the hardware and
high-level processing and decision making into separate programs. Because of this
separation, we can temporarily replace those low-level programs (and their corre-
sponding hardware) with a simulator, to test the behavior of the high-level part of
the system.
R ROS also provides a simple way to record and play back sensor data and other kinds
of messages. This facility means that we can obtain more leverage from the time
we do spend operating a physical robot. By recording the robot’s sensor data, we
can replay it many times to test different ways of processing that same data. In ROS
parlance, these recordings are called “bags” and a tool called rosbag is used to record
and replay them. See Chapter 9.
A crucial point for both of these features is that the change is seamless. Because the real
robot, the simulator, and the bag playback mechanism can all provide identical (or at least
very similar) interfaces, your software does not need to be modified to operate in these
distinct scenarios, and indeed need not even “know” whether it is talking to a real robot or
to something else.
Of course, ROS is not the only platform that offers these capabilities. What is unique
about ROS, at least in the author’s judgment, is the level of widespread support for ROS
Í2http://www.ros.org/browse
3

1. INTRODUCTION
across the robotics community. This “critical mass” of support makes it reasonable to pre-
dict that ROS will continue to evolve, expand, and improve in the future.
ROS is not . . . Finally, let’s take a moment to review a few things that are not true about
ROS.
R ROS is not a programming language. In fact, ROS programs are routinely written
in C++,Í3 and this book has some explicit instructions on how to do that. Client
libraries are also available for Python,Í4 Java,Í5 Lisp,Í6 and a handful of other lan-
guages.Í7
R ROS is not (only) a library. Although ROS does include client libraries, it also includes
(among other things), a central server, a set of command-line tools, a set of graphical
tools, and a build system.
R ROS is not an integrated development environment. Although ROS does not pre-
scribe any particular development environment, it can be used with most popular
IDEs.Í8 It is also quite reasonable (and, indeed, it is the author’s personal prefer-
ence) to use ROS from a text editor and the command line, without any IDE.
1.2 What to expect
The goal of this book is to provide an integrated overview of the concepts and techniques
you’ll need to know to write ROS software. This goal places a few important constraints on
the content of the book.
R This is not an introduction to programming. We won’t discuss basic programming
concepts in any great detail. This book assumes that you’ve studied C++ in sufficient
depth to read, write, and understand code in that language.
Í3http://wiki.ros.org/roscpp
Í4http://wiki.ros.org/rospy
Í5http://wiki.ros.org/rosjava
Í6http://wiki.ros.org/roslisp
Í7http://wiki.ros.org/ClientLibraries
Í8http://wiki.ros.org/IDEs
4

1.2. What to expect
R This is not a reference manual. There is plenty of detailed information about ROS,
including both tutorialsÍ9 and exhaustive reference material,Í10 available online.
This book makes no attempt to replace those resources. Instead, we present a se-
lected subset of ROS features that, in the author’s view, represents a useful starting
point for using ROS.
R This is not a textbook on robotics algorithms. The study of robots, especially the study
of algorithms for controlling autonomous robots, can be quite fascinating. A dizzy-
ing variety of algorithms have been developed for various parts of this problem. This
book will not teach you any of those algorithms.2 Our focus is on a specific tool,
namely ROS, that can ease the implementation and testing of those algorithms.
Chapters and dependencies Figure 1.1 shows the organization of the book. Chapters
are shown as rectangles; arrows show the major dependencies between them. It should be
fairly reasonable to read this book in any order that follows those constraints.
Intended audience This book should be useful for both students in robotics courses and
for researchers or hobbyists that want to get a quick start with ROS. We’ll assume that read-
ers are comfortable with Linux (including tasks like using the command line, installing
software, editing files, and setting environment variables), are familiar with C++, and want
to write software to control robots. Generally, we’ll assume that you are using Ubuntu
Linux 14.04 (the newest version that is, at this writing, officially supported) and the bash
shell. However, there are relatively few instances where these choices matter; other Linux
distributions (especially those based on deb packages) and other shells will not usually be
problematic.
2. . . but you should learn them anyway.
Í9http://wiki.ros.org/ROS/Tutorials
Í10http://wiki.ros.org/APIs
5

1. INTRODUCTION
1. Introduction
2. Basics
3. Publish/Subscribe
9. Bags4. Logging 5. Names
10. Conclusion
6. Launch 7. Parameters 8. Services
Figure 1.1: Dependencies between chapters.
6
1.3. Conventions
1.3 Conventions
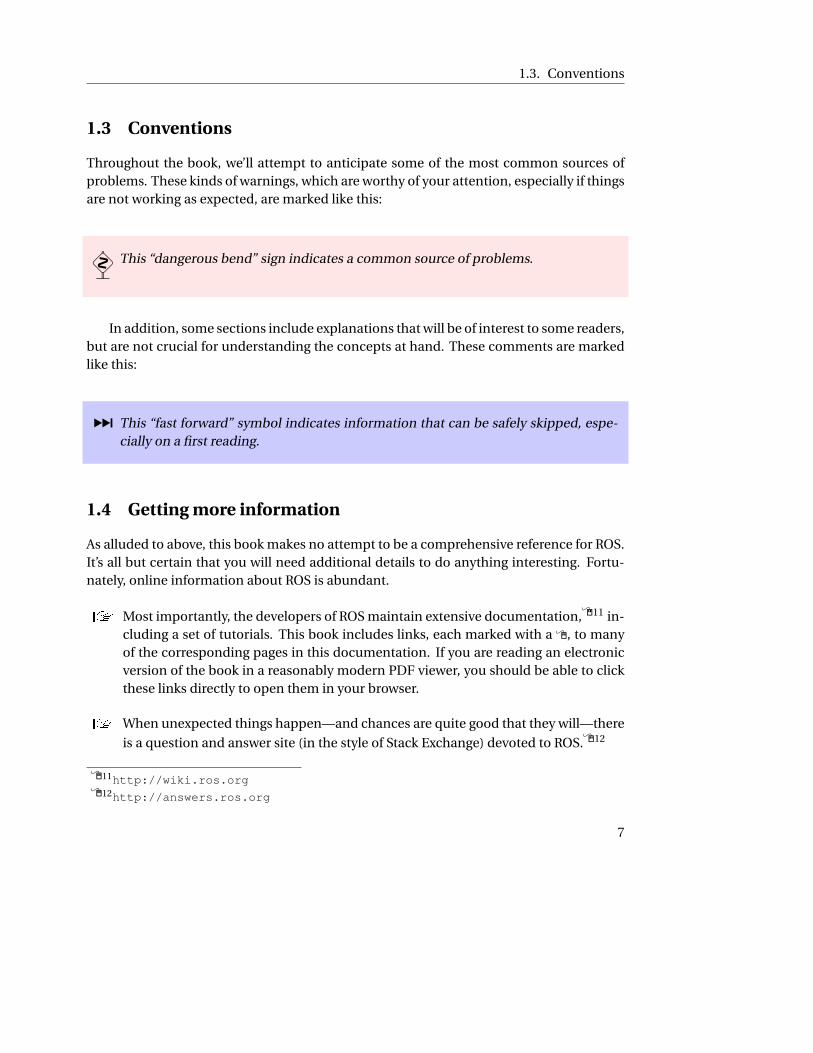
Throughout the book, we’ll attempt to anticipate some of the most common sources of
problems. These kinds of warnings, which are worthy of your attention, especially if things
are not working as expected, are marked like this:
� This “dangerous bend” sign indicates a common source of problems.
In addition, some sections include explanations that will be of interest to some readers,
but are not crucial for understanding the concepts at hand. These comments are marked
like this:
¹ This “fast forward” symbol indicates information that can be safely skipped, espe-
cially on a first reading.
1.4 Getting more information
As alluded to above, this book makes no attempt to be a comprehensive reference for ROS.
It’s all but certain that you will need additional details to do anything interesting. Fortu-
nately, online information about ROS is abundant.
R Most importantly, the developers of ROS maintain extensive documentation,Í11 in-
cluding a set of tutorials. This book includes links, each marked with a Í, to many
of the corresponding pages in this documentation. If you are reading an electronic
version of the book in a reasonably modern PDF viewer, you should be able to click
these links directly to open them in your browser.
R When unexpected things happen—and chances are quite good that they will—there
is a question and answer site (in the style of Stack Exchange) devoted to ROS.Í12
Í11http://wiki.ros.org
Í12http://answers.ros.org
7

1. INTRODUCTION
R It may also be valuable to subscribe to the ros-users mailing list,Í13 on which an-
nouncements sometimes appear.
Here are two important details that will help you make sense of some of the documenta-
tion, but are not always fully explained in context there.
Distributions Major versions of ROS are called distributions, and are named using ad-
jectives that start with with successive letters of the alphabet.Í14 (This is, for compari-
son, very similar to the naming schemes used for other large software projects, including
Ubuntu and Android.) At the time of this writing, the current distribution is indigo. The
next distribution, named jade, is due in May 2015.Í15 Older distributions include hy-
dro, groovy, fuerte, electric, diamondback, C Turtle, and box turtle. These distribution
names appear in many places throughout the documentation.
� To keep things as simple and up-to-date as possible, this book assumes that you are
using indigo.
¹ If, for some reason, you need to use hydro instead of indigo, nearly all of the book’s
content still applies without modification.
The same is true for groovy as well, with one important exception: In distributions
newer than groovy (and, therefore, in this book), velocity commands for the turtle-
sim simulator have been changed to use a standard message type and topic name
that happen to be shared with many real mobile robots.
Distribution Topic name Message type
groovy /turtle1/command_velocity turtlesim/Velocity
indigo, hydro /turtle1/cmd_vel geometry_msgs/Twist
This change has a few practical implications:
R When adding dependencies to your package (see page 44), you’ll need a de-
pendency on turtlesim, instead of on geometry_msgs.
Í13http://lists.ros.org/mailman/listinfo/ros-users
Í14http://wiki.ros.org/Distributions
Í15http://wiki.ros.org/jade
8

1.5. Looking forward
R The relevant header file (see page 49) is
turtlesim/Velocity.h
rather than
geometry_msgs/Twist.h
R The turtlesim/Velocity message type has only two fields, called linear and
angular. These fields play the same roles as the linear.x and angular.z fields
of geometry_msgs/Twist. This change applies both on the command line
(see page 31) and in C++ code (see page 51).
Build systems Starting with the groovy distribution, ROS made some major changes to
the way software is compiled. Older, pre-groovy distributions used a build system called
rosbuild, but more recent versions have begun to replace rosbuild with a new build sys-
tem called catkin. It is important to know about this change because a few of the tutorials
have separate versions, depending on whether you’re using rosbuild or catkin. These sep-
arate versions are selected using a pair of buttons near the top of the tutorial. This book
describes catkin, but there may be some cases in which rosbuild is a better choice.Í16
1.5 Looking forward
In the next chapter, we’ll get started working with ROS, learning some basic concepts and
tools.
Í16http://wiki.ros.org/catkin_or_rosbuild
9


Chapter 2
Getting startedIn which we install ROS, introduce some basic ROS concepts, and interact with
a working ROS system.
Before jumping into the details of how to write software that uses ROS, it will be valuable
to get ROS up and running and to understand a few of the basic ideas that ROS uses. This
chapter lays that groundwork. After a quick discussion of how to install ROS and configure
your user account to use it, we’ll have a look at a working ROS system (specifically, an
instance of the turtlesim simulator) and learn how to interact with that system using some
command line tools.
2.1 Installing ROS
Before you can do anything with ROS, naturally you must ensure that it is installed on
your computer. (If you are working with a computer on which someone else has already
installed ROS—including the ros-indigo-turtlesim package—you can skip directly to Sec-
tion 2.2.) The installation process is well documented and mostly straightforward.Í1Í2
Here’s a summary of the necessary steps.
Adding the ROS repository As root, create a file called
/etc/apt/sources.list.d/ros-latest.list
Í1http://wiki.ros.org/ROS/Installation
Í2http://wiki.ros.org/indigo/Installation/Ubuntu
11
2. GETTING STARTED
containing a single line:
deb http://packages.ros.org/ros/ubuntu trusty main
� This line is specific to Ubuntu 14.04, whose codename is trusty. If you are using
Ubuntu 13.10 instead, you can substitute saucy for trusty.
¹ Other versions of Ubuntu—both older and and newer—are not supported by
the pre-compiled packages for the indigo distribution of ROS. However, for
Ubuntu versions newer than 14.04, installing ROS from its sourceÍ3 may be
a reasonable option.
If you are unsure of which Ubuntu version you’re using, you can find out using this
command:
lsb_release -a
The output should show both a codename and a release number.
Installing the package authentication key Before installing the ROS packages, you must
acquire their package authentication key. First, download the key:
wget https://raw.githubusercontent.com/ros/rosdistro/master/ros.key
If this works correctly, you’ll have a small binary file called ros.key. Next, you should con-
figure the apt package management system to use this key:
sudo apt-key add ros.key
After completing this step (apt-key should say “OK”), you can safely delete ros.key.
Downloading the package lists Once the repositories are configured, you can get the
latest lists of available packages in the usual way:
Í3http://wiki.ros.org/indigo/Installation/Source
12
2.1. Installing ROS
sudo apt-get update
Note that this will update all of the repositories configured on your system, not just the
newly added ROS repositories.
Installing the ROS packages Now we can actually install the ROS software. The simplest
approach is to perform a complete install of the core ROS system:
sudo apt-get install ros-indigo-desktop-full
If you have plenty of free disk space—a few GB should suffice—this package is almost cer-
tainly the best choice. If you need them, there are also some more compact alternatives, in-
cluding ros-indigo-desktop and ros-indigo-ros-base, that omit some packages and tools
in favor of reduced disk space requirements.
Installing turtlesim In this book we’ll refer many times to a simple “simulator” called
turtlesim to illustrate how things work. If you plan to follow along with any of the ex-
amples—Recommended answer: Yes—you’ll need to install turtlesim. Use a command
like this:
sudo apt-get install ros-indigo-turtlesim
Setting up rosdep systemwide After installing the ROS packages, you’ll need to execute
this command:
sudo rosdep init
This is a one-time initialization step; once ROS is working correctly, many users will not
need to revisit rosdep.
¹ As its name suggests, the purpose of this command is to initialize rosdep, which
is a tool for checking and installing package dependencies in an OS-independent
way.Í4 On Ubuntu, for example, rosdep acts as a front end to apt-get. We won’t
use rosdep directly, but we will use a few tools that invoke it behind the scenes.
Those tools will be very unhappy if rosdep is not set up correctly.
Í4http://wiki.ros.org/rosdep
13
2. GETTING STARTED
� The online documentation occasionally mentions a tool called rosinstall, whose
job is to install ROS software from source.Í5 Í6 The software that we’ll need in this
book is all available in Ubuntu deb packages, which do not require rosinstall.
2.2 Configuring your account
Whether you install ROS yourself or use a computer on which ROS is already installed,
there are two important configuration steps that must be done within the account of every
user that wants to use ROS.
Setting up rosdep in a user account First, you must initialize the rosdep system in your
account, using this command:
rosdep update
This command stores some files in your home directory, in a subdirectory called .ros. It
generally only needs to be done once.
� Note that, unlike rosdep init above, the rosdep update command should be run
using your normal user account, not using sudo.
Setting environment variables ROS relies on a few environment variables to locate the
files it needs. To set these environment variables, you’ll need to execute the setup.bash
script that ROS provides, using this command:Í7
source /opt/ros/indigo/setup.bash
You can then confirm that the environment variables are set correctly using a command
like this:
export | grep ROS
Í5http://wiki.ros.org/rosinstall
Í6http://www.ros.org/doc/independent/api/rosinstall/html/
Í7http://wiki.ros.org/rosbash
14
2.3. A minimal example using turtlesim
If everything has worked correctly, you should see a handful of values (showing values for
environment variables like ROS_DISTRO and ROS_PACKAGE_PATH) as the out-
put from this command. If setup.bash has not been run, then the output of this command
will usually be empty.
� If you get “command not found” errors from the ROS commands introduced later
in this chapter, the most likely reason is that setup.bash has not been run in your
current shell.
Note, however, that the steps listed above apply only to the current shell. It would
work perfectly well to simply execute that source command each time you start a new
shell in which you’d like to execute ROS commands. However, this is both annoying and
remarkably easy to forget, especially when you consider that the modular design of many
ROS systems often calls for several different commands to execute concurrently, each in a
separate terminal.
Thus, you’ll want to configure your account to run the setup.bash script automatically,
each time you start a new shell. To do this, edit the file named .bashrc in your home
directory, and put the above source command at the bottom.
¹ In addition to setting environment variables, this setup.bash script also defines
bash functions to implement a few commands, including roscd and rosls, which
are introduced below. These functions are defined in the rosbash package.Í8
2.3 A minimal example using turtlesim
Before we begin to examine the details of how ROS works, let’s start with an example. This
quick exercise will serve a few different purposes: It will help you confirm that ROS is in-
stalled correctly, it will introduce the turtlesim simulatorÍ9 that is used in many online
tutorials and throughout this book, and it will provide a working (albeit quite simple) sys-
tem that we’ll refer back to in the rest of this chapter.
Í8http://wiki.ros.org/rosbash
Í9http://wiki.ros.org/turtlesim
15
2. GETTING STARTED
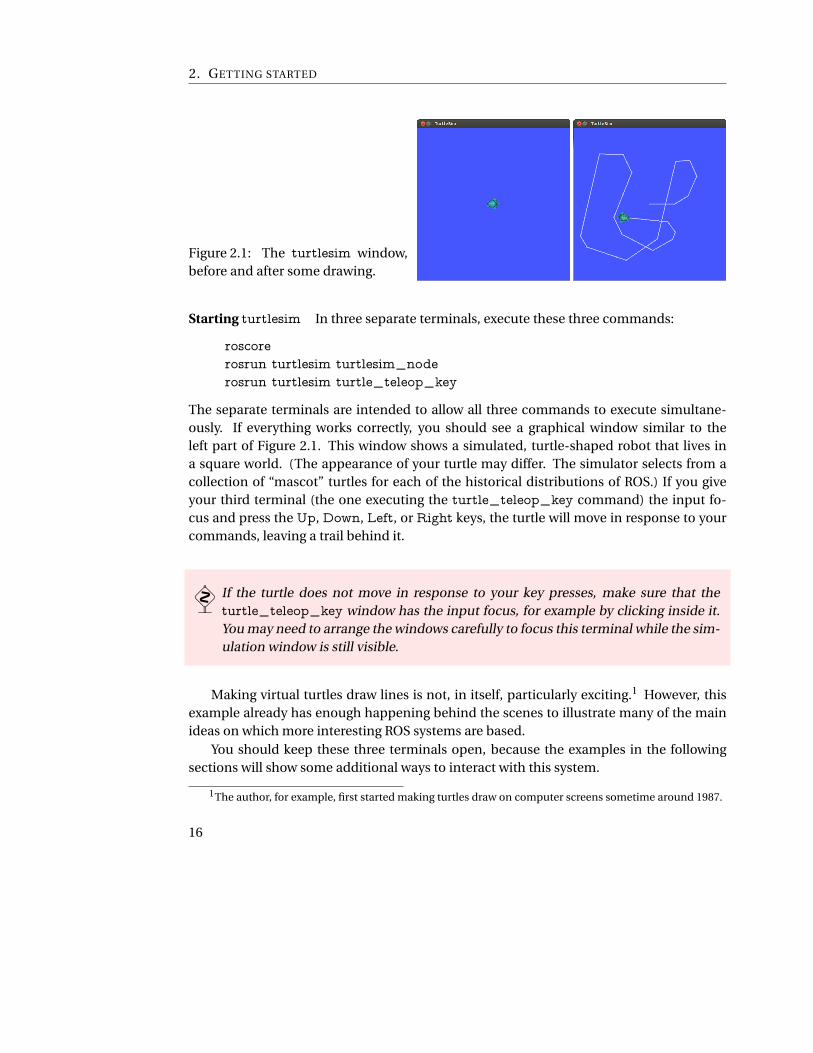
Figure 2.1: The turtlesim window,
before and after some drawing.
Starting turtlesim In three separate terminals, execute these three commands:
roscore
rosrun turtlesim turtlesim_node
rosrun turtlesim turtle_teleop_key
The separate terminals are intended to allow all three commands to execute simultane-
ously. If everything works correctly, you should see a graphical window similar to the
left part of Figure 2.1. This window shows a simulated, turtle-shaped robot that lives in
a square world. (The appearance of your turtle may differ. The simulator selects from a
collection of “mascot” turtles for each of the historical distributions of ROS.) If you give
your third terminal (the one executing the turtle_teleop_key command) the input fo-
cus and press the Up, Down, Left, or Right keys, the turtle will move in response to your
commands, leaving a trail behind it.
� If the turtle does not move in response to your key presses, make sure that the
turtle_teleop_key window has the input focus, for example by clicking inside it.
You may need to arrange the windows carefully to focus this terminal while the sim-
ulation window is still visible.
Making virtual turtles draw lines is not, in itself, particularly exciting.1 However, this
example already has enough happening behind the scenes to illustrate many of the main
ideas on which more interesting ROS systems are based.
You should keep these three terminals open, because the examples in the following
sections will show some additional ways to interact with this system.
1The author, for example, first started making turtles draw on computer screens sometime around 1987.
16
2.4. Packages
2.4 Packages
All ROS software is organized into packages. A ROS package is a coherent collection of files,
generally including both executables and supporting files, that serves a specific purpose.
In the example, we used two executables called turtlesim_node and turtle_teleop_key,
both of which are members of the turtlesim package.
� Be careful of the difference between ROS packages and the packages used by your
operating system’s package manager, such as the deb packages used by Ubuntu.
The concepts are similar, and installing a deb package may add one or more ROS
packages to your installation, but the two are not equivalent.
It is not an overstatement to say that all ROS software is part of one package or another.
Importantly, this includes new programs that you create. We’ll see how to create new pack-
ages in Section 3.1. In the meantime, ROS provides several commands for interacting with
installed packages.
Listing and locating packages You can obtain a list of all of the installed ROS packages
using this command:Í10Í11
rospack list
On the author’s system, this produces a list of 188 packages.
Each package is defined by a manifest, which is a file called package.xml. This file
defines some details about the package, including its name, version, maintainer, and de-
pendencies. The directory containing package.xml is called the package directory. (In
fact, this is the definition of a ROS package: Any directory that ROS can find that contains
a file named package.xml is a package directory.) This directory stores most of the pack-
age’s files.
¹ An important exception is that, for most packages—specifically, those that have
been updated to use the new catkin build system—compiled executables are not
stored in the package directory, but in a separate standardized directory hierarchy.
Í10http://wiki.ros.org/ROS/Tutorials/NavigatingTheFilesystem
Í11http://wiki.ros.org/rospack
17

2. GETTING STARTED
For packages installed by apt-get, this hierarchy is rooted at /opt/ros/indigo. Ex-
ecutables are stored in the lib subdirectory under this root. Similarly, automatically
generated include files are stored inside the include subdirectory under this root.
When it needs them, ROS finds these files by searching in the directories listed in the
CMAKE_PREFIX_PATH environment variable, which is set automatically by
setup.bash. This sort of out-of-source compilation is one of the primary changes
introduced by catkin in the groovy distribution of ROS, compared to fuerte and
older distributions. Generally, though, all of this happens behind the scenes, and
we can rely on ROS to find the files it needs.
To find the directory of a single package, use the rospack find command:
rospack find package-name
Of course, there may be times when you don’t know (or can’t remember) the complete
name of the package that you’re interested in. In these cases, it’s quite convenient that
rospack supports tab completion for package names. For example, you could type
rospack find turtle
and, before pressing Enter, press the Tab key twice to see a list of all of the installed ROS
packages whose names start with turtle.
In fact, most ROS commands support this kind of tab completion, not just for pack-
age names, but in nearly every place in which it makes sense. In the command above,
you could also use Tabs to complete both the command name rospack and the “sub-
command” find.
� Frequent use of tab completion can go a long way toward reducing the number of
things you’ll need to remember, including the full names of packages, nodes, top-
ics, message types, and services. Computers are quite good at storing and recalling
these kinds of things. Unsolicited advice: Let your computer do that job for you.
Inspecting a package To view the files in a package directory, use a command like this:
rosls package-name
If you’d like to “go to” a package directory, you can change the current directory to a par-
ticular package, using a command like this:
18
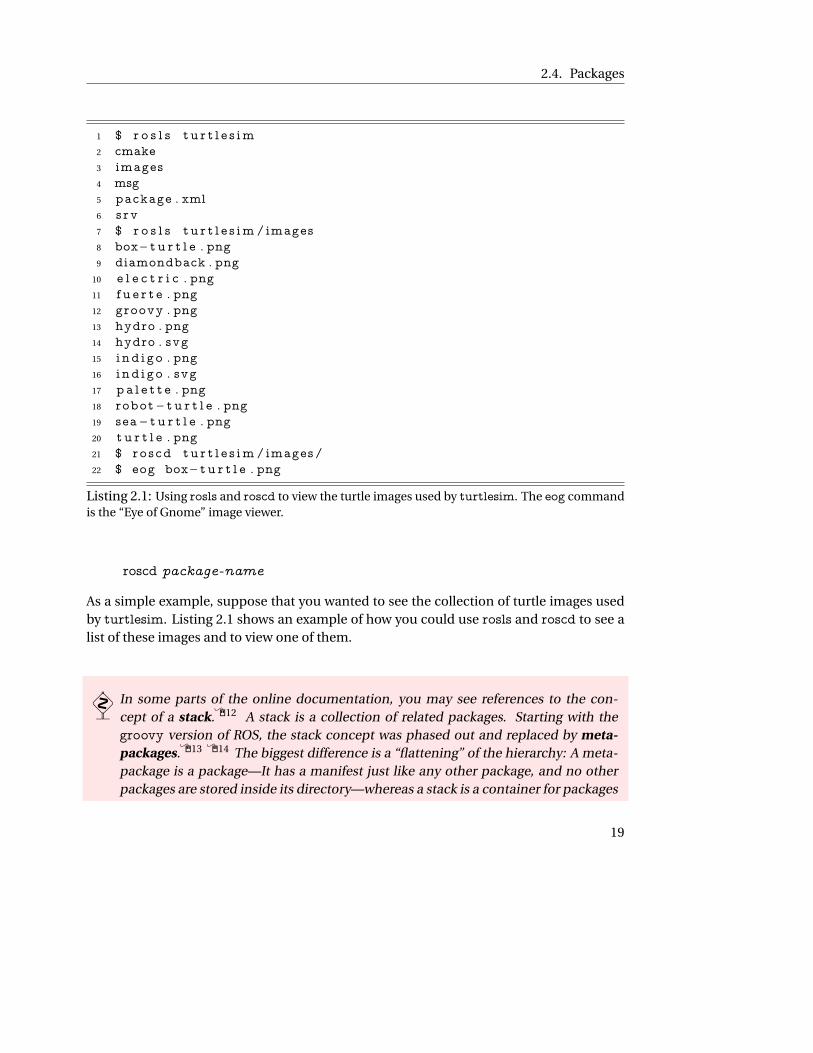
2.4. Packages
1 $ r o s l s t u r t l e s im
2 cmake
3 images
4 msg
5 package . xml
6 s rv
7 $ r o s l s t u r t l e s im / images
8 box− t u r t l e . png
9 diamondback . png
10 e l e c t r i c . png
11 f u e r t e . png
12 groovy . png
13 hydro . png
14 hydro . svg
15 i nd i go . png
16 i nd i go . svg
17 pa l e t t e . png
18 robot− t u r t l e . png
19 sea− t u r t l e . png
20 t u r t l e . png
21 $ roscd tu r t l e s im / images /
22 $ eog box− t u r t l e . png
Listing 2.1: Using rosls and roscd to view the turtle images used by turtlesim. The eog command
is the “Eye of Gnome” image viewer.
roscd package-name
As a simple example, suppose that you wanted to see the collection of turtle images used
by turtlesim. Listing 2.1 shows an example of how you could use rosls and roscd to see a
list of these images and to view one of them.
� In some parts of the online documentation, you may see references to the con-
cept of a stack.Í12 A stack is a collection of related packages. Starting with the
groovy version of ROS, the stack concept was phased out and replaced by meta-
packages.Í13 Í14 The biggest difference is a “flattening” of the hierarchy: A meta-
package is a package—It has a manifest just like any other package, and no other
packages are stored inside its directory—whereas a stack is a container for packages
19
2. GETTING STARTED
stored as subdirectories. There’s rarely a reason for new users to interact directly
with stacks.
2.5 The master
So far we’ve talked primarily about files, and how they are organized into packages. Let’s
shift gears and talk now about how to actually execute some ROS software.
One of the basic goals of ROS is to enable roboticists to design software as a collection
of small, mostly independent programs called nodes that all run at the same time. For this
to work, those nodes must be able to communicate with one another. The part of ROS
that facilitates this communication is called the ROS master. To start the master, use this
command:
roscore
We’ve already seen this in action in the turtlesim example. For once, there is no additional
complexity to worry about: roscore does not take any arguments, and does not need to be
configured.
You should allow the master to continue running for the entire time that you’re using
ROS. One reasonable workflow is to start roscore in one terminal, then open other termi-
nals for your “real” work. There are not many reasons to stop roscore, except when you’ve
finished working with ROS. When you reach that point, you can stop the master by typing
Ctrl-C in its terminal.
¹ Though not many, there are a few reasons that restarting roscore might be a good
idea. Examples: To switch to a new set of log files (See Chapter 4) or to clear the
parameter server (See Chapter 7).
Í12http://wiki.ros.org/rosbuild/Stacks
Í13http://wiki.ros.org/catkin/conceptual_overview
Í14http://wiki.ros.org/catkin/package.xml
20

2.6. Nodes
� Most ROS nodes connect to the master when they start up, and do not attempt to
reconnect if that connection fails later on. Therefore, if you stop roscore, any other
nodes running at the time will be unable to establish new connections, even if you
restart roscore later.
The roscore command shown here is used to explicitly start the ROS master. In Chap-
ter 6, we’ll learn about a tool called roslaunch whose purpose is to start many nodes at
once; this tool is smart enough to start a master if none is running, but will also happily
use an existing master if there is one.
2.6 Nodes
Once you’ve started roscore, you can run programs that use ROS. A running instance of a
ROS program is called a node.Í15
¹ The phrase “running instance of” in this definition is important. If we execute mul-
tiple copies of the same program at the same time—taking care to ensure that each
uses a different node name—each of those copies is treated as a separate node. We
will see this difference in action in Section 2.8.
In the turtlesim example, we created two nodes. One node is an instance of an exe-
cutable called turtlesim_node. This node is responsible for creating the turtlesim win-
dow and simulating the motion of the turtle. The second node is an instance of an ex-
ecutable called turtle_teleop_key. The abbreviation teleop is a shortened form of the
word teleoperation, which refers to situations in which a human controls a robot remotely
by giving direct movement commands. This node waits for an arrow key to be pressed,
converts that key press to a movement command, and sends that command to the turtlesim-
_node node.
Starting nodes The basic command to create a node (also known as “running a ROS pro-
gram”) is rosrun:Í16
Í15http://wiki.ros.org/ROS/Tutorials/UnderstandingNodes
Í16http://wiki.ros.org/rosbash#rosrun
21

2. GETTING STARTED
rosrun package-name executable-name
There are two required parameters to rosrun. The first parameter is a package name. We
discussed package names in Section 2.4. The second parameter is simply the name of an
executable file within that package.
¹ There’s nothing “magical” about rosrun: It’s just a shell script that understands
ROS’s file organization well enough to know where to look for executables by their
package names. Once it finds the program you ask for, rosrun executes that pro-
gram normally. For example, if you really wanted to, you could execute turtlesim-
_node directly, just like any other program:
/opt/ros/indigo/lib/turtlesim/turtlesim_node
The work of registering with the master to become a ROS node happens inside the
program, not in rosrun.
Listing nodes ROS provides a few ways to get information about the nodes that are run-
ning at any particular time. To get a list of running nodes, try this command:Í17
rosnode list
If you do this after executing the commands from Section 2.3, you’ll see a list of three
nodes:
/rosout
/teleop_turtle
/turtlesim
A few things about this list are worthy of note.
R The /rosout node is a special node that is started automatically by roscore. Its pur-
pose is somewhat similar to the standard output (i.e. std::cout) that you might use
in a console program. We look at /rosout more fully in Section 4.4.2.
Í17http://wiki.ros.org/rosnode
22
2.6. Nodes
¹ The leading / in the name /rosout indicates that this node’s name is in the
global namespace. ROS has a rich system for naming nodes and other ob-
jects. This system, which Chapter 5 discusses in more detail, uses name-
spaces to organize things.Í18
R The other two nodes should be fairly clear: They’re the simulator (turtlesim) and
the teleoperation program (teleop_turtle) we started in Section 2.3.
R If you compare the output of rosnode list to the executable names in the rosrun
commands from Section 2.3, you’ll notice that node names are not necessarily the
same as the names of the executables underlying those nodes.
¹ You can explicitly set the name of a node as part of the rosrun command:
rosrun package-name executable-name __name:=node-name
This approach will override the name that the node would normally have
given itself, and can be important because ROS insists that every node have
a distinct name. (We’ll use __name in Section 2.8 to construct a slightly
larger example system.) Generally, though, if you’re assigning names using
__name on a regular basis, you probably should be using a launch file—See
Chapter 6—instead of running nodes individually.
Inspecting a node You can get some information about a particular node using this com-
mand:
rosnode info node-name
The output includes a list of topics—See Section 2.7.2—for which that node is a publisher
or subscriber, the services—See Chapter 8—offered by that node, its Linux process identi-
fier (PID), and a summary of the connections it has made to other nodes.
Killing a node To kill a node you can use this command:
rosnode kill node-name
Í18http://wiki.ros.org/Names
23
2. GETTING STARTED
Unlike killing and restarting the master, killing and restarting a node usually does not
have a major impact on other nodes; even for nodes that are exchanging messages, those
connections would be dropped when the node is killed and reestablished when the node
restarts.
� You can also kill a node using the usual Ctrl-C technique. However, that method
may not give the node a chance to unregister itself from the master. A symptom of
this problem is that the killed node may still be listed by rosnode list for a while.
This is harmless, but might make it more difficult to tell what’s going on. To remove
dead nodes from the list, you can use this command:
rosnode cleanup
2.7 Topics and messages
In our turtlesim example, it’s clear that the teleoperation node and the simulator node
must be talking to each other somehow. Otherwise, how would the turtle, which lives in
the latter node, know when to move in response to your key presses, which are collected
by the former node?
The primary mechanism that ROS nodes use to communicate is to send messages.
Messages in ROS are organized into named topics.Í19 The idea is that a node that wants
to share information will publish messages on the appropriate topic or topics; a node that
wants to receive information will subscribe to the topic or topics that it’s interested in. The
ROS master takes care of ensuring that publishers and subscribers can find each other; the
messages themselves are sent directly from publisher to subscriber.
2.7.1 Viewing the graph
This idea is probably easiest to see graphically, and the easiest way to visualize the publish-
subscribe relationships between ROS nodes is to use this command:
rqt_graph
In this name, the r is for ROS, and the qt refers to the Qt GUI toolkit used to implement
the program. You should see a GUI, most of which is devoted to showing the nodes in the
Í19http://wiki.ros.org/ROS/Tutorials/UnderstandingTopics
24

2.7. Topics and messages
Figure 2.2: The rqt_graph interface,
showing the graph for the turtlesim ex-
ample. Debug nodes, including rosout,
are omitted by default.
/turtlesim
/rosout
/rosout/teleop_turtle
/turtle1/cmd_vel
/rosout
/rqt_gui_py_node_5487
/rosout
Figure 2.3: The complete turtlesim graph, including nodes that rqt_graph classifies as
debug nodes.
current system. In this case, you will see something like Figure 2.2. In this graph, the ovals
represent nodes, and the directed edges represent publisher-subscriber relationships. The
graph tells us that the node named /teleop_turtle publishes messages on a topic called
/turtle1/cmd_vel, and that the node named /turtlesim subscribes to those messages.
(In this context, the name “cmd_vel” is short for “command velocity.”)
You might notice that the rosout node that we saw in Section 2.6 is missing from this
view. By default, rqt_graph hides nodes that it thinks exist only for debugging. You can
disable this feature by unchecking the “Hide debug” box. Figure 2.3 shows the resulting
graph.
R Notice that rqt_graph itself appears as a node.
R All of these nodes publish messages on a topic called /rosout, to which the node
named /rosout subscribes. This topic is one mechanism through which nodes can
generate textual log messages. Chapter 4 has more about logging in ROS.
25
2. GETTING STARTED
� The name /rosout refers to both a node and a topic. ROS doesn’t get confused
by these kinds of duplicate names because it’s always clear from the context
whether we want to talk about the /rosout node or the /rosout topic.
This view of debug nodes is useful for seeing a true picture of the current state of things,
but can also clutter the graph quite a bit with information that is not often very helpful.
The rqt_graph tool has several other options for tweaking the way that it shows the
graph. The author’s personal preference is to change the dropdown from “Nodes only” to
“Nodes/Topics (all)”, and to disable all of the checkboxes except “Hide Debug.” This setup,
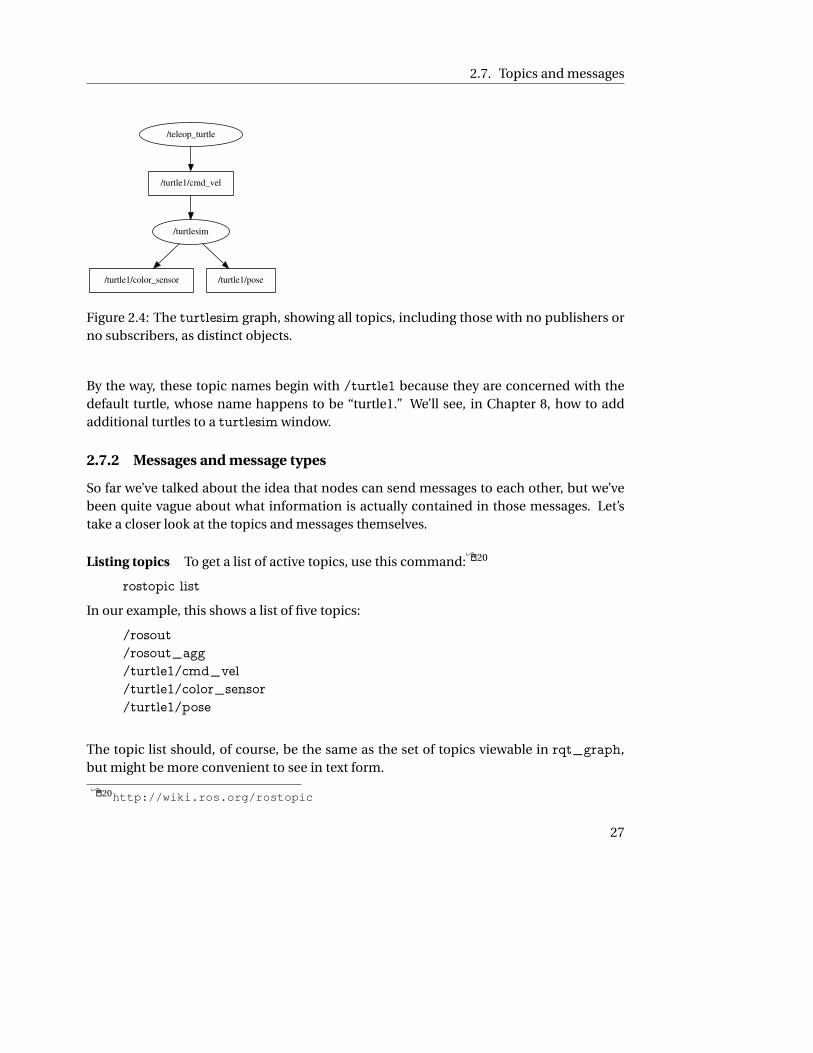
whose results are shown in Figure 2.4, has the advantage that all of the topics are shown
in rectangles, separate from the nodes. One can see, for example, that the turtlesim node,
in addition to subscribing to velocity commands, also publishes both its current pose and
data from a simulated color sensor. When you’re exploring a new ROS system, rqt_graph,
especially with these options, can be a useful way to discover what topics are available for
your programs to use to communicate with the existing nodes.
� The phenomenon of having topics with no subscribers may seem like a bug, but
it’s actually very common. The intuition is that ROS nodes are usually designed
to publish the useful information that they have, without worrying about whether
anyone is subscribing to those messages. This helps to reduce the level of coupling
between individual nodes.
Now we can understand at least part of how the turtlesim teleoperation system works.
When you press a key, the /teleop_turtle node publishes messages with those movement
commands on a topic called /turtle1/cmd_vel. Because it subscribes to that topic, the
turtlesim_node receives those messages, and simulates the turtle moving with the re-
quested velocity. The important points here are:
R The simulator doesn’t care (or even know) which program publishes those cmd_vel
messages. Any program that publishes on that topic can control the turtle.
R The teleoperation program doesn’t care (or even know) which program subscribes
to the cmd_vel messages it publishes. Any program that subscribes to that topic is
free to respond to those commands.
26
2.7. Topics and messages
/turtle1/color_sensor
/turtle1/cmd_vel
/turtlesim
/turtle1/pose
/teleop_turtle
Figure 2.4: The turtlesim graph, showing all topics, including those with no publishers or
no subscribers, as distinct objects.
By the way, these topic names begin with /turtle1 because they are concerned with the
default turtle, whose name happens to be “turtle1.” We’ll see, in Chapter 8, how to add
additional turtles to a turtlesim window.
2.7.2 Messages and message types
So far we’ve talked about the idea that nodes can send messages to each other, but we’ve
been quite vague about what information is actually contained in those messages. Let’s
take a closer look at the topics and messages themselves.
Listing topics To get a list of active topics, use this command:Í20
rostopic list
In our example, this shows a list of five topics:
/rosout
/rosout_agg
/turtle1/cmd_vel
/turtle1/color_sensor
/turtle1/pose
The topic list should, of course, be the same as the set of topics viewable in rqt_graph,
but might be more convenient to see in text form.
Í20http://wiki.ros.org/rostopic
27
2. GETTING STARTED
Echoing messages You can see the actual messages that are being published on a single
topic using the rostopic command:
rostopic echo topic-name
This command will dump any messages published on the given topic to the terminal. List-
ing 2.2 shows some example output from
rostopic echo /turtle1/cmd_vel
taken at a time when /teleop_turtle was receiving keystrokes. Each --- line in the out-
put shows the end of one message and the start of another. In this case, there were three
messages.
Measuring publication rates There are also two commands for measuring the speed at
which messages are published and the bandwidth consumed by those messages:
rostopic hz topic-name
rostopic bw topic-name
These commands subscribe to the given topic and output statistics in units of messages
per second and bytes per second, respectively.
� Even if you don’t care much about the specific rates, these commands can be useful
for debugging, because they provide an easy way to verify that messages are indeed
being published regularly on particular topics.
Inspecting a topic You can learn more about a topic using the rostopic info command:
rostopic info topic-name
For example, from this command:
rostopic info /turtle1/color_sensor
you should see output similar to this:
Type: turtlesim/Color
Publishers:
* /turtlesim (http://donatello:46397/)
Subscribers: None
28
2.7. Topics and messages
1 l i n e a r :
2 x : 2 . 0
3 y : 0 . 0
4 z : 0 . 0
5 angular :
6 x : 0 . 0
7 y : 0 . 0
8 z : 0 . 0
9 −−−
10 l i n e a r :
11 x : 0 . 0
12 y : 0 . 0
13 z : 0 . 0
14 angular :
15 x : 0 . 0
16 y : 0 . 0
17 z : −2.0
18 −−−
19 l i n e a r :
20 x : 2 . 0
21 y : 0 . 0
22 z : 0 . 0
23 angular :
24 x : 0 . 0
25 y : 0 . 0
26 z : 0 . 0
27 −−−
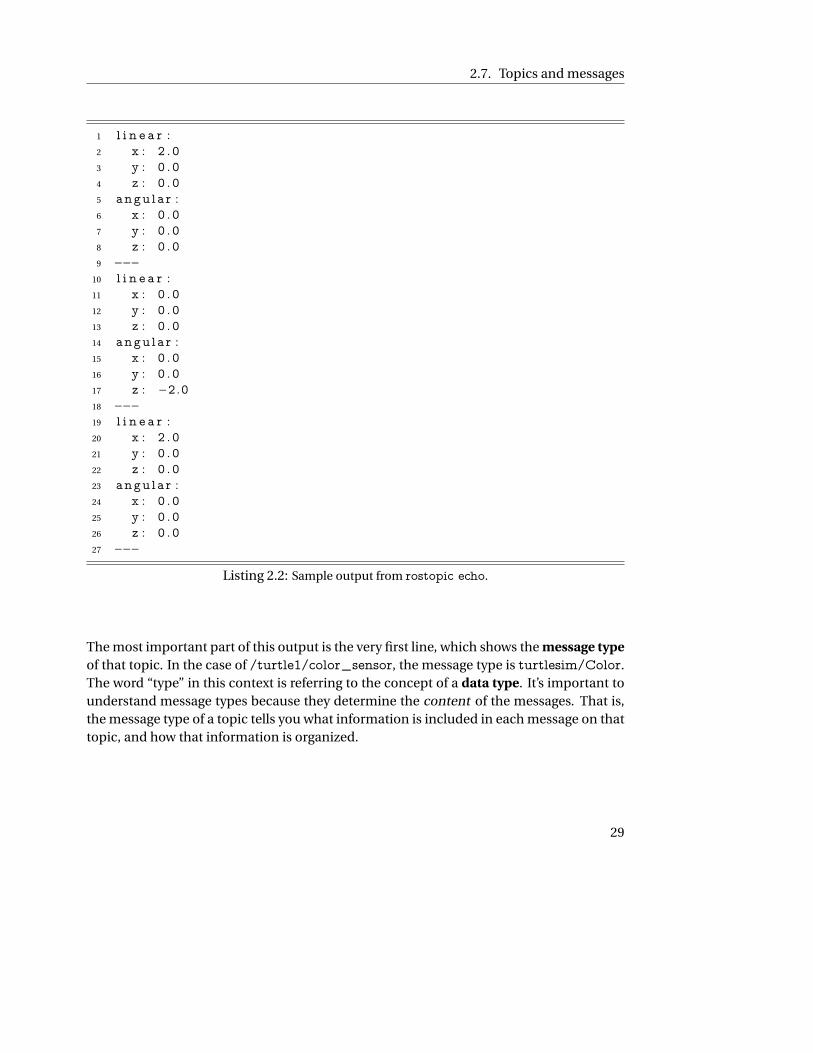
Listing 2.2: Sample output from rostopic echo.
The most important part of this output is the very first line, which shows the message type
of that topic. In the case of /turtle1/color_sensor, the message type is turtlesim/Color.
The word “type” in this context is referring to the concept of a data type. It’s important to
understand message types because they determine the content of the messages. That is,
the message type of a topic tells you what information is included in each message on that
topic, and how that information is organized.
29

2. GETTING STARTED
Inspecting a message type To see details about a message type, use a command like
this:Í21Í22
rosmsg show message-type-name
Let’s try using it on the message type for /turtle1/color_sensor that we found above:
rosmsg show turtlesim/Color
The output is:
uint8 r
uint8 g
uint8 b
The format is a list of fields, one per line. Each field is defined by a built-in data type (like
int8, bool, or string) and a field name. The output above tells us that a turtlesim/Color
is a thing that contains three unsigned 8-bit integers called r, g, and b. Every message on
any topic with message type turtlesim/Color is defined by values for these three fields.
(As you might guess, these numbers correspond the the red-green-blue color intensities
for the pixel under the center of the simulated turtle.)
Another example, one we’ll revisit several times, is geometry_msgs/Twist. This is the
message type for the /turtle1/cmd_vel topic, and it is slightly more complicated:
geometry_msgs/Vector3 linear
float64 x
float64 y
float64 z
geometry_msgs/Vector3 angular
float64 x
float64 y
float64 z
In this case, both linear and angular are composite fields whose data type is geometry-
_msgs/Vector3. The indentation shows that fields named x, y, and z are members within
those two top-level fields. That is, a message with type geometry_msgs/Twist contains
exactly six numbers, organized into two vectors called linear and angular. Each of these
numbers has the built-in type float64, which means, naturally, that each is a 64-bit floating
point number.
Í21http://wiki.ros.org/rosmsg
Í22http://wiki.ros.org/msg
30
2.7. Topics and messages
In general, a composite field is simply a combination of one or more sub-fields, each
of which may be another composite field or a simple field with a built-in data type. The
same idea appears in C++ and other object-oriented languages, in which one object may
have other objects as data members.
¹ It’s worth noting that the data types of composite fields are message types in their
own right. For example, it would be perfectly legitimate to have topic with message
type geometry_msgs/Vector3. Messages on with this type would consist of three
top-level fields, namely x, y, and z.
This kind of nesting can be useful to preventing code duplication for systems in
which many message types share common elements. A common example is the
message type std_msgs/Header, which contains some basic sequence, timestamp,
and coordinate frame information. This type is included as a composite field called
header in hundreds of other message types.
Fortunately, rosmsg show automatically expands composite fields all the way down
to the underlying built-in types, using indentation to show the nested structure, so
there is often no need to inspect the nested message types directly.
Message types can also contain arrays with fixed or variable length (shown with square
brackets []) and constants (generally for interpreting the contents of other, non-constant
fields). These features are not used by turtlesim. For an example message type that uses
these features, have a look at sensor_msgs/NavSatFix, which represents a single GPS fix.
Publishing messages from the command line Most of the time, the work of publishing
messages is done by specialized programs.2 However, you may find it useful at times to
publish messages by hand. To do this, use rostopic:Í23
rostopic pub -r rate-in-hz topic-name message-type message-content
This command repeatedly publishes the given message on the given topic at the given rate.
The final message content parameter should provide values for all of the fields in the
message type, in order. Here’s an example:
rostopic pub -r 1 /turtle1/cmd_vel geometry_msgs/Twist ’[2, 0, 0]’ ’[0, 0, 0]’
2Indeed, creating those programs is the primary subject matter of this book!
Í23http://wiki.ros.org/rostopic
31

2. GETTING STARTED
The values are assigned to message fields in the same order that they are shown by rosmsg
show. In the case, the first three numbers denote the desired linear velocity and the final
three numbers denote the desired angular velocity. We use single quotes (’. . . ’) and
square brackets ([. . . ]) to group the individual subfields into the two top-level composite
fields. As you might guess, the messages generated by this example command the turtle to
drive straight ahead (along its x-axis), with no rotation.
Likewise, a command like this will command the robot to rotate in place about its z-
axis (which is perpendicular to your computer’s screen):
rostopic pub -r 1 /turtle1/cmd_vel geometry_msgs/Twist ’[0, 0, 0]’ ’[0, 0, 1]’
� In fact, the two non-zero fields from the last two examples—specifically, linear.x
and angular.z—are the only fields within geometry_msgs/Twist that turtlesim
pays any attention to. Because the other four fields represent motions that the two-
dimensional simulator does not allow, turtlesim ignores them.
¹ The syntax shown above has the distinct disadvantage that you must remember all
of the fields of the message type and the order in which they appear. An alternative
is to give single parameter specifying all of the fields as a single YAML (a recursive
acronym for “YAML Ain’t Markup Language”Í24) dictionary. This command (which
does, in fact, contain newline characters) is equivalent to the one above, but it ex-
plicitly shows the mapping from field names to values:
rostopic pub /turtle1/cmd_vel geometry_msgs/Twist "linear:
x: 2.0
y: 0.0
z: 0.0
angular:
x: 0.0
y: 0.0
z: 0.0"
There are enough tricky interactions between bash and YAML that the online doc-
umentation has an entire page devoted just to the use of YAML on the command
line.Í25 Í26 The simplest way to get the syntax correct is to use tab completion.
32
2.7. Topics and messages
Pressing Tab after entering the message type will insert a fully formed YAML dic-
tionary, with all of the fields in the given message type. The tab-generated message
will use default values (zero, false, empty string, etc), but you can edit it to contain
the real message content that you want.
There are a few additional options to rostopic pub that might be of use.
R The form shown here uses -r to select the “rate mode” of rostopic pub, which pub-
lishes messages at regular intervals. This command also supports a one-time mode
(-1 “dash one”) and a special “latched” mode (-l “dash ell”) that publishes only once
but ensures that new subscribers to that topic will receive the message. Latched
mode is actually the default.
R It is also possible to read messages from a file (using -f) or from standard input (by
omitting both -f and the message content from the command). In both cases, the
input should be formatted like the output of rostopic echo.
� Perhaps you have begun to imagine possibilities for using a scripted combination
of rostopic echo and rostopic pub as a way of “recording” and “playing back” mes-
sages, for automating testing of your programs. If so, you’ll be interested in the
rosbag tool (Chapter 9), which is a more complete implementation of this kind of
idea.
Understanding message type names Like everything else in ROS, every message type
belongs to a specific package. Message type names always contain a slash, and the part
before the slash is the name of the containing package:
package-name/type-name
For example, the turtlesim/Color message type breaks down this way:
turtlesim︸ ︷︷ ︸
package name
+ Color︸ ︷︷ ︸
type name
⇒ turtlesim/Color︸ ︷︷ ︸
message data type
Í24http://www.yaml.org/
Í25http://wiki.ros.org/YAMLOverview
Í26http://wiki.ros.org/ROS/YAMLCommandLine
33

2. GETTING STARTED
This division of message type names serves a few purposes.
R Most directly, including packages in the message type names helps to prevent name
collisions. For example, geometry_msgs/Pose and turtlesim/Pose are distinct
message types that contain different (but conceptually similar) data.
R As we’ll see in Chapter 3, when writing ROS programs, we’ll need to declare depen-
dencies on other packages that contain message types that we use. Including the
package name as part of the message type name makes these dependencies easier
to see.
R Finally, knowing the package that contains a given message type can be useful for fig-
uring out that type’s purpose. For example, the type name ModelState is quite mys-
terious in isolation, but the full name gazebo/ModelState clarifies that this mes-
sage type is part of the Gazebo simulator, and likely contains information about one
of the models within that simulation.
2.8 A larger example
So far in this chapter, we’ve seen how to start the ROS master, how to start ROS nodes,
and how to investigate the topics those nodes use to communicate with one another. This
section wraps up our introduction with an example a little larger than the one from Sec-
tion 2.3, intended to illustrate a bit more fully the way topics and messages work.
First, stop any nodes that might be currently running. Start roscore if it’s not already
active. Then, in four separate terminals, run these four commands:
rosrun turtlesim turtlesim_node __name:=A
rosrun turtlesim turtlesim_node __name:=B
rosrun turtlesim turtle_teleop_key __name:=C
rosrun turtlesim turtle_teleop_key __name:=D
This should start two instances of the turtlesim simulator—These should appear in two
separate windows—and two instances of the turtlesim teleoperation node.
The only element in the example that might be unfamiliar is the __name parameter
to rosrun. These parameters override the default name that each node tries to assign to
itself. They’re needed because the ROS master does not allow multiple nodes with the
same name.
34

2.8. A larger example
/turtle1/cmd_vel
/B
/A
/turtle1/color_sensor
/turtle1/pose
/C
/D
Figure 2.5: A slightly more complex ROS graph, with two turtlesim nodes named A and B
and two teleoperation nodes named C and D.
¹ If you do attempt to start two nodes with the same name, the new node will start
without any problem, but the original node will terminate with a message like this:
[ WARN] [1369835799.391679597]: Shutdown request received.
[ WARN] [1369835799.391880002]: Reason given for shutdown:
[new node registered with same name]
Even though we’re working to avoid it here, this behavior can be useful in general.
This is especially true if you are debugging and revising a node, because it ensures
that you won’t have multiple versions of the same node running by mistake.
Before we discuss this four-node example, you may wish to take a moment to think
about how the system will behave. What would the graph, as displayed by rqt_graph,
look like? Which turtles would move in response to which teleoperation nodes?
Hopefully, you predicted that the graph would look like Figure 2.5, and that both turtles
would make the same movements in response to key presses sent to either teleoperation
node. Let’s see why.
2.8.1 Communication via topics is many-to-many.
You might have expected each teleoperation node to connect to one simulator, creating
two independently controllable simulations.3 Note, however, that these two kinds of nodes
publish and subscribe, respectively, on the /turtle1/cmd_vel topic. Messages published
on this topic, regardless of which node publishes them, are delivered to every subscriber
of that topic.
In this example, every message published by teleoperation node C is delivered to both
simulation nodes, namely A and B. Likewise, messages published by D are delivered to
3In Chapter 6, we’ll see the right way to create these sorts of parallel, independent turtlesim simulations.
35

2. GETTING STARTED
both A and B. When these messages arrive, the turtles move accordingly, regardless of
which node published them. The main idea here is that topics and messages are used
for many-to-many communication. Many publishers and many subscribers can share a
single topic.
2.8.2 Nodes are loosely coupled.
No doubt you have noticed that we did not need to reprogram the turtlesim simulator to
accept movement commands from multiple sources, nor did the teleoperation node need
to be designed to drive multiple instances of the simulator at once. In fact, it would be an
easy exercise to extend this example to arbitrarily many4 nodes of either type.
At the other extreme, consider what would happen if the turtlesim simulator were
started in isolation, without any other nodes. In that situation, the simulator would wait
for messages on /turtle1/cmd_vel, happily oblivious to the fact that there are no pub-
lishers for that topic.
The punchline is that our turtlesim nodes specifically—and most well-designed ROS
nodes generally—are loosely coupled. None of the nodes explicitly know about any of the
others; their only interactions are indirect, at the level of topics and messages. This inde-
pendence of nodes, along with the decomposition it facilitates of larger tasks into smaller
reusable pieces, is one of the key design features of ROS.
R Software (like turtle_teleop_key) that produces information can publish that in-
formation, without worrying about how that information is consumed.
R Software (like turtlesim_node) that consumes information can subscribe to the
topic or topics containing the data it needs, without worrying about how those data
are produced.
ROS does provide a mechanism, called services, for slightly more direct, one-to-one com-
munication. This secondary technique is much less common, but does have its uses.
Chapter 8 describes how to create and use services.
4...within reason. The author’s computer, for example, begins to complain about having too many active
X clients after starting about 100 simultaneous instances of turtlesim_node.
36
2.9. Checking for problems
2.9 Checking for problems
One final (for now) command line tool, which can be helpful when ROS is not behaving
the way you expect, is roswtf,5Í27 Í28 which can be run with no arguments:
roswtf
This command performs a broad variety of sanity checks, including examinations of your
environment variables, installed files, and running nodes. For example, roswtf checks
whether the rosdep portions of the install process have been completed, whether any
nodes appear to have hung or died unexpectedly, and whether the active nodes are cor-
rectly connected to each other. A complete list of checks performed by roswtf seems to
exist, unfortunately, only in the Python source code for that tool.
2.10 Looking forward
The goal of this chapter was to introduce some basic ROS objects like nodes, messages, and
topics, along with some command line tools for interacting with those objects. In the next
chapter, we’ll move beyond interacting with existing ROS programs and on to the process
of writing new programs.
5The name of this tool is not explained in its documentation, but the author is pretty sure that it’s an
acronym for “Why The Failure?”
Í27http://wiki.ros.org/roswtf
Í28http://wiki.ros.org/ROS/Tutorials/Gettingstartedwithroswtf
37


Chapter 3
Writing ROS programsIn which we write ROS programs to publish and subscribe to messages.
So far we’ve introduced a few core ROS features, including packages, nodes, topics, and
messages. We also spent a bit of time exploring some existing software built on those fea-
tures. Now it’s finally time to begin creating your own ROS programs. This chapter de-
scribes how to set up a development workspace and shows three short programs, includ-
ing the standard “hello world” example, and two that show how to publish and subscribe
to messages.
3.1 Creating a workspace and a package
We saw in Section 2.4 that all ROS software, including software we create, is organized into
packages. Before we write any programs, the first steps are to create a workspace to hold
our packages, and then to create the package itself.
Creating a workspace Packages that you create should live together in a directory called
a workspace.Í1 For example, the author’s workspace is a directory called /home/jokane-
/ros, but you can name your workspace whatever you like, and store the directory any-
where in your account that you prefer. Use the normal mkdir command to create a direc-
tory. We’ll refer to this new directory as your workspace directory.
Í1http://wiki.ros.org/catkin/Tutorials/create_a_workspace
39

3. WRITING ROS PROGRAMS
¹ For many users, there’s no real need to use more than one ROS workspace. However,
ROS’s catkin build system, which we’ll introduce in Section 3.2.2, attempts to build
all of the packages in a workspace at once. Therefore, if you’re working on many
packages or have several distinct projects, it may be useful to maintain several in-
dependent workspaces.
One final step is needed to set up the workspace. Create a subdirectory called src inside
the workspace directory. As you might guess, this subdirectory will contain the source code
for your packages.
Creating a package The command to create a new ROS package, which should be run
from the src directory of your workspace, looks like this:Í2
catkin_create_pkg package-name
Actually, this package creation command doesn’t do much: It creates a directory to hold
the package and creates two configuration files inside that directory.
R The first configuration file, called package.xml, is the manifest discussed in Sec-
tion 2.4.
R The second file, called CMakeLists.txt, is a script for an industrial-strength cross-
platform build system called CMake. It contains a list of build instructions includ-
ing what executables should be created, what source files to use to build each of
them, and where to find the include files and libraries needed for those executables.
CMake is used internally by catkin.
In the coming sections, we’ll see a few edits you’ll need to make to each of these files to
configure your new package. For now, it’s enough to understand that catkin_create_pkg
doesn’t do anything magical. Its job is simply to make things a bit more convenient by
creating both the package directory and default versions of these two configuration files.
� This three-layered directory structure—a workspace directory, containing a src di-
rectory, containing a package directory—might seem to be overkill for simple pro-
jects and small workspaces, but the catkin build system requires it.
Í2http://wiki.ros.org/ROS/Tutorials/CreatingPackage
40
3.2. Hello, ROS!
¹ ROS package names follow a naming convention that allows only lowercase letters,
digits, and underscores. The convention also requires that the first character be a
lowercase letter. A few ROS tools, including catkin, will complain about packages
that do not follow this convention.
All of the examples in this book belong to a package called agitr, named after the ini-
tials of the book’s title. If you’d like to recreate this package yourself, you can create a
package with this name running this command from your workspace’s src directory:
catkin_create_pkg agitr
An alternative to creating the agitr package yourself is to download the archive of this
package from the book’s website, and expand it from within your workspace directory.
Editing the manifest After creating your package, you may want to edit its package.xml,
which contains some metadata describing the package. The default version installed by
catkin_create_pkg is liberally commented and largely self-explanatory. Note, however,
that most of this information is not utilized by ROS, neither at build time nor at run time,
and only becomes really important if you release your package publicly. In the spirit of
keeping documentation in sync with actual functionality, a reasonable minimum might
be to fill in the description and maintainer fields. Listing 3.1 shows the manifest from our
agitr package.
3.2 Hello, ROS!
Now that we’ve created a package, we can start writing ROS programs.
3.2.1 A simple program
Listing 3.2 shows a ROS version of the canonical “Hello, world!” program. This source file,
named hello.cpp, belongs in your package folder, right next to package.xml and CMake-
Lists.txt.
� Some online tutorials suggest creating a src directory within your package directory
to contain C++ source files. This additional organization might be helpful, espe-
cially for larger packages with many types of files, but it isn’t strictly necessary.
41

3. WRITING ROS PROGRAMS
1 <?xml ve r s i on ="1.0"?>
2 <package>
3 <name>ag i t r </name>
4 <vers ion >0.0.1</ vers ion>
5 <des c r i p t i on >
6 Examples from A Gentle In t roduc t i on to ROS
7 </de s c r i p t i on >
8 <mainta iner emai l="jokane@cse . sc . edu">
9 Jason O' Kane
10 </maintainer>
11 <l i c e n s e >TODO</l i c e n s e >
12 <buildtool_depend>catkin </buildtool_depend>
13 <build_depend>geometry_msgs</build_depend>
14 <run_depend>geometry_msgs</run_depend>
15 <build_depend>tur t l e s im </build_depend>
16 <run_depend>tur t l e s im </run_depend>
17 </package>
Listing 3.1: The manifest (that is, package.xml) for this book’s agitr package.
We’ll see how to compile and run this program momentarily, but first let’s examine the
code itself.
R The header file ros/ros.h includes declarations of the standard ROS classes. You’ll
want to include it in every ROS program that you write.
R The ros::init function initializes the ROS client library. Call this once at the begin-
ning of your program.Í3 The last parameter is a string containing the default name
of your node.
¹ This default name can be overridden by a launch file (see page 87) or by a
rosrun command line parameter (see page 23).
R The ros::NodeHandle object is the main mechanism that your program will use to
interact with the ROS system.Í4 Creating this object registers your program as a
Í3http://wiki.ros.org/roscpp/Overview/InitializationandShutdown
Í4http://wiki.ros.org/roscpp/Overview/NodeHandles
42
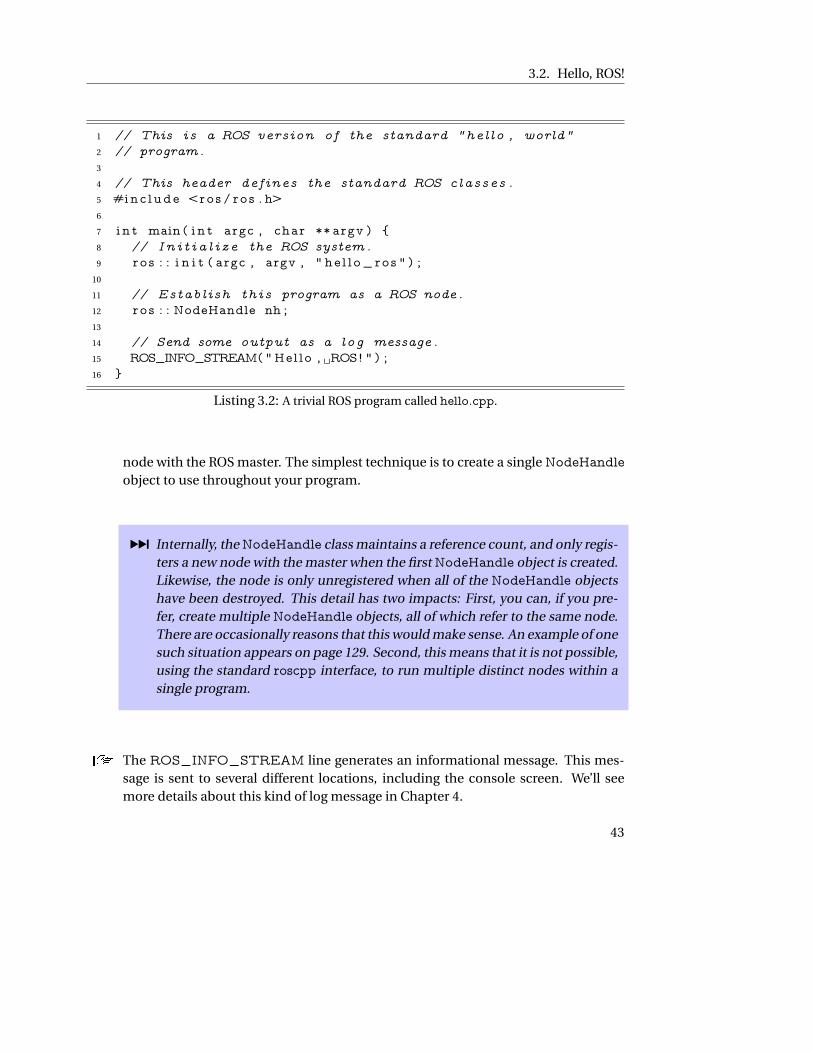
3.2. Hello, ROS!
1 // This is a ROS version of the standard "hello , world"
2 // program.
3
4 // This header defines the standard ROS classes .
5 #inc lude <ros / ro s . h>
6
7 i n t main ( i n t argc , char ∗∗ argv ) {
8 // In i t i a l i z e the ROS system .
9 ro s : : i n i t ( argc , argv , " he l l o_ros " ) ;
10
11 // Establish this program as a ROS node.
12 ro s : : NodeHandle nh ;
13
14 // Send some output as a log message .
15 ROS_INFO_STREAM("Hel lo , ␣ROS! " ) ;
16 }
Listing 3.2: A trivial ROS program called hello.cpp.
node with the ROS master. The simplest technique is to create a single NodeHandle
object to use throughout your program.
¹ Internally, the NodeHandle class maintains a reference count, and only regis-
ters a new node with the master when the first NodeHandle object is created.
Likewise, the node is only unregistered when all of the NodeHandle objects
have been destroyed. This detail has two impacts: First, you can, if you pre-
fer, create multiple NodeHandle objects, all of which refer to the same node.
There are occasionally reasons that this would make sense. An example of one
such situation appears on page 129. Second, this means that it is not possible,
using the standard roscpp interface, to run multiple distinct nodes within a
single program.
R The ROS_INFO_STREAM line generates an informational message. This mes-
sage is sent to several different locations, including the console screen. We’ll see
more details about this kind of log message in Chapter 4.
43
3. WRITING ROS PROGRAMS
3.2.2 Compiling the Hello program
How can you compile and run this program? This is handled by ROS’s build system, called
catkin. There are four steps.Í5
Declaring dependencies First, we need to declare the other packages on which ours de-
pends. For C++ programs, this step is needed primarily to ensure that catkin provides
the C++ compiler with the appropriate flags to locate the header files and libraries that it
needs.
To list dependencies, edit the CMakeLists.txt in your package directory. The default
version of this file has this line:
find_package(catkin REQUIRED)
Dependencies on other catkin packages can be added in a COMPONENTS section on
this line:
find_package(catkin REQUIRED COMPONENTS package-names)
For the hello example, we need one dependency on a package called roscpp, which pro-
vides the C++ ROS client library. The required find_package line, therefore, is:
find_package(catkin REQUIRED COMPONENTS roscpp)
We should also list dependencies in the package manifest (package.xml), using the build-
_depend and run_depend elements:
<build_depend>package-name</build_depend>
<run_depend>package-name</run_depend>
In our example, the hello program needs roscpp both at build time and at run time, so the
manifest should contain:
<build_depend>roscpp</build_depend>
<run_depend>roscpp</run_depend>
However, dependencies declared in the manifest are not used in the build process; if you
omit them here, you likely won’t see any error messages until you distribute your package
to others who try to build it without having the required packages installed.
Í5http://wiki.ros.org/ROS/Tutorials/BuildingPackages
44
3.2. Hello, ROS!
Declaring an executable Next, we need to add two lines to CMakeLists.txt declaring
the executable we would like to create. The general form is
add_executable(executable-name source-files)
target_link_libraries(executable-name ${catkin_LIBRARIES})
The first line declares the name of the executable we want, and a list of source files that
should be combined to form that executable. If you have more than one source file, list
them all here, separated by spaces. The second line tells CMake to use the appropriate
library flags (defined by the find_package line above) when linking this executable. If
your package contains more than one executable, copy and modify these two lines for
each executable you have.
In our example, we want an executable called hello, compiled from a single source file
called hello.cpp, so we would add these lines to CMakeLists.txt:
add_executable(hello hello.cpp)
target_link_libraries(hello ${catkin_LIBRARIES})
For reference, Listing 3.3 shows a short CMakeLists.txt that suffices for our example.
The default version of CMakeLists.txt created by catkin_create_pkg contains some
commented-out guidance for a few other purposes; for many simple programs, something
similar to the simple version shown here is enough.
Building the workspace Once your CMakeLists.txt is set up, you can build your work-
space—including compiling all of the executables in all of its packages—using this com-
mand:
catkin_make
Because it’s designed to build all of the packages in your workspace, this command must be
run from your workspace directory. It will perform several configuration steps (especially
the first time you run it) and create subdirectories called devel and build within your work-
space. These two new directories contain build-related files like automatically-generated
makefiles, object code, and the executables themselves. If you like, the devel and build
subdirectories can safely be deleted when you’ve finished working on your package.
If there are compile errors, you’ll see them here. After correcting them, you can catkin-
_make again to complete the build process.
� If you see errors from catkin_make that the header ros/ros.h cannot be found,
or “undefined reference” errors on ros::init or other ROS functions, the most likely
45
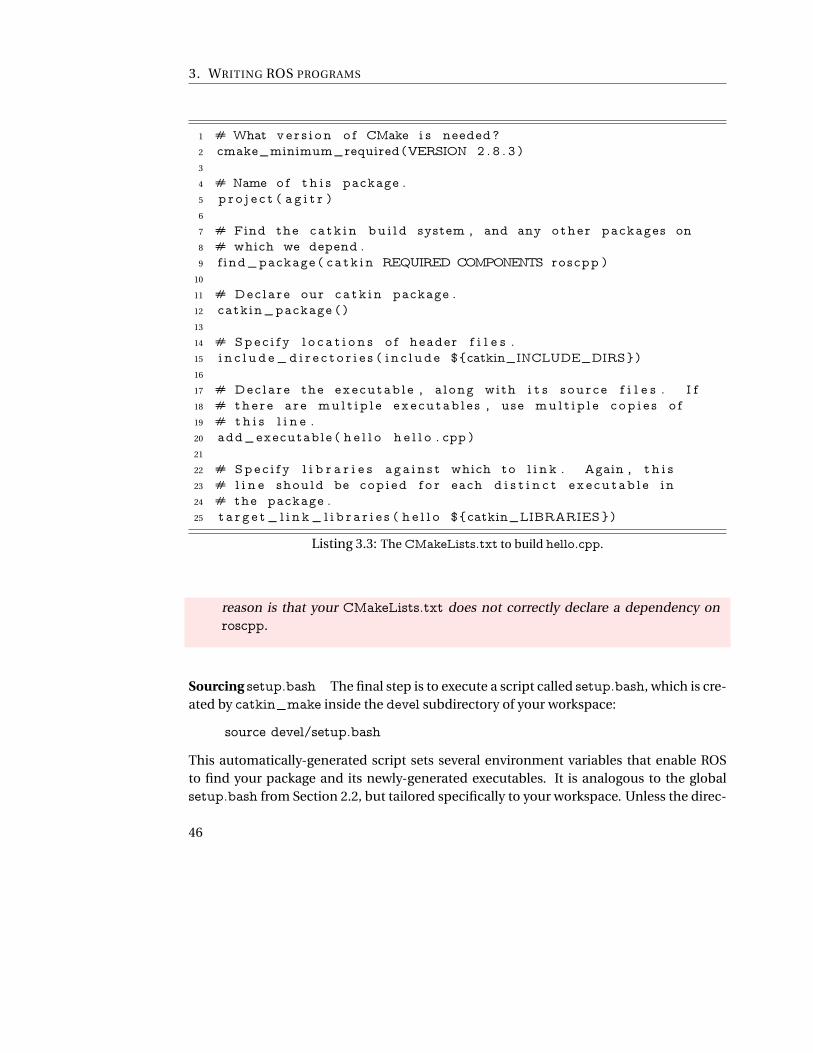
3. WRITING ROS PROGRAMS
1 # What ve r s i on o f CMake i s needed ?
2 cmake_minimum_required (VERSION 2 . 8 . 3 )
3
4 # Name o f t h i s package .
5 p r o j e c t ( a g i t r )
6
7 # Find the ca tk in bu i ld system , and any other packages on
8 # which we depend .
9 f ind_package ( ca tk in REQUIRED COMPONENTS roscpp )
10
11 # Declare our ca tk in package .
12 catkin_package ( )
13
14 # Spec i f y l o c a t i o n s o f header f i l e s .
15 i n c l ud e_d i r e c t o r i e s ( i n c lude ${catkin_INCLUDE_DIRS})
16
17 # Declare the executab le , a long with i t s source f i l e s . I f
18 # there are mu l t ip l e executab le s , use mu l t ip l e c op i e s o f
19 # th i s l i n e .
20 add_executable ( h e l l o h e l l o . cpp )
21
22 # Spec i f y l i b r a r i e s aga in s t which to l i n k . Again , t h i s
23 # l i n e should be copied f o r each d i s t i n c t executab l e in
24 # the package .
25 t a r g e t_ l i n k_ l i b r a r i e s ( h e l l o ${catkin_LIBRARIES})
Listing 3.3: The CMakeLists.txt to build hello.cpp.
reason is that your CMakeLists.txt does not correctly declare a dependency on
roscpp.
Sourcing setup.bash The final step is to execute a script called setup.bash, which is cre-
ated by catkin_make inside the devel subdirectory of your workspace:
source devel/setup.bash
This automatically-generated script sets several environment variables that enable ROS
to find your package and its newly-generated executables. It is analogous to the global
setup.bash from Section 2.2, but tailored specifically to your workspace. Unless the direc-
46

3.3. A publisher program
tory structure changes, you only need to do this only once in each terminal, even if you
modify the code and recompile with catkin_make.
3.2.3 Executing the hello program
When all of those build steps are complete, your new ROS program is ready to execute
using rosrun (Section 2.6), just like any other ROS program. In our example, the command
is:
rosrun agitr hello
The program should produce output that looks something like this:
[ INFO] [1416432122.659693753]: Hello, ROS!
Don’t forget to start roscore first: This program is a node, and nodes need a master to run
correctly. By the way, the numbers in this output line represent the time—measured in
seconds since January 1, 1970—when our ROS_INFO_STREAM line was executed.
� This rosrun, along with some other ROS commands, may generate an error that
looks like this:
[rospack] Error: stack/package package-name not found
Two common causes of this error are (a) misspelling the package name, and (b)
failing to run the setup.bash for your workspace.
3.3 A publisher program
The hello program from the previous section showed how to compile and run a simple
ROS program. That program was useful as an introduction to catkin, but, like all “Hello,
World!” programs, it didn’t do anything useful. In this section, we’ll look at a program that
interacts with ROS a bit more.Í6 Specifically, we’ll see how to send randomly-generated
velocity commands to a turtlesim turtle, causing it to wander aimlessly. The brief C++
source code for the program, called pubvel, appears as Listing 3.4. This program shows all
of the elements needed to publish messages from code.
Í6http://wiki.ros.org/ROS/Tutorials/WritingPublisherSubscriber(c++)
47
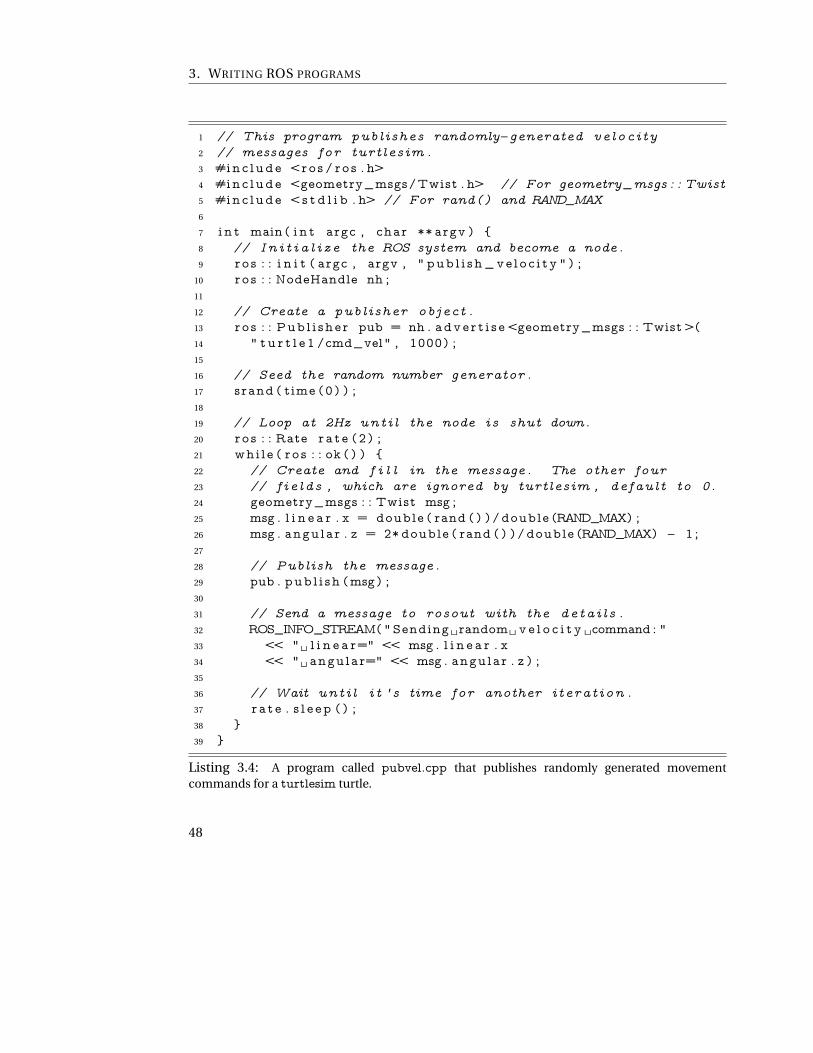
3. WRITING ROS PROGRAMS
1 // This program publishes randomly−generated velocity
2 // messages for turtlesim .
3 #inc lude <ros / ro s . h>
4 #inc lude <geometry_msgs/Twist . h> // For geometry_msgs : : Twist
5 #inc lude <s t d l i b . h> // For rand() and RAND_MAX
6
7 i n t main ( i n t argc , char ∗∗ argv ) {
8 // In i t i a l i z e the ROS system and become a node .
9 ro s : : i n i t ( argc , argv , " pub l i sh_ve loc i ty " ) ;
10 ro s : : NodeHandle nh ;
11
12 // Create a publisher object .
13 ro s : : Pub l i she r pub = nh . adve r t i s e <geometry_msgs : : Twist>(
14 " t u r t l e 1 /cmd_vel" , 1000) ;
15
16 // Seed the random number generator .
17 srand ( time (0 ) ) ;
18
19 // Loop at 2Hz unti l the node is shut down.
20 ro s : : Rate r a t e (2 ) ;
21 whi le ( ro s : : ok ( ) ) {
22 // Create and f i l l in the message . The other four
23 // f ie lds , which are ignored by turtlesim , default to 0.
24 geometry_msgs : : Twist msg ;
25 msg . l i n e a r . x = double ( rand ( ) ) / double (RAND_MAX) ;
26 msg . angular . z = 2∗ double ( rand ( ) ) / double (RAND_MAX) − 1 ;
27
28 // Publish the message .
29 pub . pub l i sh (msg) ;
30
31 // Send a message to rosout with the detai ls .
32 ROS_INFO_STREAM("Sending␣random␣ v e l o c i t y ␣command : "
33 << "␣ l i n e a r=" << msg . l i n e a r . x
34 << "␣ angular=" << msg . angular . z ) ;
35
36 // Wait unti l i t ' s time for another iteration .
37 r a t e . s l e e p ( ) ;
38 }
39 }
Listing 3.4: A program called pubvel.cpp that publishes randomly generated movement
commands for a turtlesim turtle.
48

3.3. A publisher program
3.3.1 Publishing messages
The main differences between pubvel and hello all stem from the need to publish mes-
sages.
Including the message type declaration You’ll likely recall from Section 2.7.2 that ev-
ery ROS topic is associated with a message type. Each message type has a corresponding
C++ header file. You’ll need to #include this header for every message type used in your
program, with code like this:
#include <package_name/type_name.h>
Note that the package name should be the name of the package containing the message
type, and not (necessarily) the name of your own package. In pubvel, we want to pub-
lish messages of type geometry_msgs/Twist—a type named Twist owned by a package
named geometry_msgs—so we need this line:
#include <geometry_msgs/Twist.h>
The purpose of this header is to define a C++ class that has the same data members as
the fields of the given message type. This class is defined in a namespace named after the
package. The practical impact of this naming is that when referring to message classes
in C++ code, you’ll use the double colon (::)—also called the scope resolution operator—
to separate the package name from the type name. In our pubvel example, the header
defines a class called geometry_msgs::Twist.
Creating a publisher object The work of actually publishing the messages is done by an
object of class ros::Publisher.Í7 A line like this creates the object we need:
ros::Publisher pub = node_handle.advertise<message_type>(
topic_name, queue_size);
Let’s have a look at each part of this line.
R The node_handle is an object of class ros::NodeHandle, one that you created near
the start of your program. We’re calling the advertise method of that object.
R The message_type part inside the angle brackets—formally called the template
parameter—is the data type for the messages we want to publish. This should be the
name of the class defined in the header discussed above. In the example, we use the
geometry_msgs::Twist class.
Í7http://wiki.ros.org/roscpp/Overview/PublishersandSubscribers
49
3. WRITING ROS PROGRAMS
R The topic_name is a string containing the name of the topic on which we want to
publish. It should match the topic names shown by rostopic list or rqt_graph, but
(usually) without the leading slash (/). We drop the leading slash to make the topic
name a relative name; Chapter 5 explains the mechanics and purposes of relative
names. In the example, the topic name is "turtle1/cmd_vel".
� Be careful about the difference between the topic name and the message type.
If you accidentally swap these two, you’ll get lots of potentially confusing
compile errors.
R The last parameter to advertise is an integer representing the size of the message
queue for this publisher. In most cases, a reasonably large value, say 1000, is suit-
able. If your program rapidly publishes more messages than the queue can hold, the
oldest unsent messages will be discarded.
¹ This parameter is needed because, in most cases, the message must be trans-
mitted to another node. This communication process can be time consum-
ing, especially compared to the time needed to create messages. ROS miti-
gates this delay by having the publish method (see below) store the message
in an “outbox” queue and return right away. A separate thread behind the
scenes actually transmits the message. The integer value given here is the
number of messages—and not, as you might guess, the number of bytes—
that the message queue can hold.
Interestingly, the ROS client library is smart enough to know when the pub-
lisher and subscriber nodes are part of the same underlying process. In these
cases, the message is delivered directly to the subscriber, without using any
network transport. This feature is very important for making nodeletsÍ8 —
that is, multiple nodes that can be dynamically loaded into a single process—
efficient.
If you want to publish messages on multiple topics from the same node, you’ll need to
create a separate ros::Publisher object for each topic.
Í8http://wiki.ros.org/nodelet
50

3.3. A publisher program
� Be mindful of the lifetime of your ros::Publisher objects. Creating the publisher
is an expensive operation, so it’s a usually bad idea to create a new ros::Publisher
object each time you want to publish a message. Instead, create one publisher for
each topic, and use that publisher throughout the execution of your program. In
pubvel, we accomplish this by declaring the publisher outside of the while loop.
Creating and filling in the message object Next, we create the message object itself. We
already referred to the message class when we created the ros::Publisher object. Objects
of that class have one publicly accessible data member for each field in the underlying
message type.
We used rosmsg show (Section 2.7.2) to see that the geometry_msgs/Twist message
type has two top-level fields (linear and angular), each of which contains three sub-fields
(x, y, and z). Each of these sub-fields is a 64-bit floating point number, called a double by
most C++ compilers. The code in Listing 3.4 creates a geometry_msgs::Twist object and
assigns pseudo-random numbers to two of these data members:
geometry_msgs::Twist msg;
msg.linear.x = double(rand())/double(RAND_MAX);
msg.angular.z = 2*double(rand())/double(RAND_MAX) - 1;
This code sets the linear velocity to a number between 0 and 1, and the angular velocity to a
number between −1 and 1. Because turtlesim ignores the other four fields (msg.linear.y,
msg.linear.z, msg.angular.x, and msg.angular.y), we leave them with their default value,
which happens to be zero.
Of course, most message types have fields with types other than float64. Fortunately,
the mapping from ROS field types to C++ types works precisely the way you might ex-
pect.Í9 One fact that may not be obvious is that fields with array types—shown with
square brackets by rosmsg show—are realized as STL vectors in C++ code.
Publishing the message After all of that preliminary work, it is very simple to actually
publish the message, using the publish method of the ros::Publisher object. In the exam-
ple, it looks like this:
pub.publish(msg);
This method adds the given msg the publisher’s outgoing message queue, from which it
will be sent as soon as possible to any subscribers of the corresponding topic.
Í9http://wiki.ros.org/msg
51
3. WRITING ROS PROGRAMS
Formatting the output Although it’s not directly related to publishing our velocity com-
mands, the ROS_INFO_STREAM line in Listing 3.4 is worth a look. This is a more
complete illustration of what ROS_INFO_STREAM can do, because it shows the abil-
ity to insert data other than strings—in this case, the specific randomly generated mes-
sage fields—into the output. Section 4.3 has more information about how ROS_INFO-
_STREAM works.
3.3.2 The publishing loop
The previous section covered the details of message publishing. Our pubvel example re-
peats the publishing steps inside a while loop to publish many different messages as time
passes. The program uses a two additional constructs to form this loop.
Checking for node shutdown The condition of pubvel’s while loop is:
ros::ok()
Informally, this function checks whether our program is still in “good standing” as a ROS
node. It will return true, until the node has some reason to shut down. There are a few
ways to get ros::ok() to return false:
R You can use rosnode kill on the node.
R You can send an interrupt signal (Ctrl-C) to the program.
¹ Interestingly, ros::init() installs a handler for this signal, and uses it to initiate
a graceful shutdown. The impact is that Ctrl-C can be used to make ros::ok()
return false, but does not immediately terminate the program. This can be
important if there are clean-up steps—Writing log files, saving partial results,
saying goodbye, etc—that should happen before the program exits.
R You can call, somewhere in the program itself,
ros::shutdown()
This function can be a useful way to signal that your node’s work is complete from
deep within your code.
R You can start another node with the same name. This usually happens if you start a
new instance of the same program.
52
3.3. A publisher program
Controlling the publishing rate The last new element of pubvel is its use of a ros::Rate
object:Í10
ros::Rate rate(2);
This object controls how rapidly the loop runs. The parameter in its constructor is in units
of Hz, that is, in cycles per second. This example creates a rate object designed to regulate
a loop that executes two iterations per second. Near the end of each loop iteration, we call
the sleep method of this object:
rate.sleep();
Each call to the this method causes a delay in the program. The duration of the delay is cal-
culated to prevent the loop from iterating faster than the specified rate. Without this kind
of control, the program would publish messages as fast as the computer allows, which can
overwhelm publish and subscribe queues and waste computation and network resources.
(On the author’s computer, an unregulated version of this program topped out around
6300 messages per second.)
You can confirm that this regulation is working correctly, using rostopic hz. For pub-
vel, the results should look similar to this:
average rate: 2.000
min: 0.500s max: 0.500s std dev: 0.00006s window: 10
We can see that our messages are being published at a rate of two per second, with very
little deviation from this schedule.
� You might be thinking of an alternative to ros::Rate that uses a simple, fixed delay—
perhaps generated by sleep or usleep—in each loop iteration. The advantage of
a ros::Rate object over this approach is that ros::Rate can account for the time
consumed by other parts of the loop. If there is nontrivial computation to be done
in each iteration (as we would expect from a real program), the time consumed by
this computation is subtracted from the delay. In extreme cases, in which the real
work of the loop takes longer than the requested rate, the delay induced by sleep()
can be reduced to zero.
Í10http://wiki.ros.org/roscpp/Overview/Time
53

3. WRITING ROS PROGRAMS
3.3.3 Compiling pubvel
The process of building pubvel is mostly the same as for hello: Modify CMakeLists.txt
and package.xml, and then use catkin_make to build your workspace. There is, however,
one important difference from hello.
Declaring message type dependencies Because pubvel uses a message type from the
geometry_msgs package, we must declare a dependency on that package. This takes the
same form as the roscpp dependency discussed in Section 3.2.2. Specifically, we must
modify the find_package line in CMakeLists.txt to mention geometry_msgs in addi-
tion to roscpp:
find_package(catkin REQUIRED COMPONENTS roscpp geometry_msgs)
Note that we are modifying the existing find_package line, rather than creating a new one.
In package.xml, we should add elements for the new dependency:
<build_depend>geometry_msgs</build_depend>
<run_depend>geometry_msgs</run_depend>
� If you skip (or forget) this step, then catkin_make may not be able to find the
header file geometry_msgs/Twist.h. When you see errors about missing header
files, it’s a good idea to verify the dependencies of your package.
3.3.4 Executing pubvel
At last, we’re ready to run pubvel. As usual, rosrun can do the job.
rosrun agitr pubvel
You’ll also want to run a turtlesim simulator, so that you can see the turtle respond to the
motion commands that pubvel publishes:
rosrun turtlesim turtlesim_node
Figure 3.1 shows an example of the results.
54
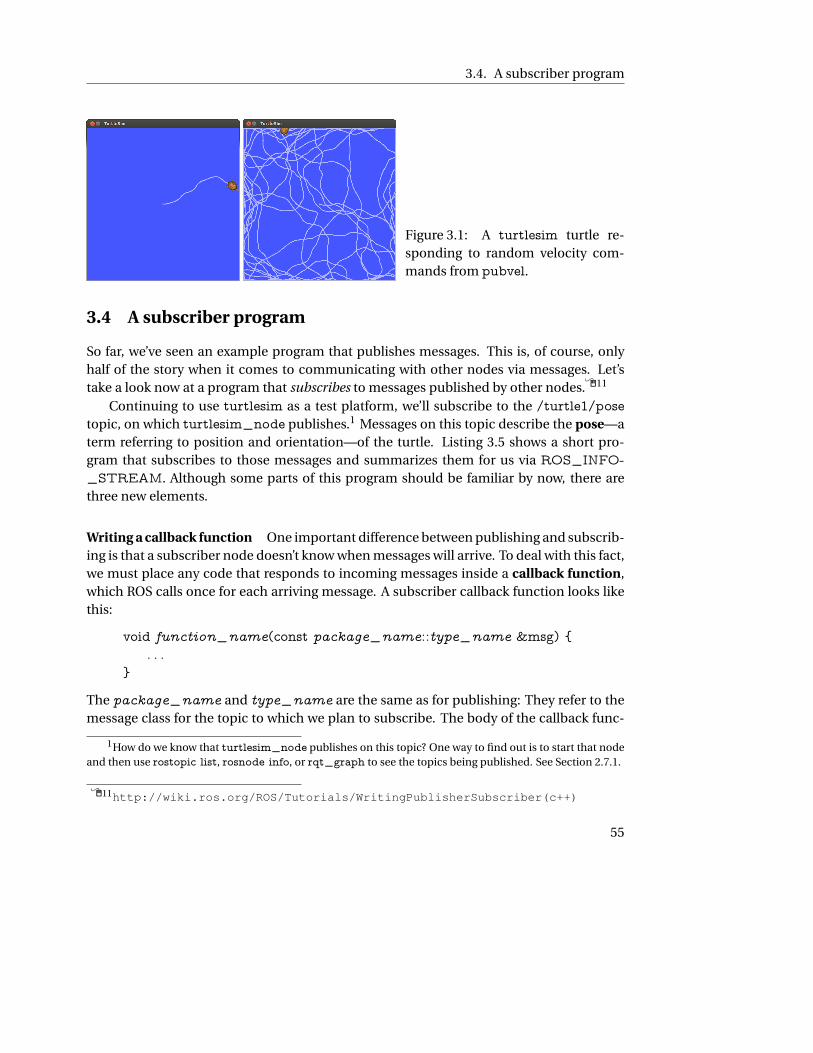
3.4. A subscriber program
Figure 3.1: A turtlesim turtle re-
sponding to random velocity com-
mands from pubvel.
3.4 A subscriber program
So far, we’ve seen an example program that publishes messages. This is, of course, only
half of the story when it comes to communicating with other nodes via messages. Let’s
take a look now at a program that subscribes to messages published by other nodes.Í11
Continuing to use turtlesim as a test platform, we’ll subscribe to the /turtle1/pose
topic, on which turtlesim_node publishes.1 Messages on this topic describe the pose—a
term referring to position and orientation—of the turtle. Listing 3.5 shows a short pro-
gram that subscribes to those messages and summarizes them for us via ROS_INFO-
_STREAM. Although some parts of this program should be familiar by now, there are
three new elements.
Writing a callback function One important difference between publishing and subscrib-
ing is that a subscriber node doesn’t know when messages will arrive. To deal with this fact,
we must place any code that responds to incoming messages inside a callback function,
which ROS calls once for each arriving message. A subscriber callback function looks like
this:
void function_name(const package_name::type_name &msg) {
. . .
}
The package_name and type_name are the same as for publishing: They refer to the
message class for the topic to which we plan to subscribe. The body of the callback func-
1How do we know that turtlesim_node publishes on this topic? One way to find out is to start that node
and then use rostopic list, rosnode info, or rqt_graph to see the topics being published. See Section 2.7.1.
Í11http://wiki.ros.org/ROS/Tutorials/WritingPublisherSubscriber(c++)
55
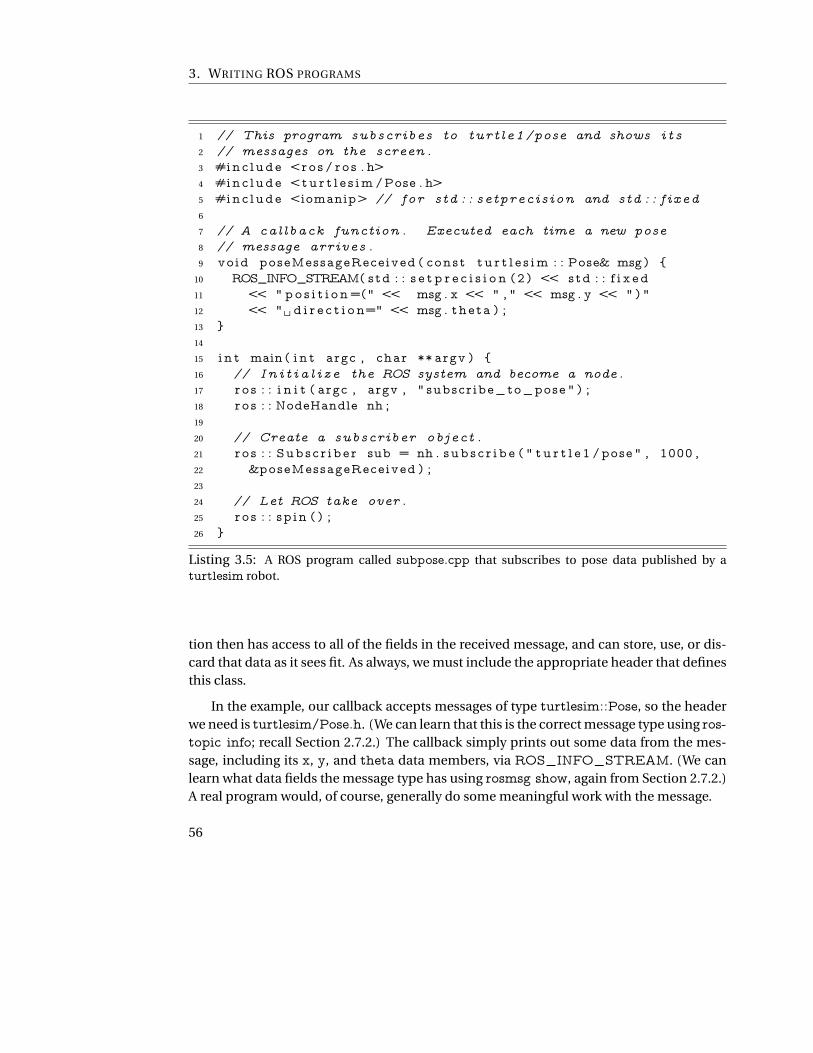
3. WRITING ROS PROGRAMS
1 // This program subscribes to turt le1/pose and shows i t s
2 // messages on the screen .
3 #inc lude <ros / ro s . h>
4 #inc lude <tu r t l e s im /Pose . h>
5 #inc lude <iomanip> // for std : : setprecision and std : : fixed
6
7 // A callback function . Executed each time a new pose
8 // message arrives .
9 void poseMessageReceived ( const t u r t l e s im : : Pose& msg) {
10 ROS_INFO_STREAM( std : : s e t p r e c i s i o n (2 ) << std : : f i x ed
11 << " po s i t i o n=(" << msg . x << " , " << msg . y << " ) "
12 << "␣ d i r e c t i o n=" << msg . theta ) ;
13 }
14
15 i n t main ( i n t argc , char ∗∗ argv ) {
16 // In i t i a l i z e the ROS system and become a node .
17 ro s : : i n i t ( argc , argv , " subscribe_to_pose " ) ;
18 ro s : : NodeHandle nh ;
19
20 // Create a subscriber object .
21 ro s : : Subsc r ibe r sub = nh . sub s c r i b e ( " t u r t l e 1 /pose " , 1000 ,
22 &poseMessageReceived ) ;
23
24 // Let ROS take over .
25 ro s : : sp in ( ) ;
26 }
Listing 3.5: A ROS program called subpose.cpp that subscribes to pose data published by a
turtlesim robot.
tion then has access to all of the fields in the received message, and can store, use, or dis-
card that data as it sees fit. As always, we must include the appropriate header that defines
this class.
In the example, our callback accepts messages of type turtlesim::Pose, so the header
we need is turtlesim/Pose.h. (We can learn that this is the correct message type using ros-
topic info; recall Section 2.7.2.) The callback simply prints out some data from the mes-
sage, including its x, y, and theta data members, via ROS_INFO_STREAM. (We can
learn what data fields the message type has using rosmsg show, again from Section 2.7.2.)
A real program would, of course, generally do some meaningful work with the message.
56
3.4. A subscriber program
Notice that subscriber callback functions have a void return type. A bit of thought
should confirm that this makes sense. Since it’s ROS’s job to call this function, there’s no
place in our program for any non-void return value to go.
Creating a subscriber object To subscribe to a topic, we create a ros::Subscriber ob-
ject:Í12
ros::Subscriber sub = node_handle.subscribe(topic_name,
queue_size, pointer_to_callback_function);
This line has several moving parts (most of which have analogues in the declaration of a
ros::Publisher):
R The node_handle is the same node handle object that we’ve seen several times
already.
R The topic_name is the name of the topic to which we want to subscribe, in the
form of a string. This example uses "turtle1/pose". Again, we omit the leading
slash to make this string a relative name.
R The queue_size is the integer size of the message queue for this subscriber. Usu-
ally, you can use a large value like 1000 without worrying too much about the queu-
ing process.
¹ When new messages arrive, they are stored in a queue until ROS gets a chance
to execute your callback function. This parameter establishes a maximum
number of messages that ROS will store in that queue at one time. If new
messages arrive when the queue is full, the oldest unprocessed messages will
be dropped to make room. This may seem, on the surface, to be very similar
to the technique used for publishing messages—See page 50—but differs in
an important way: The rate at which ROS can empty a publishing queue de-
pends on the time taken to actually transmit the messages to subscribers, and
is largely out of our control. In contrast, the speed with which ROS empties
a subscribing queue depends on how quickly we process callbacks. Thus, we
can reduce the likelihood of a subscriber queue overflowing by (a) ensuring
that we allow callbacks to occur, via ros::spin or ros::spinOnce, frequently,
and (b) reducing the amount of time consumed by each callback.
Í12http://wiki.ros.org/roscpp/Overview/PublishersandSubscribers
57

3. WRITING ROS PROGRAMS
R The last parameter is a pointer to the callback function that ROS should execute
when messages arrive. In C++, you can get a pointer to a function using the amper-
sand (&, “address-of”) operator on the function name. In our example, it looks like
this:
&poseMessageReceived
� Don’t make the common mistake of writing () (or even (msg)) after the func-
tion name. Those parentheses (and arguments) are needed only when you ac-
tually want to call a function, not when you want to get a pointer to a function
without calling it, as we are doing here. ROS supplies the required arguments
when it calls your callback function.
¹ Comment on C++ syntax: The ampersand is actually optional, and many pro-
grams omit it. The compiler can tell that you want a pointer to the function,
rather than the value returned from executing the function, because the func-
tion name is not followed by parentheses. The author’s suggestion is to in-
clude it, because it makes the fact that we’re dealing with a pointer more ob-
vious to human readers.
You might notice that, while creating a ros::Subscriber object, we do not explicitly
mention the message type anywhere. In fact, the subscribe method is templated, and
the C++ compiler infers the correct message type based on the data type of the callback
function pointer we provide.
� If you use the wrong message type as the argument to your callback function, the
compiler will not be able to detect this error. Instead, you’ll see run-time error mes-
sages complaining about the type mismatch. These errors could, depending on the
timing, come from either the publisher or subscriber nodes.
One potentially counterintuitive fact about ros::Subscriber objects is that it is quite
rare to actually call any of their methods. Instead, the lifetime of that object is the most
58
3.4. A subscriber program
relevant part: When we construct a ros::Subscriber, our node establishes connections
with any publishers of the named topic. When the object is destroyed—either by going out
of scope, or by a delete of an object created by the new operator—those connections are
dropped.
Giving ROS control The final complication is that ROS will only execute our callback
function when we give it explicit permission to do so.Í13 There are actually two slightly
different ways to accomplish this. One version looks like this:
ros::spinOnce();
This code asks ROS to execute all of the pending callbacks from all of the node’s subscrip-
tions, and then return control back to us. The other option looks like this:
ros::spin();
This alternative to ros::spinOnce() asks ROS to wait for and execute callbacks until the
node shuts down. In other words, ros::spin() is roughly equivalent to this loop:
while(ros::ok()) {
ros::spinOnce();
}
The question of whether to use ros::spinOnce() or ros::spin() comes down to this: Does
your program have any repetitive work to do, other than responding to callbacks? If the
answer is “No,” then use ros::spin(). If the answer is “Yes,” then a reasonable option is to
write a loop that does that other work and calls ros::spinOnce() periodically to process
callbacks. Listing 3.5 uses ros::spin() because that program’s only job is to receive and
summarize incoming pose messages.
� A common error in subscriber programs is to mistakenly omit both ros::spinOnce
and ros::spin. In this case, ROS never has an opportunity to execute your callback
function. Omitting ros::spin will likely cause your program to exit shortly after it
starts. Omitting ros::spinOnce might make it appear as though no messages are
being received.
Í13http://wiki.ros.org/roscpp/Overview/CallbacksandSpinning
59

3. WRITING ROS PROGRAMS
1 [ INFO] [1370972120 .089584153 ] : p o s i t i o n =(2 .42 ,2 . 32 ) d i r e c t i o n =1.93
2 [ INFO] [1370972120 .105376510 ] : p o s i t i o n =(2 .41 ,2 . 33 ) d i r e c t i o n =1.95
3 [ INFO] [1370972120 .121365352 ] : p o s i t i o n =(2 .41 ,2 . 34 ) d i r e c t i o n =1.96
4 [ INFO] [1370972120 .137468325 ] : p o s i t i o n =(2 .40 ,2 . 36 ) d i r e c t i o n =1.98
5 [ INFO] [1370972120 .153486499 ] : p o s i t i o n =(2 .40 ,2 . 37 ) d i r e c t i o n =2.00
6 [ INFO] [1370972120 .169468546 ] : p o s i t i o n =(2 .39 ,2 . 38 ) d i r e c t i o n =2.01
7 [ INFO] [1370972120 .185472204 ] : p o s i t i o n =(2 .39 ,2 . 39 ) d i r e c t i o n =2.03
Listing 3.6: Sample output from subpose, showing gradual changes in the robot’s pose.
3.4.1 Compiling and executing subpose
This program can be compiled and executed just like the first two examples we’ve seen.
� Don’t forget to ensure that your package has a dependency on turtlesim, which is
needed because we’re using the turtlesim/Pose message type. See Section 3.3.3 for
a reminder of how to declare this dependency.
A sample of the program’s output, from when both turtlesim_node and pubvel were
also running, appears as Listing 3.6.
3.5 Looking forward
This chapter’s intent was to show how to write, compile, and execute a few simple pro-
grams, including programs that perform the core ROS operations of publishing and sub-
scribing. Each of these programs used a macro called ROS_INFO_STREAM to gener-
ate informational log messages. In the next chapter, we’ll examine ROS’s logging system,
of which ROS_INFO_STREAM is just a small part, more completely.
60
Chapter 4
Log messagesIn which we generate and view log messages.
We have already seen, in the example programs from Chapter 3, a macro called ROS-
_INFO_STREAM that displays informative messages to the user. These messages are
examples of log messages. ROS provides a rich logging system that includes ROS_INFO-
_STREAM along with a number of other features. In this chapter, we’ll see how to use
that logging system.
4.1 Severity levels
The idea of ROS’s logging system—and, for the most part, software logging in general—is
to allow programs to generate a stream of short text strings called log messages. In ROS,
log messages are classified into five groups called severity levels, which are sometimes
called just severities and sometimes called just levels. The levels are, in order of increasing
importance:Í1
DEBUG
INFO
WARN
ERROR
FATAL
The idea is that DEBUG messages may be generated very frequently, but are not gener-
ally interesting when the program is working correctly. At the other end of the spectrum,
Í1http://wiki.ros.org/VerbosityLevels
61
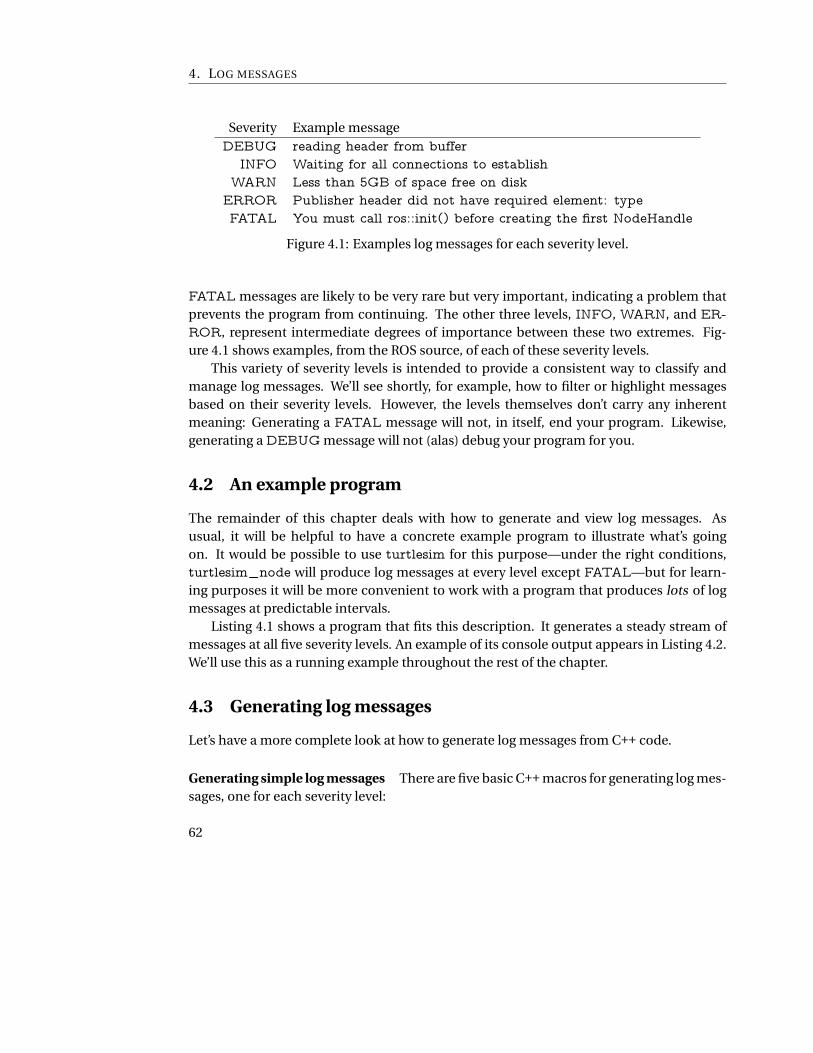
4. LOG MESSAGES
Severity Example message
DEBUG reading header from buffer
INFO Waiting for all connections to establish
WARN Less than 5GB of space free on disk
ERROR Publisher header did not have required element: type
FATAL You must call ros::init() before creating the first NodeHandle
Figure 4.1: Examples log messages for each severity level.
FATAL messages are likely to be very rare but very important, indicating a problem that
prevents the program from continuing. The other three levels, INFO, WARN, and ER-
ROR, represent intermediate degrees of importance between these two extremes. Fig-
ure 4.1 shows examples, from the ROS source, of each of these severity levels.
This variety of severity levels is intended to provide a consistent way to classify and
manage log messages. We’ll see shortly, for example, how to filter or highlight messages
based on their severity levels. However, the levels themselves don’t carry any inherent
meaning: Generating a FATAL message will not, in itself, end your program. Likewise,
generating a DEBUG message will not (alas) debug your program for you.
4.2 An example program
The remainder of this chapter deals with how to generate and view log messages. As
usual, it will be helpful to have a concrete example program to illustrate what’s going
on. It would be possible to use turtlesim for this purpose—under the right conditions,
turtlesim_node will produce log messages at every level except FATAL—but for learn-
ing purposes it will be more convenient to work with a program that produces lots of log
messages at predictable intervals.
Listing 4.1 shows a program that fits this description. It generates a steady stream of
messages at all five severity levels. An example of its console output appears in Listing 4.2.
We’ll use this as a running example throughout the rest of the chapter.
4.3 Generating log messages
Let’s have a more complete look at how to generate log messages from C++ code.
Generating simple log messages There are five basic C++ macros for generating log mes-
sages, one for each severity level:
62
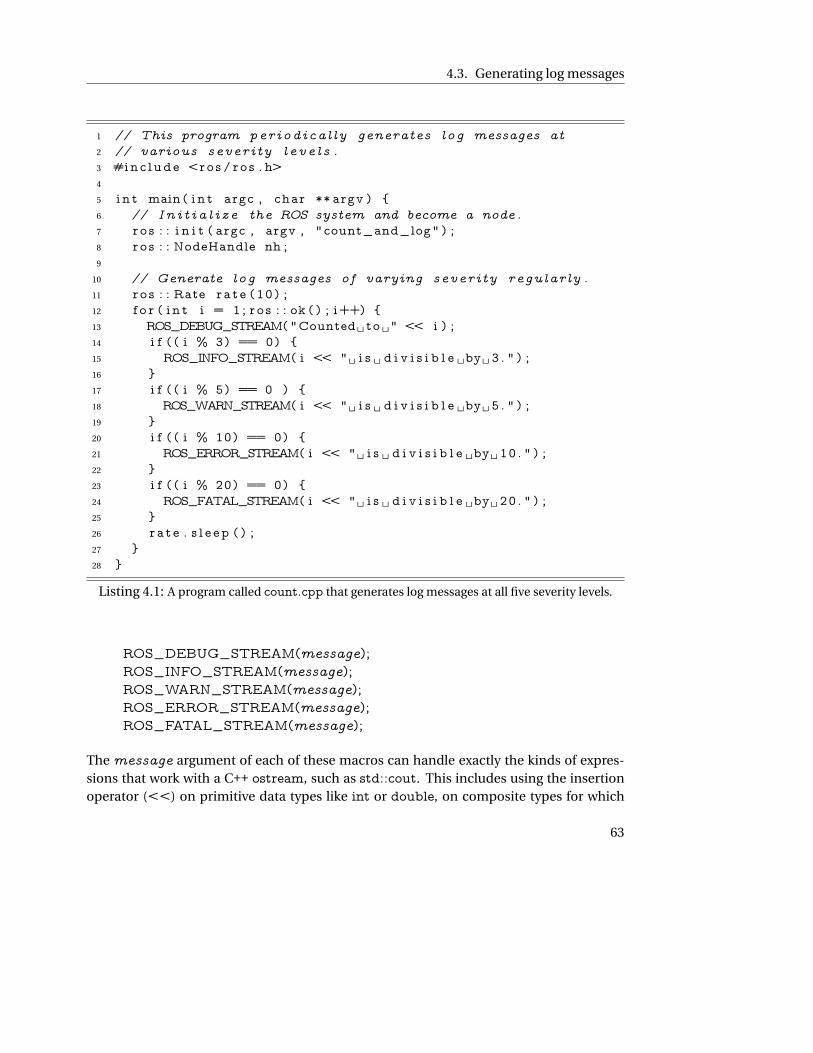
4.3. Generating log messages
1 // This program periodical ly generates log messages at
2 // various severity leve l s .
3 #inc lude <ros / ro s . h>
4
5 i n t main ( i n t argc , char ∗∗ argv ) {
6 // In i t i a l i z e the ROS system and become a node .
7 ro s : : i n i t ( argc , argv , "count_and_log" ) ;
8 ro s : : NodeHandle nh ;
9
10 // Generate log messages of varying severity regularly .
11 ro s : : Rate r a t e (10) ;
12 f o r ( i n t i = 1 ; ro s : : ok ( ) ; i++) {
13 ROS_DEBUG_STREAM("Counted␣ to ␣" << i ) ;
14 i f ( ( i % 3) == 0) {
15 ROS_INFO_STREAM( i << "␣ i s ␣ d i v i s i b l e ␣by␣ 3 . " ) ;
16 }
17 i f ( ( i % 5) == 0 ) {
18 ROS_WARN_STREAM( i << "␣ i s ␣ d i v i s i b l e ␣by␣ 5 . " ) ;
19 }
20 i f ( ( i % 10) == 0) {
21 ROS_ERROR_STREAM( i << "␣ i s ␣ d i v i s i b l e ␣by␣ 10 . " ) ;
22 }
23 i f ( ( i % 20) == 0) {
24 ROS_FATAL_STREAM( i << "␣ i s ␣ d i v i s i b l e ␣by␣ 20 . " ) ;
25 }
26 r a t e . s l e e p ( ) ;
27 }
28 }
Listing 4.1: A program called count.cpp that generates log messages at all five severity levels.
ROS_DEBUG_STREAM(message);
ROS_INFO_STREAM(message);
ROS_WARN_STREAM(message);
ROS_ERROR_STREAM(message);
ROS_FATAL_STREAM(message);
The message argument of each of these macros can handle exactly the kinds of expres-
sions that work with a C++ ostream, such as std::cout. This includes using the insertion
operator (<<) on primitive data types like int or double, on composite types for which
63
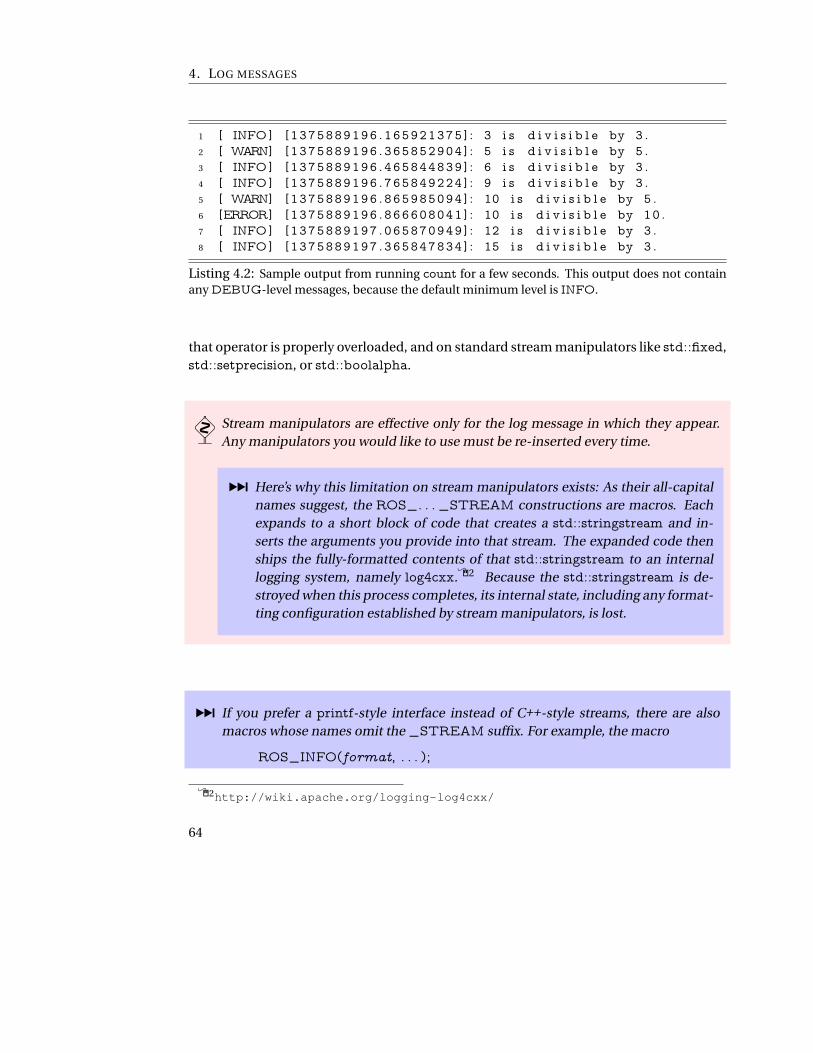
4. LOG MESSAGES
1 [ INFO ] [ 1375889196 .165921375 ] : 3 i s d i v i s i b l e by 3 .
2 [ WARN] [1375889196 .365852904 ] : 5 i s d i v i s i b l e by 5 .
3 [ INFO ] [ 1375889196 .465844839 ] : 6 i s d i v i s i b l e by 3 .
4 [ INFO ] [ 1375889196 .765849224 ] : 9 i s d i v i s i b l e by 3 .
5 [ WARN] [1375889196 .865985094 ] : 10 i s d i v i s i b l e by 5 .
6 [ERROR] [1375889196 .866608041 ] : 10 i s d i v i s i b l e by 10 .
7 [ INFO ] [ 1375889197 .065870949 ] : 12 i s d i v i s i b l e by 3 .
8 [ INFO ] [ 1375889197 .365847834 ] : 15 i s d i v i s i b l e by 3 .
Listing 4.2: Sample output from running count for a few seconds. This output does not contain
any DEBUG-level messages, because the default minimum level is INFO.
that operator is properly overloaded, and on standard stream manipulators like std::fixed,
std::setprecision, or std::boolalpha.
� Stream manipulators are effective only for the log message in which they appear.
Any manipulators you would like to use must be re-inserted every time.
¹ Here’s why this limitation on stream manipulators exists: As their all-capital
names suggest, the ROS_. . . _STREAM constructions are macros. Each
expands to a short block of code that creates a std::stringstream and in-
serts the arguments you provide into that stream. The expanded code then
ships the fully-formatted contents of that std::stringstream to an internal
logging system, namely log4cxx.Í2 Because the std::stringstream is de-
stroyed when this process completes, its internal state, including any format-
ting configuration established by stream manipulators, is lost.
¹ If you prefer a printf-style interface instead of C++-style streams, there are also
macros whose names omit the _STREAM suffix. For example, the macro
ROS_INFO(format, . . . );
Í2http://wiki.apache.org/logging-log4cxx/
64

4.3. Generating log messages
generates INFO-level log messages. These macros work exactly as you might ex-
pect, at least if you’re familiar with printf. As a concrete example, the output line in
Listing 3.4 is roughly equivalent to:
ROS_INFO("position=(%0.2f,%0.2f) direction=%0.2f",
msg.x, msg.y, msg.theta);
There are also printf-style versions of the one time (. . . _ONCE) and throttled (. . . -
_THROTTLE) families of macros introduced below, again with names that omit
the _STREAM part.
Notice that there’s no need to use std::endl nor any other line terminator, because the
logging system is already line-oriented. Each call to any of these macros will generate a
single, complete log message which will be displayed as a single line.
Generating one-time log messages Sometimes, log messages that are generated inside
loops or in frequently-called functions are important to the user, but also irritatingly repet-
itive. One natural way to deal with these situations would be to use a static variable to
ensure that the message is generated only once, the first time it is reached. Listing 4.3
shows a C++ fragment that would accomplish this. To avoid repeating this cumbersome
block of code—Wrapping it in a function would not work, because this technique needs a
distinct static variable for each statement—ROS provides shorthand macros that generate
precisely these sorts of one-time only log messages.
ROS_DEBUG_STREAM_ONCE(message);
ROS_INFO_STREAM_ONCE(message);
ROS_WARN_STREAM_ONCE(message);
ROS_ERROR_STREAM_ONCE(message);
ROS_FATAL_STREAM_ONCE(message);
The first time these macros are encountered during a program’s execution, they generate
the same log messages as the corresponding non-ONCE versions. After that first execu-
tion, these statements have no effect. Listing 4.4 shows a minimal example, in which the
logging macros each generate one message, on the first iteration of the loop, and are ig-
nored on all future iterations.
Generating throttled log messages Similarly, there are macros for throttling the rate at
which a given log message appears.
65

4. LOG MESSAGES
1 // Don' t do this direct ly . Use ROS_. . ._STREAM_ONCE instead .
2 {
3 s t a t i c bool f i r s t_t ime = true ;
4 i f ( f i r s t_t ime ) {
5 ROS_INFO_STREAM("Here ' s ␣some␣ important ␣ in fo rmat ion "
6 << "␣ that ␣ w i l l ␣ only ␣ appear ␣once . " ) ;
7 f i r s t_t ime = f a l s e ;
8 }
9 }
Listing 4.3: A fragment of C++ that disables a log message after its first execution. The
ROS_. . ._STREAM_ONCE macros expand to very similar code blocks.
1 // This program generates a single log message at each
2 // severity l eve l .
3 #inc lude <ros / ro s . h>
4
5 i n t main ( i n t argc , char ∗∗ argv ) {
6 ro s : : i n i t ( argc , argv , " log_once" ) ;
7 ro s : : NodeHandle nh ;
8
9 whi le ( ro s : : ok ( ) ) {
10 ROS_DEBUG_STREAM_ONCE("This ␣ appears ␣ only ␣once . " ) ;
11 ROS_INFO_STREAM_ONCE("This ␣ appears ␣ only ␣once . " ) ;
12 ROS_WARN_STREAM_ONCE("This ␣ appears ␣ only ␣once . " ) ;
13 ROS_ERROR_STREAM_ONCE("This ␣ appears ␣ only ␣once . " ) ;
14 ROS_FATAL_STREAM_ONCE("This ␣ appears ␣ only ␣once . " ) ;
15 }
16 }
Listing 4.4: A C++ program called once.cpp that generates only five log messages.
ROS_DEBUG_STREAM_THROTTLE(interval, message);
ROS_INFO_STREAM_THROTTLE(interval, message);
ROS_WARN_STREAM_THROTTLE(interval, message);
ROS_ERROR_STREAM_THROTTLE(interval, message);
ROS_FATAL_STREAM_THROTTLE(interval, message);
The interval parameter is a double that specifies the minimum amount of time, mea-
sured in seconds, that must pass between successive instances of the given log message.
66
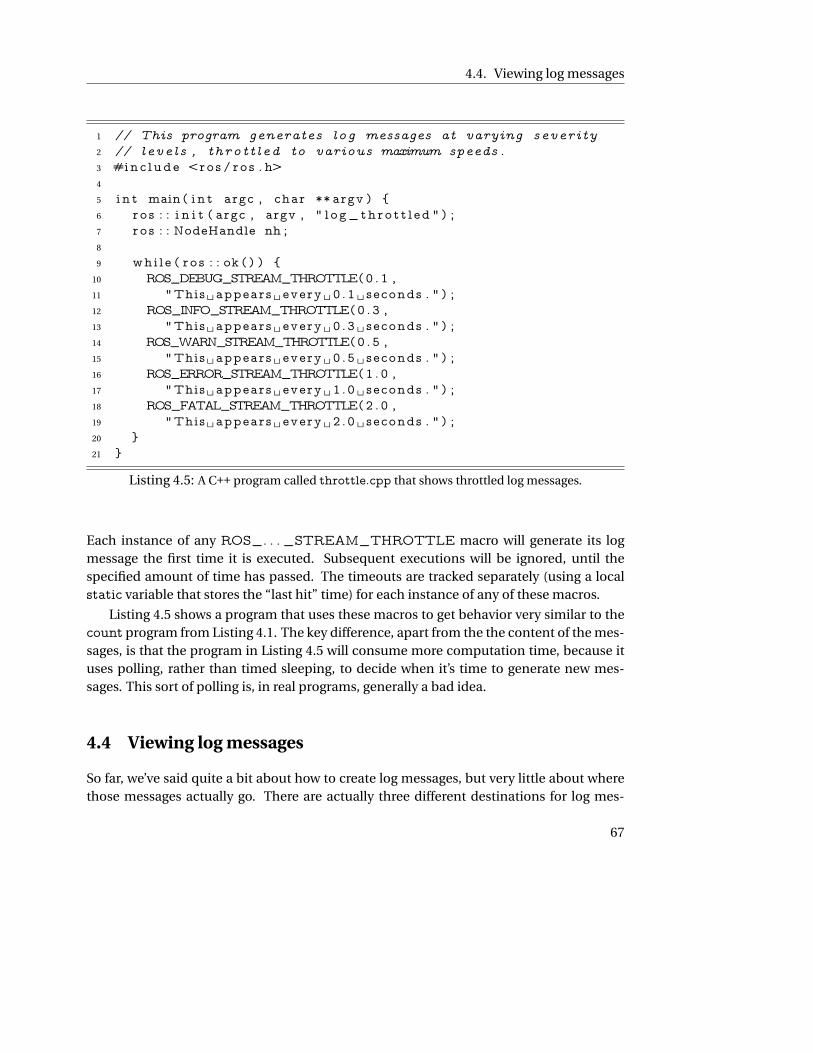
4.4. Viewing log messages
1 // This program generates log messages at varying severity
2 // levels , thrott led to various maximum speeds .
3 #inc lude <ros / ro s . h>
4
5 i n t main ( i n t argc , char ∗∗ argv ) {
6 ro s : : i n i t ( argc , argv , " l og_thro t t l ed " ) ;
7 ro s : : NodeHandle nh ;
8
9 whi le ( ro s : : ok ( ) ) {
10 ROS_DEBUG_STREAM_THROTTLE(0 . 1 ,
11 "This ␣ appears ␣ every ␣ 0 .1 ␣ seconds . " ) ;
12 ROS_INFO_STREAM_THROTTLE(0 . 3 ,
13 "This ␣ appears ␣ every ␣ 0 .3 ␣ seconds . " ) ;
14 ROS_WARN_STREAM_THROTTLE(0 . 5 ,
15 "This ␣ appears ␣ every ␣ 0 .5 ␣ seconds . " ) ;
16 ROS_ERROR_STREAM_THROTTLE(1 . 0 ,
17 "This ␣ appears ␣ every ␣ 1 .0 ␣ seconds . " ) ;
18 ROS_FATAL_STREAM_THROTTLE(2 . 0 ,
19 "This ␣ appears ␣ every ␣ 2 .0 ␣ seconds . " ) ;
20 }
21 }
Listing 4.5: A C++ program called throttle.cpp that shows throttled log messages.
Each instance of any ROS_. . . _STREAM_THROTTLE macro will generate its log
message the first time it is executed. Subsequent executions will be ignored, until the
specified amount of time has passed. The timeouts are tracked separately (using a local
static variable that stores the “last hit” time) for each instance of any of these macros.
Listing 4.5 shows a program that uses these macros to get behavior very similar to the
count program from Listing 4.1. The key difference, apart from the the content of the mes-
sages, is that the program in Listing 4.5 will consume more computation time, because it
uses polling, rather than timed sleeping, to decide when it’s time to generate new mes-
sages. This sort of polling is, in real programs, generally a bad idea.
4.4 Viewing log messages
So far, we’ve said quite a bit about how to create log messages, but very little about where
those messages actually go. There are actually three different destinations for log mes-
67
4. LOG MESSAGES
sages: Each log message can appear as output on the console, as a message on the rosout
topic, and as an entry in a log file. Let’s see how to use each of these.
4.4.1 Console
First, and most visibly, log messages are sent to the console. Specifically, DEBUG and
INFO messages are printed on standard output, whereas WARN, ERROR, and FATAL
messages are sent to standard error.Í3
¹ The distinction here between standard output and standard error is basically irrel-
evant, unless you want to redirect one or both of these streams to a file or a pipe, in
which case it causes some complications. The usual file redirection technique
command > file
redirects standard output, but not standard error. To capture all of the log messages
to the same file, use something like this instead:
command &> file
Be careful, however, because differences in the way these two streams are buffered
can cause the messages to appear out of order—with DEBUG and INFO messages
appearing later than one might expect—in the result. You can force the messages
into their natural order by using the stdbuf command to convince standard output
to use line buffering:
stdbuf -oL command &> file
Finally, note that ROS inserts ANSI color codes—which look, to humans and to soft-
ware that does not understand them, something like this: ˆ[[0m—into its output,
even if the output is not being directed to a terminal. To view a file containing these
sorts of codes, try a command like this:
less -r file
Formatting console messages You can tweak the format used to print log messages on
the console by setting the ROSCONSOLE_FORMAT environment variable. This vari-
Í3http://wiki.ros.org/roscpp/Overview/Logging
68
4.4. Viewing log messages
able will generally contain one or more field names, each denoted by a dollar sign and
curly braces, showing where the log message data should be inserted. The default format
is equivalent to:
[${severity}] [${time}]: ${message}
This format is probably suitable for most uses, but there are a few other fields that might
be useful:Í4
R To insert details about the source code location from which the message was gener-
ated, use some combination of the ${file}, ${line}, and ${function} fields.
R To insert the name of the node that generated the log message, use the ${node}
field.
� The roslaunch tool (which we’ll introduce in Chapter 6) does not, by default, funnel
standard output and standard error from the nodes it launches to its own output
streams. To see output from a roslaunched node, you must explicitly use the out-
put="screen" attribute, or force all nodes to have this attribute with the --screen
command-line parameter to roslaunch. See page 88.
4.4.2 Messages on rosout
In addition to appearing on the console, every log message is also published on the topic
/rosout. The message type of this topic is rosgraph_msgs/Log. Listing 4.6 shows the
fields in this data type, which includes the severity level, the message itself, and some other
associated metadata.
You might notice that the information in each of these messages is quite similar to
the details in the console output discussed above. The primary usefulness of the /rosout
topic, compared to the console output, is that it includes, in a single stream, log messages
from every node in the system. All of those log messages show up on /rosout, regardless
of where, when, or how their nodes were started, or even which computer they’re running
on.
Since /rosout is just an ordinary topic, you could, of course, use
Í4http://wiki.ros.org/rosconsole
69
4. LOG MESSAGES
1 byte DEBUG=1
2 byte INFO=2
3 byte WARN=4
4 byte ERROR=8
5 byte FATAL=16
6 std_msgs/Header header
7 uint32 seq
8 time stamp
9 s t r i n g frame_id
10 byte l e v e l
11 s t r i n g name
12 s t r i n g msg
13 s t r i n g f i l e
14 s t r i n g func t i on
15 uint32 l i n e
16 s t r i n g [ ] t o p i c s
Listing 4.6: Fields in the rosgraph_msgs/Log message type.
rostopic echo /rosout
to see the messages directly. If you insist, could even write a program of your own to sub-
scribe to /rosout and display or process the messages however you like. However, the
simplest way to see /rosout messages is to use this command:Í5Í6
rqt_console
Figure 4.2 depicts the resulting GUI. It shows log messages from all nodes, one per line,
along with options to hide or highlight messages based on various kinds of filters. The GUI
itself should not need any extra explanation.
¹ The description of rqt_console above is not quite true. In fact, rqt_console sub-
scribes to /rosout_agg instead of /rosout. Here’s the true graph, when both our
count example and an instance of rqt_console are running:
Í5http://wiki.ros.org/ROS/Tutorials/UsingRqtconsoleRoslaunch
Í6http://wiki.ros.org/rqt_console
70

4.4. Viewing log messages
Figure 4.2: The GUI for
rqt_console.
/rosout_agg
/rqt_gui_py_node
/rosout /rosout/count_and_log
The _agg suffix refers to the fact that messages are aggregated by the rosout node.
Every message published on the /rosout topic is echoed on the /rosout_agg topic
by the rosout node.
The reason for this apparent redundancy is to reduce the overhead of debugging.
Because each publisher-subscriber relationship leads to a direct network connec-
tion between the two nodes, subscribing to /rosout (for which every node is a
publisher) can be costly on systems with many nodes, especially when those nodes
generate many log messages. The idea is that the rosout node will be the only sub-
scriber to /rosout and the only publisher on /rosout_agg. Then debugging tools
can access the complete stream of log messages, without creating extra work for
every node in the system, by subscribing to /rosout_agg.
As an aside, ROS packages for some robots, including the PR2 and the TurtleBot,
use the same pattern for diagnostic messages, which are originally published on a
topic called /diagnostics and echoed by an aggregator node on another topic called
/diagnostics_agg.
71
4. LOG MESSAGES
4.4.3 Log files
The third and final destination for log messages is a log file generated by the rosout node.
As part of its callback function for the /rosout topic, this node writes a line to a file with a
name like this:
∼/.ros/log/run_id/rosout.log
This rosout.log log file is a plain text file. It can be viewed with command line tools like
less, head, or tail, or with your favorite text editor. The run_id is a universally-unique
identifier (UUID) which is generated—based on your computer’s hardware MAC address
and the current time—when the master is started. Here’s an example run_id:
57aa1860-d765-11e2-a830-f0def1e189cc
The use of this sort of unique identifier makes it possible to distinguish logs from separate
ROS sessions.
Finding the run id There at least two easy ways to learn the run_id of the current ses-
sion.
R You can examine the output generated by roscore. Near the end of this output, you’ll
see a line that looks something like this.
setting /run_id to run_id
R You can ask the master for the current run_id, using a command like this:
rosparam get /run_id
This works because the run_id is stored on the parameter server. More details about
parameters are in Chapter 7.
Checking and purging log files These log files accumulate over time, which can be prob-
lematic if you use ROS for a while on a system that has meaningful limitations (due either
to an account quota or to hardware limits) on disk space. Both roscore and roslaunch per-
form checks to monitor the size of existing logs, and warn you when they exceed 1GB, but
neither will take any steps to reduce the size. You can use this command to see the amount
of disk space in the current user account consumed by ROS logs:Í7
rosclean check
Í7http://wiki.ros.org/rosclean
72
4.5. Enabling and disabling log messages
If the logs are consuming too much disk space, you can remove all of the existing logs using
this command:
rosclean purge
You can also, if you prefer, delete the log files by hand.
4.5 Enabling and disabling log messages
If you executed the programs in Listings 4.1, 4.4, and 4.5 for yourself (or read the sample
output in Listing 4.2 carefully), you might have noticed that no DEBUG-level messages
are generated, even though those programs call the ROS_DEBUG_STREAM macro.
What happened to those DEBUG-level messages? The answer is that, by default, ROS C++
programs only generate log messages at the INFO level and higher; attempts to generate
DEBUG-level messages are discarded.
This is a specific example of the concept of logger levels, which specify, for each node,
a minimum severity level. The default logger level is INFO, which explains the absence of
DEBUG-level messages from our example program. The general idea behind logger levels
is to provide, at run time, the ability to regulate the level of detail for each node’s logs.
� Setting the logger level is somewhat similar to the severity filtering options in rqt-
_console. The difference is that changing the logger level prevents log messages
from ever being generated at their source, whereas the filters in rqt_console accept
any incoming log messages, and selectively choose not to display some of them.
Except for some overhead, the effect is similar.
¹ For log messages that are disabled by the logger level, the message expression is not
even evaluated. This is possible because ROS_INFO_STREAM and similar con-
structions are macros rather than function calls. The expansions of these macros
check whether the message is enabled, and only evaluate the message expression
itself if the answer is yes. This means (a) that you should not rely on any side effects
that might occur from building the message string, and (b) that disabled log mes-
sages will not slow your program, even if the parameter to the logging macro would
be time-consuming to evaluate.
73
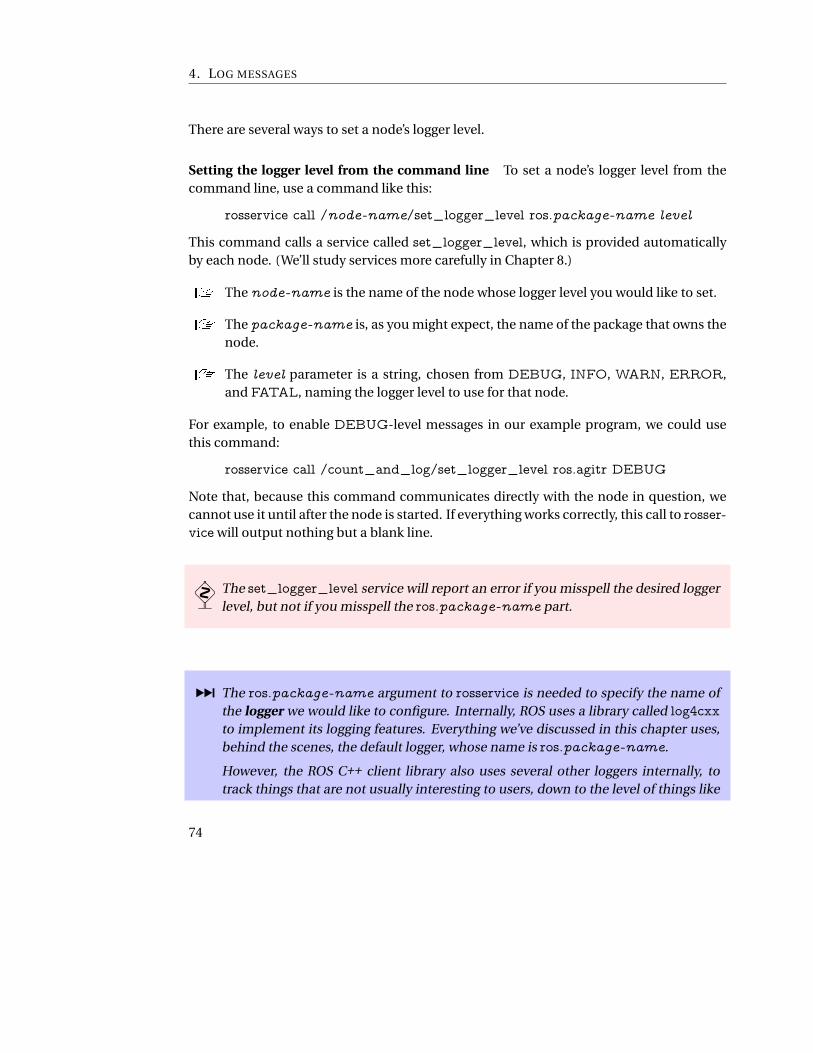
4. LOG MESSAGES
There are several ways to set a node’s logger level.
Setting the logger level from the command line To set a node’s logger level from the
command line, use a command like this:
rosservice call /node-name/set_logger_level ros.package-name level
This command calls a service called set_logger_level, which is provided automatically
by each node. (We’ll study services more carefully in Chapter 8.)
R The node-name is the name of the node whose logger level you would like to set.
R The package-name is, as you might expect, the name of the package that owns the
node.
R The level parameter is a string, chosen from DEBUG, INFO, WARN, ERROR,
and FATAL, naming the logger level to use for that node.
For example, to enable DEBUG-level messages in our example program, we could use
this command:
rosservice call /count_and_log/set_logger_level ros.agitr DEBUG
Note that, because this command communicates directly with the node in question, we
cannot use it until after the node is started. If everything works correctly, this call to rosser-
vice will output nothing but a blank line.
� The set_logger_level service will report an error if you misspell the desired logger
level, but not if you misspell the ros.package-name part.
¹ The ros.package-name argument to rosservice is needed to specify the name of
the logger we would like to configure. Internally, ROS uses a library called log4cxx
to implement its logging features. Everything we’ve discussed in this chapter uses,
behind the scenes, the default logger, whose name is ros.package-name.
However, the ROS C++ client library also uses several other loggers internally, to
track things that are not usually interesting to users, down to the level of things like
74
4.5. Enabling and disabling log messages
Figure 4.3: The GUI for rqt_logger_level.
bytes being written and read, connections being established and dropped, and call-
backs being invoked. Because the set_logger_level service provides an interface
to all of these loggers, we must explicitly specify which logger we want to configure.
This extra level of complexity is the reason that the rosservice command above
won’t complain if you misspell the logger name. Instead of generating an error,
log4cxx silently (and, one might add, uselessly) creates a new logger with the spec-
ified name.
Setting the logger level from a GUI If you prefer a GUI instead of this command line
interface, try this command:
rqt_logger_level
The resulting window, shown in Figure 4.3, allows you to select from a list of nodes, a list of
loggers—You almost certainly want ros.package-name—and finally a list of logger levels.
Changing the logger level using this tool has the same effect as the rosservice command
mentioned above, because it uses the same service call interface to each node.
Setting the logger level from C++ code It is also possible for a node to modify its own
logger levels. The most direct way to do this is to access the log4cxx infrastructure that
ROS uses to implement its logging features, using code like this:
#include <log4cxx/logger.h>
. . .
log4cxx::Logger::getLogger(ROSCONSOLE_DEFAULT_NAME)->setLevel(
ros::console::g_level_lookup[ros::console::levels::Debug]
);
ros::console::notifyLoggerLevelsChanged();
75

4. LOG MESSAGES
Aside from the necessary syntactic camouflage, this code should be readily identifiable as
setting the logger level to DEBUG. The Debug token can, of course, be replaced by Info,
Warn, Error, or Fatal.
¹ The call to ros::console::notifyLoggerLevelsChanged() is necessary because the
enabled/disabled status of each logging statement is cached. It can be omitted if
you set the logger level before any logging statements are executed.
4.6 Looking forward
In this chapter, we saw how to generate log messages from within ROS programs, and how
to view those messages in several different ways. These messages can be useful for tracking
and debugging the behavior of complex ROS systems, especially when those systems span
many different nodes. The next chapter discusses ROS names, which, when used wisely,
can also help us to compose complicated systems of nodes from smaller parts.
76

Chapter 5
Graph resource namesIn which we learn how ROS resolves the names of nodes, topics, parameters, and
services.
In Chapter 3, we used strings like "hello_ros" and "publish_velocity" to give names to
nodes, and strings like "turtle1/cmd_vel" and "turtle1/pose" as the names of topics.
All of these are examples of graph resource names. ROS has a flexible naming system
that accepts several different kinds of names. (These four, for example, are all relative
names.) In this chapter, we’ll take a short detour to understand the various kinds of graph
resource names, and how ROS resolves them. We present these ideas, which are actually
quite simple, as a separate chapter because they’re relevant to most of the concepts in the
second half of this book.
5.1 Global names
Nodes, topics, services, and parameters are collectively referred to as graph resources.
Every graph resource is identified by a short string called a graph resource name.Í1 Graph
resource names are ubiquitous, both in ROS command lines and in code. Both rosnode
info and ros::init expect node names; both rostopic echo and the constructor for ros::-
Publisher expect topic names. All of these are instances of graph resource names. Here
are some specific graph resource names that we’ve encountered already:
/teleop_turtle
/turtlesim
Í1http://wiki.ros.org/Names
77
5. GRAPH RESOURCE NAMES
/turtle1/cmd_vel
/turtle1/pose
/run_id
/count_and_log/set_logger_level
These names are all examples of a specific class of names called global names. They’re
called global names because they make sense anywhere they’re used. These names have
clear, unambiguous meanings, whether they’re used as arguments to one of the many
command line tools or inside a node. No additional context information is needed to de-
cide which resource the name refers to.
There are several parts to a global name:
R A leading slash /, which identifies the name as a global name.
R A sequence of zero or more namespaces, separated by slashes. Namespaces are used
to group related graph resources together. The example names above include two
explicit namespaces, called turtle1 and count_and_log. Multiple levels of name-
spaces are allowed, so this is also a valid (but rather unlikely) global name, consisting
of 11 nested namespaces:
/a/b/c/d/e/f/g/h/i/j/k/l
Global names that don’t explicitly mention any namespace—including three of the
examples above—are said to be in the global namespace.
R A base name that describes the resource itself. The base names in the example above
are teleop_turtle, turtlesim, cmd_vel, pose, run_id, and set_logger_level.
Notice that, if global names were required everywhere, then there would be little to
gain from the complexity of using namespaces, other than perhaps making it easier for
humans to keep track of things. The real advantage of this naming system comes from the
use of relative names and private names.
5.2 Relative names
The main alternative to providing a global name, which—as we’ve just seen—includes a
complete specification of the namespace in which the name lives, is to allow ROS to supply
a default namespace. A name that uses this feature is called a relative graph resource
name, or simply a relative name. The characteristic feature of a relative name is that it
lacks a leading slash (/). Here are some example relative names:
78

5.2. Relative names
teleop_turtle
turtlesim
cmd_vel
turtle1/pose
run_id
count_and_log/set_logger_level
The key to understanding relative names is to remember that relative names cannot be
matched to specific graph resources unless we know the default namespace that ROS is
using to resolve them.
Resolving relative names The process of mapping relative names to global names is ac-
tually quite simple. To resolve a relative name to a global name, ROS attaches the name
of the current default namespace to the front of the relative name. For example, if we use
the relative name cmd_vel in a place where the default namespace is /turtle1, then ROS
resolves the name by combining the two:
/turtle1︸ ︷︷ ︸
default
namespace
+ cmd_vel︸ ︷︷ ︸
relative name
⇒ /turtle1/cmd_vel︸ ︷︷ ︸
global name
Relative names can also begin with a sequence of namespaces, which are treated as nested
namespaces inside the default namespace. As an extreme example, if we use the relative
name g/h/i/j/k/l in a place where the default namespace is /a/b/c/d/e/f, ROS performs
this combination:
/a/b/c/d/e/f︸ ︷︷ ︸
default
namespace
+ g/h/i/j/k/l︸ ︷︷ ︸
relative name
⇒ /a/b/c/d/e/f/g/h/i/j/k/l︸ ︷︷ ︸
global name
The resulting global name is then used to identify a specific graph resource, just as though
a global name had been specified originally.
Setting the default namespace This default namespace is tracked individually for each
node, rather than being a system-wide setting. If you don’t take any specific steps to set the
default namespace, then ROS will, as you might expect, use the global namespace (/). The
best and most common method for choosing a different default namespace for a node or
group of nodes is to use ns attributes in a launch file. (See Section 6.3.) However, there are
also a couple of mechanisms for doing this manually.
79
5. GRAPH RESOURCE NAMES
R Most ROS programs, including all C++ programs that call ros::init, accept a com-
mand line parameter called __ns, which specifies a default namespace for that
program.
__ns:=default-namespace
R You can also set the default namespace for every ROS program executed within a
shell, using an environment variable.
export ROS_NAMESPACE=default-namespace
This environment variable is used only when no other default namespace is speci-
fied by the __ns parameter.
Understanding the purpose of relative names Aside from the question how to deter-
mine the default namespace used for relative names, one other likely question is “Who
cares?” At first glance, the concept of relative names appears to be just a shortcut to avoid
typing the full global names every time. Although relative names do provide this kind of
convenience, their real value is that they make it easier to build complicated systems by
composing smaller parts.
When a node uses relative names, it is essentially giving its users the ability to easily
push that node and the topics it uses down into a namespace that the node’s original de-
signers did not necessarily anticipate. This kind of flexibility can make the organization of
a system more clear and, more importantly, can prevent name collisions when groups of
nodes from different sources are combined. In contrast, every explicit global name makes
it harder to achieve this kind of composition. Therefore, when writing nodes, it’s recom-
mended to avoid using global names, except in the unusual situations where there is a very
good reason to use them.
5.3 Private names
Private names, which begin with a tilde (∼) character, are the third and final class of graph
resource names. Like relative names, private names do not fully specify the namespace in
which they live, and instead rely on the ROS client library to resolve the name to a complete
global name. The difference is that, instead of using the current default namespace, private
names use the name of their node as a namespace.
For instance, in a node whose global name is /sim1/pubvel, the private name ∼max-
_vel would be converted to a global name like this:
80
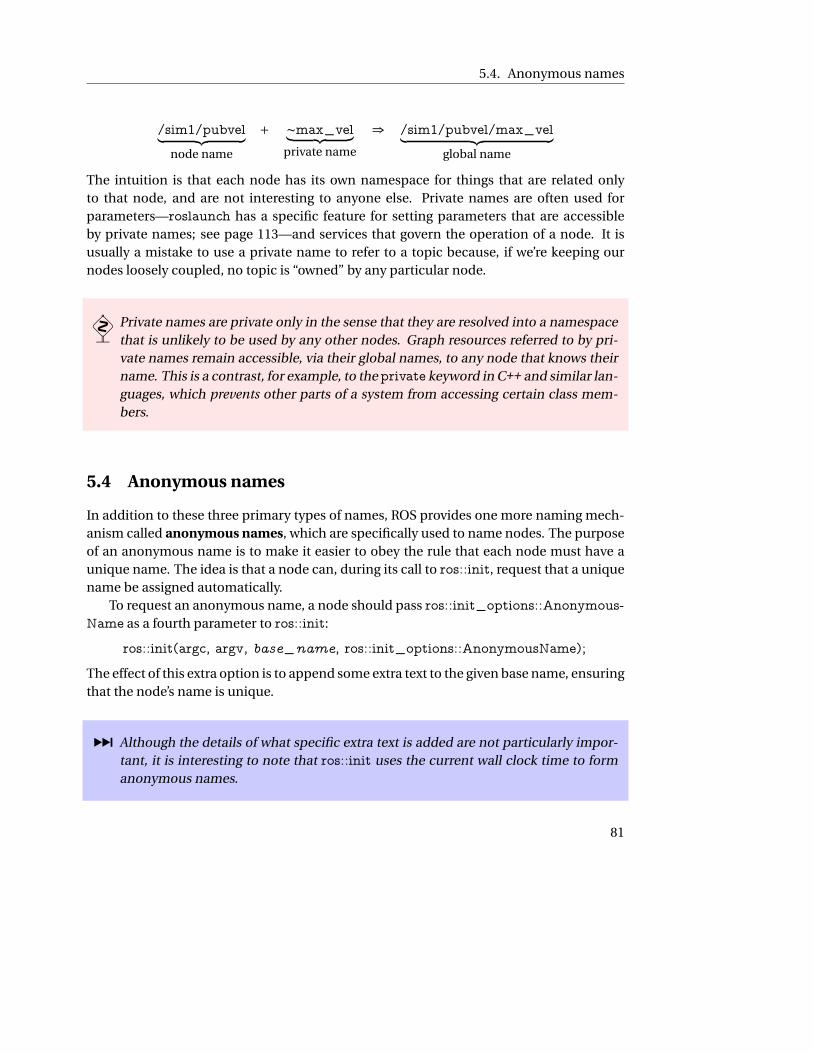
5.4. Anonymous names
/sim1/pubvel︸ ︷︷ ︸
node name
+ ∼max_vel︸ ︷︷ ︸
private name
⇒ /sim1/pubvel/max_vel︸ ︷︷ ︸
global name
The intuition is that each node has its own namespace for things that are related only
to that node, and are not interesting to anyone else. Private names are often used for
parameters—roslaunch has a specific feature for setting parameters that are accessible
by private names; see page 113—and services that govern the operation of a node. It is
usually a mistake to use a private name to refer to a topic because, if we’re keeping our
nodes loosely coupled, no topic is “owned” by any particular node.
� Private names are private only in the sense that they are resolved into a namespace
that is unlikely to be used by any other nodes. Graph resources referred to by pri-
vate names remain accessible, via their global names, to any node that knows their
name. This is a contrast, for example, to the private keyword in C++ and similar lan-
guages, which prevents other parts of a system from accessing certain class mem-
bers.
5.4 Anonymous names
In addition to these three primary types of names, ROS provides one more naming mech-
anism called anonymous names, which are specifically used to name nodes. The purpose
of an anonymous name is to make it easier to obey the rule that each node must have a
unique name. The idea is that a node can, during its call to ros::init, request that a unique
name be assigned automatically.
To request an anonymous name, a node should pass ros::init_options::Anonymous-
Name as a fourth parameter to ros::init:
ros::init(argc, argv, base_name, ros::init_options::AnonymousName);
The effect of this extra option is to append some extra text to the given base name, ensuring
that the node’s name is unique.
¹ Although the details of what specific extra text is added are not particularly impor-
tant, it is interesting to note that ros::init uses the current wall clock time to form
anonymous names.
81

5. GRAPH RESOURCE NAMES
1 // This program starts with an anonymous name, which
2 // allows multiple copies to execute at the same time ,
3 // without needing to manually create dist inct names
4 // for each of them.
5 #inc lude <ros / ro s . h>
6
7 i n t main ( i n t argc , char ∗∗ argv ) {
8 ro s : : i n i t ( argc , argv , "anon" ,
9 ro s : : i n i t_opt i on s : : AnonymousName) ;
10 ro s : : NodeHandle nh ;
11 ro s : : Rate r a t e (1 ) ;
12 whi le ( ro s : : ok ( ) ) {
13 ROS_INFO_STREAM("This ␣message␣ i s ␣ from␣"
14 << ros : : this_node : : getName ( ) ) ;
15 r a t e . s l e e p ( ) ;
16 }
17 }
Listing 5.1: A program called anon.cpp whose nodes have anonymous names. We can start as
many simultaneous copies of this program as we like, without any node name conflicts.
Listing 5.1 shows a sample program that uses this feature. Instead of simply being
named anon, nodes started from this program get names that look like this:
/anon_1376942789079547655
/anon_1376942789079550387
/anon_1376942789080356882
The program’s behavior is quite unremarkable, but because it requests an anonymous
name, we are free to run as many simultaneous copies of that program as we like, knowing
that each will be assigned a unique name when it starts.
5.5 Looking forward
In this chapter, we learned about how ROS interprets the names of graph resources. In par-
ticular, non-trivial ROS systems with many interacting nodes can benefit from the flexibil-
ity arising from using relative or private names. The next chapter introduces a tool called
roslaunch that simplifies the process of starting and configuring these kinds of multi-node
ROS sessions.
82

Chapter 6
Launch filesIn which we configure and run many nodes at once using launch files.
If you’ve worked through all of the examples so far, by now you might be getting frus-
trated by the need to start so many different nodes, not to mention roscore, by hand in
so many different terminals. Fortunately, ROS provides a mechanism for starting the mas-
ter and many nodes all at once, using a file called a launch file. The use of launch files
is widespread through many ROS packages. Any system that uses more than one or two
nodes is likely to take advantage of launch files to specify and configure the nodes to be
used. This chapter introduces these files and the roslaunch tool that uses them.
6.1 Using launch files
Let’s start by seeing how roslaunch enables us to start many nodes at once. The basic idea
is to list, in a specific XML format, a group of nodes that should be started at the same
time.Í1 Listing 6.1 shows a small example launch file that starts a turtlesim simulator,
along with the teleoperation node that we saw in Chapter 2 and the subscriber node we
wrote in Chapter 3. This file is saved as example.launch in the main package directory for
the agitr package. Before we delve into specifics of the launch file format, let’s see how
those files can be used.
Executing launch files To execute a launch file, use the roslaunch command:Í2
Í1http://wiki.ros.org/roslaunch/XML
Í2http://wiki.ros.org/roslaunch/CommandlineTools
83
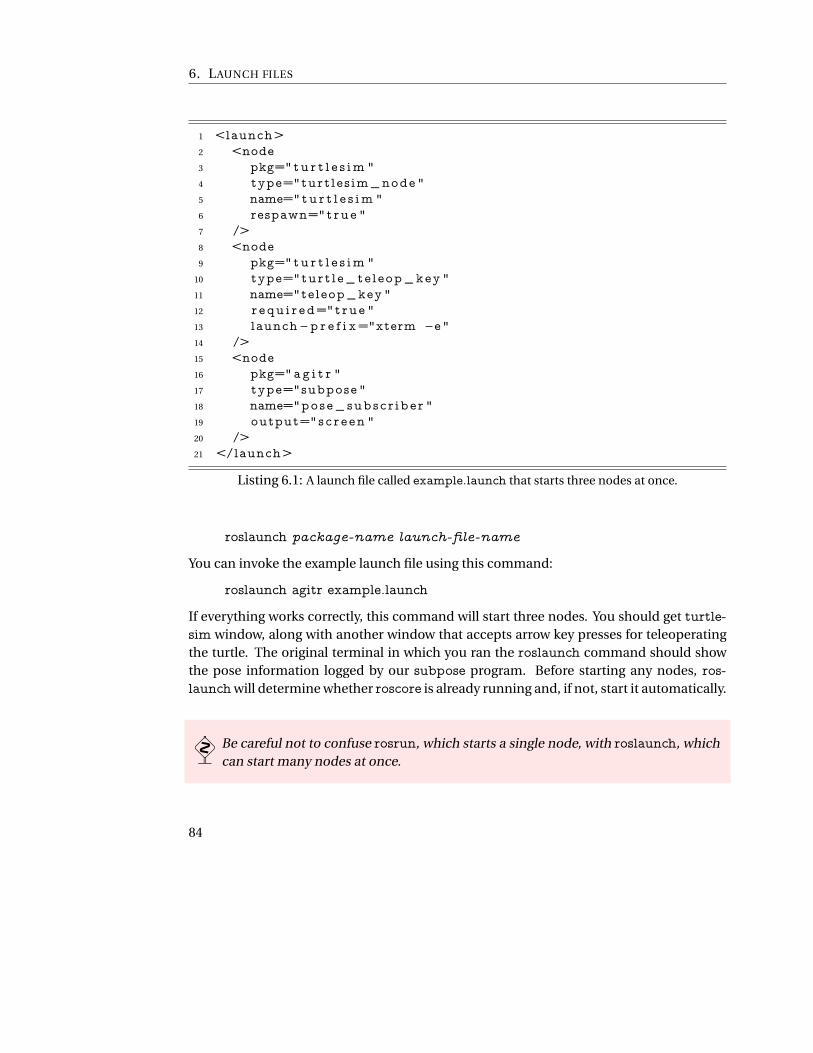
6. LAUNCH FILES
1 <launch>
2 <node
3 pkg="tu r t l e s im "
4 type="turt les im_node "
5 name="tu r t l e s im "
6 respawn="true "
7 />
8 <node
9 pkg="tu r t l e s im "
10 type="turt le_te leop_key "
11 name="teleop_key "
12 r equ i r ed="true "
13 launch−p r e f i x="xterm −e"
14 />
15 <node
16 pkg="a g i t r "
17 type="subpose "
18 name="pose_subscr iber "
19 output="sc r e en "
20 />
21 </launch>
Listing 6.1: A launch file called example.launch that starts three nodes at once.
roslaunch package-name launch-file-name
You can invoke the example launch file using this command:
roslaunch agitr example.launch
If everything works correctly, this command will start three nodes. You should get turtle-
sim window, along with another window that accepts arrow key presses for teleoperating
the turtle. The original terminal in which you ran the roslaunch command should show
the pose information logged by our subpose program. Before starting any nodes, ros-
launch will determine whether roscore is already running and, if not, start it automatically.
� Be careful not to confuse rosrun, which starts a single node, with roslaunch, which
can start many nodes at once.
84

6.1. Using launch files
¹ It is also possible to use launch files that are not part of any package. To do this,
give roslaunch only the path to the launch file, without mentioning any package.
For example, in the author’s account, this command starts our example launch file,
without relying on the fact that it’s a part of any ROS package:
roslaunch ∼/ros/src/agitr/example.launch
This sort of workaround to circumvent the usual package organization is probably
not a good idea for anything but very simple, very short-lived experimentation.
An important fact about roslaunch—one that can be easy to forget—is that all of the
nodes in a launch file are started at roughly the same time. As a result, you cannot be sure
about the order in which the nodes will initialize themselves. Well-written ROS nodes don’t
care about the order in which they and their siblings start up. (Section 7.3 has an example
program in which this becomes important.)
¹ This behavior is a reflection of the ROS philosophy that each node should be largely
independent of the other nodes. (Recall our discussion of loose coupling of nodes
from Section 2.8.) Nodes that function well only when launched in a specific order
are a poor fit for this modular design. Such nodes can almost always be redesigned
to avoid ordering constraints.
Requesting verbosity Like many command line tools, roslaunch has an option to re-
quest verbose output:
roslaunch -v package-name launch-file-name
Listing 6.2 shows an example of the information this option generates beyond the usual
status messages. It can occasionally be useful for debugging to see this detailed explana-
tion of how roslaunch is interpreting your launch file.
Ending a launched session To terminate an active roslaunch, use Ctrl-C. This signal
will attempt to gracefully shut down each active node from the launch, and will forcefully
kill any nodes that do not exit within a short time after that.
85
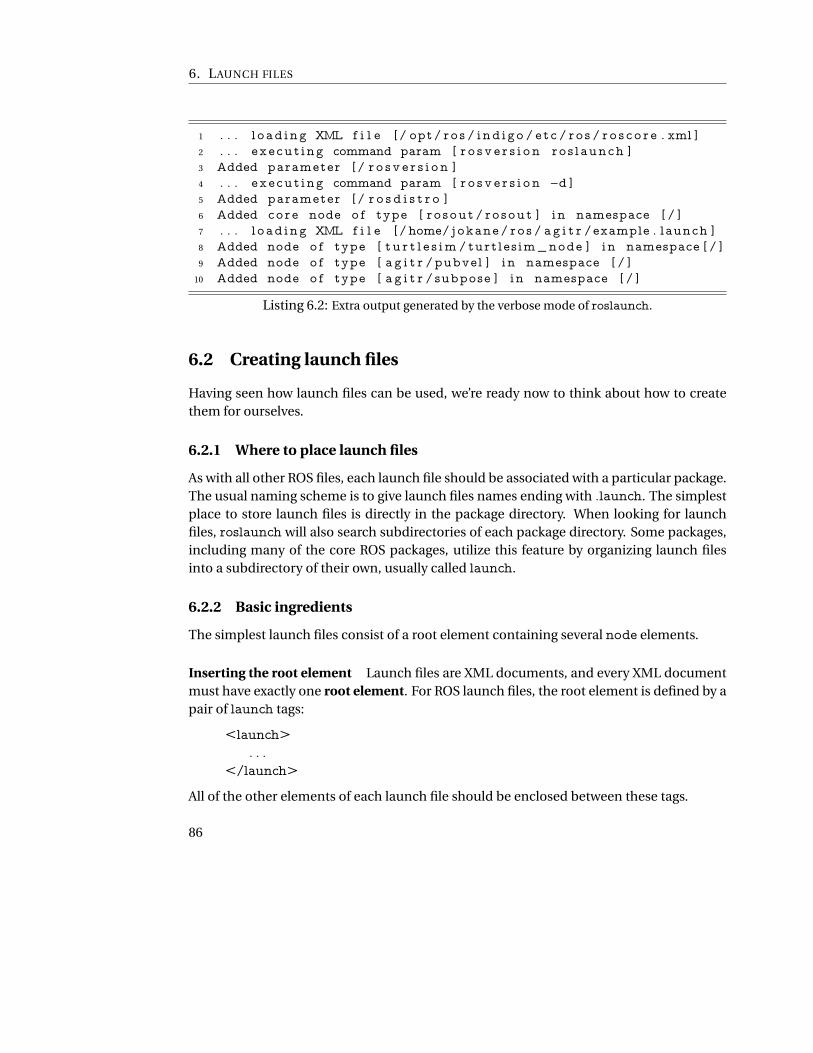
6. LAUNCH FILES
1 . . . l oad ing XML f i l e [ / opt/ ro s / ind igo / e t c / ro s / r o s c o r e . xml ]
2 . . . execut ing command param [ r o s v e r s i o n ros launch ]
3 Added parameter [ / r o s v e r s i o n ]
4 . . . execut ing command param [ r o s v e r s i o n −d ]
5 Added parameter [ / r o s d i s t r o ]
6 Added core node o f type [ rosout / rosout ] in namespace [ / ]
7 . . . l oad ing XML f i l e [ / home/ jokane / ros / a g i t r /example . launch ]
8 Added node o f type [ t u r t l e s im / turt les im_node ] in namespace [ / ]
9 Added node o f type [ a g i t r /pubvel ] in namespace [ / ]
10 Added node o f type [ a g i t r / subpose ] in namespace [ / ]
Listing 6.2: Extra output generated by the verbose mode of roslaunch.
6.2 Creating launch files
Having seen how launch files can be used, we’re ready now to think about how to create
them for ourselves.
6.2.1 Where to place launch files
As with all other ROS files, each launch file should be associated with a particular package.
The usual naming scheme is to give launch files names ending with .launch. The simplest
place to store launch files is directly in the package directory. When looking for launch
files, roslaunch will also search subdirectories of each package directory. Some packages,
including many of the core ROS packages, utilize this feature by organizing launch files
into a subdirectory of their own, usually called launch.
6.2.2 Basic ingredients
The simplest launch files consist of a root element containing several node elements.
Inserting the root element Launch files are XML documents, and every XML document
must have exactly one root element. For ROS launch files, the root element is defined by a
pair of launch tags:
<launch>
. . .
</launch>
All of the other elements of each launch file should be enclosed between these tags.
86
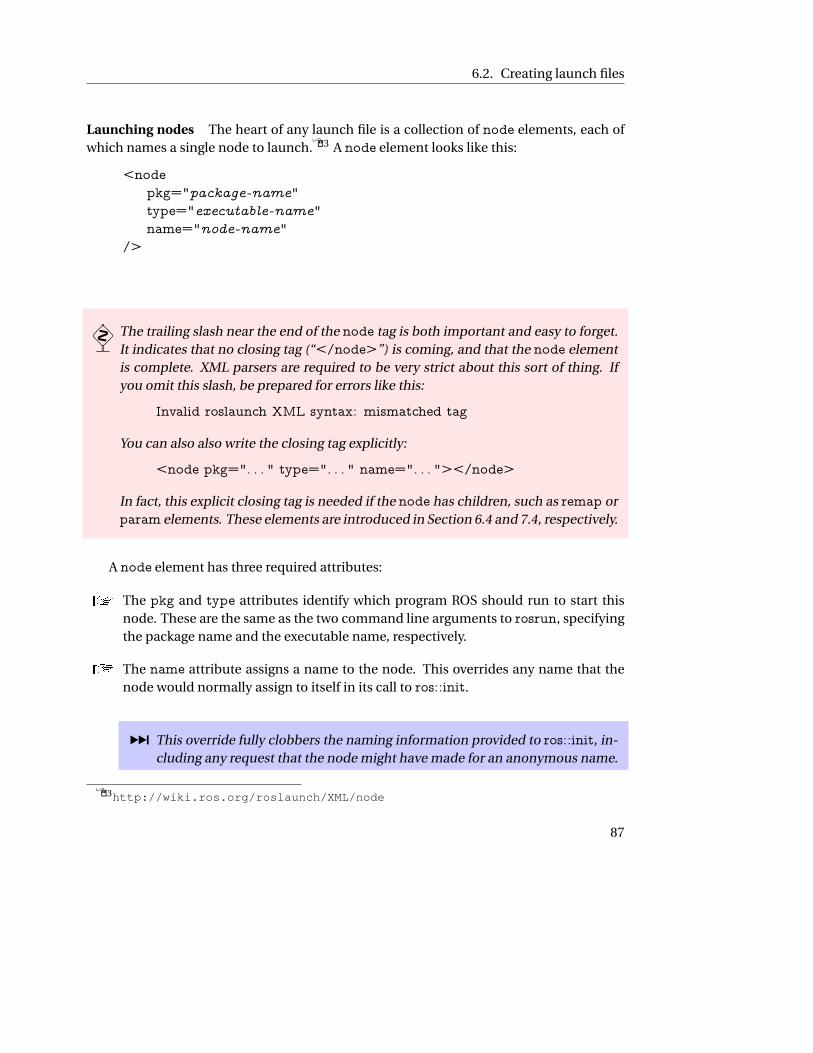
6.2. Creating launch files
Launching nodes The heart of any launch file is a collection of node elements, each of
which names a single node to launch.Í3 A node element looks like this:
<node
pkg="package-name"
type="executable-name"
name="node-name"
/>
� The trailing slash near the end of the node tag is both important and easy to forget.
It indicates that no closing tag (“</node>”) is coming, and that the node element
is complete. XML parsers are required to be very strict about this sort of thing. If
you omit this slash, be prepared for errors like this:
Invalid roslaunch XML syntax: mismatched tag
You can also also write the closing tag explicitly:
<node pkg=". . . " type=". . . " name=". . . "></node>
In fact, this explicit closing tag is needed if the node has children, such as remap or
param elements. These elements are introduced in Section 6.4 and 7.4, respectively.
A node element has three required attributes:
R The pkg and type attributes identify which program ROS should run to start this
node. These are the same as the two command line arguments to rosrun, specifying
the package name and the executable name, respectively.
R The name attribute assigns a name to the node. This overrides any name that the
node would normally assign to itself in its call to ros::init.
¹ This override fully clobbers the naming information provided to ros::init, in-
cluding any request that the node might have made for an anonymous name.
Í3http://wiki.ros.org/roslaunch/XML/node
87
6. LAUNCH FILES
(See Section 5.4.) To use an anonymous name from within a launch file, use
an anon substitutionÍ4 for the name attribute, like this:
name="$(anon base_name)"
Note, however, that multiple uses of the same base name will generate the
same anonymous name. This means that (a) we can refer to that name in
other parts of the launch file, but (b) we must be careful to use different base
names for each node we want to anonymize.
Finding node log files An important difference between roslaunch and running each
node individually using rosrun is that, by default, standard output from launched nodes is
redirected to a log file, and does not appear on the console.1 The name of this log file is:
∼/.ros/log/run_id/node_name-number-stdout.log
The run_id is a unique identifier generated when the master is started. (See page 72 for
details about how to look up the current run_id.) The numbers in these file names are
small integers that number the nodes. For example, running the launch file in Listing 6.1
sends the standard output of two of its nodes to log files with these names:
turtlesim-1-stdout.log
telep_key-3-stdout.log
These log files can be viewed with the text editor of your choice.
Directing output to the console To override this behavior for a single node, use the out-
put attribute in its node element:
output="screen"
Nodes launched with this attribute will display their standard output on screen instead
of in the log files discussed above. The example uses this attribute for the subpose node,
which explains why the INFO messages from this node appear on the console. It also
explains why this node is missing from the list of log files above.
1In the current version of roslaunch, output on standard error—notably including console outputs of
ERROR- and FATAL-level log messages—appears on the console, rather than in log files. However, a com-
ment in the roslaunch source code notes that this behavior may be changed in the future.
Í4http://wiki.ros.org/roslaunch/XML
88
6.2. Creating launch files
In addition to the output attribute, which affects only a single node, we can also force
roslaunch to display output from all of its nodes, using the --screen command-line option:
roslaunch --screen package-name launch-file-name
� If a program, when started from roslaunch, does not appear to be producing the
output you expect, you should verify that that node has the output="screen" at-
tribute set.
Requesting respawning After starting all of the requested nodes, roslaunch monitors
each node, keeping track of which ones remain active. For each node, we can ask ros-
launch to restart it when it terminates, by using a respawn attribute:
respawn="true"
This can be useful, for example, for nodes that might terminate prematurely, due to soft-
ware crashes, hardware problems, or other reasons.
The respawn attribute is not really necessary in our example—All three programs are
quite reliable—but we include it for the turtlesim_node to illustrate how respawning
works. If you close the turtlesim window, the corresponding node will terminate. ROS
quickly notices this and, since that node is marked as a respawn node, a new turtlesim
node, with its accompanying window, appears to replace the previous one.
Requiring nodes An alternative to respawn is to declare that a node is required:
required="true"
When a required node terminates, roslaunch responds by terminating all of the other ac-
tive nodes and exiting itself. That sort of behavior might be useful, for example, for nodes
that (a) are so important that, if they fail, the entire session should be abandoned, and (b)
cannot be gracefully restarted by the respawn attribute.
The example uses the required attribute for the turtle_teleop_key node. If you close
the window in which the teleoperation node runs, roslaunch will kill the other two nodes
and exit.
89
6. LAUNCH FILES
� Because their meanings conflict with one another, roslaunch will complain if you
set both the respawn and required attributes for a single node.
Launching nodes in their own windows One potential drawback to using roslaunch,
compared to our original technique of using rosrun in a separate terminal for each node,
is that all of the nodes share the same terminal. This is manageable (and often helpful) for
nodes that simply generate log messages, and do not accept console input. For nodes that
do rely on console input, as turtle_teleop_key does, it may be preferable to retain the
separate terminals.
Fortunately, roslaunch provides a clean way to achieve this effect, using the launch-
prefix attribute of a node element:
launch-prefix="command-prefix"
The idea is that roslaunch will insert the given prefix at the start of the command line it
constructs internally to execute the given node. In example.launch, we used this attribute
for the teleoperation node:
launch-prefix="xterm -e"
Because of this attribute, this node element is roughly equivalent to this command:
xterm -e rosrun turtlesim turtle_teleop_key
As you may know, the xterm command starts a simple terminal window. The -e argument
tells xterm to execute the remainder of its command line (in this case, rosrun turtlesim
turtle_teleop_key) inside itself, in lieu of a new interactive shell. The result is that turtle-
_teleop_key, a strictly text-based program, appears inside a graphical window.
¹ The launch-prefix attribute is, of course, not limited to xterm. It can also be use-
ful for debugging (via gdb or valgrind), or for lowering the scheduling priority of a
process (via nice).Í5
Í5http://wiki.ros.org/rqt_console
90
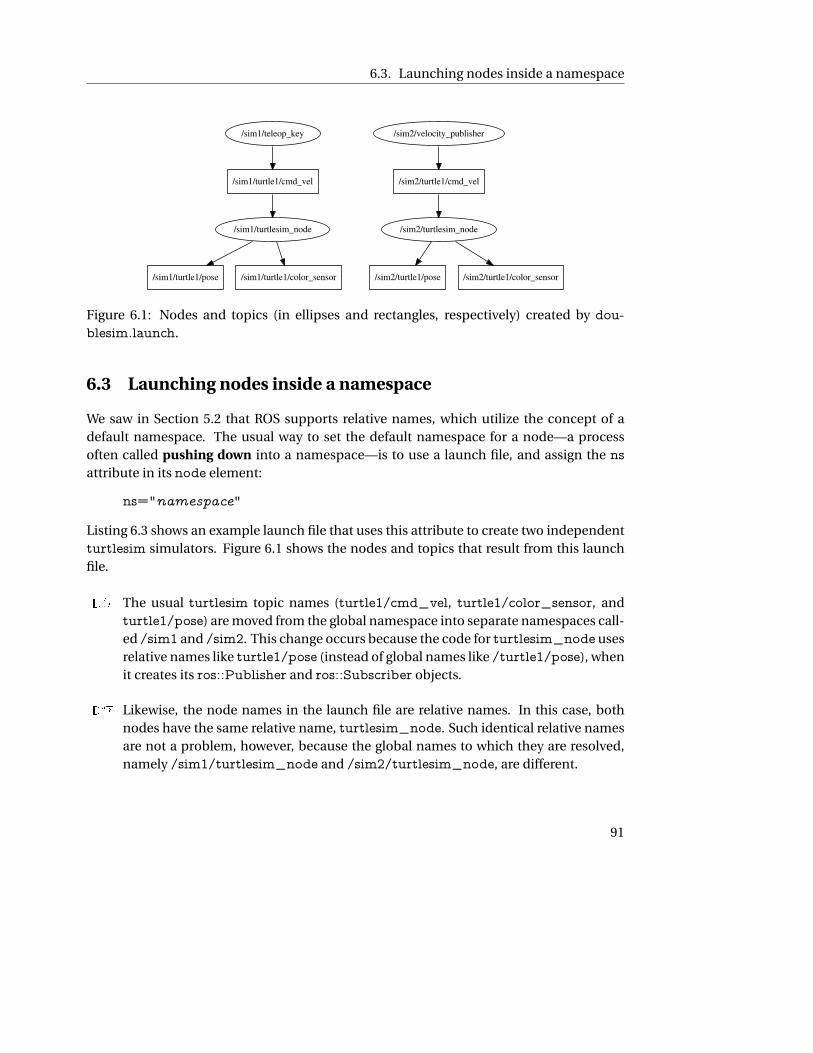
6.3. Launching nodes inside a namespace
/sim1/turtle1/cmd_vel
/sim1/turtlesim_node
/sim1/turtle1/pose /sim1/turtle1/color_sensor
/sim2/turtle1/cmd_vel
/sim2/turtlesim_node
/sim2/turtle1/pose /sim2/turtle1/color_sensor
/sim1/teleop_key /sim2/velocity_publisher
Figure 6.1: Nodes and topics (in ellipses and rectangles, respectively) created by dou-
blesim.launch.
6.3 Launching nodes inside a namespace
We saw in Section 5.2 that ROS supports relative names, which utilize the concept of a
default namespace. The usual way to set the default namespace for a node—a process
often called pushing down into a namespace—is to use a launch file, and assign the ns
attribute in its node element:
ns="namespace"
Listing 6.3 shows an example launch file that uses this attribute to create two independent
turtlesim simulators. Figure 6.1 shows the nodes and topics that result from this launch
file.
R The usual turtlesim topic names (turtle1/cmd_vel, turtle1/color_sensor, and
turtle1/pose) are moved from the global namespace into separate namespaces call-
ed /sim1 and /sim2. This change occurs because the code for turtlesim_node uses
relative names like turtle1/pose (instead of global names like /turtle1/pose), when
it creates its ros::Publisher and ros::Subscriber objects.
R Likewise, the node names in the launch file are relative names. In this case, both
nodes have the same relative name, turtlesim_node. Such identical relative names
are not a problem, however, because the global names to which they are resolved,
namely /sim1/turtlesim_node and /sim2/turtlesim_node, are different.
91
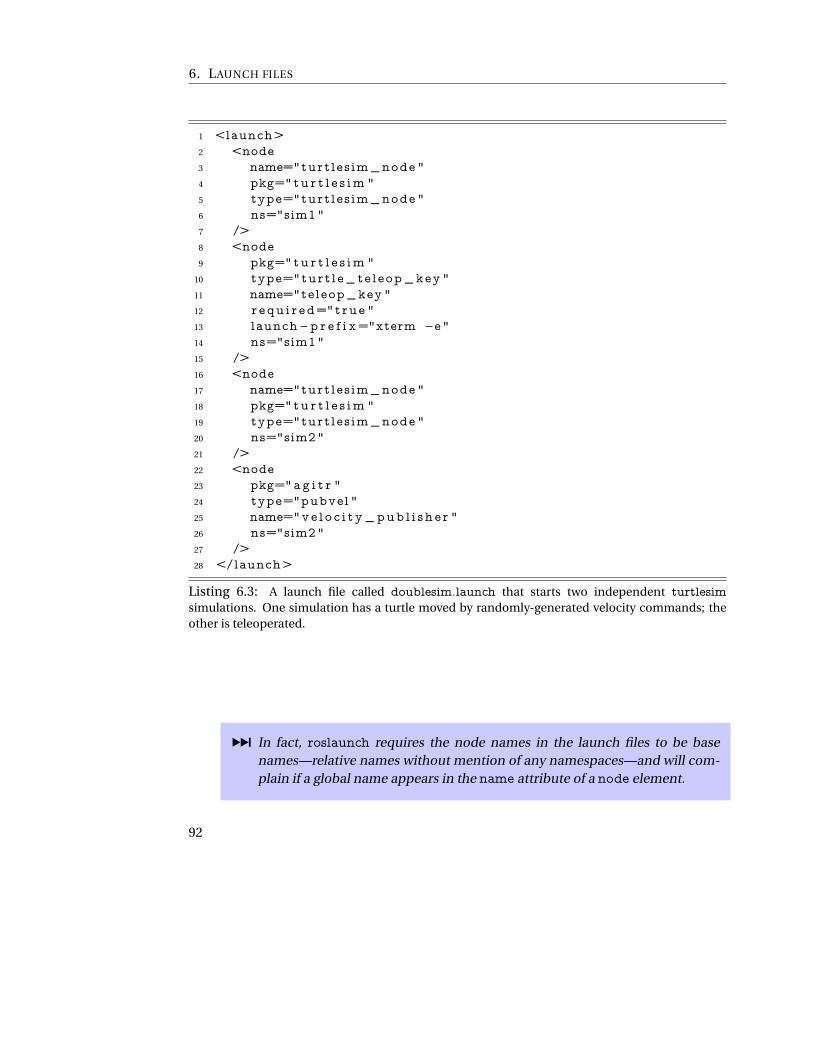
6. LAUNCH FILES
1 <launch>
2 <node
3 name="turt les im_node "
4 pkg="tu r t l e s im "
5 type="turt les im_node "
6 ns="sim1"
7 />
8 <node
9 pkg="tu r t l e s im "
10 type="turt le_te leop_key "
11 name="teleop_key "
12 r equ i r ed="true "
13 launch−p r e f i x="xterm −e"
14 ns="sim1"
15 />
16 <node
17 name="turt les im_node "
18 pkg="tu r t l e s im "
19 type="turt les im_node "
20 ns="sim2"
21 />
22 <node
23 pkg="a g i t r "
24 type="pubvel "
25 name="ve l o c i t y_pub l i sh e r "
26 ns="sim2"
27 />
28 </launch>
Listing 6.3: A launch file called doublesim.launch that starts two independent turtlesim
simulations. One simulation has a turtle moved by randomly-generated velocity commands; the
other is teleoperated.
¹ In fact, roslaunch requires the node names in the launch files to be base
names—relative names without mention of any namespaces—and will com-
plain if a global name appears in the name attribute of a node element.
92
6.4. Remapping names
This example has some similarities to the system discussed in Section 2.8.2 In both
cases, we start multiple turtlesim nodes. The results, however, are quite different. In Sec-
tion 2.8, we changed only the node names, and left all of the nodes in the same namespace.
As a result, both turtlesim nodes subscribe to and publish on the same topics. There is no
straightforward way to interact with either of the two simulations individually. In the new
example from Listing 6.3, we pushed each simulator node into its own namespace. The re-
sulting changes to the topic names make the two simulators truly independent, enabling
us to publish different velocity commands to each one.
¹ In this example, the namespaces specified by the ns attributes are themselves rel-
ative names. That is, we used the names sim1 and sim2 in a context within the
launch file in which the default namespace is the global namespace /. As a result,
the default namespaces for our two nodes are resolved to /sim1 and /sim2.
It is technically possible to provide a global name for this attribute instead. How-
ever, that’s almost always a bad idea, for essentially the same reason that using
global names inside nodes is a bad idea. Doing so would prevent the launch file
from itself being pushed into a namespace of its own, for example as a result of be-
ing included by another launch file.
6.4 Remapping names
In addition to resolving relative names and private names, ROS nodes also support remap-
pings, which provide a finer level of control for modifying the names used by our nodes.Í6
Remappings are based on the idea of substitution: Each remapping provides an original
name and a new name. Each time a node uses any of its remappings’ original names, the
ROS client library silently replaces it with the new name from that remapping.
6.4.1 Creating remappings
There are two ways create remappings when starting a node.
2As an aside, now that we’ve seen launch files, you should be able to replace the ugly series of four rosrun
commands that section with a single small launch file.
Í6http://wiki.ros.org/RemappingArguments
93
6. LAUNCH FILES
R To remap a name when starting a node from the command line, give the original
name and the new name, separated by a :=, somewhere on the command line.
original-name:=new-name
For example, to run a turtlesim instance that publishes its pose data on a topic
called /tim instead of /turtle1/pose, use a command like this:
rosrun turtlesim turtlesim_node turtle1/pose:=tim
R To remap names within a launch file, use a remap element:Í7
<remap from="original-name" to="new-name" />
If it appears at the top level, as a child of the launch element, this remapping will
apply to all subsequent nodes. These remap elements can also appear as children of
a node element, like this:
<node node-attributes >
<remap from="original-name" to="new-name" />
. . .
</node>
In this case, the given remappings are applied only to the single node that owns
them. For example, the command line above is essentially equivalent to this launch
file construction:
<node pkg="turtlesim" type="turtlesim_node"
name="turtlesim" >
<remap from="turtle1/pose" to="tim" />
</node>
There is one important thing to remember about the way remappings are applied: All
names, including the original and new names in the remapping itself, are resolved to global
names, before ROS applies any remappings. As a result, names that appear in remappings
are often relative names. After name resolution is complete, remapping is done by a di-
rect string comparison, looking for names used by a node that exactly match the resolved
original name in any remapping.
Í7http://wiki.ros.org/roslaunch/XML/remap
94

6.4. Remapping names
6.4.2 Reversing a turtle
For a concrete example of how these kinds of remappings might be helpful, consider a
scenario in which we want to use turtle_teleop_key to drive a turtlesim turtle, but with
the meanings of arrow keys reversed. That is, suppose we want the left and right arrow keys
to rotate the turtle clockwise and counterclockwise, respectively, and the up and down
arrows to move the turtle backward and forward, respectively. The example may seem
contrived, but it does represent a general class of real problems in which the messages
published by one node must be “translated” into a format expected by another node.
One option, of course, would be to make a copy of the turtle_teleop_key source code
and modify it to reflect the change we want. This option is very unsatisfying, because
it would require us to understand and, even worse, to duplicate the turtle_teleop_key
code. Instead, let’s see how to do this compositionally, creating a new program that inverts
the velocity commands published by the existing teleoperation node.
Listing 6.4 shows a short program that performs the change that we need: It subscribes
to turtle1/cmd_vel and, for each message it receives, it inverts the both linear and angu-
lar velocities, publishes the resulting velocity command on turtle1/cmd_vel_reversed.
The only complication—and the reason this example belongs in a section about re-
mappings—is that the turtlesim simulator does not actually subscribe to those reversed
velocity messages. Indeed, starting the three relevant nodes with simple rosrun com-
mands leads to the graph structure shown in Figure 6.2. From the graph, it’s clear that this
system would not have the desired behavior. Because velocity commands still travel di-
rectly from teleop_turtle to turtlesim, the turtle will still respond in its usual, unreversed
way.
This situation—one in which some node subscribes to the “wrong” topic—is precisely
the kind of situation for which remappings are intended. In this case, we can correct
the problem by sending a remapping to turtlesim that replaces turtle1/cmd_vel with
turtle1/cmd_vel_reversed. Listing 6.5 shows a launch file that starts all three nodes,
including the appropriate remap for the turtlesim_node; Figure 6.3 shows the correct
graph that results.
95

6. LAUNCH FILES
1 // This program subscribes to turt le1/cmd_vel and
2 // republishes on turt le1/cmd_vel_reversed ,
3 // with the signs inverted .
4 #inc lude <ros / ro s . h>
5 #inc lude <geometry_msgs/Twist . h>
6
7 ro s : : Pub l i she r ∗pubPtr ;
8
9 void commandVelocityReceived (
10 const geometry_msgs : : Twist& msgIn
11 ) {
12 geometry_msgs : : Twist msgOut ;
13 msgOut . l i n e a r . x = −msgIn . l i n e a r . x ;
14 msgOut . angular . z = −msgIn . angular . z ;
15 pubPtr−>publ i sh (msgOut) ;
16 }
17
18 i n t main ( i n t argc , char ∗∗ argv ) {
19 ro s : : i n i t ( argc , argv , " r ev e r s e_ve l o c i t y " ) ;
20 ro s : : NodeHandle nh ;
21
22 pubPtr = new ros : : Pub l i she r (
23 nh . adve r t i s e <geometry_msgs : : Twist>(
24 " t u r t l e 1 /cmd_vel_reversed" ,
25 1000) ) ;
26
27 ro s : : Subsc r ibe r sub = nh . sub s c r i b e (
28 " t u r t l e 1 /cmd_vel" , 1000 ,
29 &commandVelocityReceived ) ;
30
31 ro s : : sp in ( ) ;
32
33 de l e t e pubPtr ;
34 }
Listing 6.4: A C++ program called reverse_cmd_vel that reverses turtlesim velocity commands.
96
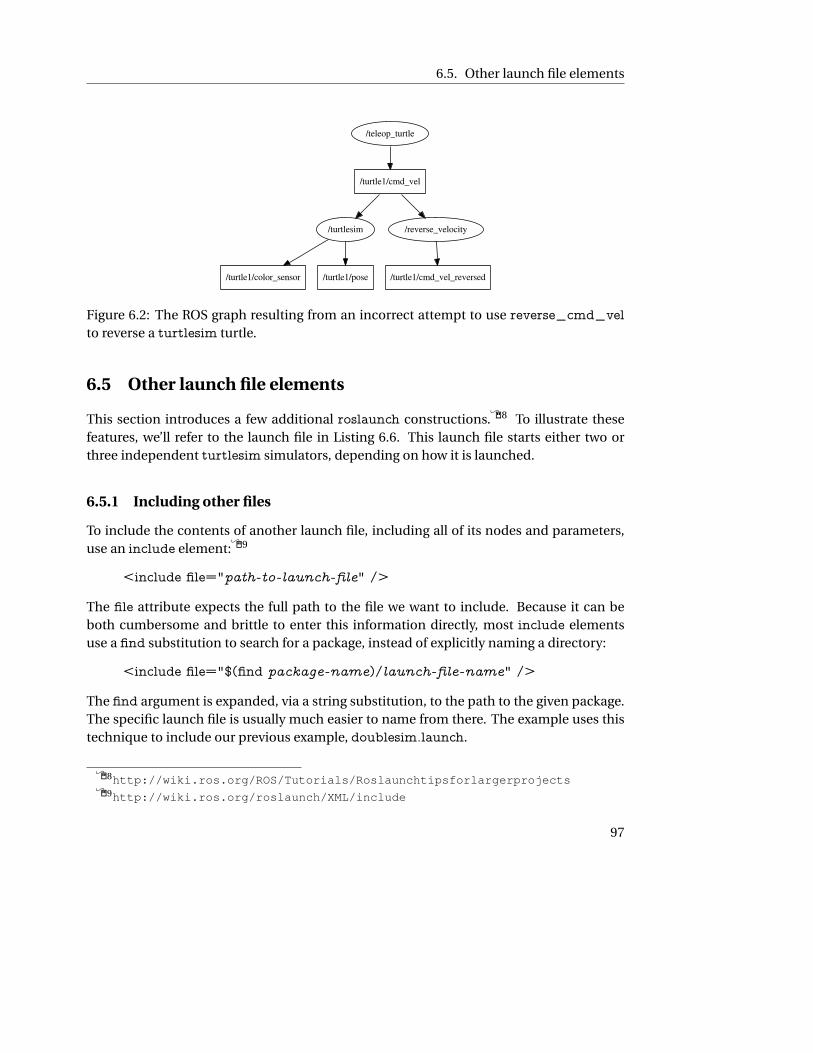
6.5. Other launch file elements
/turtle1/color_sensor
/turtle1/cmd_vel
/turtlesim /reverse_velocity
/turtle1/cmd_vel_reversed/turtle1/pose
/teleop_turtle
Figure 6.2: The ROS graph resulting from an incorrect attempt to use reverse_cmd_vel
to reverse a turtlesim turtle.
6.5 Other launch file elements
This section introduces a few additional roslaunch constructions.Í8 To illustrate these
features, we’ll refer to the launch file in Listing 6.6. This launch file starts either two or
three independent turtlesim simulators, depending on how it is launched.
6.5.1 Including other files
To include the contents of another launch file, including all of its nodes and parameters,
use an include element:Í9
<include file="path-to-launch-file" />
The file attribute expects the full path to the file we want to include. Because it can be
both cumbersome and brittle to enter this information directly, most include elements
use a find substitution to search for a package, instead of explicitly naming a directory:
<include file="$(find package-name)/launch-file-name" />
The find argument is expanded, via a string substitution, to the path to the given package.
The specific launch file is usually much easier to name from there. The example uses this
technique to include our previous example, doublesim.launch.
Í8http://wiki.ros.org/ROS/Tutorials/Roslaunchtipsforlargerprojects
Í9http://wiki.ros.org/roslaunch/XML/include
97
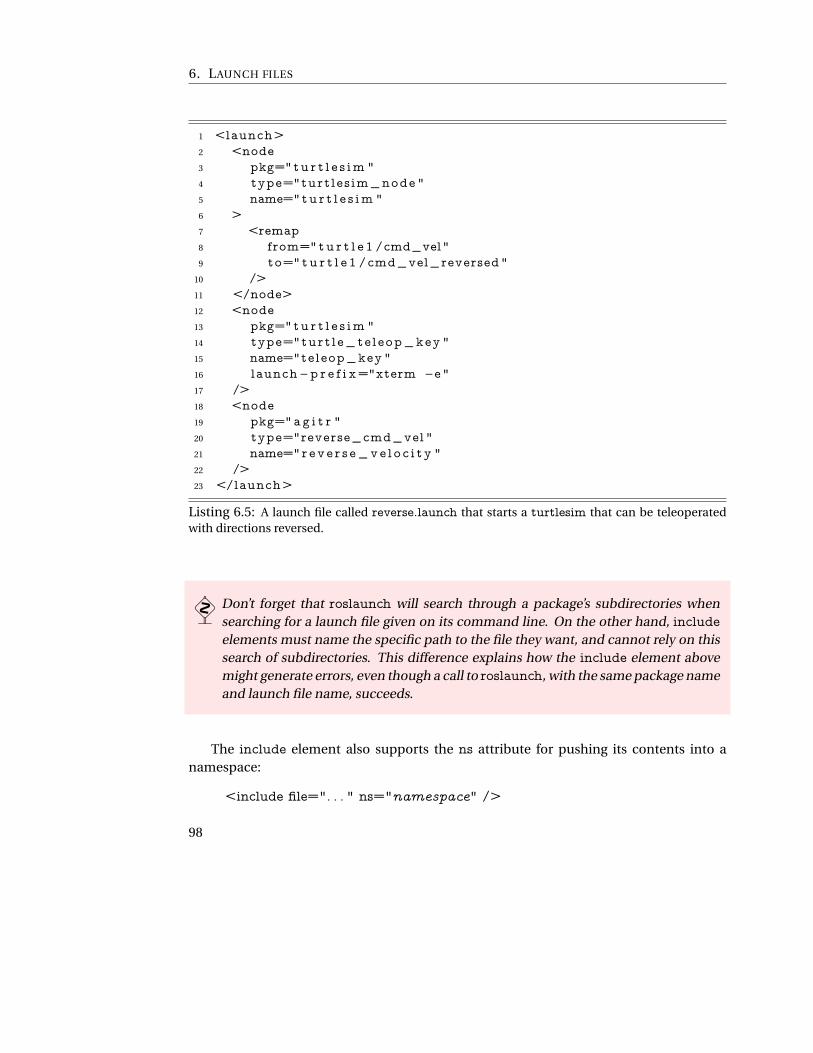
6. LAUNCH FILES
1 <launch>
2 <node
3 pkg="tu r t l e s im "
4 type="turt les im_node "
5 name="tu r t l e s im "
6 >
7 <remap
8 from="tu r t l e 1 /cmd_vel"
9 to="t u r t l e 1 /cmd_vel_reversed"
10 />
11 </node>
12 <node
13 pkg="tu r t l e s im "
14 type="turt le_te leop_key "
15 name="teleop_key "
16 launch−p r e f i x="xterm −e"
17 />
18 <node
19 pkg="a g i t r "
20 type="reverse_cmd_vel "
21 name="r eve r s e_ve l o c i t y "
22 />
23 </launch>
Listing 6.5: A launch file called reverse.launch that starts a turtlesim that can be teleoperated
with directions reversed.
� Don’t forget that roslaunch will search through a package’s subdirectories when
searching for a launch file given on its command line. On the other hand, include
elements must name the specific path to the file they want, and cannot rely on this
search of subdirectories. This difference explains how the include element above
might generate errors, even though a call to roslaunch, with the same package name
and launch file name, succeeds.
The include element also supports the ns attribute for pushing its contents into a
namespace:
<include file=". . . " ns="namespace" />
98

6.5. Other launch file elements
/turtle1/color_sensor
/turtle1/cmd_vel
/reverse_velocity
/turtle1/cmd_vel_reversed
/turtlesim
/turtle1/pose
/teleop_key
Figure 6.3: The correct ROS graph resulting from reversed.launch. The remap element
enables the nodes to connect properly.
This setup occurs fairly commonly, especially when the included launch file is part of a
another package, and should operate mostly independently of the rest of the nodes.
6.5.2 Launch arguments
To help make launch files configurable, roslaunch supports launch arguments, also called
arguments or even args, which function somewhat like local variables in an executable
program.Í10 The advantage is that you can avoid code duplication by writing launch files
that use arguments for the small number of details that might change from run to run.
To illustrate this idea, the example launch file uses one argument, called use_sim3, to
determine whether to start three copies of turtlesim or only two.
� Although the terms argument and parameter are used somewhat interchangeably
in many computing contexts, their meanings are quite different in ROS. Parameters
are values used by a running ROS system, stored on the parameter server and acces-
sible to active nodes via the ros::param::get functions and to users via rosparam.
Í10http://wiki.ros.org/roslaunch/XML/arg
99

6. LAUNCH FILES
1 <launch>
2 <inc lude
3 f i l e ="$ ( f i nd a g i t r ) / doublesim . launch "
4 />
5 <arg
6 name="use_sim3"
7 de f au l t="0"
8 />
9
10 <group ns="sim3" i f ="$ ( arg use_sim3 ) " >
11 <node
12 name="turt les im_node "
13 pkg="tu r t l e s im "
14 type="turt les im_node "
15 />
16 <node
17 pkg="tu r t l e s im "
18 type="turt le_te leop_key "
19 name="teleop_key "
20 r equ i r ed="true "
21 launch−p r e f i x="xterm −e"
22 />
23 </group>
24 </launch>
Listing 6.6: A launch file called triplesim.launch that illustrates group, include, and arg
arguments.
(See Chapter 7.) In contrast, arguments make sense only within launch files; their
values are not directly available to nodes.
Declaring arguments To declare the existence of an argument, use an arg element:
<arg name="arg-name" />
Declarations like this are not strictly required (unless you want to assign a default or a
value—see below), but are a good idea because they can make it clear to a human reader
what arguments the launch file is expecting.
100

6.5. Other launch file elements
Assigning argument values Every argument used in a launch file must have an assigned
value. There are a few ways to accomplish this. You can provide a value on the roslaunch
command line:
roslaunch package-name launch-file-name arg-name:=arg-value
Alternatively, you can provide a value as part of the arg declaration, using one of these two
syntaxes:
<arg name="arg-name" default="arg-value" />
<arg name="arg-name" value="arg-value" />
The only difference between them is that a command line argument can override a de-
fault, but not a value. In the example, use_sim3 has a default value of 0, but this can be
changed from the command line, like this:
roslaunch agitr triplesim.launch use_sim3:=1
If we were to modify the launch file, replacing default with value, then this command
would generate an error, because argument values set by value cannot be changed.
Accessing argument values Once an argument is declared and a value assigned to it, you
can use its value using an arg substitution, like this:
$(arg arg-name)
Anywhere this substitution appears, roslaunch will replace it with the value of the given
argument. In the example, we use the use_sim3 argument once, inside the if attribute of
a group element. (We’ll introduce both if and group shortly.)
Sending argument values to included launch files One limitation of the argument set-
ting technique presented so far is that it does not provide any means for passing arguments
to subordinate launch files that we import using include elements. This is important be-
cause, much like (lexical) local variables, arguments are only defined for the launch file
that declares them. Arguments are not “inherited” by included launch files.
The solution is to insert arg elements as children of the include element, like this:
<include file="path-to-launch-file">
<arg name="arg-name" value="arg-value"/>
. . .
</include>
101
6. LAUNCH FILES
Note that this usage of the arg element differs from the arg declarations we’ve seen so
far. The arguments mentioned between the include tags are arguments for the included
launch file, not for the launch file in which they appear. Because the purpose is to establish
values for the arguments needed by the included file, the value attribute is required in this
context.
One common scenario is that both launch files—the included one and the including
one—have some arguments in common. In such cases, we might want to pass those values
along unchanged. An element like this, using the same argument name in both places,
does this:
<arg name="arg-name" value="$(arg arg-name)" />
In this instance, the first appearance of the argument’s name refers, as usual, to that argu-
ment in the included launch file. The second appearance of the name refers to the argu-
ment in the including launch file. The result is that the given argument will have the same
value in both launch files.
6.5.3 Creating groups
One final launch file feature is the group element, which provides a convenient way to
organize nodes in a large launch file.Í11 The group element can serve two purposes:
R Groups can push several nodes into the same namespace.
<group ns="namespace">
. . .
</group>
Every node within the group starts with the given default namespace.
¹ If a grouped node has its own ns attribute, and that name is (as it probably
should be) a relative name, then the resulting node will be started with a de-
fault namespace that nests the latter namespace within the former. These
rules, which match what one would expect for resolving relative names, also
apply to nested groups.
R Groups can conditionally enable or disable nodes.
Í11http://wiki.ros.org/roslaunch/XML/group
102
6.5. Other launch file elements
<group if="0-or-1">
. . .
</group>
If the value of the if attribute is 1, then the enclosed elements are included normally.
If this attribute has value 0, then the enclosed elements are ignored. The unless
attribute works similarly, but with the meanings reversed:
<group unless="1-or-0">
. . .
</group>
Of course, it is unusual to directly type a 0 or 1 for these attributes. Combined with
the arg substitution technique, however, they form a powerful way of making your
launch files configurable.
� Note that 0 and 1 are the only legitimate values for these attributes. In partic-
ular, the usual boolean AND and OR operations that you might expect are not
directly available.
The example has a single group that combines these two purposes. The group has
both the ns attribute (to push the group’s two nodes into the sim3 namespace) and the
if attribute (to implement the enabling or disabling of that third simulation based on the
use_sim3 argument).
� Notice that group is never strictly necessary. It’s always possible to write the ns, if,
and unless attributes manually for each element that we might otherwise include
in a group. However, groups can often reduce duplication—the namespaces and
conditions appear only once—and make the launch file’s organization more readily
apparent.
¹ Unfortunately, only these three attributes can be passed down via a group. For ex-
ample, as much as we might want to, output="screen" cannot be set for a group
element, and must be given directly to each node to which we want to apply it.
103

6. LAUNCH FILES
6.6 Looking forward
In the chapters so far, we’ve seen how to create nodes that communicate by passing mes-
sages and how to start many nodes at once, with potentially complex configurations. The
next chapter introduces the parameter server, which provides a centralized way to provide
parts of that configuration information to nodes.
104
Chapter 7
ParametersIn which we configure nodes using parameters.
In addition to the messages that we’ve studied so far, ROS provides another mechanism
called parameters to get information to nodes. The idea is that a centralized parameter
server keeps track of a collection of values—things like integers, floating point numbers,
strings, or other data—each identified by a short string name.Í1Í2 Because parameters
must be actively queried by the nodes that are interested in their values, they are most
suitable for configuration information that will not change (much) over time.
This chapter introduces parameters, showing how to access them from the command
line, from within nodes, and in launch files.
7.1 Accessing parameters from the command line
Let’s start with a few commands to see how parameters work.
Listing parameters To see a list of all existing parameters, use this command:Í3
rosparam list
On the author’s system, with no nodes running, the output is:
Í1http://wiki.ros.org/roscpp/Overview/ParameterServer
Í2http://wiki.ros.org/ParameterServer
Í3http://wiki.ros.org/rosparam
105
7. PARAMETERS
/rosdistro
/roslaunch/uris/host_donatello__38217
/rosversion
/run_id
Each of these strings is a name—specifically, a global graph resource name (see Chap-
ter 5)—that the parameter server has associated with some value.
¹ In the current version of ROS, the parameter server is actually part of the master, so
it is started automatically by roscore or roslaunch. In nearly all cases, the param-
eter server works correctly behind the scenes, and there’s no reason to think about
it explicitly. Keep in mind however, that all parameters are “owned” by the param-
eter server rather than by any particular node. This means that parameters—even
those created with private names—will continue to exist even after the node they’re
intended for has terminated.
Querying parameters To ask the parameter server for the value of a parameter, use the
rosparam get command:
rosparam get parameter_name
For example, to read the value of the /rosdistro parameter, use this command:
rosparam get /rosdistro
The output is the string indigo, which is not too much of a surprise. It is also possible to
retrieve the values of every parameter in a namespace:
rosparam get namespace
For example, by asking about the global namespace, we can see the values of every param-
eter all at once:
rosparam get /
On the author’s computer, the output is:
rosdistro: indigo
roslaunch:
uris: host_donatello__38217: ’http://donatello:38217/’
rosversion: 1.11.9
run_id: e574a908-70c5-11e4-899e-60d819d10251
106
7.1. Accessing parameters from the command line
Setting parameters To assign a value to a parameter, use a command like this:
rosparam set parameter_name parameter_value
This command can modify the values of existing parameters or create new ones. For ex-
ample, these commands create string parameters that store the wardrobe preferences of a
certain group of cartoon ducks:
rosparam set /duck_colors/huey red
rosparam set /duck_colors/dewey blue
rosparam set /duck_colors/louie green
rosparam set /duck_colors/webby pink
¹ Alternatively, we can set several parameters in the same namespace at once:
rosparam set namespace values
The values should be specified as a YAML dictionary that maps parameter names to
values. Here’s an example that has the same effect as the four commands above:
rosparam set /duck_colors "huey: red
dewey: blue
louie: green
webby: pink"
Note that this syntax requires newline characters in the command itself. This is not
a problem because the opening quotation mark signals to bash that the command is
not yet complete. Pressing Enter when a quoted argument is open inserts a newline
character, as desired, instead of executing the command.
� The spaces after the colons are important, to ensure that rosparam treats this
as a collection of parameters in the /duck_colors namespace, rather than as
a single string parameter called duck_colors in the global namespace.
Creating and loading parameter files To store all of the parameters from a namespace,
in YAML format, to a file, use rosparam dump:
107
7. PARAMETERS
rosparam dump filename namespace
The opposite of dump is load, which reads parameters from a file and adds them to the
parameter server:
rosparam load filename namespace
For both of these commands, the namespace argument is optional, and defaults to the
global namespace (/). The combination of dump and load can be useful for testing, be-
cause it provides a quick way to take a “snapshot” of the parameters in effect at a certain
time, and to recreate that scenario later.
7.2 Example: Parameters in turtlesim
For a more concrete example of how parameters can be useful, let’s see how turtlesim uses
them. If you start roscore and a turtlesim_node, and then ask for a rosparam list, you’ll
see output like this:
/background_b
/background_g
/background_r
/rosdistro
/roslaunch/uris/host_donatello__59636
/rosversion
/run_id
We’ve already seen those last four parameters, which are created by the master. In addition,
it looks like our turtlesim_node has created three parameters. Their names (correctly)
suggest that they specify the background color that turtlesim is using, separated into red,
green, and blue channels.
This illustrates that nodes can, and sometimes do, create and modify parameter values.
In this case, turtlesim_node sets those three parameters as part of its initialization. In this
regard, turtlesim_node is atypical, because its initialization will clobber any values that
might already have been set for those parameters. That is, every turtlesim_node starts
with the same blue background, at least for a short time, regardless of any steps we might
take to specify a different starting color.
108

7.2. Example: Parameters in turtlesim
� A better strategy—and a better example of how “real” ROS nodes usually work—
might have been for turtlesim to first to test whether those parameters exist, and
assign the default blue color only if those parameters do not already exist.
Reading the background color We can inspect the values of the background parameters
using rosparam get:
rosparam get /background_r
rosparam get /background_g
rosparam get /background_b
The values returned by these commands are 69, 86, and 255. Since the values are relatively
small integers, a good guess (and, it turns out, a correct guess) is that each channel is an
8-bit integer, ranging from 0 to 255. Thus, turtlesim defaults to a background color of
(69,86,255), corresponding to the deep blue color to which we’re accustomed.
Setting the background color Suppose we want to change the background from this
blue color to a bright yellow instead. We might try to do this by changing the parameter
values after the turtlesim node starts up:
rosparam set /background_r 255
rosparam set /background_g 255
rosparam set /background_b 0
However, even after setting these parameters, the background color remains the same.
Why? The explanation is that turtlesim_node only reads the values of these parameters
when its /clear service is called. One way to call this service is using this command:
rosservice call /clear
After the service call completes, the background color will finally be changed appropri-
ately. Figure 7.1 shows the effect of this change.
The important thing to notice here is that updated parameter values are not automat-
ically “pushed” to nodes. Instead, nodes that care about changes to some or all of their
parameters must explicitly ask the parameter server for those values. Likewise, if we ex-
pect to change the values of parameters used by an active node, we must be aware of how
(or if) that node re-queries its parameters. (Quite often, but not for turtlesim, the answer
is based on a subsystem called dynamic_reconfigure, which we do not cover here.Í4)
Í4http://wiki.ros.org/dynamic_reconfigure
109

7. PARAMETERS
Figure 7.1: Before (left) and after
(right) a change to the background
color of a turtlesim node.
¹ It is possible for a node to ask the parameter server to send updated values when
a parameter changes, by using ros::param::getCached instead of ros::param::get.
However, this approach is only intended to improve efficiency, and doesn’t elimi-
nate the need for the node to check the parameter’s value.
7.3 Accessing parameters from C++
The C++ interface to ROS parameters is quite straightforward:Í5
void ros::param::set(parameter_name, input_value);
bool ros::param::get(parameter_name, output_value);
In both cases, the parameter name is a string, which can be a global, relative, or private
name. The input value for set can be a std::string, a bool, an int, or a double; the output
value for get should be a variable (which is passed by reference) of one of those types.
The get function returns true if the value was read successfully and false if there was a
problem, usually indicating that the requested parameter has not been assigned a value.
To see these functions in action, let’s have a look at two examples.
R Listing 7.1 illustrates ros::param::set. It assigns integer values to all three turtlesim
background color parameters. This program includes code to ensure that the turtle-
sim node has started up by waiting for the /clear service that it provides—necessary
to ensure that turtlesim does not overwrite the values that we set here—and to call
that service to force turtlesim to read the new values that we’ve set. (Our focus here
is on the parameters themselves; See Chapter 8 for details about services.)
Í5http://wiki.ros.org/roscpp_tutorials/Tutorials/Parameters
110

7.3. Accessing parameters from C++
1 // This program waits for a turtlesim to start up, and
2 // changes i t s background color .
3 #inc lude <ros / ro s . h>
4 #inc lude <std_srvs /Empty . h>
5
6 i n t main ( i n t argc , char ∗∗ argv ) {
7 ro s : : i n i t ( argc , argv , " set_bg_color " ) ;
8 ro s : : NodeHandle nh ;
9
10 // Wait unti l the clear service is available , which
11 // indicates that turtlesim has started up, and has
12 // set the background color parameters .
13 ro s : : s e r v i c e : : wa i tForServ i ce ( " c l e a r " ) ;
14
15 // Set the background color for turtlesim ,
16 // overriding the default blue color .
17 ro s : : param : : s e t ( "background_r" , 255) ;
18 ro s : : param : : s e t ( "background_g" , 255) ;
19 ro s : : param : : s e t ( "background_b" , 0) ;
20
21 // Get turtlesim to pick up the new parameter values .
22 ro s : : S e r v i c eC l i e n t c l e a rC l i e n t
23 = nh . s e r v i c eC l i e n t <std_srvs : : Empty>("/ c l e a r " ) ;
24 std_srvs : : Empty srv ;
25 c l e a rC l i e n t . c a l l ( s rv ) ;
26
27 }
Listing 7.1: A C++ program called set_bg_color.cpp that sets the background color of a
turtlesim window.
R Listing 7.2 shows an example of ros::param::get. It extends our original pubvel ex-
ample (Listing 3.4) by reading a private floating point parameter called max_vel
and using that value to scale the randomly-generated linear velocities.
This program requires a value for a parameter called max_vel in its private name-
space, which must be set before the program starts:
rosparam set /publish_velocity/max_vel 0.1
If that parameter is not available, the program generates a fatal error and terminates.
111
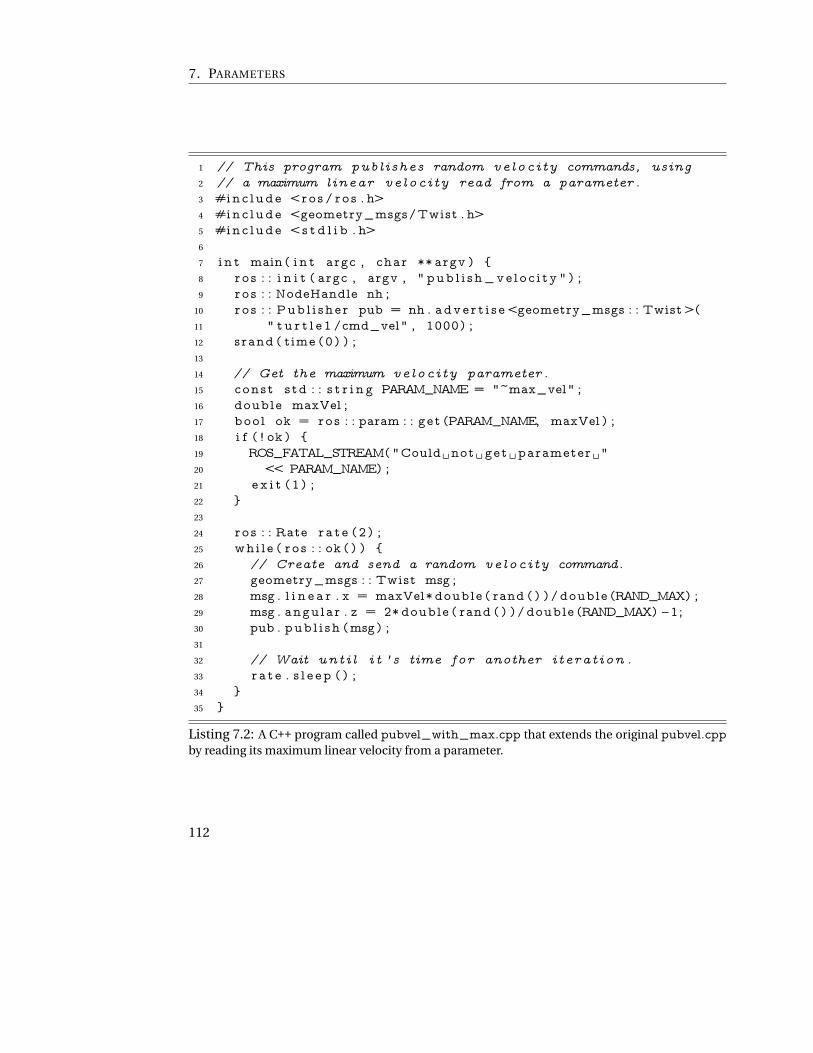
7. PARAMETERS
1 // This program publishes random velocity commands, using
2 // a maximum linear velocity read from a parameter .
3 #inc lude <ros / ro s . h>
4 #inc lude <geometry_msgs/Twist . h>
5 #inc lude <s t d l i b . h>
6
7 i n t main ( i n t argc , char ∗∗ argv ) {
8 ro s : : i n i t ( argc , argv , " pub l i sh_ve loc i ty " ) ;
9 ro s : : NodeHandle nh ;
10 ro s : : Pub l i she r pub = nh . adve r t i s e <geometry_msgs : : Twist>(
11 " t u r t l e 1 /cmd_vel" , 1000) ;
12 srand ( time (0 ) ) ;
13
14 // Get the maximum velocity parameter .
15 const std : : s t r i n g PARAM_NAME = "~max_vel" ;
16 double maxVel ;
17 bool ok = ros : : param : : get (PARAM_NAME, maxVel ) ;
18 i f ( ! ok ) {
19 ROS_FATAL_STREAM("Could␣not␣ get ␣parameter ␣"
20 << PARAM_NAME) ;
21 e x i t (1 ) ;
22 }
23
24 ro s : : Rate r a t e (2 ) ;
25 whi le ( ro s : : ok ( ) ) {
26 // Create and send a random velocity command.
27 geometry_msgs : : Twist msg ;
28 msg . l i n e a r . x = maxVel∗ double ( rand ( ) ) / double (RAND_MAX) ;
29 msg . angular . z = 2∗ double ( rand ( ) ) / double (RAND_MAX) −1;
30 pub . pub l i sh (msg) ;
31
32 // Wait unti l i t ' s time for another iteration .
33 r a t e . s l e e p ( ) ;
34 }
35 }
Listing 7.2: A C++ program called pubvel_with_max.cpp that extends the original pubvel.cpp
by reading its maximum linear velocity from a parameter.
112

7.4. Setting parameters in launch files
¹ It is technically possible (but somewhat messy) to assign a private parameter
to a node on its command line using a remap-like syntax, by prepending the
name with an underscore (_):
_param-name:=param-value
These kinds of arguments are converted to ros::param::set calls, replacing
the _ with a ∼ to form a proper private name, by ros::init. For example, we
could successfully launch pubvel_with_max using this command:
rosrun agitr pubvel_with_max _max_vel:=1
7.4 Setting parameters in launch files
Another very common method for setting parameters is to do so within a launch file.
Setting parameters To ask roslaunch to set a parameter value, use a param element:Í6
<param name="param-name" value="param-value" />
This element, as one would expect, assigns the given value to parameter with the given
name. The parameter name should, as usual, be a relative name. For example, this launch
file fragment is equivalent to the rosparam set commands on page 107:
<group ns="duck_colors">
<param name="huey" value="red" />
<param name="dewey" value="blue" />
<param name="louie" value="green" />
<param name="webby" value="pink" />
</group>
Setting private parameters Another option is to include param elements as children of
a node element.
Í6http://wiki.ros.org/roslaunch/XML/param
113

7. PARAMETERS
<node . . . >
<param name="param-name" value="param-value" />
. . .
</node>
With this construction, the parameter names are treated as private names for that node.
¹ This is an exception to the usual rules for resolving names. Parameter names given
in param elements that are children of node elements are always resolved as private
names, regardless of whether they begin with ∼ or even /.
For example, we might use code like this to launch our pubvel_with_max node with
its private max_vel parameter set correctly:
<node
pkg="agitr"
type="pubvel_with_max"
name="publish_velocity"
/>
<param name="max_vel" value="3" />
</node>
Listing 7.3 shows a complete launch file that launches a turtlesim and our two example
programs. Its result should be to show a turtlesim turtle moving quickly across a yellow
background.
Reading parameters from a file Finally, launch files also support an equivalent to ros-
param load, to set many parameters at once.Í7
<rosparam command="load" file="path-to-param-file" />
The parameter file listed here is usually one created by rosparam dump. As with other
references to specific files (such as the include element from Section 6.5.1) it is typical to
use a find substitution to specify the file name relative to a package directory:
<rosparam
command="load"
file="$(find package-name)/param-file"
/>
Í7http://wiki.ros.org/roslaunch/XML/rosparam
114

7.5. Looking forward
1 <launch>
2 <node
3 pkg="tu r t l e s im "
4 type="turt les im_node "
5 name="tu r t l e s im "
6 />
7 <node
8 pkg="a g i t r "
9 type="pubvel_with_max"
10 name="pub l i sh_ve loc i ty "
11 >
12 <param name="max_vel" va lue="3" />
13 </node>
14 <node
15 pkg="a g i t r "
16 type="set_bg_color "
17 name="set_bg_color "
18 />
19 </launch>
Listing 7.3: A launch file called fast_yellow.launch. It starts the example programs from
Listings 7.1 and 7.2 and sets the max_vel parameter.
Along withrosparam load, this facility can be helpful for testing, because it allows us to
recreate the parameters that were in effect at a certain time in the past.
7.5 Looking forward
Parameters are a relatively simple idea that can lead to substantial flexibility and config-
urability in ROS nodes. The next chapter deals with one final communication mechanism,
called services, which implements one-to-one, bidirectional flows of information.
115


Chapter 8
ServicesIn which we call services and respond to service requests.
In Chapters 2 and 3, we focused on how messages travel between nodes. Even though they
are the primary method for communication in ROS, messages do have some limitations.
This chapter introduces an alternative method of communication called service calls. Ser-
vice calls differ from messages in two ways.
R Service calls are bi-directional. One node sends information to another node and
waits for a response. Information flows in both directions. In contrast, when a mes-
sage is published, there is no concept of a response, and not even any guarantee that
anyone is subscribing to those messages.
R Service calls implement one-to-one communication. Each service call is initiated
by one node, and the response goes back to that same node. On the other hand,
each message is associated with a topic that might have many publishers and many
subscribers.
Aside from these (very important!) differences, services are similar to messages. In this
chapter, we’ll see how to inspect and call services from the command line, and how to
write nodes that act as either service clients or as servers.
8.1 Terminology for services
Here is the basic flow of information for service calls:
117

8. SERVICES
client server
response
request
The idea is that a client node sends some data called a request to a server node and waits
for a reply. The server, having received this request, takes some action (computing some-
thing, configuring hardware or software, changing its own behavior, etc.) and sends some
data called a response back to the client.
The specific content of the request and response data is determined by the service data
type, which is analogous to the message types that determine the content of messages
(recall Section 2.7.2). Like a message type, a service data type is defined by a collection
of named fields. The only difference is that a service data type is divided into two parts,
representing the request (which is supplied by the client to the server) and the response
(which is sent by the server back to the client).
8.2 Finding and calling services from the command line
Although services are most commonly used by code within nodes, there do exist a few
command line tools for interacting with them. Experimenting with these tools can make
it easier to understand how service calls work.
Listing all services You can get a list of services that are currently active using this com-
mand:Í1
rosservice list
On the author’s computer, with just a turtlesim node running, the list of services looks like
this:
/clear
/kill
/reset
/rosout/get_loggers
/rosout/set_logger_level
/spawn
/turtle1/set_pen
/turtle1/teleport_absolute
Í1http://wiki.ros.org/rosservice
118
8.2. Finding and calling services from the command line
/turtle1/teleport_relative
/turtlesim/get_loggers
/turtlesim/set_logger_level
Each line shows the name of one service that is currently available to call. Service names
are graph resource names, and like other graph resource names can be specified as global,
relative, or private names. The output of rosservice list shows the full global name of each
service.
The services in this example, and many ROS services in general, can be divided into
two basic types.
R Some services, such as the get_loggers and set_logger_level services in the list
above, are used to get information from or pass information to specific nodes. These
kinds of services usually use their node’s name as a namespace to prevent name col-
lisions, and to allow their nodes to offer them via private names like ∼get_loggers
or ∼set_logger_level. (See Section 4.5 for details about loggers and logger levels.)
R Other services represent more general capabilities that are not conceptually tied to
any particular node. For example, the service called /spawn, which creates a new
simulated turtle, is offered by the turtlesim node. However, in a different system,
this service could conceivably be offered by a different node; when we call /spawn,
we only care that a new turtle is created, not about the details of which node does
that work. All of the services in the list above, except the get_loggers and set-
_logger_level services, fit this description. These kinds of services typically have
names that describe their function, but that do not mention any specific node.
Listing services by node To see the services offered by one particular node, use the ros-
node info command:
rosnode info node-name
For example, here’s the relevant portion of the output of this command for a turtlesim
node:
Services:
* /turtle1/teleport_absolute
* /turtlesim/get_loggers
* /turtlesim/set_logger_level
* /reset
* /spawn
* /clear
119
8. SERVICES
* /turtle1/set_pen
* /turtle1/teleport_relative
* /kill
This shows, hopefully unsurprisingly, that most of the services currently available are of-
fered by the turtlesim node. (The only exceptions are the two logging services offered by
/rosout.)
Finding the node offering a service To perform the reverse query—that is, to see which
node offers a given service—use this command:
rosservice node service-name
As expected, this command outputs /turtlesim when asked about any of the services
listed by rosnode info /turtlesim, and /rosout when asked about the other two services.
Finding the data type of a service You can determine the service data type of a service
using a command like this:
rosservice info service-name
For example, from the command
rosservice info /spawn
the output is:
Node: /turtlesim
URI: rosrpc://donatello:47441
Type: turtlesim/Spawn
Args: x y theta name
We can see that the data type of the /spawn service is turtlesim/Spawn. As with message
types, a service data type has two parts, one naming the package that owns the type, and
one naming the type itself:
turtlesim︸ ︷︷ ︸
package name
+ Spawn︸ ︷︷ ︸
type name
⇒ turtlesim/Spawn︸ ︷︷ ︸
service data type
Service data types are always referenced by these kinds of complete names.
120

8.2. Finding and calling services from the command line
Inspecting service data types We can get some details about service data types using the
rossrv command:
rossrv show service-data-type-name
For example,
rossrv show turtlesim/Spawn
produces this output:
float32 x
float32 y
float32 theta
string name
---
string name
In this case, the data before the dashes (---) are the elements of the request. This is the
information that the client node sends to the server node. Everything after the dashes is
the response, or information that the server sends back from the client when the server
has finished acting on the request.
� Be careful about the difference between rosservice and rossrv. The former is for
interacting with services that are currently offered by some node. The latter—whose
name comes from the .srv extension used for files that declare service data types—
is for asking about service data types, whether or not any currently available service
has that type. The difference is similar to the difference between the rostopic and
rosmsg commands:
Topics Services
active things rostopic rosservice
data types rosmsg rossrv
Note that the request, the response, or both can be empty. For example, in the /reset
service offered by turtlesim_node, which has type std_srvs/Empty, both the request
and response parts are empty. This is roughly equivalent to a C++ function that accepts no
arguments and returns void. No information goes in or out, but useful things (that is, side
effects) still may happen.
121

8. SERVICES
Calling services from the command line To get a feel for how services work, you can call
them from the command line using this command:
rosservice call service-name request-content
The request content part should list values for each field of the request, as shown by rossrv
show. Here’s an example:
rosservice call /spawn 3 3 0 Mikey
The effect of this service call is to create a new turtle named “Mikey,” at position (x, y) =
(3,3), facing angle θ = 0, within the existing simulator.
� This new turtle comes with its own set of resources, including cmd_vel, pose, and
color_sensor topics and set_pen, teleport_absolute, teleport_relative services.
These new resources live in a namespace called—in this example—Mikey. These
are in addition to the usual resources in the turtle1 namespace, and are needed to
allow other nodes to control the separate turtles individually. This nicely illustrates
the way that namespaces can prevent name collisions.
The output from rosservice call shows the server’s response data. For the example
above, the response should be:
name: Mikey
In this case, the server sends the new turtle’s name back as part of the response.
In addition to sending the response data, the server also tells the client whether the call
has succeed or failed. For example, in turtlesim, each turtle must have a unique name.
If we run the rosservice call example above twice, the first call should succeed, but the
second will generate an error that looks like this:
ERROR: service [/spawn] responded with an error:
The error occurs because we’ve attempted to create two turtles with the same name.
¹ This error message ends with a colon because turtlesim has replied with an empty
error message. The underlying infrastructure is able to return short error message
strings when service calls fail, but the C++ client library, which turtlesim is using,
does not provide an easy way to return a non-empty error message.
122

8.3. A client program
8.3 A client program
Calling services from the command line is handy for exploring and for things that only
need to be done occasionally, but of course it’s much more useful to be able to call services
from your code.Í2 Listing 8.1 shows a short example of how to do that. That example
illustrates all of the basic elements of a service client program.
Declaring the request and response types Just like message types (recall Section 3.3.1),
every service data has an associated C++ header file that we must include:
#include <package_name/type_name.h>
In the example, we say
#include <turtlesim/Spawn.h>
to include the definition of a class called turtlesim::Spawn, which defines the data type—
including both the request and response parts—of the service we want to call.
Creating a client object After initializing itself as a node (by calling ros::init and creat-
ing a NodeHandle object), our program must create an object of type ros::ServiceClient,
whose job is to actually carry out the service call. The declaration of a ros::ServiceClient
looks like this:
ros::ServiceClient client = node_handle.serviceClient<service_type>(
service_name);
This line has three important parts.
R The node_handle is the usual ros::NodeHandle object. We’re calling its service-
Client method.
R The service_type is the name of the service object defined in the header file we
included above. In the example, it’s turtlesim::Spawn.
R The service_name is a string naming the service that we want to call. This should
be a relative name, but can also be a global name. The example uses the relative
name "spawn".
By default, creating this object is relatively inexpensive because it doesn’t do much, except
to store the details about the service we’ll want to call later.
Í2http://wiki.ros.org/ROS/Tutorials/WritingServiceClient(c++)
123
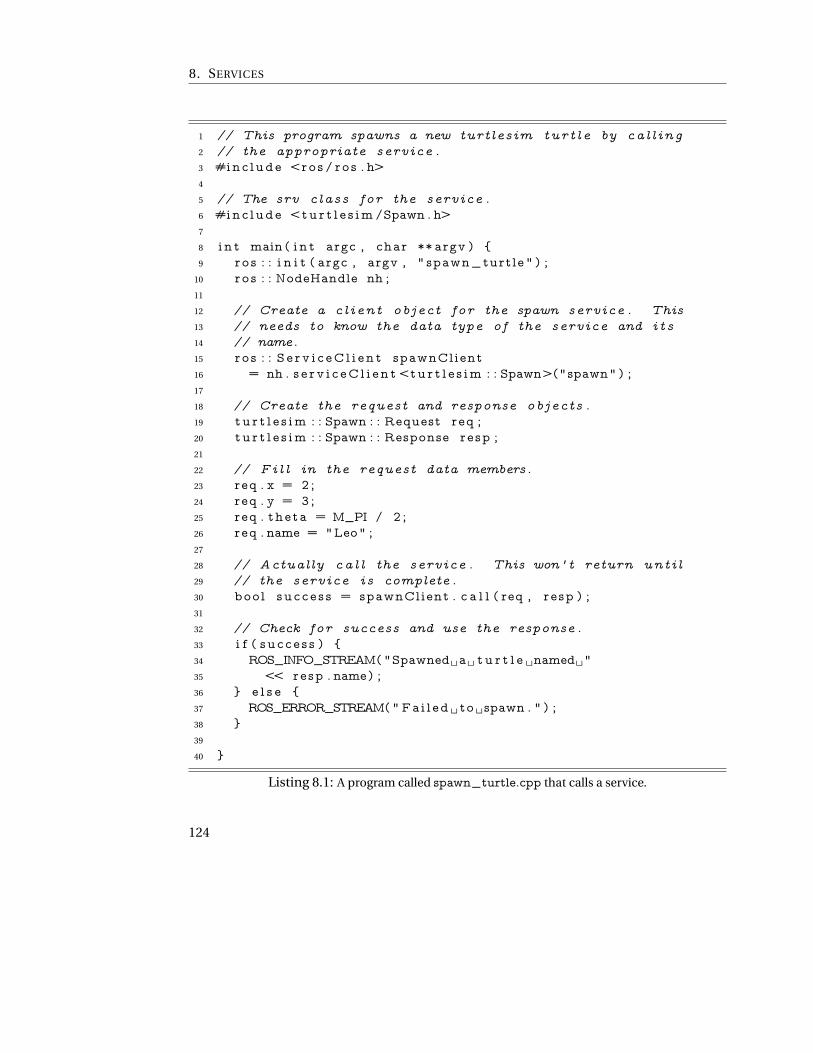
8. SERVICES
1 // This program spawns a new turtlesim turt le by cal l ing
2 // the appropriate service .
3 #inc lude <ros / ro s . h>
4
5 // The srv class for the service .
6 #inc lude <tu r t l e s im /Spawn . h>
7
8 i n t main ( i n t argc , char ∗∗ argv ) {
9 ro s : : i n i t ( argc , argv , " spawn_turtle " ) ;
10 ro s : : NodeHandle nh ;
11
12 // Create a cl ient object for the spawn service . This
13 // needs to know the data type of the service and i t s
14 // name.
15 ro s : : S e r v i c eC l i e n t spawnClient
16 = nh . s e r v i c eC l i e n t <tu r t l e s im : : Spawn>("spawn" ) ;
17
18 // Create the request and response objects .
19 t u r t l e s im : : Spawn : : Request req ;
20 t u r t l e s im : : Spawn : : Response resp ;
21
22 // Fi l l in the request data members.
23 req . x = 2 ;
24 req . y = 3 ;
25 req . theta = M_PI / 2 ;
26 req . name = "Leo" ;
27
28 // Actually ca l l the service . This won' t return unti l
29 // the service is complete .
30 bool su c c e s s = spawnClient . c a l l ( req , re sp ) ;
31
32 // Check for success and use the response .
33 i f ( s u c c e s s ) {
34 ROS_INFO_STREAM("Spawned␣a␣ t u r t l e ␣named␣"
35 << resp . name) ;
36 } e l s e {
37 ROS_ERROR_STREAM(" Fa i l ed ␣ to ␣spawn . " ) ;
38 }
39
40 }
Listing 8.1: A program called spawn_turtle.cpp that calls a service.
124

8.3. A client program
� Notice that creating a ros::ServiceClient does not require a queue size, in contrast
to the analogous ros::Publisher. This difference occurs because service calls do
not return until the response arrives. Because the client waits for the service call to
complete, there is no need to maintain a queue of outgoing service calls.
Creating request and response objects Once the ros::ServiceClient has been construct-
ed, the next step is to create a request object to contain the data to be sent to the server.
The header we included above includes separate classes for the response and request parts
of the service data type, named Request and Response, respectively. These classes must
be referenced via the package name and service type, like this:
package_name::service_type::Request
package_name::service_type::Response
Each of these classes has data members matching the fields of the service type. (Recall that
rossrv show can list those fields and their data types for us.) These fields are mapped to
C++ data types in the same way that messages fields are. The Request constructor supplies
meaningless default values for those fields, so we should assign a value to each field. In
the example, we create a turtlesim::Spawn::Request object and assign values to its x, y,
theta, and name fields.
We’ll also need a Response object—in the example, a turtlesim::Spawn::Response—
but, since that information should come from the server, we should not attempt to fill in
its data members.
� Service type header files also define a single class (a struct really) named
package_name::service_type
that contains both a Request and a Response as data members. An object from this
class is usually called a srv. If you prefer—as the authors of many online tutorials
apparently do—you can pass an object of this class to the call method introduced
below, instead of separate Request and Response objects.
Calling the service Once we have a ServiceClient, a completed Request, and a Re-
sponse, we can actually call the service:
125
8. SERVICES
bool success = service_client.call(request, response);
This method does the actual work of locating the server node, transmitting the request
data, waiting for a response, and storing the response data the Response we provided.
The call method returns a boolean value that tells us if the service call completed suc-
cessfully. Failures can occur because of problems with the ROS infrastructure—for exam-
ple, attempting to call a service not offered by any node—or for reasons specific to an in-
dividual service. In the example, a failed call most commonly indicates that another turtle
already exists with the requested name.
� A common mistake is to fail to check the return value of call. This can lead to unex-
pected problems if the service call fails. It takes only a minute or two to add code to
check this value and call ROS_ERROR_STREAM when the service call fails. It’s
quite likely that this investment of time will be repaid with easier debugging in the
future.
¹ By default, the process of finding and connecting to the server node occurs inside
the call method. This connection is used for that service call and then closed before
call returns. ROS also supports a concept of persistent service clients, in which the
ros::ServiceClient constructor establishes a connection to the server, which is then
reused for every subsequent call for that client object. A persistent service client can
be created by passing true for the second parameter of the constructor (which we’ve
allowed to default to false in the previous examples):
ros::ServiceClient client = node_handle.advertise<service_type>(
service_name, true);
The use of persistent clients is mildly discouraged by the documentation,Í3 be-
cause the performance gains tend to be rather small—The author’s informal exper-
iments showed an improvement of only about 10%—and the resulting system can
be less robust to restarts or changes of the server node.
Í3http://www.ros.org/doc/api/roscpp/html/classros_1_1NodeHandle.html
126

8.4. A server program
After the service call successfully completes, you access the response data from the
Request object that you passed to call. In the example, the response includes only an
echo of the name field from the request.
Declaring a dependency That’s all there is to the client code. However, to get catkin-
_make to correctly compile a client program, we must be sure that the program’s package
declares a dependency on the package that owns the service type. Such dependencies,
which are the same as those we needed for message types (recall Section 3.3.3), require
edits to CMakeLists.txt and to the manifest, package.xml. To compile the example pro-
gram, we must ensure that the find_package line in CMakeLists.txt mentions the turtle-
sim package:
find_package(catkin REQUIRED COMPONENTS roscpp turtlesim)
In package.xml, we should ensure that build_depend and run_depend elements exist
that name the package:
<build_depend>turtlesim</build_depend>
<run_depend>turtlesim</run_depend>
After completing these changes, the usual catkin_make should compile the program.
8.4 A server program
Now let’s take a look at the other side of service calls, by writing a program that acts as a
server. Listing 8.2 shows an example that offers a service called toggle_forward and also
drives a turtlesim robot, alternating between forward motions and rotations each time
that service is called.
The code for acting as a server is remarkably similar to the code for subscribing to a
topic. Aside from differences in names—we must create a ros::ServiceServer instead of a
ros::Subscriber—the only difference is that a server can send data back to the client, via
both a response object and a boolean indication of success or failure.
Writing a service callback Just like with subscriptions, each service that our nodes offer
must be associated with a callback function. A service callback looks like this:
bool function_name(
package_name::service_type::Request &req,
package_name::service_type::Response &resp
) {
127

8. SERVICES
1 // This program toggles between rotation and translation
2 // commands, based on ca l l s to a service .
3 #inc lude <ros / ro s . h>
4 #inc lude <std_srvs /Empty . h>
5 #inc lude <geometry_msgs/Twist . h>
6
7 bool forward = true ;
8 bool toggleForward (
9 std_srvs : : Empty : : Request &req ,
10 std_srvs : : Empty : : Response &resp
11 ) {
12 forward = ! forward ;
13 ROS_INFO_STREAM("Now␣ sending ␣" << ( forward ?
14 " forward " : " r o t a t e " ) << "␣commands . " ) ;
15 r e turn t rue ;
16 }
17
18 i n t main ( i n t argc , char ∗∗ argv ) {
19 ro s : : i n i t ( argc , argv , " pubvel_toggle " ) ;
20 ro s : : NodeHandle nh ;
21
22 // Register our service with the master .
23 ro s : : S e rv i c eS e rv e r s e r v e r = nh . a dv e r t i s e S e r v i c e (
24 " toggle_forward " , &toggleForward ) ;
25
26 // Publish commands, using the la tes t value for forward ,
27 // unti l the node shuts down.
28 ro s : : Pub l i she r pub = nh . adve r t i s e <geometry_msgs : : Twist>(
29 " t u r t l e 1 /cmd_vel" , 1000) ;
30 ro s : : Rate r a t e (2 ) ;
31 whi le ( ro s : : ok ( ) ) {
32 geometry_msgs : : Twist msg ;
33 msg . l i n e a r . x = forward ? 1 .0 : 0 . 0 ;
34 msg . angular . z = forward ? 0 .0 : 1 . 0 ;
35 pub . pub l i sh (msg) ;
36 ro s : : spinOnce ( ) ;
37 r a t e . s l e e p ( ) ;
38 }
39 }
Listing 8.2: A program called pubvel_toggle.cpp that changes the velocity commands it
publishes, based on a service that it offers.
128

8.4. A server program
. . .
}
ROS executes the callback function once for each service call that our node receives. The
Request parameter contains the data sent from the client. The callback’s job is to fill in
the data members of the Response object. These are the same Request and Response
types that we used on the client side above, and as such, they require the same header and
the same package dependencies to compile properly. The callback function should return
true to indicate success or false to indicate failure.
In the example, we use the std_srvs/Empty message type, in which both the Request
and Response sides are empty, so there is no processing to perform for either of those
objects. The callback’s only work is to toggle a global boolean variable, called forward,
that governs the velocity messages published in main.
Creating a server object To associate the callback function with a service name, and to
offer the service to other nodes, we must advertise the service:
ros::ServiceServer server = node_handle.advertiseService(
service_name,
pointer_to_callback_function
);
All of these elements have appeared before.
R The node_handle is the same old node handle that we know and love.
R The service_name is a the string name of the service we would like to offer. This
should be a relative name, but could also be a global name.
¹ Because of some perceived ambiguity in how private names should be re-
solved, ros::NodeHandle::advertiseService refuses to accept private names
(that is, those that begin with ∼).The solution to this constraint is to exploit
the fact—one we have not used so far—that we can create ros::NodeHandle
objects with their own specific default namespaces. For example, we could
create a ros::NodeHandle like this:
ros::NodeHandle nhPrivate("∼");
The default namespace for any relative names we send to this NodeHandle
would then be the same as the node’s name. In particular, this means that if
129

8. SERVICES
we use this handle and a relative name to advertise a service, it would have the
same effect as using a private name. For example, in a node named /foo/bar,
we can advertise a service called /foo/bar/baz like this:
ros::ServiceServer server = nhPrivate.advertiseService(
"baz",
callback
);
That is, this code has the same effect we might expect from attempting to
advertise a service called ∼baz using our usual NodeHandle, if that handle
were willing to accept private names.
R The last parameter is a pointer to the callback function. A quick introduction to
function pointers, including some advice on potential syntax errors, appeared on
page 58. The same ideas apply here.
As with ros::Subscriber objects, it is rare to call any methods of ros::ServiceServer objects.
Instead, we should keep careful track of the lifetime of that object, because the service will
be available to other nodes only until the ros::ServiceServer is destroyed.
Giving ROS control Don’t forget that ROS will not execute any callback functions until we
specifically ask it to, using ros::spin() or ros::spinOnce(). (Details about the differences
between these two functions appear, in the context of a subscriber program, near the end
of Section 3.4.)
In the example, we use ros::spinOnce(), instead of ros::spin(), because we have other
work to do—specifically, publishing velocity commands—when there are no incoming ser-
vice calls to process.
8.4.1 Running and improving the server program
To test the pubvel_toggle example program, compile it and run both turtlesim_node
and pubvel_toggle. With both running, you can switch the motion commands from
translation to rotation and back by calling the toggle_forward service from the command
line:
rosservice call /toggle_forward
Figure 8.1 shows an example of the results.
130
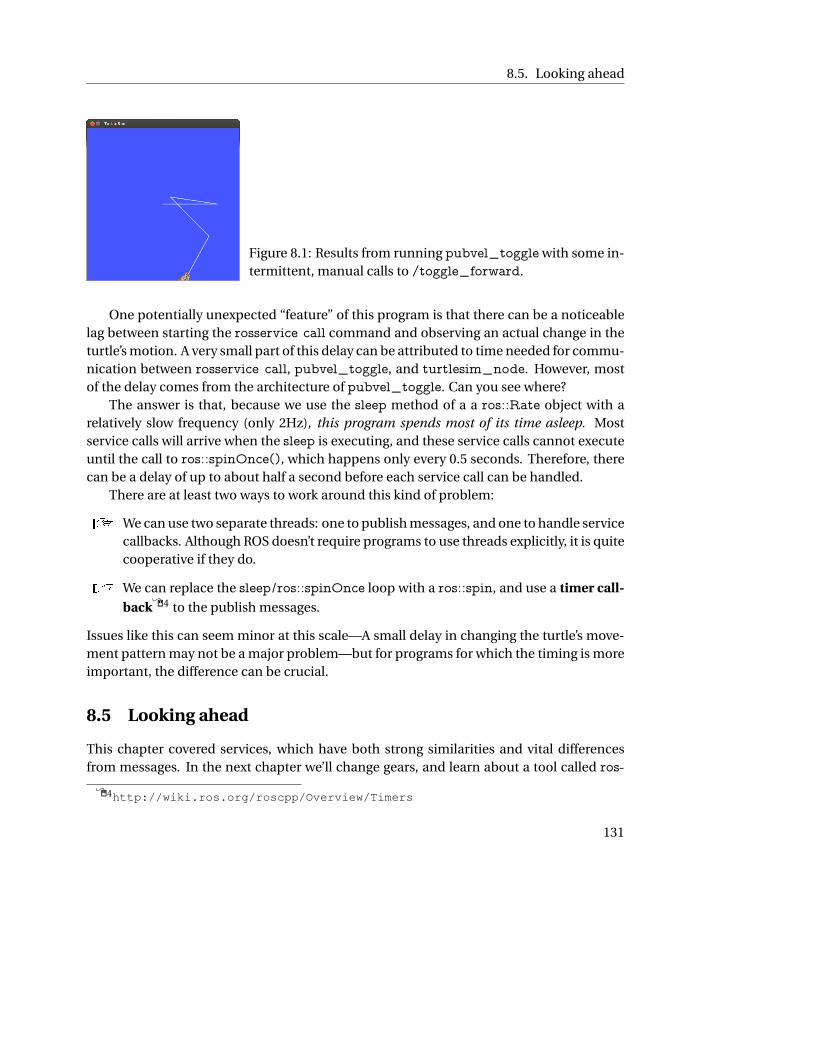
8.5. Looking ahead
Figure 8.1: Results from running pubvel_toggle with some in-
termittent, manual calls to /toggle_forward.
One potentially unexpected “feature” of this program is that there can be a noticeable
lag between starting the rosservice call command and observing an actual change in the
turtle’s motion. A very small part of this delay can be attributed to time needed for commu-
nication between rosservice call, pubvel_toggle, and turtlesim_node. However, most
of the delay comes from the architecture of pubvel_toggle. Can you see where?
The answer is that, because we use the sleep method of a a ros::Rate object with a
relatively slow frequency (only 2Hz), this program spends most of its time asleep. Most
service calls will arrive when the sleep is executing, and these service calls cannot execute
until the call to ros::spinOnce(), which happens only every 0.5 seconds. Therefore, there
can be a delay of up to about half a second before each service call can be handled.
There are at least two ways to work around this kind of problem:
R We can use two separate threads: one to publish messages, and one to handle service
callbacks. Although ROS doesn’t require programs to use threads explicitly, it is quite
cooperative if they do.
R We can replace the sleep/ros::spinOnce loop with a ros::spin, and use a timer call-
backÍ4 to the publish messages.
Issues like this can seem minor at this scale—A small delay in changing the turtle’s move-
ment pattern may not be a major problem—but for programs for which the timing is more
important, the difference can be crucial.
8.5 Looking ahead
This chapter covered services, which have both strong similarities and vital differences
from messages. In the next chapter we’ll change gears, and learn about a tool called ros-
Í4http://wiki.ros.org/roscpp/Overview/Timers
131

8. SERVICES
bag, which enables rapid, repeatable experimentation by recording and playing back mes-
sages.
132

Chapter 9
Recording and replaying messagesIn which we use bag files to record and replay messages.
One of the primary features of a well-designed ROS system is that parts of the system that
consume information should not care about the mechanism used to produce that infor-
mation. This architecture is easy to see in the publish-subscribe model of communication
that ROS primarily uses. A good subscriber node should work any time the messages it
needs are being published, regardless of which other node or nodes is publishing them.
This chapter describes a tool called rosbag that is a concrete example of this kind of
flexibility. With rosbag, we can record the messages published on one or more topics to
a file, and then later replay those messages. Taken together, these two capabilities form a
powerful way to test some kinds of robot software: We can run the robot itself only a few
times, recording the topics we care about, and then replay the messages on those topics
many times, experimenting with the software that processes those data.
9.1 Recording and replaying bag files
The term bag file refers to a specially formatted file that stores timestamped ROS messages.
The rosbag command can be used both to record and to replay bag files.Í1Í2
Recording bag files To create a bag file, use the rosbag command:
rosbag record -O filename.bag topic-names
Í1http://wiki.ros.org/rosbag
Í2http://wiki.ros.org/rosbag/Commandline
133

9. RECORDING AND REPLAYING MESSAGES
If you don’t give a file name, rosbag will choose one for you based on the current date and
time. In addition, there are a few other options for rosbag record that might be useful.
R Instead of listing specific topics, you can use rosbag record -a to record messages
on every topic that is currently being published.
� Recording every topic is no problem for the kinds of small-scale systems that
appear in this book. However, it can be a surprisingly bad idea on many real
robot systems. For example, most robots equipped with cameras have nodes
that publish multiple topics containing images that have undergone varying
amounts of processing and varying levels of compression. Recording all of
these topics can create staggeringly huge bag files very quickly. Think twice
before using -a, or at least keep an eye on the size of the bag file.
R You can enable compression in the bag file using rosbag record -j. This has the
usual tradeoffs of compression: Generally smaller file sizes in exchange for slightly
more computation to read and write. In the author’s opinion, compression generally
seems to be a good idea for bag files.
When you’ve finished recording, use Ctrl-C to stop rosbag.
Replaying bag files To replay a bag file, use a command like this:
rosbag play filename.bag
The messages stored in the bag file are then replayed, in the same order and with the same
time intervals between them as when they were originally published.
Inspecting bag files The rosbag info command can provide a number of interesting
snippets of information about a bag:
rosbag info filename.bag
An an example, here’s the output for a bag that the author recorded while writing the next
section:
path: square.bag
version: 2.0
duration: 1:08s (68s)
134

9.2. Example: A bag of squares
start: Jan 06 2014 00:05:34.66 (1388984734.66)
end: Jan 06 2014 00:06:42.99 (1388984802.99)
size: 770.8 KB
messages: 8518
compression: none [1/1 chunks]
types: geometry_msgs/Twist [9f195f881246fdfa2798d1d3eebca84a]
turtlesim/Pose [863b248d5016ca62ea2e895ae5265cf9]
topics: /turtle1/cmd_vel 4249 msgs : geometry_msgs/Twist
/turtle1/pose 4269 msgs : turtlesim/Pose
In particular, the duration, message count, and topic lists are likely to be interesting.
9.2 Example: A bag of squares
Let’s work through an example to get a feel for how bag files work.
Drawing squares First, start roscore and the usual turtlesim_node. From the turtlesim
package, start a draw_square node:
rosrun turtlesim draw_square
This node resets the simulation (by calling its reset service) and publishes velocity com-
mands that drive the turtle in a close approximation of a repeating square pattern. (You
could also use any of the nodes we’ve written to publish velocity commands. The prefabri-
cated draw_square program is a good choice because unlike, say, pubvel, it’s easy to see
the structure of the motions the turtle makes.)
Recording a bag of squares While the turtle is drawing squares, run this command to
record both the velocity commands and turtle pose messages:
rosbag record -O square.bag /turtle1/cmd_vel /turtle1/pose
The initial output will let you know that rosbag is subscribing to /turtle1/cmd_vel and
to /turtle1/pose, and that it is recording to square.bag. At this point, the graph (as shown
by rqt_graph) would look something like Figure 9.1. The new and interesting part is that
rosbag has created a new node, called /record_. . . , that subscribes to /turtle1/cmd-
_vel. The graph shows that rosbag records messages by subscribing to the topics you ask
for, just like any other node, using the same mechanisms that we learned in Chapter 3.
135

9. RECORDING AND REPLAYING MESSAGES
Figure 9.1: The graph of nodes and topics while rosbag
record is running.
/draw_square
/turtle1/cmd_vel
/turtlesim
/record_...
/turtle1/color_sensor /turtle1/pose
� Nodes created by rosbag use anonymous names, which we discussed in Section 5.4.
In this chapter, we’ve replaced the trailing numbers from those names with ellipses
(. . .) for brevity. Note that the use of anonymous names means that we can run
multiple rosbag record instances at once, if we choose to.
Replaying the bag of squares After this system has run for a while—a minute or two
should be plenty—kill rosbag to stop the recording and kill draw_square to stop the tur-
tle’s drawing. Next, let’s replay the bag. After ensuring that roscore and turtlesim are still
running, use this command:
rosbag play square.bag
Notice that the turtle will resume moving. This happens because rosbag has created a
node named play_. . . that is now publishing on /turtle1/cmd_vel, as shown in Fig-
ure 9.2. As we would expect, the messages that it publishes are the same ones that draw-
_square originally published.
Figure 9.3 illustrates drawings that might result from this sequence of operations. De-
pending on how carefully you’ve thought about what rosbag does, these drawings might
be a bit surprising.
R The squares drawn during rosbag play might not be in the same place as squares
drawn during rosbag record. Why not? Because rosbag only replicates a sequence
of messages. It does not replicate the initial conditions. The second batch of squares,
136
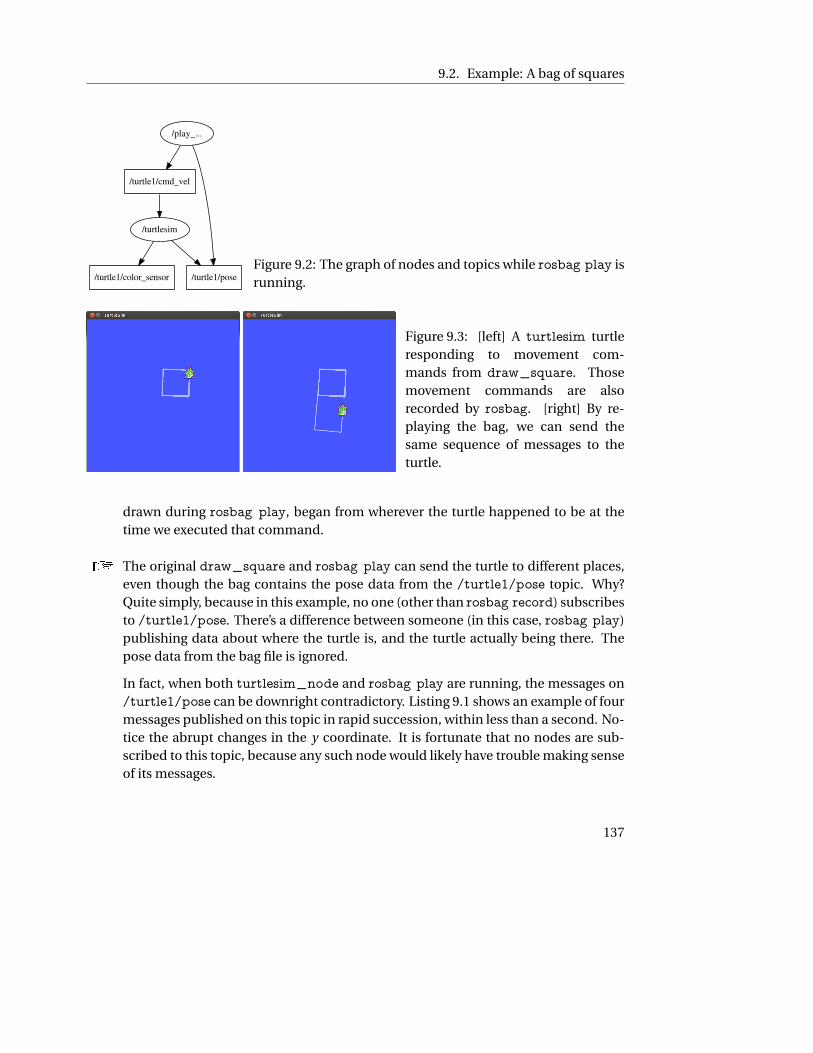
9.2. Example: A bag of squares
/turtle1/color_sensor
/turtle1/cmd_vel
/turtlesim
/turtle1/pose
/play_...
Figure 9.2: The graph of nodes and topics while rosbag play is
running.
Figure 9.3: [left] A turtlesim turtle
responding to movement com-
mands from draw_square. Those
movement commands are also
recorded by rosbag. [right] By re-
playing the bag, we can send the
same sequence of messages to the
turtle.
drawn during rosbag play, began from wherever the turtle happened to be at the
time we executed that command.
R The original draw_square and rosbag play can send the turtle to different places,
even though the bag contains the pose data from the /turtle1/pose topic. Why?
Quite simply, because in this example, no one (other than rosbag record) subscribes
to /turtle1/pose. There’s a difference between someone (in this case, rosbag play)
publishing data about where the turtle is, and the turtle actually being there. The
pose data from the bag file is ignored.
In fact, when both turtlesim_node and rosbag play are running, the messages on
/turtle1/pose can be downright contradictory. Listing 9.1 shows an example of four
messages published on this topic in rapid succession, within less than a second. No-
tice the abrupt changes in the y coordinate. It is fortunate that no nodes are sub-
scribed to this topic, because any such node would likely have trouble making sense
of its messages.
137

9. RECORDING AND REPLAYING MESSAGES
1 x : 5.93630695343
2 y : 4.66894054413
3 theta : 5 .85922956467
4 l i n e a r_ve l o c i t y : 0 . 0
5 angu la r_ve loc i ty : 0 .40000000596
6 −−−
7 x : 5.56227588654
8 y : 7.4833817482
9 theta : 4 .17920017242
10 l i n e a r_ve l o c i t y : 0 . 0
11 angu la r_ve loc i ty : 0 .40000000596
12 −−−
13 x : 5.93630695343
14 y : 4.66894054413
15 theta : 5 .865629673
16 l i n e a r_ve l o c i t y : 0 . 0
17 angu la r_ve loc i ty : 0 .40000000596
18 −−−
19 x : 5.56227588654
20 y : 7.4833817482
21 theta : 4 .18560028076
22 l i n e a r_ve l o c i t y : 0 . 0
23 angu la r_ve loc i ty : 0 .40000000596
24 −−−
Listing 9.1: Four successive messages published on /turtle1/pose in short period time, with
conflicting reports about the location of the turtle. Notice the large difference in the y coordinates.
The conflict occurs because both turtlesim and rosbag play are publishing on this topic.
� The lesson is to avoid (or, at a minimum, to be very careful with) systems in
which both rosbag and “real” nodes are publishing on the same topic.
R Figure 9.3 also illustrates that service calls (see Chapter 8) are not recorded in bag
files. If they were, then the bag might include some record of when draw_square
called /reset before beginning to send messages, and the turtle would have returned
to its starting point.
138

9.3. Bags in launch files
9.3 Bags in launch files
In addition to the rosbag command that we have seen already, ROS also provides executa-
bles named record and play that are members of the rosbag package. These programs
have the same functions and accept the same command line parameters as rosbag record
and rosbag play, respectively.
This means, for one thing, that it is possible—but needlessly verbose—to record or
replay bag files using rosrun, like this:
rosrun rosbag record -O filename.bag topic-names
rosrun rosbag play filename.bag
More importantly, these record and play executables make it easy to include bags as part
of our launch files, by including the appropriate node elements. For example, a record
node might look like this:
<node
pkg="rosbag"
name="record"
type="record"
args="-O filename.bag topic-names"
/>
Likewise, a play node might look like this:
<node
pkg="rosbag"
name="play"
type="play"
args="filename.bag"
/>
Aside from the need to pass args for their command lines, these nodes don’t need any
unusual treatment from roslaunch.
� At this point, you might be surprised to see the chapter ending without any discus-
sion of how to use bag files from C++ programs. In fact, there does exist an API for
reading and writing bag files.Í3 However, that API is really only needed for spe-
cialized applications. For simple recording and playback operations, the rosbag
command line interface is quite sufficient.
139

9. RECORDING AND REPLAYING MESSAGES
9.4 Looking forward
This concludes our guided tour of the essential elements of ROS. The next chapter wraps
things up by briefly mentioning a few other topics that show up frequently in real ROS
systems.
Í3http://wiki.ros.org/rosbag/CodeAPI
140
Chapter 10
ConclusionIn which we preview some additional topics.
In the preceding chapters, we’ve looked into the basic workings of ROS in some detail. We
saw examples of most of those concepts using the turtlesim simulator. Of course, it is
quite unlikely that your original interest in ROS was based on a desire to drive imaginary
turtles around. If this book has done its job, you should be ready to start using ROS—
certainly with the help of the documentation, and quite likely with the help of existing
packages—to solve the real robotics problems that you care about.
10.1 What next?
This section contains short previews (with links to the relevant documentation) of a few
additional topics that, although we have not covered them here, do occur quite commonly
in real ROS systems.
Running ROS over a network You might remember from Chapter 1 that one of the ad-
vantages of ROS is that it facilitates distributed operation of robots, in which many dif-
ferent programs running on multiple computers can interact with each other. However,
throughout this book, the entire ROS system has been contained on a single computer.
To use ROS across a network of multiple computers requires configuration both at the
network level (to ensure that all of the computers can talk to each other) and at the ROS
141
10. CONCLUSION
level (to ensure that all of nodes can communicate with the master).Í1Í2Í3 The good
news is that, once you have configured things correctly, ROS will take care of the details
of network communication. Nodes on different machines can communicate seamlessly,
using precisely the same methods that we’ve been using on a single machine.
Writing cleaner programs The source code for the example programs in this book is pri-
marily optimized for brevity and clarity, rather than for extensibility and maintainability.
In fact, several guidelines are often suggested to write “cleaner” programs that we have not
obeyed in this book. For example, some developers suggest the use of ros::Timer call-
backs instead of ros::Rate objects.Í4 Some developers also prefer to reduce the number
of global variables and functions by encapsulating all or part of a node’s data in a class, us-
ing methods of that class as callbacks.Í5 The payoff from these kinds of techniques tends
to increase as the size and complexity of the program grows.
Visualizing data with rviz Working with turtlesim, nearly all of the data in our mes-
sages dealt with relatively simple information such as two-dimensional positions, orienta-
tions, and velocities. In contrast, real robots are often substantially more complicated, and
none of the techniques we’ve learned in this book are really suitable for viewing the com-
plex and noisy data that they typically produce. To fill this gap, ROS provides a graphical
tool called rviz that can display a wide variety of information—naturally, by subscribing to
appropriately-typed topics that a user selects—about how the robot itself is operating.Í6
Creating message and service types The examples in this book have all relied exclusively
on existing data types for messages and services. However, it is also straightforward to
create new data types that belong to our own packages.Í7Í8
Managing coordinate frames with tf Because robots operate in the physical world, it
is very natural to use coordinates to describe the positions of various parts of the robot,
along with objects the robot would like to avoid or interact with. Therefore, it becomes
Í1http://wiki.ros.org/ROS/NetworkSetup
Í2http://wiki.ros.org/ROS/Tutorials/MultipleMachines
Í3http://wiki.ros.org/ROS/EnvironmentVariables
Í4http://wiki.ros.org/roscpp/Overview/Timers
Í5http://wiki.ros.org/roscpp_tutorials/Tutorials/UsingClassMethodsAsCallbacks
Í6http://wiki.ros.org/rviz
Í7http://wiki.ros.org/ROS/Tutorials/CreatingMsgAndSrv
Í8http://wiki.ros.org/ROS/Tutorials/DefiningCustomMessages
142

10.2. Looking forward
crucial to keep careful track of the coordinate frames in which those coordinates are ex-
pressed. Many message types include a frame_id field that identifies the coordinate frame
in which that message’s data are expressed.
To make sense of those different coordinate frames, we need to know they are related
to one another. Specifically, we would often like to know the transformation that can
convert coordinates from one frame to another. ROS provides a standard package called
tf—short for “transformation”—whose job is to enable nodes to utilize information about
those kinds of transforms.Í9Í10Í11Í12 The tf package is designed to work robustly, even
when the transformation data is distributed across many nodes, and even when the trans-
formations are changing over time.
Simulating with Gazebo One of the biggest advantages of the modular software design
that ROS encourages is that we can easily “swap out” various components of a working sys-
tem, in order to reduce development time and make testing easier. Chapter 9 described
one example of this capability, in which we can temporarily replace one or more nodes
with a recorded bag of the messages those nodes published. Another more powerful op-
tion is to use Gazebo, which is a high-fidelity robot simulator.Í13 Using Gazebo, we can
define the characteristics of both our robot (or robots) and the world, and interact with
that robot, via ROS, in the same way that we would interact with the real thing.
10.2 Looking forward
That’s the end of our gentle introduction to ROS. The author sincerely hopes, however, this
is only the very beginning of your journey using ROS to create a new generation of smarter,
more capable robots.
Í9http://wiki.ros.org/tf/Tutorials/Introductiontotf
Í10http://wiki.ros.org/tf/Tutorials/Writingatflistener(C++)
Í11http://wiki.ros.org/tf/Overview/DataTypes
Í12http://ros.org/doc/indigo/api/tf/html/c++/
Í13http://gazebosim.org/wiki/Tutorials/1.9/Overview_of_new_ROS_integration
143

Index
---, 28
/, 23, 50, 78, 79, 93, 108, 114, see also names,
global
::, 49
:=, 94, 113
<<, 63
[], 31
&, 58
_, 113
¹, 7, 8, 12, 13, 15, 17, 20–23, 31, 32, 34,
39, 41–43, 50, 52, 57, 58, 64, 68,
70, 73, 74, 76, 81, 84, 85, 87, 90,
91, 93, 102, 103, 106, 107, 109,
111, 114, 122, 126, 129
Í, 1, 3–5, 7–9, 11–15, 17, 19, 21–24, 27,
30–32, 37, 39, 40, 42, 44, 47, 49–
51, 53, 55, 57, 59, 61, 64, 68–70,
72, 77, 83, 87, 88, 90, 93, 94, 97,
99, 102, 105, 109, 110, 113, 114,
118, 123, 126, 131, 133, 139, 142,
143
ˆ[[0m, 68�
, 7, 8, 12–20, 24–26, 28, 32, 33, 40, 41,
45, 47, 50, 53, 54, 58–60, 64, 69,
73, 74, 81, 84, 87, 89, 97, 99, 103,
107, 108, 121–123, 125, 126, 134,
135, 137, 139
∼, 80, 113, 114, 129
account configuration, 14–15
add_executable, 45
advertise, 49, 50, 129
agitr, 41, 42, 83
angular, 30, 95
anon, 88
anon.cpp, 82
answers.ros.org, 7
apt, 12
apt-get, 13, 18
install, 13
update, 12
apt-key, 12
145

INDEX
arg, 99–103
args, 139
arrays, 31
audience, 5
bag files, 133–135
API, 139
compression, 134
example, 135–138
inspecting, 134
recording, 133, 135
replaying, 134, 136
bash, 5, 15, 32, 107
.bashrc, 15
bool, 30, 110
box turtle, 8
build, 45
build systems, 9
build_depend, 44, 127
build_depend, 44
built-in data type, 30
C Turtle, 8
C++, 4, 5, 9, 31, 41, 44, 47, 49, 51, 58, 62–
67, 73, 74, 80, 81, 96, 110–112,
121–123, 125, 139
call, 125–127
callback functions, 55, 127, 130, 142
allowing, 59, 130
timers, 131
catkin, 9, 17, 18, 40, 41, 44, 47
catkin_create_pkg, 40, 41, 45
catkin_make, 45–47, 54, 127
catkin_create_pkg, 40, 41
catkin_make, 45
/clear, 109, 110
CMake, 40, 45
CMAKE_PREFIX_PATH, 18
CMakeLists.txt, 40, 41, 44–46, 54, 127
editing, 45
cmd_vel, 78, 79, 122
cmd_vel, 26, 79
coding style, 142
color_sensor, 122
communication
many-to-many, 36
one-to-one, 117
complexity via composition, 2, 36, 80
coordinate frames, 142
count.cpp, 63, 64, 67, 70
Ctrl-C, 20, 24, 52, 85, 134
data types, 29, see also messages, types,
see also services, types
deb, 14, 17
DEBUG, 61, 62, 64, 68, 73, 74, 76
Debug, 76
default, 100, 101
description, 41
devel, 45
/diagnostics, 71
/diagnostics_agg, 71
diamondback, 8
double, 51, 63, 66, 110
doublesim.launch, 91, 92, 97
draw_square, 135–138
dynamic_reconfigure, 109
electric, 8
eog, 19
ERROR, 61, 62, 68, 74, 88
Error, 76
example.launch, 83, 84, 90
executables, adding to package, 45
export, 14, 80
fast_yellow.launch, 115
146
Index
FATAL, 61, 62, 68, 74, 88
Fatal, 76
${file}, 69
file, 97
find, 97, 114
find_package, 44, 45, 54, 127
float64, 51
frame_id, 143
fuerte, 8, 18
${function}, 69
function pointers, 58, 130
Gazebo, 143
gazebo/ModelState, 34
gdb, 90
geometry_msgs, 8, 54
::Twist, 49, 51
geometry_msgs/Twist, 9, 30, 32, 49, 51
geometry_msgs/Twist.h, 54
geometry_msgs/Vector3, 30
geometry_msgs/Pose, 34
get_loggers, 119
graph resource names, see names
graph resources, 77
groovy, 8, 9, 18, 19
group, 100–103
hello.cpp, 41–47, 49, 54
compiling, 44–47
executing, 47
hydro, 8
IDE, 4
if, 101, 103
#include, 49, 56, 123
include, 93, 97, 98, 100–102, 114
indigo, 8, 106
INFO, 61, 62, 64, 65, 68, 73, 74, 88
Info, 76
init, 42
int, 63, 110
int8, 30
jade, 8
launch, 86, 94
launch files, 83–104
arguments, 99–102
accessing, 101
declaring, 100
includes, 101
values, 100
bags, 139
creating, 86–90
executing, 83–85
groups, 102–103, 113
includes, 97–99
nodes, 87, 113
directing output, 88
name, 87
output, 69, 103
pkg, 87
requiring, 89
respawning, 89
separate window, 90
type, 87
remappings, 93–95
root element, 86
rosparam, 114
syntax, 86–90
terminating, 85
verbosity, 85
launch-prefix, 90
${line}, 69
linear, 9, 30, 95
log files, 72
finding, 72
147

INDEX
roslaunch, 88
purging, 72
log messages, 61–76
enabling and disabling, 73–76
from C++, 75
from command line, 74
from GUI, 75
example, 62
formatting, 68
generating, 62–67
one time, 65
simple, 62
throttled, 65
viewing, 67–73
in log files, 72–73
rosout, 69–71
on the console, 68–69
log4cxx, 64, 74, 75
logger levels, 73–76, see also severity lev-
els
maintainer, 41
manifest, 40
master, see roscore
max_vel, 111, 114
max_vel, 115
${message}, 69
messages, 24
objects, 51
publishing, 47–54
queues, 50
subscribing, 55–60
types, 29, 33, 49
arrays, 31, 51
constants, 31
creating, 142
fields, 30
nesting, 30
metapackage, 19
ModelState, 34
multiple computers, 2, 141
__name, 23, 34, 42
name, 92
names, 77–82
anonymous, 81–82, 87, 136
base, 78
collisions, 34, 80, 119, 122
global, 77–78
private, 80–81, 113
relative, 50, 78–80
purpose, 80
resolving, 79
remappings, 93–95
namespaces, 23, 78
global, 23, 78
launching in, 91–93
setting default, 79, see also names, rel-
ative
nice, 90
${node}, 69
node, 86, 87, 89–92, 94, 102, 103, 113, 114,
139
NodeHandle, 43, 123, 129, 130
nodelets, 50
nodes, 20–24
dead, 24
inspecting, 23
killing, 23
listing, 22, 23
names, 23, 34, 42, 52, 87
services, 120
starting, 21
__ns, 80
ns, 79, 91, 93, 98, 102, 103
148
Index
once.cpp, 66
/opt/ros/indigo, 18
ostream, 63
out-of-source compilation, 18
package authentication key, 12
package.xml, 17, 40–42, 44, 54, 127
editing, 41
packages, 17–20
creating, 40
dependencies, 34, 44, 54, 127
directories, 17, 86
finding, 18
listing, 17
manifest, see package.xml
param, 87, 113, 114
parameters, 105–115
files, 107, 114
in C++, 110–113
in launch files, 113–115
setting, 113
on the command line, 105–108
listing, 105
querying, 106
setting, 107
private names, 113
server, 105, 106
play, 139
polling, 67
pose, 78, 122
poses, 55
printf, 64, 65
private, 81
publish, 50, 51
publishing, see messages
publishing loops, 52–53
pubvel.cpp, 47–49, 51–55, 60, 111, 112,
135
compiling, 54
executing, 54
pubvel_with_max.cpp, 112
pubvel_toggle.cpp, 128, 130, 131
pubvel_with_max.cpp, 113, 114
pushing down, 91
Qt, 24
record, 139
redirection, 68
remap, 87, 93–95, 99
repository, 11
Request, 125, 127, 129
required, 89, 90
respawn, 89, 90
Response, 125, 126, 129
reverse.launch, 98
reverse_cmd_vel, 96, 97
reversed.launch, 99
Robot Operating System (ROS), 1–143
ROS
distributions, 8
documentation, 5, 7–9
installing, 11–14
limitations, 4
motivation, 1–4
pronunciation, 1
uniqueness, 3
versions, see also indigo, see ROS, dis-
tributions
ros
::NodeHandle, 42, 49, 123
::advertiseService, 129
::NodeHandle, 129
::Publisher, 49–51, 57, 91, 125
::Rate, 53, 131, 142
::ServiceClient, 123, 125, 126
149
INDEX
::ServiceServer, 127, 130
::Subscriber, 57–59, 91, 127, 130
::Timer, 142
::Publisher, 77
::ServiceClient, 125
::param
::get, 110
::getCached, 110
::spin, 59
::spinOnce, 59
::console
::notifyLoggerLevelsChanged, 76
::init, 42, 45, 52, 77, 80, 81, 87, 113,
123
::init_options
::AnonymousName, 81
::ok, 52
::param
::get, 99, 110, 111
::set, 110, 113
::shutdown, 52
::spin, 57, 59, 130, 131
::spinOnce, 57, 59, 130, 131
ros-indigo-desktop, 13
ros-indigo-ros-base, 13
ros-indigo-turtlesim, 11
ros-users, 8
ros.key, 12
ros/ros.h, 42, 45
ROS_DEBUG_STREAM, 73
ROS_DISTRO, 15
ROS_ERROR_STREAM, 126
ROS_INFO_STREAM, 43, 47, 52, 55,
56, 60, 61, 73
ROS_PACKAGE_PATH, 15
ROS_DEBUG, 64
ROS_DEBUG_STREAM, 62, 73
. . . _ONCE, 65
. . . _THROTTLE, 65
ROS_ERROR, 64
ROS_ERROR_STREAM, 62
. . . _ONCE, 65
. . . _THROTTLE, 65
ROS_FATAL, 64
ROS_FATAL_STREAM, 62
. . . _ONCE, 65
. . . _THROTTLE, 65
ROS_INFO, 64
ROS_INFO_STREAM, 62
. . . _ONCE, 65
. . . _THROTTLE, 65
ROS_WARN, 64
ROS_WARN_STREAM, 62
. . . _ONCE, 65
. . . _THROTTLE, 65
rosbag, 3, 33, 131, 133–140
info, 134
play, 134, 136, 137
record, 133, 135
-a, 134
rosbash, 15
rosbuild, 9
roscd, 15, 18, 19
rosclean
check, 72
purge, 73
ROSCONSOLE_FORMAT, 68
roscore, 16, 20–22, 34, 47, 72, 83, 84, 106,
108, 136
roscpp, 43, 44, 46, 54
rosdep, 13, 14, 37
init, 13, 14
update, 14
/rosdistro, 106
rosgraph_msgs/Log, 69
rosgraph_msgs/Log, 69, 70
150
Index
rosinstall, 14
roslaunch, 21, 69, 72, 81–86, 88–90, 92,
97–99, 101, 106, 113, 139
--screen, 69, 88
-v, 85
rosls, 15, 18, 19
rosmsg, 121
show, 30, 51, 56
rosnode
cleanup, 24
info, 23, 55, 77, 119
kill, 23, 52
list, 22, 23
/rosout, 120
rosout, 22, 25, 68, 69, 71, 72, 120
rosout.log, 72
rosout_agg, 70, 71
rospack, 18, 47
find, 18
list, 17
rosparam, 99, 107
dump, 107, 114
get, 72, 106, 109
list, 105, 108
load, 108, 114, 115
set, 107, 111, 113
rosrun, 21–23, 34, 42, 47, 54, 84, 87, 88,
90, 93, 95, 139
rosservice, 74, 75, 121
call, 74, 109, 122, 130, 131
info, 120
list, 118, 119
node, 120
rossrv, 121
show, 121, 122, 125
rostopic, 31, 121
bw, 28
echo, 28, 33, 69, 77
hz, 28, 53
info, 28, 56
list, 27, 50, 55
pub, 31, 33
-1 (dash one), 33
-l (dash ell), 33
roswtf, 37
rqt_console, 70, 73
rqt_graph, 25–27, 35, 50, 135
rqt_console, 69, 70
rqt_graph, 24–27, 55
rqt_logger_level, 75
run_depend, 44, 127
run_id, 72, 78, 88
run_depend, 44
run_id, 72
rviz, 142
sensor_msgs/NavSatFix, 31
ServiceClient, 125
serviceClient, 123
services, 36, 117–132
calling, 125
clients, writing, 123–127
from the command line, 118–122
listing, 118, 119
request and response objects, 123, 125
servers, 129
in C++, 127–131
types, 118
creating, 142
finding, 120
inspecting, 121
set_logger_level, 74, 75, 78, 119
set_pen, 122
set_bg_color.cpp, 111
setup.bash, 14, 15, 18, 46, 47
${severity}, 69
151
INDEX
severity levels, 61–62
simulation, 3, 143
sleep, 53, 131
software reuse, 2
/spawn, 119, 120
spawn_turtle.cpp, 124
src, 40, 41
stack, 19
static, 65, 67
std
::boolalpha, 64
::cout, 22, 63
::endl, 65
::fixed, 64
::setprecision, 64
::string, 110
::stringstream, 64
::stringstream, 64
std_msgs/Header, 31
std_srvs/Empty, 121, 129
stdbuf, 68
string, 30
subpose.cpp, 56, 60, 84, 88
subscribe, 58
subscribing, see messages
sudo, 12, 14
Tab, 33
tab completion, 18, 32, 33
target_link_libraries, 45
/teleop_turtle, 25, 26, 28
teleop_turtle, 23, 78, 95
teleoperation, 21
teleport_absolute, 122
template parameter, 49
testing, 3
tf, 142, 143
throttle.cpp, 67
${time}, 69
toggle_forward, 127, 130
topics, 27–34
transformations, 143
triplesim.launch, 100
turtle1, 27, 78, 79, 122
/cmd_vel, 91, 95, 135, 136
/cmd_vel_reversed, 95
/cmd_vel, 25, 26, 35, 36, 79
/color_sensor, 91
/pose, 55, 91, 94, 135, 137, 138
turtle_teleop_key, 16, 17, 21, 36, 89, 90,
95
/turtlesim, 25
turtlesim, 8, 11, 13, 15–17, 19–21, 23–27,
34–36, 47, 48, 54–56, 60, 62, 78,
83, 84, 89, 91–99, 108–111, 114,
118–120, 122, 127, 136–138, 141,
142
::Pose, 56
::Spawn, 123
background color
reading, 109
setting, 109
cmd_vel, 77
draw_square, 135
installing, 13
multiple instances, 34–36
parameters, 108–110
pose, 77
reset, 121, 135, 138
reversing directions, 95
starting, 16
teleport_absolute, 122
teleport_relative, 122
turtle_teleop_key, 90
turtlesim/Color, 29, 30, 33
turtlesim/Pose, 34, 60
152
Index
turtlesim/Spawn, 120
turtlesim/Velocity, 9
turtlesim_node, 17, 21, 22, 36, 55, 60,
62, 89, 91, 95, 108, 109, 121, 130,
131, 137
turtlesim_node, 26, 36, 55
tutorials, 5, 7
Ubuntu, 5, 11
universally-unique identifier (UUID), 72
unless, 103
usleep, 53
valgrind, 90
value, 100–102
void, 121
WARN, 61, 62, 68, 74
Warn, 76
workspaces, 39–41
building, 45
creating, 39
directories, 39
X, 36
XML, 83
xterm, 90
YAML, 32
153

Acknowledgments
The author is thankful to the friends, colleagues, and students that have pro-
vided feedback and advice about this project.
Students, too numerous to name, from the author’s csce574 courses at the
University of South Carolina provided priceless feedback on early versions of
this book. Michael Reynolds, Laura Boccanfuso, G. vd. Hoorn, Nik Elson,
Mateusz Przybyla, Karel Sirks, and Dmitry Pashmentov helped the author to
correct many mistakes in the text. The author is, of course, to blame for any
remaining errors.
The author is also grateful to the University of South Carolina for providing
a supportive and encouraging environment, and to the U. S. National Science
Foundation for a grant that helped to support the author’s time for this project.
Any opinions, findings, and conclusions or recommendations expressed in
this material are those of the author and do not necessarily reflect the views
of the National Science Foundation.
155