Embed Size (px)
Citation preview
1 Office 365 staff user guide
A guide for staff
E-mail, Calendar, Contacts
Outlook

Office 365 staff user guide
© Crown copyright 2014WG21424
Hwb / Hwb+ Office365 Staff user guide
Audience
Overview
Action required
Further information
Additional copies
Hwb / Hwb+ authenticated Staff
All authenticated Hwb / Hwb+ users are provided with access to the Microsoft Office365 toolset. This provides web based access to the Microsoft Office suite, including e-mail, video conferencing, online storage and online versions of the Microsoft Office applications including Word, Excel, PowerPoint and OneNote.
None – for information only.
Enquiries about this document should be directed to:Hwb TeamDigital Learning DivisionDepartment for Education and SkillsWelsh GovernmentCathays ParkCardiffCF10 3NQ
e-mail: [email protected]
This document can be accessed from the Hwb website at hwb.wales.gov.uk

Office 365 staff user guide
Contents
Outlook 4
E-mail 4
New E-mail 4
Attachments 8
Sent Items 11
Receiving Mail 12
Categories 13
Sorting, Filtering and Searching 14
Reply, Reply All, Forward 15
Deleting E-mails 17
Folders 21
Flag 23
Tasks 24
E-mail Signature 27
Automatic Replies 28
E-mail Display Settings 30
Calendar 31
New Event 31
Categories 34
Marking Events as Private 35
Event Notification 36
Calendar Views 37
Create a New Calendar 37
Viewing Multiple Calendars 38
Sharing your Calendar 39
People 41
Global Address List 41
Managing your Contacts using People 42
New Contact 43
New Group 43
Changing the Interface language for Outlook 45
Theme 48
3 Office 365 staff user guide
4Office 365 staff user guide
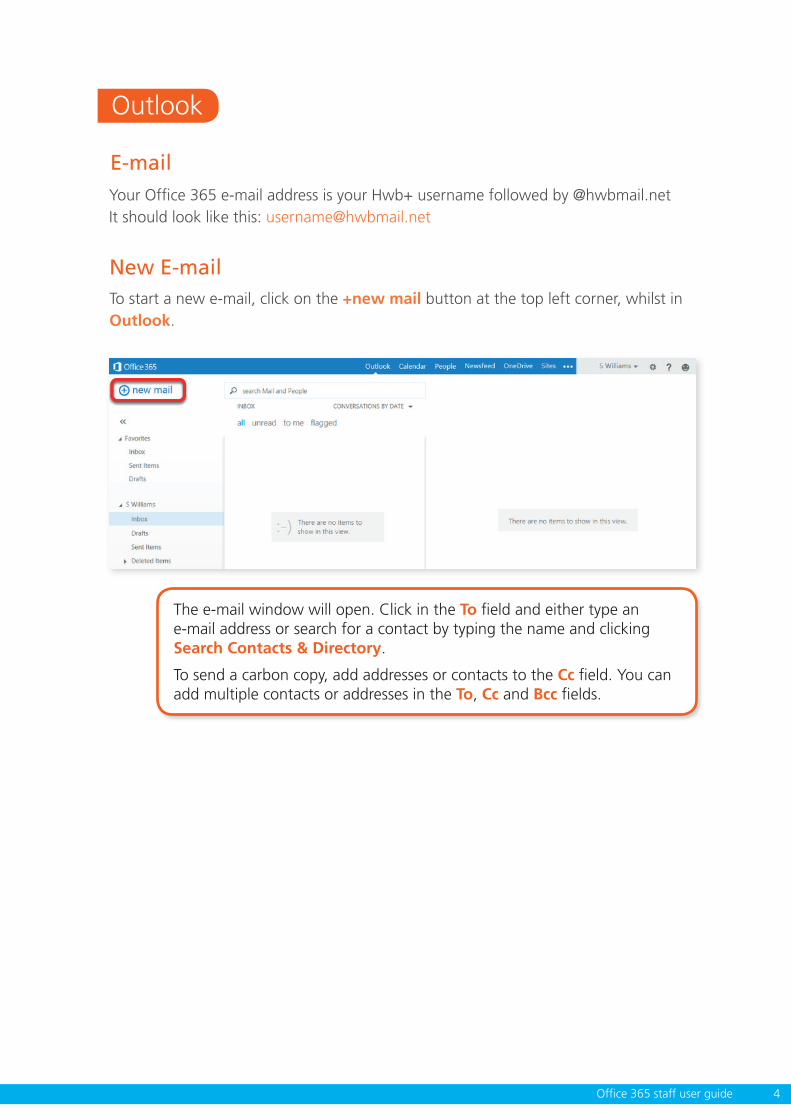
E-mail Your Office 365 e-mail address is your Hwb+ username followed by @hwbmail.net It should look like this: [email protected]
Outlook
New E-mailTo start a new e-mail, click on the +new mail button at the top left corner, whilst in Outlook.
The e-mail window will open. Click in the To field and either type an e-mail address or search for a contact by typing the name and clicking Search Contacts & Directory.
To send a carbon copy, add addresses or contacts to the Cc field. You can add multiple contacts or addresses in the To, Cc and Bcc fields.
5 Office 365 staff user guide
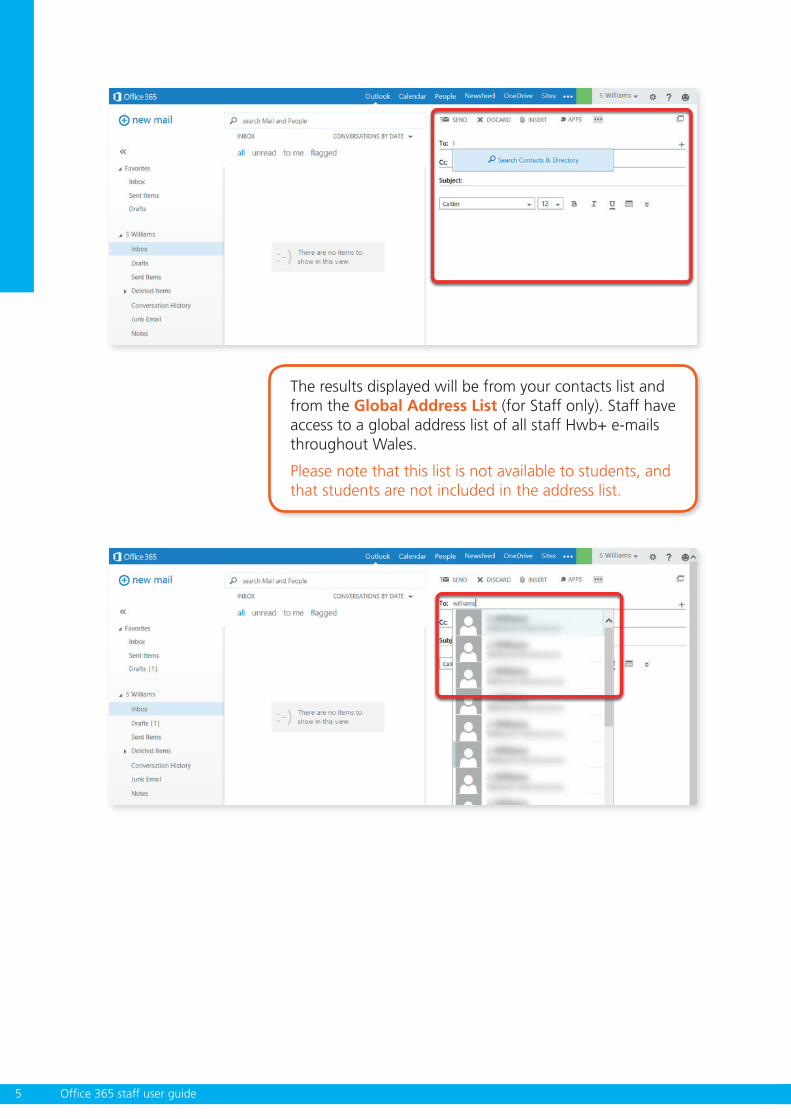
The results displayed will be from your contacts list and from the Global Address List (for Staff only). Staff have access to a global address list of all staff Hwb+ e-mails throughout Wales.
Please note that this list is not available to students, and that students are not included in the address list.

6Office 365 staff user guide
Other Options
• Save – Saves the e-mail in the Drafts folder.
• Show Bcc – Shows the Bcc field. Addresses or contacts added to the Bcc field of an e-mail won’t appear to recipients of the e-mail, whereas addresses and contacts in the To and Cc will.
• Show from – Shows the From field. If you have multiple e-mail accounts linked to Office 365, this field allows you to choose the account you are sending the e-mail from.
• Check names – Checks the addresses or names entered against the global address list.
• Set importance – Allows you to set the importance of an e-mail to high, normal or low. E-mails are set to normal by default. High will display a ! Low will show a downward pointing arrow.
• Switch to plain text – This takes out the formatting of the text.
• Show message options... – Allows you to set the sensitivity of the e-mail. Request a delivery receipt and read receipt.

7 Office 365 staff user guide
It is considered good practice to give the e-mail a subject. Write your e-mail in the blank space under the text editor tools.
Text Editor Tools
Change the font, the size and click on the arrows button to view more editing options.
8Office 365 staff user guide
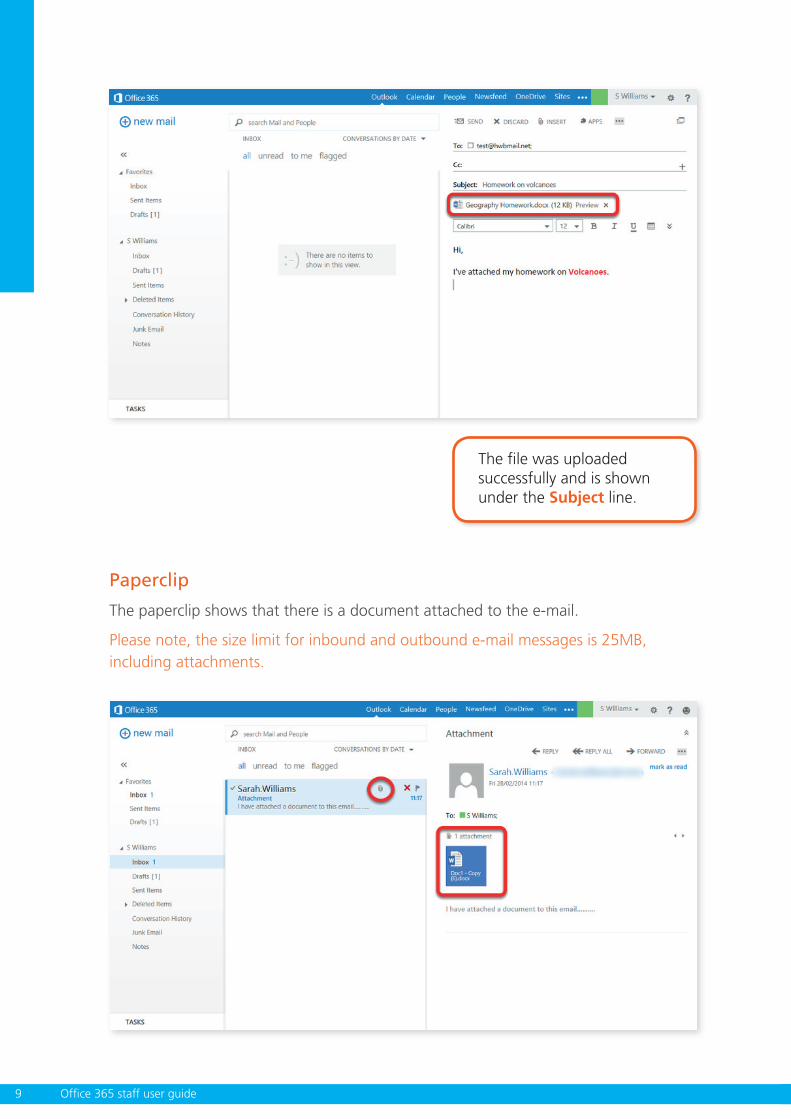
Attachments
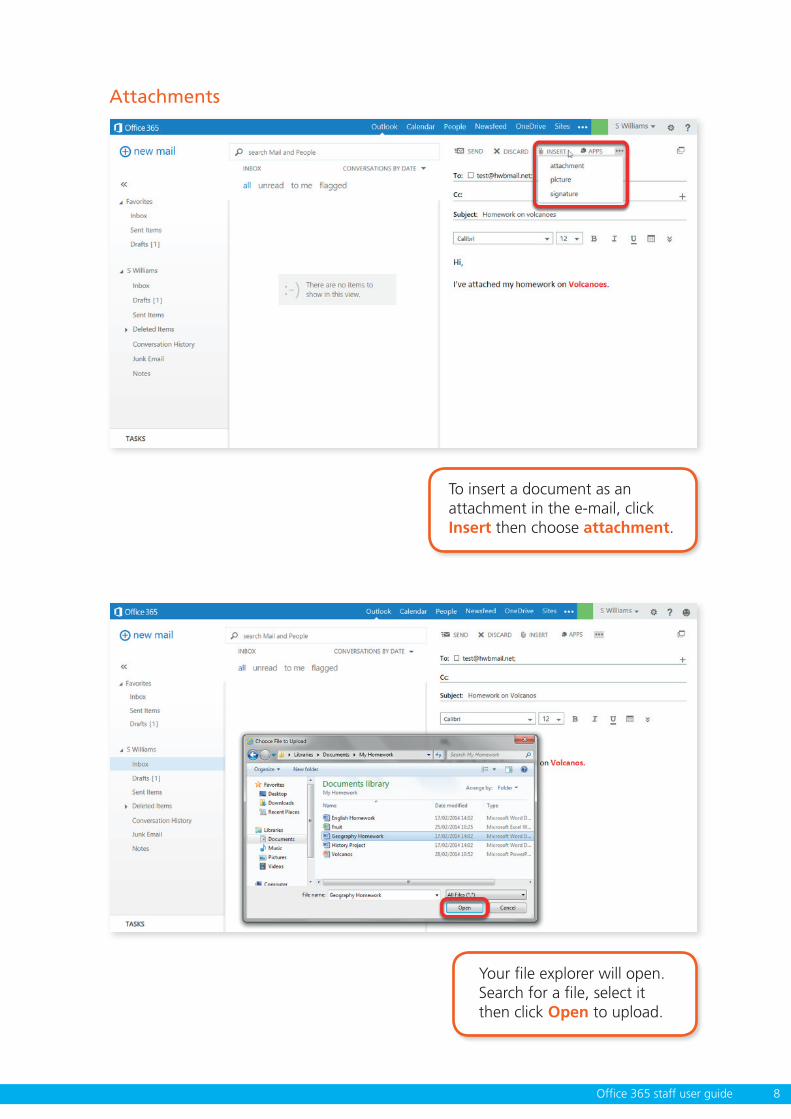
To insert a document as an attachment in the e-mail, click Insert then choose attachment.
Your file explorer will open. Search for a file, select it then click Open to upload.
9 Office 365 staff user guide
The file was uploaded successfully and is shown under the Subject line.
Paperclip
The paperclip shows that there is a document attached to the e-mail.
Please note, the size limit for inbound and outbound e-mail messages is 25MB, including attachments.

10Office 365 staff user guide
To insert a picture in to the e-mail, click Insert, then picture.
Search for a picture then select it. Click Open to upload.
Inserting a Picture
11 Office 365 staff user guide
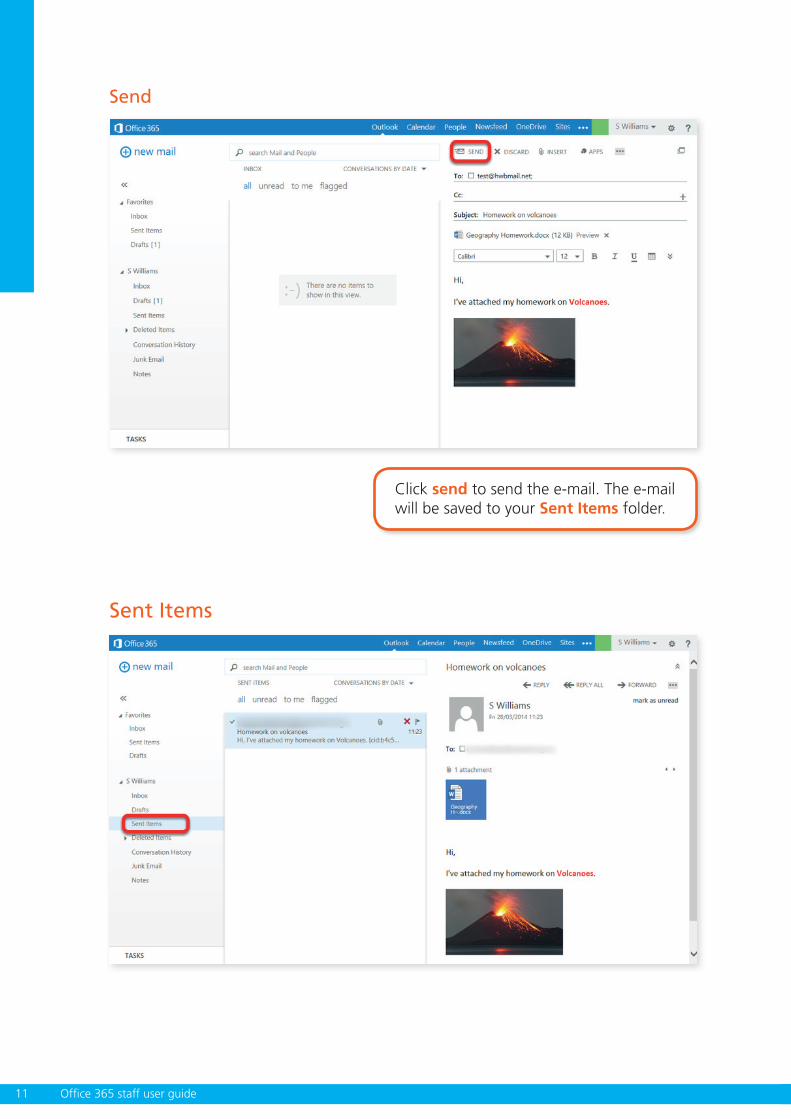
Click send to send the e-mail. The e-mail will be saved to your Sent Items folder.
Sent Items
Send

12Office 365 staff user guide
Receiving MailWhen receiving a new e-mail, you will see the following:
1. e-mail icon on the top navigation bar
2. Pop out notification from the top navigation bar
3. The number of new unread e-mails will be displayed next to Inbox
4. The subject line of unread e-mails will be displayed in a different colour.
13 Office 365 staff user guide
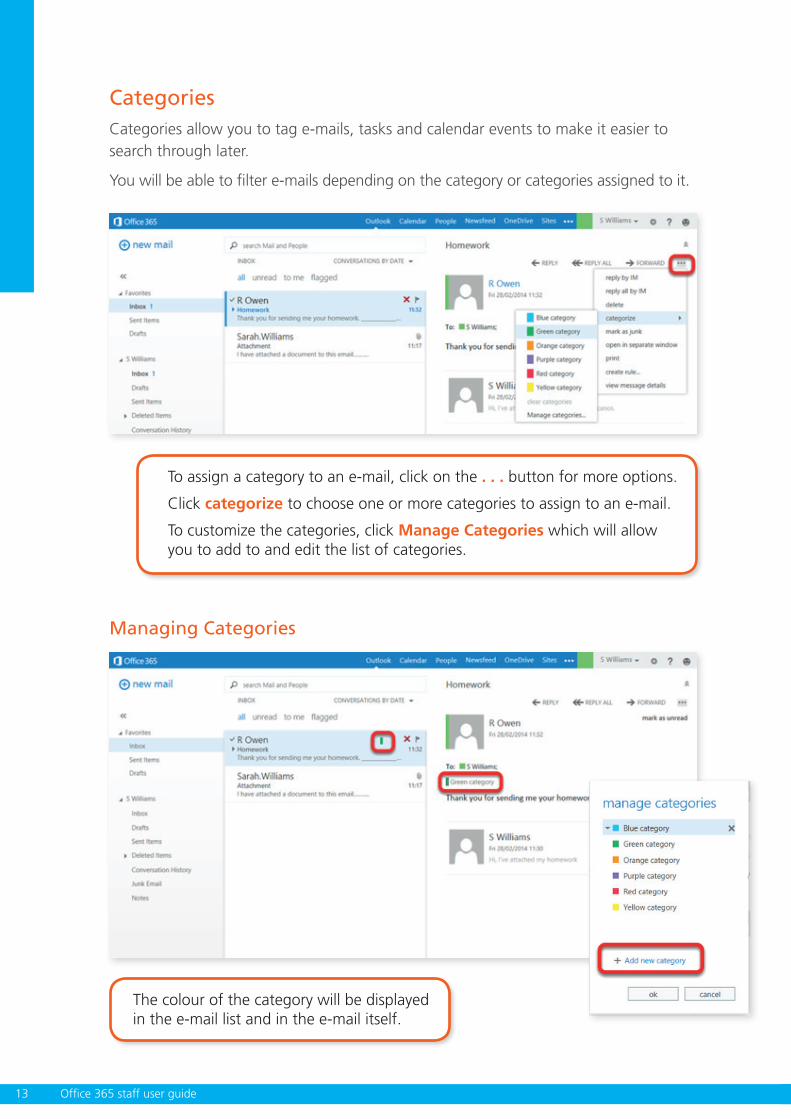
To assign a category to an e-mail, click on the . . . button for more options.
Click categorize to choose one or more categories to assign to an e-mail.
To customize the categories, click Manage Categories which will allow you to add to and edit the list of categories.
The colour of the category will be displayed in the e-mail list and in the e-mail itself.
CategoriesCategories allow you to tag e-mails, tasks and calendar events to make it easier to search through later.
You will be able to filter e-mails depending on the category or categories assigned to it.
Managing Categories

14Office 365 staff user guide
Sorting, Filtering and SearchingSorting, filtering and searching through your e-mails makes it easier for you to look back through your e-mails.
Sorting your e-mail
Your e-mail is sorted by date by default – the most recent e-mails appear at the top. It is possible to sort by other fields – see the list for all options.
Filtering
Use the filter buttons to find your unread e-mails, e-mails sent directly to you or flagged e-mails.

15 Office 365 staff user guide
Search
Use the search box to search for key words in e-mails. Search results are displayed with the search words highlighted.
Reply, Reply All, Forward
Reply, Reply All
Reply will send an e-mail to the addresses in the To field.
Reply All will send an e-mail to the addresses in the To field and the Cc field.
RE: is added to the beginning of the subject line to show that the e-mail is a reply.
New addresses or contacts can be added to the To, Cc and Bcc fields.
Please note that when replying to e-mails with attachments, the attachments will not be sent on.

16Office 365 staff user guide
The < arrow shows that you have replied to the e-mail.
FW: is added to the beginning of the subject line to show that it has been forwarded.
Please note, attachments in the original e-mail will be forwarded along with the e-mail.
Forward

17 Office 365 staff user guide
The > arrow shows that you have forwarded the e-mail.
To delete an e-mail, either
1. Click on the X in the e-mail list or,
2. In the e-mail, click . . . then delete.
The deleted e-mail will be moved to the Deleted Items folder as soon as you delete it.
Deleting e-mails

18Office 365 staff user guide
To delete multiple e-mails, hover over the left of the senders name for a tick box to appear then click to tick it.
Once you have ticked more than one e-mail, options will appear where the e-mail is normally displayed.
This also gives you the option to flag multiple e-mails (Flags will be covered later on in this guide) and to move multiple e-mails (see the Folders section for more on this).
Deleted Items
Deleted e-mails are moved to the Deleted Items folder for 30 days until they are permanently deleted.
To retrieve a deleted e-mail, go to the Deleted Items folder.
19 Office 365 staff user guide
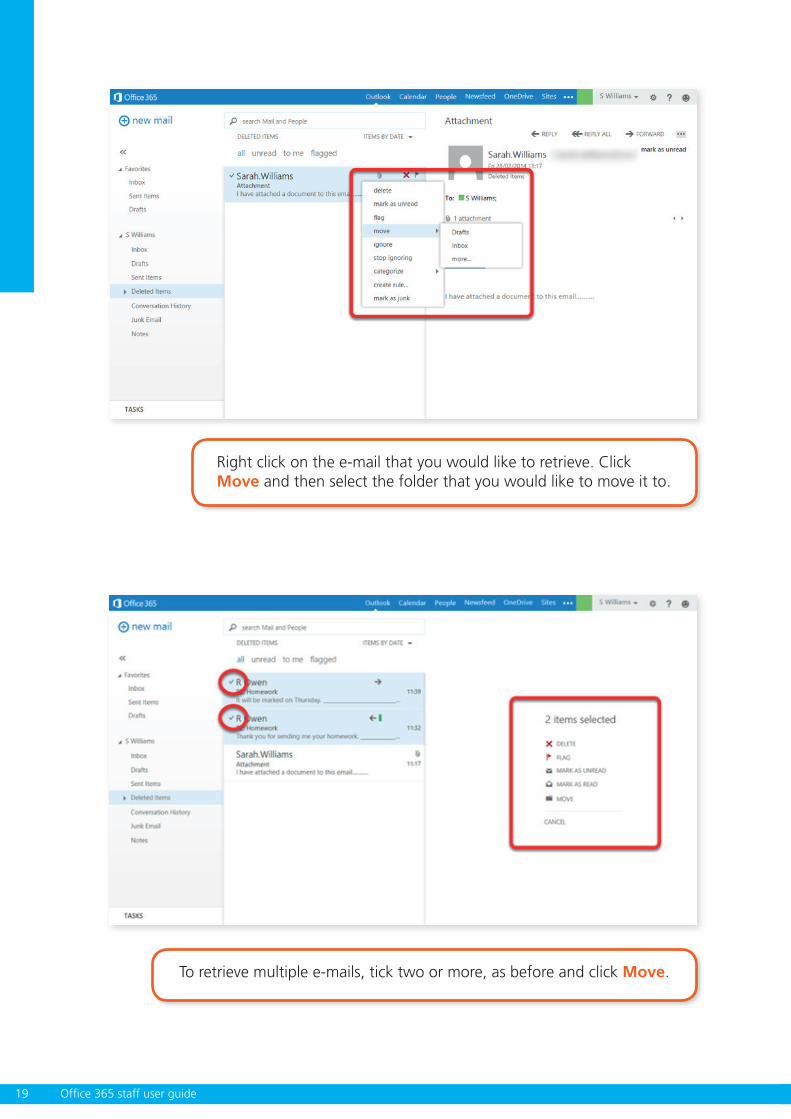
Right click on the e-mail that you would like to retrieve. Click Move and then select the folder that you would like to move it to.
To retrieve multiple e-mails, tick two or more, as before and click Move.

20Office 365 staff user guide
To permanently delete an e-mail, click the X next to the e-mail whilst in the Deleted Items folder.

21 Office 365 staff user guide
FoldersSorting your e-mails into folders helps you keep track of your e-mails.
Example:
A teacher may have a folder for e-mails from pupils regarding homework.
A pupil may have a folder for e-mails relating to a subject, lesson or project.
Creating new folders
To create a new folder, right click where you’d like the folder to come under then click create new folder.

22Office 365 staff user guide
I have named the new folder ‘Homework’. To rename a folder, right click on it and choose rename.
To move e-mails to another folder, right click on the e-mail and click Move.
Choose the folder you want to move the e-mail to from the list, then click move.
The e-mail has been moved to the new ‘Homework’ folder.

23 Office 365 staff user guide
FlagIf an e-mail needs an action which you cannot do immediately, or plan to do later on, you can flag it which will act as a reminder to you.
To flag an e-mail, click on the flag icon. Flagged e-mails will also appear in the Tasks area.
Right click on the flag for more options.

24Office 365 staff user guide
To get to Tasks, click on Tasks at the bottom left corner in Outlook.
TasksThe tasks area acts as a ‘to-do’ list which can help to plan your work. As well as showing all flagged e-mails, you can also create your own tasks.

25 Office 365 staff user guide
Adding a new task
Attaching a file
To add a new task, click on the +new task button.
The Insert button opens the file explorer. Search for a file and click Open to upload.
The document has been uploaded.

26Office 365 staff user guide
Categories
Categories allow you to tag e-mails, tasks and calendar events to make it easier to search through later.
Please note that you will need to save the task before you are able to assign a category.
Click on the Show more details button to add more information.
Click on . . . then categorize.
27 Office 365 staff user guide
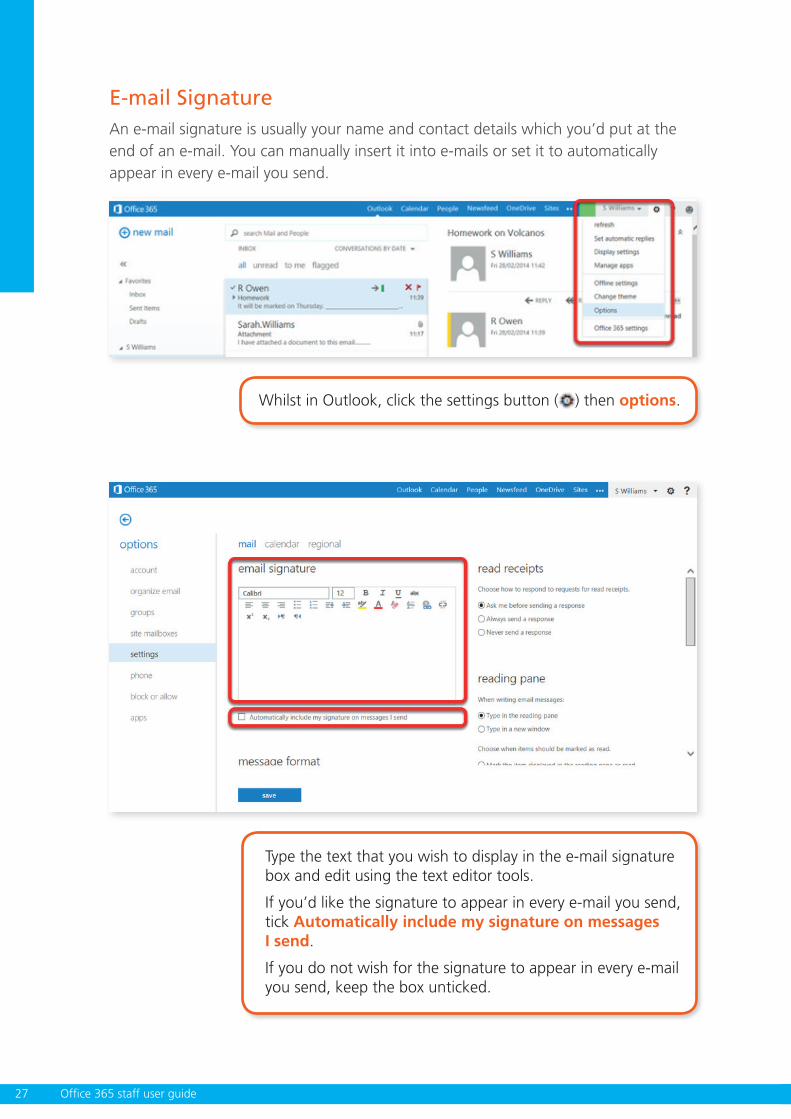
E-mail SignatureAn e-mail signature is usually your name and contact details which you’d put at the end of an e-mail. You can manually insert it into e-mails or set it to automatically appear in every e-mail you send.
Whilst in Outlook, click the settings button ( ) then options.
Type the text that you wish to display in the e-mail signature box and edit using the text editor tools.
If you’d like the signature to appear in every e-mail you send, tick Automatically include my signature on messages I send.
If you do not wish for the signature to appear in every e-mail you send, keep the box unticked.

28Office 365 staff user guide
To add the signature manually, click Insert then signature whilst editing an e-mail.
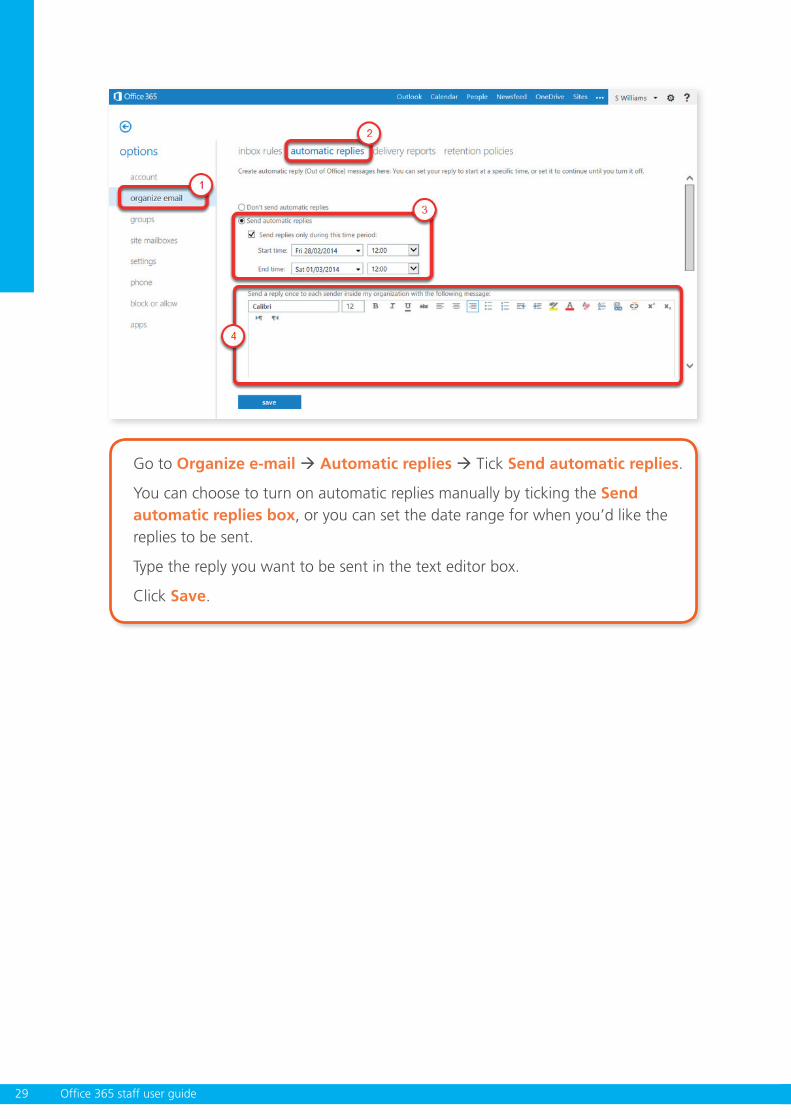
To set up Automatic Replies, go to the settings button on the top navigation menu then click Options.
Automatic RepliesReplies can be sent automatically to e-mails received when you are unable to check your e-mail. For example, when you are away on holiday.
29 Office 365 staff user guide
Go to Organize e-mail Automatic replies Tick Send automatic replies.
You can choose to turn on automatic replies manually by ticking the Send automatic replies box, or you can set the date range for when you’d like the replies to be sent.
Type the reply you want to be sent in the text editor box.
Click Save.
30Office 365 staff user guide
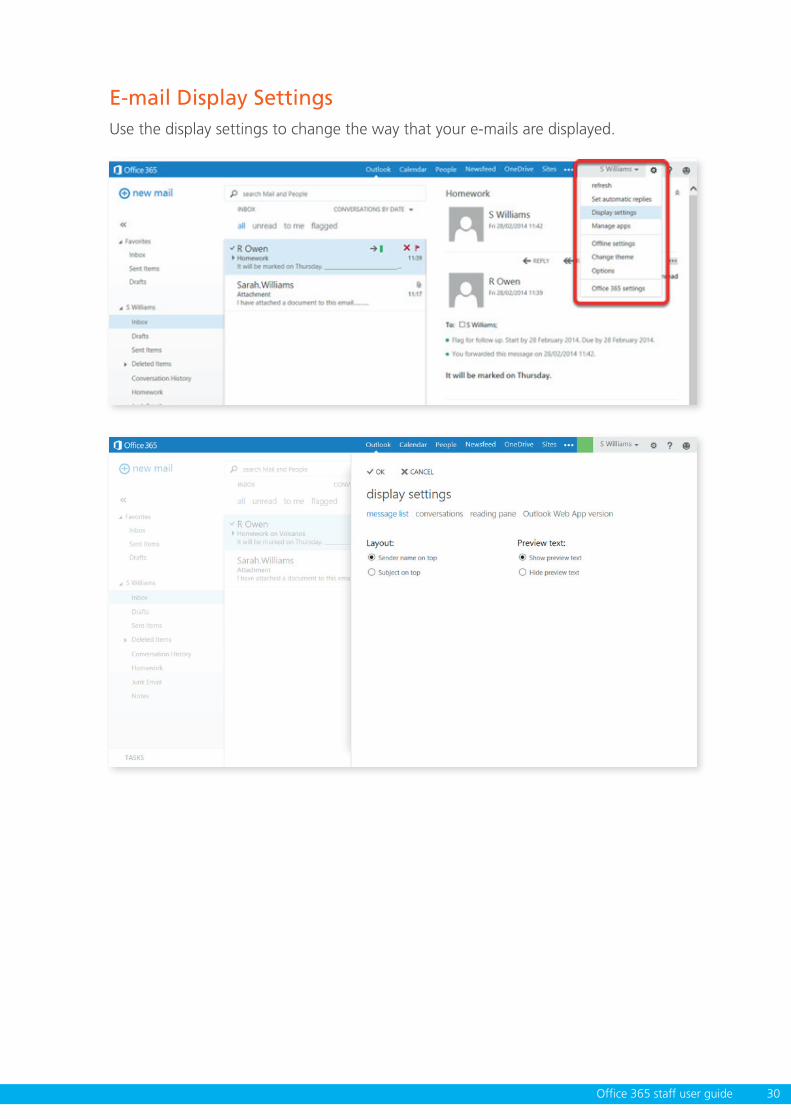
E-mail Display SettingsUse the display settings to change the way that your e-mails are displayed.
31 Office 365 staff user guide
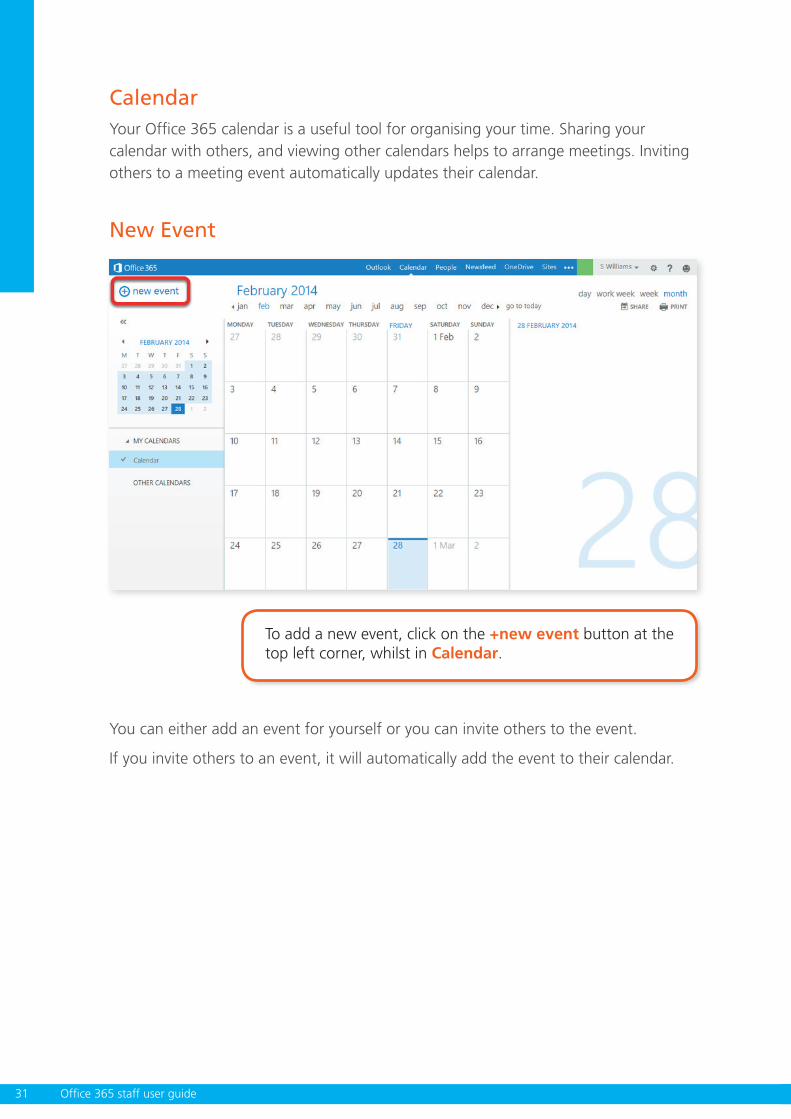
CalendarYour Office 365 calendar is a useful tool for organising your time. Sharing your calendar with others, and viewing other calendars helps to arrange meetings. Inviting others to a meeting event automatically updates their calendar.
New Event
To add a new event, click on the +new event button at the top left corner, whilst in Calendar.
You can either add an event for yourself or you can invite others to the event.
If you invite others to an event, it will automatically add the event to their calendar.

32Office 365 staff user guide
Click on the . . . button, then insert and attachment.
Adding a description
Attaching a file

33 Office 365 staff user guide
Your file explorer will open. Search for a file, select it then click Open to upload.
Enter the details of the event. Click on the + in the Attendees field to search for contacts.

34Office 365 staff user guide
CategoriesCategories allow you to tag e-mails, tasks and calendar events to make it easier to search through later.

35 Office 365 staff user guide
Marking Events as PrivateWhen sharing your calendar with others, the only information shared for events marked as private will be your availability – Free, Working elsewhere, Tentative, Busy, Away.
A lock is displayed to show that the event is private.

36Office 365 staff user guide
Click on events to open a pop-up displaying more information. Click Edit to edit the event.
Event NotificationEvent notifications are displayed in the same area as e-mail notifications.

37 Office 365 staff user guide
Calendar ViewsThe default view for the calendar is Month. Click on the view buttons to change the view.
To navigate through the calendars, use the small calendar on the left and the months across the top.
Create a New Calendar
To create a new calendar, right click on My Calendars and click new calendar.

38Office 365 staff user guide
Name your calendar. I have named the new calendar ‘My Timetable’ and I’ve added events in for my lessons. I have set them to repeat every week.
Viewing Multiple CalendarsTicking the calendar allows you to view multiple calendars at the same time. The timetables are colour coded to make it easier to see which calendar the events belong to.

39 Office 365 staff user guide
Sharing your Calendar
To share your calendar with others, click on the Share button.
You can add several e-mail addresses or contacts in the Share with field.

40Office 365 staff user guide
Choose what you would like to share.
If you have more than one calendar, you can choose which ones you’d like to share.

41 Office 365 staff user guide
PeopleThis is your Contacts list or Address book.
Global Address ListStaff have access to a global address list of all staff Hwb+ e-mails throughout Wales called All Wales Staff.
Please note that this list is not available to students, and that students are not included in the address list.
On the People page, under Directory, you will find All Wales Staff. click on it to open the list and use the search box to search through the list.

42Office 365 staff user guide
Click +new to create new contacts and contact groups.
Managing your Contacts using People

43 Office 365 staff user guide
New ContactEnter as much information as you like to add a new contact.
New GroupTo create a new group, give it a name then add members. Either type e-mail addresses into the members field, or use it to search for contacts.

44Office 365 staff user guide
You can also add contacts from an e-mail. Click on the person’s name to open a pop-up box, then click add to contacts.
A new contact page will open where you can add more details.

45 Office 365 staff user guide
Changing the Interface language for Outlook Please note, we are currently only able to change the interface language to Welsh for Outlook, Calendar and People.
To change the interface language for Outlook, Calendar and People, whilst in one of the three, click on the settings button in the top navigation menu ( ) and click Options.
Click settings then regional. Use the drop down menu of available languages to select a different language.

46Office 365 staff user guide
Once you have selected the language, click Save.
In this example, we will change the interface language to Welsh.

47 Office 365 staff user guide
The language has been changed.
The language of the menus, buttons and folders will change but folders that you have created and text in e-mails will remain the same.
48Office 365 staff user guide
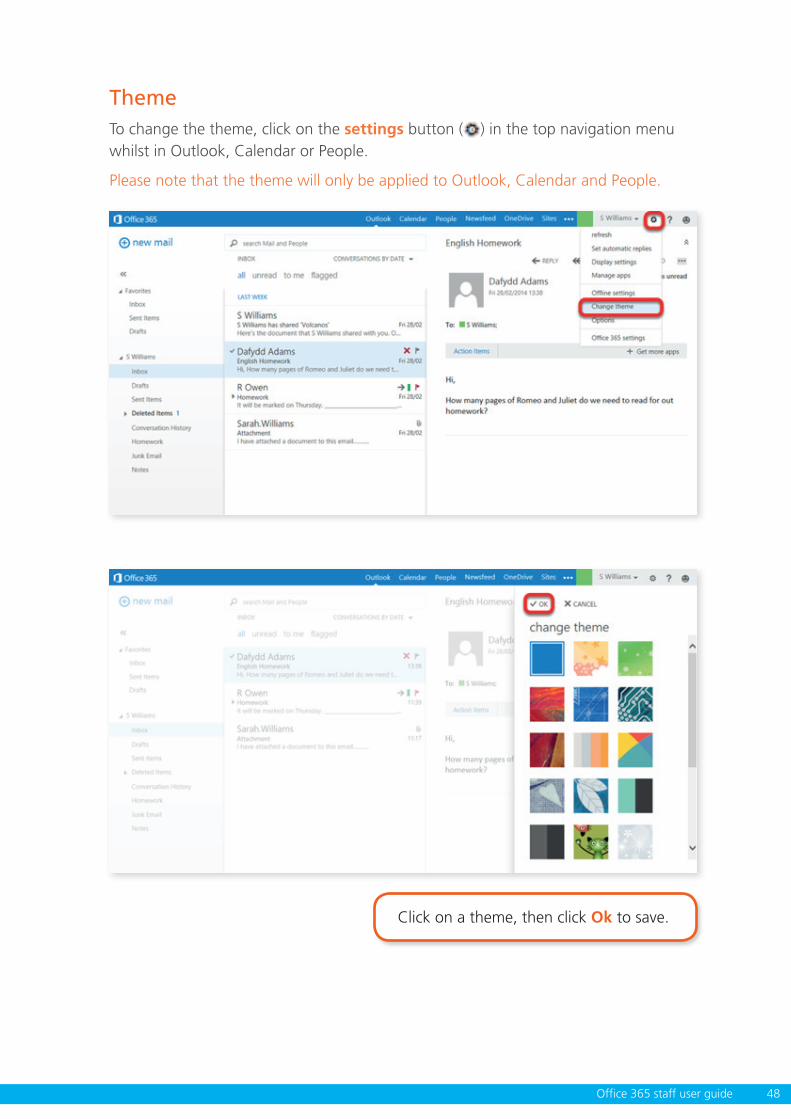
ThemeTo change the theme, click on the settings button ( ) in the top navigation menu whilst in Outlook, Calendar or People.
Please note that the theme will only be applied to Outlook, Calendar and People.
Click on a theme, then click Ok to save.

49 Office 365 staff user guide