Embed Size (px)
Citation preview

Instruction Manual
A New Standard of Automated Cell Counter
Copyright NanoEnTek, Inc. All rights reserved.
ADAM


All the materials in this instruction manual are protected by Korean and international copyright laws. They cannot be reproduced, translated, published or distributed without the permission of the copyright owner.
ADAM-CellT Instruction ManualWebsite : www.nanoentek.comE-mail : [email protected]
Manufactured by
NanoEnTek, Inc. 851-14, Seohae-ro, Paltan-myeon, Hwaseong-si, Gyeonggi-do, 18531, KoreaTel. +82-2-6220-7940Fax. +82-2-6220-7999
NanoEnTek America, Inc. 240 Bear Hill Road, Suite 101, Waltham, MA 02451, USATel. +1-781-472-2558Fax. +1-781-790-5649
The information in this manual is described as accurately as possible. Firmware and software changes and updates may change without prior consent or notification.
Copyright © 2019 by NanoEnTek Inc.All rights reserved. Published in Korea.
Documentation: NESMU-ACT-001E
Revision history: V.0.0 OCT 2019


Table of contents
IntroductionGeneral description
Technology
Basic principle of counting
SettingSetting
Wifi
Update
UserUser
User manage
Log manage
Document manage
Deleted list
Product Contents ADAM-CellT
AccuChip kit
Upon receiving the instrument
Maintenance and cleaning
Trouble shooting
Warranty
Technical specifications
Product list
Safety precautions
Safety symbols
Warnings
Technical Support
General Operation Introduction
Sample preparation
Counting cell
Measure Run sample
Result analysis
Result analysis -Error code
DataData list
Edit
Image
Power offLock
Power offGetting Started Environmental requirements
Power on and initial display
Error messages during booting
Count setting
Product Description Front view of ADAM-CellT
Rear view of ADAM-CellT
2
3
4
5
5
5
6
7
8
8
9
10
11
12
12
15
16
17
18
19
20
21
22
23
23
24
25
26
27
28
29
29
30
31
32
33
34
35
36
37
38
2
Introduction
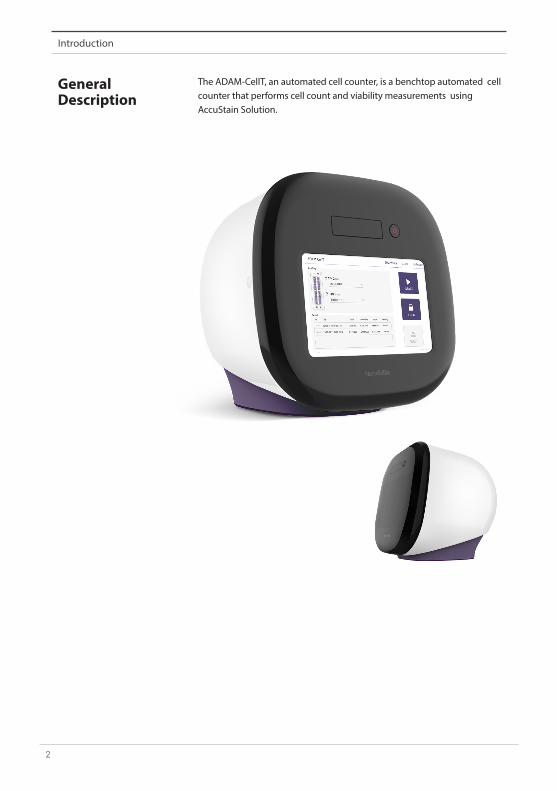
GeneralDescription
The ADAM-CellT, an automated cell counter, is a benchtop automated cell counter that performs cell count and viability measurements using AccuStain Solution.

ADAM-CellT, A New Standard of Automated Cell Counter 3
Introduction
Technology Until now, cell counting and viability measurement for many types of cells have been performed manually using hemocytometer with Trypan Blue exclusion method, which is to distinguish viable cells from non-viable cells. One drawback of this method, however, is the propensity for the staining of artifacts; another drawback is that the naked eye can only differenti-ate between cells in a limited concentration range in the hemocytometer chamber. This combined with the potential problem of cell aggregation and limited sample volume leads to the common variation of counts nor-mally associated with this method.
To address these problems, NanoEnTek has developed the ADAM-CellT, which is based on a fluorescent microscopy technique for counting cells. The ADAM-CellT utilizes sensitive fluorescence dye staining, LED optics and CMOS detection technologies to make the cell analysis more accurate and reliable.
To count cells using ADAM-CellT, the cells are mixed with a Propidium Io-dide (PI) stain and directly pipetted on to a disposable plastic chip. The chip is then loaded onto a precision stage. An ADAM-CellT system is au-tomatically focused onto the chip and cells that have been stained are recorded by a sensitive CMOS camera. The image results are automatically processed generating the cell count which is displayed on the front of the instrument. Simple. Fast. Accurate. Reliable.
AccuChip
CMOS Camera
Emission Filter
Dichroic Filter
Objective Lens
Excitation filter
Lenses
Green LED Mirror

4
Introduction
Basic principle of counting
ADAM-CellT is based on staining mammalian cell DNA with a fluorescent dye, Propidium Iodide (PI). PI does not enter cells with intact membranes or active metabolism. In contrast, cells with damaged membranes or withinactive metabolism are unable to prevent PI entering the cell. As a result, the nuclei of non-viable cells will only be stained. The ADAM-CellT pro-vides two kinds of staining solutions. AccuStain Solution T for the total cell counting is composed of the fluorescent dye (PI) and lysis solution. Ac-cuStain Solution N for the non-viable cell counting is composed of the fluorescent dye and PBS.
In order to measure the total concentration of cells, the plasma mem-branes of all the cells must be disrupted to stain all the Nuclei with PI. The process of disrupting and staining is achieved by treatment with AccuStain Solution T.
In the second solution, live cells remain intact and are not stained.Only the non-viable cells are stained and detected. After treatment, the prepared cells will be loaded into the chip. The viability will be automati-cally calculated in the ADAM-CellT software after each measurement of the total cells and the non-viable cells.
Add PI
T Channel
A: Total cell / B: Non-viable cell
N Channel
AccuChip 4 Channel
AccuChip 2 Channel
*Viability(%)= X 100A
(A-B)
Total cell count Non-viable cell count
Non-viable cellNon-viable cell
Viable cellViable cellPI-stained nuclei
PI-stained nuclei PI-stained nuclei
T1N
1
T2N
2
Add PI + Iysis sol.

ADAM-CellT, A New Standard of Automated Cell Counter 5
Introduction
ADAM-CellT
AccuChip kit
Upon receiving the instrument
The contents of the ADAM-CellT are listed below:
The contents of the ADAM-CellT’s AccuChip Kit are listed below:
• Examine the instrument carefully for any damage incurred during transit.• Ensure that all parts of the instrument including accessories listed above are included with the product.• Any damage claims must be filed with the carrier.• The warranty does not cover in-transit damage.• Upon receipt, store AccuChip at room temperature. AccuStain Solution should be stored at 2~8°C
Item Quantity
Main device 1
Instruction manual 1
USB hub 1
Wifi dongle 1
Power cord 1
Adapter 1
AccuChip Kit 1
Calibration Bead 1
Item AccuChip2x Kit(Cat. No: AD2K-200)
AccuChip4x Kit(Cat. No: AD4K-200)
AccuStain Solution (Cat. No: ADR-1000)
Disposable
Chip200pcs (2 channel) 200pcs (4 channel) N/A
Solution T 12.5 mL x 2ea 12.5 mL x 2ea 12.5 mL x 4ea
Solution N 12.5 mL x 1ea 12.5 mL x 1ea 12.5 mL x 2ea
Available
test Q’ty
Min. 200 test/kit Min. 400 test/kit
Max. 400 test/kit(Only total cell count)
Max. 800 test/kit(Only total cell count)
Product Contents

6
Introduction
Front view of ADAM-CellT
The front view showing various parts of the ADAM-CellT is shown below:
Control buttons Description
① Door Slide holder is inserted and ejected.
② Power Power on / off.
③ LCD Display processes and results.
④ START Performs all procedures of automatic counting.
⑤ LOCK
Protects the alignment of stage from external shock when ADAM-CellT is being moved.
Lock ADAM-CellT before turning it off or moving it.
⑥ EJECT Ejects the slide holder from ADAM-CellT. Functions as unload.
Product Description
DoorPower
LCD
⑥
④
⑤
①②
③

ADAM-CellT, A New Standard of Automated Cell Counter 7
Introduction
Rear view of ADAM-CellT
The rear view showing various parts of the ADAM-CellT.
Port Description
① USB Port Port for software update and save the data.
③ Power Plug Connects ADAM-CellT power cord to wall outlet
Product Description
① USB Port ② PC Port ③ Power plug
Do not use the PC port. This port does not recognize USB.
! CAUTION
②
8
Introduction
Power on and Initial Display
Getting Started
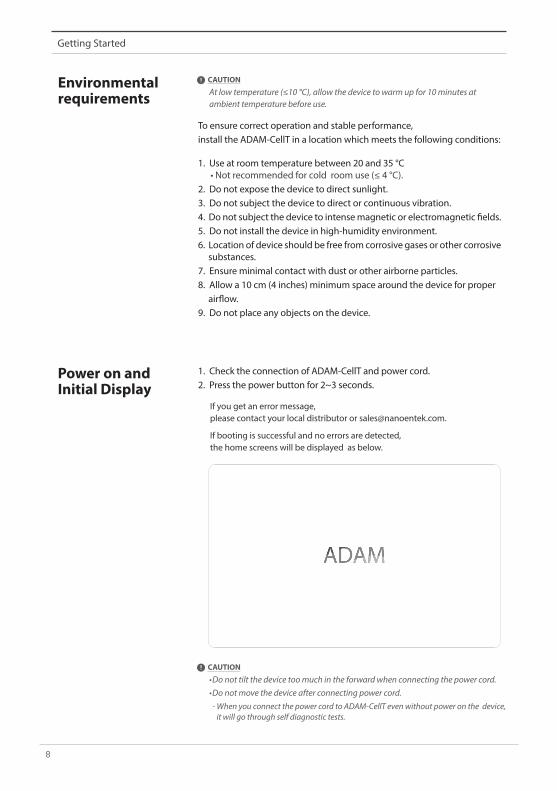
Environmental requirements
To ensure correct operation and stable performance,install the ADAM-CellT in a location which meets the following conditions:
1. Use at room temperature between 20 and 35 °C • Not recommended for cold room use (≤ 4 °C).2. Do not expose the device to direct sunlight.3. Do not subject the device to direct or continuous vibration.4. Do not subject the device to intense magnetic or electromagnetic fields.5. Do not install the device in high-humidity environment.6. Location of device should be free from corrosive gases or other corrosive substances.7. Ensure minimal contact with dust or other airborne particles.8. Allow a 10 cm (4 inches) minimum space around the device for proper airflow.9. Do not place any objects on the device.
1. Check the connection of ADAM-CellT and power cord.2. Press the power button for 2~3 seconds.
If you get an error message,please contact your local distributor or [email protected].
If booting is successful and no errors are detected, the home screens will be displayed as below.
At low temperature (≤10 °C), allow the device to warm up for 10 minutes at ambient temperature before use.
! CAUTION
•Do not tilt the device too much in the forward when connecting the power cord.•Do not move the device after connecting power cord. - When you connect the power cord to ADAM-CellT even without power on the device, it will go through self diagnostic tests.
! CAUTION

ADAM-CellT, A New Standard of Automated Cell Counter 9
Introduction
Error Messages during booting
[System State]
Error code Cause
0x00000C00 Failure of X-axis sensor
0x00007000 Failure of Y-axis sensor
0x00008000 Failure of Z-axis sensor
0x06000000 Failure of Locking module sensor
Getting Started
It appears when booting is not working properly. Turn off main power and restart device.
If this message still appears after restarting,contact your local distributor or [email protected].

10
IntroductionGetting Started
Count setting Set the conditions in the ‘Setting’ tap before counting.
[AccuChip]Set the AccuChip according to you are using.
[Cell size]Set the minimum and maximum size of cell.
[Dilution factor]When diluting sample, set the Dilution factor.
Factor values for the AccuStain Solution is already applied.
! CAUTION
2Ch4ChAccuchip
4Ch 2ChAccuchip
Cell size Min 5 Max 80
Dilution factor
T1N
1
T2N
2
1.0

ADAM-CellT, A New Standard of Automated Cell Counter 11
IntroductionGeneral Operation
Introduction Instruction are provided in this section for preparing the sample with AccuStain Solution for use with disposable AccuChip for automated cell count using the ADAM-CellT.
Please check the procedure of sample preparation and testing below.For more detailed information, please refer to the next page.
2. Load the mixed sample. Then, wait 1 minute for the sample settling.
1. Mix the sample with AccuStain Solution.
3. Insert AccuChip. Get the result.
AccuStain Solution 50 μL
Sample 50 μL
OR
- Result -
2 channel: 23μL4 channel: 13μL
T channel: Total cell N channel: Non-viable cell
12
Introduction
T1N
1
T2N
2
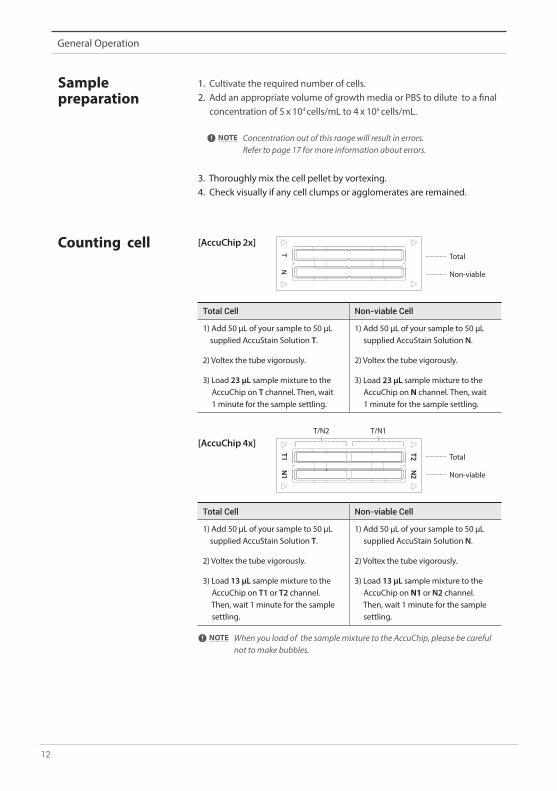
When you load of the sample mixture to the AccuChip, please be careful not to make bubbles.
! NOTE
Concentration out of this range will result in errors. Refer to page 17 for more information about errors.
! NOTE
Counting cell
General Operation
Sample preparation
3. Thoroughly mix the cell pellet by vortexing.4. Check visually if any cell clumps or agglomerates are remained.
[AccuChip 2x]
[AccuChip 4x]
Total Cell Non-viable Cell
1) Add 50 µL of your sample to 50 µL supplied AccuStain Solution T.
2) Voltex the tube vigorously.
3) Load 23 µL sample mixture to the AccuChip on T channel. Then, wait 1 minute for the sample settling.
1) Add 50 µL of your sample to 50 µL supplied AccuStain Solution N.
2) Voltex the tube vigorously.
3) Load 23 µL sample mixture to the AccuChip on N channel. Then, wait 1 minute for the sample settling.
Total Cell Non-viable Cell
1) Add 50 µL of your sample to 50 µL supplied AccuStain Solution T.
2) Voltex the tube vigorously.
3) Load 13 µL sample mixture to the AccuChip on T1 or T2 channel. Then, wait 1 minute for the sample settling.
1) Add 50 µL of your sample to 50 µL supplied AccuStain Solution N.
2) Voltex the tube vigorously.
3) Load 13 µL sample mixture to the AccuChip on N1 or N2 channel. Then, wait 1 minute for the sample settling.
Total
Total
T/N2 T/N1
Non-viable
Non-viable
1. Cultivate the required number of cells.2. Add an appropriate volume of growth media or PBS to dilute to a final concentration of 5 x 10 cells/mL to 4 x 10 cells/mL.4 6

ADAM-CellT, A New Standard of Automated Cell Counter 13
Introduction
T1N
1
T2N
2
T1N
1
T2N
2
T1N
1
T2N
2
General Operation
Counting cell
Correct volume
Low volume
[Sample loading error]Be cautious of loading the correct volume of the sample into AccuChip. The instrument will not detect low or high sample volumes.
! WARNING
Avoid bubbles which may negatively affect the result.! CAUTION
14
IntroductionGeneral Operation
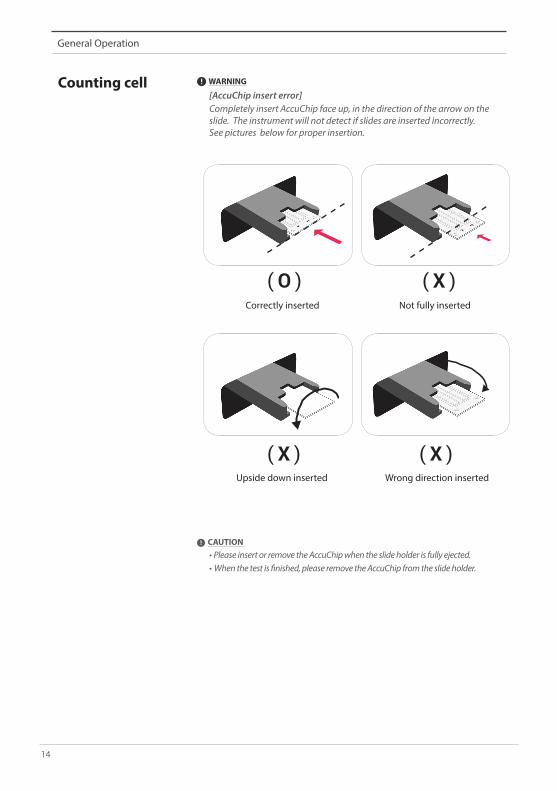
Counting cell [AccuChip insert error]Completely insert AccuChip face up, in the direction of the arrow on the slide. The instrument will not detect if slides are inserted incorrectly. See pictures below for proper insertion.
! WARNING
• Please insert or remove the AccuChip when the slide holder is fully ejected.• When the test is finished, please remove the AccuChip from the slide holder.
! CAUTION
( O )
( X )
( X )
( X )
Correctly inserted
Upside down inserted
Not fully inserted
Wrong direction inserted

ADAM-CellT, A New Standard of Automated Cell Counter 15
IntroductionMeasure
Run Sample Start counting process by pressing ‘START’.It may take about 2 minutes longer for auto focus at the initial test.
While the test is in progress, you can check the cell images of each channel.

16
IntroductionMeasure
Result Analysis The result will be displayed after being automatically calculated by ADAM- CellT software.
TitleNumber of Total cell
Number of Non-Viable cell
Viability
Viability 01 T1 (1.10E6) N1 (5.50E5) 50%
Viability 02 T2 (2.20E6) N2 (5.50E5) 75%
• The viability will be automatically calculated by the ADAM-CellT software after each measurement of the total cells and the non-viable cells.
• First, the total cell number and second, non-viable cell number were measured and then the cell viability is calculated as subtracting non-viable cell counting numbers from total cell counting.
* 1.10E6 = 1.10 X 10 cells/mL6

ADAM-CellT, A New Standard of Automated Cell Counter 17
IntroductionMeasure
Result Analysis- Error code
Error code Cause
E Frames with errors are over 50% of total counting frame.
O Cells are more than 4X10 cells/mL.
H Cells are more than 2X10 cells/mL.
L Cells are less than 4X10 cells/mL.
U Cells are less than 5X10 cells/mL.
Error frame [#]
Frame with error that contains cells whose diameter is larger than 100μm.
When this error shown in result window, please check the image.
4
5
6
6

18
IntroductionData
Data list
Control buttons Description
① All Select all data in Data List.
② SEARCH Display the data of the selected date.
③ EDITView and edit the data.Multiple data can be edited with the same settings.
④ IMAGE Check the cell images of each channel.
⑤ SAVE Save the selected data to USB(PDF, Excel, Image).
⑥ DELETE Delete the selected data.
⑦ MAILSend the Excel, PDF, and Image files of selected data to e-mail.
①
③
④⑤
⑥
⑦
②

ADAM-CellT, A New Standard of Automated Cell Counter 19
IntroductionData
EDIT
Control buttons Description
① Sample Edit the sample name.
② Cell size graph View the cell size graph each channel(T/N).
③ Cell size table View the number of cells in each cell size.
④ Channel Select a channel(T/N).
⑤ Cell size setting Set the min/max size of the cell.
⑥ Dilution FactorSet the dilution factor of sample. Factor values for the AccuStain Solution is already applied.
⑦ Frame graph View the counted cell number of each frame.
⑤④ ⑥
⑦
③
①②
20
IntroductionData
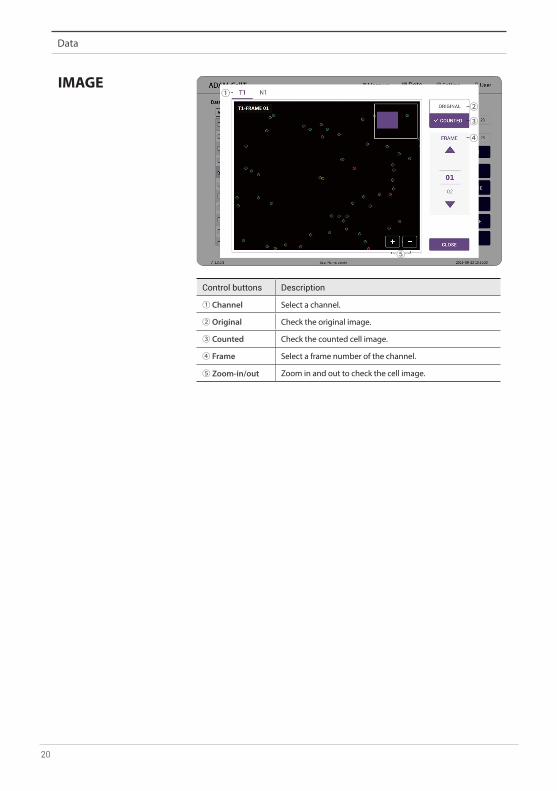
IMAGE
Control buttons Description
① Channel Select a channel.
② Original Check the original image.
③ Counted Check the counted cell image.
④ Frame Select a frame number of the channel.
⑤ Zoom-in/out Zoom in and out to check the cell image.
①②③
④
⑤
ADAM-CellT, A New Standard of Automated Cell Counter 21
IntroductionData
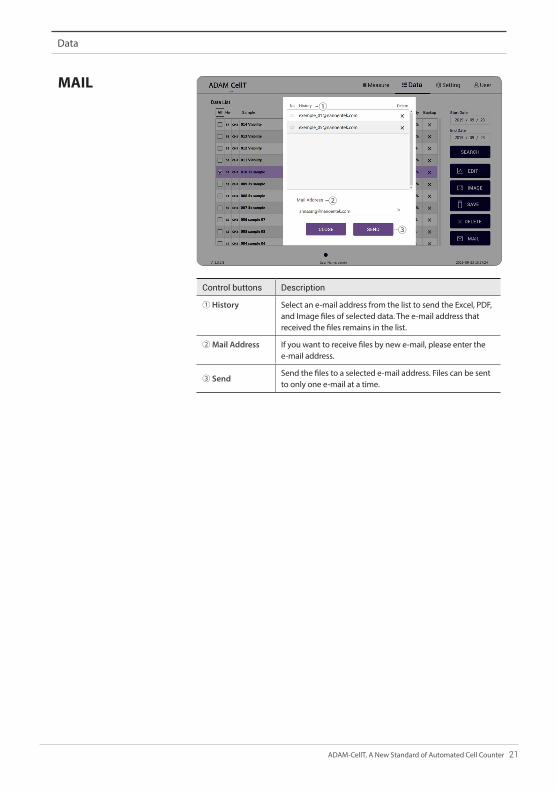
Control buttons Description
① History Select an e-mail address from the list to send the Excel, PDF, and Image files of selected data. The e-mail address that received the files remains in the list.
② Mail Address If you want to receive files by new e-mail, please enter the e-mail address.
③ SendSend the files to a selected e-mail address. Files can be sent to only one e-mail at a time.
①
②
③

22
IntroductionSetting
Setting
Control buttons Description
① Count settingSet the conditions in the setting tap before counting.Refer to page 10 for more information.
② Wifi Set the wifi to use the e-mail function.
③ Mail Do not change the setting in mail.
④ Number Select Auto-Numbering
⑤ Update Firmware or Software update through the USB.
⑥ Date&Time Set the current date and time.
⑦ Capacity Check remaining capacity.
⑧ Data Backup View the storage path of additional data backup.
③
④
⑤
⑥
⑦
⑧
①
②

ADAM-CellT, A New Standard of Automated Cell Counter 23
IntroductionSetting
Wifi
Update
1. Click the Refresh button.2. Select the wifi.3. Insert the password of selected wifi.4. Click the Connect button.
1. Prepare the USB with update file. 2. Insert the USB.3. Click the UPDATE button.
If connection error occurs, please contact a laboratory facility manager. ! CAUTION
• The ‘AdamUpdate’ folder must exist in the root path of the USB folder.
• ADAM-CellT can be updated only when the firmware or software file exists in the ‘AdamUpdate’ folder. The ‘ADAM CellT.eve’ file should be in the ‘AdamUpdate’ folder.
• Do not rename the ‘AdamUpdate’ folder. The folder name should be ‘AdamUpdate’.
! CAUTION
24
IntroductionUser
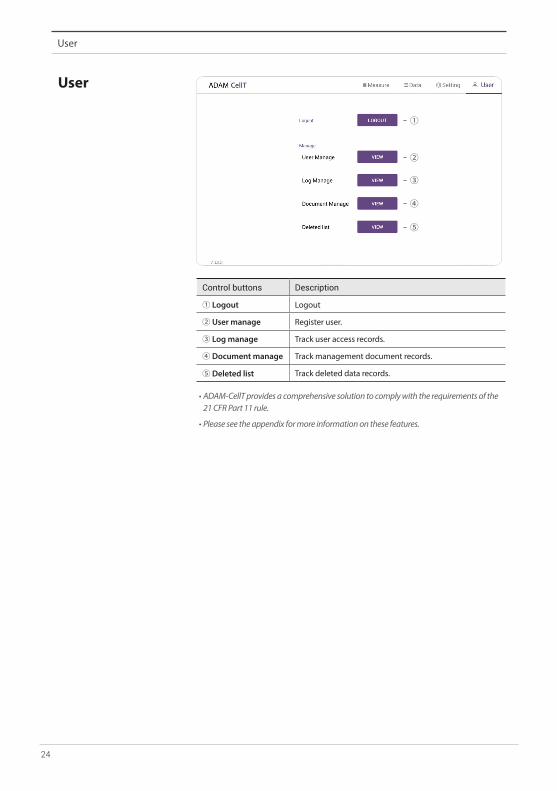
User
Control buttons Description
① Logout Logout
② User manage Register user.
③ Log manage Track user access records.
④ Document manage Track management document records.
⑤ Deleted list Track deleted data records.
①
②
③
④
⑤
• ADAM-CellT provides a comprehensive solution to comply with the requirements of the 21 CFR Part 11 rule.
• Please see the appendix for more information on these features.

ADAM-CellT, A New Standard of Automated Cell Counter 25
IntroductionUser
User manage
Control buttons Description
① User Name View the registered user list.
② Permission View the user access authority.
③ New Registration Register new user.
⑤ Supervisor permission Register as a supervisor.
① ② ③
④
26
IntroductionUser
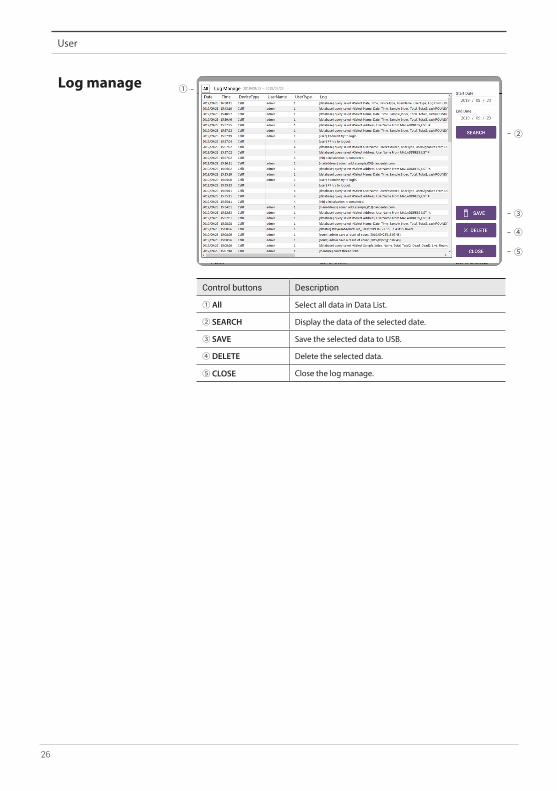
Log manage
Control buttons Description
① All Select all data in Data List.
② SEARCH Display the data of the selected date.
③ SAVE Save the selected data to USB.
④ DELETE Delete the selected data.
⑤ CLOSE Close the log manage.
①
②
③
④
⑤
ADAM-CellT, A New Standard of Automated Cell Counter 27
Introduction
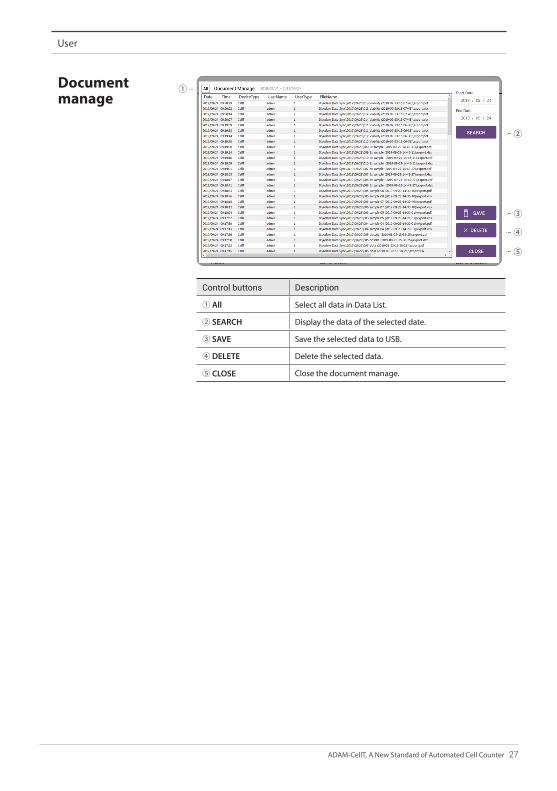
Control buttons Description
① All Select all data in Data List.
② SEARCH Display the data of the selected date.
③ SAVE Save the selected data to USB.
④ DELETE Delete the selected data.
⑤ CLOSE Close the document manage.
①
②
③
④
⑤
User
Document manage

28
Introduction
Control buttons Description
① All Select all data in Data List.
② SEARCH Display the data of the selected date.
③ SAVE Save the selected data to USB.
④ DELETE Delete the selected data.
⑤ CLOSE Close the deleted list.
①
②
③
④
⑤
User
Deletedlist

ADAM-CellT, A New Standard of Automated Cell Counter 29
IntroductionPower off
Lock
Power off
Press LOCK before turning off the device.If there is no operation for 3 minutes, the lock function will be activated automatically.
When the device is locked, the screen will be changed as shown below.
If you press the power button for 2~3 seconds, then ‘Slide to shut down your PC’ message will appear. Slide down the screen to turn off the power.
Slide to shut down your PC

30
Introduction
1. ADAM-CellT does not need regular maintenance.2. ADAM-CellT has no replacement of consumable materials.3. Please clean the exposed surface of ADAM-CellT frequently or before testing, using a soft cloth and isopropyl alcohol or deionized water.
Dispose of wipes in an appropriately labeled solvent contaminated waste container.
! CAUTION
Maintenance and cleaning
Maintenance and cleaning

ADAM-CellT, A New Standard of Automated Cell Counter 31
IntroductionTrouble shooting
Trouble shooting
Problem Description Solution
ADAM-CellT doesnot power up
• No power from outlet
• Bad power cord.
• Check power source.
• Replace.
Inaccurate result • Cell number may be out of range.
• AccuStain Solution has expired.
• Too high clumped cells.
• Adjust the number of cells between 54X10 ~ 46X10 cells/mL (refer to page 12).
• Discard AccuStain that have expired. Purchase the AccuStain(ADR-1000).
• Try again after vortexing the cells.
When error message is shown
(For information oneach error message,see page 17)
• When frames with errors are over 50% of total counting frame. (Error message: E)
• Check the suspension of cells if all cells are fully dissociated into single cells.
• If contaminants except cells are found, prepare sample again.
• When over 100μm diameter of cells are included. (Error message: Error frame [#])
• Check fully dissociated into single cells.
• High concentration of cells (Error message: H)
• Over detection range (Error message: O)
• Check if concentration of cell is too high.
• Dilute the sample and count again.
• Low concentration of cells (Error message: L)
• Under detection range (Error message: U)
• Check if concentration of cell is too low.
• Use concentrated sample and count again.

32
Introduction
If any defects occur in the ADAM-CellT during one(1) year warranty period, NanoEnTek will repair or replace the defective parts at its discretion with-out charge. The following defects, however, are specifically excluded:
1. Defects caused by improper operation.2. Repair or modification done by anyone other than NanoEnTek or an authorized agent.3. Damage caused by substituting alternative parts.4. Use of fittings or spare parts supplied by anyone other than NanoEnTek.5. Damage caused by accident or misuse.6. Damage caused by disaster.7. Corrosion caused by improper solvent or sample.
For your protection, items being returned must be insured against possi-ble damage or loss. NanoEnTek cannot be responsible for damage incurred during shipment of a repair instrument. It is recommend that you save the original packing material in which the instrument was shipped. This war-ranty should be limited to the replacement of defective products.
For any inquiry or request for repair service,Contact [email protected] or your local distributor.
Warranty
Warranty
ADAM-CellT, A New Standard of Automated Cell Counter 33
Introduction
AccuChip
AccuStain Solution
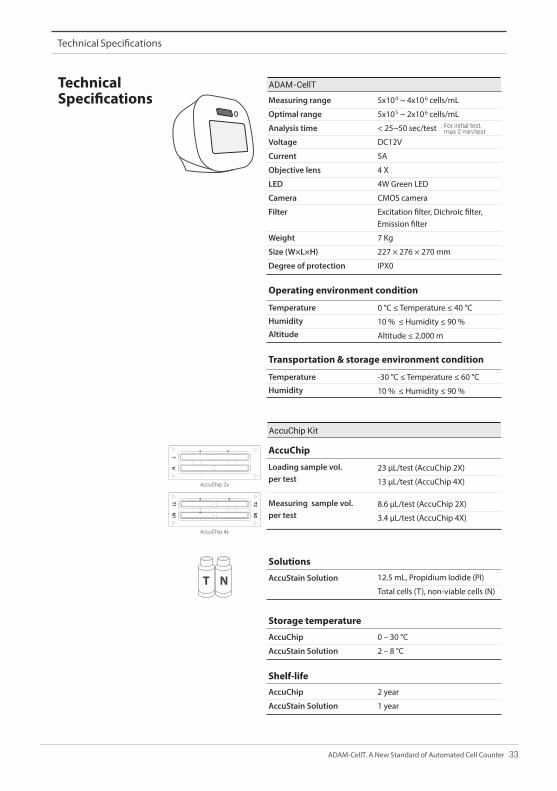
2 year
1 year
Technical Specifications
Technical Specifications Measuring range
Optimal range
Analysis time
Voltage
Current
Objective lens
LED
Camera
Filter
Weight
Size (W×L×H)
Degree of protection
Loading sample vol. per test
Measuring sample vol. per test
AccuStain Solution
AccuChip
AccuStain Solution
AccuChip
Solutions
Storage temperature
Shelf-life
5x10 ~ 4x10 cells/mL
5x10 ~ 2x10 cells/mL
< 25~50 sec/test
DC12V
5A
4 X
4W Green LED
CMOS camera
Excitation filter, Dichroic filter,Emission filter
7 Kg
227 × 276 × 270 mm
IPX0
23 µL/test (AccuChip 2X)
13 µL/test (AccuChip 4X)
8.6 µL/test (AccuChip 2X)
3.4 µL/test (AccuChip 4X)
12.5 mL, Propidium Iodide (PI)
Total cells (T), non-viable cells (N)
0 – 30 °C
2 – 8 °C
Temperature
Humidity
Altitude
Temperature
Humidity
Operating environment condition
Transportation & storage environment condition
0 °C ≤ Temperature ≤ 40 °C
10 % ≤ Humidity ≤ 90 %
Altitude ≤ 2,000 m
-30 °C ≤ Temperature ≤ 60 °C
10 % ≤ Humidity ≤ 90 %
ADAM-CellT
AccuChip Kit
4
5
6
6
AccuChip 4x
AccuChip 2x
T1N
1
T2N
2
: For initial test, max 2 min/test

34
IntroductionProduct List
Product List Cat. No. Product Contents Quantity
AD2K-200 AccuChip2X Kit*
200 pcs AccuChip 2X 1
12.5 mL AccuStain Solution T 2
12.5 mL AccuStain Solution N 1
AD4K-200 AccuChip4X Kit
200 pcs AccuChip 4X 1
12.5 mL AccuStain Solution T 2
12.5 mL AccuStain Solution N 1
ADR-1000 AccuStain12.5 mL AccuStain Solution T 4
12.5 mL AccuStain Solution N 2
ADB-500 ADAM Calibration Bead 5 mL Calibration Bead 1
*AccuChip 2x: please consult your distributor or manufacture for availability.

ADAM-CellT, A New Standard of Automated Cell Counter 35
IntroductionSafety Precautions
Safety Precautions
Review and follow the safety instructions below :
• Always ensure that the power supply input voltage matches the voltage available at your location.
• To avoid the danger of electric shock, install the instrument per the environmental specifications located in “Technical Specifications”. If water or other material enters the instrument, the adaptor, or power inlet, disconnect the power cord and contact a service person.
• Do not touch the main plug or power cord with wet hands.
• This machine is air-cooled so its surfaces become hot during operation. During installation and use, leave more than 10 cm (4 inches) free around the device.
• Do not install the instrument on a slant or a place prone to vibrations or the risk of instrument malfunction or damage to the instrument will in crease.
• Never insert any objects (especially metallic) into the air vents of the instru- ment as this could result in electrical shock, personal injury, and equip- ment damage.
• Always set the main switch on the power supply unit to OFF before con- necting the power cord to the wall outlet.
• To avoid a potential shock hazard, always connect the grounding termi- nal of the instrument and that of the wall outlet properly. The power cord should be connected to a grounded, 3-conductor power outlet.
• Position the device so that there is sufficient length for the cables and their respective connections.
• Set the main switch to “ O ” (OFF), unplug the power cord, and lock the stage before moving.
• If the instrument is broken or dropped, disconnect the power cord and contact an authorized service person. Do not disassemble the instrument.
• Only use authorized accessories.
• Use this equipment only as specified in this manual and as specified in any documentation associated with its components. Use of the equip- ment in an unspecified manner may result in damage to the device or injury to the user.
36
IntroductionSafety Symbols
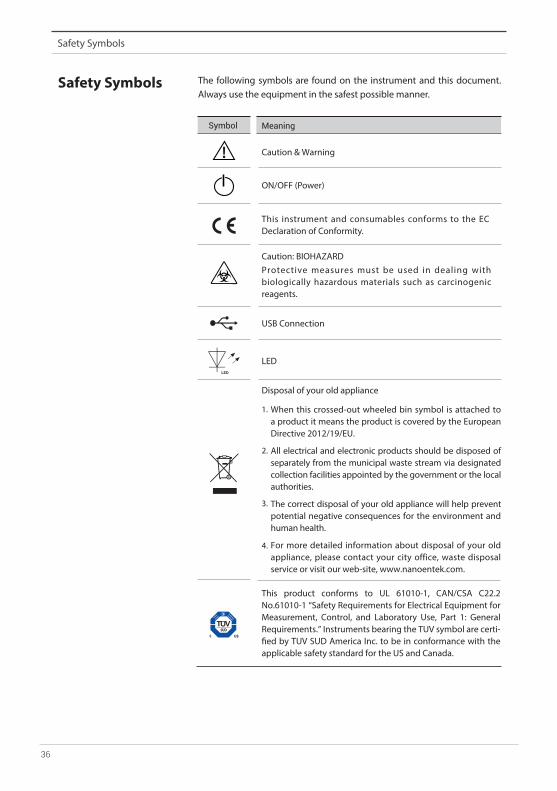
Safety Symbols The following symbols are found on the instrument and this document. Always use the equipment in the safest possible manner.
LED
Symbol Meaning
Caution & Warning
ON/OFF (Power)
This instrument and consumables conforms to the EC Declaration of Conformity.
Caution: BIOHAZARDProtective measures must be used in dealing with biologically hazardous materials such as carcinogenic reagents.
This product conforms to UL 61010-1, CAN/CSA C22.2 No.61010-1 “Safety Requirements for Electrical Equipment for Measurement, Control, and Laboratory Use, Part 1: General Requirements.” Instruments bearing the TUV symbol are certi-fied by TUV SUD America Inc. to be in conformance with the applicable safety standard for the US and Canada.
LED
USB Connection
When this crossed-out wheeled bin symbol is attached to a product it means the product is covered by the European Directive 2012/19/EU.
All electrical and electronic products should be disposed of separately from the municipal waste stream via designated collection facilities appointed by the government or the local authorities.
The correct disposal of your old appliance will help prevent potential negative consequences for the environment and human health.
For more detailed information about disposal of your old appliance, please contact your city office, waste disposal service or visit our web-site, www.nanoentek.com.
Disposal of your old appliance
1.
2.
3.
4.
ADAM-CellT, A New Standard of Automated Cell Counter 37
IntroductionWarnings
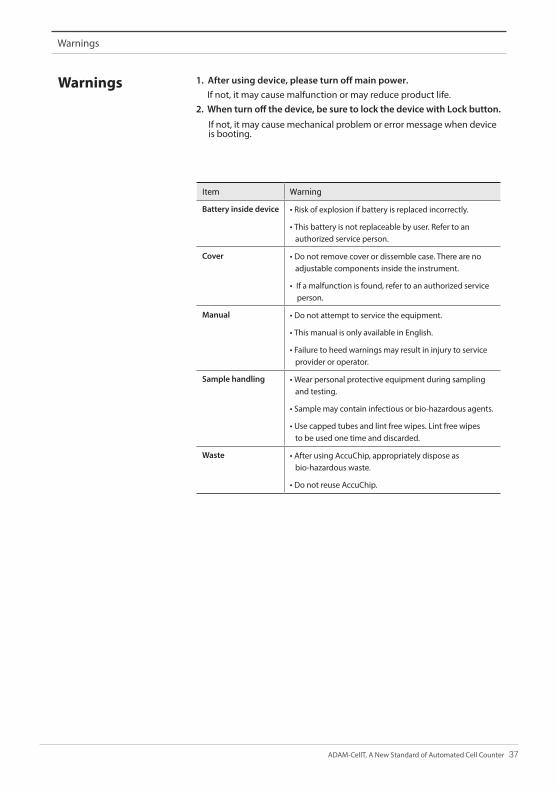
Warnings 1. After using device, please turn off main power.If not, it may cause malfunction or may reduce product life.
2. When turn off the device, be sure to lock the device with Lock button.
If not, it may cause mechanical problem or error message when device is booting.
Item Warning
Battery inside device • Risk of explosion if battery is replaced incorrectly.
• This battery is not replaceable by user. Refer to an authorized service person.
Cover • Do not remove cover or dissemble case. There are no adjustable components inside the instrument.
• If a malfunction is found, refer to an authorized service person.
Manual • Do not attempt to service the equipment.
• This manual is only available in English.
• Failure to heed warnings may result in injury to service provider or operator.
Sample handling • Wear personal protective equipment during sampling and testing.
• Sample may contain infectious or bio-hazardous agents.
• Use capped tubes and lint free wipes. Lint free wipes to be used one time and discarded.
Waste • After using AccuChip, appropriately dispose as bio-hazardous waste.
• Do not reuse AccuChip.

38
IntroductionTechnical Support
Technical Support
Visit the our Website at www.nanoentek.com for :
For more information or technical assistance, please call or email.
• Technical resources, including manuals, FAQs, etc.
• Technical support contact information
• Additional product information and special offers.
NanoEnTek, Inc. 851-14, Seohae-ro, Paltan-myeon, Hwaseong-si, Gyeonggi-do, 18531, KoreaTel. +82-2-6220-7940Fax. +82-2-6220-7999
NanoEnTek America, Inc. 240 Bear Hill Road, Suite 101, Waltham, MA 02451, USATel. +1-781-472-2558Fax. +1-781-790-5649
Websitewww.nanoentek.com


NanoEnTek, Inc. 851-14, Seohae-ro, Paltan-myeon, Hwaseong-si, Gyeonggi-do, 18531, Korea
Tel :+82-2-6220-7940Fax:+82-2-6220-7999
NanoEnTek America, Inc.240 Bear Hill Road, Suite 101, Waltham, MA 02451, USA
Tel: +1-781-472-2558Fax: +1-781-790-5649
Websitewww.nanoentek.com
NESMU-ACT-001E (V.0.0)