Embed Size (px)
Citation preview
Peralta Community College District
ePAFS version 1.0Electronic Personnel Action Form System
Users Guide for Initiators & Approvers
Version 7/6/12
The most current version of this document can always be found at:\\glenpark.ad.peralta.edu\pccddata\data\ePAFS
Version 8/24/12
Epafs Users Guide - Initiators & Approvers 8-24-12.Docx
–
EPAFS INTRODUCTION ........................................................................................................................................... 1
WHO SUPPORTS AND MANAGES EPAFS ................................................................................................................ 2
GETTING IMMEDIATE SUPPORT ON CAMPUS ....................................................................................................................... 2 IMPROVING AND UPGRADING EPAFS VER. 1.0 .................................................................................................................... 2 IF YOU FIND AN ERROR WITH EPAFS ................................................................................................................................. 2
ROLES & RESPONSIBILITIES .................................................................................................................................... 4
READ-ONLY USERS ........................................................................................................................................................ 4
LOCATING AND LOGGING ON TO EPAFS VIA THE PCCD WEB SITE .......................................................................... 5
EPAF MAIN MENU ........................................................................................................................................................ 6
APPROVERS QUICK START GUIDE .......................................................................................................................... 7
EMAIL NOTIFICATION ...................................................................................................................................................... 7 APPROVERS IN BOX ........................................................................................................................................................ 8 APPROVING AN EPAF ..................................................................................................................................................... 9 APPROVER’S COMMENTS SCREEN ................................................................................................................................... 10 USING THE EPAFS HISTORY SCREENS .............................................................................................................................. 11 EDITING AN EPAF ........................................................................................................................................................ 12
INITIATOR’S GUIDE .............................................................................................................................................. 13
1.0 PICK THE EMPLOYEE, ACTION, AND ASSIGNMENT ......................................................................................... 13
1.1 SELECT LOCATION .................................................................................................................................................. 13 1.2 IDENTIFY EMPLOYEE ............................................................................................................................................... 14 1.3 SEARCH RESULTS - SELECT EMPLOYEE ........................................................................................................................ 15 1.4 SELECT ACTION ...................................................................................................................................................... 16 1.5 SELECT EXISTING ASSIGNMENT ................................................................................................................................. 17 2.1 ASSIGNMENT ACTION ............................................................................................................................................. 18 2.2 NEW HIRE / REHIRE NAME AND ADDRESSES ............................................................................................................... 19 2.3 SELECT POSITION ................................................................................................................................................... 20 2.4 POOLED POSITION DEFINITION ................................................................................................................................. 21
As Seen for All Actions Except Stipends .............................................................................................................. 21 As Seen for Stipends ........................................................................................................................................... 22
2.5 ASSIGNMENT DETAIL .............................................................................................................................................. 23 As Seen for All Actions Except Stipends .............................................................................................................. 23 As Seen for Stipends: .......................................................................................................................................... 24
2.6 ASSIGN CONFIRMATION SCREEN ............................................................................................................................. 25 2.7 ASSIGN APPROVER’S SCREEN .................................................................................................................................. 26
3.0 CHANGE EXISTING ASSIGNMENT.................................................................................................................... 27
3.1 CHANGE EXISTING ASSIGNMENT ............................................................................................................................... 27 3.4 CURRENT POOLED POSITION COMBO CODE ................................................................................................................ 28 3.2 CHANGE EXISTING ASSIGNMENT CONFIRMATION SCREEN .............................................................................................. 29 3.3 CHANGE APPROVER’S SCREEN ................................................................................................................................ 30
Epafs Users Guide - Initiators & Approvers 8-24-12.Docx
4.0 TERMINATION AND SEPARATION .................................................................................................................. 31
4.1 SEPARATE EMPLOYEE / TERMINATE ASSIGNMENT......................................................................................................... 32 4.4 CURRENT POOLED POSITION COMBO CODE ................................................................................................................ 33 4.2 TERMINATE / SEPARATE CONFIRMATION SCREEN ......................................................................................................... 34 4.3 TERMINATE / SEPARATE APPROVERS SCREEN............................................................................................................... 35
5.0 LEAVES OF ABSENCE ...................................................................................................................................... 36
CHANGE OF PRACTICE FOR LEAVE RETURNS ...................................................................................................................... 37 5.1 CREATE A NEW LEAVE OF ABSENCE OR RETURN FROM LEAVE ......................................................................................... 38
Create a New Leave............................................................................................................................................ 38 Create a Return from Leave ............................................................................................................................... 39
5.2 LOA CONFIRMATION SCREEN ................................................................................................................................... 40 5.3 APPROVE LOA OR RETURN FROM LOA ...................................................................................................................... 41
APPENDICES......................................................................................................................................................... 42
WORKFLOW ............................................................................................................................................................... 42 District Approval Workflow ................................................................................................................................ 43 Merritt Approval Workflow ................................................................................................................................ 44 Alameda Approval Workflow ............................................................................................................................. 45 Laney Approval Workflow .................................................................................................................................. 46 Berkeley Approval Workflow .............................................................................................................................. 47 District Operating Departments Workflow ........................................................................................................ 48
REPORTS .................................................................................................................................................................... 49
Epafs Users Guide - Initiators & Approvers 8-24-12.Docx Page 1
ePAFS Introduction
ePAFS, the Peralta Electronic Personnel Action Form System replaces the paper-form personnel
action form for almost all actions created on campus with a new, very user friendly web-based
system. ePAFS has five main features:
1. Electronic workflow: The electronic forms are passed from initiator through all the
required levels of approval as defined by your campus and the district office. These are
never lost and the location and status of any ePAF can be immediately determined.
2. Live data feed from PeopleSoft: Whenever an entry is required for data that is already
present in PeopleSoft ePAFS will pre-fill or allow selection from the most current
PeopleSoft HR data.
3. No knowledge or use of PeopleSoft HR and payroll codes required: The data you must
read or enter is always presented in plain English. The codes required by PeopleSoft are
created accurately behind the scenes.
4. Wizard-based design: By asking you a series of simple questions to which you respond,
ePAFS creates your electronic PAF. Based on your responses you will be shown and
asked to respond to only information that is relevant to the action you are preparing.
5. Behind the scenes data validation: A large number of rules have been incorporated
behind each screen that are designed to help you build an accurate ePAF.
ePAFS is not designed to handle 100% of PA transactions. There are still a small number of
infrequent or sensitive transactions that must be handled directly by District HR. ePAFS will
alert you if the action you are trying to create requires this type of special attention.
ePAF organizes everything you would commonly do with a personnel action into four intuitive
action groups:
ASSIGN: Create an additional assignment, new primary assignment (temp or perm) including
transfer between campuses, new hire, rehire, all student assignments, new stipends, and new shift
differentials.
CHANGE: Change an existing assignment including: start date, end date, FTE or Hours, shift
differential, combination code (budget code), and 10 and 11 month classified non-working
schedule.
TERMINATE / SEPARATE: Terminate an assignment. Separate an employee from
employment with the district due to: resignation, retirement, death, or involuntary termination for
performance during the classified probation period.
LEAVE OF ABSENCE: Create a new leave or return an employee to active status at the
conclusion of a leave.
Epafs Users Guide - Initiators & Approvers 8-24-12.Docx Page 2
Who Supports and Manages ePAFS
ePAFS is sponsored by District HR. David Betts, Director HR is the executive sponsor.
The master ePAFS System Administrator is Cody Pelletier, District HR who:
Provides support to campus users that cannot be adequately addressed by campus
resources.
Maintains the system; ensures it is up and operating; performs necessary maintenance,
and resolves with the development team or the District IT group any system-wide
software problem that may occur.
Maintains and prioritizes requests for future enhancements.
Getting Immediate Support on Campus
You can receive immediate assistance on campus from these campus ePAFS administrators:
Campus ePAF Administrator Alternate
Campus ePAF Administrator Alternate
Alameda: MaryBeth Benvenutti Ava Lee-Pang
Berkeley Shirley Slaughter John Pang
Laney Connie Willis
Merritt Dettie Del Rosario
Your campus ePAFS administrator is equipped to:
Provide authorization to new users to use ePAFS.
Assign specific individuals to the roles in their campus ePAFS workflow.
Temporarily replace an approver due to illness or absence.
Provide new user training.
Adjust campus approval workflows as required.
Improving and Upgrading ePAFS ver. 1.0
Version 1.0, like all software, is a work in progress. You are likely to see features and
capabilities that you’d like to have in ePAFS, and these ideas and suggestions should be sent to
the ePAFS System Administrator. The ePAFS Steering Committee is assigned the responsibility
of planning the modifications to the system and coordinating logical rollouts of features in the
future.
If You Find an Error with ePAFS
Version 1.0 has been heavily tested but like any software it is possible that you may discover a
previously undetected problem.
Epafs Users Guide - Initiators & Approvers 8-24-12.Docx Page 3
If ePAFS does not work as you expected, has an error in the way it produces the ePAF, has a
logic error in programming, or does not perform in a way that is convenient and useful for you,
make careful notes and email them to the ePAFS System Administrator.
The best way to do this is to paste a copy of the ePAFS screen into an email message, describe in
detail what you were trying to do, what you expected to happen, and what you believe is in error.
To copy and paste a copy of a screen into an email message:
1. Open a new blank email message.
2. While the target screen is visible on your computer, press the Print Screen key on your computer. This places the image on your computer’s clipboard.
3. Return to the blank email message and either right click and press ‘paste’ or hit CNTRL and the V keys together. The screen image will now be pasted into your email.
4. Complete the text description of the problem and email as you would normally.
Epafs Users Guide - Initiators & Approvers 8-24-12.Docx Page 4
Roles & Responsibilities
There are two roles which most users will fall into:
Initiator: The initiator is the individual who first creates the ePAF. This might typically be the
administrative assistant to a college Dean or VP, or they may be the Dean or VP themselves.
The initiator cannot further approve the ePAF. Initiators may HOLD or SUBMIT items they
have created.
Approver: An approver is a member of administration who is authorized to approve personnel
actions (and also may initiate personnel actions). After reviewing the action, approvers may
APPROVE, EDIT, HOLD, CANCEL or RETURN actions sent to them for approval.
Initiators may create ePAFs for any assignment on their campus. Approvers are determined by
role, cost center, or object code depending on the specific assignment and action type of the
ePAF.
There is one other special role:
Final Reviewer (District HR Generalists): The final reviewers in all cases are the District HR
Generalists who conduct a final technical review of the transaction for accuracy and enter it into
PeopleSoft.
Read-Only Users
Individuals designated by campus or district system administrators may also be given read-only
access to the system where they can view ePAFS that are in-process or complete and have access
to the many ePAFS reports.
Epafs Users Guide - Initiators & Approvers 8-24-12.Docx Page 5
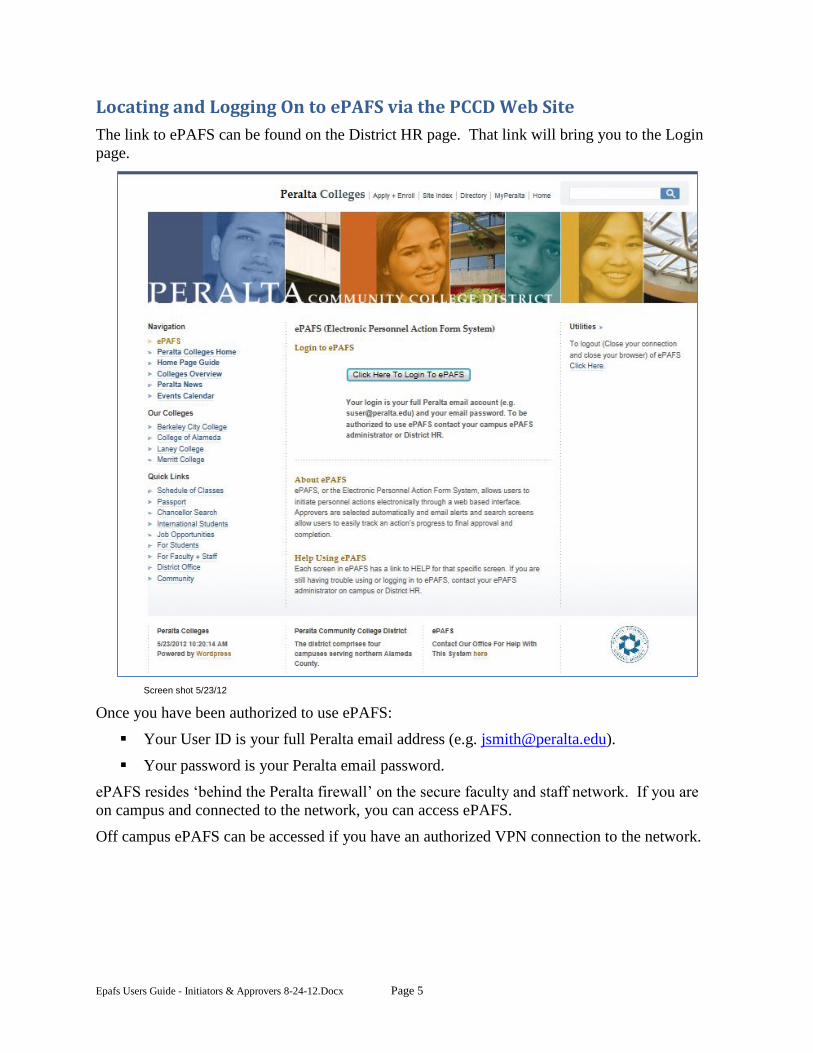
Locating and Logging On to ePAFS via the PCCD Web Site
The link to ePAFS can be found on the District HR page. That link will bring you to the Login
page.
Screen shot 5/23/12
Once you have been authorized to use ePAFS:
Your User ID is your full Peralta email address (e.g. [email protected]).
Your password is your Peralta email password.
ePAFS resides ‘behind the Peralta firewall’ on the secure faculty and staff network. If you are
on campus and connected to the network, you can access ePAFS.
Off campus ePAFS can be accessed if you have an authorized VPN connection to the network.
Epafs Users Guide - Initiators & Approvers 8-24-12.Docx Page 6
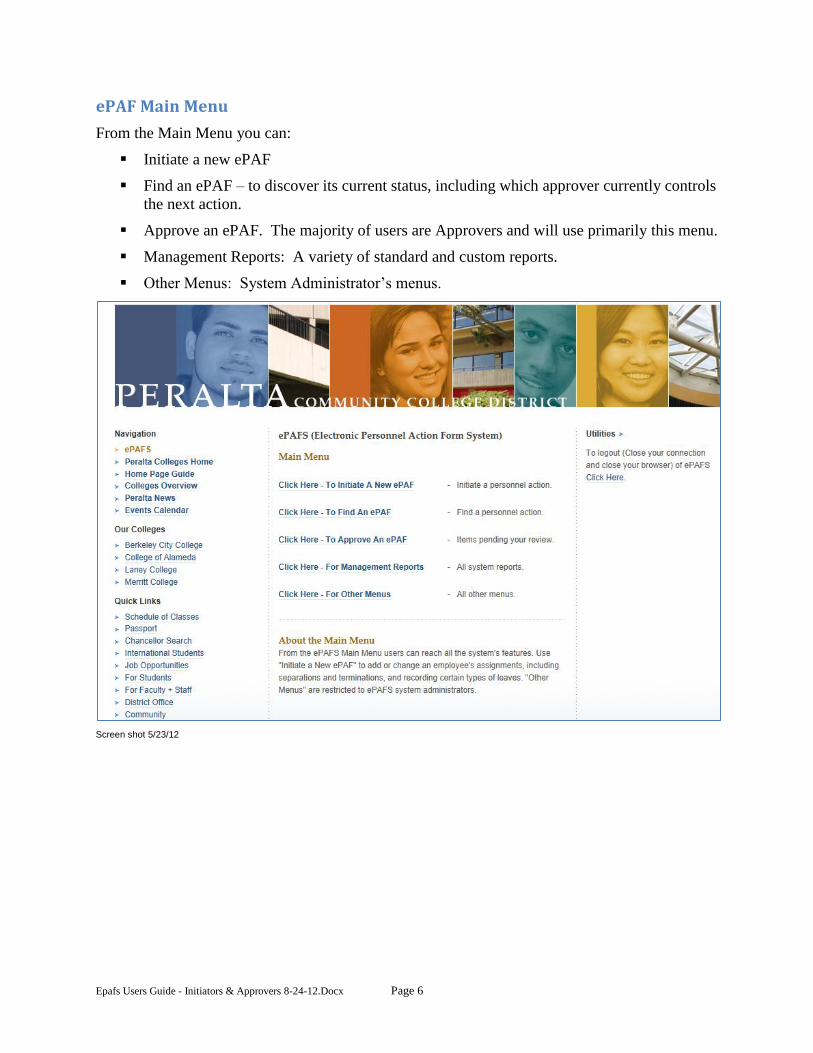
ePAF Main Menu
From the Main Menu you can:
Initiate a new ePAF
Find an ePAF – to discover its current status, including which approver currently controls
the next action.
Approve an ePAF. The majority of users are Approvers and will use primarily this menu.
Management Reports: A variety of standard and custom reports.
Other Menus: System Administrator’s menus.
Screen shot 5/23/12
Epafs Users Guide - Initiators & Approvers 8-24-12.Docx Page 7
Approvers Quick Start Guide
Most authorized users of ePAFS will be Approvers. Although Approvers can also be Initiators,
if all you will be doing is to review and approve ePAFs, here’s what you need to know to get
started.
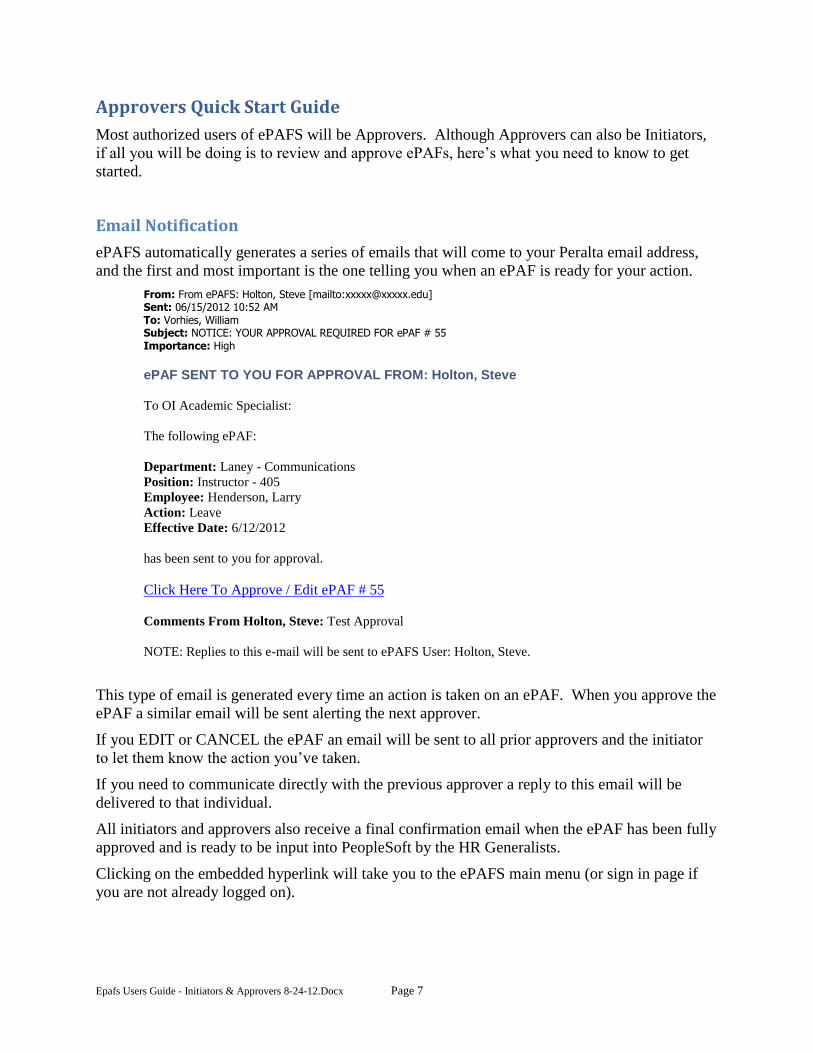
Email Notification
ePAFS automatically generates a series of emails that will come to your Peralta email address,
and the first and most important is the one telling you when an ePAF is ready for your action.
From: From ePAFS: Holton, Steve [mailto:[email protected]] Sent: 06/15/2012 10:52 AM To: Vorhies, William Subject: NOTICE: YOUR APPROVAL REQUIRED FOR ePAF # 55 Importance: High
ePAF SENT TO YOU FOR APPROVAL FROM: Holton, Steve
To OI Academic Specialist:
The following ePAF:
Department: Laney - Communications
Position: Instructor - 405
Employee: Henderson, Larry
Action: Leave
Effective Date: 6/12/2012
has been sent to you for approval.
Click Here To Approve / Edit ePAF # 55
Comments From Holton, Steve: Test Approval
NOTE: Replies to this e-mail will be sent to ePAFS User: Holton, Steve.
This type of email is generated every time an action is taken on an ePAF. When you approve the
ePAF a similar email will be sent alerting the next approver.
If you EDIT or CANCEL the ePAF an email will be sent to all prior approvers and the initiator
to let them know the action you’ve taken.
If you need to communicate directly with the previous approver a reply to this email will be
delivered to that individual.
All initiators and approvers also receive a final confirmation email when the ePAF has been fully
approved and is ready to be input into PeopleSoft by the HR Generalists.
Clicking on the embedded hyperlink will take you to the ePAFS main menu (or sign in page if
you are not already logged on).
Epafs Users Guide - Initiators & Approvers 8-24-12.Docx Page 8
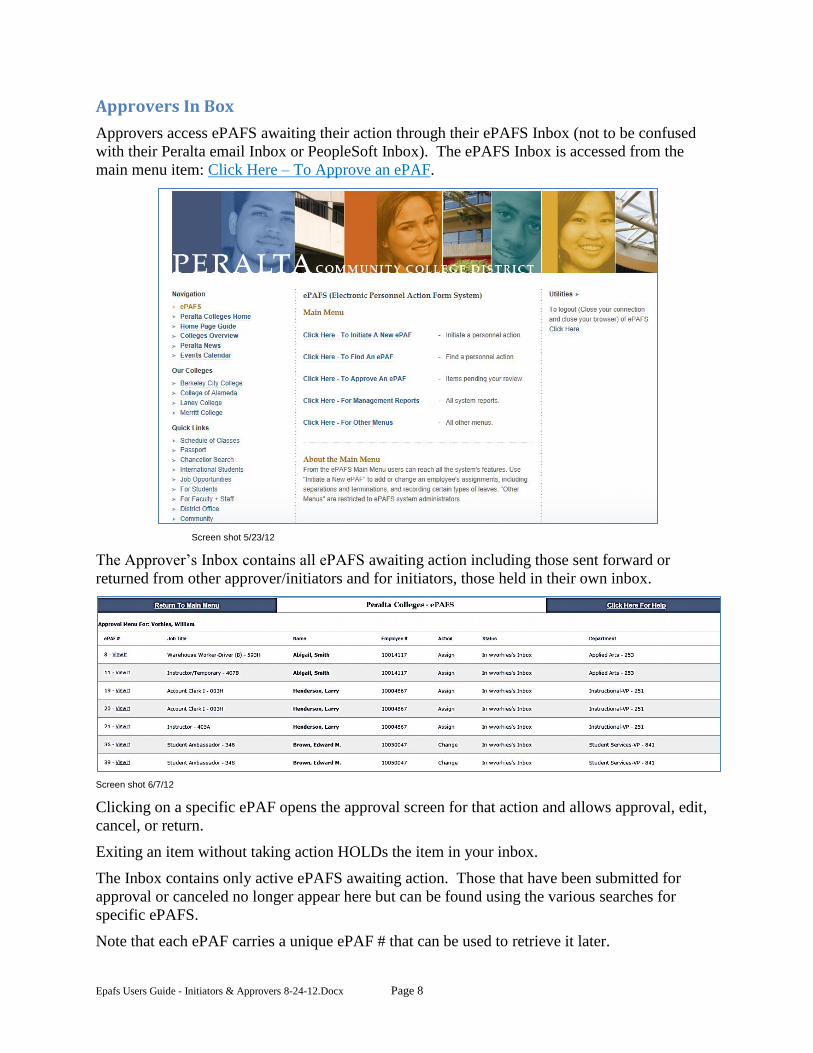
Approvers In Box
Approvers access ePAFS awaiting their action through their ePAFS Inbox (not to be confused
with their Peralta email Inbox or PeopleSoft Inbox). The ePAFS Inbox is accessed from the
main menu item: Click Here – To Approve an ePAF.
Screen shot 5/23/12
The Approver’s Inbox contains all ePAFS awaiting action including those sent forward or
returned from other approver/initiators and for initiators, those held in their own inbox.
Screen shot 6/7/12
Clicking on a specific ePAF opens the approval screen for that action and allows approval, edit,
cancel, or return.
Exiting an item without taking action HOLDs the item in your inbox.
The Inbox contains only active ePAFS awaiting action. Those that have been submitted for
approval or canceled no longer appear here but can be found using the various searches for
specific ePAFS.
Note that each ePAF carries a unique ePAF # that can be used to retrieve it later.
Epafs Users Guide - Initiators & Approvers 8-24-12.Docx Page 9
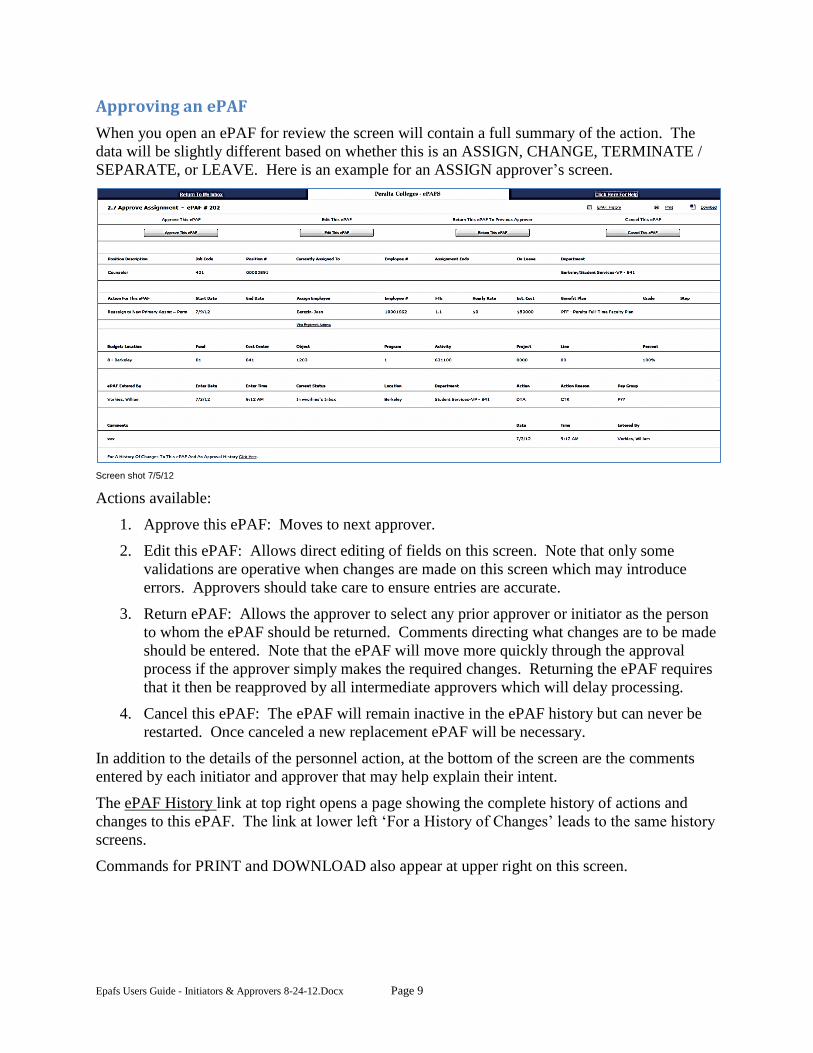
Approving an ePAF
When you open an ePAF for review the screen will contain a full summary of the action. The
data will be slightly different based on whether this is an ASSIGN, CHANGE, TERMINATE /
SEPARATE, or LEAVE. Here is an example for an ASSIGN approver’s screen.
Screen shot 7/5/12
Actions available:
1. Approve this ePAF: Moves to next approver.
2. Edit this ePAF: Allows direct editing of fields on this screen. Note that only some
validations are operative when changes are made on this screen which may introduce
errors. Approvers should take care to ensure entries are accurate.
3. Return ePAF: Allows the approver to select any prior approver or initiator as the person
to whom the ePAF should be returned. Comments directing what changes are to be made
should be entered. Note that the ePAF will move more quickly through the approval
process if the approver simply makes the required changes. Returning the ePAF requires
that it then be reapproved by all intermediate approvers which will delay processing.
4. Cancel this ePAF: The ePAF will remain inactive in the ePAF history but can never be
restarted. Once canceled a new replacement ePAF will be necessary.
In addition to the details of the personnel action, at the bottom of the screen are the comments
entered by each initiator and approver that may help explain their intent.
The ePAF History link at top right opens a page showing the complete history of actions and
changes to this ePAF. The link at lower left ‘For a History of Changes’ leads to the same history
screens.
Commands for PRINT and DOWNLOAD also appear at upper right on this screen.
Epafs Users Guide - Initiators & Approvers 8-24-12.Docx Page 10
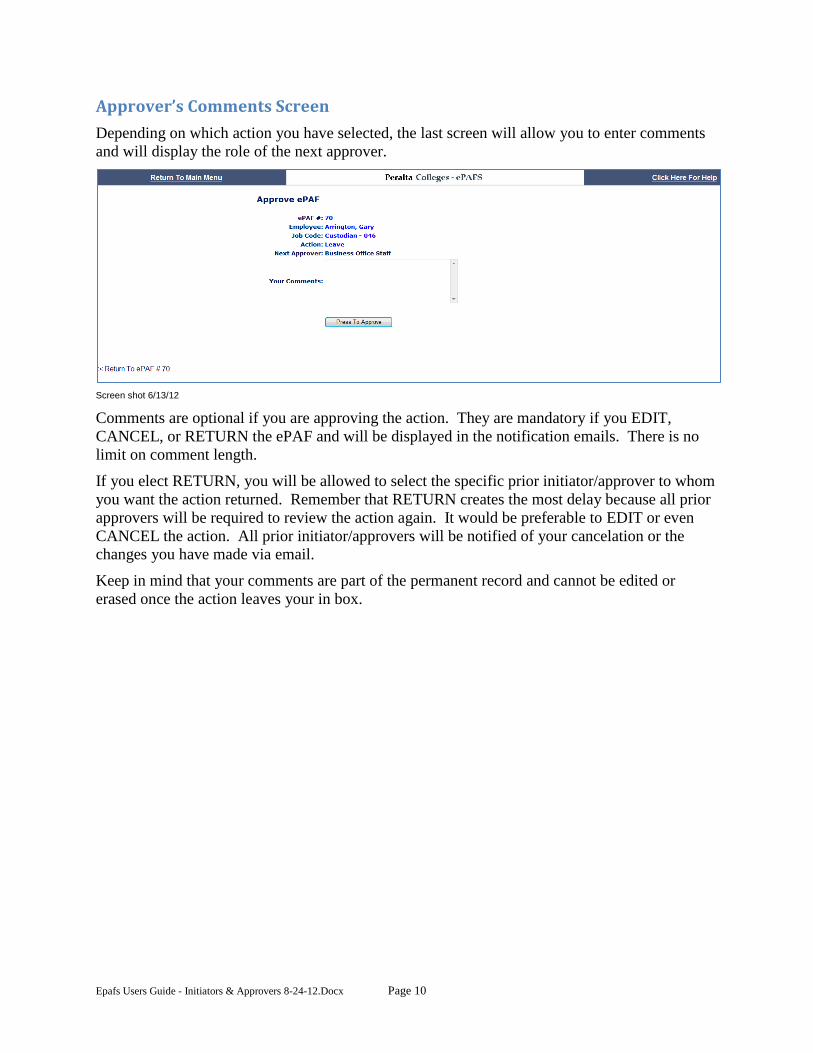
Approver’s Comments Screen
Depending on which action you have selected, the last screen will allow you to enter comments
and will display the role of the next approver.
Screen shot 6/13/12
Comments are optional if you are approving the action. They are mandatory if you EDIT,
CANCEL, or RETURN the ePAF and will be displayed in the notification emails. There is no
limit on comment length.
If you elect RETURN, you will be allowed to select the specific prior initiator/approver to whom
you want the action returned. Remember that RETURN creates the most delay because all prior
approvers will be required to review the action again. It would be preferable to EDIT or even
CANCEL the action. All prior initiator/approvers will be notified of your cancelation or the
changes you have made via email.
Keep in mind that your comments are part of the permanent record and cannot be edited or
erased once the action leaves your in box.
Epafs Users Guide - Initiators & Approvers 8-24-12.Docx Page 11
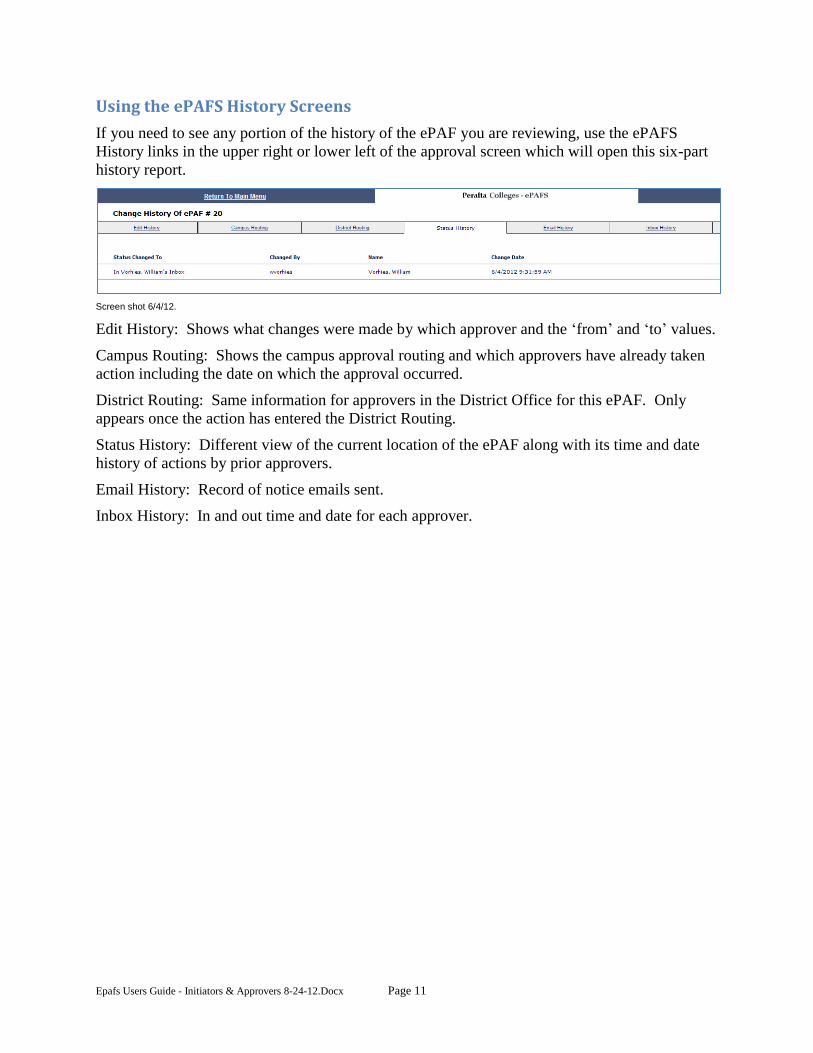
Using the ePAFS History Screens
If you need to see any portion of the history of the ePAF you are reviewing, use the ePAFS
History links in the upper right or lower left of the approval screen which will open this six-part
history report.
Screen shot 6/4/12.
Edit History: Shows what changes were made by which approver and the ‘from’ and ‘to’ values.
Campus Routing: Shows the campus approval routing and which approvers have already taken
action including the date on which the approval occurred.
District Routing: Same information for approvers in the District Office for this ePAF. Only
appears once the action has entered the District Routing.
Status History: Different view of the current location of the ePAF along with its time and date
history of actions by prior approvers.
Email History: Record of notice emails sent.
Inbox History: In and out time and date for each approver.
Epafs Users Guide - Initiators & Approvers 8-24-12.Docx Page 12
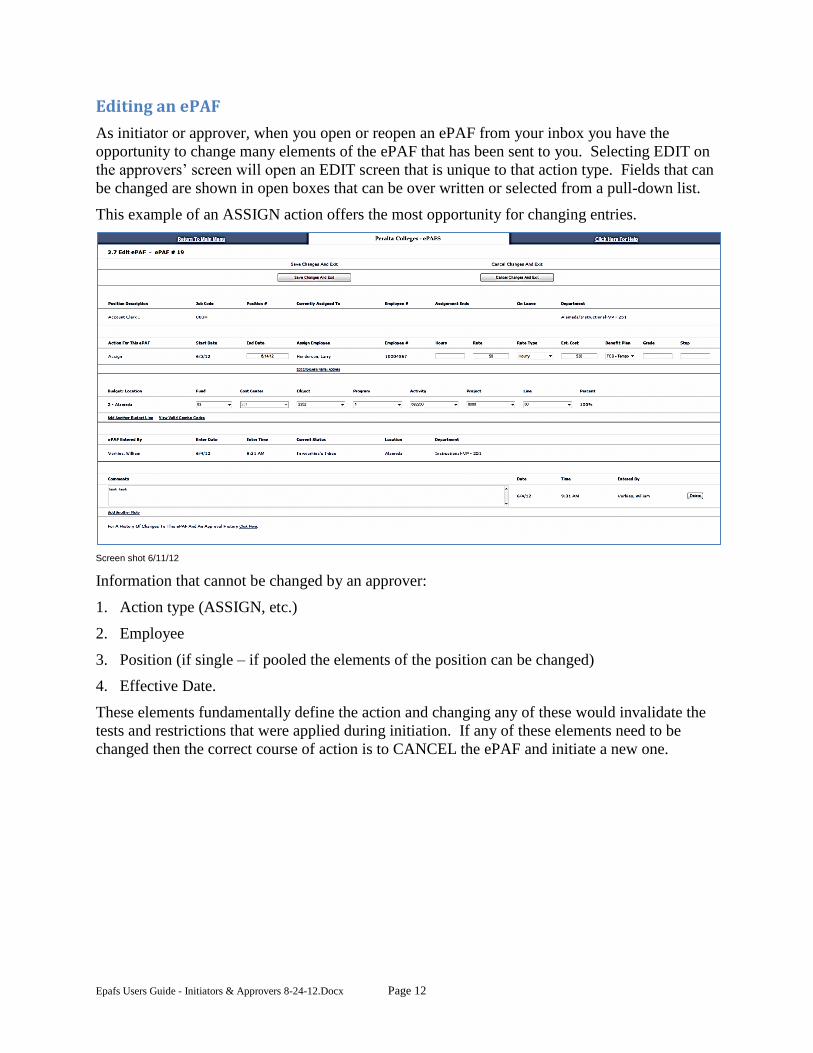
Editing an ePAF
As initiator or approver, when you open or reopen an ePAF from your inbox you have the
opportunity to change many elements of the ePAF that has been sent to you. Selecting EDIT on
the approvers’ screen will open an EDIT screen that is unique to that action type. Fields that can
be changed are shown in open boxes that can be over written or selected from a pull-down list.
This example of an ASSIGN action offers the most opportunity for changing entries.
Screen shot 6/11/12
Information that cannot be changed by an approver:
1. Action type (ASSIGN, etc.)
2. Employee
3. Position (if single – if pooled the elements of the position can be changed)
4. Effective Date.
These elements fundamentally define the action and changing any of these would invalidate the
tests and restrictions that were applied during initiation. If any of these elements need to be
changed then the correct course of action is to CANCEL the ePAF and initiate a new one.
Epafs Users Guide - Initiators & Approvers 8-24-12.Docx Page 13
Initiator’s Guide
The following pages will lead you through initiating the four different action types:
ASSIGN
CHANGE
TERMINATE / SEPARATE
LEAVE OF ABSENCE
In each action type the screens are numbered but the key thing to remember is that you will be
presented only those screens that are necessary for your action. For example, capturing the name
and address information will only occur if the action is for a new hire or rehire.
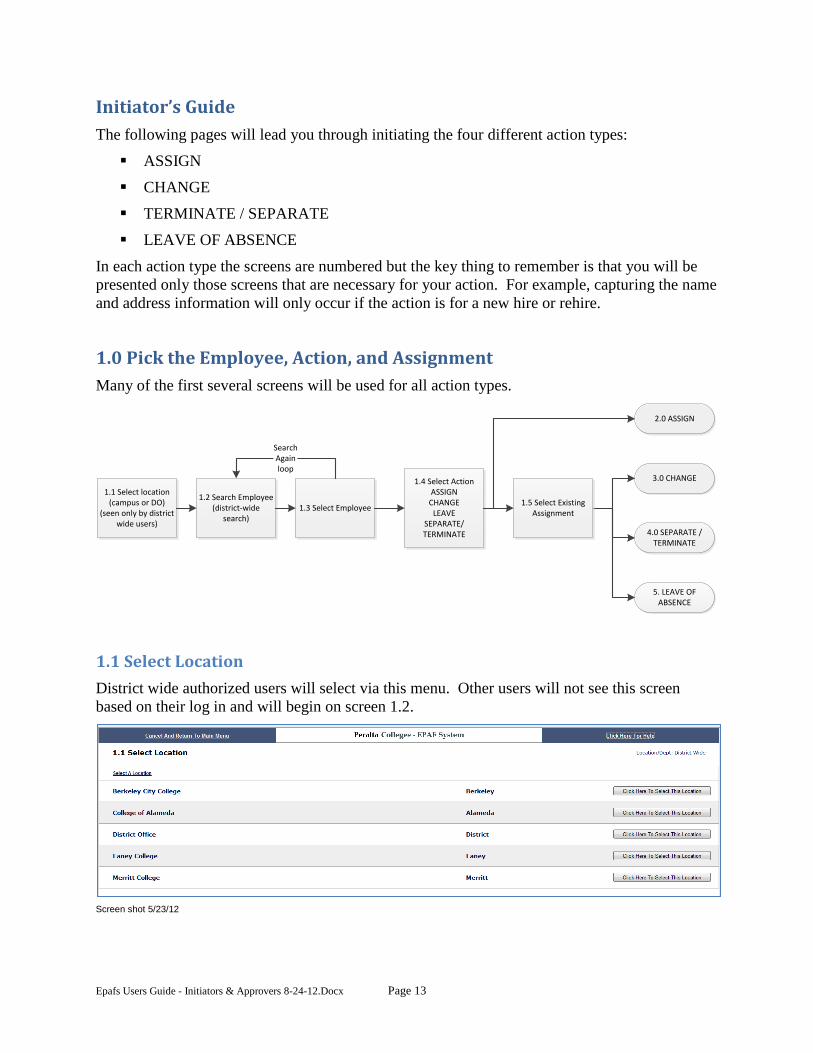
1.0 Pick the Employee, Action, and Assignment
Many of the first several screens will be used for all action types.
1.1 Select location(campus or DO)
(seen only by district wide users)
1.4 Select ActionASSIGN
CHANGELEAVE
SEPARATE/TERMINATE
1.2 Search Employee(district-wide
search)1.3 Select Employee
SearchAgainloop
2.0 ASSIGN
3.0 CHANGE
4.0 SEPARATE / TERMINATE
5. LEAVE OF ABSENCE
1.5 Select Existing Assignment
1.1 Select Location
District wide authorized users will select via this menu. Other users will not see this screen
based on their log in and will begin on screen 1.2.
Screen shot 5/23/12
Epafs Users Guide - Initiators & Approvers 8-24-12.Docx Page 14
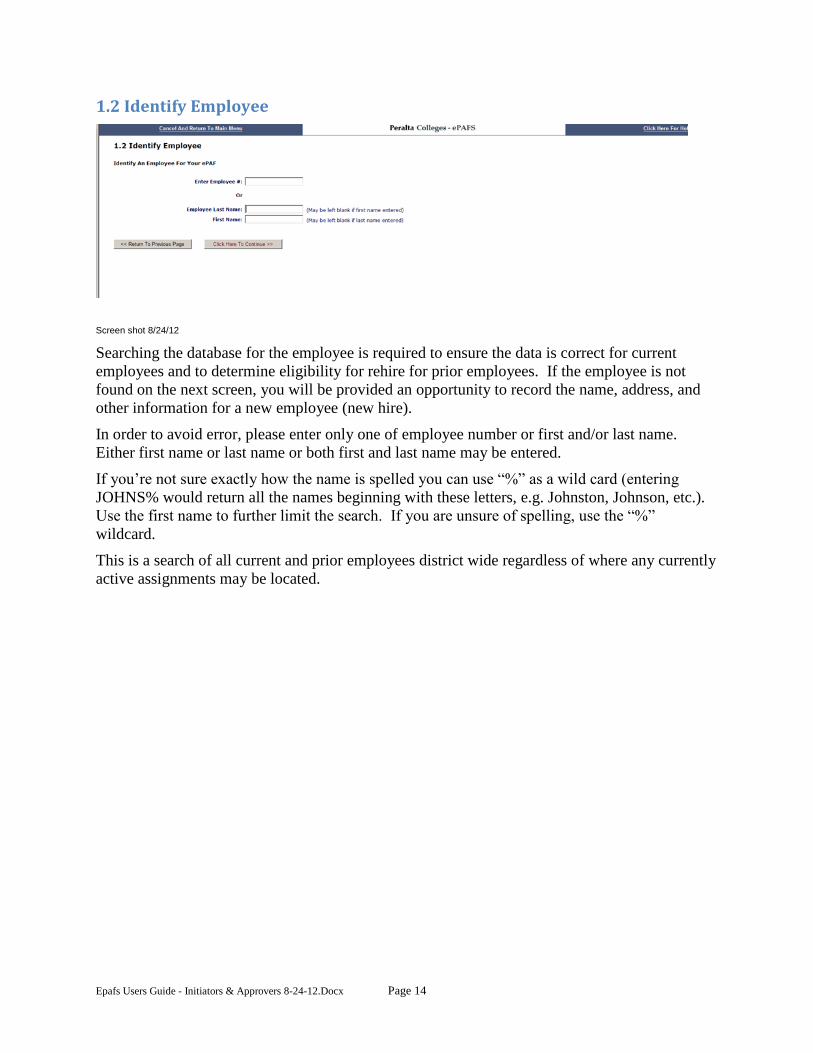
1.2 Identify Employee
Screen shot 8/24/12
Searching the database for the employee is required to ensure the data is correct for current
employees and to determine eligibility for rehire for prior employees. If the employee is not
found on the next screen, you will be provided an opportunity to record the name, address, and
other information for a new employee (new hire).
In order to avoid error, please enter only one of employee number or first and/or last name.
Either first name or last name or both first and last name may be entered.
If you’re not sure exactly how the name is spelled you can use “%” as a wild card (entering
JOHNS% would return all the names beginning with these letters, e.g. Johnston, Johnson, etc.).
Use the first name to further limit the search. If you are unsure of spelling, use the “%”
wildcard.
This is a search of all current and prior employees district wide regardless of where any currently
active assignments may be located.
Epafs Users Guide - Initiators & Approvers 8-24-12.Docx Page 15
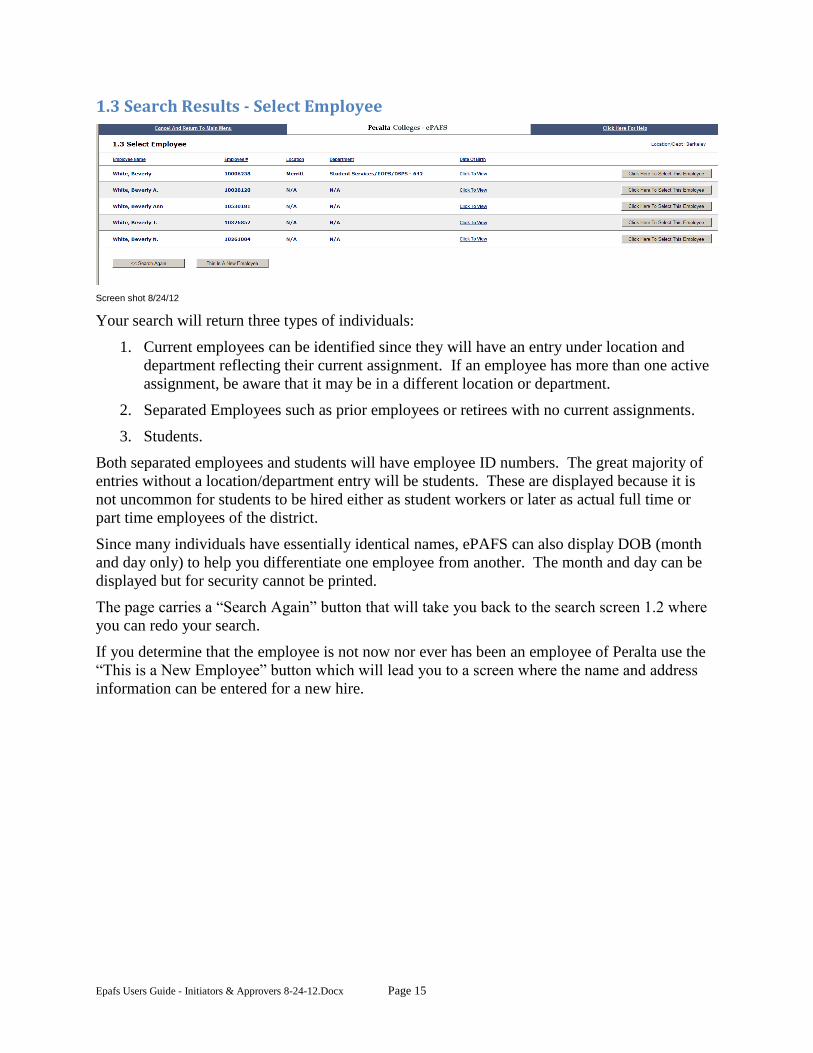
1.3 Search Results - Select Employee
Screen shot 8/24/12
Your search will return three types of individuals:
1. Current employees can be identified since they will have an entry under location and
department reflecting their current assignment. If an employee has more than one active
assignment, be aware that it may be in a different location or department.
2. Separated Employees such as prior employees or retirees with no current assignments.
3. Students.
Both separated employees and students will have employee ID numbers. The great majority of
entries without a location/department entry will be students. These are displayed because it is
not uncommon for students to be hired either as student workers or later as actual full time or
part time employees of the district.
Since many individuals have essentially identical names, ePAFS can also display DOB (month
and day only) to help you differentiate one employee from another. The month and day can be
displayed but for security cannot be printed.
The page carries a “Search Again” button that will take you back to the search screen 1.2 where
you can redo your search.
If you determine that the employee is not now nor ever has been an employee of Peralta use the
“This is a New Employee” button which will lead you to a screen where the name and address
information can be entered for a new hire.
Epafs Users Guide - Initiators & Approvers 8-24-12.Docx Page 16
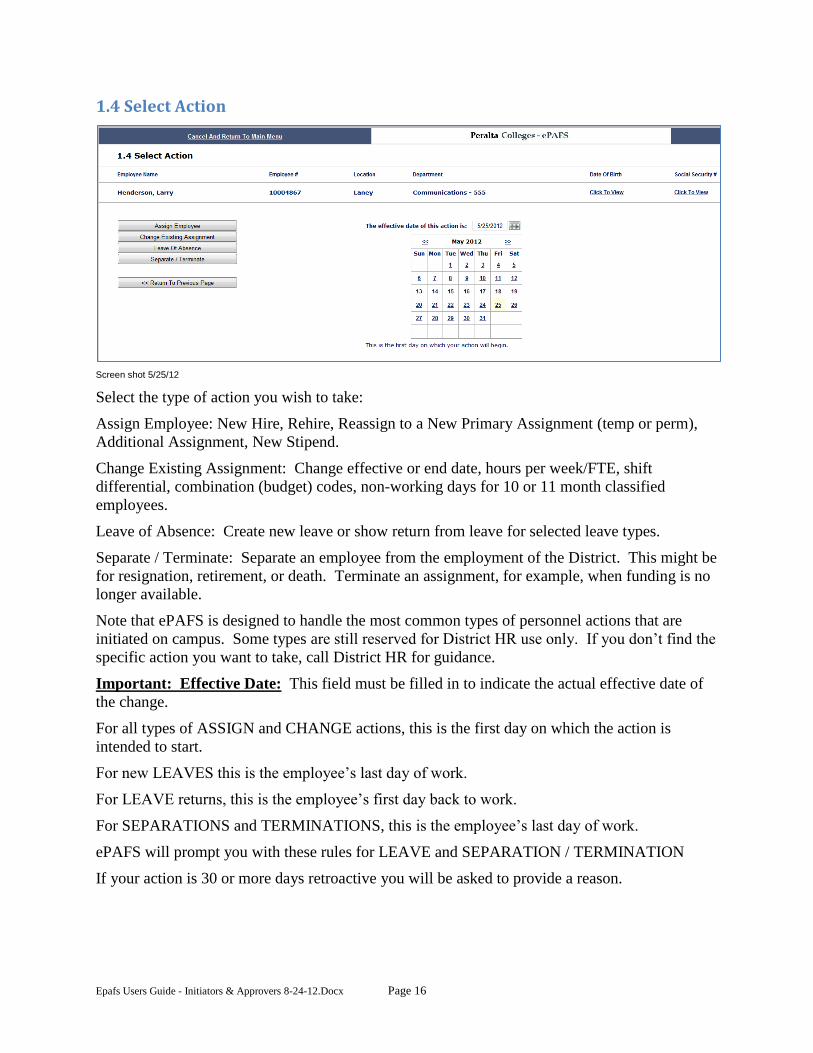
1.4 Select Action
Screen shot 5/25/12
Select the type of action you wish to take:
Assign Employee: New Hire, Rehire, Reassign to a New Primary Assignment (temp or perm),
Additional Assignment, New Stipend.
Change Existing Assignment: Change effective or end date, hours per week/FTE, shift
differential, combination (budget) codes, non-working days for 10 or 11 month classified
employees.
Leave of Absence: Create new leave or show return from leave for selected leave types.
Separate / Terminate: Separate an employee from the employment of the District. This might be
for resignation, retirement, or death. Terminate an assignment, for example, when funding is no
longer available.
Note that ePAFS is designed to handle the most common types of personnel actions that are
initiated on campus. Some types are still reserved for District HR use only. If you don’t find the
specific action you want to take, call District HR for guidance.
Important: Effective Date: This field must be filled in to indicate the actual effective date of
the change.
For all types of ASSIGN and CHANGE actions, this is the first day on which the action is
intended to start.
For new LEAVES this is the employee’s last day of work.
For LEAVE returns, this is the employee’s first day back to work.
For SEPARATIONS and TERMINATIONS, this is the employee’s last day of work.
ePAFS will prompt you with these rules for LEAVE and SEPARATION / TERMINATION
If your action is 30 or more days retroactive you will be asked to provide a reason.
Epafs Users Guide - Initiators & Approvers 8-24-12.Docx Page 17
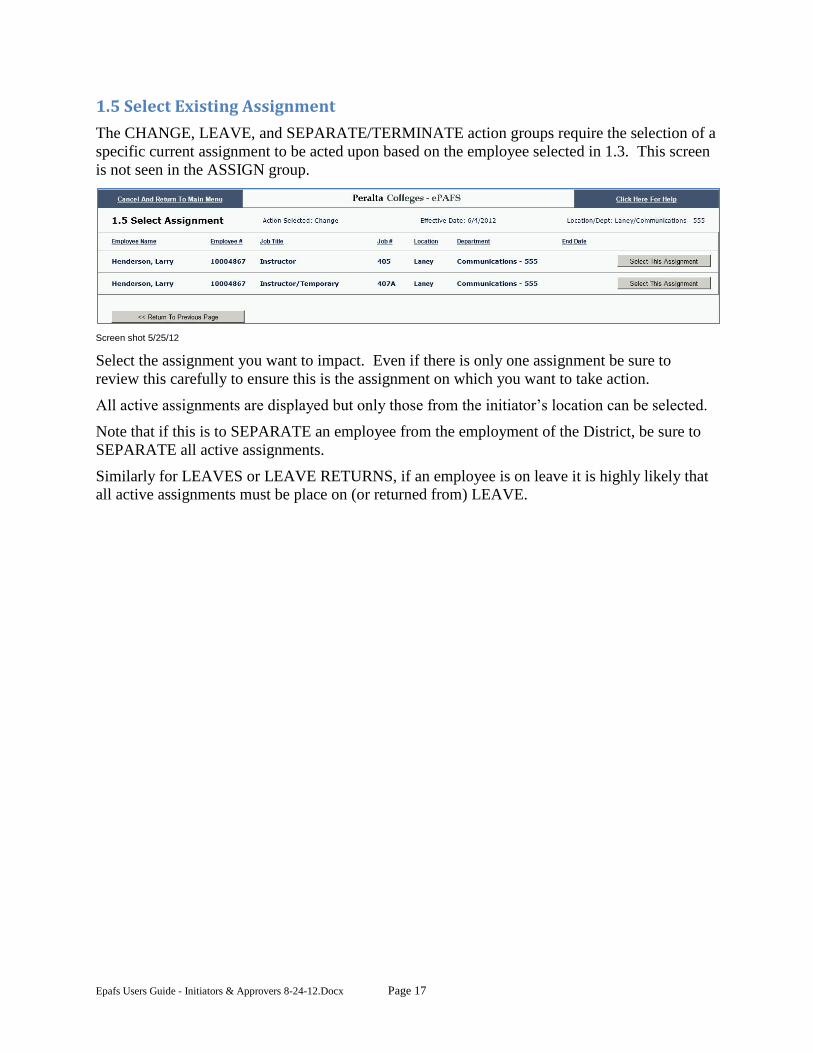
1.5 Select Existing Assignment
The CHANGE, LEAVE, and SEPARATE/TERMINATE action groups require the selection of a
specific current assignment to be acted upon based on the employee selected in 1.3. This screen
is not seen in the ASSIGN group.
Screen shot 5/25/12
Select the assignment you want to impact. Even if there is only one assignment be sure to
review this carefully to ensure this is the assignment on which you want to take action.
All active assignments are displayed but only those from the initiator’s location can be selected.
Note that if this is to SEPARATE an employee from the employment of the District, be sure to
SEPARATE all active assignments.
Similarly for LEAVES or LEAVE RETURNS, if an employee is on leave it is highly likely that
all active assignments must be place on (or returned from) LEAVE.
Epafs Users Guide - Initiators & Approvers 8-24-12.Docx Page 18
2.1 Assignment Action
Screen shot 5/25/12
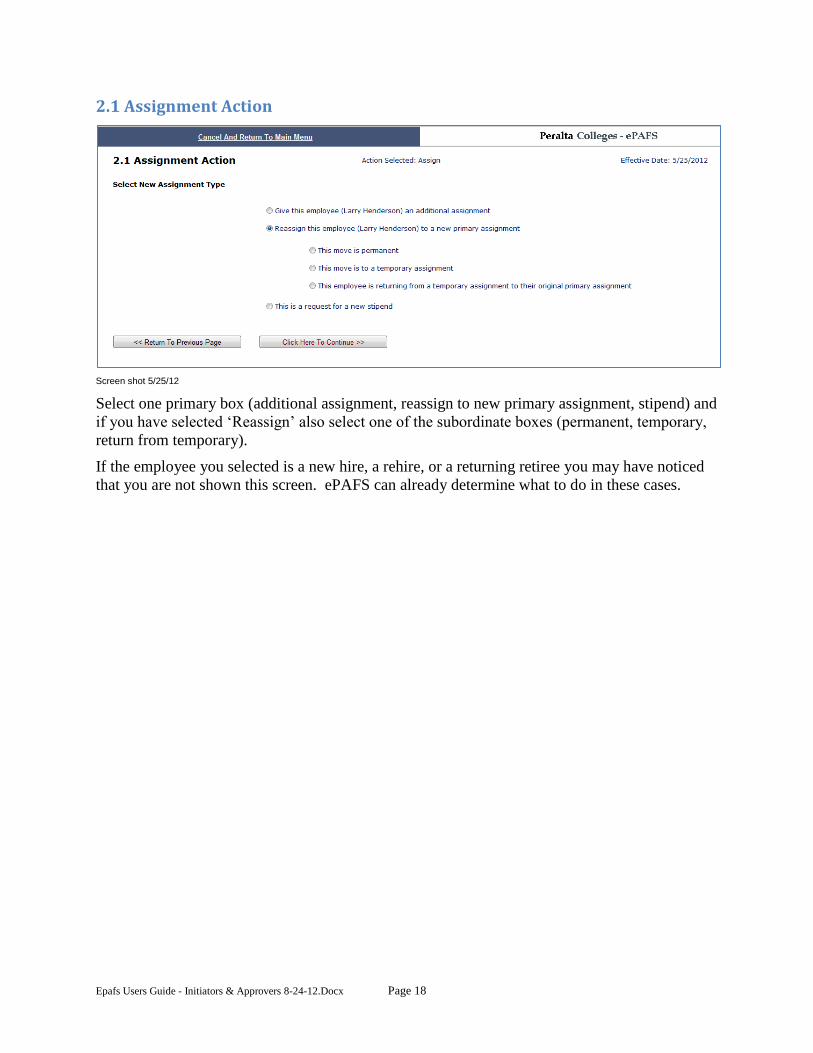
Select one primary box (additional assignment, reassign to new primary assignment, stipend) and
if you have selected ‘Reassign’ also select one of the subordinate boxes (permanent, temporary,
return from temporary).
If the employee you selected is a new hire, a rehire, or a returning retiree you may have noticed
that you are not shown this screen. ePAFS can already determine what to do in these cases.
Epafs Users Guide - Initiators & Approvers 8-24-12.Docx Page 19
2.2 New Hire / Rehire Name and Addresses
Screen shot 5/29/12
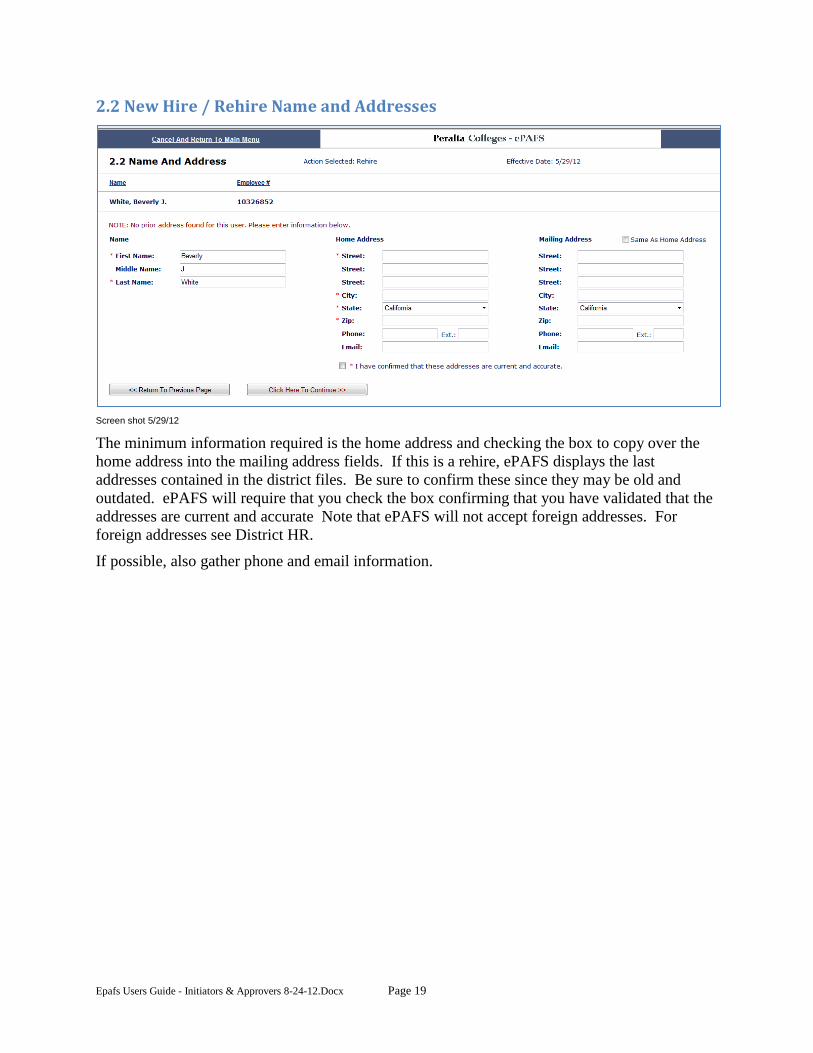
The minimum information required is the home address and checking the box to copy over the
home address into the mailing address fields. If this is a rehire, ePAFS displays the last
addresses contained in the district files. Be sure to confirm these since they may be old and
outdated. ePAFS will require that you check the box confirming that you have validated that the
addresses are current and accurate Note that ePAFS will not accept foreign addresses. For
foreign addresses see District HR.
If possible, also gather phone and email information.
Epafs Users Guide - Initiators & Approvers 8-24-12.Docx Page 20
2.3 Select Position
Screen shot 5/29/12
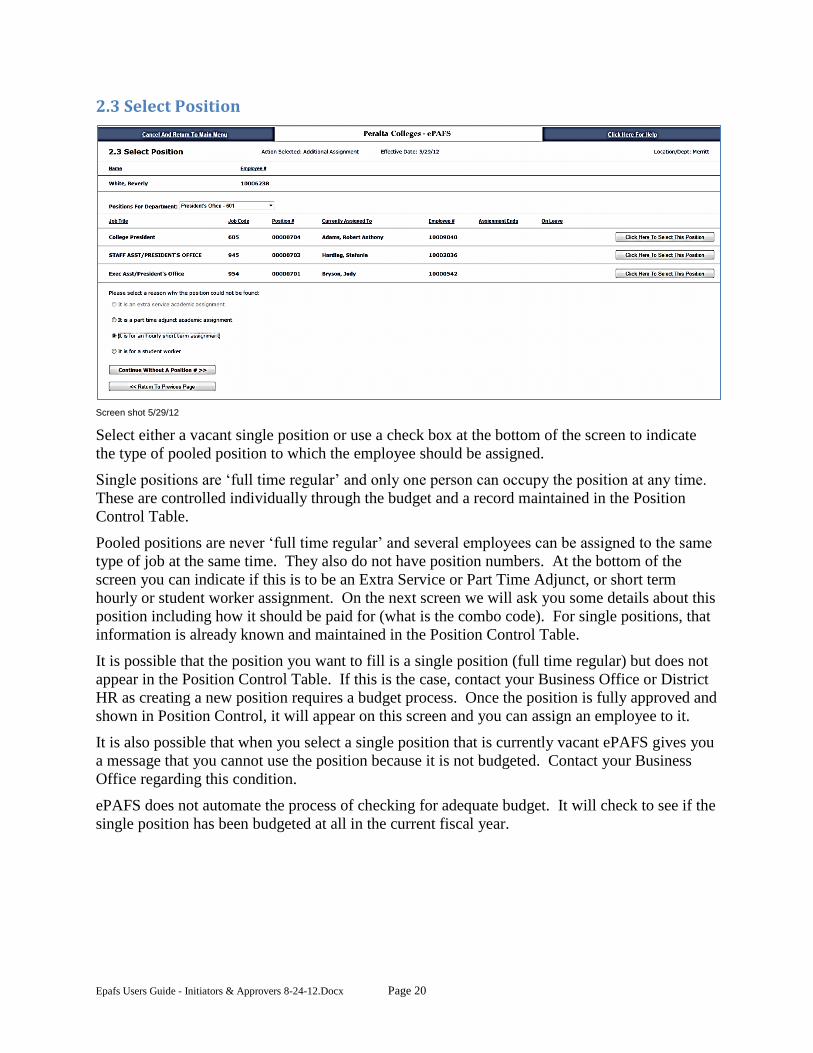
Select either a vacant single position or use a check box at the bottom of the screen to indicate
the type of pooled position to which the employee should be assigned.
Single positions are ‘full time regular’ and only one person can occupy the position at any time.
These are controlled individually through the budget and a record maintained in the Position
Control Table.
Pooled positions are never ‘full time regular’ and several employees can be assigned to the same
type of job at the same time. They also do not have position numbers. At the bottom of the
screen you can indicate if this is to be an Extra Service or Part Time Adjunct, or short term
hourly or student worker assignment. On the next screen we will ask you some details about this
position including how it should be paid for (what is the combo code). For single positions, that
information is already known and maintained in the Position Control Table.
It is possible that the position you want to fill is a single position (full time regular) but does not
appear in the Position Control Table. If this is the case, contact your Business Office or District
HR as creating a new position requires a budget process. Once the position is fully approved and
shown in Position Control, it will appear on this screen and you can assign an employee to it.
It is also possible that when you select a single position that is currently vacant ePAFS gives you
a message that you cannot use the position because it is not budgeted. Contact your Business
Office regarding this condition.
ePAFS does not automate the process of checking for adequate budget. It will check to see if the
single position has been budgeted at all in the current fiscal year.
Epafs Users Guide - Initiators & Approvers 8-24-12.Docx Page 21
2.4 Pooled Position Definition
As Seen for All Actions Except Stipends
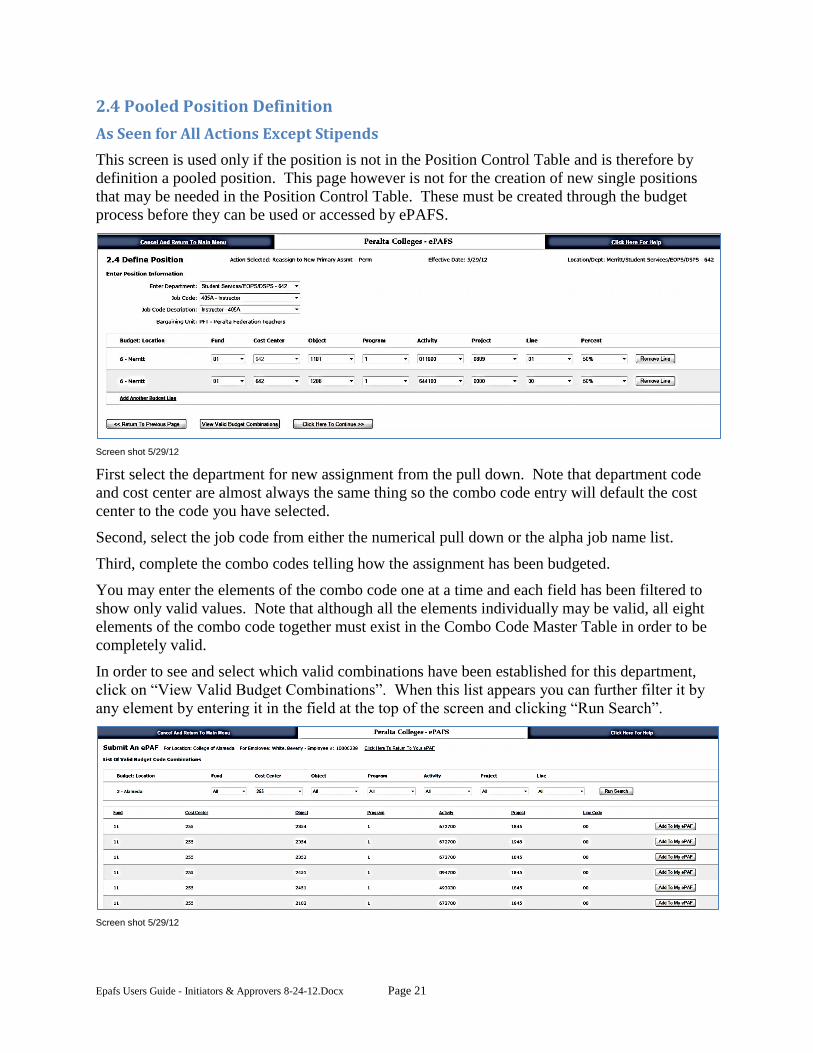
This screen is used only if the position is not in the Position Control Table and is therefore by
definition a pooled position. This page however is not for the creation of new single positions
that may be needed in the Position Control Table. These must be created through the budget
process before they can be used or accessed by ePAFS.
Screen shot 5/29/12
First select the department for new assignment from the pull down. Note that department code
and cost center are almost always the same thing so the combo code entry will default the cost
center to the code you have selected.
Second, select the job code from either the numerical pull down or the alpha job name list.
Third, complete the combo codes telling how the assignment has been budgeted.
You may enter the elements of the combo code one at a time and each field has been filtered to
show only valid values. Note that although all the elements individually may be valid, all eight
elements of the combo code together must exist in the Combo Code Master Table in order to be
completely valid.
In order to see and select which valid combinations have been established for this department,
click on “View Valid Budget Combinations”. When this list appears you can further filter it by
any element by entering it in the field at the top of the screen and clicking “Run Search”.
Screen shot 5/29/12
Epafs Users Guide - Initiators & Approvers 8-24-12.Docx Page 22
Note that the first combo code cost center cannot be changed since it belongs to the department
selected. Second and subsequent combo codes also default to this department but can be over
written to account for those rare cases where an assignment may be shared between two
departments (cost centers).
If you have entered more than one combination code the percentage fields at the end of each line
must total 100%.
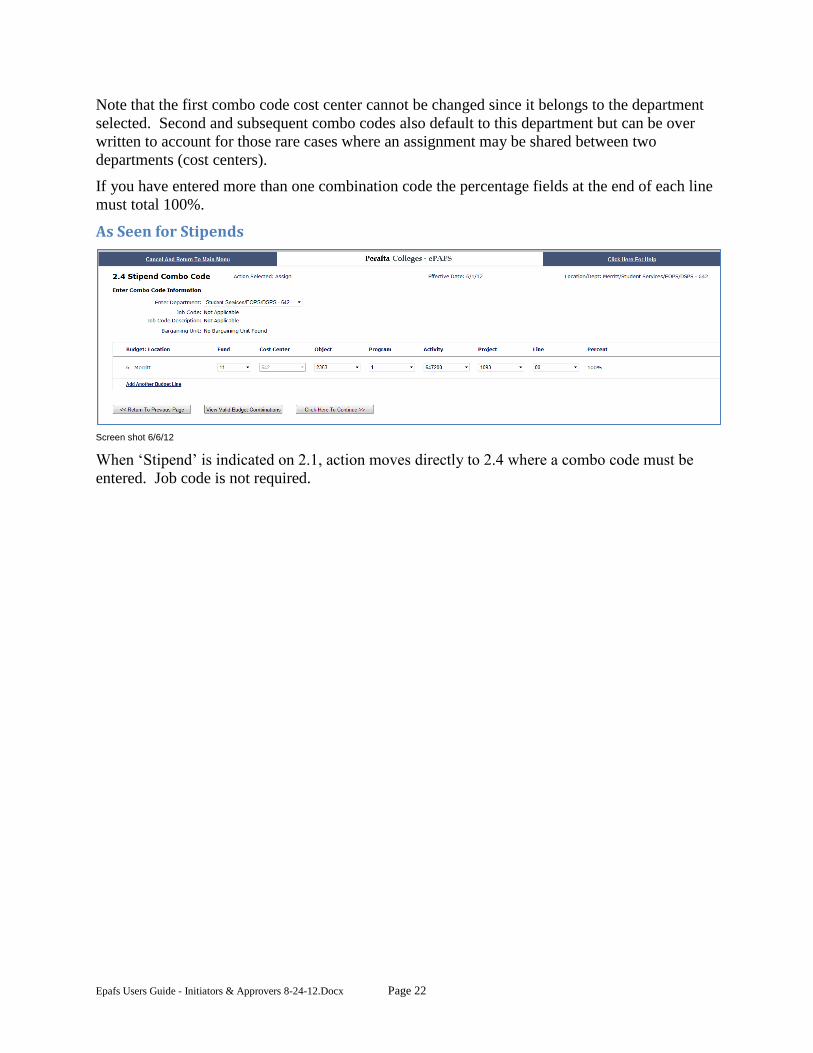
As Seen for Stipends
Screen shot 6/6/12
When ‘Stipend’ is indicated on 2.1, action moves directly to 2.4 where a combo code must be
entered. Job code is not required.

Epafs Users Guide - Initiators & Approvers 8-24-12.Docx Page 23
2.5 Assignment Detail
As Seen for All Actions Except Stipends
Screen shot 6/6/12
The data you must enter on this screen varies based on the type of assignment. Required entries
are marked with a red asterisk (*).
Effective Date: Cannot be changed on this screen. To change the effective date return to screen
1.4 Select Action.
End date: Is now a mandatory entry for many types of assignments. This is the last day on
which work will be performed.
Hours per week or FTE:
If fund = 3 (fee based) then the hours per week/FTE field is inactive and cannot be filled. It is
not meaningful for fee based assignments.
If the fund is any other fund except 03 then hours per week/FTE is a required field.
For classified regular single position the value is recorded as hours per week defaulted to
the standard (budgeted) hours from the Position Control Table but can be over written to
a smaller value. Larger values require a budget action prior to assignment.
For all certificated contract and part time adjunct the value is recorded as FTE. This is a
free form fill in with no conversion to hours. ePAFS does not calculate or check for total
load or convert to equated hours.
For short term hourly the value is hours per week. This is a free form fill in.
For students the value is hours per week. This is a free form fill in. Remember that
students are limited to a maximum of 20 hours per week during the semester but may
work more than this limit during the summer and intercessions.
Benefit Plan: Usually there is only one choice and it is displayed. However, if the assignment
is Administration (pay group ADM) or contract certificated (pay group P10, P11, or P12) a drop
down menu will present the two available choices.
Shift Differential: If the assignment is eligible for a shift differential based on job code, a drop
down box for each day of the week will be presented. Use these boxes only if the assignment
Epafs Users Guide - Initiators & Approvers 8-24-12.Docx Page 24
will be assigned to work outside of normal business hours. For the days on which work will
regularly be during non-standard hours, select from swing, graveyard, or split shifts.
Total Estimated Cost Excluding Benefits: This field is required by your Business Office to
evaluate the cost of the assignment against budget. Consult your Business Office for the method
of calculation appropriate for your location. The rate per hour (or month, or annual) is an
optional field. You may also recommend grade and step for the assignment.
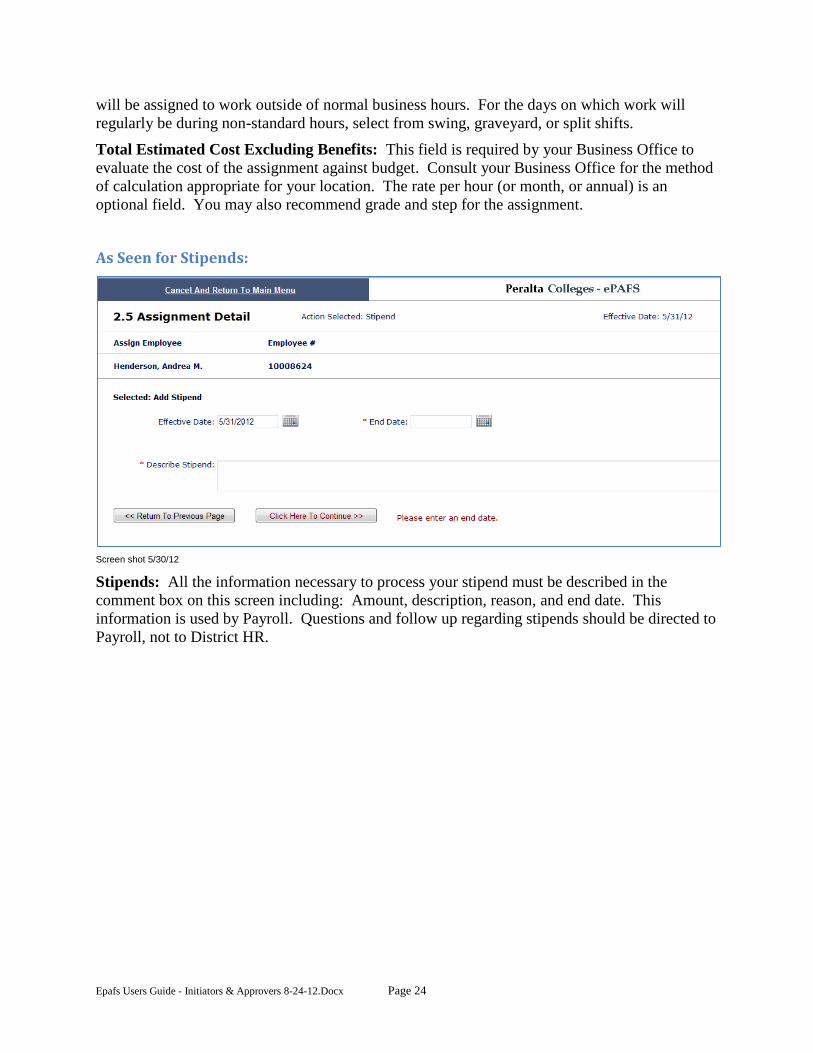
As Seen for Stipends:
Screen shot 5/30/12
Stipends: All the information necessary to process your stipend must be described in the
comment box on this screen including: Amount, description, reason, and end date. This
information is used by Payroll. Questions and follow up regarding stipends should be directed to
Payroll, not to District HR.
Epafs Users Guide - Initiators & Approvers 8-24-12.Docx Page 25
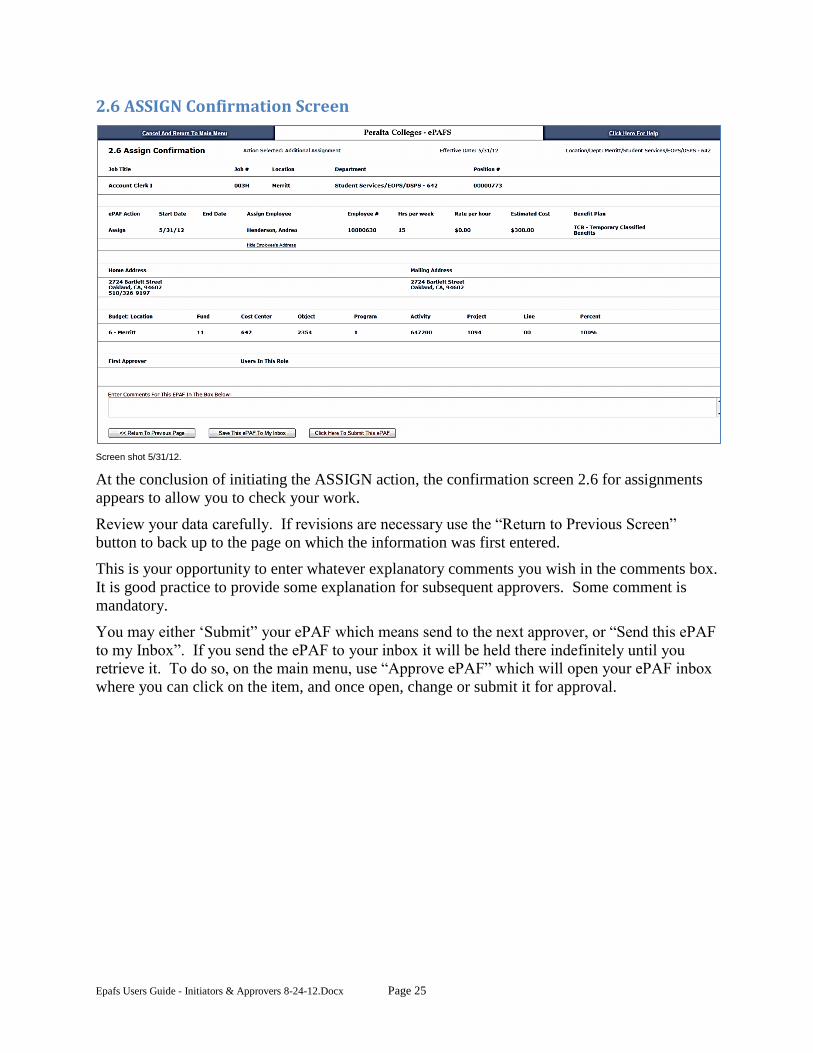
2.6 ASSIGN Confirmation Screen
Screen shot 5/31/12.
At the conclusion of initiating the ASSIGN action, the confirmation screen 2.6 for assignments
appears to allow you to check your work.
Review your data carefully. If revisions are necessary use the “Return to Previous Screen”
button to back up to the page on which the information was first entered.
This is your opportunity to enter whatever explanatory comments you wish in the comments box.
It is good practice to provide some explanation for subsequent approvers. Some comment is
mandatory.
You may either ‘Submit” your ePAF which means send to the next approver, or “Send this ePAF
to my Inbox”. If you send the ePAF to your inbox it will be held there indefinitely until you
retrieve it. To do so, on the main menu, use “Approve ePAF” which will open your ePAF inbox
where you can click on the item, and once open, change or submit it for approval.
Epafs Users Guide - Initiators & Approvers 8-24-12.Docx Page 26
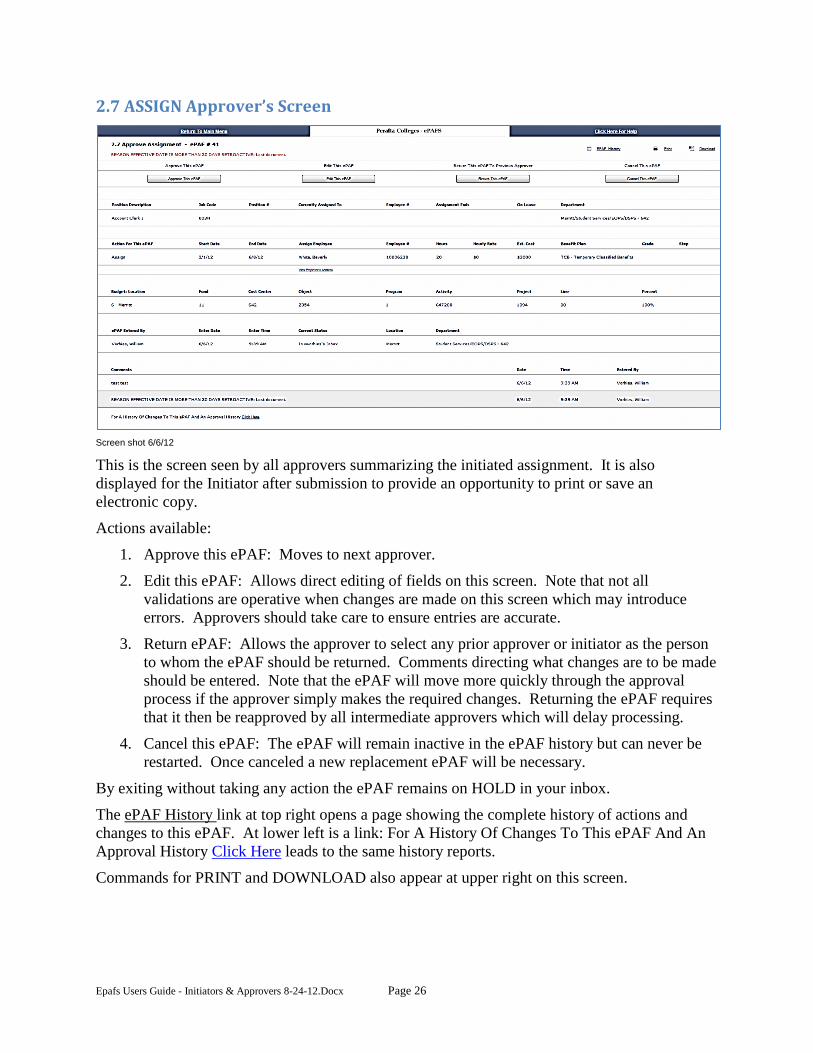
2.7 ASSIGN Approver’s Screen
Screen shot 6/6/12
This is the screen seen by all approvers summarizing the initiated assignment. It is also
displayed for the Initiator after submission to provide an opportunity to print or save an
electronic copy.
Actions available:
1. Approve this ePAF: Moves to next approver.
2. Edit this ePAF: Allows direct editing of fields on this screen. Note that not all
validations are operative when changes are made on this screen which may introduce
errors. Approvers should take care to ensure entries are accurate.
3. Return ePAF: Allows the approver to select any prior approver or initiator as the person
to whom the ePAF should be returned. Comments directing what changes are to be made
should be entered. Note that the ePAF will move more quickly through the approval
process if the approver simply makes the required changes. Returning the ePAF requires
that it then be reapproved by all intermediate approvers which will delay processing.
4. Cancel this ePAF: The ePAF will remain inactive in the ePAF history but can never be
restarted. Once canceled a new replacement ePAF will be necessary.
By exiting without taking any action the ePAF remains on HOLD in your inbox.
The ePAF History link at top right opens a page showing the complete history of actions and
changes to this ePAF. At lower left is a link: For A History Of Changes To This ePAF And An
Approval History Click Here leads to the same history reports.
Commands for PRINT and DOWNLOAD also appear at upper right on this screen.
Epafs Users Guide - Initiators & Approvers 8-24-12.Docx Page 27
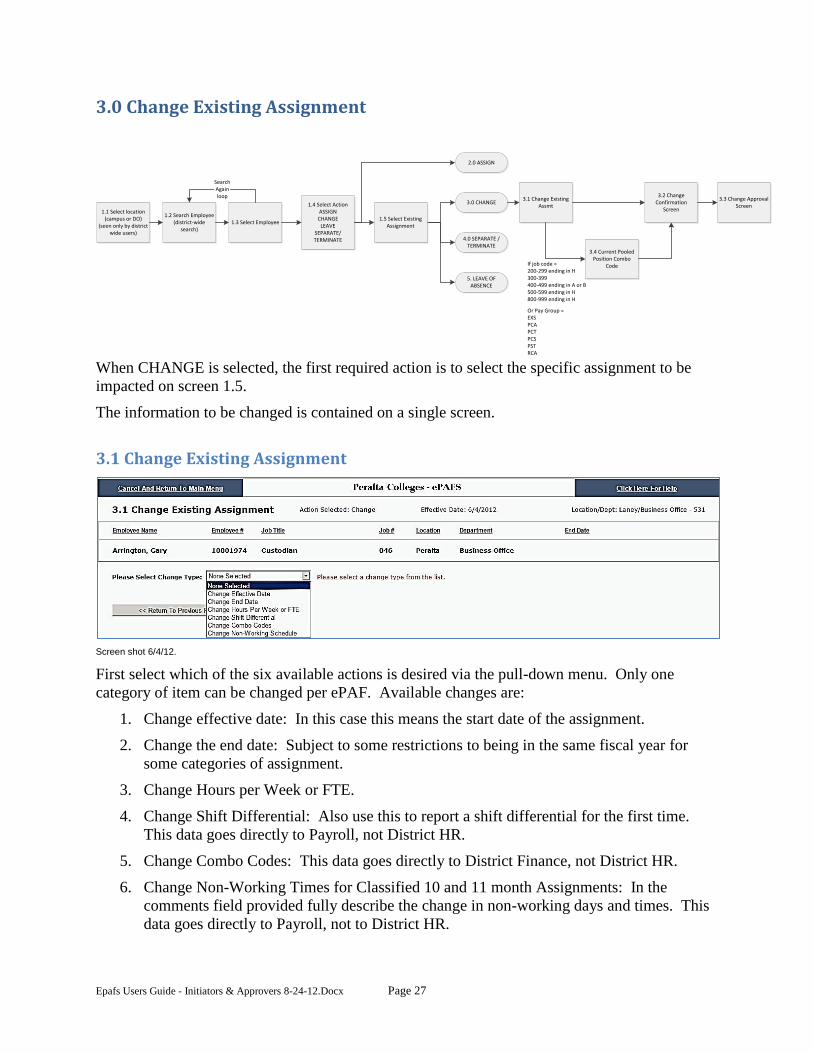
3.0 Change Existing Assignment
3.1 Change Existing Assmt
3.2 Change Confirmation
Screen1.1 Select location(campus or DO)
(seen only by district wide users)
1.4 Select ActionASSIGN
CHANGELEAVE
SEPARATE/TERMINATE
1.2 Search Employee(district-wide
search)1.3 Select Employee
SearchAgainloop
2.0 ASSIGN
3.0 CHANGE
4.0 SEPARATE / TERMINATE
5. LEAVE OF ABSENCE
1.5 Select Existing Assignment
3.4 Current Pooled Position Combo
CodeIf job code =200-299 ending in H300-399400-499 ending in A or B500-599 ending in H800-999 ending in H
Or Pay Group =EXSPCAPCTPCSPSTRCA
3.3 Change Approval Screen
When CHANGE is selected, the first required action is to select the specific assignment to be
impacted on screen 1.5.
The information to be changed is contained on a single screen.
3.1 Change Existing Assignment
Screen shot 6/4/12.
First select which of the six available actions is desired via the pull-down menu. Only one
category of item can be changed per ePAF. Available changes are:
1. Change effective date: In this case this means the start date of the assignment.
2. Change the end date: Subject to some restrictions to being in the same fiscal year for
some categories of assignment.
3. Change Hours per Week or FTE.
4. Change Shift Differential: Also use this to report a shift differential for the first time.
This data goes directly to Payroll, not District HR.
5. Change Combo Codes: This data goes directly to District Finance, not District HR.
6. Change Non-Working Times for Classified 10 and 11 month Assignments: In the
comments field provided fully describe the change in non-working days and times. This
data goes directly to Payroll, not to District HR.
Epafs Users Guide - Initiators & Approvers 8-24-12.Docx Page 28
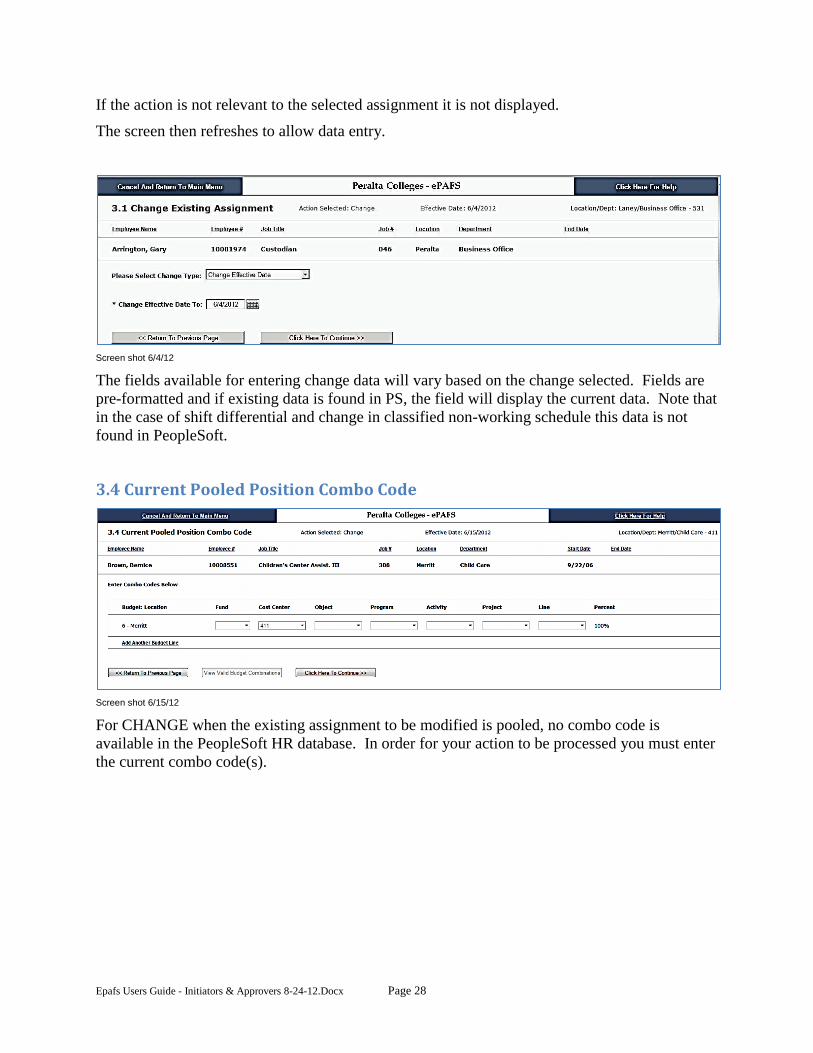
If the action is not relevant to the selected assignment it is not displayed.
The screen then refreshes to allow data entry.
Screen shot 6/4/12
The fields available for entering change data will vary based on the change selected. Fields are
pre-formatted and if existing data is found in PS, the field will display the current data. Note that
in the case of shift differential and change in classified non-working schedule this data is not
found in PeopleSoft.
3.4 Current Pooled Position Combo Code
Screen shot 6/15/12
For CHANGE when the existing assignment to be modified is pooled, no combo code is
available in the PeopleSoft HR database. In order for your action to be processed you must enter
the current combo code(s).
Epafs Users Guide - Initiators & Approvers 8-24-12.Docx Page 29
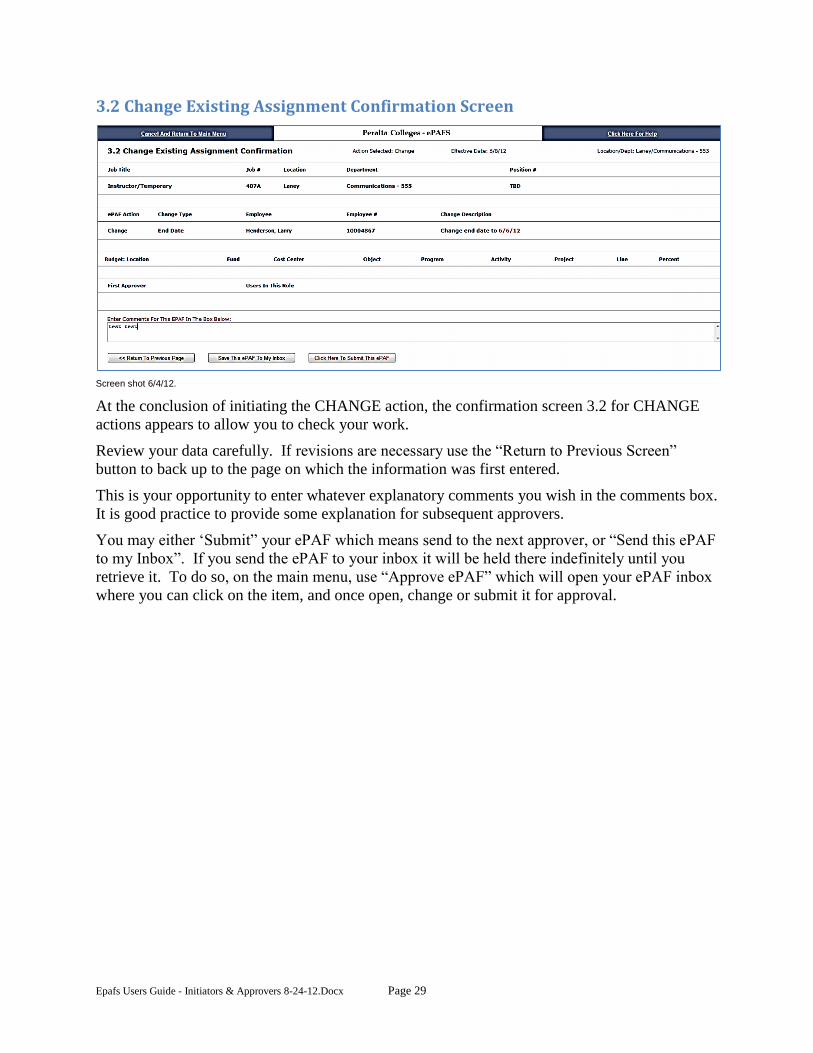
3.2 Change Existing Assignment Confirmation Screen
Screen shot 6/4/12.
At the conclusion of initiating the CHANGE action, the confirmation screen 3.2 for CHANGE
actions appears to allow you to check your work.
Review your data carefully. If revisions are necessary use the “Return to Previous Screen”
button to back up to the page on which the information was first entered.
This is your opportunity to enter whatever explanatory comments you wish in the comments box.
It is good practice to provide some explanation for subsequent approvers.
You may either ‘Submit” your ePAF which means send to the next approver, or “Send this ePAF
to my Inbox”. If you send the ePAF to your inbox it will be held there indefinitely until you
retrieve it. To do so, on the main menu, use “Approve ePAF” which will open your ePAF inbox
where you can click on the item, and once open, change or submit it for approval.

Epafs Users Guide - Initiators & Approvers 8-24-12.Docx Page 30
3.3 CHANGE Approver’s Screen
Screen shot 6/6/12.
This is the screen seen by all approvers summarizing the initiated change to an existing
assignment. It is also displayed for the Initiator after submission to provide an opportunity to
print or save an electronic copy.
Actions available:
1. Approve this ePAF: Moves to next approver.
2. Edit this ePAF: Allows direct editing of fields on this screen. Note that most validations
are not operative when changes are made on this screen which may introduce errors.
Approvers should take care to ensure entries are accurate.
3. Return ePAF: Allows the approver to select any prior approver or initiator as the person
to whom the ePAF should be returned. Comments directing what changes are to be made
should be entered. Note that the ePAF will move more quickly through the approval
process if the approver simply makes the required changes. Returning the ePAF requires
that it then be reapproved by all intermediate approvers which will delay processing.
4. Cancel this ePAF: The ePAF will remain inactive in the ePAF history but can never be
restarted. Once canceled a new replacement ePAF will be necessary.
By exiting without taking any action the ePAF remains on HOLD in your inbox.
The ePAF History link at top right opens a page showing the complete history of actions and
changes to this ePAF. At lower left is a link: For A History Of Changes To This ePAF And An
Approval History Click Here leads to the same history reports.
Commands for PRINT and DOWNLOAD also appear at upper right on this screen.
Epafs Users Guide - Initiators & Approvers 8-24-12.Docx Page 31
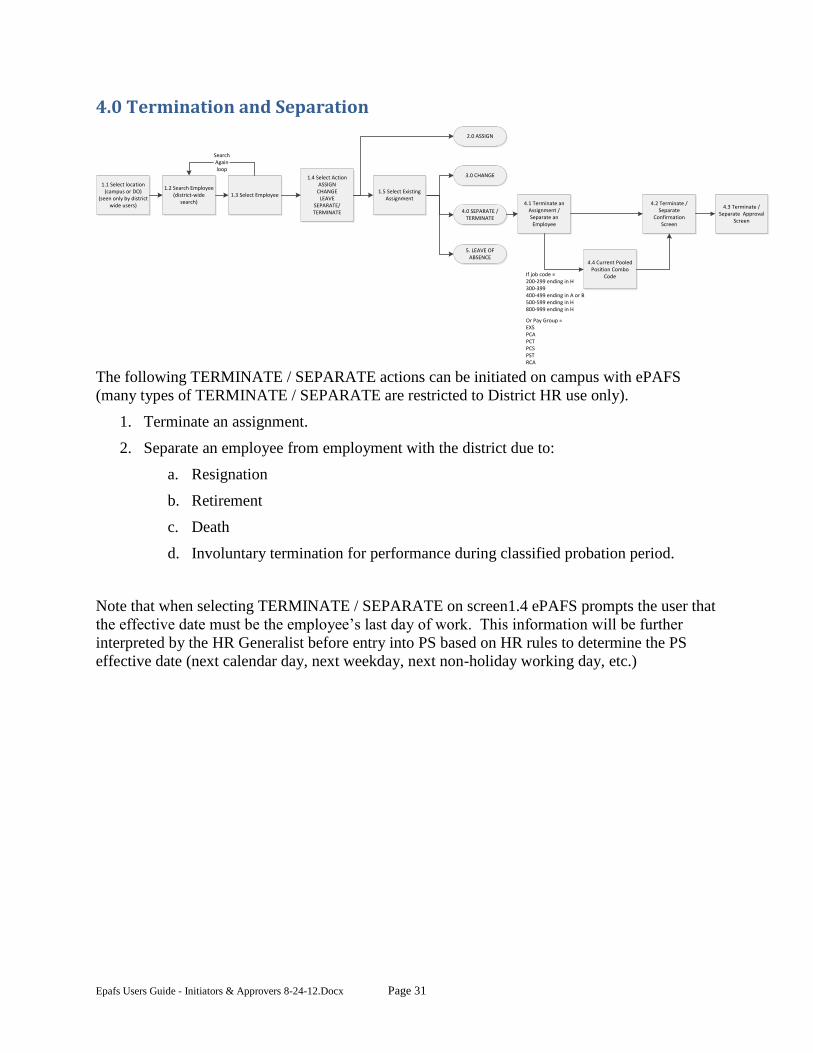
4.0 Termination and Separation
4.1 Terminate an Assignment / Separate an Employee
4.2 Terminate / Separate
Confirmation Screen
1.1 Select location(campus or DO)
(seen only by district wide users)
1.4 Select ActionASSIGN
CHANGELEAVE
SEPARATE/TERMINATE
1.2 Search Employee(district-wide
search)1.3 Select Employee
SearchAgainloop
2.0 ASSIGN
3.0 CHANGE
4.0 SEPARATE / TERMINATE
5. LEAVE OF ABSENCE
1.5 Select Existing Assignment
4.4 Current Pooled Position Combo
CodeIf job code =200-299 ending in H300-399400-499 ending in A or B500-599 ending in H800-999 ending in H
Or Pay Group =EXSPCAPCTPCSPSTRCA
4.3 Terminate / Separate Approval
Screen
The following TERMINATE / SEPARATE actions can be initiated on campus with ePAFS
(many types of TERMINATE / SEPARATE are restricted to District HR use only).
1. Terminate an assignment.
2. Separate an employee from employment with the district due to:
a. Resignation
b. Retirement
c. Death
d. Involuntary termination for performance during classified probation period.
Note that when selecting TERMINATE / SEPARATE on screen1.4 ePAFS prompts the user that
the effective date must be the employee’s last day of work. This information will be further
interpreted by the HR Generalist before entry into PS based on HR rules to determine the PS
effective date (next calendar day, next weekday, next non-holiday working day, etc.)
Epafs Users Guide - Initiators & Approvers 8-24-12.Docx Page 32
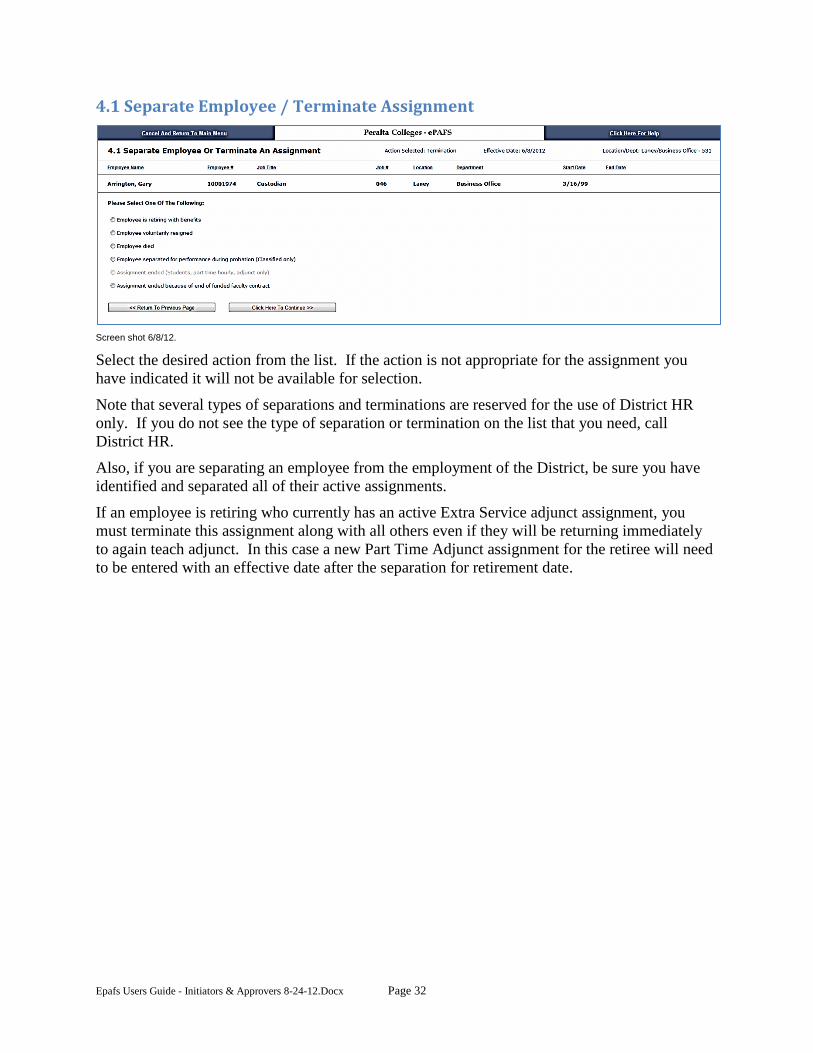
4.1 Separate Employee / Terminate Assignment
Screen shot 6/8/12.
Select the desired action from the list. If the action is not appropriate for the assignment you
have indicated it will not be available for selection.
Note that several types of separations and terminations are reserved for the use of District HR
only. If you do not see the type of separation or termination on the list that you need, call
District HR.
Also, if you are separating an employee from the employment of the District, be sure you have
identified and separated all of their active assignments.
If an employee is retiring who currently has an active Extra Service adjunct assignment, you
must terminate this assignment along with all others even if they will be returning immediately
to again teach adjunct. In this case a new Part Time Adjunct assignment for the retiree will need
to be entered with an effective date after the separation for retirement date.
Epafs Users Guide - Initiators & Approvers 8-24-12.Docx Page 33
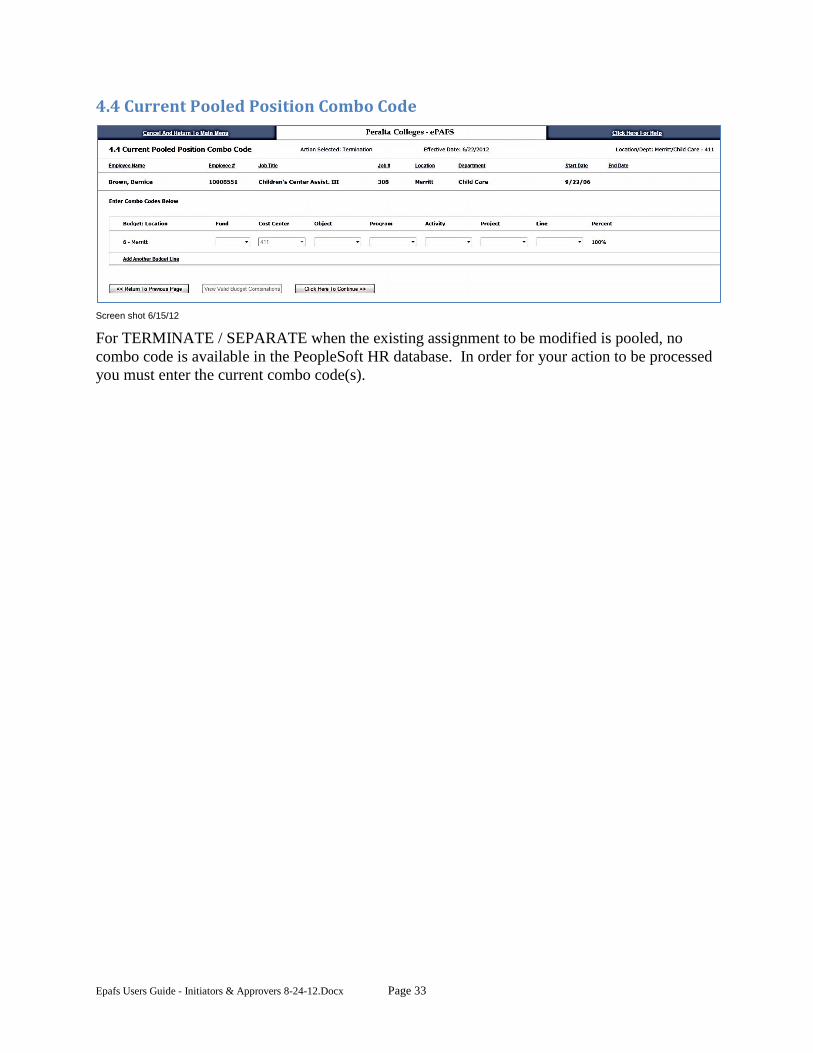
4.4 Current Pooled Position Combo Code
Screen shot 6/15/12
For TERMINATE / SEPARATE when the existing assignment to be modified is pooled, no
combo code is available in the PeopleSoft HR database. In order for your action to be processed
you must enter the current combo code(s).
Epafs Users Guide - Initiators & Approvers 8-24-12.Docx Page 34
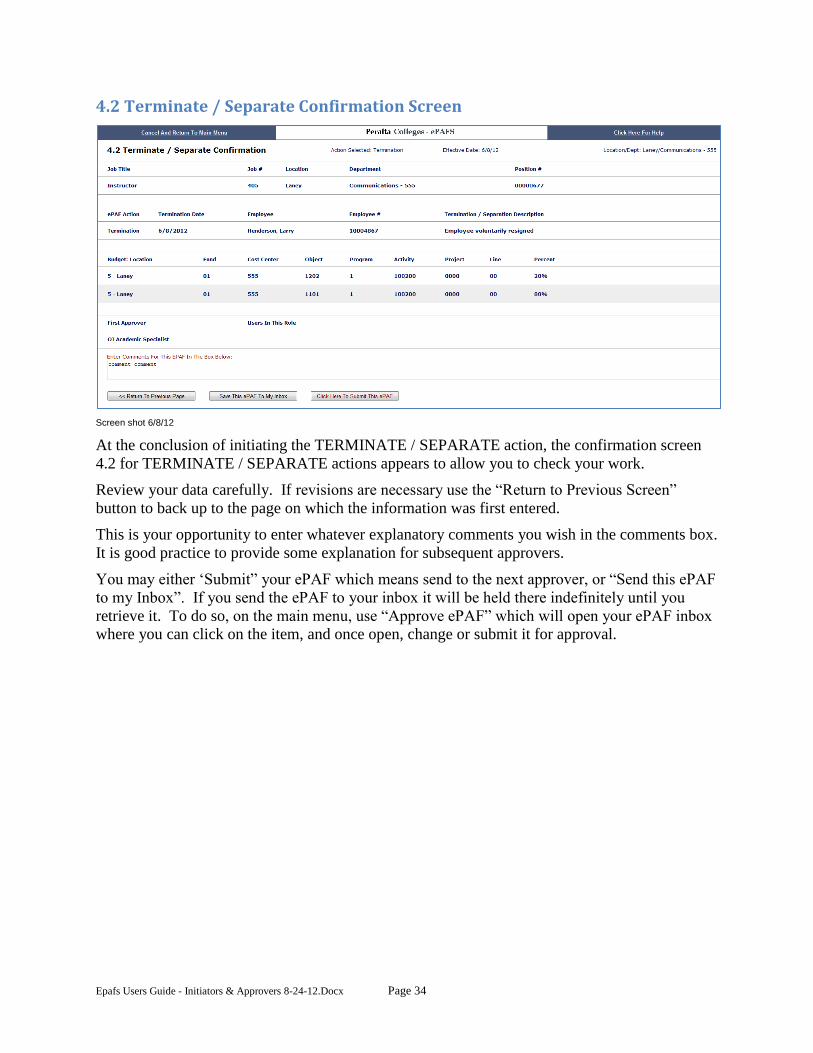
4.2 Terminate / Separate Confirmation Screen
Screen shot 6/8/12
At the conclusion of initiating the TERMINATE / SEPARATE action, the confirmation screen
4.2 for TERMINATE / SEPARATE actions appears to allow you to check your work.
Review your data carefully. If revisions are necessary use the “Return to Previous Screen”
button to back up to the page on which the information was first entered.
This is your opportunity to enter whatever explanatory comments you wish in the comments box.
It is good practice to provide some explanation for subsequent approvers.
You may either ‘Submit” your ePAF which means send to the next approver, or “Send this ePAF
to my Inbox”. If you send the ePAF to your inbox it will be held there indefinitely until you
retrieve it. To do so, on the main menu, use “Approve ePAF” which will open your ePAF inbox
where you can click on the item, and once open, change or submit it for approval.
Epafs Users Guide - Initiators & Approvers 8-24-12.Docx Page 35
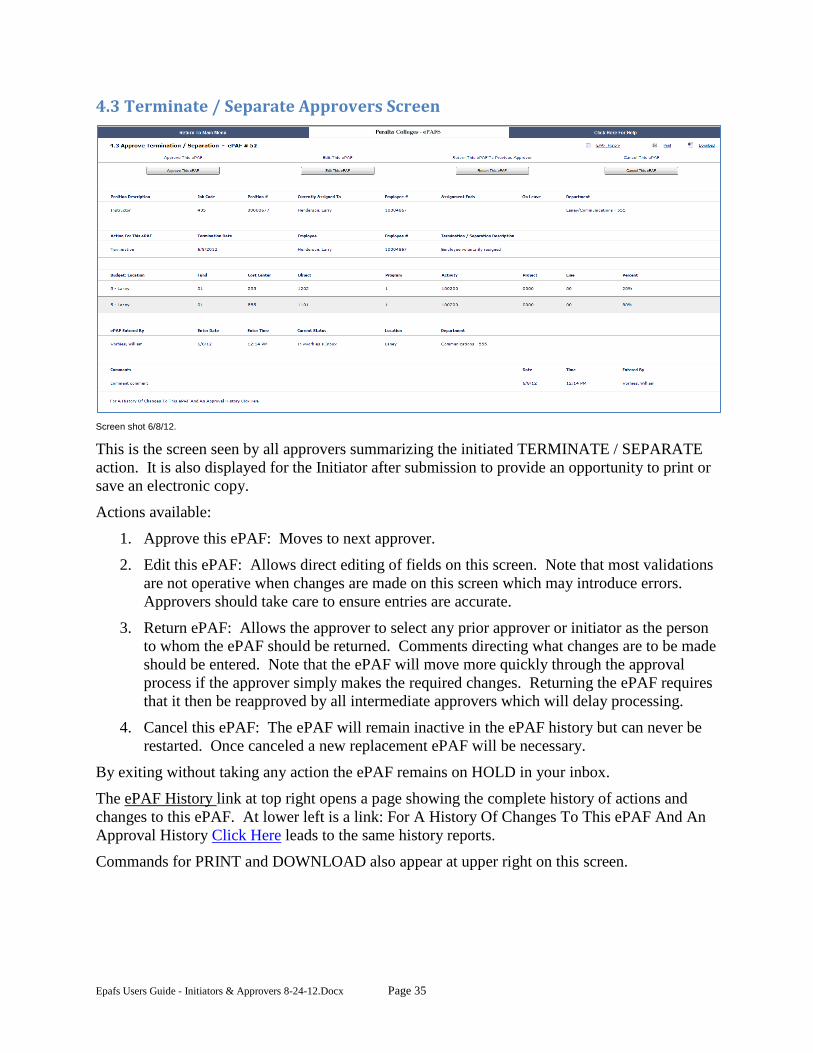
4.3 Terminate / Separate Approvers Screen
Screen shot 6/8/12.
This is the screen seen by all approvers summarizing the initiated TERMINATE / SEPARATE
action. It is also displayed for the Initiator after submission to provide an opportunity to print or
save an electronic copy.
Actions available:
1. Approve this ePAF: Moves to next approver.
2. Edit this ePAF: Allows direct editing of fields on this screen. Note that most validations
are not operative when changes are made on this screen which may introduce errors.
Approvers should take care to ensure entries are accurate.
3. Return ePAF: Allows the approver to select any prior approver or initiator as the person
to whom the ePAF should be returned. Comments directing what changes are to be made
should be entered. Note that the ePAF will move more quickly through the approval
process if the approver simply makes the required changes. Returning the ePAF requires
that it then be reapproved by all intermediate approvers which will delay processing.
4. Cancel this ePAF: The ePAF will remain inactive in the ePAF history but can never be
restarted. Once canceled a new replacement ePAF will be necessary.
By exiting without taking any action the ePAF remains on HOLD in your inbox.
The ePAF History link at top right opens a page showing the complete history of actions and
changes to this ePAF. At lower left is a link: For A History Of Changes To This ePAF And An
Approval History Click Here leads to the same history reports.
Commands for PRINT and DOWNLOAD also appear at upper right on this screen.
Epafs Users Guide - Initiators & Approvers 8-24-12.Docx Page 36
5.0 Leaves of Absence
5.1 New or Return from LOA
5.2 LOA Confirmation Screen
1.1 Select location(campus or DO)
(seen only by district wide users)
1.4 Select ActionASSIGN
CHANGELEAVE
SEPARATE/TERMINATE
1.2 Search Employee(district-wide
search)1.3 Select Employee
SearchAgainloop
2.0 ASSIGN
3.0 CHANGE
4.0 SEPARATE / TERMINATE
5. LEAVE OF ABSENCE
1.5 Select Existing Assignment
5.4 Current Pooled Position Combo
CodeIf job code =200-299 ending in H300-399400-499 ending in A or B500-599 ending in H800-999 ending in H
Or Pay Group =EXSPCAPCTPCSPSTRCA
5.3 LOA Approval Screen
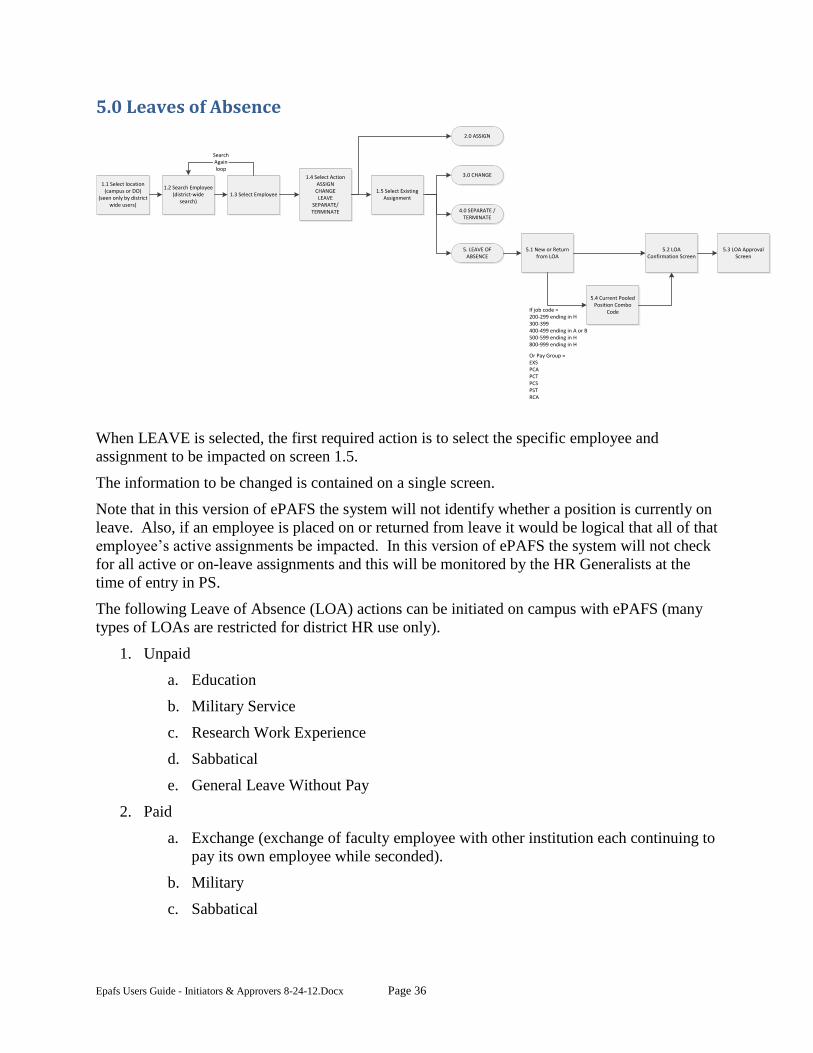
When LEAVE is selected, the first required action is to select the specific employee and
assignment to be impacted on screen 1.5.
The information to be changed is contained on a single screen.
Note that in this version of ePAFS the system will not identify whether a position is currently on
leave. Also, if an employee is placed on or returned from leave it would be logical that all of that
employee’s active assignments be impacted. In this version of ePAFS the system will not check
for all active or on-leave assignments and this will be monitored by the HR Generalists at the
time of entry in PS.
The following Leave of Absence (LOA) actions can be initiated on campus with ePAFS (many
types of LOAs are restricted for district HR use only).
1. Unpaid
a. Education
b. Military Service
c. Research Work Experience
d. Sabbatical
e. General Leave Without Pay
2. Paid
a. Exchange (exchange of faculty employee with other institution each continuing to
pay its own employee while seconded).
b. Military
c. Sabbatical
Epafs Users Guide - Initiators & Approvers 8-24-12.Docx Page 37
Note that when selecting LEAVE OF ABSENCE on screen 1.4 ePAFS prompts the user that the
effective date must be the employee’s last day of work (or first day back to work if returning
from leave). This information will be further interpreted by the HR Generalist before entry into
PS based on HR rules to determine the PS effective date (next calendar day, next weekday, next
non-holiday working day, etc.)
Change of Practice for Leave Returns
In order to close a potential exposure for unintentional overpayment you must now create a PA
Return from Leave for all of these leave types. Previously, while these leaves were required to
have return dates recorded when submitted, pay was automatically restored on these dates,
without further confirmation that the employee had returned to work either before or after this
originally scheduled date.
Epafs Users Guide - Initiators & Approvers 8-24-12.Docx Page 38
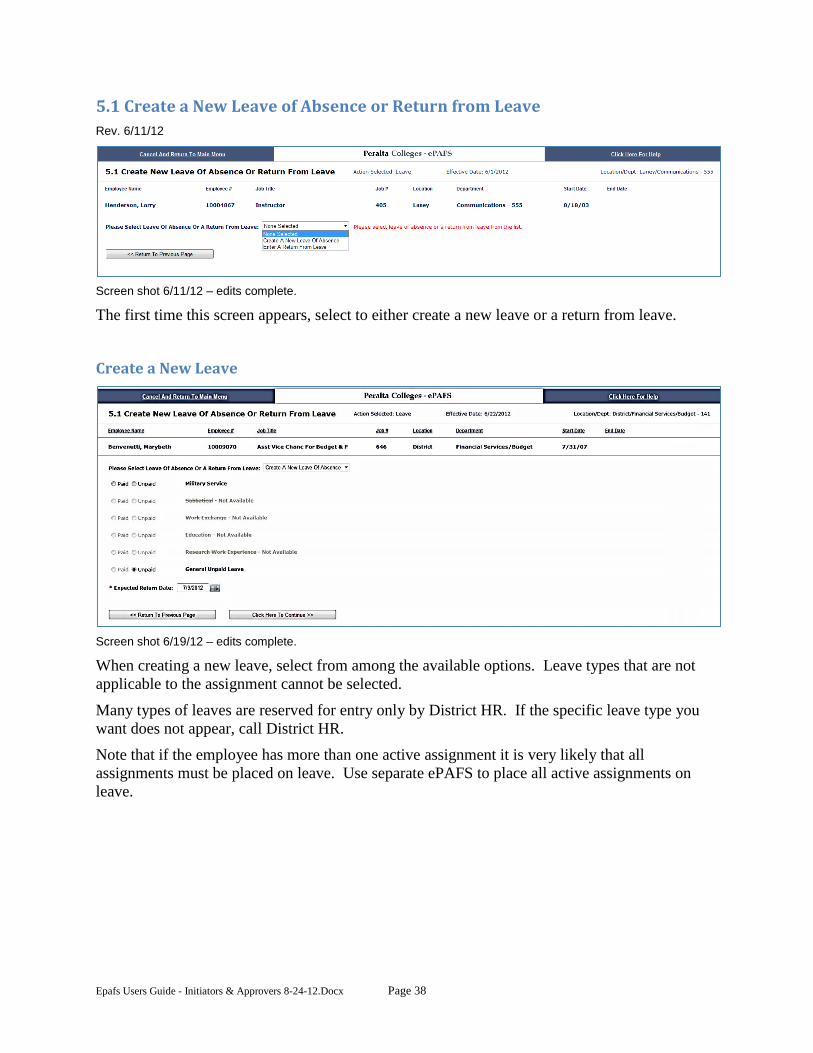
5.1 Create a New Leave of Absence or Return from Leave
Rev. 6/11/12
Screen shot 6/11/12 – edits complete.
The first time this screen appears, select to either create a new leave or a return from leave.
Create a New Leave
Screen shot 6/19/12 – edits complete.
When creating a new leave, select from among the available options. Leave types that are not
applicable to the assignment cannot be selected.
Many types of leaves are reserved for entry only by District HR. If the specific leave type you
want does not appear, call District HR.
Note that if the employee has more than one active assignment it is very likely that all
assignments must be placed on leave. Use separate ePAFS to place all active assignments on
leave.
Epafs Users Guide - Initiators & Approvers 8-24-12.Docx Page 39
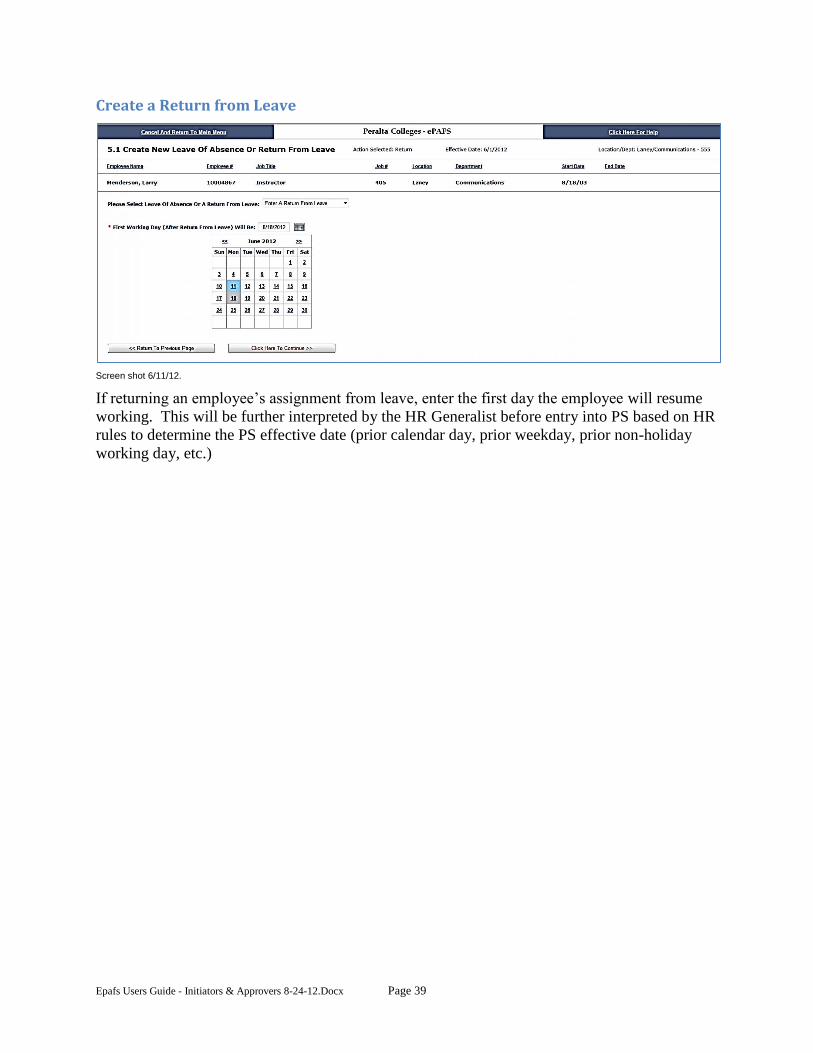
Create a Return from Leave
Screen shot 6/11/12.
If returning an employee’s assignment from leave, enter the first day the employee will resume
working. This will be further interpreted by the HR Generalist before entry into PS based on HR
rules to determine the PS effective date (prior calendar day, prior weekday, prior non-holiday
working day, etc.)
Epafs Users Guide - Initiators & Approvers 8-24-12.Docx Page 40
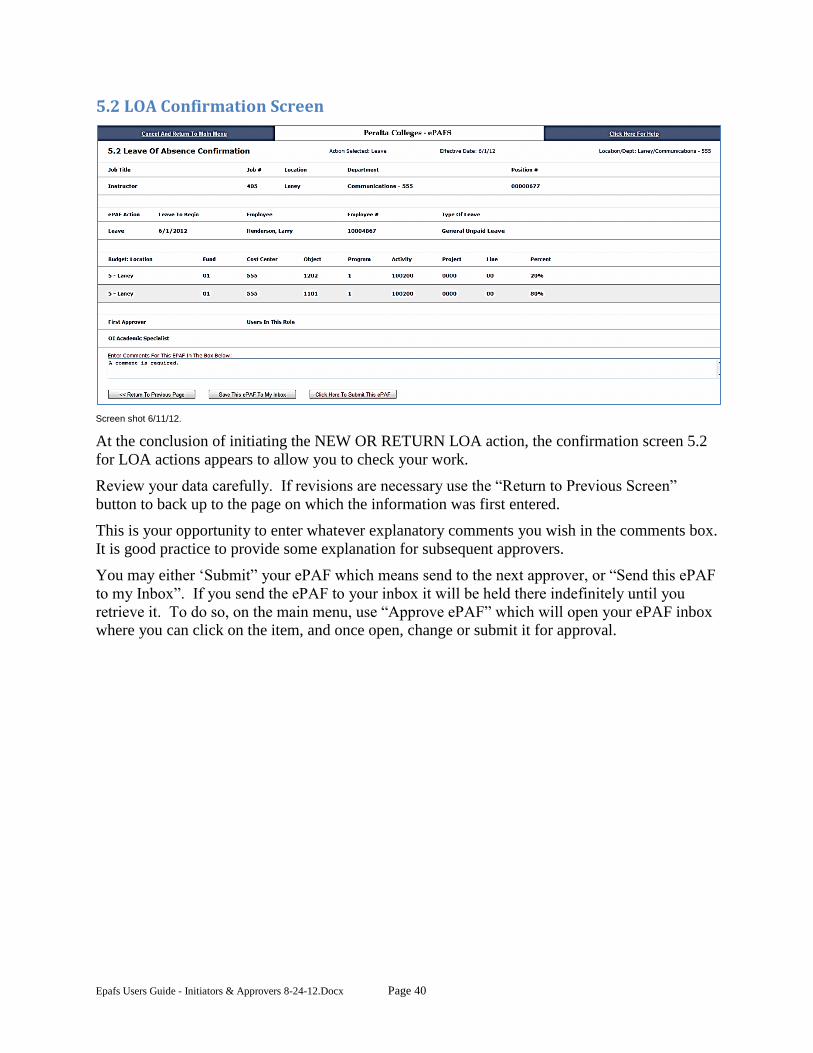
5.2 LOA Confirmation Screen
Screen shot 6/11/12.
At the conclusion of initiating the NEW OR RETURN LOA action, the confirmation screen 5.2
for LOA actions appears to allow you to check your work.
Review your data carefully. If revisions are necessary use the “Return to Previous Screen”
button to back up to the page on which the information was first entered.
This is your opportunity to enter whatever explanatory comments you wish in the comments box.
It is good practice to provide some explanation for subsequent approvers.
You may either ‘Submit” your ePAF which means send to the next approver, or “Send this ePAF
to my Inbox”. If you send the ePAF to your inbox it will be held there indefinitely until you
retrieve it. To do so, on the main menu, use “Approve ePAF” which will open your ePAF inbox
where you can click on the item, and once open, change or submit it for approval.
Epafs Users Guide - Initiators & Approvers 8-24-12.Docx Page 41
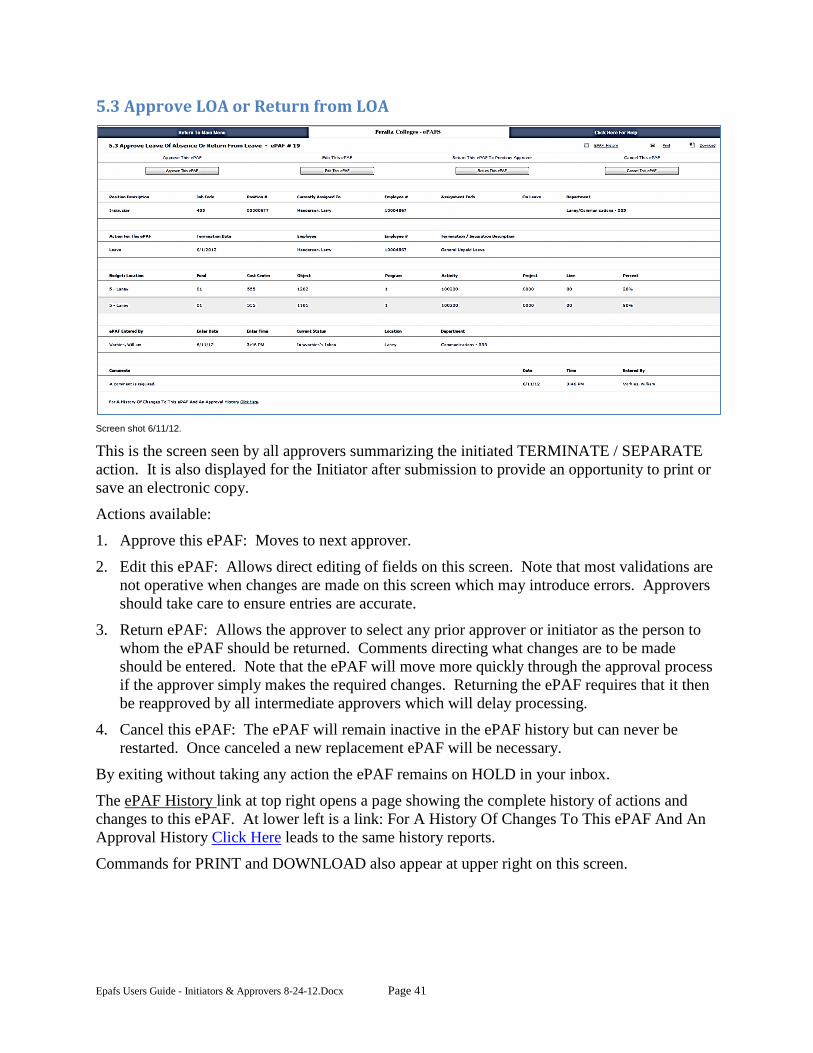
5.3 Approve LOA or Return from LOA
Screen shot 6/11/12.
This is the screen seen by all approvers summarizing the initiated TERMINATE / SEPARATE
action. It is also displayed for the Initiator after submission to provide an opportunity to print or
save an electronic copy.
Actions available:
1. Approve this ePAF: Moves to next approver.
2. Edit this ePAF: Allows direct editing of fields on this screen. Note that most validations are
not operative when changes are made on this screen which may introduce errors. Approvers
should take care to ensure entries are accurate.
3. Return ePAF: Allows the approver to select any prior approver or initiator as the person to
whom the ePAF should be returned. Comments directing what changes are to be made
should be entered. Note that the ePAF will move more quickly through the approval process
if the approver simply makes the required changes. Returning the ePAF requires that it then
be reapproved by all intermediate approvers which will delay processing.
4. Cancel this ePAF: The ePAF will remain inactive in the ePAF history but can never be
restarted. Once canceled a new replacement ePAF will be necessary.
By exiting without taking any action the ePAF remains on HOLD in your inbox.
The ePAF History link at top right opens a page showing the complete history of actions and
changes to this ePAF. At lower left is a link: For A History Of Changes To This ePAF And An
Approval History Click Here leads to the same history reports.
Commands for PRINT and DOWNLOAD also appear at upper right on this screen.
Epafs Users Guide - Initiators & Approvers 8-24-12.Docx Page 42
Appendices
Workflow
Vertical workflow ‘channels’ on campus are defined exclusively by location, cost center, and
object as determined by reading the first combo code on the PA. The routing is designed to
always begin from the bottom to ensure that all approvers always see the appropriate PAs. Stops
within a channel are defined exclusively by cost center (department).
Workflows are defined in two separate sections, the campus workflow and the district workflow.
When the ePAF completes the campus workflow it automatically enters the district workflow.
Because workflow is entirely dependent on cost center and object code, when combo codes are
not present (as in the case of single positions without combo codes recorded in PS) or where the
code is recorded as “SUSPENSE” (TBD), workflow cannot operate.
When this condition is detected on any of the confirmation screens for any of the action groups
ePAFS displays the message “No valid combo code found for this assignment. ePAF cannot
proceed”
There are instances in which a PA may be initiated by District HR. The normal workflow
behavior of these items will be to start at the bottom of the appropriate campus approval channel.
If desired, District HR can bypass campus approval by having the PA held in the in box of the
initiator, then rerouted from campus to district by the ePAFS System Administrator, Cody
Pelletier.
Epafs Users Guide - Initiators & Approvers 8-24-12.Docx Page 43
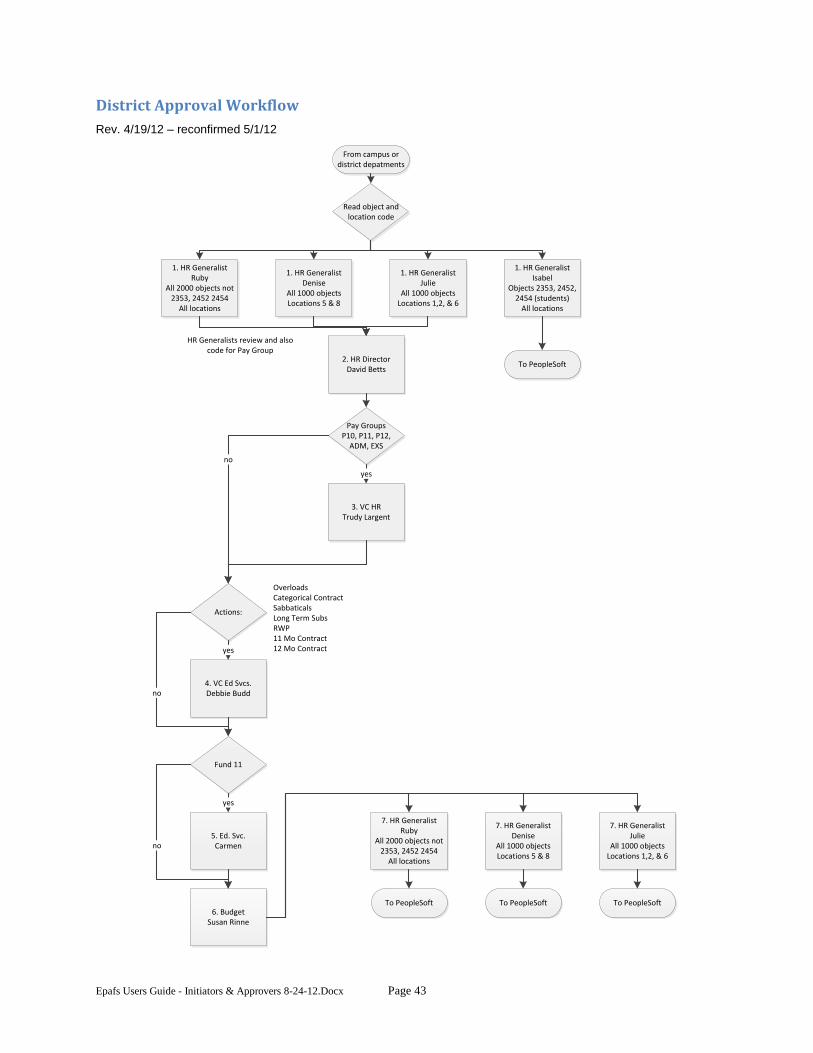
District Approval Workflow
Rev. 4/19/12 – reconfirmed 5/1/12
From campus or district depatments
Read object and location code
1. HR GeneralistRuby
All 2000 objects not 2353, 2452 2454
All locations
1. HR GeneralistDenise
All 1000 objectsLocations 5 & 8
1. HR GeneralistJulie
All 1000 objectsLocations 1,2, & 6
1. HR GeneralistIsabel
Objects 2353, 2452, 2454 (students)
All locations
To PeopleSoft2. HR Director
David Betts
Pay GroupsP10, P11, P12,
ADM, EXS
3. VC HRTrudy Largent
yes
Actions:
OverloadsCategorical ContractSabbaticalsLong Term SubsRWP11 Mo Contract12 Mo Contract
no
4. VC Ed Svcs.Debbie Budd
Fund 11
yes
no
5. Ed. Svc.Carmen
yes
6. BudgetSusan Rinne
no
7. HR GeneralistRuby
All 2000 objects not 2353, 2452 2454
All locations
7. HR GeneralistDenise
All 1000 objectsLocations 5 & 8
7. HR GeneralistJulie
All 1000 objectsLocations 1,2, & 6
To PeopleSoft To PeopleSoft To PeopleSoft
HR Generalists review and also code for Pay Group
Epafs Users Guide - Initiators & Approvers 8-24-12.Docx Page 44
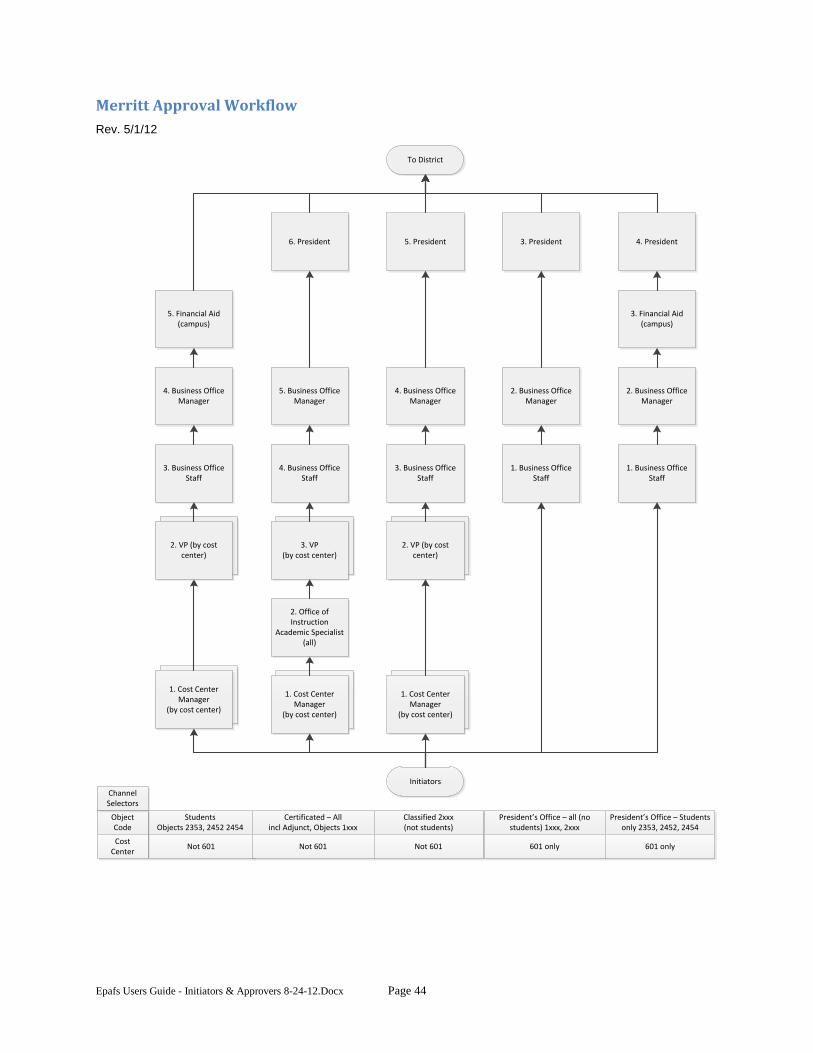
Merritt Approval Workflow
Rev. 5/1/12
Initiators
1. Cost Center Manager
(by cost center)
1. Cost Center Manager
(by cost center)
1. Cost Center Manager
(by cost center)
3. VP (by cost center)
2. VP (by cost center)
3. Business Office Staff
4. Business Office Staff
3. Business Office Staff
4. Business Office Manager
5. Business Office Manager
4. Business Office Manager
5. Financial Aid (campus)
6. President 5. President
To District
2. Office of Instruction
Academic Specialist(all)
StudentsObjects 2353, 2452 2454
Certificated – All incl Adjunct, Objects 1xxx
Classified 2xxx(not students)
Not 601 Not 601 Not 601
ObjectCode
CostCenter
ChannelSelectors
President’s Office – all (no students) 1xxx, 2xxx
President’s Office – Students only 2353, 2452, 2454
601 only 601 only
2. VP (by cost center)
1. Business Office Staff
2. Business Office Manager
3. President
1. Business Office Staff
2. Business Office Manager
4. President
3. Financial Aid (campus)

Epafs Users Guide - Initiators & Approvers 8-24-12.Docx Page 45
Alameda Approval Workflow
Rev. 4/18/12 - Reconfirmed 5/1/12
Initiators
Cost Center Manager
(by cost center)
1. Cost Center Manager
(by cost center)
1. Cost Center Manager
(by cost center)
1. Cost Center Manager
(by cost center)
3. VP OI / SS(by cost center)
2. VP OI / SS(by cost center)
2. Business Office Staff
4. Business Office Staff
3. Business Office Staff
3. Business Office Manager
5. Business Office Manager
4. Business Office Manager
4. Financial Aid (campus)
6. President 5. President
To District
2. Office of Instruction
Academic Specialist(all)
StudentsObjects 2353, 2452 2454
Certificated – All incl Adjunct, Objects 1xxx
Classified 2xxx(not students)
all all all
ObjectCode
CostCenter
ChannelSelectors
Epafs Users Guide - Initiators & Approvers 8-24-12.Docx Page 46
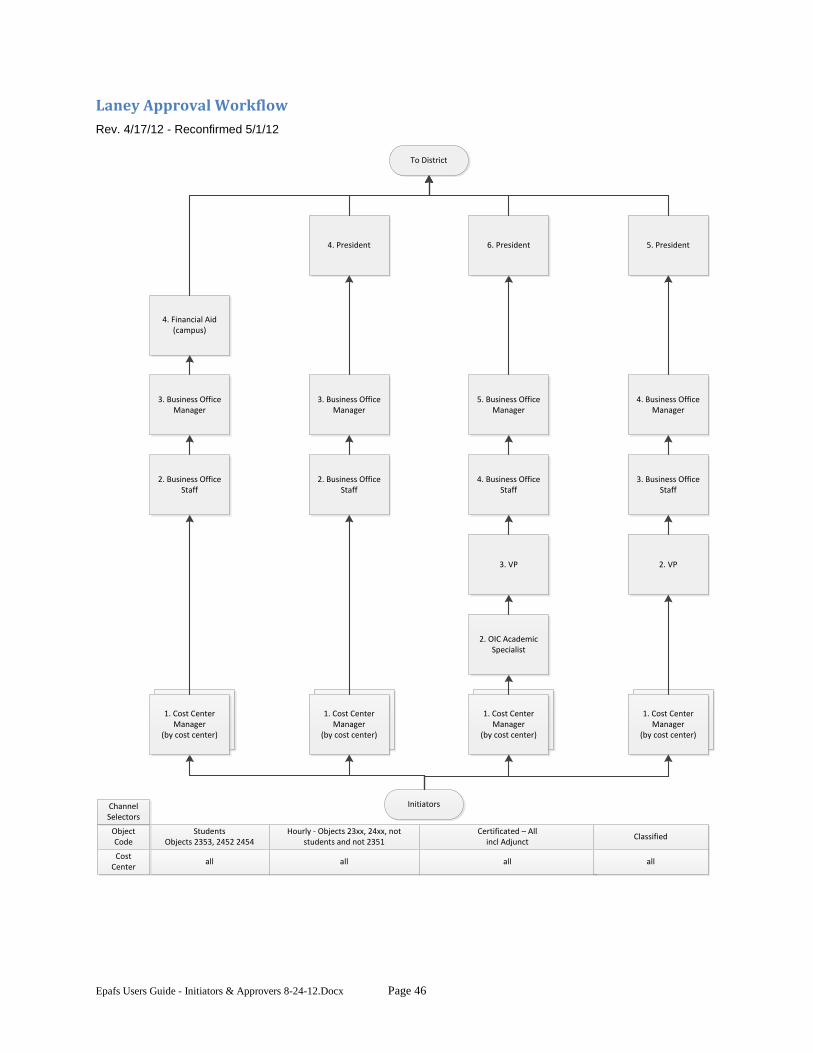
Laney Approval Workflow
Rev. 4/17/12 - Reconfirmed 5/1/12
Initiators
1. Cost Center Manager
(by cost center)
1. Cost Center Manager
(by cost center)
3. VP
2. Business Office Staff
2. Business Office Staff
4. Business Office Staff
3. Business Office Manager
3. Business Office Manager
5. Business Office Manager
4. Financial Aid (campus)
4. President
To District
1. Cost Center Manager
(by cost center)
2. VP
3. Business Office Staff
4. Business Office Manager
5. President
1. Cost Center Manager
(by cost center)
2. OIC Academic Specialist
6. President
StudentsObjects 2353, 2452 2454
Hourly - Objects 23xx, 24xx, not students and not 2351
Certificated – All incl Adjunct
Classified
all all all all
ObjectCode
CostCenter
ChannelSelectors
Epafs Users Guide - Initiators & Approvers 8-24-12.Docx Page 47
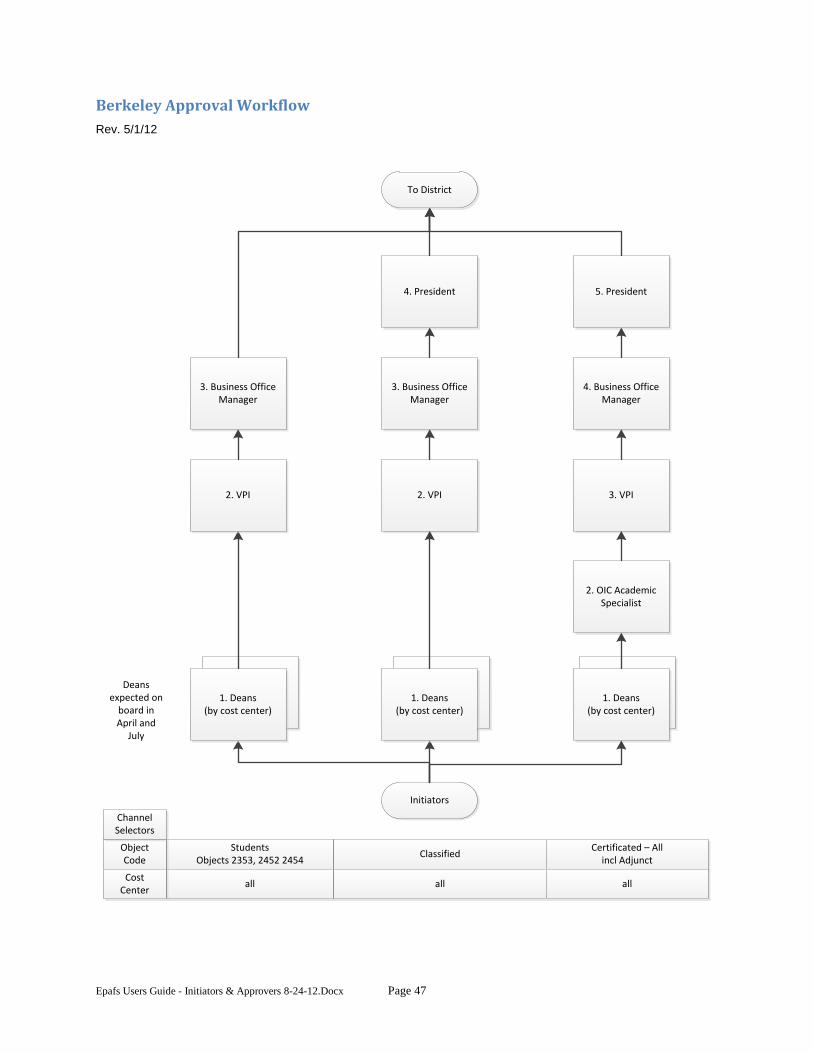
Berkeley Approval Workflow
Rev. 5/1/12
Initiators
2. VPI
3. Business Office Manager
3. Business Office Manager
4. President
To District
1. Deans(by cost center)
1. Deans(by cost center)
StudentsObjects 2353, 2452 2454
ClassifiedCertificated – All
incl Adjunct
all all all
ObjectCode
CostCenter
ChannelSelectors
3. VPI
4. Business Office Manager
5. President
2. OIC Academic Specialist
1. Deans(by cost center)
Deans expected on
board in April and
July
2. VPI

Epafs Users Guide - Initiators & Approvers 8-24-12.Docx Page 48
District Operating Departments Workflow
This single workflow accommodates all seven major district operating departments. All can be
differentiated based on cost center.
1. Chancellor’s Office (including BOT)
2. Office of General Counsel
3. Finance & Administration (including IT, purchasing and payroll)
4. Ed Services
5. Student Service and Financial Aid (including child care)
6. General Services
7. Human Resources
Initiators
1. Cost Center (Area) Manager
(by cost center)
2. VC(by cost center)
To District
All object codes
Epafs Users Guide - Initiators & Approvers 8-24-12.Docx Page 49
Reports
A variety of standard pre-defined reports are available. Reports fall into two broad categories:
Status monitoring, describing the status or history of individual PAs, and Process Monitoring,
describing the performance of aspects of the ePAFS system and its users.
These reports all allow filtering by any combination of the following factors (using logical AND
statements):
location at the college level
department as defined by cost center
user defined time period based on entered stop and end dates
individual user defined by their Peralta email address prefix.
1. Status Monitoring:
a. PA's currently in process
b. PA’s entered in the past user-defined time period
c. PA’s overdue for approval (based on a user defined time considered to be ‘overdue’
d. PA’s rejected/cancelled
e. All PA’s for a specific employee (by single employee ID only).
2. Process Monitoring
a. Average time in queue by approver/department
b. PA’s entered with retroactive effective dates
c. Total time from initiation to final approval
In addition we provide a reporting mechanism by which Finance and Payroll can monitor those
ePAFS which are not entered in HCM but are generated exclusively for the purpose of informing
Finance and Payroll regarding changes.
All reports are accessible to all initiator/approvers with some being logically restricted to the
individual’s college and cost centers.
Users requiring detailed instruction on how to utilize these reports should refer to the most
current “ePAFS Project Master.doc”.


![Recycling of Tungsten - ITIA...5 Based on recent studies performed by ITIA [2,3], the global tungsten flow has been mapped for the year 2016 (Figure 3).The total input for production](https://img.pdfslide.net/doc/110x75/5e4166657ffeb52dd23d3525/recycling-of-tungsten-itia-5-based-on-recent-studies-performed-by-itia-23.jpg)


![Physics Today Fleming PhysToday.pdfto ]]] IP: 128.32.208.2 On: Wed, 13 Nov 2013 23:33:12. T H E P R IM A R Y S TE P S O F PHOTOSYNTHESI S T h e tw o im p o rta n t in itia l ste p](https://img.pdfslide.net/doc/110x75/5fe3376264708b21140abe81/physics-fleming-phystodaypdf-to-ip-128322082-on-wed-13-nov-2013-233312.jpg)