Embed Size (px)
DESCRIPTION
Citation preview
A Quick Intro to Coding Applications for AndroidBeginners, stop searching Google and start here.
Written by Trevelyn([email protected])
Feb 2010

ABSTRACT:
This guide is for those who never coded in Java before, or never used an IDE. This paper, by any means, will not teach you Java. Java is an Object Oriented Programming Language (OOP). It is not the best programming language to start using as a beginner, as it is quite complicated. Not only is the language hard to understand, but the combination of using an IDE, SDK and API's to help you code and add to that using multiple compilation sources (“.java” files) and multiple XML files makes Android a tough platform for beginner.
An IDE (Integrated Developing Environment) is simply an application to help you as you write out your code. The code is written in a window called a "console" in Eclipse. There are many tips that the IDE will give you, just like that of a word processor. The words or (syntax) in programming Android are scanned in real time (meaning over and over all the time in the background) and will underline incorrect syntax, similar to OpenOffice.org. This red underlined syntax can be easily fixed by simply following what the IDE suggests to you, like for example - import a new Method simply by hovering your mouse over the underlined text for a few seconds.
I will try my best to show off some of these cool features and get the newbie programmers feet slightly wet with actual code. Not advanced code, nothing fancy. This application is the Phone Losers of America Red Box Soundboard application.
This guide assumes that you have the IDE Eclipse installed on a Linux system, and that you have already downloaded and installed all of the proper SDK files needed to start coding in the IDE for Android. If you are using a Debian derivative, such as WeakNet Linux, BackTrack, or Ubuntu, I wouldn't recommend using the usual Synaptic or Aptitude (same thing, just a command line version). You should get the Eclipse IDE right from the authors' website. If you have a problem finding dependencies and you are using a live disk or temp installation here is a trick you can do. Use Aptitude to install Eclipse, then do:
apt-get remove eclipse
to get rid of just the executable. The dependencies should stay right were they are. Once installed, follow the guide at the Android website to install their SDK. The “SDK” is simply a bunch of pre-compiled “methods” or functions, if you will, that allow you to easily type out code that calls such functions. And example, would be MediaPlayer. This method (or group of) will allow you to play a sound file from either a remote location or from your SD card in your system.
You can actually install a AVD or “Android Virtual Device” onto Linux to test simple applications, like the Sound board application that we will do in this paper. The Emulator, or AVD, is just like the actual phone. My MyTouch 3g takes about 2-3 minutes to boot. This is how long it takes to boot the emulator as well. Both start up their own OS (Linux kernel'ed Android). It's best when developing and testing, to keep the Emulator open all the time.
Sometimes I say “directory” which is simply another name for “folder.” All guides and links are referenced at the end of this document. If you need more help, you can simply Email me at the address provided above.
Getting Started!
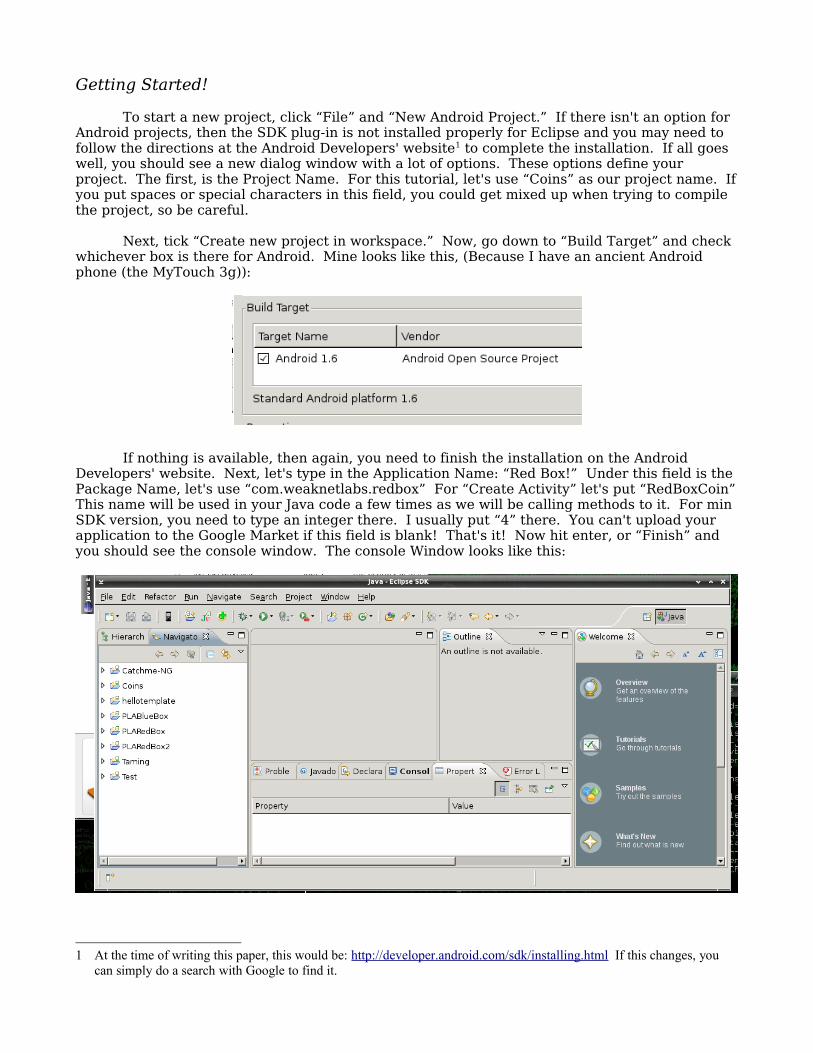
To start a new project, click “File” and “New Android Project.” If there isn't an option for Android projects, then the SDK plug-in is not installed properly for Eclipse and you may need to follow the directions at the Android Developers' website1 to complete the installation. If all goes well, you should see a new dialog window with a lot of options. These options define your project. The first, is the Project Name. For this tutorial, let's use “Coins” as our project name. If you put spaces or special characters in this field, you could get mixed up when trying to compile the project, so be careful.
Next, tick “Create new project in workspace.” Now, go down to “Build Target” and check whichever box is there for Android. Mine looks like this, (Because I have an ancient Android phone (the MyTouch 3g)):
If nothing is available, then again, you need to finish the installation on the Android Developers' website. Next, let's type in the Application Name: “Red Box!” Under this field is the Package Name, let's use “com.weaknetlabs.redbox” For “Create Activity” let's put “RedBoxCoin” This name will be used in your Java code a few times as we will be calling methods to it. For min SDK version, you need to type an integer there. I usually put “4” there. You can't upload your application to the Google Market if this field is blank! That's it! Now hit enter, or “Finish” and you should see the console window. The console Window looks like this:
1 At the time of writing this paper, this would be: http://developer.android.com/sdk/installing.html If this changes, you can simply do a search with Google to find it.
Android's Java, not Java's Java
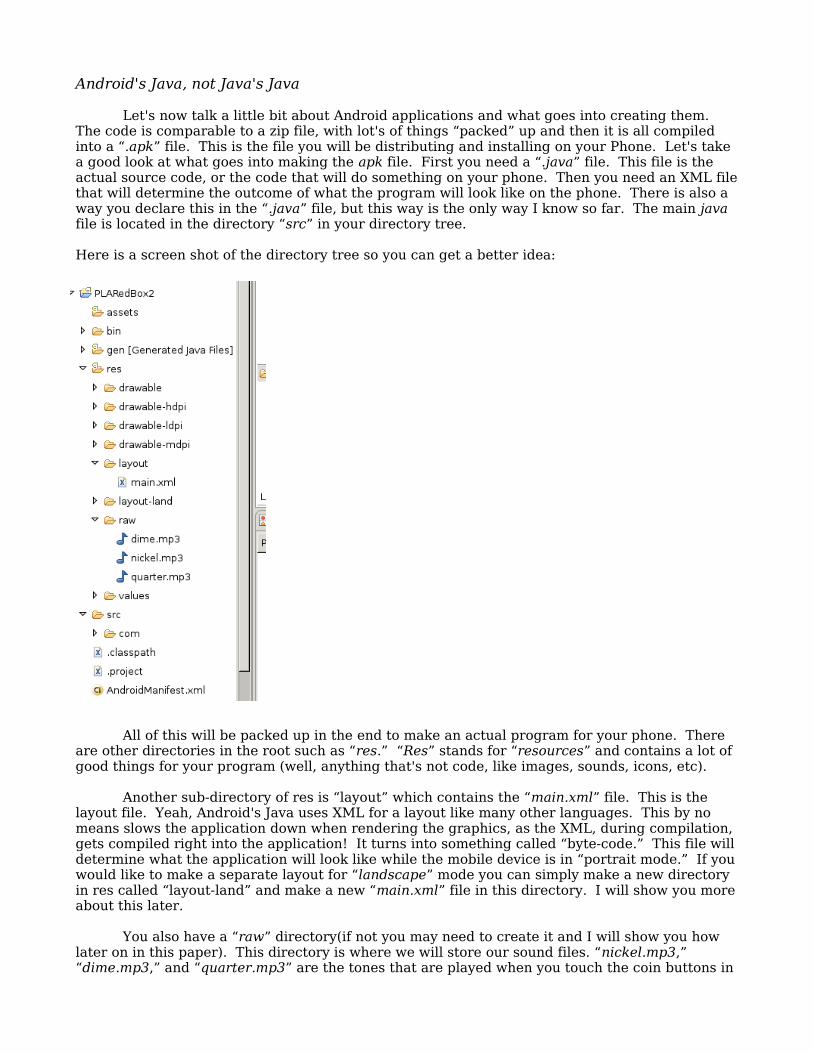
Let's now talk a little bit about Android applications and what goes into creating them. The code is comparable to a zip file, with lot's of things “packed” up and then it is all compiled into a “.apk” file. This is the file you will be distributing and installing on your Phone. Let's take a good look at what goes into making the apk file. First you need a “.java” file. This file is the actual source code, or the code that will do something on your phone. Then you need an XML file that will determine the outcome of what the program will look like on the phone. There is also a way you declare this in the “.java” file, but this way is the only way I know so far. The main java file is located in the directory “src” in your directory tree.
Here is a screen shot of the directory tree so you can get a better idea:
All of this will be packed up in the end to make an actual program for your phone. There are other directories in the root such as “res.” “Res” stands for “resources” and contains a lot of good things for your program (well, anything that's not code, like images, sounds, icons, etc).
Another sub-directory of res is “layout” which contains the “main.xml” file. This is the layout file. Yeah, Android's Java uses XML for a layout like many other languages. This by no means slows the application down when rendering the graphics, as the XML, during compilation, gets compiled right into the application! It turns into something called “byte-code.” This file will determine what the application will look like while the mobile device is in “portrait mode.” If you would like to make a separate layout for “landscape” mode you can simply make a new directory in res called “layout-land” and make a new “main.xml” file in this directory. I will show you more about this later.
You also have a “raw” directory(if not you may need to create it and I will show you how later on in this paper). This directory is where we will store our sound files. “nickel.mp3,” “dime.mp3,” and “quarter.mp3” are the tones that are played when you touch the coin buttons in
the PLA Red Box application. You will want to keep your sounds here.
Another sub-directory of “res” is “drawable.” If it's not there by default, you can simply right click on res and go to New Folder and add it. Here is where you put all images used for buttons, backgrounds, and menu icons. Here is where I have the quarter, dime, nickel, PLA logo, and WeakNet Android Logo images in PNG format. The “drawable-ldpi,” “drawable-mdpi,” and “drawable-hdpi” directories contain the icons that will be used by your application. If you edit the icons, make sure you keep the resolutions the same. The “hi” DPI (dots per inch, similar to resolution) icon is 72x72 pixels, the mid is 48x48 pixels, and the low is 36x36 pixels. These are different sizes for different device resolutions.
Let's get out of res and look at the rest. The “gen” directory contains an automatically generated file called “R.java” which assign hexadecimal values to all variable objects in your main java file. For example, in our R.java file I can see that dimedroid which is the PNG image for the dime button, is assigned “0x7f020000.” This is an automatically generated file and should not be edited by hand. In fact, if you do, the IDE (Eclipse) will revert it back to it's original condition!
Then we have another very important file: Manifest.xml. This file contains a lot of information about your application, including “permissions.” Permissions are required when you use something like WiFi, 3g, accessing SD cards, accessing Contacts list, and more for security purposes. When someone installs an application, the Manifest.xml file's byte-code will be accessed and tell the user which hardware and software will be accessed by your application. If you fail to mention a permission, the user will experience a “Force Close” SIGQUIT from your application, which is not nice! Also, this file contains things called Activities. Activities are your applications actions, or what it does. Usually an Activity will take up the whole screen at once. As an example, RedBoxCoin as an activity would be the black screen with the coin buttons, just as expressed by our layout form in our “main.xml” file in res.
All of these files and folders in this tree structure, constitute the “Project” in your Workspace. The project is simply the absolute root directory in your workspace, which is just another directory. That's kind of confusing to a beginner, I'm sure, but here is an outline of what I mean:
WorkspaceProject 1 Project 2
res reslayout layout
gen genbin binsrc src
main.java main.javamanifest.xml manifest.xml
This structure, or outline, is our directory tree of our whole “workspace.”
Alright! What's Next?! I Want My Application!
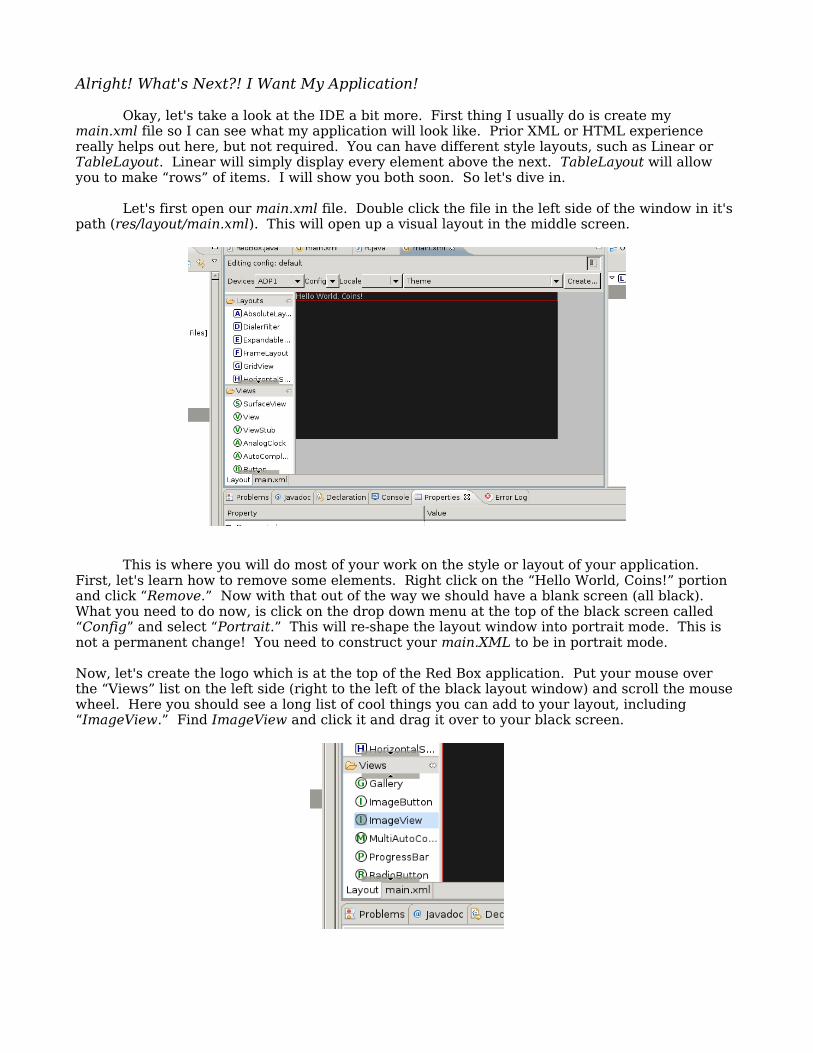
Okay, let's take a look at the IDE a bit more. First thing I usually do is create my main.xml file so I can see what my application will look like. Prior XML or HTML experience really helps out here, but not required. You can have different style layouts, such as Linear or TableLayout. Linear will simply display every element above the next. TableLayout will allow you to make “rows” of items. I will show you both soon. So let's dive in.
Let's first open our main.xml file. Double click the file in the left side of the window in it's path (res/layout/main.xml). This will open up a visual layout in the middle screen.
This is where you will do most of your work on the style or layout of your application. First, let's learn how to remove some elements. Right click on the “Hello World, Coins!” portion and click “Remove.” Now with that out of the way we should have a blank screen (all black). What you need to do now, is click on the drop down menu at the top of the black screen called “Config” and select “Portrait.” This will re-shape the layout window into portrait mode. This is not a permanent change! You need to construct your main.XML to be in portrait mode.
Now, let's create the logo which is at the top of the Red Box application. Put your mouse over the “Views” list on the left side (right to the left of the black layout window) and scroll the mouse wheel. Here you should see a long list of cool things you can add to your layout, including “ImageView.” Find ImageView and click it and drag it over to your black screen.
You see the “main.XML” tab in the above image? Clicking this tab will display the actual XML code which constitutes the physical layout. You can edit this code if you know XML or HTML. There are a bunch of tags, and in the tags you have android specific id's, or elements. Here is an example of an ImageButton in the XML code:
<ImageButton android:id="@+id/ImageButton01" android:layout_width="wrap_content" android:layout_height="wrap_content"
</ImageButton>
A general structure of the tags would be like so:
<START-TAG (a bunch of elements that define the properties of the tag)></END-TAG>
Your code will not be formatted like mine. It will most likely be all on one line. You can hit enter after each element within the tags to make it formatted like mine, because “whitespace,” or blank areas, are okay in XML.
Now, what do you see missing from this code? That's right, the actual image that will constitute the ImageButton. Let's add that following the android element syntax:
android:src=”@drawable/nickel”
Make sure it is within the <> of the beginning ImageButton tag and all together, like so:
<ImageButton android:id="@+id/ImageButton01" android:layout_width="wrap_content" android:layout_height="wrap_content"android:src="@drawable/nickel">
</ImageButton>
If you don't the colors will be wrong and you will notice immediately.
Now we need to create the directory drawable and place an image named “icon” in it. It doesn't matter what the file type is, but I always use PNG. Right click on “res” in the left side of the Eclipse window that shows your tree, and navigate to “New” then click “Folder.” Type in the name “drawable” and hit enter. Now you need to create an image. Make sure the image fits on your screen. My screen, for instance, is only 320x480 pixels. Once you have made the image, you can drag the image from any file manager, including your desktop if using Gnome or KDE right into the Eclipse window and drop it right on the “drawable” folder! This copies the file into the workspace, which gets compiled right into your application.
Now, if you click the “Layout” tab beneath the code window (when you clicked to change to code view) you will see the layout view, just how it will appear on the mobile device. If all went well, you should see your image button there.
The code “@drawable/icon” means “@” (use resource), “drawable” (in drawable directory), and “icon” (whatever file there has the prefix “icon”, e.g. icon.PNG, icon.JPG). You don't use the suffix or extension for the file name. This will be the same for mp3's. When you want the button to play an mp3, you need to specify where the mp3 is. You don't do this in the XML though, this is something the RedBoxCoin.java file needs. Here is an example:
public void updateTime1() {if(mp !=null){mp.stop();}mp = MediaPlayer.create(this, R.raw.nickel);mp.start();
That small piece of code is enough for the Java file to play an mp3. Notice the “R.raw.nickel” string. This tells Java that the resource “nickel.mp3” is in the “raw” directory. This doesn't instantiate the process, meaning the mp3 doesn't play by itself. That you will need to specify. Here is how I do that:
ImageButton btn1;btn1=(ImageButton)findViewById(R.id.ImageButton01);btn1.setOnClickListener(this);if (v==btn1){updateTime1();}
Those lines stay in that order. The first line, declares the button as the variable btn1. This basically means “Hey Java, I am making an Image Button soon.” The second line, assigns the variable (which is an ImageButton, yeah you repeat yourself a lot in Java) and the tells Java the button is in the XML already waiting for it to do something. It finds it in the XML file by the findViewById() function, and there we declared the button as “ImageButton01.” Check the XML code in layout if you need to. The third line says “Hey Java, I might press that button and I might not, so watch for it.” The fourth is what Java is supposed to do if the button is, in fact, pressed.
This is a lot of code and remembering this for being a beginner would be tough. A lot of code is actually suggested to you via Eclipse, and since this is a beginners' guide, I am going to forgo a full on introduction to Java.
Layout and Design.Everything in this section, you have already learned in the paragraphs above. Here I will just go over exactly
how to code the sound board application. We will simply use my code that I put into the Phone Losers Red Box application.
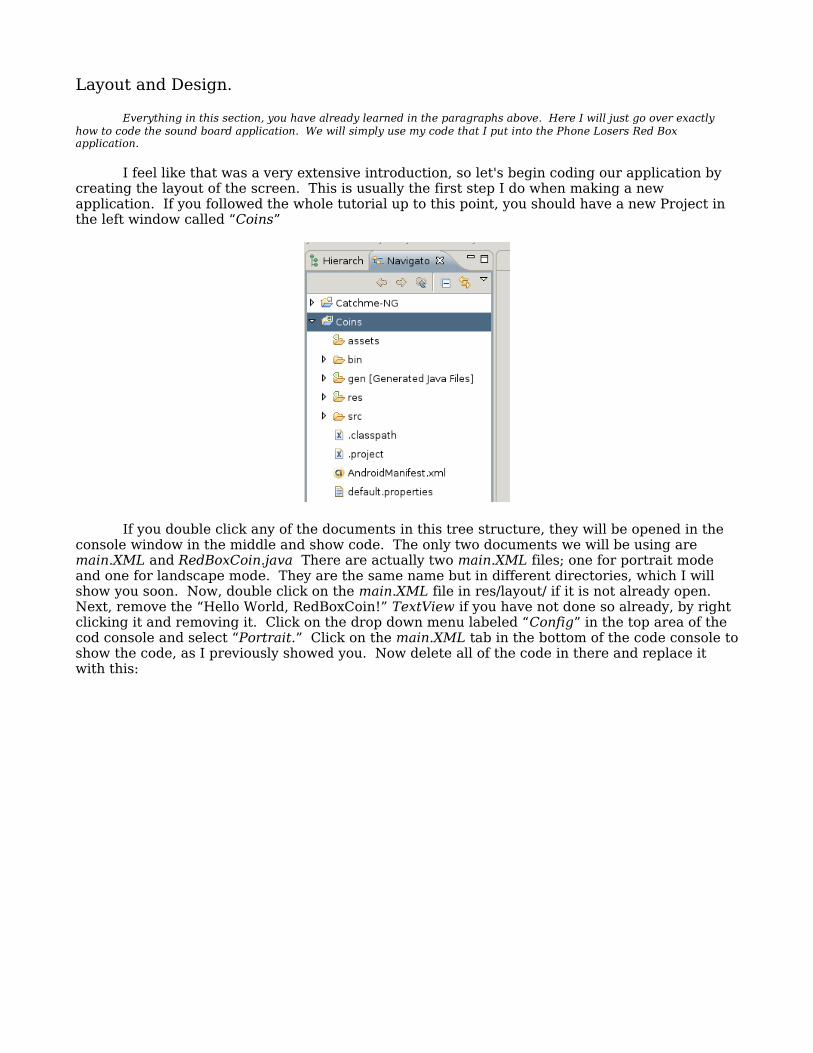
I feel like that was a very extensive introduction, so let's begin coding our application by creating the layout of the screen. This is usually the first step I do when making a new application. If you followed the whole tutorial up to this point, you should have a new Project in the left window called “Coins”
If you double click any of the documents in this tree structure, they will be opened in the console window in the middle and show code. The only two documents we will be using are main.XML and RedBoxCoin.java There are actually two main.XML files; one for portrait mode and one for landscape mode. They are the same name but in different directories, which I will show you soon. Now, double click on the main.XML file in res/layout/ if it is not already open. Next, remove the “Hello World, RedBoxCoin!” TextView if you have not done so already, by right clicking it and removing it. Click on the drop down menu labeled “Config” in the top area of the cod console and select “Portrait.” Click on the main.XML tab in the bottom of the code console to show the code, as I previously showed you. Now delete all of the code in there and replace it with this:
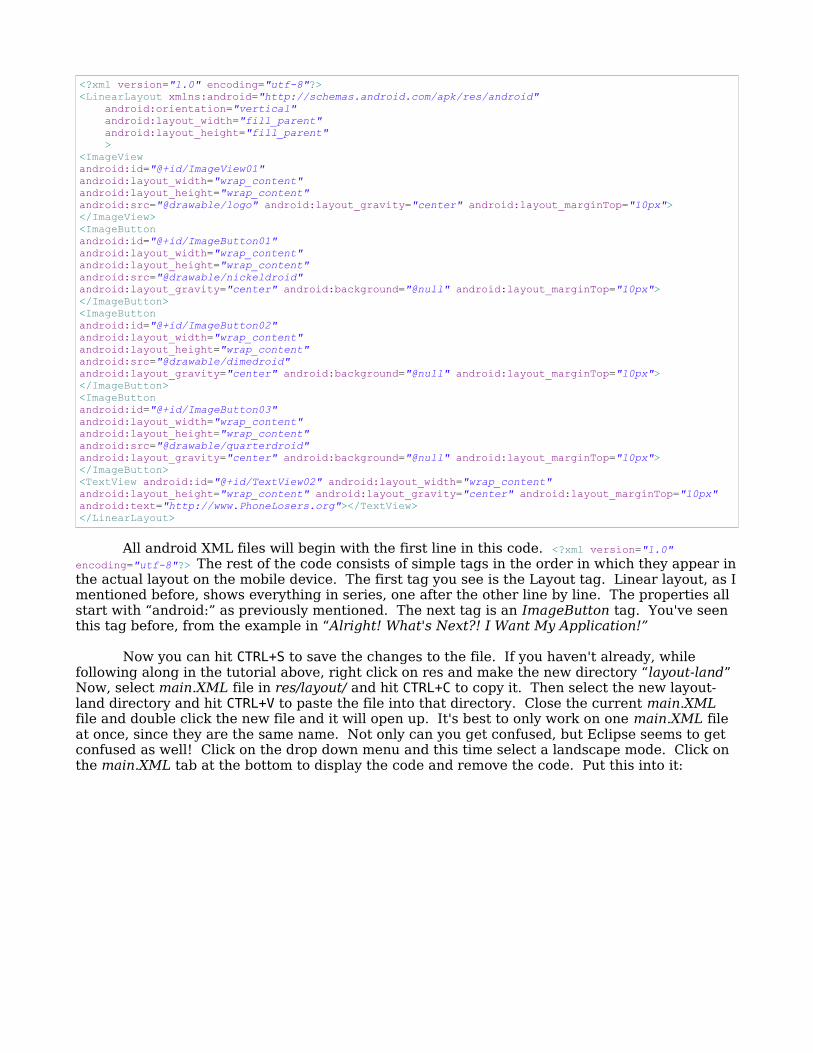
<?xml version="1.0" encoding="utf-8"?><LinearLayout xmlns:android="http://schemas.android.com/apk/res/android" android:orientation="vertical" android:layout_width="fill_parent" android:layout_height="fill_parent" ><ImageView android:id="@+id/ImageView01" android:layout_width="wrap_content" android:layout_height="wrap_content"android:src="@drawable/logo" android:layout_gravity="center" android:layout_marginTop="10px"></ImageView><ImageButton android:id="@+id/ImageButton01" android:layout_width="wrap_content"android:layout_height="wrap_content"android:src="@drawable/nickeldroid" android:layout_gravity="center" android:background="@null" android:layout_marginTop="10px"></ImageButton><ImageButton android:id="@+id/ImageButton02" android:layout_width="wrap_content" android:layout_height="wrap_content"android:src="@drawable/dimedroid" android:layout_gravity="center" android:background="@null" android:layout_marginTop="10px"></ImageButton><ImageButton android:id="@+id/ImageButton03" android:layout_width="wrap_content" android:layout_height="wrap_content"android:src="@drawable/quarterdroid" android:layout_gravity="center" android:background="@null" android:layout_marginTop="10px"></ImageButton><TextView android:id="@+id/TextView02" android:layout_width="wrap_content" android:layout_height="wrap_content" android:layout_gravity="center" android:layout_marginTop="10px" android:text="http://www.PhoneLosers.org"></TextView></LinearLayout>
All android XML files will begin with the first line in this code. <?xml version="1.0" encoding="utf-8"?> The rest of the code consists of simple tags in the order in which they appear in the actual layout on the mobile device. The first tag you see is the Layout tag. Linear layout, as I mentioned before, shows everything in series, one after the other line by line. The properties all start with “android:” as previously mentioned. The next tag is an ImageButton tag. You've seen this tag before, from the example in “Alright! What's Next?! I Want My Application!”
Now you can hit CTRL+S to save the changes to the file. If you haven't already, while following along in the tutorial above, right click on res and make the new directory “layout-land” Now, select main.XML file in res/layout/ and hit CTRL+C to copy it. Then select the new layout-land directory and hit CTRL+V to paste the file into that directory. Close the current main.XML file and double click the new file and it will open up. It's best to only work on one main.XML file at once, since they are the same name. Not only can you get confused, but Eclipse seems to get confused as well! Click on the drop down menu and this time select a landscape mode. Click on the main.XML tab at the bottom to display the code and remove the code. Put this into it:
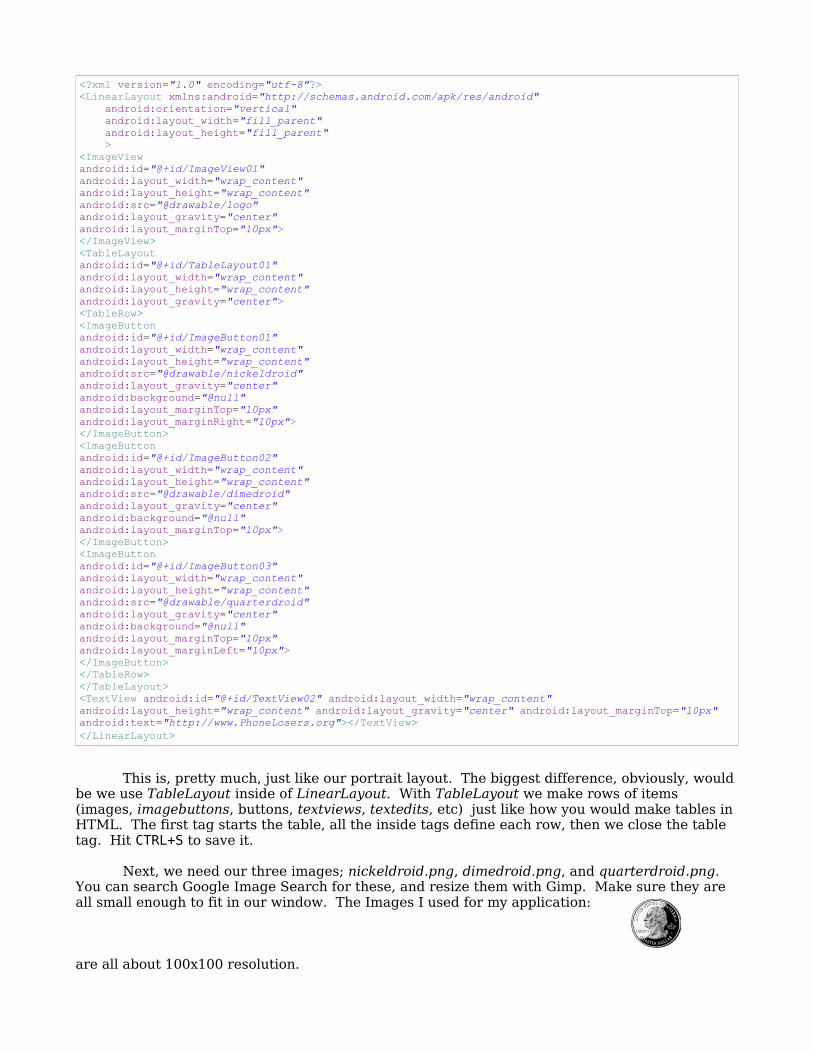
<?xml version="1.0" encoding="utf-8"?><LinearLayout xmlns:android="http://schemas.android.com/apk/res/android" android:orientation="vertical" android:layout_width="fill_parent" android:layout_height="fill_parent" ><ImageView android:id="@+id/ImageView01" android:layout_width="wrap_content" android:layout_height="wrap_content"android:src="@drawable/logo" android:layout_gravity="center" android:layout_marginTop="10px"></ImageView><TableLayout android:id="@+id/TableLayout01" android:layout_width="wrap_content" android:layout_height="wrap_content" android:layout_gravity="center"><TableRow><ImageButton android:id="@+id/ImageButton01" android:layout_width="wrap_content"android:layout_height="wrap_content"android:src="@drawable/nickeldroid" android:layout_gravity="center" android:background="@null" android:layout_marginTop="10px" android:layout_marginRight="10px"></ImageButton><ImageButton android:id="@+id/ImageButton02" android:layout_width="wrap_content" android:layout_height="wrap_content"android:src="@drawable/dimedroid" android:layout_gravity="center" android:background="@null" android:layout_marginTop="10px"></ImageButton><ImageButton android:id="@+id/ImageButton03" android:layout_width="wrap_content" android:layout_height="wrap_content"android:src="@drawable/quarterdroid" android:layout_gravity="center" android:background="@null" android:layout_marginTop="10px" android:layout_marginLeft="10px"></ImageButton></TableRow></TableLayout><TextView android:id="@+id/TextView02" android:layout_width="wrap_content" android:layout_height="wrap_content" android:layout_gravity="center" android:layout_marginTop="10px" android:text="http://www.PhoneLosers.org"></TextView></LinearLayout>
This is, pretty much, just like our portrait layout. The biggest difference, obviously, would be we use TableLayout inside of LinearLayout. With TableLayout we make rows of items (images, imagebuttons, buttons, textviews, textedits, etc) just like how you would make tables in HTML. The first tag starts the table, all the inside tags define each row, then we close the table tag. Hit CTRL+S to save it.
Next, we need our three images; nickeldroid.png, dimedroid.png, and quarterdroid.png. You can search Google Image Search for these, and resize them with Gimp. Make sure they are all small enough to fit in our window. The Images I used for my application:
are all about 100x100 resolution.
Now we need a logo and an icon. The logo is the Phone Losers logo (which I used without permission, go ahead Brad, sue me!) and the icon is the small icon displayed when someone hits the about button in the menu.
Once you have these three images made, you can click them from your file manager or desktop and drop them into the drawable folder, just as we did previously in this tutorial. Make sure you name the images as they are called from main.XML! All code, XML or Java will refernce the same images obviously. So let's keep all of the names the same. Our three images should be named (if you haven't guessed already): nickeldroid.png, dimedroid.png, and quarterdroid.png
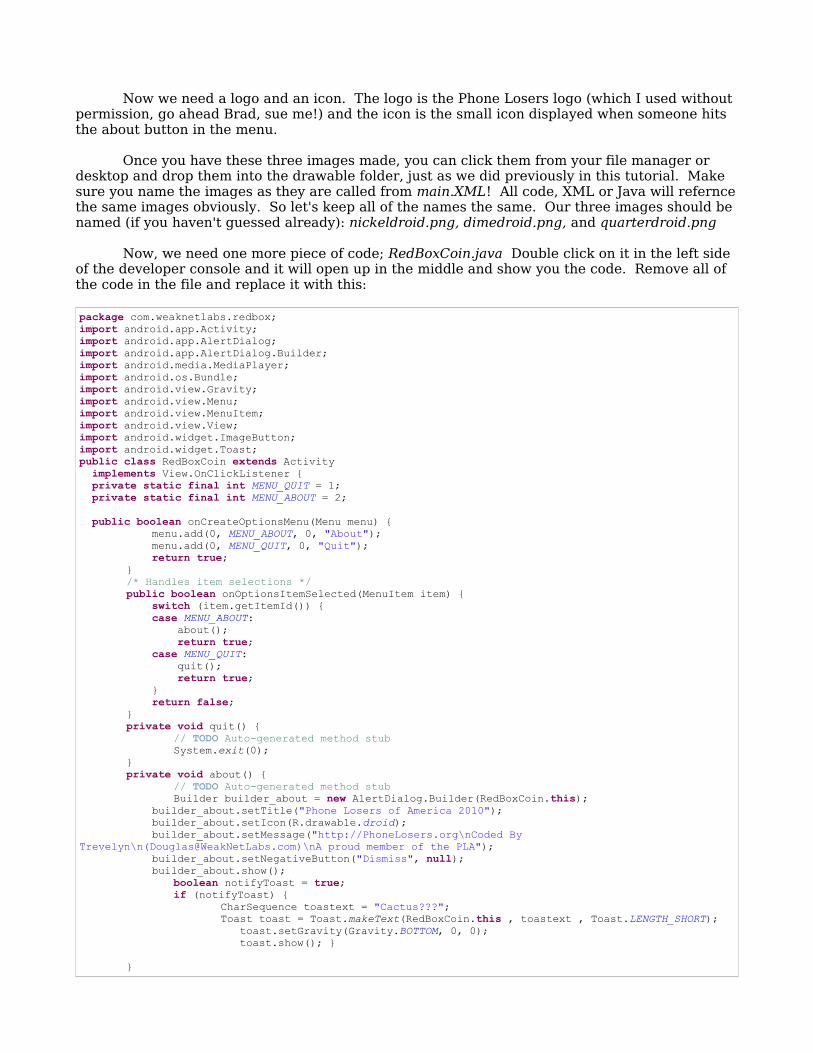
Now, we need one more piece of code; RedBoxCoin.java Double click on it in the left side of the developer console and it will open up in the middle and show you the code. Remove all of the code in the file and replace it with this:
package com.weaknetlabs.redbox;import android.app.Activity;import android.app.AlertDialog;import android.app.AlertDialog.Builder;import android.media.MediaPlayer;import android.os.Bundle;import android.view.Gravity;import android.view.Menu;import android.view.MenuItem;import android.view.View;import android.widget.ImageButton;import android.widget.Toast;public class RedBoxCoin extends Activity implements View.OnClickListener { private static final int MENU_QUIT = 1; private static final int MENU_ABOUT = 2; public boolean onCreateOptionsMenu(Menu menu) {
menu.add(0, MENU_ABOUT, 0, "About"); menu.add(0, MENU_QUIT, 0, "Quit"); return true;}/* Handles item selections */public boolean onOptionsItemSelected(MenuItem item) { switch (item.getItemId()) { case MENU_ABOUT: about(); return true; case MENU_QUIT: quit(); return true; } return false;}private void quit() {
// TODO Auto-generated method stubSystem.exit(0);
}private void about() {
// TODO Auto-generated method stubBuilder builder_about = new AlertDialog.Builder(RedBoxCoin.this);
builder_about.setTitle("Phone Losers of America 2010"); builder_about.setIcon(R.drawable.droid); builder_about.setMessage("http://PhoneLosers.org\nCoded By
Trevelyn\n([email protected])\nA proud member of the PLA"); builder_about.setNegativeButton("Dismiss", null); builder_about.show();
boolean notifyToast = true;if (notifyToast) {
CharSequence toastext = "Cactus???";Toast toast = Toast.makeText(RedBoxCoin.this , toastext , Toast.LENGTH_SHORT); toast.setGravity(Gravity.BOTTOM, 0, 0); toast.show(); }
}
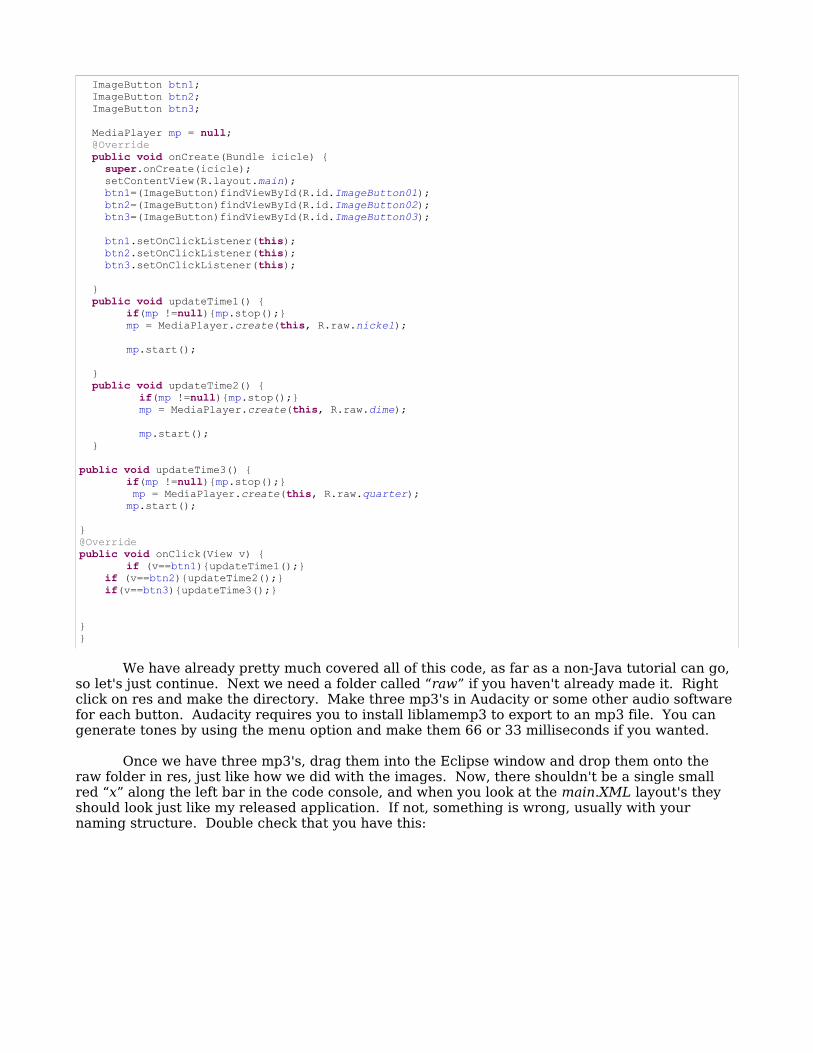
ImageButton btn1; ImageButton btn2; ImageButton btn3; MediaPlayer mp = null; @Override public void onCreate(Bundle icicle) { super.onCreate(icicle); setContentView(R.layout.main); btn1=(ImageButton)findViewById(R.id.ImageButton01); btn2=(ImageButton)findViewById(R.id.ImageButton02); btn3=(ImageButton)findViewById(R.id.ImageButton03); btn1.setOnClickListener(this); btn2.setOnClickListener(this); btn3.setOnClickListener(this); } public void updateTime1() {
if(mp !=null){mp.stop();}mp = MediaPlayer.create(this, R.raw.nickel);mp.start();
} public void updateTime2() {
if(mp !=null){mp.stop();} mp = MediaPlayer.create(this, R.raw.dime); mp.start();
} public void updateTime3() {
if(mp !=null){mp.stop();} mp = MediaPlayer.create(this, R.raw.quarter);mp.start();
}@Overridepublic void onClick(View v) {
if (v==btn1){updateTime1();} if (v==btn2){updateTime2();} if(v==btn3){updateTime3();} }}
We have already pretty much covered all of this code, as far as a non-Java tutorial can go, so let's just continue. Next we need a folder called “raw” if you haven't already made it. Right click on res and make the directory. Make three mp3's in Audacity or some other audio software for each button. Audacity requires you to install liblamemp3 to export to an mp3 file. You can generate tones by using the menu option and make them 66 or 33 milliseconds if you wanted.
Once we have three mp3's, drag them into the Eclipse window and drop them onto the raw folder in res, just like how we did with the images. Now, there shouldn't be a single small red “x” along the left bar in the code console, and when you look at the main.XML layout's they should look just like my released application. If not, something is wrong, usually with your naming structure. Double check that you have this:
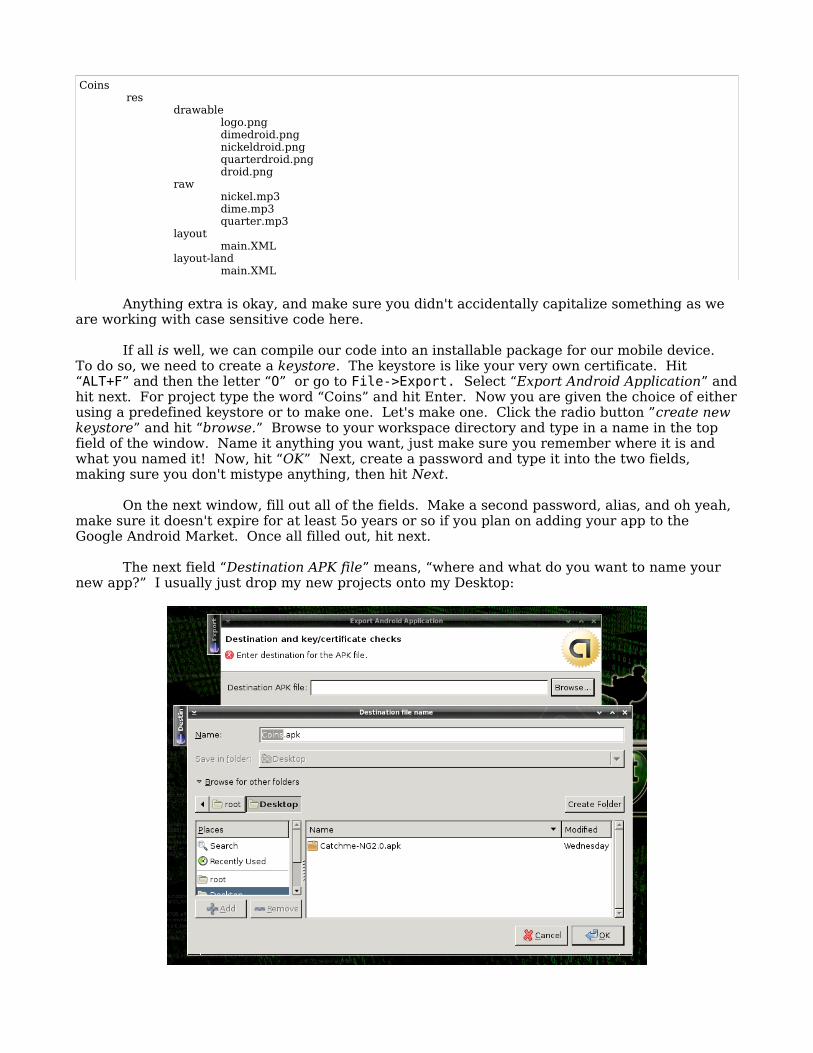
Coinsres
drawablelogo.pngdimedroid.pngnickeldroid.pngquarterdroid.pngdroid.png
rawnickel.mp3dime.mp3quarter.mp3
layoutmain.XML
layout-landmain.XML
Anything extra is okay, and make sure you didn't accidentally capitalize something as we are working with case sensitive code here.
If all is well, we can compile our code into an installable package for our mobile device. To do so, we need to create a keystore. The keystore is like your very own certificate. Hit “ALT+F” and then the letter “O” or go to File->Export. Select “Export Android Application” and hit next. For project type the word “Coins” and hit Enter. Now you are given the choice of either using a predefined keystore or to make one. Let's make one. Click the radio button ”create new keystore” and hit “browse.” Browse to your workspace directory and type in a name in the top field of the window. Name it anything you want, just make sure you remember where it is and what you named it! Now, hit “OK” Next, create a password and type it into the two fields, making sure you don't mistype anything, then hit Next.
On the next window, fill out all of the fields. Make a second password, alias, and oh yeah, make sure it doesn't expire for at least 5o years or so if you plan on adding your app to the Google Android Market. Once all filled out, hit next.
The next field “Destination APK file” means, “where and what do you want to name your new app?” I usually just drop my new projects onto my Desktop:
Now that you have your installable application, you are ready to install it on your mobile device. Mount your device2 and make a HOMEBREW directory. Drag your new app over to your HOMEBREW directory on your SD card and then unmount the drive.3 Now you need an app on your device that will allow you to browse files on your SD card. I prefer and recommend “Linda” file manager. It is free in the app market and very stable. Browse to the file APK file and click it in Linda File Manager. Go through each prompt to install it and then click “Run.”
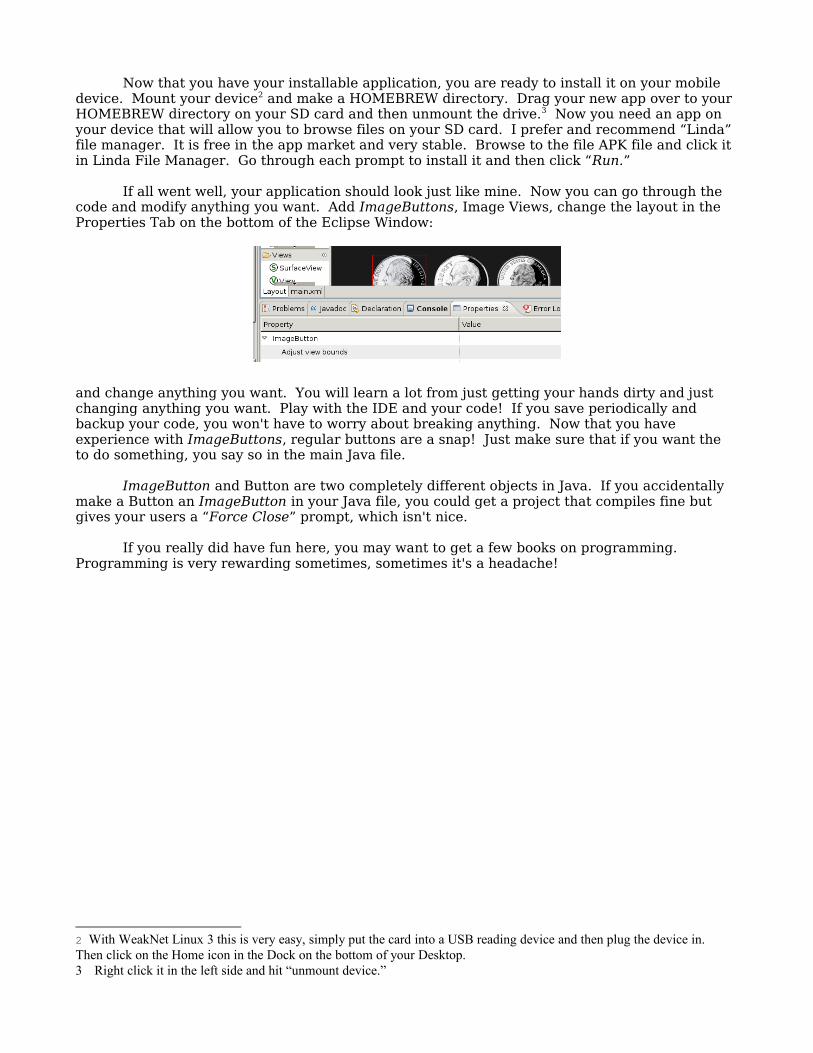
If all went well, your application should look just like mine. Now you can go through the code and modify anything you want. Add ImageButtons, Image Views, change the layout in the Properties Tab on the bottom of the Eclipse Window:
and change anything you want. You will learn a lot from just getting your hands dirty and just changing anything you want. Play with the IDE and your code! If you save periodically and backup your code, you won't have to worry about breaking anything. Now that you have experience with ImageButtons, regular buttons are a snap! Just make sure that if you want the to do something, you say so in the main Java file.
ImageButton and Button are two completely different objects in Java. If you accidentally make a Button an ImageButton in your Java file, you could get a project that compiles fine but gives your users a “Force Close” prompt, which isn't nice.
If you really did have fun here, you may want to get a few books on programming. Programming is very rewarding sometimes, sometimes it's a headache!
2 With WeakNet Linux 3 this is very easy, simply put the card into a USB reading device and then plug the device in. Then click on the Home icon in the Dock on the bottom of your Desktop. 3 Right click it in the left side and hit “unmount device.”