Embed Size (px)
Citation preview
- 1 -
A Step-by-Step Guide to getting started with Hot Potatoes Hot Potatoes Software: http://web.uvic.ca/hrd/hotpot/
Andrew Balaam
Objectives: To put together a short cycle of exercises linked together based on the
topic of animals. Examples here are in French, but feel free to choose your own
language!
Instructions
Before you begin work you will need to create a Folder called Animals into which you
can save your work. When creating a cycle of Hot Potatoes exercises it is important
that all exercises and any associated pictures, sounds or videos making up a unit are
contained in one folder. I suggest that the folder should be on the hard drive of your
computer. Into the folder that you’ve called Animals, copy the pictures and sounds
from the Animals folder on the Toolkit CD. You are now ready to start work.
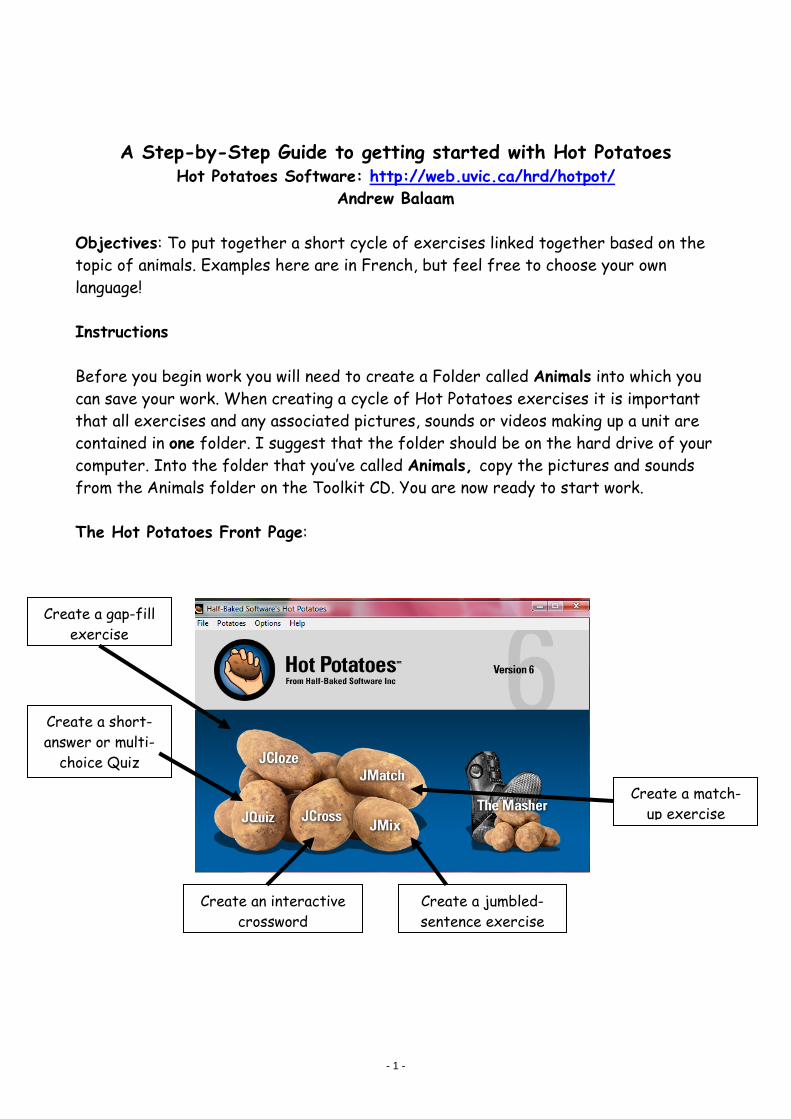
The Hot Potatoes Front Page:
Create a short-
answer or multi-
choice Quiz
Create a jumbled-
sentence exercise
Create a gap-fill
exercise
Create a match-
up exercise
Create an interactive
crossword
- 2 -
A. Creating a drag and drop Match-up Exercise with pictures and target language words.
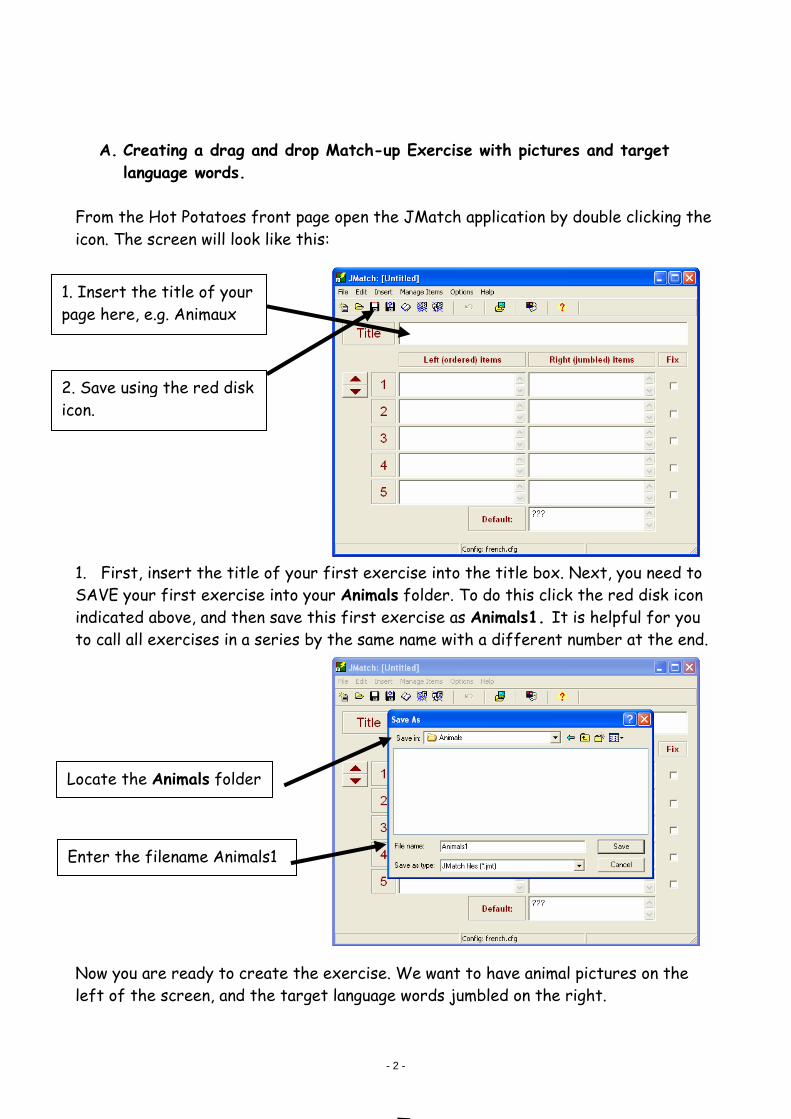
From the Hot Potatoes front page open the JMatch application by double clicking the
icon. The screen will look like this:
1. First, insert the title of your first exercise into the title box. Next, you need to
SAVE your first exercise into your Animals folder. To do this click the red disk icon
indicated above, and then save this first exercise as Animals1. It is helpful for you
to call all exercises in a series by the same name with a different number at the end.
Now you are ready to create the exercise. We want to have animal pictures on the
left of the screen, and the target language words jumbled on the right.
Locate the Animals folder
Enter the filename Animals1
2. Save using the red disk
icon.
1. Insert the title of your
page here, e.g. Animaux
- 3 -
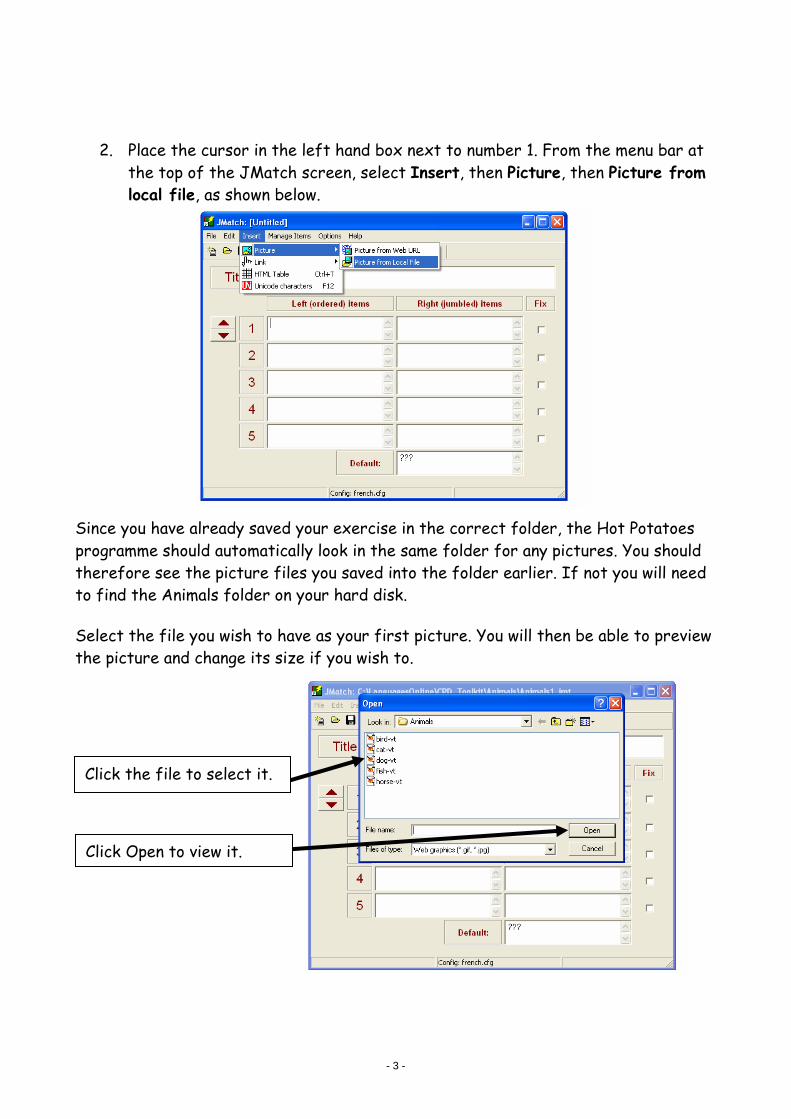
2. Place the cursor in the left hand box next to number 1. From the menu bar at
the top of the JMatch screen, select Insert, then Picture, then Picture from
local file, as shown below.
Since you have already saved your exercise in the correct folder, the Hot Potatoes
programme should automatically look in the same folder for any pictures. You should
therefore see the picture files you saved into the folder earlier. If not you will need
to find the Animals folder on your hard disk. Select the file you wish to have as your first picture. You will then be able to preview
the picture and change its size if you wish to.
Click the file to select it.
Click Open to view it.
- 4 -
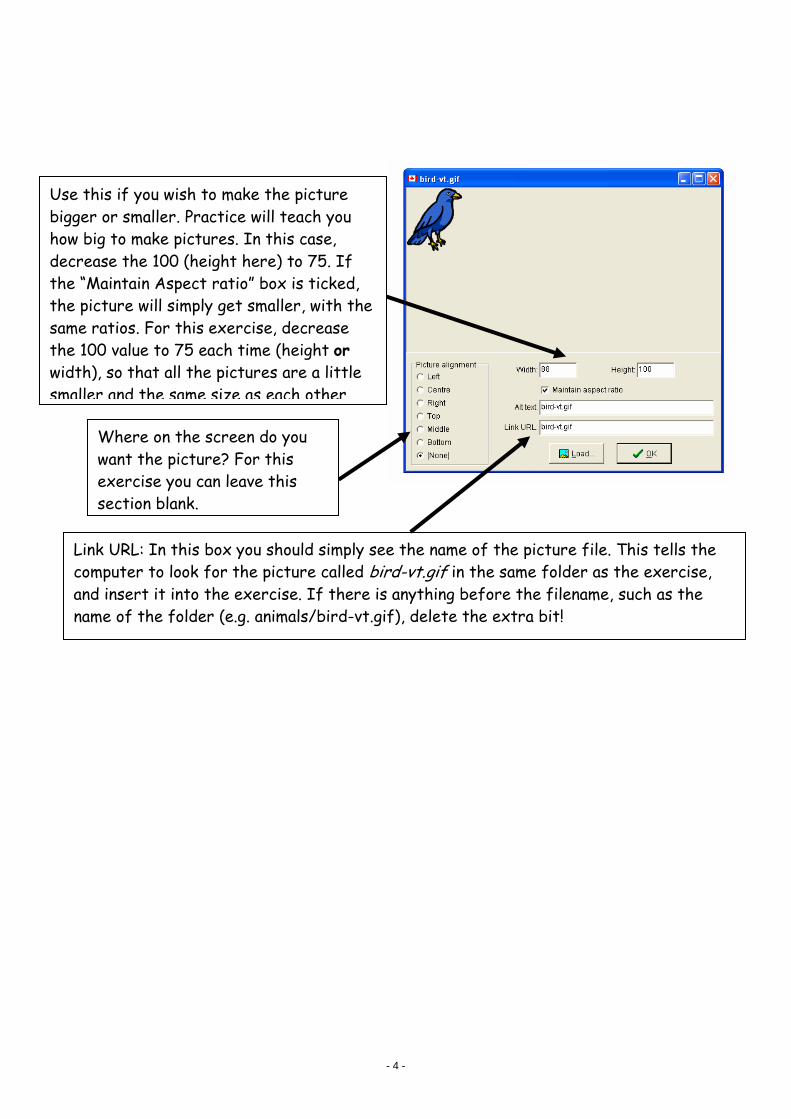
Use this if you wish to make the picture
bigger or smaller. Practice will teach you
how big to make pictures. In this case,
decrease the 100 (height here) to 75. If
the “Maintain Aspect ratio” box is ticked,
the picture will simply get smaller, with the
same ratios. For this exercise, decrease
the 100 value to 75 each time (height or
width), so that all the pictures are a little
smaller and the same size as each other.
Where on the screen do you
want the picture? For this
exercise you can leave this
section blank.
Link URL: In this box you should simply see the name of the picture file. This tells the
computer to look for the picture called bird-vt.gif in the same folder as the exercise,
and insert it into the exercise. If there is anything before the filename, such as the
name of the folder (e.g. animals/bird-vt.gif), delete the extra bit!
- 5 -
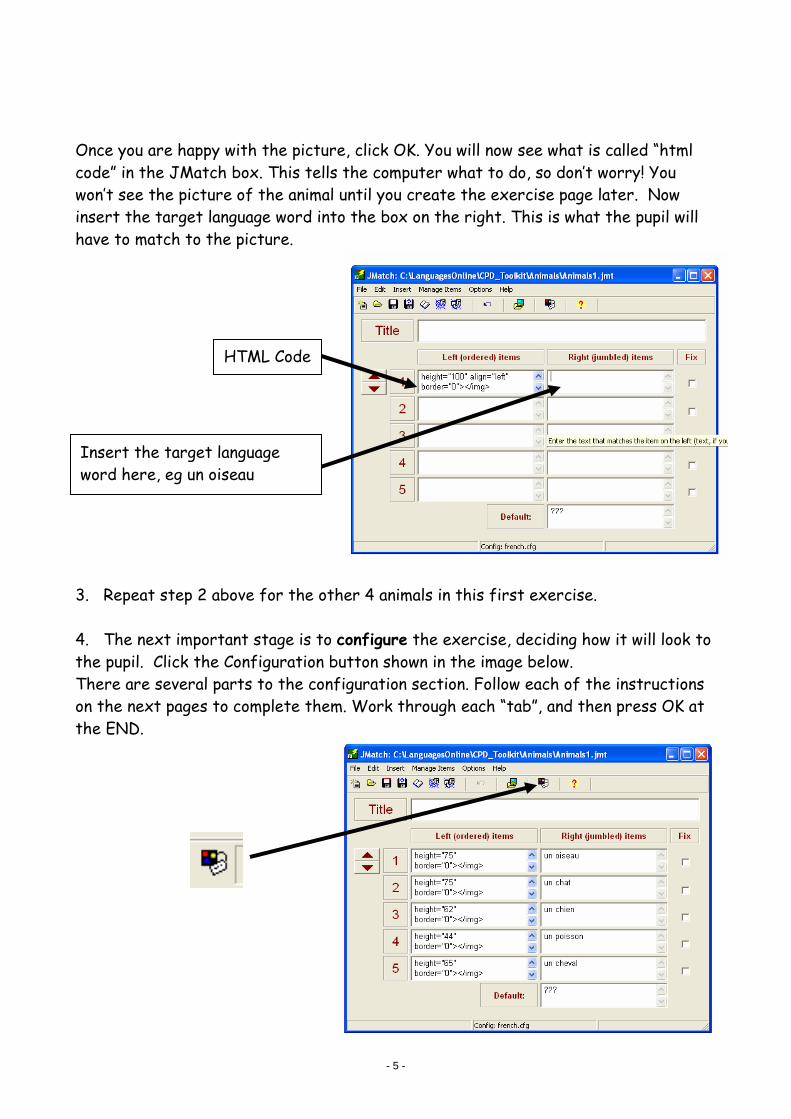
Once you are happy with the picture, click OK. You will now see what is called “html
code” in the JMatch box. This tells the computer what to do, so don’t worry! You
won’t see the picture of the animal until you create the exercise page later. Now
insert the target language word into the box on the right. This is what the pupil will
have to match to the picture.
3. Repeat step 2 above for the other 4 animals in this first exercise.
4. The next important stage is to configure the exercise, deciding how it will look to
the pupil. Click the Configuration button shown in the image below.
There are several parts to the configuration section. Follow each of the instructions
on the next pages to complete them. Work through each “tab”, and then press OK at
the END.
HTML Code
Insert the target language
word here, eg un oiseau
- 6 -
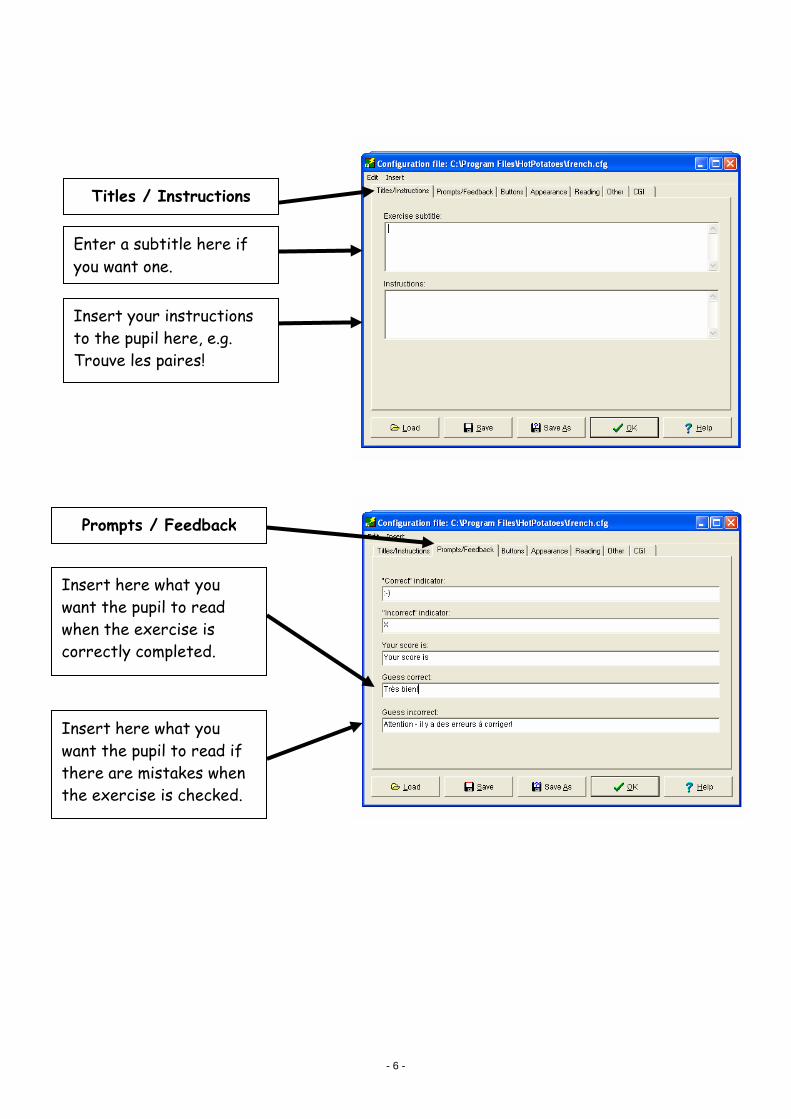
Titles / Instructions
Enter a subtitle here if
you want one.
Insert your instructions
to the pupil here, e.g.
Trouve les paires!
Insert here what you
want the pupil to read
when the exercise is
correctly completed.
Insert here what you
want the pupil to read if
there are mistakes when
the exercise is checked.
Prompts / Feedback
- 7 -
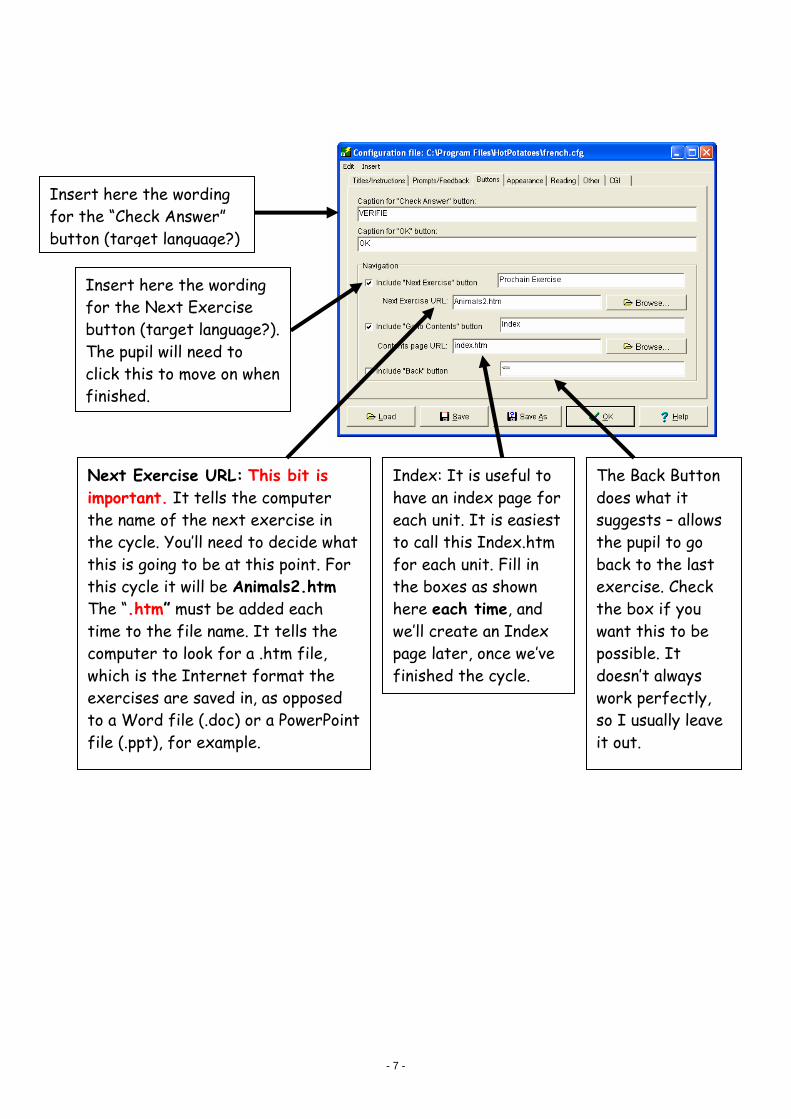
Insert here the wording
for the “Check Answer”
button (target language?)
Insert here the wording
for the Next Exercise
button (target language?).
The pupil will need to
click this to move on when
finished.
Next Exercise URL: This bit is
important. It tells the computer
the name of the next exercise in
the cycle. You’ll need to decide what
this is going to be at this point. For
this cycle it will be Animals2.htm
The “.htm” must be added each
time to the file name. It tells the
computer to look for a .htm file,
which is the Internet format the
exercises are saved in, as opposed
to a Word file (.doc) or a PowerPoint
file (.ppt), for example.
Index: It is useful to
have an index page for
each unit. It is easiest
to call this Index.htm
for each unit. Fill in
the boxes as shown
here each time, and
we’ll create an Index
page later, once we’ve
finished the cycle.
The Back Button
does what it
suggests – allows
the pupil to go
back to the last
exercise. Check
the box if you
want this to be
possible. It
doesn’t always
work perfectly,
so I usually leave
it out.
- 8 -
The remaining three “tabs” do not apply to this exercise so you can ignore them. Click
“OK” to complete your configuration.
5. You are now ready to create your first exercise. You now need to SAVE the
exercise twice. The first save will save the JMatch file with all the information
you’ve entered. You will need this in case you want to make any alterations later. The
second save will create and save the web page that the pupil will see and use.
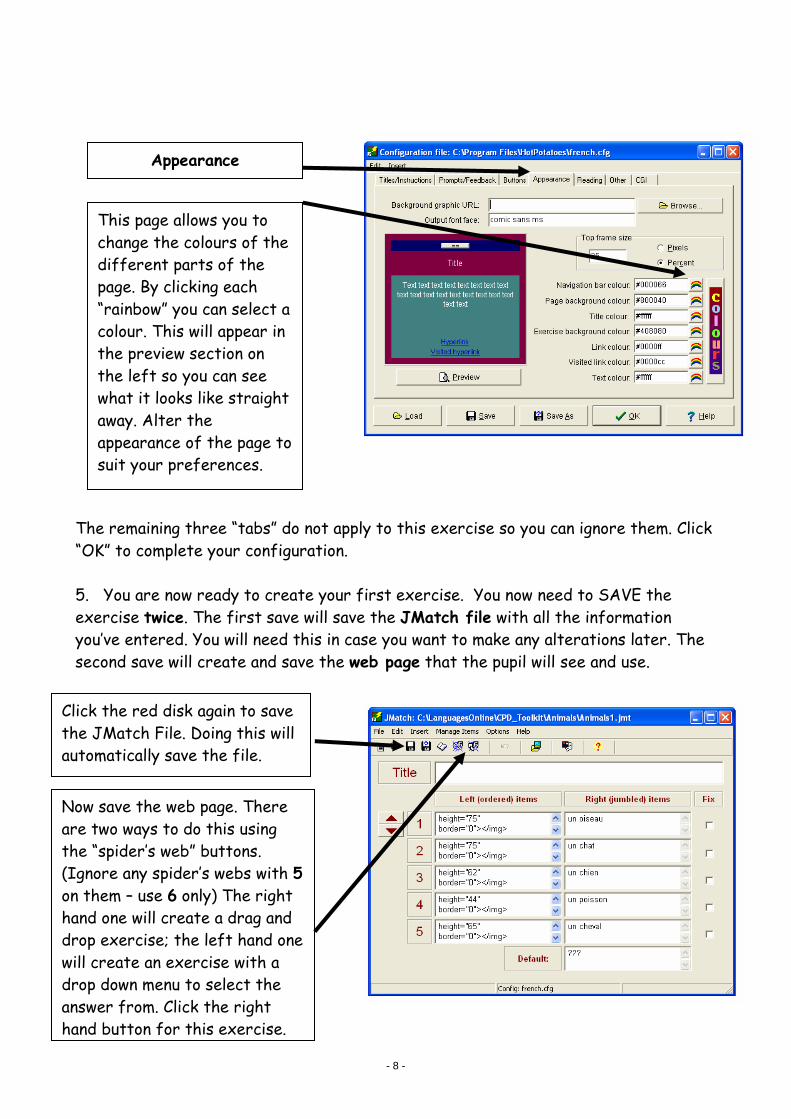
This page allows you to
change the colours of the
different parts of the
page. By clicking each
“rainbow” you can select a
colour. This will appear in
the preview section on
the left so you can see
what it looks like straight
away. Alter the
appearance of the page to
suit your preferences.
Appearance
Click the red disk again to save
the JMatch File. Doing this will
automatically save the file.
Now save the web page. There
are two ways to do this using
the “spider’s web” buttons.
(Ignore any spider’s webs with 5
on them – use 6 only) The right
hand one will create a drag and
drop exercise; the left hand one
will create an exercise with a
drop down menu to select the
answer from. Click the right
hand button for this exercise.
- 9 -
Now click Save.
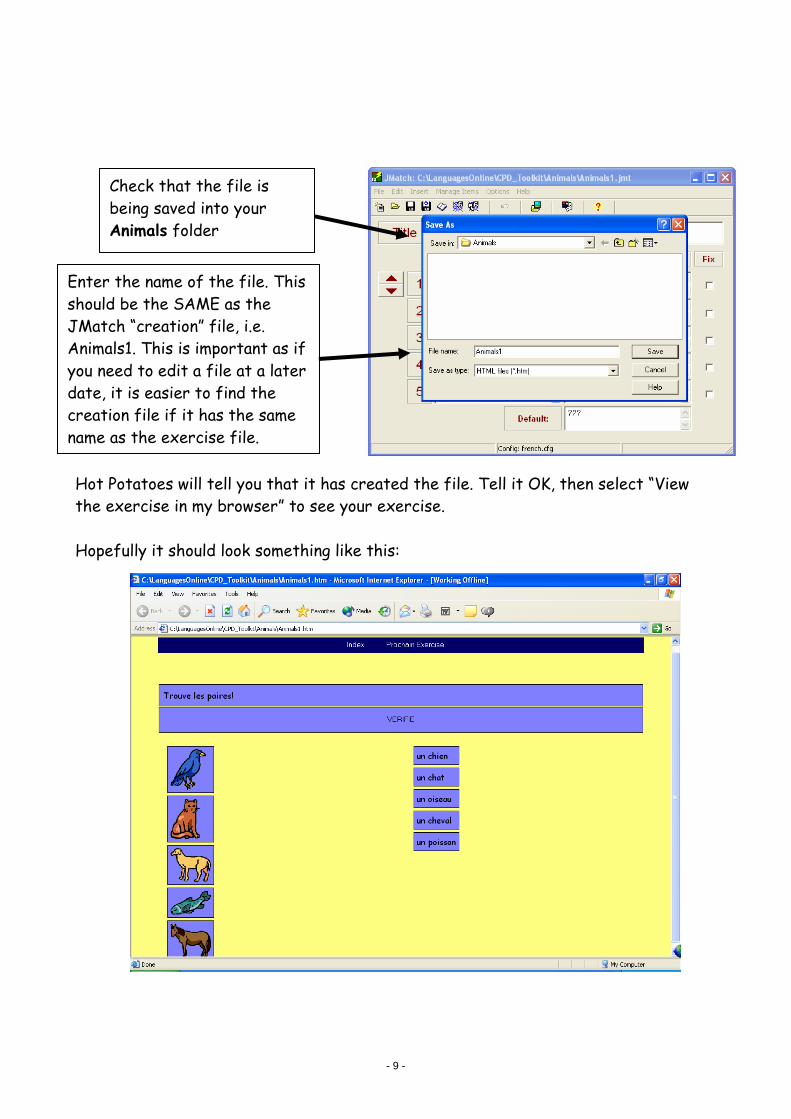
Hot Potatoes will tell you that it has created the file. Tell it OK, then select “View
the exercise in my browser” to see your exercise.
Hopefully it should look something like this:
Check that the file is
being saved into your
Animals folder
Enter the name of the file. This
should be the SAME as the
JMatch “creation” file, i.e.
Animals1. This is important as if
you need to edit a file at a later
date, it is easier to find the
creation file if it has the same
name as the exercise file.
- 10 -
So now you’ve created your very first interactive exercise using the Hot Potatoes
Programme. The process may have seemed quite long, but the good news is that you
have now covered most of the basics needed across all the “Potatoes”.
You can go back into the JMatch screen to make any amendments if you need to. For
example if the pictures are too big, delete the html code where you inserted it in the
box and re-insert the picture, changing the size. Should you spot a smelling pistake
you can simply amend it, and then resave the page – Jmatch file first, then web page.
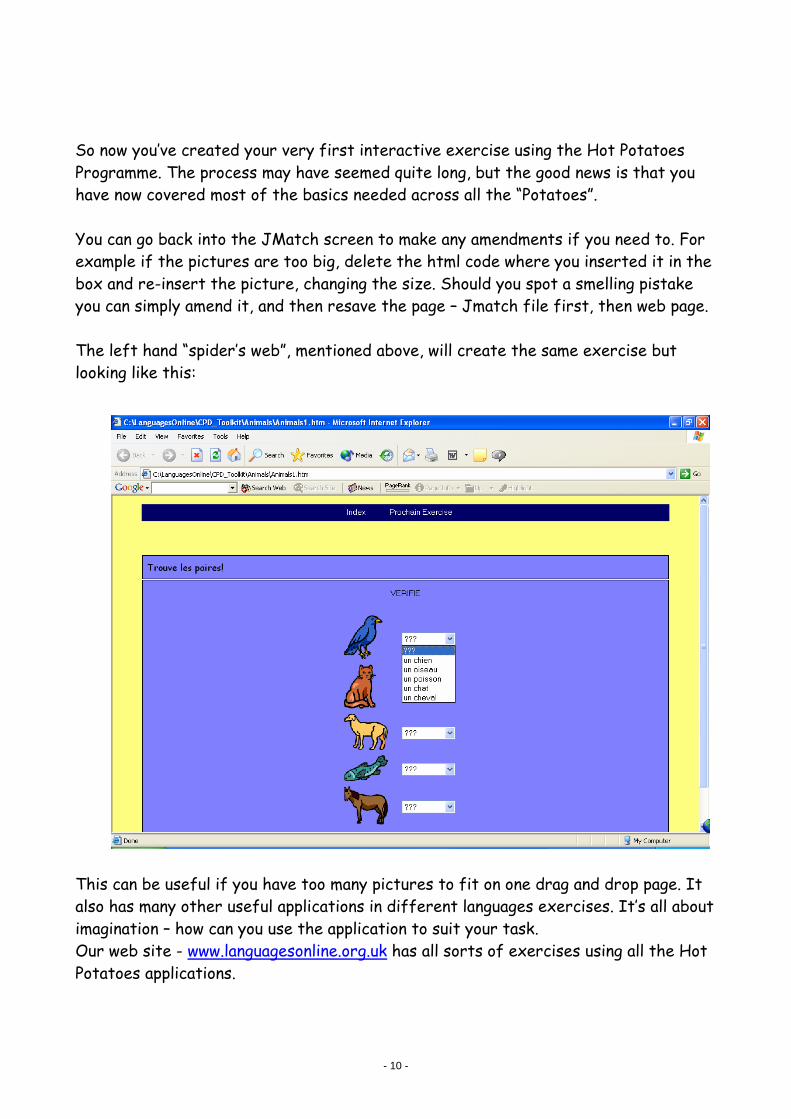
The left hand “spider’s web”, mentioned above, will create the same exercise but
looking like this:
This can be useful if you have too many pictures to fit on one drag and drop page. It
also has many other useful applications in different languages exercises. It’s all about
imagination – how can you use the application to suit your task.
Our web site - www.languagesonline.org.uk has all sorts of exercises using all the Hot
Potatoes applications.
- 11 -
B. Creating a Multi-choice exercise using JBC
Now let’s move on to exercise two in our cycle. This is going to be a multi-choice
exercise where the pupil will have to identify and click the correct word from a list
of four to identify the animal in the picture.
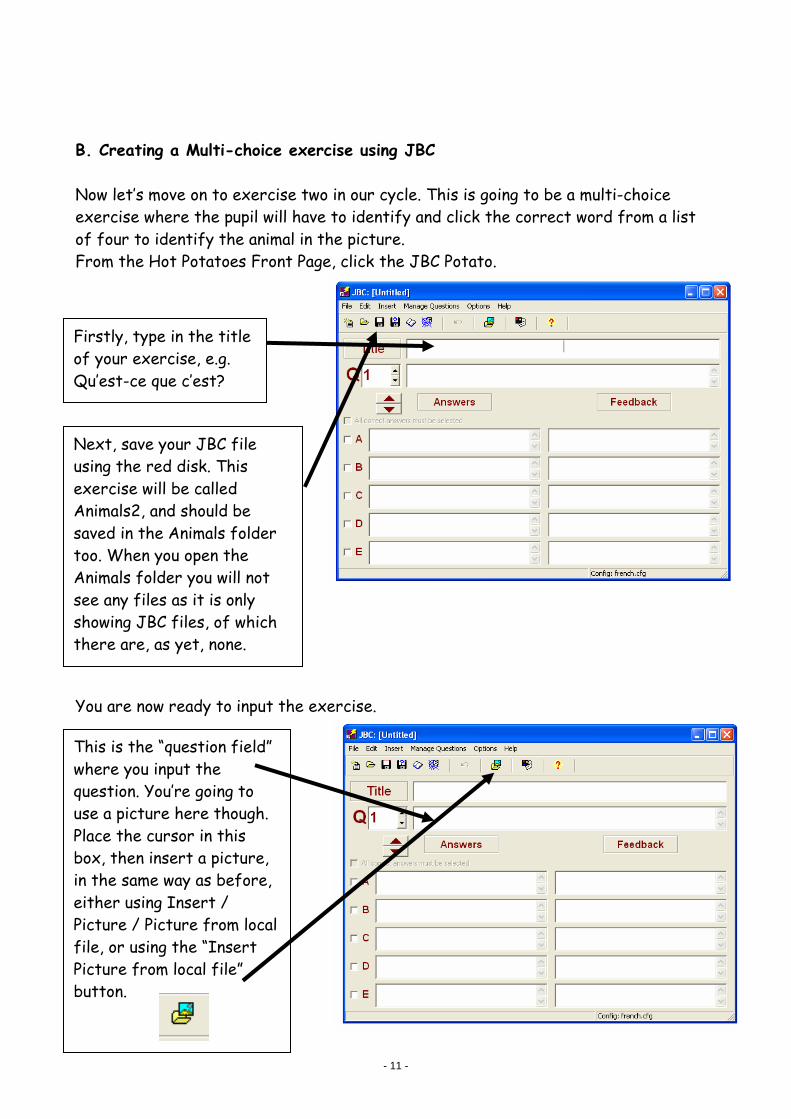
From the Hot Potatoes Front Page, click the JBC Potato.
You are now ready to input the exercise.
Firstly, type in the title
of your exercise, e.g.
Qu’est-ce que c’est?
Next, save your JBC file
using the red disk. This
exercise will be called
Animals2, and should be
saved in the Animals folder
too. When you open the
Animals folder you will not
see any files as it is only
showing JBC files, of which
there are, as yet, none.
This is the “question field”
where you input the
question. You’re going to
use a picture here though.
Place the cursor in this
box, then insert a picture,
in the same way as before,
either using Insert /
Picture / Picture from local
file, or using the “Insert
Picture from local file”
button.

- 12 -
Once you’ve entered the exercise, you need to configure it, in the same way as
before. Check back to section 4 above if you need a reminder of how to do this. The
screens to work through are essentially the same as in JMatch. Don’t forget that the
next exercise in your cycle will be called Animals3.htm. The one extra screen you
need to look at is the “Other” tab:
Next input the four
possible answers, one right,
three wrong.
You need to tell the
computer which is the
correct answer by ticking
the box next to the
correct one.
Enter as many pictures and sets of possible answers as you wish
by working through the questions.
This is fairly obvious. Tick
the boxes you want to be
active in your page.
- 13 -
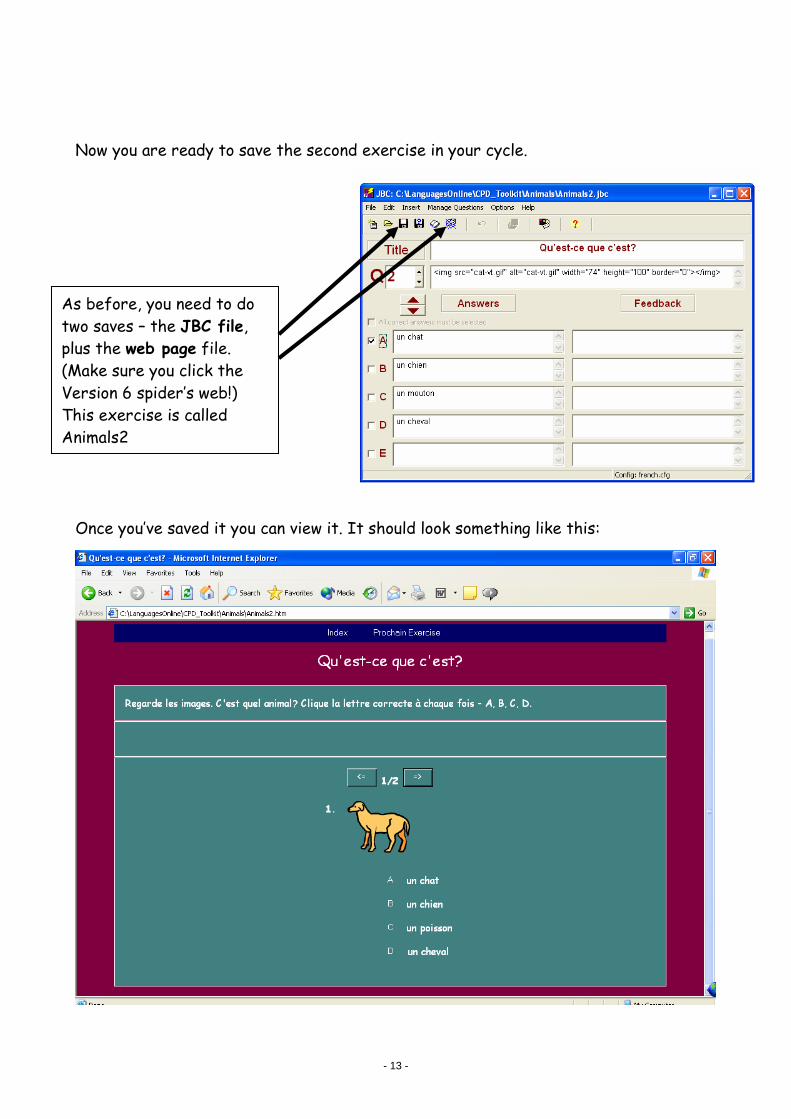
Now you are ready to save the second exercise in your cycle.
Once you’ve saved it you can view it. It should look something like this:
As before, you need to do
two saves – the JBC file,
plus the web page file.
(Make sure you click the
Version 6 spider’s web!)
This exercise is called
Animals2
- 14 -
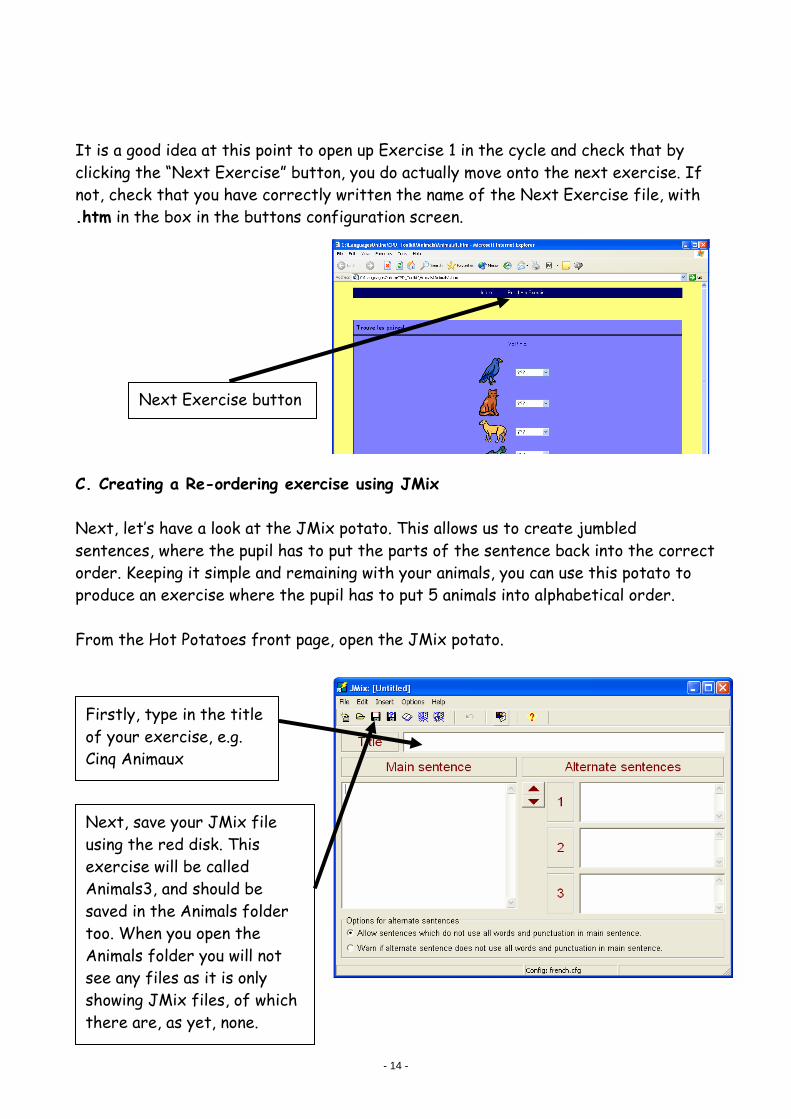
It is a good idea at this point to open up Exercise 1 in the cycle and check that by
clicking the “Next Exercise” button, you do actually move onto the next exercise. If
not, check that you have correctly written the name of the Next Exercise file, with
.htm in the box in the buttons configuration screen.
C. Creating a Re-ordering exercise using JMix
Next, let’s have a look at the JMix potato. This allows us to create jumbled
sentences, where the pupil has to put the parts of the sentence back into the correct
order. Keeping it simple and remaining with your animals, you can use this potato to
produce an exercise where the pupil has to put 5 animals into alphabetical order.
From the Hot Potatoes front page, open the JMix potato.
Firstly, type in the title
of your exercise, e.g.
Cinq Animaux
Next, save your JMix file
using the red disk. This
exercise will be called
Animals3, and should be
saved in the Animals folder
too. When you open the
Animals folder you will not
see any files as it is only
showing JMix files, of which
there are, as yet, none.
Next Exercise button
- 15 -
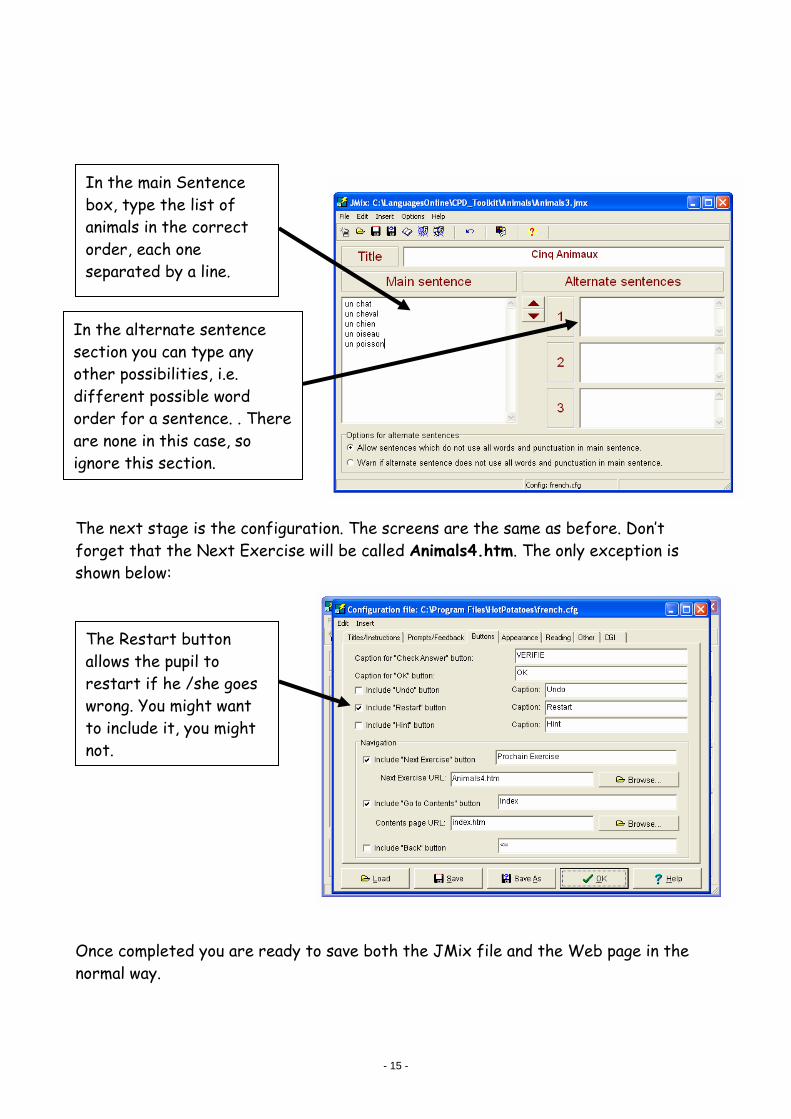
The next stage is the configuration. The screens are the same as before. Don’t
forget that the Next Exercise will be called Animals4.htm. The only exception is
shown below:
Once completed you are ready to save both the JMix file and the Web page in the
normal way.
In the main Sentence
box, type the list of
animals in the correct
order, each one
separated by a line.
In the alternate sentence
section you can type any
other possibilities, i.e.
different possible word
order for a sentence. . There
are none in this case, so
ignore this section.
The Restart button
allows the pupil to
restart if he /she goes
wrong. You might want
to include it, you might
not.
- 16 -
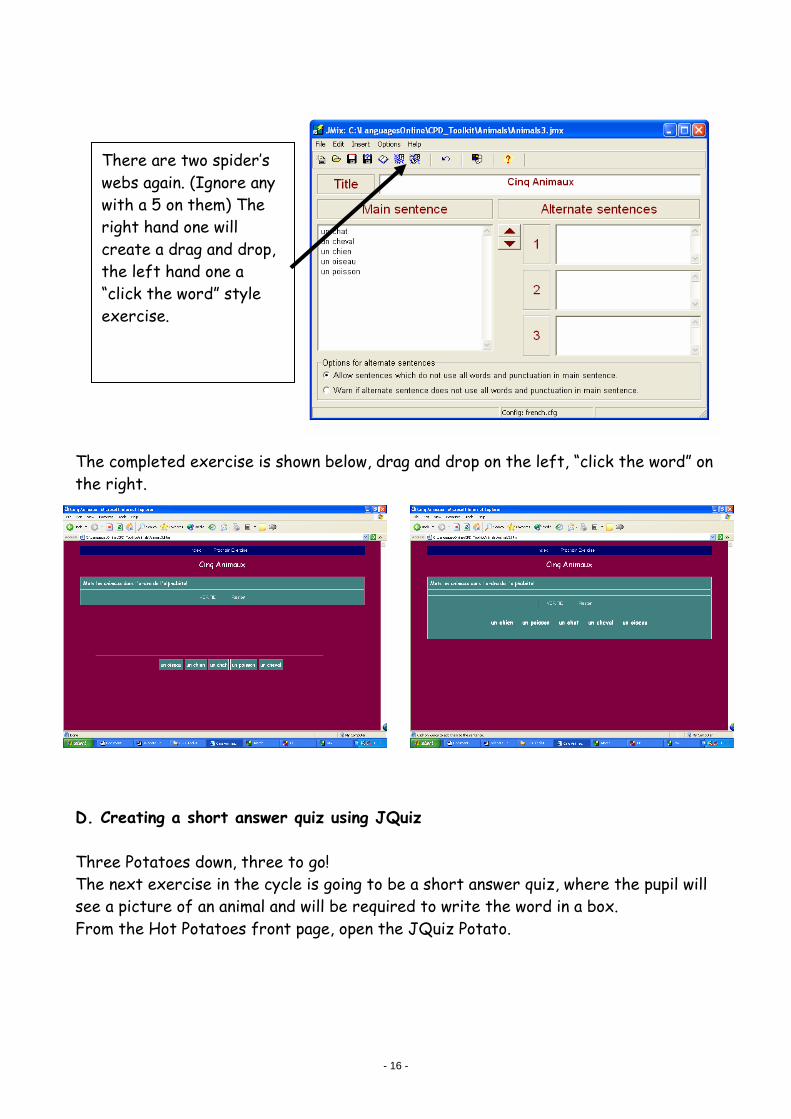
The completed exercise is shown below, drag and drop on the left, “click the word” on
the right.
D. Creating a short answer quiz using JQuiz
Three Potatoes down, three to go!
The next exercise in the cycle is going to be a short answer quiz, where the pupil will
see a picture of an animal and will be required to write the word in a box.
From the Hot Potatoes front page, open the JQuiz Potato.
There are two spider’s
webs again. (Ignore any
with a 5 on them) The
right hand one will
create a drag and drop,
the left hand one a
“click the word” style
exercise.
- 17 -
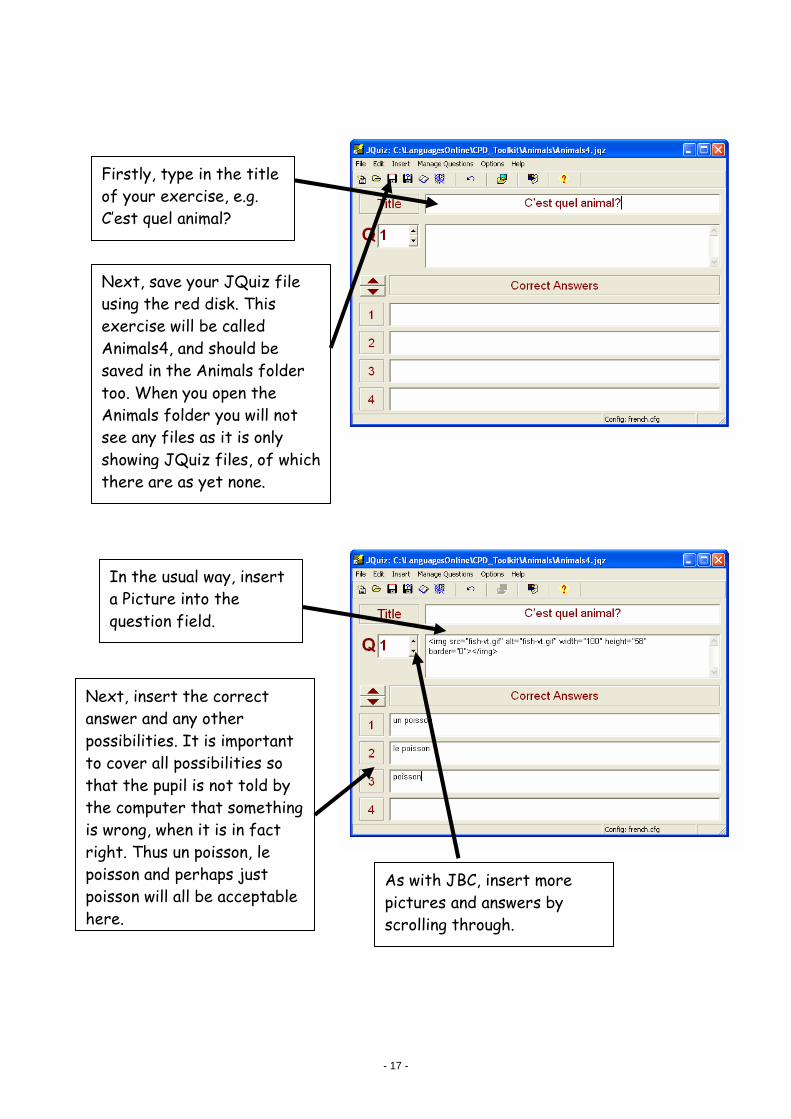
Firstly, type in the title
of your exercise, e.g.
C’est quel animal?
Next, save your JQuiz file
using the red disk. This
exercise will be called
Animals4, and should be
saved in the Animals folder
too. When you open the
Animals folder you will not
see any files as it is only
showing JQuiz files, of which
there are as yet none.
In the usual way, insert
a Picture into the
question field.
Next, insert the correct
answer and any other
possibilities. It is important
to cover all possibilities so
that the pupil is not told by
the computer that something
is wrong, when it is in fact
right. Thus un poisson, le
poisson and perhaps just
poisson will all be acceptable
here.
As with JBC, insert more
pictures and answers by
scrolling through.
- 18 -
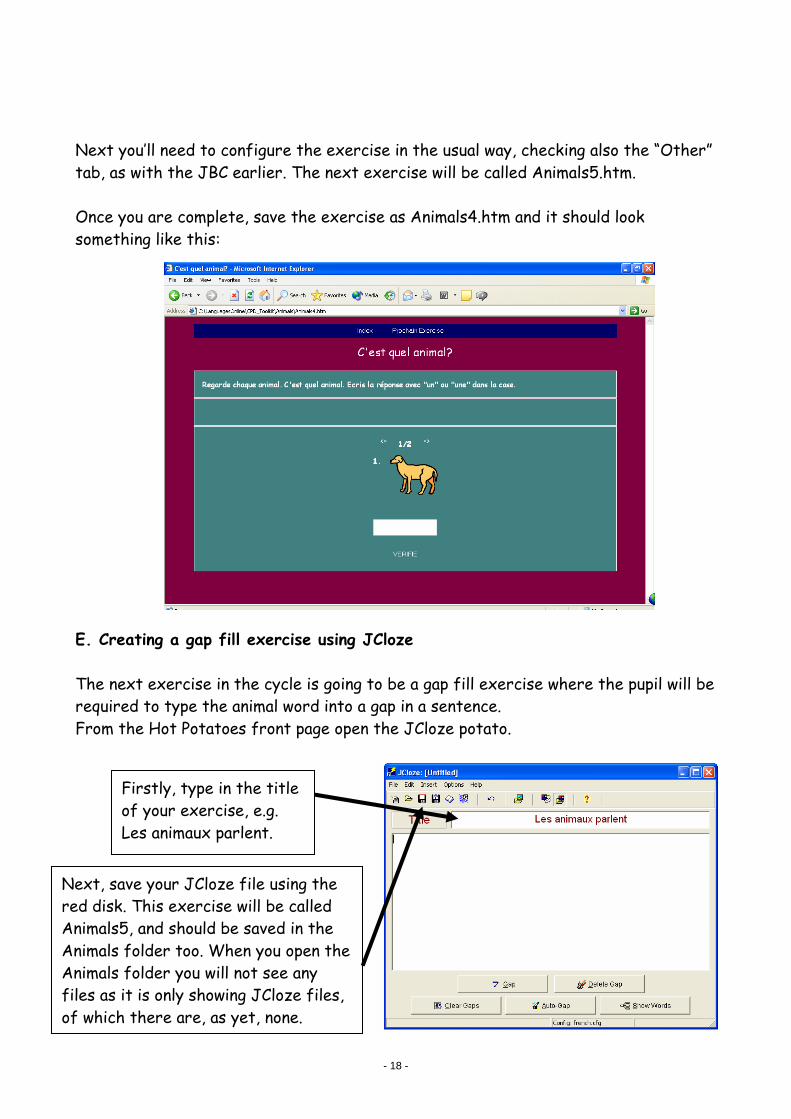
Next you’ll need to configure the exercise in the usual way, checking also the “Other”
tab, as with the JBC earlier. The next exercise will be called Animals5.htm.
Once you are complete, save the exercise as Animals4.htm and it should look
something like this:
E. Creating a gap fill exercise using JCloze
The next exercise in the cycle is going to be a gap fill exercise where the pupil will be
required to type the animal word into a gap in a sentence.
From the Hot Potatoes front page open the JCloze potato.
Firstly, type in the title
of your exercise, e.g.
Les animaux parlent.
Next, save your JCloze file using the
red disk. This exercise will be called
Animals5, and should be saved in the
Animals folder too. When you open the
Animals folder you will not see any
files as it is only showing JCloze files,
of which there are, as yet, none.
- 19 -
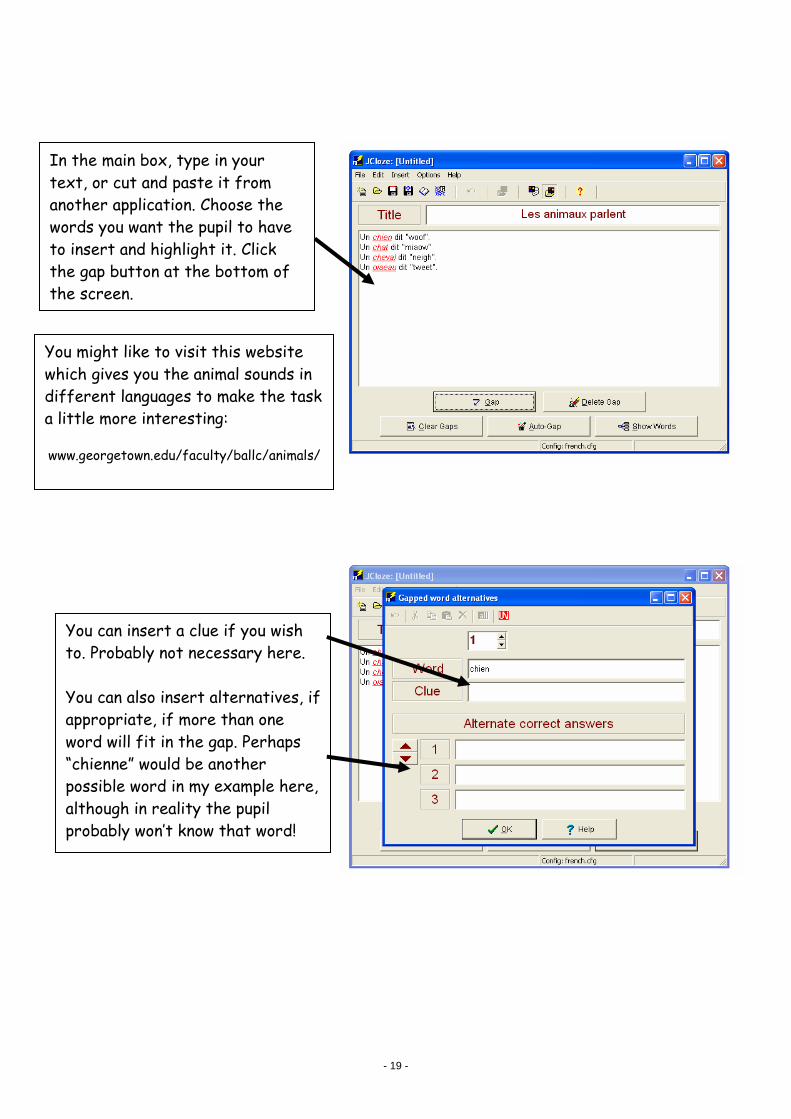
In the main box, type in your
text, or cut and paste it from
another application. Choose the
words you want the pupil to have
to insert and highlight it. Click
the gap button at the bottom of
the screen.
You can insert a clue if you wish
to. Probably not necessary here.
You can also insert alternatives, if
appropriate, if more than one
word will fit in the gap. Perhaps
“chienne” would be another
possible word in my example here,
although in reality the pupil
probably won’t know that word!
You might like to visit this website
which gives you the animal sounds in
different languages to make the task
a little more interesting:
www.georgetown.edu/faculty/ballc/animals/
- 20 -
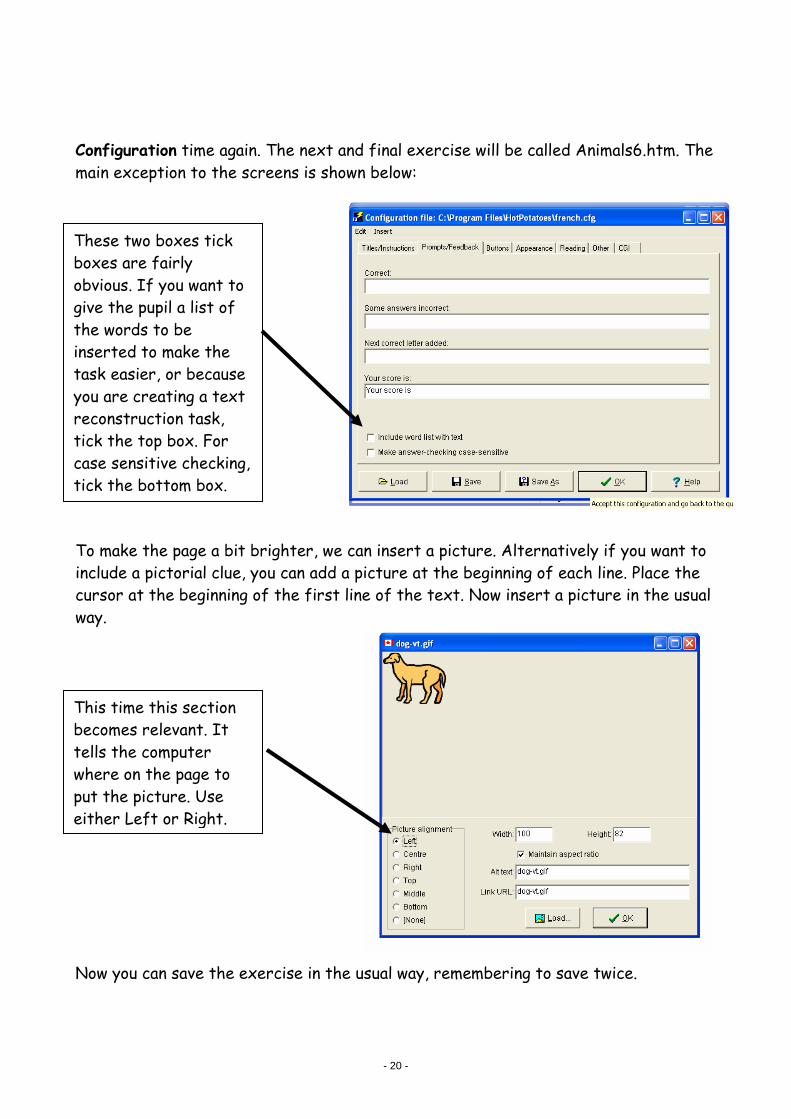
Configuration time again. The next and final exercise will be called Animals6.htm. The
main exception to the screens is shown below:
To make the page a bit brighter, we can insert a picture. Alternatively if you want to
include a pictorial clue, you can add a picture at the beginning of each line. Place the
cursor at the beginning of the first line of the text. Now insert a picture in the usual
way.
Now you can save the exercise in the usual way, remembering to save twice.
These two boxes tick
boxes are fairly
obvious. If you want to
give the pupil a list of
the words to be
inserted to make the
task easier, or because
you are creating a text
reconstruction task,
tick the top box. For
case sensitive checking,
tick the bottom box.
This time this section
becomes relevant. It
tells the computer
where on the page to
put the picture. Use
either Left or Right.
- 21 -
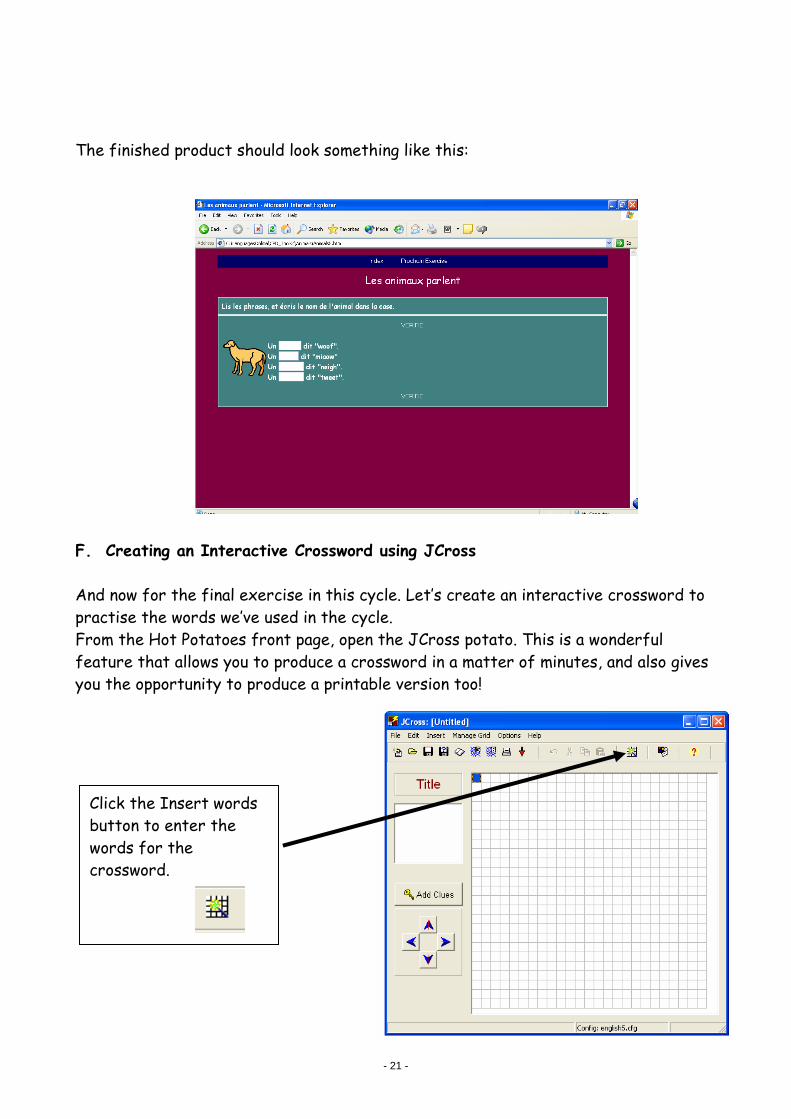
The finished product should look something like this:
F. Creating an Interactive Crossword using JCross
And now for the final exercise in this cycle. Let’s create an interactive crossword to
practise the words we’ve used in the cycle.
From the Hot Potatoes front page, open the JCross potato. This is a wonderful
feature that allows you to produce a crossword in a matter of minutes, and also gives
you the opportunity to produce a printable version too!
Click the Insert words
button to enter the
words for the
crossword.
- 22 -
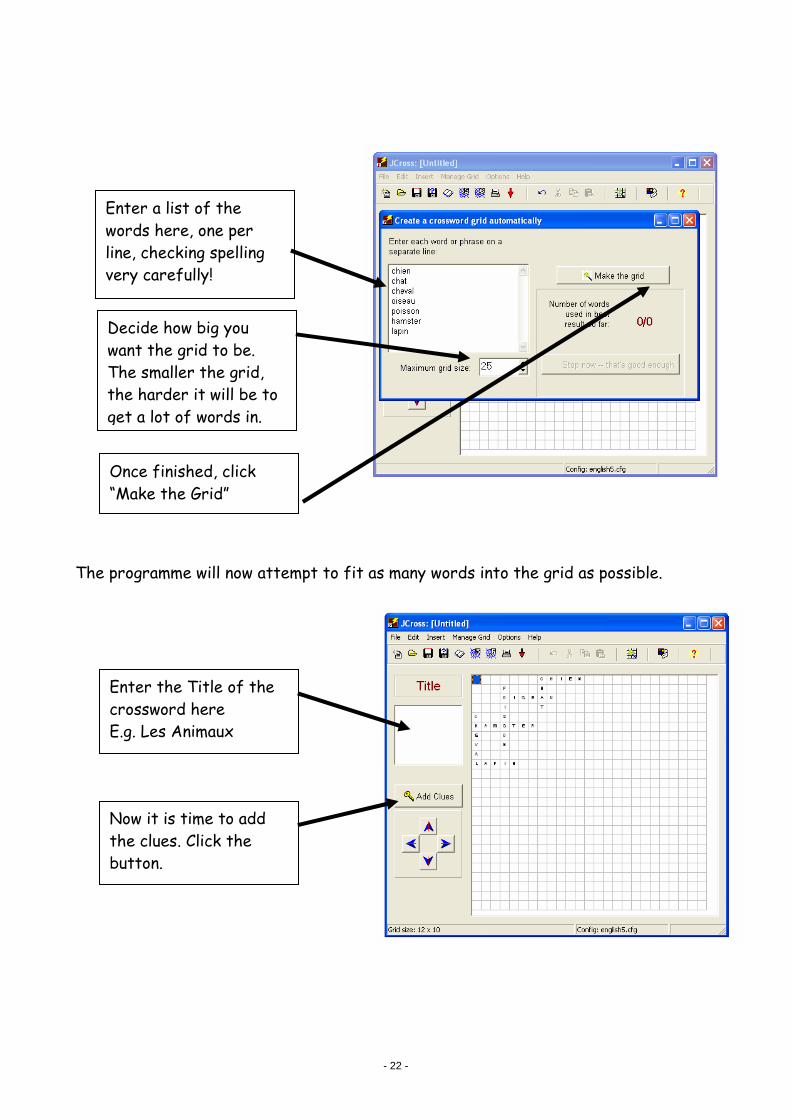
The programme will now attempt to fit as many words into the grid as possible.
Enter a list of the
words here, one per
line, checking spelling
very carefully!
Once finished, click
“Make the Grid”
Decide how big you
want the grid to be.
The smaller the grid,
the harder it will be to
get a lot of words in.
Now it is time to add
the clues. Click the
button.
Enter the Title of the
crossword here
E.g. Les Animaux
- 23 -
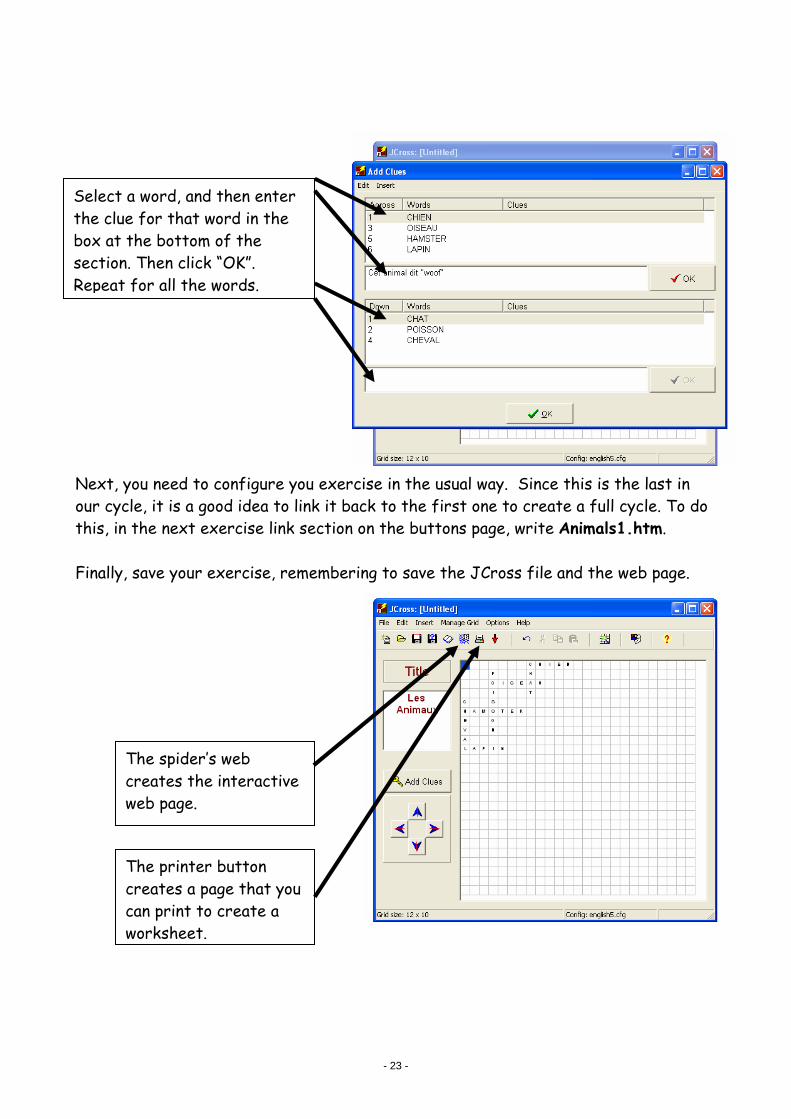
Next, you need to configure you exercise in the usual way. Since this is the last in
our cycle, it is a good idea to link it back to the first one to create a full cycle. To do
this, in the next exercise link section on the buttons page, write Animals1.htm.
Finally, save your exercise, remembering to save the JCross file and the web page.
Select a word, and then enter
the clue for that word in the
box at the bottom of the
section. Then click “OK”.
Repeat for all the words.
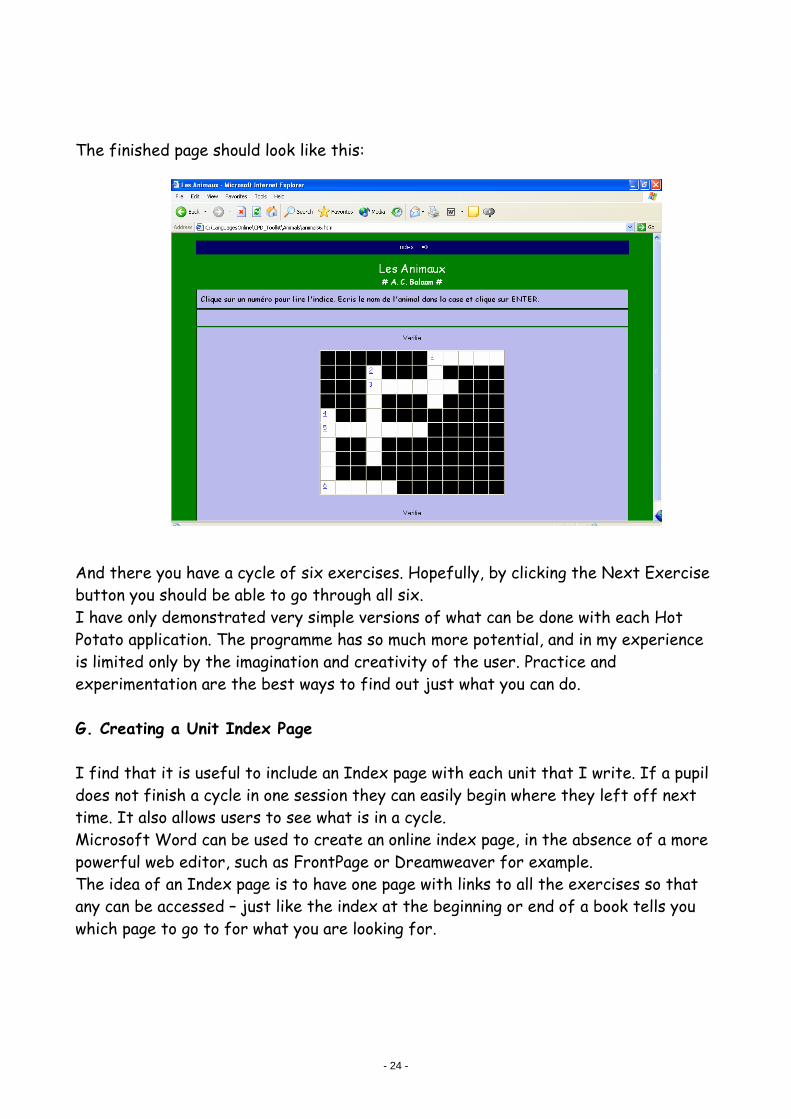
The printer button
creates a page that you
can print to create a
worksheet.
The spider’s web
creates the interactive
web page.
- 24 -
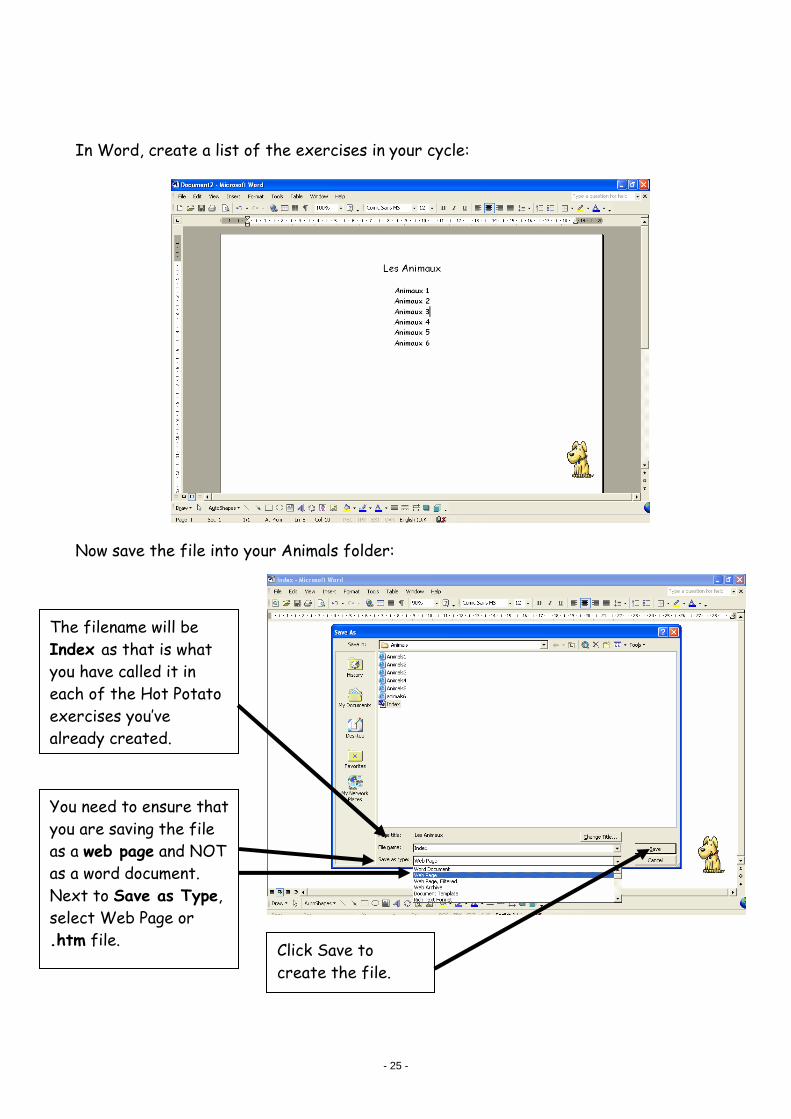
The finished page should look like this:
And there you have a cycle of six exercises. Hopefully, by clicking the Next Exercise
button you should be able to go through all six.
I have only demonstrated very simple versions of what can be done with each Hot
Potato application. The programme has so much more potential, and in my experience
is limited only by the imagination and creativity of the user. Practice and
experimentation are the best ways to find out just what you can do.
G. Creating a Unit Index Page
I find that it is useful to include an Index page with each unit that I write. If a pupil
does not finish a cycle in one session they can easily begin where they left off next
time. It also allows users to see what is in a cycle.
Microsoft Word can be used to create an online index page, in the absence of a more
powerful web editor, such as FrontPage or Dreamweaver for example.
The idea of an Index page is to have one page with links to all the exercises so that
any can be accessed – just like the index at the beginning or end of a book tells you
which page to go to for what you are looking for.
- 25 -
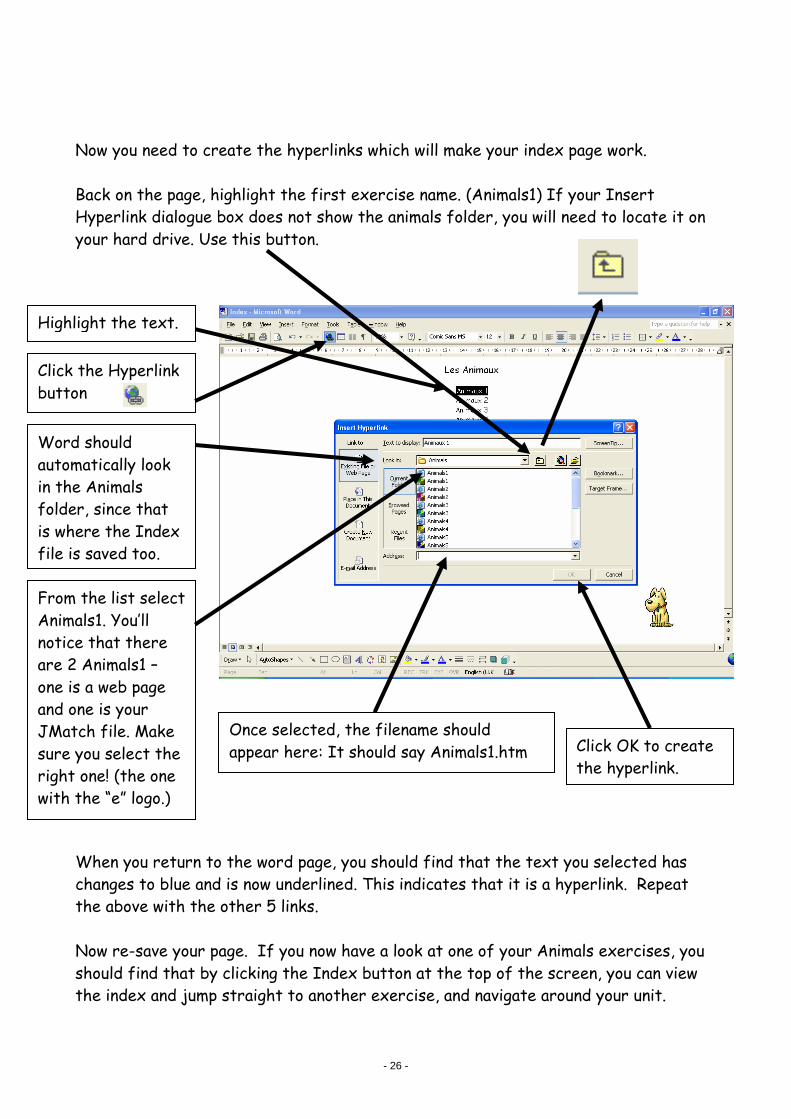
In Word, create a list of the exercises in your cycle:
Now save the file into your Animals folder:
You need to ensure that
you are saving the file
as a web page and NOT
as a word document.
Next to Save as Type,
select Web Page or
.htm file.
The filename will be
Index as that is what
you have called it in
each of the Hot Potato
exercises you’ve
already created.
Click Save to
create the file.
- 26 -
Now you need to create the hyperlinks which will make your index page work.
Back on the page, highlight the first exercise name. (Animals1) If your Insert
Hyperlink dialogue box does not show the animals folder, you will need to locate it on
your hard drive. Use this button.
When you return to the word page, you should find that the text you selected has
changes to blue and is now underlined. This indicates that it is a hyperlink. Repeat
the above with the other 5 links.
Now re-save your page. If you now have a look at one of your Animals exercises, you
should find that by clicking the Index button at the top of the screen, you can view
the index and jump straight to another exercise, and navigate around your unit.
Highlight the text.
Word should
automatically look
in the Animals
folder, since that
is where the Index
file is saved too.
From the list select
Animals1. You’ll
notice that there
are 2 Animals1 –
one is a web page
and one is your
JMatch file. Make
sure you select the
right one! (the one
with the “e” logo.)
Once selected, the filename should
appear here: It should say Animals1.htm Click OK to create
the hyperlink.
Click the Hyperlink
button
- 27 -
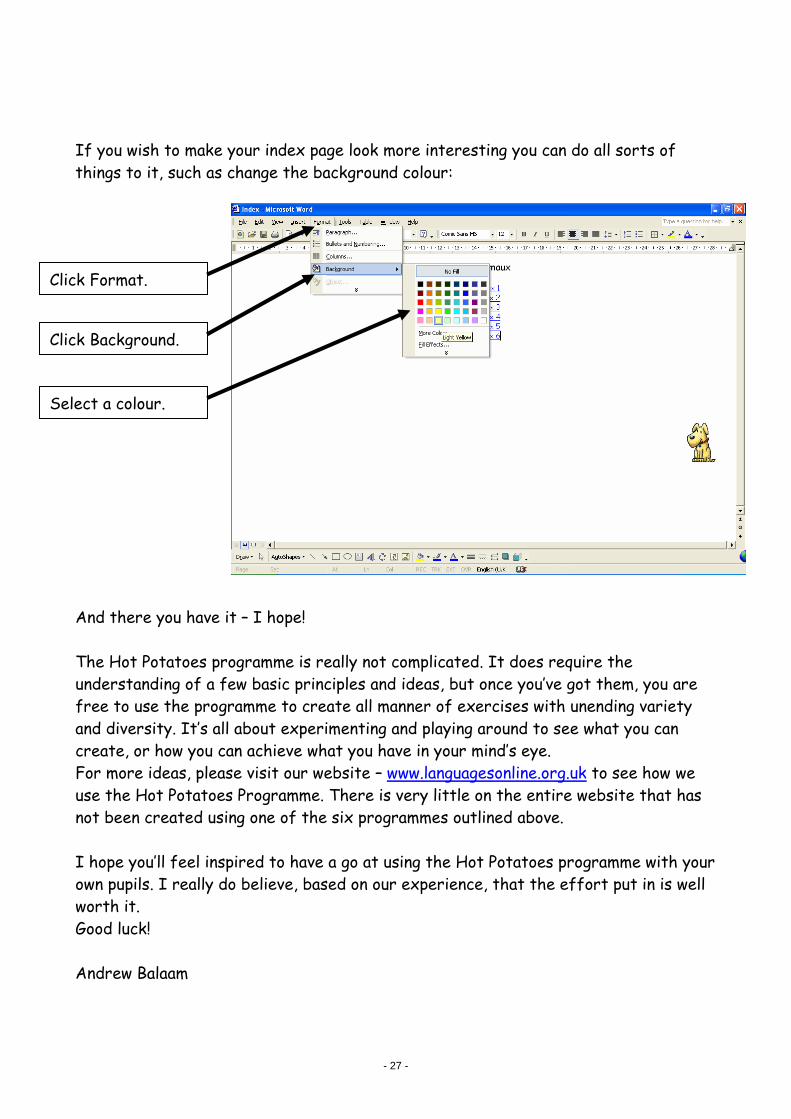
If you wish to make your index page look more interesting you can do all sorts of
things to it, such as change the background colour:
And there you have it – I hope!
The Hot Potatoes programme is really not complicated. It does require the
understanding of a few basic principles and ideas, but once you’ve got them, you are
free to use the programme to create all manner of exercises with unending variety
and diversity. It’s all about experimenting and playing around to see what you can
create, or how you can achieve what you have in your mind’s eye.
For more ideas, please visit our website – www.languagesonline.org.uk to see how we
use the Hot Potatoes Programme. There is very little on the entire website that has
not been created using one of the six programmes outlined above.
I hope you’ll feel inspired to have a go at using the Hot Potatoes programme with your
own pupils. I really do believe, based on our experience, that the effort put in is well
worth it.
Good luck!
Andrew Balaam
Click Format.
Click Background.
Select a colour.