Embed Size (px)
Citation preview
AAQ Controller Quick Start Guide With CIP configured as router
AvL Technologies | 15 North Merrimon Ave. Asheville, NC 28804 AP0017 Rev 2.2 7/17/2015
AvL antenna systems provide completely automatic satellite acquisition. Utilizing the AAQ Antenna Controller our products provide superior operation and reliability under the most demanding conditions. Operation via the included software package & the CIP (Control Interface Panel) is included in this guide.
AAQ GUI Installation
- If there are any previous versions of the GUI installed, ensure that they are removed before you continue.
Run the “AAQRemoteSetup_XXXX.msi” installation file Included in the customer files, disk or drive, package.
*(Note) The Wizard will install the application to the Correct location for your Operating System. Do not change location.
Connecting Your Equipment
Control Interface Panel Optional Handheld (Front & Rear shown)
Remote or PC Laptop Front Panel Ethernet
AAQ LAN/Ctrl Connector AC Mains (90 - 240VAC WAN Connector US power cord included Antenna Control Cable LAN to PC / Laptop or Modem (if equipped) Serial for Aux equipment or Modem, (if equipped) AAQ Power Connector
Note: Your equipment may vary, See Users Manual for System Connection & Configuration examples.
AAQ System Startup
- Turn power on to the Control Interface Panel & start the AAQ Remote Software. *Modem & Beacon rcvr., if equipped, must also be on.
- File>Settings window displays the default controller IP address. Be sure that PC or LAN is in the same network.
Ensure that Communications are established between the Controller & Application as shown by green icon.
- Under “Login”, enter your user name and password contained in your User Information Package.
See the Users Manual for Network Configuration details.
Vista and XP also acceptable
Windows 7, Vista & XP may be used
AAQ Controller Quick Start Guide With CIP configured as router
AvL Technologies | 15 North Merrimon Ave. Asheville, NC 28804 AP0017 Rev 2.2 7/17/2015
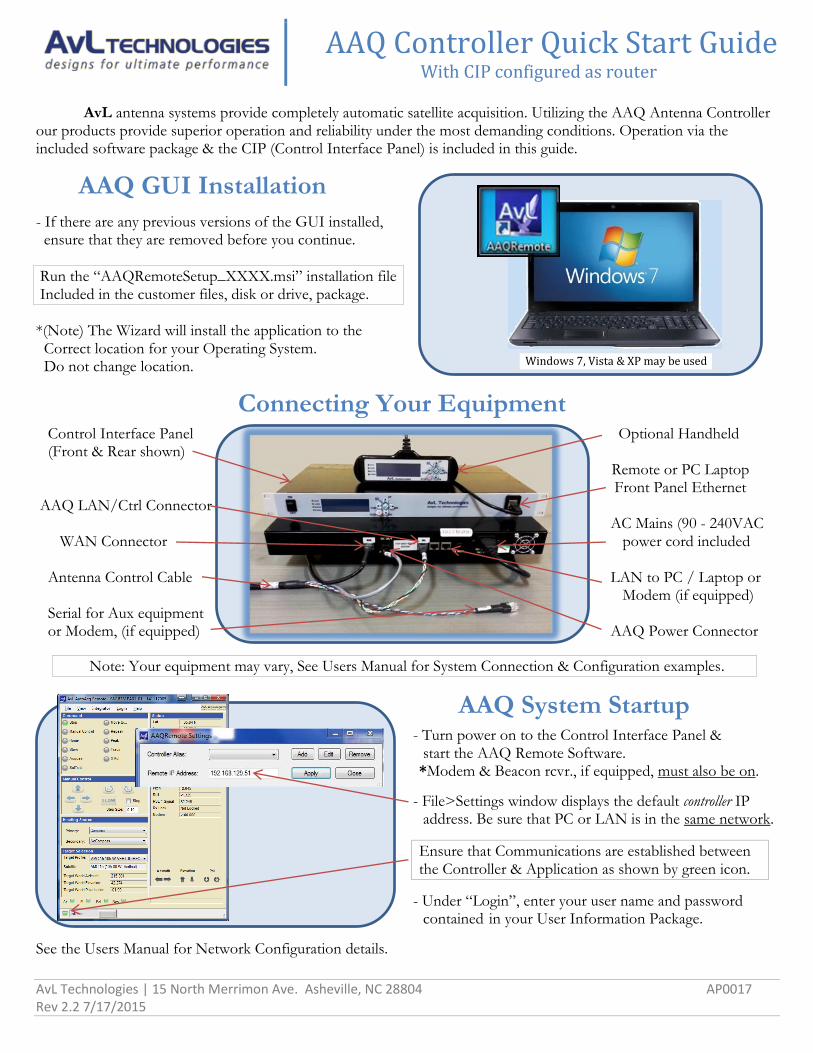
Selecting a Satellite/Profile
- To begin acquisition, you must first select a Satellite or Target. Your customer profile(s) will be shown in the drop down selections.
Once a Satellite or “Target” is selected, it is then “associated” with the Command functions.
- See the Users Manual for information on how to edit and create profiles.
AAQ Auto Acquisition
Pressing “Acquire” will initialize the controller and send the Antenna to the “Home” position before scanning for the Satellite.
- Once peaked on the satellite, a Cross-Pol check may be required by the service provider. Pressing “X Pol” will offset the feed by 90 degrees for the test. Press again to return to normal operation.
Press “Stow” to return the antenna to its Non-Service mode position.
Manual Control
- The Manual Control Pane contains the controls for manually jogging the antenna along any axis.
If the Step Mode Checkbox is unchecked, the system will jog in the requested direction until released.
- If the Step Mode Checkbox is checked, the system will jog the indicated amount each time the button is pressed and released.
Note, Step Mode requires initializing at “Home” position
- The Slow button reduces the speed of the antenna in Degrees per Second. Press again for Fast mode.
Please see additional System Setup information in the AAQ Controller Users Manual.
Current Satellite Display
Calculated Look Angles
Step Mode Checkbox
Manual Control Buttons
Step Size Display
AAQ Controller Quick Start Guide With CIP configured as router
AvL Technologies | 15 North Merrimon Ave. Asheville, NC 28804 AP0017 Rev 2.2 7/17/2015
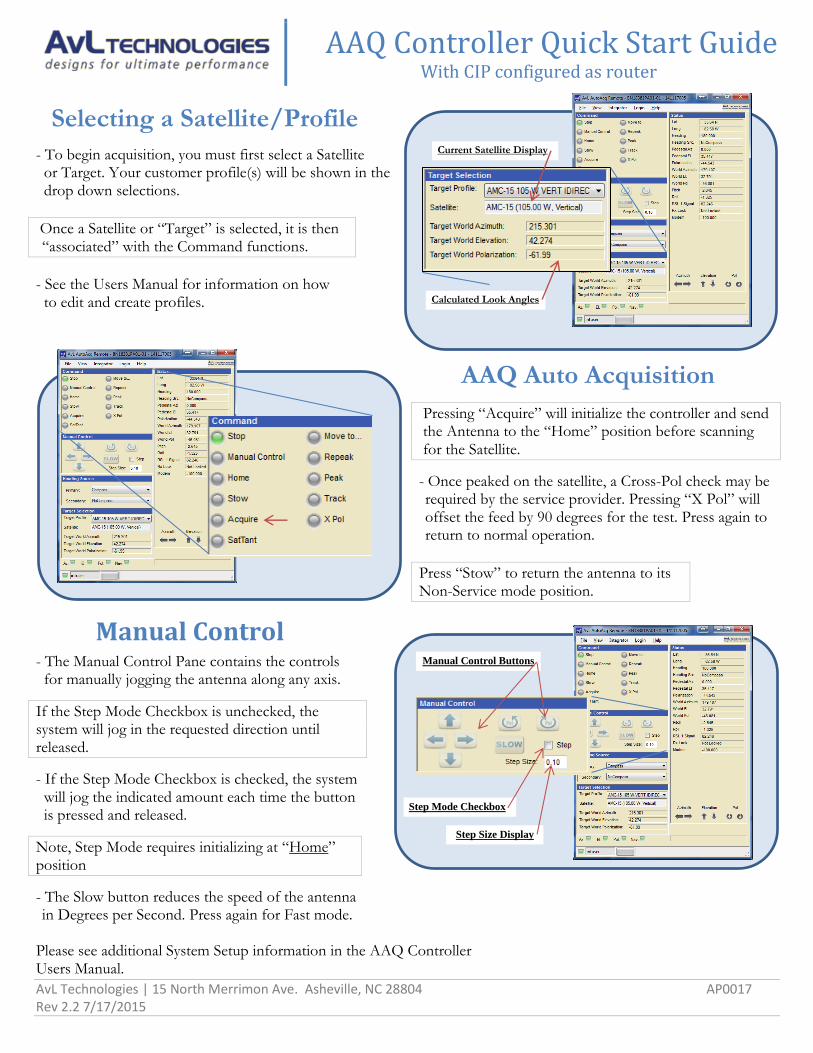
CIP - Control Interface Panel
LED Ind. Name Description LED Color Notification Description
RxLKD Receive Lock Off / Green Not Locked / Receive Lock
Alarm System Alarm Off / Red No Alarm / Alarm Present
Motion Movement Off / Green No Movement / Movement (any direction)
Stowed Stow Off / Red Operating Position / Stowed
Once powered on, the CIP will initialize. This may take up to 60 seconds. Initialization will finish by “flashing” the screen and LEDs to show “ready” state.*
* Note: Alarm may indicate from “Stowed Limit”, Move or Acquire to clear.
- The down arrow brings you to the next screen in the Main menu.
- Pressing the Check or “Go”(Enter) button selects desired function.
- Pressing the “X” or “Stop”/ Escape button sends you back to the prior screen.
To Acquire Target, press “Check / Go” for 3 seconds.
To Stop the Antenna, press the “X / Stop” once.
To Stow the Antenna, press the “X / Stop” for 3 seconds.
- Once Stow is initiated, a “Movement Confirmation” screen requires acknowledgement for three seconds. The
display will then return to the Main Status screen.
* For removeable Antenna types, “Stow” will first bring you to the disassembly position, press for 3 additional seconds after disassembly for final Stow position.
World coordinates are shown along with Signal Strength, Band in use & Satellite longitude.
Power Switch
LED Indicators Main LCD Display
Control Pad
Handheld Remote / LAN Jack STOP (Escape) Button
GO (enter) Button
AAQ Controller Quick Start Guide With CIP configured as router
AvL Technologies | 15 North Merrimon Ave. Asheville, NC 28804 AP0017 Rev 2.2 7/17/2015
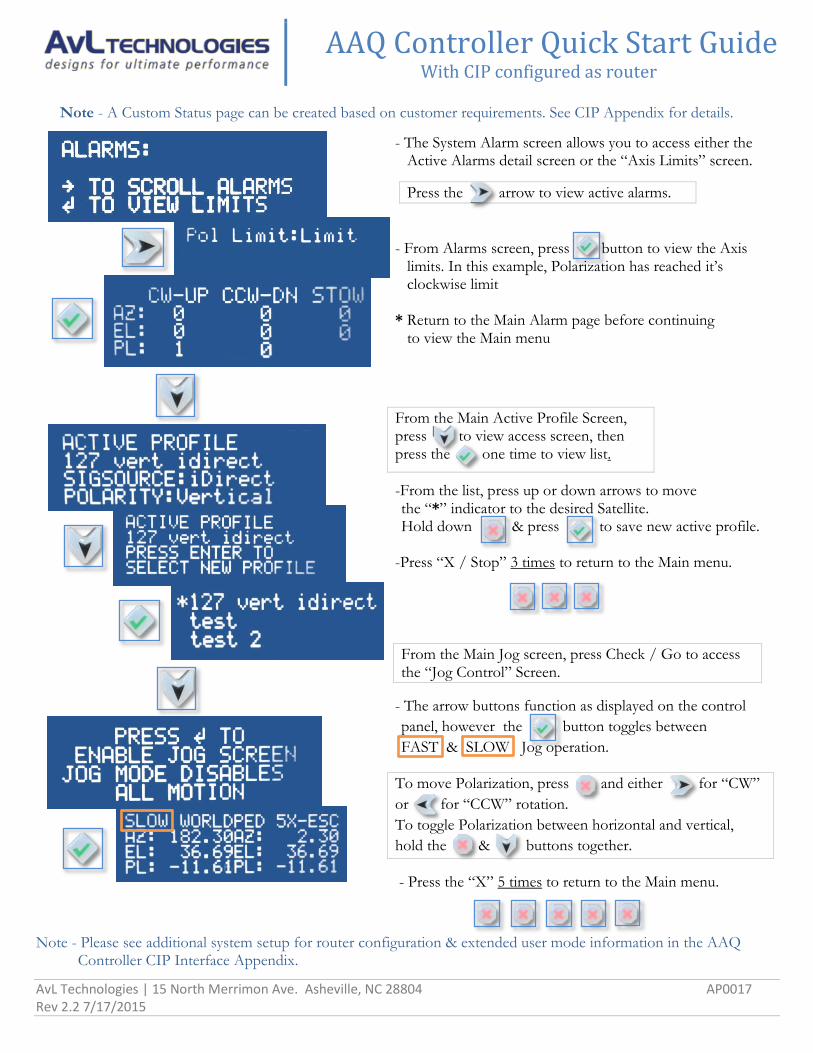
Note - A Custom Status page can be created based on customer requirements. See CIP Appendix for details.
- The System Alarm screen allows you to access either the Active Alarms detail screen or the “Axis Limits” screen.
Press the arrow to view active alarms.
- From Alarms screen, press button to view the Axis
limits. In this example, Polarization has reached it’s clockwise limit
* Return to the Main Alarm page before continuing to view the Main menu
From the Main Active Profile Screen, press to view access screen, then press the one time to view list.
-From the list, press up or down arrows to move the “*” indicator to the desired Satellite. Hold down & press to save new active profile.
-Press “X / Stop” 3 times to return to the Main menu.
From the Main Jog screen, press Check / Go to access the “Jog Control” Screen.
- The arrow buttons function as displayed on the control
panel, however the button toggles between
FAST & SLOW Jog operation.
To move Polarization, press and either for “CW”
or for “CCW” rotation.
To toggle Polarization between horizontal and vertical,
hold the & buttons together.
- Press the “X” 5 times to return to the Main menu.
Note - Please see additional system setup for router configuration & extended user mode information in the AAQ Controller CIP Interface Appendix.