Embed Size (px)
Citation preview
AC750 Wireless Dual-Band Router
CR2
User Manual

CR2 AC750 Wireless Dual-Band Router
Version 1.0 | 4/25/2014
CR2 AC750 Wireless Dual-Band Router
1
Table of Content
Chapter 1 Introduction ............................................................................................................... 3 1.1 Features ........................................................................................................................... 3 1.2 System Requirement ...................................................................................................... 3 1.3 Package Contents .......................................................................................................... 4
Chapter 2 Hardware Installation .............................................................................................. 5 2.1 Led indicators .................................................................................................................. 5 2.2 Back Rear Panel ............................................................................................................. 5 2.3 Typical install ................................................................................................................... 6
Chapter 3 Quick Installation Guide ......................................................................................... 8 3.1 Set the Network Configurations .................................................................................... 8 3.2 Getting Started .............................................................................................................. 10 3.3 Setup Wizard ................................................................................................................. 11
Chapter 4 Configuring the Router ........................................................................................ 18 4.1 WAN Interface ............................................................................................................... 18
4.1.1 WAN Interface .................................................................................................... 18 4.1.2 DDNS .................................................................................................................. 18
4.2 LAN Interface................................................................................................................. 19 4.2.1 LAN Interface ..................................................................................................... 19 4.2.2 Static DHCP ....................................................................................................... 20 4.2.3 DHCP Client ....................................................................................................... 21
4.3 Wireless 5G ................................................................................................................... 22 4.3.1 Basic .................................................................................................................... 22 4.3.2 Advanced ............................................................................................................ 23 4.3.3 Security ............................................................................................................... 23 4.3.4 Access Control ................................................................................................... 24 4.3.5 WDS .................................................................................................................... 24 4.3.6 Site Survey ......................................................................................................... 25 4.3.7 WPS..................................................................................................................... 25 4.3.8 Schedule ............................................................................................................. 26
4.4 Wireless 2.4G ................................................................................................................ 26 4.4.1 Basic .................................................................................................................... 27 4.4.2 Advanced ............................................................................................................ 27 4.4.3 Security ............................................................................................................... 28 4.4.4 Access Control ................................................................................................... 29 4.4.5 WDS .................................................................................................................... 29 4.4.6 Site Survey ......................................................................................................... 30 4.4.7 WPS..................................................................................................................... 30 4.4.8 Schedule ............................................................................................................. 31
4.5 Service Setup ................................................................................................................ 31
CR2 AC750 Wireless Dual-Band Router
2
4.5.1 Port Forwarding ................................................................................................. 32 4.5.2 DMZ ..................................................................................................................... 32
4.6 Security .......................................................................................................................... 33 4.6.1 Port Filtering ....................................................................................................... 33 4.6.2 IP Filtering ........................................................................................................... 34 4.6.3 URL Filtering ...................................................................................................... 34 4.6.4 MAC Filtering ..................................................................................................... 35
4.7 QoS ................................................................................................................................. 36 4.8 System ............................................................................................................................ 36
4.8.1 Time Zone Setting ............................................................................................. 37 4.8.2 Upgrade Firmware ............................................................................................. 37 4.8.3 Save/Reload Settings ....................................................................................... 37 4.8.4 Password ............................................................................................................ 38 4.8.5 Reboot ................................................................................................................. 38 4.8.6 Language ............................................................................................................ 38
Chapter 5 Status ........................................................................................................................ 39 5.1 Status ...................................................................................................................... 39 5.2 Statistics ................................................................................................................. 40 5.3 Log .......................................................................................................................... 40
Chapter 6 Logout ...................................................................................................................... 42 Chapter 7 FCC ID Warning:………………………………………………………………… 43
CR2 AC750 Wireless Dual-Band Router
3
Chapter 1 Introduction
Congratulations on your purchase of this outstanding AC750 Wireless Dual-Band Router. The Wireless Router using 2.4G and 5G dual-band concurrent technology, support latest 802.11ac standards, backward compatibility IEEE802.11a/b/g/n, 2.4GHz and 5GHz wireless transmission rate up to 750Mbps when concurrent operation, Integrated router, Wi-Fi access point, 4 ports 100M switch and firewall functions in one. Provide convenient and comprehensive network management functions, supports URL filtering, MAC address filtering and the QoS bandwidth control function, can effectively allocate the client's download rate. Supports wireless data encryption, and can guarantee the security of data transmission in wireless network.
1.1 Features
Provides a 10/100M WAN interface, can be connected to xDSL modem, Cable modem and Ethernet.
Provides four 10/100M LAN interfaces, can be connected to various Ethernet devices.
2.4G and 5G concurrent working wireless transmission rate up to 750Mbps. Supports the WPS one key encryption, easy to implementing network encrypted
connection. Supports 64/128-bit WEP, WPA/WPA2, WPA-PSK/WPA2-PSK, etc. encryption and
security mechanism. Built-in Network Address Translation (NAT) supports virtual server, special
application and DMZ host. Built-in DHCP server, and also supports static address allocation. Supports the VPN pass - through, can build a VPN client. Built-in firewall functions, supports domain and MAC address filtering. Supports QoS bandwidth control function, can effectively allocate the client's
download rate. Supports for dynamic DNS function, can provide domain name service for dynamic
IP address. Supports access control based on MAC address, can effectively to control the
Intranet user Internet access permissions. Supports remote Web management and software upgrades.
1.2 System Requirement
An Ethernet-Based Cable or xDSL modem An Ethernet Card on PC TCP/IP network protocol for each PC RJ45 Twisted-pair

CR2 AC750 Wireless Dual-Band Router
4
Microsoft IE (or Firefox or Netscape)
1.3 Package Contents
Please unpack the box and check the following items:
One AC750 Wireless Dual-Band Router One Power Adapter One User Manual

CR2 AC750 Wireless Dual-Band Router
5
Chapter 2 Hardware Installation
2.1 Led indicators
The top panel contains LED indicators that show the status of the unit.
Name Status Indication
Power
Off Power is off.
On Power is on.
SYS/WPS
Flashing the LED flashes about two minutes during WPS working.
WAN
LAN(1-4)
Off There is no device linked to the corresponding port.
On There is a device linked to the corresponding port but there is no activity.
Flashing There is an active device linked to the corresponding port.
5GHz
Off The wireless function is disabled.
Flashing The wireless function is enabled. The router is working on 5GHz radio band.
2.4GHz
Off The wireless function is disabled.
Flashing The wireless function is enabled. The router is working on 2.4GHz radio band.
2.2 Back Rear Panel
The following parts are located on the rear panel.
CR2 AC750 Wireless Dual-Band Router
6
LAN (1,2,3,4): These four LAN ports are where you will connect networked devices, such as PCs, print servers, remote hard drives, and anything else you want to put on your network. If you connect this product with the Hub (or Switchboard) correctly, the router’s corresponding LED and the Hub’s (or the Switchboard’s) must be illuminates. WAN: 10/100Mbps RJ45 port. The WAN port is where you will connect Cable/xDSL Modem or other LAN. RESET: The Reset Button has two functions, WPS and Factory Default. With the router powered on, When selecting the WPS function,use a pin to press and hold the button about 2 seconds, the WPS LED will flash two minutes. The other one, use a pin to press and hold the button about 5 seconds, the router will restore to factory default. POWER: The Power socket is where you will connect the power adapter. Please use the power adapter provided with this router. Wireless antenna: To receive and transmit the wireless data.
2.3 Typical install
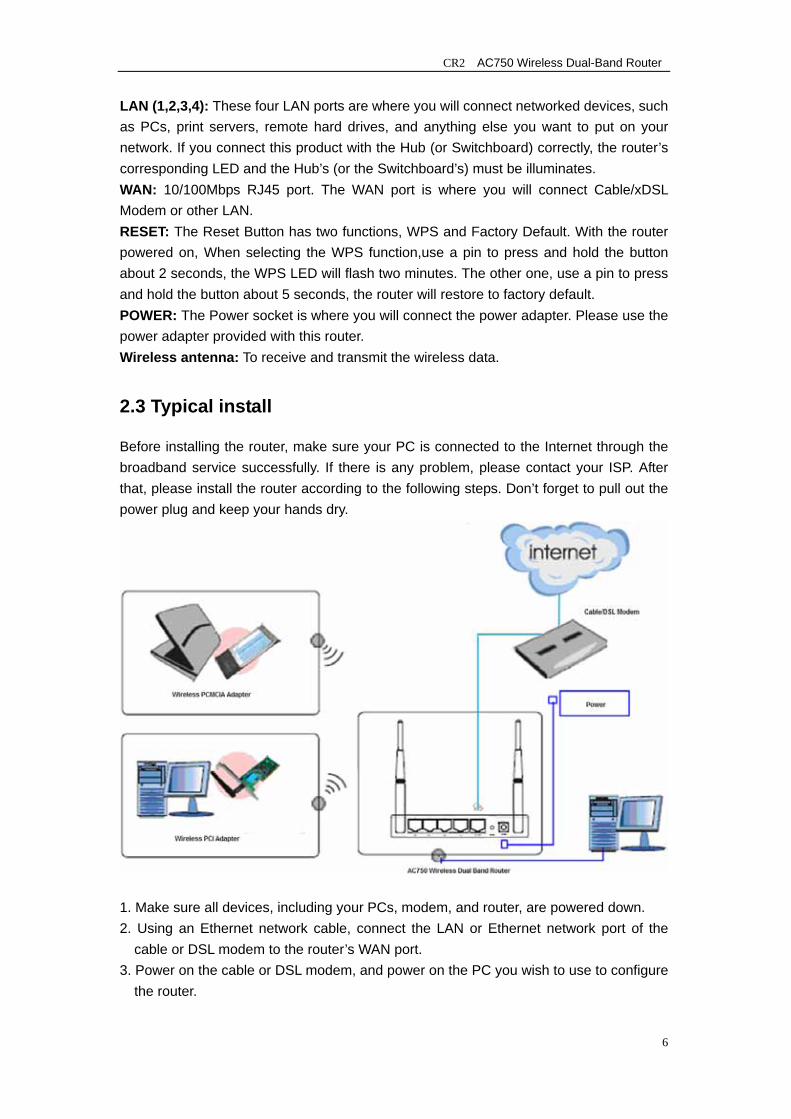
Before installing the router, make sure your PC is connected to the Internet through the broadband service successfully. If there is any problem, please contact your ISP. After that, please install the router according to the following steps. Don’t forget to pull out the power plug and keep your hands dry.
1. Make sure all devices, including your PCs, modem, and router, are powered down. 2. Using an Ethernet network cable, connect the LAN or Ethernet network port of the
cable or DSL modem to the router’s WAN port. 3. Power on the cable or DSL modem, and power on the PC you wish to use to configure
the router.

CR2 AC750 Wireless Dual-Band Router
7
4. Connect the included power adapter to the router. And connect the other end of the adapter to an electrical outlet.
CR2 AC750 Wireless Dual-Band Router
8
Chapter 3 Quick Installation Guide
The chapter mainly presents how to enter the router’s Web page and simple router settings. After you have finished the hardware installation (Please refer to chapter 2), the following steps will assist you to set the network configurations for you computer.
3.1 Set the Network Configurations
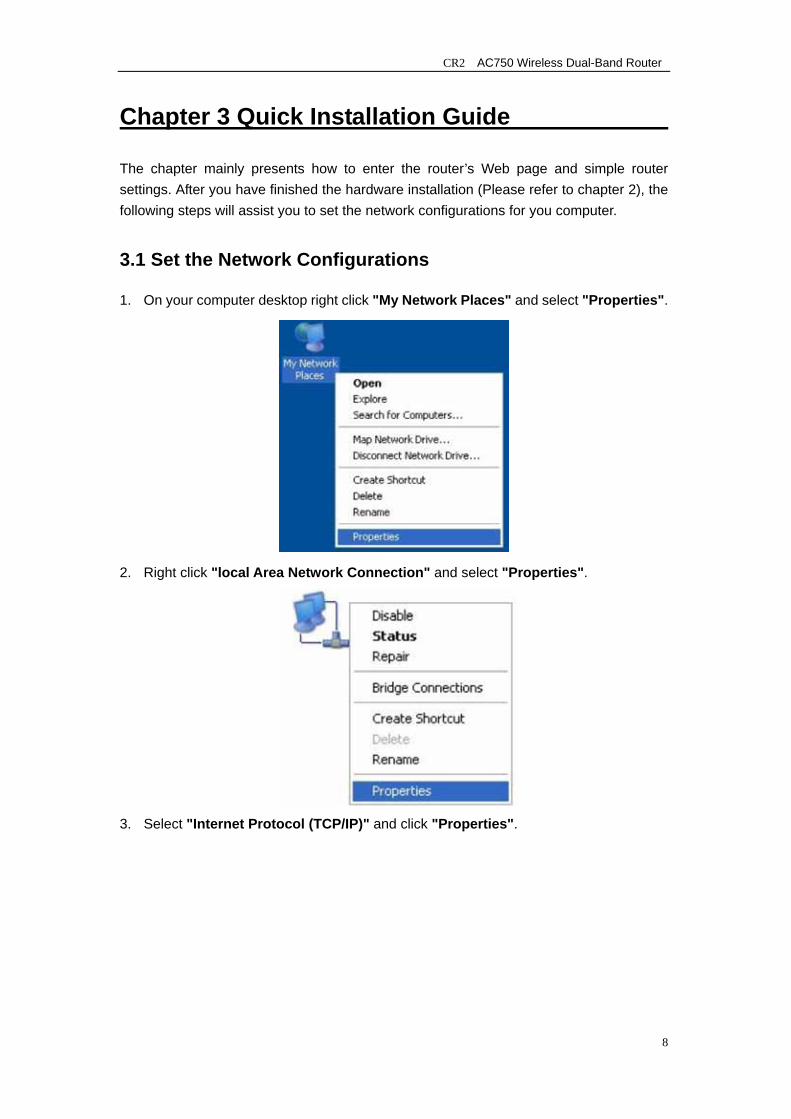
1. On your computer desktop right click "My Network Places" and select "Properties".
2. Right click "local Area Network Connection" and select "Properties".
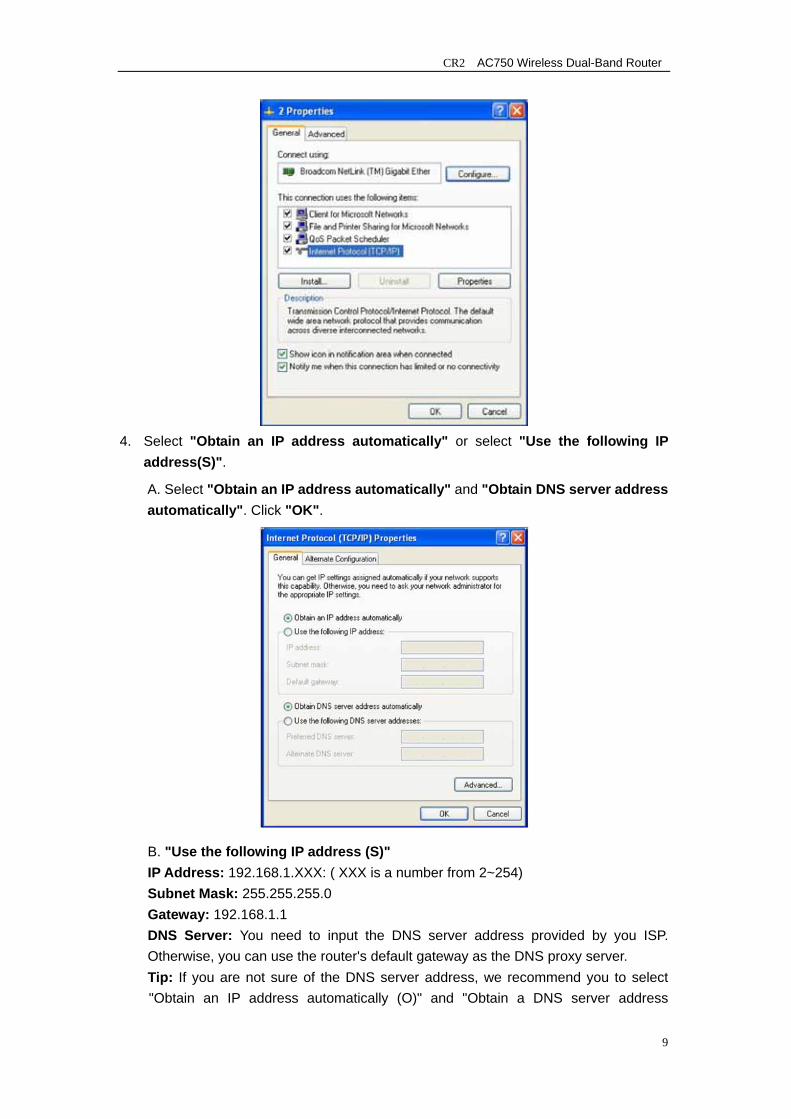
3. Select "Internet Protocol (TCP/IP)" and click "Properties".
CR2 AC750 Wireless Dual-Band Router
9
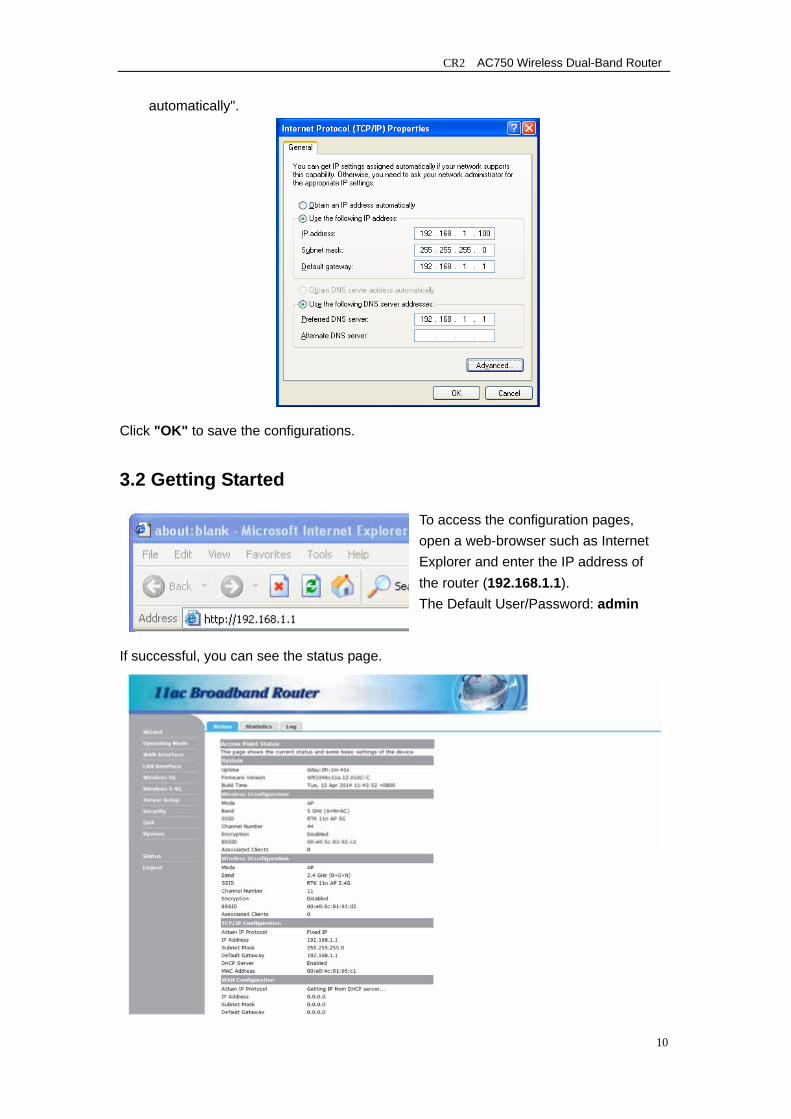
4. Select "Obtain an IP address automatically" or select "Use the following IP
address(S)".
A. Select "Obtain an IP address automatically" and "Obtain DNS server address automatically". Click "OK".
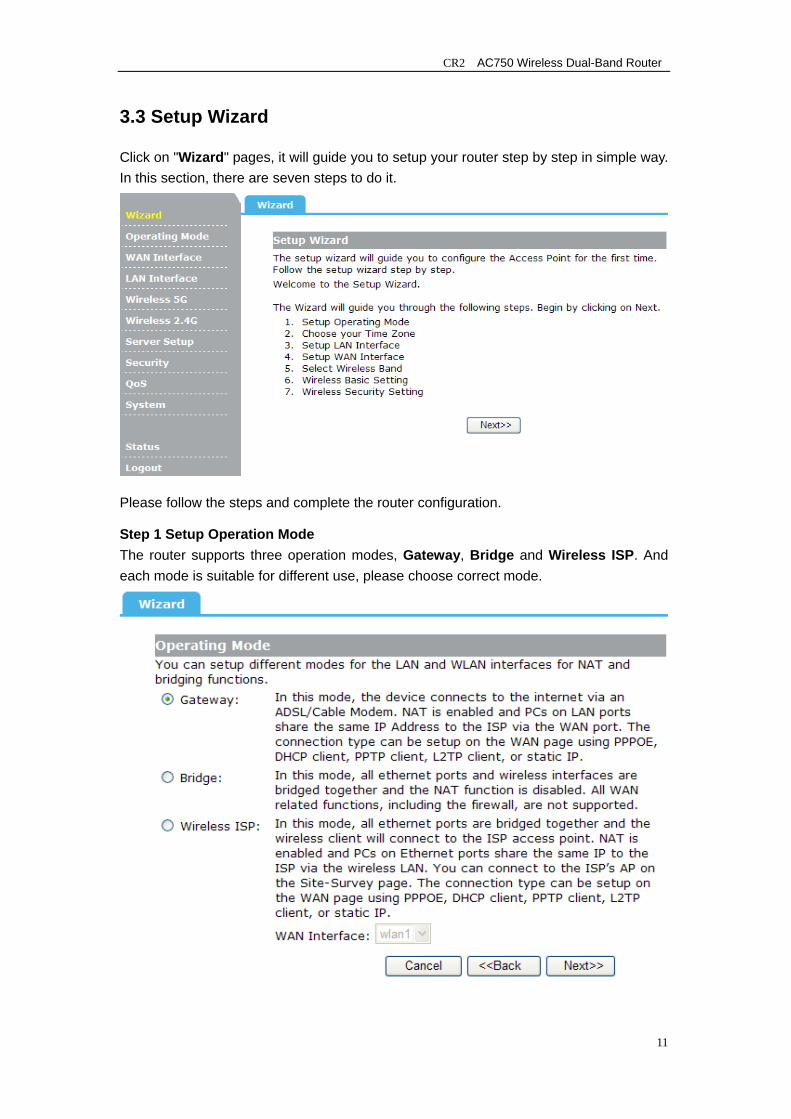
B. "Use the following IP address (S)" IP Address: 192.168.1.XXX: ( XXX is a number from 2~254) Subnet Mask: 255.255.255.0 Gateway: 192.168.1.1 DNS Server: You need to input the DNS server address provided by you ISP. Otherwise, you can use the router's default gateway as the DNS proxy server. Tip: If you are not sure of the DNS server address, we recommend you to select "Obtain an IP address automatically (O)" and "Obtain a DNS server address
CR2 AC750 Wireless Dual-Band Router
10
automatically".
Click "OK" to save the configurations.
3.2 Getting Started
To access the configuration pages, open a web-browser such as Internet Explorer and enter the IP address of the router (192.168.1.1). The Default User/Password: admin
If successful, you can see the status page.
CR2 AC750 Wireless Dual-Band Router
11
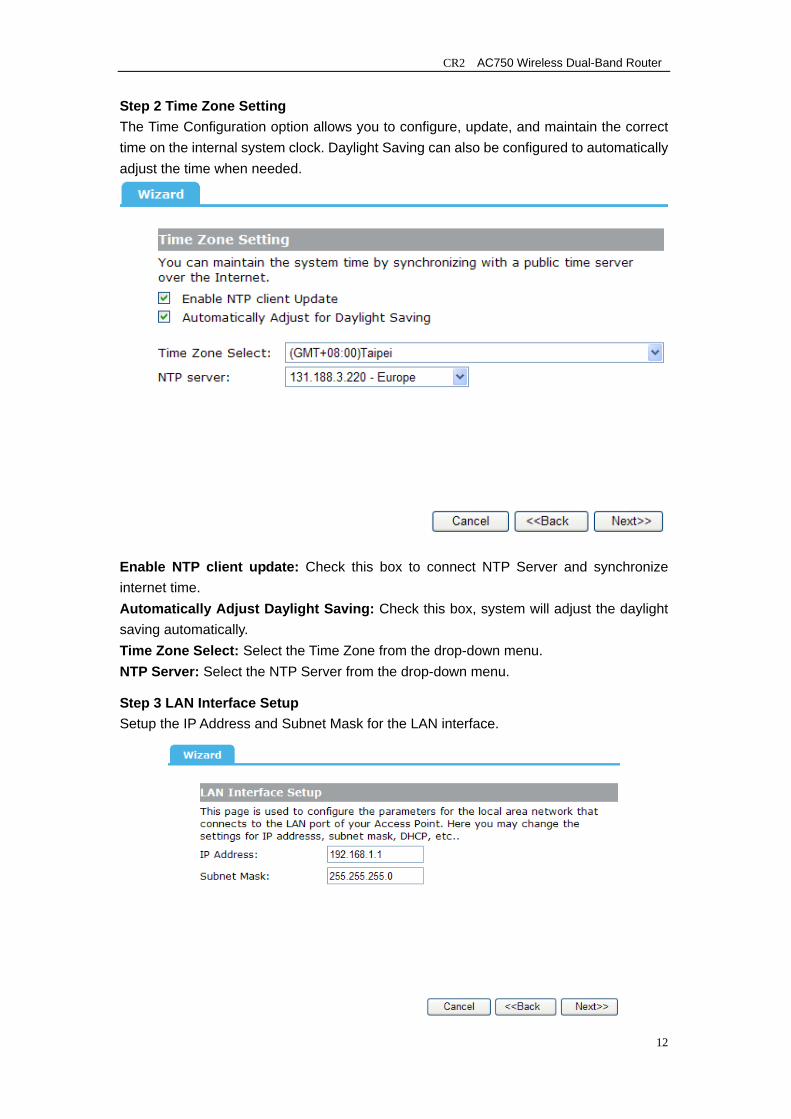
3.3 Setup Wizard
Click on "Wizard" pages, it will guide you to setup your router step by step in simple way. In this section, there are seven steps to do it.
Please follow the steps and complete the router configuration.
Step 1 Setup Operation Mode The router supports three operation modes, Gateway, Bridge and Wireless ISP. And each mode is suitable for different use, please choose correct mode.
CR2 AC750 Wireless Dual-Band Router
12
Step 2 Time Zone Setting The Time Configuration option allows you to configure, update, and maintain the correct time on the internal system clock. Daylight Saving can also be configured to automatically adjust the time when needed.
Enable NTP client update: Check this box to connect NTP Server and synchronize internet time. Automatically Adjust Daylight Saving: Check this box, system will adjust the daylight saving automatically. Time Zone Select: Select the Time Zone from the drop-down menu. NTP Server: Select the NTP Server from the drop-down menu.
Step 3 LAN Interface Setup Setup the IP Address and Subnet Mask for the LAN interface.
CR2 AC750 Wireless Dual-Band Router
13
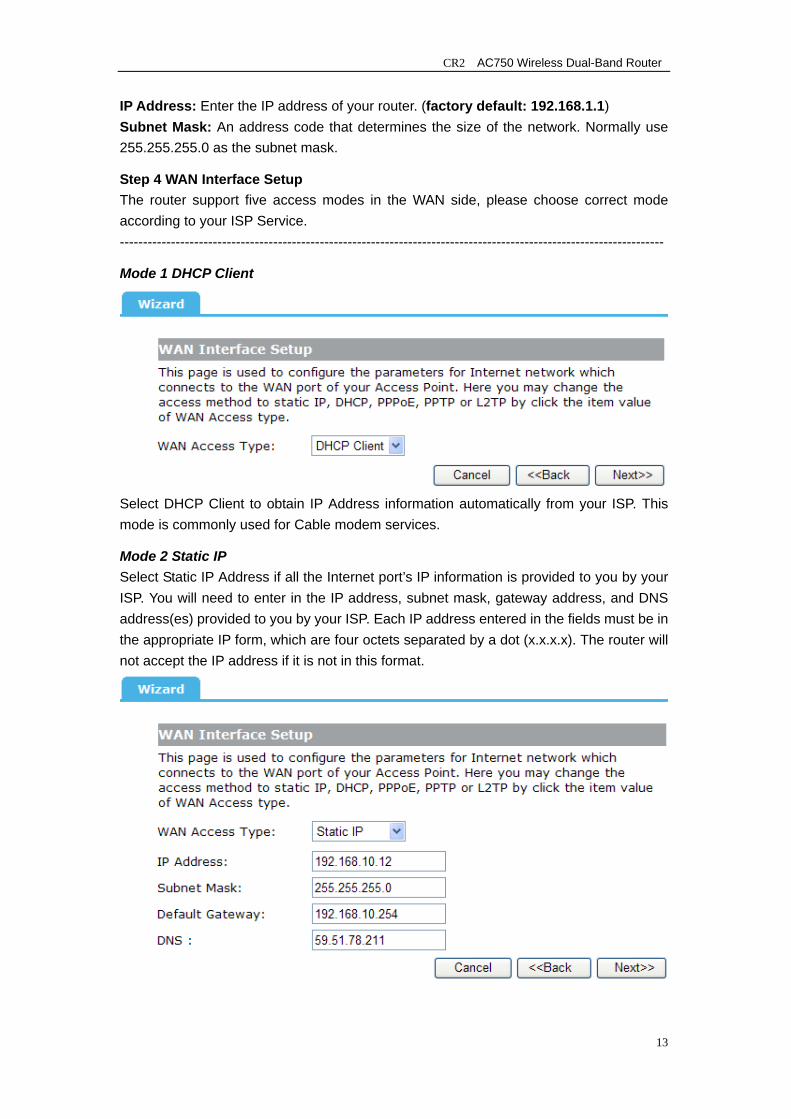
IP Address: Enter the IP address of your router. (factory default: 192.168.1.1) Subnet Mask: An address code that determines the size of the network. Normally use 255.255.255.0 as the subnet mask.
Step 4 WAN Interface Setup The router support five access modes in the WAN side, please choose correct mode according to your ISP Service. ---------------------------------------------------------------------------------------------------------------------
Mode 1 DHCP Client
Select DHCP Client to obtain IP Address information automatically from your ISP. This mode is commonly used for Cable modem services.
Mode 2 Static IP Select Static IP Address if all the Internet port’s IP information is provided to you by your ISP. You will need to enter in the IP address, subnet mask, gateway address, and DNS address(es) provided to you by your ISP. Each IP address entered in the fields must be in the appropriate IP form, which are four octets separated by a dot (x.x.x.x). The router will not accept the IP address if it is not in this format.
CR2 AC750 Wireless Dual-Band Router
14
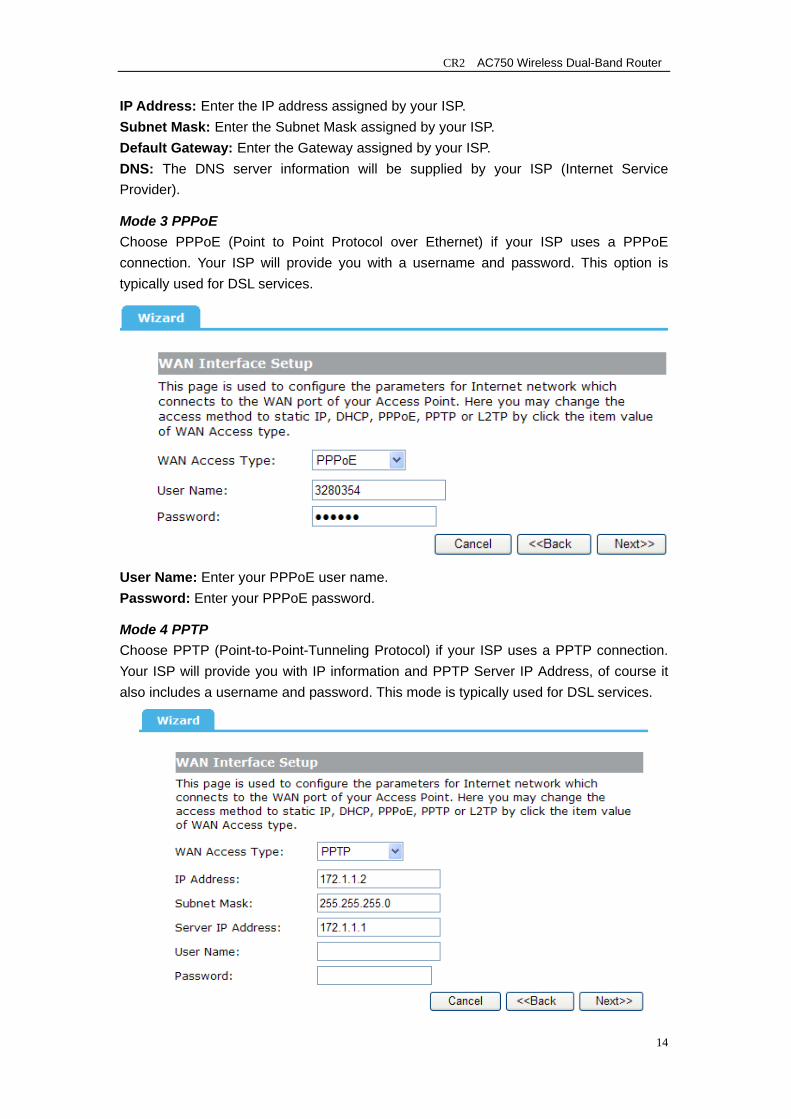
IP Address: Enter the IP address assigned by your ISP. Subnet Mask: Enter the Subnet Mask assigned by your ISP. Default Gateway: Enter the Gateway assigned by your ISP. DNS: The DNS server information will be supplied by your ISP (Internet Service Provider).
Mode 3 PPPoE Choose PPPoE (Point to Point Protocol over Ethernet) if your ISP uses a PPPoE connection. Your ISP will provide you with a username and password. This option is typically used for DSL services.
User Name: Enter your PPPoE user name. Password: Enter your PPPoE password.
Mode 4 PPTP Choose PPTP (Point-to-Point-Tunneling Protocol) if your ISP uses a PPTP connection. Your ISP will provide you with IP information and PPTP Server IP Address, of course it also includes a username and password. This mode is typically used for DSL services.
CR2 AC750 Wireless Dual-Band Router
15
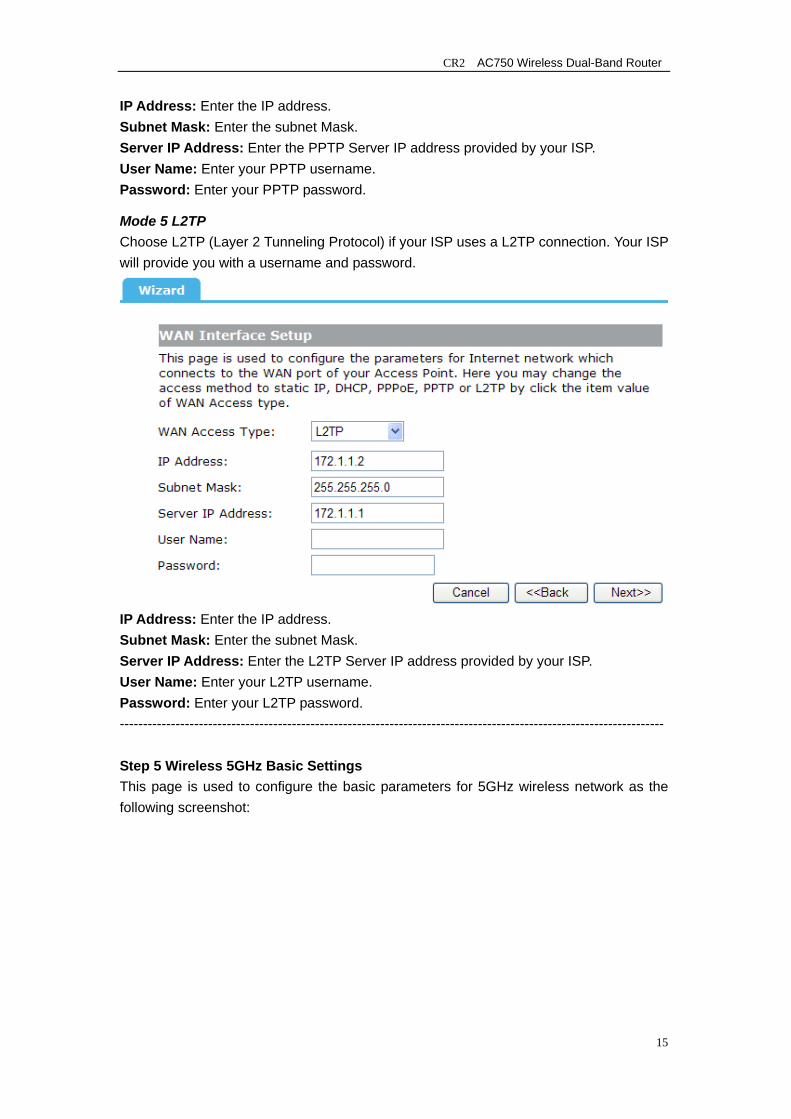
IP Address: Enter the IP address. Subnet Mask: Enter the subnet Mask. Server IP Address: Enter the PPTP Server IP address provided by your ISP. User Name: Enter your PPTP username. Password: Enter your PPTP password.
Mode 5 L2TP Choose L2TP (Layer 2 Tunneling Protocol) if your ISP uses a L2TP connection. Your ISP will provide you with a username and password.
IP Address: Enter the IP address. Subnet Mask: Enter the subnet Mask. Server IP Address: Enter the L2TP Server IP address provided by your ISP. User Name: Enter your L2TP username. Password: Enter your L2TP password. ---------------------------------------------------------------------------------------------------------------------
Step 5 Wireless 5GHz Basic Settings This page is used to configure the basic parameters for 5GHz wireless network as the following screenshot:
CR2 AC750 Wireless Dual-Band Router
16
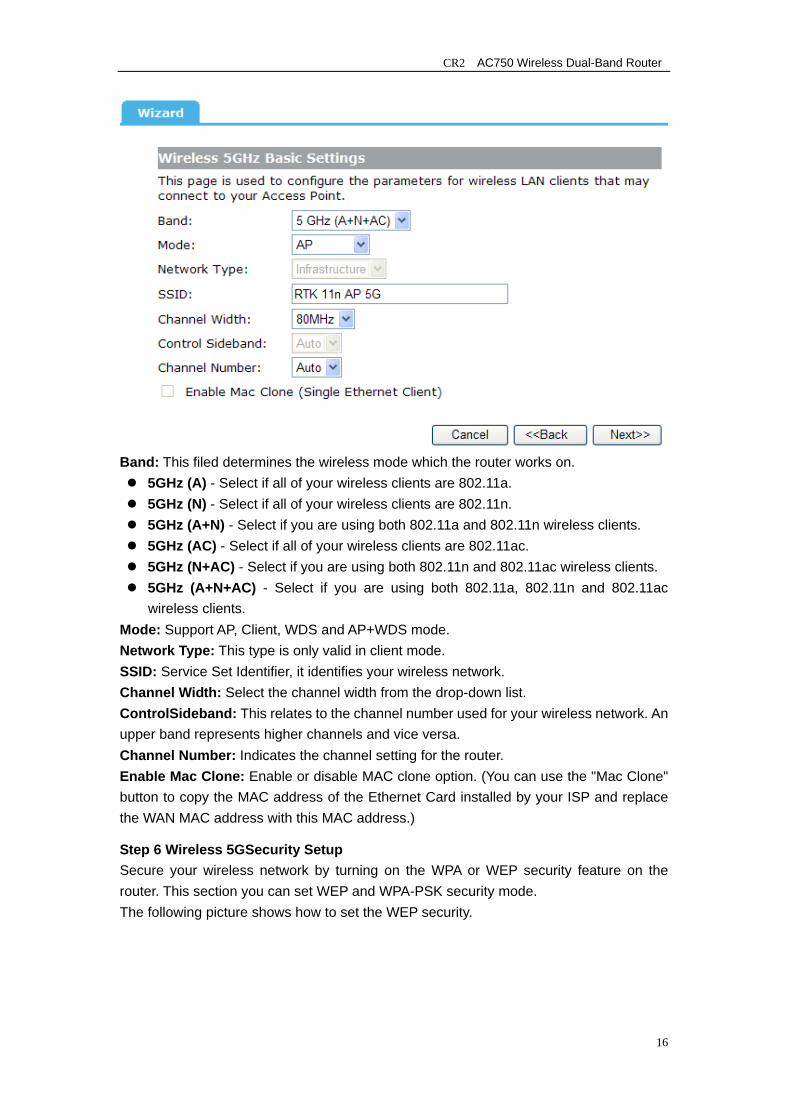
Band: This filed determines the wireless mode which the router works on.
5GHz (A) - Select if all of your wireless clients are 802.11a. 5GHz (N) - Select if all of your wireless clients are 802.11n. 5GHz (A+N) - Select if you are using both 802.11a and 802.11n wireless clients. 5GHz (AC) - Select if all of your wireless clients are 802.11ac. 5GHz (N+AC) - Select if you are using both 802.11n and 802.11ac wireless clients. 5GHz (A+N+AC) - Select if you are using both 802.11a, 802.11n and 802.11ac
wireless clients. Mode: Support AP, Client, WDS and AP+WDS mode. Network Type: This type is only valid in client mode. SSID: Service Set Identifier, it identifies your wireless network. Channel Width: Select the channel width from the drop-down list. ControlSideband: This relates to the channel number used for your wireless network. An upper band represents higher channels and vice versa. Channel Number: Indicates the channel setting for the router. Enable Mac Clone: Enable or disable MAC clone option. (You can use the "Mac Clone" button to copy the MAC address of the Ethernet Card installed by your ISP and replace the WAN MAC address with this MAC address.)
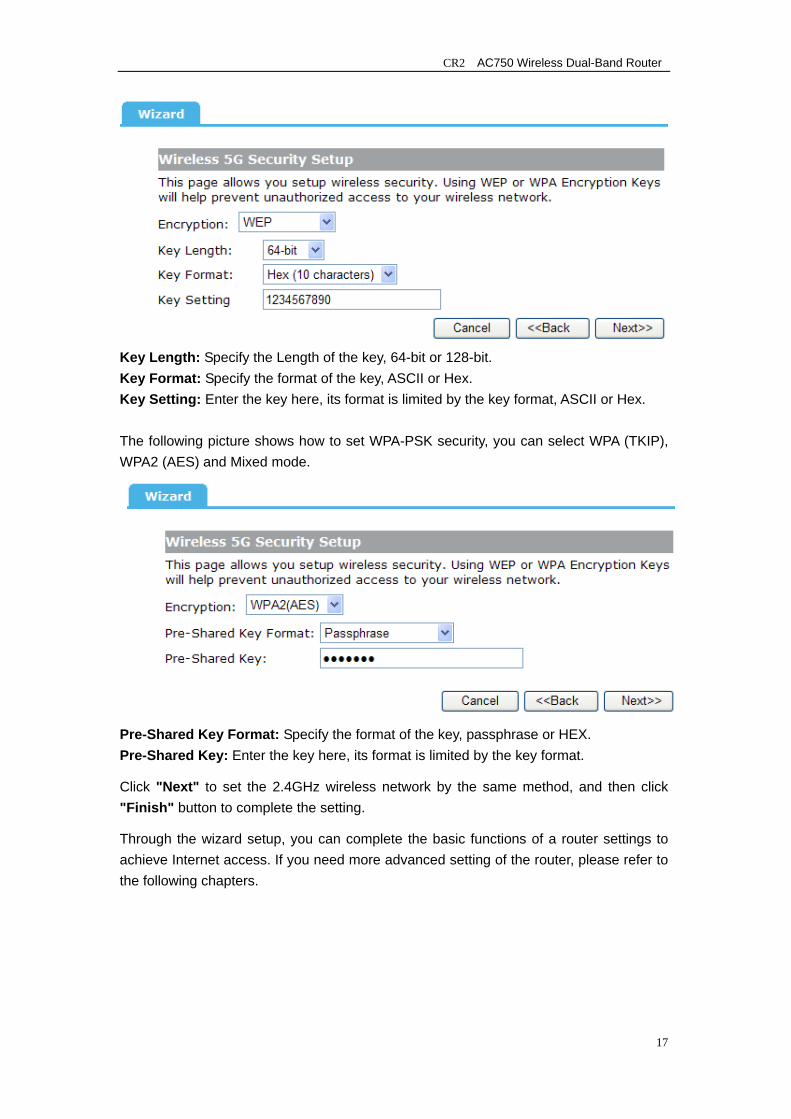
Step 6 Wireless 5GSecurity Setup Secure your wireless network by turning on the WPA or WEP security feature on the router. This section you can set WEP and WPA-PSK security mode. The following picture shows how to set the WEP security.
CR2 AC750 Wireless Dual-Band Router
17
Key Length: Specify the Length of the key, 64-bit or 128-bit. Key Format: Specify the format of the key, ASCII or Hex. Key Setting: Enter the key here, its format is limited by the key format, ASCII or Hex.
The following picture shows how to set WPA-PSK security, you can select WPA (TKIP), WPA2 (AES) and Mixed mode.
Pre-Shared Key Format: Specify the format of the key, passphrase or HEX. Pre-Shared Key: Enter the key here, its format is limited by the key format.
Click "Next" to set the 2.4GHz wireless network by the same method, and then click "Finish" button to complete the setting.
Through the wizard setup, you can complete the basic functions of a router settings to achieve Internet access. If you need more advanced setting of the router, please refer to the following chapters.
CR2 AC750 Wireless Dual-Band Router
18
Chapter 4 Configuring the Router
4.1 WAN Interface
There are two submenus under the WAN Interface menu: WAN Interface, DDNS. Click any of them, and you will be able to configure the corresponding function.
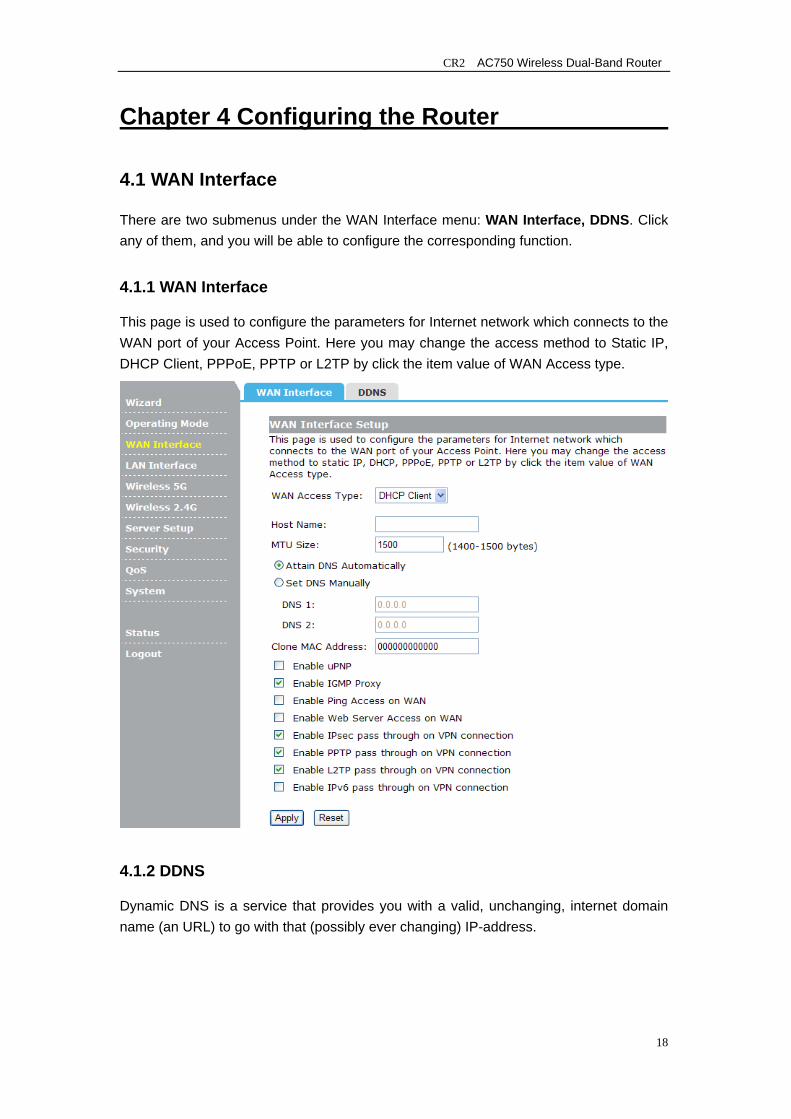
4.1.1 WAN Interface
This page is used to configure the parameters for Internet network which connects to the WAN port of your Access Point. Here you may change the access method to Static IP, DHCP Client, PPPoE, PPTP or L2TP by click the item value of WAN Access type.
4.1.2 DDNS
Dynamic DNS is a service that provides you with a valid, unchanging, internet domain name (an URL) to go with that (possibly ever changing) IP-address.

CR2 AC750 Wireless Dual-Band Router
19
Service Provider: Select one from the drop-down menu, such as DynDNS, OrayDDNS or TZO. Domain Name: Enter the domain name (Such as host.dyndns.org). User Name/Email: Enter the user name or email the same as the registration name. Password/Key: Enter the password you set.
4.2 LAN Interface
There are three submenus under the LAN Interface menu: LAN Interface, Static DHCP, DHCP Client. Click any of them, and you will be able to configure the corresponding function.
4.2.1 LAN Interface
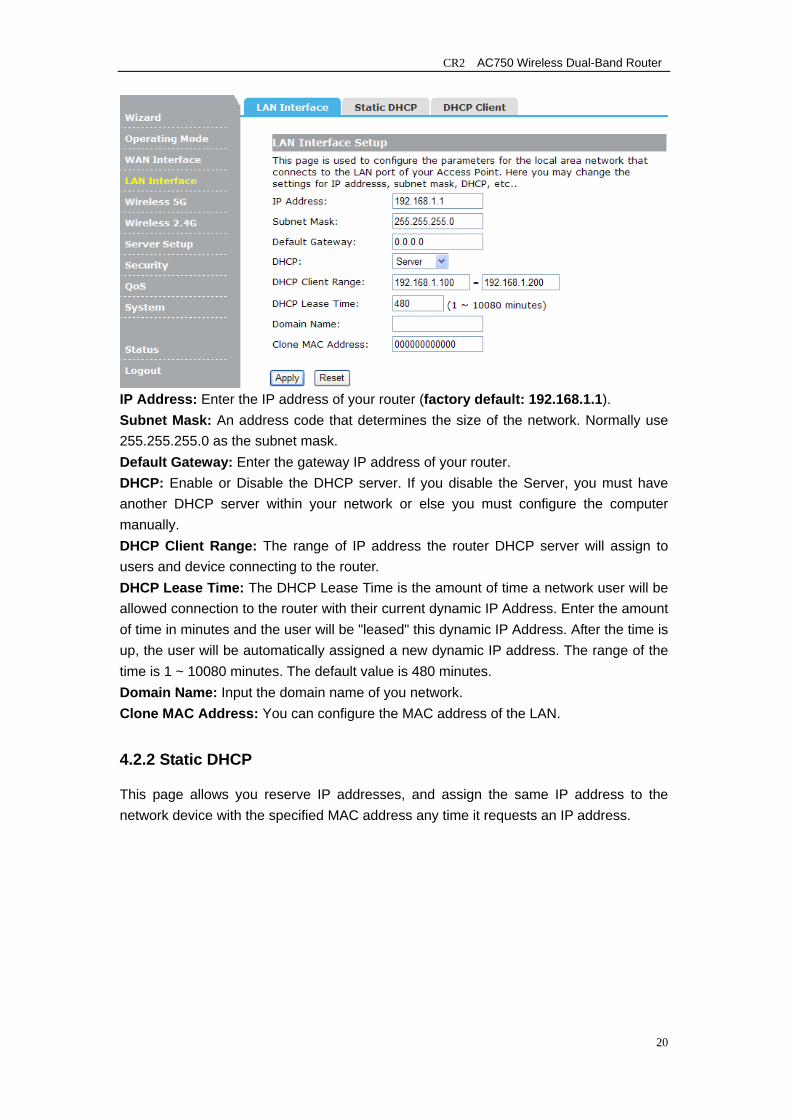
This page is used to configure the parameters for local area network which connects to the LAN port of your Access Point. Here you may change the setting for IP address, subnet mask, DHCP, etc..
CR2 AC750 Wireless Dual-Band Router
20
IP Address: Enter the IP address of your router (factory default: 192.168.1.1). Subnet Mask: An address code that determines the size of the network. Normally use 255.255.255.0 as the subnet mask. Default Gateway: Enter the gateway IP address of your router. DHCP: Enable or Disable the DHCP server. If you disable the Server, you must have another DHCP server within your network or else you must configure the computer manually. DHCP Client Range: The range of IP address the router DHCP server will assign to users and device connecting to the router. DHCP Lease Time: The DHCP Lease Time is the amount of time a network user will be allowed connection to the router with their current dynamic IP Address. Enter the amount of time in minutes and the user will be "leased" this dynamic IP Address. After the time is up, the user will be automatically assigned a new dynamic IP address. The range of the time is 1 ~ 10080 minutes. The default value is 480 minutes. Domain Name: Input the domain name of you network. Clone MAC Address: You can configure the MAC address of the LAN.
4.2.2 Static DHCP
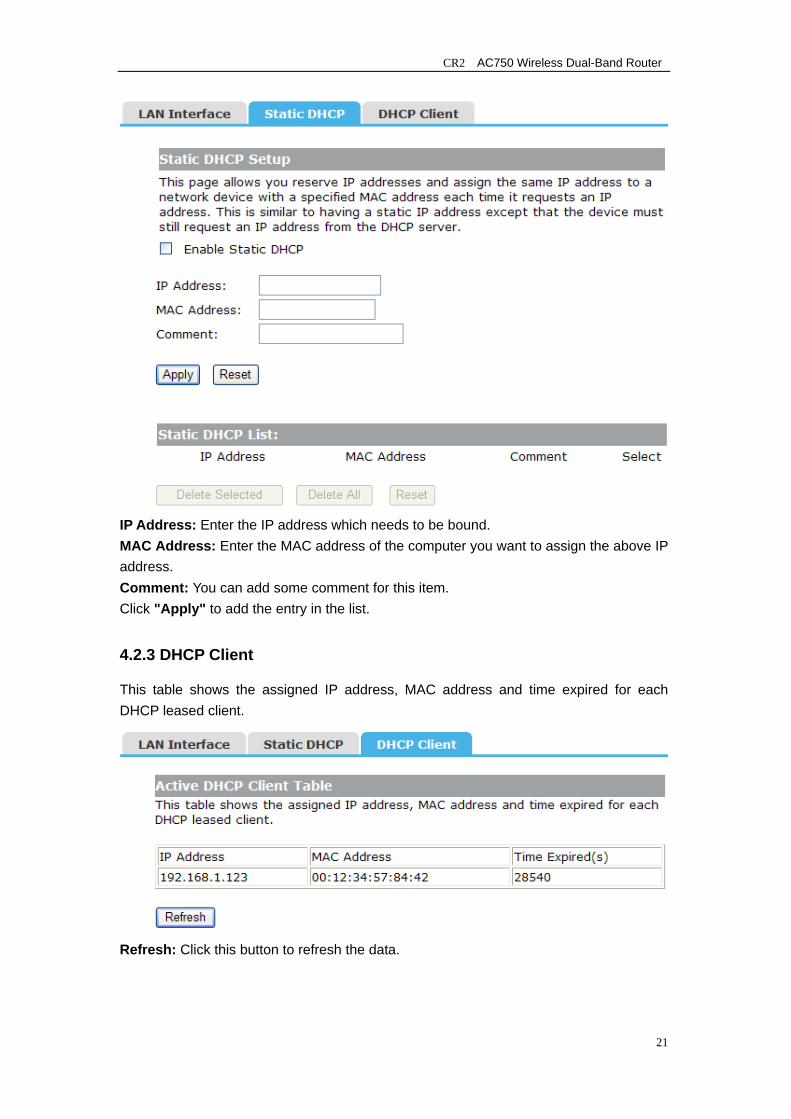
This page allows you reserve IP addresses, and assign the same IP address to the network device with the specified MAC address any time it requests an IP address.
CR2 AC750 Wireless Dual-Band Router
21
IP Address: Enter the IP address which needs to be bound. MAC Address: Enter the MAC address of the computer you want to assign the above IP address. Comment: You can add some comment for this item. Click "Apply" to add the entry in the list.
4.2.3 DHCP Client
This table shows the assigned IP address, MAC address and time expired for each DHCP leased client.
Refresh: Click this button to refresh the data.
CR2 AC750 Wireless Dual-Band Router
22
4.3 Wireless 5G
There are eight submenus under the Wireless 5G menu: Basic, Advanced, Security, Access Control, WDS, Site Survey, WPS, Schedule. Click any of them, and you will be able to configure the corresponding function.
4.3.1 Basic
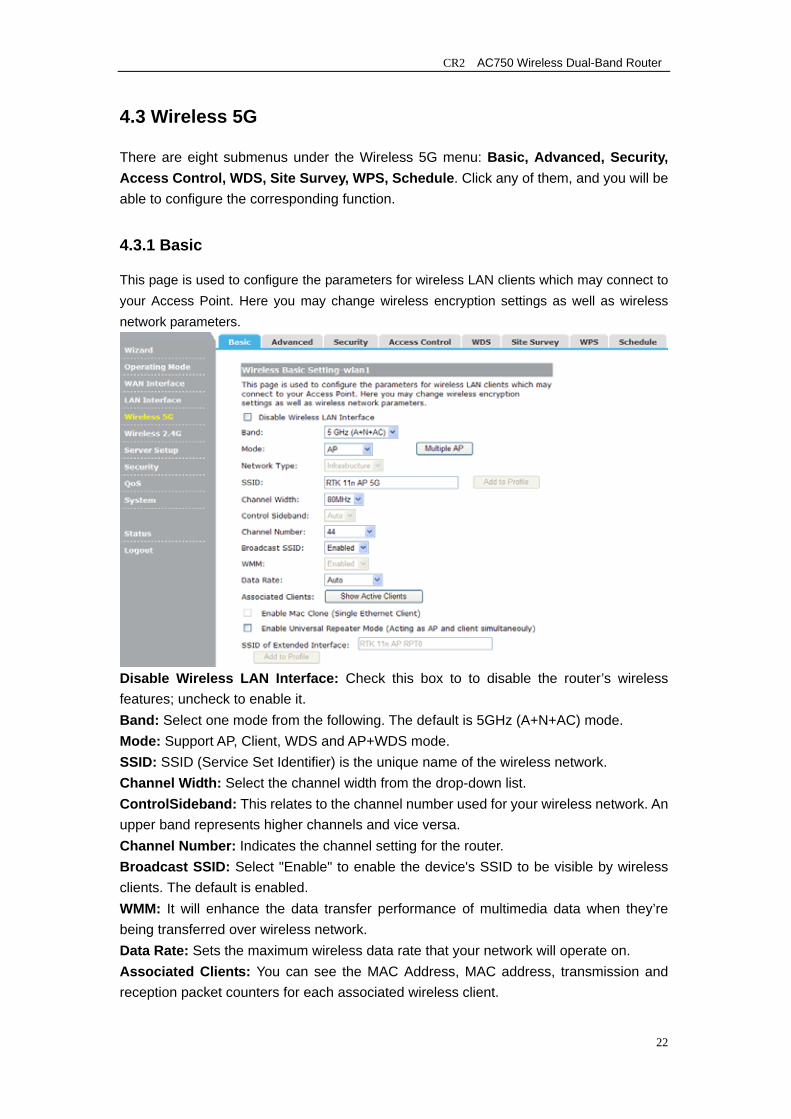
This page is used to configure the parameters for wireless LAN clients which may connect to your Access Point. Here you may change wireless encryption settings as well as wireless network parameters.
Disable Wireless LAN Interface: Check this box to to disable the router’s wireless features; uncheck to enable it. Band: Select one mode from the following. The default is 5GHz (A+N+AC) mode. Mode: Support AP, Client, WDS and AP+WDS mode. SSID: SSID (Service Set Identifier) is the unique name of the wireless network. Channel Width: Select the channel width from the drop-down list. ControlSideband: This relates to the channel number used for your wireless network. An upper band represents higher channels and vice versa. Channel Number: Indicates the channel setting for the router. Broadcast SSID: Select "Enable" to enable the device's SSID to be visible by wireless clients. The default is enabled. WMM: It will enhance the data transfer performance of multimedia data when they’re being transferred over wireless network. Data Rate: Sets the maximum wireless data rate that your network will operate on. Associated Clients: You can see the MAC Address, MAC address, transmission and reception packet counters for each associated wireless client.
CR2 AC750 Wireless Dual-Band Router
23
4.3.2 Advanced
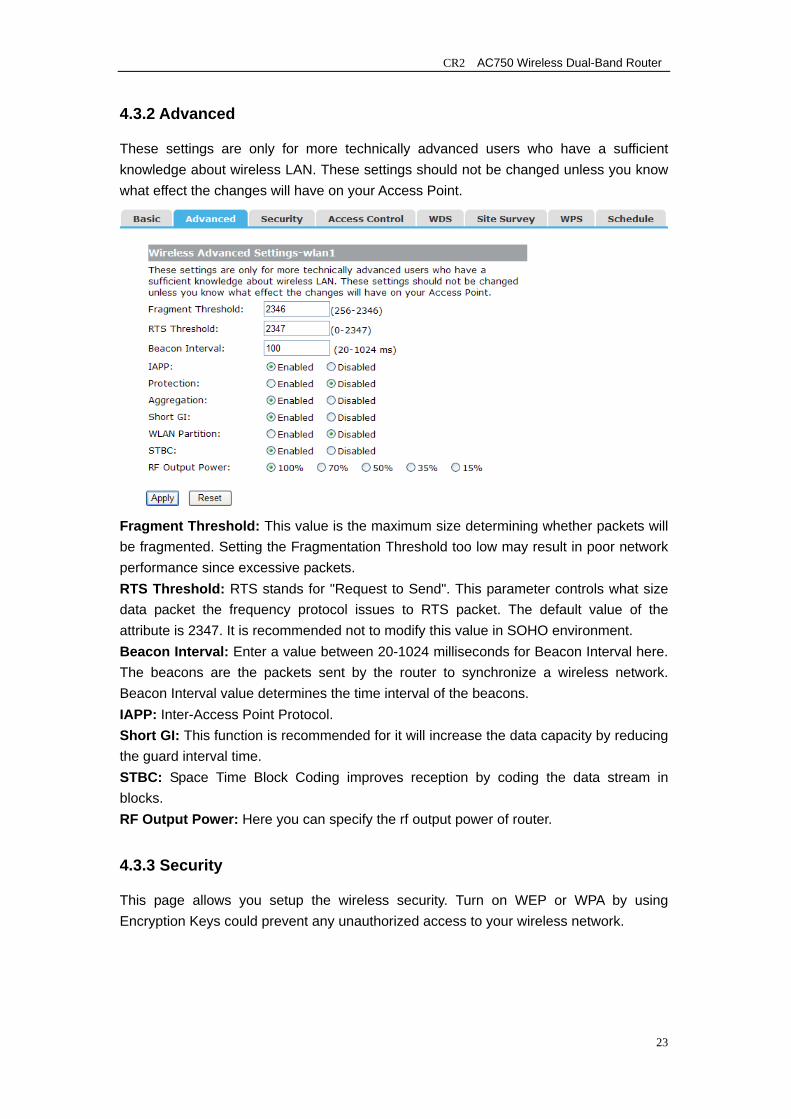
These settings are only for more technically advanced users who have a sufficient knowledge about wireless LAN. These settings should not be changed unless you know what effect the changes will have on your Access Point.
Fragment Threshold: This value is the maximum size determining whether packets will be fragmented. Setting the Fragmentation Threshold too low may result in poor network performance since excessive packets. RTS Threshold: RTS stands for "Request to Send". This parameter controls what size data packet the frequency protocol issues to RTS packet. The default value of the attribute is 2347. It is recommended not to modify this value in SOHO environment. Beacon Interval: Enter a value between 20-1024 milliseconds for Beacon Interval here. The beacons are the packets sent by the router to synchronize a wireless network. Beacon Interval value determines the time interval of the beacons. IAPP: Inter-Access Point Protocol. Short GI: This function is recommended for it will increase the data capacity by reducing the guard interval time. STBC: Space Time Block Coding improves reception by coding the data stream in blocks. RF Output Power: Here you can specify the rf output power of router.
4.3.3 Security
This page allows you setup the wireless security. Turn on WEP or WPA by using Encryption Keys could prevent any unauthorized access to your wireless network.

CR2 AC750 Wireless Dual-Band Router
24
4.3.4 Access Control
The Wireless MAC Address Filtering feature allows you to control wireless stations accessing the router, which depend on the station’s MAC addresses.
Wireless Access Control Mode: If you choose 'Allowed Listed', only those clients whose wireless MAC addresses are in the access control list will be able to connect to your Access Point. When 'Deny Listed' is selected, these wireless clients on the list will not be able to connect the Access Point. The MAC Address format is 001122334455.
4.3.5 WDS
Wireless Distribution System uses wireless media to communicate with other APs, like the Ethernet does. To do this, firstly you must set AP Mode to WDS or AP+WDS in basic setting, then enable WDS function and set another AP MAC which you wan to communicate with. The WDS supports WEP and PSK security mode. Of course in order to make APs work, you have to keep them the same channel and security mode.
CR2 AC750 Wireless Dual-Band Router
25
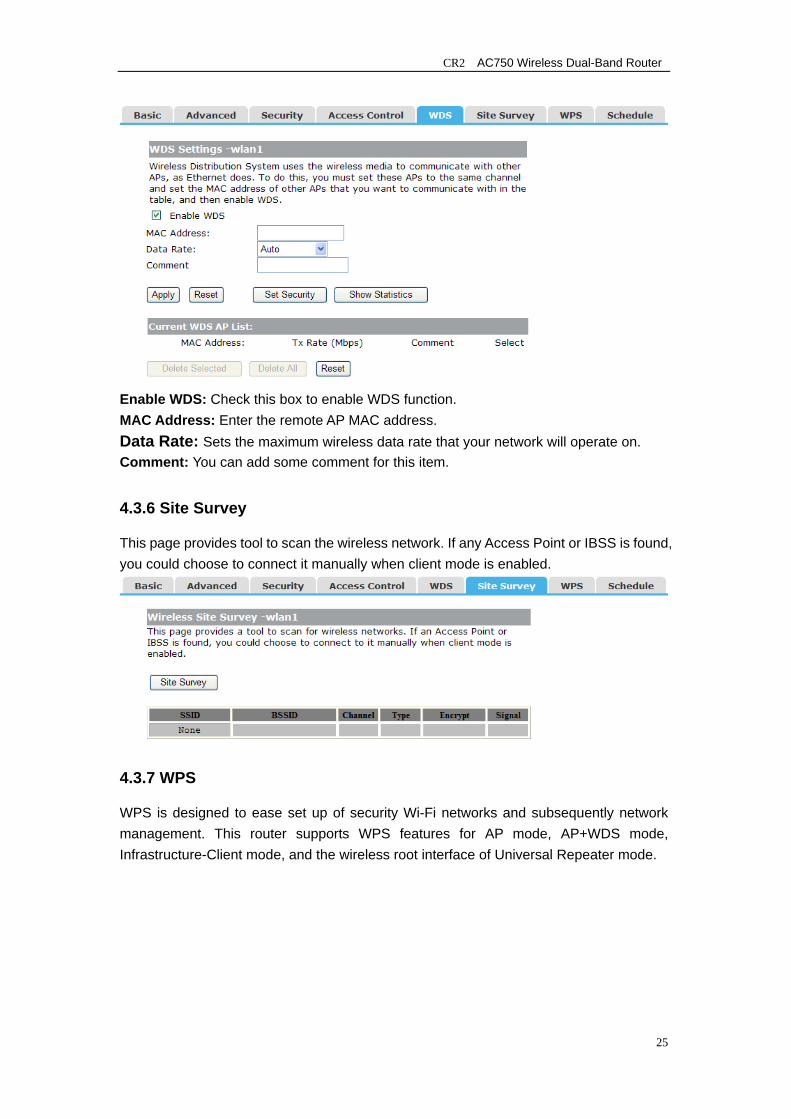
Enable WDS: Check this box to enable WDS function. MAC Address: Enter the remote AP MAC address. Data Rate: Sets the maximum wireless data rate that your network will operate on. Comment: You can add some comment for this item.
4.3.6 Site Survey
This page provides tool to scan the wireless network. If any Access Point or IBSS is found, you could choose to connect it manually when client mode is enabled.
4.3.7 WPS
WPS is designed to ease set up of security Wi-Fi networks and subsequently network management. This router supports WPS features for AP mode, AP+WDS mode, Infrastructure-Client mode, and the wireless root interface of Universal Repeater mode.
CR2 AC750 Wireless Dual-Band Router
26
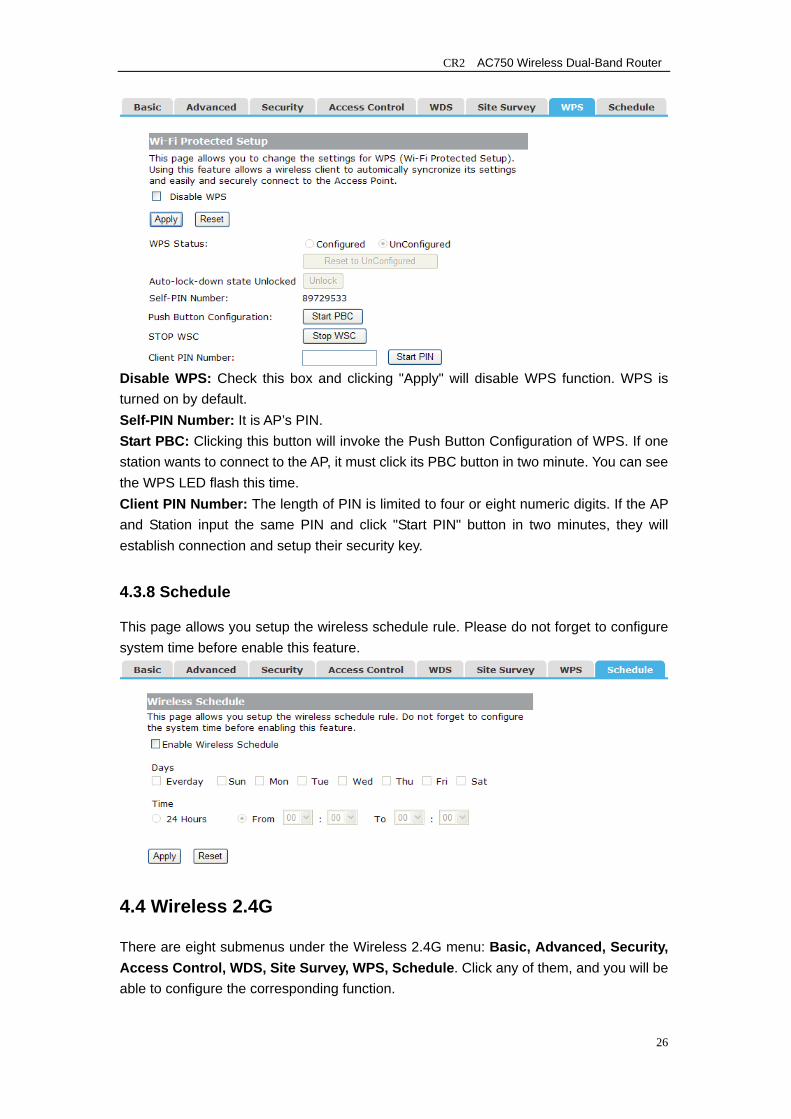
Disable WPS: Check this box and clicking "Apply" will disable WPS function. WPS is turned on by default. Self-PIN Number: It is AP’s PIN. Start PBC: Clicking this button will invoke the Push Button Configuration of WPS. If one station wants to connect to the AP, it must click its PBC button in two minute. You can see the WPS LED flash this time. Client PIN Number: The length of PIN is limited to four or eight numeric digits. If the AP and Station input the same PIN and click "Start PIN" button in two minutes, they will establish connection and setup their security key.
4.3.8 Schedule
This page allows you setup the wireless schedule rule. Please do not forget to configure system time before enable this feature.
4.4 Wireless 2.4G
There are eight submenus under the Wireless 2.4G menu: Basic, Advanced, Security, Access Control, WDS, Site Survey, WPS, Schedule. Click any of them, and you will be able to configure the corresponding function.
CR2 AC750 Wireless Dual-Band Router
27
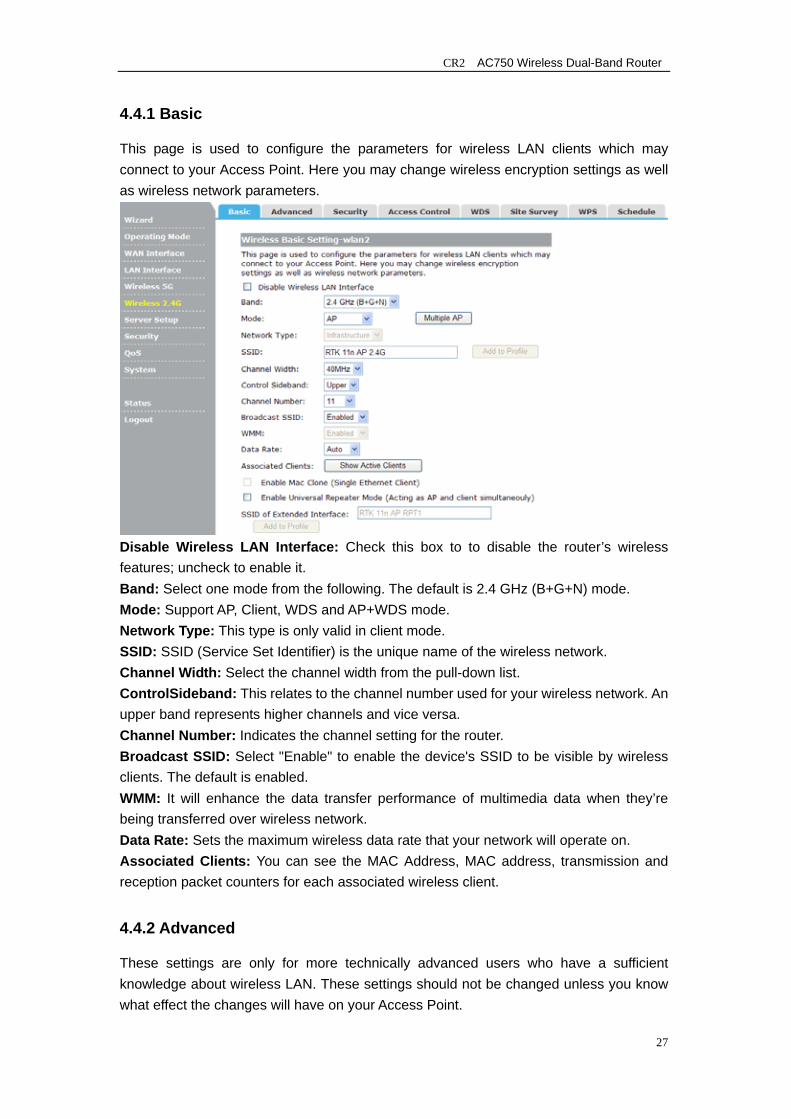
4.4.1 Basic
This page is used to configure the parameters for wireless LAN clients which may connect to your Access Point. Here you may change wireless encryption settings as well as wireless network parameters.
Disable Wireless LAN Interface: Check this box to to disable the router’s wireless features; uncheck to enable it. Band: Select one mode from the following. The default is 2.4 GHz (B+G+N) mode. Mode: Support AP, Client, WDS and AP+WDS mode. Network Type: This type is only valid in client mode. SSID: SSID (Service Set Identifier) is the unique name of the wireless network. Channel Width: Select the channel width from the pull-down list. ControlSideband: This relates to the channel number used for your wireless network. An upper band represents higher channels and vice versa. Channel Number: Indicates the channel setting for the router. Broadcast SSID: Select "Enable" to enable the device's SSID to be visible by wireless clients. The default is enabled. WMM: It will enhance the data transfer performance of multimedia data when they’re being transferred over wireless network. Data Rate: Sets the maximum wireless data rate that your network will operate on. Associated Clients: You can see the MAC Address, MAC address, transmission and reception packet counters for each associated wireless client.
4.4.2 Advanced
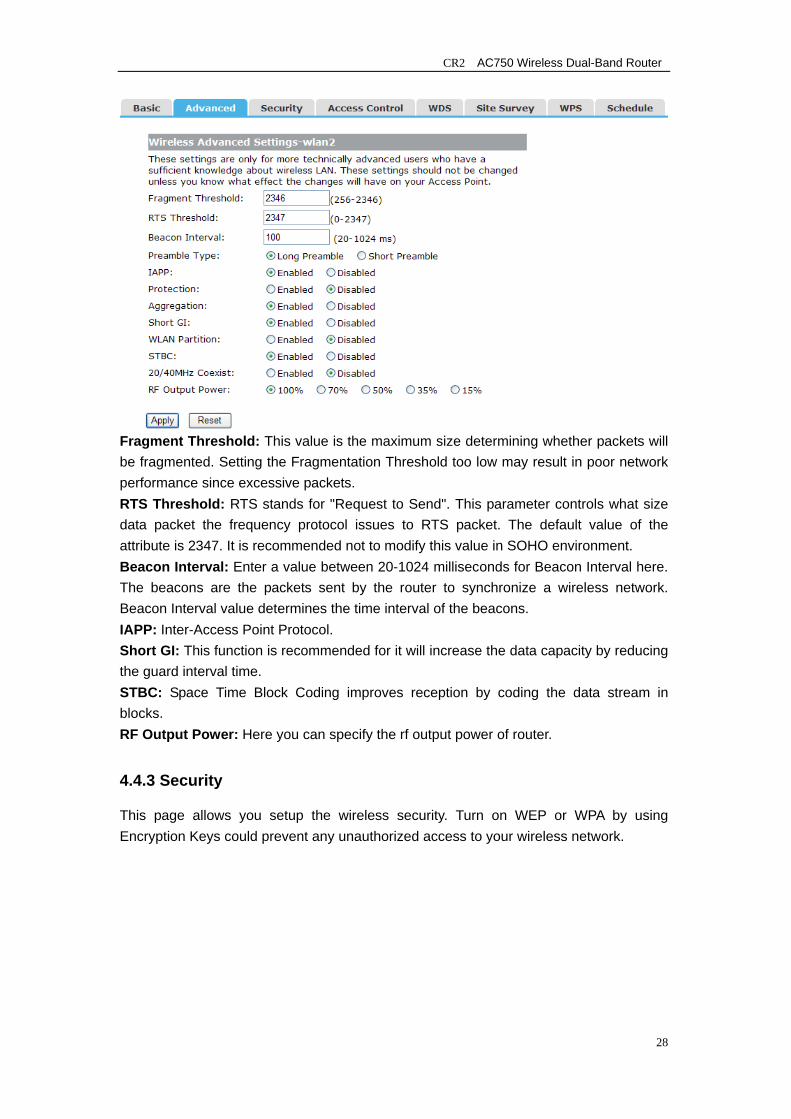
These settings are only for more technically advanced users who have a sufficient knowledge about wireless LAN. These settings should not be changed unless you know what effect the changes will have on your Access Point.
CR2 AC750 Wireless Dual-Band Router
28
Fragment Threshold: This value is the maximum size determining whether packets will be fragmented. Setting the Fragmentation Threshold too low may result in poor network performance since excessive packets. RTS Threshold: RTS stands for "Request to Send". This parameter controls what size data packet the frequency protocol issues to RTS packet. The default value of the attribute is 2347. It is recommended not to modify this value in SOHO environment. Beacon Interval: Enter a value between 20-1024 milliseconds for Beacon Interval here. The beacons are the packets sent by the router to synchronize a wireless network. Beacon Interval value determines the time interval of the beacons. IAPP: Inter-Access Point Protocol. Short GI: This function is recommended for it will increase the data capacity by reducing the guard interval time. STBC: Space Time Block Coding improves reception by coding the data stream in blocks. RF Output Power: Here you can specify the rf output power of router.
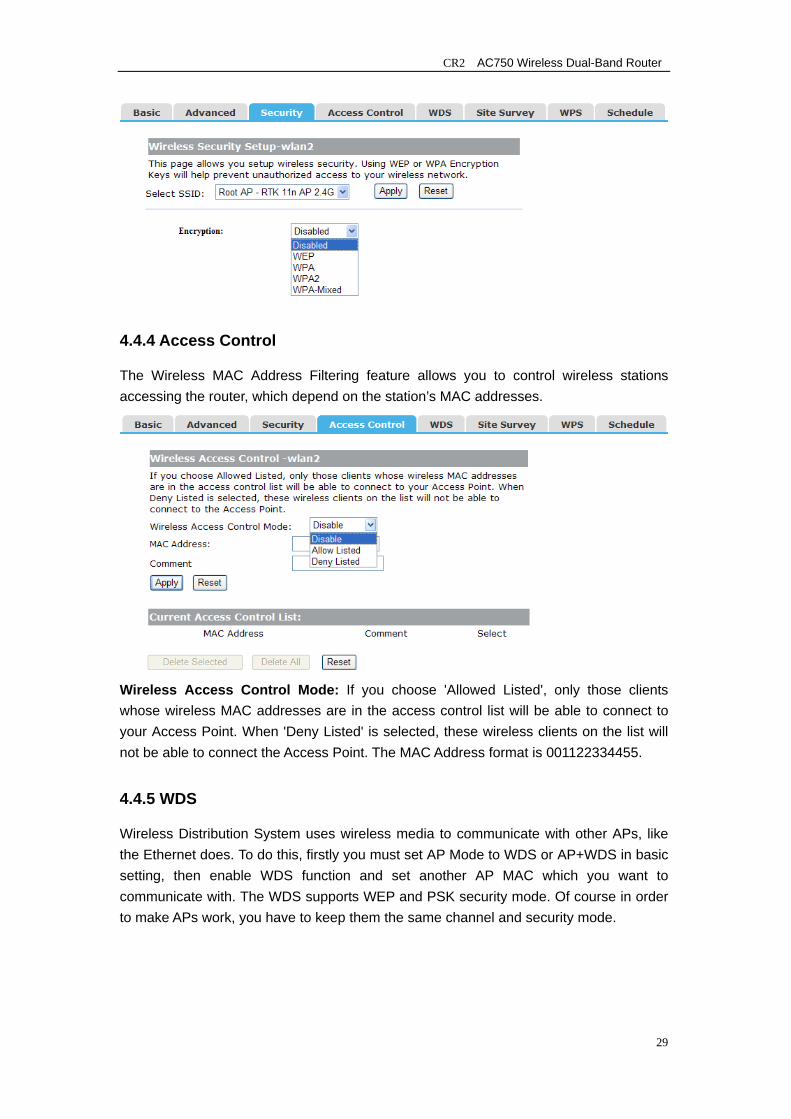
4.4.3 Security
This page allows you setup the wireless security. Turn on WEP or WPA by using Encryption Keys could prevent any unauthorized access to your wireless network.
CR2 AC750 Wireless Dual-Band Router
29
4.4.4 Access Control
The Wireless MAC Address Filtering feature allows you to control wireless stations accessing the router, which depend on the station’s MAC addresses.
Wireless Access Control Mode: If you choose 'Allowed Listed', only those clients whose wireless MAC addresses are in the access control list will be able to connect to your Access Point. When 'Deny Listed' is selected, these wireless clients on the list will not be able to connect the Access Point. The MAC Address format is 001122334455.
4.4.5 WDS
Wireless Distribution System uses wireless media to communicate with other APs, like the Ethernet does. To do this, firstly you must set AP Mode to WDS or AP+WDS in basic setting, then enable WDS function and set another AP MAC which you want to communicate with. The WDS supports WEP and PSK security mode. Of course in order to make APs work, you have to keep them the same channel and security mode.

CR2 AC750 Wireless Dual-Band Router
30
Enable WDS: Check this box to enable WDS function. MAC Address: Enter the remote AP MAC address. Data Rate: Sets the maximum wireless data rate that your network will operate on. Comment: You can add some comment for this item.
4.4.6 Site Survey
This page provides tool to scan the wireless network. If any Access Point or IBSS is found, you could choose to connect it manually when client mode is enabled.
4.4.7 WPS
WPS is designed to ease set up of security Wi-Fi networks and subsequently network management. This router supports WPS features for AP mode, AP+WDS mode, Infrastructure-Client mode, and the wireless root interface of Universal Repeater mode.

CR2 AC750 Wireless Dual-Band Router
31
Disable WPS: Check this box and clicking "Apply" will disable WPS function. WPS is turned on by default. WPS Status: When router’s settings are factory default, it is set to open security and un-configured state, some registers such as Vista WCN can configure AP. Otherwise If it already shows "Configured", it means that the router has setup its security. Self-PIN Number: It is AP’s PIN. Start PBC: Clicking this button will invoke the Push Button Configuration of WPS. If one station wants to connect to the AP, it must click its PBC button in two minute. You can see the WPS LED flash this time. Client PIN Number: The length of PIN is limited to four or eight numeric digits. If the AP and Station input the same PIN and click "Start PIN" button in two minutes, they will establish connection and setup their security key.
4.4.8 Schedule
This page allows you setup the wireless schedule rule. Please do not forget to configure system time before enable this feature.
4.5 Service Setup
There are two submenus under the Server Setup menu: Port Forwarding, DMZ. Click
CR2 AC750 Wireless Dual-Band Router
32
any of them, and you will be able to configure the corresponding function.
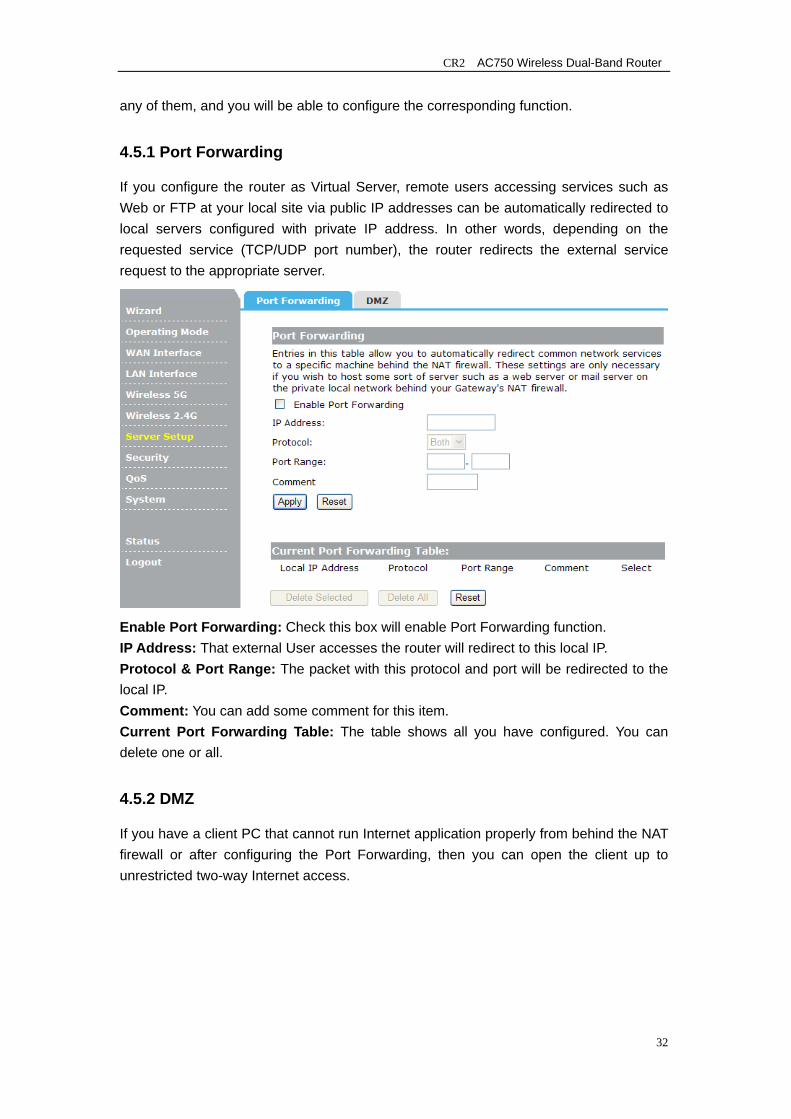
4.5.1 Port Forwarding
If you configure the router as Virtual Server, remote users accessing services such as Web or FTP at your local site via public IP addresses can be automatically redirected to local servers configured with private IP address. In other words, depending on the requested service (TCP/UDP port number), the router redirects the external service request to the appropriate server.
Enable Port Forwarding: Check this box will enable Port Forwarding function. IP Address: That external User accesses the router will redirect to this local IP. Protocol & Port Range: The packet with this protocol and port will be redirected to the local IP. Comment: You can add some comment for this item. Current Port Forwarding Table: The table shows all you have configured. You can delete one or all.
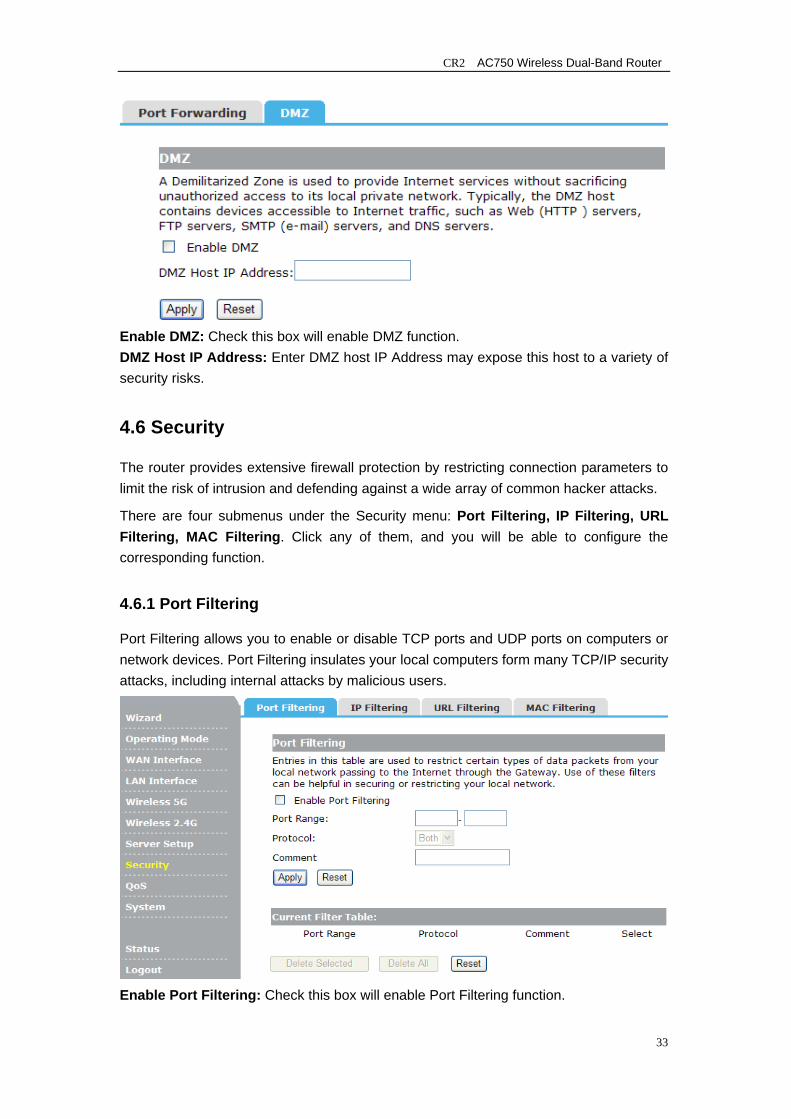
4.5.2 DMZ
If you have a client PC that cannot run Internet application properly from behind the NAT firewall or after configuring the Port Forwarding, then you can open the client up to unrestricted two-way Internet access.
CR2 AC750 Wireless Dual-Band Router
33
Enable DMZ: Check this box will enable DMZ function. DMZ Host IP Address: Enter DMZ host IP Address may expose this host to a variety of security risks.
4.6 Security
The router provides extensive firewall protection by restricting connection parameters to limit the risk of intrusion and defending against a wide array of common hacker attacks.
There are four submenus under the Security menu: Port Filtering, IP Filtering, URL Filtering, MAC Filtering. Click any of them, and you will be able to configure the corresponding function.
4.6.1 Port Filtering
Port Filtering allows you to enable or disable TCP ports and UDP ports on computers or network devices. Port Filtering insulates your local computers form many TCP/IP security attacks, including internal attacks by malicious users.
Enable Port Filtering: Check this box will enable Port Filtering function.
CR2 AC750 Wireless Dual-Band Router
34
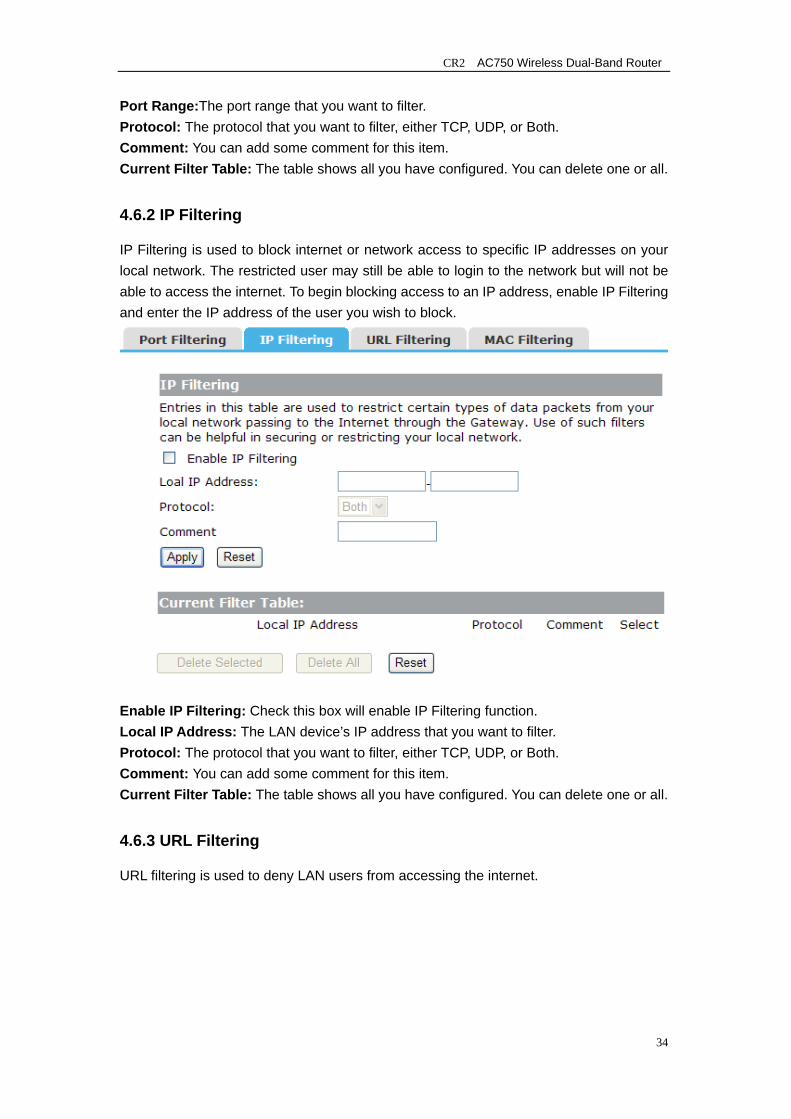
Port Range:The port range that you want to filter. Protocol: The protocol that you want to filter, either TCP, UDP, or Both. Comment: You can add some comment for this item. Current Filter Table: The table shows all you have configured. You can delete one or all.
4.6.2 IP Filtering
IP Filtering is used to block internet or network access to specific IP addresses on your local network. The restricted user may still be able to login to the network but will not be able to access the internet. To begin blocking access to an IP address, enable IP Filtering and enter the IP address of the user you wish to block.
Enable IP Filtering: Check this box will enable IP Filtering function. Local IP Address: The LAN device’s IP address that you want to filter. Protocol: The protocol that you want to filter, either TCP, UDP, or Both. Comment: You can add some comment for this item. Current Filter Table: The table shows all you have configured. You can delete one or all.
4.6.3 URL Filtering
URL filtering is used to deny LAN users from accessing the internet.
CR2 AC750 Wireless Dual-Band Router
35
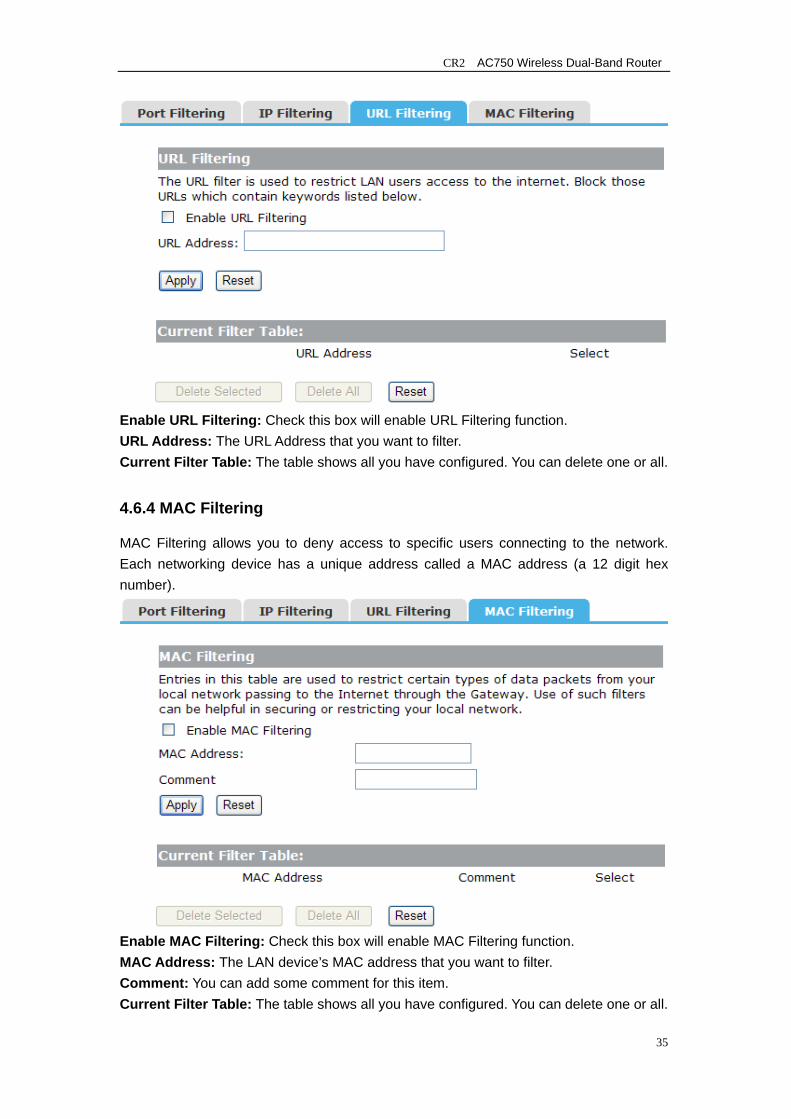
Enable URL Filtering: Check this box will enable URL Filtering function. URL Address: The URL Address that you want to filter. Current Filter Table: The table shows all you have configured. You can delete one or all.
4.6.4 MAC Filtering
MAC Filtering allows you to deny access to specific users connecting to the network. Each networking device has a unique address called a MAC address (a 12 digit hex number).
Enable MAC Filtering: Check this box will enable MAC Filtering function. MAC Address: The LAN device’s MAC address that you want to filter. Comment: You can add some comment for this item. Current Filter Table: The table shows all you have configured. You can delete one or all.
CR2 AC750 Wireless Dual-Band Router
36
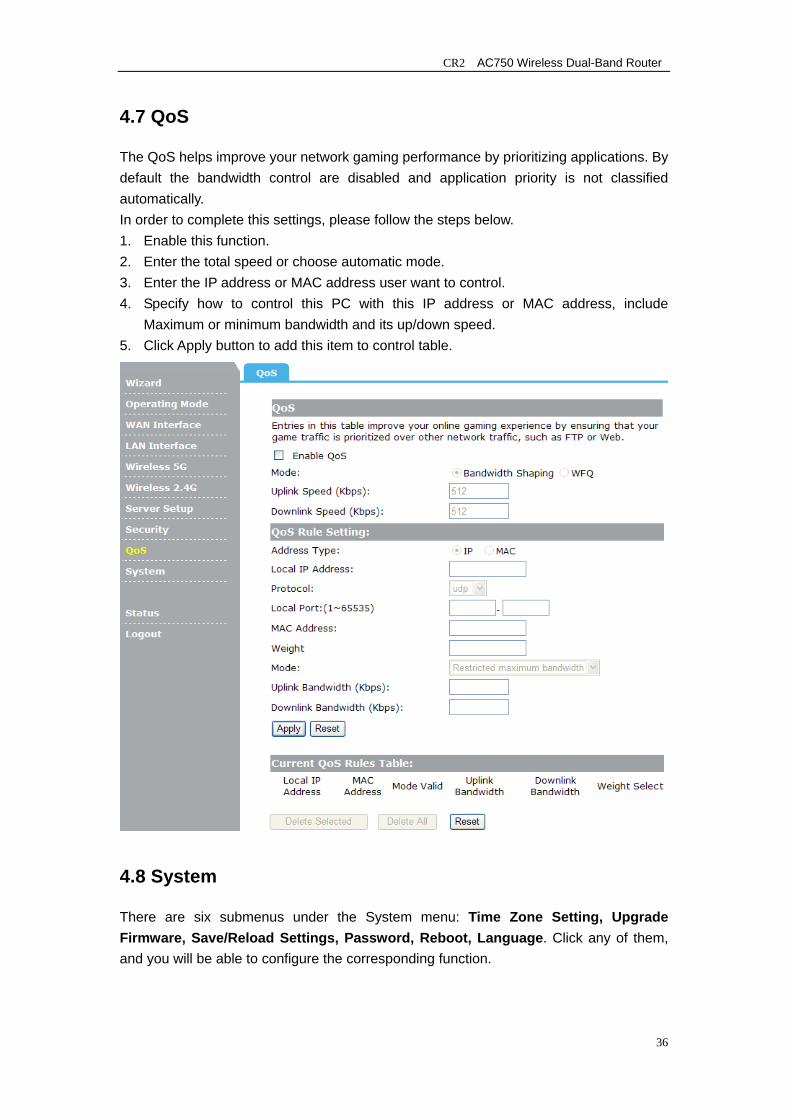
4.7 QoS
The QoS helps improve your network gaming performance by prioritizing applications. By default the bandwidth control are disabled and application priority is not classified automatically. In order to complete this settings, please follow the steps below. 1. Enable this function. 2. Enter the total speed or choose automatic mode. 3. Enter the IP address or MAC address user want to control. 4. Specify how to control this PC with this IP address or MAC address, include
Maximum or minimum bandwidth and its up/down speed. 5. Click Apply button to add this item to control table.
4.8 System
There are six submenus under the System menu: Time Zone Setting, Upgrade Firmware, Save/Reload Settings, Password, Reboot, Language. Click any of them, and you will be able to configure the corresponding function.
CR2 AC750 Wireless Dual-Band Router
37
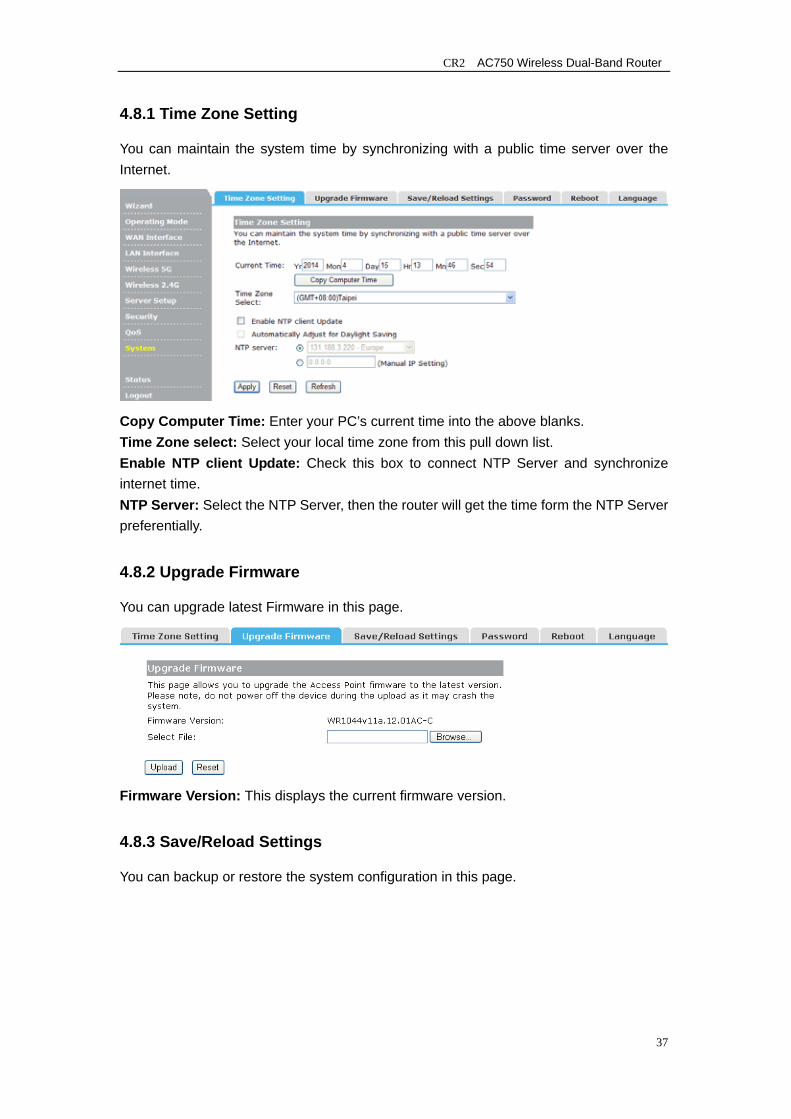
4.8.1 Time Zone Setting
You can maintain the system time by synchronizing with a public time server over the Internet.
Copy Computer Time: Enter your PC’s current time into the above blanks. Time Zone select: Select your local time zone from this pull down list. Enable NTP client Update: Check this box to connect NTP Server and synchronize internet time. NTP Server: Select the NTP Server, then the router will get the time form the NTP Server preferentially.
4.8.2 Upgrade Firmware
You can upgrade latest Firmware in this page.
Firmware Version: This displays the current firmware version.
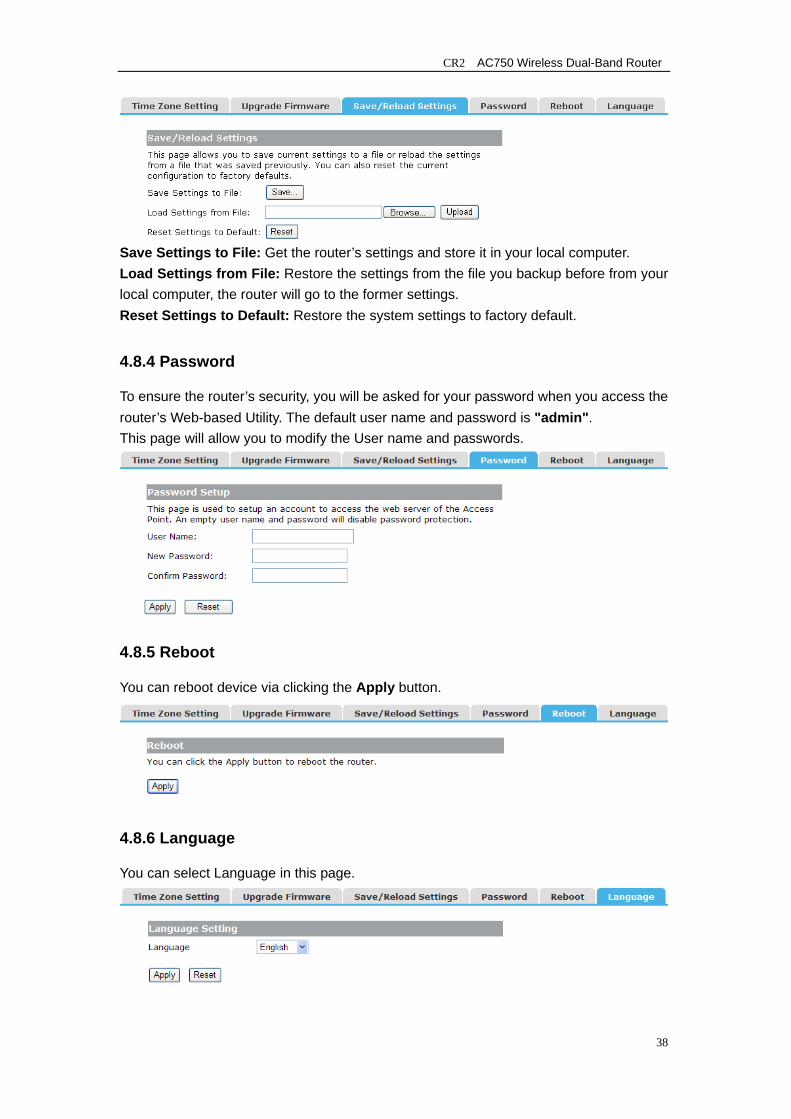
4.8.3 Save/Reload Settings
You can backup or restore the system configuration in this page.
CR2 AC750 Wireless Dual-Band Router
38
Save Settings to File: Get the router’s settings and store it in your local computer. Load Settings from File: Restore the settings from the file you backup before from your local computer, the router will go to the former settings. Reset Settings to Default: Restore the system settings to factory default.
4.8.4 Password
To ensure the router’s security, you will be asked for your password when you access the router’s Web-based Utility. The default user name and password is "admin". This page will allow you to modify the User name and passwords.
4.8.5 Reboot
You can reboot device via clicking the Apply button.
4.8.6 Language
You can select Language in this page.

CR2 AC750 Wireless Dual-Band Router
39
Chapter 5 Status
There are three submenus under the Status menu: Status, Statistics, Log. Click anyone, you will see the following status.
5.1 Status
The System Status provides you with a snapshot of your router’s current connections and settings.
The System Information section provides you with the router’s firmware version and build. This is used to help our support department determine what firmware version your device is running. The Current Date / Time is the setting for the system clock. The Wireless Configuration shows the details of the 5.0GHz and 2.4GHz wireless networks.
The TCP/IP Configuration displays the current configurations for local network IP address and DHCP server settings.
The WAN Configuration displays the information from your Internet Provider. If for some reason your Internet connection stops working, you may try running through the Smart Setup Wizard again.
CR2 AC750 Wireless Dual-Band Router
40
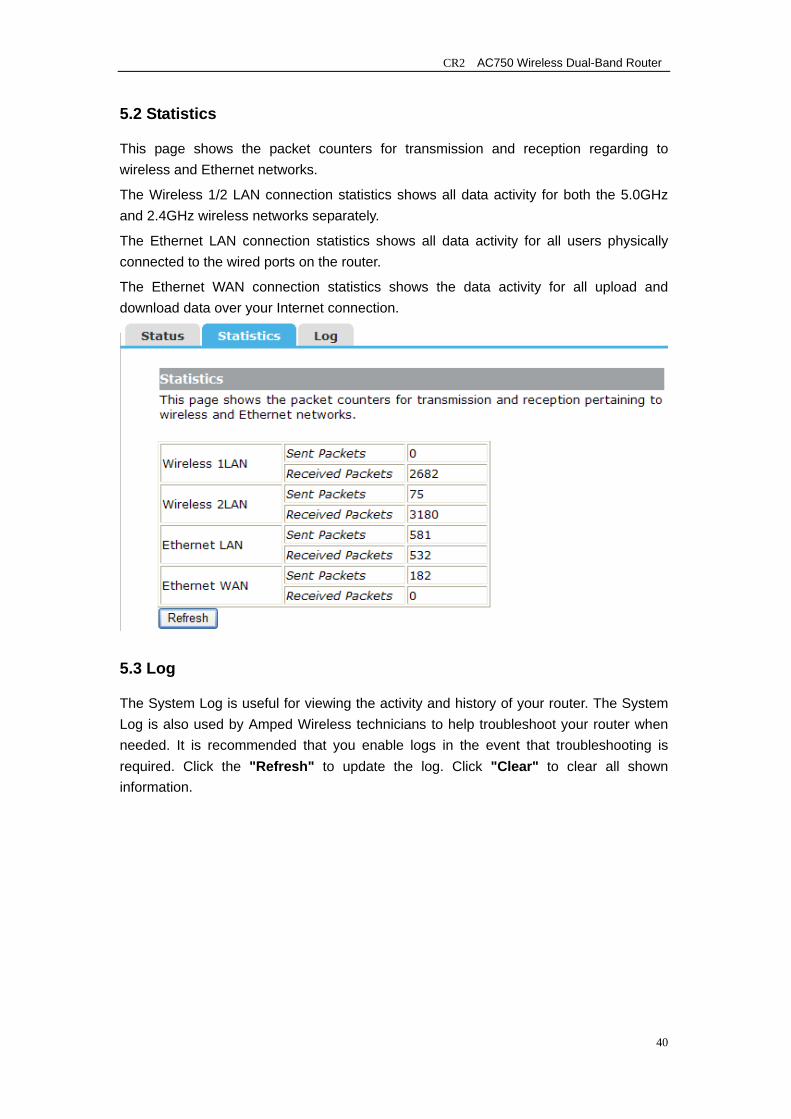
5.2 Statistics
This page shows the packet counters for transmission and reception regarding to wireless and Ethernet networks.
The Wireless 1/2 LAN connection statistics shows all data activity for both the 5.0GHz and 2.4GHz wireless networks separately.
The Ethernet LAN connection statistics shows all data activity for all users physically connected to the wired ports on the router.
The Ethernet WAN connection statistics shows the data activity for all upload and download data over your Internet connection.
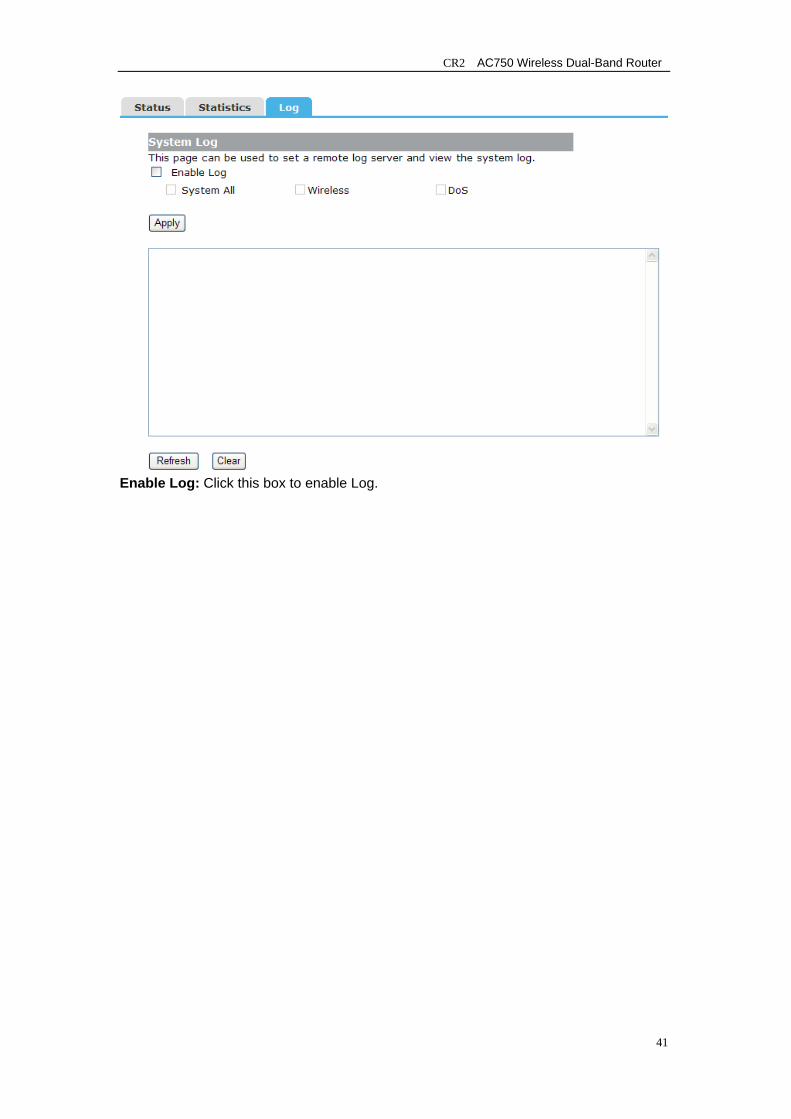
5.3 Log
The System Log is useful for viewing the activity and history of your router. The System Log is also used by Amped Wireless technicians to help troubleshoot your router when needed. It is recommended that you enable logs in the event that troubleshooting is required. Click the "Refresh" to update the log. Click "Clear" to clear all shown information.
CR2 AC750 Wireless Dual-Band Router
41
Enable Log: Click this box to enable Log.
CR2 AC750 Wireless Dual-Band Router
42
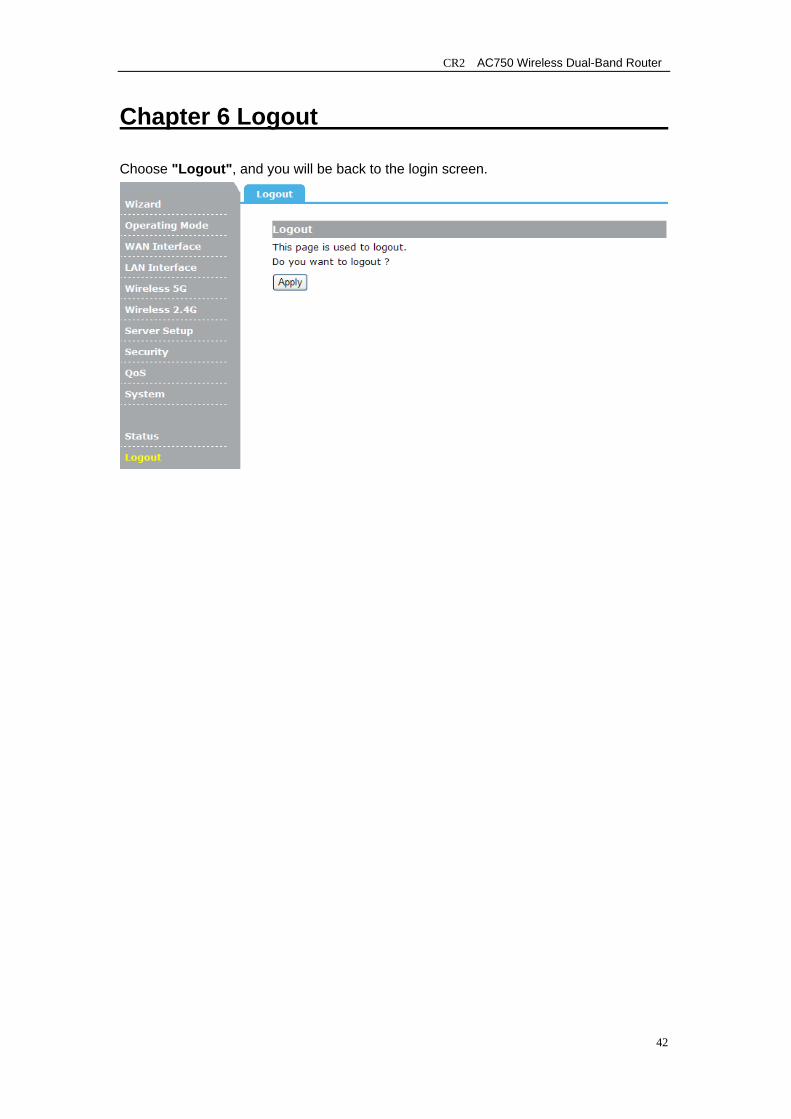
Chapter 6 Logout
Choose "Logout", and you will be back to the login screen.
CR2 AC750 Wireless Dual-Band Router
43
Chapter 7 FCC ID Warning:
To operate the equipment NOTE:THE MANUFACTURER IS NOT RESPONSIBLE FOR ANY RADIO OR TV INTERFERENCE CAUSED BY UNAUTHORIZED MODIFICATIONS TO THIS EQUIPMENT.SUCH MODIFICATIONS COULD VOID THE USER’S AUTHORITY TO OPERATE THE EQUIPMENT. NOTE: This equipment has been tested and found to comply with the limits for a Class B digital device, pursuant to Part 15 of the FCC Rules. These limits are designed to provide reasonable protection against harmful interference in a residential installation. This equipment generates, uses and can radiate radio frequency energy and, if not installed and used in accordance with the instructions, may cause harmful interference to radio communications. However, there is no guarantee that interference will not occur in a particular installation. If this equipment does cause harmful interference to radio or television reception, which can be determined by turning the equipment off and on, the user is encouraged to try to correct the interference by one or more of the following measures: -- Reorient or relocate the receiving antenna. -- Increase the separation between the equipment and receiver. -- Connect the equipment into an outlet on a circuit different from that to which the receiver is connected. -- Consult the dealer or an experienced radio/TV technician for help. FCC Radiation Exposure Statement: This equipment complies with FCC RF radiation exposure limits set forth for an uncontrolled environment. This device and its antenna must not be co-located or operating in conjunction with any other antenna or transmitter. To comply with FCC RF exposure compliance requirements, this grant is applicable to only Mobile Configurations. The antennas used for this transmitter must be installed to provide a separation distance of at least 20 cm from all persons and must not be co-located or
operating in conjunction with any other antenna or transmitter.”