Embed Size (px)
Citation preview

©Tu
many
an/S
hutte
rstoc
k
Files You Will NeedQuestTravel-C.accdbQuestLogo.bmpRealEstate-C.accdbForSale.bmpDives-C.accdb
Membership-C.accdbPeople.jpgRecycle-C.accdbJobs-C.accdbBaseball-C.accdb
Samantha Hooper, a tour developer at Quest Specialty Travel, asks you to create forms to make tour information easier to access, enter, and update.
Using Forms
• Use the Form Wizard
• Create a split form
• Use Form Layout View
• Add fields to a form
• Modify form controls
• Create calculations
• Modify tab order
• Insert an image
Unit ObjectivesAfter completing this unit, you will be able to:
CASE
Microsoft® product screenshots used with permission from Microsoft® Corporation.
Access 2013 Unit C
C8444_UnitC_ptg01_hr_053-078.indd 53 2/22/13 11:06 AM
Propert
y of C
enga
ge Le
arning

Using FormsAccess 54
Access 2013
UNIT C
Learning Outcomes•CreateaformwiththeFormWizard
•Sortdatainaform•Describeformterminologyandviews
Use the Form WizardAformisaneasy-to-usedataentryandnavigationscreen.Aformallowsyoutoarrangethefieldsofarecordinanylayoutsoadatabaseusercanquicklyandeasilyfind,enter,edit,andanalyzedata.Thedatabasedesigner isthepersonresponsibleforbuildingandmaintainingtables,queries, forms,andreports forallof thedatabaseusers. CASE Samantha Hooper asks you to build a form to enter and maintain tour information.
1. Start Access, open the QuestTravel-C.accdb database from the location where you store your Data Files, then enable content if prompted You can use many methods to create a new form, but the Form Wizard is a fast and popular tool that helps you get started. The Form Wizard prompts you for information it needs to create a form, such as the fields, layout, and title for the form.
2. Click the CREATE tab on the Ribbon, then click the Form Wizard button in the Forms groupThe Form Wizard starts, prompting you to select the fields for this form. You want to create a form to enter and update data in the Tours table.
3. Click the Tables/Queries list arrow, click Table: Tours, then click the Select All Fields button You could now select fields from other tables, if necessary, but in this case, you have all of the fields you need.
4. Click Next, click the Columnar option button, click Next, type Tours Entry Form as the title, then click FinishThe Tours Entry Form opens in Form View, as shown in FigUrE C-1. Access provides three different views of forms, as summarized in TAblE C-1. Each item on the form is called a control. A label control is used to describe the data shown in other controls such as text boxes. A label is also used for the title of the form, Tours Entry Form. A text box is used to display the data as well as enter, edit, find, sort, and also filter the data. A combo box is a combination of two controls: a text box and a list. The Category data is displayed in a combo box control. You click the arrow button on a combo box control to display a list of values, or you can edit data directly in the combo box itself.
5. Click Breeze Bay Shelling in the TourName text box, click the Ascending button in the Sort & Filter group, then click the Next record button in the navigation bar to move to the second recordThe Ames Ski Club is the second record when the records are sorted in ascending order on the TourName data. Information about the current record number and total number of records appears in the navigation bar, just as it does in a datasheet.
6. Click the Previous record button in the navigation bar to move back to the first record, click the TourName text box, then change American Heritage Tour to Washington DC History Tour Your screen should look like FigUrE C-2. Forms displayed in Form View are the primary tool for database users to enter, edit, and delete data in an Access database.
7. Right-click the Tours Entry Form tab, then click CloseWhen a form is closed, Access automatically saves any edits made to the current record.
STEpS
Clickinthetextboxofthefieldyouwanttosortbeforeclickingasortbutton.
QUiCK Tip
C8444_UnitC_ptg01_hr_053-078.indd 54 2/22/13 11:06 AM
Propert
y of C
enga
ge Le
arning

Using Forms Access 55
Access 2013
TAblE C-1: Form views
view primary purpose
Form Tofind,sort,enter,andeditdata
Layout Tomodifythesize,position,orformattingofcontrols;showsdataasyoumodifytheform,makingitthetoolofchoicewhenyouwanttochangetheappearanceandusabilityoftheformwhileviewinglivedata
Design TomodifytheFormHeader,Detail,andFootersection,ortoaccessthecompleterangeofcontrolsandformproperties;DesignViewdoesnotdisplaydata
© 2
014
Ceng
age
Lear
ning
FigUrE C-2: Displaying the results of a calculation in Form View
Edit record symbol
Editing data in the TourName text box
FigUrE C-1: Tours Entry Form in Form View
Ascending button
Navigation barTotal number of records Next record button
Category combo box
Text boxes
Labels
C8444_UnitC_ptg01_hr_053-078.indd 55 2/22/13 11:06 AM
Propert
y of C
enga
ge Le
arning

Using FormsAccess 56
Access 2013
UNIT C
Learning Outcomes•Createasplitform•Enterandeditdatainaform
Create a Split FormInadditiontotheFormWizard,youshouldbefamiliarwithseveralotherformcreationtools.TAblE C-2
identifiesthosetoolsandthepurposeforeach. CASE Samantha Hooper asks you to create another form to manage customer data. You’ll work with the Split Form tool for this task.
1. Click the Customers table in the Navigation Pane, click the CREATE tab, click the More Forms button, click Split Form, then click the Add Existing Fields button in the Tools group on the DESIGN tab to close the Field List if it opensThe Customers data appears in a split form with the top half in Layout View, as shown in FigUrE C-3. The benefit of a split form is that the upper pane allows you to display the fields of one record in any arrange-ment, and the lower pane maintains a datasheet view of the first few records. If you edit, sort, or filter records in the upper pane, the lower pane is automatically updated, and vice versa.
2. Click MO in the State text box in the upper pane, click the HOME tab, click the Selection button in the Sort & Filter group, then click Does Not Equal “MO”Thirty-seven records are filtered where the State field is not equal to MO. You also need to change a value in the Jacob Alman record.
3. In the lower pane, select Des Moines in the City field of the first record, edit the entry to read Dallas Center, click any other record in the lower pane, then click Jacob in the first record of the lower paneMoving from record to record automatically saves data. Note that “Dallas Center” is now the entry in the City field in both the upper and lower panes, as shown in FigUrE C-4.
4. Click the record selector for the Kristen Collins record in the lower pane, then click the Delete button in the Records group on the HOME tabYou cannot delete this record because it contains related records in the Sales table. This is a benefit of refer-ential integrity on the one-to-many relationship between the Customers and Sales tables. Referential integ-rity prevents the creation of orphan records, records on the many side of a relationship (in this case, the Sales table) that do not have a match on the one side (in this case, the Customers table).
5. Click OK, right-click the Customers form tab, click Close, click Yes when prompted to save changes, then click OK to save the form with the name Customers
STEpS
LayoutViewallowsyoutoviewandfilterthedata,butnoteditit.
QUiCK Tip
Makesureyouedittherecordinthedatasheetinthelowerpane.
TrOUblE
TAblE C-2: Form creation tools
tool icon creates a formForm withoneclickbasedontheselectedtableorquery
Form Design fromscratchinFormDesignView
Blank Form fromscratchinFormLayoutView
Form Wizard byansweringaseriesofquestionsprovidedbytheFormWizarddialogboxes
Navigation usedtonavigateormovebetweendifferentareasofthedatabase
More Forms basedonMultipleItems,Datasheet,SplitForm,ModalDialog,PivotChart,orPivotTablearrangements
Split Form withtwopanes,theuppershowingonerecordatatimeandthelowerdisplayingadatasheetofmanyrecords
© 2
014
Ceng
age
Lear
ning
C8444_UnitC_ptg01_hr_053-078.indd 56 2/22/13 11:06 AM
Propert
y of C
enga
ge Le
arning
Using Forms Access 57
Access 2013
FigUrE C-3: Customers table in a split form
Lower pane in Datasheet View
Upper pane in Layout View
FigUrE C-4: Editing data in a split form
Record selector for record in upper pane
Record selector for Kristen
Collins record
Filtered button indicates the
records are filtered
Selection button
Delete button
Des Moines changed to Dallas Center
C8444_UnitC_ptg01_hr_053-078.indd 57 2/22/13 11:06 AM
Propert
y of C
enga
ge Le
arning

Using FormsAccess 58
Access 2013
UNIT C
Learning Outcomes•ResizecontrolsinLayoutView
•FormatcontrolsinLayoutView
Use Form layout ViewLayout Viewletsyoumakesomedesignchangestoaformwhileyouarebrowsingthedata.Forexample,youcanmoveandresizecontrols,addordeleteafieldontheform,filterandsortdata,orchangeformat-tingcharacteristics,suchasfontsandcolors. CASE Samantha Hooper asks you to make several design changes to the Tours Entry Form. You can make these changes in Layout View.
1. Right-click Tours Entry Form in the Navigation Pane, then click Layout ViewIn Layout View, you can move through the records, but you cannot enter or edit the data as you can in Form View.
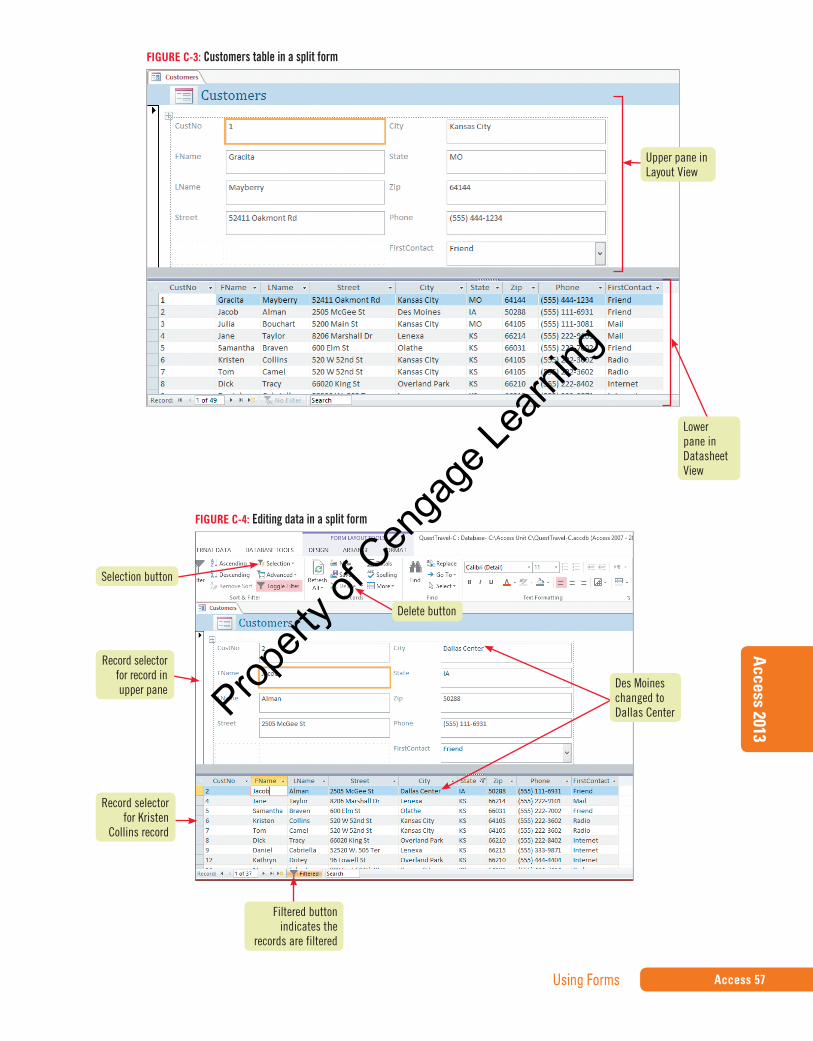
2. Click the Next record button in the navigation bar twice to move to the third record, Bigfoot Rafting ClubYou often use Layout View to make minor design changes, such as editing labels and changing formatting characteristics.
3. Click the TourNo label to select it if it is not already selected, click between the words Tour and No, then press [Spacebar]You also want to edit a few more labels.
4. Continue editing the labels, as shown in FigUrE C-5
You also want to change the text color of the first two labels, Tour No and Tour Name, to red to make them more noticeable.
5. Click the Tour No label, click the HOME tab, click the Font Color button in the Text Formatting group, click the Tour Name label, then click Often, you want to apply the same formatting enhancement to multiple controls. For example, you decide to narrow the City and StateAbbrev text boxes. Select the text boxes at the same time to make the same change to both.
6. Click Placerville in the City text box, press and hold [Shift], click CA in the StateAbbrev text box to select the two text boxes at the same time, release [Shift], then use the pointer to drag the right edge of the selection to the left to make the text boxes approximately half as wideLayout View for the Tours Entry Form should look like FigUrE C-6. Mouse pointers in Form Layout and Form Design View are very important as they indicate what happens when you drag the mouse. Mouse pointers are described in TAblE C-3.
STEpS
IfyourthirdrecordisnotBigfootRaftingClub,sorttherecordsinascendingorderontheTourNamefield.
TrOUblE
Besuretomodifythelabels in the left columninsteadofthetextboxesontheright.
TrOUblE
Besuretomodifythetext boxes in theright columninsteadofthelabelsontheleft.
TrOUblE
TAblE C-3: Mouse pointer shapes
shape when does this shape appear? actionWhen you point to any unselected control on the form (the default mouse pointer)
Single-clickingwiththismousepointerselectsacontrol
When you point to theupper-left corner or edge of a selected control in Form Design View or the middle of the control in Form Layout View
Draggingwiththismousepointermovestheselectedcontrol(s)
When you point to any sizing handle (except the larger one in the upper-left corner in Form Design View)
Draggingwithoneofthesemousepointersresizesthecontrol
© 2
014
Ceng
age
Lear
ning
C8444_UnitC_ptg01_hr_053-078.indd 58 2/22/13 11:06 AM
Propert
y of C
enga
ge Le
arning
Using Forms Access 59
Access 2013
Layoutsprovideawaytogroupseveralcontrolstogetheronaformorreporttomorequicklyadd,delete,rearrange,resize,oraligncontrols.Toinsertalayoutintoaformorreport,selectthecontrolsyouwanttogrouptogether,thenchoosetheStackedorTabularbuttonontheARRANGEtab.Eachoptionappliesatable
layouttothecontrolssothatyoucaninsert,delete,merge,orsplitthecellsinthelayouttoquicklyrearrangeoreditthecontrolsinthelayout.Toremovealayout,usetheRemoveLayoutbuttonontheARRANGEtabinFormDesignView.
Table layouts
FigUrE C-5: Using Layout View to modify form labels on the Tours Entry Form
Edit these labels to include a
space between the words
FigUrE C-6: Layout View for the Tours Entry Form
Resize mouse pointer
Labels are red
C8444_UnitC_ptg01_hr_053-078.indd 59 2/22/13 11:06 AM
Propert
y of C
enga
ge Le
arning

Using FormsAccess 60
Access 2013
UNIT C
Learning Outcomes•Addfieldstoaform
•Aligncontrols•Resizecontrols
Add Fields to a FormAddinganddeletingfieldsinanexistingformisacommonactivity.YoucanaddordeletefieldsinaformineitherLayoutVieworDesignViewusingtheFieldList.TheField Listliststhedatabasetablesandthefieldstheycontain.Toaddafieldtotheform,dragitfromtheFieldListtothedesiredlocationontheform.Todeleteafieldonaform,clickthefieldtoselectit,thenpressthe[Delete]key.Deletingafieldfromaformdoesnotdeleteitfromtheunderlyingtableorhaveanyeffectonthedatacontainedinthefield.YoucantoggletheFieldListonandoffusingtheAddExistingFieldsbuttonontheDESIGNtab. CASE Samantha Hooper asks you to add the tour description from the TourCategories table to the Tours Entry Form. You can use Layout View and the Field List to accomplish this goal.
1. Click the DESIGN tab on the Ribbon, click the Add Existing Fields button in the Tools group, then click the Show all tables link in the Field ListThe Field List opens in Layout View, as shown in FigUrE C-7. Notice that the Field List is divided into sections. The upper section shows the tables currently used by the form, the middle section shows directly related tables, and the lower section shows other tables in the database. The expand/collapse button to the left of the table names allows you to expand (show) the fields within the table or collapse (hide) them. The Description field is in the TourCategories table in the middle section.
2. Click the expand button to the left of the TourCategories table, drag the Description field to the form, then use the pointer to drag the new Description text box and label below the Price labelWhen you add a new field to a form, two controls are usually created: a label and a text box. The label contains the field name and the text box displays the data in the field. The TourCategories table moved from the middle to the top section of the Field List. You also want to align and size the new controls with others already on the form. Form Design View works well for alignment activities.
3. Right-click the Tours Entry Form tab, click Design View, click the Description label, press and hold [Shift], click the Price label to select both labels, release [Shift], click the ARRANGE tab, click the Align button in the Sizing & Ordering group, then click Left Now resize the labels.
4. With the two labels still selected, click the Size/Space button in the Sizing & Ordering group, then click To WidestWith the new controls in position, you want to enter a new record. You must switch to Form View to edit, enter, or delete data.
5. Click the HOME tab, click the View button to switch to Form View, click the New (blank) record button in the navigation bar, click the TourName text box, then enter a new record in the updated form, as shown in FigUrE C-8
Note that when you select a value in the Category combo box, the Description is automatically updated. This is due to the one-to-many relationship between the TourCategories and Tours tables in the Relationships window.
STEpS
Ifyoumakeamistake,clicktheUndobutton andtryagain.
QUiCK Tip
Don’tworryifyourTourNovaluedoesn’tmatchFigUrE C-8.AsanAutoNumbervalue,thevalueisinsertedautomaticallyandiscontrolledbyAccess.
TrOUblE
C8444_UnitC_ptg01_hr_053-078.indd 60 2/22/13 11:06 AM
Propert
y of C
enga
ge Le
arning

Using Forms Access 61
Access 2013
Controlsareeitherboundorunbound.Bound controlsdisplayvaluesfromafieldsuchastextboxesandcomboboxes.Unbound controlsdonotdisplaydata;unboundcontrolsdescribedataorenhancetheappearanceoftheform.Labelsarethemostcommontypeofunboundcontrol,butothertypesincludelines,images,tabs,andcommandbuttons.Anotherway
todistinguishboundfromunboundcontrolsistoobservetheformasyoumovefromrecordtorecord.Becauseboundcontrolsdisplaydata,theircontentschangeasyoumovethroughtherecords,displayingtheentryinthefieldofthecurrentrecord.Unboundcontrolssuchaslabelsandlinesdonotchangeasyoumovethroughtherecordsinaform.
Bound versus unbound controls
FigUrE C-7: Field List in Form Layout View
Field List
Add Existing Fields button
TourCategories table
FigUrE C-8: Entering a record in the updated Tours Entry Form in Form View
Your TourNo value may be different
New Description combo box
Price label
Description label
C8444_UnitC_ptg01_hr_053-078.indd 61 2/22/13 11:06 AM
Propert
y of C
enga
ge Le
arning
Using FormsAccess 62
Access 2013
UNIT C
Learning Outcomes•Modifycontrolproperties
•Defineboundandunboundcontrols
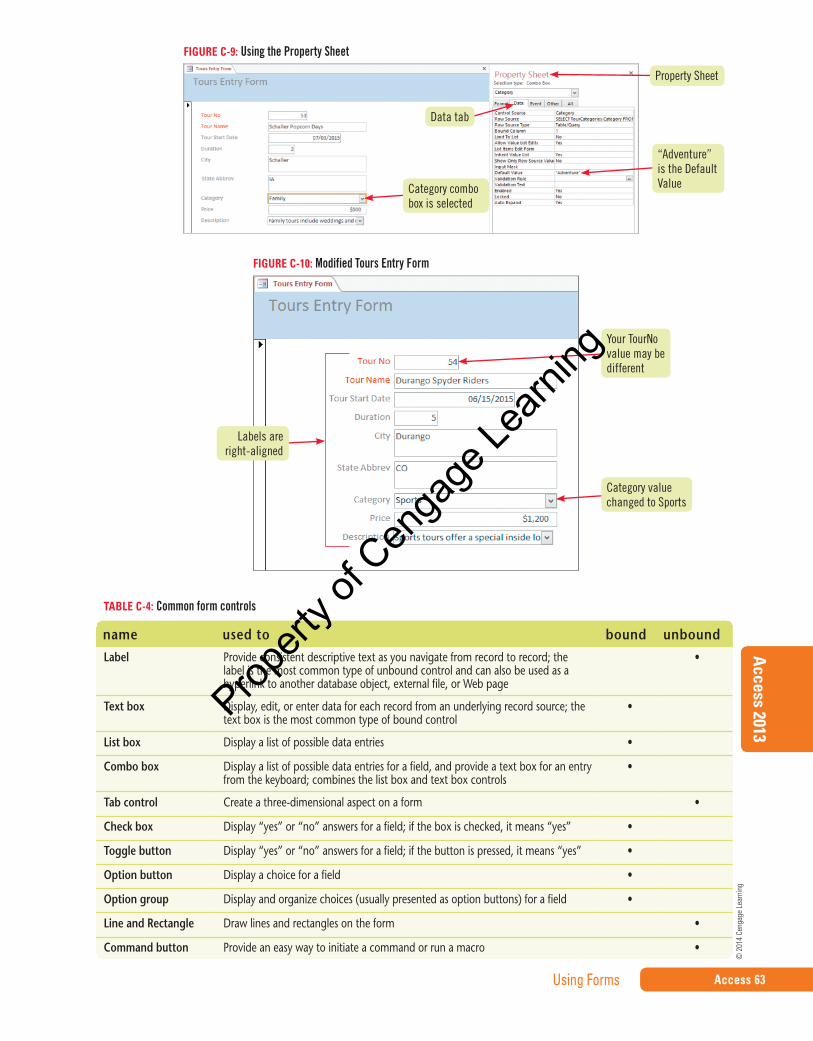
Modify Form ControlsYouhavealreadymademanymodificationstoformcontrols,suchaschangingthefontcoloroflabelsandthe size of text boxes. Labels and text boxes are the twomost popular form controls.Other commoncontrolsarelistedinTAblE C-4.Whenyoumodifycontrols,youchangetheirproperties(characteristics).Allofthecontrolcharacteristicsyoucanmodifyarestoredinthecontrol’sProperty Sheet. CASE Because Quest offers more Adventure tours than any other type of tour, you decide to use the Property Sheet of the Category field to modify the default value to be “Adventure.” You also use the Property Sheet to make other control modifications to better size and align the controls.
1. Click the Layout View button on the HOME tab, then click the Property Sheet button in the Tools groupThe Property Sheet opens, showing you all of the properties for the selected item.
2. Click the Category combo box, click the Data tab in the Property Sheet (if it is not already selected), click the Default Value box, type Adventure, then press [Enter] The Property Sheet should look like FigUrE C-9. Access often helps you with the syntax (rules) of entering property values. In this case, Access added quotation marks around “Adventure” to indicate that the default entry is text. Properties are categorized in the Property Sheet with the Format, Data, Event, and Other tabs. The All tab is a complete list of all the control’s properties. You can use the Property Sheet to make all con-trol modifications, although you’ll probably find that some changes are easier to make using the Ribbon. The property values change in the Property Sheet as you modify a control using the Ribbon.
3. Click the Format tab in the Property Sheet, click the Tour No label in the form to select it, click the HOME tab on the Ribbon, then click the Align Right button in the Text Formatting groupNotice that the Text Align property on the Format tab in the Property Sheet is automatically updated from Left to Right even though you changed the property using the Ribbon instead of within the Property Sheet.
4. Click the Tour Name label, press and hold [Shift], then click each other label in the first column on the formWith all the labels selected, you can modify their Text Align property at the same time.
5. Click in the Text Formatting groupDon’t be overwhelmed by the number of properties available for each control on the form or the number of ways to modify each property. Over time, you will learn about most of these properties. At this point, it’s only important to know the purpose of the Property Sheet and understand that properties are modified in various ways.
6. Click the Save button on the Quick Access toolbar, click the Form View button to switch to Form View, click the New (blank) record button in the navigation bar, then enter the record shown in FigUrE C-10
For new records, “Adventure” is provided as the default value for the Category combo box, but you can change it by typing a new value or selecting one from the list. With the labels right-aligned, they are much closer to the data in the text boxes that they describe.
STEpS
BesuretoclicktheTourNolabelontheleft,nottheTourNotextboxontheright.
TrOUblE
Don’tworryifyourTourNovaluedoesn’tmatchFigUrE C-10.ItisanAutoNumbervalue,controlledbyAccess.
TrOUblE
Youmayneedto
click twice.
TrOUblE
C8444_UnitC_ptg01_hr_053-078.indd 62 2/22/13 11:06 AM
Propert
y of C
enga
ge Le
arning
Using Forms Access 63
Access 2013
name used to bound unboundLabel Provideconsistentdescriptivetextasyounavigatefromrecordtorecord;the
labelisthemostcommontypeofunboundcontrolandcanalsobeusedasahyperlinktoanotherdatabaseobject,externalfile,orWebpage
•
Text box Display,edit,orenterdataforeachrecordfromanunderlyingrecordsource;thetextboxisthemostcommontypeofboundcontrol
•
List box Displayalistofpossibledataentries •
Combo box Displayalistofpossibledataentriesforafield,andprovideatextboxforanentryfromthekeyboard;combinesthelistboxandtextboxcontrols
•
Tab control Createathree-dimensionalaspectonaform •
Check box Display“yes”or“no”answersforafield;iftheboxischecked,itmeans“yes” •
Toggle button Display“yes”or“no”answersforafield;ifthebuttonispressed,itmeans“yes” •
Option button Displayachoiceforafield •
Option group Displayandorganizechoices(usuallypresentedasoptionbuttons)forafield •
Line and Rectangle Drawlinesandrectanglesontheform •
Command button Provideaneasywaytoinitiateacommandorrunamacro •
TAblE C-4: Common form controls
© 2
014
Ceng
age
Lear
ning
FigUrE C-10: Modified Tours Entry Form
Your TourNo value may be different
Category value changed to Sports
Labels are right-aligned
FigUrE C-9: Using the Property Sheet
Property Sheet
Data tab
“Adventure” is the Default Value Category combo
box is selected
C8444_UnitC_ptg01_hr_053-078.indd 63 2/22/13 11:06 AM
Propert
y of C
enga
ge Le
arning
Using FormsAccess 64
Access 2013
UNIT C
Learning Outcomes•Buildcalculationsonaform
•Movecontrolsonaform
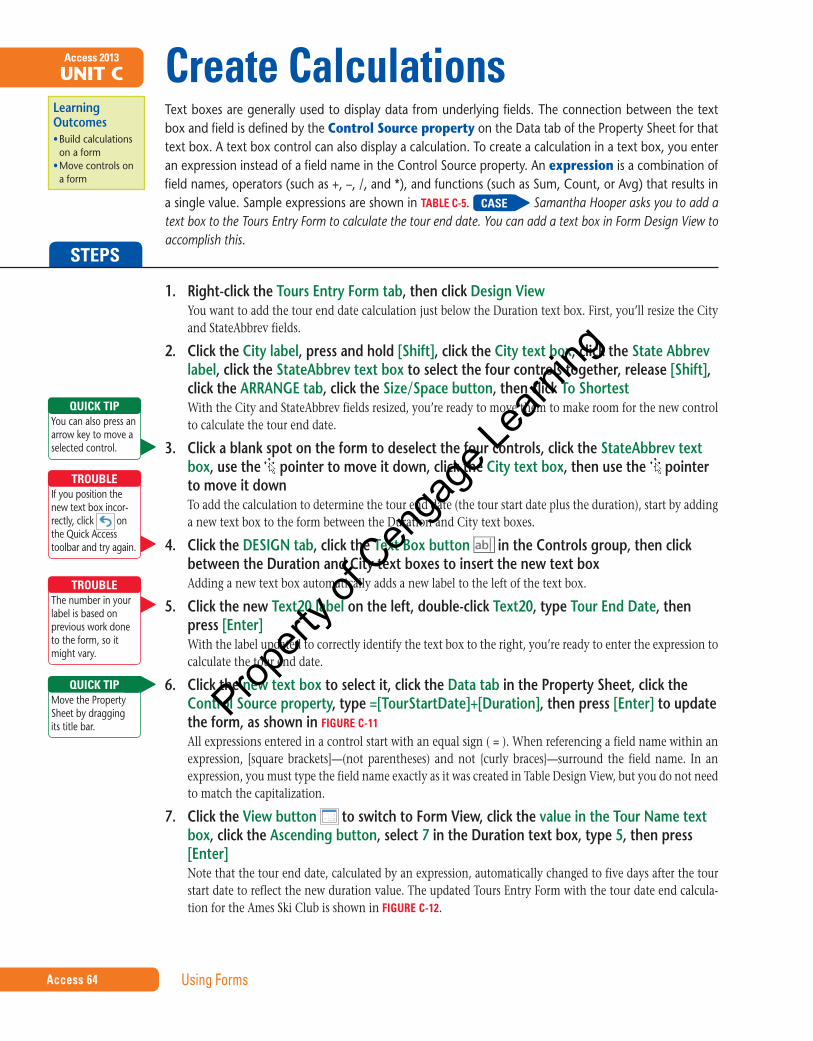
Create CalculationsTextboxesaregenerallyusedtodisplaydatafromunderlyingfields.TheconnectionbetweenthetextboxandfieldisdefinedbytheControl Source propertyontheDatatabofthePropertySheetforthattextbox.Atextboxcontrolcanalsodisplayacalculation.Tocreateacalculationinatextbox,youenteranexpressioninsteadofafieldnameintheControlSourceproperty.Anexpressionisacombinationoffieldnames,operators(suchas+,–,/,and*),andfunctions(suchasSum,Count,orAvg)thatresultsinasinglevalue.SampleexpressionsareshowninTAblE C-5. CASE Samantha Hooper asks you to add a text box to the Tours Entry Form to calculate the tour end date. You can add a text box in Form Design View to accomplish this.
1. Right-click the Tours Entry Form tab, then click Design View You want to add the tour end date calculation just below the Duration text box. First, you’ll resize the City and StateAbbrev fields.
2. Click the City label, press and hold [Shift], click the City text box, click the State Abbrev label, click the StateAbbrev text box to select the four controls together, release [Shift], click the ARRANGE tab, click the Size/Space button, then click To ShortestWith the City and StateAbbrev fields resized, you’re ready to move them to make room for the new control to calculate the tour end date.
3. Click a blank spot on the form to deselect the four controls, click the StateAbbrev text box, use the pointer to move it down, click the City text box, then use the pointer to move it downTo add the calculation to determine the tour end date (the tour start date plus the duration), start by adding a new text box to the form between the Duration and City text boxes.
4. Click the DESIGN tab, click the Text Box button in the Controls group, then click between the Duration and City text boxes to insert the new text box Adding a new text box automatically adds a new label to the left of the text box.
5. Click the new Text20 label on the left, double-click Text20, type Tour End Date, then press [Enter]With the label updated to correctly identify the text box to the right, you’re ready to enter the expression to calculate the tour end date.
6. Click the new text box to select it, click the Data tab in the Property Sheet, click the Control Source property, type =[TourStartDate]+[Duration], then press [Enter] to update the form, as shown in FigUrE C-11
All expressions entered in a control start with an equal sign ( = ). When referencing a field name within an expression, [square brackets]—(not parentheses) and not {curly braces}—surround the field name. In an expression, you must type the field name exactly as it was created in Table Design View, but you do not need to match the capitalization.
7. Click the View button to switch to Form View, click the value in the Tour Name text box, click the Ascending button, select 7 in the Duration text box, type 5, then press [Enter]Note that the tour end date, calculated by an expression, automatically changed to five days after the tour start date to reflect the new duration value. The updated Tours Entry Form with the tour date end calcula-tion for the Ames Ski Club is shown in FigUrE C-12.
STEpS
Youcanalsopressanarrowkeytomoveaselectedcontrol.
QUiCK Tip
Ifyoupositionthenewtextboxincor-rectly,click ontheQuickAccesstoolbarandtryagain.
TrOUblE
Thenumberinyourlabelisbasedonpreviousworkdonetotheform,soitmightvary.
TrOUblE
MovethePropertySheetbydraggingitstitlebar.
QUiCK Tip
C8444_UnitC_ptg01_hr_053-078.indd 64 2/22/13 11:06 AM
Propert
y of C
enga
ge Le
arning

Using Forms Access 65
Access 2013TAblE C-5: Sample expressions
sample expression description=Sum([Salary]) UsestheSum functiontoaddthevaluesintheSalaryfield
=[Price] * 1.05 MultipliesthePricefieldby1.05(adds5%tothePricefield)
=[Subtotal] + [Shipping] AddsthevalueoftheSubtotalfieldtothevalueoftheShippingfield
=Avg([Freight]) UsestheAvg functiontodisplayanaverageofthevaluesintheFreightfield
=Date() UsestheDate functiontodisplaythecurrentdateintheformofmm-dd-yy
=”Page “ &[Page] DisplaysthewordPage,aspace,andtheresultofthe[Page]field,anAccessfieldthatcontainsthecurrentpagenumber
=[FirstName]& “ “ &[LastName] DisplaysthevalueoftheFirstNameandLastNamefieldsinonecontrol,separatedbyaspace
=Left([ProductNumber],2) UsestheLeft functiontodisplaythefirsttwocharactersintheProductNumberfield
© 2
014
Ceng
age
Lear
ning
FigUrE C-12: Displaying the results of a calculation in Form View
Tour End Date recalculated to 5 days after the Tour Start Date =[TourStartDate]+[Duration]
FigUrE C-11: Adding a text box to calculate a value
New text box is selected
Expression entered in Control Source propertyModified label
C8444_UnitC_ptg01_hr_053-078.indd 65 2/22/13 11:06 AM
Propert
y of C
enga
ge Le
arning

Using FormsAccess 66
Access 2013
UNIT C
Learning Outcomes•Modifytaborderproperties
Modify Tab Order Afterpositioningallofthecontrolsontheform,youshouldcheckthetaborderandtabstops.Tab orderistheorderthefocusmovesasyoupress[Tab]inFormView.Atab stopreferstowhetheracontrolcanreceivethefocusinthefirstplace.Bydefault,theTabStoppropertyforalltextboxesandcomboboxesissettoYes,butsometextboxes,suchasthosethatcontainexpressions,willnotbeusedfordataentry.Therefore,theTabStoppropertyforatextboxthatcontainsacalculationshouldbesettoNo.UnboundcontrolssuchaslabelsandlinesdonothaveaTabStoppropertybecausetheycannotbeusedtoenteroreditdata. CASE You plan to check the tab order of the Tours Entry Form, then change tab stops and tab order as necessary.
1. Press [Tab] enough times to move through several records, watching the focus move through the bound controls of the form Because the Tour End Date text box is a calculated field, you don’t want it to receive the focus. To prevent the Tour End Date text box from receiving the focus, you set its Tab Stop property to No using its Property Sheet. You can work with the Property Sheet in either Layout or Design View.
2. Right-click the Tours Entry Form tab, click Design View, click the text box with the Tour End Date calculation if it is not selected, click the Other tab in the Property Sheet, double-click the Tab Stop property to toggle it from Yes to No, then change the Name property to TourEndDate, as shown in FigUrE C-13
The Other tab of the Property Sheet contains the properties you need to change the tab stop and tab order. The Tab Stop property determines whether the field accepts focus, and the Tab Index property indi-cates the numeric tab order for all controls on the form that have the Tab Stop property set to Yes. The Name property on the Other tab is also important as it identifies the name of the control, which is used in other areas of the database. To review your tab stop changes, return to Form View.
3. Click the View button to switch to Form View, then press [Tab] nine times to move to the next recordNow that the tab stop has been removed from the TourEndDate text box, the tab order flows correctly from the top to the bottom of the form, but skips the calculated field. To review the tab order for the entire form in one dialog box, you must switch to Form Design View.
4. Right-click the Tours Entry Form tab, click Design View, then click the Tab Order button in the Tools group to open the Tab Order dialog box, as shown in FigUrE C-14
The Tab Order dialog box allows you to view and change the tab order by dragging fields up or down using the field selector to the left of the field name. Moving fields up and down in this list also renumbers the Tab Index property for the controls in their respective Property Sheets. If you want Access to create a top-to-bottom and left-to-right tab order, click Auto Order.
5. Click OK to close the Tab Order dialog box, click the Property Sheet button to toggle it off, then click the Save button on the Quick Access toolbar to save your work
STEpS
YoucanalsoswitchbetweenviewsusingtheViewbuttonsinthelower-rightcornerofthewindow.
QUiCK Tip
InFormDesignView,press[Ctrl][.]toswitchtoFormView.InFormView,press[Ctrl][,]toswitchtoFormDesignView.
QUiCK Tip
IftheorderofyourfieldsdoesnotmatchthoseinFigUrE C-14,moveafieldbyclick-ingthefieldselectorandthendraggingthefieldupordown.
TrOUblE
C8444_UnitC_ptg01_hr_053-078.indd 66 2/22/13 11:06 AM
Propert
y of C
enga
ge Le
arning

Using Forms Access 67
Access 2013
Ifthecontrolsonaformareorganizedinalayout,youcanquicklymodifythatlayoutbymodifyingthemargins,padding,andanchoringoptionsofthelayout.EachofthesefeaturesisfoundinthePositiongroupontheARRANGEtabinFormDesign
View.Marginreferstothespacebetweentheouteredgeofthecontrolandthedatadisplayedinsidethecontrol.Paddingisthespacebetweenthecontrols.Anchoringallowsyoutotiecontrolstogethersoyoucanworkwiththemasagroup.
Layout positioning
FigUrE C-13: Using the Property Sheet to set tab properties
Tab Order button
Property Sheet button
Other tab
Name property set to TourEndDate
Tab Stop property set to No
FigUrE C-14: Tab Order dialog box
TourEndDate text box
Auto Order button
Field selector button to the left of the field name
C8444_UnitC_ptg01_hr_053-078.indd 67 2/22/13 11:06 AM
Propert
y of C
enga
ge Le
arning

Using FormsAccess 68
Access 2013
UNIT C
Learning Outcomes•Insertanimageonaform
•Modifyformsections
•Printaselectedrecord
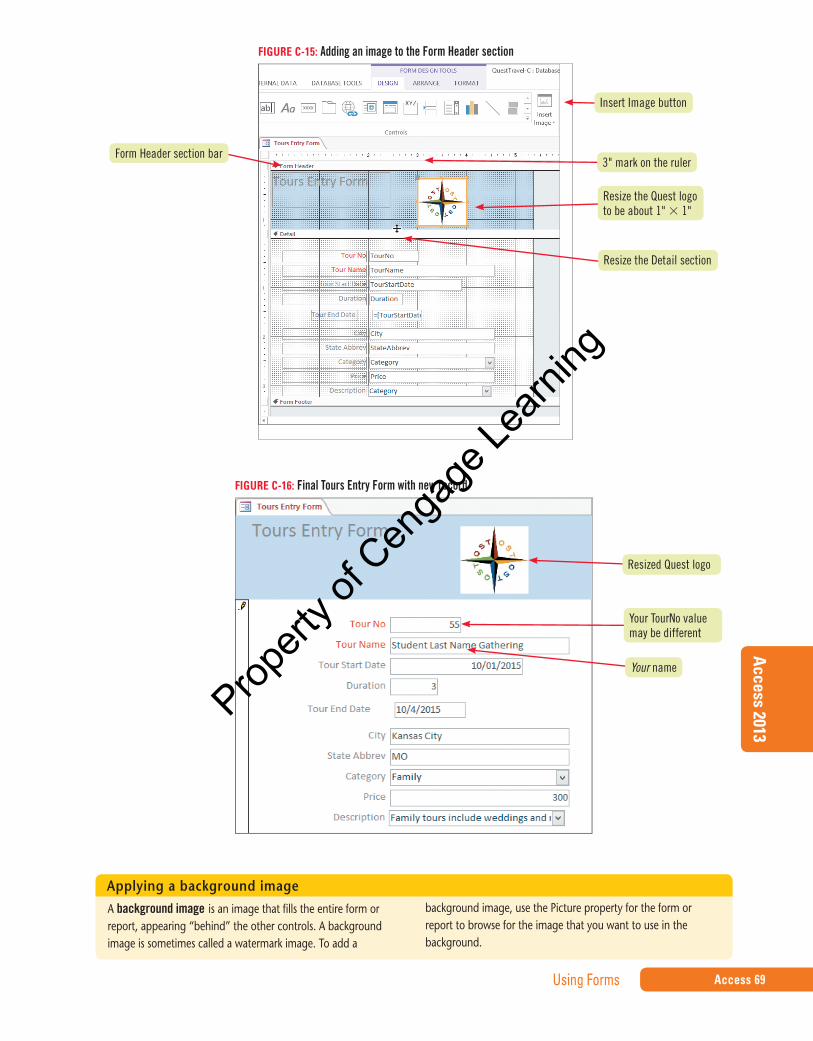
insert an imageGraphic images,suchaspictures,logos,orclipart,canaddstyleandprofessionalismtoaform.Theformsectioninwhichyouplacetheimagesissignificant.Form sectionsdeterminewherecontrolsaredisplayedandprinted;theyaredescribedinTAblE C-6.Forexample,ifyouaddacompanylogototheFormHeadersection,theimageappearsatthetopoftheforminFormViewaswellasatthetopofaprintout. IfyouaddthesameimagetotheDetailsection, itprintsnexttoeachrecord intheprintoutbecausetheDetailsectionisprintedforeveryrecord. CASE Samantha Hooper suggests that you add the Quest logo to the top of the Tours Entry Form. You can add the control in either Layout or Design View, but if you want to place it in the Form Header section, you have to work in Design View.
1. Click the Form Header section bar, click the Insert Image button in the Controls group, click Browse, then navigate to the location where you store your Data FilesThe Insert Picture dialog box opens, prompting you for the location of the image.
2. Double-click QuestLogo.bmp, then click in the Form Header section at about the 3" mark on the horizontal rulerThe QuestLogo image is added to the right side of the Form Header. You want to resize it to about 1" 3 1".
3. With the QuestLogo image still selected, use the pointer to drag the lower-right corner of the image up and to the left so that the image is about 1" 3 1", then drag the top edge of the Detail section up using the pointer, as shown in FigUrE C-15
When an image or control is selected in Design View, you can use sizing handles, which are small squares at the corners of the selection box. Drag a handle to resize the image or control. With the form completed, you open it in Form View to observe the changes.
4. Click the Save button on the Quick Access toolbar, then click the View button to switch to Form ViewYou decide to add one more record with your final Tours Entry Form.
5. Click the New (blank) record button in the navigation bar, then enter the new record shown in FigUrE C-16, using your last name in the TourName fieldNow print only this single new record.
6. Click the FILE tab, click Print in the navigation bar, click Print, click the Selected Record(s) option button, then click OK
7. Close the Tours Entry Form, click Yes if prompted to save it, close the QuestTravel-C.accdb database, then exit Access 2013
STEpS
Thelower-rightcorneroftheimagetouchesthetopedgeoftheDetailsection.ToresizetheQuestlogo,clickittoselectit.
TrOUblE
IfyoudonotclicktheSelectedRecord(s)optionbutton,youwillprintallrecords,whichcreatesaverylongprintout.
TrOUblE
© 2
014
Ceng
age
Lear
ning
TAblE C-6: Form sections
section controls placed in this section print:Form Header Onlyonceatthetopofthefirstpageoftheprintout
Detail Onceforeveryrecord
Form Footer Onlyonceattheendofthelastpageoftheprintout
C8444_UnitC_ptg01_hr_053-078.indd 68 2/22/13 11:06 AM
Propert
y of C
enga
ge Le
arning
Using Forms Access 69
Access 2013
FigUrE C-15: Adding an image to the Form Header section
FigUrE C-16: Final Tours Entry Form with new record
Abackground image isanimagethatfillstheentireformorreport,appearing“behind”theothercontrols.Abackgroundimageissometimescalledawatermarkimage.Toadda
backgroundimage,usethePicturepropertyfortheformorreporttobrowsefortheimagethatyouwanttouseinthebackground.
Applying a background image
Insert Image button
Resized Quest logo
Your TourNo value may be different
Your name
3" mark on the ruler
Resize the Quest logo to be about 1" 3 1"
Resize the Detail section
Form Header section bar
C8444_UnitC_ptg01_hr_053-078.indd 69 2/22/13 11:06 AM
Propert
y of C
enga
ge Le
arning