Embed Size (px)
DESCRIPTION
WWW
Citation preview
Categories Learning Guides
3D & Motion Graphics
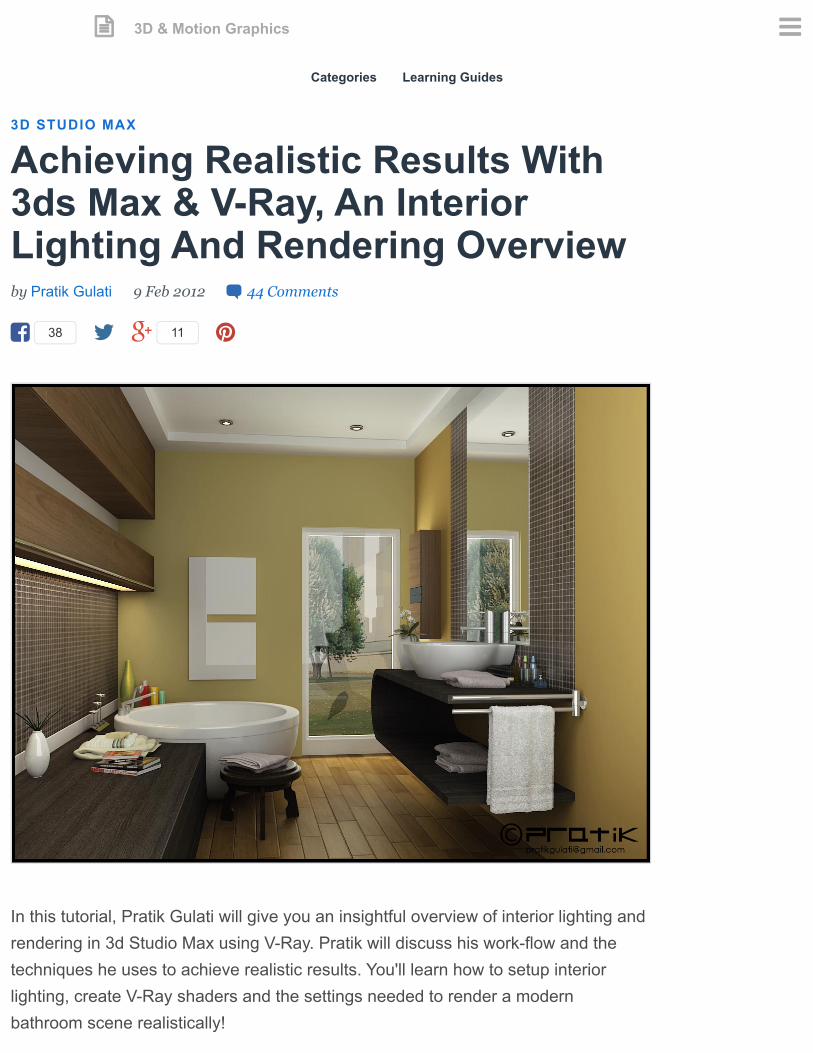
In this tutorial, Pratik Gulati will give you an insightful overview of interior lighting andrendering in 3d Studio Max using VRay. Pratik will discuss his workflow and thetechniques he uses to achieve realistic results. You'll learn how to setup interiorlighting, create VRay shaders and the settings needed to render a modernbathroom scene realistically!
3D STUDIO MAX
Achieving Realistic Results With3ds Max & VRay, An InteriorLighting And Rendering Overviewby Pratik Gulati 9 Feb 2012 44 Comments
38 11
Step 1After opening 3D Studio Max, the first thing we need to do is change our units setup.So go to Customize>Units Setup... and choose "US Standard Feet w/DecimalInches" as our units.
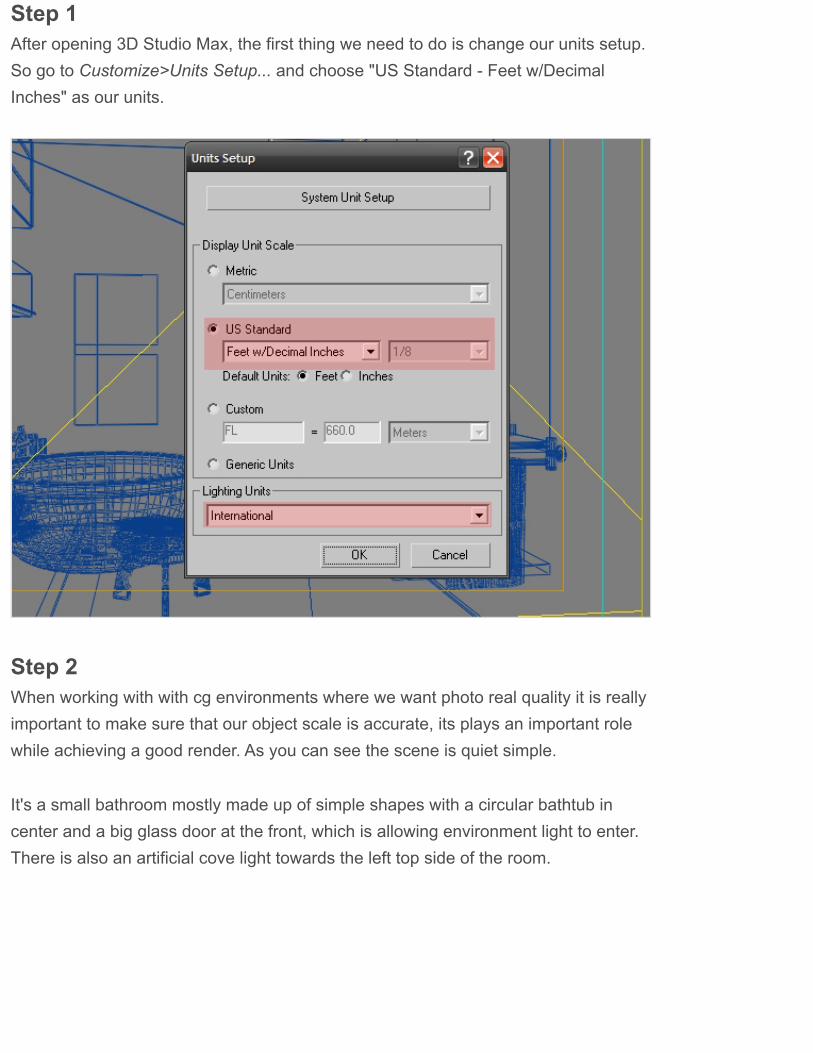
Step 2When working with with cg environments where we want photo real quality it is reallyimportant to make sure that our object scale is accurate, its plays an important rolewhile achieving a good render. As you can see the scene is quiet simple.
It's a small bathroom mostly made up of simple shapes with a circular bathtub incenter and a big glass door at the front, which is allowing environment light to enter.There is also an artificial cove light towards the left top side of the room.

Step 3Next we'll assign VRay as our renderer. Press "F10" and a new window will comeup, this will allow you to enable VRay as the render engine and also enable VRaymaterials in the material editor.
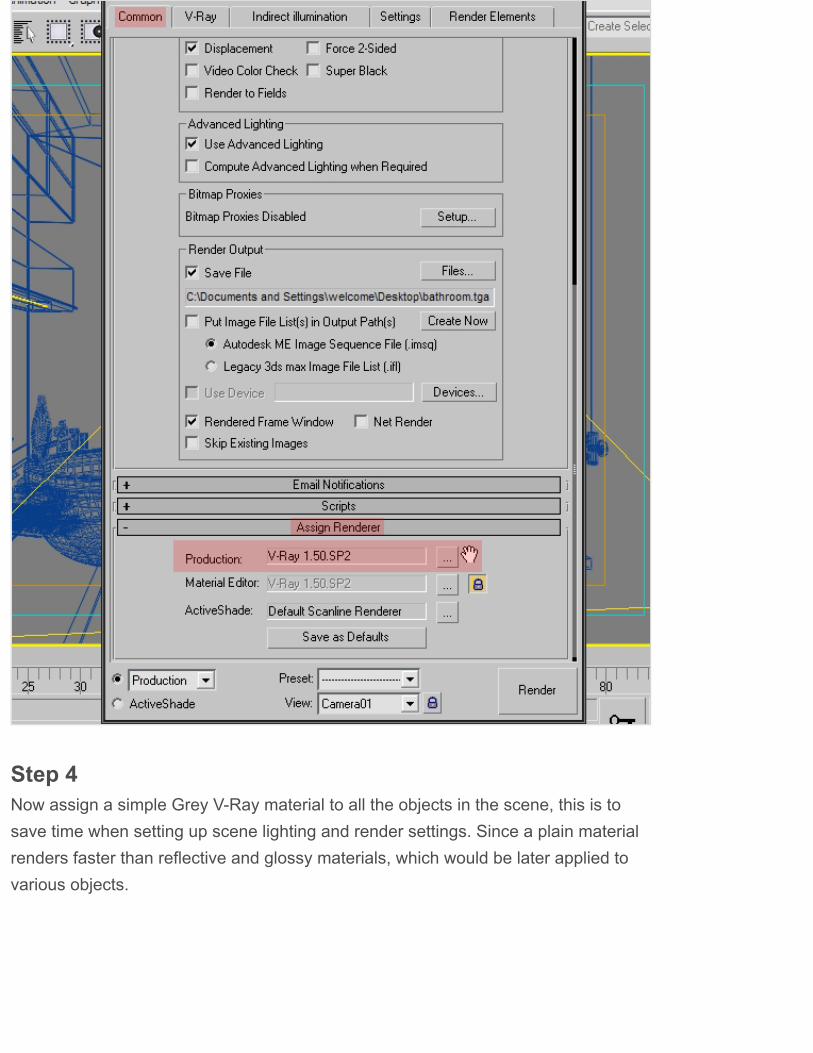
Step 4Now assign a simple Grey VRay material to all the objects in the scene, this is tosave time when setting up scene lighting and render settings. Since a plain materialrenders faster than reflective and glossy materials, which would be later applied tovarious objects.

Step 5I am using a normal Max camera for this scene. To create a camera, go to the"Cameras" tab in the Create menu and click on "Free". This will allow you to create afree camera (ie without a target.)
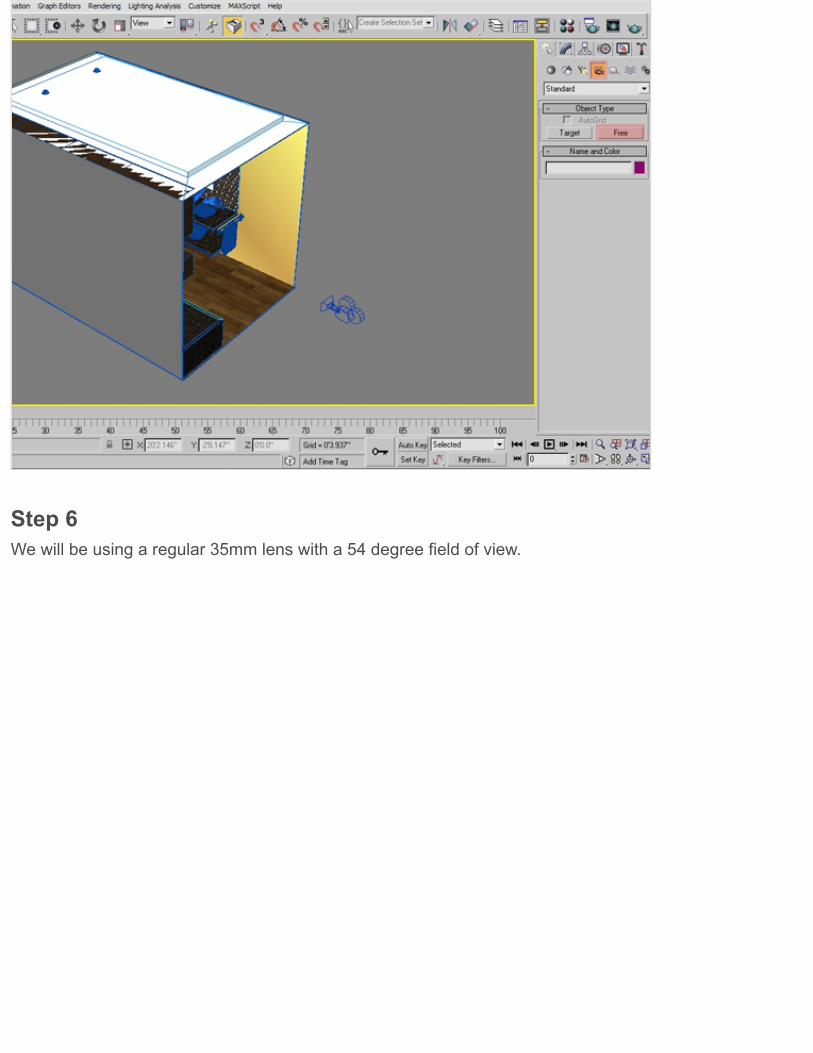
Step 6We will be using a regular 35mm lens with a 54 degree field of view.
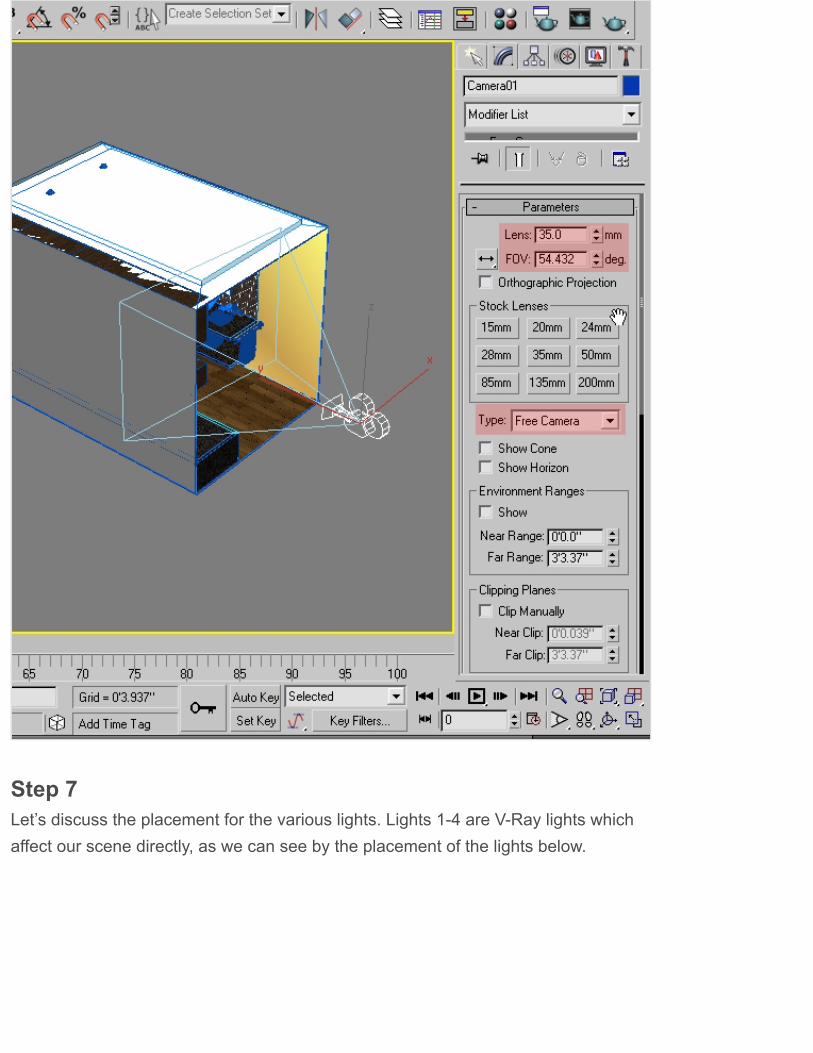
Step 7Let’s discuss the placement for the various lights. Lights 14 are VRay lights whichaffect our scene directly, as we can see by the placement of the lights below.

Step 8Here are the basic parameters of the lights that are changed:
Color The color of the light.Multiplier Multiplier for the light color; this is also the light intensity in the unitschosen by the Intensity units parameter.Invisible This setting controls whether the shape of the VRayLight source isvisible in the rendered result. When this option is turned off, the source isrendered in the current light color. Otherwise it is not visible in the scene.

Subdivs This defines the samples or the "Quality" of the light, 810 should beused for test renders, and 1520 for finals. Increasing the samples will increaseyour render times.
Step 9

Color settings of the lights.
Step 10We also use a "Target Direct Light", to mimic the light from the sun and sky.

Step 11Here are the basic parameters that I've changed for the Direct light.

Step 12For the cove area we have used a vray light and the vray light shader. To achievethe effect we create the vray light according to the size of the opening, and place thelight facing downwards

Step 13In the steps below we will do the render settings in VRay, press "F10" and then in

the "Global Switches" rollout uncheck "Default Lights ".
Default lights Allows you to control the default lights in the scene.Off The default lights in the scene will be always switched off.In the "Image Sampler (Antialiasing) rollout, select "Adaptive DMC" for the"Type", and "CatmullRom" as the "Antialiasing Filter". Also change the "Min"and "Max: subdivs.
Image sampler refers to an algorithm for sampling and filtering the image function.
Fixed This sampler always takes the same number of samples per pixel.Adaptive DMC This sampler takes a variable number of samples per pixeldepending on the difference in the intensity of the pixels.Adaptive subdivision This sampler divides the image into an adaptive gridlikestructure and refines depending on the difference in pixel Intensity.
Also in the "Color Mapping" rollout, change the color mapping "Type" to"Exponential", this mode will saturate the colors based on their brightness. This canbe useful to prevent Burnouts in very bright areas (for example around light sourcesetc). This mode will not clip bright colors, but will instead saturate them.

Step 14In the "Indirect Illumination (GI)" rollout, select "Irradiance Map" and "Light Cache"as the primary and secondary engine.

Step 15Irradiance Map The basic idea is to compute the indirect illumination only atsome points in the scene, and interpolate for the rest of the Points. Theirradiance map is very fast compared to direct computation, especially forscenes with large flat areasCurrent preset This dropdown list allows you to choose from several presetsfor some of the irradiance map parametersHemispheric subdivs (HSph. subdivs) This controls the quality of individual GIsamples. Smaller values make things faster, but may produce Blotchy results.Higher values produce smoother images.
Step 16

Light Cache The light map is built by tracing many eye paths from thecamera. Each of the bounces in the path stores the illumination from the rest ofthe path into a 3D structure, very similar to the photon map
In the "Light Cache" rollout, put 3000 for "Subdivs" and set the "Number Of Passes"to 5 .
Subdivs This determines how many paths are traced from the camera. Theactual number of paths is the square of the subdivs (the default of 1000Subdivs means that 1 000 000 paths will be traced from the camera.)Number of passes The light cache is computed in several passes, which arethen combined into the final light cache. Each pass is rendered in a separatethread independently of the other passes. This ensures that the light cache isconsistent across computers with a different number of CPUs. In general, alight cache computed with a smaller number of passes may be less noisy thana light cache computed with more passes, for the same number of samples;however a small number of passes cannot be distributed effectively acrossseveral threads.
Step 17

Now let's texture the scene, actually its quiet simple. The basic parameters that willbe used in material are as follows:
Diffuse This is the Diffuse color of the material.Roughness This parameter can be used to simulate rough surfaces, orsurfaces covered with dust.Reflect The reflection color.Reflection Glossiness Controls the sharpness of reflections. A value of 1.0means perfect mirrorlike reflections; lower values produce Blurry or "Glossy"reflections. Use the "Subdivs" parameter below to control the quality of glossyreflections.
Step 18The wood rack is made of a VRay Material with a Diffuse map and a slight amount ofReflection and Glossiness.

Step 19The bath tub is a White VRay material with some glossy reflections.
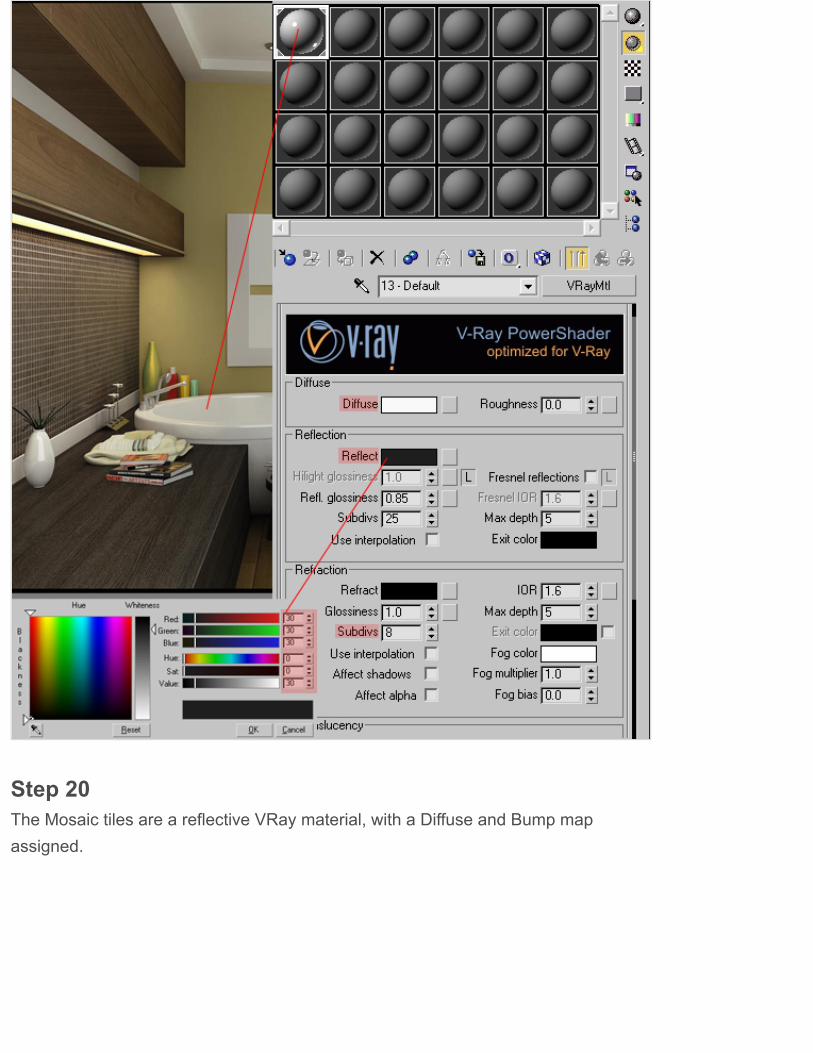
Step 20The Mosaic tiles are a reflective VRay material, with a Diffuse and Bump mapassigned.

Advertisement
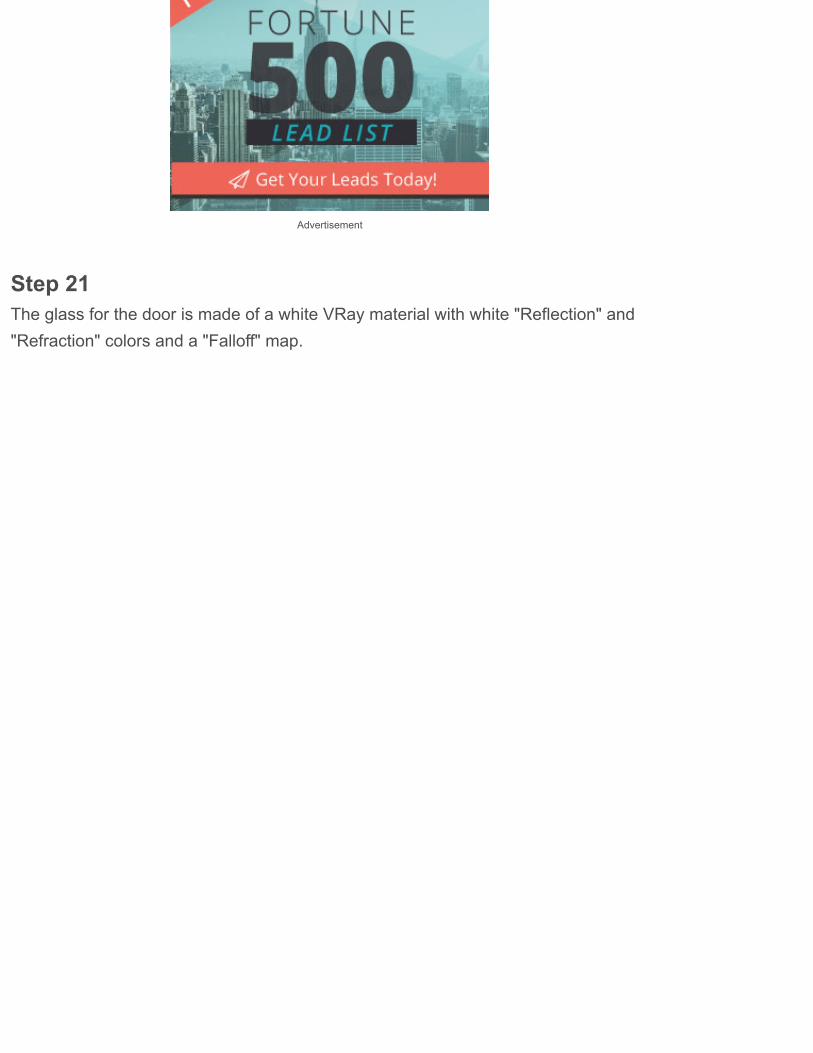
Step 21The glass for the door is made of a white VRay material with white "Reflection" and"Refraction" colors and a "Falloff" map.

Step 22And finally the mirror is made of a White VRay material with white sharp reflections.
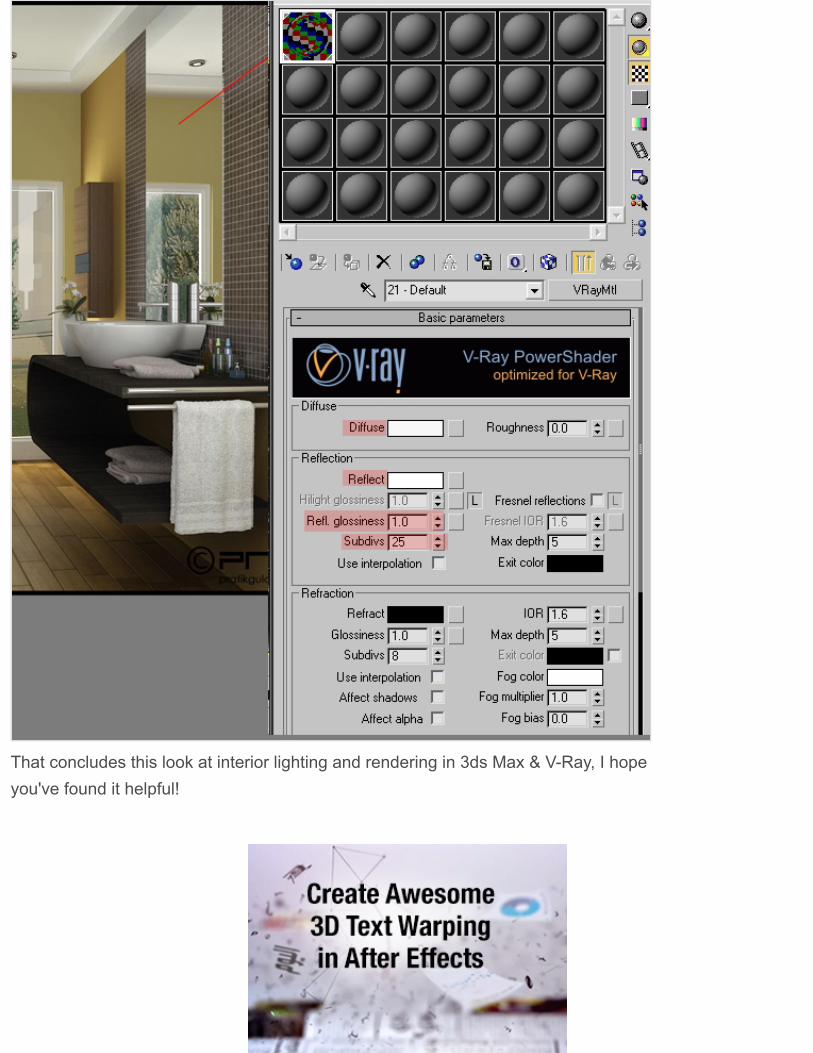
That concludes this look at interior lighting and rendering in 3ds Max & VRay, I hopeyou've found it helpful!

Advertisement
Advertisement
Suggested Tuts+ Course
Difficulty:Intermediate
Length:Medium
Categories:
3D Studio Max 3D VRay Lighting rendering Photorealism Interior
Translations Available:
Tuts+ tutorials are translated by our community members. If you'd like to translate this post into another language, let us know!
Download Attachment
About Pratik Gulati
Hi friends, this is Pratik. I am a 3d artist from India. My areas of expertise include texturing, lighting and rendering. 3d artis my passion and profession, and my hobbies are Photography ,music, movies, computers, latest gadgets, cars and allsorts of tech stuff. Here to learn, inspire, and grow!

Related Tutorials
Jobs
Envato Market Item
Introduction to Cinema 4D $15
Real Time Rendering With Marmoset Toolbag3D & Motion Graphics
Two Ways to Generate Z Depth in 3ds Max3D & Motion Graphics
Three Ways to Generate Ambient Occlusion in 3ds Max3D & Motion Graphics
WordPress Plugin Developmentat Lutz Academy in Denver, CO, USA
Senior Engineer AngularJS and Rubyat Subvertical in Portland, OR, USA

44 Comments Cgtuts+ Login
Sort by Best Share⤤
Join the discussion…
• Reply •
Noman • 2 years ago
nice 1
• Reply •
Goran J. • 3 years ago
I have to agree with "Bobr Formalin," this is a bad tutorial. photorealistic effect might be better. particularlybothers me as render settings are not optimized, completely amateurish, almost all settings at maximum,no adjustment in relation to the scene and the environment. When it comes to production render verybad tutorial, it might be good for hobby modellers.
1
• Reply •
Zemljak • 8 months ago> Goran J.
O premudri Gorane. Naravno da uvek je lakse kritikovati nekog ko nesto uradi nego sam.Oval covek je barem pokusao da nesto uradi za druge.
• Reply •
gokul • 2 years ago> Goran J.
Dear Sir this gokul am 3d designer am i c so many problem vray lighting now also how to giverealistic render please tel me ur idea that very useful for me this my mail id [email protected]
• Reply •
Bobr Formalin • 3 years ago> Goran J.
Hobby modellers that's a really good choice of words. Lots of tutorials here and now done by andfor such kind of people... It was a lot better when CGtuts aimed for experienced users.
• Reply •
Andrew • 3 years ago> Bobr Formalin
Totally agree with you as for tutorials quality
• Reply •
darshan • 6 months ago
Dear Sir I m Darshan joshi 3d visualiser i have so many problem in vray lighting so how to give realisticrender please tell me ur idea that very useful for me sir this my mail id [email protected]
Reply
haresh jadhav • 7 months ago
i want to all interior materiel valus lick diffuse , reflect, glossines, fresnel reflections,f
Recommend
Share ›
Share ›
Share ›
Share ›
Share ›
Share ›
Share ›
Share ›

• Reply •
• Reply •
shuhaib • 7 months ago
Thanks for this tutorial. Very helpful. Can you please add the flooring. ? [email protected]
• Reply •
Rocio • a year ago
Thank you! For me, it was very helpful :)
• Reply •
Sunil Mistry • a year ago
Beautiful Construction and good tutorial
• Reply •
MissBunny • 2 years ago
in my case the final render gave to much light, so i had to change the VRay light Cache to 600 and addsome omni lights...but in the end this is a very useful tutorial :)
• Reply •
joanne • 2 years ago
nice! thank you for sharing this :)
• Reply •
Fahad Samran • 2 years ago
fantastic planning detail with more reflection
• Reply •
LAM • 2 years ago
Excellent tutorials, clear and detail. Please share me VRay Final Setting High Quality bothExterior and Interior including VRay lighting.
• Reply •
dani • 3 years ago
vry good .....thanx
• Reply •
vinod • 3 years ago
great work i wana more interior lighting tutorials can u tell me how i improve our interior rendring myinterior work r not good plz tell me some [email protected]
Ronaldo_BRASIL • 3 years ago
Share ›
Share ›
Share ›
Share ›
Share ›
Share ›
Share ›
Share ›
Share ›
Share ›

• Reply •
Whenever a Bate Doubt I refer to your tutorial dear friend!thank you!
• Reply •
Broos • 3 years ago
A lot of thnx.
• Reply •
Raul • 3 years ago
Good job....keep it up..;)
• Reply •
Ali • 3 years ago
Hi my name is subhan ali any body tell me about v ray bufer ? Thank plz give me sugestion on my mailadress ...
• Reply •
Thiago Faracini • 3 years ago
Very nice tutorial , thanks! ;D
• Reply •
alok • 3 years ago
GETING NO HALPS... USELESS..
• Reply •
Dragos • 3 years ago
Very useful and in depth. Thanks and keep it up :)
• Reply •
iconss • 3 years ago
Nice tutorial! Thanks !
• Reply •
3d max kursu • 3 years ago
thanks a lot for this useful tutorial. vray is the best render engine for arc. projects.
• Reply •
marcelo Brasil • 3 years ago
hello to really enjoying the tutorial wanted the model in this tutorial 3dmax the room if possible paid
• Reply •
zack • 3 years ago
thx please you can tell me i have doupt about lens camera and quality some time i make dept view fieldtoo big that effect the quality ?
Andrew • 3 years ago
Share ›
Share ›
Share ›
Share ›
Share ›
Share ›
Share ›
Share ›
Share ›
Share ›
Share ›
• Reply •
Andrew • 3 years ago
What's happened with cg.tutsplus last time you posted so poor tutorials with word "realistic" in title!
As for this tutorial how can you achieve a realistic render just using 1 pass even without Ambientocclusion, color correction, you also didn't use gamma 2.2, frame buffer and vray camera.In indirect illumination you set Primary and Secondary bounces to 1 it means your light rays withoutattenuation are you serious, where did you see this effect in real world especially for artificial lightsources?
• Reply •
Jeyanth • 3 years ago
Nice results. But why have you used 2 vray area lights coming in from the outside? Also many of theartists have used very high hsphere subdvis and interp. samples. Is that required or is it okay to do withthe default 50? Sometimes I lose details when using high interpolation.
• Reply •
MMasterdesign • 3 years ago
Cheer man! for me you're very good that you made tutorial for people, however this tutorial is not good forsome people, but i'm sure that your tutorial would be good for another people, so that mean there aremany people want to say thanks to you :)
thank you so much for the tutorial, keep it up...waiting for you next tuts
• Reply •
sansar • 3 years ago
I think the tutorial is amazing. I dont know what few people are talking about. You did very good job PTK.Thanks for the tutorial.
• Reply •
Goncalo Palma • 3 years ago
After read the other comments, i have to say that two of them make me sad. How it's possible some guyssaid bad things about the work of another guys, that posted tutorials to help who learn things with this. Ifthey want sites for experieced people, leave this and make one for them. Very bad thing indeed. Theyhave to understand that we are not all the same in experiencing 3D modelling. Bobr Formalin and Goran J SHAME ON YOU men or girl (because i don't known their sex)
• Reply •
Goncalo Palma • 3 years ago
I'd like to say that when i found this site, i start immediatly to follow the amazing tutorials that you offer tous. But as architect i am i never see a tutorial from the beggining to the end based on architecture. Nowthat you offer this ammazing tutorial unfortunatly the base files are only to premium users. I understandyour policy but at this time i don't work and have no money to buy a montly acess to use the base files tofollow the tutorial. I'll try to make the model and we will see. But if you offer this that will be awesome, andi'll be one more thankfull to you. One more thing . I will love to see the continue of the mini semi truck withv ray materials and render. Continue the great job and one more time Thankyou for your support helpingus to lern more things.
Share ›
Share ›
Share ›
Share ›
Share ›
Share ›
• Reply •
RobSteady • 3 years ago
Bobr and Goran are right: unfortunately another amateur VRay tutorial with total unnecessary settings.
• Reply •
nour el islam • 3 years ago
you lesson was very interesting to be made and it was so relistic for the first look well done sir
• Reply •
ptk • 3 years ago
thanks !
• Reply •
parv • 3 years ago
hey thanks mate
• Reply •
Bobr Formalin • 3 years ago
Achieving realistic results? So where are they?
• Reply •
Clay Lam • 3 years ago> Bobr Formalin
Hey Bobr Formalin, I am Clay. Kindly upload your version of rendering as opposed to the abovepresentation otherwise it useless making a comment and nothing to show. If you have real talentpresent it and show it off so we can all decide if you are truly worth your comment. Such lamewords for someone who has so little to show. Grow some balls and post your presentation so itcan be appreciated by others. Cheers!!!
• Reply •
Kurtrofl • 2 years ago> Clay Lam
Really Clay? Bobr doesn't have to show you or anyone shit, it's his own opinion. There isno need to call someone out like that. As for the tutorial, yes, it is very amateurish. Likeothers have said, it would suite very well for hobby modellers or maybe beginners(normally free tutorials do)
• Reply •
bmt • 3 years ago
Thanks for this article. As stated in the title. These simple settings lead to realistic results. Good job!
Share ›
Share ›
Share ›
Share ›
Share ›
Share ›
Share ›
Share ›

19,177 Tutorials 484 Video Courses
Custom digital services like logo design, WordPress installation, video production and more.
Check out Envato Studio
Add motion graphics to your projects: Animations, lower thirds templates, transitions,background loops and more.
Browse Motion Graphics on VideoHive
Advertisement
Teaching skills to millions worldwide.
Follow Us
Help and Support
FAQTerms of UseContact SupportAbout Tuts+AdvertiseTeach at Tuts+
Email Newsletters
Get Tuts+ updates, news, surveys &offers.
Email Address
Subscribe
Privacy Policy

© 2015 Envato Pty Ltd. Trademarks and brands are the property of their respective owners.


![[Tuts] Bermain Blending Mode](https://img.pdfslide.net/doc/110x75/563db91a550346aa9a9a0aa1/tuts-bermain-blending-mode.jpg)