Embed Size (px)
DESCRIPTION
Guide from Acoustica: Mixcraft 6 Teachers Guide
Citation preview

MIXCRAFT 6 TEACHER’S GUIDE
Written by Parker Tichko • Edited by Peter Clarke • Design by Alan Reynolds

Mixcraft 6 Teacher’s Guide©2013 Acoustica Inc. All rights reserved.The content of this guide is furnished for informational use only, and is subject to change without notice. Acoustica Inc. assumes no responsibility or liability for any errors or inaccuracies that may appear in the informational content contained in this guide.Please remember that existing music, video, or images that you may want to include in your project may be protected under copyright law. The unauthorized incorporation of such material into your new work could be a violation of the rights of the copyright owner. Please be sure to obtain any permission required from the copyright owner.Acoustica and Mixcraft are registered trademarks of Acoustica, Inc. in the United States and/or other countries.All other trademarks are the property of their respective owners.
Written by: Parker TichkoEdited by: Peter ClarkeCover design: Alan ReynoldsInterior design: Alan Reynolds
www.acoustica.com

MIXCRAFT 6 TEACHER’S GUIDE
Written by Parker Tichko • Edited by Peter Clarke • Design by Alan Reynolds

2
UNDERSTANDING MIXCRAFT1 ● CONSTRUCTING A MUSIC LAB WITH MIXCRAFT Setting up your music lab . . . . . . . . . . . . . . . . . . . . . . . . . . . . . . . . . . . . . . . . . . . . . . . . . . . 10 Suggested software . . . . . . . . . . . . . . . . . . . . . . . . . . . . . . . . . . . . . . . . . . . . . . . . . . . . . . . . .12 Mixcraft’s built-in virtual instruments and effects plugins. . . . . . . . . . . . . . . . . . . . . . . . .12 School environments for a music lab . . . . . . . . . . . . . . . . . . . . . . . . . . . . . . . . . . . . . . . . . .13 Music station setups . . . . . . . . . . . . . . . . . . . . . . . . . . . . . . . . . . . . . . . . . . . . . . . . . . . . . . . .14 Further reading . . . . . . . . . . . . . . . . . . . . . . . . . . . . . . . . . . . . . . . . . . . . . . . . . . . . . . . . . . . . .16
2 ● A SURVEY OF MIXCRAFT Mixcraft’s interface . . . . . . . . . . . . . . . . . . . . . . . . . . . . . . . . . . . . . . . . . . . . . . . . . . . . . . . . . .18 Timeline . . . . . . . . . . . . . . . . . . . . . . . . . . . . . . . . . . . . . . . . . . . . . . . . . . . . . . . . . . . . . . . . . . .19 Master bar . . . . . . . . . . . . . . . . . . . . . . . . . . . . . . . . . . . . . . . . . . . . . . . . . . . . . . . . . . . . . . . . 20 Tab area: project, sound, mixer & library . . . . . . . . . . . . . . . . . . . . . . . . . . . . . . . . . . . . . . .21 The piano roll . . . . . . . . . . . . . . . . . . . . . . . . . . . . . . . . . . . . . . . . . . . . . . . . . . . . . . . . . . . . . . 22 Notation . . . . . . . . . . . . . . . . . . . . . . . . . . . . . . . . . . . . . . . . . . . . . . . . . . . . . . . . . . . . . . . . . . 23 Toolbar . . . . . . . . . . . . . . . . . . . . . . . . . . . . . . . . . . . . . . . . . . . . . . . . . . . . . . . . . . . . . . . . . . . 24 Opening a new song . . . . . . . . . . . . . . . . . . . . . . . . . . . . . . . . . . . . . . . . . . . . . . . . . . . . . . . 24 Saving/exporting songs . . . . . . . . . . . . . . . . . . . . . . . . . . . . . . . . . . . . . . . . . . . . . . . . . . . . 25
3 ● USING AUDIO WITH MIXCRAFT On audio tracks . . . . . . . . . . . . . . . . . . . . . . . . . . . . . . . . . . . . . . . . . . . . . . . . . . . . . . . . . . . . 26 Recording with Mixcraft. . . . . . . . . . . . . . . . . . . . . . . . . . . . . . . . . . . . . . . . . . . . . . . . . . . . . 28 Editing audio with Mixcraft . . . . . . . . . . . . . . . . . . . . . . . . . . . . . . . . . . . . . . . . . . . . . . . . . . .31 Looping audio . . . . . . . . . . . . . . . . . . . . . . . . . . . . . . . . . . . . . . . . . . . . . . . . . . . . . . . . . . . . . 32 Snapping audio regions to the timeline . . . . . . . . . . . . . . . . . . . . . . . . . . . . . . . . . . . . . . . 33 Mixing down audio . . . . . . . . . . . . . . . . . . . . . . . . . . . . . . . . . . . . . . . . . . . . . . . . . . . . . . . . . 33
4 ● USING MIDI WITH MIXCRAFT What is MIDI?. . . . . . . . . . . . . . . . . . . . . . . . . . . . . . . . . . . . . . . . . . . . . . . . . . . . . . . . . . . . . . 34 On virtual instrument tracks . . . . . . . . . . . . . . . . . . . . . . . . . . . . . . . . . . . . . . . . . . . . . . . . . 35 Recording MIDI with Mixcraft . . . . . . . . . . . . . . . . . . . . . . . . . . . . . . . . . . . . . . . . . . . . . . . . 37 Recording MIDI: a work flow . . . . . . . . . . . . . . . . . . . . . . . . . . . . . . . . . . . . . . . . . . . . . . . . . 37 Editing MIDI with Mixcraft . . . . . . . . . . . . . . . . . . . . . . . . . . . . . . . . . . . . . . . . . . . . . . . . . . . 40 Quantizing . . . . . . . . . . . . . . . . . . . . . . . . . . . . . . . . . . . . . . . . . . . . . . . . . . . . . . . . . . . . . . . . .41 Transposing . . . . . . . . . . . . . . . . . . . . . . . . . . . . . . . . . . . . . . . . . . . . . . . . . . . . . . . . . . . . . . . .41 Editing MIDI regions on the timeline . . . . . . . . . . . . . . . . . . . . . . . . . . . . . . . . . . . . . . . . . . .41 Looping MIDI regions . . . . . . . . . . . . . . . . . . . . . . . . . . . . . . . . . . . . . . . . . . . . . . . . . . . . . . . 42 Mixing down MIDI . . . . . . . . . . . . . . . . . . . . . . . . . . . . . . . . . . . . . . . . . . . . . . . . . . . . . . . . . . 42
5 ● MIXCRAFT VIDEO Video equipment . . . . . . . . . . . . . . . . . . . . . . . . . . . . . . . . . . . . . . . . . . . . . . . . . . . . . . . . . . 44 Video tutorial . . . . . . . . . . . . . . . . . . . . . . . . . . . . . . . . . . . . . . . . . . . . . . . . . . . . . . . . . . . . . . 44 Using still images & photographs with Mixcraft . . . . . . . . . . . . . . . . . . . . . . . . . . . . . . . . 46 Mixing down your movie or slideshow . . . . . . . . . . . . . . . . . . . . . . . . . . . . . . . . . . . . . . . . 47
KEYStudent tutorial lesson

3
6 ● USING MIXCRAFT’S EFFECT PLUGINS, LOOPS & INSTRUMENTS Mixcraft’s effect plugins . . . . . . . . . . . . . . . . . . . . . . . . . . . . . . . . . . . . . . . . . . . . . . . . . . . . 48 Reverb . . . . . . . . . . . . . . . . . . . . . . . . . . . . . . . . . . . . . . . . . . . . . . . . . . . . . . . . . . . . . . . . . . . 48 Delay . . . . . . . . . . . . . . . . . . . . . . . . . . . . . . . . . . . . . . . . . . . . . . . . . . . . . . . . . . . . . . . . . . . . . 50 More effects . . . . . . . . . . . . . . . . . . . . . . . . . . . . . . . . . . . . . . . . . . . . . . . . . . . . . . . . . . . . . . . .51 Mixcraft loops . . . . . . . . . . . . . . . . . . . . . . . . . . . . . . . . . . . . . . . . . . . . . . . . . . . . . . . . . . . . . 52 Mixcraft instruments . . . . . . . . . . . . . . . . . . . . . . . . . . . . . . . . . . . . . . . . . . . . . . . . . . . . . . . 54
7 ● MUSIC COMPOSITION WITH MIXCRAFT What’s in a song? . . . . . . . . . . . . . . . . . . . . . . . . . . . . . . . . . . . . . . . . . . . . . . . . . . . . . . . . . . 56 Common song sections . . . . . . . . . . . . . . . . . . . . . . . . . . . . . . . . . . . . . . . . . . . . . . . . . . . . . 58 Arrangement/Orchestration . . . . . . . . . . . . . . . . . . . . . . . . . . . . . . . . . . . . . . . . . . . . . . . . . 59 One approach to making music with Mixcraft: Loop-based music . . . . . . . . . . . . . . . . 59 Composing an 8-bar or 12-bar song with loops . . . . . . . . . . . . . . . . . . . . . . . . . . . . . . . . 60 Trick and tips with loops . . . . . . . . . . . . . . . . . . . . . . . . . . . . . . . . . . . . . . . . . . . . . . . . . . . . 62 Beyond loops . . . . . . . . . . . . . . . . . . . . . . . . . . . . . . . . . . . . . . . . . . . . . . . . . . . . . . . . . . . . . 63
8 ● USING MIXCRAFT FOR SCHOOL PROJECTS Teaching and lesson statement . . . . . . . . . . . . . . . . . . . . . . . . . . . . . . . . . . . . . . . . . . . . . . 64 Short projects: Tutorials for recording & editing audio/MIDI in Mixcraft . . . . . . . . . . . . 65 Long projects: Interdisciplinary lessons . . . . . . . . . . . . . . . . . . . . . . . . . . . . . . . . . . . . . . . 66
SHORT PROJECTS9 ● VOCAL FX PROJECT Activity: Recording vocals . . . . . . . . . . . . . . . . . . . . . . . . . . . . . . . . . . . . . . . . . . . . . . . . . . . 69 Plugin effects . . . . . . . . . . . . . . . . . . . . . . . . . . . . . . . . . . . . . . . . . . . . . . . . . . . . . . . . . . . . . .71 Student assignments . . . . . . . . . . . . . . . . . . . . . . . . . . . . . . . . . . . . . . . . . . . . . . . . . . . . . . . 72 Student assignments . . . . . . . . . . . . . . . . . . . . . . . . . . . . . . . . . . . . . . . . . . . . . . . . . . . . . . . 72 Student assignments . . . . . . . . . . . . . . . . . . . . . . . . . . . . . . . . . . . . . . . . . . . . . . . . . . . . . . . 73 Student assignments . . . . . . . . . . . . . . . . . . . . . . . . . . . . . . . . . . . . . . . . . . . . . . . . . . . . . . . 74 Student assignments . . . . . . . . . . . . . . . . . . . . . . . . . . . . . . . . . . . . . . . . . . . . . . . . . . . . . . . 74 Additional lesson plans . . . . . . . . . . . . . . . . . . . . . . . . . . . . . . . . . . . . . . . . . . . . . . . . . . . . . 75
● VOCAL FX PROJECT Activity . . . . . . . . . . . . . . . . . . . . . . . . . . . . . . . . . . . . . . . . . . . . . . . . . . . . . . . . . . . . . . . . . . . 76 Effect plugins . . . . . . . . . . . . . . . . . . . . . . . . . . . . . . . . . . . . . . . . . . . . . . . . . . . . . . . . . . . . . 79 Assignment . . . . . . . . . . . . . . . . . . . . . . . . . . . . . . . . . . . . . . . . . . . . . . . . . . . . . . . . . . . . . . . 80 Assignment . . . . . . . . . . . . . . . . . . . . . . . . . . . . . . . . . . . . . . . . . . . . . . . . . . . . . . . . . . . . . . . 80 Assignment . . . . . . . . . . . . . . . . . . . . . . . . . . . . . . . . . . . . . . . . . . . . . . . . . . . . . . . . . . . . . . . .81 Assignment . . . . . . . . . . . . . . . . . . . . . . . . . . . . . . . . . . . . . . . . . . . . . . . . . . . . . . . . . . . . . . . .81 Assignment . . . . . . . . . . . . . . . . . . . . . . . . . . . . . . . . . . . . . . . . . . . . . . . . . . . . . . . . . . . . . . . 82
10 ● MIXCRAFT MIXLIBS PROJECT Activity . . . . . . . . . . . . . . . . . . . . . . . . . . . . . . . . . . . . . . . . . . . . . . . . . . . . . . . . . . . . . . . . . . . 84 Additional lesson plans . . . . . . . . . . . . . . . . . . . . . . . . . . . . . . . . . . . . . . . . . . . . . . . . . . . . . 87
● MIXCRAFT MIXLIBS PROJECT Activity . . . . . . . . . . . . . . . . . . . . . . . . . . . . . . . . . . . . . . . . . . . . . . . . . . . . . . . . . . . . . . . . . . . 88

4
11 ● MIDI INSTRUMENT SURVEY PROJECT Activity . . . . . . . . . . . . . . . . . . . . . . . . . . . . . . . . . . . . . . . . . . . . . . . . . . . . . . . . . . . . . . . . . . . 93 Additional lesson plans . . . . . . . . . . . . . . . . . . . . . . . . . . . . . . . . . . . . . . . . . . . . . . . . . . . . . 96
● MIDI INSTRUMENT SURVEY PROJECT Activity . . . . . . . . . . . . . . . . . . . . . . . . . . . . . . . . . . . . . . . . . . . . . . . . . . . . . . . . . . . . . . . . . . . 98
12 ● MIDI BEATS PROJECT Activity . . . . . . . . . . . . . . . . . . . . . . . . . . . . . . . . . . . . . . . . . . . . . . . . . . . . . . . . . . . . . . . . . . . 101 Additional lesson plans . . . . . . . . . . . . . . . . . . . . . . . . . . . . . . . . . . . . . . . . . . . . . . . . . . . . 105
● MIDI BEATS PROJECT Activity . . . . . . . . . . . . . . . . . . . . . . . . . . . . . . . . . . . . . . . . . . . . . . . . . . . . . . . . . . . . . . . . . . 106
LONG PROJECTS13 ● REMIX PROJECT Activity . . . . . . . . . . . . . . . . . . . . . . . . . . . . . . . . . . . . . . . . . . . . . . . . . . . . . . . . . . . . . . . . . . . 113 Additional lesson plans . . . . . . . . . . . . . . . . . . . . . . . . . . . . . . . . . . . . . . . . . . . . . . . . . . . . . 115
● REMIX PROJECT Activity . . . . . . . . . . . . . . . . . . . . . . . . . . . . . . . . . . . . . . . . . . . . . . . . . . . . . . . . . . . . . . . . . . . 116 Beginning to remix . . . . . . . . . . . . . . . . . . . . . . . . . . . . . . . . . . . . . . . . . . . . . . . . . . . . . . . . . 117
14 ● SOUND COLLAGE PROJECT Activity . . . . . . . . . . . . . . . . . . . . . . . . . . . . . . . . . . . . . . . . . . . . . . . . . . . . . . . . . . . . . . . . . . . 121 Additional lesson plans . . . . . . . . . . . . . . . . . . . . . . . . . . . . . . . . . . . . . . . . . . . . . . . . . . . . 124
● SOUND COLLAGE PROJECT Activity . . . . . . . . . . . . . . . . . . . . . . . . . . . . . . . . . . . . . . . . . . . . . . . . . . . . . . . . . . . . . . . . . . 126
15 ● DEBATE PODCAST PROJECT Activity . . . . . . . . . . . . . . . . . . . . . . . . . . . . . . . . . . . . . . . . . . . . . . . . . . . . . . . . . . . . . . . . . . 130 Additional lesson plans . . . . . . . . . . . . . . . . . . . . . . . . . . . . . . . . . . . . . . . . . . . . . . . . . . . . 133
● DEBATE PODCAST PROJECT Activity . . . . . . . . . . . . . . . . . . . . . . . . . . . . . . . . . . . . . . . . . . . . . . . . . . . . . . . . . . . . . . . . . . 134 Recording the podcast . . . . . . . . . . . . . . . . . . . . . . . . . . . . . . . . . . . . . . . . . . . . . . . . . . . . 134
16 ● RAP IMPROVISATION PROJECT Activity . . . . . . . . . . . . . . . . . . . . . . . . . . . . . . . . . . . . . . . . . . . . . . . . . . . . . . . . . . . . . . . . . . 138 Improvising with Mixcraft . . . . . . . . . . . . . . . . . . . . . . . . . . . . . . . . . . . . . . . . . . . . . . . . . . 139 Additional lesson plans . . . . . . . . . . . . . . . . . . . . . . . . . . . . . . . . . . . . . . . . . . . . . . . . . . . . . 141
● RAP IMPROVISATION PROJECT Activity . . . . . . . . . . . . . . . . . . . . . . . . . . . . . . . . . . . . . . . . . . . . . . . . . . . . . . . . . . . . . . . . . . 142 Improvising with Mixcraft . . . . . . . . . . . . . . . . . . . . . . . . . . . . . . . . . . . . . . . . . . . . . . . . . . 143
KEYStudent tutorial lesson

5
17 ● LYRICAL SONGWRITING PROJECT Activity . . . . . . . . . . . . . . . . . . . . . . . . . . . . . . . . . . . . . . . . . . . . . . . . . . . . . . . . . . . . . . . . . . 145 Writing a song in Mixcraft . . . . . . . . . . . . . . . . . . . . . . . . . . . . . . . . . . . . . . . . . . . . . . . . . . .147 Recording the lyrics in Mixcraft . . . . . . . . . . . . . . . . . . . . . . . . . . . . . . . . . . . . . . . . . . . . . 150 Additional lesson plans . . . . . . . . . . . . . . . . . . . . . . . . . . . . . . . . . . . . . . . . . . . . . . . . . . . . . 151
● LYRICAL SONGWRITING PROJECT Activity . . . . . . . . . . . . . . . . . . . . . . . . . . . . . . . . . . . . . . . . . . . . . . . . . . . . . . . . . . . . . . . . . . .152 Writing a song in Mixcraft . . . . . . . . . . . . . . . . . . . . . . . . . . . . . . . . . . . . . . . . . . . . . . . . . . 154 Recording the lyrics in Mixcraft . . . . . . . . . . . . . . . . . . . . . . . . . . . . . . . . . . . . . . . . . . . . . .157
18 ● RADIO JINGLE PROJECT Activity . . . . . . . . . . . . . . . . . . . . . . . . . . . . . . . . . . . . . . . . . . . . . . . . . . . . . . . . . . . . . . . . . . 160 Making a beat in Mixcraft . . . . . . . . . . . . . . . . . . . . . . . . . . . . . . . . . . . . . . . . . . . . . . . . . . 160 Recording the jingle in Mixcraft . . . . . . . . . . . . . . . . . . . . . . . . . . . . . . . . . . . . . . . . . . . . . . 161 Additional lesson plans . . . . . . . . . . . . . . . . . . . . . . . . . . . . . . . . . . . . . . . . . . . . . . . . . . . . 162
● RADIO JINGLE PROJECT Activity . . . . . . . . . . . . . . . . . . . . . . . . . . . . . . . . . . . . . . . . . . . . . . . . . . . . . . . . . . . . . . . . . . 163 Making a beat in Mixcraft . . . . . . . . . . . . . . . . . . . . . . . . . . . . . . . . . . . . . . . . . . . . . . . . . . 163 Recording the jingle in Mixcraft . . . . . . . . . . . . . . . . . . . . . . . . . . . . . . . . . . . . . . . . . . . . . 164
19 ● STOMP NOTATION PROJECT Activity . . . . . . . . . . . . . . . . . . . . . . . . . . . . . . . . . . . . . . . . . . . . . . . . . . . . . . . . . . . . . . . . . . .167 Writing a part for the STOMP Instrument . . . . . . . . . . . . . . . . . . . . . . . . . . . . . . . . . . . . . .167 Performing . . . . . . . . . . . . . . . . . . . . . . . . . . . . . . . . . . . . . . . . . . . . . . . . . . . . . . . . . . . . . . . 170 Additional lesson plans . . . . . . . . . . . . . . . . . . . . . . . . . . . . . . . . . . . . . . . . . . . . . . . . . . . . . 171
● STOMP NOTATION PROJECT Activity . . . . . . . . . . . . . . . . . . . . . . . . . . . . . . . . . . . . . . . . . . . . . . . . . . . . . . . . . . . . . . . . . . .172 Writing a Part for the STOMP Instrument . . . . . . . . . . . . . . . . . . . . . . . . . . . . . . . . . . . . . .172 Performing . . . . . . . . . . . . . . . . . . . . . . . . . . . . . . . . . . . . . . . . . . . . . . . . . . . . . . . . . . . . . . . .176
20 ● FILM SCORING PROJECT Activity . . . . . . . . . . . . . . . . . . . . . . . . . . . . . . . . . . . . . . . . . . . . . . . . . . . . . . . . . . . . . . . . . . .178 Scoring the film . . . . . . . . . . . . . . . . . . . . . . . . . . . . . . . . . . . . . . . . . . . . . . . . . . . . . . . . . . . .178 Finishing the film . . . . . . . . . . . . . . . . . . . . . . . . . . . . . . . . . . . . . . . . . . . . . . . . . . . . . . . . . 180 Additional lesson plans . . . . . . . . . . . . . . . . . . . . . . . . . . . . . . . . . . . . . . . . . . . . . . . . . . . . . 181
● FILM SCORING PROJECT Activity . . . . . . . . . . . . . . . . . . . . . . . . . . . . . . . . . . . . . . . . . . . . . . . . . . . . . . . . . . . . . . . . . . 182 Scoring the film . . . . . . . . . . . . . . . . . . . . . . . . . . . . . . . . . . . . . . . . . . . . . . . . . . . . . . . . . . . 182 Finishing the film . . . . . . . . . . . . . . . . . . . . . . . . . . . . . . . . . . . . . . . . . . . . . . . . . . . . . . . . . 184
21 ● COMMERCIAL PROJECT Activity . . . . . . . . . . . . . . . . . . . . . . . . . . . . . . . . . . . . . . . . . . . . . . . . . . . . . . . . . . . . . . . . . . .187 Scoring the commercial . . . . . . . . . . . . . . . . . . . . . . . . . . . . . . . . . . . . . . . . . . . . . . . . . . . . 188 Additional lesson plans . . . . . . . . . . . . . . . . . . . . . . . . . . . . . . . . . . . . . . . . . . . . . . . . . . . . 189

6
● COMMERCIAL PROJECT Activity . . . . . . . . . . . . . . . . . . . . . . . . . . . . . . . . . . . . . . . . . . . . . . . . . . . . . . . . . . . . . . . . . . 190 Scoring the commercial . . . . . . . . . . . . . . . . . . . . . . . . . . . . . . . . . . . . . . . . . . . . . . . . . . . . . 191
APPENDIX Configuring Mixcraft . . . . . . . . . . . . . . . . . . . . . . . . . . . . . . . . . . . . . . . . . . . . . . . . . . . . . . . 194 Recording techniques . . . . . . . . . . . . . . . . . . . . . . . . . . . . . . . . . . . . . . . . . . . . . . . . . . . . . 195 Solo recordings . . . . . . . . . . . . . . . . . . . . . . . . . . . . . . . . . . . . . . . . . . . . . . . . . . . . . . . . . . . 195 Group recordings . . . . . . . . . . . . . . . . . . . . . . . . . . . . . . . . . . . . . . . . . . . . . . . . . . . . . . . . . 195 Solo recordings . . . . . . . . . . . . . . . . . . . . . . . . . . . . . . . . . . . . . . . . . . . . . . . . . . . . . . . . . . . 195 Group recordings . . . . . . . . . . . . . . . . . . . . . . . . . . . . . . . . . . . . . . . . . . . . . . . . . . . . . . . . . 196 Ideas for student projects . . . . . . . . . . . . . . . . . . . . . . . . . . . . . . . . . . . . . . . . . . . . . . . . . . 196 Acknowledgements . . . . . . . . . . . . . . . . . . . . . . . . . . . . . . . . . . . . . . . . . . . . . . . . . . . . . . . 196
KEYStudent tutorial lesson
7
INTRODUCTION
WELCOMEMixcraft’s Teaching Guide is designed to compliment educational programs that use Mixcraft. The book examines Mixcraft’s many capabilities including, for example, digital signal processing and music composition. Suggestions on how Mixcraft can be incorporated into both music and non-music assignments (such as marketing/advertising, podcast creation, and the spoken word performances) are provided throughout the course of the book. Also with the book is an “Additional Material Download” which includes teaching aids, such as printable lesson plans (in .pdf form), that give students and educators the ability to work through assignments together. Most importantly however, the text offers strategies for teaching these principles and articulates complex concepts in terms that students will understand. In addition, the internet contains many tutorials on various areas of Mixcraft use. Acoustica’s YouTube page contains dozens of Mixcraft tutorial that are guided by Craig Anderson. Finally, Mixcraft has an excellent “Help” section accessible once the software has been opened. Feel free to use these resources in conjunction with this manual.
ADDITIONAL MATERIALS DOWNLOADYou can download the Additional Materials for this book at: http://www.acoustica.com/mixcraft/v6guide.htm
The Additional Materials file contains sample projects, videos, photographs, and student handouts that can be very helpful in teaching the lessons found in this book.
THE LAYOUT OF THE BOOKChapter 1 begins with suggestions on constructing a music lab. Various designs are offered to help educators create an ideal teaching environment. Chapter 2 examines Mixcraft’s various functions and features including details of the interface and preferences for tweaking the software to match the demands of the individual classroom. Chapters 3 and 4 offer brief tutorials on two principal areas – how to use both audio and MIDI with Mixcraft. For educators interested in developing film or video lesson plans, Chapter 5 covers Mixcraft’s video functions. All of the software’s extra features, such as plugins, virtual instruments, and audio loops, are included in Chapter 6. And finally, Chapter 7 covers what presumably the majority of educators will be interested in – music composition using Mixcraft.
There has been a strong demand for lesson plans specifically designed for Mixcraft. Consequently, the final two-thirds of this manual offer detailed, exemplary lesson plans that are designed specifically for grade school, middle school, and high school students. The lesson plans are divided by estimated classroom time and by relevance to interdisciplinary topics. Chapter 8 covers the formal introduction to these comprehensive lesson plans.

8
NATIONAL STANDARDS FOR MUSIC EDUCATIONBefore formalized and national guidelines were created for music education, school administrators were perplexed by how to measure and assess the educational value of a music-based curriculum. As a result, the National Standards for Music Education (NSME) were created. These nine standards are intended to guide educators when creating and teaching student projects and lesson plans. In this book, all of these standards are addressed. There are lesson plans on solo and group music performance, on listening and analyzing music, and of course on composing and arranging music within specified guidelines. Additionally, many of these standards can supplement the lesson plans in ways that are not outlined in this text. Should educators wish to extend the proposed lesson plans, brainstorming with the concepts inherent in the NSME is an excellent approach.
THE NATIONAL STANDARDS FOR MUSIC EDUCATION 1. Singing, alone and with others, a varied repertoire of music.
2. Performing on instruments, alone and with others, a varied repertoire of music.
3. Improvising melodies, variations, and accompaniments.
4. Composing and arranging music within specified guidelines.
5. Reading and notating music.
6. Listening to, analyzing, and describing music.
7. Evaluating music and music performances.
8. Understanding relationships between music, the other arts, and disciplines outside the arts.
9. Understanding music in relation to history and culture.
(Taken from: http://musiced.nafme.org/resources/national-standards-for-music-education/)

UNDERSTANDING MIXCRAFT

CHAPTER
10
CONSTRUCTING A MUSIC LAB WITH MIXCRAFT
Educators are often faced with tough decisions when creating a computer-based music lab. Financial constraints, classroom space and availability, and curriculum limitations will inevitably influence the purchasing of equipment, the classroom setup, and the lesson plans. For educators who have no background working with music equipment or software, building a music lab can feel especially overwhelming. Researching and learning about audio equipment takes time and a great deal of patience: one can easily get lost in the sea of equipment that is readily available. This chapter attempts to rectify these issues and to demystify the audio world. First, in the “Setting Up Your Music Lab” section, an overview of affordable music hardware and software is offered. Included is a selection of the common pieces of equipment that should jump start the process of turning a classroom or computer lab into a fully functioning music lab. Next, “School Environments For Your Music Lab” outlines how to configure and setup music hardware and software. For educators interested in more technical explanations, a great amount of literature is available that discusses audio equipment, recording arts, and audio production.
SETTING UP YOUR MUSIC LABSUGGESTED HARDWARE
PC Computer: Mixcraft is for PC computers only. Currently, Mixcraft version 6 is supported by Windows® 7 and 8, Vista, and XP. During student lessons, it would be best for each student to have a computer. If this is not possible, then the class can be divided into small groups of students who share what individual computers are available. When resources are scarce, however, at a bare minimum, having one central PC and projector run by the educator will suffice for many lessons, especially for those recording projects that include the entire classroom.
Computer Audio Drivers/Sound Device: PC computers have built in “audio drivers” that enable communication between software applications and a computer’s sound card. The default audio driver for Windows is DirectSound displayed as the “Wave” driver in Mixcraft. This manual recommends downloading and installing Steinberg’s Audio Stream Input/Output (ASIO) onto your computer for enhanced playback and recording. You can download the driver from ASIO4ALL’s website: http://www.asio4all.com/.
Projector/Projection Screen: It might be necessary for educators to walk students through lesson plans step-by-step. Using a projector and projection screen during classroom projects will accomplish this instruction need. A mobile projector on a cart is appropriate when using shared classroom space because it allows educators to easily set up or tear down.
Microphones: Educators looking to record student solo or group performances might need to use a microphone. There are many resources available that explain microphone types, setup, positioning, and microphone care. For classroom purposes, investing in a cheap condenser microphone (around $100.00 USD) or a USB microphone will suffice for most student projects.
Acoustica MVS USB Microphone. USB Microphones plug directly into computers and do not need an audio/computer interface.
1

11
Audio/Computer Interface: In short, an audio/computer interface is a device that converts an incoming audio signal into a digital signal that is recognizable by a computer. This conversion allows engineers to use an audio software equipped computer to record musicians. In addition to supporting audio, some interfaces also support MIDI.
Audio/computer interface devices require little set up, often plugging directly into a computer’s USB or firewire slot. Shop around and look for devices that fit the budget of the classroom. Also keep in mind how the device will be used in the classroom. Will the class be recording more than one or two tracks simultaneously? Will MIDI instruments be used? Depending on the physical setup or budget of the class, either buy one device for a main teaching computer or buy smaller devices suitable for each individual computer station (having both setups would be best). Mixcraft is compatible with all pc-based audio/computer interfaces.
Instruments: A music curriculum often requires the recording of acoustic or electronic instruments. Acoustic instruments such as acoustic guitars, drums, string, brass, wind, or percussive instruments are typically “miked” or recorded with a microphone. Electronic instruments, ranging from electric guitars, synthesizers, or drum machines, are typically recorded directly through an audio cable that can be plugged into an audio/computer interface. Mixcraft is capable of recording all acoustic and electronic instruments.
Instrument and Microphone Cables: Whether for recording with an external microphone or with an instrument itself, it is important to purchase the right audio cables. Microphones generally take an XLR cable; electronic instruments normally use a TRS cable. Finally, a MIDI instrument to Mixcraft hookup usually requires MIDI cable. Much like socks in the washer, cords tend to disappear, so do not hesitate to purchase a couple of extras!
MIDI Controller: MIDI Controllers are devices that normally use a keyboard interface to control virtual instruments or other external hardware. These devices work well in a classroom setting to control and perform with Mixcraft’s virtual instruments. For example, a student performing with a MIDI keyboard device can actually “play” Mixcraft’s Organ Instrument. MIDI Controllers vary widely in price range, but a small, reliable MIDI keyboard can be purchased for around 100 dollars.
Monitors or Headphones: It will be important to monitor class recordings and Mixcraft sessions. For student computer stations, it would be ideal to have one pair of headphones per computer station. For educator stations, a decent pair of monitor speakers should allow the whole class to hear whatever Mixcraft session the class has been working on.
USB Audio/Computer Interface. This device supports the use of external microphones and instruments during recording.
MIDI Keyboard Controller. Keyboards such as this model, work with Mixcraft and can play and control Mixcraft’s built-in virtual instruments.
XLR Microphone Cable with “Male” and “Female” ends.
MIDI Cable1/8” Stereo Mini and 1/4” Mono Plug
USB Cable

12
SUGGESTED SOFTWAREMixcraft: Mixcraft is a Digital Audio Workstation (DAW) that allows users to record, edit, mix, and play back audio. Mixcraft also supports MIDI, has scoring capabilities, and comes with a selection of built-in virtual instruments and over 6,000 audio loops. Currently, the latest release is Version 6 and is for PC only.
Mixcraft Built-in Virtual Instruments: Mixcraft bundled a variety of built-in, “soft” or virtual instruments with their software. These instruments range from software replications of classic organs, electric pianos, synthesizers and to even drum sets! Educators and students can create these sounds using Mixcraft without owning or recording any of the actual instruments. Simply launch Mixcraft and load up an instrument on Mixcraft’s virtual instrument tracks. Though not required, a MIDI controller works best when performing with virtual instruments.
MIXCRAFT’S BUILT-IN VIRTUAL INSTRUMENTS AND EFFECTS PLUGINS.Mixcraft Loops: Mixcraft 6 comes bundled with 6,000 (WOW!) professionally produced loops. Mixcraft loops are segments of pre-recorded and edited audio that spread across a range of different sounds and instruments. Loops include drum beats, guitar chord progressions, keyboard parts, and even world music instruments! The lesson plans included in this manual address how to use these loops for student projects. Students and educators will need an internet connection to download loops on demand.

13
SCHOOL ENVIRONMENTS FOR A MUSIC LABThe layout and construction of a music lab depends on either classroom size or on access to a computer lab. With these specific restrictions in mind, three common setups of a music lab in a school environment will handle most situations. For educators whose only option is to transform their home classroom into a music lab, the “1 Teacher, 1 Computer, 1 Projector” layout works well. Educators, however, who have access to a computer lab, will make set-up choices based on whether the lab is for music exclusively or is a shared, general use facility.
In this setup, a designated PC is used to run Mixcraft. An audio/computer interface is connected to the PC through USB or firewire protocols and acts as a liaison for MIDI instruments, electronic instruments, and microphones. Situated at the front of the classroom is a projector and projector screen that shows the main PC’s screen to students. Alongside the screen are two monitor speakers that play back audio from the Mixcraft session.
REQUIRED MATERIALS
• PC Computer
• Mixcraft
• Projector (Projection Screen)
• Computer Speakers
RECOMMENDED MATERIALS
• Audio/Computer Interface
• MIDI Controller
• Monitor Speakers
• USB Microphone
• Interactive White Board
SINGLE CLASSROOM SETUPS
• 1 Teacher • 1 Computer • 1 Projector
When an educator does not have access to a computer lab or extra classroom, the basic setup of a computer, projector, and monitor speakers will be sufficient to create an in-house music lab.
Discussion: Depending on the layout of the classroom, it is important to keep in mind how students will engage with lesson plans and Mixcraft. For instance, students should be able to see the educator’s computer screen clearly: coupling a main computer with a projector and projection screen will allow a classroom of students to follow a handout or lesson plan easily. This approach might also be effective in familiarizing students with the basics of audio software, running simple lesson plans, or orchestrating class-sized projects. One drawback of such a setup, however, is that only one student or teacher at a time will be able to use Mixcraft. Nevertheless, for class-sized lesson plans where the educator oversees the use of audio hardware with Mixcraft for such projects as Rap Improvisation or STOMP, this arrangement is ideal.

14
MUSIC STATION SETUPS1) The Shared Computer Lab: Schools will have one main computer lab that multiple educators and classes share. A shared computer lab can be divided into small, computer booths (“music stations”) that are outfitted with audio hardware and software. In this setting, students will be able to work independently or in small groups to complete assignments. For educators with access to a shared computer lab, remember to allow ample time to set up and clean up the classroom
REQUIRED MATERIALS:
• PC Computers
• Mixcraft
• Computer Speakers or Headphones
RECOMMENDED MATERIALS:
• Audio/Computer Interfaces
• MIDI Controllers
• Monitor Speakers or headphones
• Microphones, USB Microphones, or Instruments
• Interactive White Board
Discussion: For smaller projects, such as the Mixlibs Project or Vocal FX Project, this setup is ideal. If classroom space allows, having a portable projector and projection screen at the front of the computer lab will help the educator facilitate and oversee the lesson. Remember, because this is shared space, it might be best to set up the lab before class starts to maximize lesson time (particularly if the selected lesson involves musical instruments and other music gear).

15
2) The Music Computer Lab: In some school environments, an entire computer lab might be dedicated to audio recording and production. As with the shared computer lab, “music stations” would comprise the majority of the music computer lab space. A larger workstation for the educator could include, but not be limited to, a mixing board, projector, and projection screen. Since the mixing board can record multiple instruments simultaneously (ideal for student group performances) and can monitor the volume output from each music station, the teacher can control all the student work from one central station. Incorporating other music equipment into this setup – for example a hardware compressor, EQs, or a variety of instruments – might be useful.
Discussion: The music computer lab setup will be the most resource exhausting of the three lab types covered. Nevertheless, a fully equipped music lab is ideal for handling the widest variety of audio projects, from recording solo singers or voice actors to recording larger music projects such as student jazz quartets, rock bands, and word music ensembles. Larger student projects would certainly benefit from having such a setup, specifically the Remix and Lyrical Songwriting projects.
REQUIRED MATERIALS:
• PC Computers
• Mixcraft
• Computer Speakers or Headphones
RECOMMENDED MATERIALS:
• Audio/Computer Interfaces
• MIDI Controllers
• Monitor Speakers or headphones
• Microphones, USB Microphones, or Instruments
• Mixer
• Projector and Projection Screen
• Interactive White Board

16
In this setup, the audio/computer interface is the focal point of all recording and monitoring. Attached to the PC through USB or firewire ports, the interface should have a headphone jack, audio inputs for microphones, and inputs for electronic instruments. Students should be familiarized, prior to recording or monitoring their music, to the model and functions of the audio/computer interface. Additional capabilities on the interface may include analog in and outs for monitors and MIDI in and outs for other MIDI devices.
FURTHER READINGThere are many setup options for creating a music lab. If the above suggestions are not possible, seeking out other literature will help cultivate alternatives. The “For Dummies” book series is a great place to start; the language is directed towards the layperson and the content is thorough. Creating a solid music lab is no easy task; the process should not be rushed!
Strong, J. Home Recording For Musicians For Dummies. Strong, J. PC Recording Studios For Dummies. Eargle, J. Eargle’s The Microphone Book.

17

CHAPTER
18
A SURVEY OF MIXCRAFT
An eager user launches Mixcraft for the first time and loads in some previously recorded audio. Now what? Without any knowledge of the interfaces of the program, it would be difficult to know where to begin – even finding the magic “play” button would be uncertain! This chapter, which will help educators learn to navigate Mixcraft’s visual interface, begins with a look at the workspace. The Workspace is then deconstructed into individual components. The chapter concludes with a description of these individual Workspace components. For easier learning, the most important and necessary functions of Mixcraft have been highlighted. For specific walkthroughs on how to use audio, MIDI, or video with Mixcraft refer to Chapters 3, 4, or 5 (respectively). If educators should have further questions, multiple technical references and Mixcraft’s built-in Help Menu are available.
MIXCRAFT’S INTERFACE
Mixcraft’s workspace with eight audio tracks.
Arguably the most important piece of Mixcraft’s interface, the Workspace allows users to manage their session by adding or deleting tracks, starting or stopping playback, editing and arranging audio, and controlling the master volume. This is where all the magic happens. The left column displays all the in-use tracks. These tracks are used to mix and record audio or to use Mixcraft’s virtual instruments (shown in the above screen shot are eight audio tracks earmarked by the speaker clip art). The white open space to the right, with a grid-like backdrop, is Mixcraft’s Timeline. This space allows users to arrange, edit, and visualize their sessions. The top area contains the menu and toolbar, while at the bottom is the master bar (there is that magic play button!). The record button and the master volume slider are located on the master bar.
Below is a deconstruction of the Workspace. We recommend reviewing these essential features before beginning the lesson plans:
2

19
TIMELINEThe Timeline is a linear organization of all audio tracks, virtual instrument tracks, video tracks, send tracks (tracks that apply effects over multiple tracks) and submixing tracks (tracks that contain other tracks). Here, users will see audio recordings represented as “audio regions” that are illustrated with audio waveforms. Virtual instrument tracks use MIDI and thus are shown as “MIDI regions” that display MIDI graphics. There are several important functions relative to the Timeline that educators should become acquainted with:
1. The Playback Cursor: The Playback Cursor, denoted by a green marker, acts like a vertical cursor on the Timeline. Click anywhere on the Timeline to set the cursor. Playback begins from the cursor’s location. The cursor can also be used to highlight or select regions on the Timeline.
2. Markers: Adding markers is a handy way to narrate a Mixcraft session because it enables a user to label specific parts of a song (verse, chorus, bridge) on the Timeline. Located at the top of the Timeline are numbers that refer to measures and beats. Simply right click on a beat number to add a marker.
3. Snap Setting: Though technically part of the Toolbar, the snap setting influences how regions on the Timeline behave. When editing audio and MIDI regions, activating the snap settings automatically “snaps” the regions to the Timeline’s grid. Users can easily rearrange or edit regions and ensure that they remain aligned with the rest of the session.
Audio and MIDI Regions: Both audio and MIDI information appears on the Timeline in the form of “regions.”
Audio Regions are editable chunks of audio that can be dragged, cropped/extended, or cut to be arranged on the Timeline. Regions illustrate the waveforms of either imported or recorded audio. Users will notice that for percussion sounds or instruments with a quick attack, the audio region will display peaks in the waveforms that refer to these transients (the quick percussive attack of a sound).
An example of how audio appears on Mixcraft’s Timeline.
MIDI Regions illustrate MIDI notes and MIDI data. Horizontal lines within the region refer to the duration of a note (how long the note will be sustained) while the vertical position of a line refers to pitch (higher lines have a higher relative pitch to lower lines).
A virtual bass instrument realized as MIDI on Mixcraft’s Timeline.

20
Master Transport Contols Loop, Metronome and Punch In/Out Controls
Tempo and Time Screen Master Volume Control
MASTER BARThe Master Bar, located at the bottom of the Workspace, allows users to play (click the green arrow icon or hit space bar), stop play (click the green arrow or hit space bar again), or record (click the red circle or hit “R”) during your Mixcraft session. Simply hover the cursor over each icon to learn its relative function. Remember, play back or recording begins from the position of the playback cursor. Mixcraft also has rewind and fast forward functions.
The master bar controls: recording (red dot), play (green arrow), and fast forward and rewind icons.
Three additional toolbar icons, located to the right of the master play button on the master bar, activate loop mode, the metronome, and punch in/out recording. The green screen interface to the right refers to the play position or time, the tempo of the session (calculated in BPM), and the session’s master meter and key. To adjust the tempo or key, simply click the interface and change the parameters.
Tempo and time screen: Users can double-click on the interface to edit certain parameters such as key and meter.
Master volume slider: A master volume slider controls the level of Mixcraft’s overall audio output. Select the slider with your cursor and move it left or right to adjust the master volume Moving it to the right increases the volume. Moving it to the left decreases the volume.
The metronome icon and settings
Metronome: The metronome function enables a metronome that will sound along with the music during playback or recording. By having the accompaniment of the underlying beat, students playing along can (hopefully!) achieve cleaner performance takes. Additionally, recording to a metronome ensures that the audio tracks are aligned to Mixcraft’s Timeline, which makes recordings easier to edit. The metronome has three settings: playback, recording, and count-in measures. Users should become acquainted with the recording and recording count-in measures because these settings are commonly employed. The latter setting activates a count off before Mixcraft starts recording and is useful for recording groups of students.

21
TAB AREA: PROJECT, SOUND, MIXER & LIBRARYThe Tab Area (lower left of Workspace) is a group of windows organized into four “tabs” (Project, Sound, Mixer, and Library). For student projects, the most important tabs will be the Library and Mixer areas. Both teachers and students should become familiar with the search and browsing features of the Library and the layout of the Mixer.
Project Tab: The Project Tab displays general information about a Mixcraft session. Here, users will find the master tempo, key, time signature, and master effects chain listed. All of these parameters are modifiable through this window.
Here, the project tab displays a tempo of 90 BPM, key of E major, 4/4 time and a compressor on the master effects chain.
Most importantly however, is the audio beat match function. Once enabled, Mixcraft will automatically adjust sound clips imported to Mixcraft to the master tempo. This function might be useful for students using samples or producing loop-based music. The default settings activate the audio beat match function.
Sound Tab: The Sound Tab displays a graphic representation of a selected audio region on the Timeline and specific parameters that can change the tempo, key, pitch, or length of the audio region. Users can also edit longer audio regions into short loops by dragging the Loop Start and Loop End markers (as shown in the figure above). Try importing some audio samples and notice how Mixcraft represents these files visually. Transients, or the quick percussive attack of a sound, are often illustrated as peaks and are used as a reference when editing audio and creating loops.
Waveform of an audio file imported into Mixcraft.
Mixer Tab: The Mixer is modeled off of old analog mixing consoles. Mixing consoles control the level and panning of individual tracks, allowing audio engineers to “mix” or mold each individual track into one master track (for example, a song). For students, the most important component of the mixer is the volume slider: each track has a corresponding slider that raises or lowers its volume (the sliders are orientated vertically). Pan sliders allow users to move tracks, or “pan” them, to the left, right, or center area of the listening environment (they run horizontally and are located at the top of the volume sliders). Try experimenting with different volume and pan settings during student projects.
Mixcraft’s mixer is modeled after old analog mixing consoles. Here students can adjust the volume and panning of each track.

22
Library Area: Mixcraft likes loops. And as an educator you will learn quickly, so too do students. The Library Tab allows students to search, preview, and ultimately use loops in Mixcraft. Students can browse the library categories on the left by instrument, key, tempo, style, etc. to easily find a sample that might compliment a lesson. For music-intensive projects, the library is an accessible and incredible resource for finding high quality audio loops that allow students with no formal music training or background to begin producing music.
The loop library is an organized collection of Mixcraft’s loops. Users can browse the loops or search with a specific loop in mind.
THE PIANO ROLLThe Piano Roll is an interface that enables users to edit MIDI notes and other MIDI parameters. The Piano Roll consists of a small, horizontal time line and vertical key board spread. Users can draw notes (using the pencil icon in the upper left hand corner) onto the Piano Roll. The notes appear as horizontal lines and users can trim, highlight, and arrange these lines on the Piano Roll’s time line. Underneath each note, a vertical line appears that determines the “note velocity.” Increasing the velocity increases the loudness of and accents a note. Additionally, users can record a performance on a MIDI instrument and use the Piano Roll to make precise edits such as quantizing and transposing.
Example of a bass line performance notated on the Piano Roll.

23
NOTATIONAn additional function found in the Piano Roll enables Mixcraft to create notation either from MIDI data or by free hand drawing. The notation window is located under the Sound Tab under “editor types.” By toggling between the editing types, Mixcraft will display a MIDI arrangement either as MIDI data on the Piano Roll or as Notation.
Select the “Editor Type” on the Sound Tab to toggle between the Piano Roll and Notation.
As exemplified below, Mixcraft can effortlessly switch between the Piano Roll and Notation windows. Users can thus make edits easily in the Notation window. These edits will consequently be reflected in the Piano Roll window.
A MIDI performance in the Piano Roll prior to be converted to notation.
The MIDI performance from above now converted into notation.

24
The opening Mixcraft screen which allows users to select from three work session templates.
TOOLBARThe Toolbar, located at the top of the Workspace, is a collection of shortcuts relative to specific actions in Mixcraft. There are icons for opening and saving sessions, mixing down audio, and even burning audio to CD. To become familiar with the toolbar, highlight the icons the cursor. The most important functions for students to learn are the zooming and snap to measure features:
Zooming In and Out: The two magnifying glass icons allow users to either zoom in (+) or out (-) of the Timeline. This feature is incredibly helpful when either editing audio and video or arranging regions on the Timeline.
Snap To Measure: As mentioned in the Timeline section, the snap to measure function aligns regions to the Timeline grid. This feature is useful for editing audio or MIDI regions or for using Mixcraft’s loops. The drop down menu changes the snap to grid settings to different note sizes. Generally, the 1/8th or 1/16th note is a good setting to start with.
OPENING A NEW SONGMixcraft offers three templates that allow students and educators to start working with the software immediately:
1) Record Yourself or Your Band; 2) Build Loop & Beat Matched Music; and 3) Build Virtual Instruments.
Each template loads tracks and settings that will help users create a specific type of music. Many of the student projects utilize these templates. Be sure to test load the three templates to get a sense of how each may be included in lesson plans. Remember, it is preferable for students to spend their time making music with Mixcraft, rather than setting it up! If you want to create your own template, simply close New Project window and get started.
TIP:Educators can save custom templates by going to:
Menu › Save As… › Save As Mixcraft Template.

25
SAVING/EXPORTING SONGSSaving: Users can save any Mixcraft session to a computer hard drive for later use. Simply go to the Menu > File > Save As…
All recordings, Timeline arrangements, plugin effects and parameter settings will be saved in the session file and an accompanying folder stored on the main computer hard drive.
Exporting: Mixcraft Version 6 supports several file formats for mixing down audio. Educators and students should begin by mixing down sessions in either .MP3 or .WAV file formats.
To mix down a session go to the Menu > Mix Down To > File format.
Mixing down a session in Mixcraft.
Before mixing down, it is important to check the peak volume on the master fader. As is the case with audio tracks, peaking into the red zone can add artifacts (unwanted or accidental sounds) or distort the final mix down. After mixing down the session, the audio file can then be played through computer software, burned to a CD, or added to a digital media player (such as an MP3 player or a smart phone).

CHAPTER
26
USING AUDIO WITH MIXCRAFT
Audio is the main component of Mixcraft. Prior to supporting MIDI and virtual instruments, Mixcraft was primarily used to record either solo performers or groups of musicians. As a result, the audio components of the software are incredibly lucid and well thought-out. For educators and students, audio will be the driving force behind both the music and non-music lesson plans found in this book: learning to record a music performance or capturing a non-music recording (such as a speech) are objectives that run throughout the student projects. Chapter 3 provides instructions for recording, editing, and looping audio. First, an overview of Mixcraft’s audio functions is given: beginning with the audio track, users will learn how to operate not only these pieces of software but also their respective components as well. Next, a tutorial on recording audio is provided. Educators are encouraged to go over this tutorial, step-by-step, prior to teaching the lesson plans. Finally, several editing techniques are described. Educators and students will find these techniques useful during post-production.
ON AUDIO TRACKSBack in the early days of recording, music was recorded directly to and captured on analog tape. With the introduction of computers to the modern recording studio, software engineers have simulated the functionality of these early tape machines and analog tracks by creating audio software with virtual tracks. Audio Tracks in Mixcraft are pieces of software specialized for recording and editing audio. Users can capture their own recordings or can import audio directly onto Mixcraft’s audio tracks. Generally, each audio track is reserved for a specific instrument. Mixcraft, however, has no limits on the number of audio tracks users can add (at least as many as your computer’s processor can handle!). Audio tracks also display certain acoustic properties of a recording or audio sample – audio “waveforms,” for example. The waveform “height” (easily spotted as peaks or transients) is correlated with loudness: taller parts of the waveform are perceived to be louder than shorter parts. These graphic representations are useful for editing or for finding certain sections of a recording.
Mixcraft’s Audio Track. Since Mixcraft’s audio track is a compilation of several important audio functions, a user should understand each function prior to recording. Below is a breakdown of the audio track:
Mixcraft’s Audio Track
Tuning Fork: An ingenious feature, the Tuning Fork, monitors and displays the pitch of an incoming audio signal. Users can tune instruments without the need for an external tuner or a superfluous effect plugin. To activate the tuning fork, an audio track must be armed by left clicking the arm button. Once armed, a turning fork icon will appear in the left hand corner. Selecting the icon activates the tuner.
An armed audio track with the tuning fork selected.
TUTORIAL3

27
Monitor Signal: Before recording, it is important to monitor the level of an incoming audio signal. The volume meter contains two horizontal rectangles (one for the left and one for the right speaker) and a volume slider. The volume meter contains a color spectrum – as the volume of a sound increases the hues of the meter change from green to red. Ask the performer to perform at the intended volume level and track where the loudest peak reaches on the volume meter. Recording should be done in the “yellow” zone. In this zone, recordings will be audible but not so loud that added artifacts (accidental or unwanted sounds) will “dirty” the recording with, for example, clipping or distortion.
An example of the yellow or “safe” zone to record in.
If the meter is reaching the “red” area, try dialing back the gain on the audio/computer interface, turning down the volume on the instrument, or moving the performer away from the microphone.
An example of the “red” or “unsafe” zone. This area could damage your ears and recordings.
Mute/Solo: The Mute and Solo buttons control the playing or recording of audio tracks. A track is silenced completely with the mute button. Muting may be useful when deciding on arrangements or when comparing different audio track combinations. The solo button allows only the selected track to play or record, while the remaining tracks are muted. Soloing is useful when users only want to monitor one track. Remember, however, that tracks can be either muted or soloed in any combination. Two examples: With eight tracks, two could be soloed which would mute the other six; or two could be muted which would allow the other six to play or be recorded.
Automation Toggle: Automation is an advanced technique which makes it possible to program changes for particular parameters (pan and volume) in Mixcraft that automatically adjust over time. For example, users can program volume (such as volume shifts during a chorus section) and pan (such as moving an instrument audio to the left, center or right of the listening environment) with changes that will then automate during playback/recording. To toggle the automation interface, select the icon with three dots connected by two lines. A subtrack will appear below the audio track. To change the values of volume or of panning, left click and hold on the line running across the middle of the subtrack, then drag the point created up or down. Each click on the line will create a point which can be moved up or down for multiple volume or pan changes to the track.
Sample automation of volume levels. In this example, the highest dot increases the volume of the track by 3Db while the lowest dot decreases the volume by 2 Db. The volume amplification or reductions follows the contour of the automation.
Pan: Panning is the placement of a sound in the left, right, or center of the listening environment. The pan slider, located alongside the volume meter, moves the track along this continuum. The default pan placement is in the center. Certain instruments are placed in this default position. For example, a kick drum or bass guitar is likely to be panned dead center. Rhythm guitars, tom toms,

28
or orchestral instruments might be pushed to the left or right side of the listening environment. There is no correct way to pan instruments but many mixing engineers try to replicate how a live orchestra or band might sound to the audience. Thus, many pan the instruments according to the setup of music stages or orchestra pits.
FX: The FX icon launches the FX window in which users can select and apply effect plugins to the instrument track. These effects range from reverb and delay to equalization and compression. An overview of Mixcraft’s built-in effects is covered in Chapter 6.
Arm for recording: The Arm icon activates the audio track for recording. Once armed, the audio track will turn red and the volume meter will now display the level of any incoming audio. To start recording on the Timeline, hit the round, red master record button or press ctrl-r on the computer keyboard.
RECORDING WITH MIXCRAFTThis section examines basic audio recording. Educators will learn how to prepare software and hardware prior to recording, workflows for recording, and finally techniques for editing audio.
SETTING UP FOR RECORDING
At this stage, educators should have an idea of what hardware and software is required for their curriculum. Ideas on how to set up a music lab can be found in Chapter 1.
Before beginning to record, have on hand everything required for the session. Brainstorm beforehand to facilitate this process. Make lists. For instance, microphones are usually needed to record acoustic instruments and vocals; while electronic instruments, like guitars or synthesizers, require different hardware such as instrument cables (usually TRS cable) and an audio/computer interface. Be prepared. Finally, it is vital to properly set up and configure the audio hardware with the Mixcraft software beforehand.
Below are common recording scenarios that educators may face: Scenario one: I am recording a solo instrumental or vocal performance. Scenario two: I am recording a large group a cappella performance. Scenario three: I am recording a jazz trio or string quartet.
Each of these recording scenarios requires a different setup. For instance, recording a solo performer only requires one microphone or one instrument cable. However, when recording multiple instruments or voices simultaneously, several microphones or instrument cables might be needed.
SETTING UP RECORDING ENVIRONMENTS WITH A MICROPHONE
1. Turn off monitors (and use headphones): To prevent feedback during set up, turn off any speakers or monitors attached to the computer’s audio output. Have performers record with headphones on because this will allow them to hear the recording session without creating a feedback loop. Connect headphones to the headphone jack on the audio/computer interface or on the computer.
2. Next, connect the microphone(s) to the audio/computer interface with a microphone cord. Some microphones may require external power (usually in the form of 48v). Check your microphone’s manual before activating the 48v option on your preamp or
TUTORIAL

29
audio/computer interface. If using a microphone pop filter for vocal recordings, place the filter in front of the microphone.
3 Position the microphone near the performer or instrument. It is important to correctly position the microphone at an optimal distance from the performer. For tips on recording with microphones, refer to the appendix.
SETTING UP RECORDING ENVIRONMENTS WITH ELECTRONIC INSTRUMENTS
1. Turn off monitors (and use headphones): To prevent feedback during set up, turn off any speakers or monitors attached to the computer’s audio output. Have performers record with headphones on because this will allow them to hear the recording session without creating a feedback loop. Connect headphones to the headphone jack on the audio/ computer interface or on the computer.
2. First, connect an instrument cable to the instrument. Next, connect the instrument cable to the audio/computer interface or to a preamp. Arm an audio track in Mixcraft to test whether sound from the instrument is reaching the software.
Trouble Shooting: At times, an audio track is armed in Mixcraft but no sound is heard when the performer plays! An excellent strategy for trouble shooting an audio signal is to conceptualize and then investigate the audio signal path: audio will first be generated by a vocalist or instrument then will travel through a microphone or instrument cable. These cables might be attached to a direct box, preamp, or computer/audio interface before reaching a computer. Scrutinizing each of the “stops” an audio signal makes is an effective methodology for validating the signal path. (For example, is the instrument’s volume knob turned on? Is the preamp’s gain set at an optimal level? Is the audio track in Mixcraft armed?). Once a working signal path is established, it is time to record.
RECORDING WORK FLOW
1. In this tutorial, either test record by speaking/singing into a microphone or record a musician playing an instrument. To begin recording, open Mixcraft and select the Recording Yourself or Your Band template.
Mixcraft will load eight audio tracks into the Workspace. Since this tutorial will only be using one audio track, delete the extra tracks to tidy up the Workspace (select tracks and click Ctrl + Shift + D).
2. Recording Equipment. Ensure that the microphone(s) or cable(s) and audio/computer interface are set up properly and that the gain or volume is turned up on all devices.
3. Now that the equipment is set up, it is time to record!
A) Arm the audio track in the Workspace by clicking “arm.” The downward arrow next to the arm button will enable users to select the source of incoming audio. Make sure the correct interface is selected. To check the configuration, try speaking into the microphone or playing a note on the instrument – the volume meter should jump.

30
B) For clean recordings users will want to monitor the incoming audio on the audio track’s volume meter. Remember to record in the “yellow” zone for the best results.
C) Enable the metronome. Clicking the metronome icon brings up the metronome settings window. Activate the metronome to play during “recording” and “recording count-in measures.”
Select the metronome and activate the “recording” and “recording count-in measures” settings.
D) Rewind the cursor to the beginning of the timeline before recording by selecting the rewind button (outlined in blue) on the master bar.
E) Start recording by either selecting the master record button (outlined in red in the image above) or the “R” key on the computer keyboard. The cursor will begin moving down the timeline and the waveforms of the recorded speech or instrument will appear. To edit, or re-record audio, stop the recording by hitting “R” or the space bar. Select the area that needs to be re-recorded with your cursor and hit the master record button.
Don’t forget to wear headphones to hear what is being recorded!
F) Once the recording is completed, disarm the audio track and playback the audio from the beginning. Listen closely for parts that may need editing (rearrange, split or remove) or to be re-recorded.
4. Importing Pre-Recorded Audio. In addition to recording live audio, Mixcraft also supports many audio file formats. For educators this means students can use audio samples, audio prepared by the educator, or recordings from a different class with Mixcraft.
To import pre-recorded audio, simply drag and drop the audio files onto an audio track in Mixcraft. Alternatively, go to the top menu and select Sound > Add Sound File > Select file.

31
EDITING AUDIO WITH MIXCRAFTAfter recording or importing an audio file into Mixcraft, users can edit the piece via the audio regions on the Timeline. The following technical audio editing skills are essential for all students who want to produce polished and professional sounding tracks:
1. Arranging Audio Regions: Users can arrange audio on Mixcraft’s Timeline by dragging and dropping audio regions onto an audio track. Once a region is attached to a track, users can select the region and move it along the Timeline.
2. Splitting Audio Regions: With the splitting function users can chop a large audio region into smaller regions. This clever edit is useful for either cropping out a desired part of a recording or for removing an unwanted section. To split a region, right click an area on the audio region and select “split” (Ctrl + T). The region will now be cut into two pieces. Grab and move the regions on the Workspace to rearrange the recording.
Splitting audio regions is easy. Simple right click and select “split.”
3. Merging Audio Regions: Users can also merge, or combine, separate audio regions into one. Highlight the relative regions (Shift + Click) and right click to find the option “merge” (Ctrl + W). Make sure to place the two regions next to each other on the Timeline. If there is any space between the regions, silence will be added to the merged region in place of this space.
4. Trimming Audio Regions: The trimming function makes it possible either to extend or to shorten an audio region. This might be helpful when creating loops or organizing audio regions on the Timeline. To trim an audio region, move the cursor near the ends of an audio region until a double-sided arrow appears. Simply click, and drag the cursor left or right to trim or extend the audio region.
5. Deleting Audio Regions: Deleting audio regions from the Timeline is simple. Highlight or select the region(s) intended for deletion and click “delete” on the computer keyboard. Additionally, right clicking on a region and selecting “delete” will also remove it.

32
LOOPING AUDIOAt times users may want to have a certain audio region repeat over a few bars or repeat throughout an entire song. This process, referred to as “looping,” can be conducted in several ways in Mixcraft:
1. Loop Button on an audio region: The loop function is located in the upper left hand corner of every audio region. Clicking the circle with the “+” doubles the audio region on the Timeline. The circle with the “+” icon loops the audio region.
2. Doubling a region manually: Users can quickly copy one section of an audio region by selecting the region, holding the Alt key down on the computer keyboard, and dragging the region onto an empty space of the Timeline. (Note: To drag the section, the pointer must be in dark green upper bar.)
Selecting an audio region while holding Alt on the keyboard enables users to quickly create a copy of the selected region.
3. Copy + Paste Audio Regions: Of course, as with other software, users can use copy and paste functions to duplicate audio regions. Select an audio region or highlight a broader area on the Timeline. Next, browse the pulldown Edit menu from the top menu bar to find the copy and paste options.

33
SNAPPING AUDIO REGIONS TO THE TIMELINEAudio regions can be time-locked or “snapped” to the Timeline. A grid in the background of the Timeline displays the beat intervals or rhythmic values which the grid is set to. The grid divisions can be changed using the drop down snap menu located above the Timeline. A standard setting is generally the 1/8 or 1/16 note value.
The snap menu changes how the Timeline grid is divided, thus changing which rhythmic positions an audio region can be snapped to.
MIXING DOWN AUDIOWhen a Mixcraft production is completed, all of the audio tracks can be mixed down to one master track. Mixcraft supports several audio file formats including .WAV and .MP3. Before mixing down, play the production through and monitor the master volume meter. Notice if the master volume peaks or hits the red zone. If necessary, dial back the master volume a few decibels. To mix down, select from the top menu File > Mix Down To… > and select the desired file format.

CHAPTER
34
USING MIDI WITH MIXCRAFT
MIDI use is an integral part of the creative process for composers, music producers, and engineers. If audio is the father of the Mixcraft family then certainly MIDI (Musical Instrument Digital Interface) is the mother. The marriage of Mixcraft’s audio and MIDI functions creates a powerful tool not just for music production but also for teaching. Starting with a definition of MIDI, Chapter 4 moves on to cover MIDI terminology, how MIDI is used in Mixcraft and, of course, applications for the classroom. A look at Mixcraft’s virtual instrument tracks is coupled with a brief tutorial on how to record, program, and edit MIDI data. Finally, educators will learn how to mix down MIDI productions into a finished master track.
WHAT IS MIDI?MIDI, or Musical Instrumental Digital Interface, is a communication protocol that connects and/or synchronizes audio hardware to computer software. MIDI is often conceptualized as a “language” that facilitates communication between these two separate modalities. Schematically, MIDI is comprised of specific parameters or values that contain music-related information. This information includes the pitch of a note, duration of a note, and on/off messages that define when a note is released or held. In Mixcraft, educators and students can edit and automate these parameters. MIDI is normally used in the classroom either to synchronize external audio devices (such as a keyboard MIDI controller) with Mixcraft or to compose performances solely within a computer environment. Below are several teaching scenarios in which MIDI is commonly engaged:
What is MIDI used for?
Creating a performance that never occurred: Using MIDI programming, students will be able to compose music without needing to actually perform with instruments.
Experimenting with various transpositions of a song or part: MIDI data can be transposed on the fly, enabling students to experiment with different music keys. For educators, this function might be useful in demonstrating what a music key is.
Precisely editing a melody or rhythmic part, such as quantizing: One of the banes of recording audio is the likelihood that performers may mess up and play out of time during recording. With MIDI this is not an issue: MIDI data can be time-locked or quantized to specific rhythmic values, for creating perfectly in time music. In other words, once quantized, MIDI notes are moved to align with the beats (e.g. beat 1, beat 2) or fractions of beats (e.g. quarter notes, eighth notes, and sixteenth notes).
Opportunities for MIDI-related applications arise quite often while working with Mixcraft and appear in several of the lesson plans in this book (notably the MIDI Instrument Survey and the MIDI Beats projects). Though certainly MIDI has more to offer, understanding these three applications of MIDI first will provide a beginning foundation to build upon later.
TUTORIAL4

35
ON VIRTUAL INSTRUMENT TRACKSMixcraft’s virtual instrument tracks are pieces of software specialized for software instruments and MIDI-based music. Many of the virtual instrument track functions are analogous to audio track operations. The tool bars are the same and there is no limit to the number of virtual instrument tracks users can add to a session. Just as audio information is displayed as audio regions on Mixcraft’s audio track Timeline, so too does MIDI information appear as MIDI regions on the virtual instrument Timeline. Both audio and MIDI timelines display graphic representations of each note’s pitch and duration. However, unlike an audio track, a virtual instrument track also contains a Piano Roll, which is a keyboard interface that allows a wide range of nuanced MIDI programming.
COMPONENTS OF MIXCRAFT’S VIRTUAL INSTRUMENT TRACK
Similar to audio tracks, virtual instrument tracks are an amalgamation of individual components. Here is the virtual instrument track deconstructed:
Mixcraft’s Virtual Instrumental Track.
Mute/Solo: The mute and solo buttons control the playing or recording of virtual instrument tracks. A track is silenced completely with the mute button. Muting may be useful when choosing arrangements or when comparing different virtual instrument track recordings. The solo button allows only the selected track to play or record, while the remaining tracks are muted. Soloing is useful when users only want to monitor one track. Remember, however, that tracks can be either muted or soloed in any combination. Two examples: With eight tracks, two could be soloed which would mute the other six; or two tracks could be muted which would allow the other six to play or be recorded.
Automation Toggle: Automation is an advanced technique which makes it possible to program changes for particular parameters (pan and volume) in Mixcraft that automatically adjust over time. Users can use this function on Mixcraft’s virtual instrument tracks. For example, users can program volume (volume shifts of Acoustica’s drum kit snare) and pan (placement of the snare sound in the listening environment) with changes that will then automate during playback/recording. Another common example might be automating filters on a software synthesizer to create an evolving, animated sound.
To toggle the automation interface, select the icon with three dots and two lines. A subtrack will appear below the audio track. To change the values of volume or of panning, left click and hold on the line running across the middle of the subtrack, then drag the point created up or down. Each click on the line will create a point which can be moved up or down for multiple volume or pan changes to the track.
Here, the filter cutoff frequency to the Alien 303 Bass Synthesizer virtual instrument is being automated. As the automation contour ascends, the cutoff frequency is raised. As the contour descends, the cutoff frequency is lowered. This results in a bass instrument whose sound continuously evolves over time.

36
Change Instrument. The small keyboard icon launches the change instrument window. Here users can load any of Mixcraft’s bundled virtual instruments, VST effect plugins or use 3rd party instruments. The change instrument window can also launch keyboard typing, allowing students to control a virtual instrument with their computer keyboard.
Mixcraft’s Change Instrument window that allows users to load virtual instruments.
Pan: Panning places the virtual instrument to the left, right, or center of the listening environment. The pan slider, located alongside the volume meter, controls this parameter. The default placement is in the center: moving the slider left or right pushes the virtual instrument to its respective area in the listening environment.
FX: The FX icon launches the FX window in which users can select and apply audio effects to the virtual instrument track. These effects range from emulations of recording environments and ambiances (such as reverb and delay) to practical mixing tools (such as equalization and compression). It should be noted that some software instruments come bundled with built-in, on-board effects. An overview of Mixcraft’s built-in effects is covered in Chapter 6.
Arm for recording: The Arm icon activates the virtual instrument track for recording. Once armed, the virtual instrument track will turn red and users can then control the instrument with either musical typing or with a MIDI controller. When notes are played on the virtual instrument, the volume meter will display the output volume of the instrument. To start recording on the Timeline, click the master record button or press Ctrl+R on the computer keyboard.

37
RECORDING MIDI WITH MIXCRAFTThis tutorial covers the use of MIDI with Mixcraft. Educators will learn how to setup Mixcraft and MIDI hardware for recording, a workflow for recording MIDI data, and finally, techniques for editing MIDI data.
SETTING UP FOR MIDI RECORDING:
There are three methods by which students can use MIDI to record or program a music performance with Mixcraft: 1) MIDI hardware, 2) Musical Typing, and 3) Drawing MIDI notes:
MIDI Hardware: MIDI controllers, such as a MIDI keyboard, can be used with Mixcraft to record a music performance in MIDI format. External MIDI controllers are ideal for student projects. They work efficiently with Mixcraft and offer a playability that is not possible with either music typing or MIDI programming.
Musical Typing: Mixcraft has a built-in software keyboard called Musical Typing. This piece of software transforms the computer keyboard into a piano keyboard. Though a bit clunky to play, it makes a great substitution for an external hardware MIDI controller.
Drawing MIDI Notes: MIDI data can also be manually programmed. Users can use the pencil tool and draw MIDI notes onto the Piano Roll. Programming is highly useful when composing with virtual drum instruments.
Before recording, it is important to properly setup and configure all audio hardware and Mixcraft. External MIDI controllers can be hooked directly through USB or firewire ports, while other external keyboards might require the use of MIDI in/out cables and an audio/computer interface. Referring to the documentation of the hardware will assist in proper setup:
1. To begin setting up, turn on monitors: Don’t worry about creating a feedback loop when recording with MIDI (unless of course there is an active microphone elsewhere in the recording area!). Use monitors or headphones to follow the level of the MIDI-controlled virtual instrument or listen to a MIDI performance in real time.
2. Next, connect the MIDI controller to the audio/computer interface or directly to the computer. Mixcraft will display a notification that it has detected a change in its MIDI configuration.
RECORDING MIDI: A WORK FLOW 1. To begin recording MIDI, open Mixcraft and select Build Virtual Instrument Tracks.
Mixcraft will load two virtual instrument tracks and six audio tracks into the Workspace. Since this tutorial will only be using one virtual instrument track, delete the extra tracks to tidy up the Workspace (select tracks and click Ctrl + Shift + D).
TUTORIAL

38
2. Select a virtual instrument by clicking the keyboard icon on the virtual instrument track.
This keyboard icon prompts the virtual instrument window.
For this tutorial, we will be using Mixcraft’s Organ Model F Plugin. The Model F is a software emulation of a vintage organ instrument. Select the plugin by navigating the virtual instrument browser: VSTI Instrument > Combo Organ Model F.
Use this browser to locate any virtual instruments that are stored on the computer. For this tutorial, select the Combo Organ Model F instrument.
3. Next, enable musical typing by clicking the “musical typing” keyboard icon.
Clicking the music typing icon will launch Mixcraft’s virtual piano keyboard.
Try playing a few notes on the virtual organ by pressing keys on the computer keyboard. During lesson plans if MIDI controllers are not available, students will be able to use the musical typing feature to record a performance with MIDI.
4. It is time to record! Educators should learn to record MIDI with a MIDI controller and with musical typing. Try recording using both methods:
A) First, arm the virtual instrument track in the workspace by clicking “arm.” The downward arrow next to the arm button will enable users to select the source of an incoming MIDI signal. The default setting is generally fine, but intricate MIDI setups might require specifying a MIDI device. To check the configuration, play a few notes on a MIDI controller or on the musical typing interface: the volume meter should jump and the organ should play.
B) Enable the metronome when recording with MIDI. First, click the metronome icon to bring up the metronome settings window. Choose both “recording” and “recording count-in measures” for metronome play. Click “OK.”
TIP:To bring up the Organ’s interface, click the edit button that appears once the Combo Organ Model F has loaded

39
C) Before recording, rewind the cursor to the beginning of the timeline by selecting the rewind button (outlined in blue) on the master bar.
D) Start recording by either selecting either the master record button (outlined in red) or by pressing the “R” key on the computer keyboard. The cursor will begin moving down the timeline and regions of the recorded MIDI will appear.
E) Once the recording is completed, disarm the virtual instrument track and play back the performance from the beginning.
An alternative to “performing” with either a MIDI controller or with musical typing is to program (write/compose) a MIDI part directly from scratch. Programming offers greater control over MIDI parameters and can circumvent the human errors that arise during performance.
1. To start programming a MIDI part, create a new virtual instrument track by selecting one from the menu: Track > Add Track > Add Virtual Instrument track.
2. Double click on the Timeline area that corresponds to the new virtual instrument track. A blank MIDI region should appear and the Piano Roll window should expand from the bottom of the screen.
3. Selecting the pencil tool in the Piano Roll allows users to “draw” MIDI notes onto the Piano Roll. Notes drawn on the Piano Roll will then appear in the MIDI region on the Timeline.
The Piano Roll Toolbar consists of the pointer arrow, the pencil tool, and the eraser tool.
4. Try drawing a basic melody using the notes C – D – E – F of the C Major Scale.
A sample melody in C Major programmed using Mixcraft’s Pencil tool and the Piano Roll.

40
5. Next, quantize the MIDI notes by selecting the MIDI Editing menu on the Piano Roll. Quantizing time-locks each MIDI note onto the Piano Roll’s grid. Quantizing can also be used to control the duration of each note. In this example, the notes were quantized to an “8th note” with the “note ends” option selected.
Sample quantize settings.
6. Next, create a loop out of the MIDI region on the timeline. Trim the MIDI region to a length of two bars by moving the pointer to the region’s end. Click and drag to extend or shorten the region. Then select the loop function (the circle with a plus icon) on the MIDI region.
Our programmed MIDI melody now appears in the MIDI region on Mixcraft’s Timeline.
Selecting the loop function adds a duplicate MIDI region of the melody.
EDITING MIDI WITH MIXCRAFTOnce a MIDI part is recorded or programmed, the MIDI data can be edited any number of times. With a few simple clicks composers can experiment with different instrumental arrangements, time-lock MIDI notes to certain rhythmic values on a grid, or transpose a part into different keys.
The MIDI Editing menu offers users a variety of methods to quickly organize and arrange MIDI notes.

41
QUANTIZINGA MIDI editor’s best friend, quantizing, time-locks MIDI notes on the Piano Roll’s grid to a specified note value. For instance, if a quantization is set to “8th notes,” MIDI notes that are not locked to an 8th note will be moved to the nearest 8th note position on the Piano Roll’s grid. Additionally, if there are discrepancies in note durations, quantizing can be used to equalize these durations. Quantizing is primarily used to fix errors in human performance, errors in MIDI programming, or errors that result from latency.
TRANSPOSINGThe transposing feature (Top Menu/sound > MIDI editing > transpose) is somewhat self-evident – it transposes a selected MIDI section to a new key. For students unfamiliar with key signatures, transposing is the act of preserving the relative relationships between the notes of a melody but assigning a new set of notes, or a “key,” to the melody. This feature is useful when creating arrangements for large student ensembles, for experimenting with different note registers, or when writing parts for different instrument families.
EDITING MIDI REGIONS ON THE TIMELINEAs discussed, users can employ a variety of techniques to edit MIDI in Mixcraft. With the Piano Roll an array of MIDI parameters can be meticulously controlled. MIDI parts can also be edited effectively on Mixcraft’s Timeline where MIDI data is represented as MIDI regions virtually identical to audio regions. Like audio regions, they can be split, merged, looped, snapped to the Timeline, and will also display any programmed automation.
Splitting/Merging MIDI Regions
Splitting and merging MIDI regions is useful when crafting an arrangement on the Timeline. The split feature chops a MIDI region into separate units which can be arranged, deleted, or looped. The merge feature compiles separate regions into a single unit, creating a seamless block of MIDI information.
A complete MIDI region containing an example melody.
The MIDI region has now been split into two separate regions.
To split regions, right click on the region and select the “split” edit. To merge regions, highlight all the relevant MIDI regions and right click to find the “merge” feature. Users can also use a keyboard shortcut to split (Ctrl + T) or to merge (Ctrl + W).
TIP:Although quantizing is effective in fixing human errors, the changes can often result in parts feeling “mechanical” or “machine-like.” To counter this, it may be advantageous to leave a few notes un-quantized or to use the “humanize” function under the MIDI Editing menu.

42
LOOPING MIDI REGIONSAs shown in the MIDI tutorial above, MIDI regions can be looped on the Timeline to quickly flesh-out an arrangement and to build larger music structures. The next big hit may find its beginning in a MIDI performance composition that tentatively starts with a four bar melody that is repeated with the looping function.
To loop a region, select the “loop” icon (a circle with a plus sign) displayed in the upper left hand corner. A notification displaying “+ 1 Loop” will appear.
The loop icon, conveniently displayed on a MIDI region.
MIXING DOWN MIDIWhen a MIDI production is completed, all of the virtual instrument tracks can be mixed down to one master audio track. Mixcraft supports several audio file formats including .WAV and .MP3. Before mixing down, play the production through and monitor the master volume meter. Notice if the master volume peaks or hits the red zone. If necessary, dial back the master volume a few decibels. To mix down, select from the top menu File > Mix Down To… > and select the desired file format.
TIP:Often, users may want to loop a particular section of a larger MIDI region. To loop a specific selection, the region needs to be trimmed and then set as its own loop. Once the region is trimmed, right click the region and select “set loop to crop.” Now this region can be looped

43
NOTES:

CHAPTER
44
TUTORIAL
MIXCRAFT VIDEO
If educators intend to use video or pictures for a lesson plan, great news – Mixcraft supports video and image files! Chapter 5 is a tutorial on how to use Mixcraft to import and edit videos and still images to create custom movies and slide shows. Additionally, Mixcraft can be used to add sound (music or sound effects) and text to video or image files. Common applications and examples of these features might include creating soundtracks for videos or adding text to end-of-the year slide show presentations. The skills acquired in this tutorial are also relevant to several lesson plans in this manual including the Commercial projects and the Film Project. The chapter begins with an overview of essential video equipment. A short tutorial then demonstrates how Mixcraft can be used to add music or text to both images and videos. The chapter concludes by showing how to mix down a video or slide show for viewing.
VIDEO EQUIPMENTThere are many types of video cameras on the market. Modern digital camcorders record directly onto a SD card, making it easy to transfer and rip videos to a computer. Older cameras that record onto analog tape need a converter (usually a USB device) to rip videos from the tape to a computer. Collaborating with a film class to shoot videos and then launching Mixcraft to do post-production is an ideal workflow.
VIDEO TUTORIALSetup: Before beginning the video tutorial, you will need to retrieve several files from the “Additional Materials Download. Find the Video Tutorials directory. From here, drag and drop the “Alaska Animals” and “Sample Movie” folders onto the desktop.
1. Open Mixcraft and select the Record Yourself or Your Band template.
Mixcraft will load eight audio tracks into the Workspace. Since this tutorial will need one video track, delete the extra audio tracks to tidy up the workspace (select tracks and click Ctrl + Shift + D).
2. Insert a video track by going to the top menu and selecting Track > Add Track > Video Track.
3. There are two ways to import a video or movie file into the Workspace: 1) Drag and drop the video file straight onto the video track or 2) simply select the file through the directory on the top Menu > Video > Insert Video.
A) Find and load the SampleMovie.avi from the “Additional Materials Download” folder into Mixcraft. If you have a video of your own, you can load that into Mixcraft instead.
B) Mixcraft automatically imports any audio that may accompany a video and places it on an audio track that is linked to the video track.
4. Play through the video in Mixcraft and watch for areas that may need to be edited. First, double-click on the video region to open the video preview window. Initiated play back by clicking the master play button on the master bar.
5For video-based student projects the following equipment is recommended:
REQUIRED EQUIPMENT
• Video Camera (Digital or Analog)
• PC Computer
• Mixcraft
SUGGESTED EQUIPMENT
• Digital Video Camera
• SD Card
• Tripod
• Film Software
• Music or Audio Samples

45
5. Editing videos in Mixcraft is analogous to editing audio or MIDI regions. Screen shots from a video file appear as moveable regions on a video track and users can trim or arrange these regions:
Splitting video sections: To rearrange segments of a video, first “split” or cut a movie into smaller, editable chunks. To split a video region, right click on the desired area and select “Split” (Ctrl + T).
Trimming video clips: To trim video regions, move the cursor near the ends of the video region until a double-sided arrow appears. Simply click, and drag left or right to trim the region to the desired length.
Deleting video: To edit out parts of a movie select and highlight a video region and hitting delete. Additionally, the unwanted section can be split into an independent video region and then deleted.
6. Try a few of these editing techniques on the Samplemovie.avi and watch the video. For instance, try splitting the video into smaller video regions and rearranging them on the Timeline. Note how the edits modified the video.
7. Beyond Video. Mixcraft can also add audio and text to a video.
A) Adding Audio: If the original video file has audio, Mixcraft will automatically import it as a separate audio track. This audio track is “linked” to the video track to ensure the audio remains aligned with the video images.
I. First, “unlink” the audio by clicking the “unlink” button on the audio track.
The unlink button on an audio track.
II. Next, delete the current audio regions from this audio track. Now record narration, import a song, or add sound effects to the video and really bring it to life! Additionally, the original audio can be kept and built upon by adding new audio tracks. This is important for videos that have recorded dialogue.
III. Add new sounds to the video by dragging or importing them onto the audio track. For this tutorial, try adding several of Mixcraft’s loops. Preview the video.
B) Adding Text: There are two categories of text one can add to a movie with Mixcraft: stagnant or scrolling.
I. Stagnant Text: Stagnant Text does not support text animation and remains stationary in one location on the screen. Often, this text is used to add a title such as the name of a movie or the author of a video.
II. To add stagnant text to the sample movie, go to the top menu and select Video > Add Text…
III. The “Edit Text” Window and “Text Track” will appear. Try typing in some text and changing the font color and position of the text on the screen:
TIP:To remove or edit the audio imported from the video file, click the “unlink” button (the icon with overlapping circles and an “x”).
TIP:To add loops, open Mixcraft’s Loop Library in the Tab Area located on the lower left hand area of the Workspace. Simply select a loop and drag and drop it on to the audio track.

46
Example of adding stagnant text to a movie.
IIII. The text should now appear as a region on the Text track. Just like with audio and video regions, users can arrange, trim, split, or delete text regions. Try moving the text region to different places on the Timeline.
V. Scrolling Text: Scrolling Text contains text animation that “scrolls” text across the screen. It is possible to control the fade in and fade out of text.
VI. To add Scrolling Text go to the Menu and select Video > Add Scrolling Text…
VII. For this tutorial, add a title screen with the stagnant text and a scrolling credit screen with the scrolling text.
USING STILL IMAGES & PHOTOGRAPHS WITH MIXCRAFT 1. Mixcraft can also create video presentations from still images (JPEG, PNG, etc.). Again, users can drag and drop individual images on to the video track or select multiple files through the video directory: Menu > Video > Add Still Images. Try dragging the “Alaska Animals” folder from the “Additional Material Download” file onto the video track. The photographs should automatically become editable regions.
Multiple still images on a video track in Mixcraft.
2. Editing still images in Mixcraft is identical to editing videos in Mixcraft. Screen shots of the still images appear as moveable regions on a video track. Users can trim or arrange these regions. For review:
A. Splitting still images: To rearrange still images, it is often best to split up larger image regions into smaller regions. To split an image region, right click on the desired area and select “Split” (Crtl + T).
Splitting still image regions on the Timeline.

47
B. Trimming still images: To trim still image regions, move the cursor near the ends of a region until you see a double-sided arrow. Simply click, and drag left or right to trim the region to the desired length.
C. Deleting images: To remove image regions from the Timeline, highlight (drag + select regions) and hit delete.
3. Edit and arrange the “Alaska Animals” still images to create most effective and entertaining slide show. Preview the slide show by double-clicking on an image region and starting playback.
4. Final Touches. Mixcraft allows users to add a song or additional audio to any slide show presentation. First, insert an audio track (Ctrl + T) and drag and drop a song file to add a musical background to the slideshow. Edit if need be.
MIXING DOWN YOUR MOVIE OR SLIDESHOWThe final and perhaps, most exciting step in creating a movie or slideshow in Mixcraft – mixing it down! Mixcraft supports two movie files, AVI or WMV. For student projects, either format will suffice. To export the session into a playable file, go to the top menu and select File > Mix Down To… > WMV or AVI. The video or slide show is now playable by computer media players. The files can also be burned to a DVD.
TIP:Try dragging one image region over another. Notice that they overlap. This technique will create a neat fade-in effect during playback.

CHAPTER
48
USING MIXCRAFT’S EFFECT PLUGINS, LOOPS & INSTRUMENTS
Chapter 6 examines the extra features that come bundled with the current version of Mixcraft. These features include effect plugins, loops, and a variety of virtual instruments. Effect plugins are smaller portions of software that are programmed to represent an audio effect. Educators can use these effect plugins in lessons on music production and sound design or to mix songs. Quite popular among students of all ages, loops are brief segments of audio (usually only a few measures long) that are arranged on a track of Mixcraft Timeline. The 6,000 custom loops in Mixcraft’s database are accessible with an internet connection. Finally, Mixcraft comes with many virtual instruments – software emulations of popular musical instruments that students can use to compose or perform music.
In addition, the chapter provides suggestions on how to incorporate these various extra features into classroom plans and also explores the creative possibilities involved. Though not essential to the majority of lesson plans, we suggest that educators become familiar with several common effect plugins and virtual instruments.
MIXCRAFT’S EFFECT PLUGINSMixcraft is packaged with many effect plugins. These Effect plugins are mini programs that represent an audio effect such as distortion, flanger, and chorus. Students can apply these effects to recordings to significantly change the character of the track(s). Certainly one could spend hours tweaking parameters and listening to all of the various Mixcraft’s plugins (which students are certainly encouraged to do privately). For the tutorial lesson plans, however, educators and students are required to become acquainted with at least the two main effect plugins:
Acoustica Reverb
Acoustica Delay
REVERBWhat is it? Reverb is one of the most common effects used when mixing audio. Reverb effects are simulations of natural environments or creations of synthetic environments that add ambiance to a “dry” recording. These effects are used either to add ambient sound texture that might not have been captured during the initial recording process or are used to create dramatic and lush effects not found in the natural world. Reverbs vary in size, length, and timbre and are often labeled with an appropriate title that describes the reverb sound; for instance, reverbs of a hall, room, canyon, church, and even a bathroom are standard presets in many reverb effect processors and are modeled after these real-world environments.
6

49
The Acoustica Reverb Adjustment Window is found by: “Effects” or “fx”>”Effect” column pull down >“Acoustica Reverb”> Preset” column pull down >“Canyon”>Edit. (Box in the Effect column must be checked to activate an effect.)
Mixcraft comes with a built-in reverb effect called Acoustica Reverb. The Acoustica Reverb can be activated on both audio and virtual instrument tracks (for advanced mixing, the reverb plugin can also be used on send and sub-mix tracks). The Acoustica Reverb consists of several editable parameters that significantly alter the sound and nature of the reverb effect. Educators should spend time learning the function of each parameter on the Acoustica Reverb interface. Below is a breakdown of these parameters:
Reverberation: This is used to adjust the intensity of the reverb. A shorter value produces a small, subtle reverb while a larger value creates a dramatic and sustained reverb.
High Freq. Damping: The high frequency damping parameter dulls the sound of the reverb by removing high-end frequencies. A lower percentage adjustment produces a more natural sounding reverb (less high-end frequencies); while a higher percentage gives a synthetic, sparkling ambiance.
Stereo Width: Stereo width refers to the spatial orientation of the reverb. Larger width settings result in a reverb that spreads across the left and right areas of the listening environment that encompasses the listener. A narrower width results in a focused, centered reverb.
Wet Mix: The wet mix parameter allows users to raise or lower the volume of the reverb effect. Dialing in a higher value results in a more audible reverb. Be careful with this dial – too much reverb can ruin a recording with excessive ambiance.
Dry Mix: The dry mix parameter raises or lowers the volume of dry input record. A careful balance between the dry and wet mix is needed to obtain a noticeable, but soft reverb effect.
Mixcraft Reverb Presets: Dialing in a reverb setting from scratch can be quite difficult for students. Using with the reverb presets that Acoustica has supplied is a fantastic strategy for teaching. Simply use the drop down menu on the reverb interface to load and sample the presets.

50
The presets cover a wide pallet of sound environments from the natural (“Room” and “Gymnasium”) to the more experimental (“Train Station” and “John’s Verb”).
Creative Implications for Students: Students will most likely use reverb to make recordings sound “more natural.” Reverb can be applied to either instrumental recordings (guitars, strings, recorders, etc.) or to vocal tracks. Remind students to imagine the desired recording environment before selecting reverb presets; for example, a large and lush environment might be emulated by a canyon or outer space reverb, while a small or medium room reverb will add just the right amount of ambiance to a dry recording without being overbearing. It is also important for students to be aware of how the reverb might influence the overall mix. If a recording has multiple instruments, using a large reverb might hide and cover the other instruments – certainly an undesirable effect. A solo performance, however, could greatly benefit from a large reverb that emulates a performance hall or stadium in order to compensate for the lack of a layered arrangement.
DELAYWhat is it? Similar to reverb, a delay effect produces several copies of an incoming audio signal and plays them back at specific time intervals. The result is an “echoing” effect. Though delays can be used to create a dramatic ambiance, they are commonly conceptualized as an effect to thicken instrumental recordings. There are a variety of delay types and settings that influence the nature of the delay effect. Mixcraft’s Acoustica Delay is a simple effect plugin that allows users to control delay time, feedback, and panning.
Delay: This parameter adjusts the time intervals between delays on a scale from 1ms to 2000 ms. A shorter delay time results in immediate playback of the delay which can be used for a slap-back effect or simple echo. A long delay places more time between the dry signal and delay effect. This creates a drastic, evolving echo effect.

51
Feedback: The feedback parameter creates a feedback loop that gradually cascades and sustains. Selecting lower values adds a tasteful amount of feedback that creates an interesting delay effect. Be careful with this parameter: too much feedback and your recording will get swallowed in a sea of noise.
Pan: The pan parameter orients the delay in the left, right, or center area of the listening environment. A value of zero means the pan is dead center. Shifting to the left or right slowly moves the delay to those respective areas.
Wet Mix: The wet mix parameter allows users to raise or lower the volume of the delay effect. Higher values result in more delay. Generally, the delay is mixed slightly lower in volume relative to the dry signal.
Dry Mix: The dry mix parameter raises or lowers the volume of the unprocessed (no delay) signal.
Mixcraft Delay Presets: Unlike reverb effects, dialing in a custom delay setting is standard practice when mixing audio. Acoustica, however, has supplied some great presets for their delay plugin. Simply use the drop down menu on the delay interface to load and sample the presets. For that classic echoing effect try the “Long Repeater” or “Echoes” presets.
Creative Implications for Students: Applying delays to instrumental recordings, such as guitars or wind instruments, is an excellent way to illustrate the effect to students. For example, try placing a long delay on a single piano chord or a guitar chord. Delays can also be used on vocal recordings: often, a delay is mixed in slightly to create an ambiance in substitute of a reverb. Finally, students should experiment with using reverb and delay on the same recording. The result can be a surprisingly lush and evolving ambiance.
MORE EFFECTSIn addition to the reverb and delay plugins, Acoustica has included several more effects plugins with Mixcraft. Though this manual avoids deconstructing each plugin down to its schematics, a survey of and suggestions on how to artistically apply these effects plugins is provided:
Chorus: A chorus effect creates a duplication of an audio signal or recording and slightly adjusts the duplicate’s tuning. The result is a thickening of the sound that lends itself to the distinct tone of popular music from the 1980s. Try applying the effect on instrumental recordings such as guitar, flute/recorder, or even vocal tracks. Do not, however, try Chorus on drum tracks.
Flanger: The flanger creates a “sweeping” filter effect, stimulating movement to an otherwise stagnant sound. Try applying a flanger to a sustained chord, string section, or synthesizer pad. A flanger will harness a more dramatic effect with sounds that contain a large range of spectral frequencies.
Distortion: Distortion plugins add extra harmonics and slight compression to a recording. The result is an identifiable “crunchy” tone. Although distortion is more often associated with electric guitar processing, applying the effect in unorthodox ways can encourage students to think outside the box; for example, how would a drum kick sound with extra distortion? Or an electric piano? Try adding distortion to a vocal track for an aggressive tinge.
Compression: Compression is a tool commonly used during the mixing process. Often, a track might fluctuate in volume or dynamics, making it difficult to place in the mix. Compression can help tame these variations.

52
EQ: An equalizer, or EQ, is used to boost or attenuate specific frequency bands of a recording. Remember, recordings are not objective replications of an audio source – any piece of hardware that an audio signal passes through consequently alters the sound (this includes microphones, preamps, amplifiers, and A/D converters). Often, recordings may have excessive bass frequencies or a diminished amount of high frequencies. Using EQ can help rectify these problems by balancing the tonal properties of a recording.
Amp Simulators: These plugins are virtual emulations of amplifiers, including legendary guitar and bass amplifiers. Mixcraft’s amp simulator, appropriately named “Shred,” packs 100 amp heads into a single effect plugin granting students access to an endless range of tones. Presumably, students will use “Shred” when recording with electronic instruments (such as an electric guitar). However, running drum, keyboard, and vocal recordings through the amp simulator can drastically change their timbre by adding grit and low-levels of distortion.
MIXCRAFT LOOPSPerhaps the most important feature of Mixcraft for the classroom is the Loop Library. This library is an extensive collection of ready-to-use samples. Students can browse through 6,000 pre-recorded and edited loops that expand across dozens of instrumental families and were produced by some of the industry’s top musicians. Using loops, instead of recording, is ideal for younger students or for classroom exercises in which recording live performances is not an option. Loops also allow students to immediately engage with the software and thus are useful for lessons that involve songwriting and arranging. Finally, the high caliber and wide range of Mixcraft’s loops should inspire student composers.
Mixcraft’s Loop Library Interface
Mixcraft’s loops are organized in the Library tab of the Tab Area. Clicking the tab reveals the library browser and search bar. Users can sort through predetermined loop categories using the “Sort By” function. Categories such as instruments, key, tempo and date imported, will help students navigate and find a desired loop.
An example loop: Disco Pizz. The tempo, bars, key, instrument, style, song kit, and author are displayed.

53
Clicking the green arrow next to a loop initiates playback. The blue plus sign “+” downloads the loop onto the computer hard drive. Remember, an internet connection is required to download loops!
Once a loop is downloaded, users can begin to arrange loops in Mixcraft by simply dragging and dropping a loop onto an audio track on Mixcraft’s Timeline. Mixcraft will also automatically synchronize the loop’s tempo to the master tempo of the session. Additionally, the waveform(s) of the loop will be displayed. Users can split/merge, cut/copy, or shorten loops.
The Rhodes 2 Loop and its waveforms.
The play arrow located in the upper left corner allows users to play back the loop in isolation. Clicking the circle with a plus sign “+” activates the “loop” feature and automatically generates a duplicate of the loop on the Timeline.
The Rhodes 2 Loop is now doubled after clicking the “loop” icon.
CREATIVE IMPLICATIONS FOR STUDENTS
Educators should spend time learning how to incorporate the Loop Library into lesson plans. Many, if not all, of the lesson plans in this book could benefit by using Mixcraft’s loops.

54
MIXCRAFT INSTRUMENTSIn addition to loops, Mixcraft comes bundled with several high-quality virtual instruments. These virtual instruments are software replications of famous organs, synthesizers, and drum sounds. Virtual instruments are activated on Mixcraft’s virtual instrument tracks and can be played with a computer keyboard (“musical typing”) or MIDI controller. Additional programming can be done on Mixcraft’s Piano Roll making it easy to edit a performance or to program one in its entirety. Below is an overview of Mixcraft’s virtual instruments:
Acoustica Studio Drums: The studio drums collection is comprised of acoustic and electronic drum and percussion samples that are mapped onto to a virtual keyboard. Users can load specific presets and use Musical Typing or a MIDI controller to trigger the drum sounds. Students will find this instrument useful in programming custom drum parts during lessons that address rhythm in music, or when participating in discussions on conventional vs. unorthodox performance practices (Are the drum samples mightier than the drummer?).
Alien 303 Bass Synthesizer: Modeled off of the famous Roland TB-303 Bass Synthesizer, the Alien 303 is great for synthesizing deep, wobbly bass lines and rubbery lead sounds. This instrument is monophonic – only one note can be performed at a time. Nonetheless, the instrument is powerful and can be used as a teaching tool to convey basic music technology concepts (i.e. analog synthesis, the components of a synthesizer, and audio signal flow); to illustrate the history of particular electronic music genres; or to produce either electronic music or space rock.
Combo Organ Model F, Combo Organ Model V & VB3 Organ: This trifecta of instruments contains virtual replications of three influential organs from the 1960s and 1970s. Organs fit well into popular music genre productions, particularly productions that attempt to emulate the sound of classic rock and roll, gospel, or blues music.
Impulse: Impulse is a virtual polyphonic analog synthesizer. Modeled after popular synthesizers from the 1980s, Impulse is a fantastic comrade to the Alien 303 instrument. From a strong keyboard setup, try using one polyphonic synthesizer and one monophonic synthesizer.
Lounge Lizard Electric Piano: Modeled after the famous Rhodes and Wurlitzer electric pianos from the 1970s, the Lounge Lizard is a hybrid instrument that allows users to switch between emulations of three Rhodes pianos and one Wurlitzer piano. Students can control the subtleties of these vintage keyboards (for example, drive and the signature tremolo). For projects, try using the Lounge Lizard on Rock, Jazz, or R & B productions.
Messiah: The Messiah is a virtual version of Sequential Circuit’s Prophet 5 synthesizer. A complex and intricate instrument, this virtual emulation faithfully replicates the tone of the legendary synthesizer while adding several features missing from the original hardware such as onboard effects and additional polyphony.
Minimogue VA: Another analog synthesizer emulation, the Minimogue VA, is a tribute to one of the most treasured analog synthesizers – the Minimoog. This digital remake adds several features missing from its hardware counterpart, including a selection of onboard effects and an arpeggiator.
CREATIVE IMPLICATIONS FOR STUDENTS
Mixcraft’s virtual instruments are the most complex tools for composing music in Mixcraft. Virtual instruments can be used for lessons on composition, music performance, or music history. Understand that students might need class time to experiment with and learn how to use these virtual instruments before composing with them. Regardless, mastering these virtual instruments will open up many possibilities for music composition and production.

55
NOTES:

CHAPTER
56
MUSIC COMPOSITION WITH MIXCRAFT
Finally, this is the chapter that educators and students have been patiently looking forward to – Music Composition with Mixcraft! Chapter 7 surveys concepts of music composition in the form of songwriting. For educators who do not boast a rich music background and are unfamiliar with songwriting, the song structure is dissected into several understandable components. Next, several approaches towards songwriting are explored using a number of popular song structures. Students are encouraged to adapt these structures during songwriting efforts. Finally, as a specific example exercise, a brief tutorial on loop-based composition with Mixcraft is provided. This concluding tutorial demonstrates how to create a simple, 12-bar blues song in minutes using just four loops.
WHAT’S IN A SONG?Music is an intricate and multifaceted art form. As listeners, we learn to talk about and appreciate music from the perspective of the bystander. Often this form of discussion masks or trivializes the struggle of writing an original piece of music. However, undertaking the actual task of writing a song quickly reveals both the challenge and the difficulty of organizing notes and lyrics into a meaningful work of art. Before embarking on the journey of songwriting, educators and students need to know the basic structures of a song. Below is a breakdown of a prototypical song. Included with the definitions are ways that these concepts are reflected in Mixcraft. Educators may use this information to highlight the structural components of a song. Finally, it may be helpful for educators to accompany a lesson by having students listen to examples.
A song is simply a music composition that contains words and may be arranged to include musical instruments. The modern world is alive with song; nearly everywhere we go songs from all genres serenade us. Thus it should be easy, then, to engage students in a discussion of music favorites. There will probably be a range of music style preferences to be debated over or agreed upon. Perhaps this discussion could then be nudged into a look at the history of song and the changes that have occurred as various song genres have evolved over the past decades and historical eras and new forms have been created. At this point, students should be primed to learn that all the diverse songs they have fiercely argued about have more in common than is readily apparent; and that these songs are linked by many of the same common core components that follow:
1. Melody: The prominent theme or “tune” on which a composition or song is based. A melody is a collection of individual notes that are perceived as a unit or as a whole phrase. Notes of the melody are usually selected from a musical scale – a set of notes related to a musical key – and often move in a step-wise fashion.
A) In Mixcraft: •MelodicInstrumentLoops(e.g. Cello, Fiddle, Trumpet, Bagpipes, etc.) •MonophonicVirtualInstruments(e.g. Alien 303 Bass Synthesizer & Synth Lead – Hard/Soft virtual instruments)
2. Harmony: Contrastingly, harmony refers to notes that are played simultaneously. In popular music, harmony is often discussed in terms of chords (chords are comprised of three to four notes stacked according to the interval of a 3rd) and their relativity to other chords (called “chord progressions”).
TUTORIAL7

57
B) In Mixcraft: •HarmonicInstrumentLoops(e.g. Choir, Guitar, Piano, Organ, etc.) •PolyphonicVirtualInstruments(Combo Organ Model F / V, Minimogue VA, Lounge Lizard Electric Piano, etc.)
3. Meter: Meter refers to the underlying pulse or “beat” of a song. Simple meters such as 4/4 have evenly-spaced beats while complex meters such as 7/8 have unevenly-spaced beats. These categories of meters are often culture-specific. American students are likely to be familiar with simple metrical times, while Balkan students might prefer complex meters. Thus, cultural and musical background may define which meter a student chooses for a song writing assignment.
C) In Mixcraft: •TimeSignature
4. Rhythm: Rhythm refers to the temporal variation between note onsets. In other words, rhythm refers to the time or space between individual notes. In a metrical hierarchy, rhythm is subordinate to meter. Rhythmic events can occur on, between, or even off beats. Many different rhythms may coexist in a song.
C) In Mixcraft: •DrumorPercussionLoops(e.g. Tambourine, Shakers, Hip-Hop Drums, etc.) •AcousticaStudioDrumsvirtualinstrument.
5. Timbre: Timbre refers to the “tone color” of an instrument. Timbre is a component notoriously difficult to define. It is, however, an easy concept to illustrate: imagine a piano player and flute player both playing the same note, for example, F#. The only perceived difference between the two instruments and the note produced is the quality or color of the instrument itself. The same could be said about the voices of two singers. Timbre is an important facet of music composition and is generally considered when arranging songs or when synthesizing sounds.
D) In Mixcraft: •MixcraftInstrumentLoops(i.e. varying classes of instruments) •VirtualInstruments,notablyMixcraft’svirtualsynthesizerinstruments
6. Tempo: The tempo defines the speed at which a song is to be performed. In Mixcraft, the tempo is defined in beats-per-minute (BPM) which determines the rate at which the software plays audio. From a compositional perspective, setting the tempo can drastically influence the perceived emotion of the song: slower tempos tend to be felt as “sadder” while faster tempos tend to be associated with joy or happiness. For educators and students used to traditional tempo terms, below is a list of their respective BPM values in Mixcraft:
Largo – very slow, (40–50 BPM) Adagio – “at ease,” slow and steady (51–60 BPM) Andante – moderately slow, at a walking pace (61–80 BPM) Moderato – moderate (81–90 BPM) Allegretto – moderately quick (91–104 BPM) Allegro – fast (105–132 BPM) Vivace – fast, lively (≈132 BPM) Presto – very fast (168–177 BPM) Prestissimo – extremely fast (178–208 BPM)

58
E) In Mixcraft: •BeatsPerMinute(BPM).
7. Key: A musical key is a determined set of notes that is used in a particular composition. The key of a song has the name of its keynote (for example, a song may be in “C major”). Keys can be either major or minor, depending upon the tonal relationships between the notes. For students, the key is important for establishing a mood for the music. Major music tends to be perceived as happy, carefree, and uplifting. On the other hand, minor music is often described as somber, melancholy or bleak. Many of Mixcraft’s loops are labeled with their respective keys, making it easy to compile and experiment with loops from different libraries.
F) In Mixcraft: •Key
COMMON SONG SECTIONSThe structure of songs differs according to genre. Songs that are comprised of repetitive structures are referred to as strophic songs. In contrast, thorough-composed songs are linear but non-repetitive. Much of popular music uses the strophic form. These songs are comprised of smaller parts, or sections, that are strung together to create several minutes of music. Before attempting the composition of a popular piece, a student should understand the unique song sections usually found in strophic forms. Below is a brief overview of these common song sections:
Introduction: The introduction is a musical greeting which prepares or sets up the audience for the song experience that follows. Introductions are primarily instrumental sections that transition to the first verse. In popular music, introductions are kept relatively short – usually only a few measures long. However, some music genres and songs use extended instrumental introductions (see: Pink Floyd’s “Shine On You Crazy Diamond” or “Heart Of the Sunrise” by Yes). Students should ensure that their introductions do not sound disconnected or unrelated to the music in the first verse.
Verse: A good songwriter is a good storyteller. Verses are sections of songs reserved for the lyrics that provide the listener with a narrative. Between verses, lyrics tend to vary drastically, yet each subsequent verse remains related to the topic of the song and continues the story. Students should consider plotting the story of the song before writing lyrics. When discussing song structures, verses are referred to as the “A” section.
Chorus: The chorus is a repeated section of a song often referred to as “the hook.” Lyrically, the chorus might compliment or summarize the content of the verses. Lyrics rarely change between choruses (repetition is a powerful tool in songwriting). This section of the song is designed to be catchy and memorable and should stand out from the rest of the song. Choruses are referred to as the “B” section.
Bridge: True to its name, the bridge is a short section of a song that occurs after a chorus and before a verse, thus “bridging” these two sections. The bridge usually introduces new music and new lyrics and occurs only once. The bridge comes later in the song, usually after a 2nd or 3rd chorus. Bridges are referred to as the “C” section.
Example Song Structures: The above song sections can be arranged to form higher-level, complex musical structures. In most instances, the verse (or introduction) is the primary section that starts the song. Below are song structures that are widely prevalent in popular music. Adventurous students can create their own song structures and use these examples as starting points. As a reminder, verses are deemed the “A” section, choruses the “B” section, and the bridge the “C” section:
AABA (Verse-Verse-Chorus-Verse) AAA (Verse-Verse-Verse) ABAB (Verse-Chorus-Verse-Chorus) ABABCAB (Verse-Chorus-Verse-Chorus-Bridge-Verse-Chorus)

59
ARRANGEMENT / ORCHESTRATIONOnce a song is written, it needs to be arranged or orchestrated for a set of instruments. This process involves assigning an instrument to play a specified part. When arranging, it is important to consider the instruments available to the student or educator, the expectations of the audience, and the structural components of the music. For example, including a flute part might be a senseless decision if there is no a flute player to perform the part (of course you could always use Mixcraft’s virtual flute instruments or a flute loop in place of a performer). If the audience is expecting a particular kind of music, say electronic music, a rock song might not be an appropriate addition to the repertoire. Finally, be careful when choosing instruments for parts: designating a melody that is out of the playing range of a particular instrument is a common mistake among young songwriters and composers.
Music genres: Classical: Strings (violins, violas, contrabass, cellos), Brass (Trumpets, French Horns) Jazz: Piano, Trumpet, Upright/Electric Bass, Guitar, Percussion Instruments Rock: Guitar, Electric Bass, Drums, Synthesizer, Piano, Organ, Percussion Electronic: Drum Samples, Synthesizer, Field Recordings Indian: Sitar, Tabla, Violins Irish: Irish Whistle, Bodhran, Fiddle, Harp, Uilleann Pipes
ONE APPROACH TO MAKING MUSIC WITH MIXCRAFT: LOOP-BASED MUSICWhen it comes to music composition, there is no “correct” method. In Mixcraft, this is certainly illustrated by the unlimited potential held within the software: Mixcraft has no limit on the number of audio or virtual instrument tracks that can be active during a session. Theoretically, students could add an infinite number of tracks to their composition. The only limit is the CPU capacity of the computer on which Mixcraft is installed. Various approaches towards music composition can be taken within Mixcraft, including using Mixcraft’s built-in virtual instruments or by recording live music into the software. However what may contribute the most to Mixcraft’s unique identity as a compositional tool is its extensive loop library.
Loop-based music is a form of music that is constructed entirely from loops. In the classroom, loop-based music is a great compositional strategy to use with students of all ages. Younger students, with little or no knowledge of music, can create songs simply by arranging loops. Older students will find that loops can compliment recordings and are great tools for producing specific types of music such as dub-step or hip-hop. Finally, educators will appreciate both the affordability of loops (they come free with Mixcraft and require no additional music equipment) and the convenience of using loops to prepare lesson plans. Below are some advantages and disadvantages of loop-based music:
Benefits of using loops in the classroom: • High quality audio •Alreadyedited,easytoarrange •Comprehensivelooplibrarythatcoversallgenres •Studentsdonothavetoperformthemusic(i.e. loops are ideal for non-musicians)
Limits of using loops in the classroom: • Editing is limited by music key and tempo •Constrainedtothemelodiesorharmoniesintheloop •Canresultinextremelyrepetitivemusic

60
Chord # I (1) V (2) IV (3) IV (4) I (5) V/IV (6) I (7) V (8)
In the key of C Major
C G F F C G/F C G
Chord #I
(1)I
(2)I
(3)I
(4)IV (5)
IV (6)
I (7)
I (8)
V (9)
V (10)
I (11)
I (12)
In the key of C Major
C C C C F F C C G G C C
COMPOSING AN 8-BAR OR 12-BAR SONG WITH LOOPSThe 8-bar and 12-bar song formats are common chord progressions played in 4/4 time that are used in blues music. The progressions consist of three chords (I – V – IV chords) that alternate over the course of 8 or 12 bars (one bar is equal to 4 beats). Both structures are ideal for students who are unfamiliar with harmonic progressions. Though multiple versions of a basic 8 or 12-bar structure exist, it is recommend to start with the original blues forms. Below are the standard 8-bar and 12-bar blues:
The 8-bar format
The 12-bar format
In the brief tutorial that follows, Mixcraft’s blues loops will be used to create a 12-bar blues song. The libraries by Blues Ballad and Michael Bacich are excellent selections for high-quality blues loops.
1. First, open Mixcraft and select the “Build Loop & Beat Matched Music” template.
Selecting this template loads 8 audio tracks onto the Timeline.
2. Loop Library. Open the Loop Library by selecting the Library tab in the Tab Area (located in the lower left hand corner). Change the “Sort By” setting to “Style” and select “Blues” from the menu below. Only Mixcraft’s blues loops will now be displayed in the browser to the right.
Changing the “Sort By” setting to Style allows users to browse the Blues loops.
TUTORIAL

61
3. Creating the rhythm section. Start by creating a rhythm section consisting of rhythm guitar, piano, and bass. For the guitar loop, select the Rhythm Guitar 1 loop in G Major by Michael Bacich.
In the loop library browse or search to find the Rhythm Guitar 1 loop.
4. Drag the loop onto a free audio track in Mixcraft’s Timeline. Mixcraft will prompt the user to change the project’s key. Select “yes.”
5. Adding Piano. Next, select the Piano RH 1 loop in G major, again by Michael Bacich and drag the loop onto the Timeline. Align it with the Rhythm Guitar 1 loop.
6. Adding Bass. Select the Bass 2 loop in G major by Michael Bacich. Repeat the process of adding the loop to the Timeline.
7. Finishing the blues with drums. Finally, add the Drums 2 loop by Blues Ballad. Drag the loop onto a free audio track on the Timeline.
8. Looping loops. Things are starting to get a bit loopy(!), but in order to finish the 12-bar blues several of the blues loops must be extended:
A) Start with the drum loop. Click the circle with a “+” to extend the loop another bar. Keep looping the audio region until the drums are playing throughout the song.
The circle with the “+” loops the audio region.
B) Next, loop the guitar, bass and piano for another 12 bars. The song should now be 24 bars long.
C) After all the looping is completed, Mixcraft’s Timeline should appear as follows:
This 12-bar blues piece consisting of guitar, piano, bass, and drums has been looped to 24 bars.

62
Copying and pasting large structures: Once a verse or chorus has been created, users can highlight the verse or chorus, copy the selection, and then paste the verse or chorus on the Timeline to create a duplication. This workflow is helpful in creating complete songs with a minimal amount of clicks.
In this screen shot, Verse 1 and Verse 2 are identical. Verse 2 was created by copying and pasting the loops from Verse 1 onto the Timeline where Verse 2 is located following the chorus.
TRICK AND TIPS WITH LOOPSIn addition to performing the standard edits to loops and their respective audio regions, here are some tricks and tips that educators can use with loop-based music:
1. Changing the pitch of a loop: Users can change the key or the pitch of the loop in the Sound tab. Simply double-click on a loop or select the Sound tab in the Tab Area to open the window. Here, users can transpose the loop to a new key or adjust the loop’s pitch by semitones (half-steps).
With the “adjust pitch by” option select, users can now modify the loop’s pitch by semitones.
2. Placing Effect Plugins on loops: If students wish to add effect plugins to loops, they can begin by clicking the “FX” button on the corresponding audio track. This will open the effects browser.
Selecting the “FX” button on the Bass Guitar audio track will allow users to apply effects to the bass loops on that track.
TIP:Changing a loop’s pitch is useful for creating chord progressions. For example, users can create a basic I-IV-V progression by semitones (IV = 5 semitones) (V = 7 semitones)

63
3. Creative approaches: Experimenting with loops can be a lot of fun but it is easy to mindlessly abuse their usability. Often, students hoping to create an interesting song will layer dozens of loops on the timeline. The end result is a convoluted mess in which the definition of each instrument is lost. Encourage students to remember the following when creating music with loops:
A) What is the “density” of the arrangement?
B) What is the “focus” of the track – is it a vocal track? Or a solo instrument? Leave space for the main attraction.
BEYOND LOOPSUsing loops is just one approach to making music with Mixcraft. Students can also use Mixcraft’s virtual instruments or record directly with acoustic and/or electronic instruments.

64
USING MIXCRAFT FOR SCHOOL PROJECTS
TEACHING AND LESSON STATEMENTOur philosophy when designing lesson plans is akin to our philosophy when designing software: we believe that, “Software [and these lesson plans!] should be easy to use.” Thus, the student projects in this manual have been engineered to maximize ease of operation. The lesson plans have detailed (but not convoluted) instructions which permit students to work through a project without the need for previous experience with the software. Additionally, there are close to a dozen topics that are covered by lessons usable in virtually any classroom or for any curriculum. Lesson topics vary from the simple and straightforward to the challenging and creative. It is our hope that educators and students alike will enjoy working through these lesson plans and will have as much fun as we did designing them.
As music technology advances and current music hardware and software is either updated or replaced, lesson plans run the risk of becoming archaic. Mindful of this, we have selected activities that we believe will endure such technological innovation and change. Though the medium through which music is made or expressed may change (and most certainly it will with the advent of new musical interfaces and software), it is our hope that these lesson plans can be adapted and that the creative strategies they teach will become and will remain an integral part of any education system.
Each project begins with a brief overview of the lesson plan. The required materials and lesson activity are covered along with both the recommended classroom setup and with the ideal workflow for the project. Finally, to facilitate teaching, educators have available a teacher’s edition which contains additional insights and information about the lesson topic; supplemental lesson plans to modify or combine with the main project; and a list of suggested literature for educators whose interests extends beyond the lesson.
A uniform layout is found across all the lesson plans in this book. Each lesson plan contains the following information:
NSME (National Standards for Music Education) are labeled in the upper right hand corner of each lesson plan by their numerical value. Educators can use this information to quickly judge what and how students will learn about music.
Student demographics are supplied in the upper left hand corner. Each lesson is marked with an appropriate age group such as “grade school,” “middle school” or “high school.” Some lesson plans might be well suited for older students while others were designed with the younger student in mind.
Class Time is an estimate of a lesson plan’s completion time.
Skills Learned lists both technical and creative skills that students will learn as they progress through each lesson plan. Some lesson plans were designed to teach standard audio engineering skills while other lesson plans grant students a large degree of creative freedom and the opportunity to explore their artistic talents.
CHAPTER
8

65
Required Materials are the minimum amount of hardware and software needed to setup and complete each lesson. Many of the lesson plans only require Mixcraft, a computer, and an internet connection to get started. The “Additional Materials Download” file also contains examples for many of the lesson plans.
Recommended Materials are additional tools that can be used with each lesson plan. Some lesson plans might benefit from a MIDI keyboard, while others might benefit from an external microphone.
Activity is a step-by-step walk through of the lesson plan. Included is both instruction and screen shots for many of the steps. Additionally, printable versions of the student lesson plans are included in the “Additional Materials Download” file.
Additional Lesson Plans are listed at the end of the activity and offer ideas for extending the lesson or creating an alternative of the main project.
Further Reading suggests texts that educators may find intellectually fulfilling but also practical to teaching.
SHORT PROJECTS: TUTORIALS FOR RECORDING & EDITING AUDIO/MIDI IN MIXCRAFTThe shorter projects are engineered for skills acquisition and to prepare students for larger, multidisciplinary activities. Each lesson focuses on a primary function relating either to Mixcraft or to audio/MIDI recording and editing. The list below will help determine which projects are appropriate for a curriculum. We recommend students complete one smaller lesson before tackling the larger projects:
AUDIO TUTORIALS:
Vocal FX Project: The Vocal FX project utilizes Mixcraft’s built-in effect plugins to explore digital signal processing. Students will first learn how to record a speech, poem, or vocal improvisation. Next, students will acquire essential audio editing techniques to arrange their recording for play back. Finally, the lesson examines several important audio effects to help students create interesting mixes.
Mixcraft Mixlibs: Most educators will be familiar with this game, as Mixcraft Mixlibs is a twist on this classic kid’s game: players submit a noun, verb, or adjective whenever the text calls for one to fill blanks in a story. Once completed, the narrative is read aloud and shared with everyone who played the game. With Mixcraft, Students will first load Mixcraft Mixlib templates, each marked with flags to denote where a noun, verb, or adjective should be recorded and inserted. Students then record their own words to finish the story. In this lesson, students will acquire basic audio editing and recording skills.
MIDI TUTORIALS
MIDI Instrument Survey: A music-orientated activity, the MIDI Instrument Survey project is a journey through different instrument families. Students will learn practical applications of MIDI by quickly assigning virtual instruments to melodies composed with MIDI. Students will also learn to work with MIDI files by importing several popular children’s songs that have previously been coded in this universal format.
MIDI Beats: The MIDI Beats project teaches basic MIDI programming skills by using Mixcraft’s drum virtual instruments and MIDI functions. Students can program an original drum beat or use a popular drum pattern and experiment with different drum samples. The beat is then mixed down and saved for possible use in a later class project.

66
LONG PROJECTS: INTERDISCIPLINARY LESSONSIn addition to the short projects, we have engineered large, interdisciplinary lessons that educators and students will find to be stimulating and creative. Though not necessary, it is recommended that students have some familiarity with Mixcraft before tackling these longer projects. Since much of the material is interdisciplinary it might be best to partner these lesson plans with other courses (music software is not just for music lessons but can also be invaluable for slide presentations and for video creation). We hope that educators will find additional ways to incorporate Mixcraft into other educational programs, especially non-music courses. These lesson plans could lead to a more diverse and multidisciplinary curriculum. Below is a list of the longer projects available in this book:
Remix Project
Sound Collage
Radio Jingle
Classroom Rap Improvisation
Lyrical Songwriting
STOMP Instruments
Music & Film Project
TV Commercial Project

SHORT PROJECTS

CHAPTER
68
TUTORIAL
TEACHER’S GUIDE NSME: 1, 4, 6, 8
GRADE SCHOOL – HIGH SCHOOL
CLASS TIME: 2 ONE-HOUR PERIODS
VOCAL FX PROJECT
OVERVIEW: Learning to record and edit audio is a fundamental step when working with audio software. It is essential that students learn early on how to record and edit recordings and audio samples. After audio is recorded, it often goes through various stages of production such as effects processing, mixing and mastering. Digital Signal Processing (DSP) is concept coined to describe any digital transformation of audio (in this case, the audio recordings of students). In a computer music context, DSP refers to adding specific “effects” to audio (such as reverb being used to simulate an ambiance that was not captured in the original recording). Other effects, such as delay or chorus, allow students to alter their recordings to create new sounds and textures. Though a myriad of DSP effects is available to students, it is important that the curriculum focuses on a few, universally recognized effects. Thus, the objective of this lesson is two-fold:
1) To familiarize students with basic audio recording and editing in Mixcraft; and
2) to creatively apply Mixcraft’s built in plugin effects to recorded audio.
LESSON: For grade school, middle school and high school classes, the Vocal FX Project walks students through a basic session of audio recording, editing, and effects processing. This project is designed to teach students how to record a vocal track (song, story, or poetry) using Mixcraft’s interface and external audio equipment (microphone and audio/computer interface). If the suggested equipment is unavailable, pre-recorded audio is provided in the “Additional Material Downloads.” The latter half of the lesson builds upon audio recording by demonstrating how Mixcraft can modify audio files with effect plugins. An overview of several common audio effects, such as delay and reverb, will encourage students to approach audio production creatively (for example, how would we make our vocal track sound like it comes from a cave?). For high school classes a discussion on additional effects, particularly EQ and compression, would compliment higher-level courses on music and technology. The skills learned in this lesson are applicable to all lessons and projects in this book.
SKILLS GAINED:
Audio Recording
Audio Editing
Audio Effects Processing
Understanding Common Audio FXs
REQUIRED MATERIALS:
• Vocal Recordings (Pre-recorded or Recorded in the classroom)
• Computer with Mixcraft
• Mixcraft’s Built In Effect Plugins
• Copies of the Student Guide (“Additional Materials Download”)
SUGGESTED MATERIALS:
• Text to record (poem, story, or improvised speech)
• Headphones
• Microphone
• Microphone Cable
• Microphone Pop Filter
• Audio/Computer Interface
• Further Reading Materials
9
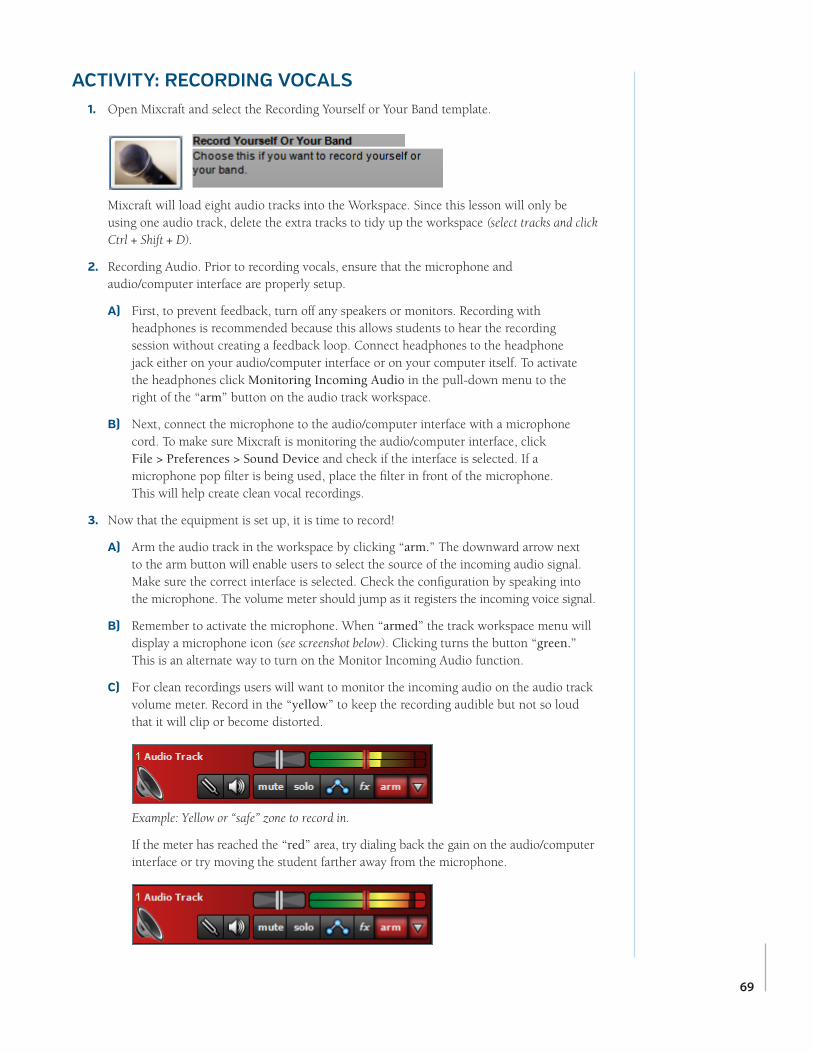
69
ACTIVITY: RECORDING VOCALS 1. Open Mixcraft and select the Recording Yourself or Your Band template.
Mixcraft will load eight audio tracks into the Workspace. Since this lesson will only be using one audio track, delete the extra tracks to tidy up the workspace (select tracks and click Ctrl + Shift + D).
2. Recording Audio. Prior to recording vocals, ensure that the microphone and audio/computer interface are properly setup.
A) First, to prevent feedback, turn off any speakers or monitors. Recording with headphones is recommended because this allows students to hear the recording session without creating a feedback loop. Connect headphones to the headphone jack either on your audio/computer interface or on your computer itself. To activate the headphones click Monitoring Incoming Audio in the pull-down menu to the right of the “arm” button on the audio track workspace.
B) Next, connect the microphone to the audio/computer interface with a microphone cord. To make sure Mixcraft is monitoring the audio/computer interface, click File > Preferences > Sound Device and check if the interface is selected. If a microphone pop filter is being used, place the filter in front of the microphone. This will help create clean vocal recordings.
3. Now that the equipment is set up, it is time to record!
A) Arm the audio track in the workspace by clicking “arm.” The downward arrow next to the arm button will enable users to select the source of the incoming audio signal. Make sure the correct interface is selected. Check the configuration by speaking into the microphone. The volume meter should jump as it registers the incoming voice signal.
B) Remember to activate the microphone. When “armed” the track workspace menu will display a microphone icon (see screenshot below). Clicking turns the button “green.” This is an alternate way to turn on the Monitor Incoming Audio function.
C) For clean recordings users will want to monitor the incoming audio on the audio track volume meter. Record in the “yellow” to keep the recording audible but not so loud that it will clip or become distorted.
Example: Yellow or “safe” zone to record in.
If the meter has reached the “red” area, try dialing back the gain on the audio/computer interface or try moving the student farther away from the microphone.

70
D) Example: “Red” or “unsafe” zone. This area could damage both your ears and your recordings.
E) Disarm the metronome. Since vocals are not required to be recorded “in time” to instrument tracks, the metronome might be a distraction to students.
F) Rewind the cursor to the beginning of the timeline before recording.
G) Start recording by either clicking the master record button or by selecting the “R” key on the computer keyboard. The cursor will begin moving down the Timeline and waveforms of the recorded speech will appear. To edit, or re-record audio, stop the recording by hitting “R” or the space bar. Select the area that needs to be redone with your cursor and hit the master record button. Don’t forget to wear headphones to hear what is being recorded!
An example of recorded speech, illustrated as an audio region on the Timeline.
H) After finishing the recording, disarm the audio track and playback the audio from the beginning. Listen closely for parts that may need editing (rearrange, split or remove).
4. Importing Pre-Recorded Audio. In addition to live audio recording, users can also import audio files (such as .WAV or .MP3) directly into Mixcraft. For educators this means students can use samples with Mixcraft or save and import recordings from a different class into Mixcraft:
A) To import pre-recorded audio, simply drag and drop the audio files onto an audio track or go to the Menu and select Sound > Add Sound File > Select file.
B) Remember, the imported audio will automatically be synced to Mixcraft’s tempo and key. To undo these changes, select the “Sound” tab in the Tabs Area to view your audio file’s properties. Unselect the “Adjust to project tempo” feature.
5. Editing Audio. After recording the vocals or importing pre-recorded vocals, it may be necessary to tidy up the audio with an edit. Here are three common edits:
A) Arranging audio: To arrange pieces of audio, it is best to cut up the recording into segments. Right click an area on an audio region of the recording and select “split” (Ctrl + T). The region will now be cut into two pieces. Grab and move the regions on the Workspace to rearrange the recording.
Splitting audio regions is easy. Simple right click and select “split.”
TIP:For educators who do not have access to recording equipment, included in the “Additional Materials Download” folder is pre-recorded audio
TIP:Try splitting the audio regions of your vocal recording. Rearrange the recording to create a nonsensical story.

71
Students can also merge separate audio segments into one segment. Simply highlight the relative segments (Shift + Click) and right click to find the option “merge” (Ctrl + W).
B) Trimming audio: To trim audio or to shorten/extend recordings, move the cursor near the ends of an audio region until a double-sided arrow appears. Simply click, and drag left or right to trim the audio region to the desired length.
C) Deleting audio: To remove audio, users can highlight large areas (drag + select regions) or split audio regions into parts and hit delete. This will remove sections of audio.
PLUGIN EFFECTS 1. Audio Effects. After learning to record and edit audio, the next step in audio production is adding audio effects to recordings. Mixcraft includes a unique selection of adjustable presets for each particular effect; these are handy for fine tuning the effect the user is trying to create. For educators, the most important effects (and effects presets) reviewed in this lesson are Reverb, Delay, Pitch Correction, Pitch Shifting and the Telephonic (Phone-Filter) Effect.
2. Adding Effects: Adding effects to recorded audio is easy in Mixcraft. On an audio track, click the “FX” button. This will launch the Effect List window. From there, select an individual effect with the “Select An Effect” menu or an effect chain with the “Select Effect Chain” menu. To help students understand common audio FXs, start by looking at some of Mixcraft’s built in effects:
To become familiar with the Effects List Window, try browsing through the many choices.
A) Acoustica Reverb: Reverb is an effect that adds space or ambiance to recordings. The Acoustica Reverb contains many “presets” that emulate a range of real-world environments. This allows a user to create a project that gives the illusion that it was recorded somewhere besides in an actual studio or classroom – perhaps, for example, the piece aims to create the illusion that the performance took place in a canyon or a train station. Some of the presets can be used to create synthetic spaces and other strange or ethereal effects.
I. Adding Reverb. To add reverb to the vocal track, click the “FX” button on the audio track. The Effects List window will appear. Select from the drop down menu “Acoustica Reverb.”
II. Reverb Presets. Users can select predetermined reverb settings, or “presets” from the “Preset” drop down menu. Feel free to dial in a few presets and listen to the changes created in the recording. Try comparing bigger and more spacious presets like “Train Station” to smaller sounding reverbs like “Lite Verb.” For more control, click the “edit” button to tweak individual parameters for Acoustica’s reverb.
TIP:Remember, try zooming in and out of the workspace using the “+” and “-“ keys. The plus zoom lengthens the piece for easier and more precise edits.

72
STUDENT ASSIGNMENTS How would you make your recording sound like its coming from a large stadium?
Educator recommendation: Try a big, long reverb preset like “Canyon.” Or edit the “Reverberation” or “Wet” parameters of a different reverb setting.
How would you make your recording sound like its coming from a small closet or even a bathroom?
Educator recommendation: Try a smaller reverb setting like the “Room (small)” or “Studio 1 Dub” presets.
Acoustica Delay: Delay is an effect that creates and plays back copies of an audio recording. Often, this produces an “echo” effect that adds a distinct atmosphere to the mix.
Adding Delay: To add delay to the vocal track, click the “FX” button on the audio track. The Effects List window will appear. Select “Acoustica Delay” from the drop down menu.
Delay Presets. Select a delay preset from the drop down menu. Dial in a few presets. Try the “Long Repeater” and “Slap Back Echo” to hear different delay effects. For more control, click the “edit” button to tweak individual parameters for Acoustica’s Delay. Try adjusting the “feedback” parameter.
STUDENT ASSIGNMENTS How would you make your recording sound like it’s echoing in a cave or valley?
Educator recommendation: A delay with multiple repetitions will do this. Experiment with the “Echoes” or “Long Repeater” presets – try adjusting the feedback parameter of delay.
How would you make your recording sound metallic or robotic?
Educator recommendation: The “Metal Detector” and “Robotico” presets add a tint of metallic feedback to recordings. Use them to produce futuristic sounds.
Gsnap Pitch Correction: A popular effect to add on vocals, pitch correction automatically tunes audio recordings to their intended pitch. Since no vocalist can sing absolutely “on key,” Gsnap gives a unique robotic effect to vocal recordings.
Selecting Pitch Correction: To add pitch correction to the vocal track, click the “FX” button on the audio track. The Effects List window will appear. Select “Gsnap Pitch Correction” from the drop down menu.
Reverb Presets. The presets for Gsnap vary from subtle pitch correction to drastic pitch glides. Sample a few and listen to how the contour of the recorded speech changes with each choice. The “Tea-Pane” presets are a great starting point for producing a robotic sound.

73
STUDENT ASSIGNMENTS How would you correct an out-of-tune instrumental performance or an off-key singer?
Educator recommendation: Try a transparent setting on Gsnap like “Subtle Pitch Correction.” If you know the key of your music performance, in the edit window you can assign a key signature which will significantly enhance the effectiveness of the plugin.
How would you make your recording sound like a singer from a hit Hip Hop or Top 40 Track?
Educator recommendation: To acquire that synthetic effect, commonly heard on popular music tracks, select the “Tea Pane Chromatic” preset. Explore this series of presets for more pronounced versions of the effect.
Adjust Pitch By/Adjust Project Key: Although not technically a plugin at all, this built-in feature of Mixcraft (accessed in the Sound window) has been added to the plug-in section because, in addition having a key transposing function, it also shows another way – called “pitch shifting” – to control pitch. This makes it a good companion to the plug-in approach outlined in the previous section. With this alternative feature users can shift or adjust the pitch of a recording in unique ways or can transpose a piece into another key. For example, with Adjust Project Key, a guitar part recorded in the wrong key can be adjusted to match the intended key. To produce unique effects for vocals, use Adjust Pitch By. This allows pitch shifting by semitones: high pitch shifting creates a “chipmunk” squeak, while low pitch shifting creates a deep and boomy voice.
Selecting. To access pitch shifting, select an audio segment on the timeline and click “Sound” on the Tab Menu. The pitch pull-down menu has three choices; “Adjust Pitch By,” “Adjust to Project Key,” and “Do Not Fix Pitch.” The “Adjust To Project Key” activates a “key” selector box. Select “Adjust Pitch by.” Below the pitch pull-down, an area will appear where you can adjust pitch by semitones.
Audio Adjusted by –5 Semitones

74
STUDENT ASSIGNMENTS How would you make your recording sound like a Chip and Dale rendition?
Educator recommendation: Try boosting your recording up by 4 or 5 semitones.
How would you make your recording sound deep, like a monster’s voice?
Educator recommendation: Try decreasing the pitch of your recording by 4 or 5 semitones.
Acoustica EQ Effect: EQ has many presets. One of the more popular is the “Telephonic” which produces what is widely known as a “phone-filter” effect. With this preset, the recording sounds like it is coming from a telephone.
Selecting Acoustica EQ: Add Acoustica’s EQ to the vocal recording. Click the “FX” button on the audio track and select “Acoustica EQ” from the Effects List window.
EQ Presets. First try the “Telephonic” preset for the phone-filter effect. Now select “AM Radio,” or “1 K Notch.” Notice how each preset uniquely shapes the tone of the recording. For more results, change the parameters of the EQ to create alternate tones.
EQ settings window. Experiment with the adjustment sliders.
STUDENT ASSIGNMENT How would you make your recording sound muffled?
Educator recommendation: Slide the faders, 500 and above, down to -18 db. This will remove the higher frequencies of the recording and create a muffled effect.
How would you add sparkle and presence to your recording?
Educator recommendation: For sparkle, slightly boost the 8K and 16K faders. To add presence, try boosting the 2K fader.

75
ADDITIONAL LESSON PLANSBeyond Reverb & Delay: Besides the audio effects covered in this lesson, Acoustica includes the Distortion, Flanger, and Chorus audio plugins. This wide range of effects (and presets) gives students tremendous power for controlling and for shaping the sound of recordings as well as for expanding the mixing techniques used. If class time allows, try experimenting on the recorded vocals by using the Distortion, Flanger or Chorus effects.
Using Buses: Applying individual effects are on multiple tracks can be very demanding on a computer’s CPU processing power. By bussing multiple tracks to a submix track, a user can still apply the same FX to multiple tracks, but with a single use of a plugin. This reduces the CPU load for effects processing. Learning to use busses is a moderate to advanced mixing technique.
Other instruments: This lesson showcased Mixcraft’s effect plugins on vocal tracks. Try using these plugins on other recordings such as traditional instruments, percussive sounds (clapping and tapping), or virtual instruments.
Further Reading Senior, M. Mixing Secrets for the Small Studio Sonnenschein, D. Sound Design

LESSON
76
TUTORIAL
STUDENT’S GUIDE CLASS TIME:
NAME:
PERIOD:
TEACHER:
CLASS:
VOCAL FX PROJECT
ACTIVITYRecording Vocals
1. Ask your teacher what you will be recording during this project. If your teacher does not have a required text, try recording a short poem, speech, or perhaps a conversation between you and another student. The objective of this project is to create a clean, vocal recording.
2. Open Mixcraft and select the Recording Yourself or Your Band template.
Mixcraft will load eight audio tracks into the Workspace. Since we will be only using one audio track, delete the extra tracks to tidy up the workspace (select track; Ctrl +Shift + D).
3. Setting Up Your Recording Workstation. Before recording, ask your teacher if your computer, audio hardware, and Mixcraft are setup properly:
A) Turn off any speakers or monitors. If possible, use headphones while recording. If you have a pair, connect them to the headphone jack either on your computer or on your audio/computer interface.
B) Next, connect your microphone with your microphone cable to your audio/computer interface (or to your computer) and set up your microphone pop filter if you have one. Ask your teacher for help if you are unsure.
4. Ready to record!
A) Arm the audio track in the Workspace by clicking “arm.” The downward arrow next to the arm button will allow you to select the device capturing and delivering the sound signal (a microphone in this case). Make sure your device (microphone) is selected. Check your configuration by speaking into the microphone. You should see the volume meter jump as it registers your voice.
B) If you have them, remember to activate the headphones. When “armed” the track workspace menu will display a microphone (see screenshot below). Clicking turns this button “green.” This is an alternate way to turn on the Monitor Incoming Audio function.
REQUIRED MATERIALS:
• Audio Files (Pre-recorded or Recorded in the classroom)
• Computer with Mixcraft
• Mixcraft’s Built In Audio FXs
SUGGESTED MATERIALS:
• Text to record (poem, story, or improvised speech)
• Headphones
• Microphone
• Microphone Cable
• Microphone Pop Filter
• Audio/Computer Interface
• Further Reading Materials
9

77
C) For clean recordings you will want to monitor the incoming audio on the audio track volume meter. If possible, record in the “yellow” zone. In this zone, your recordings will be audible, but not so loud that the recording will distort.
Clean Audio.
D) If the meter is reaching the “red” area, try dialing back the gain on your audio/computer interface or moving away from the microphone.
Distorted Audio.
Disarm the metronome. Click the metronome icon (outlined in red) and uncheck all of the boxes.
You will not need to use the metronome when creating your recording. Here, all the boxes are unchecked.
E) Rewind the cursor to the beginning of the timeline before recording by hitting the “rewind” icon (outlined in blue in the image below).
F) Start recording by either clicking the master record button (outlined in red in the image below) or by hitting the R key on your keyboard. The cursor will begin moving down the Timeline and waveforms of your recorded speech will appear. To edit, or re-record audio, stop the recording by hitting either “R” or the space bar. Select the area that needs to be re-recorded with your cursor and hit the master record button. Don’t forget to wear headphones to hear what is being recorded!
Selecting the master record button (outline in red) begins the recording. The rewind icon is outlined in blue.
G) After you finish recording, disarm the audio track, rewind and the play back the recording from the beginning. Listen closely for parts that you may want to rearrange, split or remove.

78
5. Editing Audio. After recording or importing pre-recorded audio, you can turn to editing the audio if necessary. Here are three edits that are used often:
A) Arranging audio: To arrange audio regions on the Timeline, cut a large audio region into smaller segments. Right click an area on your waveform that you would like to rearrange and select “split” (Ctrl + T). The audio region will now be cut into two pieces. Cut as many sections as you need. Grab and move the regions on your workspace to re-arrange the recording. Try rearranging the words or sentences of your recording.
Selecting the “split” option splices the audio region into two audio regions.
These separate audio segments can be merged into one segment. Simply highlight the relative segments (Shift + Click with a sweep over the segments) and right click to find the option “merge” (Ctrl +W).
B) Trimming audio: To trim, shorten, or extend audio regions move your cursor near the ends of your waveform until you see a double-sided arrow. Simply click, and drag left or right to trim your audio region to the desired length. This edit is useful for quickly cropping out sections of audio that are undesired. If there are parts of the audio recording you want to remove, try splitting and then trimming the regions.
C) Deleting audio: To remove audio, you can highlight (drag + select regions) then delete; or split your waveform into parts, highlight unwanted segments and then hit delete. Make a mistake? The “undo” button (curved arrow icon) can be found on the top left menu bar next to the “floppy disk – Save” icon.
TIP:Remember, you can zoom in and out of the workspace using the “+” and “-“ keys. Zoom in for more precise edits.

79
EFFECT PLUGINS 1. After your recording has been edited to completion, it is time to consider adding effect plugins. Effects plug-ins are small software programs, each of which is designed individually to create a specific audio effect. The character of a recorded piece can be shaped and changed significantly by the use of one or more of these effects.
2. Adding effects: To start, click the “FX” button on the audio track of your recording. This will launch the Effects List window. From here, you select an individual effect with the “Select An Effect” menu.
The Effect Window.
Let’s take a look at some common effects you can add to your vocal track:
A) Reverb: How can you make your recording sound like it comes from a different place than the classroom? The answer, of course, is “reverb.”
I. Adding Reverb. To add reverb to a vocal track, click the “FX” button on the audio track. The Effects List window will appear. Select from the drop down menu “Acoustica Reverb.”
II. Reverb Presets. Predetermined reverb settings, or “presets,” are accessed on the drop down menu. Feel free to preview a few of these to see how they influence your recording. Try comparing bigger, more spacious presets like “Train Station” to small sound reverbs like “Lite Verb.” For more control, click the “edit” button to tweak the individual parameters of the reverb.

80
ASSIGNMENT How would you make your recording sound like its coming from a large stadium?
How would you make your recording sound like its coming from a small closet or a bathroom?
Delay: Delay produces an “echo” effect that adds a distinct atmosphere to recordings. Let’s add some delay to our vocal track!
Adding Delay: To add delay to our vocal track, click the “FX” button on the audio track. The Effects List window will appear. Select “Acoustica Delay” from the drop down menu.
Reverb Presets. Choose delay presets from the drop down menu. Try “Long Repeater” and then “Slap Back Echo” to sample different delay effects. For more control, click the “edit” button to tweak the individual parameters of the Acoustica Delay presets. Try adjusting the “feedback” parameter for a cool effect.
Example of using both Reverb and Delay FXs.
ASSIGNMENT How would you make your recording sound like it’s echoing in a cave or valley?
How would you make your recording sound metallic or robotic?
Gsnap Pitch Correction: Gsnap creates a unique effect on vocal recordings – they sound robotic.
Selecting Gsnap Pitch Correction: To add pitch correction to our vocal track, click the “FX” button on the audio track. The Effects List window will appear. Select from the drop down menu “Gsnap Pitch Correction.”
Reverb Presets. The presets for Gsnap vary from subtle pitch correction to drastic pitch glides. Sample a few and listen to how the contour of our speech changes with each choice. The “Tea-Pane” presets offer a great start for achieving that popular robotic sound.
TIP:Experiment by coupling a reverb and a delay effect! First, dial in a reverb preset and then add a delay after it. Try mixing and matching different reverb and delay presets. Listen closely to what happens to your recording.

81
ASSIGNMENT How would you correct an out-of-tune instrumental performance or an off-key singer?
How would you make your recording sound like the singer of a hit song from a Hip Hop or a Top 40 Track?
Adjust Pitch By (Pitch Shifting): This feature, which changes or adjusts the pitch by semitone increments, is commonly called “pitch shifting.” Pitch shifting is a built-in feature of Mixcraft rather than an actual plug-in effect. It is included here, however, because it is another way to influence the pitch of a recording. Here is a common question: How can we lower or raise the pitch of our recording, without having to re-record our vocal track? The answer, of course, is through Pitch Shifting.
Creative Ideas. To access pitch shifting, select an audio segment on your timeline and click the “Sound” tab on the Tab Menu (below middle-left) or double click the timeline track. Select Adjust Pitch By in the pull-down menu. Alter the semitone setting, then playback to hear the change to your recording. Repeat with another setting.
Audio Adjusted by -5 Semitones
ASSIGNMENT How would you make your recording sound muffled?
How would you add sparkle and presence to your recording?
Mixing Down. After you have added an effect to your recording, mix down the recording into an audio file. By the end of the project, you will have several variations of your original recording! To mix down your work at any point go to the top menu > Mix Down To…> and select either .MP3 or .WAV format. Labeled the first file “Vocal_Recording_A” then the next “Vocal_Recording_B,” etc.
Playing them back. After you have finished adding each effect to your recording and have mixed them down, notify your teacher. Play back through each recording and see if you can remember which effect was added.

82
ASSIGNMENT How would you make your recording sound like a Chip and Dale rendition?
How would you make your recording sound deep, like a monster’s voice?
Acoustica EQ Effect: Acoustic EQ has many presets. One of the more popular is the “Telephonic” preset which produces what is widely known as a “phone-filter” effect. With this preset the recording sounds like it is coming from a telephone. Feel free to get creative with all of these presets. Try replicating sound environments that you might encounter every day.
Selecting Acoustica EQ: To start, add Acoustica’s EQ to your vocal recording. Click the “fx” button on the audio track, and select “Acoustica EQ” from the Effects List window.
EQ Presets. Next, try the presets “Telephonic,” “AM Radio,” and “1 K Notch.” Notice how they shape the tone of your recording. Try editing the parameters of the EQ to create your own tones.
Try Dialing in your own EQ settings.
Acoustica’s EQ. The sliders change the volume of the frequency bands.

CHAPTER
83
TEACHER’S GUIDE NSME: 1, 4, 6, 8, 9
GRADE SCHOOL – HIGH SCHOOL
CLASS TIME: 2 ONE-HOUR PERIODS TUTORIAL
MIXCRAFT MIXLIBS PROJECT
OVERVIEW: An alternative to the Vocal FX project, the Mixlibs project reinforces basic audio recording and editing skills. The Mixlibs project is a contemporary twist on a classic literary game: the game begins with a story that is constructed with missing words or gaps. Players must complete these gaps by using their own vocabulary. Clues are given as to which type of word should be used (nouns, verbs, or adjectives) and players are encouraged to get creative with their word choice. Once all the blanks are filled in, the story is read out loud back to the players. The result is usually a nonsensical, silly tale that both younger and older students will find humorous. Additionally, this game-like tutorial will cover many areas: using pre-saved Mixcraft sessions or templates; working with audio tracks; recording audio; exploring the ins and outs of the Timeline interface; and other essentials to Mixcraft’s interface.
LESSON: For grade school, middle school & high school classes, Mixcraft’s Mixlibs Project walks students through basic audio recording and editing by using pre-made sessions located in the “Additional Materials Download” folder. The project is designed to teach students how to record, edit, and arrange vocals (i.e. words to complete the Mixlib) using Mixcraft’s interface and external audio equipment (microphone and audio/computer interface). First, students will load a Mixcraft Mixlib session. Next, students will record words by following the markers (or flags) to complete the Mixlib. Finally, educators will export and play back the Mixlibs to the rest of the class.
SKILLS GAINED:
Audio Recording
Audio Editing
Familiarity with Mixcraft’s Interface
REQUIRED MATERIALS:
• Mixcraft Mixlib Session Files (“Additional Materials Download”)
• Computer with Mixcraft
• Student Guides (“Additional Materials Download”)
• Microphone (Built-in or External)
SUGGESTED MATERIALS:
• Headphones
• External Microphone
• Microphone Cable
• Microphone Pop Filter
• Audio/Computer Interface
• Blank CDs for burning Mixlibs
• Further Reading Materials
10

84
ACTIVITYPrepare the Mixlib lesson by moving the Mixlib session files from the “Additional Materials Download” onto student computers.
1. Open Mixcraft and select the appropriate Mixlib session file or double-click on the session files moved to the desktop. Mixcraft will load the Mixlib project. Users should see two audio tracks on the Timeline – one with recorded audio and one with no audio.
The Mixlib session file, Mixlib_Journey, is now loaded.
2. Recording Audio Setup. To prepare for the recording of audio, ensure that the microphone and audio/computer interface are properly set up.
A) First, to prevent feedback, turn off any speakers or monitors. Recording with headphones is suggested, because this allows students to hear what they are recording without creating a feedback loop. Connect headphones to the headphone jack either on your audio/computer interface or on your computer.
B) Next, connect the microphone to the audio/computer interface with a microphone cord. To make sure Mixcraft is monitoring the audio/computer interface, check the File > Preferences > Sound Device tab and make sure the proper interface is selected. If using a microphone pop filter, place the filter in front of the microphone. This will help create clean vocal recordings.
3. Testing the audio signal chain!
A) Arm the second audio track in the workspace (right below the audio track named “story”) by clicking “arm.” The downward arrow next to the arm button will enable us to select the source of your recorded audio. Make sure your interface is selected. To check, speak into the microphone – you should see the volume meter jump.
B) Remember: For clean recordings, monitor the incoming audio on the audio track’s volume meter. You want to record in the “yellow” zone. In this zone, your recordings will be audible, but not so loud that you will add junk to your recording!
The yellow zone is the best area to record in.
If the meter is reaching the “red” area, try dialing back the gain on your audio/computer interface or move farther away from the microphone.
Careful! Recording in the “red” zone could be harmful to your equipment or your ears and could distort the recorded audio!

85
I. The markers (flags) denote the gaps in the Mixlib. Each flag offers a clue as to the category and type of word a student should record in the blank area of the track.
The orange flags demarcate the Mixlib into sections. Students should start recording at the flag and stop before the waveform that follows.
Common words include nouns (objects, animals, names of places, etc.), adjectives, and verbs. Student or teacher names may be requested to create a personalized Mixlib.
4. Make sure that the first audio track (the story track) is muted (mute button) before beginning the recording. Remember students are not supposed to hear the story until fill-in words have been added!
5. Selecting a marker (flag) aligns the play back cursor with that section of the Mixlib.
6. Record. With the second audio track armed, click the master record button (outlined in red) or the “R” key and immediately record a word right after one of the marker flags.
The red circle is the master record button. The blue circle is the rewind or return button.
7. Stop recording by hitting the space bar or the stop master record button again. Rewind and play back the recorded word and check for artifacts (unwanted sound), distortion, or other unpleasant sounds that may have been recorded.
Recording a Mixlib: The top track (containing the story) is muted so the story will remain silent while the bottom track is being used for recording. Each student added word must be recorded right after the flag markers and before the wave form that follows.
8. Continue recording a word after each marker flag. The recording is finished when all the Mixlib gaps have been filled in with a word. Hit the space bar or the master record button to stop the recording.
9. Rewind. Deselect the mute button. The “story” track will now be audible. Play back the Mixlib story. Listen for parts that may need editing: are some words too isolated? Does the story sound like a continuous narrative?
TIP:In order to accurately select the beginning spot for recording, try to Zoom in using the magnifying glass icons or by hitting the “+” key. This will give a closer look at marker placement on the track.

86
10. If the Mixlib needs editing, trimming and splitting the recorded audio into individual regions is a useful strategy for changing the arrangement of the Mixlib on the Timeline:
A) Trimming audio: To trim audio or to shorten/extend recordings, move the cursor near the end of an audio region until a double-sided arrow appears. Simply click, and drag left or right to trim the audio region to the desired length.
An audio region with excessive silence.
The beginning of the audio has been trimmed closer to the attack (beginning tone) of the waveform, making it easier to line up this region with the rest of the story.
B) Splitting audio: To move audio regions, it is best to cut the recording into segments. Right click an appropriate area of the audio region and select “split” (Ctrl + T). The region will now be cut into two pieces. Grab and move the regions on the Workspace to rearrange the recording.
Splitting audio regions is easy. Simple right click and select “split.”
Once the recorded audio regions have been tidied up, arrange the regions to match the rest of the story.

87
11. When the Mixlib is finished, mix down the story to a file on the computer. Go to the Menu and select File > Mix down to… > .MP3. Name and save your Mixlib on the desktop!
12. After the students have mixed down their Mixlibs to .MP3s, educators can gather them and burn the collection to an audio CD. Additionally, educators can create a playlist with a media player and share the Mixlibs during any remaining class time.
ADDITIONAL LESSON PLANSMore Mixlibs: Forgo the templates from the “Additional Materials” download and let students create their own Mixlibs. First, encourage students to write a Mixlib on paper. The Mixlib should tell a story. Next, have students record the story into Mixcraft. Arrange each story with markers and gaps. Have students fill in the blanks to complete the Mixlib assignment. Play back. Edit. Mix down. Share the results.
Further Reading: Price, R. & Stern, L. Kid Libs. Price, R. & Stern, L. Best of Mad Libs.

LESSON
88
TUTORIAL
STUDENT’S GUIDE CLASS TIME:
NAME:
PERIOD:
TEACHER:
CLASS:
MIXCRAFT MIXLIBS PROJECT
ACTIVITY 1. Open Mixcraft and select the Mixlib session file or double-click on the session files moved to the desktop. Mixcraft will load the Mixlib project. If you do not know the location of the Mixlib session files, ask your teacher for help. Once the session is open, you should see two audio tracks on the Timeline – one with recorded audio and one with no audio.
The Mixlib session file, Mixlib_Journey, is now loaded.
2. Recording Audio Setup. To prepare for the recording of audio, ensure that the microphone and audio/computer interface are properly setup. Again, you may need your teacher’s help during this setup.
A) First, to prevent feedback, turn off any speakers or monitors. If possible, use headphones while recording. Connect headphones to the headphone jack on your audio/computer interface, or on your computer.
B) Next, connect the microphone to the audio/computer interface with a microphone cord. To make sure Mixcraft is monitoring the audio/computer interface, check the File > Preferences > Sound Device tab and make sure the proper interface is selected. If using a microphone pop filter, place the filter in front of the microphone. This will help create clean vocal recordings.
3. Testing the audio signal chain.
A) Arm the second audio track in the workspace (right below the audio track named “story”) by clicking “arm.” The downward arrow next to the arm button will enable us to select the source of your recorded audio. Make sure your interface is selected. To check speak into the microphone – you should see the volume meter jump.
B) Remember: For clean recordings, monitor the incoming audio on the audio track’s volume meter. You want to record in the “yellow” zone. In this zone, your recordings will be audible, but not so loud that you will add junk to your recording.
REQUIRED MATERIALS:
• Mixcraft Mixlib Session Files (“Additional Materials Download”)
• Computer with Mixcraft
• Student Guides (“Additional Materials Download”)
• Microphone (Built-in or External)
SUGGESTED MATERIALS:
• Headphones
• External Microphone
• Microphone Cable
• Microphone Pop Filter
• Audio/Computer Interface
• Blank CDs for burning Mixlibs
TIP:Don’t forget to wear your headphones to hear what is being recorded.
10

89
If the meter is reaching the “red” area, try dialing back the gain on your audio/computer interface or move farther away from the microphone.
Careful! Recording in the “red” zone could be harmful to your equipment or ears and could distort the recorded audio.
4. The markers (the flags) denote the gaps in the Mixlib. Each flag offers a clue about the word you should record in the blank area of the track.
The orange flags divide the Mixlib into sections. Record your words right after the flag markers and stop before the waveforms.
5. Ensure the first audio track (the story track) is muted before recording. Remember you are not supposed to hear the story until the Mixlib is completed. No cheating!
6. Double clicking a flag marker aligns the play back cursor with that section of the Mixlib. This means recording will also start from this position.
7. Record. With the second audio track armed, click the master record button (outlined in red) or the R key and try to record a word right after one of the markers.
The red circle is the master record button.
8. Stop recording by hitting the space bar or the master record button again. Play back the recorded word and check for artifacts, distortion, or other unpleasant sounds that may have been recorded. If you need to record you word again, simply click on your recording and hit “delete” on the computer keyboard.
Recording a Mixlib: The top track is muted as to not play back the story, while the bottom is being used for recording. Each word is recorded right after the markers.
TIP:Zoom in using the magnifying glass icon or by hitting the “+” key to get a closer look at the markers.

90
9. Continue recording and finish filling in the Mixlib. Try to come up with imaginative words for your story.
10. Once this task is completed, deselect the mute button of the “story” track. Both tracks will now be audible. Rewind and play back the Mixlib. Listen for parts that may need editing: are some words too isolated? Does the story sound like a continuous narrative?
11. If the Mixlib needs editing, “trimming” and “splitting” the recorded audio into individual regions is a useful strategy to arrange the Mixlib on the Timeline:
A) Trimming audio: To trim audio or to shorten/extend recordings, move the cursor near the ends of an audio region (but not on the region’s horizontal center line) until a double-sided arrow appears. Simply click, and drag left or right to set the audio region to the desired length.
An audio region with excessive silence.
The beginning of the audio has been trimmed closer to the attack (beginning of the tone) of the waveform, making it easier to line up this region with the rest of the story.
B) Splitting audio: To move audio regions, it is best to cut up the recording into segments. Right click an area on an audio region and select “split” (Ctrl + T). The region will now be cut into two pieces. The region can be cut into as many segments as necessary. Grab and move the regions on the Workspace to rearrange the recording.

91
Splitting audio regions is easy. Simple right click and select “split.”
Once the recorded audio regions have been tidied up, arrange the regions to match the rest of the story. Use the waveforms as reference points. Place your words right after the flag markers and close to the waveforms on the “story” audio track.
C) To merge the segments, select them all and “merge” (Ctrl + W).
12. Sharing. Notify your teacher that you have finished your Mixlib. Have your teacher listen to your creation.
13. With your teacher’s approval, mix down the story to a file on the computer. Go to the Menu and select File > Mix down to… > .MP3. Name and save your Mixlib on the desktop.

CHAPTER
92
TUTORIAL
MIDI INSTRUMENT SURVEY PROJECT
OVERVIEW: MIDI (Musical Instrument Digital Interface) is a digital system that allows certain music hardware and software to communicate. Computer software such as Mixcraft commonly uses MIDI for composing, arranging, or recording music. With MIDI, Mixcraft users can program, note by note, a melody or a drum beat and can quickly assign virtual instruments for play back. This workflow enables composers to experiment with various instrumental arrangements even after a melody has been written. Additional MIDI capabilities include automation, transposition, and even notation. Advanced lesson plans might explore these functions. Because MIDI is an integral component of computer music and of digital music production, students need to have a solid understanding of how to use MIDI in a computer environment. This lesson guides students through the process of using MIDI to work on imported pieces, to compose melodies, and to assign virtual instruments for play back.
LESSON: For grade school and middle school projects, several MIDI-transcribed versions of popular children songs are included in the “Additional Material Download.” Students will import these MIDI files into Mixcraft and use Mixcraft’s virtual instruments to arrange the melodies. For younger students, a lesson focused on instrument identification can benefit from the workflow and setup in the following task: Quickly assign different timbres or instruments to a single MIDI melody and ask students to identify each instrument. For high school classes, students can either compose an original melody using MIDI or program sheet music into a MIDI format. In both contexts, students will gain an understanding of MIDI and learn its application in both music composition and arrangement.
SKILLS GAINED
Understanding of MIDI
Understanding Virtual/Software Instruments
MIDI Programming
MIDI Editing
TEACHER’S GUIDE NSME: 2, 4, 6, 7, 8, 9
GRADE SCHOOL – HIGH SCHOOL
CLASS TIME: 2 ONE-HOUR PERIODS
REQUIRED MATERIALS:
• Computer with Mixcraft
• Headphones or Monitors
• MIDI Versions of Children’s Songs (Additional Material Download)
• Copies of the MIDI Instrument Survey Student Guide (Additional Material Download)
SUGGESTED MATERIALS:
• MIDI keyboard
• Sheet Music to Transcribe (For Older Students)
• Further Reading Materials
11

93
ACTIVITY 1. Research instrument families. The Hornbostel–Sachs classification system is a respected catalog of musical instruments that are sorted according to structural and functional criteria. However, depending on the age of your students, it may not be necessary to focus on the minute differences between instruments: instead, highlighting large and general characteristics across instrument families is suitable for this lesson. Several exemplars are listed below:
Brass family Woodwind family String family Percussion family
2. To begin the lesson, open Mixcraft and select the Build Virtual Instruments template.
Mixcraft will load six audio tracks and two virtual instrument tracks into the Workspace. Since this lesson only needs one virtual instrument track, delete the audio tracks and the extra virtual instrument track (Ctrl + Shift + D).
3. Import a MIDI file of a song from the “Additional Materials Download Area” into Mixcraft. Simply, drag and drop the file onto Mixcraft’s Timeline or onto the virtual instrument track. A Mixcraft prompt window will give users the option to change the master tempo to the tempo in the MIDI file. Select “Yes” for now.
Users will be prompted with the option to change the master tempo. Select “Yes” for now.
4. A MIDI region of the song will now appear on a virtual instrument track. Lines on the region refer to note duration and pitch: higher lines on a vertical axis have higher pitch while longer notes on the horizontal axis represent duration.
A MIDI representation of “Eency Weency Spider.”

94
5. Before playing back the newly-imported song, assign a virtual instrument to the virtual instrument track. Click the “keyboard” icon on the virtual instrument track. A new window will appear.
Click the keyboard icon on the virtual instrument track to assign virtual instruments.
6. Browse Mixcraft’s virtual instruments by instrumental category. Brass, guitar, wind, and keyboard sounds are readily available – simply double-click on a sound to assign it to the virtual instrument track.
Mixcraft’s instrumental categories.
7. Play back (hit the master play button or space bar) the melody and notice how the selected virtual instrument is now “playing” the MIDI song.
8. With this basic setup, educators can construct multiple lesson plans that emphasize different attributes of instruments and their respective instrumental families. Here are some simple lesson plans for students:
Describe a particular instrument family (say the “brass family”) and ask students to find a brass sound.
Assign different instruments to the same melody, one at a time, and ask students to describe the timbre (“tone” or “color”) of each instrument.
Browse through Mixcraft’s synthesized sounds and compare these digital emulations to their acoustic counterparts.
Duplicate the MIDI melody and assign different instruments to it. Combine and mix down timbres for more complex and rich tone colors.
Assigning a pizzicato string sound to the Eency Weency Spider melody.

95
9. Older students can compose original melodies or transcribe sheet music into MIDI format by using Mixcraft’s Piano Roll:
A) First, create a new virtual instrument track by selecting one from the menu: Track > Add Track > Add Virtual Instrument track.
B) Double click on the Timeline area that corresponds to the new virtual instrument track. A blank MIDI region should appear and the Piano Roll window should expand from the bottom of the screen.
C) Select the Pencil tool in the Piano Roll. This tool allows users to “draw” MIDI notes onto the Piano Roll. Notes drawn on the Piano Roll will then appear in the MIDI region on the Timeline as well.
The Piano Roll Toolbar consists of the pointer arrow, the pencil tool, and the eraser tool.
D) Users can draw basic melodies or transcribe sheet music onto the Piano Roll.
A sample melody in C Major programmed using Mixcraft’s Pencil tool and the Piano Roll.
E) To tidy up the MIDI notes, quantize them. Quantizing locks each MIDI note to the Piano Roll grid and can also be used to control the duration of each note. To do this, select “Quantize” from the MIDI Editing menu at the top of the Piano Roll window. In the example above, the notes were then quantized to an “8th note” with the “note endings” option selected.
Example settings in the “Quantize” window.

96
10. If available, provide sheet music for students to transcribe or allow students to freely compose a short melody using Mixcraft’s Piano Roll. Once the transcription or composition is completed, encourage student to experiment with different instrumental arrangements.
11. Students can save their MIDI melodies in MIDI format. Simply select the MIDI regions and go to File > Save as MIDI file … These files will now be stored on the computer hard drive and can be exported, imported by different computers or used in new Mixcraft sessions.
12. After students have explored Mixcraft’s virtual instruments and MIDI functions, they will be prepared for larger, MIDI-intensive projects!
ADDITIONAL LESSON PLANSMIDI Symphony: A symphony in the classroom? Of course! With Mixcraft you can create an entire symphony with one computer and virtual instruments. Create a lesson plan that explores the elements of the orchestra. Use Mixcraft’s virtual instruments and virtual instrument tracks to demonstrate each instrument in the orchestra. Finally, attempt to compose a smaller melody for orchestra by using multiple virtual instruments.
FURTHER READING Black, D. Essential Dictionary of Orchestra. Levine, R. Story of the Orchestra: Listen While You learn about the Instruments, the Music, and the Composers Who Wrote the Music!

97
NOTES:

LESSON
98
TUTORIAL
MIDI INSTRUMENT SURVEY PROJECT
ACTIVITY 1. Before starting the lesson, ask your teacher if you will be using MIDI files from the “Additional Materials Download” or whether you will be composing/transcribing your own.
2. To begin the lesson, open Mixcraft and select the Build Virtual Instruments template.
Mixcraft will load six audio tracks and two virtual instrument tracks into the Workspace. Since this lesson only needs one virtual instrument track, delete the audio tracks and the extra virtual instrument track (Ctrl + Shift + D).
3. Importing MIDI files. If you are importing a MIDI file from the “Additional Materials Download” into Mixcraft, simply drag and drop the file onto Mixcraft’s Timeline or onto the virtual instrument track. A Mixcraft prompt window will give you the option to change the master tempo to the tempo in the MIDI file. Select “Yes” for now.
Users will be prompted with the option to change the master tempo. Select “Yes” for now.
STUDENT’S GUIDE CLASS TIME:
NAME:
PERIOD:
TEACHER:
CLASS:
REQUIRED MATERIALS:
• Computer with Mixcraft
• Headphones or Monitors
• MIDI Versions of Children’s Songs (Additional Material Download Area)
• Copies of the MIDI Instrument Survey Student Guide (Additional Material Download)
SUGGESTED MATERIALS:
• MIDI keyboard
• Sheet Music to Transcribe (For Older Students)
• Further Reading Materials
11

99
4. A MIDI region of the song will appear on a virtual instrument track. Lines on the region refer to note duration and pitch: higher lines on a vertical axis have higher pitch while longer notes on the horizontal axis represent duration.
A MIDI representation of “Eency Weency Spider.”
5. Before playing back the newly-imported song, assign a virtual instrument to the virtual instrument track. Click the “keyboard” icon on the virtual instrument track. A new window will appear.
Click the keyboard icon on the virtual instrument track to assign virtual instruments.
6. Select your instrument. Browse Mixcraft’s virtual instruments by instrumental category. Brass, guitar, wind, and keyboard sounds are readily available – simply double-click on a sound to assign it to the virtual instrument track.
Browse through a variety of virtual instruments in this window.
7. Play back your melody. Press the master play button or hit space bar to listen to the melody. Notice how the selected virtual instrument is now “playing” the song.
8. Experiment with different instruments. Ask your teacher whether he or she has a specific lesson plan for you at this point. If she does not, experiment with different virtual instruments:
Try loading a string instrument, such as a violin.
Try loading a brass instrument, such as a trumpet.
Try loading a synthesized sound, such as a lead patch.
Assigning a pizzicato string sound to the Eency Weency Spider melody.

100
9. Composing with MIDI and the Piano Roll. Try composing an original melody or transcribing sheet music into MIDI format by using Mixcraft’s Piano Roll:
A) First, create a new virtual instrument track by selecting one from the menu: Track > Add Track > Add Virtual Instrument track.
B) Double click on the Timeline area that corresponds to the new virtual instrument track. A blank MIDI region should appear and the Piano Roll window should expand from the bottom of the screen.
C) Select the Pencil tool in the Piano Roll and “draw” MIDI notes onto the Piano Roll. Notes drawn on the Piano Roll will then appear in the MIDI region on the Timeline as well.
The Piano Roll Toolbar consists of the pointer arrow, the pencil tool, and the eraser tool.
D) Listen closely as you draw a few notes. Try to create an ascending melody like the example below:
A sample melody in C Major programmed using Mixcraft’s Pencil tool and the Piano Roll.
E) When you have finished your melody, tidy up the MIDI notes by quantizing them. Quantizing locks each MIDI note to the Piano Roll grid and can also be used to control the duration of each note. To do this, select “Quantize” from the MIDI Editing menu at the top of the Piano Roll window. In the example above, the notes were quantized to an “8th note” with the “note endings” option selected.
Example settings in the “Quantize” window.
10. Save the MIDI melodies. Save your MIDI melody (-ies). Simply select the MIDI regions and go to File > Save as MIDI file … These files will now be stored on the computer hard drive and can then be exported, imported by different computers or used in new Mixcraft sessions.

CHAPTER
101
TEACHER’S GUIDE NSME: 2, 4, 6, 7
GRADE SCHOOL – HIGH SCHOOL
CLASS TIME: 1-2 ONE-HOUR PERIODS TUTORIAL
MIDI BEATS PROJECT
OVERVIEW: Developed in the 1980s, MIDI (Musical Instrument Digital Interface) is a protocol that allows certain instruments and audio devices to communicate to one another. It has become common, even standard, for MIDI to be used for music production in many recording environments. A few examples of the many MIDI uses: 1) To control virtual software instruments that host a wide range of sounds (from sampled acoustic instruments to synthesized electronic soundscapes); 2) To program a music performance that is “unplayable” or that has never occurred naturally; and 3) To quickly transpose keys and to assign instrumental parts to different instruments. In this lesson, students will learn to create computer music (i.e. a basic drum beat) without loops or recorded audio; instead, students will program virtual instrument “performances” with MIDI and Mixcraft’s virtual drum kits.
LESSON: The MIDI Beats Project at the grade school and middle school level enables students to quickly and easily create a drum beat. Younger novice students will be able to create music even if they lack music performance skills. For high school classes, exposure to advanced programming and MIDI techniques (humanizing, transposition, etc.) and a discussion of MIDI parameters (velocity, note values and durations) should fit seamlessly into this project. Through this process, older students will learn that MIDI is an essential part of understanding the use of contemporary music technology in the composition and production of music.
SKILLS GAINED
Understanding of MIDI
Music Performance using MIDI
MIDI Programming
MIDI Editing
REQUIRED MATERIALS:
• Computer with Mixcraft
• Headphones or Monitors
• Copies of the MIDI Beats Student Guide (Additional Material Download)
SUGGESTED MATERIALS:
• MIDI keyboard
• Further Reading Materials
12

102
ACTIVITY 1. Open Mixcraft and select the Build Virtual Instruments template.
Mixcraft will load six audio tracks and two virtual instrument tracks into the Workspace. Since we will be using only the virtual instrument track, delete the audio tracks (Ctrl + Shift + D).
2. Preparing for beat making: To prepare for producing a beat with MIDI, double check to see if the hardware and software are set up properly:
A) Turn on any speakers or monitors. If headphones are being used instead, connect them to the computer or to an audio/computer interface.
B) If a MIDI controller is being used, make sure it is directly connected to the computer or to an audio/computer interface.
3. Choosing the “beats:” Mixcraft comes with several virtual drum kits that cover studio, drum machine, and electronic drum sounds.
A) Choosing a kit: Select the “Change Instrument” feature (keyboard icon) on the first virtual instrument track. This will launch the Virtual Instrument Window.
The green keyboard icon will launch your virtual instrument window.
B) In the “category” column, scroll down and click the Percussion – Drum Kits list. A list of the available drum kits will appear on the right.
Before previewing the virtual drum kits, think about what kind of beat you would like to create. Do you want a rock beat? Or a dance beat? How about a jazz beat? Below are drum kit recommendations for different styles of music:
Rock: Studio Drum Kit, Spacious Studio Drum Kit, Heavy Metal Kit
Jazz: Jazz Kit, Brush Kit
Classical: Orchestral Kit
House/Techno/ Dub Step Music: Dance Kit, Electronic Kit 1-5
Electronic/Industrial Music: Drum Machine Kit, Nine Inch Nails Drum Kit
80s/90s pop music: 808-909 Kit
C) To load a drum kit, simply double click your selection. The virtual instrument track should now be renamed with the title of the selected drum kit.

103
Selecting Mixcraft’s virtual drum kits. Double click on a drum kit to load the sounds.
D) To preview a kit, use either Mixcraft’s Musical Typing or a MIDI Controller. The Musical Typing allows users to type on a computer keyboard to control the drum kit. Click the Musical Typing icon in the drum kit window:
The Musical Typing window illustrates how a computer keyboard functions as a music keyboard: the letter keys correspond to different notes. Try tapping the “D” and “F” letter keys on your keyboard. You should hear drum sounds.
Mixcraft’s Musical Typing interface.
E) Preview different drum kits using Musical Typing. After previewing some kits, try practice “playing” a drumbeat on the computer keyboard and get ready to record!
4. Recording a beat:
A) First, enable the metronome. Click the metronome icon (outlined in red) and select the recording (Alt + O) box.
Enable the metronome during recording. The metronome will keep the beat and make it easier to record.

104
B) Before recording, rewind the cursor to the beginning of the timeline by hitting the “rewind” icon (outlined in blue in the screenshot below).
C) Arm the virtual instrument track for recording by clicking the “arm” icon.
D) Start recording by either clicking the master record button (outlined in red below) or “R” on your keyboard. Begin playing a drum beat on the computer keyboard. The cursor will begin moving down the timeline and MIDI graphics of the beat will appear. To edit, or re-record the beat, stop the recording by hitting “R” or the space bar. Select the area that needs to be recorded with your cursor and hit the master record button.
The red dot begins master recording. The left-facing arrow (in blue) rewinds the Timeline to the beginning.
E) After recording, disarm the virtual instrument track and play back the beat from the beginning. The beat may not sound perfectly in time. Listen closely for parts to edit, rearrange, split or remove.
An example of a MIDI region after a recorded drum “performance.”
5. Programming a beat: With Mixcraft’s MIDI, users program drum beats with a pencil tool rather than a keyboard. This offers more control over drum rhythms and makes it easy to visualize the different parts of a virtual drum kit.
A) First, on the Timeline, double click on the MIDI regions created from performing a drum beat with the keyboard (or simply double click on the blank timeline region of a new Drum Kit track). This will launch the Sound Tab and Piano Roll window. The list of drum beat parts (hi-hat, cowbell, kick drum, etc.) runs down the left side of the Piano Roll. The small, horizontal lines/dashes in the tracks correspond to the MIDI data of each part.
B) Select the pencil tool in the upper left hand corner of the Piano Roll.
C) Now, “draw” MIDI notes on the Piano Roll to create drum patterns (below is an example of a programmed drum beat).
D) Notice at the top of the Piano Roll that the beats are labeled with numbers. Use this as a reference when programming a beat.
E) First, find a hi-hat or cymbal track. With the pencil tool draw a pattern of straight 8th notes. Next, choose a snare or clap track and pencil them in on beats two and four. Finally, add a kick drum on beats 1 and 3. Note: when drawing, the lines might not align with the Piano Roll grid (see the next image for reference).

105
A programmed drum beat using the Drum Kit 3 virtual instrument: hi-hats (top row) on every 8th note, snare (middle row) on beats 2 & 4 and finally a kick drum (bottom row) on beats 1 & 3.
6. Editing MIDI. After recording or programming a drum beat, it may be necessary to tidy up and edit the MIDI data. Here are several common edits:
Quantizing MIDI: “Quantizing” MIDI allows users to align MIDI notes to the Piano Roll grid. This edit fixes any performance or programming errors that might occur when working with MIDI. First, select the arrow cursor and drag to highlight all MIDI notes. Right click on the selection and choose MIDI Editing > Quantize (try the 1/8th note setting). Notice how the MIDI notes are aligned perfectly to the Piano Roll grid.
Trimming and deleting MIDI regions: To trim or extend MIDI regions, move the cursor to the end of a region – a double-sided arrow appears. Simply click, and drag left or right to trim the MIDI region to the desired length. To delete MIDI regions, you can highlight (drag + select regions) or split MIDI regions into parts and hit delete.
Looping MIDI regions: As is possible with audio, Mixcraft can loop MIDI regions. Loop the drum beat by clicking the loop button on the MIDI region (the half circle with a “+” sign). Try looping the beat four or eight times.
The circle and + sign icon quickly loops MIDI regions.
7. Mixing Down: To mix down the MIDI drum beat into an audio file, go to the Menu and select File > Mix down to… > and select .MP3 or .WAV
ADDITIONAL LESSON PLANSMIDI Drums: In this lesson, we programmed a typical rock drum beat in 4/4 time. However, the ability to program complex drum beats with MIDI and Mixcraft is also a possibility. Search online for common drum patterns of different music genres. For example, what is a common dance or techno beat? Try programming beats in different time signatures such as 3/4 or 5/4. Additionally, brainstorm ways to incorporate the drum beat from this lesson into other lessons. Perhaps, the beats programmed by students could be used for a class improvisation or as a backdrop for a slide show presentation.
MIDI Instruments/MIDI Parameters: Controlling a virtual drum kit with MIDI is just the tip of the world of software instruments. After learning the basics of MIDI recording and editing, try operating Mixcraft’s other virtual instruments with MIDI. MIDI has many parameters than can be automated (parameters for volume, intensity, even program changes). Identify these additional parameters and learn how to incorporate them into the workflow.
TIP:Quantizing is an excellent tool for tidying up MIDI notes. However, for drum beats, quantizing can often leave the beat feeling “mechanical” and “machine-like.” It might be more natural to leave some notes un-quantized or to use Mixcraft’s “humanize” feature.
FURTHER READING:
Huber, D.M. The MIDI Manual: A Practical Guide to MIDI in the Project Studio
Vines, R.D. Composing Digital Music for Dummies
Pejrolo, A. & DeRosa, R. Acoustic and MIDI Orchestration for the Contemporary Composer
TIP:Remember, you can zoom in and out of the workspace using the “+” and
“-“ keys. A larger view will help the user make more precise edits

LESSON
106
TUTORIAL
STUDENT’S GUIDE CLASS TIME:
NAME:
PERIOD:
TEACHER:
CLASS:
MIDI BEATS PROJECT
ACTIVITY 1. Open Mixcraft and select the Build Virtual Instruments template.
Mixcraft will load six audio tracks and two virtual instrument tracks into the Workspace. Since we will be only using virtual instrument track, delete the audio tracks (Ctrl + Shift + D).
2. Preparing for beat making: Ready to make your first beat? To prepare, ask your teacher if your computer, audio hardware, and Mixcraft software are set up properly:
A) Turn on any speakers or monitors. If you are using headphones instead, make sure they are connected to your computer or your audio/computer interface.
B) If you are using a MIDI controller make sure it is connected to your computer your audio/computer interface or to your computer.
3. Choosing your “beats”: Mixcraft comes with a range of virtual drum kits that cover studio, drum machine, and electronic drum sounds. Before selecting your virtual instrument, think about what kind of beat you would like to create. Do you want a rock beat? Or a dance beat? Or ask your teacher what you will be using the beat for. This decision will help narrow down your choice.
4. Choosing a kit. Select the “change instrument” feature (the keyboard icon) on the first virtual instrument track. This will launch the Virtual Instrument Window.
The green keyboard icon will launch your Virtual Instrument Window.
A) In the “category” column, scroll down to find the Percussion – Drum Kits list. You will see a list of the available drum kits on the right.
B) To load a drum kit, simply double click on a selection. The virtual instrument track should now be renamed with the title of the selected drum kit.
REQUIRED MATERIALS
• Computer with Mixcraft
• Headphones or Monitors
• Copies of the MIDI Beats Student Guide (Additional Materials Download
SUGGESTED MATERIALS
• MIDI keyboard
• Further Reading Materials
12

107
Selecting Mixcraft’s virtual drum kits. Double click on a drum kit to load it to a track.
C) To see how your kit sounds, use either Mixcraft’s Musical Typing or a MIDI Controller. Musical Typing allows you to use your computer keyboard to control the drum kit. Click the Musical Typing icon on the bottom of the drum kit window.
D) The Musical Typing window illustrates how your computer keyboard functions as a music keyboard: the letter keys correspond to different notes. Try tapping the “D” and “F” letter keys on your keyboard. You should hear drum sounds.
Mixcraft’s Musical Typing interface.
E) Preview different drum kits using Musical Typing. When you have found a drum kit you like, practice “playing” a drumbeat with your keyboard and get ready to record.
5. Recording Your Beat:
A) First, enable the metronome. Click the metronome icon (outlined in red) and select the recording (Alt + O) box.
Enable the metronome during recording. The metronome will keep the beat and make it easier to record.

108
B) Before recording, hit the “rewind” icon (outlined in blue in the screenshot below) to rewind the cursor to the beginning of the timeline.
C) Arm the virtual instrument track for recording by clicking the “arm” icon.
D) Start recording by clicking either the master record button (outlined in red) or “R” on the keyboard. Begin playing a drum beat on your keyboard. The cursor will begin moving down the timeline and the MIDI graphics of your beat will appear. To edit, or re-record your beat, stop the recording by hitting “R” or the space bar. Select the area that needs to be re-recorded with your cursor and hit the master record button.
The red dot begins master recording. The left-facing arrow (in blue) rewinds the Timeline to the beginning.
E) After you have finished recording, disarm your virtual instrument track and play back your beat from the beginning. The beat may not sound perfectly in time. Listen closely for parts that you may want to edit, rearrange, split or remove.
An example of a MIDI region after a recorded drum “performance.”
6. Programming Your Beat: With Mixcraft’s MIDI, users can program drum beats with the pencil tool of the Piano Roll. Programming a beat offers more control over your drum beat and makes it easy to visualize the different parts of your virtual drum kit.
A) First, on the Timeline, double click on the MIDI regions created from performing a drum beat with the keyboard (or simply double click on the blank timeline region of a new Drum Kit track). This will launch the Sound Tab and Piano Roll window. The list of drum beat parts (hi-hat, cowbell, kick drum, etc.) runs down the left side of the Piano Roll. The small, horizontal lines/dashes in the tracks correspond to the MIDI data of each part.
B) Select the pencil tool in the upper left hand corner of the Piano Roll.
C) Now you can “draw” MIDI notes on your Piano Roll. Let’s try programming a typical drum beat (use the screenshot below for reference.)
D) Notice at the top of the Piano Roll that the beats are labeled with numbers. We can use this as a reference when programming our beat.
E) To start, find a hi-hat or cymbal track. With the pencil tool draw a pattern of straight 8th notes (see the below image for reference). Next, choose a snare or clap track and pencil them in on beats two and four. Finally, add a kick drum on beats 1 and 3. Note: when drawing, the lines might not align with the Piano Roll grid. In the next section we will learn how to edit our programmed or recorded drum beat.

109
A programmed drum beat using the Drum Kit 3 virtual instrument: hi-hats (top row) on every 8th note, snare (middle row) on beats 2 & 4 and finally a kick drum (bottom row) on beats 1 & 3.
7. Editing MIDI: After recording or programming a drum beat, it may be necessary to tidy up and edit the MIDI data. Here are several common edits:
A) To tidy up the MIDI programming and recording, highlight all of the MIDI notes (Ctrl + A, or by dragging your cursor over the notes) and right click > MIDI Editing > Quantize. Make sure the Note Type is set to 1/8th notes. Click “ok.” Notice that the MIDI notes are now perfectly aligned to the Piano Roll Grid.
B) Trimming and deleting MIDI regions: To trim or extend MIDI regions, move the cursor to the end of a region – a double-sided arrow appears. Simply click, and drag left or right to trim the MIDI region to a desired length. To delete MIDI regions, you can highlight (drag + select regions) or split MIDI regions into parts and hit delete.
C) Finally, loop your drum beat to a desired length. On the timeline, click the loop button on the MIDI region (the half circle with a “+” sign) to finalize your beat! Try looping your beat four times.
D) Show your teacher your new beat! To mix down your beat to a file on your computer, go to the Menu and select File > Mix down to… > .MP3. Name and save your beat on the desktop.

110
NOTES:

LONG PROJECTS

CHAPTER
112
TUTORIAL
TEACHER’S GUIDE NSME: 3, 4, 8, 9
GRADE SCHOOL – HIGH SCHOOL
CLASS TIME: 4 ONE-HOUR PERIODS
REMIX PROJECT
OVERVIEW: A “remix” is the modification of preexisting musical material to create a novel composition. In plainer terms, “remixing” is the process of creating new songs from parts or stems of old songs. Historically, remixes originated from live dub music played in Jamaican dancehalls. DJs would add effects and edits to their music in real-time to keep the dance floor moving. It is not surprising to find that modern remixes stay true to the spirit of dancing: today, remixing is commonly used to transform a song from a specific genre, such as Rock, R&B, or Hip-Hop, into an electronic dance music production (House, Techno, Trance, Dubstep, etc.). Contemporary remixers take vocal tracks from popular songs and produce new music that compliments the original track. These remixes are often beat-driven, and are comprised of drum loops, virtual instruments, and synthesized sounds. Thus our project will exploit Mixcraft’s extensive loop library and packaged virtual instruments to help create our remix.
For educators looking to incorporate this project into interdisciplinary courses, remixes and remix culture stir up many questions regarding artistic ownership and aesthetic value. Copyrighted materials used in remixes have provoked intense legal and aesthetic debates: violations of music ownership continue to be reported (for examples, see Dangermouse’s Grey Album, Truth Hurts’ single “Addictive,” or the work of DJ, Girl Talk ) and some critics have claimed remixes are “derivative” and “inferior” to original compositions (for a debate, see Laurence Lessig’s book Remix).
LESSON: For middle school & high school classes, the remix project directs students to explore creativity within predetermined boundaries: this project requires students to create songs from prerecorded material, rather than having them create original music. For high school classes, the actual experience of remixing could compliment lectures on copyright issues (plagiarism), music and culture, music composition, and aesthetics.
SKILLS GAINED
Creative Problem Solving
Audio Editing
Loop arranging
MIDI Editing
REQUIRED MATERIALS:
• Computer with Mixcraft
• Headphones or Monitors
• MIDI Versions of Children’s Songs (Additional Material Download)
• Copies of the MIDI Instrument Survey Student Guide (Additional Material Download)
SUGGESTED MATERIALS:
• MIDI keyboard
• Sheet Music to Transcribe (For Older Students)
• Further Reading Materials
13

113
ACTIVITY 1. Setup. In this lesson, students will learn to craft their own remix out of Ben Hale’s song “Repunzel.” For setup, drag the “Remix_Template.mx6” file from the Remix Project folder of the Additional Materials Download to your desktop. Open the Mixcraft project:
The Workspace of the Remix Template project.
The project, which contains only the vocal track of the song, has already been divided into sections marked with colored flags. To hear the original instrumentation, simply load up the default song in Mixcraft 6 (file > open project > Example Projects > Rapunzel.mx6). Notice “Rapunzel” follows a strict Intro-AABAB structure. As students work through their mix, it will be important to remind them to work within this structure.
NOTE: If the course is designed to remix another song, below are common steps for setting up:
A) Open Mixcraft and select the Build Loop & Beatmatched Music template.
B) Import the stems (submix tracks). Make sure the tracks are aligned with the beginning of the timeline window.
C) Under the Project Tab, Mixcraft will show the key and master tempo of the song. For individual track information on tempo and key open the Sound Tab. Detected key information will be noted next to the “key” window; while tempo information will be provided under the “Adjust To Project Tempo” window.
2. Creating a beat. For your introduction, you will want to introduce a beat. First, create a new Audio Track (Ctrl + G). Double click on the name “Audio Track” to give it the new name “Kick Drum.” In the Tabs Area, select the “Library” tab. Then: Sort By > Instrument > Drums. Search through the drum categories for interesting loops. If you are connected to the internet, you can preview and download each loop by clicking the green play button next to the file name. Try the Kick Clap 3 loop.
Using the Library Tab to find a drum loop.
TIP:Remember the default start-up song in Mixcraft 6, “Rapunzel” comes in the form of multiple tracks that are not linked (locked in place). These tracks can be made into, (or treated like) “stems” (submixes or separations of audio material for later, bigger mixes). Earlier versions of Mixcraft have different start-up songs (such as by Toad the Wet Sprocket).
In any case, if time or resources are limited, try remixing the default start-up song (hopefully “Rapunzel”).
A small additional selection of songs (that can also easily be remixed) can be found by going to: File > Open Project > Example Projects. To repeat, however, the Additional Materials Download in the remix project folder contains a template for the present project.

114
3. Arranging a beat. When you have decided on a drum loop, simply highlight the file and drag it onto your “Kick Drum” audio track. You may want your drum loop to repeat throughout the entire remix. There are many ways to do this: 1) Select the audio segment, hold down Alt key, slide right and drop. Repeat as necessary. 2) Copy and paste audio segments. 3) Use the “loop” icon on an audio region to repeat loops along the Timeline. Repeat as necessary. 4) Place cursor at the end of the loop to activate the double arrow symbol, left click and drag the loop to extend as far as necessary.
Copies of our Kick Clap 3 Loop.
4. Developing your beat. Depending on the density of the drum loop, you may want to improve the beat. For instance, does your loop include a hi-hat part? A snare drum? Or a clap? Search for other loops that will develop your beat.
5. Adding Harmony. Next, let’s add harmony. Browse your favorite instrument categories and look for loops that include chord progressions. Again, keep the structure of your mix in mind. For the verses, you might want to use a different loop than the one used with the choruses. For a laid back, jazzy feel to the mix, try importing the Rhodes 2 loop for the verses: Library > Sort By Instrument > E.Piano > Rhodes 2.
The Rhodes 2 loop adds some jazzy and rich harmony to the verses.
6. Adding Bass. After arranging the harmony, browse the bass loops. The bass will be the foundation of your mix, so pay particular attention to how it sounds with the harmony. After previewing several bass loops, try arranging a loop on the Timeline. For an attention- grabbing effect, bring in the bass right as the vocals enter. Again, keep in mind how the structure of the verse and chorus differs. [library > Sort By > Instrument > Bass > Bass (Tempo79)]
This Bass loop (“Bass” from the Ambient Chill Out Song Kit by DJ Puzzle) sounds great against the Rhodes 2 chords.
7. Building on the Harmony. Now is the time to really explore with the rest of Mixcraft’s loops. With the foundation of the remix in place (bass, drum, and chord loops) try adding other instruments and melodies to accompany the rest of the mix. Remember the “style” of remix when selecting over loops. For instance, a metal guitar loop might sound a bit harsh against a soft piano ballad loop. Additionally, try mixing and matching different styles of loops.
8. Creating Movement and Tension. Remixes can get a bit boring and predictable with just the basic instrumentation. Often, adding some strange FX loops can liven up the mix! Try this one: go to “Library Tab” > Sort By > Instrument > “FX” > WhiteWoosh SFX. Add this loop right before a verse or chorus. Notice the movement and transitional effect as the mix
TIP:Try to vary your beat during different sections of your remix. You might have the hi-hat play during the choruses, but not the verses. Experiment with different arrangements
TIP:Don’t worry about only selecting loops that match the key of our song. Mixcraft will automatically transpose any loop to our session’s master key

115
shifts between the verse and chorus. Please note that these are “loop” sound effects not “plugin effects.” Do not confuse this with either the functions of the “fx” plugin button on the audio track or the “fx” button at the top of the mixer panel.
Try using the WhiteWoosh SFX from Mixcraft’s library to add movement to a mix.
9. Rough Mix. Once a solid remix arrangement is established, it is helpful to start setting appropriate track volume levels to create a rough mix. Mixing is the processing of molding together the arrangement. Common goals in mixing include adding clarity and definition of each instrument; controlling the dynamics of individual instruments; adding plugin effects to create ambiance; and finally adjusting volume and pan settings.
10. Open the Mixer tab in the bottom left part of the Workspace. In the mixer window all the tracks are represented in vertical columns of adjustment panels. To raise or lower the volume of an instrument, move the vertical slider, the volume slider, up or down. The pan slider, located above the volume slider, moves horizontally and pushes an instrument to the left or right of the listening field. Try dialing in different volume and pan settings to the mix.
The volume (vertical) and pan (horizontal) sliders on a kick drum track.
11. Almost there! When the remix is finished, the final step is mixing down the track. Go to the Menu > File > Mixing Down To… > .MP3. Click and mix down the remix to the computer’s desktop.
Remember, these are general guidelines on how to remix. There is no wrong or right way to remix a song! Encourage the students to explore other loops and arrangements or have students make multiple remixes of the same song.
ADDITIONAL LESSON PLANSRemix competition: Remix competitions are often hosted by labels and artists, as a way to include their audience in the music-making process. Remixers can sign up on a variety of websites, download stems, and post their mixes for judges and other mixers to rate and comment on. Search the internet for current remix competitions and host a classroom-wide remix competition. Sites such as http://www.remixcomps.com/ is a great place to start. Have each student create their own remix of a selected song and arrange a blind-judging panel (so students are unaware of who made the mixes) to determine some of the favorite remixes of the class.
Beyond Dance Remixes: Our project led us through the creation of a dance music remix. What about other kinds of remixes? How about a jazz remix? A rap remix? A folk remix?
FURTHER READING:
Lawrence, L. Remix: Making Art and Commerce Thrive in the Hybrid Economy. Langford, S. The Remix Manual

LESSON
116
TUTORIAL
STUDENT’S GUIDE CLASS TIME:
NAME:
PERIOD:
TEACHER:
CLASS:
REMIX PROJECT
ACTIVITY 1. Hello remixer! In this lesson, you will learn to craft your own remix from either Ben Hale’s song “Repunzel” or a song supplied by your teacher. Ask your teacher about setting up the “Remix_Template.mx6” file from the “Additional Materials Download” to your desktop. Open the Mixcraft project:
The Workspace of the Remix Template project.
2. The project is already divided into sections marked with colored flags and contains only the vocal track. If you would like to hear the original instrumentation, simply load up the default song in Mixcraft 6 (File > Open Projects > Rapunzel.mx6). Notice “Repunzel” follows a strict Intro-AABAB (verse-verse-chorus-verse-chorus) structure. As you work through their mix, it will be important to keep this structure in mind.
NOTE: If you are remixing another song, here are some helpful steps to import.
A) Open Mixcraft and select the Build Loop & Beatmatched Music template.
B) Import the stems. Make sure the tracks are aligned with the beginning of the timeline window.
REQUIRED MATERIALS:
• Computer with Mixcraft
• Headphones or Monitors
• Mixcraft Loops
• REMIX stems (“Additional Materials Download”)
• Remix Student Guides (“Additional Materials Download”]
SUGGESTED MATERIALS:
• MIDI keyboard
• Internet Connection
13

117
C) Adjust the key and Mixcraft’s master tempo to your remix tracks. Usually this information is provided with the song’s stems. Under the Project Tab, Mixcraft will show the key and master tempo of the song. For individual track information on tempo and key open the Sound Tab. Detected key information will be noted next to the “key” window; while tempo information will be provided under the “Adjust To Project Tempo” window.
BEGINNING TO REMIX 1. Starting your remix: creating a beat. For the song’s introduction, you will want to introduce a beat. First, create a new Audio Track (Ctrl + G) and rename it “Kick Drum.” In the Tabs Area, select the “Library” tab, then: Then: Sort By > Instrument > Drums. Search through the drum categories for interesting loops. If you are connected to the internet, you can preview and download each loop by clicking the green play button next to the file name. Try the Kick Clap 3 loop.
Using the Library Tab to find a drum loop.
2. Arranging a beat. When you have decided on a drum loop, simply highlight the file and drag it onto your “Kick Drum” audio track on the Timeline. You may want your drum loop to repeat throughout the entire remix. There are many ways to do this: 1) Select the audio segment, hold down Alt key, slide right and drop. Repeat as necessary. 2) Copy and paste audio segments. 3) Use the “loop” icon on an audio region to repeat loops along the Timeline. Repeat as necessary. 4) Place cursor at the end of the loop to activate the double arrow symbol, left click and drag the loop to extend as far as necessary.
Copies of our Kick Clap 3 Loop.
3. Developing your beat. Depending on the drum loop, you may want to expand upon your beat. For instance, does your loop include a hi-hat part? A snare drum? Or a clap? Search for other loops that will thicken your beat.
4. Adding Harmony. Next, let’s add harmony. Browse your favorite instrument categories and look for loops that include chord progressions. Again, keep the structure of your mix in mind. For the verses, you might want to use a different loop than the one used with the choruses. Try importing the Rhodes 2 loop for the verses. If offers a laid back, jazzy feel to the mix: Library > Sort By Instrument > E.Piano > Rhodes 2.
The Rhodes 2 loop adds some jazzy and rich harmony to the verses.
TIP:Try to vary your beat during different sections of your remix. You might have the hi-hat play during the choruses, but not the verses. Experiment with different arrangements
TIP:Don’t worry about only selecting loops that match the key of our song. Mixcraft will automatically transpose any loop to our session’s master key

118
5. Adding Bass. After arranging the harmony, browse the bass loops. The bass will be the foundation of your mix, so pay particular attention to how it sounds with the harmony. After previewing several bass loops, try arranging a loop on the Timeline. For an attention- grabbing effect, bring in the bass right as the vocals enter. Again, keep in mind how the structure of the verse and chorus differs. [library > Sort By > Instrument > Bass > Bass(Tempo79)]
This Bass loop sounds great against the Rhodes 2 chords.
6. Building on the Harmony. Now is the time to really explore with the rest of Mixcraft’s loops. With the foundation in place (bass, drum, and chord loops) try adding other instruments and melodies to accompany the rest of the mix. Remember the “style” of remix when selecting through loops. For instance, a metal guitar loop might sound a bit harsh against a soft piano ballad loop (unless, of course, you want to act outside the box by mixing and matching different styles of loops).
7. Creating Movement and Tension. Remixes can get a bit boring, predictable, and repetitious with just the basic instrumentation. Adding sound effects loops can liven up a mix! Try this one: In the Library tab, click “FX” in the instrument column, then select the WhiteWoosh SFX loop .Add this loop right before a verse or chorus. Notice the movement and transitional effect as the mix shifts between the verse and chorus. Please note that these are “loop” sound effects not “plugin effects.” Do not confuse this with either the functions of the “fx” plugin button on the audio track or the “fx” button at the top of the mixer panel.
Try using the WhiteWoosh SFX from Mixcraft’s library to add movement to a mix.
8. Fitting it all together. Once a solid remix arrangement is established, it is time to mix your remix! Mixing is the processing of molding together your arrangement.
9. Open the Mixer tab in the bottom left part of the Workspace. Here, your audio and instrumental tracks will be displayed in vertical panels. To raise or lower the volume of an instrument, move the vertical slider, the volume slider, up or down. The pan slider, located above the volume slider, moves horizontally and pushes an instrument to the left or right of the listening field. Try dialing in different volume and pan settings in the mix.
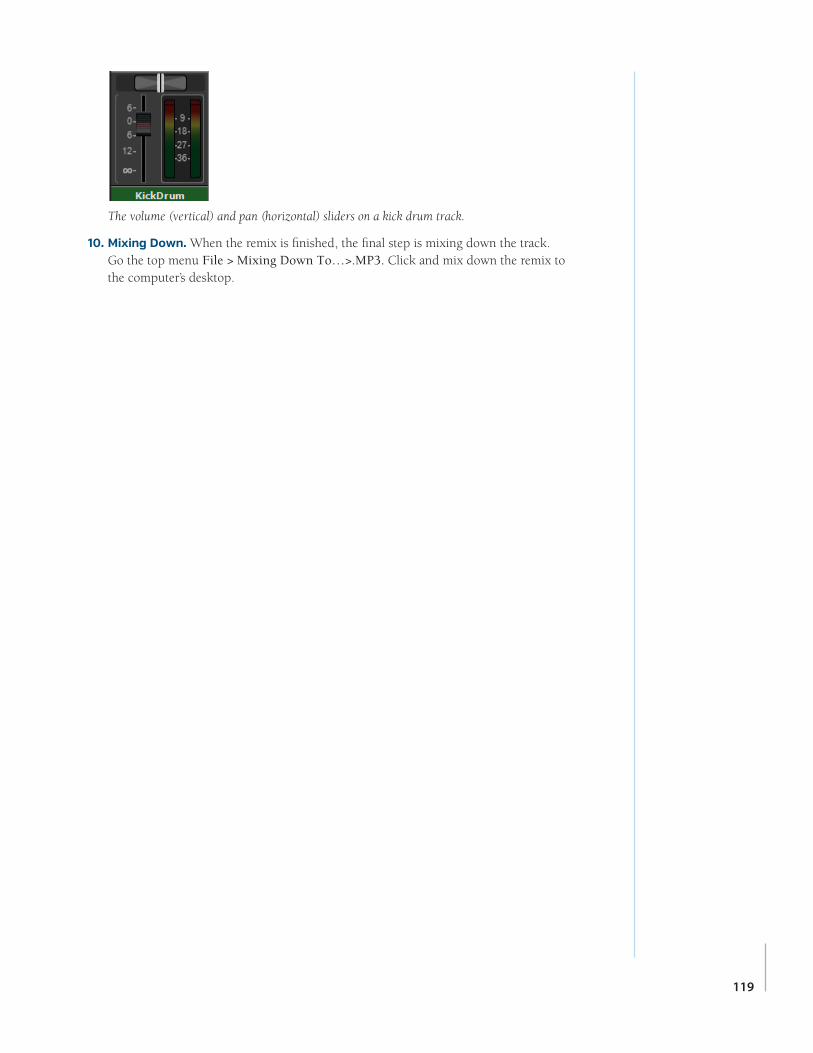
119
The volume (vertical) and pan (horizontal) sliders on a kick drum track.
10. Mixing Down. When the remix is finished, the final step is mixing down the track. Go the top menu File > Mixing Down To…>.MP3. Click and mix down the remix to the computer’s desktop.

CHAPTER
120
TUTORIAL
TEACHER’S GUIDE NSME: 2, 3, 4, 6, 7, 8, 9
GRADE SCHOOL – HIGH SCHOOL
CLASS TIME: 1-2 ONE-HOUR PERIODS
SOUND COLLAGE PROJECT
OVERVIEW: The concept of a sound collage emerged in the early to mid 20th century from a French movement called musique concrete. Composers of musique concrete recorded incidental sounds onto analog tape and spliced the tape to rearrange and create layers upon layers of noise. These collages contained no formalized structure, no melodic material, and were certainly not “musical.” The composers involved with musique concrete, chiefly Pierre Schaeffer, believed that the final composition should inhibit audiences from identifying or relating to the sounds – these sounds should be unrecognizable and detached from any psychological association. This tedious process of cutting-rearranging-patching tape to reach this unidentifiable quality certainly consumed countless hours of the composers time. Luckily for us today, a similar effect can be completed within minutes with Mixcraft.
LESSON: During this lesson, students will take an abstract and unorthodox approach to composing music. First, sounds from the classroom or home environment will be recorded into Mixcraft. These sounds can quickly and easily be separated into loops and arranged on the Timeline (no cutting of analog tape needed!). Students should experiment with various arrangements of the sounds and strive to make a collage that is one to three minutes long. For grade school and middle school classes, educators may need to help students with their recording of sounds. If creating original recordings is not appropriate (or possible) for the classroom, there are various free sound libraries online (such as the Free Sound Project) from which users can download recordings. Before starting their projects, high school level students could be given a lecture on the trends in 20th century music that trace the history of sound collage (e.g. early avant-garde and electronic music). This might provide a unique lens through which to view the possibilities of the project and, consequently, might produce some interesting results.
SKILLS GAINED
Audio Recording
Audio Editing
Music Composition
Sound Design
Abstract Thinking
REQUIRED MATERIALS:
• Computer with Mixcraft
• Headphones or Monitors
• Sound Collage Student Guide (“Additional Materials Download”)
SUGGESTED MATERIALS:
• Microphone/ Microphone cable
• Audio/Computer Interface
• Headphones/ Monitors
• Freesound Project Account
• Further Reading Materials
• Example Sound Collage (“Additional Materials Download”)
14

121
ACTIVITY 1. Open Mixcraft and select the Recording Yourself or Your Band template.
Mixcraft will load eight audio tracks into the Workspace.
2. Downloading or recording sounds? For this project, students have the option of recording their own sounds for the collage or using an online database of free samples.
A) If downloading: The freesound project is an online database of free recordings (http://www.freesound.org/). There, users can search for samples using key words (e.g. “rain,” “pots and pans,” “sea shells,” “distorted guitar”). It should be noted that opening a freesound account is a requisite for downloading samples. The accounts are free but do require an email address. Additionally, if using downloaded sounds, students can skip the steps that pertain to recording (steps 4 – 7).
B) If recording: Recording original samples for a sound collage is an effective method of teaching audio recording and microphone placement techniques. Tell students that the objects used for the recordings should be brought from home or gathered from the rich school environment. Encourage students to get creative when selecting things – some objects might produce a more percussive sound (a hammer and trash can lid), while others might produce a sustained sound (wet air from a pinched balloon).
3. Importing Samples. To import samples downloaded from the freesound website, simply drag and drop the files onto an audio track in Mixcraft. Alternatively, users can import audio files directly through the menu: Sound > Add Sound file > Select the sound file. Import any samples you will be using to create the sound collage.
4. Recording Audio. If educators and students decide to record sounds in the classroom, it is necessary to prepare for the recording of these sounds by ensuring that the microphone and audio/computer interface are setup properly. Equipment setup review:
A) First, to prevent feedback, turn off any speakers or monitors. Instead, if possible, students should use headphones to follow the live recording without creating a feedback loop. Connect headphones to the headphone jack on your audio/computer interface, or on your computer.
B) Next, connect the microphone to the audio/computer interface with a microphone cord. To make sure Mixcraft is monitoring the audio/computer interface, check the File > Preferences > Sound Device tab and check to confirm that the interface is selected.
5. Now that the equipment is set up, it is time to record some sounds!
A) Arm the first audio track in the workspace by clicking “arm.” The downward arrow next to the arm button will enable users to select the source of the “incoming audio signal” (often a microphone). Make sure the correct interface is selected. To check the configuration, try speaking into the microphone – the volume meter should jump. Also check that the headphones are working.
B) For clean recordings users will want to monitor the incoming audio on the audio track’s volume meter. Record in the “yellow” zone. In this zone, recordings will be audible but not so loud that added artifacts (unwanted, accidental sounds) will “dirty” the recording.

122
An example of the yellow or “safe” zone to record in.
If the meter is reaching the “red” area, try dialing back the gain on the audio/computer interface or move the object farther away from the microphone. Careful! Recording in the “red” zone could be harmful to your equipment or ears and could distort the recorded audio!
An example of the “red” or “unsafe” zone. This area could damage your ears and recordings.
6. On the first audio track, record a few seconds of noise created from a mundane object. Try dropping, rubbing, or tapping various objects together to produce sounds. A few ideas are listed below:
Record a straw being drawn through a plastic cup lid.
Record the shaking of a plastic bag filled with seas shells, rice, or bottle caps.
Record the sound of scissors cutting paper.
Recording the sound of someone biting an apple.
7. Proceed to record sounds on each of the available blank audio tracks. Remember, recording a variety of different sounds will add novelty to the sound collage.
8. Creating loops. A loop can be created from several seconds of any sound recording. If necessary, trim the ends of the recorded segment as shown in the screenshot below, where the left and right ends of a recording were each trimmed back (perhaps to get rid of silence or an unwanted cough). To do this, first place the cursor at one end of the region. This activates the double arrow icon. Now drag the line back to the desired area of the sound profile. Repeat with the other side. To cut from the middle, use the split function of Mixcraft. Drag back to eliminate the unwanted parts, set the two segments side-by-side and then “select” both and “merge” them back into one. When the segment is satisfactory and complete, right-click the audio region and select “Set Loop To Crop.” The new “loop” segment can now be looped, copy and pasted or drag/lengthened for arrangement on the Timeline. Make loops of all the recordings created for the lesson.
Trimming an audio region to create a loop.
9. Arranging a sound collage. The sound collage is a collective arrangement of seemingly unrelated noises. Creating a dynamic and cinematic arrangement is crucial for captivating the listener. First, from the top of the screen, turn off Mixcraft’s snap function. Setting the snap function to “off” unlocks audio regions from the Timeline grid and allows users to move audio regions freely on the Timeline to create a free-metered composition.
Mixcraft’s snap function is now disabled.

123
10. Begin arranging the recordings or samples on Mixcraft’s Timeline by dragging and moving audio regions. It is typical to assign individual samples or recordings to their own audio track. In the example arrangement below, each audio track has been relabeled to describe its contents. This is done by “double clicking” the track name (the default name for an audio track is “audio track) and then typing in the new label.
An example arrangement of a sound collage. Multiple audio tracks are in use, each designated to a specific sample or field recording.
11. Mix. Once the sound collage is arranged, brainstorm ways to modify and experiment with the mix. Try lowering or raising the volume of certain tracks with the mixer. Dial in pan settings. Utilize plugin effects.
Educator Recommendations:
Try reversing audio regions.
Try automating volume or pan-levels.
Add timbre-altering effects, such as distortion, to specific tracks.
Use a send (aux buss) track to create a global effect (i.e. reverb or delay) and route multiple audio tracks to it: Menu > Track > Send Track. Give the send track a plugin effect such as reverb. Name the send track “reverb” by double clicking the track name. Go to the Mixer Tab and find that the vertical panels all now have a “send” dial. Each track can be dialed in with the Send Track (which itself does not have the send dial) effect.
Explore Mixcraft’s Loop library for other sound effects that might compliment a sound collage.
12. Mixing down. When the sound collage is finished, mix down the arrangement to a .WAV or .MP3 file. Go to the Menu > Mix Down To > and select the correct file format.

124
ADDITIONAL LESSON PLANSElectroacoustic Composition/Songwriting: With the advent of analog and digital music technology in the 20th century, combining electronic and acoustic elements during music composition was no longer a distant, futuristic, day-dream for composers. The marriage of the electronic and the acoustic, two seemingly separate musical worlds with distinct methodological approaches and aesthetic ambitions, holds a far greater artistic potential than either approach alone. Design a lesson plan that incorporates both electronic and acoustic elements: perhaps an acoustic folk song project that requires environment sounds to be interpolated between verses, or a spoken-word project that utilizes field sounds to “illustrate” the lyrics.
Visual/Sound Collage Installations: By drawing comparisons to the visual arts, particularly visual collages, educators can illustrate artistic trends across disciplines to students. Design an installation project that combines both visual and auditory collages: first, create a visual collage using excerpts from magazines, photographs, or images from online. Then create a sonorous interpretation of the visual collage in the form of a sound collage. Frame and present the visual collages and loop their relative sound collages on an Ipod with small speakers to complete the installation.
FURTHER READING
Demers, J. Listening through the Noise: The Aesthetics of Experimental Electronic Music.

125
NOTES:

LESSON
126
TUTORIAL
STUDENT’S GUIDE CLASS TIME:
NAME:
PERIOD:
TEACHER:
CLASS:
SOUND COLLAGE PROJECT
ACTIVITY 1. Open Mixcraft and select the Recording Yourself or Your Band template.
Mixcraft will load eight audio tracks into the Workspace.
2. Ask your teacher to see whether you will be recording your own sounds or downloading sounds for your collage.
A) Downloading Samples: The freesound project is an online database of free recordings (http://www.freesound.org/). Ask your teacher to help you set up an account. Once the account is active, search for sounds using key words (e.g. “rain,” “pots and pans,” “sea shells,” “distorted guitar”). After downloading several samples, you will need to import them into Mixcraft.
B) If recording: You can record your own samples and noises for your sound collage. This is a great way to learn audio recording and microphone placement techniques. For the recordings, bring objects from home or gathered them from the school environment. Brainstorm which objects you would like to record. Be creative when selecting things – some objects might produce a more percussive sound (a hammer and trash can lid), while others might produce a sustained sound (wet air from a pinched balloon).
3. Importing Samples. To import samples downloaded from the freesound website, simply drag and drop the files onto empty areas on an audio track in Mixcraft. Alternatively, users can import audio files directly through the menu: Sound > Add Sound file > Select the sound file. Import any samples you will be using to create the sound collage. Use different sounds for each track and fill all the tracks. From here, skip the steps that pertain to recording (steps 4-7) and start at step 8.
4. Recording Audio. Before recording your sounds, ensure that the microphone and audio/computer interface are setup properly. Ask your teacher for help if need be. Equipment setup review:
A) First, to prevent feedback, turn off any speakers or monitors. Record with headphones, because you can hear what you are recording without creating a feedback loop. Connect headphones to the headphone jack on your audio/computer interface, or on your computer.
REQUIRED MATERIALS:
• Computer with Mixcraft
• Headphones or Monitors
• Copies of the MIDI Beats Student Guide (Additional Materials Download)
SUGGESTED MATERIALS:
• MIDI keyboard
• Further Reading Materials
14

127
B) Next, connect the microphone to the audio/computer interface with a microphone cable. To make sure Mixcraft is monitoring the audio/computer interface, check the File > Preferences > Sound Device tab and check to confirm that the interface is selected.
5. Now that the equipment is set up, it is time to record some sounds!
A) Arm the first audio track in the workspace by clicking “arm.” The downward arrow next to the arm button will enable you to select the source of the “incoming audio signal” (often a microphone). Make sure the correct interface is selected. To check the configuration, try speaking into the microphone – the volume meter should jump. Also confirm that the headphones are working.
B) For clean recordings monitor the incoming audio on the audio track’s volume meter. Record in the “yellow” zone. In this zone, recordings will be audible but not so loud that added artifacts (unwanted, accidental sounds) will “dirty” the recording.
An example of the yellow or “safe” zone to record in.
If the meter is reaching the “red” area, try dialing back the gain on the audio/computer interface or move the object farther away from the microphone. Careful! Recording in the “red” zone could be harmful to your equipment or ears and could distort the
recorded audio!
An example of the “red” or “unsafe” zone. This area could damage your ears and recordings.
6. On the first audio track, record a few seconds of noise created from objects you have selected. Try dropping, rubbing, or tapping different objects together to produce sounds. A few ideas are listed below:
Record a straw being drawn through a plastic cup lid.
Record the shaking of a plastic bag filled with seas shells, rice, or bottle caps.
Record the sound of scissors cutting paper.
Recording the sound of someone biting an apple.
7. Record sounds for each of the available blank audio tracks. Remember, recording and arranging a variety of different sounds will result in an interesting sound collage.
8. Creating loops. Loops can be created from several seconds of your recordings and are ideal for creating an arrangement on the Timeline. If necessary, trim the ends of the recorded segment as shown in the screenshot below, where the left and right ends of a recording were each trimmed back (perhaps to get rid of silence or an unwanted cough). To do this, first place the cursor at one end of the region. This activates the double arrow icon. Now drag the line back to the desired area of the sound profile. Repeat with the other side. To cut from the middle, use the split function of Mixcraft. Drag back to eliminate the unwanted

128
parts, set the two segments side-by-side and then “select” both and “merge” them back into one. When the segment is satisfactory and complete, right-click the audio region and select “Set Loop To Crop.” The new “loop” segment can now be looped, copy and pasted
or drag/lengthened for arrangement on the Timeline. Make loops of all the recordings created for the lesson.
Trimming an audio region to create a loop.
9. Arranging a sound collage. The sound collage is a collective arrangement of seemingly unrelated noises. Creating a dynamic and cinematic arrangement is crucial for captivating
the listener. First, from the top of the screen, turn off Mixcraft’s snap function. Setting the snap function to “off” unlocks audio regions from the Timeline grid and allows you to move audio regions around freely on the Timeline to create a free-metered composition.
Mixcraft’s snap function is now disabled.
10. Begin arranging the recordings or samples on Mixcraft’s Timeline by dragging and moving audio regions. Use all the techniques we have learned: “Loop” button; “drag and drop”; “copy and paste”; cursor at loop end and drag to lengthen; and “trim.” Keep each sample
sound or recording on its own audio track. Label each track. In the example arrangement below, each audio track has been relabeled to describe its contents. This is done by “double clicking” the track name (default for an audio track is “audio track) and then typing in the new label.
An example arrangement of a sound collage. Multiple audio tracks are in use, each designated to a specific sample or field recording.
11. Mixing the collage. Once the sound collage is arranged, brainstorm ways to modify and experiment with the mix. Try lowering or raising the volume of certain tracks on the mixer, dialing in pan settings, or instantiating plugin effects. Click the “Mixer” tab in the Tab Area to get started.
12. Mixing down. When the sound collage is finished, mix down the arrangement to a .WAV or .MP3 file. Go to the Menu > Mix Down To > and select the correct file format. Notify your teacher that you have finished.

CHAPTER
129
TUTORIAL
DEBATE PODCAST PROJECT
OVERVIEW: A debate is an organized argument held between two parties in an attempt to persuade an audience to agree with or to dissuade an audience from a particular view. In a classroom environment, a group of students is first randomly divided into point and counter-point groups. One side holds the “pro” views while the other asserts the “con” views. Usually a classroom debate is governed by a mediator (e.g. an educator). Topics of debates include politics, science and religion, and the arts. Bringing up a contemporary or current issue is a great way to start a heated debate. Options for this project might include educators and their students forming a debate club or perhaps the school might already have one as an extracurricular activity. Collaborating with such a group might be a convenient way to do this lesson plan: educators could record and curate a blog for the debate club.
LESSON: Consider this lesson plan an invitation to use Mixcraft outside the arts. Audio software is often used by educators solely for teaching music or audio arts lesson plans. Here, however, we offer an interdisciplinary lesson that besides music education, includes a teaching focus on the practical communication skills of debating and internet blogging. For middle school & high school classes, then, this lesson plan includes three areas of study: debating, audio software, and internet technology (e.g. blogging). First, the educator selects several debate topics. The classroom is divided into smaller groups of students. A blog is then created and opened. The debate and blog is curated by the educator. Each separate group of students subsequently researches the subject and develops an argument for defining the group’s position. Each argument is then recorded and posted on the blog. Students from opposing groups read the blog and comment on the posts (or defend their group’s position) in an attempt to create an online discussion or debate. Older students might benefit if this lesson plan included a brief talk on debating tactics or, perhaps, on the philosophy of logical fallacies.
SKILLS GAINED
Debating
Recording Audio
Editing Audio
Understanding Podcasts and Internet Blogs
TEACHER’S GUIDE NSME: 1, 8, 9
MIDDLE SCHOOL – HIGH SCHOOL
CLASS TIME: 2-3 ONE-HOUR PERIODS
REQUIRED MATERIALS:
• Computer with Mixcraft
• Headphones or Monitors
• Microphone
• Copies of the Debate Podcast Student Guide (“Additional Materials Download’)
SUGGESTED MATERIALS:
• Audio/Computer Interface
• Sources to research for the debate
• Further Reading Materials
15

130
ACTIVITYPreparing For the Podcast
1. Select a debate topic. Online sources (such as http://www.debate.org/opinions/) are an excellent choice for finding debate topic. Below are several suggestions:
•Localcurrentevent. •Politicalissue. •Currenttrendsinscience. •Areviewofaperformingart. •Podcastdiary.
2. Create a blog specifically for the debate. Students will use this blog to post the podcasts of the debate and to respond with comments or links to additional articles. Wordpress (http://wordpress.com/) and Blogspot (http://blogspot.com/) are common blogging platforms that are user friendly and free.
3. Divide students into small groups. Generally, debates are demarcated into point and counter-point sections. For example, a debate topic such as the impact of human society on global warming would have two sides (e.g. human society does not influence global warming vs. human society does influence global warming).
4. Podcasts vary in length, but for this class debate, each side should have 5-10 minutes to give opposing arguments. If more than one student will be giving arguments for a group’s position, limit each presenter to several minutes of podcast time.
5. Once debate groups have been created, debate topics distributed and positions decided upon, require students to write out a script of their part of the podcast. Do this before beginning the actual recording. This will help most students (especially nervous ones) be more relaxed. Because the arguments will have been written down beforehand, they can now be delivered more articulately. With a script in hand, it is time for to record the podcast!
Recording the Podcast
1. Open Mixcraft and select the Recording Yourself or Your Band template.
Mixcraft will load eight audio tracks into the workspace. Since this lesson will only be using one audio track, delete the extra tracks to tidy up the workspace (select tracks and click Ctrl + Shift + D).
2. Recording Audio. To prepare for the recording of audio, ensure that the microphone and audio/computer interface are properly set up.
A) First, to prevent feedback, turn off any speakers or monitors. Record with headphones. This will allow students to hear what they are recording without creating a feedback loop. Connect headphones to the headphone jack on your audio/computer interface, or on your computer.
B) Next, connect the microphone to the audio/computer interface with a microphone cord. To make sure Mixcraft is monitoring the audio/computer interface, check the File > Preferences > Sound Device tab and check to confirm that the interface is selected. If you are using a microphone pop filter, place the filter in front of the microphone. This will help create clean vocal recordings.

131
3. Now that the equipment is set up, it is time to record your debate!
A) Arm the audio track in the workspace by clicking “arm.” The downward arrow next to the arm button will enable users to select the source of the “incoming audio signal” (usually a microphone). Make sure the correct interface is selected. To check the configuration, try speaking into the microphone – the volume meter should jump. Also confirm the headphones are working.
B) For clean recordings monitor the incoming audio on the audio track’s volume meter. Record in the “yellow” zone. In this zone, recordings will be audible but not so loud that added artifacts (unwanted, accidental sounds) will “dirty” the recording.
An example of the yellow or “safe” zone to record in.
If the meter is reaching the “red” area, try dialing back the gain on the audio/ computer interface or move farther away from the microphone. Careful! Recording in the “red” zone could be harmful to your equipment or ears and could distort the recorded audio!
An example of the “red” or “unsafe” zone. This area could damage your ears and recordings.
C) Disarm the metronome. Since we do not need to record our vocals “in time” to instrument tracks, the metronome might be a distraction to students.
D) Rewind the cursor to the beginning of the timeline before recording.
E) Start recording by hitting the “master record button” (or “R” key). The first speaker should begin speaking. The cursor will move down the timeline and waveforms of the recorded speech will appear. To edit, re-record, or finish the audio, stop the recording by hitting “R” or the “space bar.” If a mistake has been made, select the area that needs to be rerecorded with your cursor and hit the master record button. Don’t forget to wear headphones to hear what is being recorded!
An example of recorded speech, illustrated as an audio region on the Timeline.
F) After finishing the recording, disarm the audio track from record mode and playback the audio from the beginning. Listen closely for parts that may need editing (rearrange, split or remove) or rerecording.
4. Edit the debate if necessary by splitting/merging, deleting, or rearranging audio regions on the Timeline.
A) Arranging audio: To arrange audio regions of your podcast on the Timeline, cut a large audio region into smaller segments. Right click an area on your waveform that you would like to rearrange and select “split” (Ctrl + T). The audio region will now be cut into two pieces. Cut as many sections as you need. Grab and move the regions on your workspace to re-arrange the recording.

132
Selecting the “split” option splices the audio region into two audio regions.
Separate audio segments can be merged into one segment. Simply highlight the relative segments (Shift + Click with a sweep over the segments) and right click to find the option “merge” (Ctrl +W).
B) Trimming audio: To trim, shorten, or extend the audio regions of your podcast, move your cursor near the ends of your waveform until you see a double-sided arrow. Simply click, and drag left or right to trim your audio region to the desired length. This edit is useful for quickly cropping out sections of your podcast that are undesired. If there are parts of the audio recording you want to remove, try splitting and then trimming the regions.
C) Deleting audio: To remove audio from your podcast, you can highlight (drag + select regions) then delete; or split your waveform into parts, highlight unwanted segments and then hit delete. Make a mistake? The “undo” button (curved arrow icon) can be found on the top left menu bar next to the “floppy disk – Save” icon.
5. Mix down the recording into a .WAV or .MP3 file (menu > Mix Down To > and select the correct file format). Remember, blogs and websites host specific audio files – if the blogging platform does not directly host audio files, look into third party websites that do. These sites are generally free and allow bloggers to embed audio files directly into blog posts.
6. Upload the podcast to the class blog. It might help to organize podcast uploads and blog posts by debate topic and to include both sides of the debate in one post.
7. Assign students the task of listening to the blog and commenting on the post with additional questions, remarks, or links to relevant articles.
8. Once a group has finished offer the spotlight to the next group. One small group per week is a time efficient pace to work at.

133
ADDITIONAL LESSON PLANSStory Telling: An alternative to the debate lesson plan is a project on story telling. The story telling project can include a curriculum from an English or theater class. Either choose a short story for the students or have students write their own short stories. Students should then “perform” their stories by reading and recording them into Mixcraft. Create a blog in which the stories can be posted.
FURTHER READING
Shuster, K. Speak Out! Debate and Public Speaking in the Middle Grades. Pirie, M. How to Win Every Argument: The Use and Abuse of Logic.

LESSON
134
TUTORIAL
DEBATE PODCAST PROJECT
ACTIVITYPreparing For the Podcast
1. Debate topic. Ask your teacher which debate topic you will be using for the podcast recording.
2. Research the topic at hand and construct an argument that defends your position on the subject.
3. Division of labor. Remember, your podcast should be 5-10 minutes long. If multiple students are in your group, consider dividing speaking time between them. More specifically, since debates usually cover multiple lines of attack, have each student cover a different point of the debate argument.
4. Write out a script of your podcast that highlights the main points of the argument. Once the script is finished, and prior to recording, read it aloud and rehearse your delivery.
RECORDING THE PODCAST 1. Once you are ready to record the podcast, open Mixcraft and select the Recording Yourself or Your Band template.
Mixcraft will load eight audio tracks into the workspace. Since a podcast only requires one audio track, delete the extra tracks to tidy up the workspace (select tracks and click Ctrl + Shift + D).
2. Recording Audio. To prepare for the recording of audio, ensure that the microphone and audio /computer interface are properly setup. Ask your teacher for help if necessary.
A) First, to prevent feedback, turn off any speakers or monitors. Record with headphones. This will allow you to hear what you are recording without creating a feedback loop. Connect headphones to the headphone jack on your audio/computer interface, or to your computer.
B) Next, connect the microphone to the audio/computer interface with a microphone cord. To make sure Mixcraft is monitoring the audio/computer interface, click the
STUDENT’S GUIDE CLASS TIME:
NAME:
PERIOD:
TEACHER:
CLASS:REQUIRED MATERIALS:
• Computer with Mixcraft
• Headphones or Monitors
• Microphone
• Copies of the Debate Podcast Student Guide (“Additional Materials Download”)
SUGGESTED MATERIALS:
• MIDI keyboard
• Audio/Computer Interface
• Further Reading Materials
15

135
File > Preferences > Sound Device tab and check to confirm that the interface is selected. If you are using a microphone pop filter, place the filter in front of the microphone. This will help create clean vocal recordings.
3. Now that the equipment is set up, it is time to record your debate!
A) Arm the audio track in the workspace by clicking “arm.” The downward arrow next to the arm button will enable users to select the source of the “incoming audio signal” (usually a microphone). Make sure the correct interface is selected. To check the configuration, try speaking into the microphone – the volume meter should jump. Also confirm the headphones are working.
B) For clean recordings, monitor the incoming audio on the audio track’s volume meter. Record in the “yellow” zone. In this zone, recordings will be audible but not so loud that added artifacts (unwanted, accidental sounds) will “dirty” the recording.
An example of the yellow or “safe” zone to record in.
C) If the meter is reaching the “red” area, try dialing back the gain on the audio/computer interface or move farther away from the microphone. Careful! Recording in the “red” zone could be harmful to your equipment or ears and could distort the recorded audio!
An example of the “red” or “unsafe” zone. This area could damage your ears and recordings.
D) Disarm the metronome. Since we do not need to record our vocals “in time” to instrument tracks, the metronome might be a distraction.
E) Rewind the cursor to the beginning of the timeline before recording.
F) Start recording by pressing the “master record button” (or “R” key). The first speaker should begin speaking. The cursor will begin moving down the timeline and waveforms of the recorded speech will appear. To edit, or re-record, or finish the audio, stop the recording by hitting “R” or the “space bar”. If a mistake has been made, select the area that needs to be rerecorded with your cursor and hit the master record button. Don’t forget to wear headphones to hear what is being recorded!
An example of recorded speech, illustrated as an audio region on the Timeline.
G) After finishing the recording, disarm the audio track from record mode and playback the audio of the debate from the beginning. Listen closely for parts that may need editing (rearrange, split or remove) or rerecording.
4. Edit the debate if necessary by splitting/merging, deleting, or rearranging audio regions on the Timeline.

136
A) Arranging audio: To arrange audio regions of your podcast on the Timeline, cut a large audio region into smaller segments. Right click an area on your waveform that you would like to rearrange and select “split” (Ctrl + T). The audio region will now be cut into two pieces. Cut as many sections as you need. Grab and move the regions on your workspace to re-arrange the recording.
Selecting the “split” option splices the audio region into two audio regions.
Separate audio segments can be merged into one segment. Simply highlight the relative segments (Shift + Click with a sweep over the segments) and right click to find the option “merge” (Ctrl +W).
B) Trimming audio: To trim, shorten, or extend the audio regions of your podcast, move your cursor near the ends of your waveform until you see a double-sided arrow. Simply click, and drag left or right to trim your audio region to the desired length. This edit is useful for quickly cropping out sections of your podcast that are undesired. If there are parts of the audio recording you want to remove, try splitting and then trimming the regions.
C) Deleting audio: To remove audio from your podcast, you can highlight (drag + select regions) then delete; or split your waveform into parts, highlight unwanted segments and then hit delete. Make a mistake? The “undo” button (curved arrow icon) can be found on the top left menu bar next to the “floppy disk – Save” icon.
5. Once the podcast sounds satisfactory it is time to mix the recording down into a file. Mix down the recording into a .WAV or .MP3 file. Go to menu > Mix Down To > and select the correct file format. Ask your teacher which file format is compatible with the blog. Once your podcast is completed and mixed down, notify your teacher.

CHAPTER
137
TUTORIAL
RAP IMPROVISATION PROJECT
OVERVIEW: Improvisation refers to the spontaneous creation of music, and is a skill that is often used either during a music performance or as an approach to music composition. Its use varies with the type of music: some specific music genres, such as jazz, Indian classical music, or modern Hip-hop rely heavily on improvisation. Hip-hop, however, is stylistically distinct from many of the other music styles, both contemporary and classic, because of its use of vocal (as opposed to instrumental) improvisation. A vocalist commonly referred to as the “MC” or “master of ceremony” improvises lyrics and rhymes over a repetitious musical background (i.e. “the beat”). Dexterous MCs are masters of wordplay, rhyme, and delivery and are able to produce witty rhymes on the spot. In this lesson plan, the students become the MC through the transformation of the class into a huge, improvising ensemble.
LESSON: Students or the teacher will produce a simple hip-hop beat using Mixcraft’s loops. This beat will serve as the foundation for the student improvisations. Next, each students will, one-after-another, improvise a few lines centered on a theme decided upon beforehand. Recorded the entire performance live and then mix down the recording for later play back. For grade school students, it is often helpful to write down a rhyme before recording. Though this is not true improvisation, younger students might benefit from having a reference. Middle and high school students, however, should try to improvise for the assignment. Jotting down a few lines or ideas might facilitate the rap, but students should not use notes as a crutch. Consider concluding the lesson with a discussion on the practice of improvisation; its relationship to multiple music genres; and its application in music performance.
SKILLS GAINED
Vocal Improvisation
An understanding of loop-based music
Audio Recording /Editing
TEACHER’S GUIDE NSME: 1, 2, 3, 7, 9
MIDDLE SCHOOL – HIGH SCHOOL
CLASS TIME: 2-3 ONE-HOUR PERIODS
REQUIRED MATERIALS:
• Computer with Mixcraft
• Headphones or Monitors
• Microphone
• Copies of Rap Improvisation Student Guide (Download Folder)
SUGGESTED MATERIALS:
• Audio/Computer Interface
• Internet Connection
• Further Reading Materials
16

138
ACTIVITYMaking a Beat in Mixcraft
1. Educators can create a beat or have students produce their own beats before recording the improvisation. Or use a beat from a previous lesson.
2. First, open Mixcraft and select the Build Loop & Beat Matched Music template.
Mixcraft will load eight audio tracks onto Mixcraft’s Timeline. Depending on class time and the complexity of the beat, either keep all eight tracks or delete those that are unnecessary. Often, users can create a beat with just two or three audio tracks and a handful of Mixcraft loops.
3. Finding Loops. Use Mixcraft’s loop library to create a simple hip hop beat:
A) First, click the “Library” tab in the Tab Area (located in bottom left hand corner). Mixcraft’s loop library will appear.
B) Change the “Sort by” option to “Style.”
C) Select the “Hip Hop” category.
D) Begin browsing the Hip Hop category for a drum loop. Keep in mind the tempo of the loop.
E) Preview and download loops by selecting the green play arrow next to a loop’s title. Mixcraft will begin to play the loop.
The Mixed Beat 4 in the Urban Street Mix kit is a great Hip Hop drum loop.
4. Select a drum loop. The Mixed Beat 4 from the Urban Street Mix kit is a fantastic hip hop drum loop. Once a drum loop has been selected, simply drag and drop it onto a free audio track in Mixcraft’s Timeline.
5. Loop the drum beat for several measures by clicking the circle with a “+” sign icon the on the loop’s audio region.
TIP:Included on the “Additional Materials Download” is a pre-made beat from a Mixcraft session. If educators are pressed for time, simply use this session and immediately start improvising!
TIP:To download loops your computer must be connected to the internet. Hopefully the computers in the lab are networked.
TIP:A Hip Hop song is usually played at a tempo of 90 – 100 BPM. Look for loops that are close to this BPM range.

139
The drum beat has now been looped for several measures by clicking the circle and plus sign icon.
6. Next, select a piano, keys, or synthesizer loop. The Rhodes 3 piano loop in the Urban Street Mix kit fits well in many hip-hop songs.
Browse through keyboard loops that might compliment a hip hop beat. Here the Rhodes 3 loop is selected.
7. Drag the selected keyboard loop onto a new audio track in Mixcraft’s Timeline. If desired, loop the keyboard part for multiple measures.
8. A single drum loop with a groovy keyboard is adequate for a hip-hop beat. However, you might want to spice up interest in the beat by adding more instrumental loops. For example, in the sample beat from the “Additional Materials Download,” several parts were added to the drum beat and keyboard loops: a synth lead, scratching sounds, and an electric bass line. This helped vary the mix and arrangement. Remember that you will be improvising over the beat – so be sure to leave space in the mix for these vocal parts.
9. Finish the beat by looping the drums and keyboards to provide several minutes of play time. Depending on the class size and the allocated measures for each student improvisation, you may need to loop your beat beyond the number duration of a popular song. Even ten minutes may be too short.
IMPROVISING WITH MIXCRAFT 1. Choose a topic for the rap improvisation. For younger students, daily narratives (such as a weekend expedition or an event that took place during summer vacation) are easy topics to rap about. The improvised rap relays a story. Older students can improvise about more complex topics. Suggestions are listed below:
Rap about your favorite food
Rap about a pet, a friend, or your favorite teacher
Rap about your favorite holiday
Rap about one of your hobbies
2. If necessary, encourage students to write out a script or even a few lines. Though a predetermined rap is a deviation from a lesson on improvisation, a script may help younger student deliver the rap into the microphone during recording.
3. Recording the improvisation. There will be only one set up, since this lesson is a group effort. First, ensure that the microphone and audio/computer interface are set up properly. Here is a typical setup practice:

140
A) Turn on monitors but move the microphone away from the speakers. Students will need to hear the music while improvising. However, if the microphone starts to pick up the audio coming from the monitors a feedback loop will be created.
B) Next, connect the microphone to the audio/computer interface with a microphone cord. Use a long microphone cord if possible. This will make it easy to pass the microphone around the room. To make sure Mixcraft is monitoring the audio/ computer interface, click File > Preferences > Sound Device tab and confirm that the interface is selected.
C) Insert a new audio track (Top Menu > Track > Add Track > Audio Track). This track will be used to record the rap improvisation.
D) Arm the new audio track in the workspace by clicking “arm.” The downward arrow next to the arm button will enable users to select the source of the “incoming audio signal” (the microphone). Make sure the correct interface is selected. To check the configuration, speak into the microphone – the volume meter should jump.
E) For clean recordings educators will want to monitor the incoming audio of the student’s improvisation by checking the audio track’s volume meter. Record in the “yellow” zone. In this zone, recordings will be audible but not so loud that added artifacts (unwanted or accidental sounds) will “dirty” the recording.
An example of the yellow or “safe” zone to record in.
If the meter is reaching the “red” area, try dialing back the gain on the audio/computer interface or tell the student to move farther away from the microphone. Careful! Recording in the “red” zone could be harmful to your equipment or ears and could distort the recorded audio!
An example of the “red” or “unsafe” zone. This area could damage your ears and recordings.
4. Begin recording by hitting the “master record button” or by pushing “R” on the computer keyboard.
5. Start the improvisation by recording an introduction over the beat. Identify the class, the period, and what the rap improvisation will be about.
6. Pass the microphone around to each student and let him/her improvise. Assign an amount of improvisation time: two measures should be enough for each student to improvise a few lines. Continuing passing the microphone until all the students have improvised.
7. Stop recording by clicking the master stop button.
8. Select the “mixer” tab in the Tabs Area. If need be, adjust the volume of the vocal improvisation track or of the other instrument tracks so the vocal improvisation sits “on top” of the mix and can easily be heard.
9. Finally, mixdown the improvisation. Go to Menu > Mix Down To > and select the correct file format (.MP3 or .WAV).

141
ADDITIONAL LESSON PLANSSpoken word: Spoken word is a type of performance poetry that focuses on dramatic interpretations of written text. Create a project in which a class participates in a grand performance of a poem. Have each student write a verse and then string all the verses together to form a complete poem. Spoken word is generally not performed with music. Encourage students to focus on their unaccompanied, solo delivery. Record the performance, as the students, one after the other, recites a verse of the poem.
FURTHER READING
Edwards, P. How to Rap: The Art and Science of the Hip-Hop MC
Brewster, B. & Broughton, F. Last Night a DJ Saved My Life.

LESSON
142
TUTORIAL
RAP IMPROVISATION PROJECT
ACTIVITYMaking a Beat in Mixcraft
1. Ask your teacher whether you will be making your own beat, using one made by your teacher, or using the beat supplied in the “Additional Materials Download.”
2. If the lesson requires you to produce your own hip hop beat, open Mixcraft and select the Build Loop & Beat Matched Music template.
Mixcraft will load eight audio tracks onto Mixcraft’s Timeline. Depending on class time and the complexity of the beat, either keep all eight tracks or delete those that are unnecessary. Often, users can create a beat with just two or three audio tracks and a handful of Mixcraft loops.
3. Finding Loops. We will use Mixcraft’s loop library to create a simple hip hop beat:
A) First, click the “Library” tab in the Tab Area (located in the bottom left hand corner). Mixcraft’s loop library will appear.
B) Change the “Sort By” option to “Style.”
C) Select the “Hip Hop” category.
D) Begin browsing the Hip Hop category for a drum loop. Keep in mind the tempo of the loop.
E) Preview and download loops by selecting the green play arrow next to a loop’s title. Mixcraft will begin to play the loop.
The Mixed Beat 4 in the Urban Street Mix kit is a great Hip Hop drum loop.
REQUIRED MATERIALS:
• Computer with Mixcraft
• Headphones or Monitors
• Microphone/USB Microphone
Rap Improvisation Student Guides (Additional Materials Download
SUGGESTED MATERIALS:
• Audio/Computer Interface
• Internet Connection
• Further Reading Materials
STUDENT’S GUIDE CLASS TIME:
NAME:
PERIOD:
TEACHER:
CLASS:
16

143
4. Select a drum loop. The Mixed Beat 4 from the Urban Street Mix kit is a fantastic hip hop drum loop. Once a drum loop has been selected, simply drag and drop the loop onto a free audio track in Mixcraft’s Timeline.
5. Loop the drum beat for several measures by clicking the circle with a “+” sign icon the on the loop’s audio region.
The drum beat has now been looped for several measures by clicking the circle and plus sign icon.
6. Next, select a piano, keys, or synthesizer loop. The Rhodes 3 piano loop in the Urban Street Mix kit fits well in many hip hop songs.
Browse through the keyboard loops that might compliment a hip hop beat. Here the Rhodes 3 loop is selected.
7. Drag the selected keyboard loop onto a new audio track in Mixcraft’s Timeline. If desired, loop the keyboard part for multiple measures.
8. A single drum loop with a groovy keyboard is adequate for a hip-hop beat. However, you might want to spice up interest in the beat by adding more instrumental loops. For example, in the sample beat from the “Additional Materials Download,” several parts were added to the drum beat and keyboard loops: a synth lead, scratching sounds, and an electric bass line. This helped vary the mix and arrangement. Remember that you will be improvising over the beat – so be sure to leave space in the mix for these vocal parts.
9. Finish the beat by looping the drums and keyboards to provide several minutes of play time. Ask your teacher how long the beat should be. Choose one of the beats created by the class to serve as the beat for the rap improvisation.
IMPROVISING WITH MIXCRAFT 1. Choosing a topic to rap about. Ask your teacher what you will be rapping about. Your assignment is to spontaneously make up rhymes and lines that relate to this topic.
2. If necessary write out a script or a few lines of your rap. Rehearse these lines beforehand.
3. Recording the improvisation. When it is your turn to improvise, speak into the microphone clearly and rap a few lines.
4. When your time is up, pass the microphone around to the next student. Continuing passing the microphone until all students have improvised.
5. Someone will stop the recording by clicking the master stop button.
6. Mixing the improvisation. Since there will be only one recording, your teacher will help the class adjust the volume of the tracks of the improvisation session.
7. Finally, your teacher will help the class mix down the improvisation performance. Go to menu> Mix Down To>and select the correct file format (.MP3 or .WAV).
TIP:To download loops your computer must be connected to the internet. Hopefully the computers in the lab are networked.
TIP:A Hip Hop song is usually played at a tempo of 90 – 100 BPM. Look for loops that are close to this BPM range.

CHAPTER
144
TUTORIAL
TEACHER’S GUIDE NSME: 1, 2, 3, 4, 6
GRADE SCHOOL – HIGH SCHOOL
CLASS TIME: 4-6 ONE-HOUR PERIODS
REQUIRED MATERIALS:
• Computer with Mixcraft
• Microphone
• Headphones or Monitors
• Copies of the Lyrical Songwriting Student Guide (Additional Mat. Download)
SUGGESTED MATERIALS:
• Internet Connection
• MIDI Controller
• Acoustic Instruments
• Audio/Computer Interface
• Further Reading Materials
17LYRICAL SONGWRITING PROJECT
OVERVIEW: A song is a relatively short voice composition that is set to music and is performed by at least one singer with or without instrument accompaniment. Song compositions sung simultaneously by multiple voices are called “choruses” and songs written for voice only, without instrument accompaniment, are referred to as “a cappella.” Educators please note that “chorus” can also refer to a stanza in a song that is preserved and repeated over the course of the song (often following each verse or after several verses). Much of popular music is dominated by a particular type of song which is termed “strophic.” Strophic songs often contain well-known song structures or sections, such as the “verse” and “chorus,” that are referred back to at various points in the song. By contrast, “thoroughly-composed” songs lack this repeated structure and are composed straight through with no repeated sections.
The art of songwriting certainly has a rich and complex history. Songs have always been intertwined with and representative of cultural identity and political ideology. Many famous songwriters have had the dubious honor of being placed on government “watch” lists of those considered potential threats to domestic security. For educators interested in the art of songwriting as viewed through an anthropological, political or historical lens, this lesson offers the opportunity to explore such topics.
LESSON: This lesson is designed to be a collaboration between an English/writing class and a music class. First, students will analyze several popular song lyrics supplied by the educator. Students will then write their own lyrics or short pieces of poetry and set their word creations to music using Mixcraft’s loops. The topic of the lyrics/poetry can be determined by the student or educator. Though not required, it is recommended that students have some familiarity with Mixcraft before undertaking this holistic project. If the class is a mixture of English and music students, perhaps the music students could help with the Mixcraft part of the lesson.
This lesson organizes the text and music in an ABAB format or a Verse-Chorus-Verse-Chorus structure (though educators can certainly modify this song structure to extend the lesson plan). For grade school students, simple songs can be written and sung by the entire class. If students are unable to produce music in Mixcraft, rhythmic accompaniment, such as clapping or drumming, will suffice as the musical setting for the lyrics. This will also generate group participation without the need for a more technical setup. Middle and high school students will be directly engaged with basic music production and will learn to write more complex lyrics and music. As a prelude to the songwriting part, older students might enjoy discussing the evolution of song by analyzing various song genres (art songs, folk songs, current popular songs). There is always, of course, the unresolved philosophical query: What comes first, the lyrics or the musical composition – or can both evolve together? This question could even be incorporated into the lesson plan and might help inspire a student discussion on strategies for writing lyrics and music. Finally, the lesson can be altered to teach audio recording and music performance techniques: using Mixcraft’s loops instead of actually recording live instruments will certainly satisfy students looking for a demanding and challenging project. Student voice imitations of instruments could also be used in the creation of loops.
SKILLS GAINED
Songwriting (both music and lyrics)
Using Mixcraft Loops
Audio Recording

145
YOUNGER STUDENTS OLDER STUDENTS
Favorite Animal A story of a historical event
Favorite Food A fictional story that includes themselves as protagonists
About a family member A story about dreams and aspirations
About a holiday A story about something that is bothering them
Fieldtrip
A Vacation
ACTIVITYWriting Lyrics
Research several popular music songs and analyze the lyrics with students. In this lesson plan, we will be using the song structure ABAB (verse-chorus-verse-chorus). There are, of course, other strophic forms (song forms that use repetition of verses and choruses – like ABAB above), that educators could use as a potential lesson plan extension.
Have students brainstorm for a topic to write about. If possible, collaborate with an English class during the writing process. Students could compose lyrics about a historical, mathematical, or scientific event. Younger students might write about simple events, family relations, pets, friendships, games or objects; or they could use the type of “counting” song that involves letters and numbers. Perhaps describing a school fieldtrip or their favorite type of food would excite grade school children. Have older students tell a story using more complex lyrics. They might even use songwriting as a coping mechanism – to write about something that is troubling them. Below are a few ideas for topics:
Write lyrics in an ABAB form. Students will write a verse, followed by a chorus, then a verse and finally a chorus – ABAB. Rhyming is a strategy songwriters employ to give a special texture or rhythm to the sound of the lyrics and to enhance memorization by the listener. For younger students, writing several simple rhymes can suffice for their project. Older students should work on telling a story and use each verse to continue the narrative (much like “chapters” in a book). The terms “verse” or “chorus” with regard to lyrics are defined as:
Verse: A unique section of lyrics that is not repeated. A song may have any number of verses, all different. Verses tell the story of the song.
Chorus: A phrase of lyrics (like a verse) that is repeated without alteration several times in a song. Usually the repeated chorus has identical lyrics or lyrics slight variations. The chorus is also known for carrying “the hook,” or the infectious, sing-along part of the song.
Here are two examples of lyrics that follow an ABAB structure (Verse-Chorus-Verse-Chorus):

146
YOUNGER STUDENT LYRICS
“My Pets”
A (Verse): My favorite fish is a fish named Polly Polly likes to swim around Polly likes to hide under rocks
B (Chorus): These are my pets These are my pets
A (Verse 2) My favorite dog is a dog named Wally Wally likes to sniff around Wally likes to wag his tail
B (Chorus): These are my pets These are my pets
OLDER STUDENT LYRICS
“Homesick”
A (Verse): All the houses on the street seem to have faces And no matter where I go, no matter which places I visit, they keep staring with windows aglow It is though I am never alone
B (Chorus): When the lights are dimmed Take me home, take me home When the leaves start to thin Take me home, take me home
A (Verse 2) I walk down these snow covered roads Till I find they begin to feel less cold, less old The sun is rising and her warmth seems near A jealous breeze pushes her here
B (Chorus): When the lights are aglow Take me home, take me home When the leaves start to grow I want to go home, take me home
In the younger student song, the author is writing about his or her favorite pets. Each verse provides the listener with information about the animal including the pet’s name and behavioral habits. The chorus is a simple repetition, almost a chant, of one line “these are my pets/these are my pets” – certainly an affirmation of the song’s playful topic.
In the older student song, the author describes being homesick. Verse one describes a feeling of isolation even while wandering down a street with well lit houses. The first chorus refers to dim lights and thin leafs, perhaps it is autumn or winter, to place the listener in a seasonal context. The lyrics in the second verse appear hopeful on the surface with depictions of warmth and a heightened sense of familiarity (“they [the roads] begin to feel less cold, less old”). Also there is, perhaps, even a reference to a motherly figure or lost lover, “the sun is rising and her warmth seems near/a jealous breeze pushes her here.” Finally, the narrative comes full circle in the second chorus when the seasons described are now spring and summer.
Brainstorm the music. After the students have written their lyrics, they have a couple of important decisions to make before producing music for their lyrics in Mixcraft:
A) Meter: A simple meter like 4/4 will work with most songs. However if students write a waltz or in another form that uses 3/4 time, this will have to be configured within Mixcraft.
B) Tempo: Is the song slow or fast? Decide on the tempo of the song. Tempo is measured in BPM (beats per minute) in Mixcraft. A BPM between 80 and 90 is considered slow, while a BPM of 130 – 140 is considered moderately fast.
C) Mood: Is your song sad or happy? Students can use certain scales or keys to covey particular moods: try a minor scale or key for a sad song. Try a major scale or key for a happy song.
D) Arrangement: How many instruments will be used? Do you want a drum track? Guitars? Orchestral sounds? With Mixcraft loops, it is easy to add all of these instruments. Decide on your arrangement beforehand.

147
WRITING A SONG IN MIXCRAFT 1. Once the lyrics are finalized and a rough idea for the music has been formed, it is time to actually create music and set the lyrics to music.
2. First, open Mixcraft and select the Build Loop & Beat Matched Music template.
Mixcraft will load eight audio tracks on Mixcraft’s Timeline.
3. Change the tempo, meter, or key of the song by clicking on the master bar’s display.
Clicking this display on the master bar will allow users to change the tempo, meter, or key.
4. Setting markers. Markers are an easy way to note where specific parts of the song begin and end on Mixcraft’s Timeline. Measure numbers run along the top of the Timeline. We will be setting markers on certain measures for the ABAB structure:
A) At measure 1 on the Timeline, double-click on the blue flag that says “Start.” Change the marker title to “Introduction.”
B) Next, add a marker at measure 9 by right-clicking just next to the number on the Timeline (Or double click 9). Select “Add marker…” Label the marker “Verse 1.”
Right-click next to measure 9 on the timeline to add a marker. Label the marker “Verse 1”
C) Next, add a marker at measure 25 and label it “Chorus 1.”
D) Finish adding markers and renaming them: at measure 41 (“Verse 2”); measure 57 (“Chorus 2”); and measure 73 (“Outro”).
E) These markers will help you compose music for your introduction, verse, chorus, and outro (concluding) sections. You can start playback at any of the markers by right-clicking the marker and selecting “Play from marker…”
5. Verse music. This lesson will use the song form ABAB to demonstrate one approach to creating a song in Mixcraft. Although the exercise calls for the use of Mixcraft’s loops for the music, students can always choose to record themselves playing instruments. Remind students that they will be singing their lyrics over the section of each verse that has been reserved for lyrics on the timeline. This might influence which Mixcraft loops they choose.

148
A) Verse drums. Select the “Library” tab in the Tab Area (located in the lower left hand corner). This will display Mixcraft’s loop library. To review drums: Sort By > Instruments > Drums. A long list will appear in the large selection area of the window. Browsing some of the available loops. To preview a loop, simply click the green play arrow located next to it. Remember, an internet connection is required to download loops currently not stored on the computer hard drive.
To find Acoustica’s drum loops: Library > All > Sort By > Instrument > Drums.
B) When you have found a loop you like, drag and drop the loop onto the first audio track on measure 9. Mixcraft will ask if you want to change the master tempo to the tempo of the loop – select “No.”
C) The drum loop should be played through the entire verse (verse 1). To extend the loop, students can either “copy and paste” the loop, or select the loop option (icon with “circle” and “+”) above the audio region of the drum loop.
A drum loop dragged onto measure 9 of the first audio track. Clicking the circle with a “+” sign on the audio region will loop the track.
D) Harmony. Next, find a keyboard, piano, or synthesizer loop for the verse. Use the Mixcraft loop library to browse and preview. Pay particular attention to the key of the loop. If the key does not match Mixcraft’s master key, Mixcraft will automatically transpose the key. The key will also say whether the loop is in major or minor. Use this information to convey the mood of the song. Repeat the above steps and loop the keyboard all the way through the verse (verse 1).
E) Finish the verse by adding one or two more instruments. A bass part is generally needed, but not required. Try previewing the bass loops or other instruments. Drag any new loops onto a blank audio track at measure 9. Each instrument should have its own track.

149
F) Arrange the verse. Try alternating between loops throughout the verse. For example, the bass could play on measures 9 -12 and rest on 13. A new loop could start playing on measure 13 in place of the bass. Try different patterns with your arrangement. Below is a sample arrangement for verse one:
In this arrangement, the drum, a synthesizer bass loop, and a synthesizer swirling pad, are being played throughout the verse. The trumpet and lead solo loops alternate measures.
G) Once verse one is completed, highlight and copy all the loops of the verse 1 Timeline segment (measures 9-25) and paste them onto measure 41(which is the beginning of verse 2). The music for these verses will now be identical.
H) Creating the chorus. The Timeline from measure 25 to measure 41 will still be blank. This is where the chorus will be created. Starting at the measure 25 flag use the same drum loop selected for verse 1. Now, however, is the opportunity to use different instrumental loops on the other tracks! These new loops will alert the listener to the shift from verse to chorus. Try finding loops in the same key as the verse (two different keys may sound “off” to the listener).
I) Once the instrumentation of chorus one is completed, copy and paste the chorus one segment (measures 25-41) onto measure 57 (or chorus two). Now the music for both the verses and choruses should be completed.
J) Finally, create an intro and outro (introduction and ending section). An introduction is usually an instrumental part of the song that leads up to the first verse. Create an introduction starting at measure one by using the same loops from verse one (“copy and paste” or “drag”). The outro, or ending to the song, can easily be created by expanding the loops of the chorus along the timeline. To review; Intro, measures 1-9; Verse 1, measures 9-25; Chorus 1, measures 25-41; Verse 2, measures 41-57; Chorus 2, measures 57-73; and Outro, 73-----.
K) With the music completed, save your Mixcraft session. The final step of songwriting involves putting the cherry on top – recording the lyrics!

150
6. Prior to recording, have students practice humming or singing the lyrics over the music. Hopefully a usable melody will emerge from this initial rehearsal. If there are students who are uncomfortable singing alone, ask a less shy fellow student to help by singing along.
7. Students may need to adjust their lyrics to fit the music. Allow them time to experiment and rehearse with different vocal melodies, delivery tempos and lyrical arrangements.
8. To avoid noise interference and distraction, make sure the students are in a quiet environment for the recording. Try to find a time of day that will not be disruptive to other classes.
RECORDING THE LYRICS IN MIXCRAFT 1. Recording Audio. Set up:
a) First, to prevent feedback, turn off any speakers or monitors. Record with headphones because this will allow students to hear what they are recording without creating a feedback loop. Connect headphones to the headphone jack on your audio/computer interface, or on your computer.
b) Next, connect the microphone to the audio/computer interface with a microphone cord. To make sure Mixcraft is monitoring the audio/computer interface, check the File > Preferences > Sound Device tab and confirm that the interface is selected. If using a microphone pop filter, place the filter in front of the microphone. This will help create clean vocal recordings.
2. Testing the audio signal chain:
A) Arm a blank audio track in the workspace by clicking “arm.” Click the downward arrow next to the arm button and select the source of the recorded audio (the microphone). Make sure your interface is selected. To check the configuration, speak into the microphone – the volume meter should jump. Also check “Monitor Incoming Audio” to activate the headphones.
B) Remember, for clean recordings, monitor the incoming audio on the audio track’s volume meter. Record in the “yellow” zone. In this zone, the recordings will be audible, but not so loud that the recording will be distorted.
An example of recording in the “yellow zone.”
If the meter is reaching the “red” area, try dialing back the gain on the audio/computer interface or move the performer/performers farther away from the microphone.
An example of recording in the “red zone.” Careful! Recording in the “red” zone could be harmful to your equipment or ears and could distort the recorded audio!

151
3. With Mixcraft and the recording equipment configured, help students record their lyrics. To start recording, press the master record button on the Master Bar or press “R” on the keyboard. Students will sing their lyrics at the proper places by watching the flow of the piece on the timeline – they will sing the verses in the appropriate areas of the verse segments and the chorus in the chorus segments. Prompt if necessary. Make any edits that may be required.
The master record button located on the Master Bar.
4. Once the recording is finished, mix the song using the “Mixer” tab in the Tab Area. Adjust the volume or pan settings as necessary. When mixing, try to keep the vocals audible and clear, but not so loud that they drown out the instruments. Likewise don’t let the instruments overwhelm the singer.
5. When the mix is satisfactory, mix down the song into a .WAV or .MP3 file. Go to top file and select File > Mix Down To…> and select the file type.
ADDITIONAL LESSON PLANSThoroughly-composed song: For older students, breaking away from the constraints of traditional songwriting structure (i.e. verse/chorus variations such as ABAB) can provide an opportunity to flex their creative muscle with undefined, abstract forms. A thoroughly-composed song structure is described as “free form” – it requires no structure (or planning). Create a lesson plan in which students write a thoroughly-composed song about a particular topic. Remember, no lyrics or words should be explicitly repeated. In a similar fashion, the instrumental part should also not follow the verse/chorus structure.
Lieder: Lieder (also called art-songs) are vocal compositions of poems set to music. Design a project in which students set a target poem to music. Younger students will enjoy using popular children’s poems (e.g. Shel Silverstein’s poems); while older students could choose more intricate works (e.g. Edgar Allan Poe).
FURTHER READING
Pattison, P. Writing Better Lyrics
Zollo, P. Songwriters on Songwriting.

LESSON
152
TUTORIAL
LYRICAL SONGWRITING PROJECT
ACTIVITYWriting Lyrics
With the help of your teacher, research several popular music songs and analyze the lyrics. Note how songwriters use lyrics to convey ideas, themes, or images.
Brainstorm to come up with a song topic of your own. Below are a few ideas:
Write lyrics in an ABAB form. Write lyrics for a verse (A), followed by a chorus (B), then a verse again (A) and finally a chorus (B). The terms “verse” or “chorus” in relation to lyrics are defined as:
Verse: A unique section of lyrics that is not repeated. A song may have any number of verses, all different. Verses tell the story of the song.
Chorus: A phrase of lyrics (like a verse) that is repeated several times in a song with only slight, if any, alteration. The chorus is also known for carrying “the hook,” or the infectious, sing-along part of the song.
REQUIRED MATERIALS:
• Computer with Mixcraft
• Headphones or Monitors
• Microphone/USB Microphone
• Mixcraft Loops
• Copies of the Lyrical Songwriting Student Guide (Additional Materials)
SUGGESTED MATERIALS:
• Audio/Computer Interface
• Internet Connection
• MIDI Controller
• Acoustic Instruments
• Further Reading Materials
STUDENT’S GUIDE CLASS TIME:
NAME:
PERIOD:
TEACHER:
CLASS:
YOUNGER STUDENTS OLDER STUDENTS
Favorite Animal A story of a historical event
Favorite Food A fictional story that includes themselves as protagonists
About a family member A story about dreams and aspirations
About a holiday A story about something that is bothering them
Fieldtrip
A Vacation
17

153
Here are two examples of lyrics that follow an ABAB structure:
YOUNGER STUDENT LYRICS
“My Pets”
A (Verse): My favorite fish is a fish named Polly Polly likes to swim around Polly likes to hide under rocks
B (Chorus): These are my pets These are my pets
A (Verse 2) My favorite dog is a dog named Wally Wally likes to sniff around Wally likes to wag his tail
B (Chorus): These are my pets These are my pets
OLDER STUDENT LYRICS
“Homesick”
A (Verse): All the houses on the street seem to have faces And no matter where I go, no matter which places I visit, they keep staring with windows aglow It is though I am never alone
B (Chorus): When the lights are dimmed Take me home, take me home When the leaves start to thin Take me home, take me home
A (Verse 2) I walk down these snow covered roads Till I find they begin to feel less cold, less old The sun is rising and her warmth seems near A jealous breeze pushes her here
B (Chorus): When the lights are aglow Take me home, take me home When the leaves start to grow I want to go home, take me home
Brainstorm the music. With the lyrics complete, but before producing music in Mixcraft, students must select a:
Meter: A simple meter like 4/4 will work with most songs. However, a waltz or some other form might use a 3/4 time. The different meter will have to be re-configured within Mixcraft. (Project tab > Meter)
Tempo: Is the song slow or fast? Decide on the tempo of song. Tempo is measured in BPM in Mixcraft. A BPM between 80 and 90 is considered slow, while a BPM of 130 – 140 is considered moderately fast. (Project tab > Tempo)
Mood: Is your song sad or happy? Students can use certain scales or keys to covey particular moods: try a minor scale or key for a sad song. Use a major scale or key for a happier song. (Project Tab > Key)
Arrangement: How many instruments will be used? Do you want a drum track? Guitars? Orchestral sounds? With Mixcraft loops, it is easy to add all of these instruments. Decide on your arrangement beforehand.

154
WRITING A SONG IN MIXCRAFT 1. Once the lyrics are finalized and a rough idea for the music has been formed, it is time to actually create and shape the music and set your lyrics to the music!
2. First, open Mixcraft and select the Build Loop & Beat Matched Music template.
Mixcraft will load eight audio tracks on Mixcraft’s Timeline.
3. If necessary, change the tempo, meter, or key of the song by clicking on the master bar’s display (can also be done under the “Project” tab).
Clicking this display on the master bar will allow users to change the tempo, meter, or key for the song or for marker defined segments of the song.
4. Setting markers. Markers are an easy way to note where specific parts of the song begin and end on Mixcraft’s Timeline. Measure numbers run across the top of the timeline. We will be setting markers on certain measures for the ABAB structure:
A) At measure 1 on the Timeline, double-click on the blue flag that says “Start.” Change the maker title to “Introduction.”
B) Next, add a marker at measure 9 by right-clicking just next to the number on the Timeline (or double click 9). Select “Add marker…” Label the marker “Verse 1.”
Right-click next to measure 9 on the timeline to add a marker. Label the marker “Verse 1”
C) Next, add a marker at measure 25 and label it “Chorus 1.”
D) Finish adding markers and renaming them: at measure 41 (“Verse 2”); measure 57 (“Chorus 2”); and measure 73 (“Outro”).
E) These markers will help you compose music for your introduction, verse, chorus, and outro (concluding) sections. You can start playback for any of the markers by right-clicking the marker and selecting “Play from marker…”
5. Verse music. This lesson will use the verse form ABAB to demonstrate one approach to creating a song in Mixcraft. To produce the music, this lesson will use Mixcraft’s loops. Alternately, however, feel free to record yourself playing an instrument. Remember you will be singing your lyrics over the section of each verse that has been reserved for lyrics on the timeline. Too much music and your listener won’t be able to hear your vocals!
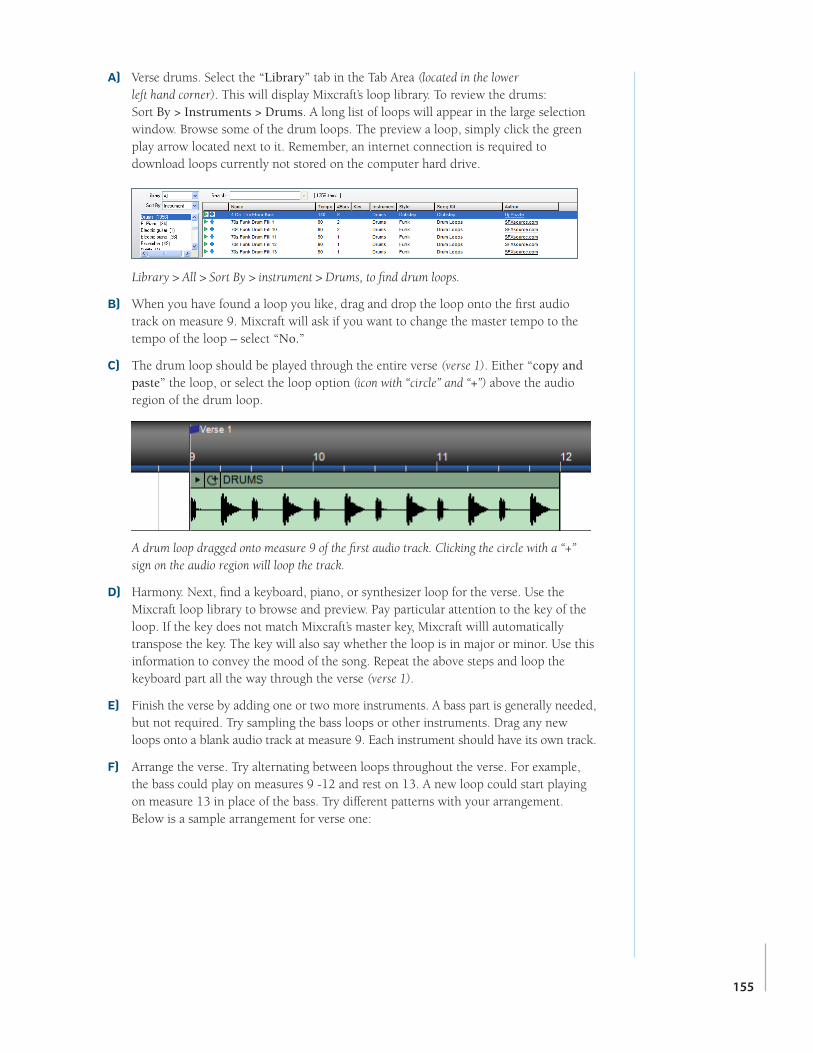
155
A) Verse drums. Select the “Library” tab in the Tab Area (located in the lower left hand corner). This will display Mixcraft’s loop library. To review the drums: Sort By > Instruments > Drums. A long list of loops will appear in the large selection window. Browse some of the drum loops. The preview a loop, simply click the green play arrow located next to it. Remember, an internet connection is required to download loops currently not stored on the computer hard drive.
Library > All > Sort By > instrument > Drums, to find drum loops.
B) When you have found a loop you like, drag and drop the loop onto the first audio track on measure 9. Mixcraft will ask if you want to change the master tempo to the tempo of the loop – select “No.”
C) The drum loop should be played through the entire verse (verse 1). Either “copy and paste” the loop, or select the loop option (icon with “circle” and “+”) above the audio region of the drum loop.
A drum loop dragged onto measure 9 of the first audio track. Clicking the circle with a “+” sign on the audio region will loop the track.
D) Harmony. Next, find a keyboard, piano, or synthesizer loop for the verse. Use the Mixcraft loop library to browse and preview. Pay particular attention to the key of the loop. If the key does not match Mixcraft’s master key, Mixcraft willl automatically transpose the key. The key will also say whether the loop is in major or minor. Use this information to convey the mood of the song. Repeat the above steps and loop the keyboard part all the way through the verse (verse 1).
E) Finish the verse by adding one or two more instruments. A bass part is generally needed, but not required. Try sampling the bass loops or other instruments. Drag any new loops onto a blank audio track at measure 9. Each instrument should have its own track.
F) Arrange the verse. Try alternating between loops throughout the verse. For example, the bass could play on measures 9 -12 and rest on 13. A new loop could start playing on measure 13 in place of the bass. Try different patterns with your arrangement. Below is a sample arrangement for verse one:

156
In this arrangement, the drum, a synthesizer bass loop, and a synthesizer swirling pad, are being played throughout the verse. The trumpet and lead solo loops alternate measures.
G) Once verse one is completed, highlight and copy all of the loops of the verse 1 Timeline segment (measures 9-25) and paste them onto measure 41(which is the beginning of verse 2). The music for these verses will now be identical.
H) Creating the chorus. The Timeline from measure 25 to measure 41 will still be blank. This is where the chorus will be created. . Starting at the measure 25 flag, use the same drum loop selected for verse 1. Extend to measure 41. Now, however, is the opportunity to use different instrumental loops on the other tracks! These new loops will alert the listener to the shift from verse to chorus. Try finding loops in the same key as the verse (two different keys may sound “off” to the listener).
I) Once chorus one is completed, copy and paste chorus one segment (measures 25-41) onto measure 57 (to form chorus 2 between measures 57-73). Now both verses and choruses should be completed.
J) Finally, create an intro/outro (introduction and ending section). An introduction is usually an instrumental part of the song that leads up to the first verse (where the vocal part first begins). You can easily create an introduction by using the same loops from verse one (“copy and paste” or click the beginning line of the loop and “drag”). The outro, or ending to the song, can easily by created by expanding the loops of the chorus along the timeline (“copy and paste” or “drag”). To review what we have created: Intro, measures 1-9; Verse 1, measures 9-25; Chorus 1, measures 25-41; Verse 2, measures 41-57; Chorus 2, measures 57-73; and Outro, measures 73-----.
K) With the music completed, save your Mixcraft session. The final step of songwriting involves putting the cherry on top – recording the lyrics!

157
6. Prior to recording, practice humming or singing the lyrics over the music. Try different vocal melodies and tempos. If any strong melody results from this warm-up exercise, try to use it! If you are not comfortable singing, ask a fellow student to sing along with you.
7. You may find that the lyrics you initially wrote do not exactly match your music. Experiment with the lyrics and adjust them to fit the music.
8. To record the lyrics, make sure you are in a quiet area. Try to record in a room in which there is not a lot of background noise.
RECORDING THE LYRICS IN MIXCRAFT 1. Recording Audio. Set up. Ask your teacher for help if needed:
A) First, to prevent feedback, turn off any speakers or monitors. Record with headphones because this will allow you to hear what you are recording without creating a feedback loop. Connect headphones to the headphone jack on your audio/computer interface, or on your computer.
B) Next, connect the microphone to the audio/computer interface with a microphone cord. To make sure Mixcraft is monitoring the audio/computer interface, check the File > Preferences > Sound Device tab and confirm that the interface is selected. If using a microphone pop filter, place the filter in front of the microphone. This will help create clean vocal recordings.
2. Testing the audio signal chain:
A) Arm a blank audio track in the workspace by clicking “arm.” Clicking the downward arrow next to the arm button will allow us to select the source of your recorded audio. Make sure your interface is selected (should be “microphone”). To check your configuration, speak into the microphone – the volume meter should jump. Also select “Monitor Incoming Audio” to activate the headphones.
B) Remember, for clean recordings, monitor the incoming audio on the audio track’s volume meter. Record in the “yellow” zone. In this zone, the recordings will be audible, but not so loud that the recording will be distorted.
An example of recording in the “yellow zone.”
If the meter is reaching the “red” area, try dialing back the gain on the audio/computer interface or move farther away from the microphone.
An example of recording in the “red zone.” Careful! Recording in the “red” zone could be harmful to your equipment or ears and could distort the recorded audio!

158
3. With Mixcraft and the recording equipment configured, it is time to record your lyrics. To start recording press the master record button on the Master Bar or press “R” on the keyboard. Sing your lyrics at the proper places in your verses by watching the flow of the piece on the timeline – sing your verses in the appropriate areas of the verse segments and sing the chorus in the chorus segments. Ask for prompting if you need it. Play back your results. If necessary, edit or re-record.
The master record button located on the Master Bar.
4. Once the recording is finished, mix the song using the “Mixer” tab in the Tab Area. Adjust the volume or pan settings. When mixing, try to keep the vocals audible and clear, but not so loud that they drown the rest of the instruments. Likewise don’t let the instruments overwhelm the singer.
5. When the mix is satisfactory, mix down the song into a .WAV or .MP3 file. Go to top file and select File > Mix Down To…> and select the file type. Enjoy.

CHAPTER
159
TEACHER’S GUIDE NSME: 1, 2, 3, 4
MIDDLE SCHOOL – HIGH SCHOOL
CLASS TIME: 1-3 ONE-HOUR PERIODS
REQUIRED MATERIALS:
• Computer with Mixcraft
• Mixcraft Loops
• Microphone
• Radio Jingle Student Guides (Additional Materials Download)
SUGGESTED MATERIALS:
• Internet Connection
• Headphones/ Monitors
• Audio/Computer Interface
• Further Reading Materials
18TUTORIAL
RADIO JINGLE PROJECT
OVERVIEW: Music and advertising have a long history together. From the very beginnings of both radio and television, advertisers have used music to create timely, playful, and, most importantly, memorable commercials to sell their products and instill “branding”. Radio advertisers commonly use the “jingle” (a short, catchy tune with a “hook”) to bring products (and the companies that make them) to the attention of the listening audience. The exact origin of radio jingle use is unknown; however, early radio advertisements from the 1920s contained musical elements. Almost anyone today can easily bring to mind examples of contemporary jingles.
LESSON: This project will teach students about basic advertising, loop-based music, and audio recording through the construction of an original radio jingle. Students will choose (or design) a product to be advertised; write a jingle that captures something special about their product; and then use Mixcraft loops to create a simple music piece to go with the jingle. Finally, students will record the jingle over the music and polish the new advertisement by mixing it down into an audio file. For middle and high school students the exercise can become a truly interdisciplinary lesson if the project is partnered with a lesson from a business or marketing course. As part of the lesson, students can study the effects of music on advertising and examine creative marketing strategies that might be applicable to the corporate world.
SKILLS GAINED:
Product Design
Music Production
Audio Recording

160
ACTIVITYWriting a Jingle
1. Have students brainstorm a jingle idea: Research radio jingles or music-based TV advertisements. Many TV and radio networks and TV and radio advertisements use characteristically short melodies or songs to connect to their audience. Name some popular jingles that are currently being aired. How is music being used in these advertisements? Encourage students to listen to radio commercials played on the internet or on analog stations.
2. Instruct students to select a popular product that they would like to compose a jingle for (alternately, students could create their own product or service). If applicable, coordinate with a business course and market a product as part of an extended lesson plan. Here are a few marketing ideas:
A local Pizza shop.
Bus tours for a major city.
Vacation getaways.
A new basketball shoe.
3. Brainstorm: What is the best way to use a jingle to advertise or showcase this particular product? What effect should the jingle try to achieve? How should it sound? Remember: Jingles make people want the product; and jingles make people remember the product. Here are the three main components of a jingle:
The “hook:” A short, supremely memorable melody or motif that introduces, runs through, or ends the advertisement. The hook is designed to capture the attention of the audience.
Accompanying music: Music that is played in the background while the narrator presents the product. Sometimes it has a catchy, memorable part.
The advertisement: The narration that describes the product to the audience. The narration can be formal, casual, or humorous.
MAKING A BEAT IN MIXCRAFT 1. First, open Mixcraft and select the Build Loop & Beat Matched Music template.
Mixcraft will load eight audio tracks on Mixcraft’s Timeline. Often the music accompanying a radio jingle is simple. This allows listeners to focus on the message of the advertisement without being distracted by noisy or busy music. Delete the extra audio tracks (Ctrl + Shift + D) until there are four audio tracks remaining.
2. Starting with the beat. Use Mixcraft’s loop library and select a simple drum loop that will be played throughout the jingle. Again, remind students that the product of the advertisement dictates the nature of the music: should the music be happy and upbeat (amusement park ad)? Or sophisticated and relaxing (bath oil)? Or wild and crazy (beverage commercial)?
TIP:To download loops your computer must be connected to the internet
ASK:Will the selected beat compliment the message of the advertisement and help sell the product?
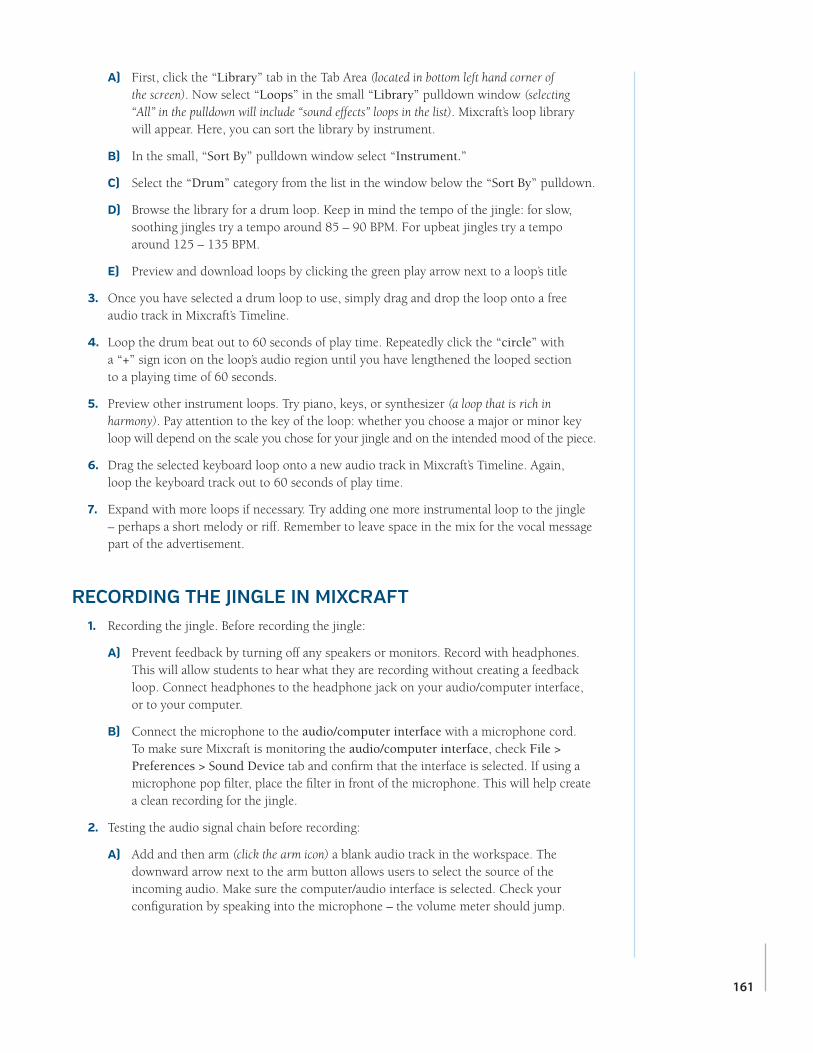
161
A) First, click the “Library” tab in the Tab Area (located in bottom left hand corner of the screen). Now select “Loops” in the small “Library” pulldown window (selecting “All” in the pulldown will include “sound effects” loops in the list). Mixcraft’s loop library will appear. Here, you can sort the library by instrument.
B) In the small, “Sort By” pulldown window select “Instrument.”
C) Select the “Drum” category from the list in the window below the “Sort By” pulldown.
D) Browse the library for a drum loop. Keep in mind the tempo of the jingle: for slow, soothing jingles try a tempo around 85 – 90 BPM. For upbeat jingles try a tempo around 125 – 135 BPM.
E) Preview and download loops by clicking the green play arrow next to a loop’s title
3. Once you have selected a drum loop to use, simply drag and drop the loop onto a free audio track in Mixcraft’s Timeline.
4. Loop the drum beat out to 60 seconds of play time. Repeatedly click the “circle” with a “+” sign icon on the loop’s audio region until you have lengthened the looped section to a playing time of 60 seconds.
5. Preview other instrument loops. Try piano, keys, or synthesizer (a loop that is rich in harmony). Pay attention to the key of the loop: whether you choose a major or minor key loop will depend on the scale you chose for your jingle and on the intended mood of the piece.
6. Drag the selected keyboard loop onto a new audio track in Mixcraft’s Timeline. Again, loop the keyboard track out to 60 seconds of play time.
7. Expand with more loops if necessary. Try adding one more instrumental loop to the jingle – perhaps a short melody or riff. Remember to leave space in the mix for the vocal message part of the advertisement.
RECORDING THE JINGLE IN MIXCRAFT 1. Recording the jingle. Before recording the jingle:
A) Prevent feedback by turning off any speakers or monitors. Record with headphones. This will allow students to hear what they are recording without creating a feedback loop. Connect headphones to the headphone jack on your audio/computer interface, or to your computer.
B) Connect the microphone to the audio/computer interface with a microphone cord. To make sure Mixcraft is monitoring the audio/computer interface, check File > Preferences > Sound Device tab and confirm that the interface is selected. If using a microphone pop filter, place the filter in front of the microphone. This will help create a clean recording for the jingle.
2. Testing the audio signal chain before recording:
A) Add and then arm (click the arm icon) a blank audio track in the workspace. The downward arrow next to the arm button allows users to select the source of the incoming audio. Make sure the computer/audio interface is selected. Check your configuration by speaking into the microphone – the volume meter should jump.

162
B) Remember, for clean recordings it best to monitor the incoming audio on the audio track’s volume meter. Record in the “yellow” zone. In this zone, the recordings will be audible, but not so loud that the recording is distorted.
An example of recording in the “yellow zone.”
C) If the meter is reaching the “red” area, try dialing back the gain on the audio/computer interface or move the student farther from the microphone.
An example of recording in the “red zone.” Careful! Recording in the “red” zone could be harmful to your equipment or ears and could distort the recorded audio!
3. With Mixcraft and the recording equipment configured, help students record their jingles. If necessary, prompt students for the entry points of their vocal parts. To start, press the master record button on the Master Bar or press “R” on the keyboard.
The master record button located on the Master Bar.
4. Once the recording is finished, mix the jingle using the “Mixer” tab in the Tab Area. Adjust the volume or pan settings. When mixing, try to keep the vocals audible and clear – they need to be heard by the audience! Play back the results. Is the “hook” working? Is the jingle catchy? Any need to re-record or edit?
5. When the mix is satisfactory, mix down the song into a .WAV or .MP3 file. Go to the top left of the workspace and select File > Mix Down To…> and select the file ”type.”
ADDITIONAL LESSON PLANSMovie Preview: There are, of course, several other mediums which use music to attract its audience. Movie previews short teasers that use music, dialogue, and other sound effects to bring the film to life and hook the audience into wanting to see it. Design a lesson plan in which students create a 1-2 minute movie preview. Supply video footage to the students. Students can then edit the audio and add music where necessary.
FURTHER READING
Karmen, S. Who Killed the Jingle? How a Unique American Art form Disappeared

LESSON
163
18TUTORIAL
RADIO JINGLE PROJECT
ACTIVITYWriting a Jingle
1. Brainstorm ideas for a jingle: With your teacher’s help, research radio jingles or music-based TV advertisements. Listen to radio commercials played on the internet or on analog stations.
2. Select a popular product or create a product (or service) to write a jingle for. Here are a few ideas for products/services for your jingle:
A local Pizza shop.
Bus tours for a major city.
Vacation getaways.
A new basketball shoe.
3. Brainstorm: What is the best way to advertise or showcase your particular product using a jingle? What effect should your jingle try to achieve? How should it sound? Remember: Jingles make people want the product; and jingles make people remember the product. Here are three main components of a jingle:
The “hook:” A short melody or motif that introduces, runs through or ends the advertisement. The hook is designed to capture the attention of the audience, so they “WILL NOT CHANGE THE CHANNEL OR GO TO THE RESTROOM!”
Accompanying music: Music that is played in the background while the narrator presents the product. Sometimes it has a catchy, memorable part.
The advertisement: A narration that describes the product to the audience. The narration can be formal, casual or humorous.
MAKING A BEAT IN MIXCRAFT 1. First, open Mixcraft and select the Build Loop & Beat Matched Music template.
Mixcraft will load eight audio tracks on Mixcraft’s Timeline. Often the music accompanying a radio jingle is simple. This allows listeners to focus on the message of the advertisement without being distracted by noisy or busy music. Delete the extra audio tracks (Ctrl + Shift + D) until there are four audio tracks remaining.
REQUIRED MATERIALS:
• Computer with Mixcraft
• Mixcraft Loops
• Microphone
• Radio Jingle Student Guides (Additional Materials Download)
SUGGESTED MATERIALS:
• Audio/Computer Interface
• Headphones/ Monitors
• Internet Connection
• Further Reading Materials
STUDENT’S GUIDE CLASS TIME:
NAME:
PERIOD:
TEACHER:
CLASS:
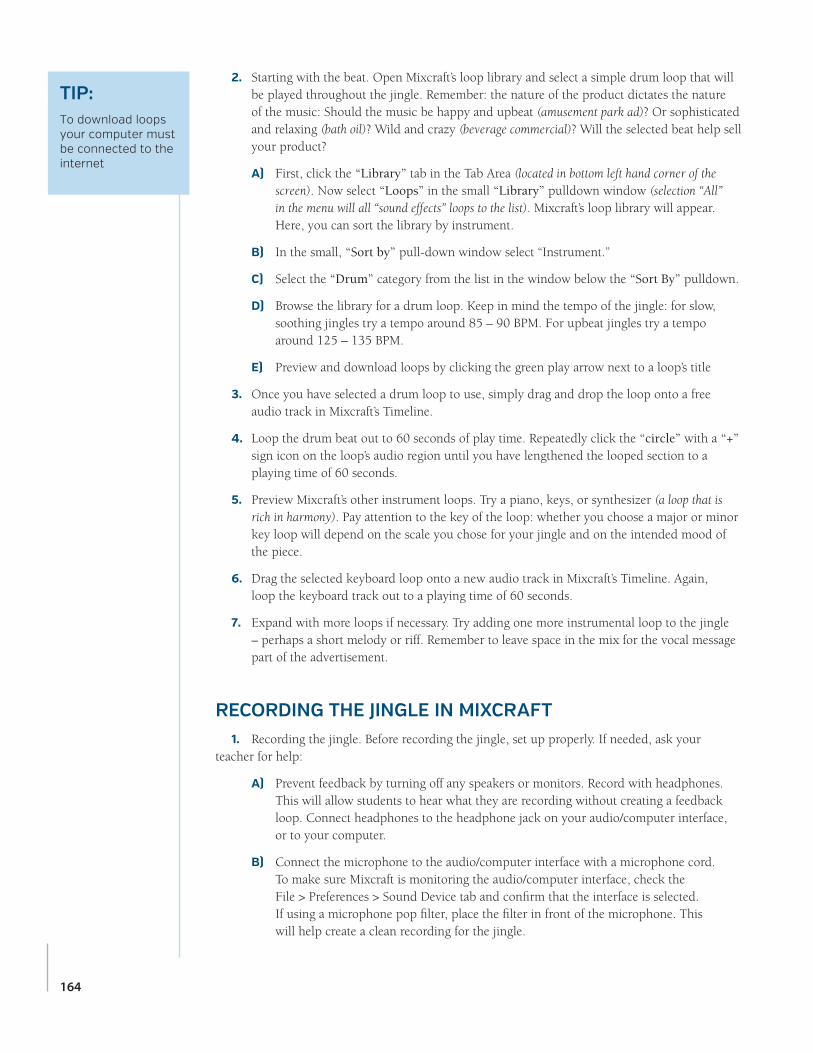
164
2. Starting with the beat. Open Mixcraft’s loop library and select a simple drum loop that will be played throughout the jingle. Remember: the nature of the product dictates the nature of the music: Should the music be happy and upbeat (amusement park ad)? Or sophisticated and relaxing (bath oil)? Wild and crazy (beverage commercial)? Will the selected beat help sell your product?
A) First, click the “Library” tab in the Tab Area (located in bottom left hand corner of the screen). Now select “Loops” in the small “Library” pulldown window (selection “All” in the menu will all “sound effects” loops to the list). Mixcraft’s loop library will appear. Here, you can sort the library by instrument.
B) In the small, “Sort by” pull-down window select “Instrument.”
C) Select the “Drum” category from the list in the window below the “Sort By” pulldown.
D) Browse the library for a drum loop. Keep in mind the tempo of the jingle: for slow, soothing jingles try a tempo around 85 – 90 BPM. For upbeat jingles try a tempo around 125 – 135 BPM.
E) Preview and download loops by clicking the green play arrow next to a loop’s title
3. Once you have selected a drum loop to use, simply drag and drop the loop onto a free audio track in Mixcraft’s Timeline.
4. Loop the drum beat out to 60 seconds of play time. Repeatedly click the “circle” with a “+” sign icon on the loop’s audio region until you have lengthened the looped section to a playing time of 60 seconds.
5. Preview Mixcraft’s other instrument loops. Try a piano, keys, or synthesizer (a loop that is rich in harmony). Pay attention to the key of the loop: whether you choose a major or minor key loop will depend on the scale you chose for your jingle and on the intended mood of the piece.
6. Drag the selected keyboard loop onto a new audio track in Mixcraft’s Timeline. Again, loop the keyboard track out to a playing time of 60 seconds.
7. Expand with more loops if necessary. Try adding one more instrumental loop to the jingle – perhaps a short melody or riff. Remember to leave space in the mix for the vocal message part of the advertisement.
RECORDING THE JINGLE IN MIXCRAFT 1. Recording the jingle. Before recording the jingle, set up properly. If needed, ask your teacher for help:
A) Prevent feedback by turning off any speakers or monitors. Record with headphones. This will allow students to hear what they are recording without creating a feedback loop. Connect headphones to the headphone jack on your audio/computer interface, or to your computer.
B) Connect the microphone to the audio/computer interface with a microphone cord. To make sure Mixcraft is monitoring the audio/computer interface, check the File > Preferences > Sound Device tab and confirm that the interface is selected. If using a microphone pop filter, place the filter in front of the microphone. This will help create a clean recording for the jingle.
TIP:To download loops your computer must be connected to the internet

165
2. Testing the audio signal chain before recording:
A) Add and then arm (click the “arm” icon) a blank audio track in the workspace. The downward arrow next to the arm button allows you to select the source of the incoming audio. Make sure the computer/audio interface is selected. Check your configuration by speaking into the microphone – the volume meter should jump.
B) Remember, for clean recordings it best to monitor the incoming audio on the audio track’s volume meter. In this zone, the recordings will be audible, but not so loud that the recording is distorted.
An example of recording in the “yellow zone.”
If the meter is reaching the “red” area, try dialing back the gain on the audio/computer interface or move the student farther from the microphone.
An example of recording in the “red zone.” Careful! Recording in the “red” zone could be harmful to your equipment or ears and could distort the recorded audio!
3. With Mixcraft and the recording equipment configured start recording: press the master record button on the Master Bar or press “R” on the keyboard. Ask your teacher for help if you have trouble.
The master record button located on the Master Bar.
4. Once the recording is finished, mix the jingle using the “Mixer” tab in the Tab Area. Adjust the volume or pan settings. When mixing, try to keep your vocals audible and clear – they need to be heard by the audience! Play back the results. Is the “hook” working? Is the jingle catchy? Any need to re-record or edit? What do students think of each other’s results?
5. When the mix is satisfactory, mix down the song into a .WAV or .MP3 file. Go to top left of the workspace and select File > Mix Down To…> and select the file “type.”

CHAPTER
166
TUTORIAL
TEACHER’S GUIDE NSME: 2, 3, 4, 7
GRADE SCHOOL – HIGH SCHOOL
CLASS TIME: 3-4 ONE-HOUR PERIODS
REQUIRED MATERIALS:
• Computer with Mixcraft
• Headphones or Monitors
• Ingredients for a home made instruments
SUGGESTED MATERIALS:
• Copy of STOMP on video
• MIDI Keyboard
• Headphones/ Monitors
• Further Reading Materials
19STOMP NOTATION PROJECT
OVERVIEW: In the mid-nineties a new British musical soared into popularity. Appropriately named STOMP, this hybrid music and theater act was driven by a rhythmically-dense soundtrack outlandishly performed with household objects. Sticks, basketballs, brooms, metal sinks, fenders, hub caps, every kind of can, pail, container and trash can lid were banged, rattled, clashed together and scraped to create complex percussion rhythms. Using mundane objects for music performance is certainly not revolutionary (20th century composers have been tinkering with similar practices for over fifty years); nevertheless their use in Stomp gave a unique charm and a riveting excitement to the musical. Turn your classroom into a STOMP ensemble by using homemade instruments and similar performance tactics. This is not an assignment on sound collage (which is another lesson in this book). Sound collage is somewhat formless: Stomp is most certainly not. There must be a perceivable organization to the music. If possible, show the class a DVD of the Stomp performance or have them watch some of the many Stomp performance clips available on the internet.
LESSON: The STOMP Notation Project teaches rudimentary notation skills by providing students with the opportunity to create homemade instruments; write a percussive or melodic line for these instruments; and finally notate these parts using Mixcraft. Prior to instrument design and notation work, a class is divided into small groups of students (3 -5 students) and each student is assigned a homemade instrument to play. Students can bring in household objects; use objects located in the classroom as an instrument; or construct their own instrument. For grade school classes, it may be best to have the educator write and notate the student parts: younger students can thus spend their time reading over and discussing the notation before attempting to actually “play” their individual parts. For middle school and high school classes, students should attempt to write and notate their own parts with Mixcraft. Students should focus on writing as a unit and collaborate with fellow group members to ensure each part is consistent with the overall vision of the piece. Those who want to teach musical principles during this course should focus specifically on rhythm. Perhaps giving an overview of different rhythms and metrical times will inspire the STOMP ensembles. Finally, once each student has written his/her part, each group should perform their STOMP song before the class.
Since their students will be producing rhythm based compositions for the STOMP exercise, it would be useful for educators to have some background in music notation ahead of time. Some of the more ambitious or capable students may even conjure up especially complex rhythms, which may prove challenging to notate. Because of this, teachers should consider practicing rhythm notation in Mixcraft beforehand. The student exercise for this lesson, however, does contains a walkthrough section on how to notate parts in Mixcraft. In addition, located in the “Additional Materials Download” is a Mixcraft session that contains a demonstration of notation and includes arrangements for four homemade instruments.
SKILLS GAINED
Notation/Editing Notation
MIDI Editing
Instrument Design/ Creation
Group Instrumental Performance

167
ACTIVITYMaking a STOMP Instrument
1. First, research homemade instrument recipes and the STOMP musical. Several popular video hosting websites have clips of the STOMP musical. Watch several clips and notice how household objects were converted into musical instruments (even better if you can acquire a full version of the STOMP video). Additionally, there is a multitude of online resources that provide recipes and instructions on how to create homemade or do-it-yourself instruments. Below are several basic ideas:
Shakers made of rice or beans
Basketballs for bouncing
Cups filled with varying amounts of water
Chopsticks for drumming
Pillows for thumping
2. Assign the students to small groups. Generally groups consisting of 3 to 5 students are enough for small STOMP ensembles. Remember, each student is responsible for developing and creating one homemade instrument.
3. Next, students should create their instruments. Remind students to work with the rest of the group. To avoid having composition and performance duplication, have each student in an ensemble create a different instrument.
WRITING A PART FOR THE STOMP INSTRUMENT 1. After the instruments have been made, it is time to write and notate parts for the STOMP ensembles.
2. Begin by brainstorming about the parts for each STOMP instrument. For example, a bouncing ball might be an instrument that keeps an underlying pulse and carries momentum throughout the song. To illustrate, a student could bounce the ball on beats 1 and 3 in a 4/4 time; shakers could play consistent 8th notes; and of course melodic instruments could play melodies!
3. To write and notate the instrumental parts, open Mixcraft and select the Build Virtual Instruments template. Mixcraft will load six audio tracks and two virtual instrument tracks into the Workspace. Since we will be only using the two virtual instrument tracks, delete the audio tracks (Ctrl + Shift + D). Ensure there are enough virtual instrument tracks for each instrument in a STOMP ensemble. If necessary add a few more to the Timeline (Crtl + E).

168
4. To start writing, double-click the Timeline on the blank area for the first virtual instrument track. Click at measure one to place the blank MIDI region at the beginning of the Timeline.
Double clicking on the Timeline places a blank MIDI region on the virtual instrument track.
5. Next, double-click on the blank MIDI region. The Sound Tab will launch and display the Piano Roll Editor. Change the “editor type” from Piano Roll to “notation.”
Change the Editor Type to the Notation setting. Now educators and students can use notation within MIxcraft!
6. The notation interface will appear. For simplicity’s sake, keep the meter in 4/4 time. To begin the notation:
A) Create a 4-measure loop. Drag the “loop end” flag on the notation window to the beginning of measure 5. The MIDI region on the Timeline will now extend to four measures.
Drag the Loop End flag to measure 5. This will set a loop that consists of 4 measures.
B) Select the pencil tool and the desired note type. In the above screen shot, the note type was set to quarter note. This will allow users to “draw” quarter notes on the sheet music.
The pencil tool and the quarter note settings are selected in this screen shot.
C) Begin composing by drawing notes to form a part. Small tick marks above the sheet music area denote where each beat falls. If you intended to place a note on a specific beat, try clicking in line with the tick marks.
Small tick marks alert the user to where a beat falls. In this example the first eighth note in measure 2 falls on beat two and is aligned with the tick mark directly above the note.
TIP:If you draw an unintended note: simply delete it by selecting the eraser tool; or by clicking undo (Ctrl + Z): or by clicking the undo button (counter clockwise circled arrow) at the top of the workspace.

169
D) For a percussive instrument, select a note (for example the “A” below middle “C” or A4) to denote a “hit” or “bounce.” In the example below, a part written for a bouncing ball calls for the performer to bounce the ball (which produces a “bouncing” sound) on beats 1 and 3.
A completed 4-bar part for bouncing ball. The ball is to sound on beats 1 and 3 (using quarter notes).
E) Repeat steps 4 – 6 (up to section “c” of 6) and continue writing 4-bar parts for each homemade instrument. Rewind. It may help to activate the metronome. Play back the results by clicking the master play button. Listen carefully. Below are some sample rhythms that students can notate:
Sample Rhythm1: Quarter note on Beats 1 & 3.
Sample Rhythm2: Double eighth notes on Beats 2 & 4.
Sample Rhythm3: Single eighth note on Beats 2 & 4.
Sample Rhythm4: Double eighth note on Beats 1,2,3 &4..
7. Arranging the parts. Once finished, users can arrange the 4-bar parts on the Timeline. Though not required, this might be a helpful workflow when arranging the parts for live performance. First, create an introduction in which one instrument starts playing. Then slowly introduce more instruments and finally, slowly fade out each instrument until the starting instrument is left playing.

170
A) Loop the MIDI regions of each instrument on the Timeline by clicking the circle with a “+” icon on a region. Loop each instrument for the identical number of measures.
Clicking the circle with a “+” icon, loops the MIDI region. Here the initial 4-bar region has been looped several times.
B) Next, trim the beginning regions of the instruments that will enter later in the performance: Place the cursor at the beginning line of a region to be shortened and wait for a double-sided arrow to appear. Now simply drag the line back until the region’s beginning is at the correct place in the performance.
C) Finally, trim the ending segments of the instruments that will exit the performance before the end: Place the cursor at the ending line of a region and wait for a double- sided arrow to appear. Now simply drag the ending line until the region is at the desired position for a fade out. One by one the instruments will drop off until only the single beginning instrument is left playing as the arrangement comes to a close.
A sample arrangement. First, the 4-bars of each track were looped for 60 measures. Then the regions for three instruments were trimmed to allow different instruments to enter or leave the arrangement.
8. Finally, print out the sheet music to each 4-bar loop. With the notation interface open, select the “print…” icon in the upper right hand corner.
The print icon allows educators and students to print out their notated parts.
PERFORMING 1. With the parts printed out, help the students learn to the play each part on their instrument. Once rehearsed, help choreograph each STOMP ensemble performance.
2. Thinking about the arrangement. If you previously arranged the MIDI regions of each instrument in Mixcraft, try to replicate that arrangement for the performance. If you skipped that step, one strategy for conducting the performance is to cue in each student. Have one student begin, then after a few measures add another and another until all the students are playing. Finally, slowly cue one student at a time to stop playing until the

171
student who started is the only one left. A terrific applause will ensue.
3. Performance. Have each group perform their STOMP song to the class. The teacher may wish to compare in a positive way the student performances to some of the professional STOMP performances. The class might get valuable lessons from comparison to the pros!
ADDITIONAL LESSON PLANSCup Symphony: First, supply each student with five glass cups. Fill the cups up with varying amount of water. Next, students can play the cups with a pencil: tapping the glasses produces a note. What kind of pitch does a glass with a small amount of what produce? How about a glass with a full amount? Students can then compose short melodies on the cups.
FURTHER READING
Orr, M. Homemade Music Factory: The Ultimate Guide to Making Foot-Stompin’-Good Instruments

LESSON
172
TUTORIAL
REQUIRED MATERIALS:
• Computer with Mixcraft
• Headphones or Monitors
• Ingredients for a home made instruments
SUGGESTED MATERIALS:
• Copy of STOMP on video
• MIDI Keyboard
• Headphones/ Monitors
• Further Reading Materials
19STOMP NOTATION PROJECT
ACTIVITYMaking a STOMP Instrument
1. Ask your teacher whether you will be creating a homemade instrument or using an object from home or the classroom for your instrument. Below are several basic ideas if you do decide to make your own instrument:
Shakers made of rice or beans
Basketballs for bouncing
Cups filled with varying amounts of water
Chopsticks for drumming
Pillows for thumping
2. Create your instrument. However, each member of your group must make a different instrument – one of you can have the same instrument.
3. Begin imagining a part for your instrument. Consider: Is your instrument percussive or melodic? Try tapping out different rhythms (chop sticks on trash can) or melodies (spoon on glasses of water). Work with your fellow classmates to gain feedback.
WRITING A PART FOR THE STOMP INSTRUMENT 1. After your instrument is completed, it is time to develop and notate parts for your STOMP ensemble!
2. Begin by brainstorming. What parts of the arrangement will include your STOMP instrument? What role will your instrument have? For example, a bouncing ball might be an instrument that keeps an underlying pulse and carries momentum throughout the song. To illustrate: you could bounce the ball on beats 1 and 3 in a 4/4 time; a bean shaker instrument in the ensemble could play consistent 8th notes; while, of course, a melodic instrument player could tap out melodies on water glasses!
3. To begin writing and notating your part, open Mixcraft and select the Build Virtual Instruments template.
STUDENT’S GUIDE CLASS TIME:
NAME:
PERIOD:
TEACHER:
CLASS:

173
Mixcraft will load six audio tracks and two virtual instrument tracks into the Workspace. Since we will be only using the virtual instrument tracks, delete the audio tracks (Ctrl + Shift + D). If you are working in a group, ensure there are enough virtual instrument tracks for each instrument in your STOMP ensemble. If necessary add a few more to the Timeline (Crtl + E).
4. To start writing your part, double-click the Timeline on the blank area of the first virtual instrument track (or, if the first track has already been filled by another member of your ensemble, use any available empty track). Click at measure one to place the blank MIDI region at the beginning of the Timeline.
Double clicking on the Timeline places a blank MIDI region on the virtual instrument track.
5. Next, double-click on the blank MIDI region. The Sound Tab will launch and display the Piano Roll Editor. Change the “editor type” from Piano Roll to “notation.”
Change the Editor Type to the Notation setting. Now educators and students can use notation within MIxcraft!
6. The notation interface will appear. For simplicity’s sake, keep the meter in 4/4 time. To begin the notation:
A) Create a 4-measure loop. Drag the “loop end” flag on the notation window to the beginning of measure 5. The MIDI region on the Timeline will now extend to four measures.
Drag the Loop End flag to measure 5. This will set a loop that consists of 4 measures.
B) Select the pencil tool and the desired note type. In the above screen shot, the note type was set to quarter note. This will allow you to “draw” quarter notes on the sheet music.
The pencil tool and the quarter note settings are selected in this screen shot.
C) Begin composing your part by drawing notes to form a part. Small tick marks above the sheet music area denote where each beat falls. If you intended to place a note on a specific beat, try clicking in line with the tick marks.
TIP:If you draw an unintended note, simply delete it by selecting the eraser tool or by clicking undo (Ctrl + Z).

174
Small tick marks alert the user to where a beat falls. In this example the first eighth note in measure 2 falls on beat two and is aligned with the tick mark directly above the note.
D) For a percussive part, select a note (for example the “A” below middle “C” or A4) to denote a “hit” or “bounce.” In the example below, a part written for a bouncing ball calls for the performer to bounce the ball (which produces a “bouncing” sound) on beats 1 and 3.
A completed 4-bar part for bouncing ball. The ball is to sound on beats 1 and 3.
E) Repeat these steps and continue writing 4-bar parts for each homemade instrument in the STOMP ensemble. Rewind. It may help to activate the metronome. Play back the results by clicking the master play button. Listen carefully. Below are some sample rhythms that students can notate:
Sample Rhythm1: Quarter note on Beats 1 & 3.
Sample Rhythm2: Double eighth notes on Beats 2 & 4.
Sample Rhythm3: Single eighth note on Beats 2 & 4.
Sample Rhythm4: Double eighth note on Beats 1,2,3 &4..

175
Arranging the parts. Ask your teacher whether you will be arranging the parts. If it is required, start by creating an introduction in which only one instrument starts playing. Slowly introduce more instruments until everyone in the ensemble is playing simultaneously. Finally, slowly fade out each instrument until the starting instrument is left playing.
A) Loop the MIDI regions of each instrument on the Timeline by clicking the circle with a “+” icon on a region. Loop each instrument for the identical number of measures.
Clicking the circle with a “+” icon, loops the MIDI region. Here the initial 4-bar region has been looped several times.
B) Next, trim the beginning regions of the instruments that will enter later in the performance: Place the cursor at the beginning line of a region to be shortened and wait for a double-sided arrow to appear. Now simply drag the line back until the region’s beginning is at the correct place in the performance.
C) Finally, trim the ending segments of the instruments that will exit the performance before the end: Place the cursor at the ending line of a region and wait for a double- sided arrow to appear. Now simply drag the ending line until the region is at the desired position for a fade out. One by one the instruments will drop off until only the single beginning instrument is left playing as the arrangement comes to a close.
A sample arrangement. First, the 4-bars of each track were looped for 60 measures. Then the regions for three instruments were trimmed to allow different instruments to enter or leave the arrangement.
8. Finally, print out the sheet music to each 4-bar loop. With the notation interface open, select the “print…” icon in the upper right hand corner.
The print icon allows educators and students to print out their notated parts.

176
PERFORMING 1. With the parts printed out, rehearse your part with your fellow group members.
2. Thinking about the arrangement. If you previously arranged the MIDI regions of each instrument in Mixcraft try to replicate that arrangement for the performance. If you skipped that step, have your teacher conduct the performance and cue in each student one at a time: have one student start then after a few measures add another and then another until all the students are playing. Finally, slowly cue one student at a time to stop playing until the student who started is the only one left. A terrific applause will ensue.
3. Performance. Perform your STOMP song to the rest of the class!

CHAPTER
177
TUTORIAL
FILM SCORING PROJECT
OVERVIEW: A film score is a collection of music written specifically for film. It is used to convey the mood of a scene (if a character is feeling sad the music tends to reflect this); to accent dramatic events (a car crashing could be accompanied by loud, orchestral bangs and clattering); or to provide transitions between scenes (an idyllic scene is about to disappear in an explosion of violence). Traditionally a composer’s job is to write the music for a film. The composer or arranger prepares the score based on the needs of the film as defined by the director. After it has been recorded (using digital samples, live musicians or a combination of both), the score is time-stamped to synchronize it with the video.
Conventionally, film music is orchestral. However, many modern film scores contain a hybrid of music styles: they combine western classical music elements with the electronic sounds created by contemporary music technology. In this vein, directors will often choose electronic musicians or indie rock artists to score their film with popular music that is reminiscent of the music of a particular era.
LESSON: In this lesson, high school students will write a short or long film; perform and shoot the film; and complete post-production by adding a score in Mixcraft. The videos can then be scored with loop-based music or with recorded instrumental music. Particular videos can be also selected for the lesson plan. For example, as an alternative to a feature film, students can shoot and produce a music video or Lip-Dub. Lip-Dubs (a live singing overdub of a song) have grown in popularity among middle and high school students. Simply search popular video-hosting sites to find a few examples. As this project incorporates a variety of technical skills, it is recommended that students should have prior experience working with Mixcraft and understand several basic functions – adding /deleting tracks, using Mixcraft’s loops and virtual instruments, editing techniques and perhaps basic recording skills. Additionally, this lesson plan is looser and allows a greater degree of freedom and flexibility. Step-by-step instructions are less structured than they have been for other lessons. Instead of exact how-tos, the lesson offers concepts and approaches for the composition of music for film (and for the filming itself).
SKILLS GAINED
Video Editing
Audio Editing
MIDI Editing
TEACHER’S GUIDE NSME: 2, 3, 4, 6, 7, 8, 9
MIDDLE SCHOOL – HIGH SCHOOL
CLASS TIME: 3-6 ONE-HOUR PERIODS
REQUIRED MATERIALS:
• Computer with Mixcraft
• Video to be set to music
• Music Video Student Guides (Additional Materials Download
SUGGESTED MATERIALS:
• Mixcraft Loops & Virtual Instruments
• Samples Movies (Additional Materials Download)
• Further Reading Materials
20

178
ACTIVITYShooting the Film
1. First, if possible, collaborate with a film class or the school’s video department. Perhaps the school has a video club. Video equipment and software will be needed to shoot and edit the film. Prior to shooting, decide on the length of the proposed film. Short films will inherently require less music and consequently can be scored quickly. Longer videos, however, are usually complex projects that require longer pieces of music and have multiple scenes to score. If a larger project is called for, the lesson can be tailored to have an interdisciplinary approach. This can lighten the burden of the project and broaden the areas of learning. Assume that a music class is usually the core of the project. Below are a number of possible film projects
A) Short Film: Students write, film, and edit a five minute film. The topic can be anything, from a current event to a toothpaste commercial. Link with other classes if available (e.g. drama, history, English, political science courses):
Create a political advertisement for an upcoming election.
Pretend to be a news anchor and report a current event.
Direct and shoot a short silent film. Silent films lacked dialogue but often required music.
Create a fictitious, “day in the life” documentary pertaining to a character from a book.
Create a music video (lip-dub) of a student composition or production.
B) Feature Film: Students write, film, and edit a 20-30 minute film. Obvious connections to humanities classes might be: English, theater, or dance. (It might be instructive to have the class watch the movie Super 8 (2011) to get ideas about collaborative efforts.)
I. First, select a film genre such as mystery, western, or film noir. Then write, direct, and shoot a feature length film.
II. Create an extended video mashup (a video created by combining clips mined from multiple videos).
2. Ensure that students have completed all pre-filming technical preparation (equipment checks, script completion, costuming, etc.) and have rehearsed adequately for all the scenes.
3. In collaboration with the film department or a film class, if possible, film each scene individually.
4. Rip the recorded video onto a computer. Digital cameras use SD cards, a memory storage device that makes video ripping easy. If possible, rip the video into .AVI or .WMV format.
5. Edit the film if needed. For advanced edits, use film-editing software. For standard edits, Mixcraft’s video functions can be used.
SCORING THE FILM 1. Open Mixcraft and select the Recording Yourself or Your Band template.
Mixcraft will load eight audio tracks into the Workspace. Delete these tracks (Shift + Ctrl + D).
TIP:Films shot with VCR cameras or with old style film stock will need to be converted to a digital recording. This requires special equipment and will usually require technical assistance. It would be best if students recorded with digital equipment.

179
2. Import the video file. From the top menu select Video > Add A Video File > Select the target video file. Currently, Mixcraft only supports .AVI or .WMV file types.
A video imported into Mixcraft. Both the video frames and audio is imported.
3. Delete any unnecessary music or sound effects that might accompany the video. To do this, first you have to unlink the audio and video tracks. Left-click-hold and sweep-select the video and audio tracks. Release. Now, on either of the tracks: right click > Link > Unlink Selected Tracks. The tracks will now be unlinked. You can now right-click on the unwanted audio track and select “delete.” Be careful not to delete any dialogue or audio sounds that need to be retained!
The imported audio track was deleted and a new audio track was loaded in its place.
4. Play and watch the video in Mixcraft. Encourage students to note important events or sequences that might benefit from the addition of music. Below are suggestions:
A) Contemplate the mood of the video. Is the scene happy, sad, or suspenseful?
B) Note any scene changes or transitions.
C) Note places in which characters exchange dialogue.
D) Be on the lookout for certain actions or events that take place (i.e. a plate being dropped, a knife chopping a head of lettuce).
5. Setting a master tempo. After watching the video and taking notes, decide whether the musical accompaniment should be fast or slow: Slow and sustained music for an intimate or dreary scene; or fast paced, suspenseful music for an action-packed scene. Should the music change tempo: bad guys suddenly crash a romantic, candle-lit dinner. Adjust the master tempo to fit the mood of the video (for a fast tempo try setting 140 – 160 BPM, for a slow tempo try setting 75 – 90 BPM).
6. Begin Composing. Depending upon the flexibility of the lesson plan, students can employ three strategies when composing music for film. Below are suggested workflows:
A) Use Mixcraft’s Loops Mixcraft’s loop library is an excellent starting place and a quick way to build a score. First, select a drum or percussion loop and loop it throughout the duration of the video. Next, begin to introduce instrumental parts. A bass line or a loop of chords makes an excellent starting place. Finish the score off by adding sound effects.
B) Use Mixcraft’s Virtual Instruments Students can compose original melodies by using Mixcraft’s virtual instruments. Such an approach might be used to capture specific moods: compose in a minor key for
TIP:Several sample videos are supplied on Mixcraft’s Additional Materials Download for classes that are unable to film.
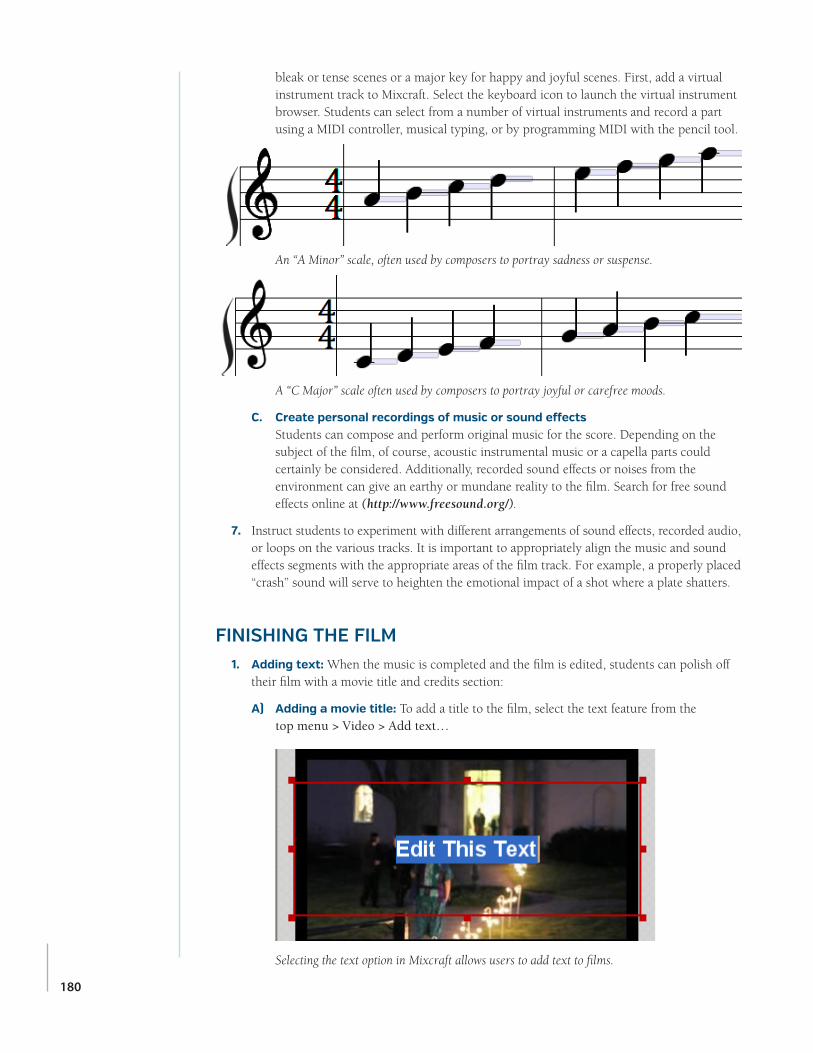
180
bleak or tense scenes or a major key for happy and joyful scenes. First, add a virtual instrument track to Mixcraft. Select the keyboard icon to launch the virtual instrument browser. Students can select from a number of virtual instruments and record a part using a MIDI controller, musical typing, or by programming MIDI with the pencil tool.
An “A Minor” scale, often used by composers to portray sadness or suspense.
A “C Major” scale often used by composers to portray joyful or carefree moods.
C. Create personal recordings of music or sound effects Students can compose and perform original music for the score. Depending on the subject of the film, of course, acoustic instrumental music or a capella parts could certainly be considered. Additionally, recorded sound effects or noises from the environment can give an earthy or mundane reality to the film. Search for free sound effects online at (http://www.freesound.org/).
7. Instruct students to experiment with different arrangements of sound effects, recorded audio, or loops on the various tracks. It is important to appropriately align the music and sound effects segments with the appropriate areas of the film track. For example, a properly placed “crash” sound will serve to heighten the emotional impact of a shot where a plate shatters.
FINISHING THE FILM 1. Adding text: When the music is completed and the film is edited, students can polish off their film with a movie title and credits section:
A) Adding a movie title: To add a title to the film, select the text feature from the top menu > Video > Add text…
Selecting the text option in Mixcraft allows users to add text to films.

181
B) Next, type the movie title in the text box.
C) Adding credits: Credits will need to use scrolling text. First, select the “add scrolling text…” feature from the top menu > Video > Add Scrolling text…
D) Type the credits into the text box.
E) Finally, arrange the text regions on Timeline. Place the movie title region near the beginning of the film. Place the credit regions near the end of the film.
Here, the text region for the title is moved to the beginning of the video.
2. When the music is completed, walk students through mixing down their video. From the top menu select File > Mix Down To > AVI or WMV video format.
ADDITIONAL LESSON PLANSLip-Dub: Host a school wide lip dub. For ideas, visit popular video-hosting websites and search for “lip dub.” (Olympic swimmers singing “Call Me Maybe” is a good one). You must have access to video equipment. The cameraman will be recording the overdub in real time. First, select a song to choreograph. Chart a course through the school and have designated locations where different individuals and groups (of students, staff, and faculty) will sing particular parts of the song. The cameraman then moves through the course filming as the various school groups sing their assigned parts. Finish with some special visual. (Perhaps the Principal gets the last line – call me maybe?) Rip the video and align it with the original recorded version of the song.
Film Sound Design: Part of the film production process is the creation of sound effects (the practice which is commonly called “sound design”). Audio engineers are contracted to design sound effects that are novel and memorable (for example, think of the distinct beeps from R2D2, the robot character in Star Wars). Create a lesson plan in which students design sound effects for a general sound library. Encourage students to get creative with how they make and record the songs.
FURTHER READING Davis, R. Complete Guide to Film Scoring. Bellis, R. The Emerging Film Composer: An Introduction to the People, Problems, and Psychology of the Film Music Business

LESSON
182
TUTORIAL
STUDENT’S GUIDE CLASS TIME:
NAME:
PERIOD:
TEACHER:
CLASS:REQUIRED MATERIALS:
• Computer with Mixcraft
• Video to be set to music
• Music Video Student Guides (Additional Materials Download)
SUGGESTED MATERIALS:
• Mixcraft Loops & Virtual Instruments
• Samples Movies (Additional Materials Download)
• Further Reading Materials
FILM SCORING PROJECT
ACTIVITYShooting The Film
1. First, ask your teacher whether you will be writing a short or a long film. Is the project a joint effort with a film class? What equipment will be used? Finally, ask is there a particular topic or theme that must be included in the film.
2. Write a script of the film. Once the script is completed, have your teacher and review it.
3. Begin filming. Film each scene independently. Be aware of shot angles and whether dialogue is being recorded.
4. When the scenes are finished, rip the recorded video onto a computer. Digital cameras use SD cards, a memory storage device that makes ripping easy. If possible, rip the video into .AVI or .WMV format.
5. Edit the film if needed. For advanced edits, use film-editing software. For standard edits, Mixcraft’s video functions can be used.
SCORING THE FILM 1. Open Mixcraft and select the Recording Yourself or Your Band template.
2. Mixcraft will load eight audio tracks into the Workspace. Delete these tracks (Shift + Ctrl + D).
3. Import the movie or a video file. From the top menu select Video > Add A Video File > Select the video file. Currently, Mixcraft only supports .AVI or .WMV file types.
A video imported into Mixcraft. Both the video frames and audio is imported.
20

183
3. Delete any unnecessary music or sound effects that might accompany the video. To do this, first you have to unlink the audio and video tracks. Left-click-hold and sweep-select the video and audio tracks. Release. Now, on either of the tracks: right click > Link > Unlink Selected Tracks. The tracks will now be unlinked. You can now right-click on the unwanted audio track and select “delete.” Be careful not to delete any dialogue or audio sounds that need to be retained!
The imported audio track was deleted and a new audio track was loaded in its place.
4. Play and watch the video in Mixcraft. Encourage students to note important events or sequences that might benefit from the addition of music. Below are suggestions:
A) Contemplate the mood of the video. Is the scene happy, sad, or suspenseful?
B) Note any scene changes or transitions.
C) Note places in which characters exchange dialogue.
D) Be on the lookout for certain actions or events that take place (i.e. a plate being dropped, a knife chopping a head of lettuce).
5. Setting a master tempo. After watching the video and taking notes, decide whether the musical accompaniment should be fast or slow: Slow and sustained music for an intimate or dreary scene; or fast paced, suspenseful music for an action-packed scene. Should the music change tempo: bad guys suddenly crash a romantic, candle-lit dinner? Adjust the master tempo to fit the mood of the video (for a fast tempo try setting 140 – 160 BPM, for a slow tempo try setting 75 – 90 BPM).
6. Begin Composing. Composing the music is up to you. Below are three suggestions to get started. Experiment with one approach or combine several to create the score. Remember, focus on being creative and working with the film:
A) Using Mixcraft’s Loops Mixcraft’s loop library is an excellent starting place and a quick way to build a score. First, select a drum or percussion loop and loop it throughout the duration of the video. Next, begin to introduce instrumental parts. A bass line or a loop of chords makes an excellent starting place. Finish the score off by adding sound effects.
B) Using Mixcraft’s Virtual Instruments You can compose original melodies by using Mixcraft’s virtual instruments. Such an approach might be used to capture specific moods: compose in a minor key for bleak or tense scenes or a major key for happy and joyful scenes. First, add a virtual instrument track to Mixcraft. Select the keyboard icon to launch the virtual instrument browser. Select from the available virtual instruments and record a part using a MIDI controller, musical typing, or by programming MIDI with the pencil tool.
TIP:Several sample videos are supplied on Mixcraft’s Additional Materials Download for classes that are unable to film.

184
An “A Minor” scale, often used by composers to portray sadness or suspense.
A “C Major” scale often used by composers to portray joyful or carefree moods.
C) Create personal recordings of music or sound effects Finally, try composing and performing original music for the score. Depending on the subject of your film, of course, acoustic instrumental music or a capella parts could certainly be considered. Additionally, recorded sound effects or noises from the environment can give an earthy or mundane reality to the film. Search for free sound effects online at (http://www.freesound.org/).
7. Start arranging loops, recorded audio, or sound effects on Mixcraft’s Timeline. It is important to align the music or sound effects with the film on the Timeline. For example, lining up a “crash” sound with a shot of a plate breaking be impactful to the audience.
FINISHING THE FILM 1. Start arranging loops, recorded audio, or sound effects on each of their Mixcraft tracks. It is important to align the music or sound effects with the appropriate areas of the film track. Use the Timeline. For example, a properly placed “crash” sound will serve to heighten the emotional impact of a shot where a plate shatters.
2. Adding text. When the music is completed and the film is edited, consider adding a title and credits to the film:
A) Adding a movie title: To add a title to the film, select the text feature from the top menu > Video > Add text…
Selecting the text option in Mixcraft allows users to add text to films.

185
B) Next, type the movie title in the text box.
C) Adding credits: Credits will need to use scrolling text. First, select the “add scrolling text…” feature from the top menu > Video > Add Scrolling text…
D) Type the credits into the text box.
E) Finally, arrange the text regions on the video track. Place the movie title region near the beginning of the film. Place the credit regions near the end of the film.
Here, the text region for the title is moved to the beginning of the video.
3. Mixing down. When the film is completed it is time to mix down the session into a video file. From the top menu select File > Mix Down To > AVI or WMV video format.

CHAPTER
186
TUTORIAL
COMMERCIAL PROJECT
OVERVIEW: Akin to the relationship between feature films and music scores, video commercials and music jingles are nearly inseparable – like bread with butter. The first TV advertisement in the United States debuted in 1941. Only ten seconds long, the advertisement fired off the clever slogan, “American runs on Bulova time.” (Bulova, naturally, is a watch company.) No music was played during that initial airing; however it was obvious that the catchy slogan begged to be set to music. Soon advertisers did just that for their “slogans.” The audience of this new media was flooded with music-based commercials, or “sound branding.” Today most advertisements use melodies or jingles to create a visceral memory link between the products they peddle and the mind of the consumer. Psychological research has validated this marketing strategy: people remember words that are sung better than they remember words that are spoken. The commercial project intends to teach creative marketing basics through the creation of a video commercial. A discussion on the differences and similarities between radio and TV advertising could connect this lesson with the Radio Jingle project.
LESSON: This lesson is intended to be interdisciplinary: a collaboration between business, marketing, psychology, film or design courses. First, an analysis of music and advertising will demonstrate the intertwined relationship between the two. Students will watch several example commercials selected by the educator and will examine the extent to which music is used to sell the product. Next, students will propose their own “product” by either selecting a well-known commodity or by designing their own. A short, one-minute commercial will then be filmed showcasing the product. If students do not have access to film equipment, a custom surfboard company advertisement video is available in the Additional Materials Download. Finally, the commercial will be edited, scored, and mixed down in Mixcraft. Students should have prior experience working with Mixcraft before tackling this project: multiple disciplines are involved that require a wider range of technical skills than encountered in other projects. Do not be intimidated, however.
SKILLS GAINED:
Product Design & Product Marketing
Video Filming
Using Mixcraft’s Loops
Video, Audio & MIDI Editing
TEACHER’S GUIDE NSME: 1, 2, 3, 4, 6, 7, 8, 9
HIGH SCHOOL
CLASS TIME: 3-6 ONE-HOUR PERIODS
REQUIRED MATERIALS:
• Computer with Mixcraft
• A product to be advertised
• Commercial Project Student Guide (Additional Materials Download)
SUGGESTED MATERIALS:
• Digital Camcorder
• Headphones/ Monitor Speakers
• Internet Connection
• Further Reading Materials
21

187
ACTIVITYPreparing & Shooting The Commercial
1. Research and study the effect of music on consumer behavior. Search popular video-hosting websites for commercials with music. For example, several eminent fast food companies associate food with short melodies.
2. First, select a product for the commercial. Students can invent their own product or select a well known product (for example, what could be a competing product for Nike shoes? Or a coffee-chain that competes against Starbucks?). Collaborating with a business or design course could help cultivate ideas.
3. Discuss the potential marketing and advertising strategies for the product:
A) What is the consumer demographic? (i.e. is the product targeted to a specific gender or age group?)
B) What other companies sell a similar product? (How would a new company compete against these existing products?).
C) Is selling the product dependent on location?
4. Watch, review, and discuss with students several popular TV commercials. Note how the product in each commercial is filmed and how the music interacts with the product:
A) How is the product portrayed in the film?
B) Do actors interact with the product? If they do, in what way?
C) What environment is the product depicted in?
D) From what angles is the product filmed?
E) Is there any catchy dialogue or phrasing?
Additionally,
A) What is the mood of the music?
B) What instruments are being used?
C) Is the music composition simple and accessible or complex and technical?
D) Are certain musical themes associated with the product or company?
5. Film a one-minute long commercial showcasing the product. Collaborating with a film class or a film department might be helpful.
6. Once the filming is completed, rip the recorded video onto a computer. If possible, rip the video into .AVI or .WMV format.
TIP:If the video cannot initially be ripped into .AVI or .WMV, it must be converted to one of these formats to be compatible with Mixcraft

188
SCORING THE COMMERCIAL 1. Open Mixcraft and select the Recording Yourself or Your Band template.
Mixcraft will load eight audio tracks into the Workspace. Depending on what the music arrangement calls for, delete tracks or add additional audio/virtual instrument tracks.
2. Import the commercial into Mixcraft. From the top menu select Video > Add A Video File > Select the video file. Currently, Mixcraft only supports .AVI or .WMV file types.
Delete any unnecessary music or sound effects that might accompany the video. To do this, first you may have to unlink the audio and video tracks. Left-click-hold and sweep-select
the video and audio tracks. Release. Now, on either of the tracks: right click > Link > Unlink Selected Tracks. The tracks will now be unlinked. You can now right-click on the unwanted audio track and select “delete.” Be careful not to delete any dialogue or audio sounds that need to be retained.
An imported video. Note: the linked audio track’s regions have been deleted.
3. Editing the video. Before scoring, complete all video edits. With Mixcraft, users can remove, arrange, or repeat parts of the video:
A) Splitting video sections: To rearrange segments of a video, start by “splitting” or cutting a movie into smaller video regions. Right click on the movie and select “Split” (Crtl + T). Next, simply drag and move the new region on the track. Try looping a small section of the video for a “stutter edit.”
B) Trimming video clips: Trimming videos regions can shorten or extend the region on the timeline. To trim, move the cursor near the ends (beginning or ending) of the video region: a double-sided arrow will appear. Next, click and drag left or right to trim the region to the desired length.
C) Deleting video: Remove parts of a movie by selecting and highlighting video regions and hitting delete on the computer keyboard. An effective strategy is splitting unwanted movie sections into regions and then deleting them.
4. Brainstorm music ideas. The music should be representative of the product. Pairing a light orchestral arrangement with a commercial endorsing cheese or wine might be a more effective selection than, perhaps, trance or house music. Alternatively, house and trance music might work well to showcase a high-end sports car commercial.
5. Scoring the commercial. Once a style of music has been selected for the commercial, students can begin creating the accompanying music. Below are three strategies which students can use for music creation:
•UsingMixcraft’sLoops •UsingMixcraft’sVirtualInstruments •Creatingpersonalrecordingsofmusicorsoundeffects

189
Mixcraft’s Loops. Though, student can compose, record, and edit their own music, Mixcraft loops are a great tool for scoring a commercial. In the Tabs Area, select the “Library” tab and search through the instrument categories. If your computer is connected to the internet, users can preview and download each loop by clicking the green play button next to the file name.
Mixcraft’s Loop Library is filled with drum and instrument loops.
6. Loop Arrangement. Because the commercial is relatively short, the music does not necessarily require a complete structure of beginning, middle and end. Often, beginning with an explosive drum loop will suffice for an introduction. Experiment with different loops and arrangements.
7. Product/Company theme. Have students compose a theme for the product or company. They can use Mixcraft loops or use their own recordings. Have them try the theme at the either the beginning or the ending of the commercial. Write a witty slogan to be sung or spoken over the theme.
8. Finishing with sounds effects. A great strategy for scoring a commercial is to add sound effects that correspond to specific actions or events on film. A commercial that has a cop car enter the opening shot chasing a speeding Trek bicycle rider might get more immediate attention if the “siren” is blaring – adding sound effects heightens our alertness. Make sure the video track images and sound effects regions on the audio tracks are aligned properly so that sounds coincide with the intended video content. The siren needs to accompany the grand entrance of the cop car not come blaring in long after the black and white has exited the shot.
9. Mixing Down. Once the commercial is finished, mix down the video by selecting File > Mix Down To… > Select either .AVI or .WMV.
10. Marketing: With the completed commercials, organize a viewing session in which students can analyze the results. Administer a survey or have a class vote on which commercials were the most effective in attracting customers. Why were some commercials more effective than others? What worked? What didn’t? Why?
ADDITIONAL LESSON PLANSMovie Preview: There are, of course, several other mediums that use music to attract its audience. Movie previews are short, heavily edited teasers that use music, dialogue, and sound effects to bring the film to life. The goal of course is to compel the audience to see the film even if it turns out later (surprise!) to be a total stinker. Design a lesson plan in which students create a 1 to 2 minute movie preview. Supply video footage to the students. Students can then edit the audio and add music where necessary. The goal is to make a teaser that sells an absolutely “must see” movie.
FURTHER READING Elin, L. & Lapides, A. Designing and Producing the Television Commercial. Richter, T. The 30-Second Storyteller: The Art and Business of Directing Commercials

LESSON
190
TUTORIAL
COMMERCIAL PROJECT
ACTIVITYPreparing & Shooting The Commercial
1. First, select a product for the commercial. Ask your teacher whether you will be inventing your own product or selecting a well known product (for example, what could be a competing product for Nike shoes? Or a coffee-chain that competes against Starbucks?).
2. Brainstorm and discuss the potential marketing and advertising strategies for the product:
A) What is the consumer demographic? (I.e. is the product targeted to a specific gender or age group?)
B) What other companies sell a similar product? (How would a new company compete against these existing products?)
C) Is selling the product dependent on location?
3. Watch several TV commercials with your teacher or class. Note how the product in each commercial is filmed and how the music interacts with the product:
A) How is the product portrayed in the film?
B) Do actors interact with the product? If they do, in what way?
C) What environment is the product depicted in?
D) From what angles is the product filmed?
E) Is there any catchy dialogue or phrasing?
Additionally,
F) What is the mood of the music?
G) What instruments are being used?
H) Is the music composition simple and accessible or complex and technical?
I) Are certain musical themes associated with the product or company?
4. Film a one-minute long commercial showcasing the product. Collaborating with a film class or a film department might be helpful.
5. One the filming is completed, rip the recorded video onto a computer. If possible, rip the video into .AVI or .WMV format.
REQUIRED MATERIALS:
• Computer with Mixcraft
• Mixcraft’s Loops
Headphones or Monitors
SUGGESTED MATERIALS:
• MIDI keyboard
• Further Reading Materials
STUDENT’S GUIDE CLASS TIME:
NAME:
PERIOD:
TEACHER:
CLASS:
21

191
SCORING THE COMMERCIAL 1. Open Mixcraft and select the Recording Yourself or Your Band template.
Mixcraft will load eight audio tracks into the Workspace. Depending on what the music arrangement calls for, delete tracks or add additional audio/virtual instrument tracks.
2. Import your commercial into Mixcraft. From the top menu select Video Add A Video File > Select the video file. Currently, Mixcraft only supports .AVI or .WMV file types.
Delete any unnecessary music or sound effects that might accompany the video. To do this, first you may have to unlink the audio and video tracks. Left-click-hold and sweep-select the video and audio tracks. Release. Now, on either of the tracks: right click > Link > Unlink Selected Tracks. The tracks will now be unlinked. You can now right-click on the unwanted audio track and select “delete.” Be careful not to delete any dialogue or audio sounds that need to be retained.
An imported video. Note: the linked audio track’s regions have been deleted.
3. Editing the video. Before scoring, complete all video edits. With Mixcraft, users can remove, arrange, or repeat parts of the video Prior to adding music, complete all video edits to your movie. For instance, you may want to short, remove, or repeat certain areas of the video. Here are some edits that will help:
A) Splitting video sections: To rearrange segments of a video, start by “splitting” or cutting a movie into smaller video regions. Right click on the movie and select “Split” (Crtl + T). Next, simply drag and move the new region on the track. Try looping a small section of the video for a “stutter edit.”
B) Trimming video clips: Trimming videos regions can shorten or extend the region on the timeline. To trim, move the cursor near the ends (beginning or ending) of the video region: a double-sided arrow will appear. Next, click and drag left or right to trim the region to the desired length.
C) Deleting video: Remove parts of a movie by selecting and highlighting video regions and hitting delete on the computer keyboard. An effective strategy is splitting unwanted movie sections into regions and then deleting them.
4. Brainstorm music ideas: Before you begin producing music, contemplate which music style would best compliment your product. Pairing a light orchestral arrangement with a commercial endorsing cheese or wine might be a more effective selection than, perhaps, trance or house music. Alternatively, house and trance music might work well to showcase a high-end sports car commercial.
5. Approaching the commercial’s score: Once you have picked a music style for your commercial, begin creating the accompanying music using Mixcraft’s loops, Mixcraft’s virtual instruments or by recording your own music. In this demonstration, we will use Mixcraft’s loops to build our score.
TIP:If the video cannot initially be ripped into .AVI or .WMV, it must be converted to one of these formats to be compatible with Mixcraft

192
6. Mixcraft’s Loops: Mixcraft’s loops are convenient for scoring a commercial. In the Tabs Area, select the “Library” tab and search through the instrument categories. If your computer is connected to the internet, you can preview and download each loop by clicking the green play button next to the file name.
Mixcraft’s Loop Library is filled with drum and instrument loops.
7. Loop Arrangement: Because the commercial is relatively short, the music does not necessarily require a complete structure of beginning, middle and end. Often, beginning with an explosive drum loop will suffice for an introduction. Experiment with different loops and arrangements. To start experimenting: simply drag and drop a loop onto an empty audio track.
8. Product/Company theme: While arranging the commercial’s music, you might want to create a theme for your product. Either compose your own theme or design a Mixcraft loop-based theme. Play the theme at the either the beginning or the ending of the commercial. Write a witty slogan to be sung or spoken over the theme.
9. Finishing with sounds effects: A great strategy for scoring a commercial is to add sound effects that correspond to specific actions or events on film. A commercial that has a cop car enter the opening shot chasing a speeding Trek bicycle rider might get more immediate attention if the “siren” is blaring – adding sound effects heightens our alertness. Make sure the video track images and sound effects regions on the audio tracks are aligned properly so that sounds coincide with the intended video content. The siren needs to accompany the grand entrance of the cop car not come blaring in long after the black and white has exited the shot.
10. Mixing Down: Once the commercial is finished, mix down the video by selecting File > Mix Down To… > Select either .AVI or .WMV.

APPENDIX

194
APPENDIXCONFIGURING MIXCRAFTIn most cases, educators will have no need to make adjustments to Mixcraft’s preferences for the lesson plans. However, if multiple pieces of audio hard ware are being used, several adjustments might help. From the top menu select File > Preferences. The Mixcraft preference window will open. Here, users can make general tweaks to the interface. Most importantly however, educators and students can control the sound devices, MIDI devices, and loop library.
Mixcraft’s Preferences.
Sound Device: The driver setting changes how Mixcraft receives and plays back audio. “Wave” is the default setting on all PC computers. It is recommended however, to use the ASIO driver (this driver must be downloaded from online). This driver is more stable and generally has lower latency than Wave. Additionally, users can direct where audio is inputted from and outputted to. This is useful if educators or students are using various pieces of audio hard ware. For example, you may want to switch the input to an audio/computer interface and the output to a pair of monitors connected to the audio/computer interface.
MIDI: From the MIDI tab, users can assign MIDI inputs and outputs. This might be necessary if educators or students are using multiple pieces of MIDI hard ware. Users can also change the default MIDI settings from this menu. Upon startup, the “Default Virtual Instrument” and the “Default General MIDI (GM) Instrument” are the “Acoustica Instruments.”

195
Library: The Library tab displays the directory to which all Mixcraft’s loops are stored. Here, users can change the directory to another folder. Loops can be imported using the “+ Import” button at the top right of the Library window.
A window will open with a small “Import From” window. Next to this widow is a “Browse” button. Find the loop and import it.
RECORDING TECHNIQUESVocal Recording: A good condenser microphone with a wide diaphragm will suffice for recording vocalists. Condenser microphones can vary in price but educators should be able to purchase a solid microphone for around $100 – 150. For a cleaner vocal recording, a pop filter is recommended. The filter has a nylon screen that removes plosives. They may be relatively inexpensive but are quite valuable during recording.
SOLO RECORDINGSPosture: Students should stand up straight and speak or sing into the microphone without swaying.
Position: Students should stand a few inches away from the microphone. Standing too close can distort a recording; while standing far away will create a quiet recording. Touching or tapping the microphone is not recommended.
If plosives or pops are being recorded, use a pop filter or have the vocalist sing at an off-centered angle to the microphone.
GROUP RECORDINGSPosture: Students should stand up straight and speak or sing into the microphone without swaying.
Position: Students can form a semicircle around the microphone and sing in its direction. Listen to a test recording and note whether the recording sounds balanced: are there any voices that are popping out? If so, try arranging the students so that each voice blends.
Instrumental Recording: For the recording of instruments, three types of microphones are used -- dynamic, condenser, and ribbon microphones. Dynamic microphones can withstand high volumes during recording. Thus, for loud instruments such as amplifiers or drums, a dynamic microphone is an excellent choice. For delicate and intimate instruments, such as an acoustic guitar or solo violin, a condenser or ribbon microphone is the ideal piece of recording equipment.
SOLO RECORDINGSThere are two main approaches to miking an instrument -- spot miking and distant miking. In spot miking, the microphone is placed a few inches away from the instrument. With this technique, the transients of a sound are more pronounced; lower frequencies are easily picked up (creating bass-heavy recordings); and the room ambiance is not printed on to the recording. With distant miking, the microphone is placed a few feet away from the instrument. This method dulls the transients of an instrument and captures the ambiance of the room. Depending on the desired effect, educators and students can use both techniques when recording.

196
GROUP RECORDINGSWhen recording small or large ensembles, educators can either mike each instrument separately or record with several overhead microphones to capture the whole ensemble. Miking each instrument individually offers more control over the mix: if each instrument is being recorded to a separate track in Mixcraft, educators can adjust the volume and panning of each instrument during post-production. If recording with overhead microphones, the panning and relative volume levels are printed to the recording and are difficult to modify (though this can be done with the use of compression and equalization). Additionally, when recording multiple instruments, educators should be aware of microphone placement. Misplacement might cause bleeding – the result of a microphone picking up and recording an untargeted instrument.
IDEAS FOR STUDENT PROJECTSThe semester has come to an end and now you are left with all of these completed student projects. What to do with them? Here are some suggestions to help clear your desk and to showcase the students’ hard work:
School Theater Productions (e.g. Plays or Musicals)
Morning Assembly or Morning Announcements
Sports Games Intermission
School’s Website or Blog
Fundraising Events
Student Portfolios
Host a “listening night” for parents and showcase the student work
School open house
ACKNOWLEDGEMENTSAbout the author: Parker Tichko is the Lab Manager for the University of Nevada, Las Vegas’ Auditory Cognition & Development Lab, a research facility that studies how human knowledge of music is shaped. He is an active composer and musician and in his spare time blogs about scientific research related to music and hunts down old or unique synthesizers. He holds a B.A. in both Music and Psychology from Wheaton College (MA) and hopes to continue studying music and the brain. This is his first book.
Parker would like to thank the Acoustica team (particularly Dan Goldstein) for the opportunity to create a teaching guide, Sky Sabin for supplying the video materials for the lesson plans, and to all those individuals who helped him discover what music “the kids” listen to these days.
About the contributors: Sky Sabin is a musician, filmmaker, and photographer. He holds a B.A. in music with a concentration in music composition. He has performed his original songs in Boston, Providence, New York and Cork, Ireland. His first short film, “At The Heart Is The Guitar,” debuted at the Woods Hole Film Festival in 2010. Since then, Sky has made a variety of short films about local agriculture for Buy Fresh Buy Local Cape Cod, filmed the Boston GuitarFest 2010, created a how-to video about backyard chickens, and has been making surf and skate videos for local shops in New Port, RI.


![Using Mixcraft 4 to Edit Audio[1]](https://img.pdfslide.net/doc/110x75/577d2ed41a28ab4e1eb017c1/using-mixcraft-4-to-edit-audio1.jpg)