Embed Size (px)
Citation preview

1
The purpose of this independent study was to determine how to remotely
manipulate Cisco routers via software. One driving factor behind this study was the need
to continuously update Cisco routing tables, as well as keep abreast of the current
topology of a network in a real time manner. This study complements the SAAM
project, where a SAAM router makes routing decisions in a centralized environment and
is responsible for keeping its designated routers’ routing tables up to date in response to
changing network topologies.
Acquiring Cisco Routers
The project started with the need to acquire routers on which to experiment on.
Three routers that I had set up in a previous class in the electrical engineering lab were no
longer available, so I spent the first two weeks researching which type of Cisco router
would suite the needs of the study. Additionally, it was necessary to consider that I had a
very limited budget. After two weeks of cost analysis, and searching on eBay for a
vendor that the school could contract with, we put in the order for two Cisco 2611
routers. Each router is currently configured with 64K of RAM, 32MB of flash memory,
and is running Cisco IOS Version 12.0.
Configuring Routers using Telnet
While waiting for the routers to arrive I decided to tackle one part of the problem
at a time. The first problem I tackled was the issue of how to query a router for its
current configuration. Querying a router seemed simple enough, all I had to do was
telnet into the router and issue a command corresponding to what I wanted to know.
This brought up two separate issues: the first issue was that Cisco routers use proprietary
commands, and the second issue dealt with what commands are available at each user-
level of Cisco’s IOS. In order to figure out which commands I needed to both initially
set-up and then maintain each router I visited Cisco’s website, and then ended up buying
two Cisco CCIE Professional Development books, written by Jeff Doyle. Although these
books are well written for new users who are unfamiliar with networks and routers, they

2
are not as useful as they could be for advanced users who are looking for easily
referenced commands. Once the routers arrived I configured them using their automated
set-up utility, with each router connected to a workstation running hyper-terminal.
Screen shots of configuring the Cisco router using hyper-terminal are included later in
this report.
Cisco Router’s two User Levels
Cisco routers have two levels of user access: Exec Mode and Privileged Exec
Mode. The user is automatically placed into exec mode upon connecting to the router.
While in exec mode every user is able to query the router about certain information that
would not unduly give away too much information regarding the router’s set-up.
Analogous to the difference between a standard user and Super User in UNIX,
Cisco routers reserve access to specific commands for authorized privileged users. In
order to manipulate a Cisco Router’s ARP table, enable SNMP, or other more interesting
configurable features, the user will need to know the router’s Privileged Exec Mode
password. Getting into privileged exec mode is simple enough, the user simply types in
the command: enable, and then the required password when prompted.
Intro to Cisco Commands
The Cisco IOS is very forgiving and helpful for the user who does not know all the commands. If the user simply types enough of a command that will make it discernable to the IOS, hitting the <enter key> will result in a help message indicating what the entire command is, plus the fact that it has more options or required parts. An example dialog that explains this process is as follows:
Router>sh “User types in sh <Enter key> The router responds as follows:
% Type "show ?" for a list of subcommands The user then responds with
“Router>show ?” The router then displays all the options and their breakouts as summarized: backup Backup status c2600 Show c2600 information

3
cca CCA information cdapi CDAPI information cef Cisco Express Forwarding class-map Show QoS Class Map clock Display the system clock
By typing the command show <plus options> the following can be displayed at
the Exec level.
backup Backup status
c2600 Show c2600 information
cca CCA information
cdapi CDAPI information
cef Cisco Express Forwarding
class-map Show QoS Class Map
clock Display the system clock
compress Show compression statistics
connection Show Connection
dialer Dialer parameters and statistics
exception exception informations
flash: display information about flash: file system
history Display the session command history
hosts IP domain-name, lookup style, nameservers, and host table
location Display the system location
modemcap Show Modem Capabilities database
policy-map Show QoS Policy Map
ppp PPP parameters and statistics
queue Show queue contents
queueing Show queueing configuration
radius Shows radius information
rmon rmon statistics
rtr Response Time Reporter (RTR)
sessions Information about Telnet connections
snmp snmp statistics
tacacs Shows tacacs+ server statistics

4
template Template information
terminal Display terminal configuration parameters
traffic-shape traffic rate shaping configuration
users Display information about terminal lines
version System hardware and software status
Of note, all commands available in the Exec mode are also available in the Privileged
Exec mode. The following pages contain screen shots of a few of the commands as well
as give the reader a clear idea of how to interact with a Cisco router using hyper-terminal.

5
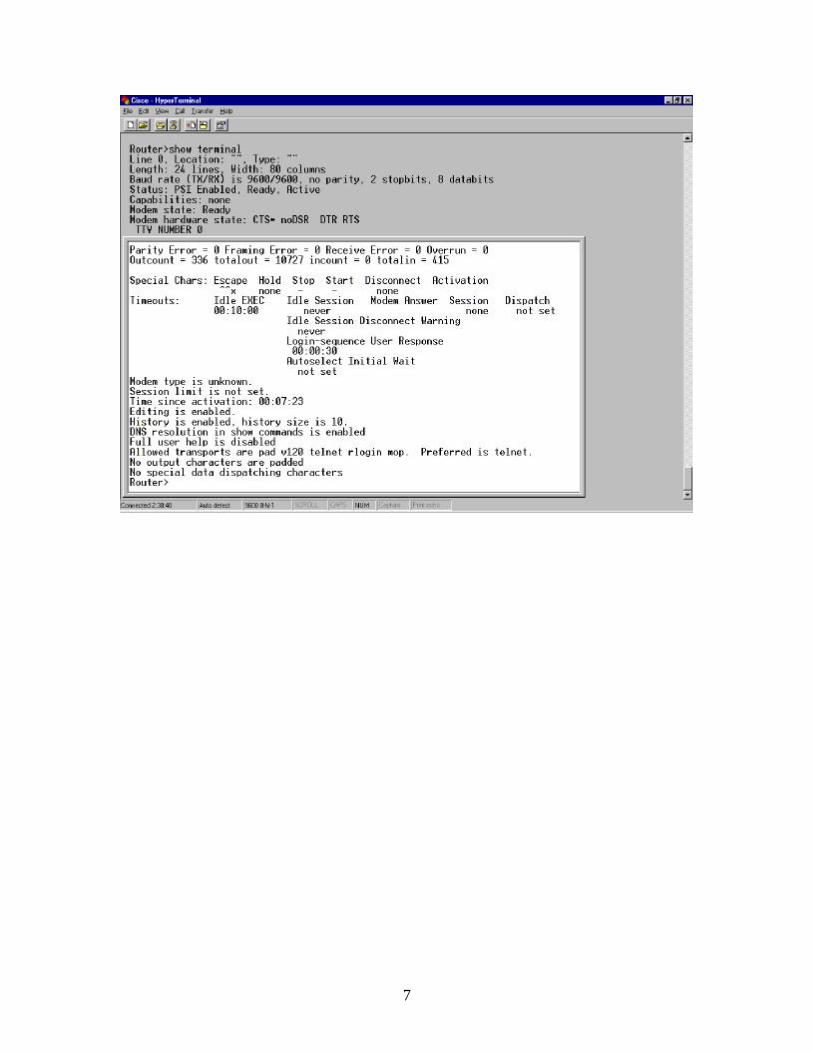
Starting in Exec Mode When a router first starts up, if you are attached to the console port, hit the <Enter> key to begin interactions with the router. You are now in user Exec mode. This will allow you to view the router’s configurations. The show command is the quickest way to determine what has been set on the router. I have included a screen shot for how to use the show command. Simply typing show ? will print out all the options for the show command and what they do. Note: Many of theses options also have additional switches. To determine the additional switches simply type show option1 ? (The question mark always gives help where it is available)

6
In order to see what ports and hosts are directly visible to the router use the following command: show arp In this case the router has one host directly connected it, so its ARP table is not very interesting.
7

8
To get a look at the router’s hardware set-up simply type: show version

9
Here is an example of a two-option show command: show ppp ?
To see all the IP information use this command:

10
11
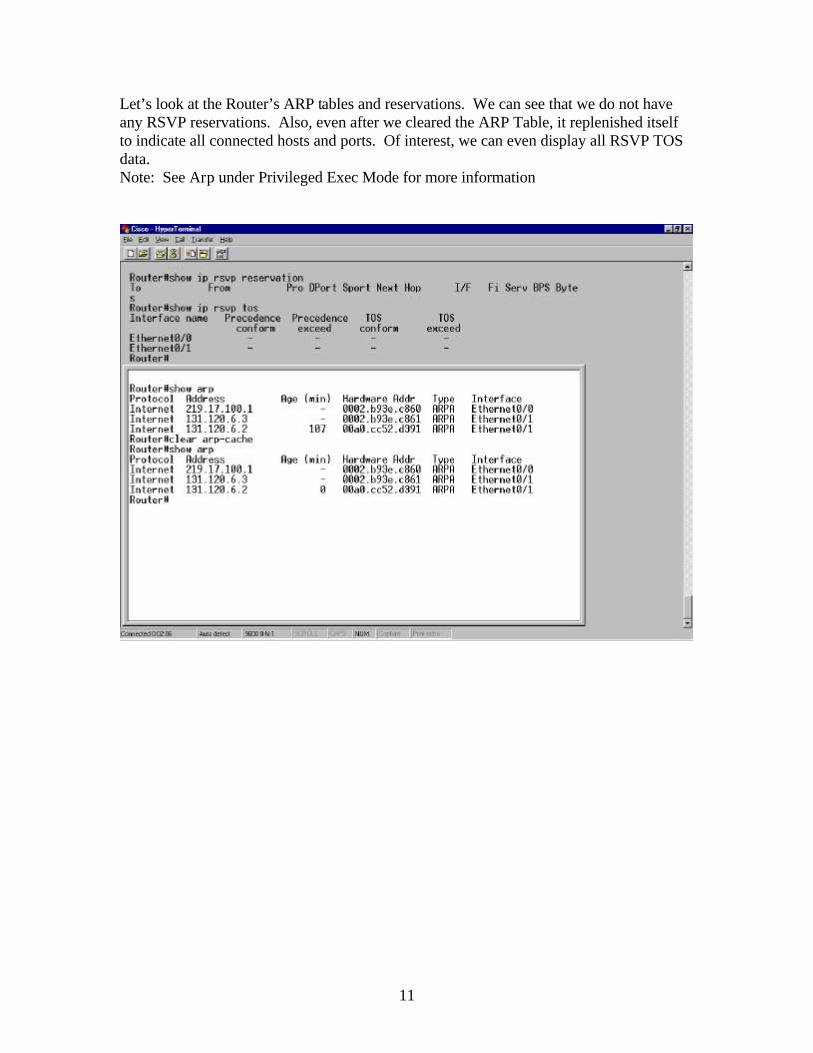
Let’s look at the Router’s ARP tables and reservations. We can see that we do not have any RSVP reservations. Also, even after we cleared the ARP Table, it replenished itself to indicate all connected hosts and ports. Of interest, we can even display all RSVP TOS data. Note: See Arp under Privileged Exec Mode for more information

12
Privileged Exec Mode In order to make any changes to the routers configuration you must be in Privileged Exec mode. You enable this mode by typing: enable <Enter> and respond with the correct password. The router is now configurable. The following screen shot shows how to configure an Ethernet port, ensure it does not shutdown, and save the new running-configuration as the startup-configuration

13
ARP Configurations The default ARP timeout is 4 hours, so a router will retain its ARP entries for 4 hours before attempting an update. This time can be shortened by indicating the number of seconds for the new timeout: An example of how to change the timeout to 30 minutes is: Arp timeout 1800

14
Writing Software that leverages Telnet
Once I figured out how to manipulate Cisco routers using Telnet, I needed to find
a language that would allow me to write a Telnet script. Although there are several
languages that allow a call to an operating system command, telnet has issues that are not
readily resolved by a simple script. The first issue that needs to be addressed when trying
to automate a telnet session is that the program must be interactive, and cannot simply be
run as a series of scripted commands. To initiate a telnet session the program must
connect, and then login to the telnet server. Now the program must wait for a pattern to
appear within a specified amount of time that indicates that the server has favorably
responded to the login or last query.
Interestingly enough the scripts cue that its last command has ended is the return
of a command line prompt. This means that the user must know what specific prompt the
telnet server will be return. For exec mode a Cisco router returns the following prompt:
“Router>” (minus the quotes). In privileged exec mode a Cisco router returns :
“Router#”. Of course both prompts are what the user actually sees, whereas the default
command prompt actually returned by a Cisco router looks like:
“/[s().-]*[\$#>]s?(?:\enable\))?\s**$/”
It’s not hard to imagine that it took a while to figure out how to connect to Cisco using
Telnet and being able to respond to it’s unique privileged exec mode prompt.
Fortunately, I discovered that the Perl scripting language provides all kinds of unique
modules that focus around networking issues. Now that I had found the Perl language, I
simply needed to learn how to set it up, the language syntax, and how to write a nice
GUI-based program. After spending several weeks trying to get the enable prompt
working I discovered a nicely developed Perl module called Net::Telent::Cisco that
automated this process. Although it would have been nice to have found this module
right away, I did learn a lot in the process.

15
Choosing a Perl Version and Setting it up
Although Perl comes standard on all Linux installations, the latest versions of Perl
and its modules can be found and downloaded from the following website:
www.cpan.org. Since I was interested in developing multiple threaded programs I
downloaded and configured Perl 5.6.1. Previous versions of Perl do not support multi-
threading. There is an automated utility called CPAN, that is downloadable and is
supposed to automatically check module dependencies while ensuring a painless
installation. Although CPAN does work, I found it to be less than reliable the more
complex my Perl configuration became. Eventually, I simply downloaded the modules I
needed and waited for the installation to complain that it needed another module and
worked my way through the configuration via brute force and determination.
After my initial installation of Perl V5.6.1 I installed the following packages in
the following order: Bundle::Libnet
Net::Telnet
Term::Readkey
Net::Telnet::Cisco
Net::SNMP-3.65
Net::SNMP-Inerfaces-0.2
Data::Compare-0.02
SNMP-MIB-Compiler-0.06
Net::Daemon
Storable-1.0.13
RPC::PlServer
RPC::P1Client
DBI-1.20
SNMP 1.7
Mailtools
DBD::Mysql
IO::AtomicFIle
IO::Scalar
16
HTML::EP
SNMP-Monitor-0.1012
SNMP-Util-1.8
Glade-Perl-0.59 (For creating GUI programs)
The downloading and configuration of the above modules should be expected to
take a few days. As can be readily seen, I elected to use SNMP for monitoring the health
of a network. I will discuss this in more detail later. Although I configured Perl in
Linux, the Perl language and modules are readily available of UNIX and MS
Windows/NT users alike. The following are commands required to install a module
once it has been downloaded and unzipped:
Perl makefile.PL
Make
Make test
Make install
Creating a Perl GUI-based Program
I used the program Glade for generating my initial GUI. Glade allows the user to
create a project, and most of its GUI components, as well as multiple windows. The
project is saved as an XML file, which is then used to generate a general skeleton in the
selected language. Glade currently supports generation of C, C++, Ada, Perl and Eiffel;
however, in order to generate the proper code for Perl, the Glade-to-Perl module must be
loaded. Additionally, the user should ensure that he/she does not select the Enable
Gnome Support option. Tying Glade’s code generation into the O/S’s GUI library can
eventually cause problems. I depended on Glade to generate its GUI based on the GTK
libraries.

17

18


![[MS-TSRAP]: Telnet Server Remote Administration Protocol... · 2016. 6. 22. · telnet server: An implementation of the server side of Telnet Protocol [RFC854]. telnet session: An](https://img.pdfslide.net/doc/110x75/60b2d555f3bc7731e14c7b76/ms-tsrap-telnet-server-remote-administration-protocol-2016-6-22-telnet.jpg)