Embed Size (px)
Citation preview
1
Activ! Voice Configuration Guide (VPConfig) Version 4.0 (rev c)
VPI • 160 Camino Ruiz, Camarillo, CA 93012-6700(Voice) 800-200-5430 • 805-389-5200 • (Fax) 805-389-5202
www.vpi-corp.com
AAAAActiv! Vctiv! Vctiv! Vctiv! Vctiv! Voice - Configuroice - Configuroice - Configuroice - Configuroice - Configuraaaaation Guidetion Guidetion Guidetion Guidetion Guide(VPConfig) V(VPConfig) V(VPConfig) V(VPConfig) V(VPConfig) Version 4.0ersion 4.0ersion 4.0ersion 4.0ersion 4.0
2
Activ! Voice Configuration Guide (VPConfig) Version 4.0 (rev c)
TOC
Contents
Introduction ------------------------------------------------------------------------------------------------------------------------------------ 4
Activ! Voice Service Operational Overview ---------------------------------------------------------------------------------------------- 4System and File Layout --------------------------------------------------------------------------------------------------------------- 4Anti Virus and Third Party Software Conflicts ..................................................................................................... 5Ports Used ------------------------------------------------------------------------------------------------------------------------------- 5Logging in to the Activ! Voice Service ---------------------------------------------------------------------------------------------- 6Enabling Automatic Logon ------------------------------------------------------------------------------------------------------------ 7Disabling “Shutdown Event Tracking” for Windows 2003 Server Edition .............................................................. 8Logging out of the Activ! Voice Service ............................................................................................................... 8Shutting Down the Activ! Voice Service .............................................................................................................. 8
Activ! Voice Service - Home Section - Server Status ............................................................................................... 10Activ! Voice Service - Home Section - Environment Status ...................................................................................... 11Activ! Voice Service - Channels Section -----------------------------------------------------------------------------------------------12Activ! Voice Service - Buffer Manager Section ........................................................................................................ 13Activ! Voice Service - Archive Manager -------------------------------------------------------------------------------------------------14Activ! Service - Database Disconnect---------------------------------------------------------------------------------------------------16Activ! Service – VPI Icon -------------------------------------------------------------------------------------------------------------------18Activ! Service – System Tray -------------------------------------------------------------------------------------------------------------18
VPConfig > Login Screen------------------------------------------------------------------------------------------------------------------19VPConfig > Channel Manager Tab-------------------------------------------------------------------------------------------------------21
Call Playback Phone Number/Extension .......................................................................................................... 21Live Monitoring --------------------------------------------------------------------------------------------------------------------------22Perishable Pin Prompt ----------------------------------------------------------------------------------------------------------------22Call Playback Options ----------------------------------------------------------------------------------------------------------------22Auto Logout -----------------------------------------------------------------------------------------------------------------------------22Idle Alarm Rep --------------------------------------------------------------------------------------------------------------------------23VOX and VOX Emulation -------------------------------------------------------------------------------------------------------------23Recording Alert (Beep Tone) Configuration ....................................................................................................... 23Factory Default Settings -------------------------------------------------------------------------------------------------------------23
VPConfig > Channel Manager > Avaya Proactive Dialer Options ............................................................................. 24Avaya Proactive Dialer Options -----------------------------------------------------------------------------------------------------24
VPConfig > Channel Manager > Database-Tab (Avaya Dialer) ................................................................................ 25Avaya Proactive Database Mappings ----------------------------------------------------------------------------------------------25
VPConfig > Channel Manager > Channels Tab ....................................................................................................... 26Modifying Channels --------------------------------------------------------------------------------------------------------------------26Channel Setup Options ---------------------------------------------------------------------------------------------------------------27Details ------------------------------------------------------------------------------------------------------------------------------------27Advance Channel Configuration -----------------------------------------------------------------------------------------------------29
3
Activ! Voice Configuration Guide (VPConfig) Version 4.0 (rev c)
TOC
Copyright © Voice Print International, Inc.
The information contained herein is subject to change without notice.
As the registered end user, you are free to make and use as manycopies of this manual as you like, so long as it is used for internalpurposes only and is not transmitted in any manner whatsoever to anyindividual, organization or corporate entity not specifically named inyour End User License Agreement.
Voice Print International, Inc., shall not be liable for technical or editorialerrors or omissions contained herein.
VPConfig > Agents Tab --------------------------------------------------------------------------------------------------------------------32Adding or Modifying Agents ---------------------------------------------------------------------------------------------------------32Deleting Agents ------------------------------------------------------------------------------------------------------------------------33Adding and Defining Rights ----------------------------------------------------------------------------------------------------------33Privacy Locks (CTI Environment) ---------------------------------------------------------------------------------------------------34Details (Only viewable in Fixed Seating Environments) .................................................................................... 35Group ID and Group Access---------------------------------------------------------------------------------------------------------36
VPConfig > Buffer Manager Tab ----------------------------------------------------------------------------------------------------------37BUFF 01-Primary Buffer Device (Short Term Storage) ....................................................................................... 37BUFF 02-Secondary Buffer Device (Long Term Storage) ................................................................................... 38Long Term Storage (LTS) Overview -------------------------------------------------------------------------------------------------39
VPConfig > Archive Manager Tab --------------------------------------------------------------------------------------------------------40Archive Sessions ----------------------------------------------------------------------------------------------------------------------40Sweep Sessions -----------------------------------------------------------------------------------------------------------------------41ARCH01-Primary Archive Device ---------------------------------------------------------------------------------------------------41ARCH02-Secondary Archive or Playback Device .............................................................................................. 41Media Recycle Options ---------------------------------------------------------------------------------------------------------------41Tasks -------------------------------------------------------------------------------------------------------------------------------------42Properties Archive Device ------------------------------------------------------------------------------------------------------------42
VPConfig > Database Tab > Backup Tab ----------------------------------------------------------------------------------------------45Location for Backup Files/Overwrite Existing Backup....................................................................................... 45Backup Now Button -------------------------------------------------------------------------------------------------------------------46
VPConfig > Event Properties -------------------------------------------------------------------------------------------------------------47VPConfig - Logout ---------------------------------------------------------------------------------------------------------------------------48Technical Support Information ------------------------------------------------------------------------------------------------------------49Revision History -----------------------------------------------------------------------------------------------------------------------------50
4
Activ! Voice Configuration Guide (VPConfig) Version 4.0 (rev c)
Introduction
This guide will assist you with the administration and configuration of the Activ! Voice Server (also referred to as theVoice Print Server).
Familiarity with using Windows Operating Systems and Windows Networks is a prerequisite for the proper operationand use of the Activ! Voice Server.
Activ! Voice Service Operational Overview
Activ! Voice Server, Version 4.0, runs as a service or as an application and maintains the same functional features asversion 2.8.3.10. Additionally, Version 4.0 has a 192 channel capacity, versus the 96 channels limitation of Version2.8.3.10.
System and File Layout
A typical configuration consists of two drives in a RAID 1 (mirrored) and 4 partitions (C, D, E and F drives).Regardless of the amount of physical drives and their redundant configuration, below shows the partition configurationof Activ! Voice:
C: Used for Operating System use (All Voice Print Applications are installed on this partition)
D: Used for Database storage for all Voice Print Products (GDB; GBK)CRITICAL! DO NOT BACKUP WITH NETWORK!
E: Short Term Storage (TMP; PCM)CRITICAL! DO NOT DELETE *. TMP files!
F: Long Term Storage (LTS)CRITICAL! DO NOT DELETE *. LTS files!
G: DVD RAM Archive Device (If Installed)
H: DVD RAM Archive Device (If Installed)
NOTE: A mirrored drive will show LOCKED and full at all times, this is correct.
IMPORTANT: DO NOT point any network backup device or software at a file with an extension of*.GDB; this is an active database file. Instead point the software towards the backupdatabase file *.GBK. By default, database files are retained on the D: partition(i.e.,D:\DB).
Activ! Voice Server Operational Overview
5
Activ! Voice Configuration Guide (VPConfig) Version 4.0 (rev c)
Anti Virus and Third Party Software Conflicts
Anti-Virus software is processor intensive and virtually takes full control of the Operating System for file handling.Minimum configuration requirements are required when installing Anti-Virus software on a system running anyVoice Print Server Application.
Please refer to the Voice Print International, Inc. “Anti-Virus Policy” available from our Operations Departmentregarding any antivirus requirements.
IMPORTANT! Deviation from these requirements set forth in the “Anti-Virus Policy” will void yourWarranty/Maintenance Agreement.
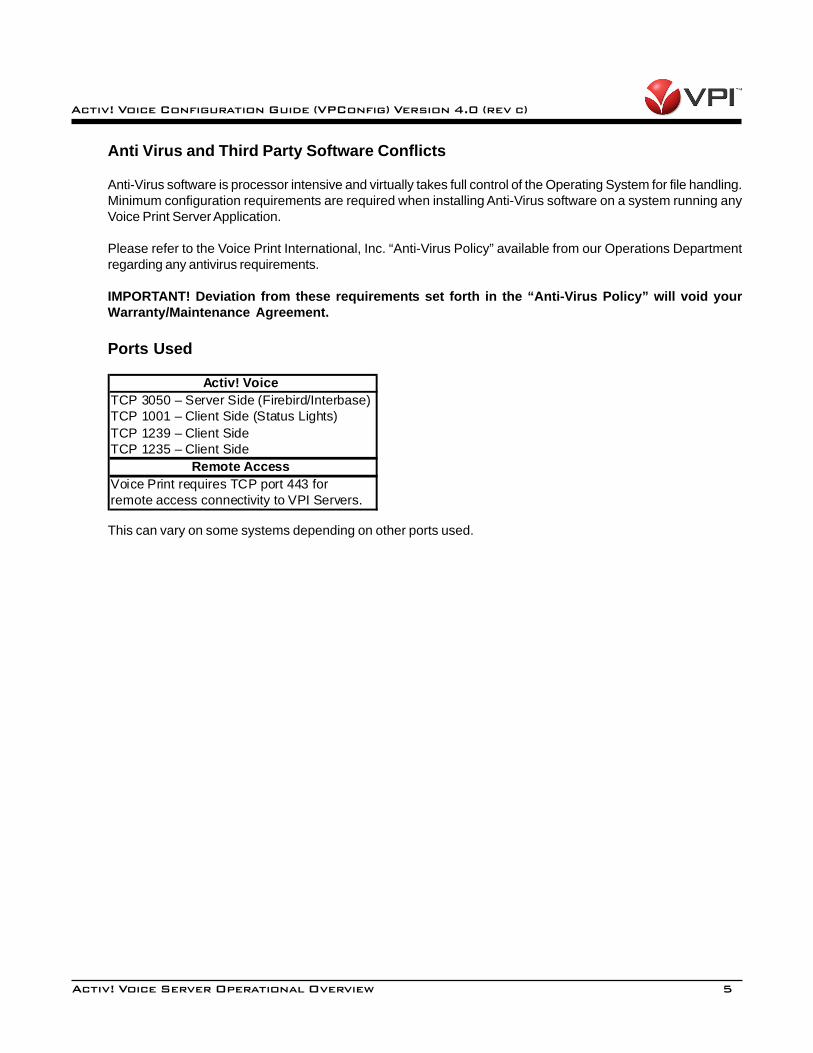
Ports Used
Activ! VoiceTCP 3050 – Server Side (Firebird/Interbase)TCP 1001 – Client Side (Status Lights)TCP 1239 – Client SideTCP 1235 – Client Side Remote AccessVoice Print requires TCP port 443 forremote access connectivity to VPI Servers.
This can vary on some systems depending on other ports used.
Activ! Voice Server Operational Overview
6
Activ! Voice Configuration Guide (VPConfig) Version 4.0 (rev c)
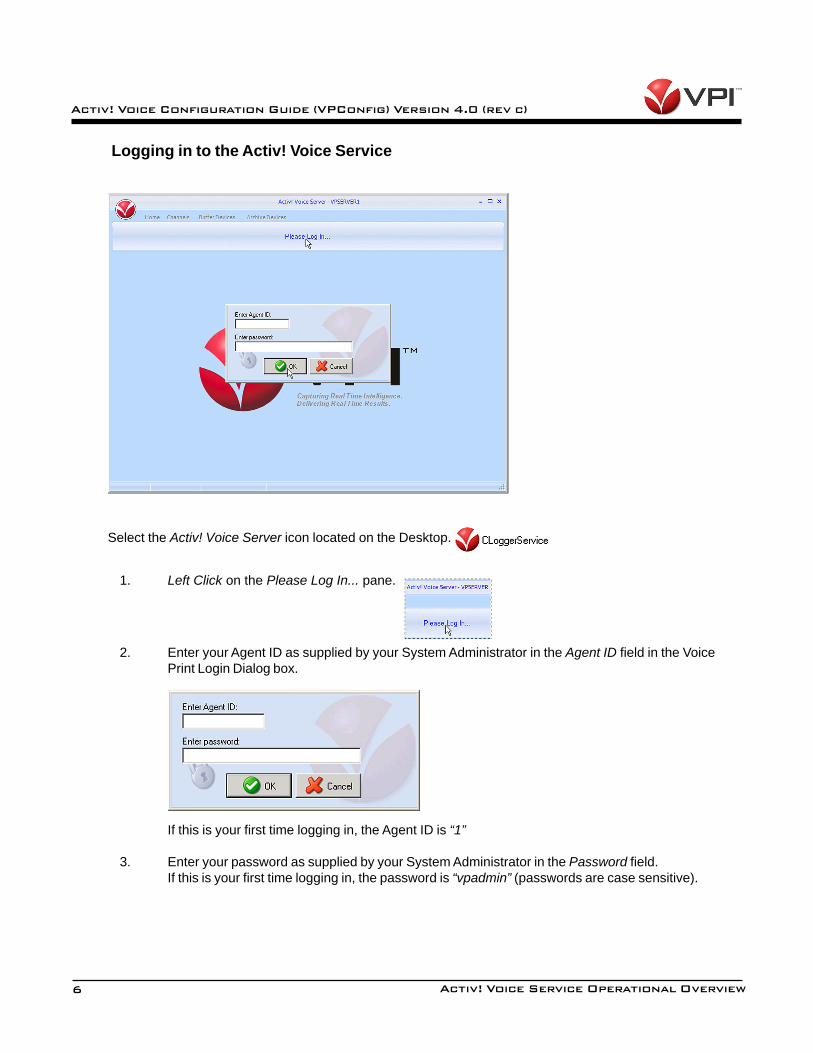
Logging in to the Activ! Voice Service
Select the Activ! Voice Server icon located on the Desktop.
1. Left Click on the Please Log In... pane.
2. Enter your Agent ID as supplied by your System Administrator in the Agent ID field in the VoicePrint Login Dialog box.
If this is your first time logging in, the Agent ID is “1”
3. Enter your password as supplied by your System Administrator in the Password field.If this is your first time logging in, the password is “vpadmin” (passwords are case sensitive).
Activ! Voice Service Operational Overview
7
Activ! Voice Configuration Guide (VPConfig) Version 4.0 (rev c)
4. Left Click on the OK box.
5. If you are unable to login to Voice Print properly, please call either your System Administrator orVoice Print Technical Support for assistance.
Enabling Automatic Logon
The Activ! Voice Service allows you to automate the logon process by storing your password and otherpertinent information in the Registry database.
Important! This procedure contains information about modifying the registry. Before you modify theregistry, make sure to back it up and make sure that you understand how to restore the registry if a problemoccurs. For information about how to back up, restore, and edit the registry, visit http://support.microsoft.com/and search for the appropriate Microsoft Knowledge Base Article for your operating system.
Select Start > Run > and in the Run field type in regedt32.
Locate the following Registry subkey:
HKEY_LOCAL_MACHINE\SOFTWARE\Microsoft\WindowsNT\CurrentVersion\Winlogon
1. Search for or create a New STRING and name it AutoAdminLogon.Value Data should be “1”
2. Search for or create a New STRING and name it DefaultUserName.Value Data will be an Administrator account in User Manager such as “Administrator” or “vpadmin”.
3. Create a New STRING and name it DefaultPassword. The Value Data should be the correspondingpassword to the user name specified above such as “12345” or “vpadmin”.
NOTE: If no DefaultPassword string is specified, Windows automatically changes the value of theAutoAdminLogon key from 1 (true) to 0 (false), thus disabling the AutoAdminLogonfeature.
4. Close the Registry Editor and reboot PC, it should automatically login.
You can bypass the Automatic Logon feature by holding down the SHIFT key as Windows is starting. If youare already logged on, press CTRL+ALT+DEL, choose the Logoff button, choose the OK button, and thenimmediately hold down the SHIFT key until the Welcome dialog box appears.
The problem of bypassing the automatic logon feature is that the original DefaultUserName is no longer keptfor subsequent logons, because the name of the last user to logon is retained in the Username box of theWelcome dialog box and the Registry. To enable the AutoAdminLogon once again, enter the originalDefaultUserName and password in the Welcome dialog box.
It is also important to note that if the DONTDISPLAYLASTUSERNAME value is set to 1, AutoAdminLogon willnot function.
Activ! Voice Service Operational Overview
8
Activ! Voice Configuration Guide (VPConfig) Version 4.0 (rev c)
Disabling “Shutdown Event Tracking” for Windows 2003 Server Edition
By default, Windows 2003 Server Edition uses “Shutdown Event Tracking” to add more detail to shutdownevents. However, this feature will interfere with the AutoAdminLogon feature and needs to be disabled. Reasonbeing is that Shutdown Event Tracking requires user intervention to continue the startup process thereby defeatingthe purpose of self system startup.
To disable “Shutdown Event Tracking” please reference “Configuring Shutdown Event Tracker for Microsoft WindowsServer 2003” on the Microsoft.com Website http://www.microsoft.com.
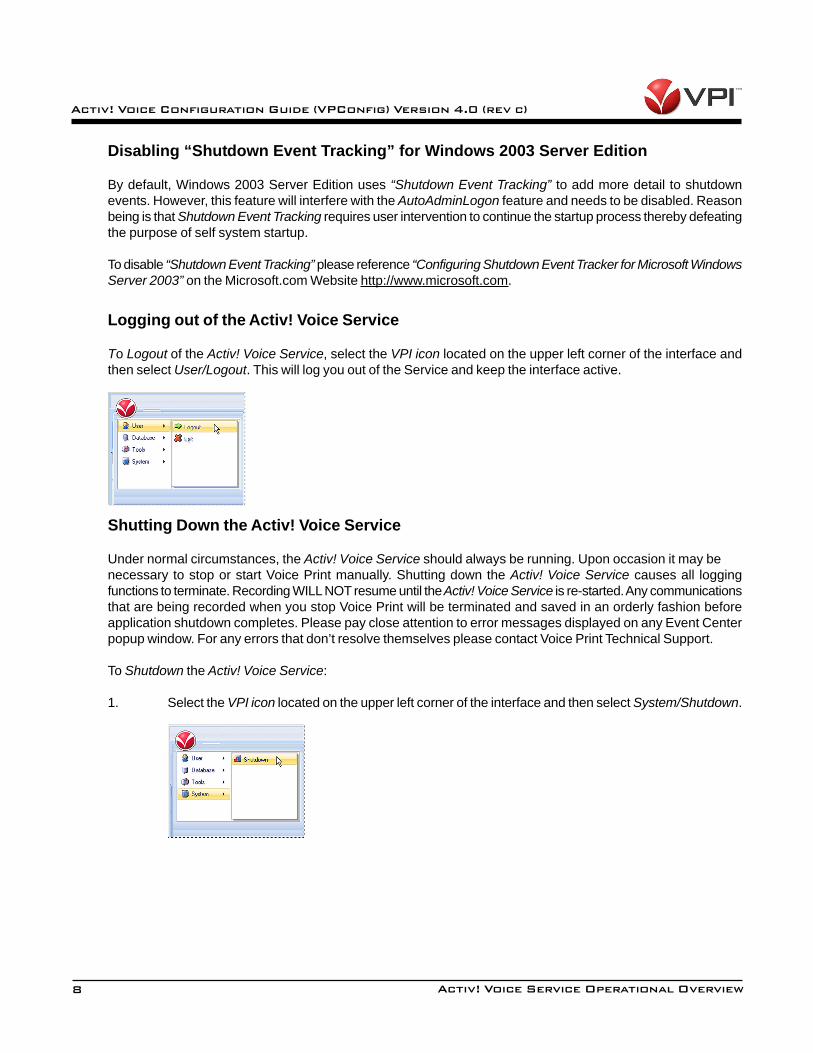
Logging out of the Activ! Voice Service
To Logout of the Activ! Voice Service, select the VPI icon located on the upper left corner of the interface andthen select User/Logout. This will log you out of the Service and keep the interface active.
Shutting Down the Activ! Voice Service
Under normal circumstances, the Activ! Voice Service should always be running. Upon occasion it may benecessary to stop or start Voice Print manually. Shutting down the Activ! Voice Service causes all loggingfunctions to terminate. Recording WILL NOT resume until the Activ! Voice Service is re-started. Any communicationsthat are being recorded when you stop Voice Print will be terminated and saved in an orderly fashion beforeapplication shutdown completes. Please pay close attention to error messages displayed on any Event Centerpopup window. For any errors that don’t resolve themselves please contact Voice Print Technical Support.
To Shutdown the Activ! Voice Service:
1. Select the VPI icon located on the upper left corner of the interface and then select System/Shutdown.
Activ! Voice Service Operational Overview
9
Activ! Voice Configuration Guide (VPConfig) Version 4.0 (rev c)
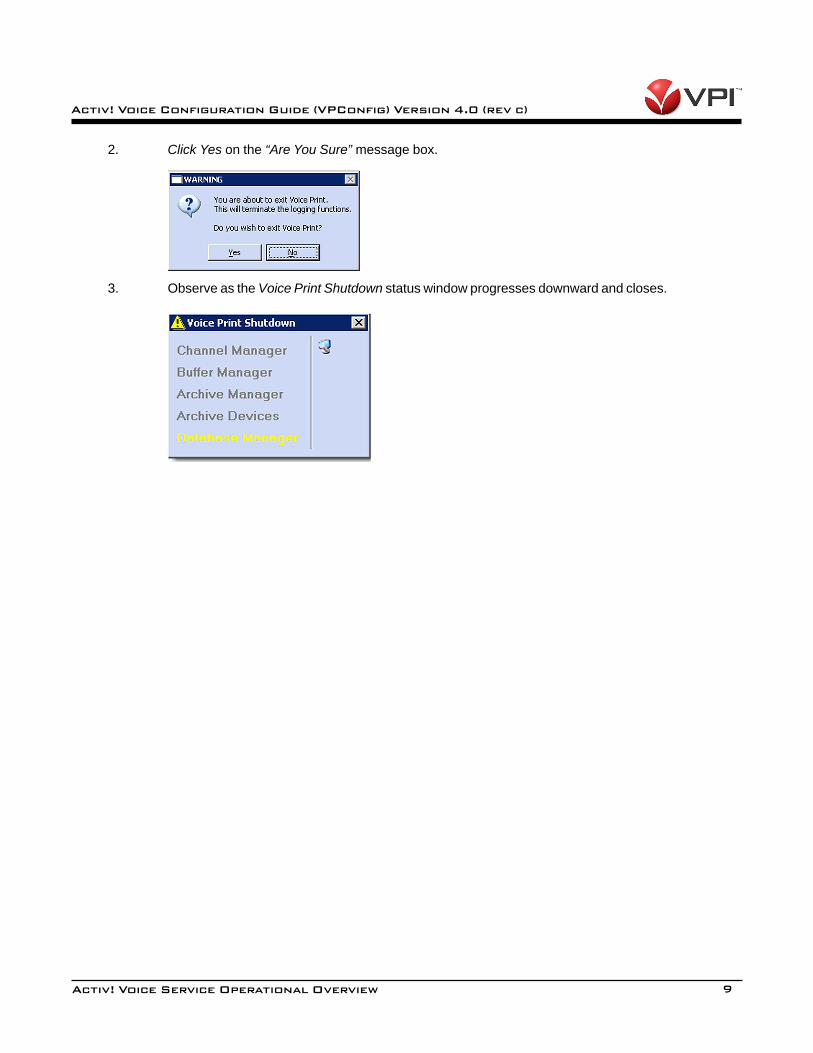
2. Click Yes on the “Are You Sure” message box.
3. Observe as the Voice Print Shutdown status window progresses downward and closes.
Activ! Voice Service Operational Overview
10
Activ! Voice Configuration Guide (VPConfig) Version 4.0 (rev c)
Server Status
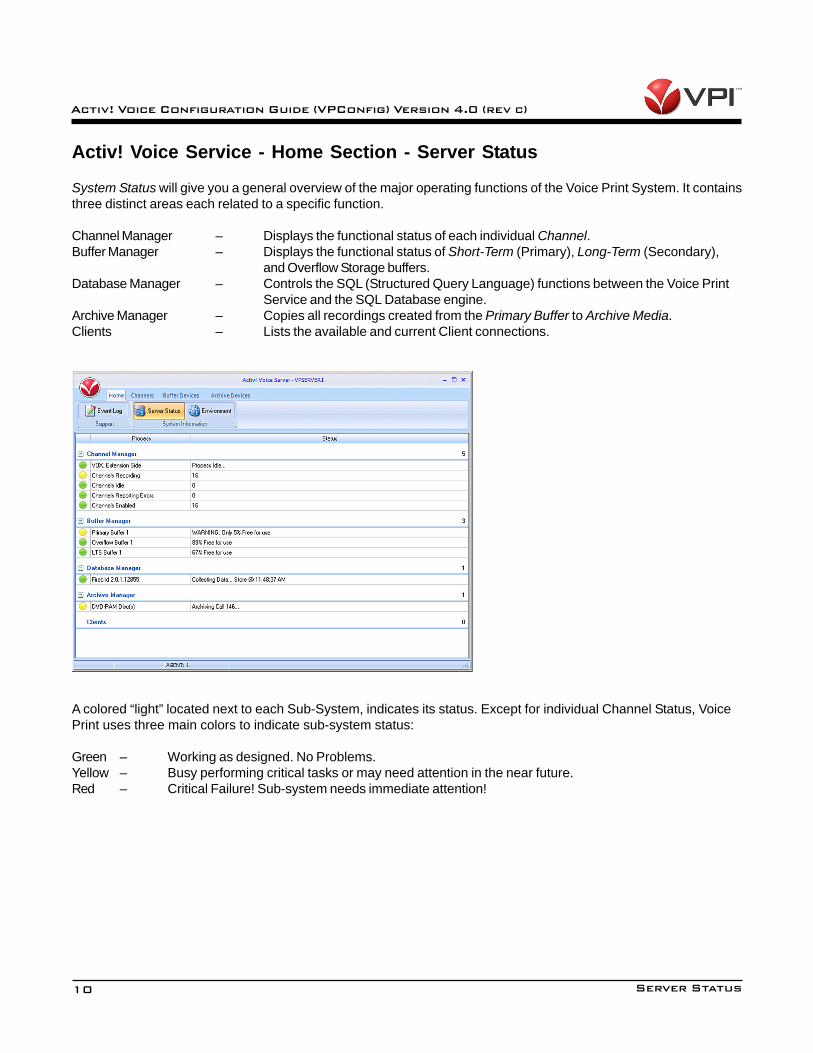
Activ! Voice Service - Home Section - Server Status
System Status will give you a general overview of the major operating functions of the Voice Print System. It containsthree distinct areas each related to a specific function.
Channel Manager – Displays the functional status of each individual Channel.Buffer Manager – Displays the functional status of Short-Term (Primary), Long-Term (Secondary),
and Overflow Storage buffers.Database Manager – Controls the SQL (Structured Query Language) functions between the Voice Print
Service and the SQL Database engine.Archive Manager – Copies all recordings created from the Primary Buffer to Archive Media.Clients – Lists the available and current Client connections.
A colored “light” located next to each Sub-System, indicates its status. Except for individual Channel Status, VoicePrint uses three main colors to indicate sub-system status:
Green – Working as designed. No Problems.Yellow – Busy performing critical tasks or may need attention in the near future.Red – Critical Failure! Sub-system needs immediate attention!
11
Activ! Voice Configuration Guide (VPConfig) Version 4.0 (rev c)
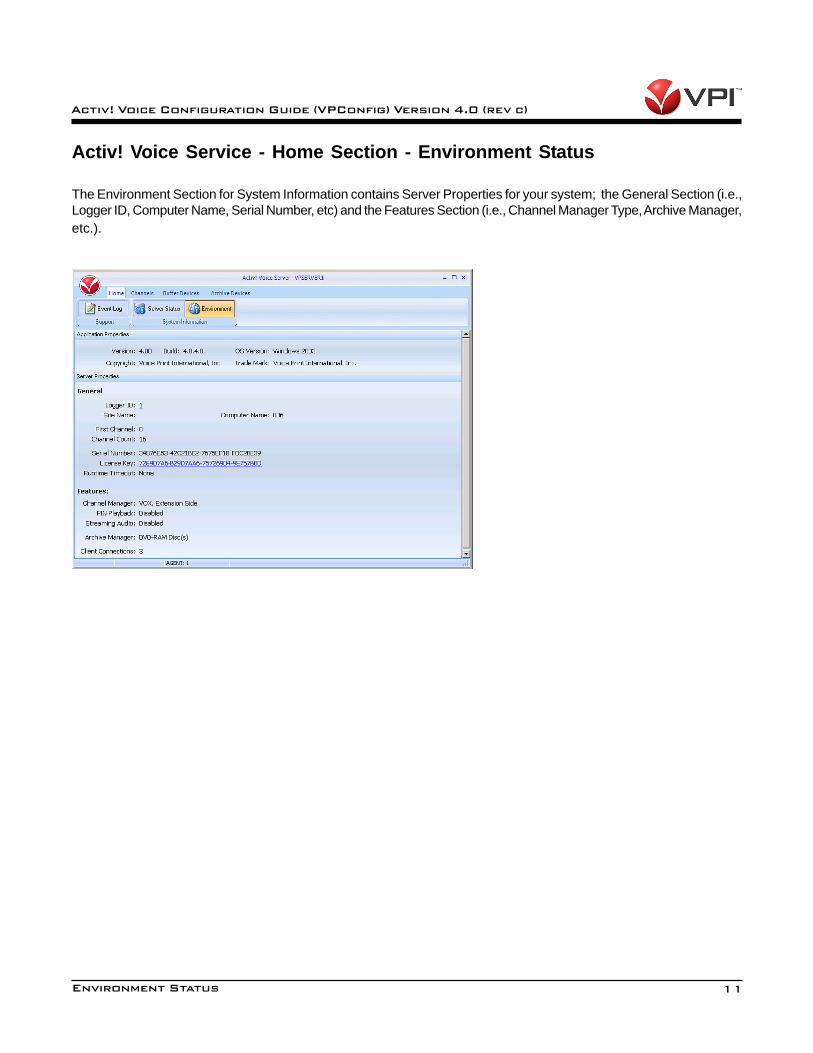
Activ! Voice Service - Home Section - Environment Status
The Environment Section for System Information contains Server Properties for your system; the General Section (i.e.,Logger ID, Computer Name, Serial Number, etc) and the Features Section (i.e., Channel Manager Type, Archive Manager,etc.).
Environment Status
12
Activ! Voice Configuration Guide (VPConfig) Version 4.0 (rev c)
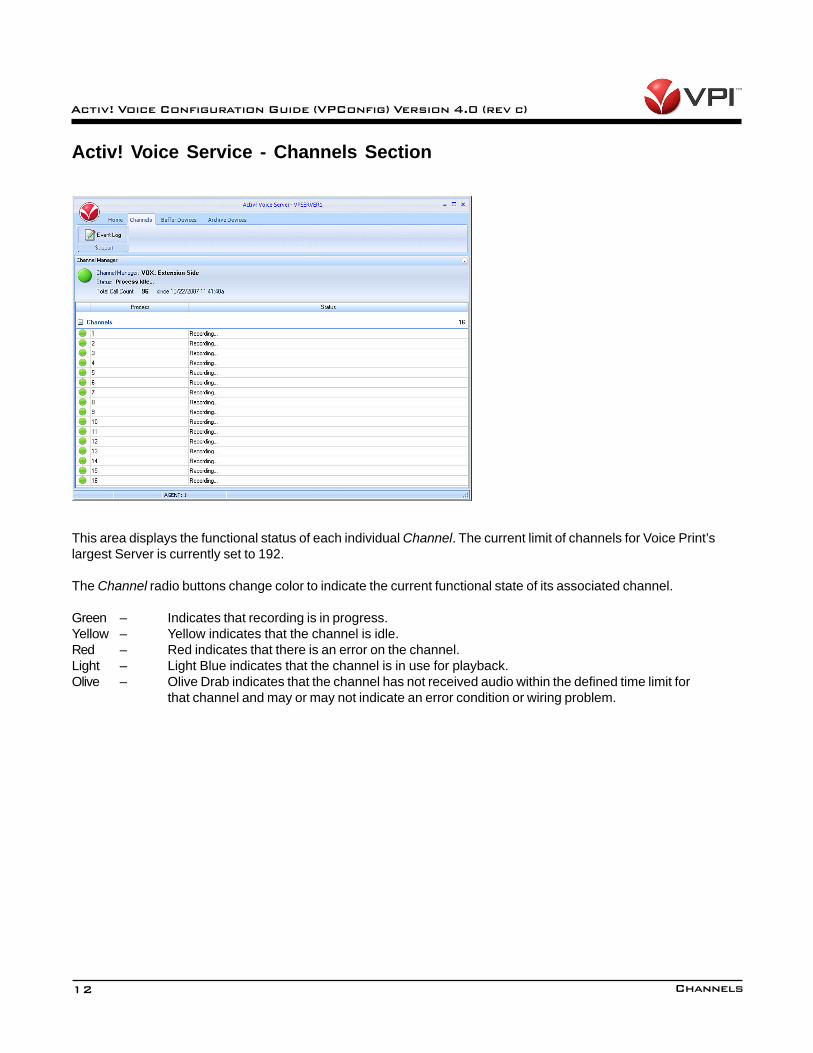
Activ! Voice Service - Channels Section
This area displays the functional status of each individual Channel. The current limit of channels for Voice Print’slargest Server is currently set to 192.
The Channel radio buttons change color to indicate the current functional state of its associated channel.
Green – Indicates that recording is in progress.Yellow – Yellow indicates that the channel is idle.Red – Red indicates that there is an error on the channel.Light – Light Blue indicates that the channel is in use for playback.Olive – Olive Drab indicates that the channel has not received audio within the defined time limit for
that channel and may or may not indicate an error condition or wiring problem.
Channels
13
Activ! Voice Configuration Guide (VPConfig) Version 4.0 (rev c)
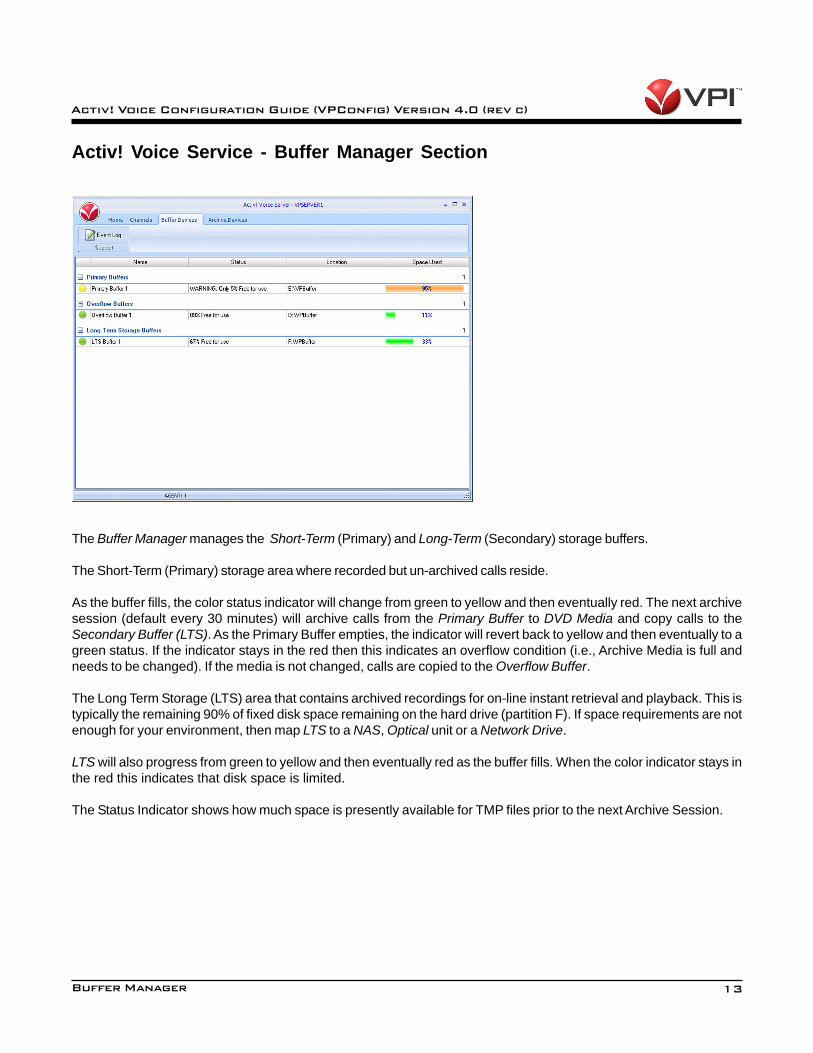
Activ! Voice Service - Buffer Manager Section
The Buffer Manager manages the Short-Term (Primary) and Long-Term (Secondary) storage buffers.
The Short-Term (Primary) storage area where recorded but un-archived calls reside.
As the buffer fills, the color status indicator will change from green to yellow and then eventually red. The next archivesession (default every 30 minutes) will archive calls from the Primary Buffer to DVD Media and copy calls to theSecondary Buffer (LTS). As the Primary Buffer empties, the indicator will revert back to yellow and then eventually to agreen status. If the indicator stays in the red then this indicates an overflow condition (i.e., Archive Media is full andneeds to be changed). If the media is not changed, calls are copied to the Overflow Buffer.
The Long Term Storage (LTS) area that contains archived recordings for on-line instant retrieval and playback. This istypically the remaining 90% of fixed disk space remaining on the hard drive (partition F). If space requirements are notenough for your environment, then map LTS to a NAS, Optical unit or a Network Drive.
LTS will also progress from green to yellow and then eventually red as the buffer fills. When the color indicator stays inthe red this indicates that disk space is limited.
The Status Indicator shows how much space is presently available for TMP files prior to the next Archive Session.
Buffer Manager
14
Activ! Voice Configuration Guide (VPConfig) Version 4.0 (rev c)
Activ! Voice Service - Archive Manager
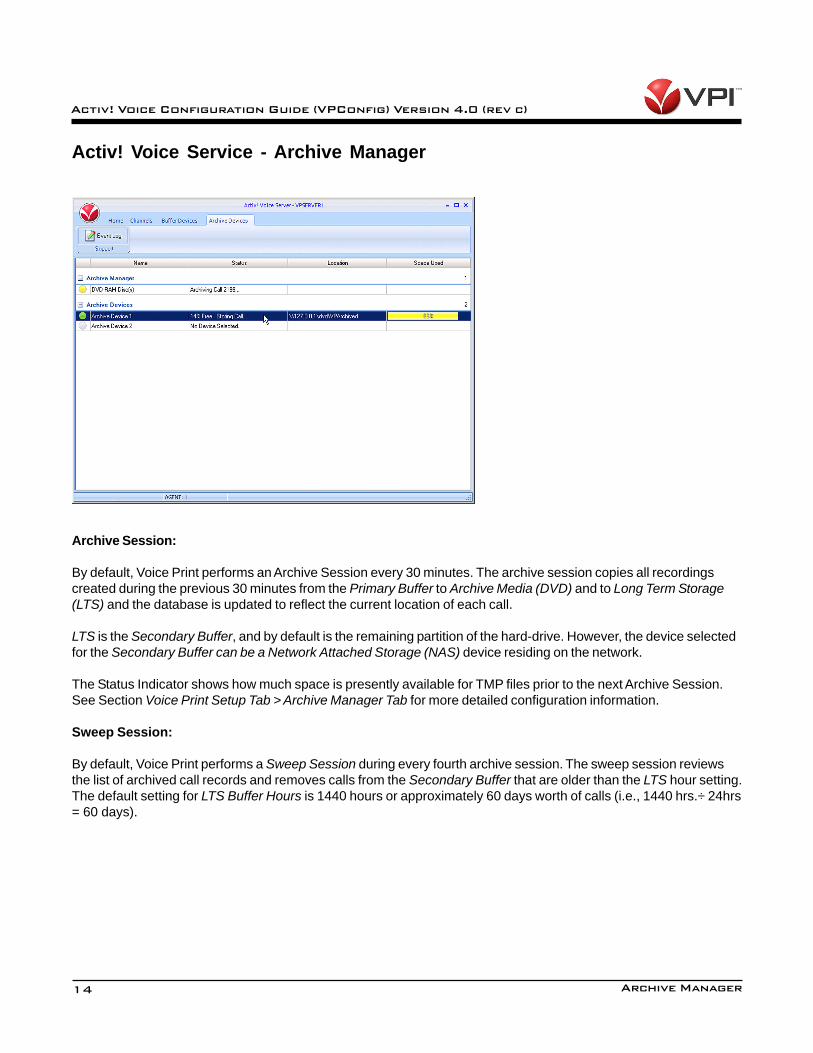
Archive Session:
By default, Voice Print performs an Archive Session every 30 minutes. The archive session copies all recordingscreated during the previous 30 minutes from the Primary Buffer to Archive Media (DVD) and to Long Term Storage(LTS) and the database is updated to reflect the current location of each call.
LTS is the Secondary Buffer, and by default is the remaining partition of the hard-drive. However, the device selectedfor the Secondary Buffer can be a Network Attached Storage (NAS) device residing on the network.
The Status Indicator shows how much space is presently available for TMP files prior to the next Archive Session.See Section Voice Print Setup Tab > Archive Manager Tab for more detailed configuration information.
Sweep Session:
By default, Voice Print performs a Sweep Session during every fourth archive session. The sweep session reviewsthe list of archived call records and removes calls from the Secondary Buffer that are older than the LTS hour setting.The default setting for LTS Buffer Hours is 1440 hours or approximately 60 days worth of calls (i.e., 1440 hrs.÷ 24hrs= 60 days).
Archive Manager
15
Activ! Voice Configuration Guide (VPConfig) Version 4.0 (rev c)
Archive Device 1:
The indicator gives status of the first archive device. Status indicates the current state of the drive and loaded media.Location displays the currently loaded media ID number. Space Used gives a graphical representation of how full thearchive media is and indicates how much free space is available on the currently loaded media.
The Archive Device radio buttons change color to indicate the current functional state of its associated media.The indicator block has three states:
Green – Indicates that media is loaded and has space available to archive recordings.Yellow – Indicates that media is loaded but is close to running out of space to archive
recordings.Red – Indicates that either media is not loaded or that the loaded media is full and
cannot store any more data.
Archive Device 2:
Archive Device 2 indicates the status of the second archive device if it is present. Each of the indicators worksexactly as described in Archive Device 1. Systems configured with “Mirrored” archive devices will show the drive asLOCKED and FULL at all times
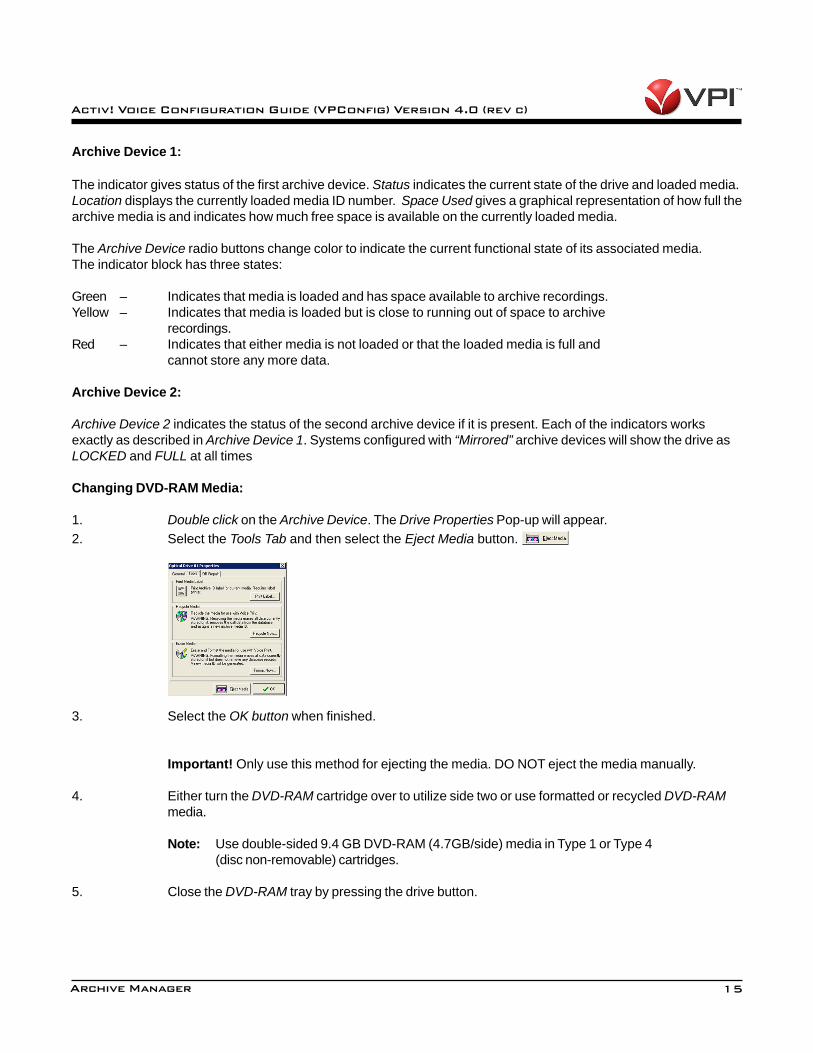
Changing DVD-RAM Media:
1. Double click on the Archive Device. The Drive Properties Pop-up will appear.2. Select the Tools Tab and then select the Eject Media button.
3. Select the OK button when finished.
Important! Only use this method for ejecting the media. DO NOT eject the media manually.
4. Either turn the DVD-RAM cartridge over to utilize side two or use formatted or recycled DVD-RAMmedia.
Note: Use double-sided 9.4 GB DVD-RAM (4.7GB/side) media in Type 1 or Type 4(disc non-removable) cartridges.
5. Close the DVD-RAM tray by pressing the drive button.
Archive Manager
16
Activ! Voice Configuration Guide (VPConfig) Version 4.0 (rev c)
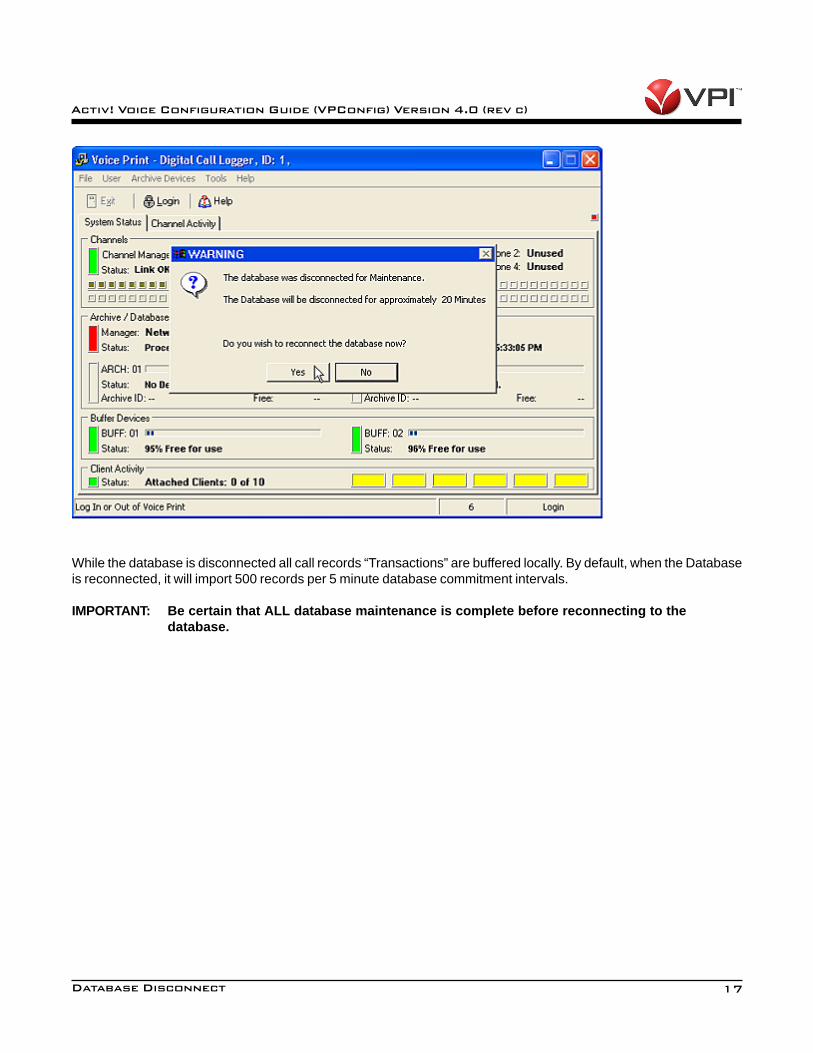
Activ! Service - Database Disconnect
To disconnect the database for maintenance:
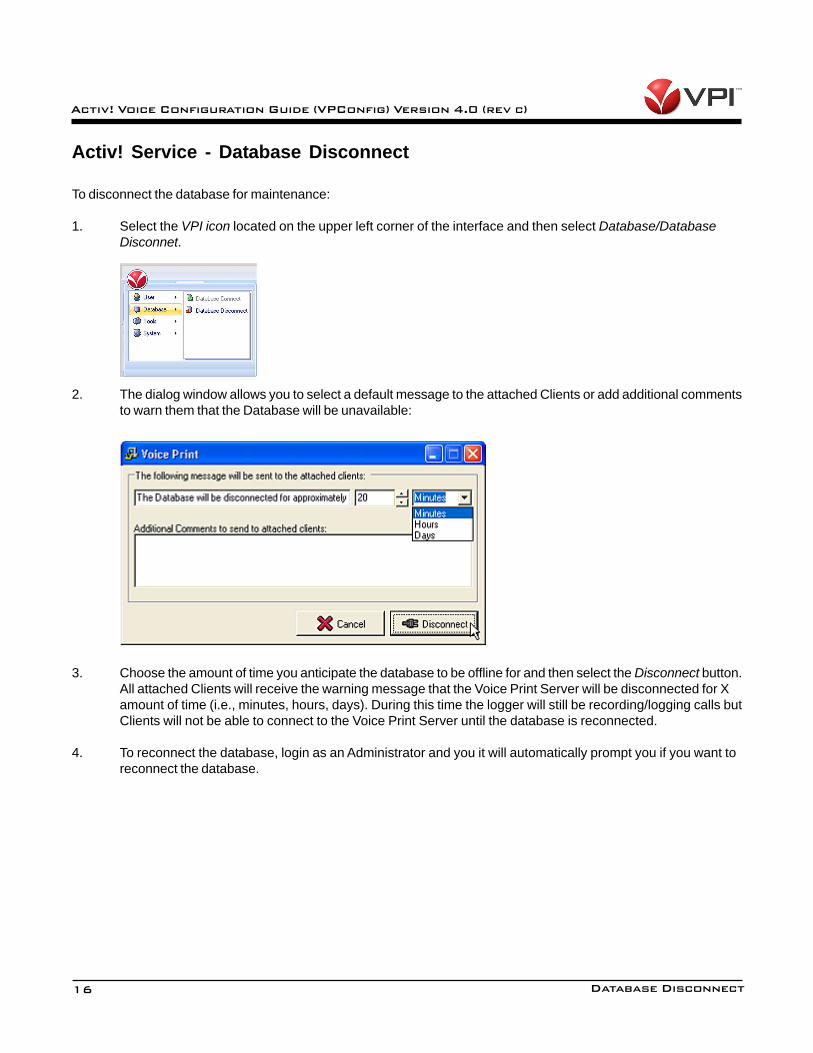
1. Select the VPI icon located on the upper left corner of the interface and then select Database/DatabaseDisconnet.
2. The dialog window allows you to select a default message to the attached Clients or add additional commentsto warn them that the Database will be unavailable:
3. Choose the amount of time you anticipate the database to be offline for and then select the Disconnect button.All attached Clients will receive the warning message that the Voice Print Server will be disconnected for Xamount of time (i.e., minutes, hours, days). During this time the logger will still be recording/logging calls butClients will not be able to connect to the Voice Print Server until the database is reconnected.
4. To reconnect the database, login as an Administrator and you it will automatically prompt you if you want toreconnect the database.
Database Disconnect
17
Activ! Voice Configuration Guide (VPConfig) Version 4.0 (rev c)
While the database is disconnected all call records “Transactions” are buffered locally. By default, when the Databaseis reconnected, it will import 500 records per 5 minute database commitment intervals.
IMPORTANT: Be certain that ALL database maintenance is complete before reconnecting to thedatabase.
Database Disconnect
18
Activ! Voice Configuration Guide (VPConfig) Version 4.0 (rev c)
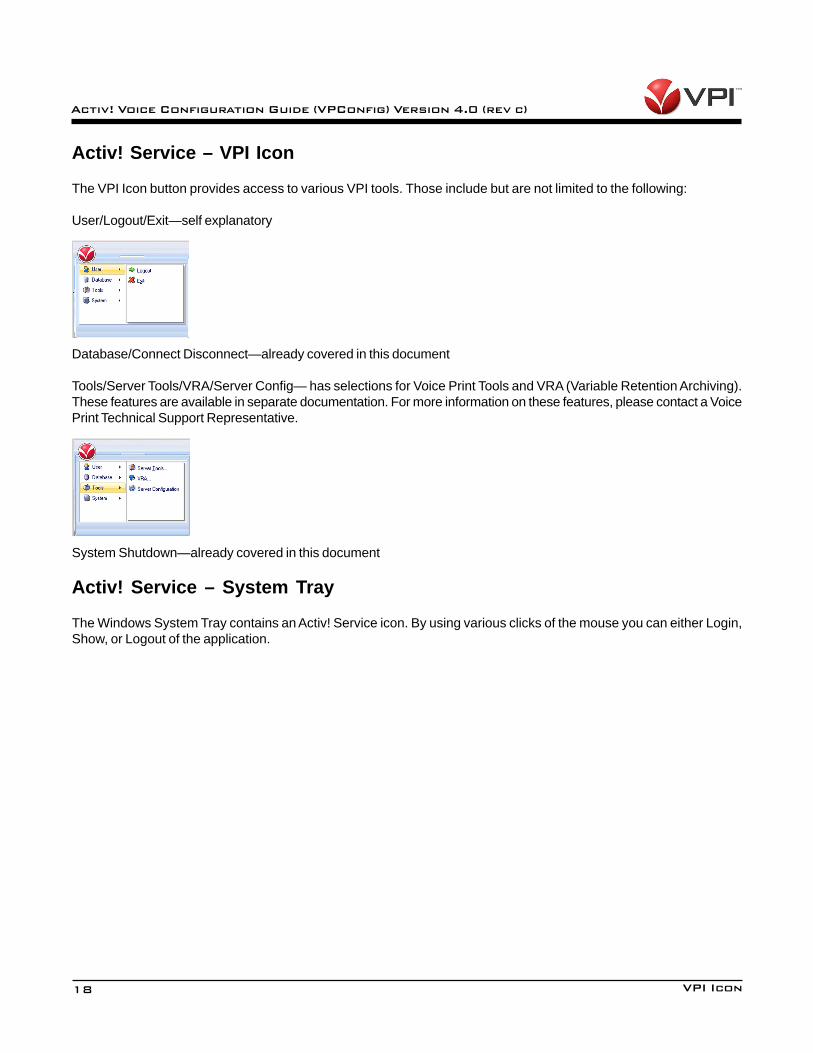
Activ! Service – VPI Icon
The VPI Icon button provides access to various VPI tools. Those include but are not limited to the following:
User/Logout/Exit—self explanatory
Database/Connect Disconnect—already covered in this document
Tools/Server Tools/VRA/Server Config— has selections for Voice Print Tools and VRA (Variable Retention Archiving).These features are available in separate documentation. For more information on these features, please contact a VoicePrint Technical Support Representative.
System Shutdown—already covered in this document
Activ! Service – System Tray
The Windows System Tray contains an Activ! Service icon. By using various clicks of the mouse you can either Login,Show, or Logout of the application.
VPI Icon
19
Activ! Voice Configuration Guide (VPConfig) Version 4.0 (rev c)
VPConfig - Login Screen
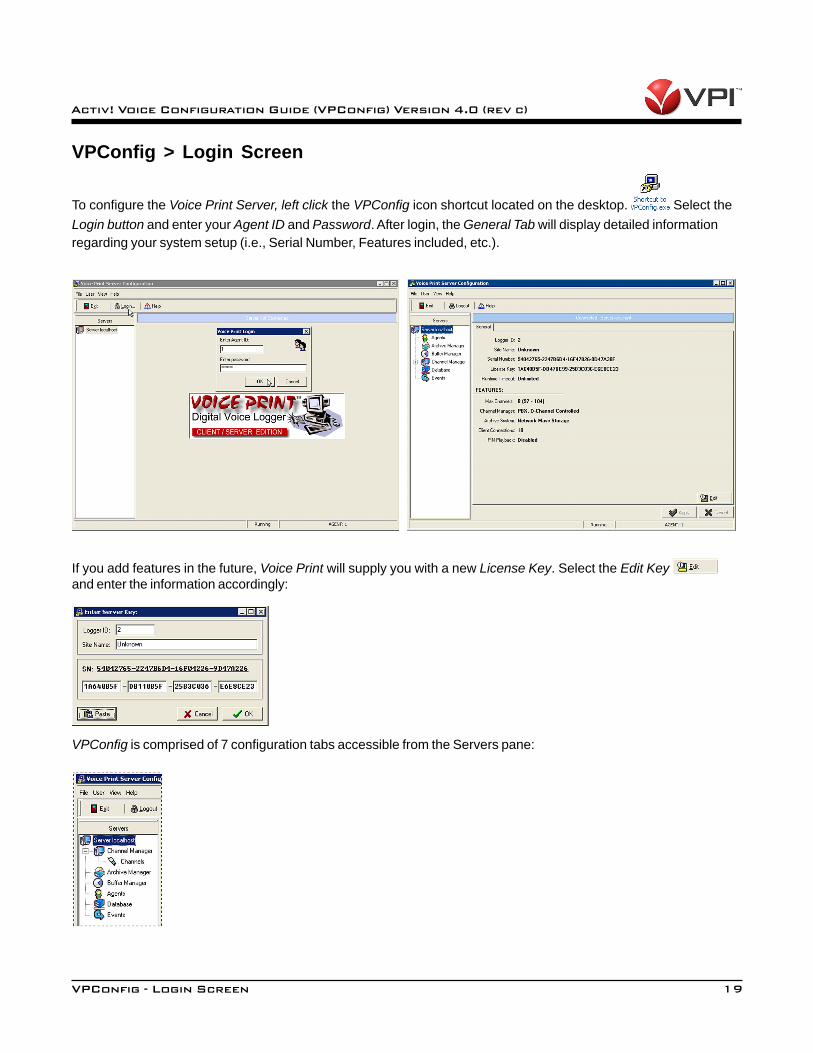
VPConfig > Login Screen
To configure the Voice Print Server, left click the VPConfig icon shortcut located on the desktop. Select theLogin button and enter your Agent ID and Password. After login, the General Tab will display detailed informationregarding your system setup (i.e., Serial Number, Features included, etc.).
If you add features in the future, Voice Print will supply you with a new License Key. Select the Edit Key and enter the information accordingly:
VPConfig is comprised of 7 configuration tabs accessible from the Servers pane:
20
Activ! Voice Configuration Guide (VPConfig) Version 4.0 (rev c)
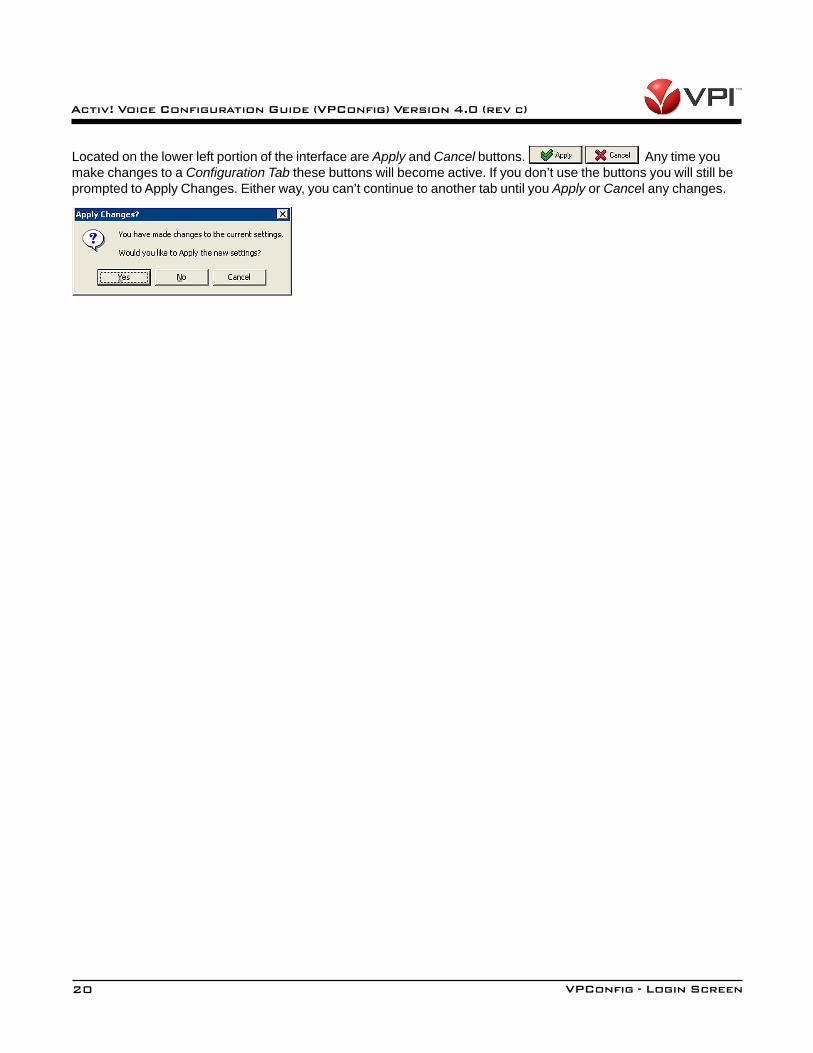
Located on the lower left portion of the interface are Apply and Cancel buttons. Any time youmake changes to a Configuration Tab these buttons will become active. If you don’t use the buttons you will still beprompted to Apply Changes. Either way, you can’t continue to another tab until you Apply or Cancel any changes.
VPConfig - Login Screen
21
Activ! Voice Configuration Guide (VPConfig) Version 4.0 (rev c)
VPConfig - Channel Manager Tab
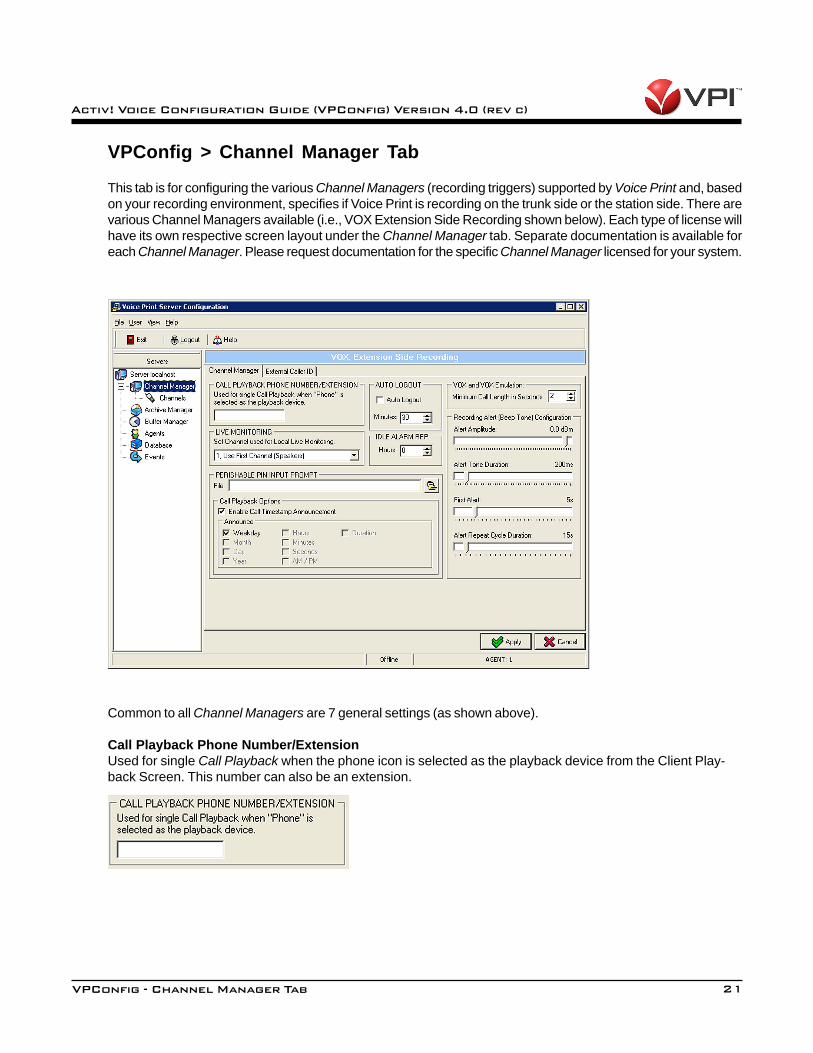
VPConfig > Channel Manager Tab
This tab is for configuring the various Channel Managers (recording triggers) supported by Voice Print and, basedon your recording environment, specifies if Voice Print is recording on the trunk side or the station side. There arevarious Channel Managers available (i.e., VOX Extension Side Recording shown below). Each type of license willhave its own respective screen layout under the Channel Manager tab. Separate documentation is available foreach Channel Manager. Please request documentation for the specific Channel Manager licensed for your system.
Common to all Channel Managers are 7 general settings (as shown above).
Call Playback Phone Number/ExtensionUsed for single Call Playback when the phone icon is selected as the playback device from the Client Play-back Screen. This number can also be an extension.
22
Activ! Voice Configuration Guide (VPConfig) Version 4.0 (rev c)
VPConfig - Channel Manager Tab
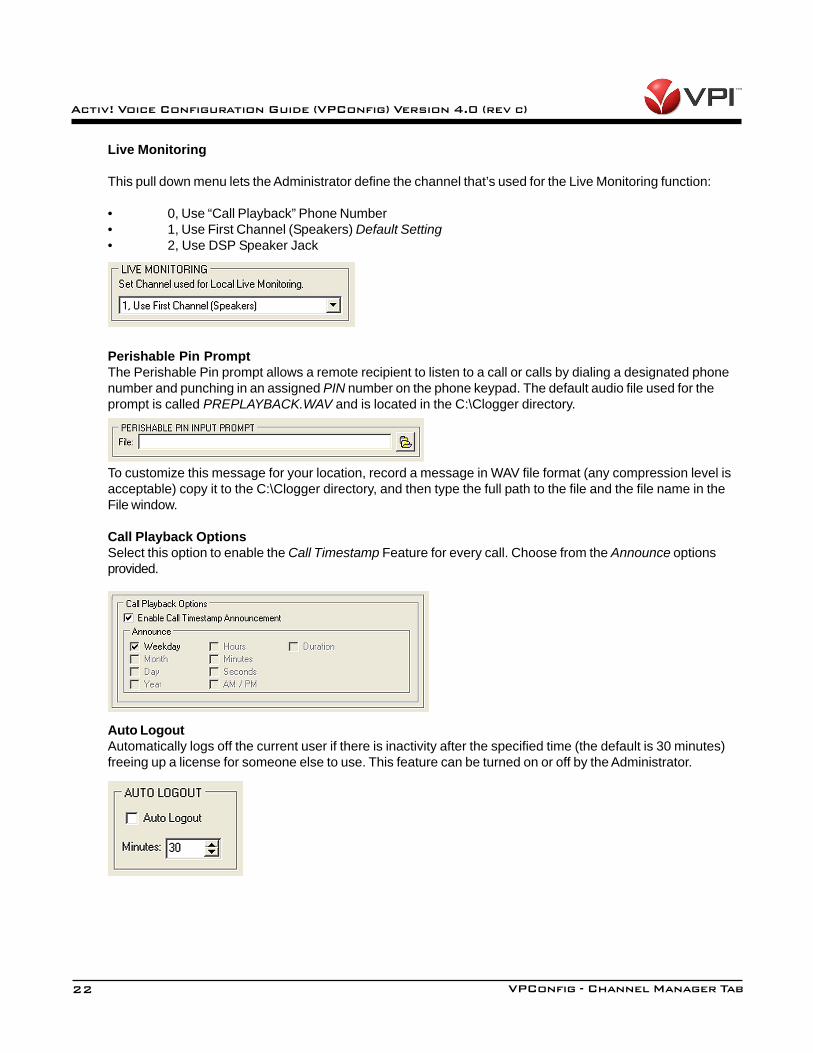
Live Monitoring
This pull down menu lets the Administrator define the channel that’s used for the Live Monitoring function:
• 0, Use “Call Playback” Phone Number• 1, Use First Channel (Speakers) Default Setting• 2, Use DSP Speaker Jack
Perishable Pin PromptThe Perishable Pin prompt allows a remote recipient to listen to a call or calls by dialing a designated phonenumber and punching in an assigned PIN number on the phone keypad. The default audio file used for theprompt is called PREPLAYBACK.WAV and is located in the C:\Clogger directory.
To customize this message for your location, record a message in WAV file format (any compression level isacceptable) copy it to the C:\Clogger directory, and then type the full path to the file and the file name in theFile window.
Call Playback OptionsSelect this option to enable the Call Timestamp Feature for every call. Choose from the Announce optionsprovided.
Auto LogoutAutomatically logs off the current user if there is inactivity after the specified time (the default is 30 minutes)freeing up a license for someone else to use. This feature can be turned on or off by the Administrator.
23
Activ! Voice Configuration Guide (VPConfig) Version 4.0 (rev c)
VPConfig - Channels Tab
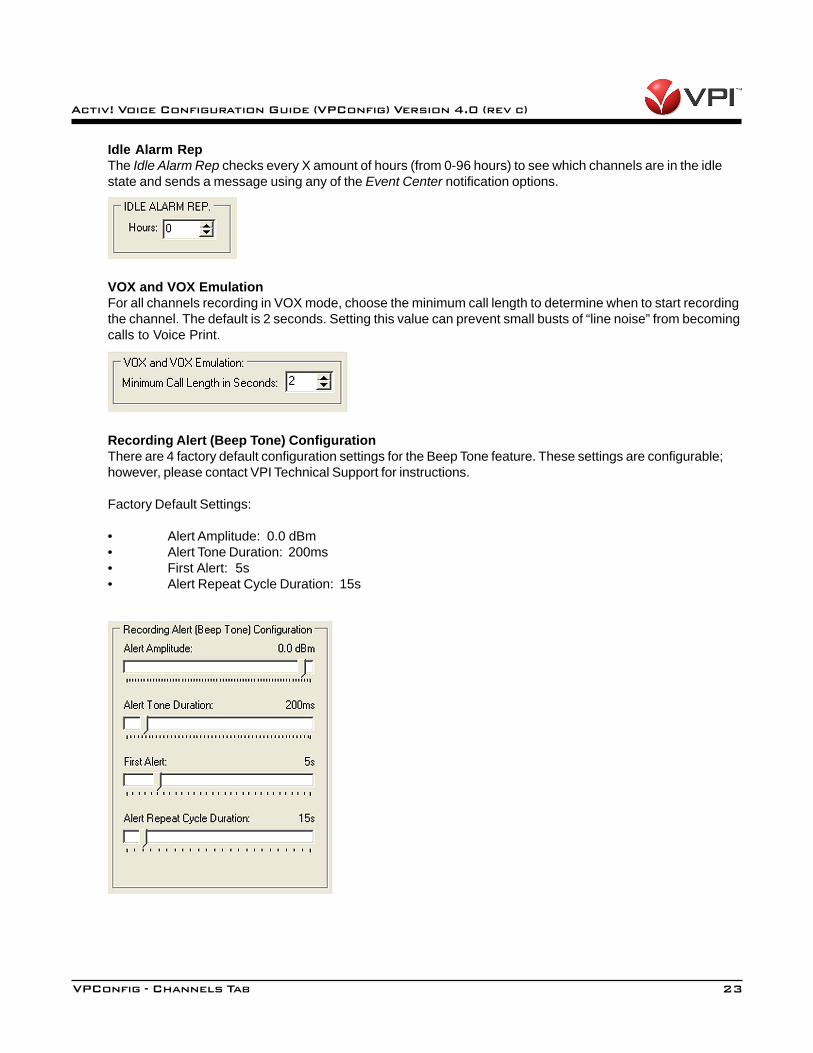
Idle Alarm RepThe Idle Alarm Rep checks every X amount of hours (from 0-96 hours) to see which channels are in the idlestate and sends a message using any of the Event Center notification options.
VOX and VOX EmulationFor all channels recording in VOX mode, choose the minimum call length to determine when to start recordingthe channel. The default is 2 seconds. Setting this value can prevent small busts of “line noise” from becomingcalls to Voice Print.
Recording Alert (Beep Tone) ConfigurationThere are 4 factory default configuration settings for the Beep Tone feature. These settings are configurable;however, please contact VPI Technical Support for instructions.
Factory Default Settings:
• Alert Amplitude: 0.0 dBm• Alert Tone Duration: 200ms• First Alert: 5s• Alert Repeat Cycle Duration: 15s
24
Activ! Voice Configuration Guide (VPConfig) Version 4.0 (rev c)
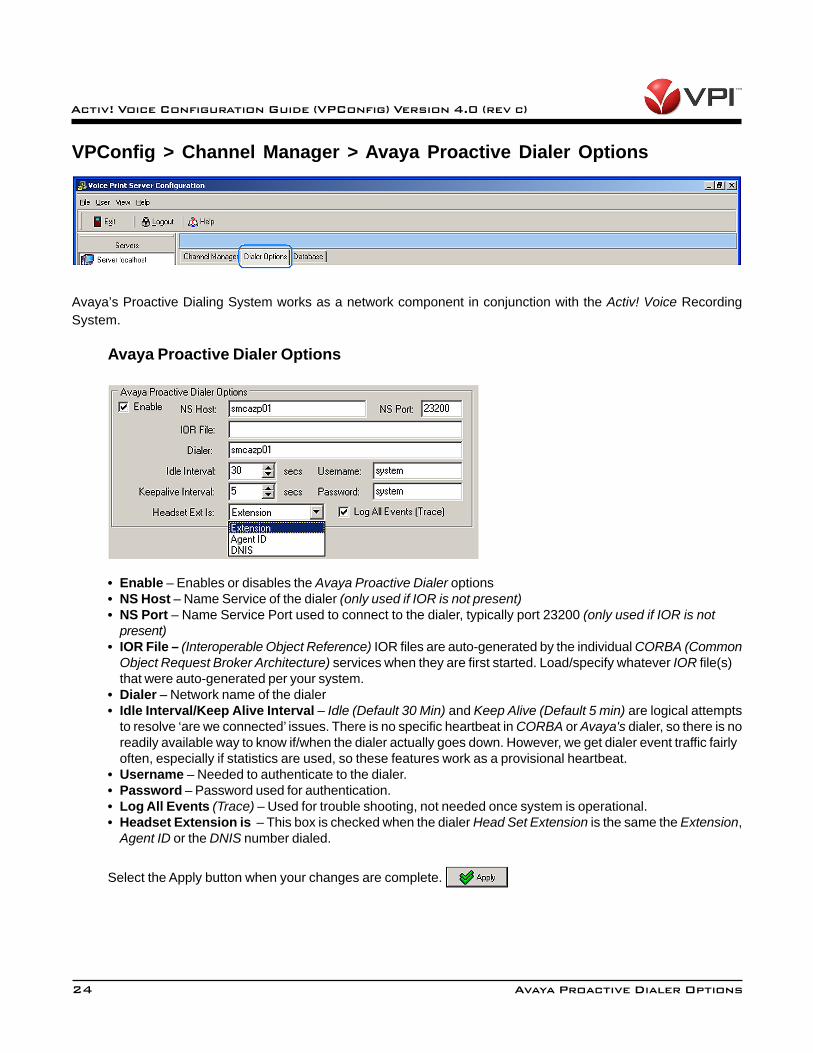
VPConfig > Channel Manager > Avaya Proactive Dialer Options
Avaya’s Proactive Dialing System works as a network component in conjunction with the Activ! Voice RecordingSystem.
Avaya Proactive Dialer Options
• Enable – Enables or disables the Avaya Proactive Dialer options• NS Host – Name Service of the dialer (only used if IOR is not present)• NS Port – Name Service Port used to connect to the dialer, typically port 23200 (only used if IOR is not
present)• IOR File – (Interoperable Object Reference) IOR files are auto-generated by the individual CORBA (Common
Object Request Broker Architecture) services when they are first started. Load/specify whatever IOR file(s)that were auto-generated per your system.
• Dialer – Network name of the dialer• Idle Interval/Keep Alive Interval – Idle (Default 30 Min) and Keep Alive (Default 5 min) are logical attempts
to resolve ‘are we connected’ issues. There is no specific heartbeat in CORBA or Avaya's dialer, so there is noreadily available way to know if/when the dialer actually goes down. However, we get dialer event traffic fairlyoften, especially if statistics are used, so these features work as a provisional heartbeat.
• Username – Needed to authenticate to the dialer.• Password – Password used for authentication.• Log All Events (Trace) – Used for trouble shooting, not needed once system is operational.• Headset Extension is – This box is checked when the dialer Head Set Extension is the same the Extension,
Agent ID or the DNIS number dialed.
Select the Apply button when your changes are complete.
Avaya Proactive Dialer Options
25
Activ! Voice Configuration Guide (VPConfig) Version 4.0 (rev c)
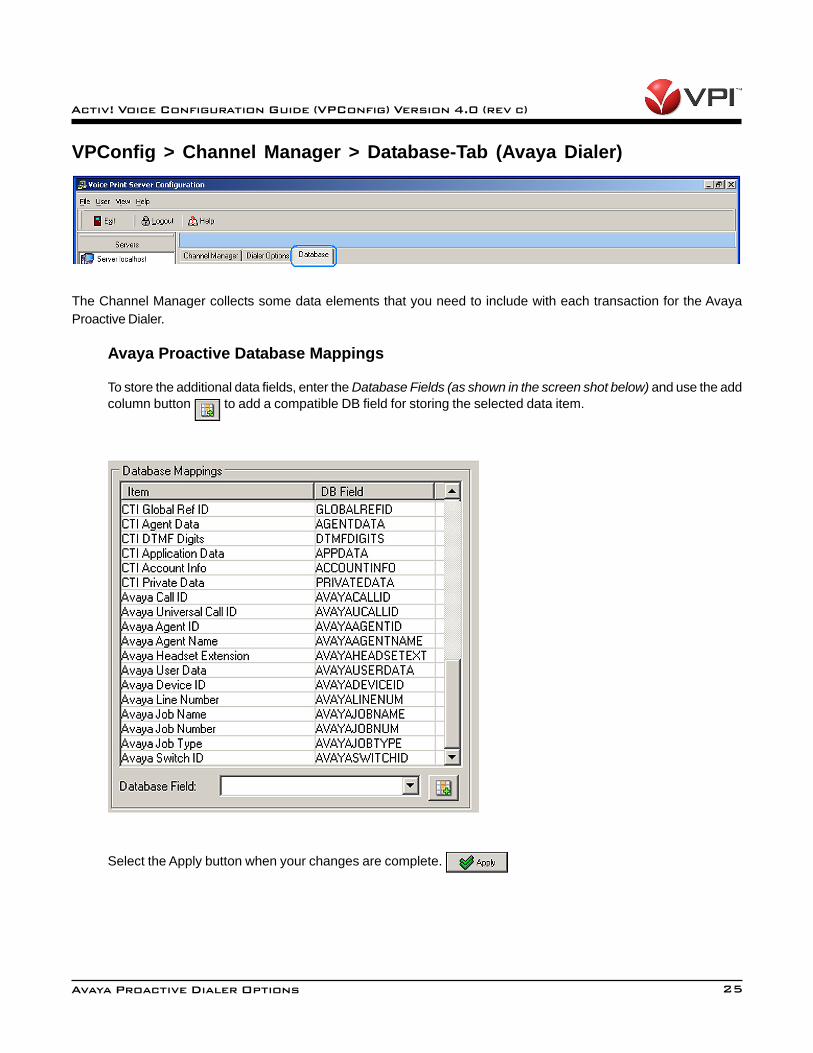
VPConfig > Channel Manager > Database-Tab (Avaya Dialer)
The Channel Manager collects some data elements that you need to include with each transaction for the AvayaProactive Dialer.
Avaya Proactive Database Mappings
To store the additional data fields, enter the Database Fields (as shown in the screen shot below) and use the addcolumn button to add a compatible DB field for storing the selected data item.
Select the Apply button when your changes are complete.
Avaya Proactive Dialer Options
26
Activ! Voice Configuration Guide (VPConfig) Version 4.0 (rev c)
VPConfig - Channels Tab
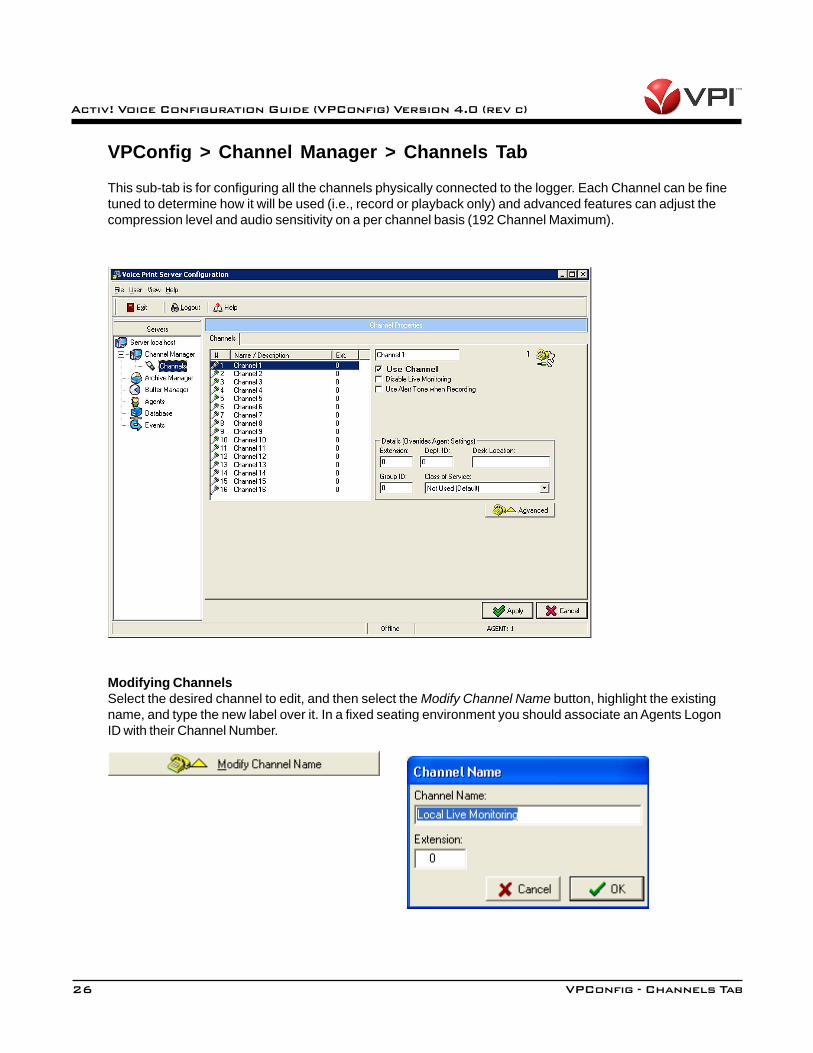
VPConfig > Channel Manager > Channels Tab
This sub-tab is for configuring all the channels physically connected to the logger. Each Channel can be finetuned to determine how it will be used (i.e., record or playback only) and advanced features can adjust thecompression level and audio sensitivity on a per channel basis (192 Channel Maximum).
Modifying ChannelsSelect the desired channel to edit, and then select the Modify Channel Name button, highlight the existingname, and type the new label over it. In a fixed seating environment you should associate an Agents LogonID with their Channel Number.
27
Activ! Voice Configuration Guide (VPConfig) Version 4.0 (rev c)
VPConfig - Channels Tab
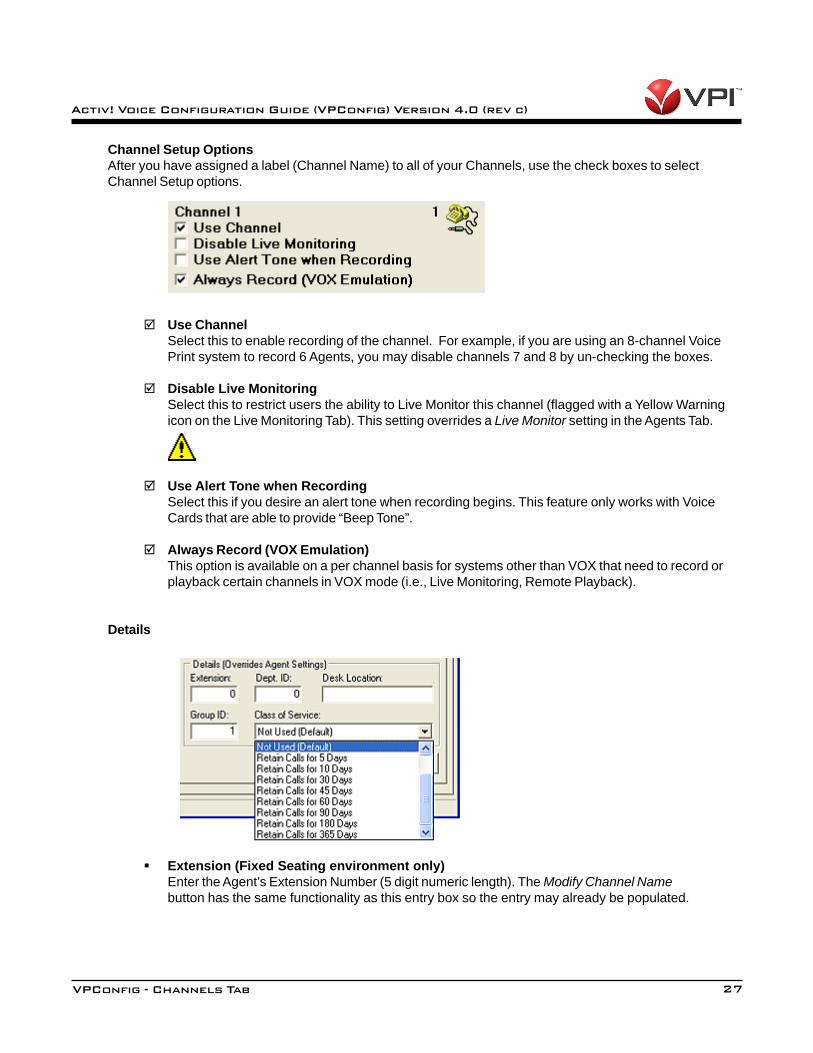
Channel Setup OptionsAfter you have assigned a label (Channel Name) to all of your Channels, use the check boxes to selectChannel Setup options.
Use ChannelSelect this to enable recording of the channel. For example, if you are using an 8-channel VoicePrint system to record 6 Agents, you may disable channels 7 and 8 by un-checking the boxes.
Disable Live MonitoringSelect this to restrict users the ability to Live Monitor this channel (flagged with a Yellow Warningicon on the Live Monitoring Tab). This setting overrides a Live Monitor setting in the Agents Tab.
Use Alert Tone when RecordingSelect this if you desire an alert tone when recording begins. This feature only works with VoiceCards that are able to provide “Beep Tone”.
Always Record (VOX Emulation)This option is available on a per channel basis for systems other than VOX that need to record orplayback certain channels in VOX mode (i.e., Live Monitoring, Remote Playback).
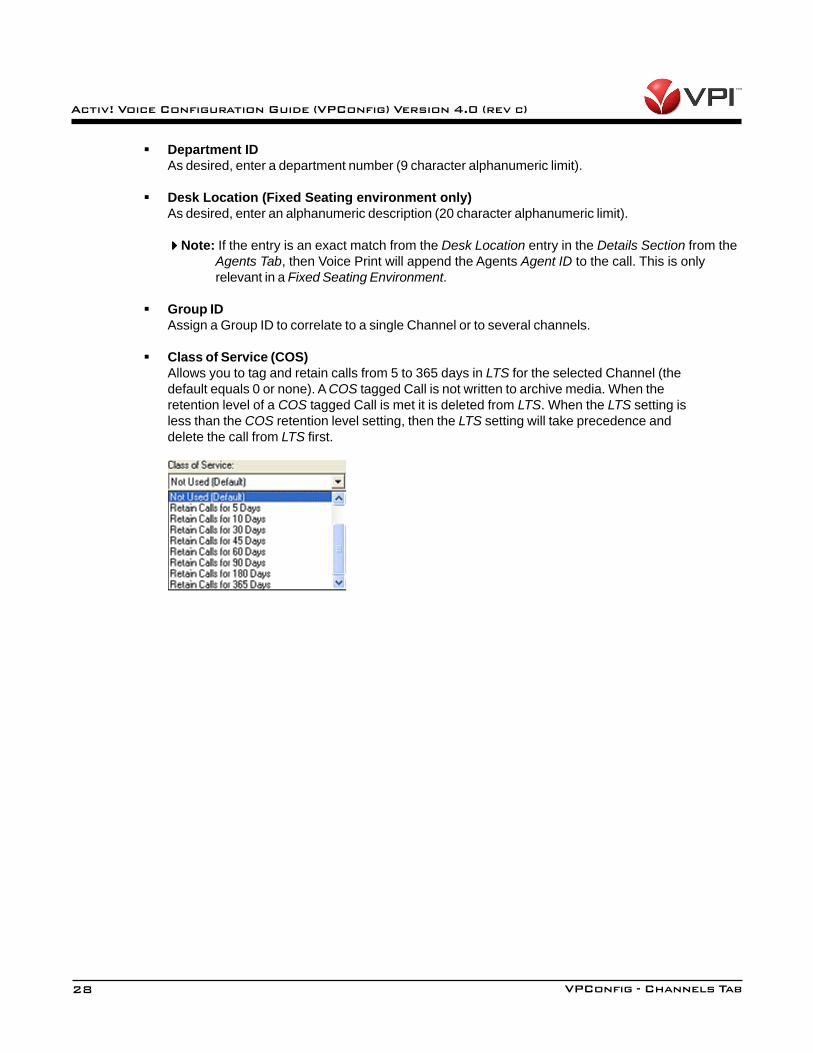
Details
Extension (Fixed Seating environment only)Enter the Agent’s Extension Number (5 digit numeric length). The Modify Channel Namebutton has the same functionality as this entry box so the entry may already be populated.
28
Activ! Voice Configuration Guide (VPConfig) Version 4.0 (rev c)
VPConfig - Channels Tab
Department IDAs desired, enter a department number (9 character alphanumeric limit).
Desk Location (Fixed Seating environment only)As desired, enter an alphanumeric description (20 character alphanumeric limit).
Note: If the entry is an exact match from the Desk Location entry in the Details Section from theAgents Tab, then Voice Print will append the Agents Agent ID to the call. This is onlyrelevant in a Fixed Seating Environment.
Group IDAssign a Group ID to correlate to a single Channel or to several channels.
Class of Service (COS)Allows you to tag and retain calls from 5 to 365 days in LTS for the selected Channel (thedefault equals 0 or none). A COS tagged Call is not written to archive media. When theretention level of a COS tagged Call is met it is deleted from LTS. When the LTS setting isless than the COS retention level setting, then the LTS setting will take precedence anddelete the call from LTS first.
29
Activ! Voice Configuration Guide (VPConfig) Version 4.0 (rev c)
VPConfig - Channels Tab
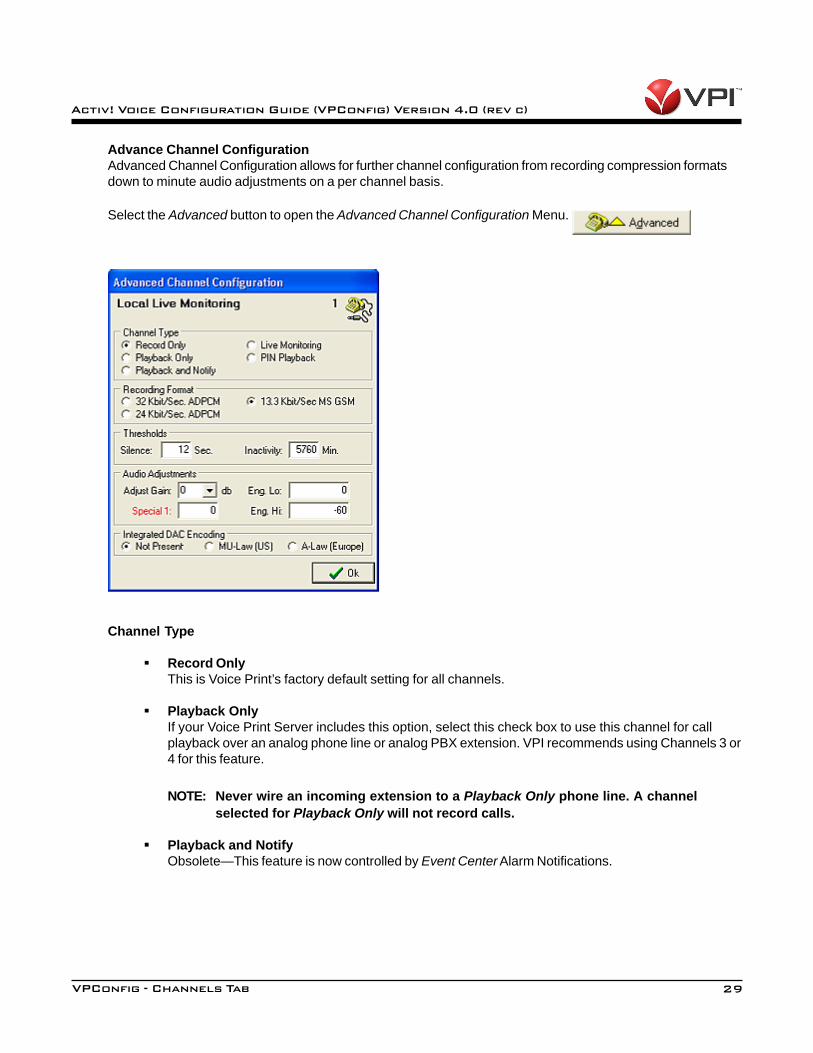
Advance Channel ConfigurationAdvanced Channel Configuration allows for further channel configuration from recording compression formatsdown to minute audio adjustments on a per channel basis.
Select the Advanced button to open the Advanced Channel Configuration Menu.
Channel Type
Record OnlyThis is Voice Print’s factory default setting for all channels.
Playback OnlyIf your Voice Print Server includes this option, select this check box to use this channel for callplayback over an analog phone line or analog PBX extension. VPI recommends using Channels 3 or4 for this feature.
NOTE: Never wire an incoming extension to a Playback Only phone line. A channelselected for Playback Only will not record calls.
Playback and NotifyObsolete—This feature is now controlled by Event Center Alarm Notifications.
30
Activ! Voice Configuration Guide (VPConfig) Version 4.0 (rev c)
VPConfig - Channels Tab
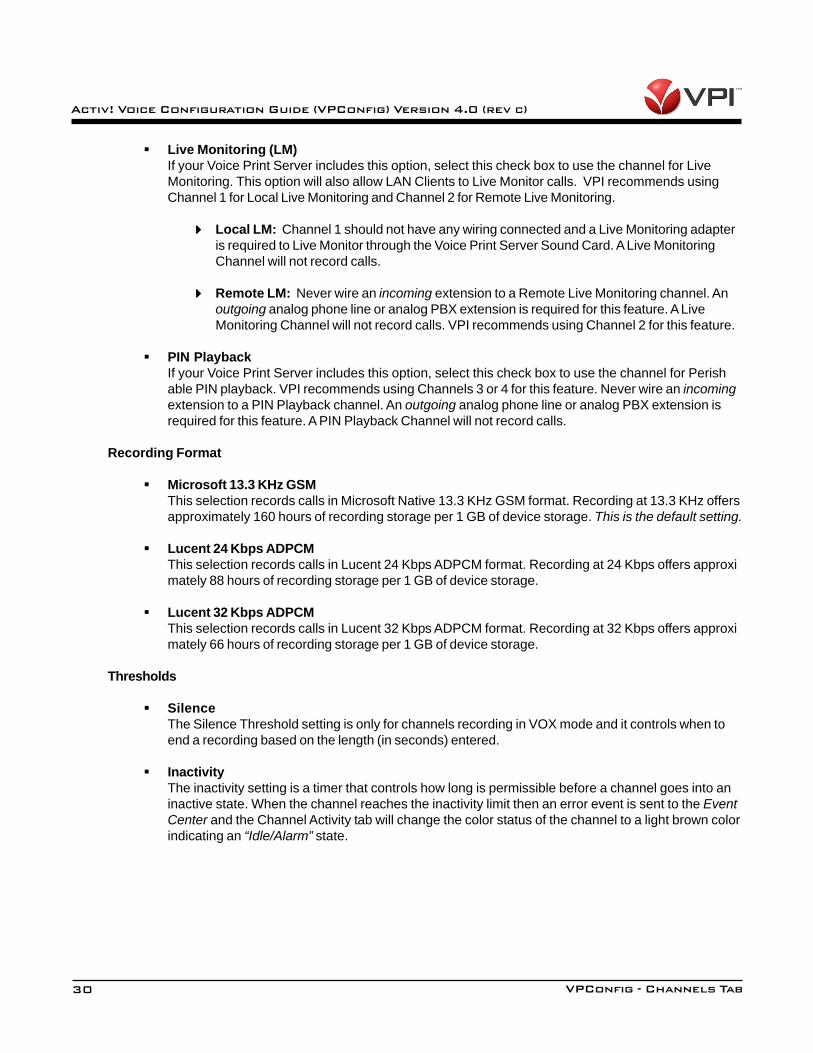
Live Monitoring (LM)If your Voice Print Server includes this option, select this check box to use the channel for LiveMonitoring. This option will also allow LAN Clients to Live Monitor calls. VPI recommends usingChannel 1 for Local Live Monitoring and Channel 2 for Remote Live Monitoring.
Local LM: Channel 1 should not have any wiring connected and a Live Monitoring adapteris required to Live Monitor through the Voice Print Server Sound Card. A Live MonitoringChannel will not record calls.
Remote LM: Never wire an incoming extension to a Remote Live Monitoring channel. Anoutgoing analog phone line or analog PBX extension is required for this feature. A LiveMonitoring Channel will not record calls. VPI recommends using Channel 2 for this feature.
PIN PlaybackIf your Voice Print Server includes this option, select this check box to use the channel for Perishable PIN playback. VPI recommends using Channels 3 or 4 for this feature. Never wire an incomingextension to a PIN Playback channel. An outgoing analog phone line or analog PBX extension isrequired for this feature. A PIN Playback Channel will not record calls.
Recording Format
Microsoft 13.3 KHz GSMThis selection records calls in Microsoft Native 13.3 KHz GSM format. Recording at 13.3 KHz offersapproximately 160 hours of recording storage per 1 GB of device storage. This is the default setting.
Lucent 24 Kbps ADPCMThis selection records calls in Lucent 24 Kbps ADPCM format. Recording at 24 Kbps offers approximately 88 hours of recording storage per 1 GB of device storage.
Lucent 32 Kbps ADPCMThis selection records calls in Lucent 32 Kbps ADPCM format. Recording at 32 Kbps offers approximately 66 hours of recording storage per 1 GB of device storage.
Thresholds
SilenceThe Silence Threshold setting is only for channels recording in VOX mode and it controls when toend a recording based on the length (in seconds) entered.
InactivityThe inactivity setting is a timer that controls how long is permissible before a channel goes into aninactive state. When the channel reaches the inactivity limit then an error event is sent to the EventCenter and the Channel Activity tab will change the color status of the channel to a light brown colorindicating an “Idle/Alarm” state.
31
Activ! Voice Configuration Guide (VPConfig) Version 4.0 (rev c)
VPConfig - Channels Tab
Audio Adjustments
Adjust GainUsed to increase or decrease the Audio Volume. The setting range is from -6db to +6db. The defaultsetting is 0 db.
Special 1Do not change this setting unless instructed to do so by a VPI Support Technician! Used topreclude “runaway calls” when recording in VOX mode for Legacy Cards. The setting range is 1 forLegacy Cards and 0 for all others.
Eng LoThis setting is for the energy threshold that determines the minimum level in which to maintain thecall recording. The range is from 0 to -51. The default setting is 0.
Eng HiThis setting is for the sound threshold that determines the maximum level in which to trigger therecording. The range is from 0 to -60. The default setting is 0.
NOTE: If you enter a value outside the allowable range for Eng settings you will receive anerror for the null value. The error will state “Invalid variant type conversion”.
Integrated DAC Encoding
Mu-law algorithm (ì-law) is a standard analog signal compression algorithm, used in digital communica-tion systems of the North American digital hierarchy, to optimize, i.e., modify the dynamic range of ananalog signal prior to digitizing. It is similar to the A- law algorithm used in Europe. Choose the appropri-ate algorithm for your country. The Not Present selection will use standard linear encoding for thechannel.
NOTE: Smartworks Voice Cards require the Mu-law checked for D-Channel configuredsystems.
32
Activ! Voice Configuration Guide (VPConfig) Version 4.0 (rev c)
VPConfig - Agents Tab
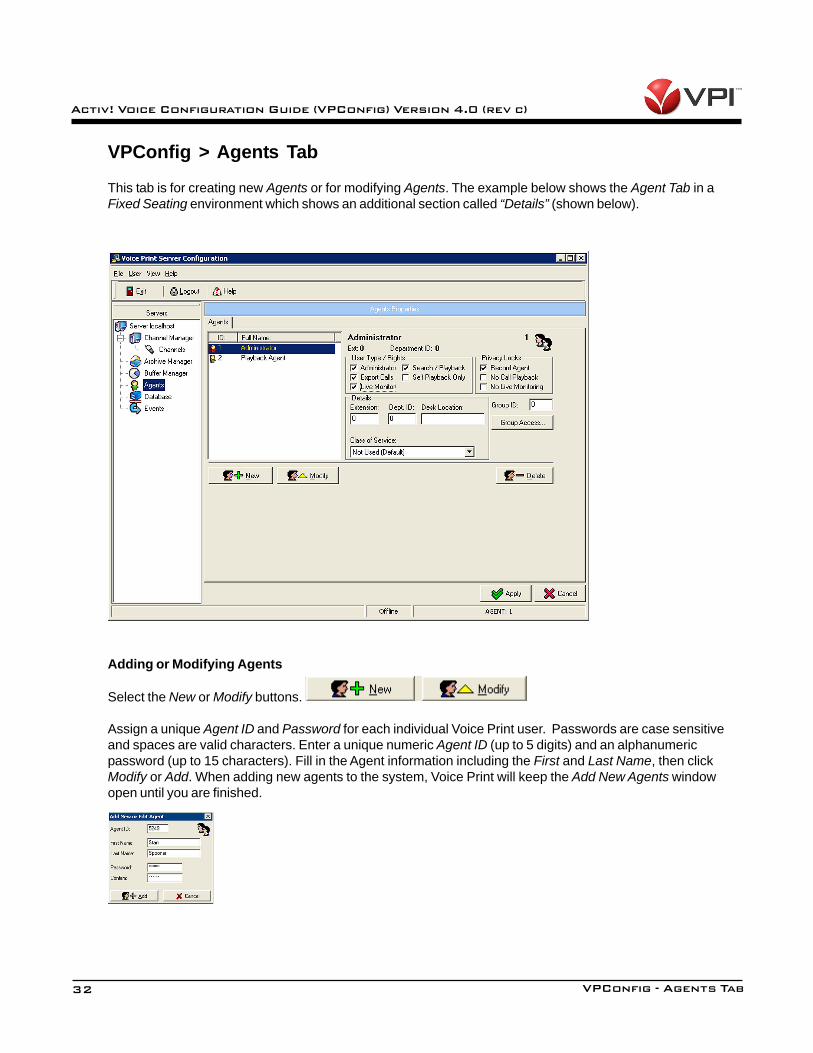
VPConfig > Agents Tab
This tab is for creating new Agents or for modifying Agents. The example below shows the Agent Tab in aFixed Seating environment which shows an additional section called “Details” (shown below).
Adding or Modifying Agents
Select the New or Modify buttons.
Assign a unique Agent ID and Password for each individual Voice Print user. Passwords are case sensitiveand spaces are valid characters. Enter a unique numeric Agent ID (up to 5 digits) and an alphanumericpassword (up to 15 characters). Fill in the Agent information including the First and Last Name, then clickModify or Add. When adding new agents to the system, Voice Print will keep the Add New Agents windowopen until you are finished.
33
Activ! Voice Configuration Guide (VPConfig) Version 4.0 (rev c)
VPConfig - Agents Tab
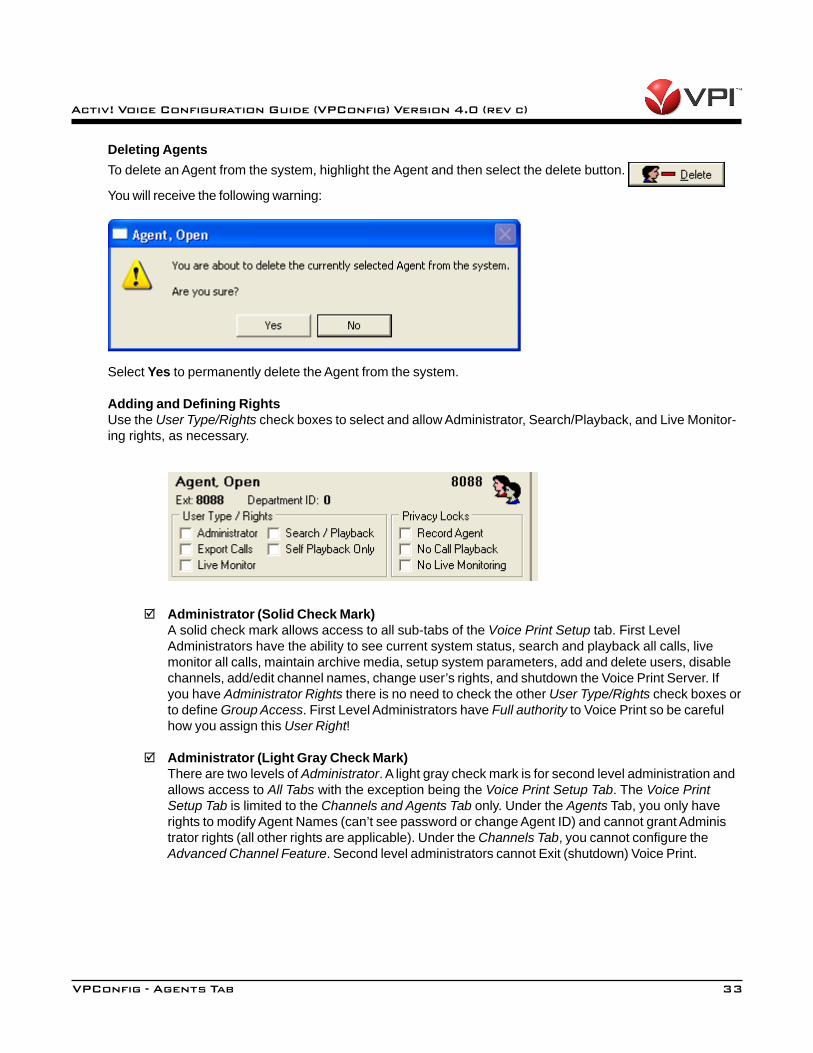
Deleting AgentsTo delete an Agent from the system, highlight the Agent and then select the delete button.
You will receive the following warning:
Select Yes to permanently delete the Agent from the system.
Adding and Defining RightsUse the User Type/Rights check boxes to select and allow Administrator, Search/Playback, and Live Monitor-ing rights, as necessary.
Administrator (Solid Check Mark)A solid check mark allows access to all sub-tabs of the Voice Print Setup tab. First LevelAdministrators have the ability to see current system status, search and playback all calls, livemonitor all calls, maintain archive media, setup system parameters, add and delete users, disablechannels, add/edit channel names, change user’s rights, and shutdown the Voice Print Server. Ifyou have Administrator Rights there is no need to check the other User Type/Rights check boxes orto define Group Access. First Level Administrators have Full authority to Voice Print so be carefulhow you assign this User Right!
Administrator (Light Gray Check Mark)There are two levels of Administrator. A light gray check mark is for second level administration andallows access to All Tabs with the exception being the Voice Print Setup Tab. The Voice PrintSetup Tab is limited to the Channels and Agents Tab only. Under the Agents Tab, you only haverights to modify Agent Names (can’t see password or change Agent ID) and cannot grant Administrator rights (all other rights are applicable). Under the Channels Tab, you cannot configure theAdvanced Channel Feature. Second level administrators cannot Exit (shutdown) Voice Print.
34
Activ! Voice Configuration Guide (VPConfig) Version 4.0 (rev c)
VPConfig - Agents Tab
Search/PlaybackThis checkbox allows access to the Search/Playback tab. Additionally, Agents will have the abilityto view System Status, Channel Activity, and maintain Archive Media on the Voice Print Server.
Self Playback OnlyThis checkbox allows Agents to playback export and save calls tagged only with their own AgentID. This feature only works in conjunction with the Search/Playback tab. Additionally, Agents willhave the ability to view System Status, Channel Activity, and maintain Archive Media on the VoicePrint Server.
NOTE: Self Playback Only overrides any settings in Group Access in a fixed seatingenvironment. Self Playback Only is not applicable in a free seating environment soyou will need to assign the Agent to a Channel Group(s) using Group ID or GroupAccess for playback capability.
Export CallsThis checkbox allows the user to export a call to email or to a file if the Search/Playback box isalso checked. Additionally, Agents will have the ability to view System Status, Channel Activity, andmaintain Archive Media on the Voice Print Server. For the export to email feature to work, a MAPIprofile must be setup on the Voice Print Server.
Live MonitorThis checkbox allows access to the Live Monitor Tab where you can monitor a call in real-time.Additionally, Agents will have the ability to view System Status, Channel Activity, and maintainArchive Media on the Voice Print Server. You can restrict which channels can be Live Monitored bychecking the Disable Live Monitoring checkbox on a per channel basis (see the Channels Tab forinstructions).
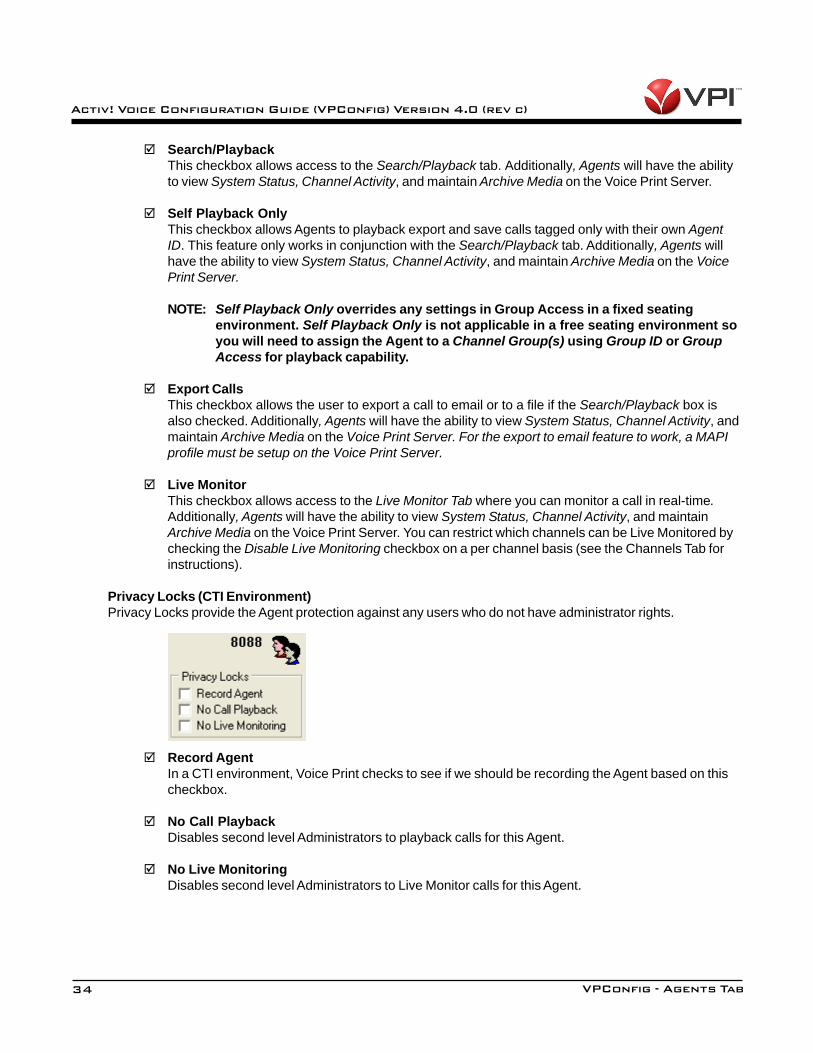
Privacy Locks (CTI Environment)Privacy Locks provide the Agent protection against any users who do not have administrator rights.
Record AgentIn a CTI environment, Voice Print checks to see if we should be recording the Agent based on thischeckbox.
No Call PlaybackDisables second level Administrators to playback calls for this Agent.
No Live MonitoringDisables second level Administrators to Live Monitor calls for this Agent.
35
Activ! Voice Configuration Guide (VPConfig) Version 4.0 (rev c)
VPConfig - Agents Tab
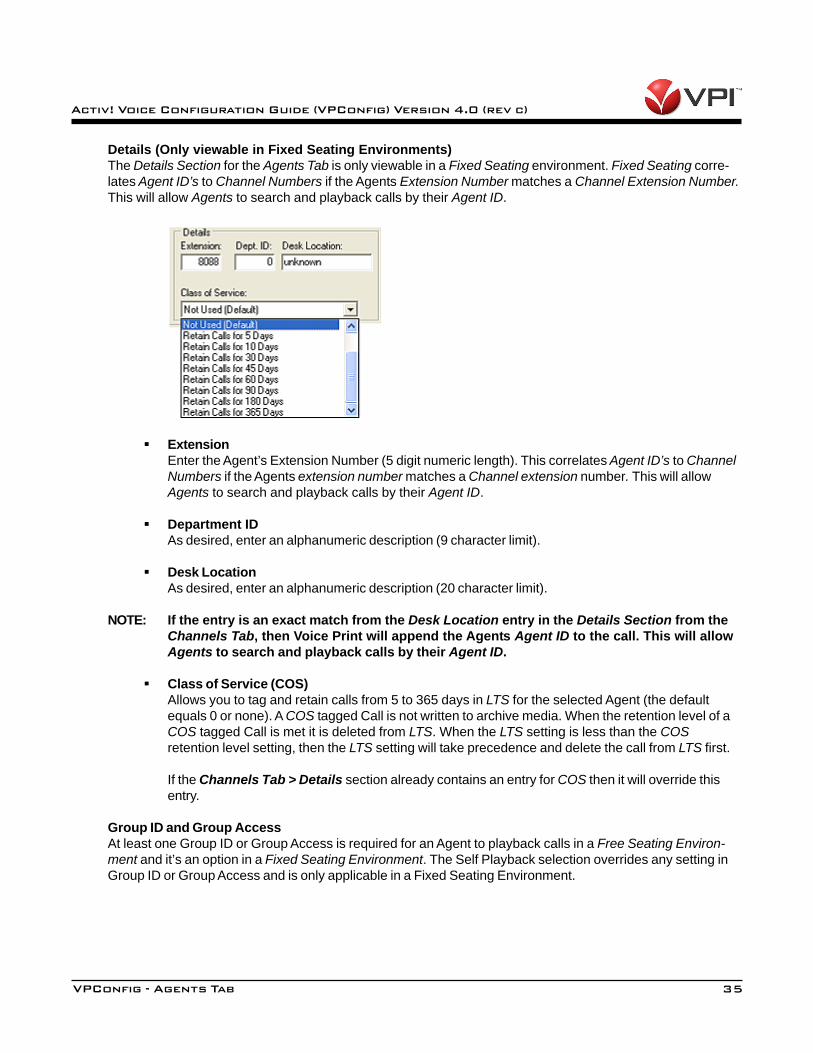
Details (Only viewable in Fixed Seating Environments)The Details Section for the Agents Tab is only viewable in a Fixed Seating environment. Fixed Seating corre-lates Agent ID’s to Channel Numbers if the Agents Extension Number matches a Channel Extension Number.This will allow Agents to search and playback calls by their Agent ID.
ExtensionEnter the Agent’s Extension Number (5 digit numeric length). This correlates Agent ID’s to ChannelNumbers if the Agents extension number matches a Channel extension number. This will allowAgents to search and playback calls by their Agent ID.
Department IDAs desired, enter an alphanumeric description (9 character limit).
Desk LocationAs desired, enter an alphanumeric description (20 character limit).
NOTE: If the entry is an exact match from the Desk Location entry in the Details Section from theChannels Tab, then Voice Print will append the Agents Agent ID to the call. This will allowAgents to search and playback calls by their Agent ID.
Class of Service (COS)Allows you to tag and retain calls from 5 to 365 days in LTS for the selected Agent (the defaultequals 0 or none). A COS tagged Call is not written to archive media. When the retention level of aCOS tagged Call is met it is deleted from LTS. When the LTS setting is less than the COSretention level setting, then the LTS setting will take precedence and delete the call from LTS first.
If the Channels Tab > Details section already contains an entry for COS then it will override thisentry.
Group ID and Group AccessAt least one Group ID or Group Access is required for an Agent to playback calls in a Free Seating Environ-ment and it’s an option in a Fixed Seating Environment. The Self Playback selection overrides any setting inGroup ID or Group Access and is only applicable in a Fixed Seating Environment.
36
Activ! Voice Configuration Guide (VPConfig) Version 4.0 (rev c)
VPConfig - Agents Tab
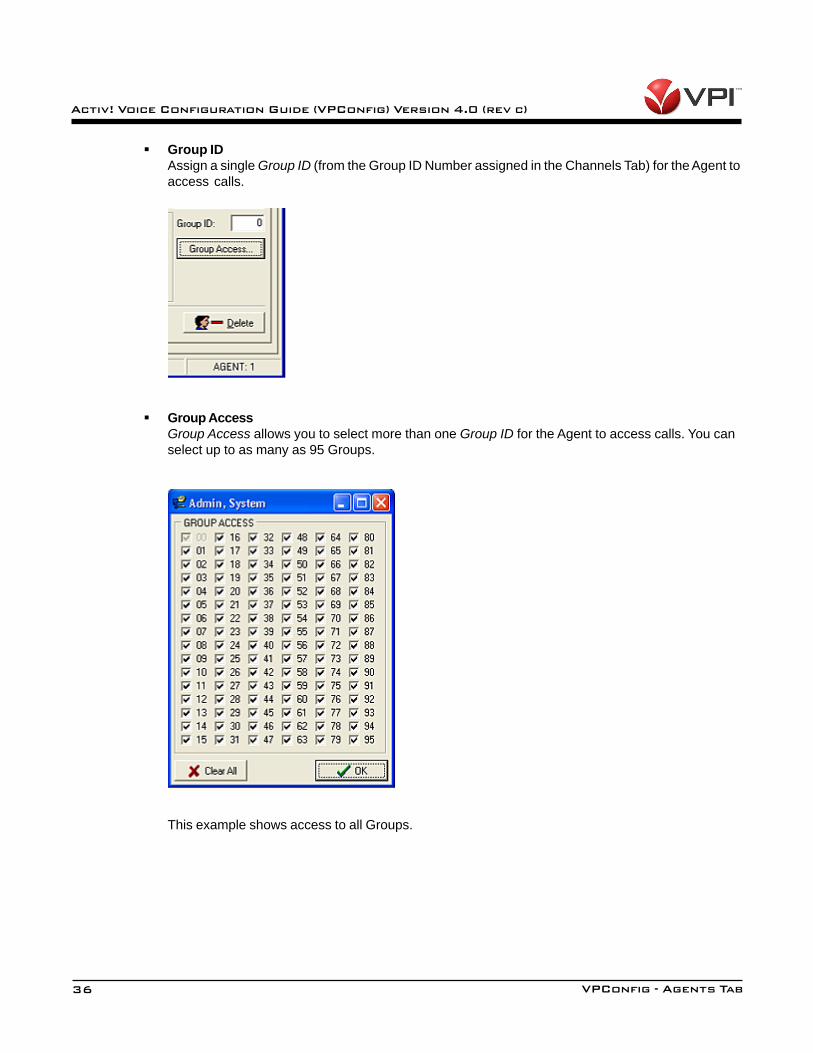
Group IDAssign a single Group ID (from the Group ID Number assigned in the Channels Tab) for the Agent toaccess calls.
Group AccessGroup Access allows you to select more than one Group ID for the Agent to access calls. You canselect up to as many as 95 Groups.
This example shows access to all Groups.
37
Activ! Voice Configuration Guide (VPConfig) Version 4.0 (rev c)
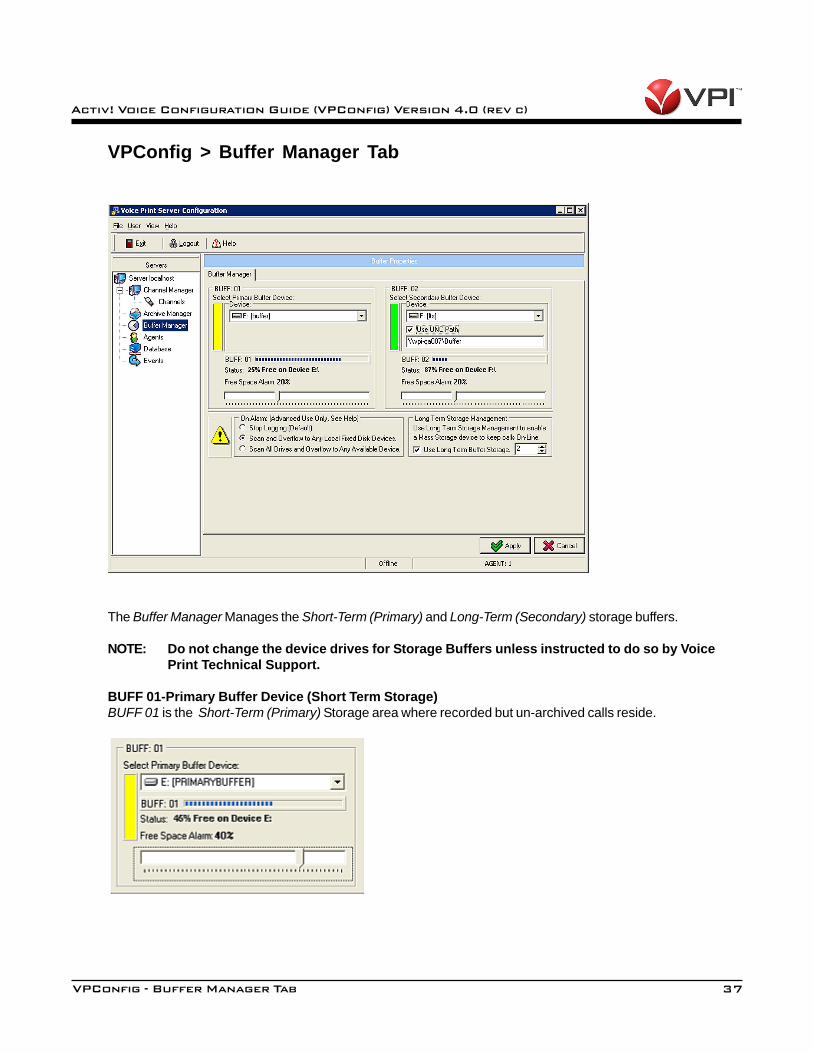
VPConfig - Buffer Manager Tab
VPConfig > Buffer Manager Tab
The Buffer Manager Manages the Short-Term (Primary) and Long-Term (Secondary) storage buffers.
NOTE: Do not change the device drives for Storage Buffers unless instructed to do so by VoicePrint Technical Support.
BUFF 01-Primary Buffer Device (Short Term Storage)BUFF 01 is the Short-Term (Primary) Storage area where recorded but un-archived calls reside.
38
Activ! Voice Configuration Guide (VPConfig) Version 4.0 (rev c)
VPConfig - Buffer Manager Tab
As the buffer fills, the color status indicator will change from green to yellow and then eventually red. The nextarchive session (default every 30 minutes) will archive calls from the Primary Buffer to DVD Media and copycalls to the Secondary Buffer (LTS). As the Primary Buffer empties, the indicator will revert back to yellow andthen eventually to a green status. If the indicator stays in the red then this indicates an overflow condition (i.e.,Archive Media is full and needs to be changed).
The Free Space Alarm will send an event to the Event Center to notify you that disk space is limited. To adjustthe range; slide the scroll bar from the left at 3% (97% free space remaining) or to the right at 50% of free diskspace remaining. 3% is the recommended setting because the higher the alarm is set the more alarm notifica-tions you will receive, and some may be unnecessary.
BUFF 02-Secondary Buffer Device (Long Term Storage)BUFF 02 is the Long Term Storage (LTS) area that contains archived recordings for on-line instant retrieval andplayback. This is typically the remaining 90% of fixed disk space remaining on the hard drive (partition F). Ifspace requirements are not enough for your environment, then map BUFF 02 to a NAS, Optical (UNC Path)unit or a Network Drive.
BUFF 02 will also progress from green to yellow and then eventually red as the buffer fills. When the colorindicator stays in the red this indicates that disk space is limited. As stated in BUFF 01, use the Free SpaceAlarm to send an event to the Event Center to notify you that disk space is getting limited. To adjust the FreeSpace Alarm use the method as described in BUFF 01.
NOTE: Buffer overflow does not apply to LTS.
The Voice Print server has backup buffers configured to ensure normal system operation (explained next).
On Alarm (Overflow Backup Buffers for Primary Buffer)When an overflow condition exits, one of the following rules can be selected:
• Stop LoggingThis will disable the system from recording any further calls. Not recommended!
• Scan and Overflow to Any Local Fixed Disk DevicesThis will look for any other space on any local fixed drive contained within the server and write tothat location. The sequence goes from F (LTS) to E to D to C. When the Primary Buffer local drive(E) can accept more data, then the system will retrieve the files written to the remote drive(s) andarchive them accordingly. This is the recommended method!
• Scan All Drives and Overflow to Any Available DeviceThis will look for any other space on any mapped network drive and write to that location. Thesequence goes from last network mapped drive (i.e. Z) and works its way up to the next mappednetwork drive and so forth. When the Primary Buffer local drive (E) can accept more data, then thesystem will retrieve the files written to the remote drive(s) and archive them accordingly.

39
Activ! Voice Configuration Guide (VPConfig) Version 4.0 (rev c)
VPConfig - Buffer Manager Tab
Long Term Storage (LTS) OverviewThe setting used to control the size of the Secondary Buffer is the Long Term Storage Manager. Based on thissetting (in hours) determines the space requirement for the buffer. If set to high you will receive an overflowcondition. If set to low (and there is still plenty of space) then you will be loosing the ability to retain as manycalls on-line as possible therefore causing archive media to be inserted for call playback. The default setting is1440 hours (or 60 days). It’s best to review this setting and adjust it incrementally based on your call volume.

40
Activ! Voice Configuration Guide (VPConfig) Version 4.0 (rev c)
VPConfig - Archive Manager Tab
VPConfig > Archive Manager Tab
Archive SessionsBy default, Voice Print performs an Archive Session every 30 minutes. The archive session copies all record-ings created during the previous 30 minutes from the Primary Buffer to Archive Media (DVD) and to the LongTerm Storage (LTS) Secondary Buffer and the database is updated to reflect the current location of each call.
LTS is the Secondary Buffer, and by default is the remaining partition of the hard-drive. However, the deviceselected for the Secondary Buffer can be mapped to a NAS, Optical (UNC Path) unit or a Network Drive.
41
Activ! Voice Configuration Guide (VPConfig) Version 4.0 (rev c)
VPConfig - Archive Manager Tab
Sweep SessionsBy default, Voice Print performs a Sweep Session during every fourth archive session. The sweep sessionreviews the list of archived call records and removes calls that are older than the LTS hour setting (refer to theBuffer Manager section). The default setting for LTS Buffer Hours is 1440 hours or approximately 60 daysworth of calls (i.e., 1440 hrs.÷ 24hrs = 60 days).
ARCH01-Primary Archive DeviceARCH01 stands for Archive Device number 1. The indicator gives status of the first archive device. The bluesliding indicator gives a graphical representation of how full the archive media is. Status indicates the currentstate of the drive and loaded media. Archive ID displays the currently loaded media ID number. Free indicateshow much free space is available on the currently loaded media.As the media fills, the color status indicator will change from green to yellow and then eventually red. If theindicator stays in the red then this indicates the media is full and needs to be changed.
The Change Media Alarm will send an event to the Event Center to notify you that archive is full. To adjust therange; slide the scroll bar from the left at 1% (99% free space remaining) or to the right at 20% of free spaceremaining. 1% to 5% is the recommended setting because the higher the alarm is set the more alarm notifica-tions you will receive, and some may be unnecessary.
ARCH02-Secondary Archive or Playback DeviceARCH02 indicates the status of the second archive device if it is present. Each of the indicators works exactlyas described in ARCH01. Systems configured with “Mirrored” archive devices will show the drive as LOCKEDand FULL at all times. ARCH02 can also be setup to store data sequentially. Therefore when ARCH01 is full,data will begin to archive to ARCH02.
NOTE: Media is Type 1 double-sided 9.4GB (4.7GB per side) in non removable disk cartridges.
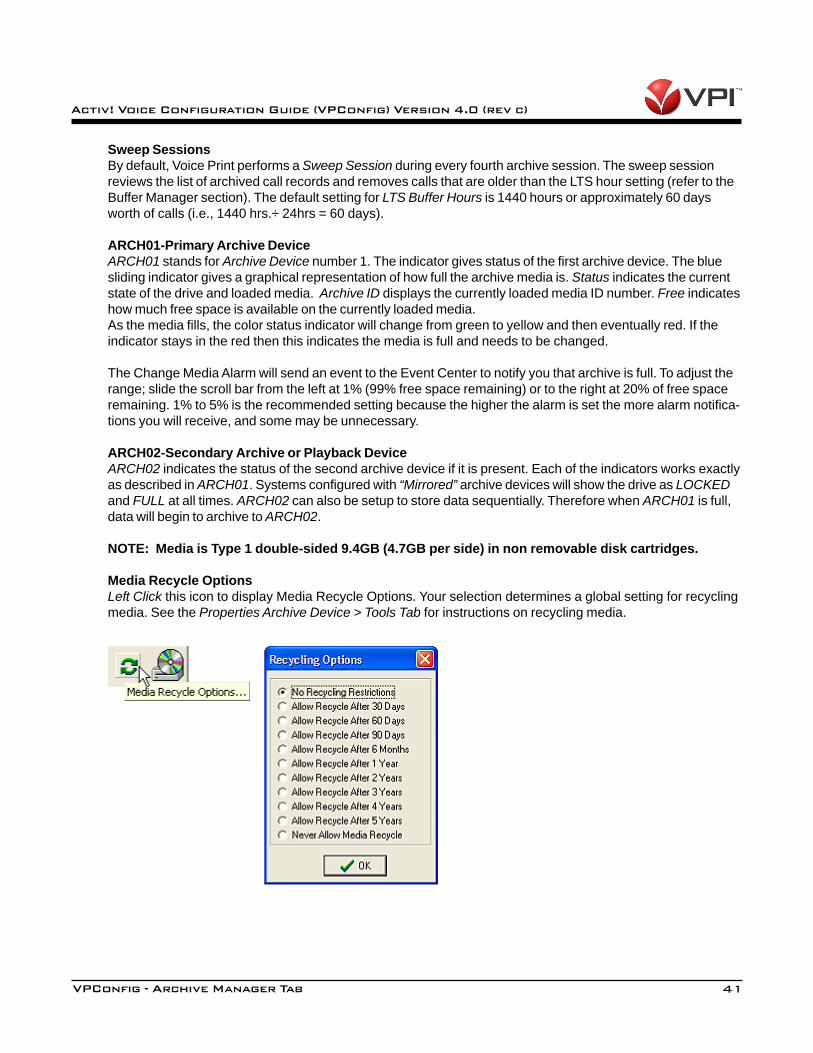
Media Recycle OptionsLeft Click this icon to display Media Recycle Options. Your selection determines a global setting for recyclingmedia. See the Properties Archive Device > Tools Tab for instructions on recycling media.
42
Activ! Voice Configuration Guide (VPConfig) Version 4.0 (rev c)
VPConfig - Archive Manager Tab
Tasks
Radial buttons are available to enable or disable the Archive Devices.
Archive/PlaybackDisable
Properties Archive Device
Click the Properties Archive Device button.
This will take you to the General Drive Utilities.
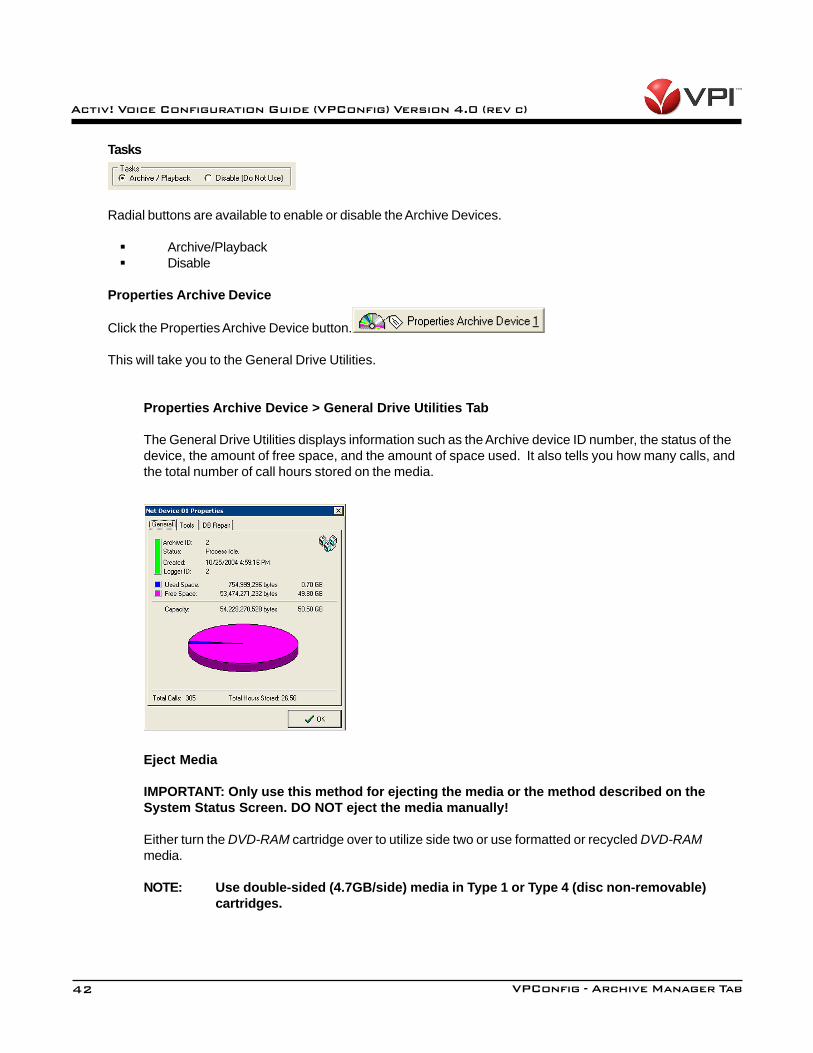
Properties Archive Device > General Drive Utilities Tab
The General Drive Utilities displays information such as the Archive device ID number, the status of thedevice, the amount of free space, and the amount of space used. It also tells you how many calls, andthe total number of call hours stored on the media.
Eject Media
IMPORTANT: Only use this method for ejecting the media or the method described on theSystem Status Screen. DO NOT eject the media manually!
Either turn the DVD-RAM cartridge over to utilize side two or use formatted or recycled DVD-RAMmedia.
NOTE: Use double-sided (4.7GB/side) media in Type 1 or Type 4 (disc non-removable)cartridges.
43
Activ! Voice Configuration Guide (VPConfig) Version 4.0 (rev c)
Close the DVD-RAM tray by pressing the DVD-RAM drive button.
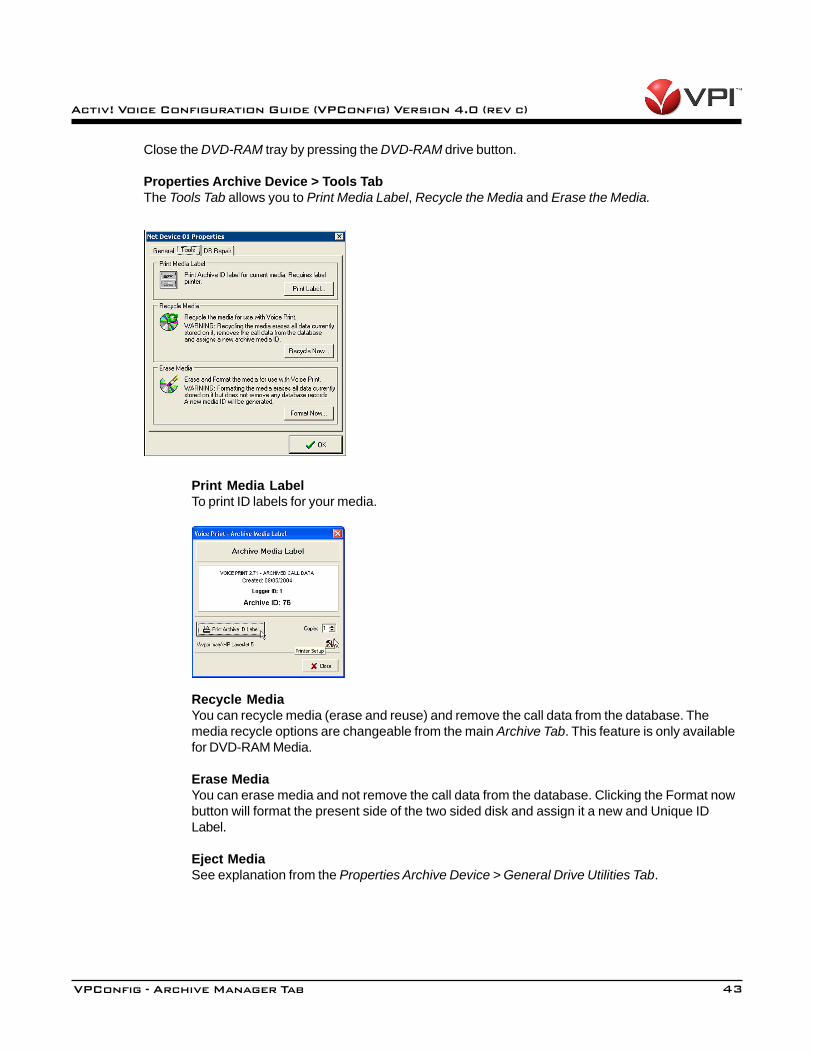
Properties Archive Device > Tools TabThe Tools Tab allows you to Print Media Label, Recycle the Media and Erase the Media.
Print Media LabelTo print ID labels for your media.
Recycle MediaYou can recycle media (erase and reuse) and remove the call data from the database. Themedia recycle options are changeable from the main Archive Tab. This feature is only availablefor DVD-RAM Media.
Erase MediaYou can erase media and not remove the call data from the database. Clicking the Format nowbutton will format the present side of the two sided disk and assign it a new and Unique IDLabel.
Eject MediaSee explanation from the Properties Archive Device > General Drive Utilities Tab.
VPConfig - Archive Manager Tab
44
Activ! Voice Configuration Guide (VPConfig) Version 4.0 (rev c)
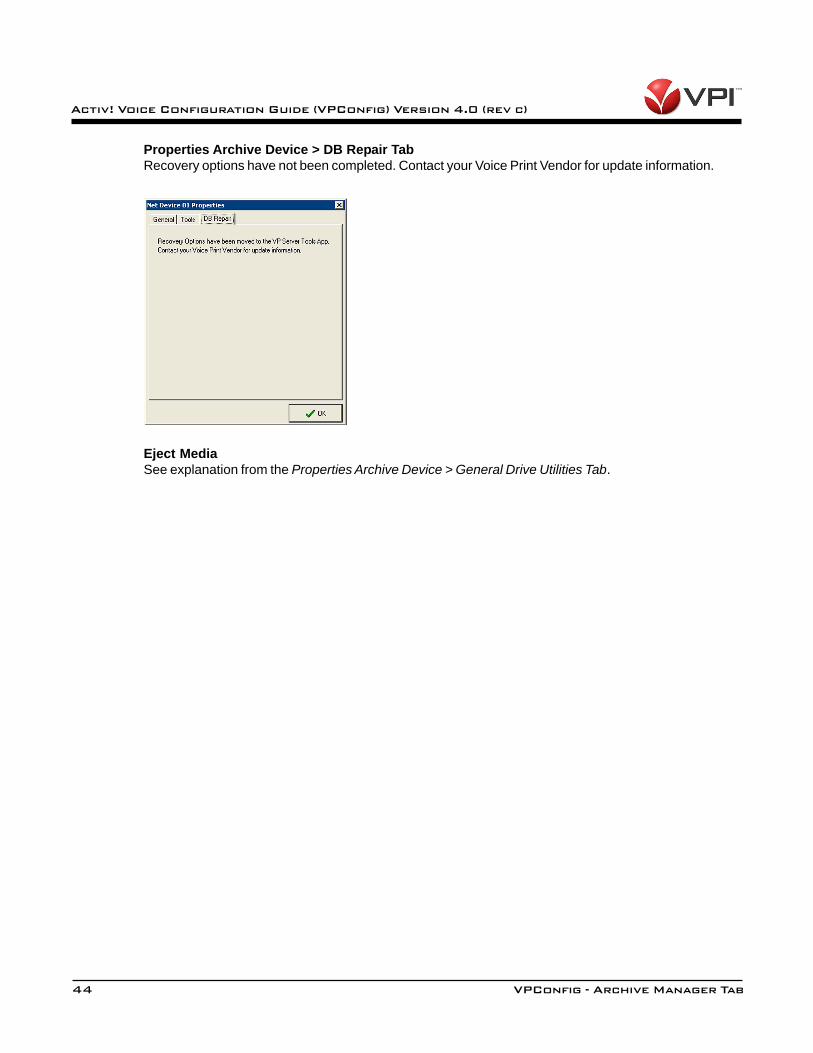
Properties Archive Device > DB Repair TabRecovery options have not been completed. Contact your Voice Print Vendor for update information.
Eject MediaSee explanation from the Properties Archive Device > General Drive Utilities Tab.
VPConfig - Archive Manager Tab
45
Activ! Voice Configuration Guide (VPConfig) Version 4.0 (rev c)
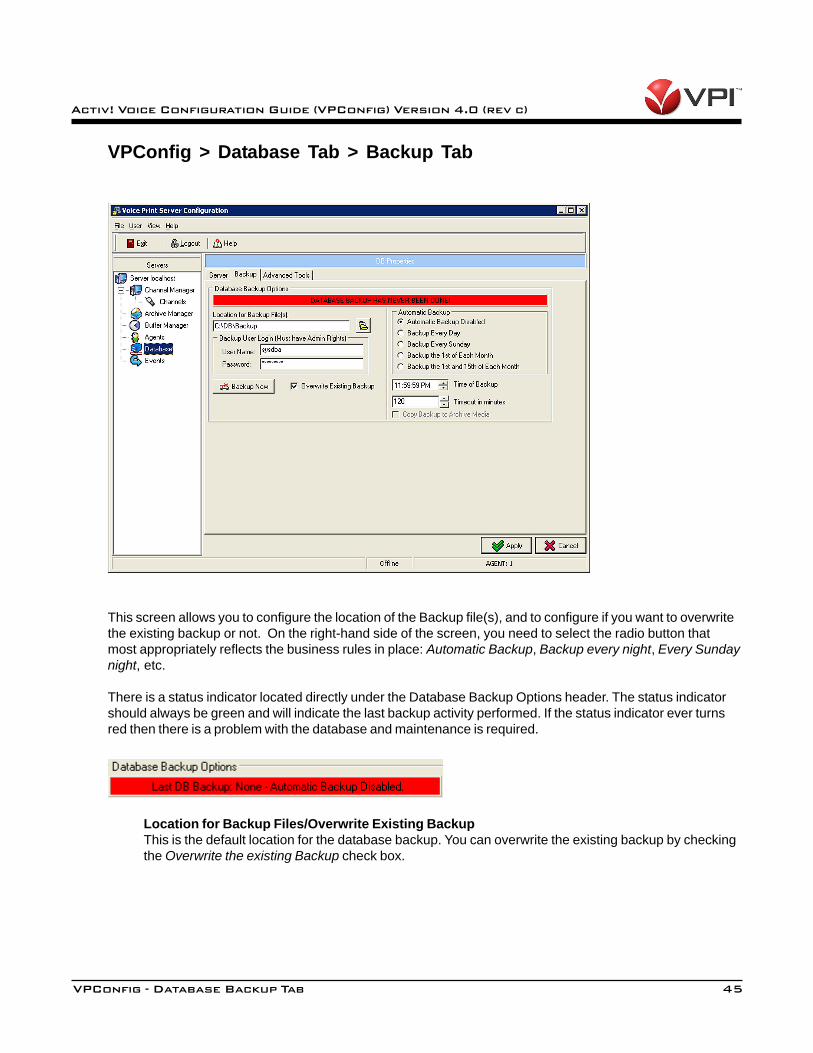
VPConfig > Database Tab > Backup Tab
This screen allows you to configure the location of the Backup file(s), and to configure if you want to overwritethe existing backup or not. On the right-hand side of the screen, you need to select the radio button thatmost appropriately reflects the business rules in place: Automatic Backup, Backup every night, Every Sundaynight, etc.
There is a status indicator located directly under the Database Backup Options header. The status indicatorshould always be green and will indicate the last backup activity performed. If the status indicator ever turnsred then there is a problem with the database and maintenance is required.
Location for Backup Files/Overwrite Existing BackupThis is the default location for the database backup. You can overwrite the existing backup by checkingthe Overwrite the existing Backup check box.
VPConfig - Database Backup Tab

46
Activ! Voice Configuration Guide (VPConfig) Version 4.0 (rev c)
Backup Now Button You can perform a backup at any time using the “Backup Now” button. Click the “Backup Now” button
• You will see the Database Backup Running status window.• When complete, you will see the “Complete Database Backup” status window.
VPConfig - Database Backup Tab
47
Activ! Voice Configuration Guide (VPConfig) Version 4.0 (rev c)
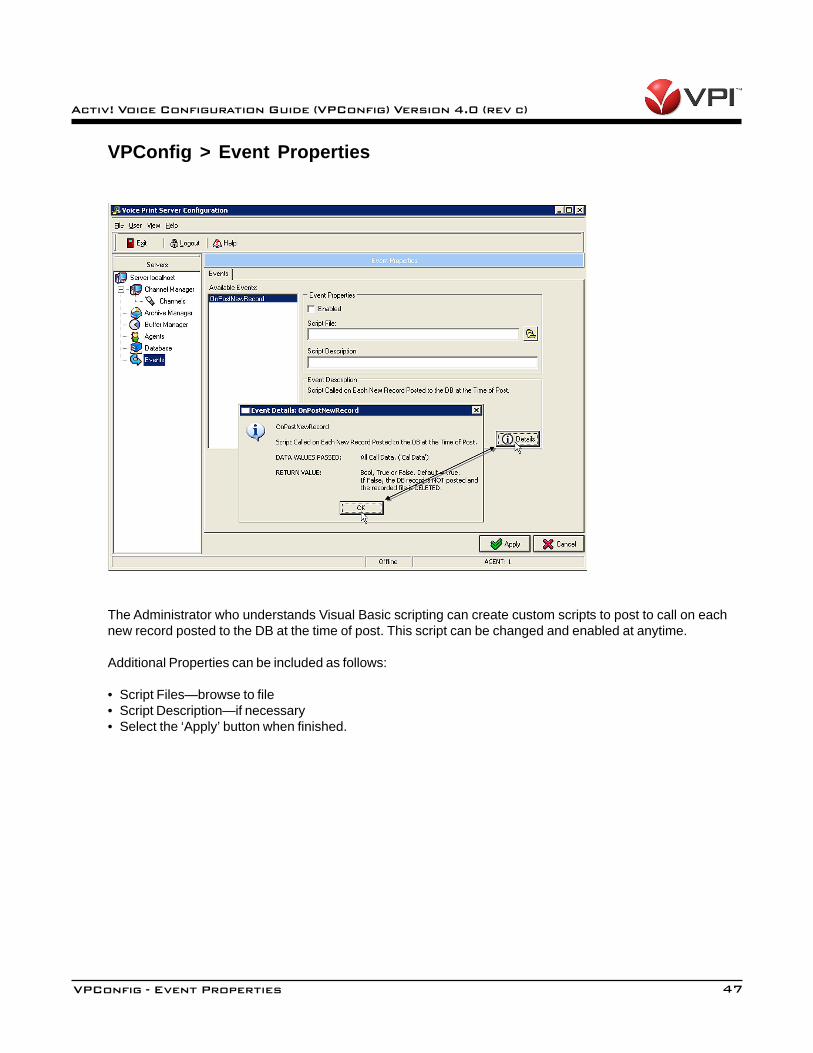
VPConfig > Event Properties
The Administrator who understands Visual Basic scripting can create custom scripts to post to call on eachnew record posted to the DB at the time of post. This script can be changed and enabled at anytime.
Additional Properties can be included as follows:
• Script Files—browse to file• Script Description—if necessary• Select the ‘Apply’ button when finished.
VPConfig - Event Properties
48
Activ! Voice Configuration Guide (VPConfig) Version 4.0 (rev c)
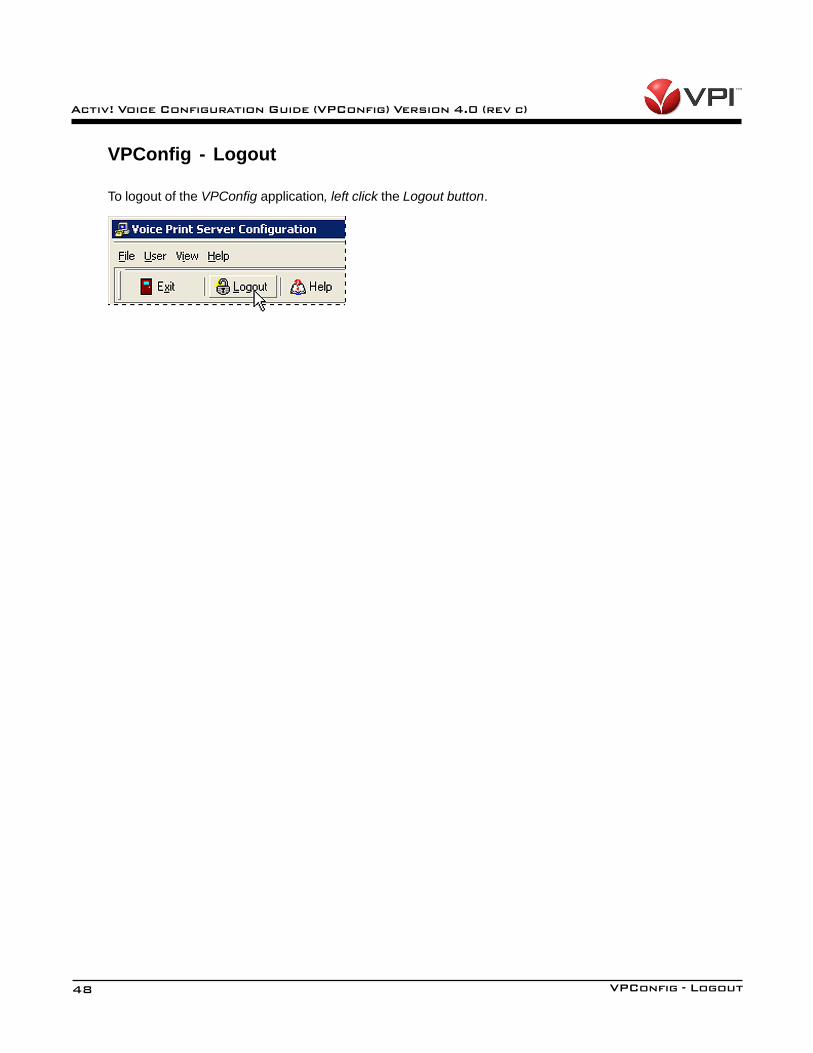
VPConfig - Logout
To logout of the VPConfig application, left click the Logout button.
VPConfig - Logout
49
Activ! Voice Configuration Guide (VPConfig) Version 4.0 (rev c)
Technical Support Information
Please contact our certified Technical Service Technicians during our posted Technical Support hours. Afterhours support is available to Gold Service Contract holders and Emergency Public Support Service Agencies. Allother accounts are subject to a service fee for this option. Call the Technical Support line for further informationand phone numbers.
Monday thru Friday6am to 6pmPacific Standard Time(805) 389-5201
Technical Support
50
Activ! Voice Configuration Guide (VPConfig) Version 4.0 (rev c)
Revision History
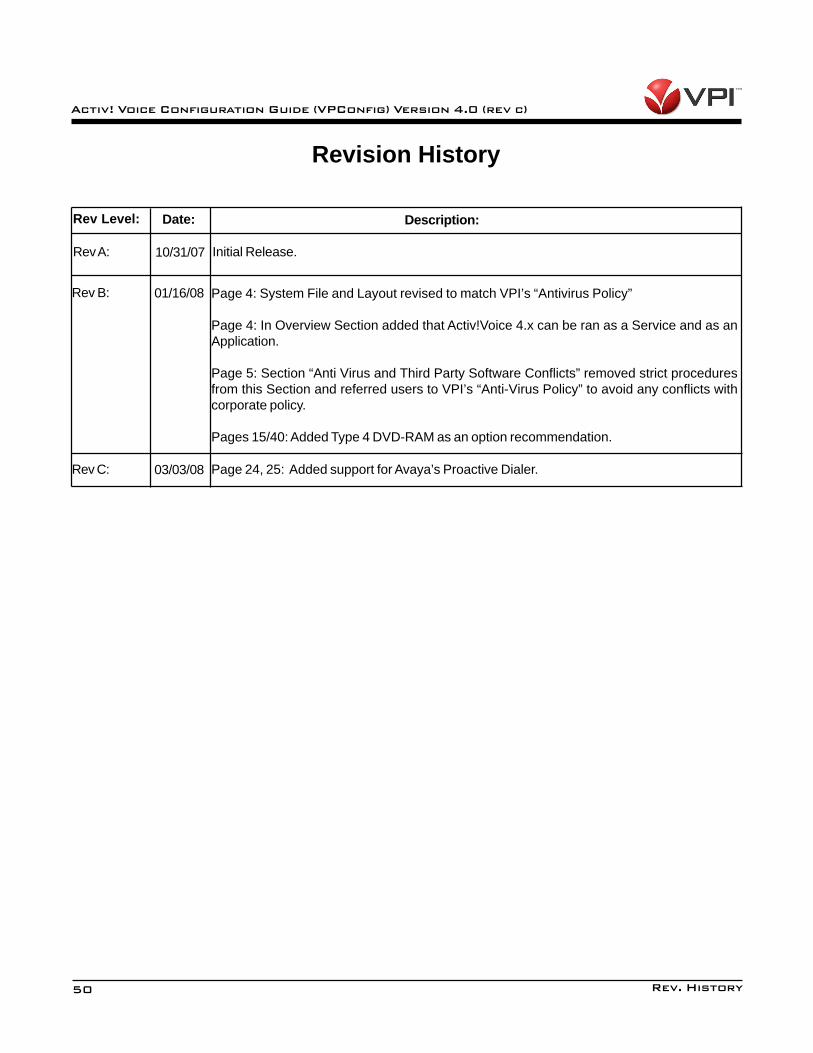
Rev A:
Rev Level: Date: Description:
10/31/07 Initial Release.
Rev. History
Rev B: 01/16/08 Page 4: System File and Layout revised to match VPI’s “Antivirus Policy”
Page 4: In Overview Section added that Activ!Voice 4.x can be ran as a Service and as anApplication.
Page 5: Section “Anti Virus and Third Party Software Conflicts” removed strict proceduresfrom this Section and referred users to VPI’s “Anti-Virus Policy” to avoid any conflicts withcorporate policy.
Pages 15/40: Added Type 4 DVD-RAM as an option recommendation.
Rev C: 03/03/08 Page 24, 25: Added support for Avaya’s Proactive Dialer.