Embed Size (px)
Citation preview

add-e
Mounting manual
Dismantling - mounting - Adjusting
Thank you,for choosing add-e.

Page 1
Contents
(1.) - Parts List Page 2
(2.) - Needed Tools Page 3
(3.) - Dismounting of the cranks/bottom bracket Page 4
(4.) - Attaching the mounting plate Page 6
(5.) - Mounting the PAS sensor Page 10
(6.) - Mounting the magnets / magnetic disk Page 15
(7.) - Adaptation of the Drive Unit Page 18
(8.) - Sensor check & Wheel circumference Page 22
(9.) - Important notes on handling Page 26 (10.) - Legal Notice Page 27 (11.) - Special notes Page 28
(12.) - Warranty Page 30
(13.) - Mapping for add-e Sport / Custom Page 31
The add-e set
Contents

Page 2
Parts list
Before starting, open the package, take out all the parts and check the content against the following list for completeness.
1x Battery with bottle holder 1x Soring protector in the bottle holder
1.) 1x Charger2.) 1x Charger cable
1x Drive unit 1.) 2x M5 Allen screws2.) 6x M4 Torx (star) screws3.) 1x M8 Allen screw short4.) 1x M8 Allen screw long (with spacer & nut)
5.) 3x M4 Torx (star) screws long6.) 1x 73mm Spacer 7.) Allen keys
1x Mounting aid (setting gauge)
1.) 2x Carbon arm type 12.) 2x Carbon arm type 23.) 1x Mounting plate4.) 1x Kickstand bracket
1.) 4x Cable ties2.) 1x Sensor with cable3.) 1x Magnetic disc4.) 1x Spoke magnet5.) 4x chain ring screw6.) 5x Magnets for the chain ring
Parts list
1.2.
3.4.
5.6.
1. 2.
1.
2.
3.4.
1.
2.
3.
4.
5.
6.
1.
2. 3.
4.
5.6.
7.

Page 3
Needed tools 1.) Wire cutter or scissors 2.) Extractor (varies from bottom bracket to bottom bracket) 3.) Socket wrench for extractor (nut) 4.) Small phillips screwdriver No.4 5.) 4mm & 6mm allen keys 6.) possibly, adjustable pliers (variiert) 7.) 16mm open ended spanner (could vary) 8.) TX20 torx key
Nr. 1 Nr. 2 Nr. 3Nr. 4
Nr. 5
Nr. 7
Nr. 6
Nr. 8
Needed tools

Page 4
Disassembly of the cranks/bottom bracket
1.) Remove the mounting screws of both cranks.
2.) Remove both crank arms from the bottom bracket with a crank arm extractor and a 16mm open ended spanner.
Disassembly of the cranks/bottom bracket
*Depending on the type of your bike this process may vary.

Page 5
3.) Remove the bottom bracket with the provided tools (bearing socket wrench & adjustable grips both sides).
Disassembly of the cranks/bottom bracket

Page 6
Attaching the mounting plate
1.) Select the required type to be fitted:
Type 1 - fitted to kickstand (direct mounting)
Type 2 - fitted to bottom bracket (mounted with carbon arms)
Attaching the mounting plate
Typ 1 Typ 2a Typ 2b
from 2.76 inches
till 2.76 inches

Page 7
2.) Mounting type 1 (kickstand mounting)
Attaching the mounting plate

Page 8
3.) Mounting Type 2a and 2b (fitted to bottom bracket)
Fasten both carbon arms evenly to the mounting plate with the 6pcs. M4 torx screws and TX20 torx screwdriver. (dont screw unevenly, or the carbon arms may break.)
4.) Place the mounting aid like as shown on the picture (page 9, picture 1) on the bottom side of the mounting plate. Please mind the gap between the bottom bracket and the tire (till 7cm / 2.76 inches please use the short carbon arms, from 7cm / 2.76 inches please use the long carbon arms). Also note the correct orientation of the carbon arms, oblique to the tire, as shown on the picture (page 9, picture 1). The three holes, must be on the side of the crank, these holes are for the PAS sensor, if you use the Type B mounting for your bike (page 10, picture 2).
Attaching the mounting plate

Page 9
5.) Position the mounting plate as shown, making sure that the carbon arm is on the left side of the bottom bracket bearing. Fasten the left side carbon arm with the left bearing cup.
Attaching the mounting plate
Page 10Mounting the PAS sensor
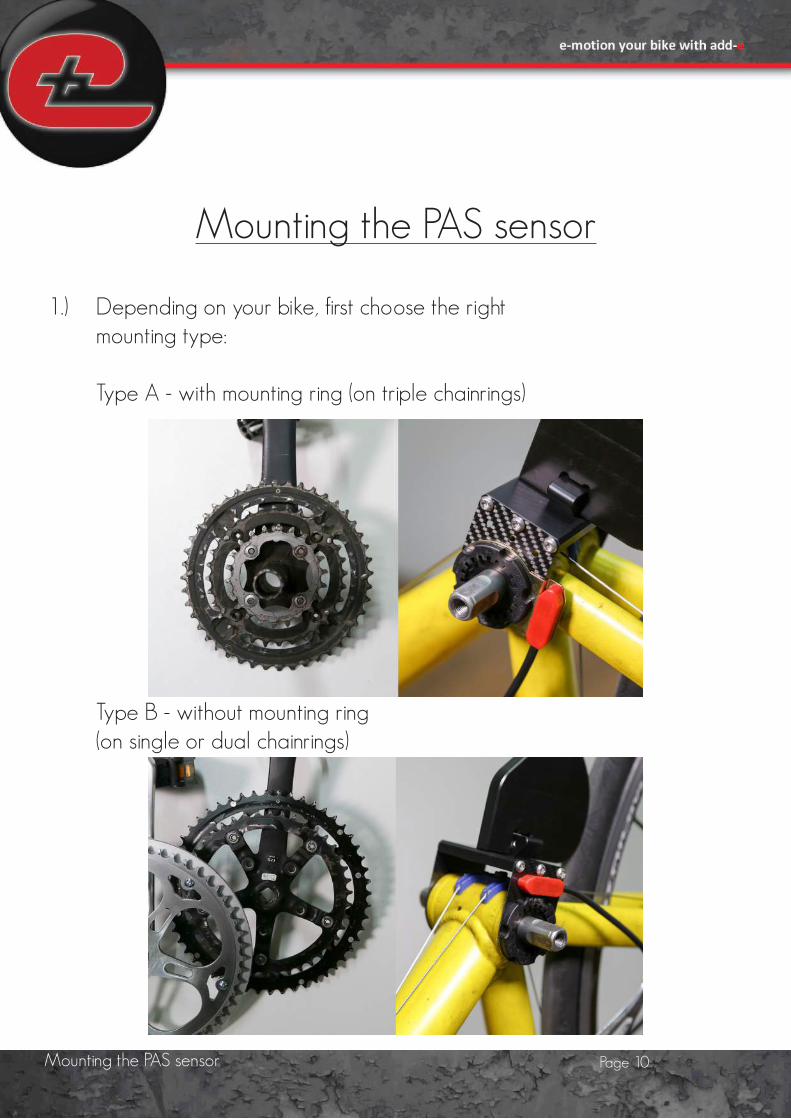
Mounting the PAS sensor
1.) Depending on your bike, first choose the right mounting type:
Type A - with mounting ring (on triple chainrings)
Type B - without mounting ring (on single or dual chainrings)

Page 11
2.) MOUNTING TYPE A (on triple chainrings)
Mount the PAS sensor incl. mounting ring (on chainring side) on carbonarm. Fix the PAS sensor by hand tightening the right bottom bearing cup.
3.) MOUNTING TYPE B (on single or dual chainrings)
Screw the right bottom bearing cup handtight. Remove the PAS sensor from the mounting ring. Attach the PAS sensor directly on the carbonarm (on chainring side).
Mounting the PAS sensor

Page 12Mounting the PAS sensor
4.) Now tighten both bearing cups. Please make sure to screw them evenly. The mounting aid should lightly touch the tires.
5.) Mount the speed sensor on a suitable position on the frame and fasten with the provided cable ties. Fasten the provided magnet on the spoke opposite the speed sensor. The distance between sensor and magnet should have a maximum of 5mm. (0.2 inches)

Page 13
6.) Attach the bottle cage to the cycle frame using the soring protector and 2x M5 allen screws
7.) Lay the cable to the Drive Unit and fasten to the frame with the cable tie provided.
Mounting the PAS sensor
Page 14
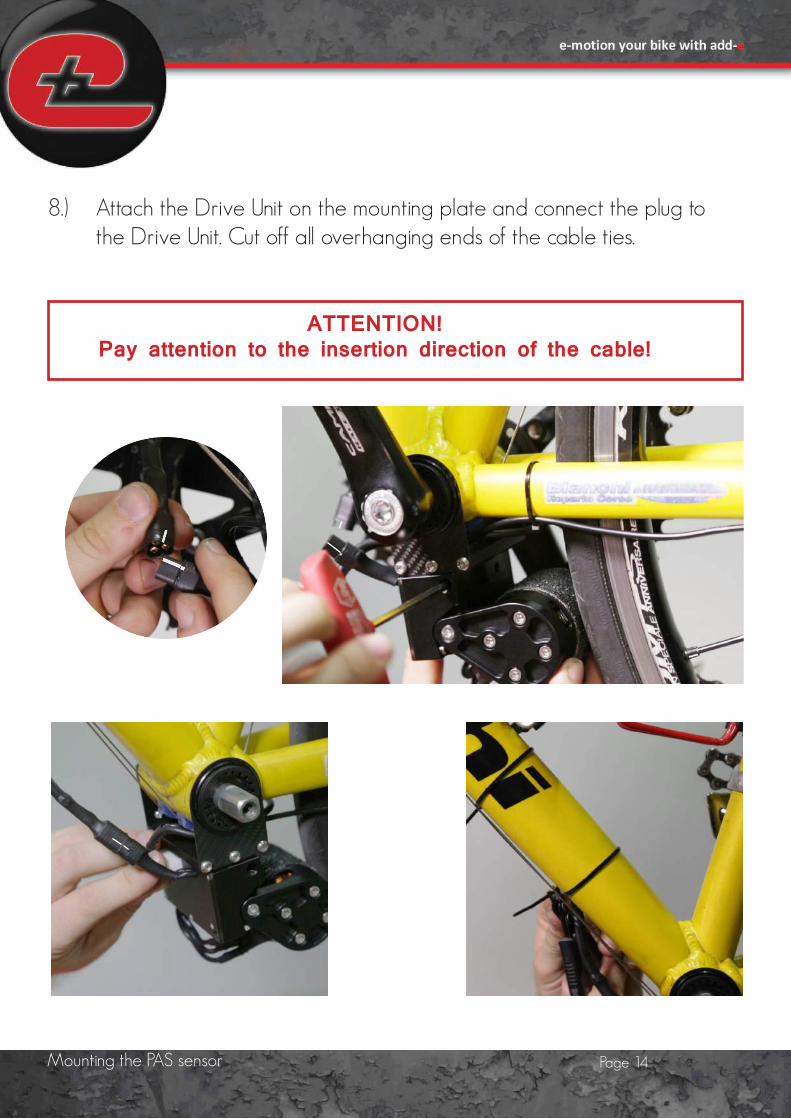
8.) Attach the Drive Unit on the mounting plate and connect the plug to the Drive Unit. Cut off all overhanging ends of the cable ties.
Mounting the PAS sensor
ATTENTION!Pay attention to the insertion direction of the cable!

Page 15
Mounting the PAS magnets /magnet disk
1.) Depending on your bike, first choose the right mounting type:
Type A - On triple chainrings with an bolt circle of 64mm (about 2.52 inches) use the provided rod magnets. Make sure that the magnetic poles are pointing in the same direction.
Note: If necessary, replace the existing aluminum screws through the provided steel screws.
Mounting the magnets / magnet disk
ATTENTION!
Please make sure, that all magnets are aligned in the same direction!
2.52 inches

Page 16
Type B - For any other chainrings use the provided magnet disk. Fixing the magnet disk by mounting of the chain ring.
Note: On both mounting types the maximum distance between sensor and magnet should be 1 - 5mm (0.040 - 0.20 inches)
Mounting the magnets / magnet disk
Distance - 1 - 5 mm

Page 17
2.) After you attached the magnets, please tighten the cranks of your bicycle properly.
Mounting the magnets / magnet disk

Page 18Adaptation of the Drive Unit
Adaptation of the Drive Unit
1.) SETTING THE UPPER STOP
Press the swing arm in the highest position. Try to draw an imaginary line to the wheel axle.
If necessary, correct the upper stop with the adjusting screw.
swing arm
ATTENTION! Please check your tire pressure before you start
and correct it, if needed.
Page 19
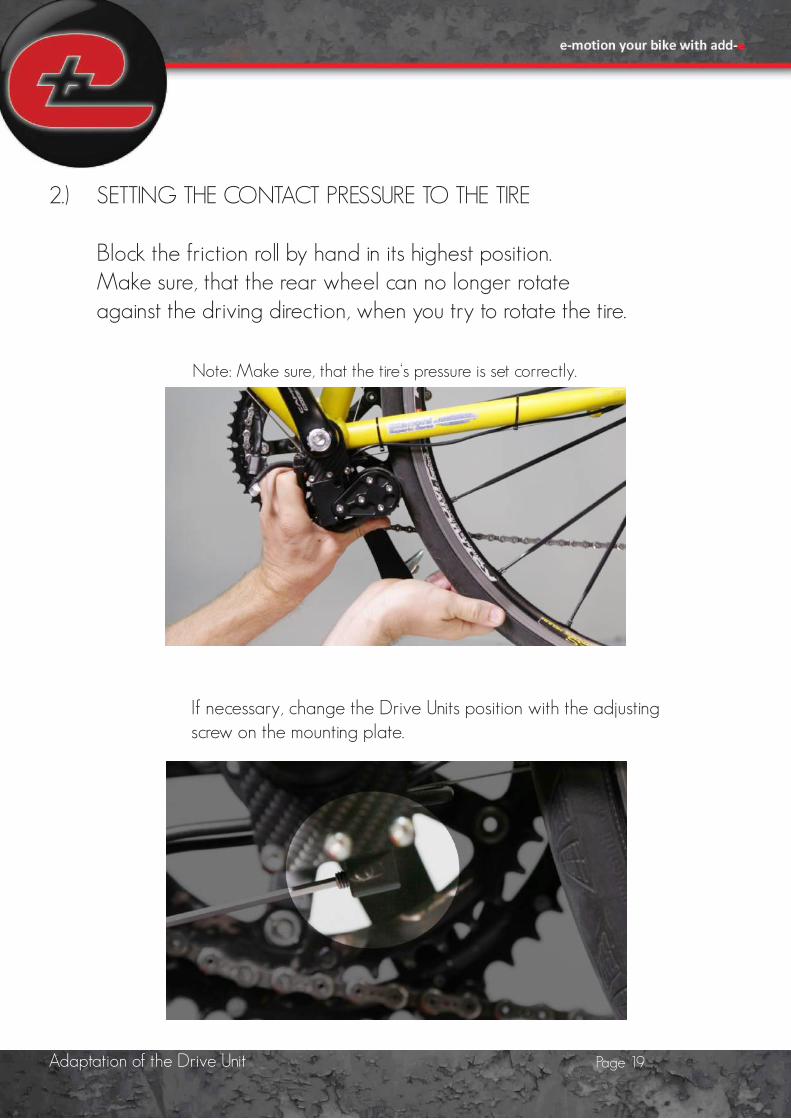
2.) SETTING THE CONTACT PRESSURE TO THE TIRE Block the friction roll by hand in its highest position. Make sure, that the rear wheel can no longer rotate against the driving direction, when you try to rotate the tire.
Note: Make sure, that the tire‘s pressure is set correctly.
If necessary, change the Drive Units position with the adjusting screw on the mounting plate.
Adaptation of the Drive Unit

Page 20
3.) FREEWHEEL SETTING Make sure the bike is standing on a straight surface. Check the distance between the friction roll and the tire. It should be arround 3mm (0.12 inches).
If necessary change the freewheeling distance with the laterally adjusting screw.
Adaptation of the Drive Unit
Distance - 3 mm

Page 21
4.) LOWER STOP SETTING Make sure, that the lower adjusting screw almost touches the swing arm. If necessary, correct the lower adjusting screw.
After all, please reconnect every cable with the Drive Unit.
Adaptation of the Drive Unit
ATTENTION!Pay attention to the insertion direction of the cable!

Page 22
Sensor check and detecting the wheel circumference
1.) Place the fully charged battery in the bottle cage.
NOTE:After the system check
you should hear a beep sound. (1x short low, 1x
short high)
2.) Turn the crank and check if the status LED flashes red, every time a magnet pass the sensor!!! (one flash per magnet, e.g. 4 or 5 times)
Sensor check
ATTENTION!
Please turn your bike upside down.

Page 23
1.) Place the fully charged battery in the bottle cage.
3.) CHECK THE SPEED SENSOR You turned your bike upside down. Now turn the rear wheel without turning the crank and check if the status LED flashes red, when the magnet pass the speed sensor (spoke manget).
4.) DETECTION OF THE WHEEL CIRCUMFERENCE Take the fully charged battery out and put it back in. Turn the power adjustment on the battery repeatedly all the way to the left and right. Wait between every directionturn about 2 seconds in the endposition, until the status LED light glows constantly. Wait for a beep sound (the LED goes out).
Sensor check

Page 24
5.) Now turn the crank until the Drive Unit starts to drive the rear wheel by itself. The determination of the tire circumference will stop automatically after a few seconds.
Determining the wheel circumference

Page 25End
Congratulation!
You have successfully fitted and configured your add-e set.
But before you go onto the public road, we suggest you to familiarise yourself with add-e in familiar surroundings.
We also recommend the use of safety equipment e.g. cycle helmet and safety wear. -------------------------------!ATTENTION!---------------------------------- add-e sport is not approved by traffic laws and should only be used on private property and at your own risk!
PLEASE CONSIDER THE VALID LAWS AND REGULATIONS IN YOUR COUNTRY! ------------------------------------------------------------------------------------

Page 26
Important notes for add-e handling
Before you use add-e please read through the complete manual here or on http://www.add-e.at/montage, as it provides you with important notes for the correct handling and minimize the risk.
Furthermore you can also watch our mounting video about the first assembly on: https://www.youtube.com/add-eAT . For damage caused by non-observance of this manual, the warranty expires.
A proper maintenance of the bicycle and the add-e kit are indispensable and reduce the risk of injury or accidents with potentially fatal consequences for the cyclist or others.
Driving with add-e requires high attention and specific skills.Never ride in intoxicated condition or if you do not feel safe.Start with simple driving exercises at a familiar surrounding to get used to the new driving performance with add-e.
Before each ride, test add-e and the bicycle which it is mounted on, for damage and proper function. Its not allowed to start driving or continue driving, if malfunctions, damage or other security related restrictions are visible. Each crash by bicycle can result in serious or even fatal injuries.Therefore always wear protective clothing and a helmet for your safety.
Depending on the intensity of using the add-e set and its components, they must be inspected and if necessary serviced regularly. Please apply yourself therefore directly to a distributor or to the add-e Service - [email protected]
Before each ride the correct setting and the right mounting of add-e must be checked and adjusted if necessary.
Important notes on handling
Page 27
Disclaimeradd-e allows you to drive with a significantly higher average speed. It is the responsibility of the user, to adapt the speed according to the weather conditions (in particular weather conditions and other users on the road).
When children cycling assisted with an add-e, the responsible law guardian persons are responsible that the children can participate in road traffic and wear appropriate safety clothing. We assume no liability for any damages, injuries and other compensation caused by third parties due to the improper use of add-e or by the breach of the monitoring obligations of any kind.
The legislative provides different rules for the use of e-drives and e-bikes in the different countries. The customer is responsible to inform himself over the applicable legal regulations and conduct themselves accordingly. There are off-road regulations regarding the electric power, speed and pedaling assistance.
If the selected configuration does not meet or comply the legal regulations of the relevant country, add-e may be only used with special permission and / or only rided on private property.
For warranty & terms of conditions, please visit: www.add-e.at General advice on use and installation of add-e
add-e is designed to fit on virtually any bicycle. We recommend to do the initial installation by yourself only if you have already gained experience with crafting activities on bicycles. add-e is ready for installation by delivery. Take your time to avoid assembly erros during the initial installation. In case of difficulty, or deviations from these instructions, please contact our service team. (You can find the contact at the end of this manual) For more information, images and videos please visit our website.
All informations for guidance in this manual refers to the normal travel direction and the normal orientation.
Legal notice

Page 28
add-e was designed for a wide range of applications. Therefore the use on different types of bicycles is possible, but it can not be ruled out, that outlying frame shapes and / or additional equipment may limit the use of add-e. More information on this topic you can find in this manual and on our websites (www.add-e.at, www.add-e.de, www.add-e.us, www.add-e.co.uk).
Basically it is possible to ride bicycles which have mounted add-e on it, also without the motor assistance. Depending on your configuration and setting add-e can be used as pedelec (assistance by pedaling) or operate with an hand trottle (s-pedelec, self propelled, in the EU only 6km/h are allowed)Please note the legal regulations in your country!
When choosing your clothing to ride, make sure that there are no loose or wide textiles in the area where add-e is mounted. In particular, open laces and wide trousers legs could get caught in the Drive Unit and cause injury or a fall.
Despite its open design, add-e works when its wet, in dirt and in extreme cases also under water for short time. PLEASE DONT SINK YOUR BICYCLE OR ADD-E UNDER WATER FOR TESTING! Nevertheless, while cleaning you should make sure, that no dirt (especially stones) get into the engine. The use of high pressure cleaners and aggressive cleaning agents is generally not recommended. Use instead a sponge or brush and clean the drive with running water. (for example, use an garden hose with low water pressure)
To ensure the longest possible and error-free operation, it is recommended to clean the drive regularly and to lubricate moving parts with oil. To always be able to ensure a high efficiency and low tire wear, it must be particularly ensured that the friction roll is not too dirty and worn and it is always right fitted. The outside of the friction roll should never be greased or oiled.
Special warnings for the use of the add-e Drive UnitBefore you perform any installation or maintenance work on add-e, make sure the battery has been disconnected from your bike (stake out). If the drive unit is connected to the battery, it may activate the drive unit unintentionally and so possibly turns on during an tube change for example.There is an increased risk of injury!
Special notes

Page 29
add-e was designed, to discharge the resulting heat through the aluminum case and the ambient air. In this case, both the engine and the housing can lead to painful burns when getting in contact with bare skin. Therefore, wait for a sufficiently time till the drive cools down before handling with add-e, so you don‘t burn yourself.
Important information for handling add-e batteries
Please read through this section with special attention! Accidents involving bicycle batteries are produced almost exclusively by improper and/or incorrect use. If damage is caused by not following the safety instructions listed here, we don‘t accept liability for them. The battery technology used (Lithium Polymer) is know contrary to previous batteries to have no „memory effect“. This makes it possible to charge the battery at any time. It is even recommended to always charge the battery only partially. For char-ging use the original battery charger only. Basically the battery should never be charged if it is mechanically damaged and/or it has been exposed to increased mechanical stress. (for example, if the battery was dropped on the floor). We recommend to remove the battery from the bottle cage if it is not in use, to prevent any damage (for example in winter or longer holidays etc.).
Before connecting the charger to your network, please check if the battery charger is appropriate for the network of your country (observer voltage level and general voltage). Before connecting the battery with the charger, that all cable connections and the charger are in good conditions.
Original add-e batteries are protected against overvoltage, over-discharge and thermal issues with different electronic circuits.
Nevertheless it must be ensured, that the battery is always in a temperture range from 0 °C to 50 °C. (degree celsius) / from F 32 to F 122 (degree fahrenheit). If not used for longer periods, (min. every 2 months) the battery needs to be recharged regularly. Our contact details: Websites: http://www.add-e.at - http://www.add-e.de - http://www.add-e.us Email: [email protected] or [email protected] Phone: +43 699 / 192 86 752 oder +43 660 / 300 88 66
Special notes

Page 30
The offerd warranty is 6 months on the battery and24 months on the mechanical components of the application according to the EU regulations.
Excluded from the warranty are wear parts, such as battery housing and the friction roll(for example, scratches, drops). Also excluded is the case ot theft (please secure your bike)
However, we offer a free replacement to our customers for the friction roll coatingwhen these should be worn off after a long time.The customer has to pay for its shipment.
The warranty expires by modification or mechanical effects on our product(eg. tampering with motor, controller, battery pack).For example, also if its used in a non-designated use or improper handling(for example, under water or similar).
Damage to the battery by deep discharge (because eg. not charging over winter period or when longer not used) or by the use of any other non original charger is not covered by the warranty.
In case of warranty please get in contact with the distributor.Defective parts will be repaired or replaced by the manufacturer or distributor.
The defective parts or add-e set must be provided at the expense of the customerby the warranty terms. Note that this is an electric assist motor.It is therefore necessary to constantly check the temperature development of motor and controller, and in particular when riding uphill. Overheating damage done by improper use arenot covered by the warranty.
We wish you much joy with your new add-e!
add-e by GP Motion GmbHTirolerstrasse 809500 VillachÖsterreich / Austria
UID: ATU69704028
Warranty
Web: http://www.add-e.at - http://www.add-e.de - http://www.add-e.usEmail: [email protected] oder [email protected]
Mapping add-e Sport / Custom
Page 31
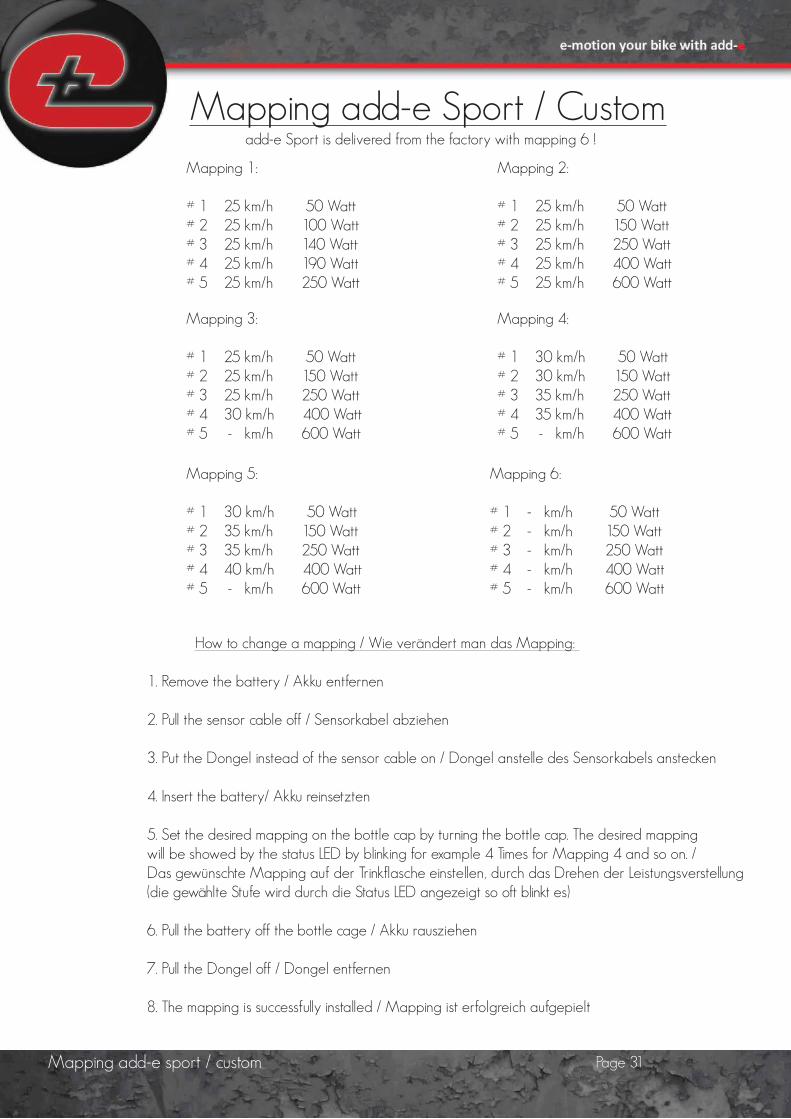
How to change a mapping / Wie verändert man das Mapping:
1. Remove the battery / Akku entfernen 2. Pull the sensor cable off / Sensorkabel abziehen 3. Put the Dongel instead of the sensor cable on / Dongel anstelle des Sensorkabels anstecken
4. Insert the battery/ Akku reinsetzten
5. Set the desired mapping on the bottle cap by turning the bottle cap. The desired mapping will be showed by the status LED by blinking for example 4 Times for Mapping 4 and so on. / Das gewünschte Mapping auf der Trinkflasche einstellen, durch das Drehen der Leistungsverstellung (die gewählte Stufe wird durch die Status LED angezeigt so oft blinkt es) 6. Pull the battery off the bottle cage / Akku rausziehen
7. Pull the Dongel off / Dongel entfernen
8. The mapping is successfully installed / Mapping ist erfolgreich aufgepielt
Mapping add-e Sport / CustomMapping 1:
# 1 25 km/h 50 Watt # 2 25 km/h 100 Watt # 3 25 km/h 140 Watt # 4 25 km/h 190 Watt # 5 25 km/h 250 Watt
Mapping 2: # 1 25 km/h 50 Watt # 2 25 km/h 150 Watt # 3 25 km/h 250 Watt # 4 25 km/h 400 Watt # 5 25 km/h 600 Watt
Mapping 3:
# 1 25 km/h 50 Watt # 2 25 km/h 150 Watt # 3 25 km/h 250 Watt # 4 30 km/h 400 Watt # 5 - km/h 600 Watt
Mapping 4:
# 1 30 km/h 50 Watt # 2 30 km/h 150 Watt # 3 35 km/h 250 Watt # 4 35 km/h 400 Watt # 5 - km/h 600 Watt
Mapping 5:
# 1 30 km/h 50 Watt # 2 35 km/h 150 Watt # 3 35 km/h 250 Watt # 4 40 km/h 400 Watt # 5 - km/h 600 Watt
Mapping 6:
# 1 - km/h 50 Watt # 2 - km/h 150 Watt # 3 - km/h 250 Watt # 4 - km/h 400 Watt # 5 - km/h 600 Watt
Mapping add-e sport / custom
add-e Sport is delivered from the factory with mapping 6 !

Page 32Checklist Dos and Don‘ts
ChecklistDos and Don‘ts
- If you don‘t use your add-e, please put out the battery from the bottle cage to avoid deep discharge and eventual damage to the battery.
- Don‘t expose the battery to extreme weather conditions (for example high or low temperatures and extreme sunshine).
- Please check all sensors before you start riding (page 22 - 23).
- Before you start riding, check the freewheel setting (page 20).
- The battery bottle is not suitable as drinking bottle, do not insert any liquids.
- Don‘t touch the Drive Unit or the friction with your fingers or other bodyparts when it‘s hot, you can burn yourself!
- Don‘t touch the Drive Unit or the friction with your fingers or other bodyparts when in use, you can hurt yourself seriously!
- Don‘t use high pressure water cleaners and/or agressive cleaning agents.
- Please recharge your battery if it is not used for longer periods (for example in the winter period).