Embed Size (px)
Citation preview

Addendum 32: Grand Format Embroidery with Art and Stitch

Addendum 32 - page 2© Robin Hrabik and Loes van der Heijden
About the Author - Robin Hrabik
Robin Hrabik - had been quilting by hand when herchildren were young. She made the transition tocomputer guided quilting years ago, and loves theprecision it provides.
She opened her quilting business Candy Apple Quilts(west of Cleveland, Ohio) in 2006, and runs her web siteCandyAppleQuilts.com to connect with other quiltersand provide designs, patterns, and more.
Robin is a Certified Master Trainer for Innova's Auto Pilotsoftware, and is the Sales Manager for AccomplishQuilting. Her specialty is designing on a large scale forInnova's Grand Format Embroidery, and she loves beingable to embroider on a longarm quilting machine.
Robin HrabikCandyAppleQuilts.com
Addendum 32 - page 3© Robin Hrabik and Loes van der Heijden
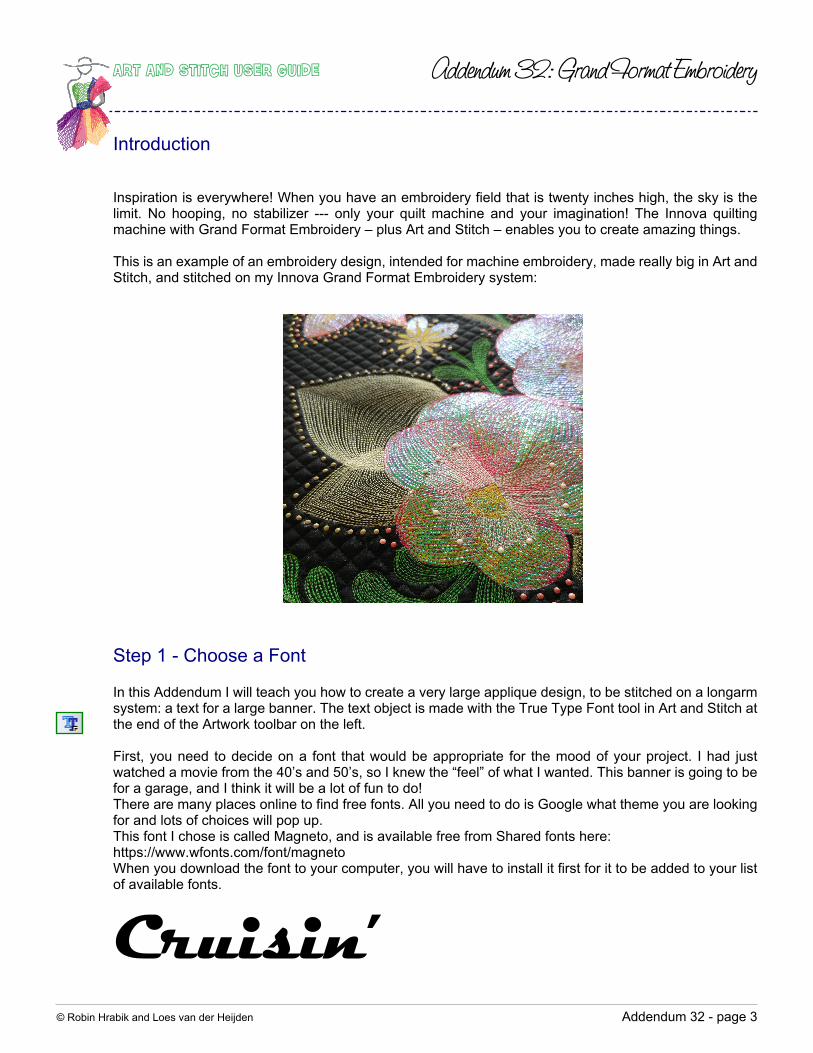
Inspiration is everywhere! When you have an embroidery field that is twenty inches high, the sky is thelimit. No hooping, no stabilizer --- only your quilt machine and your imagination! The Innova quiltingmachine with Grand Format Embroidery – plus Art and Stitch – enables you to create amazing things.
This is an example of an embroidery design, intended for machine embroidery, made really big in Art andStitch, and stitched on my Innova Grand Format Embroidery system:
Introduction
Step 1 - Choose a Font
In this Addendum I will teach you how to create a very large applique design, to be stitched on a longarmsystem: a text for a large banner. The text object is made with the True Type Font tool in Art and Stitch atthe end of the Artwork toolbar on the left.
First, you need to decide on a font that would be appropriate for the mood of your project. I had justwatched a movie from the 40’s and 50’s, so I knew the “feel” of what I wanted. This banner is going to befor a garage, and I think it will be a lot of fun to do!There are many places online to find free fonts. All you need to do is Google what theme you are lookingfor and lots of choices will pop up.This font I chose is called Magneto, and is available free from Shared fonts here:https://www.wfonts.com/font/magnetoWhen you download the font to your computer, you will have to install it first for it to be added to your listof available fonts.

Addendum 32 - page 4© Robin Hrabik and Loes van der Heijden
Let’s get started in Art and Stitch.The first thing you may notice is that I have chosen Design Page Style “Quilting” instead of “Embroidery”for the actual design process, even though this will be an embroidery file when it is complete. I made thischoice because I did not need any tie off commands (they are performed on the quilt machine), andbecause I do not want any underlay treatments.Via Menu Toools > Select Quilting Area/Hoop, button “New” I have set up my Quilting area and saved itas Grand Format Embroidery 100 x 21. This way, when I show the hoop size, I can easily see that mydesign will be within my sewing area:
Step 2 - Setup Design Page Style and Quilting Area

Addendum 32 - page 5© Robin Hrabik and Loes van der Heijden
Choose the Text Tool from the left side. Type in the word you want to use. Select the font and chooseBold. Click on OK.
Step 3 - Create the Text Object
Back on the Design Page leave the letters ungrouped because we will be moving them.
Addendum 32 - page 6© Robin Hrabik and Loes van der Heijden
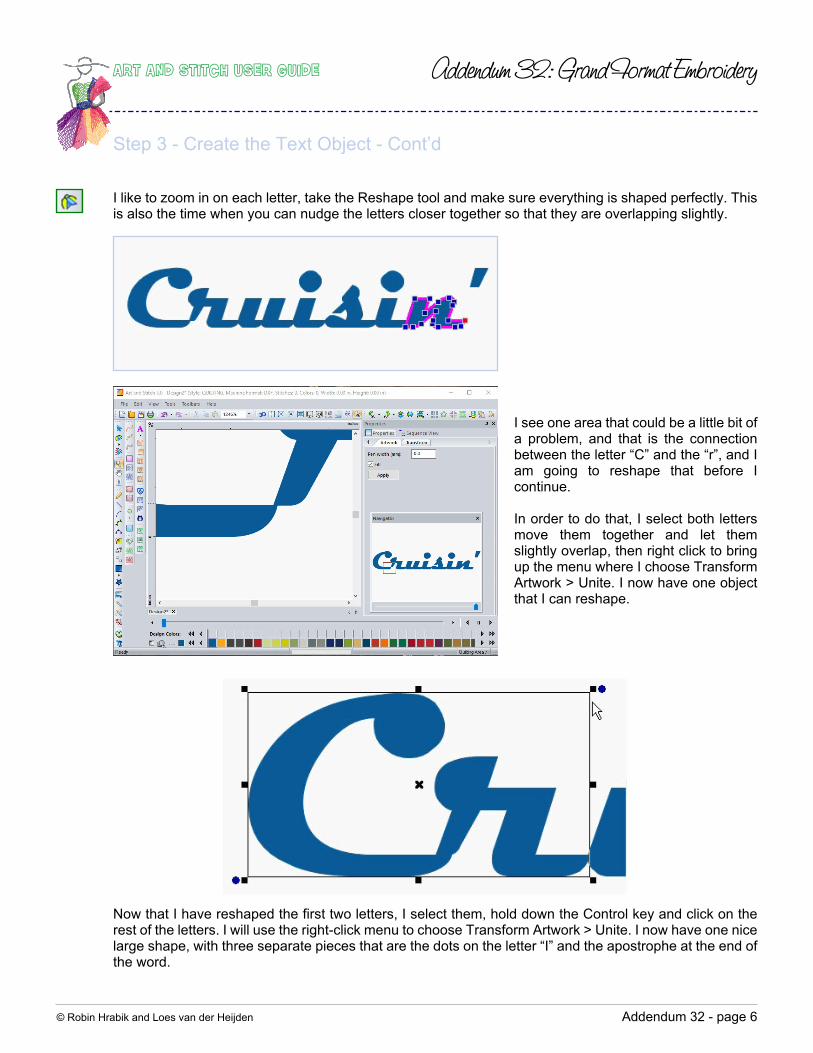
I like to zoom in on each letter, take the Reshape tool and make sure everything is shaped perfectly. Thisis also the time when you can nudge the letters closer together so that they are overlapping slightly.
Step 3 - Create the Text Object - Cont’d
I see one area that could be a little bit ofa problem, and that is the connectionbetween the letter “C” and the “r”, and Iam going to reshape that before Icontinue.
In order to do that, I select both lettersmove them together and let themslightly overlap, then right click to bringup the menu where I choose TransformArtwork > Unite. I now have one objectthat I can reshape.
Now that I have reshaped the first two letters, I select them, hold down the Control key and click on therest of the letters. I will use the right-click menu to choose Transform Artwork > Unite. I now have one nicelarge shape, with three separate pieces that are the dots on the letter “I” and the apostrophe at the end ofthe word.
Addendum 32 - page 7© Robin Hrabik and Loes van der Heijden
Step 4 - Adjusting the Size
It’s time to resize the project so we can do applique on an Innova quilting machine with Grand FormatEmbroidery.
One thing to note here: We can take this project over to the machine and use the Path Applyfunction within the software, but I prefer to do projects like this with Art and Stitch becauseof the vast selection of choices for the edge stitches, and the ability to edit individual stitches.Once you take this design over to the quilt machine, you cannot edit the size of the design,and you can no longer edit individual stitches --- so it is best to perfect everything now andenjoy stitching when you take it to the machine.
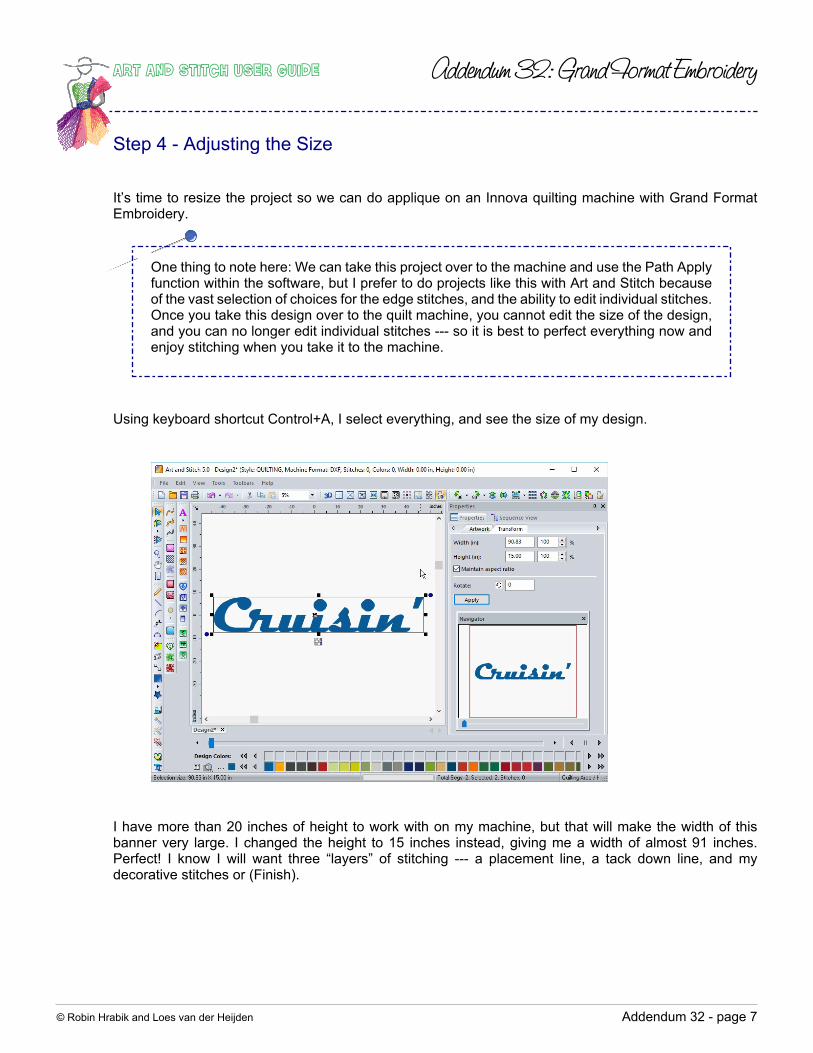
Using keyboard shortcut Control+A, I select everything, and see the size of my design.
I have more than 20 inches of height to work with on my machine, but that will make the width of thisbanner very large. I changed the height to 15 inches instead, giving me a width of almost 91 inches.Perfect! I know I will want three “layers” of stitching --- a placement line, a tack down line, and mydecorative stitches or (Finish).
Addendum 32 - page 8© Robin Hrabik and Loes van der Heijden
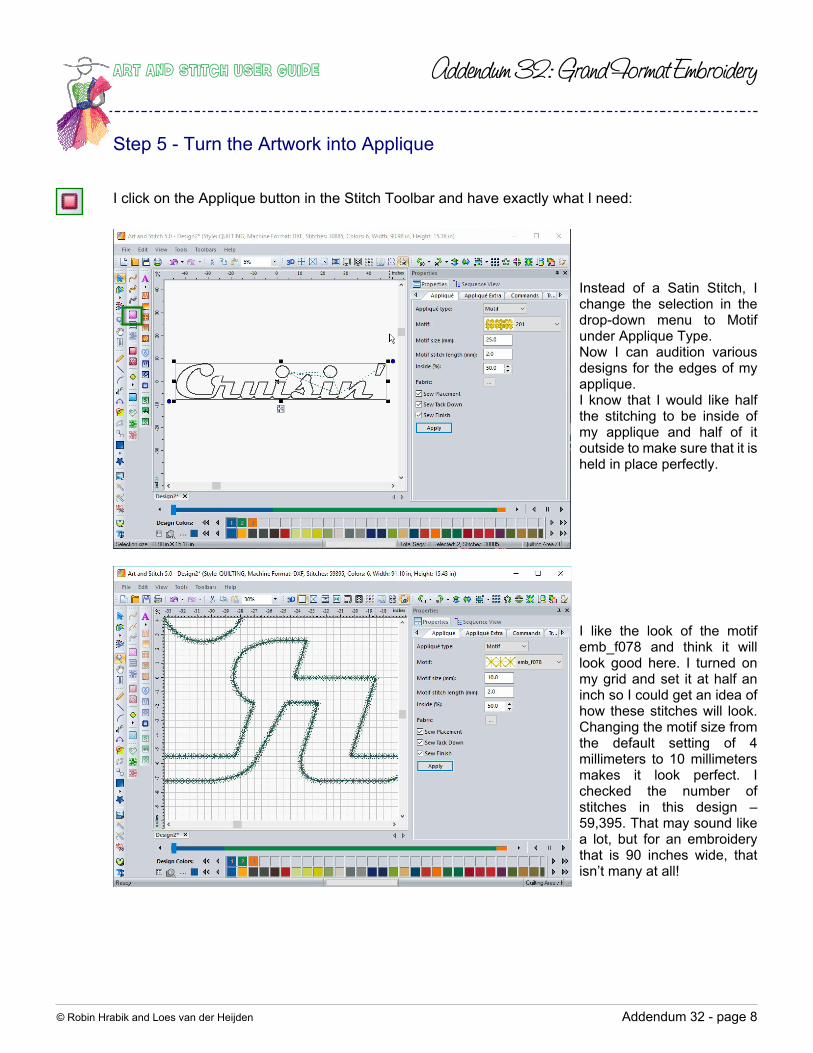
I click on the Applique button in the Stitch Toolbar and have exactly what I need:
Step 5 - Turn the Artwork into Applique
Instead of a Satin Stitch, Ichange the selection in thedrop-down menu to Motifunder Applique Type.Now I can audition variousdesigns for the edges of myapplique.I know that I would like halfthe stitching to be inside ofmy applique and half of itoutside to make sure that it isheld in place perfectly.
I like the look of the motifemb_f078 and think it willlook good here. I turned onmy grid and set it at half aninch so I could get an idea ofhow these stitches will look.Changing the motif size fromthe default setting of 4millimeters to 10 millimetersmakes it look perfect. Ichecked the number ofstitches in this design –59,395. That may sound likea lot, but for an embroiderythat is 90 inches wide, thatisn’t many at all!
Addendum 32 - page 9© Robin Hrabik and Loes van der Heijden
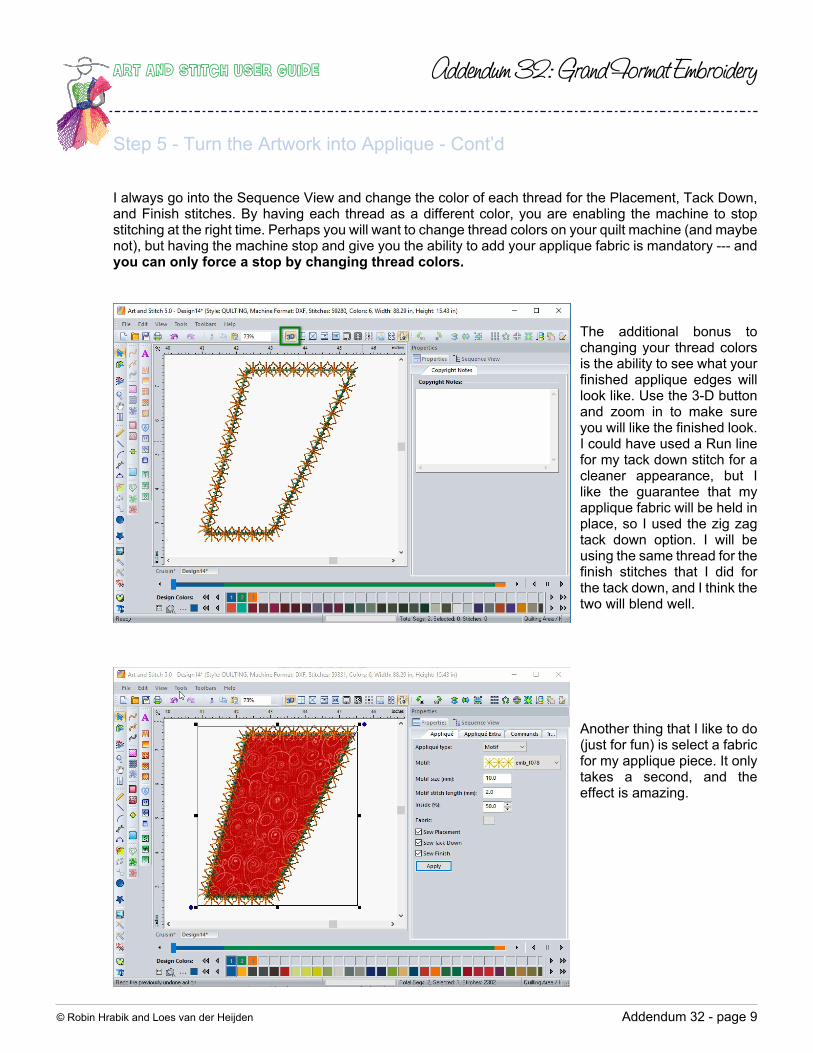
I always go into the Sequence View and change the color of each thread for the Placement, Tack Down,and Finish stitches. By having each thread as a different color, you are enabling the machine to stopstitching at the right time. Perhaps you will want to change thread colors on your quilt machine (and maybenot), but having the machine stop and give you the ability to add your applique fabric is mandatory --- andyou can only force a stop by changing thread colors.
The additional bonus tochanging your thread colorsis the ability to see what yourfinished applique edges willlook like. Use the 3-D buttonand zoom in to make sureyou will like the finished look.I could have used a Run linefor my tack down stitch for acleaner appearance, but Ilike the guarantee that myapplique fabric will be held inplace, so I used the zig zagtack down option. I will beusing the same thread for thefinish stitches that I did forthe tack down, and I think thetwo will blend well.
Another thing that I like to do(just for fun) is select a fabricfor my applique piece. It onlytakes a second, and theeffect is amazing.
Step 5 - Turn the Artwork into Applique - Cont’d
Addendum 32 - page 10© Robin Hrabik and Loes van der Heijden
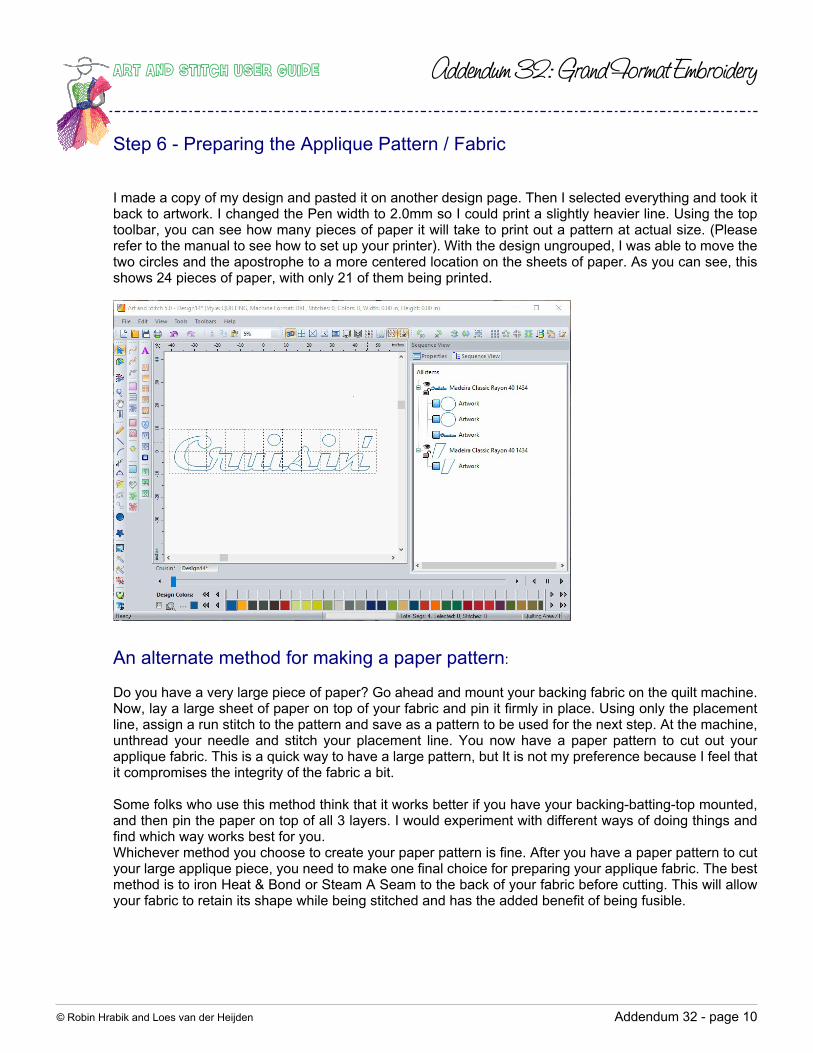
I made a copy of my design and pasted it on another design page. Then I selected everything and took itback to artwork. I changed the Pen width to 2.0mm so I could print a slightly heavier line. Using the toptoolbar, you can see how many pieces of paper it will take to print out a pattern at actual size. (Pleaserefer to the manual to see how to set up your printer). With the design ungrouped, I was able to move thetwo circles and the apostrophe to a more centered location on the sheets of paper. As you can see, thisshows 24 pieces of paper, with only 21 of them being printed.
Step 6 - Preparing the Applique Pattern / Fabric
An alternate method for making a paper pattern:
Do you have a very large piece of paper? Go ahead and mount your backing fabric on the quilt machine.Now, lay a large sheet of paper on top of your fabric and pin it firmly in place. Using only the placementline, assign a run stitch to the pattern and save as a pattern to be used for the next step. At the machine,unthread your needle and stitch your placement line. You now have a paper pattern to cut out yourapplique fabric. This is a quick way to have a large pattern, but It is not my preference because I feel thatit compromises the integrity of the fabric a bit.
Some folks who use this method think that it works better if you have your backing-batting-top mounted,and then pin the paper on top of all 3 layers. I would experiment with different ways of doing things andfind which way works best for you.Whichever method you choose to create your paper pattern is fine. After you have a paper pattern to cutyour large applique piece, you need to make one final choice for preparing your applique fabric. The bestmethod is to iron Heat & Bond or Steam A Seam to the back of your fabric before cutting. This will allowyour fabric to retain its shape while being stitched and has the added benefit of being fusible.

Addendum 32 - page 11© Robin Hrabik and Loes van der Heijden
Make sure to reverse your paper pattern so your fabricapplique pattern is facing the right way! I used a light box undermy sheets of paper and taped them together.
Accuracy is important, and Art & Stitch gives you this accuracy--- but it’s up to you to take your time during the following stepsto maintain that accuracy.
Step 6 - Preparing the Applique Pattern / Fabric - Cont’d
A quick note…. If you have any seams in your applique fabric, try to disguise them in small areas whereyour letters are connecting. They will be less noticeable here, such as the example below:
I have an iron right next to my quiltmachine, making it easy to fuse theapplique in place right over myplacement stitches. Stabilized fabricis always the first choice, but if youfind yourself without supplies, youcan try using a glue stick to hold yourapplique in place. That’s a trick usedwhen doing applique in a smallembroidery hoop, and it is not thebest approach for a design this large--- but quilters have a way of makingthings work if there is a quiltingemergency!

Addendum 32 - page 12© Robin Hrabik and Loes van der Heijden
I have found that applique looks very nice when placed over a completely quilted background. That makesit so much easier than having to mask and saves a lot of time. I decided to audition some motifs and makea pre-quilted background for this banner. Using motif pattern Line, and playing with the curve capabilities,I was able to shape a background that has a lot of movement to it, and will stitch very quickly:
Step 7 - Again in Art and Stitch: the Background Quilting
This is one of my favorite tools to play with, but that’s a story for another day…..

Addendum 32 - page 13© Robin Hrabik and Loes van der Heijden
You can add fabric to your applique design, and place it on top of your background for a preview of yourfinished project:
Step 7 - Again in Art and Stitch: the Background Quilting - Cont’d

Addendum 32 - page 14© Robin Hrabik and Loes van der Heijden
Save your background design as an ANS file, and as a PAT file to take to your machine. You can bequilting the background while you are cutting the fabric for the applique.
Save your applique design as an ANS file, and as a DST file to take to the Innova machine with a USB.When you are at the quilt machine, import the DST design into your library and pull it up on the screen.You are ready to start stitching! The colors you have chosen will make the machine stop at the appropriatetimes so you can add your layers or change your threads if you choose. When you have your backgroundstitched, open GFE for your embroidery. Note that even though you determined where your start and stoppoints were, saving the design as a DST file does not guarantee that those points will be where you expectthem to be. Prepare to be flexible when the machine starts stitching somewhere in the design that you didnot plan. This is not a problem with Innova or Art & Stitch. It is simply a characteristic of the file format youare using. That is why your colors appear differently than they did when you set up your applique layerstoo. This is easy to manage. You can change colors and dequeue parts within the GFE menu at yourmachine. All your sections will be in the correct order, so get ready to stitch!
Within the GFE, open the choice Edit Colors:
On this screen, you can change the colorsof your thread to match what you will beusing, or just use any color.
Earlier I mentioned that you need to havecolor changes so that the machine willknow to stop for you. If you left all three ofthe colors the same for this applique, themachine would keep stitching. You wouldnot be able to stop and add your appliqueor change your thread colors.
Please do not skip this step!
Step 8 - From Art and Stitch to your Innova
Addendum 32 - page 15© Robin Hrabik and Loes van der Heijden
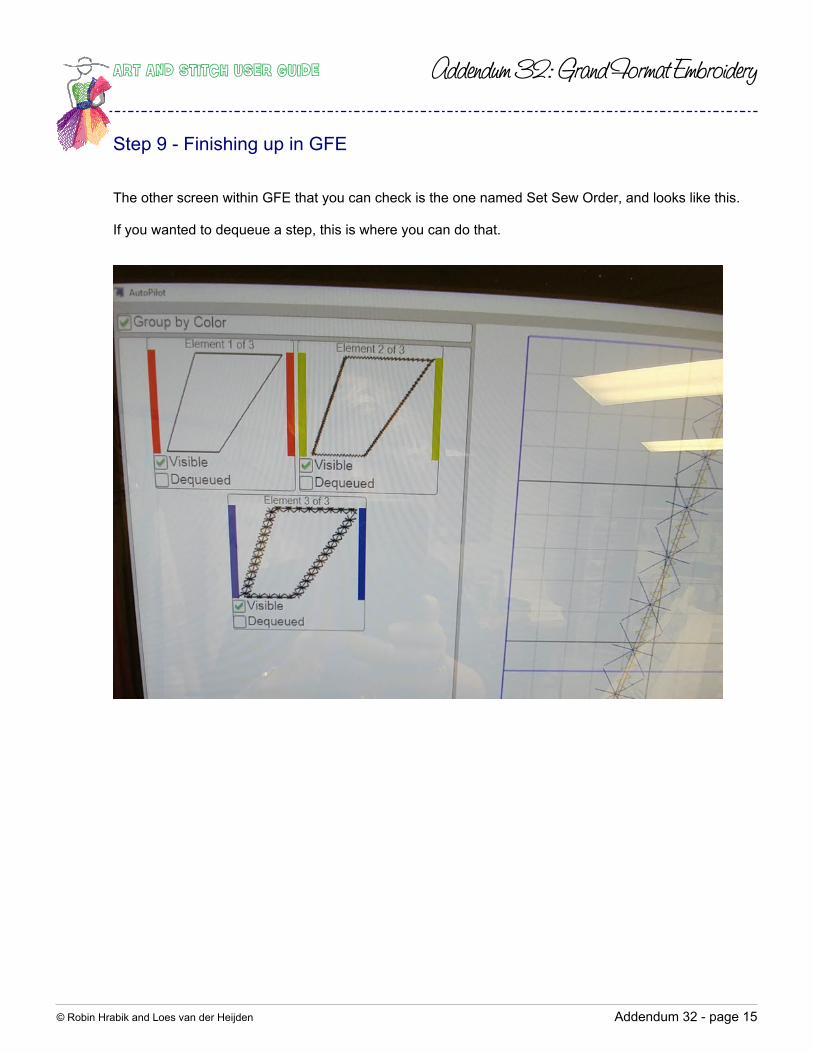
The other screen within GFE that you can check is the one named Set Sew Order, and looks like this.
If you wanted to dequeue a step, this is where you can do that.
Step 9 - Finishing up in GFE
Addendum 32 - page 16© Robin Hrabik and Loes van der Heijden
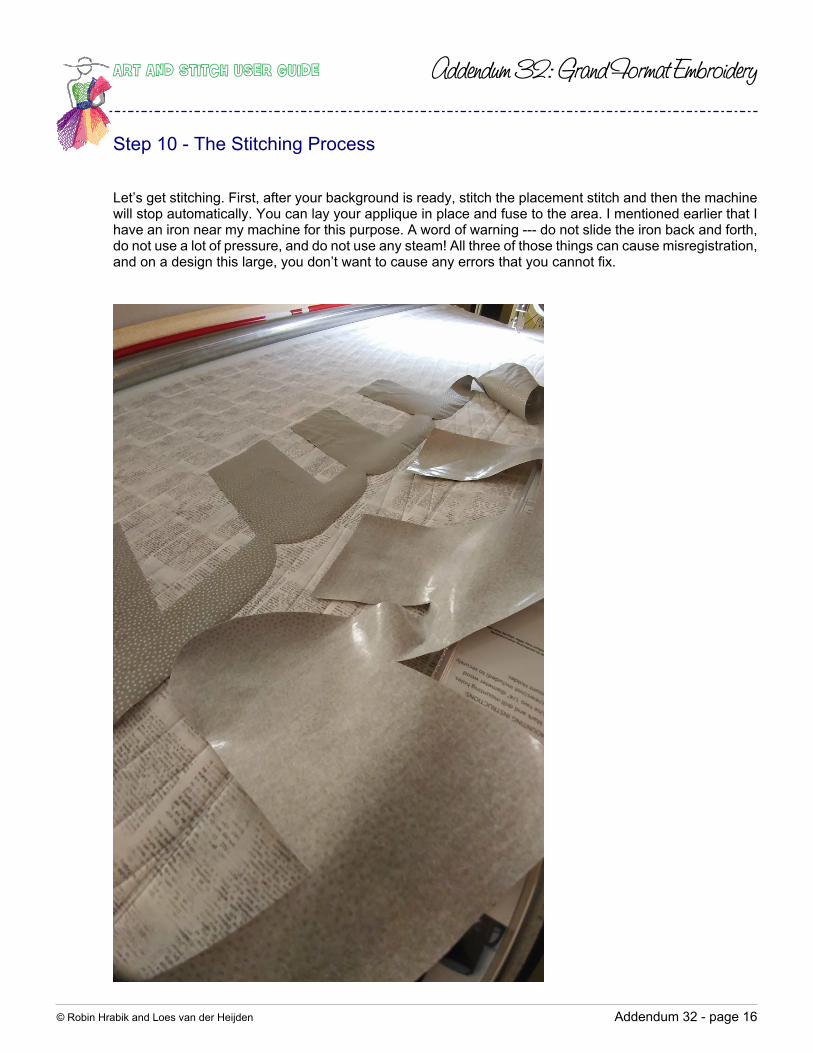
Let’s get stitching. First, after your background is ready, stitch the placement stitch and then the machinewill stop automatically. You can lay your applique in place and fuse to the area. I mentioned earlier that Ihave an iron near my machine for this purpose. A word of warning --- do not slide the iron back and forth,do not use a lot of pressure, and do not use any steam! All three of those things can cause misregistration,and on a design this large, you don’t want to cause any errors that you cannot fix.
Step 10 - The Stitching Process

Addendum 32 - page 17© Robin Hrabik and Loes van der Heijden
Slowly line up your entire design, press lightly, and then start your tack down stitch. You are almost done!Don’t worry too much about wobbly lumps and bumps in your applique piece. If the adhesive wasn’tapplied properly, this can happen. You can always iron the entire piece to perfection after you remove itfrom the machine (if lightly pressing it doesn’t remove all the wrinkles).
Step 10 - The Stitching Process - Cont’d

Addendum 32 - page 18© Robin Hrabik and Loes van der Heijden
Here is what the edge of the applique piece looks like with the zig zag tack down stitch that I have chosen:
Step 10 - The Stitching Process - Cont’d

Addendum 32 - page 19© Robin Hrabik and Loes van der Heijden
Here is a close-up of the finished lettering:
And the entire banner with a 90-inch-wide embroidery!
Step 10 - The Stitching Process - Cont’d
Addendum 32 - page 20© Robin Hrabik and Loes van der Heijden
With the Innova, you have a wide assortment of embroidery threads that you can easily use to really makethese decorative stitches beautiful. You can download lots of different fonts to make wide banners like this--- but don’t stop there! You can rotate your letters by 90 degrees and make a vertical sign too! You caneven use the Wing Dings to make pretty designs. Using different fonts can be so much fun, and there arelots of other uses for Grand Format Embroidery as well!I have seen banners, decorations for the front of tables at shows, signs in windows --- all done in GrandFormat Embroidery. The sky is the limit!
The Sky is the Limit