Embed Size (px)
Citation preview

Additional Compensation Payments
Training Guide
COPYRIGHT & TRADEMARKS Copyright © 1998, 2009, Oracle and/or its affiliates. All rights reserved.
Oracle is a registered trademark of Oracle Corporation and/or its affiliates. Other names may be trademarks of their respective owners.
This software and related documentation are provided under a license agreement containing restrictions on use and disclosure and are protected by intellectual property laws. Except as expressly permitted in your license agreement or allowed by law, you may not use, copy, reproduce, translate, broadcast, modify, license, transmit, distribute, exhibit, perform, publish or display any part, in any form, or by any means. Reverse engineering, disassembly, or decompilation of this software, unless required by law for interoperability, is prohibited.
The information contained herein is subject to change without notice and is not warranted to be error-free. If you find any errors, please report them to us in writing.
If this software or related documentation is delivered to the U.S. Government or anyone licensing it on behalf of the U.S. Government, the following notice is applicable:
U.S. GOVERNMENT RIGHTS Programs, software, databases, and related documentation and technical data delivered to U.S. Government customers are “commercial computer software” or “commercial technical data” pursuant to the applicable Federal Acquisition Regulation and agency-specific supplemental regulations. As such, the use, duplication, disclosure, modification, and adaptation shall be subject to the restrictions and license terms set forth in the applicable Government contract, and, to the extent applicable by the terms of the Government contract, the additional rights set forth in FAR 52.227-19, Commercial Computer Software License (December 2007). Oracle USA, Inc., 500 Oracle Parkway, Redwood City, CA 94065.
This software is developed for general use in a variety of information management applications. It is not developed or intended for use in any inherently dangerous applications, including applications which may create a risk of personal injury. If you use this software in dangerous applications, then you shall be responsible to take all appropriate fail-safe, backup, redundancy and other measures to ensure the safe use of this software. Oracle Corporation and its affiliates disclaim any liability for any damages caused by use of this software in dangerous applications.
This software and documentation may provide access to or information on content, products and services from third parties. Oracle Corporation and its affiliates are not responsible for and expressly disclaim all warranties of any kind with respect to third party content, products and services. Oracle Corporation and its affiliates will not be responsible for any loss, costs, or damages incurred due to your access to or use of third party content, products or services.
Training Guide Additional Compensation Payments
Page iii
Table of Contents Additional Compensation Payments ............................................................................... 1
Additional Compensation Payments ........................................................................................ 1 PAC Curriculum ..................................................................................................................................... 2 Additional Compensation Defined ......................................................................................................... 2
Additional Compensation Payments at Columbia University ............................................................................. 3 Earnings Codes Defined ................................................................................................................................. 4
Clinical Earnings Codes ............................................................................................................................ 4 Benefits Eligible Earnings Codes .............................................................................................................. 4
Fringe Benefit Rate ........................................................................................................................................ 5 ChartFields ChartStrings and Combination Codes ............................................................................................. 6
ChartFields ..................................................................................................................................................... 6 ChartFields cont. ............................................................................................................................................ 7 ChartString ..................................................................................................................................................... 8 Combination Codes ........................................................................................................................................ 9 Putting it Together - ChartFields ChartStrings and Combo Codes ............................................................... 10
Combination Codes and Add Comp Transactions ............................................................................................ 11 Locate and Select Combo Codes .................................................................................................................. 12
Search for a Combo Code ....................................................................................................................... 13 Create Combo Codes ................................................................................................................................... 16 New Combo Code Request Process ............................................................................................................. 17 New Combo Code Request Process Screen Prints ....................................................................................... 18 New Combo Code Request ChartField Selection Rules ............................................................................... 19 New Combo Code Request Result ............................................................................................................... 20
Request and Create a New Combo Code ................................................................................................. 21 Access Additional Compensation Page in PAC ................................................................................... 35
Access Additional Compensation Page ............................................................................................................ 36 Access Additional Compensation Page ........................................................................................................ 37
Find Pending Transactions ................................................................................................................................ 38 Find Pending Transactions-Search Feature .................................................................................................. 39 Find Pending Transactions ........................................................................................................................... 40
Review Employee Information ............................................................................................................. 42 Create New Add Comp-Search and Select Employee Record .......................................................................... 42
Search Results - Select Employee Record .................................................................................................... 43 Verify Employee Record for the Add Comp ................................................................................................ 44
Review Current and Historical Add Comps ...................................................................................................... 45 Review Historical Add Comp Example ....................................................................................................... 46 Review Current Add Comp Example ........................................................................................................... 47 Transaction Overlays ................................................................................................................................... 48 Transaction Overlays-Warning Messages .................................................................................................... 49
New Additional Compensation Section ............................................................................................................ 50 Create Additional Compensation Payments ......................................................................................... 51
Add Comps for Employees within the Home Department(s)............................................................................ 51 Enter an Add Comp Comment ..................................................................................................................... 54 Select an Earnings Code............................................................................................................................... 55
Select an Earnings Code .......................................................................................................................... 56 Actual Period Start and End Dates ............................................................................................................... 57 Retroactive Add Comp Payments 1 ............................................................................................................. 58 Retroactive Add Comp Payments 2 ............................................................................................................. 59 Total Earnings Code Payment and Pay Period Amount ............................................................................... 60
Enter Actual Period Dates and Total Payment Amount .......................................................................... 61 Pay Period Amounts and Paychecks ............................................................................................................ 63 Combination Codes ...................................................................................................................................... 64
Combination Code Errors ........................................................................................................................ 65 Correcting Combination Code Errors ...................................................................................................... 66
Percent Distribution and Combo Code Amount ........................................................................................... 67 Allocate Charges by Percent ................................................................................................................... 68 Allocate Charges by Combination Code Amount ................................................................................... 70
Training Guide Additional Compensation Payments
Page iv
Allocate Charges to Multiple Combo Codes ........................................................................................... 72 Enter a Second Add Comp in the Same Transaction ................................................................................... 75 Save and Submit the Add Comp Transaction .............................................................................................. 76
Save the Transaction for Later ................................................................................................................ 77 Access and Submit a Saved Transaction ................................................................................................. 78
Overlaying (Replacing) Current Add Comp Payments ................................................................................ 81 Overlaying a Current Payment with New Funding Information ............................................................. 82 Overlay a Current Payment with a New Amount .................................................................................... 83 Create an Additional Payment using a Different Earn Code ................................................................... 84
Stop or Reduce an Add Comp Payment Immediately .................................................................................. 85 Submit Paper Add Comps ............................................................................................................................ 86 Suspense Charges ........................................................................................................................................ 87
Add Comps for Employees Outside the Home Department(s) ......................................................................... 88 Employee Outside the Home Department Add Comp Page ......................................................................... 89
Additional Compensation Transaction Examples ............................................................................................. 90 Create a Single Payment Add Comp Charged to One Combo Code (ChartString) ...................................... 91 Create a Single Payment Add Comp Charged to Multiple Combo Codes (ChartStrings) ............................ 96 Create a Five Month Add Comp Charged to Multiple Combo Codes (ChartStrings) ................................ 102 Stop or Reduce a Current Add Comp Payment as of a Future ................................................................... 109 Create Two Add Comp Payments in One Transaction .............................................................................. 113 Increase an Add Comp Payment Retroactively .......................................................................................... 117 Create an Add Comp Payment for an Employee Outside the Home Department ...................................... 125
Additional Compensation Payments Workflow ................................................................................. 131 Additional Compensation Payments Workflow ............................................................................................. 131 Using the Payroll Calendar ............................................................................................................................. 132
Transaction Status and Location ........................................................................................................ 133 Pending Transactions - Initiator View ............................................................................................................ 134 More on the Pending Transaction Page .......................................................................................................... 135
Locate Transactions on the Pending Transactions Page ............................................................................. 136 Locating Transactions in Workflow - Approver View ................................................................................... 140 View Additional Compensation Approval History ......................................................................................... 141
Course References.............................................................................................................................. 142 Knowledge Assessment ..................................................................................................................... 143
Glossary ......................................................................................................................... 144
Training Guide Additional Compensation Payments
Page 1
Additional Compensation Payments
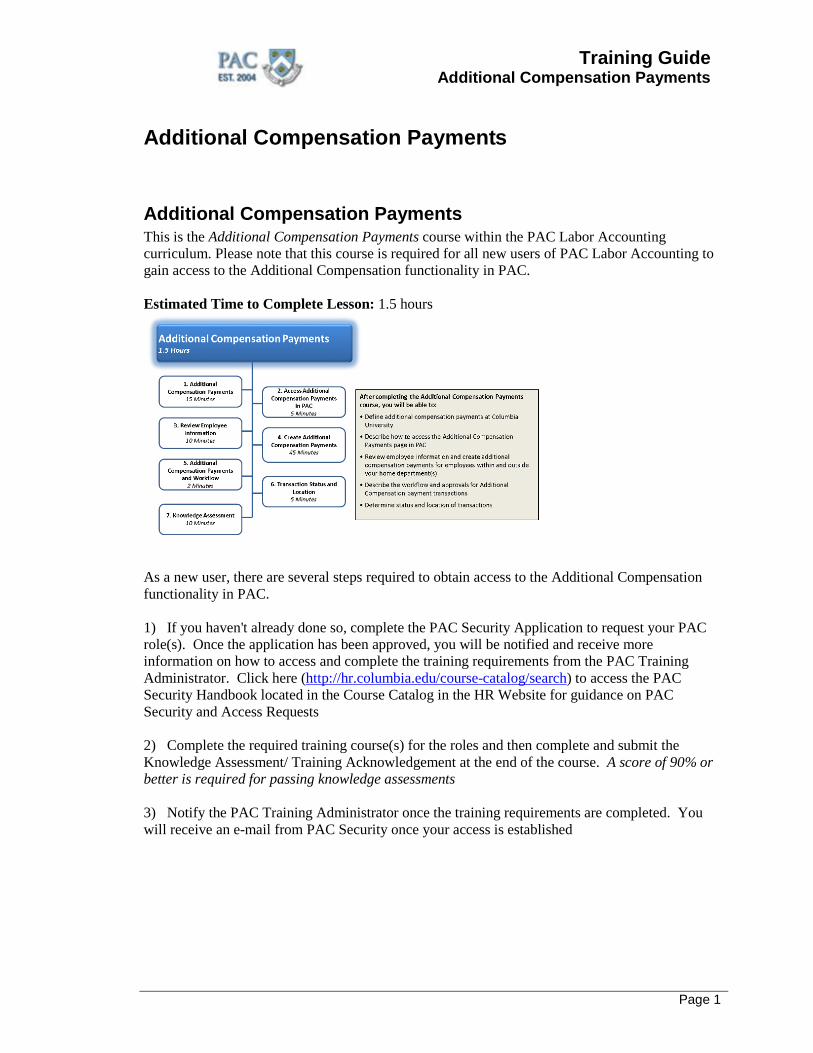
Additional Compensation Payments This is the Additional Compensation Payments course within the PAC Labor Accounting curriculum. Please note that this course is required for all new users of PAC Labor Accounting to gain access to the Additional Compensation functionality in PAC. Estimated Time to Complete Lesson: 1.5 hours
As a new user, there are several steps required to obtain access to the Additional Compensation functionality in PAC. 1) If you haven't already done so, complete the PAC Security Application to request your PAC role(s). Once the application has been approved, you will be notified and receive more information on how to access and complete the training requirements from the PAC Training Administrator. Click here (http://hr.columbia.edu/course-catalog/search) to access the PAC Security Handbook located in the Course Catalog in the HR Website for guidance on PAC Security and Access Requests 2) Complete the required training course(s) for the roles and then complete and submit the Knowledge Assessment/ Training Acknowledgement at the end of the course. A score of 90% or better is required for passing knowledge assessments 3) Notify the PAC Training Administrator once the training requirements are completed. You will receive an e-mail from PAC Security once your access is established
Training Guide Additional Compensation Payments
Page 2
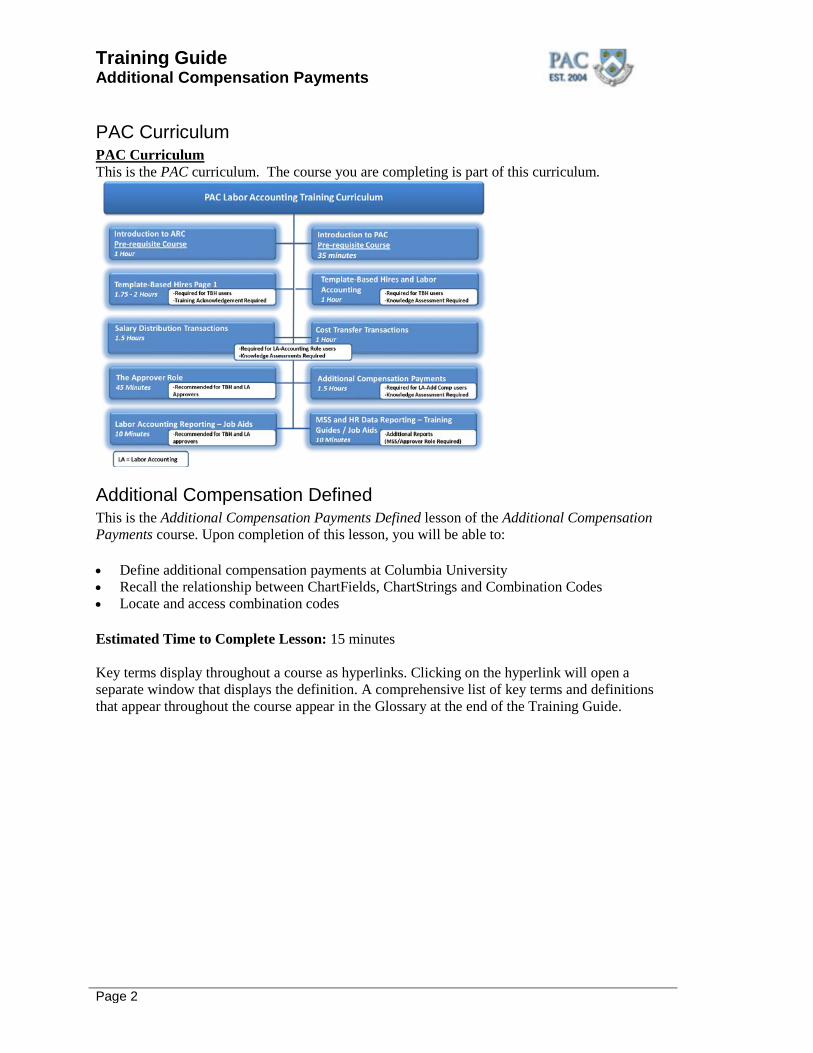
PAC Curriculum PAC Curriculum This is the PAC curriculum. The course you are completing is part of this curriculum.
Additional Compensation Defined This is the Additional Compensation Payments Defined lesson of the Additional Compensation Payments course. Upon completion of this lesson, you will be able to:
• Define additional compensation payments at Columbia University • Recall the relationship between ChartFields, ChartStrings and Combination Codes • Locate and access combination codes
Estimated Time to Complete Lesson: 15 minutes Key terms display throughout a course as hyperlinks. Clicking on the hyperlink will open a separate window that displays the definition. A comprehensive list of key terms and definitions that appear throughout the course appear in the Glossary at the end of the Training Guide.
Training Guide Additional Compensation Payments
Page 3
Additional Compensation Payments at Columbia University What are Additional Compensation Payments? Additional Compensation Payments are one-time or ongoing payments that are made in addition to regular earnings for active salaried officers. This includes officers of instruction, research, libraries and administration, plus student officers. Also known as add comp or additional pay. Add comps can be entered at the time of new hire/rehire processing, or later on the PAC Additional Compensation page. When you enter an add comp into PAC, you also specify which ChartString(s) should be charged. Why are Additional Compensation Payments made? Add comps are made for many reasons, including extra pay for additional duties performed, special one-time payments and ongoing clinical payments of varying types. With what Frequency are Additional Compensation Payments paid? An add comp can be paid all in one pay period or be spread out over multiple pay periods. Can Additional Compensation Payments be made to employees outside of the home department(s)? Yes. There are differences when creating add comp payments for employees outside of the home department(s). See the lesson on Creating Additional Compensation payments for more information. How are Additional Payments made to Hourly Officers? Payments for additional time worked are handled in the Time Collection Module in FFE. If additional compensation is to be paid, submit the paper Labor Accounting Form (PAC) - Salary Distribution and Additional Compensation to the HRPC. What are Non-Officer Additional Payments and how are they paid? All additional payments for Union and Non Union Support Staff and Casuals, for example OT or shift differential, are handled in the Time Collection Module in FFE.
Training Guide Additional Compensation Payments
Page 4
Earnings Codes Defined Earnings Codes This code specifies the type of payments with related tax withholding, benefits information and fringe rate. Earnings codes are entered when creating add comp payments or cost transfer transactions. Every add comp transaction has an Earnings Code. An earnings code identifies the type of add comp the employee is to receive. This code distinguishes the transaction from other add comp payments by:
• linking the payment to an accounting distribution record • coding retirement benefits eligibility and fringe rate • coding tax withholding procedure (whether flat tax or annualized tax rates are used)
Earning codes can be campus, department or employee-type specific (i.e. for summer session instructional payments only). Exercise caution when choosing earnings codes. The earnings codes available for employees may be campus or position specific.
Clinical Earnings Codes Clinical Earnings Codes/Clinical Faculty Codes There are a few earnings codes specific to the CUMC campus that are used to pay clinical add comps (both one-time and annual) related to private practice activities. In general, you will use the annual clinical earn codes 005 Tier 1 private practice with benefits and 004 Tier 2 private practice no benefits. These earn codes will automatically require the use of certain combo codes that are associated with clinical attributes in the financial system. One-time add comp practice payments - Special CUMC only earnings codes have been created for add comp payments being paid under Tier 3 private practice situations.
Benefits Eligible Earnings Codes Benefits Eligible Earnings Codes In order for an add comp to be eligible for benefits, an employee must:
• be working continuously on a project plus performing additional responsibilities for at least 8 months or more and the total payment must be $1,000 or more
Using this criteria, bonuses for exceptional performance are NOT benefits eligible. However, certain add comps such as summer session instructional payments are benefits eligible even though the work is performed for less than 8 months.
Training Guide Additional Compensation Payments
Page 5
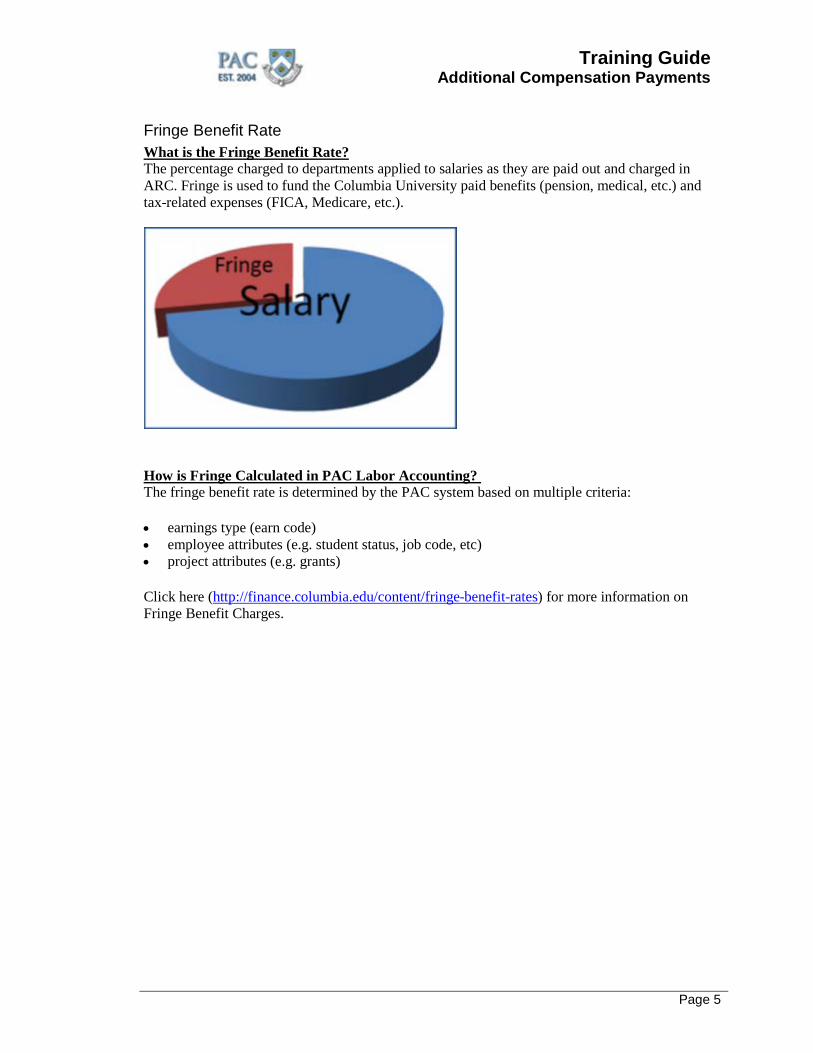
Fringe Benefit Rate What is the Fringe Benefit Rate? The percentage charged to departments applied to salaries as they are paid out and charged in ARC. Fringe is used to fund the Columbia University paid benefits (pension, medical, etc.) and tax-related expenses (FICA, Medicare, etc.).
How is Fringe Calculated in PAC Labor Accounting? The fringe benefit rate is determined by the PAC system based on multiple criteria:
• earnings type (earn code) • employee attributes (e.g. student status, job code, etc) • project attributes (e.g. grants)
Click here (http://finance.columbia.edu/content/fringe-benefit-rates) for more information on Fringe Benefit Charges.
Training Guide Additional Compensation Payments
Page 6
ChartFields ChartStrings and Combination Codes ChartFields ChartStrings and Combination Codes ChartFields, ChartStrings and Combination Codes are used to indicate the allocation of charges. The following topics describe these terms and how they are used in PAC.
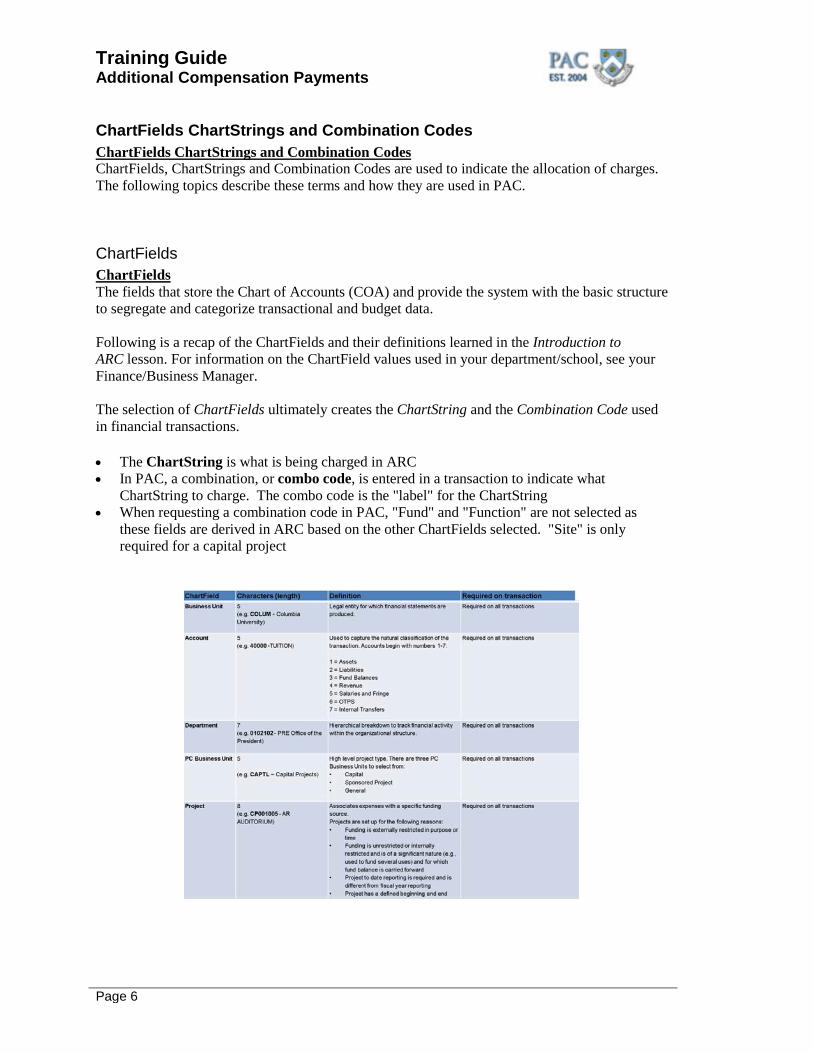
ChartFields ChartFields The fields that store the Chart of Accounts (COA) and provide the system with the basic structure to segregate and categorize transactional and budget data. Following is a recap of the ChartFields and their definitions learned in the Introduction to ARC lesson. For information on the ChartField values used in your department/school, see your Finance/Business Manager. The selection of ChartFields ultimately creates the ChartString and the Combination Code used in financial transactions.
• The ChartString is what is being charged in ARC • In PAC, a combination, or combo code, is entered in a transaction to indicate what
ChartString to charge. The combo code is the "label" for the ChartString • When requesting a combination code in PAC, "Fund" and "Function" are not selected as
these fields are derived in ARC based on the other ChartFields selected. "Site" is only required for a capital project
Training Guide Additional Compensation Payments
Page 7
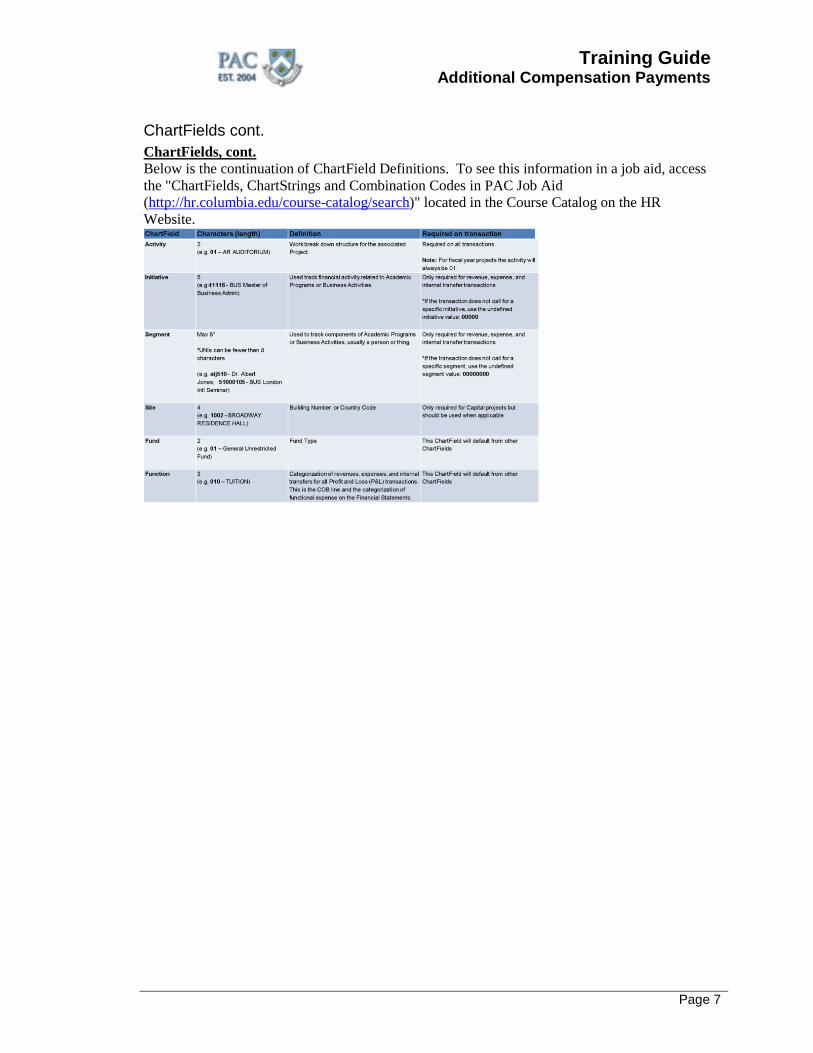
ChartFields cont. ChartFields, cont. Below is the continuation of ChartField Definitions. To see this information in a job aid, access the "ChartFields, ChartStrings and Combination Codes in PAC Job Aid (http://hr.columbia.edu/course-catalog/search)" located in the Course Catalog on the HR Website.
Training Guide Additional Compensation Payments
Page 8
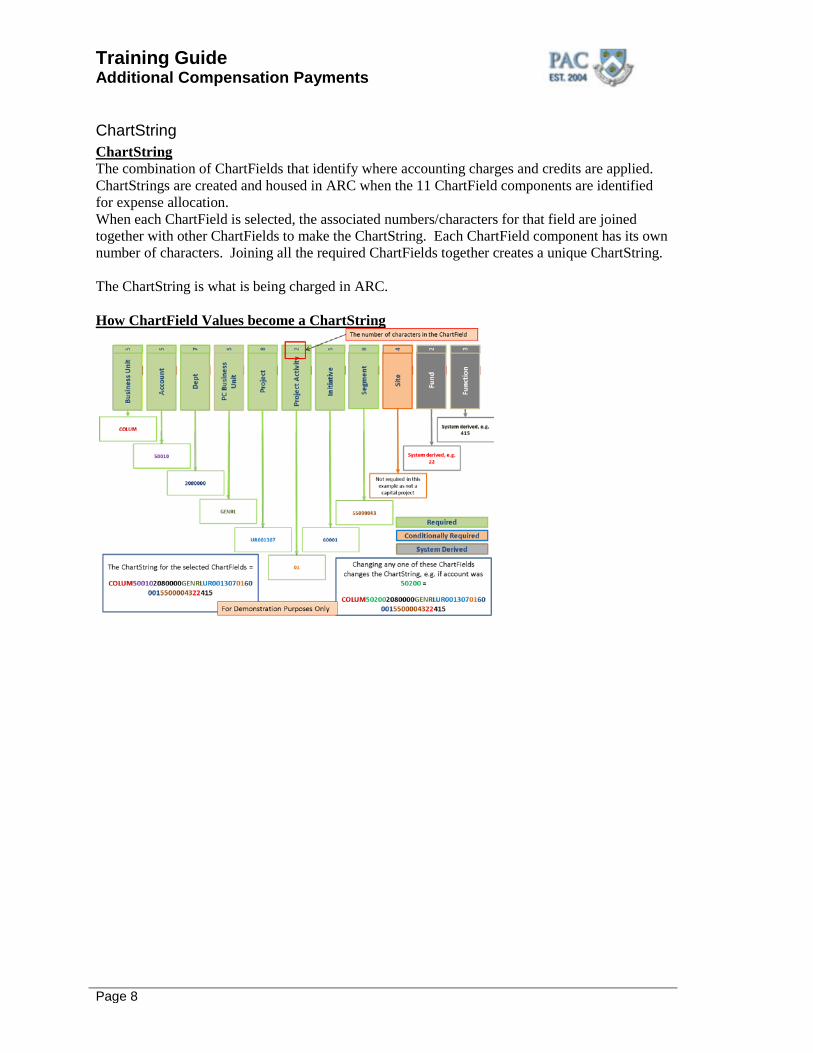
ChartString ChartString The combination of ChartFields that identify where accounting charges and credits are applied. ChartStrings are created and housed in ARC when the 11 ChartField components are identified for expense allocation. When each ChartField is selected, the associated numbers/characters for that field are joined together with other ChartFields to make the ChartString. Each ChartField component has its own number of characters. Joining all the required ChartFields together creates a unique ChartString. The ChartString is what is being charged in ARC. How ChartField Values become a ChartString
Training Guide Additional Compensation Payments
Page 9
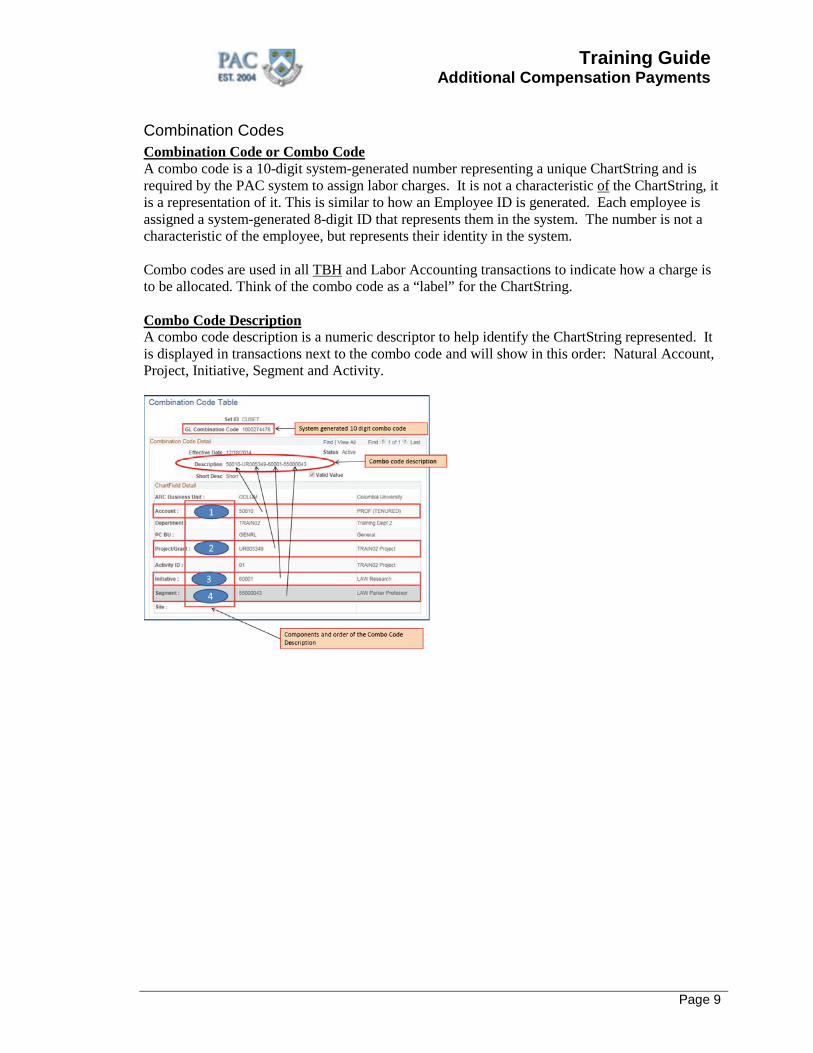
Combination Codes Combination Code or Combo Code A combo code is a 10-digit system-generated number representing a unique ChartString and is required by the PAC system to assign labor charges. It is not a characteristic of the ChartString, it is a representation of it. This is similar to how an Employee ID is generated. Each employee is assigned a system-generated 8-digit ID that represents them in the system. The number is not a characteristic of the employee, but represents their identity in the system. Combo codes are used in all TBH and Labor Accounting transactions to indicate how a charge is to be allocated. Think of the combo code as a “label” for the ChartString. Combo Code Description A combo code description is a numeric descriptor to help identify the ChartString represented. It is displayed in transactions next to the combo code and will show in this order: Natural Account, Project, Initiative, Segment and Activity.
Training Guide Additional Compensation Payments
Page 10
Putting it Together - ChartFields ChartStrings and Combo Codes Putting it All Together - ChartFields, ChartStrings, and Combination (Combo) Codes ChartFields are the fields that store the Chart of Accounts (COA) and provide the system with the basic structure to segregate and categorize financial activity. ChartStrings are the unique combinations of ChartFields to which accounting charges and credits are applied. The ChartString is what is charged in ARC. ChartStrings can be as long as 54 characters. Combination, or Combo, Code is the 10-digit system-generated number representing a unique ChartString. It is not a characteristic of the ChartString, it is a representation of it. Combo codes are used in PAC to assign labor charges. Think of the combo code as a “label” for the ChartString. Combo codes are used in all TBH and Labor Accounting transactions to indicate how a charge is to be allocated. Using the ChartString example we saw earlier, a combo code generated by PAC could be “1000030781.” This 10-digit number is not a characteristic of the ChartString (COLUM500102080000GENRLUR00130701600015500004322415), but represents it in PAC. Meaning that, whenever the combo code 1000030781 is used in a PAC transaction, the ChartString it represents, COLUM500102080000GENRLUR00130701600015500004322415, will be charged. Access the ChartFields, ChartStrings, and Combination (Combo) Codes Job Aid (http://hr.columbia.edu/course-catalog/search) for reference located in the Course Catalog on the HR Website.
Training Guide Additional Compensation Payments
Page 11
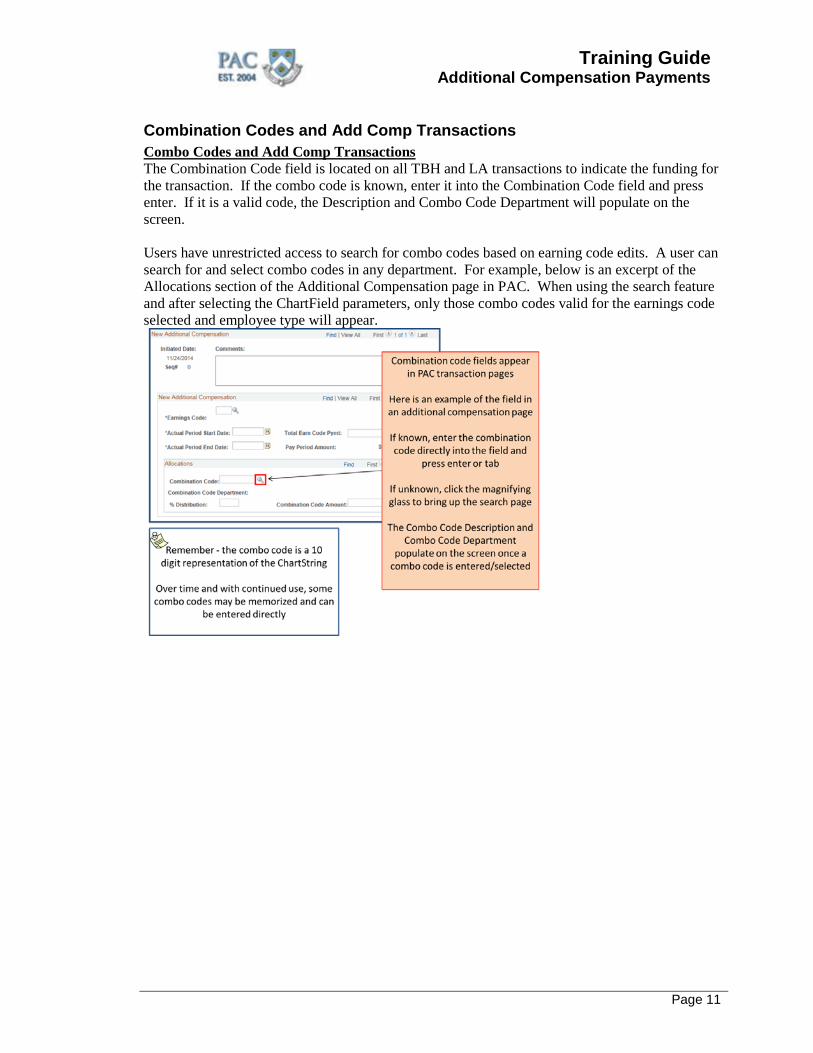
Combination Codes and Add Comp Transactions Combo Codes and Add Comp Transactions The Combination Code field is located on all TBH and LA transactions to indicate the funding for the transaction. If the combo code is known, enter it into the Combination Code field and press enter. If it is a valid code, the Description and Combo Code Department will populate on the screen. Users have unrestricted access to search for combo codes based on earning code edits. A user can search for and select combo codes in any department. For example, below is an excerpt of the Allocations section of the Additional Compensation page in PAC. When using the search feature and after selecting the ChartField parameters, only those combo codes valid for the earnings code selected and employee type will appear.
Training Guide Additional Compensation Payments
Page 12
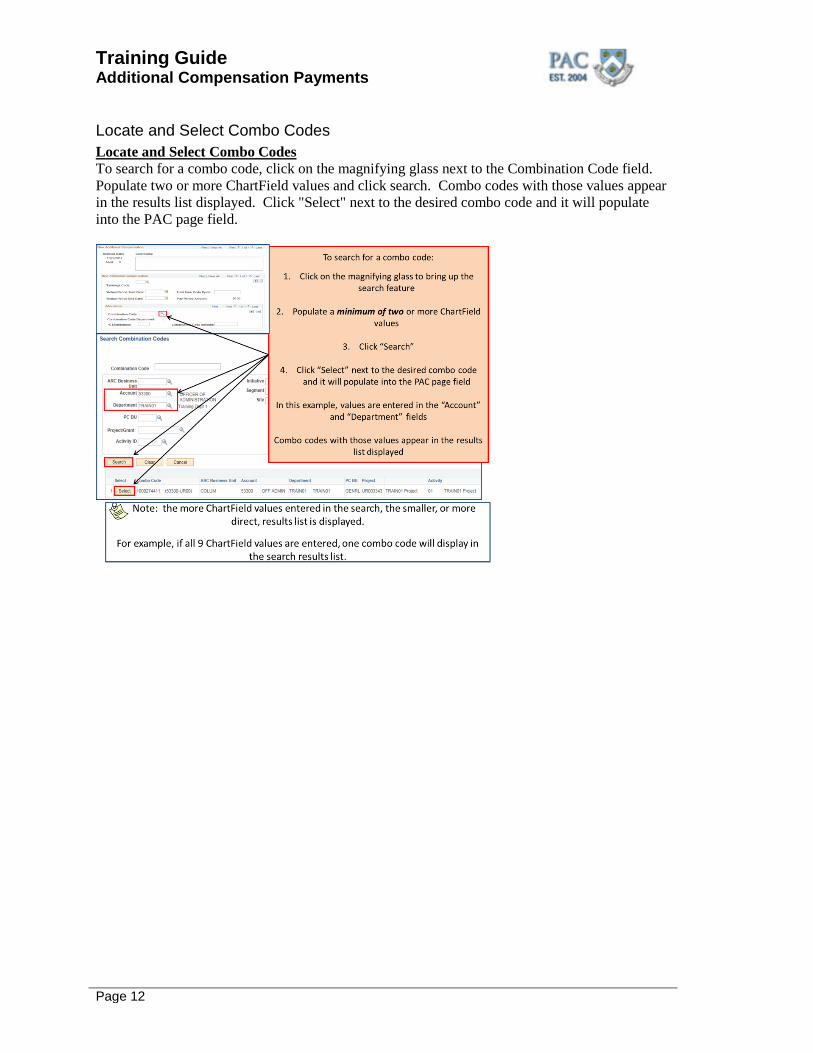
Locate and Select Combo Codes Locate and Select Combo Codes To search for a combo code, click on the magnifying glass next to the Combination Code field. Populate two or more ChartField values and click search. Combo codes with those values appear in the results list displayed. Click "Select" next to the desired combo code and it will populate into the PAC page field.
Training Guide Additional Compensation Payments
Page 13
Search for a Combo Code Let's practice selecting a combo code by entering criteria into the search feature.
Procedure This is the Search for a Combo Code topic where you will learn how to search for a combination code within a transaction.
Step Action
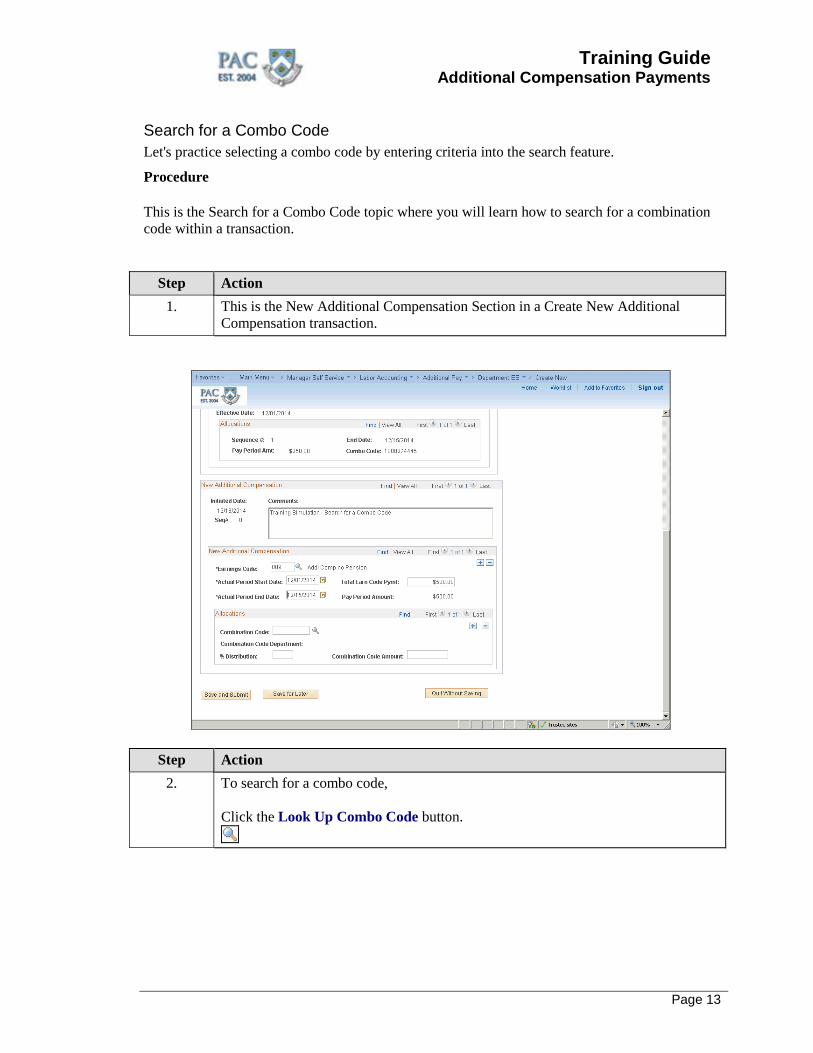
1. This is the New Additional Compensation Section in a Create New Additional Compensation transaction.
Step Action 2. To search for a combo code,
Click the Look Up Combo Code button.
Training Guide Additional Compensation Payments
Page 14
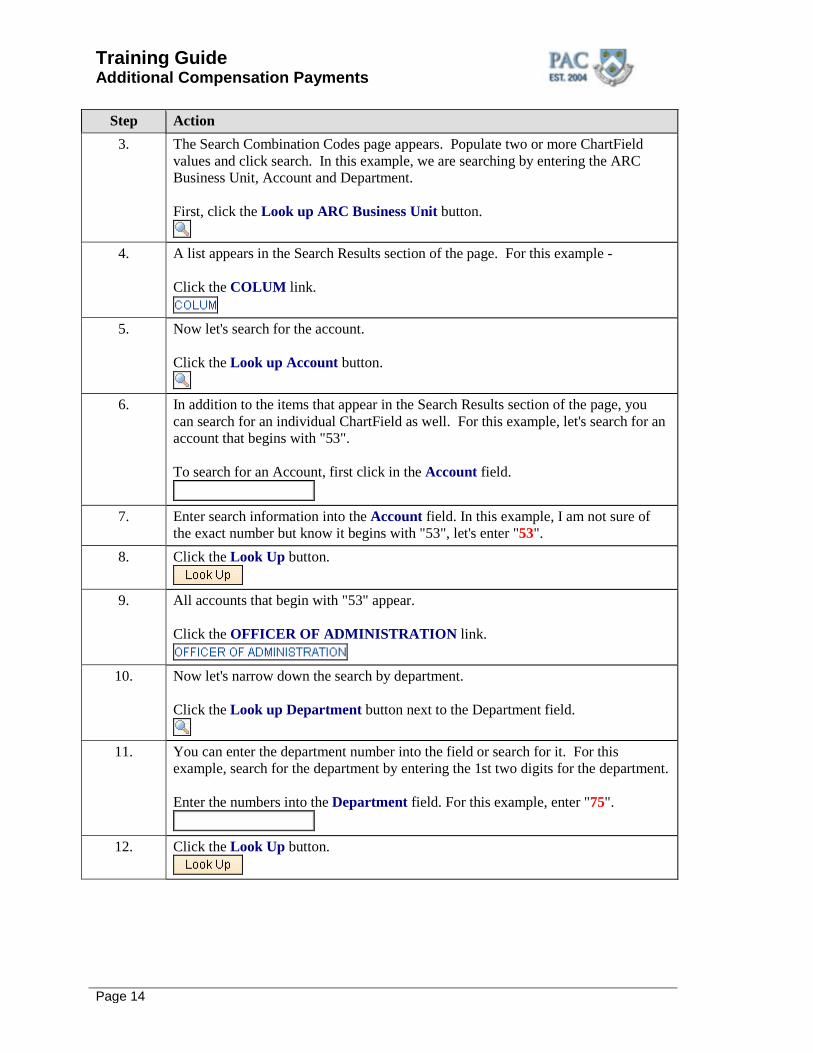
Step Action 3. The Search Combination Codes page appears. Populate two or more ChartField
values and click search. In this example, we are searching by entering the ARC Business Unit, Account and Department. First, click the Look up ARC Business Unit button.
4. A list appears in the Search Results section of the page. For this example -
Click the COLUM link.
5. Now let's search for the account.
Click the Look up Account button.
6. In addition to the items that appear in the Search Results section of the page, you
can search for an individual ChartField as well. For this example, let's search for an account that begins with "53". To search for an Account, first click in the Account field.
7. Enter search information into the Account field. In this example, I am not sure of
the exact number but know it begins with "53", let's enter "53". 8. Click the Look Up button.
9. All accounts that begin with "53" appear.
Click the OFFICER OF ADMINISTRATION link.
10. Now let's narrow down the search by department.
Click the Look up Department button next to the Department field.
11. You can enter the department number into the field or search for it. For this
example, search for the department by entering the 1st two digits for the department. Enter the numbers into the Department field. For this example, enter "75".
12. Click the Look Up button.
Training Guide Additional Compensation Payments
Page 15
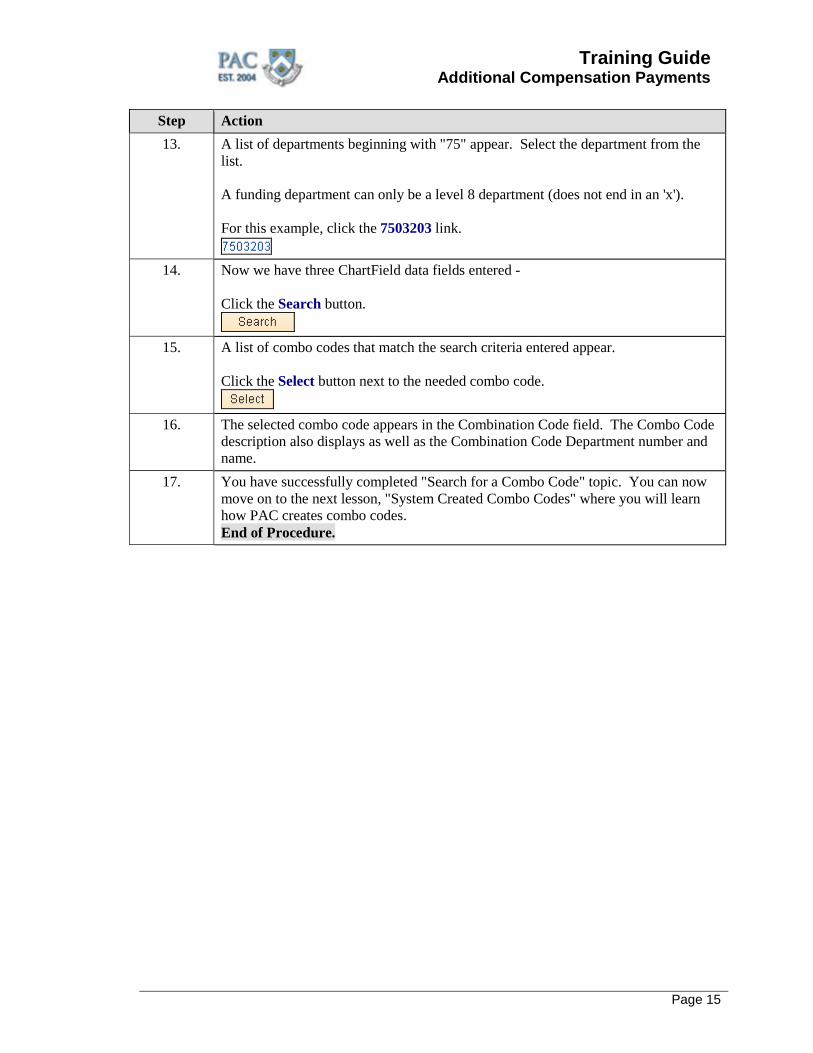
Step Action 13. A list of departments beginning with "75" appear. Select the department from the
list. A funding department can only be a level 8 department (does not end in an 'x'). For this example, click the 7503203 link.
14. Now we have three ChartField data fields entered -
Click the Search button.
15. A list of combo codes that match the search criteria entered appear.
Click the Select button next to the needed combo code.
16. The selected combo code appears in the Combination Code field. The Combo Code
description also displays as well as the Combination Code Department number and name.
17. You have successfully completed "Search for a Combo Code" topic. You can now move on to the next lesson, "System Created Combo Codes" where you will learn how PAC creates combo codes. End of Procedure.
Training Guide Additional Compensation Payments
Page 16
Create Combo Codes Create Combo Codes Combo codes are added to PAC in two ways.
1. New ChartStrings created in the Budget Tool will generate a combo code in PAC for that ChartString with various natural account values
2. Specific users who have the "Create Combo Code" role in PAC can create combo codes in real time
Let's explore this process for creating combo codes.
Training Guide Additional Compensation Payments
Page 17
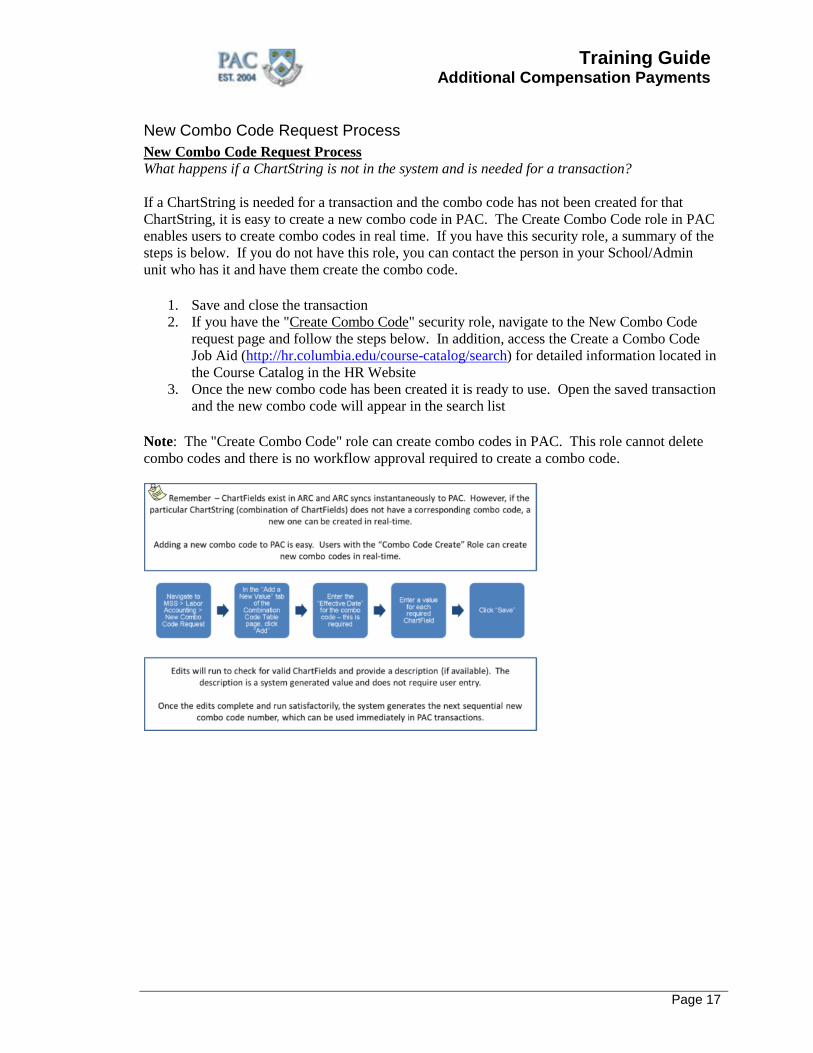
New Combo Code Request Process New Combo Code Request Process What happens if a ChartString is not in the system and is needed for a transaction? If a ChartString is needed for a transaction and the combo code has not been created for that ChartString, it is easy to create a new combo code in PAC. The Create Combo Code role in PAC enables users to create combo codes in real time. If you have this security role, a summary of the steps is below. If you do not have this role, you can contact the person in your School/Admin unit who has it and have them create the combo code.
1. Save and close the transaction 2. If you have the "Create Combo Code" security role, navigate to the New Combo Code
request page and follow the steps below. In addition, access the Create a Combo Code Job Aid (http://hr.columbia.edu/course-catalog/search) for detailed information located in the Course Catalog in the HR Website
3. Once the new combo code has been created it is ready to use. Open the saved transaction and the new combo code will appear in the search list
Note: The "Create Combo Code" role can create combo codes in PAC. This role cannot delete combo codes and there is no workflow approval required to create a combo code.
Training Guide Additional Compensation Payments
Page 18
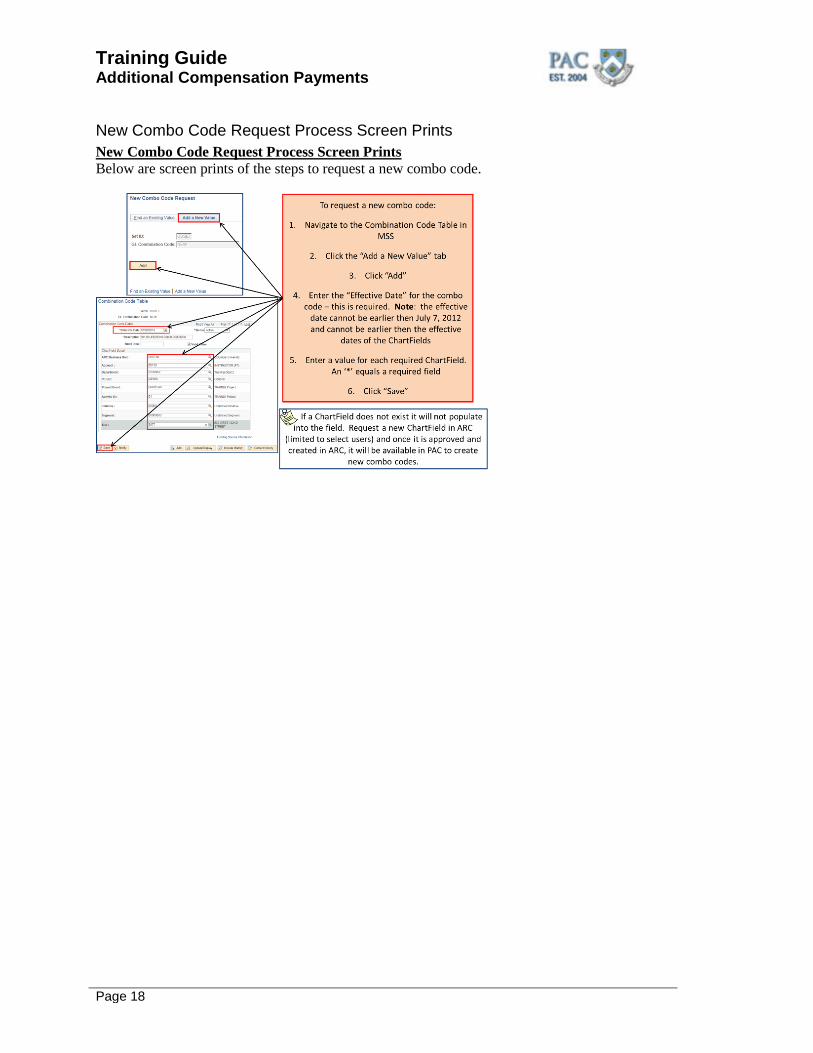
New Combo Code Request Process Screen Prints New Combo Code Request Process Screen Prints Below are screen prints of the steps to request a new combo code.

Training Guide Additional Compensation Payments
Page 19
New Combo Code Request ChartField Selection Rules New Combo Code Request ChartField Definitions and Guidelines ChartFields are created in ARC and ARC syncs instantaneously to PAC. Edits will run to check to ensure that the Combo Code is valid (that is, all selected ChartFields are active). When selecting ChartFields, follow the guidelines below.
Training Guide Additional Compensation Payments
Page 20
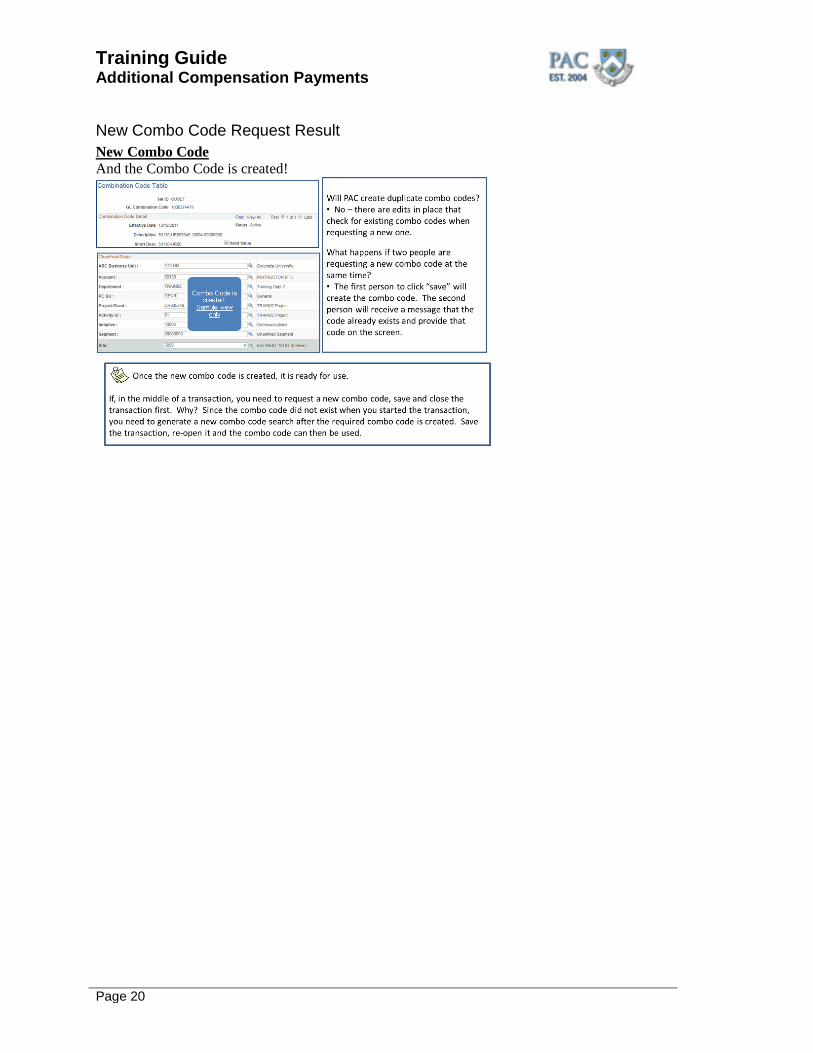
New Combo Code Request Result New Combo Code And the Combo Code is created!
Training Guide Additional Compensation Payments
Page 21
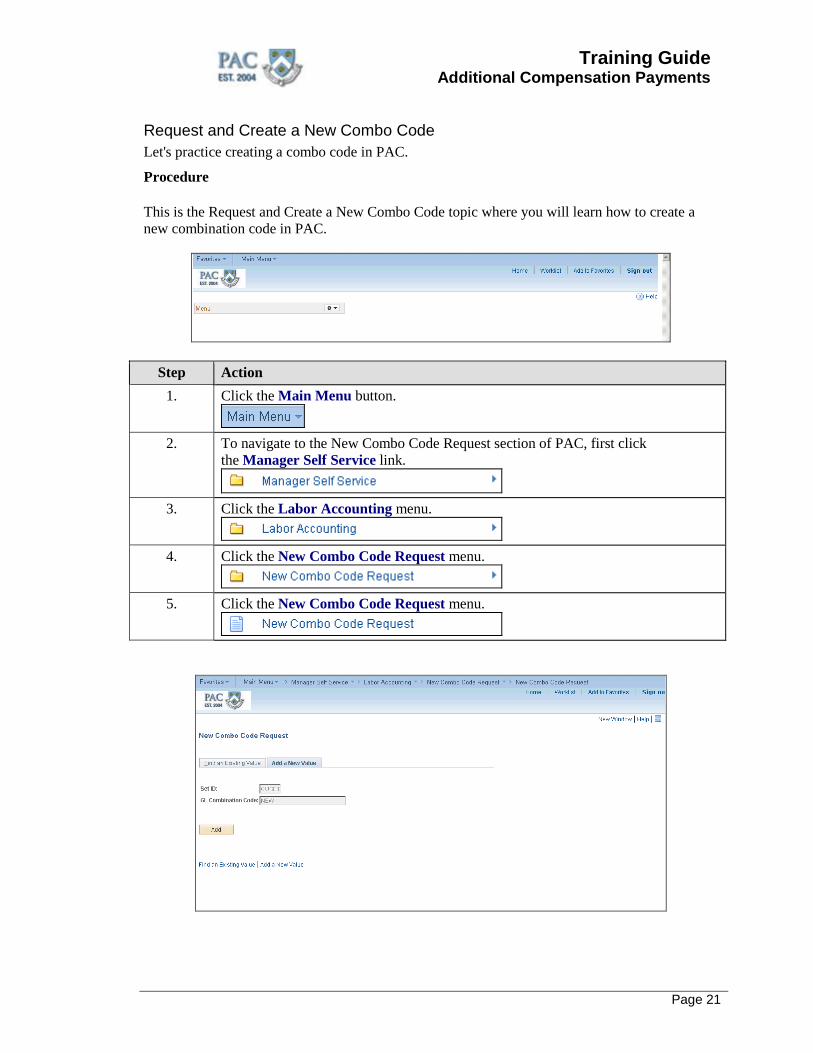
Request and Create a New Combo Code Let's practice creating a combo code in PAC.
Procedure This is the Request and Create a New Combo Code topic where you will learn how to create a new combination code in PAC.
Step Action 1. Click the Main Menu button.
2. To navigate to the New Combo Code Request section of PAC, first click
the Manager Self Service link.
3. Click the Labor Accounting menu.
4. Click the New Combo Code Request menu.
5. Click the New Combo Code Request menu.

Training Guide Additional Compensation Payments
Page 22
Step Action 6. There are two tabs on the New Combo Code Request page, one to "Add a New
Value" and one to "Find an Existing Value". Creating combo codes are completed in the "Add a New Value" tab. From here, click the Add button.
7. Enter the effective date for the new combo code. Enter the date into the Effective
Date field. For this example, enter "12/18/2014".
8. Enter the ChartField values to create the combo code.
First, click the Look up Chartfield Value button next to the ARC Business Unit field.
Step Action 9. Select the Business Unit from the list.
For this example, click the COLUM link.
Training Guide Additional Compensation Payments
Page 23
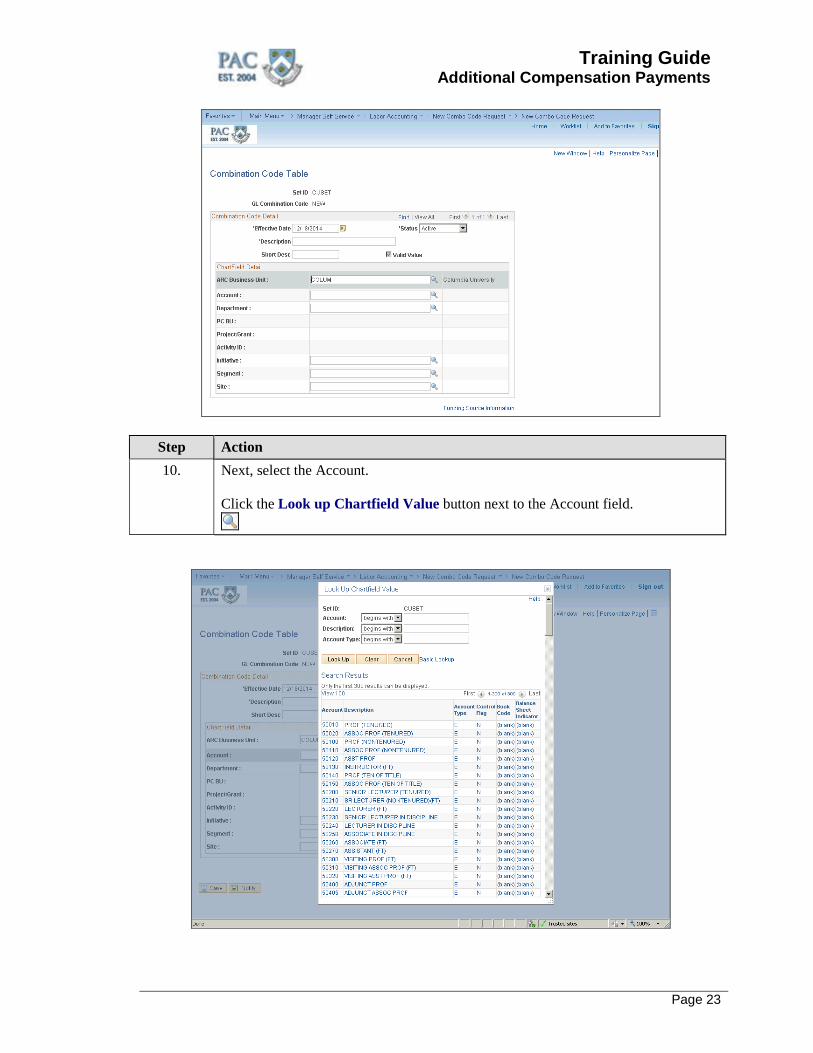
Step Action 10. Next, select the Account.
Click the Look up Chartfield Value button next to the Account field.
Training Guide Additional Compensation Payments
Page 24
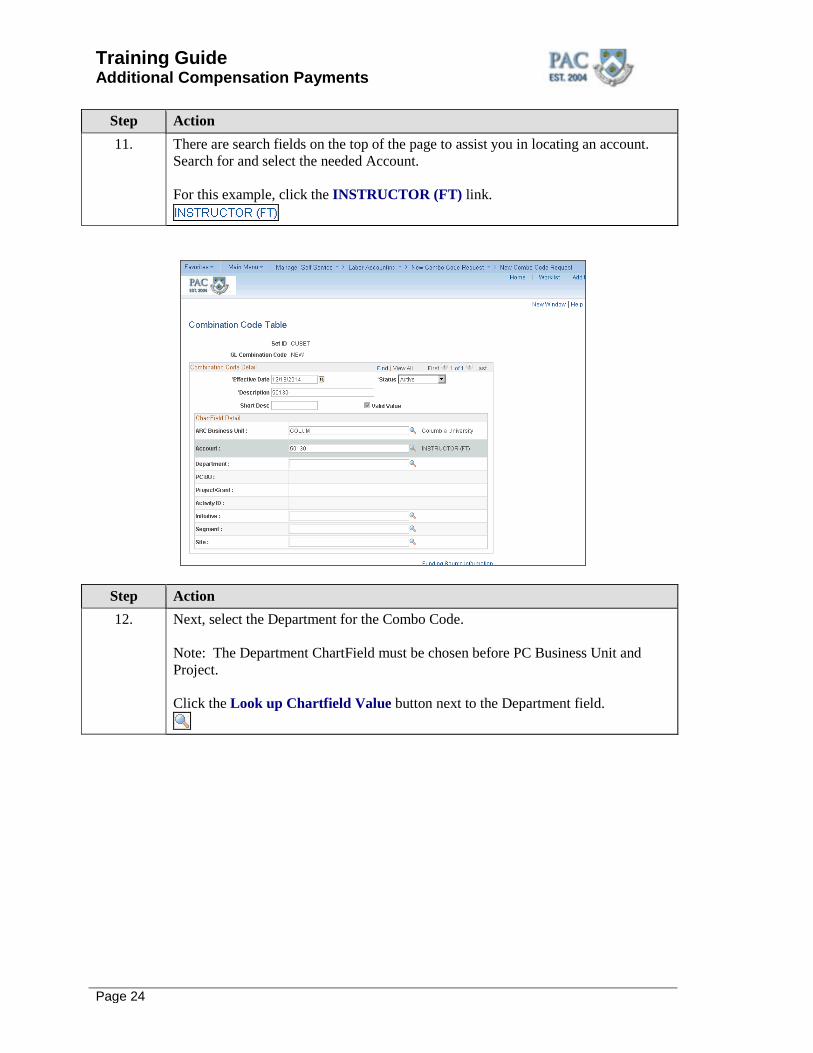
Step Action 11. There are search fields on the top of the page to assist you in locating an account.
Search for and select the needed Account. For this example, click the INSTRUCTOR (FT) link.
Step Action 12. Next, select the Department for the Combo Code.
Note: The Department ChartField must be chosen before PC Business Unit and Project. Click the Look up Chartfield Value button next to the Department field.
Training Guide Additional Compensation Payments
Page 25
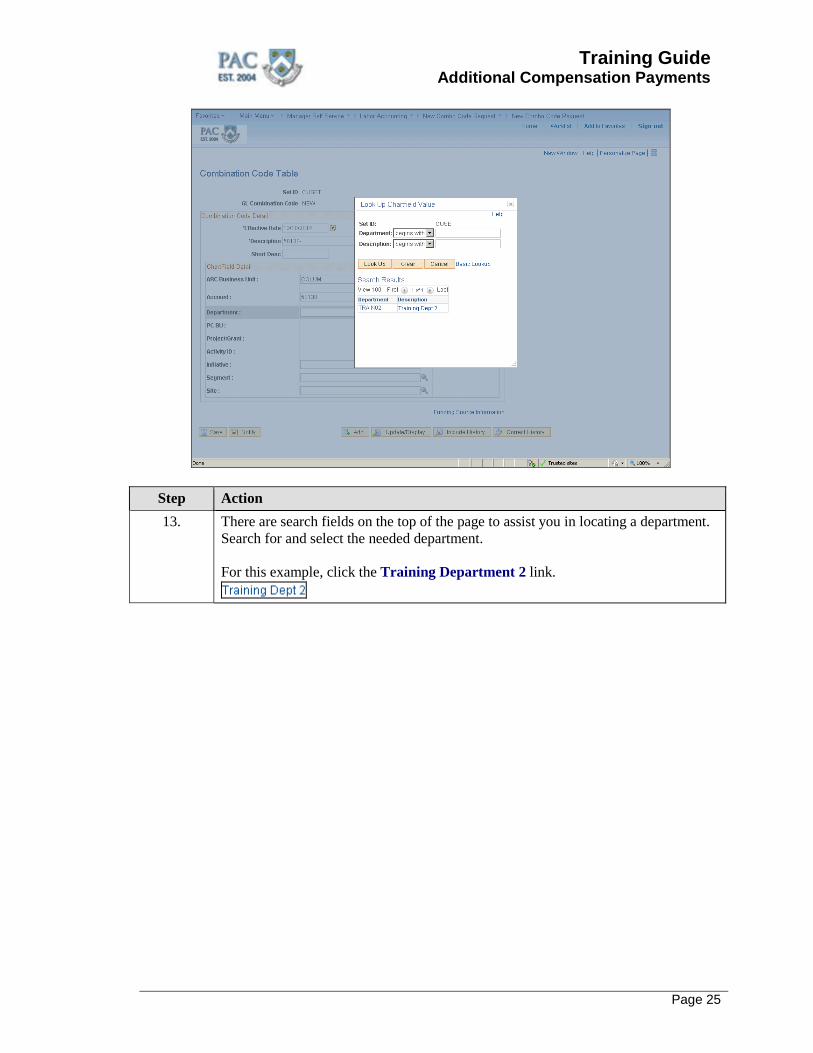
Step Action 13. There are search fields on the top of the page to assist you in locating a department.
Search for and select the needed department. For this example, click the Training Department 2 link.
Training Guide Additional Compensation Payments
Page 26
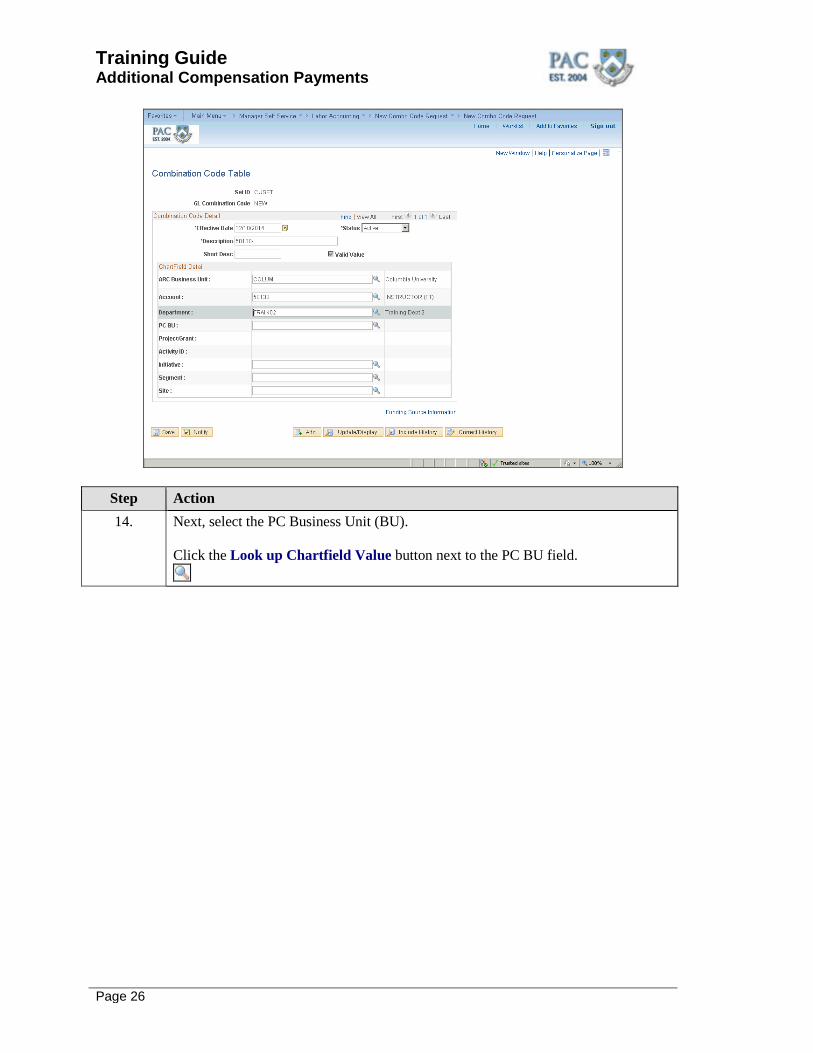
Step Action 14. Next, select the PC Business Unit (BU).
Click the Look up Chartfield Value button next to the PC BU field.
Training Guide Additional Compensation Payments
Page 27
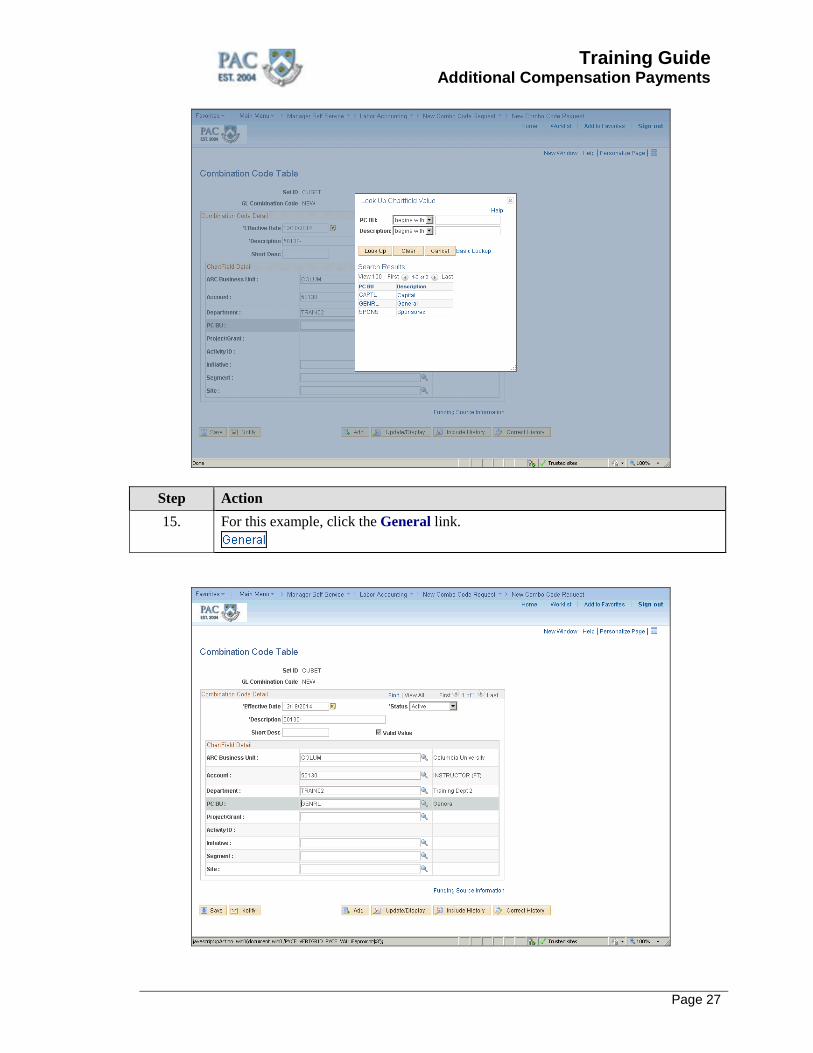
Step Action 15. For this example, click the General link.
Training Guide Additional Compensation Payments
Page 28
Step Action 16. Next, select the Project/Grant.
Click the Look up Chartfield Value button next to the Project/Grant field.
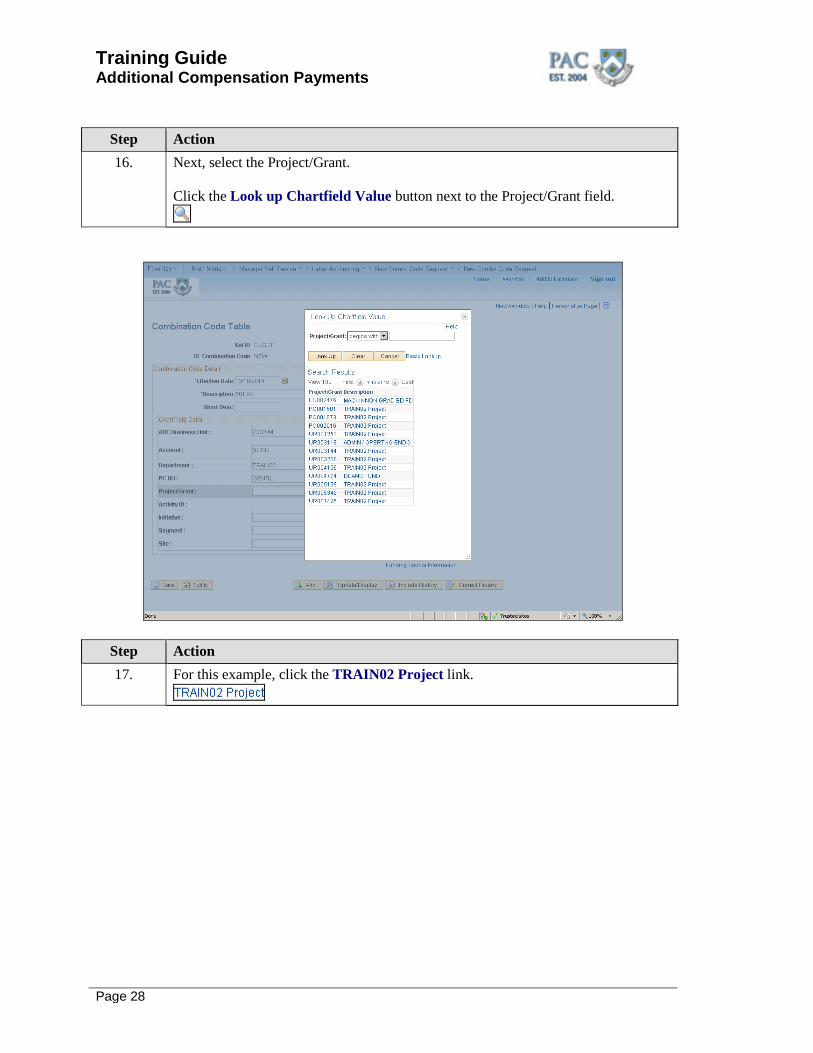
Step Action 17. For this example, click the TRAIN02 Project link.
Training Guide Additional Compensation Payments
Page 29
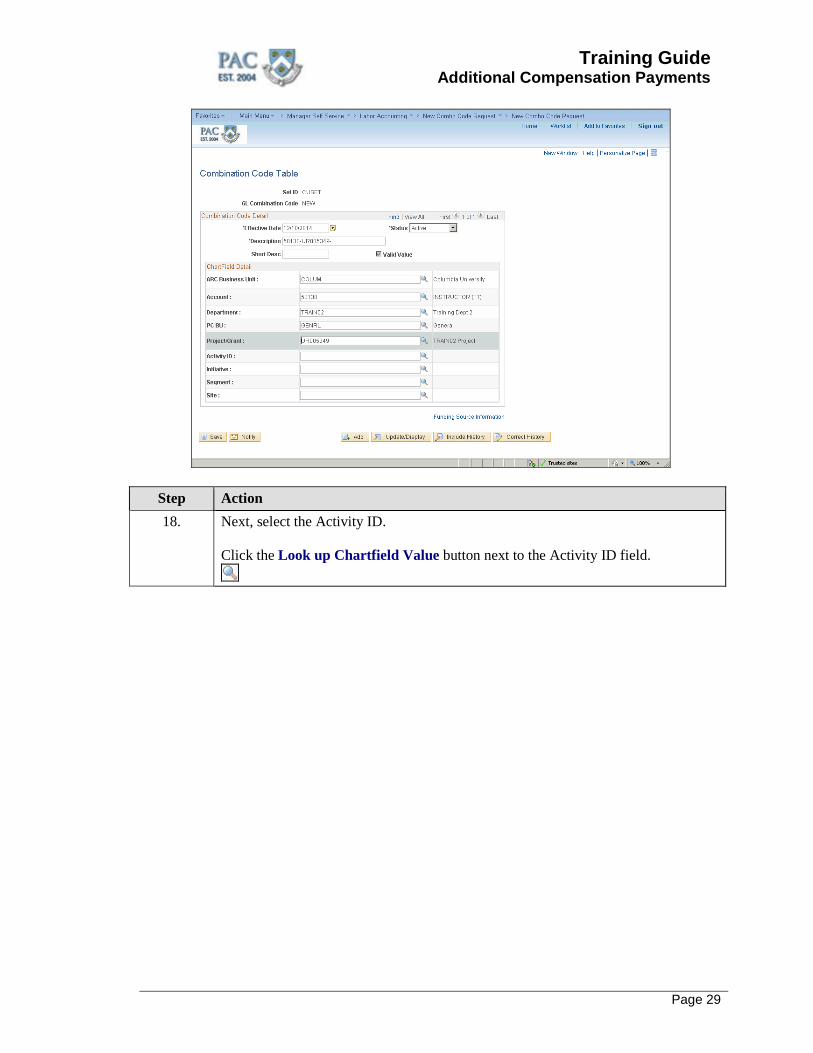
Step Action 18. Next, select the Activity ID.
Click the Look up Chartfield Value button next to the Activity ID field.
Training Guide Additional Compensation Payments
Page 30
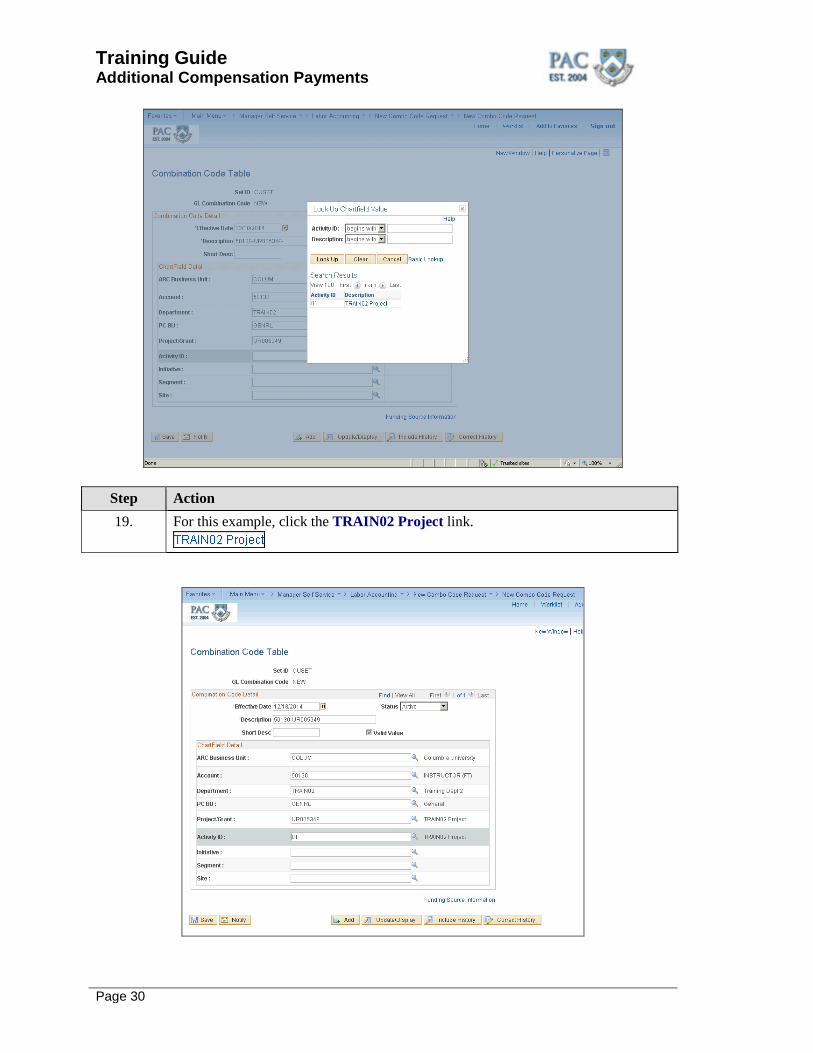
Step Action 19. For this example, click the TRAIN02 Project link.
Training Guide Additional Compensation Payments
Page 31
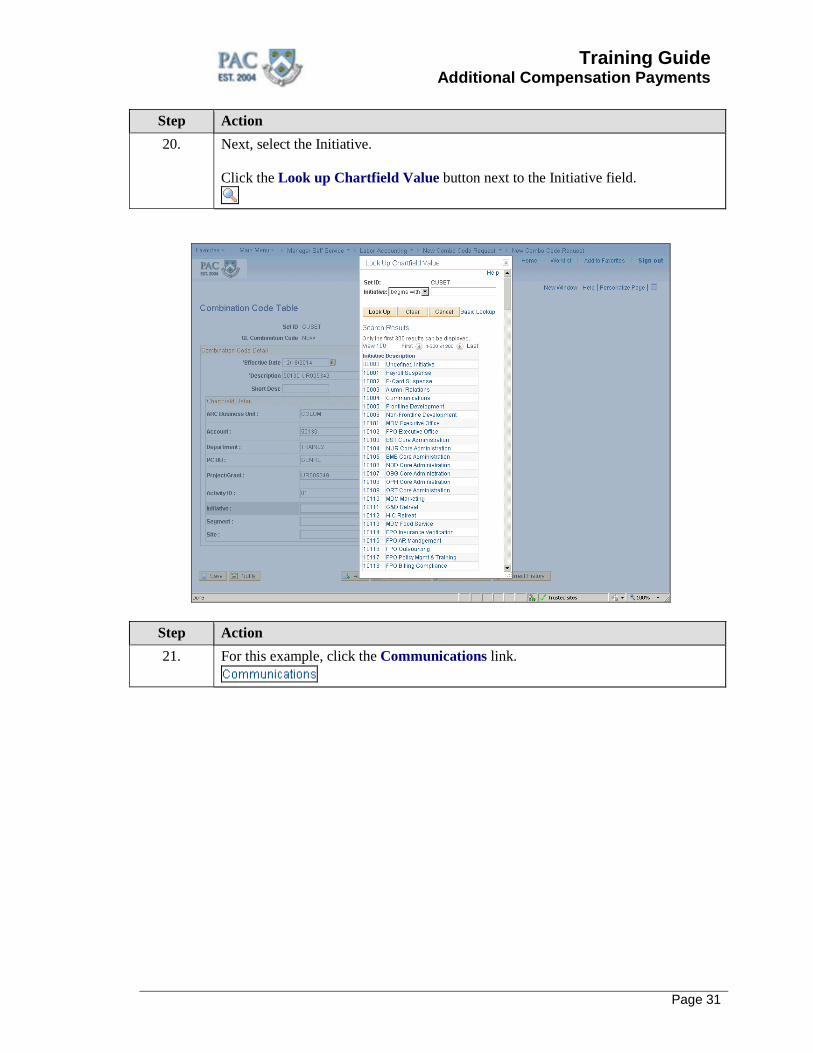
Step Action 20. Next, select the Initiative.
Click the Look up Chartfield Value button next to the Initiative field.
Step Action 21. For this example, click the Communications link.
Training Guide Additional Compensation Payments
Page 32
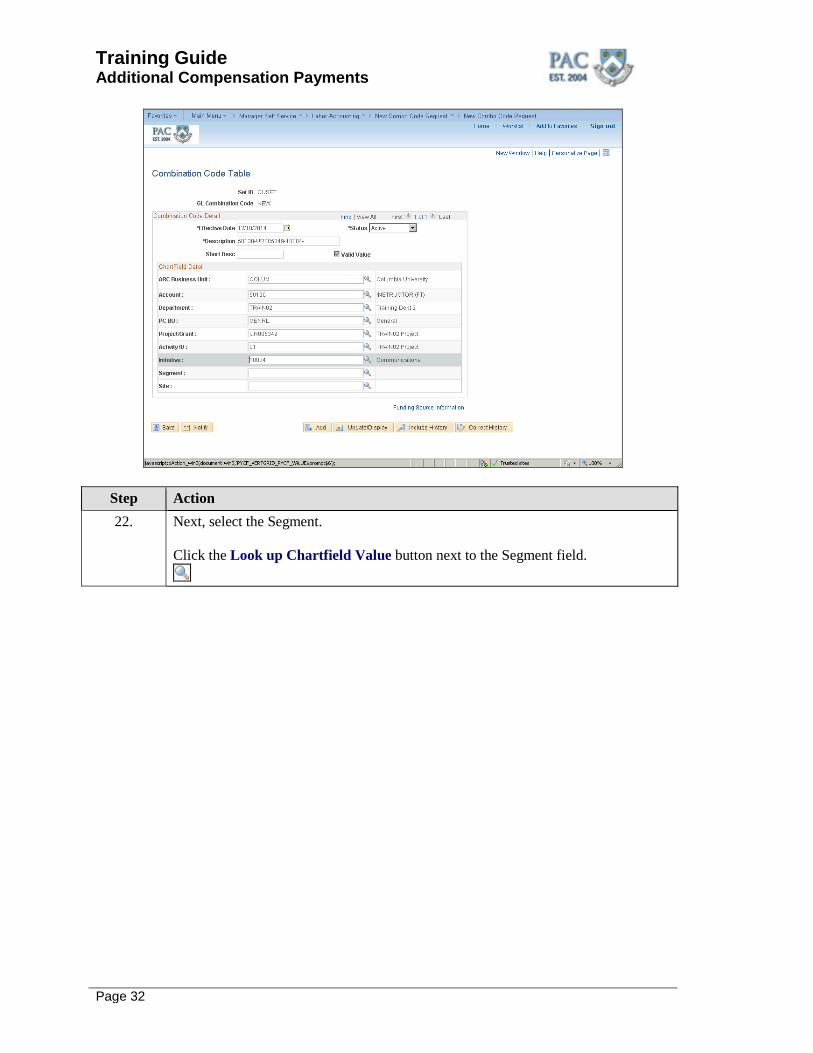
Step Action 22. Next, select the Segment.
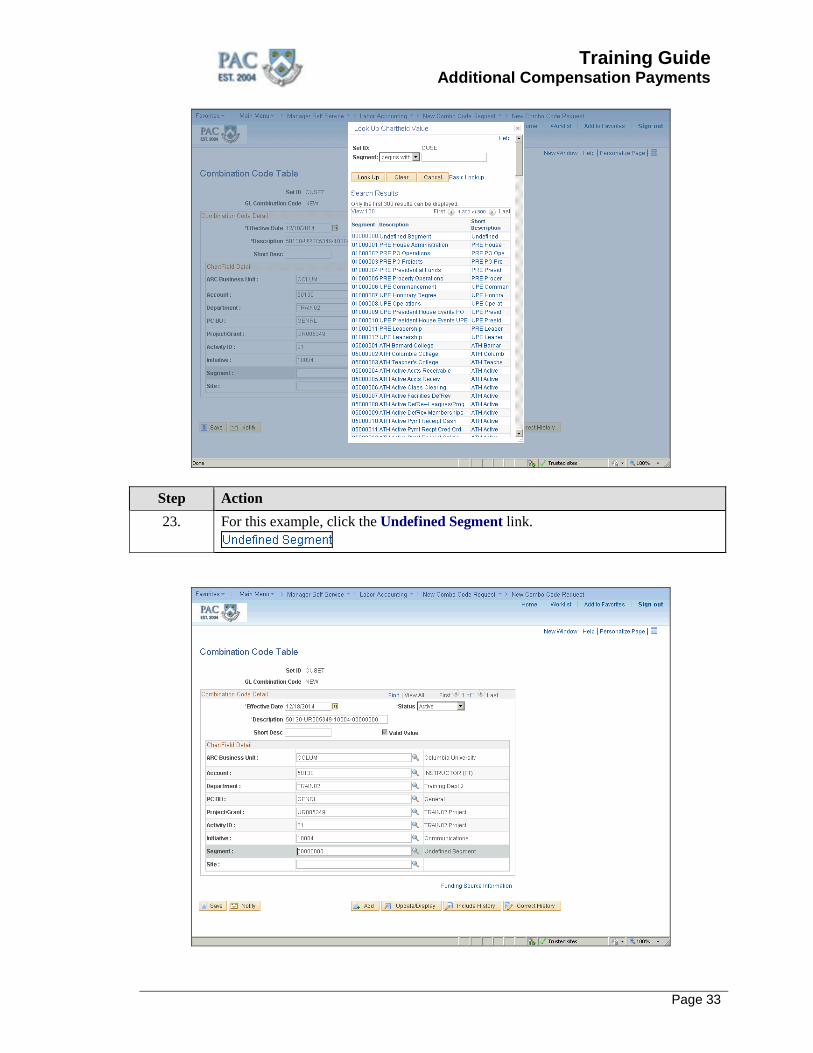
Click the Look up Chartfield Value button next to the Segment field.
Training Guide Additional Compensation Payments
Page 33
Step Action 23. For this example, click the Undefined Segment link.
Training Guide Additional Compensation Payments
Page 34
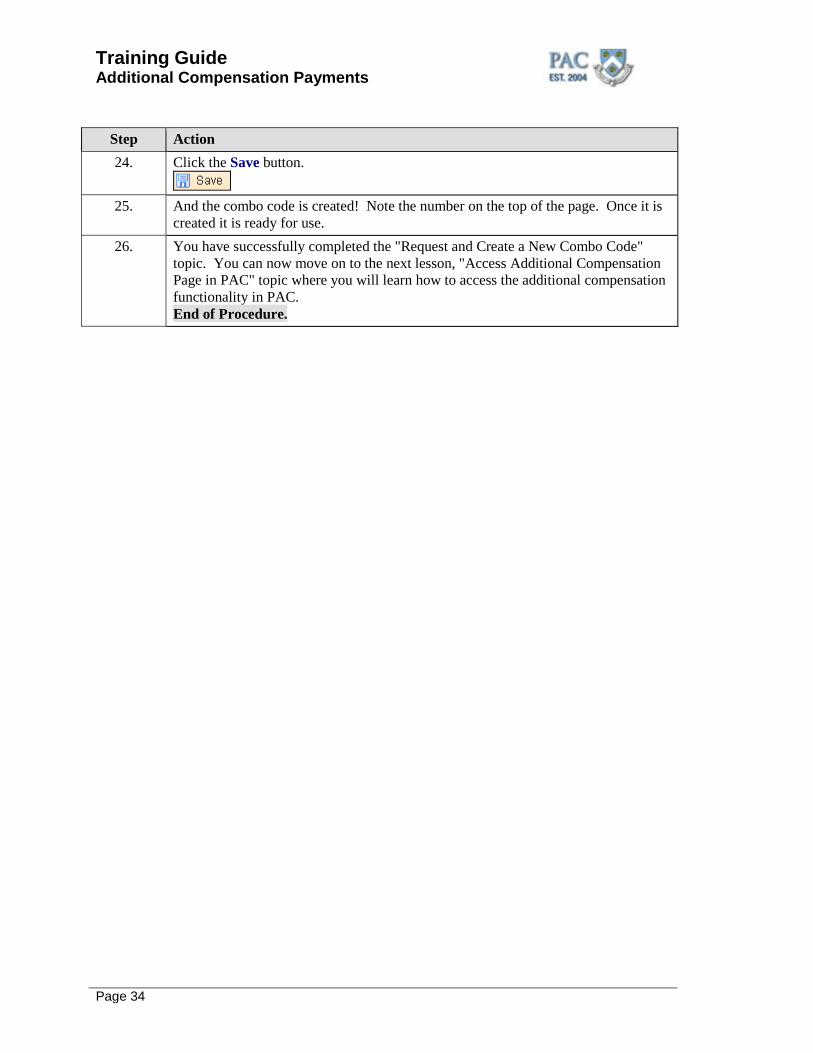
Step Action 24. Click the Save button.
25. And the combo code is created! Note the number on the top of the page. Once it is
created it is ready for use. 26. You have successfully completed the "Request and Create a New Combo Code"
topic. You can now move on to the next lesson, "Access Additional Compensation Page in PAC" topic where you will learn how to access the additional compensation functionality in PAC. End of Procedure.
Training Guide Additional Compensation Payments
Page 35
Access Additional Compensation Page in PAC This is the Access Additional Compensation Page lesson of the Additional Compensation Payments course. Upon completion of this lesson, you will be able to:
• Demonstrate how to access the Additional Compensation Page in PAC • Find Pending Additional Compensation Transactions
For a refresher on how to access PAC, see the Introduction to PAC course. Estimated Time to Complete Lesson: 5 minutes
Training Guide Additional Compensation Payments
Page 36
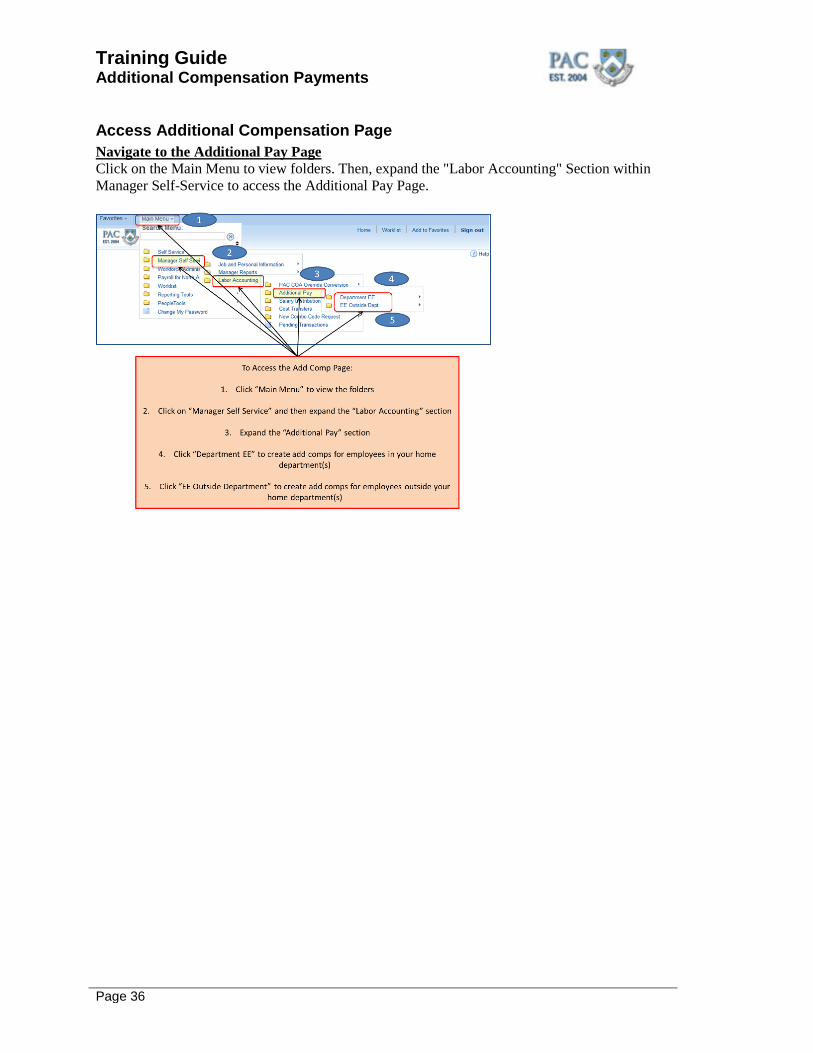
Access Additional Compensation Page Navigate to the Additional Pay Page Click on the Main Menu to view folders. Then, expand the "Labor Accounting" Section within Manager Self-Service to access the Additional Pay Page.
Training Guide Additional Compensation Payments
Page 37
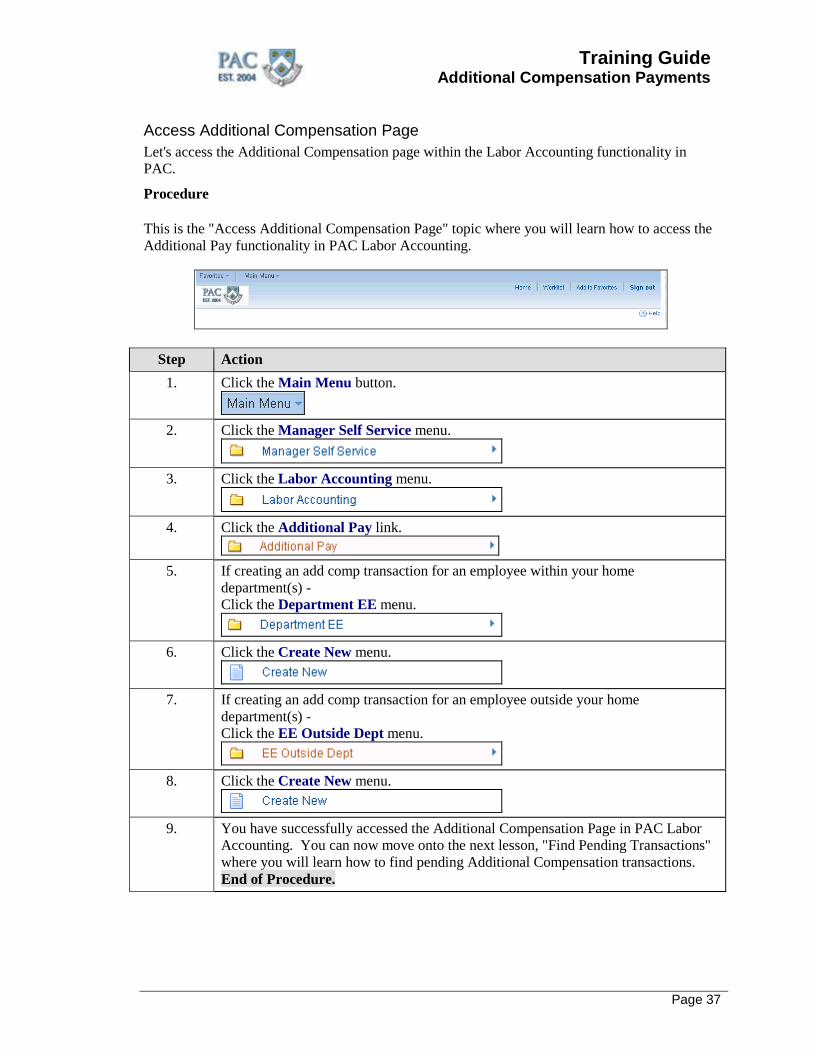
Access Additional Compensation Page Let's access the Additional Compensation page within the Labor Accounting functionality in PAC.
Procedure This is the "Access Additional Compensation Page" topic where you will learn how to access the Additional Pay functionality in PAC Labor Accounting.
Step Action 1. Click the Main Menu button.
2. Click the Manager Self Service menu.
3. Click the Labor Accounting menu.
4. Click the Additional Pay link.
5. If creating an add comp transaction for an employee within your home
department(s) - Click the Department EE menu.
6. Click the Create New menu.
7. If creating an add comp transaction for an employee outside your home
department(s) - Click the EE Outside Dept menu.
8. Click the Create New menu.
9. You have successfully accessed the Additional Compensation Page in PAC Labor
Accounting. You can now move onto the next lesson, "Find Pending Transactions" where you will learn how to find pending Additional Compensation transactions. End of Procedure.
Training Guide Additional Compensation Payments
Page 38
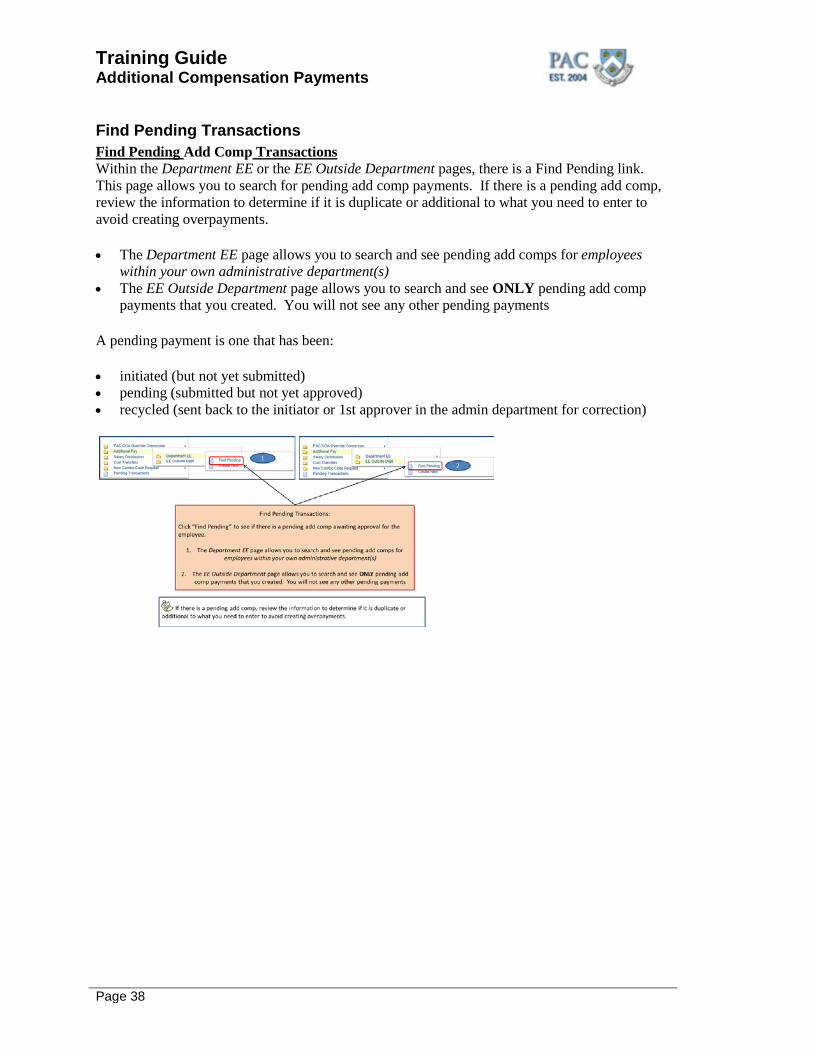
Find Pending Transactions Find Pending Add Comp Transactions Within the Department EE or the EE Outside Department pages, there is a Find Pending link. This page allows you to search for pending add comp payments. If there is a pending add comp, review the information to determine if it is duplicate or additional to what you need to enter to avoid creating overpayments.
• The Department EE page allows you to search and see pending add comps for employees within your own administrative department(s)
• The EE Outside Department page allows you to search and see ONLY pending add comp payments that you created. You will not see any other pending payments
A pending payment is one that has been:
• initiated (but not yet submitted) • pending (submitted but not yet approved) • recycled (sent back to the initiator or 1st approver in the admin department for correction)
Training Guide Additional Compensation Payments
Page 39
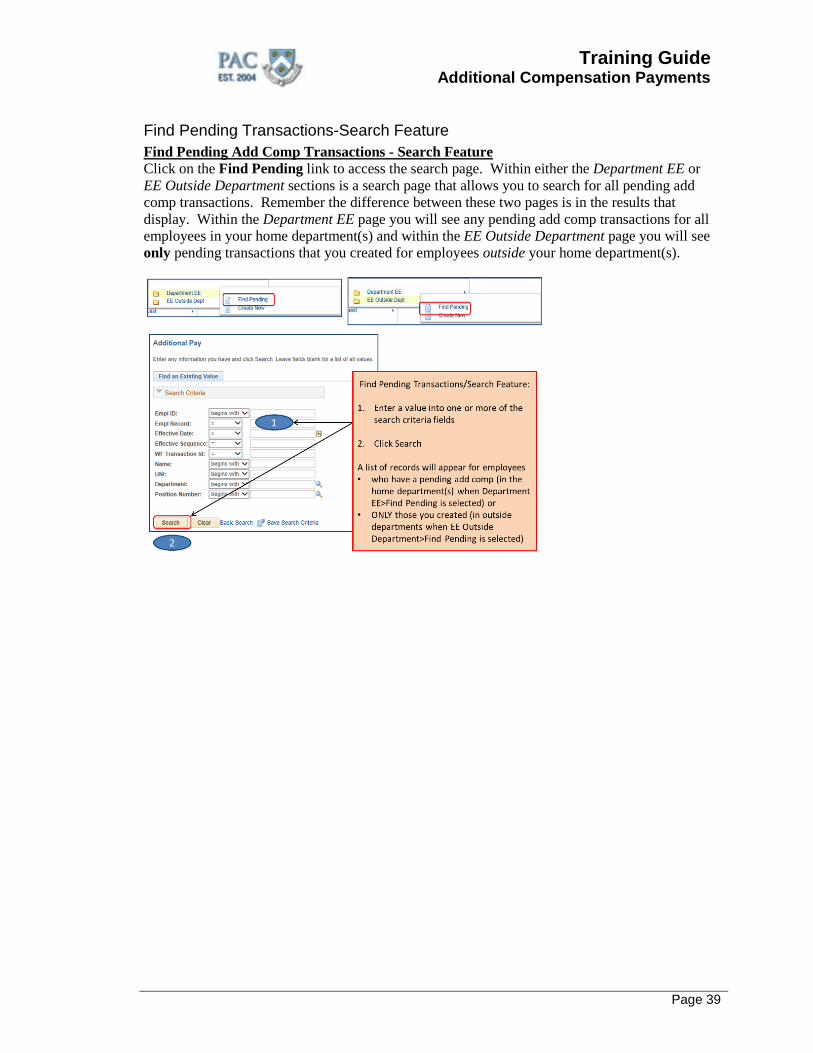
Find Pending Transactions-Search Feature Find Pending Add Comp Transactions - Search Feature Click on the Find Pending link to access the search page. Within either the Department EE or EE Outside Department sections is a search page that allows you to search for all pending add comp transactions. Remember the difference between these two pages is in the results that display. Within the Department EE page you will see any pending add comp transactions for all employees in your home department(s) and within the EE Outside Department page you will see only pending transactions that you created for employees outside your home department(s).
Training Guide Additional Compensation Payments
Page 40
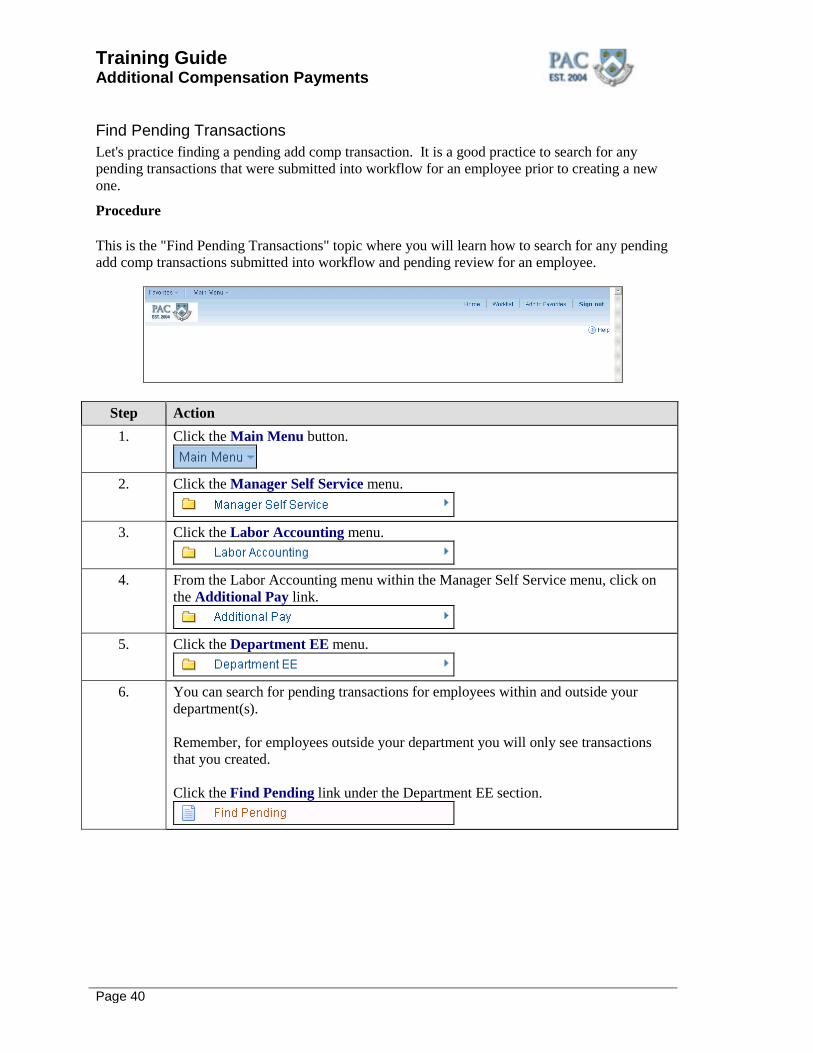
Find Pending Transactions Let's practice finding a pending add comp transaction. It is a good practice to search for any pending transactions that were submitted into workflow for an employee prior to creating a new one.
Procedure This is the "Find Pending Transactions" topic where you will learn how to search for any pending add comp transactions submitted into workflow and pending review for an employee.
Step Action 1. Click the Main Menu button.
2. Click the Manager Self Service menu.
3. Click the Labor Accounting menu.
4. From the Labor Accounting menu within the Manager Self Service menu, click on
the Additional Pay link.
5. Click the Department EE menu.
6. You can search for pending transactions for employees within and outside your
department(s). Remember, for employees outside your department you will only see transactions that you created. Click the Find Pending link under the Department EE section.
Training Guide Additional Compensation Payments
Page 41
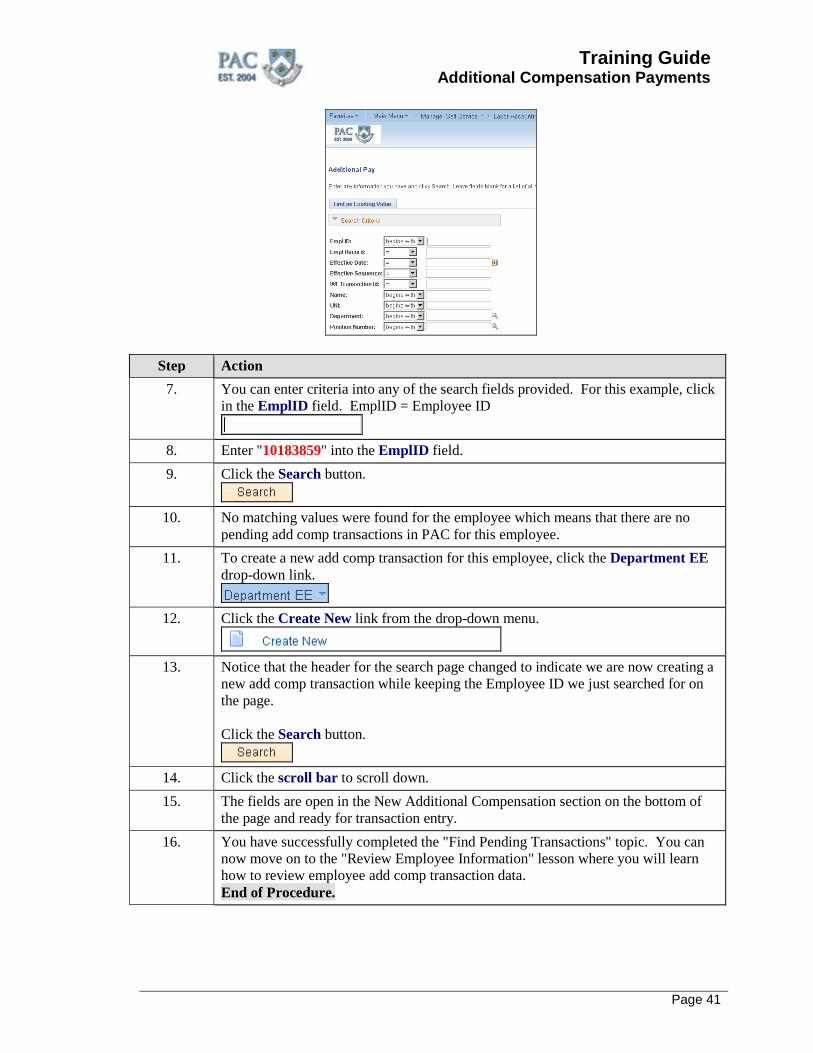
Step Action 7. You can enter criteria into any of the search fields provided. For this example, click
in the EmplID field. EmplID = Employee ID
8. Enter "10183859" into the EmplID field. 9. Click the Search button.
10. No matching values were found for the employee which means that there are no
pending add comp transactions in PAC for this employee. 11. To create a new add comp transaction for this employee, click the Department EE
drop-down link.
12. Click the Create New link from the drop-down menu.
13. Notice that the header for the search page changed to indicate we are now creating a
new add comp transaction while keeping the Employee ID we just searched for on the page. Click the Search button.
14. Click the scroll bar to scroll down. 15. The fields are open in the New Additional Compensation section on the bottom of
the page and ready for transaction entry. 16. You have successfully completed the "Find Pending Transactions" topic. You can
now move on to the "Review Employee Information" lesson where you will learn how to review employee add comp transaction data. End of Procedure.

Training Guide Additional Compensation Payments
Page 42
Review Employee Information This is the Review Employee Information lesson of the Additional Compensation Payments course. Upon completion of this lesson, you will be able to:
• Review Employee Information and Verify the Correct Employee Job Record is Selected • Review an Employee's Current and Historical Additional Compensation Payment Record(s)
Estimated Time to Complete Lesson: 10 minutes
Create New Add Comp-Search and Select Employee Record Create New Add Comp Transactions - Search Feature Click on the Create New link to access the search page. Within either the Department EE or EE Outside Department sections is a search page that allows you to search for an employee record. The difference between these two pages is in the resulting employee record displayed. For employees within your home department(s), Department EE, you will see all historical and pending add comp transactions and for employees outside your home department(s), EE Outside Department, you will not see any historical add comp data or pending add comp transactions you did not create for the employee.

Training Guide Additional Compensation Payments
Page 43
Search Results - Select Employee Record Select Employee Record When searching for an employee record, the results list displayed is based upon the search criteria entered. For example, if you entered an employee ID (EmplID) or UNI, the results list will display records for that employee only. If you entered a first name (Name) or Department, the results list will display records for all employees with that first name in your home department(s) or all employees in your home department(s).
• Note: When more than one record appears for a person, ensure you select the correct job record on which to create the additional compensation payment because that is the record on which the payment will be processed.
Training Guide Additional Compensation Payments
Page 44
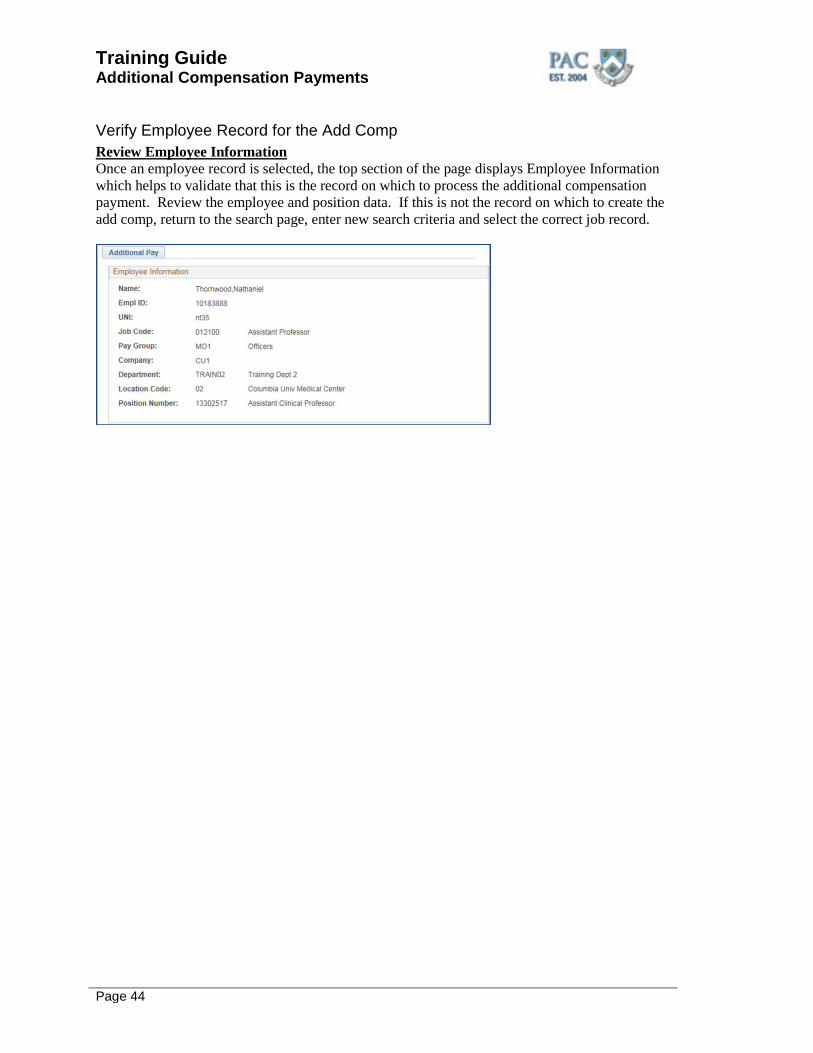
Verify Employee Record for the Add Comp Review Employee Information Once an employee record is selected, the top section of the page displays Employee Information which helps to validate that this is the record on which to process the additional compensation payment. Review the employee and position data. If this is not the record on which to create the add comp, return to the search page, enter new search criteria and select the correct job record.
Training Guide Additional Compensation Payments
Page 45
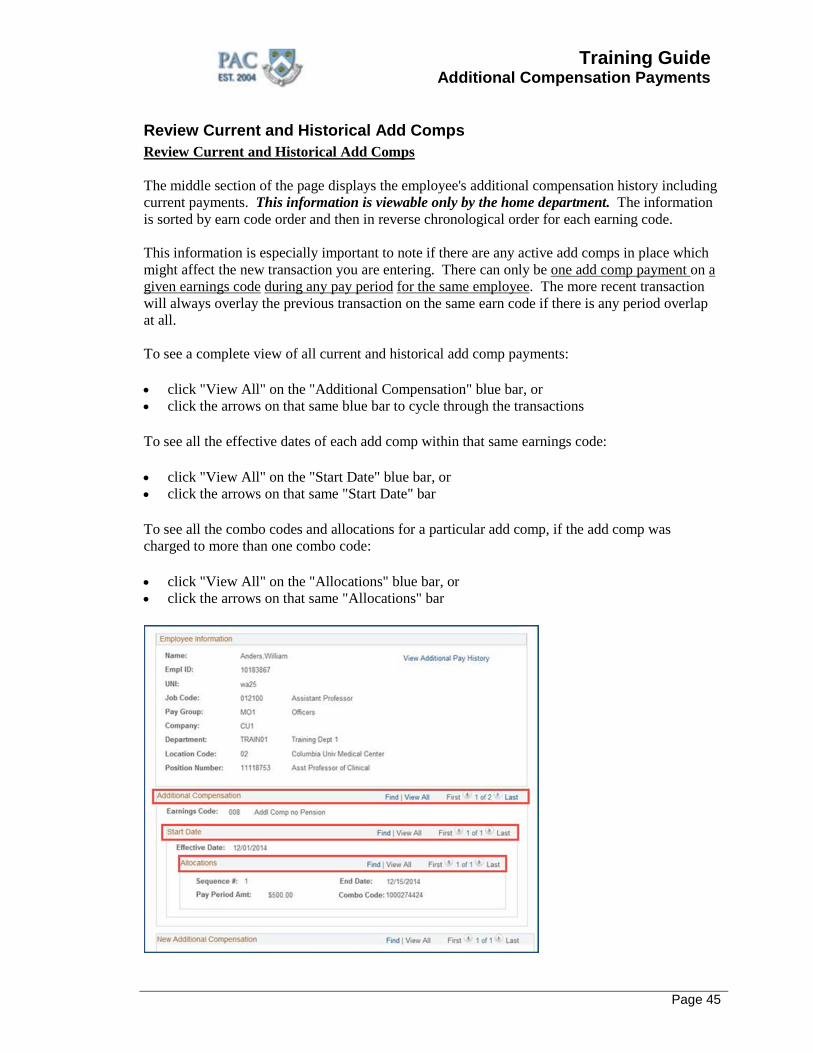
Review Current and Historical Add Comps Review Current and Historical Add Comps The middle section of the page displays the employee's additional compensation history including current payments. This information is viewable only by the home department. The information is sorted by earn code order and then in reverse chronological order for each earning code. This information is especially important to note if there are any active add comps in place which might affect the new transaction you are entering. There can only be one add comp payment on a given earnings code during any pay period for the same employee. The more recent transaction will always overlay the previous transaction on the same earn code if there is any period overlap at all. To see a complete view of all current and historical add comp payments:
• click "View All" on the "Additional Compensation" blue bar, or • click the arrows on that same blue bar to cycle through the transactions
To see all the effective dates of each add comp within that same earnings code:
• click "View All" on the "Start Date" blue bar, or • click the arrows on that same "Start Date" bar
To see all the combo codes and allocations for a particular add comp, if the add comp was charged to more than one combo code:
• click "View All" on the "Allocations" blue bar, or • click the arrows on that same "Allocations" bar
Training Guide Additional Compensation Payments
Page 46
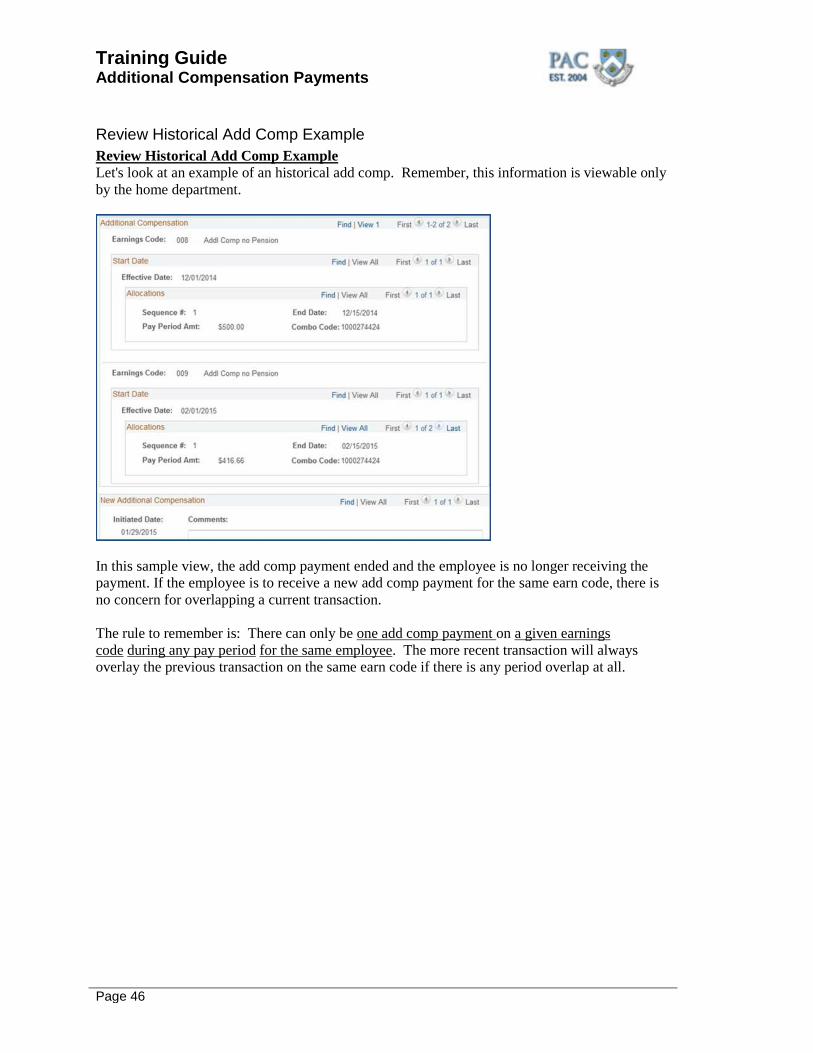
Review Historical Add Comp Example Review Historical Add Comp Example Let's look at an example of an historical add comp. Remember, this information is viewable only by the home department.
In this sample view, the add comp payment ended and the employee is no longer receiving the payment. If the employee is to receive a new add comp payment for the same earn code, there is no concern for overlapping a current transaction. The rule to remember is: There can only be one add comp payment on a given earnings code during any pay period for the same employee. The more recent transaction will always overlay the previous transaction on the same earn code if there is any period overlap at all.
Training Guide Additional Compensation Payments
Page 47
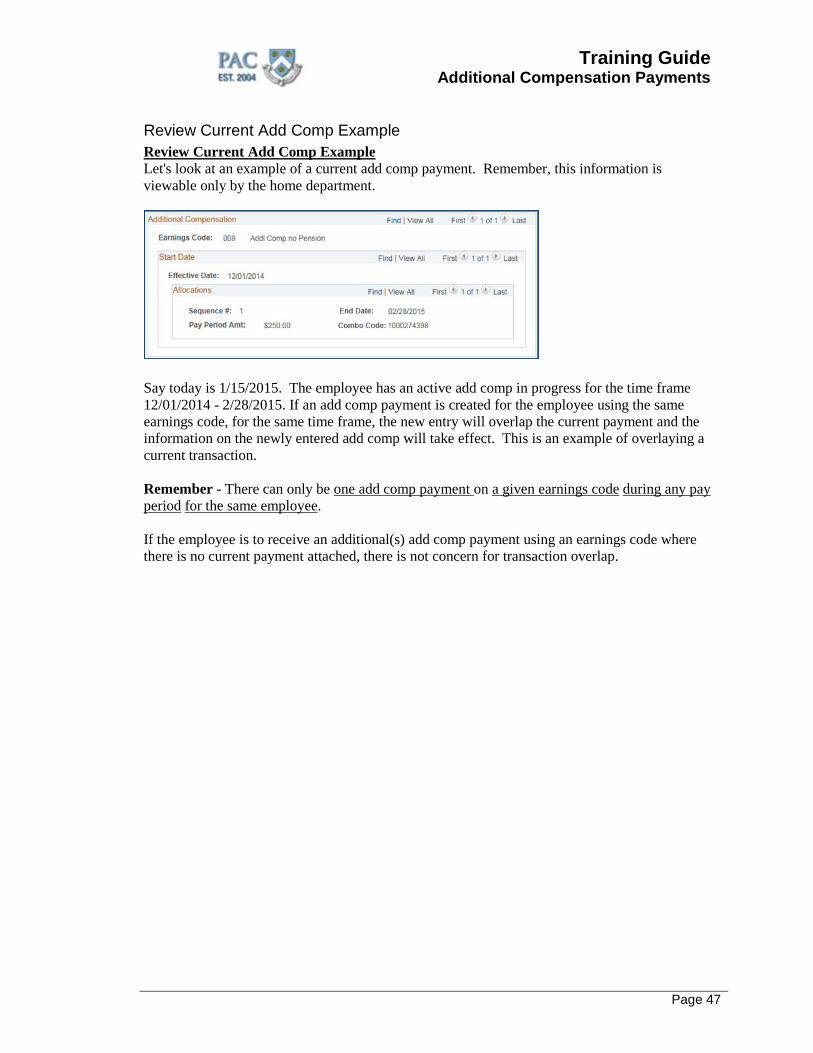
Review Current Add Comp Example Review Current Add Comp Example Let's look at an example of a current add comp payment. Remember, this information is viewable only by the home department.
Say today is 1/15/2015. The employee has an active add comp in progress for the time frame 12/01/2014 - 2/28/2015. If an add comp payment is created for the employee using the same earnings code, for the same time frame, the new entry will overlap the current payment and the information on the newly entered add comp will take effect. This is an example of overlaying a current transaction. Remember - There can only be one add comp payment on a given earnings code during any pay period for the same employee. If the employee is to receive an additional(s) add comp payment using an earnings code where there is no current payment attached, there is not concern for transaction overlap.
Training Guide Additional Compensation Payments
Page 48
Transaction Overlays Add Comp Transaction Overlays and Avoiding Overpayments Here's an important note about using earn codes. If you use certain earnings code(s), e.g. 007 for a payment period that has a pre-existing transaction submitted on a different earn code, e.g. 011, both transactions will be processed in PAC. As such, be very careful not to mistakenly process the same transaction twice on two different earn codes. This would create an overpayment. Similarly, if you use a specific earning code, e.g. 007 for a period that has the SAME earning code, also 007, only the later transaction will be processed in PAC. The original transaction will be overlayed by the subsequent one. Be careful not to overlap an existing payment that you also want to go through (as the former one would be cancelled out). Remember - There can only be one add comp payment on a given earnings code during any pay period for the same employee. We'll see an example of processing an overlay transaction a bit later in the lesson.
Training Guide Additional Compensation Payments
Page 49
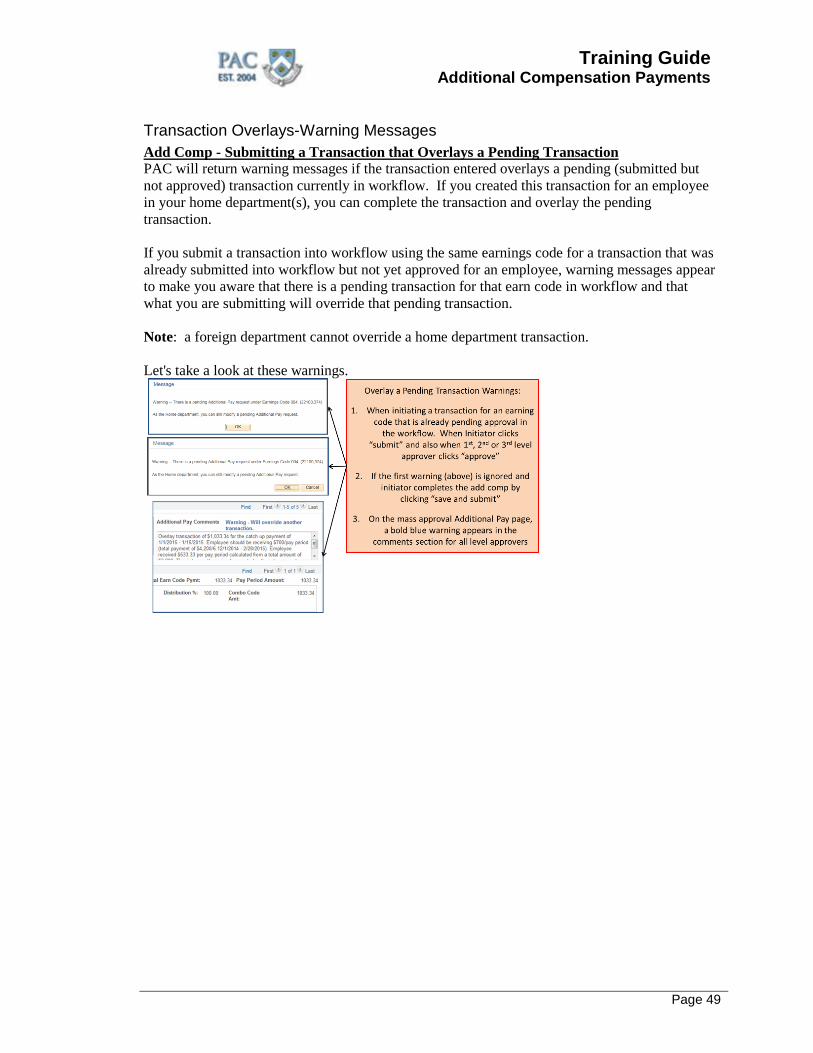
Transaction Overlays-Warning Messages Add Comp - Submitting a Transaction that Overlays a Pending Transaction PAC will return warning messages if the transaction entered overlays a pending (submitted but not approved) transaction currently in workflow. If you created this transaction for an employee in your home department(s), you can complete the transaction and overlay the pending transaction. If you submit a transaction into workflow using the same earnings code for a transaction that was already submitted into workflow but not yet approved for an employee, warning messages appear to make you aware that there is a pending transaction for that earn code in workflow and that what you are submitting will override that pending transaction. Note: a foreign department cannot override a home department transaction. Let's take a look at these warnings.
Training Guide Additional Compensation Payments
Page 50
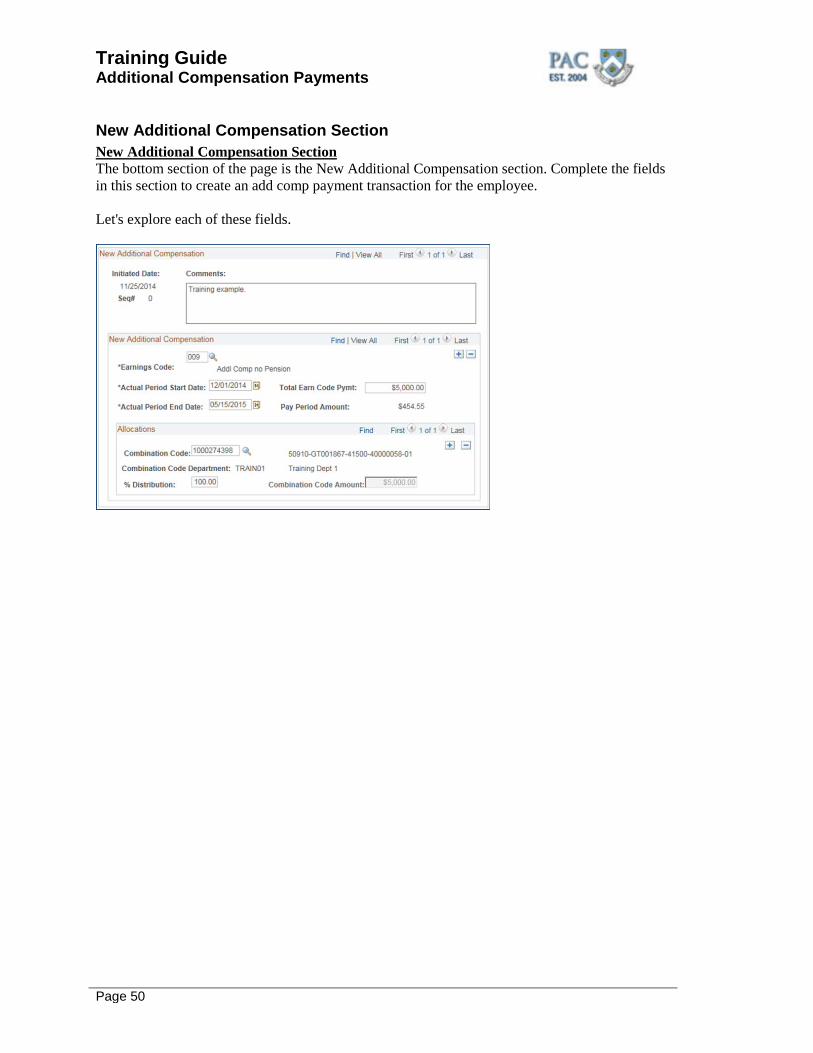
New Additional Compensation Section New Additional Compensation Section The bottom section of the page is the New Additional Compensation section. Complete the fields in this section to create an add comp payment transaction for the employee. Let's explore each of these fields.

Training Guide Additional Compensation Payments
Page 51
Create Additional Compensation Payments This is the Create Additional Compensation Payments lesson of the Additional Compensation Payments course. Upon completion of this lesson, you will be able to:
• Create and Submit New Additional Compensation Payments for Active Employees within and outside the Home Department, Identify Fields Requiring Data Input and Use the Search Feature (Look Up Glass) to search for Field Values
Estimated Time to Complete Lesson: 45 minutes
Add Comps for Employees within the Home Department(s) Create New Add Comp Transactions - For Employees within the Home (Admin) Department(s) Do you recall how to begin the process to create an additional compensation payment? Within the Additional Pay menu, click on the Create New link within either the Department EE or EE Outside Dept section. As we are creating an add comp for an employee in our home department, let's click on the Create New link with the Department EE section. Then, enter search criteria in any of the available fields and click search. Do you recall the difference between creating an add comp for an employee within your admin department and one created for an employee outside your admin department? Yes! For employees within your admin department(s), you will see all historical and pending add comp transactions. This information is not viewable when creating an add comp for employees outside your admin department(s).
Training Guide Additional Compensation Payments
Page 52
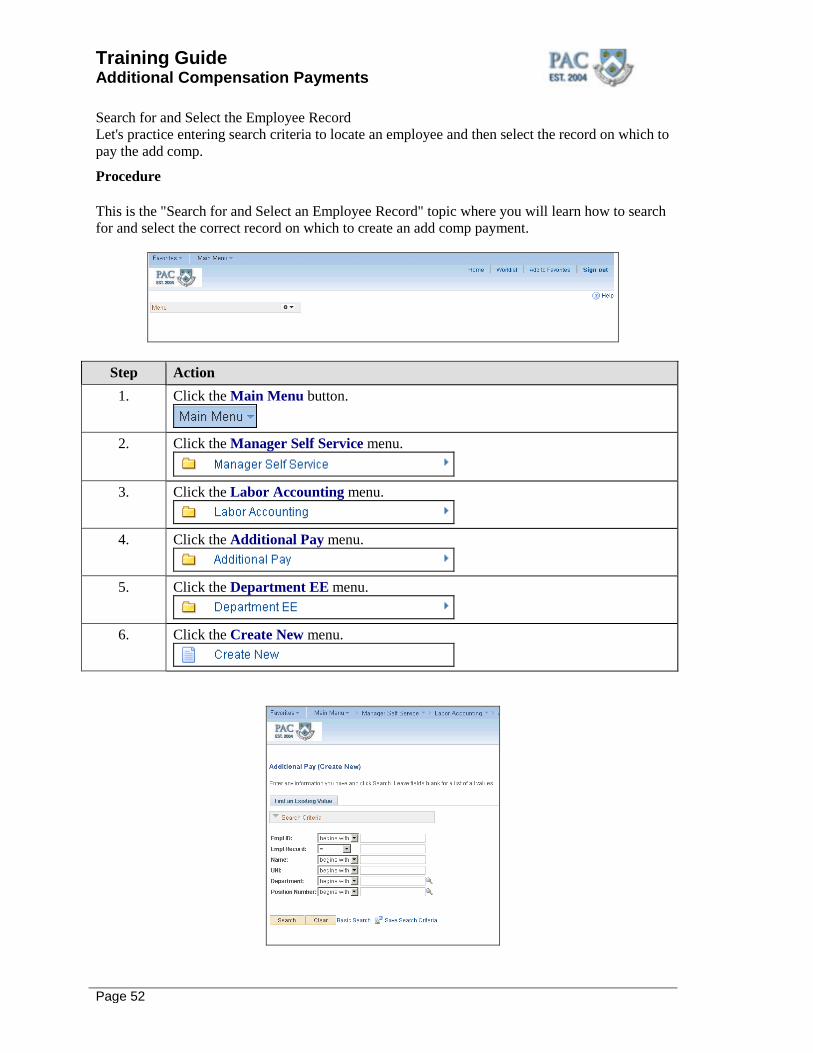
Search for and Select the Employee Record Let's practice entering search criteria to locate an employee and then select the record on which to pay the add comp.
Procedure This is the "Search for and Select an Employee Record" topic where you will learn how to search for and select the correct record on which to create an add comp payment.
Step Action 1. Click the Main Menu button.
2. Click the Manager Self Service menu.
3. Click the Labor Accounting menu.
4. Click the Additional Pay menu.
5. Click the Department EE menu.
6. Click the Create New menu.
Training Guide Additional Compensation Payments
Page 53
Step Action
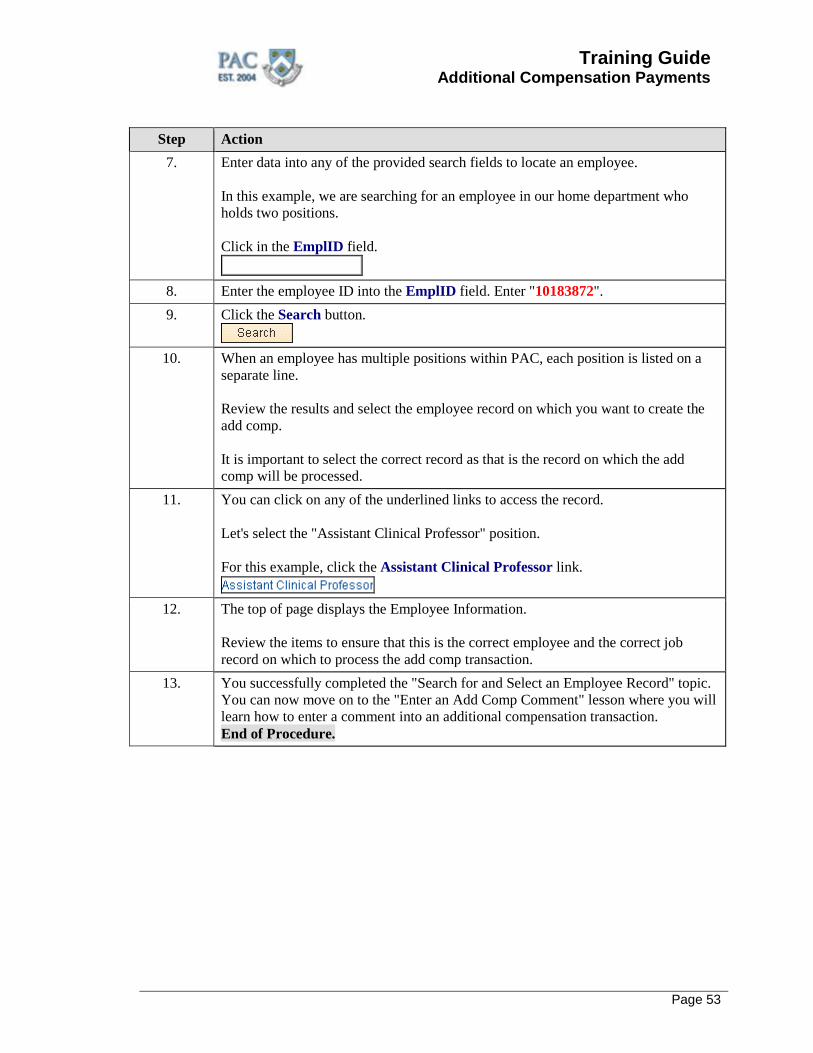
7. Enter data into any of the provided search fields to locate an employee. In this example, we are searching for an employee in our home department who holds two positions. Click in the EmplID field.
8. Enter the employee ID into the EmplID field. Enter "10183872". 9. Click the Search button.
10. When an employee has multiple positions within PAC, each position is listed on a
separate line. Review the results and select the employee record on which you want to create the add comp. It is important to select the correct record as that is the record on which the add comp will be processed.
11. You can click on any of the underlined links to access the record. Let's select the "Assistant Clinical Professor" position. For this example, click the Assistant Clinical Professor link.
12. The top of page displays the Employee Information.
Review the items to ensure that this is the correct employee and the correct job record on which to process the add comp transaction.
13. You successfully completed the "Search for and Select an Employee Record" topic. You can now move on to the "Enter an Add Comp Comment" lesson where you will learn how to enter a comment into an additional compensation transaction. End of Procedure.
Training Guide Additional Compensation Payments
Page 54
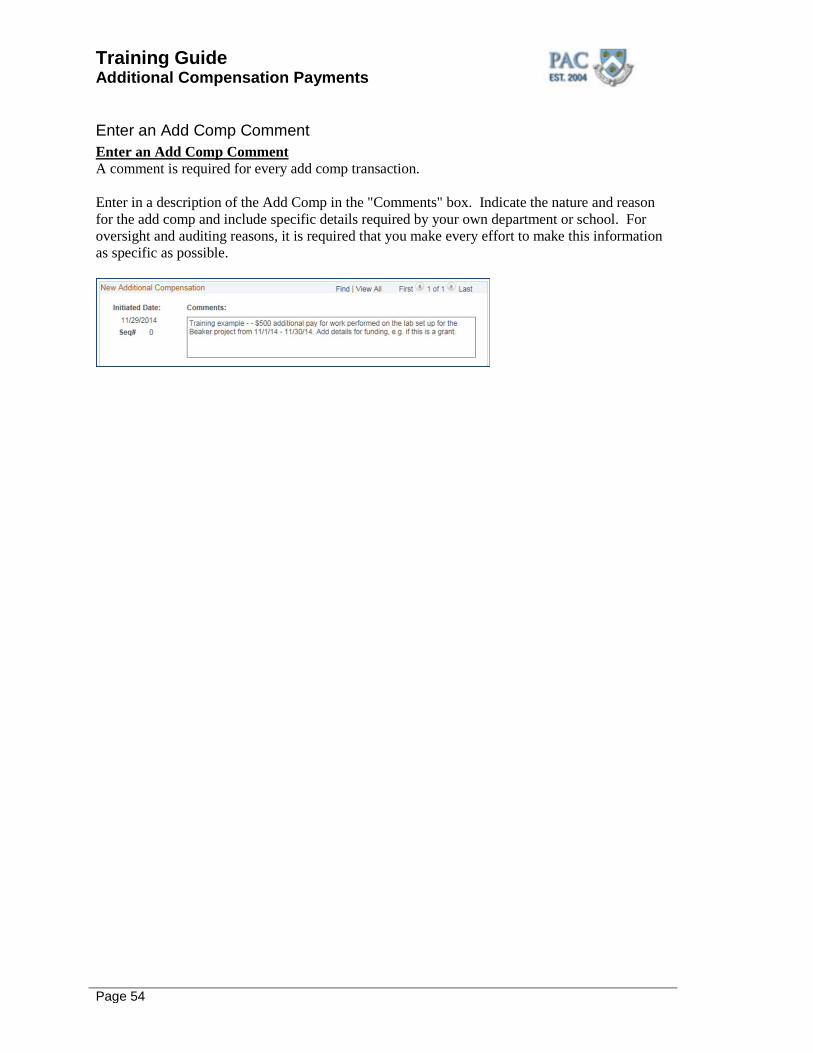
Enter an Add Comp Comment Enter an Add Comp Comment A comment is required for every add comp transaction. Enter in a description of the Add Comp in the "Comments" box. Indicate the nature and reason for the add comp and include specific details required by your own department or school. For oversight and auditing reasons, it is required that you make every effort to make this information as specific as possible.
Training Guide Additional Compensation Payments
Page 55
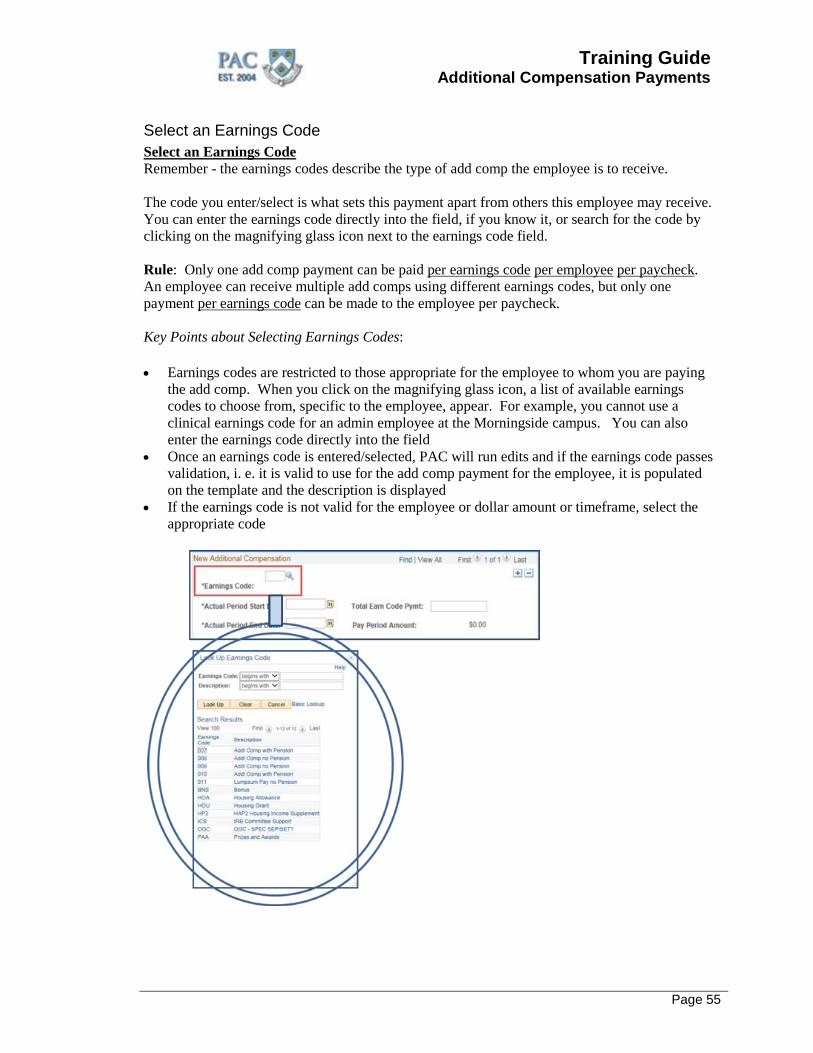
Select an Earnings Code Select an Earnings Code Remember - the earnings codes describe the type of add comp the employee is to receive. The code you enter/select is what sets this payment apart from others this employee may receive. You can enter the earnings code directly into the field, if you know it, or search for the code by clicking on the magnifying glass icon next to the earnings code field. Rule: Only one add comp payment can be paid per earnings code per employee per paycheck. An employee can receive multiple add comps using different earnings codes, but only one payment per earnings code can be made to the employee per paycheck. Key Points about Selecting Earnings Codes:
• Earnings codes are restricted to those appropriate for the employee to whom you are paying the add comp. When you click on the magnifying glass icon, a list of available earnings codes to choose from, specific to the employee, appear. For example, you cannot use a clinical earnings code for an admin employee at the Morningside campus. You can also enter the earnings code directly into the field
• Once an earnings code is entered/selected, PAC will run edits and if the earnings code passes validation, i. e. it is valid to use for the add comp payment for the employee, it is populated on the template and the description is displayed
• If the earnings code is not valid for the employee or dollar amount or timeframe, select the appropriate code
Training Guide Additional Compensation Payments
Page 56
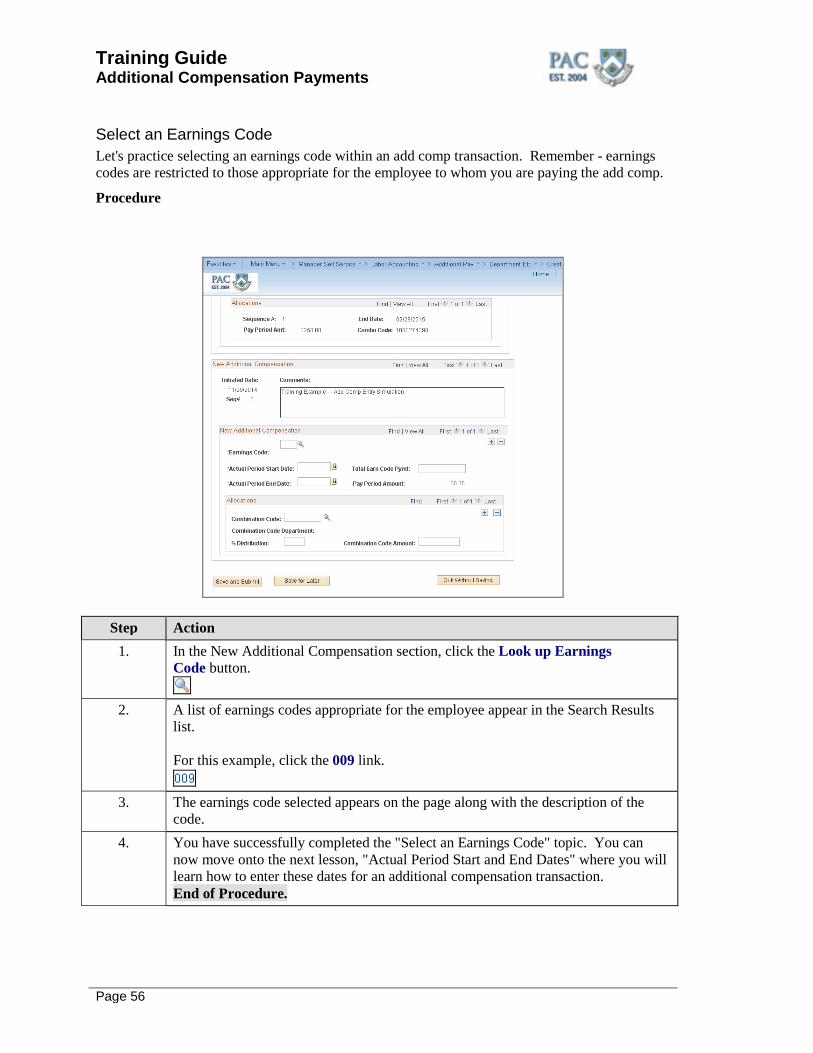
Select an Earnings Code Let's practice selecting an earnings code within an add comp transaction. Remember - earnings codes are restricted to those appropriate for the employee to whom you are paying the add comp.
Procedure
Step Action 1. In the New Additional Compensation section, click the Look up Earnings
Code button.
2. A list of earnings codes appropriate for the employee appear in the Search Results list. For this example, click the 009 link.
3. The earnings code selected appears on the page along with the description of the
code. 4. You have successfully completed the "Select an Earnings Code" topic. You can
now move onto the next lesson, "Actual Period Start and End Dates" where you will learn how to enter these dates for an additional compensation transaction. End of Procedure.
Training Guide Additional Compensation Payments
Page 57
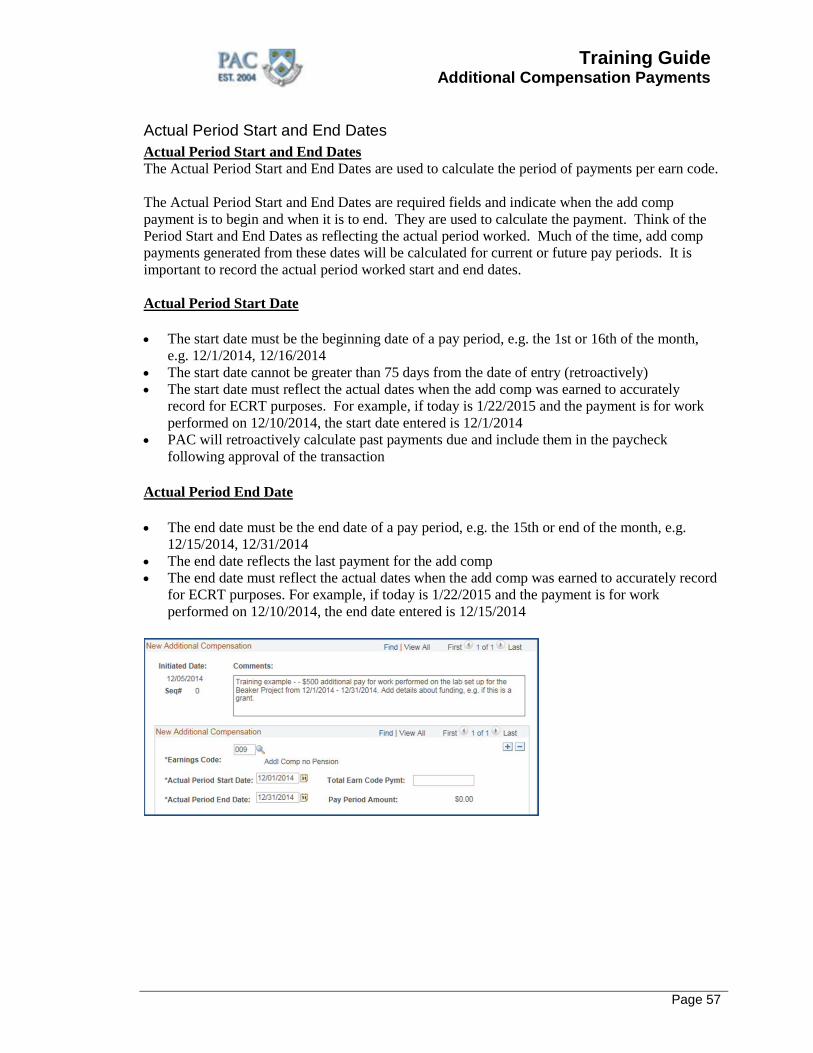
Actual Period Start and End Dates Actual Period Start and End Dates The Actual Period Start and End Dates are used to calculate the period of payments per earn code. The Actual Period Start and End Dates are required fields and indicate when the add comp payment is to begin and when it is to end. They are used to calculate the payment. Think of the Period Start and End Dates as reflecting the actual period worked. Much of the time, add comp payments generated from these dates will be calculated for current or future pay periods. It is important to record the actual period worked start and end dates. Actual Period Start Date
• The start date must be the beginning date of a pay period, e.g. the 1st or 16th of the month, e.g. 12/1/2014, 12/16/2014
• The start date cannot be greater than 75 days from the date of entry (retroactively) • The start date must reflect the actual dates when the add comp was earned to accurately
record for ECRT purposes. For example, if today is 1/22/2015 and the payment is for work performed on 12/10/2014, the start date entered is 12/1/2014
• PAC will retroactively calculate past payments due and include them in the paycheck following approval of the transaction
Actual Period End Date
• The end date must be the end date of a pay period, e.g. the 15th or end of the month, e.g. 12/15/2014, 12/31/2014
• The end date reflects the last payment for the add comp • The end date must reflect the actual dates when the add comp was earned to accurately record
for ECRT purposes. For example, if today is 1/22/2015 and the payment is for work performed on 12/10/2014, the end date entered is 12/15/2014
Training Guide Additional Compensation Payments
Page 58
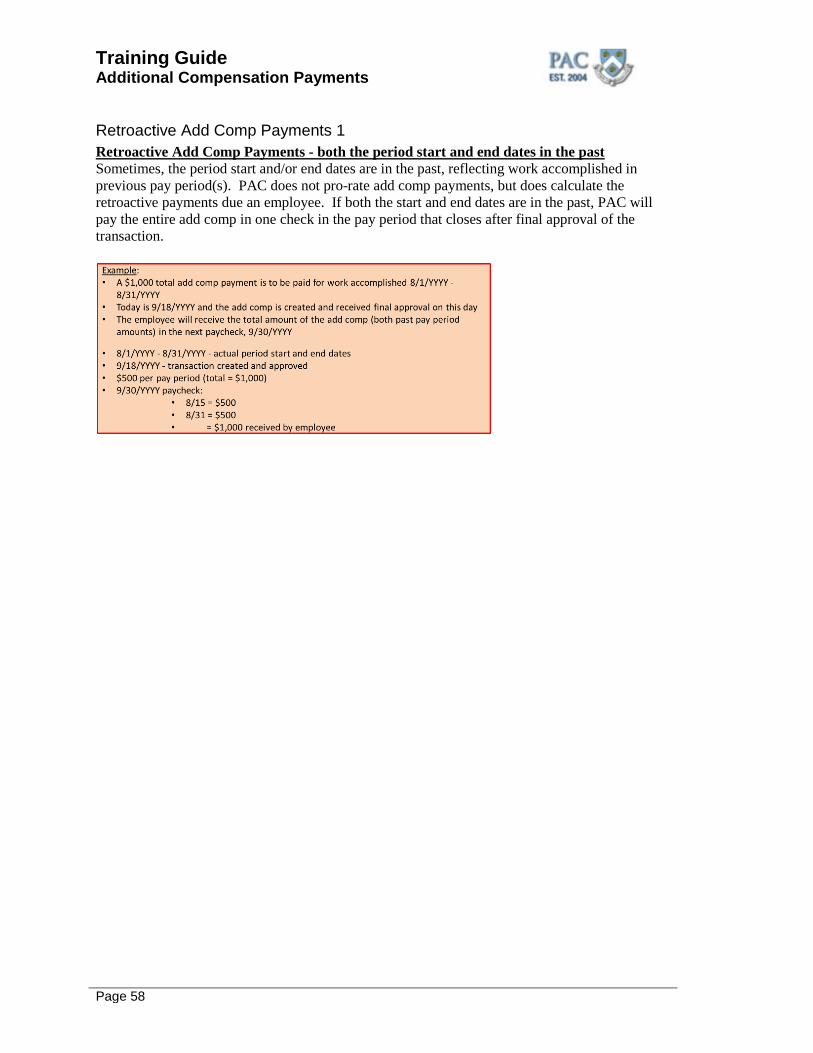
Retroactive Add Comp Payments 1 Retroactive Add Comp Payments - both the period start and end dates in the past Sometimes, the period start and/or end dates are in the past, reflecting work accomplished in previous pay period(s). PAC does not pro-rate add comp payments, but does calculate the retroactive payments due an employee. If both the start and end dates are in the past, PAC will pay the entire add comp in one check in the pay period that closes after final approval of the transaction.
Training Guide Additional Compensation Payments
Page 59
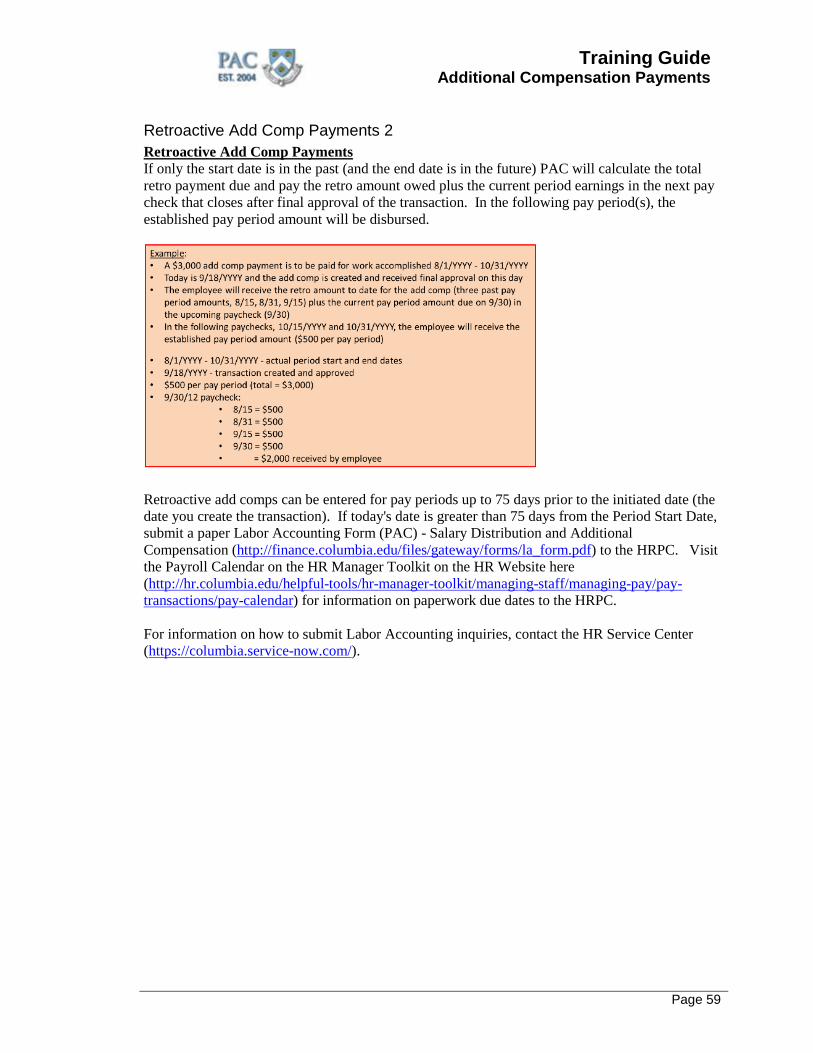
Retroactive Add Comp Payments 2 Retroactive Add Comp Payments If only the start date is in the past (and the end date is in the future) PAC will calculate the total retro payment due and pay the retro amount owed plus the current period earnings in the next pay check that closes after final approval of the transaction. In the following pay period(s), the established pay period amount will be disbursed.
Retroactive add comps can be entered for pay periods up to 75 days prior to the initiated date (the date you create the transaction). If today's date is greater than 75 days from the Period Start Date, submit a paper Labor Accounting Form (PAC) - Salary Distribution and Additional Compensation (http://finance.columbia.edu/files/gateway/forms/la_form.pdf) to the HRPC. Visit the Payroll Calendar on the HR Manager Toolkit on the HR Website here (http://hr.columbia.edu/helpful-tools/hr-manager-toolkit/managing-staff/managing-pay/pay-transactions/pay-calendar) for information on paperwork due dates to the HRPC. For information on how to submit Labor Accounting inquiries, contact the HR Service Center (https://columbia.service-now.com/).
Training Guide Additional Compensation Payments
Page 60
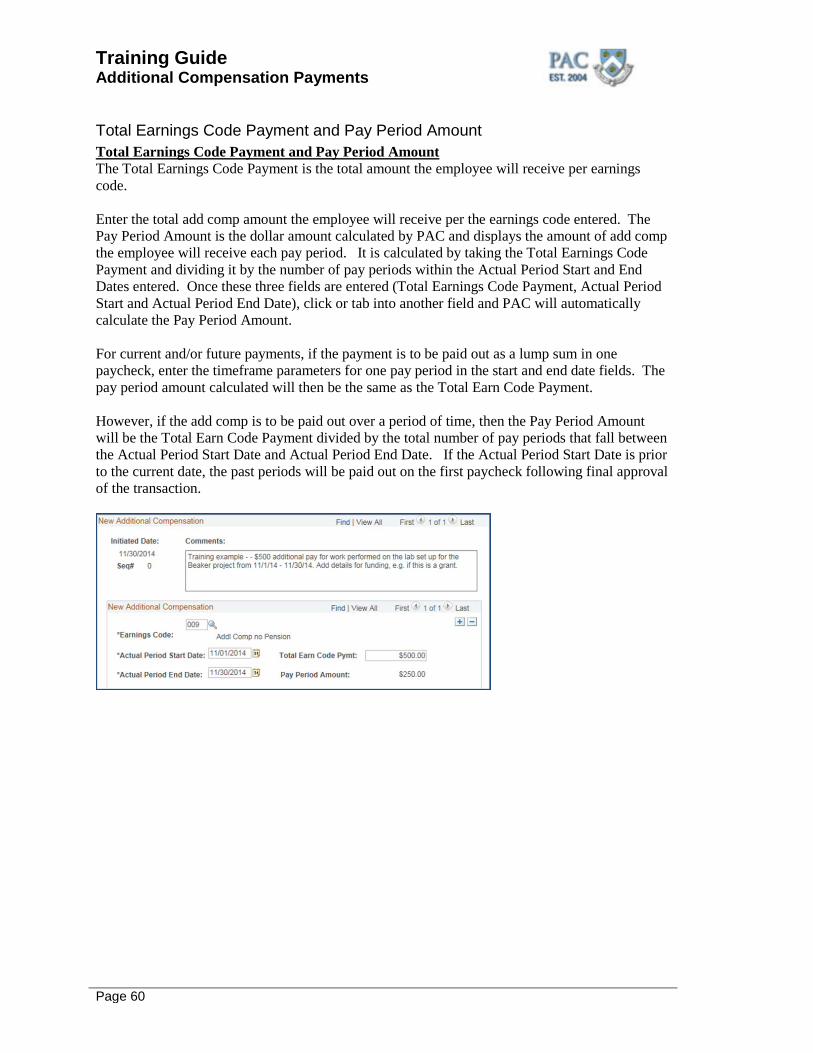
Total Earnings Code Payment and Pay Period Amount Total Earnings Code Payment and Pay Period Amount The Total Earnings Code Payment is the total amount the employee will receive per earnings code. Enter the total add comp amount the employee will receive per the earnings code entered. The Pay Period Amount is the dollar amount calculated by PAC and displays the amount of add comp the employee will receive each pay period. It is calculated by taking the Total Earnings Code Payment and dividing it by the number of pay periods within the Actual Period Start and End Dates entered. Once these three fields are entered (Total Earnings Code Payment, Actual Period Start and Actual Period End Date), click or tab into another field and PAC will automatically calculate the Pay Period Amount. For current and/or future payments, if the payment is to be paid out as a lump sum in one paycheck, enter the timeframe parameters for one pay period in the start and end date fields. The pay period amount calculated will then be the same as the Total Earn Code Payment. However, if the add comp is to be paid out over a period of time, then the Pay Period Amount will be the Total Earn Code Payment divided by the total number of pay periods that fall between the Actual Period Start Date and Actual Period End Date. If the Actual Period Start Date is prior to the current date, the past periods will be paid out on the first paycheck following final approval of the transaction.
Training Guide Additional Compensation Payments
Page 61
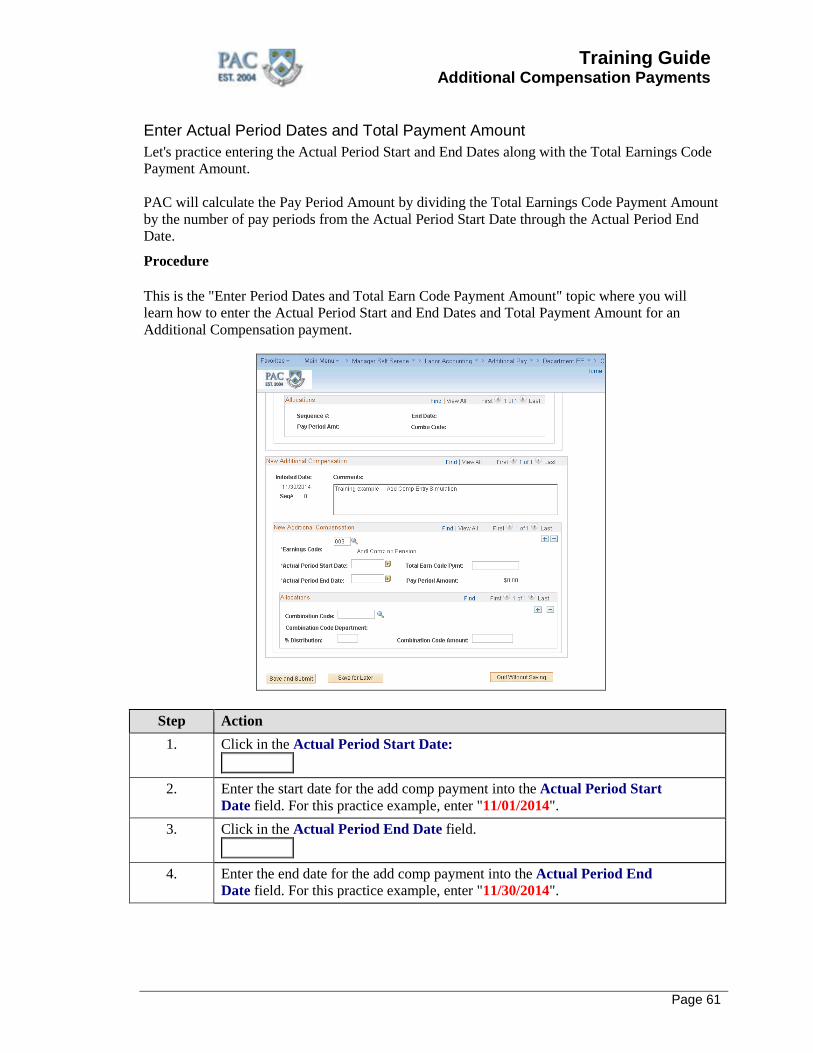
Enter Actual Period Dates and Total Payment Amount Let's practice entering the Actual Period Start and End Dates along with the Total Earnings Code Payment Amount. PAC will calculate the Pay Period Amount by dividing the Total Earnings Code Payment Amount by the number of pay periods from the Actual Period Start Date through the Actual Period End Date.
Procedure This is the "Enter Period Dates and Total Earn Code Payment Amount" topic where you will learn how to enter the Actual Period Start and End Dates and Total Payment Amount for an Additional Compensation payment.
Step Action 1. Click in the Actual Period Start Date:
2. Enter the start date for the add comp payment into the Actual Period Start
Date field. For this practice example, enter "11/01/2014". 3. Click in the Actual Period End Date field.
4. Enter the end date for the add comp payment into the Actual Period End
Date field. For this practice example, enter "11/30/2014".
Training Guide Additional Compensation Payments
Page 62
Step Action 5. Now let's enter the total amount of the add comp payment.
Click in the Total Earn Code Pymt field.
6. Enter the total amount of the add comp into the Total Earn Code Pymt field. For
this practice example, enter "500.00". 7. Press [Enter]. 8. In this section of the transaction you indicated the start and end dates for the add
comp payment as well as the total amount to be paid to the employee. Notice how PAC calculates the Pay Period Amount by dividing the Total Earn Code Payment amount ($500) by the number of pay periods within the Actual Period Start and End Dates (2 pay periods). $500/2 = $250.00
9. You have successfully completed the "Enter Actual Period Dates and Total Payment Amount" topic. You can now move onto the next topic, "Pay Period Amounts and Paychecks" where you will learn more on how PAC calculates and pays entered add comps. End of Procedure.
Training Guide Additional Compensation Payments
Page 63
Pay Period Amounts and Paychecks Pay Period Amounts and Paychecks Let's explore this a bit more - - - An add comp payment is entered and final approval received on 10/2/YYYY for the following transaction.
• Earnings code BNS for a total payment amount of $1,000 for the timeframe 10/1/YYYY - 10/15/YYYY (one pay period) which are also the Actual Period Start and End Dates. The Pay Period Amount = $1,000, i.e. PAC will pay the employee a total of $1,000 under earnings code BNS and the employee will receive the total amount ($1,000) in one paycheck.
An add comp payment is entered and final approval received on 10/2/YYYY for the following transaction.
• Earnings code 009 for a total payment amount of $1,000 for the timeframe 10/1/YYYY - 11/30/YYYY (four pay periods) which are also the Actual Period Start and End Dates. The Pay Period Amount = $250, i.e. PAC will pay the employee a total of $1,000 under earnings code 009 and the employee will receive the total amount ($1,000) over four paychecks, $250 per paycheck.
Retroactive Payments and Paychecks Let's look at that last example again changing the entry and final approval date to a date that is past the Actual Period Start Date. An add comp payment is entered and final approval received on 10/20/YYYY for the following transaction.
• Earnings code 009 for a total payment amount of $1,000 for the timeframe 10/1/YYYY - 11/30/YYYY (four pay periods). The Pay Period Amount still equals $250 and the employee will still receive a total of $1,000 under earnings code 009. However, as the Actual Period Start Date is prior to the current date the past periods will be paid out on the first paycheck. For example, the employee will receive $500 in the 10/31/YYYY paycheck and $250 in each the 11/15/YYYY and 11/30/YYYY paychecks
Important! Always check to verify that the calculated Pay Period Amount is as intended.
Training Guide Additional Compensation Payments
Page 64
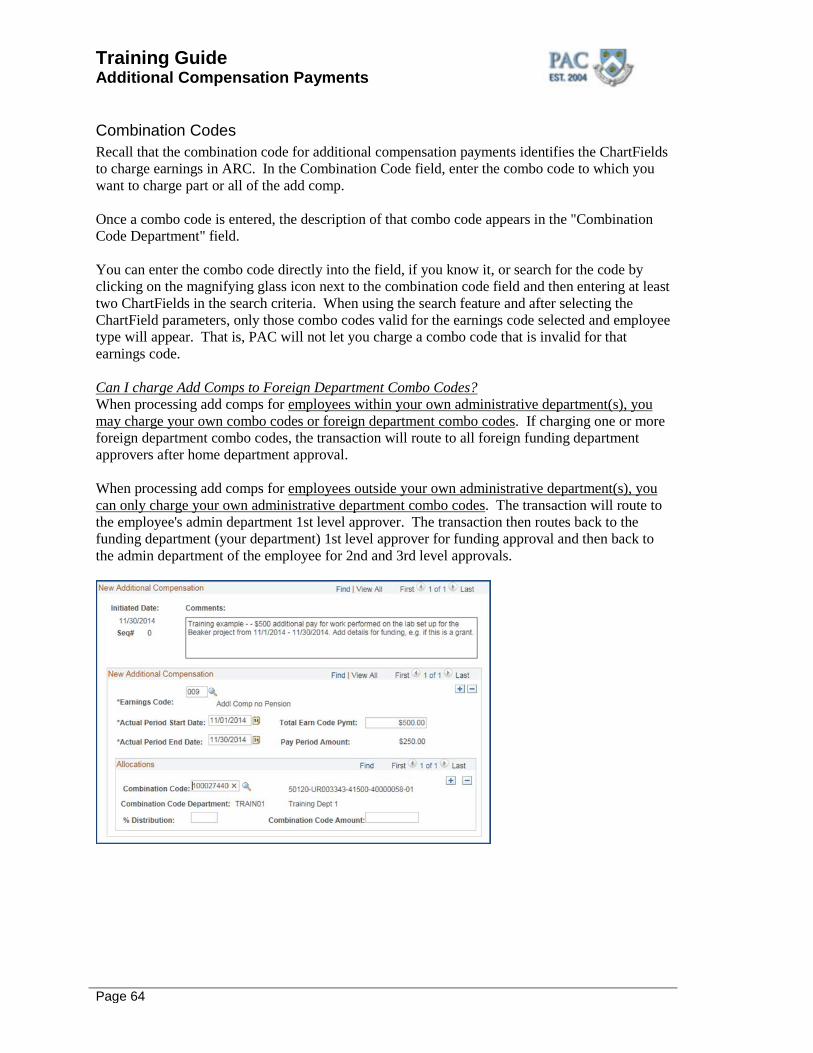
Combination Codes Recall that the combination code for additional compensation payments identifies the ChartFields to charge earnings in ARC. In the Combination Code field, enter the combo code to which you want to charge part or all of the add comp. Once a combo code is entered, the description of that combo code appears in the "Combination Code Department" field. You can enter the combo code directly into the field, if you know it, or search for the code by clicking on the magnifying glass icon next to the combination code field and then entering at least two ChartFields in the search criteria. When using the search feature and after selecting the ChartField parameters, only those combo codes valid for the earnings code selected and employee type will appear. That is, PAC will not let you charge a combo code that is invalid for that earnings code. Can I charge Add Comps to Foreign Department Combo Codes? When processing add comps for employees within your own administrative department(s), you may charge your own combo codes or foreign department combo codes. If charging one or more foreign department combo codes, the transaction will route to all foreign funding department approvers after home department approval. When processing add comps for employees outside your own administrative department(s), you can only charge your own administrative department combo codes. The transaction will route to the employee's admin department 1st level approver. The transaction then routes back to the funding department (your department) 1st level approver for funding approval and then back to the admin department of the employee for 2nd and 3rd level approvals.
Training Guide Additional Compensation Payments
Page 65
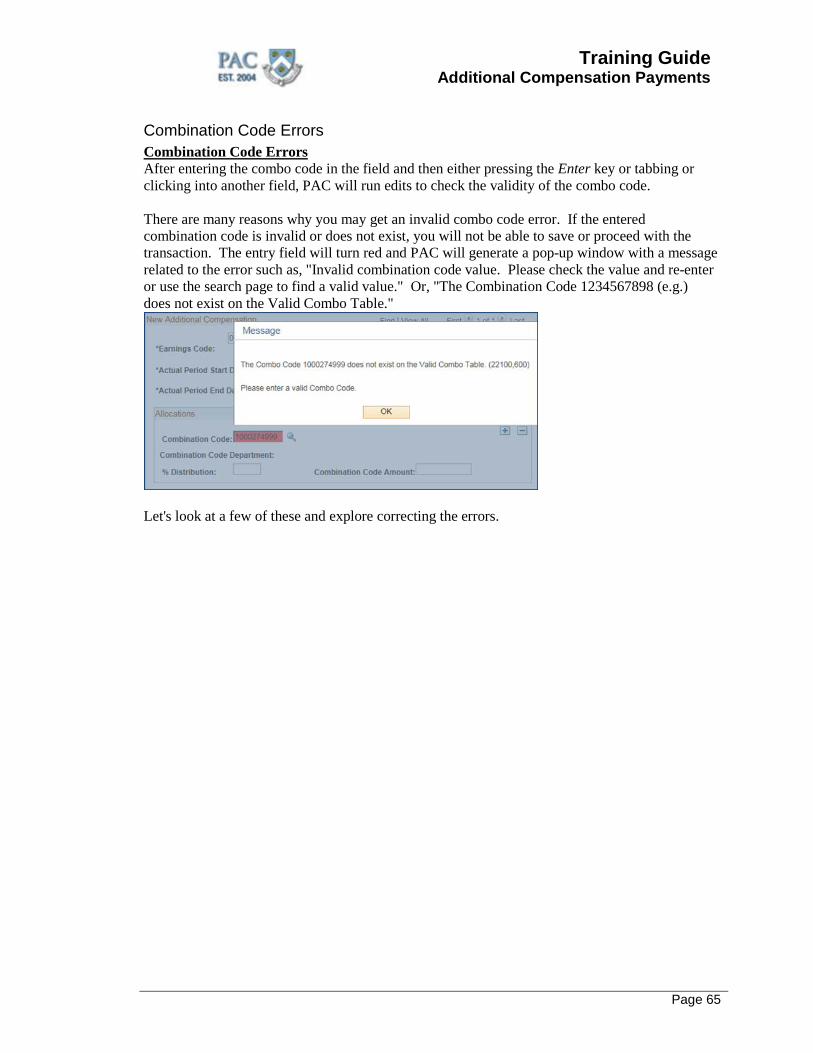
Combination Code Errors Combination Code Errors After entering the combo code in the field and then either pressing the Enter key or tabbing or clicking into another field, PAC will run edits to check the validity of the combo code. There are many reasons why you may get an invalid combo code error. If the entered combination code is invalid or does not exist, you will not be able to save or proceed with the transaction. The entry field will turn red and PAC will generate a pop-up window with a message related to the error such as, "Invalid combination code value. Please check the value and re-enter or use the search page to find a valid value." Or, "The Combination Code 1234567898 (e.g.) does not exist on the Valid Combo Table."
Let's look at a few of these and explore correcting the errors.
Training Guide Additional Compensation Payments
Page 66
Correcting Combination Code Errors Correcting Combination Code Errors Here are some examples of combination code errors and reasons why they appear. Depending on the error, you may need to research the attributes with your department to resolve the error. Once you have the correct combo code, or the correct combo code is valid in PAC, you may enter the transaction.
• Inactive Combo Code - An inactive combo code is a "frozen" combo code that cannot be used for any transactions. Check if the combination code is inactive. For example, if a project is active from 1/1/12 - 12/31/14, the combo code(s) for that project will become inactive on 1/1/15
• Project Activity Date Errors - This occurs when the transaction dates fall outside of the start and/or end date of the Activity associated with a combo code. If the combo code is active but the project activity end date passed, the combo code will give you an error message when the transaction dates are outside the activity dates. This is because a combo code is system-generated for each segment of Project Activity. If a project is active from 1/1/12 - 12/31/14, a combo code can be created for each of the project activity segments, e.g. Activity 1 = 1/1/12 - 12/31/12 = combo code 1234567891, Activity 2 = 1/1/13 - 12/31/13 = combo code 1425369685 and activity 3 = 1/1/14 - 12/31/14 = combo code 1236547898
• All ChartFields Active for the Period - Are all the ChartFields active for the period of time for the transaction?
• Combo Code and Earnings Code - Is the combination code valid for the earnings code used? i.e. Is the ChartString that the combo code represents valid to use for the earnings code selected?
• Combination Code does not exist - Is this the first time the ChartString is used? Remember, combo codes are a representation of the ChartString. If a ChartString is needed for a transaction and a combo code has not been created for that ChartString, it must first be created. Refer to the "Request a New Combo Code" topic for detailed information and a simulation of the request
Training Guide Additional Compensation Payments
Page 67
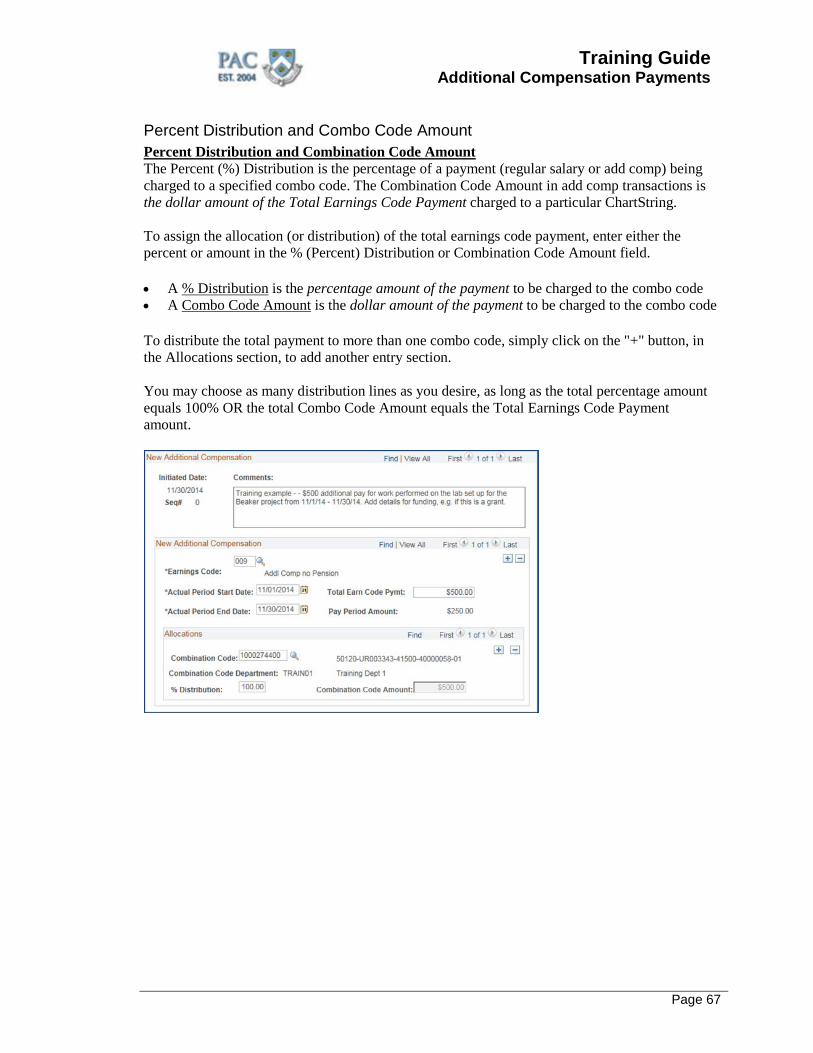
Percent Distribution and Combo Code Amount Percent Distribution and Combination Code Amount The Percent (%) Distribution is the percentage of a payment (regular salary or add comp) being charged to a specified combo code. The Combination Code Amount in add comp transactions is the dollar amount of the Total Earnings Code Payment charged to a particular ChartString. To assign the allocation (or distribution) of the total earnings code payment, enter either the percent or amount in the % (Percent) Distribution or Combination Code Amount field.
• A % Distribution is the percentage amount of the payment to be charged to the combo code • A Combo Code Amount is the dollar amount of the payment to be charged to the combo code
To distribute the total payment to more than one combo code, simply click on the "+" button, in the Allocations section, to add another entry section. You may choose as many distribution lines as you desire, as long as the total percentage amount equals 100% OR the total Combo Code Amount equals the Total Earnings Code Payment amount.
Training Guide Additional Compensation Payments
Page 68
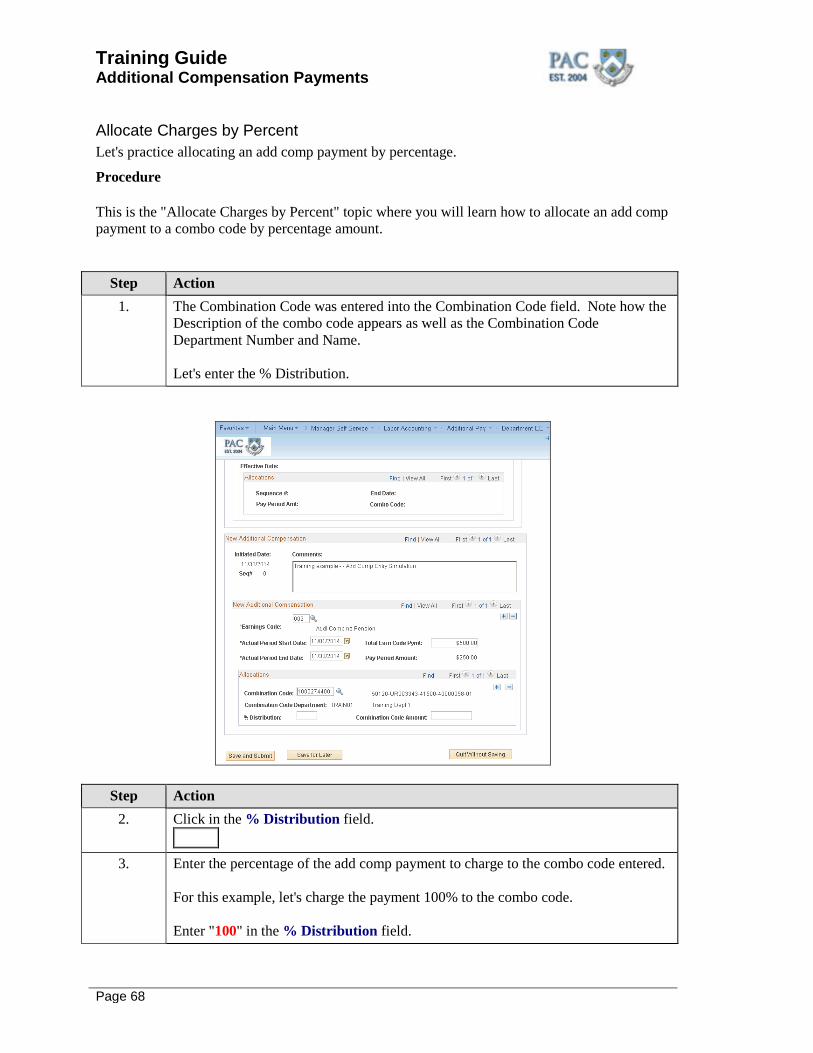
Allocate Charges by Percent Let's practice allocating an add comp payment by percentage.
Procedure This is the "Allocate Charges by Percent" topic where you will learn how to allocate an add comp payment to a combo code by percentage amount.
Step Action
1. The Combination Code was entered into the Combination Code field. Note how the Description of the combo code appears as well as the Combination Code Department Number and Name. Let's enter the % Distribution.
Step Action 2. Click in the % Distribution field.
3. Enter the percentage of the add comp payment to charge to the combo code entered.
For this example, let's charge the payment 100% to the combo code. Enter "100" in the % Distribution field.

Training Guide Additional Compensation Payments
Page 69
Step Action 4. Press [Enter]. 5. Notice how PAC calculates the Combination Code Amount based upon the number
entered into the % Distribution field. To recap - 100% of this $500 add comp payment (i.e. $500) will be charged to the combo code entered.
6. You have successfully completed the "Allocate Charges by Percent" topic. You can now move onto the next topic, "Allocate Charges by Combination Code Amount" where you will learn how to enter the allocation for an add comp payment by combo code amount (dollar amount). End of Procedure.
Training Guide Additional Compensation Payments
Page 70
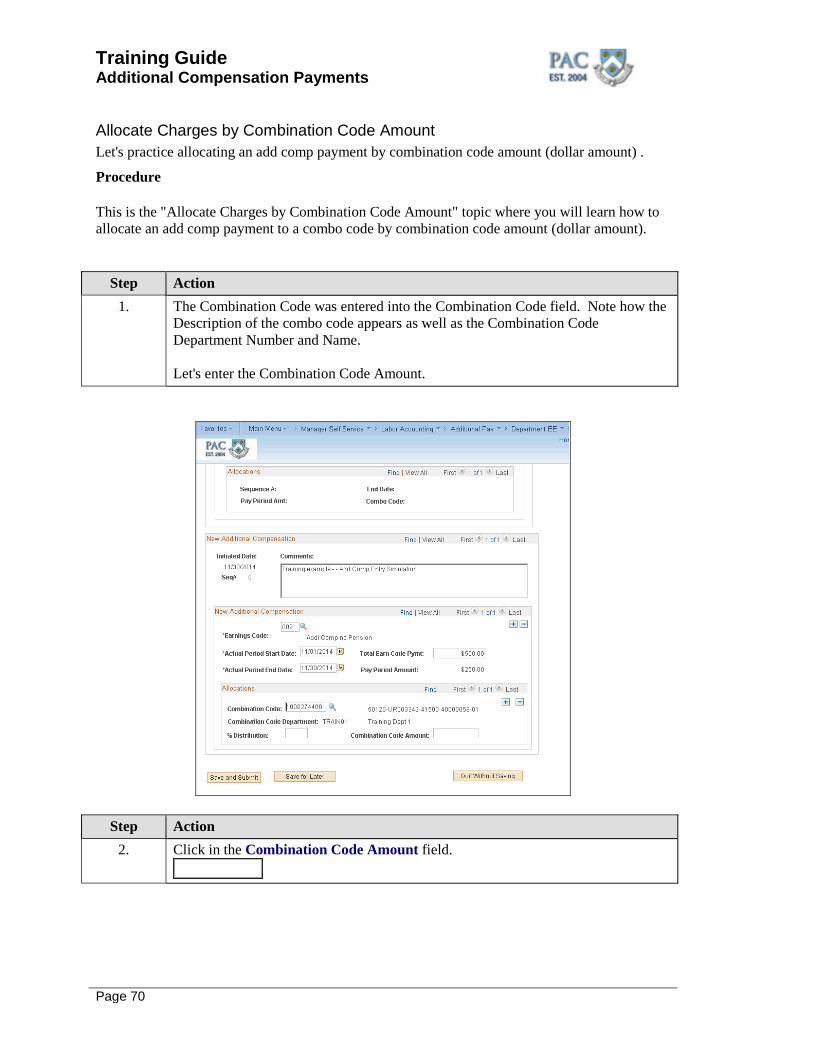
Allocate Charges by Combination Code Amount Let's practice allocating an add comp payment by combination code amount (dollar amount) .
Procedure This is the "Allocate Charges by Combination Code Amount" topic where you will learn how to allocate an add comp payment to a combo code by combination code amount (dollar amount).
Step Action
1. The Combination Code was entered into the Combination Code field. Note how the Description of the combo code appears as well as the Combination Code Department Number and Name. Let's enter the Combination Code Amount.
Step Action 2. Click in the Combination Code Amount field.

Training Guide Additional Compensation Payments
Page 71
Step Action 3. Enter the dollar amount of the add comp payment to charge to the combo code
entered. For this example, let's charge the full dollar amount of the payment to the combo code. Enter "500" in the Combination Code Amount field.
4. Press [Enter]. 5. Notice how PAC calculates the percentage based upon the dollar amount entered
into the Combination Code Amount field. To recap - $500 of this $500 add comp payment will be charged to the combo code entered.
6. You have successfully completed the "Allocate Charges by Combination Code Amount" topic. You can now move onto the next topic, "Allocate Charges by Multiple Combination Codes" where you will learn how to enter the allocation for an add comp payment charging it to multiple combo codes. End of Procedure.
Training Guide Additional Compensation Payments
Page 72
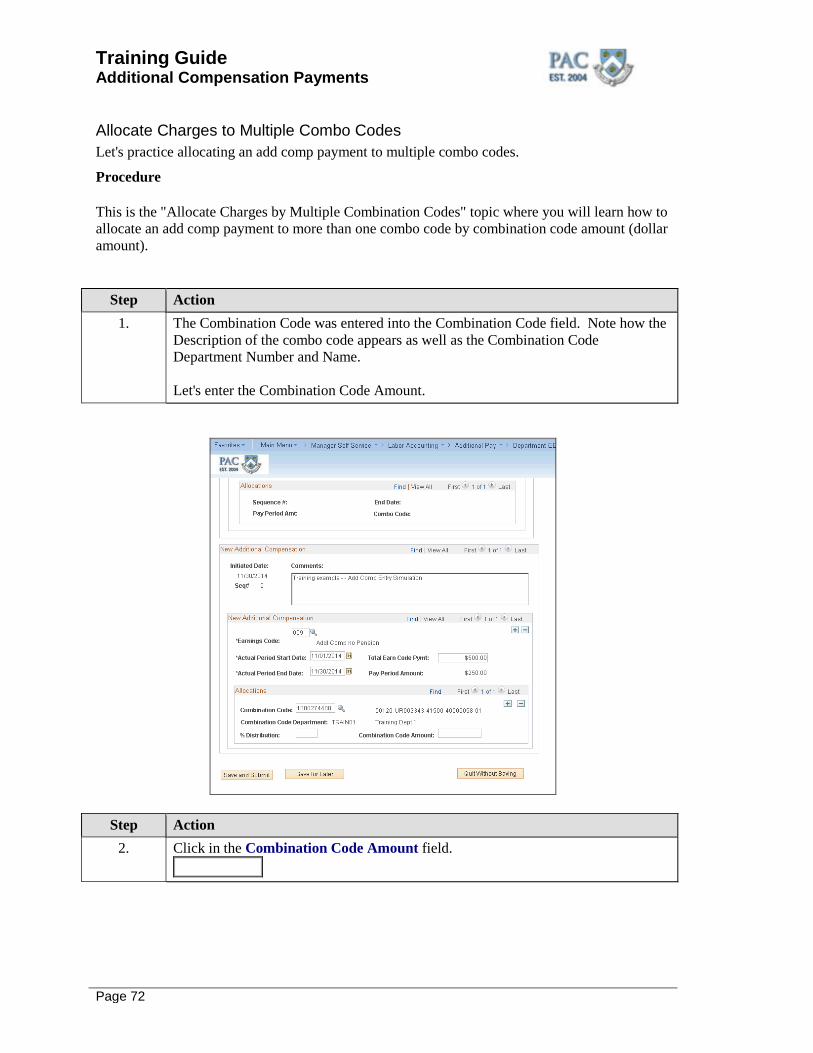
Allocate Charges to Multiple Combo Codes Let's practice allocating an add comp payment to multiple combo codes.
Procedure This is the "Allocate Charges by Multiple Combination Codes" topic where you will learn how to allocate an add comp payment to more than one combo code by combination code amount (dollar amount).
Step Action
1. The Combination Code was entered into the Combination Code field. Note how the Description of the combo code appears as well as the Combination Code Department Number and Name. Let's enter the Combination Code Amount.
Step Action 2. Click in the Combination Code Amount field.
Training Guide Additional Compensation Payments
Page 73
Step Action 3. Enter the dollar amount of the add comp payment to charge to the combo code
entered. For this example, let's charge $300 of the Total Earn Code Payment to one combo code and the balance of $200 to another combo code. Enter "300" into the Combination Code Amount field.
4. Press [Enter]. 5. Notice how PAC calculates the percentage based upon the dollar amount entered
into the Combination Code Amount field. The % Distribution field displays the percentage of the payment charged to the combo code. In this example, it is 60% (which is $300 of $500) To recap - $300 of this $500 add comp payment will be charged to the combo code entered.
6. To open up another allocation section, click the + button on the top right side of the Allocations section. Note: You can create as many additional allocation lines as needed. Simply continue to click on the "+ button". To remove an allocation line, click on the "- button".
7. Another section to enter a combination code and either the % Distribution or Combo
Code Amount appears. Let's enter the second combination code first. Click in the Combination Code field.
8. Enter "1000274401" into the Combination Code field. 9. Press [Enter]. 10. Now let's enter the remaining dollar amount to charge to the other combo code.
Click in the Combination Code Amount field.
11. Enter the dollar amount of the add comp payment to charge to the combo code
entered. For this entry, charge the remaining $200 of the Total Earn Code Payment to the combo code entered. Enter "200" into the Combination Code Amount field.
12. Press [Enter].
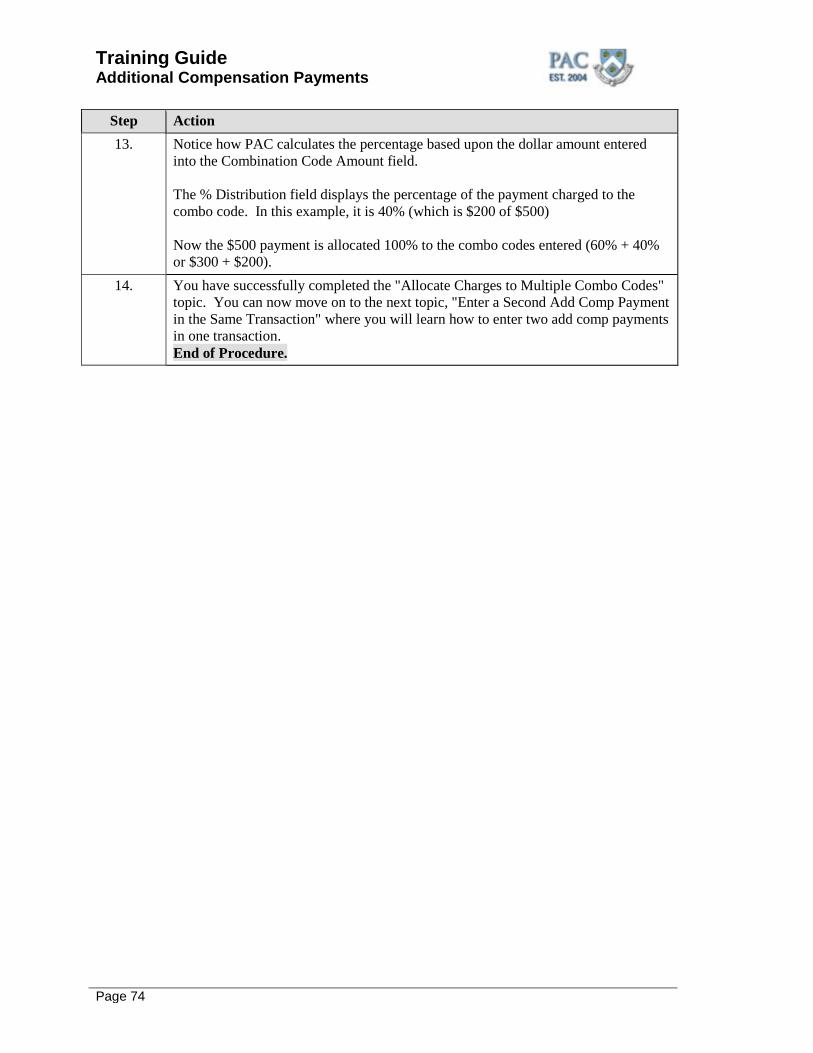
Training Guide Additional Compensation Payments
Page 74
Step Action 13. Notice how PAC calculates the percentage based upon the dollar amount entered
into the Combination Code Amount field. The % Distribution field displays the percentage of the payment charged to the combo code. In this example, it is 40% (which is $200 of $500) Now the $500 payment is allocated 100% to the combo codes entered (60% + 40% or $300 + $200).
14. You have successfully completed the "Allocate Charges to Multiple Combo Codes" topic. You can now move on to the next topic, "Enter a Second Add Comp Payment in the Same Transaction" where you will learn how to enter two add comp payments in one transaction. End of Procedure.
Training Guide Additional Compensation Payments
Page 75
Enter a Second Add Comp in the Same Transaction Enter a Second Add Comp Payment in the Same Transaction Two add comp payments can be entered in the same transaction. To create an additional add comp payment to another earnings code, simply click on the "+" button, to the right of the Earnings Code field. This will open up another section where you can complete the entry for the additional payment. You can create up to two separate add comp payments (to two earnings codes) in one transaction. If the employee is to receive more than two add comps, create a new transaction for the additional earnings codes after submitting the one you are currently completing. Note in the screen print below that once a new section is open, the "+" sign no longer appears, thus not allowing more than two add comps to be entered. If two add comps are submitted in the same transaction, they will be approved/denied/recycled together. An approver cannot take an action on one and a different action on the other. We'll review workflow and approver actions later in the lesson.
Training Guide Additional Compensation Payments
Page 76
Save and Submit the Add Comp Transaction Review, Save and Submit the Transaction Now that the add comp is entered, you are ready to submit the transaction through workflow for review and approval. Review the information entered for accuracy and click the "Save and Submit" button on the bottom of the page. Note: read and review any warning messages that appear. When initiating a transaction using an earning code for a payment that is already being paid or that is already pending approval in the workflow an overlay warning message appears. If the home department is initiating the transaction, the warning can be ignored by clicking OK and this newly entered transaction (once approved) will be effective. Prior to submission, ensure that you do want to override an existing transaction. We will explore overlaying transactions shortly.
Save the Transaction for Later If you are not ready to submit the transaction because you are waiting for information or need to confirm an item entry, click the "Save for Later" button and the transaction will remain in initiator status where you, or another initiator can access it and update it with new information. How do I access a saved transaction? Navigate to the "Find Pending" link within the Additional Pay section and enter search criteria for the transaction. The data that was saved appears. Note: If a transaction was saved for later, and not yet submitted into workflow, it cannot be deleted. If the transaction needs to be deleted, submit the transaction into workflow and inform the 1st level approver(s) to deny the transaction. This will remove the transaction and you will be able to enter a new transaction. Quit Without Saving To return to the Search page without saving any entered information, click the "Quit Without Saving" button.
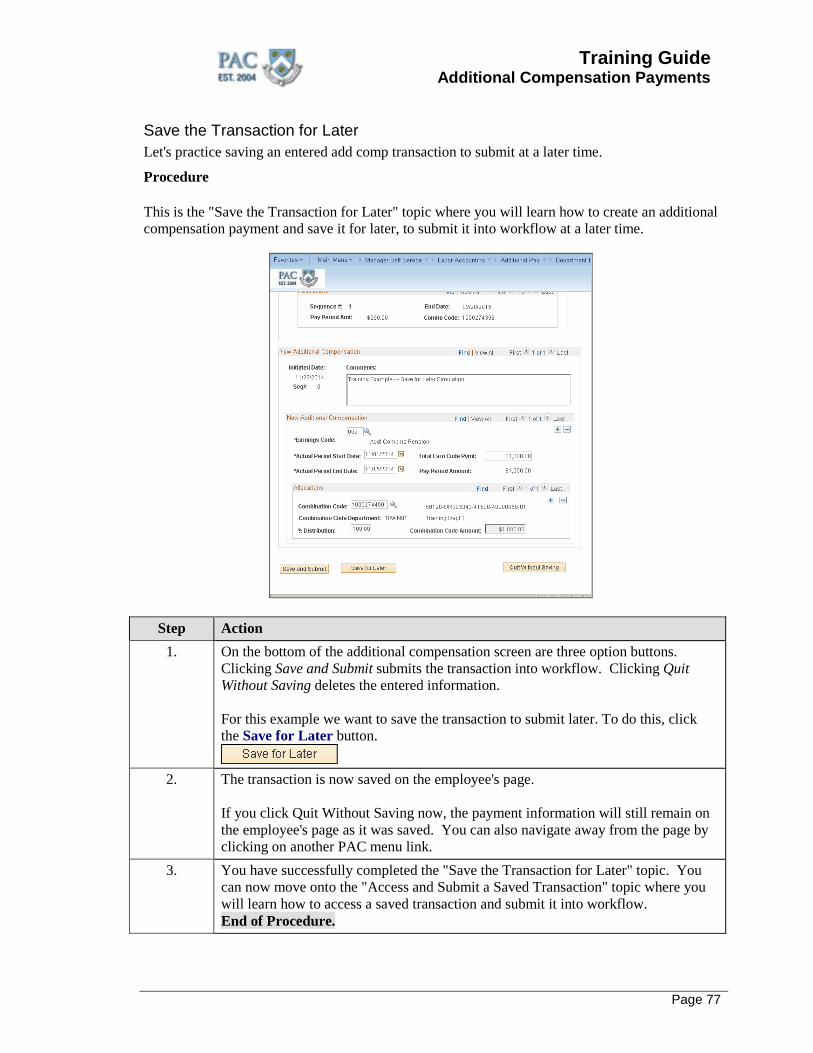
Training Guide Additional Compensation Payments
Page 77
Save the Transaction for Later Let's practice saving an entered add comp transaction to submit at a later time.
Procedure This is the "Save the Transaction for Later" topic where you will learn how to create an additional compensation payment and save it for later, to submit it into workflow at a later time.
Step Action 1. On the bottom of the additional compensation screen are three option buttons.
Clicking Save and Submit submits the transaction into workflow. Clicking Quit Without Saving deletes the entered information. For this example we want to save the transaction to submit later. To do this, click the Save for Later button.
2. The transaction is now saved on the employee's page.
If you click Quit Without Saving now, the payment information will still remain on the employee's page as it was saved. You can also navigate away from the page by clicking on another PAC menu link.
3. You have successfully completed the "Save the Transaction for Later" topic. You can now move onto the "Access and Submit a Saved Transaction" topic where you will learn how to access a saved transaction and submit it into workflow. End of Procedure.
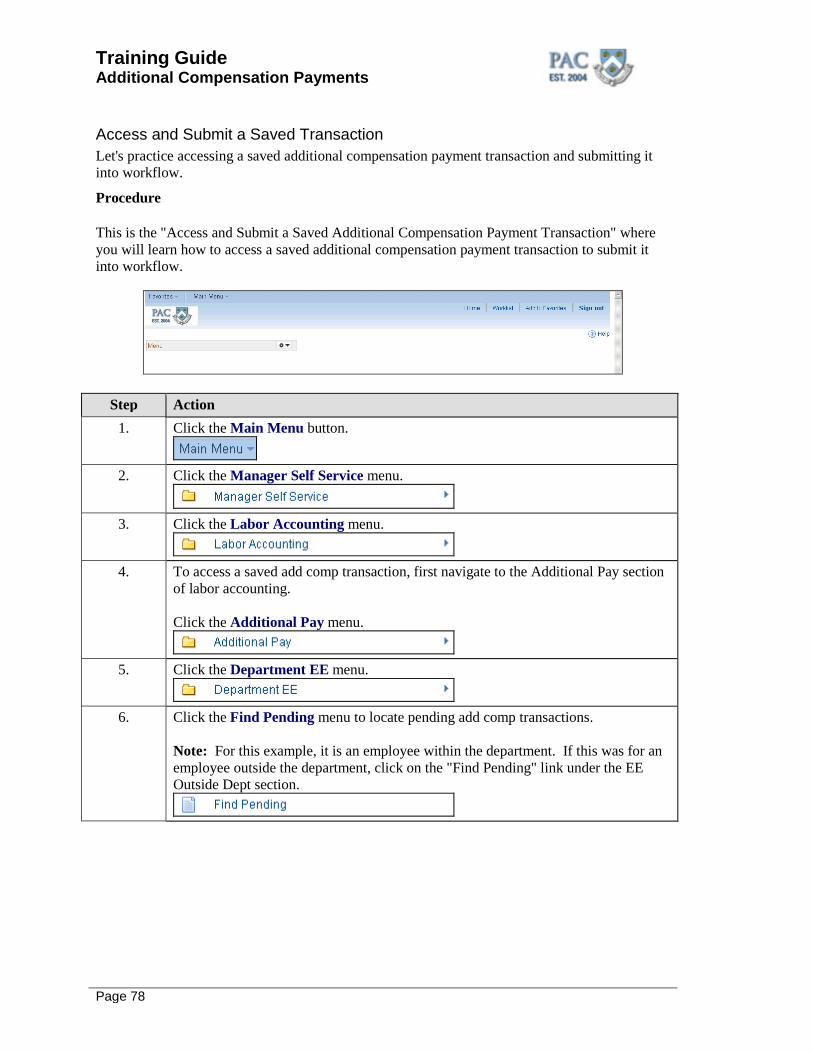
Training Guide Additional Compensation Payments
Page 78
Access and Submit a Saved Transaction Let's practice accessing a saved additional compensation payment transaction and submitting it into workflow.
Procedure This is the "Access and Submit a Saved Additional Compensation Payment Transaction" where you will learn how to access a saved additional compensation payment transaction to submit it into workflow.
Step Action 1. Click the Main Menu button.
2. Click the Manager Self Service menu.
3. Click the Labor Accounting menu.
4. To access a saved add comp transaction, first navigate to the Additional Pay section
of labor accounting. Click the Additional Pay menu.
5. Click the Department EE menu.
6. Click the Find Pending menu to locate pending add comp transactions.
Note: For this example, it is an employee within the department. If this was for an employee outside the department, click on the "Find Pending" link under the EE Outside Dept section.
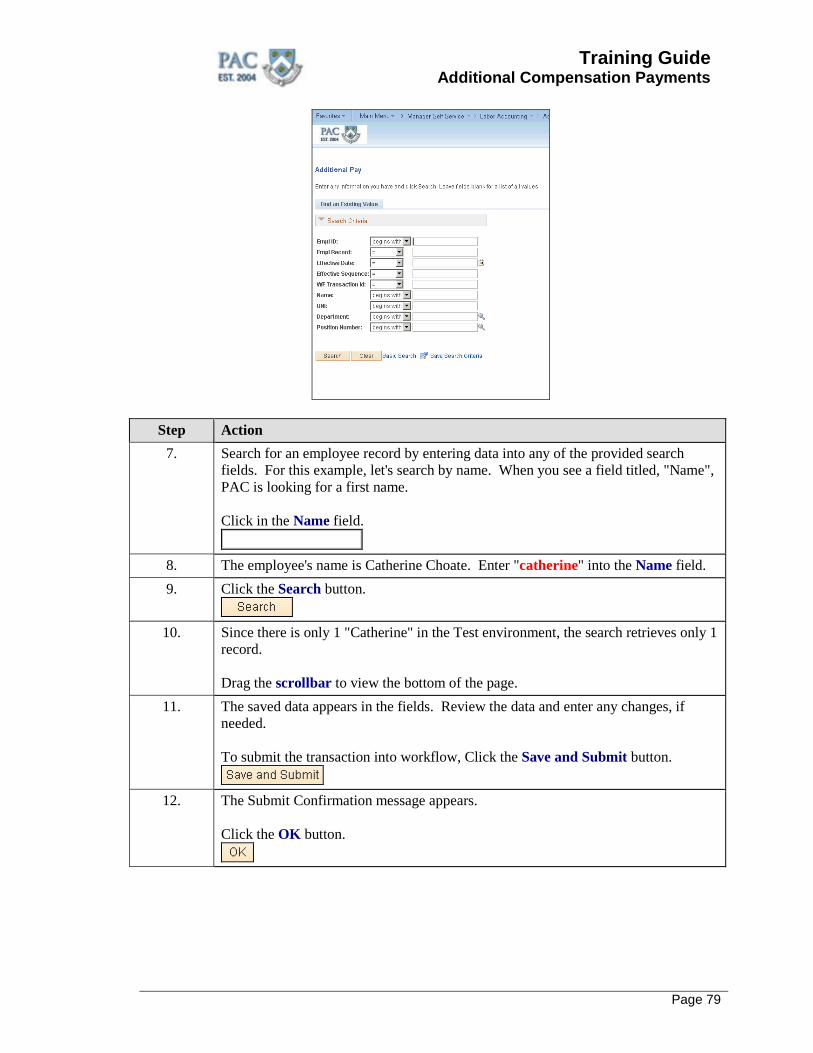
Training Guide Additional Compensation Payments
Page 79
Step Action 7. Search for an employee record by entering data into any of the provided search
fields. For this example, let's search by name. When you see a field titled, "Name", PAC is looking for a first name. Click in the Name field.
8. The employee's name is Catherine Choate. Enter "catherine" into the Name field. 9. Click the Search button.
10. Since there is only 1 "Catherine" in the Test environment, the search retrieves only 1
record. Drag the scrollbar to view the bottom of the page.
11. The saved data appears in the fields. Review the data and enter any changes, if needed. To submit the transaction into workflow, Click the Save and Submit button.
12. The Submit Confirmation message appears.
Click the OK button.
Training Guide Additional Compensation Payments
Page 80
Step Action 13. Process Tip
Once data is saved using the "Save for Later" feature, it cannot be removed. Note that there is not a "cancel" button. Deleting the data from the fields does not remove it as it remains in saved status. If upon review, it is determined that this transaction should be cancelled, submit it into workflow and notify the 1st level approver to "deny' it. This will remove the transaction from workflow and clear the entry fields in the employee record.
14. You have successfully completed the "Access and Submit a Saved Additional Compensation Payment Transaction" topic. You can now move onto the "Overlaying (Replacing) Existing Additional Compensation Payments" where you will learn how to replace a current add comp payment. End of Procedure.
Training Guide Additional Compensation Payments
Page 81
Overlaying (Replacing) Current Add Comp Payments Overlaying a Current Add Comp Payment Overlaying a payment is to create a new add comp payment with the same earn code as a currently paid add comp which then replaces the current transaction. Overlaying (replacing) a payment is used when either the current total payment amount, pay period amount, combo code(s) or distribution(s) need to be changed. Important: If you enter a retro add comp overlaying a current payment (using the same earnings code and already past pay period dates), you will overpay the employee. Let's look at a few examples of overlaying add comp payments.
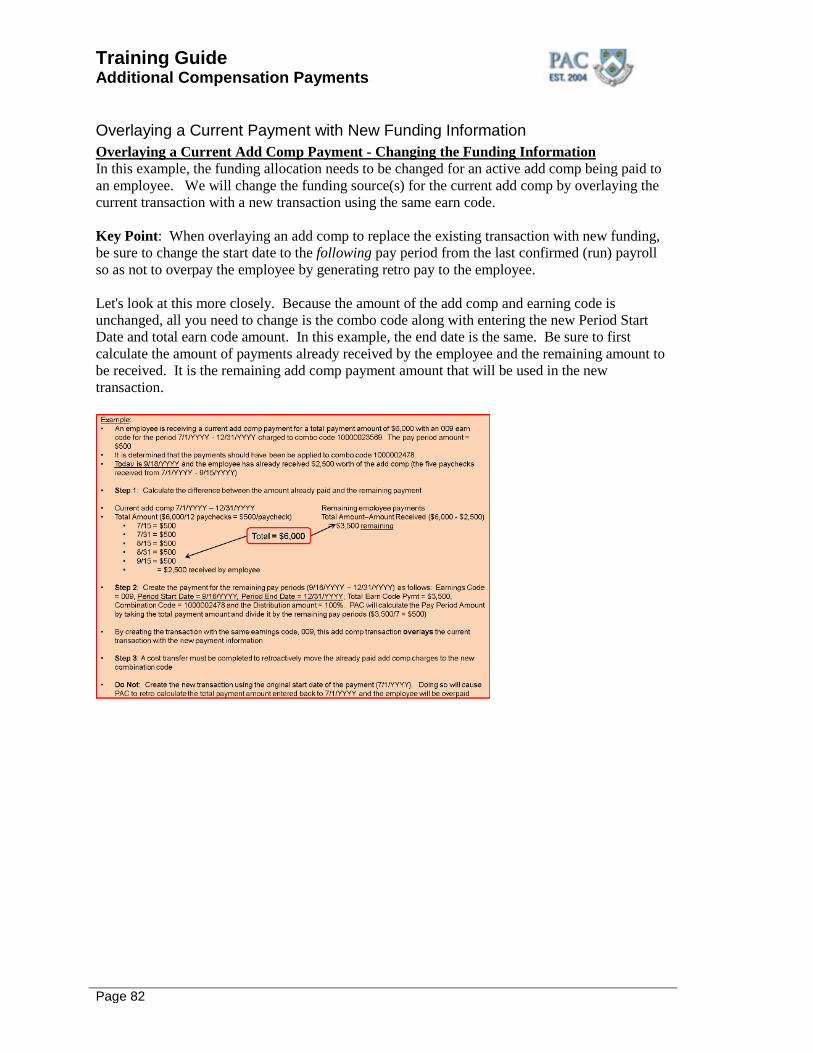
Training Guide Additional Compensation Payments
Page 82
Overlaying a Current Payment with New Funding Information Overlaying a Current Add Comp Payment - Changing the Funding Information In this example, the funding allocation needs to be changed for an active add comp being paid to an employee. We will change the funding source(s) for the current add comp by overlaying the current transaction with a new transaction using the same earn code. Key Point: When overlaying an add comp to replace the existing transaction with new funding, be sure to change the start date to the following pay period from the last confirmed (run) payroll so as not to overpay the employee by generating retro pay to the employee. Let's look at this more closely. Because the amount of the add comp and earning code is unchanged, all you need to change is the combo code along with entering the new Period Start Date and total earn code amount. In this example, the end date is the same. Be sure to first calculate the amount of payments already received by the employee and the remaining amount to be received. It is the remaining add comp payment amount that will be used in the new transaction.
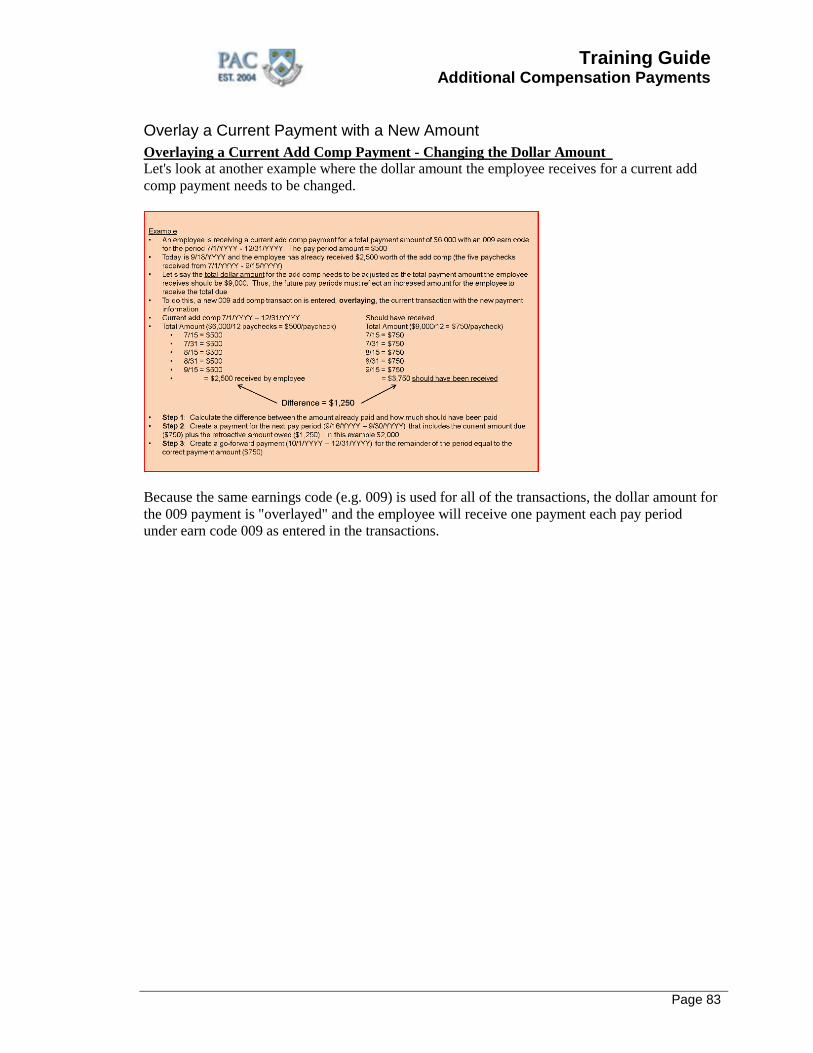
Training Guide Additional Compensation Payments
Page 83
Overlay a Current Payment with a New Amount Overlaying a Current Add Comp Payment - Changing the Dollar Amount Let's look at another example where the dollar amount the employee receives for a current add comp payment needs to be changed.
Because the same earnings code (e.g. 009) is used for all of the transactions, the dollar amount for the 009 payment is "overlayed" and the employee will receive one payment each pay period under earn code 009 as entered in the transactions.
Training Guide Additional Compensation Payments
Page 84
Create an Additional Payment using a Different Earn Code Creating an Additional Add Comp Payment using a Different Earn Code If you use a certain earnings code (e.g. 007) for a period that has a pre-existing transaction submitted on a different earn code (e.g. 011), the employee will receive two payments. One under the 007 earn code and one under the 011 earn code. Employees can receive multiple payments under multiple earn codes and this may be a valid entry. If the employee is to receive multiple add comps, be careful not to overlap an existing payment that you also want to go through with the same earning code as the former one would be cancelled out, as we just saw in the prior overlay examples. Alternately, if you wanted to overlay the current payment with new information and entered a different earn code by mistake, the employee will receive payments under each earn code and thus be overpaid. Remember: Only one transaction can be paid per earnings code per employee per paycheck. We'll practice making changes to current add comp payments, reviewing the Payroll Calendar and how pay cycle dates impact add comp payments a bit later in the lesson.
Training Guide Additional Compensation Payments
Page 85
Stop or Reduce an Add Comp Payment Immediately Stop or Reduce an Add Comp Payment Immediately There are times when you need to change a current add comp payment. Let's say you need to change a multi-month add comp that is already in process. For example, an administrative officer is receiving a 6-month add comp for additional duties. However, three months into the project, the additional duties are reduced or eliminated, resulting in either terminating or reducing the existing add comp payment. As such, the original add comp needs to be discontinued or reduced prior to the original period end date. Rule: If an active add comp exists for an employee and needs to be stopped or reduced effective as of the end of the current pay period, you must submit a paper Labor Accounting Form (PAC) - Salary Distribution and Additional Compensation (http://finance.columbia.edu/files/gateway/forms/la_form.pdf) to the HRPC before the payroll deadline. As long as the HRPC receives the form before the close of the current pay period, no add comp payment will be made in that upcoming paycheck. It is important to refer to the payroll calendar when modifying existing add comp payments. For information on how to submit Labor Accounting inquiries, contact the HR Service Center (https://columbia.service-now.com/).
Training Guide Additional Compensation Payments
Page 86
Submit Paper Add Comps Submit Paper Add Comps There are certain situations that require you to process an Additional Compensation transaction submitting a paper Labor Accounting Form (PAC) - Salary Distribution and Additional Compensation (http://finance.columbia.edu/files/gateway/forms/la_form.pdf) to the HRPC.
• To immediately stop or reduce an add comp payment in the current pay period • To retroactively change an add comp payment that was benefits ineligible (i.e. 009) to
benefits eligible (i.e. 007) due to continuation of additional duties • To retroactively change the payment composition of an add-comp transaction (i.e. for a
clinical faculty member, to change salary amounts already paid on 005 and 004). CUMC only
• To pay an add comp payment more than 75 days retroactively • To pay an add comp payment to a tax treaty employee (the MO3 pay group). Note: a
resident alien or non-resident alien can be in any pay group. If they are in an M01 pay group, the add comp can be done in PAC. If they are in an M03 pay group (tax treaty), the add comp is submitted on paper
• To pay an add comp payment to an Hourly Officer • Payments that cannot be accomplished electronically in PAC, such as terminated positions or
unpaid leave of absence
Training Guide Additional Compensation Payments
Page 87
Suspense Charges Suspense Charges What is Payroll Suspense? When an employee is paid, the earnings need to be allocated to one or more combo codes (representing ChartStrings.) If during the course of employment, an employee's earnings are charged to combo codes that are no longer active, the expense defaults to a departmental suspense ChartString/Combo Code. There are two funding allocations for suspense; the Default ChartString and the Suspense ChartString. Both are considered suspense and the difference is that the default ChartString is used to charge salary and additional compensation when the ChartString to charge has not yet been established and the suspense ChartString is charged when the ChartString/Combo Code to which an employee's earnings are being charged has expired, reached a limit or becomes inactive. Both types are department specific. It is the responsibility of each department to make sure that its Departmental Payroll Suspense is cleared of all charges on a monthly basis. The Payroll Department issues a monthly report of suspense by department to senior management.
Common Causes of Payroll Suspense for Add Comps and Solutions
Causes
• At the time of hire, the Grant Project was not yet established and the expenses were allocated to the department default ChartString/Combo Code via Template-Based Hire
• One or more ChartFields become inactive before the payment end date for the add comp is reached
Solutions
• Once the ChartFields are active in ARC, create the combo code • Establish the new go-forward payment charging the correct combo code(s), and • Complete a cost transfer to move the suspense charges to the correct ChartString/Combo Code
How can funding end for an add comp but an employee continue to receive the payment? As we just saw, when creating transactions there are edits in place to prevent charging add comps to combo codes beyond their active timeframes. However, there are times when ChartFields in ARC become inactive before the Period End Date for the additional compensation transaction. For example: Let's say an employee is receiving a $200 add comp each pay period from 11/1/14 - 3/31/15 funded separately by two sources. The transaction is created allocating the payment equally to the sources, say to the home department ChartString and to a grant funded ChartString. On 1/15/15, one or more ChartFields associated with the grant funding becomes inactive. The employee still receives the $200 payment, however, PAC does not have a ChartString to allocate the grant funded portion toward so it is placed in department suspense.
To move charges out of suspense, a cost transfer must be completed in addition to setting up an add comp transaction indicating the correct funding for the current and future payrolls.
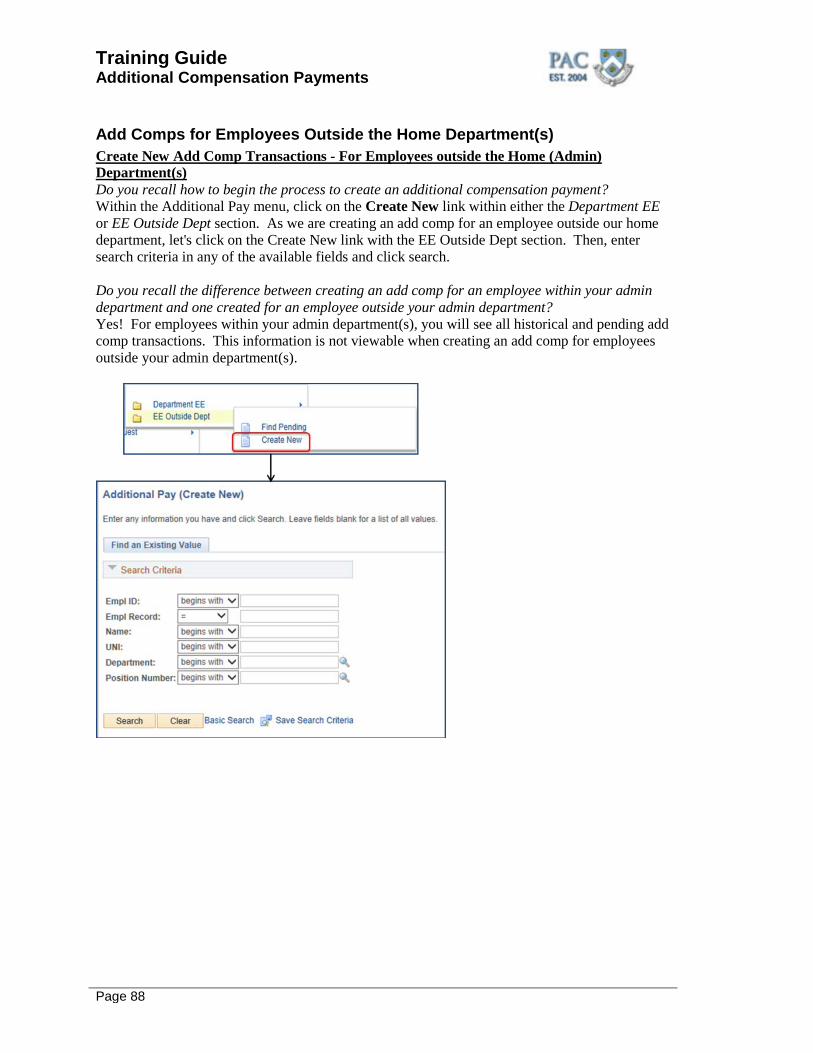
Training Guide Additional Compensation Payments
Page 88
Add Comps for Employees Outside the Home Department(s) Create New Add Comp Transactions - For Employees outside the Home (Admin) Department(s) Do you recall how to begin the process to create an additional compensation payment? Within the Additional Pay menu, click on the Create New link within either the Department EE or EE Outside Dept section. As we are creating an add comp for an employee outside our home department, let's click on the Create New link with the EE Outside Dept section. Then, enter search criteria in any of the available fields and click search. Do you recall the difference between creating an add comp for an employee within your admin department and one created for an employee outside your admin department? Yes! For employees within your admin department(s), you will see all historical and pending add comp transactions. This information is not viewable when creating an add comp for employees outside your admin department(s).
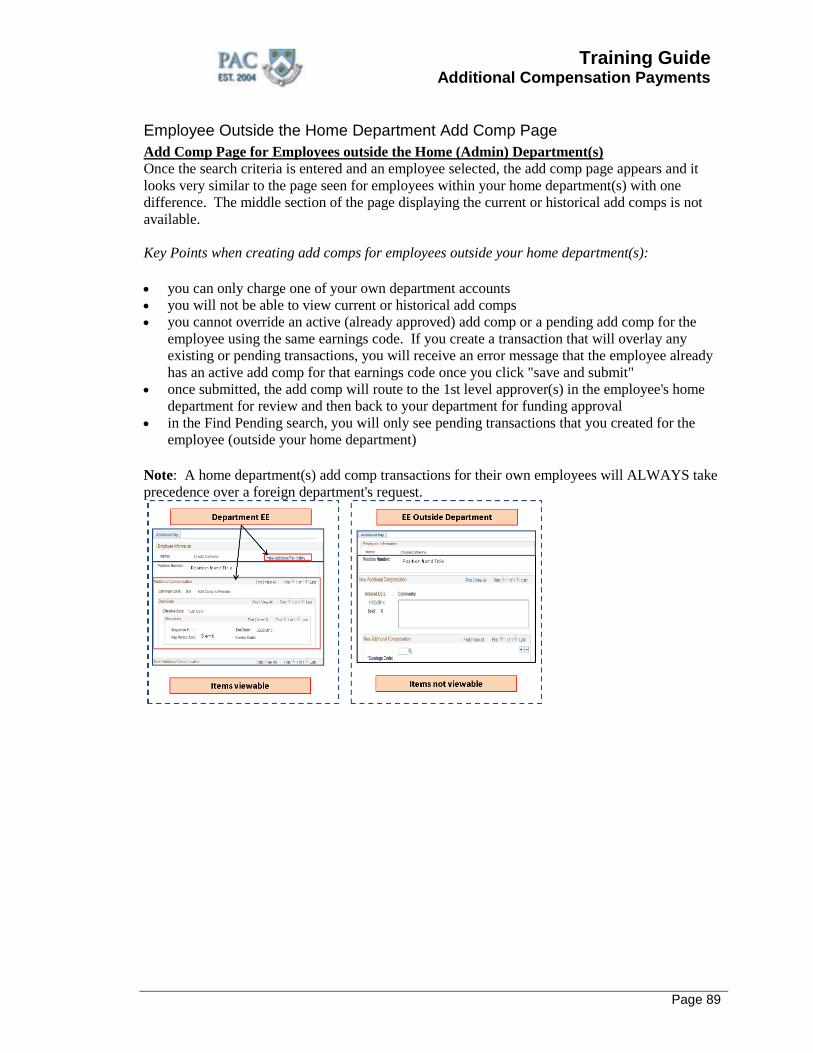
Training Guide Additional Compensation Payments
Page 89
Employee Outside the Home Department Add Comp Page Add Comp Page for Employees outside the Home (Admin) Department(s) Once the search criteria is entered and an employee selected, the add comp page appears and it looks very similar to the page seen for employees within your home department(s) with one difference. The middle section of the page displaying the current or historical add comps is not available. Key Points when creating add comps for employees outside your home department(s):
• you can only charge one of your own department accounts • you will not be able to view current or historical add comps • you cannot override an active (already approved) add comp or a pending add comp for the
employee using the same earnings code. If you create a transaction that will overlay any existing or pending transactions, you will receive an error message that the employee already has an active add comp for that earnings code once you click "save and submit"
• once submitted, the add comp will route to the 1st level approver(s) in the employee's home department for review and then back to your department for funding approval
• in the Find Pending search, you will only see pending transactions that you created for the employee (outside your home department)
Note: A home department(s) add comp transactions for their own employees will ALWAYS take precedence over a foreign department's request.

Training Guide Additional Compensation Payments
Page 90
Additional Compensation Transaction Examples Additional Compensation Transaction Examples Following are sample additional compensation transactions.
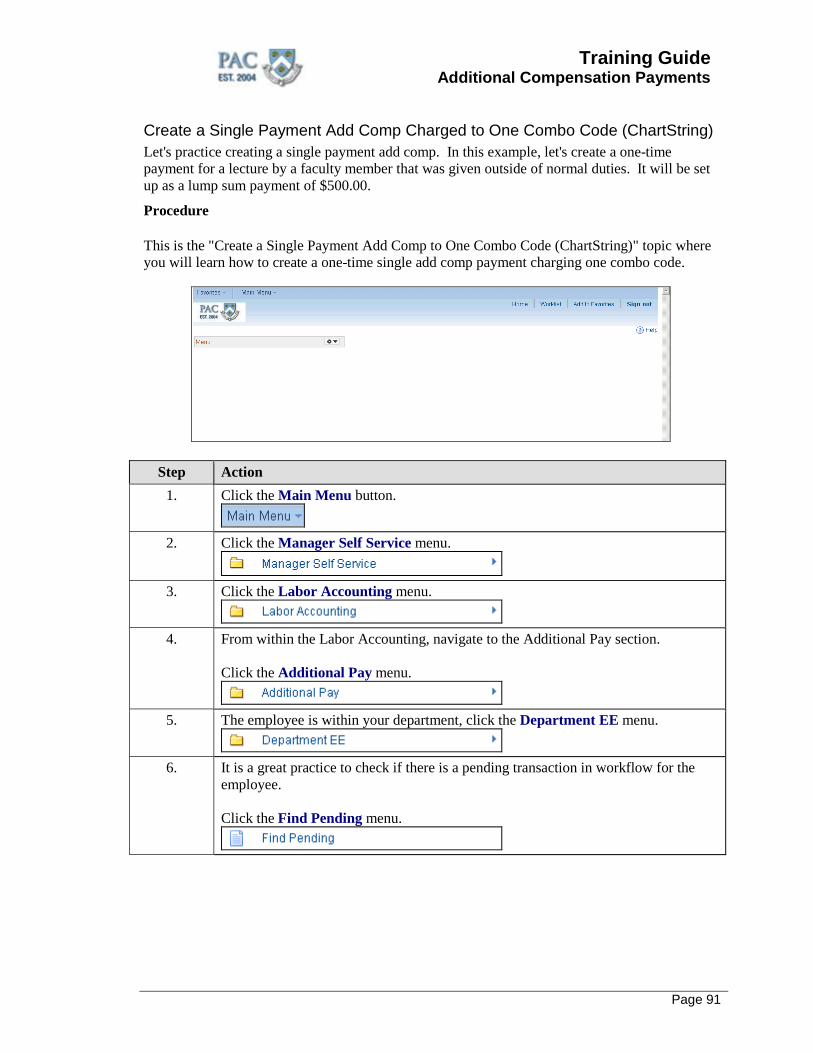
Training Guide Additional Compensation Payments
Page 91
Create a Single Payment Add Comp Charged to One Combo Code (ChartString) Let's practice creating a single payment add comp. In this example, let's create a one-time payment for a lecture by a faculty member that was given outside of normal duties. It will be set up as a lump sum payment of $500.00.
Procedure This is the "Create a Single Payment Add Comp to One Combo Code (ChartString)" topic where you will learn how to create a one-time single add comp payment charging one combo code.
Step Action 1. Click the Main Menu button.
2. Click the Manager Self Service menu.
3. Click the Labor Accounting menu.
4. From within the Labor Accounting, navigate to the Additional Pay section.
Click the Additional Pay menu.
5. The employee is within your department, click the Department EE menu.
6. It is a great practice to check if there is a pending transaction in workflow for the
employee. Click the Find Pending menu.
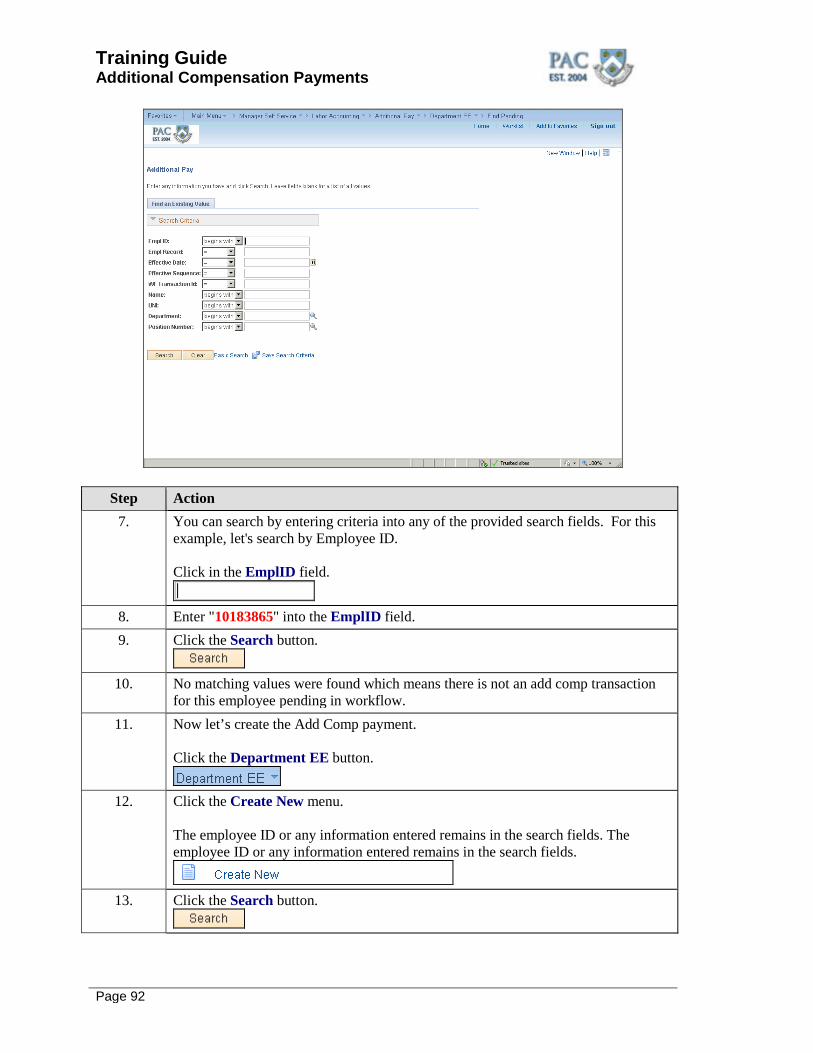
Training Guide Additional Compensation Payments
Page 92
Step Action 7. You can search by entering criteria into any of the provided search fields. For this
example, let's search by Employee ID. Click in the EmplID field.
8. Enter "10183865" into the EmplID field. 9. Click the Search button.
10. No matching values were found which means there is not an add comp transaction
for this employee pending in workflow. 11. Now let’s create the Add Comp payment.
Click the Department EE button.
12. Click the Create New menu.
The employee ID or any information entered remains in the search fields. The employee ID or any information entered remains in the search fields.
13. Click the Search button.
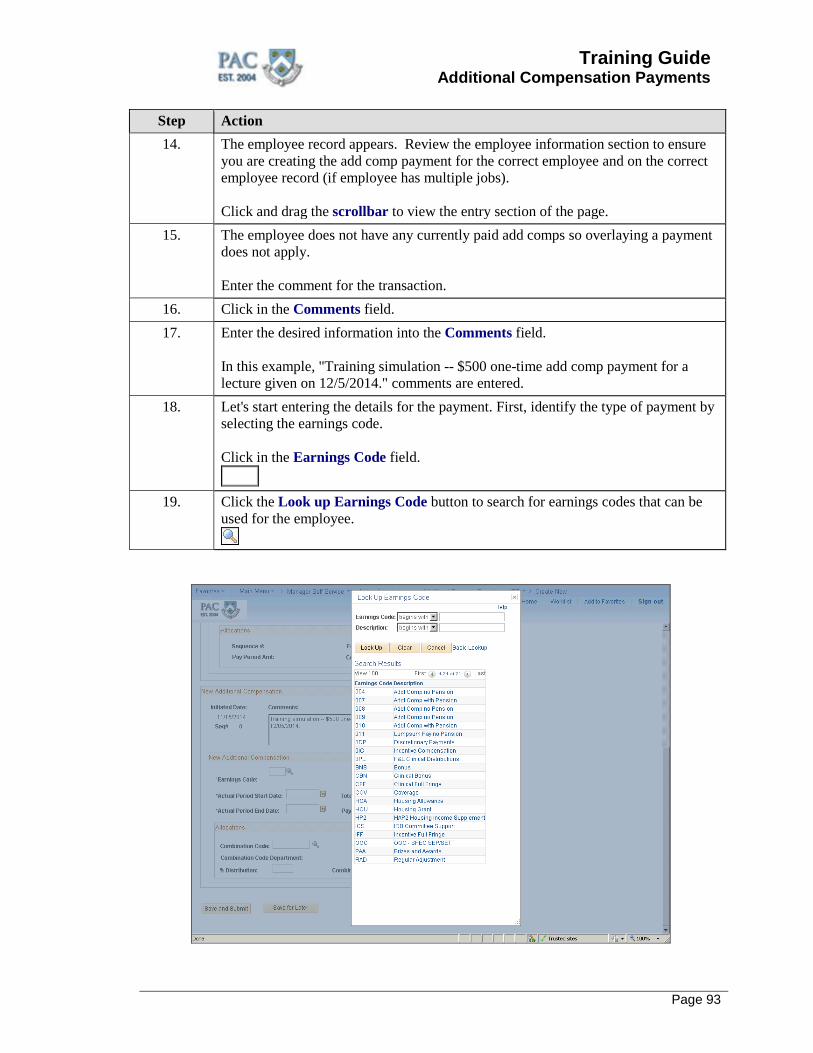
Training Guide Additional Compensation Payments
Page 93
Step Action 14. The employee record appears. Review the employee information section to ensure
you are creating the add comp payment for the correct employee and on the correct employee record (if employee has multiple jobs). Click and drag the scrollbar to view the entry section of the page.
15. The employee does not have any currently paid add comps so overlaying a payment does not apply. Enter the comment for the transaction.
16. Click in the Comments field. 17. Enter the desired information into the Comments field.
In this example, "Training simulation -- $500 one-time add comp payment for a lecture given on 12/5/2014." comments are entered.
18. Let's start entering the details for the payment. First, identify the type of payment by selecting the earnings code. Click in the Earnings Code field.
19. Click the Look up Earnings Code button to search for earnings codes that can be
used for the employee.
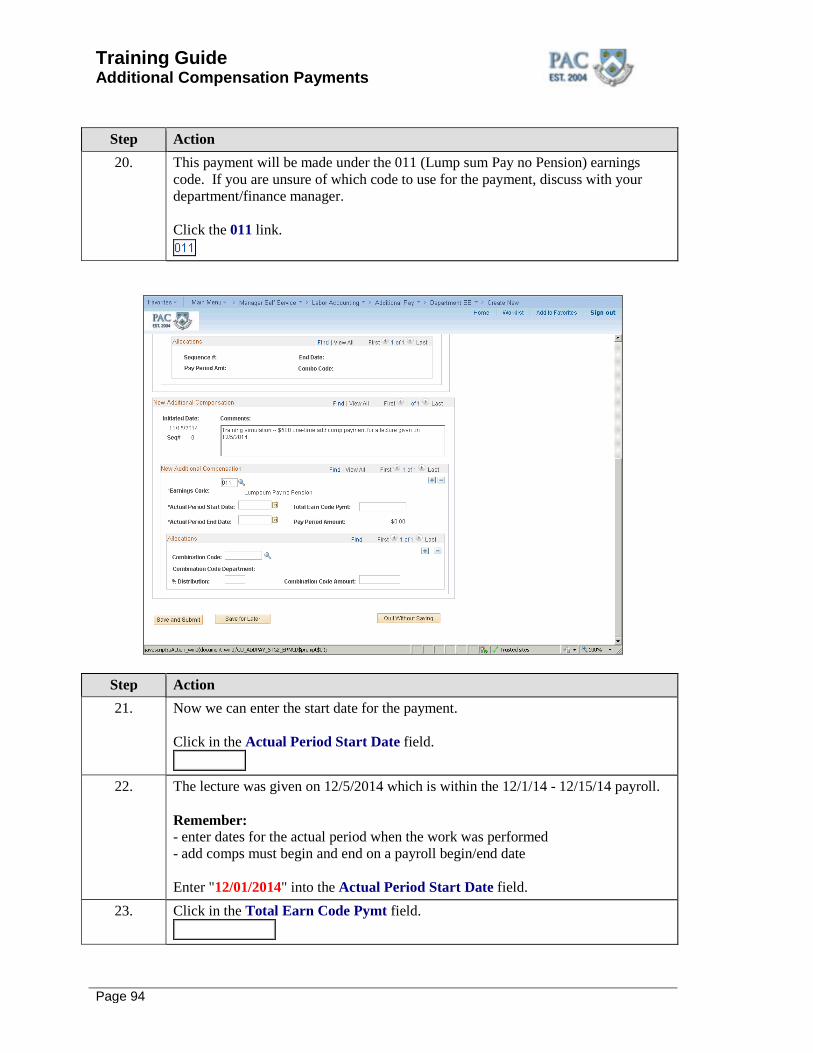
Training Guide Additional Compensation Payments
Page 94
Step Action 20. This payment will be made under the 011 (Lump sum Pay no Pension) earnings
code. If you are unsure of which code to use for the payment, discuss with your department/finance manager. Click the 011 link.
Step Action 21. Now we can enter the start date for the payment.
Click in the Actual Period Start Date field.
22. The lecture was given on 12/5/2014 which is within the 12/1/14 - 12/15/14 payroll.
Remember: - enter dates for the actual period when the work was performed - add comps must begin and end on a payroll begin/end date Enter "12/01/2014" into the Actual Period Start Date field.
23. Click in the Total Earn Code Pymt field.
Training Guide Additional Compensation Payments
Page 95
Step Action 24. Next, let's enter the total amount of the add comp for the earn code selected. In this
example, it is $500. Enter $500 in the Total Earn Code Pymt field. 25. Press [Enter]. 26. Now we can enter the end date for the payment. Click in the Actual Period End
Date field.
27. Enter "12/15/2014" into the Actual Period End Date field. 28. Press [Enter]. 29. Next, indicate the combo code to be charged for the payment. In this example, the
total payment is to be charged to one combo code. Click in the Combination Code field.
30. Enter "1000274400" into the Combination Code field. 31. Next, indicate the percentage amount of the payment to charge to the combo code.
In this example, the entire payment is charged to one combo code. Click in the % Distribution field.
32. Enter "100" into the % Distribution field. 33. Press [Enter]. 34. Let's recap the entry.
- A $500 one-time add comp payment using earn code 011 for a lecture given on 12/5/2014 is entered - The actual period start and end dates reflect one payroll timeframe when the work was performed (note the pay period amount = $500, the same amount of the total payment) - combo code 1000274400 will be charged 100% (or $500) for the payment
35. The payment is entered and is ready to submit into workflow for review. Click the Save and Submit button.
36. The Submit Confirmation message appears.
Click the OK button.
37. You have successfully completed the "Create a Single Payment Add Comp to One
Combo Code (ChartString)" topic. You can now move onto the next topic, "Create a Single Payment Add Comp to Multiple Combo Codes". End of Procedure.
Training Guide Additional Compensation Payments
Page 96
Create a Single Payment Add Comp Charged to Multiple Combo Codes (ChartStrings) Let's practice creating a single payment add comp. In this example, let's create a one-time payment for a lecture by a faculty member that was given outside of normal duties. It will be set up as a lump sum payment of $500.00 and will be charged to two combo codes. Combo code #1 will be charged $300 and combo code #2 will be charged $200.
Procedure This is the "Create a Single Payment Add Comp Charging Multiple Combo Codes (ChartStrings)" topic where you will learn how to create an add comp payment and charge it to more than one combo code.
Step Action 1. Click the Main Menu button.
2. Click the Manager Self Service menu.
3. Click the Labor Accounting menu.
4. From within the Labor Accounting, navigate to the Additional Pay section.
Click the Additional Pay menu.
5. The employee is within your department, click the Department EE menu.
6. It is a great practice to check if there is a pending transaction in workflow for the
employee. Click the Find Pending menu.
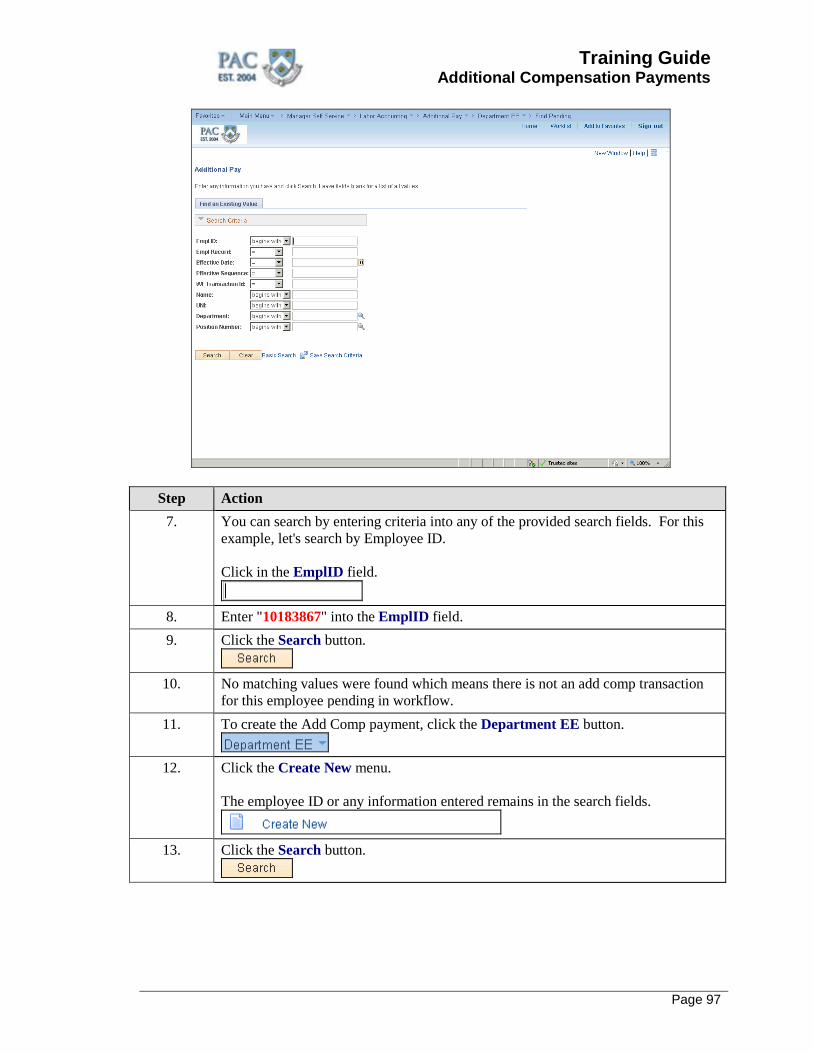
Training Guide Additional Compensation Payments
Page 97
Step Action 7. You can search by entering criteria into any of the provided search fields. For this
example, let's search by Employee ID. Click in the EmplID field.
8. Enter "10183867" into the EmplID field. 9. Click the Search button.
10. No matching values were found which means there is not an add comp transaction
for this employee pending in workflow. 11. To create the Add Comp payment, click the Department EE button.
12. Click the Create New menu.
The employee ID or any information entered remains in the search fields.
13. Click the Search button.
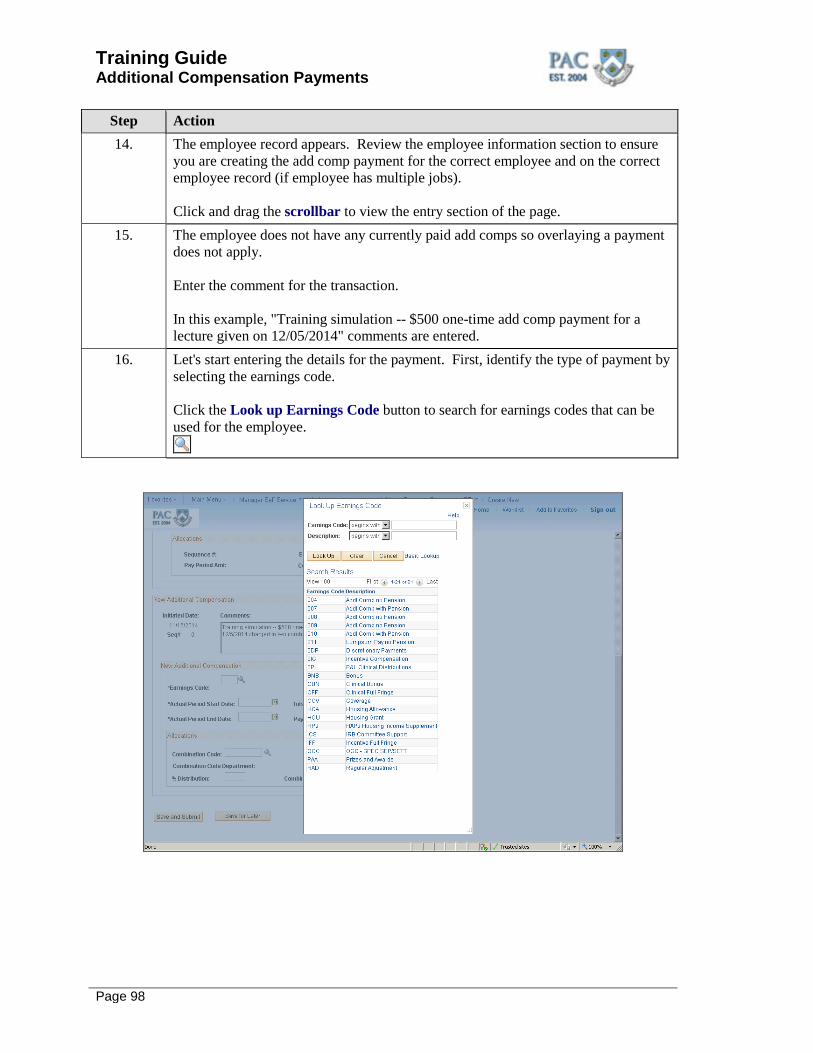
Training Guide Additional Compensation Payments
Page 98
Step Action 14. The employee record appears. Review the employee information section to ensure
you are creating the add comp payment for the correct employee and on the correct employee record (if employee has multiple jobs). Click and drag the scrollbar to view the entry section of the page.
15. The employee does not have any currently paid add comps so overlaying a payment does not apply. Enter the comment for the transaction. In this example, "Training simulation -- $500 one-time add comp payment for a lecture given on 12/05/2014" comments are entered.
16. Let's start entering the details for the payment. First, identify the type of payment by selecting the earnings code. Click the Look up Earnings Code button to search for earnings codes that can be used for the employee.
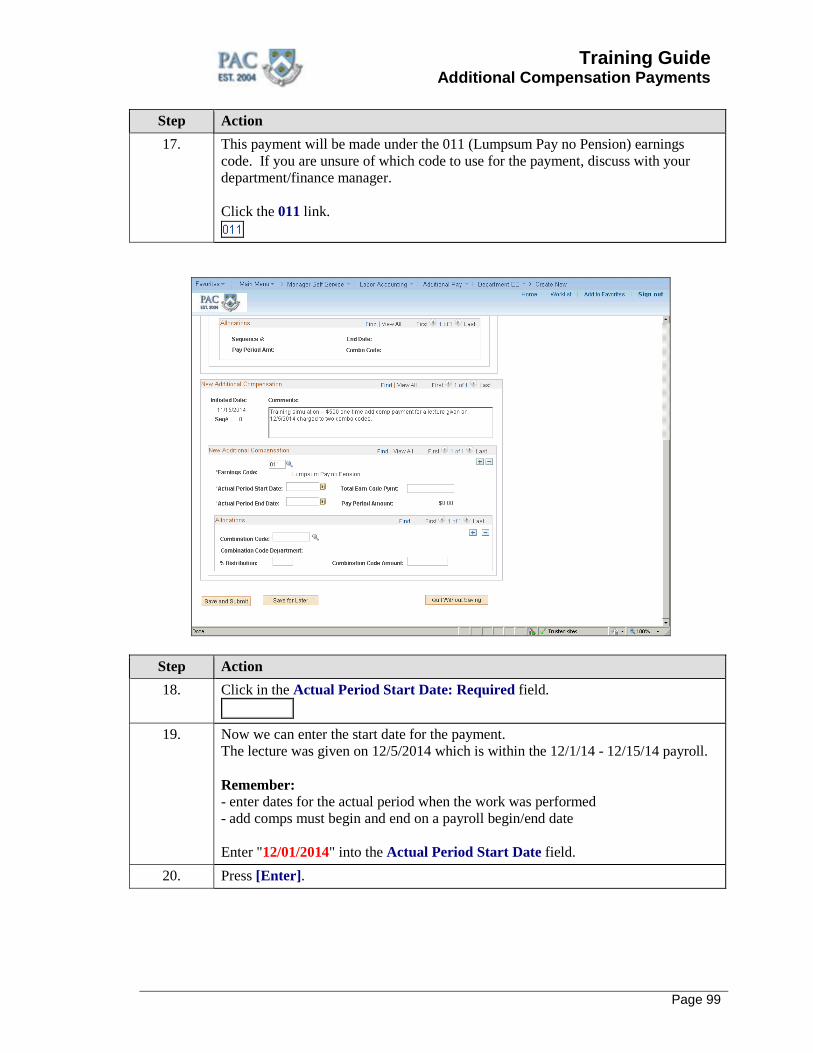
Training Guide Additional Compensation Payments
Page 99
Step Action 17. This payment will be made under the 011 (Lumpsum Pay no Pension) earnings
code. If you are unsure of which code to use for the payment, discuss with your department/finance manager. Click the 011 link.
Step Action 18. Click in the Actual Period Start Date: Required field.
19. Now we can enter the start date for the payment.
The lecture was given on 12/5/2014 which is within the 12/1/14 - 12/15/14 payroll. Remember: - enter dates for the actual period when the work was performed - add comps must begin and end on a payroll begin/end date Enter "12/01/2014" into the Actual Period Start Date field.
20. Press [Enter].
Training Guide Additional Compensation Payments
Page 100
Step Action 21. Next, let's enter the total amount of the add comp for the earn code selected. In this
example, it is $500. Click in the Total Earn Code Pymt field.
22. Enter the desired information into the Total Earn Code Pymt field. Enter "500". 23. Press [Enter]. 24. Now we can enter the end date for the payment.
Click in the Actual Period End Date: Required field.
25. Enter "12/15/2014" into the Actual Period End Date field. 26. Press [Enter]. 27. Click in the Combination Code field.
28. Next, indicate the combo code to be charged for the payment. In this example, the
total payment is to be charged to two combo codes. We'll enter the allocation information for the charge to combo code 1. Enter "1000274400" into the Combination Code field.
29. Press [Enter]. 30. The combination code information displays.
Next, indicate the amount of the payment to charge to the combo code. Remember, you can enter either a percent Distribution or Combination Code Amount (dollar amount). In this example, the entire payment is charged to two combo codes and combo code #1 is charged $300 of the $500 payment. To enter a dollar amount for the payment, click in the Combination Code Amount field.
31. Enter "300" into the Combination Code Amount field. 32. Press [Enter]. 33. Next, add another section to allocate the remainder of the payment.
Click the "+" button to add a new row at row.
Training Guide Additional Compensation Payments
Page 101
Step Action 34. Another allocation section appears where we can enter the information for combo
code #2. Click and drag the scrollbar to view the new allocation section.
35. Now we can enter the 2nd combination code.
Click in the Combination Code field.
36. Enter "1000274401" into the Combination Code field. 37. Press [Enter]. 38. The combination code information appears.
To allocate the remaining portion of the payment, click in the Combination Code Amount field.
39. Enter "200" which is the remaining portion of the payment into the Combination
Code Amount field. 40. Press [Enter]. 41. Let's recap the entry.
- A $500 one-time add comp payment using earn code 011 for a lecture given on 12/5/2014 is entered - The actual period start and end dates reflect one payroll timeframe when the work was performed (note the pay period amount = $500, the same amount of the total payment) - combo code 1000274400 will be charged $300 (or 60%) of the $500 payment - combo code 1000274401 will be charged $200 (or 40%) of the $500 payment
42. The payment is entered and is ready to submit into workflow for review. Click the Save and Submit button.
43. The Submit Confirmation message appears.
Click the OK button.
44. You have successfully completed the "Create a Single Add Comp Payment Charged
to Multiple Combo Codes (ChartStrings)" topic. You can now move onto the next topic, "Create a Five Month Add Comp Charged to Multiple Combo Codes." End of Procedure.
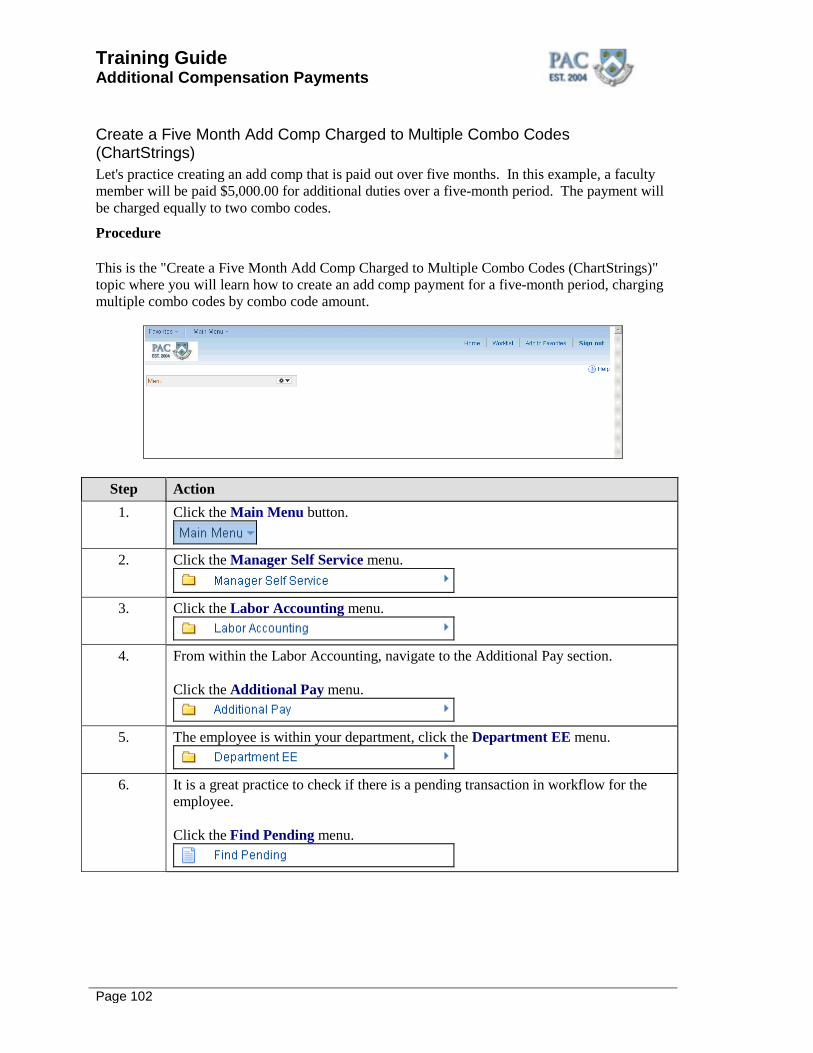
Training Guide Additional Compensation Payments
Page 102
Create a Five Month Add Comp Charged to Multiple Combo Codes (ChartStrings) Let's practice creating an add comp that is paid out over five months. In this example, a faculty member will be paid $5,000.00 for additional duties over a five-month period. The payment will be charged equally to two combo codes.
Procedure This is the "Create a Five Month Add Comp Charged to Multiple Combo Codes (ChartStrings)" topic where you will learn how to create an add comp payment for a five-month period, charging multiple combo codes by combo code amount.
Step Action 1. Click the Main Menu button.
2. Click the Manager Self Service menu.
3. Click the Labor Accounting menu.
4. From within the Labor Accounting, navigate to the Additional Pay section.
Click the Additional Pay menu.
5. The employee is within your department, click the Department EE menu.
6. It is a great practice to check if there is a pending transaction in workflow for the
employee. Click the Find Pending menu.
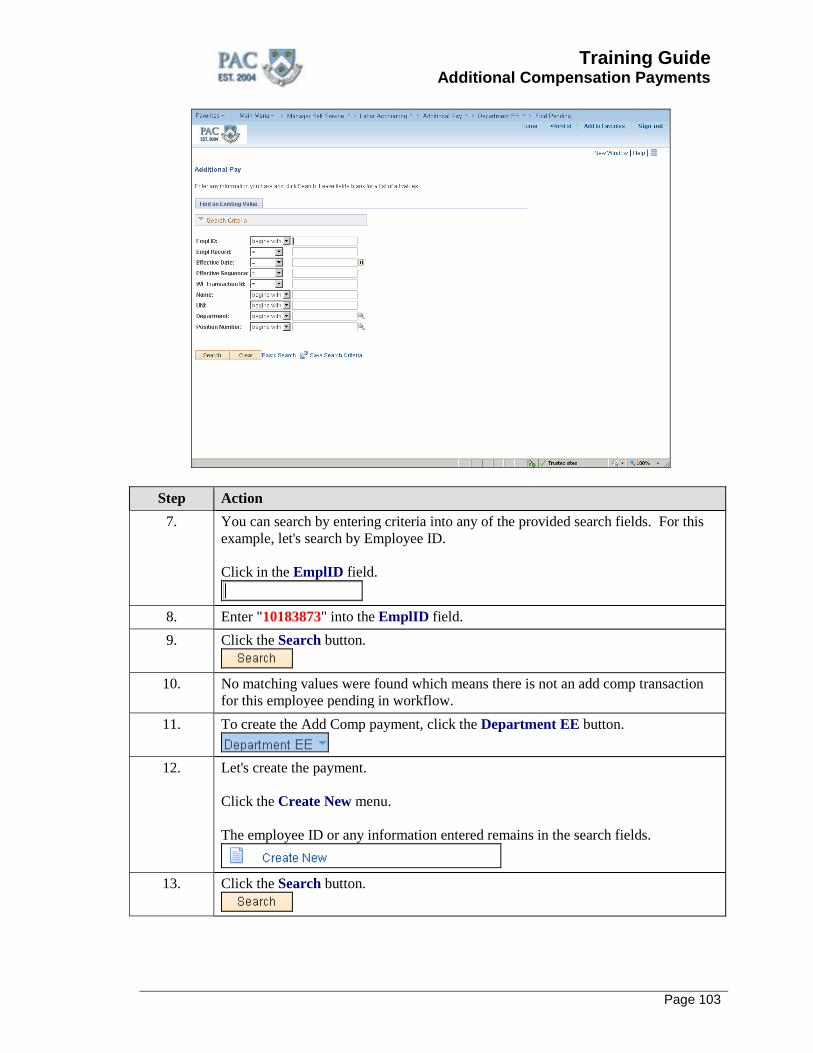
Training Guide Additional Compensation Payments
Page 103
Step Action 7. You can search by entering criteria into any of the provided search fields. For this
example, let's search by Employee ID. Click in the EmplID field.
8. Enter "10183873" into the EmplID field. 9. Click the Search button.
10. No matching values were found which means there is not an add comp transaction
for this employee pending in workflow. 11. To create the Add Comp payment, click the Department EE button.
12. Let's create the payment.
Click the Create New menu. The employee ID or any information entered remains in the search fields.
13. Click the Search button.
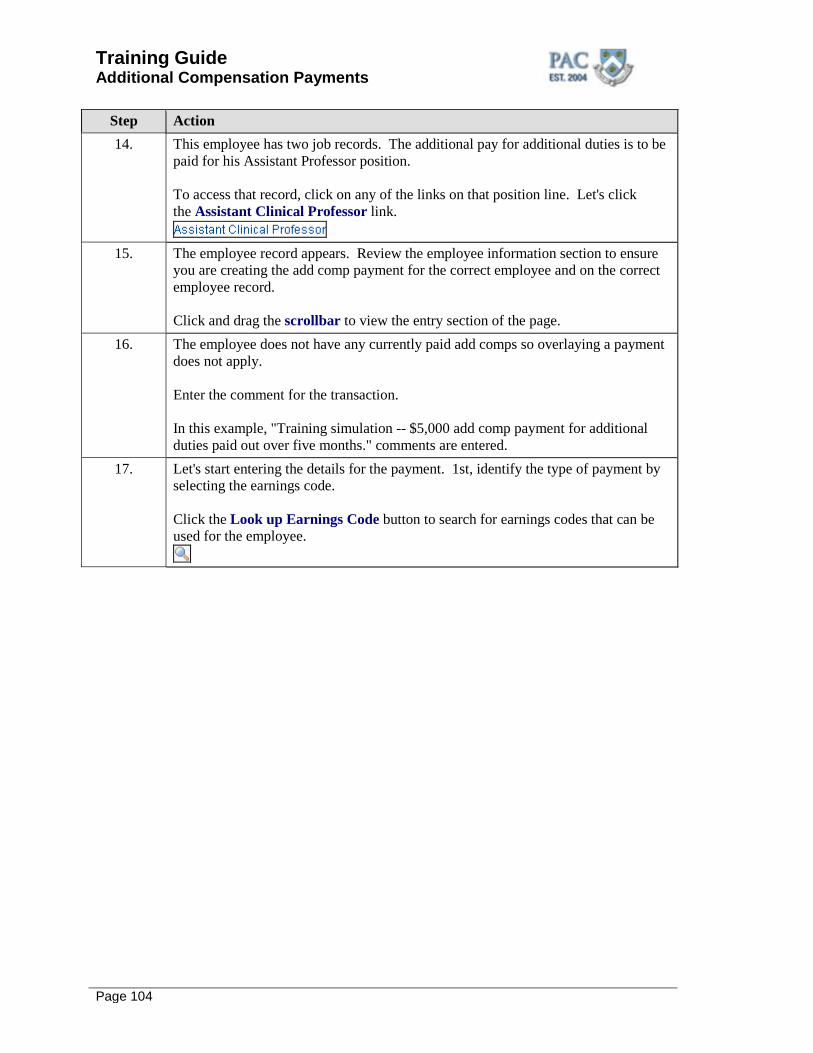
Training Guide Additional Compensation Payments
Page 104
Step Action 14. This employee has two job records. The additional pay for additional duties is to be
paid for his Assistant Professor position. To access that record, click on any of the links on that position line. Let's click the Assistant Clinical Professor link.
15. The employee record appears. Review the employee information section to ensure
you are creating the add comp payment for the correct employee and on the correct employee record. Click and drag the scrollbar to view the entry section of the page.
16. The employee does not have any currently paid add comps so overlaying a payment does not apply. Enter the comment for the transaction. In this example, "Training simulation -- $5,000 add comp payment for additional duties paid out over five months." comments are entered.
17. Let's start entering the details for the payment. 1st, identify the type of payment by selecting the earnings code. Click the Look up Earnings Code button to search for earnings codes that can be used for the employee.
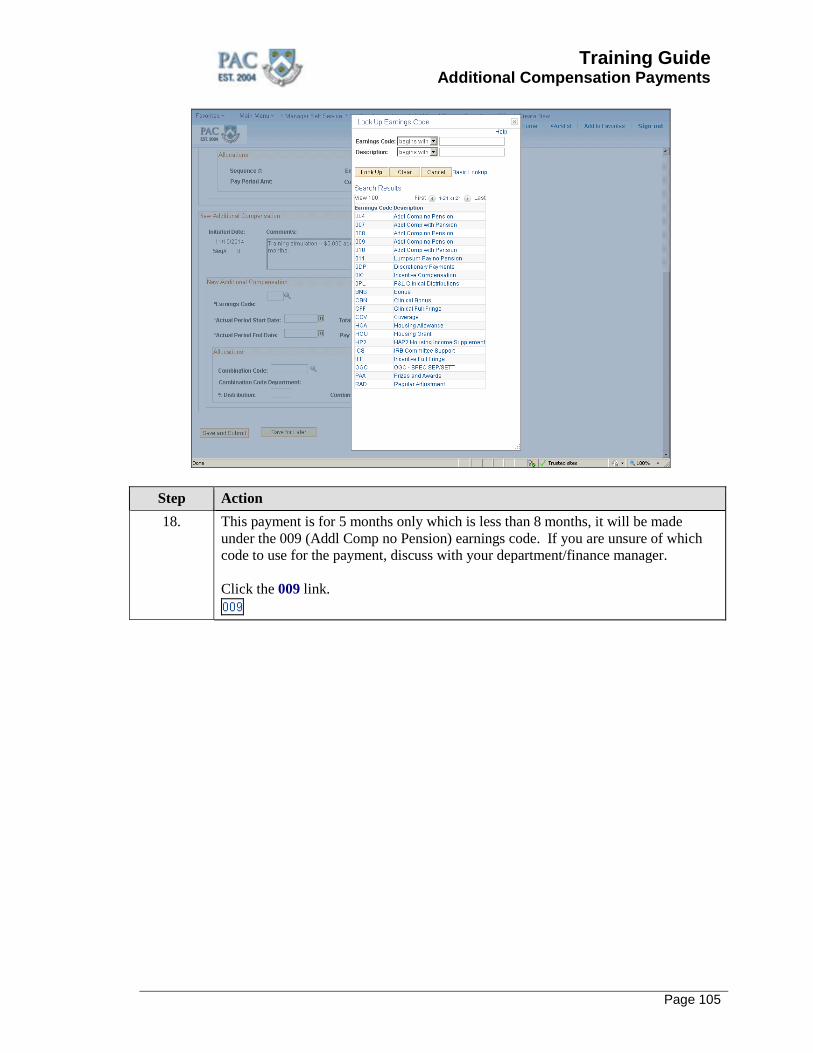
Training Guide Additional Compensation Payments
Page 105
Step Action 18. This payment is for 5 months only which is less than 8 months, it will be made
under the 009 (Addl Comp no Pension) earnings code. If you are unsure of which code to use for the payment, discuss with your department/finance manager. Click the 009 link.
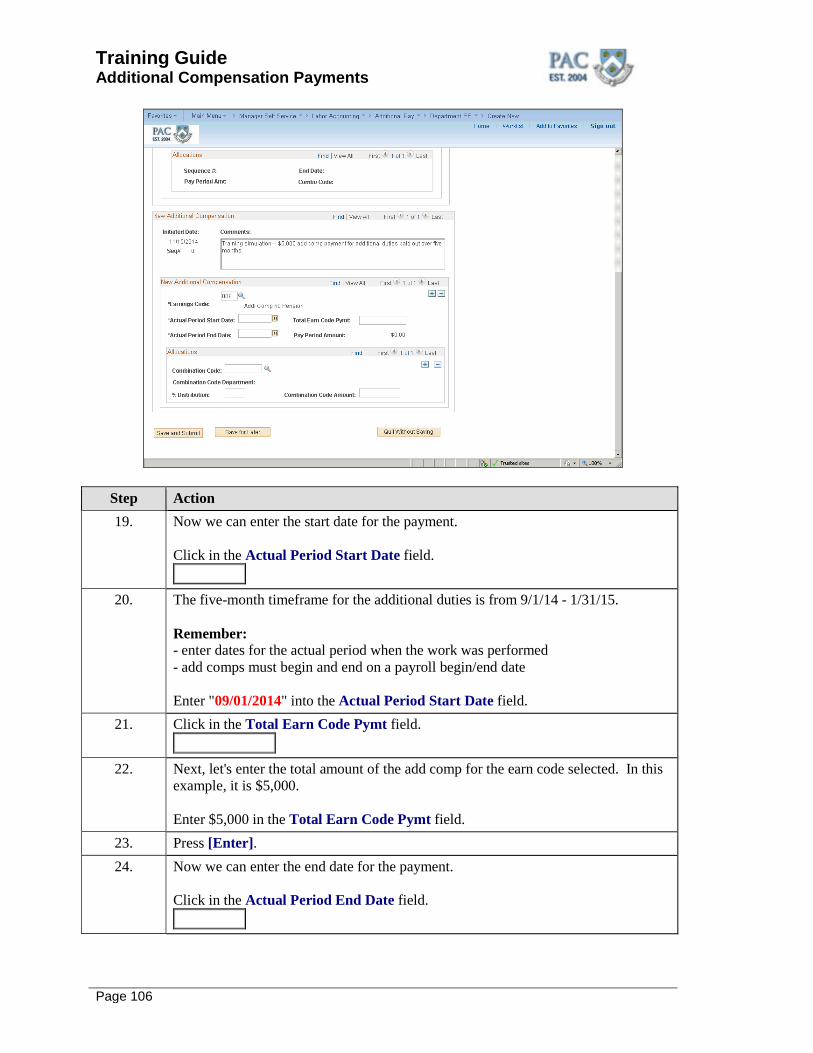
Training Guide Additional Compensation Payments
Page 106
Step Action 19. Now we can enter the start date for the payment.
Click in the Actual Period Start Date field.
20. The five-month timeframe for the additional duties is from 9/1/14 - 1/31/15.
Remember: - enter dates for the actual period when the work was performed - add comps must begin and end on a payroll begin/end date Enter "09/01/2014" into the Actual Period Start Date field.
21. Click in the Total Earn Code Pymt field.
22. Next, let's enter the total amount of the add comp for the earn code selected. In this
example, it is $5,000. Enter $5,000 in the Total Earn Code Pymt field.
23. Press [Enter]. 24. Now we can enter the end date for the payment.
Click in the Actual Period End Date field.
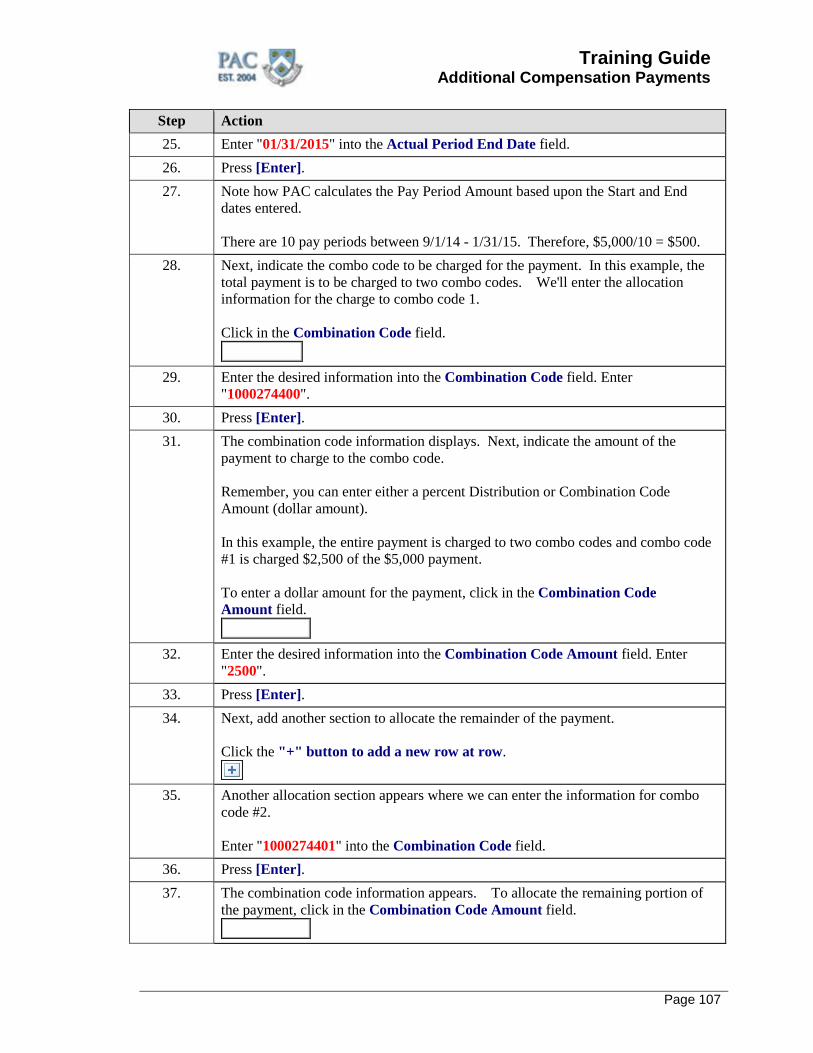
Training Guide Additional Compensation Payments
Page 107
Step Action 25. Enter "01/31/2015" into the Actual Period End Date field. 26. Press [Enter]. 27. Note how PAC calculates the Pay Period Amount based upon the Start and End
dates entered. There are 10 pay periods between 9/1/14 - 1/31/15. Therefore, $5,000/10 = $500.
28. Next, indicate the combo code to be charged for the payment. In this example, the total payment is to be charged to two combo codes. We'll enter the allocation information for the charge to combo code 1. Click in the Combination Code field.
29. Enter the desired information into the Combination Code field. Enter
"1000274400". 30. Press [Enter]. 31. The combination code information displays. Next, indicate the amount of the
payment to charge to the combo code. Remember, you can enter either a percent Distribution or Combination Code Amount (dollar amount). In this example, the entire payment is charged to two combo codes and combo code #1 is charged $2,500 of the $5,000 payment. To enter a dollar amount for the payment, click in the Combination Code Amount field.
32. Enter the desired information into the Combination Code Amount field. Enter
"2500". 33. Press [Enter]. 34. Next, add another section to allocate the remainder of the payment.
Click the "+" button to add a new row at row.
35. Another allocation section appears where we can enter the information for combo
code #2. Enter "1000274401" into the Combination Code field.
36. Press [Enter]. 37. The combination code information appears. To allocate the remaining portion of
the payment, click in the Combination Code Amount field.
Training Guide Additional Compensation Payments
Page 108
Step Action 38. Enter "2500" which is the remaining portion of the payment into the Combination
Code Amount field. 39. Press [Enter]. 40. Let's recap the entry.
- A $5,000 add comp payment using earn code 009 for additional duties performed from 9/1/14 - 1/31/15 - The actual period start and end dates reflect the actual start and end dates for the work performed (note the pay period amount = $500, the amount of the total payment to be received each pay period) - combo code 1000274400 will be charged $2,500 (or 50%) of the $5,000 payment - combo code 1000274401 will be charged $2,500 (or 50%) of the $5,000 payment
41. Let's discuss the dates the employee receives the pay in relation to when the transaction is initiated and approved. Note: This transaction was completed in a test environment where the initiated date is 11/15/14. Let's say this transaction receives approval prior to the start of the 9/1/2014 paycheck, the employee will receive the additional $500 beginning with the 9/15/2014 paycheck. Let's say this transaction receives approval on 10/6/2014. The employee will receive $1,500 in the 10/15/2014 paycheck ($500 payment x 3) and then continue to receive $500 each following pay period through 1/31/2015.
42. Click and drag the scrollbar to view the "Save and Submit" section of the page.
43. The payment is entered and is ready to submit into workflow for review. Click the Save and Submit button.
44. The Submit Confirmation message appears.
Click the OK button.
45. You have successfully completed the "Create a Five-Month Add Comp Charged to
Multiple Combo Codes". You can now move onto the next topic, "Stop or Reduce a Current Add Comp" where you will learn how to stop or reduce an add comp payment currently being paid. End of Procedure.
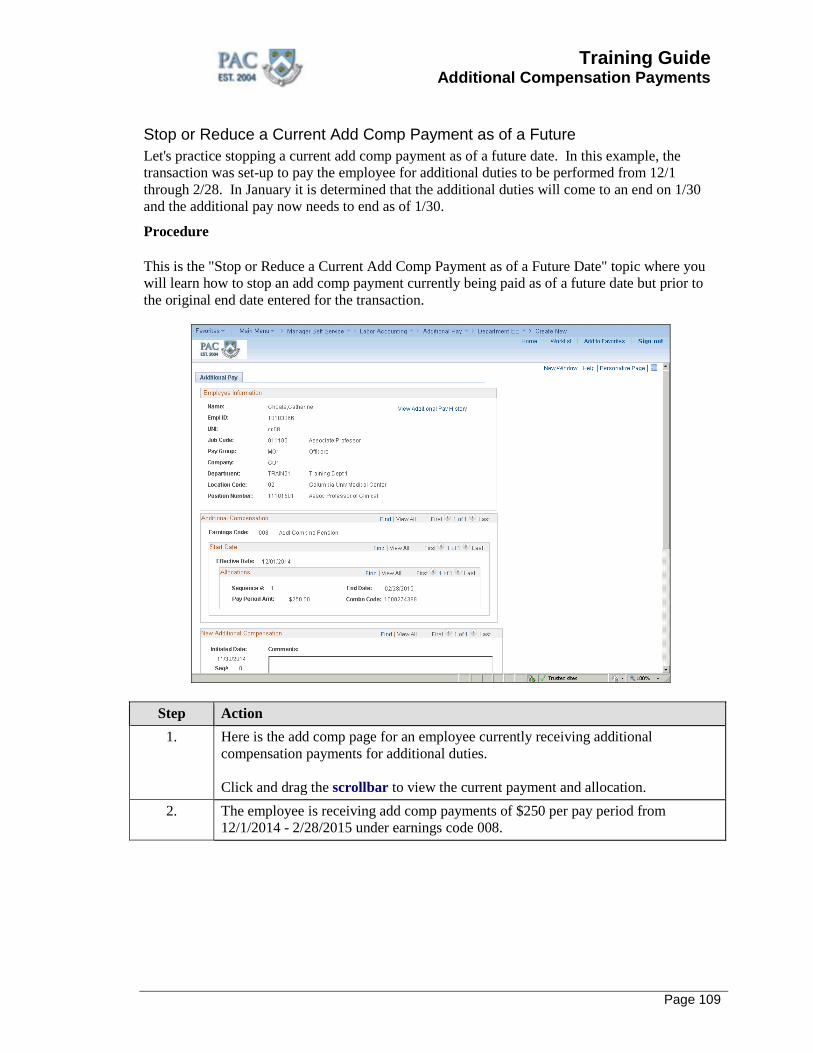
Training Guide Additional Compensation Payments
Page 109
Stop or Reduce a Current Add Comp Payment as of a Future Let's practice stopping a current add comp payment as of a future date. In this example, the transaction was set-up to pay the employee for additional duties to be performed from 12/1 through 2/28. In January it is determined that the additional duties will come to an end on 1/30 and the additional pay now needs to end as of 1/30.
Procedure This is the "Stop or Reduce a Current Add Comp Payment as of a Future Date" topic where you will learn how to stop an add comp payment currently being paid as of a future date but prior to the original end date entered for the transaction.
Step Action 1. Here is the add comp page for an employee currently receiving additional
compensation payments for additional duties. Click and drag the scrollbar to view the current payment and allocation.
2. The employee is receiving add comp payments of $250 per pay period from 12/1/2014 - 2/28/2015 under earnings code 008.
Training Guide Additional Compensation Payments
Page 110
Step Action 3. In this example, assume it is 1/19/2015 and the payments need to end as of
1/31/2015. This is done by creating an overlay transaction. If an active add comp exists for an employee and needs to be stopped or reduced as of a future pay period, create a new add comp transaction with a start date of the next payroll period and the new end date.
4. Enter the comment for the transaction. Next, enter the same earnings code to overlay the transaction, click in the Earnings Code field.
5. Enter the same earnings code as the current payment. Enter "008" into the Earnings
Code field. Be sure to use the same earnings code. If you use a different earnings code you will overpay the employee as the employee will begin receiving payments using the earnings code entered in addition to the prior payments.
6. Now enter the start date for the payment. Click in the Actual Period Start Date field.
7. Today is 1/19/2015 and the final payment is to be paid through 1/31/2015.
Therefore, enter the start date as 1/16/2015 which is the next payroll start date from the last received payment. Enter "01/16/2015" into the Actual Period Start Date field.
8. As there is one more payment due, and each payment equals $250, enter "250" into the Total Earn Code Pymt field.
9. Press [Enter]. 10. As the payments are to be paid through 1/31/2015, enter "1/31/2015" into the Actual
Period End Date field. 11. Press [Enter]. 12. Next, enter the combination code to charge the payment.
Click in the Combination Code field.
13. Enter "1000274400" into the Combination Code field. 14. Press [Enter].
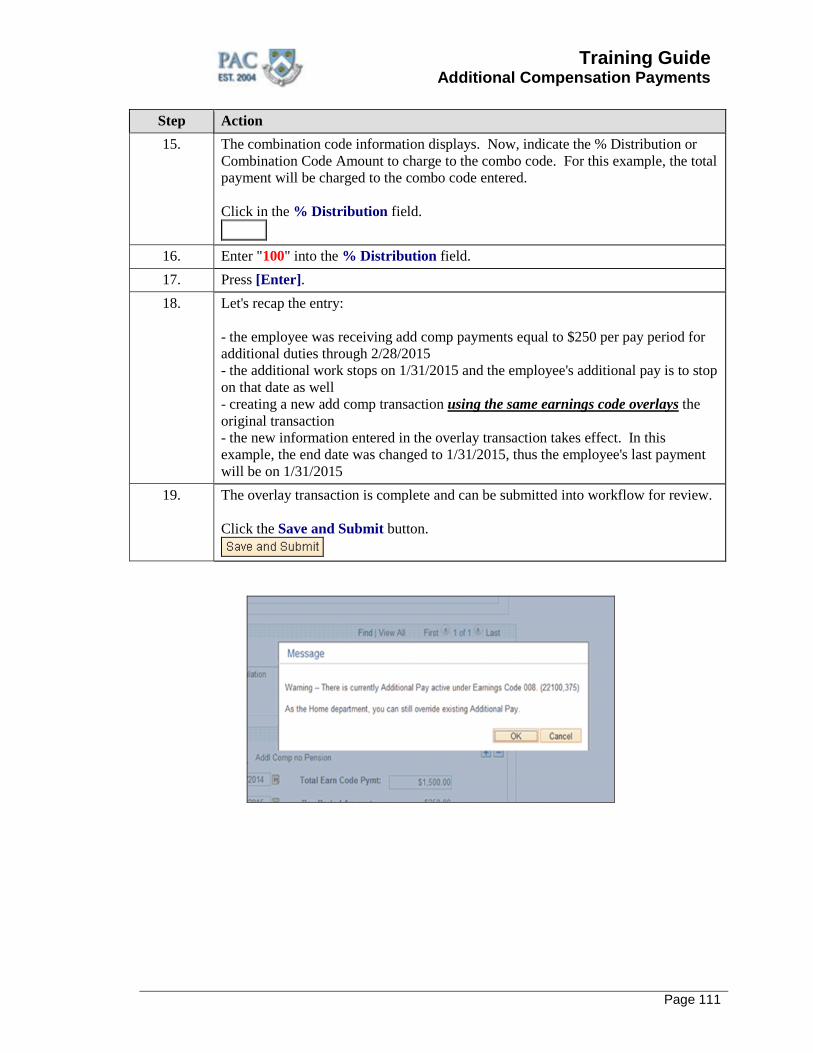
Training Guide Additional Compensation Payments
Page 111
Step Action 15. The combination code information displays. Now, indicate the % Distribution or
Combination Code Amount to charge to the combo code. For this example, the total payment will be charged to the combo code entered. Click in the % Distribution field.
16. Enter "100" into the % Distribution field. 17. Press [Enter]. 18. Let's recap the entry:
- the employee was receiving add comp payments equal to $250 per pay period for additional duties through 2/28/2015 - the additional work stops on 1/31/2015 and the employee's additional pay is to stop on that date as well - creating a new add comp transaction using the same earnings code overlays the original transaction - the new information entered in the overlay transaction takes effect. In this example, the end date was changed to 1/31/2015, thus the employee's last payment will be on 1/31/2015
19. The overlay transaction is complete and can be submitted into workflow for review. Click the Save and Submit button.

Training Guide Additional Compensation Payments
Page 112
Step Action 20. When overlaying a currently active transaction, a warning appears to alert you that
there is a currently active payment under the earnings code entered. In this example, 008. Review the warning to ensure that you did indeed want to overlay the transaction. As the home department, you can override an existing add comp transaction. Click the OK button.
Step Action 21. The Submit Confirmation message appears.
Click the OK button.
22. You have successfully completed the, "Stop or Reduce a Current Add Comp
Payment as of a Future Date" topic. You can now move onto the next topic, "Create Two Add Comp Payments in One Transaction." End of Procedure.
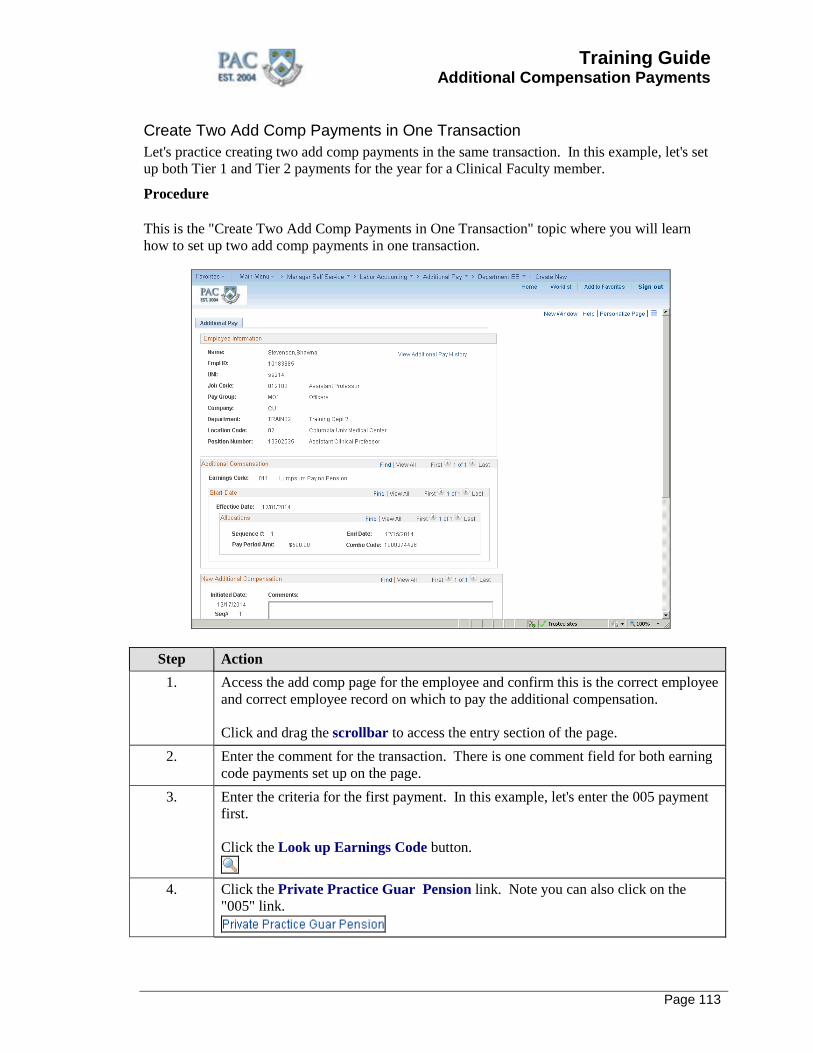
Training Guide Additional Compensation Payments
Page 113
Create Two Add Comp Payments in One Transaction Let's practice creating two add comp payments in the same transaction. In this example, let's set up both Tier 1 and Tier 2 payments for the year for a Clinical Faculty member.
Procedure This is the "Create Two Add Comp Payments in One Transaction" topic where you will learn how to set up two add comp payments in one transaction.
Step Action 1. Access the add comp page for the employee and confirm this is the correct employee
and correct employee record on which to pay the additional compensation. Click and drag the scrollbar to access the entry section of the page.
2. Enter the comment for the transaction. There is one comment field for both earning code payments set up on the page.
3. Enter the criteria for the first payment. In this example, let's enter the 005 payment first. Click the Look up Earnings Code button.
4. Click the Private Practice Guar Pension link. Note you can also click on the
"005" link.
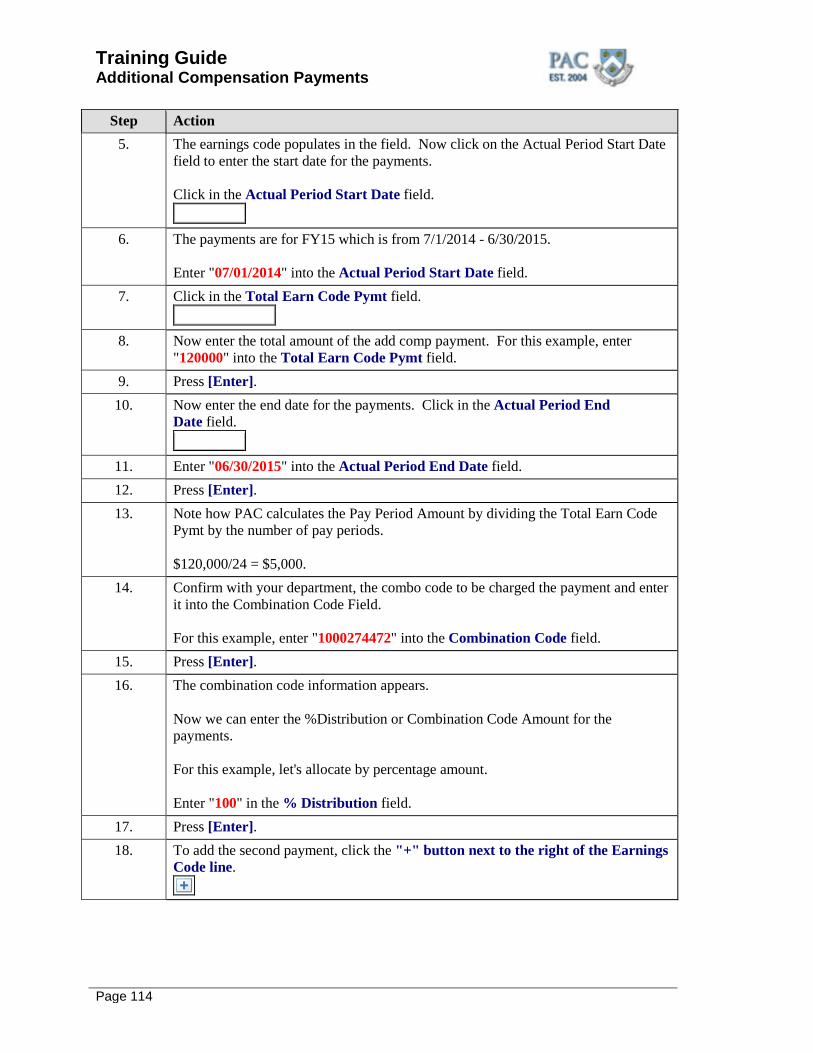
Training Guide Additional Compensation Payments
Page 114
Step Action 5. The earnings code populates in the field. Now click on the Actual Period Start Date
field to enter the start date for the payments. Click in the Actual Period Start Date field.
6. The payments are for FY15 which is from 7/1/2014 - 6/30/2015.
Enter "07/01/2014" into the Actual Period Start Date field.
7. Click in the Total Earn Code Pymt field.
8. Now enter the total amount of the add comp payment. For this example, enter
"120000" into the Total Earn Code Pymt field. 9. Press [Enter]. 10. Now enter the end date for the payments. Click in the Actual Period End
Date field.
11. Enter "06/30/2015" into the Actual Period End Date field. 12. Press [Enter]. 13. Note how PAC calculates the Pay Period Amount by dividing the Total Earn Code
Pymt by the number of pay periods. $120,000/24 = $5,000.
14. Confirm with your department, the combo code to be charged the payment and enter it into the Combination Code Field. For this example, enter "1000274472" into the Combination Code field.
15. Press [Enter]. 16. The combination code information appears.
Now we can enter the %Distribution or Combination Code Amount for the payments. For this example, let's allocate by percentage amount. Enter "100" in the % Distribution field.
17. Press [Enter]. 18. To add the second payment, click the "+" button next to the right of the Earnings
Code line.
Training Guide Additional Compensation Payments
Page 115
Step Action 19. A blank Earnings Code section appears where the second payment is entered.
To view both the 1st and 2nd payment sections at the same time, click the View All link.
20. Click and drag the scrollbar to view the second payment section. 21. Click the Look up Earnings Code button to select the earnings code for the 2nd
add comp payment.
22. Click the Addl Comp no Pension link. Note you can also click the "004" link.
23. The earnings code populates in the field. Now click on the Actual Period Start Date field to enter the start date for the payments. Click in the Actual Period Start Date field.
24. The payments are for FY15 which is from 07/01/2014 - 06/30/2015.
Enter "07/01/2014" into the Actual Period Start Date field.
25. Click in the Total Earn Code Pymt field.
26. Now enter the total amount of the add comp payment. For this example, enter
"85000" into the Total Earn Code Pymt field. 27. Press [Enter]. 28. Now enter the end date for the payments. Click in the Actual Period End
Date field.
29. Enter "06/30/2015" into the Actual Period End Date field. 30. Press [Enter]. 31. Note how PAC calculates the Pay Period Amount by dividing the Total Earn Code
Pymt by the number of pay periods. $85,000/24 = $3541.67.
32. Confirm with your department, the combo code to be charged the payment and enter it into the Combination Code Field. For this example, enter "1000274474" into the Combination Code field.
33. Press [Enter].
Training Guide Additional Compensation Payments
Page 116
Step Action 34. The combination code information appears.
Now we can enter the %Distribution or Combination Code Amount for the payments. For this example, let's allocate by percentage amount. Enter "100" in the % Distribution field.
35. Press [Enter]. 36. Let's recap the entry:
- Two add comp payments were set up in one transaction - The timeframe for the payments is from 07/1/2014 - 06/30/2015 - The Clinical Faculty Member will begin to receive the pay period amount for each payment on the paycheck following the final approval for the transaction (including any past due payments) Note: Only two add comp payments can be entered on one transaction. Additional payments can be set up by creating a new transaction and entering the payments on the new page.
37. The transaction is complete and can be submitted into workflow for review. Click the Save and Submit button.
38. The Submit Confirmation message appears.
Click the OK button.
39. You have successfully completed the "Create Two Add Comp Payments in One
Transaction" topic. You can now move onto the next topic, "Increase an Add Comp Retroactively". End of Procedure.
Training Guide Additional Compensation Payments
Page 117
Increase an Add Comp Payment Retroactively Let's practice increasing an add comp payment retroactively. In this example, an employee was set up to receive $3,200 for additional duties for the period (12/1 - 2/28). Part way through the payment, it is realized that the payment should have been set up for a total of $4,200.
Procedure This is the "Increase an Add Comp Payment retroactively" where you will learn how increase the amount of an add comp payment that is actively paid to the employee.
Step Action
1. Here is the add comp page for an employee currently receiving additional compensation payments for additional duties.
Step Action 2. Notice the Allocations Bar list items 1 of 2 indicating there are more transactions to
view. To see the allocations, click the View All link.
Training Guide Additional Compensation Payments
Page 118
Step Action 3. Step 1 - Review the original payment.
The employee is receiving add comp payments of $533.33 per pay period from 12/01/2014 - 2/28/2015 under earnings code 009. This was derived from entering the original payment of $3,200. $3,200/6 = $533.33 (pay periods from 12/01/2012 - 2/28/2015).
4. Step 2 - Determine how much was already paid out. We are revising this transaction at the end of December and the employee will have received two payments (12/15/2015 paycheck and the 12/31/2015 paycheck) of $533.33 for a total of $1,066.66.
5. Step 3 - Calculate the difference between what the employee DID receive, and what she SHOULD HAVE received. The employee should be receiving payment amounts based on a total of $4,200, thus the pay period amount should be $700. $4,200/6 = $700. This means that each pay period, she should have received $700 and over the 2 pay periods already paid equals $1,400. The difference between what the employee should have received ($1,400) and what she did receive ($1066.66) is $333.34. This employee is owed a $333.34 retroactive add comp payment.
6. Step 4 - Enter an overlay payment for the catch up payment and the current pay period due. In this example, the catch up payment is $1,033.34 which is the revised pay period amount ($700) plus the retroactive add comp payment ($333.34). The catch up payment is entered in the next pay period. In this example, 1/1/2015 - 1/15/2015.
7. Step 5 - Create the go-forward payment. Since the catch up payment was made in the pay period 1/1/2015 - 1/15/2015, the go-forward payment is for the period 1/16/2015 - 2/28/2015. Recall that you have already determined what the correct pay period amount would be ($700). For the period of 1/16/2015 - 2/28/2015 there are 3 pay periods so the total is $700 * 3 = $2,100.
Training Guide Additional Compensation Payments
Page 119
Step Action 8. Let's enter the overlay payment for the catch up payment and the current pay period
amount. In the blank entry section, first enter the comment for the payment, then enter the earnings code. Enter "009" into the Earnings Code field.
9. Press [Enter]. 10. Next, enter the start date for the catch up payment.
Enter "01/01/2015" in the Actual Period Start Date field.
11. Now let's enter the catch up payment total amount. Click in the Total Earn Code Pymt field.
12. Enter "1033.34" into the Total Earn Code Pymt field.
The catch up payment equals the retroactive money owed ($333.34)plus the revised pay period amount ($700).
13. Press [Enter]. 14. Next, enter the end date for the catch up payment.
Click in the Actual Period End Date field.
15. As this is for one pay period, enter "01/15/2015" into the Actual Period End
Date field. 16. Press [Enter]. 17. Next, enter the combination code to charge the payment. For this example, only one
combination code is charged. Remember, you can allocate the payment to additional combo codes by clicking on the "+" sign to the right of the combination code line to open up another entry section. Enter "1000274455" into the Combination Code field.
18. Next, indicate the % or $ amount to charge to the combo code. For this example, charge 100% to the combo code entered. Enter "100" into the % Distribution field.
19. Press [Enter]. 20. Great, the catch up payment is entered. Now let's set up the go-forward payment.
Because the go-forward payment uses the same earnings code, it must be set up in a new transaction because one transaction cannot have two payments using the same earnings code. View the next screens to see the error that occurs.

Training Guide Additional Compensation Payments
Page 120
Step Action 21. Click the "+" to open a new entry section.
22. Click the View All link.
23. Click and drag the scrollbar down. 24. Enter "009" into the Earnings Code field. 25. Press [Enter]. 26. Here is the error message that displays.
Click the OK button.
Step Action 27. To remove the entry from the transaction, click the Delete row "-" sign button.
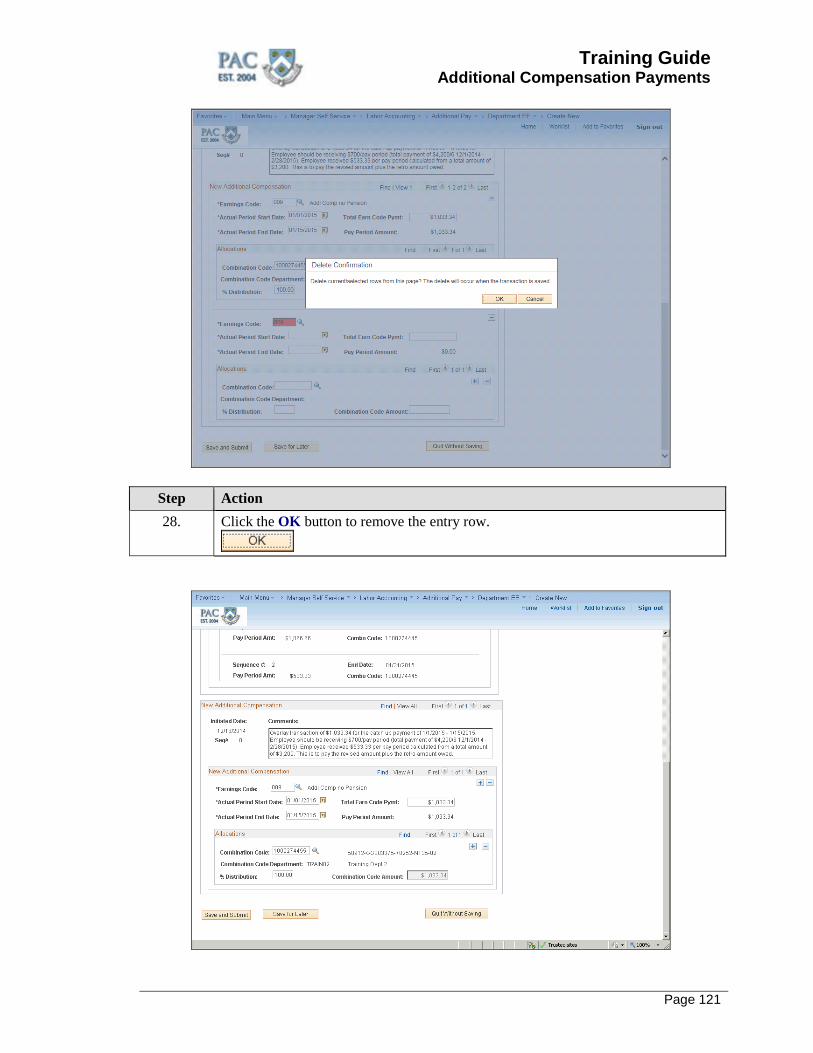
Training Guide Additional Compensation Payments
Page 121
Step Action 28. Click the OK button to remove the entry row.
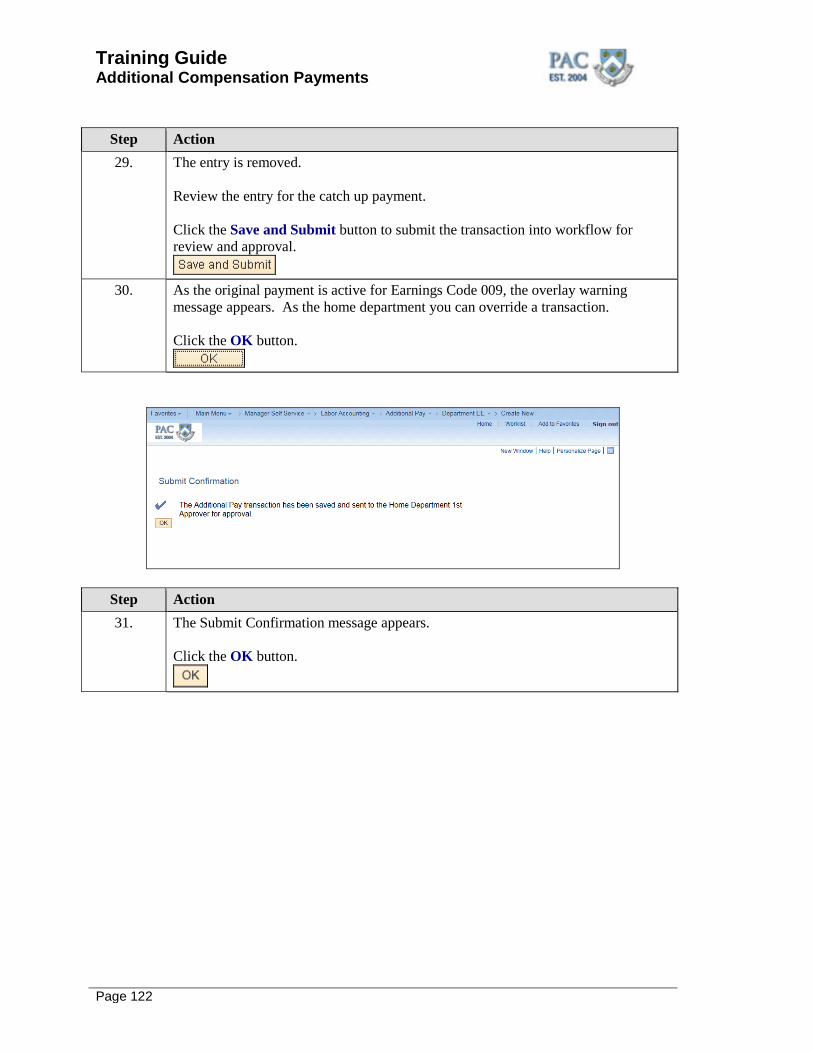
Training Guide Additional Compensation Payments
Page 122
Step Action 29. The entry is removed.
Review the entry for the catch up payment. Click the Save and Submit button to submit the transaction into workflow for review and approval.
30. As the original payment is active for Earnings Code 009, the overlay warning
message appears. As the home department you can override a transaction. Click the OK button.
Step Action 31. The Submit Confirmation message appears.
Click the OK button.
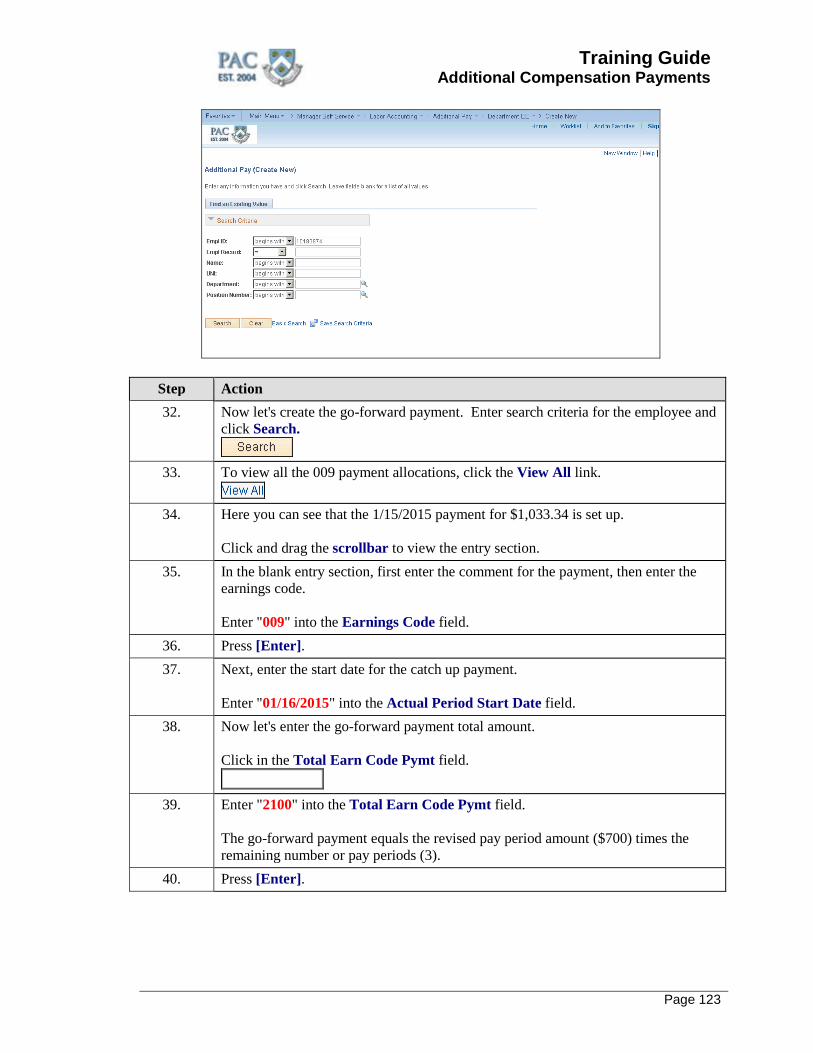
Training Guide Additional Compensation Payments
Page 123
Step Action 32. Now let's create the go-forward payment. Enter search criteria for the employee and
click Search.
33. To view all the 009 payment allocations, click the View All link.
34. Here you can see that the 1/15/2015 payment for $1,033.34 is set up. Click and drag the scrollbar to view the entry section.
35. In the blank entry section, first enter the comment for the payment, then enter the earnings code. Enter "009" into the Earnings Code field.
36. Press [Enter]. 37. Next, enter the start date for the catch up payment.
Enter "01/16/2015" into the Actual Period Start Date field.
38. Now let's enter the go-forward payment total amount. Click in the Total Earn Code Pymt field.
39. Enter "2100" into the Total Earn Code Pymt field.
The go-forward payment equals the revised pay period amount ($700) times the remaining number or pay periods (3).
40. Press [Enter].
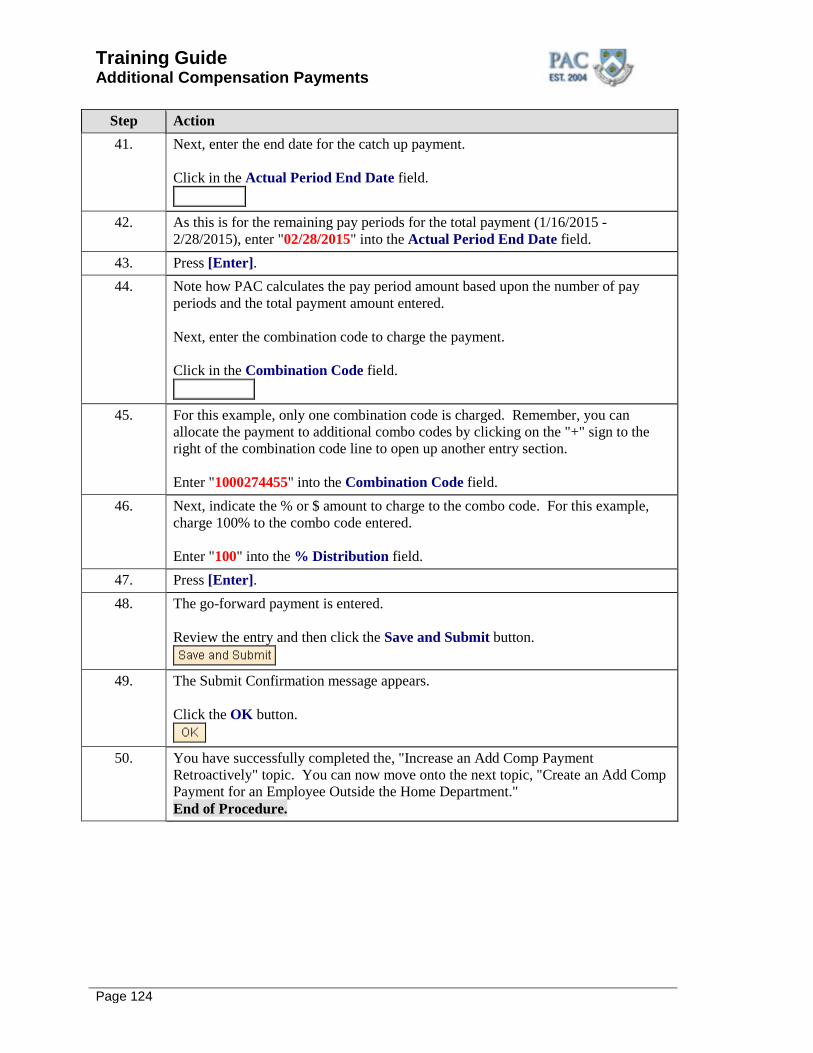
Training Guide Additional Compensation Payments
Page 124
Step Action 41. Next, enter the end date for the catch up payment.
Click in the Actual Period End Date field.
42. As this is for the remaining pay periods for the total payment (1/16/2015 -
2/28/2015), enter "02/28/2015" into the Actual Period End Date field. 43. Press [Enter]. 44. Note how PAC calculates the pay period amount based upon the number of pay
periods and the total payment amount entered. Next, enter the combination code to charge the payment. Click in the Combination Code field.
45. For this example, only one combination code is charged. Remember, you can
allocate the payment to additional combo codes by clicking on the "+" sign to the right of the combination code line to open up another entry section. Enter "1000274455" into the Combination Code field.
46. Next, indicate the % or $ amount to charge to the combo code. For this example, charge 100% to the combo code entered. Enter "100" into the % Distribution field.
47. Press [Enter]. 48. The go-forward payment is entered.
Review the entry and then click the Save and Submit button.
49. The Submit Confirmation message appears.
Click the OK button.
50. You have successfully completed the, "Increase an Add Comp Payment
Retroactively" topic. You can now move onto the next topic, "Create an Add Comp Payment for an Employee Outside the Home Department." End of Procedure.
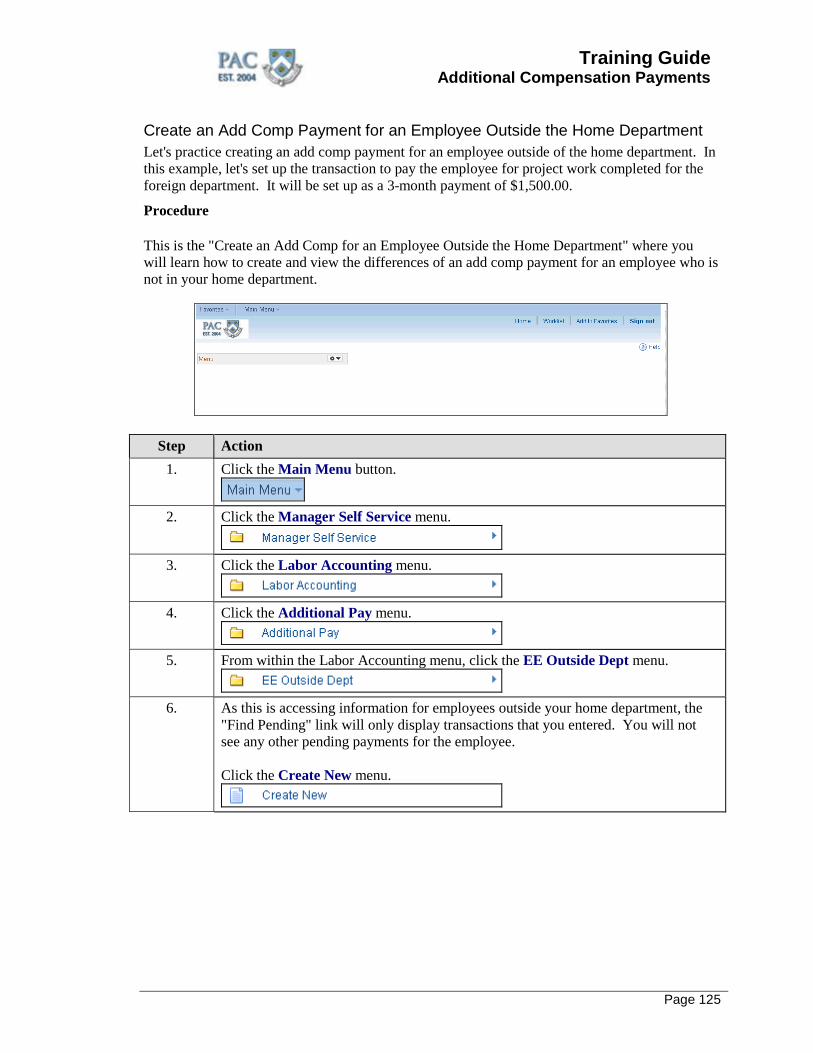
Training Guide Additional Compensation Payments
Page 125
Create an Add Comp Payment for an Employee Outside the Home Department Let's practice creating an add comp payment for an employee outside of the home department. In this example, let's set up the transaction to pay the employee for project work completed for the foreign department. It will be set up as a 3-month payment of $1,500.00.
Procedure This is the "Create an Add Comp for an Employee Outside the Home Department" where you will learn how to create and view the differences of an add comp payment for an employee who is not in your home department.
Step Action 1. Click the Main Menu button.
2. Click the Manager Self Service menu.
3. Click the Labor Accounting menu.
4. Click the Additional Pay menu.
5. From within the Labor Accounting menu, click the EE Outside Dept menu.
6. As this is accessing information for employees outside your home department, the
"Find Pending" link will only display transactions that you entered. You will not see any other pending payments for the employee. Click the Create New menu.
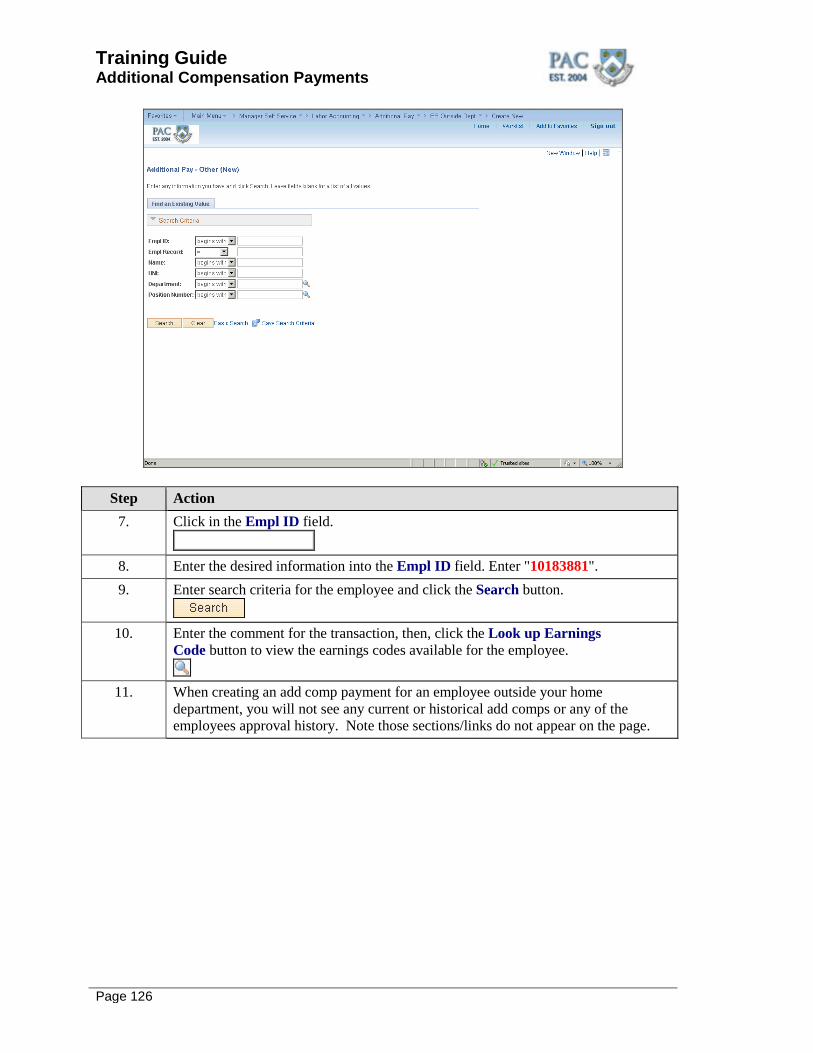
Training Guide Additional Compensation Payments
Page 126
Step Action 7. Click in the Empl ID field.
8. Enter the desired information into the Empl ID field. Enter "10183881". 9. Enter search criteria for the employee and click the Search button.
10. Enter the comment for the transaction, then, click the Look up Earnings
Code button to view the earnings codes available for the employee.
11. When creating an add comp payment for an employee outside your home department, you will not see any current or historical add comps or any of the employees approval history. Note those sections/links do not appear on the page.
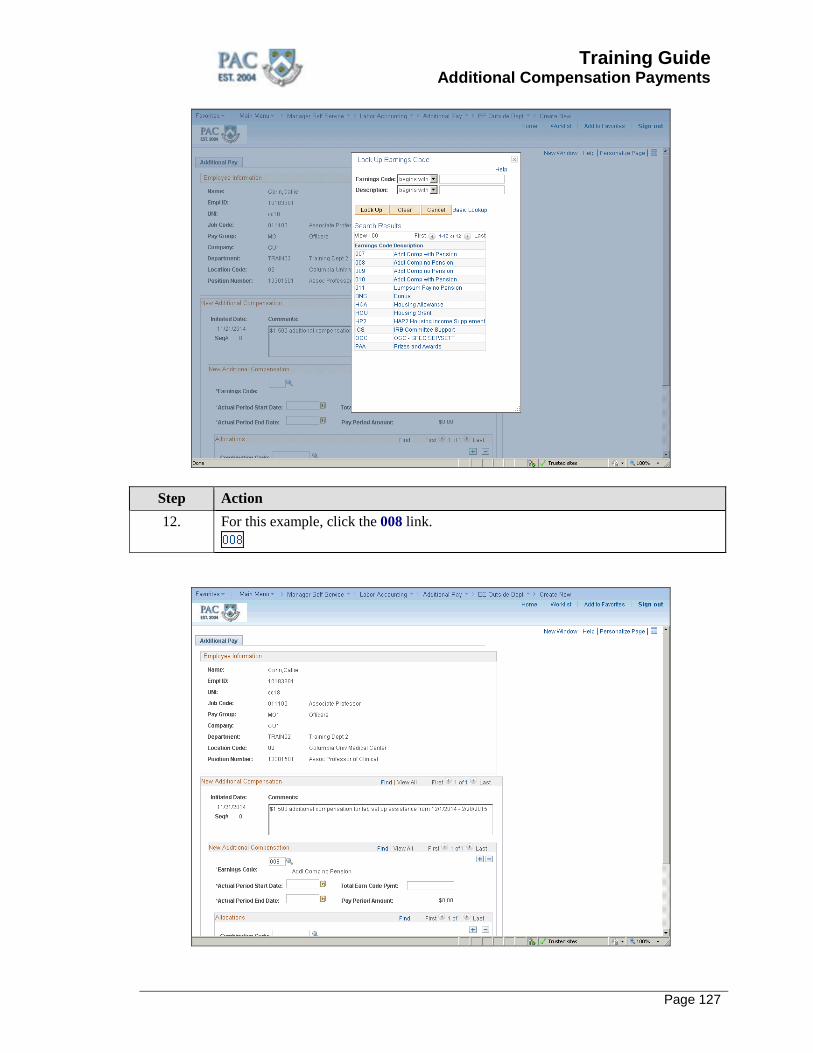
Training Guide Additional Compensation Payments
Page 127
Step Action 12. For this example, click the 008 link.
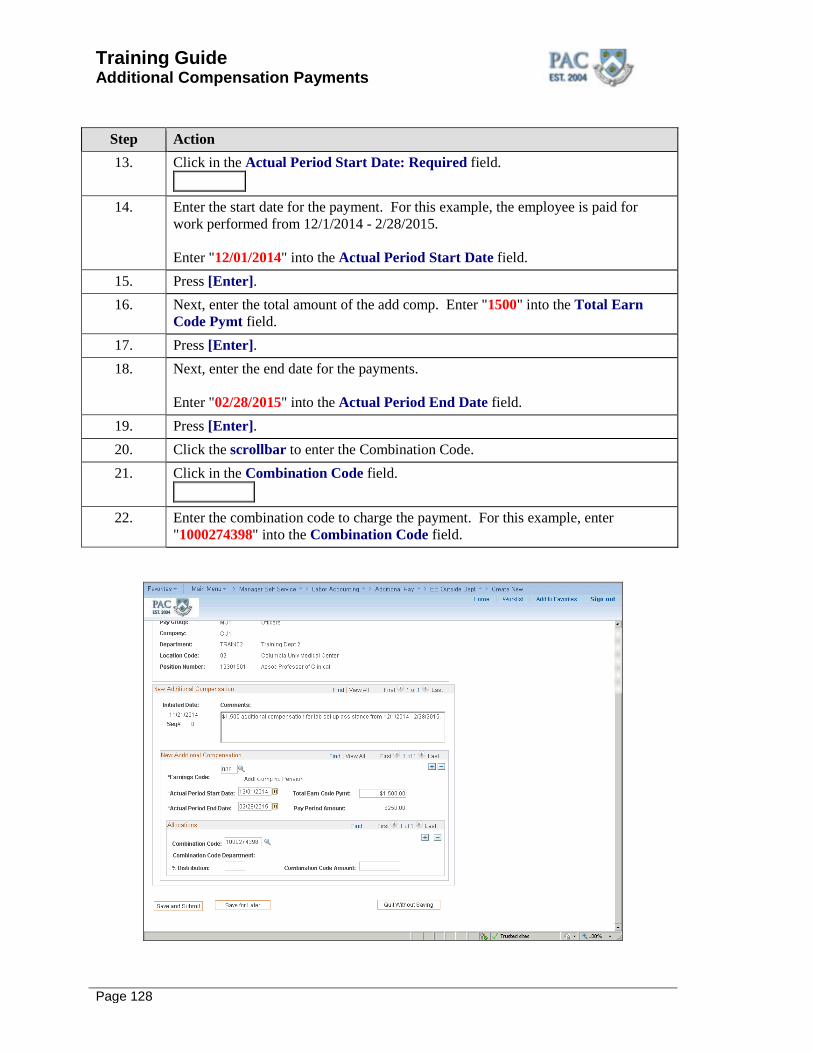
Training Guide Additional Compensation Payments
Page 128
Step Action 13. Click in the Actual Period Start Date: Required field.
14. Enter the start date for the payment. For this example, the employee is paid for
work performed from 12/1/2014 - 2/28/2015. Enter "12/01/2014" into the Actual Period Start Date field.
15. Press [Enter]. 16. Next, enter the total amount of the add comp. Enter "1500" into the Total Earn
Code Pymt field. 17. Press [Enter]. 18. Next, enter the end date for the payments.
Enter "02/28/2015" into the Actual Period End Date field.
19. Press [Enter]. 20. Click the scrollbar to enter the Combination Code. 21. Click in the Combination Code field.
22. Enter the combination code to charge the payment. For this example, enter
"1000274398" into the Combination Code field.
Training Guide Additional Compensation Payments
Page 129
Step Action 23. Press [Enter].
Step Action 24. Now indicate the % or $ amount for the charge. For this example, enter "100"into
the % Distribution field. 25. Press [Enter]. 26. The payment entry is complete and ready to submit into workflow for review.
Review the entry, then, click the Save and Submit button.
27. Remember: A foreign department cannot overlay either an active (already approved) transaction or a pending add comp. If you create a transaction that will overlay any existing or pending transactions, you will receive an error message once you click "save and submit". Please also note: A home department(s) add comp transactions for their own employee(s) will ALWAYS take precedence over a foreign department's request.
Training Guide Additional Compensation Payments
Page 130
Step Action 28. The Submit Confirmation message appears.
Click the OK button.
29. You have successfully completed the, "Create an Add Comp Payment for an
Employee Outside the Home Department" topic. You can now move onto the next lesson, "Additional Compensation Workflows" where you will learn the path an add comp transaction takes when it is submitted into workflow for review and approval. End of Procedure.
Training Guide Additional Compensation Payments
Page 131
Additional Compensation Payments Workflow This is the Additional Compensation Payments Workflow lesson of the Additional Compensation Payments course. Upon completion of this lesson, you will be able to:
• Recall the Additional Compensation Payment Workflows and the required approval levels • Using the Payroll Calendar, understand the relationship between the Initiated Date, Approved
Date and the Additional Compensation Payment Date
Estimated Time to Complete Lesson: 2 minutes For more information on workflow, roles and access, reference the Introduction to PAC course.
Additional Compensation Payments Workflow Additional Compensation Payments Workflow Below is a representation of the Additional Compensation workflow. This is the path followed when submitting Additional Compensation payment transactions.
Training Guide Additional Compensation Payments
Page 132
Using the Payroll Calendar Additional Compensation Payments and the Payroll Calendar Now that we reviewed workflow, let's review the relationship between the Initiated Date, Approved Date and the Additional Compensation Payment Date. The initiated date is system generated when the transaction is created. The transaction then goes to the 1st level home department for approval and then to any 1st level foreign department approvers if indicated by the combination codes entered. Next, the transaction goes to the 2nd level approval, if needed, and then on the 3rd level, for final approval. As per the CUMC or Morningside Payroll Calendar, if a transaction is initiated and final approval occurs in advance of the Final Approve Add Comp Date, the Pay Period Amount payment along with any retroactive payments due will appear in the employee's paycheck following the Period Start Date entered. If a transaction is initiated or receives final approval after the final approval date for a payroll, the Pay Period Amount payment along with any retroactive payments due will appear in the employee's paycheck following the final approval date. Visit the Payroll Calendar section of the HR Website for more information.
Training Guide Additional Compensation Payments
Page 133
Transaction Status and Location This is the Transaction Status and Location lesson of the Additional Compensation Payments course. Upon completion of this lesson, you will be able to:
• Determine Status and Location of Transactions
Estimated Time to Complete Lesson: 5 minutes
Training Guide Additional Compensation Payments
Page 134
Pending Transactions - Initiator View Pending Transactions Page The Pending Transactions page provides a view only summary of pending, cancelled (denied) and processed Labor Accounting transactions from an Initiator view. If you initiated a transaction, the status for those transactions only is viewable on this page. This is the status view an Initiator Only role sees as that role does not have access to Approver pages. If you are also an approver, you will see this transaction in your Worklist Status and also Workflow Status pages (per the department security access granted). How do I access the Pending Transactions Page? Click on the “Pending Transactions” link within the "Labor Accounting" section in "Manager Self Service". Note: This page provides view only status. You cannot access or take action on a transaction from this page.
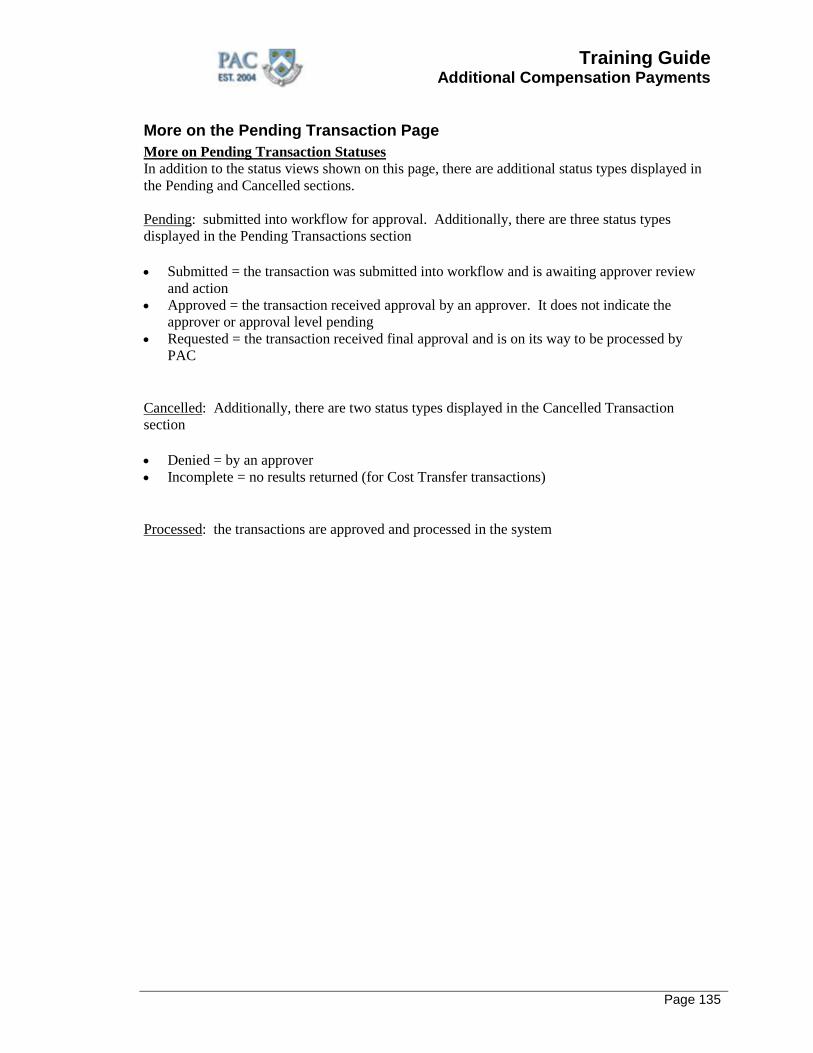
Training Guide Additional Compensation Payments
Page 135
More on the Pending Transaction Page More on Pending Transaction Statuses In addition to the status views shown on this page, there are additional status types displayed in the Pending and Cancelled sections. Pending: submitted into workflow for approval. Additionally, there are three status types displayed in the Pending Transactions section
• Submitted = the transaction was submitted into workflow and is awaiting approver review and action
• Approved = the transaction received approval by an approver. It does not indicate the approver or approval level pending
• Requested = the transaction received final approval and is on its way to be processed by PAC
Cancelled: Additionally, there are two status types displayed in the Cancelled Transaction section
• Denied = by an approver • Incomplete = no results returned (for Cost Transfer transactions)
Processed: the transactions are approved and processed in the system
Training Guide Additional Compensation Payments
Page 136
Locate Transactions on the Pending Transactions Page Let's practice navigating to the Pending Transaction page to locate pending add comps.
Procedure This is the "Locate Transactions on the Pending Transaction Page" topic where you will learn how to navigate to the Pending Transactions page and locate transactions.
Step Action 1. Click the Main Menu button.
2. Click the Manager Self Service menu.
3. Click the Labor Accounting menu.
4. From within the Labor Accounting menu, click the Pending Transactions menu.
5. This is the Pending Transactions Page. The top section displays Pending
Transactions that you submitted. You will not see any other initiator's transactions. In this section there are 5 Pending Transactions and PAC is displaying the items 1 - 5. To cycle through the transactions by pages, click the "arrow" button.
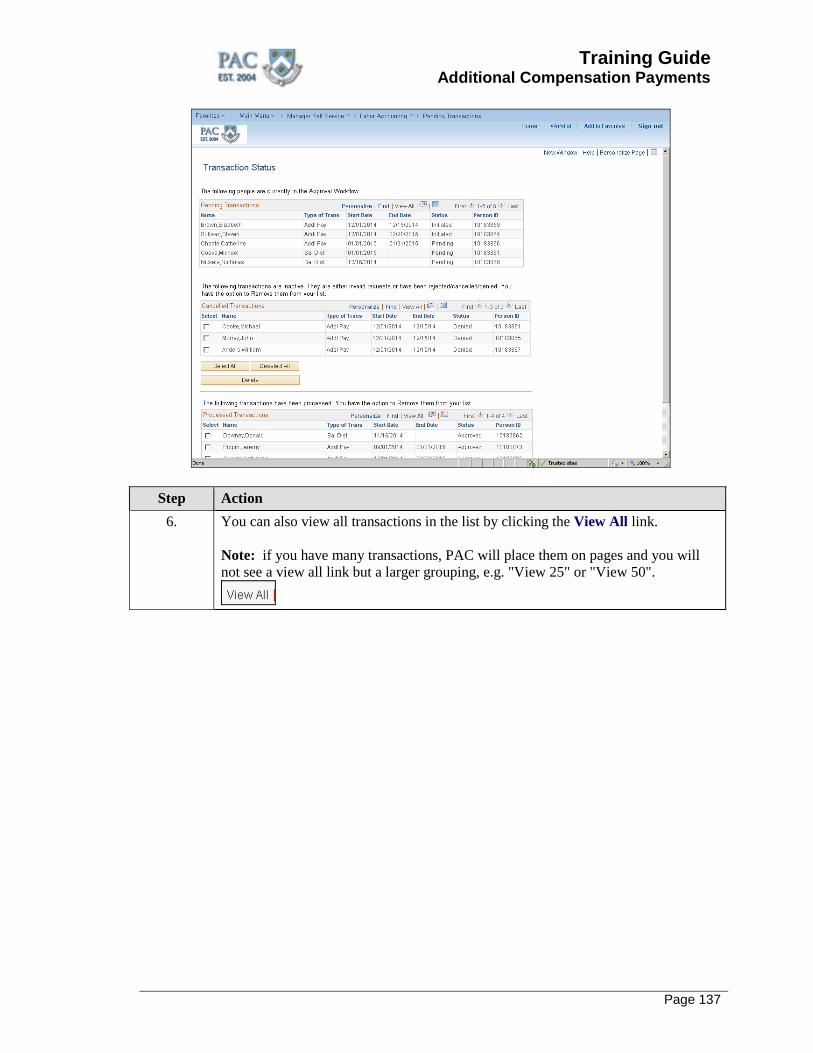
Training Guide Additional Compensation Payments
Page 137
Step Action 6. You can also view all transactions in the list by clicking the View All link.
Note: if you have many transactions, PAC will place them on pages and you will not see a view all link but a larger grouping, e.g. "View 25" or "View 50".
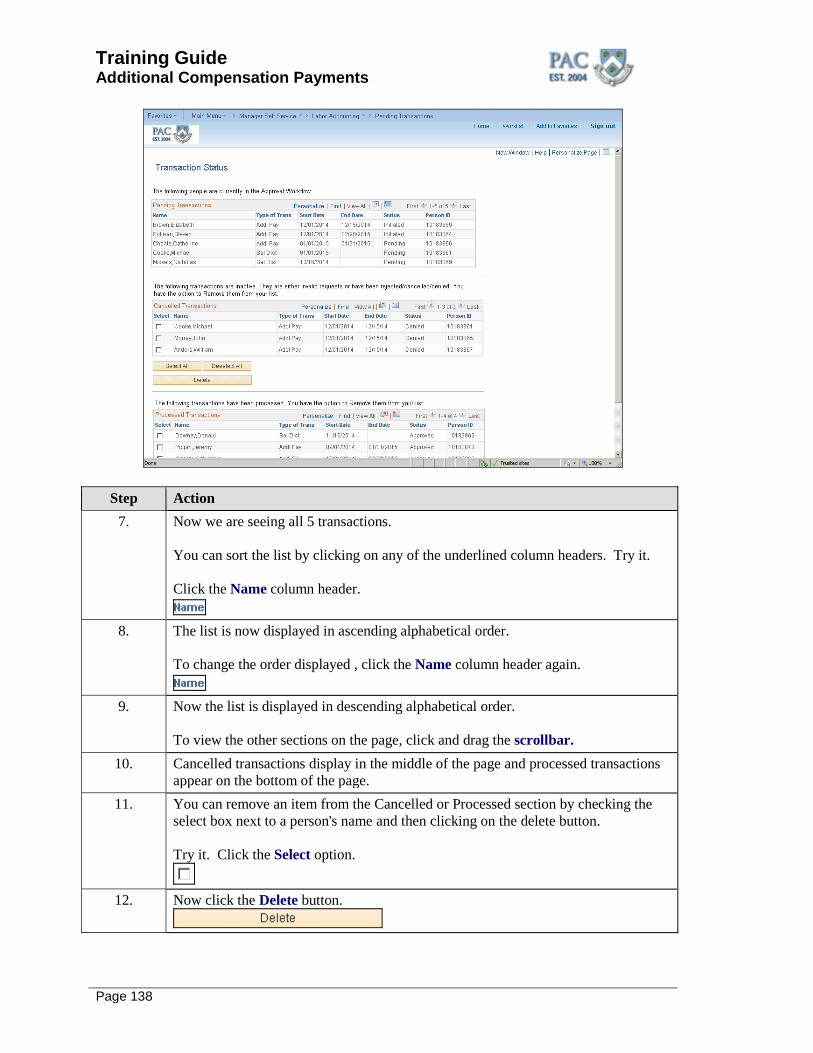
Training Guide Additional Compensation Payments
Page 138
Step Action 7. Now we are seeing all 5 transactions.
You can sort the list by clicking on any of the underlined column headers. Try it. Click the Name column header.
8. The list is now displayed in ascending alphabetical order.
To change the order displayed , click the Name column header again.
9. Now the list is displayed in descending alphabetical order.
To view the other sections on the page, click and drag the scrollbar.
10. Cancelled transactions display in the middle of the page and processed transactions appear on the bottom of the page.
11. You can remove an item from the Cancelled or Processed section by checking the select box next to a person's name and then clicking on the delete button. Try it. Click the Select option.
12. Now click the Delete button.
Training Guide Additional Compensation Payments
Page 139
Step Action 13. The selected employee is removed from view on the page.
Remember: this page only displays status of transactions. Transactions cannot be accessed on this page.
14. You have successfully completed the, "Locate Transactions on the Pending Transactions Page" topic. You can now move onto the next lesson, "Locate Transactions in Workflow - Approver View" where you will learn how an approver can locate where a transaction is in the workflow. End of Procedure.
Training Guide Additional Compensation Payments
Page 140
Locating Transactions in Workflow - Approver View Workflow Status Approvers access transactions submitted into workflow via the Worklist. Within the worklist is a Workflow Status page which provides the location of transactions currently in workflow. This page is not viewable to the Initiator Only role. If you have the Initiator Only role and to inquire on the location of a transaction, contact a department approver(s) who can locate this information for you. Workflow Status Page Filter On this page, a list of transactions currently in workflow appear on the displayed list. On the top section of the page is a Filter used to locate a specific transaction or group of transactions. This feature is helpful when looking for a specific transaction and you have the name, employee ID or Transaction ID. Locate Transaction in Workflow Next to each transaction is a "Details" link. Clicking on this link displays the status, details and current location of the transaction in workflow. Workflow Status and the Current Active Worklists Section On the bottom of the Workflow Page is a "Current Active Worklists" section that lists which approvers can review the transaction at the level indicated. If you are an approver, more information and details on the Workflow Status page and the Worklist can be found in the Approver course.
Training Guide Additional Compensation Payments
Page 141
View Additional Compensation Approval History View Additional Compensation Approval History In the upper right hand corner of the screen is a "View Additional Compensation Approval History" link. This view allows you to view the chain of approvals and comments for all prior approved additional compensation transactions for the employee. Note: This link and the information is only viewable to the Home Department. If you are creating a transaction for an employee outside the home department, this link and information does not appear.
Training Guide Additional Compensation Payments
Page 142
Course References Course References Please find links to all of the Job Aids, Policies, and Procedures that were referenced throughout this course: Lessons: Additional Compensation Payments Course Training Guide Job Aids (located in the Course Catalog in the HR Website): Additional Compensation Payments (http://hr.columbia.edu/course-catalog/search) Getting Started with the Web-Based Training Tool (http://hr.columbia.edu/course-catalog/search) How to Create Favorites in PAC (http://hr.columbia.edu/course-catalog/search) How to Navigate PAC (http://hr.columbia.edu/course-catalog/search) Create a Combo Code Job Aid (http://hr.columbia.edu/course-catalog/search) Search Combo Codes Job Aid (http://hr.columbia.edu/course-catalog/search) ChartFields, ChartStrings and Combo Codes in PAC (http://hr.columbia.edu/course-catalog/search) PAC Security Handbook (http://hr.columbia.edu/course-catalog/search) Websites: Columbia University Human Resources Website (http://hr.columbia.edu/) Course Catalog (in the HR Website) (http://hr.columbia.edu/course-catalog/search) Payroll Calendar (http://hr.columbia.edu/helpful-tools/hr-manager-toolkit/managing-staff/managing-pay/pay-transactions/pay-calendar) Payroll/PAC Forms (in the Forms Library in the Finance Gateway) (http://finance.columbia.edu/forms-library) CourseWorks (https://courseworks.columbia.edu/welcome/) HR Service Center (https://columbia.service-now.com/)

Training Guide Additional Compensation Payments
Page 143
Knowledge Assessment Congratulations! You have successfully navigated through the instructional portion of the Additional Compensation Payments course. We hope that the concepts and skills you have learned in this course have prepared you for your day to day tasks. Please complete the required knowledge assessment associated with this course. Successful completion of the knowledge assessment (a passing grade of 90%) is required to receive credit for the course and to gain access to the Additional Compensation functionality in PAC. To access and complete the knowledge assessment, click on the following link. You will be prompted to log in with your UNI and Password to access CourseWorks. Additional Compensation Payments Knowledge Assessment (https://courseworks.columbia.edu/samigo-app/servlet/Login?id=0ca4ee8b-c782-4c51-ba50-7f2bd2add6431424836041453) Estimated Time to Complete Assessment: 10 minutes
Training Guide Additional Compensation Payments
Page 144
Glossary Add Comp Additional Compensation Payment. Also known as Additional Pay or Add
Pay. ARC Accounting and Reporting at Columbia, our finance system. Chart of Accounts
Columbia’s Chart of Accounts is comprised of 11 ChartFields that are used to organize and record financial activity at the University (also known as COA).
ChartFields The fields that store the Chart of Accounts (COA) and provide the system with the basic structure to segregate and categorize transactional and budget data.
ChartStrings The combination of ChartFields and the level at which accounting charges and credits are applied.
COA Chart of Accounts. Columbia’s Chart of Accounts is comprised of 11 ChartFields that are used to organize and record financial activity at the University.
Combination Code
A 10-digit system-generated number representing a unique ChartString. It is not a characteristic of the ChartString, it is a representation of it. Combo codes are required by PAC to assign labor charges. Also known as combination code.
Combination Code Amount
In add comp transactions, the combination code amount is the dollar amount of the Total Earnings Code Payment charged to a particular ChartString. In salary distribution transactions it is the dollar amount of the salary to be charged to the ChartString.
Combo Code A 10-digit system-generated number representing a unique ChartString. It is not a characteristic of the ChartString, it is a representation of it. Combo codes are required by PAC to assign labor charges. Also known as combination code.
Combo Code Amount
In add comp transactions, the combo code amount (or combination code amount) is the dollar amount of the Total Earnings Code Payment charged to a particular ChartString. In salary distribution transactions it is the dollar amount of the salary to be charged to the ChartString.
Cost Transfer Ability to change the accounting for an employee’s salary or add comp retroactively in PAC. Also refers to the retroactive transfer of expenditures from one account to another.
CUMC Columbia University Medical Center. Earn Code Specifies the type of payment with related tax withholding, benefits
information and fringe rate. Also known as Earnings Code. Earnings Code Specifies the type of payment with related tax withholding, benefits
information and fringe rate. Also known as Earn Code. ECRT ECRT is the Effort Certification and Reporting Technology. Effort reporting
is the federally-mandated process by which the salary charged to a sponsored project is certified as being reasonable in relation to the effort performed on that project. The ECRT system facilitates both the monitoring of effort distributions during the year and the required annual certification of effort.
EmplID Employee ID: Unique identification code for an individual associated with the University.
Training Guide Additional Compensation Payments
Page 145
FFE Financial Front End. It is the front end interface that enables users to access various financial modules. As of July 2012 the modules in FFE are: Cash; ZT Time Entry; Endowment Term Sheets; and, PAD. Interfaces with ARC.
Field An area on a page that displays or requires data. Fringe Rate The percentage charged to departments applied to salaries as they are paid out
and charged in ARC. Fringe is used to fund the Columbia University paid benefits (pension, medical, etc) and tax related expenses (FICA, Medicare, etc).
HRPC Human Resources Processing Center. Labor Accounting
Manages an employee’s salary profile, additional compensation, and cost transfers.
Manager Self-Service
MSS. Manager Self-Service is a set of pages in PAC that allows managers to view job and personal data for the employees in their departments.
Module Groupings of software programs that collectively support a specific business function.
PAC People@Columbia. The customized version of PeopleSoft Human Resources Capital Management that integrates and processes all Human Resources and Payroll transactions for Columbia University including hire/rehire, salary distribution, additional compensation and cost transfer transactions.
Pay Period Amount
The dollar amount of an add comp payment an employee will receive each pay period. It is calculated by PAC in the Add Comp module and user calculated in Template-Based Hire.
PC Petty Cash - cash held in department for small or emergency purchases. Percent (%) Distribution
The percentage of a payment (regular salary or add comp) being charged to a specified combo code.
Period Amount The Period Amount is the amount of regular earnings to allocate for the timeframe beginning on the Profile Effective Date through the Funding End Date. It is used to calculate the percent distribution when a combo code amount is entered. Used in Salary Distribution transactions.
Project A specific funding source. The First (highest) level at which you can budget and record project activity. Projects are generally set up where a separate fund balance must be tracked and carried forward.
Receiving A system record of goods received from purchase orders. Role A named set of work that a user can do. A role is associated with one or
more permission lists that authorize access to particular system functions. TBH Template-Based Hire. A function within PAC where new hire and rehire
transactions are initiated electronically in the departments and schools through PAC templates.
UNI University Network Identification. Workflow The routing of transactions based on rules. Worklist The automated to-do list created by workflow. From the worklist, you can
directly access the pages you need to perform the next action, and then return to the worklist for another item.