Embed Size (px)
Citation preview
i
Administration 207Accounts Payable
Customer Support
Host Based Internet Based
Innovative Enterprise Software (IES) IES Access and Access Plus
1-800-238-1762 1-800-238-3895
http://www.innovativecomputingcorp.com
© 2007 Innovative Computing Corporation
ii
AcknowledgementsCopyright
Copyright 2007 Innovative Computing Corporation. All rights are reserved.
“This document contains proprietary and licensed information. Only the licensee of the Innovative Enterprise Software® who is a party to a license agreement with Innovative Computing Corporation (ICC) is authorized to have a copy of this documentation. Such licensee may make copies of this documentation in accordance with the license agreement to which it is a party and solely for the internal convenience of the licensee. No copies may be made for any other reason. In particular, no one may make copies of this document (except as mentioned above), create derivative works or compilations with this documentation and no one may republish, redistribute, sell, rent, lease or use this document in connection with any commercial activity, including without limitation the use of this work in support of or in conjunction with any service or service offerings. The licensee should consult the license agreement to which it is a party for a description of its rights and obligations with respect to the software and this documentation. In the event any provision herein conflicts with a provision of the license agreement between the licensee and ICC, the terms of the license agreement shall control.”
Trademarks
Innovative Enterprise Software® is a registered mark of Innovative Computing Corporation. IES®, IES Access®, IES Access Plus® and @Tools® are registered marks of BetaZone, Inc. All other marks are property of their respective owners.
Disclaimer
This document may contain technical and/or typographical errors. Revisions are continually incorporated for future releases, and all information is subject to change without notice.
Innovative Enterprise Software®
5924 N.W. 2nd Street, Suite 100 750 Old Hickory Blvd., Suite 290
Oklahoma City, OK 73127 Brentwood, TN 37027
Phone: (405) 495-8788 Phone: (615) 986-1900
Fax: (405) 782-7510 Fax: (615) 377-8865
Customer Support
Host Based Internet Based
Innovative Enterprise Software (IES) IES Access and Access Plus
1-800-238-1762 1-800-238-3895
http://www.innovativecomputingcorp.com
© 2007 Innovative Computing Corporation
Administration 207
Accounts Payable 1
Accounts Payable
I. IntroductionAccounts Payable is where you pay your bills. Whether it’s your monthly utility bill or the purchase of a new power unit, the payment is processed and checks written through your IES Accounts Payable module.
The source documents for accounts payable (a utility bill, lease agreement, etc.) are entered into the IES system as Vouchers. The company that provides the service/merchandise and receives your payment is the Vendor. This training guide will cover the basics of setting up your Vendor Master File, entering your vouchers, paying the voucher, and updating your records. For a more detailed explanation, please see your User’s Guide.
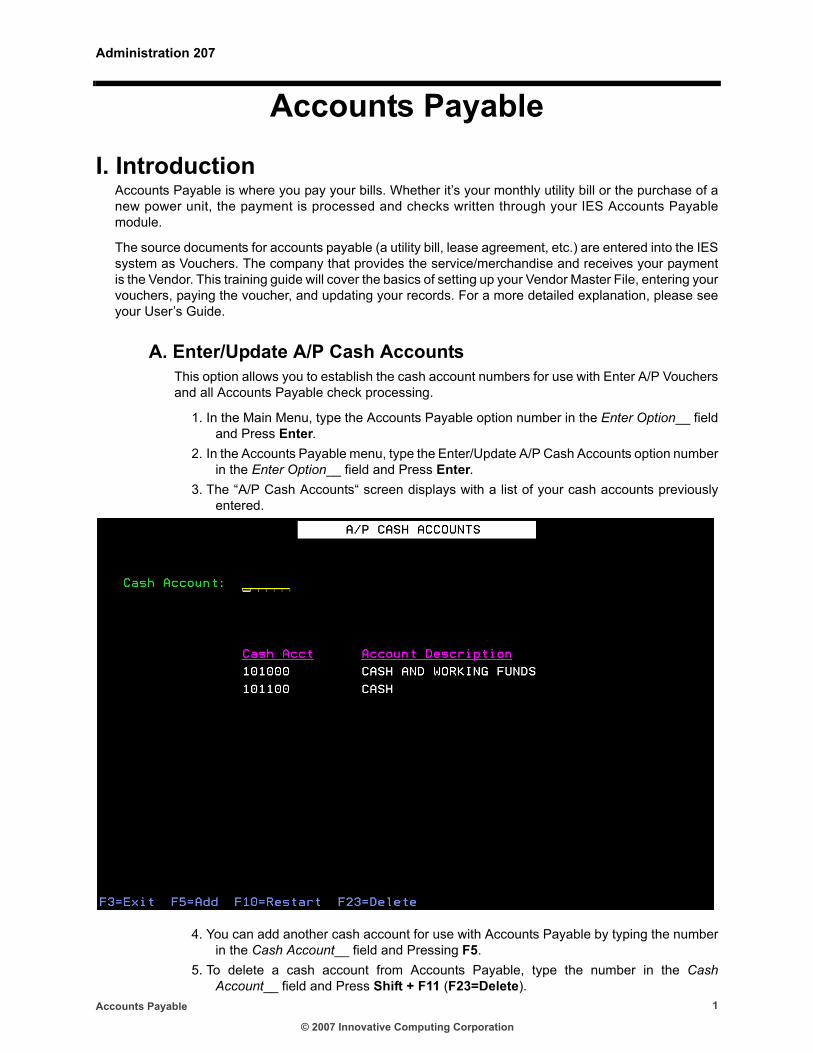
A. Enter/Update A/P Cash AccountsThis option allows you to establish the cash account numbers for use with Enter A/P Vouchers and all Accounts Payable check processing.
1. In the Main Menu, type the Accounts Payable option number in the Enter Option__ field and Press Enter.
2. In the Accounts Payable menu, type the Enter/Update A/P Cash Accounts option number in the Enter Option__ field and Press Enter.
3. The “A/P Cash Accounts“ screen displays with a list of your cash accounts previously entered.
4. You can add another cash account for use with Accounts Payable by typing the number in the Cash Account__ field and Pressing F5.
5. To delete a cash account from Accounts Payable, type the number in the Cash Account__ field and Press Shift + F11 (F23=Delete).
© 2007 Innovative Computing Corporation
Administration 207
Accounts Payable 2
6. Otherwise, Press F3 to return to the Accounts Payable menu.
B. Vendor MasterThis option allows you to set up and maintain your Vendor records. For training purposes, we will enter a new Vendor.
1. In the Accounts Payable menu, type the Vendor Master option number in the Enter Option__ field and Press Enter.
You can also access the Vendor Master option through the Master Files Menu.
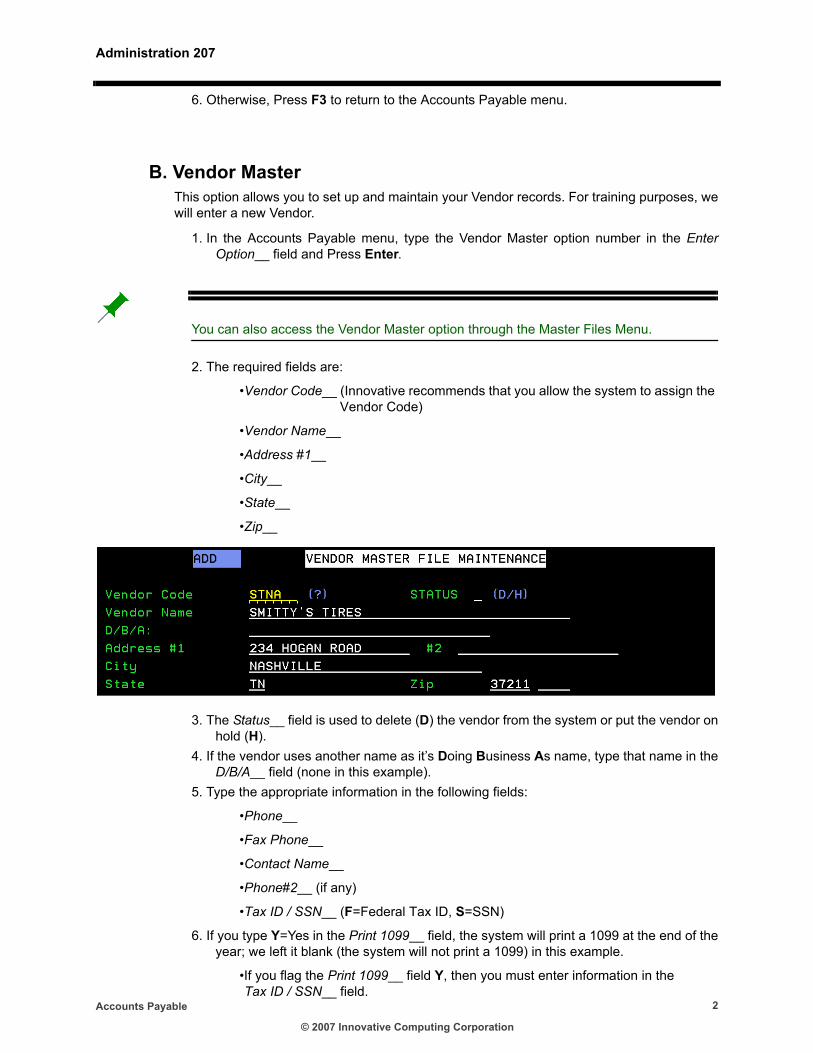
2. The required fields are:
•Vendor Code__ (Innovative recommends that you allow the system to assign the Vendor Code)
•Vendor Name__
•Address #1__
•City__
•State__
•Zip__
3. The Status__ field is used to delete (D) the vendor from the system or put the vendor on hold (H).
4. If the vendor uses another name as it’s Doing Business As name, type that name in the D/B/A__ field (none in this example).
5. Type the appropriate information in the following fields:
•Phone__
•Fax Phone__
•Contact Name__
•Phone#2__ (if any)
•Tax ID / SSN__ (F=Federal Tax ID, S=SSN)
6. If you type Y=Yes in the Print 1099__ field, the system will print a 1099 at the end of the year; we left it blank (the system will not print a 1099) in this example.
•If you flag the Print 1099__ field Y, then you must enter information in the Tax ID / SSN__ field.
© 2007 Innovative Computing Corporation
Administration 207
Accounts Payable 3
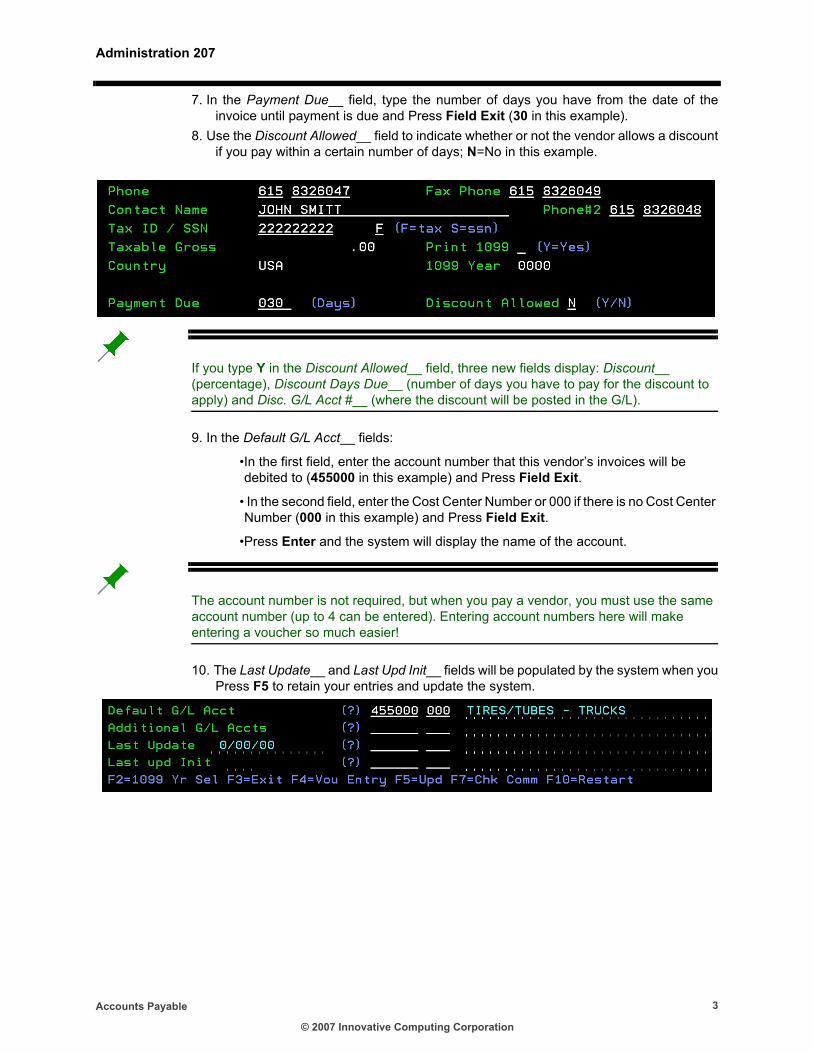
7. In the Payment Due__ field, type the number of days you have from the date of the invoice until payment is due and Press Field Exit (30 in this example).
8. Use the Discount Allowed__ field to indicate whether or not the vendor allows a discount if you pay within a certain number of days; N=No in this example.
If you type Y in the Discount Allowed__ field, three new fields display: Discount__ (percentage), Discount Days Due__ (number of days you have to pay for the discount to apply) and Disc. G/L Acct #__ (where the discount will be posted in the G/L).
9. In the Default G/L Acct__ fields:
•In the first field, enter the account number that this vendor’s invoices will be debited to (455000 in this example) and Press Field Exit.
• In the second field, enter the Cost Center Number or 000 if there is no Cost Center Number (000 in this example) and Press Field Exit.
•Press Enter and the system will display the name of the account.
The account number is not required, but when you pay a vendor, you must use the same account number (up to 4 can be entered). Entering account numbers here will make entering a voucher so much easier!
10. The Last Update__ and Last Upd Init__ fields will be populated by the system when you Press F5 to retain your entries and update the system.
© 2007 Innovative Computing Corporation
Administration 207
Accounts Payable 4
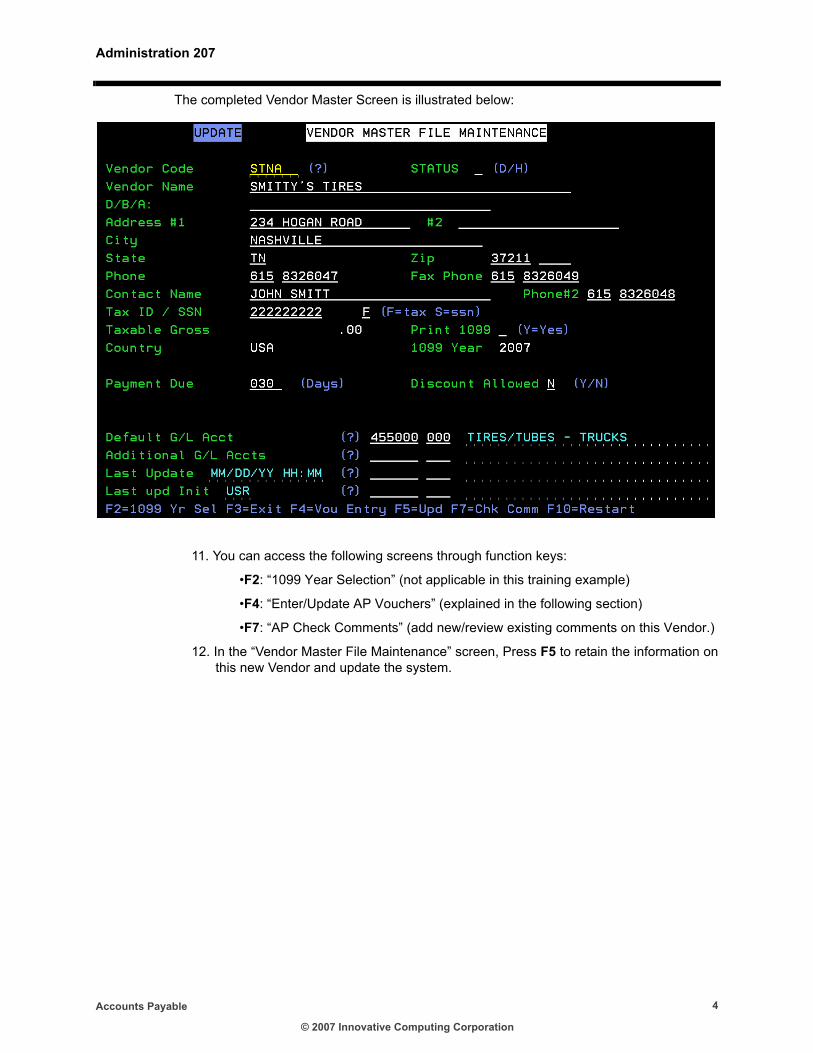
The completed Vendor Master Screen is illustrated below:
11. You can access the following screens through function keys:
•F2: “1099 Year Selection” (not applicable in this training example)
•F4: “Enter/Update AP Vouchers” (explained in the following section)
•F7: “AP Check Comments” (add new/review existing comments on this Vendor.)
12. In the “Vendor Master File Maintenance” screen, Press F5 to retain the information on this new Vendor and update the system.
© 2007 Innovative Computing Corporation
Administration 207
Accounts Payable 5
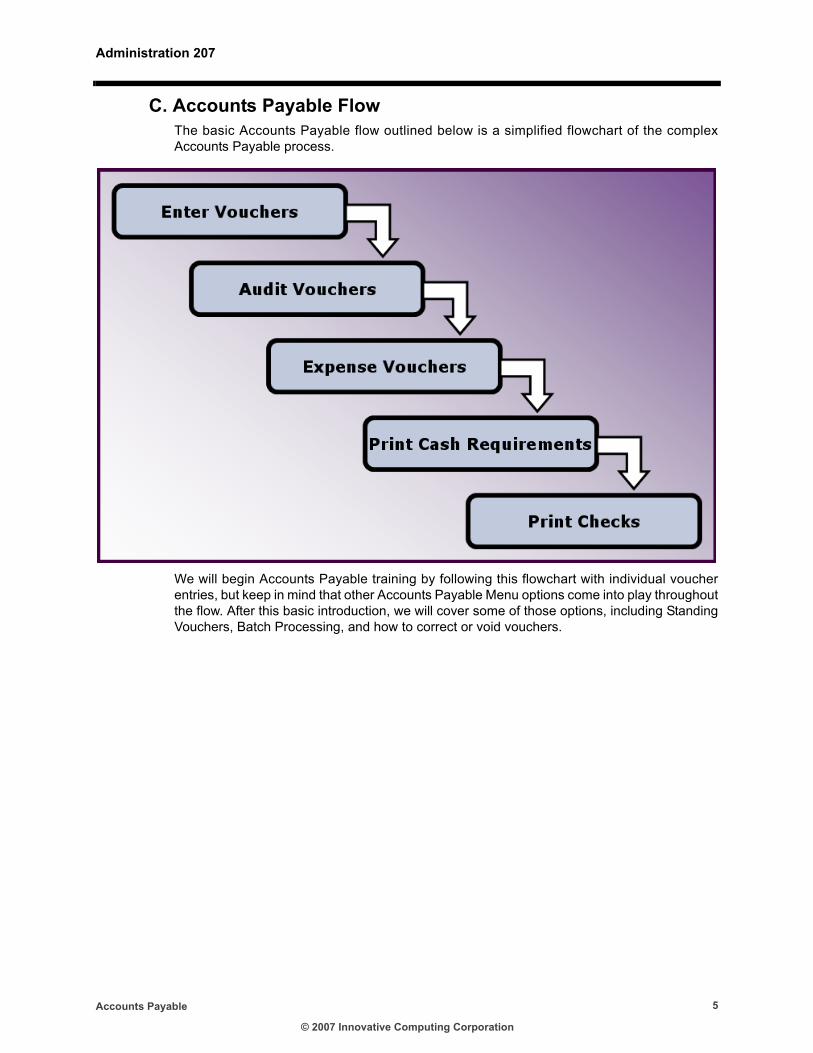
C. Accounts Payable FlowThe basic Accounts Payable flow outlined below is a simplified flowchart of the complex Accounts Payable process.
We will begin Accounts Payable training by following this flowchart with individual voucher entries, but keep in mind that other Accounts Payable Menu options come into play throughout the flow. After this basic introduction, we will cover some of those options, including Standing Vouchers, Batch Processing, and how to correct or void vouchers.
© 2007 Innovative Computing Corporation
Administration 207
Accounts Payable 6
D. Enter A/P VouchersThis option is the entry way into the Accounts Payable module. This is where you enter your invoices (vouchers) and determine how you will print the checks. For training purposes, we will cover entering invoices individually for printing by the system. We will also explain how to hand write a check and issue a Quick Check.
For details on other functions available through this option, please see your User’s Guide.
1) Voucher EntryWe will first enter vouchers individually for printing by the system.
a. In the Accounts Payable Menu, type the Enter A/P Vouchers option number in the Enter Option__ field and Press Enter.
You can access the “Enter/Update AP Vouchers” screen from the F4=Vou Entry function key in the “Vendor Master File Maintenance” screen.
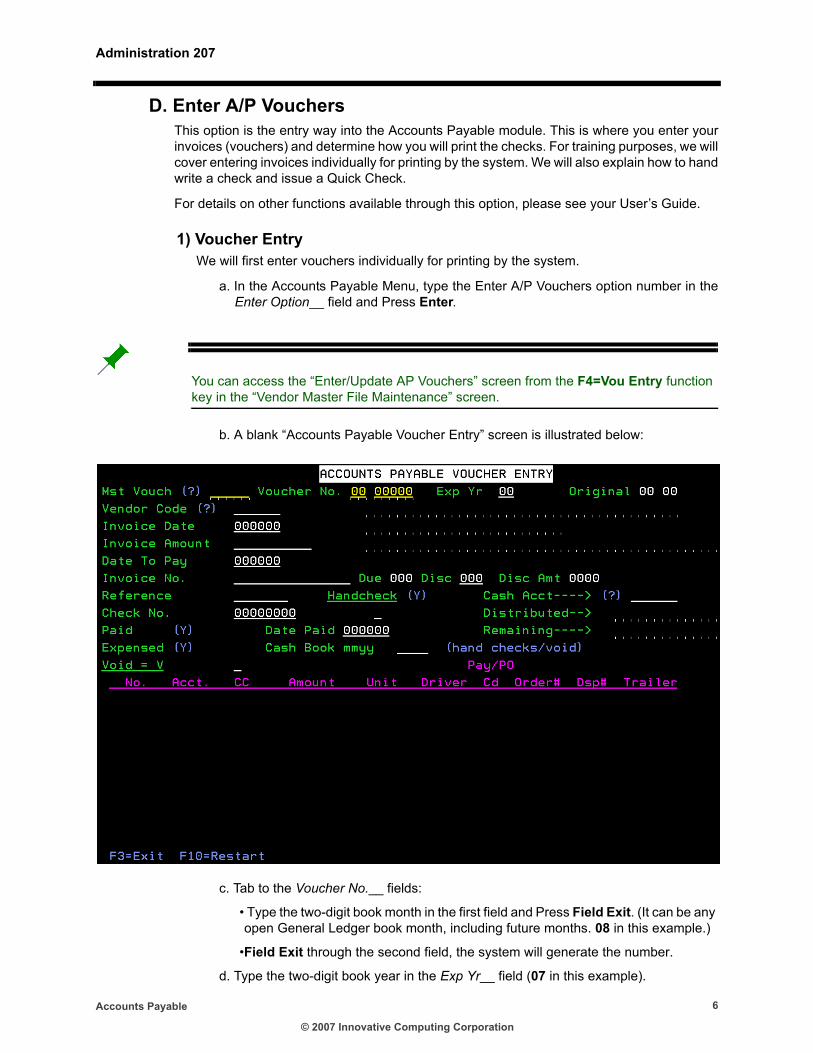
b. A blank “Accounts Payable Voucher Entry” screen is illustrated below:
c. Tab to the Voucher No.__ fields:
• Type the two-digit book month in the first field and Press Field Exit. (It can be any open General Ledger book month, including future months. 08 in this example.)
•Field Exit through the second field, the system will generate the number.
d. Type the two-digit book year in the Exp Yr__ field (07 in this example).
© 2007 Innovative Computing Corporation
Administration 207
Accounts Payable 7
e. Type a ? in the Vendor Code__ field. Select the vendor from the “Vendor Master Selection” screen (Smitty’s Tires in this example) and Press Enter.
f. The Vendor Code, name, and address will display. g. Type the invoice date in the Invoice Date__ field (012007 in this example) and Press
Field Exit.
•The vendor’s payment terms were entered in the Vendor Master (payment due in 30 days in this example), so the system added the number of days to the invoice date and populated the Date to Pay__ field (021907 in this example).
h. Type the amount of the invoice in the Invoice Amount__ field (50000 for $500.00 in this example) and Press Field Exit.
i. Type the invoice number in the Invoice No.__ field (1200 in this example) and Press Field Exit.
j. The Due__, Disc__, and Disc Amt__ fields are populated by the system if the vendor offers a discount. (No discount in this example.)
k. The Cash Acct__ field is populated by the system with the General Ledger Cash Account number (101000 in this example.)
The remaining fields at the top of the screen deal with Quick Checks and Handwritten checks. They will be explained later in this training guide.
l. Press Enter and the Remaining__ field is populated with 500.00 and the cursor moves to the distribution section of the screen -- located at the bottom of the screen below the pink line.
•The distribution Acct.__ field is populated with the account number. See an explanation of the Distribution fields below, after the screen illustration.
© 2007 Innovative Computing Corporation
Administration 207
Accounts Payable 8
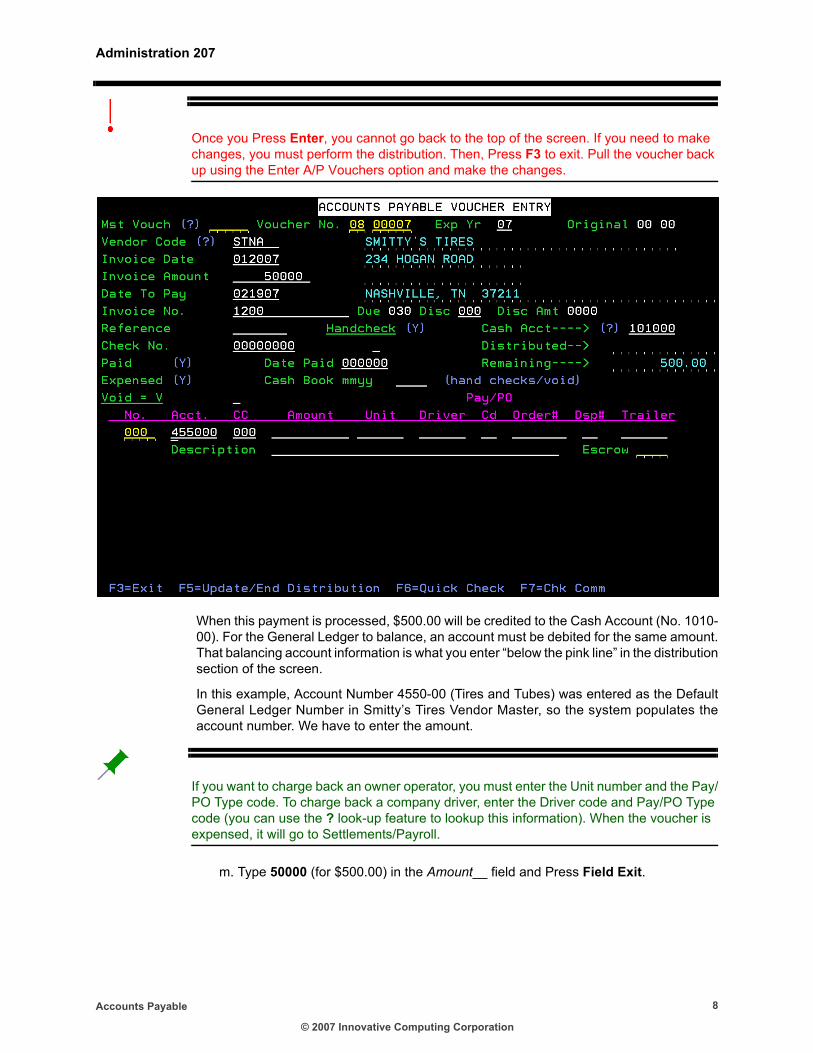
Once you Press Enter, you cannot go back to the top of the screen. If you need to make changes, you must perform the distribution. Then, Press F3 to exit. Pull the voucher back up using the Enter A/P Vouchers option and make the changes.
When this payment is processed, $500.00 will be credited to the Cash Account (No. 1010-00). For the General Ledger to balance, an account must be debited for the same amount. That balancing account information is what you enter “below the pink line” in the distribution section of the screen.
In this example, Account Number 4550-00 (Tires and Tubes) was entered as the Default General Ledger Number in Smitty’s Tires Vendor Master, so the system populates the account number. We have to enter the amount.
If you want to charge back an owner operator, you must enter the Unit number and the Pay/PO Type code. To charge back a company driver, enter the Driver code and Pay/PO Type code (you can use the ? look-up feature to lookup this information). When the voucher is expensed, it will go to Settlements/Payroll.
m. Type 50000 (for $500.00) in the Amount__ field and Press Field Exit.
© 2007 Innovative Computing Corporation
Administration 207
Accounts Payable 9
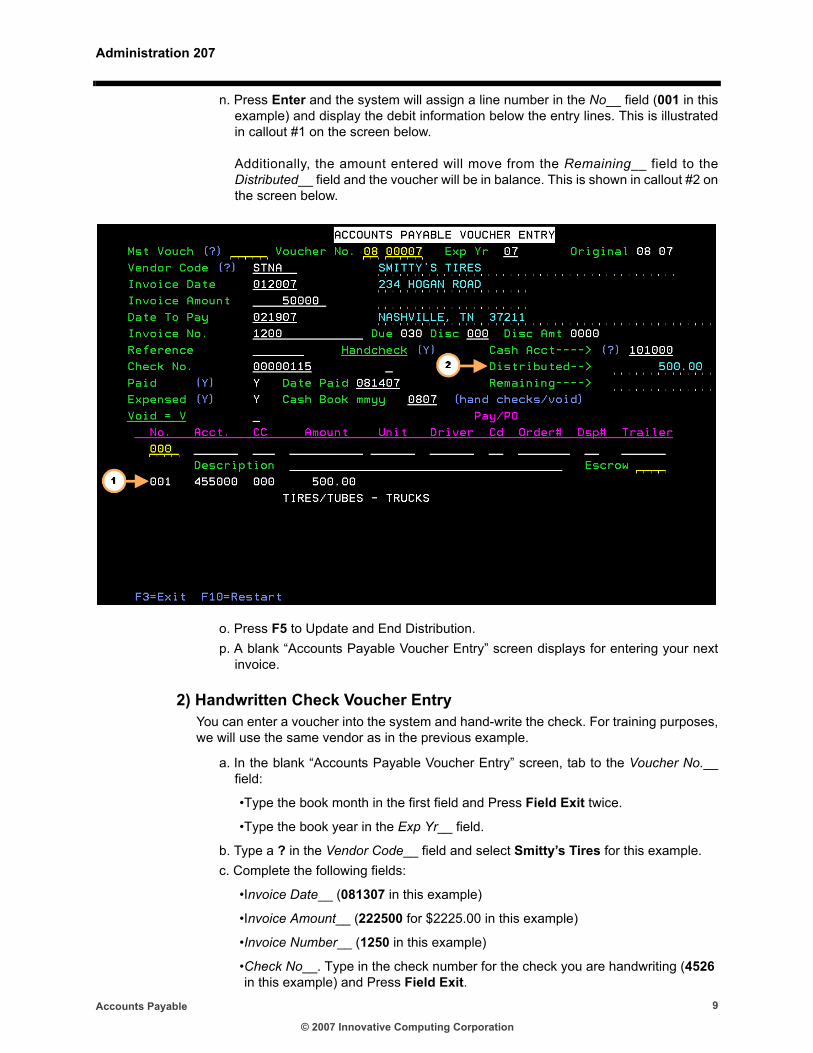
n. Press Enter and the system will assign a line number in the No__ field (001 in this example) and display the debit information below the entry lines. This is illustrated in callout #1 on the screen below. Additionally, the amount entered will move from the Remaining__ field to the Distributed__ field and the voucher will be in balance. This is shown in callout #2 on the screen below.
o. Press F5 to Update and End Distribution. p. A blank “Accounts Payable Voucher Entry” screen displays for entering your next
invoice.
2) Handwritten Check Voucher EntryYou can enter a voucher into the system and hand-write the check. For training purposes, we will use the same vendor as in the previous example.
a. In the blank “Accounts Payable Voucher Entry” screen, tab to the Voucher No.__field:
•Type the book month in the first field and Press Field Exit twice.
•Type the book year in the Exp Yr__ field.
b. Type a ? in the Vendor Code__ field and select Smitty’s Tires for this example. c. Complete the following fields:
•Invoice Date__ (081307 in this example)
•Invoice Amount__ (222500 for $2225.00 in this example)
•Invoice Number__ (1250 in this example)
•Check No__. Type in the check number for the check you are handwriting (4526 in this example) and Press Field Exit.
© 2007 Innovative Computing Corporation
Administration 207
Accounts Payable 10
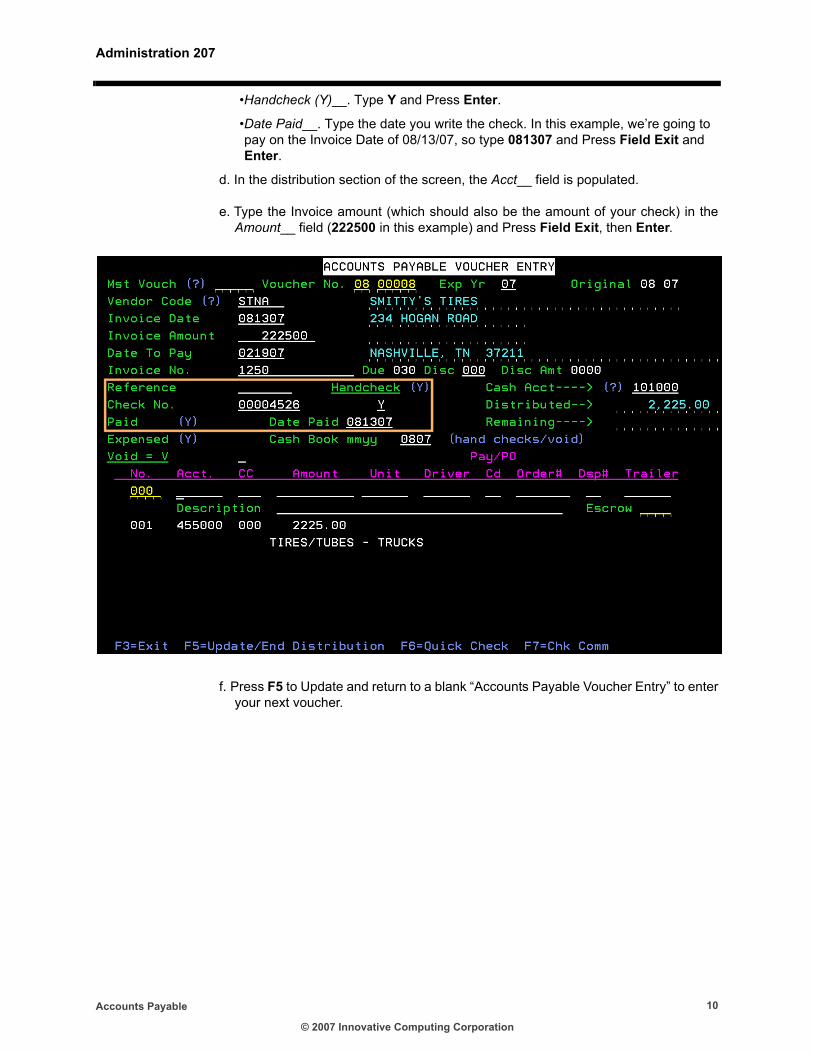
•Handcheck (Y)__. Type Y and Press Enter.
•Date Paid__. Type the date you write the check. In this example, we’re going to pay on the Invoice Date of 08/13/07, so type 081307 and Press Field Exit and Enter.
d. In the distribution section of the screen, the Acct__ field is populated.
e. Type the Invoice amount (which should also be the amount of your check) in the Amount__ field (222500 in this example) and Press Field Exit, then Enter.
f. Press F5 to Update and return to a blank “Accounts Payable Voucher Entry” to enter your next voucher.
© 2007 Innovative Computing Corporation
Administration 207
Accounts Payable 11
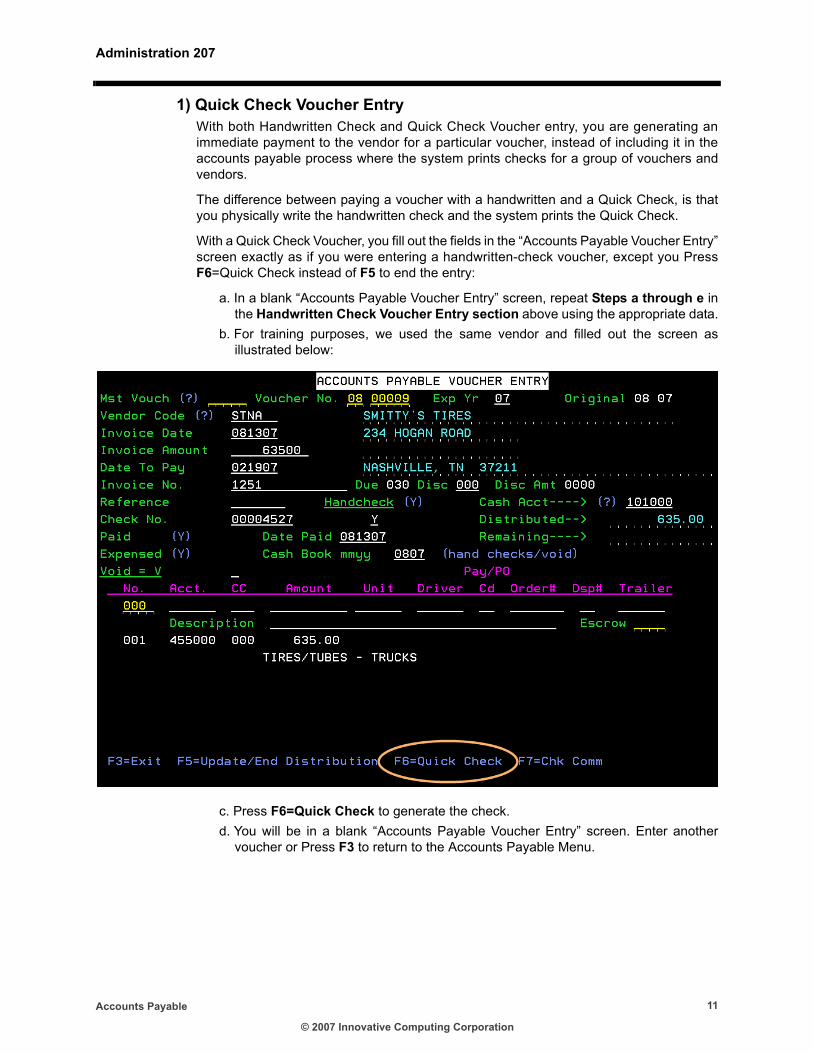
1) Quick Check Voucher EntryWith both Handwritten Check and Quick Check Voucher entry, you are generating an immediate payment to the vendor for a particular voucher, instead of including it in the accounts payable process where the system prints checks for a group of vouchers and vendors.
The difference between paying a voucher with a handwritten and a Quick Check, is that you physically write the handwritten check and the system prints the Quick Check.
With a Quick Check Voucher, you fill out the fields in the “Accounts Payable Voucher Entry” screen exactly as if you were entering a handwritten-check voucher, except you Press F6=Quick Check instead of F5 to end the entry:
a. In a blank “Accounts Payable Voucher Entry” screen, repeat Steps a through e in the Handwritten Check Voucher Entry section above using the appropriate data.
b. For training purposes, we used the same vendor and filled out the screen as illustrated below:
c. Press F6=Quick Check to generate the check. d. You will be in a blank “Accounts Payable Voucher Entry” screen. Enter another
voucher or Press F3 to return to the Accounts Payable Menu.
© 2007 Innovative Computing Corporation
Administration 207
Accounts Payable 12
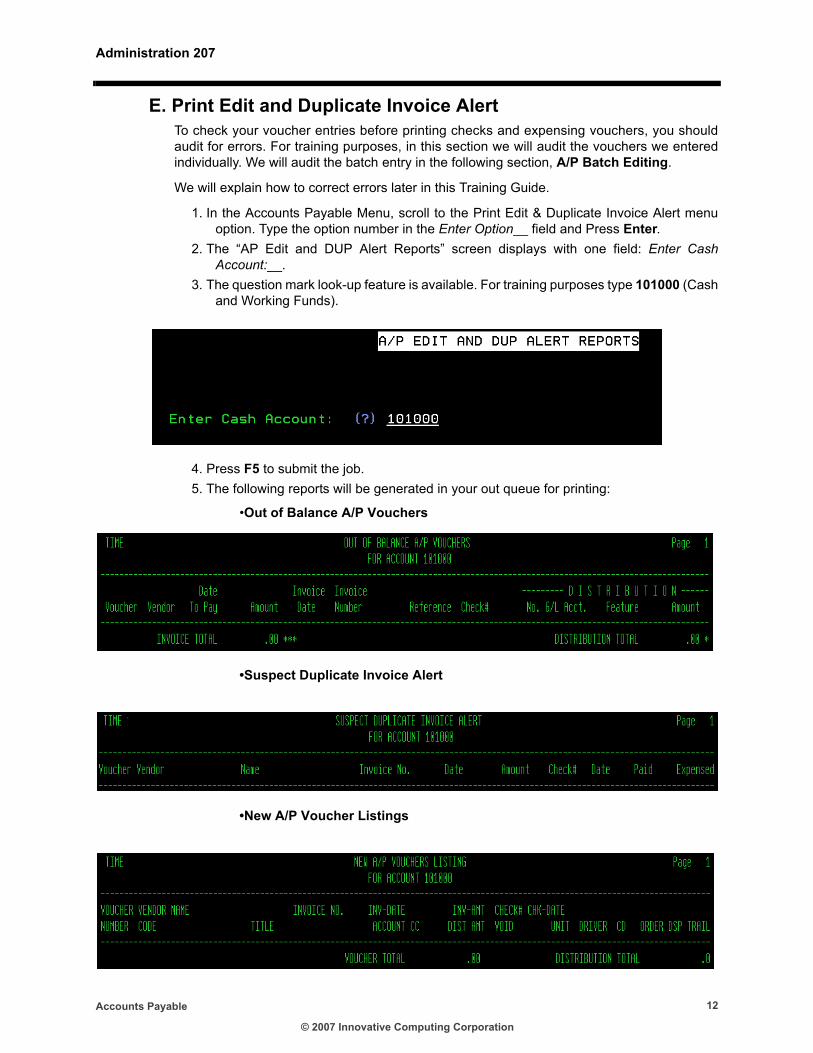
E. Print Edit and Duplicate Invoice AlertTo check your voucher entries before printing checks and expensing vouchers, you should audit for errors. For training purposes, in this section we will audit the vouchers we entered individually. We will audit the batch entry in the following section, A/P Batch Editing.
We will explain how to correct errors later in this Training Guide.
1. In the Accounts Payable Menu, scroll to the Print Edit & Duplicate Invoice Alert menu option. Type the option number in the Enter Option__ field and Press Enter.
2. The “AP Edit and DUP Alert Reports” screen displays with one field: Enter Cash Account:__.
3. The question mark look-up feature is available. For training purposes type 101000 (Cash and Working Funds).
4. Press F5 to submit the job.5. The following reports will be generated in your out queue for printing:
•Out of Balance A/P Vouchers
•Suspect Duplicate Invoice Alert
•New A/P Voucher Listings
© 2007 Innovative Computing Corporation
Administration 207
Accounts Payable 13
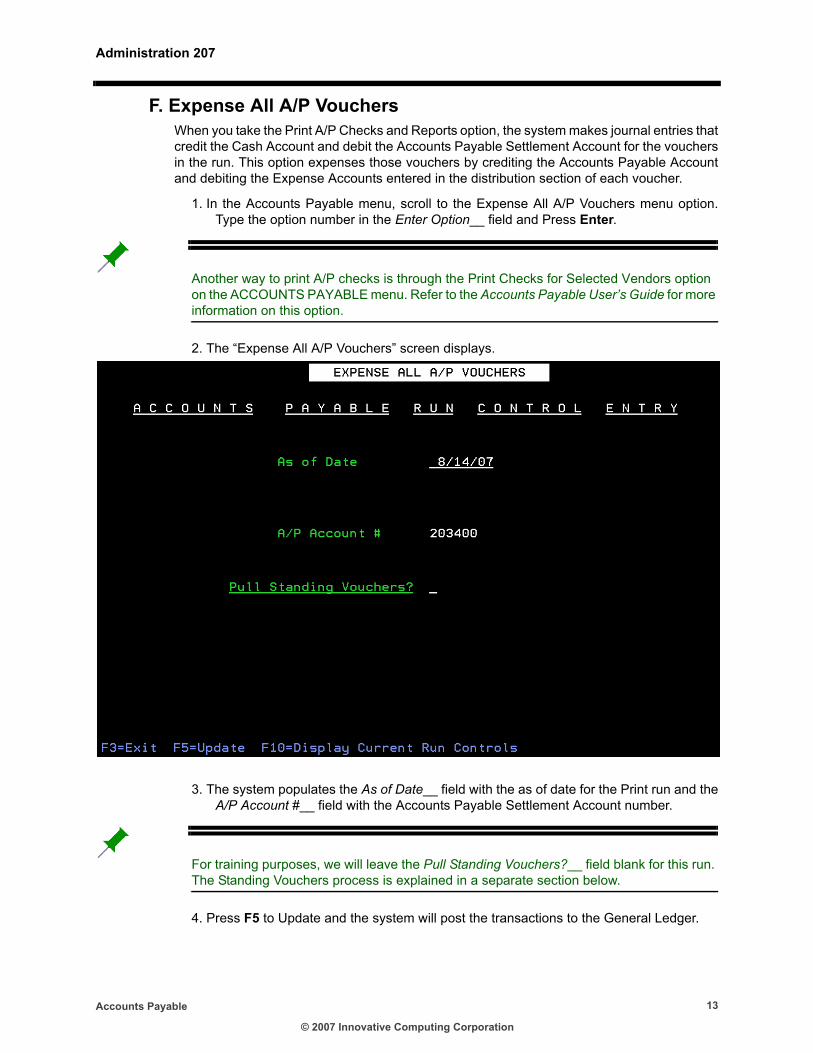
F. Expense All A/P VouchersWhen you take the Print A/P Checks and Reports option, the system makes journal entries that credit the Cash Account and debit the Accounts Payable Settlement Account for the vouchers in the run. This option expenses those vouchers by crediting the Accounts Payable Account and debiting the Expense Accounts entered in the distribution section of each voucher.
1. In the Accounts Payable menu, scroll to the Expense All A/P Vouchers menu option. Type the option number in the Enter Option__ field and Press Enter.
Another way to print A/P checks is through the Print Checks for Selected Vendors option on the ACCOUNTS PAYABLE menu. Refer to the Accounts Payable User’s Guide for more information on this option.
2. The “Expense All A/P Vouchers” screen displays.
3. The system populates the As of Date__ field with the as of date for the Print run and the A/P Account #__ field with the Accounts Payable Settlement Account number.
For training purposes, we will leave the Pull Standing Vouchers?__ field blank for this run. The Standing Vouchers process is explained in a separate section below.
4. Press F5 to Update and the system will post the transactions to the General Ledger.
© 2007 Innovative Computing Corporation
Administration 207
Accounts Payable 14
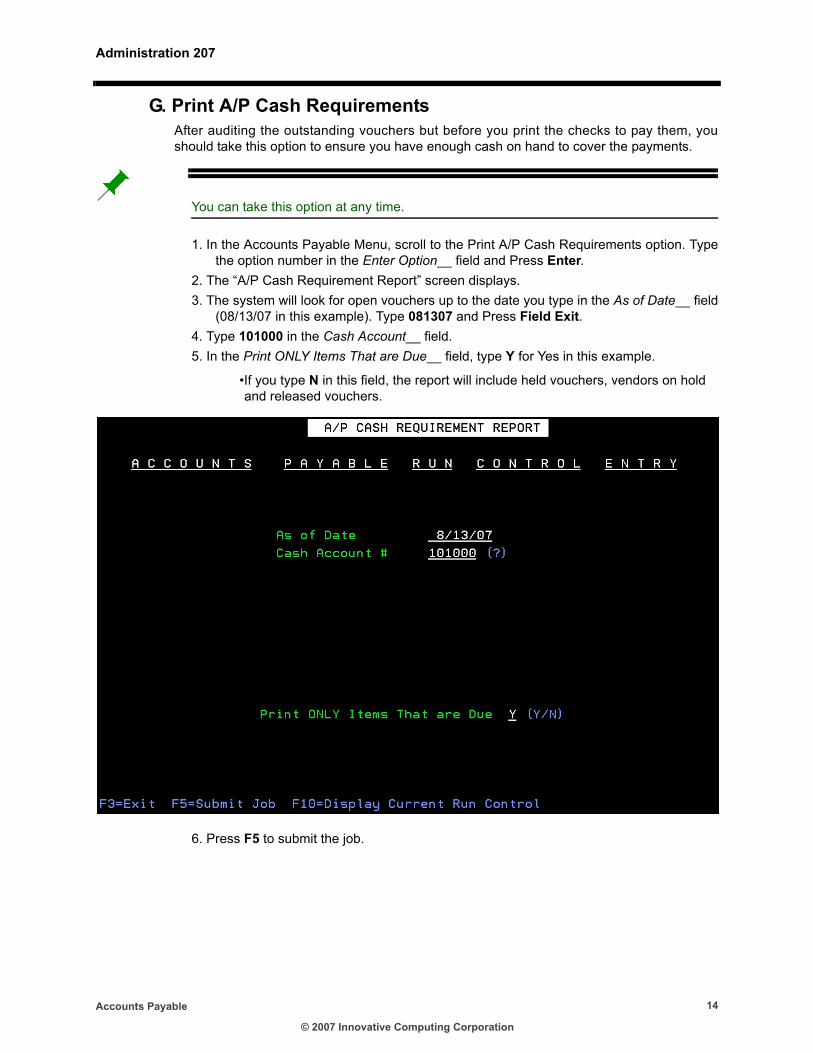
G. Print A/P Cash RequirementsAfter auditing the outstanding vouchers but before you print the checks to pay them, you should take this option to ensure you have enough cash on hand to cover the payments.
You can take this option at any time.
1. In the Accounts Payable Menu, scroll to the Print A/P Cash Requirements option. Type the option number in the Enter Option__ field and Press Enter.
2. The “A/P Cash Requirement Report” screen displays.3. The system will look for open vouchers up to the date you type in the As of Date__ field
(08/13/07 in this example). Type 081307 and Press Field Exit.4. Type 101000 in the Cash Account__ field.5. In the Print ONLY Items That are Due__ field, type Y for Yes in this example.
•If you type N in this field, the report will include held vouchers, vendors on hold and released vouchers.
6. Press F5 to submit the job.
© 2007 Innovative Computing Corporation
Administration 207
Accounts Payable 15
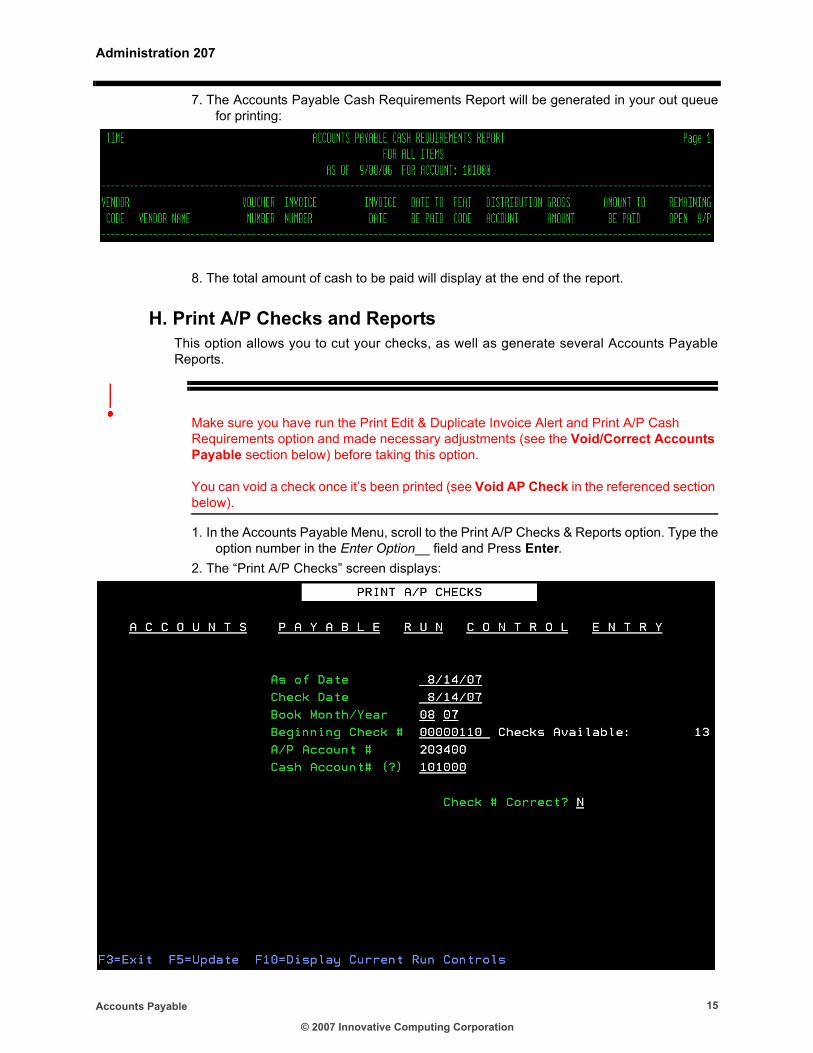
7. The Accounts Payable Cash Requirements Report will be generated in your out queue for printing:
8. The total amount of cash to be paid will display at the end of the report.
H. Print A/P Checks and ReportsThis option allows you to cut your checks, as well as generate several Accounts Payable Reports.
Make sure you have run the Print Edit & Duplicate Invoice Alert and Print A/P Cash Requirements option and made necessary adjustments (see the Void/Correct Accounts Payable section below) before taking this option. You can void a check once it’s been printed (see Void AP Check in the referenced section below).
1. In the Accounts Payable Menu, scroll to the Print A/P Checks & Reports option. Type the option number in the Enter Option__ field and Press Enter.
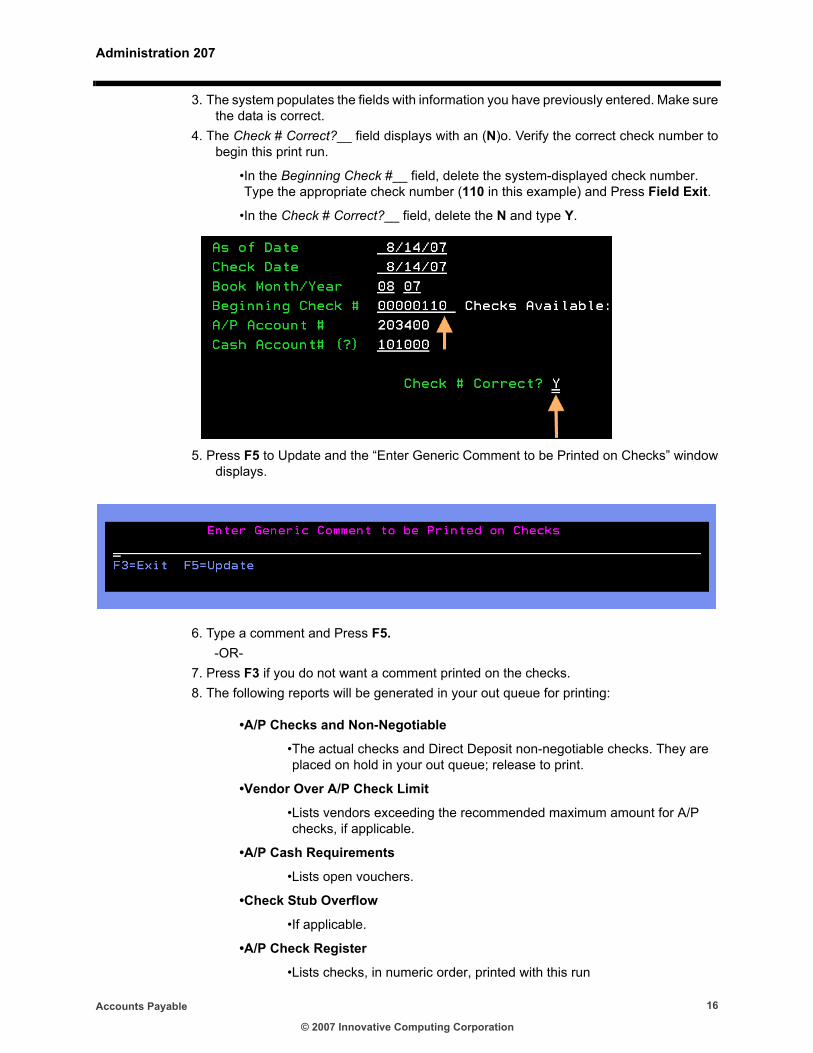
2. The “Print A/P Checks” screen displays:
© 2007 Innovative Computing Corporation
Administration 207
Accounts Payable 16
3. The system populates the fields with information you have previously entered. Make sure the data is correct.
4. The Check # Correct?__ field displays with an (N)o. Verify the correct check number to begin this print run.
•In the Beginning Check #__ field, delete the system-displayed check number. Type the appropriate check number (110 in this example) and Press Field Exit.
•In the Check # Correct?__ field, delete the N and type Y.
5. Press F5 to Update and the “Enter Generic Comment to be Printed on Checks” window displays.
6. Type a comment and Press F5. -OR-
7. Press F3 if you do not want a comment printed on the checks.8. The following reports will be generated in your out queue for printing:
•A/P Checks and Non-Negotiable
•The actual checks and Direct Deposit non-negotiable checks. They are placed on hold in your out queue; release to print.
•Vendor Over A/P Check Limit
•Lists vendors exceeding the recommended maximum amount for A/P checks, if applicable.
•A/P Cash Requirements
•Lists open vouchers.
•Check Stub Overflow
•If applicable.
•A/P Check Register
•Lists checks, in numeric order, printed with this run
© 2007 Innovative Computing Corporation
Administration 207
Accounts Payable 17
•Void and Handcheck Register
•Lists voided and handchecks for the run
•Accounts Payable Distribution
•Expensed vouchers distribution
•Immediate Mode
•Subledger Error Listing - lists journal entries with errors
•Daily Journal List & Summary - lists journal entries recorded in the General Ledger
•Batch Mode
•Subledger Error Listing - lists journal entries with errors
•Subledger Listing - lists journal entries posted to the subledger
•Immediate Mode
•GL07
•GL07S
© 2007 Innovative Computing Corporation
Administration 207
Accounts Payable 18
II. Standing VouchersIf you have regular expenses that are the same amount each time you pay -- for example, a monthly insurance premium of $200.00 -- you do not have to enter vouchers each time you pay them. Instead, you can enter them one time as Standing Vouchers and the system will include them in the Accounts Payable process when you take the Pull Standing Vouchers option.
Innovative recommends that you use Standing Vouchers only with payments that are flat and fixed, such as a trailer lease, insurance premium, or rent. Additionally, do not make any changes to Standard Vouchers are they are created.
A. Standing Voucher EntryEntering a Standing Voucher is similar to entering a regular voucher. For training purposes, we will enter a Standing Voucher for a $200.00 monthly insurance premium payable to Ace Insurance.
1. In the Accounts Payable Menu, scroll to the Standing Voucher Entry option. Type the option number in the Enter Option__ field and Press Enter.
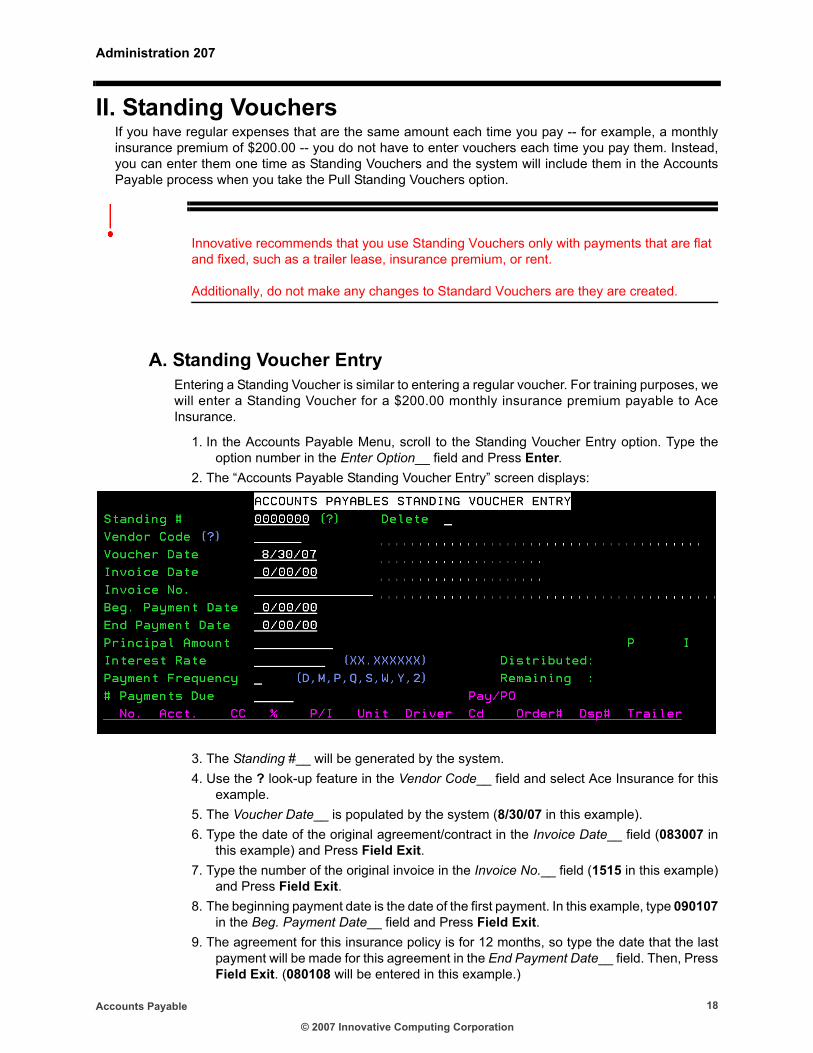
2. The “Accounts Payable Standing Voucher Entry” screen displays:
3. The Standing #__ will be generated by the system. 4. Use the ? look-up feature in the Vendor Code__ field and select Ace Insurance for this
example.5. The Voucher Date__ is populated by the system (8/30/07 in this example).6. Type the date of the original agreement/contract in the Invoice Date__ field (083007 in
this example) and Press Field Exit.7. Type the number of the original invoice in the Invoice No.__ field (1515 in this example)
and Press Field Exit.8. The beginning payment date is the date of the first payment. In this example, type 090107
in the Beg. Payment Date__ field and Press Field Exit.9. The agreement for this insurance policy is for 12 months, so type the date that the last
payment will be made for this agreement in the End Payment Date__ field. Then, Press Field Exit. (080108 will be entered in this example.)
© 2007 Innovative Computing Corporation
Administration 207
Accounts Payable 19
10. In the Principal Amount__ field type the full amount of the obligation. In this example, it is a 12-month insurance policy for $2400.00, so type 240000 in the field and Press Field Exit.
In this example, there is no interest paid, so leave the Interest Rate__ field blank. Additionally, Innovative does not recommend that you use Standing Vouchers for any type of interest-bearing voucher.
11. How often you are to make payments goes in the Payment Frequency__ field. Type Mfor monthly in this example and Press Enter.
12. The system populates the following fields:
•Standing #__ (4 in this example)
•# of Payments Due__ (12 in this example)
•Remaining__ (100.0 for 100% remaining to be distributed in this example)
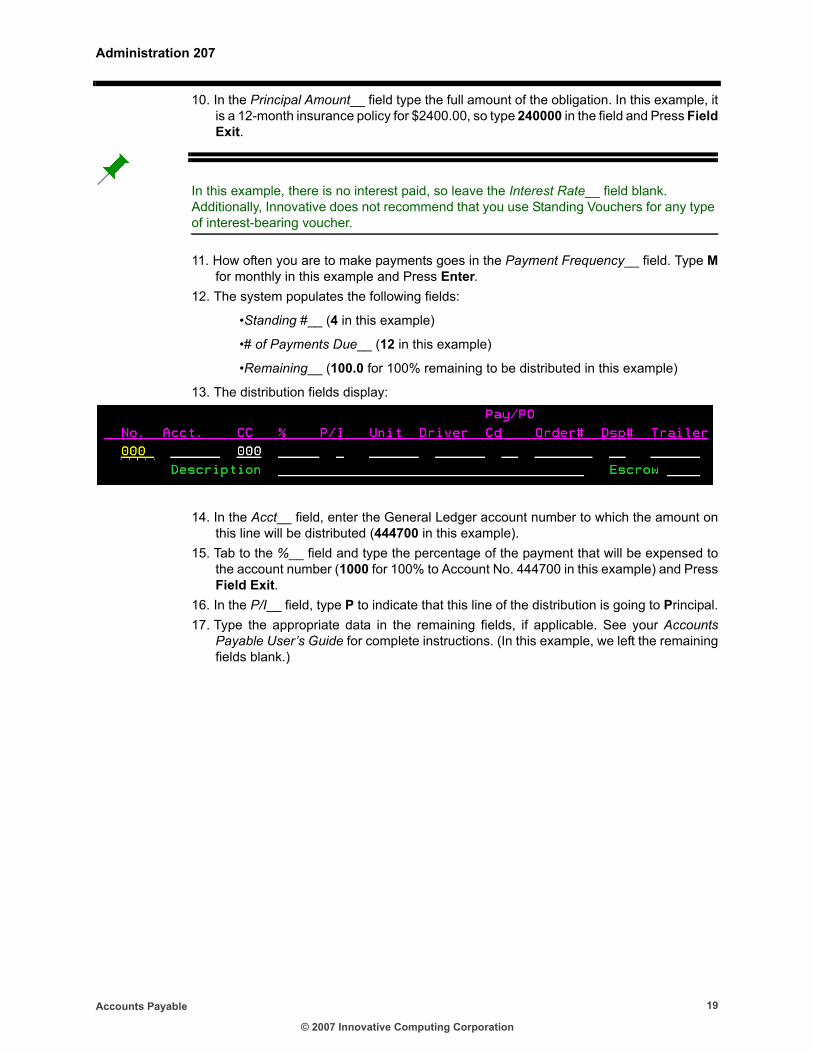
13. The distribution fields display:
14. In the Acct__ field, enter the General Ledger account number to which the amount on this line will be distributed (444700 in this example).
15. Tab to the %__ field and type the percentage of the payment that will be expensed to the account number (1000 for 100% to Account No. 444700 in this example) and Press Field Exit.
16. In the P/I__ field, type P to indicate that this line of the distribution is going to Principal.17. Type the appropriate data in the remaining fields, if applicable. See your Accounts
Payable User’s Guide for complete instructions. (In this example, we left the remaining fields blank.)
© 2007 Innovative Computing Corporation
Administration 207
Accounts Payable 20
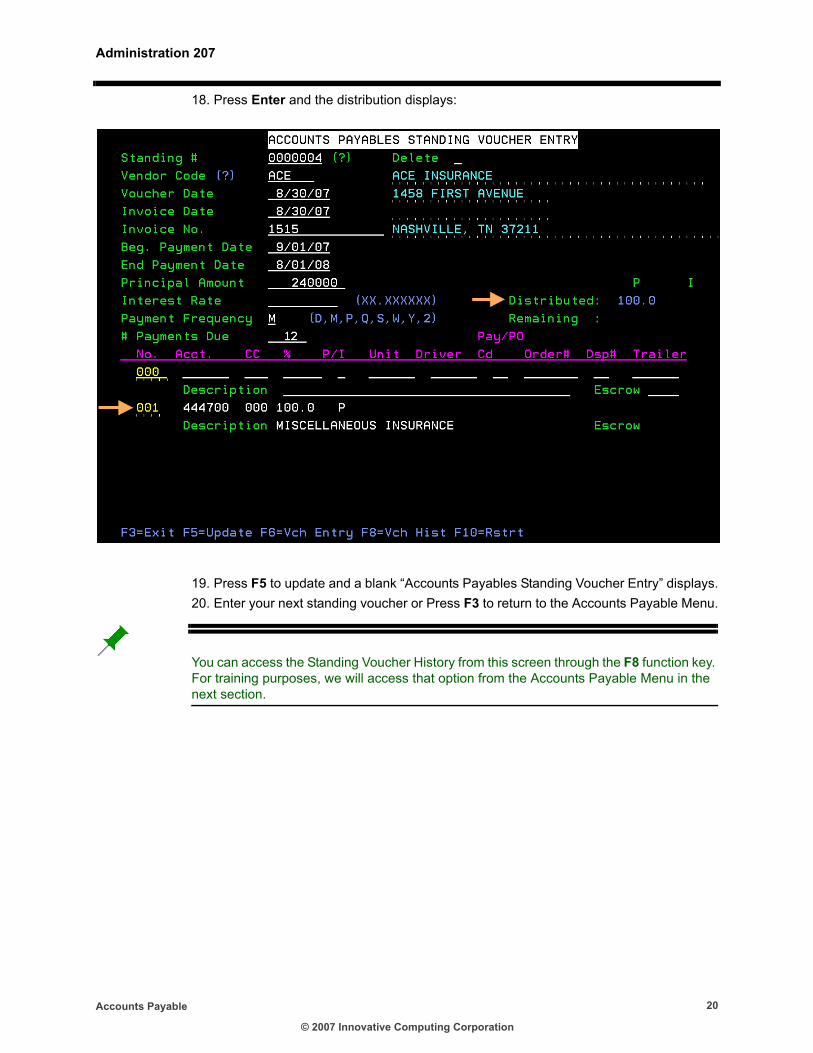
18. Press Enter and the distribution displays:
19. Press F5 to update and a blank “Accounts Payables Standing Voucher Entry” displays.20. Enter your next standing voucher or Press F3 to return to the Accounts Payable Menu.
You can access the Standing Voucher History from this screen through the F8 function key. For training purposes, we will access that option from the Accounts Payable Menu in the next section.
© 2007 Innovative Computing Corporation
Administration 207
Accounts Payable 21
B. Standing Voucher HistoryThis option allows you to view the payment history of a particular Standing Voucher.
1. In the Accounts Payable Menu, scroll to the Standing Voucher History menu option. Type the option number in the Enter Option__ field and Press Enter.
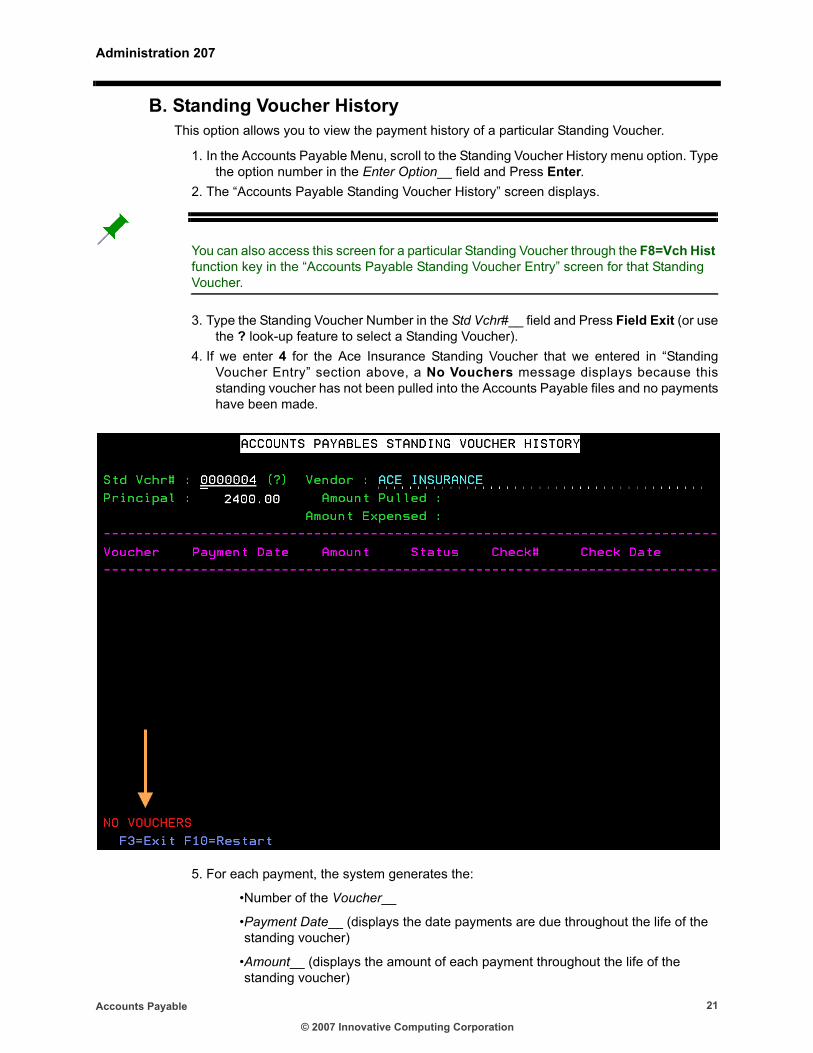
2. The “Accounts Payable Standing Voucher History” screen displays.
You can also access this screen for a particular Standing Voucher through the F8=Vch Hist function key in the “Accounts Payable Standing Voucher Entry” screen for that Standing Voucher.
3. Type the Standing Voucher Number in the Std Vchr#__ field and Press Field Exit (or use the ? look-up feature to select a Standing Voucher).
4. If we enter 4 for the Ace Insurance Standing Voucher that we entered in “Standing Voucher Entry” section above, a No Vouchers message displays because this standing voucher has not been pulled into the Accounts Payable files and no payments have been made.
5. For each payment, the system generates the:
•Number of the Voucher__
•Payment Date__ (displays the date payments are due throughout the life of the standing voucher)
•Amount__ (displays the amount of each payment throughout the life of the standing voucher)
© 2007 Innovative Computing Corporation
Administration 207
Accounts Payable 22
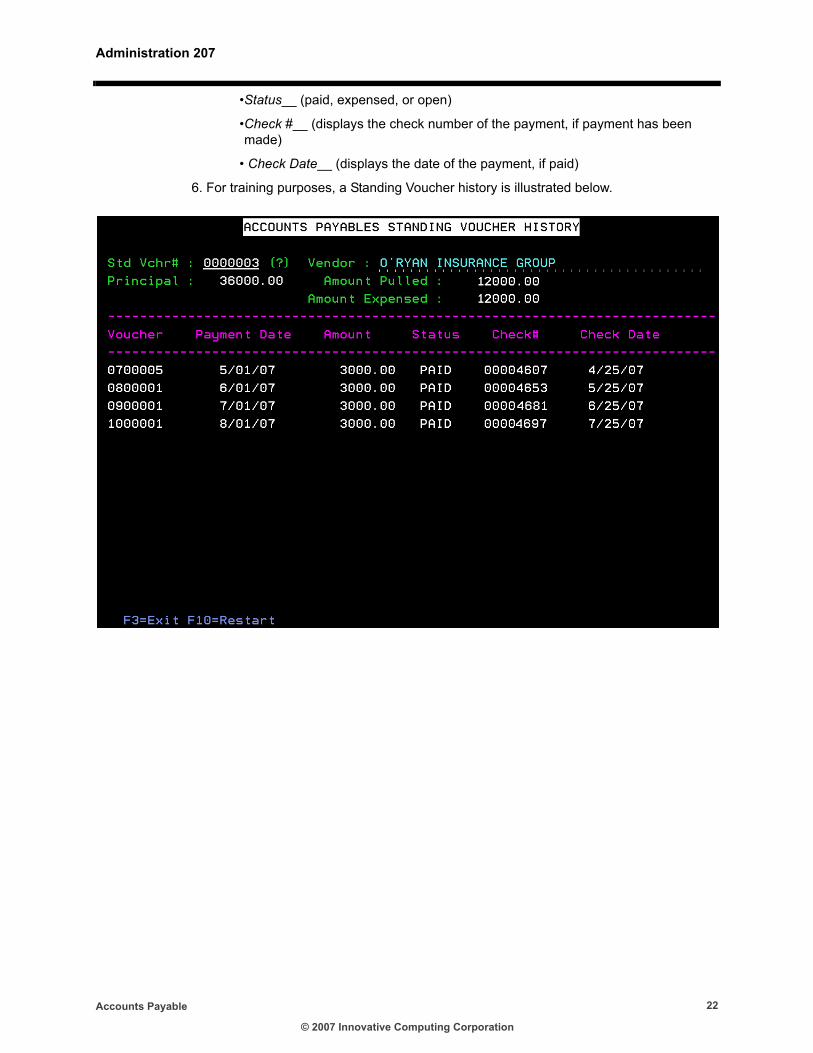
•Status__ (paid, expensed, or open)
•Check #__ (displays the check number of the payment, if payment has been made)
• Check Date__ (displays the date of the payment, if paid)
6. For training purposes, a Standing Voucher history is illustrated below.
© 2007 Innovative Computing Corporation
Administration 207
Accounts Payable 23
C. Pull Standing VoucherThis option allows you to pull the standing vouchers into the Accounts Payable files. You can also pull the standing vouchers from the “Expense All A/P Vouchers” screen by flagging the Pull Standing Vouchers?__ field Y. (See the Expense All A/P Vouchers section in this guide.)
If you take the Pull Standing Voucher option here, as you go through your Accounts Payable process (see the Accounts Payable Flow Chart) the standing vouchers will be included in the audit, etc., and you can make changes, if needed, before printing and expensing the vouchers.
If you pull the standing vouchers from the “Expense All A/P Vouchers” screen, you cannot make any changes prior to expensing.
1. In the Accounts Payable Menu, scroll to the Pull Standing Voucher menu option. Type the option number in the Enter Option__ field and Press Enter.
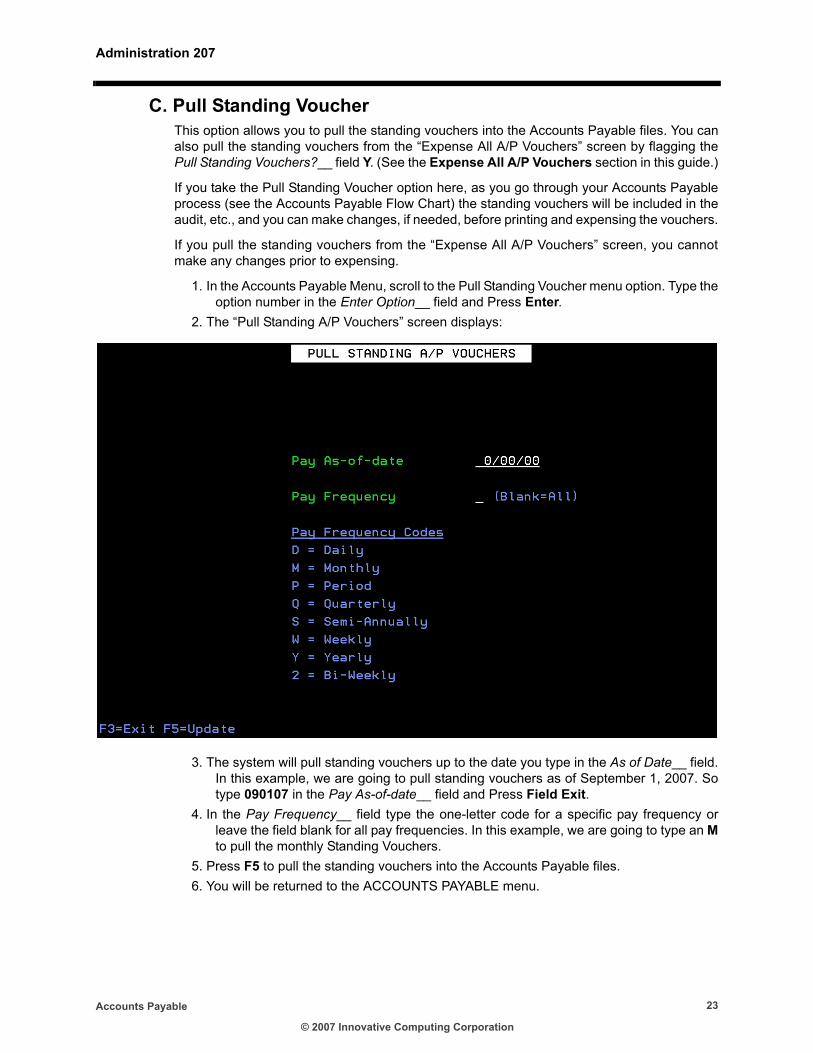
2. The “Pull Standing A/P Vouchers” screen displays:
3. The system will pull standing vouchers up to the date you type in the As of Date__ field. In this example, we are going to pull standing vouchers as of September 1, 2007. So type 090107 in the Pay As-of-date__ field and Press Field Exit.
4. In the Pay Frequency__ field type the one-letter code for a specific pay frequency or leave the field blank for all pay frequencies. In this example, we are going to type an Mto pull the monthly Standing Vouchers.
5. Press F5 to pull the standing vouchers into the Accounts Payable files.6. You will be returned to the ACCOUNTS PAYABLE menu.
© 2007 Innovative Computing Corporation
Administration 207
Accounts Payable 24
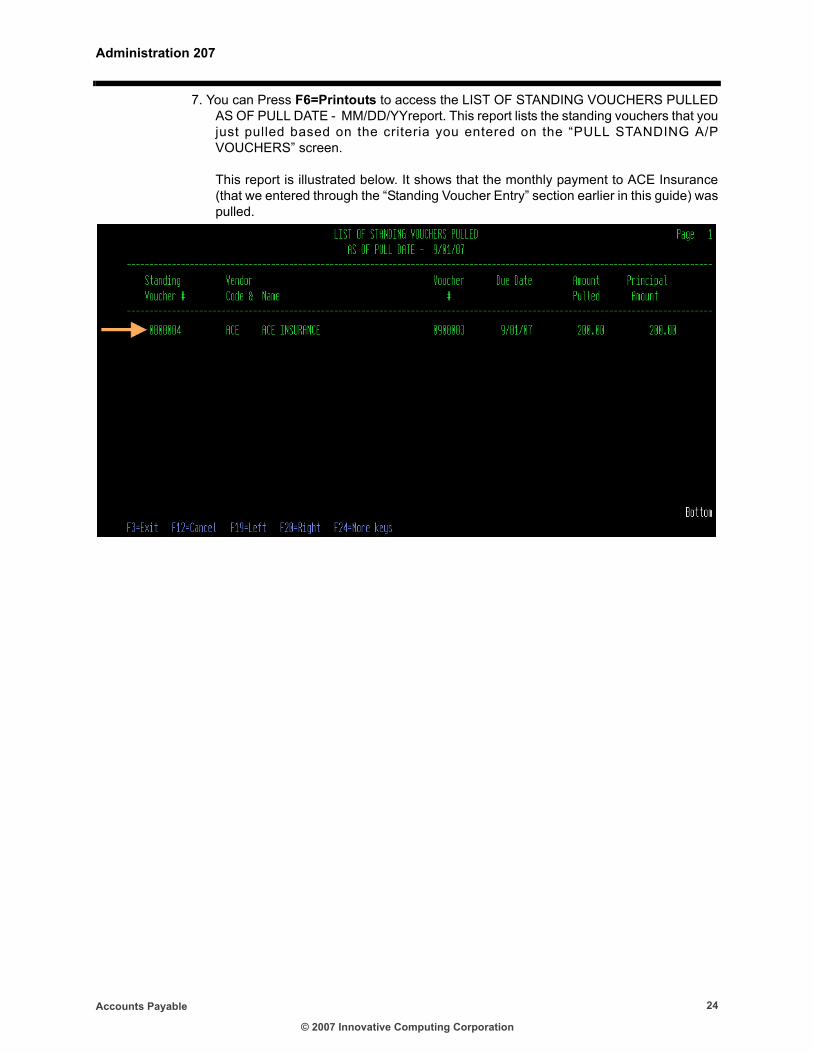
7. You can Press F6=Printouts to access the LIST OF STANDING VOUCHERS PULLED AS OF PULL DATE - MM/DD/YYreport. This report lists the standing vouchers that you just pulled based on the criteria you entered on the “PULL STANDING A/P VOUCHERS” screen. This report is illustrated below. It shows that the monthly payment to ACE Insurance (that we entered through the “Standing Voucher Entry” section earlier in this guide) was pulled.
© 2007 Innovative Computing Corporation
Administration 207
Accounts Payable 25
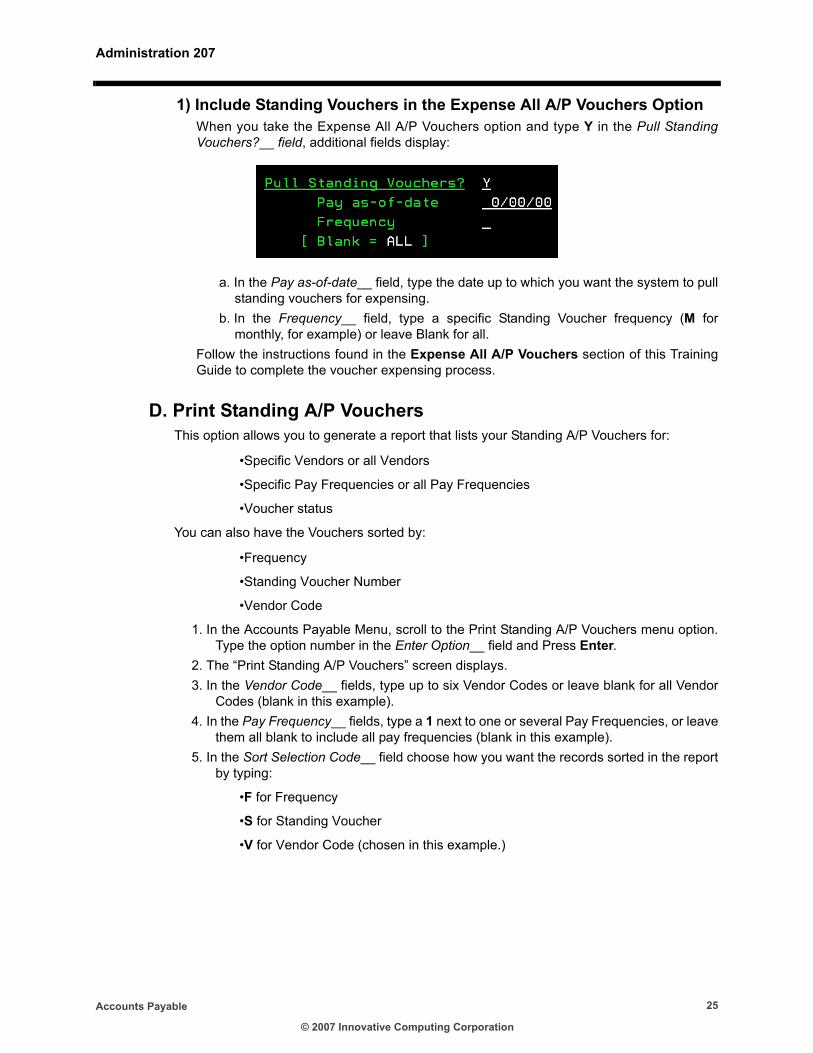
1) Include Standing Vouchers in the Expense All A/P Vouchers OptionWhen you take the Expense All A/P Vouchers option and type Y in the Pull Standing Vouchers?__ field, additional fields display:
a. In the Pay as-of-date__ field, type the date up to which you want the system to pull standing vouchers for expensing.
b. In the Frequency__ field, type a specific Standing Voucher frequency (M for monthly, for example) or leave Blank for all.
Follow the instructions found in the Expense All A/P Vouchers section of this Training Guide to complete the voucher expensing process.
D. Print Standing A/P VouchersThis option allows you to generate a report that lists your Standing A/P Vouchers for:
•Specific Vendors or all Vendors
•Specific Pay Frequencies or all Pay Frequencies
•Voucher status
You can also have the Vouchers sorted by:
•Frequency
•Standing Voucher Number
•Vendor Code
1. In the Accounts Payable Menu, scroll to the Print Standing A/P Vouchers menu option. Type the option number in the Enter Option__ field and Press Enter.
2. The “Print Standing A/P Vouchers” screen displays.3. In the Vendor Code__ fields, type up to six Vendor Codes or leave blank for all Vendor
Codes (blank in this example).4. In the Pay Frequency__ fields, type a 1 next to one or several Pay Frequencies, or leave
them all blank to include all pay frequencies (blank in this example).5. In the Sort Selection Code__ field choose how you want the records sorted in the report
by typing:
•F for Frequency
•S for Standing Voucher
•V for Vendor Code (chosen in this example.)
© 2007 Innovative Computing Corporation

Administration 207
Accounts Payable 26
6. In the Voucher Status__ field, choose if you want the report to include Active or Deleted standing vouchers (A for Active in this example).
7. Press F5 to submit the job.8. The “Standing A/P Vouchers” report for the selected parameters (“Standing A/P
Vouchers for all Vendors for all Frequencies” in this example) is generated in your out queue for printing:
© 2007 Innovative Computing Corporation
Administration 207
Accounts Payable 27
III. Batch ProcessingBatch processing groups vouchers together for entry and processing.
A. Batch A/P Voucher EntryBatch voucher entry is very similar to individual voucher entry.
To use batch processing, you must first answer Y to the Do you want to utilize A/P Batch Processing?__ field on the “UPDATE MASTER A/P CONTROL” screen. To access this screen, go to the MAIN MENU and select the Utility Menu option. When the UTILITY MENU (New) displays, select the Admin Utility Menu option. When the ADMIN UTILITY MENU displays, select the A/P Master Control option. When the “UPDATE MASTER A/P CONTROL” screen displays, type a Y in the Do you want to utilize A/P Batch Processing?__ field. Press F5 to update.
1. In the Accounts Payable Menu, type the Enter A/P Vouchers option number in the Enter Option__ field and Press Enter.
2. In the “Enter/Update AP Vouchers” screen, type Y in the Enter/Update AP Vouchers in Batch Mode (Y/N)__ field.
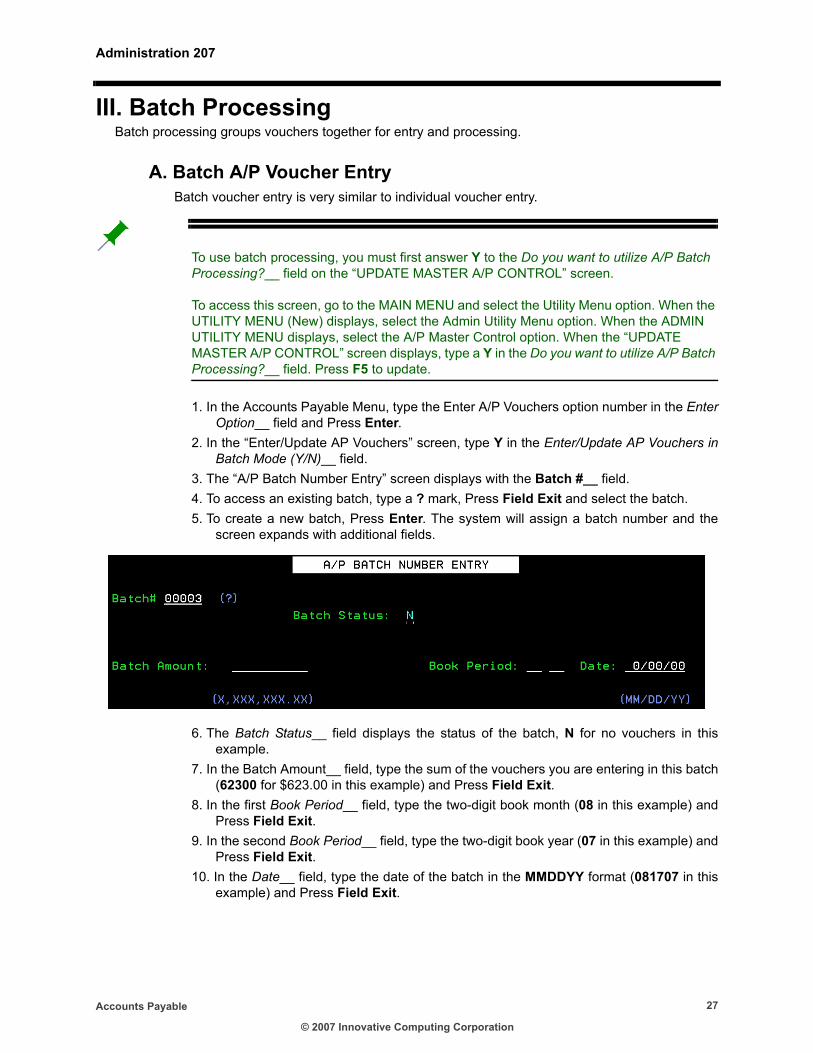
3. The “A/P Batch Number Entry” screen displays with the Batch #__ field.4. To access an existing batch, type a ? mark, Press Field Exit and select the batch.5. To create a new batch, Press Enter. The system will assign a batch number and the
screen expands with additional fields.
6. The Batch Status__ field displays the status of the batch, N for no vouchers in this example.
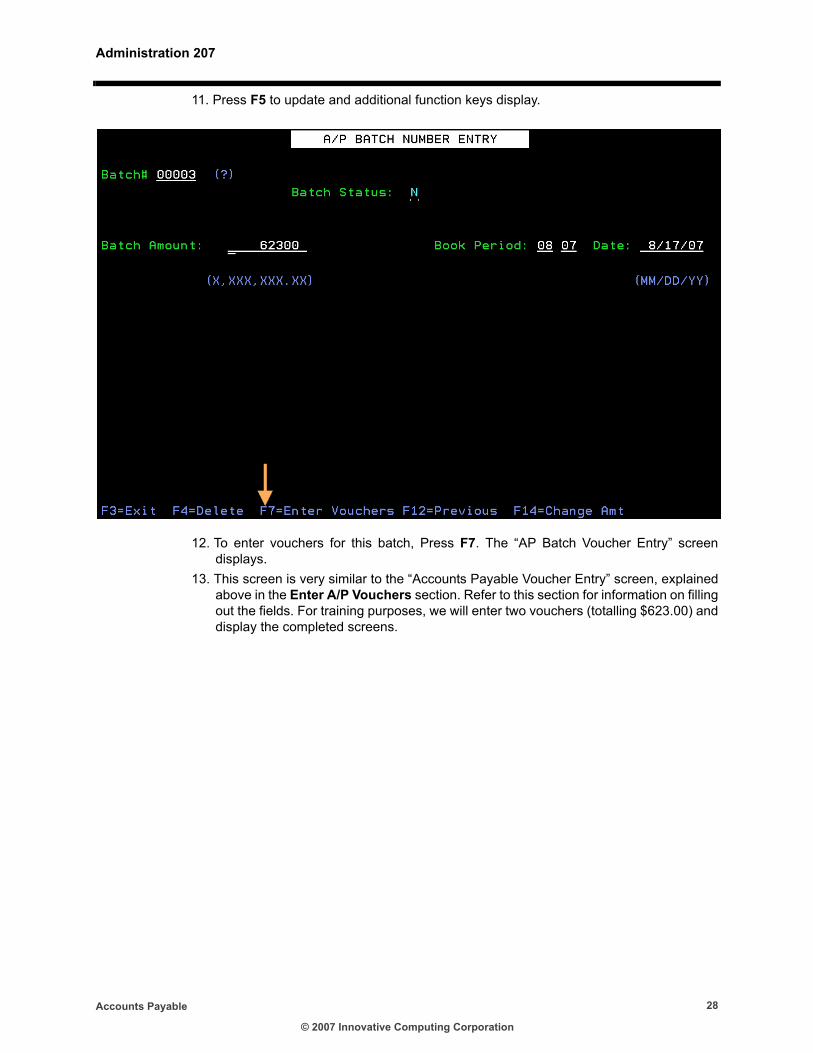
7. In the Batch Amount__ field, type the sum of the vouchers you are entering in this batch (62300 for $623.00 in this example) and Press Field Exit.
8. In the first Book Period__ field, type the two-digit book month (08 in this example) and Press Field Exit.
9. In the second Book Period__ field, type the two-digit book year (07 in this example) and Press Field Exit.
10. In the Date__ field, type the date of the batch in the MMDDYY format (081707 in this example) and Press Field Exit.
© 2007 Innovative Computing Corporation
Administration 207
Accounts Payable 28
11. Press F5 to update and additional function keys display.
12. To enter vouchers for this batch, Press F7. The “AP Batch Voucher Entry” screen displays.
13. This screen is very similar to the “Accounts Payable Voucher Entry” screen, explained above in the Enter A/P Vouchers section. Refer to this section for information on filling out the fields. For training purposes, we will enter two vouchers (totalling $623.00) and display the completed screens.
© 2007 Innovative Computing Corporation

Administration 207
Accounts Payable 2914. Press F5 after entry of each voucher.
© 2007 Innovative Computing Corporation

Administration 207
Accounts Payable 30
15. After pressing F5 for the last voucher, Press F3 and the following screen displays, listing the vouchers in the batch (Batch # 3 in this example).
NOTE: The Batch Status has changed to V, indicating there are Vouchers in this Batch.
16. Press F5 to Update and post the vouchers to the Voucher File.17. You are back on the first “A/P Batch Number Entry” screen with just the Batch#__ field.
Enter the next Batch or Press F3 to the Accounts Payable Menu.
© 2007 Innovative Computing Corporation
Administration 207
Accounts Payable 31
B. A/P Batch EditingThis option allows you to audit your batch entries.
1. In the Accounts Payable Menu, scroll to the A/P Batch Editing menu option. Type the option number in the Enter Option__ field and Press Enter.
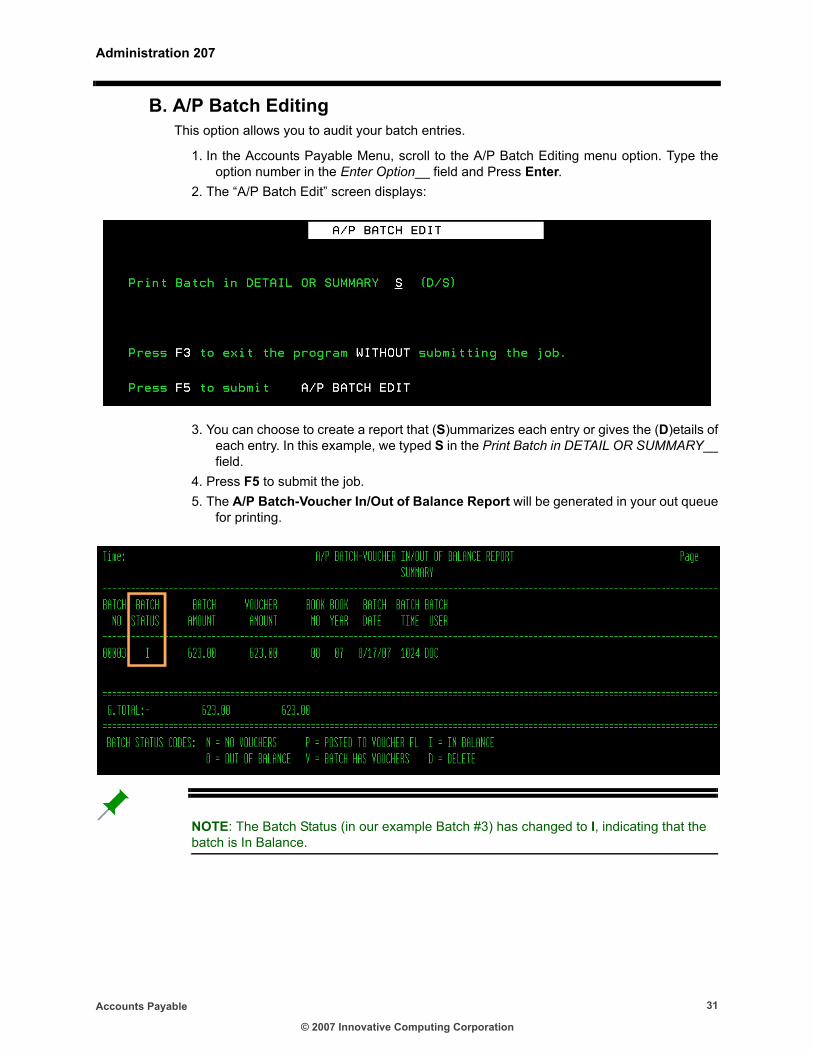
2. The “A/P Batch Edit” screen displays:
3. You can choose to create a report that (S)ummarizes each entry or gives the (D)etails of each entry. In this example, we typed S in the Print Batch in DETAIL OR SUMMARY__field.
4. Press F5 to submit the job.5. The A/P Batch-Voucher In/Out of Balance Report will be generated in your out queue
for printing.
NOTE: The Batch Status (in our example Batch #3) has changed to I, indicating that the batch is In Balance.
© 2007 Innovative Computing Corporation
Administration 207
Accounts Payable 32
IV. Void/Correct Accounts PayableIf you discover a mistake in a voucher after it is expensed, you can void the voucher and then re-enter it correctly. If the check has already been printed, you can also void the check. If expensed, you can only change the Date To Pay, void the voucher, or flag it as a Handcheck.
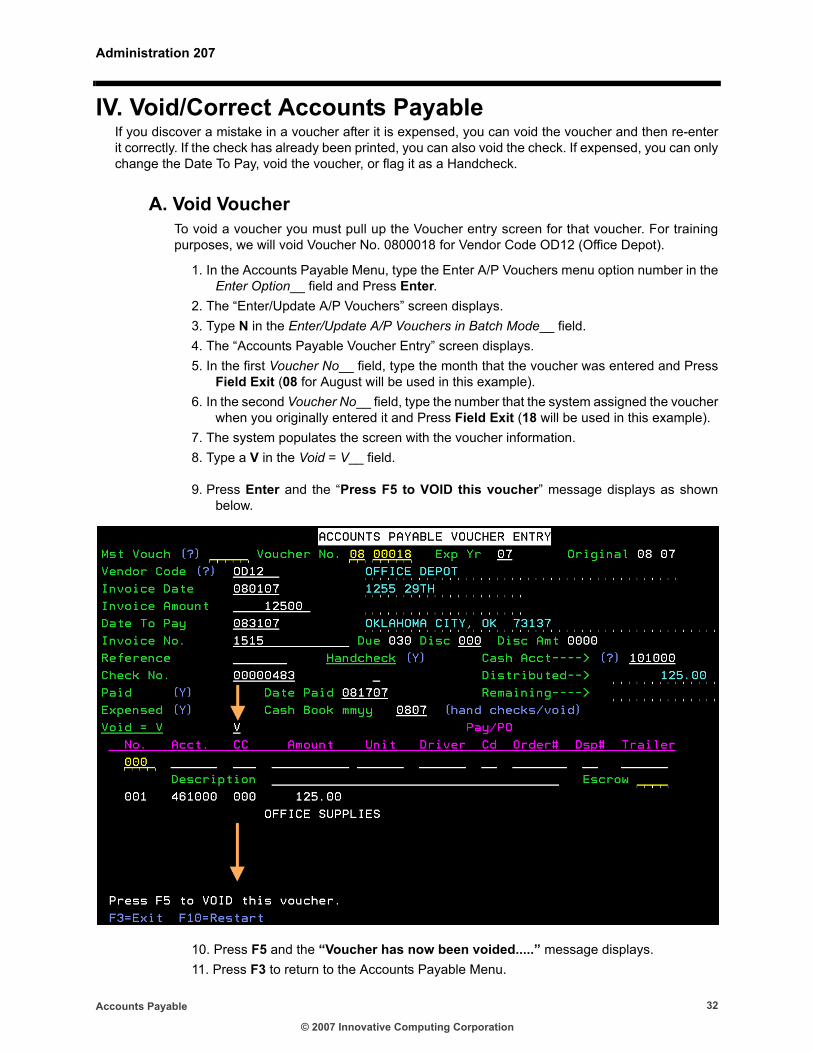
A. Void VoucherTo void a voucher you must pull up the Voucher entry screen for that voucher. For training purposes, we will void Voucher No. 0800018 for Vendor Code OD12 (Office Depot).
1. In the Accounts Payable Menu, type the Enter A/P Vouchers menu option number in the Enter Option__ field and Press Enter.
2. The “Enter/Update A/P Vouchers” screen displays.3. Type N in the Enter/Update A/P Vouchers in Batch Mode__ field.4. The “Accounts Payable Voucher Entry” screen displays.5. In the first Voucher No__ field, type the month that the voucher was entered and Press
Field Exit (08 for August will be used in this example). 6. In the second Voucher No__ field, type the number that the system assigned the voucher
when you originally entered it and Press Field Exit (18 will be used in this example).7. The system populates the screen with the voucher information.8. Type a V in the Void = V__ field.
9. Press Enter and the “Press F5 to VOID this voucher” message displays as shown below.
10. Press F5 and the “Voucher has now been voided.....” message displays.11. Press F3 to return to the Accounts Payable Menu.
© 2007 Innovative Computing Corporation
Administration 207
Accounts Payable 33
12. To re-enter the voucher correctly, follow the instructions in the Enter A/P Voucherssection of this training guide.
13. When you print the check or expense the voucher, the voided voucher will reverse out of the General Ledger if it was already expensed.
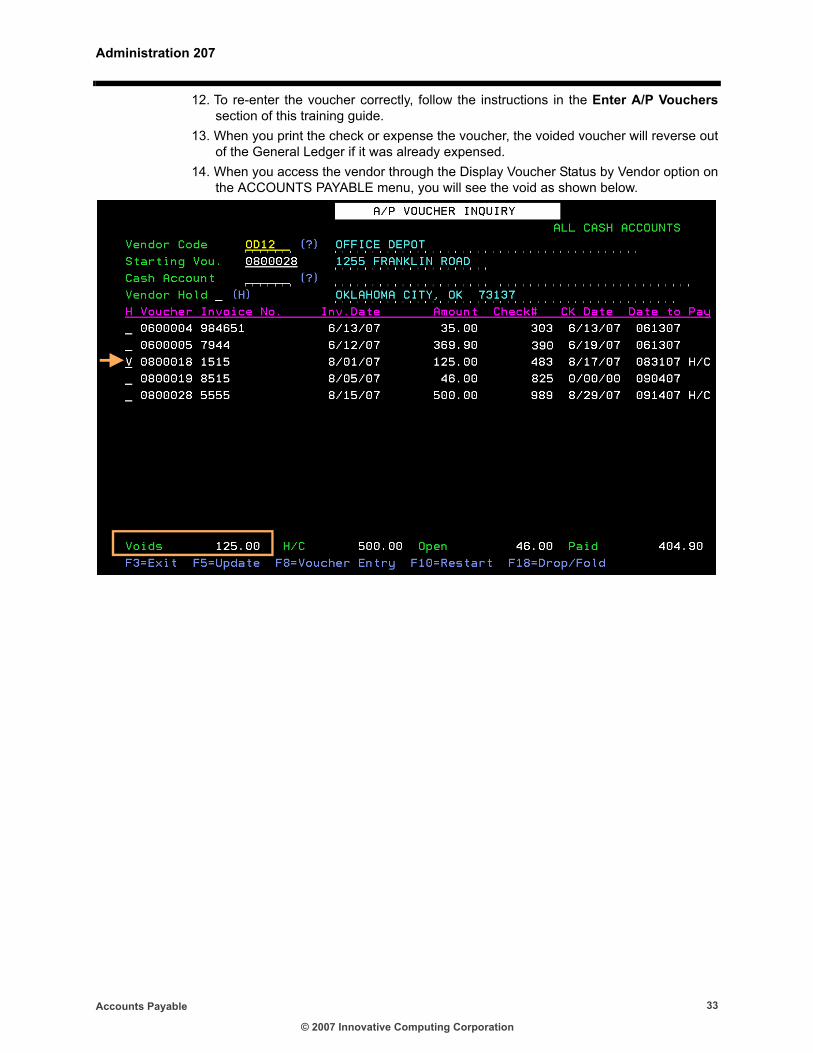
14. When you access the vendor through the Display Voucher Status by Vendor option on the ACCOUNTS PAYABLE menu, you will see the void as shown below.
© 2007 Innovative Computing Corporation
Administration 207
Accounts Payable 34
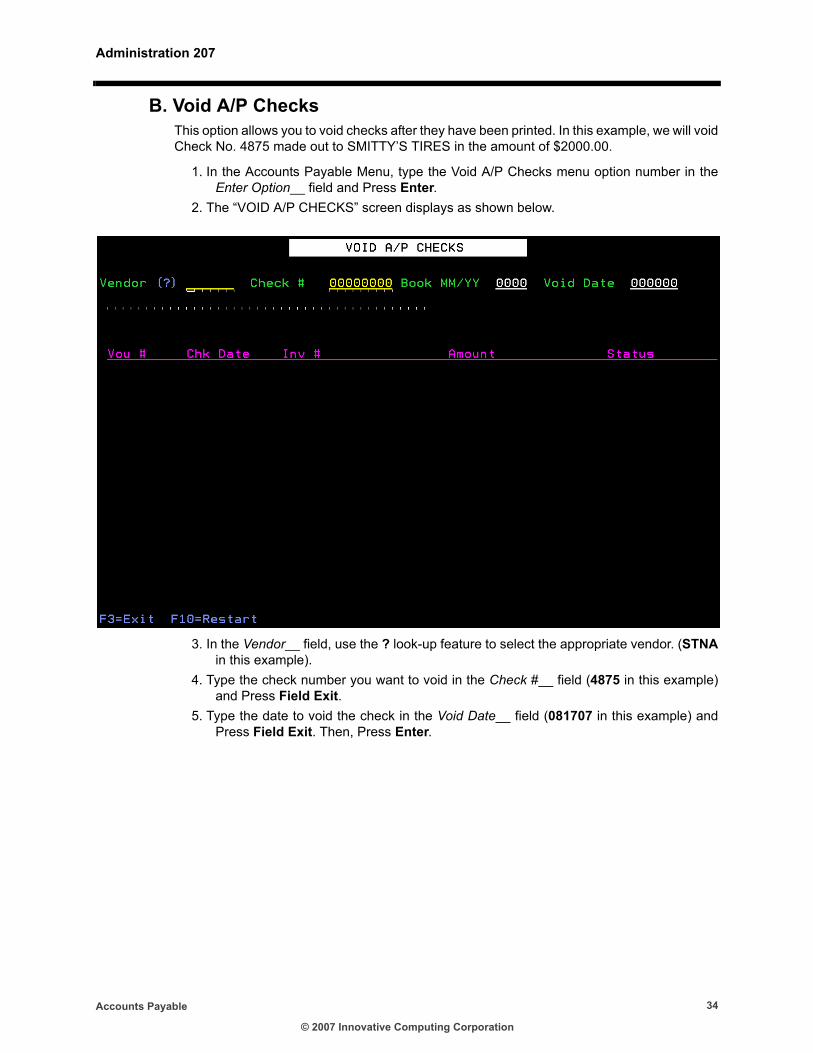
B. Void A/P ChecksThis option allows you to void checks after they have been printed. In this example, we will void Check No. 4875 made out to SMITTY’S TIRES in the amount of $2000.00.
1. In the Accounts Payable Menu, type the Void A/P Checks menu option number in the Enter Option__ field and Press Enter.
2. The “VOID A/P CHECKS” screen displays as shown below.
3. In the Vendor__ field, use the ? look-up feature to select the appropriate vendor. (STNAin this example).
4. Type the check number you want to void in the Check #__ field (4875 in this example) and Press Field Exit.
5. Type the date to void the check in the Void Date__ field (081707 in this example) and Press Field Exit. Then, Press Enter.
© 2007 Innovative Computing Corporation
Administration 207
Accounts Payable 35
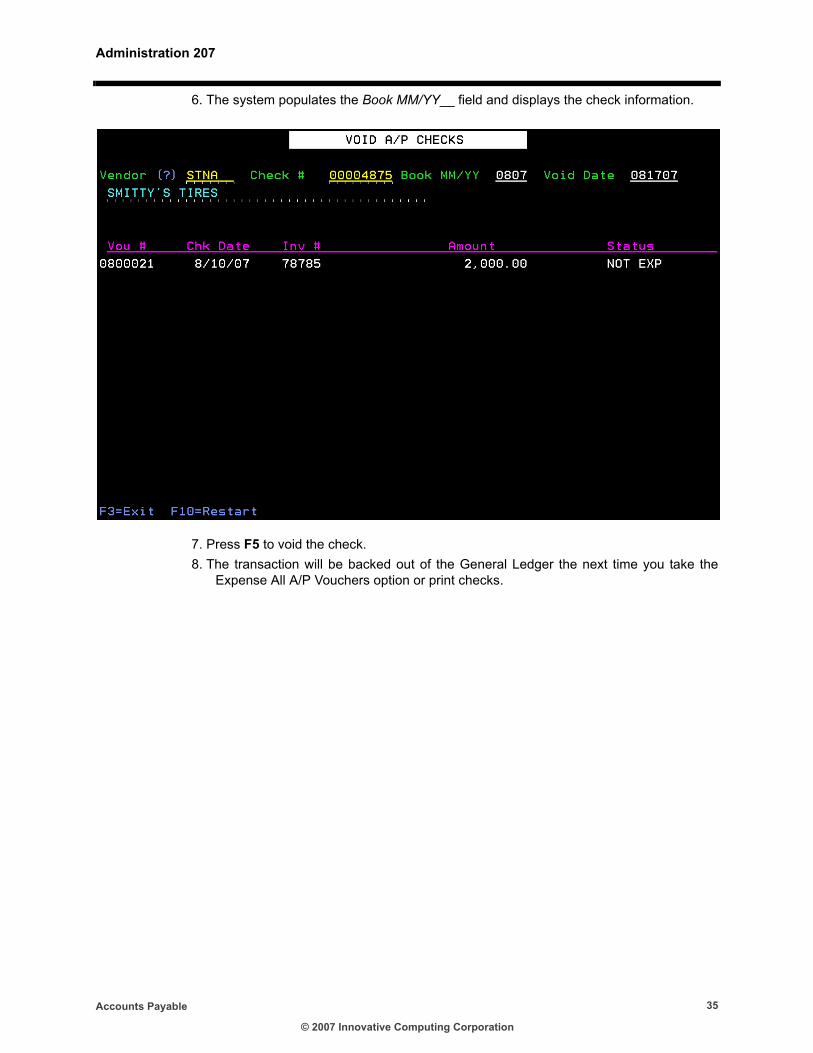
6. The system populates the Book MM/YY__ field and displays the check information.
7. Press F5 to void the check.8. The transaction will be backed out of the General Ledger the next time you take the
Expense All A/P Vouchers option or print checks.
© 2007 Innovative Computing Corporation
Administration 207
Accounts Payable 36
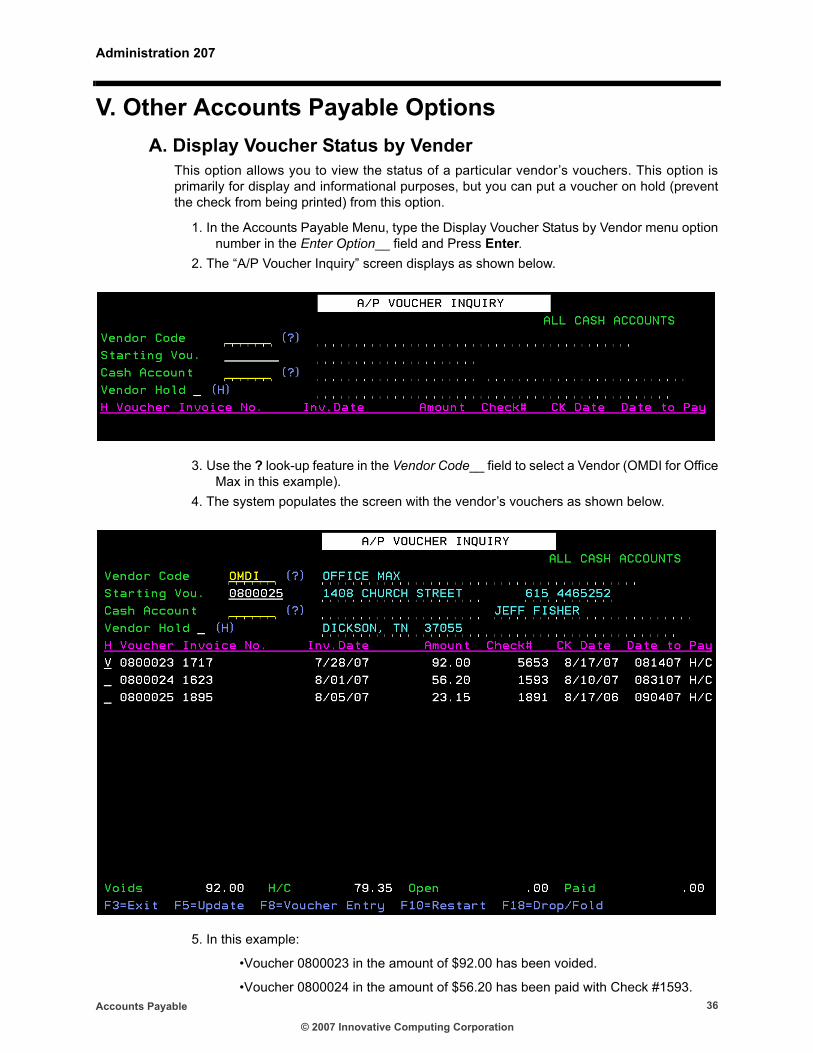
V. Other Accounts Payable Options A. Display Voucher Status by Vender
This option allows you to view the status of a particular vendor’s vouchers. This option is primarily for display and informational purposes, but you can put a voucher on hold (prevent the check from being printed) from this option.
1. In the Accounts Payable Menu, type the Display Voucher Status by Vendor menu option number in the Enter Option__ field and Press Enter.
2. The “A/P Voucher Inquiry” screen displays as shown below.
3. Use the ? look-up feature in the Vendor Code__ field to select a Vendor (OMDI for Office Max in this example).
4. The system populates the screen with the vendor’s vouchers as shown below.
5. In this example:
•Voucher 0800023 in the amount of $92.00 has been voided.
•Voucher 0800024 in the amount of $56.20 has been paid with Check #1593.
© 2007 Innovative Computing Corporation
Administration 207
Accounts Payable 37
•Voucher 0800025 in the amount of $23.15 has been paid with Check #1891.
6. The voucher totals display at the bottom of the screen for the following categories:
•Voids
•H/C (Handchecks)
•Open (Unpaid)
•Paid
7. You can place an open voucher on hold by typing H in the H__ field to the left of the voucher number, and the check will not be printed when you take the Print AP Checks & Reports option (there are no open vouchers in this example).
8. If you made any entries on the screen (such as placing a voucher on hold), Press F5 to update; otherwise Press F3 to return to the Accounts Payable Menu.
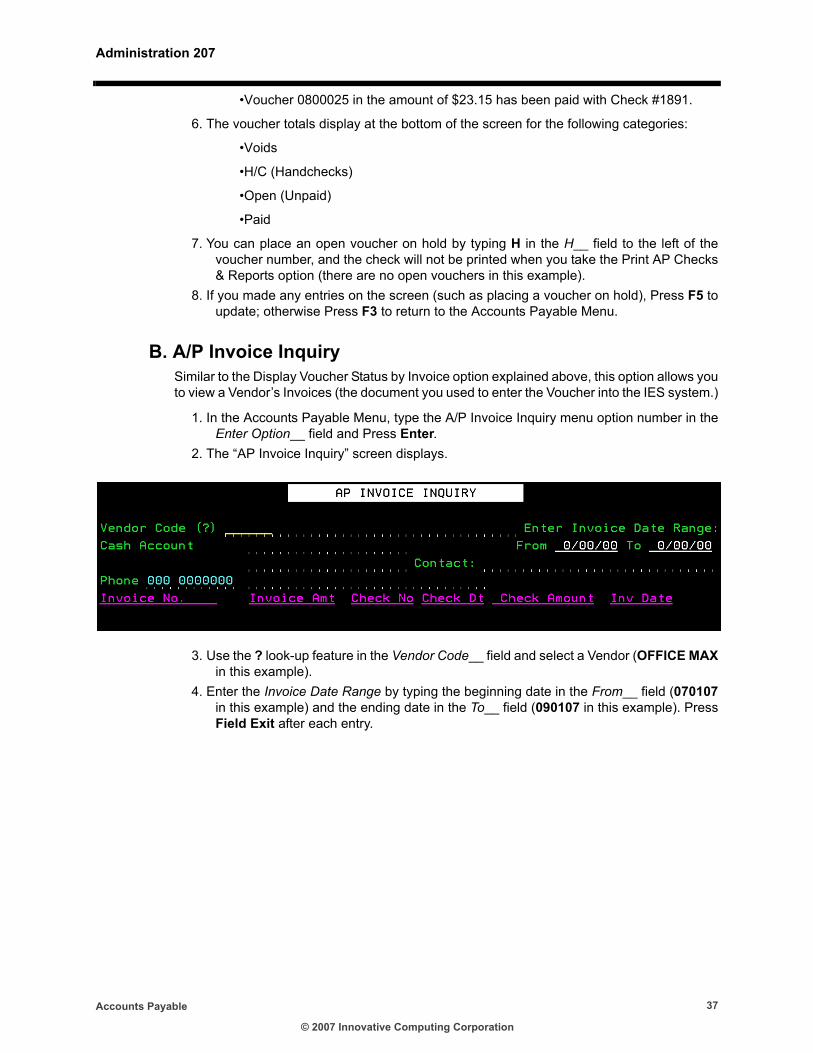
B. A/P Invoice InquirySimilar to the Display Voucher Status by Invoice option explained above, this option allows you to view a Vendor’s Invoices (the document you used to enter the Voucher into the IES system.)
1. In the Accounts Payable Menu, type the A/P Invoice Inquiry menu option number in the Enter Option__ field and Press Enter.
2. The “AP Invoice Inquiry” screen displays.
3. Use the ? look-up feature in the Vendor Code__ field and select a Vendor (OFFICE MAXin this example).
4. Enter the Invoice Date Range by typing the beginning date in the From__ field (070107in this example) and the ending date in the To__ field (090107 in this example). Press Field Exit after each entry.
© 2007 Innovative Computing Corporation
Administration 207
Accounts Payable 38
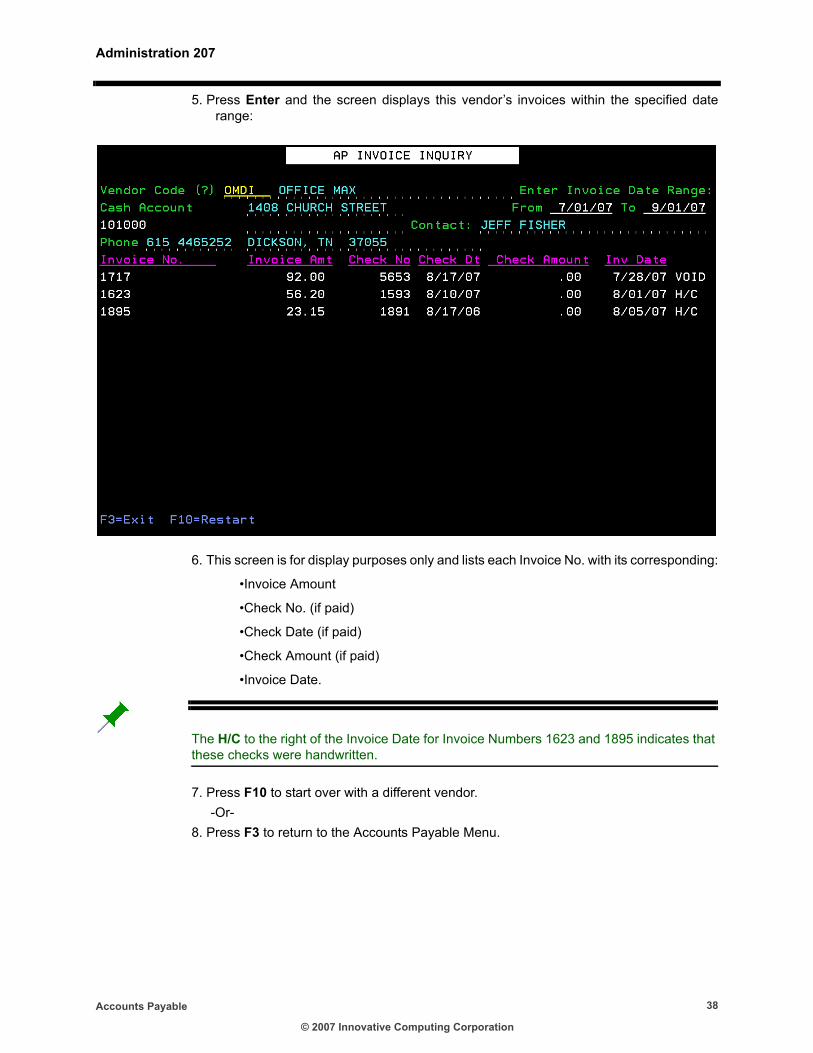
5. Press Enter and the screen displays this vendor’s invoices within the specified date range:
6. This screen is for display purposes only and lists each Invoice No. with its corresponding:
•Invoice Amount
•Check No. (if paid)
•Check Date (if paid)
•Check Amount (if paid)
•Invoice Date.
The H/C to the right of the Invoice Date for Invoice Numbers 1623 and 1895 indicates that these checks were handwritten.
7. Press F10 to start over with a different vendor.-Or-
8. Press F3 to return to the Accounts Payable Menu.
© 2007 Innovative Computing Corporation
Administration 207
Accounts Payable 39
C. Renumber A/P ChecksIf your printer jams while printing checks, you will need to renumber and reprint the checks. You accomplish this through the Renumber A/P Checks option.
1. In the Accounts Payable Menu, scroll to the Renumber A/P Checks menu option. Type the option number in the Enter Option__ field and Press Enter.
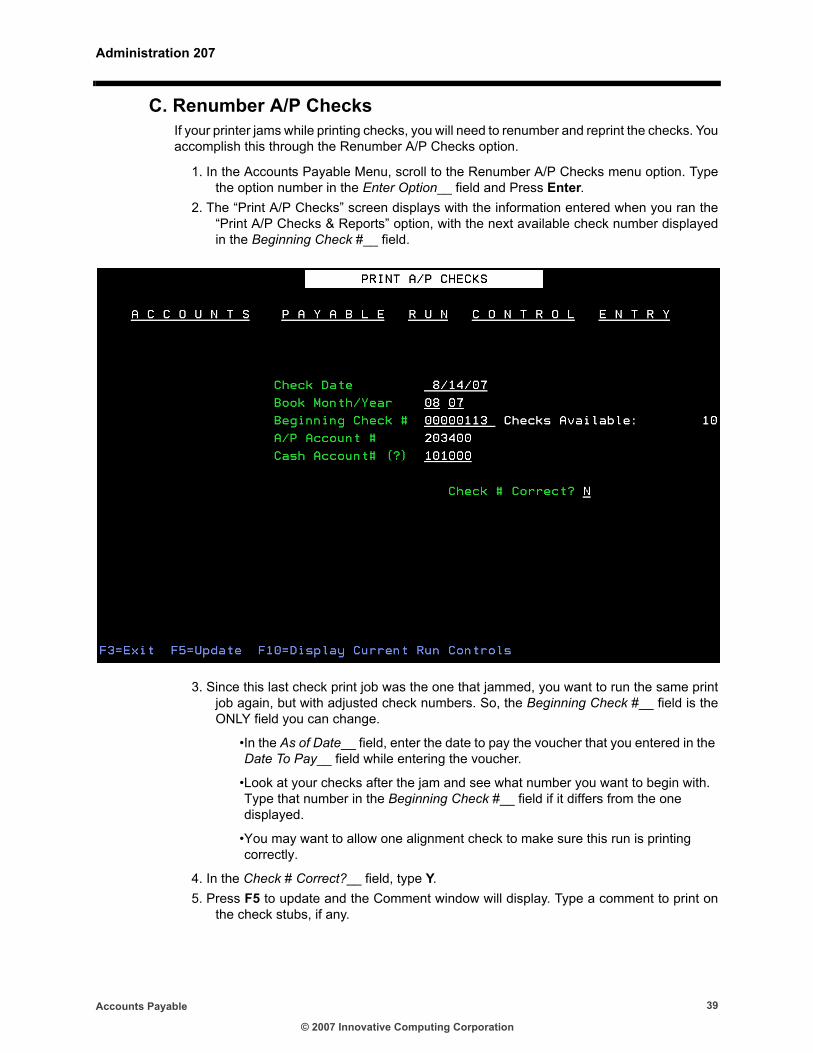
2. The “Print A/P Checks” screen displays with the information entered when you ran the “Print A/P Checks & Reports” option, with the next available check number displayed in the Beginning Check #__ field.
3. Since this last check print job was the one that jammed, you want to run the same print job again, but with adjusted check numbers. So, the Beginning Check #__ field is the ONLY field you can change.
•In the As of Date__ field, enter the date to pay the voucher that you entered in the Date To Pay__ field while entering the voucher.
•Look at your checks after the jam and see what number you want to begin with. Type that number in the Beginning Check #__ field if it differs from the one displayed.
•You may want to allow one alignment check to make sure this run is printing correctly.
4. In the Check # Correct?__ field, type Y.5. Press F5 to update and the Comment window will display. Type a comment to print on
the check stubs, if any.
© 2007 Innovative Computing Corporation
Administration 207
Accounts Payable 40
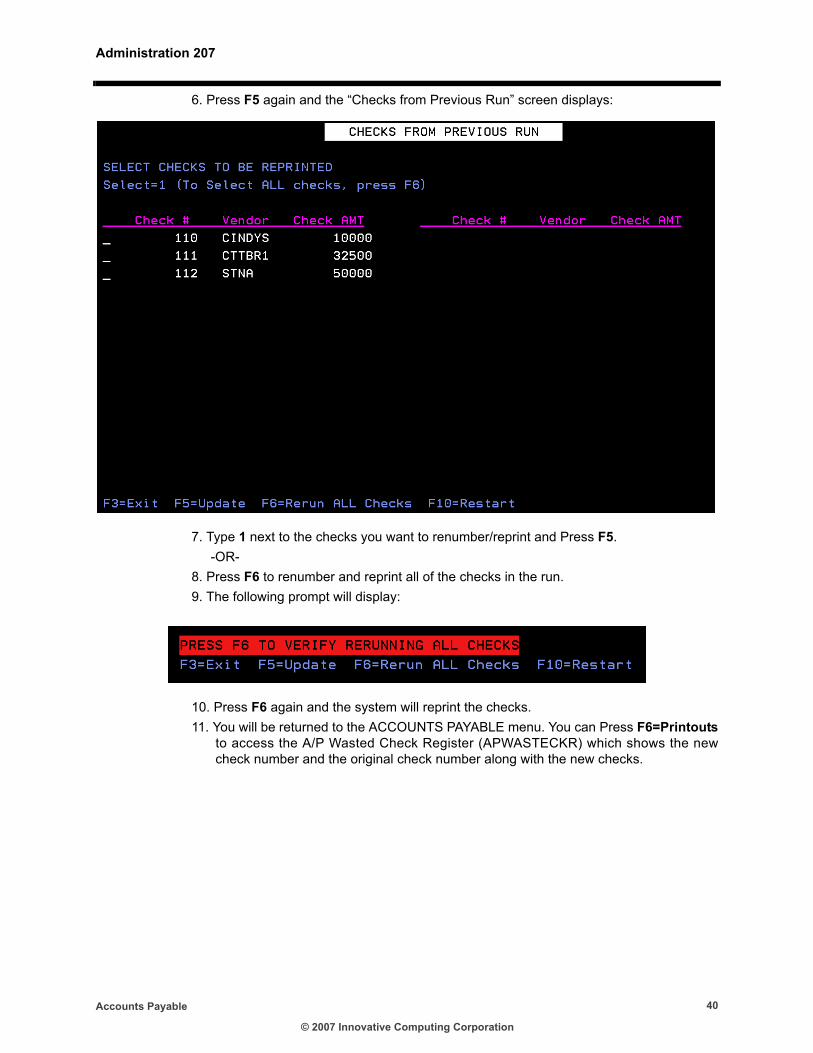
6. Press F5 again and the “Checks from Previous Run” screen displays:
7. Type 1 next to the checks you want to renumber/reprint and Press F5.-OR-
8. Press F6 to renumber and reprint all of the checks in the run.9. The following prompt will display:
10. Press F6 again and the system will reprint the checks.11. You will be returned to the ACCOUNTS PAYABLE menu. You can Press F6=Printouts
to access the A/P Wasted Check Register (APWASTECKR) which shows the new check number and the original check number along with the new checks.
© 2007 Innovative Computing Corporation
Administration 207
Accounts Payable 41
D. Enter A/P Variable Master VoucherIf you do a lot of business with a particular vendor and all of their invoices are essentially the same, you can save yourself voucher entry work by creating a Variable Master Voucher for the expense account distribution for that vendor. You then pull the information into the voucher entry screen when needed.
1. In the Accounts Payable Menu, scroll to the Enter A/P Variable Master Voucher menu option. Type the option number in the Enter Option__ field and Press Enter.
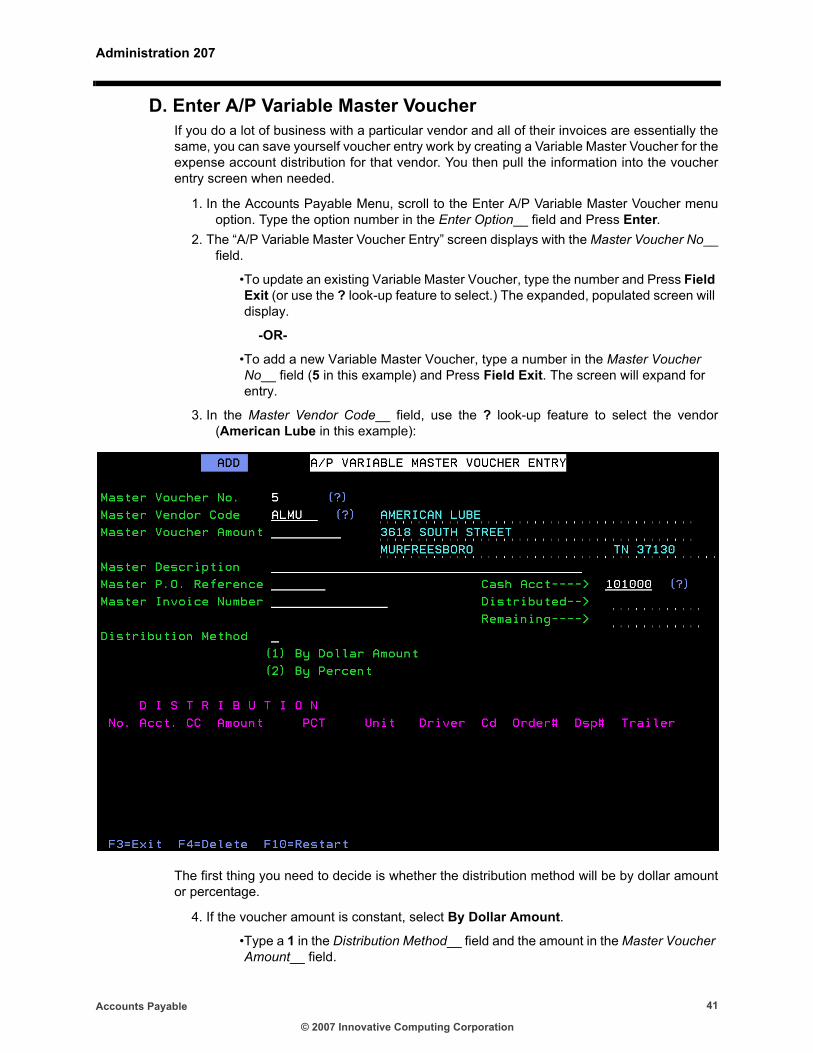
2. The “A/P Variable Master Voucher Entry” screen displays with the Master Voucher No__field.
•To update an existing Variable Master Voucher, type the number and Press Field Exit (or use the ? look-up feature to select.) The expanded, populated screen will display.
-OR-
•To add a new Variable Master Voucher, type a number in the Master Voucher No__ field (5 in this example) and Press Field Exit. The screen will expand for entry.
3. In the Master Vendor Code__ field, use the ? look-up feature to select the vendor (American Lube in this example):
The first thing you need to decide is whether the distribution method will be by dollar amount or percentage.
4. If the voucher amount is constant, select By Dollar Amount.
•Type a 1 in the Distribution Method__ field and the amount in the Master Voucher Amount__ field.
© 2007 Innovative Computing Corporation
Administration 207
Accounts Payable 42
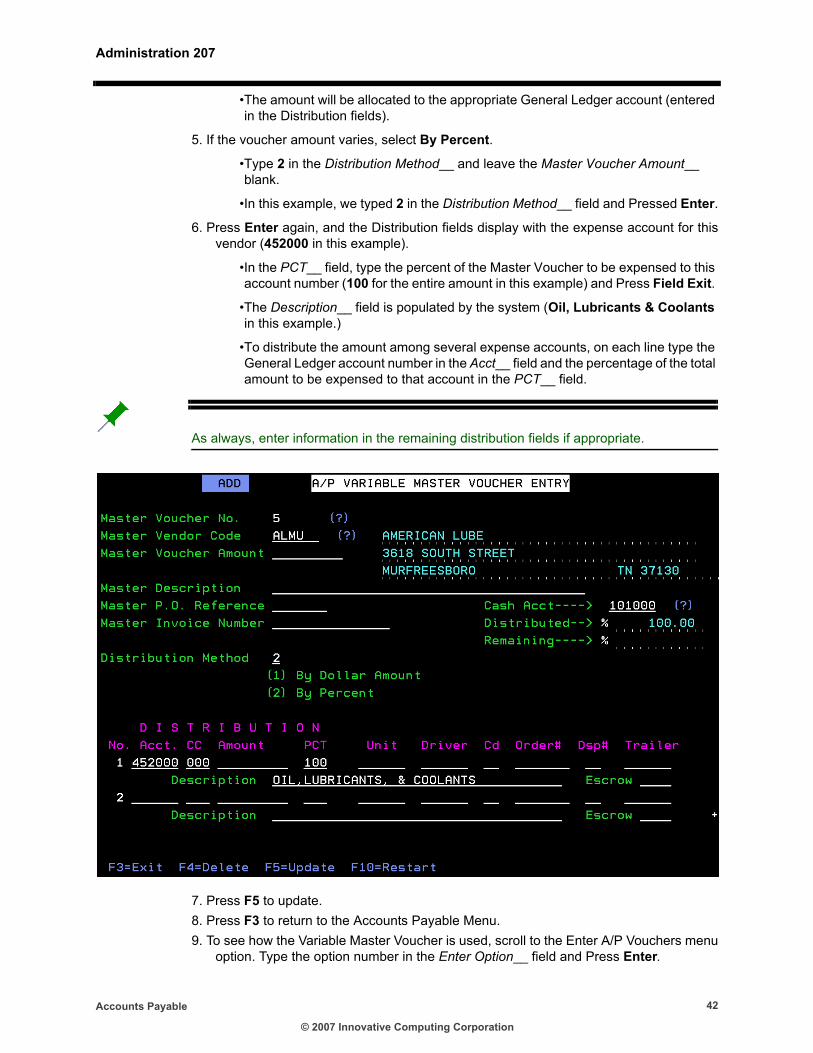
•The amount will be allocated to the appropriate General Ledger account (entered in the Distribution fields).
5. If the voucher amount varies, select By Percent.
•Type 2 in the Distribution Method__ and leave the Master Voucher Amount__ blank.
•In this example, we typed 2 in the Distribution Method__ field and Pressed Enter.
6. Press Enter again, and the Distribution fields display with the expense account for this vendor (452000 in this example).
•In the PCT__ field, type the percent of the Master Voucher to be expensed to this account number (100 for the entire amount in this example) and Press Field Exit.
•The Description__ field is populated by the system (Oil, Lubricants & Coolants in this example.)
•To distribute the amount among several expense accounts, on each line type the General Ledger account number in the Acct__ field and the percentage of the total amount to be expensed to that account in the PCT__ field.
As always, enter information in the remaining distribution fields if appropriate.
7. Press F5 to update.8. Press F3 to return to the Accounts Payable Menu.9. To see how the Variable Master Voucher is used, scroll to the Enter A/P Vouchers menu
option. Type the option number in the Enter Option__ field and Press Enter.
© 2007 Innovative Computing Corporation
Administration 207
Accounts Payable 43
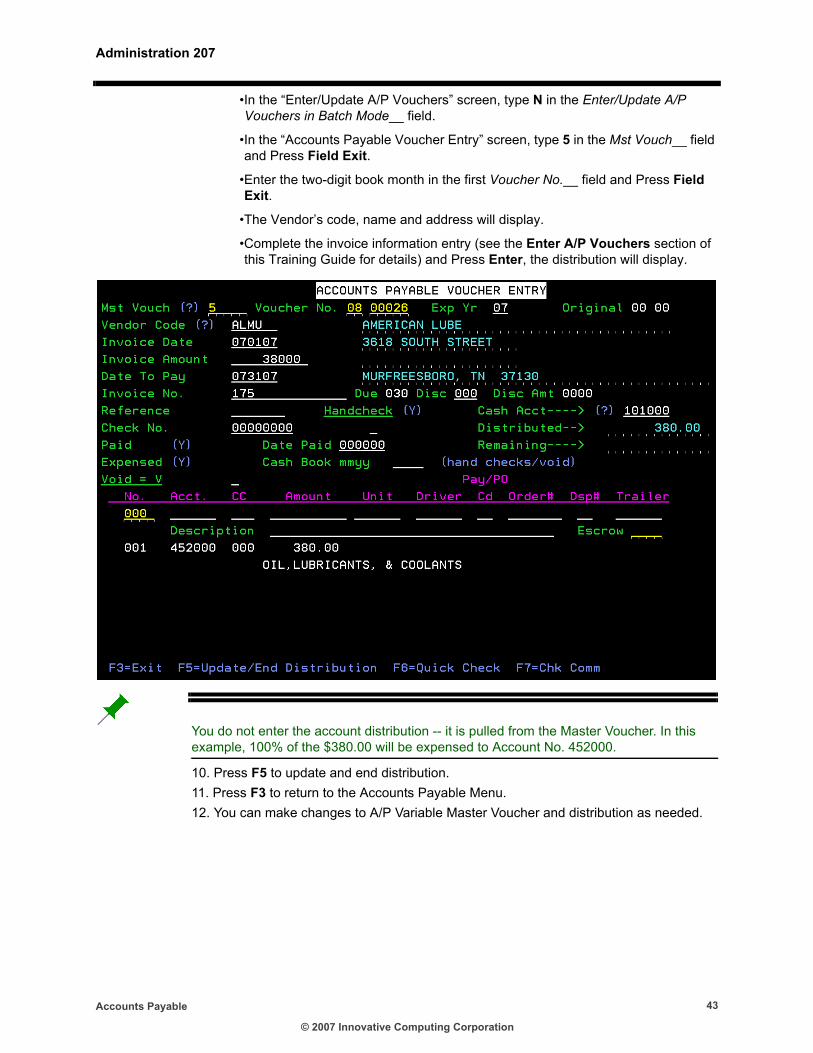
•In the “Enter/Update A/P Vouchers” screen, type N in the Enter/Update A/P Vouchers in Batch Mode__ field.
•In the “Accounts Payable Voucher Entry” screen, type 5 in the Mst Vouch__ field and Press Field Exit.
•Enter the two-digit book month in the first Voucher No.__ field and Press Field Exit.
•The Vendor’s code, name and address will display.
•Complete the invoice information entry (see the Enter A/P Vouchers section of this Training Guide for details) and Press Enter, the distribution will display.
You do not enter the account distribution -- it is pulled from the Master Voucher. In this example, 100% of the $380.00 will be expensed to Account No. 452000.
10. Press F5 to update and end distribution.11. Press F3 to return to the Accounts Payable Menu.12. You can make changes to A/P Variable Master Voucher and distribution as needed.
© 2007 Innovative Computing Corporation
Administration 207
Accounts Payable 44
VI. Review• Introduction
• Enter/Update A/P Cash Accounts
• Vendor Master
• Accounts Payable Flow
• Enter A/P Vouchers
•Voucher Entry
•Handwritten Check Voucher Entry
•Quick Check Voucher Entry
• Print Edit and Duplicate Invoice Alert
• Print A/P Cash Requirements
• Print A/P Checks and Reports
• Expense All A/P Vouchers
• Standing Vouchers
• Standing Voucher Entry
• Standing Voucher History
• Pull Standing Voucher
•Include Standing Vouchers in the Expense All A/P Vouchers Option
Print Standing A/P Vouchers
• Batch Processing
• Batch A/P Voucher Entry
• A/P Batch Editing
• Void/Correct Accounts Payable
• Void Voucher
• Void A/P Checks
• Other Accounts Payable Options
• Display Voucher Status by Vendor
• A/P Invoice Inquiry
• Renumber A/P Checks
• Enter A/P Variable Master Voucher
© 2007 Innovative Computing Corporation


![Index [link.springer.com]978-81-322-1792...mersil 205, 207 metalaxyl 25 WP 203 miltox 203 N.F. 48 207 N.F. 65 207 panogen 205, 207 perenox 203 PMA-10 205, 207 polyram 203, 207 R-28921](https://img.pdfslide.net/doc/110x75/5b0597617f8b9aba168eaa25/index-link-978-81-322-1792mersil-205-207-metalaxyl-25-wp-203-miltox-203.jpg)