Embed Size (px)
Citation preview
Rocket UniVerse
Administering UniVerse on UNIX PlatformsVersion 11.2.3April 2014
UNV-1123-ADMINU-1
Notices
Edition
Publication date: April 2014Book number: UNV-1123-ADMINU-1 Product version: Rocket UniVerse V11.2.3
Copyright
© Rocket Software, Inc. or its affiliates 1985-2014. All Rights Reserved.
Trademarks
Rocket is a registered trademark of Rocket Software, Inc. For a list of Rocket registered trademarks go to: www.rocketsoftware.com/about/legal. All other products or services mentioned in this document may be covered by the trademarks, service marks, or product names of their respective owners.
Examples
This information might contain examples of data and reports. The examples include the names of individuals, companies, brands, and products. All of these names are fictitious and any similarity to the names and addresses used by an actual business enterprise is entirely coincidental.
License agreement
This software and the associated documentation are proprietary and confidential to Rocket Software, Inc., are furnished under license, and may be used and copied only in accordance with the terms of such license.
Note: This product may contain encryption technology. Many countries prohibit or restrict the use, import, or export of encryption technologies, and current use, import, and export regulations should be followed when exporting this product.
Contact information
Website: www.rocketsoftware.comRocket Software, Inc. Headquarters77 4th Avenue, Suite 100Waltham, MA 02451-1468USATel: +1 781 577 4321Fax: +1 617 630 7100
2
Contacting Global Technical Support
If you have current support and maintenance agreements with Rocket Software, you can access the Rocket Customer Portal to report and track a problem, to submit an enhancement request or question, or to find answers in the U2 Knowledgebase. The Rocket Customer Portal is the primary method of obtaining support.
To log in to the Rocket Customer Portal, go to:
www.rocketsoftware.com/support
If you do not already have a Rocket Customer Portal account, you can request one by clicking Need an account? on the Rocket Customer Portal login page.
Alternatively, you can contact Global Technical Support by email or by telephone:
Email: [email protected]
Telephone:
North America +1 800 729 3553
United Kingdom/France +44 (0) 800 773 771 or +44 (0) 20 8867 3691
Europe/Africa +44 (0) 20 8867 3692
Australia +1 800 707 703 or +61 (0) 29412 5450
New Zealand +0800 505 515
3
Table of Contents
C:\Us(bookT
Table of Contents
Beta Beta Beta Beta Beta Beta Beta Beta Beta Beta Beta Beta Beta Beta Beta Beta Beta Beta
Chapter 1 Chapter 1: IntroductionIntroduction . . . . . . . . . . . . . . . . . . . . 1-2What is UniVerse administration? . . . . . . . . . . . . . 1-3
Who is a UniVerse administrator? . . . . . . . . . . . 1-3UniVerse files . . . . . . . . . . . . . . . . . . . . 1-4
Nonhashed files . . . . . . . . . . . . . . . . . 1-4Hashed files . . . . . . . . . . . . . . . . . . . 1-4B-Tree files . . . . . . . . . . . . . . . . . . . 1-5UV account directory files . . . . . . . . . . . . . . 1-5
UniVerse administration commands . . . . . . . . . . . . 1-8Assigning and unassigning peripheral devices . . . . . . . 1-8UniVerse BASIC programs . . . . . . . . . . . . . . 1-8File and account maintenance. . . . . . . . . . . . . 1-9Managing processes . . . . . . . . . . . . . . . . 1-11Monitoring resource . . . . . . . . . . . . . . . . 1-12Task and record locking . . . . . . . . . . . . . . . 1-12Managing transaction logging . . . . . . . . . . . . 1-13National language support. . . . . . . . . . . . . . 1-14
Chapter 2 Chapter 2: The U2 Extensible Administration toolStarting the U2 Extensible Administration Tool . . . . . . . . 2-3
Chapter 3 Chapter 3: System startup and shutdownStarting up and shutting down UniVerse on UNIX systems . . . . 3-3
Configuring UniVerse parameters at initialization time . . . . 3-3Logging on . . . . . . . . . . . . . . . . . . . 3-4Initializing the UniVerse shell . . . . . . . . . . . . . 3-4
Overview of UNIX startup and shutdown . . . . . . . . . . 3-5UNIX startup . . . . . . . . . . . . . . . . . . 3-5UNIX shutdown . . . . . . . . . . . . . . . . . 3-6
ers\awaite\Documents\U2Doc\UniVerse\11.2\Source\Adminunix\Adminunix.bkTOC.fm OC.template)
5 Admin
C:\Users\awaite\Documents\U2Doc\UniVerse\11.2\Source\Adminunix\Adminunix.bkTOC.fm (bookTOC.template)
Beta Beta Beta Beta Beta Beta Beta Beta Beta Beta Beta Beta Beta Beta Beta Beta Beta
Chapter 4 Chapter 4: Configurable UniVerse parametersThe uvconfig and .uvconfig files . . . . . . . . . . . . 4-2The uvregen program . . . . . . . . . . . . . . . 4-2Allocating shared memory . . . . . . . . . . . . . 4-2Recovering .uvconfig. . . . . . . . . . . . . . . . 4-3
The configurable parameters . . . . . . . . . . . . . . 4-4Changing configurable parameter values . . . . . . . . . . 4-24
Using the U2 Extensible Administration tool to change parameter values . . . . . . . . . . . . . . . . . 4-24
Editing the uvconfig file . . . . . . . . . . . . . . . . 4-27The default uvconfig file . . . . . . . . . . . . . . . . 4-28
Chapter 5 Chapter 5: Adding and maintaining UNIX user accountsGeneral considerations . . . . . . . . . . . . . . . . 5-2
Chapter 6 Chapter 6: UniVerse accountsAbout UniVerse accounts . . . . . . . . . . . . . . . 6-3Creating a new UniVerse account . . . . . . . . . . . . . 6-4
Creating a new account . . . . . . . . . . . . . . 6-5Deleting an account . . . . . . . . . . . . . . . . . 6-8Customizing UniVerse accounts . . . . . . . . . . . . . 6-9
UniVerse account control files . . . . . . . . . . . . 6-9Essential UniVerse files. . . . . . . . . . . . . . . 6-12Customizing a UniVerse account . . . . . . . . . . . 6-14
Chapter 7 Chapter 7: Transferring accountsTransferring non-UniVerse accounts . . . . . . . . . . . . 7-3Manually restoring accounts from tape . . . . . . . . . . . 7-6
Restoring accounts to UNIX systems . . . . . . . . . . 7-6Transferring UniVerse accounts from UNIX to Windows platforms . 7-10
Creating the backup image . . . . . . . . . . . . . 7-10Transferring the backup image . . . . . . . . . . . . 7-11Restoring the backup image . . . . . . . . . . . . . 7-11File naming conventions . . . . . . . . . . . . . . 7-12
Chapter 8 Chapter 8: UNIX system securitySecurity overview . . . . . . . . . . . . . . . . . . 8-3
User permissions and file permissions . . . . . . . . . 8-3File permission modes . . . . . . . . . . . . . . . . 8-5
Using the umask command . . . . . . . . . . . . . 8-5
istering UniVerse on UNIX Platforms
6 Admin
C:\Users\awaite\Documents\U2Doc\UniVerse\11.2\Source\Adminunix\Adminunix.bkTOC.fm (bookTOC.template)
Beta Beta Beta Beta Beta Beta Beta Beta Beta Beta Beta Beta Beta Beta Beta Beta Beta
Protecting user accounts with passwords . . . . . . . . . . 8-6Making a nonlogin account . . . . . . . . . . . . . 8-7
Using groups effectively . . . . . . . . . . . . . . . . 8-8Defining groups . . . . . . . . . . . . . . . . . 8-8
VOC file security . . . . . . . . . . . . . . . . . . 8-10Security subroutines . . . . . . . . . . . . . . . . . 8-11
Chapter 9 Chapter 9: Managing locksRecord locks and file locks . . . . . . . . . . . . . . . 9-3
Shared record lock . . . . . . . . . . . . . . . . 9-4Update record lock . . . . . . . . . . . . . . . . 9-5Shared file lock . . . . . . . . . . . . . . . . . 9-6Intent file lock . . . . . . . . . . . . . . . . . . 9-6Exclusive file lock . . . . . . . . . . . . . . . . 9-7
Transactions and locks . . . . . . . . . . . . . . . . 9-8Managing locks with the U2 Extensible Administration tool . . . 9-9
File and record locks . . . . . . . . . . . . . . . 9-11Group locks . . . . . . . . . . . . . . . . . . 9-12Clearing locks . . . . . . . . . . . . . . . . . . 9-12
Managing deadlocks . . . . . . . . . . . . . . . . . 9-14Starting and stopping the deadlock manager . . . . . . . 9-18Using the uvdlockd command . . . . . . . . . . . . 9-18Resolving deadlocks automatically . . . . . . . . . . 9-19
The uvcleanupd daemon. . . . . . . . . . . . . . . . 9-21The uvcleanupd.config file . . . . . . . . . . . . . 9-21uvcleanupd command . . . . . . . . . . . . . . . 9-22
Chapter 10 Chapter 10: Configuring peripheral devicesThe &DEVICE& file . . . . . . . . . . . . . . . . . 10-3
Administering the &DEVICE& file . . . . . . . . . . 10-4Configuring tape drives . . . . . . . . . . . . . . . . 10-5
Defining a new tape drive. . . . . . . . . . . . . . 10-5Viewing and modifying a tape drive definition . . . . . . 10-9Using the test tape button . . . . . . . . . . . . . . 10-9Deleting a tape drive definition . . . . . . . . . . . . 10-10
Configuring other devices . . . . . . . . . . . . . . . 10-11Defining a new device . . . . . . . . . . . . . . . 10-11
Mapping terminals and auxiliary printers . . . . . . . . . . 10-13
istering UniVerse on UNIX Platforms
7 Admin
C:\Users\awaite\Documents\U2Doc\UniVerse\11.2\Source\Adminunix\Adminunix.bkTOC.fm (bookTOC.template)
Beta Beta Beta Beta Beta Beta Beta Beta Beta Beta Beta Beta Beta Beta Beta Beta Beta
Chapter 11 Chapter 11: Administering printers and the UniVerse spoolerDefining a new printer . . . . . . . . . . . . . . . 11-3Viewing and modifying a printer definition . . . . . . . 11-7Deleting a printer definition . . . . . . . . . . . . . 11-7
Defining and administering printer groups . . . . . . . . . 11-8Defining a printer group . . . . . . . . . . . . . . 11-8Adding users or printers to a printer group . . . . . . . 11-11Removing users or printers from a printer group. . . . . . 11-11Deleting a printer group . . . . . . . . . . . . . . 11-12
Managing printers . . . . . . . . . . . . . . . . . . 11-13Mounting forms on a printer. . . . . . . . . . . . . 11-13Setting printer queuing options . . . . . . . . . . . . 11-14Starting and stopping printers . . . . . . . . . . . . 11-14
Configuring the UniVerse spooler . . . . . . . . . . . . 11-15Menu bar . . . . . . . . . . . . . . . . . . . 11-16Printer information . . . . . . . . . . . . . . . . 11-17Jobs list . . . . . . . . . . . . . . . . . . . . 11-17Task buttons . . . . . . . . . . . . . . . . . . 11-18Changing the spooler configuration . . . . . . . . . . 11-19
Managing print jobs . . . . . . . . . . . . . . . . . 11-23Changing print job characteristics . . . . . . . . . . . 11-23Controlling print jobs . . . . . . . . . . . . . . . 11-26
Logging spooler activity . . . . . . . . . . . . . . . . 11-29Displaying spooler log files . . . . . . . . . . . . . 11-29Determining when a job was printed . . . . . . . . . . 11-30
Starting, stopping, and resetting the spooler . . . . . . . . . 11-32Starting the spooler . . . . . . . . . . . . . . . . 11-32Stopping the spooler . . . . . . . . . . . . . . . 11-32Resetting the spooler . . . . . . . . . . . . . . . 11-32
About the UniVerse spooler. . . . . . . . . . . . . . . 11-34What happens when the spooler is installed . . . . . . . 11-34Spooler directories and files . . . . . . . . . . . . . 11-34Spooler processes and commands . . . . . . . . . . . 11-36How the spooler works . . . . . . . . . . . . . . 11-37
Using UniVerse spooler printer drivers . . . . . . . . . . . 11-39Using a UNIX executable as a driver . . . . . . . . . . 11-39The Bourne shell as a driver . . . . . . . . . . . . . 11-40Using a driver for remote printing . . . . . . . . . . . 11-41Complex shell script drivers . . . . . . . . . . . . . 11-41Setting interface characteristics in a driver . . . . . . . . 11-42
istering UniVerse on UNIX Platforms
8 Admin
C:\Users\awaite\Documents\U2Doc\UniVerse\11.2\Source\Adminunix\Adminunix.bkTOC.fm (bookTOC.template)
Beta Beta Beta Beta Beta Beta Beta Beta Beta Beta Beta Beta Beta Beta Beta Beta Beta
Capturing spool output . . . . . . . . . . . . . . 11-43Using command line arguments in driver scripts. . . . . . 11-43
Using the UNIX spooler with the UniVerse spooler . . . . . . 11-45Changing the UNIX lp interface file . . . . . . . . . . 11-45Adding a DRIVER option to the sp.config entry . . . . . . 11-46
Troubleshooting the spooler . . . . . . . . . . . . . . 11-47Printing problems . . . . . . . . . . . . . . . . 11-47Getting incorrect printout . . . . . . . . . . . . . . 11-54
Frequently asked questions . . . . . . . . . . . . . . . 11-58
Chapter 12 Chapter 12: Backing up and restoring filesBackup strategies . . . . . . . . . . . . . . . . . . 12-3
Backing up individual files . . . . . . . . . . . . . 12-4Four ways to back up and restore files . . . . . . . . . . . 12-6
Preserving the integrity of your data . . . . . . . . . . 12-6Backing up files . . . . . . . . . . . . . . . . . . . 12-7Using T.DUMP to back up UniVerse files . . . . . . . . . . 12-20Using uvbackup to back up files . . . . . . . . . . . . . 12-21
Specifying the file list . . . . . . . . . . . . . . . 12-22Restoring files . . . . . . . . . . . . . . . . . . . 12-23
Choosing the restore device . . . . . . . . . . . . . 12-23Checking the backup details . . . . . . . . . . . . . 12-24The UVRestore window . . . . . . . . . . . . . . 12-25Choosing what to restore . . . . . . . . . . . . . . 12-25Listing an index of the backup image . . . . . . . . . . 12-27Specifying how to restore files . . . . . . . . . . . . 12-27
Using T.LOAD to restore UniVerse files . . . . . . . . . . 12-29Using uvrestore to restore files . . . . . . . . . . . . . . 12-30
Specifying files and records to restore . . . . . . . . . 12-30Excluding files to restore . . . . . . . . . . . . . . 12-31Display options . . . . . . . . . . . . . . . . . 12-31Other options . . . . . . . . . . . . . . . . . . 12-31
Chapter 13 Chapter 13: Managing U2 Data ReplicationReplication . . . . . . . . . . . . . . . . . . . . 13-5Hot standby . . . . . . . . . . . . . . . . . . . . 13-6Setting up U2 Data Replication . . . . . . . . . . . . . 13-7The Replication window . . . . . . . . . . . . . . . . 13-9
Menu bar . . . . . . . . . . . . . . . . . . . 13-9Toolbar . . . . . . . . . . . . . . . . . . . . 13-11
istering UniVerse on UNIX Platforms
9 Admin
C:\Users\awaite\Documents\U2Doc\UniVerse\11.2\Source\Adminunix\Adminunix.bkTOC.fm (bookTOC.template)
Beta Beta Beta Beta Beta Beta Beta Beta Beta Beta Beta Beta Beta Beta Beta Beta Beta
Left pane . . . . . . . . . . . . . . . . . . . 13-11Right pane . . . . . . . . . . . . . . . . . . . 13-12
Configuring and managing U2 Data Replication . . . . . . . 13-13Managing a publishing system . . . . . . . . . . . . . 13-14
Configuring the publishing system . . . . . . . . . . 13-14Starting and stopping the publishing system . . . . . . . 13-16Publishing files . . . . . . . . . . . . . . . . . 13-16
Managing a subscribing system . . . . . . . . . . . . . 13-25Configuring the subscribing system . . . . . . . . . . 13-25Starting and stopping the subscribing system . . . . . . . 13-26Creating a subscriber’s list of publishing systems . . . . . 13-26Subscribing files . . . . . . . . . . . . . . . . . 13-28
Managing hot standby operations . . . . . . . . . . . . 13-36Configuring a hot standby subscriber. . . . . . . . . . 13-36Turning On fail-over mode . . . . . . . . . . . . . 13-38Reconciling the hot standby with the publisher . . . . . . 13-38
UniVerse commands for managing replication . . . . . . . . 13-41Creating a list of replication files . . . . . . . . . . . 13-41Marking files for publication. . . . . . . . . . . . . 13-41Marking files for subscription . . . . . . . . . . . . 13-42Unpublishing replication files . . . . . . . . . . . . 13-42Unsubscribing replication files . . . . . . . . . . . . 13-43
Some restrictions . . . . . . . . . . . . . . . . . . 13-44What to do when disk space fills up . . . . . . . . . . . . 13-45Removing obsolete replication log files . . . . . . . . . . . 13-46What to do when Replication fails . . . . . . . . . . . . 13-47
Chapter 14 Chapter 14: Monitoring system activityListing active UniVerse processes and jobs . . . . . . . . . 14-4Listing UniVerse jobs with PORT.STATUS . . . . . . . . . . 14-7Terminating a process. . . . . . . . . . . . . . . . . 14-8Examining shared memory . . . . . . . . . . . . . . . 14-9
Semaphore table . . . . . . . . . . . . . . . . . 14-10File lock table . . . . . . . . . . . . . . . . . . 14-11Group lock table . . . . . . . . . . . . . . . . . 14-12Update record lock table . . . . . . . . . . . . . . 14-12User process control locks. . . . . . . . . . . . . . 14-12Dynamic file table . . . . . . . . . . . . . . . . 14-13UniVerse configuration. . . . . . . . . . . . . . . 14-13General system information . . . . . . . . . . . . . 14-14
istering UniVerse on UNIX Platforms
10 Admi
C:\Users\awaite\Documents\U2Doc\UniVerse\11.2\Source\Adminunix\Adminunix.bkTOC.fm (bookTOC.template)
Beta Beta Beta Beta Beta Beta Beta Beta Beta Beta Beta Beta Beta Beta Beta Beta Beta
Catalog shared memory . . . . . . . . . . . . . . 14-14Printer memory segment . . . . . . . . . . . . . . 14-15
Monitoring response time on UNIX systems . . . . . . . . . 14-16Keeping directory files small . . . . . . . . . . . . . 14-16Running programs during off-hours . . . . . . . . . . 14-17execuv . . . . . . . . . . . . . . . . . . . . 14-17
Monitoring errors on UNIX systems . . . . . . . . . . . . 14-19
Chapter 15 Chapter 15: UniVerse file utilitiesAdministering UniVerse files . . . . . . . . . . . . . . 15-4
Listing files in a UniVerse account . . . . . . . . . . . 15-5View file properties . . . . . . . . . . . . . . . . 15-6View file statistics . . . . . . . . . . . . . . . . 15-13Running file diagnostics . . . . . . . . . . . . . . 15-15Repairing damaged files . . . . . . . . . . . . . . 15-18
The format conversion utility . . . . . . . . . . . . . . 15-22Converting the format of data files and UniVerse BASIC code . 15-22
Chapter 16 Chapter 16: Executing UniVerse commandsExecuting a command . . . . . . . . . . . . . . . . 16-3Using the command history . . . . . . . . . . . . . . 16-5
Reexecuting commands . . . . . . . . . . . . . . 16-5Editing a command . . . . . . . . . . . . . . . . 16-6
Chapter 17 Chapter 17: Sending messages to usersSending messages with the U2 Extensible Administration tool . . 17-4The UNIX write command . . . . . . . . . . . . . . . 17-5The MESSAGE command . . . . . . . . . . . . . . . 17-6Message of the day on UNIX systems . . . . . . . . . . . 17-7
Chapter 18 Chapter 18: Adding capabilities to UniVerseAdding UniVerse BASIC applications . . . . . . . . . . . 18-3Managing catalog space . . . . . . . . . . . . . . . . 18-5
Initializing system catalog space . . . . . . . . . . . 18-5Checking the status of the catalog . . . . . . . . . . . 18-6Displaying catalog contents . . . . . . . . . . . . . 18-6Deleting programs from the catalog . . . . . . . . . . 18-8
Managing catalog shared memory . . . . . . . . . . . . 18-9Setting up catalog shared memory . . . . . . . . . . . 18-9
Defining programs to run in shared memory. . . . . . . . . 18-11
nistering UniVerse on UNIX Platforms
11 Admi
C:\Users\awaite\Documents\U2Doc\UniVerse\11.2\Source\Adminunix\Adminunix.bkTOC.fm (bookTOC.template)
Beta Beta Beta Beta Beta Beta Beta Beta Beta Beta Beta Beta Beta Beta Beta Beta Beta
Adding programs to the SHM.TO.LOAD file . . . . . . . 18-12Removing a program from the SHM.TO.LOAD file . . . . . 18-13Loading programs into catalog shared memory . . . . . . 18-14
Using programs stored in catalog shared memory . . . . . . . 18-16Modifying programs in catalog shared memory. . . . . . . . 18-17
Updating a program in shared memory . . . . . . . . . 18-17Removing a program from shared memory. . . . . . . . 18-18
Removing the catalog shared memory segment . . . . . . . . 18-19Adding commands to the VOC file . . . . . . . . . . . . 18-20
Chapter 19 Chapter 19: Managing network servicesAdministering the UniRPC on UNIX systems . . . . . . . . 19-4
How the UniRPC works . . . . . . . . . . . . . . 19-4System requirements . . . . . . . . . . . . . . . 19-4Defining the UniRPC port number and maintaining the hosts file 19-5Starting and stopping the UniRPC daemon. . . . . . . . 19-7About the unirpcservices file . . . . . . . . . . . . . 19-8
Pluggable Authentication Module (PAM) . . . . . . . . . . 19-11How UniVerse authentication currently works . . . . . . 19-11PAM support . . . . . . . . . . . . . . . . . . 19-11Modifying the telnet session parameters. . . . . . . . . 19-12
Chapter 20 Chapter 20: Device licensingUniVerse licensing modes . . . . . . . . . . . . . . . 20-3Why do I need device licensing? . . . . . . . . . . . . . 20-4
Device licensing requirements . . . . . . . . . . . . 20-4Connection types . . . . . . . . . . . . . . . . . . 20-5
Direct connections . . . . . . . . . . . . . . . . 20-5Two-tier connections . . . . . . . . . . . . . . . 20-5Enabling telnet device licensing on UNIX servers . . . . . 20-6Using device subkeys . . . . . . . . . . . . . . . 20-6
Using the license tool uvlictool . . . . . . . . . . . . . . 20-7
Chapter 21 Chapter 21: Account-based licensingConfiguring the license configuration . . . . . . . . . . . 20-3
Configuring the license configuration with the U2 Extensible Administration tool. . . . . . . . . . . . . 20-4
Verifying the acct_licn.def file . . . . . . . . . . . . 20-7Listing the acct_licn.def file . . . . . . . . . . . . . 20-7Reloading the acct_licn.def file . . . . . . . . . . . . 20-8
nistering UniVerse on UNIX Platforms

12 Admi
C:\Users\awaite\Documents\U2Doc\UniVerse\11.2\Source\Adminunix\Adminunix.bkTOC.fm (bookTOC.template)
Beta Beta Beta Beta Beta Beta Beta Beta Beta Beta Beta Beta Beta Beta Beta Beta Beta
Listing licenses in use in a logical account . . . . . . . . 20-9
Appendix A Appendix A: UniVerse system administration menusOverview of menus and data entry screens . . . . . . . . . A-2
Moving around the menus . . . . . . . . . . . . . A-2Summary of standard keys . . . . . . . . . . . . . A-3
The UniVerse System Administration menu . . . . . . . . . A-6Invoking the System Administration menu. . . . . . . . A-6
Package option . . . . . . . . . . . . . . . . . . . A-7Installing and deinstalling a software package. . . . . . . A-7Administering the UniRPC . . . . . . . . . . . . . A-7UniVerse license administration . . . . . . . . . . . A-11Administering the deadlock daemon . . . . . . . . . . A-11Administering SQL Client and GCI . . . . . . . . . . A-13
Accounts option. . . . . . . . . . . . . . . . . . . A-14Using the Accounts menu. . . . . . . . . . . . . . A-14Maintaining users and user groups . . . . . . . . . . A-15Adding, changing, and deleting individual users. . . . . . A-16Maintaining UniVerse accounts . . . . . . . . . . . . A-20
Recovery option. . . . . . . . . . . . . . . . . . . A-25Backing up and restoring files . . . . . . . . . . . . A-25Using the UVBACKUP screen . . . . . . . . . . . . A-27Using the UVRESTORE screen . . . . . . . . . . . . A-31Transaction Logging . . . . . . . . . . . . . . . A-37
Spooler option . . . . . . . . . . . . . . . . . . . A-45Spooler status report . . . . . . . . . . . . . . . A-45Managing print jobs. . . . . . . . . . . . . . . . A-46Managing the spooler . . . . . . . . . . . . . . . A-48Defining printers . . . . . . . . . . . . . . . . . A-50Mounting a form on a printer . . . . . . . . . . . . A-54Configuring the spooler . . . . . . . . . . . . . . A-55Changing the spooler configuration . . . . . . . . . . A-56Maintaining printer groups . . . . . . . . . . . . . A-57Spooler log files . . . . . . . . . . . . . . . . . A-59
Shared Memory (sh Mem) option. . . . . . . . . . . . . A-61Designating programs for catalog shared memory . . . . . A-61Installing programs into catalog shared memory . . . . . . A-62Modifying catalog shared memory . . . . . . . . . . A-63Removing printer memory segments . . . . . . . . . . A-63
Import option . . . . . . . . . . . . . . . . . . . A-65
nistering UniVerse on UNIX Platforms
13 Admi
C:\Users\awaite\Documents\U2Doc\UniVerse\11.2\Source\Adminunix\Adminunix.bkTOC.fm (bookTOC.template)
Beta Beta Beta Beta Beta Beta Beta Beta Beta Beta Beta Beta Beta Beta Beta Beta Beta
Restoring non-UniVerse accounts from tape . . . . . . . A-65Updating the &DEVICE& file . . . . . . . . . . . . A-71Defining printers . . . . . . . . . . . . . . . . . A-75
User menus . . . . . . . . . . . . . . . . . . . . A-80
Appendix B Appendix B: PTERM and stty options
Appendix C Appendix C: terminfo terminal capabilitiesAdditional terminfo entries . . . . . . . . . . . . . . . C-2terminfo terminal capabilities . . . . . . . . . . . . . . C-4terminfo, termcap, and UniVerse . . . . . . . . . . . . . C-7
Appendix D Appendix D: The Wide Zero parameter in UniVerseNumber systems . . . . . . . . . . . . . . . . . . D-2Floating-point numbers . . . . . . . . . . . . . . . . D-3The UniVerse Wide Zero feature . . . . . . . . . . . . . D-5
Appendix E Appendix E: Fault numbers and error codesFatal error codes . . . . . . . . . . . . . . . . . . E-3Initialization errors. . . . . . . . . . . . . . . . . . E-9
Appendix F Appendix F: Configuring SSL for TelnetSet up UniVerse telenet service for the operating system to recognize F-2Set up SSL properties for UniVerse telnet Service . . . . . . . F-4Setting up the telnet service on Linux platforms. . . . . . . . F-5Setting up the telnet service on Solaris platforms . . . . . . . F-6
nistering UniVerse on UNIX Platforms
C:\UsMarch
1Administering UniData on Windows NT or Windows 20000
1 Chapter
ers\aw 17, 201
Beta Beta Beta Beta Beta Beta Beta Beta Beta Beta Beta Beta Beta Beta Beta Beta Beta Beta Beta Beta
Chapter 1: Introduction
Introduction . . . . . . . . . . . . . . . . . . . . 1-2What is UniVerse administration? . . . . . . . . . . . . 1-3 Who is a UniVerse administrator? . . . . . . . . . . . 1-3UniVerse files . . . . . . . . . . . . . . . . . . . 1-4 Nonhashed files . . . . . . . . . . . . . . . . . 1-4 Hashed files . . . . . . . . . . . . . . . . . . 1-4 B-Tree files . . . . . . . . . . . . . . . . . . . 1-5 UV account directory files. . . . . . . . . . . . . . 1-5UniVerse administration commands . . . . . . . . . . . 1-8 Assigning and unassigning peripheral devices . . . . . . 1-8 UniVerse BASIC programs . . . . . . . . . . . . . 1-8 File and account maintenance . . . . . . . . . . . . 1-9 Managing processes . . . . . . . . . . . . . . . . 1-11 Monitoring resource. . . . . . . . . . . . . . . . 1-12 Task and record locking . . . . . . . . . . . . . . 1-12 Managing transaction logging . . . . . . . . . . . . 1-13 National language support . . . . . . . . . . . . . 1-14
aite\Documents\U2Doc\UniVerse\11.2\Source\Adminunix\Ch1TOC.fm4 2:12 pm Administering UniData on Windows NT or Windows 2000
C:\Users\awaite\Documents\U2Doc\UniVerse\11.2\Source\Adminunix\Ch1.fm3/17/14
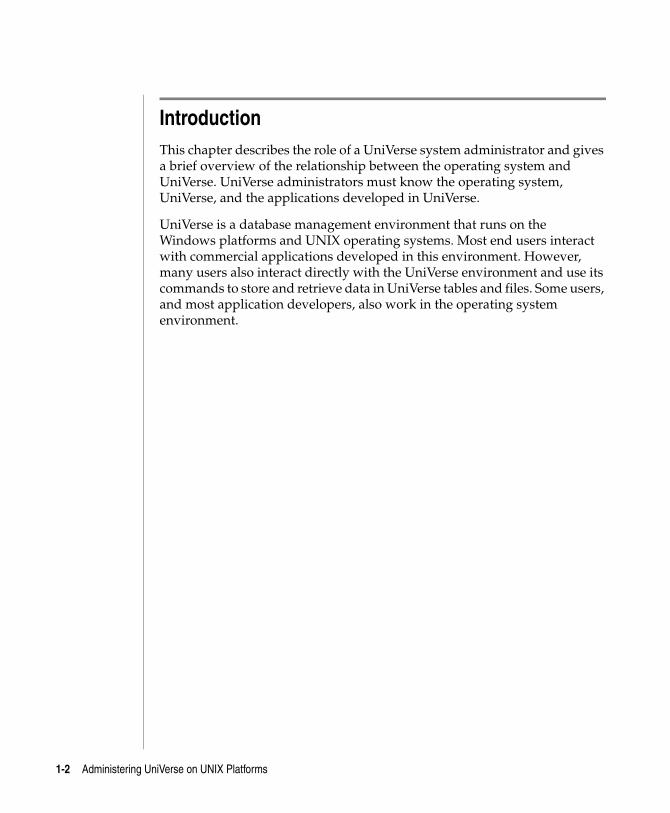
Introduction This chapter describes the role of a UniVerse system administrator and gives a brief overview of the relationship between the operating system and UniVerse. UniVerse administrators must know the operating system, UniVerse, and the applications developed in UniVerse.
UniVerse is a database management environment that runs on the Windows platforms and UNIX operating systems. Most end users interact with commercial applications developed in this environment. However, many users also interact directly with the UniVerse environment and use its commands to store and retrieve data in UniVerse tables and files. Some users, and most application developers, also work in the operating system environment.
1-2 Administering UniVerse on UNIX Platforms
C:\Users\awaite\Documents\U2Doc\UniVerse\11.2\Source\Adminunix\Ch
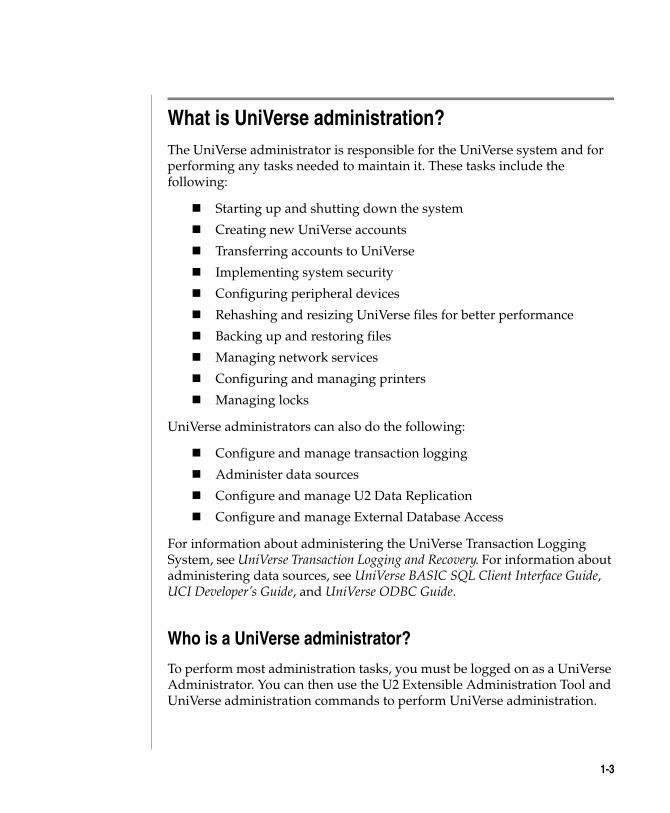
What is UniVerse administration?The UniVerse administrator is responsible for the UniVerse system and for performing any tasks needed to maintain it. These tasks include the following:
Starting up and shutting down the system
Creating new UniVerse accounts
Transferring accounts to UniVerse
Implementing system security
Configuring peripheral devices
Rehashing and resizing UniVerse files for better performance
Backing up and restoring files
Managing network services
Configuring and managing printers
Managing locks
UniVerse administrators can also do the following:
Configure and manage transaction logging
Administer data sources
Configure and manage U2 Data Replication
Configure and manage External Database Access
For information about administering the UniVerse Transaction Logging System, see UniVerse Transaction Logging and Recovery. For information about administering data sources, see UniVerse BASIC SQL Client Interface Guide, UCI Developer’s Guide, and UniVerse ODBC Guide.
Who is a UniVerse administrator?
To perform most administration tasks, you must be logged on as a UniVerse Administrator. You can then use the U2 Extensible Administration Tool and UniVerse administration commands to perform UniVerse administration.
1-3
C:\Users\awaite\Documents\U2Doc\UniVerse\11.2\Source\Adminunix\Ch1.fm3/17/14
UniVerse filesUniVerse files are described in detail in UniVerse System Description. This section summarizes the main points of the UniVerse file system.
UniVerse provides the following kinds of file organization:
Nonhashed files
Hashed files
B-tree files
Nonhashed files
Nonhashed files store text, program source code, and other data that does not have much structure to it. A nonhashed file is implemented as an operating system directory. The records in a nonhashed file are operating system files.
Hashed files
Hashed files use a hashing algorithm to distribute records in one or more groups of the file. The algorithm is applied to the record ID to generate the address of a group buffer where the record is stored. To find a record in a hashed file, UniVerse locates its group address on the disk. Within that group, individual record IDs are examined to identify the record.
Hashed files allow rapid access to records regardless of the number of records in the file. There are two kinds of hashed files: static and dynamic. A static file does not change its size to accommodate changes in the amount of data stored in it. A dynamic file resizes itself by changing the number of groups required to store records.
The maximum size of a 32-bit file is 2 GB. The maximum size of a 64-bit file is virtually imposed by the operating system.
1-4 Administering UniVerse on UNIX Platforms
C:\Users\awaite\Documents\U2Doc\UniVerse\11.2\Source\Adminunix\Ch
B-Tree files
B-tree files store data for rapid access. In a B-tree file, records are stored in sorted order. To find a record, its record ID is compared to the value at the center of the tree. If the value is greater than the record ID, the search continues with the subtree to the left of the center value. If it is less, the search continues with the subtree to the right of the center value. This process continues until the record is found.
A B-tree file is the most efficient file structure to use when frequent searches are made for partially specified keys, such as a key that comprises a region code and an invoice number. A search for the last 100 orders placed in the “NE” region would search only the branches with a key beginning with “NE”. Using partially specified keys to find records in a hashed file is inefficient because it involves reading the entire file.
UV account directory files
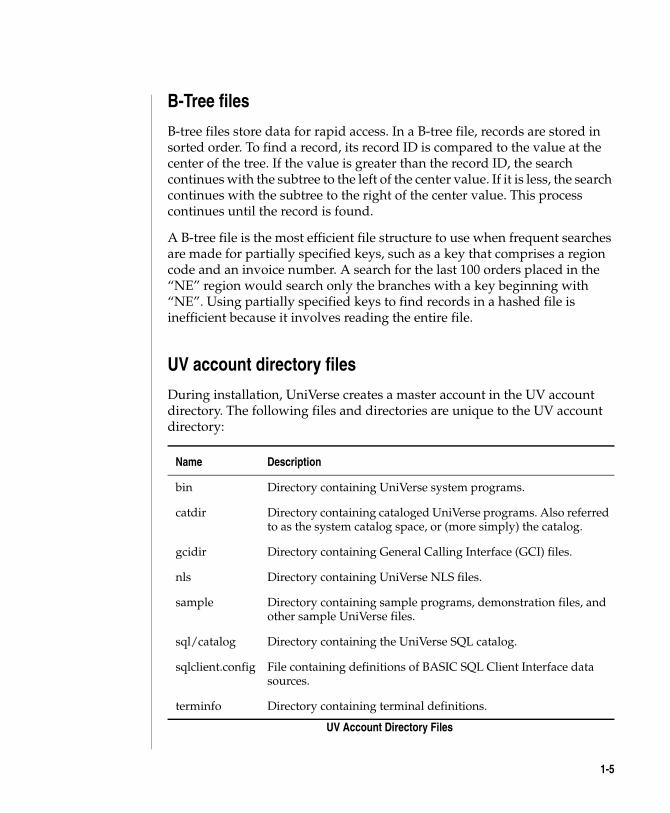
During installation, UniVerse creates a master account in the UV account directory. The following files and directories are unique to the UV account directory:
Name Description
bin Directory containing UniVerse system programs.
catdir Directory containing cataloged UniVerse programs. Also referred to as the system catalog space, or (more simply) the catalog.
gcidir Directory containing General Calling Interface (GCI) files.
nls Directory containing UniVerse NLS files.
sample Directory containing sample programs, demonstration files, and other sample UniVerse files.
sql/catalog Directory containing the UniVerse SQL catalog.
sqlclient.config File containing definitions of BASIC SQL Client Interface data sources.
terminfo Directory containing terminal definitions.
UV Account Directory Files
1-5
C:\Users\awaite\Documents\U2Doc\UniVerse\11.2\Source\Adminunix\Ch1.fm3/17/14
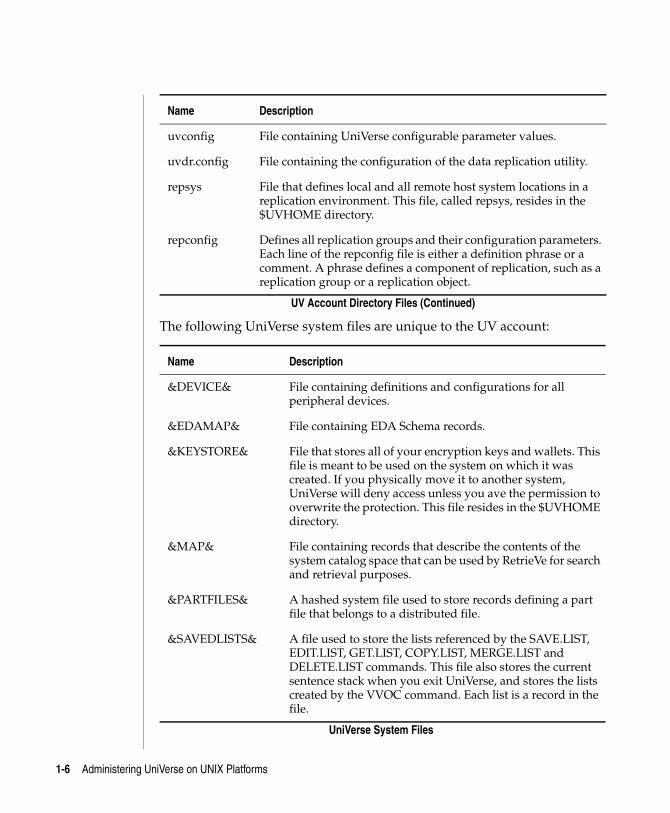
The following UniVerse system files are unique to the UV account:
uvconfig File containing UniVerse configurable parameter values.
uvdr.config File containing the configuration of the data replication utility.
repsys File that defines local and all remote host system locations in a replication environment. This file, called repsys, resides in the $UVHOME directory.
repconfig Defines all replication groups and their configuration parameters. Each line of the repconfig file is either a definition phrase or a comment. A phrase defines a component of replication, such as a replication group or a replication object.
Name Description
&DEVICE& File containing definitions and configurations for all peripheral devices.
&EDAMAP& File containing EDA Schema records.
&KEYSTORE& File that stores all of your encryption keys and wallets. This file is meant to be used on the system on which it was created. If you physically move it to another system, UniVerse will deny access unless you ave the permission to overwrite the protection. This file resides in the $UVHOME directory.
&MAP& File containing records that describe the contents of the system catalog space that can be used by RetrieVe for search and retrieval purposes.
&PARTFILES& A hashed system file used to store records defining a part file that belongs to a distributed file.
&SAVEDLISTS& A file used to store the lists referenced by the SAVE.LIST, EDIT.LIST, GET.LIST, COPY.LIST, MERGE.LIST and DELETE.LIST commands. This file also stores the current sentence stack when you exit UniVerse, and stores the lists created by the VVOC command. Each list is a record in the file.
UniVerse System Files
Name Description
UV Account Directory Files (Continued)
1-6 Administering UniVerse on UNIX Platforms
C:\Users\awaite\Documents\U2Doc\UniVerse\11.2\Source\Adminunix\Ch
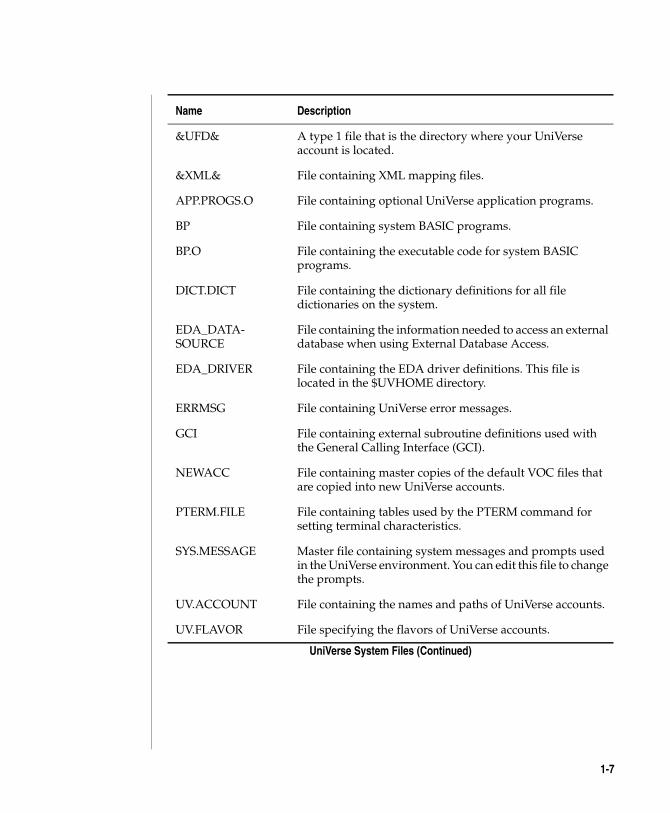
&UFD& A type 1 file that is the directory where your UniVerse account is located.
&XML& File containing XML mapping files.
APP.PROGS.O File containing optional UniVerse application programs.
BP File containing system BASIC programs.
BP.O File containing the executable code for system BASIC programs.
DICT.DICT File containing the dictionary definitions for all file dictionaries on the system.
EDA_DATA-SOURCE
File containing the information needed to access an external database when using External Database Access.
EDA_DRIVER File containing the EDA driver definitions. This file is located in the $UVHOME directory.
ERRMSG File containing UniVerse error messages.
GCI File containing external subroutine definitions used with the General Calling Interface (GCI).
NEWACC File containing master copies of the default VOC files that are copied into new UniVerse accounts.
PTERM.FILE File containing tables used by the PTERM command for setting terminal characteristics.
SYS.MESSAGE Master file containing system messages and prompts used in the UniVerse environment. You can edit this file to change the prompts.
UV.ACCOUNT File containing the names and paths of UniVerse accounts.
UV.FLAVOR File specifying the flavors of UniVerse accounts.
Name Description
UniVerse System Files (Continued)
1-7
C:\Users\awaite\Documents\U2Doc\UniVerse\11.2\Source\Adminunix\Ch1.fm3/17/14
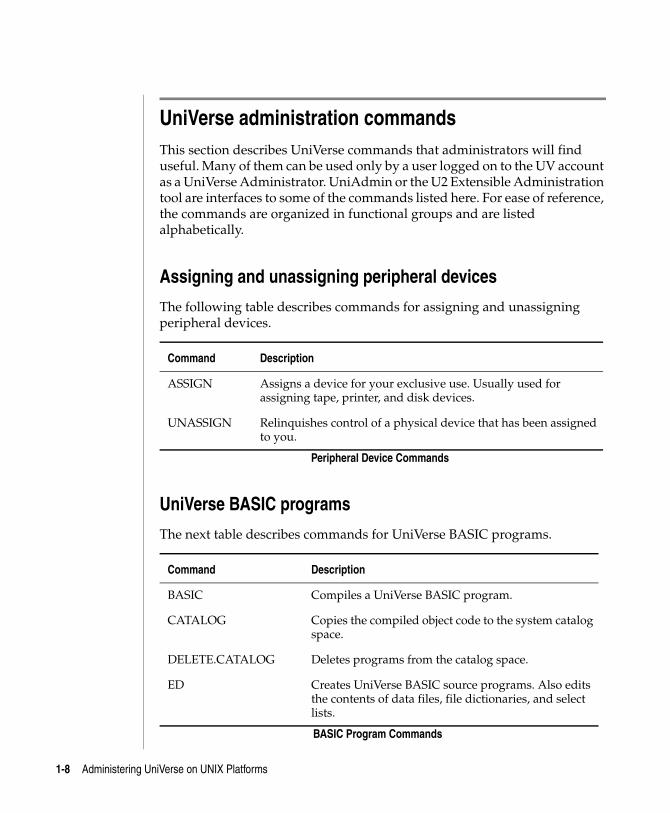
UniVerse administration commandsThis section describes UniVerse commands that administrators will find useful. Many of them can be used only by a user logged on to the UV account as a UniVerse Administrator. UniAdmin or the U2 Extensible Administration tool are interfaces to some of the commands listed here. For ease of reference, the commands are organized in functional groups and are listed alphabetically.
Assigning and unassigning peripheral devices
The following table describes commands for assigning and unassigning peripheral devices.
UniVerse BASIC programs
The next table describes commands for UniVerse BASIC programs.
Command Description
ASSIGN Assigns a device for your exclusive use. Usually used for assigning tape, printer, and disk devices.
UNASSIGN Relinquishes control of a physical device that has been assigned to you.
Peripheral Device Commands
Command Description
BASIC Compiles a UniVerse BASIC program.
CATALOG Copies the compiled object code to the system catalog space.
DELETE.CATALOG Deletes programs from the catalog space.
ED Creates UniVerse BASIC source programs. Also edits the contents of data files, file dictionaries, and select lists.
BASIC Program Commands
1-8 Administering UniVerse on UNIX Platforms

C:\Users\awaite\Documents\U2Doc\UniVerse\11.2\Source\Adminunix\Ch
File and account maintenance
The following table describes commands for file and account maintenance.
INITIALIZE.CATALOG Initializes the catalog space.
LIMIT Sets the maximum size of memory storage for a user’s active UniVerse BASIC routines.
MAKE.MAP.FILE Creates the &MAP& file from the catalog contents.
MAP Displays information about the contents of the catalog space.
RAID Debugs a UniVerse BASIC program.
VCATALOG Compares the object code of a program in the catalog to object code in the original file.
VLIST Lists UniVerse BASIC object code.
Command Description
ACCOUNT.FILE.STATS Gathers file statistics on the current state of selected files.
ANALYZE.FILE Displays statistics about a dynamic file.
CLEAN.ACCOUNT Performs routine maintenance and verifies the condition of files in an account.
CONFIGURE.FILE Changes the parameters of a dynamic file.
FILE.STAT Displays statistical information about the file size and record partitioning in a file.
FILE.USAGE Displays statistics on the use patterns of a file.
FILE.USAGE.CLEAR Resets statistics displayed by the FILE.USAGE command.
File and Account Maintenance Commands
Command Description
BASIC Program Commands (Continued)
1-9
C:\Users\awaite\Documents\U2Doc\UniVerse\11.2\Source\Adminunix\Ch1.fm3/17/14
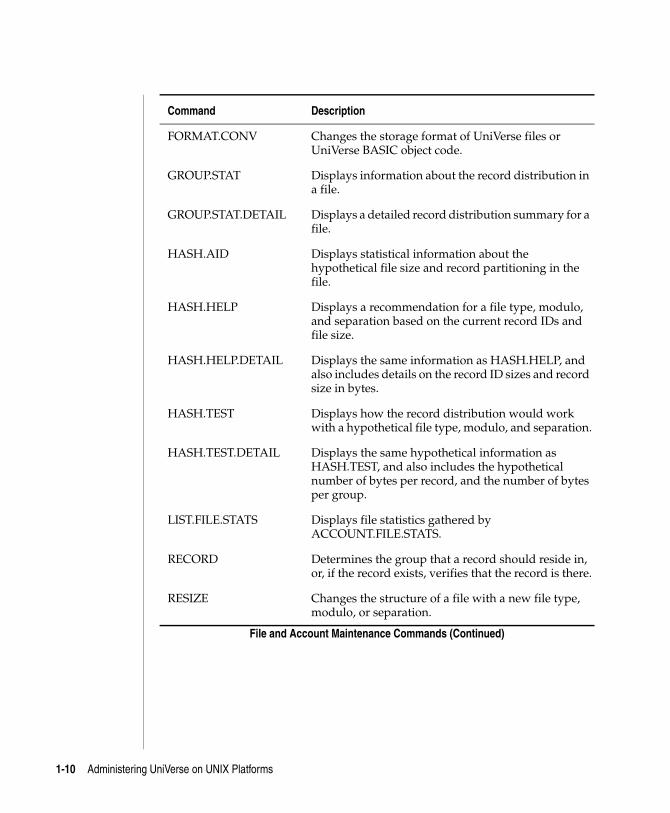
FORMAT.CONV Changes the storage format of UniVerse files or UniVerse BASIC object code.
GROUP.STAT Displays information about the record distribution in a file.
GROUP.STAT.DETAIL Displays a detailed record distribution summary for a file.
HASH.AID Displays statistical information about the hypothetical file size and record partitioning in the file.
HASH.HELP Displays a recommendation for a file type, modulo, and separation based on the current record IDs and file size.
HASH.HELP.DETAIL Displays the same information as HASH.HELP, and also includes details on the record ID sizes and record size in bytes.
HASH.TEST Displays how the record distribution would work with a hypothetical file type, modulo, and separation.
HASH.TEST.DETAIL Displays the same hypothetical information as HASH.TEST, and also includes the hypothetical number of bytes per record, and the number of bytes per group.
LIST.FILE.STATS Displays file statistics gathered by ACCOUNT.FILE.STATS.
RECORD Determines the group that a record should reside in, or, if the record exists, verifies that the record is there.
RESIZE Changes the structure of a file with a new file type, modulo, or separation.
Command Description
File and Account Maintenance Commands (Continued)
1-10 Administering UniVerse on UNIX Platforms
C:\Users\awaite\Documents\U2Doc\UniVerse\11.2\Source\Adminunix\Ch
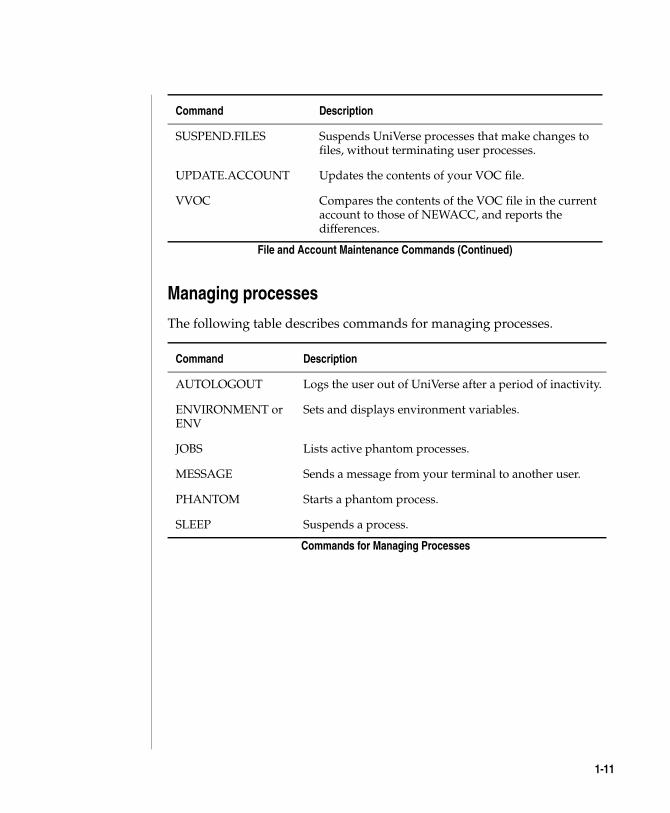
Managing processes
The following table describes commands for managing processes.
SUSPEND.FILES Suspends UniVerse processes that make changes to files, without terminating user processes.
UPDATE.ACCOUNT Updates the contents of your VOC file.
VVOC Compares the contents of the VOC file in the current account to those of NEWACC, and reports the differences.
Command Description
AUTOLOGOUT Logs the user out of UniVerse after a period of inactivity.
ENVIRONMENT or ENV
Sets and displays environment variables.
JOBS Lists active phantom processes.
MESSAGE Sends a message from your terminal to another user.
PHANTOM Starts a phantom process.
SLEEP Suspends a process.
Commands for Managing Processes
Command Description
File and Account Maintenance Commands (Continued)
1-11
C:\Users\awaite\Documents\U2Doc\UniVerse\11.2\Source\Adminunix\Ch1.fm3/17/14
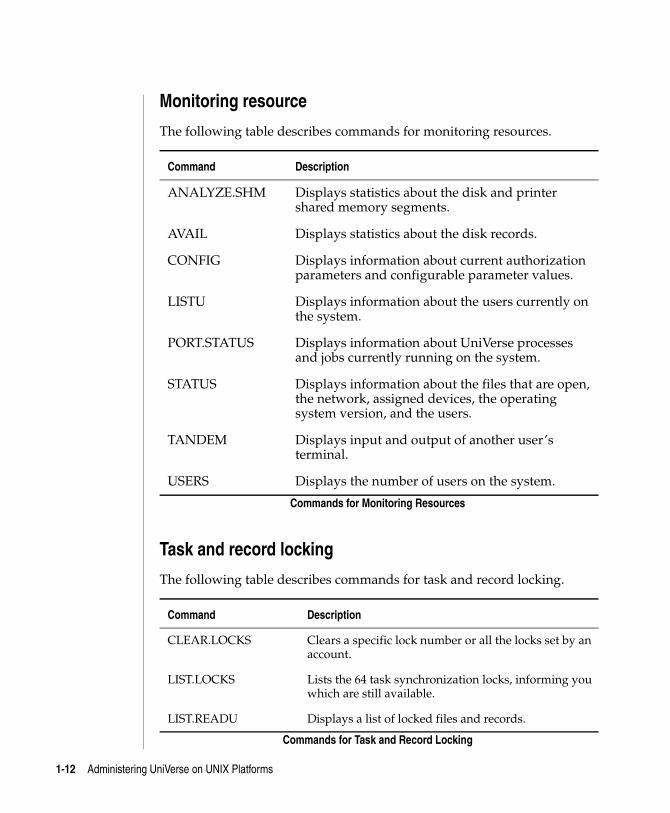
Monitoring resource
The following table describes commands for monitoring resources.
Task and record locking
The following table describes commands for task and record locking.
Command Description
ANALYZE.SHM Displays statistics about the disk and printer shared memory segments.
AVAIL Displays statistics about the disk records.
CONFIG Displays information about current authorization parameters and configurable parameter values.
LISTU Displays information about the users currently on the system.
PORT.STATUS Displays information about UniVerse processes and jobs currently running on the system.
STATUS Displays information about the files that are open, the network, assigned devices, the operating system version, and the users.
TANDEM Displays input and output of another user’s terminal.
USERS Displays the number of users on the system.
Commands for Monitoring Resources
Command Description
CLEAR.LOCKS Clears a specific lock number or all the locks set by an account.
LIST.LOCKS Lists the 64 task synchronization locks, informing you which are still available.
LIST.READU Displays a list of locked files and records.
Commands for Task and Record Locking
1-12 Administering UniVerse on UNIX Platforms
C:\Users\awaite\Documents\U2Doc\UniVerse\11.2\Source\Adminunix\Ch
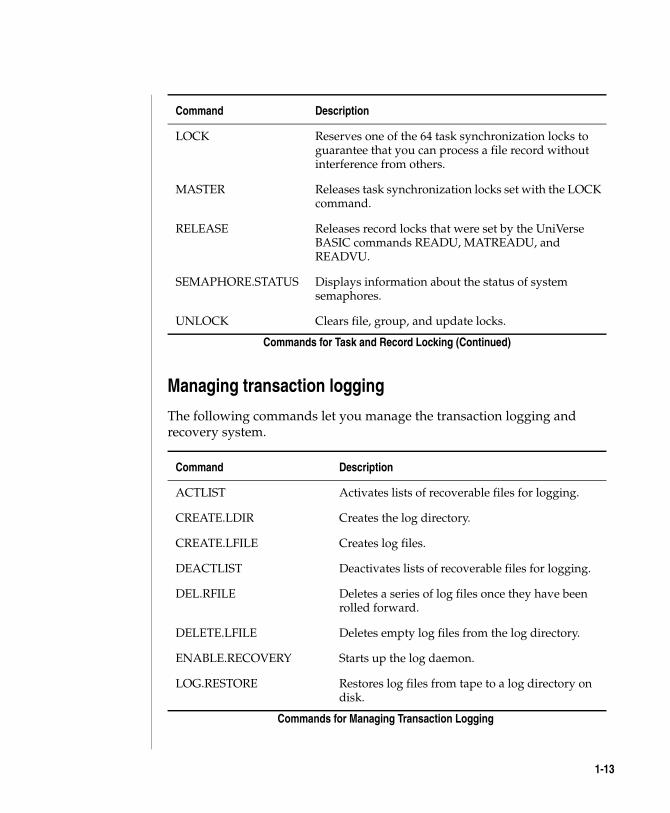
Managing transaction logging
The following commands let you manage the transaction logging and recovery system.
LOCK Reserves one of the 64 task synchronization locks to guarantee that you can process a file record without interference from others.
MASTER Releases task synchronization locks set with the LOCK command.
RELEASE Releases record locks that were set by the UniVerse BASIC commands READU, MATREADU, and READVU.
SEMAPHORE.STATUS Displays information about the status of system semaphores.
UNLOCK Clears file, group, and update locks.
Command Description
ACTLIST Activates lists of recoverable files for logging.
CREATE.LDIR Creates the log directory.
CREATE.LFILE Creates log files.
DEACTLIST Deactivates lists of recoverable files for logging.
DEL.RFILE Deletes a series of log files once they have been rolled forward.
DELETE.LFILE Deletes empty log files from the log directory.
ENABLE.RECOVERY Starts up the log daemon.
LOG.RESTORE Restores log files from tape to a log directory on disk.
Commands for Managing Transaction Logging
Command Description
Commands for Task and Record Locking (Continued)
1-13
C:\Users\awaite\Documents\U2Doc\UniVerse\11.2\Source\Adminunix\Ch1.fm3/17/14
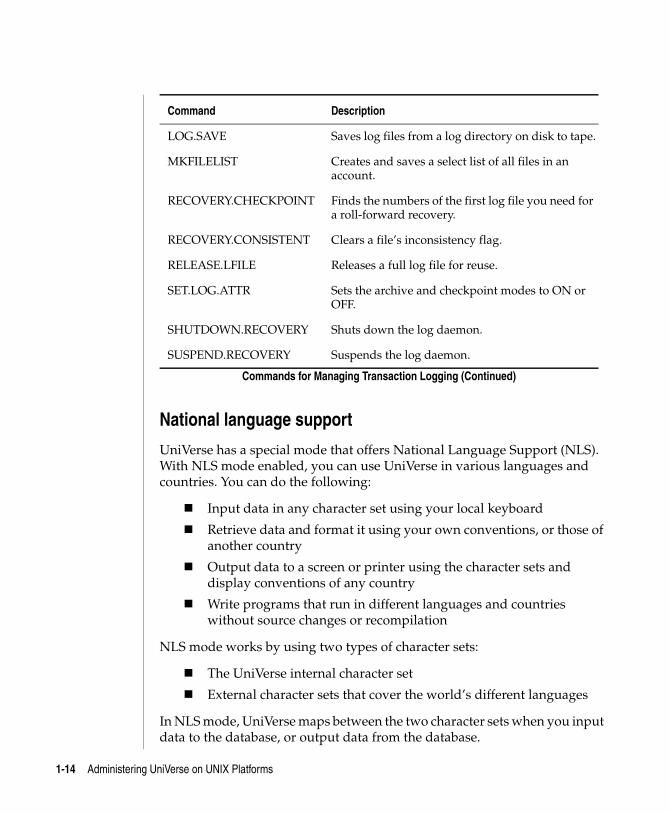
National language support
UniVerse has a special mode that offers National Language Support (NLS). With NLS mode enabled, you can use UniVerse in various languages and countries. You can do the following:
Input data in any character set using your local keyboard
Retrieve data and format it using your own conventions, or those of another country
Output data to a screen or printer using the character sets and display conventions of any country
Write programs that run in different languages and countries without source changes or recompilation
NLS mode works by using two types of character sets:
The UniVerse internal character set
External character sets that cover the world’s different languages
In NLS mode, UniVerse maps between the two character sets when you input data to the database, or output data from the database.
LOG.SAVE Saves log files from a log directory on disk to tape.
MKFILELIST Creates and saves a select list of all files in an account.
RECOVERY.CHECKPOINT Finds the numbers of the first log file you need for a roll-forward recovery.
RECOVERY.CONSISTENT Clears a file’s inconsistency flag.
RELEASE.LFILE Releases a full log file for reuse.
SET.LOG.ATTR Sets the archive and checkpoint modes to ON or OFF.
SHUTDOWN.RECOVERY Shuts down the log daemon.
SUSPEND.RECOVERY Suspends the log daemon.
Command Description
Commands for Managing Transaction Logging (Continued)
1-14 Administering UniVerse on UNIX Platforms
C:\Users\awaite\Documents\U2Doc\UniVerse\11.2\Source\Adminunix\Ch
For complete information about installing and administering NLS and using NLS commands, see the UniVerse NLS Guide and the UniVerse User Reference.
1-15
C:\UsMarch
1Administering UniData on Windows NT or Windows 20000
2 Chapter
ers\aw 17, 201
Beta Beta Beta Beta Beta Beta Beta Beta Beta Beta Beta Beta Beta Beta Beta Beta Beta Beta Beta Beta
Chapter 2: The U2 Extensible Administration tool
Starting the U2 Extensible Administration Tool . . . . . . . . 2-3
aite\Documents\U2Doc\UniVerse\11.2\Source\Adminunix\Ch2TOC.fm4 2:12 pm Administering UniData on Windows NT or Windows 2000
C:\Users\awaite\Documents\U2Doc\UniVerse\11.2\Source\Adminunix\Ch
The U2 Extensible Administration toolThe U2 Extensible Administration Tool is a Windows-based program that lets you administer UniVerse running on a UNIX or Windows server.
Note: To use the U2 Extensible Administration Tool, you must be logged on as a UniVerse Administrator.
2-2
C:\Users\awaite\Documents\U2Doc\UniVerse\11.2\Source\Adminunix\Ch2.fm3/17/14
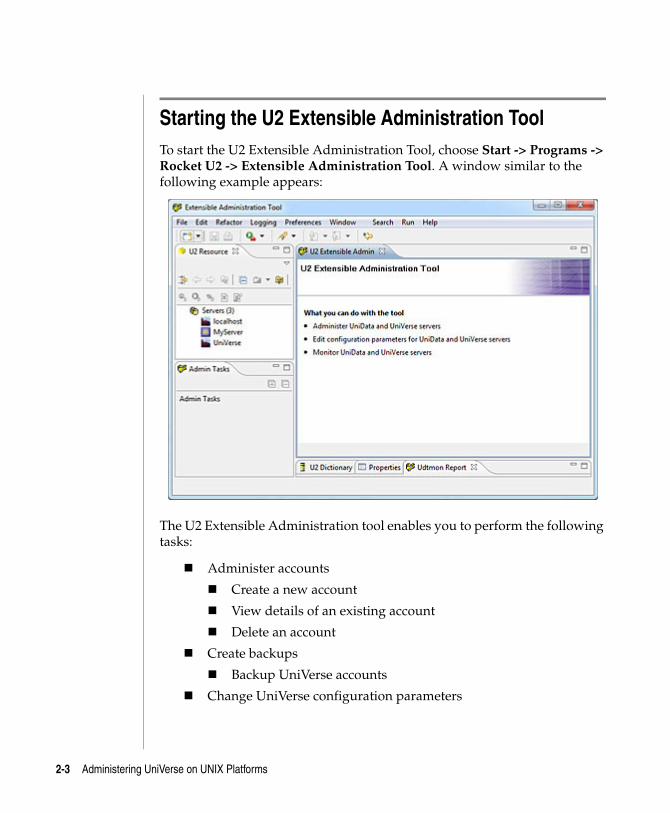
Starting the U2 Extensible Administration ToolTo start the U2 Extensible Administration Tool, choose Start -> Programs -> Rocket U2 -> Extensible Administration Tool. A window similar to the following example appears:
The U2 Extensible Administration tool enables you to perform the following tasks:
Administer accounts
Create a new account
View details of an existing account
Delete an account
Create backups
Backup UniVerse accounts
Change UniVerse configuration parameters
2-3 Administering UniVerse on UNIX Platforms
C:\Users\awaite\Documents\U2Doc\UniVerse\11.2\Source\Adminunix\Ch
Administer UCI or UniVerse ODBC data sources
Create a data source
Delete an existing data source
View or modify information about a data source
Administer UniVerse deadlocks
Start or stop the UniVerse Deadlock Manager
Configure the Deadlock Manager
Manually resolve file locking conflicts
Administer devices
Configure tapes
Configure printer
Configure other device
View file system usage
Define and update log configuration table
Define and update archive configuration table
File tools
View files in UniVerse accounts
Import
Import non-UniVerse accounts from Prime Information or Pick systems
Manually import non-UniVerse accounts from tape
License UniVerse or UV/Net
View information about licenses in use
Clean UniVerse license
Update UniVerse license
Administer locks
Monitor locks
Clear file locks
Clear record locks
Clear group locks
2-4
C:\Users\awaite\Documents\U2Doc\UniVerse\11.2\Source\Adminunix\Ch2.fm3/17/14
Administer network services
Administer telnet services
Administer other services
Monitor UniVerse processes
Monitor performance
Administer Replication
Restore files from backup
Manage shared programs
Define programs to load into shared memory
Modify programs in shared memory
Load program into catalog shared memory
Remove catalog shared memory segment
Configure SSL
Administer Transaction Logging
Execute UniVerse commands
Administer UniVerse users
View user and background processes
Terminate a UniVerse user process
Send a message to a UniVerse user
2-5 Administering UniVerse on UNIX Platforms

C:\UsMarch
2Administering UniData on Windows NT or Windows 20000
3 Chapter
ers\aw 17, 201
Beta Beta Beta Beta Beta Beta Beta Beta Beta Beta Beta Beta Beta Beta Beta Beta Beta Beta Beta Beta
Chapter 3: System startup and shutdown
Starting up and shutting down UniVerse on UNIX systems . . . 3-3 Configuring UniVerse parameters at initialization time . . . 3-3 Logging on . . . . . . . . . . . . . . . . . . . 3-4 Initializing the UniVerse shell . . . . . . . . . . . . 3-4Overview of UNIX startup and shutdown . . . . . . . . . 3-5 UNIX startup . . . . . . . . . . . . . . . . . . 3-5 UNIX shutdown . . . . . . . . . . . . . . . . . 3-6
aite\Documents\U2Doc\UniVerse\11.2\Source\Adminunix\Ch3TOC.fm4 2:12 pm Administering UniData on Windows NT or Windows 2000
C:\Users\awaite\Documents\U2Doc\UniVerse\11.2\Source\Adminunix\Ch3.fm3/17/14 System Administration
This chapter describes how to start up and shut down UniVerse.
The first part of the chapter describes how to start up and shut down UniVerse on a UNIX system.
The last part of the chapter gives an overview of what happens when a UNIX system is started up and shut down, so that you know what to do if you need to modify the standard procedure.
3-2 Administering UniVerse on UNIX Platforms
C:\Users\awaite\Documents\U2Doc\UniVerse\11.2\Source\Adminunix\Ch
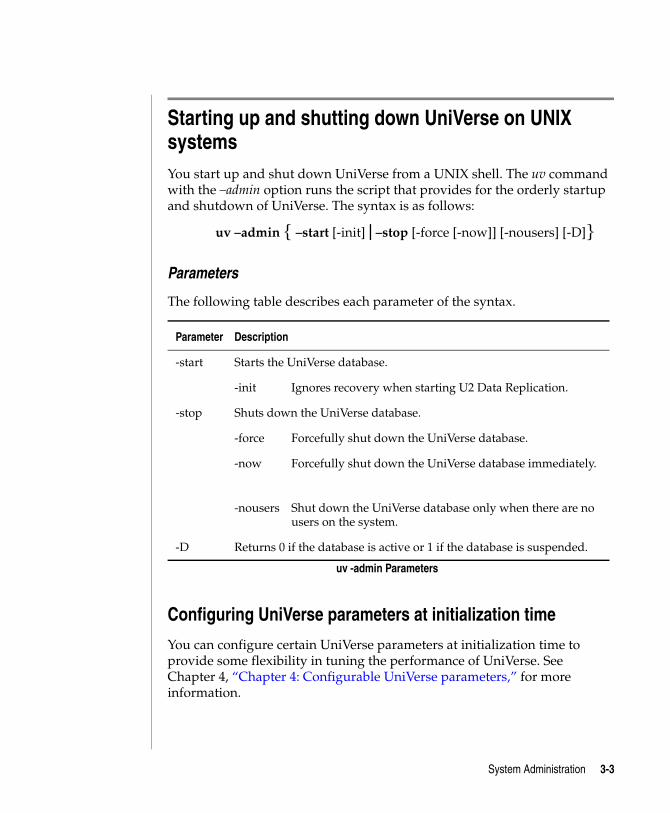
Starting up and shutting down UniVerse on UNIX systemsYou start up and shut down UniVerse from a UNIX shell. The uv command with the –admin option runs the script that provides for the orderly startup and shutdown of UniVerse. The syntax is as follows:
uv –admin { –start [-init] | –stop [-force [-now]] [-nousers] [-D]}
Parameters
The following table describes each parameter of the syntax.
Configuring UniVerse parameters at initialization time
You can configure certain UniVerse parameters at initialization time to provide some flexibility in tuning the performance of UniVerse. See Chapter 4, “Chapter 4: Configurable UniVerse parameters,” for more information.
Parameter Description
-start Starts the UniVerse database.
-init Ignores recovery when starting U2 Data Replication.
-stop Shuts down the UniVerse database.
-force Forcefully shut down the UniVerse database.
-now Forcefully shut down the UniVerse database immediately.
-nousers Shut down the UniVerse database only when there are no users on the system.
-D Returns 0 if the database is active or 1 if the database is suspended.
uv -admin Parameters
System Administration 3-3
C:\Users\awaite\Documents\U2Doc\UniVerse\11.2\Source\Adminunix\Ch3.fm3/17/14 System Administration
Logging on
Once you log on using a particular name, certain account parameters are automatically set for you. These parameters include a home directory (the starting point of your personal file hierarchy), the type of command interpreter that will be used to issue system commands (a UNIX shell or the UniVerse command processor), file protection, and so forth.
Initializing the UniVerse shell
If you specify the UniVerse command processor as the account’s command interpreter, UniVerse executes the UV.LOGIN entry in the VOC file of the UV account. You can set system-wide defaults by putting appropriate commands in the UV.LOGIN entry.
After executing UV.LOGIN, UniVerse executes the LOGIN entry in the VOC file of the user’s account. LOGIN can be a paragraph, sentence, proc, menu, or UniVerse BASIC program.
In a PICK, IN2, or REALITY flavor account, the UniVerse command processor first executes an entry with the account name. If none exists, it executes an entry with the login name. If none exists, it executes an entry named LOGIN.
3-4 Administering UniVerse on UNIX Platforms
C:\Users\awaite\Documents\U2Doc\UniVerse\11.2\Source\Adminunix\Ch
Overview of UNIX startup and shutdownWhen you start up a UNIX system, the file systems are automatically checked, a number of automatic processes (such as error logging, process accounting, and print spooling) are initiated, and all terminals are prepared for user logins. When you shut down the system, automatic processes must be terminated, and the file systems closed down gracefully so there is no disk activity when the power is turned off. Most of the system startup and shutdown processes are done automatically by a number of shell scripts and programs shipped with the system.
You must do the startup and shutdown procedures described in this chapter from a UNIX shell.
UNIX startup
Initializing UNIX: the /etc/init program
The init program runs a series of initialization scripts that check and mount the file systems, start various accounting processes and system daemons (automatic processes such as spoolers), and continuously spawn getty processes. One of the initialization scripts, /etc/rc, starts UniVerse.
The UniVerse startup script
The main script for the UNIX system initialization process is in the /etc/rc file. To see the processes invoked when the system is booted to multiuser mode, you can print this file. Among other things, /etc/rc calls other command files that vary from system to system.
The UniVerse installation procedure modifies the UNIX startup procedure to execute the commands in a file copied from /usr/uv/sample/uv.rc. You can see where this file is on your system by entering the following command from the UV account directory:
# cat .uvrcloc
System Administration 3-5
C:\Users\awaite\Documents\U2Doc\UniVerse\11.2\Source\Adminunix\Ch3.fm3/17/14 System Administration
The uv.rc file contains the script that provides for the orderly startup and shutdown of UniVerse when UNIX changes run levels. You can run this script from the UNIX prompt either to start up or to shut down UniVerse. The syntax is as follows:
uv.rc [ start | stop ]Use the uv.rc command with the start option to start up UniVerse. Use uv.rc with the stop option to shut down UniVerse. If you use uv.rc with no options, the startup procedure executes.
Note: You must be logged on as root to run the uv.rc script.
UNIX shutdown
Use the following three steps to shut down your system:
1. Run the UniVerse shutdown script.
2. Return the system to single-user mode from multiuser mode.
3. Shut down your system, or reboot it.
Running the UniVerse shutdown script
You must be in the root directory in order to shut down the system. If you are not in the root directory, enter the following command to change to the root directory:
# cd /
To shut down UniVerse from the root directory, use the uv.rc command with the stop option at the UNIX prompt:
# uv.rc stop
The UniVerse shutdown script does the following:
Shuts down the spooler
Shuts down all active UniVerse processes, freeing all resources allocated to them
3-6 Administering UniVerse on UNIX Platforms
C:\Users\awaite\Documents\U2Doc\UniVerse\11.2\Source\Adminunix\Ch
After this is done, the following message appears:
UV has been brought down.
You can now bring the UNIX system down to single-user mode from multiuser mode.
Returning to single-user mode
You execute the shutdown command to return the system to single-user mode. The shutdown command /etc/shutdown provides an automated shutdown procedure which notifies users that the system is about to be shut down after a specified interval. After the interval has elapsed, any users still on the system are automatically logged off, and the various system daemons are terminated. From the root directory enter the following command to bring the system to single-user mode:
# shutdown
Wait until shutdown notifies users and finishes running. When the shutdown is completed, the system is left in single-user mode. Depending on the reason for the shutdown, you may want to perform file system maintenance, reboot, or power down the system entirely.
Warning: You must run shutdown before turning off the power, or you risk corrupting the file system. If you are working in single-user mode and you want to turn off the power, first issue the sync command twice, as follows:
# sync; sync
See the UNIX Programmer’s Manual for a detailed description of the sync command.
Shutting down and rebooting a running system
Rebooting the system is not a cure-all. Nonetheless, there are many cases in which rebooting (that is, rerunning the initialization scripts that take the system from single-user to multiuser mode) can clear various error conditions.
To notify users that you intend to reboot the system, run the /etc/shutdown command as described in Returning to single-user mode. Wait until shutdown notifies users and finishes running, then perform the reboot as directed by the UNIX manuals for your system.
System Administration 3-7
C:\UsMarch
3Administering UniData on Windows NT or Windows 20000
4 Chapter
ers\aw 17, 201
Beta Beta Beta Beta Beta Beta Beta Beta Beta Beta Beta Beta Beta Beta Beta Beta Beta Beta Beta Beta
Chapter 4: Configurable UniVerse parameters
The uvconfig and .uvconfig files . . . . . . . . . . . . 4-2 The uvregen program . . . . . . . . . . . . . . . 4-2 Allocating shared memory . . . . . . . . . . . . . 4-2 Recovering .uvconfig . . . . . . . . . . . . . . . 4-3The configurable parameters . . . . . . . . . . . . . . 4-4Changing configurable parameter values . . . . . . . . . . 4-24 Using the U2 Extensible Administration tool to change parameter
values. . . . . . . . . . . . . . . . . . . . . 4-24Editing the uvconfig file . . . . . . . . . . . . . . . . 4-27The default uvconfig file . . . . . . . . . . . . . . . 4-28
aite\Documents\U2Doc\UniVerse\11.2\Source\Adminunix\Ch4TOC.fm4 2:12 pm Administering UniData on Windows NT or Windows 2000
C:\Users\awaite\Documents\U2Doc\UniVerse\11.2\Source\Adminunix\Ch
When UniVerse starts, configurable parameters are used to specify certain UniVerse settings and limits. This chapter describes these configurable parameters.
The uvconfig and .uvconfig files
The current settings for the configurable parameters are stored in the uvconfig file, located in the UV account directory. A command called uvregen uses the uvconfig file to create another file in the UV account directory named .uvconfig, which contains an encrypted version of the current configurable parameter settings. The .uvconfig file is used during the startup of UniVerse.
The uvregen program
When you run the uvregen program, it does the following:
Verifies that the values in the uvconfig file are reasonable
Creates a new .uvconfig file in the UV account directory
Resets the master key if you are using encryption
Some uvconfig values may be reasonable but invalid for the current kernel configuration. uvregen cannot detect such inconsistencies.
Allocating shared memory
When you start up UniVerse, the settings in the .uvconfig file are used to determine how much space to allocate for disk shared memory. Since changing the configurable parameters often changes the amount of shared memory you need, you should always restart UniVerse whenever you change any of the configurable parameters.
4-2
C:\Users\awaite\Documents\U2Doc\UniVerse\11.2\Source\Adminunix\Ch4.fm3/17/14
Recovering .uvconfig
If something happens to the .uvconfig file, there is a file named .uvconfig.bak in the UV account directory that is a backup copy of the .uvconfig file as shipped with the release. Copy it to .uvconfig to restore a usable UniVerse environment. To restore the uvconfig file, use the default values for the parameters.
4-3 Administering UniVerse on UNIX Platforms
C:\Users\awaite\Documents\U2Doc\UniVerse\11.2\Source\Adminunix\Ch
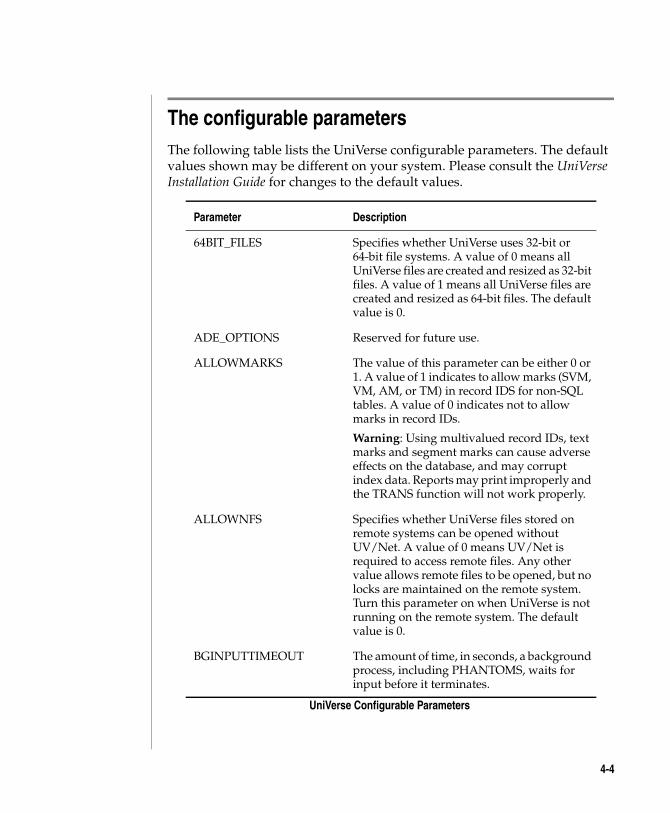
The configurable parametersThe following table lists the UniVerse configurable parameters. The default values shown may be different on your system. Please consult the UniVerse Installation Guide for changes to the default values.
Parameter Description
64BIT_FILES Specifies whether UniVerse uses 32-bit or 64-bit file systems. A value of 0 means all UniVerse files are created and resized as 32-bit files. A value of 1 means all UniVerse files are created and resized as 64-bit files. The default value is 0.
ADE_OPTIONS Reserved for future use.
ALLOWMARKS The value of this parameter can be either 0 or 1. A value of 1 indicates to allow marks (SVM, VM, AM, or TM) in record IDS for non-SQL tables. A value of 0 indicates not to allow marks in record IDs.
Warning: Using multivalued record IDs, text marks and segment marks can cause adverse effects on the database, and may corrupt index data. Reports may print improperly and the TRANS function will not work properly.
ALLOWNFS Specifies whether UniVerse files stored on remote systems can be opened without UV/Net. A value of 0 means UV/Net is required to access remote files. Any other value allows remote files to be opened, but no locks are maintained on the remote system. Turn this parameter on when UniVerse is not running on the remote system. The default value is 0.
BGINPUTTIMEOUT The amount of time, in seconds, a background process, including PHANTOMS, waits for input before it terminates.
UniVerse Configurable Parameters
4-4

C:\Users\awaite\Documents\U2Doc\UniVerse\11.2\Source\Adminunix\Ch4.fm3/17/14
BLKMAX Sets the maximum block size for UVBACKUP and UVRESTORE. It must be greater than, and a multiple of, 512.
CENTURYPIVOT Sets the century pivot year, which determines how 1 and 2 digit years are interpreted by the ICONV function. A value of 1930 means that 30 through 99 are interpreted as the 1900s, and 00 through 29 are interpreted as 2000 - 2029. If the century pivot value is two digits, the century pivot year is based on the current year, as follows: a value of 30 means the century pivot year is 1930 in 2000, 1931 in 2001, 1932 in 2002, and so forth. The default value is 1930.
CONVERT_EURO If this value is set to 0 (the default), UniVerse does not do any Euro conversion. If this value is set to 1, UniVerse performs Euro conversion.
CPLOGRLS The amount of time, in seconds, UniVerse waits before releasing a log file. If this value is 0 (the default), the uvchkd process calls the fsync function for all data files that have updates in the current log file. If this value is greater than 0, uvchkd does not call the fsync function and waits to release the log file for the number of seconds you specify.
CSHDISPATCH Defines the full path name for the csh shell command. On UNIX systems the default is /usr/bin/csh. On Windows systems the default is NOT_SUPPORTED.
DOSDISPATCH Defines the full path for the DOS shell command. On UNIX systems the default is NOT_SUPPORTED. On Windows systems the default is CMD.EXE.
Parameter Description
UniVerse Configurable Parameters (Continued)
4-5 Administering UniVerse on UNIX Platforms
C:\Users\awaite\Documents\U2Doc\UniVerse\11.2\Source\Adminunix\Ch
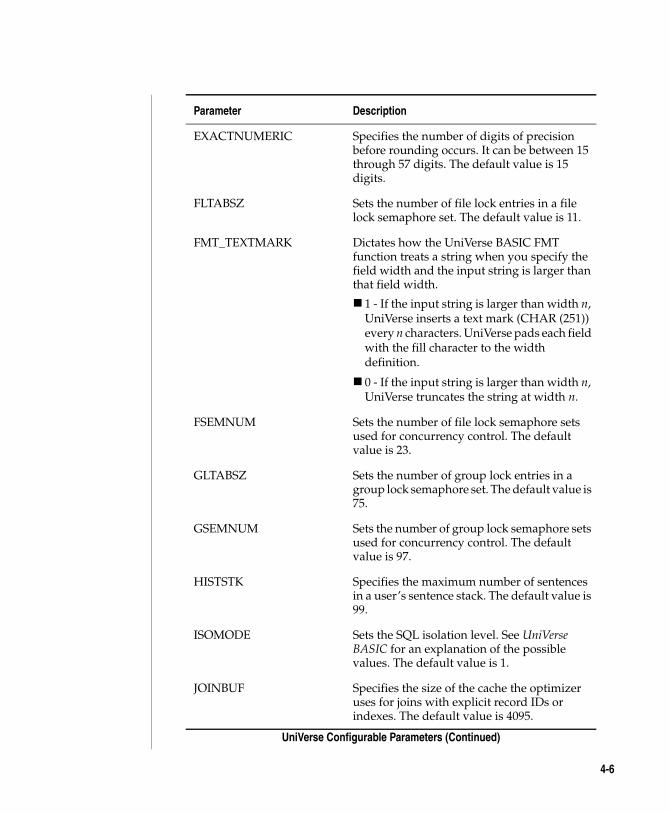
EXACTNUMERIC Specifies the number of digits of precision before rounding occurs. It can be between 15 through 57 digits. The default value is 15 digits.
FLTABSZ Sets the number of file lock entries in a file lock semaphore set. The default value is 11.
FMT_TEXTMARK Dictates how the UniVerse BASIC FMT function treats a string when you specify the field width and the input string is larger than that field width.
1 - If the input string is larger than width n, UniVerse inserts a text mark (CHAR (251)) every n characters. UniVerse pads each field with the fill character to the width definition.
0 - If the input string is larger than width n, UniVerse truncates the string at width n.
FSEMNUM Sets the number of file lock semaphore sets used for concurrency control. The default value is 23.
GLTABSZ Sets the number of group lock entries in a group lock semaphore set. The default value is 75.
GSEMNUM Sets the number of group lock semaphore sets used for concurrency control. The default value is 97.
HISTSTK Specifies the maximum number of sentences in a user’s sentence stack. The default value is 99.
ISOMODE Sets the SQL isolation level. See UniVerse BASIC for an explanation of the possible values. The default value is 1.
JOINBUF Specifies the size of the cache the optimizer uses for joins with explicit record IDs or indexes. The default value is 4095.
Parameter Description
UniVerse Configurable Parameters (Continued)
4-6
C:\Users\awaite\Documents\U2Doc\UniVerse\11.2\Source\Adminunix\Ch4.fm3/17/14
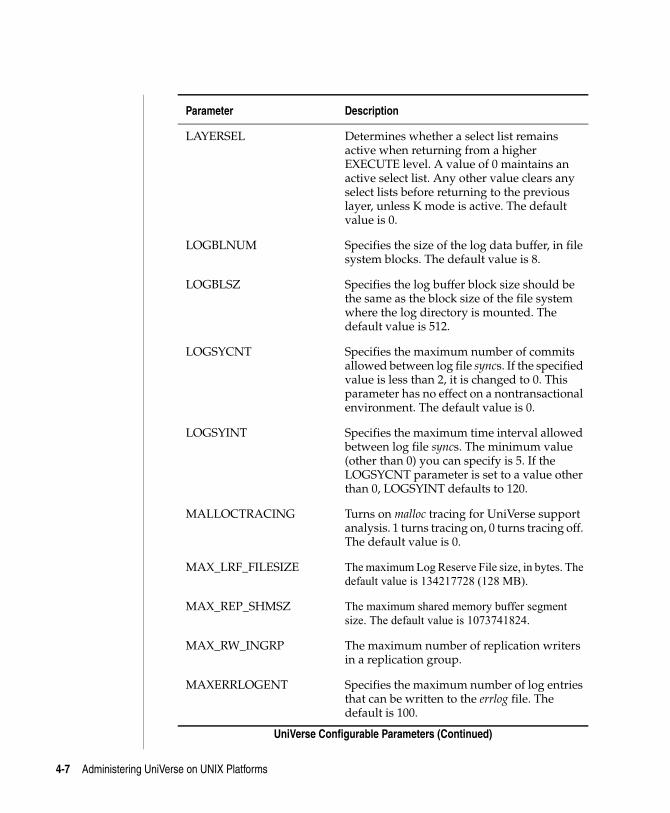
LAYERSEL Determines whether a select list remains active when returning from a higher EXECUTE level. A value of 0 maintains an active select list. Any other value clears any select lists before returning to the previous layer, unless K mode is active. The default value is 0.
LOGBLNUM Specifies the size of the log data buffer, in file system blocks. The default value is 8.
LOGBLSZ Specifies the log buffer block size should be the same as the block size of the file system where the log directory is mounted. The default value is 512.
LOGSYCNT Specifies the maximum number of commits allowed between log file syncs. If the specified value is less than 2, it is changed to 0. This parameter has no effect on a nontransactional environment. The default value is 0.
LOGSYINT Specifies the maximum time interval allowed between log file syncs. The minimum value (other than 0) you can specify is 5. If the LOGSYCNT parameter is set to a value other than 0, LOGSYINT defaults to 120.
MALLOCTRACING Turns on malloc tracing for UniVerse support analysis. 1 turns tracing on, 0 turns tracing off. The default value is 0.
MAX_LRF_FILESIZE The maximum Log Reserve File size, in bytes. The default value is 134217728 (128 MB).
MAX_REP_SHMSZ The maximum shared memory buffer segment size. The default value is 1073741824.
MAX_RW_INGRP The maximum number of replication writers in a replication group.
MAXERRLOGENT Specifies the maximum number of log entries that can be written to the errlog file. The default is 100.
Parameter Description
UniVerse Configurable Parameters (Continued)
4-7 Administering UniVerse on UNIX Platforms
C:\Users\awaite\Documents\U2Doc\UniVerse\11.2\Source\Adminunix\Ch
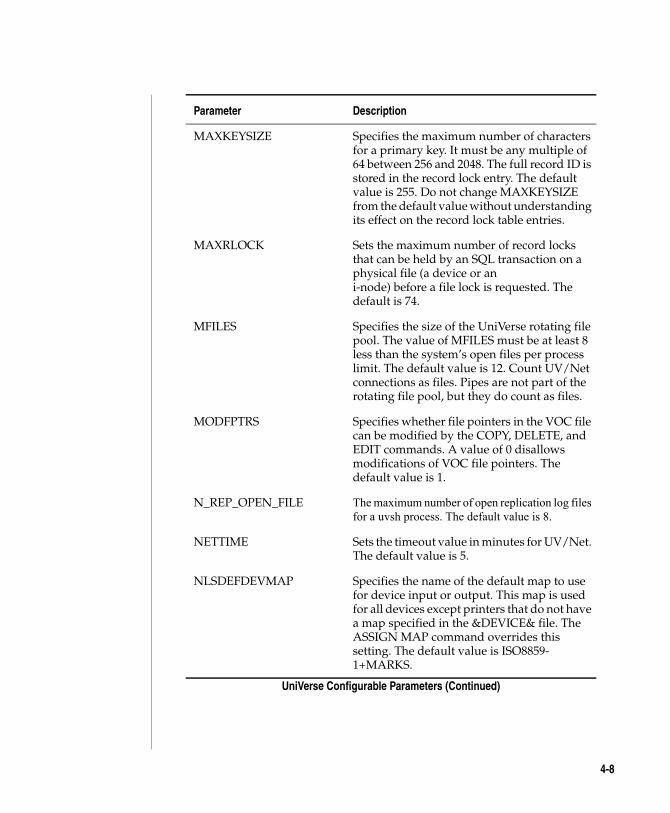
MAXKEYSIZE Specifies the maximum number of characters for a primary key. It must be any multiple of 64 between 256 and 2048. The full record ID is stored in the record lock entry. The default value is 255. Do not change MAXKEYSIZE from the default value without understanding its effect on the record lock table entries.
MAXRLOCK Sets the maximum number of record locks that can be held by an SQL transaction on a physical file (a device or an i-node) before a file lock is requested. The default is 74.
MFILES Specifies the size of the UniVerse rotating file pool. The value of MFILES must be at least 8 less than the system’s open files per process limit. The default value is 12. Count UV/Net connections as files. Pipes are not part of the rotating file pool, but they do count as files.
MODFPTRS Specifies whether file pointers in the VOC file can be modified by the COPY, DELETE, and EDIT commands. A value of 0 disallows modifications of VOC file pointers. The default value is 1.
N_REP_OPEN_FILE The maximum number of open replication log files for a uvsh process. The default value is 8.
NETTIME Sets the timeout value in minutes for UV/Net. The default value is 5.
NLSDEFDEVMAP Specifies the name of the default map to use for device input or output. This map is used for all devices except printers that do not have a map specified in the &DEVICE& file. The ASSIGN MAP command overrides this setting. The default value is ISO8859-1+MARKS.
Parameter Description
UniVerse Configurable Parameters (Continued)
4-8
C:\Users\awaite\Documents\U2Doc\UniVerse\11.2\Source\Adminunix\Ch4.fm3/17/14
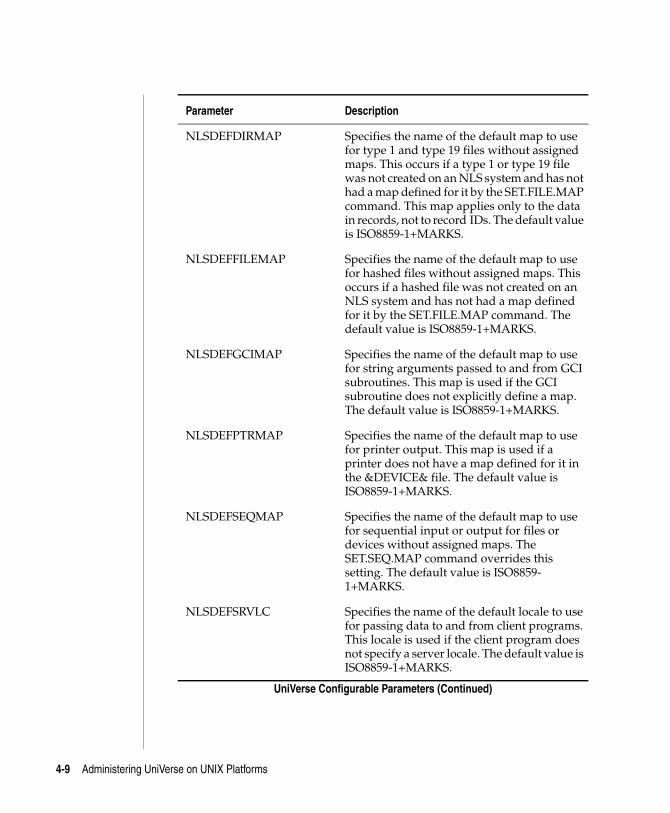
NLSDEFDIRMAP Specifies the name of the default map to use for type 1 and type 19 files without assigned maps. This occurs if a type 1 or type 19 file was not created on an NLS system and has not had a map defined for it by the SET.FILE.MAP command. This map applies only to the data in records, not to record IDs. The default value is ISO8859-1+MARKS.
NLSDEFFILEMAP Specifies the name of the default map to use for hashed files without assigned maps. This occurs if a hashed file was not created on an NLS system and has not had a map defined for it by the SET.FILE.MAP command. The default value is ISO8859-1+MARKS.
NLSDEFGCIMAP Specifies the name of the default map to use for string arguments passed to and from GCI subroutines. This map is used if the GCI subroutine does not explicitly define a map. The default value is ISO8859-1+MARKS.
NLSDEFPTRMAP Specifies the name of the default map to use for printer output. This map is used if a printer does not have a map defined for it in the &DEVICE& file. The default value is ISO8859-1+MARKS.
NLSDEFSEQMAP Specifies the name of the default map to use for sequential input or output for files or devices without assigned maps. The SET.SEQ.MAP command overrides this setting. The default value is ISO8859-1+MARKS.
NLSDEFSRVLC Specifies the name of the default locale to use for passing data to and from client programs. This locale is used if the client program does not specify a server locale. The default value is ISO8859-1+MARKS.
Parameter Description
UniVerse Configurable Parameters (Continued)
4-9 Administering UniVerse on UNIX Platforms
C:\Users\awaite\Documents\U2Doc\UniVerse\11.2\Source\Adminunix\Ch
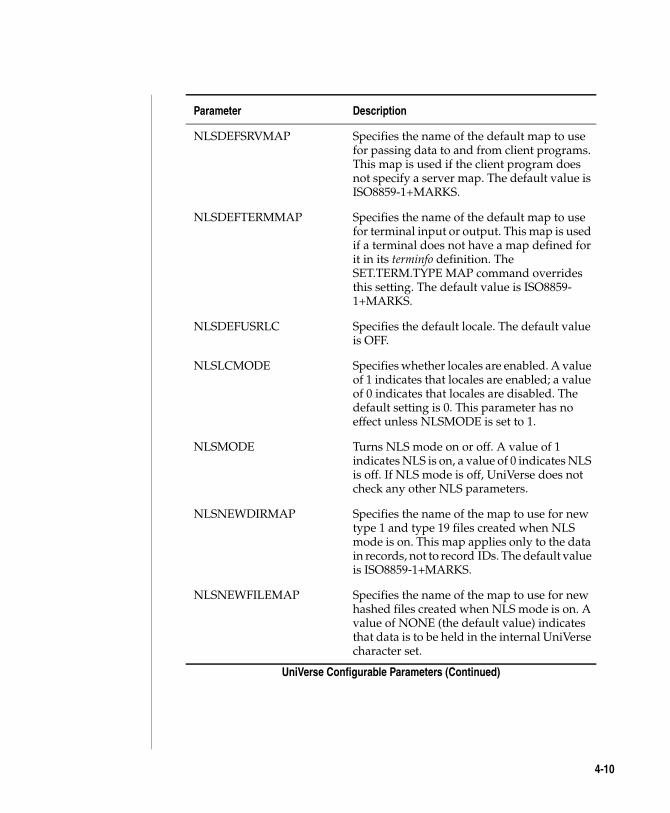
NLSDEFSRVMAP Specifies the name of the default map to use for passing data to and from client programs. This map is used if the client program does not specify a server map. The default value is ISO8859-1+MARKS.
NLSDEFTERMMAP Specifies the name of the default map to use for terminal input or output. This map is used if a terminal does not have a map defined for it in its terminfo definition. The SET.TERM.TYPE MAP command overrides this setting. The default value is ISO8859-1+MARKS.
NLSDEFUSRLC Specifies the default locale. The default value is OFF.
NLSLCMODE Specifies whether locales are enabled. A value of 1 indicates that locales are enabled; a value of 0 indicates that locales are disabled. The default setting is 0. This parameter has no effect unless NLSMODE is set to 1.
NLSMODE Turns NLS mode on or off. A value of 1 indicates NLS is on, a value of 0 indicates NLS is off. If NLS mode is off, UniVerse does not check any other NLS parameters.
NLSNEWDIRMAP Specifies the name of the map to use for new type 1 and type 19 files created when NLS mode is on. This map applies only to the data in records, not to record IDs. The default value is ISO8859-1+MARKS.
NLSNEWFILEMAP Specifies the name of the map to use for new hashed files created when NLS mode is on. A value of NONE (the default value) indicates that data is to be held in the internal UniVerse character set.
Parameter Description
UniVerse Configurable Parameters (Continued)
4-10
C:\Users\awaite\Documents\U2Doc\UniVerse\11.2\Source\Adminunix\Ch4.fm3/17/14
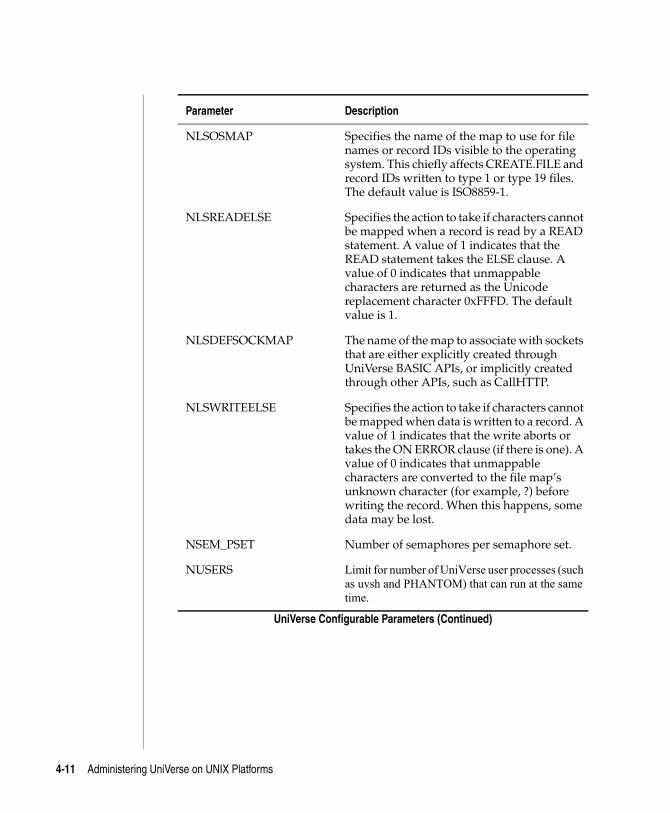
NLSOSMAP Specifies the name of the map to use for file names or record IDs visible to the operating system. This chiefly affects CREATE.FILE and record IDs written to type 1 or type 19 files. The default value is ISO8859-1.
NLSREADELSE Specifies the action to take if characters cannot be mapped when a record is read by a READ statement. A value of 1 indicates that the READ statement takes the ELSE clause. A value of 0 indicates that unmappable characters are returned as the Unicode replacement character 0xFFFD. The default value is 1.
NLSDEFSOCKMAP The name of the map to associate with sockets that are either explicitly created through UniVerse BASIC APIs, or implicitly created through other APIs, such as CallHTTP.
NLSWRITEELSE Specifies the action to take if characters cannot be mapped when data is written to a record. A value of 1 indicates that the write aborts or takes the ON ERROR clause (if there is one). A value of 0 indicates that unmappable characters are converted to the file map’s unknown character (for example, ?) before writing the record. When this happens, some data may be lost.
NSEM_PSET Number of semaphores per semaphore set.
NUSERS Limit for number of UniVerse user processes (such as uvsh and PHANTOM) that can run at the same time.
Parameter Description
UniVerse Configurable Parameters (Continued)
4-11 Administering UniVerse on UNIX Platforms
C:\Users\awaite\Documents\U2Doc\UniVerse\11.2\Source\Adminunix\Ch
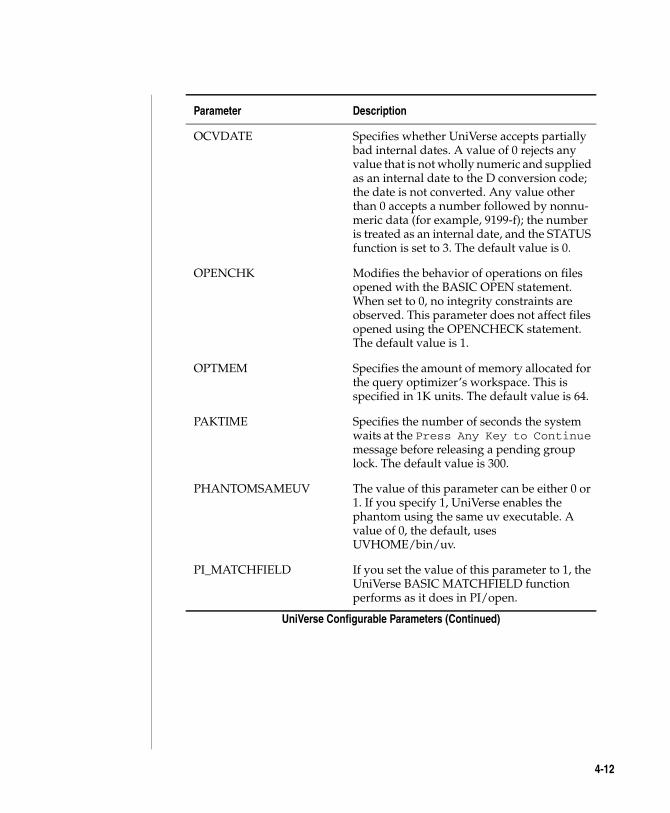
OCVDATE Specifies whether UniVerse accepts partially bad internal dates. A value of 0 rejects any value that is not wholly numeric and supplied as an internal date to the D conversion code; the date is not converted. Any value other than 0 accepts a number followed by nonnu-meric data (for example, 9199-f); the number is treated as an internal date, and the STATUS function is set to 3. The default value is 0.
OPENCHK Modifies the behavior of operations on files opened with the BASIC OPEN statement. When set to 0, no integrity constraints are observed. This parameter does not affect files opened using the OPENCHECK statement. The default value is 1.
OPTMEM Specifies the amount of memory allocated for the query optimizer’s workspace. This is specified in 1K units. The default value is 64.
PAKTIME Specifies the number of seconds the system waits at the Press Any Key to Continue message before releasing a pending group lock. The default value is 300.
PHANTOMSAMEUV The value of this parameter can be either 0 or 1. If you specify 1, UniVerse enables the phantom using the same uv executable. A value of 0, the default, uses UVHOME/bin/uv.
PI_MATCHFIELD If you set the value of this parameter to 1, the UniVerse BASIC MATCHFIELD function performs as it does in PI/open.
Parameter Description
UniVerse Configurable Parameters (Continued)
4-12

C:\Users\awaite\Documents\U2Doc\UniVerse\11.2\Source\Adminunix\Ch4.fm3/17/14
PI_SOUNDEX If you set the value of this parameter to 1, two consecutive letters from the same group return a single digit in the result. Additionally,. UniVerse retains letters from the same group which are separated by vowels in the input string, and each will return the associated group digit in the result. This behavior is consistent with PI/open.
PICK_MT The value of this parameter can be either 0 or 1. 1 indicates the MT conversion works the same as the Pick flavor in INFORMATION. A value of 0 indicates UniVerse MT conversion handling.
PICKDATE The value of this parameter can be either 0 or 1. A value of 1 indicates that UniVerse will accept Pick-style dates, and handle data in the same way as Pick. A value of 0 indicates the default UniVerse date format of yyyymmdd.
PICKNULL Sets the masked decimal conversion for empty data. A value of 1 turns on Pick-style conversions, where empty data is converted to an empty string. A value of 0 indicates UniVerse-style conversions, where empty data is converted to 0.00.
PIOPENDEFAULT Sets the INFO.CONVERT and PIOPEN.EXECUTE options of the BASIC $OPTIONS statement as defaults in PIOPEN flavor accounts.
If PIOPENDEFAULT is set to 1, UniVerse maintains the current printer location when switching between print modes 1 and 3 with the !SETPU subroutine call.
Parameter Description
UniVerse Configurable Parameters (Continued)
4-13 Administering UniVerse on UNIX Platforms
C:\Users\awaite\Documents\U2Doc\UniVerse\11.2\Source\Adminunix\Ch
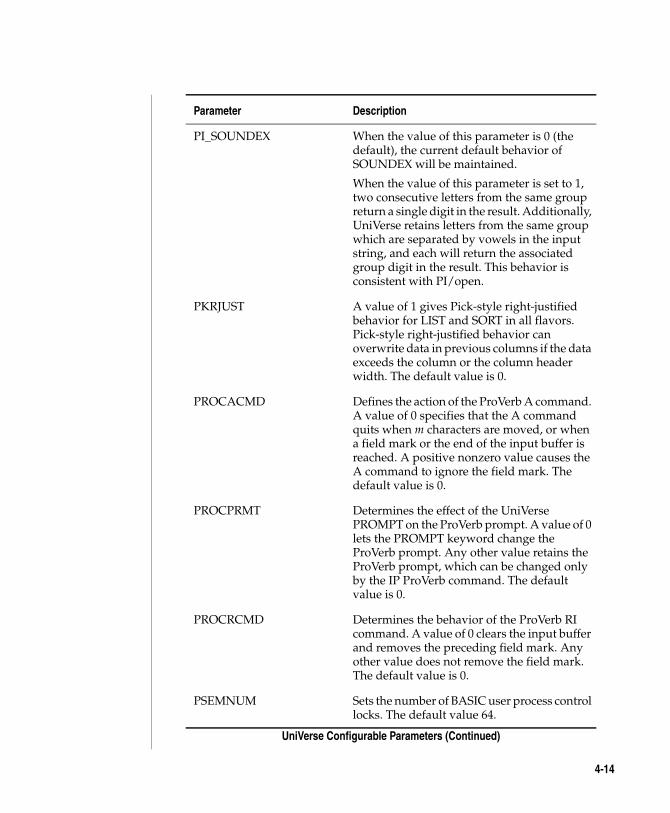
PI_SOUNDEX When the value of this parameter is 0 (the default), the current default behavior of SOUNDEX will be maintained.
When the value of this parameter is set to 1, two consecutive letters from the same group return a single digit in the result. Additionally, UniVerse retains letters from the same group which are separated by vowels in the input string, and each will return the associated group digit in the result. This behavior is consistent with PI/open.
PKRJUST A value of 1 gives Pick-style right-justified behavior for LIST and SORT in all flavors. Pick-style right-justified behavior can overwrite data in previous columns if the data exceeds the column or the column header width. The default value is 0.
PROCACMD Defines the action of the ProVerb A command. A value of 0 specifies that the A command quits when m characters are moved, or when a field mark or the end of the input buffer is reached. A positive nonzero value causes the A command to ignore the field mark. The default value is 0.
PROCPRMT Determines the effect of the UniVerse PROMPT on the ProVerb prompt. A value of 0 lets the PROMPT keyword change the ProVerb prompt. Any other value retains the ProVerb prompt, which can be changed only by the IP ProVerb command. The default value is 0.
PROCRCMD Determines the behavior of the ProVerb RI command. A value of 0 clears the input buffer and removes the preceding field mark. Any other value does not remove the field mark. The default value is 0.
PSEMNUM Sets the number of BASIC user process control locks. The default value 64.
Parameter Description
UniVerse Configurable Parameters (Continued)
4-14
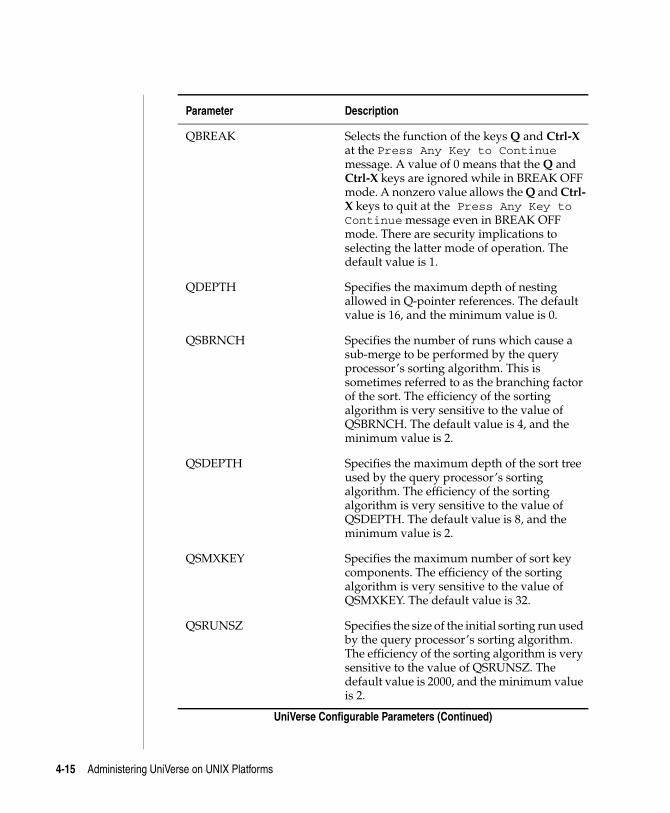
C:\Users\awaite\Documents\U2Doc\UniVerse\11.2\Source\Adminunix\Ch4.fm3/17/14
QBREAK Selects the function of the keys Q and Ctrl-X at the Press Any Key to Continue message. A value of 0 means that the Q and Ctrl-X keys are ignored while in BREAK OFF mode. A nonzero value allows the Q and Ctrl-X keys to quit at the Press Any Key to Continue message even in BREAK OFF mode. There are security implications to selecting the latter mode of operation. The default value is 1.
QDEPTH Specifies the maximum depth of nesting allowed in Q-pointer references. The default value is 16, and the minimum value is 0.
QSBRNCH Specifies the number of runs which cause a sub-merge to be performed by the query processor’s sorting algorithm. This is sometimes referred to as the branching factor of the sort. The efficiency of the sorting algorithm is very sensitive to the value of QSBRNCH. The default value is 4, and the minimum value is 2.
QSDEPTH Specifies the maximum depth of the sort tree used by the query processor’s sorting algorithm. The efficiency of the sorting algorithm is very sensitive to the value of QSDEPTH. The default value is 8, and the minimum value is 2.
QSMXKEY Specifies the maximum number of sort key components. The efficiency of the sorting algorithm is very sensitive to the value of QSMXKEY. The default value is 32.
QSRUNSZ Specifies the size of the initial sorting run used by the query processor’s sorting algorithm. The efficiency of the sorting algorithm is very sensitive to the value of QSRUNSZ. The default value is 2000, and the minimum value is 2.
Parameter Description
UniVerse Configurable Parameters (Continued)
4-15 Administering UniVerse on UNIX Platforms
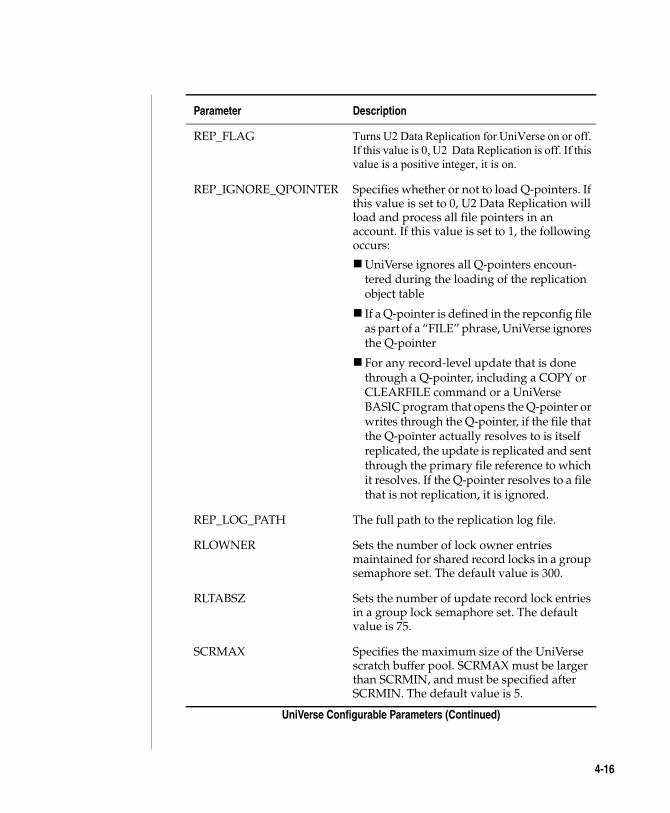
C:\Users\awaite\Documents\U2Doc\UniVerse\11.2\Source\Adminunix\Ch
REP_FLAG Turns U2 Data Replication for UniVerse on or off. If this value is 0, U2 Data Replication is off. If this value is a positive integer, it is on.
REP_IGNORE_QPOINTER Specifies whether or not to load Q-pointers. If this value is set to 0, U2 Data Replication will load and process all file pointers in an account. If this value is set to 1, the following occurs:
UniVerse ignores all Q-pointers encoun-tered during the loading of the replication object table
If a Q-pointer is defined in the repconfig file as part of a “FILE” phrase, UniVerse ignores the Q-pointer
For any record-level update that is done through a Q-pointer, including a COPY or CLEARFILE command or a UniVerse BASIC program that opens the Q-pointer or writes through the Q-pointer, if the file that the Q-pointer actually resolves to is itself replicated, the update is replicated and sent through the primary file reference to which it resolves. If the Q-pointer resolves to a file that is not replication, it is ignored.
REP_LOG_PATH The full path to the replication log file.
RLOWNER Sets the number of lock owner entries maintained for shared record locks in a group semaphore set. The default value is 300.
RLTABSZ Sets the number of update record lock entries in a group lock semaphore set. The default value is 75.
SCRMAX Specifies the maximum size of the UniVerse scratch buffer pool. SCRMAX must be larger than SCRMIN, and must be specified after SCRMIN. The default value is 5.
Parameter Description
UniVerse Configurable Parameters (Continued)
4-16
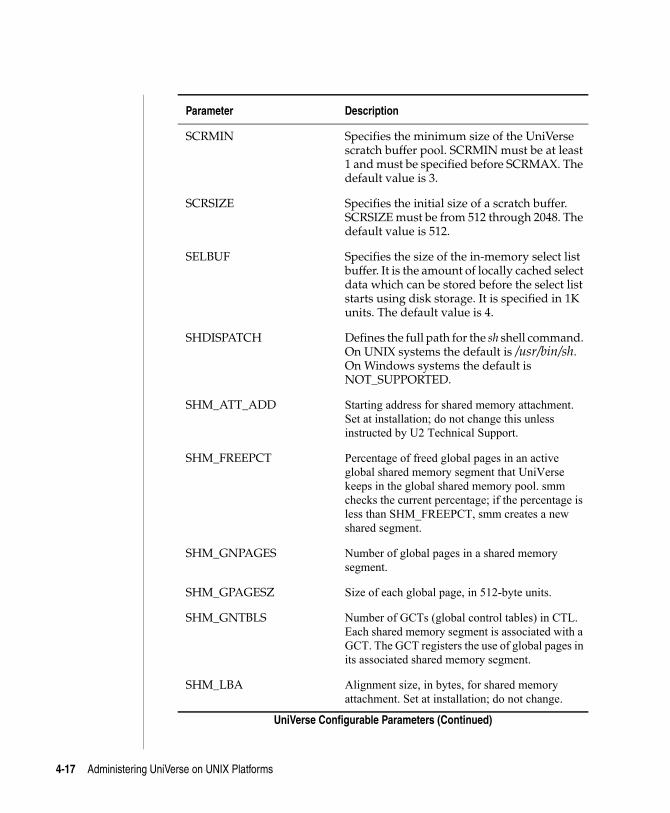
C:\Users\awaite\Documents\U2Doc\UniVerse\11.2\Source\Adminunix\Ch4.fm3/17/14
SCRMIN Specifies the minimum size of the UniVerse scratch buffer pool. SCRMIN must be at least 1 and must be specified before SCRMAX. The default value is 3.
SCRSIZE Specifies the initial size of a scratch buffer. SCRSIZE must be from 512 through 2048. The default value is 512.
SELBUF Specifies the size of the in-memory select list buffer. It is the amount of locally cached select data which can be stored before the select list starts using disk storage. It is specified in 1K units. The default value is 4.
SHDISPATCH Defines the full path for the sh shell command. On UNIX systems the default is /usr/bin/sh. On Windows systems the default is NOT_SUPPORTED.
SHM_ATT_ADD Starting address for shared memory attachment. Set at installation; do not change this unless instructed by U2 Technical Support.
SHM_FREEPCT Percentage of freed global pages in an active global shared memory segment that UniVerse keeps in the global shared memory pool. smm checks the current percentage; if the percentage is less than SHM_FREEPCT, smm creates a new shared segment.
SHM_GNPAGES Number of global pages in a shared memory segment.
SHM_GPAGESZ Size of each global page, in 512-byte units.
SHM_GNTBLS Number of GCTs (global control tables) in CTL. Each shared memory segment is associated with a GCT. The GCT registers the use of global pages in its associated shared memory segment.
SHM_LBA Alignment size, in bytes, for shared memory attachment. Set at installation; do not change.
Parameter Description
UniVerse Configurable Parameters (Continued)
4-17 Administering UniVerse on UNIX Platforms
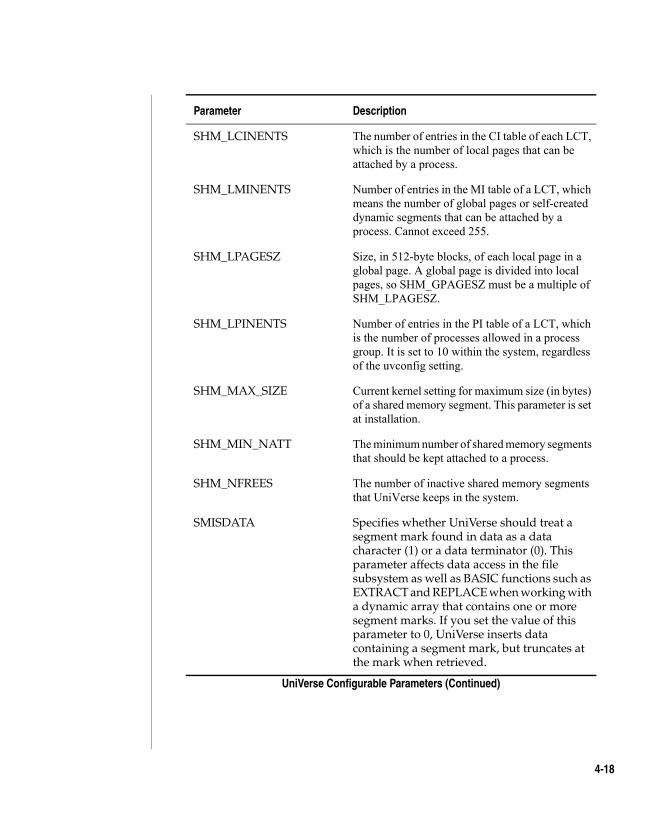
C:\Users\awaite\Documents\U2Doc\UniVerse\11.2\Source\Adminunix\Ch
SHM_LCINENTS The number of entries in the CI table of each LCT, which is the number of local pages that can be attached by a process.
SHM_LMINENTS Number of entries in the MI table of a LCT, which means the number of global pages or self-created dynamic segments that can be attached by a process. Cannot exceed 255.
SHM_LPAGESZ Size, in 512-byte blocks, of each local page in a global page. A global page is divided into local pages, so SHM_GPAGESZ must be a multiple of SHM_LPAGESZ.
SHM_LPINENTS Number of entries in the PI table of a LCT, which is the number of processes allowed in a process group. It is set to 10 within the system, regardless of the uvconfig setting.
SHM_MAX_SIZE Current kernel setting for maximum size (in bytes) of a shared memory segment. This parameter is set at installation.
SHM_MIN_NATT The minimum number of shared memory segments that should be kept attached to a process.
SHM_NFREES The number of inactive shared memory segments that UniVerse keeps in the system.
SMISDATA Specifies whether UniVerse should treat a segment mark found in data as a data character (1) or a data terminator (0). This parameter affects data access in the file subsystem as well as BASIC functions such as EXTRACT and REPLACE when working with a dynamic array that contains one or more segment marks. If you set the value of this parameter to 0, UniVerse inserts data containing a segment mark, but truncates at the mark when retrieved.
Parameter Description
UniVerse Configurable Parameters (Continued)
4-18
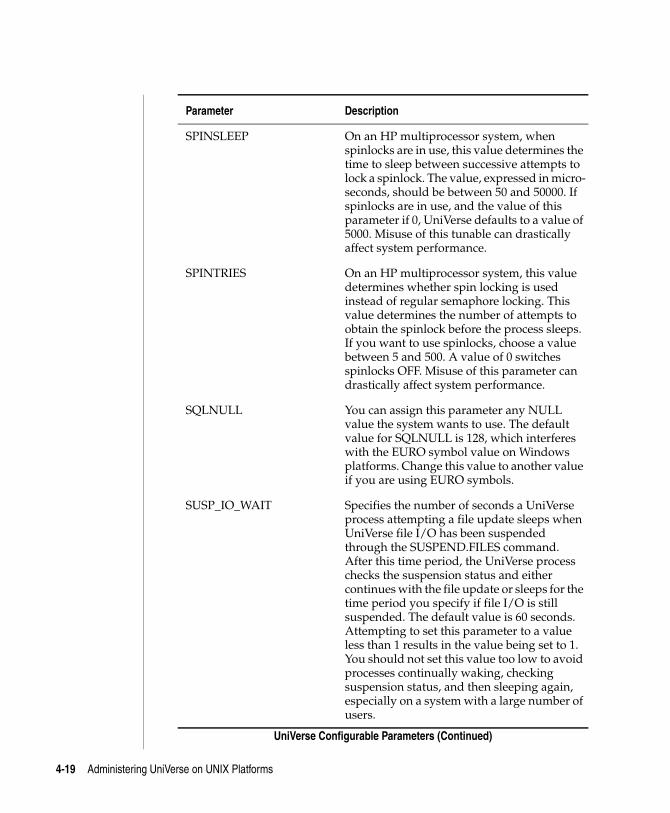
C:\Users\awaite\Documents\U2Doc\UniVerse\11.2\Source\Adminunix\Ch4.fm3/17/14
SPINSLEEP On an HP multiprocessor system, when spinlocks are in use, this value determines the time to sleep between successive attempts to lock a spinlock. The value, expressed in micro-seconds, should be between 50 and 50000. If spinlocks are in use, and the value of this parameter if 0, UniVerse defaults to a value of 5000. Misuse of this tunable can drastically affect system performance.
SPINTRIES On an HP multiprocessor system, this value determines whether spin locking is used instead of regular semaphore locking. This value determines the number of attempts to obtain the spinlock before the process sleeps. If you want to use spinlocks, choose a value between 5 and 500. A value of 0 switches spinlocks OFF. Misuse of this parameter can drastically affect system performance.
SQLNULL You can assign this parameter any NULL value the system wants to use. The default value for SQLNULL is 128, which interferes with the EURO symbol value on Windows platforms. Change this value to another value if you are using EURO symbols.
SUSP_IO_WAIT Specifies the number of seconds a UniVerse process attempting a file update sleeps when UniVerse file I/O has been suspended through the SUSPEND.FILES command. After this time period, the UniVerse process checks the suspension status and either continues with the file update or sleeps for the time period you specify if file I/O is still suspended. The default value is 60 seconds. Attempting to set this parameter to a value less than 1 results in the value being set to 1. You should not set this value too low to avoid processes continually waking, checking suspension status, and then sleeping again, especially on a system with a large number of users.
Parameter Description
UniVerse Configurable Parameters (Continued)
4-19 Administering UniVerse on UNIX Platforms
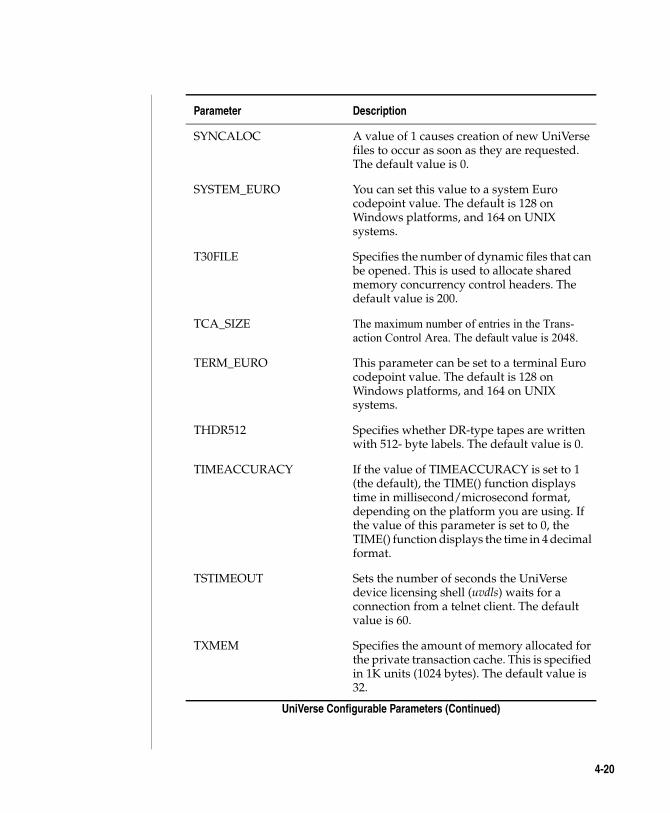
C:\Users\awaite\Documents\U2Doc\UniVerse\11.2\Source\Adminunix\Ch
SYNCALOC A value of 1 causes creation of new UniVerse files to occur as soon as they are requested. The default value is 0.
SYSTEM_EURO You can set this value to a system Euro codepoint value. The default is 128 on Windows platforms, and 164 on UNIX systems.
T30FILE Specifies the number of dynamic files that can be opened. This is used to allocate shared memory concurrency control headers. The default value is 200.
TCA_SIZE The maximum number of entries in the Trans-action Control Area. The default value is 2048.
TERM_EURO This parameter can be set to a terminal Euro codepoint value. The default is 128 on Windows platforms, and 164 on UNIX systems.
THDR512 Specifies whether DR-type tapes are written with 512- byte labels. The default value is 0.
TIMEACCURACY If the value of TIMEACCURACY is set to 1 (the default), the TIME() function displays time in millisecond/microsecond format, depending on the platform you are using. If the value of this parameter is set to 0, the TIME() function displays the time in 4 decimal format.
TSTIMEOUT Sets the number of seconds the UniVerse device licensing shell (uvdls) waits for a connection from a telnet client. The default value is 60.
TXMEM Specifies the amount of memory allocated for the private transaction cache. This is specified in 1K units (1024 bytes). The default value is 32.
Parameter Description
UniVerse Configurable Parameters (Continued)
4-20
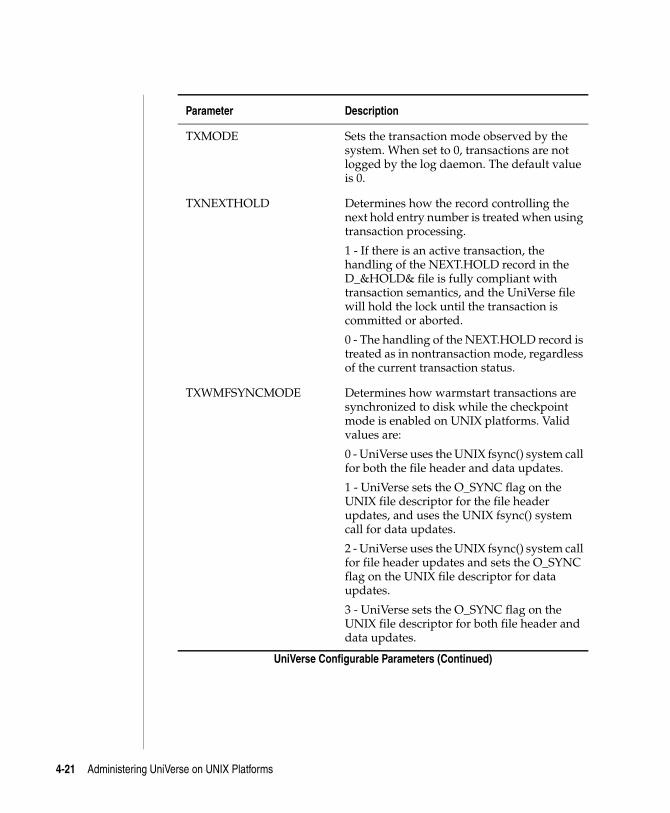
C:\Users\awaite\Documents\U2Doc\UniVerse\11.2\Source\Adminunix\Ch4.fm3/17/14
TXMODE Sets the transaction mode observed by the system. When set to 0, transactions are not logged by the log daemon. The default value is 0.
TXNEXTHOLD Determines how the record controlling the next hold entry number is treated when using transaction processing.
1 - If there is an active transaction, the handling of the NEXT.HOLD record in the D_&HOLD& file is fully compliant with transaction semantics, and the UniVerse file will hold the lock until the transaction is committed or aborted.
0 - The handling of the NEXT.HOLD record is treated as in nontransaction mode, regardless of the current transaction status.
TXWMFSYNCMODE Determines how warmstart transactions are synchronized to disk while the checkpoint mode is enabled on UNIX platforms. Valid values are:
0 - UniVerse uses the UNIX fsync() system call for both the file header and data updates.
1 - UniVerse sets the O_SYNC flag on the UNIX file descriptor for the file header updates, and uses the UNIX fsync() system call for data updates.
2 - UniVerse uses the UNIX fsync() system call for file header updates and sets the O_SYNC flag on the UNIX file descriptor for data updates.
3 - UniVerse sets the O_SYNC flag on the UNIX file descriptor for both file header and data updates.
Parameter Description
UniVerse Configurable Parameters (Continued)
4-21 Administering UniVerse on UNIX Platforms
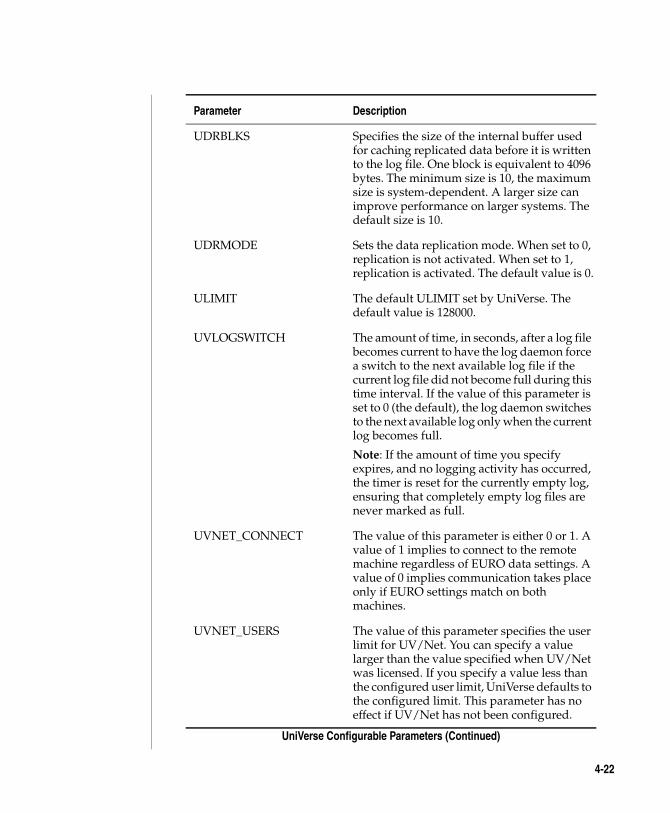
C:\Users\awaite\Documents\U2Doc\UniVerse\11.2\Source\Adminunix\Ch
UDRBLKS Specifies the size of the internal buffer used for caching replicated data before it is written to the log file. One block is equivalent to 4096 bytes. The minimum size is 10, the maximum size is system-dependent. A larger size can improve performance on larger systems. The default size is 10.
UDRMODE Sets the data replication mode. When set to 0, replication is not activated. When set to 1, replication is activated. The default value is 0.
ULIMIT The default ULIMIT set by UniVerse. The default value is 128000.
UVLOGSWITCH The amount of time, in seconds, after a log file becomes current to have the log daemon force a switch to the next available log file if the current log file did not become full during this time interval. If the value of this parameter is set to 0 (the default), the log daemon switches to the next available log only when the current log becomes full.
Note: If the amount of time you specify expires, and no logging activity has occurred, the timer is reset for the currently empty log, ensuring that completely empty log files are never marked as full.
UVNET_CONNECT The value of this parameter is either 0 or 1. A value of 1 implies to connect to the remote machine regardless of EURO data settings. A value of 0 implies communication takes place only if EURO settings match on both machines.
UVNET_USERS The value of this parameter specifies the user limit for UV/Net. You can specify a value larger than the value specified when UV/Net was licensed. If you specify a value less than the configured user limit, UniVerse defaults to the configured limit. This parameter has no effect if UV/Net has not been configured.
Parameter Description
UniVerse Configurable Parameters (Continued)
4-22
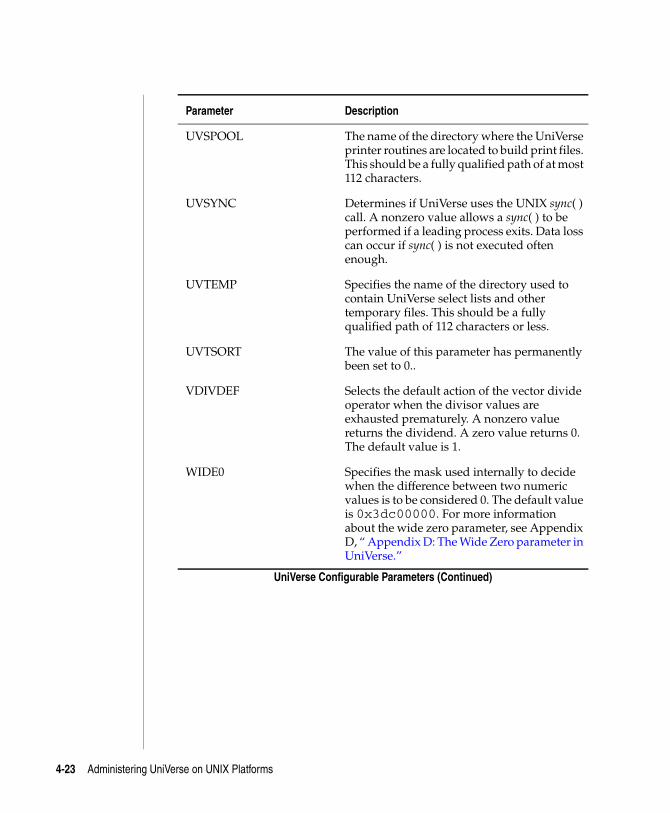
C:\Users\awaite\Documents\U2Doc\UniVerse\11.2\Source\Adminunix\Ch4.fm3/17/14
UVSPOOL The name of the directory where the UniVerse printer routines are located to build print files. This should be a fully qualified path of at most 112 characters.
UVSYNC Determines if UniVerse uses the UNIX sync( ) call. A nonzero value allows a sync( ) to be performed if a leading process exits. Data loss can occur if sync( ) is not executed often enough.
UVTEMP Specifies the name of the directory used to contain UniVerse select lists and other temporary files. This should be a fully qualified path of 112 characters or less.
UVTSORT The value of this parameter has permanently been set to 0..
VDIVDEF Selects the default action of the vector divide operator when the divisor values are exhausted prematurely. A nonzero value returns the dividend. A zero value returns 0. The default value is 1.
WIDE0 Specifies the mask used internally to decide when the difference between two numeric values is to be considered 0. The default value is 0x3dc00000. For more information about the wide zero parameter, see Appendix D, “ Appendix D: The Wide Zero parameter in UniVerse.”
Parameter Description
UniVerse Configurable Parameters (Continued)
4-23 Administering UniVerse on UNIX Platforms
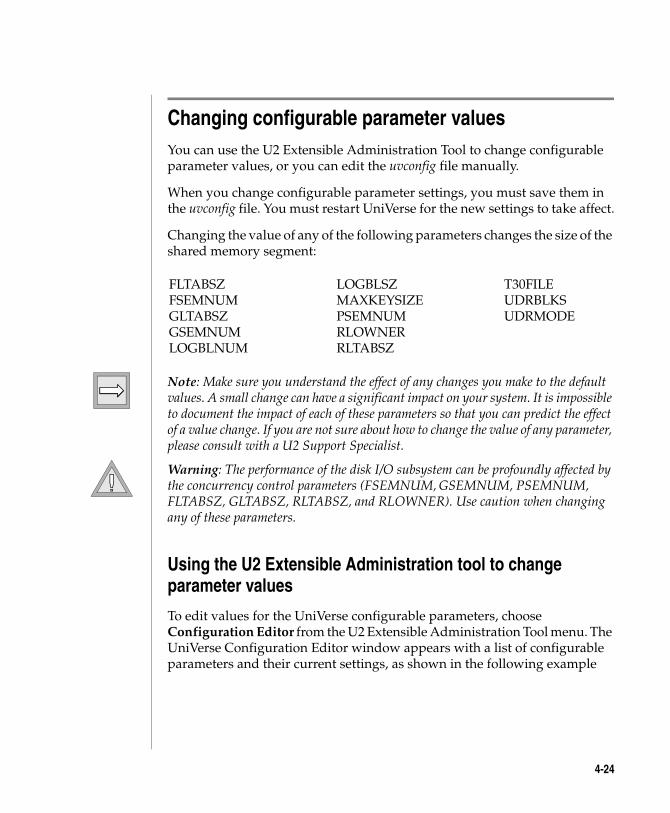
C:\Users\awaite\Documents\U2Doc\UniVerse\11.2\Source\Adminunix\Ch
Changing configurable parameter valuesYou can use the U2 Extensible Administration Tool to change configurable parameter values, or you can edit the uvconfig file manually.
When you change configurable parameter settings, you must save them in the uvconfig file. You must restart UniVerse for the new settings to take affect.
Changing the value of any of the following parameters changes the size of the shared memory segment:
Note: Make sure you understand the effect of any changes you make to the default values. A small change can have a significant impact on your system. It is impossible to document the impact of each of these parameters so that you can predict the effect of a value change. If you are not sure about how to change the value of any parameter, please consult with a U2 Support Specialist.
Warning: The performance of the disk I/O subsystem can be profoundly affected by the concurrency control parameters (FSEMNUM, GSEMNUM, PSEMNUM, FLTABSZ, GLTABSZ, RLTABSZ, and RLOWNER). Use caution when changing any of these parameters.
Using the U2 Extensible Administration tool to change parameter values
To edit values for the UniVerse configurable parameters, choose Configuration Editor from the U2 Extensible Administration Tool menu. The UniVerse Configuration Editor window appears with a list of configurable parameters and their current settings, as shown in the following example
FLTABSZFSEMNUMGLTABSZGSEMNUMLOGBLNUM
LOGBLSZMAXKEYSIZEPSEMNUMRLOWNERRLTABSZ
T30FILEUDRBLKSUDRMODE
4-24
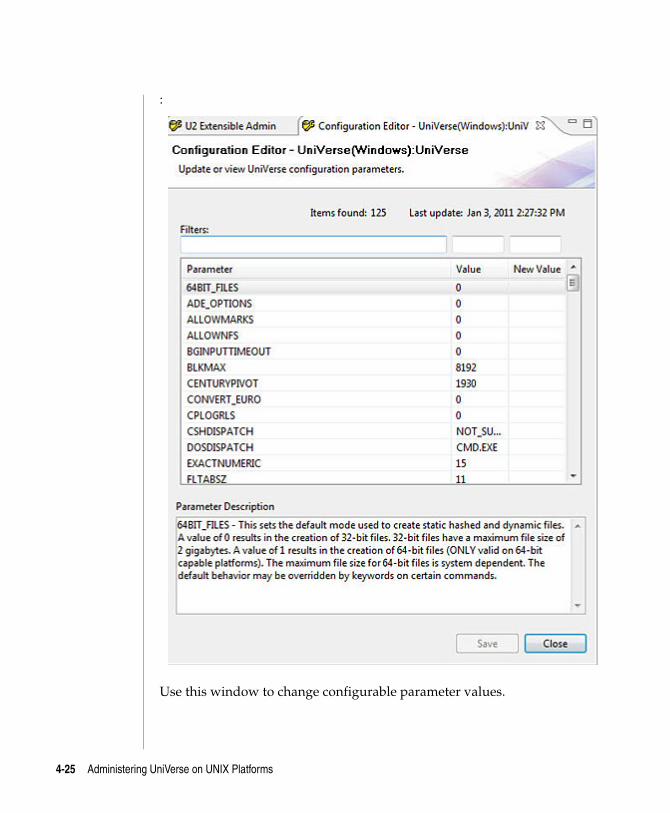
C:\Users\awaite\Documents\U2Doc\UniVerse\11.2\Source\Adminunix\Ch4.fm3/17/14
:
Use this window to change configurable parameter values.
4-25 Administering UniVerse on UNIX Platforms
C:\Users\awaite\Documents\U2Doc\UniVerse\11.2\Source\Adminunix\Ch
Changing a parameter
To change the value of a parameter:
1. Choose the parameter you want to edit from the list. A description of the parameter appears under Parameter Description, and the Parameter and Value fields are updated with the parameter name and value.
2. Enter a new value in the Value field. To return to the previously saved setting, choose the parameter from the list again.
3. Repeat steps 1 and step 2 to change other parameters before you finally save the new settings.
4. Click Save. A message box confirms that your changes have been saved and prompts you to run uvregen and restart UniVerse.
Click OK to acknowledge the message. Before restarting the UniVerse service, make sure all users have logged out of UniVerse.
4-26
C:\Users\awaite\Documents\U2Doc\UniVerse\11.2\Source\Adminunix\Ch4.fm3/17/14
Editing the uvconfig fileTo see a list of configurable parameter settings, use the CONFIG command at the UniVerse prompt with either the ALL or the DATA option.
To change the value of a configurable parameter, complete the following steps:
1. Make sure all users are logged out of UniVerse.
2. Stop all UniVerse processes.
3. Change the working directory to the UV account directory (make sure the UV account directory is in the current path).
4. Shut down UniVerse.
5. Edit the uvconfig file in the UV account directory.
6. Execute the UniVerse program uvregen.
7. Start up UniVerse:
4-27 Administering UniVerse on UNIX Platforms
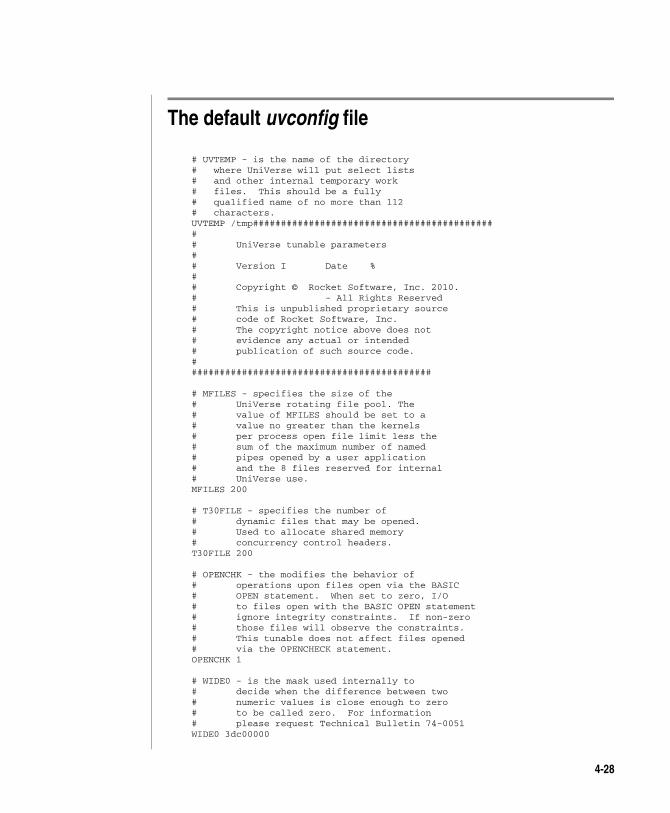
C:\Users\awaite\Documents\U2Doc\UniVerse\11.2\Source\Adminunix\Ch
The default uvconfig file
# UVTEMP - is the name of the directory# where UniVerse will put select lists# and other internal temporary work# files. This should be a fully# qualified name of no more than 112# characters.UVTEMP /tmp############################################# UniVerse tunable parameters## Version I Date %## Copyright © Rocket Software, Inc. 2010.# - All Rights Reserved# This is unpublished proprietary source# code of Rocket Software, Inc.# The copyright notice above does not# evidence any actual or intended# publication of such source code.############################################
# MFILES - specifies the size of the# UniVerse rotating file pool. The# value of MFILES should be set to a# value no greater than the kernels# per process open file limit less the# sum of the maximum number of named# pipes opened by a user application# and the 8 files reserved for internal# UniVerse use.MFILES 200
# T30FILE - specifies the number of# dynamic files that may be opened.# Used to allocate shared memory# concurrency control headers.T30FILE 200
# OPENCHK - the modifies the behavior of# operations upon files open via the BASIC# OPEN statement. When set to zero, I/O# to files open with the BASIC OPEN statement# ignore integrity constraints. If non-zero# those files will observe the constraints.# This tunable does not affect files opened# via the OPENCHECK statement.OPENCHK 1
# WIDE0 - is the mask used internally to# decide when the difference between two# numeric values is close enough to zero# to be called zero. For information# please request Technical Bulletin 74-0051WIDE0 3dc00000
4-28
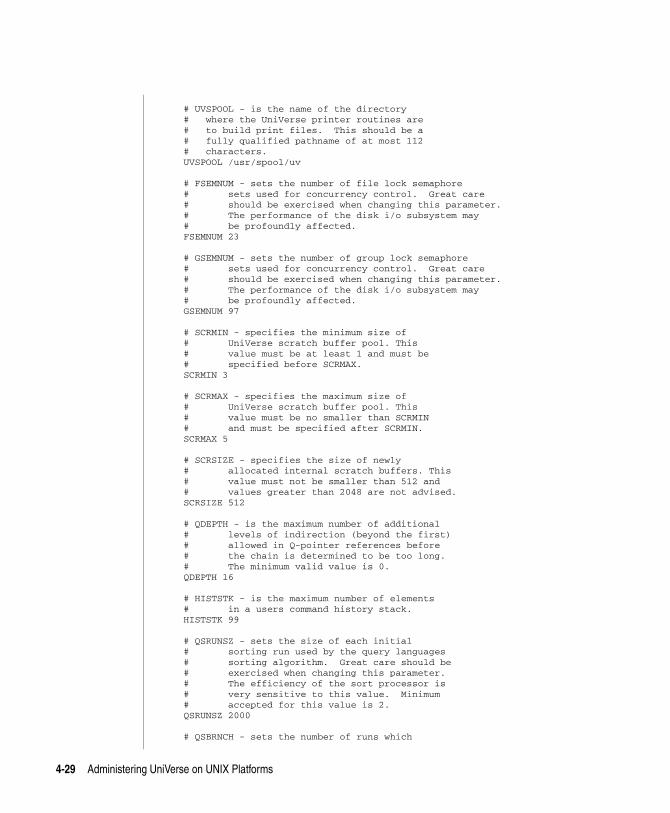
C:\Users\awaite\Documents\U2Doc\UniVerse\11.2\Source\Adminunix\Ch4.fm3/17/14
# UVSPOOL - is the name of the directory# where the UniVerse printer routines are# to build print files. This should be a# fully qualified pathname of at most 112# characters.UVSPOOL /usr/spool/uv
# FSEMNUM - sets the number of file lock semaphore# sets used for concurrency control. Great care# should be exercised when changing this parameter.# The performance of the disk i/o subsystem may# be profoundly affected.FSEMNUM 23
# GSEMNUM - sets the number of group lock semaphore# sets used for concurrency control. Great care# should be exercised when changing this parameter.# The performance of the disk i/o subsystem may# be profoundly affected.GSEMNUM 97
# SCRMIN - specifies the minimum size of# UniVerse scratch buffer pool. This# value must be at least 1 and must be# specified before SCRMAX.SCRMIN 3
# SCRMAX - specifies the maximum size of# UniVerse scratch buffer pool. This# value must be no smaller than SCRMIN# and must be specified after SCRMIN.SCRMAX 5
# SCRSIZE - specifies the size of newly# allocated internal scratch buffers. This# value must not be smaller than 512 and# values greater than 2048 are not advised.SCRSIZE 512
# QDEPTH - is the maximum number of additional# levels of indirection (beyond the first)# allowed in Q-pointer references before# the chain is determined to be too long.# The minimum valid value is 0.QDEPTH 16
# HISTSTK - is the maximum number of elements# in a users command history stack.HISTSTK 99
# QSRUNSZ - sets the size of each initial# sorting run used by the query languages# sorting algorithm. Great care should be# exercised when changing this parameter.# The efficiency of the sort processor is# very sensitive to this value. Minimum# accepted for this value is 2.QSRUNSZ 2000
# QSBRNCH - sets the number of runs which
4-29 Administering UniVerse on UNIX Platforms
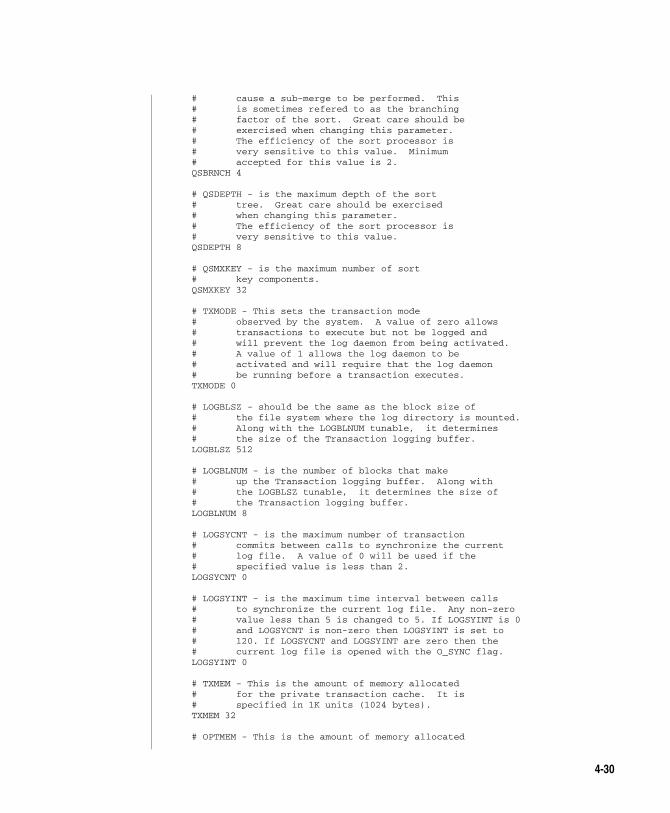
C:\Users\awaite\Documents\U2Doc\UniVerse\11.2\Source\Adminunix\Ch
# cause a sub-merge to be performed. This# is sometimes refered to as the branching# factor of the sort. Great care should be# exercised when changing this parameter.# The efficiency of the sort processor is# very sensitive to this value. Minimum# accepted for this value is 2.QSBRNCH 4
# QSDEPTH - is the maximum depth of the sort# tree. Great care should be exercised# when changing this parameter.# The efficiency of the sort processor is# very sensitive to this value.QSDEPTH 8
# QSMXKEY - is the maximum number of sort# key components.QSMXKEY 32
# TXMODE - This sets the transaction mode# observed by the system. A value of zero allows# transactions to execute but not be logged and# will prevent the log daemon from being activated.# A value of 1 allows the log daemon to be# activated and will require that the log daemon# be running before a transaction executes.TXMODE 0
# LOGBLSZ - should be the same as the block size of# the file system where the log directory is mounted.# Along with the LOGBLNUM tunable, it determines# the size of the Transaction logging buffer.LOGBLSZ 512
# LOGBLNUM - is the number of blocks that make# up the Transaction logging buffer. Along with# the LOGBLSZ tunable, it determines the size of# the Transaction logging buffer.LOGBLNUM 8
# LOGSYCNT - is the maximum number of transaction# commits between calls to synchronize the current# log file. A value of 0 will be used if the# specified value is less than 2.LOGSYCNT 0
# LOGSYINT - is the maximum time interval between calls# to synchronize the current log file. Any non-zero# value less than 5 is changed to 5. If LOGSYINT is 0# and LOGSYCNT is non-zero then LOGSYINT is set to# 120. If LOGSYCNT and LOGSYINT are zero then the# current log file is opened with the O_SYNC flag.LOGSYINT 0
# TXMEM - This is the amount of memory allocated# for the private transaction cache. It is# specified in 1K units (1024 bytes).TXMEM 32
# OPTMEM - This is the amount of memory allocated
4-30
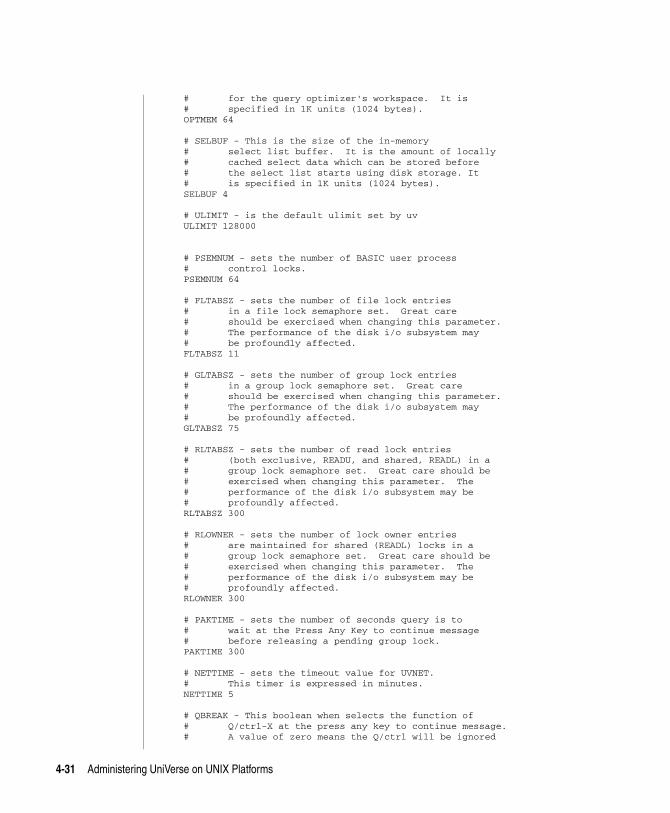
C:\Users\awaite\Documents\U2Doc\UniVerse\11.2\Source\Adminunix\Ch4.fm3/17/14
# for the query optimizer's workspace. It is# specified in 1K units (1024 bytes).OPTMEM 64
# SELBUF - This is the size of the in-memory# select list buffer. It is the amount of locally# cached select data which can be stored before# the select list starts using disk storage. It# is specified in 1K units (1024 bytes).SELBUF 4
# ULIMIT - is the default ulimit set by uvULIMIT 128000
# PSEMNUM - sets the number of BASIC user process# control locks.PSEMNUM 64
# FLTABSZ - sets the number of file lock entries# in a file lock semaphore set. Great care# should be exercised when changing this parameter.# The performance of the disk i/o subsystem may# be profoundly affected.FLTABSZ 11
# GLTABSZ - sets the number of group lock entries# in a group lock semaphore set. Great care# should be exercised when changing this parameter.# The performance of the disk i/o subsystem may# be profoundly affected.GLTABSZ 75
# RLTABSZ - sets the number of read lock entries# (both exclusive, READU, and shared, READL) in a# group lock semaphore set. Great care should be# exercised when changing this parameter. The# performance of the disk i/o subsystem may be# profoundly affected.RLTABSZ 300
# RLOWNER - sets the number of lock owner entries# are maintained for shared (READL) locks in a# group lock semaphore set. Great care should be# exercised when changing this parameter. The# performance of the disk i/o subsystem may be# profoundly affected.RLOWNER 300
# PAKTIME - sets the number of seconds query is to# wait at the Press Any Key to continue message# before releasing a pending group lock.PAKTIME 300
# NETTIME - sets the timeout value for UVNET.# This timer is expressed in minutes.NETTIME 5
# QBREAK - This boolean when selects the function of# Q/ctrl-X at the press any key to continue message.# A value of zero means the Q/ctrl will be ignored
4-31 Administering UniVerse on UNIX Platforms
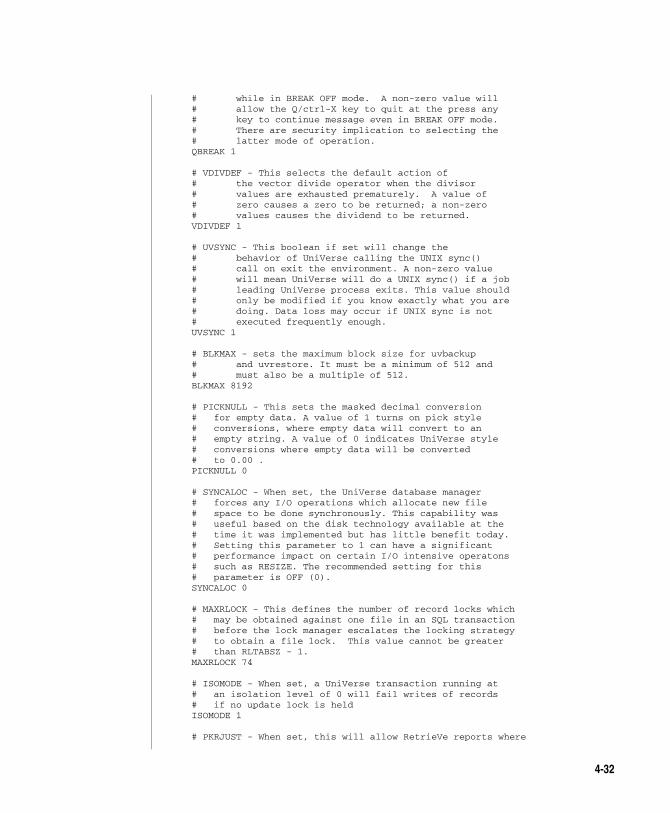
C:\Users\awaite\Documents\U2Doc\UniVerse\11.2\Source\Adminunix\Ch
# while in BREAK OFF mode. A non-zero value will# allow the Q/ctrl-X key to quit at the press any# key to continue message even in BREAK OFF mode.# There are security implication to selecting the# latter mode of operation.QBREAK 1
# VDIVDEF - This selects the default action of# the vector divide operator when the divisor# values are exhausted prematurely. A value of# zero causes a zero to be returned; a non-zero# values causes the dividend to be returned.VDIVDEF 1
# UVSYNC - This boolean if set will change the# behavior of UniVerse calling the UNIX sync()# call on exit the environment. A non-zero value# will mean UniVerse will do a UNIX sync() if a job# leading UniVerse process exits. This value should# only be modified if you know exactly what you are# doing. Data loss may occur if UNIX sync is not# executed frequently enough.UVSYNC 1
# BLKMAX - sets the maximum block size for uvbackup# and uvrestore. It must be a minimum of 512 and# must also be a multiple of 512.BLKMAX 8192
# PICKNULL - This sets the masked decimal conversion# for empty data. A value of 1 turns on pick style# conversions, where empty data will convert to an# empty string. A value of 0 indicates UniVerse style# conversions where empty data will be converted# to 0.00 .PICKNULL 0
# SYNCALOC - When set, the UniVerse database manager# forces any I/O operations which allocate new file# space to be done synchronously. This capability was# useful based on the disk technology available at the# time it was implemented but has little benefit today.# Setting this parameter to 1 can have a significant# performance impact on certain I/O intensive operatons# such as RESIZE. The recommended setting for this# parameter is OFF (0).SYNCALOC 0
# MAXRLOCK - This defines the number of record locks which# may be obtained against one file in an SQL transaction# before the lock manager escalates the locking strategy# to obtain a file lock. This value cannot be greater# than RLTABSZ - 1.MAXRLOCK 74
# ISOMODE - When set, a UniVerse transaction running at# an isolation level of 0 will fail writes of records# if no update lock is heldISOMODE 1
# PKRJUST - When set, this will allow RetrieVe reports where
4-32
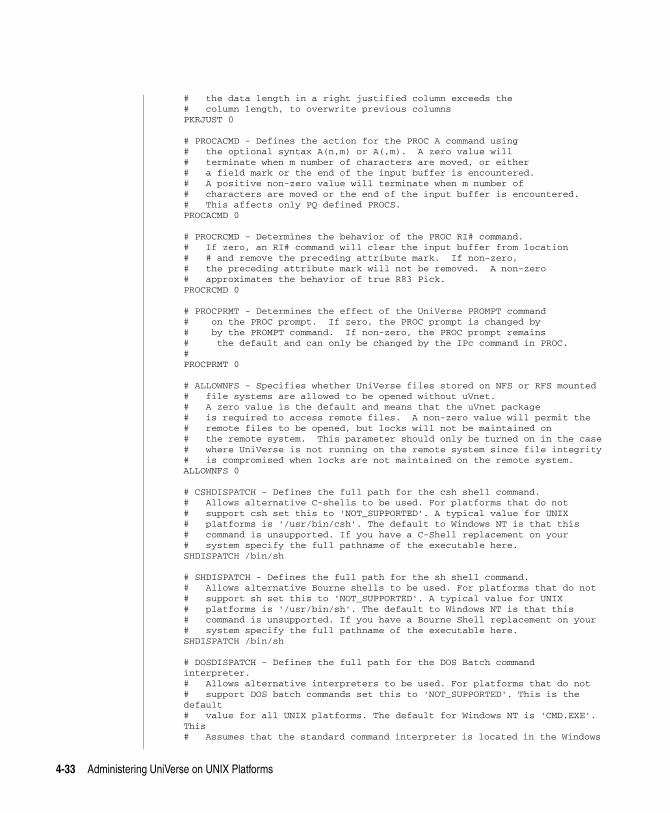
C:\Users\awaite\Documents\U2Doc\UniVerse\11.2\Source\Adminunix\Ch4.fm3/17/14
# the data length in a right justified column exceeds the# column length, to overwrite previous columnsPKRJUST 0
# PROCACMD - Defines the action for the PROC A command using# the optional syntax A(n,m) or A(,m). A zero value will# terminate when m number of characters are moved, or either# a field mark or the end of the input buffer is encountered.# A positive non-zero value will terminate when m number of# characters are moved or the end of the input buffer is encountered.# This affects only PQ defined PROCS.PROCACMD 0
# PROCRCMD - Determines the behavior of the PROC RI# command.# If zero, an RI# command will clear the input buffer from location# # and remove the preceding attribute mark. If non-zero,# the preceding attribute mark will not be removed. A non-zero# approximates the behavior of true R83 Pick.PROCRCMD 0
# PROCPRMT - Determines the effect of the UniVerse PROMPT command# on the PROC prompt. If zero, the PROC prompt is changed by# by the PROMPT command. If non-zero, the PROC prompt remains# the default and can only be changed by the IPc command in PROC.#PROCPRMT 0
# ALLOWNFS - Specifies whether UniVerse files stored on NFS or RFS mounted# file systems are allowed to be opened without uVnet.# A zero value is the default and means that the uVnet package# is required to access remote files. A non-zero value will permit the# remote files to be opened, but locks will not be maintained on# the remote system. This parameter should only be turned on in the case# where UniVerse is not running on the remote system since file integrity# is compromised when locks are not maintained on the remote system.ALLOWNFS 0
# CSHDISPATCH - Defines the full path for the csh shell command.# Allows alternative C-shells to be used. For platforms that do not# support csh set this to 'NOT_SUPPORTED'. A typical value for UNIX# platforms is '/usr/bin/csh'. The default to Windows NT is that this# command is unsupported. If you have a C-Shell replacement on your# system specify the full pathname of the executable here.SHDISPATCH /bin/sh
# SHDISPATCH - Defines the full path for the sh shell command.# Allows alternative Bourne shells to be used. For platforms that do not# support sh set this to 'NOT_SUPPORTED'. A typical value for UNIX# platforms is '/usr/bin/sh'. The default to Windows NT is that this# command is unsupported. If you have a Bourne Shell replacement on your# system specify the full pathname of the executable here.SHDISPATCH /bin/sh
# DOSDISPATCH - Defines the full path for the DOS Batch command interpreter.# Allows alternative interpreters to be used. For platforms that do not# support DOS batch commands set this to 'NOT_SUPPORTED'. This is the default# value for all UNIX platforms. The default for Windows NT is 'CMD.EXE'. This# Assumes that the standard command interpreter is located in the Windows
4-33 Administering UniVerse on UNIX Platforms

C:\Users\awaite\Documents\U2Doc\UniVerse\11.2\Source\Adminunix\Ch
NT# System32 directory. A full pathname of the command interpreter can be# specified to ensure that a similar executable is not found in the PATHDOSDISPATCH NOT_SUPPORTED
# LAYERSEL - Determines whether a select list will remain active# upon returning from a higher execute layer. A zero# value will effect traditional UniVerse behavior whereby the select# list will still be active when returning to another layer which# is not topmost. A non-zero value will clear any select lists# before returning to the previous layer, unless K mode is active.LAYERSEL 0
# OCVDATE - Specifies whether UniVerse accepts partially 'bad' internal date# data. A zero value is the default and means that any value which# is not wholly numeric and which is supplied as an internal date# value to the command OCONV(<data>,'D') will be rejected as bad# and not converted. A non-zero value for this parameter will allow# data which is a number followed by other data, e.g. 9199-f, to be# partially converted; the numbers up to the non-numeric character# will be interpreted as the internal date, and the STATUS() function# will be set to 3, indicating successful conversion of a possibly# invalid date.OCVDATE 0
# MODFPTRS - Specifies whether file pointers in the VOC file# can be modified by the COPY, DELETE, and EDIT commands.# A value of 0 disallows modifications of VOC File pointers.# The default setting for this parameter is 1.MODFPTRS 1
# THDR512 - Specifies whether DC type tapes will be written with# 512 byte labels. The default setting is 0.THDR512 0
# UDRMODE - Specifies the data replication mode observed# by the system. A value of 1 enables data replication.# A value of 0 disables data replication.UDRMODE 0
# UDRBLKS - Specifies the number of 4096 byte blocks used for# buffering by data replication. The default value is 10.# A value less than 10 will be defaulted to a value of 10.# If UDRMODE is set to 0, UDRBLKS is also set to 0.UDRBLKS 10
# MAXERRLOGENT - Specifies the number of logged entries in# the errlog file. The default setting is 100.MAXERRLOGENT 100
# JOINBUF - Specifies the size of the cache used by# the optimizer for JOINs with explicit ids or indexes.# The default setting is 4095, maximum is 32363.JOINBUF 4095
# 64BIT_FILES - This sets the default mode used to# create static hashed and dynamic files.# A value of 0 results in the creation of 32-bit# files. 32-bit files have a maximum file size of# 2 gigabytes. A value of 1 results in the creation
4-34
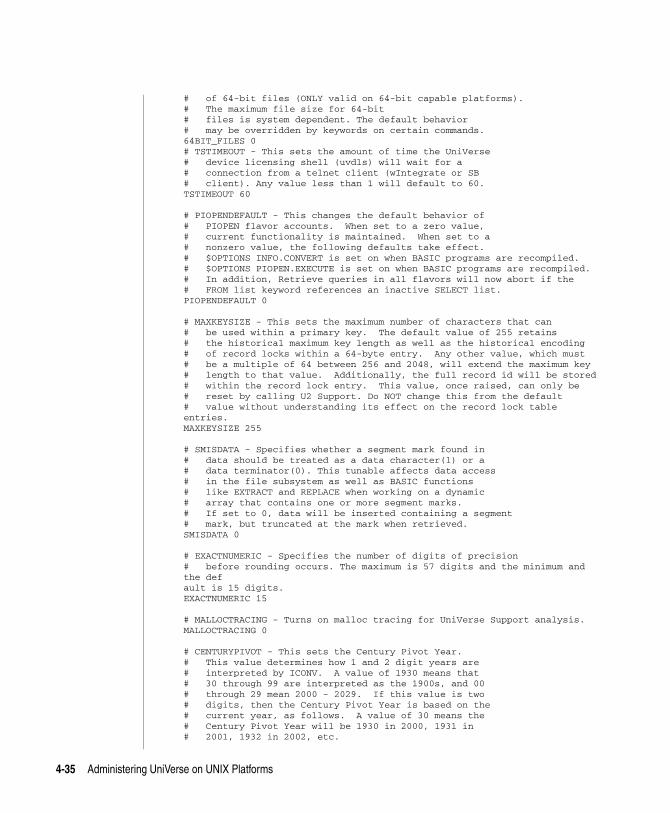
C:\Users\awaite\Documents\U2Doc\UniVerse\11.2\Source\Adminunix\Ch4.fm3/17/14
# of 64-bit files (ONLY valid on 64-bit capable platforms).# The maximum file size for 64-bit# files is system dependent. The default behavior# may be overridden by keywords on certain commands.64BIT_FILES 0# TSTIMEOUT - This sets the amount of time the UniVerse# device licensing shell (uvdls) will wait for a# connection from a telnet client (wIntegrate or SB# client). Any value less than 1 will default to 60.TSTIMEOUT 60
# PIOPENDEFAULT - This changes the default behavior of# PIOPEN flavor accounts. When set to a zero value,# current functionality is maintained. When set to a# nonzero value, the following defaults take effect.# $OPTIONS INFO.CONVERT is set on when BASIC programs are recompiled.# $OPTIONS PIOPEN.EXECUTE is set on when BASIC programs are recompiled.# In addition, Retrieve queries in all flavors will now abort if the# FROM list keyword references an inactive SELECT list.PIOPENDEFAULT 0
# MAXKEYSIZE - This sets the maximum number of characters that can# be used within a primary key. The default value of 255 retains# the historical maximum key length as well as the historical encoding# of record locks within a 64-byte entry. Any other value, which must# be a multiple of 64 between 256 and 2048, will extend the maximum key# length to that value. Additionally, the full record id will be stored# within the record lock entry. This value, once raised, can only be# reset by calling U2 Support. Do NOT change this from the default# value without understanding its effect on the record lock table entries.MAXKEYSIZE 255
# SMISDATA - Specifies whether a segment mark found in# data should be treated as a data character(1) or a# data terminator(0). This tunable affects data access# in the file subsystem as well as BASIC functions# like EXTRACT and REPLACE when working on a dynamic# array that contains one or more segment marks.# If set to 0, data will be inserted containing a segment# mark, but truncated at the mark when retrieved.SMISDATA 0
# EXACTNUMERIC - Specifies the number of digits of precision# before rounding occurs. The maximum is 57 digits and the minimum and the default is 15 digits.EXACTNUMERIC 15
# MALLOCTRACING - Turns on malloc tracing for UniVerse Support analysis.MALLOCTRACING 0
# CENTURYPIVOT - This sets the Century Pivot Year.# This value determines how 1 and 2 digit years are# interpreted by ICONV. A value of 1930 means that# 30 through 99 are interpreted as the 1900s, and 00# through 29 mean 2000 - 2029. If this value is two# digits, then the Century Pivot Year is based on the# current year, as follows. A value of 30 means the# Century Pivot Year will be 1930 in 2000, 1931 in# 2001, 1932 in 2002, etc.
4-35 Administering UniVerse on UNIX Platforms
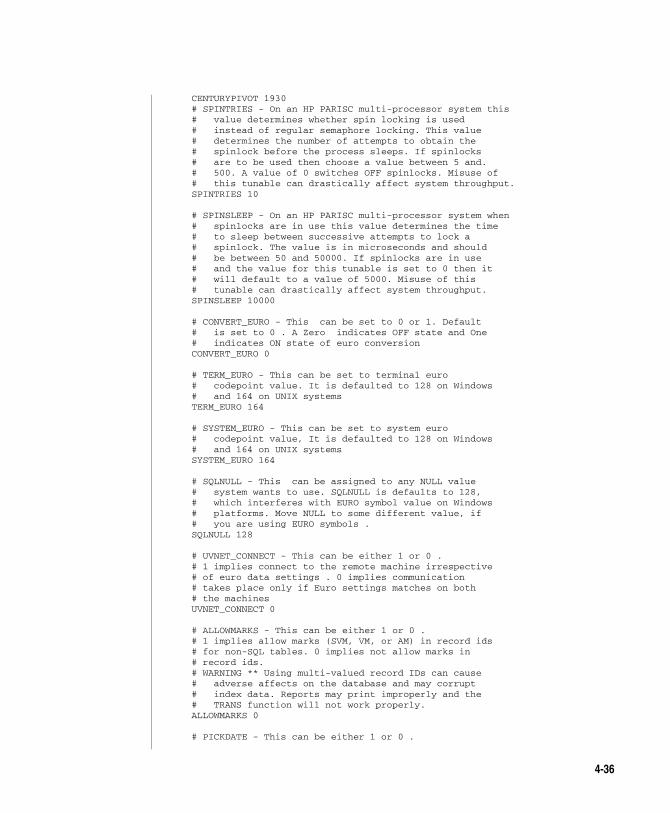
C:\Users\awaite\Documents\U2Doc\UniVerse\11.2\Source\Adminunix\Ch
CENTURYPIVOT 1930# SPINTRIES - On an HP PARISC multi-processor system this# value determines whether spin locking is used# instead of regular semaphore locking. This value# determines the number of attempts to obtain the# spinlock before the process sleeps. If spinlocks# are to be used then choose a value between 5 and.# 500. A value of 0 switches OFF spinlocks. Misuse of# this tunable can drastically affect system throughput.SPINTRIES 10
# SPINSLEEP - On an HP PARISC multi-processor system when# spinlocks are in use this value determines the time# to sleep between successive attempts to lock a# spinlock. The value is in microseconds and should# be between 50 and 50000. If spinlocks are in use# and the value for this tunable is set to 0 then it# will default to a value of 5000. Misuse of this# tunable can drastically affect system throughput.SPINSLEEP 10000
# CONVERT_EURO - This can be set to 0 or 1. Default# is set to 0 . A Zero indicates OFF state and One# indicates ON state of euro conversionCONVERT_EURO 0
# TERM_EURO - This can be set to terminal euro# codepoint value. It is defaulted to 128 on Windows# and 164 on UNIX systemsTERM_EURO 164
# SYSTEM_EURO - This can be set to system euro# codepoint value, It is defaulted to 128 on Windows# and 164 on UNIX systemsSYSTEM_EURO 164
# SQLNULL - This can be assigned to any NULL value# system wants to use. SQLNULL is defaults to 128,# which interferes with EURO symbol value on Windows# platforms. Move NULL to some different value, if# you are using EURO symbols .SQLNULL 128
# UVNET_CONNECT - This can be either 1 or 0 .# 1 implies connect to the remote machine irrespective# of euro data settings . 0 implies communication# takes place only if Euro settings matches on both# the machinesUVNET_CONNECT 0
# ALLOWMARKS - This can be either 1 or 0 .# 1 implies allow marks (SVM, VM, or AM) in record ids# for non-SQL tables. 0 implies not allow marks in# record ids.# WARNING ** Using multi-valued record IDs can cause# adverse affects on the database and may corrupt# index data. Reports may print improperly and the# TRANS function will not work properly.ALLOWMARKS 0
# PICKDATE - This can be either 1 or 0 .
4-36
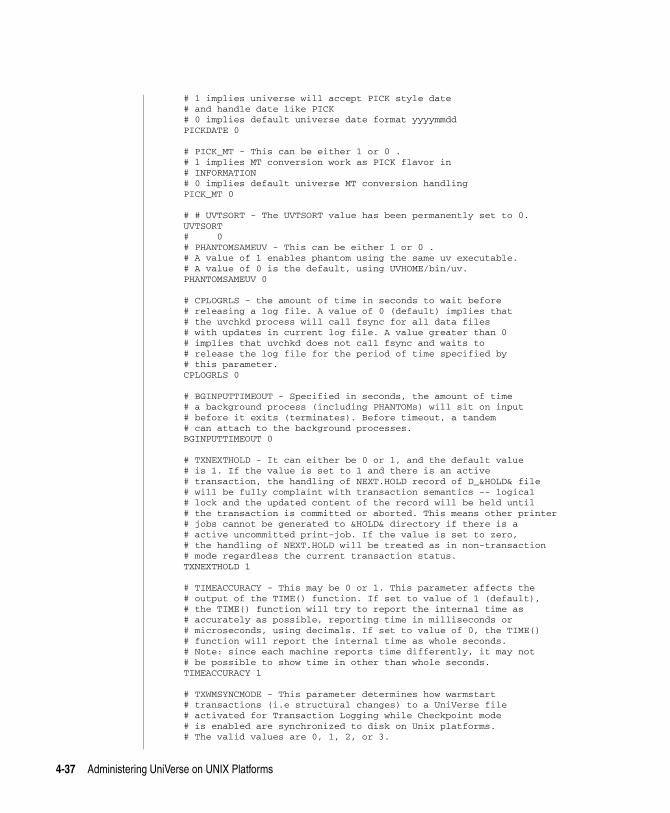
C:\Users\awaite\Documents\U2Doc\UniVerse\11.2\Source\Adminunix\Ch4.fm3/17/14
# 1 implies universe will accept PICK style date# and handle date like PICK# 0 implies default universe date format yyyymmddPICKDATE 0
# PICK_MT - This can be either 1 or 0 .# 1 implies MT conversion work as PICK flavor in# INFORMATION# 0 implies default universe MT conversion handlingPICK_MT 0
# # UVTSORT - The UVTSORT value has been permanently set to 0.UVTSORT # 0# PHANTOMSAMEUV - This can be either 1 or 0 .# A value of 1 enables phantom using the same uv executable.# A value of 0 is the default, using UVHOME/bin/uv.PHANTOMSAMEUV 0
# CPLOGRLS - the amount of time in seconds to wait before# releasing a log file. A value of 0 (default) implies that# the uvchkd process will call fsync for all data files# with updates in current log file. A value greater than 0# implies that uvchkd does not call fsync and waits to# release the log file for the period of time specified by# this parameter.CPLOGRLS 0
# BGINPUTTIMEOUT - Specified in seconds, the amount of time# a background process (including PHANTOMs) will sit on input# before it exits (terminates). Before timeout, a tandem# can attach to the background processes.BGINPUTTIMEOUT 0
# TXNEXTHOLD - It can either be 0 or 1, and the default value# is 1. If the value is set to 1 and there is an active# transaction, the handling of NEXT.HOLD record of D_&HOLD& file# will be fully complaint with transaction semantics -- logical# lock and the updated content of the record will be held until# the transaction is committed or aborted. This means other printer# jobs cannot be generated to &HOLD& directory if there is a# active uncommitted print-job. If the value is set to zero,# the handling of NEXT.HOLD will be treated as in non-transaction# mode regardless the current transaction status.TXNEXTHOLD 1
# TIMEACCURACY - This may be 0 or 1. This parameter affects the# output of the TIME() function. If set to value of 1 (default),# the TIME() function will try to report the internal time as# accurately as possible, reporting time in milliseconds or# microseconds, using decimals. If set to value of 0, the TIME()# function will report the internal time as whole seconds.# Note: since each machine reports time differently, it may not# be possible to show time in other than whole seconds.TIMEACCURACY 1
# TXWMSYNCMODE - This parameter determines how warmstart# transactions (i.e structural changes) to a UniVerse file# activated for Transaction Logging while Checkpoint mode# is enabled are synchronized to disk on Unix platforms.# The valid values are 0, 1, 2, or 3.
4-37 Administering UniVerse on UNIX Platforms
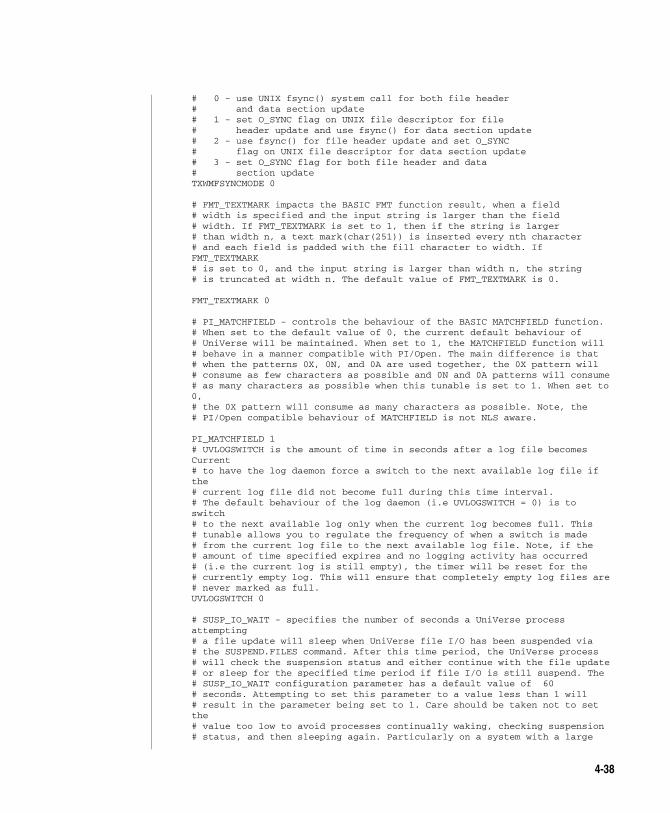
C:\Users\awaite\Documents\U2Doc\UniVerse\11.2\Source\Adminunix\Ch
# 0 - use UNIX fsync() system call for both file header# and data section update# 1 - set O_SYNC flag on UNIX file descriptor for file# header update and use fsync() for data section update# 2 - use fsync() for file header update and set O_SYNC# flag on UNIX file descriptor for data section update# 3 - set O_SYNC flag for both file header and data# section updateTXWMFSYNCMODE 0
# FMT_TEXTMARK impacts the BASIC FMT function result, when a field# width is specified and the input string is larger than the field# width. If FMT_TEXTMARK is set to 1, then if the string is larger# than width n, a text mark(char(251)) is inserted every nth character# and each field is padded with the fill character to width. If FMT_TEXTMARK# is set to 0, and the input string is larger than width n, the string# is truncated at width n. The default value of FMT_TEXTMARK is 0.
FMT_TEXTMARK 0
# PI_MATCHFIELD - controls the behaviour of the BASIC MATCHFIELD function.# When set to the default value of 0, the current default behaviour of# UniVerse will be maintained. When set to 1, the MATCHFIELD function will# behave in a manner compatible with PI/Open. The main difference is that# when the patterns 0X, 0N, and 0A are used together, the 0X pattern will# consume as few characters as possible and 0N and 0A patterns will consume# as many characters as possible when this tunable is set to 1. When set to 0,# the 0X pattern will consume as many characters as possible. Note, the# PI/Open compatible behaviour of MATCHFIELD is not NLS aware.
PI_MATCHFIELD 1# UVLOGSWITCH is the amount of time in seconds after a log file becomes Current# to have the log daemon force a switch to the next available log file if the# current log file did not become full during this time interval.# The default behaviour of the log daemon (i.e UVLOGSWITCH = 0) is to switch# to the next available log only when the current log becomes full. This# tunable allows you to regulate the frequency of when a switch is made# from the current log file to the next available log file. Note, if the# amount of time specified expires and no logging activity has occurred# (i.e the current log is still empty), the timer will be reset for the# currently empty log. This will ensure that completely empty log files are# never marked as full.UVLOGSWITCH 0
# SUSP_IO_WAIT - specifies the number of seconds a UniVerse process attempting# a file update will sleep when UniVerse file I/O has been suspended via# the SUSPEND.FILES command. After this time period, the UniVerse process# will check the suspension status and either continue with the file update# or sleep for the specified time period if file I/O is still suspend. The# SUSP_IO_WAIT configuration parameter has a default value of 60# seconds. Attempting to set this parameter to a value less than 1 will# result in the parameter being set to 1. Care should be taken not to set the# value too low to avoid processes continually waking, checking suspension# status, and then sleeping again. Particularly on a system with a large
4-38
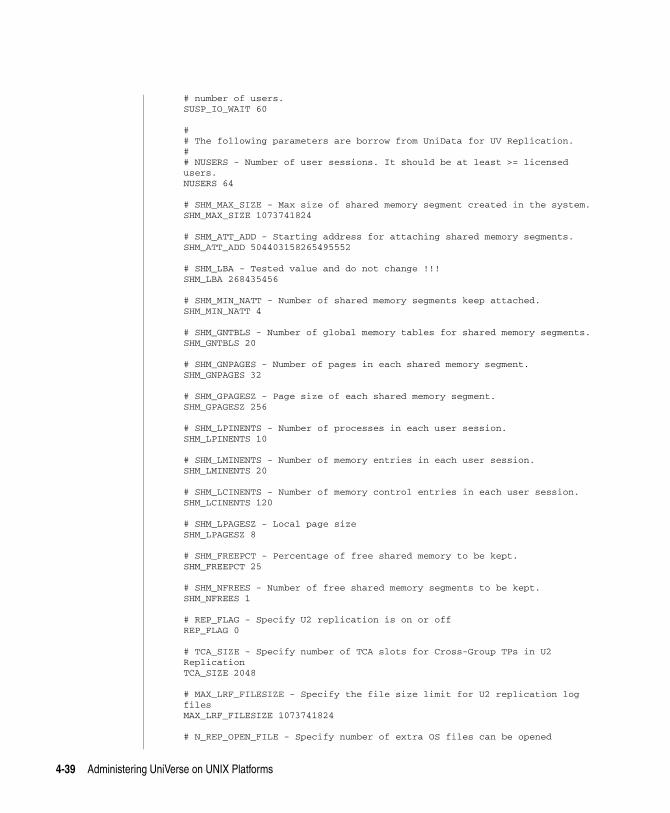
C:\Users\awaite\Documents\U2Doc\UniVerse\11.2\Source\Adminunix\Ch4.fm3/17/14
# number of users.SUSP_IO_WAIT 60
## The following parameters are borrow from UniData for UV Replication.## NUSERS - Number of user sessions. It should be at least >= licensed users.NUSERS 64
# SHM_MAX_SIZE - Max size of shared memory segment created in the system.SHM_MAX_SIZE 1073741824
# SHM_ATT_ADD - Starting address for attaching shared memory segments.SHM_ATT_ADD 504403158265495552
# SHM_LBA - Tested value and do not change !!!SHM_LBA 268435456
# SHM_MIN_NATT - Number of shared memory segments keep attached.SHM_MIN_NATT 4
# SHM_GNTBLS - Number of global memory tables for shared memory segments.SHM_GNTBLS 20
# SHM_GNPAGES - Number of pages in each shared memory segment.SHM_GNPAGES 32
# SHM_GPAGESZ - Page size of each shared memory segment.SHM_GPAGESZ 256
# SHM_LPINENTS - Number of processes in each user session.SHM_LPINENTS 10
# SHM_LMINENTS - Number of memory entries in each user session.SHM_LMINENTS 20
# SHM_LCINENTS - Number of memory control entries in each user session.SHM_LCINENTS 120
# SHM_LPAGESZ - Local page sizeSHM_LPAGESZ 8
# SHM_FREEPCT - Percentage of free shared memory to be kept.SHM_FREEPCT 25
# SHM_NFREES - Number of free shared memory segments to be kept.SHM_NFREES 1
# REP_FLAG - Specify U2 replication is on or offREP_FLAG 0
# TCA_SIZE - Specify number of TCA slots for Cross-Group TPs in U2 ReplicationTCA_SIZE 2048
# MAX_LRF_FILESIZE - Specify the file size limit for U2 replication log filesMAX_LRF_FILESIZE 1073741824
# N_REP_OPEN_FILE - Specify number of extra OS files can be opened
4-39 Administering UniVerse on UNIX Platforms

C:\Users\awaite\Documents\U2Doc\UniVerse\11.2\Source\Adminunix\Ch
# by uvsh for U2 replicationN_REP_OPEN_FILE 8
# MAX_REP_SHMSZ - Specify the maximum shared memory segment size# for U2 replication. It should not exceed SHM_MAX_SIZEMAX_REP_SHMSZ 2147467264
# REP_LOG_PATH - Specify U2 replication log directory
# MAX_RW_INGRP - Specify the maximum of RWs in a replication groupMAX_RW_INGRP 8
# ADE_OPTIONS - ADE Options, default 0.ADE_OPTIONS 0
# NSEM_PSET - Number of semaphores per semaphore id.NSEM_PSET 8
# PI_SOUNDEX - controls the behavior of the BASIC SOUNDEX function and the S# conversion code used with the ICONV/OCONV functions and in the conversion# field of dictionary fields. When set to the default value of 0, the current# default behavior of UniVerse will be maintained. When set to 1, the SOUNDEX# function will behave in a manner which is compatible with PI/Open. When set# to 1, two consecutive letters from the same group will return a single digit# in the result. Additionally, letters from the same group that are separated by# vowels in the input string will be retained and they each will return the# associated group digit in the result.PI_SOUNDEX 0
REP_LOG_PATH /disk1/srcman/alpha/uv111_110711_5739/replog
4-40
C:\UsMarch
4Administering UniData on Windows NT or Windows 20000
5 Chapter
ers\aw 17, 201
Beta Beta Beta Beta Beta Beta Beta Beta Beta Beta Beta Beta Beta Beta Beta Beta Beta Beta Beta Beta
Chapter 5: Adding and maintaining UNIX user accounts
General considerations . . . . . . . . . . . . . . . . 5-2
aite\Documents\U2Doc\UniVerse\11.2\Source\Adminunix\Ch5TOC.fm4 2:12 pm Administering UniData on Windows NT or Windows 2000
C:\Users\awaite\Documents\U2Doc\UniVerse\11.2\Source\Adminunix\Ch5.fm3/17/14 System Administration
This chapter describes how to add new user accounts and how to maintain existing accounts on UNIX systems. It covers the following topics:
Issues to consider when creating UniVerse and UNIX accounts
How to create new user groups and user login accounts, and how to modify existing user accounts
5-1 Administering UniVerse on UNIX Platforms
C:\Users\awaite\Documents\U2Doc\UniVerse\11.2\Source\Adminunix\Ch
General considerationsWhen you first install UniVerse, the UV account is created. You use the UV account for both UNIX and UniVerse system administration. Probably the first task you perform after starting up the system is to add new user accounts. Before discussing the details of how to add new user accounts, it is worth considering a few general issues.
UniVerse users can work in either of two environments, the UNIX programming environment or the UniVerse database management environment. The difference between the two environments has some implications for how you assign user accounts, particularly if you plan to implement a protection scheme in which all files and commands are not available to all users.
User accounts differ from UniVerse accountsA UNIX user account and a UniVerse account are not identical.
UNIX user accounts are actually more like personal working environments that stay with users no matter what else they may be doing or where they may be working on the system. A user account is defined by an entry in the /etc/passwd file that sets the user’s login name and password and defines the user’s home directory. Once UNIX users log on to the system, they have access to all directories and files on the system, except those protected by file permissions.
UniVerse accounts, on the other hand, are more self-contained. The user’s working environment in UniVerse is determined primarily by the UniVerse account directory into which the user is currently logged. It is not determined, as in UNIX, by the user’s login account. When users log on to a UniVerse account, they generally remain in that account and have access only to commands and files that are defined as available in that account. To access other commands and files, the user may need to log to the account containing the command or files, leaving the UniVerse account in which they have been working.
In the UNIX environment, each user is generally given a personal user account, which includes a home directory under which the user can create his or her own hierarchical directory tree of private files. Access to other parts of the system for UNIX users is easy. They can change their current
System Administration 5-2
C:\Users\awaite\Documents\U2Doc\UniVerse\11.2\Source\Adminunix\Ch5.fm3/17/14 System Administration
working directories without changing other aspects of their account environment. They can access files and commands in other accounts simply by entering the full path that identifies the proper location in the file system’s complete directory tree.
In the UniVerse environment, the account directory a user is logged on to and the user’s working environment are more or less identical. The VOC file in each UniVerse account defines the account environment, including all the files and all the commands that are available to the user. Files in other UniVerse accounts are much less available than they are in the UNIX environment, although files in other accounts can be referenced in the VOC file. Generally, to use files in another account, you must log to that account.
Setting up user environmentsIf your site plans to make both environments available to users, it is probably best to create a UNIX login account for each user.
However, if you plan to have users working primarily in the UniVerse environment, and you are concerned about limiting access to the data in that UniVerse account to members of a selected group, you may want to create group UniVerse accounts (such as for members of a department).
All users of a particular UniVerse BASIC application can share a UniVerse account, since they all need access to the same commands, data files, and file dictionaries. For example, a UniVerse account might be defined for Sales rather than for an individual user.
Implement a group user account by giving each user his or her own login name at the UNIX level, but assign the same home directory (and therefore the same UniVerse account) to all users in the group.
Maintaining user groupsAll UNIX users must be assigned to at least one user group. User groups are used for setting file access permissions. You define user groups on the system by giving each user group a name and an ID number. When you add new users to the system, you give them a group ID number as well as a user ID number. For information about adding, changing, and deleting user groups, see Maintaining users and user groups in Appendix A, “Appendix A: UniVerse system administration menus.”
5-3 Administering UniVerse on UNIX Platforms
C:\Users\awaite\Documents\U2Doc\UniVerse\11.2\Source\Adminunix\Ch
Maintaining user accountsTo gain access to UniVerse, each UNIX user must have a unique login name that identifies him or her to the system. Users may also be required to enter a password as a security precaution to prevent unauthorized access to the system.
In addition to the required login name (and an optional password), each user must also have the following:
Unique user ID number
Group ID number
Login shell
Home directory
You provide this information when adding a new user to the system. You can use the UniVerse System Administration menus to add, change, or delete UNIX users. For details, see Adding, changing, and deleting indi-vidual users in Appendix A, “Appendix A: UniVerse system administration menus.”
System Administration 5-4
C:\UsMarch
5Administering UniData on Windows NT or Windows 20000
6 Chapter
ers\aw 17, 201
Beta Beta Beta Beta Beta Beta Beta Beta Beta Beta Beta Beta Beta Beta Beta Beta Beta Beta Beta Beta
Chapter 6: UniVerse accounts
About UniVerse accounts . . . . . . . . . . . . . . . 6-3Creating a new UniVerse account . . . . . . . . . . . . 6-4 Creating a new account . . . . . . . . . . . . . . 6-5Deleting an account . . . . . . . . . . . . . . . . . 6-8Customizing UniVerse accounts . . . . . . . . . . . . . 6-9 UniVerse account control files . . . . . . . . . . . . 6-9 Essential UniVerse files. . . . . . . . . . . . . . . 6-12 Customizing a UniVerse account . . . . . . . . . . . 6-14
aite\Documents\U2Doc\UniVerse\11.2\Source\Adminunix\Ch6TOC.fm4 2:12 pm Administering UniData on Windows NT or Windows 2000
C:\Users\awaite\Documents\U2Doc\UniVerse\11.2\Source\Adminunix\Ch
This chapter describes how to add new UniVerse accounts and how to maintain existing accounts. It covers the following topics:
How to create a UniVerse account, and how to carry out additional procedures that make the account function properly in either the operating system or the UniVerse environment
How to delete a UniVerse account
How to customize a UniVerse account
When you first install UniVerse, the UV account is created. One of your first tasks after starting up the system is to add new UniVerse accounts.
6-2
C:\Users\awaite\Documents\U2Doc\UniVerse\11.2\Source\Adminunix\Ch6.fm3/17/14
About UniVerse accountsYou always enter UniVerse through a UniVerse account. A UniVerse account includes a directory containing the files required to run UniVerse in that directory. An established UniVerse account can also contain database files and program files.
The VOC file in each UniVerse account defines the account environment, including all the files and commands that are available to users who are logged on to the account.
For example, a UniVerse account might be defined for a department rather than for an individual. Each user of the SALES account might be given his or her own login name at the operating system level but be assigned the same home directory and share the same UniVerse account.
UniVerse file permissions are managed by UNIX file permissions. For information about setting file permissions, refer to the documentation that comes with your operating system.
6-3 Administering UniVerse on UNIX Platforms
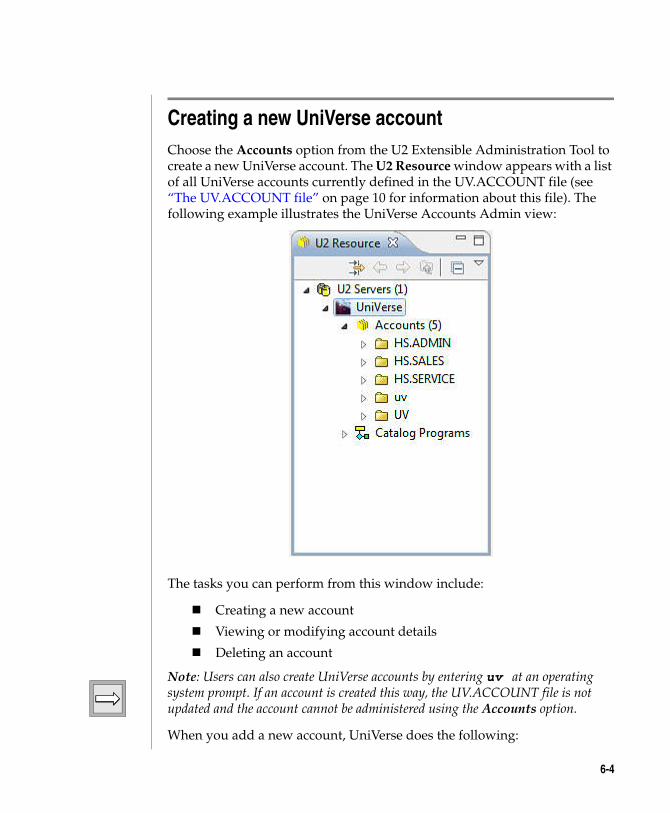
C:\Users\awaite\Documents\U2Doc\UniVerse\11.2\Source\Adminunix\Ch
Creating a new UniVerse accountChoose the Accounts option from the U2 Extensible Administration Tool to create a new UniVerse account. The U2 Resource window appears with a list of all UniVerse accounts currently defined in the UV.ACCOUNT file (see “The UV.ACCOUNT file” on page 10 for information about this file). The following example illustrates the UniVerse Accounts Admin view:
The tasks you can perform from this window include:
Creating a new account
Viewing or modifying account details
Deleting an account
Note: Users can also create UniVerse accounts by entering uv at an operating system prompt. If an account is created this way, the UV.ACCOUNT file is not updated and the account cannot be administered using the Accounts option.
When you add a new account, UniVerse does the following:
6-4
C:\Users\awaite\Documents\U2Doc\UniVerse\11.2\Source\Adminunix\Ch6.fm3/17/14
Assigns an account compatibility flavor
Updates the UV.ACCOUNT file
Edits the LOGIN entry in the UniVerse account
Creating a new account
To create a new UniVerse account, complete the following steps:
6-5 Administering UniVerse on UNIX Platforms
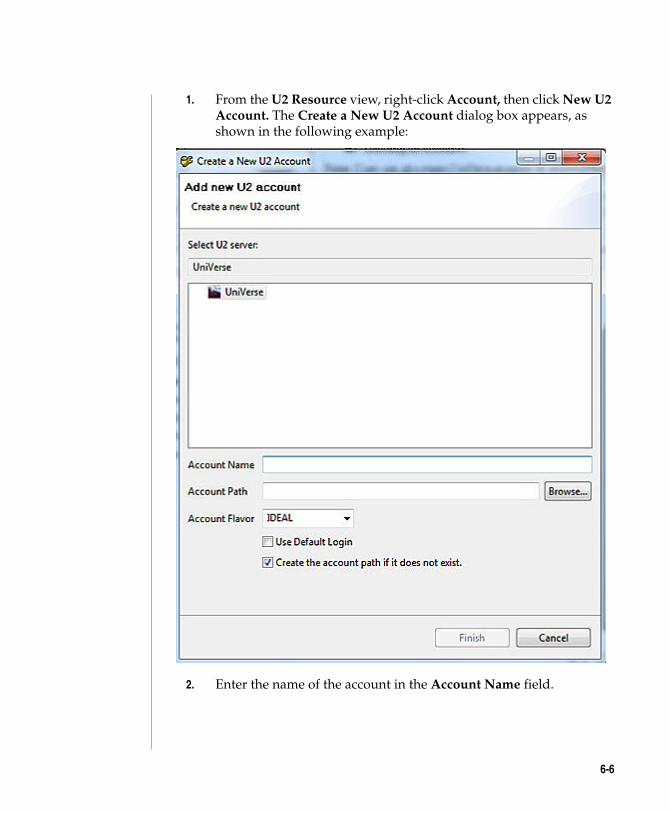
C:\Users\awaite\Documents\U2Doc\UniVerse\11.2\Source\Adminunix\Ch
1. From the U2 Resource view, right-click Account, then click New U2 Account. The Create a New U2 Account dialog box appears, as shown in the following example:
2. Enter the name of the account in the Account Name field.
6-6
C:\Users\awaite\Documents\U2Doc\UniVerse\11.2\Source\Adminunix\Ch6.fm3/17/14
3. Enter a destination for the new account in the Account Path field. Click Browse to search the system for the appropriate directory. You can also enter the path of a directory directly. If you enter the name of a directory that does not exist, it is created when you click OK. For example:
/usr/uv/test
The parent directory (/usr/uv) must exist.
4. Select one of the following flavors from the Account Flavor list:
IDEAL. Choose this flavor if you are a new user. It contains the best features of all the flavors.
INFORMATION. Choose this flavor for compatibility with Prime INFORMATION.
PIOPEN. Choose this flavor for compatibility with PI/open.
PICK. Choose this flavor for compatibility with Pick or Advanced Pick.
REALITY. Choose this flavor for compatibility with Microdata REALITY.
IN2. Choose this flavor for compatibility with IN2.
5. Select the Use Default LOGIN check box if you want to use the default LOGIN entry for the new account.
6. Select the Create the account path if it does not exist check box if you want UniVerse to create the directory you defined if it does not already exists.
7. Click OK. The UniVerse account is created in the chosen directory, with the ownership and security of the parent directory. The UV.ACCOUNT file and the U2 Resources view are updated.
Note: You can choose a directory path of an existing UniVerse account. In this case, the new account is added to the UV.ACCOUNT file, but no changes are made to the existing account files in the directory.
6-7 Administering UniVerse on UNIX Platforms
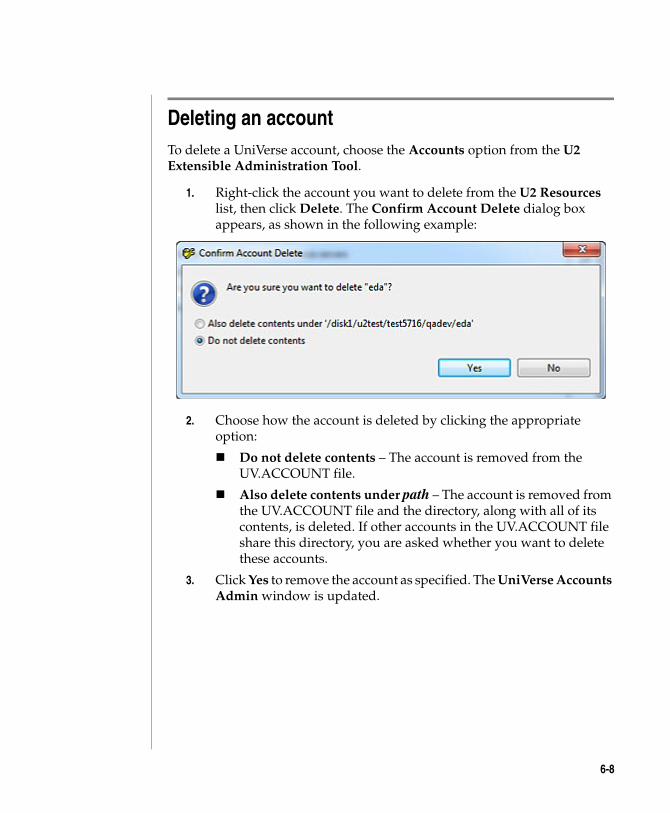
C:\Users\awaite\Documents\U2Doc\UniVerse\11.2\Source\Adminunix\Ch
Deleting an accountTo delete a UniVerse account, choose the Accounts option from the U2 Extensible Administration Tool.
1. Right-click the account you want to delete from the U2 Resources list, then click Delete. The Confirm Account Delete dialog box appears, as shown in the following example:
2. Choose how the account is deleted by clicking the appropriate option:
Do not delete contents – The account is removed from the UV.ACCOUNT file.
Also delete contents under path – The account is removed from the UV.ACCOUNT file and the directory, along with all of its contents, is deleted. If other accounts in the UV.ACCOUNT file share this directory, you are asked whether you want to delete these accounts.
3. Click Yes to remove the account as specified. The UniVerse Accounts Admin window is updated.
6-8
C:\Users\awaite\Documents\U2Doc\UniVerse\11.2\Source\Adminunix\Ch6.fm3/17/14
Customizing UniVerse accountsYou can customize UniVerse accounts. For example, you can prevent certain users from creating or modifying accounts from their own UniVerse accounts.
You can also set up alternative account flavors and their associated VOC files. To customize your system in this way, you must modify the NEWACC file and the UV.FLAVOR file.
Using the U2 Extensible Administration Tool, you can specify the account flavor to use, which in turn affects the VOC file and the user’s access to UniVerse. There are six standard flavors: IDEAL, INFORMATION, PICK, REALITY, PIOPEN, and IN2. These are listed when you create accounts using the Accounts view in the U2 Extensible Administration Tool.
UniVerse account control files
The U2 Extensible Administration Tool uses the account control files to check the validity of responses to some of the data entry screens. These files are updated only when you create or modify an account using the U2 Extensible Administration Tool, so it is important to create accounts using one of these tools.
Although these files are used primarily by the U2 Extensible Administration Tool, you can use the LIST and SORT commands to create reports. You can update them with ReVise or the UniVerse Editor.
6-9 Administering UniVerse on UNIX Platforms
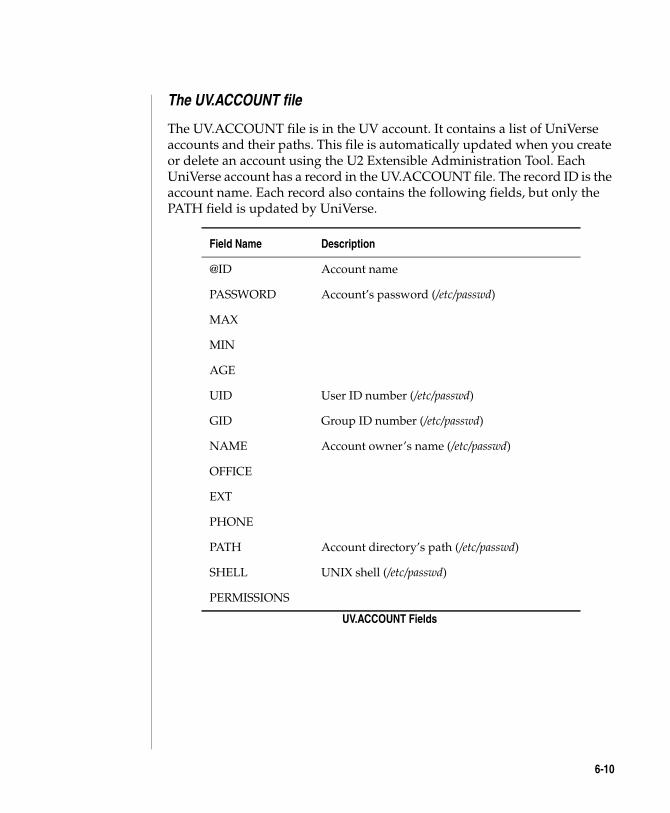
C:\Users\awaite\Documents\U2Doc\UniVerse\11.2\Source\Adminunix\Ch
The UV.ACCOUNT file
The UV.ACCOUNT file is in the UV account. It contains a list of UniVerse accounts and their paths. This file is automatically updated when you create or delete an account using the U2 Extensible Administration Tool. Each UniVerse account has a record in the UV.ACCOUNT file. The record ID is the account name. Each record also contains the following fields, but only the PATH field is updated by UniVerse.
Field Name Description
@ID Account name
PASSWORD Account’s password (/etc/passwd)
MAX
MIN
AGE
UID User ID number (/etc/passwd)
GID Group ID number (/etc/passwd)
NAME Account owner’s name (/etc/passwd)
OFFICE
EXT
PHONE
PATH Account directory’s path (/etc/passwd)
SHELL UNIX shell (/etc/passwd)
PERMISSIONS
UV.ACCOUNT Fields
6-10

C:\Users\awaite\Documents\U2Doc\UniVerse\11.2\Source\Adminunix\Ch6.fm3/17/14
The UV.FLAVOR file
The UV.FLAVOR file is in the UV account. The UV.FLAVOR file dictionary contains X-descriptors that define each flavor. The UV.FLAVOR data file contains records that specify restrictions on creating or updating accounts. This file lets you choose the account flavor for an individual or for a group of users.
Each record in UV.FLAVOR can have one of the three types of record ID:
Each record has two fields. The second field specifies one of the six different flavors: IDEAL (UniVerse), INFORMATION, PICK, REALITY, PIOPEN, or IN2. The first field specifies one of the following codes:
The following example is of a sample UV.FLAVOR file:
Access UV.FLAVOR........... Code.. Flavor......... GROUP.users F PICK OTHER C GROUP.demo F NEWACC
To prevent users creating or modifying an account, create an entry for them in the UV.FLAVOR file and set the access code to N.
Record ID Description Example
USER.name name is the login name of a user. USER.alice
GROUP.name name is the name of a user group. GROUP.users
OTHER A specially defined account. OTHER
UV.FLAVOR Record IDs
Code Description
C The user is prompted to choose an account flavor when creating or updating an account.
F The account is automatically assigned the flavor designated in field 2.
N The user cannot create or update an account.
UV.FLAVOR Record Attributes
6-11 Administering UniVerse on UNIX Platforms

C:\Users\awaite\Documents\U2Doc\UniVerse\11.2\Source\Adminunix\Ch
To use a custom flavor, create an entry in the UV.FLAVOR file for users who will use the flavor, and set the access code to F. Enter the custom flavor name in field 2 of the UV.FLAVOR file.
Essential UniVerse files
For users to work in the UniVerse environment, their current working directories must contain a number of UniVerse files, including the VOC file and its associated file dictionary. In addition, each UniVerse account is set up in a specified flavor of compatibility, such as IDEAL (UniVerse), PICK, or INFORMATION.
The system administrator does not set up the VOC file and its associated file dictionary. They are created when the user logs on to the new UniVerse account for the first time.
If the directory has not been set up as a UniVerse account, the system notifies the user that the account has not yet been set up. The user must answer the system prompts to create or update the VOC file.
The VOC file
The VOC file is created according to the restrictions specified in the UV.FLAVOR file. The master files used as templates for creating VOC files are in the file NEWACC.
If your VOC is being updated rather than created, replaced records are moved to the file &TEMP& to prevent them from being destroyed. The names of any records that are moved to &TEMP& are listed on your screen.
Note: The VOC file defines the UniVerse account. The contents of the VOC file limits access to commands and files in a UniVerse account. Users cannot access any files or commands not defined in the VOC file of the account in which they are working.
6-12
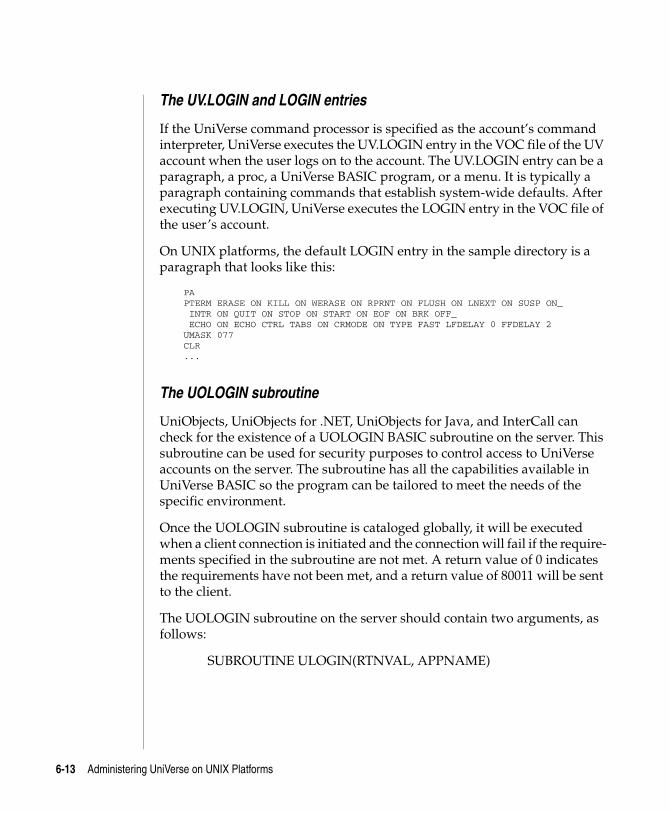
C:\Users\awaite\Documents\U2Doc\UniVerse\11.2\Source\Adminunix\Ch6.fm3/17/14
The UV.LOGIN and LOGIN entries
If the UniVerse command processor is specified as the account’s command interpreter, UniVerse executes the UV.LOGIN entry in the VOC file of the UV account when the user logs on to the account. The UV.LOGIN entry can be a paragraph, a proc, a UniVerse BASIC program, or a menu. It is typically a paragraph containing commands that establish system-wide defaults. After executing UV.LOGIN, UniVerse executes the LOGIN entry in the VOC file of the user’s account.
On UNIX platforms, the default LOGIN entry in the sample directory is a paragraph that looks like this:
PAPTERM ERASE ON KILL ON WERASE ON RPRNT ON FLUSH ON LNEXT ON SUSP ON_ INTR ON QUIT ON STOP ON START ON EOF ON BRK OFF_ ECHO ON ECHO CTRL TABS ON CRMODE ON TYPE FAST LFDELAY 0 FFDELAY 2UMASK 077CLR...
The UOLOGIN subroutine
UniObjects, UniObjects for .NET, UniObjects for Java, and InterCall can check for the existence of a UOLOGIN BASIC subroutine on the server. This subroutine can be used for security purposes to control access to UniVerse accounts on the server. The subroutine has all the capabilities available in UniVerse BASIC so the program can be tailored to meet the needs of the specific environment.
Once the UOLOGIN subroutine is cataloged globally, it will be executed when a client connection is initiated and the connection will fail if the require-ments specified in the subroutine are not met. A return value of 0 indicates the requirements have not been met, and a return value of 80011 will be sent to the client.
The UOLOGIN subroutine on the server should contain two arguments, as follows:
SUBROUTINE ULOGIN(RTNVAL, APPNAME)
6-13 Administering UniVerse on UNIX Platforms
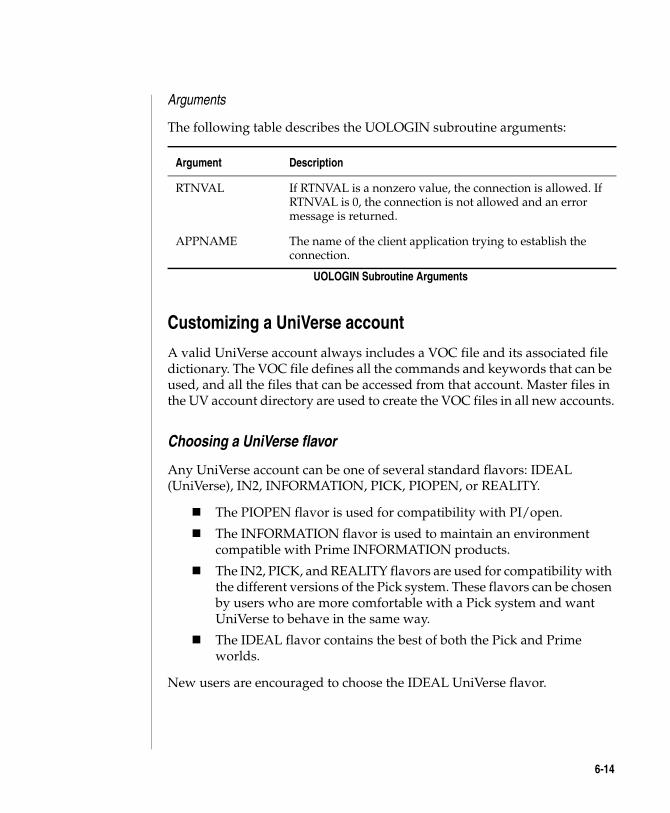
C:\Users\awaite\Documents\U2Doc\UniVerse\11.2\Source\Adminunix\Ch
Arguments
The following table describes the UOLOGIN subroutine arguments:
Customizing a UniVerse account
A valid UniVerse account always includes a VOC file and its associated file dictionary. The VOC file defines all the commands and keywords that can be used, and all the files that can be accessed from that account. Master files in the UV account directory are used to create the VOC files in all new accounts.
Choosing a UniVerse flavor
Any UniVerse account can be one of several standard flavors: IDEAL (UniVerse), IN2, INFORMATION, PICK, PIOPEN, or REALITY.
The PIOPEN flavor is used for compatibility with PI/open.
The INFORMATION flavor is used to maintain an environment compatible with Prime INFORMATION products.
The IN2, PICK, and REALITY flavors are used for compatibility with the different versions of the Pick system. These flavors can be chosen by users who are more comfortable with a Pick system and want UniVerse to behave in the same way.
The IDEAL flavor contains the best of both the Pick and Prime worlds.
New users are encouraged to choose the IDEAL UniVerse flavor.
Argument Description
RTNVAL If RTNVAL is a nonzero value, the connection is allowed. If RTNVAL is 0, the connection is not allowed and an error message is returned.
APPNAME The name of the client application trying to establish the connection.
UOLOGIN Subroutine Arguments
6-14
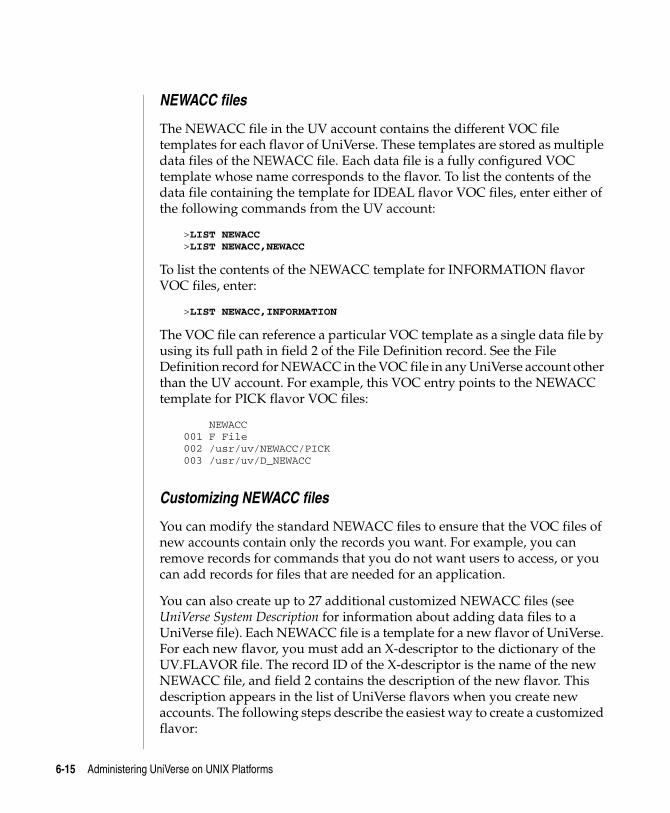
C:\Users\awaite\Documents\U2Doc\UniVerse\11.2\Source\Adminunix\Ch6.fm3/17/14
NEWACC files
The NEWACC file in the UV account contains the different VOC file templates for each flavor of UniVerse. These templates are stored as multiple data files of the NEWACC file. Each data file is a fully configured VOC template whose name corresponds to the flavor. To list the contents of the data file containing the template for IDEAL flavor VOC files, enter either of the following commands from the UV account:
>LIST NEWACC>LIST NEWACC,NEWACC
To list the contents of the NEWACC template for INFORMATION flavor VOC files, enter:
>LIST NEWACC,INFORMATION
The VOC file can reference a particular VOC template as a single data file by using its full path in field 2 of the File Definition record. See the File Definition record for NEWACC in the VOC file in any UniVerse account other than the UV account. For example, this VOC entry points to the NEWACC template for PICK flavor VOC files:
NEWACC 001 F File 002 /usr/uv/NEWACC/PICK 003 /usr/uv/D_NEWACC
Customizing NEWACC files
You can modify the standard NEWACC files to ensure that the VOC files of new accounts contain only the records you want. For example, you can remove records for commands that you do not want users to access, or you can add records for files that are needed for an application.
You can also create up to 27 additional customized NEWACC files (see UniVerse System Description for information about adding data files to a UniVerse file). Each NEWACC file is a template for a new flavor of UniVerse. For each new flavor, you must add an X-descriptor to the dictionary of the UV.FLAVOR file. The record ID of the X-descriptor is the name of the new NEWACC file, and field 2 contains the description of the new flavor. This description appears in the list of UniVerse flavors when you create new accounts. The following steps describe the easiest way to create a customized flavor:
6-15 Administering UniVerse on UNIX Platforms
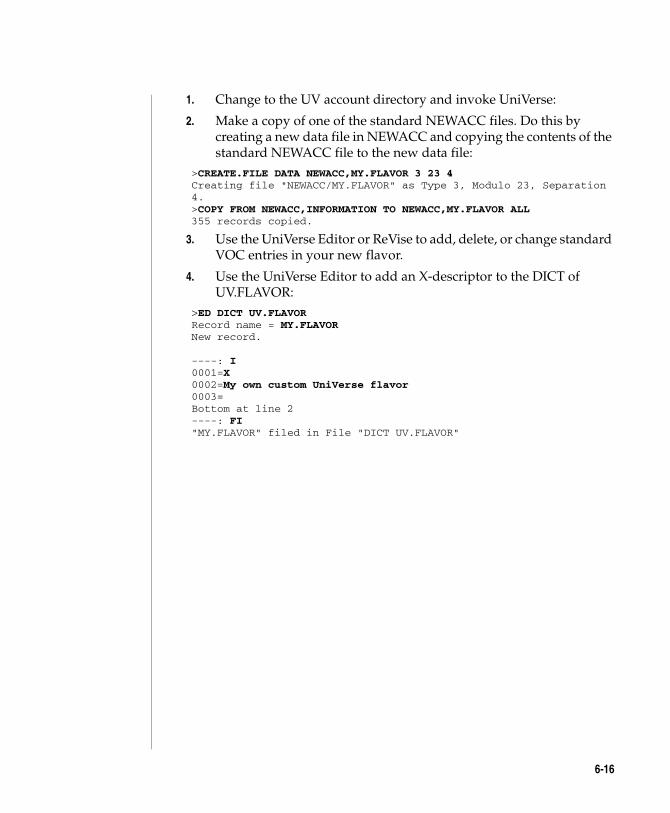
C:\Users\awaite\Documents\U2Doc\UniVerse\11.2\Source\Adminunix\Ch
1. Change to the UV account directory and invoke UniVerse:
2. Make a copy of one of the standard NEWACC files. Do this by creating a new data file in NEWACC and copying the contents of the standard NEWACC file to the new data file:
>CREATE.FILE DATA NEWACC,MY.FLAVOR 3 23 4 Creating file "NEWACC/MY.FLAVOR" as Type 3, Modulo 23, Separation 4. >COPY FROM NEWACC,INFORMATION TO NEWACC,MY.FLAVOR ALL 355 records copied.
3. Use the UniVerse Editor or ReVise to add, delete, or change standard VOC entries in your new flavor.
4. Use the UniVerse Editor to add an X-descriptor to the DICT of UV.FLAVOR:
>ED DICT UV.FLAVOR Record name = MY.FLAVOR New record. ----: I 0001=X 0002=My own custom UniVerse flavor 0003= Bottom at line 2 ----: FI "MY.FLAVOR" filed in File "DICT UV.FLAVOR"
6-16
C:\UsMarch
6Administering UniData on Windows NT or Windows 20000
7 Chapter
ers\aw 17, 201
Beta Beta Beta Beta Beta Beta Beta Beta Beta Beta Beta Beta Beta Beta Beta Beta Beta Beta Beta Beta
Chapter 7: Transferring accounts
Transferring non-UniVerse accounts . . . . . . . . . . . 7-3Manually restoring accounts from tape . . . . . . . . . . 7-6 Restoring accounts to UNIX systems . . . . . . . . . . 7-6Transferring UniVerse accounts from UNIX to Windows platforms . 7-10 Creating the backup image . . . . . . . . . . . . . 7-10 Transferring the backup image . . . . . . . . . . . . 7-11 Restoring the backup image . . . . . . . . . . . . . 7-11 File naming conventions . . . . . . . . . . . . . . 7-12
aite\Documents\U2Doc\UniVerse\11.2\Source\Adminunix\Ch7TOC.fm4 2:12 pm Administering UniData on Windows NT or Windows 2000
C:\Users\awaite\Documents\U2Doc\UniVerse\11.2\Source\Adminunix\Ch7.fm3/17/14
This chapter describes:
How to transfer non-UniVerse accounts to UniVerse
How to transfer UniVerse accounts from UNIX to Windows platforms
7-2 Administering UniVerse on UNIX Platforms
C:\Users\awaite\Documents\U2Doc\UniVerse\11.2\Source\Adminunix\Ch
Transferring non-UniVerse accountsUniVerse provides two commands for transferring non-UniVerse accounts to UniVerse:
The acct.restore command transfers an account from a Pick system ACCOUNT-SAVE tape to a UniVerse PICK flavor account.
The magrst command transfers an account from a Prime INFORMATION MAGSAV tape to a UniVerse INFORMATION flavor account.
In both cases the transfer and conversion of data has five steps:
1. Make an ACCOUNT-SAVE or MAGSAV tape.
2. Load the account onto the UniVerse system.
3. Convert the account from its original format to UniVerse format.
4. Compile the converted UniVerse dictionaries.
5. Convert and compile the UniVerse BASIC programs, recataloging them if necessary.
You can use one of two methods to transfer accounts:
Use the U2 Extensible Administration Tool.
Enter the commands from the operating system level.
First we describe how to use the U2 Extensible Administration Tool to transfer Pick and Prime INFORMATION accounts from tape. Later sections describe how to use operating system commands to transfer Pick and Prime INFORMATION accounts.
You can also use the Account Conversion menu, displayed by the CONVERT.ACCOUNT command, to convert the transferred accounts.
7-3

C:\Users\awaite\Documents\U2Doc\UniVerse\11.2\Source\Adminunix\Ch7.fm3/17/14
To transfer non-UniVerse accounts to UniVerse, choose Import from the U2 Extensible Administration Tool. The Import Account window appears, listing all the information required to transfer an account to UniVerse, as shown in the following example:
To transfer a non-UniVerse account to UniVerse:
1. Select one of the following account types from the Type list:
MAGRST
PICK
REALITY (Microdata)
IN8000
IN5000
The option you choose determines which import program is used and what tape positioning is required.
7-4 Administering UniVerse on UNIX Platforms
C:\Users\awaite\Documents\U2Doc\UniVerse\11.2\Source\Adminunix\Ch
2. Select the Multiple Save Format check box, if required. This option is available only if you chose REALITY (Microdata) as the account type.
3. Select the tape device to use from the Tape Device list. When you select a tape device, the Input Block Size and Type fields are populated with the settings stored in the &DEVICE& file.
4. Enter an alternative block size in the Input Block Size field, if required.
5. Choose one of these destinations for the transferred account:
Select an account from the Account list. The account path is entered in the Path field.
Enter a path in the Path field, or click Browse to search the system for a suitable directory.
6. Select the Use Type 19 Files check box, if required. This setting determines whether the account is restored using type 19 files or type 1 files. The default setting is unchecked, for example, type 1 files are used.
7. Click Import. The import begins and the results of the transfer appear in the UniVerse Command Output window.
8. Click Close to close this window.
7-5

C:\Users\awaite\Documents\U2Doc\UniVerse\11.2\Source\Adminunix\Ch7.fm3/17/14
Manually restoring accounts from tapeYou can also restore non-UniVerse accounts directly from tape. You may need to use this method if you require additional import options that are not available in the UniVerse Admin Import option.
Restoring accounts to UNIX systems
You can manually restore Pick or Prime INFORMATION accounts from tape to a UNIX server.
If you are restoring a single-reel ACCOUNT-SAVE or MAGSAV tape, follow these steps:
1. Log on as a UniVerse Administrator.
2. Create a new directory to be the parent directory for the account.
3. Move to that directory.
4. Use the acct.restore and magrst commands. acct.restore loads a Pick account and magrst loads a Prime INFORMATION account. These commands create a UniVerse account in the current directory as well as subdirectories that contain the accounts loaded from the tape.
If you are restoring a multireel ACCOUNT-SAVE and MAGSAV tape, you need to use the tapein command.
Using acct.restore and magrst
The acct.restore command transfers a Pick system ACCOUNT-SAVE tape to a UniVerse PICK flavor account on a UNIX server.
The magrst command transfers a Prime INFORMATION MAGSAV tape to a UniVerse INFORMATION flavor account on a UNIX server.
These commands are in the bin directory of the UV account directory. You must run these commands from the operating system level. They have the following syntax:
acct.restore [ options ]magrst [ options
7-6 Administering UniVerse on UNIX Platforms
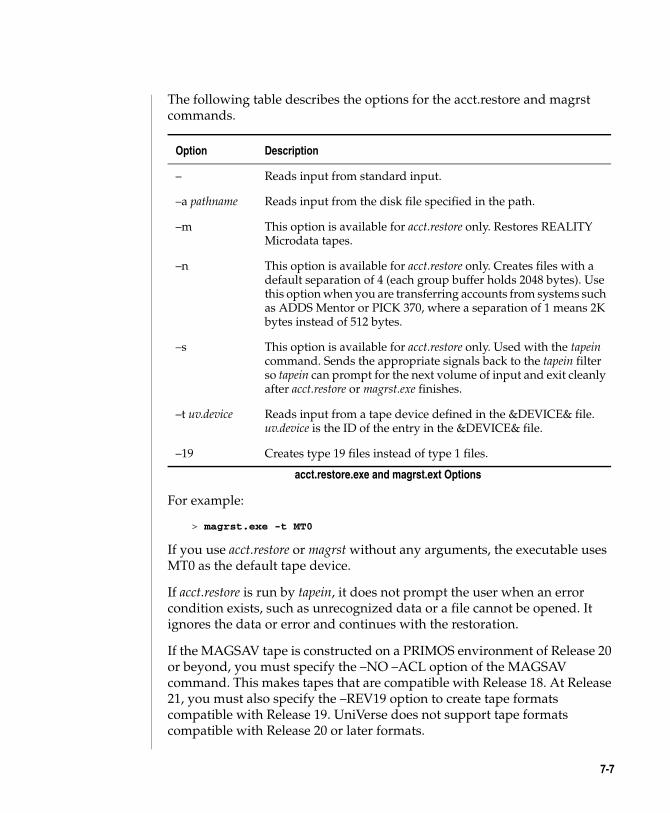
C:\Users\awaite\Documents\U2Doc\UniVerse\11.2\Source\Adminunix\Ch
The following table describes the options for the acct.restore and magrst commands.
For example:
> magrst.exe -t MT0
If you use acct.restore or magrst without any arguments, the executable uses MT0 as the default tape device.
If acct.restore is run by tapein, it does not prompt the user when an error condition exists, such as unrecognized data or a file cannot be opened. It ignores the data or error and continues with the restoration.
If the MAGSAV tape is constructed on a PRIMOS environment of Release 20 or beyond, you must specify the –NO –ACL option of the MAGSAV command. This makes tapes that are compatible with Release 18. At Release 21, you must also specify the –REV19 option to create tape formats compatible with Release 19. UniVerse does not support tape formats compatible with Release 20 or later formats.
Option Description
– Reads input from standard input.
–a pathname Reads input from the disk file specified in the path.
–m This option is available for acct.restore only. Restores REALITY Microdata tapes.
–n This option is available for acct.restore only. Creates files with a default separation of 4 (each group buffer holds 2048 bytes). Use this option when you are transferring accounts from systems such as ADDS Mentor or PICK 370, where a separation of 1 means 2K bytes instead of 512 bytes.
–s This option is available for acct.restore only. Used with the tapein command. Sends the appropriate signals back to the tapein filter so tapein can prompt for the next volume of input and exit cleanly after acct.restore or magrst.exe finishes.
–t uv.device Reads input from a tape device defined in the &DEVICE& file. uv.device is the ID of the entry in the &DEVICE& file.
–19 Creates type 19 files instead of type 1 files.
acct.restore.exe and magrst.ext Options
7-7
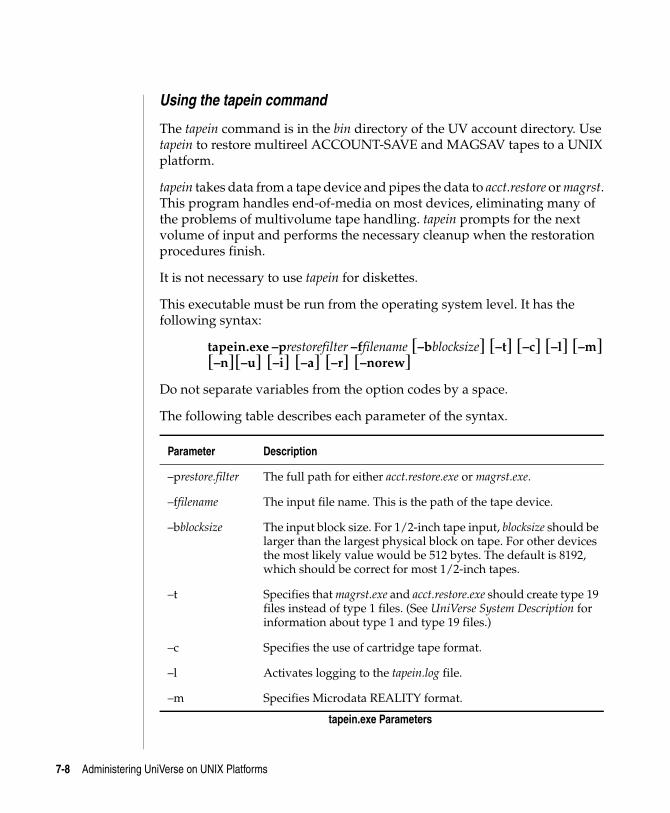
C:\Users\awaite\Documents\U2Doc\UniVerse\11.2\Source\Adminunix\Ch7.fm3/17/14
Using the tapein command
The tapein command is in the bin directory of the UV account directory. Use tapein to restore multireel ACCOUNT-SAVE and MAGSAV tapes to a UNIX platform.
tapein takes data from a tape device and pipes the data to acct.restore or magrst. This program handles end-of-media on most devices, eliminating many of the problems of multivolume tape handling. tapein prompts for the next volume of input and performs the necessary cleanup when the restoration procedures finish.
It is not necessary to use tapein for diskettes.
This executable must be run from the operating system level. It has the following syntax:
tapein.exe –prestorefilter –ffilename [–bblocksize] [–t] [–c] [–l] [–m] [–n][–u] [–i] [–a] [–r] [–norew]
Do not separate variables from the option codes by a space.
The following table describes each parameter of the syntax.
Parameter Description
–prestore.filter The full path for either acct.restore.exe or magrst.exe.
–ffilename The input file name. This is the path of the tape device.
–bblocksize The input block size. For 1/2-inch tape input, blocksize should be larger than the largest physical block on tape. For other devices the most likely value would be 512 bytes. The default is 8192, which should be correct for most 1/2-inch tapes.
–t Specifies that magrst.exe and acct.restore.exe should create type 19 files instead of type 1 files. (See UniVerse System Description for information about type 1 and type 19 files.)
–c Specifies the use of cartridge tape format.
–l Activates logging to the tapein.log file.
–m Specifies Microdata REALITY format.
tapein.exe Parameters
7-8 Administering UniVerse on UNIX Platforms
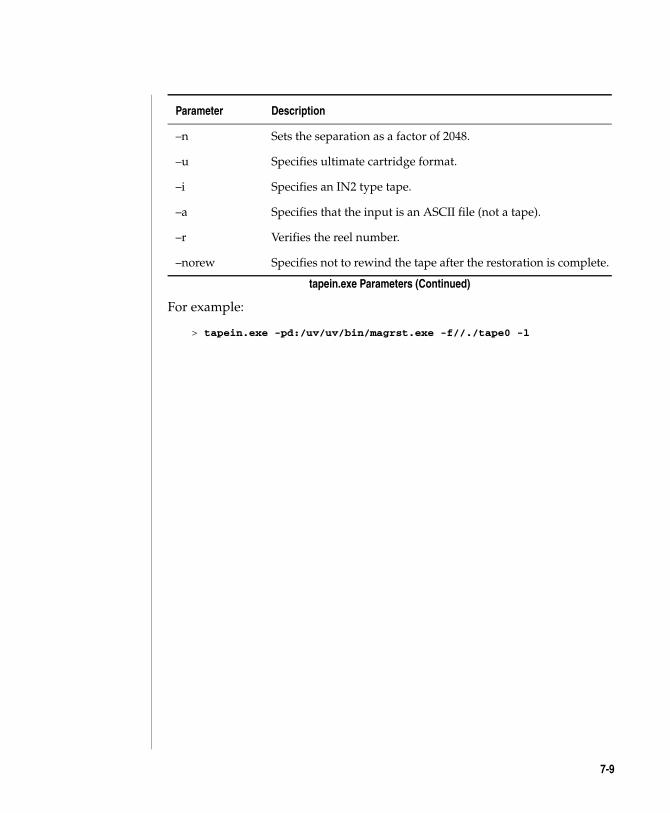
C:\Users\awaite\Documents\U2Doc\UniVerse\11.2\Source\Adminunix\Ch
For example:
> tapein.exe -pd:/uv/uv/bin/magrst.exe -f//./tape0 -l
–n Sets the separation as a factor of 2048.
–u Specifies ultimate cartridge format.
–i Specifies an IN2 type tape.
–a Specifies that the input is an ASCII file (not a tape).
–r Verifies the reel number.
–norew Specifies not to rewind the tape after the restoration is complete.
Parameter Description
tapein.exe Parameters (Continued)
7-9
C:\Users\awaite\Documents\U2Doc\UniVerse\11.2\Source\Adminunix\Ch7.fm3/17/14
Transferring UniVerse accounts from UNIX to Windows platformsThis section describes how to transfer UniVerse accounts from a UNIX system to a Windows platform. You can transfer accounts using the uvbackup and uvrestore commands. This can be done using a tape device or with the FTP utility. The process for both is similar. It involves:
1. Creating the backup image using uvbackup (UNIX)
2. Transferring the backup image to the target (Windows) machine through tape or FTP
3. Restoring the backup image using uvrestore (Windows Platforms)
Note: The uvbackup and uvrestore commands must use the relative path in the syntax for the restoration of the accounts to work when restoring them onto a Windows system.
Creating the backup image
Before you create the backup image you should change to the directory containing the file or directory that you want to transfer. For example, if you have the account, /usr/account/my_account, change to the directory /usr/account.
You can use the uvbackup utility to create the backup image in a file or directly onto a tape. In both cases, use the UNIX find utility in the command line.
To back up the account my_account to a file, use the following command:
# find my_account –print | uvbackup –f –v – >backupfile
In this example the output is sent to a file called backupfile.
To back up the account my_account to tape, use the following command:
# find my_account –print | uvbackup –f –v – –t MT0
In this example the output is sent to a valid UniVerse tape device defined in the &DEVICE& file.
7-10 Administering UniVerse on UNIX Platforms
C:\Users\awaite\Documents\U2Doc\UniVerse\11.2\Source\Adminunix\Ch
Transferring the backup image
If you save the backup image to a disk file, use FTP to transfer the file to the target machine. Since the disk file contains binary data, it is important to specify binary in your FTP utility before the transfer to ensure the data is not corrupted.
If you save the backup image to tape, put the tape in the tape drive of the target machine.
Restoring the backup image
Change to the directory where the account will be restored.
Use the uvrestore command to restore the backup. To restore an account backed up to a disk file, use the following command:
uvrestore –v backupfile
backupfile is the name of the disk file.
To restore a backup made to a tape device, use the following command:
uvrestore –v –t device
device is the name of a UniVerse tape device in the &DEVICE& file on the target system.
After the account is restored, it is a good idea to log on to the account and run the UPDATE.ACCOUNT command. This ensures that all VOC entries are updated. You should also recompile, and, if necessary, recatalog all UniVerse BASIC programs.
If the account contains applications that use absolute paths, they may not run correctly on Windows platforms, as these applications may be in different places. You may need to modify and recompile all such programs.
If the account relies on cataloged routines that are not part of the account, they may not be found on the target machine. You must transfer these separately, recompiling, and installing them in the correct location.
If the account relies on any database files outside the directory where the account resides, they are not found on the target system. These must be transferred separately and installed in the correct location.
7-11
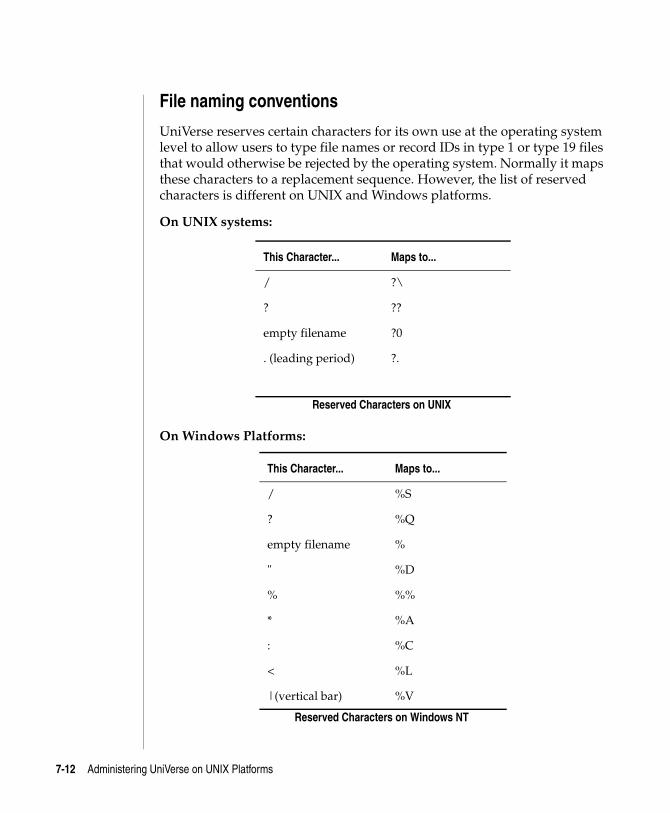
C:\Users\awaite\Documents\U2Doc\UniVerse\11.2\Source\Adminunix\Ch7.fm3/17/14
File naming conventions
UniVerse reserves certain characters for its own use at the operating system level to allow users to type file names or record IDs in type 1 or type 19 files that would otherwise be rejected by the operating system. Normally it maps these characters to a replacement sequence. However, the list of reserved characters is different on UNIX and Windows platforms.
On UNIX systems:
On Windows Platforms:
This Character... Maps to...
/ ?\
? ??
empty filename ?0
. (leading period) ?.
Reserved Characters on UNIX
This Character... Maps to...
/ %S
? %Q
empty filename %
" %D
% %%
* %A
: %C
< %L
|(vertical bar) %V
Reserved Characters on Windows NT
7-12 Administering UniVerse on UNIX Platforms
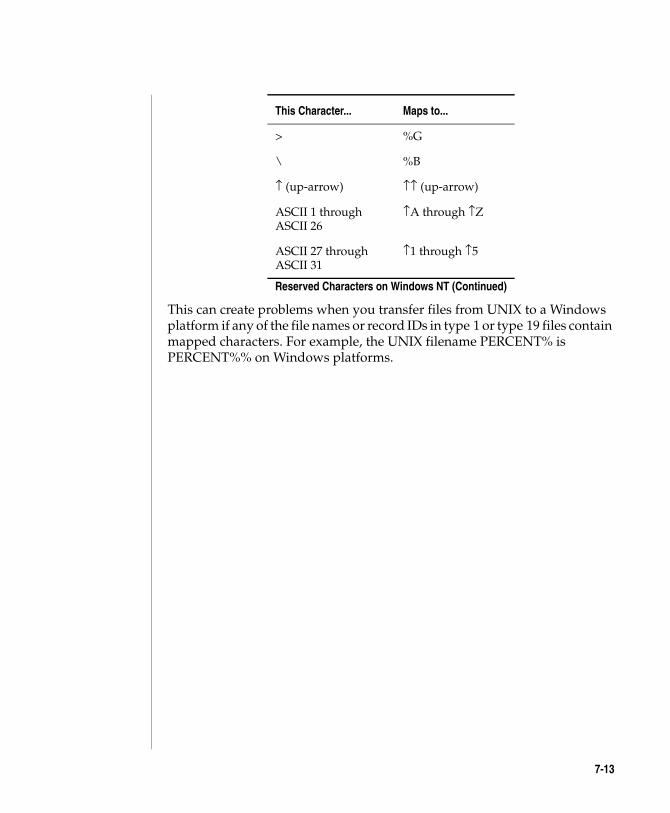
C:\Users\awaite\Documents\U2Doc\UniVerse\11.2\Source\Adminunix\Ch
This can create problems when you transfer files from UNIX to a Windows platform if any of the file names or record IDs in type 1 or type 19 files contain mapped characters. For example, the UNIX filename PERCENT% is PERCENT%% on Windows platforms.
> %G
\ %B
↑ (up-arrow) ↑↑ (up-arrow)
ASCII 1 through ASCII 26
↑A through ↑Z
ASCII 27 through ASCII 31
↑1 through ↑5
This Character... Maps to...
Reserved Characters on Windows NT (Continued)
7-13
C:\UsMarch
7Administering UniData on Windows NT or Windows 20000
8 Chapter
ers\aw 17, 201
Beta Beta Beta Beta Beta Beta Beta Beta Beta Beta Beta Beta Beta Beta Beta Beta Beta Beta Beta Beta
Chapter 8: UNIX system security
Security overview . . . . . . . . . . . . . . . . . . 8-3 User permissions and file permissions . . . . . . . . . 8-3File permission modes . . . . . . . . . . . . . . . . 8-5 Using the umask command . . . . . . . . . . . . . 8-5Protecting user accounts with passwords . . . . . . . . . . 8-6 Making a nonlogin account . . . . . . . . . . . . . 8-7Using groups effectively. . . . . . . . . . . . . . . . 8-8 Defining groups . . . . . . . . . . . . . . . . . 8-8VOC file security . . . . . . . . . . . . . . . . . . 8-10Security subroutines . . . . . . . . . . . . . . . . . 8-11
aite\Documents\U2Doc\UniVerse\11.2\Source\Adminunix\Ch8TOC.fm4 2:12 pm Administering UniData on Windows NT or Windows 2000
C:\Users\awaite\Documents\U2Doc\UniVerse\11.2\Source\Adminunix\Ch
UNIX system securityOn UNIX systems, you maintain system security using the Accounts option of the U2 Extensible Administration Tool and setting UNIX file permissions with the umask and chmod commands.
8-2
C:\Users\awaite\Documents\U2Doc\UniVerse\11.2\Source\Adminunix\Ch8.fm3/17/14
Security overviewSecurity on the UNIX operating system is configurable by installation and by user. Basic file protection is provided by mode information associated with each file when it is created. This mode information specifies permission to read, write, or execute the file. Permission is specified independently for the owner of the file, for members of the owner’s group, and for all other users.
The user password and the file permission mask in the user’s .profile file, .login file, or the UniVerse account’s LOGIN entry are the chief mechanisms by which security is implemented.
In addition to the standard UNIX security mechanisms, security can be added to a UniVerse account. This includes editing the VOC file, restricting access to it, and controlling users’ access to specific commands.
UniVerse SQL tables have their own security mechanism.UniVerse SQL security is described in UniVerse SQL Administration for DBAs.
User permissions and file permissions
It is important to distinguish between permissions that are set for a user and permissions that are set for a UniVerse account. When you use the U2 Extensible Administration Tool to change permissions on files in a UniVerse account, you actually change the permissions on the directory containing the UniVerse account and the permissions on all the files and subdirectories located in that directory.
File permissions on a user’s files and directories are set when you add the user to the system. They are also determined when a UniVerse account is created. Default file permissions are set by the umask specification in a user’s .profile file or in a UniVerse account’s LOGIN entry. The umask specification sets permissions for all files and directories subsequently created by that user.
Users can set or change their own umask specification by editing the .profile file in their home directory. They can use the UMASK command in UniVerse. You can set or change file permissions on existing files and directories from a UNIX shell using the chmod(1) command.
Users can set or change the passwords for their own login accounts with either the UNIX command passwd(1) or the UniVerse command PASSWD.
8-3 Administering UniVerse on UNIX Platforms
C:\Users\awaite\Documents\U2Doc\UniVerse\11.2\Source\Adminunix\Ch
Note: The root and uvadm accounts should be assigned passwords. The root password is important because root has essentially unlimited access to all system resources. An untrained user logged on as root can do a great deal of damage.
8-4
C:\Users\awaite\Documents\U2Doc\UniVerse\11.2\Source\Adminunix\Ch8.fm3/17/14
File permission modesUniVerse file permissions are controlled by UNIX file permissions. Refer to your UNIX documentation for descriptions of UNIX file permissions.
Specifying file permissions for UniVerse account files does two things:
It sets the permissions for all files in the directory containing the UniVerse account. It also sets the same permissions for all subdirectories (and their dependencies) in the account’s directory.
It sets the umask for the owner of the UniVerse account so that all files subsequently created in that account are given the permissions assigned to the owner of the account.
You usually set file permissions for a UniVerse account when you create it. You can also use the U2 Extensible Administration Tool to change file permissions on an existing account.
Do not change permissions on the files in the UV account directory.
Using the umask command
Permission to access files created by a user is set by the file creation mask umask, specified in the user’s .profile file or in a UniVerse account’s LOGIN entry.
The UniVerse UMASK command performs the same function as the UNIX umask command.
The default umask is set to 022 (octal) so that only the owner can write to the file but all users can read it.
8-5 Administering UniVerse on UNIX Platforms
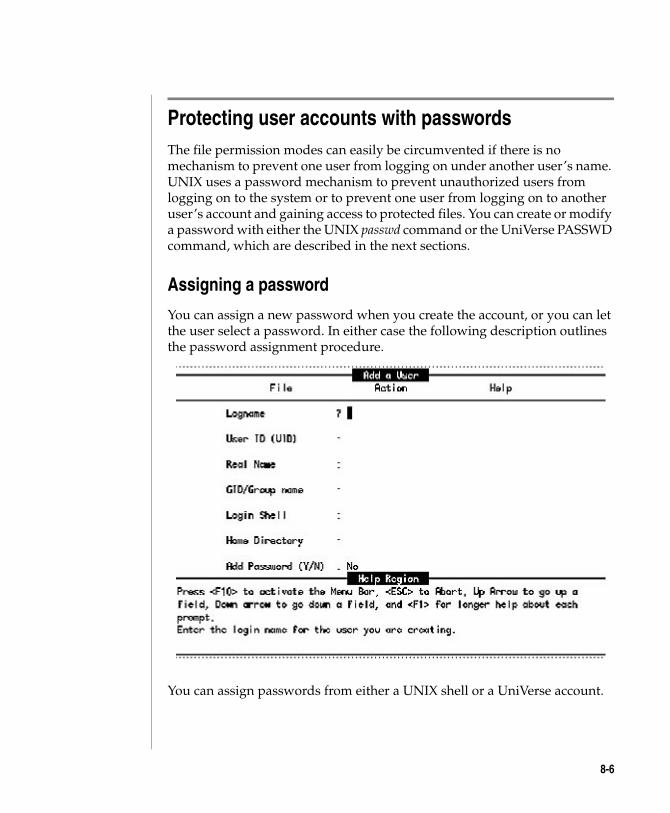
C:\Users\awaite\Documents\U2Doc\UniVerse\11.2\Source\Adminunix\Ch
Protecting user accounts with passwordsThe file permission modes can easily be circumvented if there is no mechanism to prevent one user from logging on under another user’s name. UNIX uses a password mechanism to prevent unauthorized users from logging on to the system or to prevent one user from logging on to another user’s account and gaining access to protected files. You can create or modify a password with either the UNIX passwd command or the UniVerse PASSWD command, which are described in the next sections.
Assigning a password
You can assign a new password when you create the account, or you can let the user select a password. In either case the following description outlines the password assignment procedure.
You can assign passwords from either a UNIX shell or a UniVerse account.
8-6
C:\Users\awaite\Documents\U2Doc\UniVerse\11.2\Source\Adminunix\Ch8.fm3/17/14
Making a nonlogin account
To make an account that no one can log on to, you must be logged on as root. Use an editor to replace the current password encryption in the password file with a string to which no password encrypts. The most common string is an asterisk ( * ) or a string containing blanks such as **NO LOGIN**.
8-7 Administering UniVerse on UNIX Platforms
C:\Users\awaite\Documents\U2Doc\UniVerse\11.2\Source\Adminunix\Ch
Using groups effectivelyPasswords are a basic mechanism for restricting access to the system itself. File permission modes let you to define restrictions on who can see and use certain files. They also let you restrict access to UniVerse accounts. However, unless you define groups of users, file permission modes are of limited use. They allow a single user to have private files, but they do not allow certain files to be shared by a specified group of users. Groups allow you to take full advantage of the security system.
Group IDs let the members of one group protect their files on the basis of group membership—only members of the group can read and execute the files. You can give users of a UniVerse account different permissions for files in a group account and for their own files.
Defining groups
Defining groups is a two-step process:
1. Define the group name and its associated group ID number.
2. Assign the group ID number to each user.
You can use the System Administration menus to define group names and ID numbers and to assign group ID numbers to users (see Maintaining users and user groups in Appendix A, “Appendix A: UniVerse system administration menus”).
Group permission is an important part of file system security in the UniVerse environment. Unlike standard UNIX accounts, which normally belong to individual users, UniVerse accounts are often used by a group of people performing the same function. It therefore may make sense for the users of the same UniVerse account to be defined as members of the same UNIX group.
8-8
C:\Users\awaite\Documents\U2Doc\UniVerse\11.2\Source\Adminunix\Ch8.fm3/17/14
One useful option is to create a set of related UNIX login accounts. For example, assume that you have a sales department whose members want to share the same UniVerse account. However, they would also like to have private files. You might make the following entries in /etc/passwd:
sales::100:24:Sales dept:/u1/sales:/usr/uv/bin/uv jim::101:24:Jim Hunter:/u1/sales:/usr/uv/bin/uv markj::102:24:Mark Green:/u1/sales:/usr/uv/bin/uv
The following entry is added to /etc/group:
sales::24:sales,jim,mark
Because Jim and Mark have the same home directory as sales, they have the same VOC file and hence the same UniVerse account. The default umask for the sales account should be set to 007 to allow access to the account’s files to all members of the sales group.
Individual users could set the mode for their own private files to 600 by using a umask of 077, and restrict access to these files to themselves.
Note: If you use the System Administration menus to change file permissions, ownership, or group ownership on a UniVerse account, the changes are applied to all files and subdirectories in the account directory.
8-9 Administering UniVerse on UNIX Platforms
C:\Users\awaite\Documents\U2Doc\UniVerse\11.2\Source\Adminunix\Ch
VOC file securityIn addition to the standard UNIX security mechanisms, you can exercise a degree of control over the actions of users who are logged on directly to the UniVerse environment by editing the contents of the VOC file for that account, and then assigning UNIX file permissions that prevent a user from writing the VOC file. Because the VOC file contains all the verbs and commands that a user can execute, you can keep a user from executing unwanted commands simply by removing them from the VOC file.
Note: If you want to create a secure installation in which only privileged users have access to the underlying UNIX operating system, you must define /usr/uv/bin/uv as the account’s login shell. If uv is invoked from a .profile file, interrupting the execution of the .profile (for example, by pressing the Break key) leaves the user in a UNIX shell.
8-10
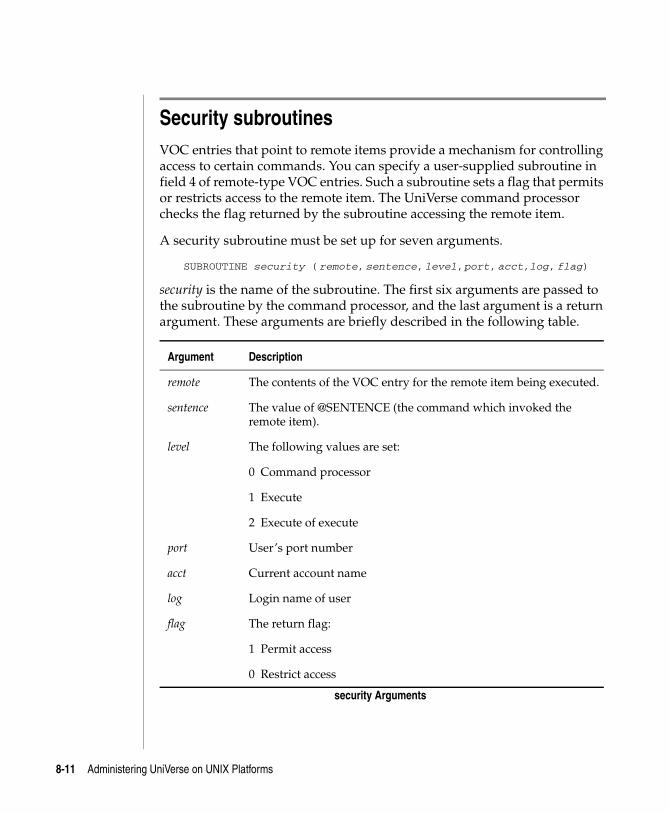
C:\Users\awaite\Documents\U2Doc\UniVerse\11.2\Source\Adminunix\Ch8.fm3/17/14
Security subroutinesVOC entries that point to remote items provide a mechanism for controlling access to certain commands. You can specify a user-supplied subroutine in field 4 of remote-type VOC entries. Such a subroutine sets a flag that permits or restricts access to the remote item. The UniVerse command processor checks the flag returned by the subroutine accessing the remote item.
A security subroutine must be set up for seven arguments.
SUBROUTINE security ( remote, sentence, level, port, acct,log, flag)
security is the name of the subroutine. The first six arguments are passed to the subroutine by the command processor, and the last argument is a return argument. These arguments are briefly described in the following table.
Argument Description
remote The contents of the VOC entry for the remote item being executed.
sentence The value of @SENTENCE (the command which invoked the remote item).
level The following values are set:
0 Command processor
1 Execute
2 Execute of execute
port User’s port number
acct Current account name
log Login name of user
flag The return flag:
1 Permit access
0 Restrict access
security Arguments
8-11 Administering UniVerse on UNIX Platforms
C:\Users\awaite\Documents\U2Doc\UniVerse\11.2\Source\Adminunix\Ch
Upon return from the subroutine, the command processor checks the return flag. If the flag is set to 1, the command pointed to by the R-type VOC record is executed. If the flag is set to 0, access to the command is denied.
An effective way to use security subroutines is to put commands to which you want to restrict access in the UV account’s VOCLIB file and put remote pointers to them in users’ VOC files. Then add the appropriate security subroutines to the new remote pointers.
8-12

C:\UsMarch
1Administering UniData on Windows NT or Windows 20000
9 Chapter
ers\aw 17, 201
Beta Beta Beta Beta Beta Beta Beta Beta Beta Beta Beta Beta Beta Beta Beta Beta Beta Beta Beta Beta
Chapter 9: Managing locks
Record locks and file locks . . . . . . . . . . . . . . . 9-3 Shared record lock . . . . . . . . . . . . . . . . 9-4 Update record lock . . . . . . . . . . . . . . . . 9-5 Shared file lock . . . . . . . . . . . . . . . . . 9-6 Intent file lock . . . . . . . . . . . . . . . . . . 9-6 Exclusive file lock . . . . . . . . . . . . . . . . 9-7Transactions and locks . . . . . . . . . . . . . . . . 9-8Managing locks with the U2 Extensible Administration tool . . . 9-9 File and record locks . . . . . . . . . . . . . . . 9-11 Group locks . . . . . . . . . . . . . . . . . . 9-12 Clearing locks . . . . . . . . . . . . . . . . . . 9-12Managing deadlocks . . . . . . . . . . . . . . . . . 9-14 Starting and stopping the deadlock manager . . . . . . . 9-18 Using the uvdlockd command . . . . . . . . . . . . 9-18 Resolving deadlocks automatically . . . . . . . . . . 9-19The uvcleanupd daemon . . . . . . . . . . . . . . . 9-21 The uvcleanupd.config file . . . . . . . . . . . . . 9-21 uvcleanupd command . . . . . . . . . . . . . . . 9-22
aite\Documents\U2Doc\UniVerse\11.2\Source\Adminunix\Ch9TOC.fm4 2:12 pm Administering UniData on Windows NT or Windows 2000
C:\Users\awaite\Documents\U2Doc\UniVerse\11.2\Source\Adminunix\Ch
Certain UniVerse BASIC statements and UniVerse commands set locks on UniVerse files. The type of lock determines what a user or process can access while other users and processes have locks on records or files. You can monitor and clear UniVerse record and file locks with the U2 Extensible Administration Tool Locks option, and you can resolve lock conflicts with the Deadlocks option.
9-2
C:\Users\awaite\Documents\U2Doc\UniVerse\11.2\Source\Adminunix\Ch9.fm3/17/14
Record locks and file locksUniVerse record and file locks control access to records and files among concurrent user processes. To control access to records and files, UniVerse supports two levels of lock granularity:
Fine granularity of record locks
Coarse granularity of file locks
Granularity refers to the level at which a process or program acquires a lock. Record locks affect a smaller element, the record, and provide a fine level of granularity, whereas file locks affect a larger element, the file, and produce a coarse level of granularity.
Lock compatibility determines what a user’s process can access while other processes have locks on records or files. Record locks allow more compatibility because they coexist with other record locks, thus allowing more transactions to take place concurrently. However these “finer-grained” locks provide a lower isolation level. File locks enforce a high isolation level, more concurrency control, but less compatibility. For information about transaction processing and isolation levels, see UniVerse BASIC.
Lock compatibility decreases and isolation level increases as strength and granularity increase. This may increase the possibility of deadlocks at high isolation levels. Within each granularity level, the strength of the lock can vary. UniVerse supports the following locks (in order of increasing strength):
Shared record lock
Update record lock
Shared file lock
Intent file lock
Exclusive file lock
The locks become less compatible as the granularity, strength, and number of locks increase. Therefore the number of lock conflicts increase, and fewer users can access records and files concurrently. Weaker locks can always be promoted to stronger locks or escalated to a coarser level of granularity if needed.
9-3 Administering UniVerse on UNIX Platforms
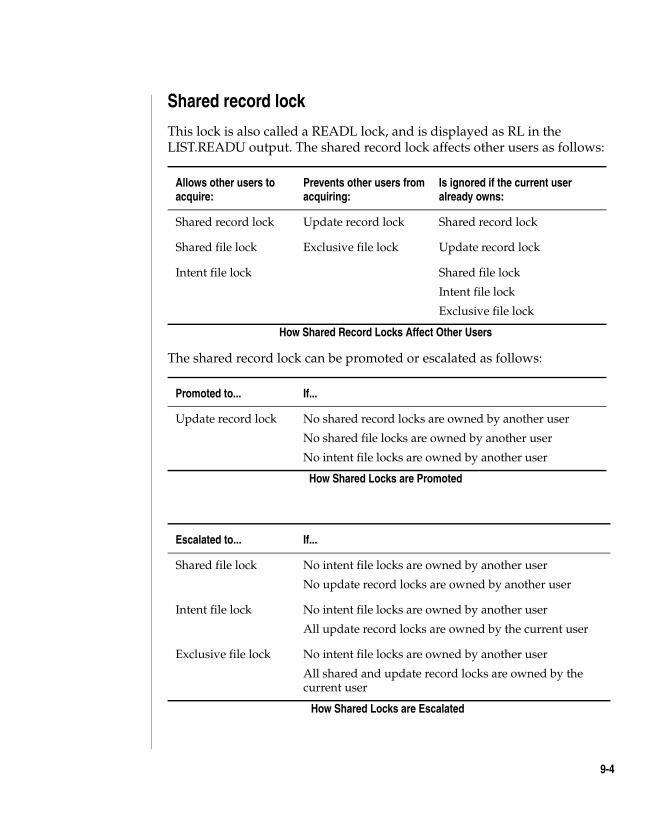
C:\Users\awaite\Documents\U2Doc\UniVerse\11.2\Source\Adminunix\Ch
Shared record lock
This lock is also called a READL lock, and is displayed as RL in the LIST.READU output. The shared record lock affects other users as follows:
The shared record lock can be promoted or escalated as follows:
Allows other users to acquire:
Prevents other users from acquiring:
Is ignored if the current user already owns:
Shared record lock Update record lock Shared record lock
Shared file lock Exclusive file lock Update record lock
Intent file lock Shared file lock
Intent file lock
Exclusive file lock
How Shared Record Locks Affect Other Users
Promoted to... If...
Update record lock No shared record locks are owned by another user
No shared file locks are owned by another user
No intent file locks are owned by another user
How Shared Locks are Promoted
Escalated to... If...
Shared file lock No intent file locks are owned by another user
No update record locks are owned by another user
Intent file lock No intent file locks are owned by another user
All update record locks are owned by the current user
Exclusive file lock No intent file locks are owned by another user
All shared and update record locks are owned by the current user
How Shared Locks are Escalated
9-4
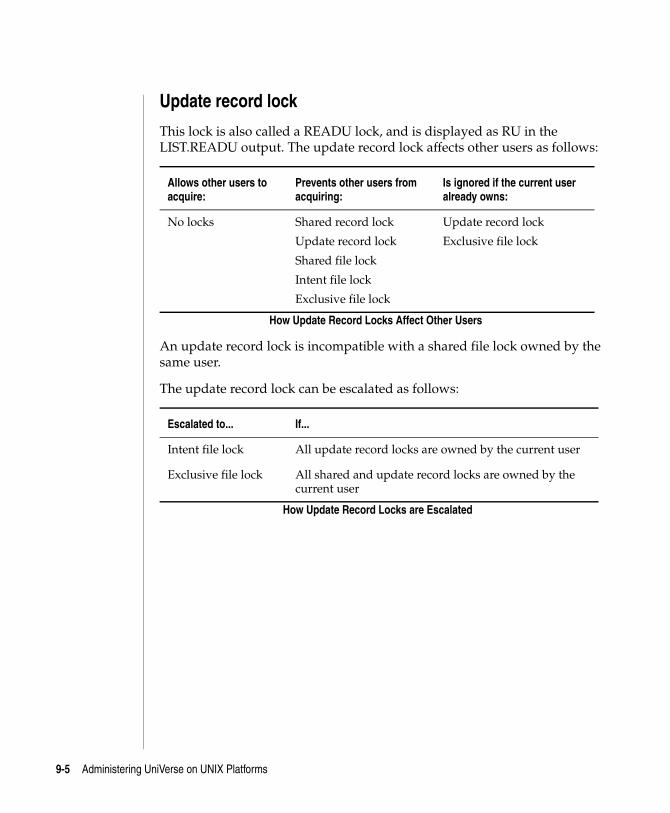
C:\Users\awaite\Documents\U2Doc\UniVerse\11.2\Source\Adminunix\Ch9.fm3/17/14
Update record lock
This lock is also called a READU lock, and is displayed as RU in the LIST.READU output. The update record lock affects other users as follows:
An update record lock is incompatible with a shared file lock owned by the same user.
The update record lock can be escalated as follows:
Allows other users to acquire:
Prevents other users from acquiring:
Is ignored if the current user already owns:
No locks Shared record lock
Update record lock
Shared file lock
Intent file lock
Exclusive file lock
Update record lock
Exclusive file lock
How Update Record Locks Affect Other Users
Escalated to... If...
Intent file lock All update record locks are owned by the current user
Exclusive file lock All shared and update record locks are owned by the current user
How Update Record Locks are Escalated
9-5 Administering UniVerse on UNIX Platforms
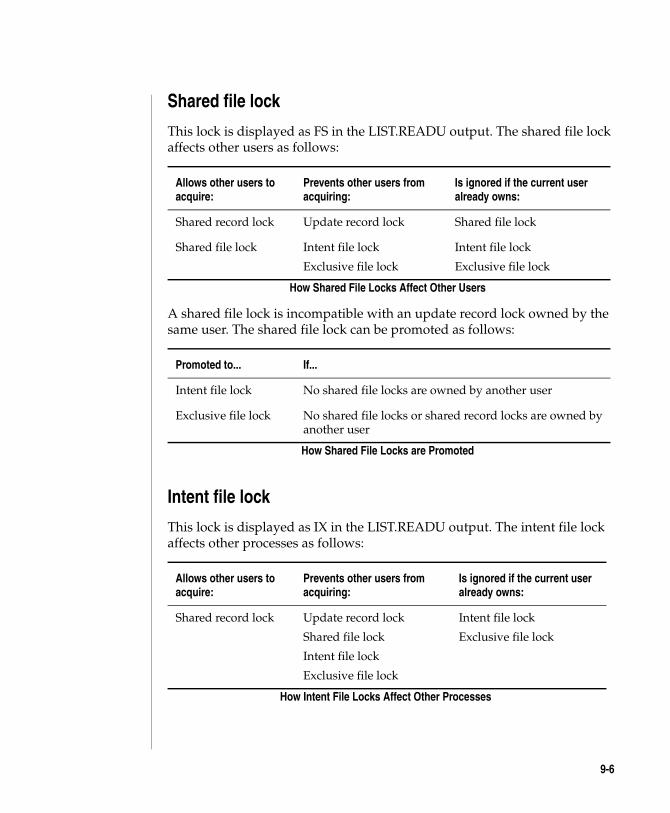
C:\Users\awaite\Documents\U2Doc\UniVerse\11.2\Source\Adminunix\Ch
Shared file lock
This lock is displayed as FS in the LIST.READU output. The shared file lock affects other users as follows:
A shared file lock is incompatible with an update record lock owned by the same user. The shared file lock can be promoted as follows:
Intent file lock
This lock is displayed as IX in the LIST.READU output. The intent file lock affects other processes as follows:
Allows other users to acquire:
Prevents other users from acquiring:
Is ignored if the current user already owns:
Shared record lock Update record lock Shared file lock
Shared file lock Intent file lock
Exclusive file lock
Intent file lock
Exclusive file lock
How Shared File Locks Affect Other Users
Promoted to... If...
Intent file lock No shared file locks are owned by another user
Exclusive file lock No shared file locks or shared record locks are owned by another user
How Shared File Locks are Promoted
Allows other users to acquire:
Prevents other users from acquiring:
Is ignored if the current user already owns:
Shared record lock Update record lock
Shared file lock
Intent file lock
Exclusive file lock
Intent file lock
Exclusive file lock
How Intent File Locks Affect Other Processes
9-6
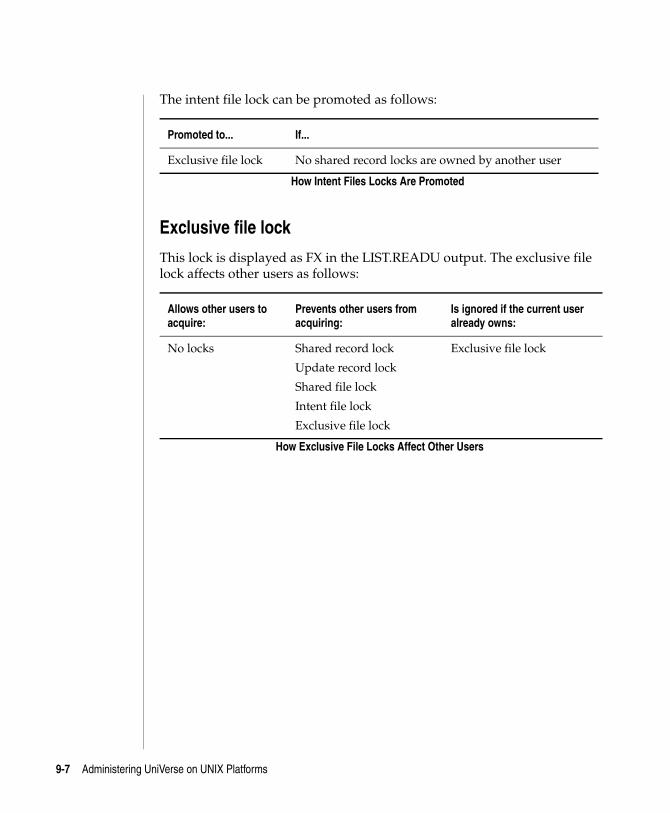
C:\Users\awaite\Documents\U2Doc\UniVerse\11.2\Source\Adminunix\Ch9.fm3/17/14
The intent file lock can be promoted as follows:
Exclusive file lock
This lock is displayed as FX in the LIST.READU output. The exclusive file lock affects other users as follows:
Promoted to... If...
Exclusive file lock No shared record locks are owned by another user
How Intent Files Locks Are Promoted
Allows other users to acquire:
Prevents other users from acquiring:
Is ignored if the current user already owns:
No locks Shared record lock
Update record lock
Shared file lock
Intent file lock
Exclusive file lock
Exclusive file lock
How Exclusive File Locks Affect Other Users
9-7 Administering UniVerse on UNIX Platforms
C:\Users\awaite\Documents\U2Doc\UniVerse\11.2\Source\Adminunix\Ch
Transactions and locksLocks acquired before a transaction exists, or outside an active transaction, are inherited by the active transaction. Locks acquired or promoted within a transaction are not released. Instead they adhere to the following behavior:
Locks acquired or promoted within a nested transaction are adopted by the parent transaction when the nested transaction commits.
Locks acquired within a nested transaction are released when the nested transaction rolls back.
Locks promoted within a nested transaction are demoted to the level they were before the start of that transaction when the nested transaction rolls back.
All locks acquired, promoted, or adopted from nested transactions are released when the top-level transaction commits or rolls back.
9-8
C:\Users\awaite\Documents\U2Doc\UniVerse\11.2\Source\Adminunix\Ch9.fm3/17/14
Managing locks with the U2 Extensible Administration toolLocks are set on UniVerse files by certain UniVerse BASIC statements and UniVerse commands. The type of lock determines what a process can access while other processes have locks on records or files. You can monitor and clear locks with the Locks option, and control the deadlock manager with the Dead Locks option.
9-9 Administering UniVerse on UNIX Platforms
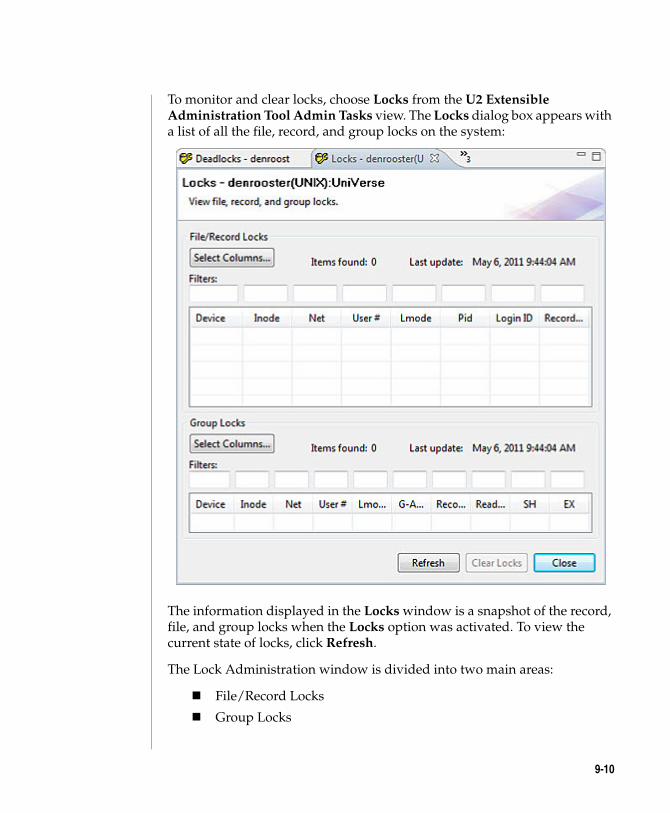
C:\Users\awaite\Documents\U2Doc\UniVerse\11.2\Source\Adminunix\Ch
To monitor and clear locks, choose Locks from the U2 Extensible Administration Tool Admin Tasks view. The Locks dialog box appears with a list of all the file, record, and group locks on the system:
The information displayed in the Locks window is a snapshot of the record, file, and group locks when the Locks option was activated. To view the current state of locks, click Refresh.
The Lock Administration window is divided into two main areas:
File/Record Locks
Group Locks
9-10
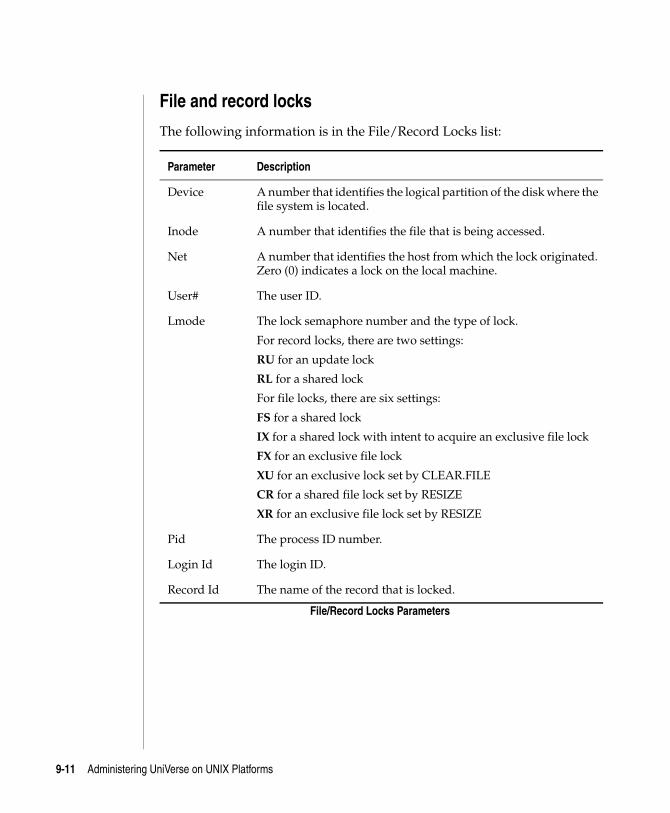
C:\Users\awaite\Documents\U2Doc\UniVerse\11.2\Source\Adminunix\Ch9.fm3/17/14
File and record locks
The following information is in the File/Record Locks list:
Parameter Description
Device A number that identifies the logical partition of the disk where the file system is located.
Inode A number that identifies the file that is being accessed.
Net A number that identifies the host from which the lock originated. Zero (0) indicates a lock on the local machine.
User# The user ID.
Lmode The lock semaphore number and the type of lock.
For record locks, there are two settings:
RU for an update lock
RL for a shared lock
For file locks, there are six settings:
FS for a shared lock
IX for a shared lock with intent to acquire an exclusive file lock
FX for an exclusive file lock
XU for an exclusive lock set by CLEAR.FILE
CR for a shared file lock set by RESIZE
XR for an exclusive file lock set by RESIZE
Pid The process ID number.
Login Id The login ID.
Record Id The name of the record that is locked.
File/Record Locks Parameters
9-11 Administering UniVerse on UNIX Platforms
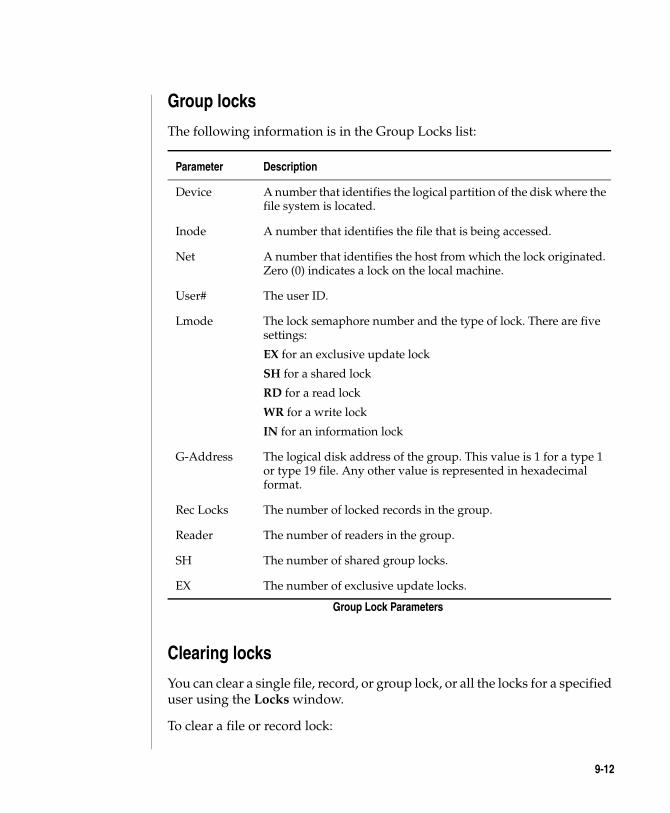
C:\Users\awaite\Documents\U2Doc\UniVerse\11.2\Source\Adminunix\Ch
Group locks
The following information is in the Group Locks list:
Clearing locks
You can clear a single file, record, or group lock, or all the locks for a specified user using the Locks window.
To clear a file or record lock:
Parameter Description
Device A number that identifies the logical partition of the disk where the file system is located.
Inode A number that identifies the file that is being accessed.
Net A number that identifies the host from which the lock originated. Zero (0) indicates a lock on the local machine.
User# The user ID.
Lmode The lock semaphore number and the type of lock. There are five settings:
EX for an exclusive update lock
SH for a shared lock
RD for a read lock
WR for a write lock
IN for an information lock
G-Address The logical disk address of the group. This value is 1 for a type 1 or type 19 file. Any other value is represented in hexadecimal format.
Rec Locks The number of locked records in the group.
Reader The number of readers in the group.
SH The number of shared group locks.
EX The number of exclusive update locks.
Group Lock Parameters
9-12
C:\Users\awaite\Documents\U2Doc\UniVerse\11.2\Source\Adminunix\Ch9.fm3/17/14
1. Select the lock from the File/Record Locks list.
2. Click Clear Lock. The Lock window is updated.
To clear a group lock:
1. Select the lock from the Group Locks list.
2. Click Clear Group Lock. The Locks window is updated.
To clear all the locks for a specified user:
1. Click User ID. The Clear User Locks window appears.
2. Enter the user ID in the User Id field.
3. Click OK. The Locks window is updated.
9-13 Administering UniVerse on UNIX Platforms

C:\Users\awaite\Documents\U2Doc\UniVerse\11.2\Source\Adminunix\Ch
Managing deadlocksDeadlocks occur when one of several processes acquiring locks incrementally tries to acquire a lock that another process owns, and the existing lock is incompatible with the requested lock. Conditions such as the following can lead to deadlocks:
Lock promotion from a shared record or shared file lock to a stronger lock
Lock escalation to file locks when two processes try to escalate at the same time
You can configure UniVerse to automatically identify and resolve deadlocks as they occur, or you can manually fix a deadlock by selecting and aborting one of the deadlocked user processes. The deadlock daemon uvdlockd identifies and resolves deadlocks.
To start, stop, or configure the deadlock manager on the server, or to manually resolve file locking conflicts, choose Dead Locks from the U2 Extensible Administration Tool main window. When the deadlock manager is running on the server, deadlocks are automatically resolved. The deadlock manager keeps a log file that records all deadlocks that it automatically resolved.
9-14

C:\Users\awaite\Documents\U2Doc\UniVerse\11.2\Source\Adminunix\Ch9.fm3/17/14
When you choose Dead Locks from the U2 Extensible Administration Tool menu, the Deadlocks window appears, as shown in the following example:
9-15 Administering UniVerse on UNIX Platforms

C:\Users\awaite\Documents\U2Doc\UniVerse\11.2\Source\Adminunix\Ch
To configure how UniVerse manages deadlocks, click Configure. The Dead Lock Configuration dialog box appears, as shown in the following example.
9-16
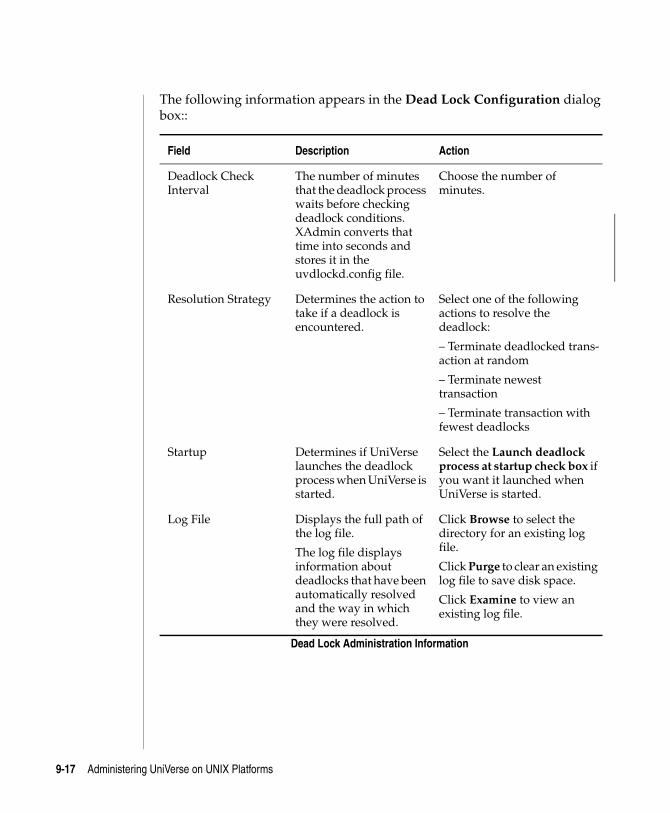
C:\Users\awaite\Documents\U2Doc\UniVerse\11.2\Source\Adminunix\Ch9.fm3/17/14
The following information appears in the Dead Lock Configuration dialog box::
Field Description Action
Deadlock Check Interval
The number of minutes that the deadlock process waits before checking deadlock conditions. XAdmin converts that time into seconds and stores it in the uvdlockd.config file.
Choose the number of minutes.
Resolution Strategy Determines the action to take if a deadlock is encountered.
Select one of the following actions to resolve the deadlock:
– Terminate deadlocked trans-action at random
– Terminate newest transaction
– Terminate transaction with fewest deadlocks
Startup Determines if UniVerse launches the deadlock process when UniVerse is started.
Select the Launch deadlock process at startup check box if you want it launched when UniVerse is started.
Log File Displays the full path of the log file.
The log file displays information about deadlocks that have been automatically resolved and the way in which they were resolved.
Click Browse to select the directory for an existing log file.
Click Purge to clear an existing log file to save disk space.
Click Examine to view an existing log file.
Dead Lock Administration Information
9-17 Administering UniVerse on UNIX Platforms
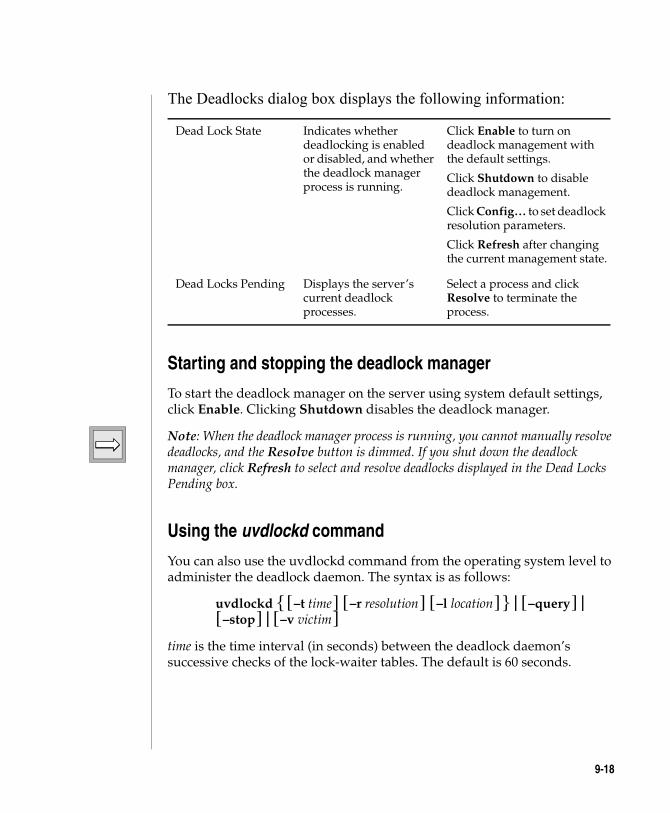
C:\Users\awaite\Documents\U2Doc\UniVerse\11.2\Source\Adminunix\Ch
The Deadlocks dialog box displays the following information:
Starting and stopping the deadlock manager
To start the deadlock manager on the server using system default settings, click Enable. Clicking Shutdown disables the deadlock manager.
Note: When the deadlock manager process is running, you cannot manually resolve deadlocks, and the Resolve button is dimmed. If you shut down the deadlock manager, click Refresh to select and resolve deadlocks displayed in the Dead Locks Pending box.
Using the uvdlockd command
You can also use the uvdlockd command from the operating system level to administer the deadlock daemon. The syntax is as follows:
uvdlockd { [ –t time ] [ –r resolution ] [ –l location ] } | [ –query ] | [ –stop ] | [ –v victim ]
time is the time interval (in seconds) between the deadlock daemon’s successive checks of the lock-waiter tables. The default is 60 seconds.
Dead Lock State Indicates whether deadlocking is enabled or disabled, and whether the deadlock manager process is running.
Click Enable to turn on deadlock management with the default settings.
Click Shutdown to disable deadlock management.
Click Config… to set deadlock resolution parameters.
Click Refresh after changing the current management state.
Dead Locks Pending Displays the server’s current deadlock processes.
Select a process and click Resolve to terminate the process.
9-18
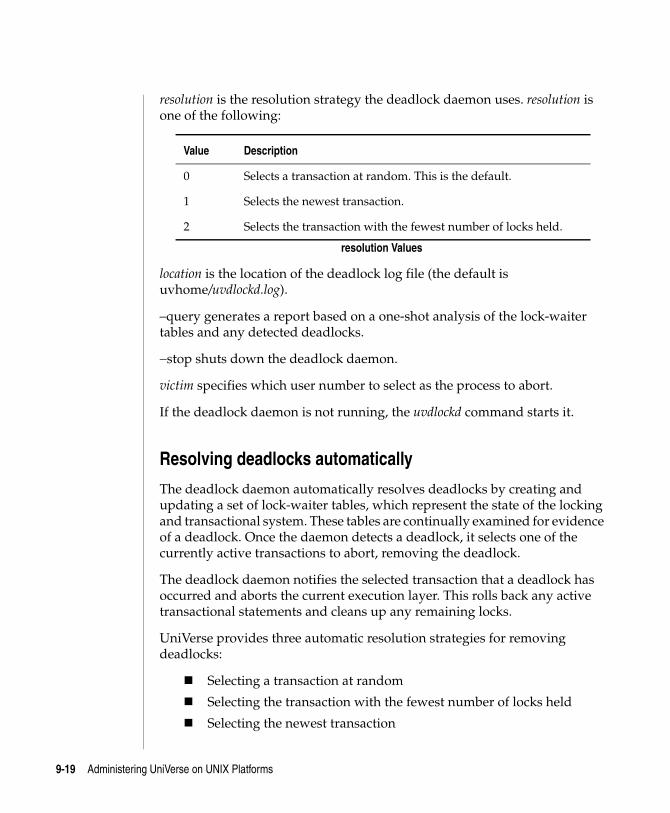
C:\Users\awaite\Documents\U2Doc\UniVerse\11.2\Source\Adminunix\Ch9.fm3/17/14
resolution is the resolution strategy the deadlock daemon uses. resolution is one of the following:
location is the location of the deadlock log file (the default is uvhome/uvdlockd.log).
–query generates a report based on a one-shot analysis of the lock-waiter tables and any detected deadlocks.
−stop shuts down the deadlock daemon.
victim specifies which user number to select as the process to abort.
If the deadlock daemon is not running, the uvdlockd command starts it.
Resolving deadlocks automatically
The deadlock daemon automatically resolves deadlocks by creating and updating a set of lock-waiter tables, which represent the state of the locking and transactional system. These tables are continually examined for evidence of a deadlock. Once the daemon detects a deadlock, it selects one of the currently active transactions to abort, removing the deadlock.
The deadlock daemon notifies the selected transaction that a deadlock has occurred and aborts the current execution layer. This rolls back any active transactional statements and cleans up any remaining locks.
UniVerse provides three automatic resolution strategies for removing deadlocks:
Selecting a transaction at random
Selecting the transaction with the fewest number of locks held
Selecting the newest transaction
Value Description
0 Selects a transaction at random. This is the default.
1 Selects the newest transaction.
2 Selects the transaction with the fewest number of locks held.
resolution Values
9-19 Administering UniVerse on UNIX Platforms
C:\Users\awaite\Documents\U2Doc\UniVerse\11.2\Source\Adminunix\Ch
Selecting a random transaction works well in most situations. Selecting the transaction with the fewest locks or selecting the newest transaction work well when transactions are long. When UniVerse starts up, the system administrator determines which of these methods the deadlock daemon should use to remove deadlocks.
9-20
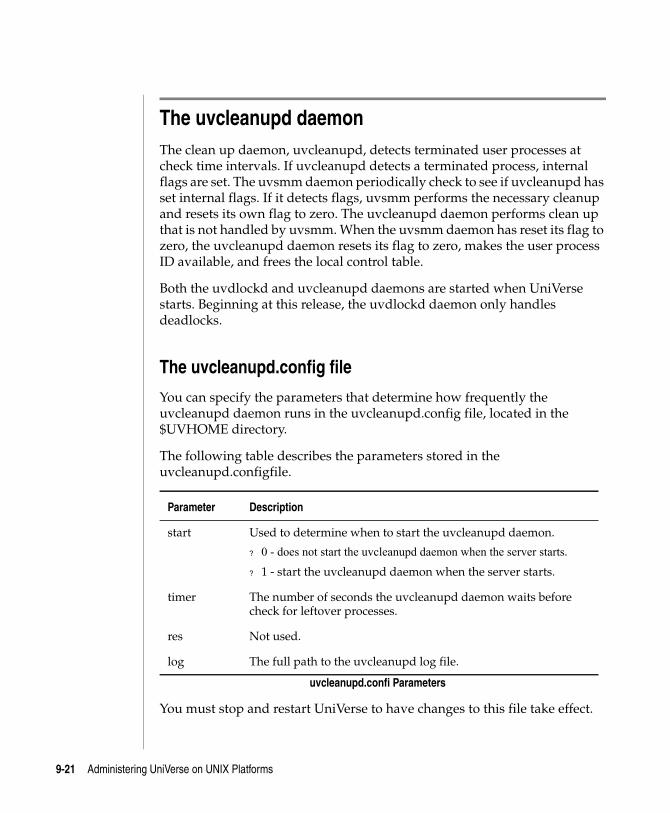
C:\Users\awaite\Documents\U2Doc\UniVerse\11.2\Source\Adminunix\Ch9.fm3/17/14
The uvcleanupd daemonThe clean up daemon, uvcleanupd, detects terminated user processes at check time intervals. If uvcleanupd detects a terminated process, internal flags are set. The uvsmm daemon periodically check to see if uvcleanupd has set internal flags. If it detects flags, uvsmm performs the necessary cleanup and resets its own flag to zero. The uvcleanupd daemon performs clean up that is not handled by uvsmm. When the uvsmm daemon has reset its flag to zero, the uvcleanupd daemon resets its flag to zero, makes the user process ID available, and frees the local control table.
Both the uvdlockd and uvcleanupd daemons are started when UniVerse starts. Beginning at this release, the uvdlockd daemon only handles deadlocks.
The uvcleanupd.config file
You can specify the parameters that determine how frequently the uvcleanupd daemon runs in the uvcleanupd.config file, located in the $UVHOME directory.
The following table describes the parameters stored in the uvcleanupd.configfile.
You must stop and restart UniVerse to have changes to this file take effect.
Parameter Description
start Used to determine when to start the uvcleanupd daemon.
? 0 - does not start the uvcleanupd daemon when the server starts.
? 1 - start the uvcleanupd daemon when the server starts.
timer The number of seconds the uvcleanupd daemon waits before check for leftover processes.
res Not used.
log The full path to the uvcleanupd log file.
uvcleanupd.confi Parameters
9-21 Administering UniVerse on UNIX Platforms
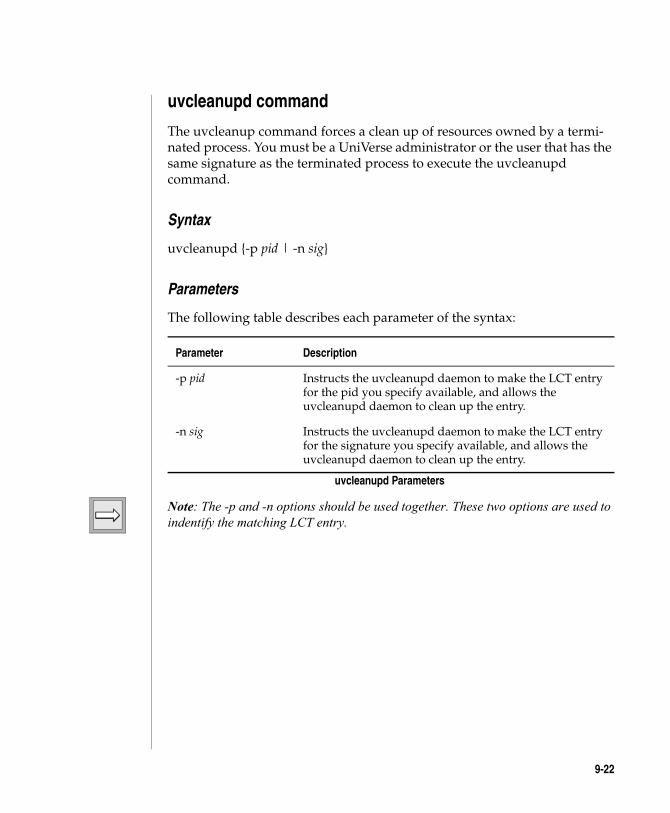
C:\Users\awaite\Documents\U2Doc\UniVerse\11.2\Source\Adminunix\Ch
uvcleanupd command
The uvcleanup command forces a clean up of resources owned by a termi-nated process. You must be a UniVerse administrator or the user that has the same signature as the terminated process to execute the uvcleanupd command.
Syntax
uvcleanupd {-p pid | -n sig}
Parameters
The following table describes each parameter of the syntax:
Note: The -p and -n options should be used together. These two options are used to indentify the matching LCT entry.
Parameter Description
-p pid Instructs the uvcleanupd daemon to make the LCT entry for the pid you specify available, and allows the uvcleanupd daemon to clean up the entry.
-n sig Instructs the uvcleanupd daemon to make the LCT entry for the signature you specify available, and allows the uvcleanupd daemon to clean up the entry.
uvcleanupd Parameters
9-22
C:\UsMarch
1Administering UniData on Windows NT or Windows 20000
10 Chapter
ers\aw 17, 201
Beta Beta Beta Beta Beta Beta Beta Beta Beta Beta Beta Beta Beta Beta Beta Beta Beta Beta Beta Beta
Chapter 10: Configuring peripheral devices
The &DEVICE& file . . . . . . . . . . . . . . . . . 10-3 Administering the &DEVICE& file . . . . . . . . . . 10-4Configuring tape drives . . . . . . . . . . . . . . . . 10-5 Defining a new tape drive. . . . . . . . . . . . . . 10-5 Viewing and modifying a tape drive definition . . . . . . 10-9 Using the test tape button . . . . . . . . . . . . . . 10-9 Deleting a tape drive definition . . . . . . . . . . . . 10-10Configuring other devices . . . . . . . . . . . . . . . 10-11 Defining a new device . . . . . . . . . . . . . . . 10-11Mapping terminals and auxiliary printers . . . . . . . . . 10-13
aite\Documents\U2Doc\UniVerse\11.2\Source\Adminunix\Ch10TOC.fm4 2:12 pm Administering UniData on Windows NT or Windows 2000
C:\Users\awaite\Documents\U2Doc\UniVerse\11.2\Source\Adminunix\Ch
This chapter describes how to configure peripheral devices such as tape drives and terminals. It also helps with solving some of the problems that can occur with these peripherals.
Chapter 11, “Chapter 11: Administering printers and the UniVerse spooler” describes how to configure printers.
10-2
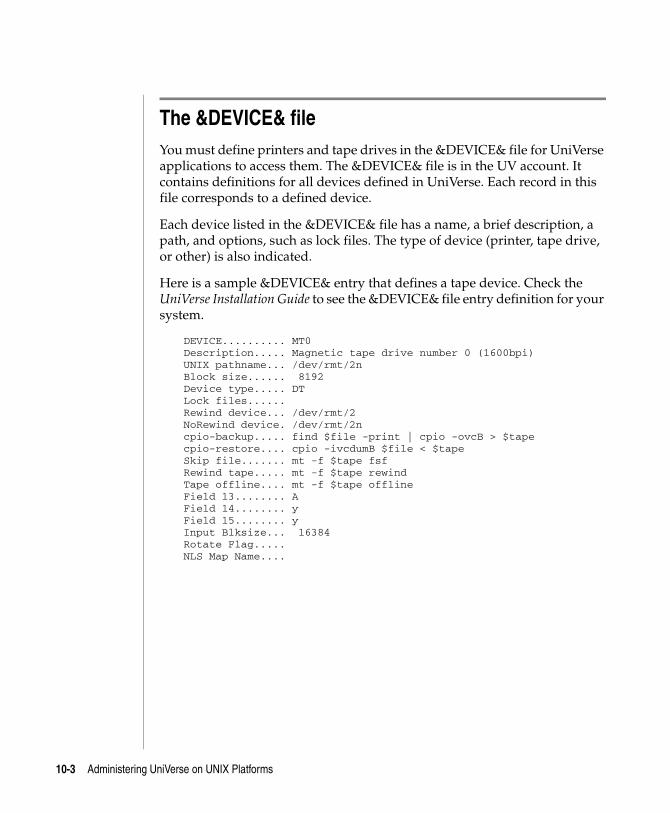
C:\Users\awaite\Documents\U2Doc\UniVerse\11.2\Source\Adminunix\Ch10.fm3/17/14
The &DEVICE& fileYou must define printers and tape drives in the &DEVICE& file for UniVerse applications to access them. The &DEVICE& file is in the UV account. It contains definitions for all devices defined in UniVerse. Each record in this file corresponds to a defined device.
Each device listed in the &DEVICE& file has a name, a brief description, a path, and options, such as lock files. The type of device (printer, tape drive, or other) is also indicated.
Here is a sample &DEVICE& entry that defines a tape device. Check the UniVerse Installation Guide to see the &DEVICE& file entry definition for your system.
DEVICE.......... MT0 Description..... Magnetic tape drive number 0 (1600bpi) UNIX pathname... /dev/rmt/2n Block size...... 8192 Device type..... DT Lock files...... Rewind device... /dev/rmt/2 NoRewind device. /dev/rmt/2n cpio-backup..... find $file -print | cpio -ovcB > $tape cpio-restore.... cpio -ivcdumB $file < $tape Skip file....... mt -f $tape fsf Rewind tape..... mt -f $tape rewind Tape offline.... mt -f $tape offline Field 13........ A Field 14........ y Field 15........ y Input Blksize... 16384 Rotate Flag..... NLS Map Name....
10-3 Administering UniVerse on UNIX Platforms
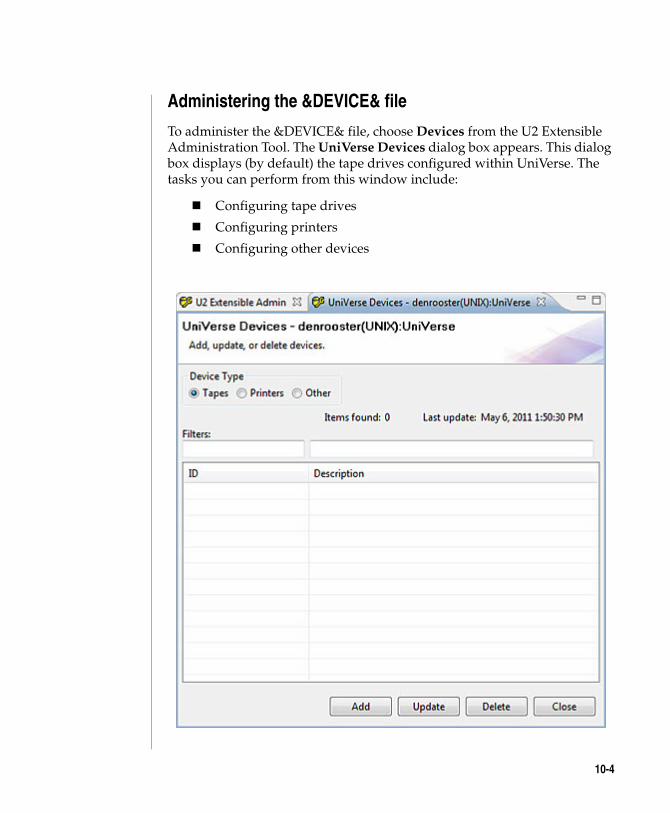
C:\Users\awaite\Documents\U2Doc\UniVerse\11.2\Source\Adminunix\Ch
Administering the &DEVICE& file
To administer the &DEVICE& file, choose Devices from the U2 Extensible Administration Tool. The UniVerse Devices dialog box appears. This dialog box displays (by default) the tape drives configured within UniVerse. The tasks you can perform from this window include:
Configuring tape drives
Configuring printers
Configuring other devices
10-4

C:\Users\awaite\Documents\U2Doc\UniVerse\11.2\Source\Adminunix\Ch10.fm3/17/14
Configuring tape drivesChoose the Devices option from the U2 Extensible Administration Tool to add, modify, and delete tape drive definitions. The &DEVICE& file is automatically updated with your changes.
To define a tape drive, click Tapes in the Device Type area of the UniVerse Devices dialog box.
The Tapes list in the UniVerse Devices dialog box displays all the tape drives defined in the &DEVICE& file.
Defining a new tape drive
Complete the following steps to define a new tape drive:
1. Click Tapes in the UniVerse Devices dialog box.
2. Click Add. The Tape Details dialog box appears, as shown in the following example:
10-5 Administering UniVerse on UNIX Platforms
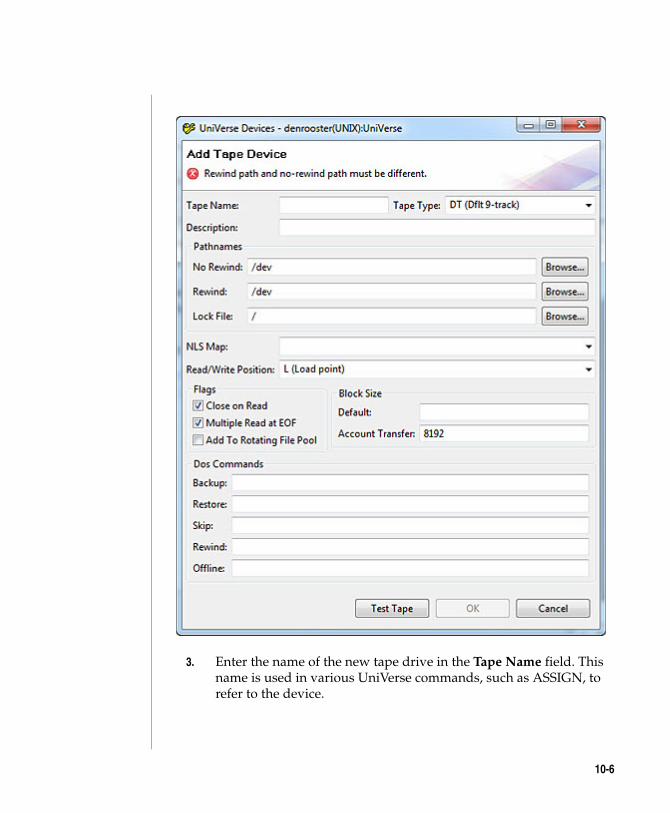
C:\Users\awaite\Documents\U2Doc\UniVerse\11.2\Source\Adminunix\Ch
3. Enter the name of the new tape drive in the Tape Name field. This name is used in various UniVerse commands, such as ASSIGN, to refer to the device.
10-6
C:\Users\awaite\Documents\U2Doc\UniVerse\11.2\Source\Adminunix\Ch10.fm3/17/14
4. Select one of the following types from the Tape Type list:
DT (Dflt 9-track)
DC (Dflt cartridge)
T (9-track)
C (Cartridge)
F (Floppy)
5. (Optional) Enter a brief description of the tape drive in the Description field.
6. Enter the path of the no rewind device in the No Rewind box (for example, /dev/rmt0n), or click Browse to locate the path. A no-rewind tape drive does not rewind when closed.
7. Enter a file path in the Rewind field (for example, /dev/rmt0), or click Browse to locate the path. You cannot use the same path as the one for the No Rewind option. A rewind tape drive rewinds when closed.
Note: Be sure to assign the correct access permissions to the device. You can set permissions for a device with the UNIX chmod command.
8. (Optional) Enter the name of a lock file in the Lock File field. You can use Browse to search the system for a suitable directory.
When a device is shared by UniVerse and UNIX system processes, it needs a special lock file that coordinates access to the device when more than one process tried to access it. This field contains the UNIX paths used to implement the locking protocol used by the UniVerse spooler and UNIX facilities such as the spooler and uucp. This field is usually empty for tape devices, but can be used to display ownership information. For information about the form of the lock file name for a system, see the UNIX reference manual for the process that is sharing the device.
9. (Optional) If your system runs with NLS enabled, enter the name of a character set map for the device in the NLS Map field. For information about maps, see the UniVerse NLS Guide.
10-7 Administering UniVerse on UNIX Platforms
C:\Users\awaite\Documents\U2Doc\UniVerse\11.2\Source\Adminunix\Ch
10. (Optional) Click Test Tape if you want to run the tape device testing program to determine the following:
Where to allow the tape to change from read to write mode
What action to take when a tape file that is opened for read is closed
If a second read call at the end-of-file should return the end-of-file condition again
If you run the tests, their results are automatically filled in for you. If you do not run the tests, you can fill in your own values for these fields.
11. Select the setting for the read/write position from the Read/Write Position list. This specifies where on a tape a change from read to write mode is allowed.
L (Load point) (This is the default.)
E (Load point or EOF)
A (Anywhere) (This usually works only on 1/2-inch tapes.)
This field is automatically updated with a suitable setting if you use the Test Tape option.
Note: Most Berkeley device drivers work with Read/Write Position set to A or E. Most System V device drivers work with Read/Write Position set to L or E.
12. Select the check boxes to set any of these flags:
Close On Read. This flag determines the action taken when a tape opened for reading is closed. If selected (the default setting) the tape moves forward to the beginning of the next file. If clear, the tape does not move forward. This field is automatically updated with a suitable setting if you use the Test Tape button.
Multiple Read at EOF. This flag specifies the behavior of the tape when EOF is reached. If selected (the default setting), the second read also returns EOF. If clear, the second read reads the next block/record after EOF. This field is automatically updated with a suitable setting if you use the Test Tape button.
Add To Rotating File Pool. This flag
10-8
C:\Users\awaite\Documents\U2Doc\UniVerse\11.2\Source\Adminunix\Ch10.fm3/17/14
13. Enter a block size in the Default field. This is the block size used for normal tape operations. If the tape drive is a cartridge (C), this value must be a multiple of 512. A block size of 0 (variable) is normally used for DT and T type drives.
14. Enter a value for the block size in the Account Transfer field. This value is used when importing accounts. You can accept the default of 8192 or enter a new value.
15. Enter commands in the Backup, Restore, Skip, Rewind, and Offline fields, if required. For example, you might enter the following in the Skip field:
tctl -f $tape fsf 1
16. Click OK. The new tape drive is written to the &DEVICE& file. The UniVerse Devices dialog box is updated.
Viewing and modifying a tape drive definition
You can view and modify the details of any tape drive defined in the &DEVICE& file. To view a tape drive definition, do one of the following:
Double-click the tape drive in the Tapes list.
Choose the tape drive from the Tapes list and click Update.
The Update Tape Device dialog box appears. You can modify any of the definition settings. Click OK to save any changes to the &DEVICE& file.
Using the test tape button
If a tape drive has a tape type of DT or DC, the Test Tape button on the Update Tape Device dialog box is enabled. You can then use this button to fill in some of the tape drive definition details.
To start the tape tests, mount the tape and click the Test Tape button. Suitable settings are found for the following fields on the Tape Details dialog box:
Read/Write Position
Close On Read
Multiple Read at EOF
10-9 Administering UniVerse on UNIX Platforms
C:\Users\awaite\Documents\U2Doc\UniVerse\11.2\Source\Adminunix\Ch
Note: On a UNIX system, suitable entries are also determined for the Backup and Restore UNIX shell command fields.
Settings found for these fields are automatically updated after the tests have been completed, overwriting any previous settings. Click OK to save the new definition.
Deleting a tape drive definition
To delete a tape drive definition:
1. Select the tape drive from the Tapes list in the UniVerse Devices dialog box.
2. Click Delete. A message box appears.
3. Click Yes. The tape drive definition is removed from the &DEVICE& file. The UniVerse Devices dialog box is updated.
10-10

C:\Users\awaite\Documents\U2Doc\UniVerse\11.2\Source\Adminunix\Ch10.fm3/17/14
Configuring other devicesChoose the Devices option from the U2 Extensible Administration Tool main window to add, modify, and delete devices other than tape drives and printers. The definitions for these devices are stored in the &DEVICE& file, with a device type of O.
To configure other devices, click Other in the UniVerse Devices dialog box.
The Others list in the Maintain UniVerse Devices dialog box is updated to display all the other devices defined in the &DEVICE& file.
Defining a new device
To define a device that is not a tape drive or a printer:
1. Click Other in the UniVerse Devices dialog box.
10-11 Administering UniVerse on UNIX Platforms
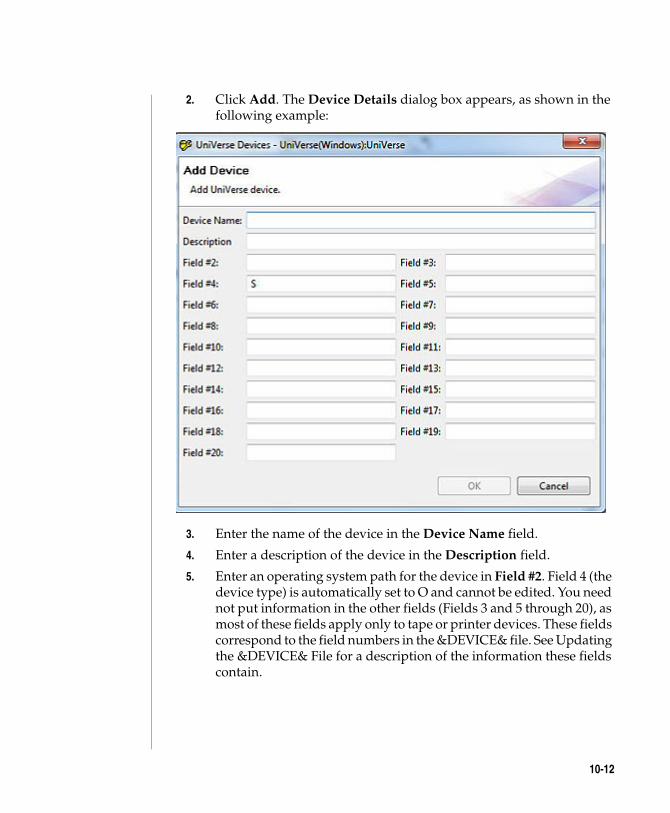
C:\Users\awaite\Documents\U2Doc\UniVerse\11.2\Source\Adminunix\Ch
2. Click Add. The Device Details dialog box appears, as shown in the following example:
3. Enter the name of the device in the Device Name field.
4. Enter a description of the device in the Description field.
5. Enter an operating system path for the device in Field #2. Field 4 (the device type) is automatically set to O and cannot be edited. You need not put information in the other fields (Fields 3 and 5 through 20), as most of these fields apply only to tape or printer devices. These fields correspond to the field numbers in the &DEVICE& file. See Updating the &DEVICE& File for a description of the information these fields contain.
10-12
C:\Users\awaite\Documents\U2Doc\UniVerse\11.2\Source\Adminunix\Ch10.fm3/17/14
Mapping terminals and auxiliary printersIf your system is running UniVerse with NLS mode enabled, you can assign a map to a terminal or auxiliary printer to convert UniVerse data from its internal storage format to an external character set. You can assign a terminal map by:
Setting the system default in the uvconfig file
Setting an entry in the terminfo file
Using the SET.TERM.TYPE command
To set the default map for any terminal having no map assigned to it, set the NLSDEFTERMMAP configurable parameter. This parameter also sets a default map for any auxiliary printer attached to a terminal. For example:
NLSDEFTERMMAP ISO8859-1
To assign a map for a terminal, change the at80 setting in a terminfo entry. To assign a map for an auxiliary printer, change the at81 setting. For example:
at80=ISO8895-1at81=ISO8895-1
To override the default map on the current terminal or its auxiliary printer, use the SET.TERM.TYPE command.
For more information about terminal and auxiliary printer maps, see UniVerse NLS Guide.
10-13 Administering UniVerse on UNIX Platforms
C:\UsMarch
2Administering UniData on Windows NT or Windows 20000
11 Chapter
ers\aw 17, 201
Beta Beta Beta Beta Beta Beta Beta Beta Beta Beta Beta Beta Beta Beta Beta Beta Beta Beta Beta Beta
Chapter 11: Administering printers and the UniVerse spooler
Defining a new printer . . . . . . . . . . . . . . . 11-3 Viewing and modifying a printer definition . . . . . . . 11-7 Deleting a printer definition . . . . . . . . . . . . . 11-7Defining and administering printer groups . . . . . . . . . 11-8 Defining a printer group . . . . . . . . . . . . . . 11-8 Adding users or printers to a printer group. . . . . . . . 11-11 Removing users or printers from a printer group. . . . . . 11-11 Deleting a printer group . . . . . . . . . . . . . . 11-12Managing printers. . . . . . . . . . . . . . . . . . 11-13 Mounting forms on a printer . . . . . . . . . . . . . 11-13 Setting printer queuing options . . . . . . . . . . . . 11-14 Starting and stopping printers . . . . . . . . . . . . 11-14Configuring the UniVerse spooler . . . . . . . . . . . . 11-15 Menu bar . . . . . . . . . . . . . . . . . . . 11-16 Printer information . . . . . . . . . . . . . . . . 11-17 Jobs list . . . . . . . . . . . . . . . . . . . . 11-17 Task buttons . . . . . . . . . . . . . . . . . . 11-18 Changing the spooler configuration . . . . . . . . . . 11-19Managing print jobs . . . . . . . . . . . . . . . . . 11-23 Changing print job characteristics . . . . . . . . . . . 11-23 Controlling print jobs . . . . . . . . . . . . . . . 11-26Logging spooler activity. . . . . . . . . . . . . . . . 11-29 Displaying spooler log files . . . . . . . . . . . . . 11-29 Determining when a job was printed . . . . . . . . . . 11-30Starting, stopping, and resetting the spooler . . . . . . . . . 11-32 Starting the spooler . . . . . . . . . . . . . . . . 11-32 Stopping the spooler . . . . . . . . . . . . . . . 11-32
aite\Documents\U2Doc\UniVerse\11.2\Source\Adminunix\Ch11TOC.fm4 2:12 pm Administering UniData on Windows NT or Windows 2000
11-2 Adm
C:\Users\awaite\Documents\U2Doc\UniVerse\11.2\Source\Adminunix\Ch11TOC.fmMarch 17, 2014 2:12 pm Administering UniData on Windows NT or Windows 2000
Beta Beta Beta Beta Beta Beta Beta Beta Beta Beta Beta Beta Beta Beta Beta Beta Beta Beta Beta Beta Beta Beta
Resetting the spooler . . . . . . . . . . . . . . . 11-32About the UniVerse spooler . . . . . . . . . . . . . . 11-34 What happens when the spooler is installed . . . . . . . 11-34 Spooler directories and files . . . . . . . . . . . . . 11-34 Spooler processes and commands . . . . . . . . . . . 11-36 How the spooler works. . . . . . . . . . . . . . . 11-37Using UniVerse spooler printer drivers. . . . . . . . . . . 11-39 Using a UNIX executable as a driver . . . . . . . . . . 11-39 The Bourne shell as a driver . . . . . . . . . . . . . 11-40 Using a driver for remote printing . . . . . . . . . . . 11-41 Complex shell script drivers . . . . . . . . . . . . . 11-41 Setting interface characteristics in a driver . . . . . . . . 11-42 Capturing spool output . . . . . . . . . . . . . . 11-43 Using command line arguments in driver scripts . . . . . . 11-43Using the UNIX spooler with the UniVerse spooler . . . . . . 11-45 Changing the UNIX lp interface file . . . . . . . . . . 11-45 Adding a DRIVER option to the sp.config entry . . . . . . 11-46Troubleshooting the spooler . . . . . . . . . . . . . . 11-47 Printing problems . . . . . . . . . . . . . . . . 11-47 Getting incorrect printout . . . . . . . . . . . . . . 11-54Frequently asked questions. . . . . . . . . . . . . . . 11-58
inistering UniVerse on UNIX Platforms
C:\Users\awaite\Documents\U2Doc\UniVerse\11.2\Source\Adminunix\Ch
This chapter describes how to configure printers and administer the UniVerse spooler on UNIX servers. Configuring Printers
Choose the Devices option from the U2 Extensible Administration Tool to add, modify, and delete printer definitions on a UNIX system. The &DEVICE& file and sp.config file are automatically updated with your changes.
Defining a new printer
Complete the following steps to define a new printer:
11-3
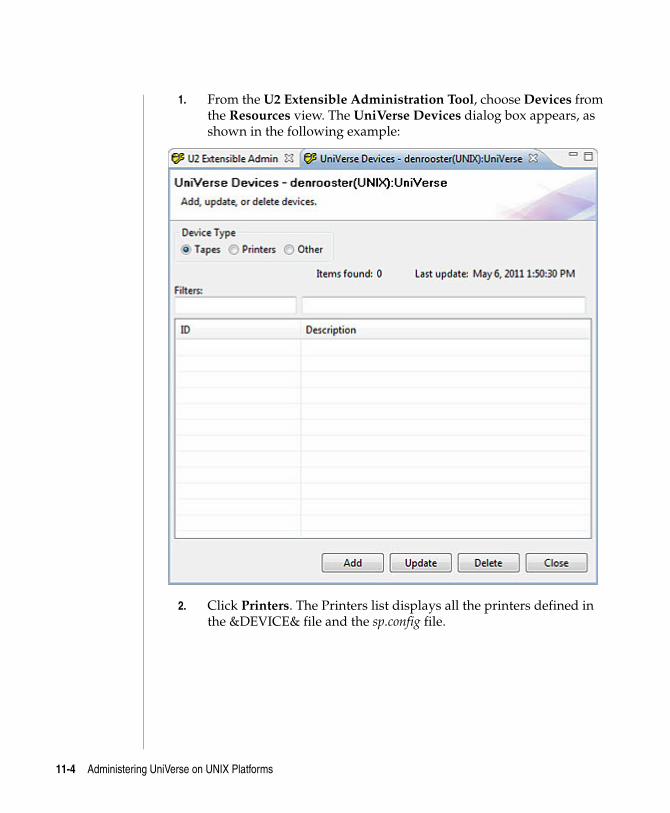
C:\Users\awaite\Documents\U2Doc\UniVerse\11.2\Source\Adminunix\Ch11.fm3/17/14
1. From the U2 Extensible Administration Tool, choose Devices from the Resources view. The UniVerse Devices dialog box appears, as shown in the following example:
2. Click Printers. The Printers list displays all the printers defined in the &DEVICE& file and the sp.config file.
11-4 Administering UniVerse on UNIX Platforms
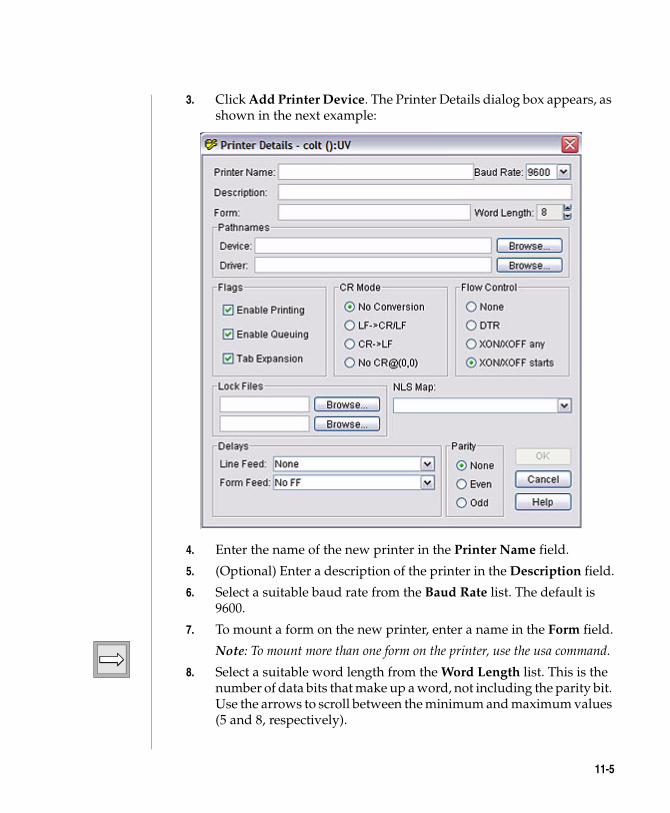
C:\Users\awaite\Documents\U2Doc\UniVerse\11.2\Source\Adminunix\Ch
3. Click Add Printer Device. The Printer Details dialog box appears, as shown in the next example:
4. Enter the name of the new printer in the Printer Name field.
5. (Optional) Enter a description of the printer in the Description field.
6. Select a suitable baud rate from the Baud Rate list. The default is 9600.
7. To mount a form on the new printer, enter a name in the Form field.
Note: To mount more than one form on the printer, use the usa command.
8. Select a suitable word length from the Word Length list. This is the number of data bits that make up a word, not including the parity bit. Use the arrows to scroll between the minimum and maximum values (5 and 8, respectively).
11-5
C:\Users\awaite\Documents\U2Doc\UniVerse\11.2\Source\Adminunix\Ch11.fm3/17/14
9. Enter the path of the printer device file in the Device field, or click Browse to search the system for a suitable file.
10. Enter the path of the driver file in the Driver field (if used), or click Browse to search the system for a suitable file.
11. Set any of these flags by selecting the appropriate check boxes:
Enable Printing. This flag determines the initial behavior of the spooler daemon for this print device. The default setting is selected, for example, printing is enabled.
Enable Queuing. This flag determines the initial behavior of the spooler daemon for this print device. The default setting is selected, for example, queuing is enabled.
Tab Expansion. This flag determines whether tabs are expanded to spaces on output. The default setting is selected, for example, tabs are expanded.
12. Determine how carriage returns and line feeds are handled by clicking the appropriate CR Mode option. The default setting is No Conversion.
13. Click the appropriate Flow Control option. This setting determines the communication flow control for the printer. The default setting is XON/XOFF starts.
14. Enter the paths of lock files to use in the Lock Files fields. These are optional fields where you can specify the paths of two different lock files. The specified files must not exist on the system. You can also use Browse to construct a suitable file path.
15. Select the line feed setting from the Line Feed list. The default setting is None.
16. Select the form feed setting from the Form Feed list. The default setting is No FF.
17. Click the appropriate Parity option. The default setting is None.
18. Edit the Other Options field, if required. You can use this field to specify any of the UniVerse PTERM settings. See UniVerse User Reference for a description of the PTERM (UNIX) command.
19. Click OK. The new print device definition is written to the &DEVICE& file and the sp.config file. The Maintain UniVerse Devices window is updated.
11-6 Administering UniVerse on UNIX Platforms
C:\Users\awaite\Documents\U2Doc\UniVerse\11.2\Source\Adminunix\Ch
Viewing and modifying a printer definition
You can view and modify the details of any printer defined in the &DEVICE& file. To view a printer definition, double-click the printer in the Printers list, or select the printer from the Printers list and click Detail.
The Printer Details dialog box appears. You can modify any of the definition settings. Click OK to save any changes to the &DEVICE& and sp.config files.
Deleting a printer definition
Complete the following steps to delete a printer:
1. Select the printer from the Printers list in the Maintain UniVerse Devices dialog box.
2. Click Delete. A message box appears.
3. Click Yes. The printer definition is removed from the &DEVICE& and sp.config files. The Maintain UniVerse Devices dialog box is updated.
11-7
C:\Users\awaite\Documents\U2Doc\UniVerse\11.2\Source\Adminunix\Ch11.fm3/17/14
Defining and administering printer groupsSystem printers are usually controlled by the system administrator. However, you can define a subset of printers as a printer group that can be controlled by users who do not have administrative privileges.
Printer groups and the users allowed to access them are defined in the print_group file, which is in the UniVerse spooler directory. The print_group file has a format similar to that of the /etc/group file. Each printer group is defined by a line in the print_group file. This line has the following format:
ptr.group : user1,user2,user3,… : printer1,printer2,printer3,…
ptr.group (field 1) is the name of the printer group. Field 2 contains the names of users who have access to the printers in the printer group. Field 3 contains the names of the printers included in the printer group.
To define or modify a printer group, from the UniAdmin main menu, click Spooler, then select the Printer menu, then click Printer Groups. The Define Printer Group dialog box appears. From this dialog box you can add, change, or delete a printer group definition. The print_group file is updated when you click Save.
Defining a printer group
When you define a printer group, you enter a unique name for the group and specify the users and printers that belong to the group. Each printer group must contain at least one printer and one user.
Complete the following steps to define a printer group:
11-8 Administering UniVerse on UNIX Platforms

C:\Users\awaite\Documents\U2Doc\UniVerse\11.2\Source\Adminunix\Ch
1. From the UniAdmin main menu, click Spooler, then select the Printer menu, then click Printer Groups. The Define Printer Group dialog box appears, as shown in the following example:
2. Enter the name of the new group in the Printer Group field.
11-9
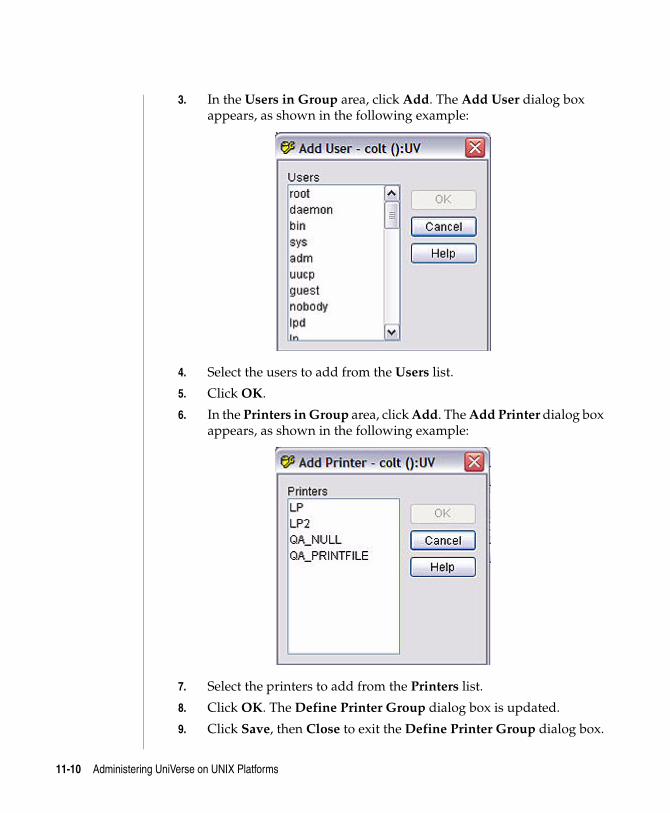
C:\Users\awaite\Documents\U2Doc\UniVerse\11.2\Source\Adminunix\Ch11.fm3/17/14
3. In the Users in Group area, click Add. The Add User dialog box appears, as shown in the following example:
4. Select the users to add from the Users list.
5. Click OK.
6. In the Printers in Group area, click Add. The Add Printer dialog box appears, as shown in the following example:
7. Select the printers to add from the Printers list.
8. Click OK. The Define Printer Group dialog box is updated.
9. Click Save, then Close to exit the Define Printer Group dialog box.
11-10 Administering UniVerse on UNIX Platforms
C:\Users\awaite\Documents\U2Doc\UniVerse\11.2\Source\Adminunix\Ch
Adding users or printers to a printer group
You can add users or printers, or both, to a printer group. Complete the following steps to add users to a printer group:
1. From the UniAdmin main menu, click Spooler, then select the Printer menu, then click Printer Groups. The Define Printer Group dialog box appears.
2. Select the printer group you want to modify from the Printer Group list.
3. In the Users in Group area, click Add. The Add User dialog box appears.
4. Select the users to add from the Users list.
5. Click OK. The Define Printer Group dialog box is updated.
6. Click Save followed by Close to exit the Define Printer Group dialog box.
Complete the following steps to add printers to a printer group:
1. From the UniAdmin main menu, click Spooler, then select the Printer menu, then click Printer Groups. The Define Printer Group dialog box appears.
2. Select the printer group you want to modify from the Printer Group list.
3. In the Printers in Group area, click Add. The Add Printer dialog box appears.
4. Select the printers to add from the Printers list.
5. Click OK. The Define Printer Group dialog box is updated.
6. Click Save, then Close to exit the Define Printer Group dialog box.
Removing users or printers from a printer group
You can remove users or printers, or both, from a printer group. To remove users from a printer group:
1. From the UniAdmin main menu, click Spooler, then select the Printer menu, then click Printer Groups. The Define Printer Group dialog box appears.
11-11
C:\Users\awaite\Documents\U2Doc\UniVerse\11.2\Source\Adminunix\Ch11.fm3/17/14
2. Select the printer group you want to modify from the Printer Group list.
3. Select the users you want to remove from the list.
4. Click Remove. The Define Printer Group dialog box is updated.
5. Click Save followed by Close to exit the Define Printer Group dialog box.
To remove printers from a printer group:
1. From the UniAdmin main menu, click Spooler, then select the Printer menu, then click Printer Groups. The Define Printer Group dialog box appears.
2. Select the printer group you want to modify from the Printer Group list.
3. Select the printers you want to remove from the list.
4. Click Remove. The Define Printer Group dialog box is updated.
5. Click Save, then Close to exit the Define Printer Group dialog box.
Deleting a printer group
Complete the following steps to delete a printer group:
1. From the UniAdmin main menu, click Spooler, then select the Printer menu, then click Printer Groups. The Define Printer Group dialog box appears.
2. Select the group you want to delete from the Printer Group list.
3. Click Delete. A message box appears.
4. Click Yes. The printer group is removed.
5. Click Save, then Close to exit the Define Printer Group dialog box.
11-12 Administering UniVerse on UNIX Platforms
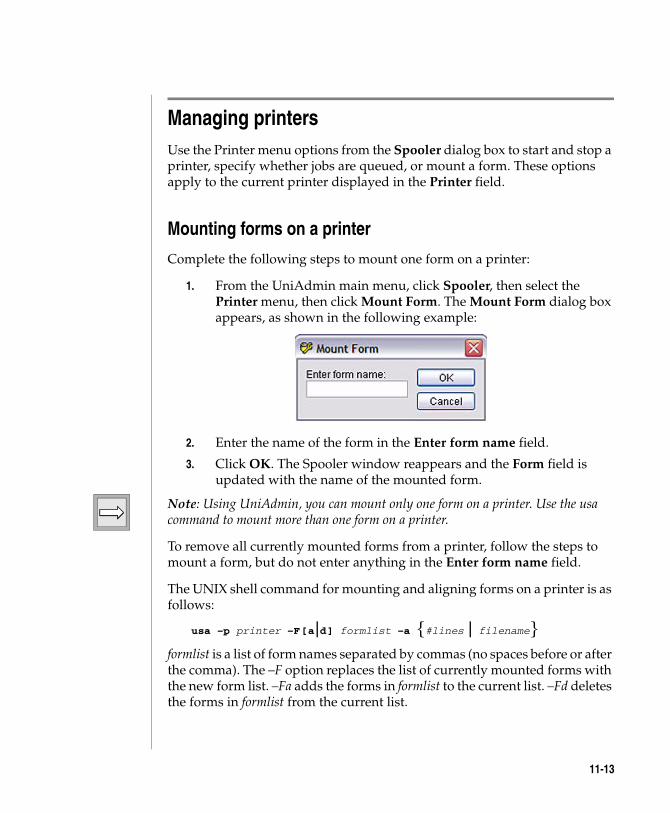
C:\Users\awaite\Documents\U2Doc\UniVerse\11.2\Source\Adminunix\Ch
Managing printersUse the Printer menu options from the Spooler dialog box to start and stop a printer, specify whether jobs are queued, or mount a form. These options apply to the current printer displayed in the Printer field.
Mounting forms on a printer
Complete the following steps to mount one form on a printer:
1. From the UniAdmin main menu, click Spooler, then select the Printer menu, then click Mount Form. The Mount Form dialog box appears, as shown in the following example:
2. Enter the name of the form in the Enter form name field.
3. Click OK. The Spooler window reappears and the Form field is updated with the name of the mounted form.
Note: Using UniAdmin, you can mount only one form on a printer. Use the usa command to mount more than one form on a printer.
To remove all currently mounted forms from a printer, follow the steps to mount a form, but do not enter anything in the Enter form name field.
The UNIX shell command for mounting and aligning forms on a printer is as follows:
usa –p printer –F [ a | d ] formlist –a {#lines | filename}formlist is a list of form names separated by commas (no spaces before or after the comma). The –F option replaces the list of currently mounted forms with the new form list. –Fa adds the forms in formlist to the current list. –Fd deletes the forms in formlist from the current list.
11-13
C:\Users\awaite\Documents\U2Doc\UniVerse\11.2\Source\Adminunix\Ch11.fm3/17/14
#lines is the number of lines of the next queued job to print. filename is the name of the UNIX file to print.
Setting printer queuing options
To allow or disallow queuing on a printer, from the UniAdmin main menu, click Spooler, then select the Printer menu, then click Allow Queuing.
This option is used to both allow and disallow queuing on a printer. When queuing is enabled, a check mark appears next to the option.
Starting and stopping printers
To start or stop a printer, from the UniAdmin main menu, click Spooler, then select the Printer menu, then click Allow Printing.
This option is used to both start and stop a printer. When a printer is started, a check mark appears next to the option.
11-14 Administering UniVerse on UNIX Platforms
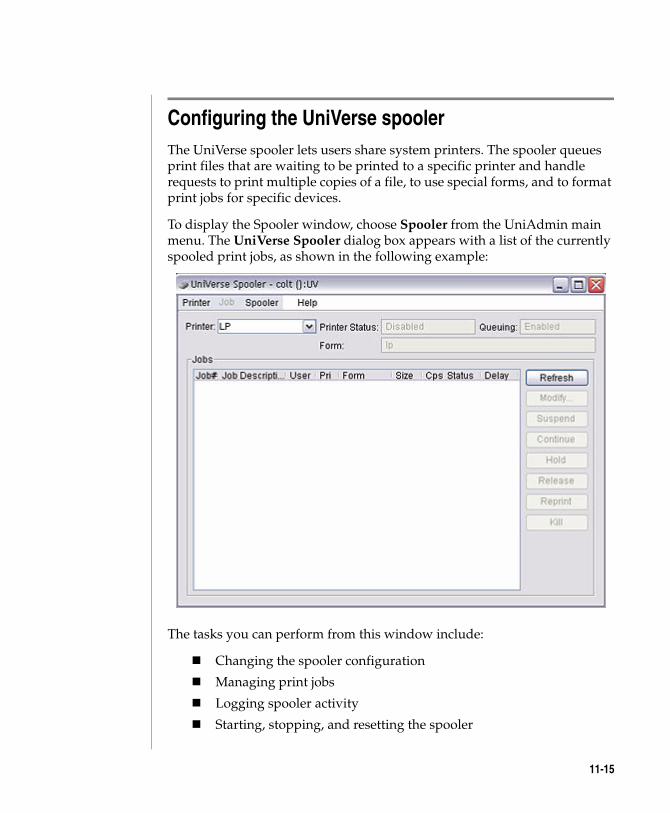
C:\Users\awaite\Documents\U2Doc\UniVerse\11.2\Source\Adminunix\Ch
Configuring the UniVerse spoolerThe UniVerse spooler lets users share system printers. The spooler queues print files that are waiting to be printed to a specific printer and handle requests to print multiple copies of a file, to use special forms, and to format print jobs for specific devices.
To display the Spooler window, choose Spooler from the UniAdmin main menu. The UniVerse Spooler dialog box appears with a list of the currently spooled print jobs, as shown in the following example:
The tasks you can perform from this window include:
Changing the spooler configuration
Managing print jobs
Logging spooler activity
Starting, stopping, and resetting the spooler
11-15
C:\Users\awaite\Documents\U2Doc\UniVerse\11.2\Source\Adminunix\Ch11.fm3/17/14
Defining and administering printer groups
Managing printers
The Spooler dialog box has the following components:
Menu bar, with four pull-down menus
Printer information
Jobs list
Task buttons
Menu bar
The menu bar has four pull-down menus:
Menu Description
Printer Manages printer groups, mounts forms, defines printer characteristics, and exits the Spooler window.
Job Modifies the characteristics of a chosen print job. This menu is available only when you select a print job.
Spooler Configures, resets, starts, and stops the spooler, and also views log files.
Help Invokes the Help system.
Spooler Menus
11-16 Administering UniVerse on UNIX Platforms
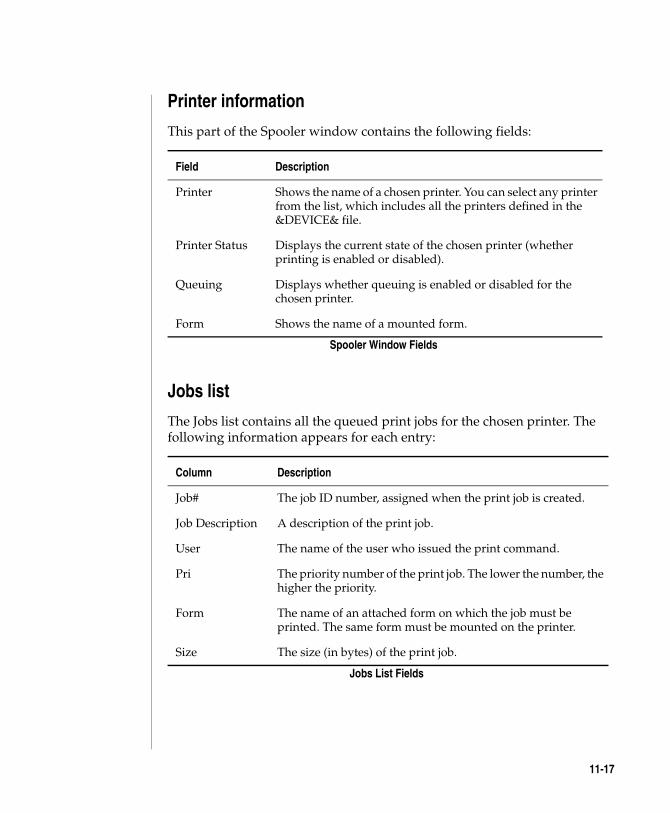
C:\Users\awaite\Documents\U2Doc\UniVerse\11.2\Source\Adminunix\Ch
Printer information
This part of the Spooler window contains the following fields:
Jobs list
The Jobs list contains all the queued print jobs for the chosen printer. The following information appears for each entry:
Field Description
Printer Shows the name of a chosen printer. You can select any printer from the list, which includes all the printers defined in the &DEVICE& file.
Printer Status Displays the current state of the chosen printer (whether printing is enabled or disabled).
Queuing Displays whether queuing is enabled or disabled for the chosen printer.
Form Shows the name of a mounted form.
Spooler Window Fields
Column Description
Job# The job ID number, assigned when the print job is created.
Job Description A description of the print job.
User The name of the user who issued the print command.
Pri The priority number of the print job. The lower the number, the higher the priority.
Form The name of an attached form on which the job must be printed. The same form must be mounted on the printer.
Size The size (in bytes) of the print job.
Jobs List Fields
11-17
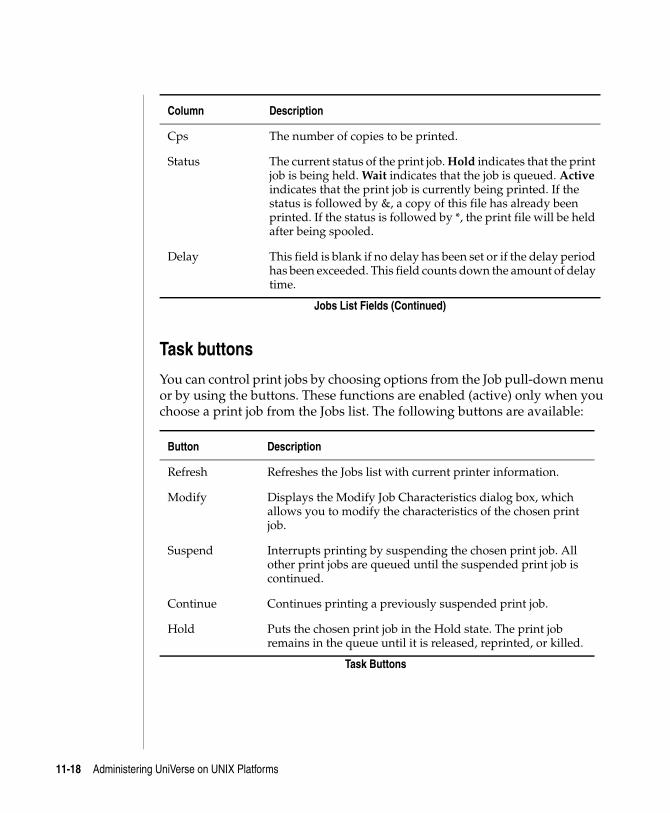
C:\Users\awaite\Documents\U2Doc\UniVerse\11.2\Source\Adminunix\Ch11.fm3/17/14
Task buttons
You can control print jobs by choosing options from the Job pull-down menu or by using the buttons. These functions are enabled (active) only when you choose a print job from the Jobs list. The following buttons are available:
Cps The number of copies to be printed.
Status The current status of the print job. Hold indicates that the print job is being held. Wait indicates that the job is queued. Active indicates that the print job is currently being printed. If the status is followed by &, a copy of this file has already been printed. If the status is followed by *, the print file will be held after being spooled.
Delay This field is blank if no delay has been set or if the delay period has been exceeded. This field counts down the amount of delay time.
Button Description
Refresh Refreshes the Jobs list with current printer information.
Modify Displays the Modify Job Characteristics dialog box, which allows you to modify the characteristics of the chosen print job.
Suspend Interrupts printing by suspending the chosen print job. All other print jobs are queued until the suspended print job is continued.
Continue Continues printing a previously suspended print job.
Hold Puts the chosen print job in the Hold state. The print job remains in the queue until it is released, reprinted, or killed.
Task Buttons
Column Description
Jobs List Fields (Continued)
11-18 Administering UniVerse on UNIX Platforms
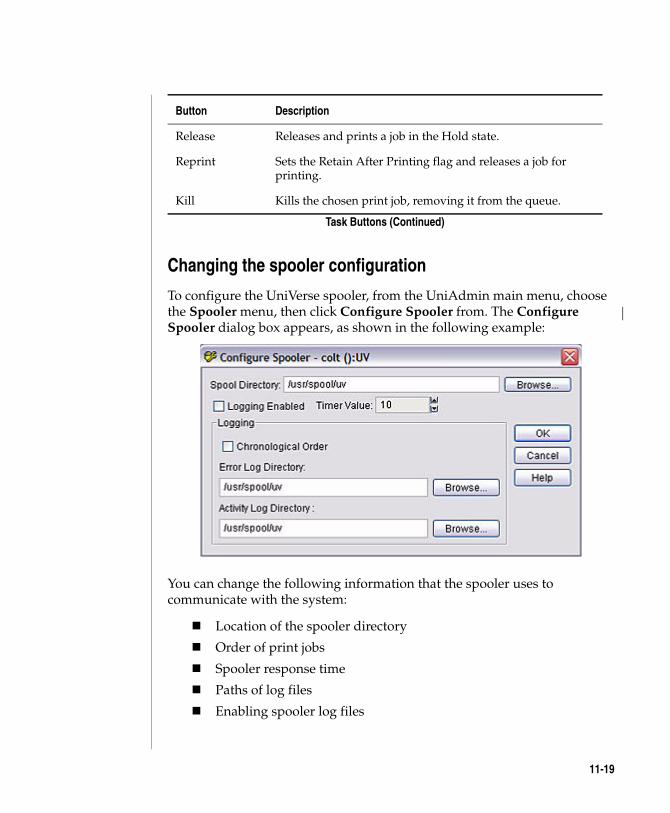
C:\Users\awaite\Documents\U2Doc\UniVerse\11.2\Source\Adminunix\Ch
Changing the spooler configuration
To configure the UniVerse spooler, from the UniAdmin main menu, choose the Spooler menu, then click Configure Spooler from. The Configure Spooler dialog box appears, as shown in the following example:
You can change the following information that the spooler uses to communicate with the system:
Location of the spooler directory
Order of print jobs
Spooler response time
Paths of log files
Enabling spooler log files
Release Releases and prints a job in the Hold state.
Reprint Sets the Retain After Printing flag and releases a job for printing.
Kill Kills the chosen print job, removing it from the queue.
Button Description
Task Buttons (Continued)
11-19
C:\Users\awaite\Documents\U2Doc\UniVerse\11.2\Source\Adminunix\Ch11.fm3/17/14
After you make the changes you want, click OK. The new settings are saved in the uv.rc file.
You can also make these changes using the UNIX shell command usd. For more information about usd, see UniVerse User Reference.
Note: To use the new settings, you must stop and restart the spooler.
Moving the UniVerse spooler directory
The spooler directory path defines where spooled files are created. The system printer configuration file sp.config, and the spooler queue log file usplog, are in this directory. To move the spooler directory, enter a new path in the Spool Directory field. You can also use Browse to search the system for a suitable path.
The UNIX shell command to change the location of the spooler directory is usd directory, where directory is the new path for the spooler directory.
Changing the order in which jobs are printed
The Chronological Order check box specifies the order in which print jobs are printed. When this check box is selected, print jobs are printed in first-in, first-out order. The default setting is cleared (off).
The UNIX shell command to change the print job order is usd −t.
Changing the response time
The response time is the number of seconds the spooler waits for the system to respond to commands. Set the time in the Timer Value field. Enter a number or use the arrows to increase or decrease the value. The default is 10 seconds.
The UNIX shell command to change the response time is usd −w seconds.
11-20 Administering UniVerse on UNIX Platforms
C:\Users\awaite\Documents\U2Doc\UniVerse\11.2\Source\Adminunix\Ch
Changing log file paths
The Error Log File field displays the name of the file the spooler uses to report errors. If this entry is the name of a directory, the default err.log file is used. To change the name or destination of the error log file, enter a new path in this field. You can also use Browse to search the system for a suitable path.
The Activity Log File field displays the name of the file that stores activity messages. If this entry is the name of a directory, the default act.log file is used. To change the name or destination of the activity log file, enter a new path in this field, or click Browse to search the system for a suitable path.
The UNIX shell command usd −L creates the default error and activity log files in the spooler directory. To create the error log file in another directory, use usd −e path; to create the activity log file in another directory, use usd −a pathname.
Enabling logging
The Logging Enabled check box determines whether logging is active. Select this check box to enable logging to the error log file and the activity log file. The default setting for this option is cleared (logging disabled).
Diagnosing spooler problems
To begin tracing, edit the sptrace.conf file in the /tmp file. This file can contain up to 2 lines of text options.
First line: trace activity category and level:
options=[A]n
Where A designates specific activities you want to trace and is a combination of m, s ans q, which stand for memory, signal, and queue, respectively. I you omit A, all categories are traced (if n is greater than 0).
11-21
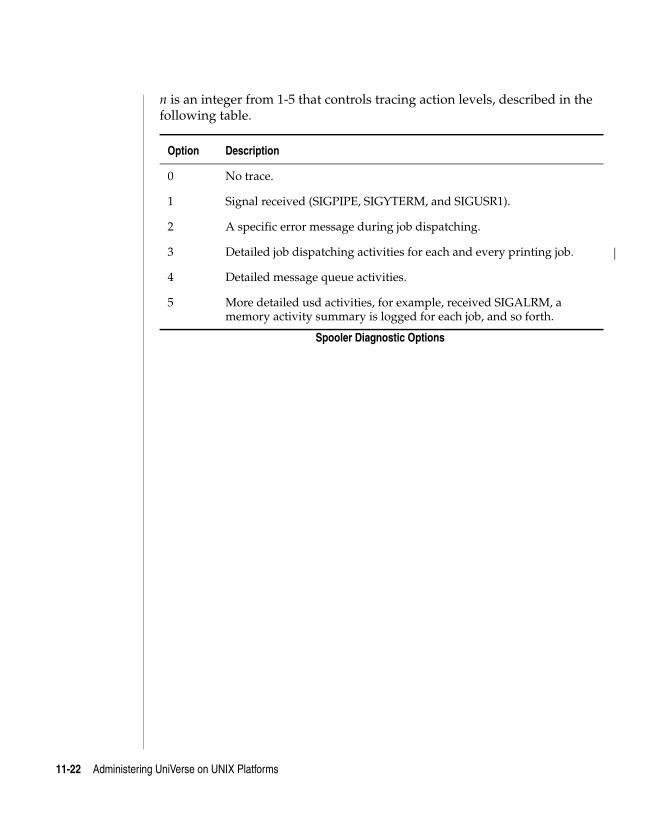
C:\Users\awaite\Documents\U2Doc\UniVerse\11.2\Source\Adminunix\Ch11.fm3/17/14
n is an integer from 1-5 that controls tracing action levels, described in the following table.
Option Description
0 No trace.
1 Signal received (SIGPIPE, SIGYTERM, and SIGUSR1).
2 A specific error message during job dispatching.
3 Detailed job dispatching activities for each and every printing job.
4 Detailed message queue activities.
5 More detailed usd activities, for example, received SIGALRM, a memory activity summary is logged for each job, and so forth.
Spooler Diagnostic Options
11-22 Administering UniVerse on UNIX Platforms
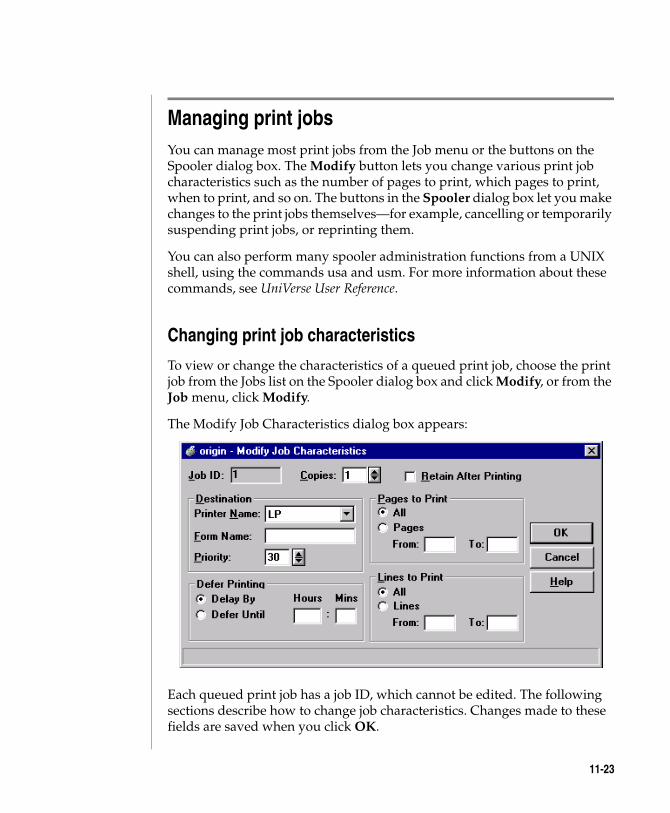
C:\Users\awaite\Documents\U2Doc\UniVerse\11.2\Source\Adminunix\Ch
Managing print jobsYou can manage most print jobs from the Job menu or the buttons on the Spooler dialog box. The Modify button lets you change various print job characteristics such as the number of pages to print, which pages to print, when to print, and so on. The buttons in the Spooler dialog box let you make changes to the print jobs themselves—for example, cancelling or temporarily suspending print jobs, or reprinting them.
You can also perform many spooler administration functions from a UNIX shell, using the commands usa and usm. For more information about these commands, see UniVerse User Reference.
Changing print job characteristics
To view or change the characteristics of a queued print job, choose the print job from the Jobs list on the Spooler dialog box and click Modify, or from the Job menu, click Modify.
The Modify Job Characteristics dialog box appears:
Each queued print job has a job ID, which cannot be edited. The following sections describe how to change job characteristics. Changes made to these fields are saved when you click OK.
11-23
C:\Users\awaite\Documents\U2Doc\UniVerse\11.2\Source\Adminunix\Ch11.fm3/17/14
Specifying the number of copies
The number of copies to print defaults to 1. Use the arrows to change the number of copies or enter a number in the Copies field. The UNIX shell command is usm −n copies print.job.
Specifying a printer
You can specify a printer to output to by selecting one from the Printer Name list. The printers defined in the &DEVICE& file are listed here. The UNIX shell command is usm −p printer print.job.
Attaching a form
The Form Name field contains the name of a form if one was specified when the print command was issued. You can attach a form to a queued print job by entering the form name in the Form Name field.
Note: The name entered must match the name of a form attached to a printer. Otherwise the print job is not printed.
The UNIX shell command is usm −F formname print.job.
Setting the job priority
The highest job priority is 1 and the lowest is 255. Use the arrows to change the priority or enter a number in the Priority field. The UNIX shell command is usm −P priority print.job.
Specifying when to print
You can define the time at which you want a print job to print. This can be done in two ways:
Delay By. This option specifies the relative time, for example, delay printing until 4 hours from now. This is the default setting.
Defer Until. This option specifies the absolute time you want the spooler to print the job, in hours and minutes.
11-24 Administering UniVerse on UNIX Platforms
C:\Users\awaite\Documents\U2Doc\UniVerse\11.2\Source\Adminunix\Ch
The delay time must be entered in the Hours and Mins fields. These fields are blank by default, that is, there is no delay period.
The UNIX shell command is usm −t delay print.job.
Specifying the pages to print
You can print all pages in the print job or only those in a selected range. The default setting for the pages to print option is All.
To print a range of pages:
1. Click the Pages option.
2. Enter the page number where you want printing to start in the From field
3. Enter the page number where you want printing to end in the To field.
The UNIX shell command is usm −x start.page [ –end.page ] print.job.
Specifying the lines to print
You can print all lines in a print job or only those in a specified range. The default setting for the lines to print option is All.
To print a range of line numbers:
1. Click the Lines option.
2. Enter the line number where you want printing to start in the From field.
3. Enter the line number where you want printing to end in the To field.
The UNIX shell command is usm −y start.line [ –end.line ] print.job.
Retaining a job after printing
You can retain a print file after it has been printed by selecting the Retain After Printing check box. The print file is retained in the Hold state, which you can release or reprint later.
This flag is set automatically when you choose to reprint a job.
11-25
C:\Users\awaite\Documents\U2Doc\UniVerse\11.2\Source\Adminunix\Ch11.fm3/17/14
Note: Once this flag has been set, it is permanently active and the Retain After Printing option is dimmed on the Modify Job Characteristics dialog box. The print job is then held in the queue in a permanent Hold state, and you must kill it to remove it from the queue.
The UNIX shell command is usm −q print.job.
Controlling print jobs
You can control a print job that is currently printing or in the queue in the following ways:
Killing a print job
Holding a print job
Releasing a print job
Reprinting a print job
Suspending a print job
Continuing a suspended print job
These tasks can be performed from the Job pull-down menu or by using the buttons in the Spooler dialog box. You can also use UNIX shell commands.
Killing a print job
You can remove (kill) a print job from the queue at any time. If the print job is actively printing, the print job ends prematurely, and the contents of the printer buffer are printed out. Complete the following steps to kill a print job:
1. Select the print job from the Jobs list.
2. Click Kill, or from the Job menu, select Kill Job.
The UNIX shell command is usm −k print.job.
Holding a print job
You can hold any print job that is not actively printing. The print job is then held with a status of Hold, and is printed when it is released or reprinted. Complete the following steps to hold a print job:
1. Select the print job from the Jobs list.
11-26 Administering UniVerse on UNIX Platforms
C:\Users\awaite\Documents\U2Doc\UniVerse\11.2\Source\Adminunix\Ch
2. Click Hold, or from the Job menu, select Hold Job.
You can also retain a print file in a Hold state after printing it by selecting the Retain After Printing check box on the Modify Job Characteristics dialog box.
A print file is also retained in a Hold state if you choose to reprint a job.
The UNIX shell command is usm −h print.job.
Releasing a print job
When a print job is held in the queue (with a Hold status), you can release it for printing as follows:
1. Select the hold file from the Jobs list.
2. Click Release, or from the Job menu, click Release Job.
The released print job is printed (when a printer becomes available) and removed from the queue.
Note: If the Retain After Printing flag has been set for the print job, clicking the Release button results in the file being printed, but the job is retained in a Hold state.
The UNIX shell command is usm −r print.job.
Reprinting a print job
When you click Reprint, the Retain After Printing flag is set for the chosen job and the file is released for printing. The print file is retained in the queue in a Hold state, and you can reprint the job again or kill it to remove it from the queue. Complete the following steps to reprint a file:
1. Select the file from the Jobs list.
2. Click Reprint, or from the Job menu, select Reprint Job.
Click the Reprint button.
Choose Job -> Reprint Job.
11-27
C:\Users\awaite\Documents\U2Doc\UniVerse\11.2\Source\Adminunix\Ch11.fm3/17/14
Suspending a print ojb
If a print job is actively printing, you can suspend it until you are ready to continue printing. Complete the following steps to suspend an active print job:
1. Select the active print job from the Jobs list.
2. Click Suspend, or from the Job menu, click Suspend Job.
The print job remains in a suspended (Wait) state until you continue printing. All other print jobs to the printer are also queued until the suspended print job is continued.
The UNIX shell command is usa −p printer −b.
Continuing a suspended print job
Complete the following steps to continue a suspended print job:
1. Select the suspended print job from the Jobs list.
2. Click Continue, or from the Job menu, select Continue Job.
The print job prints when a printer becomes available.
The UNIX shell command is usa −p printer −c.
11-28 Administering UniVerse on UNIX Platforms

C:\Users\awaite\Documents\U2Doc\UniVerse\11.2\Source\Adminunix\Ch
Logging spooler activityWhen the UniVerse spooler is first installed, the spooler queue log file usplog is created. This file contains information about the printers that exist on the system and print jobs queued for each printer.
You can create two additional spooler log files: a file that logs all spooler errors generated by the spooler process (err.log), and a file that logs all spooler and printer activity (act.log). By default, these two files are created in the UniVerse spooler directory, but you can specify any UNIX path for these log files.
See “Changing the spooler configuration” on page 19 for details about how to enable logging and how to specify an alternative path for the log files.
The options to view log files and to find out details of a print job are in the Spooler menu.
Displaying spooler log files
You can display the err.log file and the act.log file from the Spooler menu.
To display the error log file, from the Spooler menu, select Read Error Log. The Error Log File window appears. Close this window by clicking Close.
To display the activity log file, from the Spooler menu, select Read Activity Log. In this case, the Activity Log File window appears. Close this window by clicking Close.
Note: In both cases, only the last 16K bytes of the log file are displayed.
11-29
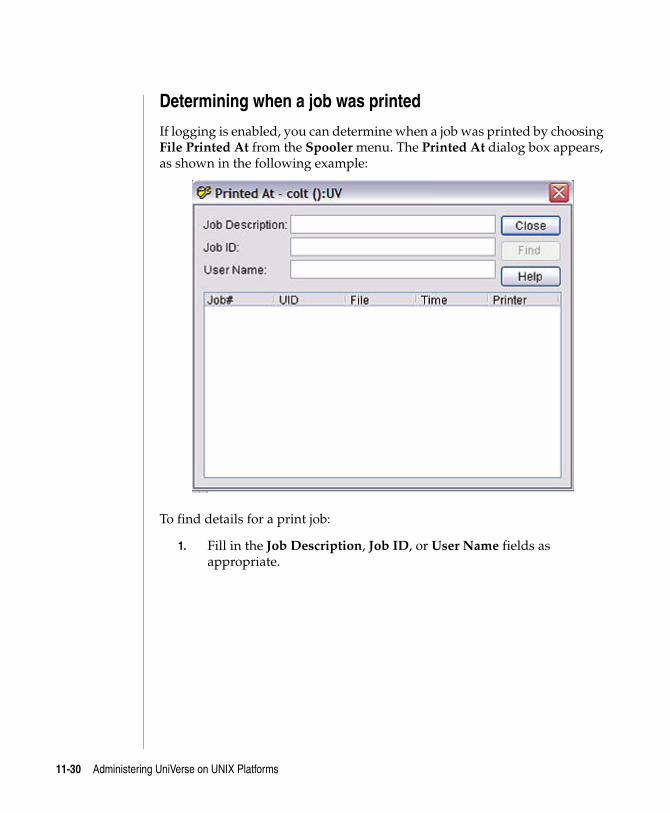
C:\Users\awaite\Documents\U2Doc\UniVerse\11.2\Source\Adminunix\Ch11.fm3/17/14
Determining when a job was printed
If logging is enabled, you can determine when a job was printed by choosing File Printed At from the Spooler menu. The Printed At dialog box appears, as shown in the following example:
To find details for a print job:
1. Fill in the Job Description, Job ID, or User Name fields as appropriate.
11-30 Administering UniVerse on UNIX Platforms
C:\Users\awaite\Documents\U2Doc\UniVerse\11.2\Source\Adminunix\Ch
2. Click Find. The list is updated with each print job that meets the entered criteria.
The following information appears for each entry in the list:
3. Click Close to close this dialog box.
Field Description
Job# The job ID of the printed file.
UID The UniVerse user number of the user who issued the print command.
File The description of the print job.
Time The time the file was printed.
Printer The printer used to output the file.
Job List Information
11-31
C:\Users\awaite\Documents\U2Doc\UniVerse\11.2\Source\Adminunix\Ch11.fm3/17/14
Starting, stopping, and resetting the spoolerYou can start, stop, and reset the spooler from the Spooler menu.
Starting the spooler
If the spooler daemon was stopped, you can restart it. When the spooler daemon starts, the usplog file is read and the queues are restored.
Complete the following steps to start the spooler daemon:
1. From the Spooler menu, select Start Spooler. (This option is available only if the spooler daemon is stopped.) The Spool message box appears.
2. Click Yes.
Stopping the spooler
If the spooler daemon is running, you can stop it. When you stop the spooler daemon, the spooler daemon process is terminated.
Complete the following steps to stop the spooler daemon:
1. From the Spooler menu, select Stop Spooler. (This option is available only if the spooler is running.) The Spool message box appears.
2. Click Yes. A message box appears.
3. Click OK to acknowledge the message.
Resetting the spooler
If the spooler daemon was started but appears to hang, you can reset it. When you reset the spooler, the spooler daemon is restarted, the sp.config file and usplog file are reread, and the queues are reinstated to the last active state.
Complete the following steps to reset the spooler daemon:
11-32 Administering UniVerse on UNIX Platforms
C:\Users\awaite\Documents\U2Doc\UniVerse\11.2\Source\Adminunix\Ch
1. From the Spooler menu, select Reset Spooler. (This option is active only when the spooler is started.) The Spool message box appears.
2. Click Yes. The spooler daemon is reset.
11-33
C:\Users\awaite\Documents\U2Doc\UniVerse\11.2\Source\Adminunix\Ch11.fm3/17/14
About the UniVerse spoolerInstallation and a general understanding of how the spooler works require a basic understanding of UNIX.
What happens when the spooler is installed
The UniVerse spooler is installed as part of the initial UniVerse installation procedure. The following things occur when the spooler is installed:
The UniVerse spooler directory (by default, /usr/spool/uv) is created.
The UniVerse spooler daemon (usd) is installed.
The UniVerse spooler queuing process command (usp) is installed.
The UniVerse spooler administration command (usa) is installed.
The UniVerse spooler queue modification command (usm) is installed.
A spooler queue log file (usplog) is created.
A system printer configuration file (sp.config) is created.
When the initialization script (/etc/uv.rc) is installed and run, any device lock files in the UniVerse spooler directory are cleared, and the UniVerse spooler daemon starts.
Spooler directories and files
Several directories and files are associated with the UniVerse spooler.
The spooler directory
The default spooler directory, unless you change it by reconfiguring UniVerse, is /usr/spool/uv. This directory stores copies of all files queued for printing. It also contains files that control the spooler. The spooler directory must have rwxrwxrwx protection, which means that it can be read, written, and executed by the owner, group, and all others.
11-34 Administering UniVerse on UNIX Platforms
C:\Users\awaite\Documents\U2Doc\UniVerse\11.2\Source\Adminunix\Ch
The system startup script /etc/uv.rc gets the spooler directory location from the configurable parameter UVSPOOL in the uvconfig file. You can move the spooler directory to a different partition.
Moving the spooler directory
You may find that the /usr partition is too small to handle many large print files. You can solve this problem by moving the UniVerse spooler directory to a partition with more space.
Note: Before moving the spooler directory, make sure no users are using UniVerse or the spooler.
To move the spooler directory:
1. Change the UVSPOOL configurable parameter in the uvconfig file to the path of the new spooler directory.
Note: This directory must already exist and have permissions rwxrwxrwx. Changing this parameter directs print files generated in the UniVerse environment and by the usp command to the specified directory.
2. Move all files in the /usr/spool/uv directory to the new directory.
3. When no users are on the system, run uvregen and DBsetup.
4. Shut down and start up the spooler using the Spooler pull-down menu options.
Spooler queue log file
A spooler queue log file called usplog is created in the spooler directory. usplog preserves information about the printers and the queued print jobs. As print files are created, their details are written to this file, overwriting the previous contents. The usplog file ensures that print files are not lost if the spooler fails or the system crashes.
Warning: Do not edit the usplog file. It contains information the spooler daemon uses when it restarts after a normal or abnormal system shutdown. The information in usplog ensures that the spooler restarts in more or less the same state it was in when the system shut down.
You can create additional files to log spooler activity. See “Logging spooler activity” on page 29.
11-35
C:\Users\awaite\Documents\U2Doc\UniVerse\11.2\Source\Adminunix\Ch11.fm3/17/14
System printer configuration file
A system printer configuration file called sp.config is created in the spooler directory. This file describes the device path and the characteristics of printers controlled by the UniVerse spooler.
When changes are made to the spooler configuration, the new settings are written back to this file.
The uv.rc script (in the /etc directory) contains the spooler configuration settings and is used to invoke the spooler daemon at system startup.
On some machines it may be necessary to rebuild the kernel to allow the spooler to function properly. Check the UniVerse Installation Guide to see if this applies to your system.
Spooler processes and commands
A single spooler process (daemon) automatically starts when the system starts.
You can use several UniVerse commands to perform spooler administration without using the Spooler option from UniAdmin. The spooler administration commands are usp, usa, and usm. You use these commands from a UNIX shell; you do not use them from the UniVerse environment. See the UniVerse User Reference for more information about syntax and use.
Spooler daemon (usd)
The UniVerse spooler daemon is installed in the bin directory of the UV account. This daemon is generally initiated at system startup and runs at all times in the background. usd monitors the spooler queue for files to be printed, manages the mounting of special forms on the system printers, and spawns copies of itself to print the files that are queued for active printers with the correct characteristics.
Spooler queuing process command (usp)
The UniVerse spooler queuing process command resides in the bin directory of the UV account. Use this command to queue files to be printed.
11-36 Administering UniVerse on UNIX Platforms
C:\Users\awaite\Documents\U2Doc\UniVerse\11.2\Source\Adminunix\Ch
Spooler administration command (usa)
The UniVerse spooler administration command resides in the bin directory of the UV account. Use this command to enable or disable printing and queuing, to define printer groups, and to manage the spooler daemon.
Spooler queue modification command (usm)
The UniVerse spooler queue modification command is installed in the bin directory of the UV account. Use this command to alter the characteristics of a job in a printer queue.
How the spooler works
Once the UniVerse spooler is installed and configured, it should be up and running. At system initialization, the UniVerse spooler daemon usd starts. usd checks for a message queue entry with a KEY of the form 0xaceaxxxx. If such a message queue entry exists, usd exits with the following message:
usd: daemon: spooler already active!
If the message queue entry does not exist, usd creates it and then reads the printer configuration file (sp.config) and the usplog file, both from the UniVerse spooler directory.
When a UniVerse user sends a printing request to the spooler, a file is created in the UniVerse spooler directory with a name in one of two forms. If the request was generated by a BASIC PRINT ON statement or by using the LPTR keyword, the form is as follows:
uvnnnnnxxxxxxx
If the request was generated by the UNIX shell command usp, the form is as follows:
usnnnnnxxxxxxx
xxxxxxx is a control sequence generated by the spooler and nnnnn is the spool job number. When the print file is closed, UniVerse sends a message via the message queue. The message states that the file is available for printing, and indicates the number of copies, the form name, whether to delay printing, and so on.
11-37
C:\Users\awaite\Documents\U2Doc\UniVerse\11.2\Source\Adminunix\Ch11.fm3/17/14
usd uses the information in the message to build an entry in the usplog file and then tries to find an available printer that matches the print file characteristics. If it does not find one, usd queues the file to the first printer defined in the sp.config file and puts it in the wait state.
If usd finds a printer, it creates a new process (a copy of itself) to print the file.
The copy of usd locks the printer by opening the device with the exclusive use bit set. If a lock file is defined in field 5 of the printer definition in the &DEVICE& file, this lock file is used by default. If a lock file is not specified, a zero-length file is created in the spooler directory. This new lock file has the name lock.xxx, where xxx is the base name of the device path. This file is used by the spooler daemon to coordinate different logical printers that are defined for the same physical printer.
The print file is printed. On completion, the copy of usd sends a message to the spooler daemon that printing is complete. It then removes the lock file, closes the device, erases the print file, and exits.
The spooler daemon removes the entry for that print job from the in-memory queue and from the usplog file, and attempts to schedule another print job to that printer.
Both the usm and the usa commands work by sending a message to the spooler daemon through the message queue. The spooler daemon acts on the request and, if appropriate, sends an answering message.
11-38 Administering UniVerse on UNIX Platforms
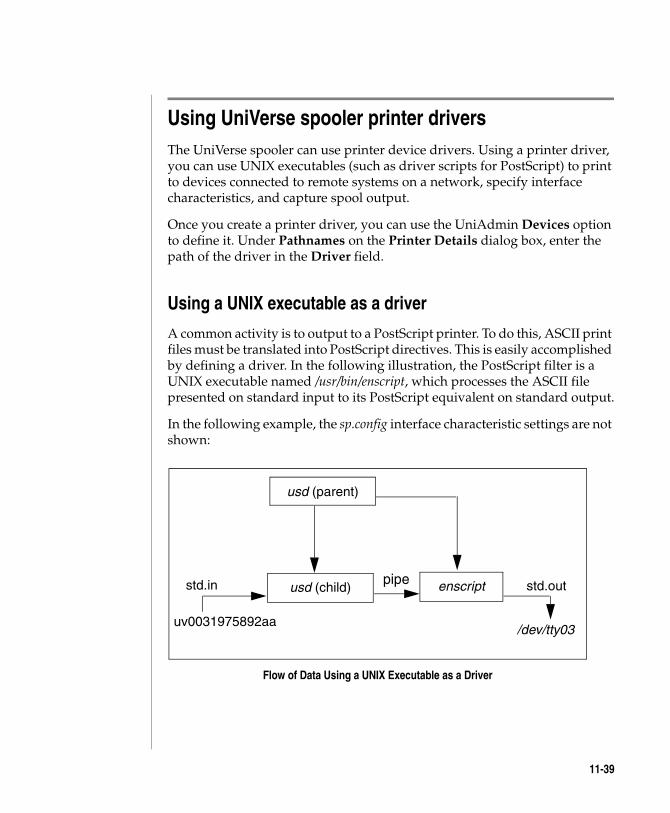
C:\Users\awaite\Documents\U2Doc\UniVerse\11.2\Source\Adminunix\Ch
Using UniVerse spooler printer driversThe UniVerse spooler can use printer device drivers. Using a printer driver, you can use UNIX executables (such as driver scripts for PostScript) to print to devices connected to remote systems on a network, specify interface characteristics, and capture spool output.
Once you create a printer driver, you can use the UniAdmin Devices option to define it. Under Pathnames on the Printer Details dialog box, enter the path of the driver in the Driver field.
Using a UNIX executable as a driver
A common activity is to output to a PostScript printer. To do this, ASCII print files must be translated into PostScript directives. This is easily accomplished by defining a driver. In the following illustration, the PostScript filter is a UNIX executable named /usr/bin/enscript, which processes the ASCII file presented on standard input to its PostScript equivalent on standard output.
In the following example, the sp.config interface characteristic settings are not shown:
usd (parent)
uv0031975892aa
std.in usd (child) enscriptpipe
/dev/tty03
std.out
Flow of Data Using a UNIX Executable as a Driver
11-39
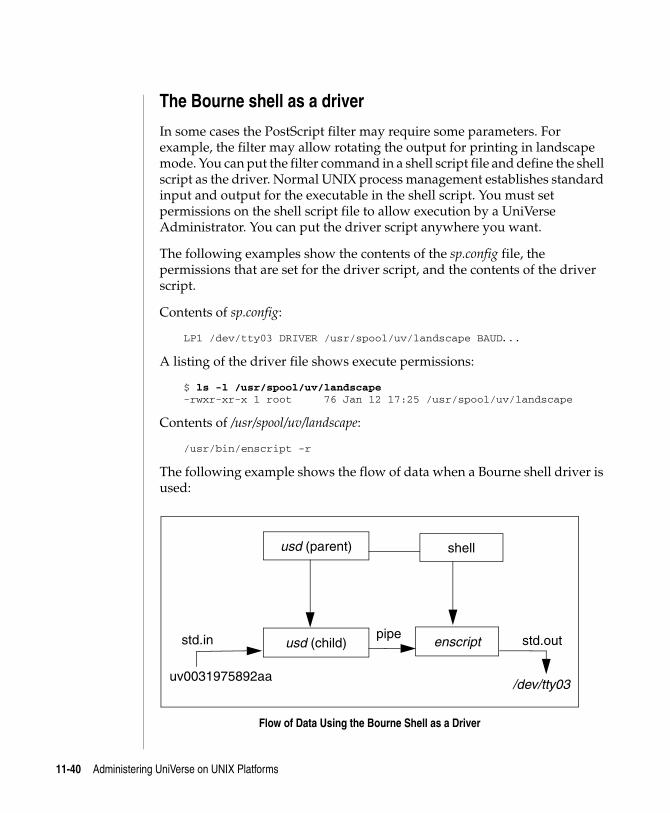
C:\Users\awaite\Documents\U2Doc\UniVerse\11.2\Source\Adminunix\Ch11.fm3/17/14
The Bourne shell as a driver
In some cases the PostScript filter may require some parameters. For example, the filter may allow rotating the output for printing in landscape mode. You can put the filter command in a shell script file and define the shell script as the driver. Normal UNIX process management establishes standard input and output for the executable in the shell script. You must set permissions on the shell script file to allow execution by a UniVerse Administrator. You can put the driver script anywhere you want.
The following examples show the contents of the sp.config file, the permissions that are set for the driver script, and the contents of the driver script.
Contents of sp.config:
LP1 /dev/tty03 DRIVER /usr/spool/uv/landscape BAUD. . .
A listing of the driver file shows execute permissions:
$ ls -l /usr/spool/uv/landscape -rwxr-xr-x 1 root 76 Jan 12 17:25 /usr/spool/uv/landscape
Contents of /usr/spool/uv/landscape:
/usr/bin/enscript -r
The following example shows the flow of data when a Bourne shell driver is used:
usd (parent)
uv0031975892aa
std.in usd (child) enscriptpipe
/dev/tty03
std.out
shell
Flow of Data Using the Bourne Shell as a Driver
11-40 Administering UniVerse on UNIX Platforms
C:\Users\awaite\Documents\U2Doc\UniVerse\11.2\Source\Adminunix\Ch
Using a driver for remote printing
Another common use of a driver is to route a print job to a printer on a remote system. In this example the printer LPREM is a printer on another system, systemb, networked using TCP/IP. The driver script uses the remote execution command rsh to have the UniVerse spooler on systemb print the file. The command executed on the remote system is the UniVerse spooler usp command, which takes the file on standard input and puts it into the spool queue on the remote system.
Contents of sp.config:
LPREM /dev/null DRIVER /usr/spool/uv/sysb.drvr BAUD...
Contents of /usr/spool/uv/sysb.drvr:
/usr/ucb/rsh systemb /usr/uv/bin/usp -e -h -F FORMNAME
The remote usp command should suppress headers because they are supplied by the local machine with the user information.
Note: The remote or network shell command may be nsh, rsh, or remsh. If rsh is the remote shell command, be careful to specify the path for rsh to ensure that the remote shell, not the restricted shell, is used. Both executables are named rsh.
Because no printing is actually done on the local system, the null device is specified as the path (/dev/null). You control which printer is assigned on nodename by using the appropriate usp option, –F or –p, in the shell script.
Complex shell script drivers
A driver script can be as complex as needed as long as the relationship between standard input and standard output are taken into account. In the following example, the output file is processed by the stream editor filter sed, changing all occurrences of ‘abc’ to ‘def’ before generating the PostScript output. (The sp.config interface characteristic settings are not shown.)
Contents of sp.config:
LP1 /dev/tty03 DRIVER /usr/spool/uv/sed.drvr BAUD...
Contents of /usr/spool/uv/sed.drvr:
sed "s/abc/def/g" | /usr/bin/enscript
11-41
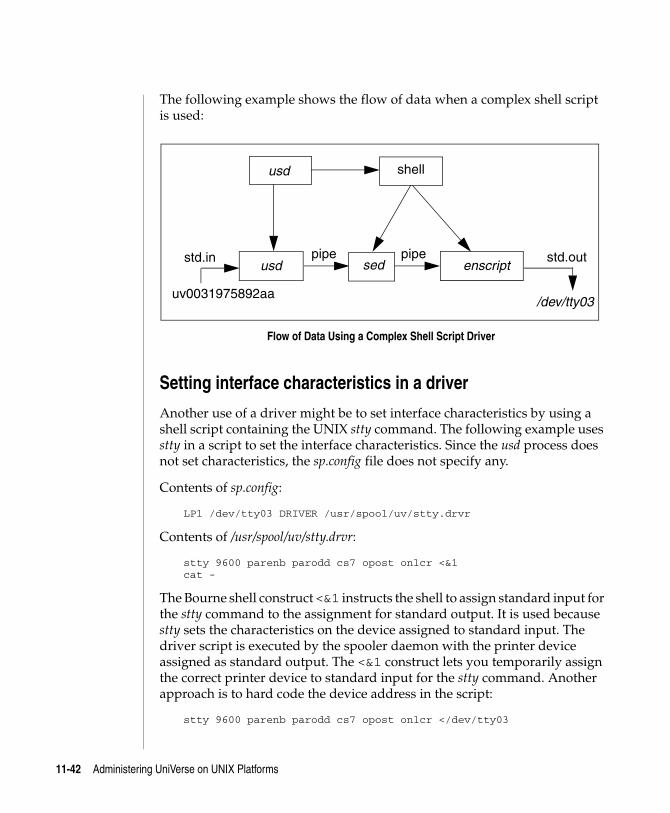
C:\Users\awaite\Documents\U2Doc\UniVerse\11.2\Source\Adminunix\Ch11.fm3/17/14
The following example shows the flow of data when a complex shell script is used:
Setting interface characteristics in a driver
Another use of a driver might be to set interface characteristics by using a shell script containing the UNIX stty command. The following example uses stty in a script to set the interface characteristics. Since the usd process does not set characteristics, the sp.config file does not specify any.
Contents of sp.config:
LP1 /dev/tty03 DRIVER /usr/spool/uv/stty.drvr
Contents of /usr/spool/uv/stty.drvr:
stty 9600 parenb parodd cs7 opost onlcr <&1 cat -
The Bourne shell construct <&1 instructs the shell to assign standard input for the stty command to the assignment for standard output. It is used because stty sets the characteristics on the device assigned to standard input. The driver script is executed by the spooler daemon with the printer device assigned as standard output. The <&1 construct lets you temporarily assign the correct printer device to standard input for the stty command. Another approach is to hard code the device address in the script:
stty 9600 parenb parodd cs7 opost onlcr </dev/tty03
usd
uv0031975892aa
std.inusd enscript
pipe
/dev/tty03
std.outpipesed
shell
Flow of Data Using a Complex Shell Script Driver
11-42 Administering UniVerse on UNIX Platforms
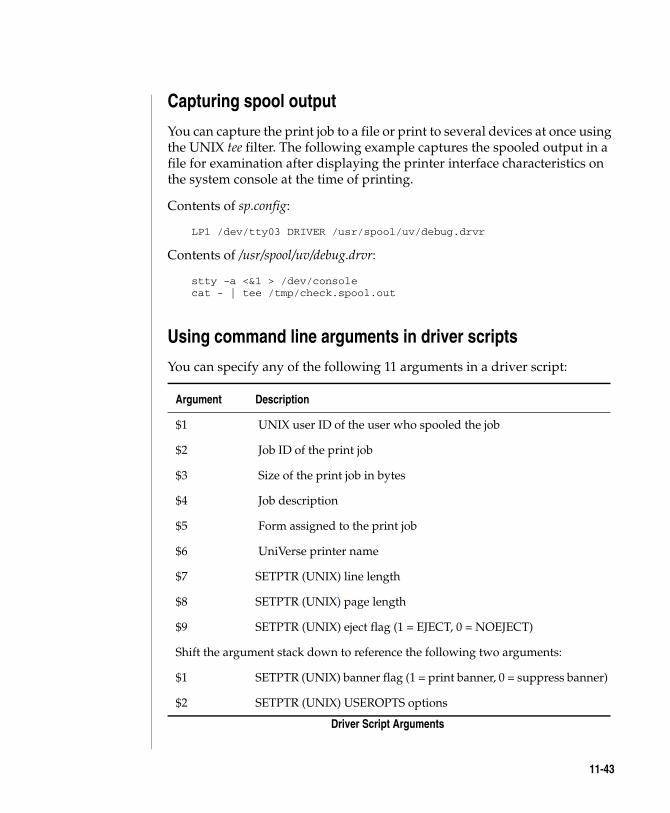
C:\Users\awaite\Documents\U2Doc\UniVerse\11.2\Source\Adminunix\Ch
Capturing spool output
You can capture the print job to a file or print to several devices at once using the UNIX tee filter. The following example captures the spooled output in a file for examination after displaying the printer interface characteristics on the system console at the time of printing.
Contents of sp.config:
LP1 /dev/tty03 DRIVER /usr/spool/uv/debug.drvr
Contents of /usr/spool/uv/debug.drvr:
stty -a <&1 > /dev/console cat - | tee /tmp/check.spool.out
Using command line arguments in driver scripts
You can specify any of the following 11 arguments in a driver script:
Argument Description
$1 UNIX user ID of the user who spooled the job
$2 Job ID of the print job
$3 Size of the print job in bytes
$4 Job description
$5 Form assigned to the print job
$6 UniVerse printer name
$7 SETPTR (UNIX) line length
$8 SETPTR (UNIX) page length
$9 SETPTR (UNIX) eject flag (1 = EJECT, 0 = NOEJECT)
Shift the argument stack down to reference the following two arguments:
$1 SETPTR (UNIX) banner flag (1 = print banner, 0 = suppress banner)
$2 SETPTR (UNIX) USEROPTS options
Driver Script Arguments
11-43
C:\Users\awaite\Documents\U2Doc\UniVerse\11.2\Source\Adminunix\Ch11.fm3/17/14
These arguments can be useful for printing across a network. Using a convention that the form name is the remote node name and the printer name is set to the desired form name on the remote node, the following shell script would route the job to the desired queue on the remote machine.
Note: rcmd is a UNIX TCP/IP remote execution command that may be spelled differently on different machines.
Contents of /usr/spool/uv/remprint.drvr:
/usr/bin/rcmd $5 usp -F $6 -h -e
11-44 Administering UniVerse on UNIX Platforms
C:\Users\awaite\Documents\U2Doc\UniVerse\11.2\Source\Adminunix\Ch
Using the UNIX spooler with the UniVerse spoolerThe System V UNIX spooler lp(1) command assumes it is the only process using the printers. This means that lp checks only itself to make sure it is not using a printer before it sends the printer another job. If another process, such as the UniVerse spooler, is using the printer, the UNIX spooler continues to send jobs to the printer as if it were available, and the two print jobs can become mixed. This problem does not occur if you send a print job with the usd command after a print job has been sent with the lp command, because the UniVerse spooler always checks the status of a printer before sending it a new print job.
The UniVerse spooler is designed to replace the UNIX spooler, so the best solution to this problem is to stop using the UNIX spooler. If you must use both spoolers, there are two ways to solve the problem:
Change the UNIX lp interface file
Add a DRIVER option to the sp.config entry
Changing the UNIX lp interface file
Change the UNIX lp interface file so it uses the same external locking file as the UniVerse spooler. There is one lp interface file for each print device that lp recognizes in the /usr/spool/lp/model directory. Add the following five lines to the beginning of each lp interface file:
while [ -f /usr/spool/uv/lock.ttyxx ] do sleep 5 done echo > /usr/spool/uv/lock.ttyxx
ttyxx is the printer name defined in the sp.config file. These lines cause the spooler to wait until the lock file for the device is removed. The spooler then creates a lock of its own and proceeds with the print job. At the end of the print job the lock file must be removed. This will be done if you add the following line just before the exit(0) line in the lp interface file:
rm /usr/spool/uv/lock.ttyxx
11-45
C:\Users\awaite\Documents\U2Doc\UniVerse\11.2\Source\Adminunix\Ch11.fm3/17/14
Adding a DRIVER option to the sp.config entry
Add a DRIVER option to the sp.config entry that invokes the System V UNIX spooler. A copy of the print job is put in the UNIX spooler queue and printed by the UNIX spooler. The proper concurrency control is maintained as long as the lp spooler is not set up with multiple destination queues defining the same device.
11-46 Administering UniVerse on UNIX Platforms
C:\Users\awaite\Documents\U2Doc\UniVerse\11.2\Source\Adminunix\Ch
Troubleshooting the spoolerThe most common causes of spooler failure are as follows:
A driver process or a usd copy has not terminated correctly and is locking a resource.
The print file characteristics or the printer configuration is specified incorrectly.
You can fix these problems using the Spooler menu in UniAdmin, or by using UNIX shell commands.
Printing problems
This section describes possible causes (and solutions) when jobs do not print.
Spooler is not running after UNIX upgrade
UniVerse and UNIX are initialized by rc scripts in the /etc directory.
When the UNIX environment is upgraded, the UNIX installation processes may replace the rc script with one that initializes the new UNIX environment. If that is done in a way that does not preserve user changes in the old rc script, neither UniVerse nor the spooler are initialized. The simplest remedy is to reinstall the group MAIN from the initialization tape. This requires reauthorization of the license.
When UNIX is upgraded, you must tune the kernel as it was before the UNIX upgrade. Insufficient kernel space for message queue parameters may allow initialization of the UniVerse environment (although not the full complement of users), but not of the spooler. Retune the kernel, reboot, and save or record the key UNIX tunable parameters before upgrading the operating system.
The Spooler daemon will not start
There are many reasons why the UniVerse spooler daemon (usd) does not start. Check for the following causes.
11-47
C:\Users\awaite\Documents\U2Doc\UniVerse\11.2\Source\Adminunix\Ch11.fm3/17/14
Message queue facility incorrectly tuned
If you have recently performed a UniVerse installation or upgraded UNIX, it is possible that the UNIX message queue facility is incorrectly tuned. See “Spooler is not running after UNIX upgrade” on page 47.
Missing files after moving the spooler directory
If you have moved the spooler directory, check that you have performed all the steps outlined in “Moving the spooler directory” on page 35.
Verify that the spooler directory has sufficient permissions. All users need permissions to write print files into the spooler directory. The permissions should be as follows:
# ls -ld /usr /usr/spool /usr/spool/uv drwxr-xr-x 33 root 2048 Apr 11 14:34 /usr dr-xr-xr-x 17 root 2048 Sep 1 12:29 /usr/spool drwxrwxrwx 2 root 2048 Sep 1 17:35 /usr/spool/uv
If you see the following messages in the error log file, it is likely that the sp.config file or the usplog file is missing:
usd: daemon: cannot find sp.configusd: cannot open daemon log file (usplog)
If the sp.config file does not exist, follow these steps to recreate it:
1. Choose the Devices option from UniAdmin. The Maintain UniVerse Devices dialog box appears.
2. Click the Printers option.
3. Display the details of a defined printer, but do not make any changes (unless you need to).
4. Click OK.
5. Click Close to exit the Devices option. The &DEVICE& file is saved. A new sp.config file is created, containing the definition for the printer you chose to view.
6. Repeat steps 3 through 5 to add other printer definitions.
11-48 Administering UniVerse on UNIX Platforms
C:\Users\awaite\Documents\U2Doc\UniVerse\11.2\Source\Adminunix\Ch
If usplog is missing, log in as a UniVerse administrator and recreate it by issuing the following UNIX commands from a system prompt:
# cd /usr/spool/uv # echo z > usplog # chmod 600 usplog
Message: ***Warning: Requested Lock File Already Exists
The UniVerse spooler uses a lock file to indicate that a device is in use. When a printer serves multiple printer queues, the lock file for the device may exist because of activity on a different queue. This warning message occurs when:
A print job is ready for a queue
The queue does not have an active print job
The lock file exists because the device is servicing another queue
Suspending an active print job may fail to remove the lock file. If you try to kill the print job or direct it to another queue, this will not remove the lock file. In this case, remove the lock file with the UNIX command:
# rm /usr/spool/uv/lock.xxx
lock.xxx is the name of the lock file. If you are not using the default spooler directory, replace /usr/spool/uv with the path of your spooler directory.
Jobs in wait state will not go active
There are many reasons why a job in the Wait state does not go Active. Check for the following possible causes.
Disabled printing
If printing has been stopped for a printer, the print jobs are not printed until the printer is restarted. Check the Printer Status field in the Spooler dialog box. If the status is Disabled, from the Printer menu, select Allow Printing. A message box appears. Click OK to start the printer.
11-49
C:\Users\awaite\Documents\U2Doc\UniVerse\11.2\Source\Adminunix\Ch11.fm3/17/14
Verify that both printing and queuing are turned on for the print queue. SPOOL -LIST should show P: on Q: on in each queue that should be printing. To turn on printing and queuing, enter the following at the UNIX shell prompt:
# usa -p print.queue +o (enable printing) # usa -p print.queue +q (enable queuing)
Suspended print job
If a print job has been suspended, the other print files in that queue are not printed (made active) until the suspended job is continued or killed.
In the following example, the status for a suspended job is susp:
# usa Printer: lp Q: on P: on Form: Job # Job description User name Pri Forms Size Cps Status Delay 00020 sp.config root 30 118 1 susp 00021 passwd root 30 3718 1 wait
To free up such a queue, use the following UNIX shell command to put the suspended job into a hold state:
# usm -h job.no
Mismatched form names
If you are using forms, you must ensure that a form mounted on the printer matches that specified for a print job. If the form names do not match, or if you have specified a form for the print job, but it is not mounted on the printer, the print job will never go active.
Note: Form names are case-sensitive.
Check the Form field on the Spooler window and the Form column for a print job. If these do not match, do one of the following:
Change the form on the printer. See “Managing printers” on page 13.
Change the form associated with the print job. See “Attaching a form” on page 24.
11-50 Administering UniVerse on UNIX Platforms
C:\Users\awaite\Documents\U2Doc\UniVerse\11.2\Source\Adminunix\Ch
The spooler initiates a print job when all the job characteristics match. The UniVerse SPOOL –LIST command displays both the form on the printer and the form associated with the print job:
Printer: lp Q: on P: on Form: LANDSCAPE Job # Job description User name Pri Forms Size Cps Status Delay 00014 sp.config root 30 MARK 118 1 wait 00015 passwd root 30 MARK 3718 1 hold &
Particular print queue was specified
If the print job was spooled to a particular print queue with SETPTR,,,,,AT PRINTER name, it does not print on another queue unless it is redirected. To direct a print job to a different queue:
1. Select the print job from the Jobs list and click Modify. The Modify Job Characteristics dialog box appears.
2. Select a different printer from the Printer Name drop-down list.
3. Click OK.
Or use the following UNIX shell command:
# usm -p new.queue job.number
Jobs in active state do not print
If print jobs in the active state do not print, you need to verify that the printer is online.
The port could be hung or it could be in use by the UNIX spooler. You cannot check this using UniAdmin. Enter the following UNIX commands at the system prompt:
# stty -a </dev/tty.device # cat >/dev/tty.device
tty.device is the name of the printer device.
If either command fails, something is wrong with the port. If stty hangs, an unfinished write on the port has filled the UNIX buffer and has not completed. Until the UNIX driver buffer clears, stty cannot interrogate the port. If the cat command fails, the port has a problem.
11-51
C:\Users\awaite\Documents\U2Doc\UniVerse\11.2\Source\Adminunix\Ch11.fm3/17/14
SPOOL –LIST and usa hang
The spooler message queue ID is 0xacea0207. If the correct message queue exists, the commands SPOOL –LIST and usa put their request in the message queue and wait for a reply. The spooler must be running to respond.
Verify that usd is not swapped out. Over time, the UNIX scheduler may lower the priority of a daemon process as the quantity of resources consumed grows. Some UNIX implementations give priority to interactive sessions at the expense of processes not associated with a terminal. A busy machine may preempt the spooler from getting the resources needed to respond to a request.
The UNIX ipcs –qa command indicates the maximum bytes available in the message queue in the QBYTES column. If there is insufficient space in the message queue to construct a reply message, the daemon ceases to function. This condition requires killing and restarting the spooler. Retune the UNIX kernel to enlarge the message queue space.
The spooler daemon times out when a bad port fails to open. If the spooler hangs trying to open a bad port, the CBYTES increases as more spooler requests are entered. Use the UNIX ipcs –qa command to monitor CBYTES. At 10-second intervals, the timer expires and gives the spooler a chance to service other requests. Another ipcs –qa command should show a reduction in the number of bytes outstanding in the message queue. Using the UNIX process status command ps, interrogate the state of usd.
If usd is not consuming CPU resources, it may be hung waiting for a bad device. Investigate the associated device from the ps command. See if the device responds to the following:
# stty –a </dev/tty.device
tty.device is the name of the printer device.
Driver not found
When the spooler tries to print a job on a queue that specifies a nonexistent driver, the following error message may appear in the error log file:
***Error: Unable to open printer driver. Verify that the driver defined in the sp.config file exists, then re-enable printer (usa +o -p printer)
11-52 Administering UniVerse on UNIX Platforms
C:\Users\awaite\Documents\U2Doc\UniVerse\11.2\Source\Adminunix\Ch
If you see this error, you need to disable the printer, check that the driver file exists, and then reenable the printer.
To disable printing, from the UniVerse Spooler menu, click Printer, then click Allow Printing.
To check that the driver exists:
1. Choose the Devices option from the UniAdmin menu. The Maintain UniVerse Devices dialog box appears.
2. Click the Printers option.
3. Double-click the printer generating the error from the Printers list, or select the printer generating the error from the Printers list, then click Detail.
4. Check the entry of the Driver Pathname field by clicking Browse.
5. Click OK to save the printer settings.
6. Click Close to exit the Devices option.
To enable the printer, from the UniVerse Spooler menu, click Printer, then click Allow Printing.
If the spooler directory has been moved and fully qualified paths are used in the sp.config file, the spooler daemon searches in the wrong place for the driver. Conversely, if fully qualified paths are not used in sp.config and the driver remains in the original directory, the spooler searches in the new spooler directory for the drivers.
Printer configuration changes do not take effect
For printer configuration changes to take effect, the spooler must be instructed to read the sp.config file. This can be done by stopping and starting the spooler.
To stop the spooler, from the UniVerse Spooler menu, click Spooler, then click Stop Spooler. A message box appears. Click Yes.
To start the spooler, from the UniVerse Spooler menu, click Spooler, then click Start Spooler. A message box appears. Click Yes.
When the spooler is started, the sp.config file is read to use the new queues that have been specified or reconfigured.
11-53
C:\Users\awaite\Documents\U2Doc\UniVerse\11.2\Source\Adminunix\Ch11.fm3/17/14
Note: If you have removed a printer definition and restarted the spooler, the jobs queued on that printer are lost.
There are two options to the UNIX shell command usa that make the spooler reread the sp.config file: −r and −R.
# usa -r
This command instructs the spooler to read the sp.config file, add new queues that have been specified, and change those that have been reconfigured. It does not remove a queue from the current queue configuration if it has been removed from the configuration file. This allows new queues to be added while old queues finish operation. When the spooler is started later, the old queues will be gone.
# usa -R
This command instructs the spooler to read the sp.config file and make the current queue configuration match what is in the configuration file. Queues that have been removed from the configuration file are removed from the current queue configuration.
Getting incorrect printout
This section examines situations in which printing occurs but something is wrong with the output.
Specify SETPTR NOEJECT, but get a formfeed at end of report
This is probably a printer issue or a cabling problem. Laser and other sheet-feed printers exhibit this symptom.
To demonstrate that the spooler is not supplying the extraneous formfeed at the end of the print job, set up a print queue in the sp.config file:
MYQUEUE /tmp/file FORMS MYFORM
11-54 Administering UniVerse on UNIX Platforms
C:\Users\awaite\Documents\U2Doc\UniVerse\11.2\Source\Adminunix\Ch
Set up the print file and print to it. The file /tmp/file contains the image of the print file when the spooler and UniVerse are done with it. Create a driver script containing the following lines:
touch /tmp/file chmod 666 /tmp/file usa -R usp -F MYFORM -e /etc/passwd
The touch command creates the file. chmod gives the file read and write permissions. usa rereads the spooler configuration, and usp prints the file /etc/passwd.
Use UNIX vi to look for ^L at the end of the file. If the formfeed character is not present, it is being supplied by the physical device.
If the formfeed character is at the end of the file, it is coming from the UniVerse environment. After the SETPTR NOEJECT was specified, another SETPTR was executed. The subsequent SETPTR needs to specify the NOEJECT or the NODEFAULT option. NODEFAULT indicates that all current SETPTR settings should be retained except those explicitly changed. Omitting NODEFAULT causes SETPTR to use the current system defaults.
As UniVerse Administrator in the UV account, you can use SETPTR on channel 0 with any desired settings. Issuing SETPTR.DEFAULT makes these settings the system defaults for all users on all print channels. If SETPTR.DEFAULT is issued before the SETPTR on channel 0, the SETPTR default settings are restored to those that shipped with the UniVerse license.
Note: Specify SETPTR NOHEAD, But Still Get Header is a variation of the same problem.
Specify SETPTR NOHEAD, but still get header
This is a variation of the previous problem (Specify SETPTR NOEJECT, But Get a Formfeed at End of Report).
Print lines do not return to the left side of the page
The sp.config entry for the queue needs to specify OCRNL to change newlines or linefeeds into linefeed and carriage return on output. In addition, OPOST or LITOUT must be specified to actuate postprocessing. A UNIX environment uses one or the other. The incorrect one will not work.
11-55
C:\Users\awaite\Documents\U2Doc\UniVerse\11.2\Source\Adminunix\Ch11.fm3/17/14
Postprocessing can be appropriate for parallel printers as well as serial devices. These parameters can also be specified in a driver with an stty command. Insert the appropriate line for your system at the beginning of the driver:
stty –a ocrnl opost <&1 (SysV)
or
stty –a –nl –litout <&1 (UCB)
If you specify other parameters after these, make sure all of them are correct for the particular UNIX implementation of the stty command. An incorrect parameter can cause parameters that follow it to be ignored.
Missing pages, lines, or characters
If you are missing pages, lines, or characters in the printout from the spooler, it is likely that buffers are being overrun in the printer. Check for a protocol problem. The UniVerse spooler can use XON/XOFF or DTR, which is set when you define a printer device.
If XON/XOFF is used, the sp.config queue should be specified with XON NOSTARTANY or with stty ixon –ixany in the driver. When the printer buffer fills, it emits a stop character, Ctrl-s. With XON NOSTARTANY specified, the UNIX driver does not send additional characters until the printer empties enough of its buffer and emits a Ctrl-q.
If XON STARTANY ON is specified, the UNIX driver sends additional characters to the printer if any character is received from the printer. Sometimes the driver is slow to respond and continues sending characters to the printer for a time before pausing. The printer buffer can fill completely, and the printer emits another Ctrl-s to get the driver to stop sending characters. With STARTANY ON, the second Ctrl-s is recognized as a signal to start transmitting additional characters. These are lost.
If these corrections do not solve the problem, verify the cabling.
Jobs do not print in first-in first-out order
The spooler normally prints smaller jobs first. To print jobs in first-in, first-out order, select the Chronological Order check box in the Configure Spooler dialog box.
11-56 Administering UniVerse on UNIX Platforms
C:\Users\awaite\Documents\U2Doc\UniVerse\11.2\Source\Adminunix\Ch
Print jobs are intermixed
If you have two different printer definitions that have the same device path, it is possible to define two different lock files to use. Because the lock files are different, the locking semaphore mechanism fails, and the two queues can simultaneously print to the same device. As a result, the print jobs are intermixed.
To prevent this from occurring, avoid using two different lock files for a single device. You can correct this problem in two different ways using the Devices option on the UniAdmin menu:
Do not specify a lock file in the printer definition. The lock file created will be constructed from the device name, resulting in a single lock file used by two queues.
Edit the printer definitions so that the entry for the lock file is the same.
SP.ASSIGN (UNIX) can try to gain exclusive use of a device. To avoid this, you can specify lock files in the &DEVICE& entry for the device. These must be fully qualified paths. If they are not, the lock file is created in the directory of the account from which the SP.ASSIGN command is issued. If SP.ASSIGN is issued by two users in different accounts, the two lock files will not collide. The two users gain apparent exclusive use of the single device.
11-57
C:\Users\awaite\Documents\U2Doc\UniVerse\11.2\Source\Adminunix\Ch11.fm3/17/14
Frequently asked questions
Question: How do I use the UNIX and the UniVerse spoolers together?
“Using the UNIX spooler with the UniVerse spooler” on page 45 describes how to print to the same device from both UNIX and UniVerse spoolers. The lp model script is modified to respect the UniVerse locking protocol, the lock.device file.
Question: How can I print to other machines on my network?
“Using a driver for remote printing” on page 41 describes how to print to other printers on the network.
Question: How do I keep a log of print jobs and printing problems?
See “Logging spooler activity” on page 29 for details on how to create and maintain spooler log files.
Log files grow. If logging is enabled, remember to purge the files occasionally, or turn off logging when the information is no longer needed.
You can use an alternative to spooler logging for one queue that uses a driver script. The following driver captures start and stop times for a print job and can be modified to do more:
echo start 'date' >> logfile cat - echo stop 'date' >> logfile
11-58 Administering UniVerse on UNIX Platforms
C:\UsMarch
3Administering UniData on Windows NT or Windows 20000
12 Chapter
ers\aw 17, 201
Beta Beta Beta Beta Beta Beta Beta Beta Beta Beta Beta Beta Beta Beta Beta Beta Beta Beta Beta Beta
Chapter 12: Backing up and restoring files
Backup strategies . . . . . . . . . . . . . . . . . . 12-3 Backing up individual files . . . . . . . . . . . . . 12-4Four ways to back up and restore files . . . . . . . . . . . 12-6 Preserving the integrity of your data . . . . . . . . . . 12-6Backing up files. . . . . . . . . . . . . . . . . . . 12-7Using T.DUMP to back up UniVerse files . . . . . . . . . . 12-20Using uvbackup to back up files . . . . . . . . . . . . . 12-21 Specifying the file list . . . . . . . . . . . . . . . 12-22Restoring files . . . . . . . . . . . . . . . . . . . 12-23 Choosing the restore device . . . . . . . . . . . . . 12-23 Checking the backup details . . . . . . . . . . . . . 12-24 The UVRestore window . . . . . . . . . . . . . . 12-26 Choosing what to restore . . . . . . . . . . . . . . 12-27 Listing an index of the backup image . . . . . . . . . . 12-28 Specifying how to restore files . . . . . . . . . . . . 12-29Using T.LOAD to restore UniVerse files . . . . . . . . . . 12-31Using uvrestore to restore files . . . . . . . . . . . . . 12-32 Specifying files and records to restore. . . . . . . . . . 12-32 Excluding files to restore . . . . . . . . . . . . . . 12-33 Display options . . . . . . . . . . . . . . . . . 12-33 Other options . . . . . . . . . . . . . . . . . . 12-33
aite\Documents\U2Doc\UniVerse\11.2\Source\Adminunix\Ch12TOC.fm4 2:12 pm Administering UniData on Windows NT or Windows 2000
C:\Users\awaite\Documents\U2Doc\UniVerse\11.2\Source\Adminunix\Ch
This chapter first suggests some backup strategies, which you can adopt or modify as needed. It then describes the file backup and restoration procedures.
Users accidentally remove their files. Open files are sometimes lost when the system crashes. It is possible to destroy an entire file system. To protect against such problems, you should regularly back up all disk files to an offline storage medium.
How frequently you back up your files depends on how many files users create or change in a specific time span, and on how much data you can afford to lose.
12-2
C:\Users\awaite\Documents\U2Doc\UniVerse\11.2\Source\Adminunix\Ch12.fm3/17/14
Backup strategiesYou should design a backup strategy that suits your needs. You must weigh the trade-offs between the possibility of losing data and the amount of time it takes to back up and restore files.
The backup strategies described here assume you are using the UVBackup and UVRestore windows of the U2 Extensible Administration Tool, or the uvbackup and uvrestore commands from the operating system level.
UniVerse provides three kinds of backup:
Daily
Weekly
Full
In daily and weekly backups, you back up only new or modified files. In full backups, you back up all files.
On an active system you might do a full backup of all files weekly in conjunction with daily backups. On a less active system you might do a full backup monthly, followed by daily and weekly backups.
A full backup copies all specified directories and files to a magnetic tape. You keep this backup tape, perhaps for several months, so you can restore the system to the state it was in during any given week (or month).
12-3 Administering UniVerse on UNIX Platforms
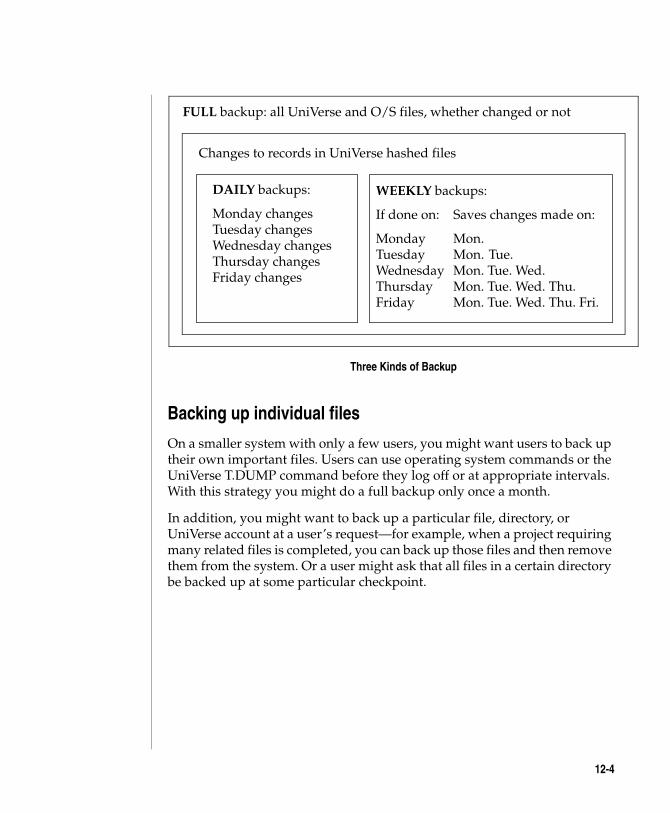
C:\Users\awaite\Documents\U2Doc\UniVerse\11.2\Source\Adminunix\Ch
Backing up individual files
On a smaller system with only a few users, you might want users to back up their own important files. Users can use operating system commands or the UniVerse T.DUMP command before they log off or at appropriate intervals. With this strategy you might do a full backup only once a month.
In addition, you might want to back up a particular file, directory, or UniVerse account at a user’s request—for example, when a project requiring many related files is completed, you can back up those files and then remove them from the system. Or a user might ask that all files in a certain directory be backed up at some particular checkpoint.
DAILY backups:
Monday changes Tuesday changes Wednesday changes Thursday changes Friday changes
WEEKLY backups:
If done on: Saves changes made on:
Monday Mon. Tuesday Mon. Tue. Wednesday Mon. Tue. Wed. Thursday Mon. Tue. Wed. Thu. Friday Mon. Tue. Wed. Thu. Fri.
FULL backup: all UniVerse and O/S files, whether changed or not
Three Kinds of Backup
Changes to records in UniVerse hashed files
12-4
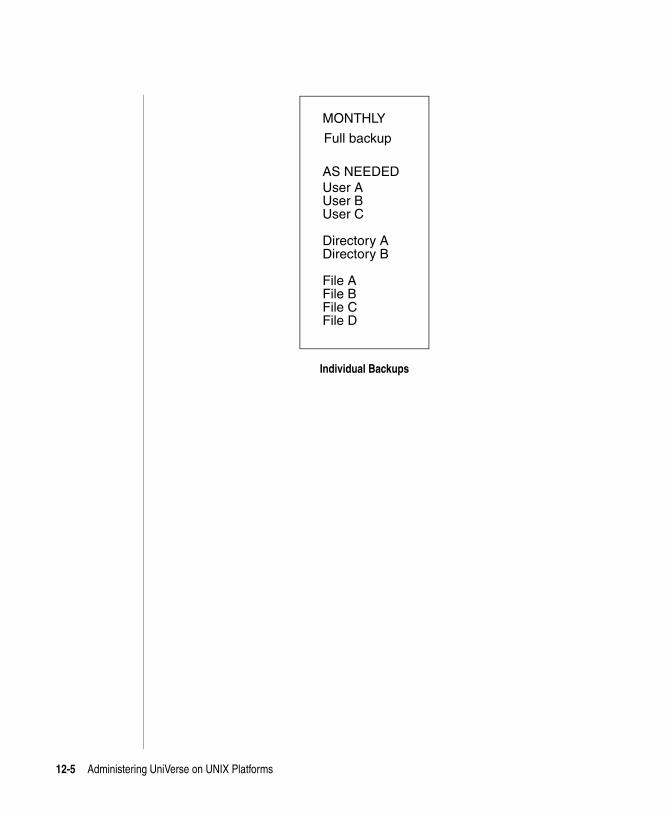
C:\Users\awaite\Documents\U2Doc\UniVerse\11.2\Source\Adminunix\Ch12.fm3/17/14
MONTHLY
AS NEEDEDUser AUser BUser C
Directory ADirectory B
File AFile BFile CFile D
Full backup
Individual Backups
12-5 Administering UniVerse on UNIX Platforms
C:\Users\awaite\Documents\U2Doc\UniVerse\11.2\Source\Adminunix\Ch
Four ways to back up and restore filesYou can choose among three methods to back up and restore files:
Use the UVBackup and UVRestore views of the U2 Extensible Administration Tool to back up and restore the entire system, the contents of UniVerse account directories, or individual files.
Use theT.DUMP andT.LOAD commands to back up and restore selected records from UniVerse files.
Use the uvbackup and uvrestore commands from the operating system level to back up and restore specified directories, UniVerse files, and operating system files.
Preserving the integrity of your data
When you use operating system commands such as cpio, tar, or backup to back up your files, you cannot guarantee either the physical or the logical integrity of your backed-up data, unless no other users are logged on.
When you use the UVBackup window, the uvbackup command, or T.DUMP to back up files, the physical integrity of your backed-up data is assured.
If you want to guarantee the physical and the logical integrity of your backed-up data, use transaction logging to back up your files. For more information, see UniVerse Transaction Logging and Recovery.
12-6
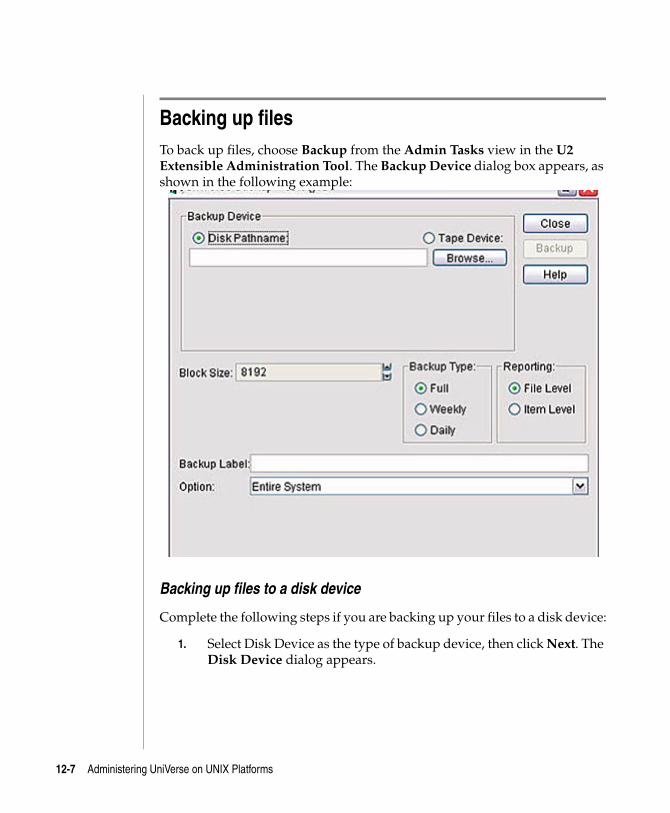
C:\Users\awaite\Documents\U2Doc\UniVerse\11.2\Source\Adminunix\Ch12.fm3/17/14
Backing up filesTo back up files, choose Backup from the Admin Tasks view in the U2 Extensible Administration Tool. The Backup Device dialog box appears, as shown in the following example:
Backing up files to a disk device
Complete the following steps if you are backing up your files to a disk device:
1. Select Disk Device as the type of backup device, then click Next. The Disk Device dialog appears.
12-7 Administering UniVerse on UNIX Platforms
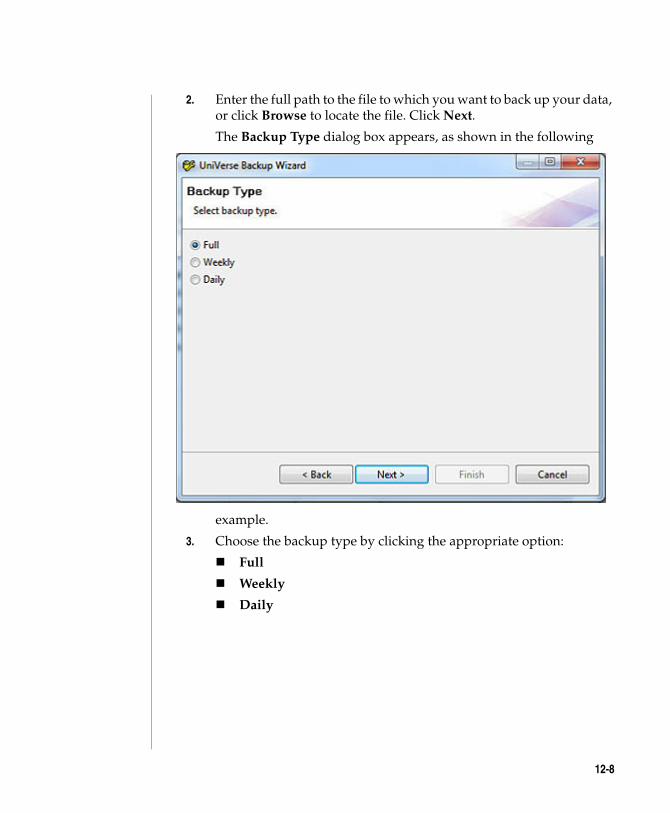
C:\Users\awaite\Documents\U2Doc\UniVerse\11.2\Source\Adminunix\Ch
2. Enter the full path to the file to which you want to back up your data, or click Browse to locate the file. Click Next.
The Backup Type dialog box appears, as shown in the following
example.
3. Choose the backup type by clicking the appropriate option:
Full
Weekly
Daily
12-8
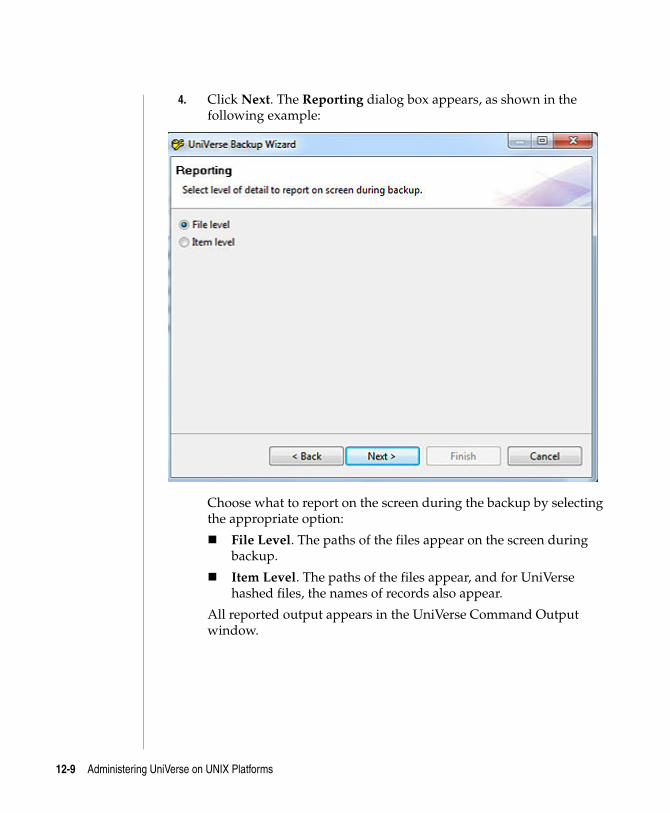
C:\Users\awaite\Documents\U2Doc\UniVerse\11.2\Source\Adminunix\Ch12.fm3/17/14
4. Click Next. The Reporting dialog box appears, as shown in the following example:
Choose what to report on the screen during the backup by selecting the appropriate option:
File Level. The paths of the files appear on the screen during backup.
Item Level. The paths of the files appear, and for UniVerse hashed files, the names of records also appear.
All reported output appears in the UniVerse Command Output window.
12-9 Administering UniVerse on UNIX Platforms
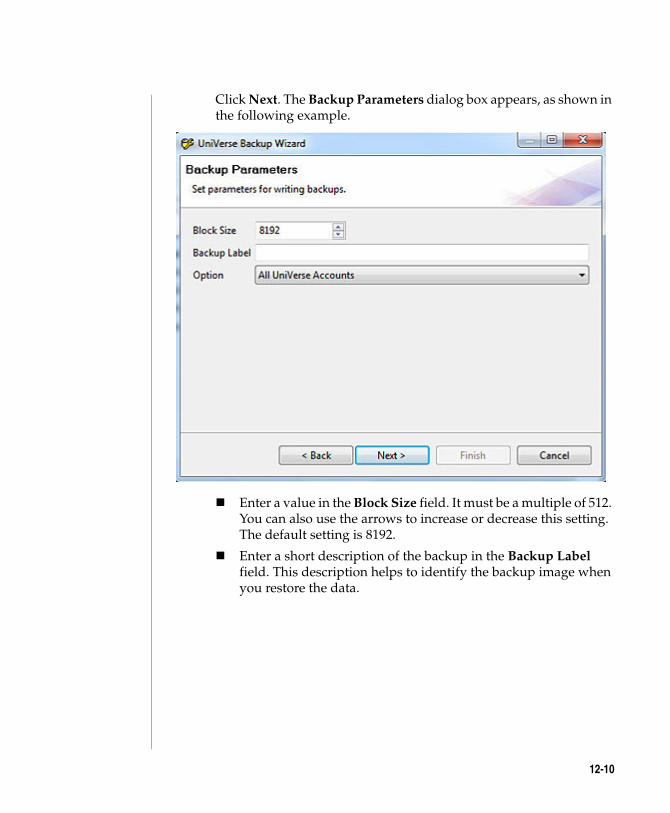
C:\Users\awaite\Documents\U2Doc\UniVerse\11.2\Source\Adminunix\Ch
Click Next. The Backup Parameters dialog box appears, as shown in the following example.
Enter a value in the Block Size field. It must be a multiple of 512. You can also use the arrows to increase or decrease this setting. The default setting is 8192.
Enter a short description of the backup in the Backup Label field. This description helps to identify the backup image when you restore the data.
12-10
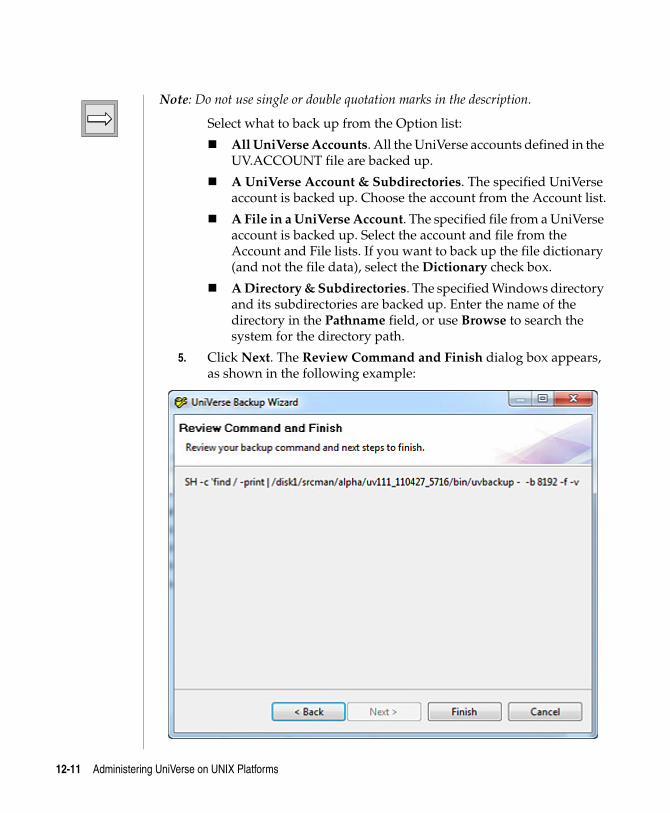
C:\Users\awaite\Documents\U2Doc\UniVerse\11.2\Source\Adminunix\Ch12.fm3/17/14
Note: Do not use single or double quotation marks in the description.
Select what to back up from the Option list:
All UniVerse Accounts. All the UniVerse accounts defined in the UV.ACCOUNT file are backed up.
A UniVerse Account & Subdirectories. The specified UniVerse account is backed up. Choose the account from the Account list.
A File in a UniVerse Account. The specified file from a UniVerse account is backed up. Select the account and file from the Account and File lists. If you want to back up the file dictionary (and not the file data), select the Dictionary check box.
A Directory & Subdirectories. The specified Windows directory and its subdirectories are backed up. Enter the name of the directory in the Pathname field, or use Browse to search the system for the directory path.
5. Click Next. The Review Command and Finish dialog box appears, as shown in the following example:
12-11 Administering UniVerse on UNIX Platforms
C:\Users\awaite\Documents\U2Doc\UniVerse\11.2\Source\Adminunix\Ch
Review the command that UniVerse will use to back up the files you selected. Click Finish to start the backup process. UniVerse displays information during the backup process and notifies you when the backup process is complete.
Backing up files to a tape device
Complete the following steps to back up your data to a tape device:
12-12
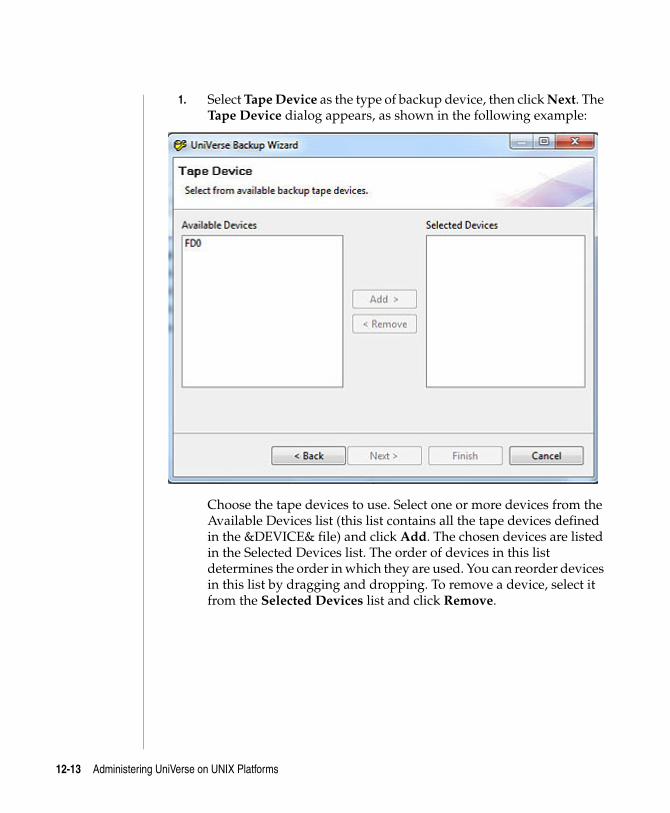
C:\Users\awaite\Documents\U2Doc\UniVerse\11.2\Source\Adminunix\Ch12.fm3/17/14
1. Select Tape Device as the type of backup device, then click Next. The Tape Device dialog appears, as shown in the following example:
Choose the tape devices to use. Select one or more devices from the Available Devices list (this list contains all the tape devices defined in the &DEVICE& file) and click Add. The chosen devices are listed in the Selected Devices list. The order of devices in this list determines the order in which they are used. You can reorder devices in this list by dragging and dropping. To remove a device, select it from the Selected Devices list and click Remove.
12-13 Administering UniVerse on UNIX Platforms

C:\Users\awaite\Documents\U2Doc\UniVerse\11.2\Source\Adminunix\Ch
2. Enter the full path to the file to which you want to back up your data, or click Browse to locate the file. Click Next.
The Backup Type dialog box appears, as shown in the following
example.
3. Choose the backup type by clicking the appropriate option:
Full
Weekly
Daily
12-14
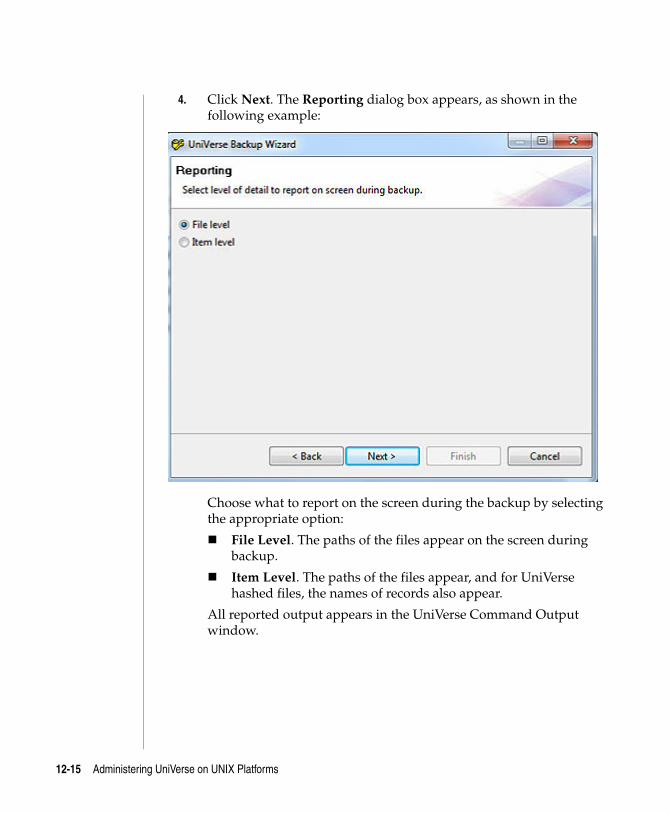
C:\Users\awaite\Documents\U2Doc\UniVerse\11.2\Source\Adminunix\Ch12.fm3/17/14
4. Click Next. The Reporting dialog box appears, as shown in the following example:
Choose what to report on the screen during the backup by selecting the appropriate option:
File Level. The paths of the files appear on the screen during backup.
Item Level. The paths of the files appear, and for UniVerse hashed files, the names of records also appear.
All reported output appears in the UniVerse Command Output window.
12-15 Administering UniVerse on UNIX Platforms

C:\Users\awaite\Documents\U2Doc\UniVerse\11.2\Source\Adminunix\Ch
Click Next. The Backup Parameters dialog box appears, as shown in the following example.
Enter a value in the Block Size field. It must be a multiple of 512. You can also use the arrows to increase or decrease this setting. The default setting is 8192.
Enter a short description of the backup in the Backup Label field. This description helps to identify the backup image when you restore the data.
12-16
C:\Users\awaite\Documents\U2Doc\UniVerse\11.2\Source\Adminunix\Ch12.fm3/17/14
Note: Do not use single or double quotation marks in the description.
Select what to back up from the Option list:
All UniVerse Accounts. All the UniVerse accounts defined in the UV.ACCOUNT file are backed up.
A UniVerse Account & Subdirectories. The specified UniVerse account is backed up. Choose the account from the Account list.
A File in a UniVerse Account. The specified file from a UniVerse account is backed up. Select the account and file from the Account and File lists. If you want to back up the file dictionary (and not the file data), select the Dictionary check box.
A Directory & Subdirectories. The specified Windows directory and its subdirectories are backed up. Enter the name of the directory in the Pathname field, or use Browse to search the system for the directory path.
Choose one of the following destinations for the backed up files:
Disk Pathname. Enter a path in the text entry field. You can also use the Browse button to search the system for a suitable file.
Tape Device. Choose the tape devices to use. Select one or more devices from the Available Devices list (this list contains all the tape devices defined in the &DEVICE& file) and click Add >. The chosen devices are listed in the Selected Devices list. The order of devices in this list determines the order in which they are used. You can reorder devices in this list by dragging and dropping. To remove a device, select it from the Selected Devices list and click < Remove.
Note: Options available in the dialog box change dynamically according to your choice to back up to disk or tape.
1. Enter a value in the Block Size field. It must be a multiple of 512. You can also use the arrows to increase or decrease this setting. The default setting is 8192.
2. Choose the backup type by clicking the appropriate option:
Full
Weekly
Daily
12-17 Administering UniVerse on UNIX Platforms
C:\Users\awaite\Documents\U2Doc\UniVerse\11.2\Source\Adminunix\Ch
3. Choose what to report on the screen during the backup by clicking the appropriate option:
None. No reporting is done during the backup. However, you are notified at the start and end of the backup.
File Level. The paths of the files appear on the screen during backup.
Item Level. The paths of the files appear, and for UniVerse hashed files, the names of records also appear.
All reported output appears in the UniVerse Command Output window.
4. Enter a short description of the backup in the Backup Label field. This description helps to identify the backup image when you restore the data.
Note: Do not use single or double quotation marks in the description.
5. Select what to back up from the Option list:
Entire System. The whole system is backed up.
All UniVerse Accounts. All the UniVerse accounts defined in the UV.ACCOUNT file are backed up.
A UniVerse Account & Subdirectories. The specified UniVerse account is backed up. Choose the account from the Account list.
A File in a UniVerse Account. The specified file from a UniVerse account is backed up. Select the account and file from the Account and File lists. If you want to back up the file dictionary (and not the file data), select the Dictionary check box.
A Directory & Subdirectories. The specified UNIX or Windows directory and its subdirectories are backed up. Enter the name of the directory in the Pathname field, or use Browse to search the system for the directory path.
6. Click Backup to start the backup. The UniVerse Command Output window appears.
7. When the backup is completed, click Close to close the UniVerse Command Output window.
12-18
C:\Users\awaite\Documents\U2Doc\UniVerse\11.2\Source\Adminunix\Ch12.fm3/17/14
Backing Up to multiple tapes
If your backup does not fit on a single tape, you need to specify how to continue the backup. How multiple tapes are used for backup is determined by the order of devices in the Selected Devices list in the UniVerse Backup dialog box.
Using a single device
If you have a single device in the Selected Devices list, the backup pauses when the tape is full. The tape rewinds, and you are prompted to enter the name of a backup device to use.
Complete one of the following steps:
Continue to use the same device. To use the same tape device, remove the first tape and load the next tape, and enter the device name at the prompt.
Choose to use a different device. To use a different tape device, make sure the tape is loaded and enter the name of the alternative tape device at the prompt.
Using multiple devices
If you have more than one device in the Selected Devices list, the backup starts using the first selected device in the list. When a second tape is required, the backup continues using the next selected device in the list.
For this to work successfully, you must make sure that you have ordered the devices correctly in the Selected Devices list, and that you have loaded the backup tapes. You can add or remove devices using the Add > and < Remove buttons, and reorder them by dragging and dropping them to a new location in the list.
12-19 Administering UniVerse on UNIX Platforms
C:\Users\awaite\Documents\U2Doc\UniVerse\11.2\Source\Adminunix\Ch
Using T.DUMP to back up UniVerse filesT.DUMP lets you write UniVerse files, including data files and dictionaries, from disk to tape. You can specify selected or sorted records in a RetrieVe selection or sort expression. Before you use T.DUMP, you must assign the tape drive using ASSIGN. When you are done, release it with UNASSIGN.
The simplest form of the command is as follows:
T.DUMP filename
If you do not use any options, T.DUMP writes the specified data file to tape. If you want to save the data file and the file dictionary, run T.DUMP for each file separately. T.DUMP puts an end-of-file mark at the end of each operation.
Because T.DUMP is a RetrieVe command, you can specify selected or sorted records with a selection or sort expression. For example, the following statement dumps all paragraph records in your VOC file to tape:
>T.DUMP VOC WITH TYPE LIKE "PA..."
12-20
C:\Users\awaite\Documents\U2Doc\UniVerse\11.2\Source\Adminunix\Ch12.fm3/17/14
Using uvbackup to back up filesUse uvbackup from a UNIX shell to save specified files on a daily, weekly, or comprehensive basis. You can specify files on the command line or from standard input. Output from uvbackup goes to standard output. The syntax is as follows:
uvbackup { –d | –w | –f } [ –b blksize ] [ −cachedetail ] [ –cmdfil filename ] [–noindex] [ −delay buffers ] [ –l "labeltext " ] [ −limit buffers ] [ −rev7 ] [ –rev8 ] [ −rev93 ] [ –rev94 ] [ –rev95 ] [ −s file ] [ { −t device } … ] [ –v | −V ] [ – | pathnames ]
Specify each option separately. Precede each option with a minus sign ( – ).
You must specify whether the backup is daily (–d), weekly (−w), or full (−f ). You must also specify the paths of the files you want to back up. You can list the paths as part of the command line, or you can use the −cmdfil option to specify the name of a file containing a list of paths of files to back up.
Use the −b option to specify the block size in increments of 512 bytes. The minimum block size is 512. The maximum is defined by the configurable parameter BLKMAX. The default is 8192.
Use the −l option to specify text to include in the backup image label.
Use the –rev7, –rev8, rev93, rev94, and –rev95 options to make a backup in formats suitable for restoring to UniVerse Releases 7, 8, 9.3, 9.4, and 9.5 respectively.
Note: The –rev95 option makes a backup suitable for restoring only to UniVerse Releases 9.5.1 through 9.5.1C.
Use the –s option with the –v or –V option to specify a file for capturing screen output.
Use the –t option to specify the device to which to write backup data. Use multiple –t options to specify a series of devices.
Use the −limit option to specify how many shared memory buffers to use for the backup. Use the −delay option to specify how many shared memory buffers to fill before flushing the buffer contents to the backup image on tape or disk. Use the−cachedetail option to list details about the shared memory cache.
12-21 Administering UniVerse on UNIX Platforms
C:\Users\awaite\Documents\U2Doc\UniVerse\11.2\Source\Adminunix\Ch
Use the −v option to display paths, or use the –V option to display paths and record IDs as they are backed up.
Specifying the file list
To specify the files you want to back up, enter their paths in the uvbackup command line.
uvbackup 12-22

C:\Users\awaite\Documents\U2Doc\UniVerse\11.2\Source\Adminunix\Ch12.fm3/17/14
Restoring filesTo restore files from a backup, choose Restore from the UniAdmin menu. The Restore Device window appears, as shown in the following example:
Use this window to choose the restore device and to check the backup details.
When you have chosen the restore device and confirmed that the backup details are correct, the UVRestore window appears. From this window you can:
Choose the level of reporting
Choose what to restore
Edit the restore selection
Generate an index of the backup
Specify how to restore the files
Start the restoration
Choosing the restore device
You can restore files from disk or from tape using the UniVerse Restore Device dialog box.
To choose the restore device:
1. Click the appropriate device type option:
12-23 Administering UniVerse on UNIX Platforms
C:\Users\awaite\Documents\U2Doc\UniVerse\11.2\Source\Adminunix\Ch
Disk Pathname. Enter the name of the file that contains the backup in the text entry field, or click Browse to search the system for this file.
Tape Device. Select one or more devices from the Available Devices list (this list contains all the tape devices defined in the &DEVICE& file) and click Add . The chosen devices are listed in the Selected Devices list. The order of devices in this list determines the order in which they are used during the restoration (if you backed up to multiple tapes). You can reorder devices in this list by dragging and dropping them. To remove a device, select it from the Selected Devices list and click Remove.
Note: Options available in the dialog box change dynamically according to your choice to back up to disk or tape.
2. If you are restoring from a tape device, check that the backup tapes have been mounted on the selected devices.
3. Click Continue. The Check Backup Label window appears, and you must check the backup details.
Checking the backup details
Before you can restore files, you must check the backup details in the Check Backup Label dialog box.
If you are restoring from tape, this window contains the backup details for the first device in the Selected Devices list.
This window displays the following backup details.
Backup Date. The date and time the backup was performed.
Reel Number. The tape number. If you backed up to a single tape or to a disk path, the value displayed is 1. If you backed up to multiple tapes, this field displays the number of the tape.
Compression. The level of compression during the backup. This feature is not supported at this release, and so this field always displays False.
Image Type. The backup type.
Block Size. The block size (in bytes) used for the backup.
NLS on. The state of NLS when the backup took place.
uvbackup 12-24
C:\Users\awaite\Documents\U2Doc\UniVerse\11.2\Source\Adminunix\Ch12.fm3/17/14
Label. The backup label. If you backed up the data using the Backup option of UniAdmin, this is the text entered in the Backup Label field on the UVBackup window.
If the backup details are correct, click Yes. The UniVerse Restore dialog box appears. If the backup details are incorrect, click No. The Restore Device window reappears and you can choose an alternative restore device.
The UVRestore window
The UVRestore window appears when you confirm the backup details are correct.
Under Backup Details, this dialog box lists the restoration source, the date the backup image was made, the type of backup, and the backup image label.
The UVRestore window has four main buttons:
Close. Exits the Restore option.
Restore. Starts the restoration.
Index. Displays the index of the backup image.
Help. Invokes the Help system.
Choosing what to restore
Select what to restore from the Restore Options list on the UniVerse Restore dialog box. When you select an option, a list of accounts or files to restore appears. To add the name of an account or file, select it and click Add. To remove the name of an account or file from the restore selection, select it and click Remove.
Entire Image. This option restores the entire backup image.
All Accounts in the UV.ACCOUNT File. This option restores all the accounts listed in the UV.ACCOUNT file. The accounts (except the UV account) are automatically added to the restore selection.
Selected UniVerse Accounts. This option restores accounts selected from those listed in the UV.ACCOUNT file.
12-25 Administering UniVerse on UNIX Platforms
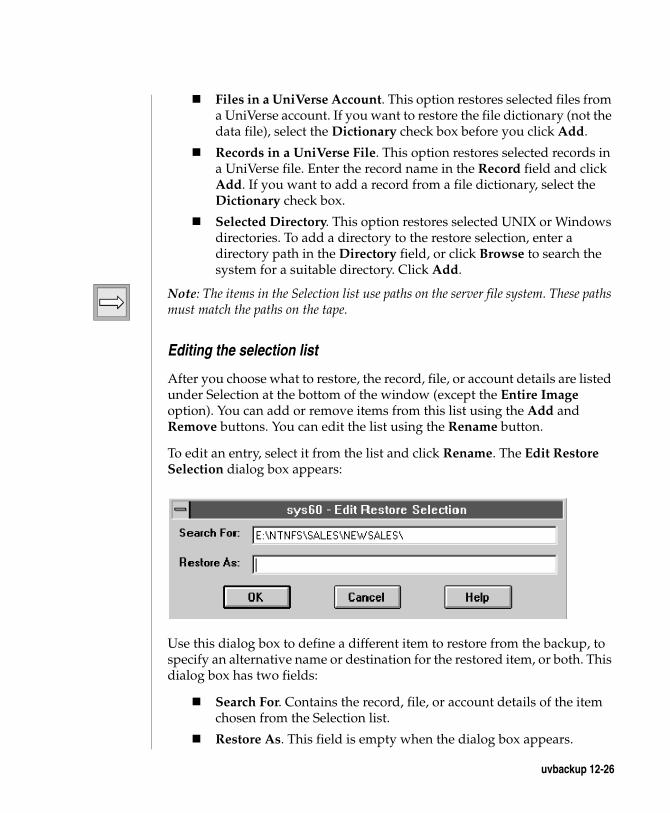
C:\Users\awaite\Documents\U2Doc\UniVerse\11.2\Source\Adminunix\Ch
Files in a UniVerse Account. This option restores selected files from a UniVerse account. If you want to restore the file dictionary (not the data file), select the Dictionary check box before you click Add.
Records in a UniVerse File. This option restores selected records in a UniVerse file. Enter the record name in the Record field and click Add. If you want to add a record from a file dictionary, select the Dictionary check box.
Selected Directory. This option restores selected UNIX or Windows directories. To add a directory to the restore selection, enter a directory path in the Directory field, or click Browse to search the system for a suitable directory. Click Add.
Note: The items in the Selection list use paths on the server file system. These paths must match the paths on the tape.
Editing the selection list
After you choose what to restore, the record, file, or account details are listed under Selection at the bottom of the window (except the Entire Image option). You can add or remove items from this list using the Add and Remove buttons. You can edit the list using the Rename button.
To edit an entry, select it from the list and click Rename. The Edit Restore Selection dialog box appears:
Use this dialog box to define a different item to restore from the backup, to specify an alternative name or destination for the restored item, or both. This dialog box has two fields:
Search For. Contains the record, file, or account details of the item chosen from the Selection list.
Restore As. This field is empty when the dialog box appears.
uvbackup 12-26
C:\Users\awaite\Documents\U2Doc\UniVerse\11.2\Source\Adminunix\Ch12.fm3/17/14
To define a different item to restore, edit the Search For field. To specify an alternative name or destination for the item to be restored, edit the Restore As field.
Click OK to update the entry in the Selection list.
If you edited the item in the Search For field, the new item replaces the original one in the Selection list.
If you chose an alternative name or destination, the Selection list entry is updated to include an equal sign between the original and new details.
Note: The Selection list items use paths on the server file system. You must be certain that these paths match the paths on the tape.
Listing an index of the backup image
To display an index of the backup image, click the Index button on the UVRestore window. The backup index appears in the UniVerse Command Output window.
The backup information displayed in the index depends on the level of reporting you choose:
None. Displays the backup details.
File Level. Displays the paths of the files in the backup.
Item Level. Displays the paths of the files, and for UniVerse hashed files, the record IDs.
Specifying how to restore files
You can control how the files are restored by selecting any of these check boxes on the UniVerse Restore dialog box:
Existing Files Only. This option restores only files that already exist in the target account. If you do not select this option, all files on the backup are restored, and any files that do not exist in the target account are created.
12-27 Administering UniVerse on UNIX Platforms
C:\Users\awaite\Documents\U2Doc\UniVerse\11.2\Source\Adminunix\Ch
Prompt Before Restoring. If you choose Item Level, this option prompts you to restore each file in turn. To restore a file, enter Y. The file is restored, overwriting the existing file on disk. To skip a file, enter N. You are then prompted for the next file in the Selection list. If you do not select this option, files are restored to the chosen account without prompting.
Overwrite Disk Files. This option determines whether files from the backup overwrite existing files in the chosen account, regardless of the last modification date. If you select this option, the files on the backup overwrite the files on the disk (if the names match). If you clear this option (the default), existing files are overwritten only if the files on the backup have the same (or a more recent) last modification date.
Under Reporting you can choose how much detail to display on the screen during the restoration:
None. No reporting is done, but you will be notified at the start and end of the restoration.
File Level. The paths of the files are displayed on the screen.
Item Level. The paths of the files are displayed, and for UniVerse hashed files, record IDs are also displayed.
All the reports appear in the UniVerse Command Output window when restoration starts.
uvbackup 12-28
C:\Users\awaite\Documents\U2Doc\UniVerse\11.2\Source\Adminunix\Ch12.fm3/17/14
Using T.LOAD to restore UniVerse filesT.LOAD lets you restore files from tape that were saved with the T.DUMP command. Before you use T.LOAD, assign the tape drive using ASSIGN. When you are done, release it with UNASSIGN.
The simplest form of the command is as follows:
T.LOAD filename
If you do not use any options, T.LOAD copies all the records in the tape file assigned to magnetic tape unit 0 to the data file on disk.
Use the MTU keyword to indicate a magnetic tape unit other than 0. The syntax is MTU mtu. The MTU keyword uses a 3-digit numeric value (mtu). For details about the MTU keyword, see the UniVerse User Reference.
12-29 Administering UniVerse on UNIX Platforms
C:\Users\awaite\Documents\U2Doc\UniVerse\11.2\Source\Adminunix\Ch
Using uvrestore to restore filesUse uvrestore from the operating system level to restore specified UniVerse accounts, files, or records saved by a previous uvbackup procedure. You can also restore an entire system. The syntax is as follows:
uvrestore [ –F pathname [ =newpathname ] [ R record [ =newrecord ] ] ] [ X pathname ] [ –b blksize ] [ –i [ b ] ] [ +I ] [ –l ] [ –L ] [ –n ] [ –p ] [ −P n ] [ –rehash ] [ −s file ] [ −startb block ] [ { −t device } … ] [ –U ] [ –v | –V ] [ –verify ] [ – | imagepath ]
Specify each option separately. Precede each option with a minus sign.
You must specify the path of the restore image. You can specify the path of a device (such as /dev/rmt/0) or of a file. Append /* to filename to restore all files in a directory. If you do not specify any other options, uvrestore restores the entire backup image.
Note: uvrestore does not support reading from stdin.
Specifying files and records to restore
Use one or more −F options to restore one or more files. Be sure that pathname matches the path saved in the image. For example, if you used the find command to specify the file list for uvbackup, the ORDERS file might be stored on the image as /usr/SALES/ORDERS or as ./ORDERS. To restore the first file, you would use the following −F option:
-F /usr/SALES/ORDERS
To restore the second file, you would use the following:
-F ./ORDERS
Use one or more −R options with one −F option to restore one or more records from a hashed file. The record ID must match the record ID saved in the image. For example, to restore records 10006 and 10007 from the ORDERS file, use the following options:
-F ./ORDERS -R 10006 -R 10007
uvrestore 12-30
C:\Users\awaite\Documents\U2Doc\UniVerse\11.2\Source\Adminunix\Ch12.fm3/17/14
To restore a record from a type 1 or type 19 file, use the −F option (remember that records in type 1 and type 19 files are implemented as operating system files). For example, to restore the program MYPROG from the BP file, use the following option:
-F ./BP/MYPROG
Excluding files to restore
Use one or more −X options to exclude one or more files from being restored.
Display options
Use the −i option to list the contents of the backup image without restoring anything. Use the −ib option to show the blocks in addition to the paths. (Use −ib with the −startb option to start restoring from a particular block.) Use the −L option to display the image label without restoring anything.
Use the −v option to list paths, or use the −V option to list paths and record IDs as they are restored. Use the −l option to display the image label before restoring files.
Other options
Specifying the Block Size. Use the –b option to specify the block size. The minimum block size is 512, the maximum is defined by the configurable parameter BLKMAX. The default is 8192.
Specifying the Backup Image Source
Use the –t option to specify the device or file from which to read the backup data. You can use multiple –t options to specify a series of devices or files.
Specifying the Starting Block. Use the −startb option to specify the block to start restoring from. (Use −startb with the −ib option to start restoring from a particular block.)
12-31 Administering UniVerse on UNIX Platforms
C:\Users\awaite\Documents\U2Doc\UniVerse\11.2\Source\Adminunix\Ch
Restoration Options. Use the −n option when you are restoring from a full backup image to prevent uvrestore from creating files automatically if they do not exist on disk. Use the −rehash option when you are restoring from a full backup image to force the rehashing of records as they are restored. Use the −U option if you want uvrestore to overwrite disk files with the same names as those being restored. On Windows systems, use the −nodrv option to strip the drive letter from restored paths so you can restore files onto a different disk.
Having uvrestore prompt you
Use the −p option if you want uvrestore to prompt you before restoring each file or record.
For full details about the uvrestore command, see the UniVerse User Reference.
The x option reads from a tape.
If you specify the name of a directory in the file list, tar copies all files in that directory and all of its subdirectories. For example, the following command performs a complete backup of /usr:
% tar c /usr
Note: Most versions of tar do not support multivolume backups.
uvrestore 12-32
C:\UsMarch
13 Chapter
ers\aw 17, 201
Beta Beta Beta Beta Beta Beta Beta Beta Beta Beta Beta Beta Beta Beta Beta Beta Beta Beta Beta Beta
Chapter 13: Managing U2 Data Replication
Replication . . . . . . . . . . . . . . . . . . . . 13-5Hot standby . . . . . . . . . . . . . . . . . . . . 13-6Setting up U2 Data Replication . . . . . . . . . . . . . 13-7The Replication window . . . . . . . . . . . . . . . 13-9 Menu bar . . . . . . . . . . . . . . . . . . . 13-9 Toolbar . . . . . . . . . . . . . . . . . . . . 13-11 Left pane . . . . . . . . . . . . . . . . . . . 13-11 Right pane . . . . . . . . . . . . . . . . . . . 13-12Configuring and managing U2 Data Replication . . . . . . . 13-13Managing a publishing system . . . . . . . . . . . . . 13-14 Configuring the publishing system . . . . . . . . . . 13-14 Starting and stopping the publishing system . . . . . . . 13-16 Publishing files . . . . . . . . . . . . . . . . . 13-16Managing a subscribing system . . . . . . . . . . . . . 13-25 Configuring the subscribing system . . . . . . . . . . 13-25 Starting and stopping the subscribing system . . . . . . . 13-26 Creating a subscriber’s list of publishing systems . . . . . 13-26 Subscribing files . . . . . . . . . . . . . . . . . 13-28Managing hot standby operations . . . . . . . . . . . . 13-36 Configuring a hot standby subscriber. . . . . . . . . . 13-36 Turning On fail-over mode . . . . . . . . . . . . . 13-38 Reconciling the hot standby with the publisher . . . . . . 13-38UniVerse commands for managing replication . . . . . . . . 13-41 Creating a list of replication files . . . . . . . . . . . 13-41 Marking files for publication . . . . . . . . . . . . . 13-41 Marking files for subscription . . . . . . . . . . . . 13-42 Unpublishing replication files . . . . . . . . . . . . 13-42
aite\Documents\U2Doc\UniVerse\11.2\Source\Adminunix\Ch13TOC.fm4 2:12 pm
13-2 Adm
Unsubscribing replication files . . . . . . . . . . . . 13-43Some restrictions . . . . . . . . . . . . . . . . . . 13-44What to do when disk space fills up . . . . . . . . . . . . 13-45Removing obsolete replication log files. . . . . . . . . . . 13-46What to do when Replication fails . . . . . . . . . . . . 13-47
inistering UniVerse on UNIX Platforms
C:\Users\awaite\Documents\U2Doc\UniVerse\11.2\Source\Adminunix\Ch13.fm3/17/14
Beginning at UniVerse11.1, we provide two ways of performing data replication. For information about U2 Data Replication, new at UniVerse 11.1, please read the U2 Data Replication manual. The information in this chapter is provided for backward compatibility.
Note: You cannot administer UniVerse Data Replication through the U2 Extensible Administration Tool, you must use UniAdmin.
The UniVerse Data Replication service provides two operations:
Replication
Hot standby
Replication maintains one or more read-only copies of UniVerse files for data backup or distribution. The copies can be on one or more computer systems.
Hot standby is a special case of replication, in which a system that maintains copies of active UniVerse files can provide read/write versions of the replicated files to users, should the original files be unavailable.
Note: Replication works only with files created or resized on Release 9.4 or later of UniVerse. To replicate files created on older systems, resize the files first.
13-4 Administering UniVerse on UNIX Platforms
C:\Users\awaite\Documents\U2Doc\UniVerse\11.2\Source\Adminunix\Ch
ReplicationUniVerse data replication provides an automatic and reliable way to deliver read-only copies of UniVerse files to other UniVerse systems.
The system where the source data resides is called the publisher. A system requesting copies of file updates from the publisher is called a subscriber.
Subscribing files on a subscriber are read-only. Users logged on to the subscriber cannot modify the replicated data.
Note: A publisher can also be a subscriber of another publisher’s files. However, a publisher cannot publish replicated (subscribing) files.
13-5
C:\Users\awaite\Documents\U2Doc\UniVerse\11.2\Source\Adminunix\Ch13.fm3/17/14
Hot standbyYou can configure data replication to create hot standby (also called hot backup) functionality, with the publisher acting as the primary UniVerse server and the subscriber acting as the development system or dormant backup system. The hot standby subscriber must be a different computer system from the publisher.
If the publisher’s disk integrity is compromised or the hardware is unusable, you use UniVerse Admin to switch from using the publisher to using the hot standby system.
If a crash occurs on the publisher, you use UniVerse Admin on the hot standby system to switch to fail-over mode, thus making the subscriber read/write-enabled. Users can then log on to the hot standby system and run their applications as usual. Later, the administrator can reconcile the originally published files on the publisher with all updates and changes made to the files on the hot standby system.
13-6 Administering UniVerse on UNIX Platforms
C:\Users\awaite\Documents\U2Doc\UniVerse\11.2\Source\Adminunix\Ch
Setting up U2 Data ReplicationBefore you can configure a subscriber, you must set up the replicated (subscribing) database on it. Then you configure the publisher and all subscribers. Finally, you start publishing on the publisher and subscribing on the subscribers.
Note: You must configure the publisher and all subscribers before you start publishing and subscribing, otherwise the replication system will start up in the crashed state.
To set up a data replication system:
1. Before setting up and configuring your publishing and subscribing systems, ensure that no users can access the files you intend to publish.
2. On the publisher, resize all files you want to publish that were created on Release 9.3 or earlier of UniVerse.
3. On the subscriber, create the UniVerse accounts to contain the replicated (subscribing) files.
4. On the subscriber, create the subscribing UniVerse files that will store the replicated data. Permissible file types are types 2 through 18 (static hashed files), type 25 (B-tree files), type 30 (dynamic hashed files), and distributed files. These files need not have the same file names as the corresponding files on the publisher, nor need they be of the same file type. The structures of distributed files on the publisher and subscriber should match.
Note: You cannot replicate type 1 or type 19 files, or secondary indexes.
5. Before configuring and starting the publishing system, ensure that:
Data in the subscriber’s files is identical to data in the publisher’s files.
No users can access the replicated files.
6. Configure the publisher and all subscribers.
13-7
C:\Users\awaite\Documents\U2Doc\UniVerse\11.2\Source\Adminunix\Ch13.fm3/17/14
7. Set the value of the UDRMODE configurable parameter to 1, then stop and restart UniVerse.
To set UDRMODE to 1, see Changing configurable parameter values in Chapter 4, “Chapter 4: Configurable UniVerse parameters.”
To unload shared memory, shut down UniVerse. For the procedure, see Chapter 3, “Chapter 3: System startup and shutdown.”
Start UniVerse again. For the procedure, see Chapter 3, “Chapter 3: System startup and shutdown.”
Note: After you configure publishing and subscribing, no published or subscribing files can be modified until you start publishing and subscribing on all systems.
8. Start publishing on the publisher, and start subscribing on all subscribers.
The following sections describe how to use the Replication window of UniAdmin to configure and manage data replication.
13-8 Administering UniVerse on UNIX Platforms
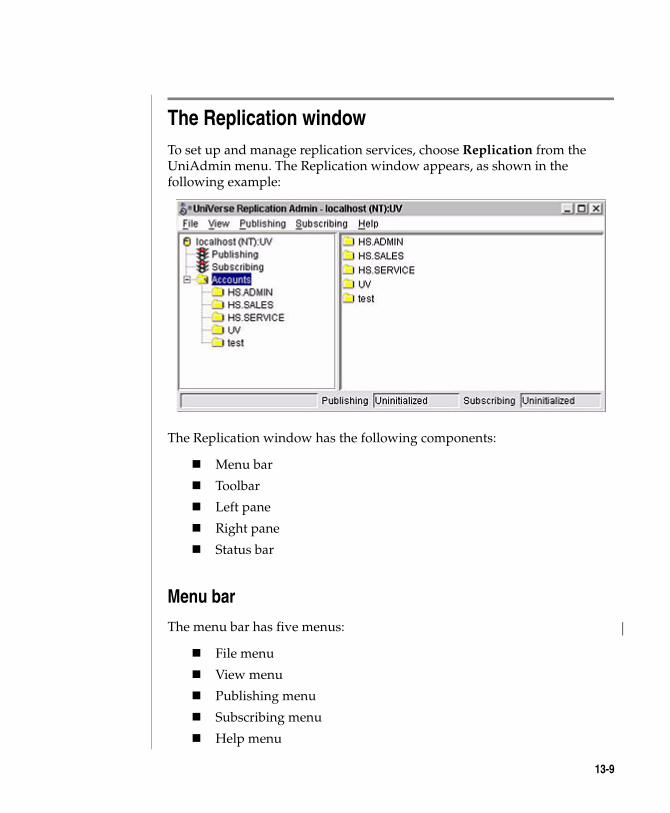
C:\Users\awaite\Documents\U2Doc\UniVerse\11.2\Source\Adminunix\Ch
The Replication windowTo set up and manage replication services, choose Replication from the UniAdmin menu. The Replication window appears, as shown in the following example:
The Replication window has the following components:
Menu bar
Toolbar
Left pane
Right pane
Status bar
Menu bar
The menu bar has five menus:
File menu
View menu
Publishing menu
Subscribing menu
Help menu
13-9
C:\Users\awaite\Documents\U2Doc\UniVerse\11.2\Source\Adminunix\Ch13.fm3/17/14
File menu
The File menu has two options:
Repair. Repairs a damaged file.
Close. Exits the Replication window.
View menu
The View menu has seven options:
Toolbar. Hides or displays the toolbar.
Status Bar. Hides or displays the status bar.
Large Icons, Small Icons, List, and Details change the way the file list appears.
Refresh. Refreshes the file list display.
Publishing menu
The Publishing menu has eight options:
Publish. Publishes the selected file.
Unpublish. Unpublishes the selected file.
Properties. Displays details about a published file.
Start Publishing. Starts the publishing system.
Stop Publishing. Stops the publishing system.
Resume Publishing. Restarts the publishing system.
Configure. Specifies log file and information file settings.
Sync. Updates the publisher with hot standby data.
Subscribing menu
The Subscribing menu has eight options:
Subscribe. Subscribes the selected file.
Unsubscribe. Unsubscribes the selected file.
Properties. Displays details about a subscribing file.
13-10 Administering UniVerse on UNIX Platforms
C:\Users\awaite\Documents\U2Doc\UniVerse\11.2\Source\Adminunix\Ch
Start Subscribing. Starts the subscribing system.
Stop Subscribing. Stops the subscribing system.
Configure. Specifies information file settings.
Systems. Specifies publishers to subscribe to.
Fail Over. Makes subscribing files writable.
Help menu
The Help menu has two options:
Contents. Displays UniAdmin online help.
Replication. Displays online help for data replication.
Toolbar
The toolbar has eight buttons:
Publish. Publishes the selected file.
Subscribe. Subscribes the selected file.
Unpublish/Unsubscribe. Unpublishes or unsubscribes the selected file.
Properties. Displays details about the selected file.
The next four buttons correspond to the four options on the View menu that control the way the file list is displayed.
Left pane
The left pane lists the following:
The host name of the computer system to which UniAdmin is connected.
A list of all accounts containing currently published UniVerse files. If the traffic signal icon is red, publishing is uninitialized. If it is green, publishing is enabled.
13-11
C:\Users\awaite\Documents\U2Doc\UniVerse\11.2\Source\Adminunix\Ch13.fm3/17/14
A list of all accounts containing currently subscribing UniVerse files. If the traffic signal icon is red, subscribing is uninitialized. If it is green, subscribing is enabled.
A list of all UniVerse accounts on the system to which UniAdmin is connected.
Right pane
The right pane lists the following:
If Publishing or Subscribing is selected in the left pane, all UniVerse accounts with published or subscribing files
If Accounts is selected in the left pane, all UniVerse accounts with publishable or subscribable files
If an account under Publishing is selected in the left pane, all currently published files in that account
If an account under Subscribing is selected in the left pane, all currently subscribing files in that account
If an account under Accounts is selected in the left pane, all UniVerse files in that account that can be published or subscribing
13-12 Administering UniVerse on UNIX Platforms
C:\Users\awaite\Documents\U2Doc\UniVerse\11.2\Source\Adminunix\Ch
Configuring and managing U2 Data ReplicationThere are two parts to data replication:
A publishing system keeps track of updates to a published database and makes information about those updates available to subscribing systems across the network. You replicate read-only copies of published UniVerse files on subscribing systems.
A subscribing system receives information about updates on published source files across the network.
Note: A special case of subscribing called hot standby lets you track updates to published UniVerse files on a subscribing system and make those subscribing copies into fully read/write files in the event that the primary publishing system becomes temporarily unavailable.
13-13
C:\Users\awaite\Documents\U2Doc\UniVerse\11.2\Source\Adminunix\Ch13.fm3/17/14
Managing a publishing systemYou can publish the following file types:
Types 2 through 18 (static hashed files)
Type 25 files (B-tree files)
Type 30 files (dynamic hashed files)
Multiple data files
Distributed files
You cannot publish the following:
Type 1 or type 19 files
Secondary indexes
Configuring the publishing system
You must configure a publishing system before you can publish its files. You can configure the following options for publishing systems:
The location of the directory containing replication log files
The size of the replication log files
The number of the current replication log file
Whether or not publishing services start up when UniVerse starts
Complete the following steps to configure a publishing system:
13-14 Administering UniVerse on UNIX Platforms
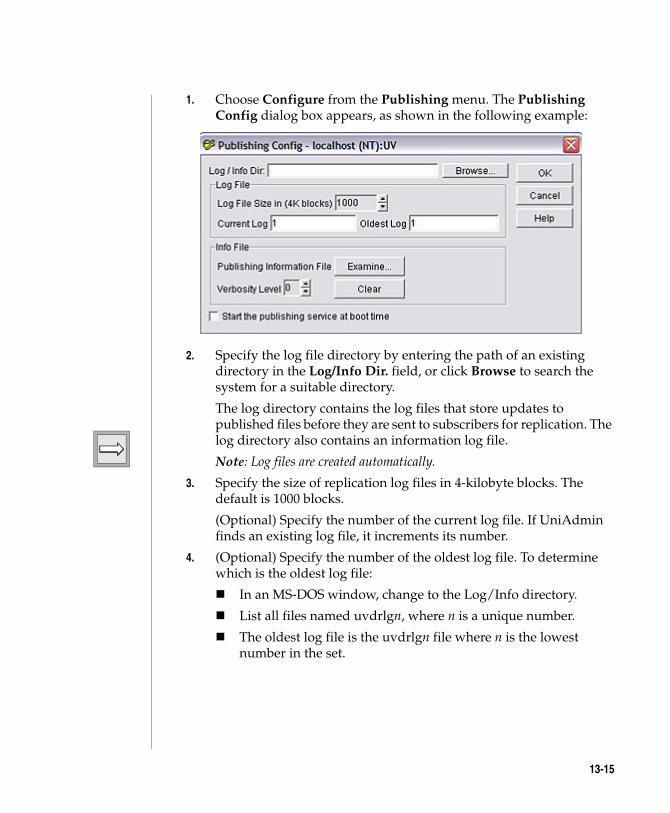
C:\Users\awaite\Documents\U2Doc\UniVerse\11.2\Source\Adminunix\Ch
1. Choose Configure from the Publishing menu. The Publishing Config dialog box appears, as shown in the following example:
2. Specify the log file directory by entering the path of an existing directory in the Log/Info Dir. field, or click Browse to search the system for a suitable directory.
The log directory contains the log files that store updates to published files before they are sent to subscribers for replication. The log directory also contains an information log file.
Note: Log files are created automatically.
3. Specify the size of replication log files in 4-kilobyte blocks. The default is 1000 blocks.
(Optional) Specify the number of the current log file. If UniAdmin finds an existing log file, it increments its number.
4. (Optional) Specify the number of the oldest log file. To determine which is the oldest log file:
In an MS-DOS window, change to the Log/Info directory.
List all files named uvdrlgn, where n is a unique number.
The oldest log file is the uvdrlgn file where n is the lowest number in the set.
13-15
C:\Users\awaite\Documents\U2Doc\UniVerse\11.2\Source\Adminunix\Ch13.fm3/17/14
5. (Optional) Set the verbosity level for the publishing information file. It can be a number from 0 to 9. The default is 0.
Note: Use the publishing information file only for debugging. For details about the publishing information file, see “The Publishing information file” on page 23.
6. (Optional) To start the publishing service at boot time, select the check box at the bottom of the dialog box.
7. Click OK to save your changes and exit the Publishing Config dialog box. Click Cancel to exit the Publishing Config dialog box without saving changes.
Starting and stopping the publishing system
To start the publishing system, choose Start Publishing from the Publishing menu. The status bar displays Enabled.
To stop the publishing system, choose Stop Publishing from the Publishing menu. The status bar displays Uninitialized.
Publishing files
You can publish:
One file at a time
Selected files
All files in an account
Publishing one UniVerse file
Complete the following steps to publish one UniVerse file in an account:
1. From the left pane, double-click Accounts (or click the + sign before it), then select one of the accounts listed. A list of UniVerse files you can replicate appears in the right pane.
13-16 Administering UniVerse on UNIX Platforms
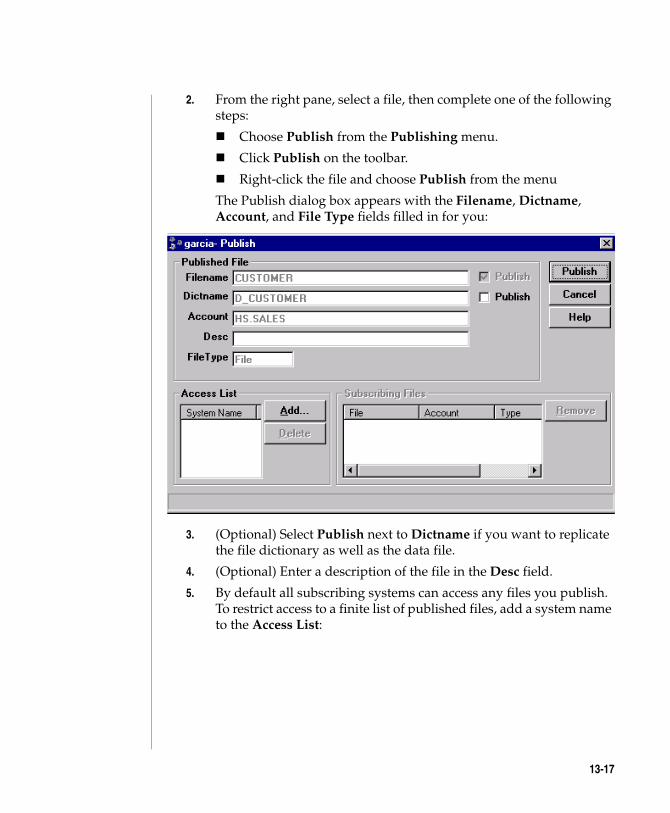
C:\Users\awaite\Documents\U2Doc\UniVerse\11.2\Source\Adminunix\Ch
2. From the right pane, select a file, then complete one of the following steps:
Choose Publish from the Publishing menu.
Click Publish on the toolbar.
Right-click the file and choose Publish from the menu
The Publish dialog box appears with the Filename, Dictname, Account, and File Type fields filled in for you:
3. (Optional) Select Publish next to Dictname if you want to replicate the file dictionary as well as the data file.
4. (Optional) Enter a description of the file in the Desc field.
5. By default all subscribing systems can access any files you publish. To restrict access to a finite list of published files, add a system name to the Access List:
13-17
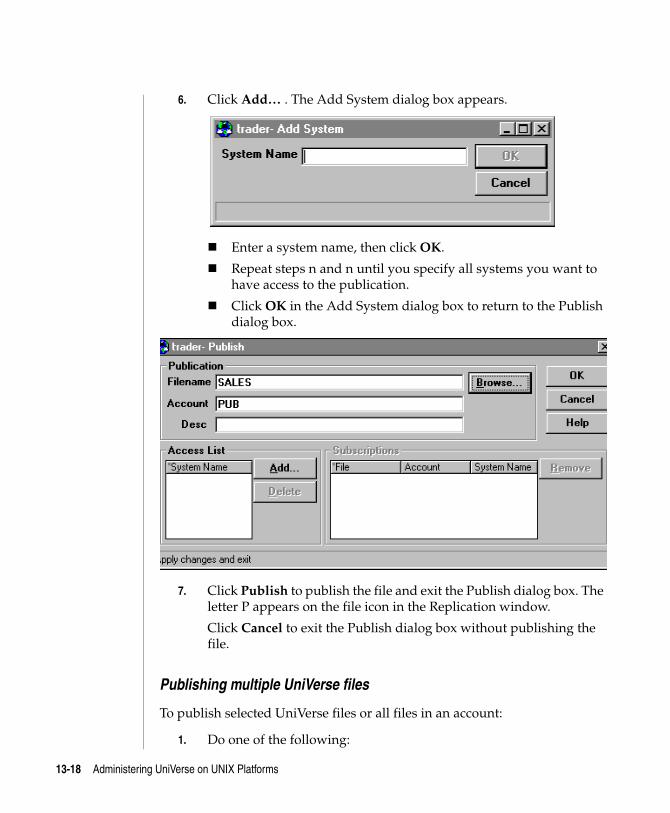
C:\Users\awaite\Documents\U2Doc\UniVerse\11.2\Source\Adminunix\Ch13.fm3/17/14
6. Click Add… . The Add System dialog box appears.
Enter a system name, then click OK.
Repeat steps n and n until you specify all systems you want to have access to the publication.
Click OK in the Add System dialog box to return to the Publish dialog box.
7. Click Publish to publish the file and exit the Publish dialog box. The letter P appears on the file icon in the Replication window.
Click Cancel to exit the Publish dialog box without publishing the file.
Publishing multiple UniVerse files
To publish selected UniVerse files or all files in an account:
1. Do one of the following:
13-18 Administering UniVerse on UNIX Platforms
C:\Users\awaite\Documents\U2Doc\UniVerse\11.2\Source\Adminunix\Ch
To publish selected files:
From the left pane, double-click Accounts (or click the + sign before it).
Select one of the accounts listed. A list of UniVerse files you can publish appears in the right pane.
To select a range of files, select the first file in the range, then hold down the Shift key and select the last file in the range.
To select random files, hold down the Ctrl key and select the files you want to publish.
To publish all files in an account:
From the left pane, select Accounts. A list of accounts appears in the right pane.
From the right pane, select the account whose files you want to publish.
2. Do one of the following:
Choose Publish from the Publishing menu.
Click Publish on the toolbar.
From the right pane, right-click the selected files or the selected account, then choose Publish from the menu.
13-19
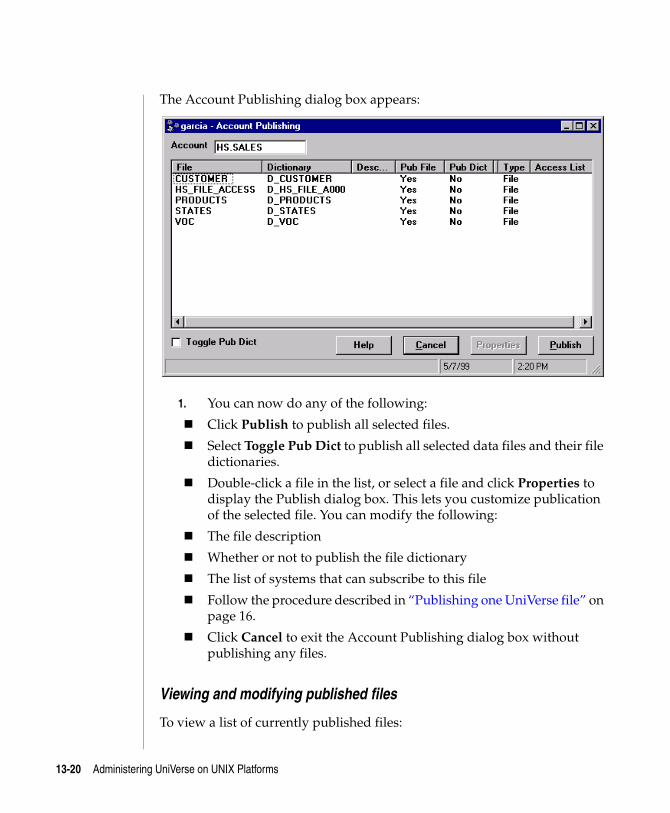
C:\Users\awaite\Documents\U2Doc\UniVerse\11.2\Source\Adminunix\Ch13.fm3/17/14
The Account Publishing dialog box appears:
1. You can now do any of the following:
Click Publish to publish all selected files.
Select Toggle Pub Dict to publish all selected data files and their file dictionaries.
Double-click a file in the list, or select a file and click Properties to display the Publish dialog box. This lets you customize publication of the selected file. You can modify the following:
The file description
Whether or not to publish the file dictionary
The list of systems that can subscribe to this file
Follow the procedure described in “Publishing one UniVerse file” on page 16.
Click Cancel to exit the Account Publishing dialog box without publishing any files.
Viewing and modifying published files
To view a list of currently published files:
13-20 Administering UniVerse on UNIX Platforms
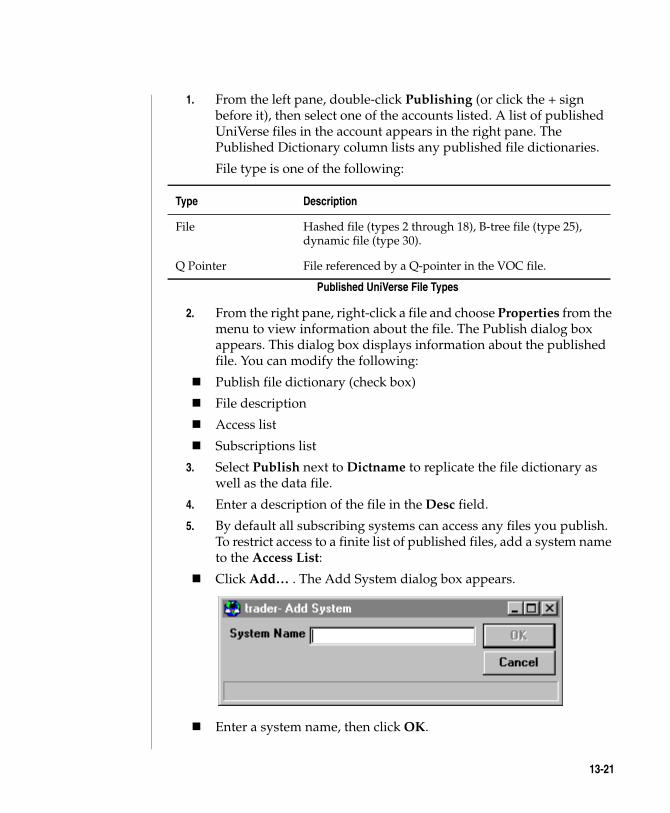
C:\Users\awaite\Documents\U2Doc\UniVerse\11.2\Source\Adminunix\Ch
1. From the left pane, double-click Publishing (or click the + sign before it), then select one of the accounts listed. A list of published UniVerse files in the account appears in the right pane. The Published Dictionary column lists any published file dictionaries.
File type is one of the following:
2. From the right pane, right-click a file and choose Properties from the menu to view information about the file. The Publish dialog box appears. This dialog box displays information about the published file. You can modify the following:
Publish file dictionary (check box)
File description
Access list
Subscriptions list
3. Select Publish next to Dictname to replicate the file dictionary as well as the data file.
4. Enter a description of the file in the Desc field.
5. By default all subscribing systems can access any files you publish. To restrict access to a finite list of published files, add a system name to the Access List:
Click Add… . The Add System dialog box appears.
Enter a system name, then click OK.
Type Description
File Hashed file (types 2 through 18), B-tree file (type 25), dynamic file (type 30).
Q Pointer File referenced by a Q-pointer in the VOC file.
Published UniVerse File Types
13-21
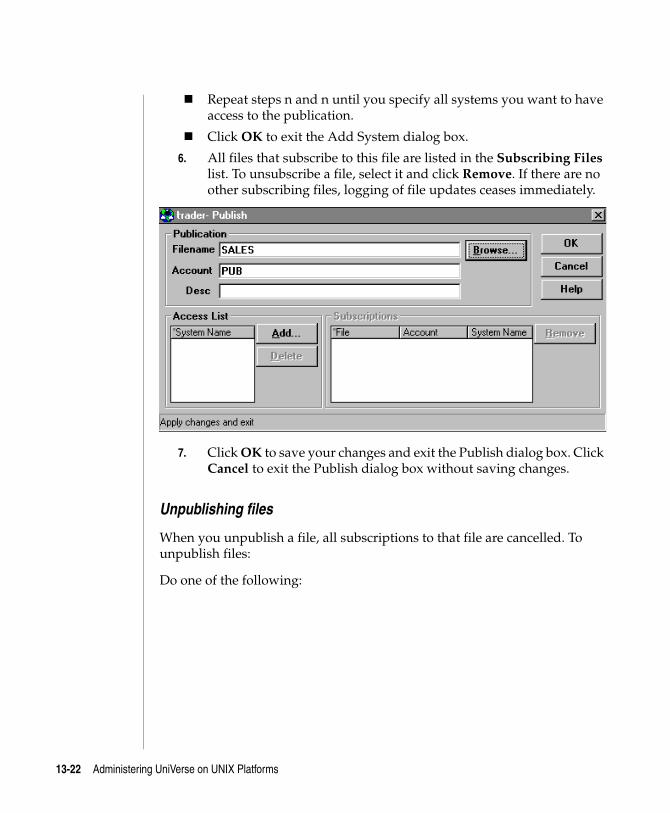
C:\Users\awaite\Documents\U2Doc\UniVerse\11.2\Source\Adminunix\Ch13.fm3/17/14
Repeat steps n and n until you specify all systems you want to have access to the publication.
Click OK to exit the Add System dialog box.
6. All files that subscribe to this file are listed in the Subscribing Files list. To unsubscribe a file, select it and click Remove. If there are no other subscribing files, logging of file updates ceases immediately.
7. Click OK to save your changes and exit the Publish dialog box. Click Cancel to exit the Publish dialog box without saving changes.
Unpublishing files
When you unpublish a file, all subscriptions to that file are cancelled. To unpublish files:
Do one of the following:
13-22 Administering UniVerse on UNIX Platforms
C:\Users\awaite\Documents\U2Doc\UniVerse\11.2\Source\Adminunix\Ch
To select individual files:
From the left pane, double-click Publishing or Accounts (or click the + sign before it).
Select one of the accounts listed. A list of published UniVerse files in that account appears in the right pane.
To select a range of files, select the first file in the range, then hold down the Shift key and select the last file in the range.
To select random files, hold down the Ctrl key and select the files you want to unpublish.
To select all files in an account:
From the left pane, select Publishing or Accounts. A list of accounts appears in the right pane.
From the right pane, select the account whose files you want to unpublish.
1. Do one of the following:
Choose Unpublish from the Publishing menu.
Click Unpublish/Unsubscribe on the toolbar.
From the right pane, right-click the selected files or the selected account, then choose Unpublish from the menu.
2. When asked if you are sure you want to unpublish the files, click Yes or No. If you click Yes, all selected files are unpublished, the filenames are removed from the Publishing list, and all subscriptions to the files are cancelled.
The Publishing information file
The publishing information file is useful for debugging. Normally you do not need to log information to this file. We recommend you log information to this file only on the advice of an UniVerse support specialist.
To activate logging to the publishing information file, set the verbosity level to a number between 1 and 9. To deactivate logging, set the verbosity level to 0. 0 is the default setting.
Setting the Verbosity Level
To set the verbosity level:
13-23
C:\Users\awaite\Documents\U2Doc\UniVerse\11.2\Source\Adminunix\Ch13.fm3/17/14
1. Choose Configure from the Publishing menu. The Publishing Config dialog box appears.
2. Under Info File, set the Verbosity Level to a number between 0 and 9. The higher the verbosity level, the more information is logged.
3. Click OK to exit the Publishing Config dialog box.
Note: Setting the verbosity level to a nonzero value disables the automatic removal of data replication logs. The behavior is intended for you to examine the logs should you encounter problems. While verbosity is set to a nonzero value, you should exercise care when managing the logs to avoid problems such as exhausting available disk space.
Viewing information files
To view the contents of the publishing information file:
1. Choose Configure from the Publishing menu. The Publishing Config dialog box appears.
2. Under Info File, click Examine. The Publishing Info File window appears, listing the contents of the publishing information file.
Clearing information files
To clear the contents of the publishing information file:
1. Choose Configure from the Publishing menu. The Publishing Config dialog box appears.
2. Under Info File, click Clear. The contents of the publishing information file are cleared.
13-24 Administering UniVerse on UNIX Platforms
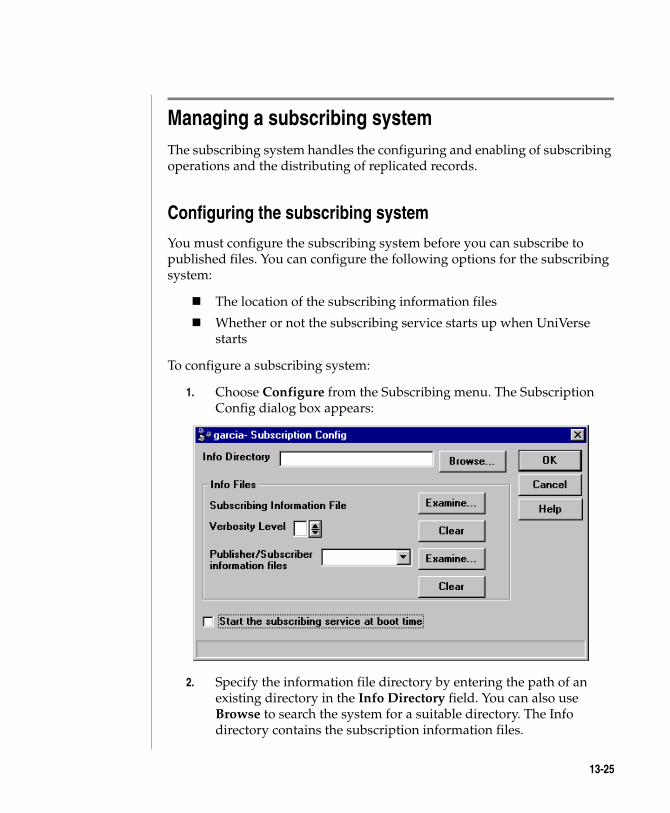
C:\Users\awaite\Documents\U2Doc\UniVerse\11.2\Source\Adminunix\Ch
Managing a subscribing systemThe subscribing system handles the configuring and enabling of subscribing operations and the distributing of replicated records.
Configuring the subscribing system
You must configure the subscribing system before you can subscribe to published files. You can configure the following options for the subscribing system:
The location of the subscribing information files
Whether or not the subscribing service starts up when UniVerse starts
To configure a subscribing system:
1. Choose Configure from the Subscribing menu. The Subscription Config dialog box appears:
2. Specify the information file directory by entering the path of an existing directory in the Info Directory field. You can also use Browse to search the system for a suitable directory. The Info directory contains the subscription information files.
13-25
C:\Users\awaite\Documents\U2Doc\UniVerse\11.2\Source\Adminunix\Ch13.fm3/17/14
3. (Optional) Set the verbosity level for the subscribing information files. It can be a number from 0 to 9. The default is 0.
Note: Use the subscribing information files only for debugging. For details about these files, see “Subscribing information files” on page 34.
4. (Optional) To choose whether to start the subscribing service at boot time, select the check box at the bottom of the window.
5. Click OK to save your changes and exit the Subscription Config dialog box. Click Cancel to exit the Subscription Config dialog box without saving changes.
Starting and stopping the subscribing system
To start the subscribing system, choose Start Subscribing from the Subscribing menu. The status bar displays Enabled.
To stop the subscribing system, choose Stop Subscribing from the Subscribing menu. The status bar displayed Uninitialized.
Creating a subscriber’s list of publishing systems
Before a subscribing system can subscribe to published files, you must first create a list of publishing systems available to the subscriber. Next you subscribe to the files published by these systems.
To add a publishing system to the subscriber’s list of publishing systems:
13-26 Administering UniVerse on UNIX Platforms
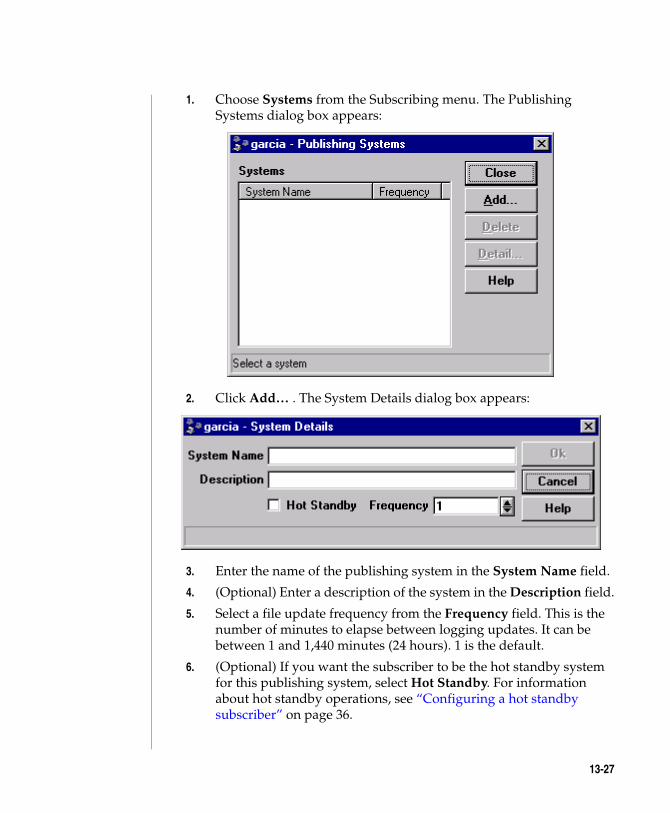
C:\Users\awaite\Documents\U2Doc\UniVerse\11.2\Source\Adminunix\Ch
1. Choose Systems from the Subscribing menu. The Publishing Systems dialog box appears:
2. Click Add… . The System Details dialog box appears:
3. Enter the name of the publishing system in the System Name field.
4. (Optional) Enter a description of the system in the Description field.
5. Select a file update frequency from the Frequency field. This is the number of minutes to elapse between logging updates. It can be between 1 and 1,440 minutes (24 hours). 1 is the default.
6. (Optional) If you want the subscriber to be the hot standby system for this publishing system, select Hot Standby. For information about hot standby operations, see “Configuring a hot standby subscriber” on page 36.
13-27
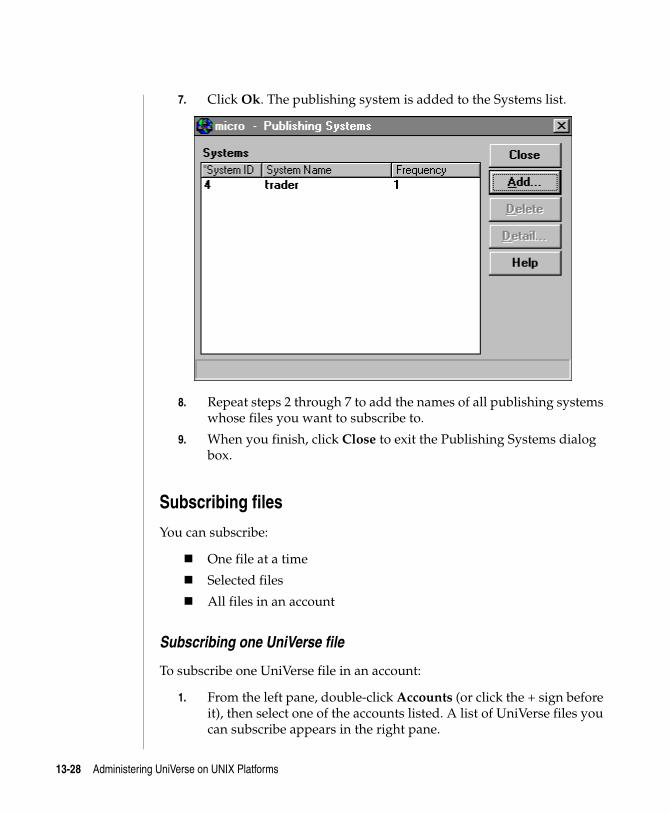
C:\Users\awaite\Documents\U2Doc\UniVerse\11.2\Source\Adminunix\Ch13.fm3/17/14
7. Click Ok. The publishing system is added to the Systems list.
8. Repeat steps 2 through 7 to add the names of all publishing systems whose files you want to subscribe to.
9. When you finish, click Close to exit the Publishing Systems dialog box.
Subscribing files
You can subscribe:
One file at a time
Selected files
All files in an account
Subscribing one UniVerse file
To subscribe one UniVerse file in an account:
1. From the left pane, double-click Accounts (or click the + sign before it), then select one of the accounts listed. A list of UniVerse files you can subscribe appears in the right pane.
13-28 Administering UniVerse on UNIX Platforms
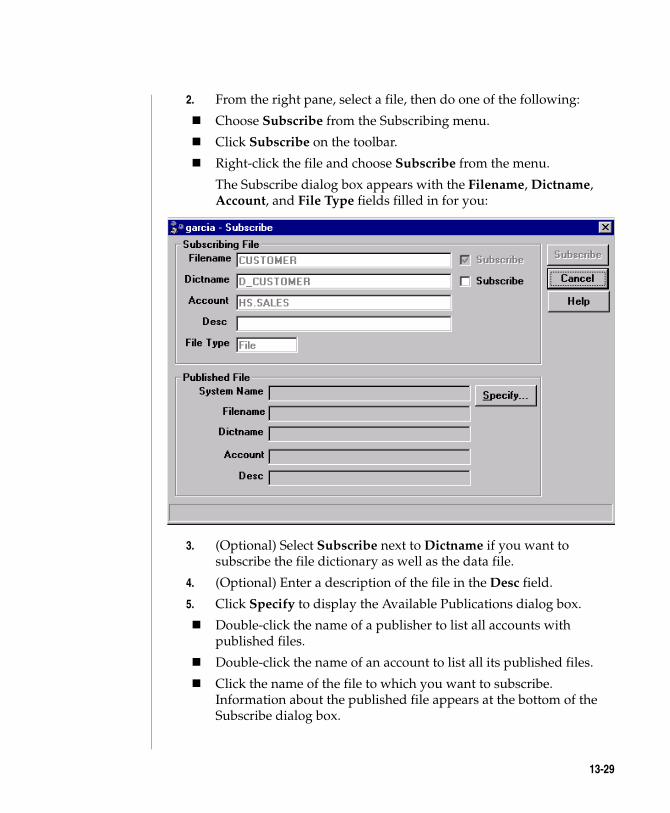
C:\Users\awaite\Documents\U2Doc\UniVerse\11.2\Source\Adminunix\Ch
2. From the right pane, select a file, then do one of the following:
Choose Subscribe from the Subscribing menu.
Click Subscribe on the toolbar.
Right-click the file and choose Subscribe from the menu.
The Subscribe dialog box appears with the Filename, Dictname, Account, and File Type fields filled in for you:
3. (Optional) Select Subscribe next to Dictname if you want to subscribe the file dictionary as well as the data file.
4. (Optional) Enter a description of the file in the Desc field.
5. Click Specify to display the Available Publications dialog box.
Double-click the name of a publisher to list all accounts with published files.
Double-click the name of an account to list all its published files.
Click the name of the file to which you want to subscribe. Information about the published file appears at the bottom of the Subscribe dialog box.
13-29
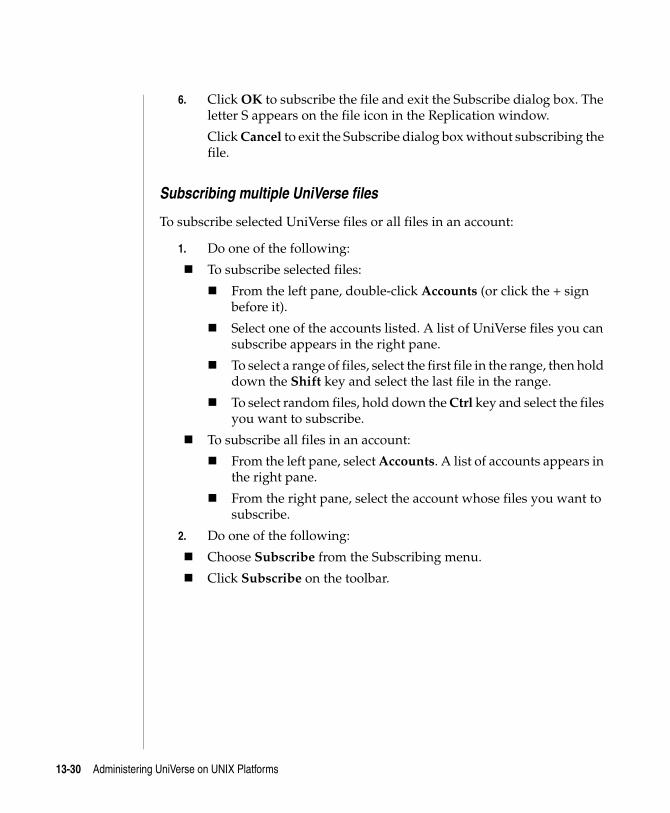
C:\Users\awaite\Documents\U2Doc\UniVerse\11.2\Source\Adminunix\Ch13.fm3/17/14
6. Click OK to subscribe the file and exit the Subscribe dialog box. The letter S appears on the file icon in the Replication window.
Click Cancel to exit the Subscribe dialog box without subscribing the file.
Subscribing multiple UniVerse files
To subscribe selected UniVerse files or all files in an account:
1. Do one of the following:
To subscribe selected files:
From the left pane, double-click Accounts (or click the + sign before it).
Select one of the accounts listed. A list of UniVerse files you can subscribe appears in the right pane.
To select a range of files, select the first file in the range, then hold down the Shift key and select the last file in the range.
To select random files, hold down the Ctrl key and select the files you want to subscribe.
To subscribe all files in an account:
From the left pane, select Accounts. A list of accounts appears in the right pane.
From the right pane, select the account whose files you want to subscribe.
2. Do one of the following:
Choose Subscribe from the Subscribing menu.
Click Subscribe on the toolbar.
13-30 Administering UniVerse on UNIX Platforms
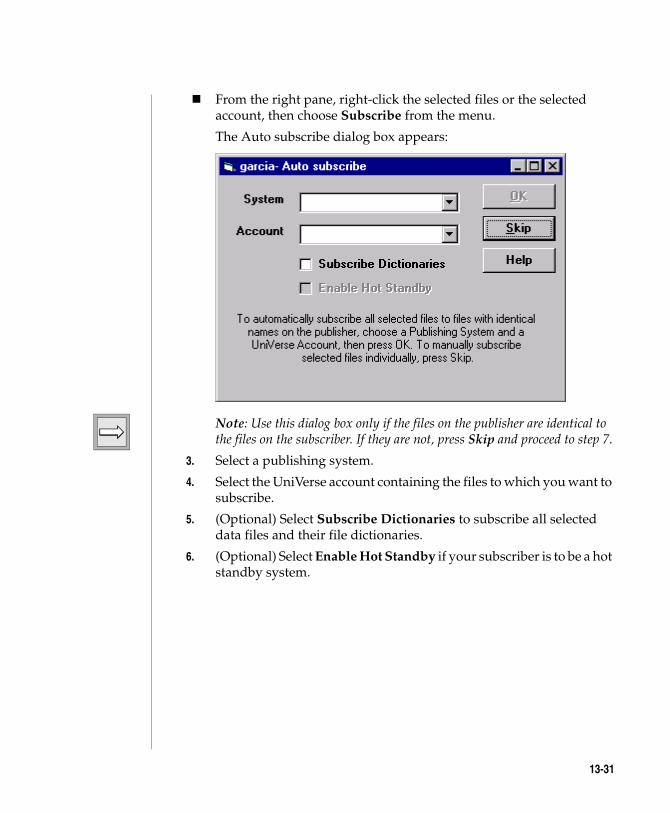
C:\Users\awaite\Documents\U2Doc\UniVerse\11.2\Source\Adminunix\Ch
From the right pane, right-click the selected files or the selected account, then choose Subscribe from the menu.
The Auto subscribe dialog box appears:
Note: Use this dialog box only if the files on the publisher are identical to the files on the subscriber. If they are not, press Skip and proceed to step 7.
3. Select a publishing system.
4. Select the UniVerse account containing the files to which you want to subscribe.
5. (Optional) Select Subscribe Dictionaries to subscribe all selected data files and their file dictionaries.
6. (Optional) Select Enable Hot Standby if your subscriber is to be a hot standby system.
13-31
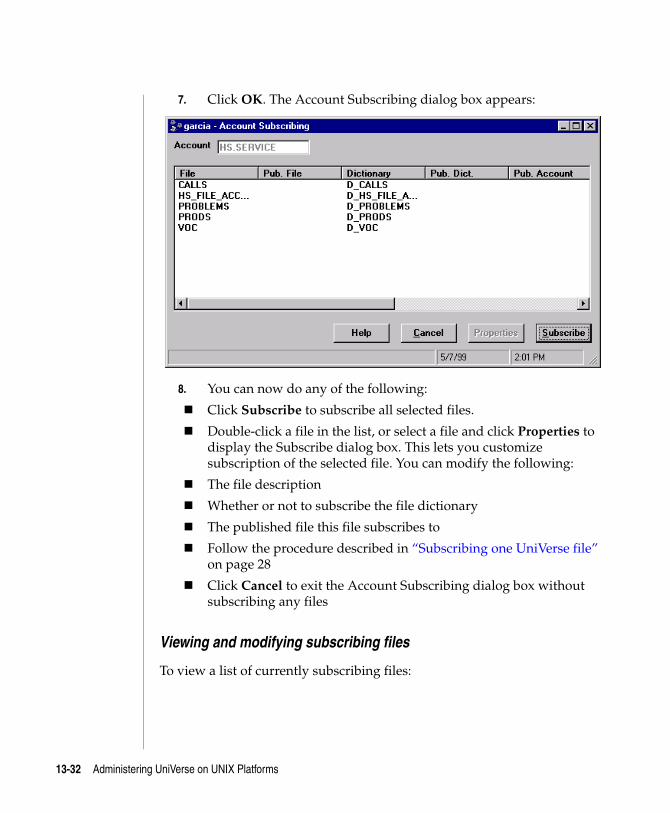
C:\Users\awaite\Documents\U2Doc\UniVerse\11.2\Source\Adminunix\Ch13.fm3/17/14
7. Click OK. The Account Subscribing dialog box appears:
8. You can now do any of the following:
Click Subscribe to subscribe all selected files.
Double-click a file in the list, or select a file and click Properties to display the Subscribe dialog box. This lets you customize subscription of the selected file. You can modify the following:
The file description
Whether or not to subscribe the file dictionary
The published file this file subscribes to
Follow the procedure described in “Subscribing one UniVerse file” on page 28
Click Cancel to exit the Account Subscribing dialog box without subscribing any files
Viewing and modifying subscribing files
To view a list of currently subscribing files:
13-32 Administering UniVerse on UNIX Platforms
C:\Users\awaite\Documents\U2Doc\UniVerse\11.2\Source\Adminunix\Ch
1. From the left pane, double-click Subscribing or Accounts (or click the + sign before it), then select one of the accounts listed. A list of subscribing UniVerse files in the account appears in the right pane. The Subscribing Dict column lists any subscribing file dictionaries. The Pub. System column lists the name of the system where the published file resides.
File type is one of the following:
2. From the right pane, double-click a file to view information about the file. The Subscribe dialog box appears. This dialog box displays information about the subscribing file.
3. (Optional) Select Publish next to Dictname if you want to subscribe the file dictionary as well as the data file.
4. (Optional) Enter or modify the description of the file in the Desc field.
5. Click OK to save your changes and exit the Subscribing dialog box. Click Cancel to exit the Subscribing dialog box without saving changes.
Unsubscribing Files
To unsubscribe files:
6. Do one of the following:
Type Description
File Hashed file (types 2 through 18), B-tree file (type 25), dynamic file (type 30).
Q Pointer File referenced by a Q-pointer in the VOC file.
Subscribing UniVerse File Types
13-33
C:\Users\awaite\Documents\U2Doc\UniVerse\11.2\Source\Adminunix\Ch13.fm3/17/14
To select individual files:
From the left pane, double-click Subscribing or Accounts (or click the + sign before it).
Select one of the accounts listed. A list of subscribing UniVerse files in that account appears in the right pane.
To select a range of files, select the first file in the range, then hold down the Shift key and select the last file in the range.
To select random files, hold down the Ctrl key and select the files you want to unsubscribe.
To select all files in an account:
From the left pane, select Subscribing or Accounts. A list of accounts appears in the right pane.
From the right pane, select the account whose files you want to unsubscribe.
7. Do one of the following:
Choose Unsubscribe from the Subscribing menu.
Click Unpublish/Unsubscribe on the toolbar.
From the right pane, right-click the selected files or the selected account, then choose Unsubscribe from the menu.
8. When asked if you are sure you want to unsubscribe the selected files, click Yes or No. If you click Yes, the files are unsubscribed and the letter S is removed from the file icon.
Subscribing information files
Information files are useful for debugging. The subscribing system has two information files:
Subscribing information file, which logs information about the subscribing system.
Publisher/Subscriber information file, which logs information about connections between subscribing and publishing systems.
Normally you do not need to log information to these information files. We recommend you log information to these files only on the advice of a UniVerse support specialist.
13-34 Administering UniVerse on UNIX Platforms
C:\Users\awaite\Documents\U2Doc\UniVerse\11.2\Source\Adminunix\Ch
To activate logging to the subscribing information files, set the verbosity level to a number between 1 and 9. To deactivate logging, set the verbosity level to 0. 0 is the default setting.
Setting the verbosity level
To set the verbosity level:
1. Choose Configure from the Subscribing menu. The Subscribing Config dialog box appears.
2. Under Info File, set the Verbosity Level to a number between 0 and 9. The higher the verbosity level, the more information is logged.
3. Click OK to exit the Subscribing Config dialog box.
Viewing information files
To view the contents of the subscribing information file:
1. Choose Configure from the Subscribing menu. The Subscribing Config dialog box appears.
2. Under Info File, click Examine. The Subscribing Info File window appears, listing the contents of the subscribing information file.
Clearing information files
To clear the contents of the subscribing information file:
1. Choose Configure from the Subscribing menu. The Subscribing Config dialog box appears.
2. Under Info File, click Clear. The contents of the subscribing information file are cleared.
13-35
C:\Users\awaite\Documents\U2Doc\UniVerse\11.2\Source\Adminunix\Ch13.fm3/17/14
Managing hot standby operationsYou can configure only one subscriber to be the hot standby system for a publisher. The hot standby system must be a different computer system from the publishing system it backs up.
A hot standby subscriber can take over for a publisher that suffers a fault or failure rendering it inoperable. When the publisher fails, you can turn on fail-over mode on the hot standby subscriber. Fail-over mode converts all replicated files from being read-only files to read/write-enabled files.
Note: If you want users to log in to the hot standby subscriber and run their applications as they run them on the publisher, you must use the same file and account names on the hot standby subscriber as the ones the publisher uses.
Configuring a hot standby subscriber
You configure a hot standby subscriber in two steps.
1. You add the name of the publishing system you want to hot-backup to the subscriber’s Publishing Systems list, selecting the Hot Standby check box on the Publishing Systems dialog box.
13-36 Administering UniVerse on UNIX Platforms
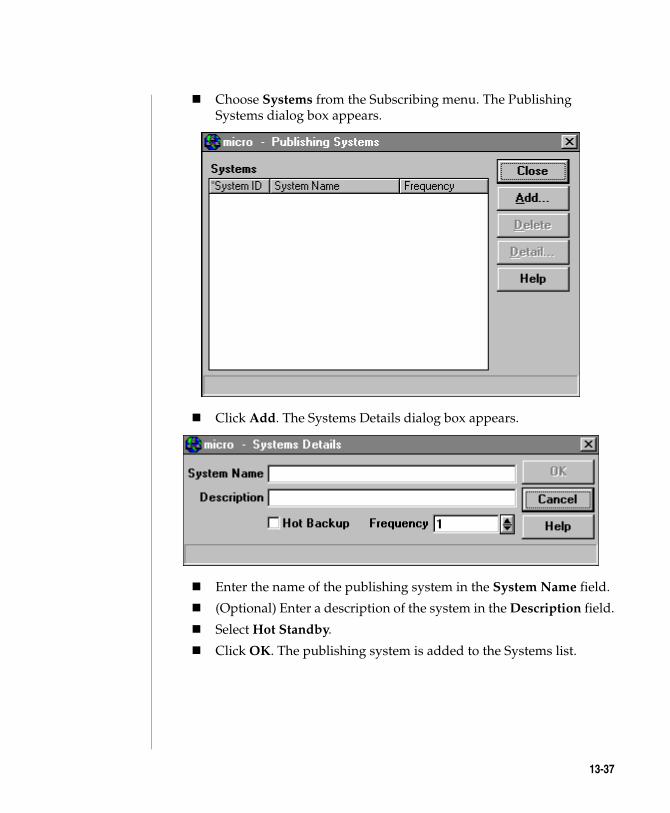
C:\Users\awaite\Documents\U2Doc\UniVerse\11.2\Source\Adminunix\Ch
Choose Systems from the Subscribing menu. The Publishing Systems dialog box appears.
Click Add. The Systems Details dialog box appears.
Enter the name of the publishing system in the System Name field.
(Optional) Enter a description of the system in the Description field.
Select Hot Standby.
Click OK. The publishing system is added to the Systems list.
13-37
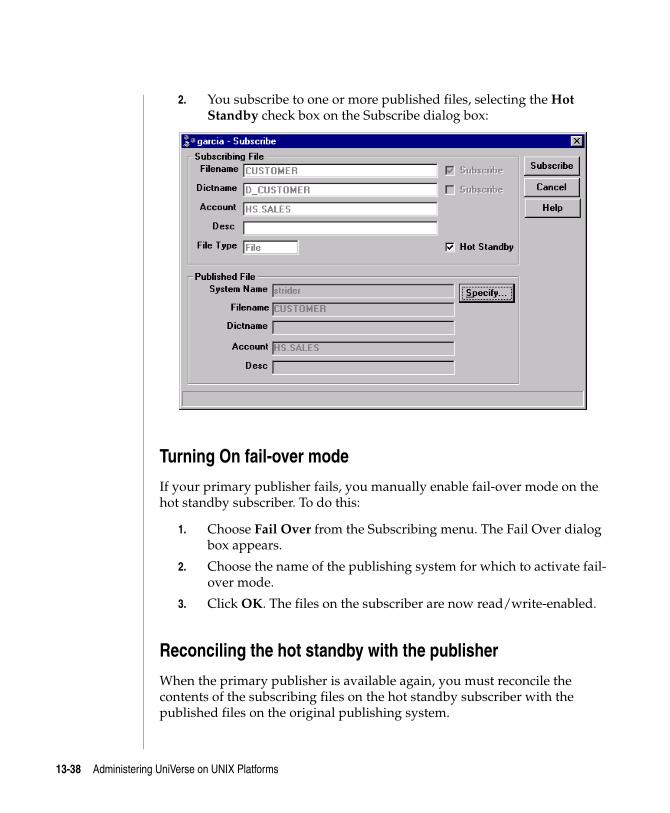
C:\Users\awaite\Documents\U2Doc\UniVerse\11.2\Source\Adminunix\Ch13.fm3/17/14
2. You subscribe to one or more published files, selecting the Hot Standby check box on the Subscribe dialog box:
Turning On fail-over mode
If your primary publisher fails, you manually enable fail-over mode on the hot standby subscriber. To do this:
1. Choose Fail Over from the Subscribing menu. The Fail Over dialog box appears.
2. Choose the name of the publishing system for which to activate fail-over mode.
3. Click OK. The files on the subscriber are now read/write-enabled.
Reconciling the hot standby with the publisher
When the primary publisher is available again, you must reconcile the contents of the subscribing files on the hot standby subscriber with the published files on the original publishing system.
13-38 Administering UniVerse on UNIX Platforms
C:\Users\awaite\Documents\U2Doc\UniVerse\11.2\Source\Adminunix\Ch
Note: When reconciling subscribing files with published files, you need at least the same amount of space as the largest single file you are reconciling. You may need even more space than that, perhaps as much as twice the size of the largest file.
Here is an outline of the reconciliation process:
1. Stop publishing on the original publisher.
2. Prepare the hot standby subscriber to be reconciled with the publisher.
3. Run the Sync command on the original publisher.
4. Reset configurations on the original publisher.
Note: You can reconcile only those published files for which a hot standby subscriber system is configured. You cannot reconcile any files published from the failed publishing system that were only replicated but not hot-backed-up.
Stopping publishing on the original publisher
1. Choose Stop Publishing from the Publishing menu.
2. Set the value of the UDRMODE configurable parameter to 0. For the procedure, see Changing configurable parameter values in Chapter 4, “Chapter 4: Configurable UniVerse parameters.”
3. To unload shared memory, shut down UniVerse. For the procedure, see Chapter 3, “Chapter 3: System startup and shutdown.”
4. Start UniVerse again. For the procedure, see Chapter 3, “Chapter 3: System startup and shutdown.”
Preparing the hot standby subscriber to be reconciled
1. On the hot standby subscriber, make sure there are no users logged on to the system.
2. Wait for all file updates to complete.
3. Choose Stop Subscribing from the Subscribing menu.
13-39
C:\Users\awaite\Documents\U2Doc\UniVerse\11.2\Source\Adminunix\Ch13.fm3/17/14
Running the sync command on the original publisher
1. On the original publisher, choose Sync from the Publishing menu. The Sync dialog box appears, listing the hot standby system.
2. Click Sync Up to start the reconciliation process. The original publisher connects to the hot standby subscriber and compares each record of each hot-backed-up file with the originally published version, and implements the updates in the original published files.
When the reconciliation process is complete, the subscribing files on the hot standby system are made read-only, and all subscriptions to the original publisher are restored.
Resetting configurations on the original publisher
To return the original publisher to full publishing status:
1. Set the value of the UDRMODE configurable parameter to 1. For the procedure, see Changing Configurable Parameter Values.
2. To unload shared memory, shut down UniVerse. For the procedure, see System Startup and Shutdown.
3. Start UniVerse again. For the procedure, see System Startup and Shutdown.
13-40 Administering UniVerse on UNIX Platforms
C:\Users\awaite\Documents\U2Doc\UniVerse\11.2\Source\Adminunix\Ch
UniVerse commands for managing replicationThis section describes UniVerse commands you can use the manage data replication.
Creating a list of replication files
The REPMKFILELIST command creates a saved list of all files and q-pointers in the VOC file of the account you specify and stores the list in the &SAVEDLISTS& file in REPFILELIST_accountname.
Syntax
REPMKFILELIST account_name
where account_name is the name of the account from you want to create the select list.
Marking files for publication
The REPPUBLIST command takes the REPFILELIST_accountname saved list, created by the REPMKFILELIST command, checks the file pointer in the list to verify the file can be opened, and marks the files and their dictionaries for publication.
Syntax
REPPUBLIST REPFILELIST_accountname
where REPFILELIST_accountname is the name of the saved list created by the REPMKFILELIST command
13-41
C:\Users\awaite\Documents\U2Doc\UniVerse\11.2\Source\Adminunix\Ch13.fm3/17/14
Marking files for subscription
The REPSUBLIST command takes the REPFILELIST_accountname saved list, created by the REPMKFILELIST command, checks the file pointer in the list to verify the file can be opened, and marks the files their dictionaries for subscription.
Syntax
REPSUBLIST REPFILELIST_accountname pubhostname subaccount
Parameters
Unpublishing replication files
The REPUNPUBLIST command takes the REPFILELIST_accountname saved list, created by the REPMKFILELIST command, and unpublishes the files and their dictionaries.
Syntax
REPUNPUBLIST REPFILELIST_accountname
where REPFILELIST_accountname is the name of the saved list created by the REPMKFILELIST command.
Parameter Description
REPFILELIST_accountname The name of the saved list created by the REPMKFILELIST command
pubhostname The name of the publishing system.
subaccount The name of the subscribing system.
REPSUBLIST Parameters
13-42 Administering UniVerse on UNIX Platforms
C:\Users\awaite\Documents\U2Doc\UniVerse\11.2\Source\Adminunix\Ch
Unsubscribing replication files
The REPUNSUBLIST command takes the REPFILELIST_accountname saved list, created by the REPMKFILELIST command, and unsubscribes the files and their dictionaries.
Syntax
REPUNSUBLIST REPFILELIST_accountname pubhostname [subaccount]
Parameters
Parameter Description
REPFILELIST_accountname The name of the saved list created by the REPMKFILELIST command
pubhostname The name of the publishing system.
subaccount The name of the subscribing system.
REPSUBLIST Parameters
13-43
C:\Users\awaite\Documents\U2Doc\UniVerse\11.2\Source\Adminunix\Ch13.fm3/17/14
Some restrictionsYou cannot use the following UniVerse commands or statements on published or subscribing files:
ALTER.TABLE
CLEAR.FILE
CNAME
DELETE.FILE
DROP.TABLE
RESIZE
You cannot use triggers with published or subscribing files.
13-44 Administering UniVerse on UNIX Platforms
C:\Users\awaite\Documents\U2Doc\UniVerse\11.2\Source\Adminunix\Ch
What to do when disk space fills upIf replication log files on a publishing system are not regularly cleared, they can fill up all available disk space. When this happens, the state of replication on the publisher changes from Enabled to Full, and all published files become inaccessible.
One reason your log files might fill up is that one or more subscribing systems are not receiving replicated data for some reason. The publisher’s log files are cleared only when all subscribing systems have received all repli-cated data. To resume replication activity in such cases, you need to fix the problem on the subscribing system so that it is receiving replicated data again. This clears the publisher’s log files, thus freeing up disk space. When there is enough space to continue, you can resume replication.
To resume replication activity:
1. Do one or both of the following:
Remove unneeded files from the publishing system’s disk to free up disk space.
Fix the problem on the subscribing systems so they can continue to receive replicated data.
2. On the publisher, choose Resume Publishing from the Publishing menu.
3. On the subscriber, choose Start Subscribing from the Subscribing menu.
13-45
C:\Users\awaite\Documents\U2Doc\UniVerse\11.2\Source\Adminunix\Ch13.fm3/17/14
Removing obsolete replication log filesWhen you start up UniVerse on a machine where replication is enabled, normally all existing replication log files are removed. Replication log files are automatically removed only under the following conditions:
The replication log file is not being used
All replication log file entries have been sent to all subscribers
The replication log file is not marked as “crashed”
In some cases, some replication log files may remain on the system. For example, a subscriber may not receive all its updates because it is off-line.
You can remove obsolete replication log files manually.
13-46 Administering UniVerse on UNIX Platforms
C:\Users\awaite\Documents\U2Doc\UniVerse\11.2\Source\Adminunix\Ch
What to do when Replication failsWhen either a publishing or a subscribing system fails for any reason, you need to ensure that the replicated data on all subscribing systems is identical with the published data on the publishing system before you restart repli-cation. In the event of any system crash, do the following:
1. Fix the problem on the systems that crashed.
2. Restart UniVerse. For the procedure, see System Startup and Shutdown.
3. Ensure that published data is identical with replicated data on all subscribers.
4. (Optional) Do one or both of the following:
On a publishing system, restart the publishing system if it is not configured to start automatically. Choose Start Publishing from the Publishing menu.
On a subscribing system, restart the subscribing system if it is not configured to start automatically. Choose Start Subscribing from the Subscribing menu.
Note: If you are fixing a problem on a subscriber only, you need not stop the publishing system on the publisher. Once the subscriber resumes operation, all of the publisher’s replicated data is sent to it.
13-47
C:\UsMarch
4Administering UniData on Windows NT or Windows 20000
14 Chapter
ers\aw 17, 201
Beta Beta Beta Beta Beta Beta Beta Beta Beta Beta Beta Beta Beta Beta Beta Beta Beta Beta Beta Beta
Chapter 14: Monitoring system activity
Listing active UniVerse processes and jobs . . . . . . . . . 14-4Listing UniVerse jobs with PORT.STATUS . . . . . . . . . 14-7Terminating a process . . . . . . . . . . . . . . . . 14-8Examining shared memory. . . . . . . . . . . . . . . 14-9 Semaphore table . . . . . . . . . . . . . . . . . 14-10 File lock table . . . . . . . . . . . . . . . . . . 14-11 Group lock table . . . . . . . . . . . . . . . . . 14-12 Update record lock table . . . . . . . . . . . . . . 14-12 User process control locks. . . . . . . . . . . . . . 14-12 Dynamic file table . . . . . . . . . . . . . . . . 14-13 UniVerse configuration. . . . . . . . . . . . . . . 14-13 General system information . . . . . . . . . . . . . 14-14 Catalog shared memory . . . . . . . . . . . . . . 14-14 Printer memory segment . . . . . . . . . . . . . . 14-15Monitoring response time on UNIX systems. . . . . . . . . 14-16 Keeping directory files small . . . . . . . . . . . . . 14-16 Running programs during off-hours . . . . . . . . . . 14-17 execuv . . . . . . . . . . . . . . . . . . . . 14-17Monitoring errors on UNIX systems . . . . . . . . . . . 14-19
aite\Documents\U2Doc\UniVerse\11.2\Source\Adminunix\Ch14TOC.fm4 2:12 pm Administering UniData on Windows NT or Windows 2000
C:\Users\awaite\Documents\U2Doc\UniVerse\11.2\Source\Adminunix\Ch14.fm3/17/14
One of the more important jobs of the system administrator is to monitor activity on the system (such as disk use and CPU use) and to deal with bottlenecks and other potential problems before they impact users. This section describes ways to find out who is doing what in UniVerse and at the operating system level. This chapter describes the following:
How to get information about all current UniVerse processes and jobs
How to terminate user and phantom processes
How to examine the use of shared memory
How to monitor disk usage
How to monitor CPU response time
How to monitor error reporting
14-3 Administering UniVerse on UNIX Platforms
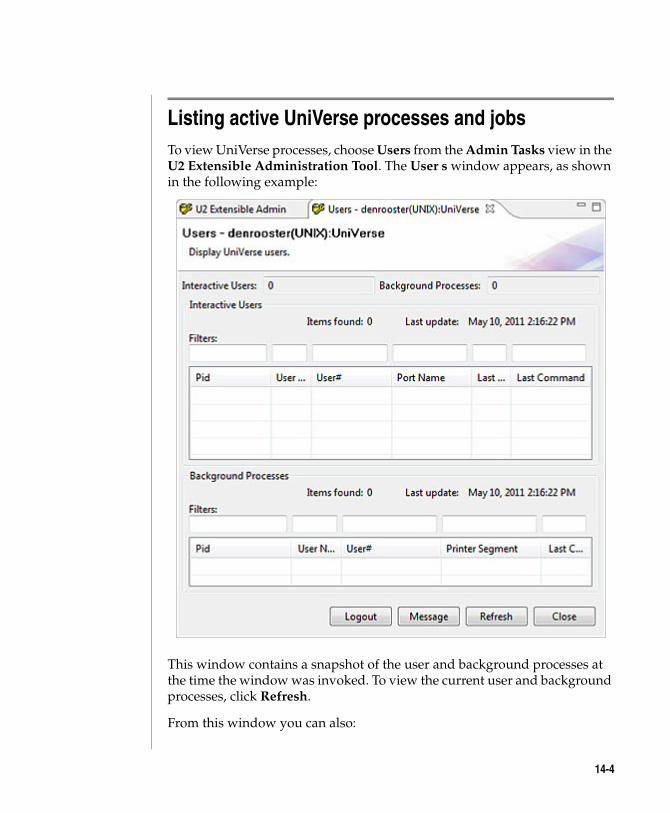
C:\Users\awaite\Documents\U2Doc\UniVerse\11.2\Source\Adminunix\Ch
Listing active UniVerse processes and jobsTo view UniVerse processes, choose Users from the Admin Tasks view in the U2 Extensible Administration Tool. The User s window appears, as shown in the following example:
This window contains a snapshot of the user and background processes at the time the window was invoked. To view the current user and background processes, click Refresh.
From this window you can also:
14-4
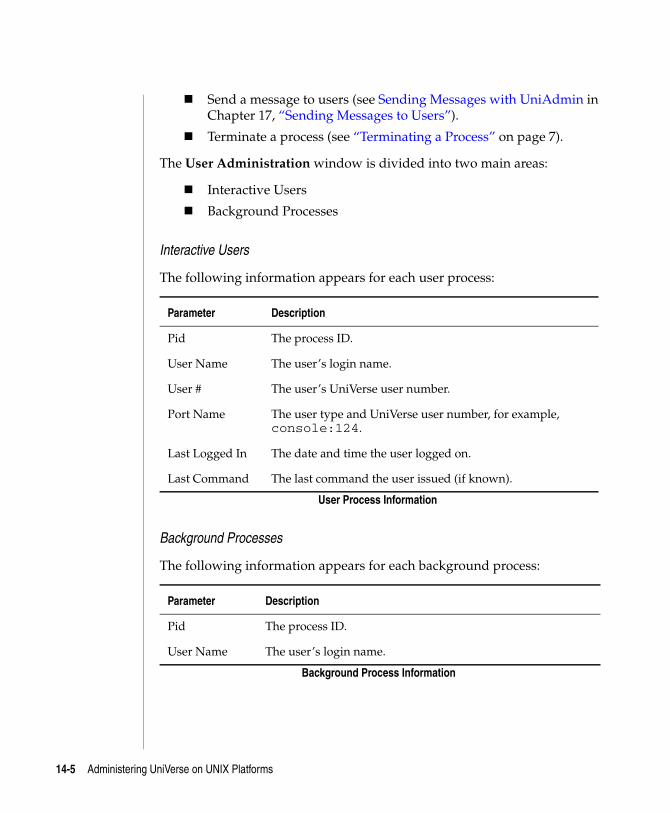
C:\Users\awaite\Documents\U2Doc\UniVerse\11.2\Source\Adminunix\Ch14.fm3/17/14
Send a message to users (see Sending Messages with UniAdmin in Chapter 17, “Sending Messages to Users”).
Terminate a process (see “Terminating a Process” on page 7).
The User Administration window is divided into two main areas:
Interactive Users
Background Processes
Interactive Users
The following information appears for each user process:
Background Processes
The following information appears for each background process:
Parameter Description
Pid The process ID.
User Name The user’s login name.
User # The user’s UniVerse user number.
Port Name The user type and UniVerse user number, for example, console:124.
Last Logged In The date and time the user logged on.
Last Command The last command the user issued (if known).
User Process Information
Parameter Description
Pid The process ID.
User Name The user’s login name.
Background Process Information
14-5 Administering UniVerse on UNIX Platforms
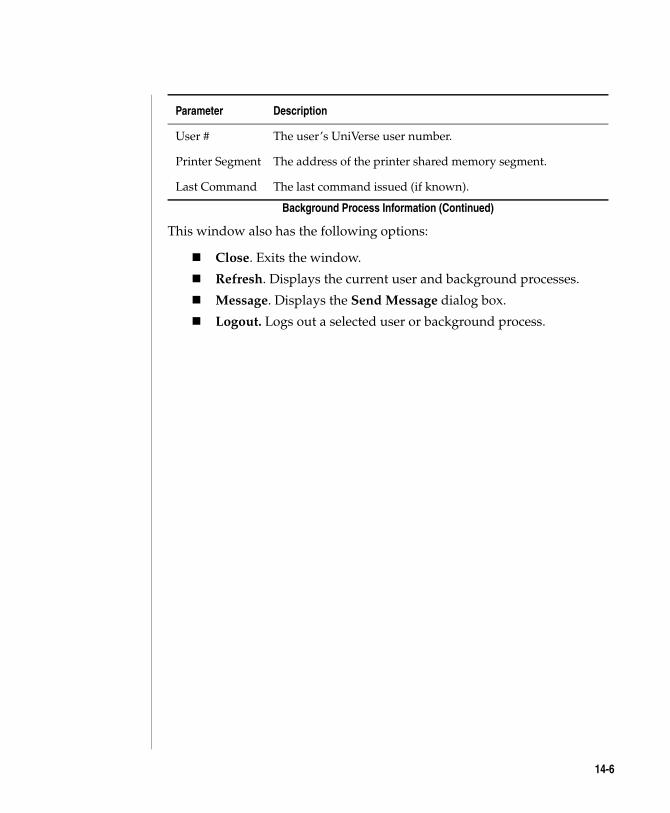
C:\Users\awaite\Documents\U2Doc\UniVerse\11.2\Source\Adminunix\Ch
This window also has the following options:
Close. Exits the window.
Refresh. Displays the current user and background processes.
Message. Displays the Send Message dialog box.
Logout. Logs out a selected user or background process.
User # The user’s UniVerse user number.
Printer Segment The address of the printer shared memory segment.
Last Command The last command issued (if known).
Parameter Description
Background Process Information (Continued)
14-6
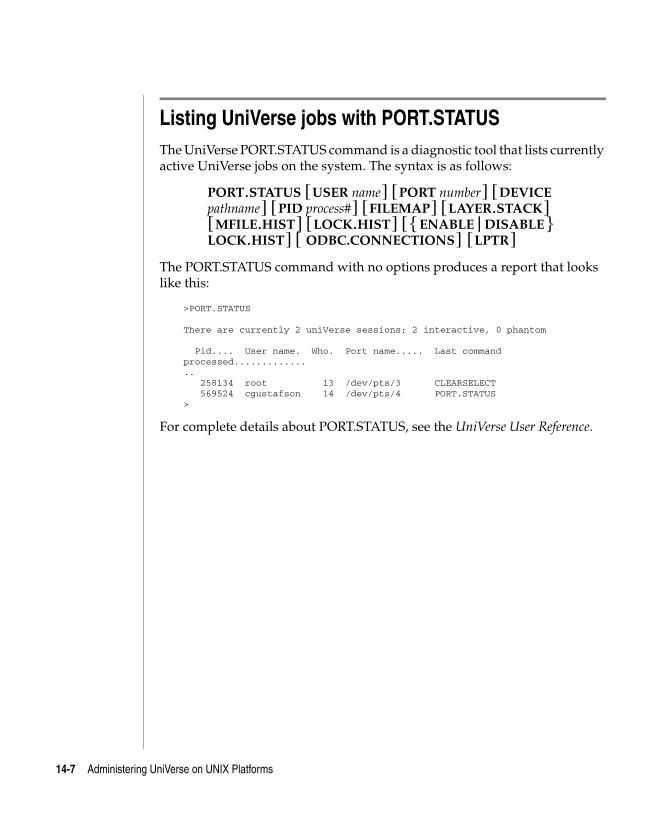
C:\Users\awaite\Documents\U2Doc\UniVerse\11.2\Source\Adminunix\Ch14.fm3/17/14
Listing UniVerse jobs with PORT.STATUSThe UniVerse PORT.STATUS command is a diagnostic tool that lists currently active UniVerse jobs on the system. The syntax is as follows:
PORT.STATUS [ USER name ] [ PORT number ] [ DEVICE pathname ] [ PID process# ] [ FILEMAP ] [ LAYER.STACK ] [ MFILE.HIST ] [ LOCK.HIST ] [ { ENABLE | DISABLE } LOCK.HIST ] [ ODBC.CONNECTIONS ] [ LPTR ]
The PORT.STATUS command with no options produces a report that looks like this:
>PORT.STATUS
There are currently 2 uniVerse sessions; 2 interactive, 0 phantom
Pid.... User name. Who. Port name..... Last command processed............... 258134 root 13 /dev/pts/3 CLEARSELECT 569524 cgustafson 14 /dev/pts/4 PORT.STATUS>
For complete details about PORT.STATUS, see the UniVerse User Reference.
14-7 Administering UniVerse on UNIX Platforms
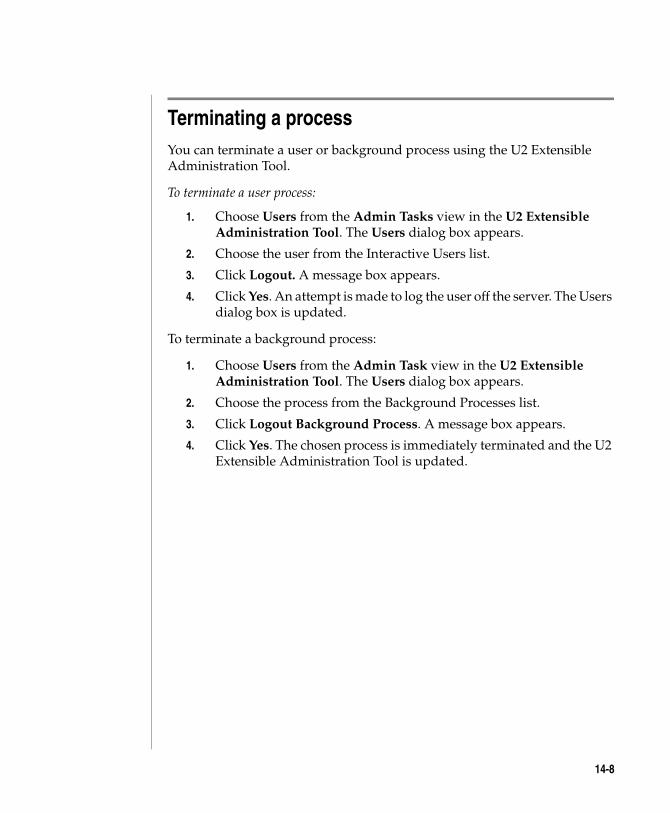
C:\Users\awaite\Documents\U2Doc\UniVerse\11.2\Source\Adminunix\Ch
Terminating a processYou can terminate a user or background process using the U2 Extensible Administration Tool.
To terminate a user process:
1. Choose Users from the Admin Tasks view in the U2 Extensible Administration Tool. The Users dialog box appears.
2. Choose the user from the Interactive Users list.
3. Click Logout. A message box appears.
4. Click Yes. An attempt is made to log the user off the server. The Users dialog box is updated.
To terminate a background process:
1. Choose Users from the Admin Task view in the U2 Extensible Administration Tool. The Users dialog box appears.
2. Choose the process from the Background Processes list.
3. Click Logout Background Process. A message box appears.
4. Click Yes. The chosen process is immediately terminated and the U2 Extensible Administration Tool is updated.
14-8
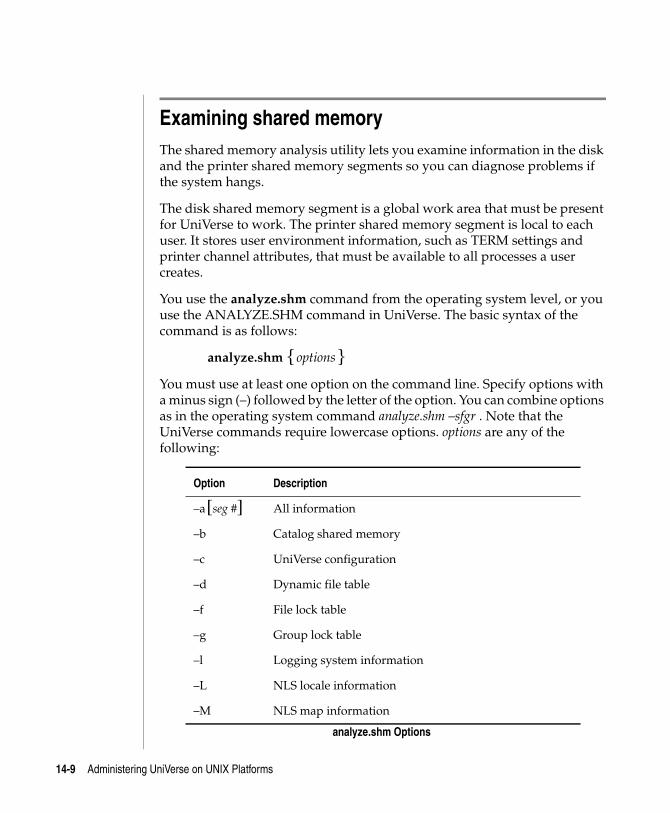
C:\Users\awaite\Documents\U2Doc\UniVerse\11.2\Source\Adminunix\Ch14.fm3/17/14
Examining shared memoryThe shared memory analysis utility lets you examine information in the disk and the printer shared memory segments so you can diagnose problems if the system hangs.
The disk shared memory segment is a global work area that must be present for UniVerse to work. The printer shared memory segment is local to each user. It stores user environment information, such as TERM settings and printer channel attributes, that must be available to all processes a user creates.
You use the analyze.shm command from the operating system level, or you use the ANALYZE.SHM command in UniVerse. The basic syntax of the command is as follows:
analyze.shm { options }You must use at least one option on the command line. Specify options with a minus sign (–) followed by the letter of the option. You can combine options as in the operating system command analyze.shm –sfgr . Note that the UniVerse commands require lowercase options. options are any of the following:
Option Description
–a [seg #] All information
–b Catalog shared memory
–c UniVerse configuration
–d Dynamic file table
–f File lock table
–g Group lock table
–l Logging system information
–L NLS locale information
–M NLS map information
analyze.shm Options
14-9 Administering UniVerse on UNIX Platforms
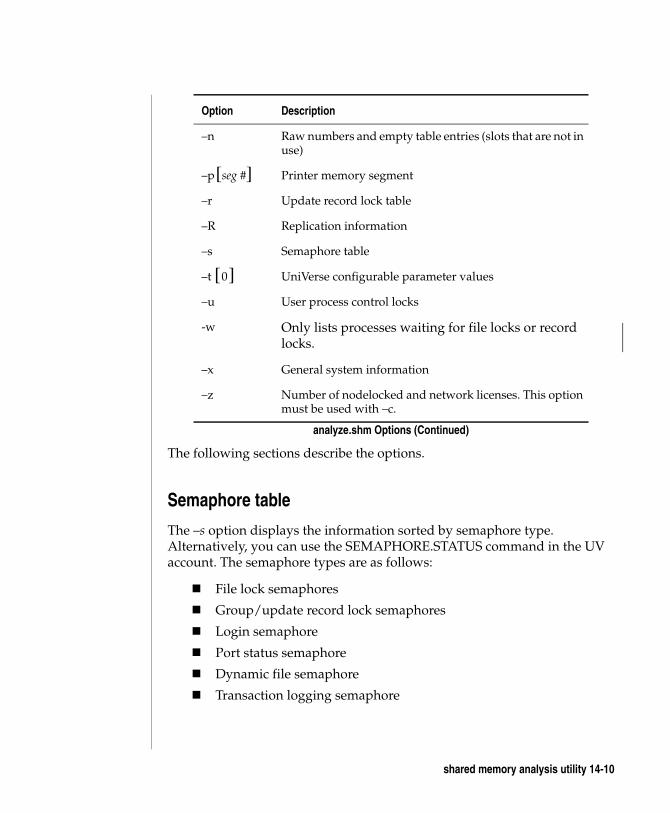
C:\Users\awaite\Documents\U2Doc\UniVerse\11.2\Source\Adminunix\Ch
The following sections describe the options.
Semaphore table
The –s option displays the information sorted by semaphore type. Alternatively, you can use the SEMAPHORE.STATUS command in the UV account. The semaphore types are as follows:
File lock semaphores
Group/update record lock semaphores
Login semaphore
Port status semaphore
Dynamic file semaphore
Transaction logging semaphore
–n Raw numbers and empty table entries (slots that are not in use)
–p [seg #] Printer memory segment
–r Update record lock table
–R Replication information
–s Semaphore table
–t [ 0 ] UniVerse configurable parameter values
–u User process control locks
-w Only lists processes waiting for file locks or record locks.
–x General system information
–z Number of nodelocked and network licenses. This option must be used with –c.
Option Description
analyze.shm Options (Continued)
shared memory analysis utility 14-10
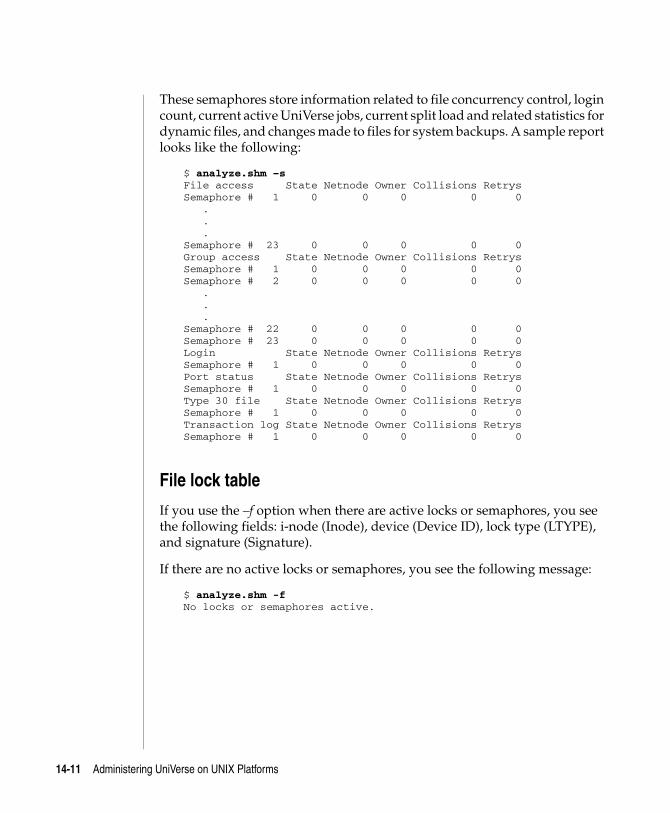
C:\Users\awaite\Documents\U2Doc\UniVerse\11.2\Source\Adminunix\Ch14.fm3/17/14
These semaphores store information related to file concurrency control, login count, current active UniVerse jobs, current split load and related statistics for dynamic files, and changes made to files for system backups. A sample report looks like the following:
$ analyze.shm –sFile access State Netnode Owner Collisions Retrys Semaphore # 1 0 0 0 0 0
.
.
. Semaphore # 23 0 0 0 0 0Group access State Netnode Owner Collisions Retrys Semaphore # 1 0 0 0 0 0 Semaphore # 2 0 0 0 0 0
.
.
. Semaphore # 22 0 0 0 0 0 Semaphore # 23 0 0 0 0 0Login State Netnode Owner Collisions Retrys Semaphore # 1 0 0 0 0 0Port status State Netnode Owner Collisions Retrys Semaphore # 1 0 0 0 0 0Type 30 file State Netnode Owner Collisions Retrys Semaphore # 1 0 0 0 0 0Transaction log State Netnode Owner Collisions Retrys Semaphore # 1 0 0 0 0 0
File lock table
If you use the –f option when there are active locks or semaphores, you see the following fields: i-node (Inode), device (Device ID), lock type (LTYPE), and signature (Signature).
If there are no active locks or semaphores, you see the following message:
$ analyze.shm -fNo locks or semaphores active.
14-11 Administering UniVerse on UNIX Platforms
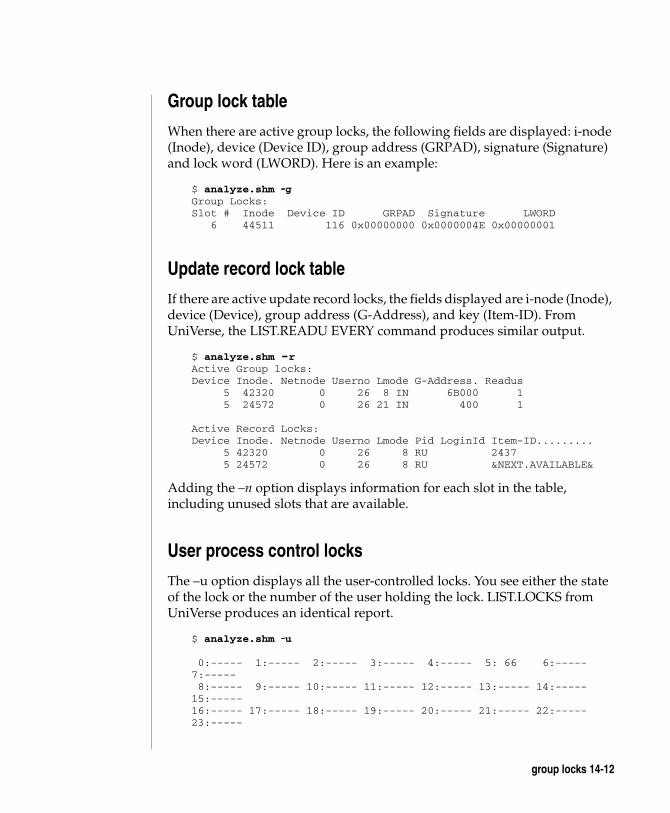
C:\Users\awaite\Documents\U2Doc\UniVerse\11.2\Source\Adminunix\Ch
Group lock table
When there are active group locks, the following fields are displayed: i-node (Inode), device (Device ID), group address (GRPAD), signature (Signature) and lock word (LWORD). Here is an example:
$ analyze.shm -gGroup Locks: Slot # Inode Device ID GRPAD Signature LWORD 6 44511 116 0x00000000 0x0000004E 0x00000001
Update record lock table
If there are active update record locks, the fields displayed are i-node (Inode), device (Device), group address (G-Address), and key (Item-ID). From UniVerse, the LIST.READU EVERY command produces similar output.
$ analyze.shm -r Active Group locks: Device Inode. Netnode Userno Lmode G-Address. Readus 5 42320 0 26 8 IN 6B000 1 5 24572 0 26 21 IN 400 1 Active Record Locks: Device Inode. Netnode Userno Lmode Pid LoginId Item-ID......... 5 42320 0 26 8 RU 2437 5 24572 0 26 8 RU &NEXT.AVAILABLE&
Adding the –n option displays information for each slot in the table, including unused slots that are available.
User process control locks
The –u option displays all the user-controlled locks. You see either the state of the lock or the number of the user holding the lock. LIST.LOCKS from UniVerse produces an identical report.
$ analyze.shm -u 0:----- 1:----- 2:----- 3:----- 4:----- 5: 66 6:----- 7:----- 8:----- 9:----- 10:----- 11:----- 12:----- 13:----- 14:----- 15:----- 16:----- 17:----- 18:----- 19:----- 20:----- 21:----- 22:----- 23:-----
group locks 14-12
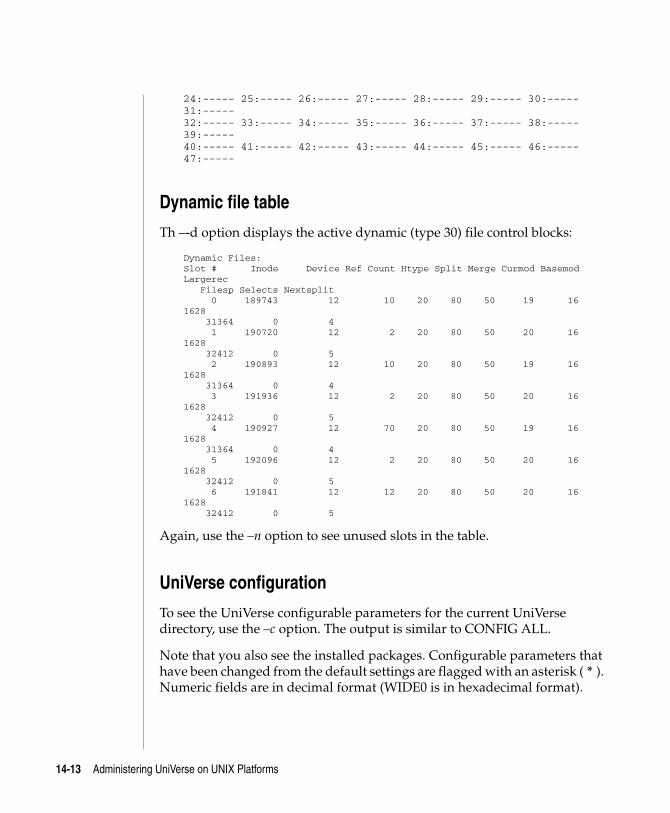
C:\Users\awaite\Documents\U2Doc\UniVerse\11.2\Source\Adminunix\Ch14.fm3/17/14
24:----- 25:----- 26:----- 27:----- 28:----- 29:----- 30:----- 31:----- 32:----- 33:----- 34:----- 35:----- 36:----- 37:----- 38:----- 39:----- 40:----- 41:----- 42:----- 43:----- 44:----- 45:----- 46:----- 47:-----
Dynamic file table
Th –-d option displays the active dynamic (type 30) file control blocks:
Dynamic Files:Slot # Inode Device Ref Count Htype Split Merge Curmod Basemod Largerec Filesp Selects Nextsplit 0 189743 12 10 20 80 50 19 16 1628 31364 0 4 1 190720 12 2 20 80 50 20 16 1628 32412 0 5 2 190893 12 10 20 80 50 19 16 1628 31364 0 4 3 191936 12 2 20 80 50 20 16 1628 32412 0 5 4 190927 12 70 20 80 50 19 16 1628 31364 0 4 5 192096 12 2 20 80 50 20 16 1628 32412 0 5 6 191841 12 12 20 80 50 20 16 1628 32412 0 5
Again, use the –n option to see unused slots in the table.
UniVerse configuration
To see the UniVerse configurable parameters for the current UniVerse directory, use the –c option. The output is similar to CONFIG ALL.
Note that you also see the installed packages. Configurable parameters that have been changed from the default settings are flagged with an asterisk ( * ). Numeric fields are in decimal format (WIDE0 is in hexadecimal format).
14-13 Administering UniVerse on UNIX Platforms
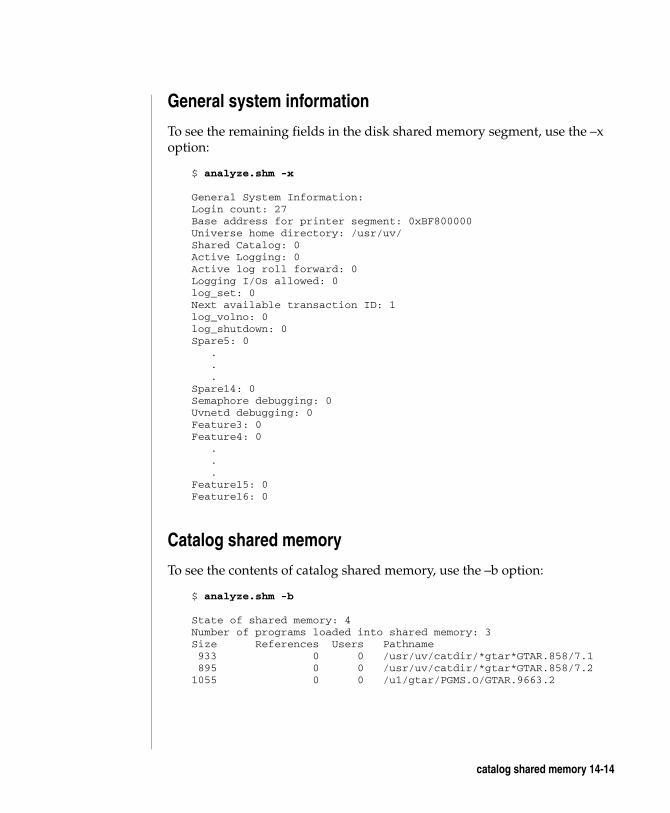
C:\Users\awaite\Documents\U2Doc\UniVerse\11.2\Source\Adminunix\Ch
General system information
To see the remaining fields in the disk shared memory segment, use the –x option:
$ analyze.shm -x General System Information: Login count: 27 Base address for printer segment: 0xBF800000 Universe home directory: /usr/uv/ Shared Catalog: 0 Active Logging: 0 Active log roll forward: 0 Logging I/Os allowed: 0 log_set: 0 Next available transaction ID: 1 log_volno: 0 log_shutdown: 0 Spare5: 0
.
.
. Spare14: 0 Semaphore debugging: 0 Uvnetd debugging: 0 Feature3: 0 Feature4: 0
.
.
. Feature15: 0 Feature16: 0
Catalog shared memory
To see the contents of catalog shared memory, use the –b option:
$ analyze.shm -b State of shared memory: 4 Number of programs loaded into shared memory: 3 Size References Users Pathname 933 0 0 /usr/uv/catdir/*gtar*GTAR.858/7.1 895 0 0 /usr/uv/catdir/*gtar*GTAR.858/7.2 1055 0 0 /u1/gtar/PGMS.O/GTAR.9663.2
catalog shared memory 14-14
C:\Users\awaite\Documents\U2Doc\UniVerse\11.2\Source\Adminunix\Ch14.fm3/17/14
The –b option is useful when you want to see what programs are in catalog shared memory, which programs are in use, and which are available. For each program loaded into shared memory, you see the size, references, user count, and path.
Printer memory segment
You must be a UniVerse Administrator to examine all the printer segments. Otherwise, you can examine only the printer memory segments that you own.
The –p option displays a user’s printer memory segment followed by the segment’s ID in decimal (the hexadecimal format indicates the key of the segment).
If you specify the segment ID after the –p option, the ID is the shared memory key of that segment. If you do not specify the segment ID, the segment of the shared memory analysis tool is used and you see the default printer settings.
The –p option displays a memory map showing used and unused sections for the user’s printer shared memory segment 609. The terminal driver (BDS or SYSV) is included.
14-15 Administering UniVerse on UNIX Platforms
C:\Users\awaite\Documents\U2Doc\UniVerse\11.2\Source\Adminunix\Ch
Monitoring response time on UNIX systemsAfter disk space, the biggest problem you may have is overuse of CPU time by certain system processes. Some processes require an inordinate amount of processing. In a multiuser system, you may need to require that certain processing be done during off-hours. The system can initiate processes automatically at a specified time, as described later in this chapter. System response time can also suffer as a result of disk fragmentation or poor organi-zation of a file system.
When the system is slow, find out why. The who(1) command lists the people logged on to they system. The ps(1) command shows what they are doing.
From UniVerse, you can print a list of the current users with the LISTU command. The STATUS command displays information about which disks are currently active, what phantom tasks are running, and which users are logged on to they system.
The following pointers can help improve response time on your system:
Keep directory files small
Run programs during off-hours
Keeping directory files small
Directories larger than 5K bytes (320 entries) are very inefficient because of file system indirection. For example, a large /usr/mail(1) or /usr/spool/uucp(1) directory can really slow the system down. The following command finds large directories:
% find / -type d -size +10 -print | more
Removing files from directories does not make the directories smaller, but you can compact directories. The following example shows the sequence of commands to compact the directory /usr/mail(1):
% mv /usr/mail /usr/omail % mkdir /usr/mail % chmod 777 /usr/mail % cd /usr/omail % find . -print | cpio -pdlm % cd .. % rm -rf omail
printer memory segment 14-16
C:\Users\awaite\Documents\U2Doc\UniVerse\11.2\Source\Adminunix\Ch14.fm3/17/14
Running programs during off-hours
The cron(8) program can be used to run programs during off-hours. This is especially important for time-consuming programs whose output is not immediately needed, such as the following:
Accounting
File system administration
Long-running user-written shell procedures
execuv
You can use the execuv command to start multiple concurrent UniVerse background processes. You can use the command from a shell script running interactively, from a shell script running in the background, or in a crontab file to start a cron job.
Examples
The following examples demonstrate some simple methods of using the execuv command. Additional shell syntax beyond the simple examples below can also be used to redirect stdout/stderr to another file if desired.
Interactive script
# cat interactive.script#!/bin/shnohup /u2/uv/bin/execuv "SLEEP 100" &nohup /u2/uv/bin/execuv "SLEEP 101" &nohup /u2/uv/bin/execuv "SLEEP 102" &
# ./interactive.script Sending output to nohup.out Sending output to nohup.out Sending output to nohup.out
# ipcs -mop | grep aceb m 177209382 0xacebfaff -rw------ root system 1 18743432 18743432 m 132124660 0xacebfb31 -rw------ root system 1 17825934 17825934 m 161484798 0xacebfb91 -rw------ root system 1 16253070 16253070
Three UniVerse processes with unique signatures were started.
14-17 Administering UniVerse on UNIX Platforms
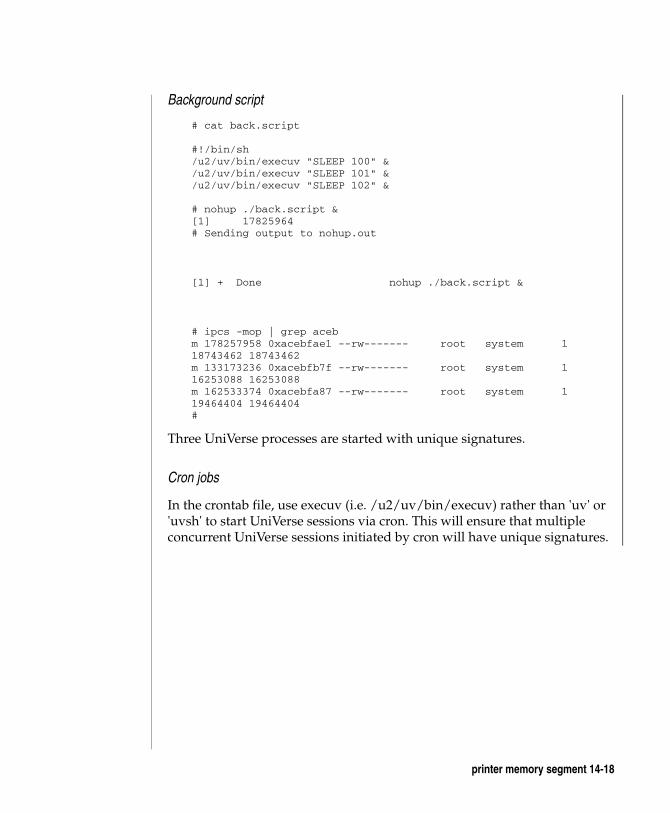
C:\Users\awaite\Documents\U2Doc\UniVerse\11.2\Source\Adminunix\Ch
Background script
# cat back.script
#!/bin/sh/u2/uv/bin/execuv "SLEEP 100" &/u2/uv/bin/execuv "SLEEP 101" &/u2/uv/bin/execuv "SLEEP 102" &
# nohup ./back.script &[1] 17825964# Sending output to nohup.out
[1] + Done nohup ./back.script &
# ipcs -mop | grep acebm 178257958 0xacebfae1 --rw------- root system 1 18743462 18743462m 133173236 0xacebfb7f --rw------- root system 1 16253088 16253088m 162533374 0xacebfa87 --rw------- root system 1 19464404 19464404#
Three UniVerse processes are started with unique signatures.
Cron jobs
In the crontab file, use execuv (i.e. /u2/uv/bin/execuv) rather than 'uv' or 'uvsh' to start UniVerse sessions via cron. This will ensure that multiple concurrent UniVerse sessions initiated by cron will have unique signatures.
printer memory segment 14-18
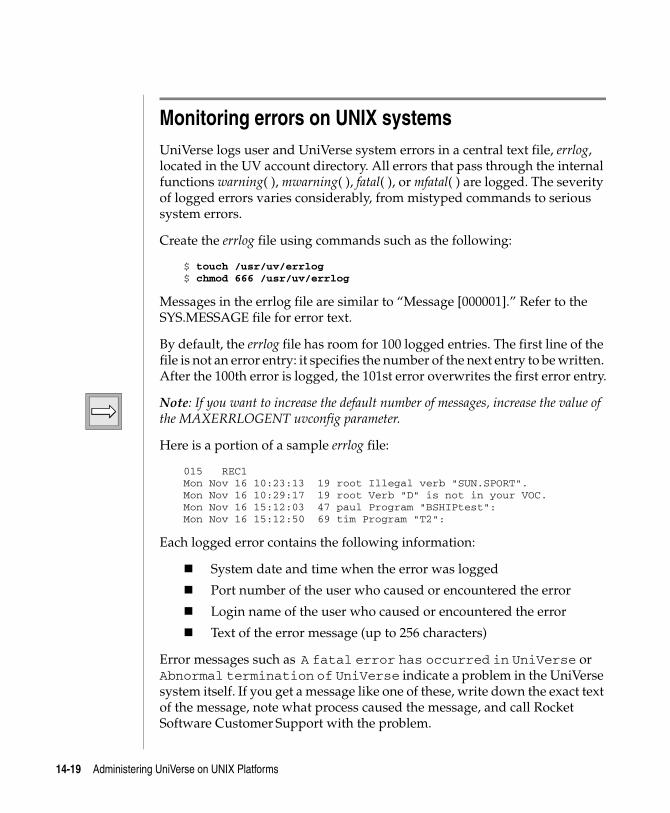
C:\Users\awaite\Documents\U2Doc\UniVerse\11.2\Source\Adminunix\Ch14.fm3/17/14
Monitoring errors on UNIX systemsUniVerse logs user and UniVerse system errors in a central text file, errlog, located in the UV account directory. All errors that pass through the internal functions warning( ), mwarning( ), fatal( ), or mfatal( ) are logged. The severity of logged errors varies considerably, from mistyped commands to serious system errors.
Create the errlog file using commands such as the following:
$ touch /usr/uv/errlog $ chmod 666 /usr/uv/errlog
Messages in the errlog file are similar to “Message [000001].” Refer to the SYS.MESSAGE file for error text.
By default, the errlog file has room for 100 logged entries. The first line of the file is not an error entry: it specifies the number of the next entry to be written. After the 100th error is logged, the 101st error overwrites the first error entry.
Note: If you want to increase the default number of messages, increase the value of the MAXERRLOGENT uvconfig parameter.
Here is a portion of a sample errlog file:
015 REC1 Mon Nov 16 10:23:13 19 root Illegal verb "SUN.SPORT". Mon Nov 16 10:29:17 19 root Verb "D" is not in your VOC. Mon Nov 16 15:12:03 47 paul Program "BSHIPtest": Mon Nov 16 15:12:50 69 tim Program "T2":
Each logged error contains the following information:
System date and time when the error was logged
Port number of the user who caused or encountered the error
Login name of the user who caused or encountered the error
Text of the error message (up to 256 characters)
Error messages such as A fatal error has occurred in UniVerse or Abnormal termination of UniVerse indicate a problem in the UniVerse system itself. If you get a message like one of these, write down the exact text of the message, note what process caused the message, and call Rocket Software Customer Support with the problem.
14-19 Administering UniVerse on UNIX Platforms
C:\Users\awaite\Documents\U2Doc\UniVerse\11.2\Source\Adminunix\Ch
printer memory segment 14-20

C:\UsMarch
5Administering UniData on Windows NT or Windows 20000
15 Chapter
ers\aw 17, 201
Beta Beta Beta Beta Beta Beta Beta Beta Beta Beta Beta Beta Beta Beta Beta Beta Beta Beta Beta Beta
Chapter 15: UniVerse file utilities
Administering UniVerse files . . . . . . . . . . . . . . 15-4 Listing files in a UniVerse account . . . . . . . . . . . 15-5 View file properties . . . . . . . . . . . . . . . . 15-6 View file statistics . . . . . . . . . . . . . . . . 15-13 Running file diagnostics . . . . . . . . . . . . . . 15-15 Repairing damaged files . . . . . . . . . . . . . . 15-18The format conversion utility . . . . . . . . . . . . . . 15-22 Converting the format of data files and UniVerse BASIC code . 15-22
aite\Documents\U2Doc\UniVerse\11.2\Source\Adminunix\Ch15TOC.fm4 2:12 pm Administering UniData on Windows NT or Windows 2000
C:\Users\awaite\Documents\U2Doc\UniVerse\11.2\Source\Adminunix\Ch
There are a number of utilities you can use to keep your files at peak efficiency. This section describes three of these utilities:
File Tool option on the U2 Extensible Administration Tool
Format conversion utility (FORMAT.CONV)
Use the File Tool option of the U2 Extensible Administration Tool for general file administration. Use the format conversion utility to import files and BASIC object code from different hardware platforms. For information about other UniVerse file maintenance commands and techniques, see UniVerse System Description.
15-3
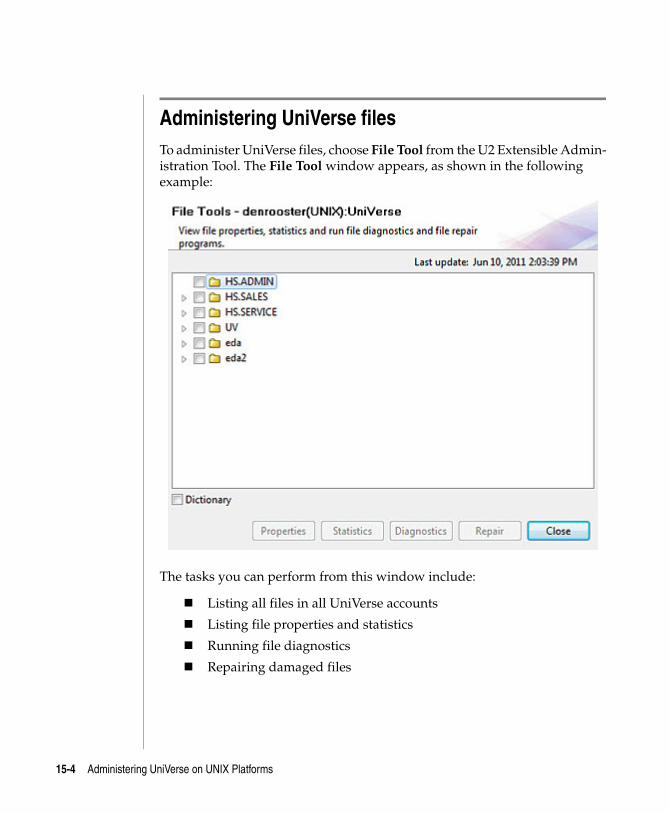
C:\Users\awaite\Documents\U2Doc\UniVerse\11.2\Source\Adminunix\Ch15.fm3/17/14
Administering UniVerse filesTo administer UniVerse files, choose File Tool from the U2 Extensible Admin-istration Tool. The File Tool window appears, as shown in the following example:
The tasks you can perform from this window include:
Listing all files in all UniVerse accounts
Listing file properties and statistics
Running file diagnostics
Repairing damaged files
15-4 Administering UniVerse on UNIX Platforms
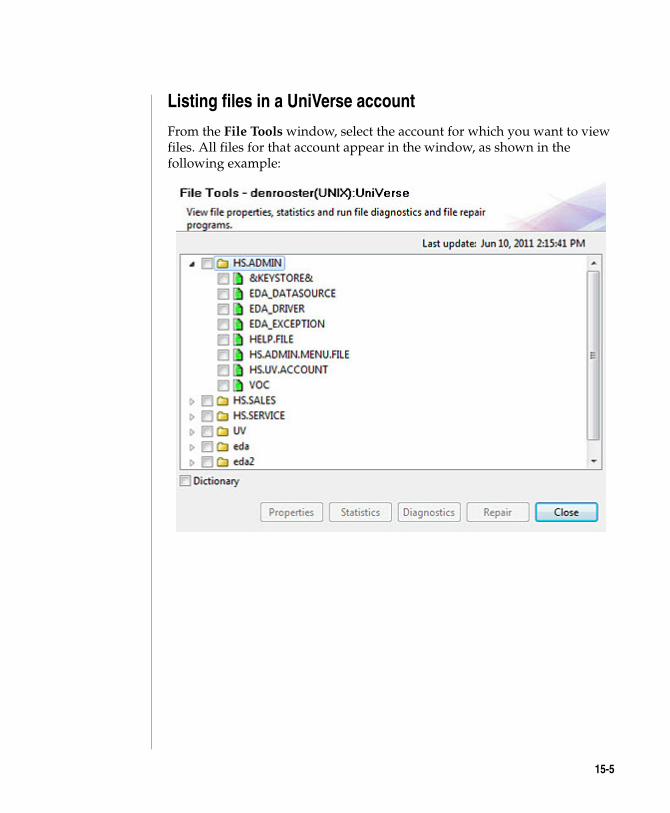
C:\Users\awaite\Documents\U2Doc\UniVerse\11.2\Source\Adminunix\Ch
Listing files in a UniVerse account
From the File Tools window, select the account for which you want to view files. All files for that account appear in the window, as shown in the following example:
15-5
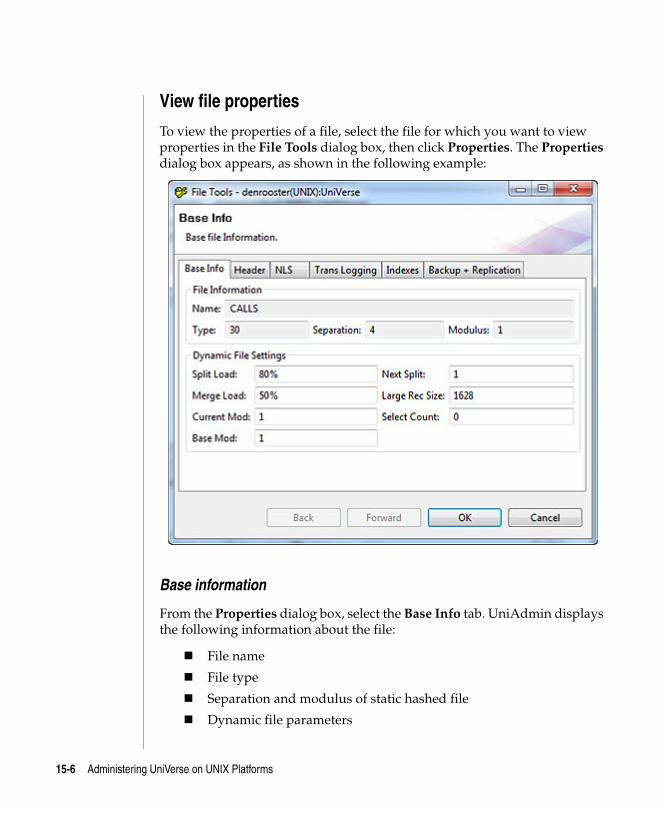
C:\Users\awaite\Documents\U2Doc\UniVerse\11.2\Source\Adminunix\Ch15.fm3/17/14
View file properties
To view the properties of a file, select the file for which you want to view properties in the File Tools dialog box, then click Properties. The Properties dialog box appears, as shown in the following example:
Base information
From the Properties dialog box, select the Base Info tab. UniAdmin displays the following information about the file:
File name
File type
Separation and modulus of static hashed file
Dynamic file parameters
15-6 Administering UniVerse on UNIX Platforms
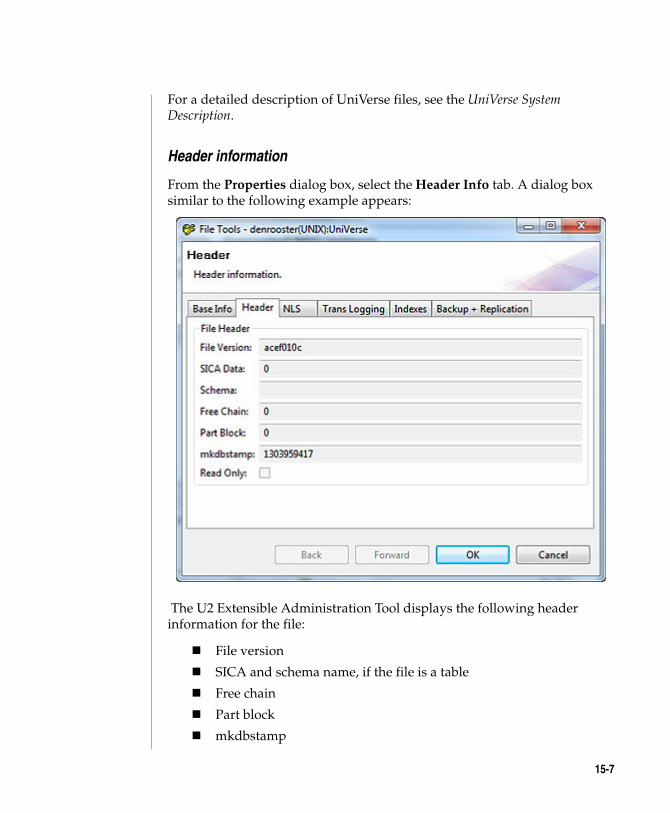
C:\Users\awaite\Documents\U2Doc\UniVerse\11.2\Source\Adminunix\Ch
For a detailed description of UniVerse files, see the UniVerse System Description.
Header information
From the Properties dialog box, select the Header Info tab. A dialog box similar to the following example appears:
The U2 Extensible Administration Tool displays the following header information for the file:
File version
SICA and schema name, if the file is a table
Free chain
Part block
mkdbstamp
15-7
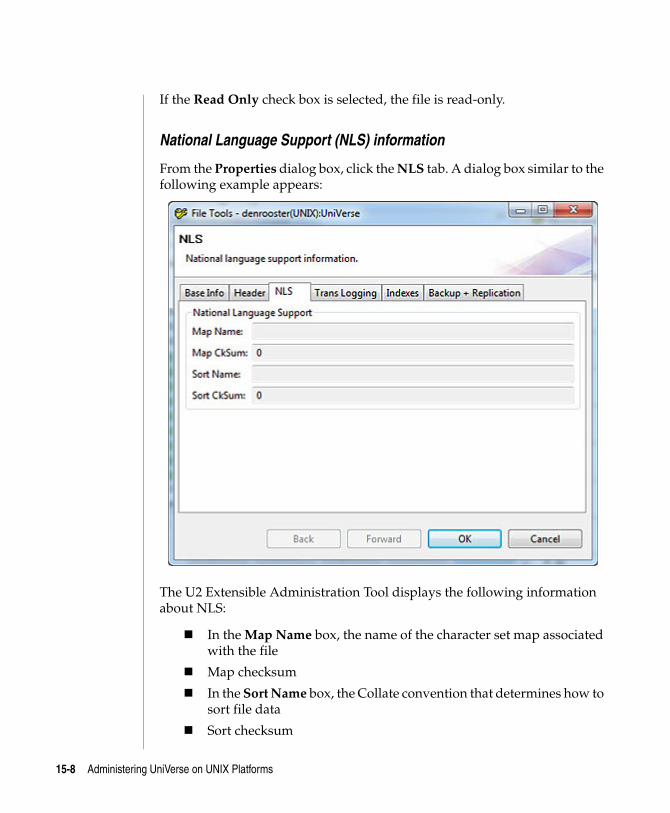
C:\Users\awaite\Documents\U2Doc\UniVerse\11.2\Source\Adminunix\Ch15.fm3/17/14
If the Read Only check box is selected, the file is read-only.
National Language Support (NLS) information
From the Properties dialog box, click the NLS tab. A dialog box similar to the following example appears:
The U2 Extensible Administration Tool displays the following information about NLS:
In the Map Name box, the name of the character set map associated with the file
Map checksum
In the Sort Name box, the Collate convention that determines how to sort file data
Sort checksum
15-8 Administering UniVerse on UNIX Platforms
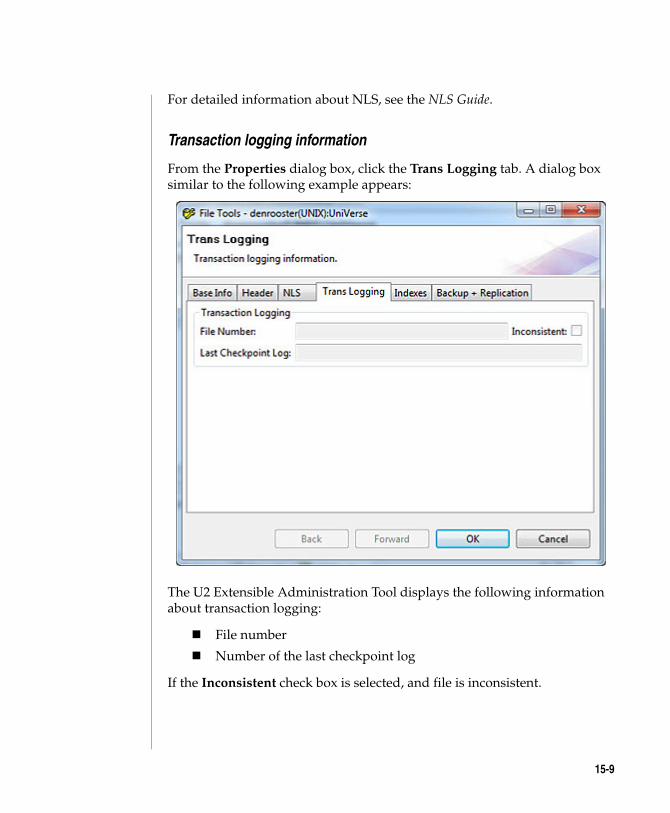
C:\Users\awaite\Documents\U2Doc\UniVerse\11.2\Source\Adminunix\Ch
For detailed information about NLS, see the NLS Guide.
Transaction logging information
From the Properties dialog box, click the Trans Logging tab. A dialog box similar to the following example appears:
The U2 Extensible Administration Tool displays the following information about transaction logging:
File number
Number of the last checkpoint log
If the Inconsistent check box is selected, and file is inconsistent.
15-9
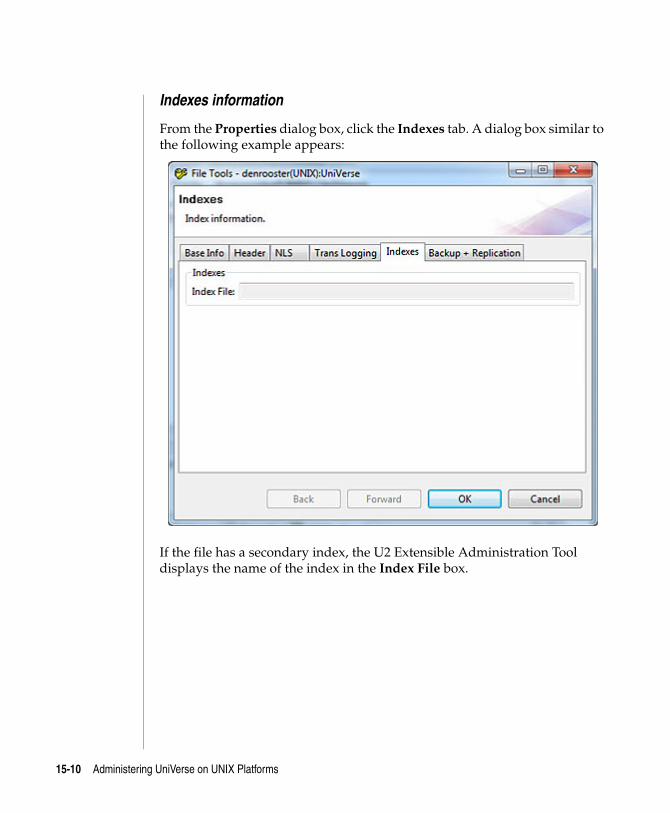
C:\Users\awaite\Documents\U2Doc\UniVerse\11.2\Source\Adminunix\Ch15.fm3/17/14
Indexes information
From the Properties dialog box, click the Indexes tab. A dialog box similar to the following example appears:
If the file has a secondary index, the U2 Extensible Administration Tool displays the name of the index in the Index File box.
15-10 Administering UniVerse on UNIX Platforms
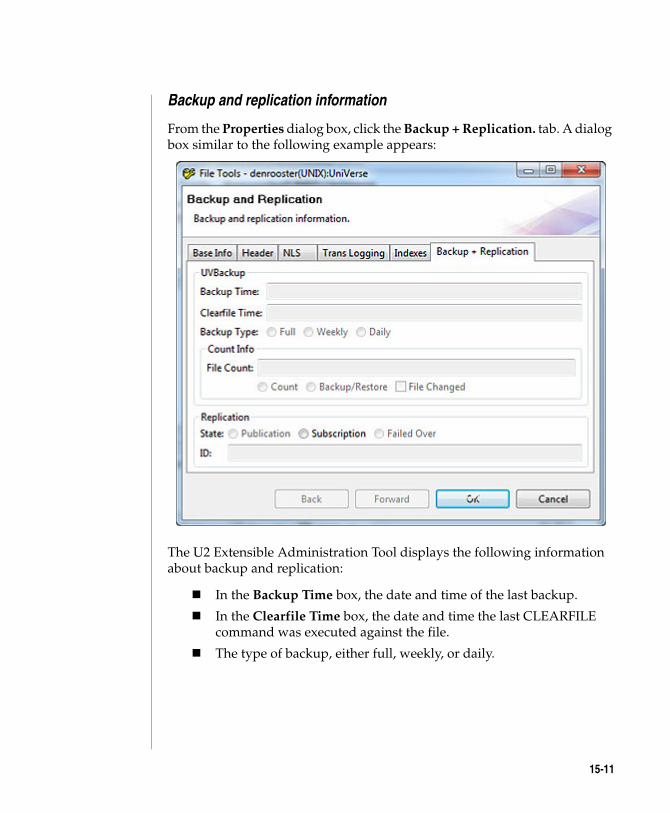
C:\Users\awaite\Documents\U2Doc\UniVerse\11.2\Source\Adminunix\Ch
Backup and replication information
From the Properties dialog box, click the Backup + Replication. tab. A dialog box similar to the following example appears:
The U2 Extensible Administration Tool displays the following information about backup and replication:
In the Backup Time box, the date and time of the last backup.
In the Clearfile Time box, the date and time the last CLEARFILE command was executed against the file.
The type of backup, either full, weekly, or daily.
15-11
C:\Users\awaite\Documents\U2Doc\UniVerse\11.2\Source\Adminunix\Ch15.fm3/17/14
In the File Count box, the number of records in the file, counted by either the last COUNT command executed against the file, the last full backup, or the last restore.
If the File Changed check box is selected, the file count may be out of date because the file has been changed since the last file count.
In the Replication area, Stat indicates whether the file is a published file, a subscription file, or a failed-over file. This area also lists the replication ID in the ID box.
15-12 Administering UniVerse on UNIX Platforms
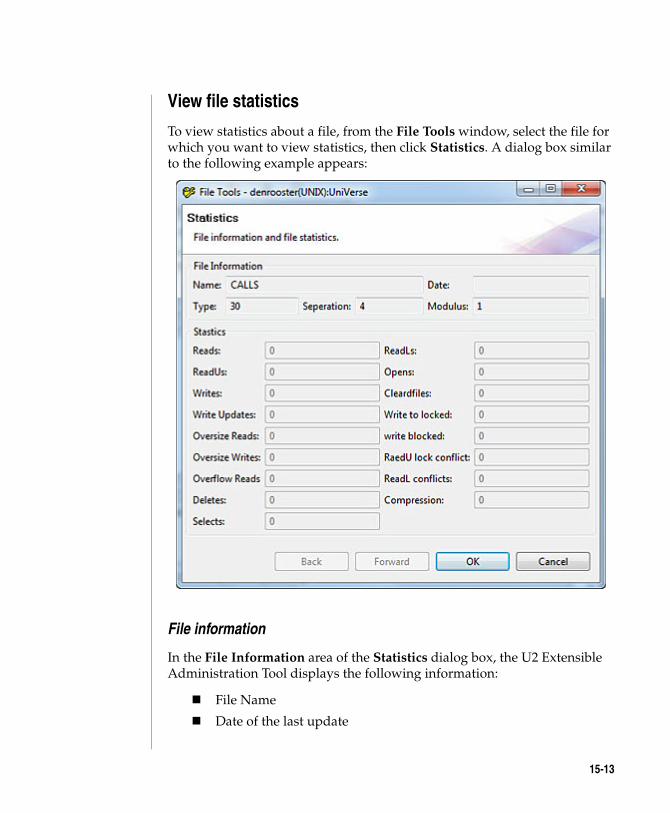
C:\Users\awaite\Documents\U2Doc\UniVerse\11.2\Source\Adminunix\Ch
View file statistics
To view statistics about a file, from the File Tools window, select the file for which you want to view statistics, then click Statistics. A dialog box similar to the following example appears:
File information
In the File Information area of the Statistics dialog box, the U2 Extensible Administration Tool displays the following information:
File Name
Date of the last update
15-13
C:\Users\awaite\Documents\U2Doc\UniVerse\11.2\Source\Adminunix\Ch15.fm3/17/14
File separation if a static hashed file
Modulus if a static hashed file
File statistics
The U2 Extensible Administration Tool displays the following statistics about the file you selected:
Field Description
Reads Total number of READ operations on the file.
ReadUs Total number of READU operations on the file.
Writes Total number of WRITE operations on the file.
Write Updates Total number of WRITEU operations on the file.
Oversize Reads Total number of READ operations executed against large records.
Oversize Writes Total number of WRITE operations executed against large records.
Overflow Reads Total number of READ operations that accessed overflow buffers.
Deletes Total number of DELETE operations on the file.
Selects Total number of SELECT operations on the file.
ReadLs Total number of READL operations on the file.
Opens Total number of OPEN operations on the file.
Clearfiles Total number of CLEARFILE operations on the file.
Write to Locked Total number of WRITE operations executed against a locked record.
Writes Blocked Total number of WRITE operations blocked by a record lock.
The U2 Extensible Administration Tool File Statistics
15-14 Administering UniVerse on UNIX Platforms
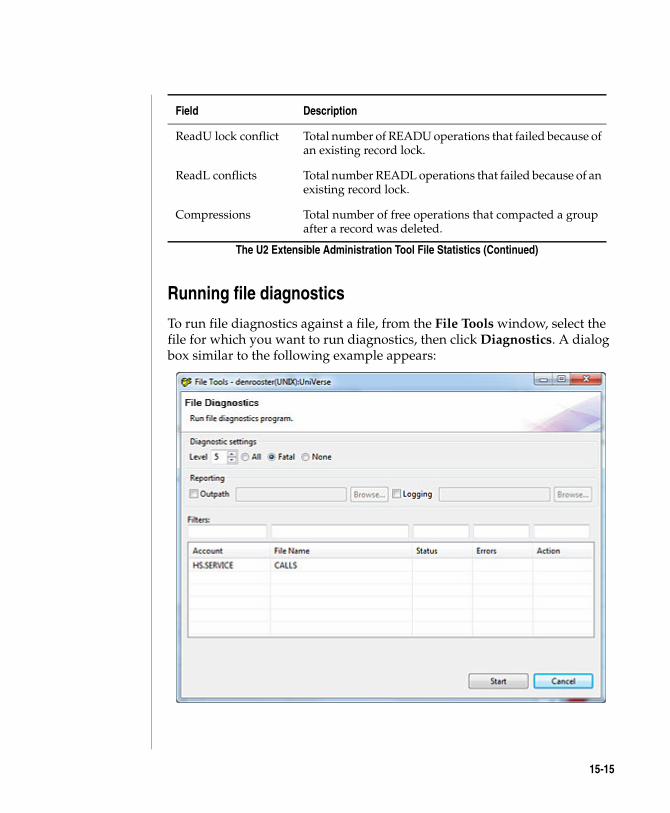
C:\Users\awaite\Documents\U2Doc\UniVerse\11.2\Source\Adminunix\Ch
Running file diagnostics
To run file diagnostics against a file, from the File Tools window, select the file for which you want to run diagnostics, then click Diagnostics. A dialog box similar to the following example appears:
ReadU lock conflict Total number of READU operations that failed because of an existing record lock.
ReadL conflicts Total number READL operations that failed because of an existing record lock.
Compressions Total number of free operations that compacted a group after a record was deleted.
Field Description
The U2 Extensible Administration Tool File Statistics (Continued)
15-15

C:\Users\awaite\Documents\U2Doc\UniVerse\11.2\Source\Adminunix\Ch15.fm3/17/14
Use the File Diagnostics dialog box to specify how much diagnostic testing to perform on the file, how much diagnostic detail to list in the error report window, and where to store output from the diagnostic test.
Determine diagnostic level
In the Diagnostics Settings area, select the level of diagnostic detail you want to produce in the Level box. The lowest diagnostic level is 1, while the highest diagnostic level is 10. The default value is 5. The higher this level setting, the longer the diagnostics test takes to complete. Use the Level arrows to select the diagnostic level.
Specify types of errors report
In the Diagnostics Settings area, select the types of errors you want to appear in the Error Report window. Select one of the following values:
All – List all diagnostic details in the Error Report window.
Fatal – List only fatal errors in the Error Report window.
None – Do not list any errors in the Error Report window.
Specify output location
If you want to save a report of irreparable groups and record blocks detected by the diagnostic test, select Outpath, then enter the full path to a directory where you want to store the output.
If you want to store a copy of the error report, select Logging, then enter the full path to a directory where you want to store the report.
If you do not specify Output or Logging, the output and error report are stored in the directory where the file currently resides.
Click Start to start the diagnostic program, or click Cancel to exit without saving changes.
15-16 Administering UniVerse on UNIX Platforms
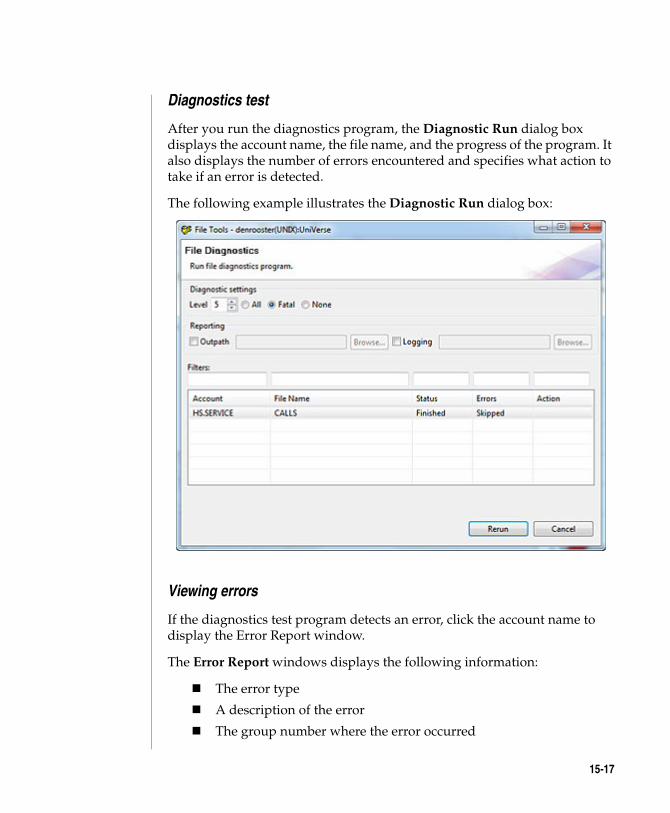
C:\Users\awaite\Documents\U2Doc\UniVerse\11.2\Source\Adminunix\Ch
Diagnostics test
After you run the diagnostics program, the Diagnostic Run dialog box displays the account name, the file name, and the progress of the program. It also displays the number of errors encountered and specifies what action to take if an error is detected.
The following example illustrates the Diagnostic Run dialog box:
Viewing errors
If the diagnostics test program detects an error, click the account name to display the Error Report window.
The Error Report windows displays the following information:
The error type
A description of the error
The group number where the error occurred
15-17
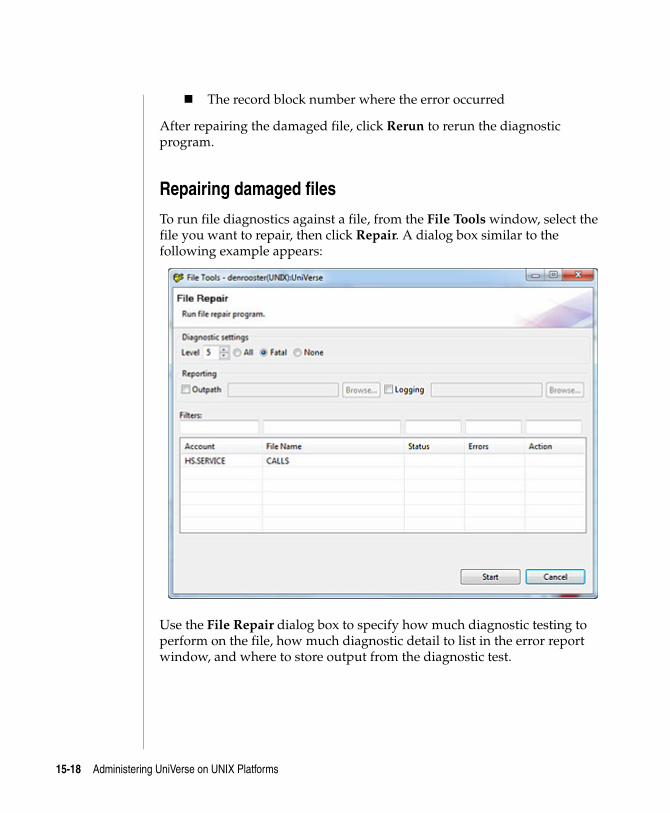
C:\Users\awaite\Documents\U2Doc\UniVerse\11.2\Source\Adminunix\Ch15.fm3/17/14
The record block number where the error occurred
After repairing the damaged file, click Rerun to rerun the diagnostic program.
Repairing damaged files
To run file diagnostics against a file, from the File Tools window, select the file you want to repair, then click Repair. A dialog box similar to the following example appears:
Use the File Repair dialog box to specify how much diagnostic testing to perform on the file, how much diagnostic detail to list in the error report window, and where to store output from the diagnostic test.
15-18 Administering UniVerse on UNIX Platforms
C:\Users\awaite\Documents\U2Doc\UniVerse\11.2\Source\Adminunix\Ch
Determine diagnostic level
In the Diagnostic Settings area, select the level of diagnostic detail you want to produce in the Level box. The lowest diagnostic level is 1, while the highest diagnostic level is 10. The default value is 5. The higher this level setting, the longer the diagnostics test takes to complete. Use the Level arrows to select the diagnostic level.
Specify types of errors report
In the Diagnostic Settings area, select the types of errors you want to appear in the Error Report window. Select one of the following values:
All – List all diagnostic details in the Error Report window.
Fatal – List only fatal errors in the Error Report window.
None – Do not list any errors in the Error Report window.
Specify output location
If you want to save a report of irreparable groups and record blocks detected by the diagnostic test, select Outpath, then enter the full path to a directory where you want to store the output.
If you want to store a copy of the error report, select Logging, then enter the full path to a directory where you want to store the report.
If you do not specify Outpath or Logging, the output and error report are stored in the directory where the file currently resides.
Click OK to save your changes and run the Repair program, or click Cancel to run the Repair program with default settings. The repair program starts.
15-19
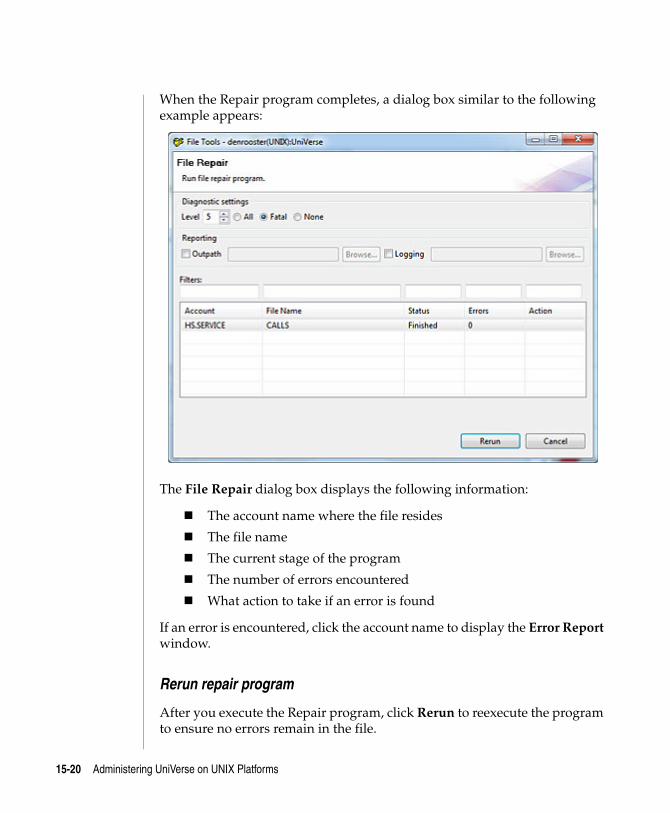
C:\Users\awaite\Documents\U2Doc\UniVerse\11.2\Source\Adminunix\Ch15.fm3/17/14
When the Repair program completes, a dialog box similar to the following example appears:
The File Repair dialog box displays the following information:
The account name where the file resides
The file name
The current stage of the program
The number of errors encountered
What action to take if an error is found
If an error is encountered, click the account name to display the Error Report window.
Rerun repair program
After you execute the Repair program, click Rerun to reexecute the program to ensure no errors remain in the file.
15-20 Administering UniVerse on UNIX Platforms
C:\Users\awaite\Documents\U2Doc\UniVerse\11.2\Source\Adminunix\Ch
Exit the program
Click Cancel the exit the dialog box and return to the File Tool window.
Repair the file if it is damaged
15-21
C:\Users\awaite\Documents\U2Doc\UniVerse\11.2\Source\Adminunix\Ch15.fm3/17/14
The format conversion utilityThe format conversion utility converts UniVerse database files, tables, and UniVerse BASIC object code from one machine’s storage format to another. Use this utility when you are transferring data files and tables between machines with different architectures. You can also use this utility when you are transferring tables from one schema to another on the same system. You can use the format.conv command from the operating system level, or you can use the FORMAT.CONVcommand in UniVerse.
You can use these commands in one of three ways:
To convert the storage format of data files and UniVerse BASIC object code.
To prepare tables for transfer to another schema, on either the same or a different system.
To convert the storage format of tables and reconstitute them in the schema to which they have been transferred.
See UniVerse SQL Administration for DBAs for a description of how to export and import tables from one schema to another.
Converting the format of data files and UniVerse BASIC code
The command options let you specify the following:
The target machine class, which determines the byte order of the converted output
The target machine type for low-order and high-order byte storage
Conversion of database files from formats compatible with later UniVerse releases to formats compatible with earlier UniVerse releases
Whether or not to display information on your screen during processing
15-22 Administering UniVerse on UNIX Platforms
C:\Users\awaite\Documents\U2Doc\UniVerse\11.2\Source\Adminunix\Ch
You can convert the file and transport it to the target machine, or you can transport the file and convert it on the target machine. Once a file has been converted, you can at any time use the format conversion utility to reconvert it. You can use the format conversion utility any number of times on the same file. The format conversion utility does not alter the logical contents of a file, such as the stored data. It alters only its physical format by modifying byte-ordering.
Converting to the current machine format
The format conversion utility changes the format of files or UniVerse BASIC programs from a machine having a different architecture so they can be used on the current machine.
The command to convert either a data file or a file containing UniVerse BASIC object code to use on the current machine has the following syntax:
format.conv filename
filename specifies the name of the file whose format you want to convert. If you do not specify a file name, the format conversion utility reads file names from standard input. For example, the following command converts a file called anyfile to the format used on the current machine:
$ format.conv anyfile
The format conversion utility identifies the byte storage format of the current machine. At the UniVerse prompt you can use the FORMAT.CONV command. The command syntax is identical for operating system and UniVerse commands. Be careful to type a lowercase letter when specifying an option for the UniVerse FORMAT.CONV command.
Converting to a different machine format
You can use the format conversion utility to prepare data files or Universe BASIC programs when you want to export them from the current machine to a machine having a different architecture. You must specify which machine format or class to use. (The default is the class of the machine on which you are running.) The basic syntax of the command is as follows:
format.conv −format.option filename
15-23
C:\Users\awaite\Documents\U2Doc\UniVerse\11.2\Source\Adminunix\Ch15.fm3/17/14
−format.option specifies the format of the target machine. The following sections describe the format options.
Explicitly specifying the machine class
Use the following form of the format.conv command to convert a file to the format of the specified machine class:
format.conv −mclass filename
Specify a minus sign followed by the letter m followed by the machine class number (no spaces are allowed). Valid class numbers are 0, 1, or 16.
For example, the following command converts basic.file (which contains UniVerse BASIC object code) to use on a class 16 machine:
$ format.conv -m16 BP.O/basic.file
If you specify multiple options and include −mclass, always specify this option last. For example, the following command specifies Release 6 format while converting data.file to use on a class 16 machine:
$ format.conv -6m16 data.file
For more information about specifying the –6 option, see “Converting to a different machine format” on page 23.
Specifying low-order byte addressing format
Use the -u option of the format.conv command to convert a file to low-order byte addressing format (big-endian), or “unix” (u) format:
format.conv −u filename
When you use the −u option to convert a data file, the conversion command assumes a machine class of 0 or 16. For a data file, the −u option produces the same result as the −m0 or −m16 option. For example, the following command converts data.file to use on a class 0 or class 16 machine:
$ format.conv -u data.file
15-24 Administering UniVerse on UNIX Platforms
C:\Users\awaite\Documents\U2Doc\UniVerse\11.2\Source\Adminunix\Ch
When you use the −u option to convert a file containing BASIC object code, the conversion command assumes a machine class of 0. For a file containing BASIC object code, the −u option produces the same result as the −m0 option. For example, the following command converts basic.file to use on a class 0 machine:
$ format.conv -u BP.O/basic.file
For information about converting a file containing BASIC object code to use on a class 16 machine, see “Explicitly specifying the machine class” on page 24.
Specifying high-order byte addressing format
Use the -x option of the format.conv command to convert a file to high-order byte addressing format (little-endian), or “xinu” (x) format.
format.conv −x filename
When you use the −x option to convert a file, the conversion command assumes a machine class of 1. The −x option produces the same result as using the −m1 option. For example, the following command converts data.file to use on a class 1 machine:
$ format.conv -x data.file
Specifying format codes and machine class options
For information about these topics, see the FORMAT.CONV command in UniVerse User Reference.
Converting a file to an earlier UniVerse release format
If you want to move a file from a later UniVerse release to an earlier one, you must use the format conversion utility to convert the files from the later file format to a format compatible with the earlier release. The procedure differs depending on which releases of UniVerse are involved.
15-25
C:\Users\awaite\Documents\U2Doc\UniVerse\11.2\Source\Adminunix\Ch15.fm3/17/14
Release 6 through Release 9.5.1B
To convert a file from a later release of UniVerse to an earlier one is a three-step process:
1. On the machine running the later release of UniVerse, use the FORMAT.CONV command with the -6 option to convert the file to UniVerse Release 6 format.
2. Transfer the converted file to the machine running the earlier release of UniVerse.
3. On the machine running the earlier release, use the RESIZE command on the file to make it compatible with the current release of UniVerse.
Release 9.5.1C or later
To convert a file created or resized on a 9.5.1C or later release of Universe to a format compatible with Release 9.5.1B or earlier is a four-step process:
1. On the machine running the later release of UniVerse, use the FORMAT.CONV command with the -o option to convert the file to UniVerse Release 9.5.1B format.
2. To convert the file in 9.5.1B format to a format compatible with Release 9.4.1 or earlier, use the FORMAT.CONV command with the -6 option.
3. Transfer the converted file to the machine running the earlier release of UniVerse.
4. On the machine running the earlier release, use the RESIZE command on the file to make it compatible with the current release of UniVerse.
Syntax
The basic syntax of the command to convert a data file to UniVerse Release 6 is:
format.conv −6 filename
A minus sign ( − ) immediately precedes the 6 (no spaces are allowed).
15-26 Administering UniVerse on UNIX Platforms
C:\Users\awaite\Documents\U2Doc\UniVerse\11.2\Source\Adminunix\Ch
filename specifies the name of the file whose format you want to convert. If you do not specify filename, the format conversion utility reads file names from standard input.
Alternately, you can use the FORMAT.CONV command at the UniVerse prompt. For example, the following commands convert beta.file from Release 9.5.1C format to Release 6 format:
> FORMAT.CONV -o beta.file > FORMAT.CONV -6 beta.file
When you use the −6 option to convert a file to Release 6 format, the format.conv command performs the following actions:
It changes item padding for the stored file.
It writes a file revision level identifier in the file header which is stored in the front of the file. For example, Release 6 files have the following file-level identifier (in hexadecimal form): 0xacef0106.
Once you convert a file to Release 6 format, you can at any time use the format.conv command to convert the file from one machine’s storage format to another. And you can use the RESIZE command to convert the file from Release 6 format to the file format of current release of UniVerse on your system.
Note: Security constraints prohibit using the format conversion utility to convert UniVerse SQL tables to an earlier file format. If you want to convert tables to an earlier file format, follow these steps:
1. Use the CREATE.FILE command to create a temporary file.
2. Copy the contents of the table to the temporary file. (The copy operation fails if the user who is trying to copy the table does not have SQL SELECT privilege.)
3. Use the format conversion utility with the −6 option to convert the temporary file to Release 6 format.
Silent or verbose output
You can specify silent or verbose options when you are using the format conversion utility. By default, the format conversion utility echoes its operation to the user’s display screen. (The default setting is verbose.)
15-27
C:\Users\awaite\Documents\U2Doc\UniVerse\11.2\Source\Adminunix\Ch15.fm3/17/14
The basic syntax of the format conversion utility command with an output option is as follows:
format.conv −output.option filename
A minus sign ( − ) immediately precedes the output code (no spaces are allowed). Valid entries are −s (for silent) or −v (for verbose).
filename is the name of the file whose format you want to convert. If you do not specify a file name, the format conversion utility reads file names from standard input. For example, the following command silences output while converting my.file to use on the current machine:
$ format.conv -s my.file
Or, for example, the following command toggles output on while reconverting my.file to use on a class 1 machine:
$ format.conv -vx my.file
This command displays the following on the screen (with the verbose setting on):
Processing 'my.file'.
15-28 Administering UniVerse on UNIX Platforms
C:\UsMarch
6Administering UniData on Windows NT or Windows 20000
16 Chapter
ers\aw 17, 201
Beta Beta Beta Beta Beta Beta Beta Beta Beta Beta Beta Beta Beta Beta Beta Beta Beta Beta Beta Beta
Chapter 16: Executing UniVerse commands
Executing a command . . . . . . . . . . . . . . . . 16-3Using the command history . . . . . . . . . . . . . . 16-5 Reexecuting commands . . . . . . . . . . . . . . 16-5 Editing a command . . . . . . . . . . . . . . . . 16-6
aite\Documents\U2Doc\UniVerse\11.2\Source\Adminunix\Ch16TOC.fm4 2:12 pm Administering UniData on Windows NT or Windows 2000
C:\Users\awaite\Documents\U2Doc\UniVerse\11.2\Source\Adminunix\Ch
This chapter describes how to execute UniVerse commands from the U2 Extensible Administration Tool. As you issue commands, a command history is created, which you can use to reexecute a command or save commands to the VOC file.
16-2
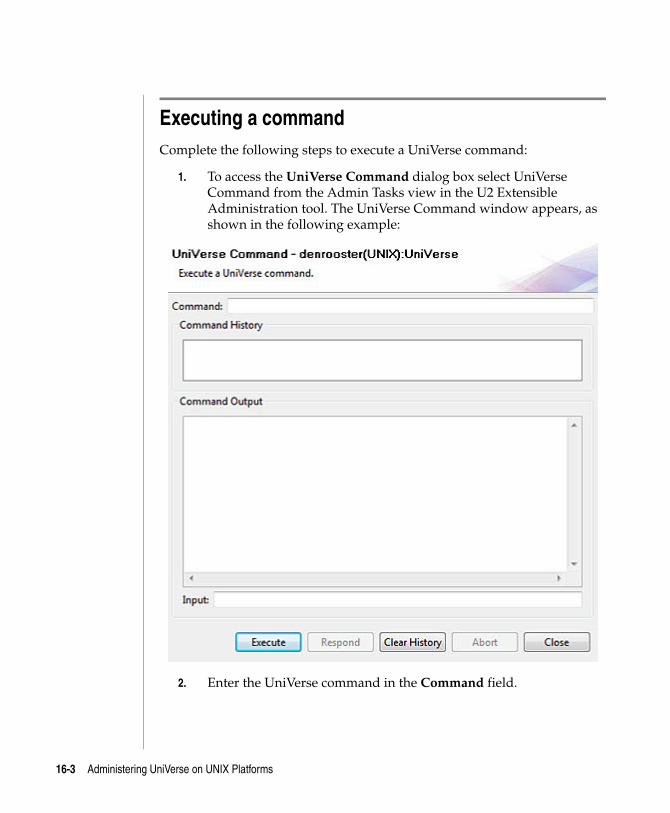
C:\Users\awaite\Documents\U2Doc\UniVerse\11.2\Source\Adminunix\Ch16.fm3/17/14
Executing a commandComplete the following steps to execute a UniVerse command:
1. To access the UniVerse Command dialog box select UniVerse Command from the Admin Tasks view in the U2 Extensible Administration tool. The UniVerse Command window appears, as shown in the following example:
2. Enter the UniVerse command in the Command field.
16-3 Administering UniVerse on UNIX Platforms

C:\Users\awaite\Documents\U2Doc\UniVerse\11.2\Source\Adminunix\Ch
3. Click Execute. The result of the command appears in the UniVerse Command output window.
The following example illustrates the output from the LIST VOC command:
4. If the command requires user input, enter an appropriate reply in the text entry box, then click Respond. Repeat entering input until no further input is required.
5. To quit from command output, click Abort.
Note: Use the UniVerse Command option to execute only a few UniVerse commands, because it is not a command shell.
16-4
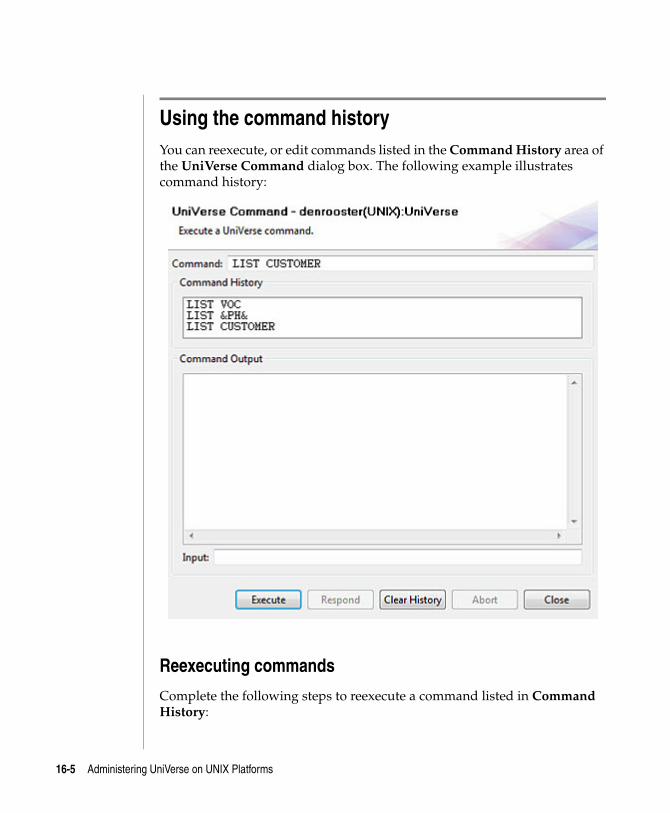
C:\Users\awaite\Documents\U2Doc\UniVerse\11.2\Source\Adminunix\Ch16.fm3/17/14
Using the command historyYou can reexecute, or edit commands listed in the Command History area of the UniVerse Command dialog box. The following example illustrates command history:
Reexecuting commands
Complete the following steps to reexecute a command listed in Command History:
16-5 Administering UniVerse on UNIX Platforms
C:\Users\awaite\Documents\U2Doc\UniVerse\11.2\Source\Adminunix\Ch
1. Double-click the command in the Command History portion of the UniVerse Command dialog box. The command appears in the Command box.
2. Click Execute. The result of the command appears in the UniVerse Command Output window.
Editing a command
Complete the following steps to edit a command that appears in the Command History box of the UniVerse Command window.
1. Double-click the command in the Command History area. The command appears in the Command box.
2. Click the Command field and make your changes to the command.
3. Click Execute to run the new command. UniVerse adds the new command to the Command History area, and the result appears in the UniVerse Command Output window.
16-6
C:\UsMarch
7Administering UniData on Windows NT or Windows 20000
17 Chapter
ers\aw 17, 201
Beta Beta Beta Beta Beta Beta Beta Beta Beta Beta Beta Beta Beta Beta Beta Beta Beta Beta Beta Beta
Chapter 17: Sending messages to users
Sending messages with the U2 Extensible Administration tool . . 17-4The UNIX write command . . . . . . . . . . . . . . . 17-5The MESSAGE command . . . . . . . . . . . . . . . 17-6Message of the day on UNIX systems . . . . . . . . . . . 17-7
aite\Documents\U2Doc\UniVerse\11.2\Source\Adminunix\Ch17TOC.fm4 2:12 pm Administering UniData on Windows NT or Windows 2000
C:\Users\awaite\Documents\U2Doc\UniVerse\11.2\Source\Adminunix\Ch
You can communicate with users using four different mechanisms:
The U2 Extensible Administration Tool
UNIX write(1) command
MESSAGE command
UNIX message of the day
These mechanisms let you communicate directly or set up system processes to send messages at a specific time or when a particular event occurs.
17-3
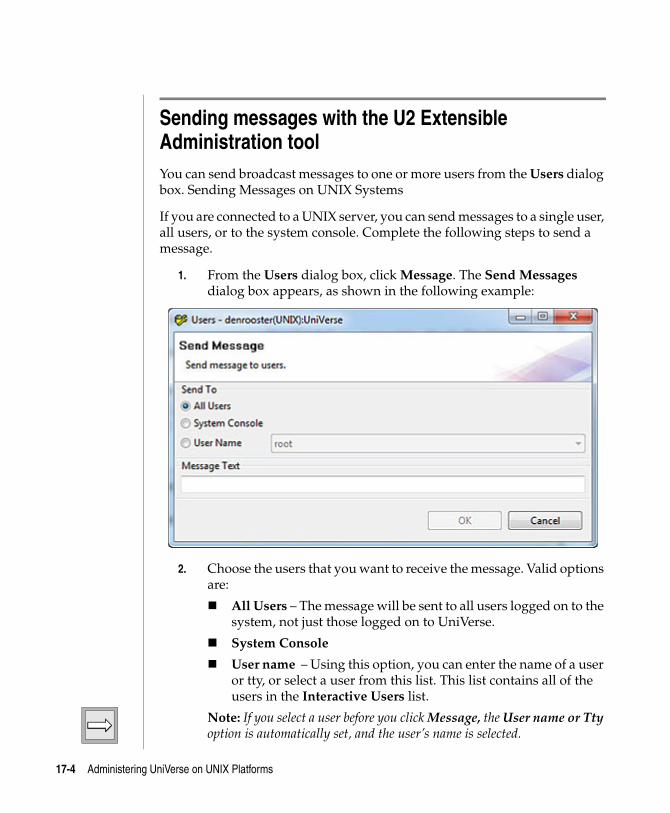
C:\Users\awaite\Documents\U2Doc\UniVerse\11.2\Source\Adminunix\Ch17.fm3/17/14
Sending messages with the U2 Extensible Administration toolYou can send broadcast messages to one or more users from the Users dialog box. Sending Messages on UNIX Systems
If you are connected to a UNIX server, you can send messages to a single user, all users, or to the system console. Complete the following steps to send a message.
1. From the Users dialog box, click Message. The Send Messages dialog box appears, as shown in the following example:
2. Choose the users that you want to receive the message. Valid options are:
All Users – The message will be sent to all users logged on to the system, not just those logged on to UniVerse.
System Console
User name – Using this option, you can enter the name of a user or tty, or select a user from this list. This list contains all of the users in the Interactive Users list.
Note: If you select a user before you click Message, the User name or Tty option is automatically set, and the user’s name is selected.
17-4 Administering UniVerse on UNIX Platforms
C:\Users\awaite\Documents\U2Doc\UniVerse\11.2\Source\Adminunix\Ch
The UNIX write commandThe UNIX write(1) command lets you send a message directly to any system user. This command writes to the terminal to which a user is logged on, even if the user is running an active process (such as the text editor) that uses the terminal.
Users can use the mesg(1) command to turn off permission for write. Depending on your need to communicate quickly with users, you may want to establish guidelines for using these commands. You should generally use write only for time-critical messages. If you use it too frequently, users may tend to turn off this capability.
17-5
C:\Users\awaite\Documents\U2Doc\UniVerse\11.2\Source\Adminunix\Ch17.fm3/17/14
The MESSAGE commandYou can use the MESSAGE command as you would the UNIX write command. It interrupts whatever a user is doing and displays a message on the screen. Use the –STATUS option to display the status of receive mode for all users.
17-6 Administering UniVerse on UNIX Platforms
C:\Users\awaite\Documents\U2Doc\UniVerse\11.2\Source\Adminunix\Ch
Message of the day on UNIX systemsOn UNIX systems when a user logs on to the system, the login procedure prints out a message of the day, if any messages containing today’s date are found in the file /etc/motd.
You can change the contents of this file using the text editor. Two messages are shown:
9/23: Reboot at 5 pm today 9/24: Down for PM from 9 to 11 am tomorrow
The /etc/motd file should be used for important messages. Obvious possibilities are messages about scheduled down-time for maintenance, cleanup messages for space-low file systems, or other useful warnings.
You should keep messages in this file short and to the point so that users are not delayed unnecessarily.
17-7
C:\UsMarch
8Administering UniData on Windows NT or Windows 20000
18 Chapter
ers\aw 17, 201
Beta Beta Beta Beta Beta Beta Beta Beta Beta Beta Beta Beta Beta Beta Beta Beta Beta Beta Beta Beta
Chapter 18: Adding capabilities to UniVerse
Adding UniVerse BASIC applications . . . . . . . . . . . 18-3Managing catalog space . . . . . . . . . . . . . . . . 18-5 Initializing system catalog space . . . . . . . . . . . 18-5 Checking the status of the catalog . . . . . . . . . . . 18-6 Displaying catalog contents . . . . . . . . . . . . . 18-6 Deleting programs from the catalog . . . . . . . . . . 18-7Managing catalog shared memory . . . . . . . . . . . . 18-9 Setting up catalog shared memory . . . . . . . . . . . 18-9Defining programs to run in shared memory . . . . . . . . 18-11 Adding programs to the SHM.TO.LOAD file . . . . . . . 18-12 Removing a program from the SHM.TO.LOAD file . . . . . 18-13 Loading programs into catalog shared memory . . . . . . 18-14Using programs stored in catalog shared memory . . . . . . . 18-16Modifying programs in catalog shared memory . . . . . . . 18-17 Updating a program in shared memory . . . . . . . . . 18-17 Removing a program from shared memory. . . . . . . . 18-18Removing the catalog shared memory segment. . . . . . . . 18-19Adding commands to the VOC file . . . . . . . . . . . . 18-20
aite\Documents\U2Doc\UniVerse\11.2\Source\Adminunix\Ch18TOC.fm4 2:12 pm Administering UniData on Windows NT or Windows 2000
C:\Users\awaite\Documents\U2Doc\UniVerse\11.2\Source\Adminunix\Ch18.fm3/17/14
Although UniVerse includes many programs and utilities, you can make additional programs available to users. These include applications written in UniVerse BASIC and non-UniVerse applications written in a Windows environment but accessible to UniVerse users.
This chapter discusses system administration considerations when making additional programs available to UniVerse users:
Adding UniVerse BASIC applications
Managing the catalog space used by UniVerse BASIC
Managing catalog shared memory for UniVerse BASIC programs
Adding non-UniVerse programs to VOC files
18-2 Administering UniVerse on UNIX Platforms
C:\Users\awaite\Documents\U2Doc\UniVerse\11.2\Source\Adminunix\Ch
Adding UniVerse BASIC applicationsUniVerse BASIC is the principal programming language in the UniVerse environment. It has many features that are designed to work in the database management environment. It allows the creation of specialized business applications.
UniVerse BASIC source code is stored in a type 1 or type 19 file. When you compile a UniVerse BASIC program, object code is created and stored in another type 1 or type 19 file whose name is the same as the source code file with the suffix .O added. To UniVerse, each program appears as a record in the source file. To the operating system, the program file is a directory, and each source program is a separate file in that directory. This means you can create program source code using either the UniVerse Editor or a text editor.
Source code is compiled with the BASIC command. Here is the syntax:
BASIC filename [ programs | * ] [ options ]filename is the name of a type 1 or type 19 file containing BASIC programs. programs are the record IDs of the programs to compile. An * (asterisk) specifies all programs in the file.
Use the UniVerse RUN command to run compiled programs. Here is the syntax:
RUN [ filename ] program [options]UniVerse automatically appends the suffix.O to filename to access the file containing the object code. If filename is omitted, BP.O is assumed to contain the object code.
program is the record containing the object code. It should have the same name as the record that contains the source code.
If programs are cataloged, you can invoke and run them directly from the UniVerse prompt; you need not use the RUN command to run cataloged programs. Cataloging programs and object modules to the system catalog space allows all users to share them.
18-3
C:\Users\awaite\Documents\U2Doc\UniVerse\11.2\Source\Adminunix\Ch18.fm3/17/14
To catalog a program, that is, to copy a compiled program to catalog space, use the CATALOG command (see UniVerse User Reference). All external subroutines must be cataloged before they can be called from within a UniVerse BASIC program with the CALL statement. Cataloging other program types is optional.
Unless you catalog the program globally, an entry is made in your VOC file pointing to the record ID of your program in the nonhashed file you set up for it.
You can also use the UniVerse Editor or ReVise to add UniVerse BASIC programs to the VOC file.
18-4 Administering UniVerse on UNIX Platforms
C:\Users\awaite\Documents\U2Doc\UniVerse\11.2\Source\Adminunix\Ch
Managing catalog spaceUsers developing UniVerse BASIC programs generally catalog their own modules. The administrator’s job is to initialize the system catalog and to periodically purge it of unused entries to improve its performance. There is no fixed limit on the size of catalog space. However, the more entries there are, the slower the access, so unused modules should not remain cataloged.
The catalog contains normally and globally cataloged programs. It does not contain locally cataloged programs, which are for use in a particular account. Normally globally cataloged programs are accessible to all users.
Normally cataloged programs have names of this form:
*account*catalog.name
Globally cataloged programs have catalog names with *, –, $, or ! as the initial character.
Globally and normally cataloged programs are stored in the catdir file in the UV account directory. The file descriptor GLOBAL.CATDIR references the catdir file from any UniVerse account.
Initializing system catalog space
The INITIALIZE.CATALOG command lets you completely delete the system catalog space and reinitialize it.
Warning: The impact of the INITIALIZE.CATALOG command is enormous. You should be absolutely sure that you want to initialize the catalog space. If the slightest doubt exists, you should not respond with Y to the Continue Initialization prompt.
18-5
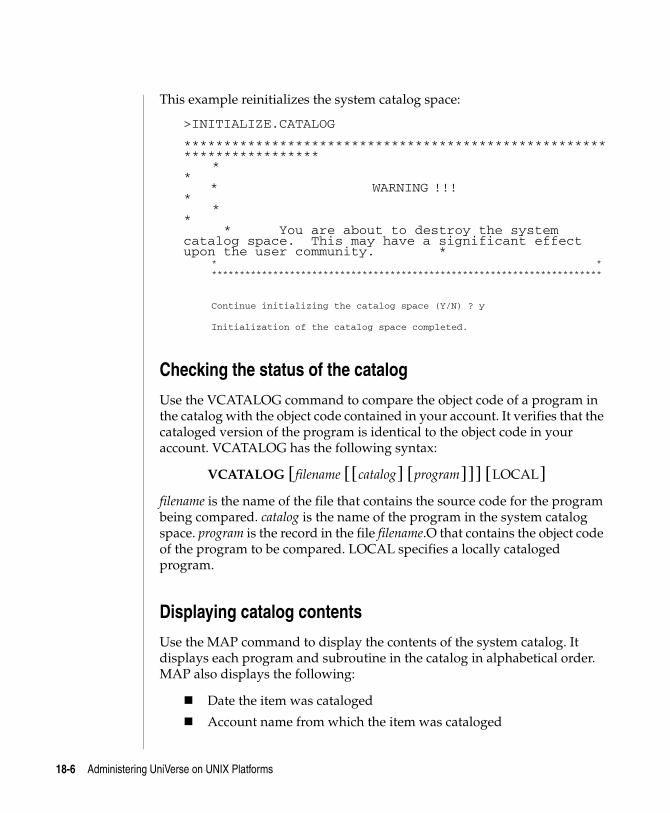
C:\Users\awaite\Documents\U2Doc\UniVerse\11.2\Source\Adminunix\Ch18.fm3/17/14
This example reinitializes the system catalog space:
>INITIALIZE.CATALOG ********************************************************************** * * * WARNING !!! * * * * You are about to destroy the system catalog space. This may have a significant effect upon the user community. * * * **********************************************************************
Continue initializing the catalog space (Y/N) ? y
Initialization of the catalog space completed.
Checking the status of the catalog
Use the VCATALOG command to compare the object code of a program in the catalog with the object code contained in your account. It verifies that the cataloged version of the program is identical to the object code in your account. VCATALOG has the following syntax:
VCATALOG [ filename [ [ catalog ] [ program ] ] ] [ LOCAL ]filename is the name of the file that contains the source code for the program being compared. catalog is the name of the program in the system catalog space. program is the record in the file filename.O that contains the object code of the program to be compared. LOCAL specifies a locally cataloged program.
Displaying catalog contents
Use the MAP command to display the contents of the system catalog. It displays each program and subroutine in the catalog in alphabetical order. MAP also displays the following:
Date the item was cataloged
Account name from which the item was cataloged
18-6 Administering UniVerse on UNIX Platforms
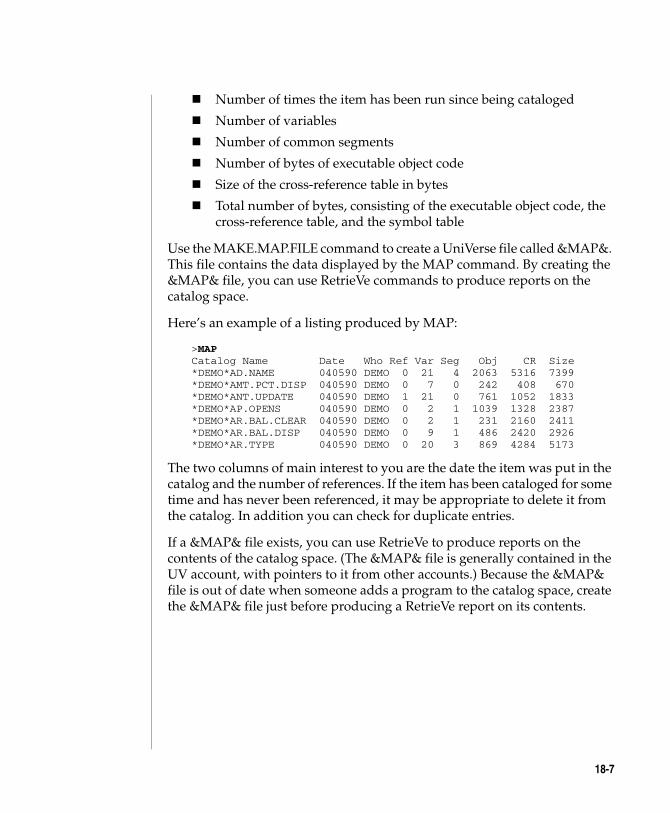
C:\Users\awaite\Documents\U2Doc\UniVerse\11.2\Source\Adminunix\Ch
Number of times the item has been run since being cataloged
Number of variables
Number of common segments
Number of bytes of executable object code
Size of the cross-reference table in bytes
Total number of bytes, consisting of the executable object code, the cross-reference table, and the symbol table
Use the MAKE.MAP.FILE command to create a UniVerse file called &MAP&. This file contains the data displayed by the MAP command. By creating the &MAP& file, you can use RetrieVe commands to produce reports on the catalog space.
Here’s an example of a listing produced by MAP:
>MAP Catalog Name Date Who Ref Var Seg Obj CR Size *DEMO*AD.NAME 040590 DEMO 0 21 4 2063 5316 7399 *DEMO*AMT.PCT.DISP 040590 DEMO 0 7 0 242 408 670 *DEMO*ANT.UPDATE 040590 DEMO 1 21 0 761 1052 1833 *DEMO*AP.OPENS 040590 DEMO 0 2 1 1039 1328 2387 *DEMO*AR.BAL.CLEAR 040590 DEMO 0 2 1 231 2160 2411 *DEMO*AR.BAL.DISP 040590 DEMO 0 9 1 486 2420 2926 *DEMO*AR.TYPE 040590 DEMO 0 20 3 869 4284 5173
The two columns of main interest to you are the date the item was put in the catalog and the number of references. If the item has been cataloged for some time and has never been referenced, it may be appropriate to delete it from the catalog. In addition you can check for duplicate entries.
If a &MAP& file exists, you can use RetrieVe to produce reports on the contents of the catalog space. (The &MAP& file is generally contained in the UV account, with pointers to it from other accounts.) Because the &MAP& file is out of date when someone adds a program to the catalog space, create the &MAP& file just before producing a RetrieVe report on its contents.
18-7
C:\Users\awaite\Documents\U2Doc\UniVerse\11.2\Source\Adminunix\Ch18.fm3/17/14
Deleting programs from the catalog
In a development environment it is not unusual to find several versions of the same program in the catalog. Delete outdated versions with the DELETE.CATALOG command. DELETE.CATALOG removes a cataloged program from the system catalog space and makes it unavailable to subsequent calls. The DELETE.CATALOG command has the following syntax:
DELETE.CATALOG catalog.name
For example, to delete the module *DEMO*AR.TYPE, enter:
>DELETE.CATALOG *DEMO*AR.TYPE
18-8 Administering UniVerse on UNIX Platforms
C:\Users\awaite\Documents\U2Doc\UniVerse\11.2\Source\Adminunix\Ch
Managing catalog shared memoryYou can load cataloged UniVerse BASIC programs into shared memory and run them from there. Shared memory reduces the amount of memory needed for multiple users to run the same program at the same time. The program also starts a little faster because it’s already in memory.
For example, if 21 users are running the same UniVerse BASIC program at the same time without catalog shared memory, and the program code requires 50 Kbytes of memory, the total amount of memory used by everyone running that program is 21x50, or 1050, Kbytes. On the other hand, if the program is loaded into catalog shared memory, all 21 users can run one copy of the program, which uses only 50 Kbytes of memory. In this example catalog shared memory saves 1000 Kbytes (1 megabyte) of memory.
Setting up catalog shared memory
Before users can use programs in catalog shared memory, the administrator must designate which programs are available and load them into shared memory. The U2 Extensible Administration tool simplifies this process. You can specify any UniVerse BASIC programs to be run in shared memory, including those listed in the system catalog space.
Use the Shared Programs dialog box to manage catalog shared memory.
From the Admin Tasks view of the U2 Extensible Administration Tool, double-click Shared Programs.
18-9
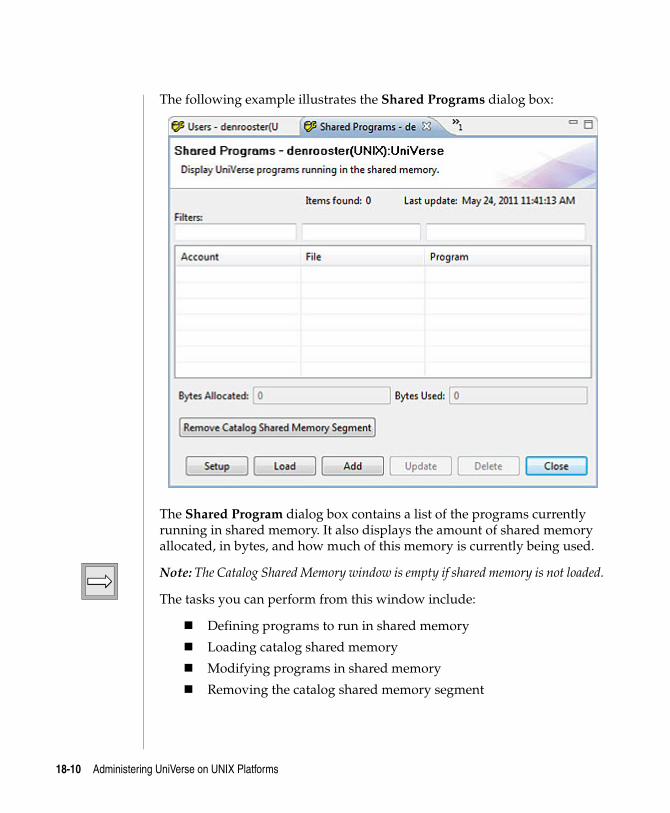
C:\Users\awaite\Documents\U2Doc\UniVerse\11.2\Source\Adminunix\Ch18.fm3/17/14
The following example illustrates the Shared Programs dialog box:
The Shared Program dialog box contains a list of the programs currently running in shared memory. It also displays the amount of shared memory allocated, in bytes, and how much of this memory is currently being used.
Note: The Catalog Shared Memory window is empty if shared memory is not loaded.
The tasks you can perform from this window include:
Defining programs to run in shared memory
Loading catalog shared memory
Modifying programs in shared memory
Removing the catalog shared memory segment
18-10 Administering UniVerse on UNIX Platforms
C:\Users\awaite\Documents\U2Doc\UniVerse\11.2\Source\Adminunix\Ch
Defining programs to run in shared memoryThe amount of memory available for catalog shared memory is limited. This limit varies from machine to machine. The administrator determines how best to use this space by designating the programs to run from catalog shared memory.
The SHM.TO.LOAD file in the UV account directory contains details, such as account, file, and program names, of the programs selected to run in shared memory. When shared memory is loaded, this file is read to determine which programs are to be loaded. An appropriate amount of shared memory is then loaded.
Note: Changes made to the SHM.TO.LOAD file take effect only the next time you start UniVerse or load shared memory.
18-11
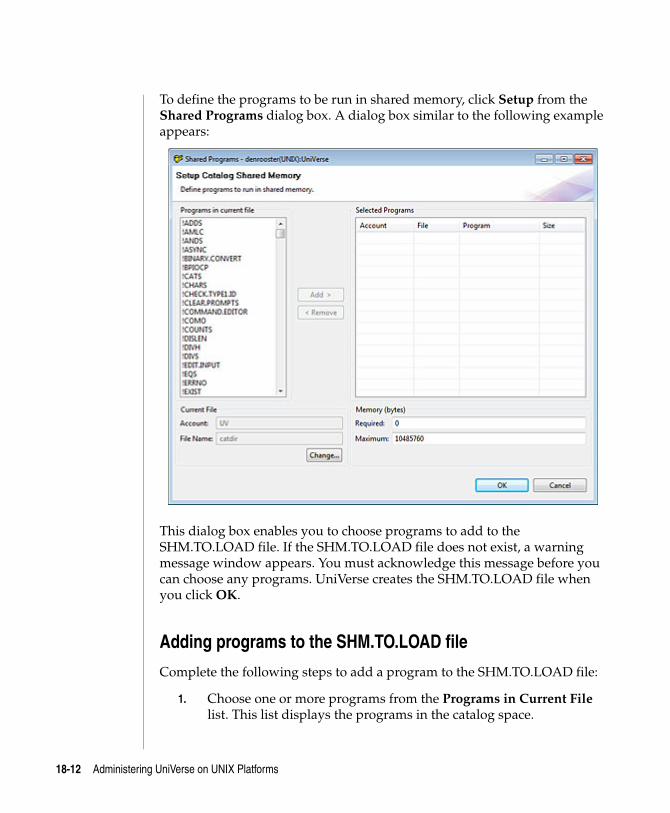
C:\Users\awaite\Documents\U2Doc\UniVerse\11.2\Source\Adminunix\Ch18.fm3/17/14
To define the programs to be run in shared memory, click Setup from the Shared Programs dialog box. A dialog box similar to the following example appears:
This dialog box enables you to choose programs to add to the SHM.TO.LOAD file. If the SHM.TO.LOAD file does not exist, a warning message window appears. You must acknowledge this message before you can choose any programs. UniVerse creates the SHM.TO.LOAD file when you click OK.
Adding programs to the SHM.TO.LOAD file
Complete the following steps to add a program to the SHM.TO.LOAD file:
1. Choose one or more programs from the Programs in Current File list. This list displays the programs in the catalog space.
18-12 Administering UniVerse on UNIX Platforms
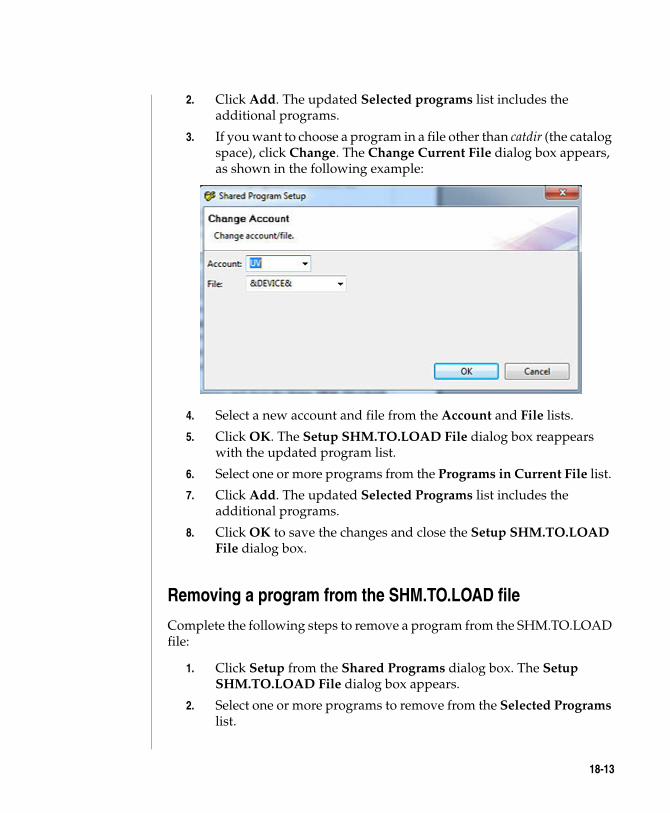
C:\Users\awaite\Documents\U2Doc\UniVerse\11.2\Source\Adminunix\Ch
2. Click Add. The updated Selected programs list includes the additional programs.
3. If you want to choose a program in a file other than catdir (the catalog space), click Change. The Change Current File dialog box appears, as shown in the following example:
4. Select a new account and file from the Account and File lists.
5. Click OK. The Setup SHM.TO.LOAD File dialog box reappears with the updated program list.
6. Select one or more programs from the Programs in Current File list.
7. Click Add. The updated Selected Programs list includes the additional programs.
8. Click OK to save the changes and close the Setup SHM.TO.LOAD File dialog box.
Removing a program from the SHM.TO.LOAD file
Complete the following steps to remove a program from the SHM.TO.LOAD file:
1. Click Setup from the Shared Programs dialog box. The Setup SHM.TO.LOAD File dialog box appears.
2. Select one or more programs to remove from the Selected Programs list.
18-13
C:\Users\awaite\Documents\U2Doc\UniVerse\11.2\Source\Adminunix\Ch18.fm3/17/14
3. Click Remove. The Selected Programs list and the memory details are updated to reflect the deletions.
4. Click OK to save the changes and close the Setup SHM.TO.LOAD File dialog box.
Loading programs into catalog shared memory
After designating the programs to be loaded into catalog shared memory, you must create the shared memory segment and load the programs into memory. This is also routinely done each time UniVerse starts.
When you load shared memory, you can do one of the following:
Load just enough memory to run the programs in the SHM.TO.LOAD file.
Load additional memory, which is then available if you want to modify the programs you are running.
Complete the following steps to load shared memory:
18-14 Administering UniVerse on UNIX Platforms
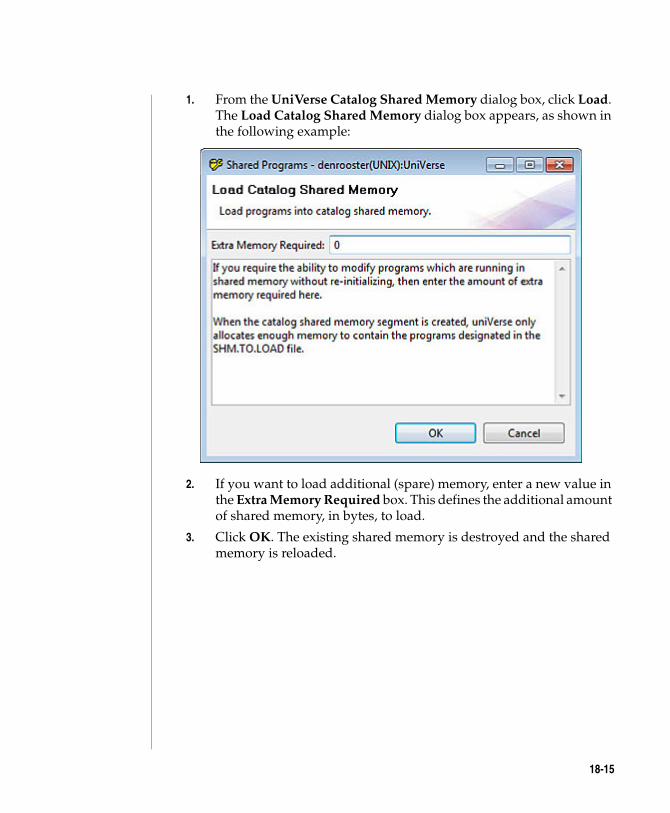
C:\Users\awaite\Documents\U2Doc\UniVerse\11.2\Source\Adminunix\Ch
1. From the UniVerse Catalog Shared Memory dialog box, click Load. The Load Catalog Shared Memory dialog box appears, as shown in the following example:
2. If you want to load additional (spare) memory, enter a new value in the Extra Memory Required box. This defines the additional amount of shared memory, in bytes, to load.
3. Click OK. The existing shared memory is destroyed and the shared memory is reloaded.
18-15
C:\Users\awaite\Documents\U2Doc\UniVerse\11.2\Source\Adminunix\Ch18.fm3/17/14
Using programs stored in catalog shared memoryUniVerse invokes programs in the same way, whether they are stored in catalog shared memory or in a disk file. UniVerse attaches to the catalog shared memory only when it starts. Therefore, anyone who starts UniVerse before catalog shared memory is loaded always uses programs from disk. To take advantage of catalog shared memory, those users must leave UniVerse (by entering Q at the prompt), and start it again. Even the system administrator must leave UniVerse and restart it to take advantage of the programs in shared memory.
Changing a UniVerse BASIC program and running the UniVerse BASIC command changes the copy of the object code stored in the system catalog, but does not change the copy stored in catalog shared memory.
18-16 Administering UniVerse on UNIX Platforms
C:\Users\awaite\Documents\U2Doc\UniVerse\11.2\Source\Adminunix\Ch
Modifying programs in catalog shared memoryOnce programs are installed in catalog shared memory, they are not affected by any changes made to the UniVerse BASIC program on disk. If you modify a program, you must install it again.
You can add, remove, and update programs running in shared memory without having to reload it. However, to do this you must have additional (spare) shared memory loaded. When you modify programs in shared memory, it acts only as a temporary measure, and no changes are made to the SHM.TO.LOAD files.
You can perform the following modification tasks from the Shared Programs dialog box:
Add a program to shared memory
Update a program in shared memory
Remove a program from shared memory
Updating a program in shared memory
If a program has been edited and recompiled, you can load the latest version of the program into shared memory. The memory used for the “old” version of the program is not made available, so the updated program will be loaded only if enough spare memory is available.
Complete the following steps to update a program in shared memory:
1. Select the program to update from the Shared Programs dialog box.
2. Click Update. A message window appears.
3. Click Yes. UniVerse checks that there is enough memory available to load the updated program. If there is not, a message window appears. You must acknowledge the message. If there is enough space, UniVerse loads the program into shared memory and updates the Shared Programs dialog box.
18-17
C:\Users\awaite\Documents\U2Doc\UniVerse\11.2\Source\Adminunix\Ch18.fm3/17/14
Removing a program from shared memory
You can remove programs from shared memory without reloading. However, the memory used by this program is not made available for reuse.
Complete the following steps to remove a program from shared memory:
1. Select the program to remove from the Shared Programs dialog box.
2. Click Delete. A message window appears.
3. Click Yes. UniVerse updates the Shared Programs dialog box.
18-18 Administering UniVerse on UNIX Platforms
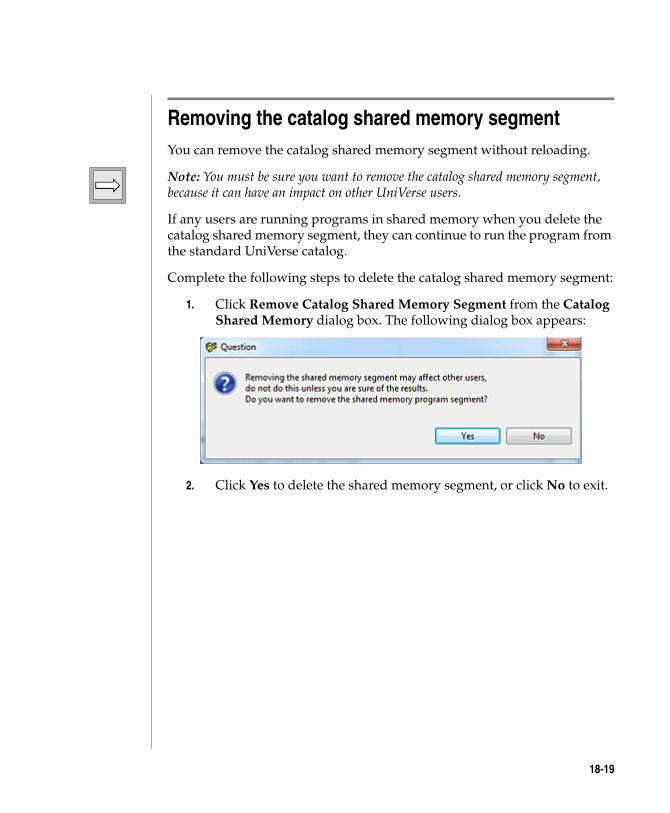
C:\Users\awaite\Documents\U2Doc\UniVerse\11.2\Source\Adminunix\Ch
Removing the catalog shared memory segmentYou can remove the catalog shared memory segment without reloading.
Note: You must be sure you want to remove the catalog shared memory segment, because it can have an impact on other UniVerse users.
If any users are running programs in shared memory when you delete the catalog shared memory segment, they can continue to run the program from the standard UniVerse catalog.
Complete the following steps to delete the catalog shared memory segment:
1. Click Remove Catalog Shared Memory Segment from the Catalog Shared Memory dialog box. The following dialog box appears:
2. Click Yes to delete the shared memory segment, or click No to exit.
18-19
C:\Users\awaite\Documents\U2Doc\UniVerse\11.2\Source\Adminunix\Ch18.fm3/17/14
Adding commands to the VOC fileYou can make standard operating system utilities and additional system and UniVerse BASIC applications available to UniVerse users through the VOC files in their accounts. Capabilities you want to make available to all accounts can be added to the NEWACC file of the appropriate flavor.
Using either ReVise or the UniVerse Editor, add a verb to the VOC. (See UniVerse System Description for a discussion of how to use ReVise and Guide to the UniVerse Editor for information on using the UniVerse Editor.) The first field of the VOC entry (defined in the VOC dictionary as F1) defines the entry type and gives an optional description. The first one or two characters in F1 define the type of VOC entry. For an executable program, the type must be V for verb.
The rest of F1 is available for an optional description of the record. F1 might look like the following example:
V VI, the UNIX text editor
The second field (F2) contains the processor name. This is the name of the program to be executed.
For an operating system command, this field would contain the full path of the program to be executed. For a UniVerse BASIC program, this field would contain the path of the object code, unless the name begins with *, $, –, or !, which indicates that the object module can be found in catalog space. You can use the MAP command to find the name of an entry in catalog space. Globally cataloged entries are available to all users of the system and have names in the form:
*NAME
The user who catalogs the program can use $, –, or ! in place of *. Standard normal cataloged entries have names in the form:
*ACCOUNT_NAME*PROGRAM_NAME
Note: Locally cataloged programs are not entered in the system catalog space and are not listed by either the MAP or the MAKE.MAP.FILE command.
18-20 Administering UniVerse on UNIX Platforms
C:\Users\awaite\Documents\U2Doc\UniVerse\11.2\Source\Adminunix\Ch
The third field (F3) specifies the dispatch type. This field should normally contain a B for a UniVerse BASIC program or a U for an operating system command. Standard UniVerse programs in $UVBIN are type E. For these programs, field 2 contains the name of the executable file in $UVBIN. The following is a full list of dispatch types:
The fourth field (F4) specifies additional information that may be needed by the program. This is referred to as the processor mode. It can be one or more of the following:
Code Dispatch Type Use
B Cataloged UniVerse BASIC program
Used with the UniVerse BASIC CALL statement, or from the UniVerse prompt.
C C shell script Used to call C shell scripts from the operating system.
E External Reserved for internal UniVerse use only.
I Internal Reserved for internal UniVerse use only.
P Primitive command Provided for compatibility with the PI/open PR command.
Q Query command Reserved for internal UniVerse use only.
S Bourne shell script Used to call Bourne shell scripts from the operating system.
U Operating system command Makes a call to an operating system command.
Dispatch Types
Code Processor Mode
A Use alternative query syntax. Reserved for internal UniVerse use only.
B Not used.
C Allow COMO files to be used with external programs and operating system commands.
D Pass DATA to subprocess. Reserved for internal UniVerse use only.
Processor Modes
18-21
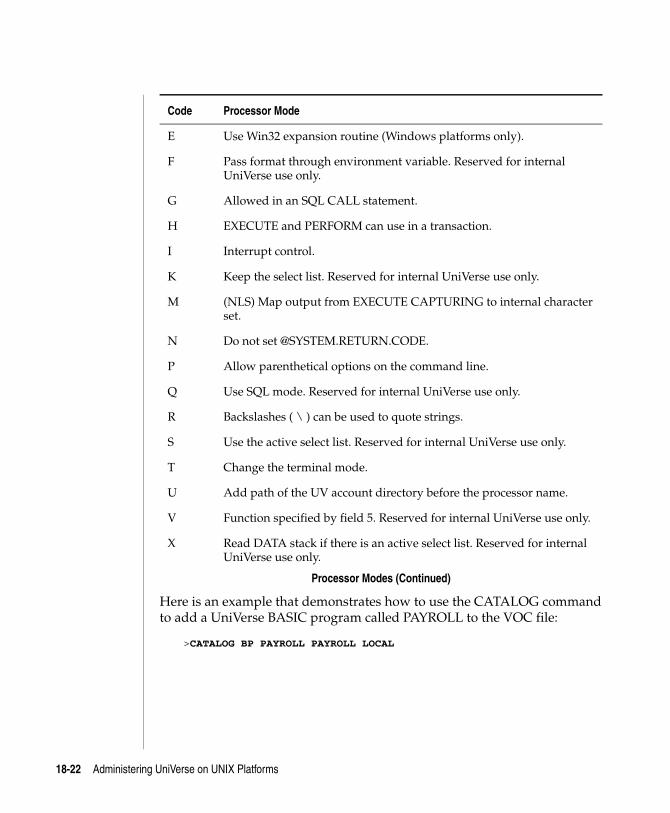
C:\Users\awaite\Documents\U2Doc\UniVerse\11.2\Source\Adminunix\Ch18.fm3/17/14
Here is an example that demonstrates how to use the CATALOG command to add a UniVerse BASIC program called PAYROLL to the VOC file:
>CATALOG BP PAYROLL PAYROLL LOCAL
E Use Win32 expansion routine (Windows platforms only).
F Pass format through environment variable. Reserved for internal UniVerse use only.
G Allowed in an SQL CALL statement.
H EXECUTE and PERFORM can use in a transaction.
I Interrupt control.
K Keep the select list. Reserved for internal UniVerse use only.
M (NLS) Map output from EXECUTE CAPTURING to internal character set.
N Do not set @SYSTEM.RETURN.CODE.
P Allow parenthetical options on the command line.
Q Use SQL mode. Reserved for internal UniVerse use only.
R Backslashes ( \ ) can be used to quote strings.
S Use the active select list. Reserved for internal UniVerse use only.
T Change the terminal mode.
U Add path of the UV account directory before the processor name.
V Function specified by field 5. Reserved for internal UniVerse use only.
X Read DATA stack if there is an active select list. Reserved for internal UniVerse use only.
Code Processor Mode
Processor Modes (Continued)
18-22 Administering UniVerse on UNIX Platforms
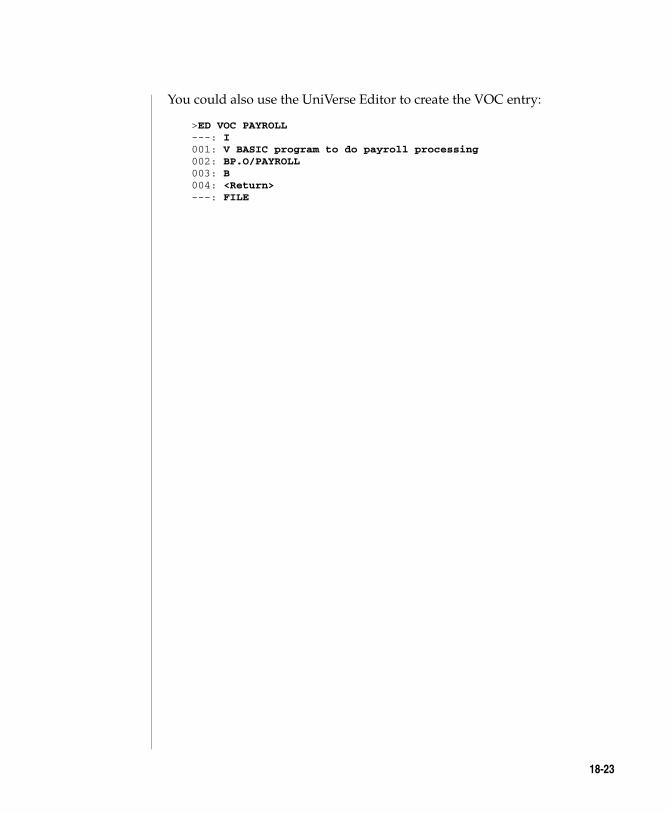
C:\Users\awaite\Documents\U2Doc\UniVerse\11.2\Source\Adminunix\Ch
You could also use the UniVerse Editor to create the VOC entry:
>ED VOC PAYROLL ---: I 001: V BASIC program to do payroll processing 002: BP.O/PAYROLL 003: B 004: <Return> ---: FILE
18-23
C:\UsMarch
9Administering UniData on Windows NT or Windows 20000
19 Chapter
ers\aw 17, 201
Beta Beta Beta Beta Beta Beta Beta Beta Beta Beta Beta Beta Beta Beta Beta Beta Beta Beta Beta Beta
Chapter 19: Managing network services
Administering the UniRPC on UNIX systems . . . . . . . . 19-4 How the UniRPC works . . . . . . . . . . . . . . 19-4 System requirements . . . . . . . . . . . . . . . 19-4 Defining the UniRPC port number and maintaining the hosts file 19-5 Starting and stopping the UniRPC daemon. . . . . . . . 19-8 About the unirpcservices file. . . . . . . . . . . . . 19-9Pluggable Authentication Module (PAM). . . . . . . . . . 19-12 How UniVerse authentication currently works . . . . . . 19-12 PAM support . . . . . . . . . . . . . . . . . . 19-12 Modifying the telnet session parameters. . . . . . . . . 19-13
aite\Documents\U2Doc\UniVerse\11.2\Source\Adminunix\Ch19TOC.fm4 2:12 pm Administering UniData on Windows NT or Windows 2000
C:\Users\awaite\Documents\U2Doc\UniVerse\11.2\Source\Adminunix\Ch
This chapter describes the following how to administer the remote procedure call utility (UniRPC).
19-3
C:\Users\awaite\Documents\U2Doc\UniVerse\11.2\Source\Adminunix\Ch19.fm3/17/14
Administering the UniRPC on UNIX systemsThe UniRPC lets UniVerse communicate with remote systems. The communicating systems must use TCP/IP networking software to make connections.
On UNIX systems the UniRPC comprises the following UniVerse components:
The UniRPC daemon unirpcd. It receives requests from remote machines for services and starts those services.
UniVerse BASIC programs for administering the UniRPC.
Note: In this chapter the terms local and remote refer to client and server programs or systems. However, because client programs can connect to server programs running on the same computer, remote does not necessarily imply that the server is on another physical computer system.
How the UniRPC works
When a client program requests a service on a server, the UniRPC daemon on the server checks the unirpcservices file to verify that the client system can request the service. If the UniRPC daemon finds the client system in the unirpcservices file, it executes the service requested by the client. Each client process connects to its own server process. Each server process uses the same amount of system resources as a local UniVerse user.
System requirements
Before installing layered or third-party products that use the UniRPC, such as UV/Net, the U2 Extensible Administration Tool, or the Uni Call Interface (UCI), you must install and configure TCP/IP using the instructions supplied by the TCP/IP facility vendor. You should then identify the systems to be networked with UniVerse by defining them in the /etc/hosts file. See “Maintaining the hosts file” on page 6 for information about how to do this.
19-4 Administering UniVerse on UNIX Platforms
C:\Users\awaite\Documents\U2Doc\UniVerse\11.2\Source\Adminunix\Ch
You must also modify the configurable UniVerse parameter MFILES. MFILES specifies the size of the UniVerse rotating file pool, which is normally at least eight less than the kernel’s limit for open files per process. You should decrease the value of MFILES by one:
For each host system you want to connect to through UV/Net
For each UniVerse server you want to connect to via the BASIC SQL Client Interface (BCI)
For information about configurable UniVerse parameters, see Chapter 4, “Chapter 4: Configurable UniVerse parameters.”
Defining the UniRPC port number and maintaining the hosts file
From the U2 Extensible Administration Tool, choose Network Services, then UniRPC from the Admin Tasks to:
Define the UniRPC port number
Maintain the hosts file on a UNIX server
The UniVerse Network Services window appears
This window has the following components:
Port # field. The current port number for the UniRPC daemon.
Hosts list. Displays the machine name and IP address for each node in the /etc/hosts file.
Note: If you are using the Network Information Services (NIS, also known as Yellow Pages), you do not need to use the /etc/hosts file to define, change, and delete network nodes. See the UNIX networking documentation provided with your system for more information.
Defining the UniRPC port number
Before you can use the UniRPC, you must specify the number of the port that the UniRPC is to use. You specify the port number on the client and the server systems.
19-5
C:\Users\awaite\Documents\U2Doc\UniVerse\11.2\Source\Adminunix\Ch19.fm3/17/14
Note: If you specify a port number other than the default, it must be the same on all systems that communicate through the UniRPC.
The current UniRPC daemon port number is displayed in the Port # field in the Network Services window. To change the number, do the following:
1. Click Change. The Change Port Number dialog box appears. Enter a new number in the Enter new Port number field.
2. Click OK. The new port number is saved and the Network Services window is updated with the new setting.
Note: To use the new port number, you must restart the UniRPC daemon (see “Starting the UniRPC daemon” on page 7).
Maintaining the hosts file
Use the Network Services option of the U2 Extensible Administration Tool to add, modify, and remove nodes in the hosts file. These tasks are performed from the UniVerse Network Services dialog box.
Adding a node
Complete the following steps to add a new node to the hosts file:
1. Click Add from the UniVerse Network Services dialog box. The Add UniRPC Machine dialog box appears.
2. Enter the node name in the Machine Name field.
3. Enter the node address in the IP Address field.
4. Click OK. The new node’s machine name and IP address are checked against existing entries in the hosts file. If the new node matches an existing entry, a message box appears. You must acknowledge the message before you can enter alternative values. If the new node details are unique, the new node definition is added to the hosts file and the Network Services window is updated.
Modifying a node
To modify the name or IP address of an existing entry in the hosts file:
1. Choose the node to modify by doing one of the following:
19-6 Administering UniVerse on UNIX Platforms
C:\Users\awaite\Documents\U2Doc\UniVerse\11.2\Source\Adminunix\Ch
Double-click the node in the Hosts list.
Choose the node and click Update.
The Update IP Address dialog box appears.
2. Edit the entries in the Machine Name and IP Address fields.
3. Click OK. The node’s machine name and IP address are checked against existing entries in the hosts file. If the node details match an existing entry, a message box appears. You must acknowledge the message before you can enter alternative values. If the node details are unique, the node definition is added to the hosts file and the UniVerse Network Services dialog box is updated.
Removing a node
To remove a node definition from the hosts file:
1. Select the node from the Hosts list.
2. Click Delete. A message box appears.
3. Click Yes. The node definition is removed from the hosts file and the UniVerse Network Services dialog box is updated.
Starting and stopping the UniRPC daemon
You cannot use the U2 Extensible Administration Tool to start or stop the UniRPC daemon because it uses the UniRPC daemon to connect to the UniVerse server. You must use the UniVerse System Administration menus on the UniVerse server itself to start and stop the UniRPC daemon.
Starting the UniRPC daemon
Complete the following steps to start the UniRPC daemon:
1. Choose Rpc administration from the Package menu, then choose Start the rpc daemon.
2. At the prompt, do one of the following to handle any error messages:
Enter the name of the file to send all error and system messages to.
Enter a space to display messages on your screen.
Press ENTER if you do not want to display or save messages.
19-7
C:\Users\awaite\Documents\U2Doc\UniVerse\11.2\Source\Adminunix\Ch19.fm3/17/14
3. At the next prompt, click Yes to start the UniRPC daemon or No to return to the Rpc administration menu.
Note: The file that receives all error and system messages can grow unchecked unless you monitor it periodically.
Once you start the UniRPC daemon, it automatically restarts whenever you boot UniVerse.
Stopping the UniRPC daemon
To stop the UniRPC daemon:
1. Choose Rpc administration from the Package menu, then choose Halt the rpc daemon.
2. At the prompt, click Yes to stop the UniRPC daemon or No to return to the Rpc administration menu.
Note: Stopping the UniRPC daemon does not interrupt active UniRPC processes.
About the unirpcservices file
Each process that uses the UniRPC automatically configures the unirpcservices file when it first starts up. If no unirpcservices file exists, it is created. This file is located in /usr/unishared/unirpc.
When a client system requests a connection to a service on a server system, the UniRPC daemon (unirpcd) on the server uses the unirpcservices file to verify that the client system can start the requested service.
19-8 Administering UniVerse on UNIX Platforms
C:\Users\awaite\Documents\U2Doc\UniVerse\11.2\Source\Adminunix\Ch
The UniRPC software uses field 3 of the unirpcservices file to verify that a machine making a request for a service is allowed to do so. The following table lists the fields in the unirpcservices file:
A unirpcservices file might contain entries such as the following:
uvnet /usr/uv/bin/uvnetd host1,host2,host3 TCP/IP 3 3600 uvdrsrv /usr/uv/bin/uvdrsrvd * TCP/IP 0 3600 uvcs /usr/uv/bin/uvapi_server * TCP/IP 0 3600 uvfilefix /usr/uv/bin/uvfilefix_server * TCP/IP 0 3600 uvserver /usr/uv/bin/uvsrvd * TCP/IP 0 3600
You can define a new service name for the UniObjects server with different parameter settings, such as the timeout value, in the unirpcservices file. The log files are based on the serverdebug file defined in the $UVHOME directory. To turn on the log files, you define"uvcs loglevel xxxx" to enable logging for all service names, such as uvcs, defcs, or uvcsdebug. If you define a new service name in the unirpcservices file and specify that service in the serverdebug file, UniVerse only generates logs for that service name.
The version of uv.rc shipped with your system (/usr/uv/sample/uv.rc) contains commands that:
Check for the existence of the unirpcservices file
Verify that services are defined in it
Start the UniRPC daemon if the file contains services.
Attribute Description
1 The name of the UniRPC service (for example, uvserver).
2 The full path of the service engine executed by the UniRPC daemon.
3 The names of nodes allowed to execute this service. This field is multivalued, with values separated by commas (no spaces). If the field contains * (asterisk), all hosts defined in /etc/hosts can execute this service.
4 The network transport mechanism for the service (TCP/IP).
5 Reserved for future use.
6 The value (in seconds) specifying how long an open connection can be idle before automatic closure from the remote connection. The default is 3600, or 60 minutes.
unirpcservices Attributes12
19-9

C:\Users\awaite\Documents\U2Doc\UniVerse\11.2\Source\Adminunix\Ch19.fm3/17/14
The UniRPC daemon is executed as part of the reboot procedure
19-10 Administering UniVerse on UNIX Platforms
C:\Users\awaite\Documents\U2Doc\UniVerse\11.2\Source\Adminunix\Ch
Pluggable Authentication Module (PAM)The PAM framework is a suite of shared libraries and modules on UNIX platforms that enable the local system administrator to choose how applications authenticate users. You can switch between authentication mechanisms without rewriting and recompling a PAM-aware application. You can plug in mechanisms for account, session, and password management through the PAM framework.
How UniVerse authentication currently works
Currently, UniVerse reads the encrypted password for a user from the passwd or the shadow file, then compares it with the encrypted form of the password the user supplies. If the passwords match, UniVerse authenticates the user and grants access to the system. If the passwords do not match the user’s request is rejected.
PAM support
UniVerse 11.1 supports the PAM framework for the following products:
UniObjects
UniObjects for Java
UniObjects for .NET
InterCall
JDBC Driver for UniData and UniVerse
UniVerse ODBC
UniOLEDB
UniVerse will not access LDAP servers directly from any of its servers, and will not support single sign-on. UniVerse will authenticate a client each time it tries to connect to a server, whether or not successful authentication occurred during a previous connection attempt.
19-11
C:\Users\awaite\Documents\U2Doc\UniVerse\11.2\Source\Adminunix\Ch19.fm3/17/14
When the server receives the user ID and password, UniVerse will first try to authenticate the user using the traditional UNIX method. If that attempt fails, UniVerse will call PAM to check the validity of the user. If both attempts fail, the connection is denied.
Telnet Port # – This field displays the TCP port that the telnet session uses. This is taken from the services file. If a uvtelnet entry exists in the services file, this is the number UniAdmin displays. If these entries do not exist in the services file, UniAdmin displays the default port number, 23.
User Policy – The User Policy setting determines how the telnet session is used when a user makes a telnet connection.
Connection Parameters – Connection Parameters are the current connection values for the telnet service. UniVerse stores these parameters in the Windows Registry on the Server.
Keep Alive Parameters – The Keep Alive parameters determine intervals when UniVerse checks the viability of a network connection between the client and server.
Modifying the telnet session parameters
You can modify any of the telnet session parameters from the Network Services dialog box.
Note: To use the new settings, you must stop and restart the uvtelnet service.
Changing the telnet session port number
To change the port number for the telnet session, enter the new port number in the Port # box. UniVerse stores the new port number as a uvtelnet entry in the services file when you click Save.
Defining the user policy
As a UniVerse administrator, you can specify how all users use the telnet session. Valid user policies are:
Home Account – On connection, users attach to their home directory. The home directory must be a valid UniVerse account.
19-12 Administering UniVerse on UNIX Platforms
C:\UsMarch
1Administering UniData on Windows NT or Windows 20000
20 Chapter
ers\aw 17, 201
Beta Beta Beta Beta Beta Beta Beta Beta Beta Beta Beta Beta Beta Beta Beta Beta Beta Beta Beta Beta
Chapter 20: Device licensing
UniVerse licensing modes . . . . . . . . . . . . . . . 20-3Why do I need device licensing? . . . . . . . . . . . . . 20-4 Device licensing requirements . . . . . . . . . . . . 20-4Connection types . . . . . . . . . . . . . . . . . . 20-5 Direct connections . . . . . . . . . . . . . . . . 20-5 Two-tier connections . . . . . . . . . . . . . . . 20-5 Enabling telnet device licensing on UNIX servers . . . . . 20-6 Using device subkeys . . . . . . . . . . . . . . . 20-6Using the license tool uvlictool. . . . . . . . . . . . . . 20-7
aite\Documents\U2Doc\UniVerse\11.2\Source\Adminunix\Ch20TOC.fm4 2:12 pm Administering UniData on Windows NT or Windows 2000
C:\Users\awaite\Documents\U2Doc\UniVerse\11.2\Source\Adminunix\Ch20.fm3/17/14
This chapter describes how to use UniVerse’s device licensing system.
20-2 Administering UniVerse on UNIX Platforms

C:\Users\awaite\Documents\U2Doc\UniVerse\11.2\Source\Adminunix\Ch
UniVerse licensing modesUniVerse provides two licensing modes:
Session licensing
Device licensing
Session licensing
Session licensing is like the UniVerse licensing system used before Release 9.5. Every connection from telnet or a UniVerse API, even from the same PC, consumes one database license. Session licensing has been enhanced to include a licensing tool, uvlictool, that reports on the current licensing state and cleans up current licensing.
Device licensing
Device licensing, sometimes called client-side licensing, tries to combine all remote connections from a single device to a UniVerse server at both the UniVerse license level and the package level.
Device licensing currently works with the following connection types:
U2 Extensible Administration Tool
UniVerse ODBC
UCI
UniObjects
UniObjects for Java
UniObjects for .NET
InterCall
Telnet connections such as:
SB Client
wIntegrate
Dynamic Connect
Note: Device licensing does not work with UV/Term.
20-3
C:\Users\awaite\Documents\U2Doc\UniVerse\11.2\Source\Adminunix\Ch20.fm3/17/14
Why do I need device licensing?Users accessing a UniVerse server through one or more client application programs may want to put their licensing scheme on a one-license-per-device basis. Such applications often open multiple connections to a UniVerse server. For example, an application might use one connection to browse, another connection to check data, yet another connection to update the database, and so forth.
Before UniVerse Release 9.5, each connection to the server consumed its own separate license, even though only one user was using all those connections from one PC. UniVerse’s device licensing lets such users consume one UniVerse license for up to 10 connections to the server from a single PC.
Device licensing requirements
Device licensing has the following requirements:
Clients must run on a Windows platform.
Clients must run on a LAN or TCP/IP with an Ethernet card. Beginning at UniVerse 11.2.3, LAN is no longer supported.
For telnet connections to UNIX servers, device licensing must be enabled.
20-4 Administering UniVerse on UNIX Platforms

C:\Users\awaite\Documents\U2Doc\UniVerse\11.2\Source\Adminunix\Ch
Connection typesThere are three ways to connect to a UniVerse server:
Direct connection. This is not a client/server connection.
Two-tier client/server connection.
Multiple-tier client/server connection.
Each PC can have up to ten connections to the server, but not all connections from a PC can be combined.
Direct connections
Direct connections are not really client/server connections because there is no real client. Examples of direct connections are:
Directly invoking UniVerse on a system
TTY serial line
Two-tier connections
Two-tier connections are typical client/server connections where a client application connects to a UniVerse server either on the same machine or on a different machine. Telnet connections to UniVerse are an example of a two-tier connection.
Client applications running on PCs different from the UniVerse server appear to the server with unique identifiers.
Multiple-tier connections
Multiple-tier connections are client applications that connect from a PC to a UniVerse server either through one or more different PCs, or through an application server component. Examples of multiple-tier connections are:
An HTTP server running scripts that use UniObjects or UniObjects for Java.
20-5
C:\Users\awaite\Documents\U2Doc\UniVerse\11.2\Source\Adminunix\Ch20.fm3/17/14
An application that connects first to an application server either on a different PC or on the server system. The application server connects to the UniVerse server.
Enabling telnet device licensing on UNIX servers
Use the shell command uvdls to enable device licensing for telnet connections to a UNIX server. When you telnet to a UNIX server, you can:
Enter the uvdls command instead of the uv command to log on to UniVerse
Configure your UniVerse initialization script (.profile, .cshrc, and so forth) or your terminal emulator to use uvdls instead of uv to log on directly to UniVerse
Some telnet client programs let you enable device licensing from the client. See your telnet client documentation for details.
Using device subkeys
Each PC that connects immediately to the UniVerse server can have up to ten connections per license.
Using multiple-tier connections, each PC that connects to an intermediate application component consumes a separate license. But each of these PCs, at one or more removes from the server, can have up to ten connections.
In order for a PC to have multiple connections to the UniVerse server and still consume only one license, users must ensure that each PC connecting to the server through another system specify a unique device subkey before requesting a connection to the server. This subkey is a string of up to 24 characters. All client applications on a given device that connect to one UniVerse server must use the same unique subkey.
20-6 Administering UniVerse on UNIX Platforms
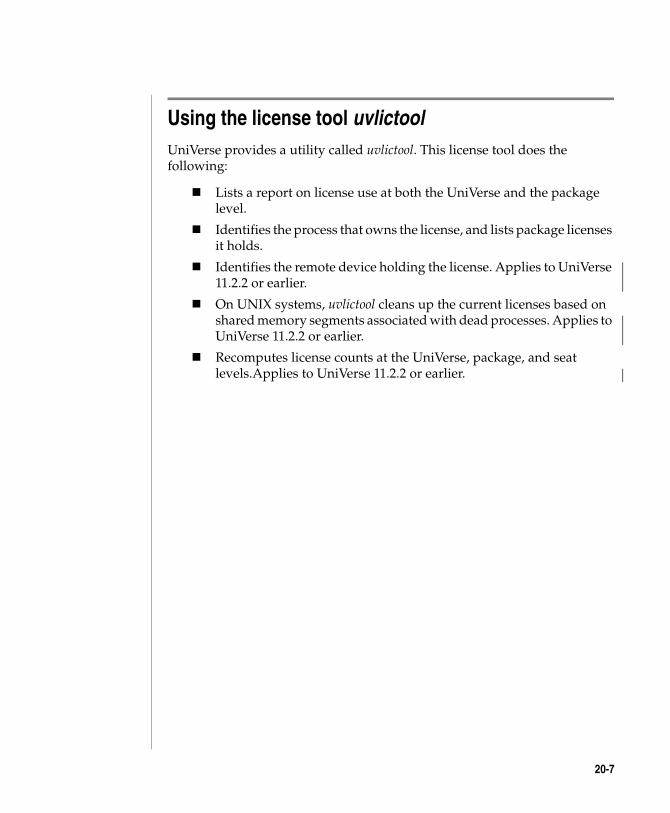
C:\Users\awaite\Documents\U2Doc\UniVerse\11.2\Source\Adminunix\Ch
Using the license tool uvlictoolUniVerse provides a utility called uvlictool. This license tool does the following:
Lists a report on license use at both the UniVerse and the package level.
Identifies the process that owns the license, and lists package licenses it holds.
Identifies the remote device holding the license. Applies to UniVerse 11.2.2 or earlier.
On UNIX systems, uvlictool cleans up the current licenses based on shared memory segments associated with dead processes. Applies to UniVerse 11.2.2 or earlier.
Recomputes license counts at the UniVerse, package, and seat levels.Applies to UniVerse 11.2.2 or earlier.
20-7
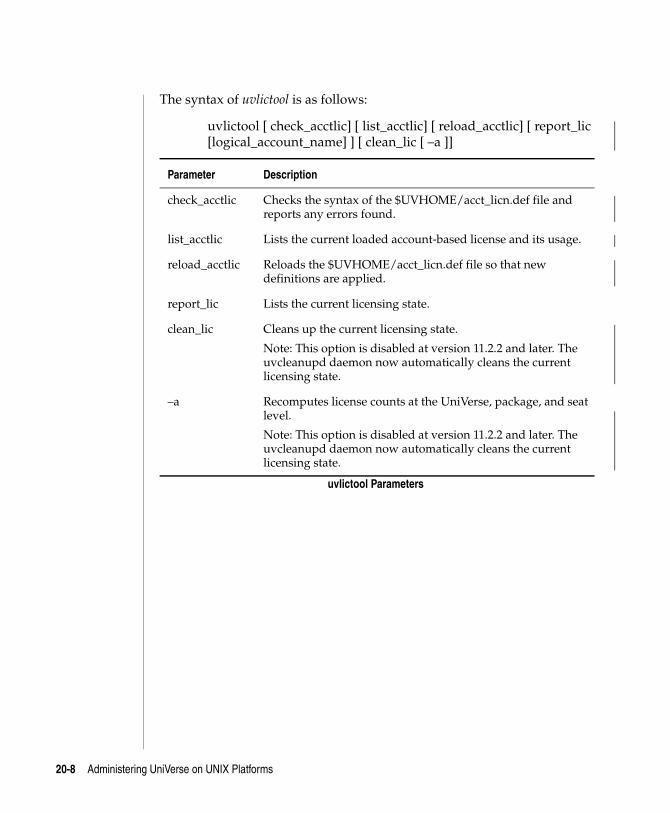
C:\Users\awaite\Documents\U2Doc\UniVerse\11.2\Source\Adminunix\Ch20.fm3/17/14
The syntax of uvlictool is as follows:
uvlictool [ check_acctlic] [ list_acctlic] [ reload_acctlic] [ report_lic [logical_account_name] ] [ clean_lic [ –a ]]
Parameter Description
check_acctlic Checks the syntax of the $UVHOME/acct_licn.def file and reports any errors found.
list_acctlic Lists the current loaded account-based license and its usage.
reload_acctlic Reloads the $UVHOME/acct_licn.def file so that new definitions are applied.
report_lic Lists the current licensing state.
clean_lic Cleans up the current licensing state.
Note: This option is disabled at version 11.2.2 and later. The uvcleanupd daemon now automatically cleans the current licensing state.
–a Recomputes license counts at the UniVerse, package, and seat level.
Note: This option is disabled at version 11.2.2 and later. The uvcleanupd daemon now automatically cleans the current licensing state.
uvlictool Parameters
20-8 Administering UniVerse on UNIX Platforms
C:\UsMarch
1Administering UniData on Windows NT or Windows 20000
21 Chapter
ers\aw 17, 201
Beta Beta Beta Beta Beta Beta Beta Beta Beta Beta Beta Beta Beta Beta Beta Beta Beta Beta Beta Beta
Chapter 21: Account-based licensing
Configuring the license configuration . . . . . . . . . . . 21-3 Configuring the license configuration with the U2 Extensible
Administration tool . . . . . . . . . . . . . . . . 21-4 Verifying the acct_licn.def file . . . . . . . . . . . . 21-7 Listing the acct_licn.def file . . . . . . . . . . . . . 21-7 Reloading the acct_licn.def file . . . . . . . . . . . . 21-8 Listing licenses in use in a logical account . . . . . . . . 21-9
aite\Documents\U2Doc\UniVerse\11.2\Source\Adminunix\Ch21TOC.fm4 2:12 pm Administering UniData on Windows NT or Windows 2000
C:\Users\awaite\Documents\U2Doc\UniVerse\11.2\Source\Adminunix\Ch21.fm3/17/14
This chapter describes how to use UniVerse’s Account-based Licensing system.
Using Account-based licensing, you can divide the number of purchased licenses to different accounts or group of accounts. These account groups are referred to as logical account IDs. You define the number of licenses to allocate to each logical account ID, then UniVerse automatically manages the licenses consumed based on the configuration you define.
At current UniVerse versions, if you use device licensing connections, you cannot connect to multiple logical account-based licensing groups from the same client machine. This restriction does not apply to installations that do not have device licensing enabled.
20-2 Administering UniVerse on UNIX Platforms
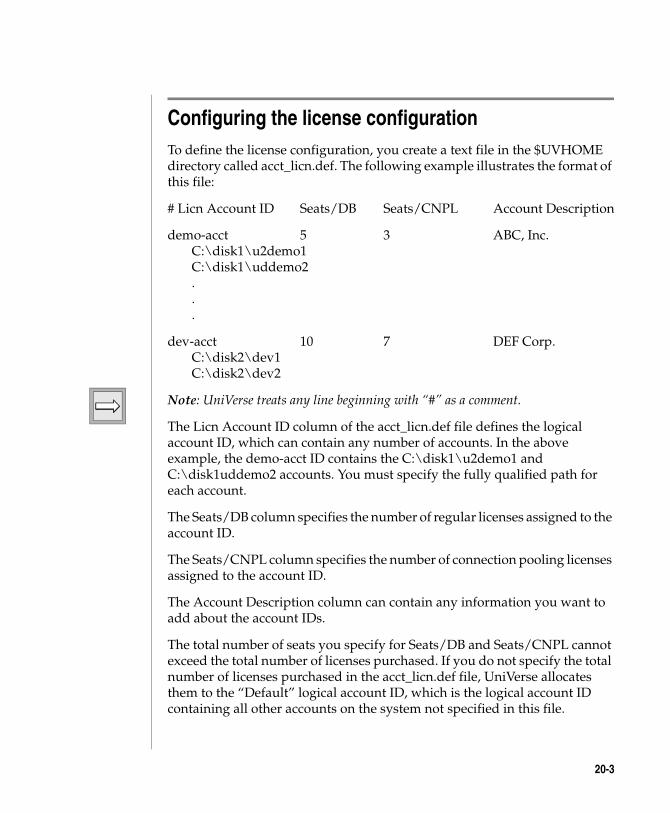
C:\Users\awaite\Documents\U2Doc\UniVerse\11.2\Source\Adminunix\Ch
Configuring the license configurationTo define the license configuration, you create a text file in the $UVHOME directory called acct_licn.def. The following example illustrates the format of this file:
# Licn Account ID Seats/DB Seats/CNPL Account Description
demo-acct 5 3 ABC, Inc. C:\disk1\u2demo1 C:\disk1\uddemo2 . . .
dev-acct 10 7 DEF Corp. C:\disk2\dev1 C:\disk2\dev2
Note: UniVerse treats any line beginning with “#” as a comment.
The Licn Account ID column of the acct_licn.def file defines the logical account ID, which can contain any number of accounts. In the above example, the demo-acct ID contains the C:\disk1\u2demo1 and C:\disk1uddemo2 accounts. You must specify the fully qualified path for each account.
The Seats/DB column specifies the number of regular licenses assigned to the account ID.
The Seats/CNPL column specifies the number of connection pooling licenses assigned to the account ID.
The Account Description column can contain any information you want to add about the account IDs.
The total number of seats you specify for Seats/DB and Seats/CNPL cannot exceed the total number of licenses purchased. If you do not specify the total number of licenses purchased in the acct_licn.def file, UniVerse allocates them to the “Default” logical account ID, which is the logical account ID containing all other accounts on the system not specified in this file.
20-3
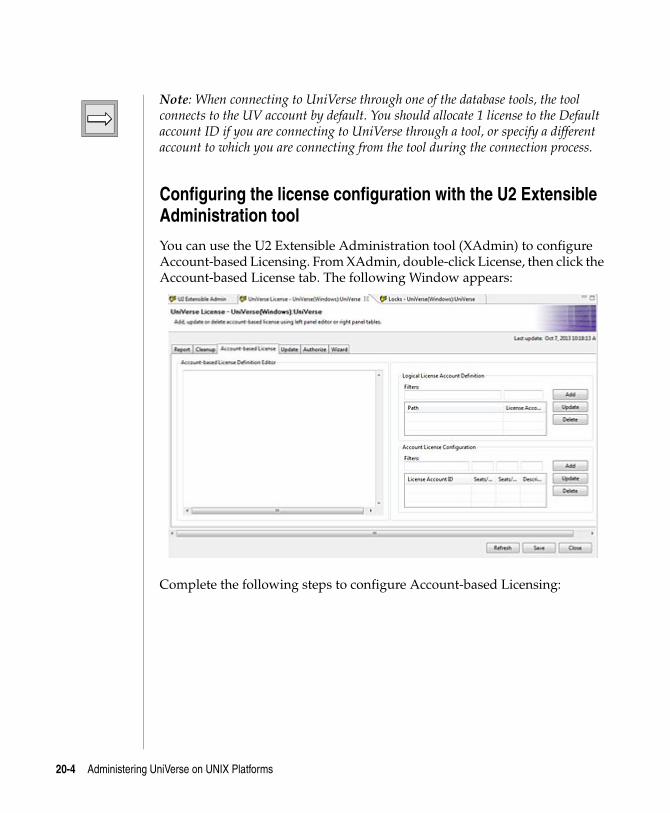
C:\Users\awaite\Documents\U2Doc\UniVerse\11.2\Source\Adminunix\Ch21.fm3/17/14
Note: When connecting to UniVerse through one of the database tools, the tool connects to the UV account by default. You should allocate 1 license to the Default account ID if you are connecting to UniVerse through a tool, or specify a different account to which you are connecting from the tool during the connection process.
Configuring the license configuration with the U2 Extensible Administration tool
You can use the U2 Extensible Administration tool (XAdmin) to configure Account-based Licensing. From XAdmin, double-click License, then click the Account-based License tab. The following Window appears:
Complete the following steps to configure Account-based Licensing:
20-4 Administering UniVerse on UNIX Platforms

C:\Users\awaite\Documents\U2Doc\UniVerse\11.2\Source\Adminunix\Ch
1. In the Logical License Account Definition area, click Add. The following window appears:
2. In the Path box, enter the full path to the account to which you want to allocate licenses, or click Browse to locate the account.
3. In the License Account ID box, enter the logical license account ID for the account.
4. In the Account License Configuration area, click Add. The following window appears:
20-5
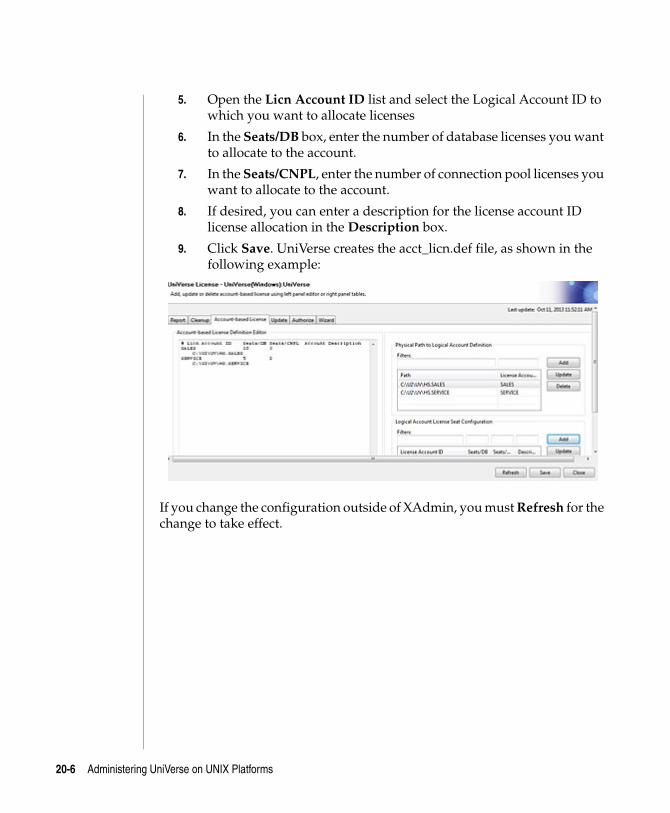
C:\Users\awaite\Documents\U2Doc\UniVerse\11.2\Source\Adminunix\Ch21.fm3/17/14
5. Open the Licn Account ID list and select the Logical Account ID to which you want to allocate licenses
6. In the Seats/DB box, enter the number of database licenses you want to allocate to the account.
7. In the Seats/CNPL, enter the number of connection pool licenses you want to allocate to the account.
8. If desired, you can enter a description for the license account ID license allocation in the Description box.
9. Click Save. UniVerse creates the acct_licn.def file, as shown in the following example:
If you change the configuration outside of XAdmin, you must Refresh for the change to take effect.
20-6 Administering UniVerse on UNIX Platforms
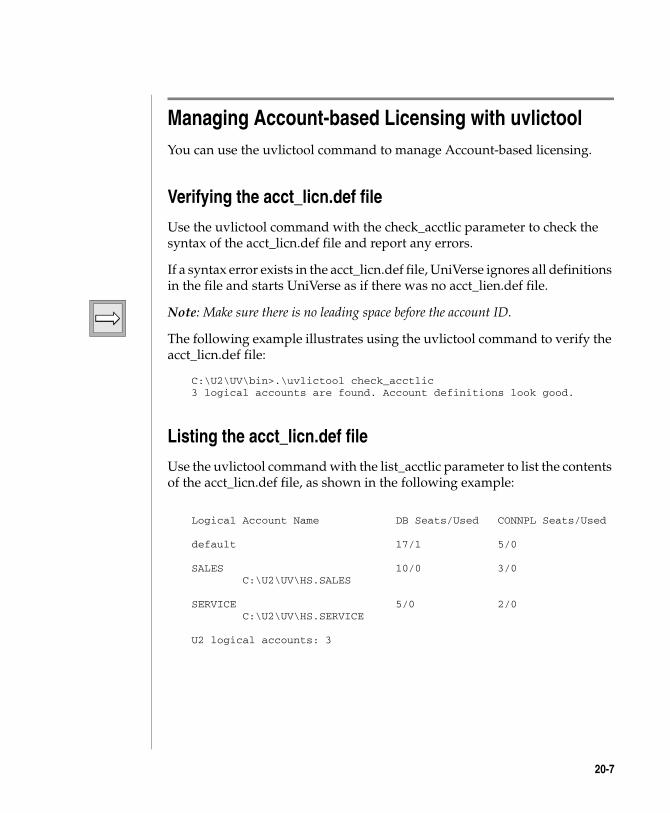
C:\Users\awaite\Documents\U2Doc\UniVerse\11.2\Source\Adminunix\Ch
Managing Account-based Licensing with uvlictoolYou can use the uvlictool command to manage Account-based licensing.
Verifying the acct_licn.def file
Use the uvlictool command with the check_acctlic parameter to check the syntax of the acct_licn.def file and report any errors.
If a syntax error exists in the acct_licn.def file, UniVerse ignores all definitions in the file and starts UniVerse as if there was no acct_lien.def file.
Note: Make sure there is no leading space before the account ID.
The following example illustrates using the uvlictool command to verify the acct_licn.def file:
C:\U2\UV\bin>.\uvlictool check_acctlic3 logical accounts are found. Account definitions look good.
Listing the acct_licn.def file
Use the uvlictool command with the list_acctlic parameter to list the contents of the acct_licn.def file, as shown in the following example:
Logical Account Name DB Seats/Used CONNPL Seats/Used
default 17/1 5/0
SALES 10/0 3/0 C:\U2\UV\HS.SALES
SERVICE 5/0 2/0 C:\U2\UV\HS.SERVICE
U2 logical accounts: 3
20-7
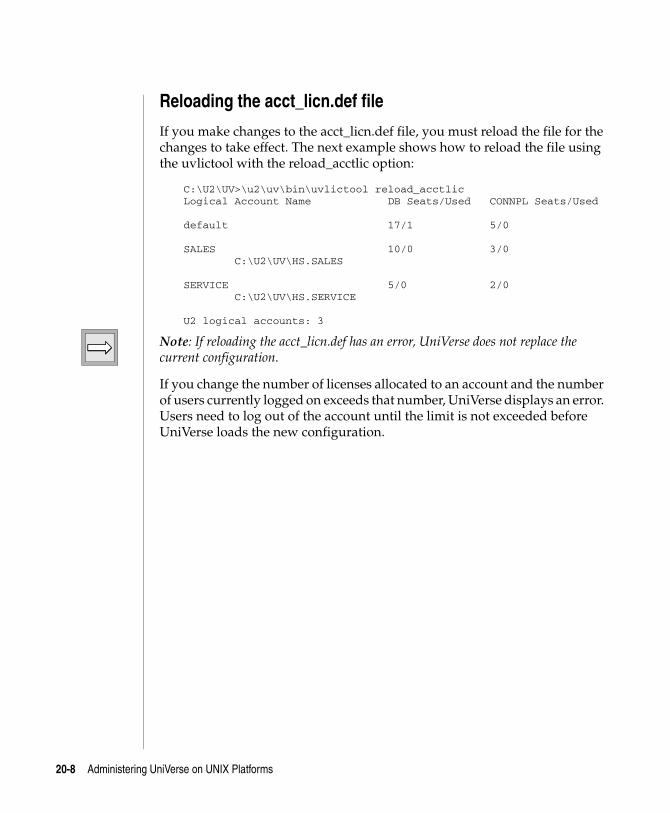
C:\Users\awaite\Documents\U2Doc\UniVerse\11.2\Source\Adminunix\Ch21.fm3/17/14
Reloading the acct_licn.def file
If you make changes to the acct_licn.def file, you must reload the file for the changes to take effect. The next example shows how to reload the file using the uvlictool with the reload_acctlic option:
C:\U2\UV>\u2\uv\bin\uvlictool reload_acctlicLogical Account Name DB Seats/Used CONNPL Seats/Used
default 17/1 5/0
SALES 10/0 3/0 C:\U2\UV\HS.SALES
SERVICE 5/0 2/0 C:\U2\UV\HS.SERVICE
U2 logical accounts: 3
Note: If reloading the acct_licn.def has an error, UniVerse does not replace the current configuration.
If you change the number of licenses allocated to an account and the number of users currently logged on exceeds that number, UniVerse displays an error. Users need to log out of the account until the limit is not exceeded before UniVerse loads the new configuration.
20-8 Administering UniVerse on UNIX Platforms
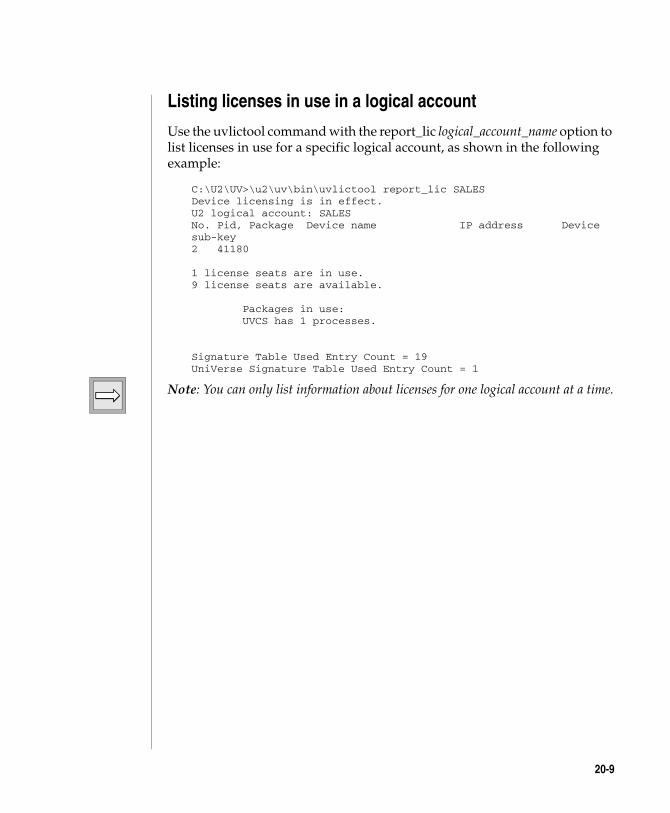
C:\Users\awaite\Documents\U2Doc\UniVerse\11.2\Source\Adminunix\Ch
Listing licenses in use in a logical account
Use the uvlictool command with the report_lic logical_account_name option to list licenses in use for a specific logical account, as shown in the following example:
C:\U2\UV>\u2\uv\bin\uvlictool report_lic SALESDevice licensing is in effect.U2 logical account: SALESNo. Pid, Package Device name IP address Device sub-key2 41180
1 license seats are in use.9 license seats are available.
Packages in use: UVCS has 1 processes.
Signature Table Used Entry Count = 19UniVerse Signature Table Used Entry Count = 1
Note: You can only list information about licenses for one logical account at a time.
20-9
C:\Us3/17/
AAppendix
Beta Beta Beta Beta Beta Beta Beta Beta Beta Beta Beta Beta Beta Beta Beta Beta Beta Beta Beta BetaBeta Beta
Appendix A: UniVerse system administration menus
On UNIX systems you can use the UniVerse System Administration menus in addition to or instead of the U2 Extensible Administration Tool to administer UniVerse. These menus let you do normal UniVerse maintenance and some UNIX system administration without having to use the UNIX shell commands or file formats.The UniVerse System Administration menus are available only to UniVerse Administrators working in the UV account. To have access to all files used for system administration, you must log in as a UniVerse Administrator.
Once you are logged on, activate the System Administration menus from the UNIX shell by changing to the UV account directory (usually /usr/uv):
# cd /usr/uv
Then use the command bin/uv:
# bin/uv
From an account in the UniVerse environment, you can use the LOGTO command to log to the UV account.
ers\awaite\Documents\U2Doc\UniVerse\11.2\Source\Adminunix\AppA.fm14
C:\Users\awaite\Documents\U2Doc\UniVerse\11.2\Source\Adminunix\AppA.fm3/17/14
Beta Beta Beta Beta Beta Beta Beta Beta Beta Beta Beta Beta Beta Beta Beta Beta Beta Beta Beta Beta Beta Beta Beta Beta Beta
Overview of menus and data entry screensThe System Administration menus and data entry screens look and work the way Motif menus do. The main menu bar appears at the top of the screen. Each option in the menu bar stands for a pull-down menu that scrolls down from the main menu bar when the user chooses an option.
Because the menu bar is the primary way to access the system administration functions, browsing through the menus gives a good overview of system administration functions.
Menus list actions that can be performed and options that display submenus (cascading menus). Options followed by an arrow ( => ) display a submenu. To display a submenu, highlight the option, then choose it.
To start an action, simply choose it. If a data entry screen appears, instructions in the lower part of the screen prompt you to enter the appropriate data. System messages also appear at the lower part of the screen.
The options listed on the submenus are names or descriptions of UniVerse sentences that are stored as part of the menu. Unlike using sentences that are stored in the VOC file, you need not remember sentence names to use an option on a menu. You need only examine the options listed on the menu, and then choose the appropriate one for the task you want to perform.
Moving around the menus
Certain responses work at all levels of the menu system. At any menu bar, use the Right Arrow key (→) and the Left Arrow key (←) to move the cursor to the option that you want.
Note that → does one of two things. If the highlighted menu option calls a submenu, pressing → displays the submenu. If the option does not call a submenu, pressing → displays the submenu belonging to the next option on the main menu bar.
A-2
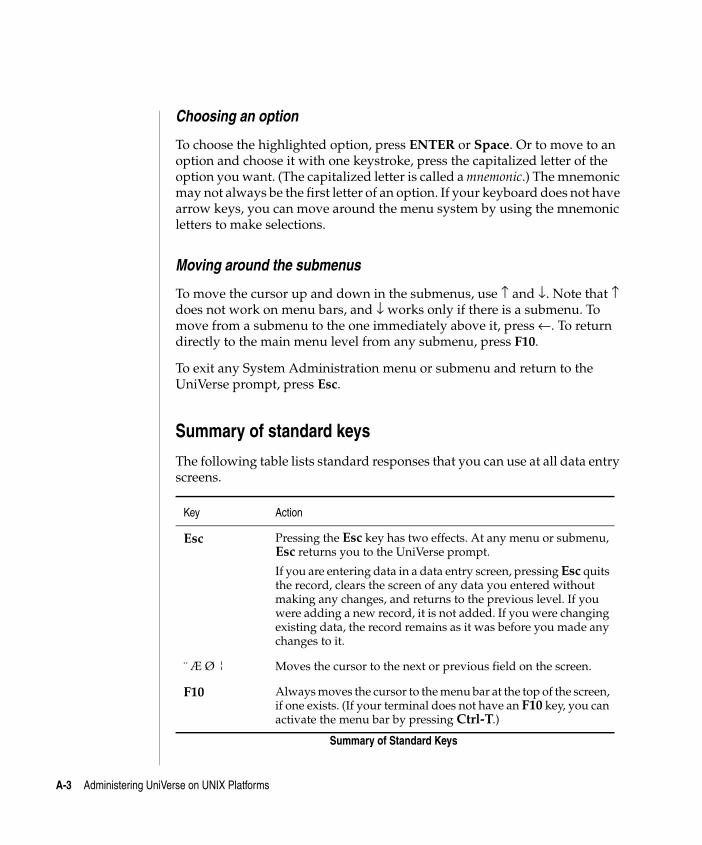
C:\Users\awaite\Documents\U2Doc\UniVerse\11.2\Source\Adminunix\AppA.fm3/17/14
Beta Beta Beta Beta Beta Beta Beta Beta Beta Beta Beta Beta Beta Beta Beta Beta Beta Beta Beta Beta Beta Beta Beta Beta Beta
Choosing an option
To choose the highlighted option, press ENTER or Space. Or to move to an option and choose it with one keystroke, press the capitalized letter of the option you want. (The capitalized letter is called a mnemonic.) The mnemonic may not always be the first letter of an option. If your keyboard does not have arrow keys, you can move around the menu system by using the mnemonic letters to make selections.
Moving around the submenus
To move the cursor up and down in the submenus, use ↑ and ↓. Note that ↑ does not work on menu bars, and ↓ works only if there is a submenu. To move from a submenu to the one immediately above it, press ←. To return directly to the main menu level from any submenu, press F10.
To exit any System Administration menu or submenu and return to the UniVerse prompt, press Esc.
Summary of standard keys
The following table lists standard responses that you can use at all data entry screens.
Key Action
Esc Pressing the Esc key has two effects. At any menu or submenu, Esc returns you to the UniVerse prompt.
If you are entering data in a data entry screen, pressing Esc quits the record, clears the screen of any data you entered without making any changes, and returns to the previous level. If you were adding a new record, it is not added. If you were changing existing data, the record remains as it was before you made any changes to it.
¨ Æ Ø ¦ Moves the cursor to the next or previous field on the screen.
F10 Always moves the cursor to the menu bar at the top of the screen, if one exists. (If your terminal does not have an F10 key, you can activate the menu bar by pressing Ctrl-T.)
Summary of Standard Keys
A-3 Administering UniVerse on UNIX Platforms
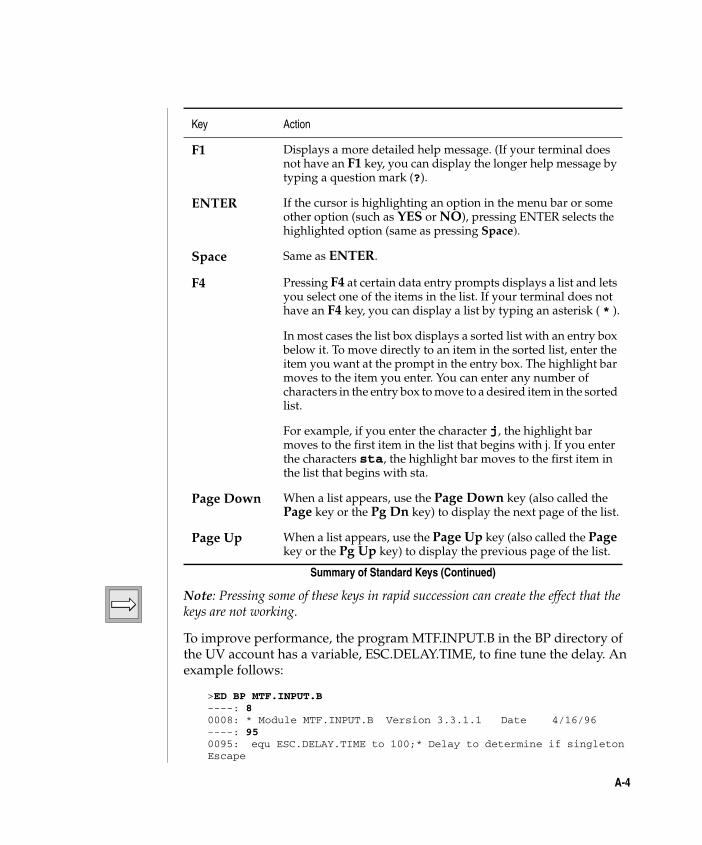
C:\Users\awaite\Documents\U2Doc\UniVerse\11.2\Source\Adminunix\AppA.fm3/17/14
Beta Beta Beta Beta Beta Beta Beta Beta Beta Beta Beta Beta Beta Beta Beta Beta Beta Beta Beta Beta Beta Beta Beta Beta Beta
Note: Pressing some of these keys in rapid succession can create the effect that the keys are not working.
To improve performance, the program MTF.INPUT.B in the BP directory of the UV account has a variable, ESC.DELAY.TIME, to fine tune the delay. An example follows:
>ED BP MTF.INPUT.B----: 8 0008: * Module MTF.INPUT.B Version 3.3.1.1 Date 4/16/96 ----: 95 0095: equ ESC.DELAY.TIME to 100;* Delay to determine if singleton Escape
F1 Displays a more detailed help message. (If your terminal does not have an F1 key, you can display the longer help message by typing a question mark (?).
ENTER If the cursor is highlighting an option in the menu bar or some other option (such as YES or NO), pressing ENTER selects the highlighted option (same as pressing Space).
Space Same as ENTER.
F4 Pressing F4 at certain data entry prompts displays a list and lets you select one of the items in the list. If your terminal does not have an F4 key, you can display a list by typing an asterisk ( * ).
In most cases the list box displays a sorted list with an entry box below it. To move directly to an item in the sorted list, enter the item you want at the prompt in the entry box. The highlight bar moves to the item you enter. You can enter any number of characters in the entry box to move to a desired item in the sorted list.
For example, if you enter the character j, the highlight bar moves to the first item in the list that begins with j. If you enter the characters sta, the highlight bar moves to the first item in the list that begins with sta.
Page Down When a list appears, use the Page Down key (also called the Page key or the Pg Dn key) to display the next page of the list.
Page Up When a list appears, use the Page Up key (also called the Page key or the Pg Up key) to display the previous page of the list.
Key Action
Summary of Standard Keys (Continued)
A-4
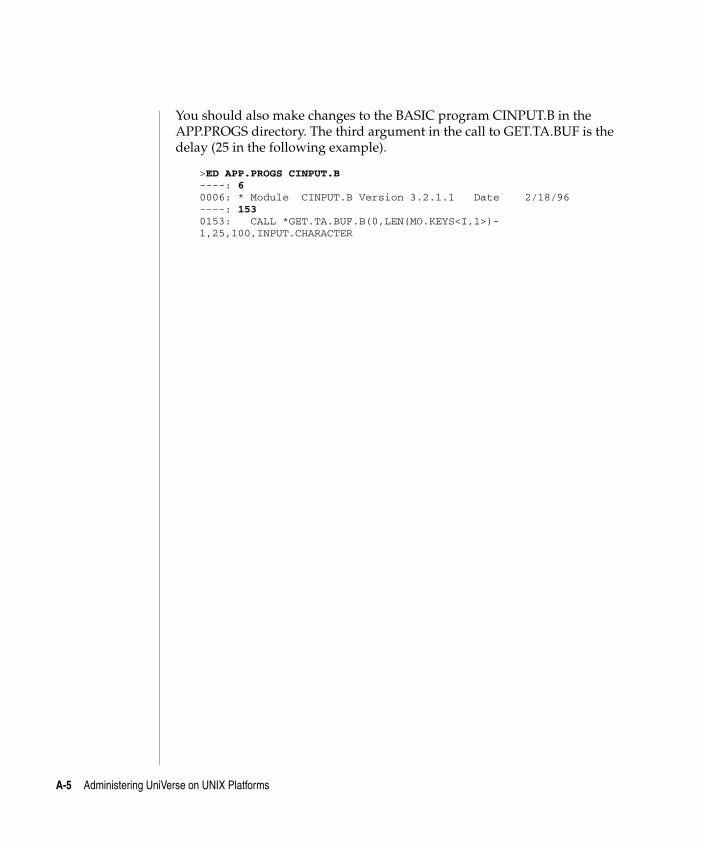
C:\Users\awaite\Documents\U2Doc\UniVerse\11.2\Source\Adminunix\AppA.fm3/17/14
Beta Beta Beta Beta Beta Beta Beta Beta Beta Beta Beta Beta Beta Beta Beta Beta Beta Beta Beta Beta Beta Beta Beta Beta Beta
You should also make changes to the BASIC program CINPUT.B in the APP.PROGS directory. The third argument in the call to GET.TA.BUF is the delay (25 in the following example).
>ED APP.PROGS CINPUT.B ----: 6 0006: * Module CINPUT.B Version 3.2.1.1 Date 2/18/96 ----: 153 0153: CALL *GET.TA.BUF.B(0,LEN(MO.KEYS<I,1>)-1,25,100,INPUT.CHARACTER
A-5 Administering UniVerse on UNIX Platforms
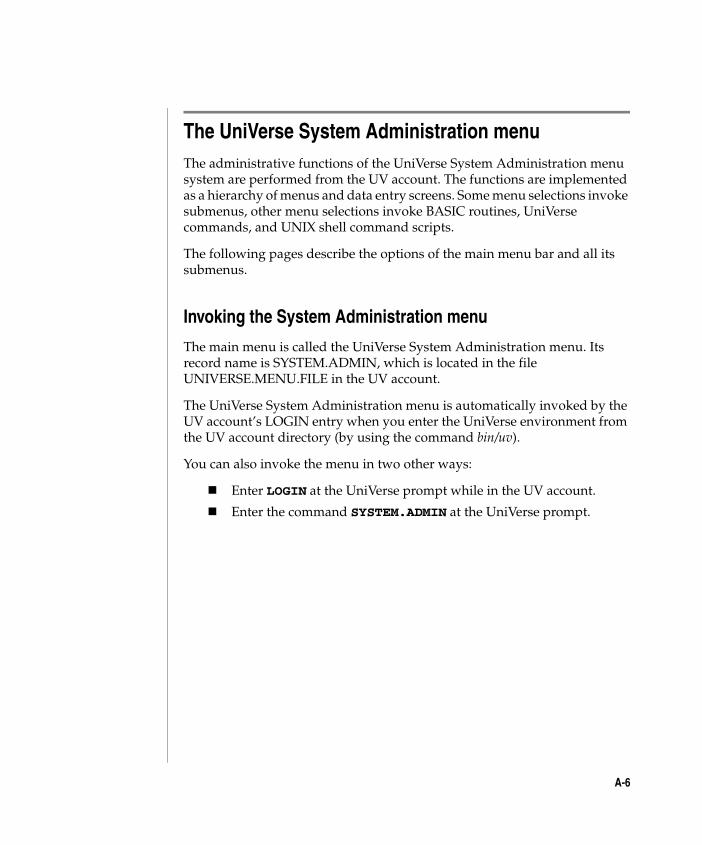
C:\Users\awaite\Documents\U2Doc\UniVerse\11.2\Source\Adminunix\AppA.fm3/17/14
Beta Beta Beta Beta Beta Beta Beta Beta Beta Beta Beta Beta Beta Beta Beta Beta Beta Beta Beta Beta Beta Beta Beta Beta Beta
The UniVerse System Administration menuThe administrative functions of the UniVerse System Administration menu system are performed from the UV account. The functions are implemented as a hierarchy of menus and data entry screens. Some menu selections invoke submenus, other menu selections invoke BASIC routines, UniVerse commands, and UNIX shell command scripts.
The following pages describe the options of the main menu bar and all its submenus.
Invoking the System Administration menu
The main menu is called the UniVerse System Administration menu. Its record name is SYSTEM.ADMIN, which is located in the file UNIVERSE.MENU.FILE in the UV account.
The UniVerse System Administration menu is automatically invoked by the UV account’s LOGIN entry when you enter the UniVerse environment from the UV account directory (by using the command bin/uv).
You can also invoke the menu in two other ways:
Enter LOGIN at the UniVerse prompt while in the UV account.
Enter the command SYSTEM.ADMIN at the UniVerse prompt.
A-6
C:\Users\awaite\Documents\U2Doc\UniVerse\11.2\Source\Adminunix\AppA.fm3/17/14
Beta Beta Beta Beta Beta Beta Beta Beta Beta Beta Beta Beta Beta Beta Beta Beta Beta Beta Beta Beta Beta Beta Beta Beta Beta
Package optionUse the Package option to do the following:
Install and deinstall additional software packages
Administer the UniRPC (remote procedure call)
Administer UniVerse licenses
Administer the deadlock daemon
Administer the BASIC SQL Client interface (BCI)
Administer the General Calling Interface (GCI)
When you choose Package from the UniVerse System Administration menu, the Package menu appears.
Installing and deinstalling a software package
To install a software package, choose Install package from the Package menu, then enter the name of the software package and the name of the device from which you are installing it.
To deinstall a software package, choose De-install package from the Package menu, then enter the name of the software package. To see a list of all currently installed software packages, press F4 or enter an asterisk ( * ) at the prompt.
For information about specific software packages, refer to the documentation provided with the package you want to install.
To display the license number, the current user limit, and the current license expiration date, exit the menus and, at the command prompt, use the CONFIG command with no options.
Administering the UniRPC
The Rpc administration menu lets you do the following:
Define or change the UniRPC port number
Start and stop the UniRPC daemon
A-7 Administering UniVerse on UNIX Platforms
C:\Users\awaite\Documents\U2Doc\UniVerse\11.2\Source\Adminunix\AppA.fm3/17/14
Beta Beta Beta Beta Beta Beta Beta Beta Beta Beta Beta Beta Beta Beta Beta Beta Beta Beta Beta Beta Beta Beta Beta Beta Beta
Add, change, or delete network nodes
Defining the UniRPC port number
To define the UniRPC port number:
1. Choose Rpc administration from the Package menu, then choose Change the rpc port. The following message appears:
2. The well-known port number defined for unirpc is '31438'. Do you wish to continue using this well-known port number for the unirpc well-known port?
3. At the prompt, choose Yes to accept the default UniRPC port number. Choose No to specify another port number.
4. If you choose No, the system prompts you to enter a new UniRPC port number. When this number is accepted, the following message appears:
5. /etc/services successfully written.
Starting the UniRPC daemon
To start the UniRPC daemon:
1. Choose Rpc administration from the Package menu, then choose Start the rpc daemon.
2. At the prompt, enter the name of the file to send all error and system messages to (this can be useful for debugging). Enter a space to display messages on your screen. Press ENTER if you don’t want to display or save messages.
3. At the next prompt, choose Yes to start the UniRPC daemon. Choose No to return to the Rpc administration menu.
Adding, changing, or deleting network nodes
Use the Maintain the RPC screen to add nodes to the network, modify the definitions for nodes on the network, and delete nodes from the network. You can also list the nodes that are defined in the /etc/hosts file.
To display the Maintain the RPC screen, choose Rpc administration from the System Administration menu, then choose Modify /etc/hosts.
A-8
C:\Users\awaite\Documents\U2Doc\UniVerse\11.2\Source\Adminunix\AppA.fm3/17/14
Beta Beta Beta Beta Beta Beta Beta Beta Beta Beta Beta Beta Beta Beta Beta Beta Beta Beta Beta Beta Beta Beta Beta Beta Beta
You can add, modify, or delete nodes by entering information in this screen. This changes the TCP/IP hosts file (/etc/hosts). The Maintain the RPC screen prompts you for the following information:
Machine name
Enter the node name for a machine (node names are case-sensitive).
Node ID
Enter the TCP/IP Internet address for a machine.
Adding nodes to the network
Use the Maintain the RPC screen to add machines to the TCP/IP hosts file (/etc/hosts). Enter the machine name and node ID in the fields provided.
If you enter the name of a machine already defined in /etc/hosts, the screen displays the name of the machine and its node ID. If you enter a node ID for an existing machine, the screen displays the following message:
A record with that Node id already exists. Is this a Synonym?
To define the new machine’s name as a synonym for the existing machine, choose Yes, otherwise choose No.
Changing an entry in the TCP/IP hosts file
Use the Maintain the RPC screen to change a node’s name or ID. For example, to change the machine name, specify the new name with the old node ID. To change the node ID, specify the new node ID with the old machine name.
To display the machines currently on the network, enter an asterisk ( * ) at the Machine Name prompt, or press F4. Use the arrow keys to move through the list, highlighting the entry you want to modify. To choose the highlighted entry, press ENTER.
A-9 Administering UniVerse on UNIX Platforms
C:\Users\awaite\Documents\U2Doc\UniVerse\11.2\Source\Adminunix\AppA.fm3/17/14
Beta Beta Beta Beta Beta Beta Beta Beta Beta Beta Beta Beta Beta Beta Beta Beta Beta Beta Beta Beta Beta Beta Beta Beta Beta
Deleting nodes from the network
Use the Maintain the RPC screen to delete a node definition from the TCP/IP hosts file. You can either enter the machine name of the node you want to delete, or you can enter an asterisk ( * ) or press F4 to display a list of names in the TCP/IP hosts file. Use the arrow keys to move through the list and to highlight the entry you want to delete. To choose the highlighted entry, press ENTER.
Press F10 to move to the menu bar, then choose Action, then choose Delete entry to delete the node from the network. The system asks you to confirm the deletion. Choose Yes to delete the node from /etc/hosts. Choose No to cancel the deletion. You can then specify a different node to delete, or you can return to the Rpc administration menu.
Listing nodes on the network
To list nodes on the network, press F10 to move to the menu bar of the Maintain the RPC screen, then choose Action, then choose List entries.
Changing the UniRPC port number
If you change the UniRPC port number, you must change it on all other systems that communicate via the UniRPC. Do the following:
1. Choose Rpc administration from the Package menu, then choose Change the rpc port. The current UniRPC port number is displayed.
2. At the prompt, choose Yes to accept the current UniRPC port number. Choose No to change the port number.
3. If you choose No, the system prompts you to enter a new UniRPC port number. When this number is accepted, the following message appears:
/etc/services successfully written.
Stopping the UniRPC daemon
1. From the main System Administration menu, choose Package, then choose Rpc administration, then choose Halt the rpc daemon.
A-10
C:\Users\awaite\Documents\U2Doc\UniVerse\11.2\Source\Adminunix\AppA.fm3/17/14
Beta Beta Beta Beta Beta Beta Beta Beta Beta Beta Beta Beta Beta Beta Beta Beta Beta Beta Beta Beta Beta Beta Beta Beta Beta
2. At the prompt, choose Yes to stop the UniRPC daemon. Choose No to return to the Rpc administration menu.
Stopping the UniRPC does not interrupt active UniRPC processes.
Note: On some systems, after you stop the UniRPC daemon and all active services terminate, it can take five minutes for UNIX or TCP/IP to recognize that the network connections used by the UniRPC are available again. Wait at least five minutes after halting the UniRPC daemon before you restart it. Use the UNIX netstat command to see what services are still active.
UniVerse license administration
The Package menu also includes the UniVerse License administration option. Use this option to authorize a licensed number of users on your system.
When you choose License administration from the Package menu, UniVerse displays the Upgrade UniVerse License data entry screen. To upgrade your license, enter the authorization code obtained from your vendor.
Administering the deadlock daemon
You can use the System Administration menus or the uvdlockd command to do the following:
Start and stop the deadlock daemon
Set the restart time, resolution strategy, and deadlock log file location
Examine the deadlock log files
Delete deadlock log files
Display the status of the deadlock daemon
1. To display the Deadlock Daemon Administration menu, choose Package from the System Administration menu, then choose dEadlock daemon administration.
A-11 Administering UniVerse on UNIX Platforms
C:\Users\awaite\Documents\U2Doc\UniVerse\11.2\Source\Adminunix\AppA.fm3/17/14
Beta Beta Beta Beta Beta Beta Beta Beta Beta Beta Beta Beta Beta Beta Beta Beta Beta Beta Beta Beta Beta Beta Beta Beta Beta
2. Choose the administrative task you want to perform from the following options:
Examine the deadlock daemon logfile. This option displays the contents of the deadlock log file. This log file records the date and time the deadlock daemon is started up and shut down, any detected deadlocks, and the resolutions applied to them.
Start the deadlock daemon. This option starts the deadlock daemon (uvdlockd) if it is not already running. The data entry screen appears:
Enter the interval time in seconds. For the resolution strategy, enter 0 (random), 1 (newest), or 2 (fewest locks). Press Return to accept the default log file location, or enter another path. Enter Y if you want the deadlock daemon to start up each time you restart UniVerse, oth-erwise enter N. Enter Y to store the current setting in the deadlock daemon configuration file (uvdlockd.config), otherwise enter N.
Halt the deadlock daemon. This option shuts down the deadlock daemon.
Purge the logfile. This option clears the deadlock log file.
Check for deadlock. This option generates a report based on a one-shot analysis of the lock-waiter tables and any detected deadlocks.
seLect victim for deadlock resolution. This option lets you select the user number of a process to abort, thus resolving the deadlock.
Resolving deadlocks manually
You can resolve deadlocks manually in two ways:
Use the seLect victim for deadlock resolution option from the Deadlock Daemon Administration menu
Use the uvdlockd command
Complete the following steps to resolve a deadlock manually:
1. Analyze the lock-waiter tables to see if there are any current deadlocks. Choose the Check for deadlock option from the Deadlock Daemon Administration menu.
2. If there is a deadlock, determine which deadlocked user process you want to abort.
A-12
C:\Users\awaite\Documents\U2Doc\UniVerse\11.2\Source\Adminunix\AppA.fm3/17/14
Beta Beta Beta Beta Beta Beta Beta Beta Beta Beta Beta Beta Beta Beta Beta Beta Beta Beta Beta Beta Beta Beta Beta Beta Beta
3. Abort the user process by choosing seLect victim for deadlock resolution from the Deadlock Daemon Administration menu.
Administering SQL Client and GCI
For information about administering the BASIC SQL Client Interface (BCI) and the General Calling Interface (GCI), see UniVerse BASIC SQL Client Interface Guide and UniVerse GCI Guide.
A-13 Administering UniVerse on UNIX Platforms
C:\Users\awaite\Documents\U2Doc\UniVerse\11.2\Source\Adminunix\AppA.fm3/17/14
Beta Beta Beta Beta Beta Beta Beta Beta Beta Beta Beta Beta Beta Beta Beta Beta Beta Beta Beta Beta Beta Beta Beta Beta Beta
Accounts optionUse the Accounts option to create and maintain user login accounts, UniVerse accounts, and user groups. The Accounts option updates and maintains the following files:
/etc/group
/etc/passwd
UV.ACCOUNT
When you choose Accounts from the UniVerse System Administration menu, the Accounts menu appears..
The following sections tell how to use the System Administration menus to add, change, and delete user login accounts, user groups, and UniVerse accounts.
Using the Accounts menu
To display the Accounts menu, choose Accounts from the UniVerse System Administration menu. You can then choose to add, change, or delete user groups, user login accounts, or UniVerse accounts.
The data entry screens for adding a new user group, adding a user, and adding a new UniVerse account include a menu bar at the top of the screen that provides the following three options:
File Action Help
The File option lets you exit the data entry screen. The Action option lets you modify or delete another group, user, or account. The Help option provides further information on each of these menu bar options.
You can also list all groups, users, or accounts currently defined in the /etc/group, /etc/passwd, or UV.ACCOUNT files. Display a list either by choosing List, or by pressing F4 or * at certain prompts.
A-14
C:\Users\awaite\Documents\U2Doc\UniVerse\11.2\Source\Adminunix\AppA.fm3/17/14
Beta Beta Beta Beta Beta Beta Beta Beta Beta Beta Beta Beta Beta Beta Beta Beta Beta Beta Beta Beta Beta Beta Beta Beta Beta
Inside a list, use the Page Down key to display the next page of the list. Use the Page Up key to display the previous page. To choose an item in the list, use the Down and Up Arrow keys to move the highlight bar to the item you want then press Return or Space. Or, at the prompt in the entry box just below the list box, enter the item you want (or the first unique characters of it) to move the highlight bar directly to that item.
Some fields on the System Administration menus have a limited amount of space, such as, you can only enter 44 characters for the user’s home directory. If you need to specify a longer path, edit the /etc/passwd file.
Maintaining users and user groups
You can do any of the following tasks to maintain user groups and user login accounts:
Add a new user group or user login account.
Change information about an existing user group or user login account.
Delete a user group or user login account from the system.
You use UNIX commands to perform these tasks. In UniVerse you can register SQL users and create SQL schemas with the GRANT and CREATE SCHEMA statements.
Adding a new user group
Complete the following steps to add a new user group:
1. Choose Add a group from the Accounts menu.
2. Enter the name of a new user group. At the Group ID prompt, enter the group ID number, or if you want to assign the next default group ID number, press ENTER at the prompt.
3. Choose Yes to add the new group. UniVerse updates the /etc/group file and clears the data entry screen. You can now enter another group name.
When you are finished adding user groups, press Esc to return to the System Administration menu.
A-15 Administering UniVerse on UNIX Platforms
C:\Users\awaite\Documents\U2Doc\UniVerse\11.2\Source\Adminunix\AppA.fm3/17/14
Beta Beta Beta Beta Beta Beta Beta Beta Beta Beta Beta Beta Beta Beta Beta Beta Beta Beta Beta Beta Beta Beta Beta Beta Beta
Changing a user group
To change the name of an existing user group:
1. Choose Modify a group from the Accounts menu. A list of all groups currently defined in the /etc/group file appears.
2. Choose the group whose name you want to change.
3. Enter the new name of the group, then choose Yes to save the new information.
When you save the revised user group information, UniVerse updates the /etc/group file. You are automatically returned to the System Administration menu.
Only the name of a group can be changed using the Modify a group option. The group ID number cannot be changed. To change a group ID number while retaining the group’s name:
1. Delete the existing group.
2. Add a new group, specifying the old group name and the new group ID number.
Deleting a user group
To delete an existing user group:
1. Choose Delete a group from the Accounts menu. A list of all groups currently defined in the /etc/group file appears.
2. Choose the name of the group you want to delete.
3. Choose Yes to delete the group.
When you are finished deleting groups, UniVerse updates the /etc/group file. You are returned to the System Administration menu.
Adding, changing, and deleting individual users
You can use the UniVerse System Administration menus to add individual users, change information about existing users, and delete users from the system. You can create new accounts with the SQL CREATE SCHEMA statement.
A-16
C:\Users\awaite\Documents\U2Doc\UniVerse\11.2\Source\Adminunix\AppA.fm3/17/14
Beta Beta Beta Beta Beta Beta Beta Beta Beta Beta Beta Beta Beta Beta Beta Beta Beta Beta Beta Beta Beta Beta Beta Beta Beta
When you add a new user, change information about a user, or delete a user from the system, UniVerse does the following:
Edits the /etc/passwd file
Adds, changes, or deletes the user’s home directory
Sets or changes file access permissions, user ownership, and group ownership for the files and subdirectories contained in the user’s home directory
Note: Your system may require users to be added using UNIX shell commands. See the UniVerse release notes for your system before you try to change the /etc/passwd file.
Adding a new user
To add a new user to the system:
1. Choose Accounts from the System Administration menu, then choose Users, then choose Add a User. UniVerse displays the Add a User screen.
2. Enter the required information at the prompts.
3. With your entries specified, choose Yes to add a new user to the system. UniVerse adds a line containing the specified user information to the /etc/passwd file.
4. You are prompted to set file permissions for the user’s home directory and all its dependent files and directories.
You can either set the default permissions, which give all users permission to read, write, or execute all files and directories, or you can specify a more limited set of permissions. If the directory specified as the user’s home directory does not yet exist on the system, UniVerse creates it.
The procedure for setting file permissions is described later in “Adding a new UniVerse account” on page 20.
What happens next depends on whether you specified UniVerse or a UNIX shell as the user’s environment:
A-17 Administering UniVerse on UNIX Platforms
C:\Users\awaite\Documents\U2Doc\UniVerse\11.2\Source\Adminunix\AppA.fm3/17/14
Beta Beta Beta Beta Beta Beta Beta Beta Beta Beta Beta Beta Beta Beta Beta Beta Beta Beta Beta Beta Beta Beta Beta Beta Beta
If you specified UNIX for Login Shell, a UniVerse account is not created for this user (you are not prompted to enter any information pertaining to a UniVerse account). Proceed to the next prompt (go to step 2).
If you specified UniVerse for Login Shell, you are prompted to enter information about the UniVerse account. Proceed to the next prompt (go to step 5).
1. Perform this step only if you specified UniVerse for Login Shell. You must create a UniVerse account for the user’s home directory:
You are prompted to specify which compatibility flavor the UniVerse account is to have. UniVerse accounts can be one of several standard flavors: INFORMATION, PICK, REALITY, IN2, PIOPEN, or IDEAL UniVerse. IDEAL is the default.
Choose the compatibility flavor for the account you are creating.
The UniVerse account is put in the user’s home directory, that is, the special UniVerse files are copied into the directory. This can take a few minutes.
You are asked if you want to add the name of the UniVerse account to the Accounts file, UV.ACCOUNT. If you choose Yes, you are prompted to enter the name of the UniVerse account. (Normally, UniVerse account names are all uppercase letters.)
2. The system asks if you want to use the default login file. The login file is a file used by the system to initialize the user’s working environment when the user logs on. Login files differ depending on which login shell the user will use.
If the user’s login shell is the Bourne shell, the login file will be the .profile file. If the user’s login shell is UniVerse, the login file will be the LOGIN entry. The default .profile and LOGIN files are in the directory /usr/uv/sample.
3. Once you have entered all the relevant user information, the cursor returns to the Logname prompt at the top of the screen. You can now add another user to the system. To return to the System Administration menu, press Esc.
Note: Your system may require new users to be added through UNIX. Please see the UniVerse release notes for your system before trying to change the /etc/passwd file.
A-18

C:\Users\awaite\Documents\U2Doc\UniVerse\11.2\Source\Adminunix\AppA.fm3/17/14
Beta Beta Beta Beta Beta Beta Beta Beta Beta Beta Beta Beta Beta Beta Beta Beta Beta Beta Beta Beta Beta Beta Beta Beta Beta
Changing user information
To modify an existing user definition:
1. Choose Accounts from the System Administration menu, then choose Users, then choose Modify a User. UniVerse lists all users currently defined in the /etc/passwd file.
2. From the list, choose the name of the user whose data you want to modify. UniVerse displays information about that user.
3. To change the information in any field, use the down and up arrows to move the cursor to the field you want, then enter the new data at the prompt. Continue in the same way to make as many changes as you want.
4. When the data is as you want it, choose Yes to save your changes. UniVerse updates the /etc/passwd file and makes any required changes to the files in the user’s home directory such as any ownership, group ownership, or file permission changes.
5. You are asked if you want to modify another user. Choose Yes to make more changes, or choose No to return to the System Administration menu.
Deleting a user
To delete a user from the system:
1. Choose Accounts from the System Administration menu, then choose Users, then choose Delete a User. UniVerse displays a list of all users currently defined in the /etc/passwd file.
2. From the list, choose the name of the user to remove from the system. UniVerse displays information about that user and asks if you want to delete the user.
3. If you choose Yes, UniVerse deletes the user by removing a line from the /etc/passwd file, displays the list of current users again, and asks if you want to delete another user.
4. Choose Yes to delete another user, or No to return to the System Administration menu.
A-19 Administering UniVerse on UNIX Platforms
C:\Users\awaite\Documents\U2Doc\UniVerse\11.2\Source\Adminunix\AppA.fm3/17/14
Beta Beta Beta Beta Beta Beta Beta Beta Beta Beta Beta Beta Beta Beta Beta Beta Beta Beta Beta Beta Beta Beta Beta Beta Beta
Maintaining UniVerse accounts
You can do any of the following tasks to maintain UniVerse accounts:
Add a new account.
Change information about an existing account.
Delete an account from the system.
You can perform these tasks using the System Administration menus. To maintain accounts in this way, choose Accounts from the System Administration menu, then choose Accounts from the submenu. The following sections tell how to use the System Administration menus to add, change, and delete UniVerse accounts.
Adding a new UniVerse account
To add a new UniVerse account:
1. Choose Accounts from the System Administration menu, then choose Accounts from the submenu, then choose Add an Account. UniVerse displays the Add an Account screen.
2. At the Account Name prompt, enter the name of the new UniVerse account. (Typically, UniVerse account names are all uppercase letters, whereas UNIX user names are all lowercase letters.)
3. Before specifying the new name, you can view the list of existing accounts. To list the current contents of the UV.ACCOUNT file, press F4 or enter an asterisk ( * ) at the prompt.
A-20
C:\Users\awaite\Documents\U2Doc\UniVerse\11.2\Source\Adminunix\AppA.fm3/17/14
Beta Beta Beta Beta Beta Beta Beta Beta Beta Beta Beta Beta Beta Beta Beta Beta Beta Beta Beta Beta Beta Beta Beta Beta Beta
4. At the Directory prompt, enter one of the following:
The full path of the UNIX directory where the UniVerse account is to be located
An existing user’s login name
A user ID number
The name of an existing UniVerse account
One of the following results occurs depending on what you enter at the Directory prompt:
If you enter an existing directory path, the UniVerse account is created in that directory. If you enter the path of a directory that does not exist, the directory is created.
If you enter an existing user login name or user ID number, that user’s home directory becomes the directory for the UniVerse account.
If you enter an existing UniVerse account name, the new account name becomes a synonym for the existing UniVerse account.
5. UniVerse asks if you want to set default file permissions for the directory where the account is located. To accept the default permissions, press ENTER at the prompt.
If you answer No, you are prompted to enter the file permissions you want to assign. Valid values are in either of the following formats: a 9-character string, or a 3-digit octal value.
Note: The file permissions assigned here will be applied to all files and subdirectories contained in the directory where the UniVerse account is located, regardless of whether or not they are UniVerse files and directories.
6. UniVerse prompts you to enter the name of a user to be the owner of the account and its files. You can enter the name of either an existing user or a new one. To see a list of all users currently defined in the /etc/passwd file, press F4 or enter an asterisk (*) at the prompt.
If you make an existing user the owner, that user’s group becomes the group owner of the account.
If you create a new user to be the account’s owner, you are prompted to specify a group owner for the account. Enter the group name at the prompt. To see a list of all groups currently defined in the /etc/group file, press F4 or enter an asterisk (*) at the prompt.
A-21 Administering UniVerse on UNIX Platforms
C:\Users\awaite\Documents\U2Doc\UniVerse\11.2\Source\Adminunix\AppA.fm3/17/14
Beta Beta Beta Beta Beta Beta Beta Beta Beta Beta Beta Beta Beta Beta Beta Beta Beta Beta Beta Beta Beta Beta Beta Beta Beta
7. UniVerse displays a list of compatibility flavors. UniVerse accounts can be one of several standard flavors: INFORMATION, PICK, REALITY, IN2, PIOPEN, or IDEAL UniVerse (IDEAL is the default).
8. Choose the compatibility flavor for the account you are creating.
9. UniVerse asks if you want to use the default LOGIN entry for the account. If you choose No, item c is skipped. If you choose Yes, UniVerse does the following:
Creates a directory for the account if it does not exist
Places the special UniVerse directories and files in the directory where the account is located
Copies the LOGIN entry located in the sample subdirectory of the UV account directory to the VOC file of the new UniVerse account
Edits the .profile file in the account’s directory
Updates the UV.ACCOUNT file
Edits the /etc/passwd file if necessary
10. The account definition is complete. UniVerse redisplays the Add an Account screen. You can now create another UniVerse account. Or, to return to the System Administration menu, press Esc.
Changing an existing UniVerse account
To modify an existing UniVerse account definition:
1. Choose Accounts from the System Administration menu, then choose Accounts from the submenu, then choose Modify an account. A list of all accounts currently defined in the UV.ACCOUNT file appears.
2. Choose the name of the account that you want to change. The name of the account and the path of the directory where the account is located appear.
3. To change either the account name or the directory path, use the Down or Up Arrow key to move to the field you want to change, then enter the new account name or directory path.
A-22
C:\Users\awaite\Documents\U2Doc\UniVerse\11.2\Source\Adminunix\AppA.fm3/17/14
Beta Beta Beta Beta Beta Beta Beta Beta Beta Beta Beta Beta Beta Beta Beta Beta Beta Beta Beta Beta Beta Beta Beta Beta Beta
4. You can change the owner, group, and file permissions on all files and subdirectories in the account directory. (This is in addition to changing the account name and directory path of a UniVerse account as described in step 2.)
To change permissions, press ENTER at the Directory prompt.
5. When you save the revised account information, UniVerse updates the UV.ACCOUNT file and edits the /etc/passwd and .profile files if necessary.
UniVerse asks if you want to modify another account. Choose Yes to make more changes, or choose No to return to the System Administration menu.
Deleting a UniVerse account
To delete a UniVerse account:
1. Choose Accounts from the System Administration menu, then choose Accounts from the submenu, then choose Delete an account. A list of all UniVerse accounts currently defined the UV.ACCOUNT file appears.
2. Choose the name of the account you want to delete. The account name and the path of its associated directory appear.
3. The system checks to see if the account’s directory is the home directory for any other users. You can choose any one of the following options:
Transfer ownership of the directory and its files by making some other user the owner of the directory.
Leave the directory as it is.
Delete the directory and all of its dependent files and subdirectories from the system.
4. You are asked to confirm that you want to delete the directory and all of its files. Be sure you want to do this before you choose Yes.
If the owner of the directory has already been deleted from the system, the directory and all its files, including the UniVerse files, remains on the system as an orphan directory, that is, the owner a user ID number without a corresponding entry in the /etc/passwd file.
A-23 Administering UniVerse on UNIX Platforms
C:\Users\awaite\Documents\U2Doc\UniVerse\11.2\Source\Adminunix\AppA.fm3/17/14
Beta Beta Beta Beta Beta Beta Beta Beta Beta Beta Beta Beta Beta Beta Beta Beta Beta Beta Beta Beta Beta Beta Beta Beta Beta
5. On deleting a UniVerse account from the system, UniVerse deletes its record in the UV.ACCOUNT file. You can then remove the UNIX directory associated with the account and all of its files.
6. UniVerse asks if you want to delete another account. Choose Yes to delete another account, or No to return to the System Administration menu.
A-24
C:\Users\awaite\Documents\U2Doc\UniVerse\11.2\Source\Adminunix\AppA.fm3/17/14
Beta Beta Beta Beta Beta Beta Beta Beta Beta Beta Beta Beta Beta Beta Beta Beta Beta Beta Beta Beta Beta Beta Beta Beta Beta
Recovery optionUse the Recovery option when you want to back up and restore the following:
The entire system
All files in all UniVerse accounts
The files in any specified account, with all of its children (files in dependent subdirectories)
A specific file
The Recovery option also includes the transaction logging facility. The options on the Transaction logging menu are documented in this Appendix. For detailed information about transaction logging, see UniVerse Transaction Logging and Recovery.When you choose Recovery from the UniVerse System Administration menu, the Recovery menu appears.
Backing up and restoring files
This section describes how to use the System Administration menus to back up and restore the following:
The entire system
The contents of all UniVerse account directories on the system
The contents of one UniVerse account directory
Any specified UniVerse or UNIX file
If you are using a peripheral device such as a tape or disk drive, you can mount your streamer tape or diskette in the drive before you invoke the System Administration menu. The rest of this chapter refers to streamer tape and diskette as a backup volume.
To back up or restore the system:
1. Choose Recovery from the UniVerse System Administration menu. The Recovery menu appears.
2. Choose either Backup or Restore. A menu of backup or restore options appears:
A-25 Administering UniVerse on UNIX Platforms
C:\Users\awaite\Documents\U2Doc\UniVerse\11.2\Source\Adminunix\AppA.fm3/17/14
Beta Beta Beta Beta Beta Beta Beta Beta Beta Beta Beta Beta Beta Beta Beta Beta Beta Beta Beta Beta Beta Beta Beta Beta Beta
3. Specify the kind of backup or restoration you want. Choose from the following options:
Entire system. This option backs up every directory and file on the system, from root on down. When restoring, use this option to restore every directory and file on the backup volume.
all uniVerse accounts. This option backs up the contents of all directories defined in the UV.ACCOUNT file. All files in the directories and their dependencies are backed up, whether or not they are UniVerse files and directories.
When restoring, use this option to restore all directories on the backup volume. UVRESTORE restores only directories defined in the current UV.ACCOUNT file.
Account and its children. This option backs up the directory containing the specified UniVerse account and all other dependent files and subdirectories. When restoring, use this option to restore the account you specify. You can also use this option to back up the contents of directories that are not set up as UniVerse accounts.
File within account. This option backs up a UniVerse file, a UNIX file, or a directory. When restoring, use this option to restore the file you specify.
The Restoration menu has two additional options:
Pre revision 7 backup (using cpio). This option restores backups made with the cpio command.
Record within file. This option restores a record from a UniVerse file.
4. Depending on whether you chose Backup or Restore in step 2, UniVerse displays the UVBACKUP or UVRESTORE screen.
5. After you finish entering data in the UVBACKUP or UVRESTORE screen, the system asks you if you are ready to start the backup or restoration. Choose Yes to start the backup or restoration.
Note: When you restore UniVerse files that have secondary indexes, rebuild the indexes with the BUILD.INDEX command.
A-26
C:\Users\awaite\Documents\U2Doc\UniVerse\11.2\Source\Adminunix\AppA.fm3/17/14
Beta Beta Beta Beta Beta Beta Beta Beta Beta Beta Beta Beta Beta Beta Beta Beta Beta Beta Beta Beta Beta Beta Beta Beta Beta
Using the UVBACKUP screen
When you choose an option from the Backup menu, UniVerse displays the UVBACKUP screen. Look for one of the following UVBACKUP screen titles:
UVBACKUP Entire System
UVBACKUP All uniVerse Accounts
UVBACKUP A uniVerse Account & Children
UVBACKUP A File within a uniVerse Account
The basic format is the same for all UVBACKUP screens. Certain fields may or may not be available for data entry depending on which backup option you specified.
The default values for UVBACKUP screen data entry fields are stored in the UniVerse SYS.MESSAGE file. The record ID is 085619. As a UniVerse Administrator you can edit this record to customize the UVBACKUP screen defaults for your site. Upgrading or reinstalling UniVerse will overwrite these records.
Use the arrow keys to move forward and backward inside the UVBACKUP screen. The Help Region at the bottom of the screen gives information about valid entries for the current field.
Specifying the backup device
The Backup Device field tells where to write the formatted output from UVBACKUP. Specify either of the following:
A full UNIX path (that is, the path begins with /, which is the root directory).
The name of a device defined in the &DEVICE& file. UVBACKUP uses the path defined in field 6 of the &DEVICE& record. The path should specify a rewind device. See Chapter 10, ”Chapter 10: Config-uring peripheral devices” for information about entries in the &DEVICE& file.
If you are backing up either the entire system or all UniVerse accounts on the system and you have not mounted the backup volume in the tape drive, you are prompted to do so.
A-27 Administering UniVerse on UNIX Platforms
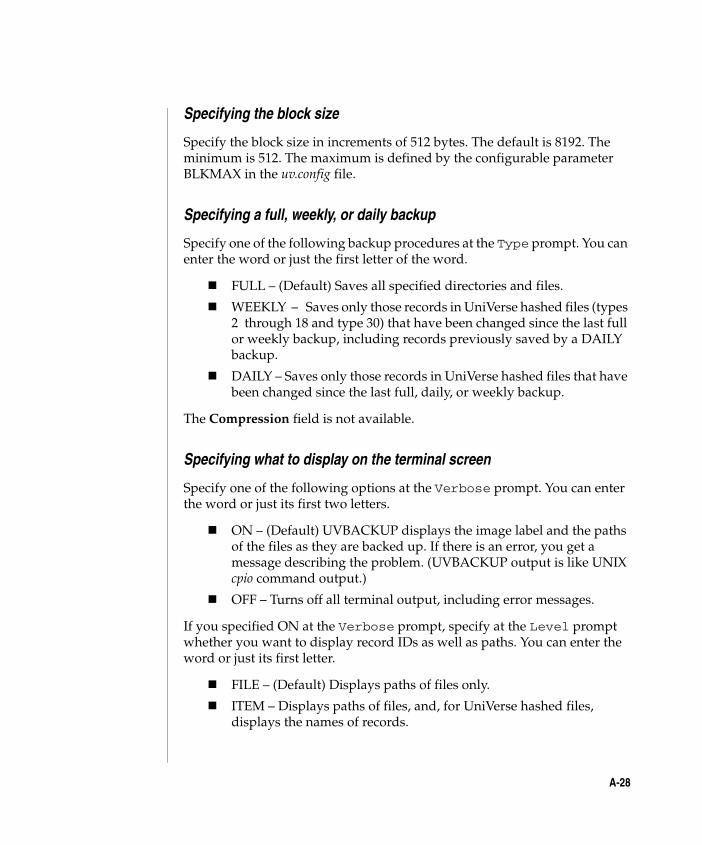
C:\Users\awaite\Documents\U2Doc\UniVerse\11.2\Source\Adminunix\AppA.fm3/17/14
Beta Beta Beta Beta Beta Beta Beta Beta Beta Beta Beta Beta Beta Beta Beta Beta Beta Beta Beta Beta Beta Beta Beta Beta Beta
Specifying the block size
Specify the block size in increments of 512 bytes. The default is 8192. The minimum is 512. The maximum is defined by the configurable parameter BLKMAX in the uv.config file.
Specifying a full, weekly, or daily backup
Specify one of the following backup procedures at the Type prompt. You can enter the word or just the first letter of the word.
FULL – (Default) Saves all specified directories and files.
WEEKLY – Saves only those records in UniVerse hashed files (types 2 through 18 and type 30) that have been changed since the last full or weekly backup, including records previously saved by a DAILY backup.
DAILY – Saves only those records in UniVerse hashed files that have been changed since the last full, daily, or weekly backup.
The Compression field is not available.
Specifying what to display on the terminal screen
Specify one of the following options at the Verbose prompt. You can enter the word or just its first two letters.
ON – (Default) UVBACKUP displays the image label and the paths of the files as they are backed up. If there is an error, you get a message describing the problem. (UVBACKUP output is like UNIX cpio command output.)
OFF – Turns off all terminal output, including error messages.
If you specified ON at the Verbose prompt, specify at the Level prompt whether you want to display record IDs as well as paths. You can enter the word or just its first letter.
FILE – (Default) Displays paths of files only.
ITEM – Displays paths of files, and, for UniVerse hashed files, displays the names of records.
A-28
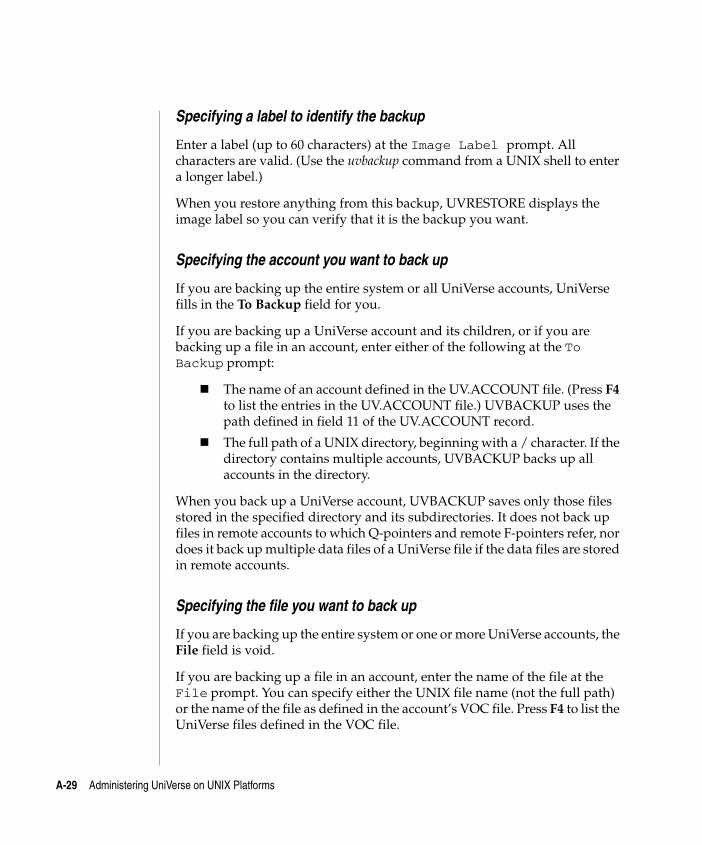
C:\Users\awaite\Documents\U2Doc\UniVerse\11.2\Source\Adminunix\AppA.fm3/17/14
Beta Beta Beta Beta Beta Beta Beta Beta Beta Beta Beta Beta Beta Beta Beta Beta Beta Beta Beta Beta Beta Beta Beta Beta Beta
Specifying a label to identify the backup
Enter a label (up to 60 characters) at the Image Label prompt. All characters are valid. (Use the uvbackup command from a UNIX shell to enter a longer label.)
When you restore anything from this backup, UVRESTORE displays the image label so you can verify that it is the backup you want.
Specifying the account you want to back up
If you are backing up the entire system or all UniVerse accounts, UniVerse fills in the To Backup field for you.
If you are backing up a UniVerse account and its children, or if you are backing up a file in an account, enter either of the following at the To Backup prompt:
The name of an account defined in the UV.ACCOUNT file. (Press F4 to list the entries in the UV.ACCOUNT file.) UVBACKUP uses the path defined in field 11 of the UV.ACCOUNT record.
The full path of a UNIX directory, beginning with a / character. If the directory contains multiple accounts, UVBACKUP backs up all accounts in the directory.
When you back up a UniVerse account, UVBACKUP saves only those files stored in the specified directory and its subdirectories. It does not back up files in remote accounts to which Q-pointers and remote F-pointers refer, nor does it back up multiple data files of a UniVerse file if the data files are stored in remote accounts.
Specifying the file you want to back up
If you are backing up the entire system or one or more UniVerse accounts, the File field is void.
If you are backing up a file in an account, enter the name of the file at the File prompt. You can specify either the UNIX file name (not the full path) or the name of the file as defined in the account’s VOC file. Press F4 to list the UniVerse files defined in the VOC file.
A-29 Administering UniVerse on UNIX Platforms
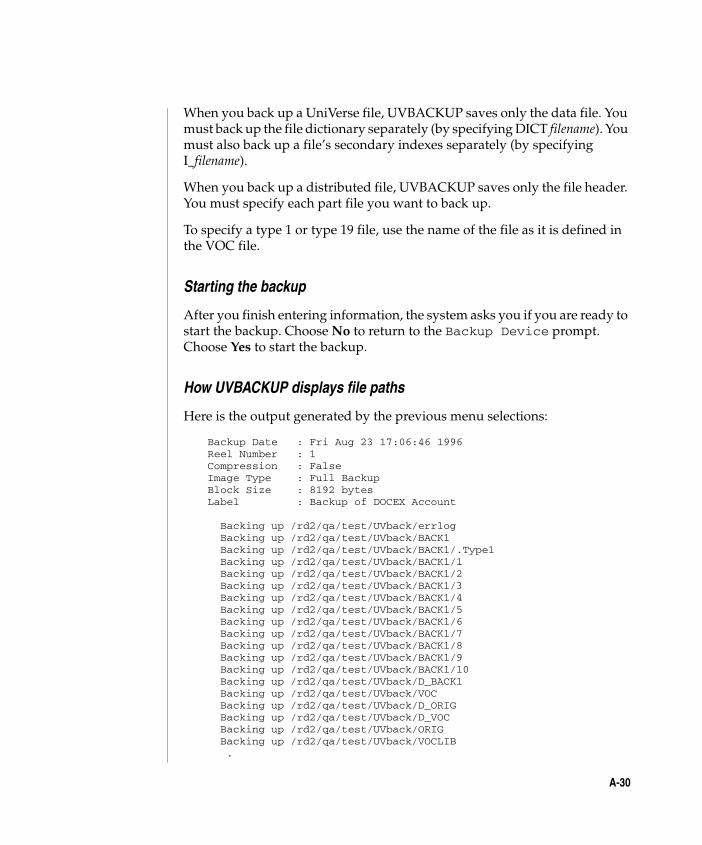
C:\Users\awaite\Documents\U2Doc\UniVerse\11.2\Source\Adminunix\AppA.fm3/17/14
Beta Beta Beta Beta Beta Beta Beta Beta Beta Beta Beta Beta Beta Beta Beta Beta Beta Beta Beta Beta Beta Beta Beta Beta Beta
When you back up a UniVerse file, UVBACKUP saves only the data file. You must back up the file dictionary separately (by specifying DICT filename). You must also back up a file’s secondary indexes separately (by specifying I_filename).
When you back up a distributed file, UVBACKUP saves only the file header. You must specify each part file you want to back up.
To specify a type 1 or type 19 file, use the name of the file as it is defined in the VOC file.
Starting the backup
After you finish entering information, the system asks you if you are ready to start the backup. Choose No to return to the Backup Device prompt. Choose Yes to start the backup.
How UVBACKUP displays file paths
Here is the output generated by the previous menu selections:
Backup Date : Fri Aug 23 17:06:46 1996 Reel Number : 1 Compression : False Image Type : Full Backup Block Size : 8192 bytes Label : Backup of DOCEX Account Backing up /rd2/qa/test/UVback/errlog Backing up /rd2/qa/test/UVback/BACK1 Backing up /rd2/qa/test/UVback/BACK1/.Type1 Backing up /rd2/qa/test/UVback/BACK1/1 Backing up /rd2/qa/test/UVback/BACK1/2 Backing up /rd2/qa/test/UVback/BACK1/3 Backing up /rd2/qa/test/UVback/BACK1/4 Backing up /rd2/qa/test/UVback/BACK1/5 Backing up /rd2/qa/test/UVback/BACK1/6 Backing up /rd2/qa/test/UVback/BACK1/7 Backing up /rd2/qa/test/UVback/BACK1/8 Backing up /rd2/qa/test/UVback/BACK1/9 Backing up /rd2/qa/test/UVback/BACK1/10 Backing up /rd2/qa/test/UVback/D_BACK1 Backing up /rd2/qa/test/UVback/VOC Backing up /rd2/qa/test/UVback/D_ORIG Backing up /rd2/qa/test/UVback/D_VOC Backing up /rd2/qa/test/UVback/ORIG Backing up /rd2/qa/test/UVback/VOCLIB .
A-30
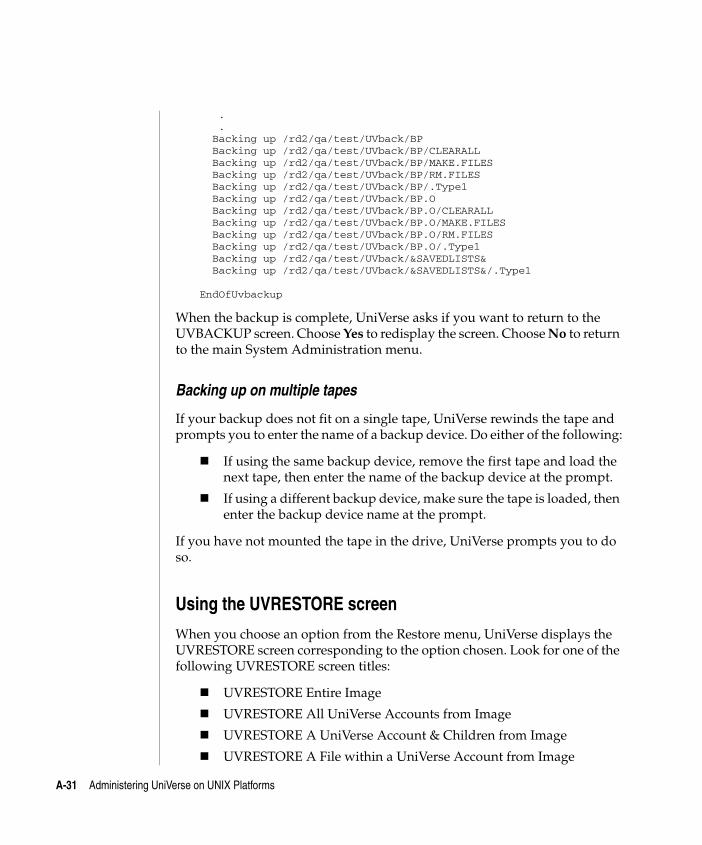
C:\Users\awaite\Documents\U2Doc\UniVerse\11.2\Source\Adminunix\AppA.fm3/17/14
Beta Beta Beta Beta Beta Beta Beta Beta Beta Beta Beta Beta Beta Beta Beta Beta Beta Beta Beta Beta Beta Beta Beta Beta Beta
. . Backing up /rd2/qa/test/UVback/BP Backing up /rd2/qa/test/UVback/BP/CLEARALL Backing up /rd2/qa/test/UVback/BP/MAKE.FILES Backing up /rd2/qa/test/UVback/BP/RM.FILES Backing up /rd2/qa/test/UVback/BP/.Type1 Backing up /rd2/qa/test/UVback/BP.O Backing up /rd2/qa/test/UVback/BP.O/CLEARALL Backing up /rd2/qa/test/UVback/BP.O/MAKE.FILES Backing up /rd2/qa/test/UVback/BP.O/RM.FILES Backing up /rd2/qa/test/UVback/BP.O/.Type1 Backing up /rd2/qa/test/UVback/&SAVEDLISTS& Backing up /rd2/qa/test/UVback/&SAVEDLISTS&/.Type1 EndOfUvbackup
When the backup is complete, UniVerse asks if you want to return to the UVBACKUP screen. Choose Yes to redisplay the screen. Choose No to return to the main System Administration menu.
Backing up on multiple tapes
If your backup does not fit on a single tape, UniVerse rewinds the tape and prompts you to enter the name of a backup device. Do either of the following:
If using the same backup device, remove the first tape and load the next tape, then enter the name of the backup device at the prompt.
If using a different backup device, make sure the tape is loaded, then enter the backup device name at the prompt.
If you have not mounted the tape in the drive, UniVerse prompts you to do so.
Using the UVRESTORE screen
When you choose an option from the Restore menu, UniVerse displays the UVRESTORE screen corresponding to the option chosen. Look for one of the following UVRESTORE screen titles:
UVRESTORE Entire Image
UVRESTORE All UniVerse Accounts from Image
UVRESTORE A UniVerse Account & Children from Image
UVRESTORE A File within a UniVerse Account from Image
A-31 Administering UniVerse on UNIX Platforms
C:\Users\awaite\Documents\U2Doc\UniVerse\11.2\Source\Adminunix\AppA.fm3/17/14
Beta Beta Beta Beta Beta Beta Beta Beta Beta Beta Beta Beta Beta Beta Beta Beta Beta Beta Beta Beta Beta Beta Beta Beta Beta
UVRESTORE A Record within a UniVerse File from Image
The screen in the following example corresponds to the Account and its children option on the Restoration menu.
The basic format is the same for all UVRESTORE screens. Certain fields may or may not be available for data entry depending on which restore option you specified.
The default values for UVRESTORE screen data entry fields are stored in the UniVerse SYS.MESSAGE file. The record ID is 085720. As a UniVerse Administrator you can edit this record to customize the UVRESTORE screen defaults for your system. Upgrading or reinstalling UniVerse overwrites any changes to this record.
Use the arrow keys to move forward and backward inside the UVRESTORE screen. The Help Region at the bottom of the screen lists valid entries for the current field.
Specifying the restore device
The Restore Device field tells the location of the backup image being restored. Specify either of the following:
A full UNIX path (that is, the path begins with /, which is the root directory).
The name of a device defined in the &DEVICE& file. UVRESTORE uses the path defined in field 6 of the &DEVICE& record. See Chapter 10, ”Chapter 10: Configuring peripheral devices” for infor-mation about creating entries in the &DEVICE& file.
If you are restoring either the entire system or all UniVerse accounts on the system and you have not mounted the backup volume in the tape drive, you are prompted to do so.
Ensuring the backup image Is the one you want
After you enter the restore device name, the UVRESTORE screen appears.
Choose No to return to the Restore Device field. Choose Yes to continue.
A-32
C:\Users\awaite\Documents\U2Doc\UniVerse\11.2\Source\Adminunix\AppA.fm3/17/14
Beta Beta Beta Beta Beta Beta Beta Beta Beta Beta Beta Beta Beta Beta Beta Beta Beta Beta Beta Beta Beta Beta Beta Beta Beta
UniVerse reads the backup type (full, weekly, daily) from the backup image and displays it in the Type field.
The Compression field is not available.
Specifying what to display on the terminal screen
Specify one of the following options at the Verbose prompt. You can enter the word or just its first two letters.
ON – (Default) UVRESTORE displays the image label and the paths of files as they are restored. If there is an error, you get a message describing the problem. (UVRESTORE output is similar to UNIX cpio command output.)
OFF – Turns off all terminal output, including error messages.
If you specified ON at the Verbose prompt, specify at the Level prompt whether you want to display record IDs as well as paths. You can enter the word or just its first letter.
FILE – (Default) Displays paths of files only.
ITEM – Displays paths of files, and, for UniVerse hashed files, the names of records.
UniVerse reads the image label from the backup image and displays it in the Image Label field.
Specifying the accounts you want to restore
If you are restoring the entire system or all UniVerse accounts, UniVerse fills in the Restore field for you.
If you are restoring one or more UniVerse accounts and their children, a file in an account, or a record in a file, enter one of the following at the Restore prompt:
The names of one or more accounts defined in the UV.ACCOUNT file. Separate account names with commas. (Press F4 to list the entries in the UV.ACCOUNT file.) UVRESTORE uses the path defined in field 11 of the UV.ACCOUNT record.
A-33 Administering UniVerse on UNIX Platforms

C:\Users\awaite\Documents\U2Doc\UniVerse\11.2\Source\Adminunix\AppA.fm3/17/14
Beta Beta Beta Beta Beta Beta Beta Beta Beta Beta Beta Beta Beta Beta Beta Beta Beta Beta Beta Beta Beta Beta Beta Beta Beta
The full paths of one or more UNIX directories. Paths should begin and end with a / character, and they must be identical to the path stored on the backup volume. Separate paths with commas.
You can specify multiple accounts if they are all in the same directory. Use an asterisk ( * ) as the last character in the UNIX path. For example, /usr/* restores all accounts in the /usr directory, and /usr/SAL* restores all accounts beginning with SAL (such as SALES.EAST and SALES.WEST) in the /usr directory.
If you want to restore the account (or file or record) to a different account on disk, enter the name of the account on the backup volume, then enter an equal sign ( = ), then enter the name of the account on disk to which you want to restore the account, file, or record. For example, to restore the backed-up account UVback to the /tmp directory on disk, enter /rd2/qa/test/UVback=/tmp/UVback.
Specifying the files you want to restore
If you are restoring the entire system or one or more UniVerse accounts, the File field is void.
If you want to restore one or more files from an account, enter the names of the UNIX files or directories (not full paths) at the File prompt exactly as they are stored on the backup volume. If you want to restore one or more records from a file, enter the name of the file at the File prompt.
Use an asterisk ( * ) as the last character in the UNIX filename to specify multiple files. If you enter just an asterisk at the File prompt, all files in the account directory are restored. If you enter ORDERS*, all files beginning with ORDERS (such as ORDERS.JAN and ORDERS.FEB) are restored.
If you want to restore a file or record to a different file on disk, enter the name of the file on the backup volume, then an equal sign ( = ), then the name of the file on the disk to which you want to restore the file or record. For example, to restore the backed-up file BACK1 to a disk file called BACK1.A, enter BACK1=BACK1.A.
Specifying the record you want to restore
If you are restoring the entire system, one or more UniVerse accounts, or a file in an account, the Record field is void.
A-34
C:\Users\awaite\Documents\U2Doc\UniVerse\11.2\Source\Adminunix\AppA.fm3/17/14
Beta Beta Beta Beta Beta Beta Beta Beta Beta Beta Beta Beta Beta Beta Beta Beta Beta Beta Beta Beta Beta Beta Beta Beta Beta
If you want to restore a record from a file, enter the record ID at the Record prompt exactly as it is stored on the backup volume. If you want to restore the record to a different record on disk, enter the record ID on the backup volume, then enter an equal sign ( = ), then enter the record ID to which you want to restore the record on disk. For example, to restore the backed-up record 1 to a new record on disk called 11, enter 1=11.
Use an asterisk ( * ) at the Record prompt to specify all records in the file. Use an asterisk as the last character of the record ID to specify multiple records. If you enter 11*, all records beginning with 11 (such as 1100, 1101, 1102, and so on) are restored.
Specifying restoration options
Enter any of the following options at the Options prompt, or press ENTER. You can enter the word or just its first two letters.
INDEX – Generates a contents listing from the image. No data is restored.
PAGING – Displays the contents listing one page at a time. The current TERM settings determine the page size.
OVERWRITE – For each restored file, removes the disk file with the same name, then restores the file from the backup image. If you do not specify OVERWRITE, uvrestore restores only files from the backup image that do not exist on disk.
If you are restoring a record in a file, OVERWRITE has no effect. UVRESTORE always overwrites a record.
PROMPT – Interactively restores files and records. Before a file or record is restored, you are prompted to verify restoration. Enter one of the following at the prompt:
y Restore the file or record.
n Do not restore the file or record.
d Disable prompting after the current prompt.
q Quit. At the prompt, choose Yes to return to the UVRESTORE screen. Choose No to return to the main System Administration menu.
A-35 Administering UniVerse on UNIX Platforms
C:\Users\awaite\Documents\U2Doc\UniVerse\11.2\Source\Adminunix\AppA.fm3/17/14
Beta Beta Beta Beta Beta Beta Beta Beta Beta Beta Beta Beta Beta Beta Beta Beta Beta Beta Beta Beta Beta Beta Beta Beta Beta
Starting the restoration
When you finish entering information, the system asks if you want to start the restoration. Choose No to return to the Restore Device prompt. Choose Yes to start the restoration.
If you entered ON at the Verbose prompt, the output looks like this:
Backup Date : Fri Aug 23 17:06:46 1996 Reel Number : 1 Compression : False Image Type : Full Backup Block Size : 8192 bytes Label : Backup of DOCEX Account Restoring /rd2/qa/test/UVback/errlog (17:06:46 1996, 000) Restoring /rd2/qa/test/UVback/BACK1 (17:06:46 1996, 000) Restoring /rd2/qa/test/UVback/BACK1/.Type1 (17:06:46 1996, 000) Restoring /rd2/qa/test/UVback/BACK1/1 (17:06:46 1996, 000) Restoring /rd2/qa/test/UVback/BACK1/2 (17:06:46 1996, 000) Restoring /rd2/qa/test/UVback/BACK1/3 (17:06:46 1996, 000) Restoring /rd2/qa/test/UVback/BACK1/4 (17:06:46 1996, 000) Restoring /rd2/qa/test/UVback/BACK1/5 (17:06:46 1996, 000) Restoring /rd2/qa/test/UVback/BACK1/6 (17:06:46 1996, 000) Restoring /rd2/qa/test/UVback/BACK1/7 (17:06:46 1996, 000) Restoring /rd2/qa/test/UVback/BACK1/8 (17:06:46 1996, 000) Restoring /rd2/qa/test/UVback/BACK1/9 (17:06:46 1996, 000) Restoring /rd2/qa/test/UVback/BACK1/10 (17:06:46 1996, 000) Restoring /rd2/qa/test/UVback/D_BACK1 (17:06:46 1996, 000) Restoring /rd2/qa/test/UVback/VOC (17:06:47 1996, 000) Restoring /rd2/qa/test/UVback/D_ORIG (17:06:47 1996, 000) Restoring /rd2/qa/test/UVback/D_VOC (17:06:47 1996, 000) Restoring /rd2/qa/test/UVback/ORIG (17:06:47 1996, 000) Restoring /rd2/qa/test/UVback/VOCLIB (17:06:48 1996, 000)
.
.
. Restoring /rd2/qa/test/UVback/BP (17:06:54 1996, 000) Restoring /rd2/qa/test/UVback/BP/CLEARALL (17:06:54 1996, 000) Restoring /rd2/qa/test/UVback/BP/MAKE.FILES (17:06:54 1996, 000) Restoring /rd2/qa/test/UVback/BP/RM.FILES (17:06:55 1996, 000) Restoring /rd2/qa/test/UVback/BP/.Type1 (17:06:55 1996, 000) Restoring /rd2/qa/test/UVback/BP.O (17:06:55 1996, 000) Restoring /rd2/qa/test/UVback/BP.O/CLEARALL (17:06:55 1996, 000) Restoring /rd2/qa/test/UVback/BP.O/MAKE.FILES (17:06:55 1996, 000) Restoring /rd2/qa/test/UVback/BP.O/RM.FILES (17:06:55 1996, 000) Restoring /rd2/qa/test/UVback/BP.O/.Type1 (17:06:55 1996, 000)
A-36
C:\Users\awaite\Documents\U2Doc\UniVerse\11.2\Source\Adminunix\AppA.fm3/17/14
Beta Beta Beta Beta Beta Beta Beta Beta Beta Beta Beta Beta Beta Beta Beta Beta Beta Beta Beta Beta Beta Beta Beta Beta Beta
Restoring /rd2/qa/test/UVback/&SAVEDLISTS& (17:06:55 1996, 000) Restoring /rd2/qa/test/UVback/&SAVEDLISTS&/.Type1 (17:06:55 1996, 000) EndOfUvrestore
When the restoration is complete, UniVerse asks if you want to return to the UVRESTORE screen. Choose Yes to redisplay the screen. Choose No to return to the main System Administration menu.
Restoring from multiple tapes
If your backup comprises several tapes, UniVerse rewinds the first tape and prompts you to enter the name of a backup device. Do either of the following:
If you use the same restoration device, remove the first tape and load the next tape, then enter the name of the restoration device at the prompt.
If you use a different restoration device, make sure the tape is loaded, then enter the name of the restoration device at the prompt.
If you have not mounted the tape in the drive, UniVerse prompts you to do so.
Transaction Logging
The Transaction Logging menu gives access to further menus that enable you to perform the following transaction logging and related activities:
Setting up for transaction logging
Setting the system-wide state of transaction logging
Activating UniVerse files for logging
Managing logging activity
Transferring log files to tape
Releasing log files
Recovering by rolling forward updates from log files
Figure shows the Transaction Logging menu. The options on this menu take you to submenus that are described on the following pages.
A-37 Administering UniVerse on UNIX Platforms
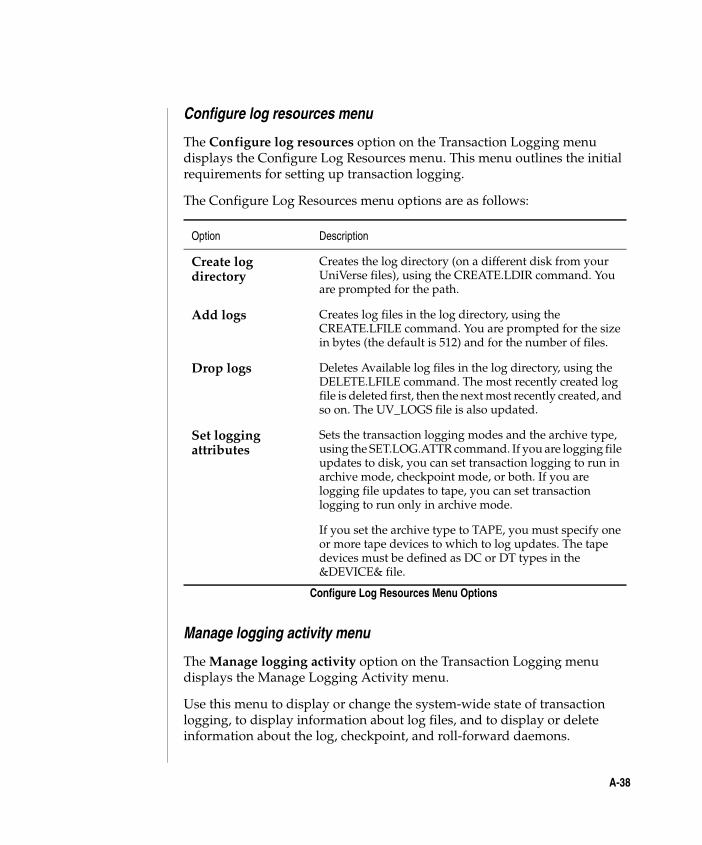
C:\Users\awaite\Documents\U2Doc\UniVerse\11.2\Source\Adminunix\AppA.fm3/17/14
Beta Beta Beta Beta Beta Beta Beta Beta Beta Beta Beta Beta Beta Beta Beta Beta Beta Beta Beta Beta Beta Beta Beta Beta Beta
Configure log resources menu
The Configure log resources option on the Transaction Logging menu displays the Configure Log Resources menu. This menu outlines the initial requirements for setting up transaction logging.
The Configure Log Resources menu options are as follows:
Manage logging activity menu
The Manage logging activity option on the Transaction Logging menu displays the Manage Logging Activity menu.
Use this menu to display or change the system-wide state of transaction logging, to display information about log files, and to display or delete information about the log, checkpoint, and roll-forward daemons.
Option Description
Create log directory
Creates the log directory (on a different disk from your UniVerse files), using the CREATE.LDIR command. You are prompted for the path.
Add logs Creates log files in the log directory, using the CREATE.LFILE command. You are prompted for the size in bytes (the default is 512) and for the number of files.
Drop logs Deletes Available log files in the log directory, using the DELETE.LFILE command. The most recently created log file is deleted first, then the next most recently created, and so on. The UV_LOGS file is also updated.
Set logging attributes
Sets the transaction logging modes and the archive type, using the SET.LOG.ATTR command. If you are logging file updates to disk, you can set transaction logging to run in archive mode, checkpoint mode, or both. If you are logging file updates to tape, you can set transaction logging to run only in archive mode.
If you set the archive type to TAPE, you must specify one or more tape devices to which to log updates. The tape devices must be defined as DC or DT types in the &DEVICE& file.
Configure Log Resources Menu Options
A-38

C:\Users\awaite\Documents\U2Doc\UniVerse\11.2\Source\Adminunix\AppA.fm3/17/14
Beta Beta Beta Beta Beta Beta Beta Beta Beta Beta Beta Beta Beta Beta Beta Beta Beta Beta Beta Beta Beta Beta Beta Beta Beta
The Manage Logging Activity menu options are as follows:
View Info Files menu
Use this menu to display any of the three information files: uvlogd.info, uvchkd.info, or uvrolf.info. The View Info Files menu options are as follows:
Option Description
Display logging state
Lists the system-wide state of transaction logging.
list log File details Displays information about the log files, using the command LIST UV_LOGS BY.DSND @ID.
View info files Displays the View Info Files menu.
deleTe info files Displays the Delete Info Files menu.
Suspend logging Suspends transaction logging system-wide, using the SUSPEND.RECOVERY command.
Enable logging Enables transaction logging system-wide, using the ENABLE.RECOVERY command.
shutdown Logging Disables transaction logging system-wide, using the SHUTDOWN.RECOVERY command.
Manage Logging Activity Menu Options
Option Description
dispLay logging info file Displays the logging information file (uvlogd.info).
display Checkpoint info file Displays the checkpoint information file (uvchkd.info).
display Rollforward info file Displays the roll-forward information file (uvrolf.info).
View Info Files Menu Options
A-39 Administering UniVerse on UNIX Platforms
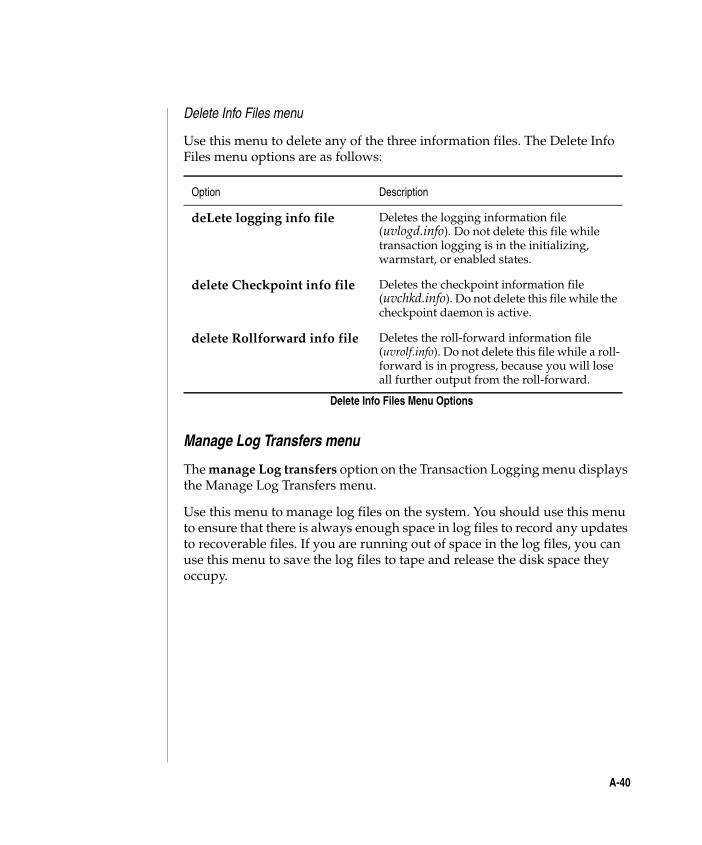
C:\Users\awaite\Documents\U2Doc\UniVerse\11.2\Source\Adminunix\AppA.fm3/17/14
Beta Beta Beta Beta Beta Beta Beta Beta Beta Beta Beta Beta Beta Beta Beta Beta Beta Beta Beta Beta Beta Beta Beta Beta Beta
Delete Info Files menu
Use this menu to delete any of the three information files. The Delete Info Files menu options are as follows:
Manage Log Transfers menu
The manage Log transfers option on the Transaction Logging menu displays the Manage Log Transfers menu.
Use this menu to manage log files on the system. You should use this menu to ensure that there is always enough space in log files to record any updates to recoverable files. If you are running out of space in the log files, you can use this menu to save the log files to tape and release the disk space they occupy.
Option Description
deLete logging info file Deletes the logging information file (uvlogd.info). Do not delete this file while transaction logging is in the initializing, warmstart, or enabled states.
delete Checkpoint info file Deletes the checkpoint information file (uvchkd.info). Do not delete this file while the checkpoint daemon is active.
delete Rollforward info file Deletes the roll-forward information file (uvrolf.info). Do not delete this file while a roll-forward is in progress, because you will lose all further output from the roll-forward.
Delete Info Files Menu Options
A-40
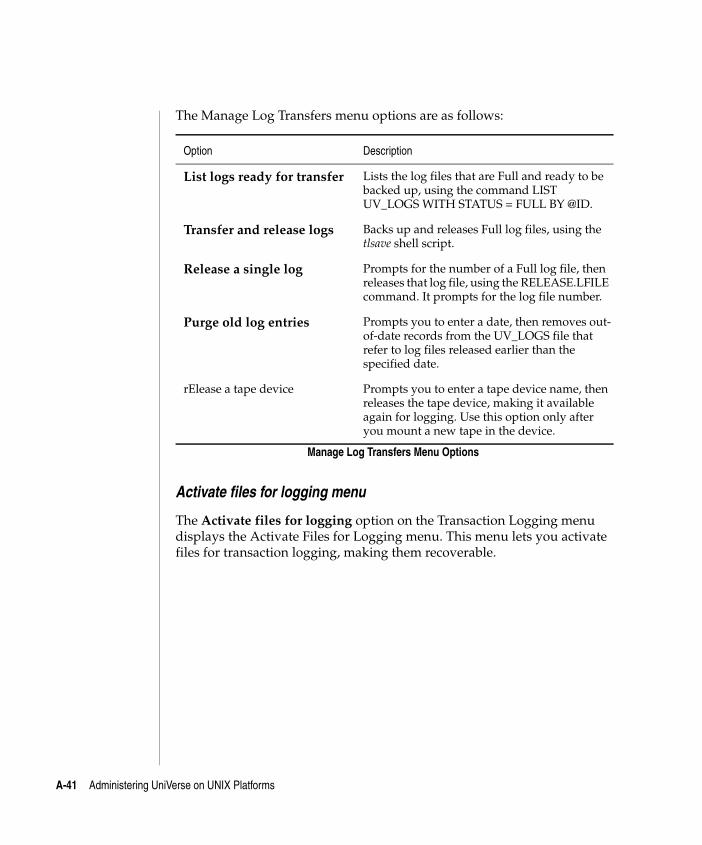
C:\Users\awaite\Documents\U2Doc\UniVerse\11.2\Source\Adminunix\AppA.fm3/17/14
Beta Beta Beta Beta Beta Beta Beta Beta Beta Beta Beta Beta Beta Beta Beta Beta Beta Beta Beta Beta Beta Beta Beta Beta Beta
The Manage Log Transfers menu options are as follows:
Activate files for logging menu
The Activate files for logging option on the Transaction Logging menu displays the Activate Files for Logging menu. This menu lets you activate files for transaction logging, making them recoverable.
Option Description
List logs ready for transfer Lists the log files that are Full and ready to be backed up, using the command LIST UV_LOGS WITH STATUS = FULL BY @ID.
Transfer and release logs Backs up and releases Full log files, using the tlsave shell script.
Release a single log Prompts for the number of a Full log file, then releases that log file, using the RELEASE.LFILE command. It prompts for the log file number.
Purge old log entries Prompts you to enter a date, then removes out-of-date records from the UV_LOGS file that refer to log files released earlier than the specified date.
rElease a tape device Prompts you to enter a tape device name, then releases the tape device, making it available again for logging. Use this option only after you mount a new tape in the device.
Manage Log Transfers Menu Options
A-41 Administering UniVerse on UNIX Platforms
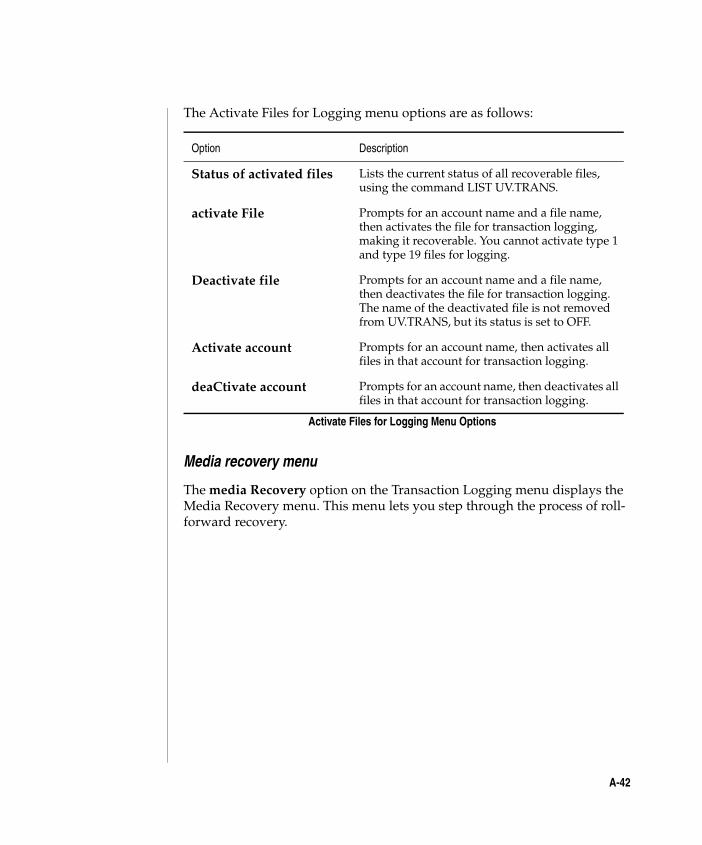
C:\Users\awaite\Documents\U2Doc\UniVerse\11.2\Source\Adminunix\AppA.fm3/17/14
Beta Beta Beta Beta Beta Beta Beta Beta Beta Beta Beta Beta Beta Beta Beta Beta Beta Beta Beta Beta Beta Beta Beta Beta Beta
The Activate Files for Logging menu options are as follows:
Media recovery menu
The media Recovery option on the Transaction Logging menu displays the Media Recovery menu. This menu lets you step through the process of roll-forward recovery.
Option Description
Status of activated files Lists the current status of all recoverable files, using the command LIST UV.TRANS.
activate File Prompts for an account name and a file name, then activates the file for transaction logging, making it recoverable. You cannot activate type 1 and type 19 files for logging.
Deactivate file Prompts for an account name and a file name, then deactivates the file for transaction logging. The name of the deactivated file is not removed from UV.TRANS, but its status is set to OFF.
Activate account Prompts for an account name, then activates all files in that account for transaction logging.
deaCtivate account Prompts for an account name, then deactivates all files in that account for transaction logging.
Activate Files for Logging Menu Options
A-42
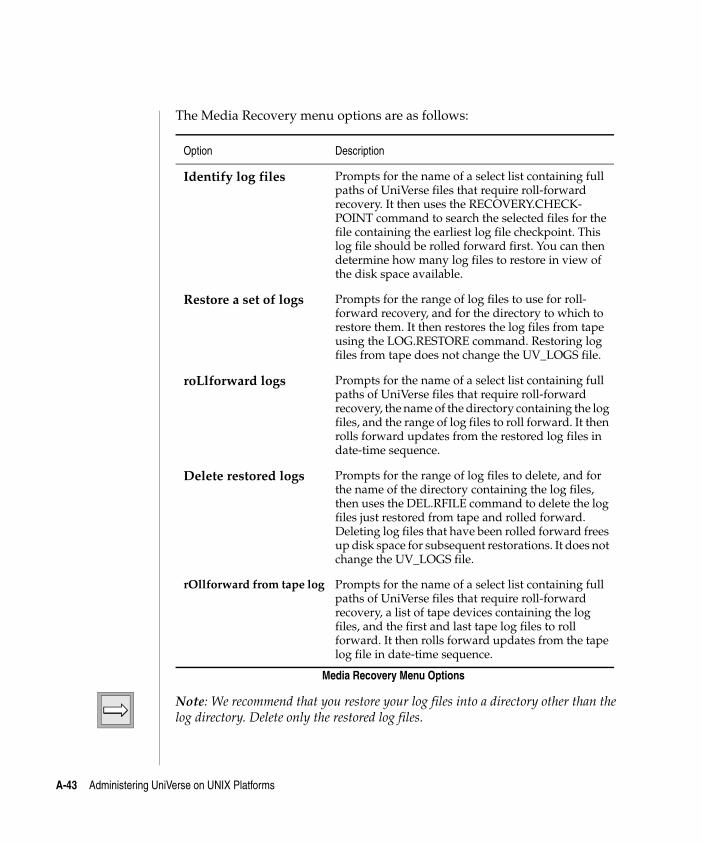
C:\Users\awaite\Documents\U2Doc\UniVerse\11.2\Source\Adminunix\AppA.fm3/17/14
Beta Beta Beta Beta Beta Beta Beta Beta Beta Beta Beta Beta Beta Beta Beta Beta Beta Beta Beta Beta Beta Beta Beta Beta Beta
The Media Recovery menu options are as follows:
Note: We recommend that you restore your log files into a directory other than the log directory. Delete only the restored log files.
Option Description
Identify log files Prompts for the name of a select list containing full paths of UniVerse files that require roll-forward recovery. It then uses the RECOVERY.CHECK-POINT command to search the selected files for the file containing the earliest log file checkpoint. This log file should be rolled forward first. You can then determine how many log files to restore in view of the disk space available.
Restore a set of logs Prompts for the range of log files to use for roll-forward recovery, and for the directory to which to restore them. It then restores the log files from tape using the LOG.RESTORE command. Restoring log files from tape does not change the UV_LOGS file.
roLlforward logs Prompts for the name of a select list containing full paths of UniVerse files that require roll-forward recovery, the name of the directory containing the log files, and the range of log files to roll forward. It then rolls forward updates from the restored log files in date-time sequence.
Delete restored logs Prompts for the range of log files to delete, and for the name of the directory containing the log files, then uses the DEL.RFILE command to delete the log files just restored from tape and rolled forward. Deleting log files that have been rolled forward frees up disk space for subsequent restorations. It does not change the UV_LOGS file.
rOllforward from tape log Prompts for the name of a select list containing full paths of UniVerse files that require roll-forward recovery, a list of tape devices containing the log files, and the first and last tape log files to roll forward. It then rolls forward updates from the tape log file in date-time sequence.
Media Recovery Menu Options
A-43 Administering UniVerse on UNIX Platforms
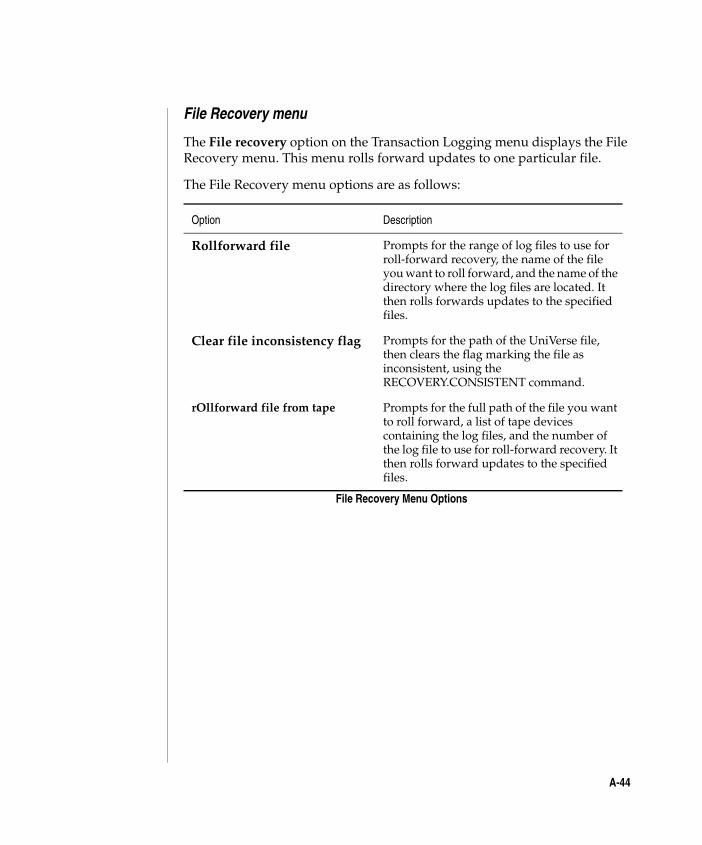
C:\Users\awaite\Documents\U2Doc\UniVerse\11.2\Source\Adminunix\AppA.fm3/17/14
Beta Beta Beta Beta Beta Beta Beta Beta Beta Beta Beta Beta Beta Beta Beta Beta Beta Beta Beta Beta Beta Beta Beta Beta Beta
File Recovery menu
The File recovery option on the Transaction Logging menu displays the File Recovery menu. This menu rolls forward updates to one particular file.
The File Recovery menu options are as follows:
Option Description
Rollforward file Prompts for the range of log files to use for roll-forward recovery, the name of the file you want to roll forward, and the name of the directory where the log files are located. It then rolls forwards updates to the specified files.
Clear file inconsistency flag Prompts for the path of the UniVerse file, then clears the flag marking the file as inconsistent, using the RECOVERY.CONSISTENT command.
rOllforward file from tape Prompts for the full path of the file you want to roll forward, a list of tape devices containing the log files, and the number of the log file to use for roll-forward recovery. It then rolls forward updates to the specified files.
File Recovery Menu Options
A-44
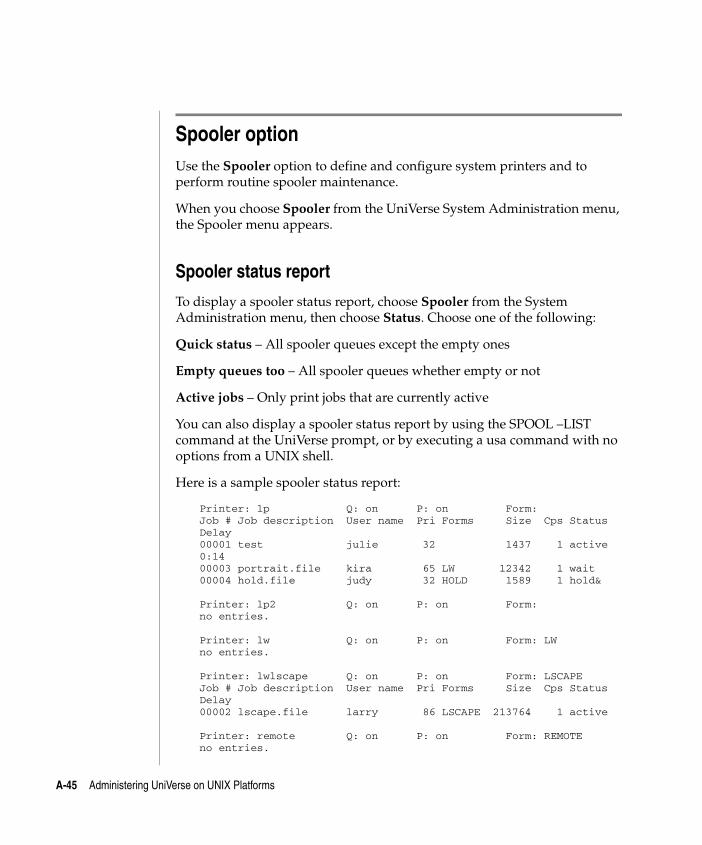
C:\Users\awaite\Documents\U2Doc\UniVerse\11.2\Source\Adminunix\AppA.fm3/17/14
Beta Beta Beta Beta Beta Beta Beta Beta Beta Beta Beta Beta Beta Beta Beta Beta Beta Beta Beta Beta Beta Beta Beta Beta Beta
Spooler optionUse the Spooler option to define and configure system printers and to perform routine spooler maintenance.
When you choose Spooler from the UniVerse System Administration menu, the Spooler menu appears.
Spooler status report
To display a spooler status report, choose Spooler from the System Administration menu, then choose Status. Choose one of the following:
Quick status – All spooler queues except the empty ones
Empty queues too – All spooler queues whether empty or not
Active jobs – Only print jobs that are currently active
You can also display a spooler status report by using the SPOOL –LIST command at the UniVerse prompt, or by executing a usa command with no options from a UNIX shell.
Here is a sample spooler status report:
Printer: lp Q: on P: on Form: Job # Job description User name Pri Forms Size Cps Status Delay 00001 test julie 32 1437 1 active 0:14 00003 portrait.file kira 65 LW 12342 1 wait 00004 hold.file judy 32 HOLD 1589 1 hold& Printer: lp2 Q: on P: on Form: no entries. Printer: lw Q: on P: on Form: LW no entries. Printer: lwlscape Q: on P: on Form: LSCAPE Job # Job description User name Pri Forms Size Cps Status Delay 00002 lscape.file larry 86 LSCAPE 213764 1 active Printer: remote Q: on P: on Form: REMOTE no entries.
A-45 Administering UniVerse on UNIX Platforms
C:\Users\awaite\Documents\U2Doc\UniVerse\11.2\Source\Adminunix\AppA.fm3/17/14
Beta Beta Beta Beta Beta Beta Beta Beta Beta Beta Beta Beta Beta Beta Beta Beta Beta Beta Beta Beta Beta Beta Beta Beta Beta
The first line for each queue shows the printer, indicating if queuing is enabled, if printing is enabled, and what form, if any, is mounted. Subsequent lines give a job-by-job summary of the queue contents. In the previous example jobs 1 and 2 are printing. Job 3 is waiting in the queue for printer lp although it requested the form that is currently mounted on printer lw, it must wait for the following reasons:
1. Job 2 is active on printer lwlscape, which is the same physical device as printer lw.
2. Queued jobs are always shown in the queue of the first defined printer, unless they are spooled to a specific printer either with the AT keyword on a SETPTR (UNIX) or SPOOL command, or with the –p option of the usp command.
3. The ampersand ( & ) after the word hold on job 4 indicates that a copy of this file has already been printed. An asterisk ( * ) would indicate a file spooled as a hold file.
Managing print jobs
You can manage most print jobs from the Job control and Modify job characteristics options of the Spooler menu. These two options display submenus when they are chosen. The Job Control menu lets you make changes to the print jobs themselves—for example, cancelling or temporarily suspending print jobs, or printing them again. The Modify Job Characteristics menu lets you change various attributes of a print job, such as the number of pages to print, which pages to print, when to print, and so on.
Changing print job characteristics
The following subsections describe how to change the characteristics of print jobs waiting in the queue. All these changes can be made from the Modify Job Characteristics menu.
Changing the number of copies you want printed
Choose Modify job characteristics from the Spooler menu, then choose Number of copies. At the prompts enter the print job number, then the number of copies you want.
A-46
C:\Users\awaite\Documents\U2Doc\UniVerse\11.2\Source\Adminunix\AppA.fm3/17/14
Beta Beta Beta Beta Beta Beta Beta Beta Beta Beta Beta Beta Beta Beta Beta Beta Beta Beta Beta Beta Beta Beta Beta Beta Beta
Specifying which pages to print
Choose Modify job characteristics from the Spooler menu, then choose Pages to print. At the prompts enter the print job number, then specify the page where you want printing to begin and the page where you want printing to end.
Specifying which lines to print
Choose Modify job characteristics from the Spooler menu, then choose Lines to print. At the prompts enter the print job number, then specify the line where you want printing to begin and the line where you want printing to end.
Changing the priority of a print job
Choose Modify job characteristics from the Spooler menu, then choose Schedule priority. At the prompts enter the print job number, then the level of priority you want to assign. 1 is the highest priority, 255 is the lowest.
Specifying when to print a job
Choose Modify job characteristics from the Spooler menu, then choose Time delay. You can then specify either the absolute time you want the spooler to print the job, for example, 3:30 p.m. or the relative time, such as 4 hours from now.
Controlling print jobs
The following subsections describe how to manipulate print jobs waiting in the queue. These changes can be made from the Job Control menu.
Holding a print job
If a print job is not printing, choose Job control from the Spooler menu, then choose Hold. At the prompt enter the print job number. This makes the print file a hold file—that is, it holds the job until you release it for printing.
To release a hold file for printing, choose Job control from the Spooler menu, then choose Release. The shell command is usm –r print.job.
A-47 Administering UniVerse on UNIX Platforms
C:\Users\awaite\Documents\U2Doc\UniVerse\11.2\Source\Adminunix\AppA.fm3/17/14
Beta Beta Beta Beta Beta Beta Beta Beta Beta Beta Beta Beta Beta Beta Beta Beta Beta Beta Beta Beta Beta Beta Beta Beta Beta
If you want to retain a print file as a hold file after it is printed, choose Modify job characteristics from the Spooler menu, then choose Hold after printing.
Suspending a print job
If the job is actively printing, choose Job control from the Spooler menu, then choose Suspend. At the prompt enter the printer number. This suspends a currently printing job until you are ready to continue printing.
To restart a suspended print job, choose Job control from the Spooler menu, then choose Continue.
Killing a print job
Choose Job control from the Spooler menu, then choose Kill a job. At the prompt enter the print job number.
Managing the spooler
Use the Queue management or the printer groUp queue management option from the Spooler menu to do the following:
Enable and disable printing on a printer
Enable and disable queuing for a printer
Mount a form on a printer
Queue management lets you do these things for any printer. printer groUp queue management lets you do them for printers belonging to a printer group. For information about mounting a form on a printer, see “Mounting a form on a printer” on page 54.
Disabling printing
To stop printing on a printer:
1. Choose Queue management or printer groUp queue management from the Spooler menu.
2. Choose Halt printing.
3. Enter the name of the printer where you want printing to stop.
A-48
C:\Users\awaite\Documents\U2Doc\UniVerse\11.2\Source\Adminunix\AppA.fm3/17/14
Beta Beta Beta Beta Beta Beta Beta Beta Beta Beta Beta Beta Beta Beta Beta Beta Beta Beta Beta Beta Beta Beta Beta Beta Beta
4. Choose Yes to stop printing.
Enabling rinting
To restart printing on a printer:
1. Choose Queue management or printer groUp queue management from the Spooler menu.
2. Choose Begin printing.
3. Enter the name of the printer where you want to restart printing.
4. Choose Yes to start printing.
Disabling queuing
To disable queuing on a printer queue:
1. Choose Queue management or printer groUp queue management from the Spooler menu.
2. Choose Deny queuing.
3. Enter the name of the printer where you want queuing to stop.
4. Choose Yes to disable queuing.
Enabling queuing
To enable queuing on a printer queue:
1. Choose Queue management or printer groUp queue management from the Spooler menu.
2. Choose Allow queuing.
3. Enter the name of the printer where you want to enable queuing.
4. Choose Yes to enable queuing.
A-49 Administering UniVerse on UNIX Platforms
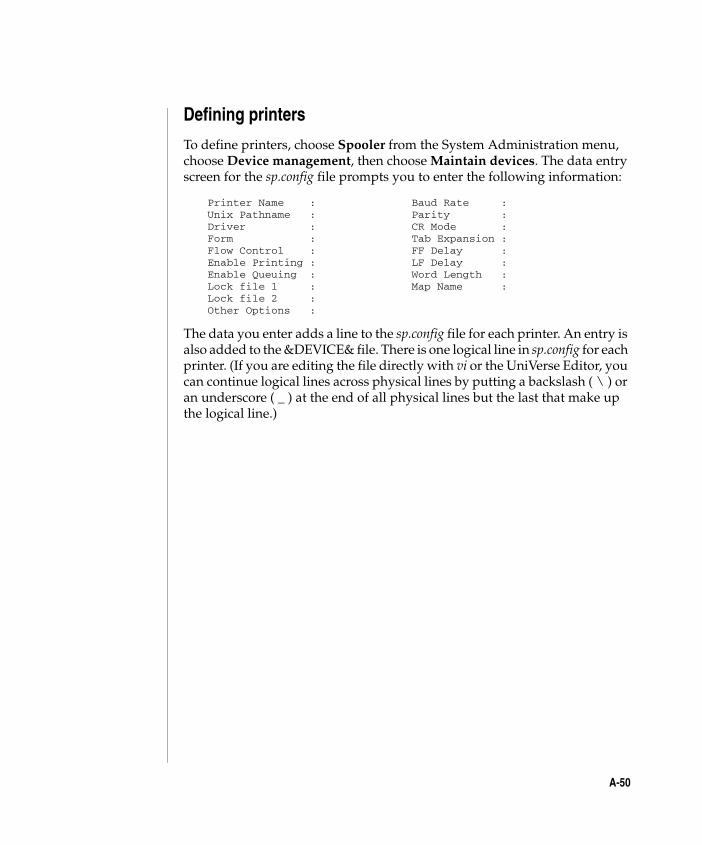
C:\Users\awaite\Documents\U2Doc\UniVerse\11.2\Source\Adminunix\AppA.fm3/17/14
Beta Beta Beta Beta Beta Beta Beta Beta Beta Beta Beta Beta Beta Beta Beta Beta Beta Beta Beta Beta Beta Beta Beta Beta Beta
Defining printers
To define printers, choose Spooler from the System Administration menu, choose Device management, then choose Maintain devices. The data entry screen for the sp.config file prompts you to enter the following information:
Printer Name : Baud Rate : Unix Pathname : Parity : Driver : CR Mode : Form : Tab Expansion : Flow Control : FF Delay : Enable Printing : LF Delay : Enable Queuing : Word Length : Lock file 1 : Map Name : Lock file 2 : Other Options :
The data you enter adds a line to the sp.config file for each printer. An entry is also added to the &DEVICE& file. There is one logical line in sp.config for each printer. (If you are editing the file directly with vi or the UniVerse Editor, you can continue logical lines across physical lines by putting a backslash ( \ ) or an underscore ( _ ) at the end of all physical lines but the last that make up the logical line.)
A-50
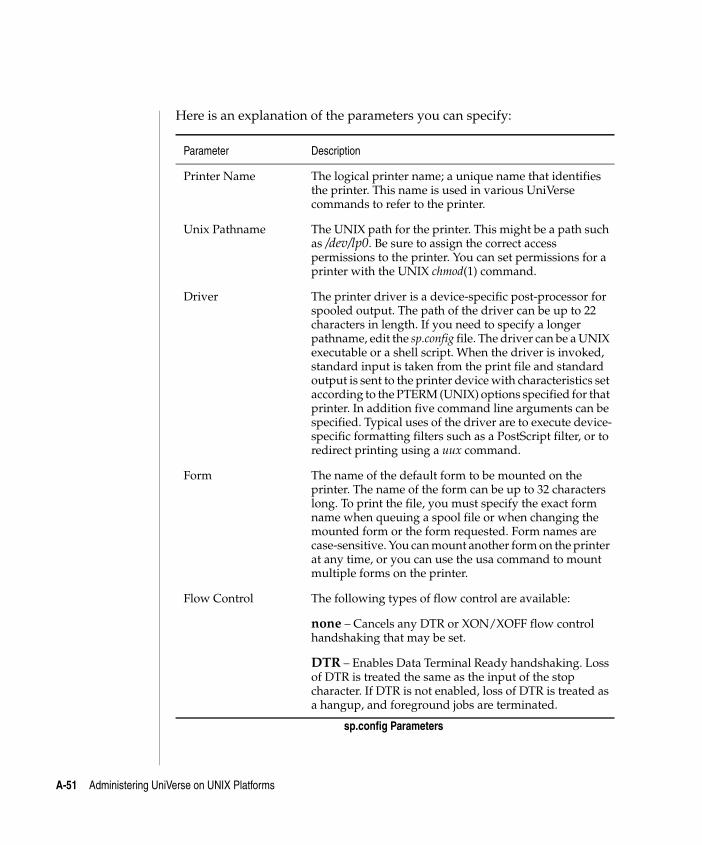
C:\Users\awaite\Documents\U2Doc\UniVerse\11.2\Source\Adminunix\AppA.fm3/17/14
Beta Beta Beta Beta Beta Beta Beta Beta Beta Beta Beta Beta Beta Beta Beta Beta Beta Beta Beta Beta Beta Beta Beta Beta Beta
Here is an explanation of the parameters you can specify:
Parameter Description
Printer Name The logical printer name; a unique name that identifies the printer. This name is used in various UniVerse commands to refer to the printer.
Unix Pathname The UNIX path for the printer. This might be a path such as /dev/lp0. Be sure to assign the correct access permissions to the printer. You can set permissions for a printer with the UNIX chmod(1) command.
Driver The printer driver is a device-specific post-processor for spooled output. The path of the driver can be up to 22 characters in length. If you need to specify a longer pathname, edit the sp.config file. The driver can be a UNIX executable or a shell script. When the driver is invoked, standard input is taken from the print file and standard output is sent to the printer device with characteristics set according to the PTERM (UNIX) options specified for that printer. In addition five command line arguments can be specified. Typical uses of the driver are to execute device-specific formatting filters such as a PostScript filter, or to redirect printing using a uux command.
Form The name of the default form to be mounted on the printer. The name of the form can be up to 32 characters long. To print the file, you must specify the exact form name when queuing a spool file or when changing the mounted form or the form requested. Form names are case-sensitive. You can mount another form on the printer at any time, or you can use the usa command to mount multiple forms on the printer.
Flow Control The following types of flow control are available:
none – Cancels any DTR or XON/XOFF flow control handshaking that may be set.
DTR – Enables Data Terminal Ready handshaking. Loss of DTR is treated the same as the input of the stop character. If DTR is not enabled, loss of DTR is treated as a hangup, and foreground jobs are terminated.
sp.config Parameters
A-51 Administering UniVerse on UNIX Platforms
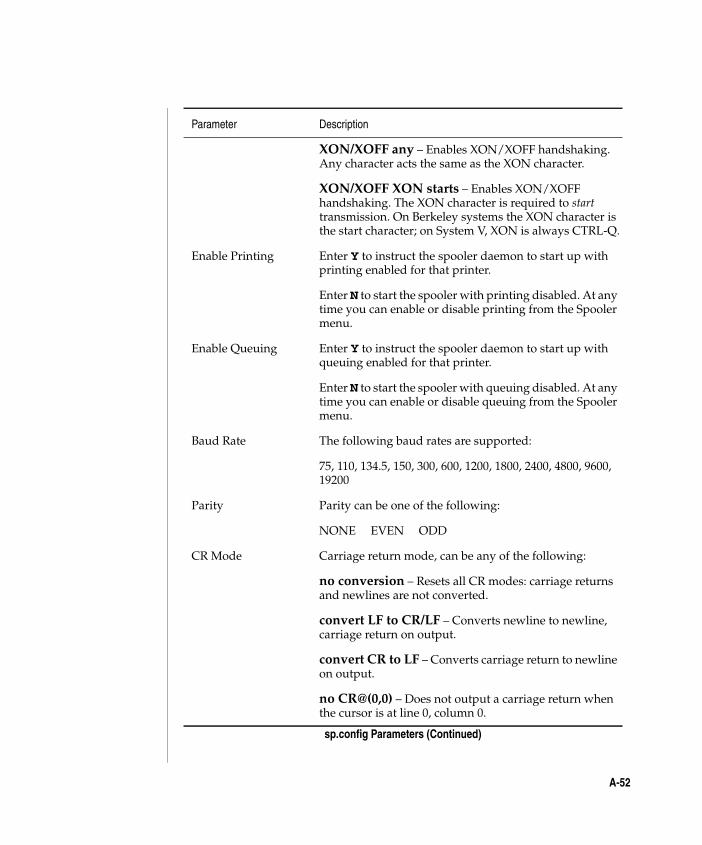
C:\Users\awaite\Documents\U2Doc\UniVerse\11.2\Source\Adminunix\AppA.fm3/17/14
Beta Beta Beta Beta Beta Beta Beta Beta Beta Beta Beta Beta Beta Beta Beta Beta Beta Beta Beta Beta Beta Beta Beta Beta Beta
XON/XOFF any – Enables XON/XOFF handshaking. Any character acts the same as the XON character.
XON/XOFF XON starts – Enables XON/XOFF handshaking. The XON character is required to start transmission. On Berkeley systems the XON character is the start character; on System V, XON is always CTRL-Q.
Enable Printing Enter Y to instruct the spooler daemon to start up with printing enabled for that printer.
Enter N to start the spooler with printing disabled. At any time you can enable or disable printing from the Spooler menu.
Enable Queuing Enter Y to instruct the spooler daemon to start up with queuing enabled for that printer.
Enter N to start the spooler with queuing disabled. At any time you can enable or disable queuing from the Spooler menu.
Baud Rate The following baud rates are supported:
75, 110, 134.5, 150, 300, 600, 1200, 1800, 2400, 4800, 9600, 19200
Parity Parity can be one of the following:
NONE EVEN ODD
CR Mode Carriage return mode, can be any of the following:
no conversion – Resets all CR modes: carriage returns and newlines are not converted.
convert LF to CR/LF – Converts newline to newline, carriage return on output.
convert CR to LF – Converts carriage return to newline on output.
no CR@(0,0) – Does not output a carriage return when the cursor is at line 0, column 0.
Parameter Description
sp.config Parameters (Continued)
A-52
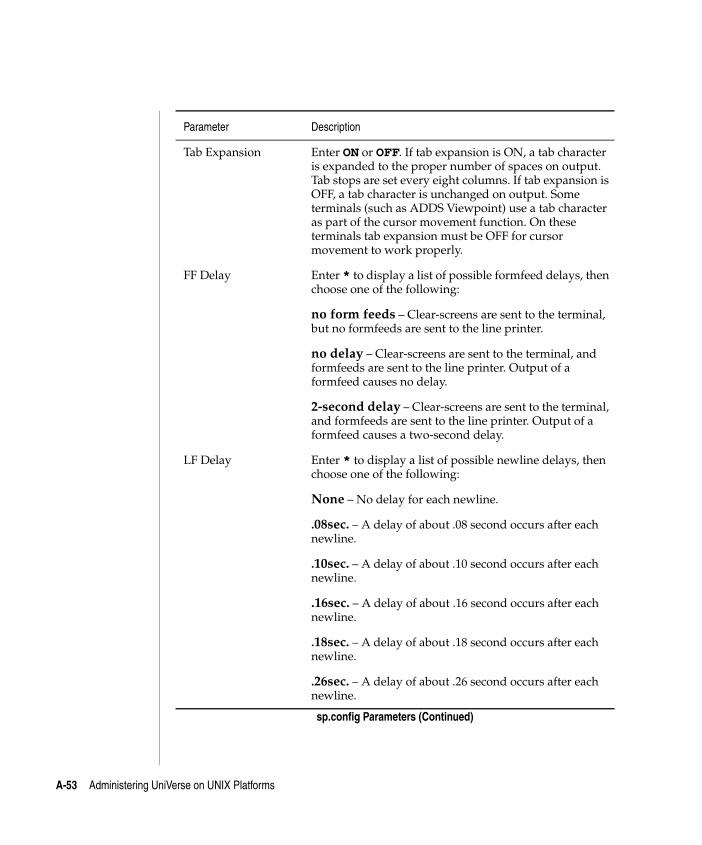
C:\Users\awaite\Documents\U2Doc\UniVerse\11.2\Source\Adminunix\AppA.fm3/17/14
Beta Beta Beta Beta Beta Beta Beta Beta Beta Beta Beta Beta Beta Beta Beta Beta Beta Beta Beta Beta Beta Beta Beta Beta Beta
Tab Expansion Enter ON or OFF. If tab expansion is ON, a tab character is expanded to the proper number of spaces on output. Tab stops are set every eight columns. If tab expansion is OFF, a tab character is unchanged on output. Some terminals (such as ADDS Viewpoint) use a tab character as part of the cursor movement function. On these terminals tab expansion must be OFF for cursor movement to work properly.
FF Delay Enter * to display a list of possible formfeed delays, then choose one of the following:
no form feeds – Clear-screens are sent to the terminal, but no formfeeds are sent to the line printer.
no delay – Clear-screens are sent to the terminal, and formfeeds are sent to the line printer. Output of a formfeed causes no delay.
2-second delay – Clear-screens are sent to the terminal, and formfeeds are sent to the line printer. Output of a formfeed causes a two-second delay.
LF Delay Enter * to display a list of possible newline delays, then choose one of the following:
None – No delay for each newline.
.08sec. – A delay of about .08 second occurs after each newline.
.10sec. – A delay of about .10 second occurs after each newline.
.16sec. – A delay of about .16 second occurs after each newline.
.18sec. – A delay of about .18 second occurs after each newline.
.26sec. – A delay of about .26 second occurs after each newline.
Parameter Description
sp.config Parameters (Continued)
A-53 Administering UniVerse on UNIX Platforms
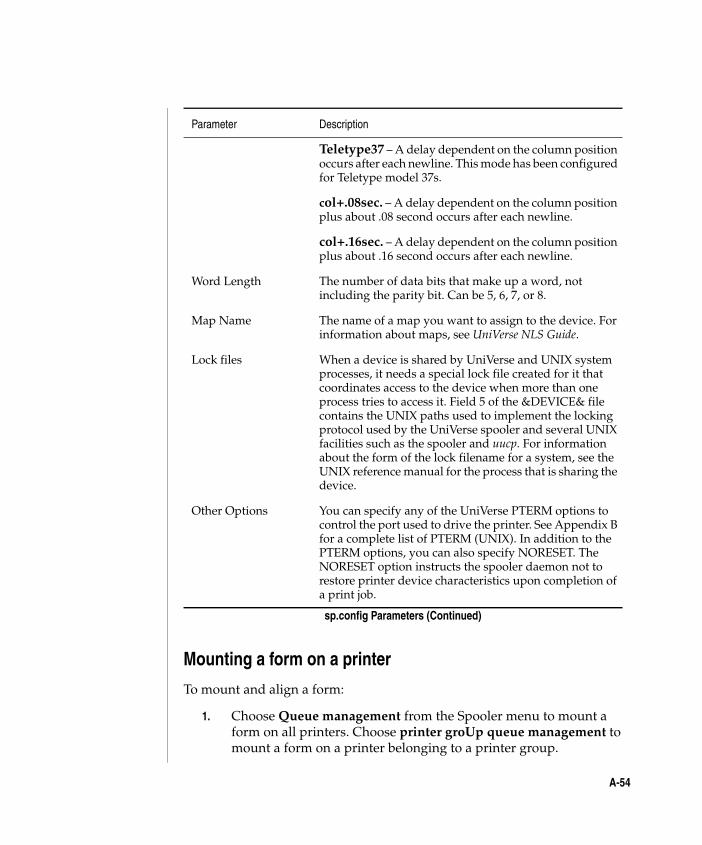
C:\Users\awaite\Documents\U2Doc\UniVerse\11.2\Source\Adminunix\AppA.fm3/17/14
Beta Beta Beta Beta Beta Beta Beta Beta Beta Beta Beta Beta Beta Beta Beta Beta Beta Beta Beta Beta Beta Beta Beta Beta Beta
Mounting a form on a printer
To mount and align a form:
1. Choose Queue management from the Spooler menu to mount a form on all printers. Choose printer groUp queue management to mount a form on a printer belonging to a printer group.
Teletype37 – A delay dependent on the column position occurs after each newline. This mode has been configured for Teletype model 37s.
col+.08sec. – A delay dependent on the column position plus about .08 second occurs after each newline.
col+.16sec. – A delay dependent on the column position plus about .16 second occurs after each newline.
Word Length The number of data bits that make up a word, not including the parity bit. Can be 5, 6, 7, or 8.
Map Name The name of a map you want to assign to the device. For information about maps, see UniVerse NLS Guide.
Lock files When a device is shared by UniVerse and UNIX system processes, it needs a special lock file created for it that coordinates access to the device when more than one process tries to access it. Field 5 of the &DEVICE& file contains the UNIX paths used to implement the locking protocol used by the UniVerse spooler and several UNIX facilities such as the spooler and uucp. For information about the form of the lock filename for a system, see the UNIX reference manual for the process that is sharing the device.
Other Options You can specify any of the UniVerse PTERM options to control the port used to drive the printer. See Appendix B for a complete list of PTERM (UNIX). In addition to the PTERM options, you can also specify NORESET. The NORESET option instructs the spooler daemon not to restore printer device characteristics upon completion of a print job.
Parameter Description
sp.config Parameters (Continued)
A-54
C:\Users\awaite\Documents\U2Doc\UniVerse\11.2\Source\Adminunix\AppA.fm3/17/14
Beta Beta Beta Beta Beta Beta Beta Beta Beta Beta Beta Beta Beta Beta Beta Beta Beta Beta Beta Beta Beta Beta Beta Beta Beta
2. Choose Mount form.
3. Enter the name of the printer.
4. Enter the name of the form you want to mount, or press ENTER to retain the form that is currently mounted on the printer.
You are asked if you want to check the vertical and horizontal alignment. If you enter Y, you are prompted to enter the path of the UNIX file you want to print to test the alignment of the printer. If you press ENTER, the next queued job is printed as an alignment test. You can also specify the number of lines you want printed.
To display the current spooler status report, press F10 to activate the menu bar, then choose Action, then choose List.
Configuring the spooler
To display the information contained in the sp.config file, choose Spooler from the System Administration menu, then choose Device management, then choose List printers. Select the printer whose configuration you want to display by highlighting it and pressing ENTER. Choose Yes when asked if you want to modify the printer. The printer details are listed, and you can modify them if you want. To exit without making changes, press Esc.
To make changes to the sp.config file, use either of the following menu options:
Choose Spooler from the System Administration menu, then choose Device management, then choose Maintain devices.
Choose Devices from the System Administration menu, then choose maintain Devices.
Changes you make will not take effect until you do one of the following:
Reread the spooler configuration
Reset the spooler daemon
A-55 Administering UniVerse on UNIX Platforms
C:\Users\awaite\Documents\U2Doc\UniVerse\11.2\Source\Adminunix\AppA.fm3/17/14
Beta Beta Beta Beta Beta Beta Beta Beta Beta Beta Beta Beta Beta Beta Beta Beta Beta Beta Beta Beta Beta Beta Beta Beta Beta
Rereading the spooler configuration
To reread the configuration without resetting the spooler daemon, choose Spooler from the System Administration menu, then choose Device management, then choose Reread configuration. Rereading the configuration does not reread the usplog file. This means that any temporary changes you made to the spooler are lost.
Resetting the spooler daemon
To reset the spooler daemon, choose Spooler from the System Administration menu, then choose sPooler management, then choose Reset spooler. Resetting the spooler daemon rereads both the sp.config file and the usplog file; any temporary changes you made to the spooler are restored.
If a job is actively printing when you reset the daemon, it is put in the suspended state. To reset or terminate the spooler gracefully, first disable printing on all printers, then wait until all active jobs have finished printing. Disable printing on all printers by choosing Spooler from the System Administration menu, then choose Queue management, then choose Halt printing. To disable printing on printers in a printer group, choose Spooler, then choose printer groUp queue management, then choose Halt printing.
Changing the spooler configuration
You can change information the spooler daemon uses to communicate with the system. You do this from the System Administration menus. You can move the spooler home directory to a partition with more space, change the path or file name of the logging files, change the order in which jobs are printed, or change the amount of time the spooler daemon waits for the system to respond. You can also specify these options with the usd command. For more information about usd, see UniVerse User Reference.
Choose Spooler from the System Administration menu, choose sPooler management, then choose Configure spooler.
The following is an explanation of the parameters:
A-56
C:\Users\awaite\Documents\U2Doc\UniVerse\11.2\Source\Adminunix\AppA.fm3/17/14
Beta Beta Beta Beta Beta Beta Beta Beta Beta Beta Beta Beta Beta Beta Beta Beta Beta Beta Beta Beta Beta Beta Beta Beta Beta
Spool Directory. Type the path of the directory in which spooled files are created. The spooler configuration files, sp.config and usplog, are in this directory. The default directory is the value of the configurable parameter UVSPOOL.
Error Log File. Type the name of the file used by the spooler daemon to report errors. If the path is a directory, the spooler uses the default file name, err.log. The default path is the spool directory.
Activity Log File. Type the name of the file in which activity messages are stored. If the path is a directory, (such as, /usr/spool/uv) the spooler uses the default filename, act.log. The default path is the spool directory.
Logging. Type ON to enable error and activity logging. The default is OFF.
Chronological Order. Type ON to print jobs in first in first out order. The default is OFF.
Timer Value. Type the number of seconds the spooler waits for the system to respond to commands. The default is 10 seconds.
After you enter the parameters, press F10 to activate the menu bar. Type F to choose the File menu. Type S to save changes to the uv.rc script. You are prompted to restart the spooler. If you want the changes to take effect immediately, choose YES.
Type E to exit the Spooler Configuration screen without any changes.
Maintaining printer groups
To define a printer group, choose Spooler from the System Administration menu, then choose printer Group management. When you add, change, or delete a printer group definition, UniVerse updates the print_group file.
Adding a printer group
To add a printer group, follow these steps:
1. Choose Spooler from the System Administration menu.
2. Choose printer Group management.
3. Choose printer Groups, then choose Add a group.
A-57 Administering UniVerse on UNIX Platforms
C:\Users\awaite\Documents\U2Doc\UniVerse\11.2\Source\Adminunix\AppA.fm3/17/14
Beta Beta Beta Beta Beta Beta Beta Beta Beta Beta Beta Beta Beta Beta Beta Beta Beta Beta Beta Beta Beta Beta Beta Beta Beta
4. At the prompts, enter the name of a new printer group.
5. Enter the login names of users who are to have access to this printer group. Enter all to specify that all users can access the printer group. To see a list of all users currently defined in the /etc/passwd file, press F4 or enter an asterisk (*) at the prompt.
6. Enter the names of the printers that are to be included in the printer group, or enter all to include all printers in the printer group. To see a list of all currently defined printers on the system, press F4 or enter an asterisk (*) at the prompt. Choose Yes to add the new printer group.
When you save the new printer group information, UniVerse updates the print_group file and clears the data entry screen. If you do not define another printer group, you are returned to the System Administration menu.
Changing a printer group
To change an existing printer group, follow these steps:
1. Choose printer Groups from the Printer Group menu.
2. Choose Add a group. To make changes, choose the printer group you want to change, use the arrow keys to move to the fields you want to change, then make the changes you want.
Deleting a printer group
To delete a printer group from the print_group file, follow these steps:
1. Choose printer Groups from the Printer Group menu.
2. Choose Delete a group. Choose the printer group you want to delete.
When you save the revised printer group information, or when you are finished deleting printer groups, UniVerse updates the print_group file. You are then returned to the System Administration menu.
A-58
C:\Users\awaite\Documents\U2Doc\UniVerse\11.2\Source\Adminunix\AppA.fm3/17/14
Beta Beta Beta Beta Beta Beta Beta Beta Beta Beta Beta Beta Beta Beta Beta Beta Beta Beta Beta Beta Beta Beta Beta Beta Beta
Maintaining printer group users and printers
You can also add, change, and delete users and printers from the print_group file. To add, change, or delete users, choose Users from the Printer Group menu. To add, change, or delete printers, choose Printers from the Printer Group menu.
Spooler log files
Use the Spooler menu to create and use the spooler log files.
Creating spooler log files
To create spooler log files, choose Spooler from the System Administration menu, then choose error and activity Logs, then choose Set log files. At the prompts, enter the UNIX paths for the files you want to create or press ENTER to accept the default log files.
Displaying spooler log files
To display the contents of the spooler log files, choose Spooler from the System Administration menu, then choose error and activity Logs, then choose either rEad error log file or reAd activity log file.
The activity log file displays information about the spooler (S), the spooler queues (Q), printers (P), and print jobs (J). Each piece of information is displayed on a separate screen (or series of screens). The subject of the information is indicated by the letter in the first column of the report.
When you choose reAd activity log file, spooler information is displayed (indicated by the letter S). Press ENTER to display queue information, printer information, and print job information. Each report lists the action performed and the date and time it was logged.
A-59 Administering UniVerse on UNIX Platforms
C:\Users\awaite\Documents\U2Doc\UniVerse\11.2\Source\Adminunix\AppA.fm3/17/14
Beta Beta Beta Beta Beta Beta Beta Beta Beta Beta Beta Beta Beta Beta Beta Beta Beta Beta Beta Beta Beta Beta Beta Beta Beta
You can use the Spooler Log menu to determine when a specified print job was printed. Choose Spooler from the System Administration menu, then choose error and activity Logs, then choose When was file printed. At the prompt, enter either the UNIX file name that was printed, the print job ID number (the number that was displayed when the print job was generated), or the name of the user who sent the job to the printer. In the latter case, all jobs sent to the printer by that user will be displayed.
A-60
C:\Users\awaite\Documents\U2Doc\UniVerse\11.2\Source\Adminunix\AppA.fm3/17/14
Beta Beta Beta Beta Beta Beta Beta Beta Beta Beta Beta Beta Beta Beta Beta Beta Beta Beta Beta Beta Beta Beta Beta Beta Beta
Shared Memory (sh Mem) optionUse the Shared Memory (sh Mem) option to load BASIC programs into catalog shared memory. Catalog shared memory reduces the amount of memory required for multiple users to run the same program concurrently.
When you choose sh Mem from the UniVerse System Administration menu, the Shared Memory menu appears.
Designating programs for catalog shared memory
To designate BASIC programs to run in catalog shared memory, choose Designate shared programs from the Shared Memory menu. The Program Selection screen appears.
This screen displays 22 programs at a time from the catdir file. The following example shows an example of programs listed on the Program Selection screen. If there are more programs than can fit on the screen, a plus sign (+) is displayed next to the last program on the screen. This screen also displays the total size of programs designated to run in catalog shared memory and the amount of space available.
The system prompts you to designate programs by entering the following:
The number appearing in front of a program name.
A to designate all the programs in the file. This may take several minutes if there are many programs in the file.
L to list the programs currently designated to run.
C to change to another program file either in the UV account or in some other account. Programs in the file you specify are listed.
The Program Selection screen first displays normally and globally cataloged programs, but any BASIC program can be loaded into catalog shared memory.
To see a list of the programs already selected, type L. This displays the account, file, record name, and the number of bytes this program will take up in catalog shared memory.
A-61 Administering UniVerse on UNIX Platforms
C:\Users\awaite\Documents\U2Doc\UniVerse\11.2\Source\Adminunix\AppA.fm3/17/14
Beta Beta Beta Beta Beta Beta Beta Beta Beta Beta Beta Beta Beta Beta Beta Beta Beta Beta Beta Beta Beta Beta Beta Beta Beta
To change to a different file of BASIC programs, type C. You are prompted to enter the account name and file you want displayed. The account name can be the name of a UniVerse account (for example, UV) or a UNIX path (such as /u1/uv/BP). The records in the file are displayed 22 at a time.
To remove a program from the list, enter the number of the program and answer N to the question Should this program run in shared memory?.
To remove all programs from the list, type A.
Installing programs into catalog shared memory
To load programs into shared memory, choose Install programs in shared memory from the Shared Memory menu.
You are asked if you want to change the amount of memory allocated for modifying shared memory. You might want to allocate extra space if all you want to do is change a few programs in catalog shared memory without completely reloading it. Most users will not need extra space and should answer N.
You are then prompted with Continue to load shared memory (Y/N)?. Answer Y to load your designated programs into catalog shared memory. Any other response stops the load. UniVerse lists the name of each program as it is loads and gives an error message for any program it cannot find and for any records that are not compiled BASIC programs.
You can allocate extra space in the catalog memory segment at startup time by modifying the uv.rc script. To increase the segment size 8192 bytes, change the following line in uv.rc:
bin/load_shm_cat 2>&1 > /dev/null
to:
bin/load_shm_cat 8192 2>&1 > /dev/null
A-62
C:\Users\awaite\Documents\U2Doc\UniVerse\11.2\Source\Adminunix\AppA.fm3/17/14
Beta Beta Beta Beta Beta Beta Beta Beta Beta Beta Beta Beta Beta Beta Beta Beta Beta Beta Beta Beta Beta Beta Beta Beta Beta
Modifying catalog shared memory
When you change and recompile a BASIC program, the changes are not applied to the copy of the program in shared memory. To update the copy in shared memory, choose Modify shared memory from the Shared Memory menu. This choice displays four modification options.
Add a program to shared memory lets you add a new program to catalog shared memory. Anyone using the program continues to use it, but everyone who starts the program after it is loaded uses the copy in catalog shared memory.
Delete a program from shared memory deletes a program from catalog shared memory. This option prompts you to choose a program by asking for an account, file, and record. If you respond Y to the Should program be deleted from shared memory prompt, the program is removed. Anyone using the program when it is deleted continues to use it. Anyone who starts using the program after it is deleted gets a copy from disk.
Update a program in shared memory updates a program already loaded into catalog shared memory. Again, anyone using the program continues to use the old copy, but anyone who starts the program after shared memory is modified gets the new version.
Remove the shared prog mem segment removes the shared memory segment. Anyone attached to the shared memory segment continues to use it (they must leave UniVerse and reenter it to detach). Anyone who enters UniVerse after the shared memory segment is removed gets all programs from disk files.
If you try to add or update a program in catalog shared memory when there is not sufficient space, you get a message that you have run out of space. The add or update is aborted. To do the add or update, you have to reload the entire segment.
Removing printer memory segments
Occasionally after an abnormal termination of UniVerse, printer shared memory segments are not automatically removed. To remove such obsolete printer memory segments:
A-63 Administering UniVerse on UNIX Platforms
C:\Users\awaite\Documents\U2Doc\UniVerse\11.2\Source\Adminunix\AppA.fm3/17/14
Beta Beta Beta Beta Beta Beta Beta Beta Beta Beta Beta Beta Beta Beta Beta Beta Beta Beta Beta Beta Beta Beta Beta Beta Beta
1. Choose Remove the shared prog mem segment from the Shared Memory menu.
2. Choose Yes at the Are you sure you want to continue? prompt.
A-64
C:\Users\awaite\Documents\U2Doc\UniVerse\11.2\Source\Adminunix\AppA.fm3/17/14
Beta Beta Beta Beta Beta Beta Beta Beta Beta Beta Beta Beta Beta Beta Beta Beta Beta Beta Beta Beta Beta Beta Beta Beta Beta
Import optionUse the Import option to import a Pick or Prime INFORMATION account from a remote system or to restore a Pick or Prime account from tape.
When you choose Import from the UniVerse System Administration menu, the Import menu appears.
Restoring non-UniVerse accounts from tape
To restore or transfer an account, a UniVerse account or a UNIX directory must exist to receive the restored or transferred account. The UniVerse account or UNIX directory will be the parent directory of the restored or transferred account. If the parent directory does not exist, you must create it before you restore or transfer an account to UniVerse. You can create a UniVerse account using the Accounts option from the System Administration menu.
The steps are as follows:
1. Choose Import from the System Administration menu. The Import menu appears.
2. Choose Magrst a prime tape to restore Prime INFORMATION tapes saved with the MAGSAV command. Choose Account-restore a pick tape to restore Pick account tapes saved with the ACCOUNT-SAVE command.
3. At the MAGRST screen or ACCOUNT-RESTORE screen prompt, enter either the name of the UniVerse account or the path of the UNIX directory under which you want to restore the account from the tape.
The account is restored in a subdirectory of the existing UniVerse account’s directory. If you specify a UniVerse account name, it must exist in the UV.ACCOUNT file. To see a list of valid UniVerse account names, enter an asterisk (*) at the prompt. Be sure to enter the UniVerse account name in uppercase letters, where applicable.
You can also enter a user name or user ID number. In this case the account is restored in a subdirectory of that user’s home directory.
A-65 Administering UniVerse on UNIX Platforms
C:\Users\awaite\Documents\U2Doc\UniVerse\11.2\Source\Adminunix\AppA.fm3/17/14
Beta Beta Beta Beta Beta Beta Beta Beta Beta Beta Beta Beta Beta Beta Beta Beta Beta Beta Beta Beta Beta Beta Beta Beta Beta
4. UniVerse prompts you to mount your MAGSAV or ACCOUNT-SAVE tape on the specified device.
5. Press ENTER. If the tape is properly mounted on the drive, a subdirectory is created with the name of the account on tape, it is made a UniVerse account, and all the files in the account on tape are restored to it. A list of the file names appears on your screen while the restoration is in progress. If the directory under which you want to restore the account on tape does not exist, an error message appears.
Restoring a Prime INFORMATION account
This section describes how to restore Prime INFORMATION accounts that have been saved on tape using the MAGSAV command. The example shows how to use the System Administration menus to restore a Prime account, named INFOACCT, to /u1/accts/SALES.
1. Choose Import from the System Administration menu. The Import menu appears.
2. Choose Magrst a prime tape. The MAGRST screen appears.
A-66
C:\Users\awaite\Documents\U2Doc\UniVerse\11.2\Source\Adminunix\AppA.fm3/17/14
Beta Beta Beta Beta Beta Beta Beta Beta Beta Beta Beta Beta Beta Beta Beta Beta Beta Beta Beta Beta Beta Beta Beta Beta Beta
3. The following text describes information you can enter in the fields on this screen:
Parent Directory. The directory that is to contain the restored account. You can specify the parent directory either as a UNIX path or as a UniVerse account defined in the UV.ACCOUNT file. You can also specify a user login name or ID number. The account is restored in the home directory of that user.
If you specify a UniVerse account, the account on tape is restored as a subdirectory in the specified UniVerse account’s parent directory. Do not specify the name of the account you are restoring as the parent directory.
In the previous example, the INFOACCT account is restored as a subdirectory under the parent directory /u1/accts; the restored account’s directory is /u1/accts/SALES.
No rewind device name. A valid entry in the &DEVICE& file, (such as MT0) or a valid UNIX device or file name (such as /dev/rmt12). It specifies the path to use for a tape device that does not rewind when finished. To display a list of all devices defined in the &DEVICE& file, enter an * at the prompt.
Rewind device name. A valid entry in the &DEVICE& file (such as MT0) or a valid UNIX device or file name (such as /dev/rmt8). It specifies the path to use for a tape device that rewinds when finished. To display a list of all devices defined in the &DEVICE& file, enter an * at the prompt.
Device type. One of the following:
F Diskette DT Default nine-track tape (1/2-inch tape) DC Default cartridge tape (1/4-inch tape)
Input block size. If the device name is found in the &DEVICE& file, the input block size is taken from field 16 of the &DEVICE& file. If field 16 of the &DEVICE& file is blank, a default of 8192 is used for 1/2-inch tape devices, and a default of 512 is used for cartridge tape devices. If the device name is not found in the &DEVICE& file, a default of 512 is used. This field is not used for diskettes.
Use type 19 files. The default for this is N, which creates type 1 files. A Y specifies type 19 files instead of type 1 files. For more information about type 1 and type 19 files, see UniVerse System Description.
A-67 Administering UniVerse on UNIX Platforms
C:\Users\awaite\Documents\U2Doc\UniVerse\11.2\Source\Adminunix\AppA.fm3/17/14
Beta Beta Beta Beta Beta Beta Beta Beta Beta Beta Beta Beta Beta Beta Beta Beta Beta Beta Beta Beta Beta Beta Beta Beta Beta
If the device name is not found in the &DEVICE& file, a warning appears and you are prompted to verify that the defaults for input block size and header files to skip are correct.
Restoring a Pick or REALITY account
This section shows how to use the ACCOUNT-SAVE command to restore accounts that have been saved on tape using the ACCOUNT-SAVE command. The example shows how to use the System Administration menu to restore a Pick account named SALES to /u1/accts.
The steps are as follows:
1. Choose Import from the System Administration menu. The Import menu appears.
2. Choose Account-restore a pick tape. The ACCT.RESTORE screen appears.
A-68
C:\Users\awaite\Documents\U2Doc\UniVerse\11.2\Source\Adminunix\AppA.fm3/17/14
Beta Beta Beta Beta Beta Beta Beta Beta Beta Beta Beta Beta Beta Beta Beta Beta Beta Beta Beta Beta Beta Beta Beta Beta Beta
3. The following text describes the information you can enter in the fields on this screen:
Parent Directory. The directory that is to contain the restored account. You can specify the parent directory either as a UNIX path or as a UniVerse account defined in the UV.ACCOUNT file. You can also specify a user login name or ID number. The account will be restored in the home directory of that user.
If you specify a UniVerse account, it is restored as a subdirectory in the specified UniVerse account’s parent directory. Do not specify the name of the account you are restoring as the parent directory.
In the previous example, the PICKACCT account is restored as a subdirectory under the parent directory /u1/accts. The restored account’s directory is /u1/accts/SALES.
No rewind device name. A valid entry in the &DEVICE& file, (such as MT0) or a valid UNIX device or file name (such as /dev/rmt12). It specifies the path to use for a tape device that does not rewind when closed. To display a list of all devices defined in the &DEVICE& file, enter an * at the prompt.
Rewind device name. A valid entry in the &DEVICE& file (such as MT0) or a valid UNIX device or file name (such as /dev/rmt8). It specifies the path to use for a tape device that rewinds when closed. To display a list of all devices defined in the &DEVICE& file, enter an * at the prompt.
Device type. One of the following:
F Diskette DT Default nine-track tape (1/2-inch tape) DC Default cartridge tape (1/4-inch tape)
Input block size. If the device name is found in the &DEVICE& file, the input block size will be taken from field 16 of the &DEVICE& file. If field 16 of the &DEVICE& is blank, a default of 8192 is used for 1/2-inch tape devices, and a default of 512 is used for cartridge tape devices. If the device name is not found in the &DEVICE& file, a default of 512 is used. This field is not used for diskettes.
For 1/2-inch tape drives, which read physical tape records, it is important that the input block size be large enough to accommodate the largest physical record on the tape, otherwise data will be lost. Note that some tapes may require a block size larger than 8192.
A-69 Administering UniVerse on UNIX Platforms
C:\Users\awaite\Documents\U2Doc\UniVerse\11.2\Source\Adminunix\AppA.fm3/17/14
Beta Beta Beta Beta Beta Beta Beta Beta Beta Beta Beta Beta Beta Beta Beta Beta Beta Beta Beta Beta Beta Beta Beta Beta Beta
Pick or Reality data tape. Specify an M (Microdata) for an ACCOUNT-SAVE created on a REALITY machine, and a P for all others.
Use type 19 files. The default for this is N which creates type 1 files. A Y specifies type 19 files instead of type 1 files.
If the device name is not found in the &DEVICE& file, the system displays a warning and prompts you to verify that the defaults for input block size, label records, and header files to skip are correct.
The system administration routines execute the UniVerse program tapein to restore multireel ACCOUNT-SAVE and MAGSAV tapes.
Running T.LOAD from a File. Before running T.LOAD, you must set up an &DEVICE& entry to access the pqic.results file.
1. Choose Devices from the System Administration menu, then choose maintain Devices.
2. Enter a new name in the Device Name field, for example, MTFILE. You can specify any user-defined name as a temporary name for the device.
3. Press ENTER to skip to Device Type and enter O for Other.
4. Enter the full path of the pqic.results file for Device Pathname (no rewind) and for Device Pathname (rewind).
5. Press ENTER to skip the remaining fields on the screen.
6. Save the device entry when prompted.
7. Exit the System Administration menu using the Esc key.
LONGNAMES mode
If you restore a file through the System Administration menus, make sure that LONGNAMES has the same value on both systems or filenames may get truncated. Devices Option
Use the Devices option to update and maintain the UniVerse file &DEVICE& and the UNIX file sp.config.
A-70
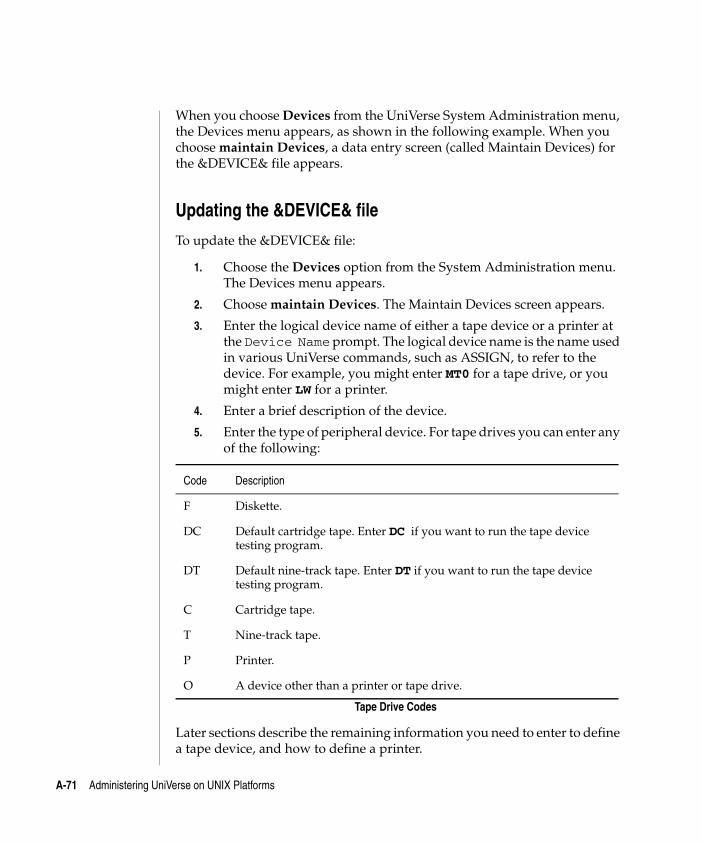
C:\Users\awaite\Documents\U2Doc\UniVerse\11.2\Source\Adminunix\AppA.fm3/17/14
Beta Beta Beta Beta Beta Beta Beta Beta Beta Beta Beta Beta Beta Beta Beta Beta Beta Beta Beta Beta Beta Beta Beta Beta Beta
When you choose Devices from the UniVerse System Administration menu, the Devices menu appears, as shown in the following example. When you choose maintain Devices, a data entry screen (called Maintain Devices) for the &DEVICE& file appears.
Updating the &DEVICE& file
To update the &DEVICE& file:
1. Choose the Devices option from the System Administration menu. The Devices menu appears.
2. Choose maintain Devices. The Maintain Devices screen appears.
3. Enter the logical device name of either a tape device or a printer at the Device Name prompt. The logical device name is the name used in various UniVerse commands, such as ASSIGN, to refer to the device. For example, you might enter MT0 for a tape drive, or you might enter LW for a printer.
4. Enter a brief description of the device.
5. Enter the type of peripheral device. For tape drives you can enter any of the following:
Later sections describe the remaining information you need to enter to define a tape device, and how to define a printer.
Code Description
F Diskette.
DC Default cartridge tape. Enter DC if you want to run the tape device testing program.
DT Default nine-track tape. Enter DT if you want to run the tape device testing program.
C Cartridge tape.
T Nine-track tape.
P Printer.
O A device other than a printer or tape drive.
Tape Drive Codes
A-71 Administering UniVerse on UNIX Platforms
C:\Users\awaite\Documents\U2Doc\UniVerse\11.2\Source\Adminunix\AppA.fm3/17/14
Beta Beta Beta Beta Beta Beta Beta Beta Beta Beta Beta Beta Beta Beta Beta Beta Beta Beta Beta Beta Beta Beta Beta Beta Beta
Note: Multireel tape handling for the UniVerse T.DUMP and T.LOAD commands is supported only for device types DC, DT, and F.
Defining a tape device
If you enter either DC or DT as the device type, you are asked if you want to run the tape device testing program to determine the following:
Where to allow the tape mode to change from read to write mode
What action to take when a tape file that is opened for read is closed
If a second read call at the end-of-file should return the end-of-file condition again
If you run the tests, their results are automatically filled in for you. If you do not run the tests, you can fill in your own values for these fields.
At the prompts, enter the following information:
Block Size (Field 3) This is needed only if the device is for cartridge tape (types DC and DT) or diskette (type F).
For diskettes the default block size is 500. Do not change this setting; any other block size can cause problems.
For cartridge tape the block size should be a multiple of 512.
For nine-track tape (types T and DT) there is no default block size for IDEAL and INFORMATION flavor accounts: tape records are read or written with variable length. If field 3 of the &DEVICE& file is empty, the default block size for PICK or REALITY flavor accounts is 8192.
If the device was assigned using the ASSIGN command, the default block size is taken from field 3 of the &DEVICE& file.
If the device was assigned using the T.ATT command, the default block size is taken from field 3 of the &DEVICE& file. If that is empty, the default block size is taken from the VOC entry for the T.ATT command.
A-72
C:\Users\awaite\Documents\U2Doc\UniVerse\11.2\Source\Adminunix\AppA.fm3/17/14
Beta Beta Beta Beta Beta Beta Beta Beta Beta Beta Beta Beta Beta Beta Beta Beta Beta Beta Beta Beta Beta Beta Beta Beta Beta
Device Pathname (Fields 2, 6, 7) For tapes, the path can be different depending on whether the tape drive is a rewind or a no-rewind device. A no-rewind tape drive that does not rewind when closed. A rewind tape drive rewinds when closed. For example, you might enter a path such as /dev/rmt0 (a rewind device), or /dev/rmt0n (a no-rewind device). It is important that you assign the correct access permissions to the device. You can set permissions for a device with the UNIX chmod(1) command.
Lock files (Field 5) When UniVerse and UNIX system processes share a device, it needs a special lock file that coordinates access to the device when more than one process tries to access it. Field 5 of the &DEVICE& file contains the UNIX paths used to implement the locking protocol used by the UniVerse spooler and UNIX facilities such as the spooler and uucp. This field is usually empty for tape devices, but can be used to display ownership information. For information about the form of the lock file name for a system, see the UNIX reference manual for the process that is sharing the device.
Backup Shell Command (Field 8) The shell command sequence used to back up files to the device.
Restore Shell Command (Field 9) The shell command sequence used to restore files from the device.
Skip Shell Command (Field 10) The shell command sequence used to move forward one logical tape block on the device.
Rewind Shell Command (Field 11) The shell command sequence used to rewind the tape.
Offline Shell Command (Field 12) The shell command sequence used to take the device offline.
If you entered either DC or DT as the device type, and you did not run the tape device testing program, fill in the following three fields:
A-73 Administering UniVerse on UNIX Platforms

C:\Users\awaite\Documents\U2Doc\UniVerse\11.2\Source\Adminunix\AppA.fm3/17/14
Beta Beta Beta Beta Beta Beta Beta Beta Beta Beta Beta Beta Beta Beta Beta Beta Beta Beta Beta Beta Beta Beta Beta Beta Beta
Read-to-Write Mode Position (Field 13) This specifies where on the tape a change from read mode to write mode is allowed. Enter one of the following:
Close on Read (Field 14) This specifies what action is taken at the close of a tape file which was opened for read. Enter one of the following:
Multiple Read at End-of-File Status (Field 15) This specifies whether a second read call at the end-of-file returns the end-of-file condition again. Enter one of the following:
Note: Most Berkeley device drivers work with F13–F15 set at A,N,N or E,N,N. Most System V device drivers work with E,Y,Y or L,Y,Y.
Account Transfer Block Size (Field 16) This specifies the input block size for use with the account transfer functions described in Chapter 7, “ Chapter 7: Transferring accounts.” The default is 8192.
Mode Description
L Write must begin at load point. This is the default.
E Write can begin at load point or after end-of-file.
A Write can begin anywhere on the tape. This usually works only on 1/2-inch tapes.
Read-to-Write Mode Positions
Option Description
Y Tape moves forward to the beginning of next file on close. This is the default value. Use Y for most 1/4-inch tape devices.
N Tape does not move forward on close. Use N for most 1/2-inch tape devices.
Close on Read Options
Option Description
Y The second read call at the end-of-file returns end-of-file indication again. This is the default value. Use Y for most 1/4-inch tape drives.
N The second read call at the end-of-file returns the first record of the next file. Use N for most 1/2–inch tape drives.
Multiple Read at End-of-File Options
A-74
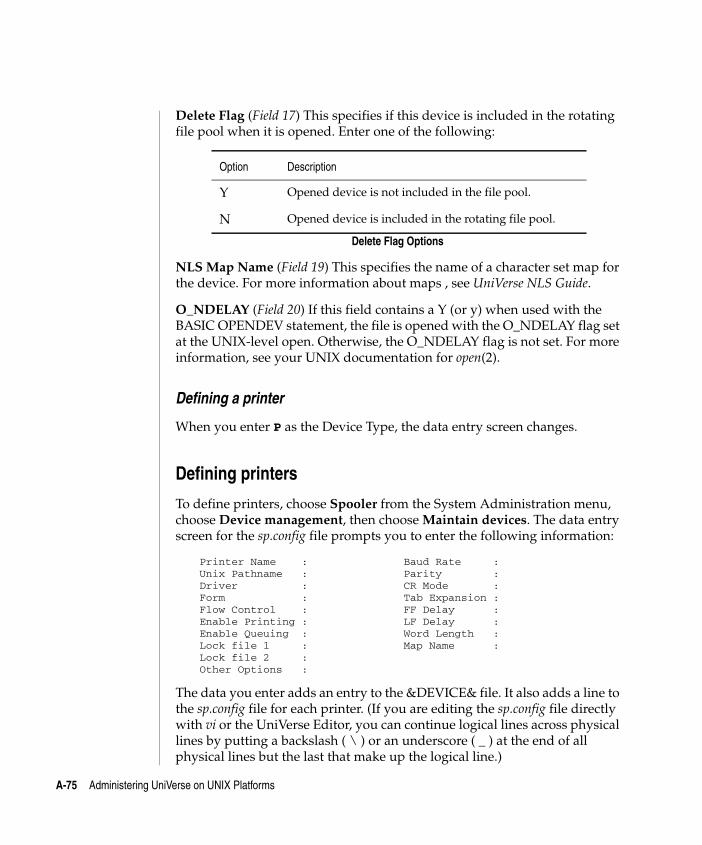
C:\Users\awaite\Documents\U2Doc\UniVerse\11.2\Source\Adminunix\AppA.fm3/17/14
Beta Beta Beta Beta Beta Beta Beta Beta Beta Beta Beta Beta Beta Beta Beta Beta Beta Beta Beta Beta Beta Beta Beta Beta Beta
Delete Flag (Field 17) This specifies if this device is included in the rotating file pool when it is opened. Enter one of the following:
NLS Map Name (Field 19) This specifies the name of a character set map for the device. For more information about maps , see UniVerse NLS Guide.
O_NDELAY (Field 20) If this field contains a Y (or y) when used with the BASIC OPENDEV statement, the file is opened with the O_NDELAY flag set at the UNIX-level open. Otherwise, the O_NDELAY flag is not set. For more information, see your UNIX documentation for open(2).
Defining a printer
When you enter P as the Device Type, the data entry screen changes.
Defining printers
To define printers, choose Spooler from the System Administration menu, choose Device management, then choose Maintain devices. The data entry screen for the sp.config file prompts you to enter the following information:
Printer Name : Baud Rate : Unix Pathname : Parity : Driver : CR Mode : Form : Tab Expansion : Flow Control : FF Delay : Enable Printing : LF Delay : Enable Queuing : Word Length : Lock file 1 : Map Name : Lock file 2 : Other Options :
The data you enter adds an entry to the &DEVICE& file. It also adds a line to the sp.config file for each printer. (If you are editing the sp.config file directly with vi or the UniVerse Editor, you can continue logical lines across physical lines by putting a backslash ( \ ) or an underscore ( _ ) at the end of all physical lines but the last that make up the logical line.)
Option Description
Y Opened device is not included in the file pool.
N Opened device is included in the rotating file pool.
Delete Flag Options
A-75 Administering UniVerse on UNIX Platforms
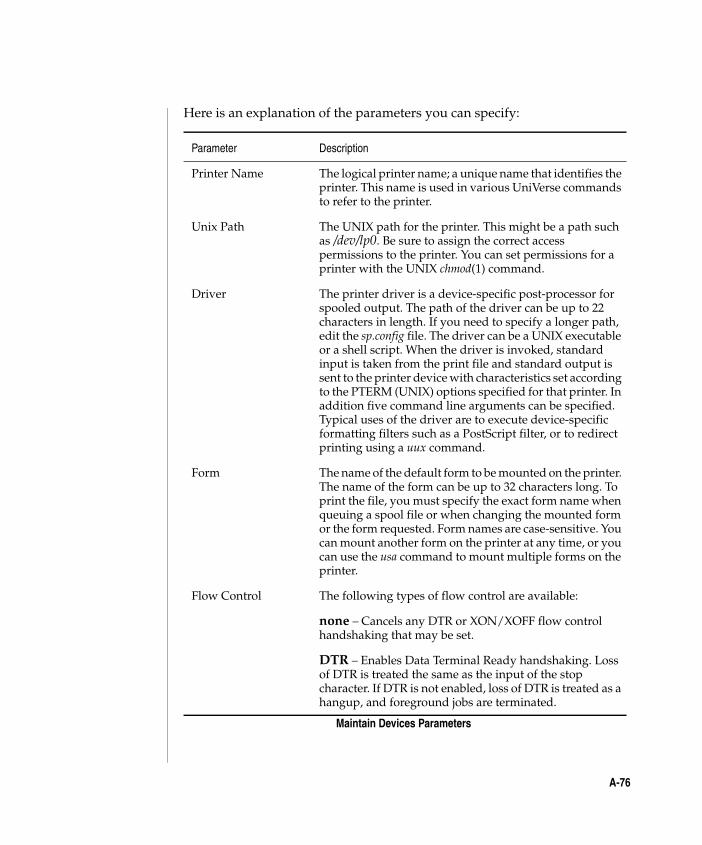
C:\Users\awaite\Documents\U2Doc\UniVerse\11.2\Source\Adminunix\AppA.fm3/17/14
Beta Beta Beta Beta Beta Beta Beta Beta Beta Beta Beta Beta Beta Beta Beta Beta Beta Beta Beta Beta Beta Beta Beta Beta Beta
Here is an explanation of the parameters you can specify:
Parameter Description
Printer Name The logical printer name; a unique name that identifies the printer. This name is used in various UniVerse commands to refer to the printer.
Unix Path The UNIX path for the printer. This might be a path such as /dev/lp0. Be sure to assign the correct access permissions to the printer. You can set permissions for a printer with the UNIX chmod(1) command.
Driver The printer driver is a device-specific post-processor for spooled output. The path of the driver can be up to 22 characters in length. If you need to specify a longer path, edit the sp.config file. The driver can be a UNIX executable or a shell script. When the driver is invoked, standard input is taken from the print file and standard output is sent to the printer device with characteristics set according to the PTERM (UNIX) options specified for that printer. In addition five command line arguments can be specified. Typical uses of the driver are to execute device-specific formatting filters such as a PostScript filter, or to redirect printing using a uux command.
Form The name of the default form to be mounted on the printer. The name of the form can be up to 32 characters long. To print the file, you must specify the exact form name when queuing a spool file or when changing the mounted form or the form requested. Form names are case-sensitive. You can mount another form on the printer at any time, or you can use the usa command to mount multiple forms on the printer.
Flow Control The following types of flow control are available:
none – Cancels any DTR or XON/XOFF flow control handshaking that may be set.
DTR – Enables Data Terminal Ready handshaking. Loss of DTR is treated the same as the input of the stop character. If DTR is not enabled, loss of DTR is treated as a hangup, and foreground jobs are terminated.
Maintain Devices Parameters
A-76
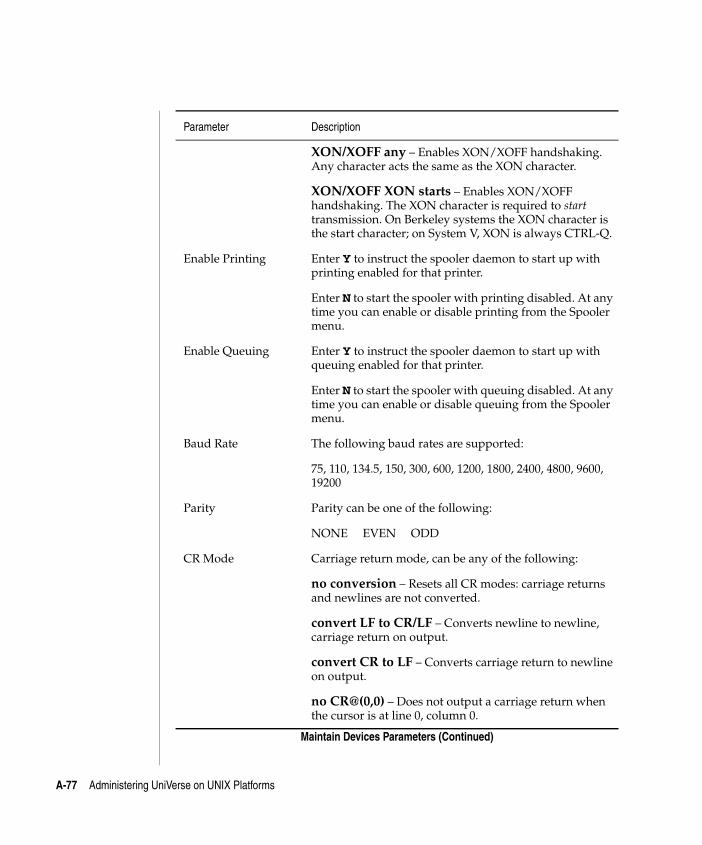
C:\Users\awaite\Documents\U2Doc\UniVerse\11.2\Source\Adminunix\AppA.fm3/17/14
Beta Beta Beta Beta Beta Beta Beta Beta Beta Beta Beta Beta Beta Beta Beta Beta Beta Beta Beta Beta Beta Beta Beta Beta Beta
XON/XOFF any – Enables XON/XOFF handshaking. Any character acts the same as the XON character.
XON/XOFF XON starts – Enables XON/XOFF handshaking. The XON character is required to start transmission. On Berkeley systems the XON character is the start character; on System V, XON is always CTRL-Q.
Enable Printing Enter Y to instruct the spooler daemon to start up with printing enabled for that printer.
Enter N to start the spooler with printing disabled. At any time you can enable or disable printing from the Spooler menu.
Enable Queuing Enter Y to instruct the spooler daemon to start up with queuing enabled for that printer.
Enter N to start the spooler with queuing disabled. At any time you can enable or disable queuing from the Spooler menu.
Baud Rate The following baud rates are supported:
75, 110, 134.5, 150, 300, 600, 1200, 1800, 2400, 4800, 9600, 19200
Parity Parity can be one of the following:
NONE EVEN ODD
CR Mode Carriage return mode, can be any of the following:
no conversion – Resets all CR modes: carriage returns and newlines are not converted.
convert LF to CR/LF – Converts newline to newline, carriage return on output.
convert CR to LF – Converts carriage return to newline on output.
no CR@(0,0) – Does not output a carriage return when the cursor is at line 0, column 0.
Parameter Description
Maintain Devices Parameters (Continued)
A-77 Administering UniVerse on UNIX Platforms
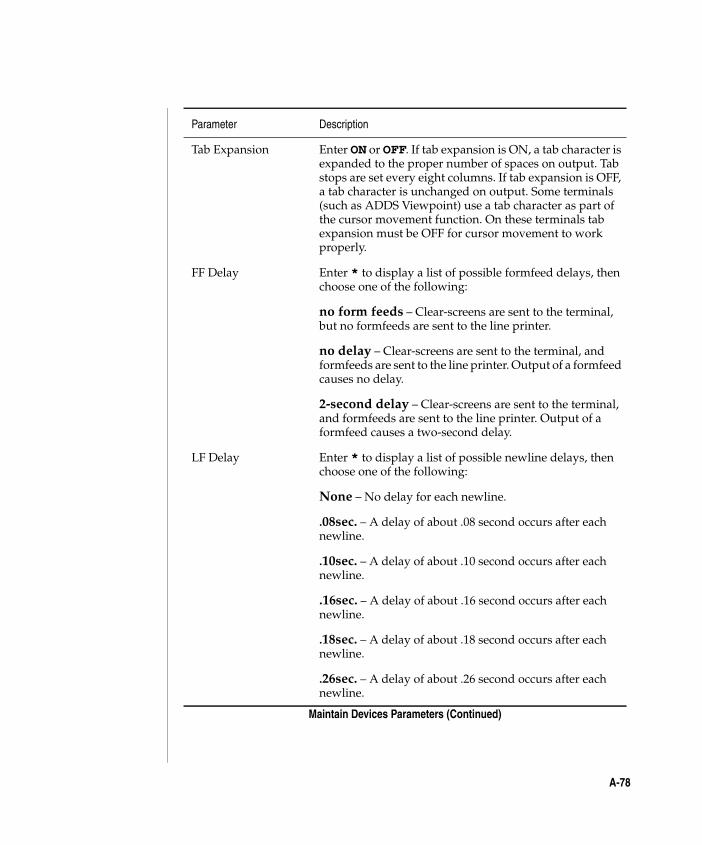
C:\Users\awaite\Documents\U2Doc\UniVerse\11.2\Source\Adminunix\AppA.fm3/17/14
Beta Beta Beta Beta Beta Beta Beta Beta Beta Beta Beta Beta Beta Beta Beta Beta Beta Beta Beta Beta Beta Beta Beta Beta Beta
Tab Expansion Enter ON or OFF. If tab expansion is ON, a tab character is expanded to the proper number of spaces on output. Tab stops are set every eight columns. If tab expansion is OFF, a tab character is unchanged on output. Some terminals (such as ADDS Viewpoint) use a tab character as part of the cursor movement function. On these terminals tab expansion must be OFF for cursor movement to work properly.
FF Delay Enter * to display a list of possible formfeed delays, then choose one of the following:
no form feeds – Clear-screens are sent to the terminal, but no formfeeds are sent to the line printer.
no delay – Clear-screens are sent to the terminal, and formfeeds are sent to the line printer. Output of a formfeed causes no delay.
2-second delay – Clear-screens are sent to the terminal, and formfeeds are sent to the line printer. Output of a formfeed causes a two-second delay.
LF Delay Enter * to display a list of possible newline delays, then choose one of the following:
None – No delay for each newline.
.08sec. – A delay of about .08 second occurs after each newline.
.10sec. – A delay of about .10 second occurs after each newline.
.16sec. – A delay of about .16 second occurs after each newline.
.18sec. – A delay of about .18 second occurs after each newline.
.26sec. – A delay of about .26 second occurs after each newline.
Parameter Description
Maintain Devices Parameters (Continued)
A-78
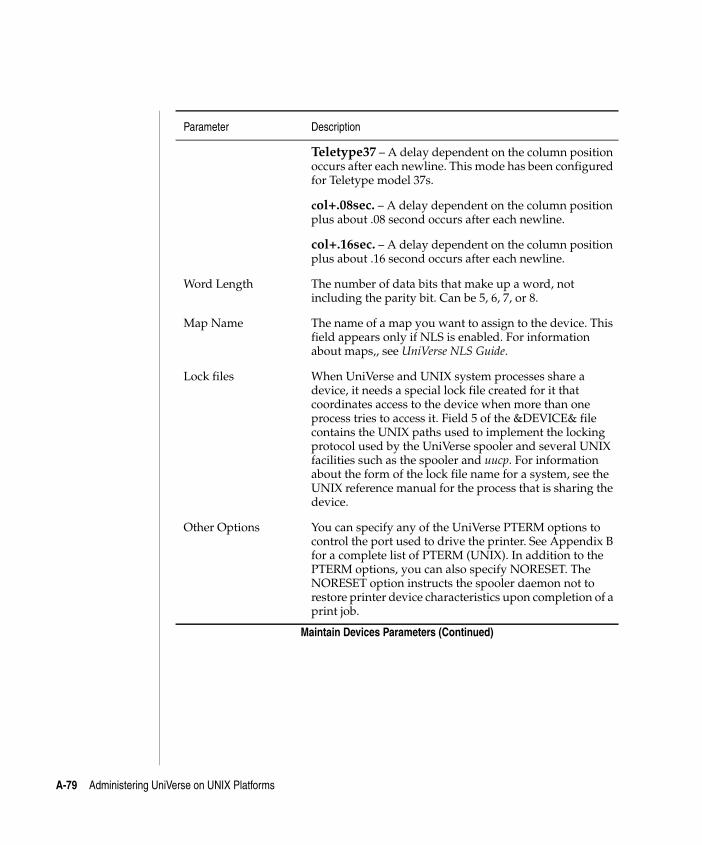
C:\Users\awaite\Documents\U2Doc\UniVerse\11.2\Source\Adminunix\AppA.fm3/17/14
Beta Beta Beta Beta Beta Beta Beta Beta Beta Beta Beta Beta Beta Beta Beta Beta Beta Beta Beta Beta Beta Beta Beta Beta Beta
Teletype37 – A delay dependent on the column position occurs after each newline. This mode has been configured for Teletype model 37s.
col+.08sec. – A delay dependent on the column position plus about .08 second occurs after each newline.
col+.16sec. – A delay dependent on the column position plus about .16 second occurs after each newline.
Word Length The number of data bits that make up a word, not including the parity bit. Can be 5, 6, 7, or 8.
Map Name The name of a map you want to assign to the device. This field appears only if NLS is enabled. For information about maps,, see UniVerse NLS Guide.
Lock files When UniVerse and UNIX system processes share a device, it needs a special lock file created for it that coordinates access to the device when more than one process tries to access it. Field 5 of the &DEVICE& file contains the UNIX paths used to implement the locking protocol used by the UniVerse spooler and several UNIX facilities such as the spooler and uucp. For information about the form of the lock file name for a system, see the UNIX reference manual for the process that is sharing the device.
Other Options You can specify any of the UniVerse PTERM options to control the port used to drive the printer. See Appendix B for a complete list of PTERM (UNIX). In addition to the PTERM options, you can also specify NORESET. The NORESET option instructs the spooler daemon not to restore printer device characteristics upon completion of a print job.
Parameter Description
Maintain Devices Parameters (Continued)
A-79 Administering UniVerse on UNIX Platforms
C:\Users\awaite\Documents\U2Doc\UniVerse\11.2\Source\Adminunix\AppA.fm3/17/14
Beta Beta Beta Beta Beta Beta Beta Beta Beta Beta Beta Beta Beta Beta Beta Beta Beta Beta Beta Beta Beta Beta Beta Beta Beta
User menusIn addition to the UniVerse System Administration menus, UniVerse also provides user menus to support print job administration and application conversion functions.
Users can invoke the menus that control spooler queue functions with the command PRINT.ADMIN.
The application conversion functions are supported only in compatibility flavor accounts: PICK, INFORMATION, PIOPEN, REALITY, and IN2. Users can invoke the Account Conversion menu with the command CONVERT.ACCOUNT.
A-80
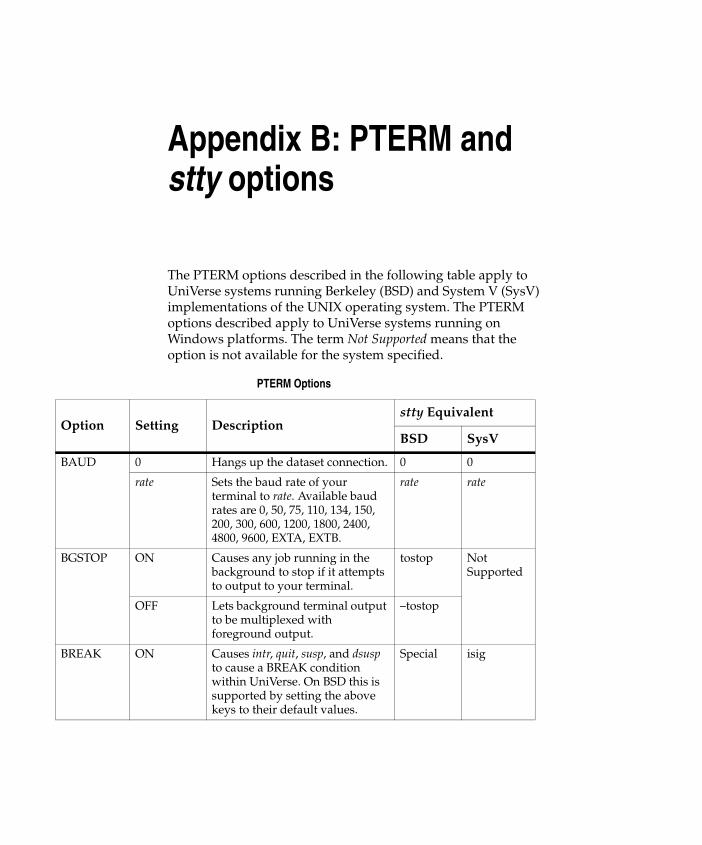
Appendix B: PTERM and stty options
The PTERM options described in the following table apply to UniVerse systems running Berkeley (BSD) and System V (SysV) implementations of the UNIX operating system. The PTERM options described apply to UniVerse systems running on Windows platforms. The term Not Supported means that the option is not available for the system specified.
PTERM Options
Option Setting Descriptionstty Equivalent
BSD SysV
BAUD 0 Hangs up the dataset connection. 0 0
rate Sets the baud rate of your terminal to rate. Available baud rates are 0, 50, 75, 110, 134, 150, 200, 300, 600, 1200, 1800, 2400, 4800, 9600, EXTA, EXTB.
rate rate
BGSTOP ON Causes any job running in the background to stop if it attempts to output to your terminal.
tostop Not Supported
OFF Lets background terminal output to be multiplexed with foreground output.
–tostop
BREAK ON Causes intr, quit, susp, and dsusp to cause a BREAK condition within UniVerse. On BSD this is supported by setting the above keys to their default values.
Special isig
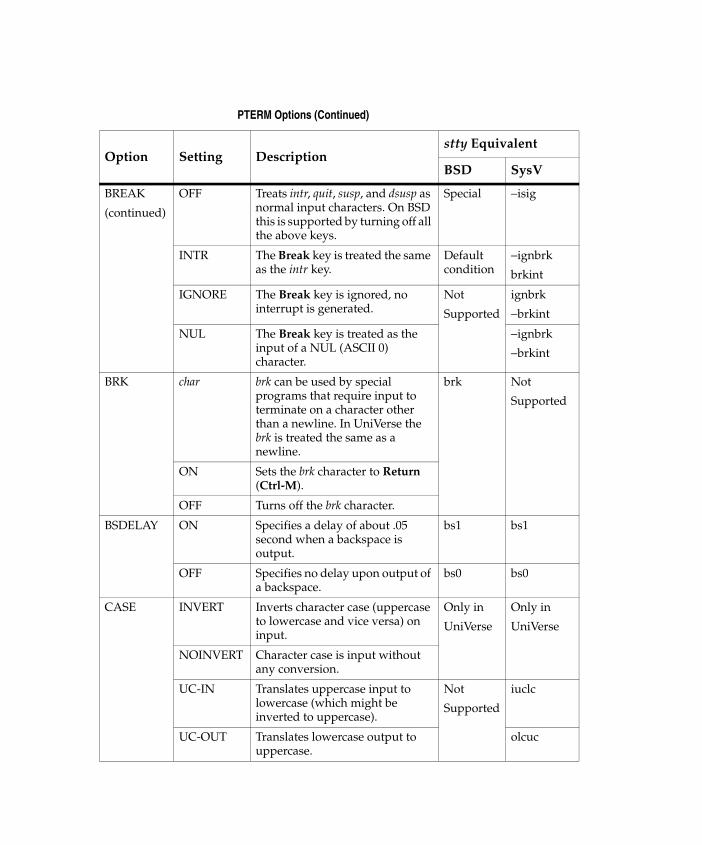
BREAK
(continued)
OFF Treats intr, quit, susp, and dsusp as normal input characters. On BSD this is supported by turning off all the above keys.
Special −isig
INTR The Break key is treated the same as the intr key.
Default condition
−ignbrk
brkint
IGNORE The Break key is ignored, no interrupt is generated.
Not
Supported
ignbrk
−brkint
NUL The Break key is treated as the input of a NUL (ASCII 0) character.
−ignbrk
−brkint
BRK char brk can be used by special programs that require input to terminate on a character other than a newline. In UniVerse the brk is treated the same as a newline.
brk Not
Supported
ON Sets the brk character to Return (Ctrl-M).
OFF Turns off the brk character.
BSDELAY ON Specifies a delay of about .05 second when a backspace is output.
bs1 bs1
OFF Specifies no delay upon output of a backspace.
bs0 bs0
CASE INVERT Inverts character case (uppercase to lowercase and vice versa) on input.
Only in
UniVerse
Only in
UniVerse
NOINVERT Character case is input without any conversion.
UC-IN Translates uppercase input to lowercase (which might be inverted to uppercase).
Not
Supported
iuclc
UC-OUT Translates lowercase output to uppercase.
olcuc
PTERM Options (Continued)
Option Setting Descriptionstty Equivalent
BSD SysV
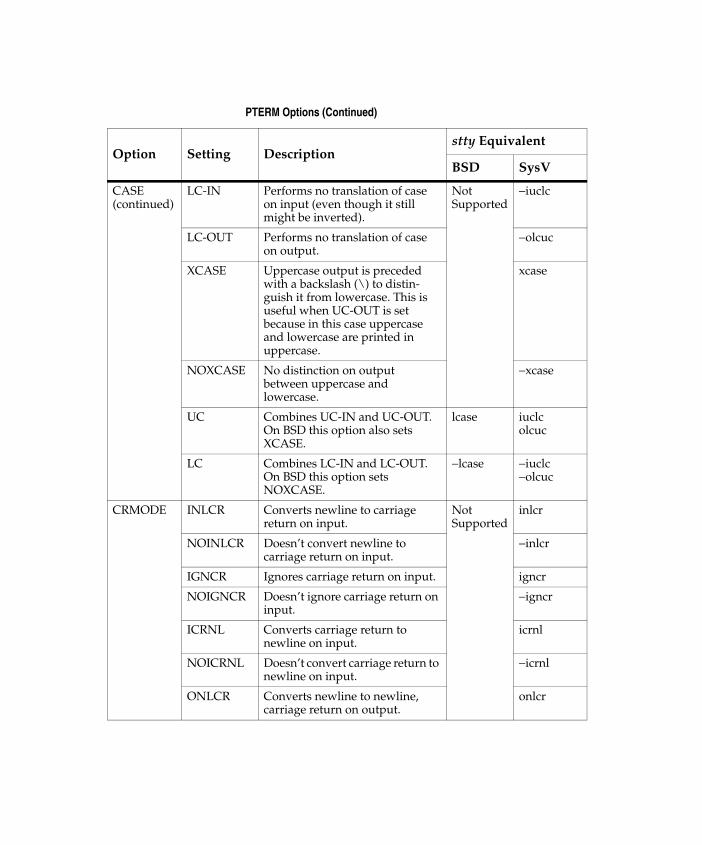
CASE(continued)
LC-IN Performs no translation of case on input (even though it still might be inverted).
Not Supported
−iuclc
LC-OUT Performs no translation of case on output.
−olcuc
XCASE Uppercase output is preceded with a backslash (\) to distin-guish it from lowercase. This is useful when UC-OUT is set because in this case uppercase and lowercase are printed in uppercase.
xcase
NOXCASE No distinction on output between uppercase and lowercase.
−xcase
UC Combines UC-IN and UC-OUT. On BSD this option also sets XCASE.
lcase iuclcolcuc
LC Combines LC-IN and LC-OUT. On BSD this option sets NOXCASE.
−lcase −iuclc−olcuc
CRMODE INLCR Converts newline to carriage return on input.
NotSupported
inlcr
NOINLCR Doesn’t convert newline to carriage return on input.
−inlcr
IGNCR Ignores carriage return on input. igncr
NOIGNCR Doesn’t ignore carriage return on input.
−igncr
ICRNL Converts carriage return to newline on input.
icrnl
NOICRNL Doesn’t convert carriage return to newline on input.
−icrnl
ONLCR Converts newline to newline, carriage return on output.
onlcr
PTERM Options (Continued)
Option Setting Descriptionstty Equivalent
BSD SysV
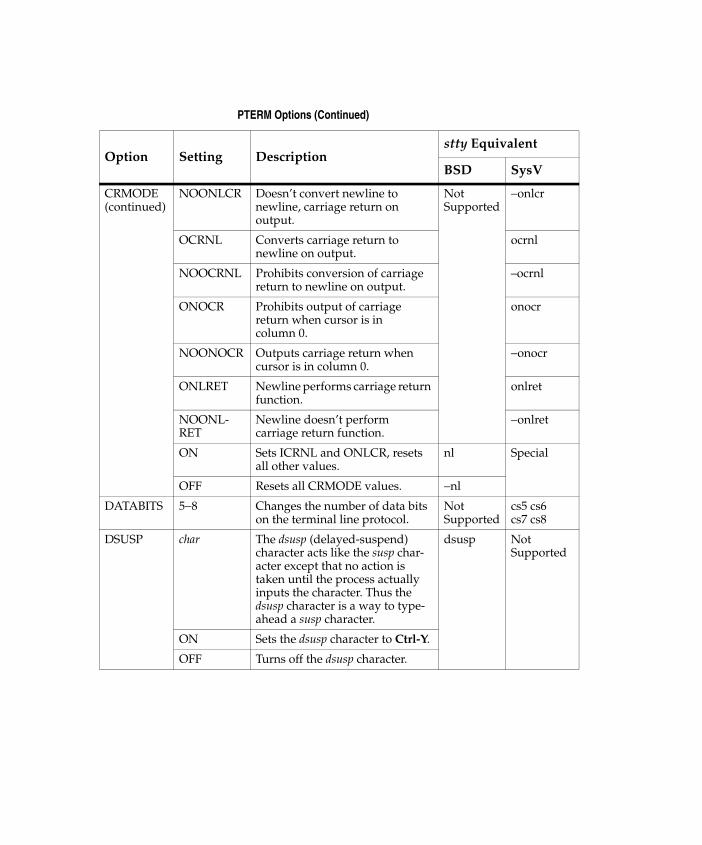
CRMODE(continued)
NOONLCR Doesn’t convert newline to newline, carriage return on output.
NotSupported
−onlcr
OCRNL Converts carriage return to newline on output.
ocrnl
NOOCRNL Prohibits conversion of carriage return to newline on output.
–ocrnl
ONOCR Prohibits output of carriage return when cursor is in column 0.
onocr
NOONOCR Outputs carriage return when cursor is in column 0.
−onocr
ONLRET Newline performs carriage return function.
onlret
NOONL-RET
Newline doesn’t perform carriage return function.
−onlret
ON Sets ICRNL and ONLCR, resets all other values.
nl Special
OFF Resets all CRMODE values. −nl
DATABITS 5−8 Changes the number of data bits on the terminal line protocol.
NotSupported
cs5 cs6cs7 cs8
DSUSP char The dsusp (delayed-suspend) character acts like the susp char-acter except that no action is taken until the process actually inputs the character. Thus the dsusp character is a way to type-ahead a susp character.
dsusp NotSupported
ON Sets the dsusp character to Ctrl-Y.
OFF Turns off the dsusp character.
PTERM Options (Continued)
Option Setting Descriptionstty Equivalent
BSD SysV
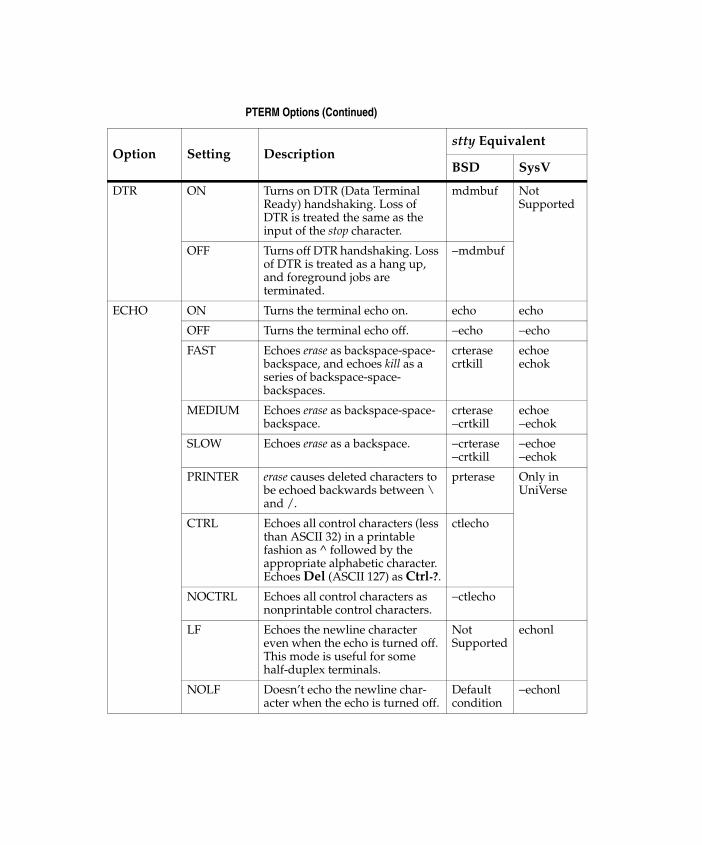
DTR ON Turns on DTR (Data Terminal Ready) handshaking. Loss of DTR is treated the same as the input of the stop character.
mdmbuf NotSupported
OFF Turns off DTR handshaking. Loss of DTR is treated as a hang up, and foreground jobs are terminated.
−mdmbuf
ECHO ON Turns the terminal echo on. echo echo
OFF Turns the terminal echo off. −echo −echo
FAST Echoes erase as backspace-space-backspace, and echoes kill as a series of backspace-space-backspaces.
crterasecrtkill
echoeechok
MEDIUM Echoes erase as backspace-space-backspace.
crterase−crtkill
echoe−echok
SLOW Echoes erase as a backspace. −crterase−crtkill
−echoe−echok
PRINTER erase causes deleted characters to be echoed backwards between \ and /.
prterase Only inUniVerse
CTRL Echoes all control characters (less than ASCII 32) in a printable fashion as ^ followed by the appropriate alphabetic character. Echoes Del (ASCII 127) as Ctrl-?.
ctlecho
NOCTRL Echoes all control characters as nonprintable control characters.
−ctlecho
LF Echoes the newline character even when the echo is turned off. This mode is useful for some half-duplex terminals.
NotSupported
echonl
NOLF Doesn’t echo the newline char-acter when the echo is turned off.
Default condition
−echonl
PTERM Options (Continued)
Option Setting Descriptionstty Equivalent
BSD SysV
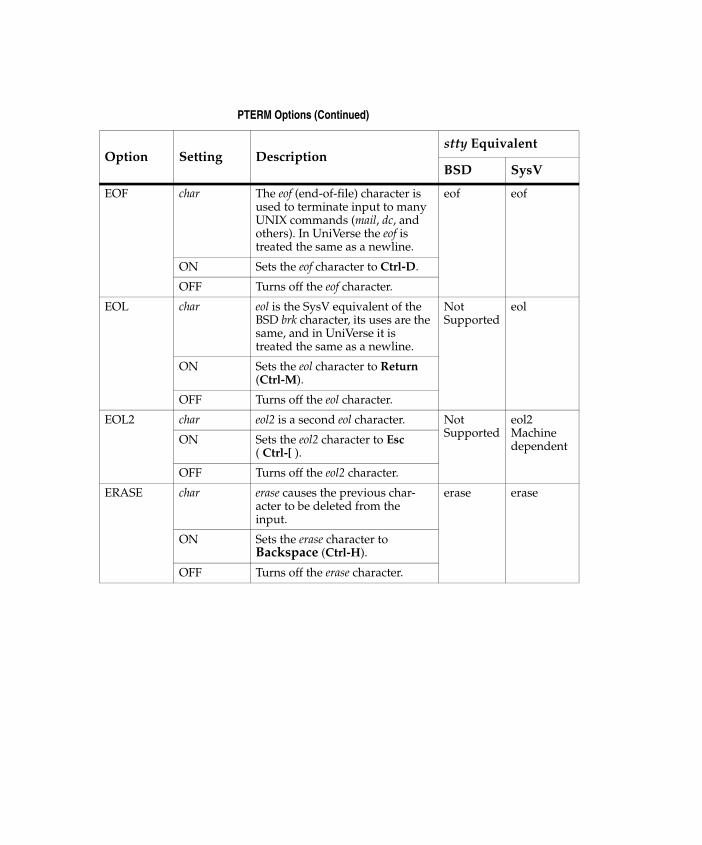
EOF char The eof (end-of-file) character is used to terminate input to many UNIX commands (mail, dc, and others). In UniVerse the eof is treated the same as a newline.
eof eof
ON Sets the eof character to Ctrl-D.
OFF Turns off the eof character.
EOL char eol is the SysV equivalent of the BSD brk character, its uses are the same, and in UniVerse it is treated the same as a newline.
NotSupported
eol
ON Sets the eol character to Return (Ctrl-M).
OFF Turns off the eol character.
EOL2 char eol2 is a second eol character. NotSupported
eol2MachinedependentON Sets the eol2 character to Esc
( Ctrl-[ ).
OFF Turns off the eol2 character.
ERASE char erase causes the previous char-acter to be deleted from the input.
erase erase
ON Sets the erase character to Backspace (Ctrl-H).
OFF Turns off the erase character.
PTERM Options (Continued)
Option Setting Descriptionstty Equivalent
BSD SysV
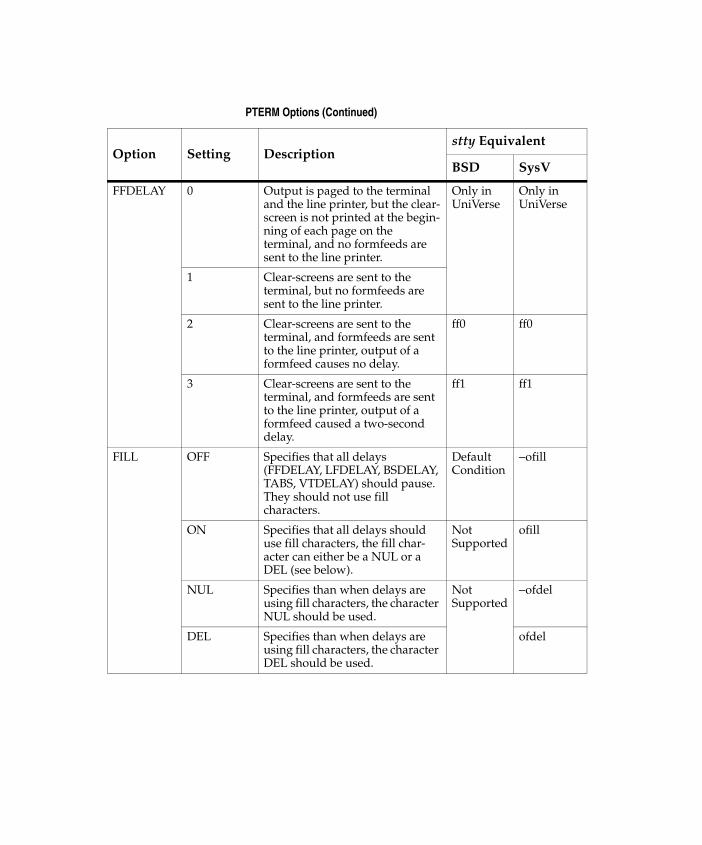
FFDELAY 0 Output is paged to the terminal and the line printer, but the clear-screen is not printed at the begin-ning of each page on the terminal, and no formfeeds are sent to the line printer.
Only inUniVerse
Only inUniVerse
1 Clear-screens are sent to the terminal, but no formfeeds are sent to the line printer.
2 Clear-screens are sent to the terminal, and formfeeds are sent to the line printer, output of a formfeed causes no delay.
ff0 ff0
3 Clear-screens are sent to the terminal, and formfeeds are sent to the line printer, output of a formfeed caused a two-second delay.
ff1 ff1
FILL OFF Specifies that all delays (FFDELAY, LFDELAY, BSDELAY, TABS, VTDELAY) should pause. They should not use fill characters.
Default Condition
−ofill
ON Specifies that all delays should use fill characters, the fill char-acter can either be a NUL or a DEL (see below).
NotSupported
ofill
NUL Specifies than when delays are using fill characters, the character NUL should be used.
NotSupported
−ofdel
DEL Specifies than when delays are using fill characters, the character DEL should be used.
ofdel
PTERM Options (Continued)
Option Setting Descriptionstty Equivalent
BSD SysV
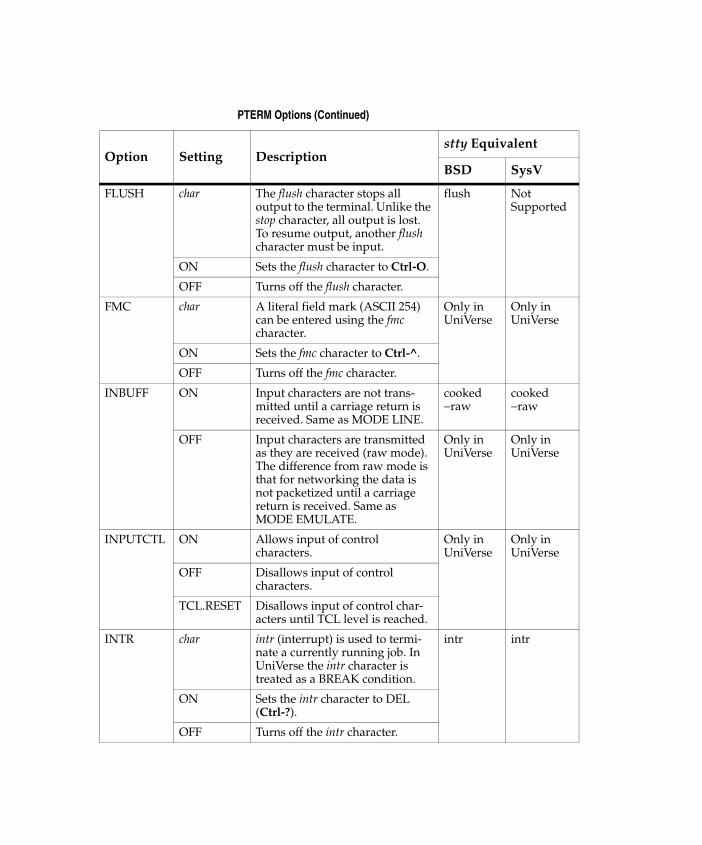
FLUSH char The flush character stops all output to the terminal. Unlike the stop character, all output is lost. To resume output, another flush character must be input.
flush NotSupported
ON Sets the flush character to Ctrl-O.
OFF Turns off the flush character.
FMC char A literal field mark (ASCII 254) can be entered using the fmc character.
Only inUniVerse
Only inUniVerse
ON Sets the fmc character to Ctrl-^.
OFF Turns off the fmc character.
INBUFF ON Input characters are not trans-mitted until a carriage return is received. Same as MODE LINE.
cooked−raw
cooked−raw
OFF Input characters are transmitted as they are received (raw mode). The difference from raw mode is that for networking the data is not packetized until a carriage return is received. Same as MODE EMULATE.
Only inUniVerse
Only inUniVerse
INPUTCTL ON Allows input of control characters.
Only inUniVerse
Only inUniVerse
OFF Disallows input of control characters.
TCL.RESET Disallows input of control char-acters until TCL level is reached.
INTR char intr (interrupt) is used to termi-nate a currently running job. In UniVerse the intr character is treated as a BREAK condition.
intr intr
ON Sets the intr character to DEL (Ctrl-?).
OFF Turns off the intr character.
PTERM Options (Continued)
Option Setting Descriptionstty Equivalent
BSD SysV
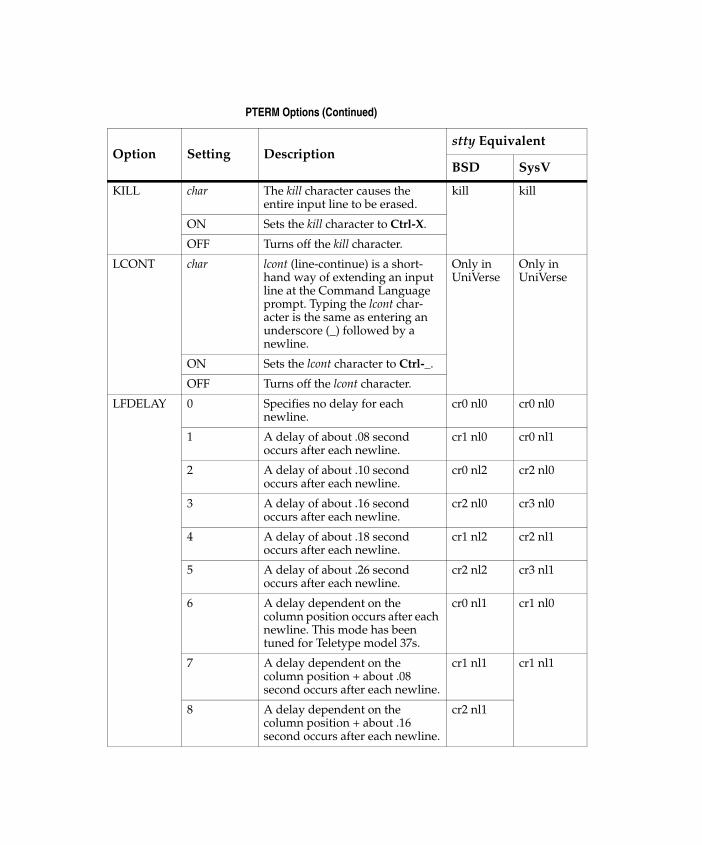
KILL char The kill character causes the entire input line to be erased.
kill kill
ON Sets the kill character to Ctrl-X.
OFF Turns off the kill character.
LCONT char lcont (line-continue) is a short-hand way of extending an input line at the Command Language prompt. Typing the lcont char-acter is the same as entering an underscore (_) followed by a newline.
Only inUniVerse
Only inUniVerse
ON Sets the lcont character to Ctrl-_.
OFF Turns off the lcont character.
LFDELAY 0 Specifies no delay for each newline.
cr0 nl0 cr0 nl0
1 A delay of about .08 second occurs after each newline.
cr1 nl0 cr0 nl1
2 A delay of about .10 second occurs after each newline.
cr0 nl2 cr2 nl0
3 A delay of about .16 second occurs after each newline.
cr2 nl0 cr3 nl0
4 A delay of about .18 second occurs after each newline.
cr1 nl2 cr2 nl1
5 A delay of about .26 second occurs after each newline.
cr2 nl2 cr3 nl1
6 A delay dependent on the column position occurs after each newline. This mode has been tuned for Teletype model 37s.
cr0 nl1 cr1 nl0
7 A delay dependent on the column position + about .08 second occurs after each newline.
cr1 nl1 cr1 nl1
8 A delay dependent on the column position + about .16 second occurs after each newline.
cr2 nl1
PTERM Options (Continued)
Option Setting Descriptionstty Equivalent
BSD SysV
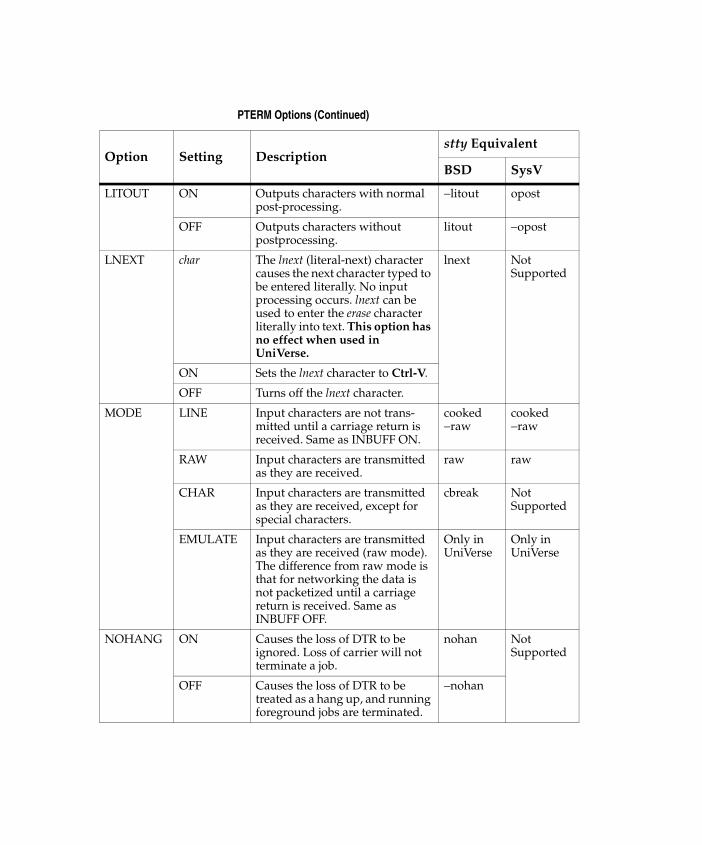
LITOUT ON Outputs characters with normal post-processing.
−litout opost
OFF Outputs characters without postprocessing.
litout −opost
LNEXT char The lnext (literal-next) character causes the next character typed to be entered literally. No input processing occurs. lnext can be used to enter the erase character literally into text. This option has no effect when used in UniVerse.
lnext NotSupported
ON Sets the lnext character to Ctrl-V.
OFF Turns off the lnext character.
MODE LINE Input characters are not trans-mitted until a carriage return is received. Same as INBUFF ON.
cooked−raw
cooked−raw
RAW Input characters are transmitted as they are received.
raw raw
CHAR Input characters are transmitted as they are received, except for special characters.
cbreak NotSupported
EMULATE Input characters are transmitted as they are received (raw mode). The difference from raw mode is that for networking the data is not packetized until a carriage return is received. Same as INBUFF OFF.
Only inUniVerse
Only inUniVerse
NOHANG ON Causes the loss of DTR to be ignored. Loss of carrier will not terminate a job.
nohan NotSupported
OFF Causes the loss of DTR to be treated as a hang up, and running foreground jobs are terminated.
−nohan
PTERM Options (Continued)
Option Setting Descriptionstty Equivalent
BSD SysV
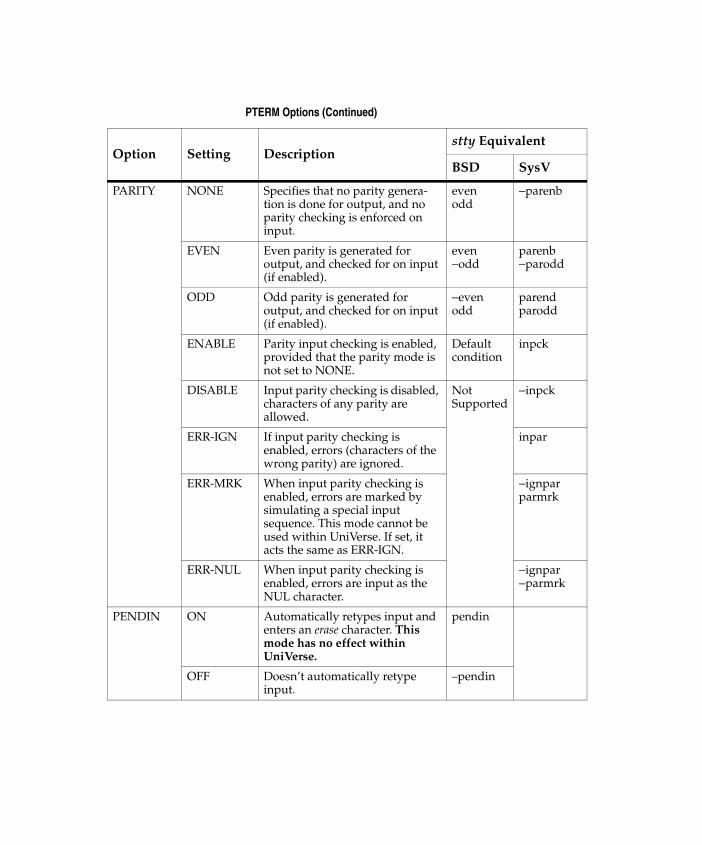
PARITY NONE Specifies that no parity genera-tion is done for output, and no parity checking is enforced on input.
evenodd
−parenb
EVEN Even parity is generated for output, and checked for on input (if enabled).
even−odd
parenb−parodd
ODD Odd parity is generated for output, and checked for on input (if enabled).
−evenodd
parendparodd
ENABLE Parity input checking is enabled, provided that the parity mode is not set to NONE.
Default condition
inpck
DISABLE Input parity checking is disabled, characters of any parity are allowed.
NotSupported
−inpck
ERR-IGN If input parity checking is enabled, errors (characters of the wrong parity) are ignored.
inpar
ERR-MRK When input parity checking is enabled, errors are marked by simulating a special input sequence. This mode cannot be used within UniVerse. If set, it acts the same as ERR-IGN.
−ignparparmrk
ERR-NUL When input parity checking is enabled, errors are input as the NUL character.
−ignpar−parmrk
PENDIN ON Automatically retypes input and enters an erase character. This mode has no effect within UniVerse.
pendin
OFF Doesn’t automatically retype input.
–pendin
PTERM Options (Continued)
Option Setting Descriptionstty Equivalent
BSD SysV
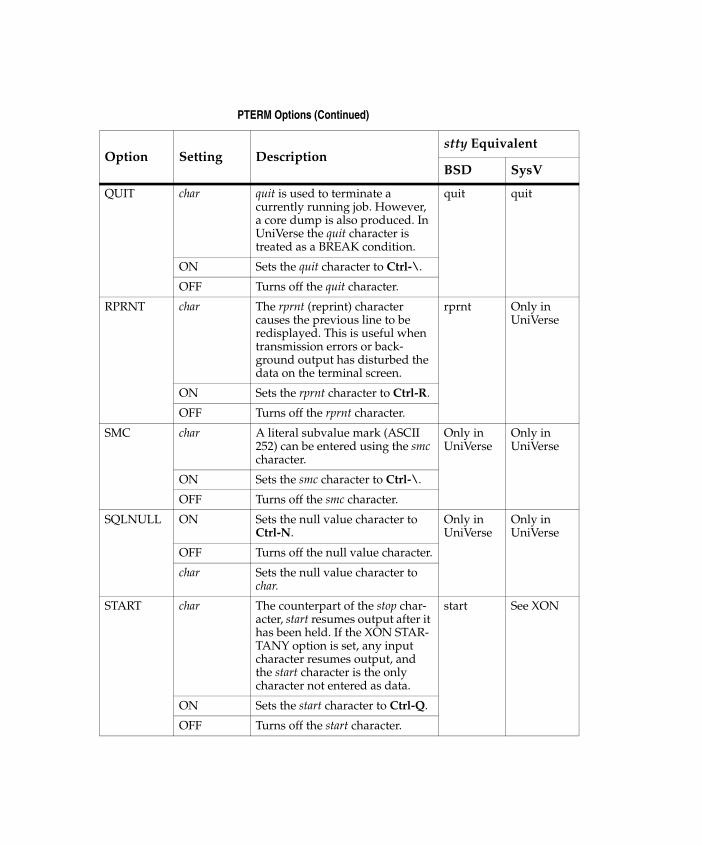
QUIT char quit is used to terminate a currently running job. However, a core dump is also produced. In UniVerse the quit character is treated as a BREAK condition.
quit quit
ON Sets the quit character to Ctrl-\.
OFF Turns off the quit character.
RPRNT char The rprnt (reprint) character causes the previous line to be redisplayed. This is useful when transmission errors or back-ground output has disturbed the data on the terminal screen.
rprnt Only inUniVerse
ON Sets the rprnt character to Ctrl-R.
OFF Turns off the rprnt character.
SMC char A literal subvalue mark (ASCII 252) can be entered using the smc character.
Only inUniVerse
Only inUniVerse
ON Sets the smc character to Ctrl-\.
OFF Turns off the smc character.
SQLNULL ON Sets the null value character to Ctrl-N.
Only in UniVerse
Only in UniVerse
OFF Turns off the null value character.
char Sets the null value character to char.
START char The counterpart of the stop char-acter, start resumes output after it has been held. If the XON STAR-TANY option is set, any input character resumes output, and the start character is the only character not entered as data.
start See XON
ON Sets the start character to Ctrl-Q.
OFF Turns off the start character.
PTERM Options (Continued)
Option Setting Descriptionstty Equivalent
BSD SysV
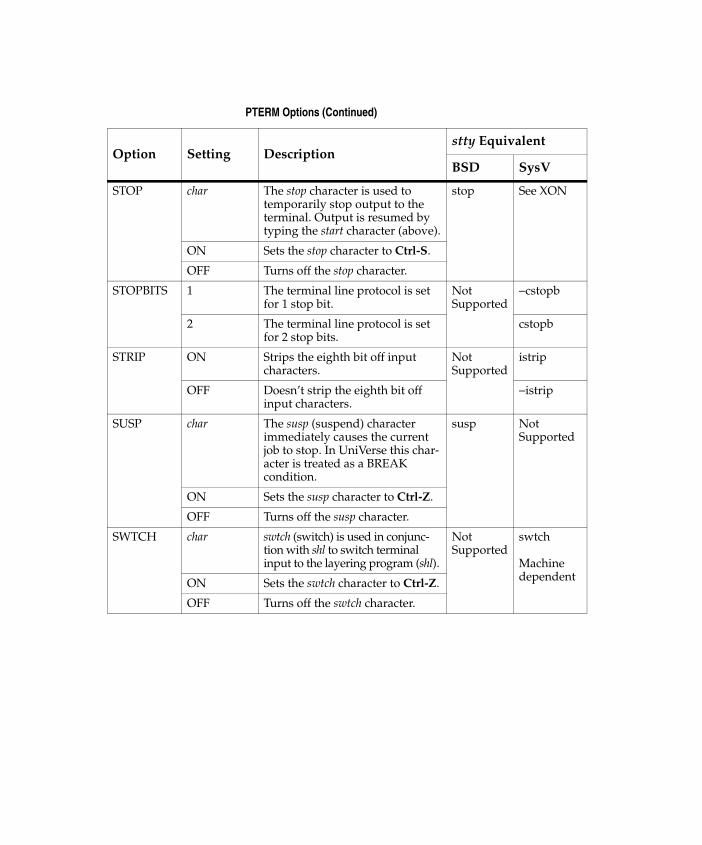
STOP char The stop character is used to temporarily stop output to the terminal. Output is resumed by typing the start character (above).
stop See XON
ON Sets the stop character to Ctrl-S.
OFF Turns off the stop character.
STOPBITS 1 The terminal line protocol is set for 1 stop bit.
Not Supported
−cstopb
2 The terminal line protocol is set for 2 stop bits.
cstopb
STRIP ON Strips the eighth bit off input characters.
Not Supported
istrip
OFF Doesn’t strip the eighth bit off input characters.
−istrip
SUSP char The susp (suspend) character immediately causes the current job to stop. In UniVerse this char-acter is treated as a BREAK condition.
susp Not Supported
ON Sets the susp character to Ctrl-Z.
OFF Turns off the susp character.
SWTCH char swtch (switch) is used in conjunc-tion with shl to switch terminal input to the layering program (shl).
Not Supported
swtch MachinedependentON Sets the swtch character to Ctrl-Z.
OFF Turns off the swtch character.
PTERM Options (Continued)
Option Setting Descriptionstty Equivalent
BSD SysV
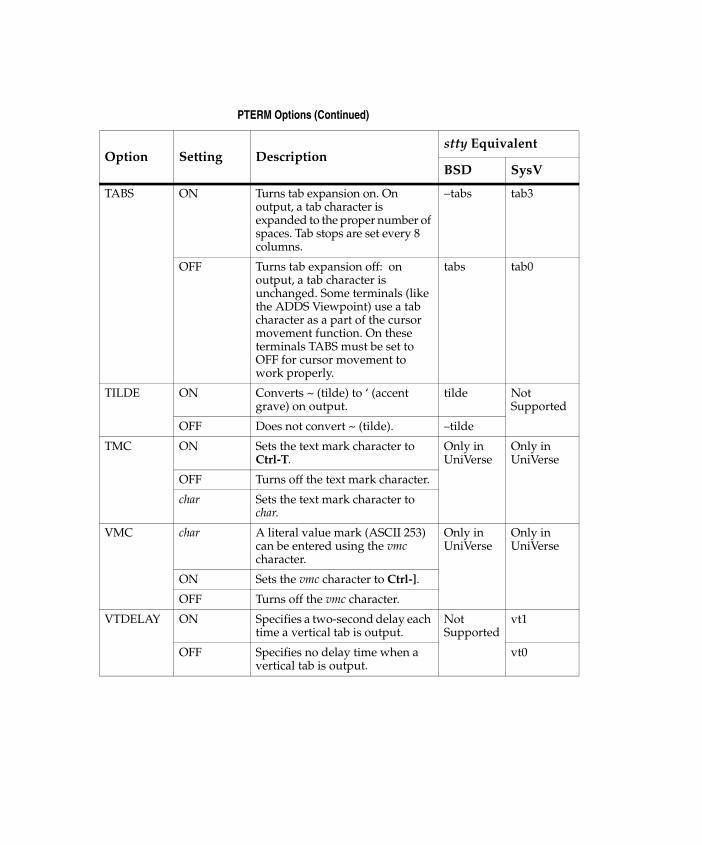
TABS ON Turns tab expansion on. On output, a tab character is expanded to the proper number of spaces. Tab stops are set every 8 columns.
−tabs tab3
OFF Turns tab expansion off: on output, a tab character is unchanged. Some terminals (like the ADDS Viewpoint) use a tab character as a part of the cursor movement function. On these terminals TABS must be set to OFF for cursor movement to work properly.
tabs tab0
TILDE ON Converts ~ (tilde) to ‘ (accent grave) on output.
tilde NotSupported
OFF Does not convert ~ (tilde). –tilde
TMC ON Sets the text mark character to Ctrl-T.
Only in UniVerse
Only in UniVerse
OFF Turns off the text mark character.
char Sets the text mark character to char.
VMC char A literal value mark (ASCII 253) can be entered using the vmc character.
Only inUniVerse
Only inUniVerse
ON Sets the vmc character to Ctrl-].
OFF Turns off the vmc character.
VTDELAY ON Specifies a two-second delay each time a vertical tab is output.
NotSupported
vt1
OFF Specifies no delay time when a vertical tab is output.
vt0
PTERM Options (Continued)
Option Setting Descriptionstty Equivalent
BSD SysV
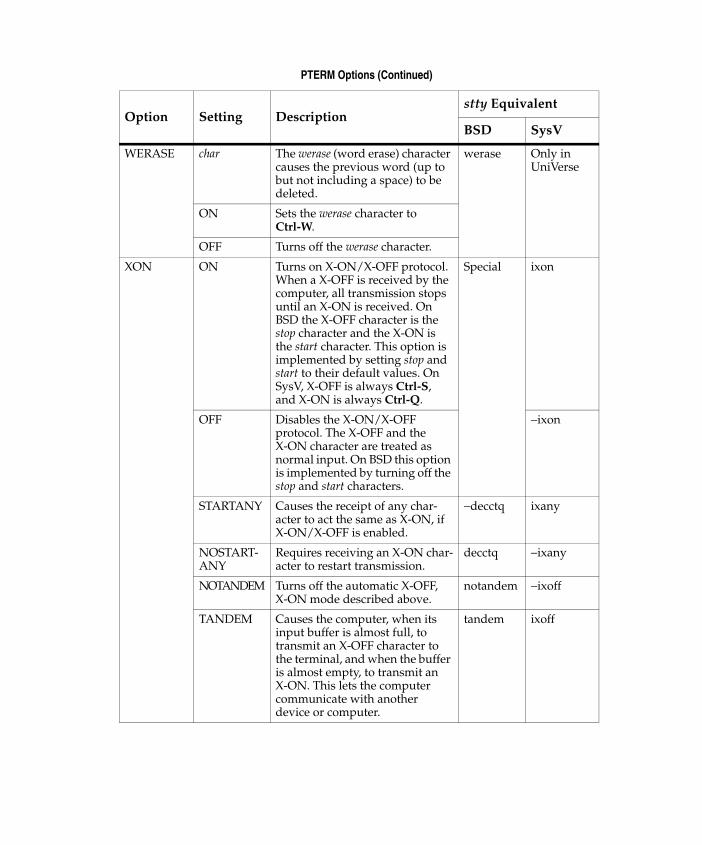
WERASE char The werase (word erase) character causes the previous word (up to but not including a space) to be deleted.
werase Only inUniVerse
ON Sets the werase character to Ctrl-W.
OFF Turns off the werase character.
XON ON Turns on X-ON/X-OFF protocol. When a X-OFF is received by the computer, all transmission stops until an X-ON is received. On BSD the X-OFF character is the stop character and the X-ON is the start character. This option is implemented by setting stop and start to their default values. On SysV, X-OFF is always Ctrl-S, and X-ON is always Ctrl-Q.
Special ixon
OFF Disables the X-ON/X-OFF protocol. The X-OFF and the X-ON character are treated as normal input. On BSD this option is implemented by turning off the stop and start characters.
−ixon
STARTANY Causes the receipt of any char-acter to act the same as X-ON, if X-ON/X-OFF is enabled.
−decctq ixany
NOSTART-ANY
Requires receiving an X-ON char-acter to restart transmission.
decctq −ixany
NOTANDEM Turns off the automatic X-OFF, X-ON mode described above.
notandem −ixoff
TANDEM Causes the computer, when its input buffer is almost full, to transmit an X-OFF character to the terminal, and when the buffer is almost empty, to transmit an X-ON. This lets the computer communicate with another device or computer.
tandem ixoff
PTERM Options (Continued)
Option Setting Descriptionstty Equivalent
BSD SysV
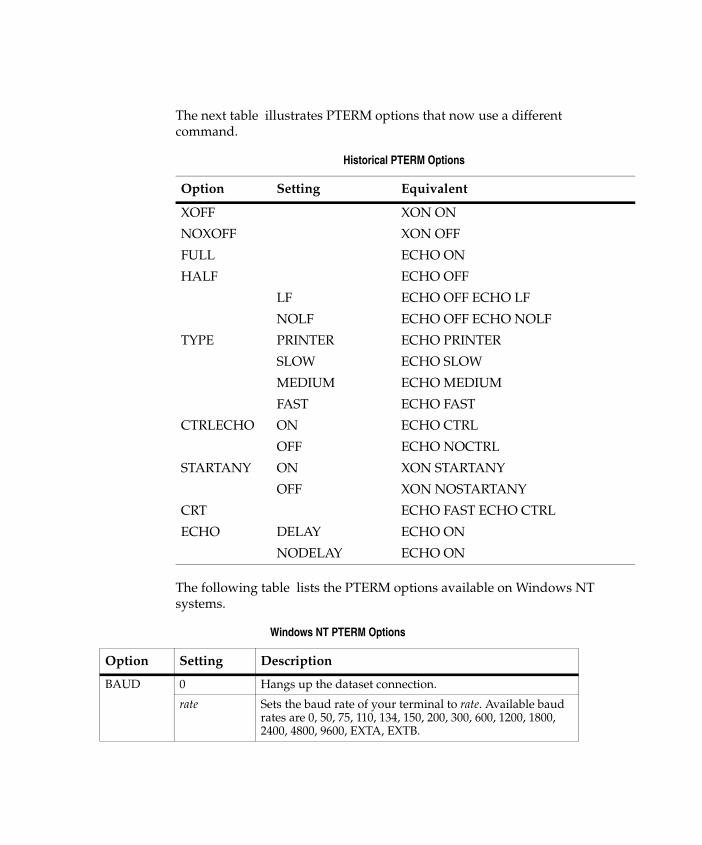
The next table illustrates PTERM options that now use a different command.
The following table lists the PTERM options available on Windows NT systems.
Historical PTERM Options
Option Setting Equivalent
XOFF XON ON
NOXOFF XON OFF
FULL ECHO ON
HALF ECHO OFF
LF ECHO OFF ECHO LF
NOLF ECHO OFF ECHO NOLF
TYPE PRINTER ECHO PRINTER
SLOW ECHO SLOW
MEDIUM ECHO MEDIUM
FAST ECHO FAST
CTRLECHO ON ECHO CTRL
OFF ECHO NOCTRL
STARTANY ON XON STARTANY
OFF XON NOSTARTANY
CRT ECHO FAST ECHO CTRL
ECHO DELAY ECHO ON
NODELAY ECHO ON
Windows NT PTERM Options
Option Setting Description
BAUD 0 Hangs up the dataset connection.
rate Sets the baud rate of your terminal to rate. Available baud rates are 0, 50, 75, 110, 134, 150, 200, 300, 600, 1200, 1800, 2400, 4800, 9600, EXTA, EXTB.
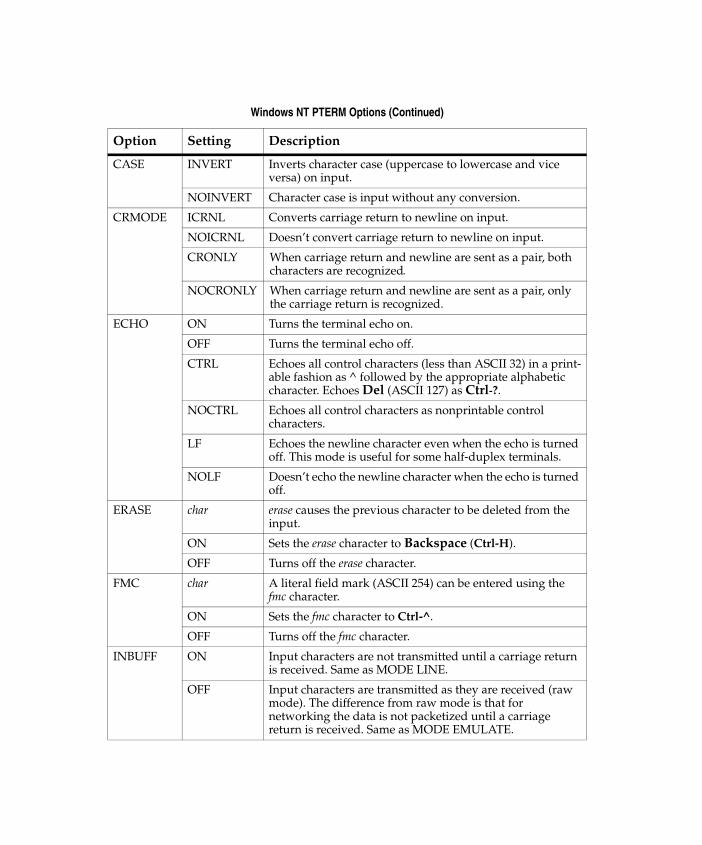
CASE INVERT Inverts character case (uppercase to lowercase and vice versa) on input.
NOINVERT Character case is input without any conversion.
CRMODE ICRNL Converts carriage return to newline on input.
NOICRNL Doesn’t convert carriage return to newline on input.
CRONLY When carriage return and newline are sent as a pair, both characters are recognized.
NOCRONLY When carriage return and newline are sent as a pair, only the carriage return is recognized.
ECHO ON Turns the terminal echo on.
OFF Turns the terminal echo off.
CTRL Echoes all control characters (less than ASCII 32) in a print-able fashion as ^ followed by the appropriate alphabetic character. Echoes Del (ASCII 127) as Ctrl-?.
NOCTRL Echoes all control characters as nonprintable control characters.
LF Echoes the newline character even when the echo is turned off. This mode is useful for some half-duplex terminals.
NOLF Doesn’t echo the newline character when the echo is turned off.
ERASE char erase causes the previous character to be deleted from the input.
ON Sets the erase character to Backspace (Ctrl-H).
OFF Turns off the erase character.
FMC char A literal field mark (ASCII 254) can be entered using the fmc character.
ON Sets the fmc character to Ctrl-^.
OFF Turns off the fmc character.
INBUFF ON Input characters are not transmitted until a carriage return is received. Same as MODE LINE.
OFF Input characters are transmitted as they are received (raw mode). The difference from raw mode is that for networking the data is not packetized until a carriage return is received. Same as MODE EMULATE.
Windows NT PTERM Options (Continued)
Option Setting Description
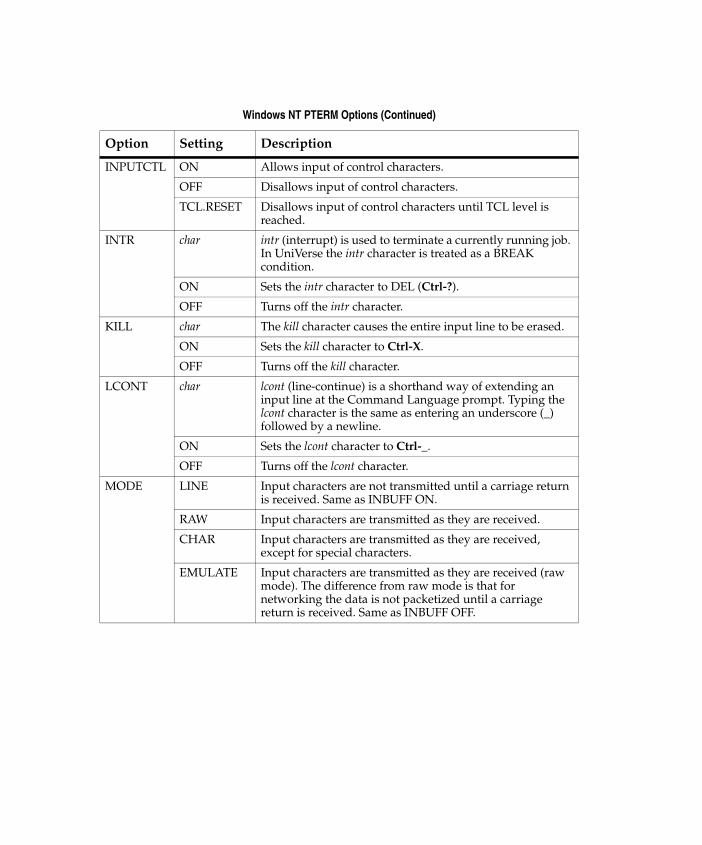
INPUTCTL ON Allows input of control characters.
OFF Disallows input of control characters.
TCL.RESET Disallows input of control characters until TCL level is reached.
INTR char intr (interrupt) is used to terminate a currently running job. In UniVerse the intr character is treated as a BREAK condition.
ON Sets the intr character to DEL (Ctrl-?).
OFF Turns off the intr character.
KILL char The kill character causes the entire input line to be erased.
ON Sets the kill character to Ctrl-X.
OFF Turns off the kill character.
LCONT char lcont (line-continue) is a shorthand way of extending an input line at the Command Language prompt. Typing the lcont character is the same as entering an underscore (_) followed by a newline.
ON Sets the lcont character to Ctrl-_.
OFF Turns off the lcont character.
MODE LINE Input characters are not transmitted until a carriage return is received. Same as INBUFF ON.
RAW Input characters are transmitted as they are received.
CHAR Input characters are transmitted as they are received, except for special characters.
EMULATE Input characters are transmitted as they are received (raw mode). The difference from raw mode is that for networking the data is not packetized until a carriage return is received. Same as INBUFF OFF.
Windows NT PTERM Options (Continued)
Option Setting Description
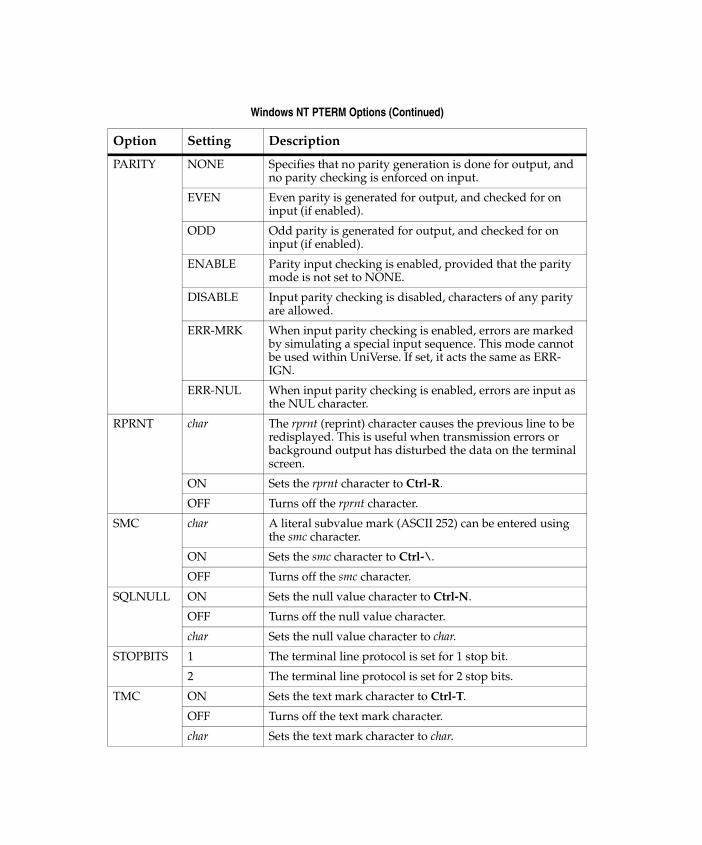
PARITY NONE Specifies that no parity generation is done for output, and no parity checking is enforced on input.
EVEN Even parity is generated for output, and checked for on input (if enabled).
ODD Odd parity is generated for output, and checked for on input (if enabled).
ENABLE Parity input checking is enabled, provided that the parity mode is not set to NONE.
DISABLE Input parity checking is disabled, characters of any parity are allowed.
ERR-MRK When input parity checking is enabled, errors are marked by simulating a special input sequence. This mode cannot be used within UniVerse. If set, it acts the same as ERR-IGN.
ERR-NUL When input parity checking is enabled, errors are input as the NUL character.
RPRNT char The rprnt (reprint) character causes the previous line to be redisplayed. This is useful when transmission errors or background output has disturbed the data on the terminal screen.
ON Sets the rprnt character to Ctrl-R.
OFF Turns off the rprnt character.
SMC char A literal subvalue mark (ASCII 252) can be entered using the smc character.
ON Sets the smc character to Ctrl-\.
OFF Turns off the smc character.
SQLNULL ON Sets the null value character to Ctrl-N.
OFF Turns off the null value character.
char Sets the null value character to char.
STOPBITS 1 The terminal line protocol is set for 1 stop bit.
2 The terminal line protocol is set for 2 stop bits.
TMC ON Sets the text mark character to Ctrl-T.
OFF Turns off the text mark character.
char Sets the text mark character to char.
Windows NT PTERM Options (Continued)
Option Setting Description
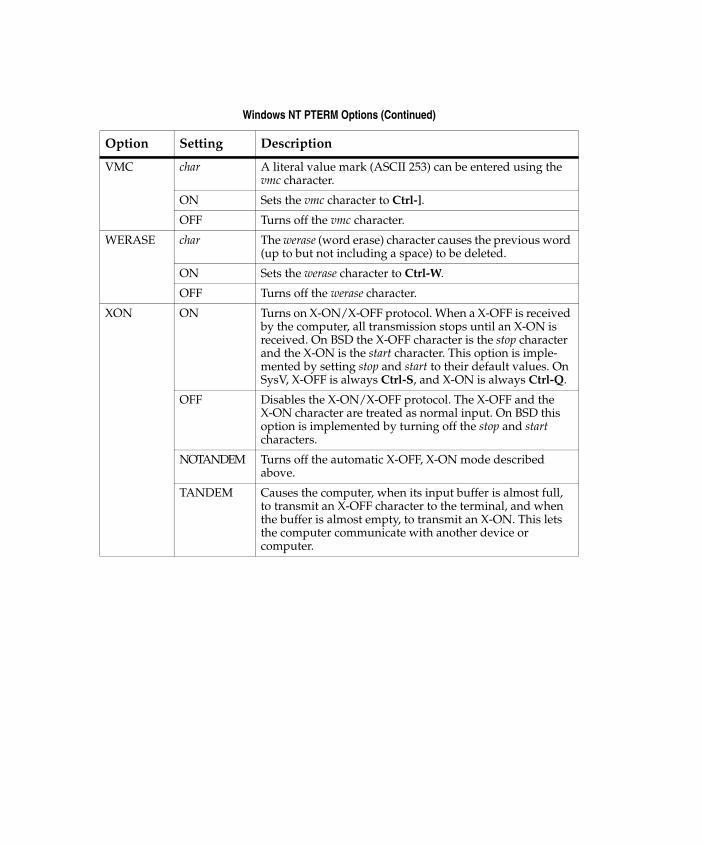
VMC char A literal value mark (ASCII 253) can be entered using the vmc character.
ON Sets the vmc character to Ctrl-].
OFF Turns off the vmc character.
WERASE char The werase (word erase) character causes the previous word (up to but not including a space) to be deleted.
ON Sets the werase character to Ctrl-W.
OFF Turns off the werase character.
XON ON Turns on X-ON/X-OFF protocol. When a X-OFF is received by the computer, all transmission stops until an X-ON is received. On BSD the X-OFF character is the stop character and the X-ON is the start character. This option is imple-mented by setting stop and start to their default values. On SysV, X-OFF is always Ctrl-S, and X-ON is always Ctrl-Q.
OFF Disables the X-ON/X-OFF protocol. The X-OFF and the X-ON character are treated as normal input. On BSD this option is implemented by turning off the stop and start characters.
NOTANDEM Turns off the automatic X-OFF, X-ON mode described above.
TANDEM Causes the computer, when its input buffer is almost full, to transmit an X-OFF character to the terminal, and when the buffer is almost empty, to transmit an X-ON. This lets the computer communicate with another device or computer.
Windows NT PTERM Options (Continued)
Option Setting Description
C:\Us3/17/
CAppendix
Beta Beta Beta Beta Beta Beta Beta Beta Beta Beta Beta Beta Beta Beta Beta Beta Beta Beta Beta BetaBeta Beta
Appendix C: terminfo terminal capabilities
This appendix contains:
A list of terminals that UniVerse adds to terminfo.src
Descriptions of the four kinds of terminal capability
A table of terminfo variables with their associated names in termcap and in UniVerse
For information about UNIX terminfo entries, see the UNIX documentation supplied with your system.
ers\awaite\Documents\U2Doc\UniVerse\11.2\Source\Adminunix\AppC.fm14 System Administration
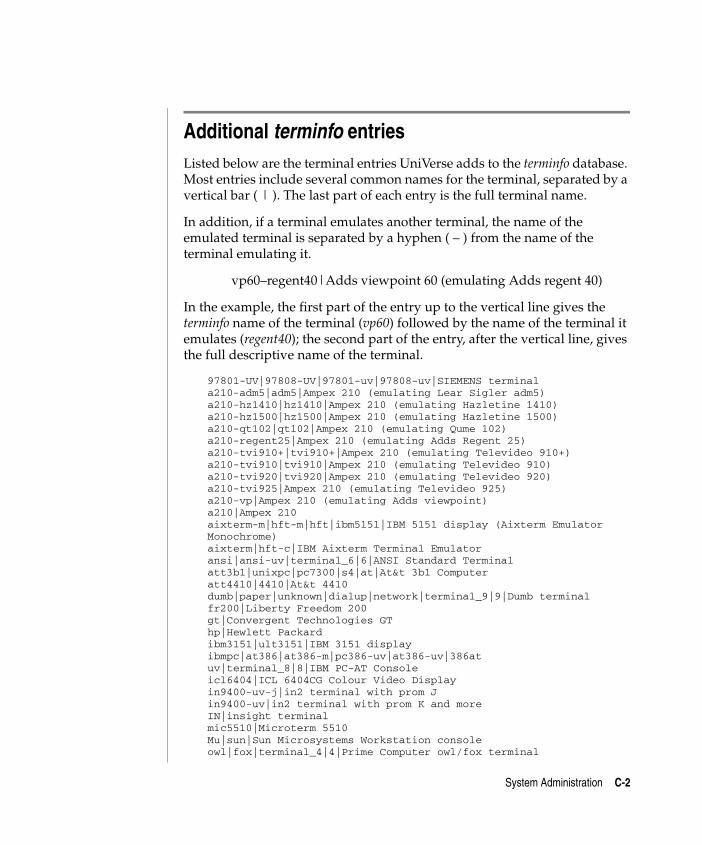
C:\Users\awaite\Documents\U2Doc\UniVerse\11.2\Source\Adminunix\AppC.fm3/17/14 System Administration
Beta Beta Beta Beta Beta Beta Beta Beta Beta Beta Beta Beta Beta Beta Beta Beta Beta Beta Beta Beta Beta Beta Beta Beta Beta
Additional terminfo entriesListed below are the terminal entries UniVerse adds to the terminfo database. Most entries include several common names for the terminal, separated by a vertical bar ( | ). The last part of each entry is the full terminal name.
In addition, if a terminal emulates another terminal, the name of the emulated terminal is separated by a hyphen ( – ) from the name of the terminal emulating it.
vp60–regent40|Adds viewpoint 60 (emulating Adds regent 40)
In the example, the first part of the entry up to the vertical line gives the terminfo name of the terminal (vp60) followed by the name of the terminal it emulates (regent40); the second part of the entry, after the vertical line, gives the full descriptive name of the terminal.
97801-UV|97808-UV|97801-uv|97808-uv|SIEMENS terminal a210-adm5|adm5|Ampex 210 (emulating Lear Sigler adm5) a210-hz1410|hz1410|Ampex 210 (emulating Hazletine 1410) a210-hz1500|hz1500|Ampex 210 (emulating Hazletine 1500) a210-qt102|qt102|Ampex 210 (emulating Qume 102) a210-regent25|Ampex 210 (emulating Adds Regent 25)a210-tvi910+|tvi910+|Ampex 210 (emulating Televideo 910+) a210-tvi910|tvi910|Ampex 210 (emulating Televideo 910) a210-tvi920|tvi920|Ampex 210 (emulating Televideo 920) a210-tvi925|Ampex 210 (emulating Televideo 925) a210-vp|Ampex 210 (emulating Adds viewpoint) a210|Ampex 210 aixterm-m|hft-m|hft|ibm5151|IBM 5151 display (Aixterm Emulator Monochrome) aixterm|hft-c|IBM Aixterm Terminal Emulator ansi|ansi-uv|terminal_6|6|ANSI Standard Terminal att3b1|unixpc|pc7300|s4|at|At&t 3b1 Computer att4410|4410|At&t 4410 dumb|paper|unknown|dialup|network|terminal_9|9|Dumb terminal fr200|Liberty Freedom 200 gt|Convergent Technologies GT hp|Hewlett Packard ibm3151|ult3151|IBM 3151 display ibmpc|at386|at386-m|pc386-uv|at386-uv|386at uv|terminal_8|8|IBM PC-AT Console icl6404|ICL 6404CG Colour Video Display in9400-uv-j|in2 terminal with prom J in9400-uv|in2 terminal with prom K and more IN|insight terminal mic5510|Microterm 5510 Mu|sun|Sun Microsystems Workstation console owl|fox|terminal_4|4|Prime Computer owl/fox terminal
System Administration C-2
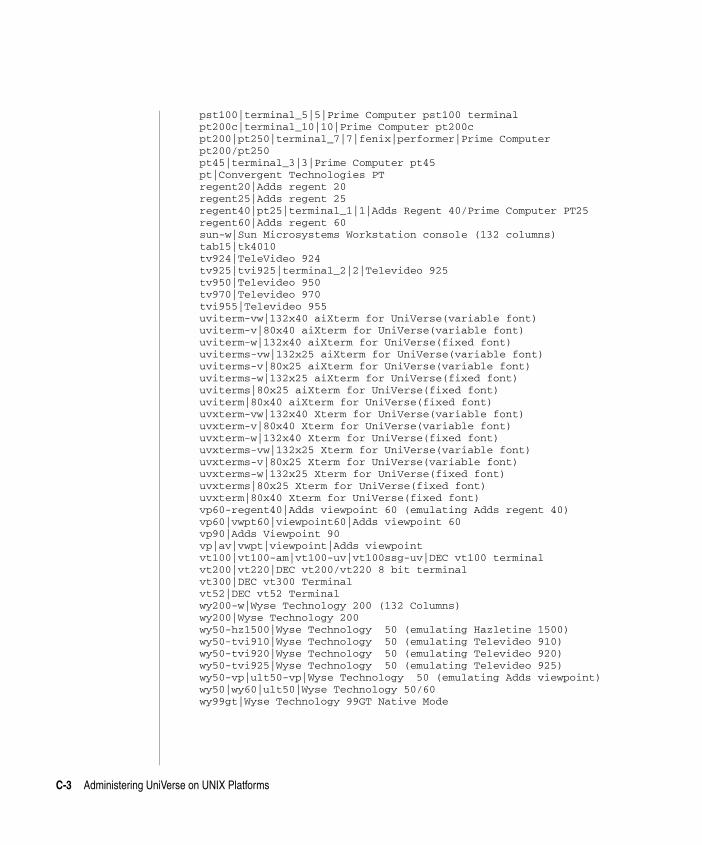
C:\Users\awaite\Documents\U2Doc\UniVerse\11.2\Source\Adminunix\AppC.fm3/17/14 System Administration
Beta Beta Beta Beta Beta Beta Beta Beta Beta Beta Beta Beta Beta Beta Beta Beta Beta Beta Beta Beta Beta Beta Beta Beta Beta
pst100|terminal_5|5|Prime Computer pst100 terminal pt200c|terminal_10|10|Prime Computer pt200c pt200|pt250|terminal_7|7|fenix|performer|Prime Computer pt200/pt250 pt45|terminal_3|3|Prime Computer pt45 pt|Convergent Technologies PT regent20|Adds regent 20 regent25|Adds regent 25 regent40|pt25|terminal_1|1|Adds Regent 40/Prime Computer PT25 regent60|Adds regent 60 sun-w|Sun Microsystems Workstation console (132 columns) tab15|tk4010 tv924|TeleVideo 924 tv925|tvi925|terminal_2|2|Televideo 925 tv950|Televideo 950 tv970|Televideo 970 tvi955|Televideo 955 uviterm-vw|132x40 aiXterm for UniVerse(variable font) uviterm-v|80x40 aiXterm for UniVerse(variable font) uviterm-w|132x40 aiXterm for UniVerse(fixed font) uviterms-vw|132x25 aiXterm for UniVerse(variable font) uviterms-v|80x25 aiXterm for UniVerse(variable font) uviterms-w|132x25 aiXterm for UniVerse(fixed font) uviterms|80x25 aiXterm for UniVerse(fixed font) uviterm|80x40 aiXterm for UniVerse(fixed font) uvxterm-vw|132x40 Xterm for UniVerse(variable font) uvxterm-v|80x40 Xterm for UniVerse(variable font) uvxterm-w|132x40 Xterm for UniVerse(fixed font) uvxterms-vw|132x25 Xterm for UniVerse(variable font) uvxterms-v|80x25 Xterm for UniVerse(variable font) uvxterms-w|132x25 Xterm for UniVerse(fixed font) uvxterms|80x25 Xterm for UniVerse(fixed font) uvxterm|80x40 Xterm for UniVerse(fixed font) vp60-regent40|Adds viewpoint 60 (emulating Adds regent 40) vp60|vwpt60|viewpoint60|Adds viewpoint 60 vp90|Adds Viewpoint 90 vp|av|vwpt|viewpoint|Adds viewpoint vt100|vt100-am|vt100-uv|vt100ssg-uv|DEC vt100 terminal vt200|vt220|DEC vt200/vt220 8 bit terminal vt300|DEC vt300 Terminal vt52|DEC vt52 Terminal wy200-w|Wyse Technology 200 (132 Columns) wy200|Wyse Technology 200 wy50-hz1500|Wyse Technology 50 (emulating Hazletine 1500) wy50-tvi910|Wyse Technology 50 (emulating Televideo 910) wy50-tvi920|Wyse Technology 50 (emulating Televideo 920) wy50-tvi925|Wyse Technology 50 (emulating Televideo 925) wy50-vp|ult50-vp|Wyse Technology 50 (emulating Adds viewpoint) wy50|wy60|ult50|Wyse Technology 50/60 wy99gt|Wyse Technology 99GT Native Mode
C-3 Administering UniVerse on UNIX Platforms
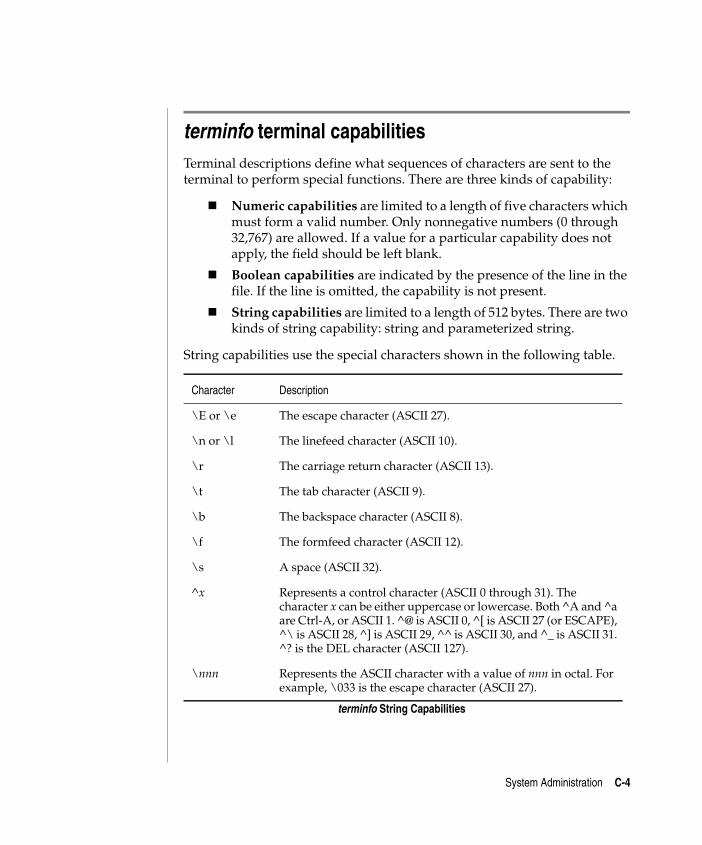
C:\Users\awaite\Documents\U2Doc\UniVerse\11.2\Source\Adminunix\AppC.fm3/17/14 System Administration
Beta Beta Beta Beta Beta Beta Beta Beta Beta Beta Beta Beta Beta Beta Beta Beta Beta Beta Beta Beta Beta Beta Beta Beta Beta
terminfo terminal capabilitiesTerminal descriptions define what sequences of characters are sent to the terminal to perform special functions. There are three kinds of capability:
Numeric capabilities are limited to a length of five characters which must form a valid number. Only nonnegative numbers (0 through 32,767) are allowed. If a value for a particular capability does not apply, the field should be left blank.
Boolean capabilities are indicated by the presence of the line in the file. If the line is omitted, the capability is not present.
String capabilities are limited to a length of 512 bytes. There are two kinds of string capability: string and parameterized string.
String capabilities use the special characters shown in the following table.
Character Description
\E or \e The escape character (ASCII 27).
\n or \l The linefeed character (ASCII 10).
\r The carriage return character (ASCII 13).
\t The tab character (ASCII 9).
\b The backspace character (ASCII 8).
\f The formfeed character (ASCII 12).
\s A space (ASCII 32).
^x Represents a control character (ASCII 0 through 31). The character x can be either uppercase or lowercase. Both ̂ A and ^a are Ctrl-A, or ASCII 1. ̂ @ is ASCII 0, ^[ is ASCII 27 (or ESCAPE), ^\ is ASCII 28, ^] is ASCII 29, ^^ is ASCII 30, and ^_ is ASCII 31. ^? is the DEL character (ASCII 127).
\nnn Represents the ASCII character with a value of nnn in octal. For example, \033 is the escape character (ASCII 27).
terminfo String Capabilities
System Administration C-4
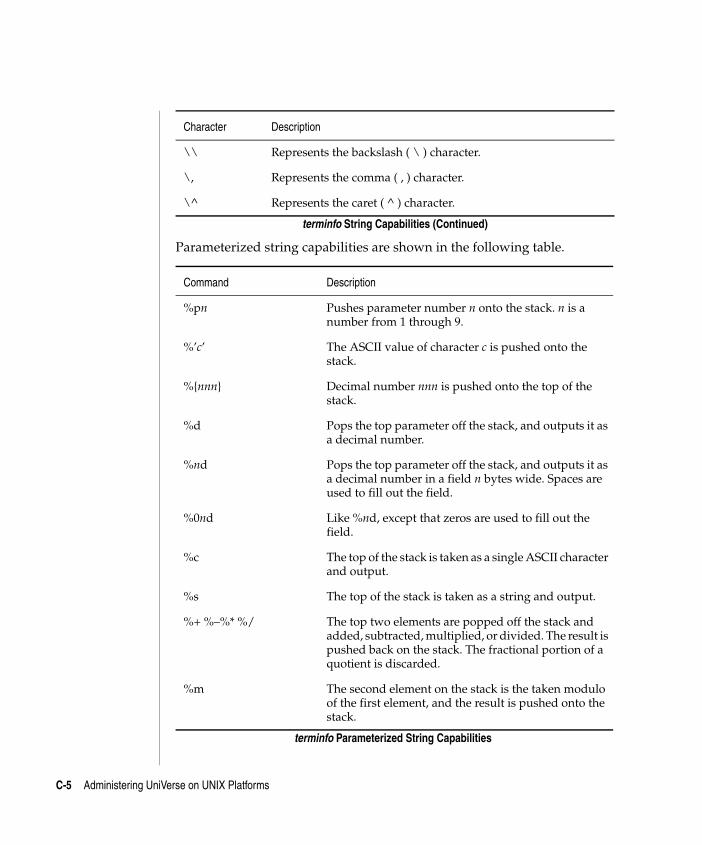
C:\Users\awaite\Documents\U2Doc\UniVerse\11.2\Source\Adminunix\AppC.fm3/17/14 System Administration
Beta Beta Beta Beta Beta Beta Beta Beta Beta Beta Beta Beta Beta Beta Beta Beta Beta Beta Beta Beta Beta Beta Beta Beta Beta
Parameterized string capabilities are shown in the following table.
\\ Represents the backslash ( \ ) character.
\, Represents the comma ( , ) character.
\^ Represents the caret ( ^ ) character.
Command Description
%pn Pushes parameter number n onto the stack. n is a number from 1 through 9.
%’c’ The ASCII value of character c is pushed onto the stack.
%{nnn} Decimal number nnn is pushed onto the top of the stack.
%d Pops the top parameter off the stack, and outputs it as a decimal number.
%nd Pops the top parameter off the stack, and outputs it as a decimal number in a field n bytes wide. Spaces are used to fill out the field.
%0nd Like %nd, except that zeros are used to fill out the field.
%c The top of the stack is taken as a single ASCII character and output.
%s The top of the stack is taken as a string and output.
%+ %–%* %/ The top two elements are popped off the stack and added, subtracted, multiplied, or divided. The result is pushed back on the stack. The fractional portion of a quotient is discarded.
%m The second element on the stack is the taken modulo of the first element, and the result is pushed onto the stack.
terminfo Parameterized String Capabilities
Character Description
terminfo String Capabilities (Continued)
C-5 Administering UniVerse on UNIX Platforms
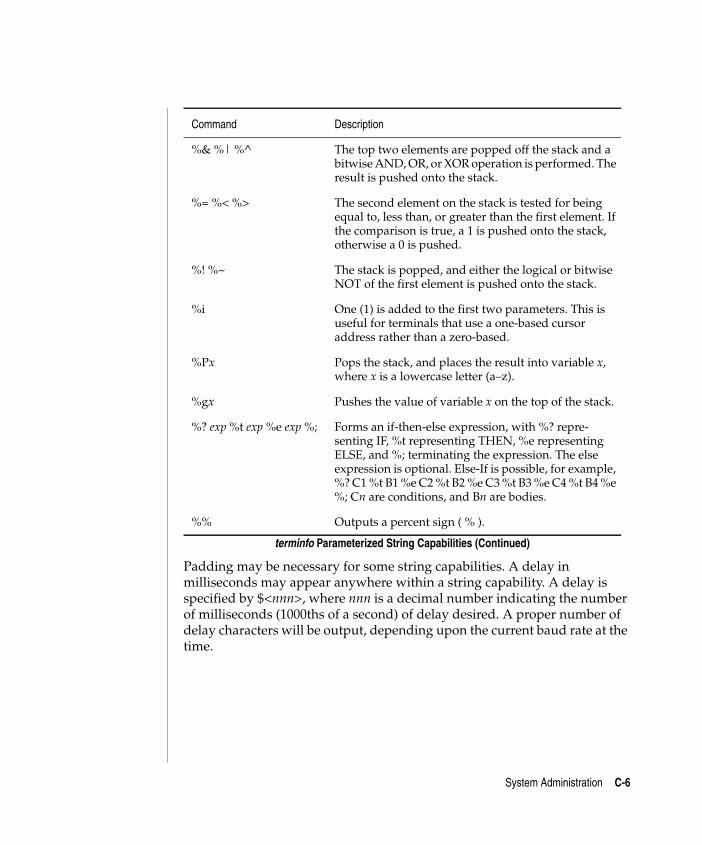
C:\Users\awaite\Documents\U2Doc\UniVerse\11.2\Source\Adminunix\AppC.fm3/17/14 System Administration
Beta Beta Beta Beta Beta Beta Beta Beta Beta Beta Beta Beta Beta Beta Beta Beta Beta Beta Beta Beta Beta Beta Beta Beta Beta
Padding may be necessary for some string capabilities. A delay in milliseconds may appear anywhere within a string capability. A delay is specified by $<nnn>, where nnn is a decimal number indicating the number of milliseconds (1000ths of a second) of delay desired. A proper number of delay characters will be output, depending upon the current baud rate at the time.
%& %| %^ The top two elements are popped off the stack and a bitwise AND, OR, or XOR operation is performed. The result is pushed onto the stack.
%= %< %> The second element on the stack is tested for being equal to, less than, or greater than the first element. If the comparison is true, a 1 is pushed onto the stack, otherwise a 0 is pushed.
%! %~ The stack is popped, and either the logical or bitwise NOT of the first element is pushed onto the stack.
%i One (1) is added to the first two parameters. This is useful for terminals that use a one-based cursor address rather than a zero-based.
%Px Pops the stack, and places the result into variable x, where x is a lowercase letter (a–z).
%gx Pushes the value of variable x on the top of the stack.
%? exp %t exp %e exp %; Forms an if-then-else expression, with %? repre-senting IF, %t representing THEN, %e representing ELSE, and %; terminating the expression. The else expression is optional. Else-If is possible, for example, %? C1 %t B1 %e C2 %t B2 %e C3 %t B3 %e C4 %t B4 %e %; Cn are conditions, and Bn are bodies.
%% Outputs a percent sign ( % ).
Command Description
terminfo Parameterized String Capabilities (Continued)
System Administration C-6
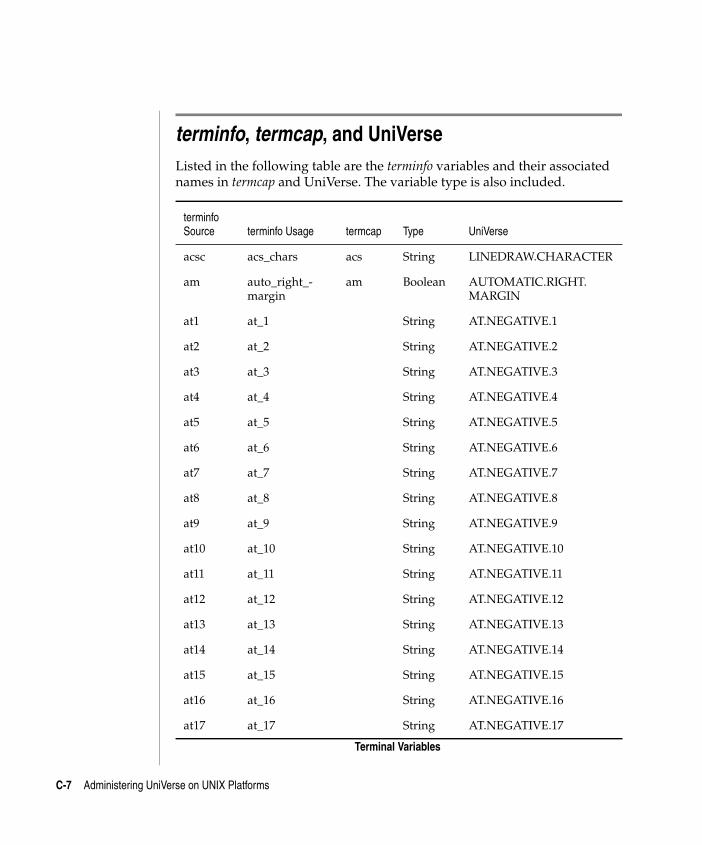
C:\Users\awaite\Documents\U2Doc\UniVerse\11.2\Source\Adminunix\AppC.fm3/17/14 System Administration
Beta Beta Beta Beta Beta Beta Beta Beta Beta Beta Beta Beta Beta Beta Beta Beta Beta Beta Beta Beta Beta Beta Beta Beta Beta
terminfo, termcap, and UniVerseListed in the following table are the terminfo variables and their associated names in termcap and UniVerse. The variable type is also included.
terminfo Source terminfo Usage termcap Type UniVerse
acsc acs_chars acs String LINEDRAW.CHARACTER
am auto_right_-margin
am Boolean AUTOMATIC.RIGHT. MARGIN
at1 at_1 String AT.NEGATIVE.1
at2 at_2 String AT.NEGATIVE.2
at3 at_3 String AT.NEGATIVE.3
at4 at_4 String AT.NEGATIVE.4
at5 at_5 String AT.NEGATIVE.5
at6 at_6 String AT.NEGATIVE.6
at7 at_7 String AT.NEGATIVE.7
at8 at_8 String AT.NEGATIVE.8
at9 at_9 String AT.NEGATIVE.9
at10 at_10 String AT.NEGATIVE.10
at11 at_11 String AT.NEGATIVE.11
at12 at_12 String AT.NEGATIVE.12
at13 at_13 String AT.NEGATIVE.13
at14 at_14 String AT.NEGATIVE.14
at15 at_15 String AT.NEGATIVE.15
at16 at_16 String AT.NEGATIVE.16
at17 at_17 String AT.NEGATIVE.17
Terminal Variables
C-7 Administering UniVerse on UNIX Platforms
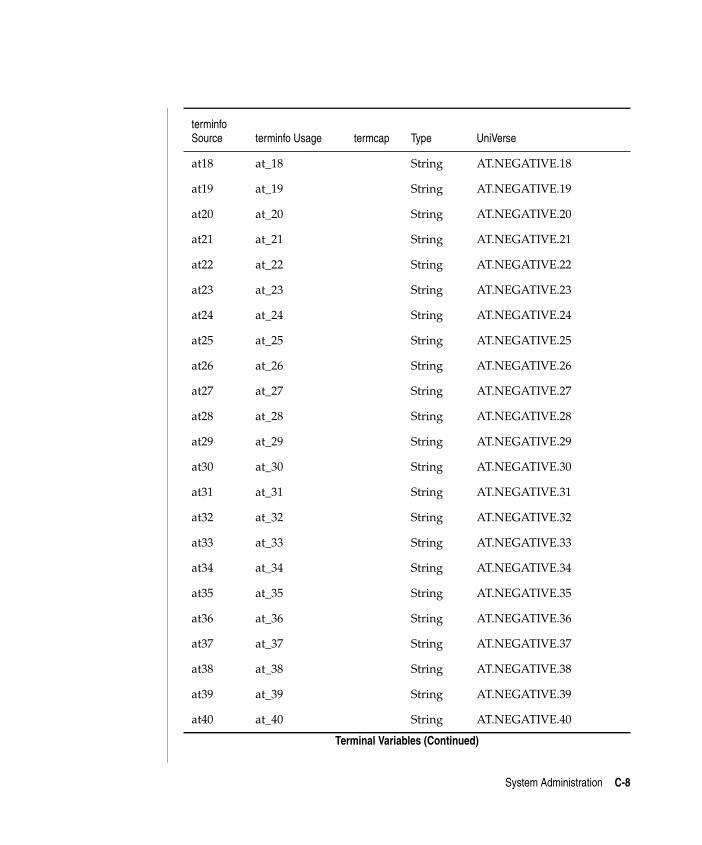
C:\Users\awaite\Documents\U2Doc\UniVerse\11.2\Source\Adminunix\AppC.fm3/17/14 System Administration
Beta Beta Beta Beta Beta Beta Beta Beta Beta Beta Beta Beta Beta Beta Beta Beta Beta Beta Beta Beta Beta Beta Beta Beta Beta
at18 at_18 String AT.NEGATIVE.18
at19 at_19 String AT.NEGATIVE.19
at20 at_20 String AT.NEGATIVE.20
at21 at_21 String AT.NEGATIVE.21
at22 at_22 String AT.NEGATIVE.22
at23 at_23 String AT.NEGATIVE.23
at24 at_24 String AT.NEGATIVE.24
at25 at_25 String AT.NEGATIVE.25
at26 at_26 String AT.NEGATIVE.26
at27 at_27 String AT.NEGATIVE.27
at28 at_28 String AT.NEGATIVE.28
at29 at_29 String AT.NEGATIVE.29
at30 at_30 String AT.NEGATIVE.30
at31 at_31 String AT.NEGATIVE.31
at32 at_32 String AT.NEGATIVE.32
at33 at_33 String AT.NEGATIVE.33
at34 at_34 String AT.NEGATIVE.34
at35 at_35 String AT.NEGATIVE.35
at36 at_36 String AT.NEGATIVE.36
at37 at_37 String AT.NEGATIVE.37
at38 at_38 String AT.NEGATIVE.38
at39 at_39 String AT.NEGATIVE.39
at40 at_40 String AT.NEGATIVE.40
terminfo Source terminfo Usage termcap Type UniVerse
Terminal Variables (Continued)
System Administration C-8
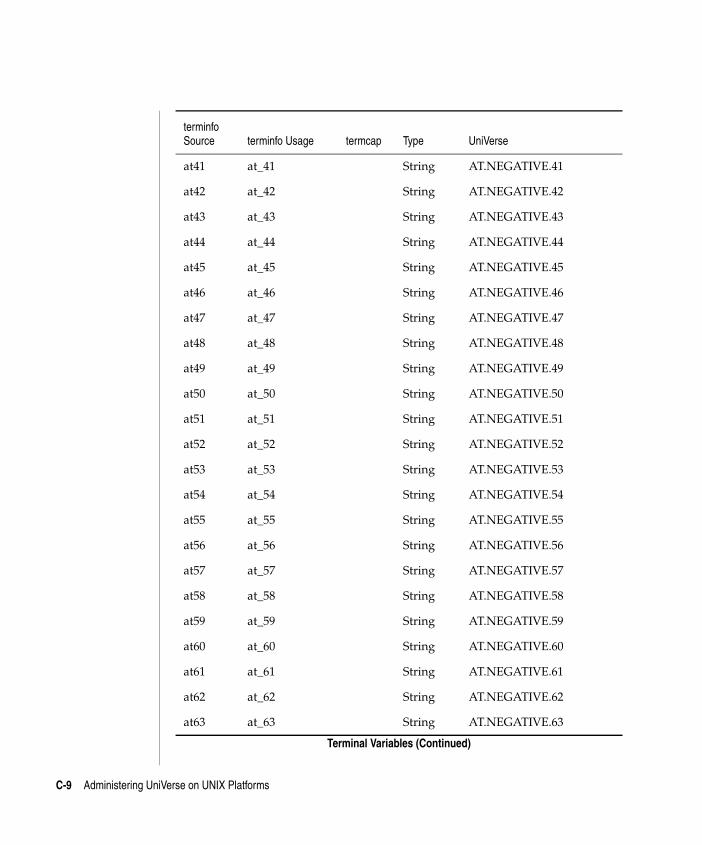
C:\Users\awaite\Documents\U2Doc\UniVerse\11.2\Source\Adminunix\AppC.fm3/17/14 System Administration
Beta Beta Beta Beta Beta Beta Beta Beta Beta Beta Beta Beta Beta Beta Beta Beta Beta Beta Beta Beta Beta Beta Beta Beta Beta
at41 at_41 String AT.NEGATIVE.41
at42 at_42 String AT.NEGATIVE.42
at43 at_43 String AT.NEGATIVE.43
at44 at_44 String AT.NEGATIVE.44
at45 at_45 String AT.NEGATIVE.45
at46 at_46 String AT.NEGATIVE.46
at47 at_47 String AT.NEGATIVE.47
at48 at_48 String AT.NEGATIVE.48
at49 at_49 String AT.NEGATIVE.49
at50 at_50 String AT.NEGATIVE.50
at51 at_51 String AT.NEGATIVE.51
at52 at_52 String AT.NEGATIVE.52
at53 at_53 String AT.NEGATIVE.53
at54 at_54 String AT.NEGATIVE.54
at55 at_55 String AT.NEGATIVE.55
at56 at_56 String AT.NEGATIVE.56
at57 at_57 String AT.NEGATIVE.57
at58 at_58 String AT.NEGATIVE.58
at59 at_59 String AT.NEGATIVE.59
at60 at_60 String AT.NEGATIVE.60
at61 at_61 String AT.NEGATIVE.61
at62 at_62 String AT.NEGATIVE.62
at63 at_63 String AT.NEGATIVE.63
terminfo Source terminfo Usage termcap Type UniVerse
Terminal Variables (Continued)
C-9 Administering UniVerse on UNIX Platforms
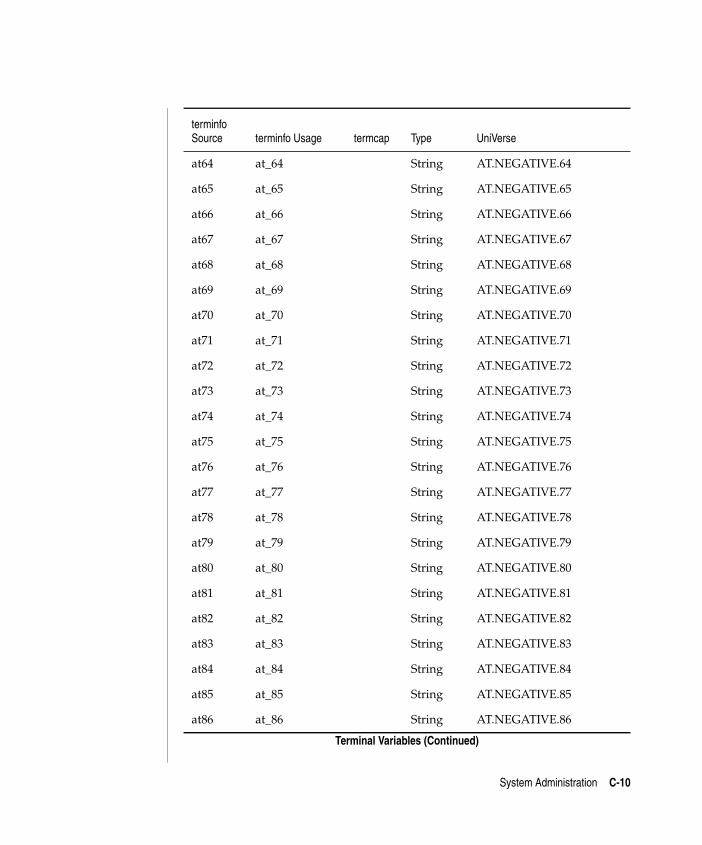
C:\Users\awaite\Documents\U2Doc\UniVerse\11.2\Source\Adminunix\AppC.fm3/17/14 System Administration
Beta Beta Beta Beta Beta Beta Beta Beta Beta Beta Beta Beta Beta Beta Beta Beta Beta Beta Beta Beta Beta Beta Beta Beta Beta
at64 at_64 String AT.NEGATIVE.64
at65 at_65 String AT.NEGATIVE.65
at66 at_66 String AT.NEGATIVE.66
at67 at_67 String AT.NEGATIVE.67
at68 at_68 String AT.NEGATIVE.68
at69 at_69 String AT.NEGATIVE.69
at70 at_70 String AT.NEGATIVE.70
at71 at_71 String AT.NEGATIVE.71
at72 at_72 String AT.NEGATIVE.72
at73 at_73 String AT.NEGATIVE.73
at74 at_74 String AT.NEGATIVE.74
at75 at_75 String AT.NEGATIVE.75
at76 at_76 String AT.NEGATIVE.76
at77 at_77 String AT.NEGATIVE.77
at78 at_78 String AT.NEGATIVE.78
at79 at_79 String AT.NEGATIVE.79
at80 at_80 String AT.NEGATIVE.80
at81 at_81 String AT.NEGATIVE.81
at82 at_82 String AT.NEGATIVE.82
at83 at_83 String AT.NEGATIVE.83
at84 at_84 String AT.NEGATIVE.84
at85 at_85 String AT.NEGATIVE.85
at86 at_86 String AT.NEGATIVE.86
terminfo Source terminfo Usage termcap Type UniVerse
Terminal Variables (Continued)
System Administration C-10
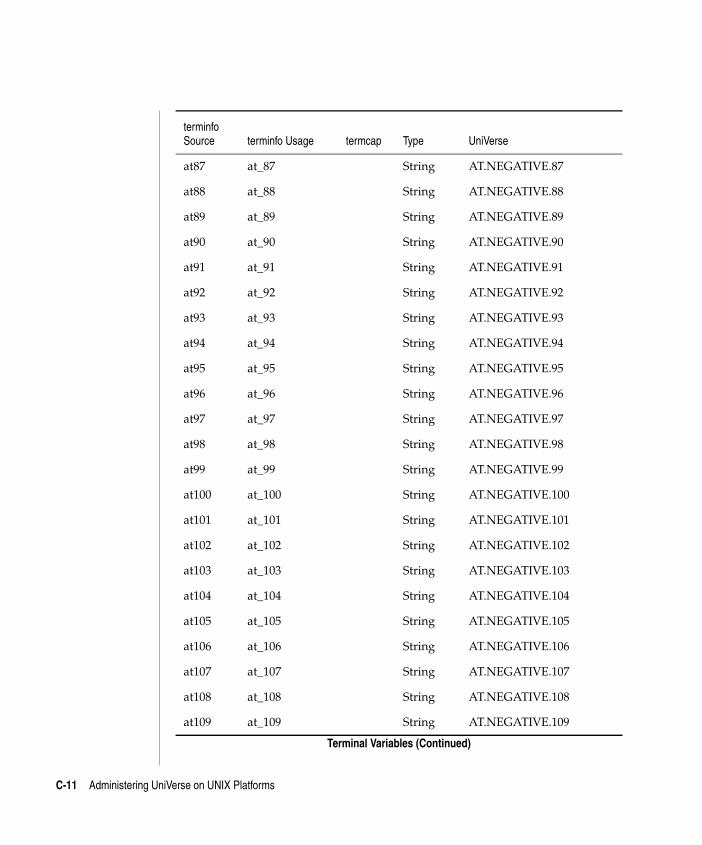
C:\Users\awaite\Documents\U2Doc\UniVerse\11.2\Source\Adminunix\AppC.fm3/17/14 System Administration
Beta Beta Beta Beta Beta Beta Beta Beta Beta Beta Beta Beta Beta Beta Beta Beta Beta Beta Beta Beta Beta Beta Beta Beta Beta
at87 at_87 String AT.NEGATIVE.87
at88 at_88 String AT.NEGATIVE.88
at89 at_89 String AT.NEGATIVE.89
at90 at_90 String AT.NEGATIVE.90
at91 at_91 String AT.NEGATIVE.91
at92 at_92 String AT.NEGATIVE.92
at93 at_93 String AT.NEGATIVE.93
at94 at_94 String AT.NEGATIVE.94
at95 at_95 String AT.NEGATIVE.95
at96 at_96 String AT.NEGATIVE.96
at97 at_97 String AT.NEGATIVE.97
at98 at_98 String AT.NEGATIVE.98
at99 at_99 String AT.NEGATIVE.99
at100 at_100 String AT.NEGATIVE.100
at101 at_101 String AT.NEGATIVE.101
at102 at_102 String AT.NEGATIVE.102
at103 at_103 String AT.NEGATIVE.103
at104 at_104 String AT.NEGATIVE.104
at105 at_105 String AT.NEGATIVE.105
at106 at_106 String AT.NEGATIVE.106
at107 at_107 String AT.NEGATIVE.107
at108 at_108 String AT.NEGATIVE.108
at109 at_109 String AT.NEGATIVE.109
terminfo Source terminfo Usage termcap Type UniVerse
Terminal Variables (Continued)
C-11 Administering UniVerse on UNIX Platforms
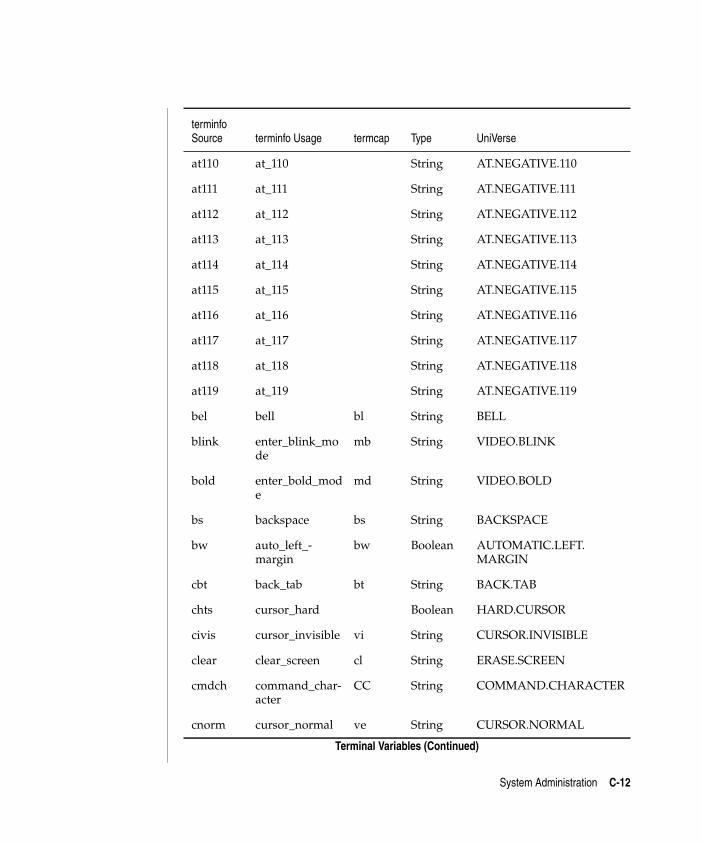
C:\Users\awaite\Documents\U2Doc\UniVerse\11.2\Source\Adminunix\AppC.fm3/17/14 System Administration
Beta Beta Beta Beta Beta Beta Beta Beta Beta Beta Beta Beta Beta Beta Beta Beta Beta Beta Beta Beta Beta Beta Beta Beta Beta
at110 at_110 String AT.NEGATIVE.110
at111 at_111 String AT.NEGATIVE.111
at112 at_112 String AT.NEGATIVE.112
at113 at_113 String AT.NEGATIVE.113
at114 at_114 String AT.NEGATIVE.114
at115 at_115 String AT.NEGATIVE.115
at116 at_116 String AT.NEGATIVE.116
at117 at_117 String AT.NEGATIVE.117
at118 at_118 String AT.NEGATIVE.118
at119 at_119 String AT.NEGATIVE.119
bel bell bl String BELL
blink enter_blink_mode
mb String VIDEO.BLINK
bold enter_bold_mode
md String VIDEO.BOLD
bs backspace bs String BACKSPACE
bw auto_left_-margin
bw Boolean AUTOMATIC.LEFT. MARGIN
cbt back_tab bt String BACK.TAB
chts cursor_hard Boolean HARD.CURSOR
civis cursor_invisible vi String CURSOR.INVISIBLE
clear clear_screen cl String ERASE.SCREEN
cmdch command_char-acter
CC String COMMAND.CHARACTER
cnorm cursor_normal ve String CURSOR.NORMAL
terminfo Source terminfo Usage termcap Type UniVerse
Terminal Variables (Continued)
System Administration C-12
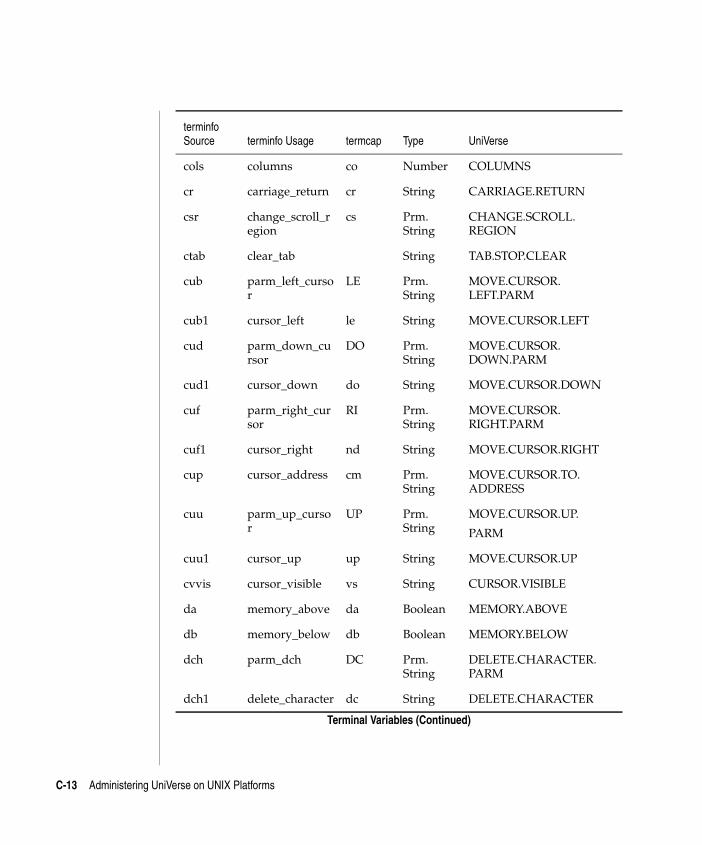
C:\Users\awaite\Documents\U2Doc\UniVerse\11.2\Source\Adminunix\AppC.fm3/17/14 System Administration
Beta Beta Beta Beta Beta Beta Beta Beta Beta Beta Beta Beta Beta Beta Beta Beta Beta Beta Beta Beta Beta Beta Beta Beta Beta
cols columns co Number COLUMNS
cr carriage_return cr String CARRIAGE.RETURN
csr change_scroll_region
cs Prm. String
CHANGE.SCROLL. REGION
ctab clear_tab String TAB.STOP.CLEAR
cub parm_left_cursor
LE Prm. String
MOVE.CURSOR. LEFT.PARM
cub1 cursor_left le String MOVE.CURSOR.LEFT
cud parm_down_cursor
DO Prm. String
MOVE.CURSOR. DOWN.PARM
cud1 cursor_down do String MOVE.CURSOR.DOWN
cuf parm_right_cursor
RI Prm. String
MOVE.CURSOR. RIGHT.PARM
cuf1 cursor_right nd String MOVE.CURSOR.RIGHT
cup cursor_address cm Prm. String
MOVE.CURSOR.TO. ADDRESS
cuu parm_up_cursor
UP Prm. String
MOVE.CURSOR.UP.
PARM
cuu1 cursor_up up String MOVE.CURSOR.UP
cvvis cursor_visible vs String CURSOR.VISIBLE
da memory_above da Boolean MEMORY.ABOVE
db memory_below db Boolean MEMORY.BELOW
dch parm_dch DC Prm. String
DELETE.CHARACTER. PARM
dch1 delete_character dc String DELETE.CHARACTER
terminfo Source terminfo Usage termcap Type UniVerse
Terminal Variables (Continued)
C-13 Administering UniVerse on UNIX Platforms
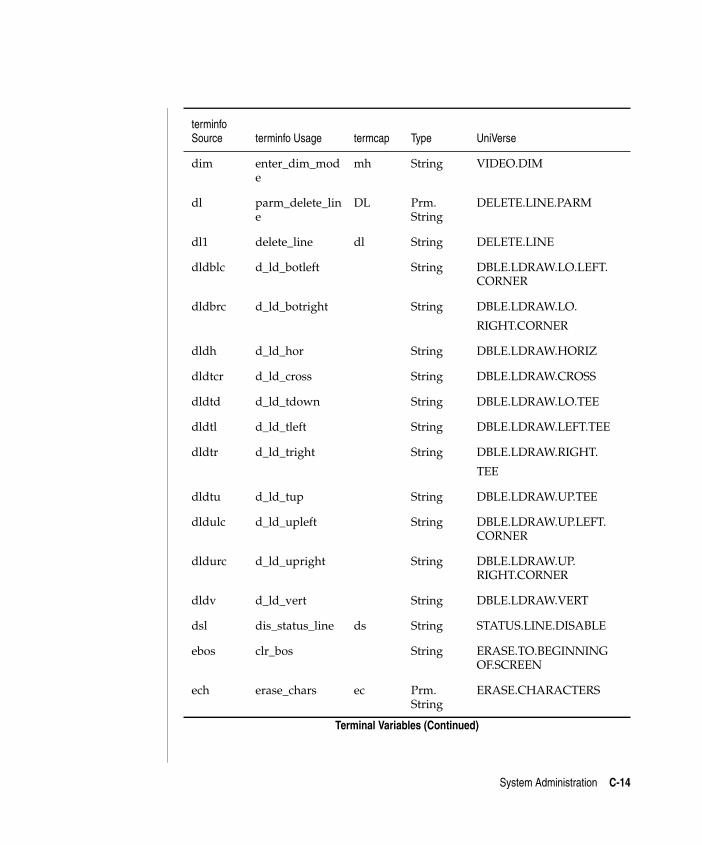
C:\Users\awaite\Documents\U2Doc\UniVerse\11.2\Source\Adminunix\AppC.fm3/17/14 System Administration
Beta Beta Beta Beta Beta Beta Beta Beta Beta Beta Beta Beta Beta Beta Beta Beta Beta Beta Beta Beta Beta Beta Beta Beta Beta
dim enter_dim_mode
mh String VIDEO.DIM
dl parm_delete_line
DL Prm. String
DELETE.LINE.PARM
dl1 delete_line dl String DELETE.LINE
dldblc d_ld_botleft String DBLE.LDRAW.LO.LEFT. CORNER
dldbrc d_ld_botright String DBLE.LDRAW.LO.
RIGHT.CORNER
dldh d_ld_hor String DBLE.LDRAW.HORIZ
dldtcr d_ld_cross String DBLE.LDRAW.CROSS
dldtd d_ld_tdown String DBLE.LDRAW.LO.TEE
dldtl d_ld_tleft String DBLE.LDRAW.LEFT.TEE
dldtr d_ld_tright String DBLE.LDRAW.RIGHT.
TEE
dldtu d_ld_tup String DBLE.LDRAW.UP.TEE
dldulc d_ld_upleft String DBLE.LDRAW.UP.LEFT. CORNER
dldurc d_ld_upright String DBLE.LDRAW.UP. RIGHT.CORNER
dldv d_ld_vert String DBLE.LDRAW.VERT
dsl dis_status_line ds String STATUS.LINE.DISABLE
ebos clr_bos String ERASE.TO.BEGINNING OF.SCREEN
ech erase_chars ec Prm. String
ERASE.CHARACTERS
terminfo Source terminfo Usage termcap Type UniVerse
Terminal Variables (Continued)
System Administration C-14
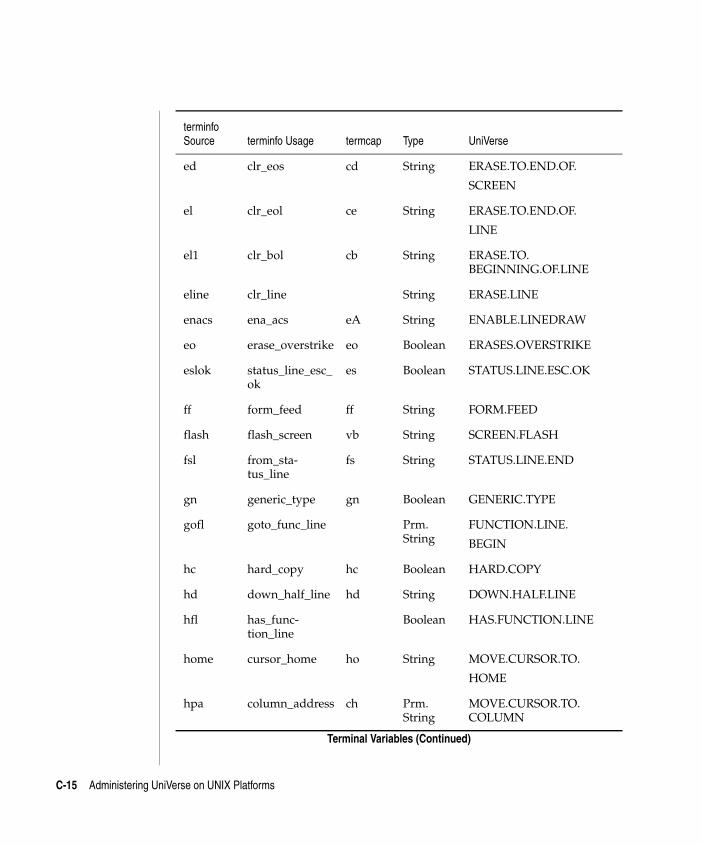
C:\Users\awaite\Documents\U2Doc\UniVerse\11.2\Source\Adminunix\AppC.fm3/17/14 System Administration
Beta Beta Beta Beta Beta Beta Beta Beta Beta Beta Beta Beta Beta Beta Beta Beta Beta Beta Beta Beta Beta Beta Beta Beta Beta
ed clr_eos cd String ERASE.TO.END.OF.
SCREEN
el clr_eol ce String ERASE.TO.END.OF.
LINE
el1 clr_bol cb String ERASE.TO. BEGINNING.OF.LINE
eline clr_line String ERASE.LINE
enacs ena_acs eA String ENABLE.LINEDRAW
eo erase_overstrike eo Boolean ERASES.OVERSTRIKE
eslok status_line_esc_ok
es Boolean STATUS.LINE.ESC.OK
ff form_feed ff String FORM.FEED
flash flash_screen vb String SCREEN.FLASH
fsl from_sta-tus_line
fs String STATUS.LINE.END
gn generic_type gn Boolean GENERIC.TYPE
gofl goto_func_line Prm. String
FUNCTION.LINE.
BEGIN
hc hard_copy hc Boolean HARD.COPY
hd down_half_line hd String DOWN.HALF.LINE
hfl has_func-tion_line
Boolean HAS.FUNCTION.LINE
home cursor_home ho String MOVE.CURSOR.TO.
HOME
hpa column_address ch Prm. String
MOVE.CURSOR.TO. COLUMN
terminfo Source terminfo Usage termcap Type UniVerse
Terminal Variables (Continued)
C-15 Administering UniVerse on UNIX Platforms
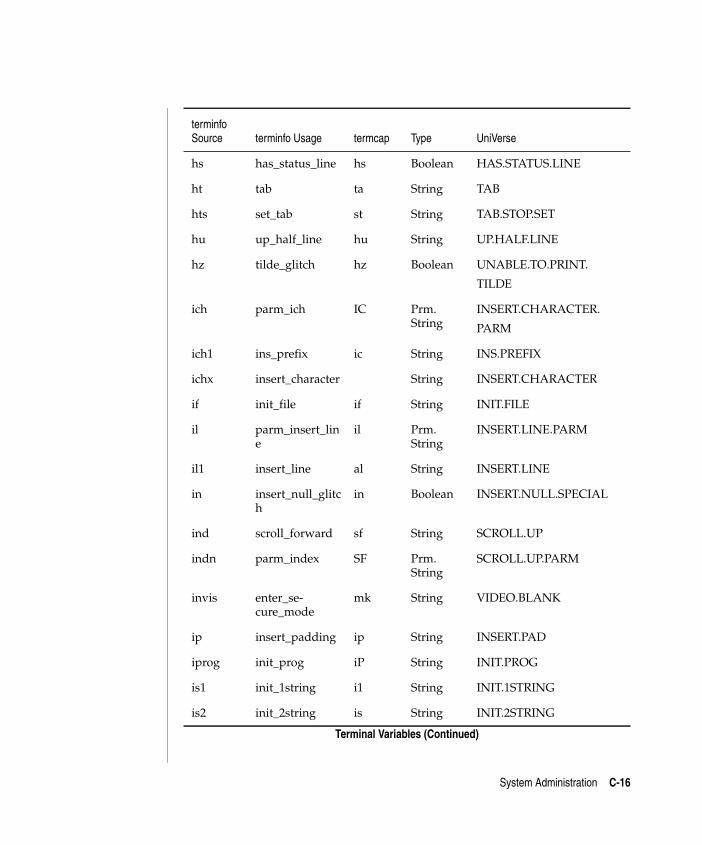
C:\Users\awaite\Documents\U2Doc\UniVerse\11.2\Source\Adminunix\AppC.fm3/17/14 System Administration
Beta Beta Beta Beta Beta Beta Beta Beta Beta Beta Beta Beta Beta Beta Beta Beta Beta Beta Beta Beta Beta Beta Beta Beta Beta
hs has_status_line hs Boolean HAS.STATUS.LINE
ht tab ta String TAB
hts set_tab st String TAB.STOP.SET
hu up_half_line hu String UP.HALF.LINE
hz tilde_glitch hz Boolean UNABLE.TO.PRINT.
TILDE
ich parm_ich IC Prm. String
INSERT.CHARACTER.
PARM
ich1 ins_prefix ic String INS.PREFIX
ichx insert_character String INSERT.CHARACTER
if init_file if String INIT.FILE
il parm_insert_line
il Prm. String
INSERT.LINE.PARM
il1 insert_line al String INSERT.LINE
in insert_null_glitch
in Boolean INSERT.NULL.SPECIAL
ind scroll_forward sf String SCROLL.UP
indn parm_index SF Prm. String
SCROLL.UP.PARM
invis enter_se-cure_mode
mk String VIDEO.BLANK
ip insert_padding ip String INSERT.PAD
iprog init_prog iP String INIT.PROG
is1 init_1string i1 String INIT.1STRING
is2 init_2string is String INIT.2STRING
terminfo Source terminfo Usage termcap Type UniVerse
Terminal Variables (Continued)
System Administration C-16
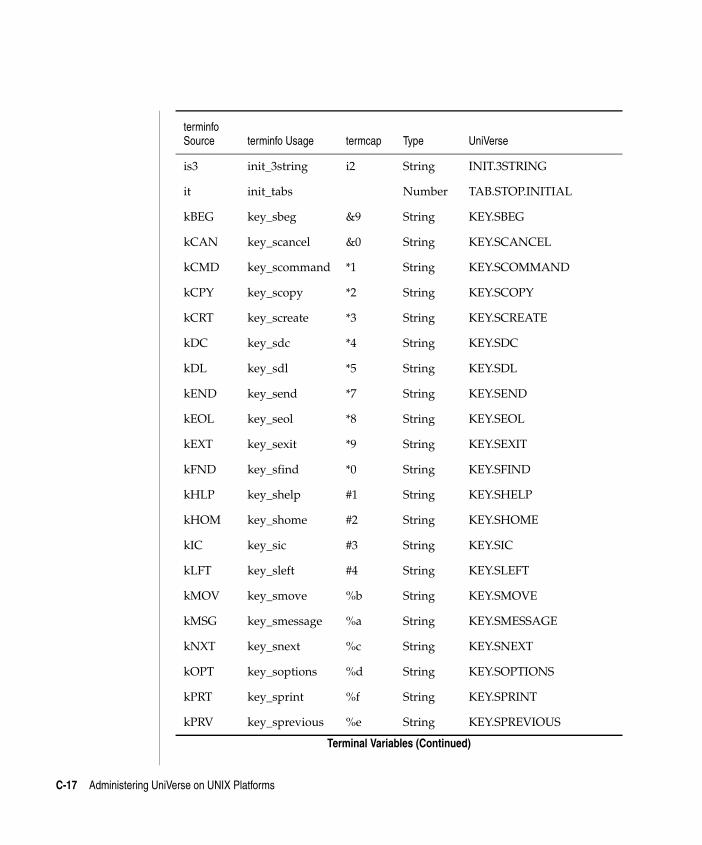
C:\Users\awaite\Documents\U2Doc\UniVerse\11.2\Source\Adminunix\AppC.fm3/17/14 System Administration
Beta Beta Beta Beta Beta Beta Beta Beta Beta Beta Beta Beta Beta Beta Beta Beta Beta Beta Beta Beta Beta Beta Beta Beta Beta
is3 init_3string i2 String INIT.3STRING
it init_tabs Number TAB.STOP.INITIAL
kBEG key_sbeg &9 String KEY.SBEG
kCAN key_scancel &0 String KEY.SCANCEL
kCMD key_scommand *1 String KEY.SCOMMAND
kCPY key_scopy *2 String KEY.SCOPY
kCRT key_screate *3 String KEY.SCREATE
kDC key_sdc *4 String KEY.SDC
kDL key_sdl *5 String KEY.SDL
kEND key_send *7 String KEY.SEND
kEOL key_seol *8 String KEY.SEOL
kEXT key_sexit *9 String KEY.SEXIT
kFND key_sfind *0 String KEY.SFIND
kHLP key_shelp #1 String KEY.SHELP
kHOM key_shome #2 String KEY.SHOME
kIC key_sic #3 String KEY.SIC
kLFT key_sleft #4 String KEY.SLEFT
kMOV key_smove %b String KEY.SMOVE
kMSG key_smessage %a String KEY.SMESSAGE
kNXT key_snext %c String KEY.SNEXT
kOPT key_soptions %d String KEY.SOPTIONS
kPRT key_sprint %f String KEY.SPRINT
kPRV key_sprevious %e String KEY.SPREVIOUS
terminfo Source terminfo Usage termcap Type UniVerse
Terminal Variables (Continued)
C-17 Administering UniVerse on UNIX Platforms
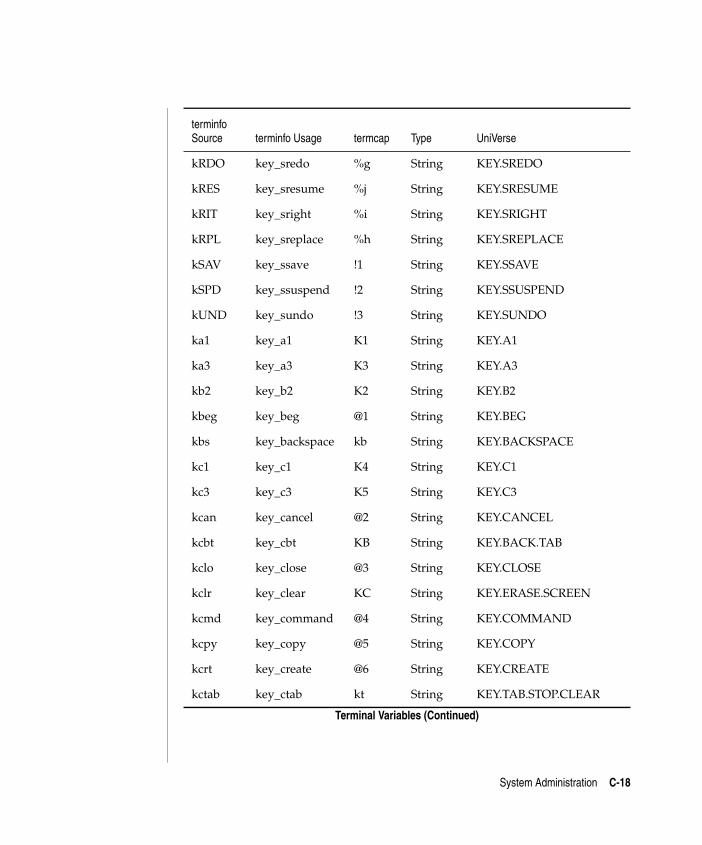
C:\Users\awaite\Documents\U2Doc\UniVerse\11.2\Source\Adminunix\AppC.fm3/17/14 System Administration
Beta Beta Beta Beta Beta Beta Beta Beta Beta Beta Beta Beta Beta Beta Beta Beta Beta Beta Beta Beta Beta Beta Beta Beta Beta
kRDO key_sredo %g String KEY.SREDO
kRES key_sresume %j String KEY.SRESUME
kRIT key_sright %i String KEY.SRIGHT
kRPL key_sreplace %h String KEY.SREPLACE
kSAV key_ssave !1 String KEY.SSAVE
kSPD key_ssuspend !2 String KEY.SSUSPEND
kUND key_sundo !3 String KEY.SUNDO
ka1 key_a1 K1 String KEY.A1
ka3 key_a3 K3 String KEY.A3
kb2 key_b2 K2 String KEY.B2
kbeg key_beg @1 String KEY.BEG
kbs key_backspace kb String KEY.BACKSPACE
kc1 key_c1 K4 String KEY.C1
kc3 key_c3 K5 String KEY.C3
kcan key_cancel @2 String KEY.CANCEL
kcbt key_cbt KB String KEY.BACK.TAB
kclo key_close @3 String KEY.CLOSE
kclr key_clear KC String KEY.ERASE.SCREEN
kcmd key_command @4 String KEY.COMMAND
kcpy key_copy @5 String KEY.COPY
kcrt key_create @6 String KEY.CREATE
kctab key_ctab kt String KEY.TAB.STOP.CLEAR
terminfo Source terminfo Usage termcap Type UniVerse
Terminal Variables (Continued)
System Administration C-18
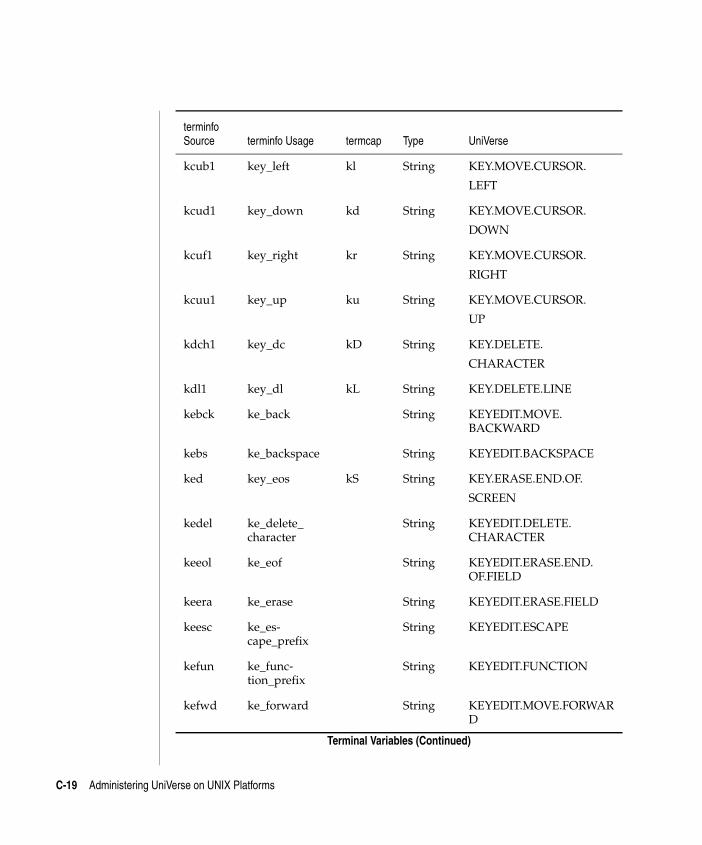
C:\Users\awaite\Documents\U2Doc\UniVerse\11.2\Source\Adminunix\AppC.fm3/17/14 System Administration
Beta Beta Beta Beta Beta Beta Beta Beta Beta Beta Beta Beta Beta Beta Beta Beta Beta Beta Beta Beta Beta Beta Beta Beta Beta
kcub1 key_left kl String KEY.MOVE.CURSOR.
LEFT
kcud1 key_down kd String KEY.MOVE.CURSOR.
DOWN
kcuf1 key_right kr String KEY.MOVE.CURSOR.
RIGHT
kcuu1 key_up ku String KEY.MOVE.CURSOR.
UP
kdch1 key_dc kD String KEY.DELETE.
CHARACTER
kdl1 key_dl kL String KEY.DELETE.LINE
kebck ke_back String KEYEDIT.MOVE. BACKWARD
kebs ke_backspace String KEYEDIT.BACKSPACE
ked key_eos kS String KEY.ERASE.END.OF.
SCREEN
kedel ke_delete_ character
String KEYEDIT.DELETE. CHARACTER
keeol ke_eof String KEYEDIT.ERASE.END. OF.FIELD
keera ke_erase String KEYEDIT.ERASE.FIELD
keesc ke_es-cape_prefix
String KEYEDIT.ESCAPE
kefun ke_func-tion_prefix
String KEYEDIT.FUNCTION
kefwd ke_forward String KEYEDIT.MOVE.FORWARD
terminfo Source terminfo Usage termcap Type UniVerse
Terminal Variables (Continued)
C-19 Administering UniVerse on UNIX Platforms
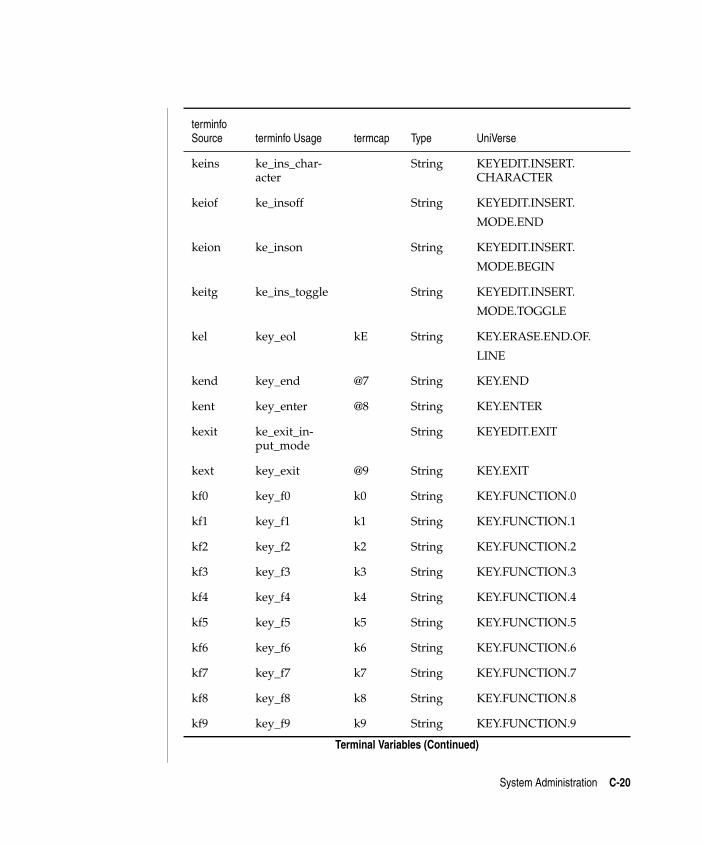
C:\Users\awaite\Documents\U2Doc\UniVerse\11.2\Source\Adminunix\AppC.fm3/17/14 System Administration
Beta Beta Beta Beta Beta Beta Beta Beta Beta Beta Beta Beta Beta Beta Beta Beta Beta Beta Beta Beta Beta Beta Beta Beta Beta
keins ke_ins_char-acter
String KEYEDIT.INSERT. CHARACTER
keiof ke_insoff String KEYEDIT.INSERT.
MODE.END
keion ke_inson String KEYEDIT.INSERT.
MODE.BEGIN
keitg ke_ins_toggle String KEYEDIT.INSERT.
MODE.TOGGLE
kel key_eol kE String KEY.ERASE.END.OF.
LINE
kend key_end @7 String KEY.END
kent key_enter @8 String KEY.ENTER
kexit ke_exit_in-put_mode
String KEYEDIT.EXIT
kext key_exit @9 String KEY.EXIT
kf0 key_f0 k0 String KEY.FUNCTION.0
kf1 key_f1 k1 String KEY.FUNCTION.1
kf2 key_f2 k2 String KEY.FUNCTION.2
kf3 key_f3 k3 String KEY.FUNCTION.3
kf4 key_f4 k4 String KEY.FUNCTION.4
kf5 key_f5 k5 String KEY.FUNCTION.5
kf6 key_f6 k6 String KEY.FUNCTION.6
kf7 key_f7 k7 String KEY.FUNCTION.7
kf8 key_f8 k8 String KEY.FUNCTION.8
kf9 key_f9 k9 String KEY.FUNCTION.9
terminfo Source terminfo Usage termcap Type UniVerse
Terminal Variables (Continued)
System Administration C-20
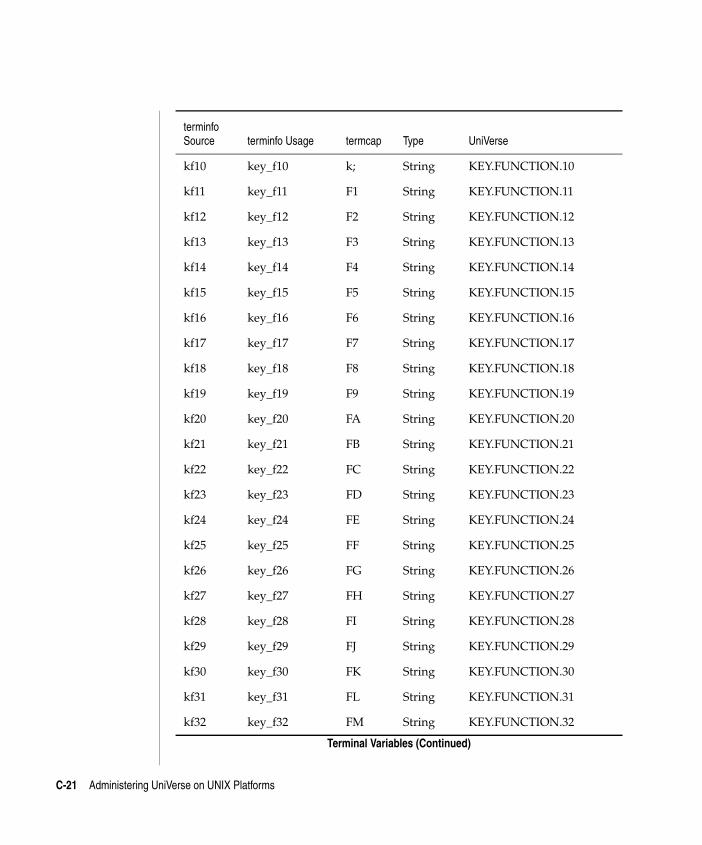
C:\Users\awaite\Documents\U2Doc\UniVerse\11.2\Source\Adminunix\AppC.fm3/17/14 System Administration
Beta Beta Beta Beta Beta Beta Beta Beta Beta Beta Beta Beta Beta Beta Beta Beta Beta Beta Beta Beta Beta Beta Beta Beta Beta
kf10 key_f10 k; String KEY.FUNCTION.10
kf11 key_f11 F1 String KEY.FUNCTION.11
kf12 key_f12 F2 String KEY.FUNCTION.12
kf13 key_f13 F3 String KEY.FUNCTION.13
kf14 key_f14 F4 String KEY.FUNCTION.14
kf15 key_f15 F5 String KEY.FUNCTION.15
kf16 key_f16 F6 String KEY.FUNCTION.16
kf17 key_f17 F7 String KEY.FUNCTION.17
kf18 key_f18 F8 String KEY.FUNCTION.18
kf19 key_f19 F9 String KEY.FUNCTION.19
kf20 key_f20 FA String KEY.FUNCTION.20
kf21 key_f21 FB String KEY.FUNCTION.21
kf22 key_f22 FC String KEY.FUNCTION.22
kf23 key_f23 FD String KEY.FUNCTION.23
kf24 key_f24 FE String KEY.FUNCTION.24
kf25 key_f25 FF String KEY.FUNCTION.25
kf26 key_f26 FG String KEY.FUNCTION.26
kf27 key_f27 FH String KEY.FUNCTION.27
kf28 key_f28 FI String KEY.FUNCTION.28
kf29 key_f29 FJ String KEY.FUNCTION.29
kf30 key_f30 FK String KEY.FUNCTION.30
kf31 key_f31 FL String KEY.FUNCTION.31
kf32 key_f32 FM String KEY.FUNCTION.32
terminfo Source terminfo Usage termcap Type UniVerse
Terminal Variables (Continued)
C-21 Administering UniVerse on UNIX Platforms
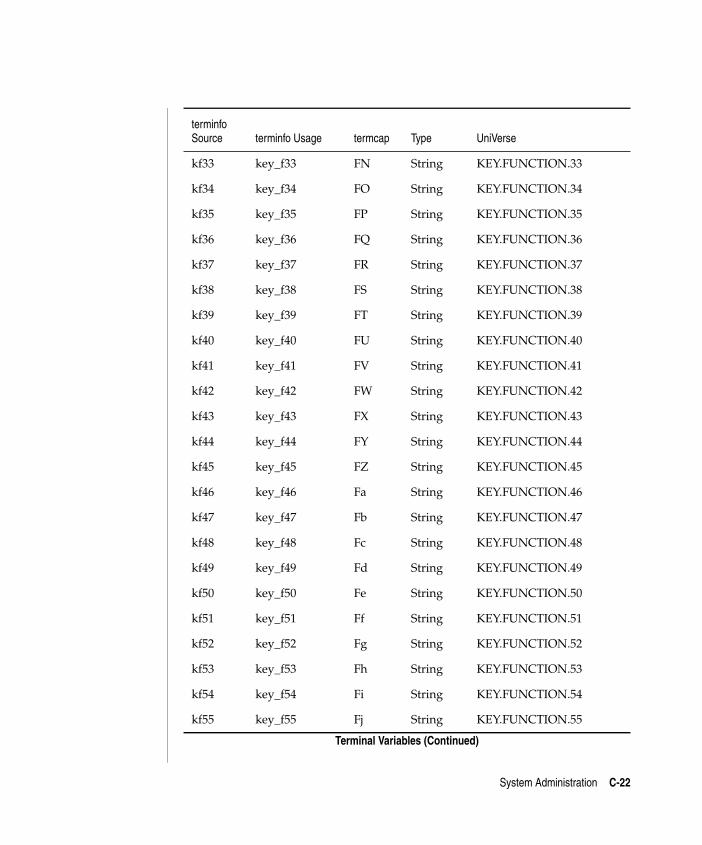
C:\Users\awaite\Documents\U2Doc\UniVerse\11.2\Source\Adminunix\AppC.fm3/17/14 System Administration
Beta Beta Beta Beta Beta Beta Beta Beta Beta Beta Beta Beta Beta Beta Beta Beta Beta Beta Beta Beta Beta Beta Beta Beta Beta
kf33 key_f33 FN String KEY.FUNCTION.33
kf34 key_f34 FO String KEY.FUNCTION.34
kf35 key_f35 FP String KEY.FUNCTION.35
kf36 key_f36 FQ String KEY.FUNCTION.36
kf37 key_f37 FR String KEY.FUNCTION.37
kf38 key_f38 FS String KEY.FUNCTION.38
kf39 key_f39 FT String KEY.FUNCTION.39
kf40 key_f40 FU String KEY.FUNCTION.40
kf41 key_f41 FV String KEY.FUNCTION.41
kf42 key_f42 FW String KEY.FUNCTION.42
kf43 key_f43 FX String KEY.FUNCTION.43
kf44 key_f44 FY String KEY.FUNCTION.44
kf45 key_f45 FZ String KEY.FUNCTION.45
kf46 key_f46 Fa String KEY.FUNCTION.46
kf47 key_f47 Fb String KEY.FUNCTION.47
kf48 key_f48 Fc String KEY.FUNCTION.48
kf49 key_f49 Fd String KEY.FUNCTION.49
kf50 key_f50 Fe String KEY.FUNCTION.50
kf51 key_f51 Ff String KEY.FUNCTION.51
kf52 key_f52 Fg String KEY.FUNCTION.52
kf53 key_f53 Fh String KEY.FUNCTION.53
kf54 key_f54 Fi String KEY.FUNCTION.54
kf55 key_f55 Fj String KEY.FUNCTION.55
terminfo Source terminfo Usage termcap Type UniVerse
Terminal Variables (Continued)
System Administration C-22
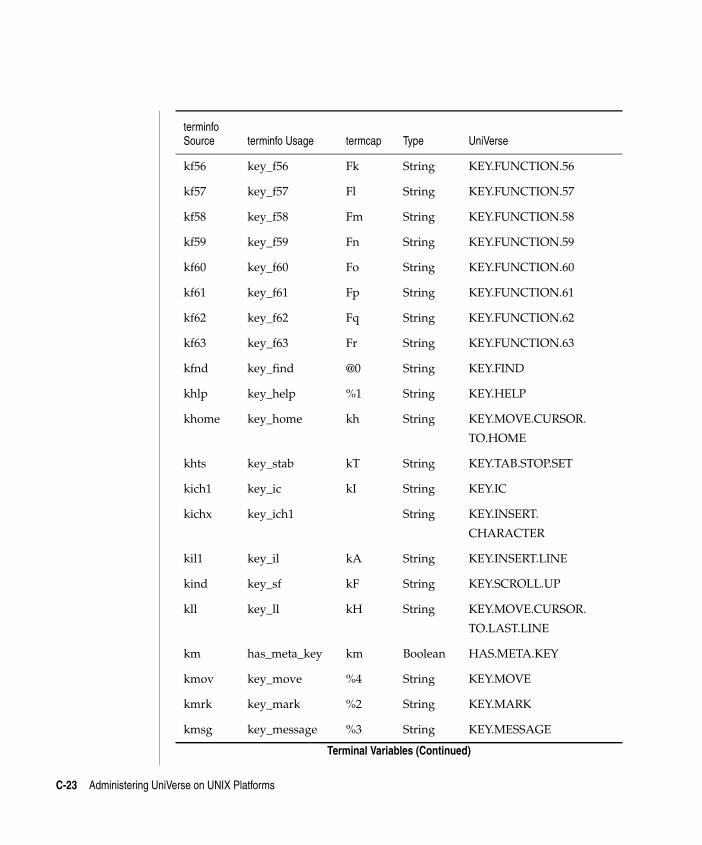
C:\Users\awaite\Documents\U2Doc\UniVerse\11.2\Source\Adminunix\AppC.fm3/17/14 System Administration
Beta Beta Beta Beta Beta Beta Beta Beta Beta Beta Beta Beta Beta Beta Beta Beta Beta Beta Beta Beta Beta Beta Beta Beta Beta
kf56 key_f56 Fk String KEY.FUNCTION.56
kf57 key_f57 Fl String KEY.FUNCTION.57
kf58 key_f58 Fm String KEY.FUNCTION.58
kf59 key_f59 Fn String KEY.FUNCTION.59
kf60 key_f60 Fo String KEY.FUNCTION.60
kf61 key_f61 Fp String KEY.FUNCTION.61
kf62 key_f62 Fq String KEY.FUNCTION.62
kf63 key_f63 Fr String KEY.FUNCTION.63
kfnd key_find @0 String KEY.FIND
khlp key_help %1 String KEY.HELP
khome key_home kh String KEY.MOVE.CURSOR.
TO.HOME
khts key_stab kT String KEY.TAB.STOP.SET
kich1 key_ic kI String KEY.IC
kichx key_ich1 String KEY.INSERT.
CHARACTER
kil1 key_il kA String KEY.INSERT.LINE
kind key_sf kF String KEY.SCROLL.UP
kll key_ll kH String KEY.MOVE.CURSOR.
TO.LAST.LINE
km has_meta_key km Boolean HAS.META.KEY
kmov key_move %4 String KEY.MOVE
kmrk key_mark %2 String KEY.MARK
kmsg key_message %3 String KEY.MESSAGE
terminfo Source terminfo Usage termcap Type UniVerse
Terminal Variables (Continued)
C-23 Administering UniVerse on UNIX Platforms
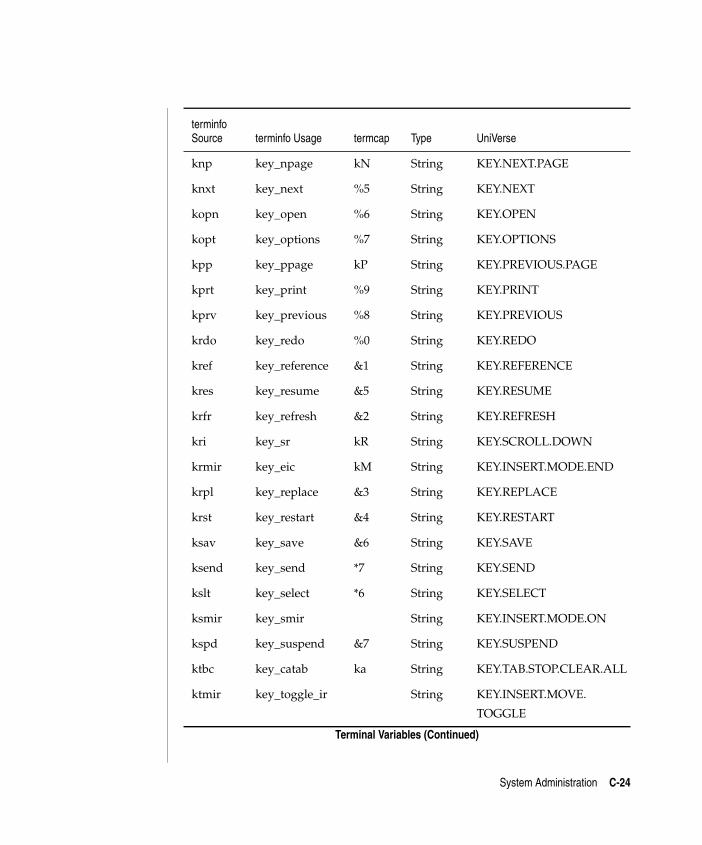
C:\Users\awaite\Documents\U2Doc\UniVerse\11.2\Source\Adminunix\AppC.fm3/17/14 System Administration
Beta Beta Beta Beta Beta Beta Beta Beta Beta Beta Beta Beta Beta Beta Beta Beta Beta Beta Beta Beta Beta Beta Beta Beta Beta
knp key_npage kN String KEY.NEXT.PAGE
knxt key_next %5 String KEY.NEXT
kopn key_open %6 String KEY.OPEN
kopt key_options %7 String KEY.OPTIONS
kpp key_ppage kP String KEY.PREVIOUS.PAGE
kprt key_print %9 String KEY.PRINT
kprv key_previous %8 String KEY.PREVIOUS
krdo key_redo %0 String KEY.REDO
kref key_reference &1 String KEY.REFERENCE
kres key_resume &5 String KEY.RESUME
krfr key_refresh &2 String KEY.REFRESH
kri key_sr kR String KEY.SCROLL.DOWN
krmir key_eic kM String KEY.INSERT.MODE.END
krpl key_replace &3 String KEY.REPLACE
krst key_restart &4 String KEY.RESTART
ksav key_save &6 String KEY.SAVE
ksend key_send *7 String KEY.SEND
kslt key_select *6 String KEY.SELECT
ksmir key_smir String KEY.INSERT.MODE.ON
kspd key_suspend &7 String KEY.SUSPEND
ktbc key_catab ka String KEY.TAB.STOP.CLEAR.ALL
ktmir key_toggle_ir String KEY.INSERT.MOVE.
TOGGLE
terminfo Source terminfo Usage termcap Type UniVerse
Terminal Variables (Continued)
System Administration C-24
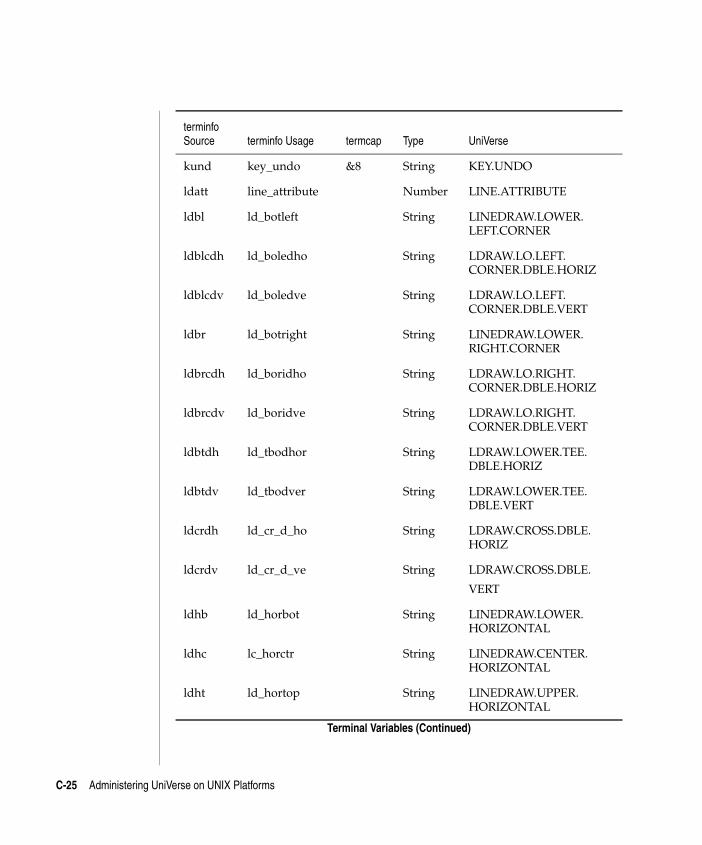
C:\Users\awaite\Documents\U2Doc\UniVerse\11.2\Source\Adminunix\AppC.fm3/17/14 System Administration
Beta Beta Beta Beta Beta Beta Beta Beta Beta Beta Beta Beta Beta Beta Beta Beta Beta Beta Beta Beta Beta Beta Beta Beta Beta
kund key_undo &8 String KEY.UNDO
ldatt line_attribute Number LINE.ATTRIBUTE
ldbl ld_botleft String LINEDRAW.LOWER. LEFT.CORNER
ldblcdh ld_boledho String LDRAW.LO.LEFT. CORNER.DBLE.HORIZ
ldblcdv ld_boledve String LDRAW.LO.LEFT. CORNER.DBLE.VERT
ldbr ld_botright String LINEDRAW.LOWER. RIGHT.CORNER
ldbrcdh ld_boridho String LDRAW.LO.RIGHT. CORNER.DBLE.HORIZ
ldbrcdv ld_boridve String LDRAW.LO.RIGHT. CORNER.DBLE.VERT
ldbtdh ld_tbodhor String LDRAW.LOWER.TEE. DBLE.HORIZ
ldbtdv ld_tbodver String LDRAW.LOWER.TEE. DBLE.VERT
ldcrdh ld_cr_d_ho String LDRAW.CROSS.DBLE. HORIZ
ldcrdv ld_cr_d_ve String LDRAW.CROSS.DBLE.
VERT
ldhb ld_horbot String LINEDRAW.LOWER. HORIZONTAL
ldhc lc_horctr String LINEDRAW.CENTER. HORIZONTAL
ldht ld_hortop String LINEDRAW.UPPER. HORIZONTAL
terminfo Source terminfo Usage termcap Type UniVerse
Terminal Variables (Continued)
C-25 Administering UniVerse on UNIX Platforms
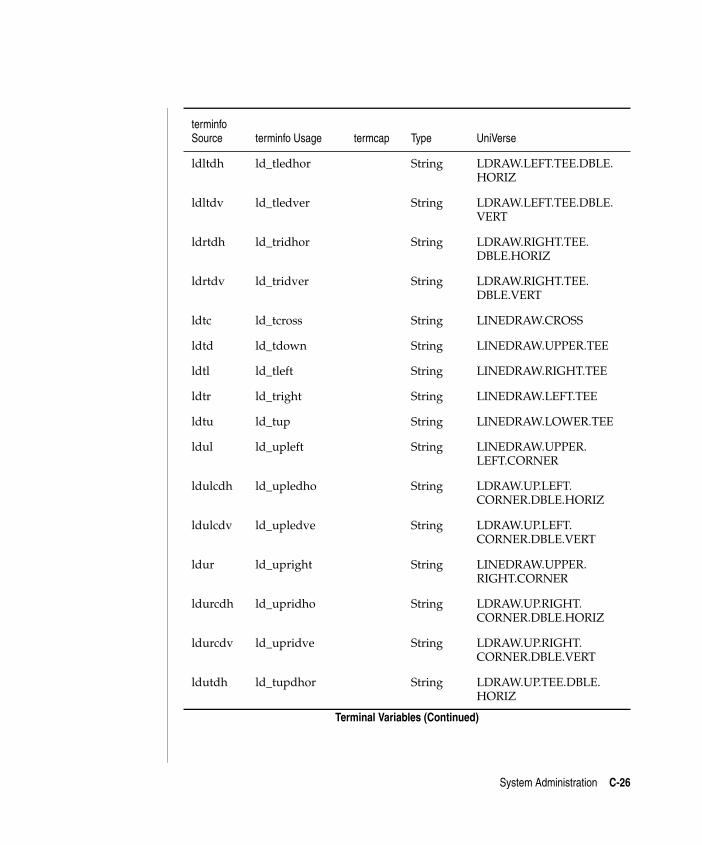
C:\Users\awaite\Documents\U2Doc\UniVerse\11.2\Source\Adminunix\AppC.fm3/17/14 System Administration
Beta Beta Beta Beta Beta Beta Beta Beta Beta Beta Beta Beta Beta Beta Beta Beta Beta Beta Beta Beta Beta Beta Beta Beta Beta
ldltdh ld_tledhor String LDRAW.LEFT.TEE.DBLE. HORIZ
ldltdv ld_tledver String LDRAW.LEFT.TEE.DBLE. VERT
ldrtdh ld_tridhor String LDRAW.RIGHT.TEE. DBLE.HORIZ
ldrtdv ld_tridver String LDRAW.RIGHT.TEE. DBLE.VERT
ldtc ld_tcross String LINEDRAW.CROSS
ldtd ld_tdown String LINEDRAW.UPPER.TEE
ldtl ld_tleft String LINEDRAW.RIGHT.TEE
ldtr ld_tright String LINEDRAW.LEFT.TEE
ldtu ld_tup String LINEDRAW.LOWER.TEE
ldul ld_upleft String LINEDRAW.UPPER. LEFT.CORNER
ldulcdh ld_upledho String LDRAW.UP.LEFT. CORNER.DBLE.HORIZ
ldulcdv ld_upledve String LDRAW.UP.LEFT. CORNER.DBLE.VERT
ldur ld_upright String LINEDRAW.UPPER. RIGHT.CORNER
ldurcdh ld_upridho String LDRAW.UP.RIGHT. CORNER.DBLE.HORIZ
ldurcdv ld_upridve String LDRAW.UP.RIGHT. CORNER.DBLE.VERT
ldutdh ld_tupdhor String LDRAW.UP.TEE.DBLE. HORIZ
terminfo Source terminfo Usage termcap Type UniVerse
Terminal Variables (Continued)
System Administration C-26
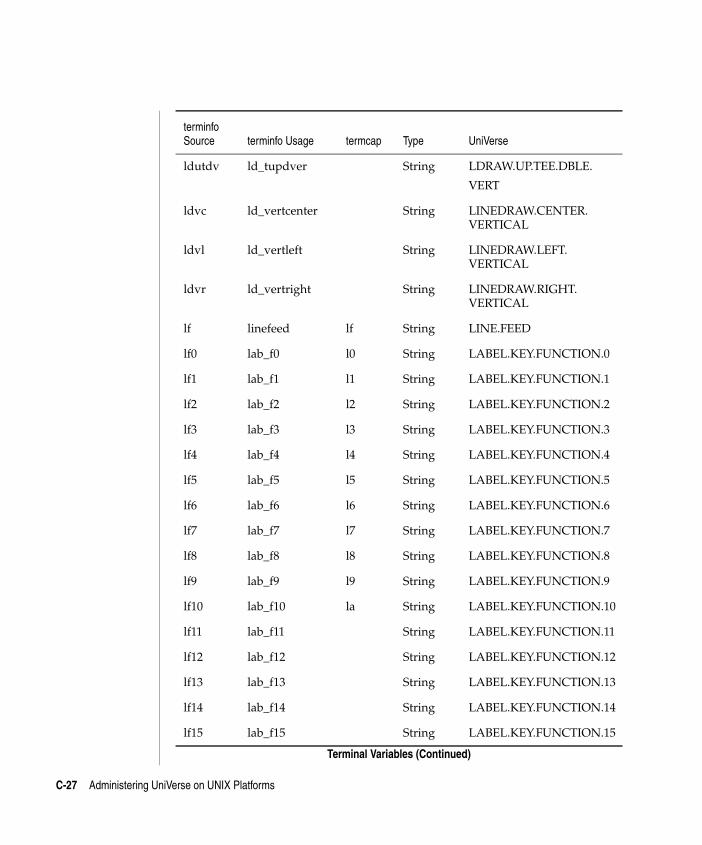
C:\Users\awaite\Documents\U2Doc\UniVerse\11.2\Source\Adminunix\AppC.fm3/17/14 System Administration
Beta Beta Beta Beta Beta Beta Beta Beta Beta Beta Beta Beta Beta Beta Beta Beta Beta Beta Beta Beta Beta Beta Beta Beta Beta
ldutdv ld_tupdver String LDRAW.UP.TEE.DBLE.
VERT
ldvc ld_vertcenter String LINEDRAW.CENTER. VERTICAL
ldvl ld_vertleft String LINEDRAW.LEFT. VERTICAL
ldvr ld_vertright String LINEDRAW.RIGHT. VERTICAL
lf linefeed lf String LINE.FEED
lf0 lab_f0 l0 String LABEL.KEY.FUNCTION.0
lf1 lab_f1 l1 String LABEL.KEY.FUNCTION.1
lf2 lab_f2 l2 String LABEL.KEY.FUNCTION.2
lf3 lab_f3 l3 String LABEL.KEY.FUNCTION.3
lf4 lab_f4 l4 String LABEL.KEY.FUNCTION.4
lf5 lab_f5 l5 String LABEL.KEY.FUNCTION.5
lf6 lab_f6 l6 String LABEL.KEY.FUNCTION.6
lf7 lab_f7 l7 String LABEL.KEY.FUNCTION.7
lf8 lab_f8 l8 String LABEL.KEY.FUNCTION.8
lf9 lab_f9 l9 String LABEL.KEY.FUNCTION.9
lf10 lab_f10 la String LABEL.KEY.FUNCTION.10
lf11 lab_f11 String LABEL.KEY.FUNCTION.11
lf12 lab_f12 String LABEL.KEY.FUNCTION.12
lf13 lab_f13 String LABEL.KEY.FUNCTION.13
lf14 lab_f14 String LABEL.KEY.FUNCTION.14
lf15 lab_f15 String LABEL.KEY.FUNCTION.15
terminfo Source terminfo Usage termcap Type UniVerse
Terminal Variables (Continued)
C-27 Administering UniVerse on UNIX Platforms
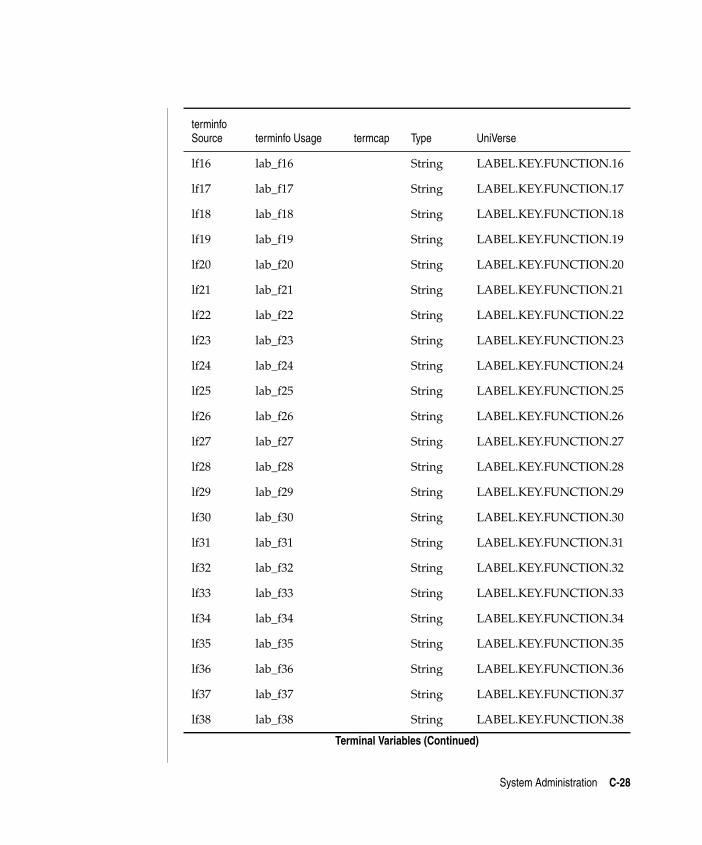
C:\Users\awaite\Documents\U2Doc\UniVerse\11.2\Source\Adminunix\AppC.fm3/17/14 System Administration
Beta Beta Beta Beta Beta Beta Beta Beta Beta Beta Beta Beta Beta Beta Beta Beta Beta Beta Beta Beta Beta Beta Beta Beta Beta
lf16 lab_f16 String LABEL.KEY.FUNCTION.16
lf17 lab_f17 String LABEL.KEY.FUNCTION.17
lf18 lab_f18 String LABEL.KEY.FUNCTION.18
lf19 lab_f19 String LABEL.KEY.FUNCTION.19
lf20 lab_f20 String LABEL.KEY.FUNCTION.20
lf21 lab_f21 String LABEL.KEY.FUNCTION.21
lf22 lab_f22 String LABEL.KEY.FUNCTION.22
lf23 lab_f23 String LABEL.KEY.FUNCTION.23
lf24 lab_f24 String LABEL.KEY.FUNCTION.24
lf25 lab_f25 String LABEL.KEY.FUNCTION.25
lf26 lab_f26 String LABEL.KEY.FUNCTION.26
lf27 lab_f27 String LABEL.KEY.FUNCTION.27
lf28 lab_f28 String LABEL.KEY.FUNCTION.28
lf29 lab_f29 String LABEL.KEY.FUNCTION.29
lf30 lab_f30 String LABEL.KEY.FUNCTION.30
lf31 lab_f31 String LABEL.KEY.FUNCTION.31
lf32 lab_f32 String LABEL.KEY.FUNCTION.32
lf33 lab_f33 String LABEL.KEY.FUNCTION.33
lf34 lab_f34 String LABEL.KEY.FUNCTION.34
lf35 lab_f35 String LABEL.KEY.FUNCTION.35
lf36 lab_f36 String LABEL.KEY.FUNCTION.36
lf37 lab_f37 String LABEL.KEY.FUNCTION.37
lf38 lab_f38 String LABEL.KEY.FUNCTION.38
terminfo Source terminfo Usage termcap Type UniVerse
Terminal Variables (Continued)
System Administration C-28
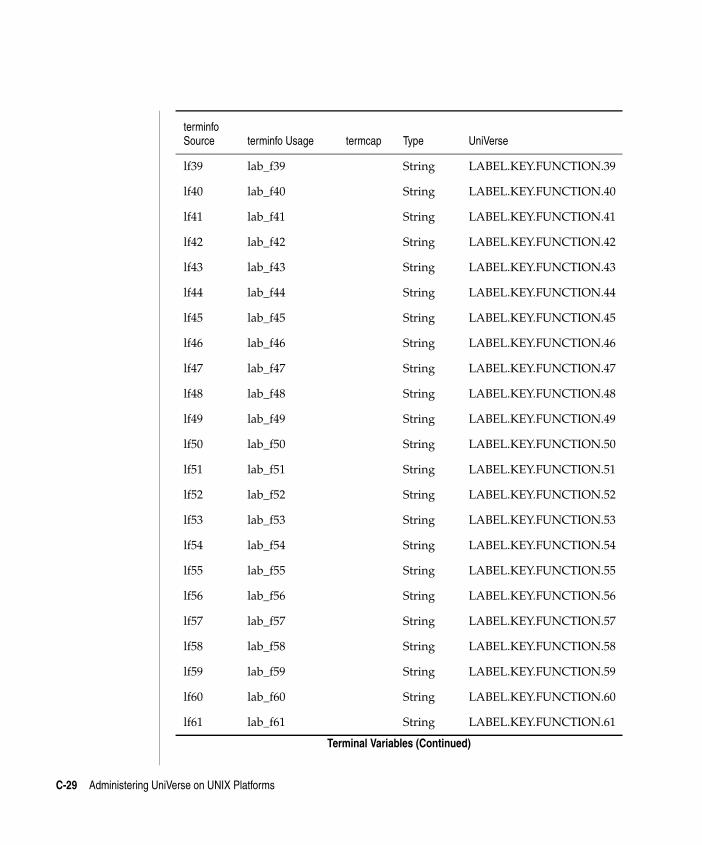
C:\Users\awaite\Documents\U2Doc\UniVerse\11.2\Source\Adminunix\AppC.fm3/17/14 System Administration
Beta Beta Beta Beta Beta Beta Beta Beta Beta Beta Beta Beta Beta Beta Beta Beta Beta Beta Beta Beta Beta Beta Beta Beta Beta
lf39 lab_f39 String LABEL.KEY.FUNCTION.39
lf40 lab_f40 String LABEL.KEY.FUNCTION.40
lf41 lab_f41 String LABEL.KEY.FUNCTION.41
lf42 lab_f42 String LABEL.KEY.FUNCTION.42
lf43 lab_f43 String LABEL.KEY.FUNCTION.43
lf44 lab_f44 String LABEL.KEY.FUNCTION.44
lf45 lab_f45 String LABEL.KEY.FUNCTION.45
lf46 lab_f46 String LABEL.KEY.FUNCTION.46
lf47 lab_f47 String LABEL.KEY.FUNCTION.47
lf48 lab_f48 String LABEL.KEY.FUNCTION.48
lf49 lab_f49 String LABEL.KEY.FUNCTION.49
lf50 lab_f50 String LABEL.KEY.FUNCTION.50
lf51 lab_f51 String LABEL.KEY.FUNCTION.51
lf52 lab_f52 String LABEL.KEY.FUNCTION.52
lf53 lab_f53 String LABEL.KEY.FUNCTION.53
lf54 lab_f54 String LABEL.KEY.FUNCTION.54
lf55 lab_f55 String LABEL.KEY.FUNCTION.55
lf56 lab_f56 String LABEL.KEY.FUNCTION.56
lf57 lab_f57 String LABEL.KEY.FUNCTION.57
lf58 lab_f58 String LABEL.KEY.FUNCTION.58
lf59 lab_f59 String LABEL.KEY.FUNCTION.59
lf60 lab_f60 String LABEL.KEY.FUNCTION.60
lf61 lab_f61 String LABEL.KEY.FUNCTION.61
terminfo Source terminfo Usage termcap Type UniVerse
Terminal Variables (Continued)
C-29 Administering UniVerse on UNIX Platforms
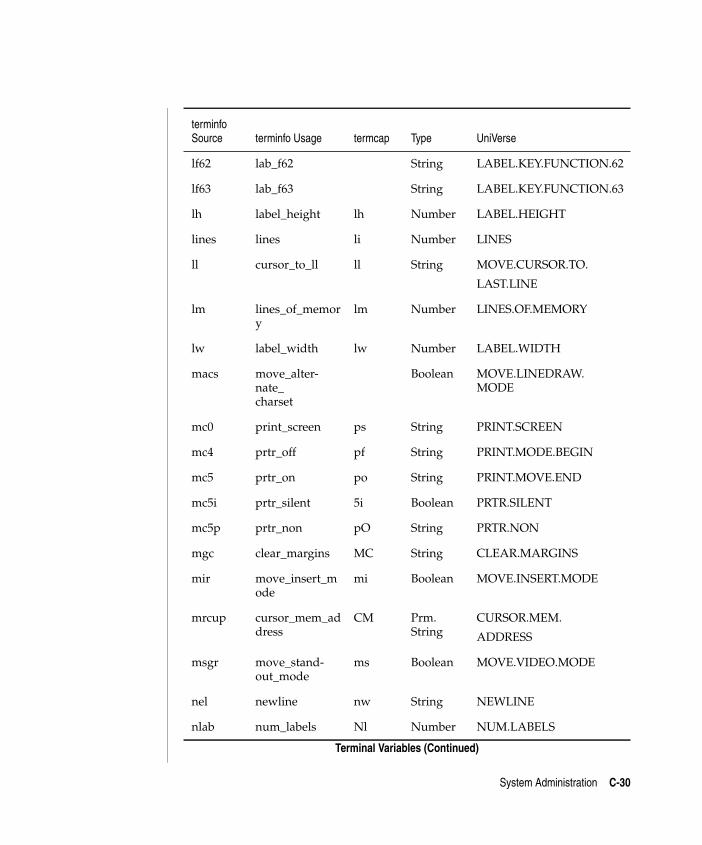
C:\Users\awaite\Documents\U2Doc\UniVerse\11.2\Source\Adminunix\AppC.fm3/17/14 System Administration
Beta Beta Beta Beta Beta Beta Beta Beta Beta Beta Beta Beta Beta Beta Beta Beta Beta Beta Beta Beta Beta Beta Beta Beta Beta
lf62 lab_f62 String LABEL.KEY.FUNCTION.62
lf63 lab_f63 String LABEL.KEY.FUNCTION.63
lh label_height lh Number LABEL.HEIGHT
lines lines li Number LINES
ll cursor_to_ll ll String MOVE.CURSOR.TO.
LAST.LINE
lm lines_of_memory
lm Number LINES.OF.MEMORY
lw label_width lw Number LABEL.WIDTH
macs move_alter-nate_ charset
Boolean MOVE.LINEDRAW. MODE
mc0 print_screen ps String PRINT.SCREEN
mc4 prtr_off pf String PRINT.MODE.BEGIN
mc5 prtr_on po String PRINT.MOVE.END
mc5i prtr_silent 5i Boolean PRTR.SILENT
mc5p prtr_non pO String PRTR.NON
mgc clear_margins MC String CLEAR.MARGINS
mir move_insert_mode
mi Boolean MOVE.INSERT.MODE
mrcup cursor_mem_address
CM Prm. String
CURSOR.MEM.
ADDRESS
msgr move_stand-out_mode
ms Boolean MOVE.VIDEO.MODE
nel newline nw String NEWLINE
nlab num_labels Nl Number NUM.LABELS
terminfo Source terminfo Usage termcap Type UniVerse
Terminal Variables (Continued)
System Administration C-30
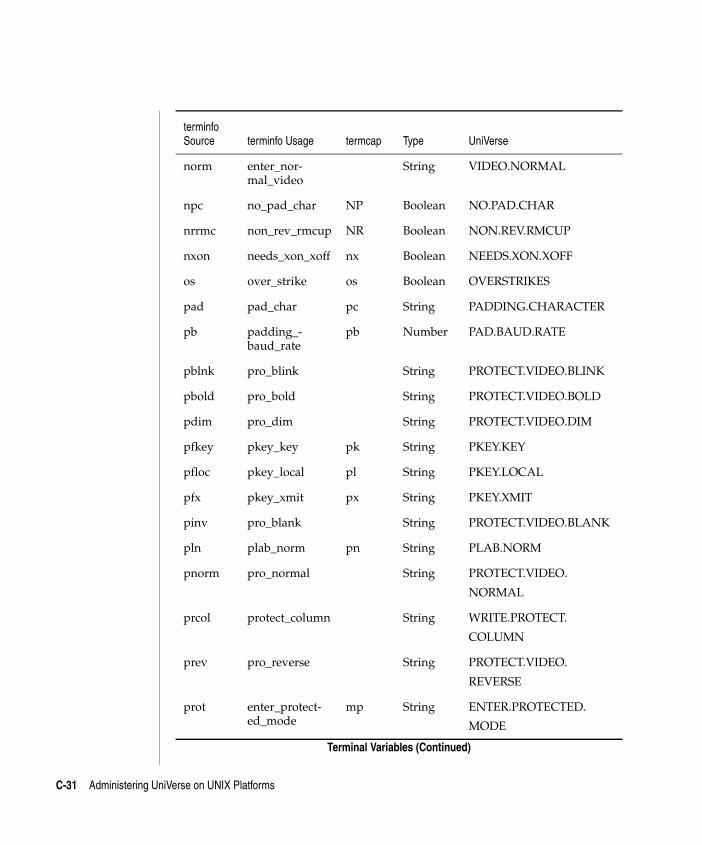
C:\Users\awaite\Documents\U2Doc\UniVerse\11.2\Source\Adminunix\AppC.fm3/17/14 System Administration
Beta Beta Beta Beta Beta Beta Beta Beta Beta Beta Beta Beta Beta Beta Beta Beta Beta Beta Beta Beta Beta Beta Beta Beta Beta
norm enter_nor-mal_video
String VIDEO.NORMAL
npc no_pad_char NP Boolean NO.PAD.CHAR
nrrmc non_rev_rmcup NR Boolean NON.REV.RMCUP
nxon needs_xon_xoff nx Boolean NEEDS.XON.XOFF
os over_strike os Boolean OVERSTRIKES
pad pad_char pc String PADDING.CHARACTER
pb padding_-baud_rate
pb Number PAD.BAUD.RATE
pblnk pro_blink String PROTECT.VIDEO.BLINK
pbold pro_bold String PROTECT.VIDEO.BOLD
pdim pro_dim String PROTECT.VIDEO.DIM
pfkey pkey_key pk String PKEY.KEY
pfloc pkey_local pl String PKEY.LOCAL
pfx pkey_xmit px String PKEY.XMIT
pinv pro_blank String PROTECT.VIDEO.BLANK
pln plab_norm pn String PLAB.NORM
pnorm pro_normal String PROTECT.VIDEO.
NORMAL
prcol protect_column String WRITE.PROTECT.
COLUMN
prev pro_reverse String PROTECT.VIDEO.
REVERSE
prot enter_protect-ed_mode
mp String ENTER.PROTECTED.
MODE
terminfo Source terminfo Usage termcap Type UniVerse
Terminal Variables (Continued)
C-31 Administering UniVerse on UNIX Platforms
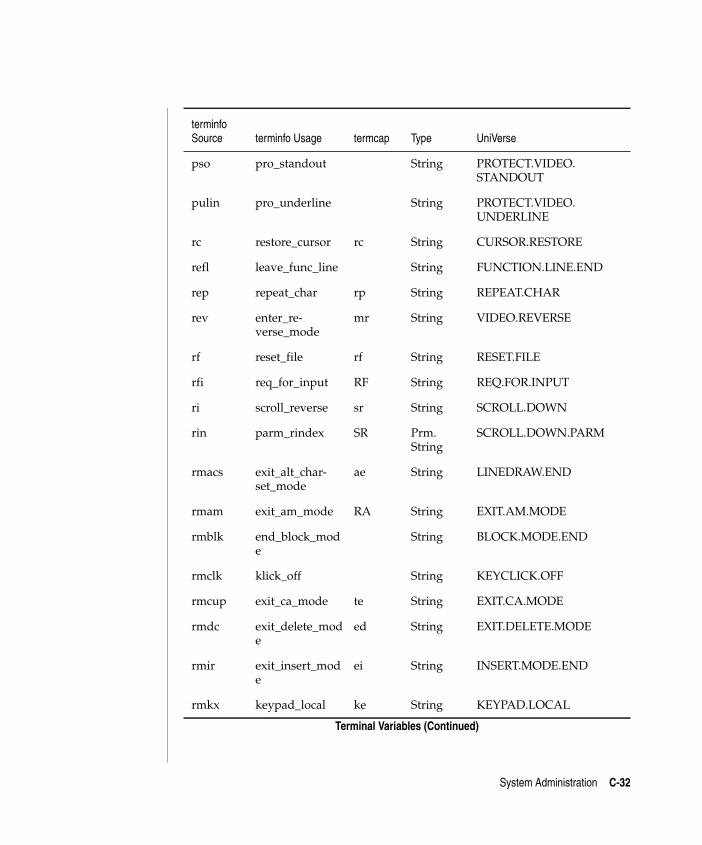
C:\Users\awaite\Documents\U2Doc\UniVerse\11.2\Source\Adminunix\AppC.fm3/17/14 System Administration
Beta Beta Beta Beta Beta Beta Beta Beta Beta Beta Beta Beta Beta Beta Beta Beta Beta Beta Beta Beta Beta Beta Beta Beta Beta
pso pro_standout String PROTECT.VIDEO. STANDOUT
pulin pro_underline String PROTECT.VIDEO. UNDERLINE
rc restore_cursor rc String CURSOR.RESTORE
refl leave_func_line String FUNCTION.LINE.END
rep repeat_char rp String REPEAT.CHAR
rev enter_re-verse_mode
mr String VIDEO.REVERSE
rf reset_file rf String RESET.FILE
rfi req_for_input RF String REQ.FOR.INPUT
ri scroll_reverse sr String SCROLL.DOWN
rin parm_rindex SR Prm. String
SCROLL.DOWN.PARM
rmacs exit_alt_char-set_mode
ae String LINEDRAW.END
rmam exit_am_mode RA String EXIT.AM.MODE
rmblk end_block_mode
String BLOCK.MODE.END
rmclk klick_off String KEYCLICK.OFF
rmcup exit_ca_mode te String EXIT.CA.MODE
rmdc exit_delete_mode
ed String EXIT.DELETE.MODE
rmir exit_insert_mode
ei String INSERT.MODE.END
rmkx keypad_local ke String KEYPAD.LOCAL
terminfo Source terminfo Usage termcap Type UniVerse
Terminal Variables (Continued)
System Administration C-32
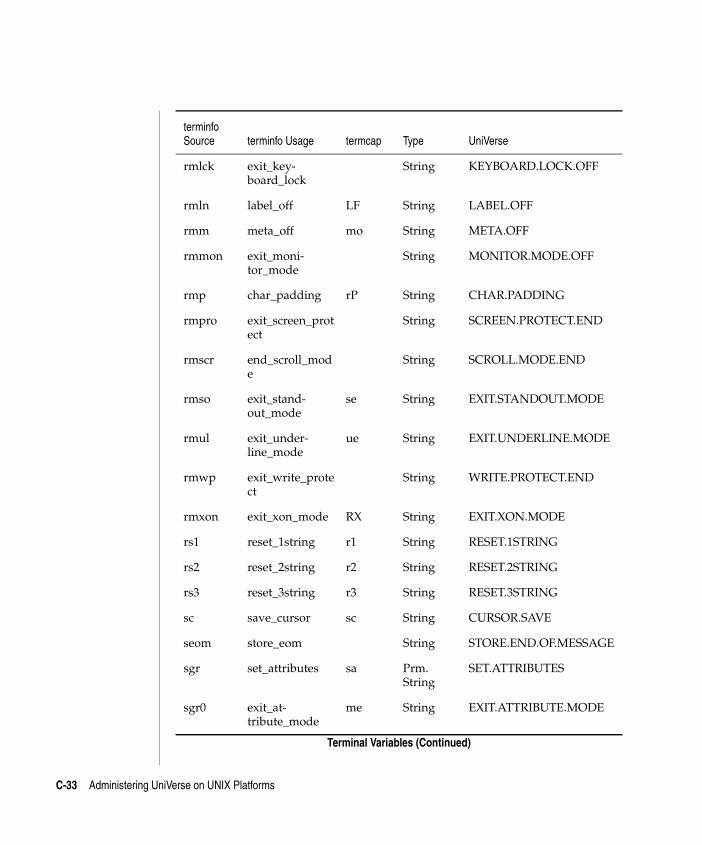
C:\Users\awaite\Documents\U2Doc\UniVerse\11.2\Source\Adminunix\AppC.fm3/17/14 System Administration
Beta Beta Beta Beta Beta Beta Beta Beta Beta Beta Beta Beta Beta Beta Beta Beta Beta Beta Beta Beta Beta Beta Beta Beta Beta
rmlck exit_key-board_lock
String KEYBOARD.LOCK.OFF
rmln label_off LF String LABEL.OFF
rmm meta_off mo String META.OFF
rmmon exit_moni-tor_mode
String MONITOR.MODE.OFF
rmp char_padding rP String CHAR.PADDING
rmpro exit_screen_protect
String SCREEN.PROTECT.END
rmscr end_scroll_mode
String SCROLL.MODE.END
rmso exit_stand-out_mode
se String EXIT.STANDOUT.MODE
rmul exit_under-line_mode
ue String EXIT.UNDERLINE.MODE
rmwp exit_write_protect
String WRITE.PROTECT.END
rmxon exit_xon_mode RX String EXIT.XON.MODE
rs1 reset_1string r1 String RESET.1STRING
rs2 reset_2string r2 String RESET.2STRING
rs3 reset_3string r3 String RESET.3STRING
sc save_cursor sc String CURSOR.SAVE
seom store_eom String STORE.END.OF.MESSAGE
sgr set_attributes sa Prm. String
SET.ATTRIBUTES
sgr0 exit_at-tribute_mode
me String EXIT.ATTRIBUTE.MODE
terminfo Source terminfo Usage termcap Type UniVerse
Terminal Variables (Continued)
C-33 Administering UniVerse on UNIX Platforms
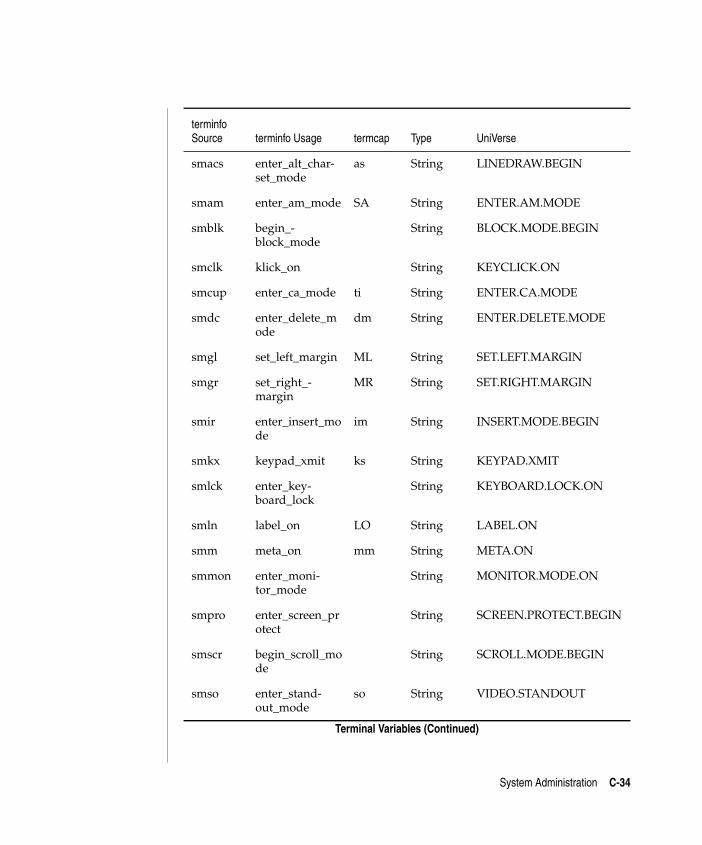
C:\Users\awaite\Documents\U2Doc\UniVerse\11.2\Source\Adminunix\AppC.fm3/17/14 System Administration
Beta Beta Beta Beta Beta Beta Beta Beta Beta Beta Beta Beta Beta Beta Beta Beta Beta Beta Beta Beta Beta Beta Beta Beta Beta
smacs enter_alt_char-set_mode
as String LINEDRAW.BEGIN
smam enter_am_mode SA String ENTER.AM.MODE
smblk begin_-block_mode
String BLOCK.MODE.BEGIN
smclk klick_on String KEYCLICK.ON
smcup enter_ca_mode ti String ENTER.CA.MODE
smdc enter_delete_mode
dm String ENTER.DELETE.MODE
smgl set_left_margin ML String SET.LEFT.MARGIN
smgr set_right_-margin
MR String SET.RIGHT.MARGIN
smir enter_insert_mode
im String INSERT.MODE.BEGIN
smkx keypad_xmit ks String KEYPAD.XMIT
smlck enter_key-board_lock
String KEYBOARD.LOCK.ON
smln label_on LO String LABEL.ON
smm meta_on mm String META.ON
smmon enter_moni-tor_mode
String MONITOR.MODE.ON
smpro enter_screen_protect
String SCREEN.PROTECT.BEGIN
smscr begin_scroll_mode
String SCROLL.MODE.BEGIN
smso enter_stand-out_mode
so String VIDEO.STANDOUT
terminfo Source terminfo Usage termcap Type UniVerse
Terminal Variables (Continued)
System Administration C-34
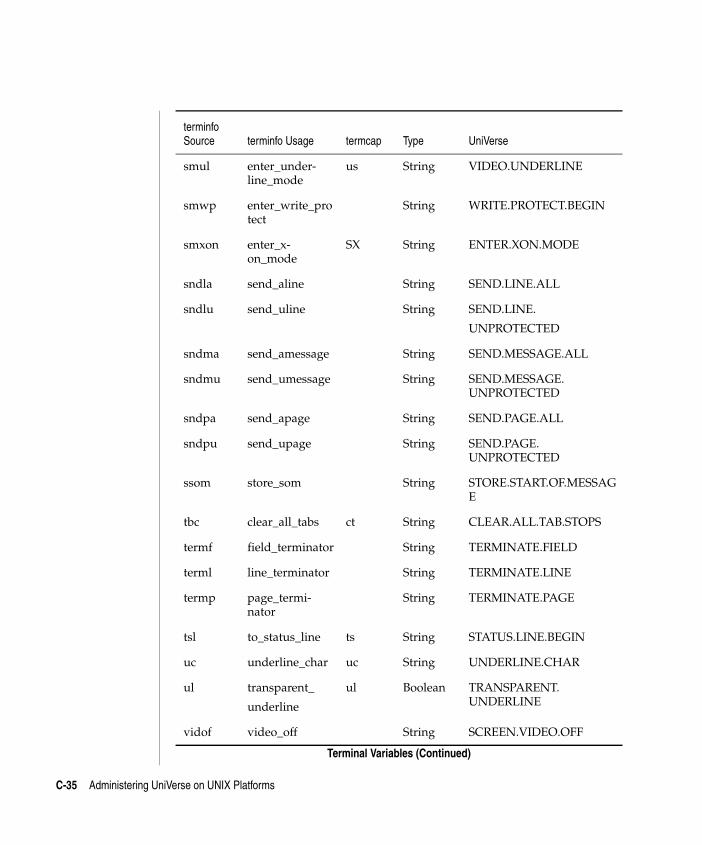
C:\Users\awaite\Documents\U2Doc\UniVerse\11.2\Source\Adminunix\AppC.fm3/17/14 System Administration
Beta Beta Beta Beta Beta Beta Beta Beta Beta Beta Beta Beta Beta Beta Beta Beta Beta Beta Beta Beta Beta Beta Beta Beta Beta
smul enter_under-line_mode
us String VIDEO.UNDERLINE
smwp enter_write_protect
String WRITE.PROTECT.BEGIN
smxon enter_x-on_mode
SX String ENTER.XON.MODE
sndla send_aline String SEND.LINE.ALL
sndlu send_uline String SEND.LINE.
UNPROTECTED
sndma send_amessage String SEND.MESSAGE.ALL
sndmu send_umessage String SEND.MESSAGE. UNPROTECTED
sndpa send_apage String SEND.PAGE.ALL
sndpu send_upage String SEND.PAGE. UNPROTECTED
ssom store_som String STORE.START.OF.MESSAGE
tbc clear_all_tabs ct String CLEAR.ALL.TAB.STOPS
termf field_terminator String TERMINATE.FIELD
terml line_terminator String TERMINATE.LINE
termp page_termi-nator
String TERMINATE.PAGE
tsl to_status_line ts String STATUS.LINE.BEGIN
uc underline_char uc String UNDERLINE.CHAR
ul transparent_
underline
ul Boolean TRANSPARENT. UNDERLINE
vidof video_off String SCREEN.VIDEO.OFF
terminfo Source terminfo Usage termcap Type UniVerse
Terminal Variables (Continued)
C-35 Administering UniVerse on UNIX Platforms
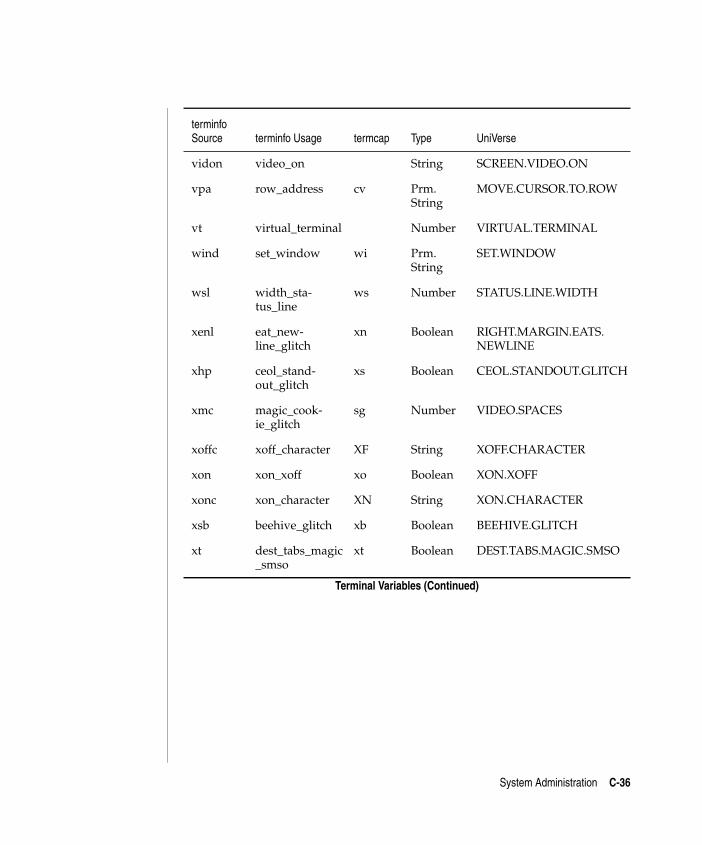
C:\Users\awaite\Documents\U2Doc\UniVerse\11.2\Source\Adminunix\AppC.fm3/17/14 System Administration
Beta Beta Beta Beta Beta Beta Beta Beta Beta Beta Beta Beta Beta Beta Beta Beta Beta Beta Beta Beta Beta Beta Beta Beta Beta
vidon video_on String SCREEN.VIDEO.ON
vpa row_address cv Prm. String
MOVE.CURSOR.TO.ROW
vt virtual_terminal Number VIRTUAL.TERMINAL
wind set_window wi Prm. String
SET.WINDOW
wsl width_sta-tus_line
ws Number STATUS.LINE.WIDTH
xenl eat_new-line_glitch
xn Boolean RIGHT.MARGIN.EATS. NEWLINE
xhp ceol_stand-out_glitch
xs Boolean CEOL.STANDOUT.GLITCH
xmc magic_cook-ie_glitch
sg Number VIDEO.SPACES
xoffc xoff_character XF String XOFF.CHARACTER
xon xon_xoff xo Boolean XON.XOFF
xonc xon_character XN String XON.CHARACTER
xsb beehive_glitch xb Boolean BEEHIVE.GLITCH
xt dest_tabs_magic_smso
xt Boolean DEST.TABS.MAGIC.SMSO
terminfo Source terminfo Usage termcap Type UniVerse
Terminal Variables (Continued)
System Administration C-36

C:\Us3/17/
D Appendix
Beta Beta Beta Beta Beta Beta Beta Beta Beta Beta Beta Beta Beta Beta Beta Beta Beta Beta Beta BetaBeta Beta
Appendix D: The Wide Zero parameter in UniVerse
UniVerse performs all arithmetic using double-precision floating-point numbers. Floating point is a system for representing numbers in a computer. This appendix describes floating-point numbers and explains why UniVerse has a user-configurable wide zero. Most of this discussion assumes the Institute of Electrical and Electronics Engineers (IEEE) standard floating-point format, but the principle, if not the actual arrangement of bits, applies to all machines.ers\awaite\Documents\U2Doc\UniVerse\11.2\Source\Adminunix\AppD.fm14
C:\Users\awaite\Documents\U2Doc\UniVerse\11.2\Source\Adminunix\AppD.fm3/17/14
Beta Beta Beta Beta Beta Beta Beta Beta Beta Beta Beta Beta Beta Beta Beta Beta Beta Beta Beta Beta Beta Beta Beta Beta Beta
Number systemsMost people use the decimal system for representing numbers. This system uses the numerals 0 through 9 to represent the numbers 0 through 9, and uses a place value system to represent numbers larger or smaller. For example, the numeral 12 (in base 10) means 1 times 10 to the first power plus 2 times 10 to the 0 power (any number to the 0 power equals 1) for a total of 12. The decimal point allows negative powers of 10 to represent quantities less than 1. The numeral 1.2 means 1 times 10 to the 0 power plus 2 times 10 to the minus one power (or one-tenth). Only numbers that can be expressed in terms of sums of integers times powers of 10 can be exactly represented in a finite number of digits. The quantity one-third cannot be represented exactly in base 10 any more than you can divide a dollar three ways without a penny left over.
Computers use the binary system for representing numbers. This system uses only two numerals, 0 and 1. In the machine, these are represented by differing levels of electrical voltage. The numeral 1012 means 1 times 2 to the second power (410) plus 0 times 2 to the first power plus 1 times 2 to the 0 power, for a total of 5. Like base 10, base 2 can be used for quantities less than 1 if you introduce the concept of the binary point. Thus 1^12 means 1 times 2 to the 0 power plus 1 times 2 to the minus one power (or 1⁄2), for a total of 1 1⁄2. Only numbers that can be built out of sums of powers of 2 can be represented exactly in binary notation.
People using base 10 have sometimes found the place value system inconvenient for representing very large or very small numbers. Scientific notation is a scheme that uses a two-part numeral. The first part, called the mantissa, is used to represent the significant digits, which are the nonzero digits of the number. The second part of the numeral is the exponent, which represents the magnitude of the number. For example, in scientific notation you can write 2.3E10 to represent 23,000,000,000.00.
D-2 Administering UniVerse on UNIX Platforms
C:\Users\awaite\Documents\U2Doc\UniVerse\11.2\Source\Adminunix\AppD.fm3/17/14
Beta Beta Beta Beta Beta Beta Beta Beta Beta Beta Beta Beta Beta Beta Beta Beta Beta Beta Beta Beta Beta Beta Beta Beta Beta
Floating-point numbersSimilarly, computers use a floating-point system, which keeps the absolute size of a number separate from the significant bits. (A bit is a Binary digIT.) In a floating- point numeral, 1 bit, called the sign bit, is usually reserved to indicate whether or not the number is greater than or less than 0. Some number of bits are reserved for the exponent part of the numeral. This is the power of 2 to which the remaining bits (the mantissa) need to be raised to yield the actual value.
The IEEE has defined a format for double-precision floating-point numbers that is 64 bits long. The left-most bit is reserved as the sign bit. This bit is set (or true or 1) if the number being represented is negative; it is cleared (or 0) if the number is positive. The next 11 bits are used for the exponent of the number. This exponent is biased; that is, to determine its actual value you must subtract a constant number from this number to obtain the actual value. This technique is used because the range of numbers representable by these bits is not the most desirable range. By adding a bias you can move the range of numbers representable to the range you would like to represent. In the case of IEEE floating-point, the constant is 102310. The rest of the bits are used to store the mantissa of the number. Knowing that, you can examine the double-precision floating-point representation of a decimal number.
Consider the decimal number 49.75. 49 comprises a 32, a 16, and a 1. In binary that would be 1100012. The fractional part comprises one-half and one-fourth, so the whole number in binary would be 110001^112. Since the mantissa is always stored as a fraction, you must move the binary point six places to the left to make the significant bits of the number fractional. Storing the mantissa as a fraction allows an arbitrary number of trailing zero trailing bits. The floating-point system provides for an extra bit of precision by always shifting one place less than needed so that the high-order bit is always 1 and therefore need not be stored. Shifting the binary point to the left five places instead of six adds five to the exponent (already 102310 from the bias) so the exponent value becomes 102810 or 100000001002. The final floating-point number becomes
0 (the sign bit)10000000100 (the exponent, 102810)1000111000000000000000000000000000000000000000000000
(the mantissa with first bit implied)
D-3
C:\Users\awaite\Documents\U2Doc\UniVerse\11.2\Source\Adminunix\AppD.fm3/17/14
Beta Beta Beta Beta Beta Beta Beta Beta Beta Beta Beta Beta Beta Beta Beta Beta Beta Beta Beta Beta Beta Beta Beta Beta Beta
or
0100000001001000111000000000000000000000000000000000000000000000
Obviously, working in binary can become tedious. Hexadecimal notation is a system that uses the numerals 0 through 9 and the letters A through F to represent numbers from 0 through 15. In this way a single character can represent four bits. By separating the bits in the number above into groups of four and using hexadecimal notation, you can write that number as 4048E000000016.
In any base there will be some numbers that cannot be represented exactly. The 64-bit floating-point numbers UniVerse uses provide an enormous amount of precision, so that calculations involving numbers which must be approximated still give answers correct to many decimal places. There is, however, one problem that needs to be addressed: number comparison.
D-4 Administering UniVerse on UNIX Platforms
C:\Users\awaite\Documents\U2Doc\UniVerse\11.2\Source\Adminunix\AppD.fm3/17/14
Beta Beta Beta Beta Beta Beta Beta Beta Beta Beta Beta Beta Beta Beta Beta Beta Beta Beta Beta Beta Beta Beta Beta Beta Beta
The UniVerse Wide Zero featureComputers compare numbers by subtracting one from the other and looking at the difference. If there are any bits set in the difference, the numbers are not equal. Even though the internal representation of a number may be an approximation so close to exact that the error is never noticed by the user, the question of equality is always binary. That is, the numbers are equal or they are not. The computer does not have a concept of “close enough.”
But UniVerse does have a “close enough.” This is the wide zero feature. It insulates users from the tiny errors introduced by representing numbers in a finite number of bits. When UniVerse compares two numbers for equality, it looks at the difference between the numbers and decides if the difference is large enough to consider the numbers not equal. The value that is used to determine whether or not a difference is large enough is called the wide zero. The default wide zero UniVerse uses allows very small differences between numbers to be considered nonzero, but it is not adjusted so finely that what are essentially “noise” bits will affect results.
In the unlikely event that you need to adjust this value, the wide zero is configurable. That is, users can change the value that UniVerse uses to decide when the difference between two numbers is so small that it should be considered 0.
When comparing two numbers, UniVerse examines the exponent of the difference between them. If the exponent of the difference indicates that the difference is a very small number, then UniVerse concludes that the numbers are equal. As shipped, UniVerse assumes that any difference smaller than 2.91E–1110 is equal to 0. This provides precision somewhat greater than the 10 decimal digits advertised by UniVerse BASIC programs. The default wide zero mask for IEEE-compliant machines is 3dc0000016.
The following table lists the exponents of 1 times various powers of 10. Use this table as a guide to configure your wide zero value. Since the numbers are represented in binary, the exact point where the numbers become equal to 0 is at power of two boundaries. For example, with a mask of 0x3fb00000 all numbers from .062 to –.062 test equal to 0.
D-5
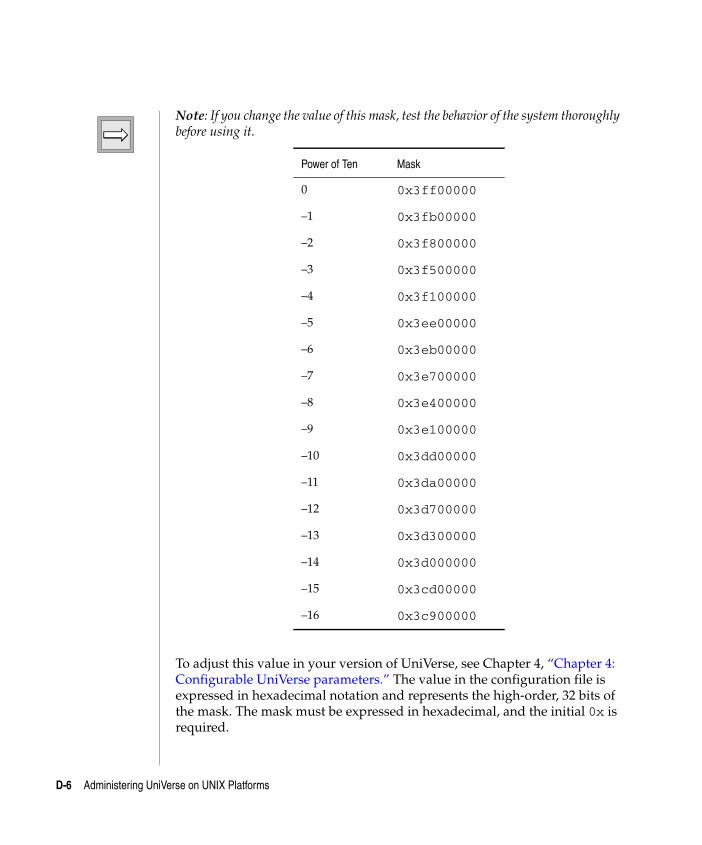
C:\Users\awaite\Documents\U2Doc\UniVerse\11.2\Source\Adminunix\AppD.fm3/17/14
Beta Beta Beta Beta Beta Beta Beta Beta Beta Beta Beta Beta Beta Beta Beta Beta Beta Beta Beta Beta Beta Beta Beta Beta Beta
Note: If you change the value of this mask, test the behavior of the system thoroughly before using it.
To adjust this value in your version of UniVerse, see Chapter 4, “Chapter 4: Configurable UniVerse parameters.” The value in the configuration file is expressed in hexadecimal notation and represents the high-order, 32 bits of the mask. The mask must be expressed in hexadecimal, and the initial 0x is required.
Power of Ten Mask
0 0x3ff00000
–1 0x3fb00000
–2 0x3f800000
–3 0x3f500000
–4 0x3f100000
–5 0x3ee00000
–6 0x3eb00000
–7 0x3e700000
–8 0x3e400000
–9 0x3e100000
–10 0x3dd00000
–11 0x3da00000
–12 0x3d700000
–13 0x3d300000
–14 0x3d000000
–15 0x3cd00000
–16 0x3c900000
D-6 Administering UniVerse on UNIX Platforms
C:\Users\awaite\Documents\U2Doc\UniVerse\11.2\Source\Adminunix\AppD.fm3/17/14
Beta Beta Beta Beta Beta Beta Beta Beta Beta Beta Beta Beta Beta Beta Beta Beta Beta Beta Beta Beta Beta Beta Beta Beta Beta
Warning: If your default mask differs from that shown previously, your machine is not IEEE-compliant. Extra care must be taken in these cases. In any event, changing this value can have a serious impact on your system. We do not advise you to change the default values without consulting Rocket Software Customer Support.
D-7
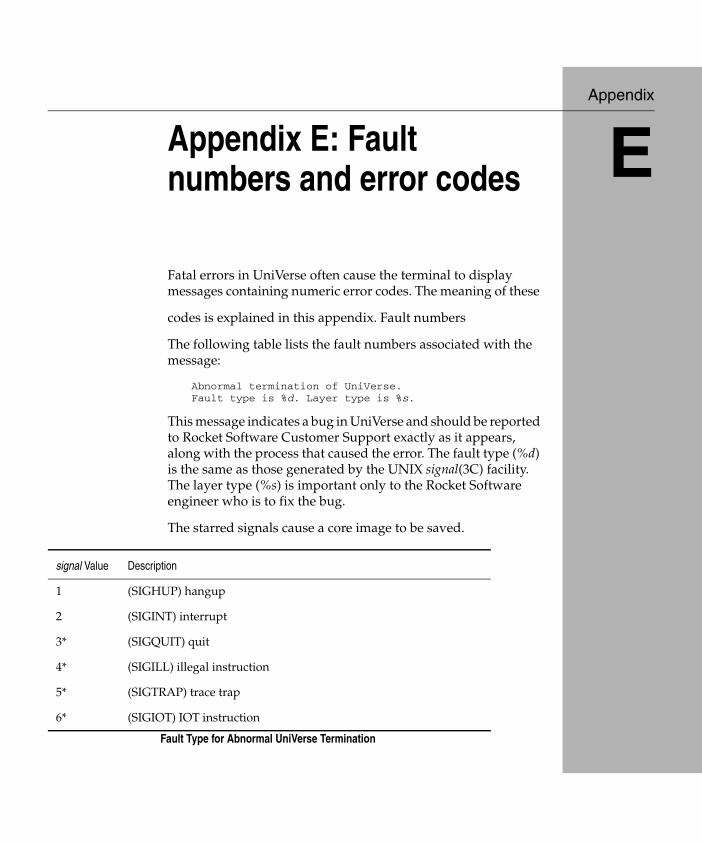
C:\Us3/17/
E Appendix
Beta Beta Beta Beta Beta Beta Beta Beta Beta Beta Beta Beta Beta Beta Beta Beta Beta Beta Beta BetaBeta Beta
Appendix E: Fault numbers and error codes
Fatal errors in UniVerse often cause the terminal to display messages containing numeric error codes. The meaning of these
codes is explained in this appendix. Fault numbers
The following table lists the fault numbers associated with the message:
Abnormal termination of UniVerse. Fault type is %d. Layer type is %s.
This message indicates a bug in UniVerse and should be reported to Rocket Software Customer Support exactly as it appears, along with the process that caused the error. The fault type (%d) is the same as those generated by the UNIX signal(3C) facility. The layer type (%s) is important only to the Rocket Software engineer who is to fix the bug.
The starred signals cause a core image to be saved.
signal Value Description
1 (SIGHUP) hangup
2 (SIGINT) interrupt
3* (SIGQUIT) quit
4* (SIGILL) illegal instruction
5* (SIGTRAP) trace trap
6* (SIGIOT) IOT instruction
Fault Type for Abnormal UniVerse Termination
ers\awaite\Documents\U2Doc\UniVerse\11.2\Source\Adminunix\AppE.fm14 System Administration
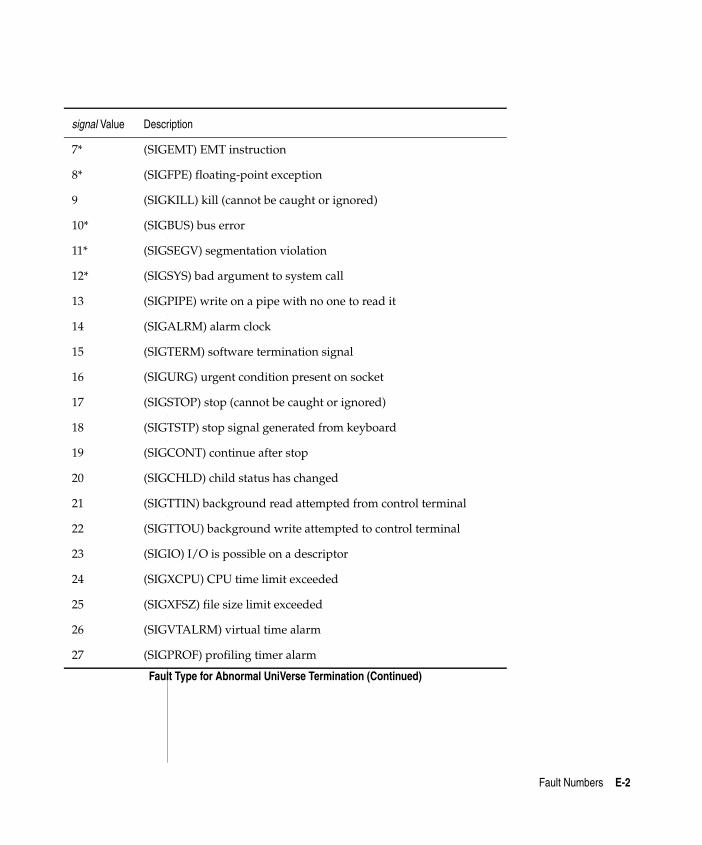
C:\Users\awaite\Documents\U2Doc\UniVerse\11.2\Source\Adminunix\AppE.fm3/17/14 Fault Numbers
Beta Beta Beta Beta Beta Beta Beta Beta Beta Beta Beta Beta Beta Beta Beta Beta Beta Beta Beta Beta Beta Beta Beta Beta Beta
7* (SIGEMT) EMT instruction
8* (SIGFPE) floating-point exception
9 (SIGKILL) kill (cannot be caught or ignored)
10* (SIGBUS) bus error
11* (SIGSEGV) segmentation violation
12* (SIGSYS) bad argument to system call
13 (SIGPIPE) write on a pipe with no one to read it
14 (SIGALRM) alarm clock
15 (SIGTERM) software termination signal
16 (SIGURG) urgent condition present on socket
17 (SIGSTOP) stop (cannot be caught or ignored)
18 (SIGTSTP) stop signal generated from keyboard
19 (SIGCONT) continue after stop
20 (SIGCHLD) child status has changed
21 (SIGTTIN) background read attempted from control terminal
22 (SIGTTOU) background write attempted to control terminal
23 (SIGIO) I/O is possible on a descriptor
24 (SIGXCPU) CPU time limit exceeded
25 (SIGXFSZ) file size limit exceeded
26 (SIGVTALRM) virtual time alarm
27 (SIGPROF) profiling timer alarm
signal Value Description
Fault Type for Abnormal UniVerse Termination (Continued)
Fault Numbers E-2
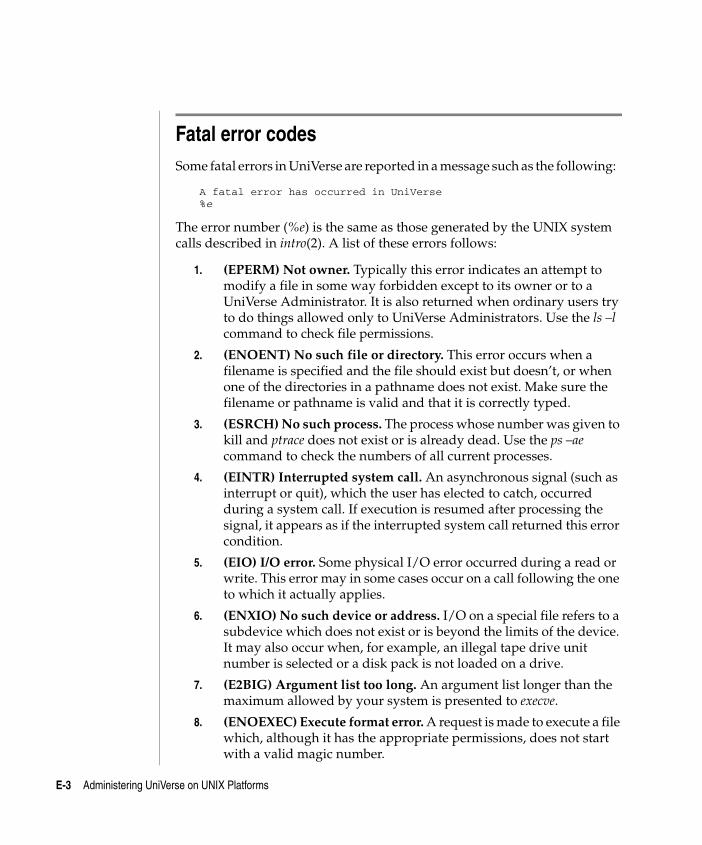
C:\Users\awaite\Documents\U2Doc\UniVerse\11.2\Source\Adminunix\AppE.fm3/17/14 Fatal Error Codes
Beta Beta Beta Beta Beta Beta Beta Beta Beta Beta Beta Beta Beta Beta Beta Beta Beta Beta Beta Beta Beta Beta Beta Beta Beta
Fatal error codesSome fatal errors in UniVerse are reported in a message such as the following:
A fatal error has occurred in UniVerse %e
The error number (%e) is the same as those generated by the UNIX system calls described in intro(2). A list of these errors follows:
1. (EPERM) Not owner. Typically this error indicates an attempt to modify a file in some way forbidden except to its owner or to a UniVerse Administrator. It is also returned when ordinary users try to do things allowed only to UniVerse Administrators. Use the ls –l command to check file permissions.
2. (ENOENT) No such file or directory. This error occurs when a filename is specified and the file should exist but doesn’t, or when one of the directories in a pathname does not exist. Make sure the filename or pathname is valid and that it is correctly typed.
3. (ESRCH) No such process. The process whose number was given to kill and ptrace does not exist or is already dead. Use the ps –ae command to check the numbers of all current processes.
4. (EINTR) Interrupted system call. An asynchronous signal (such as interrupt or quit), which the user has elected to catch, occurred during a system call. If execution is resumed after processing the signal, it appears as if the interrupted system call returned this error condition.
5. (EIO) I/O error. Some physical I/O error occurred during a read or write. This error may in some cases occur on a call following the one to which it actually applies.
6. (ENXIO) No such device or address. I/O on a special file refers to a subdevice which does not exist or is beyond the limits of the device. It may also occur when, for example, an illegal tape drive unit number is selected or a disk pack is not loaded on a drive.
7. (E2BIG) Argument list too long. An argument list longer than the maximum allowed by your system is presented to execve.
8. (ENOEXEC) Execute format error. A request is made to execute a file which, although it has the appropriate permissions, does not start with a valid magic number.
E-3 Administering UniVerse on UNIX Platforms
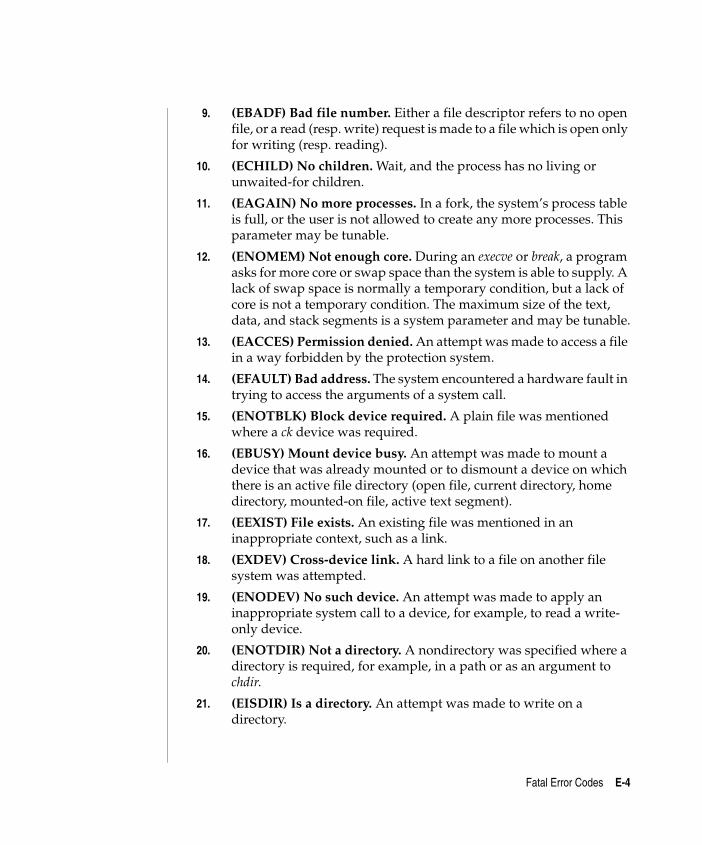
C:\Users\awaite\Documents\U2Doc\UniVerse\11.2\Source\Adminunix\AppE.fm3/17/14 Fatal Error Codes
Beta Beta Beta Beta Beta Beta Beta Beta Beta Beta Beta Beta Beta Beta Beta Beta Beta Beta Beta Beta Beta Beta Beta Beta Beta
9. (EBADF) Bad file number. Either a file descriptor refers to no open file, or a read (resp. write) request is made to a file which is open only for writing (resp. reading).
10. (ECHILD) No children. Wait, and the process has no living or unwaited-for children.
11. (EAGAIN) No more processes. In a fork, the system’s process table is full, or the user is not allowed to create any more processes. This parameter may be tunable.
12. (ENOMEM) Not enough core. During an execve or break, a program asks for more core or swap space than the system is able to supply. A lack of swap space is normally a temporary condition, but a lack of core is not a temporary condition. The maximum size of the text, data, and stack segments is a system parameter and may be tunable.
13. (EACCES) Permission denied. An attempt was made to access a file in a way forbidden by the protection system.
14. (EFAULT) Bad address. The system encountered a hardware fault in trying to access the arguments of a system call.
15. (ENOTBLK) Block device required. A plain file was mentioned where a ck device was required.
16. (EBUSY) Mount device busy. An attempt was made to mount a device that was already mounted or to dismount a device on which there is an active file directory (open file, current directory, home directory, mounted-on file, active text segment).
17. (EEXIST) File exists. An existing file was mentioned in an inappropriate context, such as a link.
18. (EXDEV) Cross-device link. A hard link to a file on another file system was attempted.
19. (ENODEV) No such device. An attempt was made to apply an inappropriate system call to a device, for example, to read a write-only device.
20. (ENOTDIR) Not a directory. A nondirectory was specified where a directory is required, for example, in a path or as an argument to chdir.
21. (EISDIR) Is a directory. An attempt was made to write on a directory.
Fatal Error Codes E-4
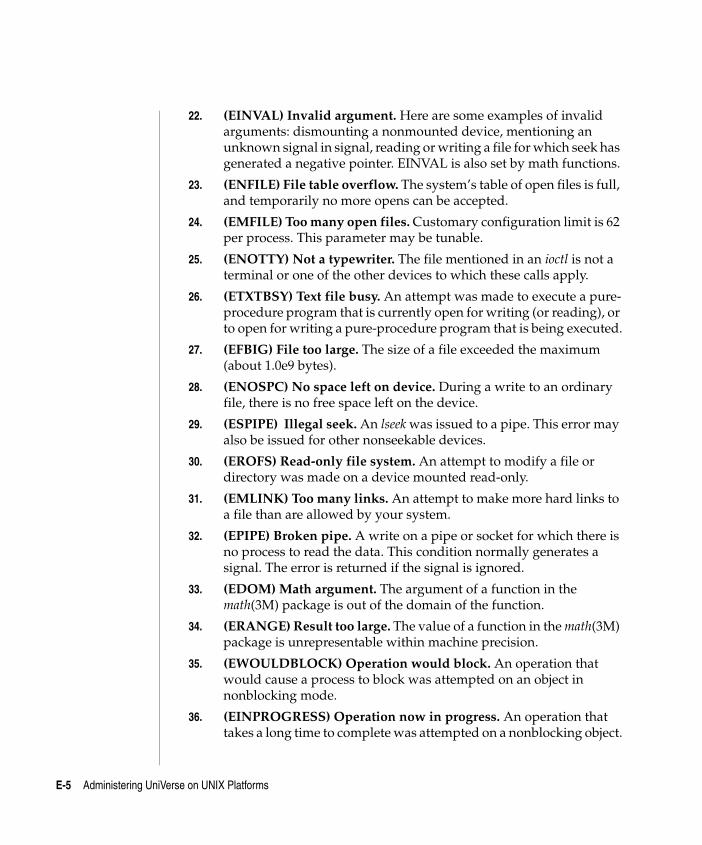
C:\Users\awaite\Documents\U2Doc\UniVerse\11.2\Source\Adminunix\AppE.fm3/17/14 Fatal Error Codes
Beta Beta Beta Beta Beta Beta Beta Beta Beta Beta Beta Beta Beta Beta Beta Beta Beta Beta Beta Beta Beta Beta Beta Beta Beta
22. (EINVAL) Invalid argument. Here are some examples of invalid arguments: dismounting a nonmounted device, mentioning an unknown signal in signal, reading or writing a file for which seek has generated a negative pointer. EINVAL is also set by math functions.
23. (ENFILE) File table overflow. The system’s table of open files is full, and temporarily no more opens can be accepted.
24. (EMFILE) Too many open files. Customary configuration limit is 62 per process. This parameter may be tunable.
25. (ENOTTY) Not a typewriter. The file mentioned in an ioctl is not a terminal or one of the other devices to which these calls apply.
26. (ETXTBSY) Text file busy. An attempt was made to execute a pure-procedure program that is currently open for writing (or reading), or to open for writing a pure-procedure program that is being executed.
27. (EFBIG) File too large. The size of a file exceeded the maximum (about 1.0e9 bytes).
28. (ENOSPC) No space left on device. During a write to an ordinary file, there is no free space left on the device.
29. (ESPIPE) Illegal seek. An lseek was issued to a pipe. This error may also be issued for other nonseekable devices.
30. (EROFS) Read-only file system. An attempt to modify a file or directory was made on a device mounted read-only.
31. (EMLINK) Too many links. An attempt to make more hard links to a file than are allowed by your system.
32. (EPIPE) Broken pipe. A write on a pipe or socket for which there is no process to read the data. This condition normally generates a signal. The error is returned if the signal is ignored.
33. (EDOM) Math argument. The argument of a function in the math(3M) package is out of the domain of the function.
34. (ERANGE) Result too large. The value of a function in the math(3M) package is unrepresentable within machine precision.
35. (EWOULDBLOCK) Operation would block. An operation that would cause a process to block was attempted on an object in nonblocking mode.
36. (EINPROGRESS) Operation now in progress. An operation that takes a long time to complete was attempted on a nonblocking object.
E-5 Administering UniVerse on UNIX Platforms
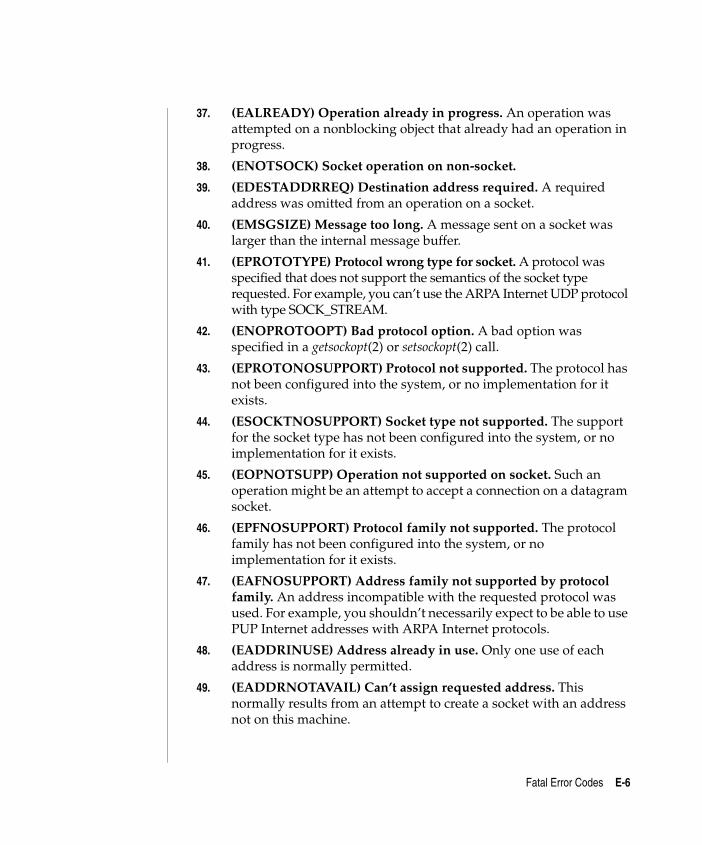
C:\Users\awaite\Documents\U2Doc\UniVerse\11.2\Source\Adminunix\AppE.fm3/17/14 Fatal Error Codes
Beta Beta Beta Beta Beta Beta Beta Beta Beta Beta Beta Beta Beta Beta Beta Beta Beta Beta Beta Beta Beta Beta Beta Beta Beta
37. (EALREADY) Operation already in progress. An operation was attempted on a nonblocking object that already had an operation in progress.
38. (ENOTSOCK) Socket operation on non-socket.
39. (EDESTADDRREQ) Destination address required. A required address was omitted from an operation on a socket.
40. (EMSGSIZE) Message too long. A message sent on a socket was larger than the internal message buffer.
41. (EPROTOTYPE) Protocol wrong type for socket. A protocol was specified that does not support the semantics of the socket type requested. For example, you can’t use the ARPA Internet UDP protocol with type SOCK_STREAM.
42. (ENOPROTOOPT) Bad protocol option. A bad option was specified in a getsockopt(2) or setsockopt(2) call.
43. (EPROTONOSUPPORT) Protocol not supported. The protocol has not been configured into the system, or no implementation for it exists.
44. (ESOCKTNOSUPPORT) Socket type not supported. The support for the socket type has not been configured into the system, or no implementation for it exists.
45. (EOPNOTSUPP) Operation not supported on socket. Such an operation might be an attempt to accept a connection on a datagram socket.
46. (EPFNOSUPPORT) Protocol family not supported. The protocol family has not been configured into the system, or no implementation for it exists.
47. (EAFNOSUPPORT) Address family not supported by protocol family. An address incompatible with the requested protocol was used. For example, you shouldn’t necessarily expect to be able to use PUP Internet addresses with ARPA Internet protocols.
48. (EADDRINUSE) Address already in use. Only one use of each address is normally permitted.
49. (EADDRNOTAVAIL) Can’t assign requested address. This normally results from an attempt to create a socket with an address not on this machine.
Fatal Error Codes E-6
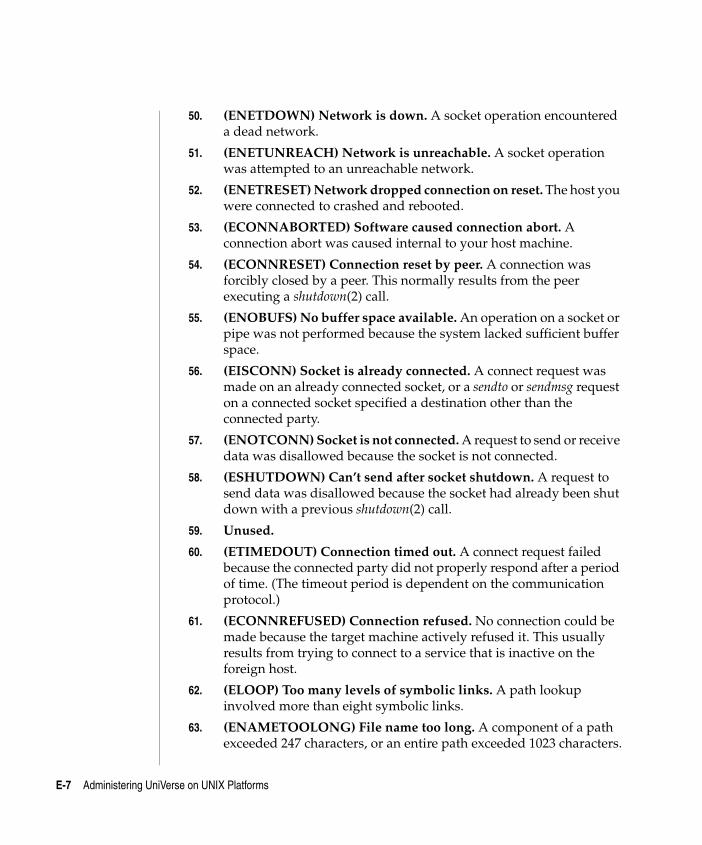
C:\Users\awaite\Documents\U2Doc\UniVerse\11.2\Source\Adminunix\AppE.fm3/17/14 Fatal Error Codes
Beta Beta Beta Beta Beta Beta Beta Beta Beta Beta Beta Beta Beta Beta Beta Beta Beta Beta Beta Beta Beta Beta Beta Beta Beta
50. (ENETDOWN) Network is down. A socket operation encountered a dead network.
51. (ENETUNREACH) Network is unreachable. A socket operation was attempted to an unreachable network.
52. (ENETRESET) Network dropped connection on reset. The host you were connected to crashed and rebooted.
53. (ECONNABORTED) Software caused connection abort. A connection abort was caused internal to your host machine.
54. (ECONNRESET) Connection reset by peer. A connection was forcibly closed by a peer. This normally results from the peer executing a shutdown(2) call.
55. (ENOBUFS) No buffer space available. An operation on a socket or pipe was not performed because the system lacked sufficient buffer space.
56. (EISCONN) Socket is already connected. A connect request was made on an already connected socket, or a sendto or sendmsg request on a connected socket specified a destination other than the connected party.
57. (ENOTCONN) Socket is not connected. A request to send or receive data was disallowed because the socket is not connected.
58. (ESHUTDOWN) Can’t send after socket shutdown. A request to send data was disallowed because the socket had already been shut down with a previous shutdown(2) call.
59. Unused.
60. (ETIMEDOUT) Connection timed out. A connect request failed because the connected party did not properly respond after a period of time. (The timeout period is dependent on the communication protocol.)
61. (ECONNREFUSED) Connection refused. No connection could be made because the target machine actively refused it. This usually results from trying to connect to a service that is inactive on the foreign host.
62. (ELOOP) Too many levels of symbolic links. A path lookup involved more than eight symbolic links.
63. (ENAMETOOLONG) File name too long. A component of a path exceeded 247 characters, or an entire path exceeded 1023 characters.
E-7 Administering UniVerse on UNIX Platforms
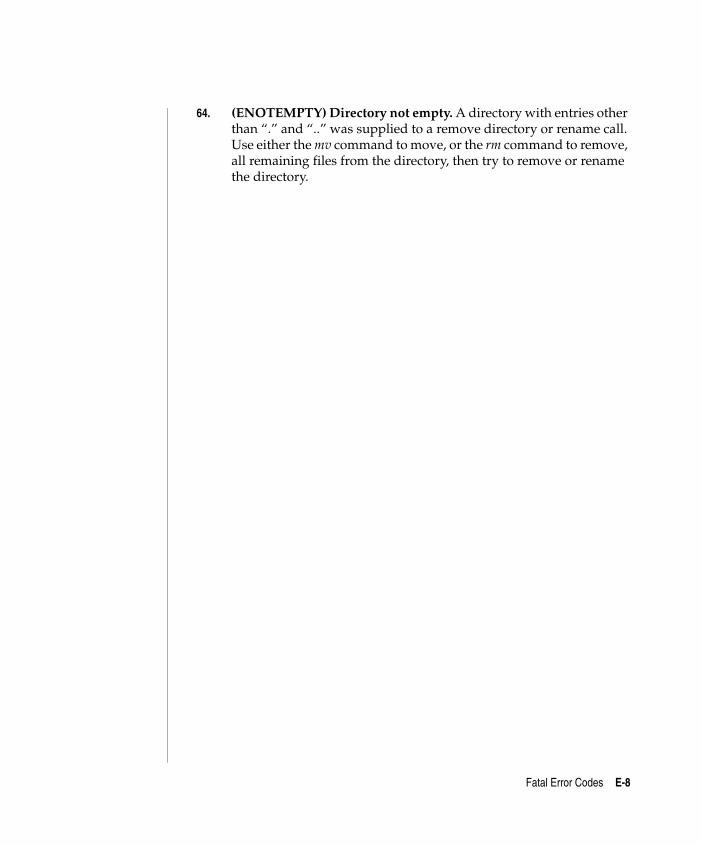
C:\Users\awaite\Documents\U2Doc\UniVerse\11.2\Source\Adminunix\AppE.fm3/17/14 Fatal Error Codes
Beta Beta Beta Beta Beta Beta Beta Beta Beta Beta Beta Beta Beta Beta Beta Beta Beta Beta Beta Beta Beta Beta Beta Beta Beta
64. (ENOTEMPTY) Directory not empty. A directory with entries other than “.” and “..” was supplied to a remove directory or rename call. Use either the mv command to move, or the rm command to remove, all remaining files from the directory, then try to remove or rename the directory.
Fatal Error Codes E-8
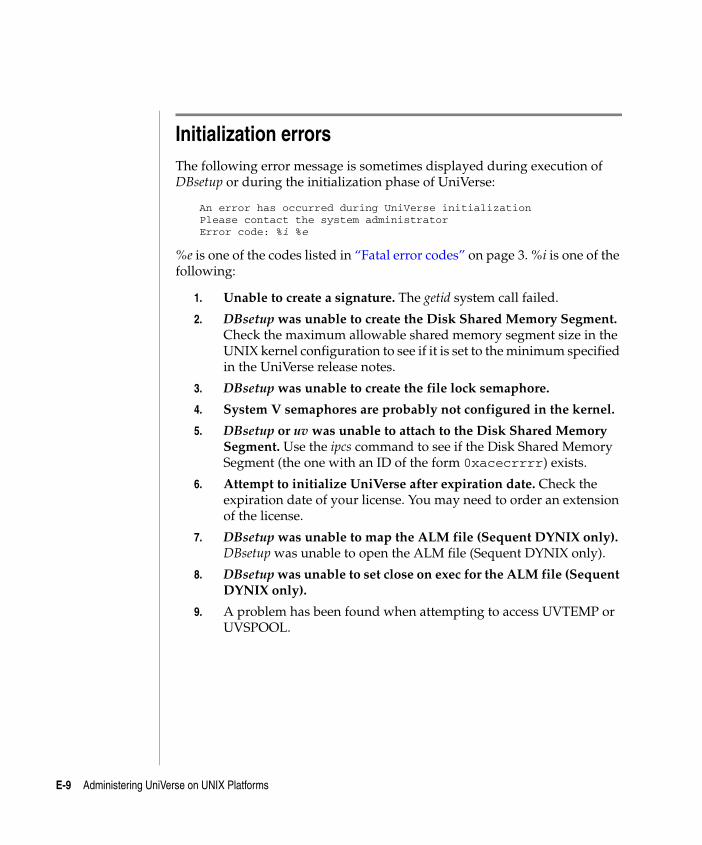
C:\Users\awaite\Documents\U2Doc\UniVerse\11.2\Source\Adminunix\AppE.fm3/17/14 Initialization Errors
Beta Beta Beta Beta Beta Beta Beta Beta Beta Beta Beta Beta Beta Beta Beta Beta Beta Beta Beta Beta Beta Beta Beta Beta Beta
Initialization errorsThe following error message is sometimes displayed during execution of DBsetup or during the initialization phase of UniVerse:
An error has occurred during UniVerse initialization Please contact the system administrator Error code: %i %e
%e is one of the codes listed in “Fatal error codes” on page 3. %i is one of the following:
1. Unable to create a signature. The getid system call failed.
2. DBsetup was unable to create the Disk Shared Memory Segment. Check the maximum allowable shared memory segment size in the UNIX kernel configuration to see if it is set to the minimum specified in the UniVerse release notes.
3. DBsetup was unable to create the file lock semaphore.
4. System V semaphores are probably not configured in the kernel.
5. DBsetup or uv was unable to attach to the Disk Shared Memory Segment. Use the ipcs command to see if the Disk Shared Memory Segment (the one with an ID of the form 0xacecrrrr) exists.
6. Attempt to initialize UniVerse after expiration date. Check the expiration date of your license. You may need to order an extension of the license.
7. DBsetup was unable to map the ALM file (Sequent DYNIX only). DBsetup was unable to open the ALM file (Sequent DYNIX only).
8. DBsetup was unable to set close on exec for the ALM file (Sequent DYNIX only).
9. A problem has been found when attempting to access UVTEMP or UVSPOOL.
E-9 Administering UniVerse on UNIX Platforms
FAppendix
Appendix F: Configuring SSL for Telnet
There are two tasks for setting up a secured telnet service for UniVerse. The first task is to set up the UniVerse telnet service for the operating system to recognize. The second task is to set up SSL properties for the UniVerse telnet service to establish secured connections. SSL properties are stored in a UniVerse Security Context Record (SCR). See the UniVerse Security manual for information about creating an SCR.
To enable SSL for UniVerse Telnet service on a Windows Server, use UniAdmin or the U2 Extensible Administration Tool (XAdmin).
To enable SSL for UniVerse Telnet server on a UNIX or Linux server, you need to edit several files on the database server.
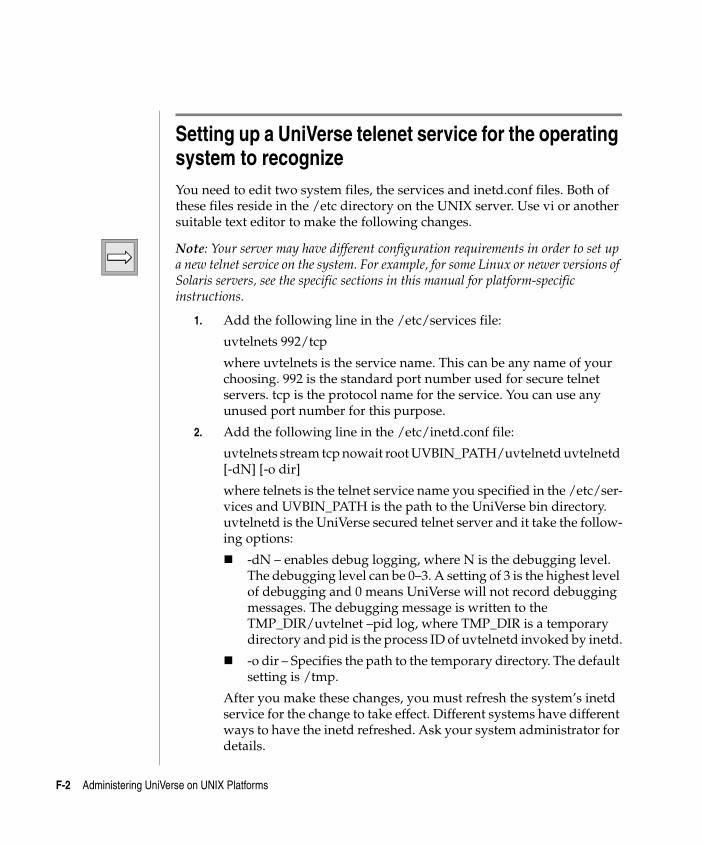
Setting up a UniVerse telenet service for the operating system to recognizeYou need to edit two system files, the services and inetd.conf files. Both of these files reside in the /etc directory on the UNIX server. Use vi or another suitable text editor to make the following changes.
Note: Your server may have different configuration requirements in order to set up a new telnet service on the system. For example, for some Linux or newer versions of Solaris servers, see the specific sections in this manual for platform-specific instructions.
1. Add the following line in the /etc/services file:
uvtelnets 992/tcp
where uvtelnets is the service name. This can be any name of your choosing. 992 is the standard port number used for secure telnet servers. tcp is the protocol name for the service. You can use any unused port number for this purpose.
2. Add the following line in the /etc/inetd.conf file:
uvtelnets stream tcp nowait root UVBIN_PATH/uvtelnetd uvtelnetd [-dN] [-o dir]
where telnets is the telnet service name you specified in the /etc/ser-vices and UVBIN_PATH is the path to the UniVerse bin directory. uvtelnetd is the UniVerse secured telnet server and it take the follow-ing options:
-dN – enables debug logging, where N is the debugging level. The debugging level can be 0–3. A setting of 3 is the highest level of debugging and 0 means UniVerse will not record debugging messages. The debugging message is written to the TMP_DIR/uvtelnet –pid log, where TMP_DIR is a temporary directory and pid is the process ID of uvtelnetd invoked by inetd.
-o dir – Specifies the path to the temporary directory. The default setting is /tmp.
After you make these changes, you must refresh the system’s inetd service for the change to take effect. Different systems have different ways to have the inetd refreshed. Ask your system administrator for details.
F-2 Administering UniVerse on UNIX Platforms

Setting up SSL properties for a UniVerse telnet serviceYou can set up the SSL properties for the UniVerse telnet service using UniAdmin or XAdmin.
If you want to set up the properties manually, edit the .unisecurity file in the unishared directory. You can determine the location of the unishared directory by running the following command:
cat /.unishared
Add the following line to the .unisecurity file:
uvtelnetd UV-account SCR-id SCR-password
where UV-account is the path to the UniVerse directory that contains the SCR database file. The SCR-id is the @ID of the SCR you want the UniVerse telnet service to us for the SSL connections. The SCR-password is the password to access the SCR you specify. If the password contains spaces, you must enclose the password in quotation marks, as shown in the following example:
uvtelnetd /disk1/uv telnetSCR "A contrived pa$w0rd"
F-3
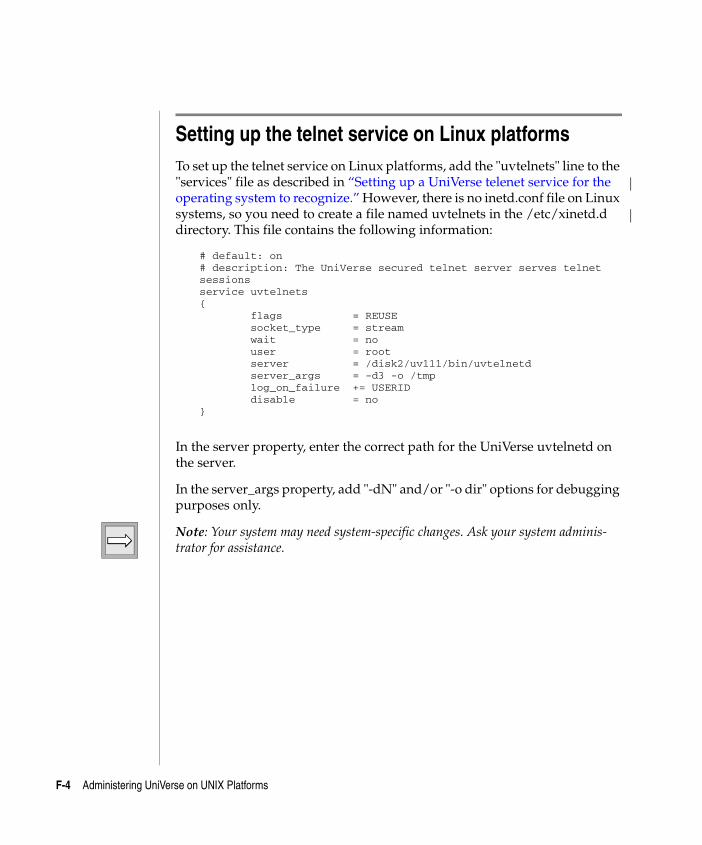
Setting up the telnet service on Linux platformsTo set up the telnet service on Linux platforms, add the "uvtelnets" line to the "services" file as described in “Setting up a UniVerse telenet service for the operating system to recognize.” However, there is no inetd.conf file on Linux systems, so you need to create a file named uvtelnets in the /etc/xinetd.d directory. This file contains the following information:
# default: on# description: The UniVerse secured telnet server serves telnet sessionsservice uvtelnets{ flags = REUSE socket_type = stream wait = no user = root server = /disk2/uv111/bin/uvtelnetd server_args = -d3 -o /tmp log_on_failure += USERID disable = no}
In the server property, enter the correct path for the UniVerse uvtelnetd on the server.
In the server_args property, add "-dN" and/or "-o dir" options for debugging purposes only.
Note: Your system may need system-specific changes. Ask your system adminis-trator for assistance.
F-4 Administering UniVerse on UNIX Platforms
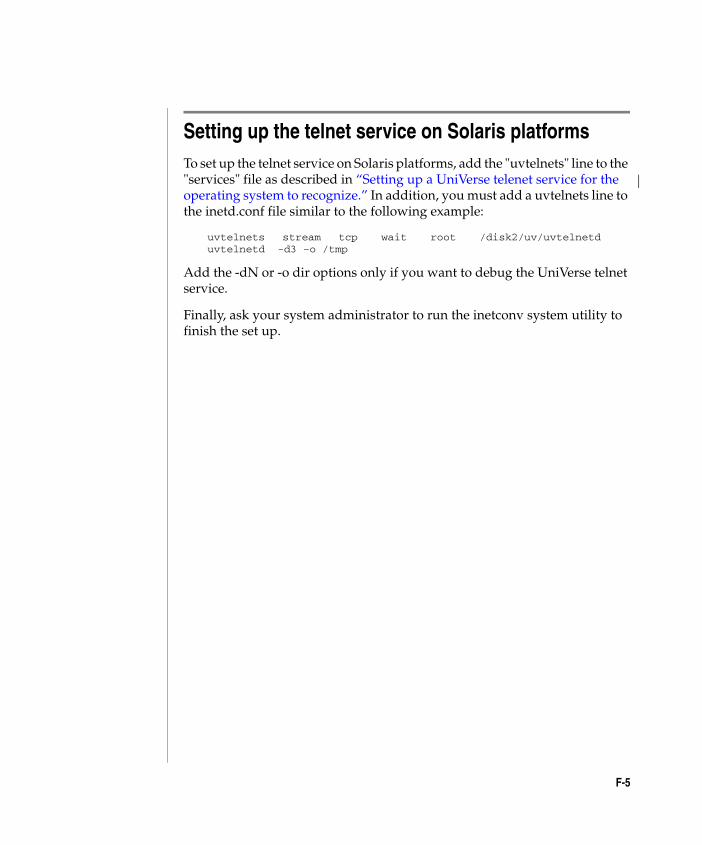
Setting up the telnet service on Solaris platformsTo set up the telnet service on Solaris platforms, add the "uvtelnets" line to the "services" file as described in “Setting up a UniVerse telenet service for the operating system to recognize.” In addition, you must add a uvtelnets line to the inetd.conf file similar to the following example:
uvtelnets stream tcp wait root /disk2/uv/uvtelnetd uvtelnetd -d3 –o /tmp
Add the -dN or -o dir options only if you want to debug the UniVerse telnet service.
Finally, ask your system administrator to run the inetconv system utility to finish the set up.
F-5