Embed Size (px)
Citation preview

ECE444 Theory and Fabrication of Integrated Circuits Laboratory
Administrative Manual
Fall 2012
Contents Introduction to the Lab ........................................................................................................ 1 Lab Schedule Overview ........................................................................................................ 2
Detailed Schedule .......................................................... 4 Grades ...................................................................................................................................... 15 Computer Access to the Lab ............................................................................................. 19
Website ......................................................................... 19 Remote Desktop ......................................................... 20 Campus Firewall/CITES VPN ................................. 21
Comments on the Process ................................................................................................. 22 Laboratory Infrastructure .................................................................................................. 24
Cleanroom Precautions .............................................. 27 Cleanliness ............................................................................................................................. 28 Safety ........................................................................................................................................ 29
Safety at a Glance ...................................................... ..29 Figure 1: Ground floor evacuation routes...35
Laboratory Health and Safety: ................................... 36 Be Aware, Be Prepared, Be Protected ........ 36
Laboratory Chemicals ................................................. 41 Medical Management of Hydrofluoric Acid Exposure 44
................................................ 50 Wet Chemical Etching
Introduction to the Lab Documentation for ece444 is extensive. In order to simplify this library of information, two manuals are used. The ‘ADMINISTRATIVE MANUAL’ contains details covering organization, grading, computers, and safety in the laboratory. The ‘OPERATING PROCEDURES’ manual contains detailed information for the equipment and processes used in the lab. And finally, the ‘PROCESSING MANUAL’, which is the concise sequence for manufacturing the circuits on the ece444 silicon wafer.
his laboratory experience is designed for engineering students of all disciplines to gain a basic, but thorough, experience in fabricating working integrated circuits. The hands-on processing is an invaluable exercise for not only the student pursuing a career in the semiconductor industry, but
for all students that will use or design semiconductor devices.
The lab follows a cookbook-style recipe in which the student can perform the necessary process step without having to understand the specifics of the process; a necessity, as the process is not in sequence with the lecture. It can be argued that this style of lab manual could lead to rote gestures to finish the lab, with little understanding. However, by the end of the semester the student will have both the personal experience of making an integrated in the lab and the ‘book-
knowledge’ of the processes from lectures, as well as the physical data that reinforces concepts introduced in ECE440: Solid State Electronic Devices. ECE444 is a different type of laboratory than most students have experienced – it is not a series of individual experiments, but a whole process sequence using standard IC processing techniques. It requires extreme care, as mistakes will result in non-functioning devices. And extreme caution must be exercised, as mistakes will result in serious injuries, even death.
Section
1
T The student will see and use fundamental technologies used in semiconductor processing.
2
As the student works throughout the semester, they should create and maintain an image (both mental and physical) of the devices that are being fabricated. They should consider the effects of mistakes in processing and how it would affect electrical performance of different devices – this is very useful, as mistakes are generally made at some point in the process, and predictions of performance based on theory can be confirmed during testing.
Lab Schedule Overview The laboratory schedule is very rigid and every effort must be made by the student to attend their normally scheduled lab. Missed labs may be made-up if the student’s TA is notified before the absence. Requests for attending another section are not automatically granted and permission must be obtained from the student’s lab TA as well as the TA of the lab section being requested to attend. It is strongly recommended for the student to stay ahead of schedule. Human error and equipment failure can cause delays in processing. Do not panic if processing is disrupted. The time to worry will be determined by the student’s lab TA or the Lab Director. Attendance is required. If the student is not able to attend their normally scheduled lab, their TA must be notified and appropriate arrangements made to make-up the lab. The student must meet at the main entrance to the cleanroom - room 50M, located on the west wing of the basement of Everitt Lab. TAs will usher groups of three into the lab. Garments are dispensed and proper cleanroom protocols are explained. In lab, basic information concerning the mechanics of the course are covered. Student is assigned to one of three pre-lab groups for proper per-lab rotation. Three groups, each consisting of a maximum of three students, will perform one of the three pre-labs each week with the help of a TA. The student must prepare for the pre-lab prior to attendance of lab. The pre-labs are performed sequentially, with the student starting the process with the pre-lab assigned during week 1. Pre-labs then rotate as follows:
oxidation → photolithography → electrical testing
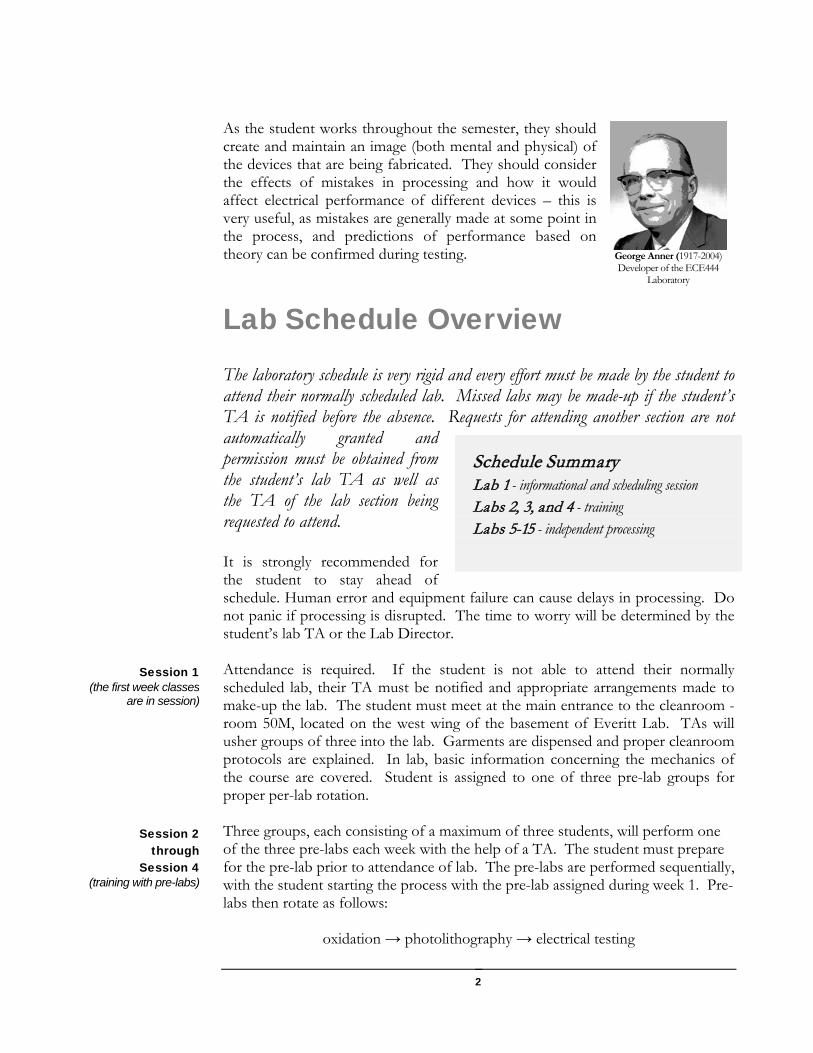
George Anner (1917-2004) Developer of the ECE444
Laboratory
Schedule Summary Lab 1 - informational and scheduling session Labs 2, 3, and 4 - training Labs 5-15 - independent processing
Session 1 (the first week classes
are in session)
Session 2 through
Session 4 (training with pre-labs)
3
Completion of all three pre-labs is required before the student earns the privilege to process independently. Approved absences must be made up following the standard request procedure described previously. Independent processing begins. To retain these privileges, the student must score 100% on the safety quiz. The student is allowed three chances; if this requirement is not met the student must schedule a meeting with the Lab Engineer for evaluation. After the evaluation, the privilege of continuing processing will be determined and the student notified of the outcome. If there is any concern on the ability of the student to safely work in the lab, that student will be expelled from the lab. The student is responsible for all processing of their IC from this point forward. As an engineer in training, the student must come fully prepared for the process step(s) required for each lab session. The role of the TA changes from trainer to supervisor, and will expect the student to be prepared. Questions that can be answered using the lab manuals, handouts, or website will not be answered, as this is an indication that the student is not prepared. Other types of questions are encouraged and will be answered to the best of the TA’s knowledge – sometimes this means a response that requires further investigation and may not be answered immediately. The focus of the lab is for the student to fabricate integrated circuits. Therefore, the time for electrical testing is highly variable. It is recommended that the student works diligently to finish processing to allow for four weeks of testing. The student should keep in mind that equipment will fail, mistakes will be made, and that there may only be limited time for testing. This is designed into the lab experience, and there are contingency processes that can be implemented if the TA or Lab Engineer determines the need.
Session 5 through
Session 12 (independent
processing)
TAs are trained to prevent students from using them as a substitute for preparedness. Do not ask questions that can be answered by reading the manuals, hand-outs, and website.
Session 13 through
End of semester (electrical testing)
4
Detailed Schedule 1. Goals of Meeting 1: To learn
• How to enter the cleanroom • How to properly gown for the cleanroom • How to find information for the lab • the processing schedule • safety considerations in the lab
2. Introduction of the TA. • Class information handout • Name • Contact information • Office hours
3. Discussion of Information sources • http://fabweb.ece.illinois.edu ∙ Main source of information for laboratory and lecture ∙ Logsheets/process traveler data entry ∙ Lecture homework
• Lab Administrative Manual (this document) ∙ Supporting information ∙ Organizational details ∙ Safety information
• Lab Processing Manual ∙ In depth process details and supporting literature ∙ Reports
• Lab Operating Procedures Manual ∙ Detailed processing documentation ∙ Equipment documentation ∙ Acronyms, terms, and equations ∙ Mask set
4. Internet access • In-lab access ∙ Workstations ∙ Wireless PDAs
• In-department access ∙ Student lounge ∙ Remote Desktop
• Off campus access ∙ Campus/department/personal firewalls ∙ vpn connections ∙ vpn compatible routers ∙ Remote Desktop
Meeting 1 Introduction to the Lab
5
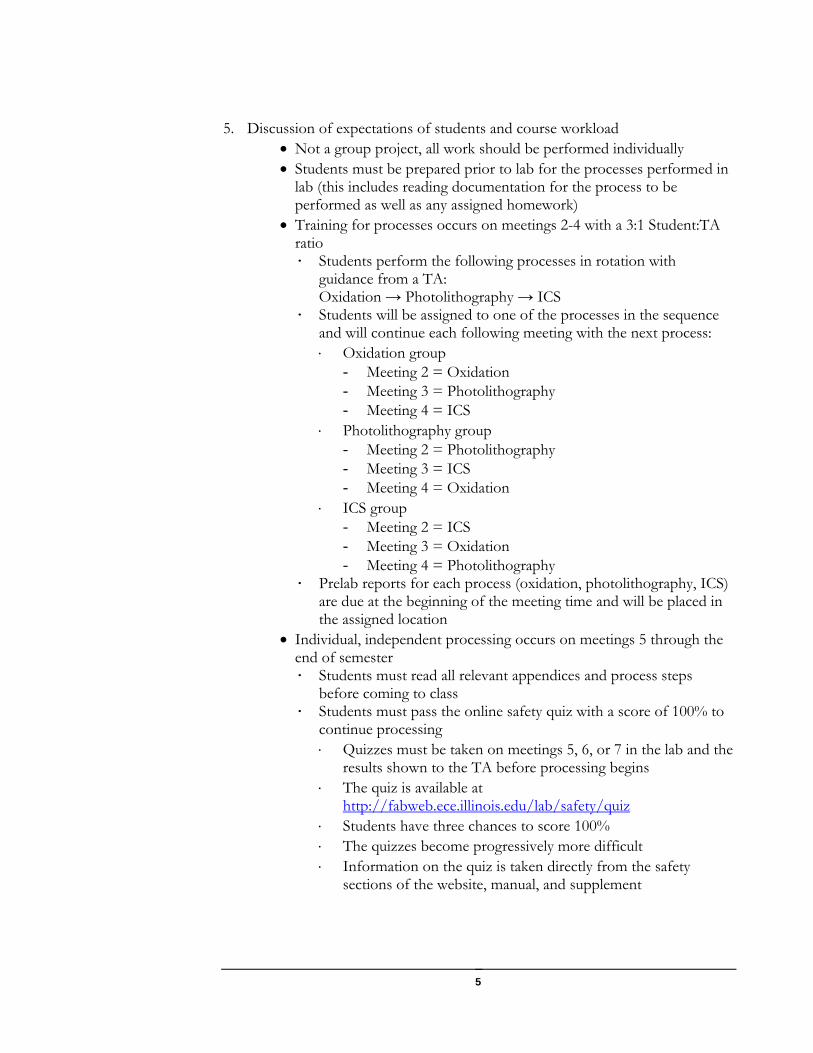
5. Discussion of expectations of students and course workload • Not a group project, all work should be performed individually • Students must be prepared prior to lab for the processes performed in
lab (this includes reading documentation for the process to be performed as well as any assigned homework)
• Training for processes occurs on meetings 2-4 with a 3:1 Student:TA ratio ∙ Students perform the following processes in rotation with
guidance from a TA: Oxidation → Photolithography → ICS
∙ Students will be assigned to one of the processes in the sequence and will continue each following meeting with the next process: ⋅ Oxidation group
- Meeting 2 = Oxidation - Meeting 3 = Photolithography - Meeting 4 = ICS
⋅ Photolithography group - Meeting 2 = Photolithography - Meeting 3 = ICS - Meeting 4 = Oxidation
⋅ ICS group - Meeting 2 = ICS - Meeting 3 = Oxidation - Meeting 4 = Photolithography
∙ Prelab reports for each process (oxidation, photolithography, ICS) are due at the beginning of the meeting time and will be placed in the assigned location
• Individual, independent processing occurs on meetings 5 through the end of semester ∙ Students must read all relevant appendices and process steps
before coming to class ∙ Students must pass the online safety quiz with a score of 100% to
continue processing ⋅ Quizzes must be taken on meetings 5, 6, or 7 in the lab and the
results shown to the TA before processing begins ⋅ The quiz is available at
http://fabweb.ece.illinois.edu/lab/safety/quiz ⋅ Students have three chances to score 100% ⋅ The quizzes become progressively more difficult ⋅ Information on the quiz is taken directly from the safety
sections of the website, manual, and supplement
6
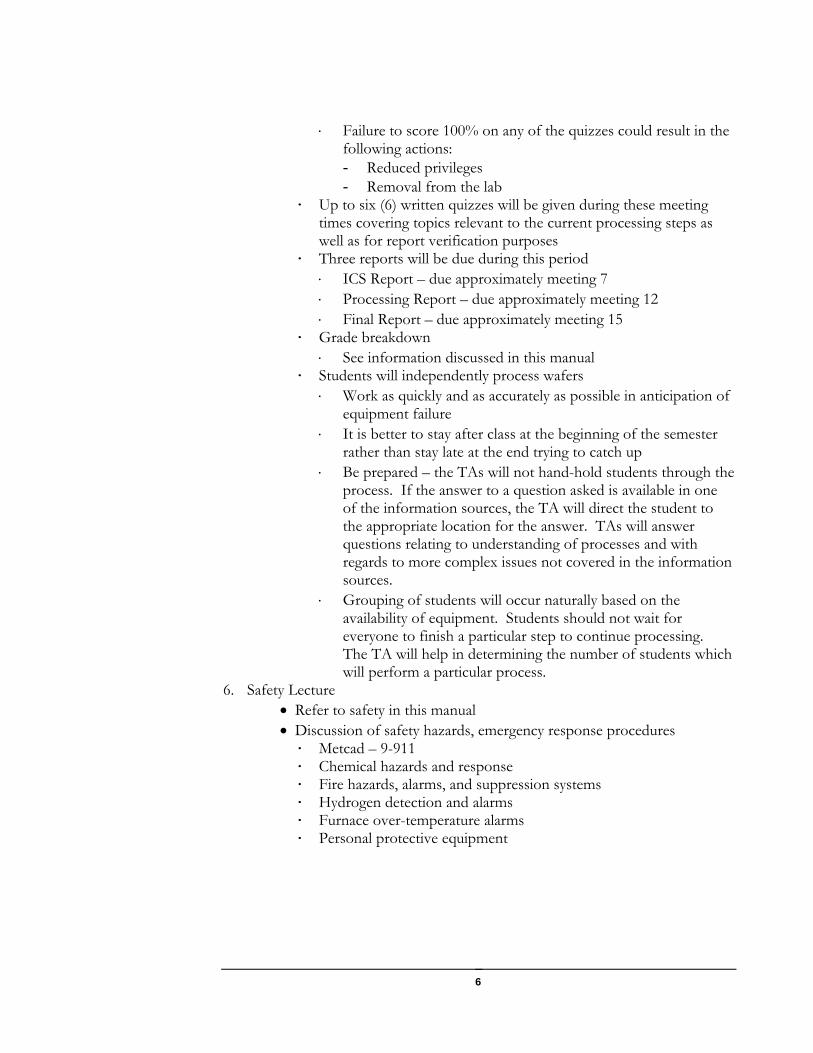
⋅ Failure to score 100% on any of the quizzes could result in the following actions: - Reduced privileges - Removal from the lab
∙ Up to six (6) written quizzes will be given during these meeting times covering topics relevant to the current processing steps as well as for report verification purposes
∙ Three reports will be due during this period ⋅ ICS Report – due approximately meeting 7 ⋅ Processing Report – due approximately meeting 12 ⋅ Final Report – due approximately meeting 15
∙ Grade breakdown ⋅ See information discussed in this manual
∙ Students will independently process wafers ⋅ Work as quickly and as accurately as possible in anticipation of
equipment failure ⋅ It is better to stay after class at the beginning of the semester
rather than stay late at the end trying to catch up ⋅ Be prepared – the TAs will not hand-hold students through the
process. If the answer to a question asked is available in one of the information sources, the TA will direct the student to the appropriate location for the answer. TAs will answer questions relating to understanding of processes and with regards to more complex issues not covered in the information sources.
⋅ Grouping of students will occur naturally based on the availability of equipment. Students should not wait for everyone to finish a particular step to continue processing. The TA will help in determining the number of students which will perform a particular process.
6. Safety Lecture • Refer to safety in this manual • Discussion of safety hazards, emergency response procedures ∙ Metcad – 9-911 ∙ Chemical hazards and response ∙ Fire hazards, alarms, and suppression systems ∙ Hydrogen detection and alarms ∙ Furnace over-temperature alarms ∙ Personal protective equipment
7
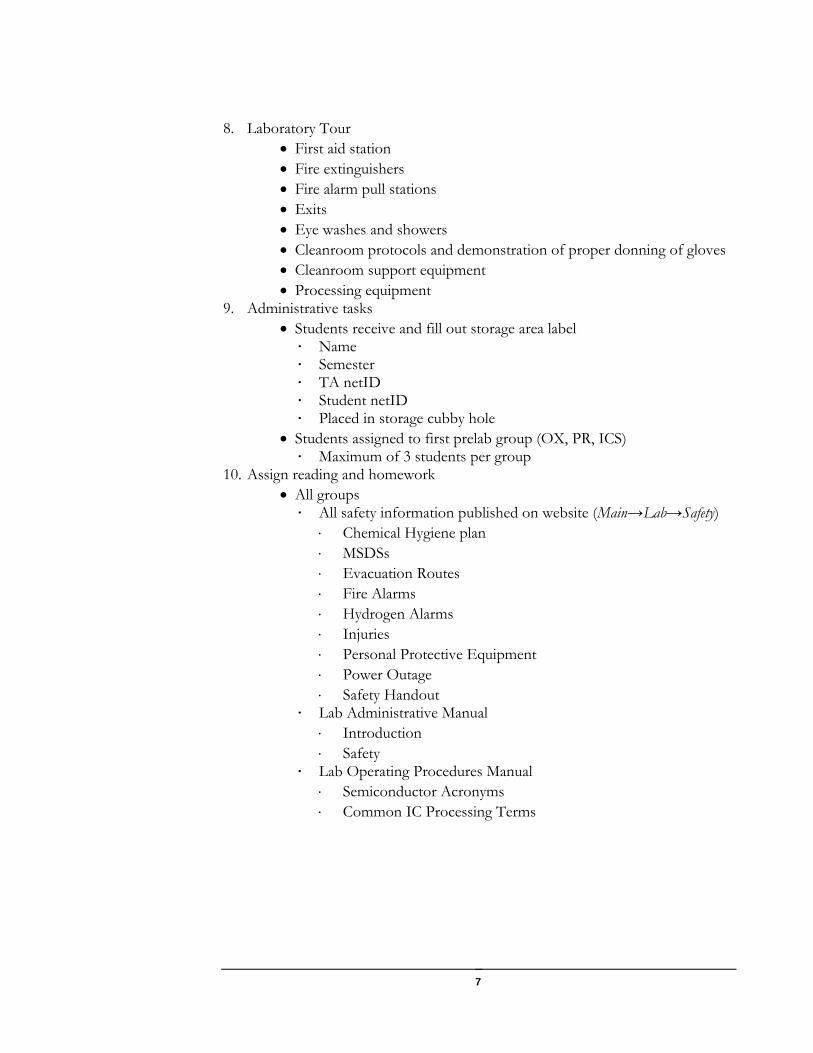
8. Laboratory Tour • First aid station • Fire extinguishers • Fire alarm pull stations • Exits • Eye washes and showers • Cleanroom protocols and demonstration of proper donning of gloves • Cleanroom support equipment • Processing equipment
9. Administrative tasks • Students receive and fill out storage area label ∙ Name ∙ Semester ∙ TA netID ∙ Student netID ∙ Placed in storage cubby hole
• Students assigned to first prelab group (OX, PR, ICS) ∙ Maximum of 3 students per group
10. Assign reading and homework • All groups ∙ All safety information published on website (Main→Lab→Safety)
⋅ Chemical Hygiene plan ⋅ MSDSs ⋅ Evacuation Routes ⋅ Fire Alarms ⋅ Hydrogen Alarms ⋅ Injuries ⋅ Personal Protective Equipment ⋅ Power Outage ⋅ Safety Handout
∙ Lab Administrative Manual ⋅ Introduction ⋅ Safety
∙ Lab Operating Procedures Manual ⋅ Semiconductor Acronyms ⋅ Common IC Processing Terms
8
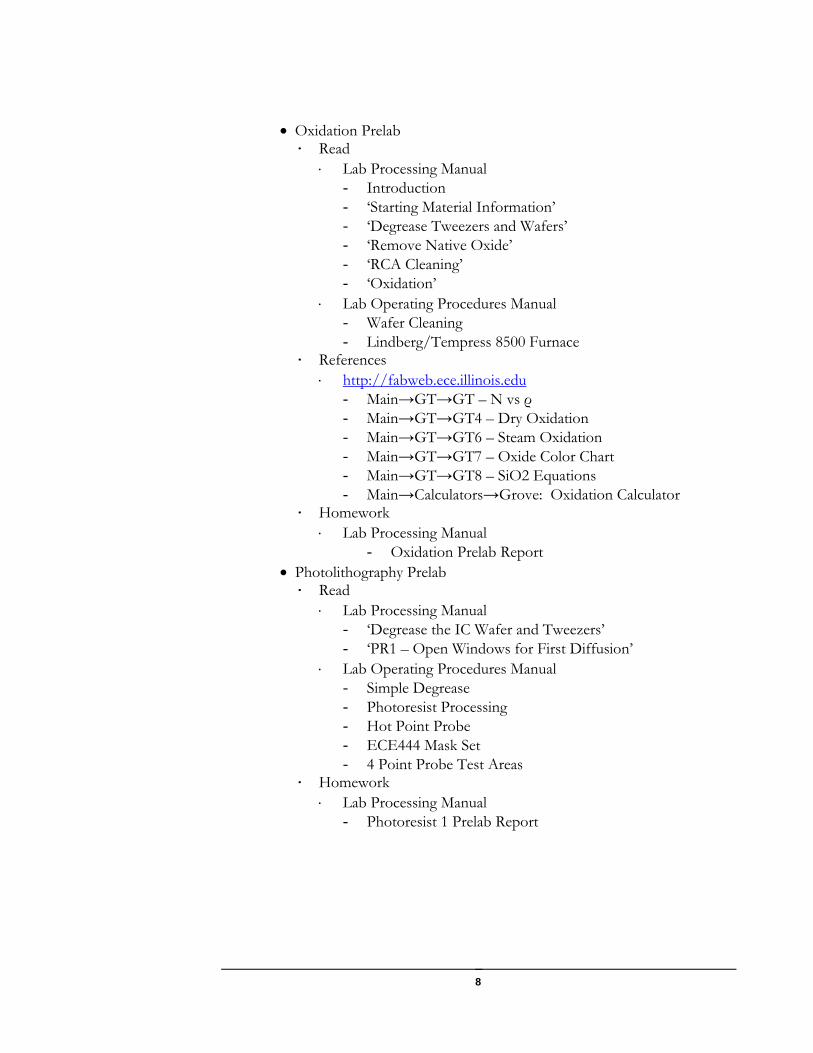
• Oxidation Prelab ∙ Read
⋅ Lab Processing Manual - Introduction - ‘Starting Material Information’ - ‘Degrease Tweezers and Wafers’ - ‘Remove Native Oxide’ - ‘RCA Cleaning’ - ‘Oxidation’
⋅ Lab Operating Procedures Manual - Wafer Cleaning - Lindberg/Tempress 8500 Furnace
∙ References ⋅ http://fabweb.ece.illinois.edu
- Main→GT→GT – N vs ρ - Main→GT→GT4 – Dry Oxidation - Main→GT→GT6 – Steam Oxidation - Main→GT→GT7 – Oxide Color Chart - Main→GT→GT8 – SiO2 Equations - Main→Calculators→Grove: Oxidation Calculator
∙ Homework ⋅ Lab Processing Manual
- Oxidation Prelab Report • Photolithography Prelab ∙ Read
⋅ Lab Processing Manual - ‘Degrease the IC Wafer and Tweezers’ - ‘PR1 – Open Windows for First Diffusion’
⋅ Lab Operating Procedures Manual - Simple Degrease - Photoresist Processing - Hot Point Probe - ECE444 Mask Set - 4 Point Probe Test Areas
∙ Homework ⋅ Lab Processing Manual
- Photoresist 1 Prelab Report
9
• ICS Prelab ∙ Read
⋅ Lab Processing Manual - ‘ICS Tutorial’ - ‘ICS Commercial Device Measurements’ through
‘Concentration vs Depletion Width Plot Derivation’ ⋅ Lab Operating Procedures Manual
- ICS - The Test Stations
∙ References ⋅ Solid State Electronic Devices – Ben Streetman
- Review operation of - BJTs - MOS Capacitors - MOSFETs - Schottky diodes
∙ http://fabweb.ece.illinois.edu ⋅ Datasheets
- Main→Lab→Testing→MTP2955 - Main→Lab→Testing→2N2222A - http://cp.literature.agilent.com/litweb/pdf/5988-
9238EN.pdf - http://cp.literature.agilent.com/litweb/pdf/5952-1431.pdf
∙ Homework ⋅ Lab Processing Manual
- ICS Prelab 11. Dismissal
• Only 3-4 students in the gown area at a time • Students choose a cubby-hole for storage ∙ Place name tag at front of storage bin ∙ Garments placed in storage bin first ∙ Wafers stored at front of storage bin ∙ No tweezers, safety glasses, or other items from the lab should be
stored in student cubbies
10
1. Goals of Prelabs • ICS : To learn
∙ How to use Metrics ICS to make electrical measurements ∙ How to use a test fixture ∙ How to use a probe stations(micromanipulators,
microscope, x-y stage) ∙ What types of measurements the Agilent 4155C SPA can
perform ∙ What types of measurements the Agilent 4284A LCR
meter can perform ∙ How to cable instruments to a DUT (device under test) ∙ How to modify test set-ups ∙ How to plot data ∙ How to create transforms with data
• Oxidation: To learn ∙ How to perform the RCA clean ∙ Why RCA cleaning is critical for high temperature furnace
steps ∙ What types of chemicals and grades are used in RCA
cleaning ∙ Why deionized water is used for processing ∙ How to perform dry and steam oxidations ∙ How to load/unload furnaces ∙ Why high purity fused silica is used for furnace processes ∙ How to handle high purity fused silica ∙ The difference between dry and steam oxides ∙ How to predict oxide thickness using oxide growth curves ∙ How to estimate oxide thickness using color chart ∙ Why oxide is grown as an initial step
• Photolithography: To learn ∙ How to degrease a wafer using the simple degrease ∙ How to coat a wafer with photoresist ∙ The components of photoresist ∙ The role of HMDS (hexamethyl disilazane) ∙ How the mask is made ∙ How a wafer is aligned to the mask in a stepper ∙ What type of light source is used for exposure and its
influence on the projected image ∙ How to expose a wafer using a step and repeat aligner ∙ The photochemical reaction that occurs in the photoresist
upon exposure to UV light ∙ How to develop a wafer properly ∙ How to determine development completeness using lines
and spaces ∙ How to etch silicon dioxide using BOE (buffered oxide
etch) in a wet bench
Meetings 2, 3, 4– Prelab Training
11
∙ How to use a hot point probe for dopant type determination
∙ How to remove photoresist from the wafer 2. To be done before lab
• Review topics and processes to be performed for lab 3. Start of lab
• Students gown-up • Students enter cleanroom • Students wait for TA to begin
∙ Students may log into the workstation to review tasks and check for announcements
4. Prelab Processing • ICS
∙ Students log into workstation ∙ TA explains prelab and demonstrates what needs to be
done ∙ Students complete prelab
• Oxidation and Photolithography ∙ Students gather by the glass doors ∙ TA gives safety lecture ∙ Oxidation and Photolithography groups separate
• Oxidation group ∙ TA hands wafers out to students ∙ TA demonstrates and explains oxidation steps ∙ Students complete prelab
• Photolithography group ∙ TA demonstrates and explains photolithography steps ∙ Students complete prelab
5. Assign Reading and Homework • Oxidation Prelab
∙ Read ⋅ Lab Processing Manual
- Introduction - ‘Starting Material Information’ - ‘Degrease Tweezers and Wafers’ - ‘Remove Native Oxide’ - ‘RCA Cleaning’ - ‘Oxidation’
⋅ Lab Operating Procedures Manual - Wafer Cleaning - Lindberg/Tempress 8500 Furnace
∙ References ⋅ http://fabweb.ece.illinois.edu
- Main→GT→GT – N vs ρ
12
- Main→GT→GT4 – Dry Oxidation - Main→GT→GT6 – Steam Oxidation - Main→GT→GT7 – Oxide Color Chart - Main→GT→GT8 – SiO2 Equations - Main→Calculators→Grove: Oxidation
Calculator ∙ Homework
⋅ Lab Processing Manual - Oxidation Prelab Report
• Photolithography Prelab ∙ Read
⋅ Lab Processing Manual - ‘Degrease the IC Wafer and Tweezers’ - ‘PR1 – Open Windows for First Diffusion’
⋅ Lab Operating Procedures Manual - Simple Degrease - Photoresist Processing - Hot Point Probe - ECE444 Mask Set - 4 Point Probe Test Areas
∙ Homework ⋅ Lab Processing Manual
- Photoresist 1 Prelab Report • ICS Prelab
∙ Read ⋅ Lab Processing Manual
- ‘ICS Tutorial’ - ‘ICS Commercial Device Measurements’
through ‘Concentration vs Depletion Width Plot Derivation’
⋅ Lab Operating Procedures Manual - ICS - The Test Stations
⋅ References - Solid State Electronic Devices – Ben Streetman
- Review operation of 1. BJTs 2. MOS Capacitors 3. MOSFETS 4. Schottky diodes
- http://fabweb.ece.illinois.edu - Main→Lab→Testing→MTP2955 - Main→Lab→Testing→2N2222A

13
- http://cp.literature.agilent.com/litweb/pdf/5988-9238EN.pdf
- http://cp.literature.agilent.com/litweb/pdf/5952-1431.pdf
∙ Homework ⋅ Lab Processing Manual
- ICS Prelab 6. Rotation
• If ICS performed this meeting, Oxidation will be performed at the next meeting
• If Oxidation is performed this meeting, Photolithography will be performed at the next meeting
• If Photolithography is performed this meeting, ICS will be performed at the next meeting
• Rotation is repeated until all three prelabs have been completed
1. Goals of independent processing: To learn • How to independently process a silicon wafer into working
electronic devices • How to perform electrical measurements at a wafer level
2. To be done before lab • Read appropriate appendices and process steps relevant to current
process • Reading material will not be assigned: it is up to the individual
student to stay current 3. Start of lab
• Students gown-up • Students enter cleanroom • Reports, if due, will be placed in appropriate drop off location • Students check with TA for specific instructions • Students begin – either
∙ Quiz ∙ Processing
4. During lab • Students process wafers independently in a safe manner as shown
during the process prelab • Performance points begin accruing as described • No horseplay or unsafe practices will be tolerated
Meetings 5-end of semester– Independent
Processing
14
6. End of lab • Students ensure lab is as clean or cleaner than when they began • Trash, used gloves will be placed in trash cans • Tweezers and processing equipment will be placed in appropriate
storage locations • Students de-gown and put garments and wafers in appropriate
storage bin 7. Assignments
• Schottky Diode Report ∙ Located in Lab Processing Manual ∙ Due approximately Meeting 7
⋅ Actual due date will be assigned by student’s section TA
⋅ Due dates will vary depending on section • Processing Report
∙ Located in Lab Processing Manual ∙ Due approximately Meeting 12
⋅ Actual due date will be assigned by student’s section TA
⋅ Due dates will vary depending on section and stage of process
⋅ Students may work ahead – report requires ~8 hours of preparation time
• Final Report ∙ Located in Lab Processing Manual ∙ Due approximately Meeting 15
⋅ Actual due date will be assigned by student’s section TA
⋅ Due dates will vary depending on section and stage of process
⋅ Students may work ahead – report requires ~8 hours of preparation time
• Final Exam ∙ The normally scheduled final exam
(http://www.fms.illinois.edu/FinalExams/) will be taken as a lab-based exam
∙ A 2 hour review session will be scheduled and announced prior to the exam
∙ Knowledge of all materials and processes described or used in lab will be the responsibility of students and will be the subject of the exam

15
Grades The ECE444 laboratory has gained a reputation for producing highly qualified process engineers. In order to accurately ‘sort’ prospective candidates for employers, a thorough, but fair, grading mechanism has been developed that takes into account both objective scores, as well as subjective evaluations. The laboratory experience contributes 25% toward the overall performance rating of the student enrolled in ECE444. The points are accumulated in lab through a combination of
• formal submitted reports • in-lab monitored quizzes • timely submittal of process data • in-lab technique and practical mastery of skills required to fabricate
integrated circuits • lab-based final exam
Grading Point Breakdown
Points Oxidation Prelab1 1
PR Prelab1 1 ICS Prelab1 1
ICS Report1,2 7 ‘Current Context’ Quizzes 10
‘Verification’ Quizzes,2 10 Processing Report1,2 10
Final Report1,3 10 Performance 25 Final Exam3 25
Total 100
1Unexcused late submittal will result in a 10% deduction per day 2Linked (explanation in text) 3Linked (explanation in text)
16
Six (6) reports must be completed and submitted for grading:
• ICS TUTORIAL PRELAB REPORT (1 point) • OXIDATION PRELAB REPORT (1 point) • PR PRELAB REPORT (1 point) • SCHOTTKY DIODE REPORT (7 points) • PROCESSING REPORT (10 points) • FINAL REPORT (10 points)
Lab Reports must include the following, as applicable:
• Title and dates performed. • Data not recorded digitally. • References to digital data should be made when appropriate. • Sample calculations when necessary. • Answers to questions and problems in an easy to follow, logical
progression. • References to information obtained from textbooks, graphs, tables, the lab
manual, other student’s data, etc. • Equations used in calculations. • Statement of assumptions. It is difficult to tell if a student really knows the
answer when he or she has not stated all assumptions clearly. For example, state your voltage reference directions when necessary.
• Brief comments on experimental results. Point out any unusual experimental observations and explain them if you can.
In addition:
• Any material written in pencil will not be accepted. • Scores will be reduced by 10% of the total possible points for each day
past the due date. • All graphs, tables, diagrams, etc. must be fully labeled. • Submitted material must be single-sided with sufficient space for marking
by the grader. • Include data files (Excel spreadsheets, .dat files, etc.) used for the report.
Most importantly:
• EACH STUDENT MUST SUBMIT THEIR OWN ORIGINAL WORK – do not share/split solutions; you may collaborate to find the correct technique(s) for answering questions, but each student must perform all calculations independently and provide unique explanations.
Reports 30 points total value
17
There will be two types of in-lab quizzes administered throughout the semester: Current Context quizzes (10 points) covering material from
• Manuals • Handouts • Supplements • Web site.
Report Verification quizzes* (10 points) on the announced due date for
• Schottky Diode Report • Processing Report *Quizzes with unique grading consequences:
• At least one question directly from the report (with modified conditions) will be included on the quiz.
• Each verification quiz has an intrinsic value of 5 points
• Each verification quiz is correlated with the submitted report: if there is significant discrepancy between the scores of the report and quiz (e.g . 95-100% correct on report, 70-75% correct on quiz), a score of zero (0) will be assigned to both the report and quiz.
Performance of students will be evaluated by the Teaching Assistants throughout the semester. A partial list of the criteria used in evaluation of performance:
• Awareness and adherence to safety protocols • Proficiency in processing protocols, including ability to use equipment and
tools properly • Attendance • Timely submittal of process logsheets
Students start the semester with 15 performance points. As the semester progresses, students can either add to or subtract from the total. Below is a partial listing of the point value for specific actions: Positive actions:
• Completion and submittal of logsheets every week (+4 pts) • Efficient use of time - e.g. multitasking, keeping on schedule or ahead of
schedule without taking shortcuts (+1 pt) • Submittal of professional* quality reports - i.e. meeting all requirements as
set forth in the ‘Reports’ section above (+1 pt) • Demonstration of understanding of the process and procedures when
informally questioned, describing problems, or asking questions (+1 pt) • Proficiency in processing – i.e. proper use of equipment and processes
(+1 pt) • Contribution to the lab experience in a significant way - i.e. exhibit
performance that can be used as an example for other students, point out and announce flaws in the lab which are significant and valid, suggest
Quizzes 20 points total value
Performance 25 points total value
18
more appropriate procedures, produce useful additions to the content of the lab, etc. (+2 pts: this is the most difficult to achieve, and is reserved for exceptional students)
Negative actions:
• Unexcused tardiness (-1 pt every 10 minutes or portion thereof; up to 5 pts each session)
• Unexcused absence (-5 pts each absence) • Failure to wear safety glasses in areas outside of wet lab (1 warning; -1 pt
each occurrence thereafter) • Failure to wear required PPE in the wet lab (-5 pt each occurrence - no
warning) • Broken wafer due to careless/improper handling (-2 pt) • Unauthorized adjustment of equipment (-10 pts) • Unprofessional practices or behavior e.g. improper language, shortcuts,
etc. (1 warning; -2pt thereafter) • Any action that could potentially jeopardize the safety of students or the
integrity of the lab (immediate expulsion and permanent ban from the lab)
The scheduled FINAL EXAM for ece444 is lab-oriented. It is closed book, with no notes allowed. The only allowed articles during the exam are a pencil or pen, calculator, eraser, and ruler. Stored functions, notes, internal memory, external memory, and any other functionality that is beyond the scope of built-in mathematical functionality must be cleared from personal calculators in the presence of a proctor. The staff of ece444 reserves the right to bar use of personally owned calculators. In this case, calculators will be supplied. The exam will consist of at least one question from each of the following areas:
• Safety • Etching processes • Thermal processes • Photolithography • Metallization • Electrical characterization
The final exam will include at least one question from the FINAL REPORT and will be used as a report verification tool, following the same guidelines as described in the REPORT VERIFICATION quiz section above. Any performance discrepancies between the question as answered on the FINAL REPORT and the question as answered on the FINAL EXAM will result in a score of zero (0) assigned to the FINAL REPORT.
Lab-based Final Exam
25 points total value
The focus of the exam is practical – “Know what you did and why you did it.”
19
Any student found to be in violation of academic integrity as defined in §1‐402 Part 4 of the Student Code will be penalized for each infraction as follows:
• a score of zero (0) for the submitted work • a reduction of total lab score by twenty-five (25) points (out of a possible
100 points) Any action that could potentially jeopardize the safety of students or the integrity of the lab will result in immediate expulsion and permanent ban of the offender from the lab.
Computer Access to the Lab Website ECE444 relies heavily on its website: http://fabweb.ece.illinois.edu. You will need to familiarize yourself with its layout and navigation. The ece444 website is a comprehensive guide to semiconductor processing. Information the student can find on the site includes:
• Homework • Schedules • Recipe • Software • Logsheets • Graphs and Tables
Some portions require authentication (logging in) to access the material. The website uses Active Directory (AD) for authentication – you must set up your AD account before accessing the pages.
• If the student can log into the PCs in lab, their account is properly setup. Student use the same credentials to authenticate on the website.
• If the student cannot access the secure areas of the website, they should open the AD account setup page located at http://www.cites.illinois.edu/accounts/index.html and follow the directions, or follow the directions on the login screen of any of the PCs in Everitt Lab.
• If the student cannot authenticate after following the directions on the AD account setup page, they should contact their TA and email Dane Sievers at [email protected].
Cheating and Plagiarism
Expulsion
20
Remote Desktop
Portions of the lab require the use of IC-CAP for data manipulation and graphing outside of class. This requires remotely logging in to the lab PCs.
The PCs in the ece444 lab run Windows Server 2008R2, which allows up to three separate user sessions to be active simultaneously, either through the terminal or through Remote Desktop. For a Remote Desktop session the student will need to install a client:
Click on Start→All Programs→Accessories→ Remote Desktop Connection
Click on Start→All Programs→Accessories→Communications→Remote Desktop Connection
Download Remote Desktop Connection Client:
http://www.microsoft.com/mac/remote-desktop-client and follow the directions for installation.
• Connect to the CITES VPN if you are off-campus (see instructions below)
• Open Remote Desktop Connection
• In the Computer: field, type in one of the following PCs:
o EVRT-050Q-01.ad.uillinois.edu o EVRT-050Q-02.ad.uillinois.edu o EVRT-050Q-03.ad.uillinois.edu o EVRT-050Q-04.ad.uillinois.edu o EVRT-050Q-05.ad.uillinois.edu o EVRT-050Q-06.ad.uillinois.edu
• Click Connect and login using your AD account. • If all three available sessions are active, the login dialog box will prevent
additional sessions. If this happens, try logging in to another workstation
Windows Vista/Windows 7
WindowsXP
Mac
To login to the lab PCs
21
When the student is finished with their remote session, they must logoff to free the computer for other users. To do this:
• Click on Start→Logoff
If there is no activity for 30 minutes, the session will automatically terminate, and any changes on open documents will not be saved.
Campus Firewall/CITES VPN Everitt Lab is protected by the campus firewall, which prevents off-campus computers from connecting to resources inside the firewall. If the student tries to connect to a lab machine via Remote Desktop from off-campus, they must use a Virtual Private Network (VPN) client.
Cites has instructions for connecting to the campus VPN at http://www.cites.illinois.edu/vpn/download-install.html
After establishing a connection to the internet from the off-campus computer, the student must authenticate with AD credentials. After successfully logging into the VPN server, the student may then establish a Remote Desktop Connection to the lab computers.
If the student is having problems connecting to one of the lab PCs, they should try the following links for help:
• http://www.cites.illinois.edu/vpn/firewallports.html
• http://www.cites.illinois.edu/vpn/vpnfaq.html
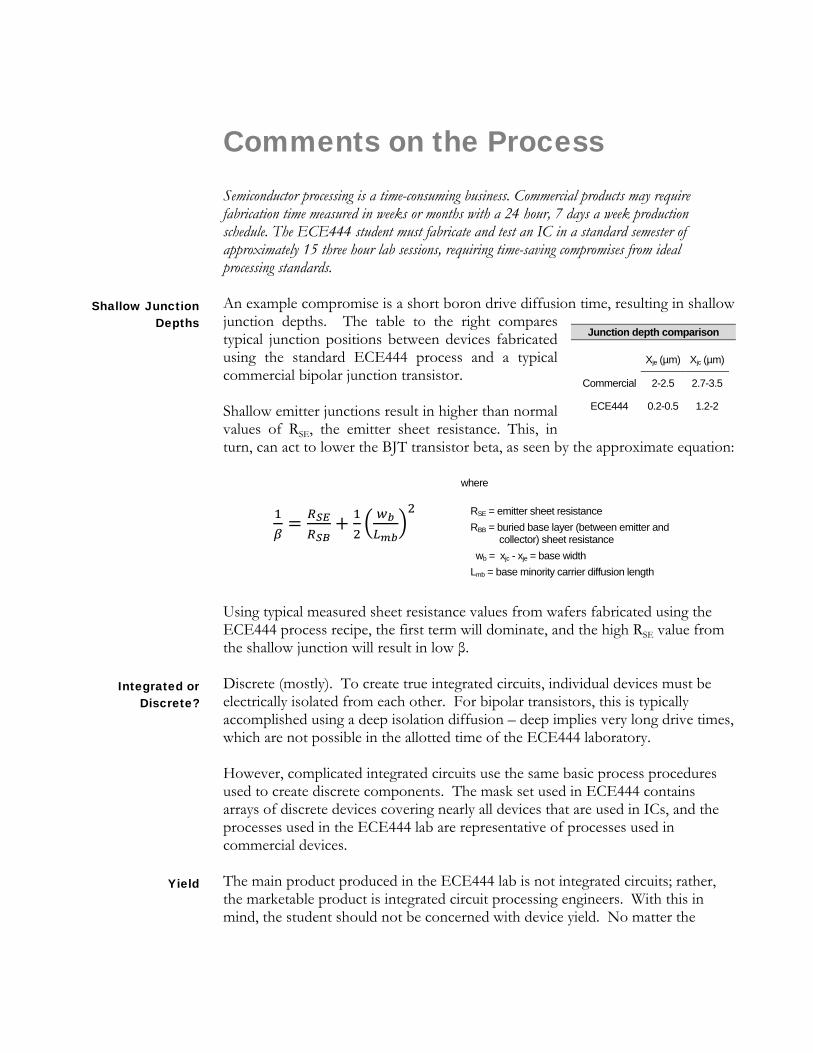
Comments on the Process Semiconductor processing is a time-consuming business. Commercial products may require fabrication time measured in weeks or months with a 24 hour, 7 days a week production schedule. The ECE444 student must fabricate and test an IC in a standard semester of approximately 15 three hour lab sessions, requiring time-saving compromises from ideal processing standards. An example compromise is a short boron drive diffusion time, resulting in shallow junction depths. The table to the right compares typical junction positions between devices fabricated using the standard ECE444 process and a typical commercial bipolar junction transistor. Shallow emitter junctions result in higher than normal values of RSE, the emitter sheet resistance. This, in turn, can act to lower the BJT transistor beta, as seen by the approximate equation:
Using typical measured sheet resistance values from wafers fabricated using the ECE444 process recipe, the first term will dominate, and the high RSE value from the shallow junction will result in low β. Discrete (mostly). To create true integrated circuits, individual devices must be electrically isolated from each other. For bipolar transistors, this is typically accomplished using a deep isolation diffusion – deep implies very long drive times, which are not possible in the allotted time of the ECE444 laboratory. However, complicated integrated circuits use the same basic process procedures used to create discrete components. The mask set used in ECE444 contains arrays of discrete devices covering nearly all devices that are used in ICs, and the processes used in the ECE444 lab are representative of processes used in commercial devices. The main product produced in the ECE444 lab is not integrated circuits; rather, the marketable product is integrated circuit processing engineers. With this in mind, the student should not be concerned with device yield. No matter the
Shallow Junction Depths
Junction depth comparison
Xje (µm) Xjc (µm)
Commercial 2-2.5 2.7-3.5
ECE444 0.2-0.5 1.2-2
1𝛽
= 𝑅𝑆𝐸𝑅𝑆𝐵
+ 12� 𝑤𝑏𝐿𝑚𝑏
�2
where
RSE = emitter sheet resistance RBB = buried base layer (between emitter and
collector) sheet resistance wb = xjc - xje = base width Lmb = base minority carrier diffusion length
Integrated or Discrete?
Yield
23
outcome of the devices, the student will have gained a tremendous amount of knowledge and experience while processing their wafer. Low yield does not mean the student failed at processing. In fact, low yield is encouraged, as it provides a learning experience for the student – if everything works as expected, not much thought is required when characterizing the devices. However, if a device does not work as expected, the student must ask “WHY doesn’t it work?” Then an analysis of the process and determination of possible mistakes must be undertaken. Mistakes force the student to think.

24
Laboratory Infrastructure The continued existence of the ECE444 laboratory requires everyone working in the lab to learn, obey, and practice proper safety protocols. Preventable accidents are not tolerated, as they affect not only the victim of the accident, but everyone that is taking the lab, and may ultimately affect the future status of the lab. There are two parties responsible for safety in the laboratory:
• ECE444 Staff provide the proper equipment, documentation, training, and supervision for a safe working environment.
• ECE444 Students must adhere to all safety protocols and shall only perform processes for which they have been properly trained.
The student is responsible for their own personal safety, as well as the safety of everyone in the lab. The student must be attentive and prepared by reading, understanding, and practicing the information below. Fume Hoods: fume hoods protect workers from exposure to air-borne contaminants, such as dangerous fumes from chemicals. The fume hoods are checked for proper operation on a yearly basis and adjusted or repaired as needed. It is the student’s responsibility to check the inspection label attached to the fume hood to ensure that it meets the minimum safe operating performance, and that the certification is current. If the label is not current, or is yellow or red, the student must not use the fume hood and must notify an ECE4444 staff member. Chemical Waste: chemicals must be disposed in a safe manner; all applicable regulations and protocols must be adhered to. Waste containers are provided and must be labeled with the contents of the container and the word “Waste”. Sinks in the laboratory are for water only; do not pour any chemical into the drain.
• Solvents and solvent waste must be stored and used only in fume hoods lined with stainless steel.
• Acids and acid waste must be stored and used only in polypropylene (white plastic) fume hoods.
When a waste container is full, the container must be tightly capped and transported to the chemical waste storage area (room 50G). After transporting acid waste to the storage area, the cap must be loosened to prevent pressurization due to outgassing. Furnaces: the furnaces in the lab operate between 400°C - 1100°C. High temperature gloves must be worn at all times when loading, unloading, and when directly handling fused silica (commonly called ‘quartz’). While handling quartzware, care must be taken to prevent accidental contact with skin; bystanders
Physical Precautions
25
must remain outside the handling zone marked by the yellow and black tape on the floor. In addition, quartzware is very fragile, expensive, and susceptible to contamination. Quartzware must be handled with care – do not exert torque or tensile strain on parts made from quartz, as it can shatter and cause severe lacerations (cuts). Contamination: semiconductor devices are susceptible to various forms of contamination that can cause non-ideal behavior or failure. The two most common types of contamination are:
• Organic contaminants – ‘oily’ material that adheres to the surface of the wafer. Sources include contact with human skin and contaminated surfaces. Masks surfaces when cleaning or etching and can contaminate furnace chambers.
• Alkali metals – typically charged ions that can diffuse or become incorporated in active components of devices. Sources include impure water, contact with human skin, and exposure to high levels of humidity. Devices affected include MOS structures; charged ions are mobile in silicon dioxide, leading to threshold voltage hysteresis. Can permanently contaminate furnace chambers, as well as increase rate of devitrification of quartzware (fused silica).
Never touch any process equipment or surfaces that contact wafers directly. The thin nitrile gloves must be worn at all times when handling wafers.
Cross contamination must be minimized by using dedicated handling equipment for each furnace process. Do not share pushrods between chambers. Solid dopant sources are susceptible to airborne contaminants and water vapor (humidity). When storing, boats containing source wafers must be placed in the center of the furnace at the appropriate standby temperature. Equipment adjustment: do not adjust any equipment in the laboratory. If a process does not work due to alignment or calibration problems, the TA or Lab Engineer must be notified. Equipment in the lab can be extremely difficult to adjust for optimal performance, and some processes require extreme accuracy in temperature, position, and time. As an example, the UT1000WF stepper has adjustments that require positional tolerances as tight as ±0.2µm. Wafer handling: extreme care must be used while handling silicon wafers. Only handle wafers with clean wafer tweezers. Keep tweezers clean – do not lay onto flat surfaces; rest the tweezers over the edge of the wafer carrier. Do not transport wafers with tweezers; tweezers should only be used to remove wafers
26
from carriers to place them into process equipment. Silicon wafers are extremely brittle and fracture easily if mishandled. General lab guidelines:
• Wait outside of the gown room if there are already three persons in the gown room.
• Don Tyvek coveralls and cap while on the "dirty" side of the bench.
• Put on boots as you step onto the "clean" side of the bench. Never step on the dirty side of the gown room with boots on. When entering the cleanroom, step directly on the tacky mat to remove particles from the soles of the boots.
• Safety glasses are required in all areas of the lab. Prescription glasses may be worn in place of safety glasses.
• Do not wear contact lenses while in the lab, as they can trap chemicals against the eye, increasing the likelihood of permanent damage.
• Consult the instructor if any mistakes are made in processing
• Consult the instructor at the beginning of the period for any special processing instructions.
• Minimize materials brought into the cleanroom. Bring only the wafer, lab manual, notebook, and a pen into the lab.
• Photoresist must not be left on wafers overnight. Do not begin a photoresist operation unless it can be finished by the end of lab.
• Never enter the wet lab without gloves, face shield, and safety glasses.
• Do not take shortcuts while processing. Follow the instructions step by step as described in the process manual.
• Avoid using excess chemicals to minimize cost and waste generation.
27
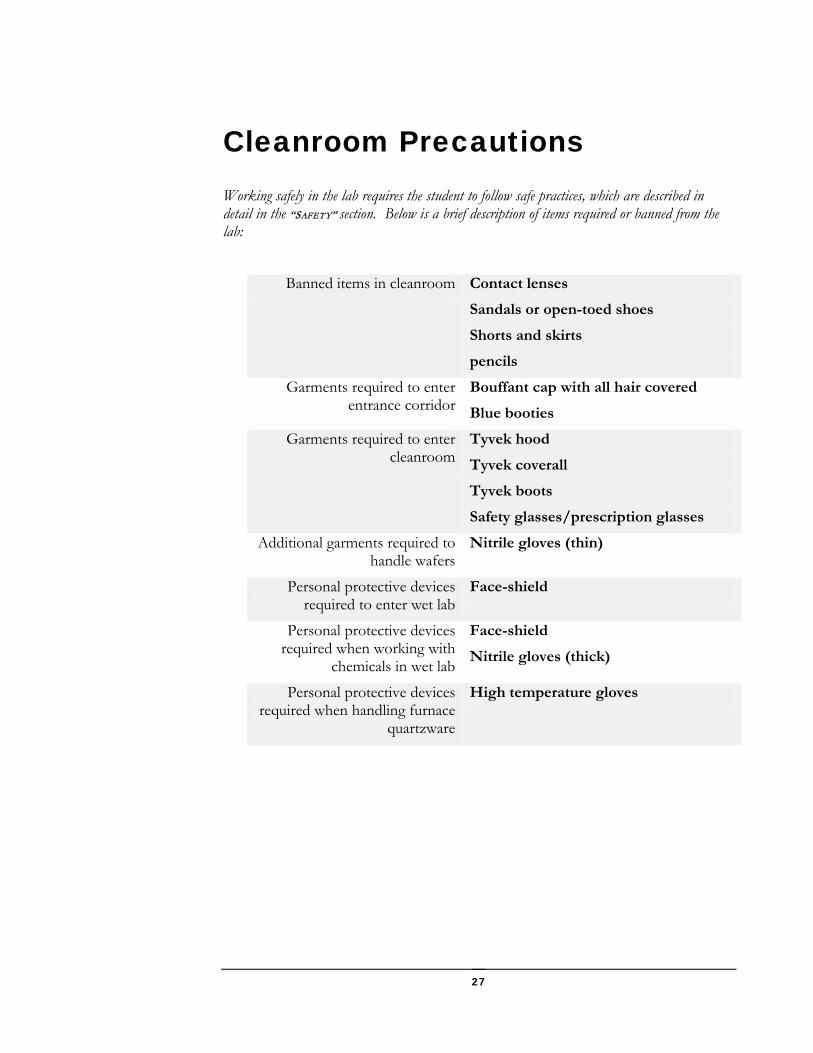
Cleanroom Precautions
Working safely in the lab requires the student to follow safe practices, which are described in detail in the “SAFETY” section. Below is a brief description of items required or banned from the lab:
Banned items in cleanroom Contact lenses
Sandals or open-toed shoes
Shorts and skirts
pencils
Garments required to enter entrance corridor
Bouffant cap with all hair covered
Blue booties
Garments required to enter cleanroom
Tyvek hood
Tyvek coverall
Tyvek boots
Safety glasses/prescription glasses
Additional garments required to handle wafers
Nitrile gloves (thin)
Personal protective devices required to enter wet lab
Face-shield
Personal protective devices required when working with
chemicals in wet lab
Face-shield
Nitrile gloves (thick)
Personal protective devices required when handling furnace
quartzware
High temperature gloves
28
Cleanliness Following appropriate cleanliness protocols is essential for the student as they process their wafer. Industrial processes require extreme levels of cleanliness in terms of particulates as well as chemical contamination. This level of cleanliness requires considerable resources which are prohibitively expense for implementation in the ece444 laboratory. Therefore, only basic measures are exercised.
• Tweezers must be cleaned and degreased prior to handling wafers. • DI water submersion rinses, where specified, must have fresh, clean DI
water. • DI water spray rinses must be thorough, using sufficient quantity of
water to cover and rinse both the front and back surfaces of the wafer. • Discoloration or spotting of the surface of the wafer must be brought to
the attention of the lab instructor before processing continues. • To reduce pollution and cost overruns, chemicals used in cleaning must
be used sparingly. No more than the necessary amounts for effective cleaning should be used.
• The student must read instructions carefully, think about what must be done, and then do it with care.
o Instructions for processing must be read prior to lab. o Changes, corrections, or addenda may be presented at any point
during the process. It is the student’s responsibility to keep current with announcements.
Cleanliness considerations:
THINK CLEAN Cleanliness is of utmost importance in the fabrication process. Contaminants introduced during the process can degrade or destroy device performance.
Safety The pages that immediately follow contain articles discussing safety:
“SAFETY AT A GLANCE” • A quick guide to safety, as told by a TA • General overview of lab specific safety precautions
“LABORATORY HEALTH AND SAFETY: BE AWARE, BE PREPARED, BE PROTECTED”
• General lab hygiene
“LABORATORY CHEMICALS” • Basic listing and description of chemicals used in the ece444 laboratory • This information should not be used as a replacement for the MSDS of the chemicals
listed “MEDICAL MANAGEMENT OF HYDROFLUORIC ACID EXPOSURE”
• Detailed information regarding contact with HF acid
“WET CHEMICAL ETCHING” • ece444 specific standard operating procedure (SOP) for wet chemical etching
Safety at a Glance The University of Illinois, and especially the ECE444 laboratory, has a long standing tradition of safety awareness. There have been no serious accidents in over 40 years of operation of the 444 lab. It's your responsibility to be familiar with this material: you will be tested on it! The first and most important tool for safety available to you is common sense. Be aware that you are working in a potentially dangerous environment where you cannot afford to be careless. Never horse around in the lab or engage in any activity that may be risky to you or other people working in the lab. Be conscious of the safety hazards of the lab: You are working with strong chemicals, with high temperatures, with vacuum pumps and with lasers. Safety in the lab begins before you get into the lab. Always wear covered shoes (no sandals) and pants (shorts and skirts only mean that you have 1 layer less of clothing between you and the lab). Never wear contact lenses; they may trap chemicals against your eyes. Before you come into the Lab make sure you are properly wearing your Tyvek® suit, cap, booties and safety glasses. If you are processing, you must wear gloves (nitrile gloves are provided). This will provide you with the basic safety equipment, and will also protect the equipment, lab and experiments from contamination you may bring into the lab. You should wear these items at all times inside the Lab.
Safety Equipment and procedures

30
Be familiar with MSDS (Material safety data sheets). These are the specifications for all the chemicals we use in the ECE444 lab. In case of an emergency, medical personnel will NEED this information. You are responsible for reading and understanding the MSDSs for all the chemicals in the lab. The Wet Lab deserves special attention due to the potentially dangerous chemicals that are stored there.
• Always wear a closed face shield inside the wet lab. • When working with chemicals, work under the appropriate fume
hood. Most of the chemicals in the lab are volatile. • Always wear the heavy nitrile gloves (thick green gloves) when working
in the acid or RCA hoods. BE ESPECIALLY CAREFUL WITH THESE GLOVES:
• Remember: never touch the outside of the gloves. • Students are usually careful when getting in and out of the gloves;
however some students tend to be careless while using the gloves. ∙ Never touch your face with the gloves. If your face / nose
itches don't use your gloved hands to scratch. ∙ Always be aware of BOTH hands. Always keep both hands
above the counter. Don't let your left hand (if you are right handed for example) out of your sight; you will tend to put it by your left hip. Remember: TYVEK and LATEX will N O T PROTECT YOU FROM CHEMICALS.
∙ If you see or feel anything wet inside the gloves let one of the TAs know. We have plenty of new gloves
• When handling chemicals for the RCA clean be careful when you get them in and out of the cabinets underneath the hoods. When you are done with the bottles and other equipment, remember to rinse them before returning them to their storage place. Always open the containers underneath the hood, some of them will give off fumes as you open them.
• If using sulfuric acid in SC-2, remember the jingle "Always do as you oughta, add ACID to WATER". When working with acids and water, water always goes first. When you add the sulfuric acid to the solution you will notice a sharp increase in temperature. If you pour too fast, or to a solution that is already too hot (above 60° C) you will reach (at least locally) the boiling point of H2SO4 (sulfuric acid). This will cause bubbling and splashing of acid outside the quartz boat. If this happens, stop pouring acid immediately, turn the temperature controller off and wait for the temperature to go below 60° C before continuing to pour the acid.
• When working with the furnaces make sure you are wearing the
appropriate gloves
The Wet Lab
The Furnaces
31
• Make sure there is only 1 person in the furnace area (marked by yellow and black tape on the floor) when someone is loading / unloading a boat.
• Whenever you turn in any of the gases make sure you check the flow and pressure settings. You want to make sure that the ball in the flow meter is floating, and that the pressure gauges read ~ 15 psi AFTER you turn the gas on.
• Hydrogen is used to produce pyrogenic steam – H2 and oxygen (O2) is injected into the chamber where combustion occurs, producing steam (H2O(v)). Under the appropriate conditions, this is a safe and controlled reaction. However, if there is an excess of H2 (leading to H2 gas leaving the chamber), or the temperature is <800°C (the temperature is too low to spontaneously combust), the potential for an explosion are present. To prevent this from occurring, the gas control panel monitors the H2/O2 ratio and temperature at the point of injection. If it is unsafe, the control panel will turn off the hydrogen and sound an alert. If this occurs, contact your TA. Note that the control panel will leave the system in a safe state (i.e. no H2 flow into the chamber). The hydrogen flow rate will need to be adjusted or the furnace will need time to reach the auto-ignition temperature.
In case of emergency always call 9-911 and give the following information: Your name Location -
Integrated Circuit Fabrication Lab Room 50Q, Basement of Everitt Lab 1406 W. Green St., Urbana
Specific information about the emergency In case of a fire, students should evacuate (see evacuation routes) the lab as soon as possible in an orderly fashion. Activate one of the fire alarms on your way out.
Emergencies
Fire
32
The lab is equipped with multiple fire suppression systems. Sprinklers: Due to the high cost and difficulty in procuring processing equipment, a wet sprinkler system would not be a prudent system to extinguish fires. Therefore, a ‘dry’ sprinkler system is employed in the lab. Specifically, the system is a single interlock pre-action dry pipe system. This system minimizes the potential for damage to the equipment in the lab due to accidental damage to sprinkler heads or false alarms. In normal operation, the sprinkler lines are sealed by a valve and pressurized with air. Before water is released into the lab, two actions must occur:
o A detecting device must sense the presence of fire – this will open the main valve to the system, filling the line with water. The lab uses smoke detectors located throughout the area.
o A sprinkler head must be activated to release the water in the charged line. The sprinkler head must reach a specified temperature before opening – the sprinkler heads in the lab contain blue bulbs, requiring a temperature of 286°F before activating.
The requirement of meeting two conditions lowers the probability of accidental release of water onto the equipment in the case of a faulty detector, a controller fault, or the accidental breakage of a sprinkler bulb. In addition to the features above, the sprinkler system in the photolithography lab is fitted with dry pendant sprinkler heads. This provides additional protection by minimizing the chance of a sprinkler head dripping water onto the equipment, even if the line is charged with water. HFC-125 Fire Suppression System – Photolithography Lab: The photolithography lab contains equipment that is difficult and expensive to repair or replace. To prevent damage, a clean agent fire suppression system is used to extinguish a fire in this area. If a fire is detected, pentafluoroethane (HFC-125) is released into the room from a pressurized storage vessel. The HFC-125 suppresses fire by absorbing heat energy at a higher rate than the amount of heat generated by the fire, preventing the fire from sustaining itself. The area to be protected must be air-tight to maintain a sufficient quantity of HFC-125 for suppression. The HFC-125 system is automatic. In the event a detector senses the presence of fire, a warning alarm will sound 30 seconds prior to the release of the suppression agent. During this 30 second warning, release of the agent can be halted by pressing the bypass button (in the case of a false alarm). Otherwise, after the 30 second warning the main fire alarm for building will be activated and the HFC-125 will be released into the room.
Fire Suppression
33
Evacuate the lab as described in ‘Evacuation Routes’, making sure that all doors to the photolithography lab are shut tight. The photolithography area also contains a single interlock pre-action dry pipe system, with the additional protection of dry pendant sprinkler heads. This type of sprinkler head provides additional protection by minimizing the chance of water dripping onto equipment, even if the line is charged with water. CO2 Fire Suppression System – Wet Lab: The wet lab houses multiple fume hoods, which poses a particular hazard in the case of a fire. A fume hood, by design, draws air into the working area and exhausts the air outside of the lab at a velocity of 80-120 feet per second. This high flow of air will cause a fire located inside the hood to grow quickly. In order to reduce the potential for an uncontrollable fire, the fume hoods contain nozzles connected to a pressurized vessel containing CO2. In the event of a fire in a fume hood, the CO2 cylinder may be manually released into the hoods. The CO2 suppresses the fire by displacing oxygen. However, people need oxygen as well in order to live. Therefore, the system should not be released until everyone has evacuated the area. This is a legacy system and should only be activated by lab personnel. Hydrogen is a highly flammable gas, with the potential of being explosive in air. The lab contains two systems which monitor hydrogen levels. Furnace Gas Control Panel: Gases are injected into the furnace chambers through the gas control panel located in the cabinet at the end of the furnace. The control panel monitors chamber temperature and the H2/O2 ratio (as explained previously). If either parameter is outside the limits of safe operation, the panel will turn off the hydrogen and sound an alarm. The alarm is local to the gas cabinet, and does not tie into the lab fire alarm system. When in alarm, the system defaults to a safe condition. There is no need to evacuate the building at this point, unless your TA indicates otherwise. Lab Area Hydrogen Detection System: The Hydrogen Detection System continuously monitors various points in the lab and reports hydrogen levels as a percentage of the lower explosive limit (LEL). The reporting unit is located to the right of the wet lab door (looking into the wet lab). It consists of the interface panel (state indicators, bypass switch, and silence button) and three LCD displays.
Hydrogen Alarms
34
The sensor heads are located at three key positions around the furnace:
o Gas cabinet o Chamber exhaust o Above the false ceiling
This system has been programmed to respond to two levels of detection:
5% LEL Alarm: • Local alarm sounds and strobe light activated. • This level of alarm is a warning to personnel that hydrogen is
being released, allowing the opportunity for the cause to be found and fixed before going into full alarm.
• Students should prepare for potential evacuation
10% LEL Alarm • Local alarm sounds, strobe light activated, and building-wide fire
alarm activated. • Building evacuation (see ‘Evacuation Routes’ below).
The ece444 laboratory has multiple emergency exits due to its size. Safe exits can be identified by illuminated signage adjacent to the exit. The exit route used in an emergency should be based on the immediate situation. Do not de-gown. After evacuation, students must meet on the sidewalk on the south side of the building (by Green Street) at a safe distance from Everitt Lab. Keep your lab garments on. It is essential to regroup so that lab personnel can account for everyone and notify the responders of anyone that is missing. Figure 1 on the following page identifies the egress routes from the lab. Green arrows indicate direction of travel. Red crossed-circles indicate doors located in the lab that should not be used for evacuation.
Evacuation Routes
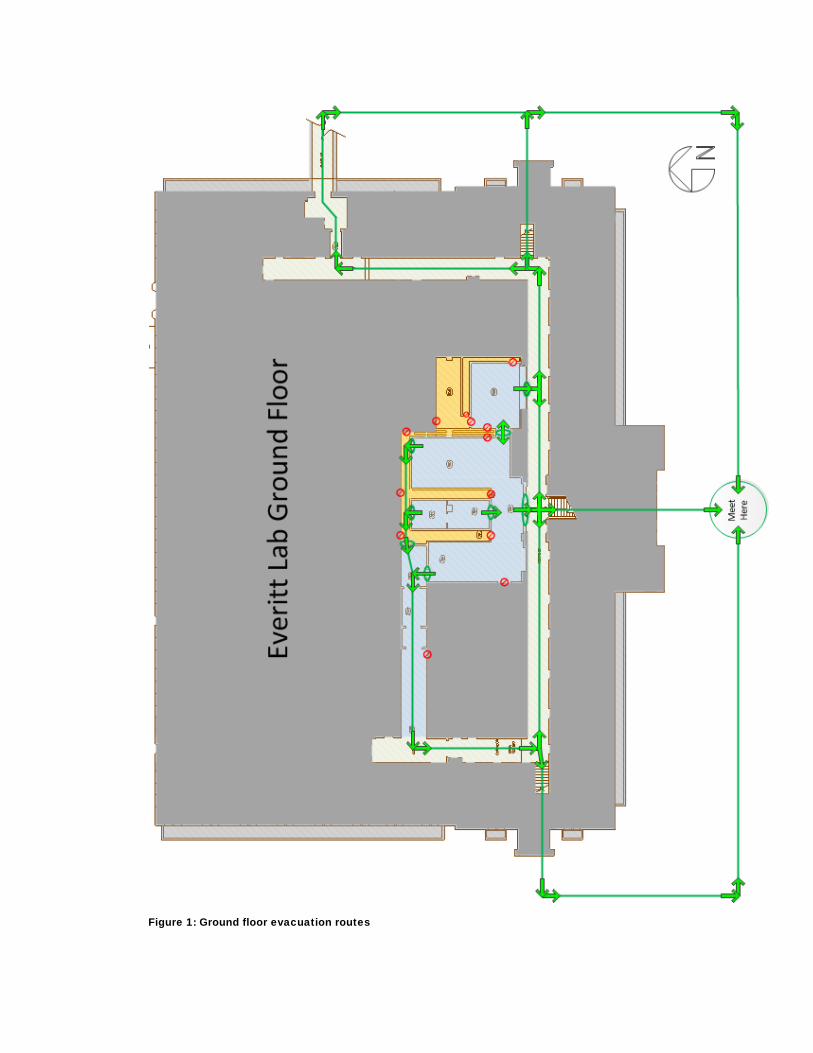
Figure 1: Ground floor evacuation routes
Laboratory Health and Safety: Be Aware, Be Prepared, Be Protected
by James. A. Kaufman
As a chemistry student, you probably spend between 3 and 30 hours per week in a laboratory. Your time there should be an education, exciting for what you can learn not for the accidents or injuries you can have. When working in the laboratory, you must be aware of the responsibilities you and your professor have for your health and safety. To do this, you need to understand and practice three important concepts of lab safety: 1. Know the hazards before you do the experiment 2. Answer the questions:
a) What are the worst things that can go wrong? b) What must I do to be prepared? c) What are the proper practices, equipment, and
facilities necessary to minimize exposure to the anticipated hazards?
3. Make health and safety an integral part of your activity.
Health and safety in the laboratory depends on many factors. Some of these factors have already been discussed in previous articles in the pHilter: “Chemical Health and Safety” (Spring ’83); “Labeling Chemicals: Training Aids
for Use” and “Chemical Waste Management in Academic Laboratories” (Fall ’83). This article will deal with four aspects of laboratory health and safety: 1. Responding to emergencies. 2. Safety rules and recommended good practice. 3. Protective equipment, and, 4. Protective facilities. While these topics do not represent all that can be said on laboratory health and safety, they do cover a broad spectrum of issues that relate to your well being and the well being of those who work around you. Assume the responsibility for yourself and others by being AWARE, PREPARED, AND PROTECTED. Responding to Emergencies
Fires, explosions, chemical exposures and spills, bleeding, unconsciousness, asphyxiation, and thermal burns are all possible in laboratory accidents. How would you respond? Without a doubt, protection comes from being prepared, from having considered your response to “the worst thing that can happen.”
What might your preparation need to be? You should know: (1) the established evacuation routes from your building, (2) the location of the list of phone numbers for
37
assistance, (3) the ways to assist in the temporary care of a variety of injures, (4) the techniques for handling certain types of small fires, and (5) how to clean up and dispose of different types of chemicals you use during your experiments. To do all these properly requires planning and practice. It requires thinking through a variety of problems and having a predetermined course of action. Most importantly, the plans your school has established need to be practiced.
If a fire, explosion, or majo9r toxic chemical spill occurs, it may become necessary to evacuate the building. Preparation for this type of accident means exit routes should have been understood and rehearsed. (Remember, elevators should never be used during emergency evacuations.) Because all good evacuation procedures include a means of accounting for people who may be inside the building, you should always move to your assigned place outside the building.
Obtaining assistance with minimum delay is possible if there is a list of phone numbers of the police and fire department, hospitals, poison center, ambulance service, and campus medical assistance group posted on or next to your laboratory’s telephone. Understanding how to use this list is a valuable aid.
Knowing how to assist in the temporary care of an injured person can be extremely important. Know what you can and cannot do to help a victim. Red Cross standard first-aid and cardiopulmonary resuscitation (CPR) courses are available from local chapters of the Red cross and sometimes through the local fire and police departments. Certainly, both help you provide informed emergency care. The boxed information on page 12 lists several important points that should be remembered when considering temporary emergency care.
Dealing with major fires is a job for trained professionals. If a serious fire occurs, your most important concern should be the prompt evacuation of all persons in the building and then a call to the fire department.
For smaller fires, training and knowledge are the important elements for success. Training will help you know which type of fire extinguisher is the correct one to use for the particular type of fire: paper, oil or grease, electrical, and active metals all require special types of extinguishers. (See the box on page 8.) In addition to using the proper extinguisher, you need to know the correct techniques for extinguishing a fire as well as when and how to use a fire blanket.
If your clothing were to catch fire it is best to drop to the floor and roll around to smother the flames. Running for a shower or fire blanket can fan the fire and increase your chances of inhaling hot vapors that can burn the throat and lungs.
There is some debate concerning the proper use of fire blankets. Traditionally, fire blankets were useful for smothering flames on clothing. Yet, the increased use of synthetics in clothing has raised a new problem. Because synthetics melt when they burn, wrapping the victim with a fire blanket could press the melting material onto the skin and cause severe burns. Therefore, rolling to smother the flames may provide the best alternative for extinguishing fires on clothing.
As with fires, large chemical spills are best handled by professionals. Lab bench spills should be cleaned up immediately and precautions appropriate to the nature of the spilled materials should be known and used. In cases involving highly toxic, flammable, or noxious compounds, it may be necessary to evacuate the building.
It is important to remember the following points:
1. When flammable liquids are involved, all gas flames, electrical equipment, and other sources of ignition should be turned off immediately.
2. When someone has been exposed to a large amount of a hazardous chemical, immediately remove all clothing (including socks, shoes, watches, and other easily removed jewelry) and flush the body area with water for at least 15 minutes. Medical assistance should be sought as soon as possible. Make sure the contaminated clothing is not put back on after the shower; it, too, needs to be cleaned.
3. Flushing the body also means giving special attention to the eyes. Eyes should be washed for 15 minutes; both top and bottom lids should be turned inside out and the eye should be constantly rolled.
Safety Rules and Recommended Good Practice
Your day-to-day lab procedures also are important. We occasionally forget to observe such things as personal hygiene; housekeeping; curtailing eating, drinking, and smoking in the lag; proper attire; general conduct; and the importance of not working alone, and of not leaving operations unattended.
The presence of hazardous substances in the chemistry lab places an extra demand on the chemist to maintain a high standard of personal hygiene. Regular washing of hands and face become particularly important; it is a food practice to wash your hands thoroughly before you leave the lab. Depending on the chemicals being used, a shower after working may be wise. Personal clothing and protective equipment like lab coats should be laundered regularly and immediately after contamination. Clean work surfaces facilitate safe operation. Small spills should be cleaned up immediately. Equipment and chemicals that are not in use should be stored to avoid the buildup of clutter. Promptly placing empty shipping cartons and packing materials in the proper trash receptacles is another way you can avoid laboratory litter.
Dirty glassware should not be allowed to accumulate in the sink. Disposable or broken glassware should be discarded separately from general trash to avoid injury to custodial personnel. In addition, discarded glassware should be as free of chemical contamination as possible.
Eating, drinking, and smoking in the lab should never be permitted. Refrigerators for storing food should be outside the laboratory area. In fact, separate areas should be designated for the consumption of food and beverages and smoking and non-smoking areas should be assigned. Hands should always be washed before food or beverages are consumed and lab coats and other protective clothing should be removed before entering the dining areas. It may seem more convenient and less time consuming to eat, drink, or smoke in the lab area but any of these practices can increase your chances of swallowing or inhaling the chemicals you are working with – a situation that can lead to a reduced life expectancy. Smoking also can act as an ignition source for a major fire or explosion.
Clothing worn in the lab should be comfortable and not restrict motion, yet should not be so loose as to catch on any moving apparatus. Because of their flammability, many synthetic fabrics are more dangerous than cotton. As an added precaution against fire, long hair should be tied back. Sandals and open-toed shoes are dangerous footwear in laboratories; they offer no protection from spilled chemicals or dropped objects. Canvas shoes and sneakers also do not provide the necessary protection from laboratory accidents. Leather shoes or steel-toed work shoes provide the best protection.

38
Extinguishers and Fires – Know the Right Ones for the Job
Every Lab should have fire extinguishers that are rated
in two ways: (1) with a number indicating the approximate number of square feet they cover, and, (2) with a letter indicating the type of materials they are designed to extinguish. Thus, a 2A extinguisher will cover about 2 square feet of a type A fire.
A type A fire is of wood, paper, rubber, or plastic materials. Extinguishers charged with water, water/soda acid, or foam can be used on type A fires. (Type A fires involve items that, when burned, make ash.)
Type B fires include flammable liquids, gases and greases. Extinguishers charged with foam, carbon dioxide, or dry chemicals can be used. (Type B fires involve materials that boil and bubble when burned.)
Type C fires are those involving electrical equipment. Only dry chemical or carbon dioxide extinguishers should be used. Carbon dioxide may be preferred because it leaves no residue in the equipment. (Type C fires involve things that can give an electrical charge.)
Fires caused by active metals are classified as type D. Only sand and special powders should be used on active metal fires. (Type D fires involve metals that burn doggone hot.)
The use of carbon tetrachloride fire extinguishers is not permitted and the extinguishers are not supposed to be in schools. (In some older schools, they may be stored in out-of-the-way places.) The material is toxic and in a fire it can form the even more toxic compound, phosgene.
Extinguishers in the lab should be small enough to be handled easily as well as provide sufficient coverage. If they are too large, they become hard to use. Everyone who might be expected to use a fire extinguisher should be instructed in its proper use. They should be inspected annually and marked with the date and initials of the inspector.
Because of the hazards which are present in the lab, a
serious working atmosphere needs to be maintained. Horse play, fooling around, or practical jokes can often lead to unintentional injury or accident.
Remember, never work alone. There should always be a person nearby who knows how to lend assistance or summon help in an emergency.
You may at times need to continue operating an experiment without supervising it. Unattended operations need special considerations. Set them up in ways that make them fail-safe; add monitors for temperature, pressure, and fluid levels. Secure hoses and shield the operation as a precaution against accident. It also is handy to have information on what to do in an emergency and the phone number of the person responsible for the experiment at a place near the operation.
Protective Equipment The hazards associated with working in laboratories
often necessitate the use of personal protective equipment. These devices, however, should never be considered substitutes for prudent practices or protective facilities.
Eye protection means industrial quality safety glasses or safety goggles. Neither should be confused with plastic lenses that are considered by the Consumer Product Safety Commission as shatter resistant. Industrial quality safety glasses and goggles meet the ANSI (American National Safety Institute) standard Z87.1; they are made of thicker
glass that has been hardened. This construction gives the lens a much higher resistance to shattering upon impact.
For glasses, the frames are constructed to prevent impact from forcing the lens towards your face. The lens must display the manufacturer’s trademark and the frame must display the Z87.1 logo on both the face and the temples. Goggles should have the same markings; they also should give splash protection.
Safety glasses should be worn at all times in laboratory work areas. When a chemist has a desk in the working area, glasses must be worn when seated there as well. There are three types of situations in which safety goggles should be used: when you are handling chemicals that would damage your eyes if splashed into them; when you are working with unknown or new chemicals; and, when you are handling hot liquids.
With prescription safety glasses available in a wide range of frame styles and sizes at prices from $15 to $30, there is no practical excuse for each chemist to not have a pair. It is a good idea for all chemistry majors to purchase a pair of industrial quality safety glasses; those with side shields provide some extra measure of safety. Often these shields are removable so the prescription glasses can be used inside and outside the laboratory.
Your lab or bookstore should have a variety of styles and sizes of goggles available so that you can find a pair that fits, is comfortable, and is not prone to fogging. If you must wear prescription glasses under your goggles, the new wide angle model by Encon and others is large enough to fit comfortably over eyeglasses and yet not pull them off your face when the goggles are removed.
Contact lenses should not be worn in the lab because chemical can become trapped in or behind the lens and do great damage. Soft contacts, in fact, tend to absorb vapors from the air, a situation that promotes eye irritation and other problems. In addition, in emergency situations, co-workers may not be able to remove lenses or they may not know or remember you wear them.
For operations that might produce flying particles injurious to your eyes, ears, face, or neck, you should use face shields. These shields come in a variety of thicknesses and shapes. The thinnest ones do not provide sufficient protection in explosion situations and are only suitable for splash protection for the face and neck. These are not, however, substitutes for safety goggles. Some face shields accommodate the simultaneous use of safety goggles better than others. If the face shields you use do not prevent liquid from running down into the eyes you should not use them as a substitute for safety goggles. Brands with rectangular rather than curved shields are excellent with safety goggles underneath.
There are an enormous variety of gloves available for hand protection. For handling hot objects, new materials are beginning to replace asbestos gloves. Leather gloves are necessary for breaking glass tubing and rods because they offer maximum abrasion resistance. Neoprene gloves are resistant to most chemicals. Playtex and other thin synthetic rubber gloves offer good chemical resistance but are generally too thin to be suitable for lab work.
One common criticism of gloves, often offered as a rationalization for not using them, is that they make it awkward to handle glassware. While there may be some element of truth to this statement, using gloves while working is like learning any new physical skill such as a new golf swing or a new tennis stroke. Once practices, their use becomes more natural and effective. All students should be provided with, or required to have and use, gloves when handling chemicals with skin contact hazard.
39
When gloves are presented as an integral part of lab work, students learn to use them comfortably.
Protective Facilities Every laboratory in which hazardous chemicals are
being used should have at least on eye wash fountain, fume hood, fire extinguisher, safety shower, and perhaps, fire blanket.
Eye wash fountains should prove a source of gentle, continuous water. Flushing should be done for 15 minutes. You may have to assist the victim in keeping his of her eyes open. Because it may be necessary to use both hands to fold back and rinse the eyelids, the control lever on the fountain should not require continuous pressure to maintain water flow. Tempered (lukewarm) water makes the flushing process much easier. Cold tap water becomes somewhat painful after a few minutes, it also makes it difficult to keep the eyes open.
Standard eye wash fountains need to be tested regularly. Running water through them once a week will insure proper operation and prevent the settling out of particulates.
If your lab does not have a fountain available, a hose with a flushing nozzle (especially hoses with wide oval nozzles that allow both eyes to be rinsed is one of several less expensive alternatives. However, this device is not the ideal substitute.
Although, small wash bottles may be food for responding quickly, they cannot give 15 minutes of continuous flushing. In addition, the water in wash bottles needs to be changed regularly so as to prevent the growth of bacteria.
On relatively inexpensive, but perhaps temporary, alternative to eye wash fountains and hoses is a device called KLEEN EYES (available through Laboratory Safety Supply and other lab equipment distributors). This device screws onto a faucet and, in one position, allows normal flow. When rotated to the other position, it diverts the water upward in two streams for flushing the eyes. Water pressure will affect the size of the stream and care must be taken no to turn on the hot water. However, the low cost (about $50) and the ease of obtaining tempered water make KLEEN EYES an attractive temporary solution.
Safety showers, like eyewash fountains, need to be tested regularly and should be fitted with control valves that remain on. A shower with a pull-on-push off lever is best.
The shower is primarily for washing off spilled chemicals. Safety goggles should not be removed until after your head, face, and hair have been thoroughly rinsed under the shower. Otherwise, chemicals splashed on your head may be washed down into your eyes. Safety showers are not made for putting out fires on people.
Fume hoods should be present in every laboratory. The National Research Council in their book Prudent Practices for Handling Hazardous Chemicals in Laboratories recommends one hood for every two chemists. All experiments with hazardous chemicals should be conducted in a fume hood, or, if necessary, in a more secure environment.
The air velocity at the hood face should be tested regularly. There is currently some disagreement on what the best air flow should be. Traditionally, flow rates of 60-100 linear feet per minute have been recommended. For highly toxic materials, rates of 125-200 linear feet per minute are recommended. Recently, Dr. Malcolm Renfrew, editor of the laboratory safety column in the Journal of Chemical Education, reported that current tests show that rates greater than 60 linear feet per minute caused a turbulence that made
Guidelines for Temporary Care
1. Do not attempt to move an injured person unless he is in a life-threatening environment. Injuries to areas such as the spine need special precautions to prevent further, perhaps permanent, damage. 2. The recommended treatment for most chemical spill exposures is immediate removal of all contaminated clothing and jewelry followed by a 15-minute wash with tempered (lukewarm) water. Be sure to seek medical assistance. 3. Bleeding can be stopped by either elevating the injured limb or by applying pressure to the wound with a clean cloth. If this is insufficient, pressure should be applied to the appropriate pressure point. Use a tourniquet only as a last resort. 4. Be sure to turn off the electric power before trying to move a person who has been exposed to electric current. 5. Remain calm and provide reassurance to the injured person to help keep him relaxed. He should be kept warm and comfortable to help prevent shock.
the fume hood less effective. It looks like more study is needed in this area.
One useful technique is to measure the flow rate at your hood face and make marks on the hood sash indicating the position of the face which will permit various flow rates. Hoods should never be used for chemical storage; bottles sitting in a hood interfere with the proper air flow. Utility controls such as gas, water, and air should be mounted outside the hood.
The duct work for hoods should be as corrosion resistant as affordable. The blower should be roof mounted to draw air out of the building. In this way, the high pressure side of the blower is outside the building. If leaks exist in the ducting, there will not be pressure forcing them into the building. With highly toxic vapors, the hood can be fitted with air flow monitor and alarm; therefore, if the flow drops below the set point, the warning alarm sounds.
One common problem with fume hoods is the re-entry of vapors into the laboratory. Testing was done in 1977 by Dr. Shair at California Institute of Technology in Pasadena (Cal Tech) using sulfur hexafluoride as a tracer gas and a parts-per-trillion gas chromatograph. Dr. Shair released the tracer gas at various locations inside and outside his laboratories. Irrespective of wind direction, he discovered that on the Cal Tech buildings tested, there was a natural air circulation pattern that returned the vapor to the roof-top air intakes in less than one minute. Unless your building’s roof-top exhausts are at least 30 feet above the air intakes, you should be aware of possible re-entry of vapors when you work in the lab. When exhausts are placed above the intakes, the exhaust enters the laminar flow region above the building.
Hoods used for perchloric acid should be used for no other purpose. You can tell if a hood is constructed for perchloric acid work if the ductwork is stainless steel and there are provisions for washing down the ducting and hood surfaces. This special construction is necessary so that the accumulation of the potentially explosive perchlorates is eliminated.
Some chemicals should be given special storage considerations. For example, peroxides often require refrigeration, while flammable liquids need special insulated cabinets. These cabinets do not necessarily need to be of metal construction to comply with NFPA (National Fire Protection Association) and OSHA (U.S. Occupational Safety and Health Administration) codes. Thick Plywood
40
also can be used; construction plans have appeared in the safety column of the Journal of Chemical Education.
Refrigerators used for chemical storage should be clearly marked and should be either explosion-resistant or explosion proof. Explosion-resistant refrigerators use magnetic strips to tightly close the door. They also have all internal electrical controls and fixtures removed from the storage area. These precautions eliminate pressure buildup and internal ignition sources.
Explosion-proof refrigerators, in addition to having the mentioned precautions, also have a special enclosure for the motor, compressor, and other potential ignition sources. In this way, if a flammable liquid is dropped in front and runs underneath, it will not be ignited by a spark from the motor.
When the chemicals being stored must be kept at a low temperature, the temperature should be monitored by an alarm that will sound if the refrigerator’s interior becomes too warm.
There are many important aspects of laboratory health
and safety not included in this article. Its primary purpose is to alert you to the skills, precautions, and protections you need for day-to-day laboratory safety. Safety equipment and facilities are never a substitute for knowing the hazards before you do the experiment. Be prepared – you will be safer and enjoy your chemistry more understand your responsibilities to yourself and to your fellow students.
James Kaufman, a chemistry professor at Curry College
in Milton, MA, is a member of the ACS Committee on Chemical Safety as well as a laboratory health and safety consultant for industrial and academic institutions.
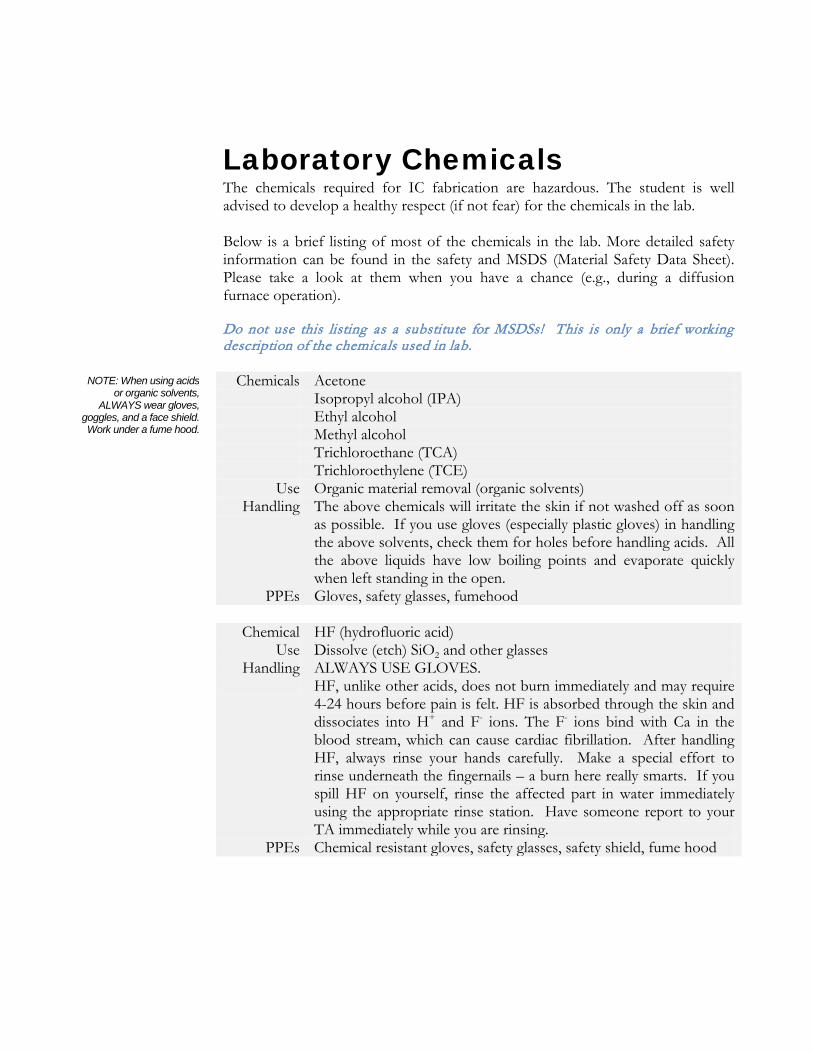
Laboratory Chemicals The chemicals required for IC fabrication are hazardous. The student is well advised to develop a healthy respect (if not fear) for the chemicals in the lab. Below is a brief listing of most of the chemicals in the lab. More detailed safety information can be found in the safety and MSDS (Material Safety Data Sheet). Please take a look at them when you have a chance (e.g., during a diffusion furnace operation). Do not use this listing as a substitute for MSDSs! This is only a brief working description of the chemicals used in lab.
Chemicals Acetone Isopropyl alcohol (IPA) Ethyl alcohol Methyl alcohol Trichloroethane (TCA) Trichloroethylene (TCE)
Use Organic material removal (organic solvents) Handling The above chemicals will irritate the skin if not washed off as soon
as possible. If you use gloves (especially plastic gloves) in handling the above solvents, check them for holes before handling acids. All the above liquids have low boiling points and evaporate quickly when left standing in the open.
PPEs Gloves, safety glasses, fumehood
Chemical HF (hydrofluoric acid) Use Dissolve (etch) SiO2 and other glasses
Handling ALWAYS USE GLOVES. HF, unlike other acids, does not burn immediately and may require
4-24 hours before pain is felt. HF is absorbed through the skin and dissociates into H+ and F- ions. The F- ions bind with Ca in the blood stream, which can cause cardiac fibrillation. After handling HF, always rinse your hands carefully. Make a special effort to rinse underneath the fingernails – a burn here really smarts. If you spill HF on yourself, rinse the affected part in water immediately using the appropriate rinse station. Have someone report to your TA immediately while you are rinsing.
PPEs Chemical resistant gloves, safety glasses, safety shield, fume hood
NOTE: When using acids or organic solvents,
ALWAYS wear gloves, goggles, and a face shield. Work under a fume hood.
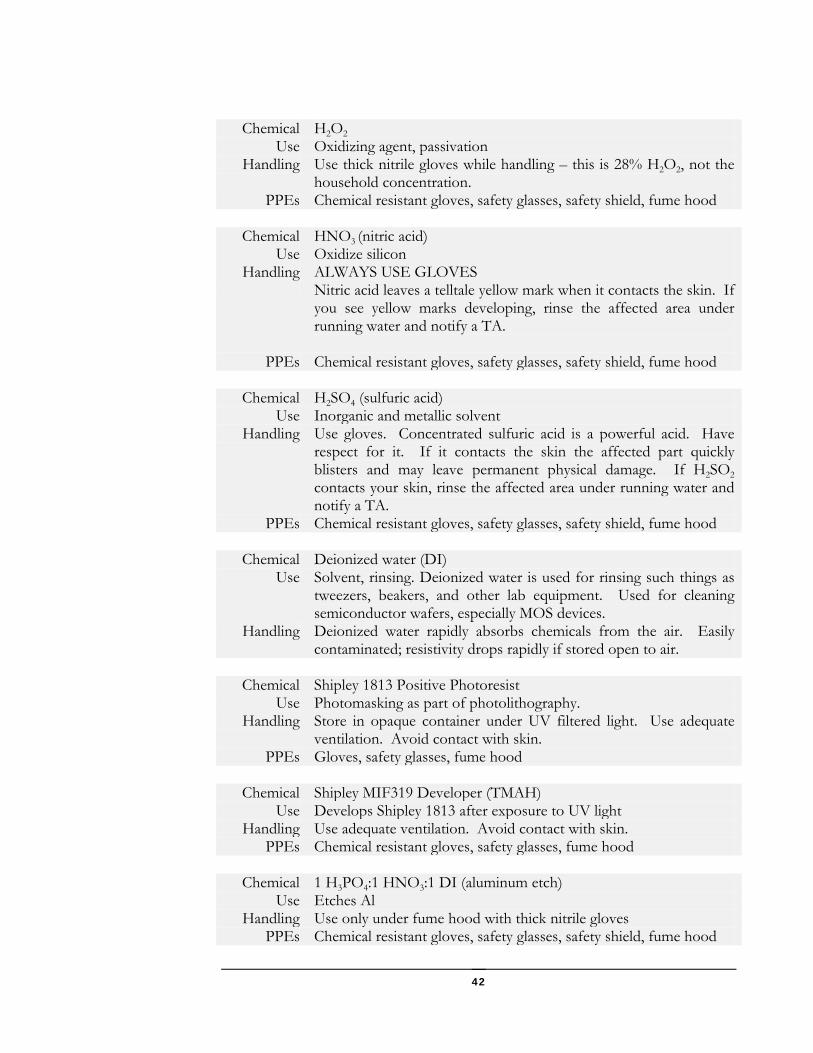
42
Chemical H2O2 Use Oxidizing agent, passivation
Handling Use thick nitrile gloves while handling – this is 28% H2O2, not the household concentration.
PPEs Chemical resistant gloves, safety glasses, safety shield, fume hood
Chemical HNO3 (nitric acid) Use Oxidize silicon
Handling ALWAYS USE GLOVES Nitric acid leaves a telltale yellow mark when it contacts the skin. If
you see yellow marks developing, rinse the affected area under running water and notify a TA.
PPEs Chemical resistant gloves, safety glasses, safety shield, fume hood
Chemical H2SO4 (sulfuric acid) Use Inorganic and metallic solvent
Handling Use gloves. Concentrated sulfuric acid is a powerful acid. Have respect for it. If it contacts the skin the affected part quickly blisters and may leave permanent physical damage. If H2SO2 contacts your skin, rinse the affected area under running water and notify a TA.
PPEs Chemical resistant gloves, safety glasses, safety shield, fume hood
Chemical Deionized water (DI) Use Solvent, rinsing. Deionized water is used for rinsing such things as
tweezers, beakers, and other lab equipment. Used for cleaning semiconductor wafers, especially MOS devices.
Handling Deionized water rapidly absorbs chemicals from the air. Easily contaminated; resistivity drops rapidly if stored open to air.
Chemical Shipley 1813 Positive Photoresist
Use Photomasking as part of photolithography. Handling Store in opaque container under UV filtered light. Use adequate
ventilation. Avoid contact with skin. PPEs Gloves, safety glasses, fume hood
Chemical Shipley MIF319 Developer (TMAH)
Use Develops Shipley 1813 after exposure to UV light Handling Use adequate ventilation. Avoid contact with skin.
PPEs Chemical resistant gloves, safety glasses, fume hood
Chemical 1 H3PO4:1 HNO3:1 DI (aluminum etch) Use Etches Al
Handling Use only under fume hood with thick nitrile gloves PPEs Chemical resistant gloves, safety glasses, safety shield, fume hood
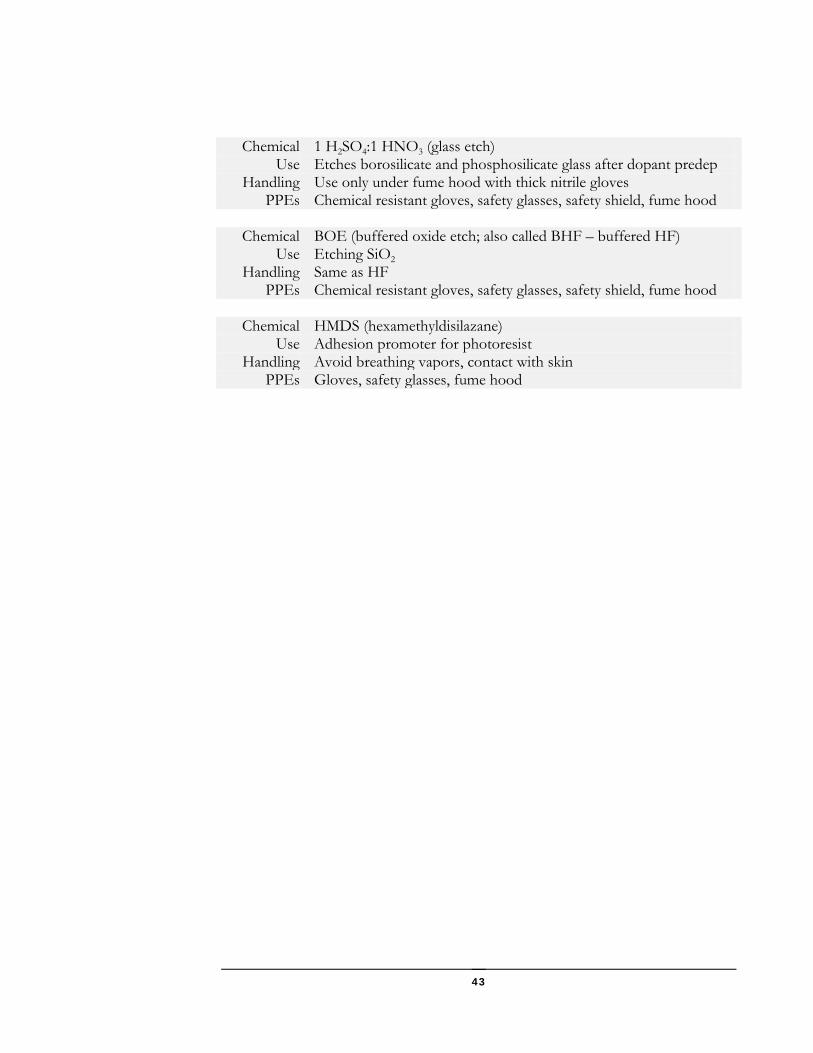
43
Chemical 1 H2SO4:1 HNO3 (glass etch)
Use Etches borosilicate and phosphosilicate glass after dopant predep Handling Use only under fume hood with thick nitrile gloves
PPEs Chemical resistant gloves, safety glasses, safety shield, fume hood
Chemical BOE (buffered oxide etch; also called BHF – buffered HF) Use Etching SiO2
Handling Same as HF PPEs Chemical resistant gloves, safety glasses, safety shield, fume hood
Chemical HMDS (hexamethyldisilazane)
Use Adhesion promoter for photoresist Handling Avoid breathing vapors, contact with skin
PPEs Gloves, safety glasses, fume hood

44
Medical Management of Hydrofluoric Acid Exposure Mark Upfal, M.D., M.P.H. Wayne State University Constance Doyle, M.D. University of Michigan Medical School
Reprinted by special permission of the
authors and the Journal of Occupational Medicine, Vol. 32, #8, pgs. 726-731, “Medical Management of Hydrofluoric Acid Exposure”, © American College of Occupational Medicine 1990.
Hydrofluoric acid burns are usually due to accidental exposure. Deep tissue injury may result, damaging nerves, blood vessels, tendons and bone. Concentrated hydrofluoric acid may result in a delay of symptoms for many hours. Symptoms are usually out of proportion to the observed injury.
Appropriate first aid and medical management can dramatically affect the prognosis. Local treatment consists of copious water lavage and the application of topical neutralization agents. For more severe exposures, calcium gluconate injection or intra-arterial infusion of calcium gluconate may be indicated as well. Life-threatening alterations of electrolytes can occur, with ensuing arrhythmias. Inhalation, ingestion, and ocular exposures require specialized treatment and referral.
Hydrofluoric acid (HF) is an extremely corrosive material used extensively in etching glass, cleaning brick and aluminum, tanning leather and in petrochemical manufacturing processes. Probably the most common HF burn seen by the emergency physician results from household use of
commercial rust removal solutions or gels that contain the acid in dilute form (less than 12%). Occupational physicians and emergency physicians in certain industrialized areas, however, may encounter a spectrum of injury ranging from mild to very severe due to the industrial use of more concentrated solutions.
Physiochemistry
Although highly corrosive to living tissue, HF is actually a very weak acid. The fluoride ion is highly electronegative and, thus, will not readily dissociate from the attached hydrogen ion (dissociation constant, K = 3.5 x 10⁻⁴)1. Compared with other acids, dilute concentrations remain relatively non-ionized. Therefore, this less ionized acid tends to more readily cross lipid barriers and penetrate to deep subcutaneous tissues.
In this relatively undissociated state, HF is unlike stronger acids that cause immediate pain and tissue destruction due to the accumulation of the hydrogen ion. Dilute forms of HF generally do not cause any immediate pain on skin contact,2 although more concentrated solutions (>50%) do. However, when hydrofluoric acid moves into the deeper tissue layers, it then releases fluoride ions in the presence of tissue cations such as calcium and magnesium (see Figure), forming insoluble salts.3 The binding of calcium is thought to increase cell membrane permeability to potassium, resulting in neuronal depolarization and intense pain.4
Injuries
The most frequent injuries are to the digits. Other exposures seen include skin contact on other regions of the body, inhalation of vapor or mist, ocular exposure and ingestion. The extent of injury from hydrofluoric acid depends upon the route of exposure, the concentration of acid (in solution or in ambient air), the total amount of acid involved, the presence of other chemical agents and other physical factors such as the temperature of the material and the
condition of the skin exposed. Proper and expeditious first aid measures may dramatically improve the outcome making the difference between a very satisfactory course of healing and surgical excision with skin grafting, permanent disability or even death. However, because of a latency period of up to 24 hours before the onset of symptoms with exposure to dilute solutions of HF, the patient and physician may miss the connection between the exposure and clinical symptoms. This may result in a delay in both first aid and medical treatment.
Cutaneous Exposure
Cutaneous exposure to weak solution of HF (below 20%) usually does not result in long-term morbidity, but may cause considerable pain. The typical incident is that of a patient who appears with severe pain, erythema and edema of a finger or hand. In some cases, blisters may form. Subungual exposure may produce a gray, black or bluish discoloration.5 Pain may be delayed for 2 to 24 hours after exposure to solutions below 50% concentration.1
Figure Hydrofluoric Acid Physiochemistry
HF
HF
CaF2
H+ + F-
SUBCUTANEOUS TISSUE
EPIDERMIS
H+ + F-
At the skin surface, HF remains more nondissociated relative to most other acids. However, once it enters the subcutaneous tissues, the formation of salts with tissue
cations such as calcium drives dissociation of the molecule.
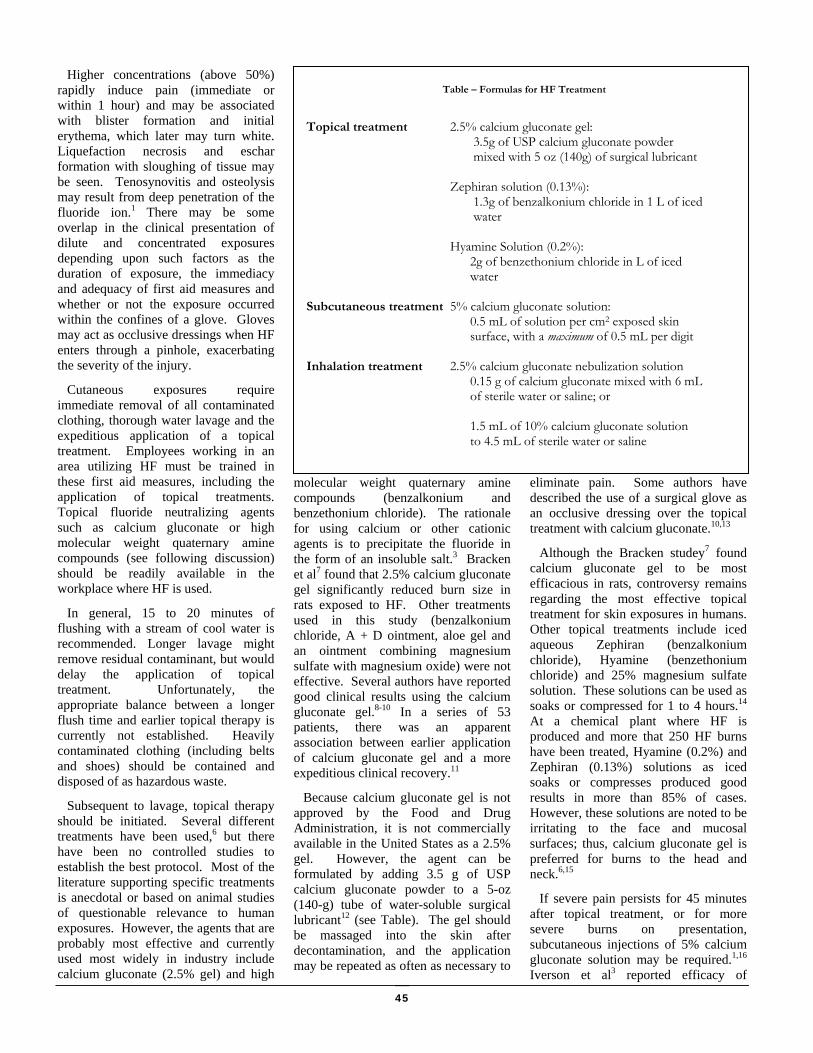
45
Higher concentrations (above 50%) rapidly induce pain (immediate or within 1 hour) and may be associated with blister formation and initial erythema, which later may turn white. Liquefaction necrosis and eschar formation with sloughing of tissue may be seen. Tenosynovitis and osteolysis may result from deep penetration of the fluoride ion.1 There may be some overlap in the clinical presentation of dilute and concentrated exposures depending upon such factors as the duration of exposure, the immediacy and adequacy of first aid measures and whether or not the exposure occurred within the confines of a glove. Gloves may act as occlusive dressings when HF enters through a pinhole, exacerbating the severity of the injury.
Cutaneous exposures require immediate removal of all contaminated clothing, thorough water lavage and the expeditious application of a topical treatment. Employees working in an area utilizing HF must be trained in these first aid measures, including the application of topical treatments. Topical fluoride neutralizing agents such as calcium gluconate or high molecular weight quaternary amine compounds (see following discussion) should be readily available in the workplace where HF is used.
In general, 15 to 20 minutes of flushing with a stream of cool water is recommended. Longer lavage might remove residual contaminant, but would delay the application of topical treatment. Unfortunately, the appropriate balance between a longer flush time and earlier topical therapy is currently not established. Heavily contaminated clothing (including belts and shoes) should be contained and disposed of as hazardous waste.
Subsequent to lavage, topical therapy should be initiated. Several different treatments have been used,6 but there have been no controlled studies to establish the best protocol. Most of the literature supporting specific treatments is anecdotal or based on animal studies of questionable relevance to human exposures. However, the agents that are probably most effective and currently used most widely in industry include calcium gluconate (2.5% gel) and high
molecular weight quaternary amine compounds (benzalkonium and benzethonium chloride). The rationale for using calcium or other cationic agents is to precipitate the fluoride in the form of an insoluble salt.3 Bracken et al7 found that 2.5% calcium gluconate gel significantly reduced burn size in rats exposed to HF. Other treatments used in this study (benzalkonium chloride, A + D ointment, aloe gel and an ointment combining magnesium sulfate with magnesium oxide) were not effective. Several authors have reported good clinical results using the calcium gluconate gel.8-10 In a series of 53 patients, there was an apparent association between earlier application of calcium gluconate gel and a more expeditious clinical recovery.11
Because calcium gluconate gel is not approved by the Food and Drug Administration, it is not commercially available in the United States as a 2.5% gel. However, the agent can be formulated by adding 3.5 g of USP calcium gluconate powder to a 5-oz (140-g) tube of water-soluble surgical lubricant12 (see Table). The gel should be massaged into the skin after decontamination, and the application may be repeated as often as necessary to
eliminate pain. Some authors have described the use of a surgical glove as an occlusive dressing over the topical treatment with calcium gluconate.10,13
Although the Bracken studey7 found calcium gluconate gel to be most efficacious in rats, controversy remains regarding the most effective topical treatment for skin exposures in humans. Other topical treatments include iced aqueous Zephiran (benzalkonium chloride), Hyamine (benzethonium chloride) and 25% magnesium sulfate solution. These solutions can be used as soaks or compressed for 1 to 4 hours.14 At a chemical plant where HF is produced and more that 250 HF burns have been treated, Hyamine (0.2%) and Zephiran (0.13%) solutions as iced soaks or compresses produced good results in more than 85% of cases. However, these solutions are noted to be irritating to the face and mucosal surfaces; thus, calcium gluconate gel is preferred for burns to the head and neck.6,15
If severe pain persists for 45 minutes after topical treatment, or for more severe burns on presentation, subcutaneous injections of 5% calcium gluconate solution may be required.1,16 Iverson et al3 reported efficacy of
Table – Formulas for HF Treatment
Topical treatment 2.5% calcium gluconate gel: 3.5g of USP calcium gluconate powder mixed with 5 oz (140g) of surgical lubricant Zephiran solution (0.13%): 1.3g of benzalkonium chloride in 1 L of iced water Hyamine Solution (0.2%): 2g of benzethonium chloride in L of iced water Subcutaneous treatment 5% calcium gluconate solution: 0.5 mL of solution per cm2 exposed skin surface, with a maximum of 0.5 mL per digit Inhalation treatment 2.5% calcium gluconate nebulization solution 0.15 g of calcium gluconate mixed with 6 mL of sterile water or saline; or 1.5 mL of 10% calcium gluconate solution to 4.5 mL of sterile water or saline
46
calcium infiltration experimentally with rats exposed to 26% and 52% HF. Furthermore, they report better clinical results in 28 patients treated in this manner as compared with 57 others treated with alternate methods.3 Dibbell et al17 also reported improved burn healing with calcium gluconate infiltration compared with topical treatments. This method of treatment, however, is usually unnecessary for exposures to less than 20% solutions of HF.16,17 Roberts and Merigian10 caution against aggressive treatment with digital injections and fingernail removal (see below) for concentrations below 10%. Multiple injections may contribute to ischemic induced tissue necrosis or susceptibility to infection, and overly aggressive infiltration could result in hypercalcemia.15 Calcium chloride should never be used for infiltration, as it is corrosive and may cause further damage.
Infiltration of calcium gluconate should be through a small-gauge needle directly into the area of the burn and about 0.5 cm peripheral to the burn. It is recommended that 0.5 mL of solution per square centimeter of exposed skin surface be used for loose areas of skin. For finger burns, one should infiltrate a maximum of 0.5 mL per digit.1 Injecting more than this into a finger may cause a local compartment syndrome. One author described performing a concomitant palmar fasciotomy with finger-tip injections to prevent this outcome.9 However, this is not a technique with widespread application and is not recommended. Calcium gluconate injections can be repeated as needed to neutralize the fluoride ion, treating the pain and limiting further tissue damage. We and many other clinicians believe that the use of local or regional anesthesia should be avoided because relief of pain is an endpoint of adequate calcium infiltration.1,14 Systemic analgesics may be necessary.
Zachary et al18 recommend supplementation of calcium gluconate injections with topical application of calcium gluconate/dimethyl sulfoxide solution. In a rat study they found this combined therapy to be more efficacious than either topical treatment or infiltration alone. They have also
used the method with good results in a worker exposed to 70% HF on the dorsum of the hand. This method would have the theoretical advantage of allowing more calcium to enter the burned area than that which could be directly injected into a digit. However, it must be recognized that the safety and efficacy of dimethyl sulfoxide used in this way is not established.
Necrotic tissue and bullae should be debrided. If there is significant subungual involvement, the fingernail may need to be removed and calcium gluconate injected directly into the nail bed. Failure to do so when indicated may allow the fluoride moiety to access the phalanx, resulting in bone erosion.19 In some situations, burr holes into the nail may be adequate in lieu of nail removal.9
Although calcium gluconate is currently the agent of choice for subcutaneous injection, one study in rats reported better results with subcutaneous injections of soluble magnesium compounds.20 As with topical treatments, the problem in selecting the best agent for injection is the lack of controlled human studies documenting the most efficacious treatment. Nonetheless, subcutaneous and intradermal magnesium infiltration has not been generally accepted as the standard of care. Until adequate evidence supports its use in humans, calcium gluconate remains the agent of choice for infiltration.
An alternative to subcutaneous injections for severe digital burns is described by Kohnlein and Achinger21 and Vance et al22 using 4-hour intra-arterial infusions of calcium gluconate through the radial or brachial artery. This method has enjoyed considerable success with good results, obviating the need for fingernail removal and painful digital injections. In addition, there may be fewer indications for subsequent skin grafting if this method is used.21 This procedure, however, does expose the patient to some vascular risk (primarily that of arterial spasm and local bleeding), and may require admission to an intensive care or coronary care unit where an arterial line can be supported. This method should be reserved for the
more severe burns of the distal upper extremity.
After specific treatment to neutralize the fluoride ion in the affected tissues and debridement as indicated, further treatment would follow the usual guidelines for thermal or chemical burns. This could include dressing changes, topical antibiotics such as silver sulfadiazine, analgesia, elevation and tetanus prophylaxis. There has been no evidence to either support or refute the prophylactic use of systemic antibiotics. Local complications of digital HF burns include nonsuppurative tenosynovitis and osteolysis. Thus, baseline radiographs should be considered when location of the burn is digital or over a bony prominence.
Ocular Exposure
The eye is highly susceptible to hydrofluoric acid damage from liquid or airborne exposures. Ocular effects may include corneal epithelial coagulation and sloughing, conjunctival inflammation and chemosis. Later, the patient may develop chronic conjunctival and corneal inflammation and scarring.23 In general, ocular effects of hydrogen fluoride exposure are noted within the first day after exposure. However, a possible case of delayed corneal damage has been described, becoming apparent four days after exposure.24
After ocular exposure to HF, immediate lavage with water should be performed in the workplace for at least 15 minutes, followed by the application of a cold pack. Once the patient is brought to medical attention, adequate lavage should be ensured by irrigation with at least 2 L of water, normal saline, 1% calcium gluconate or isotonic magnesium chloride solution. Any of these irrigants are acceptable; however, calcium gluconate is probably the irrigant of choice based upon theoretical considerations and the anecdotal experience of MacKinnon15 and Trevino et al.16,25 They have reported the successful use of a 1% solution (50mL of 10% solution in 500 mL of normal saline) after initial water irrigation. Calcium chloride solution has been found to increase the frequency of corneal ulceration.23
47
Instillation of a topical anesthetic and use of the Morgan Lens® may facilitate lavage of the eye. Furthermore, the Morgan Lens® would allow for irrigation during transport to medical care. Several drops of 10% sterile calcium gluconate solution may be advisable after irrigation as a benign method to neutralize any residual fluoride remaining in the eye.8 Corticosteroid ophthalmic drops may also be useful to minimize inflammation.16 An ophthalmologist should always be consulted.
Inhalation
Inhalation of hydrofluoric acid vapors or mist may result in effects ranging from mild upper airway and eye irritation to airway obstruction, pulmonary edema and death. Typically, the patient will experience dyspnea, cough and a burning sensation. Chills, fever, chest tightness and cyanosis may also be seen.26 Inhalation injury should be considered with any HF burns around the head and neck. One recent fatality involved a woman who was attacked with a splash of hydrofluoric acid to the face. She suffered severe skin burns to the head, thorax and arms. The cause of death was determined to be acute respiratory insufficiency due to hemorrhagic pulmonary edema.27
Treatment begins with removal from the contaminated environment. This may require rescue by personnel trained and equipped with self-contained breathing apparatus and possibly containment suits (depending upon exposure levels). The patient should be closely monitored for difficulty in breathing. A chest radiograph should be obtained and arterial blood gases should be monitored. The patient should receive humidified 100% oxygen. Although efficacy has not been established, one should attempt to neutralize the fluoride ion by providing 2.5% to 3% calcium gluconate solution by nebulization, as recommended by MacKinnon15 and Trevino et al.16 Use of this method has resulted in anecdotal relief of symptoms in a patient presenting with an inhalation exposure (C. Doyle, personal communication, 1989). A 2.5% solution can be formulated by adding 0.15 g of calcium
gluconate to 6 mL of sterile water or saline, or alternatively, 1.5 mL of 10% calcium gluconate solution to 4.5 cc of sterile water or saline. Parenteral steroids have also been recommended based upon anecdotal improvement of symptoms and the possibility that this treatment may prevent the onset of pulmonary edema.3
One should be prepared to intubate or perform a tracheostomy if upper airway obstruction develops. Pulmonary edema may follow exposure, and in some cases, may be delayed. This should be treated with positive pressure ventilation (positive end expiratory pressure or continuous positive airway pressure) and fluids (taking care to avoid fluid overload). Poisindex® discourages routine use of morphine because of the risks of respiratory depression and intracranial pressure elevation.12 Antibiotics may be used to treat infection, and corticosteroids may have value in minimizing pulmonary inflammation and longer term effects on the lung.
Inhalation exposures may pose a significant risk of systemic fluoride absorption. Electrolytes, including calcium, magnesium and potassium, should be monitored along with electrocardiograph (12-lead and rhythm strip) and renal and hepatic function. Calcium gluconate should be given intravenously as indicated by monitoring of plasma calcium levels.
Ingestion
Ingestion of hydrofluoric acid is unusual, although it may be seen as a suicide attempt or pediatric ingestion of an HF-containing household product. Initial symptoms may include nausea, emesis, diarrhea and abdominal pain.28 Oral and esophageal burns associated with severe pain would also be expected. One should watch for hematemesis, hypovolemia, upper airway obstruction, systemic fluorotoxicity, severe hypocalcemia and acidosis. Ingestion of relatively dilute solutions of hydrofluoric acid may be rapidly fatal. Manoguerra and Neuman29 described a case of a 29-year-old man who accidently ingested a mouthful of rust remover and developed sever hypocalcemia and acidosis with
ensuing fatal asystole in approximately 90 minutes. Autopsy revealed hemorrhagic pulmonary edema and diffuse hemorrhagic gastritis.
Management for ingestion, in general, is supportive. Fluorotoxicity, hypocalcemia and acidosis must be treated aggressively with intravenous calcium and bicarbonate. As with inhalation exposures, intubation or tracheostomy may be required. One to two cups of milk may be used as a diluent and a source of calcium to bind fluoride in the upper gastrointestinal tract. In general, milk is preferred to water as a diluent.30 However, if esophagoscopy is anticipated, milk may complicate the examination by obscuring the mucosal surface. If milk is used, it should be flushed with water or saline before esophagoscopy. Emesis must not be induced, although it is likely to be observed as a gastrointestinal response. Emesis may result in aspiration-induced pulmonary injury. Nasogastric suction or careful lavage may be considered in cases of large-volume exposures treated within 90 minutes of ingestion. Calcium gluconate solution can be used as the lavage fluid. However, the relatively smaller risk of perforation must be balanced against the risk of toxicity.12,28 A gastroenterologist should be consulted.
Systemic Effects
Systemic effects of hydrofluoric acid exposure can be related to a variety of electrolytic abnormalities. These may include hypocalcemia and hypomagnesemia due to complexing of these cations by fluoride, hyperkalemia due to extracellular efflux of potassium, hypercalcemia due to calcium injections and systemic fluorisis. Furthermore, alterations of pulmonary or renal cell function may contribute to hypoxia or acidosis. As a result of these ionic imbalances, cardiac rhythm and hepatic and renal function may be disturbed. Deaths have been reported associated with profound hypocalcemia and hypomagnesemia31-33 and hyperkalemia.34 A fatality described by Tepperman31 involved a third degree burn to only 2.5% of the patient’s body surface area.
48
Management of the systemic effects of hydrofluoric acid exposure is primarily supportive, with treatment of the underlying abnormality. Thus, for any significant exposure, one should closely monitor fluid and electrolyte (Ca2+, Mg2+, K+, F+) levels, along with cardiac (especially QT interval and rhythm), renal and hepatic function. If systemic absorption of significant amounts of fluoride is anticipated, one should add calcium gluconate to intravenous fluids even before calcium levels have been measured. Circumstances that may result in a significant hypocalcemic risk include:
• A dermal exposure to 50% or greater HF to 1% of body surface area (e.g., one complete hand);
• Any dermal exposure of more than 5% body surface area;
• An inhalation of vapors from 60% or greater concentration of acid solution35; or
• Ingestion of HF solutions.29
However, these are general guidelines and must be considered in the context of other factors, such as duration of exposure that may affect the absorbed fluoride dose.
Early replacement of calcium may be life saving and should not await laboratory studies. Calcium should be infused slowly to avoid inducing cardiac arrhythmias. Trevino et al16 suggest that 20 mL of 10% calcium gluconate be added to the first liter of fluids, pending reports of calcium levels. Before calcium administration, serum should be drawn. Subsequently, calcium levels should be monitored at frequent intervals (e.g., hourly) to ensure the maintenance of normocalcemia.
In one unusual case, life-threatening cardiac arrhythmias could not be controlled until the fluoride-contaminated skin (all skin circumferential between the elbow and wrist) had been surgically removed. The arrhythmias had resulted from a profound hypocalcemia (3 mEq/L), producing a severe bradycardia with a widened QT interval which then converted to recalcitrant ventricular fibrillation.36
Prevention
Most hydrofluoric acid exposure can be prevented by proper industrial hygiene controls. Engineering controls may include local exhaust ventilation and enclosure of the process using the acid. Substitution of less hazardous chemicals or methods might be considered where feasible. Safety glasses with side shields and impermeable gloves of adequate length to cover the distal forearm should always be worn when working around hydrofluoric acid. Gloves, however, should never be relied upon as a primary control, as unrecognized pinholes, tears and other defects may be present. Other personal protective equipment indicated for various exposure situations may include goggles, face shields, coveralls, cartridge air-purifying respirators, self-contained breathing apparatus and complete containment suits.
Air quality should be ensured by means of an industrial hygiene evaluation if there is any question about exposure levels. The threshold limit value for inhalation exposure to hydrofluoric acid in the workplace is 3 ppm. This is set as a ceiling exposure level (a maximum level that should not be exceeded, even for brief periods).37 In preparation for the management of accidental spills, an appropriately trained and equipped emergency response team should be designated.
However, the most important preventive measure is worker education. The employee must be trained in the hazards of HF and in work practices that will minimize their risk of exposure. Workers must also be trained in appropriate evacuation procedures in the event of an accidental environmental release or spill and in appropriate first aid measures. Topical treatments for Cutaneous HF exposure should be readily available in the plant.
Acknowledgements
We thank Neal Little, M.D., Victoria Neale, Ph.D., and Raymond Demers, M.D., M.P.H., for their contributions and review of this manuscript.
References
1. Edelman P. Hydrofluoric acid burns. State of the Art Rev Occup Med. 1986;1:89-103.
2. Stencel JR, Tobin JS. Hydrofluoric acid burn: latent period was key factor. Am Ind Hyg Assoc J. 1987:48::A451-A452
3. Iverson RE, Laub DR, Madison MS. Hydrofluoric acid burns. Plastic Reconstruct Surg. 197;:48:107-112.
4. Klauder JV, Shelanski L, Gabriel, K. Industrial uses of compounds of fluorine and oxalic acid. Arch Ind Health. 1955;12:412-419.
5. Kunkel DB. Hydrofluoric acid: A toxin
on the rise. Emerg Med. 1988; February 15:237-243.
6. MacKinnon MA. Treatment of
hydrofluoric acid burns. J Occup Med. 1986;28:804. Letter.
7. Bracken WM, Cuppage F., McLaury
RL, et al. Comparative effectiveness of topical treatments for hydrofluoric acid burns. J Occup Med. 1985;27:733-739.
8. Browne TD. The treatment of hydrofluoric acid burns. J. Soc. Occup Med. 1974;24:80-89.
9. Anderson WJ, Anderson JR.
Hydrofluoric acid burns of the hand: mechanism of injury and treatment. J. Hand Surg. 1988;13a:52-57.
10. Roberts JR, Merigian KS. Acute
hydrofluoric acid exposures. Am J Emerg Med. 1989;7:125-126.
11. El Saadi MS, Hall AH, Hall PK, Riggs
BS, Augenstein WL, Rumack BH. Hydrofluoric acid dermal exposure. Vet Hum Toxicol. 1989;31:243-247.
12. Rumack BH, Hall AH. Hydrofluoric
acid management. Poisindex, Tomes™ Information System. 1988;55. Micromedex Computerized Clinical Information System (CCIS). Micromedex, Inc., Denver, Colorado.
13. Bullock C. Hydrofluoric acid burns
cooled with calcium carbonate slurry. Emerg Med News. July, 1989:17.
14. Proctor NH, Hughes JP, Fishman ML.
Hydrogen fluoride. In:Proctor NH, et al, eds. Chemical Hazards of the Workplace, ed 2. Philadelphia, PA: Lippincott; 1988:278-281.
15. MacKinnon MA. Hydrofluoric acid
burns. Dermatol Clin. 1988;6:67-74.
49
16. Trvino MA, Herrman GH, Sprout WL. Treatment of severe hydrofluoric acid exposures. J Occup Med. 1983;25:861-863.
17. Dibbell DG, Iverson RE, Jones W,
Laub DR, Madison MS. Hydrofluoric acid burns of the hand. J Bone Joint Surg. 1970;52A:931-936.
18. Zachary LS, Reus W, Gottlieb J,
Heggers JP, Robson MC. Treatment of experimental hydrofluoric acid burns. J Burn Care. 1986;7:35-39.
19. Tintinalli JE. Hydrofluoric acid burns.
Emergency case conference. Am Coll Emerg Phys. 1978;7:24-26.
20. Harris J, Rumack BH. Comparative
efficacy of injectable calcium and magnesium salts in the therapy of hydrofluoric acid burns. Clin Toxicol. 1981;18:1027-1032.
21. Kohnlein HE, Achinger R. A new
method of treatment of hydrofluoric acid burns of the extremity. Chir Plastica. 1982;6:297-305.
22. Vance MV, Curry SC, Kunkel DB,
Ryan PJ, Ruggen SB. Digital hydrofluoric acid burns: treatment with intraarterial calcium infusion. Ann Emerg Med. 1986;15:890-896.
23. McCulley J, Whiting DW, Petitt MG,
Lauber SE. Hydrofluoric acid burns of the eye. J Occup Med. 1983;25:447-450.
24. Hatai JK, Weber, JN, Doizaki K.
Hydrofluoric acid burns of the eye: report of possible delayed toxicity. J Toxicol Cut Ocular Toxicol. 1986;5:179-184.
25. Trevino MA, Herrmann GH, Sprout WL. Further evaluation of hydrofluoric acid burns of the eye – author’s response. J Occup Med. 1984;26:483-484. Letter.
26. Flood S. Hydrofluoric acid burns. Am
Fam Phys. 1988;37:175-182.
27. Chela A, Reig R, Sanz P, Huguet E, Corbella J. Death due to hydrofluoric acid. Am J Forensic Med Pathol. 1989;10:47-48.
28. Caravati EM. Acute hydrofluoric acid
exposure. Am J Emerg Med. 1988;6:143-150.
29. Manoguerra AS, Neuman TS. Fatal
poisoning from acute hydrofluoric acid ingestion. Am J Emerg Med. 1986;4:362-363.
30. McGuigan MA. Hydrofluoric acid. In:
Haddad Lm. Winchester JF, ed. Clinical Management of Poisoning and Drug Overdose, ed 2. Philadelphia, Pa: W.B. Saunders Co: in press.
31. Tepperman PB. Fatality due to acute
systemic fluoride poisoning following hydrofluoric acid skin burn. J Occup Med. 1980;22:691-692.
32. Chan KM, Svancarek WP, Creer M.
Fatality due to acute hydrofluoric acid exposure. Clin Toxicol. 1987;25:333-339.
33. Mayer TG, Gross PL. Fatal systemic
fluorisis due to hydrofluoric acid burns. Ann Emerg Med. 1985;14:2.
34. McIvor ME. Delayed fatal
hyperkalemia in a patient with acute fluoride intoxication. Ann Emerg Med. 1987;16:1165-1167.
35. Greco RJ, Hartford CE, Haith LR, Patton ML. Hydrofluoric acid-induced hypocalcemia. J Trauma. 1988;30:873-874.
36. Buckingham FM. Surgery: a radical
approach to severe hydrofluoric acid burns. J Occup Med. 1988;30:873-874.
37. Threshold Limit Values and Biological
Exposure Indices for 1988-1989. Cincinnati, Ohio: American Conference of Governmental Industrial Hygienists, 1988.
About the Authors
Mark Upfal, M.D., is Assistant Professor of Occupational & Environmental Medicine at Wayne State University, Detroit, Michigan, involved in teaching, research, consulting and patient care. Dr. Upfal is Consulting Medical Director for Harris Semiconductor in Melbourne, Florida. He holds a Masters of Public Health Degree in Industrial Hygiene from the University of Michigan and his Medical degree from the University of Colorado.
Constance J. Doyle, M.D., FACEP,
is board certified in emergency medicine. She is a Clinical Instructor for the Department of Surgery, Section of Emergency Services, at the University of Michigan at Ann Arbor. Dr. Doyle is a Senior Attending Physician at Foote Hospital, Jackson, Michigan. She graduated from the Ohio State University College of Medicine in 1971.
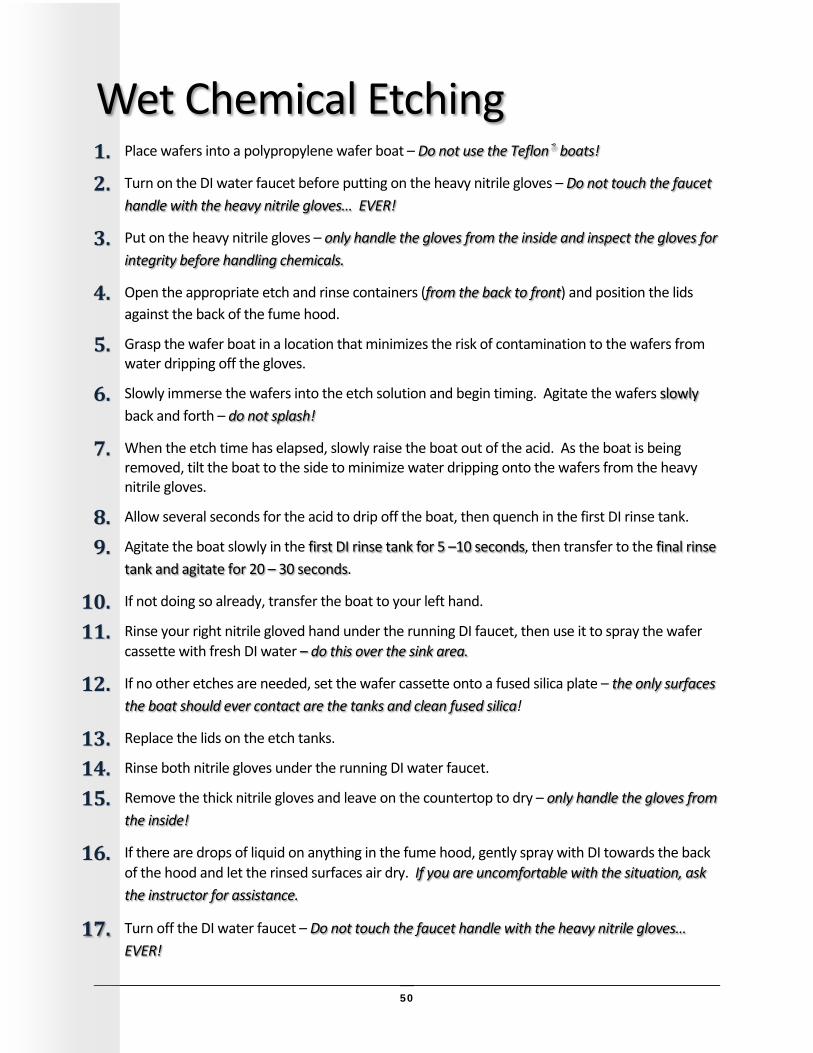
50
Wet Chemical Etching11.. Place wafers into a polypropylene wafer boat – Do not use the Teflon® boats!
22.. Turn on the DI water faucet before putting on the heavy nitrile gloves – Do not touch the faucet handle with the heavy nitrile gloves… EVER!
33.. Put on the heavy nitrile gloves – only handle the gloves from the inside and inspect the gloves for integrity before handling chemicals.
44.. Open the appropriate etch and rinse containers ( ) and position the lids from the back to frontagainst the back of the fume hood.
55.. Grasp the wafer boat in a location that minimizes the risk of contamination to the wafers from water dripping off the gloves.
66.. Slowly immerse the wafers into the etch solution and begin timing. Agitate the wafers slowlyback and forth – do not splash!
77.. When the etch time has elapsed, slowly raise the boat out of the acid. As the boat is being removed, tilt the boat to the side to minimize water dripping onto the wafers from the heavy nitrile gloves.
88.. Allow several seconds for the acid to drip off the boat, then quench in the first DI rinse tank.
99.. Agitate the boat slowly in the , then transfer to the first DI rinse tank for 5 –10 seconds final rinse . tank and agitate for 20 – 30 seconds
1100.. If not doing so already, transfer the boat to your left hand.
1111.. Rinse your right nitrile gloved hand under the running DI faucet, then use it to spray the wafer cassette with fresh DI water – do this over the sink area.
1122.. If no other etches are needed, set the wafer cassette onto a fused silica plate – the only surfaces ! the boat should ever contact are the tanks and clean fused silica
1133.. Replace the lids on the etch tanks.
1144.. Rinse both nitrile gloves under the running DI water faucet.
1155.. Remove the thick nitrile gloves and leave on the countertop to dry – only handle the gloves from the inside!
1166.. If there are drops of liquid on anything in the fume hood, gently spray with DI towards the back of the hood and let the rinsed surfaces air dry. If you are uncomfortable with the situation, ask
the instructor for assistance.
Turn off the DI water faucet – 17. Do not touch the faucet handle with the heavy nitrile gloves… EVER!

51