Embed Size (px)
Citation preview
Cheryl D. Wisestarttoweb.com
If you have been using Microsoft FrontPage, or have inherited a website that was created in FrontPage and want to use Adobe Dreamweaver 8, this article will help make your transi-tion easier.
While Dreamweaver 8 offers more features than FrontPage, you will be able to start using it to maintain your website and create new ones easily. This article walks you through getting started with Dreamweaver from the perspective of a FrontPage 2003 user.
RequirementsTo complete this tutorial you will need to install the following software:
Dreamweaver 8To download a trial version go to http://www.adobe.com/go/trydreamweaver and to purchase a full version go to http://www.adobe.com/go/buydreamweaver.
Creating your local siteDreamweaver 8 supports a wider range of server-side technologies than FrontPage 2003, adding PHP and ColdFusion support to the ASP and ASP.NET support offered by Front-Page. As a result, more Dreamweaver users come from a coding background; but don’t let that intimidate you, since other users are more WYSIWYG design–oriented. As a FrontPage user, you will find the Designer Workspace will be closest to what you know. You can always change workspaces later using Edit > Preferences if you choose (see Figure 1).
ADOBE® DREAmWEAvER® 8migRAting fROm miCROsOft fROntPAgE 2003 tO ADOBE DREAmWEAvER 8
Figure 1. Default Designer interface best suited for most FrontPage 2003 users
Adobe Migrating Guide 2
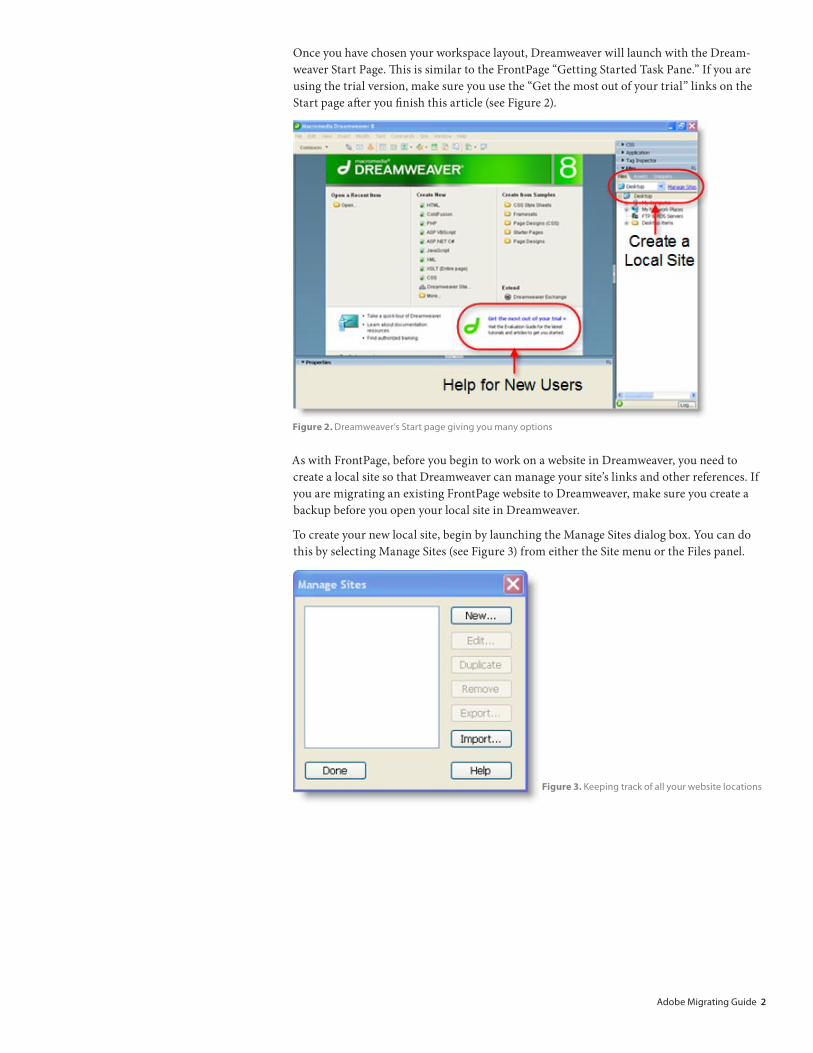
Once you have chosen your workspace layout, Dreamweaver will launch with the Dream-weaver Start Page. This is similar to the FrontPage “Getting Started Task Pane.” If you are using the trial version, make sure you use the “Get the most out of your trial” links on the Start page after you finish this article (see Figure 2).
As with FrontPage, before you begin to work on a website in Dreamweaver, you need to create a local site so that Dreamweaver can manage your site’s links and other references. If you are migrating an existing FrontPage website to Dreamweaver, make sure you create a backup before you open your local site in Dreamweaver.
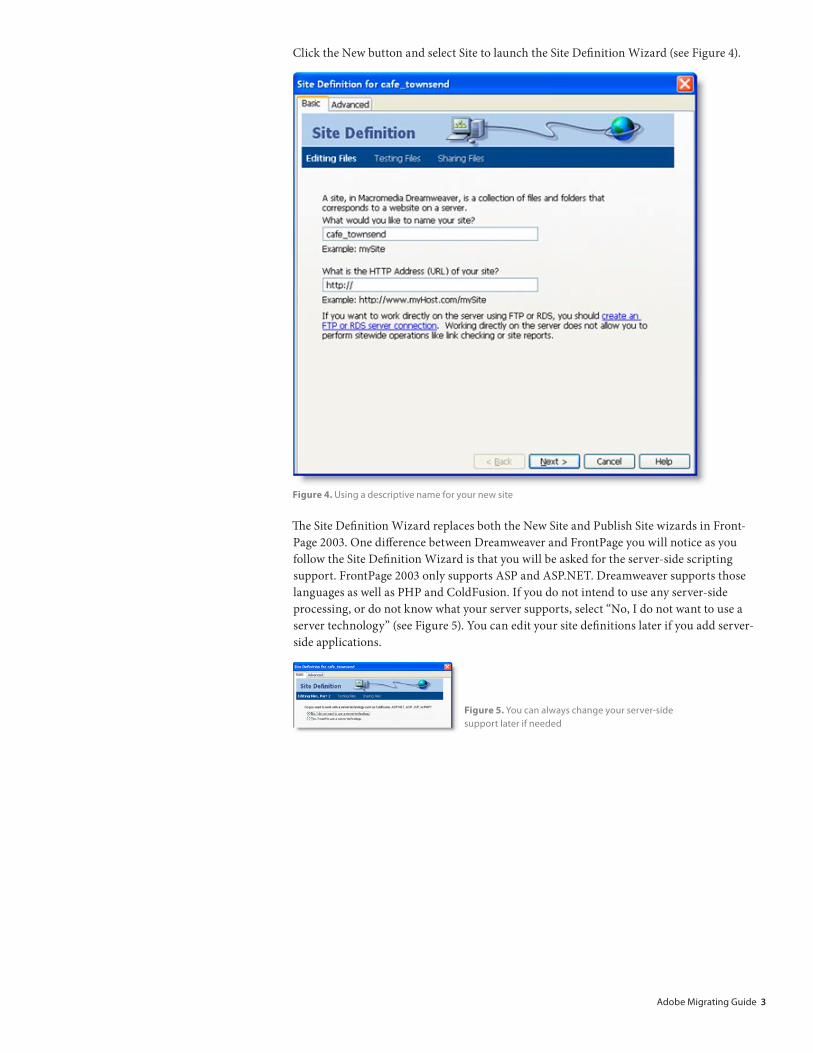
To create your new local site, begin by launching the Manage Sites dialog box. You can do this by selecting Manage Sites (see Figure 3) from either the Site menu or the Files panel.
Figure 2. Dreamweaver’s Start page giving you many options
Figure 3. Keeping track of all your website locations
Adobe Migrating Guide 3
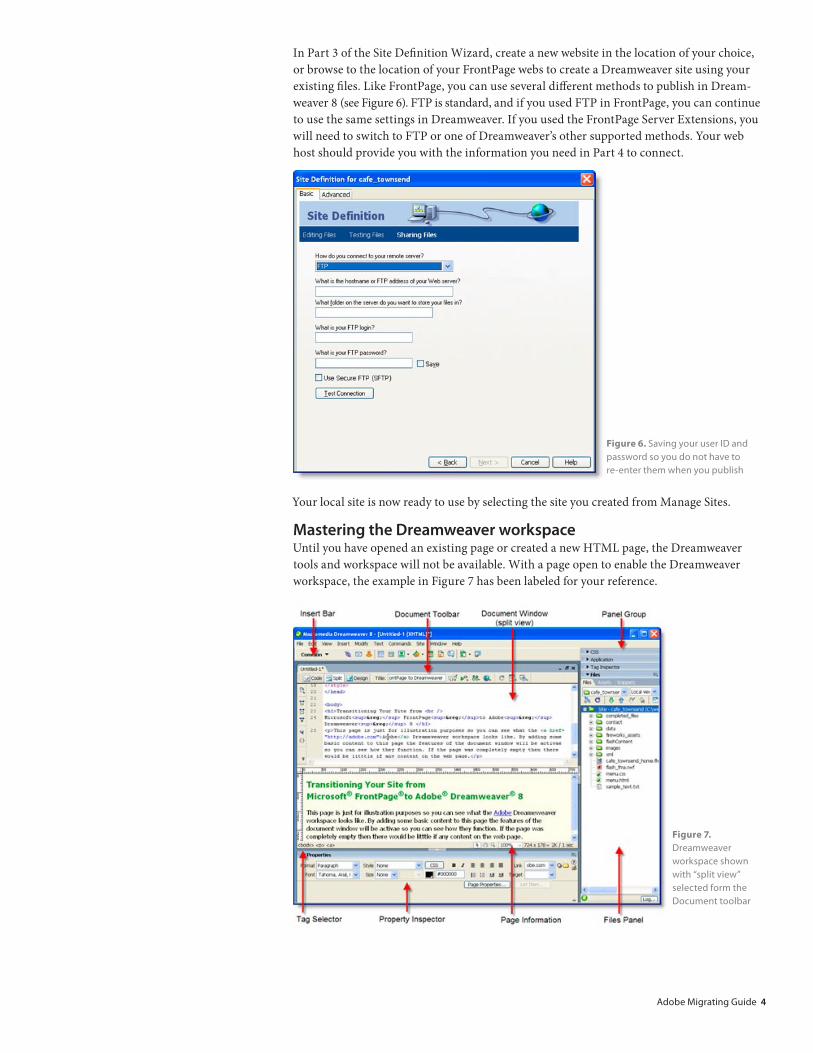
Click the New button and select Site to launch the Site Definition Wizard (see Figure 4).
The Site Definition Wizard replaces both the New Site and Publish Site wizards in Front-Page 2003. One difference between Dreamweaver and FrontPage you will notice as you follow the Site Definition Wizard is that you will be asked for the server-side scripting support. FrontPage 2003 only supports ASP and ASP.NET. Dreamweaver supports those languages as well as PHP and ColdFusion. If you do not intend to use any server-side processing, or do not know what your server supports, select “No, I do not want to use a server technology” (see Figure 5). You can edit your site definitions later if you add server-side applications.
Figure 4. Using a descriptive name for your new site
Figure 5. You can always change your server-side support later if needed
Adobe Migrating Guide �
In Part 3 of the Site Definition Wizard, create a new website in the location of your choice, or browse to the location of your FrontPage webs to create a Dreamweaver site using your existing files. Like FrontPage, you can use several different methods to publish in Dream-weaver 8 (see Figure 6). FTP is standard, and if you used FTP in FrontPage, you can continue to use the same settings in Dreamweaver. If you used the FrontPage Server Extensions, you will need to switch to FTP or one of Dreamweaver’s other supported methods. Your web host should provide you with the information you need in Part 4 to connect.
Your local site is now ready to use by selecting the site you created from Manage Sites.
mastering the Dreamweaver workspaceUntil you have opened an existing page or created a new HTML page, the Dreamweaver tools and workspace will not be available. With a page open to enable the Dreamweaver workspace, the example in Figure 7 has been labeled for your reference.
Figure 6. Saving your user ID and password so you do not have to re-enter them when you publish
Figure 7. Dreamweaver workspace shown with “split view” selected form the Document toolbar
Adobe Migrating Guide �
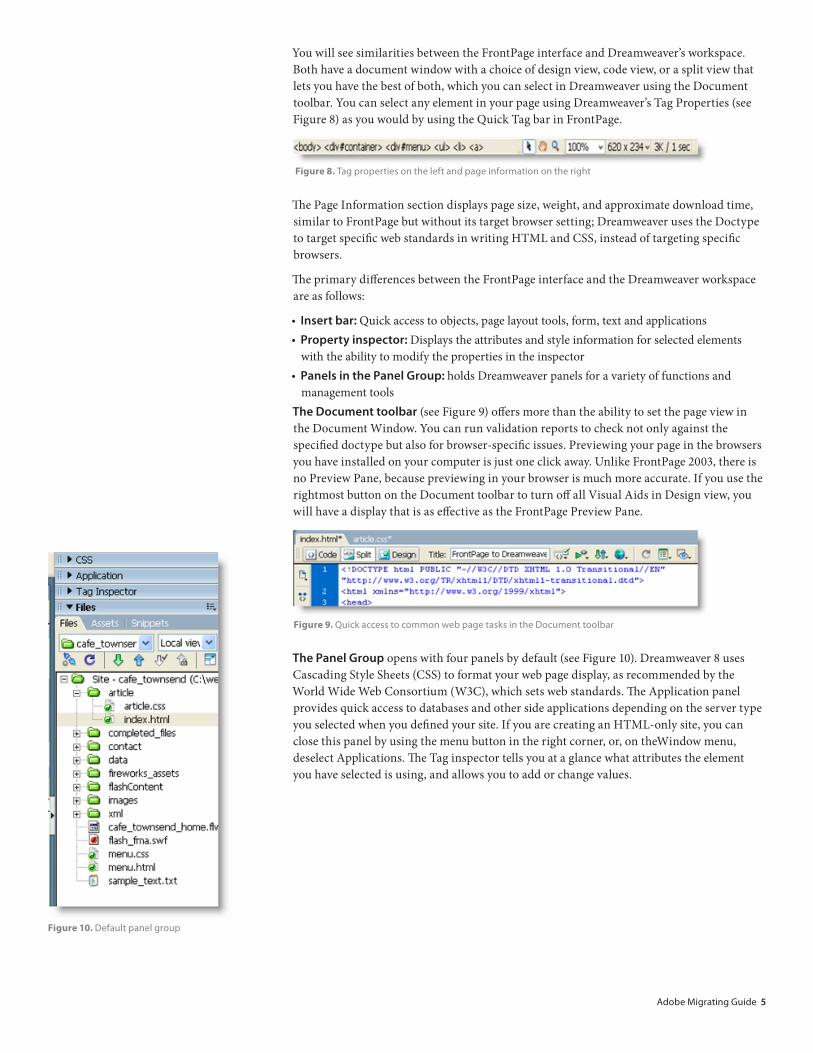
You will see similarities between the FrontPage interface and Dreamweaver’s workspace. Both have a document window with a choice of design view, code view, or a split view that lets you have the best of both, which you can select in Dreamweaver using the Document toolbar. You can select any element in your page using Dreamweaver’s Tag Properties (see Figure 8) as you would by using the Quick Tag bar in FrontPage.
The Page Information section displays page size, weight, and approximate download time, similar to FrontPage but without its target browser setting; Dreamweaver uses the Doctype to target specific web standards in writing HTML and CSS, instead of targeting specific browsers.
The primary differences between the FrontPage interface and the Dreamweaver workspace are as follows:
• insert bar: Quick access to objects, page layout tools, form, text and applications• Property inspector: Displays the attributes and style information for selected elements
with the ability to modify the properties in the inspector• Panels in the Panel group: holds Dreamweaver panels for a variety of functions and
management toolsthe Document toolbar (see Figure 9) offers more than the ability to set the page view in the Document Window. You can run validation reports to check not only against the specified doctype but also for browser-specific issues. Previewing your page in the browsers you have installed on your computer is just one click away. Unlike FrontPage 2003, there is no Preview Pane, because previewing in your browser is much more accurate. If you use the rightmost button on the Document toolbar to turn off all Visual Aids in Design view, you will have a display that is as effective as the FrontPage Preview Pane.
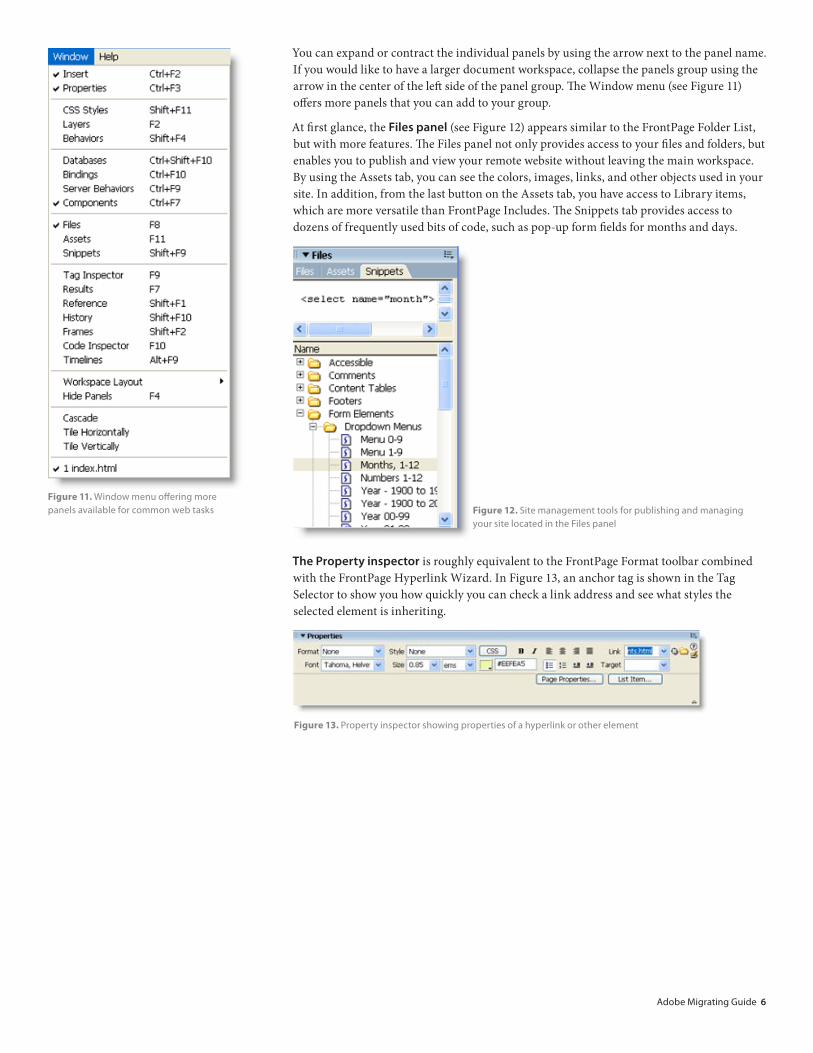
the Panel group opens with four panels by default (see Figure 10). Dreamweaver 8 uses Cascading Style Sheets (CSS) to format your web page display, as recommended by the World Wide Web Consortium (W3C), which sets web standards. The Application panel provides quick access to databases and other side applications depending on the server type you selected when you defined your site. If you are creating an HTML-only site, you can close this panel by using the menu button in the right corner, or, on theWindow menu, deselect Applications. The Tag inspector tells you at a glance what attributes the element you have selected is using, and allows you to add or change values.
Figure 8. Tag properties on the left and page information on the right
Figure 9. Quick access to common web page tasks in the Document toolbar
Figure 10. Default panel group
Adobe Migrating Guide �
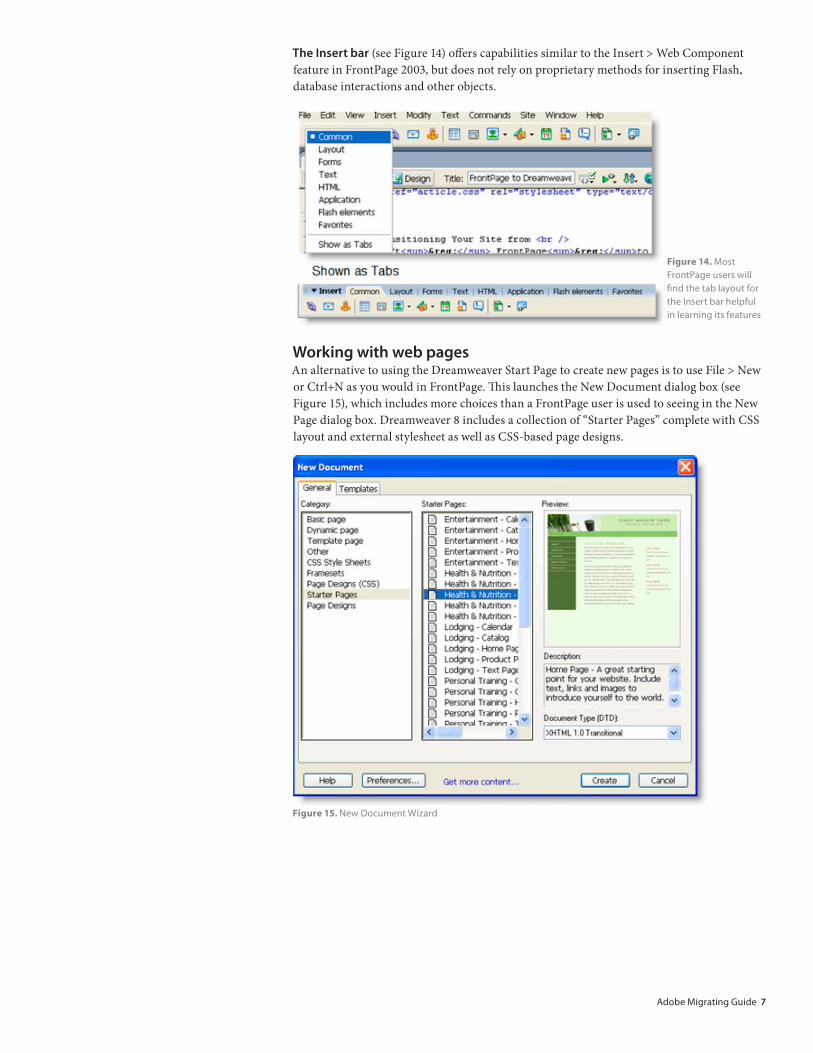
You can expand or contract the individual panels by using the arrow next to the panel name. If you would like to have a larger document workspace, collapse the panels group using the arrow in the center of the left side of the panel group. The Window menu (see Figure 11) offers more panels that you can add to your group.
At first glance, the files panel (see Figure 12) appears similar to the FrontPage Folder List, but with more features. The Files panel not only provides access to your files and folders, but enables you to publish and view your remote website without leaving the main workspace. By using the Assets tab, you can see the colors, images, links, and other objects used in your site. In addition, from the last button on the Assets tab, you have access to Library items, which are more versatile than FrontPage Includes. The Snippets tab provides access to dozens of frequently used bits of code, such as pop-up form fields for months and days.
the Property inspector is roughly equivalent to the FrontPage Format toolbar combined with the FrontPage Hyperlink Wizard. In Figure 13, an anchor tag is shown in the Tag Selector to show you how quickly you can check a link address and see what styles the selected element is inheriting.
Figure 11. Window menu offering more panels available for common web tasks Figure 12. Site management tools for publishing and managing
your site located in the Files panel
Figure 13. Property inspector showing properties of a hyperlink or other element
Adobe Migrating Guide �
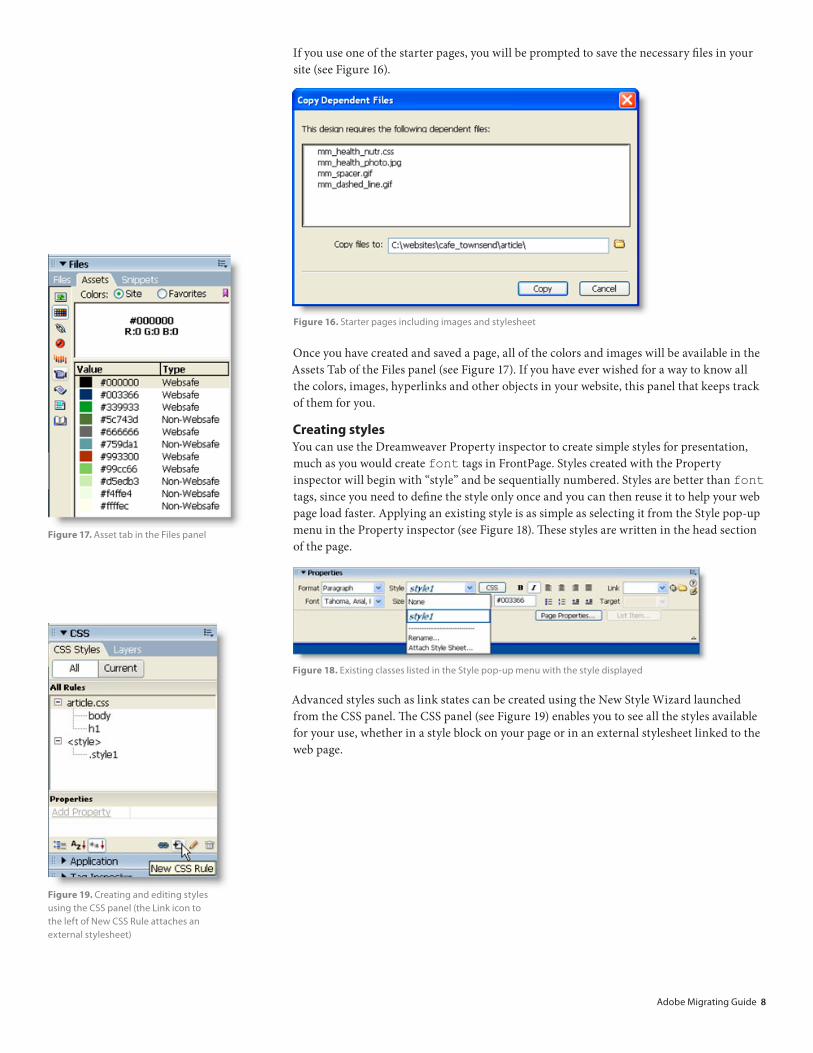
the insert bar (see Figure 14) offers capabilities similar to the Insert > Web Component feature in FrontPage 2003, but does not rely on proprietary methods for inserting Flash, database interactions and other objects.
Working with web pagesAn alternative to using the Dreamweaver Start Page to create new pages is to use File > New or Ctrl+N as you would in FrontPage. This launches the New Document dialog box (see Figure 15), which includes more choices than a FrontPage user is used to seeing in the New Page dialog box. Dreamweaver 8 includes a collection of “Starter Pages” complete with CSS layout and external stylesheet as well as CSS-based page designs.
Figure 14. Most FrontPage users will find the tab layout for the Insert bar helpful in learning its features
Figure 15. New Document Wizard
Adobe Migrating Guide 8
If you use one of the starter pages, you will be prompted to save the necessary files in your site (see Figure 16).
Once you have created and saved a page, all of the colors and images will be available in the Assets Tab of the Files panel (see Figure 17). If you have ever wished for a way to know all the colors, images, hyperlinks and other objects in your website, this panel that keeps track of them for you.
Creating stylesYou can use the Dreamweaver Property inspector to create simple styles for presentation, much as you would create font tags in FrontPage. Styles created with the Property inspector will begin with “style” and be sequentially numbered. Styles are better than font tags, since you need to define the style only once and you can then reuse it to help your web page load faster. Applying an existing style is as simple as selecting it from the Style pop-up menu in the Property inspector (see Figure 18). These styles are written in the head section of the page.
Advanced styles such as link states can be created using the New Style Wizard launched from the CSS panel. The CSS panel (see Figure 19) enables you to see all the styles available for your use, whether in a style block on your page or in an external stylesheet linked to the web page.
Figure 16. Starter pages including images and stylesheet
Figure 17. Asset tab in the Files panel
Figure 18. Existing classes listed in the Style pop-up menu with the style displayed
Figure 19. Creating and editing styles using the CSS panel (the Link icon to the left of New CSS Rule attaches an external stylesheet)
Adobe Migrating Guide �
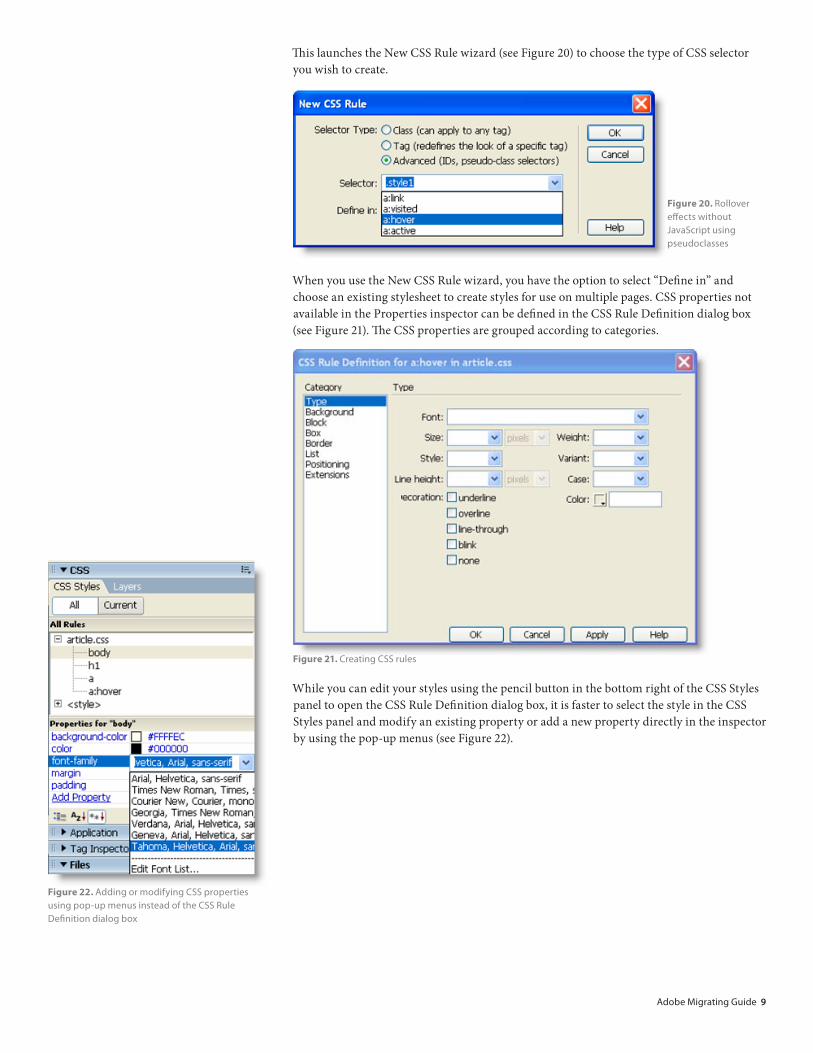
This launches the New CSS Rule wizard (see Figure 20) to choose the type of CSS selector you wish to create.
When you use the New CSS Rule wizard, you have the option to select “Define in” and choose an existing stylesheet to create styles for use on multiple pages. CSS properties not available in the Properties inspector can be defined in the CSS Rule Definition dialog box (see Figure 21). The CSS properties are grouped according to categories.
While you can edit your styles using the pencil button in the bottom right of the CSS Styles panel to open the CSS Rule Definition dialog box, it is faster to select the style in the CSS Styles panel and modify an existing property or add a new property directly in the inspector by using the pop-up menus (see Figure 22).
Figure 20. Rollover effects without JavaScript using pseudoclasses
Figure 21. Creating CSS rules
Figure 22. Adding or modifying CSS properties using pop-up menus instead of the CSS Rule Definition dialog box
Adobe Migrating Guide 10
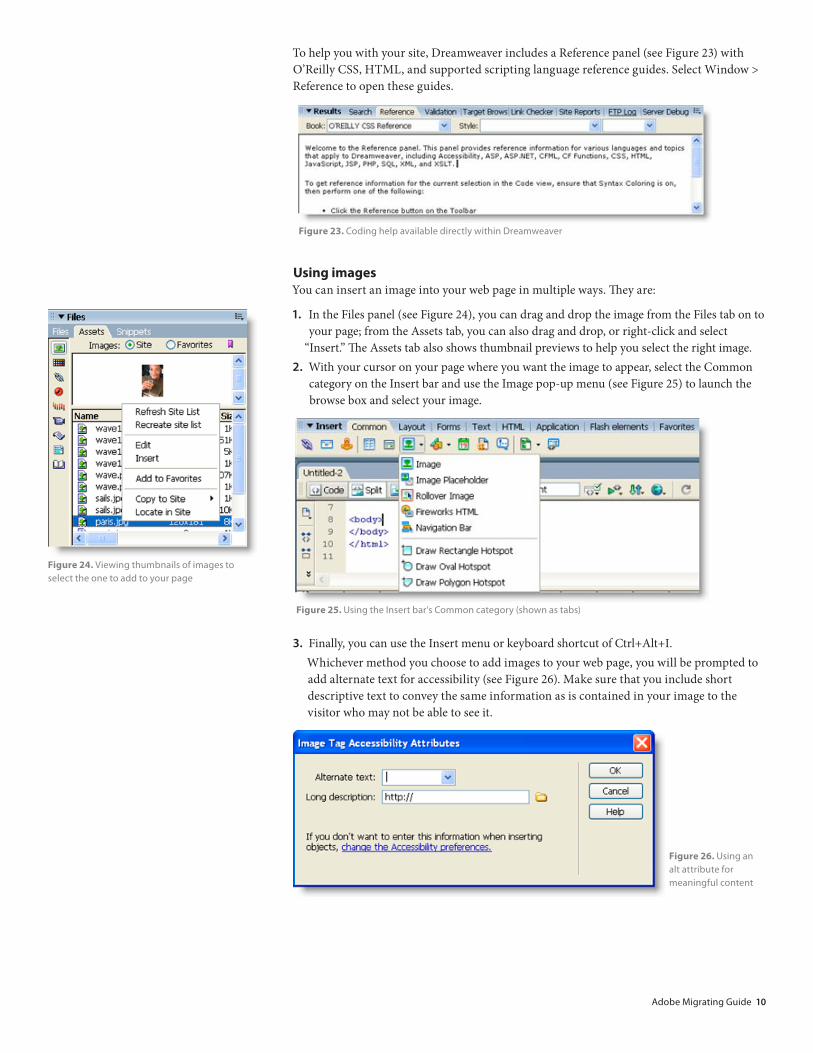
To help you with your site, Dreamweaver includes a Reference panel (see Figure 23) with O’Reilly CSS, HTML, and supported scripting language reference guides. Select Window > Reference to open these guides.
Using imagesYou can insert an image into your web page in multiple ways. They are:
1. In the Files panel (see Figure 24), you can drag and drop the image from the Files tab on to your page; from the Assets tab, you can also drag and drop, or right-click and select
“Insert.” The Assets tab also shows thumbnail previews to help you select the right image.2. With your cursor on your page where you want the image to appear, select the Common
category on the Insert bar and use the Image pop-up menu (see Figure 25) to launch the browse box and select your image.
3. Finally, you can use the Insert menu or keyboard shortcut of Ctrl+Alt+I.Whichever method you choose to add images to your web page, you will be prompted to add alternate text for accessibility (see Figure 26). Make sure that you include short descriptive text to convey the same information as is contained in your image to the visitor who may not be able to see it.
Figure 23. Coding help available directly within Dreamweaver
Figure 24. Viewing thumbnails of images to select the one to add to your page
Figure 25. Using the Insert bar’s Common category (shown as tabs)
Figure 26. Using an alt attribute for meaningful content
Adobe Migrating Guide 11
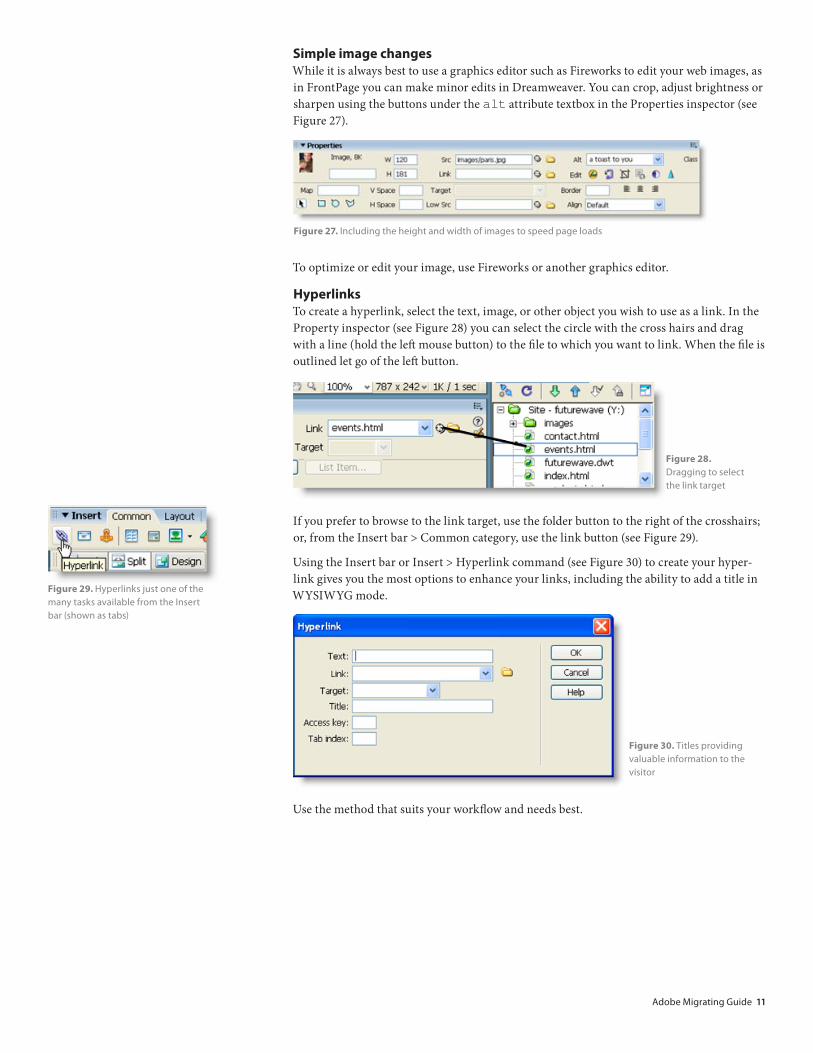
Simple image changesWhile it is always best to use a graphics editor such as Fireworks to edit your web images, as in FrontPage you can make minor edits in Dreamweaver. You can crop, adjust brightness or sharpen using the buttons under the alt attribute textbox in the Properties inspector (see Figure 27).
To optimize or edit your image, use Fireworks or another graphics editor.
HyperlinksTo create a hyperlink, select the text, image, or other object you wish to use as a link. In the Property inspector (see Figure 28) you can select the circle with the cross hairs and drag with a line (hold the left mouse button) to the file to which you want to link. When the file is outlined let go of the left button.
If you prefer to browse to the link target, use the folder button to the right of the crosshairs; or, from the Insert bar > Common category, use the link button (see Figure 29).
Using the Insert bar or Insert > Hyperlink command (see Figure 30) to create your hyper-link gives you the most options to enhance your links, including the ability to add a title in WYSIWYG mode.
Use the method that suits your workflow and needs best.
Figure 27. Including the height and width of images to speed page loads
Figure 28. Dragging to select the link target
Figure 29. Hyperlinks just one of the many tasks available from the Insert bar (shown as tabs)
Figure 30. Titles providing valuable information to the visitor
Adobe Migrating Guide 12
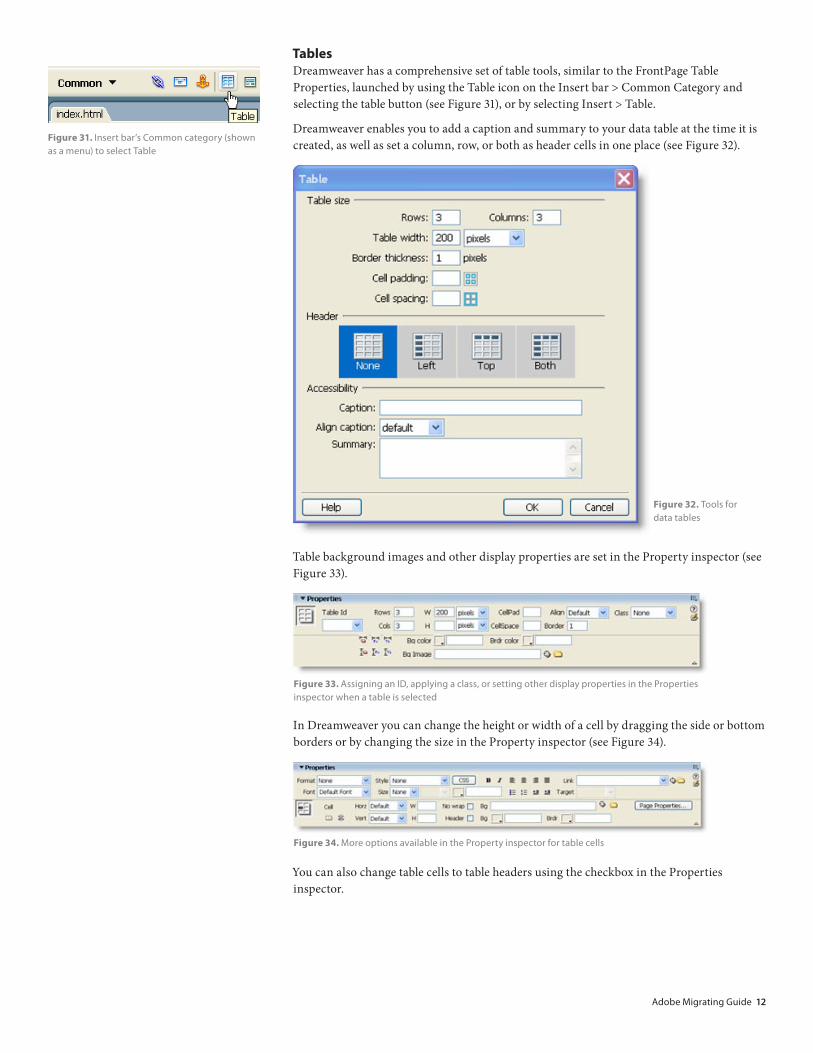
TablesDreamweaver has a comprehensive set of table tools, similar to the FrontPage Table Properties, launched by using the Table icon on the Insert bar > Common Category and selecting the table button (see Figure 31), or by selecting Insert > Table.
Dreamweaver enables you to add a caption and summary to your data table at the time it is created, as well as set a column, row, or both as header cells in one place (see Figure 32).
Table background images and other display properties are set in the Property inspector (see Figure 33).
In Dreamweaver you can change the height or width of a cell by dragging the side or bottom borders or by changing the size in the Property inspector (see Figure 34).
You can also change table cells to table headers using the checkbox in the Properties inspector.
Figure 31. Insert bar’s Common category (shown as a menu) to select Table
Figure 32. Tools for data tables
Figure 33. Assigning an ID, applying a class, or setting other display properties in the Properties inspector when a table is selected
Figure 34. More options available in the Property inspector for table cells
Adobe Migrating Guide 13
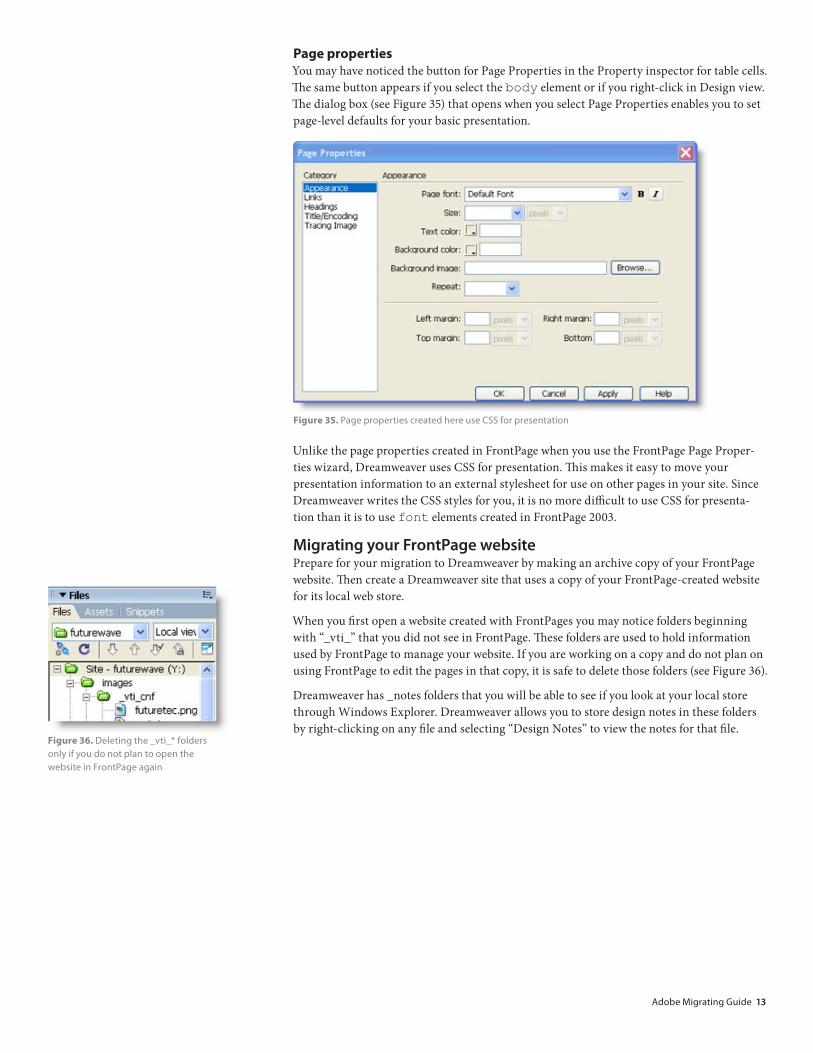
Page propertiesYou may have noticed the button for Page Properties in the Property inspector for table cells. The same button appears if you select the body element or if you right-click in Design view. The dialog box (see Figure 35) that opens when you select Page Properties enables you to set page-level defaults for your basic presentation.
Unlike the page properties created in FrontPage when you use the FrontPage Page Proper-ties wizard, Dreamweaver uses CSS for presentation. This makes it easy to move your presentation information to an external stylesheet for use on other pages in your site. Since Dreamweaver writes the CSS styles for you, it is no more difficult to use CSS for presenta-tion than it is to use font elements created in FrontPage 2003.
migrating your frontPage websitePrepare for your migration to Dreamweaver by making an archive copy of your FrontPage website. Then create a Dreamweaver site that uses a copy of your FrontPage-created website for its local web store.
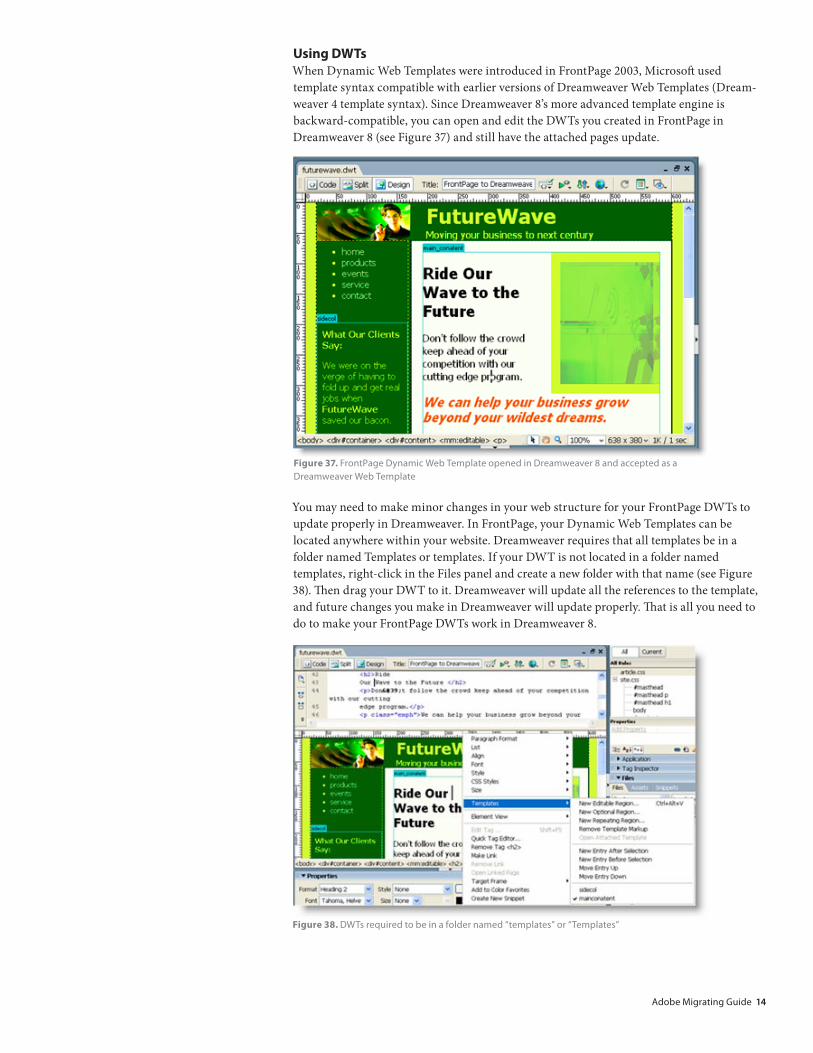
When you first open a website created with FrontPages you may notice folders beginning with “_vti_” that you did not see in FrontPage. These folders are used to hold information used by FrontPage to manage your website. If you are working on a copy and do not plan on using FrontPage to edit the pages in that copy, it is safe to delete those folders (see Figure 36).
Dreamweaver has _notes folders that you will be able to see if you look at your local store through Windows Explorer. Dreamweaver allows you to store design notes in these folders by right-clicking on any file and selecting “Design Notes” to view the notes for that file.
Figure 35. Page properties created here use CSS for presentation
Figure 36. Deleting the _vti_* folders only if you do not plan to open the website in FrontPage again
Adobe Migrating Guide 1�
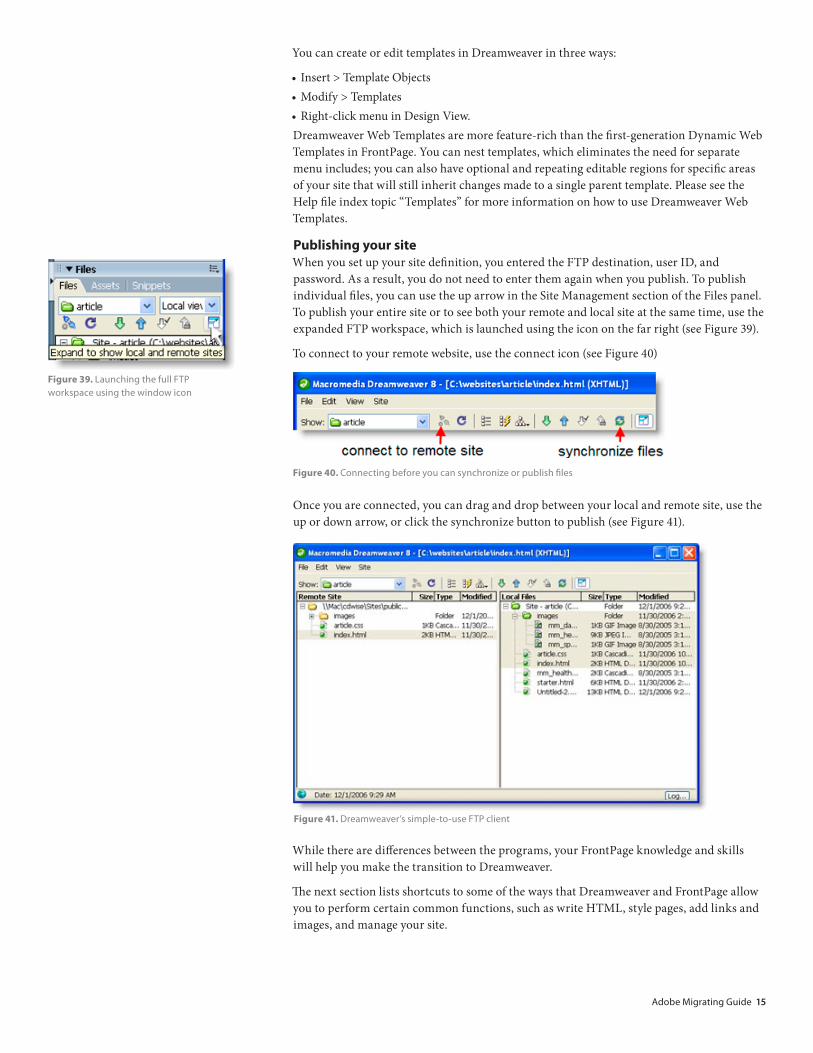
Using DWTsWhen Dynamic Web Templates were introduced in FrontPage 2003, Microsoft used template syntax compatible with earlier versions of Dreamweaver Web Templates (Dream-weaver 4 template syntax). Since Dreamweaver 8’s more advanced template engine is backward-compatible, you can open and edit the DWTs you created in FrontPage in Dreamweaver 8 (see Figure 37) and still have the attached pages update.
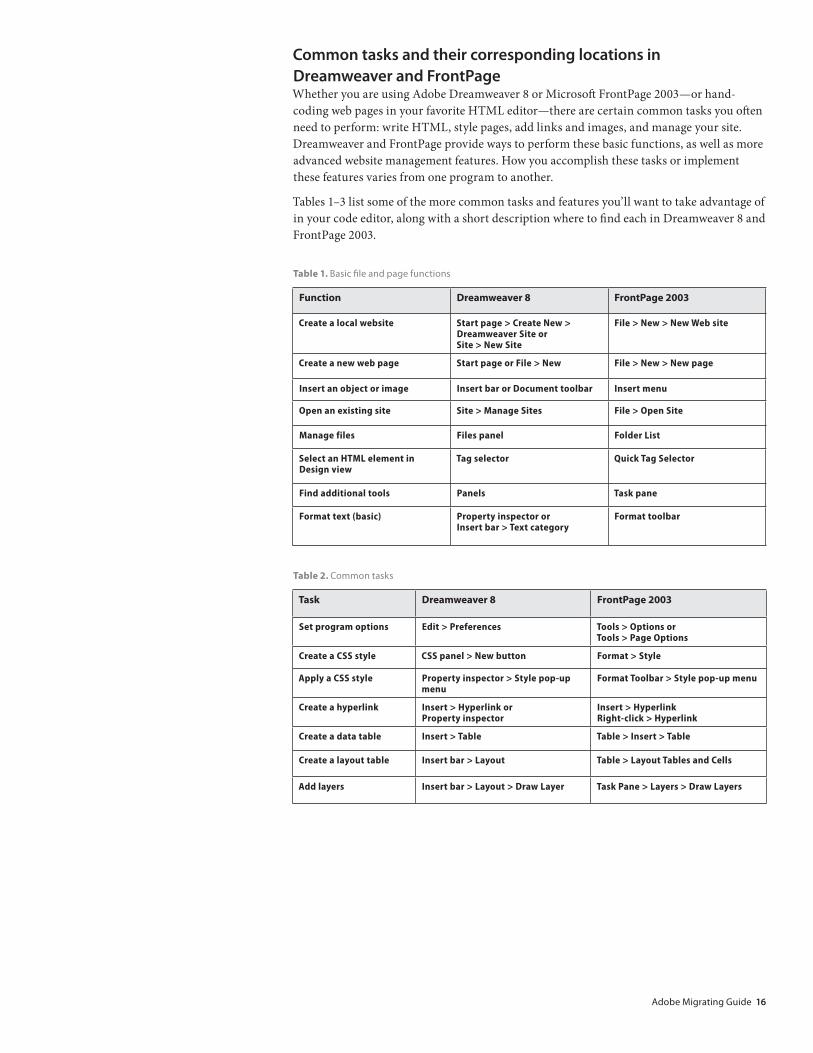
You may need to make minor changes in your web structure for your FrontPage DWTs to update properly in Dreamweaver. In FrontPage, your Dynamic Web Templates can be located anywhere within your website. Dreamweaver requires that all templates be in a folder named Templates or templates. If your DWT is not located in a folder named templates, right-click in the Files panel and create a new folder with that name (see Figure 38). Then drag your DWT to it. Dreamweaver will update all the references to the template, and future changes you make in Dreamweaver will update properly. That is all you need to do to make your FrontPage DWTs work in Dreamweaver 8.
Figure 37. FrontPage Dynamic Web Template opened in Dreamweaver 8 and accepted as a Dreamweaver Web Template
Figure 38. DWTs required to be in a folder named “templates” or “Templates”
Adobe Migrating Guide 1�
You can create or edit templates in Dreamweaver in three ways:
• Insert > Template Objects• Modify > Templates• Right-click menu in Design View.Dreamweaver Web Templates are more feature-rich than the first-generation Dynamic Web Templates in FrontPage. You can nest templates, which eliminates the need for separate menu includes; you can also have optional and repeating editable regions for specific areas of your site that will still inherit changes made to a single parent template. Please see the Help file index topic “Templates” for more information on how to use Dreamweaver Web Templates.
Publishing your siteWhen you set up your site definition, you entered the FTP destination, user ID, and password. As a result, you do not need to enter them again when you publish. To publish individual files, you can use the up arrow in the Site Management section of the Files panel. To publish your entire site or to see both your remote and local site at the same time, use the expanded FTP workspace, which is launched using the icon on the far right (see Figure 39).
To connect to your remote website, use the connect icon (see Figure 40)
Once you are connected, you can drag and drop between your local and remote site, use the up or down arrow, or click the synchronize button to publish (see Figure 41).
While there are differences between the programs, your FrontPage knowledge and skills will help you make the transition to Dreamweaver.
The next section lists shortcuts to some of the ways that Dreamweaver and FrontPage allow you to perform certain common functions, such as write HTML, style pages, add links and images, and manage your site.
Figure 39. Launching the full FTP workspace using the window icon
Figure 40. Connecting before you can synchronize or publish files
Figure 41. Dreamweaver’s simple-to-use FTP client
Adobe Migrating Guide 1�
Common tasks and their corresponding locations in Dreamweaver and frontPageWhether you are using Adobe Dreamweaver 8 or Microsoft FrontPage 2003—or hand-coding web pages in your favorite HTML editor—there are certain common tasks you often need to perform: write HTML, style pages, add links and images, and manage your site. Dreamweaver and FrontPage provide ways to perform these basic functions, as well as more advanced website management features. How you accomplish these tasks or implement these features varies from one program to another.
Tables 1–3 list some of the more common tasks and features you’ll want to take advantage of in your code editor, along with a short description where to find each in Dreamweaver 8 and FrontPage 2003.
Table 1. Basic file and page functions
Function Dreamweaver 8 FrontPage 2003
Create a local website Start page > Create New > Dreamweaver Site or Site > New Site
File > New > New Web site
Create a new web page Start page or File > New File > New > New page
Insert an object or image Insert bar or Document toolbar Insert menu
Open an existing site Site > Manage Sites File > Open Site
Manage files Files panel Folder List
Select an HTML element in Design view
Tag selector Quick Tag Selector
Find additional tools Panels Task pane
Format text (basic) Property inspector or Insert bar > Text category
Format toolbar
Table 2. Common tasks
Task Dreamweaver 8 FrontPage 2003
Set program options Edit > Preferences Tools > Options or Tools > Page Options
Create a CSS style CSS panel > New button Format > Style
Apply a CSS style Property inspector > Style pop-up menu
Format Toolbar > Style pop-up menu
Create a hyperlink Insert > Hyperlink or Property inspector
Insert > Hyperlink Right-click > Hyperlink
Create a data table Insert > Table Table > Insert > Table
Create a layout table Insert bar > Layout Table > Layout Tables and Cells
Add layers Insert bar > Layout > Draw Layer Task Pane > Layers > Draw Layers
Adobe Migrating Guide 1�
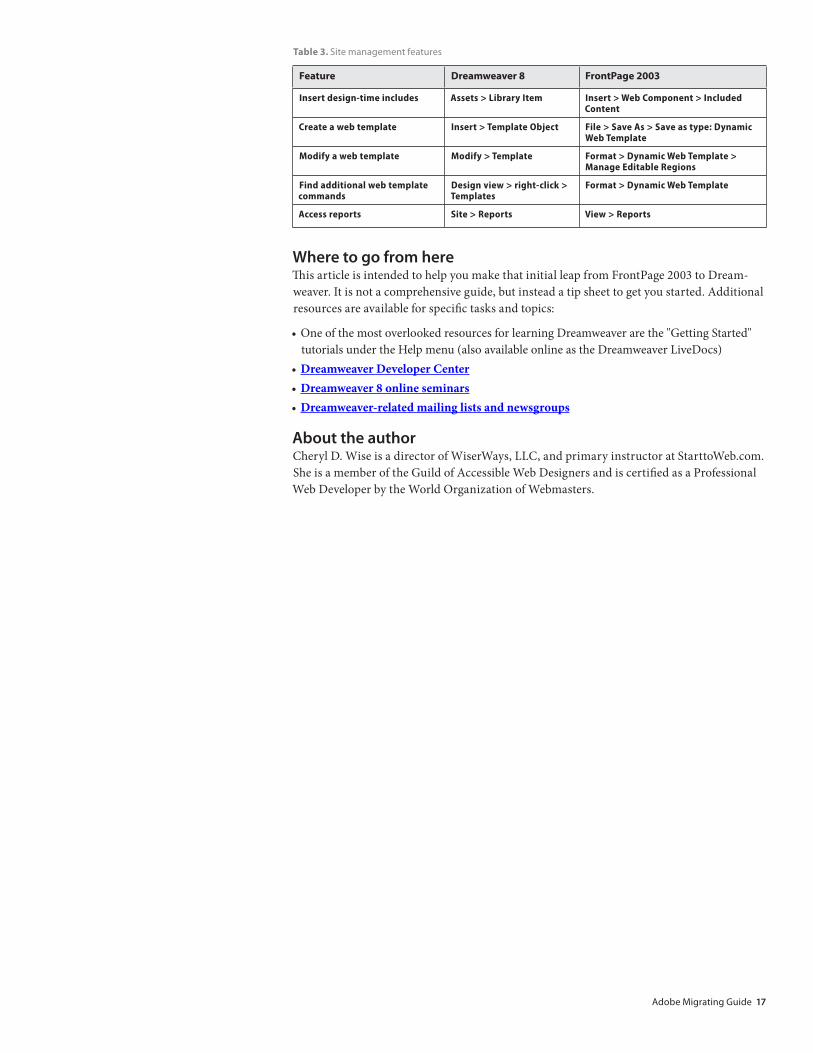
Table 3. Site management features
Feature Dreamweaver 8 FrontPage 2003
Insert design-time includes Assets > Library Item Insert > Web Component > Included Content
Create a web template Insert > Template Object File > Save As > Save as type: Dynamic Web Template
Modify a web template Modify > Template Format > Dynamic Web Template > Manage Editable Regions
Find additional web template commands
Design view > right-click > Templates
Format > Dynamic Web Template
Access reports Site > Reports View > Reports
Where to go from hereThis article is intended to help you make that initial leap from FrontPage 2003 to Dream-weaver. It is not a comprehensive guide, but instead a tip sheet to get you started. Additional resources are available for specific tasks and topics:
• One of the most overlooked resources for learning Dreamweaver are the "Getting Started" tutorials under the Help menu (also available online as the Dreamweaver LiveDocs)
• Dreamweaver Developer Center• Dreamweaver 8 online seminars• Dreamweaver-related mailing lists and newsgroups
About the authorCheryl D. Wise is a director of WiserWays, LLC, and primary instructor at StarttoWeb.com. She is a member of the Guild of Accessible Web Designers and is certified as a Professional Web Developer by the World Organization of Webmasters.