Embed Size (px)
Citation preview
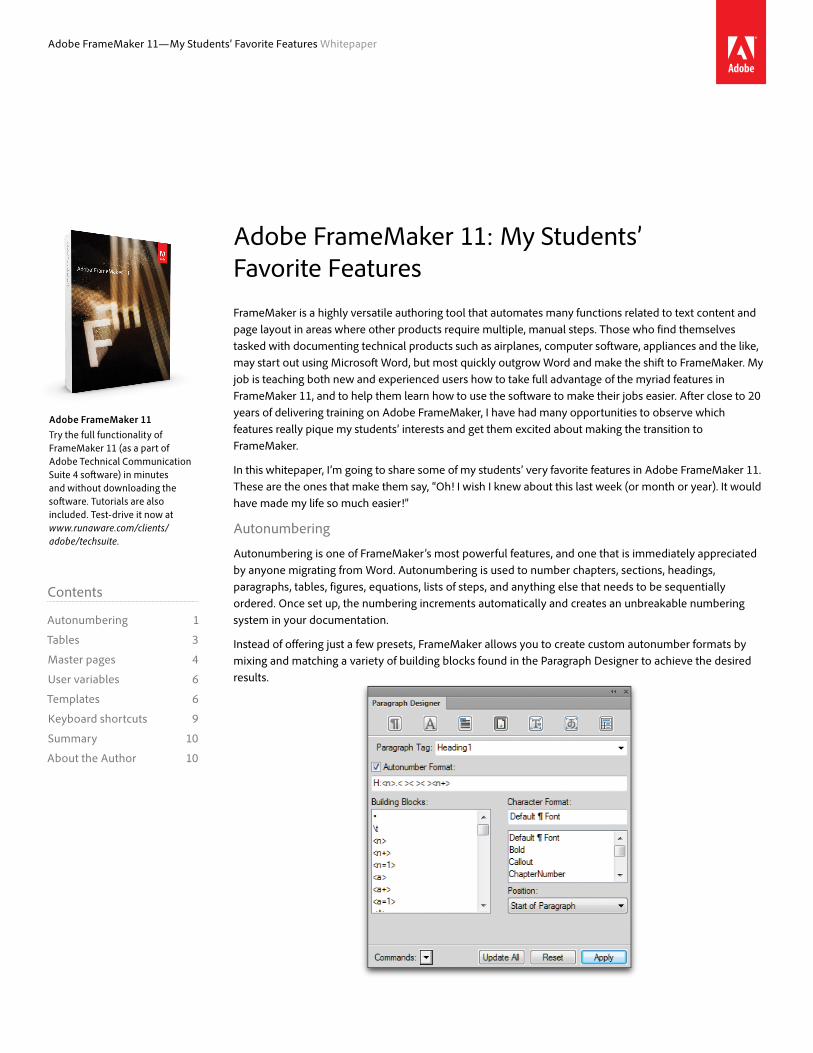
Adobe FrameMaker 11—My Students’ Favorite Features Whitepaper
Adobe FrameMaker 11: My Students’ Favorite Features
FrameMaker is a highly versatile authoring tool that automates many functions related to text content and page layout in areas where other products require multiple, manual steps. Those who find themselves tasked with documenting technical products such as airplanes, computer software, appliances and the like, may start out using Microsoft Word, but most quickly outgrow Word and make the shift to FrameMaker. My job is teaching both new and experienced users how to take full advantage of the myriad features in FrameMaker 11, and to help them learn how to use the software to make their jobs easier. After close to 20 years of delivering training on Adobe FrameMaker, I have had many opportunities to observe which features really pique my students’ interests and get them excited about making the transition to FrameMaker.
In this whitepaper, I’m going to share some of my students’ very favorite features in Adobe FrameMaker 11. These are the ones that make them say, “Oh! I wish I knew about this last week (or month or year). It would have made my life so much easier!”
Autonumbering
Autonumbering is one of FrameMaker’s most powerful features, and one that is immediately appreciated by anyone migrating from Word. Autonumbering is used to number chapters, sections, headings, paragraphs, tables, figures, equations, lists of steps, and anything else that needs to be sequentially ordered. Once set up, the numbering increments automatically and creates an unbreakable numbering system in your documentation.
Instead of offering just a few presets, FrameMaker allows you to create custom autonumber formats by mixing and matching a variety of building blocks found in the Paragraph Designer to achieve the desired results.
Contents
Autonumbering 1
Tables 3
Master pages 4
User variables 6
Templates 6
Keyboard shortcuts 9
Summary 10
About the Author 10
Adobe FrameMaker 11Try the full functionality of FrameMaker 11 (as a part of Adobe Technical Communication Suite 4 software) in minutes and without downloading the software. Tutorials are also included. Test-drive it now at www.runaware.com/clients/adobe/techsuite.
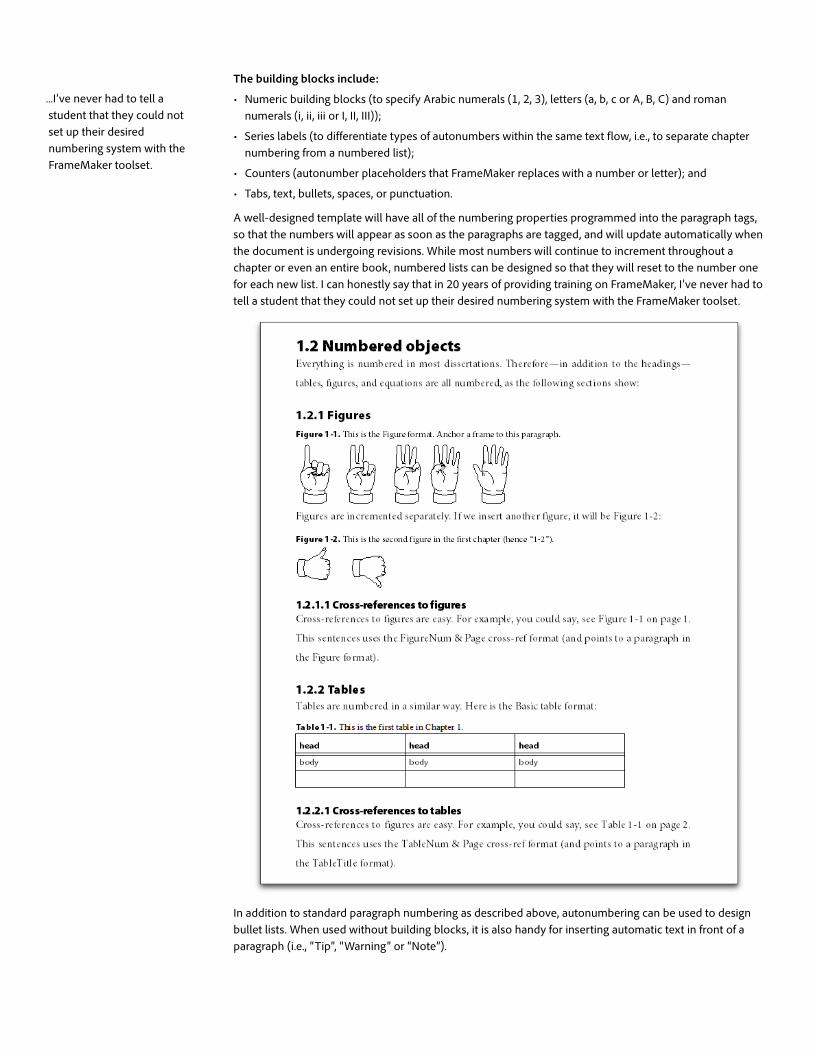
The building blocks include:
• Numeric building blocks (to specify Arabic numerals (1, 2, 3), letters (a, b, c or A, B, C) and roman numerals (i, ii, iii or I, II, III));
• Series labels (to differentiate types of autonumbers within the same text flow, i.e., to separate chapter numbering from a numbered list);
• Counters (autonumber placeholders that FrameMaker replaces with a number or letter); and
• Tabs, text, bullets, spaces, or punctuation.
A well-designed template will have all of the numbering properties programmed into the paragraph tags, so that the numbers will appear as soon as the paragraphs are tagged, and will update automatically when the document is undergoing revisions. While most numbers will continue to increment throughout a chapter or even an entire book, numbered lists can be designed so that they will reset to the number one for each new list. I can honestly say that in 20 years of providing training on FrameMaker, I’ve never had to tell a student that they could not set up their desired numbering system with the FrameMaker toolset.
In addition to standard paragraph numbering as described above, autonumbering can be used to design bullet lists. When used without building blocks, it is also handy for inserting automatic text in front of a paragraph (i.e., “Tip”, “Warning” or “Note”).
...I’ve never had to tell a student that they could not set up their desired numbering system with the FrameMaker toolset.
The building block system takes a little time to master, but offers a clear advantage over using presets: the building blocks can be combined in any order to produce whatever type of sequential numbering system is desired. What my students like best is that once the numbering properties have been set up, the numbers are assigned to the text via paragraph tags, so it is very easy for them to add the numbers as they tag their paragraphs. And best of all, they love how the numbers automatically update during the editing process, and are always correct.
Tables
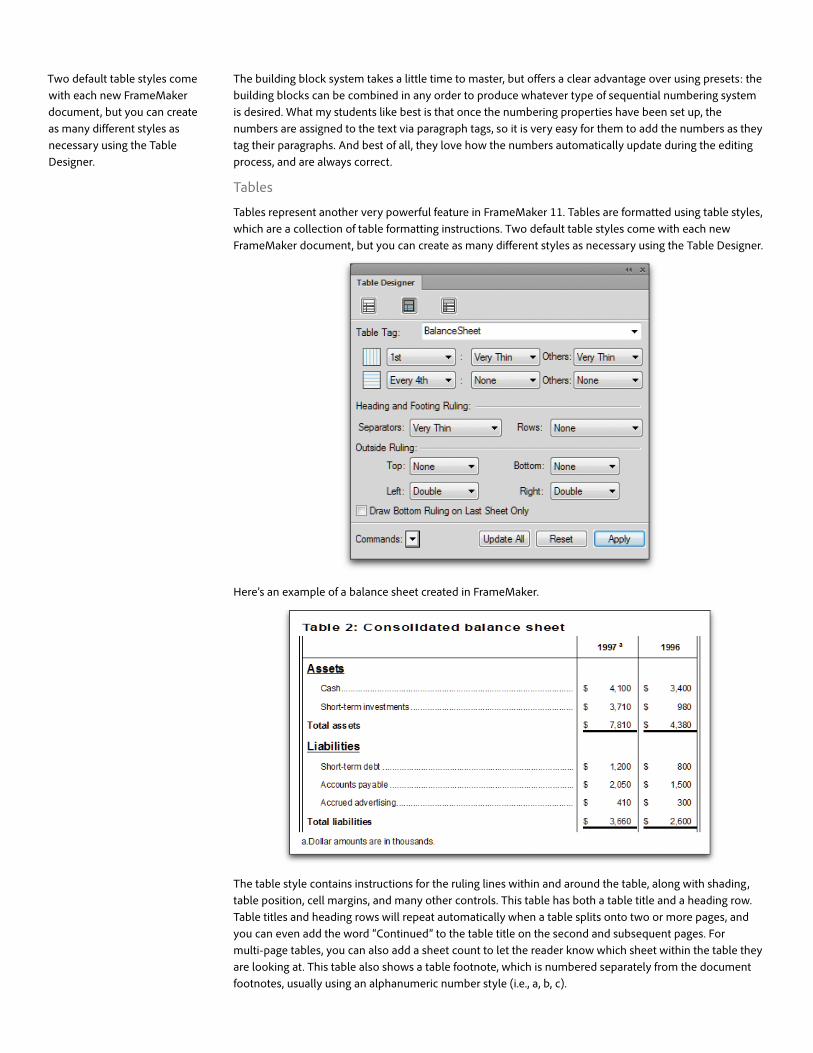
Tables represent another very powerful feature in FrameMaker 11. Tables are formatted using table styles, which are a collection of table formatting instructions. Two default table styles come with each new FrameMaker document, but you can create as many different styles as necessary using the Table Designer.
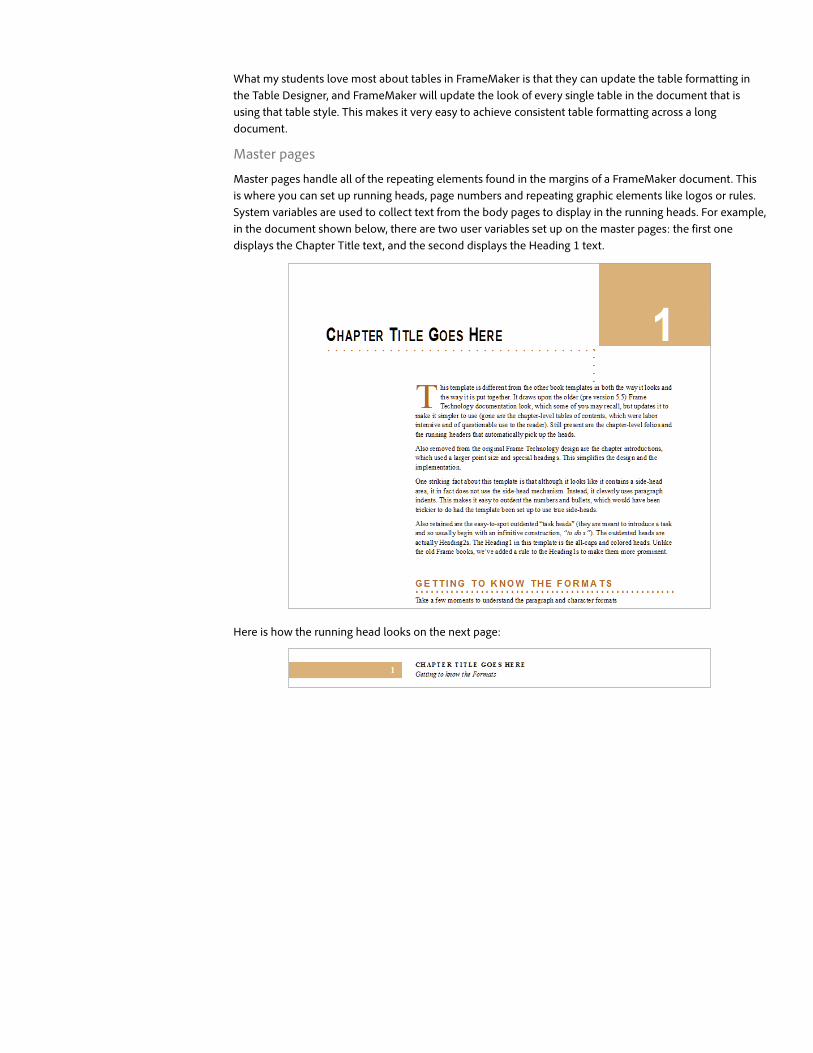
Here’s an example of a balance sheet created in FrameMaker.
The table style contains instructions for the ruling lines within and around the table, along with shading, table position, cell margins, and many other controls. This table has both a table title and a heading row. Table titles and heading rows will repeat automatically when a table splits onto two or more pages, and you can even add the word “Continued” to the table title on the second and subsequent pages. For multi-page tables, you can also add a sheet count to let the reader know which sheet within the table they are looking at. This table also shows a table footnote, which is numbered separately from the document footnotes, usually using an alphanumeric number style (i.e., a, b, c).
Two default table styles come with each new FrameMaker document, but you can create as many different styles as necessary using the Table Designer.
What my students love most about tables in FrameMaker is that they can update the table formatting in the Table Designer, and FrameMaker will update the look of every single table in the document that is using that table style. This makes it very easy to achieve consistent table formatting across a long document.
Master pages
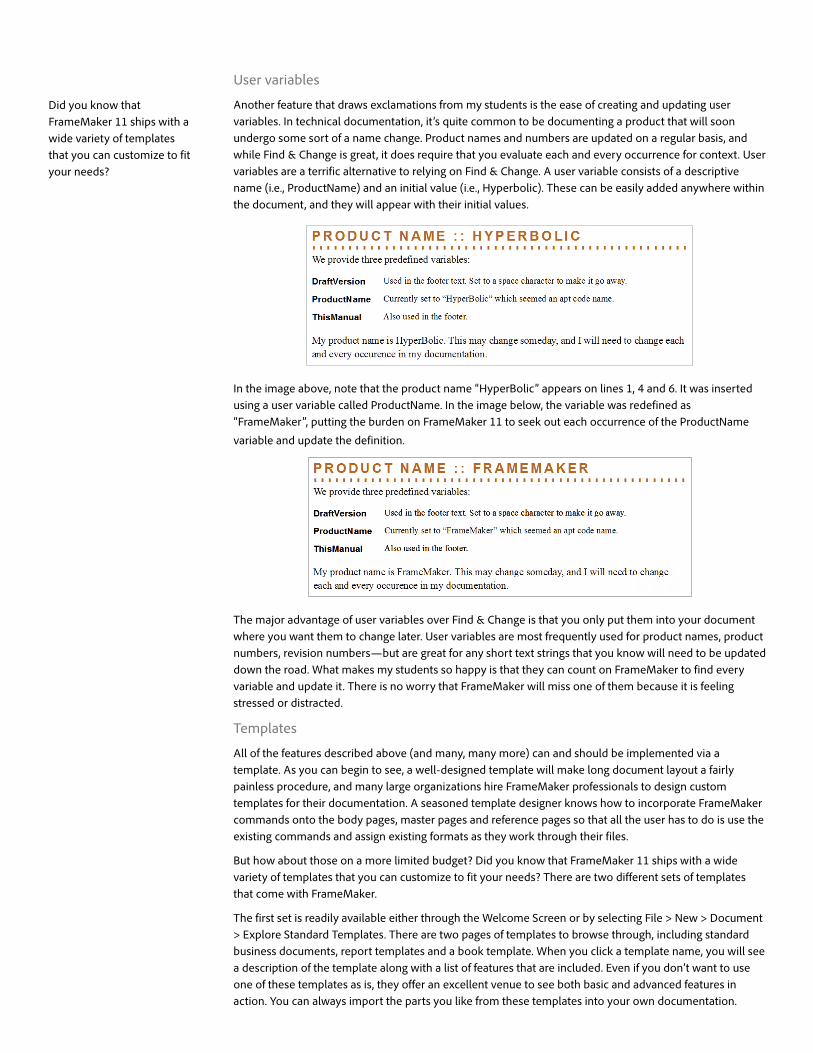
Master pages handle all of the repeating elements found in the margins of a FrameMaker document. This is where you can set up running heads, page numbers and repeating graphic elements like logos or rules. System variables are used to collect text from the body pages to display in the running heads. For example, in the document shown below, there are two user variables set up on the master pages: the first one displays the Chapter Title text, and the second displays the Heading 1 text.
Here is how the running head looks on the next page:

Once the variables have been defined and added to the master pages, changes made to the Chapter Title and/or the Heading 1 text on the body pages are immediately updated in the running heads.
The second important feature about master pages is the ability to create custom pages for particular situations. Common requests include a different look for the opening page of a chapter, or to add the words “This page intentionally left blank” on an otherwise blank body page.
While a new double-sided document has only two default master pages (one for the left-hand pages and one for the right-hand pages), you can have up to 100 master pages in a single file, each with their own unique look. Even better, you can associate a custom master page with a paragraph tag (i.e., associate a custom master page called “Chapter Opening” with a paragraph tag that only appears on the first page of a chapter, like “Chapter Title”), so that opening master page can be assigned automatically to the first page of each chapter.
Finally, it’s worth noting that you can easily rotate a running head. In this memo, the running head was rotated 90º counter-clockwise and positioned in the left margin.
Again, it’s the flexibility of the master pages that entrances my students. They can place their running heads anywhere they like, and once they are set up, they no longer have to worry about making sure the text is accurate. Any changes made to text on the body pages will be updated automatically if it is being used by the system variables.
...it’s the flexibility of the master pages that entrances my students
User variables
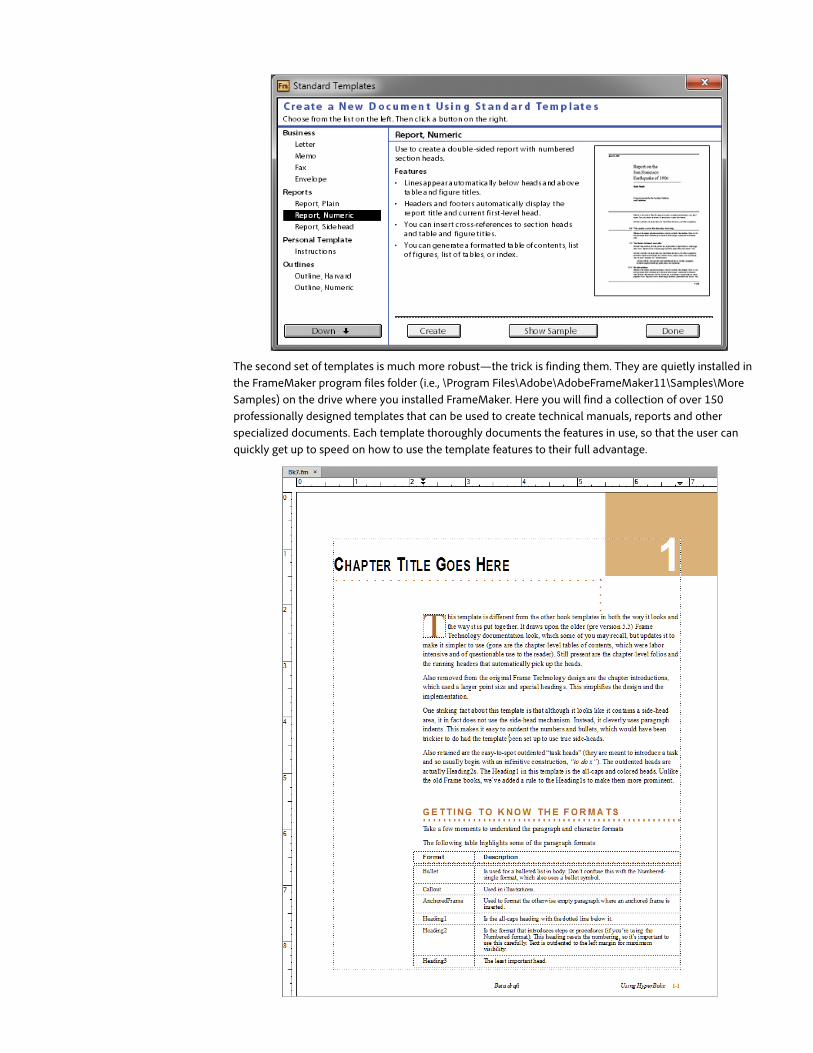
Another feature that draws exclamations from my students is the ease of creating and updating user variables. In technical documentation, it’s quite common to be documenting a product that will soon undergo some sort of a name change. Product names and numbers are updated on a regular basis, and while Find & Change is great, it does require that you evaluate each and every occurrence for context. User variables are a terrific alternative to relying on Find & Change. A user variable consists of a descriptive name (i.e., ProductName) and an initial value (i.e., Hyperbolic). These can be easily added anywhere within the document, and they will appear with their initial values.
In the image above, note that the product name “HyperBolic” appears on lines 1, 4 and 6. It was inserted using a user variable called ProductName. In the image below, the variable was redefined as “FrameMaker”, putting the burden on FrameMaker 11 to seek out each occurrence of the ProductName
variable and update the definition.
The major advantage of user variables over Find & Change is that you only put them into your document where you want them to change later. User variables are most frequently used for product names, product numbers, revision numbers—but are great for any short text strings that you know will need to be updated down the road. What makes my students so happy is that they can count on FrameMaker to find every variable and update it. There is no worry that FrameMaker will miss one of them because it is feeling stressed or distracted.
Templates
All of the features described above (and many, many more) can and should be implemented via a template. As you can begin to see, a well-designed template will make long document layout a fairly painless procedure, and many large organizations hire FrameMaker professionals to design custom templates for their documentation. A seasoned template designer knows how to incorporate FrameMaker commands onto the body pages, master pages and reference pages so that all the user has to do is use the existing commands and assign existing formats as they work through their files.
But how about those on a more limited budget? Did you know that FrameMaker 11 ships with a wide variety of templates that you can customize to fit your needs? There are two different sets of templates that come with FrameMaker.
The first set is readily available either through the Welcome Screen or by selecting File > New > Document > Explore Standard Templates. There are two pages of templates to browse through, including standard business documents, report templates and a book template. When you click a template name, you will see a description of the template along with a list of features that are included. Even if you don’t want to use one of these templates as is, they offer an excellent venue to see both basic and advanced features in action. You can always import the parts you like from these templates into your own documentation.
Did you know that FrameMaker 11 ships with a wide variety of templates that you can customize to fit your needs?
The second set of templates is much more robust—the trick is finding them. They are quietly installed in the FrameMaker program files folder (i.e., \Program Files\Adobe\AdobeFrameMaker11\Samples\More Samples) on the drive where you installed FrameMaker. Here you will find a collection of over 150 professionally designed templates that can be used to create technical manuals, reports and other specialized documents. Each template thoroughly documents the features in use, so that the user can quickly get up to speed on how to use the template features to their full advantage.
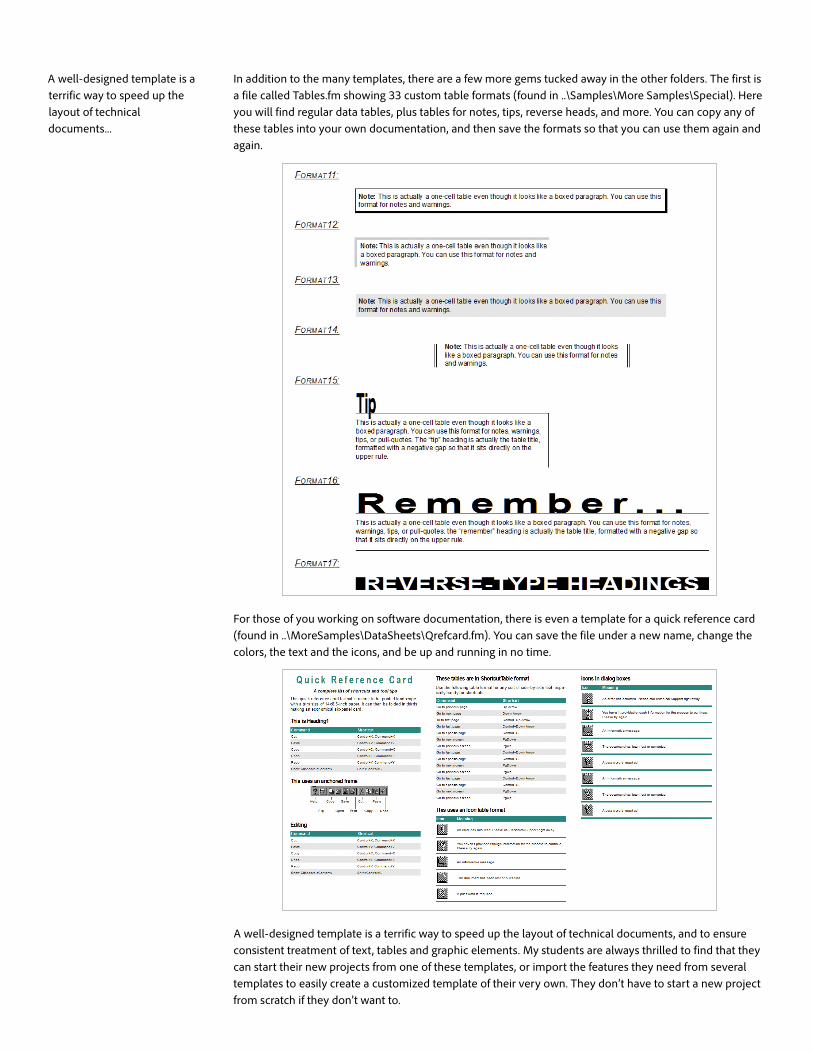
In addition to the many templates, there are a few more gems tucked away in the other folders. The first is a file called Tables.fm showing 33 custom table formats (found in ..\Samples\More Samples\Special). Here you will find regular data tables, plus tables for notes, tips, reverse heads, and more. You can copy any of these tables into your own documentation, and then save the formats so that you can use them again and again.
For those of you working on software documentation, there is even a template for a quick reference card (found in ..\MoreSamples\DataSheets\Qrefcard.fm). You can save the file under a new name, change the colors, the text and the icons, and be up and running in no time.
A well-designed template is a terrific way to speed up the layout of technical documents, and to ensure consistent treatment of text, tables and graphic elements. My students are always thrilled to find that they can start their new projects from one of these templates, or import the features they need from several templates to easily create a customized template of their very own. They don’t have to start a new project from scratch if they don’t want to.
A well-designed template is a terrific way to speed up the layout of technical documents...
Keyboard shortcuts
At first glance, there don’t appear to be many shortcuts in FrameMaker. If you pull down the File menu for example, there are only four listed: Control+o for Open, Control+w for Close, Control+s for Save and Control+p for Print. Some of the menus don’t show any shortcuts. For the experienced user who appreciates the substantial time savings afforded by implementing keyboard shortcuts, this is very disappointing. However, this is just an illusion. FrameMaker actually has more shortcuts available than most applications; they just aren’t displayed in the menus, and most don’t follow the standard Windows convention of pressing two or more keys simultaneously.
It’s great to know that there are so many shortcuts available, but before you can use them, you need to understand how they work:
You can perform many tasks by using keyboard shortcuts. The plus sign (“+”) indicates that each key must be
pressed simultaneously. For example, Control+z means to press the Control key and the z key simultaneously. If the
shortcut keystroke does not contain the plus sign (+), press each key in the order the shortcut states. For example,
“Esc m p” means to press and release the Esc (Escape) key, then the m key, and then the p key.
—Adobe FrameMaker 11 online help
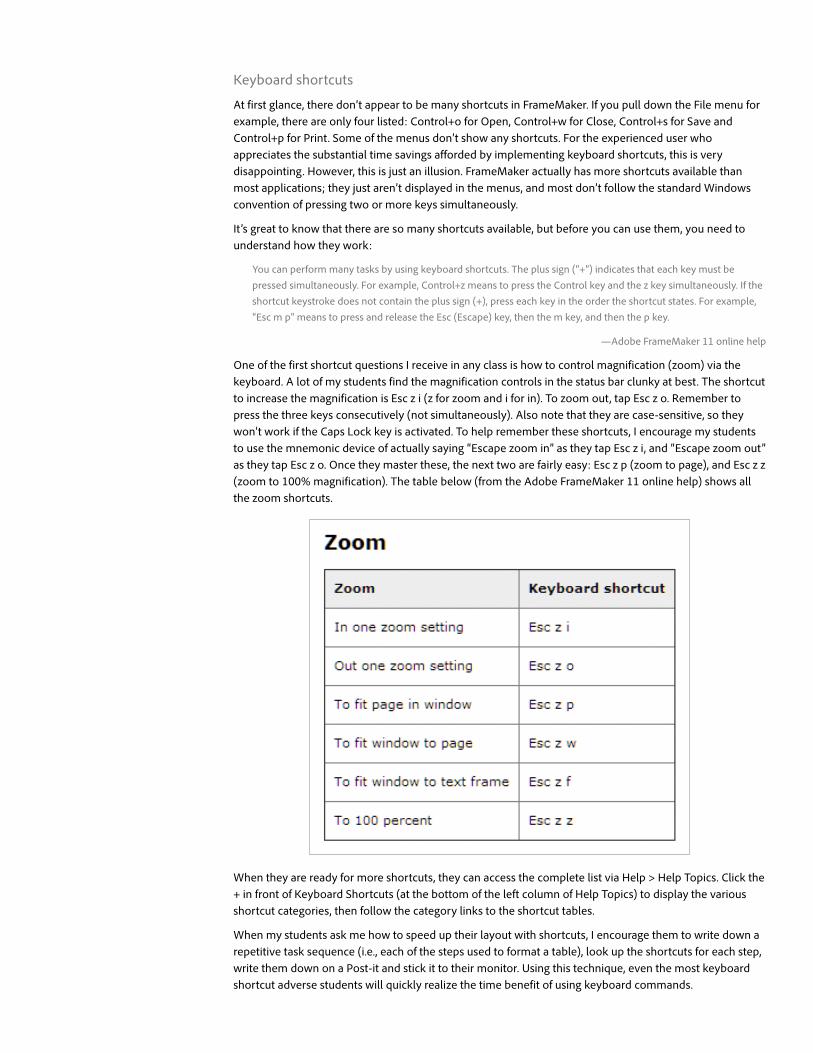
One of the first shortcut questions I receive in any class is how to control magnification (zoom) via the keyboard. A lot of my students find the magnification controls in the status bar clunky at best. The shortcut to increase the magnification is Esc z i (z for zoom and i for in). To zoom out, tap Esc z o. Remember to press the three keys consecutively (not simultaneously). Also note that they are case-sensitive, so they won’t work if the Caps Lock key is activated. To help remember these shortcuts, I encourage my students to use the mnemonic device of actually saying “Escape zoom in” as they tap Esc z i, and “Escape zoom out” as they tap Esc z o. Once they master these, the next two are fairly easy: Esc z p (zoom to page), and Esc z z (zoom to 100% magnification). The table below (from the Adobe FrameMaker 11 online help) shows all the zoom shortcuts.
When they are ready for more shortcuts, they can access the complete list via Help > Help Topics. Click the + in front of Keyboard Shortcuts (at the bottom of the left column of Help Topics) to display the various shortcut categories, then follow the category links to the shortcut tables.
When my students ask me how to speed up their layout with shortcuts, I encourage them to write down a repetitive task sequence (i.e., each of the steps used to format a table), look up the shortcuts for each step, write them down on a Post-it and stick it to their monitor. Using this technique, even the most keyboard shortcut adverse students will quickly realize the time benefit of using keyboard commands.

Adobe, the Adobe logo, and FrameMaker are either registered trademarks or trademarks of Adobe Systems Incorporated in the United States and/or other countries. All other trademarks are the property of their respective owners.
© 2013 Adobe Systems Incorporated. All rights reserved. Printed in the USA.
XXXXXXXX 8/13
Adobe Systems Incorporated 345 Park Avenue San Jose, CA 95110-2704 USA www.adobe.com
About the AuthorBarbara Binder is the owner of Rocky Mountain Training and an Adobe Certified Instructor since 1997. She is an CS6 Design Master, and an Adobe Certified Instructor on FrameMaker, InDesign CS6, InCopy CS6, Photoshop CS6, Illustrator CS6, Acrobat XI and the new Adobe Digital Publishing Suite (DPS). In 2007, Adobe Systems, Inc. recognized Barbara Binder of Rocky Mountain Training as one of the Top Five Most Highly-Rated Adobe Certified Instructors, Worldwide.
SummaryIn this white paper, we’ve covered some of the features that typically elicit very positive reactions from new FrameMaker users. Most of the new users that I see in class are migrating from Microsoft Word to FrameMaker. They’ve made this decision because Word is no longer meeting their needs, and they need a better solution to manage their very long, very complex technical documentation. Autonumbering, tables, running heads, regularly revised text strings, templates, and keyboard shortcuts are just a few of the pain points they’ve been dealing with in Word. There are many more that are beyond the scope of this paper.
As both a FrameMaker user and an Adobe Certified Instructor on FrameMaker, I can honestly say that not only does FrameMaker excel in handling the longest documents without crashing, it is also capable of elegantly managing many of the tasks that drove my students to distraction in Word.