Embed Size (px)
Citation preview


Peachpit Press
V I S U A L Q U I C K S TA R T G U I D E
Adobe Premiere Pro
CCJAN OZER
Visual QuickStart Guide
Adobe Premiere Pro CC: Visual QuickStart GuideJan Ozer
Peachpit Press
www.peachpit.com
To report errors, please send a note to [email protected]
Peachpit Press is a division of Pearson Education
Copyright © 2013 by Jan Ozer
Project Editor: Nancy Peterson
Development Editor: Stephen Nathans-Kelly
Contributing Writer: Shawn Lam
Production Editor and Compositor: Danielle Foster
Technical Editor: Pamela Berry, Luisa Winters
Copyeditor: Scout Festa
Indexer: Jack Lewis
Interior Design: Peachpit Press
Cover Design: RHDG / Riezebos Holzbaur, Peachpit Press
Logo Design: MINE™ www.minesf.com
Notice of RightsAll rights reserved. No part of this book may be reproduced or transmitted in any form by any means,
electronic, mechanical, photocopying, recording, or otherwise, without the prior written permission of the
publisher. For information on getting permission for reprints and excerpts, contact [email protected].
Photograph of author courtesy Gary McLennan
Notice of LiabilityThe information in this book is distributed on an “As Is” basis without warranty. While every precaution has
been taken in the preparation of the book, neither the author nor Peachpit Press shall have any liability to any
person or entity with respect to any loss or damage caused or alleged to be caused directly or indirectly by the
instructions contained in this book or by the computer software and hardware products described in it.
TrademarksVisual QuickStart Guide is a registered trademark of Peachpit Press, a division of Pearson Education.
All other trademarks are the property of their respective owners.
Many of the designations used by manufacturers and sellers to distinguish their products are claimed as
trademarks. Where those designations appear in this book, and Peachpit Press was aware of a trademark
claim, the designations appear as requested by the owner of the trademark. All other product names and
services identified throughout this book are used in editorial fashion only and for the benefit of such companies
with no intention of infringement of the trademark. No such use, or the use of any trade name, is intended to
convey endorsement or other affiliation with this book.
ISBN 13: 978-0-321-92954-9
ISBN 10: 0-321-92954-3
9 8 7 6 5 4 3 2 1
Printed and bound in the United States of America

DedicationTo my daughters, Elizabeth Whatley and Eleanor Rose, and my host
daughters, Fran and Victoria. You all bring immeasurable joy to my life.
Contributing AuthorShawn Lam is a professionally accredited and multi-award-winning
video producer and technical director. He has written over 50 articles
for StreamingMediaProducer.com and its predecessor EventDV Magazine. His company, Shawn Lam Video Inc., specializes in corporate
and event video production, including online video, video switching,
webcasting, and video SEO. In addition to serving 5 terms as the
President of the British Columbia Professional Videographers Association,
Shawn has taught video production business at B.C.I.T and has spoken
at several international video production conferences. Shawn lives in the
Vancouver suburb of Port Coquiltam, with his wife and three kids and
enjoys mountain biking, hiking, and going on adventures with his kids.
Table of Contents v
Table of Contents
Chapter 1 Welcome to Adobe Premiere Pro. . . . . . . . . . . . 1
Touring the Interface . . . . . . . . . . . . . . . . . . . . . 2
The Premiere Pro Workflow . . . . . . . . . . . . . . . . . 4
Choosing Your Workspace . . . . . . . . . . . . . . . . . . 9
About Your Workspace . . . . . . . . . . . . . . . . . . . 11
Customizing Your Workspace . . . . . . . . . . . . . . . 13
Setting Preferences . . . . . . . . . . . . . . . . . . . . . 17
Working with Keyboard Shortcuts . . . . . . . . . . . . . 22
Chapter 2 Setting Up Projects . . . . . . . . . . . . . . . . . . . . .25
Working with Projects. . . . . . . . . . . . . . . . . . . . 26
Working with Missing and Offline Files . . . . . . . . . . 31
Chapter 3 Importing Media. . . . . . . . . . . . . . . . . . . . . . .35
Import Options. . . . . . . . . . . . . . . . . . . . . . . . 36
Ingesting File-based Content in the
Media Browser . . . . . . . . . . . . . . . . . . . . . . 37
Importing from Tape-based Devices: Hardware . . . . . 41
Importing from Tape-based Devices: Software . . . . . 45
Using Playback Controls in the Capture Panel . . . . . . 49
Working with Adobe Photoshop Files. . . . . . . . . . . 53
Importing Files from Your Hard Disk . . . . . . . . . . . 60
Importing Content from Premiere Pro Projects . . . . . 62
Generating Media with Adobe Premiere Pro . . . . . . . 65
Working with Dynamic Link. . . . . . . . . . . . . . . . . 66
Chapter 4 Organizing and Viewing Clips . . . . . . . . . . . . . .69
Working in the Project Panel . . . . . . . . . . . . . . . . 70
Project Panel Basics. . . . . . . . . . . . . . . . . . . . . 72
Clip Management in the Project Panel . . . . . . . . . . 74
Finding Clips in the Project Panel . . . . . . . . . . . . . 78
Organizing Your Content with Bins . . . . . . . . . . . . 83
Working with Bin-Related Preferences . . . . . . . . . . 86
Working in List View. . . . . . . . . . . . . . . . . . . . . 89
Working in Icon View . . . . . . . . . . . . . . . . . . . . 93
vi Table of Contents
Viewing Clips in the Source Monitor . . . . . . . . . . . 98
Controlling Playback in the Source Monitor . . . . . . .100
Configuring the Source Monitor . . . . . . . . . . . . . . 102
Working with Clips in the Source Monitor . . . . . . . .108
Working with Subclips . . . . . . . . . . . . . . . . . . . 116
Choosing Display Modes . . . . . . . . . . . . . . . . . . 118
Working with Metadata . . . . . . . . . . . . . . . . . . . 122
Working with Sequences . . . . . . . . . . . . . . . . . . 126
Storyboard Editing in the Project Panel . . . . . . . . . . 133
Chapter 5 Working with the Timeline . . . . . . . . . . . . . . . 135
Customizing the Timeline. . . . . . . . . . . . . . . . . . 136
Adding and Deleting Tracks . . . . . . . . . . . . . . . . 143
Choosing the Timecode Display Format . . . . . . . . . 147
Navigating in the Timeline . . . . . . . . . . . . . . . . . 149
Monitoring Audio and Video . . . . . . . . . . . . . . . . 153
Sync Lock and Track Lock . . . . . . . . . . . . . . . . . 155
Getting Clips to the Timeline . . . . . . . . . . . . . . . . 158
Insert and Overwrite Edits . . . . . . . . . . . . . . . . . 162
Three- and Four-Point Edits . . . . . . . . . . . . . . . . 168
Playing Clips in the Program Monitor . . . . . . . . . . . 172
Chapter 6 Editing in the Timeline . . . . . . . . . . . . . . . . . . 175
Selecting Clips on the Timeline . . . . . . . . . . . . . . 176
Grouping and Ungrouping Clips . . . . . . . . . . . . . .180
Working with Snapping . . . . . . . . . . . . . . . . . . . 182
Dragging Clips in the Timeline . . . . . . . . . . . . . . . 183
Moving Clips via Keyboard Controls
and the Keypad . . . . . . . . . . . . . . . . . . . . . . 188
Moving Clips from Track to Track . . . . . . . . . . . . .190
Working with Track Targeting . . . . . . . . . . . . . . . 192
Cut, Copy, Paste, and Paste Insert. . . . . . . . . . . . . 194
Deleting Clips on the Timeline . . . . . . . . . . . . . . . 198
Finding and Deleting Gaps in the Timeline . . . . . . . 200
Performing Lift and Extract Edits . . . . . . . . . . . . 203
Replacing a Clip on the Timeline . . . . . . . . . . . . 205
Splitting Clips . . . . . . . . . . . . . . . . . . . . . . . 208
Linking and Unlinking Clips . . . . . . . . . . . . . . . 212
Adding Markers on the Timeline. . . . . . . . . . . . . 214
Chapter 7 Advanced Timeline Techniques . . . . . . . . . . . . 221
About the Trimming Modes. . . . . . . . . . . . . . . . 222
Editing in the Program Monitor. . . . . . . . . . . . . . 232
Table of Contents vii
Trimming with Keyboard Controls . . . . . . . . . . . . 241
Producing Split Edits . . . . . . . . . . . . . . . . . . . 244
Changing Clip Speed . . . . . . . . . . . . . . . . . . . 245
Working with Nested Clips . . . . . . . . . . . . . . . . 248
Finding Stuff . . . . . . . . . . . . . . . . . . . . . . . . 253
Chapter 8 Adding Motion to Clips . . . . . . . . . . . . . . . . . 255
Working with Premiere Pro’s Motion Controls . . . . . 256
Adjusting Effects in the Timeline . . . . . . . . . . . . 265
Working with Keyframes . . . . . . . . . . . . . . . . . 267
Working with Keyframes in the Effect
Controls Panel. . . . . . . . . . . . . . . . . . . . . . 269
Customizing Keyframes. . . . . . . . . . . . . . . . . . 273
Time Remapping via Keyframes . . . . . . . . . . . . . 277
Chapter 9 Working with Video Effects . . . . . . . . . . . . . . 279
About Premiere Pro Effects . . . . . . . . . . . . . . . 280
The Effects Workflow . . . . . . . . . . . . . . . . . . . 283
Animate an Effect with Keyframes. . . . . . . . . . . . 288
Applying Effects to Multiple Clips . . . . . . . . . . . . 290
Keying and Greenscreen Basics . . . . . . . . . . . . . 297
Applying and Configuring the Ultra Key Effect. . . . . 298
Cleaning Up Edges with Garbage Mattes . . . . . . . 304
Chapter 10 Working with Transitions . . . . . . . . . . . . . . . . 307
About Transitions . . . . . . . . . . . . . . . . . . . . . 308
Working with Transitions . . . . . . . . . . . . . . . . . 312
Customizing Transitions . . . . . . . . . . . . . . . . . 317
Fading In from and Out to Black . . . . . . . . . . . . . 320
Audio Transitions . . . . . . . . . . . . . . . . . . . . . 323
Adding the Default Transitions to Multiple Clips . . . . 326
Chapter 11 Color and Brightness Correction . . . . . . . . . . . 327
Working in Color Correction Mode . . . . . . . . . . . 328
Using the Waveform Monitor . . . . . . . . . . . . . . . 331
Color-Correcting Your Video. . . . . . . . . . . . . . . 337
Applying Lumetri Effects with Adjustment Layers . . . 341
Chapter 12 Multi-Camera Editing . . . . . . . . . . . . . . . . . . 345
Syncing Clips from Multiple Cameras . . . . . . . . . . 346
Identifying Sync Points Using a Multi-Camera
Source Sequence . . . . . . . . . . . . . . . . . . . . 348
viii Table of Contents
Accessing the Multi-Camera Source Sequence
in the Timeline. . . . . . . . . . . . . . . . . . . . . . 354
The Nested Sequence Method . . . . . . . . . . . . . 358
Producing Multi-Camera Edits . . . . . . . . . . . . . . 362
A Few Additional Audio Notes . . . . . . . . . . . . . . 365
Chapter 13 Working with Titles . . . . . . . . . . . . . . . . . . . . 367
About Titles . . . . . . . . . . . . . . . . . . . . . . . . 368
Working with the Titler . . . . . . . . . . . . . . . . . . 369
Working with Premiere Pro’s Title Templates. . . . . . 371
Working with Text . . . . . . . . . . . . . . . . . . . . . 373
Setting Text and Shape Properties . . . . . . . . . . . 377
Working with Styles . . . . . . . . . . . . . . . . . . . . 382
Creating Shapes . . . . . . . . . . . . . . . . . . . . . 384
Arranging Shapes and Text . . . . . . . . . . . . . . . 385
Centering, Aligning, and Distributing Objects . . . . . 386
Working with Logos . . . . . . . . . . . . . . . . . . . . 388
Creating Rolls and Crawls . . . . . . . . . . . . . . . . 389
Chapter 14 Working with Audio. . . . . . . . . . . . . . . . . . . . 391
Adjusting Volume in the Effect Controls Panel. . . . . 392
Adjusting Volume on the Timeline. . . . . . . . . . . . 396
Working with Gain . . . . . . . . . . . . . . . . . . . . . 398
Sending Audio to Adobe Audition . . . . . . . . . . . . 402
Entering the Audio Workspace. . . . . . . . . . . . . . 403
Working with Audio Effects. . . . . . . . . . . . . . . . 406
Chapter 15 Publishing Your Video . . . . . . . . . . . . . . . . . . 413
Exporting Still Images . . . . . . . . . . . . . . . . . . . 414
Exporting Media from Premiere Pro . . . . . . . . . . . 415
About Adobe Media Encoder . . . . . . . . . . . . . . 424
Watch Folders . . . . . . . . . . . . . . . . . . . . . . . 430
Workflows . . . . . . . . . . . . . . . . . . . . . . . . . 431
Index . . . . . . . . . . . . . . . . . . . . . . . 435

4Organizing and Viewing Clips
So you’ve captured, ingested, and
imported your clips into your project, and
there they are, quite the mess, staring at
you from the Project panel, begging for
order. Don’t be daunted; in this chapter
you’ll learn how to organize and manage
your source clips, view them in the Source
Monitor, and get them ready for inclusion
into your projects. You’ll also learn how to
create sequences, the building blocks of
video projects.
While this organizational stuff sounds
boring, efficient content management can
shave minutes, if not hours, from total proj-
ect time. Nothing is more frustrating than
spending minutes looking through your
project bin for that one video or picture
you know is there, and nothing is more
subtly disturbing than a messy project bin.
We can’t control the neatness of our kids’
bedrooms or what happens in our nations’
capitals, but by golly, we can organize and
maintain a squeaky-clean Project panel
that streamlines and simplifies an entire
project. You with me? Let’s get started.
In This ChapterWorking in the Project Panel 70
Project Panel Basics 72
Clip Management in the Project Panel 74
Finding Clips in the Project Panel 78
Organizing Your Content with Bins 83
Working with Bin-Related Preferences 86
Working in List View 89
Working in Icon View 93
Viewing Clips in the Source Monitor 98
Controlling Playback in the
Source Monitor 100
Configuring the Source Monitor 102
Working with Clips in the Source Monitor 108
Working with Subclips 116
Choosing Display Modes 118
Working with Metadata 122
Working with Sequences 126
Storyboard Editing in the Project Panel 133
70 Chapter 4
Working in the Project PanelRousing intro notwithstanding, if you’ve
spent time organizing files on your hard
drive with Windows Explorer or the Mac’s
File Manager, you’ll find most of these
concepts very familiar; Adobe made a
good decision in not trying to re-invent this
particular wheel. So it’s all about creating
bins (rather than folders), moving content
into those bins, choosing column heads
for sorting, and the like. There are some
media-specific elements, and you’ll need to
see how all this works within the Premiere
Pro interface, but we’re not breaking much
new ground here.
Let’s take a quick flyover of the Project
panel and its elements A. The bin/sub-bin
organization should look familiar, as should
the metadata columns you can use to sort
content in the bin. Just a note: I created the
organization shown in the Project panel;
every project starts with a clean slate, with
no bins or other structure.
Beneath the Preview area is the Find box,
which allows you to search for content in
the Project panel and within any metadata
associated with any clip. You’ll find this field
in many Premiere Pro panels that contain
content, including effects and transitions
panels, and it can be an exceptionally fast
way to find exactly what you’re looking for.
On the bottom left of the Project panel, you
see buttons that control the display. There
are two modes, List view and Icon view,
and the Project panel is currently in List
view. Icon view shows larger thumbnails
of the content and is very useful during
the early stages of a project, when you’re
identifying the most relevant bits of content
to include in a video.
Note the panel menu in the upper-right
corner; click it to reveal the three configu-
ration options that you can enable and
disable from that menu: Preview Area,
Thumbnails, and Hover Scrub. The Preview
Area is the little preview window in the
upper-left corner. While the window itself
is too small to show much (and a quick
double-click on the content opens it in
the Source Monitor), the content descrip-
tion to the right of the preview window is
often invaluable, so I typically leave this
open. The Thumbnails option toggles the
little display to the left of the content in the
Project panel—it’s not currently selected,
so you see content-specific buttons to the
left of content; when it is selected, you see
a tiny thumbnail of the content itself. The
default setting enables thumbnails in Icon
view and disables them in List view, and
that’s how I typically leave it. Finally, Hover
Scrub is a preview function available in
Icon view that I’ll cover in more detail later
in this chapter.
On the bottom right are other controls
that I’ll review in more detail in this chap-
ter, including the Automate to Sequence
button, a great way to create a rough cut
of your project. The Find button opens a
Find dialog that you can use if the Find
box bears no fruit. The New Bin button is a
one-click way to create a new bin (though I
prefer the right-click command), and Clear
is what it looks like, a fast way to delete
selected content.
Which leaves the New Item button, a non-
descript button that’s one of the most pow-
erful, frequently used tools on the panel.
Intrigued? How’s that for creating tension
in an otherwise dry narrative?
Organizing and Viewing Clips 71
You can maximize the display of the
Project panel by clicking it to make it active
(or pressing Shift+1) and then pressing the
accent key (`), which is to the left of the 1 key
and directly above the Tab key on most key-
boards. Restore the workspace by pressing
the accent key again.
OK, hold your applause until the end.
As you’ll learn, you can drag any piece of
content onto the New Item button and cre-
ate a sequence that perfectly matches the
content. Unsure if you shot at 30p or 60i
but need a sequence to match? No prob-
lem—just drag the imported content onto
the New Item button, and Premiere Pro will
take care of it. I use this button to create
virtually all my sequences.
Well, that’s the flyover. Let’s get down to
our detailed tasks.
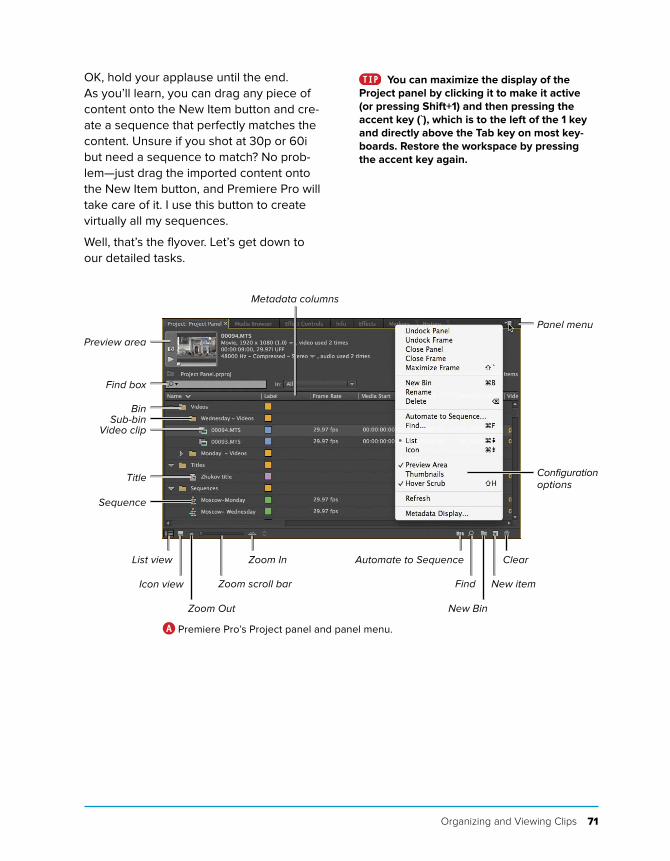
A Premiere Pro’s Project panel and panel menu.
Preview area
Find box
Metadata columns
BinSub-bin
Video clip
Title
Sequence
List view
Icon view
Zoom Out
Zoom scroll bar
Zoom In Automate to Sequence
Find
New Bin
Panel menu
Configuration options
New item
Clear
72 Chapter 4
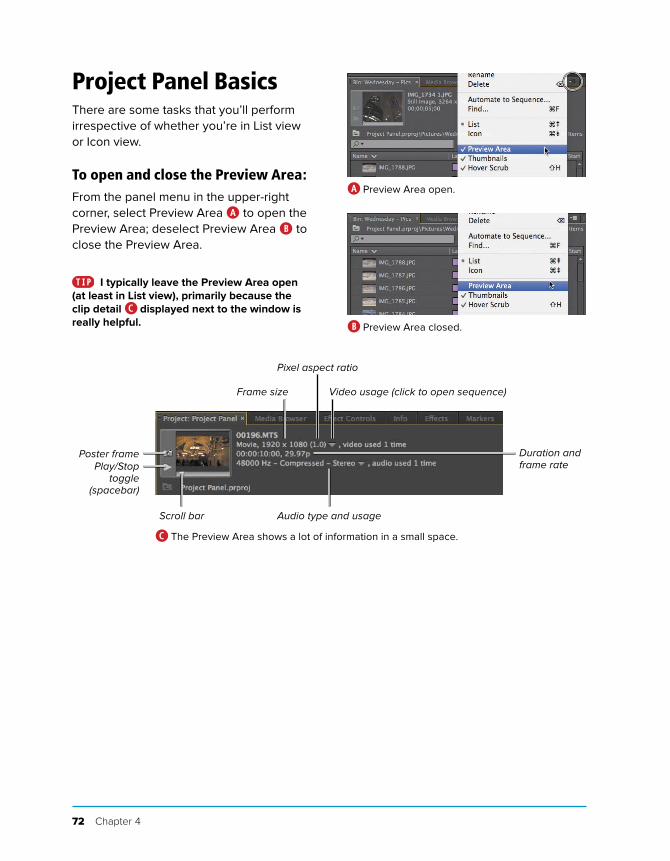
Project Panel BasicsThere are some tasks that you’ll perform
irrespective of whether you’re in List view
or Icon view.
To open and close the Preview Area:From the panel menu in the upper-right
corner, select Preview Area A to open the
Preview Area; deselect Preview Area B to
close the Preview Area.
I typically leave the Preview Area open
(at least in List view), primarily because the
clip detail C displayed next to the window is
really helpful.
A Preview Area open.
B Preview Area closed.
Frame size
Pixel aspect ratio
Video usage (click to open sequence)
Duration and frame rate
Audio type and usage
Poster framePlay/Stop
toggle (spacebar)
Scroll bar
C The Preview Area shows a lot of information in a small space.
Organizing and Viewing Clips 73
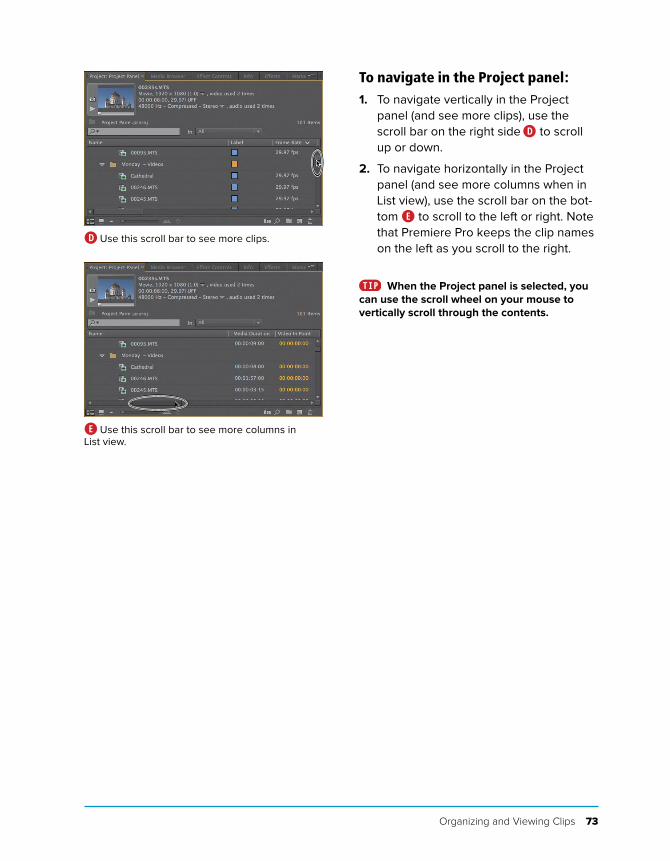
To navigate in the Project panel:1. To navigate vertically in the Project
panel (and see more clips), use the
scroll bar on the right side D to scroll
up or down.
2. To navigate horizontally in the Project
panel (and see more columns when in
List view), use the scroll bar on the bot-
tom E to scroll to the left or right. Note
that Premiere Pro keeps the clip names
on the left as you scroll to the right.
When the Project panel is selected, you
can use the scroll wheel on your mouse to
vertically scroll through the contents.
D Use this scroll bar to see more clips.
E Use this scroll bar to see more columns in
List view.
74 Chapter 4
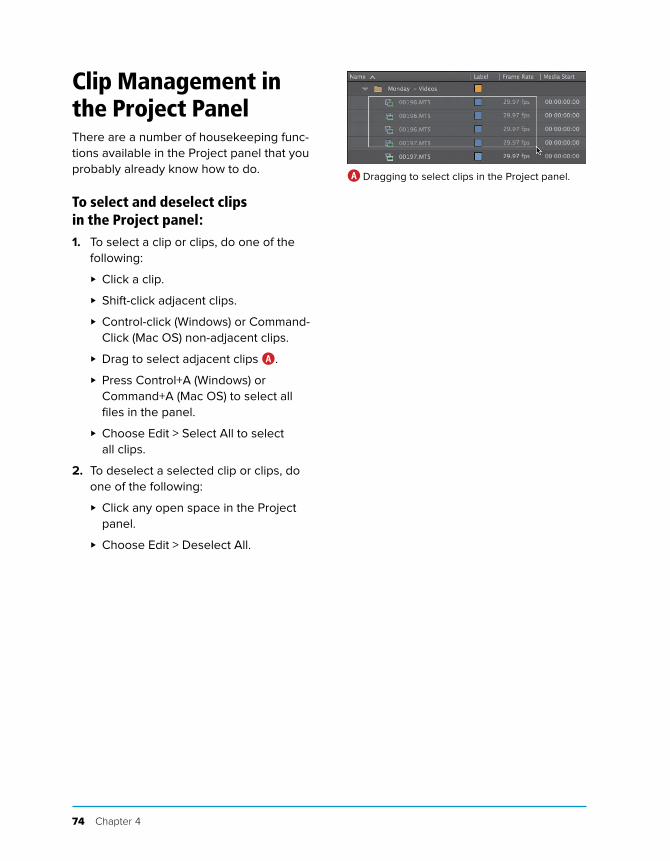
Clip Management in the Project PanelThere are a number of housekeeping func-
tions available in the Project panel that you
probably already know how to do.
To select and deselect clips in the Project panel:1. To select a clip or clips, do one of the
following:
> Click a clip.
> Shift-click adjacent clips.
> Control-click (Windows) or Command-
Click (Mac OS) non-adjacent clips.
> Drag to select adjacent clips A.
> Press Control+A (Windows) or
Command+A (Mac OS) to select all
files in the panel.
> Choose Edit > Select All to select
all clips.
2. To deselect a selected clip or clips, do
one of the following:
> Click any open space in the Project
panel.
> Choose Edit > Deselect All.
A Dragging to select clips in the Project panel.
Organizing and Viewing Clips 75
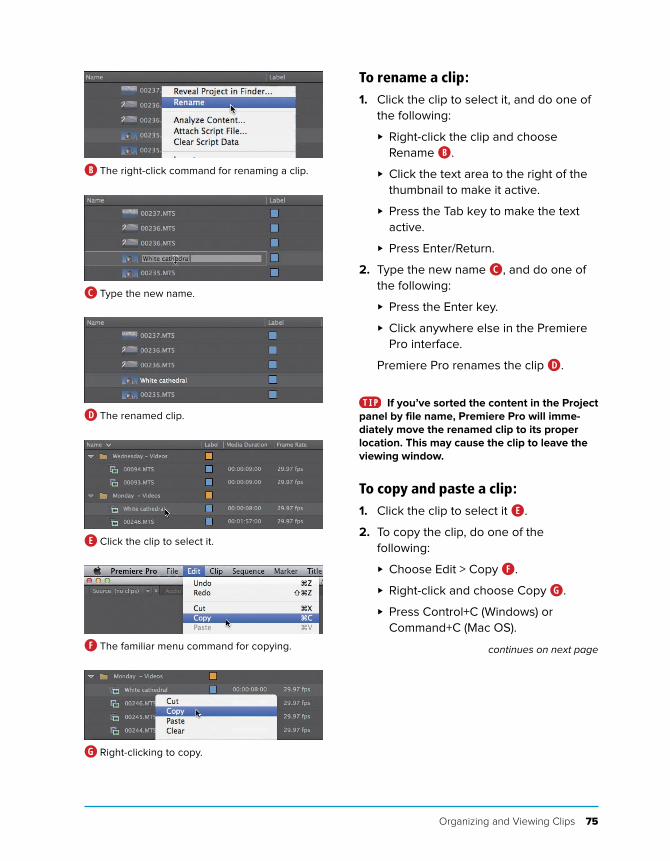
To rename a clip:1. Click the clip to select it, and do one of
the following:
> Right-click the clip and choose
Rename B.
> Click the text area to the right of the
thumbnail to make it active.
> Press the Tab key to make the text
active.
> Press Enter/Return.
2. Type the new name C, and do one of
the following:
> Press the Enter key.
> Click anywhere else in the Premiere
Pro interface.
Premiere Pro renames the clip D.
If you’ve sorted the content in the Project
panel by file name, Premiere Pro will imme-
diately move the renamed clip to its proper
location. This may cause the clip to leave the
viewing window.
To copy and paste a clip:1. Click the clip to select it E.
2. To copy the clip, do one of the
following:
> Choose Edit > Copy F.
> Right-click and choose Copy G.
> Press Control+C (Windows) or
Command+C (Mac OS).
continues on next page
B The right-click command for renaming a clip.
C Type the new name.
D The renamed clip.
E Click the clip to select it.
F The familiar menu command for copying.
G Right-clicking to copy.
76 Chapter 4
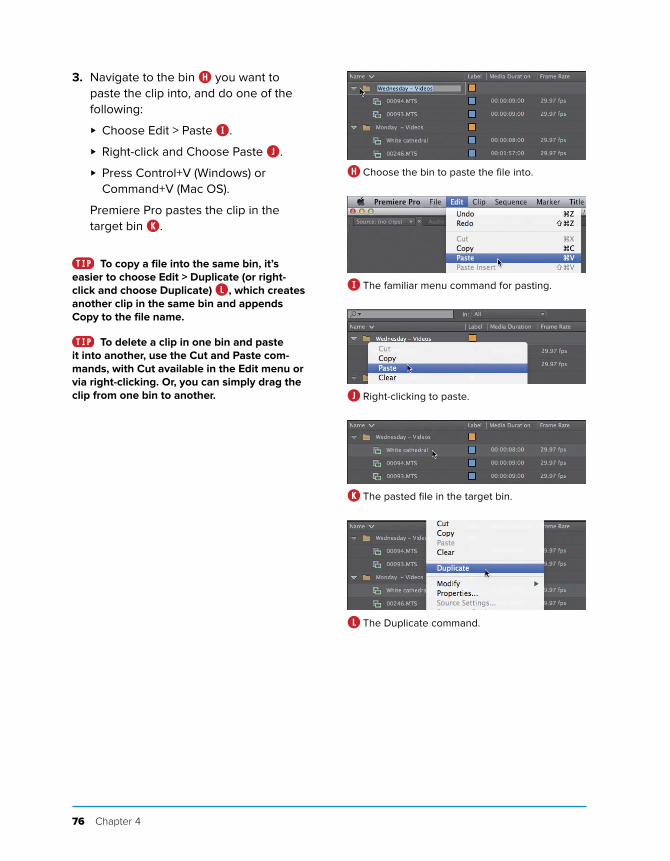
3. Navigate to the bin H you want to
paste the clip into, and do one of the
following:
> Choose Edit > Paste I.
> Right-click and Choose Paste J.
> Press Control+V (Windows) or
Command+V (Mac OS).
Premiere Pro pastes the clip in the
target bin K.
To copy a file into the same bin, it’s
easier to choose Edit > Duplicate (or right-
click and choose Duplicate) L, which creates
another clip in the same bin and appends
Copy to the file name.
To delete a clip in one bin and paste
it into another, use the Cut and Paste com-
mands, with Cut available in the Edit menu or
via right-clicking. Or, you can simply drag the
clip from one bin to another.
H Choose the bin to paste the file into.
I The familiar menu command for pasting.
J Right-clicking to paste.
K The pasted file in the target bin.
L The Duplicate command.
Organizing and Viewing Clips 77
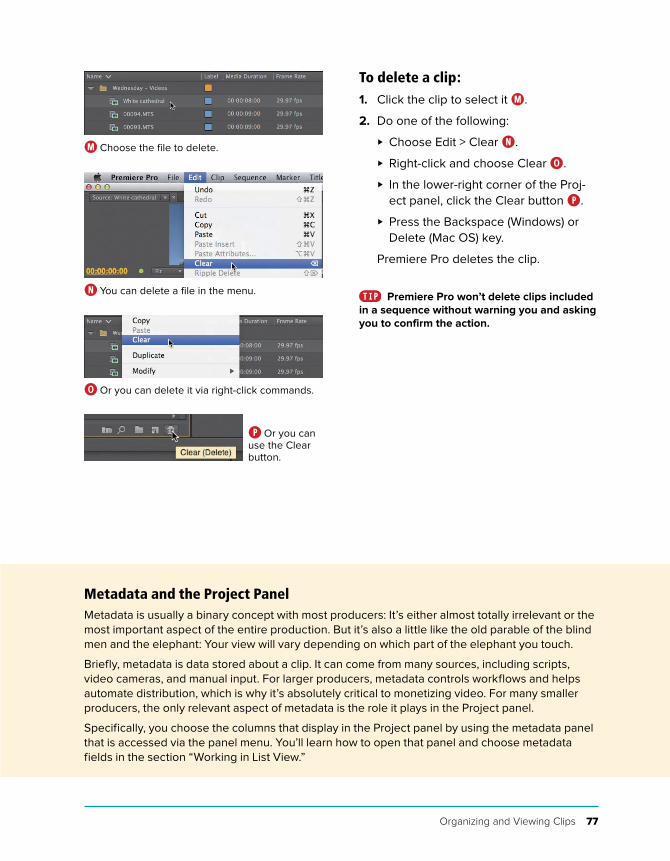
To delete a clip:1. Click the clip to select it M.
2. Do one of the following:
> Choose Edit > Clear N.
> Right-click and choose Clear O.
> In the lower-right corner of the Proj-
ect panel, click the Clear button P.
> Press the Backspace (Windows) or
Delete (Mac OS) key.
Premiere Pro deletes the clip.
Premiere Pro won’t delete clips included
in a sequence without warning you and asking
you to confirm the action.
M Choose the file to delete.
N You can delete a file in the menu.
O Or you can delete it via right-click commands.
P Or you can
use the Clear
button.
Metadata and the Project PanelMetadata is usually a binary concept with most producers: It’s either almost totally irrelevant or the
most important aspect of the entire production. But it’s also a little like the old parable of the blind
men and the elephant: Your view will vary depending on which part of the elephant you touch.
Briefly, metadata is data stored about a clip. It can come from many sources, including scripts,
video cameras, and manual input. For larger producers, metadata controls workflows and helps
automate distribution, which is why it’s absolutely critical to monetizing video. For many smaller
producers, the only relevant aspect of metadata is the role it plays in the Project panel.
Specifically, you choose the columns that display in the Project panel by using the metadata panel
that is accessed via the panel menu. You’ll learn how to open that panel and choose metadata
fields in the section “Working in List View.”

78 Chapter 4
Finding Clips in the Project PanelPremiere Pro offers two options for search-
ing for clips: the Find box and the Find
dialog. Of the two, the Find box is faster
and more convenient, while the Find dialog
is more functional. Both work similarly: You
type in your search data and Premiere Pro
displays files that meet your criteria in the
Project panel.
To find clips via the Find box:1. On the top left of the Project panel,
click the In menu and choose one of the
following A:
> All, to search all clip-related
metadata.
> Visible, to search only the metadata
that is currently visible in the Project
panel.
> Text Transcript, to search only in the
Speech to Text metadata field (essen-
tially a dialogue search).
Most of time, you’ll be searching for
clips that you’ve specifically named, so
All is the best option, though Visible
would provide identical results.
2. Next, do one of the following:
> Click the Find box in the Project
panel.
> Click to select the Project panel, and
press Shift+F.
This activates the Find box so you can
start typing search characters therein.
A Choosing which fields to search.
Organizing and Viewing Clips 79
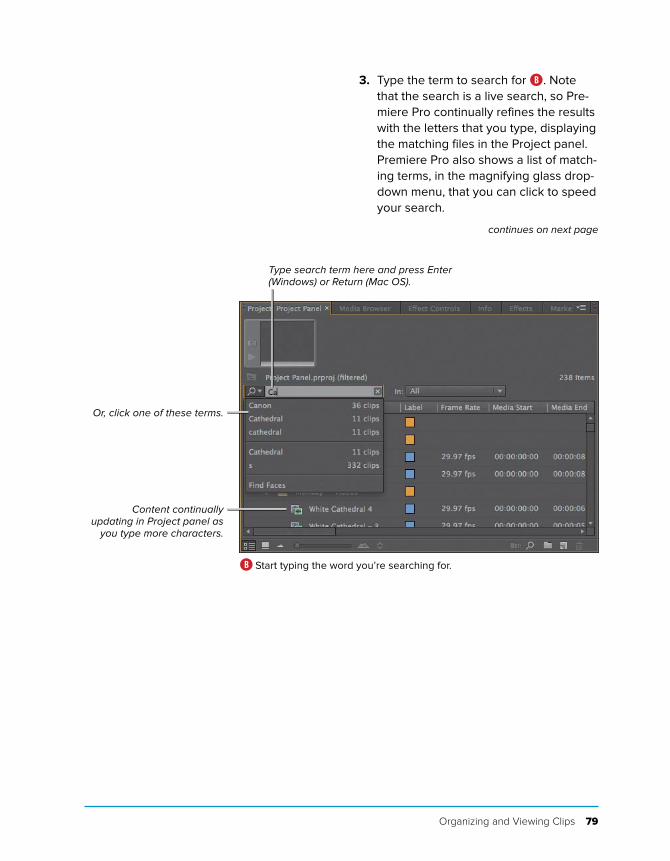
3. Type the term to search for B. Note
that the search is a live search, so Pre-
miere Pro continually refines the results
with the letters that you type, displaying
the matching files in the Project panel.
Premiere Pro also shows a list of match-
ing terms, in the magnifying glass drop-
down menu, that you can click to speed
your search.
continues on next page
Type search term here and press Enter (Windows) or Return (Mac OS).
Content continually updating in Project panel as
you type more characters.
Or, click one of these terms.
B Start typing the word you’re searching for.
80 Chapter 4
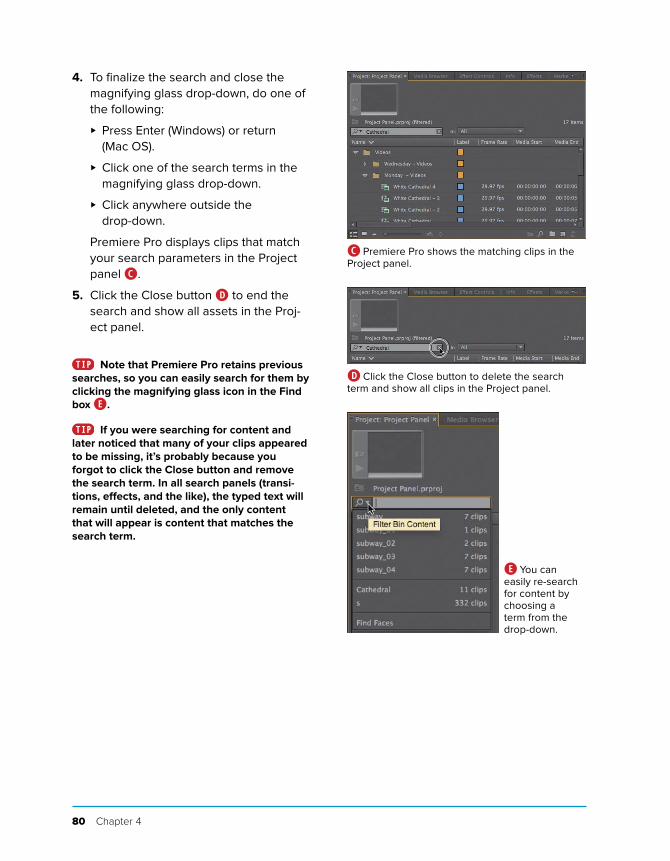
4. To finalize the search and close the
magnifying glass drop-down, do one of
the following:
> Press Enter (Windows) or return
(Mac OS).
> Click one of the search terms in the
magnifying glass drop-down.
> Click anywhere outside the
drop-down.
Premiere Pro displays clips that match
your search parameters in the Project
panel C.
5. Click the Close button D to end the
search and show all assets in the Proj-
ect panel.
Note that Premiere Pro retains previous
searches, so you can easily search for them by
clicking the magnifying glass icon in the Find
box E.
If you were searching for content and
later noticed that many of your clips appeared
to be missing, it’s probably because you
forgot to click the Close button and remove
the search term. In all search panels (transi-
tions, effects, and the like), the typed text will
remain until deleted, and the only content
that will appear is content that matches the
search term.
C Premiere Pro shows the matching clips in the
Project panel.
D Click the Close button to delete the search
term and show all clips in the Project panel.
E You can
easily re-search
for content by
choosing a
term from the
drop-down.
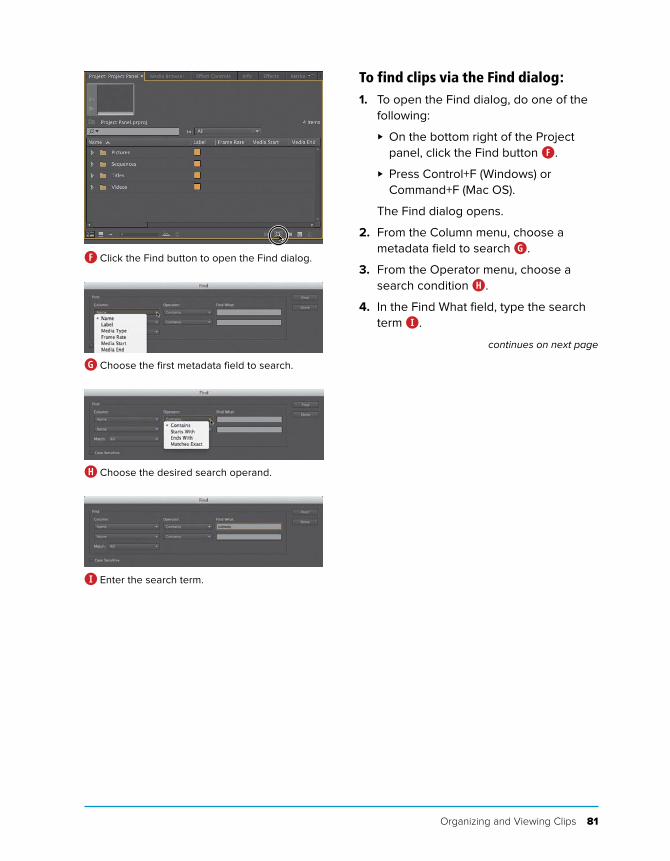
Organizing and Viewing Clips 81
To find clips via the Find dialog:1. To open the Find dialog, do one of the
following:
> On the bottom right of the Project
panel, click the Find button F.
> Press Control+F (Windows) or
Command+F (Mac OS).
The Find dialog opens.
2. From the Column menu, choose a
metadata field to search G.
3. From the Operator menu, choose a
search condition H.
4. In the Find What field, type the search
term I.
continues on next page
F Click the Find button to open the Find dialog.
G Choose the first metadata field to search.
H Choose the desired search operand.
I Enter the search term.
82 Chapter 4
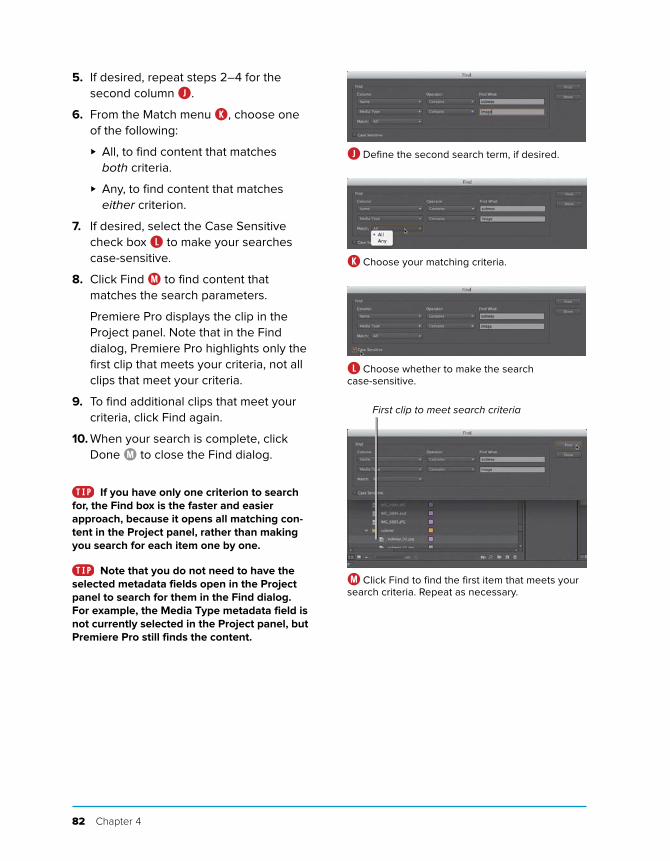
5. If desired, repeat steps 2–4 for the
second column J.
6. From the Match menu K, choose one
of the following:
> All, to find content that matches
both criteria.
> Any, to find content that matches
either criterion.
7. If desired, select the Case Sensitive
check box L to make your searches
case-sensitive.
8. Click Find M to find content that
matches the search parameters.
Premiere Pro displays the clip in the
Project panel. Note that in the Find
dialog, Premiere Pro highlights only the
first clip that meets your criteria, not all
clips that meet your criteria.
9. To find additional clips that meet your
criteria, click Find again.
10. When your search is complete, click
Done M to close the Find dialog.
If you have only one criterion to search
for, the Find box is the faster and easier
approach, because it opens all matching con-
tent in the Project panel, rather than making
you search for each item one by one.
Note that you do not need to have the
selected metadata fields open in the Project
panel to search for them in the Find dialog.
For example, the Media Type metadata field is
not currently selected in the Project panel, but
Premiere Pro still finds the content.
J Define the second search term, if desired.
K Choose your matching criteria.
L Choose whether to make the search
case-sensitive.
First clip to meet search criteria
M Click Find to find the first item that meets your
search criteria. Repeat as necessary.
Organizing and Viewing Clips 83
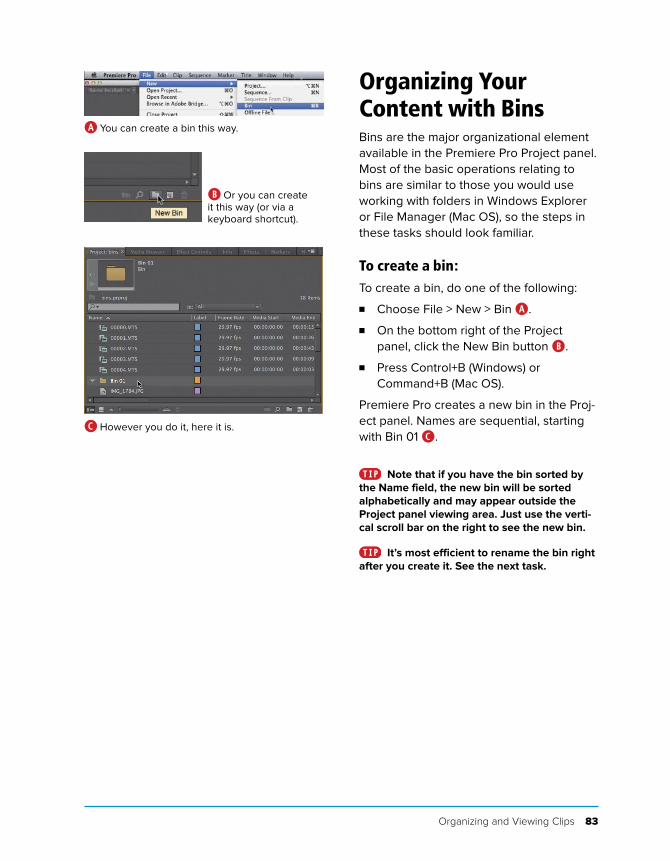
Organizing Your Content with BinsBins are the major organizational element
available in the Premiere Pro Project panel.
Most of the basic operations relating to
bins are similar to those you would use
working with folders in Windows Explorer
or File Manager (Mac OS), so the steps in
these tasks should look familiar.
To create a bin:To create a bin, do one of the following:
■ Choose File > New > Bin A.
■ On the bottom right of the Project
panel, click the New Bin button B.
■ Press Control+B (Windows) or
Command+B (Mac OS).
Premiere Pro creates a new bin in the Proj-
ect panel. Names are sequential, starting
with Bin 01 C.
Note that if you have the bin sorted by
the Name field, the new bin will be sorted
alphabetically and may appear outside the
Project panel viewing area. Just use the verti-
cal scroll bar on the right to see the new bin.
It’s most efficient to rename the bin right
after you create it. See the next task.
A You can create a bin this way.
B Or you can create
it this way (or via a
keyboard shortcut).
C However you do it, here it is.
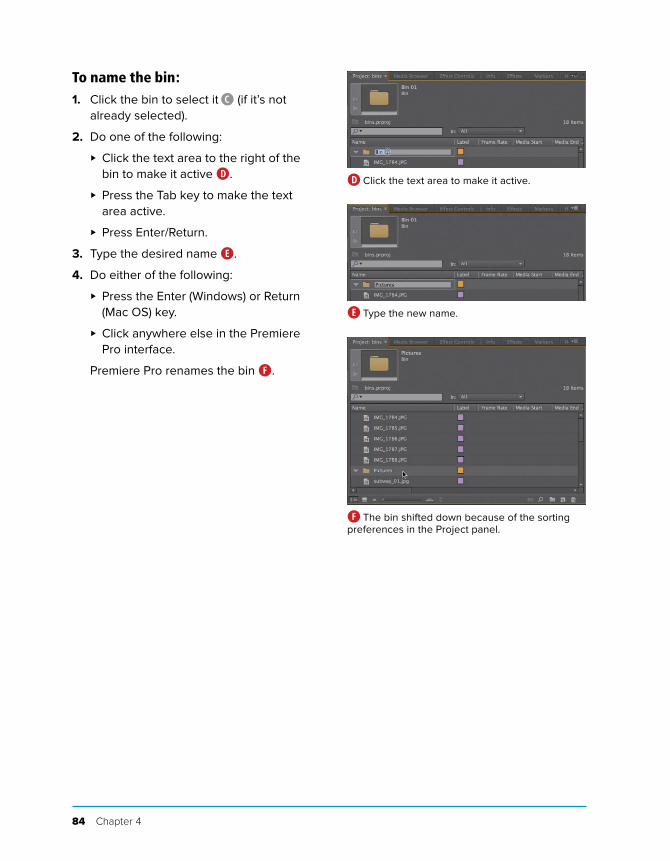
84 Chapter 4
To name the bin:1. Click the bin to select it C (if it’s not
already selected).
2. Do one of the following:
> Click the text area to the right of the
bin to make it active D.
> Press the Tab key to make the text
area active.
> Press Enter/Return.
3. Type the desired name E.
4. Do either of the following:
> Press the Enter (Windows) or Return
(Mac OS) key.
> Click anywhere else in the Premiere
Pro interface.
Premiere Pro renames the bin F.
D Click the text area to make it active.
E Type the new name.
F The bin shifted down because of the sorting
preferences in the Project panel.

Organizing and Viewing Clips 85
To move clips into a bin:1. Select the clips you’d like to move G.
2. Drag them into the bin H.
Premiere Pro moves the clips into the
bin I.
Reverse the procedure to remove clips
from a bin, or to move clips from bin to bin.
Just select and drag to the desired location.
To hide and reveal bin contents:1. To reveal the hidden contents of a
bin, click the triangle next to the bin
name J.
2. To hide the revealed contents of a
bin, click the triangle next to the bin
name K.
See the next section for more about
opening and displaying bin contents.
G Select the clips to move into the bin.
H Drag the clips in.
I There they are, in the bin.
J Click the
triangle to
open the bin.
K Click it again
to close the bin.
86 Chapter 4
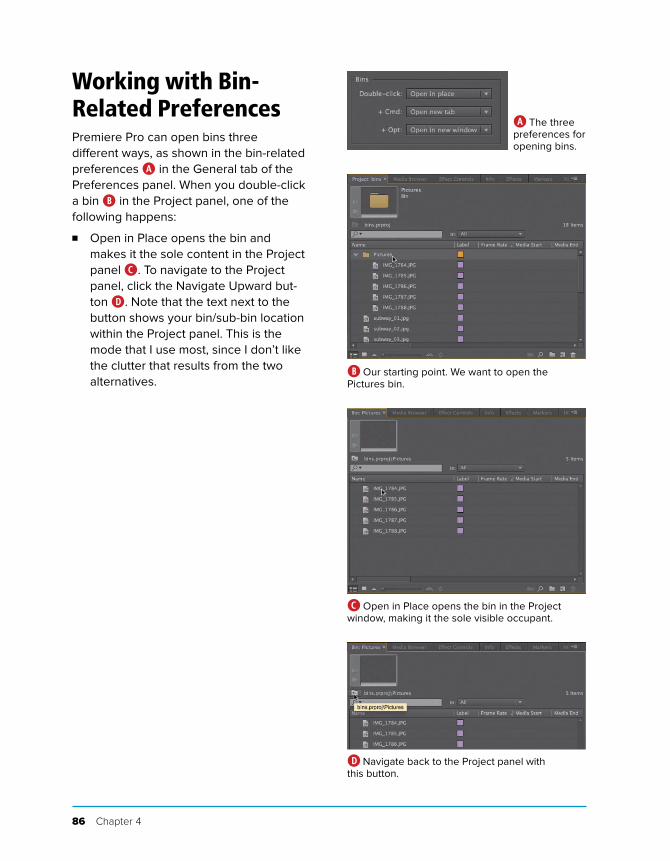
Working with Bin-Related PreferencesPremiere Pro can open bins three
different ways, as shown in the bin-related
preferences A in the General tab of the
Preferences panel. When you double-click
a bin B in the Project panel, one of the
following happens:
■ Open in Place opens the bin and
makes it the sole content in the Project
panel C. To navigate to the Project
panel, click the Navigate Upward but-
ton D. Note that the text next to the
button shows your bin/sub-bin location
within the Project panel. This is the
mode that I use most, since I don’t like
the clutter that results from the two
alternatives.
A The three
preferences for
opening bins.
B Our starting point. We want to open the
Pictures bin.
C Open in Place opens the bin in the Project
window, making it the sole visible occupant.
D Navigate back to the Project panel with
this button.
Organizing and Viewing Clips 87
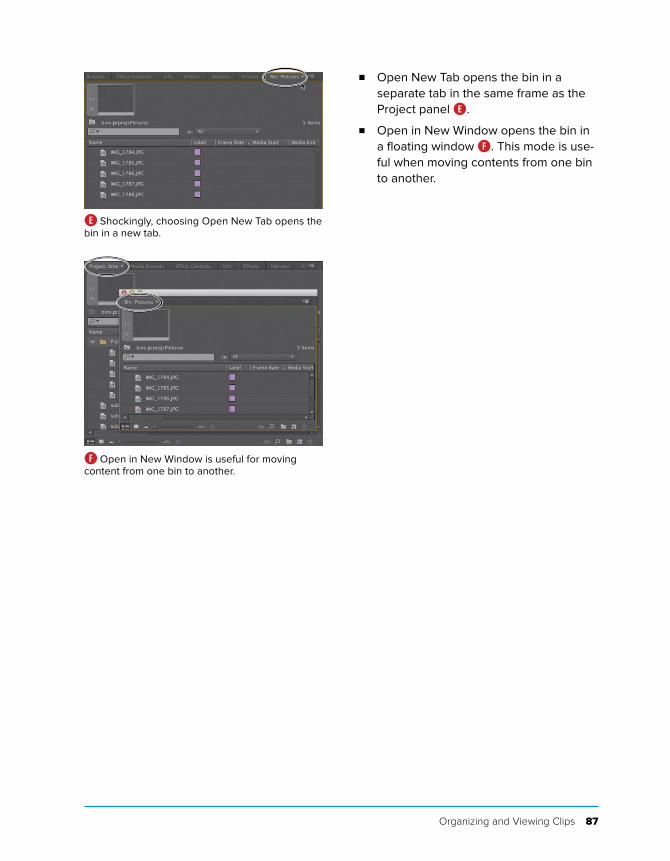
■ Open New Tab opens the bin in a
separate tab in the same frame as the
Project panel E.
■ Open in New Window opens the bin in
a floating window F. This mode is use-
ful when moving contents from one bin
to another.
E Shockingly, choosing Open New Tab opens the
bin in a new tab.
F Open in New Window is useful for moving
content from one bin to another.
88 Chapter 4
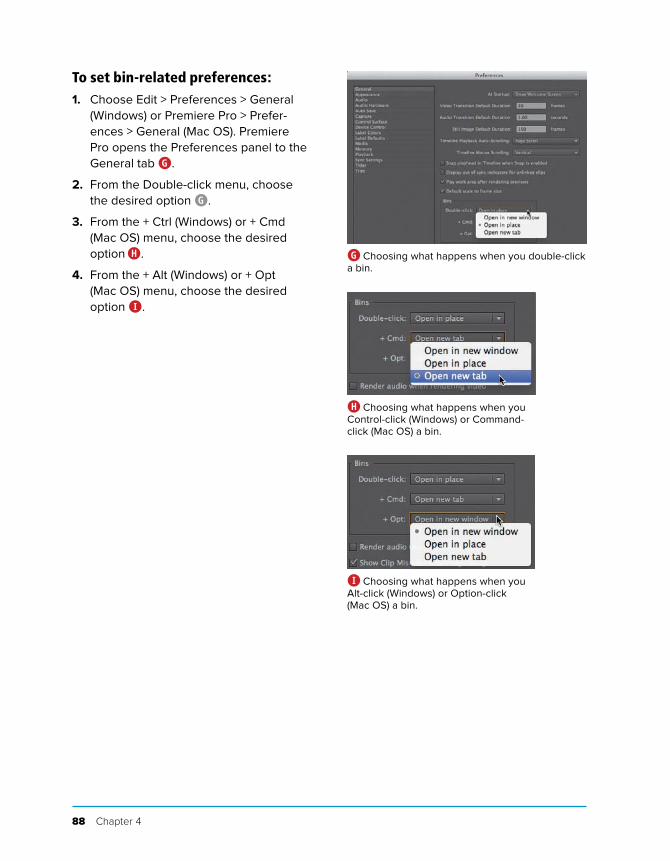
To set bin-related preferences:1. Choose Edit > Preferences > General
(Windows) or Premiere Pro > Prefer-
ences > General (Mac OS). Premiere
Pro opens the Preferences panel to the
General tab G.
2. From the Double-click menu, choose
the desired option G.
3. From the + Ctrl (Windows) or + Cmd
(Mac OS) menu, choose the desired
option H.
4. From the + Alt (Windows) or + Opt
(Mac OS) menu, choose the desired
option I.
G Choosing what happens when you double-click
a bin.
H Choosing what happens when you
Control-click (Windows) or Command-
click (Mac OS) a bin.
I Choosing what happens when you
Alt-click (Windows) or Option-click
(Mac OS) a bin.
Organizing and Viewing Clips 89
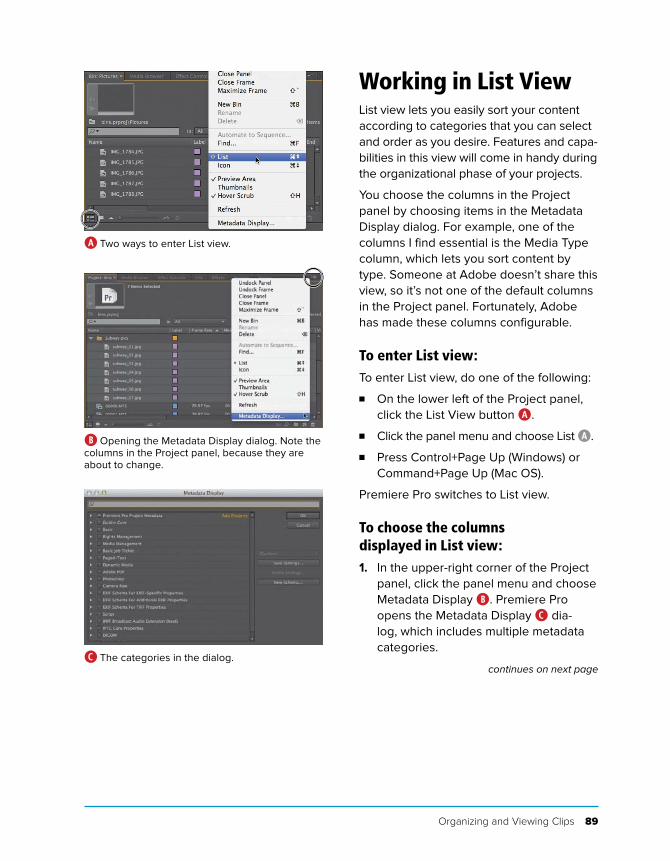
Working in List ViewList view lets you easily sort your content
according to categories that you can select
and order as you desire. Features and capa-
bilities in this view will come in handy during
the organizational phase of your projects.
You choose the columns in the Project
panel by choosing items in the Metadata
Display dialog. For example, one of the
columns I find essential is the Media Type
column, which lets you sort content by
type. Someone at Adobe doesn’t share this
view, so it’s not one of the default columns
in the Project panel. Fortunately, Adobe
has made these columns configurable.
To enter List view:To enter List view, do one of the following:
■ On the lower left of the Project panel,
click the List View button A.
■ Click the panel menu and choose List A.
■ Press Control+Page Up (Windows) or
Command+Page Up (Mac OS).
Premiere Pro switches to List view.
To choose the columns displayed in List view:1. In the upper-right corner of the Project
panel, click the panel menu and choose
Metadata Display B. Premiere Pro
opens the Metadata Display C dia-
log, which includes multiple metadata
categories.
continues on next page
A Two ways to enter List view.
B Opening the Metadata Display dialog. Note the
columns in the Project panel, because they are
about to change.
C The categories in the dialog.
90 Chapter 4
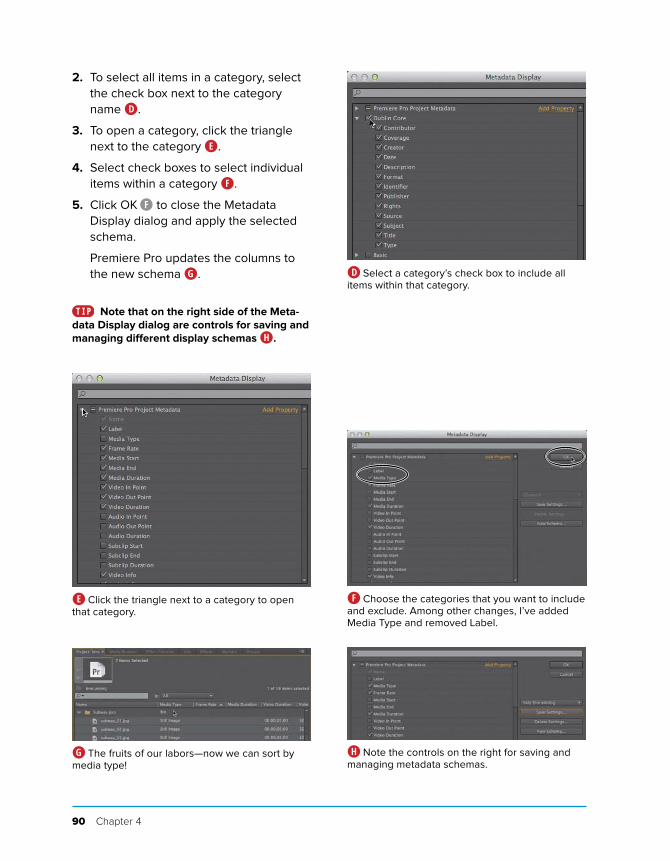
2. To select all items in a category, select
the check box next to the category
name D.
3. To open a category, click the triangle
next to the category E.
4. Select check boxes to select individual
items within a category F.
5. Click OK F to close the Metadata
Display dialog and apply the selected
schema.
Premiere Pro updates the columns to
the new schema G.
Note that on the right side of the Meta-
data Display dialog are controls for saving and
managing different display schemas H.
E Click the triangle next to a category to open
that category.
G The fruits of our labors—now we can sort by
media type!
D Select a category’s check box to include all
items within that category.
F Choose the categories that you want to include
and exclude. Among other changes, I’ve added
Media Type and removed Label.
H Note the controls on the right for saving and
managing metadata schemas.
Organizing and Viewing Clips 91
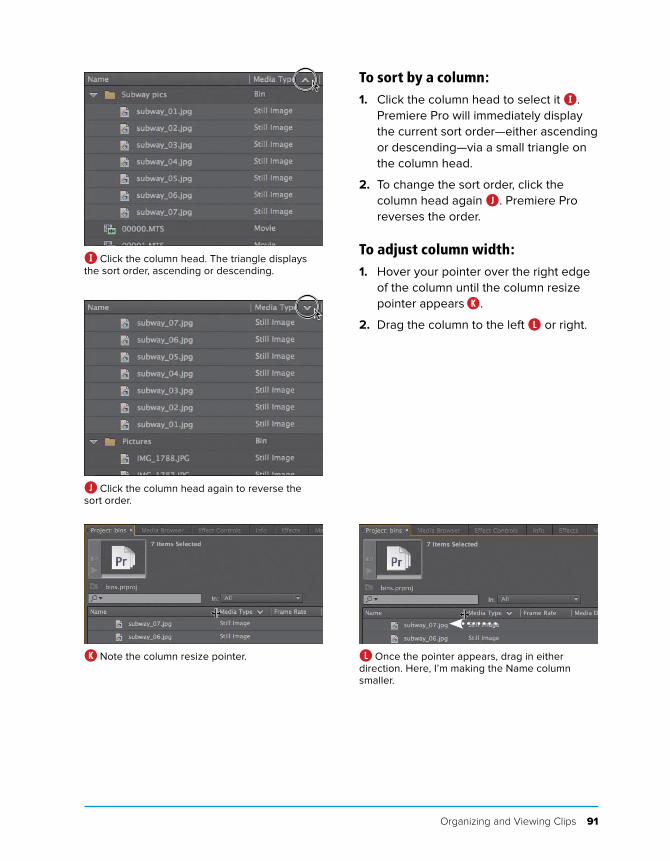
To sort by a column:1. Click the column head to select it I.
Premiere Pro will immediately display
the current sort order—either ascending
or descending—via a small triangle on
the column head.
2. To change the sort order, click the
column head again J. Premiere Pro
reverses the order.
To adjust column width:1. Hover your pointer over the right edge
of the column until the column resize
pointer appears K.
2. Drag the column to the left L or right.
I Click the column head. The triangle displays
the sort order, ascending or descending.
J Click the column head again to reverse the
sort order.
K Note the column resize pointer. L Once the pointer appears, drag in either
direction. Here, I’m making the Name column
smaller.
92 Chapter 4
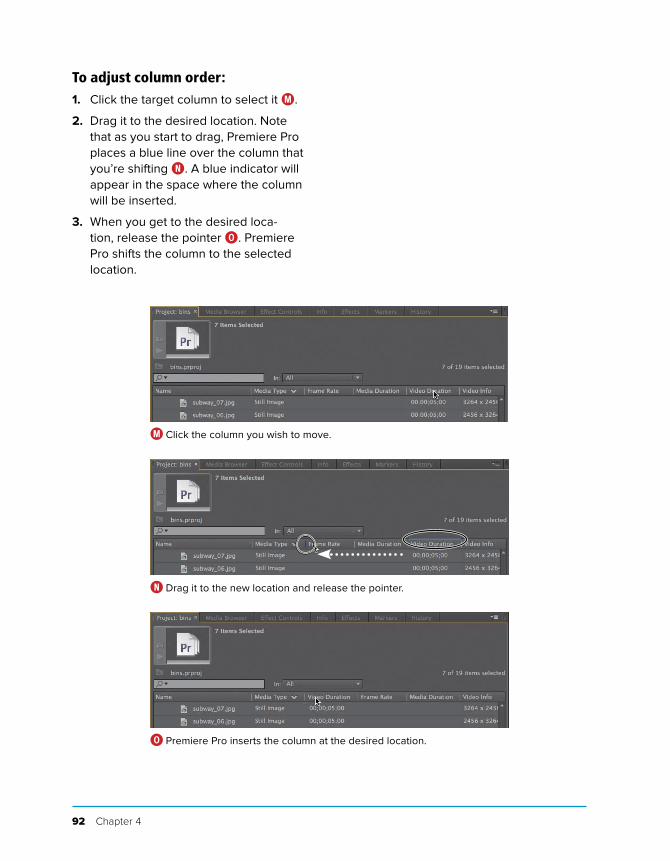
To adjust column order:1. Click the target column to select it M.
2. Drag it to the desired location. Note
that as you start to drag, Premiere Pro
places a blue line over the column that
you’re shifting N. A blue indicator will
appear in the space where the column
will be inserted.
3. When you get to the desired loca-
tion, release the pointer O. Premiere
Pro shifts the column to the selected
location.
M Click the column you wish to move.
N Drag it to the new location and release the pointer.
O Premiere Pro inserts the column at the desired location.
Organizing and Viewing Clips 93
Working in Icon ViewWhereas List view is good for fast sorting of
content, Icon view is best for quickly view-
ing your content to see exactly what you’re
working with. Icon view offers two modes
for viewing the content of source clips.
When you choose a clip, a scroll bar
appears, which you can use to drag
through the clip—you can even set In and
Out points. When you later add the clip to
a sequence, these In and Out points mark
the portion of the clip actually included in
the video, giving you a head start on the
editing process.
With unselected clips, you can use a tech-
nique called hover scrub to scrub through
the content. Combined, the two modes
simplify the task of viewing and prepping
your imported footage.
Let’s spend a few moments working with
the features and controls in Icon view.
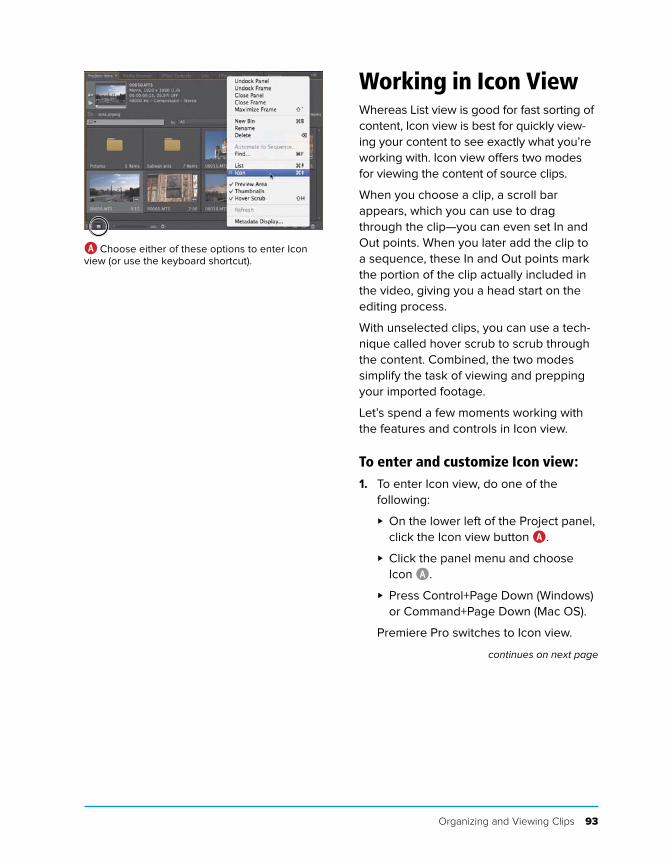
To enter and customize Icon view:1. To enter Icon view, do one of the
following:
> On the lower left of the Project panel,
click the Icon view button A.
> Click the panel menu and choose
Icon A.
> Press Control+Page Down (Windows)
or Command+Page Down (Mac OS).
Premiere Pro switches to Icon view.
continues on next page
A Choose either of these options to enter Icon
view (or use the keyboard shortcut).
94 Chapter 4
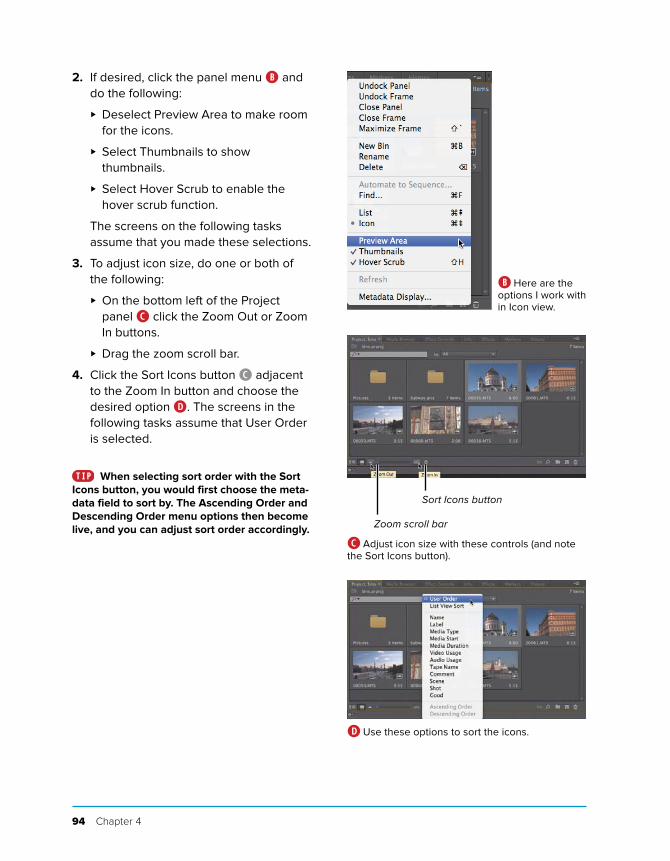
2. If desired, click the panel menu B and
do the following:
> Deselect Preview Area to make room
for the icons.
> Select Thumbnails to show
thumbnails.
> Select Hover Scrub to enable the
hover scrub function.
The screens on the following tasks
assume that you made these selections.
3. To adjust icon size, do one or both of
the following:
> On the bottom left of the Project
panel C click the Zoom Out or Zoom
In buttons.
> Drag the zoom scroll bar.
4. Click the Sort Icons button C adjacent
to the Zoom In button and choose the
desired option D. The screens in the
following tasks assume that User Order
is selected.
When selecting sort order with the Sort
Icons button, you would first choose the meta-
data field to sort by. The Ascending Order and
Descending Order menu options then become
live, and you can adjust sort order accordingly.
B Here are the
options I work with
in Icon view.
Zoom scroll bar
Sort Icons button
C Adjust icon size with these controls (and note
the Sort Icons button).
D Use these options to sort the icons.
Organizing and Viewing Clips 95
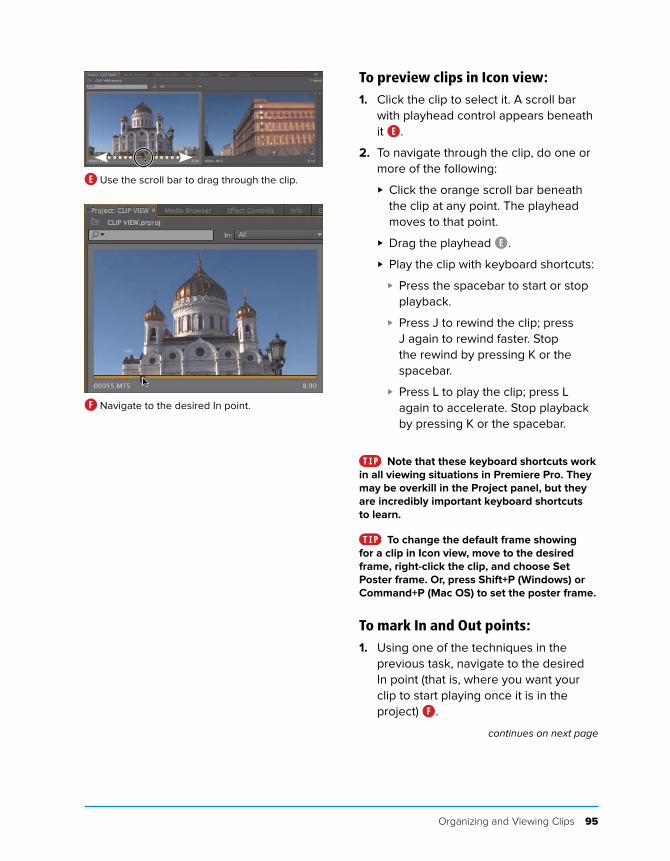
To preview clips in Icon view:1. Click the clip to select it. A scroll bar
with playhead control appears beneath
it E.
2. To navigate through the clip, do one or
more of the following:
> Click the orange scroll bar beneath
the clip at any point. The playhead
moves to that point.
> Drag the playhead E.
> Play the clip with keyboard shortcuts:
> Press the spacebar to start or stop
playback.
> Press J to rewind the clip; press
J again to rewind faster. Stop
the rewind by pressing K or the
spacebar.
> Press L to play the clip; press L
again to accelerate. Stop playback
by pressing K or the spacebar.
Note that these keyboard shortcuts work
in all viewing situations in Premiere Pro. They
may be overkill in the Project panel, but they
are incredibly important keyboard shortcuts
to learn.
To change the default frame showing
for a clip in Icon view, move to the desired
frame, right-click the clip, and choose Set
Poster frame. Or, press Shift+P (Windows) or
Command+P (Mac OS) to set the poster frame.
To mark In and Out points:1. Using one of the techniques in the
previous task, navigate to the desired
In point (that is, where you want your
clip to start playing once it is in the
project) F.
continues on next page
E Use the scroll bar to drag through the clip.
F Navigate to the desired In point.
96 Chapter 4
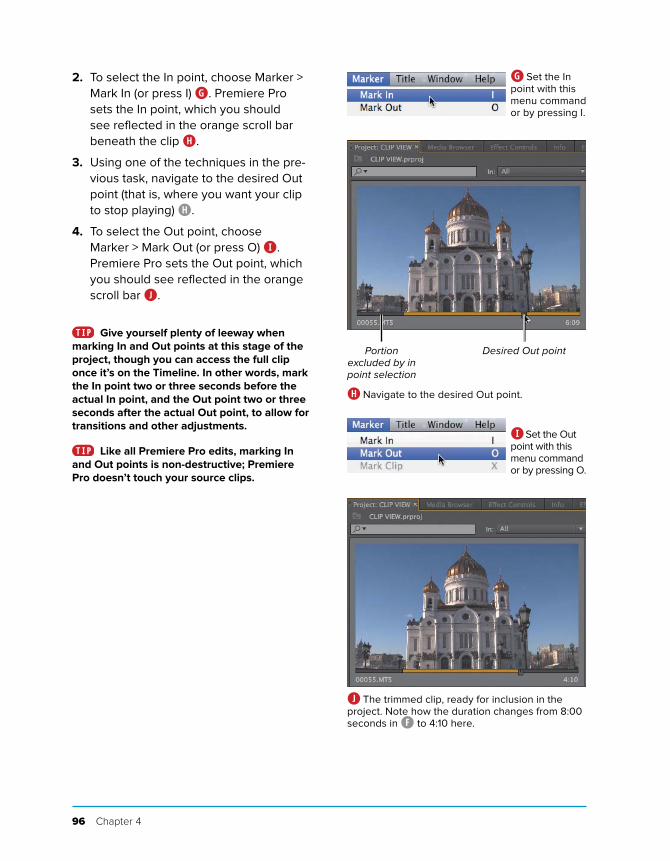
2. To select the In point, choose Marker >
Mark In (or press I) G. Premiere Pro
sets the In point, which you should
see reflected in the orange scroll bar
beneath the clip H.
3. Using one of the techniques in the pre-
vious task, navigate to the desired Out
point (that is, where you want your clip
to stop playing) H.
4. To select the Out point, choose
Marker > Mark Out (or press O) I.
Premiere Pro sets the Out point, which
you should see reflected in the orange
scroll bar J.
Give yourself plenty of leeway when
marking In and Out points at this stage of the
project, though you can access the full clip
once it’s on the Timeline. In other words, mark
the In point two or three seconds before the
actual In point, and the Out point two or three
seconds after the actual Out point, to allow for
transitions and other adjustments.
Like all Premiere Pro edits, marking In
and Out points is non-destructive; Premiere
Pro doesn’t touch your source clips.
G Set the In
point with this
menu command
or by pressing I.
Desired Out pointPortion excluded by in point selection
H Navigate to the desired Out point.
I Set the Out
point with this
menu command
or by pressing O.
J The trimmed clip, ready for inclusion in the
project. Note how the duration changes from 8:00
seconds in F to 4:10 here.
Organizing and Viewing Clips 97
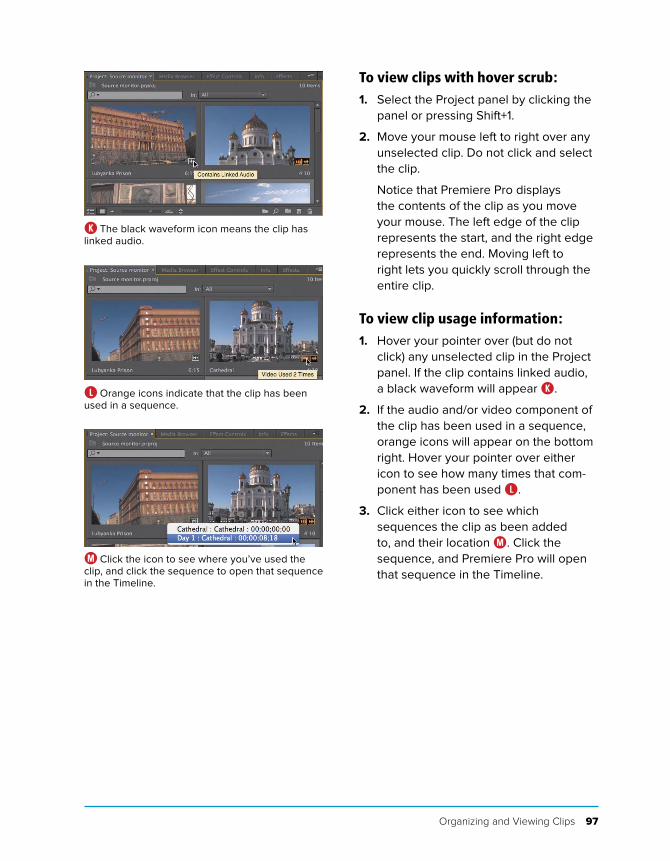
To view clips with hover scrub:1. Select the Project panel by clicking the
panel or pressing Shift+1.
2. Move your mouse left to right over any
unselected clip. Do not click and select
the clip.
Notice that Premiere Pro displays
the contents of the clip as you move
your mouse. The left edge of the clip
represents the start, and the right edge
represents the end. Moving left to
right lets you quickly scroll through the
entire clip.
To view clip usage information:1. Hover your pointer over (but do not
click) any unselected clip in the Project
panel. If the clip contains linked audio,
a black waveform will appear K.
2. If the audio and/or video component of
the clip has been used in a sequence,
orange icons will appear on the bottom
right. Hover your pointer over either
icon to see how many times that com-
ponent has been used L.
3. Click either icon to see which
sequences the clip as been added
to, and their location M. Click the
sequence, and Premiere Pro will open
that sequence in the Timeline.
K The black waveform icon means the clip has
linked audio.
L Orange icons indicate that the clip has been
used in a sequence.
M Click the icon to see where you’ve used the
clip, and click the sequence to open that sequence
in the Timeline.

98 Chapter 4
Viewing Clips in the Source MonitorThe basic function of the Source Monitor
is to display content from your project so
you can watch the footage at full resolution
and choose In and Out points. But there’s
a lot going on in a small space. As you’ll
see, there are ten different views A in the
Source Monitor (and Program Monitor),
which you’ll use for chromakeying, color
correction, and the like.
You can view all types of content in the
Source Monitor, with different views for audio
and video/images. You can load multiple clips
into the Source Monitor and switch between
them, and, of course, you can customize the
Program Monitor (check out the section “To
customize the buttons in the Source Monitor
or Program Monitor” in Chapter 1).
To navigate to the Source Monitor keyboard
shortcuts, press Shift+2. Once you’re there,
you can maximize the display of the Source
Monitor by clicking the panel to make it
active and then pressing the accent key (`),
which is to the left of the 1 key and directly
above the Tab key on most keyboards.
Restore the workspace by pressing the
same key again. You’ll want to do that a lot
to see your HD clips in their full glory.
To view clips in the Source Monitor:1. To load a single clip in the Source Moni-
tor, do one of the following:
> Double-click the clip.
> Drag the clip into the Source
Monitor B.
Premiere Pro loads the clip in the
Source Monitor C. Since narration.wav
is an audio clip, it appears as a wave-
form in the Source Monitor.
A The different views of the Source Monitor.
B Drag a clip from the Project panel to open it in
the Source Monitor.
C Audio clips appear as waveforms.
Organizing and Viewing Clips 99
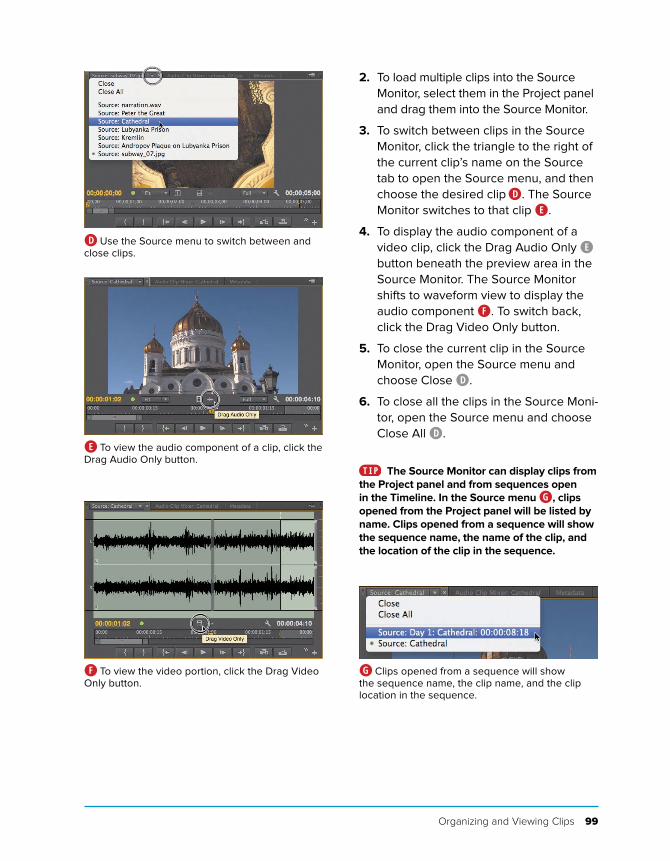
2. To load multiple clips into the Source
Monitor, select them in the Project panel
and drag them into the Source Monitor.
3. To switch between clips in the Source
Monitor, click the triangle to the right of
the current clip’s name on the Source
tab to open the Source menu, and then
choose the desired clip D. The Source
Monitor switches to that clip E.
4. To display the audio component of a
video clip, click the Drag Audio Only Ebutton beneath the preview area in the
Source Monitor. The Source Monitor
shifts to waveform view to display the
audio component F. To switch back,
click the Drag Video Only button.
5. To close the current clip in the Source
Monitor, open the Source menu and
choose Close D.
6. To close all the clips in the Source Moni-
tor, open the Source menu and choose
Close All D.
The Source Monitor can display clips from
the Project panel and from sequences open
in the Timeline. In the Source menu G, clips
opened from the Project panel will be listed by
name. Clips opened from a sequence will show
the sequence name, the name of the clip, and
the location of the clip in the sequence.
D Use the Source menu to switch between and
close clips.
E To view the audio component of a clip, click the
Drag Audio Only button.
G Clips opened from a sequence will show
the sequence name, the clip name, and the clip
location in the sequence.
F To view the video portion, click the Drag Video
Only button.
100 Chapter 4
Controlling Playback in the Source MonitorLet’s face it: In this digital age, most 5-year-
olds can work the basic playback controls
in the Source Monitor. But editing video
requires a degree of precision unneces-
sary for Barney DVDs or YouTube clips,
and keyboard shortcuts can really save
you time when you’re in a hurry. Invest a
few minutes here learning Premiere Pro’s
playback controls and their associated
shortcuts, and you’ll make up that time in
short order.
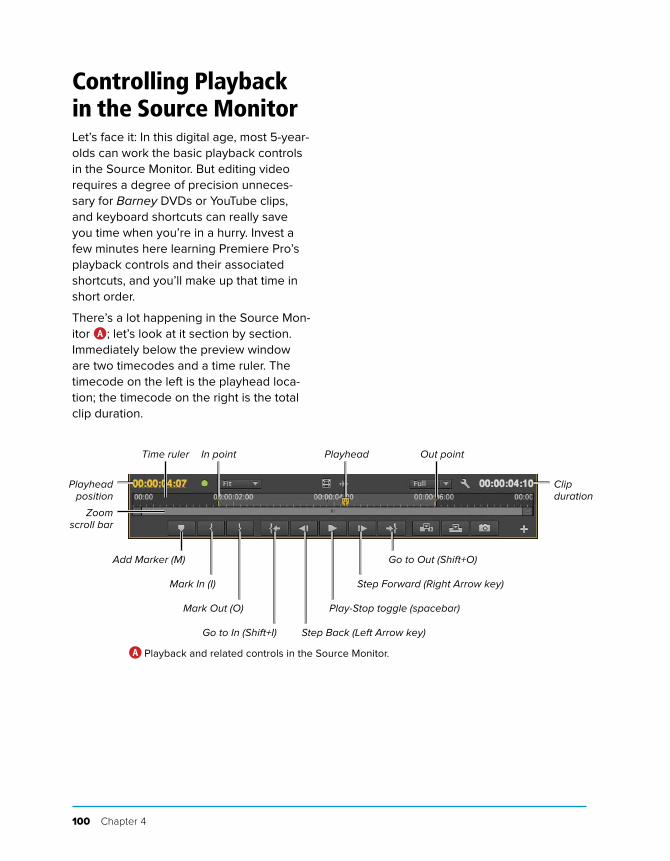
There’s a lot happening in the Source Mon-
itor A; let’s look at it section by section.
Immediately below the preview window
are two timecodes and a time ruler. The
timecode on the left is the playhead loca-
tion; the timecode on the right is the total
clip duration.
Playhead position
Zoom scroll bar
Go to In (Shift+I) Step Back (Left Arrow key)
Clip duration
Add Marker (M)
Mark In (I)
Mark Out (O) Play-Stop toggle (spacebar)
Step Forward (Right Arrow key)
Go to Out (Shift+O)
Playhead Out pointIn pointTime ruler
A Playback and related controls in the Source Monitor.
Organizing and Viewing Clips 101
for moving through the video frame by
frame are useful and easy to remember.
The spacebar toggle for play/stop is abso-
lutely essential.
Premiere Pro has shortcuts for most play-
back actions—even some that you can’t
perform via mouse commands. Here’s a
short list that you may find helpful.
■ Remember the J, K, and L keys. J plays
the clip in reverse, and pressing it
multiple times increases rewind speed.
K (or the spacebar) stops playback.
■ L plays the clip, and pressing it multiple
times increases fast-forward speed.
K (or the spacebar) stops playback.
■ Pressing Shift+J rewinds in slow motion
at about 10 percent speed (so three
frames per second instead of 30).
Pressing J accelerates rewind speed.
K (or the spacebar) stops playback.
■ Pressing Shift+L plays in slow motion
at about 10 percent speed (so three
frames per second instead of 30).
Pressing L accelerates playback.
K (or the spacebar) stops playback.
The time ruler beneath the timecodes
represents the duration of the clip. The
playhead is at whatever position is cur-
rently showing in the Source Monitor. The
playhead is a key concept in editing, and
you’ll see one practically every time you
view a clip in Premiere Pro.
If you’ve been working through this chapter,
you’ll recall this clip as 00055.MTS, since
renamed Cathedral. Earlier, in the Icon view
of the Project panel, we marked its In and
Out points. Now that the clip is loaded in
the Source Monitor, these markers appear
in the time ruler, with the selected portion of
the clip in light gray and the excluded por-
tions in darker gray. As you’ll learn later, you
can use the zoom scroll bar to zoom in to
regions of the clip, which is useful when you
want to isolate short regions of a longer clip.
Beneath the zoom scroll bar are vari-
ous controls for marking clips in and out
and for playing the clip back. Most of the
playback controls should look familiar, but
note the Step Back and Step Forward but-
tons, which you’ll use a lot, though the Left
Arrow key and Right Arrow key shortcuts
102 Chapter 4
Configuring the Source MonitorThe Source Monitor panel includes a num-
ber of configuration options that you need
to be aware of. Let’s walk through them.
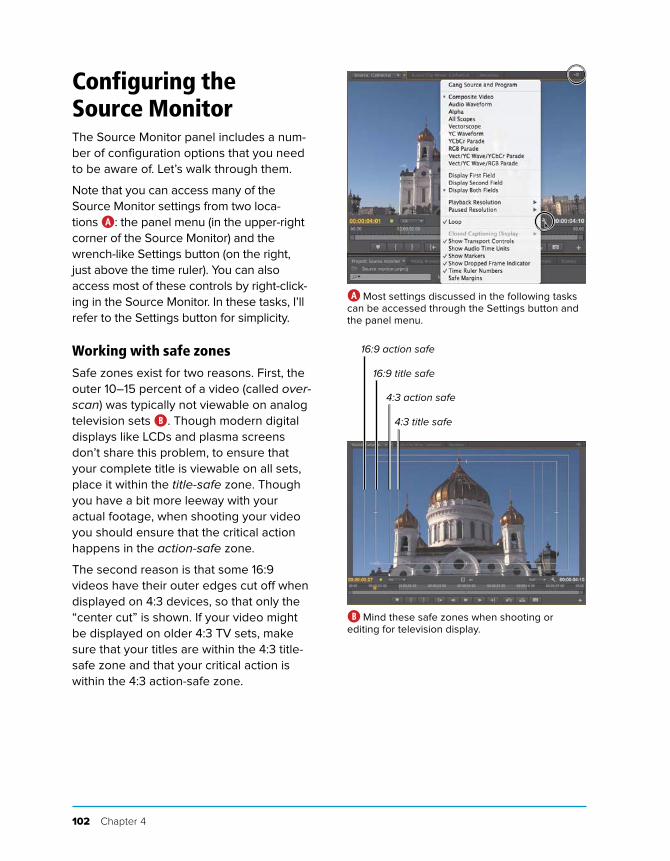
Note that you can access many of the
Source Monitor settings from two loca-
tions A: the panel menu (in the upper-right
corner of the Source Monitor) and the
wrench-like Settings button (on the right,
just above the time ruler). You can also
access most of these controls by right-click-
ing in the Source Monitor. In these tasks, I’ll
refer to the Settings button for simplicity.
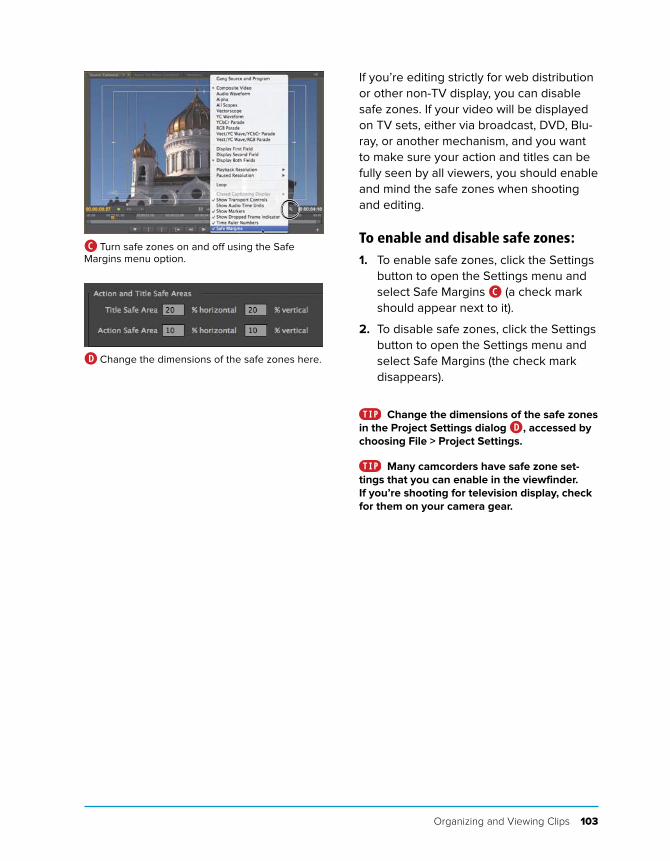
Working with safe zonesSafe zones exist for two reasons. First, the
outer 10–15 percent of a video (called over-scan) was typically not viewable on analog
television sets B. Though modern digital
displays like LCDs and plasma screens
don’t share this problem, to ensure that
your complete title is viewable on all sets,
place it within the title-safe zone. Though
you have a bit more leeway with your
actual footage, when shooting your video
you should ensure that the critical action
happens in the action-safe zone.
The second reason is that some 16:9
videos have their outer edges cut off when
displayed on 4:3 devices, so that only the
“center cut” is shown. If your video might
be displayed on older 4:3 TV sets, make
sure that your titles are within the 4:3 title-
safe zone and that your critical action is
within the 4:3 action-safe zone.
A Most settings discussed in the following tasks
can be accessed through the Settings button and
the panel menu.
16:9 action safe
16:9 title safe
4:3 action safe
4:3 title safe
B Mind these safe zones when shooting or
editing for television display.
Organizing and Viewing Clips 103
If you’re editing strictly for web distribution
or other non-TV display, you can disable
safe zones. If your video will be displayed
on TV sets, either via broadcast, DVD, Blu-
ray, or another mechanism, and you want
to make sure your action and titles can be
fully seen by all viewers, you should enable
and mind the safe zones when shooting
and editing.
To enable and disable safe zones:1. To enable safe zones, click the Settings
button to open the Settings menu and
select Safe Margins C (a check mark
should appear next to it).
2. To disable safe zones, click the Settings
button to open the Settings menu and
select Safe Margins (the check mark
disappears).
Change the dimensions of the safe zones
in the Project Settings dialog D, accessed by
choosing File > Project Settings.
Many camcorders have safe zone set-
tings that you can enable in the viewfinder.
If you’re shooting for television display, check
for them on your camera gear.
C Turn safe zones on and off using the Safe
Margins menu option.
D Change the dimensions of the safe zones here.
104 Chapter 4
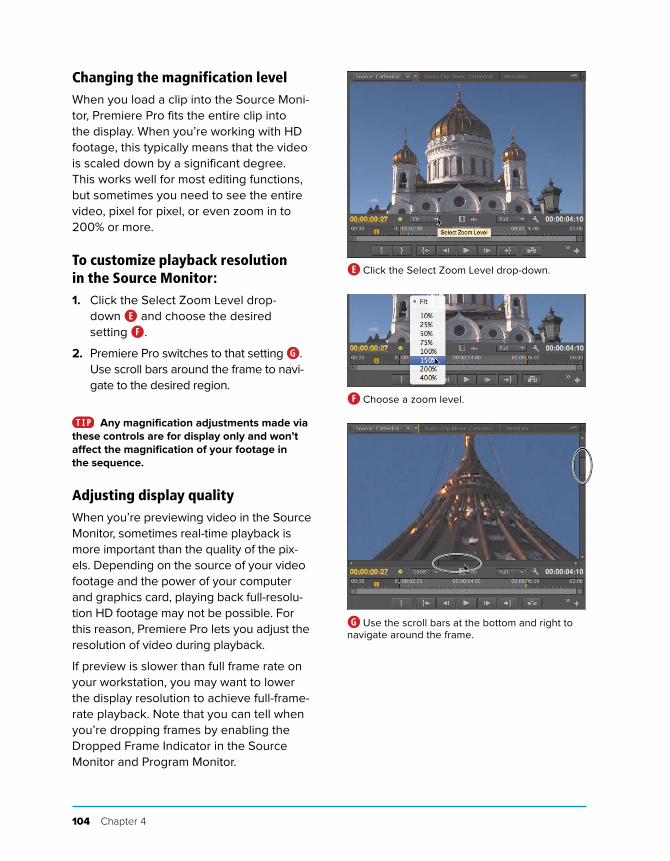
Changing the magnification levelWhen you load a clip into the Source Moni-
tor, Premiere Pro fits the entire clip into
the display. When you’re working with HD
footage, this typically means that the video
is scaled down by a significant degree.
This works well for most editing functions,
but sometimes you need to see the entire
video, pixel for pixel, or even zoom in to
200% or more.
To customize playback resolution in the Source Monitor:1. Click the Select Zoom Level drop-
down E and choose the desired
setting F.
2. Premiere Pro switches to that setting G.
Use scroll bars around the frame to navi-
gate to the desired region.
Any magnification adjustments made via
these controls are for display only and won’t
affect the magnification of your footage in
the sequence.
Adjusting display qualityWhen you’re previewing video in the Source
Monitor, sometimes real-time playback is
more important than the quality of the pix-
els. Depending on the source of your video
footage and the power of your computer
and graphics card, playing back full-resolu-
tion HD footage may not be possible. For
this reason, Premiere Pro lets you adjust the
resolution of video during playback.
If preview is slower than full frame rate on
your workstation, you may want to lower
the display resolution to achieve full-frame-
rate playback. Note that you can tell when
you’re dropping frames by enabling the
Dropped Frame Indicator in the Source
Monitor and Program Monitor.
E Click the Select Zoom Level drop-down.
F Choose a zoom level.
G Use the scroll bars at the bottom and right to
navigate around the frame.
Organizing and Viewing Clips 105
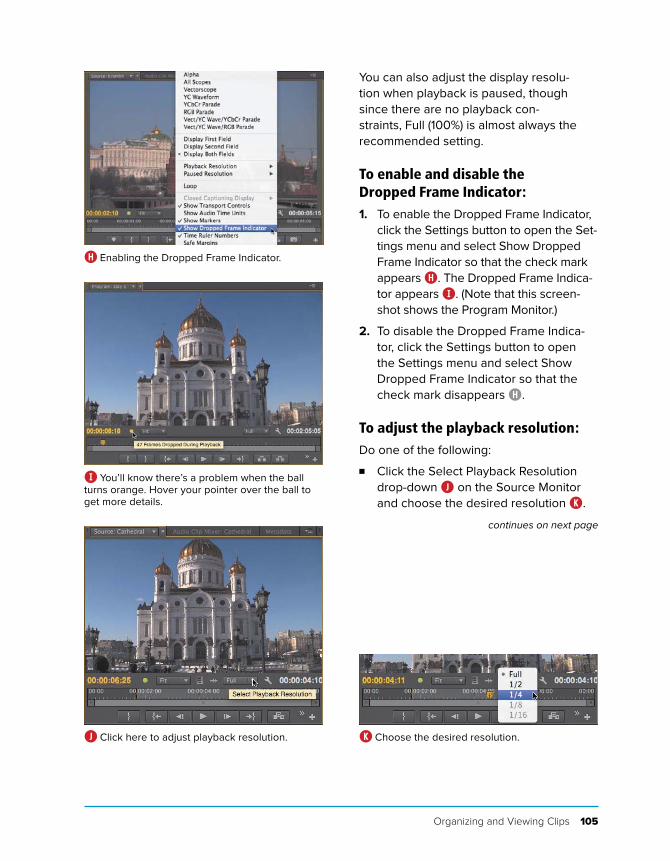
You can also adjust the display resolu-
tion when playback is paused, though
since there are no playback con-
straints, Full (100%) is almost always the
recommended setting.
To enable and disable the Dropped Frame Indicator:1. To enable the Dropped Frame Indicator,
click the Settings button to open the Set-
tings menu and select Show Dropped
Frame Indicator so that the check mark
appears H. The Dropped Frame Indica-
tor appears I. (Note that this screen-
shot shows the Program Monitor.)
2. To disable the Dropped Frame Indica-
tor, click the Settings button to open
the Settings menu and select Show
Dropped Frame Indicator so that the
check mark disappears H.
To adjust the playback resolution:Do one of the following:
■ Click the Select Playback Resolution
drop-down J on the Source Monitor
and choose the desired resolution K.
continues on next page
H Enabling the Dropped Frame Indicator.
I You’ll know there’s a problem when the ball
turns orange. Hover your pointer over the ball to
get more details.
J Click here to adjust playback resolution. K Choose the desired resolution.
106 Chapter 4
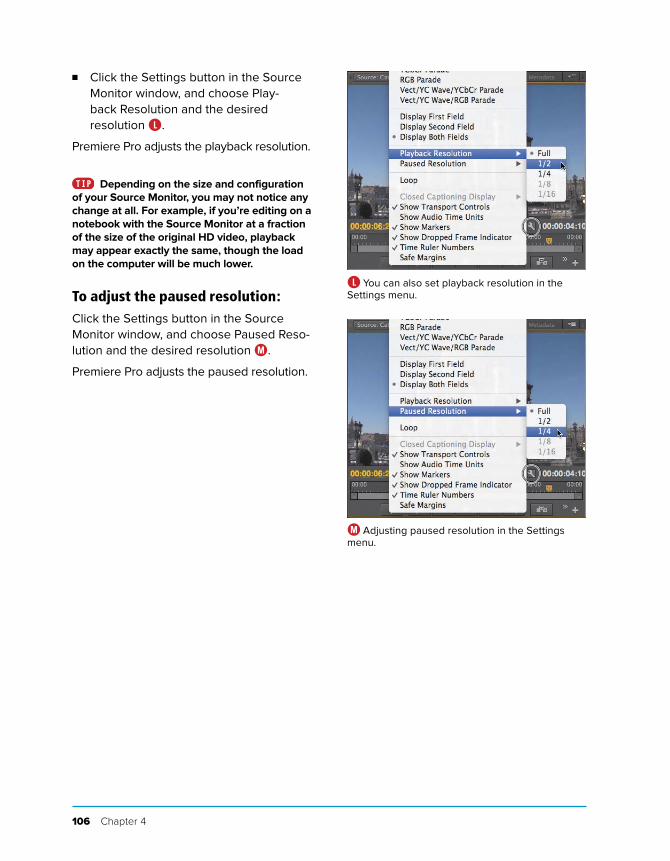
■ Click the Settings button in the Source
Monitor window, and choose Play-
back Resolution and the desired
resolution L.
Premiere Pro adjusts the playback resolution.
Depending on the size and configuration
of your Source Monitor, you may not notice any
change at all. For example, if you’re editing on a
notebook with the Source Monitor at a fraction
of the size of the original HD video, playback
may appear exactly the same, though the load
on the computer will be much lower.
To adjust the paused resolution:Click the Settings button in the Source
Monitor window, and choose Paused Reso-
lution and the desired resolution M.
Premiere Pro adjusts the paused resolution.
L You can also set playback resolution in the
Settings menu.
M Adjusting paused resolution in the Settings
menu.
Organizing and Viewing Clips 107
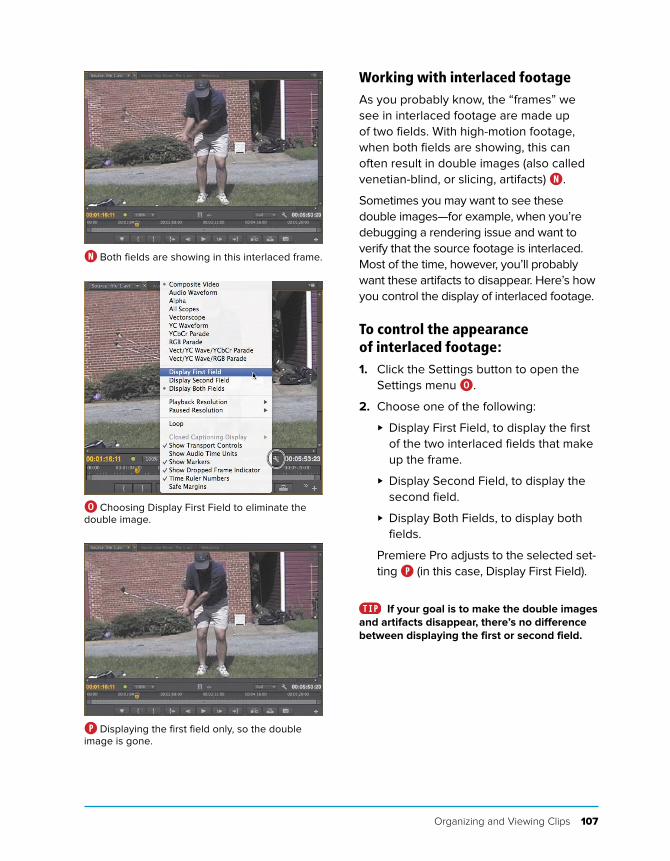
Working with interlaced footageAs you probably know, the “frames” we
see in interlaced footage are made up
of two fields. With high-motion footage,
when both fields are showing, this can
often result in double images (also called
venetian-blind, or slicing, artifacts) N.
Sometimes you may want to see these
double images—for example, when you’re
debugging a rendering issue and want to
verify that the source footage is interlaced.
Most of the time, however, you’ll probably
want these artifacts to disappear. Here’s how
you control the display of interlaced footage.
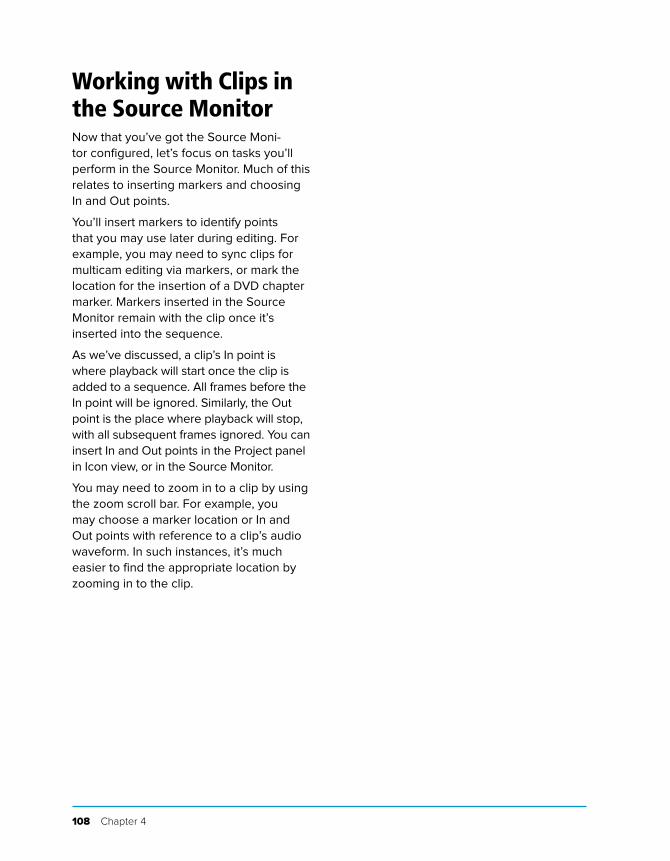
To control the appearance of interlaced footage:1. Click the Settings button to open the
Settings menu O.
2. Choose one of the following:
> Display First Field, to display the first
of the two interlaced fields that make
up the frame.
> Display Second Field, to display the
second field.
> Display Both Fields, to display both
fields.
Premiere Pro adjusts to the selected set-
ting P (in this case, Display First Field).
If your goal is to make the double images
and artifacts disappear, there’s no difference
between displaying the first or second field.
N Both fields are showing in this interlaced frame.
O Choosing Display First Field to eliminate the
double image.
P Displaying the first field only, so the double
image is gone.
108 Chapter 4
Working with Clips in the Source MonitorNow that you’ve got the Source Moni-
tor configured, let’s focus on tasks you’ll
perform in the Source Monitor. Much of this
relates to inserting markers and choosing
In and Out points.
You’ll insert markers to identify points
that you may use later during editing. For
example, you may need to sync clips for
multicam editing via markers, or mark the
location for the insertion of a DVD chapter
marker. Markers inserted in the Source
Monitor remain with the clip once it’s
inserted into the sequence.
As we’ve discussed, a clip’s In point is
where playback will start once the clip is
added to a sequence. All frames before the
In point will be ignored. Similarly, the Out
point is the place where playback will stop,
with all subsequent frames ignored. You can
insert In and Out points in the Project panel
in Icon view, or in the Source Monitor.
You may need to zoom in to a clip by using
the zoom scroll bar. For example, you
may choose a marker location or In and
Out points with reference to a clip’s audio
waveform. In such instances, it’s much
easier to find the appropriate location by
zooming in to the clip.
Organizing and Viewing Clips 109
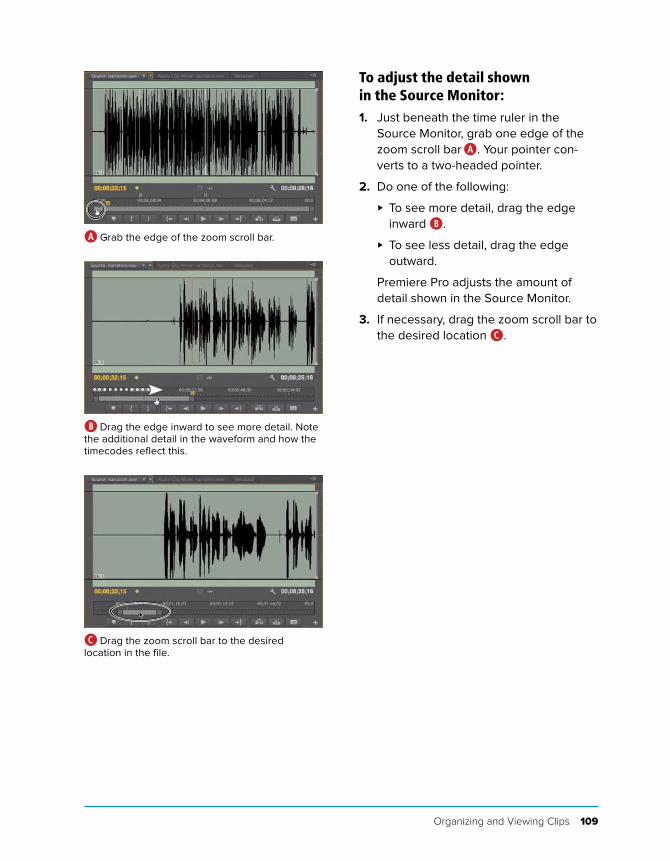
To adjust the detail shown in the Source Monitor:1. Just beneath the time ruler in the
Source Monitor, grab one edge of the
zoom scroll bar A. Your pointer con-
verts to a two-headed pointer.
2. Do one of the following:
> To see more detail, drag the edge
inward B.
> To see less detail, drag the edge
outward.
Premiere Pro adjusts the amount of
detail shown in the Source Monitor.
3. If necessary, drag the zoom scroll bar to
the desired location C.
A Grab the edge of the zoom scroll bar.
B Drag the edge inward to see more detail. Note
the additional detail in the waveform and how the
timecodes reflect this.
C Drag the zoom scroll bar to the desired
location in the file.
110 Chapter 4
Working with audio in the Source panelAs long as we’re looking at an audio
waveform, let’s examine several audio-
specific adjustments in the Source Moni-
tor. In addition to displaying the time ruler
in traditional video timecode, the Source
Monitor can display the time ruler in audio
time units, which provides 48,000 discrete
edit points in this 48 KHz audio file—much
greater precision than the 29.97 edit points
available using video timecode. In addition
to scaling horizontally into the waveform,
as you just learned, you can scale vertically
to provide a closer look at the file in the
Source Monitor.
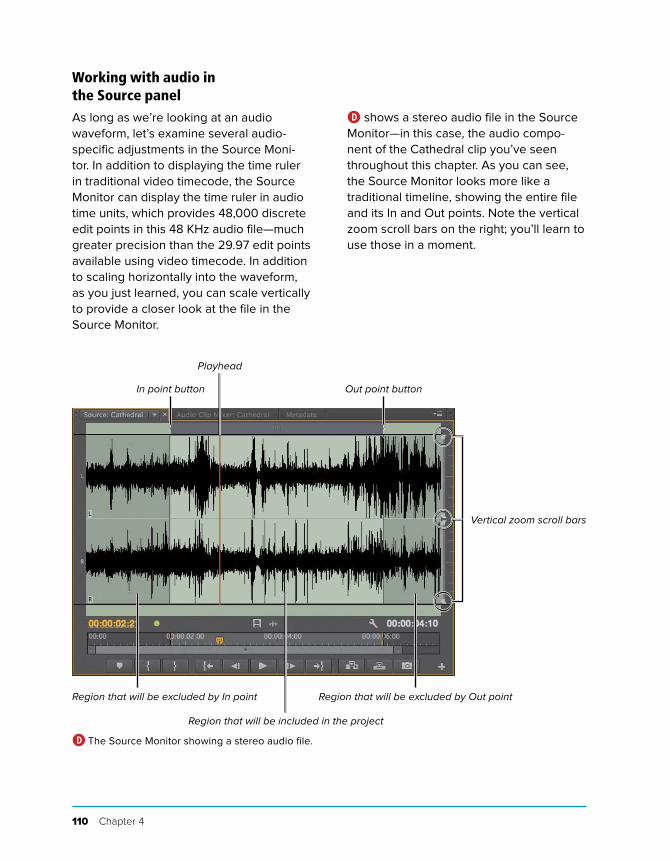
D shows a stereo audio file in the Source
Monitor—in this case, the audio compo-
nent of the Cathedral clip you’ve seen
throughout this chapter. As you can see,
the Source Monitor looks more like a
traditional timeline, showing the entire file
and its In and Out points. Note the vertical
zoom scroll bars on the right; you’ll learn to
use those in a moment.
In point button
Playhead
Out point button
Region that will be excluded by In point
Region that will be included in the project
Region that will be excluded by Out point
Vertical zoom scroll bars
D The Source Monitor showing a stereo audio file.
Organizing and Viewing Clips 111
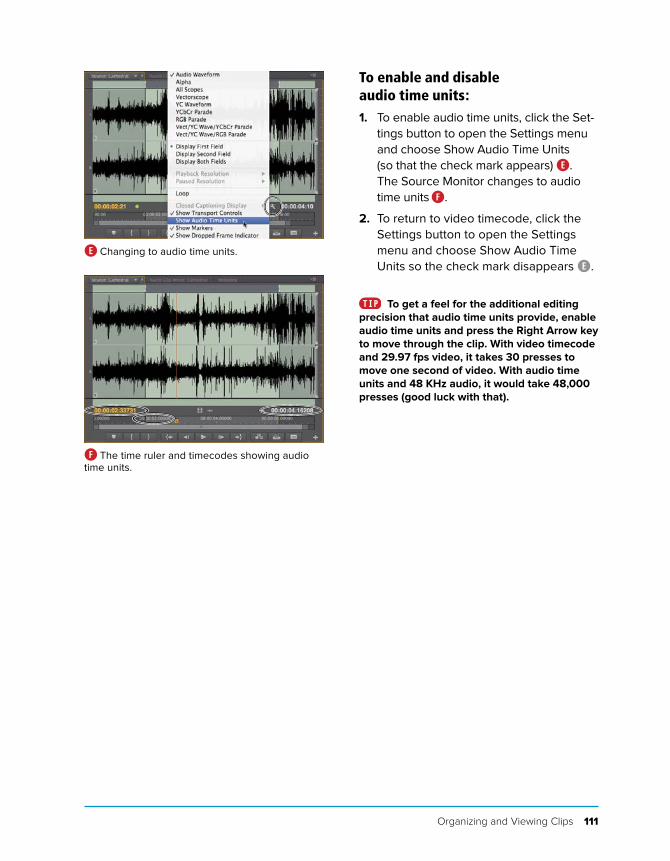
To enable and disable audio time units:1. To enable audio time units, click the Set-
tings button to open the Settings menu
and choose Show Audio Time Units
(so that the check mark appears) E.
The Source Monitor changes to audio
time units F.
2. To return to video timecode, click the
Settings button to open the Settings
menu and choose Show Audio Time
Units so the check mark disappears E.
To get a feel for the additional editing
precision that audio time units provide, enable
audio time units and press the Right Arrow key
to move through the clip. With video timecode
and 29.97 fps video, it takes 30 presses to
move one second of video. With audio time
units and 48 KHz audio, it would take 48,000
presses (good luck with that).
E Changing to audio time units.
F The time ruler and timecodes showing audio
time units.
112 Chapter 4
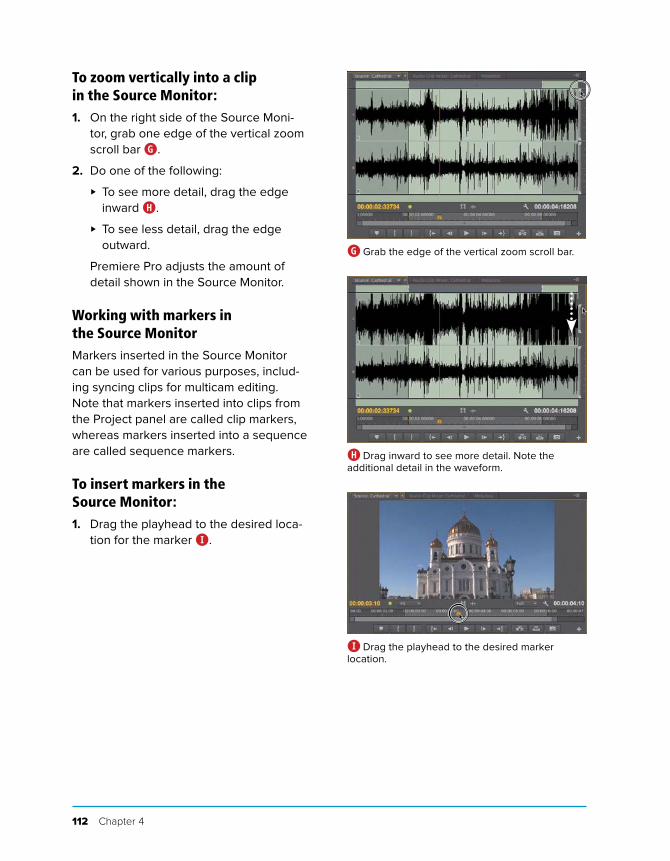
To zoom vertically into a clip in the Source Monitor:1. On the right side of the Source Moni-
tor, grab one edge of the vertical zoom
scroll bar G.
2. Do one of the following:
> To see more detail, drag the edge
inward H.
> To see less detail, drag the edge
outward.
Premiere Pro adjusts the amount of
detail shown in the Source Monitor.
Working with markers in the Source MonitorMarkers inserted in the Source Monitor
can be used for various purposes, includ-
ing syncing clips for multicam editing.
Note that markers inserted into clips from
the Project panel are called clip markers,
whereas markers inserted into a sequence
are called sequence markers.
To insert markers in the Source Monitor:1. Drag the playhead to the desired loca-
tion for the marker I.
G Grab the edge of the vertical zoom scroll bar.
H Drag inward to see more detail. Note the
additional detail in the waveform.
I Drag the playhead to the desired marker
location.
Organizing and Viewing Clips 113
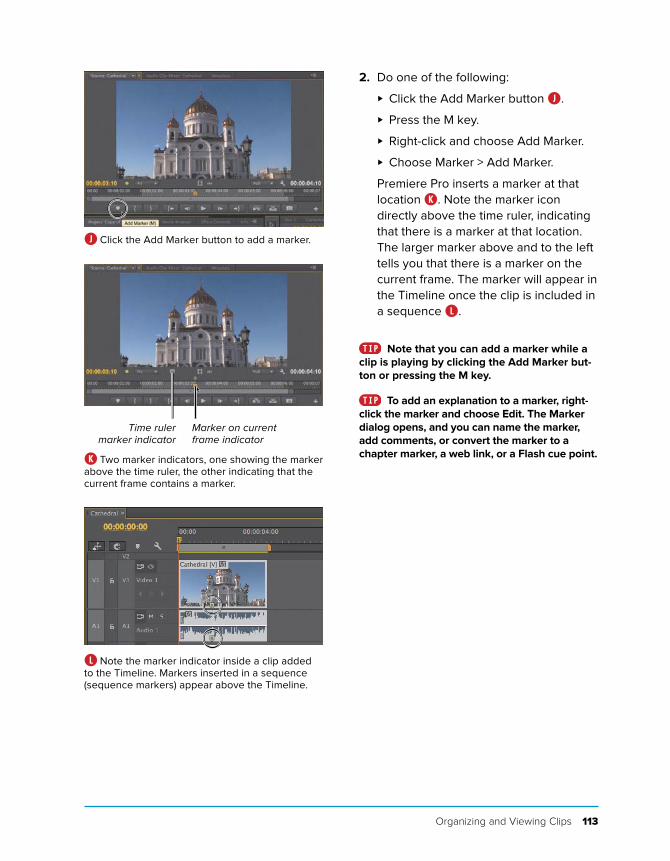
2. Do one of the following:
> Click the Add Marker button J.
> Press the M key.
> Right-click and choose Add Marker.
> Choose Marker > Add Marker.
Premiere Pro inserts a marker at that
location K. Note the marker icon
directly above the time ruler, indicating
that there is a marker at that location.
The larger marker above and to the left
tells you that there is a marker on the
current frame. The marker will appear in
the Timeline once the clip is included in
a sequence L.
Note that you can add a marker while a
clip is playing by clicking the Add Marker but-
ton or pressing the M key.
To add an explanation to a marker, right-
click the marker and choose Edit. The Marker
dialog opens, and you can name the marker,
add comments, or convert the marker to a
chapter marker, a web link, or a Flash cue point.
J Click the Add Marker button to add a marker.
Marker on current frame indicator
Time ruler marker indicator
K Two marker indicators, one showing the marker
above the time ruler, the other indicating that the
current frame contains a marker.
L Note the marker indicator inside a clip added
to the Timeline. Markers inserted in a sequence
(sequence markers) appear above the Timeline.
114 Chapter 4
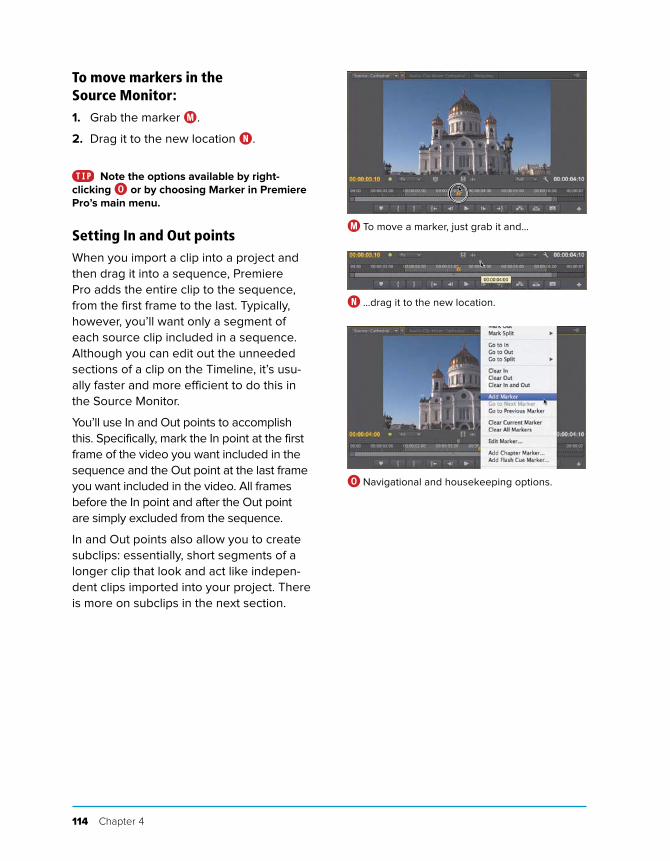
To move markers in the Source Monitor:1. Grab the marker M.
2. Drag it to the new location N.
Note the options available by right-
clicking O or by choosing Marker in Premiere
Pro’s main menu.
Setting In and Out pointsWhen you import a clip into a project and
then drag it into a sequence, Premiere
Pro adds the entire clip to the sequence,
from the first frame to the last. Typically,
however, you’ll want only a segment of
each source clip included in a sequence.
Although you can edit out the unneeded
sections of a clip on the Timeline, it’s usu-
ally faster and more efficient to do this in
the Source Monitor.
You’ll use In and Out points to accomplish
this. Specifically, mark the In point at the first
frame of the video you want included in the
sequence and the Out point at the last frame
you want included in the video. All frames
before the In point and after the Out point
are simply excluded from the sequence.
In and Out points also allow you to create
subclips: essentially, short segments of a
longer clip that look and act like indepen-
dent clips imported into your project. There
is more on subclips in the next section.
M To move a marker, just grab it and…
N …drag it to the new location.
O Navigational and housekeeping options.
Organizing and Viewing Clips 115
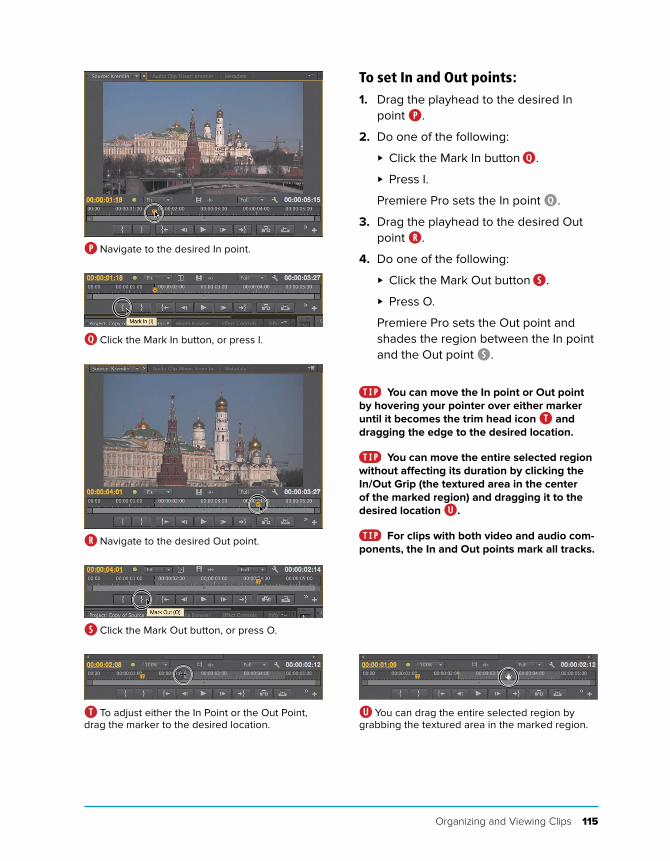
To set In and Out points:1. Drag the playhead to the desired In
point P.
2. Do one of the following:
> Click the Mark In button Q.
> Press I.
Premiere Pro sets the In point Q.
3. Drag the playhead to the desired Out
point R.
4. Do one of the following:
> Click the Mark Out button S.
> Press O.
Premiere Pro sets the Out point and
shades the region between the In point
and the Out point S.
You can move the In point or Out point
by hovering your pointer over either marker
until it becomes the trim head icon T and
dragging the edge to the desired location.
You can move the entire selected region
without affecting its duration by clicking the
In/Out Grip (the textured area in the center
of the marked region) and dragging it to the
desired location U.
For clips with both video and audio com-
ponents, the In and Out points mark all tracks.
P Navigate to the desired In point.
Q Click the Mark In button, or press I.
R Navigate to the desired Out point.
S Click the Mark Out button, or press O.
T To adjust either the In Point or the Out Point,
drag the marker to the desired location.U You can drag the entire selected region by
grabbing the textured area in the marked region.
116 Chapter 4
Working with SubclipsSubclips are sections of imported clips that
you want to edit separately in a project.
Once you’ve created a subclip, it looks and
acts much like a regular imported clip, and
you can edit it the same way.
Here’s an example. At the end of a
29-second long pan of Red Square, I shot
about five good seconds of Saint Basil’s
Cathedral. I wanted to isolate the segment
for later use in a short video on churches
in Moscow. The best way to accom-
plish this was to create a subclip of this
short segment.
One nomenclature-related note: The clip
from which a subclip is created is referred
to as the master clip.
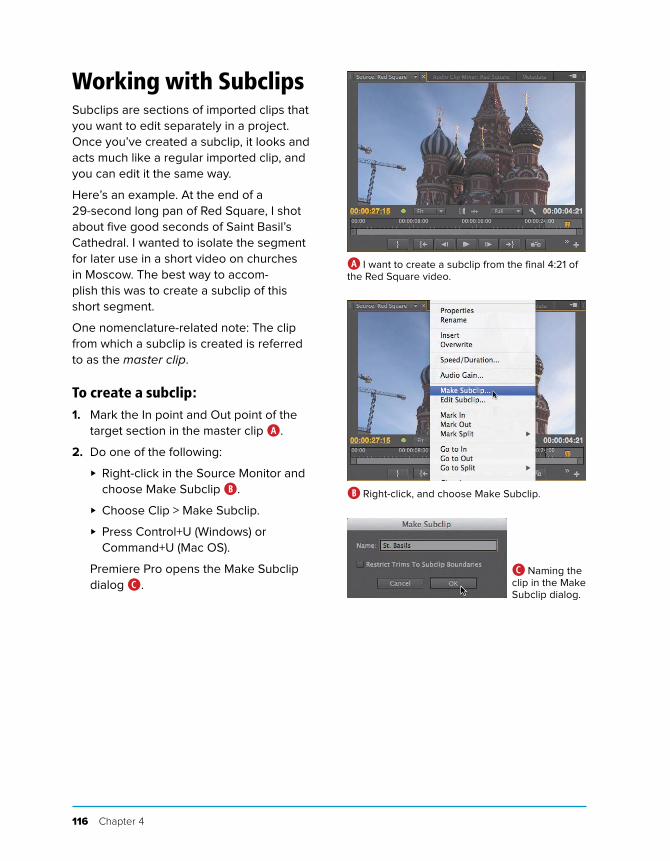
To create a subclip:1. Mark the In point and Out point of the
target section in the master clip A.
2. Do one of the following:
> Right-click in the Source Monitor and
choose Make Subclip B.
> Choose Clip > Make Subclip.
> Press Control+U (Windows) or
Command+U (Mac OS).
Premiere Pro opens the Make Subclip
dialog C.
A I want to create a subclip from the final 4:21 of
the Red Square video.
B Right-click, and choose Make Subclip.
C Naming the
clip in the Make
Subclip dialog.
Organizing and Viewing Clips 117
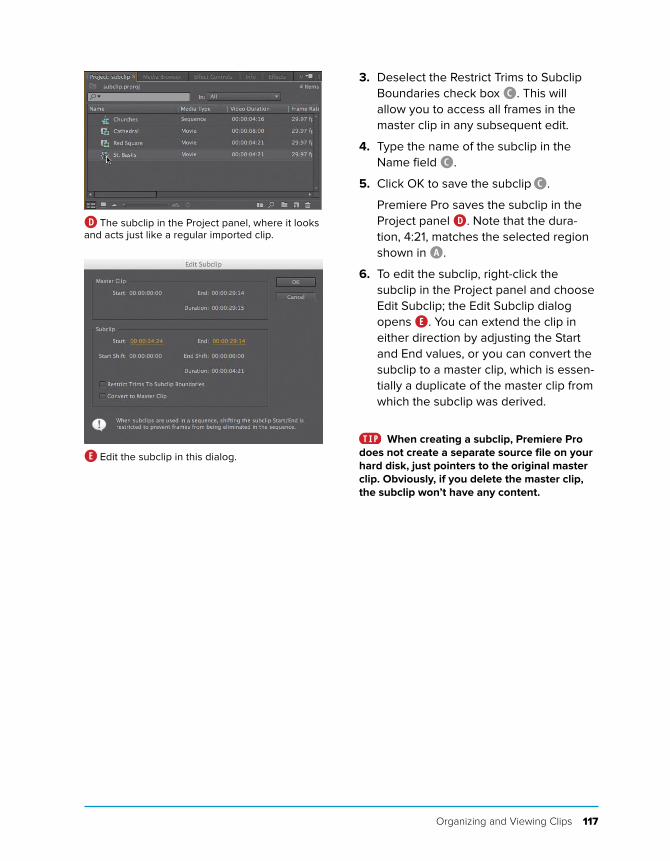
3. Deselect the Restrict Trims to Subclip
Boundaries check box C. This will
allow you to access all frames in the
master clip in any subsequent edit.
4. Type the name of the subclip in the
Name field C.
5. Click OK to save the subclip C.
Premiere Pro saves the subclip in the
Project panel D. Note that the dura-
tion, 4:21, matches the selected region
shown in A.
6. To edit the subclip, right-click the
subclip in the Project panel and choose
Edit Subclip; the Edit Subclip dialog
opens E. You can extend the clip in
either direction by adjusting the Start
and End values, or you can convert the
subclip to a master clip, which is essen-
tially a duplicate of the master clip from
which the subclip was derived.
When creating a subclip, Premiere Pro
does not create a separate source file on your
hard disk, just pointers to the original master
clip. Obviously, if you delete the master clip,
the subclip won’t have any content.
D The subclip in the Project panel, where it looks
and acts just like a regular imported clip.
E Edit the subclip in this dialog.
118 Chapter 4
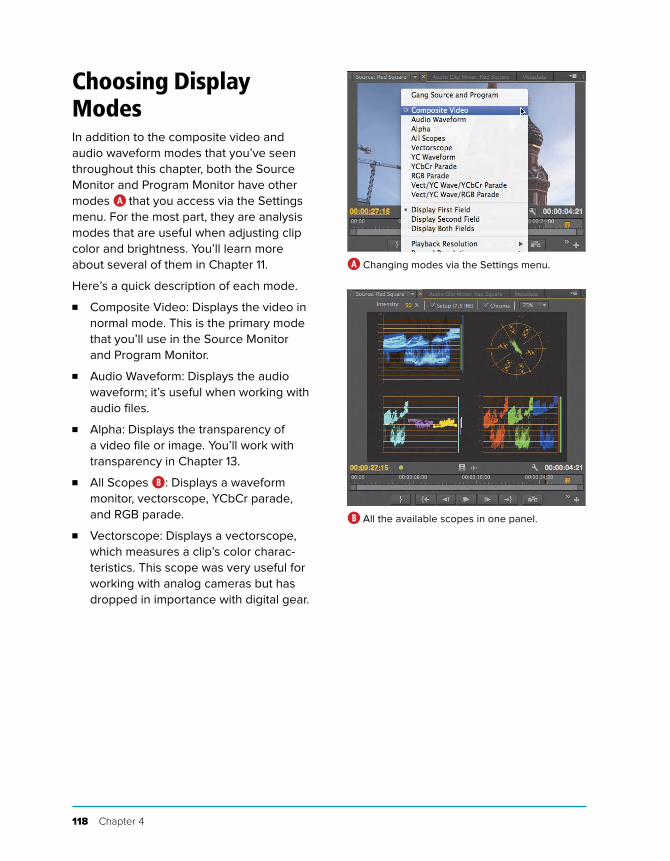
Choosing Display ModesIn addition to the composite video and
audio waveform modes that you’ve seen
throughout this chapter, both the Source
Monitor and Program Monitor have other
modes A that you access via the Settings
menu. For the most part, they are analysis
modes that are useful when adjusting clip
color and brightness. You’ll learn more
about several of them in Chapter 11.
Here’s a quick description of each mode.
■ Composite Video: Displays the video in
normal mode. This is the primary mode
that you’ll use in the Source Monitor
and Program Monitor.
■ Audio Waveform: Displays the audio
waveform; it’s useful when working with
audio files.
■ Alpha: Displays the transparency of
a video file or image. You’ll work with
transparency in Chapter 13.
■ All Scopes B: Displays a waveform
monitor, vectorscope, YCbCr parade,
and RGB parade.
■ Vectorscope: Displays a vectorscope,
which measures a clip’s color charac-
teristics. This scope was very useful for
working with analog cameras but has
dropped in importance with digital gear.
A Changing modes via the Settings menu.
B All the available scopes in one panel.
Organizing and Viewing Clips 119
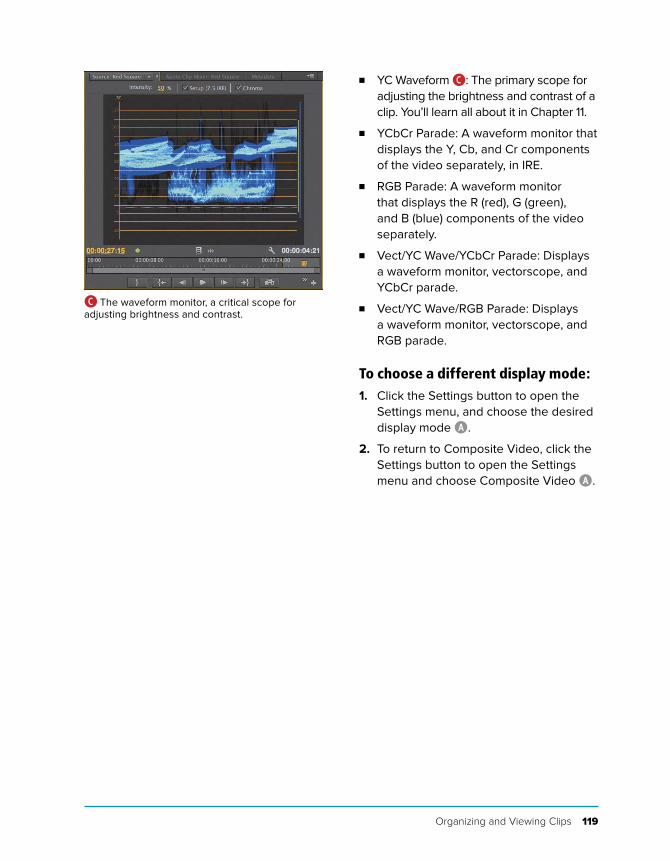
■ YC Waveform C: The primary scope for
adjusting the brightness and contrast of a
clip. You’ll learn all about it in Chapter 11.
■ YCbCr Parade: A waveform monitor that
displays the Y, Cb, and Cr components
of the video separately, in IRE.
■ RGB Parade: A waveform monitor
that displays the R (red), G (green),
and B (blue) components of the video
separately.
■ Vect/YC Wave/YCbCr Parade: Displays
a waveform monitor, vectorscope, and
YCbCr parade.
■ Vect/YC Wave/RGB Parade: Displays
a waveform monitor, vectorscope, and
RGB parade.
To choose a different display mode:1. Click the Settings button to open the
Settings menu, and choose the desired
display mode A.
2. To return to Composite Video, click the
Settings button to open the Settings
menu and choose Composite Video A.
C The waveform monitor, a critical scope for
adjusting brightness and contrast.

120 Chapter 4
Modifying Clip Properties and Interpreting FootageThere are a lot of calculations and computations going on under the hood in Premiere Pro, and one
of the most complicated is the interpretation of source footage. Specifically, the myriad types of
source footage (HDV, AVCHD, DSLR, PNG, JPEG, TIF, and so on) have an equally varied schema of
frame rates, aspect ratios, field orders, and transparency values.
The vast majority of the time, when you import disparate footage into Premiere Pro, the program
knows how to interpret the footage correctly. But every once in a while, you’ll see an image that
just looks wrong D. The place to investigate is the Interpret Footage dialog E, accessed by right-
clicking the clip and choosing Modify > Interpret Footage.
As you can see, the dialog is designed to address these four problems:
. Frame Rate: If your footage appears faster or slower than the true frame rate, select the
“Assume this frame rate” option and enter the true frames per second (fps) F. There are no
hard-and-fast rules here; you just need to experiment until the footage looks right.
D This clip has a distorted aspect ratio.
F Adjusting the frame rate.E The Interpret Footage dialog.
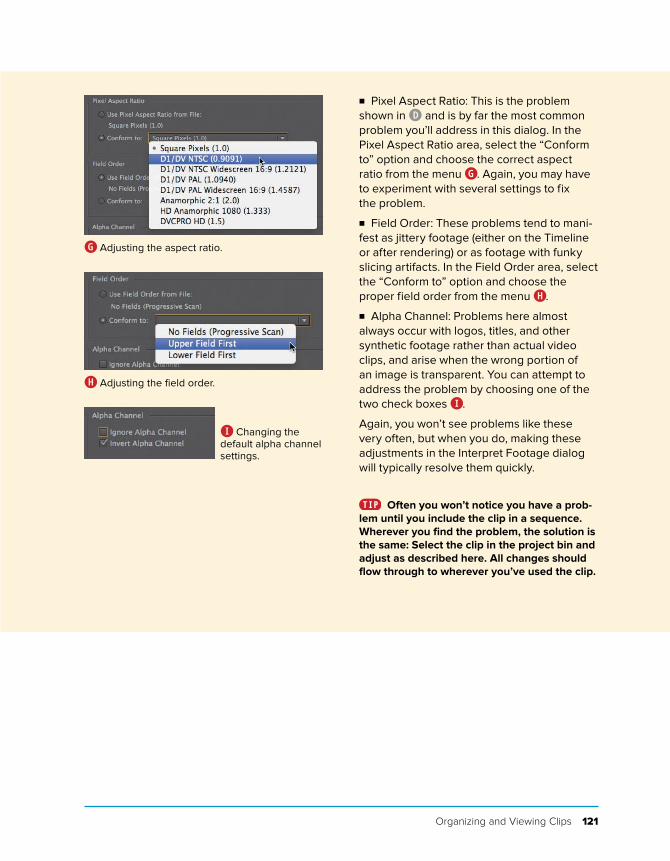
Organizing and Viewing Clips 121
. Pixel Aspect Ratio: This is the problem
shown in D and is by far the most common
problem you’ll address in this dialog. In the
Pixel Aspect Ratio area, select the “Conform
to” option and choose the correct aspect
ratio from the menu G. Again, you may have
to experiment with several settings to fix
the problem.
. Field Order: These problems tend to mani-
fest as jittery footage (either on the Timeline
or after rendering) or as footage with funky
slicing artifacts. In the Field Order area, select
the “Conform to” option and choose the
proper field order from the menu H.
. Alpha Channel: Problems here almost
always occur with logos, titles, and other
synthetic footage rather than actual video
clips, and arise when the wrong portion of
an image is transparent. You can attempt to
address the problem by choosing one of the
two check boxes I.
Again, you won’t see problems like these
very often, but when you do, making these
adjustments in the Interpret Footage dialog
will typically resolve them quickly.
Often you won’t notice you have a prob-
lem until you include the clip in a sequence.
Wherever you find the problem, the solution is
the same: Select the clip in the project bin and
adjust as described here. All changes should
flow through to wherever you’ve used the clip.
G Adjusting the aspect ratio.
H Adjusting the field order.
I Changing the
default alpha channel
settings.
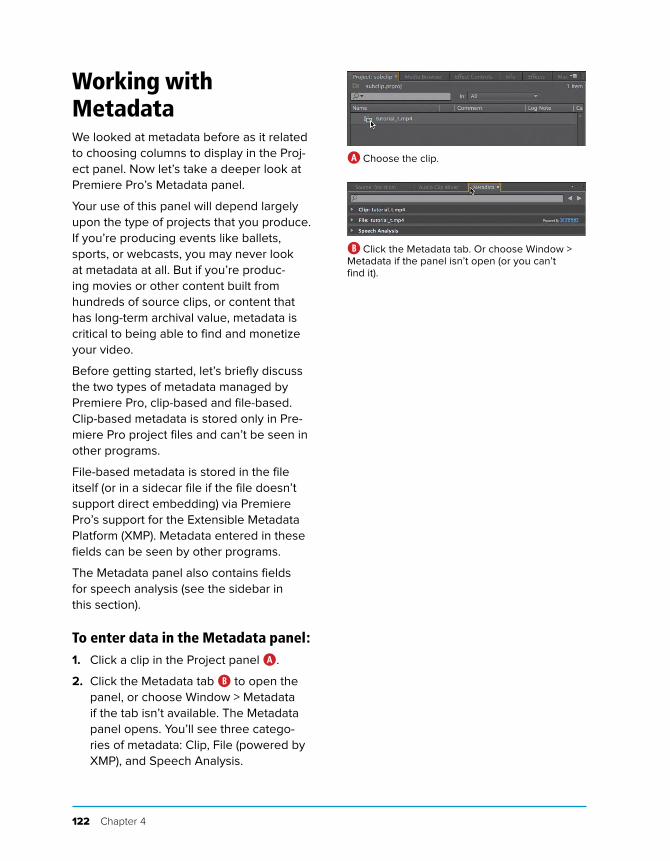
122 Chapter 4
Working with MetadataWe looked at metadata before as it related
to choosing columns to display in the Proj-
ect panel. Now let’s take a deeper look at
Premiere Pro’s Metadata panel.
Your use of this panel will depend largely
upon the type of projects that you produce.
If you’re producing events like ballets,
sports, or webcasts, you may never look
at metadata at all. But if you’re produc-
ing movies or other content built from
hundreds of source clips, or content that
has long-term archival value, metadata is
critical to being able to find and monetize
your video.
Before getting started, let’s briefly discuss
the two types of metadata managed by
Premiere Pro, clip-based and file-based.
Clip-based metadata is stored only in Pre-
miere Pro project files and can’t be seen in
other programs.
File-based metadata is stored in the file
itself (or in a sidecar file if the file doesn’t
support direct embedding) via Premiere
Pro’s support for the Extensible Metadata
Platform (XMP). Metadata entered in these
fields can be seen by other programs.
The Metadata panel also contains fields
for speech analysis (see the sidebar in
this section).
To enter data in the Metadata panel:1. Click a clip in the Project panel A.
2. Click the Metadata tab B to open the
panel, or choose Window > Metadata
if the tab isn’t available. The Metadata
panel opens. You’ll see three catego-
ries of metadata: Clip, File (powered by
XMP), and Speech Analysis.
A Choose the clip.
B Click the Metadata tab. Or choose Window >
Metadata if the panel isn’t open (or you can’t
find it).
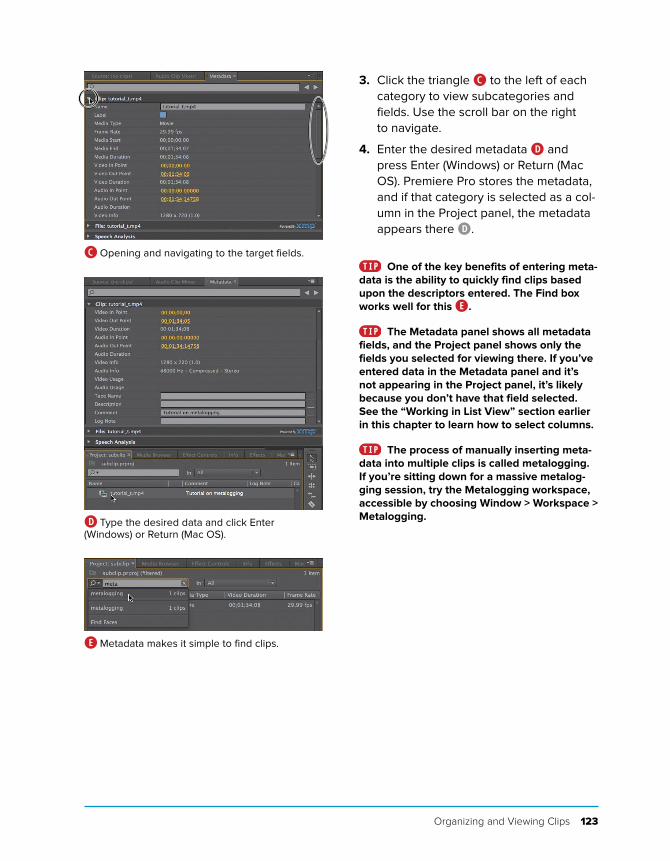
Organizing and Viewing Clips 123
3. Click the triangle C to the left of each
category to view subcategories and
fields. Use the scroll bar on the right
to navigate.
4. Enter the desired metadata D and
press Enter (Windows) or Return (Mac
OS). Premiere Pro stores the metadata,
and if that category is selected as a col-
umn in the Project panel, the metadata
appears there D.
One of the key benefits of entering meta-
data is the ability to quickly find clips based
upon the descriptors entered. The Find box
works well for this E.
The Metadata panel shows all metadata
fields, and the Project panel shows only the
fields you selected for viewing there. If you’ve
entered data in the Metadata panel and it’s
not appearing in the Project panel, it’s likely
because you don’t have that field selected.
See the “Working in List View” section earlier
in this chapter to learn how to select columns.
The process of manually inserting meta-
data into multiple clips is called metalogging.
If you’re sitting down for a massive metalog-
ging session, try the Metalogging workspace,
accessible by choosing Window > Workspace >
Metalogging.
C Opening and navigating to the target fields.
D Type the desired data and click Enter
(Windows) or Return (Mac OS).
E Metadata makes it simple to find clips.
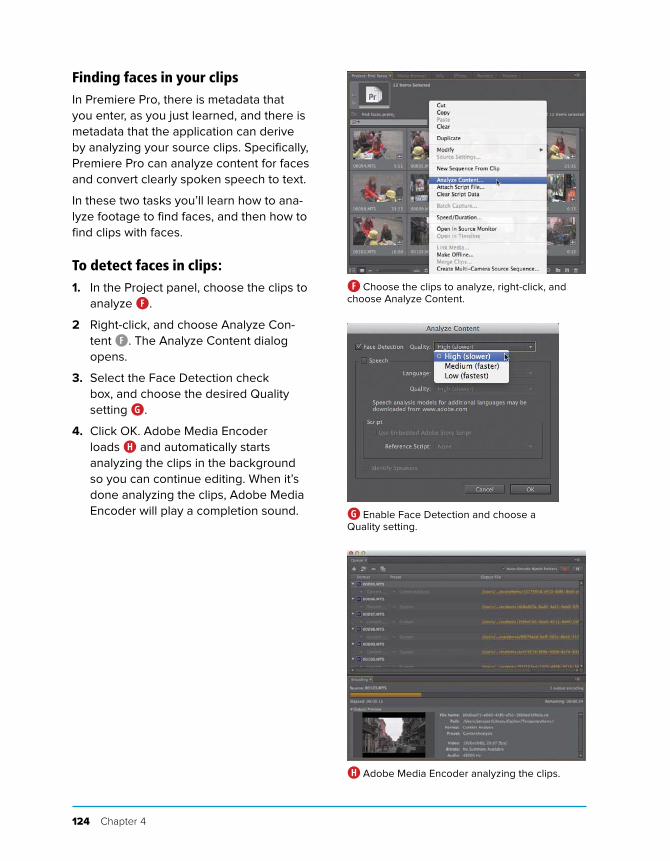
124 Chapter 4
Finding faces in your clipsIn Premiere Pro, there is metadata that
you enter, as you just learned, and there is
metadata that the application can derive
by analyzing your source clips. Specifically,
Premiere Pro can analyze content for faces
and convert clearly spoken speech to text.
In these two tasks you’ll learn how to ana-
lyze footage to find faces, and then how to
find clips with faces.
To detect faces in clips:1. In the Project panel, choose the clips to
analyze F.
2 Right-click, and choose Analyze Con-
tent F. The Analyze Content dialog
opens.
3. Select the Face Detection check
box, and choose the desired Quality
setting G.
4. Click OK. Adobe Media Encoder
loads H and automatically starts
analyzing the clips in the background
so you can continue editing. When it’s
done analyzing the clips, Adobe Media
Encoder will play a completion sound.
F Choose the clips to analyze, right-click, and
choose Analyze Content.
G Enable Face Detection and choose a
Quality setting.
H Adobe Media Encoder analyzing the clips.
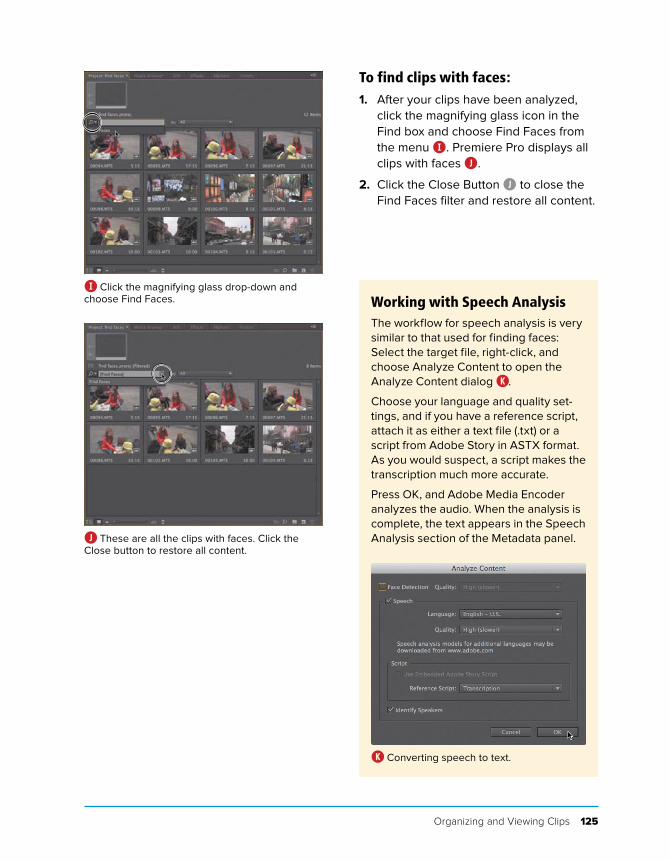
Organizing and Viewing Clips 125
To find clips with faces:1. After your clips have been analyzed,
click the magnifying glass icon in the
Find box and choose Find Faces from
the menu I. Premiere Pro displays all
clips with faces J.
2. Click the Close Button J to close the
Find Faces filter and restore all content.
I Click the magnifying glass drop-down and
choose Find Faces.
J These are all the clips with faces. Click the
Close button to restore all content.
Working with Speech AnalysisThe workflow for speech analysis is very
similar to that used for finding faces:
Select the target file, right-click, and
choose Analyze Content to open the
Analyze Content dialog K.
Choose your language and quality set-
tings, and if you have a reference script,
attach it as either a text file (.txt) or a
script from Adobe Story in ASTX format.
As you would suspect, a script makes the
transcription much more accurate.
Press OK, and Adobe Media Encoder
analyzes the audio. When the analysis is
complete, the text appears in the Speech
Analysis section of the Metadata panel.
K Converting speech to text.
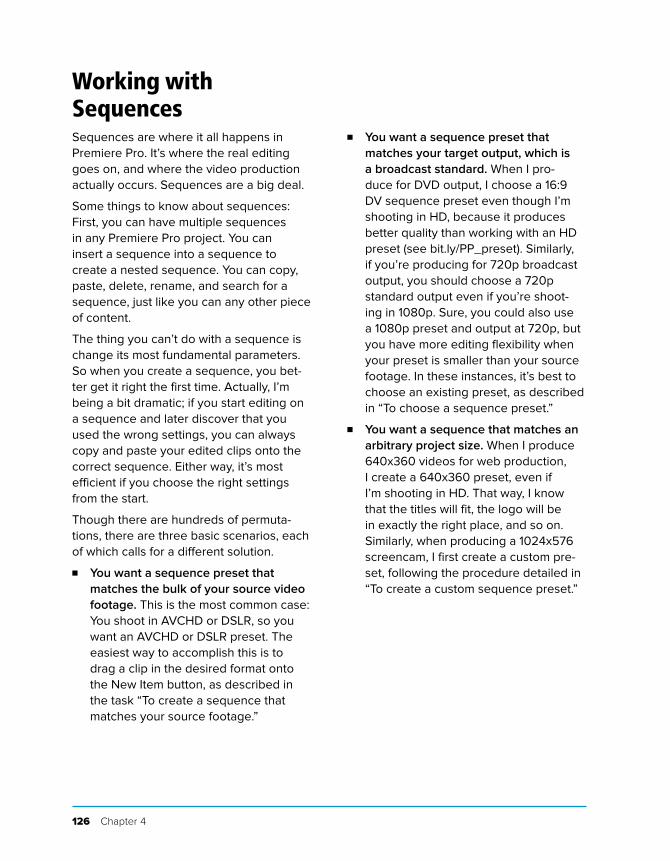
126 Chapter 4
Working with SequencesSequences are where it all happens in
Premiere Pro. It’s where the real editing
goes on, and where the video production
actually occurs. Sequences are a big deal.
Some things to know about sequences:
First, you can have multiple sequences
in any Premiere Pro project. You can
insert a sequence into a sequence to
create a nested sequence. You can copy,
paste, delete, rename, and search for a
sequence, just like you can any other piece
of content.
The thing you can’t do with a sequence is
change its most fundamental parameters.
So when you create a sequence, you bet-
ter get it right the first time. Actually, I’m
being a bit dramatic; if you start editing on
a sequence and later discover that you
used the wrong settings, you can always
copy and paste your edited clips onto the
correct sequence. Either way, it’s most
efficient if you choose the right settings
from the start.
Though there are hundreds of permuta-
tions, there are three basic scenarios, each
of which calls for a different solution.
■ You want a sequence preset that matches the bulk of your source video footage. This is the most common case:
You shoot in AVCHD or DSLR, so you
want an AVCHD or DSLR preset. The
easiest way to accomplish this is to
drag a clip in the desired format onto
the New Item button, as described in
the task “To create a sequence that
matches your source footage.”
■ You want a sequence preset that matches your target output, which is a broadcast standard. When I pro-
duce for DVD output, I choose a 16:9
DV sequence preset even though I’m
shooting in HD, because it produces
better quality than working with an HD
preset (see bit.ly/PP_preset). Similarly,
if you’re producing for 720p broadcast
output, you should choose a 720p
standard output even if you’re shoot-
ing in 1080p. Sure, you could also use
a 1080p preset and output at 720p, but
you have more editing flexibility when
your preset is smaller than your source
footage. In these instances, it’s best to
choose an existing preset, as described
in “To choose a sequence preset.”
■ You want a sequence that matches an arbitrary project size. When I produce
640x360 videos for web production,
I create a 640x360 preset, even if
I’m shooting in HD. That way, I know
that the titles will fit, the logo will be
in exactly the right place, and so on.
Similarly, when producing a 1024x576
screencam, I first create a custom pre-
set, following the procedure detailed in
“To create a custom sequence preset.”
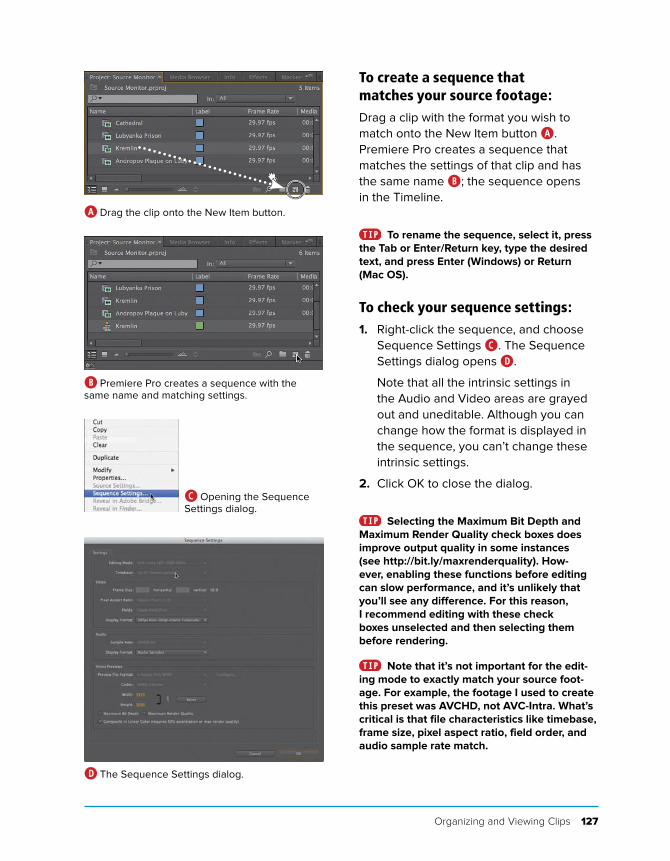
Organizing and Viewing Clips 127
To create a sequence that matches your source footage:Drag a clip with the format you wish to
match onto the New Item button A.
Premiere Pro creates a sequence that
matches the settings of that clip and has
the same name B; the sequence opens
in the Timeline.
To rename the sequence, select it, press
the Tab or Enter/Return key, type the desired
text, and press Enter (Windows) or Return
(Mac OS).
To check your sequence settings:1. Right-click the sequence, and choose
Sequence Settings C. The Sequence
Settings dialog opens D.
Note that all the intrinsic settings in
the Audio and Video areas are grayed
out and uneditable. Although you can
change how the format is displayed in
the sequence, you can’t change these
intrinsic settings.
2. Click OK to close the dialog.
Selecting the Maximum Bit Depth and
Maximum Render Quality check boxes does
improve output quality in some instances
(see http://bit.ly/maxrenderquality). How-
ever, enabling these functions before editing
can slow performance, and it’s unlikely that
you’ll see any difference. For this reason,
I recommend editing with these check
boxes unselected and then selecting them
before rendering.
Note that it’s not important for the edit-
ing mode to exactly match your source foot-
age. For example, the footage I used to create
this preset was AVCHD, not AVC-Intra. What’s
critical is that file characteristics like timebase,
frame size, pixel aspect ratio, field order, and
audio sample rate match.
A Drag the clip onto the New Item button.
B Premiere Pro creates a sequence with the
same name and matching settings.
C Opening the Sequence
Settings dialog.
D The Sequence Settings dialog.
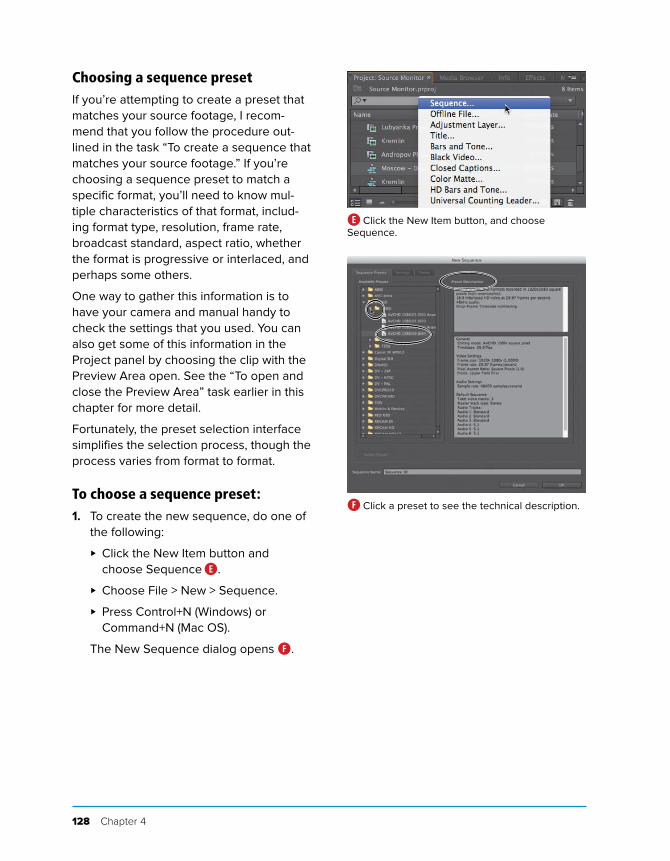
128 Chapter 4
Choosing a sequence presetIf you’re attempting to create a preset that
matches your source footage, I recom-
mend that you follow the procedure out-
lined in the task “To create a sequence that
matches your source footage.” If you’re
choosing a sequence preset to match a
specific format, you’ll need to know mul-
tiple characteristics of that format, includ-
ing format type, resolution, frame rate,
broadcast standard, aspect ratio, whether
the format is progressive or interlaced, and
perhaps some others.
One way to gather this information is to
have your camera and manual handy to
check the settings that you used. You can
also get some of this information in the
Project panel by choosing the clip with the
Preview Area open. See the “To open and
close the Preview Area” task earlier in this
chapter for more detail.
Fortunately, the preset selection interface
simplifies the selection process, though the
process varies from format to format.
To choose a sequence preset:1. To create the new sequence, do one of
the following:
> Click the New Item button and
choose Sequence E.
> Choose File > New > Sequence.
> Press Control+N (Windows) or
Command+N (Mac OS).
The New Sequence dialog opens F.
E Click the New Item button, and choose
Sequence.
F Click a preset to see the technical description.
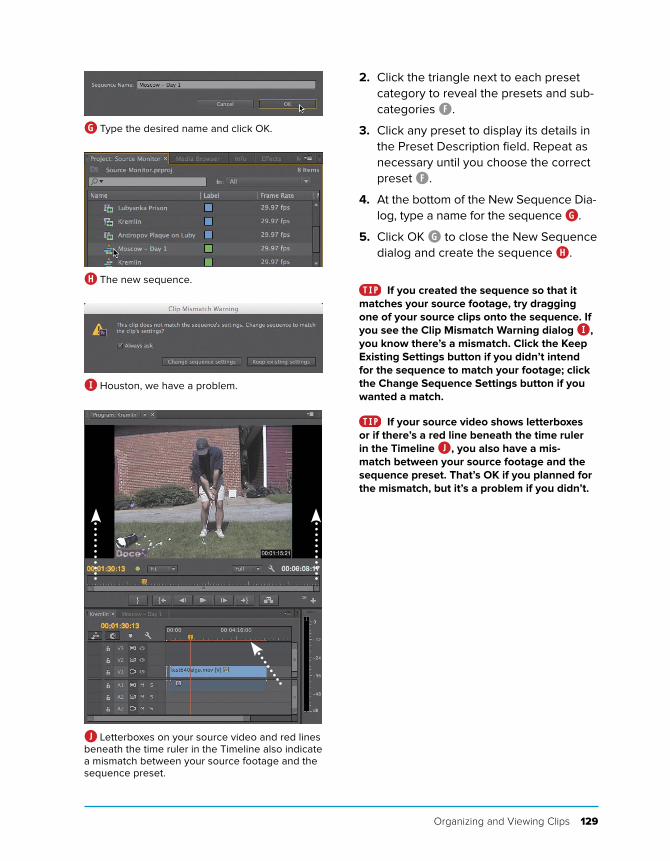
Organizing and Viewing Clips 129
2. Click the triangle next to each preset
category to reveal the presets and sub-
categories F.
3. Click any preset to display its details in
the Preset Description field. Repeat as
necessary until you choose the correct
preset F.
4. At the bottom of the New Sequence Dia-
log, type a name for the sequence G.
5. Click OK G to close the New Sequence
dialog and create the sequence H.
If you created the sequence so that it
matches your source footage, try dragging
one of your source clips onto the sequence. If
you see the Clip Mismatch Warning dialog I,
you know there’s a mismatch. Click the Keep
Existing Settings button if you didn’t intend
for the sequence to match your footage; click
the Change Sequence Settings button if you
wanted a match.
If your source video shows letterboxes
or if there’s a red line beneath the time ruler
in the Timeline J, you also have a mis-
match between your source footage and the
sequence preset. That’s OK if you planned for
the mismatch, but it’s a problem if you didn’t.
G Type the desired name and click OK.
H The new sequence.
I Houston, we have a problem.
J Letterboxes on your source video and red lines
beneath the time ruler in the Timeline also indicate
a mismatch between your source footage and the
sequence preset.

130 Chapter 4
Creating custom sequence presetsWhen I create custom sequence presets,
it’s almost always for use in a totally non-
broadcast setting, like screencams or
streaming media. This usage dictates many
of the decisions explained in the next
task. If you’re creating a custom sequence
preset for a similar purpose, you’ll find the
procedure helpful.
On the other hand, if your goal is to create
a format that’s just like an existing preset
except different in one key way—say, the
number or type of video or audio tracks—
you’re better off starting with the existing
preset, making the critical change, and
then saving the new preset. You can ben-
efit from the high-level workflow presented
in this task, but you should ignore most of
the suggested settings changes.
To create a custom sequence preset:1. To create the new sequence, do one of
the following:
> Click the New Item button and
choose Sequence E.
> Choose File > New > Sequence, or
press CtrlControl+N (Windows) or
Command+N (Mac OS).
The New Sequence dialog opens K.
2. Click the Settings tab K.
3. Choose Custom from the Editing Mode
drop-down L. This gives you complete
flexibility to change any setting.
4. Choose the desired frames per second
from the Timebase drop-down M.
K Click the Settings tab to access the settings.
L Choose Custom for editing mode or you won’t
be able to change most of the settings.
M Choose the frame rate.
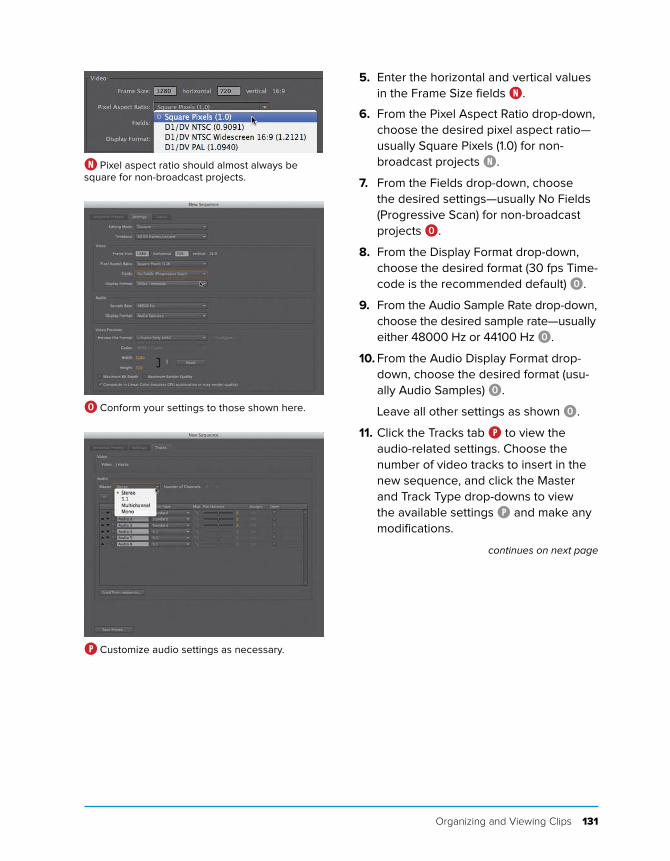
Organizing and Viewing Clips 131
5. Enter the horizontal and vertical values
in the Frame Size fields N.
6. From the Pixel Aspect Ratio drop-down,
choose the desired pixel aspect ratio—
usually Square Pixels (1.0) for non-
broadcast projects N.
7. From the Fields drop-down, choose
the desired settings—usually No Fields
(Progressive Scan) for non-broadcast
projects O.
8. From the Display Format drop-down,
choose the desired format (30 fps Time-
code is the recommended default) O.
9. From the Audio Sample Rate drop-down,
choose the desired sample rate—usually
either 48000 Hz or 44100 Hz O.
10. From the Audio Display Format drop-
down, choose the desired format (usu-
ally Audio Samples) O.
Leave all other settings as shown O.
11. Click the Tracks tab P to view the
audio-related settings. Choose the
number of video tracks to insert in the
new sequence, and click the Master
and Track Type drop-downs to view
the available settings P and make any
modifications.
continues on next page
N Pixel aspect ratio should almost always be
square for non-broadcast projects.
O Conform your settings to those shown here.
P Customize audio settings as necessary.
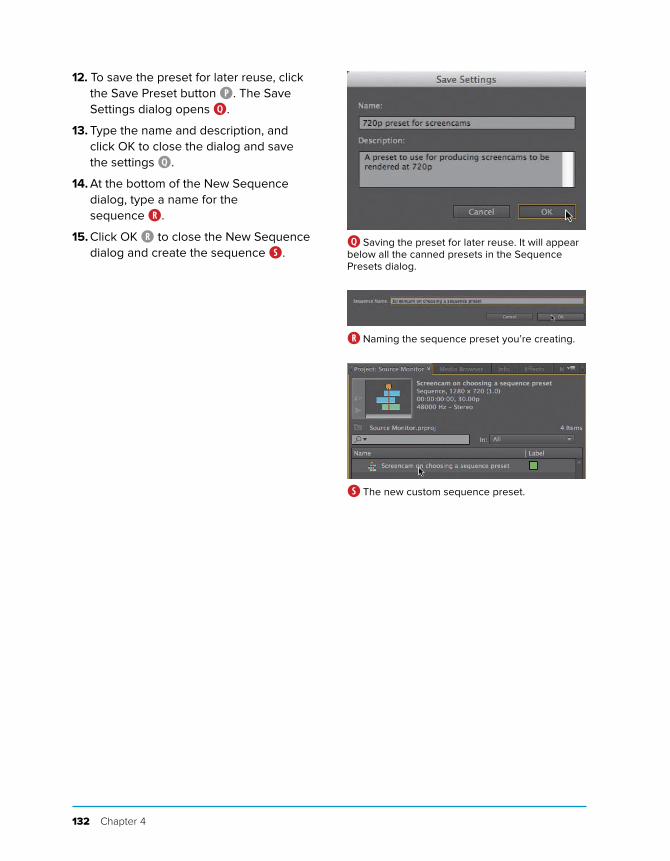
132 Chapter 4
12. To save the preset for later reuse, click
the Save Preset button P. The Save
Settings dialog opens Q.
13. Type the name and description, and
click OK to close the dialog and save
the settings Q.
14. At the bottom of the New Sequence
dialog, type a name for the
sequence R.
15. Click OK R to close the New Sequence
dialog and create the sequence S.Q Saving the preset for later reuse. It will appear
below all the canned presets in the Sequence
Presets dialog.
R Naming the sequence preset you’re creating.
S The new custom sequence preset.
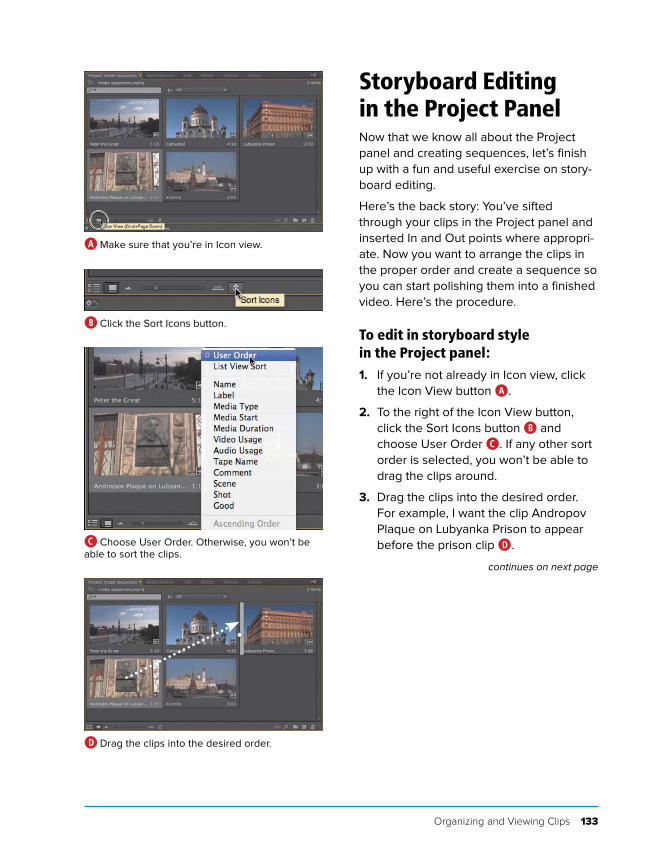
Organizing and Viewing Clips 133
Storyboard Editing in the Project PanelNow that we know all about the Project
panel and creating sequences, let’s finish
up with a fun and useful exercise on story-
board editing.
Here’s the back story: You’ve sifted
through your clips in the Project panel and
inserted In and Out points where appropri-
ate. Now you want to arrange the clips in
the proper order and create a sequence so
you can start polishing them into a finished
video. Here’s the procedure.
To edit in storyboard style in the Project panel:1. If you’re not already in Icon view, click
the Icon View button A.
2. To the right of the Icon View button,
click the Sort Icons button B and
choose User Order C. If any other sort
order is selected, you won’t be able to
drag the clips around.
3. Drag the clips into the desired order.
For example, I want the clip Andropov
Plaque on Lubyanka Prison to appear
before the prison clip D.
continues on next page
A Make sure that you’re in Icon view.
B Click the Sort Icons button.
C Choose User Order. Otherwise, you won’t be
able to sort the clips.
D Drag the clips into the desired order.
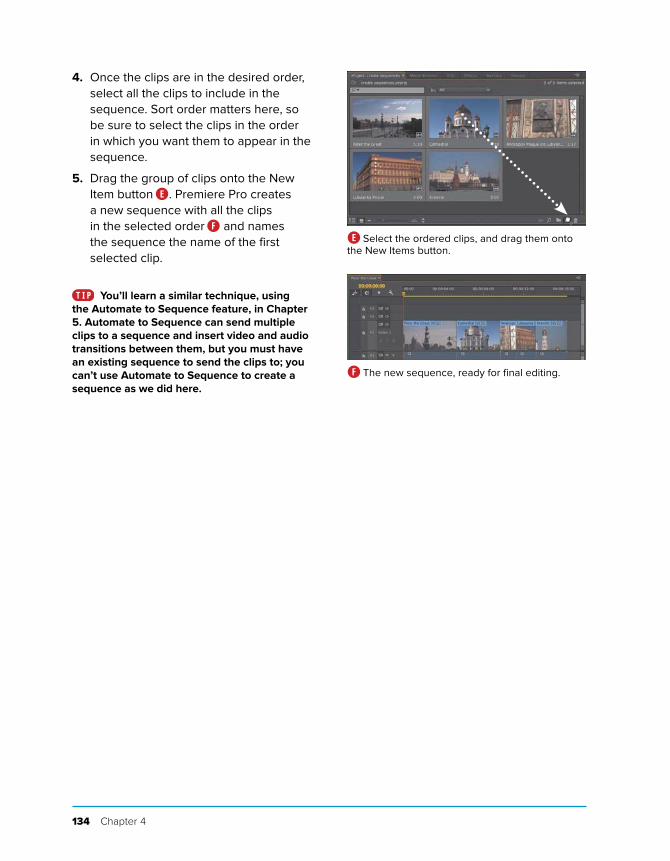
134 Chapter 4
4. Once the clips are in the desired order,
select all the clips to include in the
sequence. Sort order matters here, so
be sure to select the clips in the order
in which you want them to appear in the
sequence.
5. Drag the group of clips onto the New
Item button E. Premiere Pro creates
a new sequence with all the clips
in the selected order F and names
the sequence the name of the first
selected clip.
You’ll learn a similar technique, using
the Automate to Sequence feature, in Chapter
5. Automate to Sequence can send multiple
clips to a sequence and insert video and audio
transitions between them, but you must have
an existing sequence to send the clips to; you
can’t use Automate to Sequence to create a
sequence as we did here.
E Select the ordered clips, and drag them onto
the New Items button.
F The new sequence, ready for final editing.
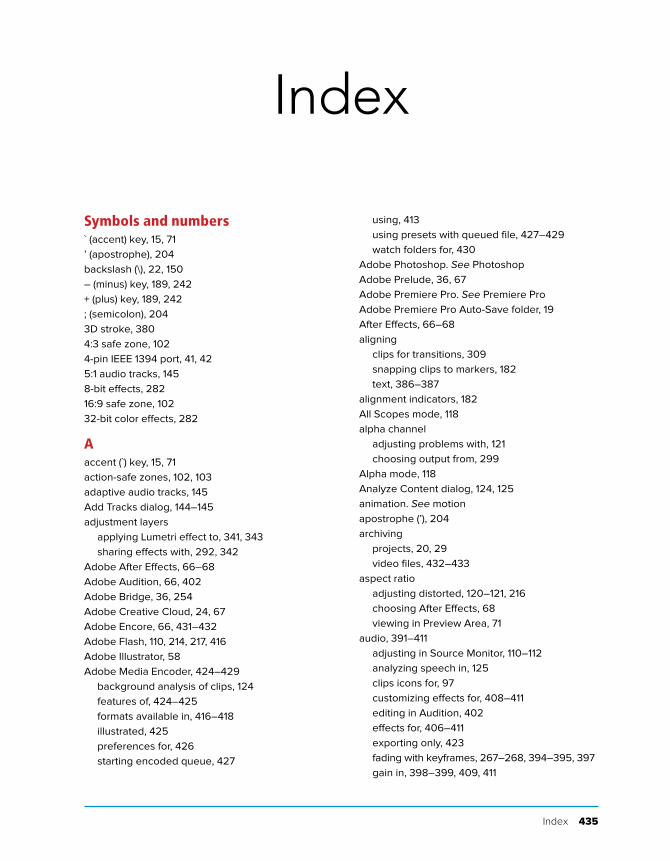
Index 435
Index
Symbols and numbers` (accent) key, 15, 71
’ (apostrophe), 204
backslash (\), 22, 150
– (minus) key, 189, 242
+ (plus) key, 189, 242
; (semicolon), 204
3D stroke, 380
4:3 safe zone, 102
4-pin IEEE 1394 port, 41, 42
5:1 audio tracks, 145
8-bit effects, 282
16:9 safe zone, 102
32-bit color effects, 282
Aaccent (`) key, 15, 71
action-safe zones, 102, 103
adaptive audio tracks, 145
Add Tracks dialog, 144–145
adjustment layers
applying Lumetri effect to, 341, 343
sharing effects with, 292, 342
Adobe After Effects, 66–68
Adobe Audition, 66, 402
Adobe Bridge, 36, 254
Adobe Creative Cloud, 24, 67
Adobe Encore, 66, 431–432
Adobe Flash, 110, 214, 217, 416
Adobe Illustrator, 58
Adobe Media Encoder, 424–429
background analysis of clips, 124
features of, 424–425
formats available in, 416–418
illustrated, 425
preferences for, 426
starting encoded queue, 427
using, 413
using presets with queued file, 427–429
watch folders for, 430
Adobe Photoshop. See Photoshop
Adobe Prelude, 36, 67
Adobe Premiere Pro. See Premiere Pro
Adobe Premiere Pro Auto-Save folder, 19
After Effects, 66–68
aligning
clips for transitions, 309
snapping clips to markers, 182
text, 386–387
alignment indicators, 182
All Scopes mode, 118
alpha channel
adjusting problems with, 121
choosing output from, 299
Alpha mode, 118
Analyze Content dialog, 124, 125
animation. See motion
apostrophe (’), 204
archiving
projects, 20, 29
video files, 432–433
aspect ratio
adjusting distorted, 120–121, 216
choosing After Effects, 68
viewing in Preview Area, 71
audio, 391–411
adjusting in Source Monitor, 110–112
analyzing speech in, 125
clips icons for, 97
customizing effects for, 408–411
editing in Audition, 402
effects for, 406–411
exporting only, 423
fading with keyframes, 267–268, 394–395, 397
gain in, 398–399, 409, 411
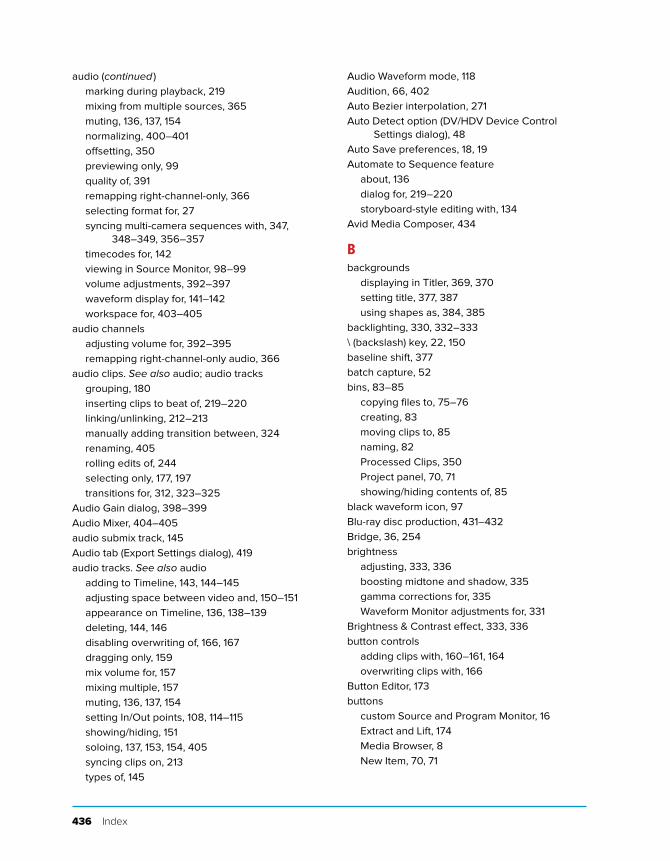
436 Index
audio (continued )
marking during playback, 219
mixing from multiple sources, 365
muting, 136, 137, 154
normalizing, 400–401
offsetting, 350
previewing only, 99
quality of, 391
remapping right-channel-only, 366
selecting format for, 27
syncing multi-camera sequences with, 347,
348–349, 356–357
timecodes for, 142
viewing in Source Monitor, 98–99
volume adjustments, 392–397
waveform display for, 141–142
workspace for, 403–405
audio channels
adjusting volume for, 392–395
remapping right-channel-only audio, 366
audio clips. See also audio; audio tracks
grouping, 180
inserting clips to beat of, 219–220
linking/unlinking, 212–213
manually adding transition between, 324
renaming, 405
rolling edits of, 244
selecting only, 177, 197
transitions for, 312, 323–325
Audio Gain dialog, 398–399
Audio Mixer, 404–405
audio submix track, 145
Audio tab (Export Settings dialog), 419
audio tracks. See also audio
adding to Timeline, 143, 144–145
adjusting space between video and, 150–151
appearance on Timeline, 136, 138–139
deleting, 144, 146
disabling overwriting of, 166, 167
dragging only, 159
mix volume for, 157
mixing multiple, 157
muting, 136, 137, 154
setting In/Out points, 108, 114–115
showing/hiding, 151
soloing, 137, 153, 154, 405
syncing clips on, 213
types of, 145
Audio Waveform mode, 118
Audition, 66, 402
Auto Bezier interpolation, 271
Auto Detect option (DV/HDV Device Control
Settings dialog), 48
Auto Save preferences, 18, 19
Automate to Sequence feature
about, 136
dialog for, 219–220
storyboard-style editing with, 134
Avid Media Composer, 434
Bbackgrounds
displaying in Titler, 369, 370
setting title, 377, 387
using shapes as, 384, 385
backlighting, 330, 332–333
\ (backslash) key, 22, 150
baseline shift, 377
batch capture, 52
bins, 83–85
copying files to, 75–76
creating, 83
moving clips to, 85
naming, 82
Processed Clips, 350
Project panel, 70, 71
showing/hiding contents of, 85
black waveform icon, 97
Blu-ray disc production, 431–432
Bridge, 36, 254
brightness
adjusting, 333, 336
boosting midtone and shadow, 335
gamma corrections for, 335
Waveform Monitor adjustments for, 331
Brightness & Contrast effect, 333, 336
button controls
adding clips with, 160–161, 164
overwriting clips with, 166
Button Editor, 173
buttons
custom Source and Program Monitor, 16
Extract and Lift, 174
Media Browser, 8
New Item, 70, 71
Index 437
Ccameras. See also HDV/DV camcorders; multi-
camera editing
compatible formats for, 36
editing angles of multiple, 363–364
troubleshooting media transfers from, 48
workflow guides for, 37
Captions tab (Export Settings dialog), 419
Capture panel
device control settings on, 46–48
importing media with, 36
playback controls for, 49
capturing media
audio and video capture, 51–52
batch capture, 52
from camcorders, 45–48
ingesting vs., 8
setting format for, 27
centering text, 386–387
.cfa files, 20
channels
alpha, 121, 299
audio, 366, 393–395
chapter markers, 113, 216
chapter points, 251
chromakeying, 297–303
adding to composite video, 302–303
applying Ultra Key effect, 298
cleaning up, 299–301
defined, 297
garbage mattes for, 304–306
removing color, 299
requirements for, 297
cleaning up color key, 299–301
Clip Fx Editor, 408–411
clip markers, 346
Clip Mismatch Warning dialog, 129
Clip Speed/Duration dialog, 245–246
clipboard, 204
clips, 69–136. See also linked clips; multiple clips;
trimming
adding with insert edits, 162–164
applying effects to, 283
button controls for inserting, 160–161, 164
changing speed of, 245–247
choosing multiple, 178
copying/pasting, 75–76, 195–196
copying to clipboard, 204
creating subclips, 116–117
cuts between, 308
deleting, 76, 77, 198–199
deselecting, 74, 176
detail shown for, 105, 106, 109
display modes for, 118–119
dragging/dropping, 158–159, 183–187
fading in, 267–268
filling gaps between, 168, 170–171
forcing ending of, 168, 169
grouping/ungrouping, 180–181
hover scrub for viewing, 97
In/Out, 232
In/Out points added to, 95–96, 108, 114–115
including in sequence to beat, 219–220
ingesting file-based, 37–40
inserting without shifting other clips, 156
keyboard and keypad adjustments for, 188–189
locating faces in, 123–125
locating with Find box, 70, 78–80, 123
locating with timecode, 160
managing interlaced, 107
marking during playback, 219
match frame for, 253
metadata for, 77, 123
mismatched, 129
modifying frame rates, 120–121
moving to bin, 83, 85, 350
nested, 248–252
normalizing audio for, 400–401
opacity of, 262, 264
placing markers in, 108, 112–114, 214–220
playing, 172–173
previewing, 95
relocating on new track, 190–191
removing effects from, 286–287
renaming, 75
replacing on Timeline, 205–207
revealing in project, 253
reversing, 246
rotating, 262, 263
scaling and reframing HD, 256–259
selecting, 74
snapping, 182
Source Monitor viewing of, 98–99
splitting, 208
438 Index
clips (continued )
syncing, 213
syncing multi-camera, 346–347
transitions between, 313
undoing pasting of, 294
video thumbnails of, 140–141
workflow for adding, 5
zooming vertically into, 110, 112
closed-caption workflow, 419
closing. See opening/closing
color. See also color correction
adjusting title, 378–379
choosing web, 318
cleaning up color key, 299–301
keying out, 297, 299
32-bit color effects, 282
trim box, 225
when to adjust, 327
color correction. See also brightness; Waveform
Monitor
choosing RGB Parade mode, 337–338
correcting backlighting, 330, 332–333
defined, 337
effects for, 330
Fast Color Corrector for, 337, 338–340
helpful scopes for, 337–338
interpreting waveform monitor, 332–333
Shadow/Highlight exposure adjustments,
333–334
viewing tonal ranges, 329–330
workspace for, 328–330
color correction widget, 339
Color Correction workspace
features of, 328–329
illustrated, 328
viewing tonal ranges, 329–330
Color Picker, 318, 379
columns
adjusting width of, 89
choosing in List view, 89–90
reordering, 92
sorting, 91
comments
adding, 215
marker, 113
composite video
choosing output for, 300
defined, 297
keying, 302–303
Composite Video mode, 118
computers. See also Mac computers; Windows
computers
capturing HDV video from camcorders, 45–48
connecting camcorders to, 41–44
finding source footage on hard drive, 254
graphics cards supported, 28
importing media from, 35, 60–61
performance with GPU acceleration, 27, 28, 420
playback resolution settings for, 106
selecting CPU, 28
separate drives for video projects, 28
syncing interface settings for, 24
troubleshooting camcorder transfers, 48
content. See media
contrast
adjusting, 333, 336
Waveform Monitor adjustments for, 331
Control panel, 51–52
copying/pasting
clips, 75–76, 194–196
effects, 293–294
effects between clips, 290–294
keyframes, 276
snippets to clipboard, 204
crawling titles, 389–390
Create Multi-Camera Source Sequence dialog,
346, 350
Creative Cloud, 24, 67
Cross Dissolve transition, 320, 321
Cube Spin transitions, 311
cue points, 110, 214, 217
customizing
audio effects, 408–411
audio waveform display, 141–142
effects, 284
Icon view, 93–94
keyboard shortcuts, 23
sequence presets, 130–132
Timeline, 136–142
transitions, 317–319
workspace, 13–16
cuts, 308
cutting/pasting clips, 76
Index 439
Ddefault poster frame, 95
default titles, 368, 372
default transitions
adding to multiple clips, 326
duration of, 308
setting, 312
shortcuts for inserting, 322
default workspaces, 12
deleting. See also ripple delete function
audio and video tracks, 144, 146
clips, 76, 77, 198–199
keyframes, 275
master clips, 117
project files, 20
transitions, 314
workspaces, 10
Depth stroke option, 380
deselecting
clips, 74, 176
Sync Lock, 198, 199
device control
batch capture using, 52
capturing audio and video with, 51–52
setting HDV/DV camcorder, 46–48
distorting text, 378
distributing text, 387
drag and drop
clips to Timeline, 158–159, 162–164, 183–187,
196–197
creating tracks with, 143
duplicating clips with, 196–197
effects on Timeline, 283
importing files with, 61
importing media with, 36
markers, 114
moving clips into bin, 85
placing clips on compatible tracks with, 190–191
reordering column order with, 92
replacing transitions with, 315
Timeline zoom bar, 149, 150
Drop Face stroke option, 380
drop-frame timecode, 147–148
drop shadows, 381
drop zones, 12
Dropped Frame indicator, 104–105, 173, 296
duplicating
clips, 162–164, 196–197
titles, 197
duration
adjusting clip, 247
transition, 17–18, 308, 312, 315–316
DV camcorders. See HDV/DV camcorders
DVD disc production, 431–432
DVD-to-web conversions, 36
Dynamic Link, 36, 66
EEdge stroke option, 380
edit points, 240
Edit Subclips dialog, 117
editing, 175–220. See also copying/pasting; drag
and drop; multi-camera editing
Adobe Media Encoder presets, 428
audio in Audition, 402
automating with markers, 218–220
clips by dragging on Timeline, 183–187
content with overwrite edits, 165–167
cut, copy, paste, and paste insert for, 194
four-point, 168, 170–171
making insert edits, 162–164
non-destructive, 4, 96
path text, 376
scaling HD clips for, 257–259
selecting clips for, 176–179
shapes, 384
storyboard, 133–134
text, 374
text properties, 377–381
three-point, 168–169
titles without overwriting, 197
using target output resolution, 262
Editing workspace, 403
edits. See also editing; trimming
auto saving, 18, 19
available in Program Monitor, 232
extract, 184, 185, 203–204
extract/insert, 187
extract/overwrite, 185
lift, 203–204
lift/overwrite, 183–185
Match Frame, 205–207
overwrite, 165–167
440 Index
edits (continued )
rearrange, 184, 187
recording multi-camera, 355, 363–364
rolling, 222, 227–228, 231
slide, 222, 230–231
slip, 222, 228–230
types available in Trim mode, 234
Effect Controls panel
adding keyframes, 273
adding motion to video, 270
adjusting clip opacity, 262, 264
advantages of, 283
animating keyframes with effects, 288–289
cleaning up color key, 299–301
customizing audio effects, 408–411
displaying in Color Correction workspace, 328
illustrated, 280
opening, 256
playing transition in, 317
Position controls on, 259
removing effects, 286–287
reordering effects, 285
resetting, 284
rotation adjustments from, 262, 263
Scale controls on, 261
Timeline features for, 269
volume adjustments in, 392–397
workflow using, 6
effects, 279–306. See also Effect Controls panel;
keying; transitions
adding to single clips, 283
adjusting on Timeline, 265
animating keyframes with, 288–289
applying transitions, 308–311
audio, 406–411
Brightness & Contrast, 333, 336
color correction, 330
copying/ pasting, 290, 291, 293–294
customizing, 284
EQ, 406–407, 408–411
Fast Color Corrector, 337, 338–340
found in Motion controls, 256
Gamma Correction, 325, 335
Luma Corrector, 330
presets for, 292, 294–295
previewing, 296
rendering and order of, 285
searching for, 281
Shadow/Highlight, 330, 333–334
toggling on/off, 284, 285
types of, 282
Ultra Key, 284, 298–303
using for multiple clips, 283, 290–296
workflow for, 283–287
Effects panel
about, 3
applying effects on Timeline from, 283
applying Ultra Key effect, 298
illustrated, 280
replacing transitions, 315
searching for effects in, 281
selecting transitions from, 308
using audio effects, 406–411
working with clips on, 6
Effects workspace, 280–281
8-bit effects, 282
enabling/disabling
audio time units, 111
audio waveform display, 141–142
Dropped Frame indicator, 104–105
effects, 284, 285
hover scrub, 40, 94
multi-camera nested sequence, 361
ripple delete function, 198, 199
safe zones, 101
Scale to Frame Size, 258, 259
scene detection, 51
snapping, 224
source track indicator, 160
Through Edit indicator, 211
Track Lock and Sync Lock, 137, 155, 156, 163
track targeting, 192–193, 195
video thumbnails, 139–140
video tracks, 154
encoding files. See Adobe Media Encoder
Encoding window (Adobe Media Encoder), 425
Encore, 66, 431–432
EQ effect, 406–407, 408–411
expanding/minimizing tracks, 138–139
Export Frame dialog, 414
Export Preset dialog, 429
Export Settings dialog
about, 416
configuration options of, 420
Index 441
formats and presets for, 416–418
illustrated, 7, 415
Match Source button of, 433
opening, 415
tabs of, 416, 418–419
exporting, 414–423. See also Export Settings dialog
Adobe Media Encoder presets, 429
content to Final Cut Pro or Avid Media
Composer, 434
custom presets for, 422
files for YouTube, 421, 434
formats and presets for, 416–418
only audio, 423
partial file or sequence, 422–423
single frames, 414
exposure
adjusting with Shadow/Highlight effect, 333–334
correcting, 330
when to adjust, 327
Extract button, 174
extract edit
lift vs., 185
performing, 203–204
using, 184
extract/insert edit, 183, 187
extract/overwrite edit, 185–186
Ffade in/out transitions, 310, 320–321
fade-ins
adjusting opacity of video, 267–268
audio, 267–268, 394–395, 397
Fast Color Corrector, 337, 338–340
field order adjustments, 121
file formats
available for exported frame, 414
compatible camera, 36
output target, 416–418
selecting audio, 27
files. See also managing files
about project, 25
archiving video, 432–433
.cfa, 20
changing location of media cache, 20, 21
compatible camera, 36
deleting project, 20
drag and drop to import, 61
dynamically linked, 66–68
encoding media, 424–429
exporting partial, 422–423
finding project, 254
importing Photoshop, 53–59
making audio-only export, 423
managing media, 20
media cache database, 20, 21
missing, 32–34
offline, 32, 34
Photoshop, 58–59
preview, 20
PSD, 53–59
recovering project, 19
relinking available, 32, 33
reverting to saved project, 29
selecting location for project, 27
storage of metadata in, 122
viewing in Media Browser, 37
working with audio, 110–112
YouTube, 421, 434
Filters tab (Export Settings dialog), 418
Final Cut Pro, 9, 22, 434
Find box
locating clips with, 70, 78–80, 123
using Find dialog vs., 82
using previous searches, 80
Find dialog, 70, 81–82
finding
audio effects, 406–407
camcorder safe zones, 101
clips, 70, 78–82
content and project elements, 253–254
effects, 281
faces in clips, 123–125
metatdata, 123
speech, 125
timecode, 50
Timeline gaps, 200
Fit Clip dialog, 171
5:1 audio tracks, 145
Flash cue point, 110, 214, 217
FlashPlayer, 416
flattening Photoshop files, 53
folders
Adobe Premiere Pro Auto-Save, 19
appearance in Media Browser, 37
442 Index
folders (continued )
organizing project files in, 28
storing imported files in, 61
watch, 430
fonts, 375, 376, 377
formatting text, 374
four-point editing, 168, 170–171
4-pin IEEE 1394 port, 41, 42
frame blending, 420, 421
frame rates, 120
frames
adjusting frame rates, 120
blending, 420, 421
changing title, 370
choosing different panel in, 13
defined, 11
drop zones within, 12
dropped, 104–105, 173, 296
exporting, 414
importing selected, 50
interpolated, 269, 271–272
maximizing, 15
opening panel in, 13
preview resolution of, 104–106
reframing via position controls, 259–260
selecting default poster, 95
transitions between, 309
FTP tab (Export Settings dialog), 419
Ggain, 398–399, 409, 411
Gamma Correction effect, 325, 335
gaps
closing with Extract, 174
filling with lift/insert edits, 186
finding Timeline, 200
fitting clips to, 168, 170–171
lift/extract edit effect on, 203
lift/overwrite edits to fill, 183–185
ripple delete to close, 201, 202
time remapping effect on, 278
when deleting clips, 198
garbage mattes, 304–306
Gaussian Blur effect, 283–285
Gaussian Blur filter, 418
General preferences
adjusting still-image options in, 55
designating bin settings, 86–88
setting, 17–18
GPU-accelerated effects, 282
GPU acceleration, 27, 28, 420
grab area, 12
graphics cards, 28
graphics in titles, 388
greenscreening. See keying
grouping/ungrouping clips, 180–181
HHDV/DV camcorders
batch capture from, 52
capturing HDV video from, 45–48
connecting to computer, 41–44
finding safe zones of, 101
safe zones for, 103
troubleshooting connections with, 44
height
text, 378
track, 138–139
hidden panels, 12, 13
hidden text, 375, 389
hiding. See showing/hiding
History panel, illustrated, 8
hold interpolation, 272
horizontal text, 374
hot keys. See keyboard shortcuts
hover scrub
defined, 39
enabling/disabling, 40, 94
viewing clips with, 95
IIcon view, 93–97
changing default frame for, 95
customizing, 93–94
marking In/Out points, 95–96
previewing clips in, 95
icons
adjusting size of, 8
orange, 97
sorting, 94
trim head, 113
types of clip, 97
IEEE 1394 ports, 41–44
Illustrator, 58
Index 443
Import command, 36
Import dialog, adding files with, 60–61, 62
Import Premiere Pro Sequence dialog, 64
Import Preset dialog, 429
importing, 35–68
about, 35
Adobe Media Encoder presets, 429
files with Import dialog, 60–61, 62
Illustrator images, 58
ingesting file-based clips, 37–40
media with Dynamic Link, 36, 66
options for, 36
Photoshop files, 53–59
previewing imported sequences, 64
project workspaces, 10
reusing project content, 62–64
selecting frames for, 50
sequences into Encore, 432
stored on hard disk, 60–61
from tape-based devices, 41–48
unrendered sequences in Adobe programs,
66–68
using Media Browser, 36, 63–64
using multiple content types, 66–68
workflow and, 4
In/Out clips, 232
In/Out points
controls for marking, 100, 101
setting, 95–96, 108, 114–115
syncing multi-camera clips using, 346,
352–353, 359–361
using in three- and four-point edits, 168–171
Info panel, 8
ingesting content
capturing media vs., 8
file-based clips, 37–40
workflow for, 4
insert edits
about, 162
button controls for, 160–161, 164
extract and, 187
making, 163–164
overwrite edits vs., 165
insert point, 163
insert target tracks pointer, 163
interactive markers, 214
interlaced footage
controlling, 107
Program Monitor options for, 173
interpolated frames, 269, 271–272
Jjump-cut transitions, 311
Kkerning text, 377
keyboard. See also keyboard shortcuts; numeric
keypad
choosing shortcut layout, 22
moving clips from, 188–189
trimming from extended, 242
Keyboard Shortcut window, 22
keyboard shortcuts
adding transitions with, 314, 322
adjusting audio tracks with, 139
audio transitions using, 325
choosing layout for, 22
customizing, 23
marker-related, 113, 218
panel switching using, 8
previewing clips with, 95
Replace With Clip using, 207
resizing Project panel with, 71
Source Monitor playback, 100, 101
specifying timecode location for clips with, 160
switching workspaces with, 10
Timeline zoom tool, 149–150
trimming with, 241–242, 243
keyframes
adding motion with, 270, 288–289
applying effects without, 290
audio adjustments using, 267–268, 394–395,
397, 409–410
copying/pasting, 276
deleting, 275
interpolation techniques for, 271–272
moving, 274
placing effects between, 290–294
resetting and removing, 287
selecting, 274
showing on Timeline, 265
time remapping using, 245, 277–278
using, 255, 267, 273
444 Index
keying, 297–303
adding to composite video, 302–303
applying Ultra Key effect, 298
cleaning up, 299–301
defined, 297
garbage mattes for, 304–306
removing color, 299
requirements for, 297
Llayers
importing files with, 53–57
using effects with adjustment, 292, 341, 342, 343
leading of text, 377
letterboxes, 129
Lift button, 174
lift edits
extract vs., 185
performing, 203–204
targeting tracks for, 192
lift/insert edits, 186
lift/overwrite edits, 183–185
linear interpolation, 271
Link Media dialog, 31–34
linked clips
about, 176
creating, 212–213
grouping, 180
relinking missing files, 32, 33
selecting video or audio only, 197
syncing, 213
List view
changing to Thumbnail view, 8
choosing media in, 89–92
entering, 89
locking
preventing split tracks with, 210
Sync Lock, 136, 137, 155, 156, 163
targeting tracks vs., 193
track, 136, 137, 155, 156
logos in titles, 388
looping playback during trim, 243
Low Memory warning, 21
Luma Corrector effect, 330
Lumetri effects, 341–343
MMac computers
IEEE 1394 cable connectors for, 41, 42
revealing clips and files in, 254
verifying camcorder connections for, 43, 44
Make Subclip dialog, 116
managing files
importance of, 35, 69
organizing content in bins, 83–85
types of project files, 20
using Project panel, 70–71
working with imported files, 61
manual adjustments
adding audio transitions, 324
making transitions with, 313
repositioning frames with, 260
scaling frame with, 262
Marker dialog, 215–217
markers, 214–220
adding from Marker dialog, 215–217
aligning clips with, 182
annotating, 113
automated editing using, 218–220
chapter, 113, 216
clearing In/Out, 296
clip, 346
inserting in Source Monitor, 108, 112–114
Markers panel for adding, 217–218
moving, 114
naming, 113
placing in clips, 108, 112–114, 214–220
shortcuts for, 218
syncing multi-camera clips using, 346,
352–353, 359–361
types of, 214
Markers panel, 214, 217–218
master audio track, 145
master clips, 117
match frames
finding, 253
making Match Frame edits, 205–207
Match Sequence Settings option (Adobe Media
Encoder), 432–433
Match Source button (Export Settings dialog), 433
Index 445
mattes
cleaning up, 301
garbage, 304–306
selecting color for, 319
media. See also importing; ingesting content;
managing files
applying style to content, 383
choosing in List view, 89–90
files for original, 20
generating in Premiere Pro, 65
importing, 36, 63–64
ingesting content, 4, 8, 37–40
managing, 20, 61
preferences for, 20–21
Media Browser
about, 4
buttons and controls for, 8
controls in, 38
importing layered Photoshop files, 56–57
importing media with, 36, 63–64
ingesting file-based clips, 37–40
locating missing files with, 33
media cache database, 20
media cache files, 20, 21
Media Encoder. See Adobe Media Encoder
memory allocation, 21
menu commands
importing media with, 36
splitting clips with, 211
undocking frames and panels with, 15
menus. See also menu commands; panel menus
keyboard shortcuts on, 22
Mercury Playback Engine, 27, 28
metadata
about, 70, 71
adding to exported files, 415, 416
defined, 77
entering, 122–123
searching for, 82
Metadata Display dialog, 89–90
Metadata panel, 122, 123
metalogging, 123
midtones, 335
minus (–) key, 189, 242
missing files
locating and relinking, 32, 33
treating as offline, 32, 34
Modify Clip dialog, 366
mono audio tracks, 145
motion
adding to video, 270
animating keyframes with effects, 288–289
Motion controls
reframing via position controls, 259
scaling and reframing HD clips, 256–259
types of, 257
viewing, 256
moving
clips to bin, 85, 350
between edit points, 240
In/Out points, 113
keyframes, 274
markers, 114
playhead, 152
text, 374
text styles, 382
viewing window, 152
multi-camera editing, 345–366
about, 345
accessing sequence in Timeline, 354–357
advanced options for, 350
mixing audio from multiple sources, 365
nested sequence method, 358–361
opening Multi-Camera Monitor, 362
recording, 355, 363–364
refining, 364
synchronization accuracy in, 347
syncing clips, 346–347
timecodes for syncing, 346, 349, 351–352
using audio to sync, 347, 348–349
Multi-Camera Monitor, 345, 362
Multi-Track Select tool, 179
multiple clips. See also sequences
adding audio transitions to, 326
applying effects to, 283, 290–296
deleting, 198
grouping/ungrouping, 180–181
removing effects from, 287
selecting, 178
sharing effects with adjustment layers, 292
splitting, 210
unlinking, 212–213
446 Index
multiple tracks. See also track targeting
extract editing for, 205
how Premiere Pro handles, 157
selecting, 129
working with, 144, 146
Multiplexer tab (Export Settings dialog), 419
muting audio, 136, 137, 154, 405
Nnaming
audio tracks, 405
bins, 84
clips, 75
markers, 113
nested sequences, 361
projects, 29
sequences, 127
title templates, 371, 372
navigating
audio time units, 111
Timeline, 149–152
within Project panel, 73
nested sequences, 248–252
creating on Timeline, 250
nesting synchronized sequences, 361
placing within nested sequence, 251
syncing multi-camera clips via, 358–361
using, 248–249
New After Effects Comp dialog, 67–68
New Item button, 70, 71
New Project window, 26–28
New Sequence dialog, 128, 130–132
New Title dialog, 369
noise, 418
non drop-frame timecode, 147–148
non-scan mode, 50
normalizing audio, 400–401
notebook computers, 42, 106
numeric keypad
moving clips with, 189
trimming from extended, 242
Ooffline files
placeholders for, 32
working with, 34
offsetting audio, 350
online video platform (OVP) uploads, 434
opacity
adjusting on Timeline, 266
changing for Cross Dissolve transition, 321
Effect Controls panel adjustments for, 262, 264
working with fade-in, 267–268
Open Project dialog, 30
opening/closing
Effect Controls panel, 256
Export Settings dialog, 415
Motion controls without Timeline, 256
Multi-Camera Monitor, 362
multi-camera sequence in Timeline, 354–355
panel menus, 15
panels, 3, 13, 14
Preferences panel, 17
Preview Area, 72
projects, 30
sequence with icon, 97
Titler, 368, 369
orange icons, 97
Out points. See In/Out points
output targets
choosing composite video, 300
choosing sequence presets for, 126
editing in resolution of, 262
publishing formats for, 416–418
selecting for archival files, 432–433
UGC and OVP content, 434
overwrite edits
filling gaps with lift and, 183–185
insert edits vs., 165
making, 165–167
using extract with, 185–186
overwrite pointer, 165, 197
OVP (online video platform) uploads, 434
Ppanel menus
opening, 15
Project, 70, 71
removing transport controls in, 16
Timeline, 137
Titler, 370
panel tabs, 12
panels
about, 11, 12
Index 447
accessing hidden, 12, 13
choosing different, 13
closing project, 29
drop zones for frames, 12
illustrated, 2
Info and Properties, 8
main workspace, 2–3, 11, 12
maximizing, 40
Media Browser, 4
opening, 3, 13, 14
reopening, 3
resizing, 14
switching between, 8
Tools, 7
panner effects, 287
panning audio, 405
paragraph text, 373
Paste Attributes dialog, 291, 293–294
Paste Insert edits, 194, 196
path text, 373, 376
paused resolution, 106
performance with GPU acceleration, 27, 28, 420
Photoshop, 53–59
creating Photoshop file in Premiere Pro, 58–59
importing layered files from, 53–57
pixel aspect ratio
adjusting distorted, 120–121, 216
choosing After Effects, 68
viewing in Preview Area, 71
pixels, brightness of, 332
playback
adding markers to clips in, 219
controlling preroll and postroll time, 240
looping during trim, 243
setting resolution of, 104–106
trimming while previewing, 240
playback controls
Capture panel, 49
Program Monitor, 172–173
Source Monitor, 100–101
playhead
illustrated, 100, 136
moving, 152
recording multi-camera edits from, 363–364
snapping to edit points on added content, 163
trimming frame under, 224
zooming on Timeline with, 150
plus (+) key, 189, 242
point text, 373
pointers. See also trimming
insert target tracks, 163
normal trim and ripple edit, 235
overwrite, 165
regular trim, 222–223
ripple trim, 225
rolling edit, 227
trimming clips with, 238–240
positioning composited video, 302–303
poster frame, 95
preferences, 17–21
Adobe Media Encoder, 426
applied to future edits, 17
Auto Save, 18, 19
choosing Media, 20–21
designating bin settings, 86–88
durations of transitions, 17–18
General, 17–18, 55, 86–88
opening Preferences panel, 17
selecting startup options, 17
still-image, 55
syncing settings, 24
working with Memory, 21
Preferences panel, 17
Prelude, 36, 67
Premiere Pro
about, 1
After Effects media in, 66–68
audio track types in, 145
camera formats compatible with, 36
exporting frames from, 414
generating media within, 65
Illustrator files with, 58
interface for, 2–3
memory allocation for, 21
Mercury Playback Engine in, 28
non-destructive editing in, 4, 96
Photoshop files with, 53–59
setting preferences for, 17–21
startup options for, 17
transport modes for, 50
using Adobe Media Encoder with, 413
workflow in, 4–8
Preset Browser (Adobe Media Encoder), 425,
427–428
448 Index
Preset Settings dialog, 428
presets
adding to queued media files, 427
audio channel, 350
choosing sequence, 126, 128–129
custom export, 422
editing Adobe Media Encoder, 428
effect, 292, 294–295
importing/exporting, 429
including in watch folder, 430
keyboard shortcuts, 22–23
preview files, 20
previewing
clips in Icon view, 95
defined, 28
effects, 296
file info on Project panel, 72
files during export, 420
four-point edits, 171
frames at lower resolution, 104–106
imported sequences, 64
media in Source Monitor, 39
trimming while, 240, 243
Processed Clips bin, 350
Program Monitor
about, 2
accessing Trim mode in, 232–240
choosing display modes for, 118–119
customizing buttons in, 16
disabling video tracks on, 154
dragging clip from Source Monitor to, 161
Dropped Frame indicator, 104–105, 173, 296
edits available in, 232
exporting frames from, 414
finding specific time on, 50
illustrated, 2
Lift and Extract buttons, 174
playback controls for, 172
playing clips in, 172–173
Tonal Range mode for, 328, 329
Trim mode controls for, 233
view when dragging content on, 185
Project panel
about, 3
buttons and controls for, 8
drag and drop files to, 61
exporting sequences from, 415
features of, 70–71
finding clips from, 70, 78–82
Icon view for, 93–97
illustrated, 71
managing clips in, 74–77
metadata displayed in, 123
multi-camera workflow in, 347, 348–353
navigating within, 73
opening/closing Preview Area, 72
organizing bins, 83–85
replacing footage in, 207
selecting media in List view, 89–92
setting bin preferences, 86–88
storyboard editing in, 133–134
using previous searches in, 80
viewing content in, 5, 95
projects. See also importing; managing files
archiving, 20, 29
auto saving and recovering, 19
choosing sequence presets for size of, 126
creating, 26–28
editing in output resolution of, 262
files for, 25
importing encoded footage back into, 420
importing workspace from other, 10
missing and offline files, 31–32
opening, 30
rendering, 7
reusing content from past, 62–64
revealing elements in, 254
reverting to last saved, 29
saving, 29
undoing edits to, 12
Properties panel, 8, 377
PSD files, 53–59
publishing videos, 413–434
about, 413
encoding video files, 424–429
exporting media from Premiere Pro, 415–423
formats for output, 416–418
selecting single frames for export, 414
uploading to YouTube, 421, 434
workflows for, 431–434
QQueue window (Adobe Media Encoder), 425
Index 449
Rrasterization, 58
Rate Stretch tool, 245, 246–247
Razor tool, 208–210
rearrange edits, 184, 187
recording multi-camera edits, 355, 363–364
recovering crashed projects, 19
rectified waveforms, 141–142
Reference Monitor
color correction using, 329
illustrated, 328
reframing clips, 259–260
regular trims, 222–224
relinking files, 32, 33
remapping
clip speed, 245, 277–278
right-channel-only audio, 366
Remove Effects dialog, 287
removing
clip effects, 286–287
keyframes, 287
time remapping, 287
transport controls in panel menus, 16
renaming
audio tracks, 405
bins, 84
clips, 75
nested sequences, 361
projects, 29
sequences, 127
rendering
Low Memory warning during, 21
options for exported files, 420, 421, 422
order of effects and, 285
overview of, 7
reordering
columns, 92
effects, 285
replacing
clips on Timeline, 205–207
footage in Project panel, 207
transitions, 315
resetting
buttons, 16
Effect Controls panel, 284
keyframes, 287
workspace, 9
resizing
panels, 14
Project panel, 71
text, 374, 375
resolution
configuring Program Monitor, 173
editing in project, 262
imported Photoshop content, 55
paused, 106
scaling HD clips for editing, 257–259
setting Source Monitor playback, 104–106
reversing clips, 246
reverting to last saved file, 29
RGB Parade mode, 119, 337–338
ripple delete function
about, 198
disabling, 199
removing Timeline gaps with, 201, 202
when available, 202
ripple trimming
about, 222, 225
box color when, 225
refining multi-camera edits with, 364
using, 225–226, 239
using Ripple Edit mode, 236
Roll/Crawl button (Titler), 369, 370
rolling edits
making, 227–228
producing split edits, 244
slide edits vs., 231
trimming in Rolling Edit mode, 237
using, 222, 227
rolling titles, 389–390
rotating
clips, 262, 263
composited video, 302–303
text, 376
Ssafe margins
for Program Monitor, 173
title options for, 370
wrapping text within, 374
safe zones
about, 102–103
enabling/disabling, 101
saturation, 340
450 Index
Save Preset dialog, 295
Save Project dialog, 29
saving
After Effects compositions, 68
custom workspace, 10
export presets, 422
new Photoshop files, 58–59
presets, 295
projects, 29
sequence presets, 132
text styles, 382
titles as template, 368, 372
Scale controls, 261
Scale to Frame Size, 258, 259
scaling
composite video, 303
HD clips for editing, 256–259
keyframe attributes, 291
methods for adjusting, 261–262
scan mode, 50
scene detection, 51
Scratch Disks tab, 27
scrolling
adjusting Source Monitor detail by, 104, 108, 109
Project panel content, 73
searching. See finding
selecting
audio format, 27
computer CPU, 28
default poster frame, 95
frames for importing, 50
keyframes, 274
location for project files, 27
matte color, 319
media in List view, 89–92
multiple tracks, 129
output target for archival files, 432–433
single frames for export, 414
text, 374
transitions from Effects panel, 308
selecting clips
for editing, 176–179
from group, 181
multiple clips, 178
only audio or video clips, 177
single clips, 74
semicolon (;), 204
Sequence Settings dialog, 127
sequences, 126–132. See also nested sequences
adding effects with layers, 292, 341, 342–343
checking settings of, 127
choosing preset, 126, 128–129
creating multi-camera source, 348, 351
customizing presets for, 130–132
exporting partial, 422–423
finding in Project panel, 254
importing Photoshop layers as, 54–55
including clips to audio beat, 219–220
opening clip from, 99
options for multi-camera, 350
previewing imported, 64
saving presets for, 132
setting In/Out points in clips, 108, 114–115
working with, 126
Set Transition Duration dialog, 315
Shadow/Highlight effect, 330, 333–334
shadows
adjusting video, 333–334, 335
configuring title drop, 381
shapes
arranging text and, 385
creating, 384
showing/hiding
bin contents, 85
panels, 12, 13
tracks, 151
transport controls, 16
sidecar XMP files, 122
6-pin IEEE 1394 port, 41, 42
slanting text, 377
slide edits, 222, 230–231
slideshows, 219–220
slip edits, 222, 228–230
small caps, 378
SMPTE timecode, 346
snapping, 182, 224
soloing audio tracks, 137, 153, 154, 405
sorting
bins, 83
columns, 91
icons, 94
sound editing. See audio; audio clips
source footage
creating sequences to match, 126–127, 128
Index 451
finding on hard drive, 254
interpreting rate of, 120–121
mismatched, 129
moving clips to Processed Clips bin, 350
Source Monitor
adjusting display quality, 104–105
audio adjustments in, 110–112
choosing display modes for, 118–119
color correction using, 328, 329
configuring, 102–107
controlling interlaced footage, 107
customizing buttons in, 16
detail shown in, 109
displaying timecode in, 142
dragging clip to Program Monitor from, 161
Dropped Frame indicator, 104–105
elements of, 12, 98
exporting frames from, 414
finding specific time on, 50
illustrated, 2
markers in, 108, 112–114
moving markers in, 114
playback controls for, 100–101
playback resolution in, 104, 105–106
previewing content in, 39
setting In/Out points, 108, 114–115
viewing clips in, 98–99
zooming vertically into clip, 110, 112
source track indicator, 159, 160
spatial interpolation, 271, 272
speech analysis, 125
speed
adjusting clip, 245–247
remapping clip, 245, 277–278
SpeedGrade, 341
Spill Suppression controls (Effect Controls panel),
302
splitting clips
trimming with split edits, 244
using Timeline, 208
standard audio tracks, 145
starting clip, 168
storyboard editing, 133–134
stroke for text, 379–381
styling text, 382–383
subclips, 116–117
switching
between panels, 8
workspaces, 10
Sync Lock
deselecting, 198, 199
enabling/disabling, 137, 155, 156, 163
toggle for, 136
synchronization points
audio as, 347, 348–349
markers as, 346, 352–353
timecodes, 346, 349, 351–352
types of multi-camera clip, 346
Synchronize Clips dialog, 359, 360
syncing
clips, 213
interface settings, 24
track, 136, 137, 155, 156
syncing multi-camera clips
fine-tuning video/audio sync, 356–357
markers for, 346, 352–353
steps for, 346–347
timecodes for, 346, 349, 351–352
using audio to sync, 347, 348–349
Ttab stops in titles, 375
tape-based devices
connecting to computer, 43–44
IEEE 1394 ports for, 41–42
software settings for, 45–48
templates for titles, 368, 371–372
Templates panel
saving titles in, 368
working with, 371–372
text
arranging on background, 385
centering and aligning, 386–387
color of, 378–379
creating title, 197, 367
displaying hidden, 375
distributing, 387
editing properties of, 377–381
fonts for, 375, 376
importing Photoshop, 55
path, 376
point, 373, 374
resizing, 374, 375
452 Index
text (continued )
rotating, 376
stroke for, 379–381
styling, 382–383
types of, 373
wrapping, 374, 375
32-bit color effects, 282
three-point editing, 168–169
Three-Way Color Corrector, 329
3D stroke, 380
Through Edit indicators, 208, 209, 211
Thumbnail view, 8
thumbnails
display options for, 140–141
enabling/disabling, 139–140
time remapping
remapping clip speed, 245, 277–278
removing, 287
time ruler
about, 101
enabling numbers on, 173
illustrated, 100
selecting audio time units in, 111–112
time units, 111
timebase for After Effects files, 68
timecodes
about, 50, 137
adjusting overwrite edits using, 167
displaying, 142
finding specific, 50
format for display, 147–148
illustrated, 136
locating clips using, 160
SMPTE, 346
syncing multi-camera clips with, 346, 349,
351–352, 358–359
Timeline. See also gaps
about, 137
adding clips on, 158–159, 183–187, 194–197
adding/deleting tracks to, 143–146
adjusting clips from keyboard, 188–189
changing camera angle from, 364
customizing, 136–142
deleting clips on, 198–199
disabling single video tracks on, 153–154
dragging/dropping files to, 61
duration of clips on, 316
Effect Controls, 269
exporting sequences from, 415
features of, 136–137
finding specific time on, 50
fine-tuning video/audio syncing, 356–357
grouping/ungrouping clips, 180–181
illustrated, 2, 136
inserting clips without shifting others, 156
keyframes on, 265
lift and extract edits for, 203
linking/unlinking clips on, 212–213
markers for, 112–114, 214–220
Mercury Playback Engine and, 28
moving playhead and viewing window, 152
multi-camera sequence workflow on, 354–357
multiple clip selection on, 178
nested sequences on, 250
opacity adjustments on, 266
placing effects on, 283
relocating clips on new track, 190–191
removing effects from clips, 286–287
replacing clips on, 205–207
selecting clips on, 176–179
snapping clips on, 182
splitting clips on, 208
targeting tracks on, 159–160, 192–193, 195
timecode display format for, 147–148
track appearance on, 138–139
trimming clips on, 222–231
volume adjustments from, 396–397
workflow using, 5
zooming in/out on, 149–150
Timeline panel menu, 137
Title Actions panel, 386–387
Title Designer panel, 369, 370, 377
Title Properties panel, 369, 370
Titler
adjusting text properties, 377–378
centering and aligning text, 386–387
configuring text stroke, 379–381
creating title templates, 371–372
distributing text, 387
features of, 369–370
logos in titles, 388
opening, 368, 369
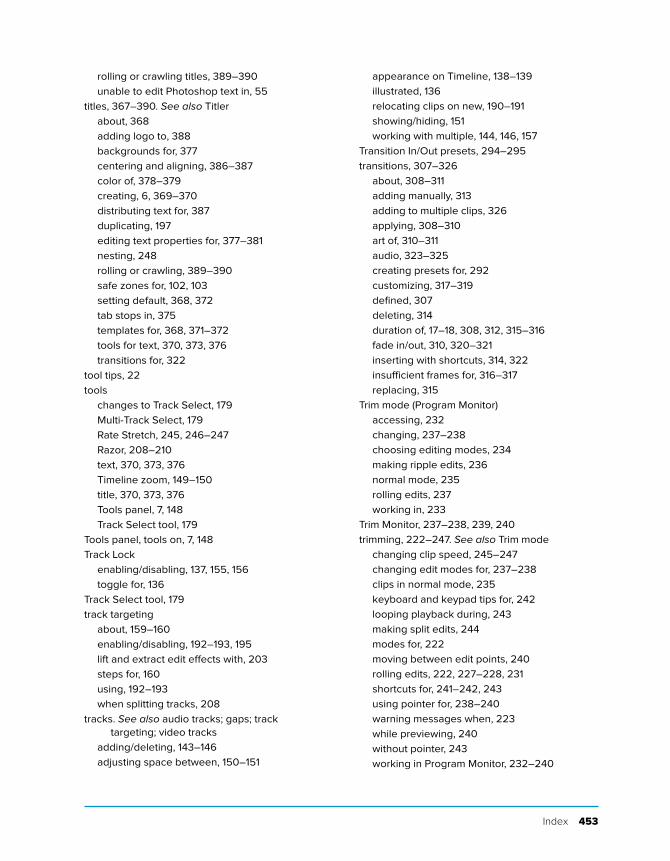
Index 453
rolling or crawling titles, 389–390
unable to edit Photoshop text in, 55
titles, 367–390. See also Titler
about, 368
adding logo to, 388
backgrounds for, 377
centering and aligning, 386–387
color of, 378–379
creating, 6, 369–370
distributing text for, 387
duplicating, 197
editing text properties for, 377–381
nesting, 248
rolling or crawling, 389–390
safe zones for, 102, 103
setting default, 368, 372
tab stops in, 375
templates for, 368, 371–372
tools for text, 370, 373, 376
transitions for, 322
tool tips, 22
tools
changes to Track Select, 179
Multi-Track Select, 179
Rate Stretch, 245, 246–247
Razor, 208–210
text, 370, 373, 376
Timeline zoom, 149–150
title, 370, 373, 376
Tools panel, 7, 148
Track Select tool, 179
Tools panel, tools on, 7, 148
Track Lock
enabling/disabling, 137, 155, 156
toggle for, 136
Track Select tool, 179
track targeting
about, 159–160
enabling/disabling, 192–193, 195
lift and extract edit effects with, 203
steps for, 160
using, 192–193
when splitting tracks, 208
tracks. See also audio tracks; gaps; track
targeting; video tracks
adding/deleting, 143–146
adjusting space between, 150–151
appearance on Timeline, 138–139
illustrated, 136
relocating clips on new, 190–191
showing/hiding, 151
working with multiple, 144, 146, 157
Transition In/Out presets, 294–295
transitions, 307–326
about, 308–311
adding manually, 313
adding to multiple clips, 326
applying, 308–310
art of, 310–311
audio, 323–325
creating presets for, 292
customizing, 317–319
defined, 307
deleting, 314
duration of, 17–18, 308, 312, 315–316
fade in/out, 310, 320–321
inserting with shortcuts, 314, 322
insufficient frames for, 316–317
replacing, 315
Trim mode (Program Monitor)
accessing, 232
changing, 237–238
choosing editing modes, 234
making ripple edits, 236
normal mode, 235
rolling edits, 237
working in, 233
Trim Monitor, 237–238, 239, 240
trimming, 222–247. See also Trim mode
changing clip speed, 245–247
changing edit modes for, 237–238
clips in normal mode, 235
keyboard and keypad tips for, 242
looping playback during, 243
making split edits, 244
modes for, 222
moving between edit points, 240
rolling edits, 222, 227–228, 231
shortcuts for, 241–242, 243
using pointer for, 238–240
warning messages when, 223
while previewing, 240
without pointer, 243
working in Program Monitor, 232–240
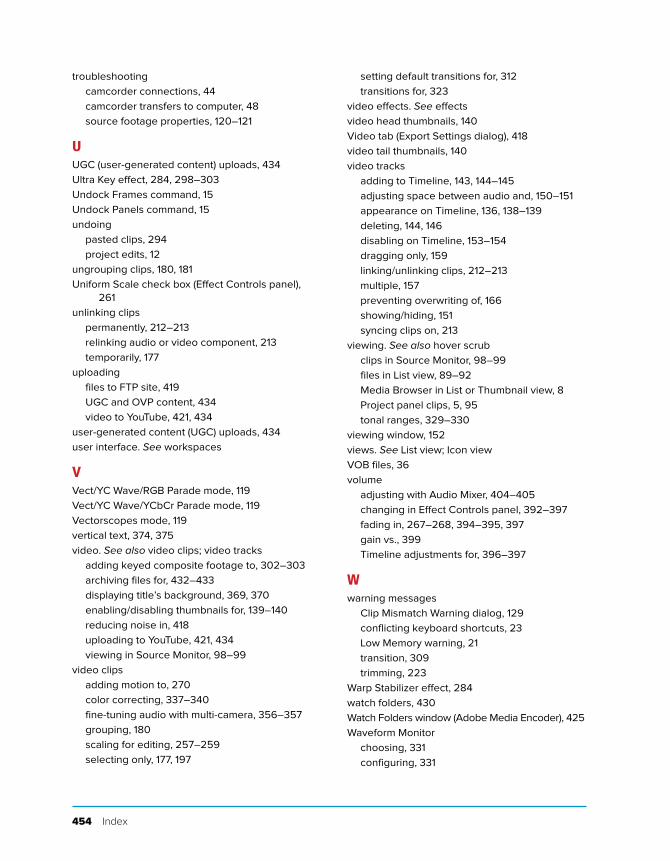
454 Index
troubleshooting
camcorder connections, 44
camcorder transfers to computer, 48
source footage properties, 120–121
UUGC (user-generated content) uploads, 434
Ultra Key effect, 284, 298–303
Undock Frames command, 15
Undock Panels command, 15
undoing
pasted clips, 294
project edits, 12
ungrouping clips, 180, 181
Uniform Scale check box (Effect Controls panel),
261
unlinking clips
permanently, 212–213
relinking audio or video component, 213
temporarily, 177
uploading
files to FTP site, 419
UGC and OVP content, 434
video to YouTube, 421, 434
user-generated content (UGC) uploads, 434
user interface. See workspaces
VVect/YC Wave/RGB Parade mode, 119
Vect/YC Wave/YCbCr Parade mode, 119
Vectorscopes mode, 119
vertical text, 374, 375
video. See also video clips; video tracks
adding keyed composite footage to, 302–303
archiving files for, 432–433
displaying title’s background, 369, 370
enabling/disabling thumbnails for, 139–140
reducing noise in, 418
uploading to YouTube, 421, 434
viewing in Source Monitor, 98–99
video clips
adding motion to, 270
color correcting, 337–340
fine-tuning audio with multi-camera, 356–357
grouping, 180
scaling for editing, 257–259
selecting only, 177, 197
setting default transitions for, 312
transitions for, 323
video effects. See effects
video head thumbnails, 140
Video tab (Export Settings dialog), 418
video tail thumbnails, 140
video tracks
adding to Timeline, 143, 144–145
adjusting space between audio and, 150–151
appearance on Timeline, 136, 138–139
deleting, 144, 146
disabling on Timeline, 153–154
dragging only, 159
linking/unlinking clips, 212–213
multiple, 157
preventing overwriting of, 166
showing/hiding, 151
syncing clips on, 213
viewing. See also hover scrub
clips in Source Monitor, 98–99
files in List view, 89–92
Media Browser in List or Thumbnail view, 8
Project panel clips, 5, 95
tonal ranges, 329–330
viewing window, 152
views. See List view; Icon view
VOB files, 36
volume
adjusting with Audio Mixer, 404–405
changing in Effect Controls panel, 392–397
fading in, 267–268, 394–395, 397
gain vs., 399
Timeline adjustments for, 396–397
Wwarning messages
Clip Mismatch Warning dialog, 129
conflicting keyboard shortcuts, 23
Low Memory warning, 21
transition, 309
trimming, 223
Warp Stabilizer effect, 284
watch folders, 430
Watch Folders window (Adobe Media Encoder), 425
Waveform Monitor
choosing, 331
configuring, 331
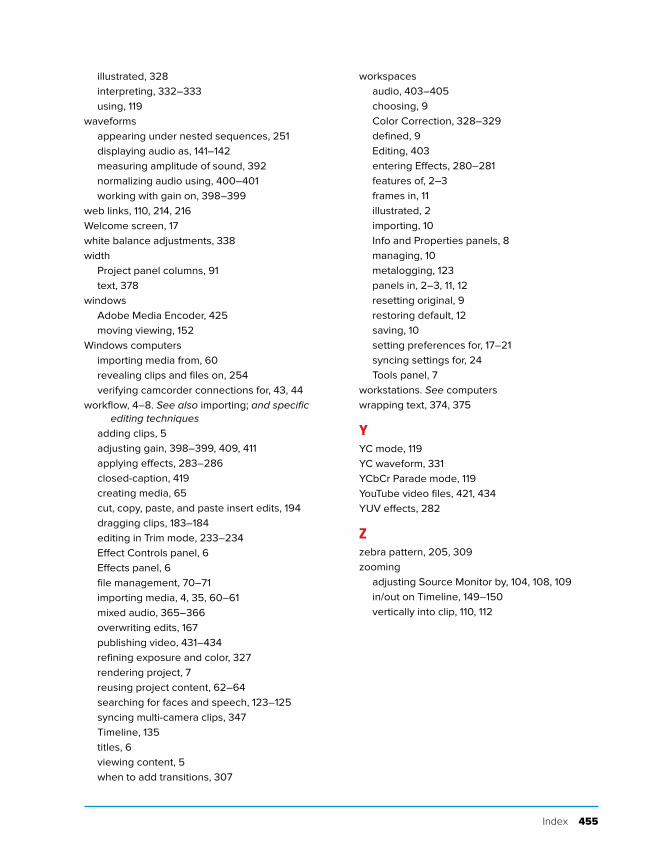
Index 455
illustrated, 328
interpreting, 332–333
using, 119
waveforms
appearing under nested sequences, 251
displaying audio as, 141–142
measuring amplitude of sound, 392
normalizing audio using, 400–401
working with gain on, 398–399
web links, 110, 214, 216
Welcome screen, 17
white balance adjustments, 338
width
Project panel columns, 91
text, 378
windows
Adobe Media Encoder, 425
moving viewing, 152
Windows computers
importing media from, 60
revealing clips and files on, 254
verifying camcorder connections for, 43, 44
workflow, 4–8. See also importing; and specific editing techniques
adding clips, 5
adjusting gain, 398–399, 409, 411
applying effects, 283–286
closed-caption, 419
creating media, 65
cut, copy, paste, and paste insert edits, 194
dragging clips, 183–184
editing in Trim mode, 233–234
Effect Controls panel, 6
Effects panel, 6
file management, 70–71
importing media, 4, 35, 60–61
mixed audio, 365–366
overwriting edits, 167
publishing video, 431–434
refining exposure and color, 327
rendering project, 7
reusing project content, 62–64
searching for faces and speech, 123–125
syncing multi-camera clips, 347
Timeline, 135
titles, 6
viewing content, 5
when to add transitions, 307
workspaces
audio, 403–405
choosing, 9
Color Correction, 328–329
defined, 9
Editing, 403
entering Effects, 280–281
features of, 2–3
frames in, 11
illustrated, 2
importing, 10
Info and Properties panels, 8
managing, 10
metalogging, 123
panels in, 2–3, 11, 12
resetting original, 9
restoring default, 12
saving, 10
setting preferences for, 17–21
syncing settings for, 24
Tools panel, 7
workstations. See computers
wrapping text, 374, 375
YYC mode, 119
YC waveform, 331
YCbCr Parade mode, 119
YouTube video files, 421, 434
YUV effects, 282
Zzebra pattern, 205, 309
zooming
adjusting Source Monitor by, 104, 108, 109
in/out on Timeline, 149–150
vertically into clip, 110, 112