Embed Size (px)
Citation preview
Advanced Administration Guide – Endpoint Protection
1
Advanced administration
guide

Advanced Administration Guide – Endpoint Protection
2
Tabla de contenidos
1. INTRODUCTION .............................................................................................................. 12
1.1. WHAT'S NEW IN THIS VERSION ........................................................................................... 13 1.2. WHAT IS ENDPOINT PROTECTION? ...................................................................................... 14
THE PROTECTION .................................................................................................................. 14 WHICH PROTECTIONS ARE AVAILABLE? ..................................................................................... 14 INSTALLATION ....................................................................................................................... 14
1.3. PROTECTION TECHNOLOGIES .............................................................................................. 15 ANTI-EXPLOIT TECHNOLOGY .................................................................................................... 15 SECURITY FROM THE CLOUD AND COLLECTIVE INTELLIGENCE ......................................................... 15
1.4. INFORMATION, QUERIES AND SERVICES ................................................................................. 16 USEFUL LINKS ....................................................................................................................... 16 ENDPOINT PROTECTION SERVICES ............................................................................................ 17 OTHER SERVICES ................................................................................................................... 17 TECHNICAL SUPPORT .............................................................................................................. 17 TROUBLESHOOTING ............................................................................................................... 17 SUGGESTION BOX .................................................................................................................. 17 ICONS.................................................................................................................................. 17
1.5. REQUIREMENTS AND EXTERNAL URLS .................................................................................. 18 REQUIREMENTS FOR WINDOWS SYSTEMS ................................................................................. 18 REQUIREMENTS FOR LINUX SYSTEMS ........................................................................................ 21 REQUIREMENTS FOR OS X SYSTEMS ......................................................................................... 23 REQUIREMENTS FOR ANDROID DEVICES .................................................................................... 23 EXTERNAL URLS ................................................................................................................... 24
2. CREATING PANDA ACCOUNT .......................................................................................... 26
2.1. WHAT IS YOUR PANDA ACCOUNT? ...................................................................................... 27 2.2. HOW TO CREATE YOUR PANDA ACCOUNT ............................................................................. 27 2.3. HOW TO ACTIVATE YOUR PANDA ACCOUNT ........................................................................... 27
3. LOGIN TO THE WEB CONSOLE ......................................................................................... 29
3.1. LOGIN TO THE WEB CONSOLE ............................................................................................. 30 OTHER OPTIONS AVAILABLE IN THE WEB CONSOLE ...................................................................... 30
3.2. PREFERENCES .................................................................................................................. 30 DEFAULT VIEW ...................................................................................................................... 30 GROUP RESTRICTIONS ............................................................................................................ 31 REMOTE ACCESS ................................................................................................................... 31 AUTOMATIC MANAGEMENT OF SUSPICIOUS FILES ....................................................................... 31 ACCOUNT MANAGEMENT ....................................................................................................... 32
4. THE STATUS WINDOW.................................................................................................... 33
4.1. PROTECTION STATUS ........................................................................................................ 34 NOTIFICATIONS ..................................................................................................................... 34 UPGRADING TO A NEW PRODUCT VERSION ................................................................................ 34 PROTECTION STATUS .............................................................................................................. 34

Advanced Administration Guide – Endpoint Protection
3
4.2. LICENSE STATUS ............................................................................................................... 35 4.3. VIEWING LICENSES ........................................................................................................... 36
LICENSE LIST ......................................................................................................................... 36 HOW TO MANAGE EXPIRED LICENSES OR LICENSES ABOUT TO EXPIRE .............................................. 37 HOW TO RELEASE LICENSES AND MOVE COMPUTERS TO THE LIST OF COMPUTERS WITHOUT A LICENSE . 37
5. DETECTED THREATS ........................................................................................................ 39
5.1. DETECTED THREATS AND DETECTION ORIGIN .......................................................................... 40 DETECTIONS ON LINUX COMPUTERS ......................................................................................... 40 DETECTIONS ON OS X COMPUTERS .......................................................................................... 40 DETECTIONS ON ANDROID DEVICES .......................................................................................... 40 DETECTIONS ON WINDOWS COMPUTERS .................................................................................. 40
5.2. FILTERED MESSAGES ......................................................................................................... 41 5.3. WEB ACCESS CONTROL ...................................................................................................... 41
WEB ACCESS CONTROL: RESULTS ............................................................................................. 41 5.4. DETECTION DETAILS .......................................................................................................... 42
VIEWING INFORMATION ABOUT DETECTED THREATS .................................................................... 43 VIEWING INFORMATION ABOUT COMPUTERS WITH MOST THREATS ................................................ 43 VIEWING INFORMATION ABOUT THE MOST DETECTED MALWARE ................................................... 44
5.5. SCHEDULED SCANS ........................................................................................................... 45 VIEWING SCHEDULED SCANS AND THEIR RESULTS ........................................................................ 45 RESULTS OF THE SCHEDULED SCAN TASKS .................................................................................. 46
6. LICENSE MANAGEMENT ................................................................................................. 47
6.1. LICENSE-RELATED WARNINGS ............................................................................................. 48 UPDATING THE NUMBER OF LICENSES ....................................................................................... 48 LICENSE EXPIRATION WARNINGS .............................................................................................. 48 EXCLUDED COMPUTERS .......................................................................................................... 48 COMPUTERS WITHOUT A LICENSE ............................................................................................. 49
6.2. RELEASING LICENSES ......................................................................................................... 49 AFFECTED COMPUTERS AND MANAGED COMPUTERS ................................................................... 49
6.3. ADDING LICENSES USING THE ACTIVATION CODE ..................................................................... 50 POSSIBLE ERRORS WHEN ADDING LICENSES FOR WINDOWS/LINUX/ANDROID COMPUTERS AND DEVICES
51 OTHER ERRORS ..................................................................................................................... 51
7. ACCOUNT MANAGEMENT .............................................................................................. 52
7.1. INTRODUCTION TO ACCOUNT MANAGEMENT ......................................................................... 53 7.2. DELEGATING ACCOUNT MANAGEMENT ................................................................................. 53
POSSIBLE ERRORS ON DELEGATING ACCOUNT MANAGEMENT ........................................................ 54 OTHER ERRORS ..................................................................................................................... 54
7.3. MERGING ACCOUNTS ....................................................................................................... 54 WHAT DOES MERGING ACCOUNTS INVOLVE? ............................................................................. 54 HOW ARE ACCOUNTS MERGED? ............................................................................................... 55 WHAT INFORMATION IS TRANSFERRED WHEN ............................................................................. 55 CONSEQUENCES OF MERGING ACCOUNTS .................................................................................. 56 POSSIBLE ERRORS WHEN MERGING ACCOUNTS ........................................................................... 56

Advanced Administration Guide – Endpoint Protection
4
8. CREATING AND MANAGING USERS ................................................................................ 58
8.1. CREATING USERS ............................................................................................................. 59 8.2. CHANGING USER DETAILS ................................................................................................... 60
CHANGING USER NAMES ......................................................................................................... 60 DELETING USERS ................................................................................................................... 61
9. CREATING AND MANAGING GROUPS ............................................................................. 62
9.1. CREATING GROUPS ........................................................................................................... 63 TYPES OF GROUPS ................................................................................................................. 63 CREATING A MANUAL GROUP .................................................................................................. 63 CREATING AN AUTOMATIC GROUP ............................................................................................ 64
9.2. MOVING COMPUTERS TO A GROUP ...................................................................................... 64 9.3. ADDING A COMPUTER TO A GROUP ...................................................................................... 65 9.4. ADDING AND DELETING GROUPS ......................................................................................... 65
ADDING A MANUAL GROUP ..................................................................................................... 65 ADDING AN AUTOMATIC GROUP .............................................................................................. 66 DELETING A GROUP ............................................................................................................... 66 EDITING A MANUAL GROUP ..................................................................................................... 67 EDITING AN AUTOMATIC GROUP .............................................................................................. 67
10. TYPES OF PERMISSIONS ................................................................................................ 69
10.1. TYPES OF PERMISSIONS ................................................................................................... 70 10.2. TOTAL CONTROL PERMISSION ........................................................................................... 70 10.3. ADMINISTRATOR PERMISSION .......................................................................................... 71 10.4. MONITORING PERMISSION .............................................................................................. 72
11. PROTECTION SETTINGS ................................................................................................. 73
11.1. INTRODUCTION ............................................................................................................. 74 11.2. DEFAULT PROFILE........................................................................................................... 74 11.3. INTRODUCTION TO THE SETTINGS ...................................................................................... 76 11.4. PROFILES ..................................................................................................................... 77
CREATING A NEW PROFILE .................................................................................................... 77 COPYING A PROFILE ............................................................................................................. 77 EDITING A PROFILE .............................................................................................................. 77
11.5. GROUPS AND PROFILES ................................................................................................... 77
12. CREATING AND CONFIGURING PROFILES ...................................................................... 78
12.1. CREATING A PROFILE ....................................................................................................... 79 PERMISSIONS ..................................................................................................................... 79 CONFIGURING A PROFILE ...................................................................................................... 79
12.2. COPYING A PROFILE ........................................................................................................ 80 12.3. GENERAL PROFILE SETTINGS ............................................................................................. 81
INFORMATION TAB .............................................................................................................. 81 PROXY SERVER TAB .............................................................................................................. 81 APPLY TO TAB ..................................................................................................................... 81
Advanced Administration Guide – Endpoint Protection
5
13. BEFORE INSTALLING THE PROTECTION ......................................................................... 82
13.1. COMPUTER REQUIREMENTS ............................................................................................. 83 COMPUTERS WITH OTHER SECURITY SOLUTIONS INSTALLED ........................................................ 83 MANUAL UNINSTALL ............................................................................................................ 83 CONFIGURING EXCLUSIONS IN THE FILE PROTECTION FOR EXCHANGE SERVER ................................ 84
13.2. INSTALLATION METHODS ACCORDING TO THE OPERATING SYSTEM ............................................ 84 13.3. QUICK INSTALLATION ...................................................................................................... 85
ADDING COMPUTERS ........................................................................................................... 85 13.4. INSTALLATION CASES ...................................................................................................... 85
INSTALLING THE SOLUTION ON COMPUTERS WITH NO PROTECTION INSTALLED ............................... 85 INSTALLING THE SOLUTION ON COMPUTERS WITH ...................................................................... 86
14. INSTALLING THE PROTECTION ...................................................................................... 87
14.1. INSTALLING THE PROTECTION ON WINDOWS/LINUX COMPUTERS ............................................. 88 INSTALLING THE PROTECTION WITH THE INSTALLER.................................................................... 88 DOWNLOADING THE INSTALLER ............................................................................................. 88
14.2. INSTALLING THE PROTECTION WITH THE DISTRIBUTION TOOL ................................................... 89 DOWNLOADING THE DISTRIBUTION TOOL ................................................................................ 89
14.3. INSTALLING THE PROTECTION ON OS X COMPUTERS .............................................................. 90 REQUIREMENTS AND INSTALLATION MODES ............................................................................. 90 INSTALLATION MODES .......................................................................................................... 90
14.4. INSTALLING THE PROTECTION ON OS X COMPUTERS .............................................................. 90 DOWNLOADING THE INSTALLER ............................................................................................. 90 GENERATING AN INSTALLATION URL ...................................................................................... 91
14.5. INSTALLING THE PROTECTION ON ANDROID DEVICES .............................................................. 94 INTRODUCTION ................................................................................................................... 94 INSTALLATION METHODS ...................................................................................................... 94 INSTALLING THE PROTECTION FROM THE WEB CONSOLE ............................................................ 94 INSTALLING THE PROTECTION FROM THE DEVICE ....................................................................... 95 INSTALLING THE PROTECTION FROM AN ANDROID FOR WORK COMPATIBLE EMM TOOL ................. 96
15. CONFIGURING THE PROTECTION FOR WINDOWS/LINUX COMPUTERS ......................... 98
15.1. GENERAL PROFILE SETTINGS FOR WINDOWS/LINUX COMPUTERS .............................................. 99 UPDATE SETTINGS ............................................................................................................... 99 CONFIGURING SCHEDULED SCANS ........................................................................................ 100 ADVANCED SCAN SETTINGS ................................................................................................. 102 WARNINGS SETTINGS ......................................................................................................... 102 ADVANCED SETTINGS ......................................................................................................... 103
15.2. CHANGING THE PROTECTION STATUS ................................................................................ 105 15.3. ANTIVIRUS PROTECTION SETTINGS ................................................................................... 106
FILES, MAIL AND WEB TABS ................................................................................................ 106 LOCAL SCANS .................................................................................................................... 107 ADVANCED ANTIVIRUS SETTINGS - FILE PROTECTION ................................................................ 108 ADVANCED ANTIVIRUS SETTINGS - EMAIL PROTECTION ............................................................. 108
15.4. FIREWALL PROTECTION SETTINGS ..................................................................................... 109 INTRODUCTION TO THE FIREWALL SETTINGS ........................................................................... 109 FIREWALL IN USER MODE .................................................................................................... 110 FIREWALL IN ADMINISTRATOR MODE .................................................................................... 110

Advanced Administration Guide – Endpoint Protection
6
15.5. DEVICE CONTROL SETTINGS ............................................................................................ 113 INTRODUCTION ................................................................................................................. 113 SETTING UP A LIST OF ALLOWED DEVICES ............................................................................... 114 ALLOWING A BLOCKED DEVICE ............................................................................................. 114
15.6. EXCHANGE SERVER PROTECTION SETTINGS ........................................................................ 115 INTRODUCTION ................................................................................................................. 115 MONITORING THE PROTECTION FOR EXCHANGE SERVER .......................................................... 116 ANTIVIRUS PROTECTION FOR EXCHANGE SERVER .................................................................... 116 ANTI-SPAM PROTECTION FOR EXCHANGE SERVER ................................................................... 118 CONTENT FILTERING FOR EXCHANGE SERVER ......................................................................... 119
15.7. WEB ACCESS CONTROL SETTINGS ..................................................................................... 120 WEB ACCESS CONTROL SETTINGS ......................................................................................... 120 CONFIGURING TIME PERIODS FOR THE WEB ACCESS CONTROL FEATURE ...................................... 121
16. CONFIGURING THE PROTECTION FOR OS X COMPUTERS ............................................ 123
16.1. INTRODUCTION ........................................................................................................... 124 16.2. CHARACTERISTICS OF THE PROTECTION FOR OS X ................................................................ 124 16.3. CONFIGURING THE PROTECTION FOR OS X COMPUTERS ........................................................ 125
17. CONFIGURING THE PROTECTION FOR ANDROID DEVICES ........................................... 126
17.1. ANTIVIRUS PROTECTION SETTINGS ................................................................................... 127 ENABLING THE PROTECTION ................................................................................................ 127 EXCLUSIONS ..................................................................................................................... 127 UPDATES ......................................................................................................................... 127 SCHEDULED SCANS ............................................................................................................ 127
17.2. ANTI-THEFT PROTECTION SETTINGS .................................................................................. 128 ENABLING THE ANTI-THEFT PROTECTION ............................................................................... 129 PRIVACY MODE ................................................................................................................. 129
18. REMOTE ACCESS TO COMPUTERS ............................................................................... 130
18.1. VIEWING COMPUTERS WITH REMOTE ACCESS TOOLS INSTALLED .............................................. 131 HOW TO GET REMOTE ACCESS TO ANOTHER COMPUTER ........................................................... 132
18.2. HOW TO USE THE REMOTE ACCESS TOOLS .......................................................................... 132 VNC TOOLS...................................................................................................................... 132 TEAMVIEWER ................................................................................................................... 132 LOGMEIN ........................................................................................................................ 133
19. COMPUTER MONITORING .......................................................................................... 134
19.1. INTRODUCTION ........................................................................................................... 135 19.2. REMOTE ACCESS .......................................................................................................... 135
PANDA REMOTE CONTROL ................................................................................................. 135 OTHER REMOTE ACCESS TOLOS ............................................................................................ 136
19.3. COMPUTER DETAILS ..................................................................................................... 136 REMOTE ACCESS ............................................................................................................... 136 DISINFECTING THE COMPUTER ............................................................................................. 137 REPORTING COMPUTER PROBLEMS....................................................................................... 137
Advanced Administration Guide – Endpoint Protection
7
RESTARTING COMPUTERS ................................................................................................... 137 DELETING AND EXCLUDING COMPUTERS ................................................................................ 137
19.4. COMPUTER DETAILS (ANDROID DEVICES) .......................................................................... 137 WIPE DEVICE .................................................................................................................... 137 LOCK DEVICE .................................................................................................................... 138 SNAP THE THIEF ................................................................................................................ 138 PRIVACY MODE ................................................................................................................. 138 TASK LIST ......................................................................................................................... 138
19.5. TASK LIST (ANDROID DEVICES) ........................................................................................ 138 TASK STATUS .................................................................................................................... 138
19.6. VIEWING COMPUTERS WITH REMOTE ACCESS TOOLS INSTALLED .............................................. 139
20. ACTIONS ON PROTECTED COMPUTERS ....................................................................... 140
20.1. ADDING AND SEARCHING FOR PROTECTED COMPUTERS ........................................................ 141 ADDING COMPUTERS ......................................................................................................... 141 COMPUTER SEARCH ........................................................................................................... 141
20.2. MOVING AND DELETING PROTECTED COMPUTERS ............................................................... 143 MOVING COMPUTERS FROM ONE GROUP TO ANOTHER ............................................................ 143 DELETING COMPUTERS ....................................................................................................... 144
20.3. RESTARTING COMPUTERS .............................................................................................. 144 IMMEDIATE RESTART ......................................................................................................... 144 POSTPONING THE RESTART ................................................................................................. 145
20.4. DISINFECTING COMPUTERS ............................................................................................ 145 VISIBLE DISINFECTION ........................................................................................................ 145 SILENT DISINFECTION ......................................................................................................... 145
20.5. TROUBLESHOOTING PROTECTION ERRORS .......................................................................... 145 20.6. TROUBLESHOOTING SIGNATURE FILE ERRORS ...................................................................... 146
21. ACTIONS ON UNPROTECTED COMPUTERS .................................................................. 147
21.1. INTRODUCTION ........................................................................................................... 148 COMPUTER SEARCH ........................................................................................................... 148
21.2. DELETING AND EXCLUDING UNPROTECTED COMPUTERS ........................................................ 149 DELETING COMPUTERS ....................................................................................................... 149 EXCLUDING COMPUTERS..................................................................................................... 149
21.3. CONFIGURING SEARCHES FOR UNPROTECTED COMPUTERS ..................................................... 149 CREATING A TASK TO SEARCH FOR UNPROTECTED COMPUTERS .................................................. 150 VIEWING SEARCHES ........................................................................................................... 150 SEARCH RESULTS ............................................................................................................... 151
22. QUARANTINE ............................................................................................................. 152
22.1. QUARANTINE .............................................................................................................. 153 QUARANTINE ON LINUX COMPUTERS .................................................................................... 153 QUARANTINE ON OS X COMPUTERS ..................................................................................... 153 QUARANTINE ON WINDOWS COMPUTERS ............................................................................. 153
22.2. SEARCHING FOR ITEMS IN QUARANTINE ............................................................................ 153 LIST OF ITEMS IN QUARANTINE ............................................................................................. 154
22.3. FILES EXCLUDED FROM THE SCAN ..................................................................................... 154
Advanced Administration Guide – Endpoint Protection
8
23. REPORTS .................................................................................................................... 155
23.1. EXECUTIVE REPORT ...................................................................................................... 156 LINUX COMPUTERS ............................................................................................................ 156 OS X COMPUTERS ............................................................................................................. 156 ANDROID DEVICES ............................................................................................................. 156
23.2. STATUS REPORT ........................................................................................................... 156 LINUX COMPUTERS ............................................................................................................ 156 OS X COMPUTERS ............................................................................................................. 157
23.3. DETECTION REPORT ...................................................................................................... 157 LINUX COMPUTERS ............................................................................................................ 157 OS X COMPUTERS ............................................................................................................. 157 ANDROID DEVICES ............................................................................................................. 157
23.4. GENERATING REPORTS .................................................................................................. 157 REPORT CONTENT ............................................................................................................. 158 REPORT SCOPE .................................................................................................................. 158 SCHEDULING REPORTS TO BE SENT BY EMAIL .......................................................................... 158
23.5. VIEWING REPORTS ....................................................................................................... 159
24. UNINSTALLATION ....................................................................................................... 160
24.1. TYPES OF UNINSTALLATION ............................................................................................ 161 24.2. LOCAL UNINSTALL ........................................................................................................ 161
HOW TO MANUALLY UNINSTALL ENDPOINT PROTECTION ......................................................... 161 24.3. CENTRALIZED UNINSTALLATION ....................................................................................... 162
DOWNLOADING AND INSTALLING THE DISTRIBUTION TOOL ....................................................... 162 UNINSTALLATION BY DOMAIN.............................................................................................. 162 UNINSTALLATION BY IP ADDRESS OR COMPUTER NAME ........................................................... 162
24.4. REMOTE UNINSTALLATION ............................................................................................. 163 CREATING REMOTE UNINSTALLATION TASKS ........................................................................... 163 CREATING A REMOTE UNINSTALLATION TASK .......................................................................... 163 VIEWING REMOTE UNISTALLATION TASKS AND THEIR RESULTS ................................................... 164 REMOTE UNINSTALLATION RESULTS ...................................................................................... 164 INCOMPATIBILITY BETWEEN SEARCHES FOR UNPROTECTED COMPUTERS AND REMOTE UNINSTALLATION
TASKS 164
25. KEY CONCEPTS ........................................................................................................... 165
........................................................................................................................................... 165
26. APPENDIX1: PERFORMING BASIC OPERATIONS USING THE COMMAND PROMPT (WINDOWS) ........................................................................................................................ 171
........................................................................................................................................... 171
26.1. INTRODUCTION ........................................................................................................... 172 26.2. PRE-INSTALL ACTION. DOWNLOADING THE INSTALLATION PACKAGE ........................................ 172
OPTIONS FOR DOWNLOADING THE INSTALLATION PACKAGE ...................................................... 172 HOW TO DOWNLOAD THE INSTALLATION PACKAGE (WAAGENT.MSI) ......................................... 172
26.3. INSTALLATION STEPS ..................................................................................................... 173
Advanced Administration Guide – Endpoint Protection
9
STEP 1. ............................................................................................................................ 173 STEP 2. ............................................................................................................................ 174
26.4. REMOTE VERIFICATION OF INSTALLATION .......................................................................... 174 VERIFICATION STEPS .......................................................................................................... 175
26.5. UNINSTALLING ENDPOINT PROTECTION ............................................................................ 175 UNINSTALLATION STEPS ...................................................................................................... 175
26.6. UPDATING THE SIGNATURE FILE ....................................................................................... 177 STEPS FOR UPDATING THE SIGNATURE FILES ........................................................................... 177 STEPS FOR UPDATING THE SETTINGS ..................................................................................... 177 OBTAINING THE SIGNATURE FILES DATE ................................................................................. 178 GETTING INFORMATION ON THE STATUS OF THE PROTECTION ................................................... 179
27. APPENDIX 2: DEPLOYING THE PROTECTION ................................................................ 182
........................................................................................................................................... 182
27.1. INTRODUCTION ........................................................................................................... 183 27.2. THE ADMINISTRATION AGENT ......................................................................................... 183 27.3. PEER-TO-PEER OR RUMOR FUNCTIONALITY ........................................................................ 183
P2P FUNCTIONALITY WORKS AS FOLLOWS: ............................................................................ 184 DYNAMIC PROXY ............................................................................................................... 185 STATIC PROXY ................................................................................................................... 185
27.4. DEPLOYING PANDA ENDPOINT AGENT .............................................................................. 186 PANDA ENDPOINT AGENT FOLDER TREE AND REGISTRY ENTRIES ................................................ 186 WINDOWS REGISTRY ENTRIES TREE ....................................................................................... 188 DISTRIBUTION OF FILES ....................................................................................................... 190
27.5. DEPLOYMENT OF ENDPOINT PROTECTION ......................................................................... 195
28. APPENDIX 3: AUTOMATIC COMPUTER SEARCH (WINDOWS) ...................................... 200
........................................................................................................................................... 200
28.1. INTRODUCTION ........................................................................................................... 201 REQUIREMENTS FOR THE COMPUTER THAT PERFORMS THE SEARCH ........................................... 201 JOB STATUS ...................................................................................................................... 202 SEARCH JOB ACTION SEQUENCE ........................................................................................... 202 SEARCH JOB RESULTS ......................................................................................................... 202 DETAILS OF UNPROTECTED COMPUTERS ................................................................................ 203
28.2. CASES IN WHIC THE SERVER MAY NOT BE AWARE THAT A COMPUTER SEARCH JOB HAS FINISHED ... 203 CASE 1 ............................................................................................................................ 203 CONSEQUENCES ................................................................................................................ 203
28.3. CASE 2 ...................................................................................................................... 204 CONSEQUENCES ................................................................................................................ 204
29. APPENDIX 4: DETECTING THE ORIGIN AND TYPE OF THE ATTACKS ............................. 205
29.1. DETECTING THE ORIGIN OF THE ATTACKS ........................................................................... 206 29.2. TYPES OF IDS ATTACKS ................................................................................................. 206
30. APPENDIX 5: THE INSTALLATION, DEPLOYMENT, RUNNING PROCESSES AND REPORTS
Advanced Administration Guide – Endpoint Protection
10
OF THE PROTECTION FOR LINUX ......................................................................................... 210
........................................................................................................................................... 210
30.1. REQUIREMENTS ........................................................................................................... 211 30.2. INSTALLATION ............................................................................................................. 211 30.3. COMMUNICATION VIA PROXY SERVER .............................................................................. 212
USER VALIDATION ............................................................................................................. 212 SIGNATURE FILE UPDATES ................................................................................................... 213
30.4. SCANS ....................................................................................................................... 213 ON-DEMAND SCANS .......................................................................................................... 213 SCHEDULED SCANS ............................................................................................................ 213 PERIODIC SCANS ................................................................................................................ 214 LAUNCHING SCANS MANUALLY ............................................................................................ 214
30.5. LIST OF DETECTIONS ..................................................................................................... 215 30.6. UPGRADING ENDPOINT PROTECTION ............................................................................... 216 30.7. UNINSTALL ................................................................................................................. 216
31. APPENDIX 6: THE INSTALLATION, DEPLOYMENT, RUNNING PROCESSES AND REPORTS OF THE PROTECTION FOR OS X ............................................................................................ 218
31.1. REQUIREMENTS ........................................................................................................... 219 31.2. INSTALLATION ............................................................................................................. 219 31.3. INSTALLATION PROCESS ................................................................................................. 219 31.4. DEPLOYMENT ............................................................................................................. 220 31.5. PROCESSES ................................................................................................................. 221
COMMUNICATION VIA PROXY SERVER ................................................................................... 221 MESSAGES SENT TO THE ENDPOINT PROTECTION SERVER ......................................................... 221
31.6. PROTECTION INSTALLED AND RUNNING: RUNNING PROCESSES ............................................... 221 31.7. INTEGRATION .............................................................................................................. 222 31.8. STATUS INFORMATION .................................................................................................. 222 31.9. USER VALIDATION ........................................................................................................ 223 31.10. CONFIGURATION ....................................................................................................... 223 31.11. SIGNATURE FILE UPDATES ............................................................................................ 223 31.12. SCANS ..................................................................................................................... 223 31.13. LIST OF DETECTIONS .................................................................................................... 223 31.14. DETECTION LOG FILE ................................................................................................... 224 31.15. UNINSTALL ............................................................................................................... 225
32. APPENDIX 7: SYSTEMS MANAGEMENT & ENDPOINT PROTECTION ............................. 226
32.1. INTRODUCTION ........................................................................................................... 227 32.2. ACTIVATING YOUR TRIAL VERSION OF SYSTEMS MANAGEMENT .............................................. 227 32.3. ENDING THE SYSTEMS MANAGEMENT TRIAL PERIOD ............................................................ 228
DEPLOYMENT PROCESS ...................................................................................................... 228 32.4. HOW TO INSTALL THE SOLUTION IF YOU ALREADY HAVE SYSTEMS MANAGEMENT LICENSES ........ 229
33. APPENDIX 8: UNINSTALLER LIST ................................................................................. 231
33.1. COMPUTER ASSOCIATES ................................................................................................ 232

Advanced Administration Guide – Endpoint Protection
11
33.2. AVAST ....................................................................................................................... 232 33.3. AVG ......................................................................................................................... 232 33.4. AVIRA ....................................................................................................................... 232 33.5. CA ........................................................................................................................... 232 33.6. BIT DEFENDER ............................................................................................................. 233 33.7. CHECK POINT .............................................................................................................. 233 33.8. ESET ......................................................................................................................... 233 33.9. FRISK ........................................................................................................................ 233 33.10. F-SECURE ................................................................................................................. 233 33.11. KASPERSKY ............................................................................................................... 234 33.12. MCAFEE .................................................................................................................. 234 33.13. NORMAN ................................................................................................................. 234 33.14. NORTON .................................................................................................................. 234 33.15. MICROSOFT .............................................................................................................. 234 33.16. MICROWORLD TECHNOLOGIES ..................................................................................... 235 33.17. PCTOOLS ................................................................................................................. 235 33.18. SOPHOS ................................................................................................................... 235 33.19. SYMANTEC ............................................................................................................... 235 33.20. TREND MICRO........................................................................................................... 235 33.21. COMODO ANTIVIRUS .................................................................................................. 236 33.22. PANDA SECURITY ....................................................................................................... 236
Advanced Administration Guide – Endpoint Protection
12
1. Introduction
What is Endpoint Protection?
Protection technologies
Information, queries and services
Requirements and external URLs
Advanced Administration Guide – Endpoint Protection
13
1.1. What's new in this version
Endpoint Protection is a security solution in constant evolution. Our technical team is
responsible for including in each version the necessary improvements to provide you with
maximum protection and security for all your devices.
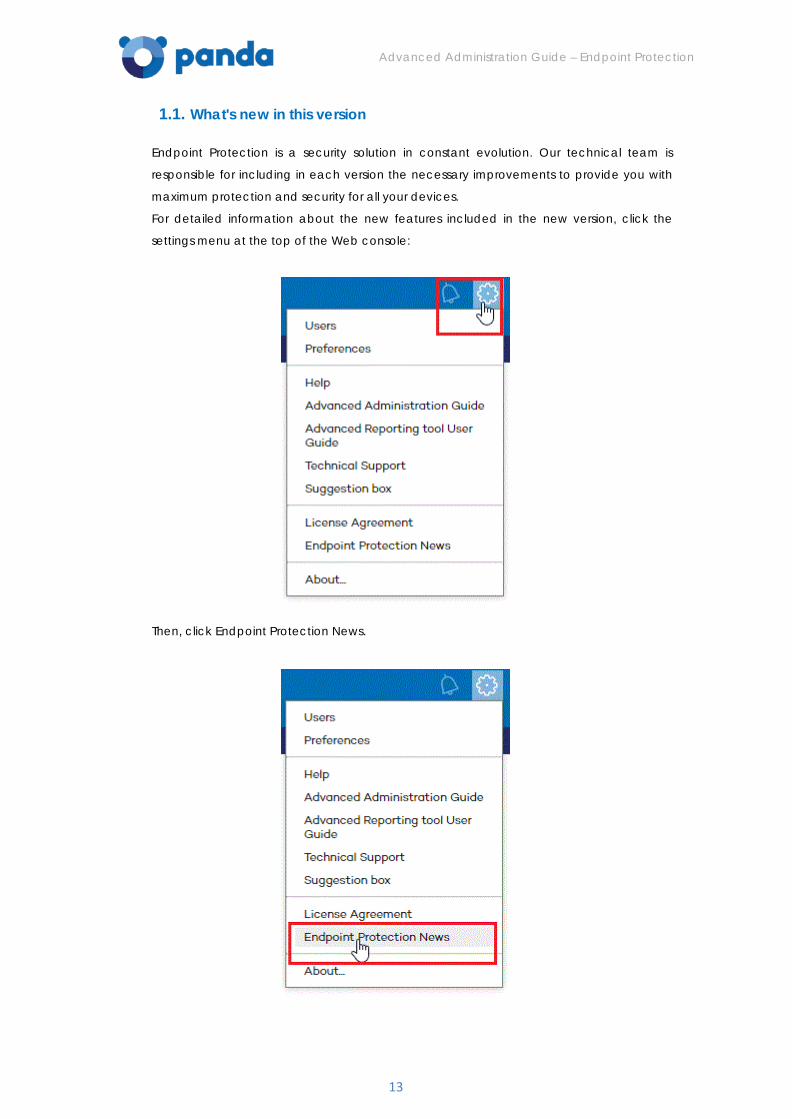
For detailed information about the new features included in the new version, click the
settings menu at the top of the Web console:
Then, click Endpoint Protection News.
Advanced Administration Guide – Endpoint Protection
14
1.2. What is Endpoint Protection?
Endpoint Protection is a complete security solution to protect your computer network and
manage security online with none of the hassle. The protection it provides neutralizes
spyware, Trojans, viruses and any other threats. Its main features include:
- Maximum protection for PCs, laptops, servers and Android devices.
- Easy to install, manage and maintain through its Web console.
- Management and organization based on protection profiles and user groups.
Endpoint Protection's management center is the Web console, which allows you to:
- Configure the protection -for Windows, Linux, OS X and Android-, distribute it and install it on your computers.
- Monitor the protection status of your computers.
- Generate reports about the security status and threats detected.
- Manage detections to monitor, at any time, what has been detected, when and on which computers.
- Configure the quarantine of suspicious items.
The protection Depending on your computers' protection needs, you will be able to create profiles and
configure the behavior of the different protection modules for each profile. Then, you will be
able to assign those profiles to the computers or computer groups to protect.
Which protections are available? Remember that you will only be able to use some of the protections provided by Endpoint
Protection if you have Endpoint Protection Plus licenses.
We advise that you visit the Endpoint Protectionand Endpoint Protection Plus Web pages for
information about each solution and to select the protection that best suits your needs.
http://www.pandasecurity.com/enterprise/solutions/cloud-office-protection/
http://www.pandasecurity.com/enterprise/solutions/cloud-office-protection-advanced
Configuring the protection
You can configure the protection installed on your computers before or after installing it. In
this Help file, the configuration process is explained as a step prior to installing the protection
on your network. In any event, we recommend that you spend some time carefully
analyzing the protection needs of your network.
These needs might vary from one computer to another, or be the same for all computers on
your network. Depending on these circumstances, you might need to create new profiles
or simply use the Endpoint Protection default settings.
Installation
Recommendations prior to installation
Advanced Administration Guide – Endpoint Protection
15
Before installing the protection, we advise that you check the Recommendations prior to
installation. You will find important information about the install and uninstall processes.
Computer requirements
Remember to check the minimum requirements that your computers and devices must
meet to install the protection on them, and configure it to make the most of all the benefits
provided by Endpoint Protection.
We hope that you find the information in this Help file useful.
1.3. Protection technologies
Anti-exploit technology Panda Security's new anti-exploit technology optimizes its security solutions and allows the
company to detect viruses no other company can detect.
Our new anti-exploit technology detects and neutralizes malware like Blackhole or Redkit
that exploits zero-day vulnerabilities (in Java, Adobe, MS Office, etc.), before it infects the
computer.
The key to detect as-yet-unknown exploits is to use heuristic technologies with powerful
detection capabilities. For this purpose, the new anti-exploit protection included in Endpoint
Protection analyzes how exploits behave instead of their morphology.
Endpoint Protection uses multiple sensors to send Collective Intelligence information about
the behavior of suspicious files that try to exploit 0-day vulnerabilities to infect systems.
This information allows Panda Security to keep the proactive technologies included in its
products constantly up-to-date (via on-the-fly updates from the cloud) .
In short, Endpoint Protection detects and neutralizes this type of malware before it has been
identified (and even created), protecting users against new malware variants.
Security from the cloud and Collective Intelligence
What is 'the cloud'?
Cloud computing is a technology that allows services to be offered across the Internet.
Consequently, the term 'the cloud' is used as a metaphor for the Internet in IT circles.
Endpoint Protection is served from the cloud, connecting to Collective Intelligence servers
to protect your computer at all times, increasing its detection capabilities and not interfering
with the performance of the computer. Now all knowledge is in the cloud, and thanks to
Endpoint Protection you can benefit from it.
What is Collective Intelligence?
Collective Intelligence is a security platform that provides high-level protection in real time,
exponentially increasing the detection capabilities of Endpoint Protection.
Advanced Administration Guide – Endpoint Protection
16
How does detection with Collective Intelligence work?
Collective Intelligence has servers that classify and process all the data provided by the user
community about detections on their computers. Endpoint Protection sends requests to
Collective Intelligence whenever it requires, ensuring maximum detection without
negatively affecting resource consumption on computers.
When new malware is detected on a computer in the user community, Endpoint Protection
sends the relevant information to our Collective Intelligence servers in the cloud,
automatically and anonymously. This information is processed by our servers, delivering the
solution to all users in the community in real time. Hence the name Collective Intelligence.
Given the current context of increasing amounts of malware, Collective Intelligence and
services hosted in the cloud are an essential complement to traditional updates to
successfully combat the enormous amount of threats in circulation.Information and queries.
1.4. Information, queries and services
Along with the products themselves, Panda Security offers you Help files and documentation
to extend information, resolve queries, access the latest updates and benefit from other
services. You can also keep up-to-speed on the latest IT security news. Visit the Panda
Security Website to access all the information you need.
Useful links - Home page
http://www.pandasecurity.com/
All the Panda Security information at your disposal.
- Documentation
http://www.pandasecurity.com/enterprise/downloads/docs/product
All the latest product documentation and other publications.
- Technical Support
http://www.pandasecurity.com/enterprise/support
Clear up any questions you may have about infections, viruses, and Panda Security products and services, with continuous and fully up-to-date information, any time of the day, all year round.
- Endpoint Protection Technical Support
http://www.pandasecurity.com/enterprise/support/cloud-office-protection.htm
- Endpoint Protection Plus Technical Support
http://www.pandasecurity.com/enterprise/support/cloud-office-protection-advanced.htm
- Trial software
http://www.pandasecurity.com/enterprise/downloads/evaluation/
Panda Security offers you free trial software of the product you want.
- Products
http://www.pandasecurity.com/enterprise/solutions/
Check out the features of all Panda Security products. You can also buy them or try
Advanced Administration Guide – Endpoint Protection
17
them without obligation.
Endpoint Protection services In addition to this Help, which will let you get the most out of your protection, Panda Security
offers you other services. These value-added services will ensure that you always have
access to expert advice and the latest security technology developed by Panda Security.
Services offered by Endpoint Protection:
- Daily updates of the signature file.
- Specialized Technical Support via email and telephone.
- General updates of Endpoint Protection
New features, improvements to its detection capabilities, etc.
- Documentation
Access to the Advanced administration guide.
http://resources.pandasecurity.com/enterprise/solutions/endpoint2015/ENDPOINT
PROTECTION-GuiaAvanzada-EN.pdf
Other services The Endpoint Protection Web console lets you access other services to send suggestions or
contact the Panda Security technical support. To do this, click Other services.
Technical support Access the Technical Support area where you will find the answers to any questions you
might have about Endpoint Protection, as well as other information and utilities provided by
Panda Security.
Troubleshooting
Visit our support Web page for a list of the most common error codes that you may face
while using Endpoint Protection as well as up-to-date information about all of them.
Go to:
http://www.pandasecurity.com/enterprise/support/card?id=50032
Suggestion box
Your comments and suggestions help us improve Endpoint Protection, adapting it to your
needs. Please do not hesitate to contact us.
Icons
The following icons appear in the guide:
Additional information, such as an alternative way of performing a certain task.
Advanced Administration Guide – Endpoint Protection
18
Suggestions and recommendations.
Important advice regarding the use of features in Adaptive Defense 360.
1.5. Requirements and external URLs Endpoint Protection is the ideal solution to protect your computer network. Nevertheless, to
make the most out of it, the computers used to access, install, configure and deploy the
protection must meet a series of hardware and software requirements.
Requirements for Windows systems Requirements for accessing the Administration Console
Browser:
• Internet Explorer
• Mozilla Firefox
• Google Chrome
Network:
• Internet connection: direct or through a local area network.
• HTTP connection (port 443).
Requirements on the computer from which deployment is performed
• Operating system: Windows 8.1 (PCOP 6.70.20), Windows 8 (PCOP 6.20.10), Windows 7 (32 and 64-bit), Windows Vista (32 and 64-bit), Windows XP Professional (32 and 64-bit), Windows 2000 Professional, Windows Server 2000, Windows Server 2003 (32 and 64-bit), Windows Server 2008 (32 and 64-bit), Windows Server 2008 R2, Windows Home Server, Windows Server 2012, Windows Server 2012 R2 (PCOP 6.70.20).
• Memory: 64 MB
• Hard disk: 20 MB
• Processor: Pentium II 300 MHz or equivalent.
• Windows Installer 2.0 (yet, Windows Installer 3.0 is recommended if you want to uninstall remotely).
• Browser: Internet Explorer 6.0 or later
Other:
• Access to the Admin$ resource on the computers to be protected.
• A user with administrator rights to the computers to which the protection is distributed.
Minimum requirements for the computers to which the protection is distributed
• Processor: Pentium 300 MHz or equivalent
• Hard disk: 256 MB
• Space for the installation: 500 MB
• Browser: Internet Explorer: 6.0 or later
Advanced Administration Guide – Endpoint Protection
19
• Others: On computers running earlier versions of Windows XP SP2 or Windows 2003 Server SP1:
• Windows Installer 2.0 (yet, Windows Installer 3.0 is recommended if you want to uninstall remotely)
• Disable the Windows firewall or configure the exception File and printer sharing (Start > Settings > Control panel>Network connections > Local area connections > (right button) Properties > General).
• To have Use simple file sharing disabled (on Windows XP, Tools > Folder Options > View> Use simple file sharing).
Workstations
• Operating systems: Windows 8.1 (PCOP 6.70.20), Windows 8 (PCOP 6.20.10), Windows 7 (32 and 64-bit), Windows Vista (32 and 64-bit), Windows XP (32 and 64-bit) and Windows 2000 Professional.
• RAM: For the antivirus protection: 64 MB, for the Firewall: 128 MB
Servers
• Operating systems: Windows 2000 Server, Windows Home Server, Windows Server 2003 (32 and 64-bit), Windows Server 2008 (32 and 64-bit)*, Windows Server 2008 R2*, Windows Server 2012 (PCOP 6.20.10) and Windows Server 2012 R2 (PCOP 6.70.20).
• RAM: 256 MB
Other compatible applications:
• VMWare ESX 3.x,4.x, 5,x
• VMWare Workstation 6.0, 6.5, 7.x, 8.x and 9.x
• Virtual PC 6.x
• Microsoft Hyper-V Server 2008 R2 and 2012 3.0
• Citrix XenDesktop 5.x, XenClient 4.x, XenServer and XenApp 5.x and 6.x
To deploy the protection from the distribution tool to machines with Windows server 2008 R2, you must enable the option Enable remote management of the server from another computer. This option is disabled by default, and is required to be enabled and allowed by the firewall. To enable this option, follow the instructions specified in the following Microsoft article: http://support.microsoft.com/kb/976839
Minimum requirements for the computers to which the Exchange Servers protection is
distributed (only in Endpoint Protection Plus)
Hardware requirements: The hardware requirements to install the Exchange Server
protection are determined according to the Exchange Server specifications:
- Exchange 2003: http://technet.microsoft.com/en-us/library/cc164322(v=exchg.65).aspx
- Exchange 2007: http://technet.microsoft.com/en-us/library/aa996719(v=EXCHG.80).aspx
- Exchange 2010: http://technet.microsoft.com/en-us/library/aa996719(v=exchg.141).aspx
Advanced Administration Guide – Endpoint Protection
20
- Exchange 2013 http://technet.microsoft.com/en-us/library/aa996719(v=exchg.150).aspx
Versions protected by the Exchange Servers protection in Endpoint Protection Plus:
• Microsoft Exchange Server 2003 Standard (SP0 / SP1 / SP2)
• Microsoft Exchange Server 2003 Enterprise (SP0 / SP1 / SP2)
• Microsoft Exchange Server 2003 included in Windows SBS 2003
• Microsoft Exchange Server 2007 Standard (SP0 / SP1 / SP2 / SP3)
• Microsoft Exchange Server 2007 Enterprise (SP0 / SP1 / SP2 / SP3)
• Microsoft Exchange Server 2007 included in Windows SBS 2008
• Microsoft Exchange Server 2010 Standard (SP0 / SP1 / SP2)
• Microsoft Exchange Server 2010 Enterprise (SP0 / SP1 / SP2)
• Microsoft Exchange Server 2010 included in Windows SBS 2011
• Microsoft Exchange Server 2013 Standard
• Microsoft Exchange Server 2013 Enterprise
Roles in which the Exchange Servers protection is installed (Exchange 2007 and Exchange
2010):
• Mailbox
• Hub Transport
• Edge Transport
Roles in which Exchange Server protection is installed in Exchange 2013
• Mailbox
Operating systems supported:
• Exchange 2003: Windows Server 2003 32-bit Edition SP1+ and Windows Server 2003 R2 32-bit Edition
• Exchange 2007: Windows Server 2003 64-bit Edition SP1+, Windows Server 2003 R2 64-bit Edition, Windows 2008 64-bit Edition and Windows 2008 R2
• Exchange 2010: Windows 2008 64-bit Edition and Windows 2008 R2
• Exchange 2013: Windows 2012
Installation of the firewall is not supported on Windows Server 2008 with NLB in PCOP 5.x versions.
For more information, refer to the following article about how to avoid loss of
communication on a Windows Server 2008 cluster with Network Load Balancing (NLB) and
install the protection:
http://www.pandasecurity.com/uk/support/card?id=50048
Bear in mind that if you want your computers to communicate with the Collective
Intelligence servers you must have an Internet connection. If you connect to the Internet via
a proxy, it must be configured correctly. To do this, enter the necessary details in the Internet
connection via a proxy section in the - Advanced options profile edit window. Go to
the General settings of Endpoint Protection Plus article for more details.
Advanced Administration Guide – Endpoint Protection
21
Requirements for Linux systems Supported distributions
• Endpoint Protection supports the following operating systems:
• Red Hat Enterprise (64-bit), version 6.0 or later
• Debian Squeeze (32-bit and 64-bit)
• Ubuntu (32-bit and 64-bit), version 12 or later
• OpenSuse (32-bit and 64-bit), version 12 or later
• Suse Enterprise Server (64-bit), version 11 SP2 or later
• CentOS 6.x and later
Preinstallation requirements
The system must meet the following requirements for the product to work correctly:
• The “lsb_release” utility must be installed (on RedHat and Debian).
• This utility is used to determine the Linux distribution the installer is running on.
• On Debian, download and install the following package: lsb-release_3.2-23.2squeeze1_all.deb
• On RedHat, download and install the following package: redhat-lsb.i686
PavSL protection dependencies (all distributions).
The PavSL protection requires the installation of the following libraries to work
properly:
• libsoup-2.4.so.1 (HTTP client/server library for GNOME)
• libgthread-2.0
• libmcrypt.so.4 (MCrypt - encryption functions)
• libz.so.1 (zlib compression and decompression library)
Make sure the /opt/PCOPAgent/PCOPScheduler/pavsl-bin/ directory contains all the “PavSL” dependencies: # ldd libPskcomms.so On SUSE/OpenSUSE x64, use the following workaroundif there are any issues:
• Install ligsoup-2_4-1-32bit (if it is not already installed). For example: # zypper install libsoup-2_4-1-32bit
• Install libgthread-2_0-0-32bit (if it is not already installed). For example: # zypper install libgthread-2_0-0-32bit
• Uninstall libmcrypt and mcrypt: # zypper rm libmcrypt # zypper rm mcrypt
• Install “libmcrypt-2.5.8-109.1.2.i586.rpm”. Download and install it, if it is not already installed.
On Ubuntu x64, run the following commands to install the required dependencies
for the service to to work properly:
• sudo dpkg --add-architecture i386
• sudo apt-get update

Advanced Administration Guide – Endpoint Protection
22
• sudo apt-get install libglib2.0-0:i386
• sudo apt-get install libsoup2.4-1:i386
• sudo apt-get install libmcrypt4:i386
• sudo apt-get install libgssapi-krb5-2:i386
AT/CRON must be properly installed and enabled (in all distributions):
Make sure the AT and CRON services are properly installed and enabled in the system
services.
Workaround for the “ATD” service (on SUSE and openSUSE)
Follow the steps below if the "ATD" service doesn’t start automatically on openSUSE:
Edit the file /etc/sysconfig/atd
ATD_BATCH_INTERVAL = "60"
ATD_LOADAVG = "0.8"
Edit the file /lib/systemd/system/atd.service as follows:
# cat /lib/systemd/system/atd.service
[Unit]
Description=Execution Queue Daemon
After=syslog.target
[Service]
Type=forking
EnvironmentFile=-/etc/sysconfig/atd
ExecStart=/usr/sbin/atd -b ${ATD_BATCH_INTERVAL} -l ${ATD_LOADAVG}
[Install]
WantedBy=multi-user.target
• Reload the daemon, start it, and check the service status: # chkconfig --add atd
• # systemctl --system daemon-reload
• # systemctl enable atd.service
• # systemctl start atd.service
• # systemctl status atd.service
atd.service - Execution Queue Daemon
Loaded: loaded (/lib/systemd/system/atd.service; disabled)
Active: active (running) since Fri, 05 Oct 2012 12:14:52 -0500; 1s ago
Process: 20851 ExecStart=/usr/sbin/atd -b ${ATD_BATCH_INTERVAL} -l ${ATD_LOADAVG}
(code=exited, status=0/SUCCESS)
Main PID: 20852 (atd)
CGroup: name=systemd:/system/atd.service
|_ 20852 /usr/sbin/atd -b 60 -l 0.8
Reboot the computer so that it takes it into account from then on:
Advanced Administration Guide – Endpoint Protection
23
# reboot
After the computer finishes booting, check the service status:
# systemctl status atd.service
To run the proxy server configuration script, the whiptail command must be available. On
SUSE, this command is included in the newt package. Run the following
command to install it:
# zipper install newt
Requirements for OS X systems
In order to install and operate Endpoint Protection for OS X systems, the computer must meet
the following system requirements:
Operating systems Endpoint Protection supports the following OS X operating systems:
• MAC OS X 10.6 Snow Leopard (Intel Core 2 Duo Processor or higher)
• MAC OS X 10.7 Lion
• MAC OS X 10.8 Mountain Lion
• Mac OS X 10.9 Mavericks
• Mac OS X 10.10 Yosemite
Hardware requirements
• Processor: Intel® Core 2 Duo
• Hard disk: 1.5 GB of available disk space
• Browser: Internet Explorer: 5.5 or later, Firefox and Chrome
Others Access to the following URLs must be granted:
• mp-agents-inst.pandasecurity.com
• mp-agents-sync.pandasecurity.com
• mp-agents-async.pandasecurity.com
• proinfo.pandasoftware.com
• http://www.netupdate2.intego.com
• https://www.netupdate2.intego.com
• http://www.integodownload.com
• http://www.intego.com
Requirements for Android devices
Android version 2.3 (Gingerbread) or later.
Before installing the protection it is advisable to make sure that you have a QR code reader
installed on your device.
Advanced Administration Guide – Endpoint Protection
24
External URLs
To access the Endpoint Protection servers and be able to download updates, at least one
of the computers on the subnet must have access to a series of Web pages.
Console
https://www.pandacloudsecurity.com/
https://managedprotection.pandasecurity.com/
https://pandasecurity.logtrust.com
Updates and Upgrades
http://acs.pandasoftware.com/member/installers/
http://acs.pandasoftware.com/member/uninstallers/
http://enterprise.updates.pandasoftware.com/pcop/pavsig/
http://enterprise.updates.pandasoftware.com/pcop/nano
http://enterprise.updates.pandasoftware.com/pcop/sigfiles/sigs
http://acs.pandasoftware.com/free/
http://acs.pandasoftware.com/sigfiles
http://acs.pandasoftware.com/pcop/uacat
http://enterprise.updates.pandasoftware.com/pcop/uacat/
http://enterprise.updates.pandasoftware.com/updates_ent/
https://pcopsupport.pandasecurity.com
http://pcoplinux.updates.pandasecurity.com/updates/nanoupdate.phtml (Linux systems)
http://pcoplinux.downloads.pandasecurity.com/nano/pavsignano/nano_1/ (Linux
systems)
http://www.intego.com (OS X systems)
http://www.integodownload.com (OS X systems)
http://www.netupdate2.intego.com (OS X systems)
https://www.netupdate2.intego.com (OS X systems)
Megaquarantine
http://hercules.pandasoftware.com/getqesi.aspx
http://hercules.pandasoftware.com/getqesd.aspx
Communication with the server
https://mp-agents-inst.pandasecurity.com
http://mp-agents-inst.pandasecurity.com/Agents/Service.svc
https://mp-agents-inst.pandasecurity.com/AgentsSecure/Service.svc
http://mp-agents-sync.pandasecurity.com/Agents/Service.svc
https://mp-agents-sync.pandasecurity.com/AgentsSecure/Service.svc
http://mp-agents-async.pandasecurity.com/Agents/Service.svc
https://agentscomp.pandasecurity.com/AgentsSecure/Service.svc
mp-agents-inst.pandasecurity.com (OS X systems)
Advanced Administration Guide – Endpoint Protection
25
mp-agents-sync.pandasecurity.com (OS X systems)
mp-agents-async.pandasecurity.com (OS X systems)
https://pac100pacprodpcop.table.core.windows.net
https://storage.accesscontrol.pandasecurity.com
https://prws.pandasecurity.com
https://rpuws.pandasecurity.com/frws (v7.10)
Communication with the Collective Intelligence servers
http://cache.pandasoftware.com
http://cache2.pandasecurity.com
https://rpkws.pandasecurity.com/kdws/files
http://proinfo.pandasoftware.com (OS X systems)
http://proinfo.pandasoftware.com/connectiontest.html
If connection to the above URL fails, the product will try to reach http://www.iana.org.
https://ims.pandasecurity.com/ProySRF
http://statistics.pandasoftware.com
https://euws.pandasecurity.com
https://rpuws.pandasecurity.com
https://rpkws.pandasecurity.com/kdws/sigs
Android
https://dmp.devicesmc.pandasecurity.com
https://pcopsupport.pandasecurity.com
https://rpuws.pandasecurity.com
https://rpkws.pandasecurity.com/kdws/sigs
http://iext.pandasecurity.com/ProyIEXT/ServletIExt
Panda Cloud Systems Management agent installation from PCOP (v6.70)
https://sm.pandasecurity.com/csm/profile/downloadAgent/
For incoming and outgoing traffic (Antispam and URL Filtering in PCOPA)
http://*.pand.ctmail.com
http://download.ctmail.com
For the correct functioninig of the P2P technology and centralization of connections with
the server through a computer, you must enable port TCP 18226 and UDP 21226 on the
client's intranet.

Advanced Administration Guide – Endpoint Protection
26
2. Creating Panda
Account
What is your Panda Account?
How to create your Panda Account
How to activate your Panda Account
Advanced Administration Guide – Endpoint Protection
27
2.1. What is your Panda Account?
When you buy Adaptive Defense 360 you will receive an email from Panda Security. Click
the link in the message to go to the website where you can create your Panda Account.
You must then activate your Panda Account using the link sent to you in another email
message.
Finally, go to Panda Cloud. There you will find the shortcut to access the Adaptive Defense
360 Web console.
This new method aims to increase the security of your login credentials as, instead of
receiving them via email, you yourself create and activate your Panda Account, the entry
point to access the Adaptive Defense 360 Web console.
Panda Cloud lets you manage your cloud solutions quickly and easily and, if necessary,
access information regarding other Panda Security solutions which will resolve all your
network’s protection needs.
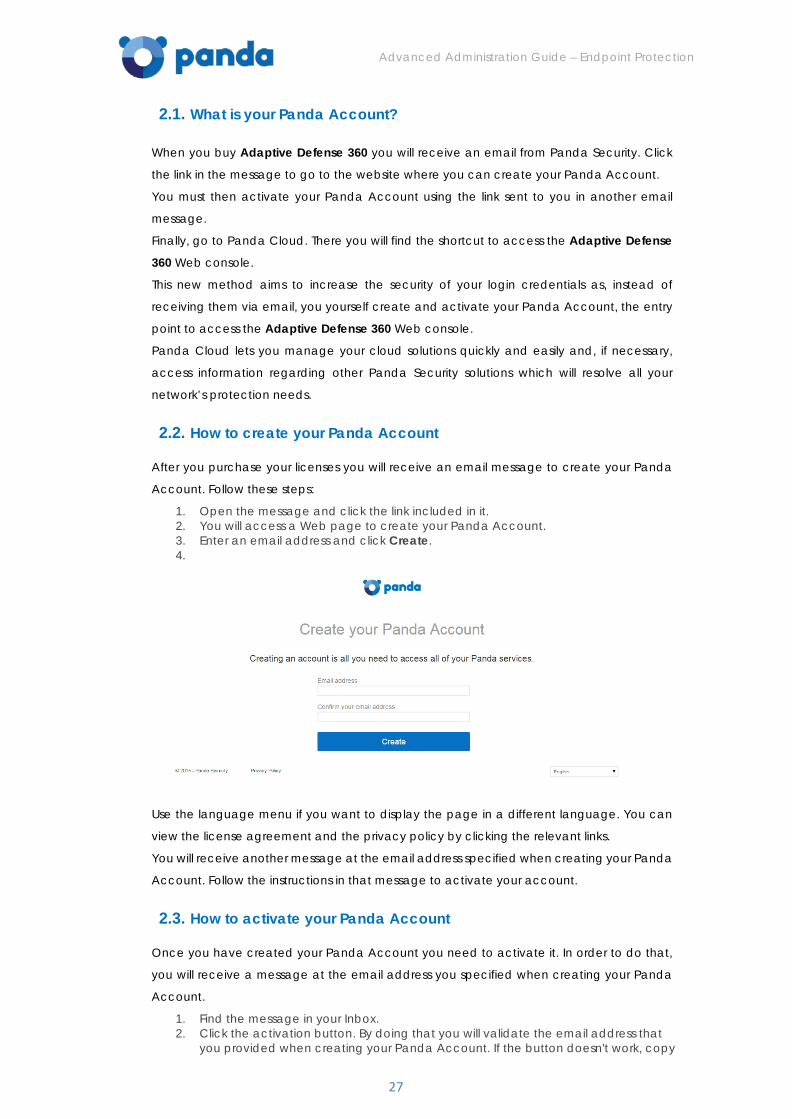
2.2. How to create your Panda Account
After you purchase your licenses you will receive an email message to create your Panda
Account. Follow these steps:
1. Open the message and click the link included in it. 2. You will access a Web page to create your Panda Account. 3. Enter an email address and click Create. 4.
Use the language menu if you want to display the page in a different language. You can
view the license agreement and the privacy policy by clicking the relevant links.
You will receive another message at the email address specified when creating your Panda
Account. Follow the instructions in that message to activate your account.
2.3. How to activate your Panda Account
Once you have created your Panda Account you need to activate it. In order to do that,
you will receive a message at the email address you specified when creating your Panda
Account.
1. Find the message in your Inbox. 2. Click the activation button. By doing that you will validate the email address that
you provided when creating your Panda Account. If the button doesn't work, copy
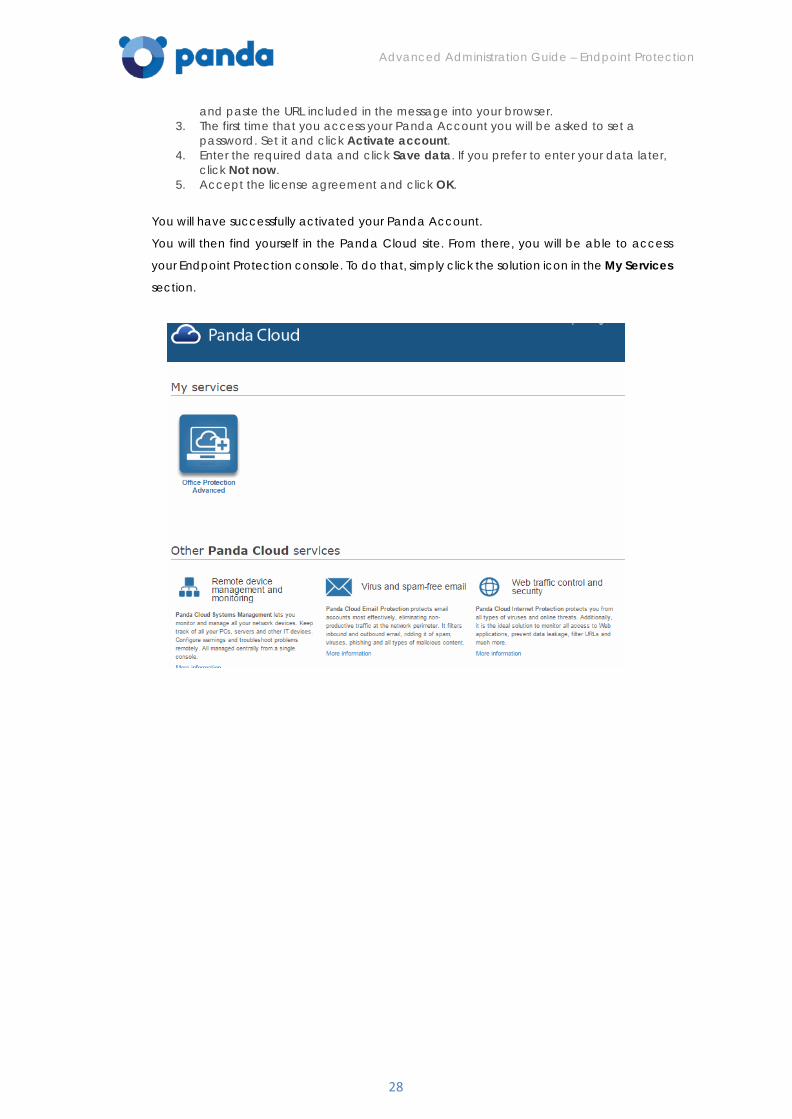
Advanced Administration Guide – Endpoint Protection
28
and paste the URL included in the message into your browser. 3. The first time that you access your Panda Account you will be asked to set a
password. Set it and click Activate account. 4. Enter the required data and click Save data. If you prefer to enter your data later,
click Not now. 5. Accept the license agreement and click OK.
You will have successfully activated your Panda Account.
You will then find yourself in the Panda Cloud site. From there, you will be able to access
your Endpoint Protection console. To do that, simply click the solution icon in the My Services
section.
Advanced Administration Guide – Endpoint Protection
29
3. Login to the Web console
Login to the Web console
Preferences
Advanced Administration Guide – Endpoint Protection
30
3.1. Login to the Web console
When you access the Web console you will see the Status window. There you will see a
number of counters with information about your licenses and the status of your protection.
If you still have not installed the protection on any of your computers, the window will display
a message prompting you to install it and indicating from where to do it.
Other options available in the Web console
Log out
Click Log out to close the session.
Select language
You can select the language for viewing the Web console. Use the Language list next to the
active language.
Create users
To create new users and assign access permissions and management privileges to them,
click Users.
Set preferences
To configure general aspects of the Web console, click Preferences.
Access more information
If you want to access the Help file, discover the latest Endpoint Protection's news or check
the Advanced Administration Guide, select the relevant option in the Help menu.
Use this menu too if you want to view the License Agreement, send suggestions to us or
access technical support (http://www.pandasecurity.com/enterprise/uk/support/cloud-
office-protection-advanced.htm)
About...
This menu shows the following information:
• Web console version.
• The Endpoint Protection version installed on the network.
• The agent version installed on the network.
• If you have several computers and each of them has a different protection version installed, the About menu will display the latest version of them all.
• If you haven’t installed the protection on any computers yet, the window will
• isplay the latest available version of the protection
3.2. Preferences
This window lets you configure a number of general settings regarding your Web
console:Default view Choose the way in which computers are displayed: by name or by IP address. Select the
option you want.
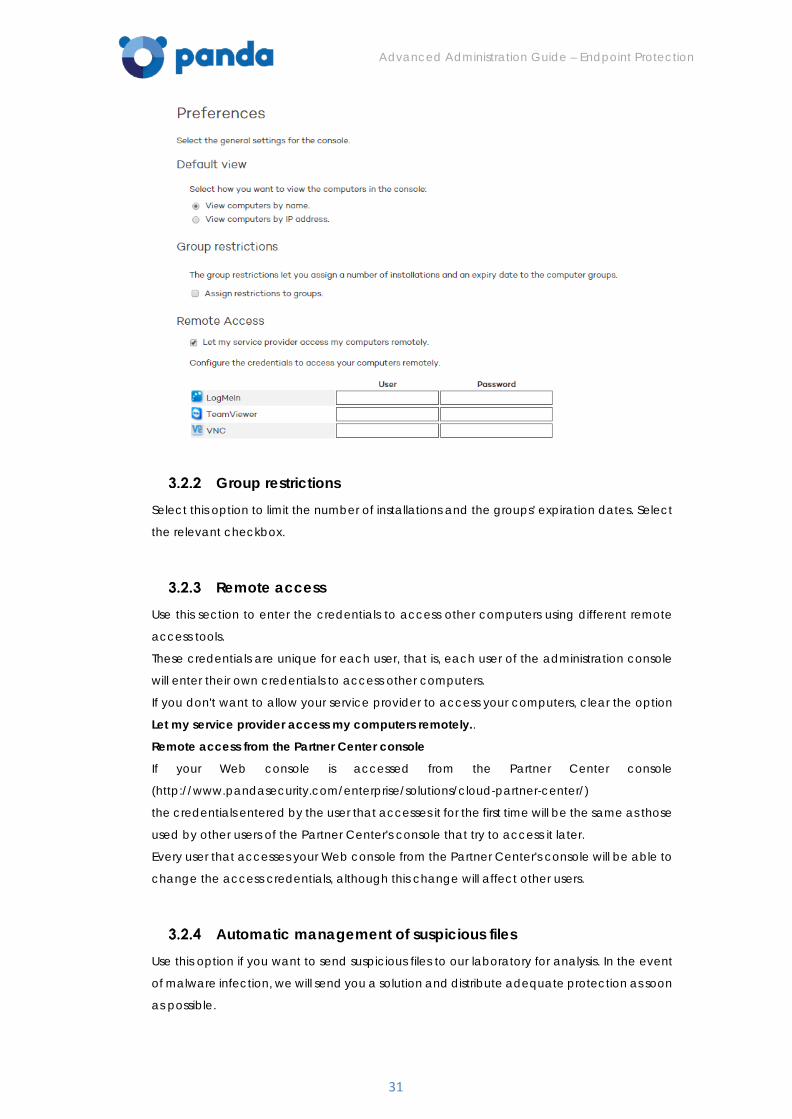
Advanced Administration Guide – Endpoint Protection
31
Group restrictions
Select this option to limit the number of installations and the groups' expiration dates. Select
the relevant checkbox.
Remote access
Use this section to enter the credentials to access other computers using different remote
access tools.
These credentials are unique for each user, that is, each user of the administration console
will enter their own credentials to access other computers.
If you don't want to allow your service provider to access your computers, clear the option
Let my service provider access my computers remotely..
Remote access from the Partner Center console
If your Web console is accessed from the Partner Center console
(http://www.pandasecurity.com/enterprise/solutions/cloud-partner-center/)
the credentials entered by the user that accesses it for the first time will be the same as those
used by other users of the Partner Center's console that try to access it later.
Every user that accesses your Web console from the Partner Center's console will be able to
change the access credentials, although this change will affect other users.
Automatic management of suspicious files
Use this option if you want to send suspicious files to our laboratory for analysis. In the event
of malware infection, we will send you a solution and distribute adequate protection as soon
as possible.

Advanced Administration Guide – Endpoint Protection
32
Account management If you are a user with total control permissions, you will be able to access the account
management feature.
- Merging accounts
- Delegating security management to a partner
Advanced Administration Guide – Endpoint Protection
33
4. The Status window
Protection status
License status
Viewing licenses
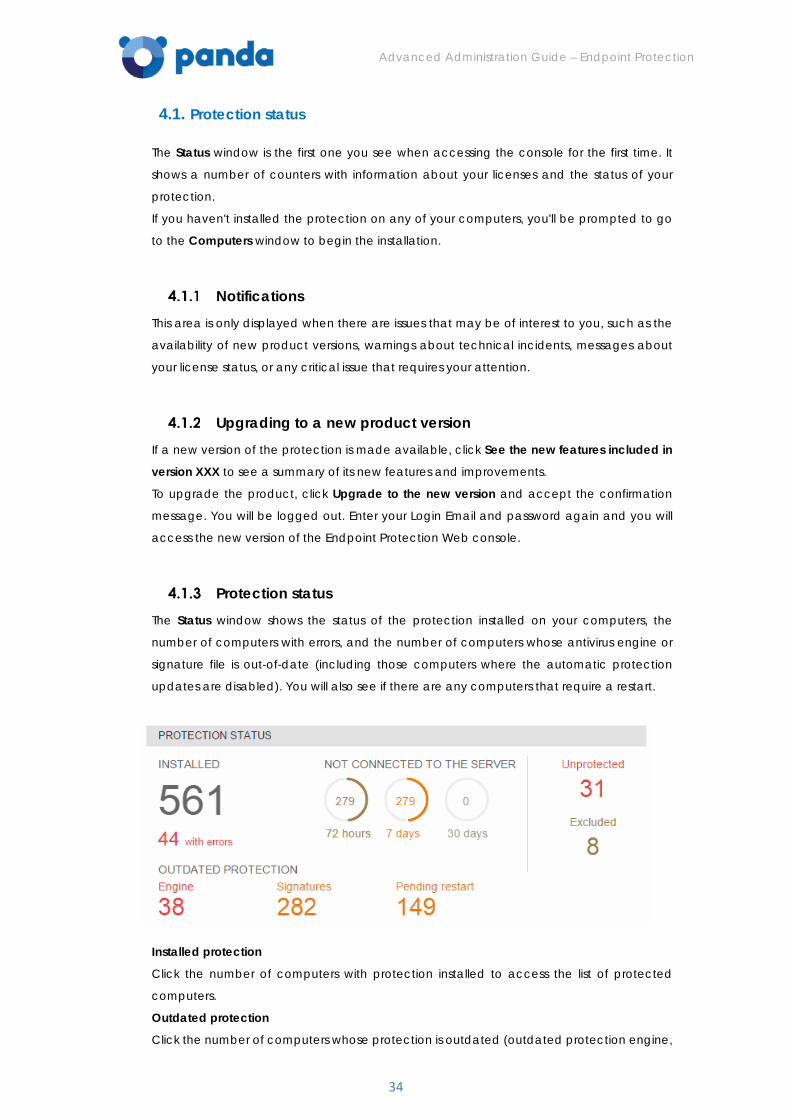
Advanced Administration Guide – Endpoint Protection
34
4.1. Protection status
The Status window is the first one you see when accessing the console for the first time. It
shows a number of counters with information about your licenses and the status of your
protection.
If you haven't installed the protection on any of your computers, you'll be prompted to go
to the Computers window to begin the installation.
Notifications
This area is only displayed when there are issues that may be of interest to you, such as the
availability of new product versions, warnings about technical incidents, messages about
your license status, or any critical issue that requires your attention.
Upgrading to a new product version If a new version of the protection is made available, click See the new features included in
version XXX to see a summary of its new features and improvements.
To upgrade the product, click Upgrade to the new version and accept the confirmation
message. You will be logged out. Enter your Login Email and password again and you will
access the new version of the Endpoint Protection Web console.
Protection status
The Status window shows the status of the protection installed on your computers, the
number of computers with errors, and the number of computers whose antivirus engine or
signature file is out-of-date (including those computers where the automatic protection
updates are disabled). You will also see if there are any computers that require a restart.
Installed protection
Click the number of computers with protection installed to access the list of protected
computers.
Outdated protection
Click the number of computers whose protection is outdated (outdated protection engine,
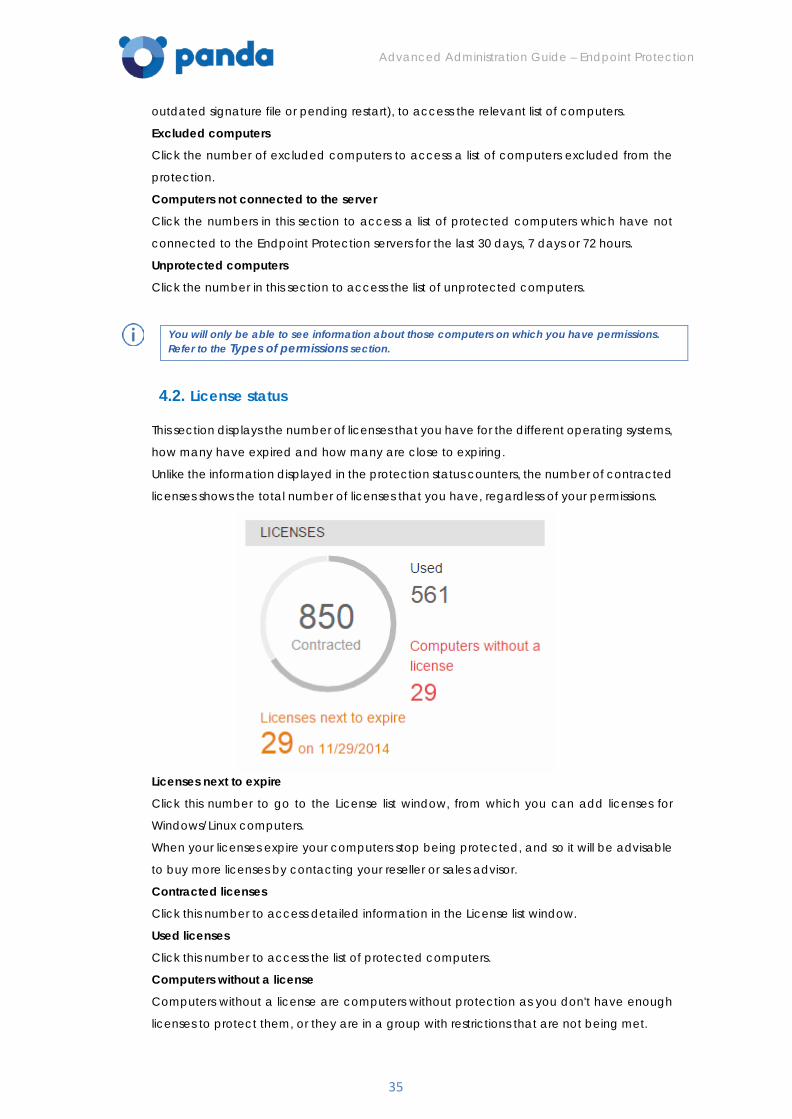
Advanced Administration Guide – Endpoint Protection
35
outdated signature file or pending restart), to access the relevant list of computers.
Excluded computers
Click the number of excluded computers to access a list of computers excluded from the
protection.
Computers not connected to the server
Click the numbers in this section to access a list of protected computers which have not
connected to the Endpoint Protection servers for the last 30 days, 7 days or 72 hours.
Unprotected computers
Click the number in this section to access the list of unprotected computers.
You will only be able to see information about those computers on which you have permissions. Refer to the Types of permissions section.
4.2. License status
This section displays the number of licenses that you have for the different operating systems,
how many have expired and how many are close to expiring.
Unlike the information displayed in the protection status counters, the number of contracted
licenses shows the total number of licenses that you have, regardless of your permissions.
Licenses next to expire
Click this number to go to the License list window, from which you can add licenses for
Windows/Linux computers.
When your licenses expire your computers stop being protected, and so it will be advisable
to buy more licenses by contacting your reseller or sales advisor.
Contracted licenses
Click this number to access detailed information in the License list window.
Used licenses
Click this number to access the list of protected computers.
Computers without a license
Computers without a license are computers without protection as you don't have enough
licenses to protect them, or they are in a group with restrictions that are not being met.
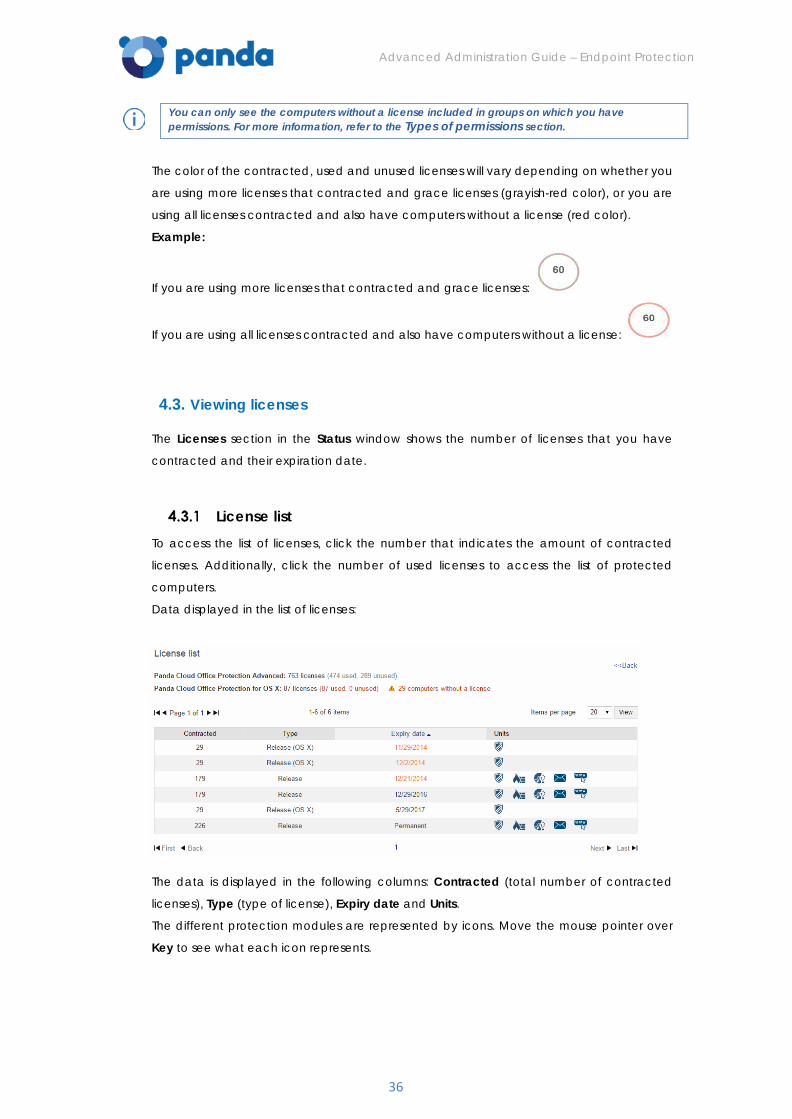
Advanced Administration Guide – Endpoint Protection
36
You can only see the computers without a license included in groups on which you have permissions. For more information, refer to the Types of permissions section.
The color of the contracted, used and unused licenses will vary depending on whether you
are using more licenses that contracted and grace licenses (grayish-red color), or you are
using all licenses contracted and also have computers without a license (red color).
Example:
If you are using more licenses that contracted and grace licenses:
If you are using all licenses contracted and also have computers without a license:
4.3. Viewing licenses
The Licenses section in the Status window shows the number of licenses that you have
contracted and their expiration date.
License list To access the list of licenses, click the number that indicates the amount of contracted
licenses. Additionally, click the number of used licenses to access the list of protected
computers.
Data displayed in the list of licenses:
The data is displayed in the following columns: Contracted (total number of contracted
licenses), Type (type of license), Expiry date and Units.
The different protection modules are represented by icons. Move the mouse pointer over
Key to see what each icon represents.
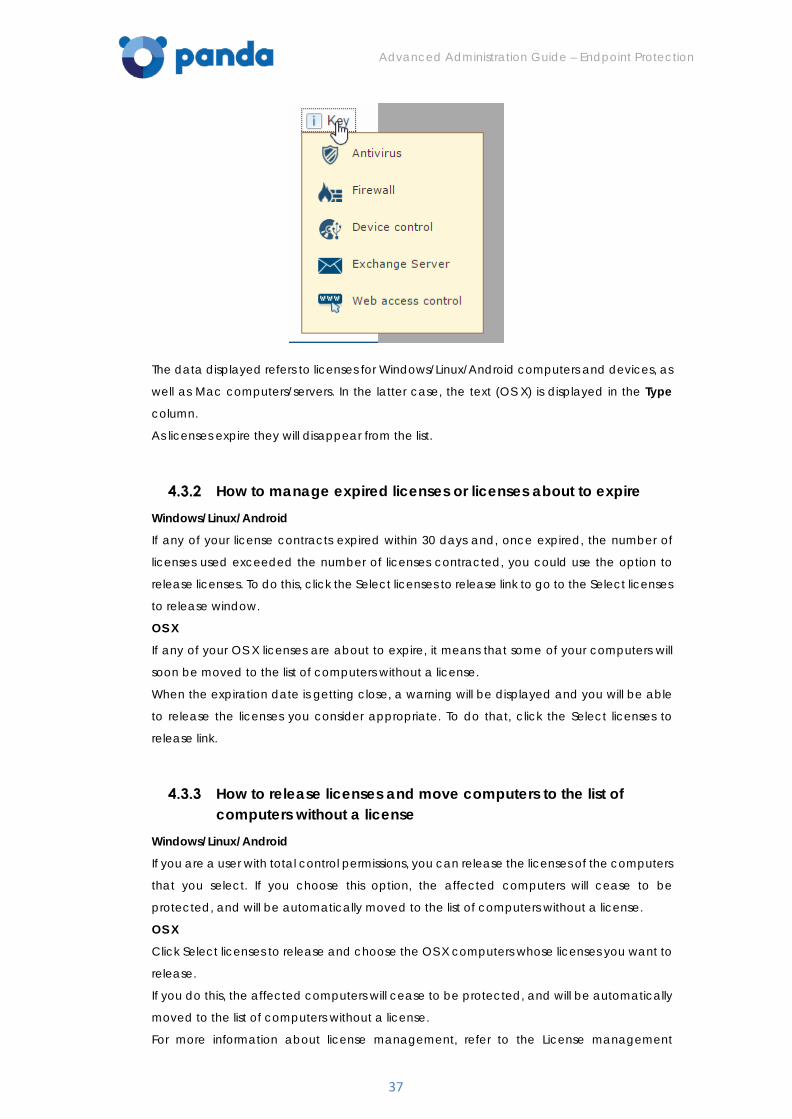
Advanced Administration Guide – Endpoint Protection
37
The data displayed refers to licenses for Windows/Linux/Android computers and devices, as
well as Mac computers/servers. In the latter case, the text (OS X) is displayed in the Type
column.
As licenses expire they will disappear from the list.
How to manage expired licenses or licenses about to expire
Windows/Linux/Android
If any of your license contracts expired within 30 days and, once expired, the number of
licenses used exceeded the number of licenses contracted, you could use the option to
release licenses. To do this, click the Select licenses to release link to go to the Select licenses
to release window.
OS X
If any of your OS X licenses are about to expire, it means that some of your computers will
soon be moved to the list of computers without a license.
When the expiration date is getting close, a warning will be displayed and you will be able
to release the licenses you consider appropriate. To do that, click the Select licenses to
release link.
How to release licenses and move computers to the list of computers without a license
Windows/Linux/Android
If you are a user with total control permissions, you can release the licenses of the computers
that you select. If you choose this option, the affected computers will cease to be
protected, and will be automatically moved to the list of computers without a license.
OS X
Click Select licenses to release and choose the OS X computers whose licenses you want to
release.
If you do this, the affected computers will cease to be protected, and will be automatically
moved to the list of computers without a license.
For more information about license management, refer to the License management

Advanced Administration Guide – Endpoint Protection
38
section.
Clients can only have licenses of one product: Endpoint Protection or Endpoint Protection Plus, which can be used for Windows/Linux/Android or OS X computers.
Advanced Administration Guide – Endpoint Protection
39
5. Detected threats
Detected threats and detection origin
Filtered messages
Web access control
Detection details
Scheduled scans
Advanced Administration Guide – Endpoint Protection
40
5.1. Detected threats and detection origin
To view information about the detections made on your network, go to the Detected threats
and Detection origin sections in the Status window.
These sections show the status of the protection installed on your computers, by malware
type and by detection origin.
Detections on Linux computers
1. The Detected threats graph adds the detections made on Linux systems to the relevant categories. If the category cannot be identified, the relevant detection will be added to Other.
2. In the Detection origin graph, the detections made on Linux systems are added to the File system category.
Detections on OS X computers 1. The Detected threats graph adds the detections made on OS X systems to the
Viruses category. 2. In the Detection origin graph, the detections made on OS X systems are added to
the File system category. To see the detections made over a given period of time, select an option in the Period
menu.
Detections on Android devices
Threats detected on Android devices will be added to the File system category in the
Detection origin graph.
As for the Detected threats graph, it will work in exactly the same way as for Windows
computers, as explained below.
Detections on Windows computers
Detected threats
Displays detections of each type of malware threat. It also displays information about the
total number of intrusion attempts, devices, dangerous operations and tracking cookies
blocked.
Malware URLs are included in the Other category, whereas phishing URLs are included in the
Phishing category.
Detection origin
Indicates the protection unit that detected the malicious items.
It shows the detections reported by the following protections:
• File system
• Web (detection of malware and/or phishing Web pages)
• Firewall
• Device control (access denied to USB flash drives, CD/DVD readers, imaging and
Advanced Administration Guide – Endpoint Protection
41
Bluetooth devices)
• Exchange Server (detections on Exchange servers)
To see the list of scheduled scans, click the Scheduled scans link.
Click Detection details for more information about the detections made.
By default, the list of detections shows the items detected over the last seven days.
5.2. Filtered messages
The Filtered messages graph shows the number of messages that have been blocked for
containing potentially dangerous attachments. This protection acts on Exchange servers.
You must have previously configured, in the Content Filtering window, the extensions that
you want to block or allow (in the case of double extensions).
For more information go to Content Filtering feature for Exchange Server.
5.3. Web access control
If you have licenses of Endpoint Protection Plus you will have the option to configure the
Web access control feature in the profile settings window.
The Status window will display statistics on the Websites visited and give you access to
detailed information.
If you want to try or buy Endpoint Protection Plus, contact your reseller or sales advisor to obtain the relevant licenses.
Web access control: Results If you have Endpoint Protection Plus licenses, you'll be able to see in this section information
about the Web pages that have been accessed from all computers on your network.
As you can see, the information is displayed in the graph with different colors for each
category. Each part of the graph shows the percentage of visits to the relevant category.
These categories will have been previously configured in the Web access control settings.
- Click the graph to expand it.
- Click the View Web access details link at the bottom of the page to go to the Web access window.
In the Web access window, first select if you want to display data about the last 7 days, the
last 24 hours or the last month. Click Apply.
The data displayed is organized into four panes:
- Top 10 most-accessed categories
- Top 10 computers with most access attempts
- Top 10 most-blocked categories
- Top 10 computers with most access attempts blocked
To see a complete list of accessed and blocked categories, or computers with most access
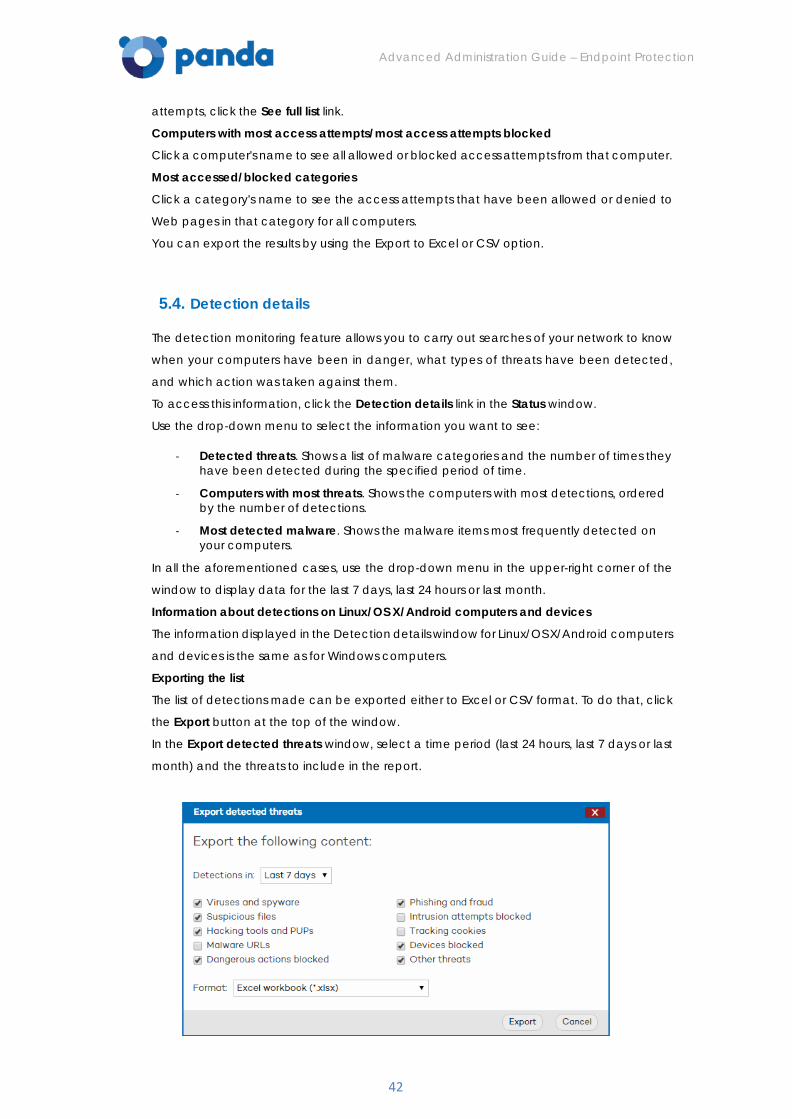
Advanced Administration Guide – Endpoint Protection
42
attempts, click the See full list link.
Computers with most access attempts/most access attempts blocked
Click a computer's name to see all allowed or blocked access attempts from that computer.
Most accessed/blocked categories
Click a category's name to see the access attempts that have been allowed or denied to
Web pages in that category for all computers.
You can export the results by using the Export to Excel or CSV option.
5.4. Detection details
The detection monitoring feature allows you to carry out searches of your network to know
when your computers have been in danger, what types of threats have been detected,
and which action was taken against them.
To access this information, click the Detection details link in the Status window.
Use the drop-down menu to select the information you want to see:
- Detected threats. Shows a list of malware categories and the number of times they have been detected during the specified period of time.
- Computers with most threats. Shows the computers with most detections, ordered by the number of detections.
- Most detected malware. Shows the malware items most frequently detected on your computers.
In all the aforementioned cases, use the drop-down menu in the upper-right corner of the
window to display data for the last 7 days, last 24 hours or last month.
Information about detections on Linux/OS X/Android computers and devices
The information displayed in the Detection details window for Linux/OS X/Android computers
and devices is the same as for Windows computers.
Exporting the list
The list of detections made can be exported either to Excel or CSV format. To do that, click
the Export button at the top of the window.
In the Export detected threats window, select a time period (last 24 hours, last 7 days or last
month) and the threats to include in the report.
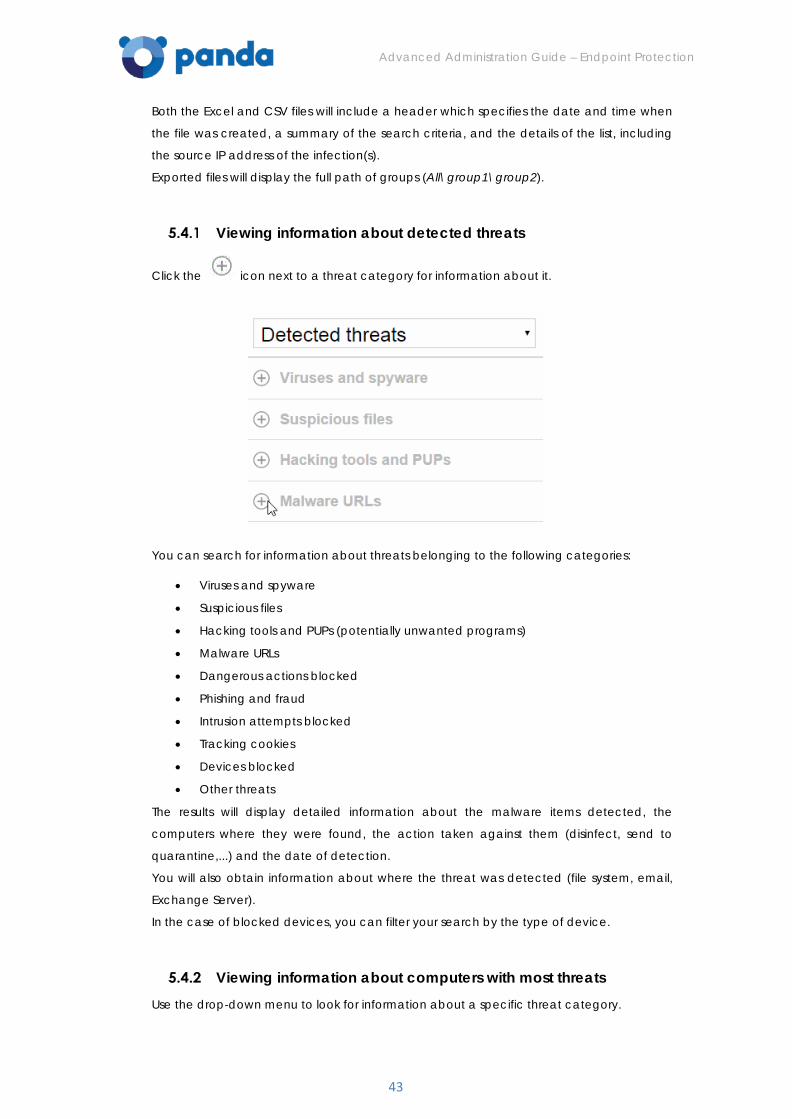
Advanced Administration Guide – Endpoint Protection
43
Both the Excel and CSV files will include a header which specifies the date and time when
the file was created, a summary of the search criteria, and the details of the list, including
the source IP address of the infection(s).
Exported files will display the full path of groups (All\group1\group2).
Viewing information about detected threats
Click the icon next to a threat category for information about it.
You can search for information about threats belonging to the following categories:
• Viruses and spyware
• Suspicious files
• Hacking tools and PUPs (potentially unwanted programs)
• Malware URLs
• Dangerous actions blocked
• Phishing and fraud
• Intrusion attempts blocked
• Tracking cookies
• Devices blocked
• Other threats
The results will display detailed information about the malware items detected, the
computers where they were found, the action taken against them (disinfect, send to
quarantine,...) and the date of detection.
You will also obtain information about where the threat was detected (file system, email,
Exchange Server).
In the case of blocked devices, you can filter your search by the type of device.
Viewing information about computers with most threats Use the drop-down menu to look for information about a specific threat category.
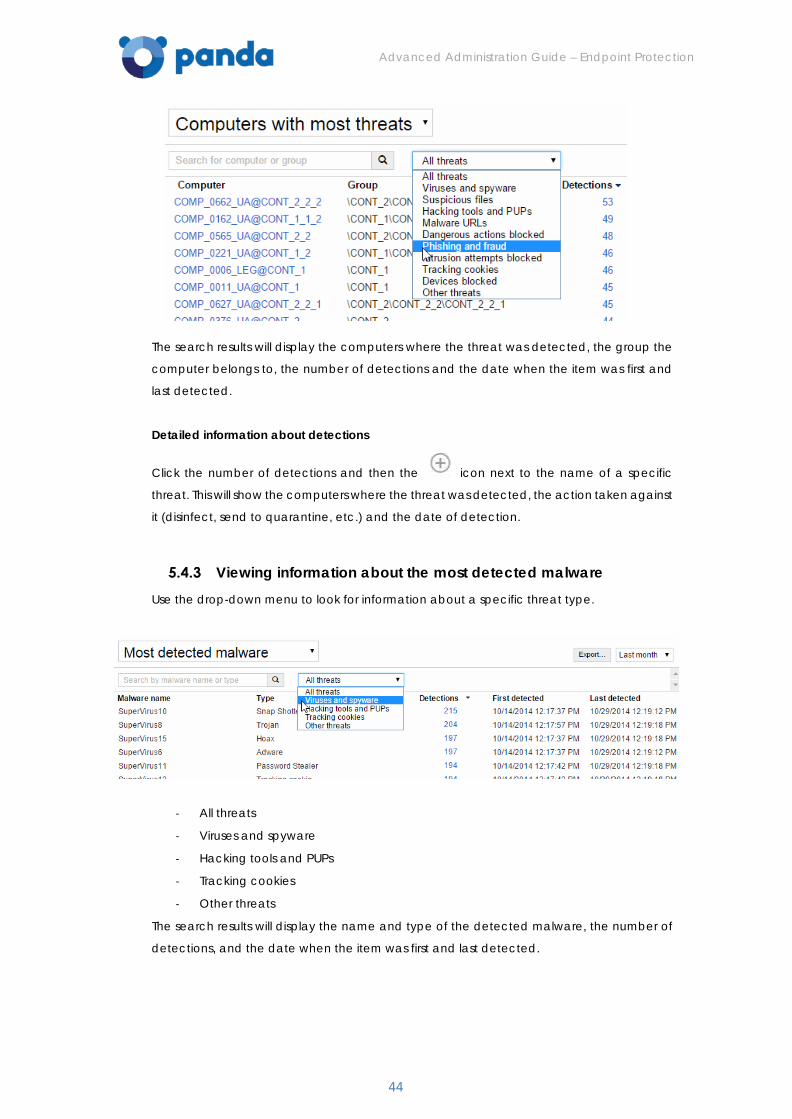
Advanced Administration Guide – Endpoint Protection
44
The search results will display the computers where the threat was detected, the group the
computer belongs to, the number of detections and the date when the item was first and
last detected.
Detailed information about detections
Click the number of detections and then the icon next to the name of a specific
threat. This will show the computers where the threat was detected, the action taken against
it (disinfect, send to quarantine, etc.) and the date of detection.
Viewing information about the most detected malware Use the drop-down menu to look for information about a specific threat type.
- All threats
- Viruses and spyware
- Hacking tools and PUPs
- Tracking cookies
- Other threats
The search results will display the name and type of the detected malware, the number of
detections, and the date when the item was first and last detected.
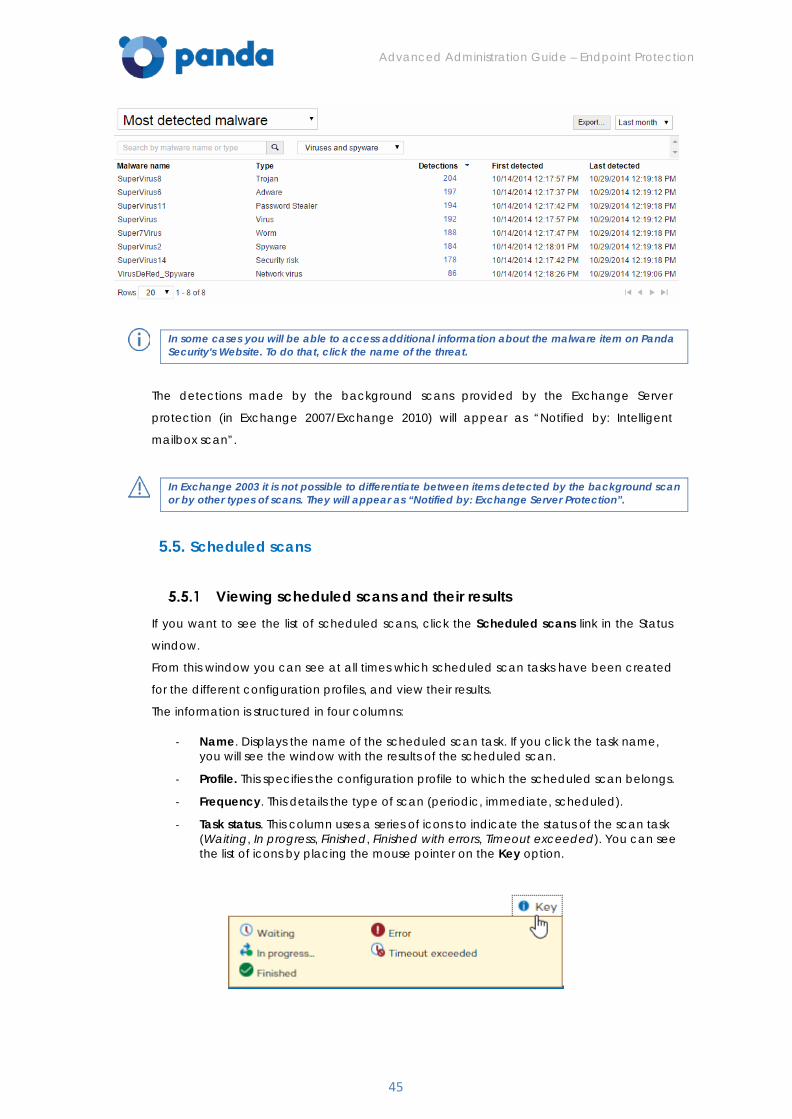
Advanced Administration Guide – Endpoint Protection
45
In some cases you will be able to access additional information about the malware item on Panda Security's Website. To do that, click the name of the threat.
The detections made by the background scans provided by the Exchange Server
protection (in Exchange 2007/Exchange 2010) will appear as “Notified by: Intelligent
mailbox scan”.
In Exchange 2003 it is not possible to differentiate between items detected by the background scan or by other types of scans. They will appear as “Notified by: Exchange Server Protection”.
5.5. Scheduled scans
Viewing scheduled scans and their results
If you want to see the list of scheduled scans, click the Scheduled scans link in the Status
window.
From this window you can see at all times which scheduled scan tasks have been created
for the different configuration profiles, and view their results.
The information is structured in four columns:
- Name. Displays the name of the scheduled scan task. If you click the task name, you will see the window with the results of the scheduled scan.
- Profile. This specifies the configuration profile to which the scheduled scan belongs.
- Frequency. This details the type of scan (periodic, immediate, scheduled).
- Task status. This column uses a series of icons to indicate the status of the scan task (Waiting, In progress, Finished, Finished with errors, Timeout exceeded). You can see the list of icons by placing the mouse pointer on the Key option.
Advanced Administration Guide – Endpoint Protection
46
Results of the scheduled scan tasks In this window you will see the list of computers subject to the scan tasks, unless the scan
status is Waiting.
If it is a periodic scan, you can choose between the options See result of last scan or See
results of previous scans.
The data is displayed in six columns:
- Computer. This indicates which computer was subject to the scan. The computer will be listed by its name or IP address, in accordance with your selection in the Preferences window.
- Container. The group to which the computer belongs.
- Status. This column uses a series of icons to indicate the status of the computer (Error, Scanning, Finishing, Timeout exceeded). You can see the list of icons by placing the mouse pointer on the Key option.
- Detections. Here you can see the number of detections during the scan. Click the number to go to the list of detections.
- Start date. Indicates the task start date and time.
- End date. Indicates the task end date and time.
To see the scheduled settings for the scan, click Scheduled scan settings.
Linux computers
The protection for Linux computers lets you run on-demand and scheduled scans. You can
scan the following items:
- The whole computer. Scans the entire computer.
- Hard disks. Scans all hard disks.
- Email. This option is not applicable to Linux computers.
- Other items. Lets you specify paths in Linux format.
Example: /root/documents
For more information about scheduled scans, refer to the Advanced scan options section.
Android devices
Android devices allow the following scan types: immediate, scheduled and periodic.
Please, for more information go to Antivirus protection settings for Android section.
Advanced Administration Guide – Endpoint Protection
47
6. License management
License-related warnings
Releasing licenses
Adding licenses using the activation code
Advanced Administration Guide – Endpoint Protection
48
6.1. License-related warnings
You can purchase licenses of Endpoint Protection for Windows/Linux/Android or Endpoint
Protection for OS X. Based on your needs, you can install the protection on your computers,
uninstall it, remove computers from the list of protected computers, add computers to that
list, etc. As you use your licenses, the number of available licenses will decrease.
Your Endpoint Protection licenses can be used interchangeably on Windows, Linux, and Android computers and devices.
However, if you want to protect your OS X workstations and servers you'll have to purchase specific licenses for OS X, which are different from the licenses purchased for Linux/Windows/Android systems.
Updating the number of licenses If you:
- Install the protection on one computer One license of Endpoint Protection for Windows/Linux/Android or Endpoint Protection for OS X will be subtracted from the total number of available licenses.
- Remove a computer from the list of protected computers One license of Endpoint Protection for Windows/Linux/Android or Endpoint Protection for OS X will be added to the total number of available licenses, depending on the operating system of the computer you remove.
- Reduce by 'X' the number of contracted licenses The solution will move to the Computers without a license section in the Computers window as many Windows/Linux/Android or OS X computers and devices as licenses you have deleted
License expiration warnings
The notification area displays different warnings relating to the expiration date of your
licenses: whether it has been exceeded, whether there are licenses expiring in the next 60
days, and whether you can be left with fewer licenses than those currently used.
These notifications are different depending on the operating system of the computers whose
licenses are about to expire. That is, warnings regarding licenses of Endpoint Protection for
Windows/Linux/Android, and Endpoint Protection for OS X appear separately.
In both cases you can renew your licenses by contacting your usual reseller or sales advisor.
Endpoint Protection will display a reminder in the Status window. When the 60-day period is
over, you will have an additional 15-day grace period to renew your licenses. After this, you
will not be able to renew them.
Excluded computers
If you exclude a computer, it will be moved to the list of excluded computers in the
Computers window. Excluded computers are only displayed in the Excluded section, they
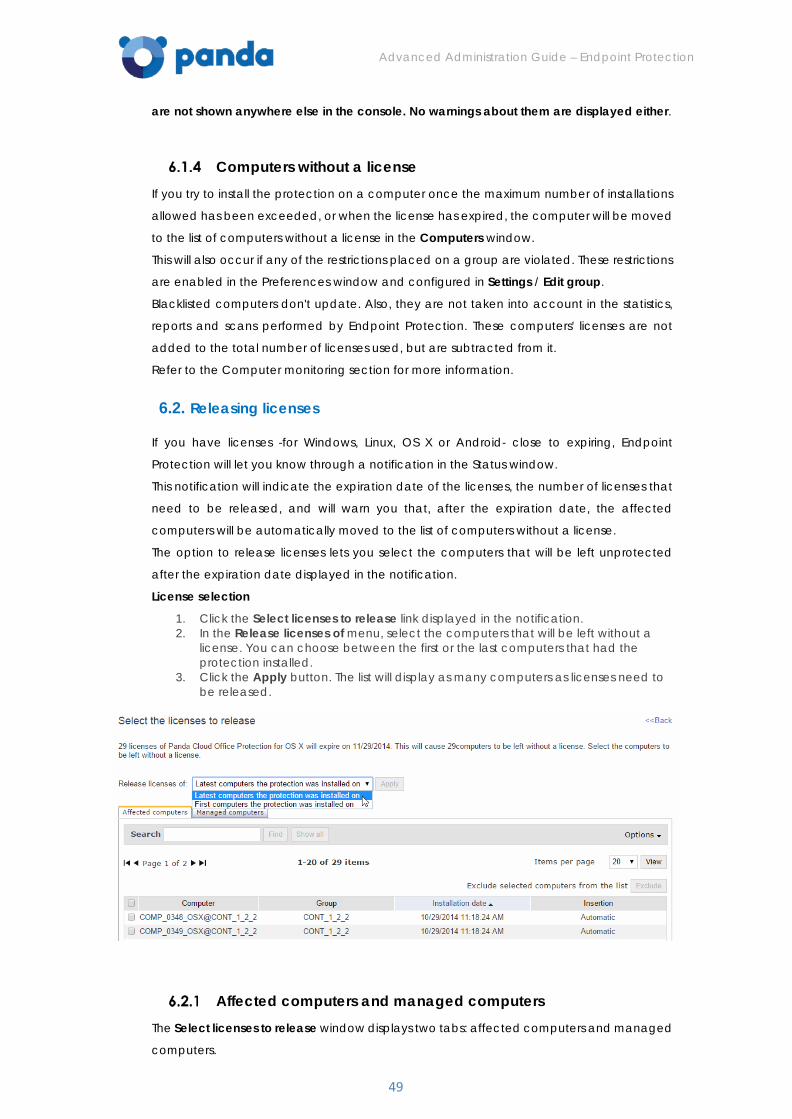
Advanced Administration Guide – Endpoint Protection
49
are not shown anywhere else in the console. No warnings about them are displayed either.
Computers without a license If you try to install the protection on a computer once the maximum number of installations
allowed has been exceeded, or when the license has expired, the computer will be moved
to the list of computers without a license in the Computers window.
This will also occur if any of the restrictions placed on a group are violated. These restrictions
are enabled in the Preferences window and configured in Settings / Edit group.
Blacklisted computers don't update. Also, they are not taken into account in the statistics,
reports and scans performed by Endpoint Protection. These computers' licenses are not
added to the total number of licenses used, but are subtracted from it.
Refer to the Computer monitoring section for more information.
6.2. Releasing licenses
If you have licenses -for Windows, Linux, OS X or Android- close to expiring, Endpoint
Protection will let you know through a notification in the Status window.
This notification will indicate the expiration date of the licenses, the number of licenses that
need to be released, and will warn you that, after the expiration date, the affected
computers will be automatically moved to the list of computers without a license.
The option to release licenses lets you select the computers that will be left unprotected
after the expiration date displayed in the notification.
License selection
1. Click the Select licenses to release link displayed in the notification. 2. In the Release licenses of menu, select the computers that will be left without a
license. You can choose between the first or the last computers that had the protection installed.
3. Click the Apply button. The list will display as many computers as licenses need to be released.
Affected computers and managed computers
The Select licenses to release window displays two tabs: affected computers and managed
computers.
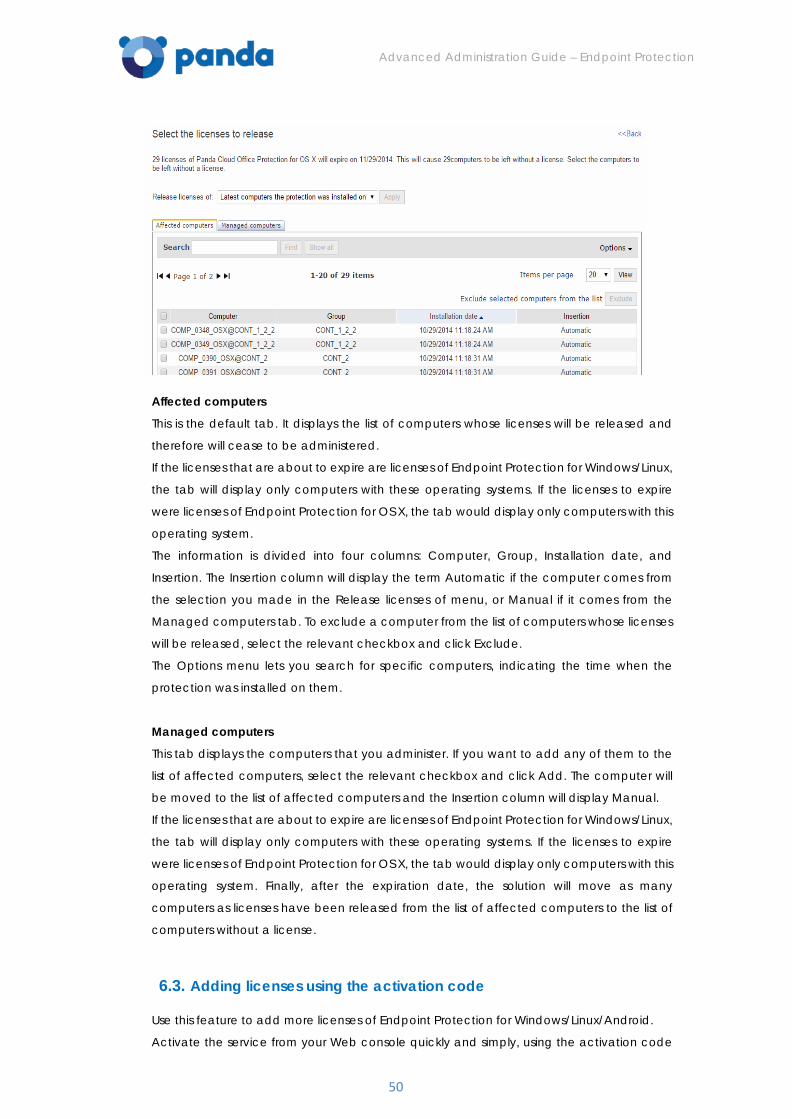
Advanced Administration Guide – Endpoint Protection
50
Affected computers
This is the default tab. It displays the list of computers whose licenses will be released and
therefore will cease to be administered.
If the licenses that are about to expire are licenses of Endpoint Protection for Windows/Linux,
the tab will display only computers with these operating systems. If the licenses to expire
were licenses of Endpoint Protection for OS X, the tab would display only computers with this
operating system.
The information is divided into four columns: Computer, Group, Installation date, and
Insertion. The Insertion column will display the term Automatic if the computer comes from
the selection you made in the Release licenses of menu, or Manual if it comes from the
Managed computers tab. To exclude a computer from the list of computers whose licenses
will be released, select the relevant checkbox and click Exclude.
The Options menu lets you search for specific computers, indicating the time when the
protection was installed on them.
Managed computers
This tab displays the computers that you administer. If you want to add any of them to the
list of affected computers, select the relevant checkbox and click Add. The computer will
be moved to the list of affected computers and the Insertion column will display Manual.
If the licenses that are about to expire are licenses of Endpoint Protection for Windows/Linux,
the tab will display only computers with these operating systems. If the licenses to expire
were licenses of Endpoint Protection for OS X, the tab would display only computers with this
operating system. Finally, after the expiration date, the solution will move as many
computers as licenses have been released from the list of affected computers to the list of
computers without a license.
6.3. Adding licenses using the activation code
Use this feature to add more licenses of Endpoint Protection for Windows/Linux/Android.
Activate the service from your Web console quickly and simply, using the activation code
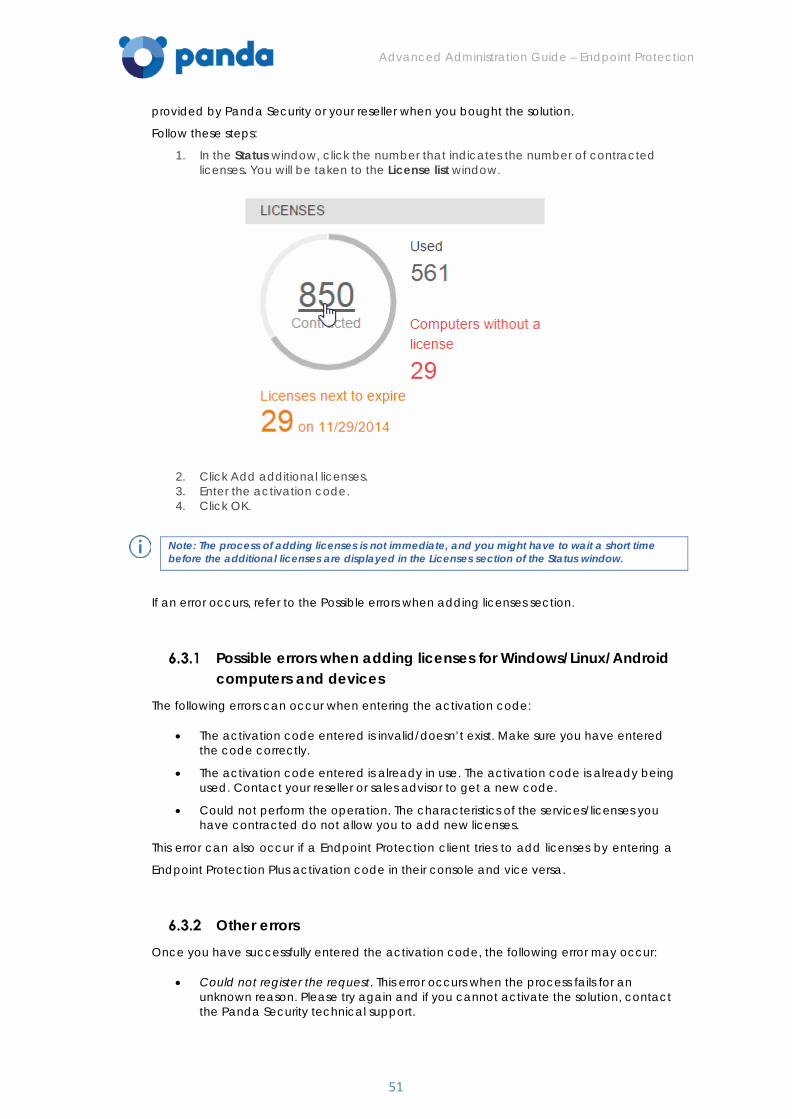
Advanced Administration Guide – Endpoint Protection
51
provided by Panda Security or your reseller when you bought the solution.
Follow these steps:
1. In the Status window, click the number that indicates the number of contracted licenses. You will be taken to the License list window.
2. Click Add additional licenses. 3. Enter the activation code. 4. Click OK.
Note: The process of adding licenses is not immediate, and you might have to wait a short time before the additional licenses are displayed in the Licenses section of the Status window.
If an error occurs, refer to the Possible errors when adding licenses section.
Possible errors when adding licenses for Windows/Linux/Android computers and devices
The following errors can occur when entering the activation code:
• The activation code entered is invalid/doesn’t exist. Make sure you have entered the code correctly.
• The activation code entered is already in use. The activation code is already being used. Contact your reseller or sales advisor to get a new code.
• Could not perform the operation. The characteristics of the services/licenses you have contracted do not allow you to add new licenses.
This error can also occur if a Endpoint Protection client tries to add licenses by entering a
Endpoint Protection Plus activation code in their console and vice versa.
Other errors Once you have successfully entered the activation code, the following error may occur:
• Could not register the request. This error occurs when the process fails for an unknown reason. Please try again and if you cannot activate the solution, contact the Panda Security technical support.

Advanced Administration Guide – Endpoint Protection
52
7. Account management
Introduction to account management
Delegating account management
Merging accounts
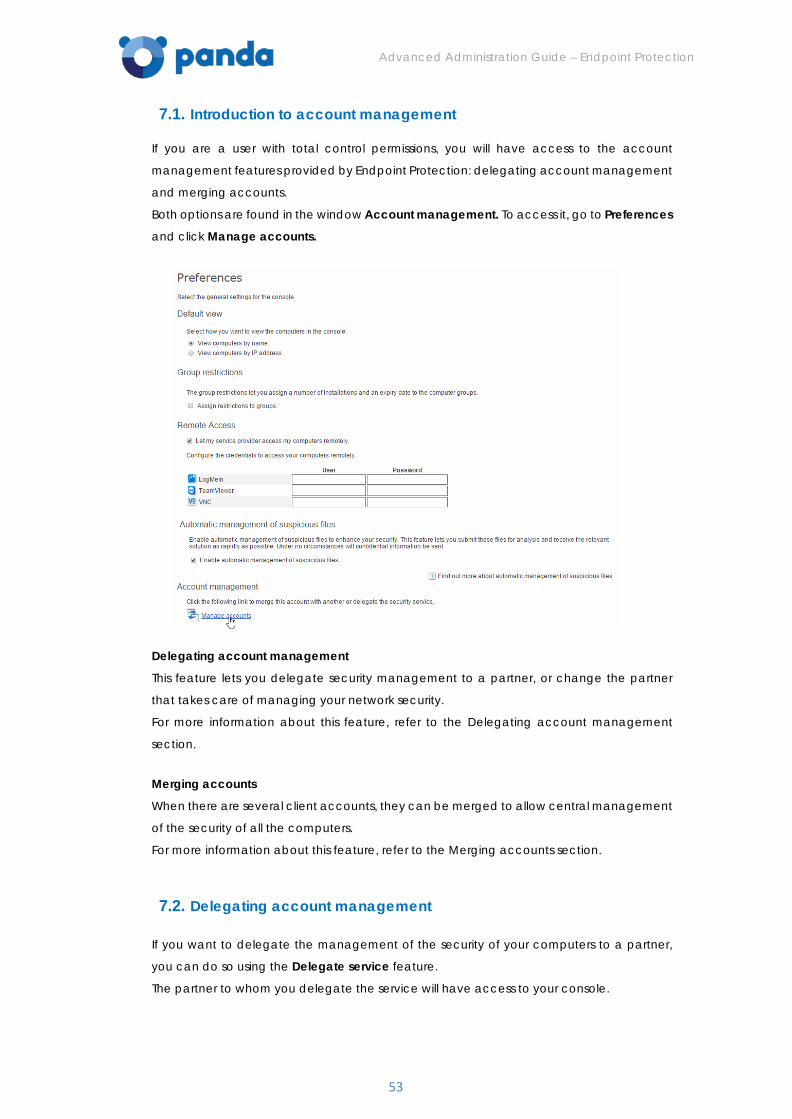
Advanced Administration Guide – Endpoint Protection
53
7.1. Introduction to account management
If you are a user with total control permissions, you will have access to the account
management features provided by Endpoint Protection: delegating account management
and merging accounts.
Both options are found in the window Account management. To access it, go to Preferences
and click Manage accounts.
Delegating account management
This feature lets you delegate security management to a partner, or change the partner
that takes care of managing your network security.
For more information about this feature, refer to the Delegating account management
section.
Merging accounts
When there are several client accounts, they can be merged to allow central management
of the security of all the computers.
For more information about this feature, refer to the Merging accounts section.
7.2. Delegating account management
If you want to delegate the management of the security of your computers to a partner,
you can do so using the Delegate service feature.
The partner to whom you delegate the service will have access to your console.
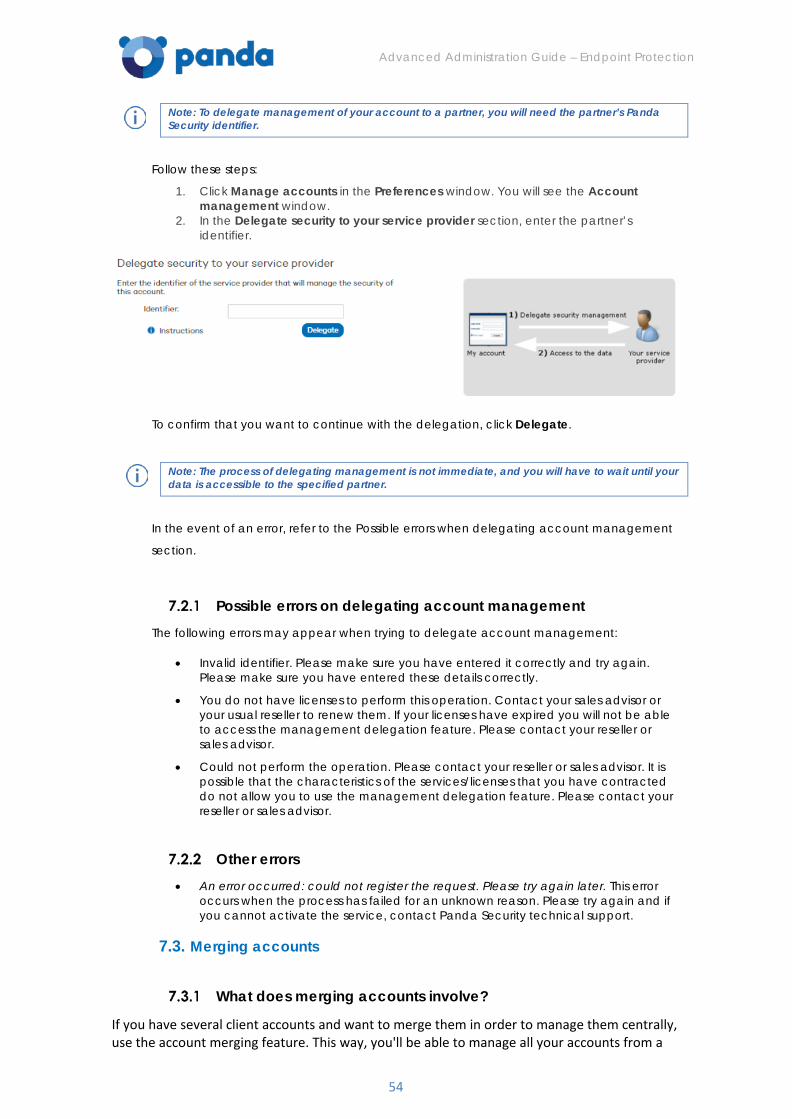
Advanced Administration Guide – Endpoint Protection
54
Note: To delegate management of your account to a partner, you will need the partner’s Panda Security identifier.
Follow these steps:
1. Click Manage accounts in the Preferences window. You will see the Account management window.
2. In the Delegate security to your service provider section, enter the partner’s identifier.
To confirm that you want to continue with the delegation, click Delegate.
Note: The process of delegating management is not immediate, and you will have to wait until your data is accessible to the specified partner.
In the event of an error, refer to the Possible errors when delegating account management
section.
Possible errors on delegating account management
The following errors may appear when trying to delegate account management:
• Invalid identifier. Please make sure you have entered it correctly and try again. Please make sure you have entered these details correctly.
• You do not have licenses to perform this operation. Contact your sales advisor or your usual reseller to renew them. If your licenses have expired you will not be able to access the management delegation feature. Please contact your reseller or sales advisor.
• Could not perform the operation. Please contact your reseller or sales advisor. It is possible that the characteristics of the services/licenses that you have contracted do not allow you to use the management delegation feature. Please contact your reseller or sales advisor.
Other errors • An error occurred: could not register the request. Please try again later. This error
occurs when the process has failed for an unknown reason. Please try again and if you cannot activate the service, contact Panda Security technical support.
7.3. Merging accounts
What does merging accounts involve?
If you have several client accounts and want to merge them in order to manage them centrally, use the account merging feature. This way, you'll be able to manage all your accounts from a
Advanced Administration Guide – Endpoint Protection
55
single Web console.
Important note: It is very important that before you merge accounts you understand the consequences. Please refer to the Consequences of merging accounts section.
When it is NOT possible to merge accounts
- When the clients are using different versions of the protection.
- When the clients have different products:
- When the client that the source account belongs to has Systems Management licenses.
- When one of the clients has Endpoint Protection licenses and the other has Endpoint Protection Plus licenses.
- If the accounts to merge belong to clients belonging to different partners.
How are accounts merged?
Basically, the process consists of transferring data from a source account (account A) to a
target account (account B). This target account must already be active.
Follow these steps to merge accounts:
1. Access the Web console of account A (the source account which will be canceled).
2. Click Manage accounts, in the Preferences window. You will be taken to the Account management window.
3. Select Merge. 4. Enter the Login Email of a user with total control permissions over the account to
transfer the data to, as well as the client number provided in the welcome message.
Once you're sure you want to merge the accounts, click Merge.
Note: The process of transferring data is not immediate. It will take a short time before you see the change reflected in the Web console of account B.
For more information about potential errors, refer to the Possible errors when merging
accounts section.
What information is transferred when merging accounts?
Merging accounts involves transferring information about the computers managed from an
account A to an account B. The following information is transferred:
- Information about active license contracts, that is, information about active licenses, start and end dates, types of licenses, etc.
- Configuration profiles. All configuration profiles from the source account. If there is a profile with the same name in the target account (for example, Sales Profile), the profile from the source account will be renamed with a numeric suffix (Sales Profile-1).
Note: The default profile -Default- from the source account will be transferred to the target account, but will be considered as just another profile and will lose the status of default profile.
Advanced Administration Guide – Endpoint Protection
56
- Groups of computers. All groups of computers. In the case of groups with the same name, the same criteria will be applied as with profiles in the previous point.
Note: The default group -Default- from the source account will be transferred to the target account, but will be considered as just another group and will lose the status of default profile.
- Information about active protections and excluded computers or computers without a license
- Reports and detection statistics.
- All items in quarantine, including excluded and restored items.
- All users of the Web console (with their permissions), except the default user.
Consequences of merging accounts Before merging accounts, it is VERY IMPORTANT that you are aware of the consequences:
- The services associated with account A will cease to be active, and the account will be deleted. Obviously, access to the Web console of account A will be denied.
- The Web console of account B will display data and information about the computers managed from account A. To check this, just access the Web console of account B.
- The protection installed on computers managed from account A will be reassigned automatically, and will be manageable from account B. It will not be necessary to reinstall the protection.
Note: The process of transferring data is not immediate, and so it will take time before you can check this has been successful in the Web console of account B.
In the event of an error, refer to the Possible errors when merging accounts section.
Possible errors when merging accounts
When accessing the form for merging accounts, the following errors may occur:
• The Login Email and/or client ID (client number) are incorrect. Please make sure you have entered these details correctly.
• Could not perform the operation. It is possible that the characteristics of the services/licenses that you have contracted do not allow you to merge accounts. Please contact your reseller or sales advisor.
• You do not have licenses to perform this operation. If your licenses have expired, you will not be able to access the account merging feature. Please contact your reseller or sales advisor to renew your licenses.
• The specified account is already being merged. If the account B (target account) that you have specified is already being merged, you will have to wait for that process to finish before starting a new one.
• The account with which you have started the session exceeds the maximum number of computers allowed. The process of merging accounts is only possible if account A (the source account) has less than 10,000 computers.
• The accounts to be merged belong to different versions of Endpoint Protection. For accounts A and B to be correctly merged, they must both correspond to the same Endpoint Protection version. It is highly unlikely that the accounts will belong to different versions, other than in situations where a version has been updated.
• Could not register the request. This error occurs when the process fails for an

Advanced Administration Guide – Endpoint Protection
57
unknown reason. Please try again and if you cannot merge the accounts, contact the Panda Security technical support.
Advanced Administration Guide – Endpoint Protection
58
8. Creating and managing
users
Creating users
Changing user details

Advanced Administration Guide – Endpoint Protection
59
8.1. Creating users
If the default user provided by the solution does not adapt to the protection needs of your
network, you can create new users and assign different types of permissions to them,
depending on what you want each user to manage.
In the main console window, click Users.
The Users window shows three columns: Login Email, Name and Permissions. As you create
users, these will appear in the list, along with the type of permissions that you have given
them.
Follow these steps to create a user:
1. In the Users window, click Add user.
2. Enter the Login Email and confirm it.
3. You can add more information in the Comments section.
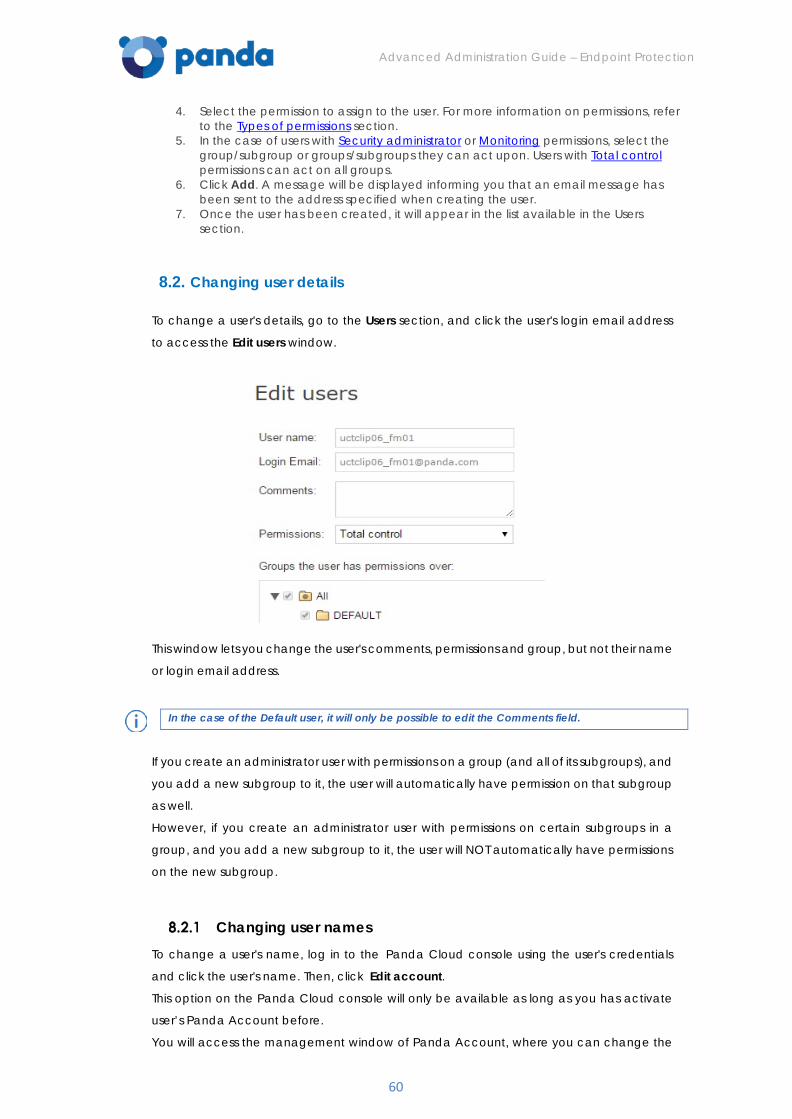
Advanced Administration Guide – Endpoint Protection
60
4. Select the permission to assign to the user. For more information on permissions, refer to the Types of permissions section.
5. In the case of users with Security administrator or Monitoring permissions, select the group/subgroup or groups/subgroups they can act upon. Users with Total control permissions can act on all groups.
6. Click Add. A message will be displayed informing you that an email message has been sent to the address specified when creating the user.
7. Once the user has been created, it will appear in the list available in the Users section.
8.2. Changing user details
To change a user's details, go to the Users section, and click the user's login email address
to access the Edit users window.
This window lets you change the user's comments, permissions and group, but not their name
or login email address.
In the case of the Default user, it will only be possible to edit the Comments field.
If you create an administrator user with permissions on a group (and all of its subgroups), and
you add a new subgroup to it, the user will automatically have permission on that subgroup
as well.
However, if you create an administrator user with permissions on certain subgroups in a
group, and you add a new subgroup to it, the user will NOT automatically have permissions
on the new subgroup.
Changing user names
To change a user's name, log in to the Panda Cloud console using the user's credentials
and click the user's name. Then, click Edit account.
This option on the Panda Cloud console will only be available as long as you has activate
user’s Panda Account before.
You will access the management window of Panda Account, where you can change the

Advanced Administration Guide – Endpoint Protection
61
username and password. Then click Update.
Automatically, both Web consoles (Panda Cloud and Endpoint Protection) will show the
new user name.
Deleting users
To delete a user, go to the Users section.
In the user list, select the checkbox next to the user that you want to delete. You can select
all users at once by selecting the checkbox in the Login Email column header. Then, click
Delete.

Advanced Administration Guide – Endpoint Protection
62
9. Creating and managing
groups
Creating groups
Moving computers to a group
Adding a computer to a group during installation
Adding and deleting groups
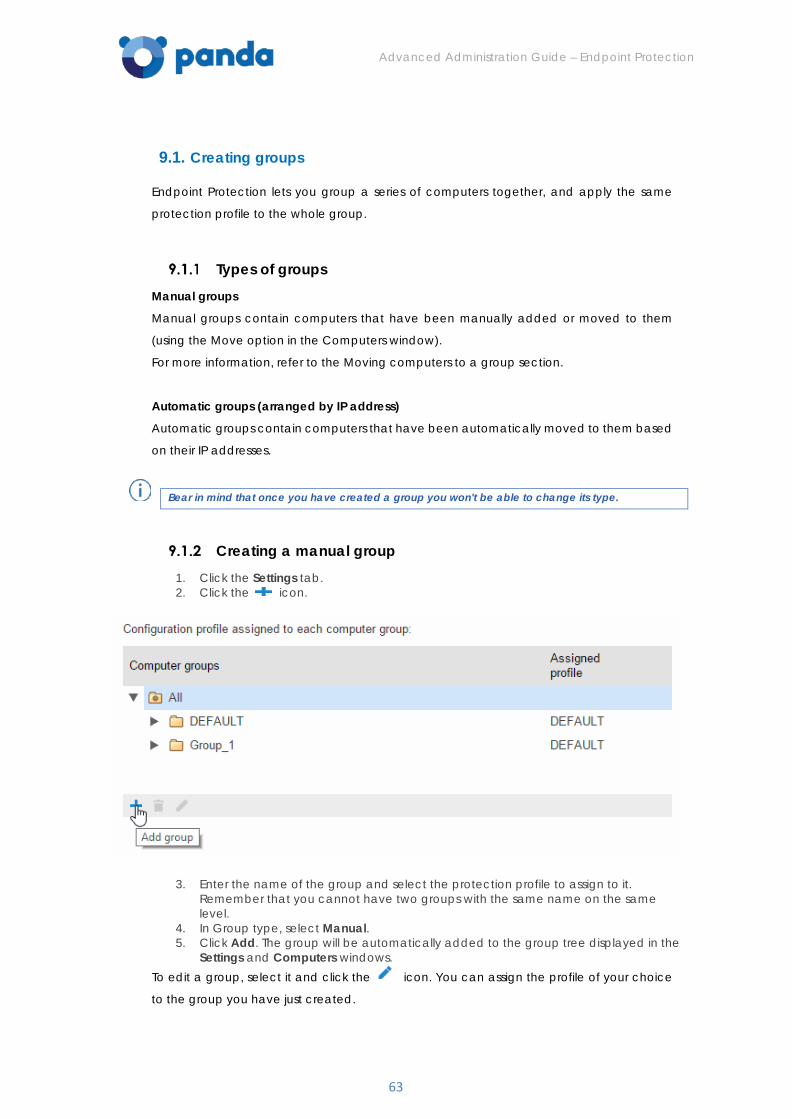
Advanced Administration Guide – Endpoint Protection
63
9.1. Creating groups
Endpoint Protection lets you group a series of computers together, and apply the same
protection profile to the whole group.
Types of groups
Manual groups
Manual groups contain computers that have been manually added or moved to them
(using the Move option in the Computers window).
For more information, refer to the Moving computers to a group section.
Automatic groups (arranged by IP address)
Automatic groups contain computers that have been automatically moved to them based
on their IP addresses.
Bear in mind that once you have created a group you won't be able to change its type.
Creating a manual group
1. Click the Settings tab. 2. Click the icon.
3. Enter the name of the group and select the protection profile to assign to it. Remember that you cannot have two groups with the same name on the same level.
4. In Group type, select Manual. 5. Click Add. The group will be automatically added to the group tree displayed in the
Settings and Computers windows. To edit a group, select it and click the icon. You can assign the profile of your choice
to the group you have just created.
Advanced Administration Guide – Endpoint Protection
64
Creating an automatic group You can only create an automatic group if the Group restrictions option in the Preferences
window is disabled.
1. The group creation process is the same as for manual groups, the only difference being that you must select Automatic (arranged by IP address) in Group type.
2. Click Add. A window will be displayed to edit the automatic group. Configure the rules to apply to the group.
You can configure them manually or import them from a .CSV file.
Importing rules from a .CSV file
1. Click Import. 2. Enter the name of the file or find it using the Select button. 3. Click OK. This will generate the relevant group structure based on the IP addresses
assigned to computers.
Format of the .CSV file
The .CSV file must have the following characteristics:
Each line must contain one to three data strings separated with tabs, and in the following
order:
1. Group path (full path). For example: \Hall of Justice\Room1 2. IP range. Two options are possible: IP-IP or IP-mask (this field is optional) 3. Profile . (This field is optional)
If a profile instead of an IP address range is used, use a double tab to separate the two visible
fields (group path and profile):
\Hall of Justice JusticeP
Other examples:
\Hospital\Emergency Room\Ambulance110.10.10.10-10.10.10.19
\Hospital\Emergency Room
\Hospital\Emergency Room\Ambulance210.10.10.20-10.10.10.29AmbulanceP
\Hospital\Boston Clinic10.10.20.10/22Clinic Profile
\Hall of Justice\Court of Appeals10.10.50.10/12Justice 2
If, when importing groups from a .CSV file, the information in one of the lines is incorrect, an
error will be displayed indicating the line and string whose format is invalid. No groups will be
imported.
Once you have successfully imported groups from a .CSV file into an automatic group, it
won't be possible to repeat the same operation for the same group.
Manually configuring group rules
1. Click the icon. 2. Select the profile to assign to the group. 3. Enter the IP addresses or IP address ranges of the computers to add to the group. 4. Click OK.
9.2. Moving computers to a group
You can move a computer or computer group to any other group, regardless of whether
Advanced Administration Guide – Endpoint Protection
65
this is a manual or automatic group (arranged by its computers' IP addresses).
The Computer details window displays information about each computer's IP address, the
group the computer was assigned to when installing the protection and the group it was
later moved to.
Follow these steps to move a computer to a group:
1. Go to the Computers window. In the Protected tab, select the computer/computers that you want to assign to a group.
2. Click Move. 3. In the Move computers window, select the group/subgroup to move the
computer/computers to. 4. Click Move.
You won't be able to assign computers to a group if you only have monitoring permissions. For information about the rest of permissions, refer to the Types of permissions section in this Help.
If you try to move one or multiple computers to a group that has reached the maximum number of allowed installations, a message will be displayed informing you that the operation cannot be carried out.
9.3. Adding a computer to a group
When installing the protection on a computer using the installer, you must select the group
that the computer will be added to once the installation is complete.
Groups can be manual or automatic (arranged by the IP addresses of the computers that
comprise them), and they can contain subgroups. In the case of the automatic
groups/subgroups, the computers that make them must meet a series of rules based on their
IP addresses. These rules are configured when creating the group/subgroup.
There are two ways to add a computer to a group/subgroup depending on whether the
group/subgroup is manual or automatic.
In the case of manual groups there are no problems, any computer can be added to a
manual group/subgroup. However, if the computer is to be added to an automatic
group/subgroup, it must meet the rules specified for it.
If the computer does not meet the rules of a subgroup but does meet those of its parent
group, it will be moved to the group whose rules it does meet.
9.4. Adding and deleting groups
Adding a manual group
Follow the steps below to add a group to an existing group:
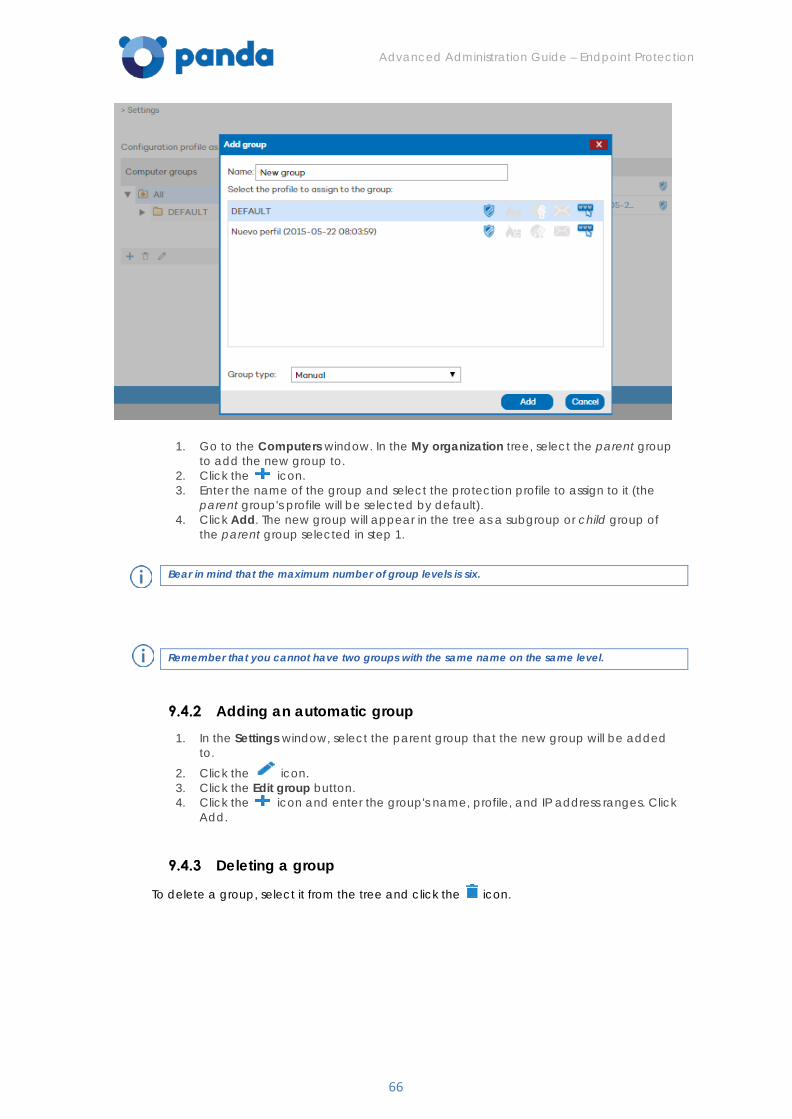
Advanced Administration Guide – Endpoint Protection
66
1. Go to the Computers window. In the My organization tree, select the parent group to add the new group to.
2. Click the icon. 3. Enter the name of the group and select the protection profile to assign to it (the
parent group's profile will be selected by default). 4. Click Add. The new group will appear in the tree as a subgroup or child group of
the parent group selected in step 1.
Bear in mind that the maximum number of group levels is six.
Remember that you cannot have two groups with the same name on the same level.
Adding an automatic group 1. In the Settings window, select the parent group that the new group will be added
to. 2. Click the icon. 3. Click the Edit group button. 4. Click the icon and enter the group's name, profile, and IP address ranges. Click
Add.
Deleting a group
To delete a group, select it from the tree and click the icon.
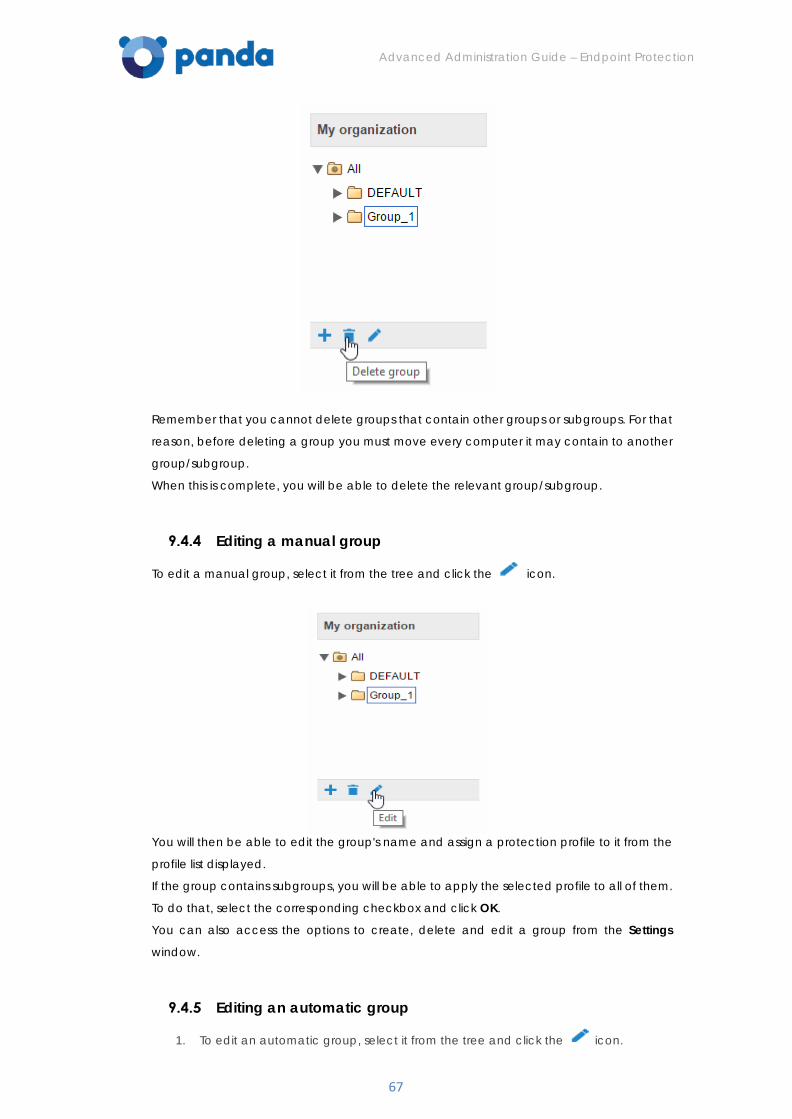
Advanced Administration Guide – Endpoint Protection
67
Remember that you cannot delete groups that contain other groups or subgroups. For that
reason, before deleting a group you must move every computer it may contain to another
group/subgroup.
When this is complete, you will be able to delete the relevant group/subgroup.
Editing a manual group
To edit a manual group, select it from the tree and click the icon.
You will then be able to edit the group's name and assign a protection profile to it from the
profile list displayed.
If the group contains subgroups, you will be able to apply the selected profile to all of them.
To do that, select the corresponding checkbox and click OK.
You can also access the options to create, delete and edit a group from the Settings
window.
Editing an automatic group
1. To edit an automatic group, select it from the tree and click the icon.

Advanced Administration Guide – Endpoint Protection
68
2. Then click the Edit group button. 3. In the window to edit the automatic group, click the icon. 4. You will then be able to edit the group's name and assign a protection profile to it
from the profile list displayed. You will also be able to add, edit or delete the IP addresses of the computers that make up the group.
Advanced Administration Guide – Endpoint Protection
69
10. Types of permissions
Types of permissions
Total Control permission
Administrator permission
Monitoring permission
Advanced Administration Guide – Endpoint Protection
70
10.1. Types of permissions
Endpoint Protection includes three types of permissions. The permission assigned to a user
will dictate which actions they can take and on which computers or groups.
The actions that a user can take affect various aspects of the basic and advanced
protection settings, and include the creation and modification of their own user credentials,
the configuration and assigning of user groups and profiles, the generation of different kinds
of reports, etc.
The permissions that exist are:
• Total Control permission
• Administrator permission
• Monitoring permission
Select the type of permission to consult the specifications. These permissions will be useful for
assigning different functions to members of your team, and getting the most out of all the
Endpoint Protection security features.
10.2. Total control permission
User management
Users can:
1. View all users created on the system. 2. Remove users.
Group and computer management
Users can:
1. Create and delete groups/subgroups.
• If a user has total control permissions on a group, they will also have them on all its subgroups.
• If a user has total control permissions on a group and later a subgroup is added to that group, the user will automatically have total control permissions on the newly created subgroup.
2. Configure the protection profiles of all groups. 3. Assign computers to all groups/subgroups. 4. Move computers from one group/subgroup to another. 5. Edit the Comments field in the Computer details window. 6. Access all computers remotely.
Profile and report management
Users can:
1. Copy profiles and view the copies made of all profiles. 2. Configure scheduled scans of specific paths for any profile. 3. View reports (non-scheduled, 'immediate' reports) about any group. 4. Create tasks to send scheduled reports about any group 5. View all report sending tasks.
Search of unprotected computers
Users can:
1. Configure searches for unprotected computers
Advanced Administration Guide – Endpoint Protection
71
2. View and/or remove any of the tasks created.
Protection uninstallation
Users can:
1. Configure protection uninstallation tasks. 2. View and/or remove any of the tasks created.
License and account management
Users can:
1. Use the option to add licenses using the activation code. 2. Use the option to merge accounts. 3. Delegate security management to a partner.
10.3. Administrator permission
The actions that administrator users can perform (manage users, computers and groups, as
well as configure and uninstall the protection), are restricted to those computers or groups
they have created or have permissions on.
User management
Administrator users can:
1. Change their own credentials. 2. Create users.
Search of unprotected computers
Administrator users can:
1. Create search tasks launched from those computers on which they have permissions.
2. View and/or delete any of the previously created search tasks but only from computers in groups on which they have permissions.
Group and computer management
Administrator users can:
1. Create manual or automatic groups/subgroups, and configure the protection profiles of the groups on which they have permissions. Administrator users cannot access a child group if they do not have access to the relevant parent group.
2. Delete the groups on which they have permissions. You can only delete groups that don't have any computers inside, that is, prior to deleting a group/subgroup you must assign or move its computers to another group/subgroup. Once you have emptied the group/subgroup, you can delete it.
3. Edit the Comments field of those computers on which they have permissions, in the Computer details window.
4. Remotely access computers that belong to groups on which they have permissions.
Protection uninstall
Administrator users can:
1. Configure uninstall tasks for those computers and groups on which they have permissions.
2. View and/or delete uninstall taks, but only on computers belonging to groups on which they have permissions.
Profile and report management
Administrator users can:
Advanced Administration Guide – Endpoint Protection
72
1. Create and view new profiles. 2. Create copies of profiles on which they have permissions and view them. 3. Configure scheduled scans of specific paths for profiles on which they have
permissions or which they have created. 4. View reports (immediate reports, not scheduled ones) about groups on which they
have permissions, provided those permissions apply to all the groups covered in the report.
5. Create tasks to send scheduled reports about groups they have permissions on. 6. View tasks to send scheduled reports about groups they have permissions on,
provided those permissions apply to all the groups covered in the report. Otherwise they will not be able to view the report sending task.
10.4. Monitoring permission
Users can:
1. Modify their user credentials. 2. View and monitor the protection of the groups/subgroups assigned to them.
• If a user has monitoring permissions on a group, they will also have them on all its subgroups.
• If a user has monitoring permissions on a group and later a subgroup is added to that group, the user will automatically have monitoring permissions on the newly created subgroup.
3. View the profiles assigned to the groups/subgroups on which they have permissions. 4. View searches for protected computers performed from computers belonging to
groups/subgroups on which they have permissions. 5. View uninstallation tasks for groups/subgroups on which they have permissions. 6. View reports (immediate reports) about groups/subgroups on which they have
permissions. 7. View tasks to send reports about groups/subgroups they have permissions on,
provided those permissions apply to all the groups/subgroups covered in the report. Otherwise they will not be able to view the report sending task.

Advanced Administration Guide – Endpoint Protection
73
11. Protection settings
Introduction
Default profile
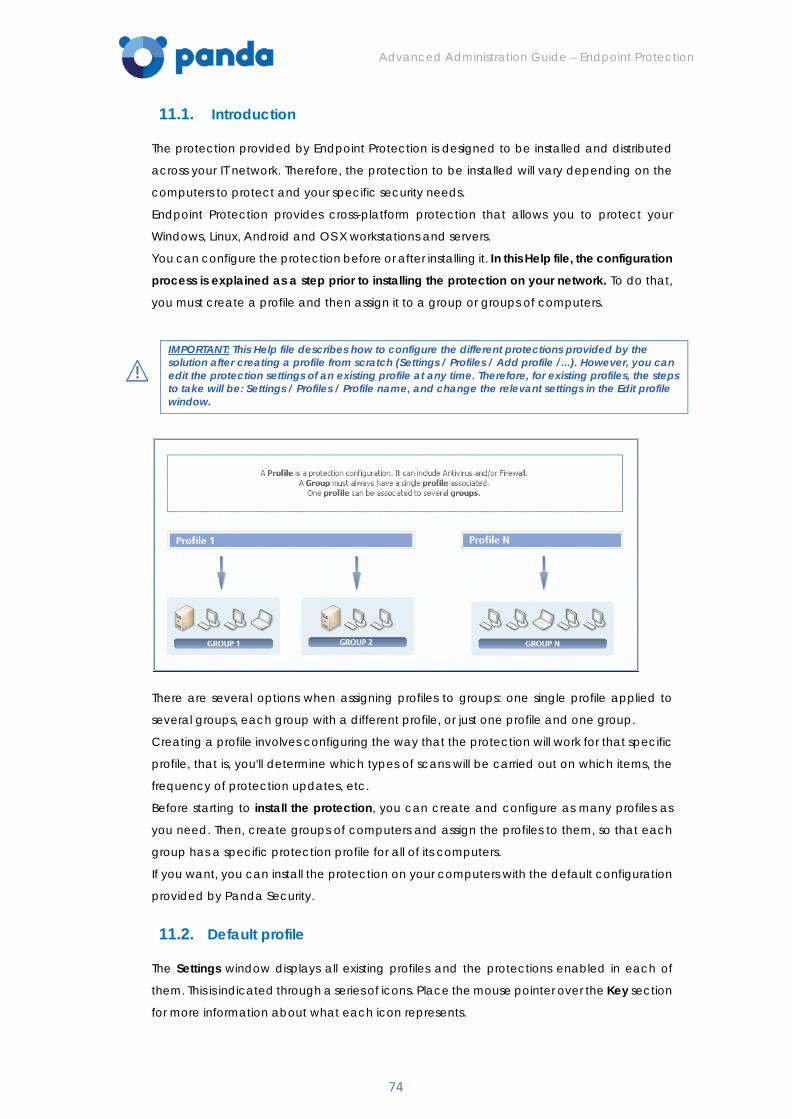
Advanced Administration Guide – Endpoint Protection
74
11.1. Introduction
The protection provided by Endpoint Protection is designed to be installed and distributed
across your IT network. Therefore, the protection to be installed will vary depending on the
computers to protect and your specific security needs.
Endpoint Protection provides cross-platform protection that allows you to protect your
Windows, Linux, Android and OS X workstations and servers.
You can configure the protection before or after installing it. In this Help file, the configuration
process is explained as a step prior to installing the protection on your network. To do that,
you must create a profile and then assign it to a group or groups of computers.
IMPORTANT: This Help file describes how to configure the different protections provided by the solution after creating a profile from scratch (Settings / Profiles / Add profile /...). However, you can edit the protection settings of an existing profile at any time. Therefore, for existing profiles, the steps to take will be: Settings / Profiles / Profile name, and change the relevant settings in the Edit profile window.
There are several options when assigning profiles to groups: one single profile applied to
several groups, each group with a different profile, or just one profile and one group.
Creating a profile involves configuring the way that the protection will work for that specific
profile, that is, you'll determine which types of scans will be carried out on which items, the
frequency of protection updates, etc.
Before starting to install the protection, you can create and configure as many profiles as
you need. Then, create groups of computers and assign the profiles to them, so that each
group has a specific protection profile for all of its computers.
If you want, you can install the protection on your computers with the default configuration
provided by Panda Security.
11.2. Default profile
The Settings window displays all existing profiles and the protections enabled in each of
them. This is indicated through a series of icons. Place the mouse pointer over the Key section
for more information about what each icon represents.
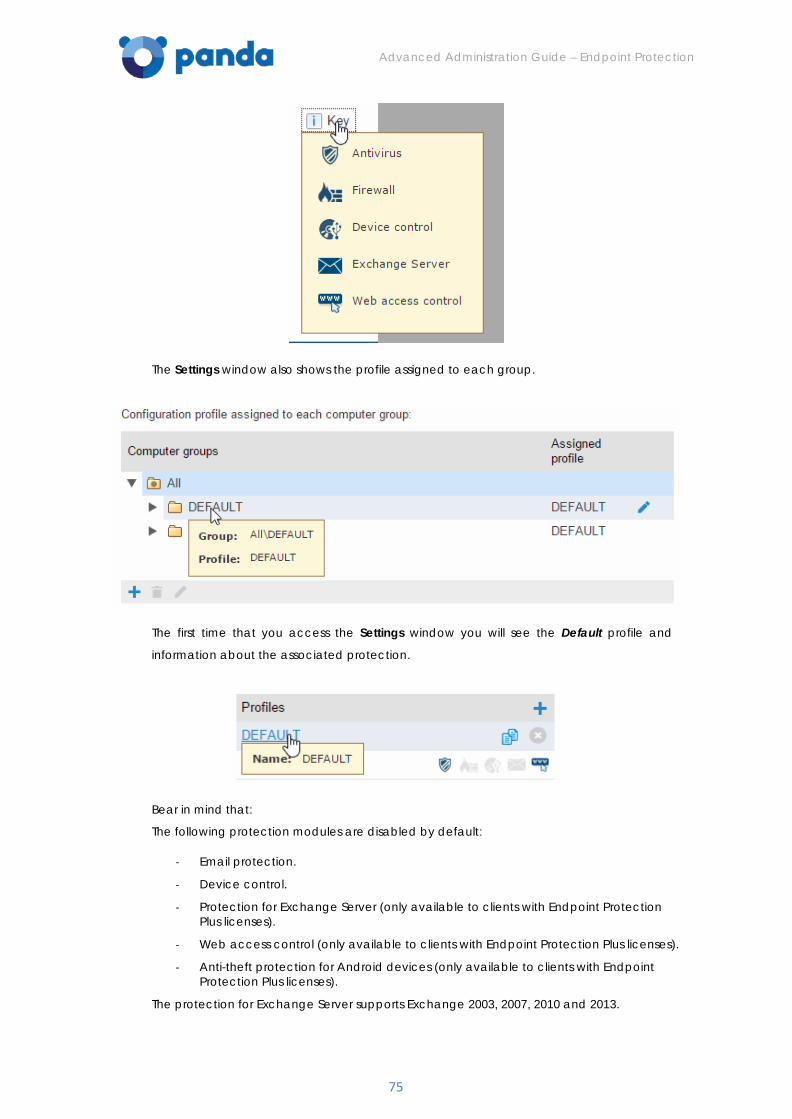
Advanced Administration Guide – Endpoint Protection
75
The Settings window also shows the profile assigned to each group.
The first time that you access the Settings window you will see the Default profile and
information about the associated protection.
Bear in mind that:
The following protection modules are disabled by default:
- Email protection.
- Device control.
- Protection for Exchange Server (only available to clients with Endpoint Protection Plus licenses).
- Web access control (only available to clients with Endpoint Protection Plus licenses).
- Anti-theft protection for Android devices (only available to clients with Endpoint Protection Plus licenses).
The protection for Exchange Server supports Exchange 2003, 2007, 2010 and 2013.
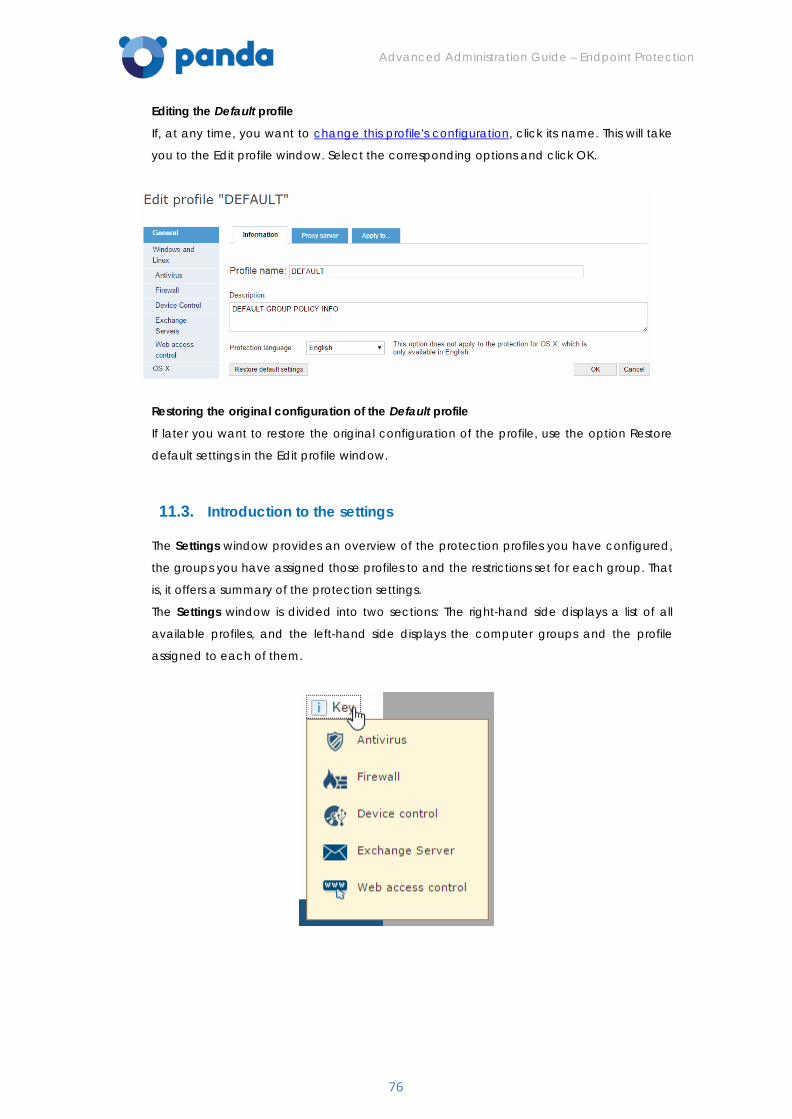
Advanced Administration Guide – Endpoint Protection
76
Editing the Default profile
If, at any time, you want to change this profile's configuration, click its name. This will take
you to the Edit profile window. Select the corresponding options and click OK.
Restoring the original configuration of the Default profile
If later you want to restore the original configuration of the profile, use the option Restore
default settings in the Edit profile window.
11.3. Introduction to the settings
The Settings window provides an overview of the protection profiles you have configured,
the groups you have assigned those profiles to and the restrictions set for each group. That
is, it offers a summary of the protection settings.
The Settings window is divided into two sections: The right-hand side displays a list of all
available profiles, and the left-hand side displays the computer groups and the profile
assigned to each of them.
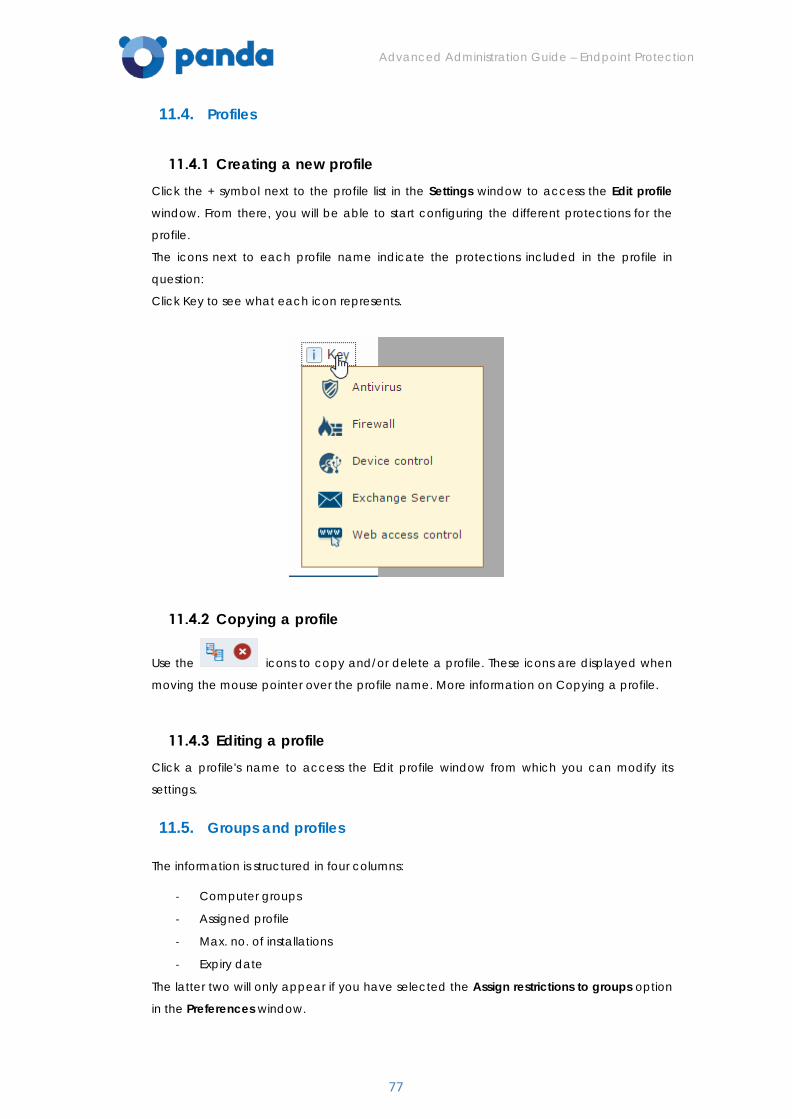
Advanced Administration Guide – Endpoint Protection
77
11.4. Profiles
Creating a new profile
Click the + symbol next to the profile list in the Settings window to access the Edit profile
window. From there, you will be able to start configuring the different protections for the
profile.
The icons next to each profile name indicate the protections included in the profile in
question:
Click Key to see what each icon represents.
Copying a profile
Use the icons to copy and/or delete a profile. These icons are displayed when
moving the mouse pointer over the profile name. More information on Copying a profile.
Editing a profile
Click a profile's name to access the Edit profile window from which you can modify its
settings.
11.5. Groups and profiles
The information is structured in four columns:
- Computer groups
- Assigned profile
- Max. no. of installations
- Expiry date
The latter two will only appear if you have selected the Assign restrictions to groups option
in the Preferences window.
Advanced Administration Guide – Endpoint Protection
78
12. Creating and
configuring profiles
Creating a profile
Copying a profile
General profile settings
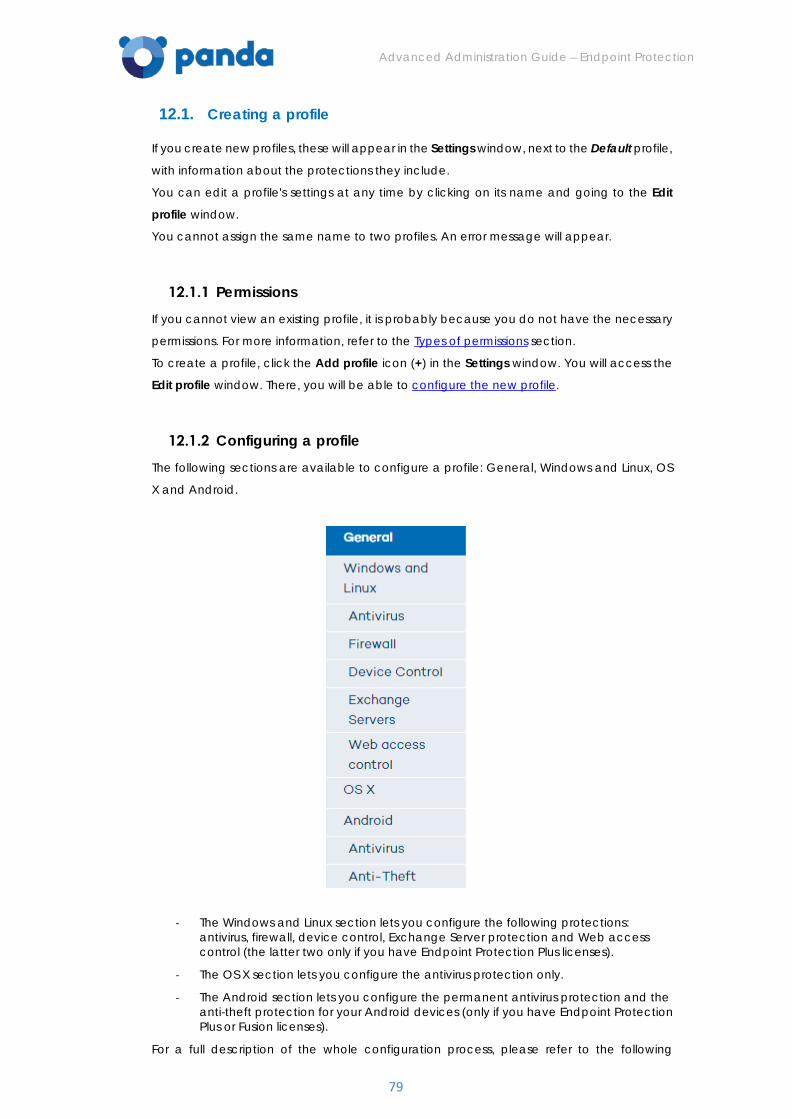
Advanced Administration Guide – Endpoint Protection
79
12.1. Creating a profile
If you create new profiles, these will appear in the Settings window, next to the Default profile,
with information about the protections they include.
You can edit a profile's settings at any time by clicking on its name and going to the Edit
profile window.
You cannot assign the same name to two profiles. An error message will appear.
Permissions
If you cannot view an existing profile, it is probably because you do not have the necessary
permissions. For more information, refer to the Types of permissions section.
To create a profile, click the Add profile icon (+) in the Settings window. You will access the
Edit profile window. There, you will be able to configure the new profile.
Configuring a profile
The following sections are available to configure a profile: General, Windows and Linux, OS
X and Android.
- The Windows and Linux section lets you configure the following protections: antivirus, firewall, device control, Exchange Server protection and Web access control (the latter two only if you have Endpoint Protection Plus licenses).
- The OS X section lets you configure the antivirus protection only.
- The Android section lets you configure the permanent antivirus protection and the anti-theft protection for your Android devices (only if you have Endpoint Protection Plus or Fusion licenses).
For a full description of the whole configuration process, please refer to the following
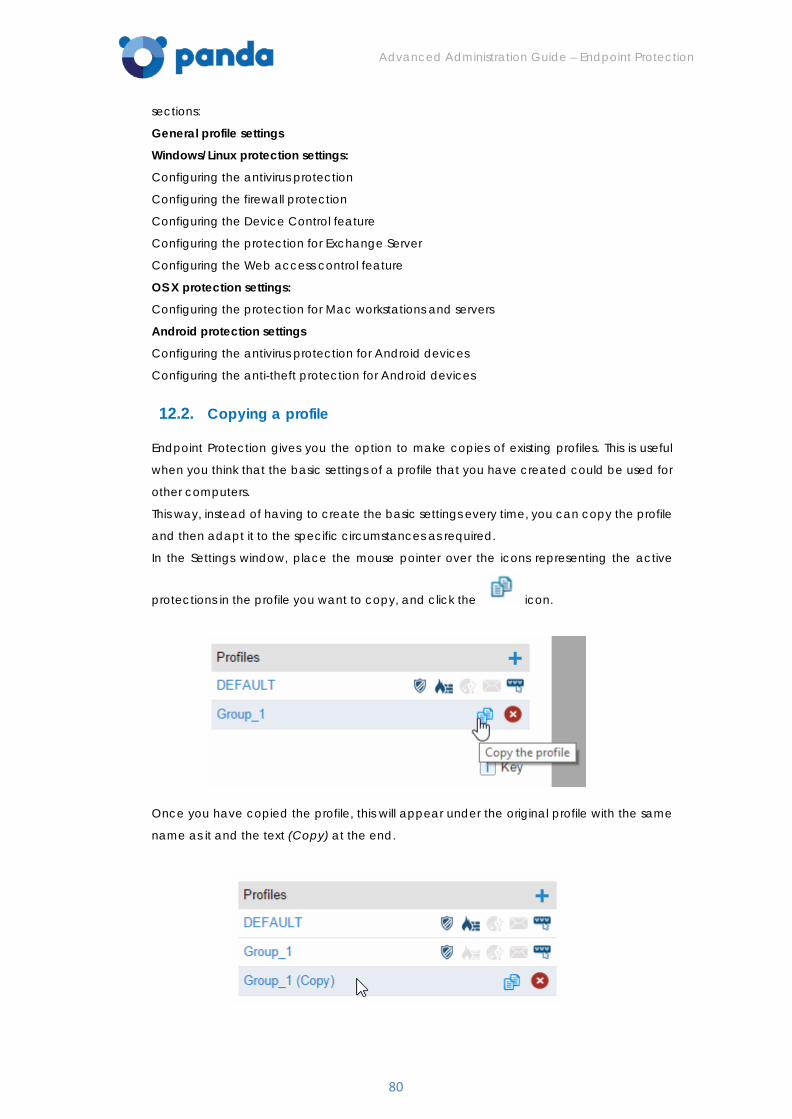
Advanced Administration Guide – Endpoint Protection
80
sections:
General profile settings
Windows/Linux protection settings:
Configuring the antivirus protection
Configuring the firewall protection
Configuring the Device Control feature
Configuring the protection for Exchange Server
Configuring the Web access control feature
OS X protection settings:
Configuring the protection for Mac workstations and servers
Android protection settings
Configuring the antivirus protection for Android devices
Configuring the anti-theft protection for Android devices
12.2. Copying a profile
Endpoint Protection gives you the option to make copies of existing profiles. This is useful
when you think that the basic settings of a profile that you have created could be used for
other computers.
This way, instead of having to create the basic settings every time, you can copy the profile
and then adapt it to the specific circumstances as required.
In the Settings window, place the mouse pointer over the icons representing the active
protections in the profile you want to copy, and click the icon.
Once you have copied the profile, this will appear under the original profile with the same
name as it and the text (Copy) at the end.
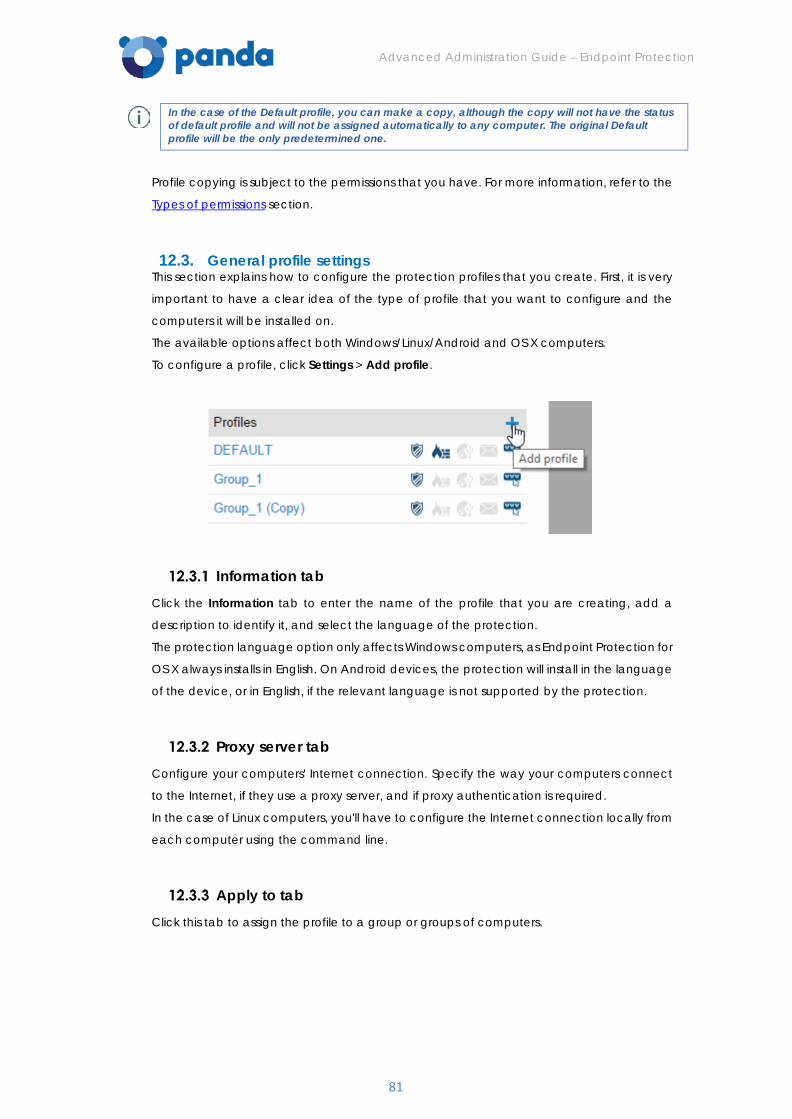
Advanced Administration Guide – Endpoint Protection
81
In the case of the Default profile, you can make a copy, although the copy will not have the status of default profile and will not be assigned automatically to any computer. The original Default profile will be the only predetermined one.
Profile copying is subject to the permissions that you have. For more information, refer to the
Types of permissions section.
12.3. General profile settings This section explains how to configure the protection profiles that you create. First, it is very
important to have a clear idea of the type of profile that you want to configure and the
computers it will be installed on.
The available options affect both Windows/Linux/Android and OS X computers.
To configure a profile, click Settings > Add profile.
Information tab
Click the Information tab to enter the name of the profile that you are creating, add a
description to identify it, and select the language of the protection.
The protection language option only affects Windows computers, as Endpoint Protection for
OS X always installs in English. On Android devices, the protection will install in the language
of the device, or in English, if the relevant language is not supported by the protection.
Proxy server tab Configure your computers' Internet connection. Specify the way your computers connect
to the Internet, if they use a proxy server, and if proxy authentication is required.
In the case of Linux computers, you'll have to configure the Internet connection locally from
each computer using the command line.
Apply to tab Click this tab to assign the profile to a group or groups of computers.
Advanced Administration Guide – Endpoint Protection
82
13. Before installing the
protection
Computer requirements Installation methods according to the operating
system Quick installation Installation cases
Advanced Administration Guide – Endpoint Protection
83
13.1. Computer requirements Regardless of the installation method to use, it is advisable to check the requirements to be
met by the computers the protection is to be installed on. Please, go to requirements.
Computers with other security solutions installed
Solutions other than Panda Security
If you want to install Endpoint Protection on a computer that already has an antivirus solution
from a vendor other than Panda Security, you can choose between installing the solution
without uninstalling the current protection so that both products coexist on the same
computer, or uninstall the other solution and work exclusively with Endpoint Protection.
The behavior will be different depending on the Endpoint Protection version to install.
• Trial versions
By default, trial versions of Endpoint Protection can be installed on computers with a solution other than Endpoint Protection installed.
• Commercial versions
By default, it is not possible to install Endpoint Protection on a computer with a solution other than Endpoint Protection installed. If Endpoint Protection includes the uninstaller to uninstall the other vendor's product, it will uninstall it and then install Endpoint Protection. Otherwise, the installation process will stop.
This behavior can be changed both for trial and commercial versions. Go to Settings / (Click the profile to edit) / Windows and Linux / Advanced settings. In addition, both the Computers and Installation windows will show at all times the installation option you have configured.
This information will be displayed only if you have the same installation option configured for all profiles.
Panda Security solutions
If the existing security solution is a Panda Security solution, you must uninstall it before
installing Endpoint Protection on the computer.
Uninstaller list
Go to Annex 8 for a list of the antivirus solutions that Endpoint Protection can uninstall
automatically. If the solution you have to uninstall is not on the list, you'll have to uninstall it
manually.
Manual uninstall In Windows 8 and later:
Control Panel > Programs > Uninstall.
You can also type 'uninstall a program' from the Windows Start Screen.
In Windows Vista, Windows 7, Windows Server 2003, 2008 and 2012:
Control Panel > Programs and Features > Uninstall or change a program.
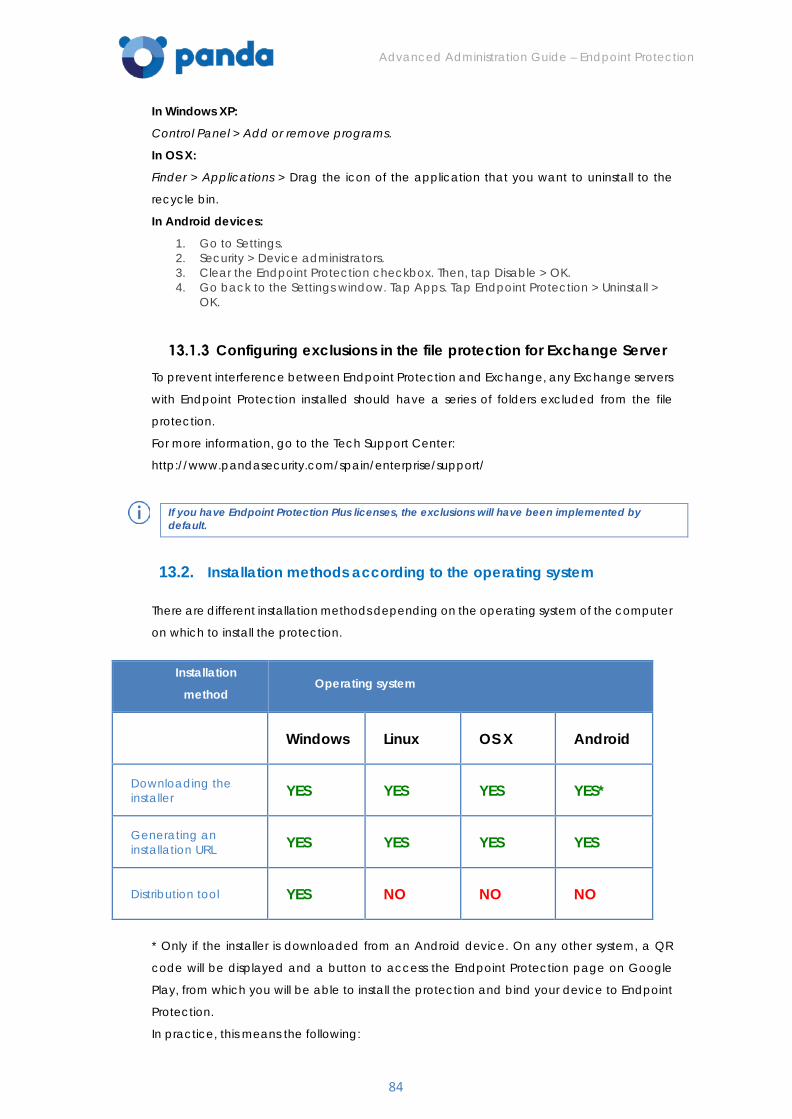
Advanced Administration Guide – Endpoint Protection
84
In Windows XP:
Control Panel > Add or remove programs.
In OS X:
Finder > Applications > Drag the icon of the application that you want to uninstall to the
recycle bin.
In Android devices:
1. Go to Settings. 2. Security > Device administrators. 3. Clear the Endpoint Protection checkbox. Then, tap Disable > OK. 4. Go back to the Settings window. Tap Apps. Tap Endpoint Protection > Uninstall >
OK.
Configuring exclusions in the file protection for Exchange Server
To prevent interference between Endpoint Protection and Exchange, any Exchange servers
with Endpoint Protection installed should have a series of folders excluded from the file
protection.
For more information, go to the Tech Support Center:
http://www.pandasecurity.com/spain/enterprise/support/
If you have Endpoint Protection Plus licenses, the exclusions will have been implemented by default.
13.2. Installation methods according to the operating system
There are different installation methods depending on the operating system of the computer
on which to install the protection.
* Only if the installer is downloaded from an Android device. On any other system, a QR
code will be displayed and a button to access the Endpoint Protection page on Google
Play, from which you will be able to install the protection and bind your device to Endpoint
Protection.
In practice, this means the following:
Installation
method Operating system
Windows Linux OS X Android
Downloading the installer YES YES YES YES*
Generating an installation URL YES YES YES YES
Distribution tool YES NO NO NO
Advanced Administration Guide – Endpoint Protection
85
- If you have licenses of Endpoint Protection for OS X and Windows/Linux/Android, you will be able to use the two installation methods above, plus the distribution tool to deploy the protection for Windows.
- If you only have licenses of Endpoint Protection for OS X, you will not be able to use the available options for Windows/Linux/Android.
- Please, go to Installing the protection chapter
13.3. Quick installation
If you have just purchased the product and still have not installed the protection on any
computers, you will be taken to the Computers window on accessing the console.
This window will inform you that you haven't installed the protection on any computers yet,
and will prompt you to do so.
You will have the following options:
- Install on this computer now. Click this option to download the Windows installer to your computer.
- Send installation URL by email.
You will also have the following options:
- Download the installer for the relevant operating system.
- Download the distribution tool (only available for Windows computers).
Once you have installed the protection across your network, your computers will appear on
the list of protected computers in the Computers window.
If you are a new client you won't have any groups. Therefore, the protection will be installed
on the Default group; that is, with the default configuration established by.
If, apart from the Default group, you have created other groups, you will see all of them in
the group tree called My organization, on the left side of the window.
Adding computers
If you have computers with the protection installed, you will be able to see them in the
Computers window. In addition, this window lets you add new computers very easily.
Selecting this option shows the same options displayed to those clients who have not
installed the protection on any computers yet:
- Install on this computer now.
- Send installation URL by email.
- Download the installer for the relevant operating system.
- Download the distribution tool (only available for Windows computers).
13.4. Installation cases
Installing the solution on computers with no protection installed 1. Access the Web console and enter your login email and password.
Advanced Administration Guide – Endpoint Protection
86
2. Create a new profile (or use the default profile, depending on your needs). 3. Configure the different protections depending on the licenses that you have:
- Antivirus protection
- Firewall protection
- Device control
- Protection for Exchange Servers (if you have Endpoint Protection Plus licenses)
- Web access control (if you have Endpoint Protection Plus licenses)
- Protection for OS X
- Antivirus protection for Android devices.
- Anti-theft protection for Android devices (if you have Endpoint Protection Plus or Fusion licenses).
4. Create a group (optional). 5. Install the protection. Use the installation method that best adapts to your needs
and the characteristics of your computer network.
Installing the solution on computers with protection installed
The installation process is similar to the previous one. However, it is very important that before
installing Endpoint Protection you choose in the settings:
- Whether to install the protection together with any other security solution that might already be installed on the computer, or
- Uninstall these prior to installing Endpoint Protection.
Check the Recommendations prior to installation.
In most cases, when installing the new protection and uninstalling the previous one, you will need to restart the computer once (twice at most).
Advanced Administration Guide – Endpoint Protection
87
14. Installing the protection
Installing the protection on Windows/Linux computers
Installing the protection on OS X computers
Installing the protection on Android devices
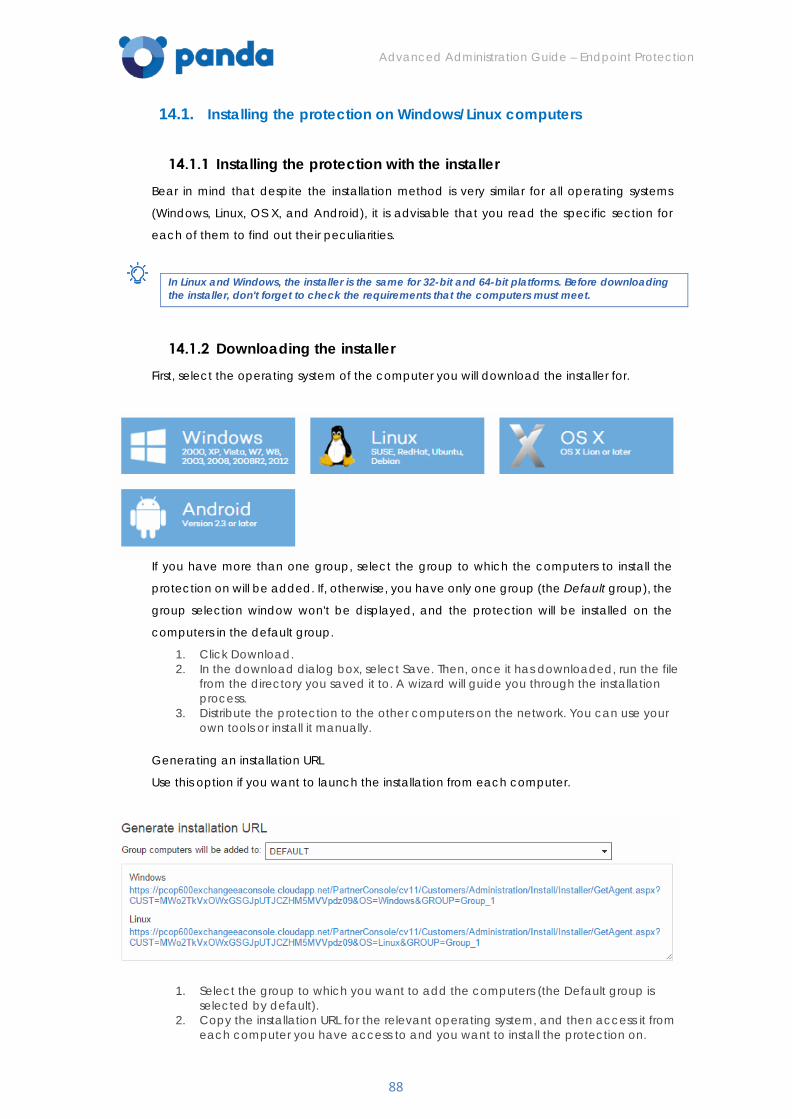
Advanced Administration Guide – Endpoint Protection
88
14.1. Installing the protection on Windows/Linux computers
Installing the protection with the installer
Bear in mind that despite the installation method is very similar for all operating systems
(Windows, Linux, OS X, and Android), it is advisable that you read the specific section for
each of them to find out their peculiarities.
In Linux and Windows, the installer is the same for 32-bit and 64-bit platforms. Before downloading the installer, don't forget to check the requirements that the computers must meet.
Downloading the installer
First, select the operating system of the computer you will download the installer for.
If you have more than one group, select the group to which the computers to install the
protection on will be added. If, otherwise, you have only one group (the Default group), the
group selection window won't be displayed, and the protection will be installed on the
computers in the default group.
1. Click Download. 2. In the download dialog box, select Save. Then, once it has downloaded, run the file
from the directory you saved it to. A wizard will guide you through the installation process.
3. Distribute the protection to the other computers on the network. You can use your own tools or install it manually.
Generating an installation URL
Use this option if you want to launch the installation from each computer.
1. Select the group to which you want to add the computers (the Default group is selected by default).
2. Copy the installation URL for the relevant operating system, and then access it from each computer you have access to and you want to install the protection on.
Advanced Administration Guide – Endpoint Protection
89
Sending the download link by email
1. Select the group to which you want to add the computers (the Default group is selected by default), and click Send by email.
2. End users will automatically receive an email with the download link for their operating systems. Clicking the link will download the installer.
3. Follow the instructions in the wizard to complete the installation process.
14.2. Installing the protection with the distribution tool
This installation method applies only to Windows computers.
Downloading the distribution tool
It is important that, before downloading the distribution tool, you check the minimum
requirements the computer must meet.
The distribution tool lets you install and uninstall the protection centrally on Windows
computers, avoiding manual intervention from end users throughout the process.
Remember that, if you want to uninstall the protection, you will be asked to enter the uninstallation password you set for the relevant configuration profile.
1. In Installation, click Download distribution tool. 2. In the download dialog box, select Save, then, once it has downloaded, run the file
from the directory you have saved it to. A wizard will guide you through the installation process.
Once you have installed the Endpoint Protection distribution tool, you have to open it in
order to deploy the protection to your computers. You will then see the main window from
which you can install and uninstall the protection.
Installing the protection
When selecting the computers on which to install the protection, the distribution tool lets you
do this on the basis of two criteria: by domain or by IP address/computer name.
By domain
1. Click Install protection. 2. Click By domain. 3. Indicate the group of computers (optional). 4. In the tree, find the computers to which you want to distribute the protection, and
select the relevant checkboxes.
Optionally, you can enter a user name and password with administrator privileges on the
selected computers.
It is advisable to use a domain administrator password. This way, you won't have to specify
the user name and password of every computer.
Advanced Administration Guide – Endpoint Protection
90
By IP address or computer name
1. Click By IP or computer name. 2. Indicate the group of computers (optional). 3. Select the computers to which you want to distribute the protection.
You can indicate the computers' names, IP addresses or IP address range, separating this
data with commas.
Click Add to add them to the list, or Delete to remove them.
• Example of an individual IP address: 127.0.0.1
• Example of a computer name: COMPUTER03
• Example of an IP address range: 192.0.17.5-192.0.17.145
Optionally, you can enter a user name and password with administrator privileges on the
selected computers.
It is advisable to use a domain administrator password. This way, you won't have to specify
the user name and password of every computer.
For more information about the task, enable the Events log (View menu).
Installing the protection using other tools
If you often use other file distribution tools you can use them to distribute the protection.
14.3. Installing the protection on OS X computers
Requirements and installation modes
Before installing the protection, make sure your computers meet the installation
requirements: Please, go to http://www.pandasecurity.com/uk/support/card?id=50076
Installation modes There are two ways to install the protection on OS X computers:
- Using the installer.
- Generating an installation URL and launching the installation from each computer.
For more information, refer to the Installing the protection on OS X computers section in this
Help.
14.4. Installing the protection on OS X computers
Downloading the installer
This installation process is similar to the installation for Windows/Linux computers.
1. Select the group to which you want to add the computers (the Default group is selected by default).
2. In the Installation window, select the option to download the installer for OS X. 3. In the download dialog box, select Save, then, once it has downloaded, run the file
from the directory you have saved it to. A wizard will guide you through the
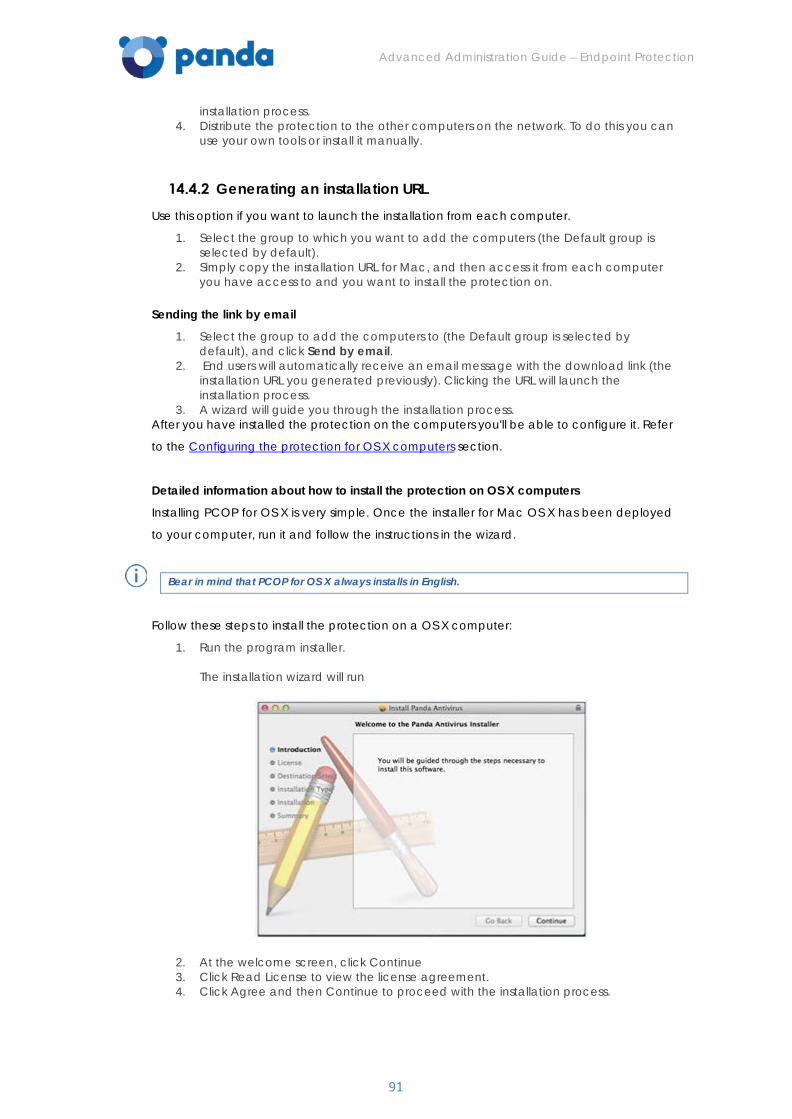
Advanced Administration Guide – Endpoint Protection
91
installation process. 4. Distribute the protection to the other computers on the network. To do this you can
use your own tools or install it manually.
Generating an installation URL
Use this option if you want to launch the installation from each computer.
1. Select the group to which you want to add the computers (the Default group is selected by default).
2. Simply copy the installation URL for Mac, and then access it from each computer you have access to and you want to install the protection on.
Sending the link by email
1. Select the group to add the computers to (the Default group is selected by default), and click Send by email.
2. End users will automatically receive an email message with the download link (the installation URL you generated previously). Clicking the URL will launch the installation process.
3. A wizard will guide you through the installation process. After you have installed the protection on the computers you'll be able to configure it. Refer
to the Configuring the protection for OS X computers section.
Detailed information about how to install the protection on OS X computers
Installing PCOP for OS X is very simple. Once the installer for Mac OS X has been deployed
to your computer, run it and follow the instructions in the wizard.
Bear in mind that PCOP for OS X always installs in English.
Follow these steps to install the protection on a OS X computer:
1. Run the program installer. The installation wizard will run
2. At the welcome screen, click Continue 3. Click Read License to view the license agreement. 4. Click Agree and then Continue to proceed with the installation process.
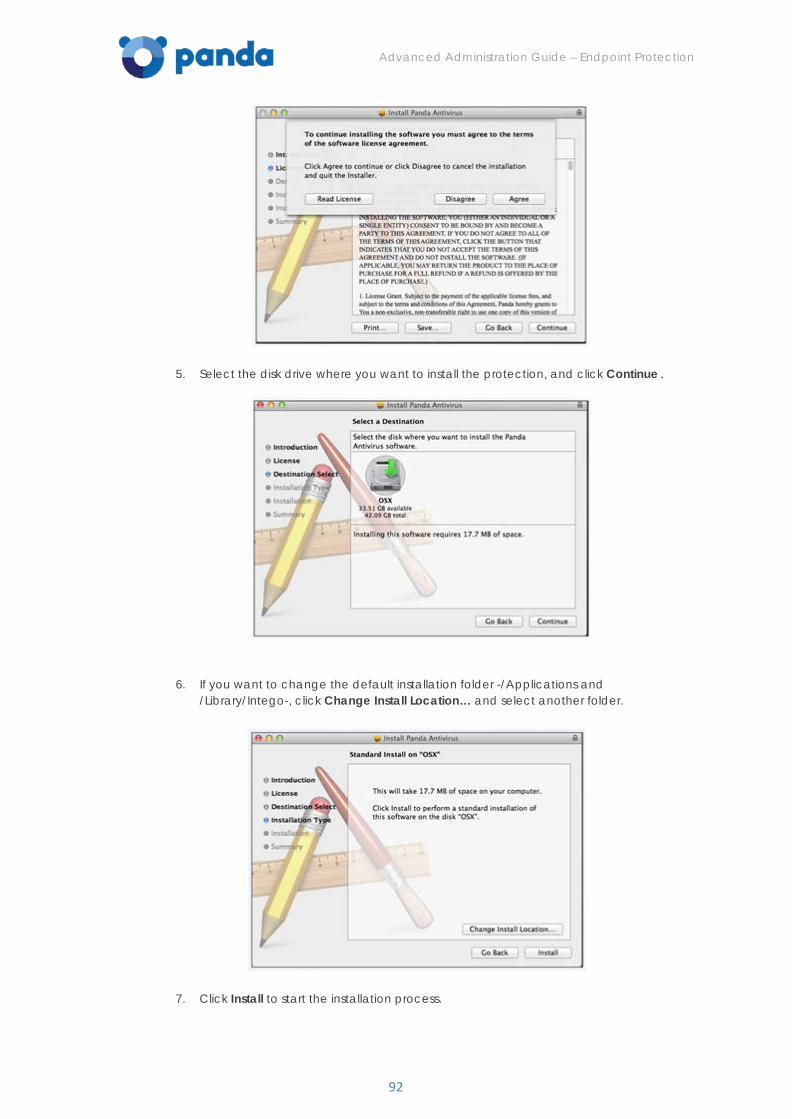
Advanced Administration Guide – Endpoint Protection
92
5. Select the disk drive where you want to install the protection, and click Continue.
6. If you want to change the default installation folder -/Applications and /Library/Intego-, click Change Install Location… and select another folder.
7. Click Install to start the installation process.
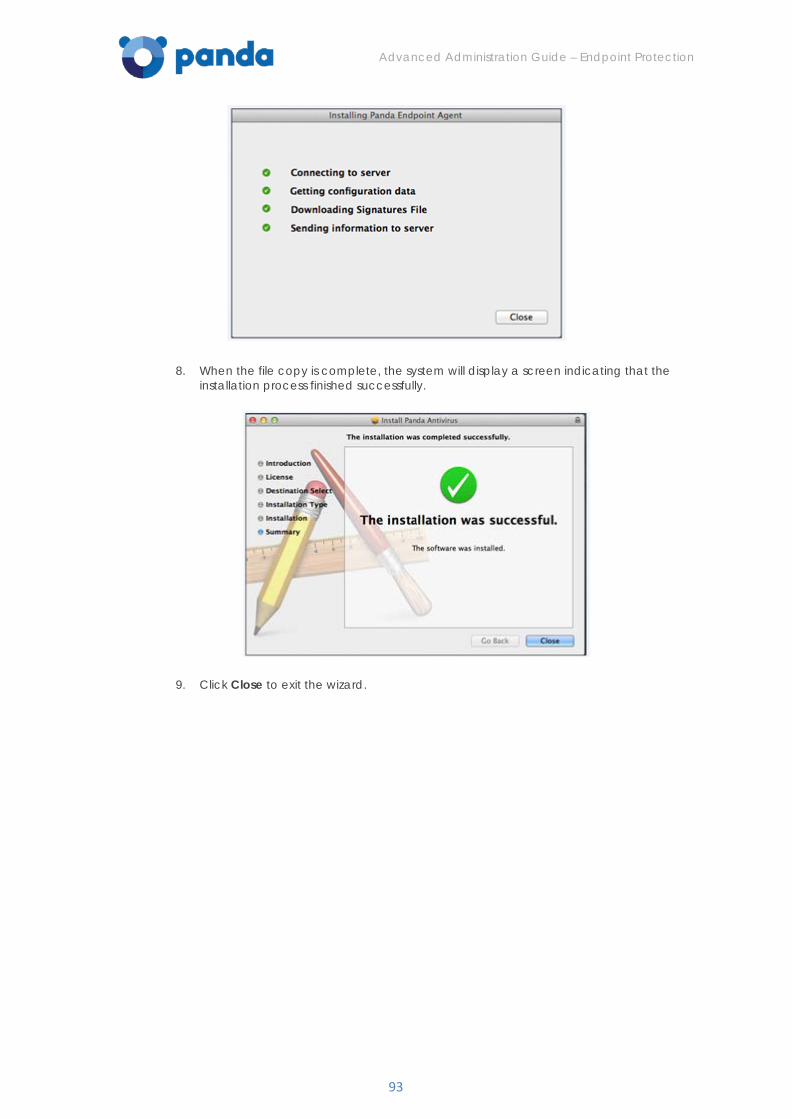
Advanced Administration Guide – Endpoint Protection
93
8. When the file copy is complete, the system will display a screen indicating that the installation process finished successfully.
9. Click Close to exit the wizard.
Advanced Administration Guide – Endpoint Protection
94
14.5. Installing the protection on Android devices
Introduction
The process to install Endpoint Protection on Android devices has the peculiarity that, once
you have installed the protection, it is necessary to take the additional step of adding the
Android device to a computer group in the Endpoint Protection Web console.
This way, the Web console will be aware of the existence of the device on the list of
protected computers.
Installation methods
There are two ways to install the protection on Android devices:
From the Endpoint Protection Web console
You must download the installer for Android devices.
From the Android device itself
- Through the Endpoint Protection page on Google Play.
- Through the installation URL sent to you by email. This message will also include the necessary URL to add the device to the Web console, as previously explained.
Installing the protection from an Android for Work compatible EMM tool
Installing the protection from the Web console
Downloading the installer
Go to the Installation tab in the Web console, and select the option to download the installer
for Android. There are two ways to install the protection:
- Installation using a QR code. This requires the user of the device to have access to the Endpoint Protection Web console. Also, they must have a QR Code reader installed on their device.
- Installation via Google Play. It's not necessary to have the device to protect at hand at the time of installation, but it is necessary to know the credentials of the Google account associated with the device.
In both cases, the user will be taken to the Endpoint Protection page in Google Play to install
the protection.
Adding the device to a group in the Web console
Once the installation is complete, the next step is to add the device to a group. Follow these
steps:
1. Open the protection you have just installed on your device. 2. A window will be displayed indicating that the process to add the device to the list
of computers and devices managed from the Endpoint Protection console is about to start.
3. Tap Use QR code. A window will be displayed indicating that you must access the Endpoint Protection Web console to scan the QR code.
4. In the console, go to the Installation tab and click the button to install the installer for Android.
5. Select the group that you want to add the device to, and scan the QR code. 6. Select a name to identify the device in the Endpoint Protection Web console, click
Continue and enable the necessary permissions to activate the anti-theft
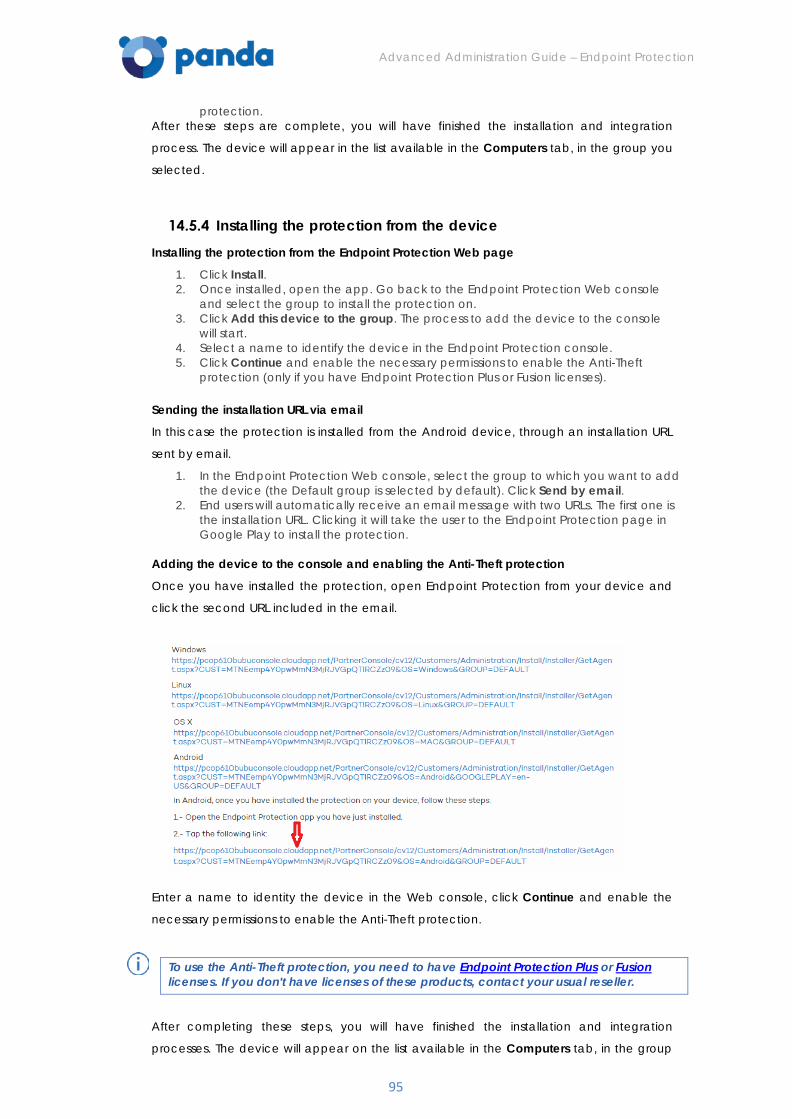
Advanced Administration Guide – Endpoint Protection
95
protection. After these steps are complete, you will have finished the installation and integration
process. The device will appear in the list available in the Computers tab, in the group you
selected.
Installing the protection from the device
Installing the protection from the Endpoint Protection Web page
1. Click Install. 2. Once installed, open the app. Go back to the Endpoint Protection Web console
and select the group to install the protection on. 3. Click Add this device to the group. The process to add the device to the console
will start. 4. Select a name to identify the device in the Endpoint Protection console. 5. Click Continue and enable the necessary permissions to enable the Anti-Theft
protection (only if you have Endpoint Protection Plus or Fusion licenses).
Sending the installation URL via email
In this case the protection is installed from the Android device, through an installation URL
sent by email.
1. In the Endpoint Protection Web console, select the group to which you want to add the device (the Default group is selected by default). Click Send by email.
2. End users will automatically receive an email message with two URLs. The first one is the installation URL. Clicking it will take the user to the Endpoint Protection page in Google Play to install the protection.
Adding the device to the console and enabling the Anti-Theft protection
Once you have installed the protection, open Endpoint Protection from your device and
click the second URL included in the email.
Enter a name to identity the device in the Web console, click Continue and enable the
necessary permissions to enable the Anti-Theft protection.
To use the Anti-Theft protection, you need to have Endpoint Protection Plus or Fusion licenses. If you don't have licenses of these products, contact your usual reseller.
After completing these steps, you will have finished the installation and integration
processes. The device will appear on the list available in the Computers tab, in the group
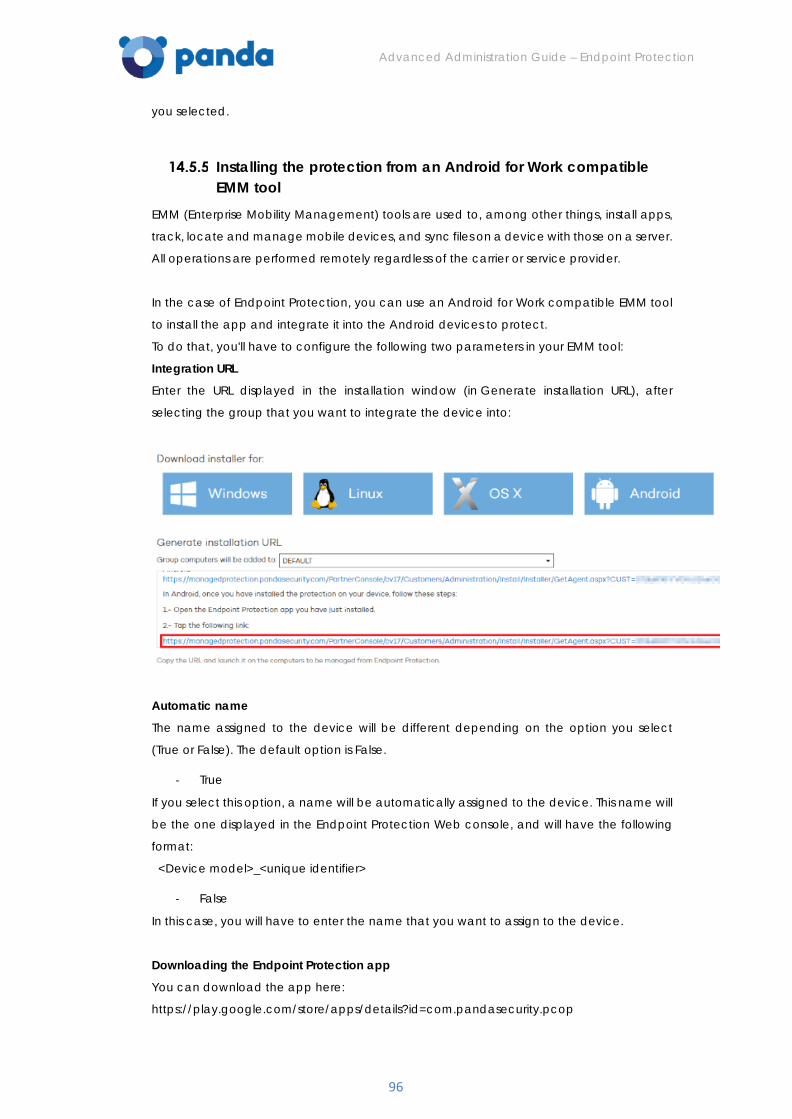
Advanced Administration Guide – Endpoint Protection
96
you selected.
Installing the protection from an Android for Work compatible EMM tool
EMM (Enterprise Mobility Management) tools are used to, among other things, install apps,
track, locate and manage mobile devices, and sync files on a device with those on a server.
All operations are performed remotely regardless of the carrier or service provider.
In the case of Endpoint Protection, you can use an Android for Work compatible EMM tool
to install the app and integrate it into the Android devices to protect.
To do that, you'll have to configure the following two parameters in your EMM tool:
Integration URL
Enter the URL displayed in the installation window (in Generate installation URL), after
selecting the group that you want to integrate the device into:
Automatic name
The name assigned to the device will be different depending on the option you select
(True or False). The default option is False.
- True
If you select this option, a name will be automatically assigned to the device. This name will
be the one displayed in the Endpoint Protection Web console, and will have the following
format:
<Device model>_<unique identifier>
- False
In this case, you will have to enter the name that you want to assign to the device.
Downloading the Endpoint Protection app
You can download the app here:
https://play.google.com/store/apps/details?id=com.pandasecurity.pcop

Advanced Administration Guide – Endpoint Protection
97
Advanced Administration Guide – Endpoint Protection
98
15. Configuring the protection
for Windows/Linux
computers
General profile settings for Windows/Linux computers
Device Control settings
Firewall protection settings
Antivirus protection settings
Exchange Server protection settings
Web access control settings
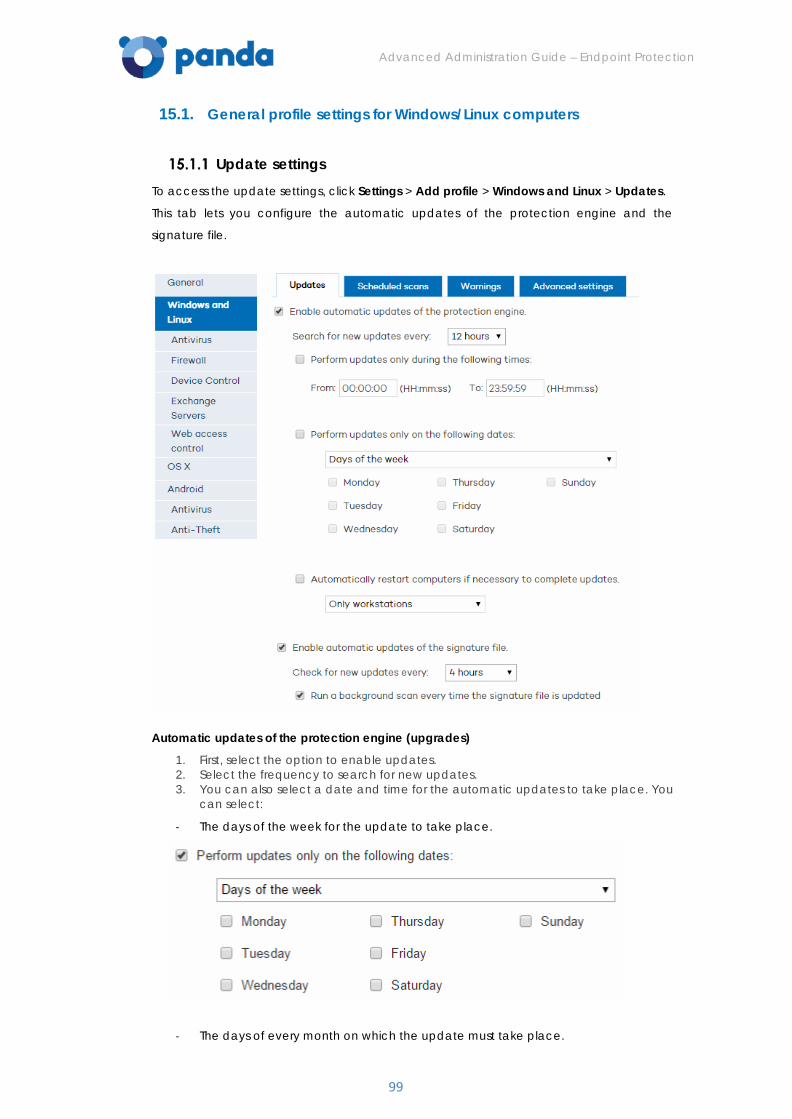
Advanced Administration Guide – Endpoint Protection
99
15.1. General profile settings for Windows/Linux computers
Update settings
To access the update settings, click Settings > Add profile > Windows and Linux > Updates.
This tab lets you configure the automatic updates of the protection engine and the
signature file.
Automatic updates of the protection engine (upgrades)
1. First, select the option to enable updates. 2. Select the frequency to search for new updates. 3. You can also select a date and time for the automatic updates to take place. You
can select:
- The days of the week for the update to take place.
- The days of every month on which the update must take place.
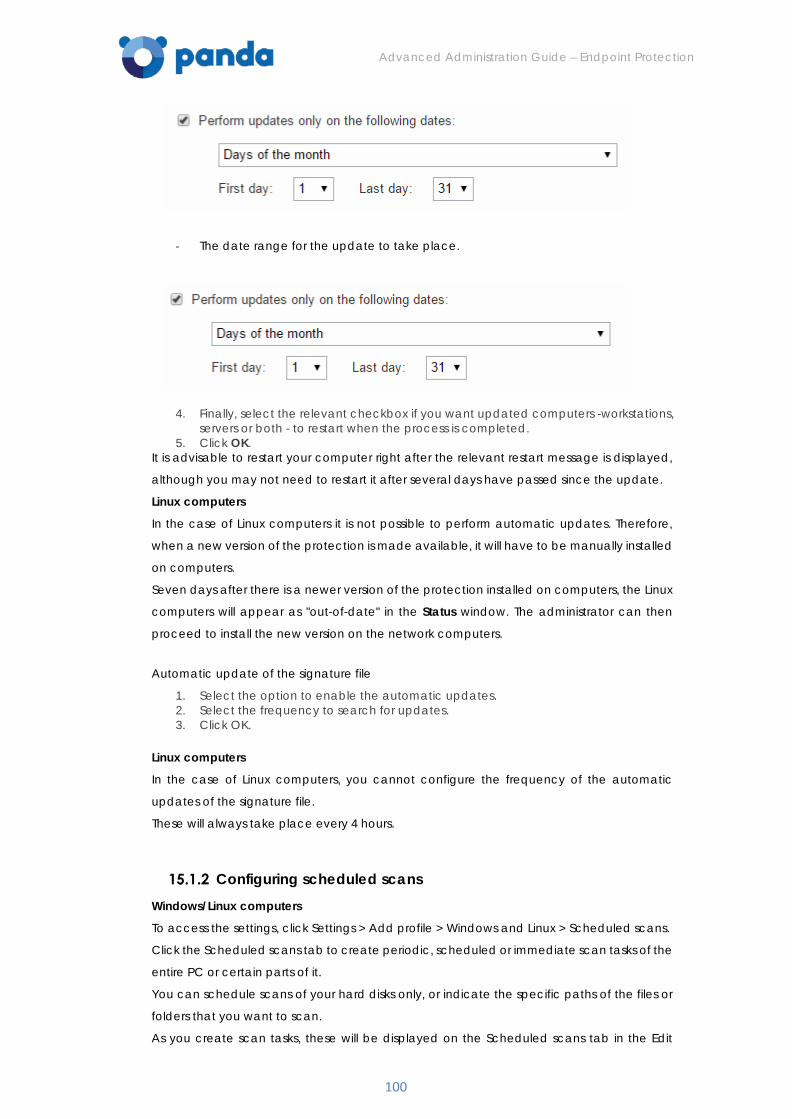
Advanced Administration Guide – Endpoint Protection
100
- The date range for the update to take place.
4. Finally, select the relevant checkbox if you want updated computers -workstations, servers or both - to restart when the process is completed.
5. Click OK. It is advisable to restart your computer right after the relevant restart message is displayed,
although you may not need to restart it after several days have passed since the update.
Linux computers
In the case of Linux computers it is not possible to perform automatic updates. Therefore,
when a new version of the protection is made available, it will have to be manually installed
on computers.
Seven days after there is a newer version of the protection installed on computers, the Linux
computers will appear as "out-of-date" in the Status window. The administrator can then
proceed to install the new version on the network computers.
Automatic update of the signature file
1. Select the option to enable the automatic updates. 2. Select the frequency to search for updates. 3. Click OK.
Linux computers
In the case of Linux computers, you cannot configure the frequency of the automatic
updates of the signature file.
These will always take place every 4 hours.
Configuring scheduled scans Windows/Linux computers
To access the settings, click Settings > Add profile > Windows and Linux > Scheduled scans.
Click the Scheduled scans tab to create periodic, scheduled or immediate scan tasks of the
entire PC or certain parts of it.
You can schedule scans of your hard disks only, or indicate the specific paths of the files or
folders that you want to scan.
As you create scan tasks, these will be displayed on the Scheduled scans tab in the Edit
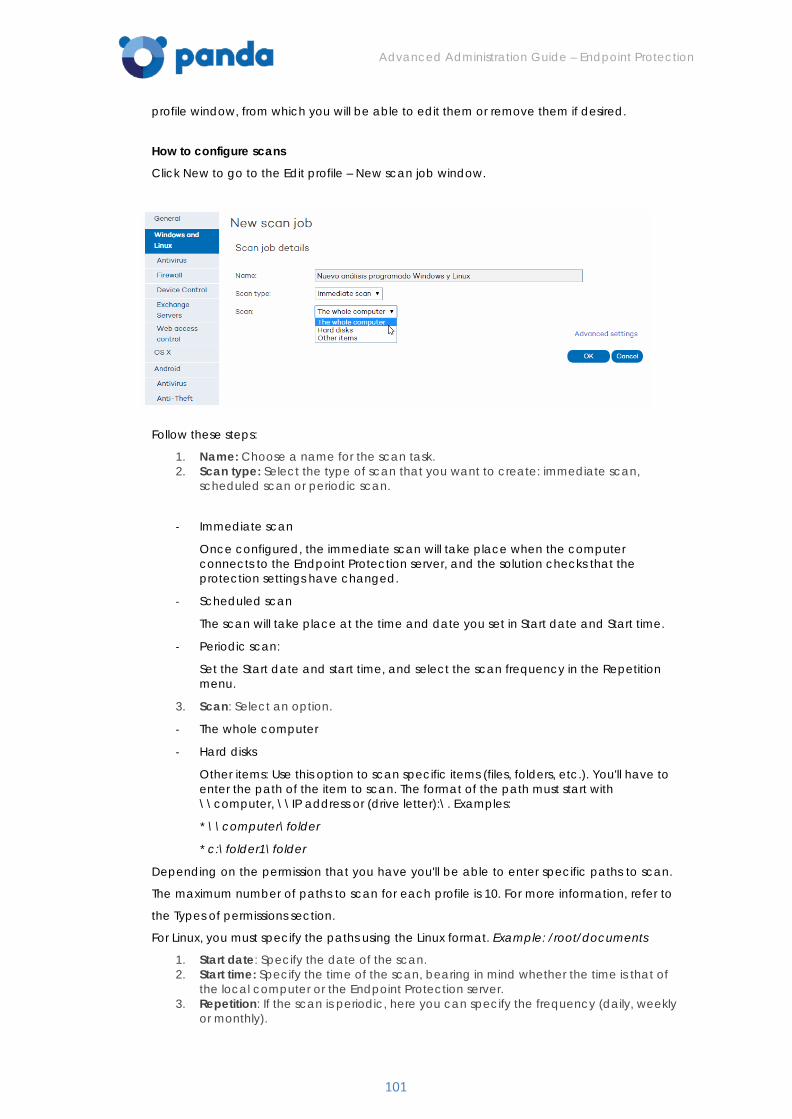
Advanced Administration Guide – Endpoint Protection
101
profile window, from which you will be able to edit them or remove them if desired.
How to configure scans
Click New to go to the Edit profile – New scan job window.
Follow these steps:
1. Name: Choose a name for the scan task. 2. Scan type: Select the type of scan that you want to create: immediate scan,
scheduled scan or periodic scan.
- Immediate scan
Once configured, the immediate scan will take place when the computer connects to the Endpoint Protection server, and the solution checks that the protection settings have changed.
- Scheduled scan
The scan will take place at the time and date you set in Start date and Start time.
- Periodic scan:
Set the Start date and start time, and select the scan frequency in the Repetition menu.
3. Scan: Select an option.
- The whole computer
- Hard disks
Other items: Use this option to scan specific items (files, folders, etc.). You'll have to enter the path of the item to scan. The format of the path must start with \\computer, \\IP address or (drive letter):\. Examples:
* \\computer\folder
* c:\folder1\folder
Depending on the permission that you have you'll be able to enter specific paths to scan.
The maximum number of paths to scan for each profile is 10. For more information, refer to
the Types of permissions section.
For Linux, you must specify the paths using the Linux format. Example: /root/documents
1. Start date: Specify the date of the scan. 2. Start time: Specify the time of the scan, bearing in mind whether the time is that of
the local computer or the Endpoint Protection server. 3. Repetition: If the scan is periodic, here you can specify the frequency (daily, weekly
or monthly).
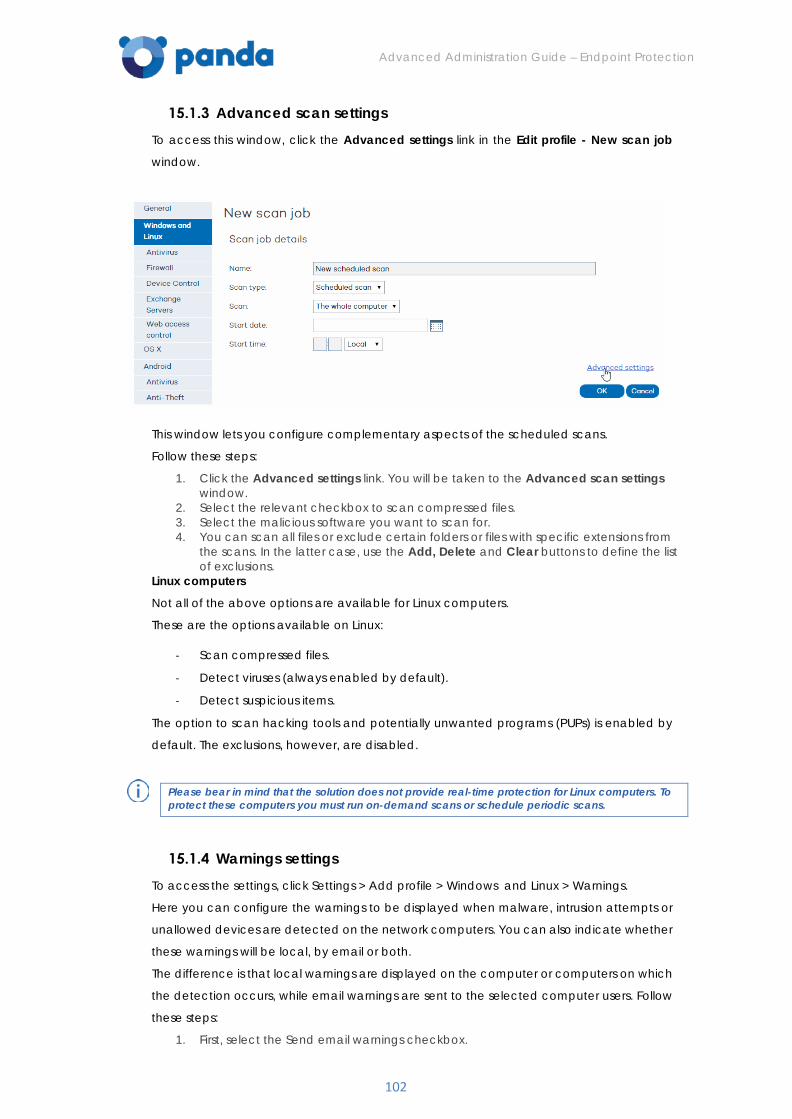
Advanced Administration Guide – Endpoint Protection
102
Advanced scan settings To access this window, click the Advanced settings link in the Edit profile - New scan job
window.
This window lets you configure complementary aspects of the scheduled scans.
Follow these steps:
1. Click the Advanced settings link. You will be taken to the Advanced scan settings window.
2. Select the relevant checkbox to scan compressed files. 3. Select the malicious software you want to scan for. 4. You can scan all files or exclude certain folders or files with specific extensions from
the scans. In the latter case, use the Add, Delete and Clear buttons to define the list of exclusions.
Linux computers
Not all of the above options are available for Linux computers.
These are the options available on Linux:
- Scan compressed files.
- Detect viruses (always enabled by default).
- Detect suspicious items.
The option to scan hacking tools and potentially unwanted programs (PUPs) is enabled by
default. The exclusions, however, are disabled.
Please bear in mind that the solution does not provide real-time protection for Linux computers. To protect these computers you must run on-demand scans or schedule periodic scans.
Warnings settings
To access the settings, click Settings > Add profile > Windows and Linux > Warnings.
Here you can configure the warnings to be displayed when malware, intrusion attempts or
unallowed devices are detected on the network computers. You can also indicate whether
these warnings will be local, by email or both.
The difference is that local warnings are displayed on the computer or computers on which
the detection occurs, while email warnings are sent to the selected computer users. Follow
these steps:
1. First, select the Send email warnings checkbox.
Advanced Administration Guide – Endpoint Protection
103
2. Complete the Message subject field. 3. Enter an email address and specify the SMTP server to be used for sending
warnings. If the server requires authentication, enter the relevant user name and password.
4. Click OK.
Advanced settings
Follow the steps below to access the advanced settings:
1. Click the Settings menu. 2. Click the profile to configure. 3. In the menu on the left, click Windows and Linux. 4. Click Advanced settings.
Here you can configure aspects related to the installation of the protection on computers,
as well as the connection of these computers to the Internet and to the Endpoint Protection
servers. You can also configure options related to the suspicious file quarantine.
Installation
Indicate in which directory you want to install the protection. Endpoint Protection will show
a default path, which you can change if you want.
In this section you can also indicate if you want Endpoint Protection to automatically
uninstall any competitor product detected on the computer, or if you want both products
to coexist on the same computer.
For more information about the default behavior for the different versions of the protection
(trial or commercial versions), go to Computers with other security solutions installed chapter.
Installing the protection on Linux computers
On Linux computers, the protection is installed in a default folder that cannot be changed.
Connection to Collective Intelligence
Administrators can disable scans with Collective Intelligence. It is advisable to keep this
option enabled if you want to benefit from all the protection provided by Collective
Intelligence.
Linux computers
- On Linux computers it is not possible to disable the connection to Collective Intelligence. Therefore, as long as a Linux computer is connected to the Internet, the installed protection will leverage Collective Intelligence.
Server connection settings
Establish how often you want the computer to send information to the Endpoint Protection
servers about the status of the protection installed.
You can change the default frequency, but it must be a value between 12 and 24 hours.
You can also specify the computer through which connections with the Endpoint Protection
server are centralized.
To do this, select the relevant checkbox and click Select. In the Select computer window,
Advanced Administration Guide – Endpoint Protection
104
choose a computer or search for it using the Find button. Then click OK.
Check the requirements of the computer used to establish connections with the server:
- Internet connection.
- At least 128 MB of RAM.
- It must be a protected computer (it must be on the list of protected computers) and have version 5.04 or later of the agent.
- It cannot be an excluded computer, nor can it be a computer without a license.
- It must not go more than 72 hours without connecting to the server.
Quarantine settings
Files in quarantine are analyzed to determine whether they represent a threat or not.
If they do not represent a threat, you can restore them by using the Restore option in the
Quarantine window and indicating the path to which they must be restored.
Uninstallation password
This option is not available for Linux or OS X computers.
The uninstallation password allows you to do uninstall tasks and configure local protection in
administrator mode. That is, with the same password you can uninstall Endpoint Protection
of the computers on which you have installed it or allow the user of such equipment who
enable or disable protection from the local Endpoint Protection console. It is not exclusive
choices, so you can choose to select both at the same time if you wish.
The administrator mode
The administrator mode allows administrators to change the settings of the protection
installed on end users' computers from the computers themselves without having to access
the Web console.
To use the administrator mode you'll have to enter an administrator password.
To access the administrator mode, click the Administrator Panel link and enter your
administrator password.
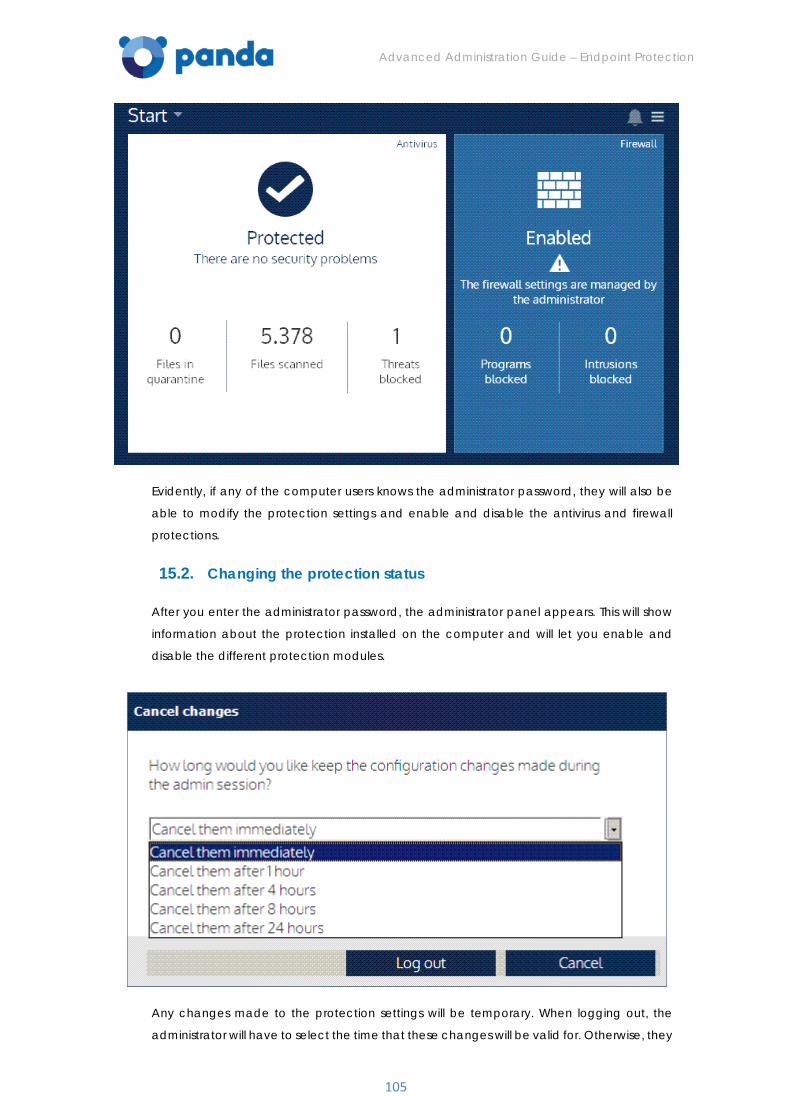
Advanced Administration Guide – Endpoint Protection
105
Evidently, if any of the computer users knows the administrator password, they will also be
able to modify the protection settings and enable and disable the antivirus and firewall
protections.
15.2. Changing the protection status
After you enter the administrator password, the administrator panel appears. This will show
information about the protection installed on the computer and will let you enable and
disable the different protection modules.
Any changes made to the protection settings will be temporary. When logging out, the
administrator will have to select the time that these changes will be valid for. Otherwise, they
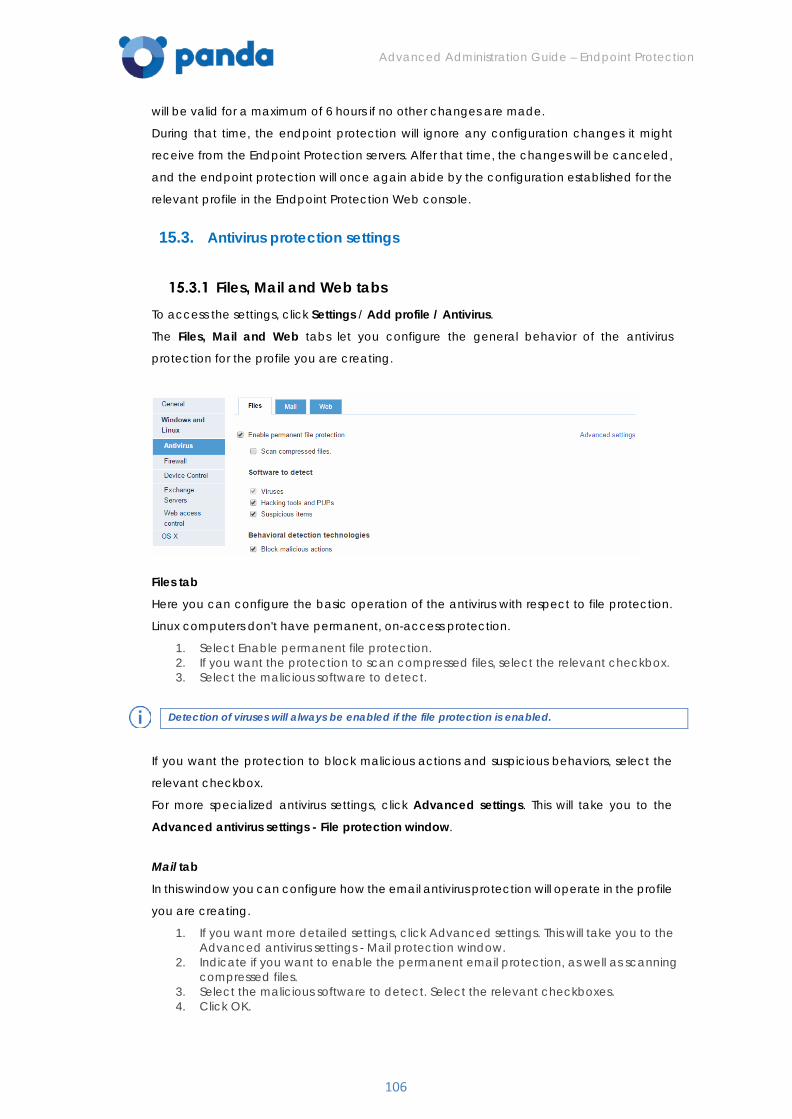
Advanced Administration Guide – Endpoint Protection
106
will be valid for a maximum of 6 hours if no other changes are made.
During that time, the endpoint protection will ignore any configuration changes it might
receive from the Endpoint Protection servers. Alfer that time, the changes will be canceled,
and the endpoint protection will once again abide by the configuration established for the
relevant profile in the Endpoint Protection Web console.
15.3. Antivirus protection settings
Files, Mail and Web tabs
To access the settings, click Settings / Add profile / Antivirus.
The Files, Mail and Web tabs let you configure the general behavior of the antivirus
protection for the profile you are creating.
Files tab
Here you can configure the basic operation of the antivirus with respect to file protection.
Linux computers don't have permanent, on-access protection.
1. Select Enable permanent file protection. 2. If you want the protection to scan compressed files, select the relevant checkbox. 3. Select the malicious software to detect.
Detection of viruses will always be enabled if the file protection is enabled.
If you want the protection to block malicious actions and suspicious behaviors, select the
relevant checkbox.
For more specialized antivirus settings, click Advanced settings. This will take you to the
Advanced antivirus settings - File protection window.
Mail tab
In this window you can configure how the email antivirus protection will operate in the profile
you are creating.
1. If you want more detailed settings, click Advanced settings. This will take you to the Advanced antivirus settings - Mail protection window.
2. Indicate if you want to enable the permanent email protection, as well as scanning compressed files.
3. Select the malicious software to detect. Select the relevant checkboxes. 4. Click OK.
Advanced Administration Guide – Endpoint Protection
107
Web tab
This tab lets you configure the Internet protection, which protects you against Internet-borne
malware and phishing attacks.
This option is disabled by default. To enable it, follow the steps below:
1. Select the Enable permanent Internet protection checkbox. 2. Selet the option to detect phishing Web pages if you want to.
The virus detection option is enabled by default.
The Detections by type section in the Status window shows detections of phishing URLs in the
Phishing category, and detections of malware URLs in the Other category.
These detections are also displayed in:
- The detection report.
- In reports.
Phishing URL detections will be included in the “Phishing” category, whereas malware URL
detections will be included in the Other category. Any phishing or malware attacks
detected by this protection will be blocked.
Malware and phishing detections reported by the Internet protection won't be counted as
blocked categories.
Local scans
Panda Endpoint Protection is the name of the protection that Endpoint Protection deploys
and installs on computers. Once installed, you can access different scan options through
the Windows right-click menu or through the right-click menu of the protection itself.
Right-click scan of a selected item
Select a folder, drive, file or any other scannable item and right-click it. You will then see a
Windows menu, giving you the option to Scan with Panda Endpoint Protection.
The scan will be launched immediately. You can pause the scan and restart it later. When it
is finished you will see the result of the scan and you will also be able to print, export or save
the report.
Local scans from Panda Endpoint Protection
- Optimized scan
If you select this option, Panda Endpoint Protection will scan the computer folders that
usually contain malware in order to detect and remove threats as soon as possible.
- Other scans
You have two options:
- Scan all My Computer
This option carries out an in-depth scan of all items on your PC: all disk drives, memory, etc.
The duration of the scan will depend on the amount of data stored on your computer, as
well as the computer characteristics.
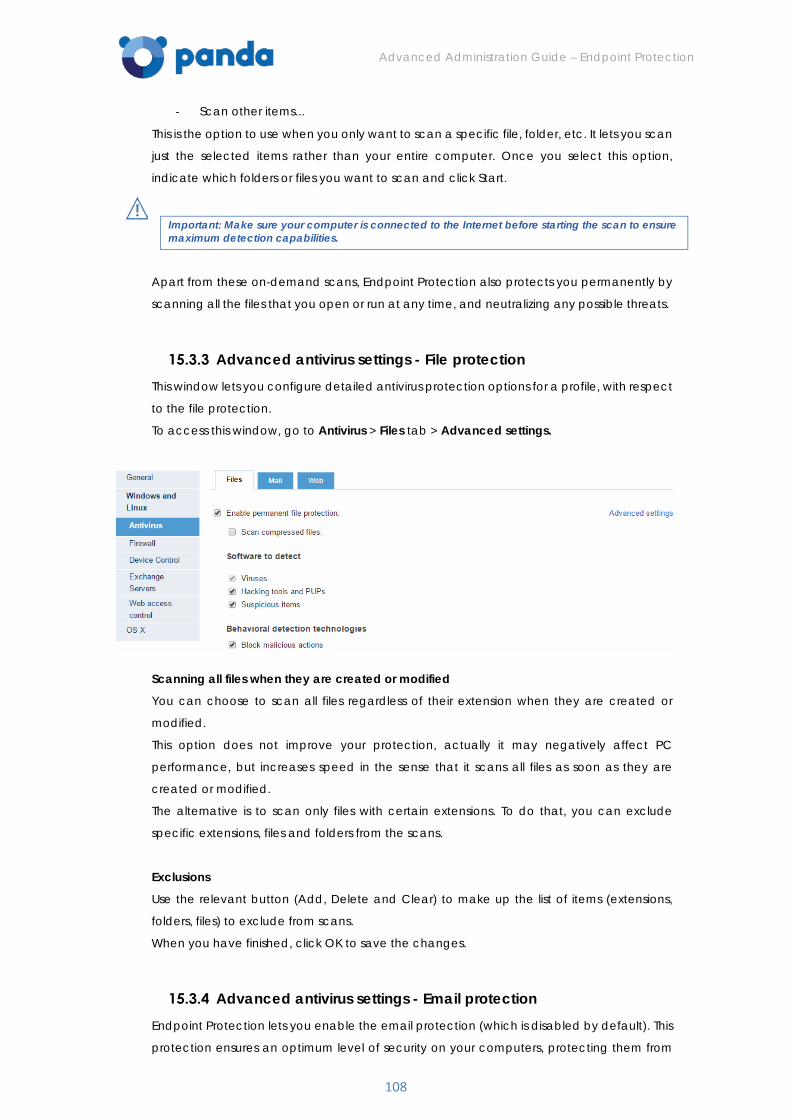
Advanced Administration Guide – Endpoint Protection
108
- Scan other items...
This is the option to use when you only want to scan a specific file, folder, etc. It lets you scan
just the selected items rather than your entire computer. Once you select this option,
indicate which folders or files you want to scan and click Start.
Important: Make sure your computer is connected to the Internet before starting the scan to ensure maximum detection capabilities.
Apart from these on-demand scans, Endpoint Protection also protects you permanently by
scanning all the files that you open or run at any time, and neutralizing any possible threats.
Advanced antivirus settings - File protection This window lets you configure detailed antivirus protection options for a profile, with respect
to the file protection.
To access this window, go to Antivirus > Files tab > Advanced settings.
Scanning all files when they are created or modified
You can choose to scan all files regardless of their extension when they are created or
modified.
This option does not improve your protection, actually it may negatively affect PC
performance, but increases speed in the sense that it scans all files as soon as they are
created or modified.
The alternative is to scan only files with certain extensions. To do that, you can exclude
specific extensions, files and folders from the scans.
Exclusions
Use the relevant button (Add, Delete and Clear) to make up the list of items (extensions,
folders, files) to exclude from scans.
When you have finished, click OK to save the changes.
Advanced antivirus settings - Email protection
Endpoint Protection lets you enable the email protection (which is disabled by default). This
protection ensures an optimum level of security on your computers, protecting them from

Advanced Administration Guide – Endpoint Protection
109
email-borne threats.
1. Click Antivirus > Mail tab. 2. Select Enable permanent mail protection 3. Select whether you want the protection to scan within compressed files. Select the
malicious software to detect.
4. Click Advanced settings. This will take you to the Advanced antivirus settings - Mail protection window.
Endpoint Protection lets you exclude certain file extensions from the scans. Use the Add,
Delete and Clear buttons as appropriate.
When you have finished, click OK to save the changes.
15.4. Firewall protection settings
Introduction to the firewall settings To access the firewall settings, click Settings / Profiles / Add profile / Firewall.
First, you must decide if the users to which the profile will be applied will be allowed to
configure the firewall from their computers or if you, as the administrator, will do it.
Letting users configure the firewall
To do that, select the relevant option.
Refer to the Firewall administration by the client section.
Managing the firewall centrally
If, otherwise, you want the configuration to be available only from the Web console, you, as
Advanced Administration Guide – Endpoint Protection
110
the administrator, will establish the firewall restrictions, blocking, permissions, etc. to be
applied to the computers you select.
Keep the default option selected: Apply the following settings to the firewall.
You must also choose to enable the firewall for Windows workstations and/or Windows
servers. Select the relevant checkboxes.
Continue configuring the firewall through the General, Programs, Intrusion prevention and
System tabs.
Firewall in user mode If the firewall is running in user mode, the user will be able to access the firewall settings
provided this has been authorized by the Endpoint Protection administrator, as explained in
section Introduction to firewall configuration.
The firewall lets users filter inbound and outbound connections to the Internet, and also
monitor connections between their computers and other network computers with which
they may share files, folders, printers and other resources.
Any time a program tries to connect to the Internet from the user's computer (outbound
connection), or there is an attempt to connect to their computer from the Internet (inbound
connections), Endpoint Protection will ask the user whether to allow or deny the connection
through a pop-up message on the screen.
To permanently allow or deny the connection in question, the user must select the relevant
option in the pop-up message.
In the case of outbound connections, if the option Enable automatic assignment of permissions is selected, Endpoint Protection will not ask the user whether to authorize or not the connection. It will do so automatically.
By doing this, as the user assigns permissions and configures the settings, they will gain total
control of the connections established to and from their computer.
For more information about how to configure the firewall, refer to the following sections:
- Connection of programs to the Internet
- Intrusion prevention
- System rules
Uninstalling Endpoint Protection
If the firewall is in user mode, it will be possible to uninstall the solution from the Windows
Control Panel.
However, if the firewall is running in administrator mode, it will be necessary to enter the
administrator password to uninstall the solution.
Firewall in administrator mode Enabling the firewall in administrator mode
1. Click the Settings tab. 2. Click the Add profile (+) icon, and then click Firewall in the left menu column. 3. Select the Apply the following settings to the firewall checkbox.
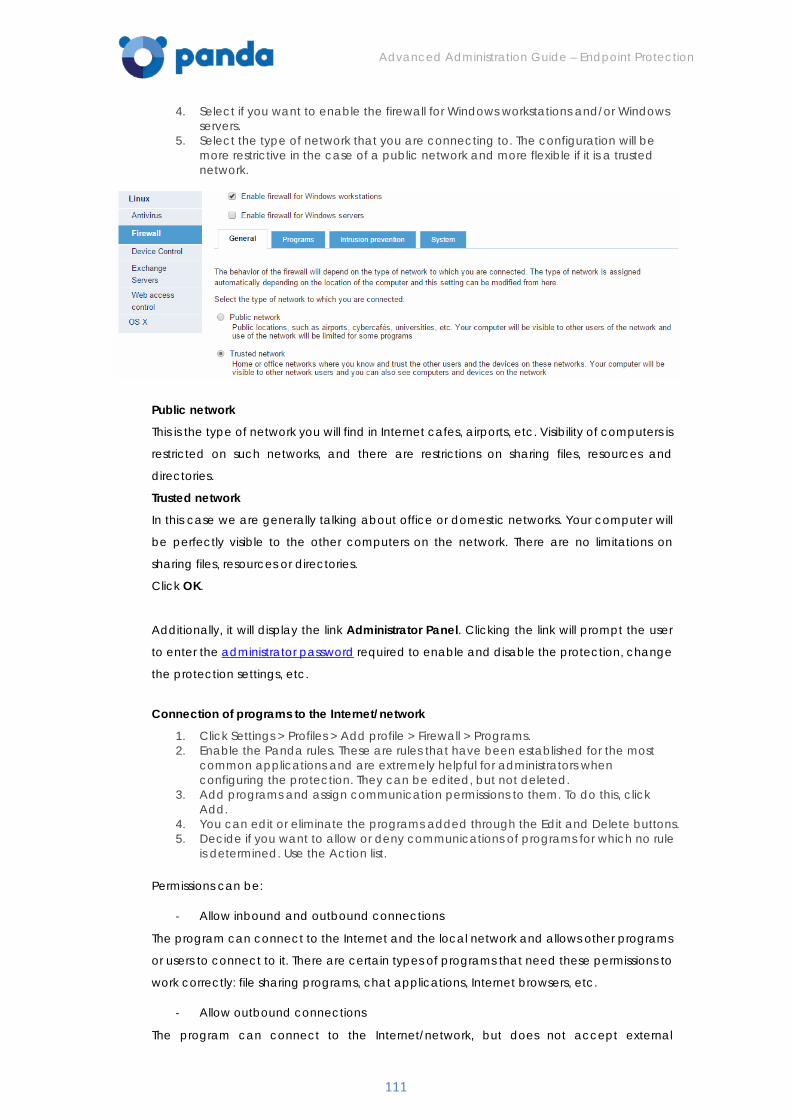
Advanced Administration Guide – Endpoint Protection
111
4. Select if you want to enable the firewall for Windows workstations and/or Windows servers.
5. Select the type of network that you are connecting to. The configuration will be more restrictive in the case of a public network and more flexible if it is a trusted network.
Public network
This is the type of network you will find in Internet cafes, airports, etc. Visibility of computers is
restricted on such networks, and there are restrictions on sharing files, resources and
directories.
Trusted network
In this case we are generally talking about office or domestic networks. Your computer will
be perfectly visible to the other computers on the network. There are no limitations on
sharing files, resources or directories.
Click OK.
Additionally, it will display the link Administrator Panel. Clicking the link will prompt the user
to enter the administrator password required to enable and disable the protection, change
the protection settings, etc.
Connection of programs to the Internet/network
1. Click Settings > Profiles > Add profile > Firewall > Programs. 2. Enable the Panda rules. These are rules that have been established for the most
common applications and are extremely helpful for administrators when configuring the protection. They can be edited, but not deleted.
3. Add programs and assign communication permissions to them. To do this, click Add.
4. You can edit or eliminate the programs added through the Edit and Delete buttons. 5. Decide if you want to allow or deny communications of programs for which no rule
is determined. Use the Action list.
Permissions can be:
- Allow inbound and outbound connections
The program can connect to the Internet and the local network and allows other programs
or users to connect to it. There are certain types of programs that need these permissions to
work correctly: file sharing programs, chat applications, Internet browsers, etc.
- Allow outbound connections
The program can connect to the Internet/network, but does not accept external
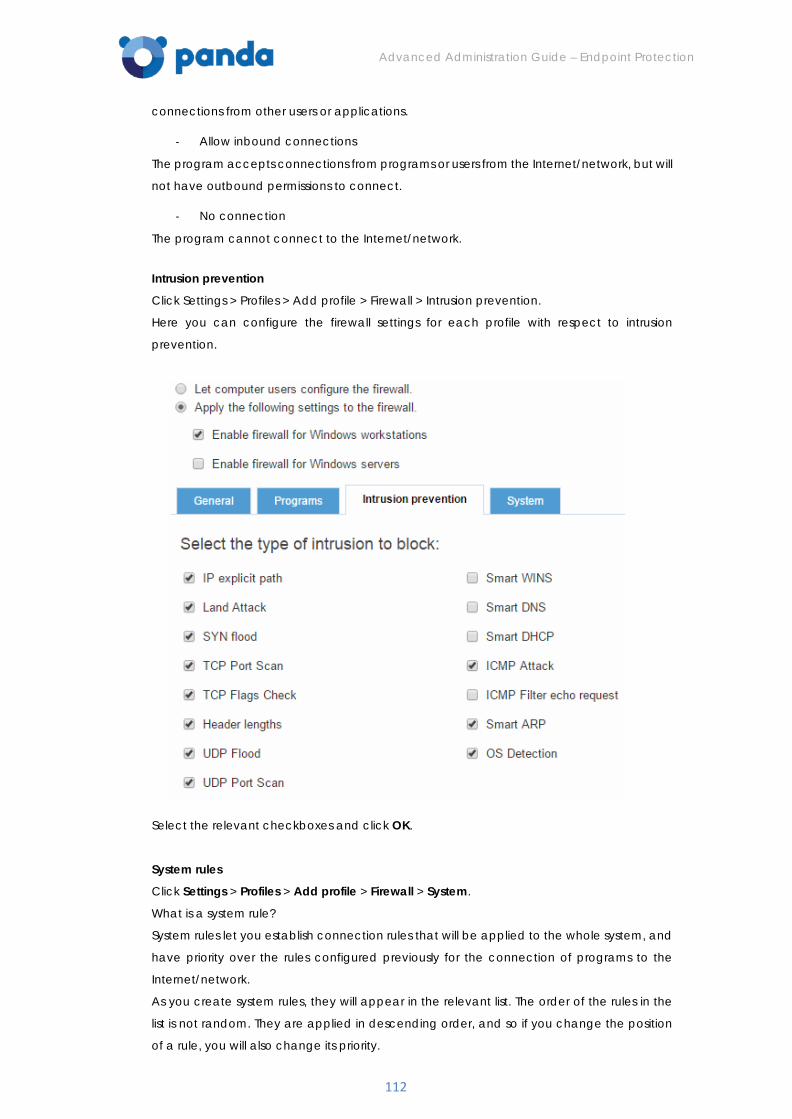
Advanced Administration Guide – Endpoint Protection
112
connections from other users or applications.
- Allow inbound connections
The program accepts connections from programs or users from the Internet/network, but will
not have outbound permissions to connect.
- No connection
The program cannot connect to the Internet/network.
Intrusion prevention
Click Settings > Profiles > Add profile > Firewall > Intrusion prevention.
Here you can configure the firewall settings for each profile with respect to intrusion
prevention.
Select the relevant checkboxes and click OK.
System rules
Click Settings > Profiles > Add profile > Firewall > System.
What is a system rule?
System rules let you establish connection rules that will be applied to the whole system, and
have priority over the rules configured previously for the connection of programs to the
Internet/network.
As you create system rules, they will appear in the relevant list. The order of the rules in the
list is not random. They are applied in descending order, and so if you change the position
of a rule, you will also change its priority.
Advanced Administration Guide – Endpoint Protection
113
Creating system rules
Enable the rules. These are a series of predefined rules that facilitate configuration tasks.
To add system rules, click Add. You will access the Edit profile - New system rule window
where you can select the action that you want to deny or allow, choose the communication
direction, and the network.
You can also determine the protocol, the port and the PCs to which the rule applies,
specifying their IP address, MAC address or both.
You can edit or eliminate the existing rules and permissions through the Settings and Delete
buttons.
15.5. Device Control settings
Introduction
Popular devices like USB flash drives, CD/DVD readers, image devices, Bluetooth devices
and modems can become an entry point for infections.
The Device Control settings allow you to configure the Device Control protection for the
profile you are creating. Select the device or devices you want to authorize or block and
specify their usage.
Notifications
The Device Control module shows different types of notifications.
- Unallowed devices
If the protection detects that a user connects a device that is not allowed according to the
security profile applied to their computer, a warning will be displayed informing them that
they do not have permission to access it.
- Read-only devices
The device will appear in the My Computer directory, but a warning message will be
displayed if the user double-clicks it. The warning message will indicate that the user does
not have permission to access it.
How to enable the Device Control feature
1. In the Settings menu, select one of the profiles in the Profiles section. 2. Select the Enable device control checkbox. 3. In the relevant menu, select the authorization level for each device type.
In the case of USB flash drives and CD/DVD drives you can choose between Block, Allow
read access or Allow read & write access.
The options available for Bluetooth and image devices, USB modems and smartphones are
Allow and Block.
4. Click OK to save the settings.
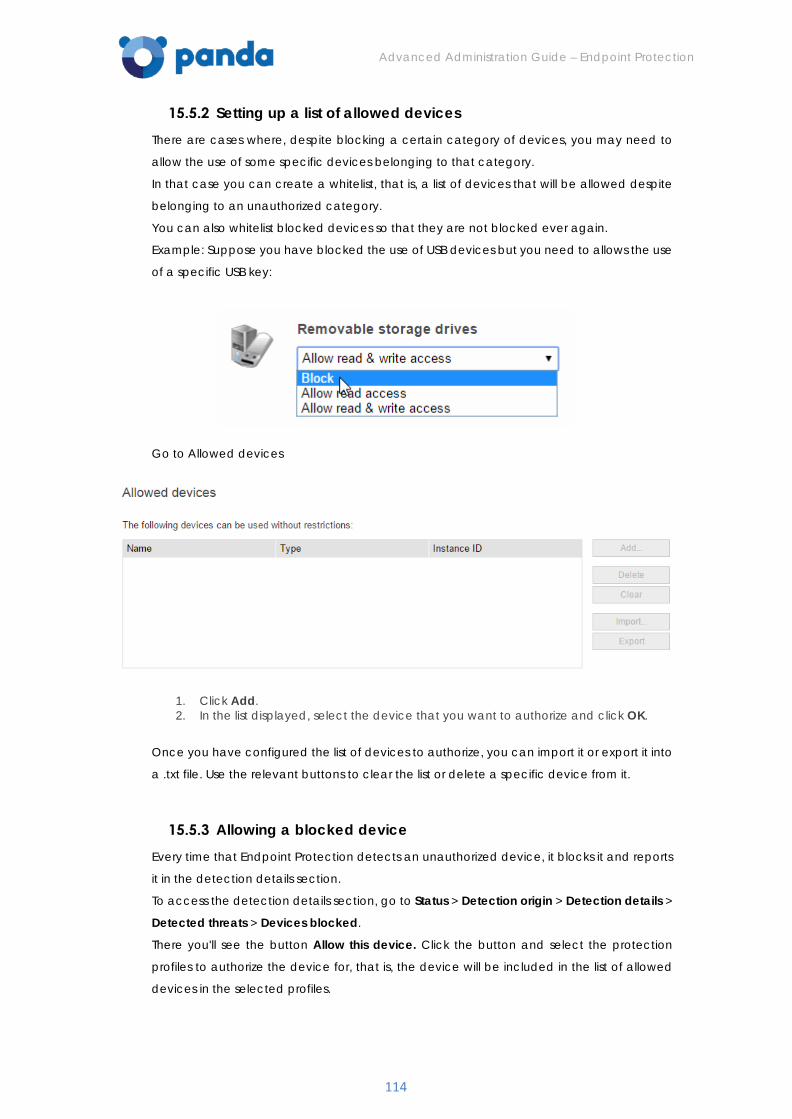
Advanced Administration Guide – Endpoint Protection
114
Setting up a list of allowed devices There are cases where, despite blocking a certain category of devices, you may need to
allow the use of some specific devices belonging to that category.
In that case you can create a whitelist, that is, a list of devices that will be allowed despite
belonging to an unauthorized category.
You can also whitelist blocked devices so that they are not blocked ever again.
Example: Suppose you have blocked the use of USB devices but you need to allows the use
of a specific USB key:
Go to Allowed devices
1. Click Add. 2. In the list displayed, select the device that you want to authorize and click OK.
Once you have configured the list of devices to authorize, you can import it or export it into
a .txt file. Use the relevant buttons to clear the list or delete a specific device from it.
Allowing a blocked device Every time that Endpoint Protection detects an unauthorized device, it blocks it and reports
it in the detection details section.
To access the detection details section, go to Status > Detection origin > Detection details >
Detected threats > Devices blocked.
There you'll see the button Allow this device. Click the button and select the protection
profiles to authorize the device for, that is, the device will be included in the list of allowed
devices in the selected profiles.
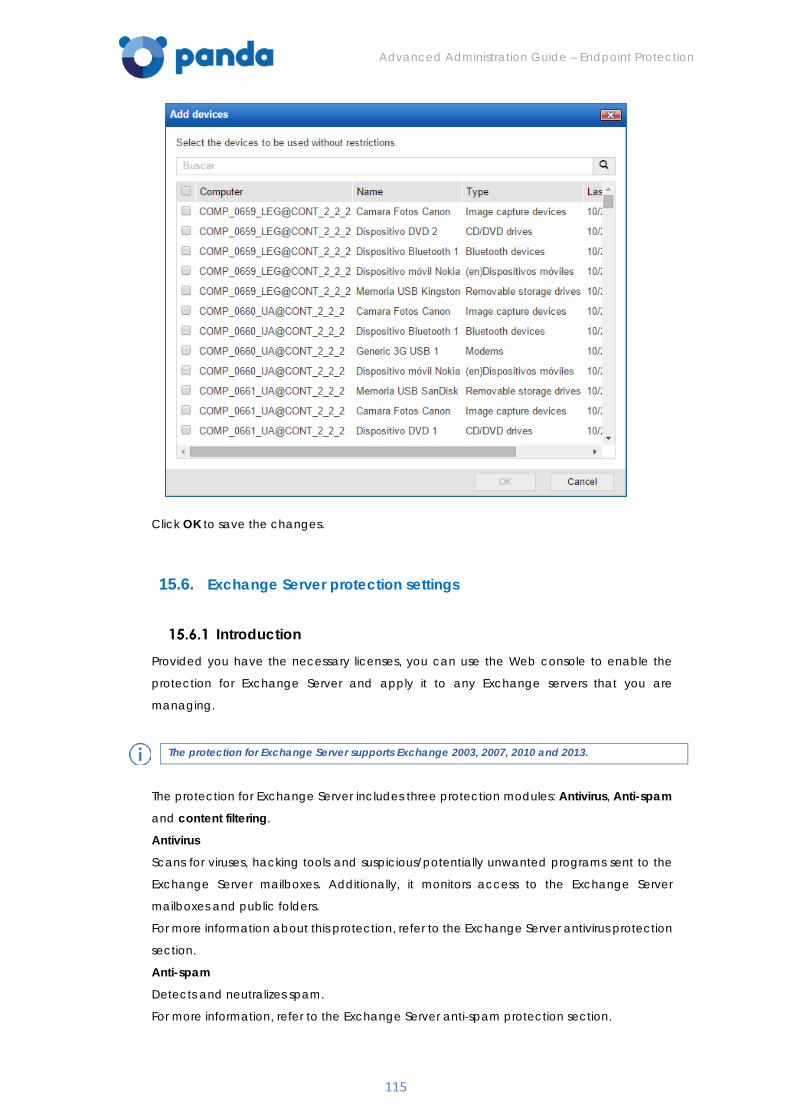
Advanced Administration Guide – Endpoint Protection
115
Click OK to save the changes.
15.6. Exchange Server protection settings
Introduction
Provided you have the necessary licenses, you can use the Web console to enable the
protection for Exchange Server and apply it to any Exchange servers that you are
managing.
The protection for Exchange Server supports Exchange 2003, 2007, 2010 and 2013.
The protection for Exchange Server includes three protection modules: Antivirus, Anti-spam
and content filtering.
Antivirus
Scans for viruses, hacking tools and suspicious/potentially unwanted programs sent to the
Exchange Server mailboxes. Additionally, it monitors access to the Exchange Server
mailboxes and public folders.
For more information about this protection, refer to the Exchange Server antivirus protection
section.
Anti-spam
Detects and neutralizes spam.
For more information, refer to the Exchange Server anti-spam protection section.
Advanced Administration Guide – Endpoint Protection
116
Content filtering
This module lets you filter email messages based on the extension of the attached files.
For more information, refer to the Exchange Server content filtering protection section.
Monitoring the protection for Exchange Server
As with the other protection modules included in Endpoint Protection Plus (antivirus, firewall,
device control), you can monitor the status of the protection for Exchange Server in the
Computers window, as well as in the reports generated by Endpoint Protection Plus.
The detections made by the protection for Exchange Server can be seen in:
- The Status window, Detection origin section, together with the other detections reported by the different Endpoint Protection Plus units.
- The list of detections.
- The detection, executive and extended executive reports.
Antivirus protection for Exchange Server Mailbox protection
To access the settings of the antivirus protection for Exchange Server, click Settings / Profiles
/ Add profile/ Exchange Servers / Antivirus.
Here you can configure the basic operation of the antivirus with respect to the mailbox
protection.
1. Select the Enable mailbox protection checkbox. By enabling the mailbox protection you will keep the emails stored in your Exchange Server
mailboxes malware-free. This will improve your security and prevent data theft and data loss.
2. In Malicious software to detect, select the items to detect.
In versions earlier than Microsoft Exchange 2013, there is a virus scanning API to check
messages and protect mailboxes.
In Exchange 2013, a new interceptor has been developed to intercept the SMTP traffic that
goes between mailboxes.
How the mailbox protection works
The mailbox protection acts on the specific malicious or suspicious item rather than on the
entire message. That is, if malware is detected in an attached file, the protection will act on
that file.
The protection works as follows:
1. The protection takes on the malicious file the action defined by our laboratory experts: Disinfect, Delete, Move to quarantine, etc.
2. A security_alert.txt notification is sent to the user. 3. If restored from quarantine, the email is restored to the recipient’s mailbox. If a
problem occurs during the restore process, the message is directly moved to the Lost&Found folder, where a file will appear with the name of the quarantined item.
How the mailbox protection works in Exchange 2013
The mailbox protection for Exchange 2013 works in the same way as the transport protection.
It works as follows:
1. Should malware or suspicious files be detected, the entire email will be moved to
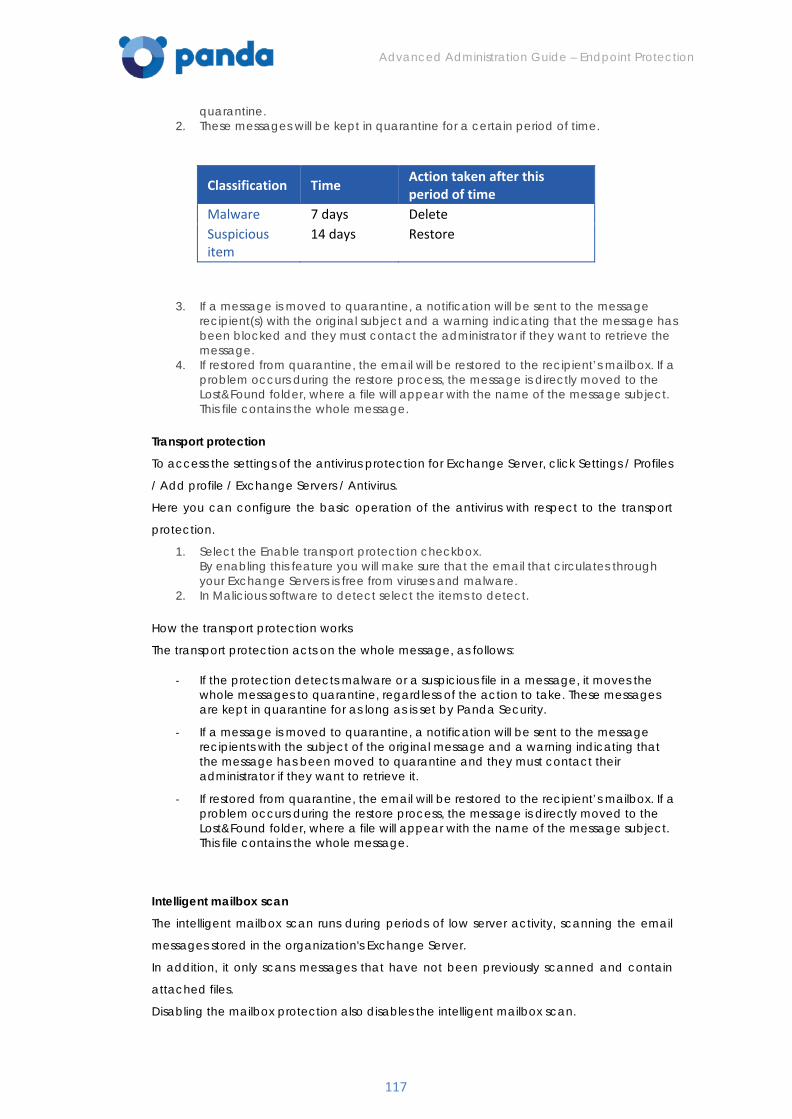
Advanced Administration Guide – Endpoint Protection
117
quarantine. 2. These messages will be kept in quarantine for a certain period of time.
Classification Time Action taken after this period of time
Malware 7 days Delete Suspicious item
14 days Restore
3. If a message is moved to quarantine, a notification will be sent to the message recipient(s) with the original subject and a warning indicating that the message has been blocked and they must contact the administrator if they want to retrieve the message.
4. If restored from quarantine, the email will be restored to the recipient’s mailbox. If a problem occurs during the restore process, the message is directly moved to the Lost&Found folder, where a file will appear with the name of the message subject. This file contains the whole message.
Transport protection
To access the settings of the antivirus protection for Exchange Server, click Settings / Profiles
/ Add profile / Exchange Servers / Antivirus.
Here you can configure the basic operation of the antivirus with respect to the transport
protection.
1. Select the Enable transport protection checkbox. By enabling this feature you will make sure that the email that circulates through your Exchange Servers is free from viruses and malware.
2. In Malicious software to detect select the items to detect.
How the transport protection works
The transport protection acts on the whole message, as follows:
- If the protection detects malware or a suspicious file in a message, it moves the whole messages to quarantine, regardless of the action to take. These messages are kept in quarantine for as long as is set by Panda Security.
- If a message is moved to quarantine, a notification will be sent to the message recipients with the subject of the original message and a warning indicating that the message has been moved to quarantine and they must contact their administrator if they want to retrieve it.
- If restored from quarantine, the email will be restored to the recipient’s mailbox. If a problem occurs during the restore process, the message is directly moved to the Lost&Found folder, where a file will appear with the name of the message subject. This file contains the whole message.
Intelligent mailbox scan
The intelligent mailbox scan runs during periods of low server activity, scanning the email
messages stored in the organization's Exchange Server.
In addition, it only scans messages that have not been previously scanned and contain
attached files.
Disabling the mailbox protection also disables the intelligent mailbox scan.
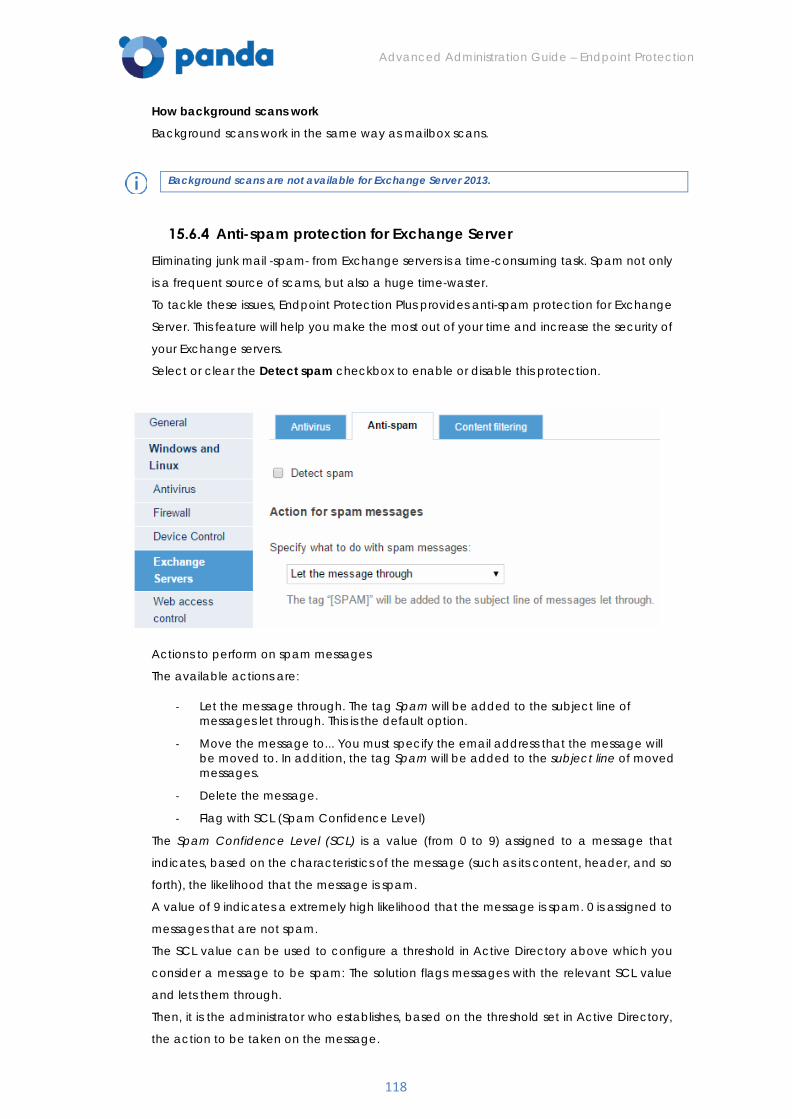
Advanced Administration Guide – Endpoint Protection
118
How background scans work
Background scans work in the same way as mailbox scans.
Background scans are not available for Exchange Server 2013.
Anti-spam protection for Exchange Server Eliminating junk mail -spam- from Exchange servers is a time-consuming task. Spam not only
is a frequent source of scams, but also a huge time-waster.
To tackle these issues, Endpoint Protection Plus provides anti-spam protection for Exchange
Server. This feature will help you make the most out of your time and increase the security of
your Exchange servers.
Select or clear the Detect spam checkbox to enable or disable this protection.
Actions to perform on spam messages
The available actions are:
- Let the message through. The tag Spam will be added to the subject line of messages let through. This is the default option.
- Move the message to... You must specify the email address that the message will be moved to. In addition, the tag Spam will be added to the subject line of moved messages.
- Delete the message.
- Flag with SCL (Spam Confidence Level)
The Spam Confidence Level (SCL) is a value (from 0 to 9) assigned to a message that
indicates, based on the characteristics of the message (such as its content, header, and so
forth), the likelihood that the message is spam.
A value of 9 indicates a extremely high likelihood that the message is spam. 0 is assigned to
messages that are not spam.
The SCL value can be used to configure a threshold in Active Directory above which you
consider a message to be spam: The solution flags messages with the relevant SCL value
and lets them through.
Then, it is the administrator who establishes, based on the threshold set in Active Directory,
the action to be taken on the message.
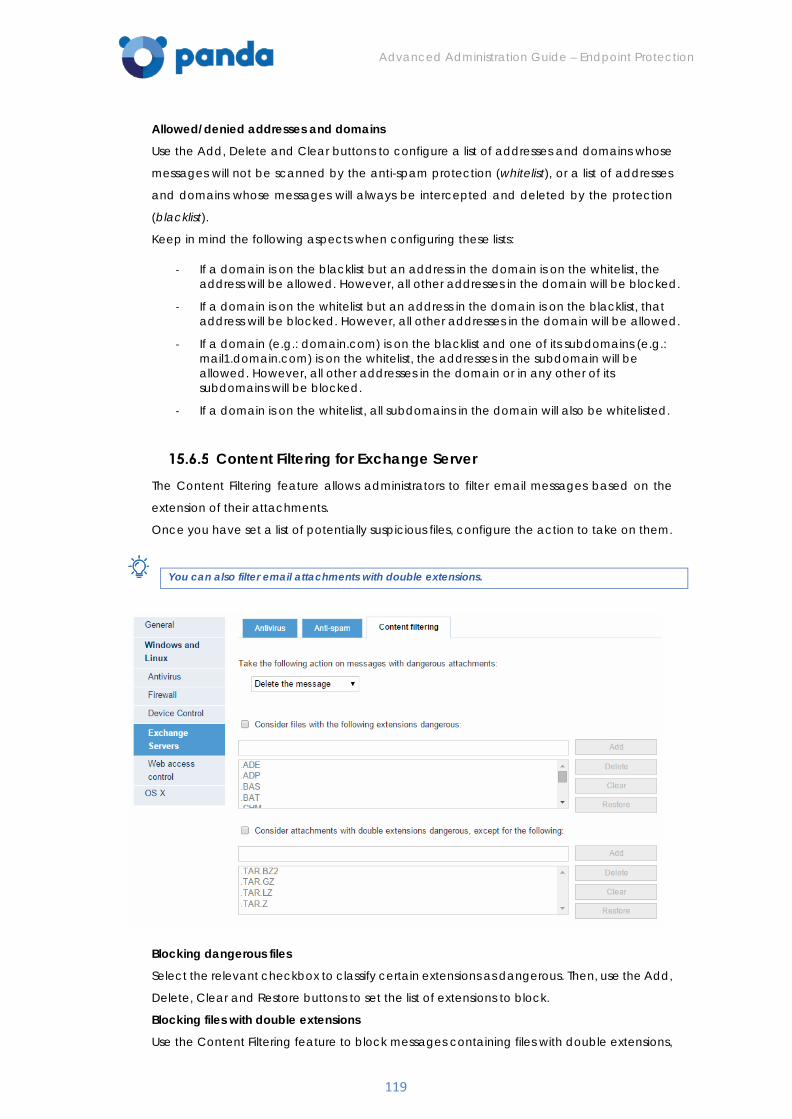
Advanced Administration Guide – Endpoint Protection
119
Allowed/denied addresses and domains
Use the Add, Delete and Clear buttons to configure a list of addresses and domains whose
messages will not be scanned by the anti-spam protection (whitelist), or a list of addresses
and domains whose messages will always be intercepted and deleted by the protection
(blacklist).
Keep in mind the following aspects when configuring these lists:
- If a domain is on the blacklist but an address in the domain is on the whitelist, the address will be allowed. However, all other addresses in the domain will be blocked.
- If a domain is on the whitelist but an address in the domain is on the blacklist, that address will be blocked. However, all other addresses in the domain will be allowed.
- If a domain (e.g.: domain.com) is on the blacklist and one of its subdomains (e.g.: mail1.domain.com) is on the whitelist, the addresses in the subdomain will be allowed. However, all other addresses in the domain or in any other of its subdomains will be blocked.
- If a domain is on the whitelist, all subdomains in the domain will also be whitelisted.
Content Filtering for Exchange Server The Content Filtering feature allows administrators to filter email messages based on the
extension of their attachments.
Once you have set a list of potentially suspicious files, configure the action to take on them.
You can also filter email attachments with double extensions.
Blocking dangerous files
Select the relevant checkbox to classify certain extensions as dangerous. Then, use the Add,
Delete, Clear and Restore buttons to set the list of extensions to block.
Blocking files with double extensions
Use the Content Filtering feature to block messages containing files with double extensions,
Advanced Administration Guide – Endpoint Protection
120
except for the ones you allow. Use the Add, Delete, Clear and Restore buttons to configure
the list of double extensions to allow.
Action to take
Select whether you want to delete files with dangerous attachments or move them to a
specific folder. This can very useful to store and analyze those files in order to make the
appropriate adjustments to the list of dangerous extensions.
Click OK. Your Exchange servers will be protected against dangerous attachments.
15.7. Web access control settings
Web access control settings To access these settings, click Settings / Profiles / Add profile and select Web access control.
You can enable this protection for workstations and servers separately.
If you are a new client and have just purchased the most current version of the product, this
feature will be enabled by default for workstations. However, it will be disabled for servers by
default.
If the version that you have is not the latest version, you will have to enable this feature in
the Web console. To do this, select the Enable Web access control checkbox.
This protection allows you to limit access to specific Web categories, and configure a list of
URLs to allow or deny access to. This feature allows you to optimize your network's bandwidth
and increase your business productivity.
Denying access to specific Web pages
Web pages are grouped into categories. Select the URL categories that you want to deny
access to. You can modify them at any time.
1. Go to Settings and click the profile for which you want to configure the Web access control feature.
2. In the menu on the left, click Web access control. 3. Select the relevant checkbox to enable the Web access control feature for
Windows workstations, Windows servers or both. 4. Then, select the categories you want to deny access to.
If a user tries to access a Web page belonging to a blocked category, an access denied
notification will be displayed. Remember that you can enable or disable these warnings. For
more information, refer to the Warning settings section.
Denying access to pages categorized as unknown
You can deny access to pages categorized as unknown simply by selecting the relevant
checkbox.
However, bear in mind that internal (intranet) sites that connect on ports 80 or 8080 may be
categorized as unknown, resulting in users not being able to access them.
Therefore, it is very important that you analyze those connections carefully before enabling
this option. Alternatively, you can enable the option to block access to pages categorized
Advanced Administration Guide – Endpoint Protection
121
as unknown and later unblock any sites you might need to access by adding them to the
list of allowed addresses and domains.
Changing allowed/denied categories and updating computers
After you change the list of allowed or denied categories, it can take up to 4 hours for your
computers to receive the new settings.
During this time, the Web access control feature will behave in exactly the same way as it
did before the modification.
Nevertheless, if necessary, you can force the update on each computer where the
protection is installed. To do this, right-click the protection icon in the taskbar (next to the
Windows clock), and select Update.
List of allowed/denied addresses and domains
Additionally, you can set a list of Web pages that will always be allowed (whitelist) or
blocked (blacklist).
You can edit these lists at any time.
1. Enter the URL for the relevant address or domain in the text box. 2. Click Add. 3. Use the Delete and Clear buttons to edit the list according to your needs. 4. Finally, click OK to save the settings.
After completing these steps, go to the Status window to see a summary of the Web pages
accessed.
Database of URLs accessed from computers
Each computer keeps a database of the URLs accessed from it.
This database can only be consulted locally, that is, from the computer itself, for 30 days.
The data collected in the database is:
- User ID.
- Protocol (HTTP or HTTPS)
- Domain.
- URL.
- Category (as returned by Commtouch)
- Action (Allow/Deny)
- Access date
- Access counter (by category and by domain).
Configuring time periods for the Web access control feature
Limiting Internet access can be very useful in order to increase productivity in the workplace.
Additionally, it will allow you to get the most out of your bandwidth, which will have a positive
impact on your business activity.
The Web access control feature can be enabled separately for workstations and servers.
Once you have made your selection, the configuration options are very similar in both cases.
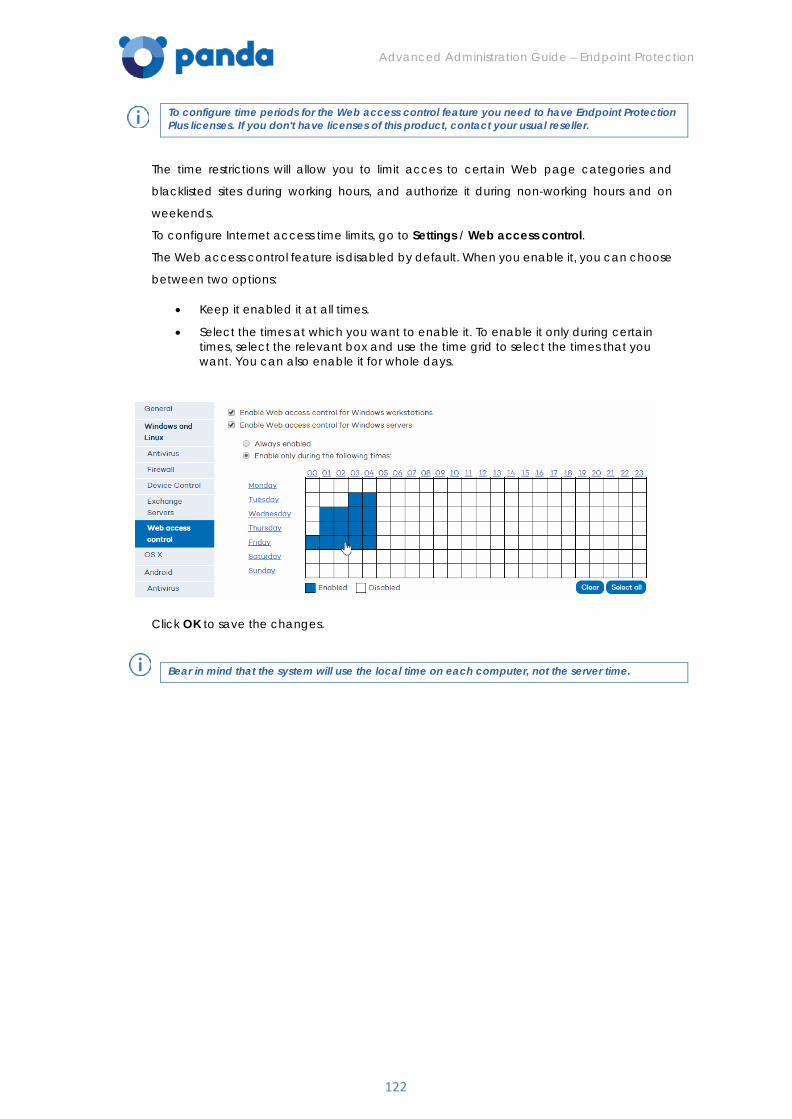
Advanced Administration Guide – Endpoint Protection
122
To configure time periods for the Web access control feature you need to have Endpoint Protection Plus licenses. If you don't have licenses of this product, contact your usual reseller.
The time restrictions will allow you to limit acces to certain Web page categories and
blacklisted sites during working hours, and authorize it during non-working hours and on
weekends.
To configure Internet access time limits, go to Settings / Web access control.
The Web access control feature is disabled by default. When you enable it, you can choose
between two options:
• Keep it enabled it at all times.
• Select the times at which you want to enable it. To enable it only during certain times, select the relevant box and use the time grid to select the times that you want. You can also enable it for whole days.
Click OK to save the changes.
Bear in mind that the system will use the local time on each computer, not the server time.

Advanced Administration Guide – Endpoint Protection
123
16. Configuring the protection
for OS X computers
Introduction
Characteristics of the protection for OS X
Configuring the protection for OS X computers
Advanced Administration Guide – Endpoint Protection
124
16.1. Introduction
The licenses of Endpoint Protection for OS X are different from those for Windows, Linux and
Android computers and devices.
Therefore, you can purchase as many trial/release licenses of Endpoint Protection for OS X
as you want, regardless of the number and type (trial /release) of licenses of Endpoint
Protection for Windows/Linux/Android that you already have. Obviously, you can also
contract trial/release licenses of Endpoint Protection for OS X only.
Additionally, the protection for OS X computers is configured separately from the options for
other operating systems.
16.2. Characteristics of the protection for OS X
The protection for OS X has a series of unique characteristics that set it apart from the
protection for Windows/Linux systems. These are as follows:
Configuring updates on OS X computers
In the case of OS X computers, it is not possible to configure the frequency of the automatic
updates of the signature file. The signature file is updated every hour.
48 hours after a signature file newer than the version currently installed on a computer has
been released, the computer will appear as out-of-date in the Status window.
Frequency of protection updates on OS X computers
The protection for OS X computers is updated with the following frequency:
- Signature file ==> Updated every hour
- Changes to the antivirus protection settings ==> Every 4 hours
- Detection information ==> Updated every 6 hours
- Computer status information ==> Updated every 12 hours
Automatic updates of the protection engine (upgrades)
The protection for OS X computers does not support automatic upgrades. Therefore, when
a new version of the protection is released, it will have to be manually downloaded and
installed on computers.
72 hours after a version newer than the version currently installed on a computer has been
released, the computer will appear as out-of-date in the Status window.
You will have to uninstall the previous version and install the new one.
Configuring scheduled scans on OS X computers
The protection for OS X computers does not support scheduled scans. It only provides
permanent on-access protection for files.
Installing the protection for OS X
You can install the protection for OS X computers in two ways: downloading the installer or
generating an installation URL.
Refer to section Installing the protection on OS X computers for more information.
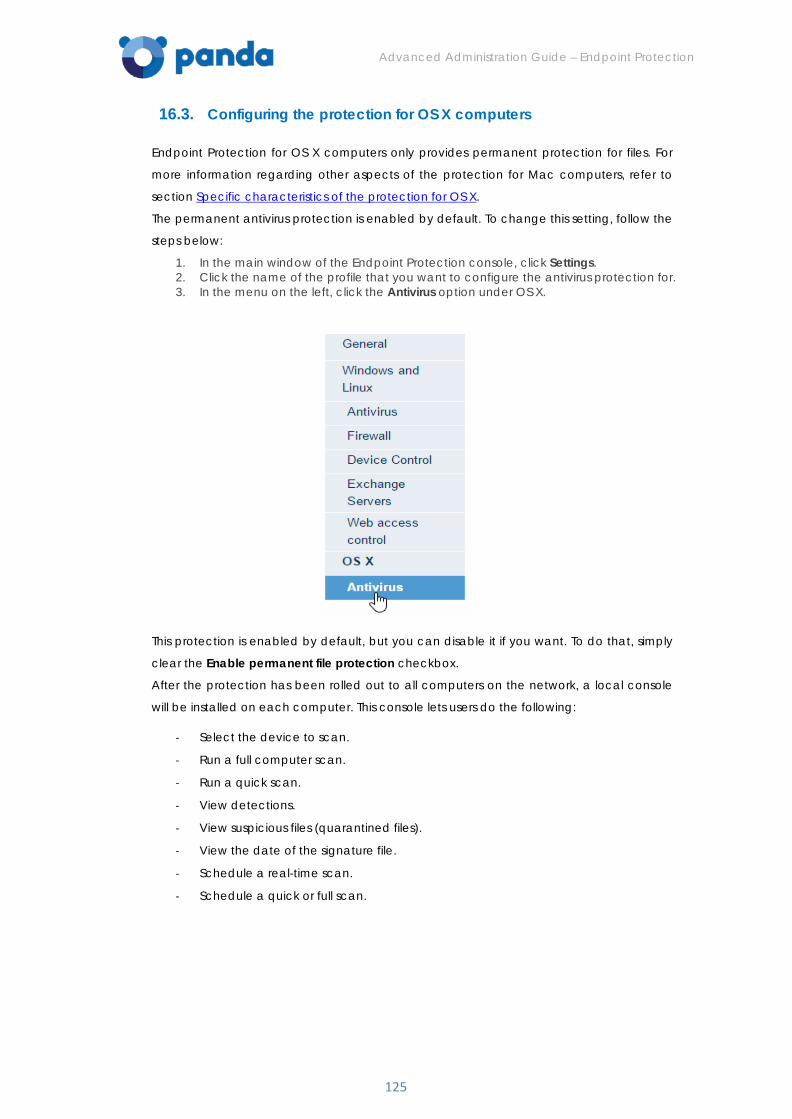
Advanced Administration Guide – Endpoint Protection
125
16.3. Configuring the protection for OS X computers
Endpoint Protection for OS X computers only provides permanent protection for files. For
more information regarding other aspects of the protection for Mac computers, refer to
section Specific characteristics of the protection for OS X.
The permanent antivirus protection is enabled by default. To change this setting, follow the
steps below:
1. In the main window of the Endpoint Protection console, click Settings. 2. Click the name of the profile that you want to configure the antivirus protection for. 3. In the menu on the left, click the Antivirus option under OS X.
This protection is enabled by default, but you can disable it if you want. To do that, simply
clear the Enable permanent file protection checkbox.
After the protection has been rolled out to all computers on the network, a local console
will be installed on each computer. This console lets users do the following:
- Select the device to scan.
- Run a full computer scan.
- Run a quick scan.
- View detections.
- View suspicious files (quarantined files).
- View the date of the signature file.
- Schedule a real-time scan.
- Schedule a quick or full scan.
Advanced Administration Guide – Endpoint Protection
126
17. Configuring the protection
for Android devices
Antivirus protection settings
Anti-Theft protection settings
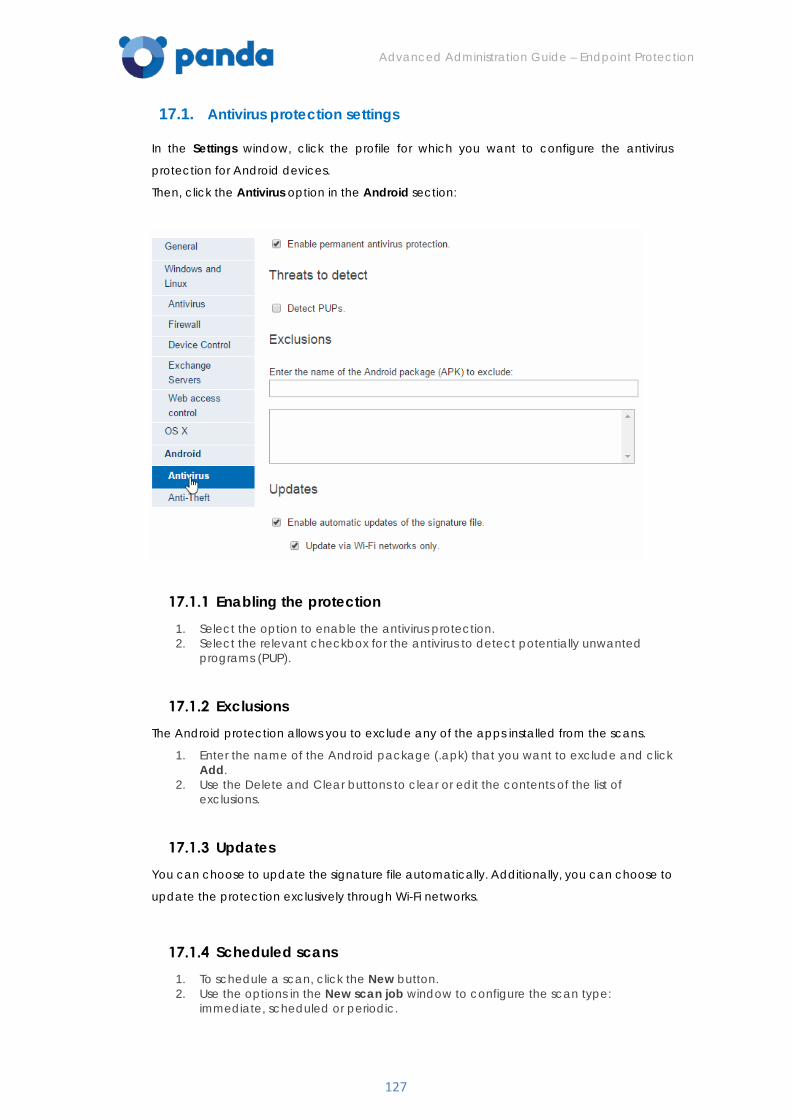
Advanced Administration Guide – Endpoint Protection
127
17.1. Antivirus protection settings
In the Settings window, click the profile for which you want to configure the antivirus
protection for Android devices.
Then, click the Antivirus option in the Android section:
Enabling the protection
1. Select the option to enable the antivirus protection. 2. Select the relevant checkbox for the antivirus to detect potentially unwanted
programs (PUP).
Exclusions
The Android protection allows you to exclude any of the apps installed from the scans.
1. Enter the name of the Android package (.apk) that you want to exclude and click Add.
2. Use the Delete and Clear buttons to clear or edit the contents of the list of exclusions.
Updates
You can choose to update the signature file automatically. Additionally, you can choose to
update the protection exclusively through Wi-Fi networks.
Scheduled scans 1. To schedule a scan, click the New button. 2. Use the options in the New scan job window to configure the scan type:
immediate, scheduled or periodic.
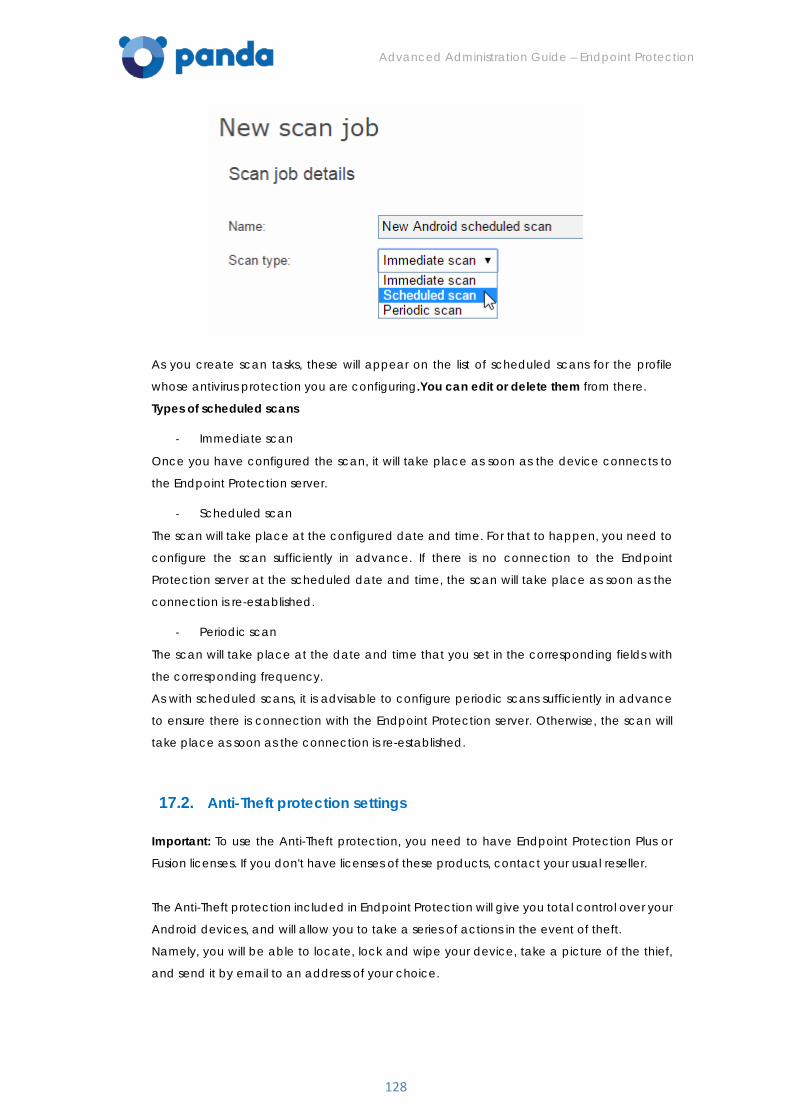
Advanced Administration Guide – Endpoint Protection
128
As you create scan tasks, these will appear on the list of scheduled scans for the profile
whose antivirus protection you are configuring.You can edit or delete them from there.
Types of scheduled scans
- Immediate scan
Once you have configured the scan, it will take place as soon as the device connects to
the Endpoint Protection server.
- Scheduled scan
The scan will take place at the configured date and time. For that to happen, you need to
configure the scan sufficiently in advance. If there is no connection to the Endpoint
Protection server at the scheduled date and time, the scan will take place as soon as the
connection is re-established.
- Periodic scan
The scan will take place at the date and time that you set in the corresponding fields with
the corresponding frequency.
As with scheduled scans, it is advisable to configure periodic scans sufficiently in advance
to ensure there is connection with the Endpoint Protection server. Otherwise, the scan will
take place as soon as the connection is re-established.
17.2. Anti-Theft protection settings
Important: To use the Anti-Theft protection, you need to have Endpoint Protection Plus or
Fusion licenses. If you don't have licenses of these products, contact your usual reseller.
The Anti-Theft protection included in Endpoint Protection will give you total control over your
Android devices, and will allow you to take a series of actions in the event of theft.
Namely, you will be able to locate, lock and wipe your device, take a picture of the thief,
and send it by email to an address of your choice.
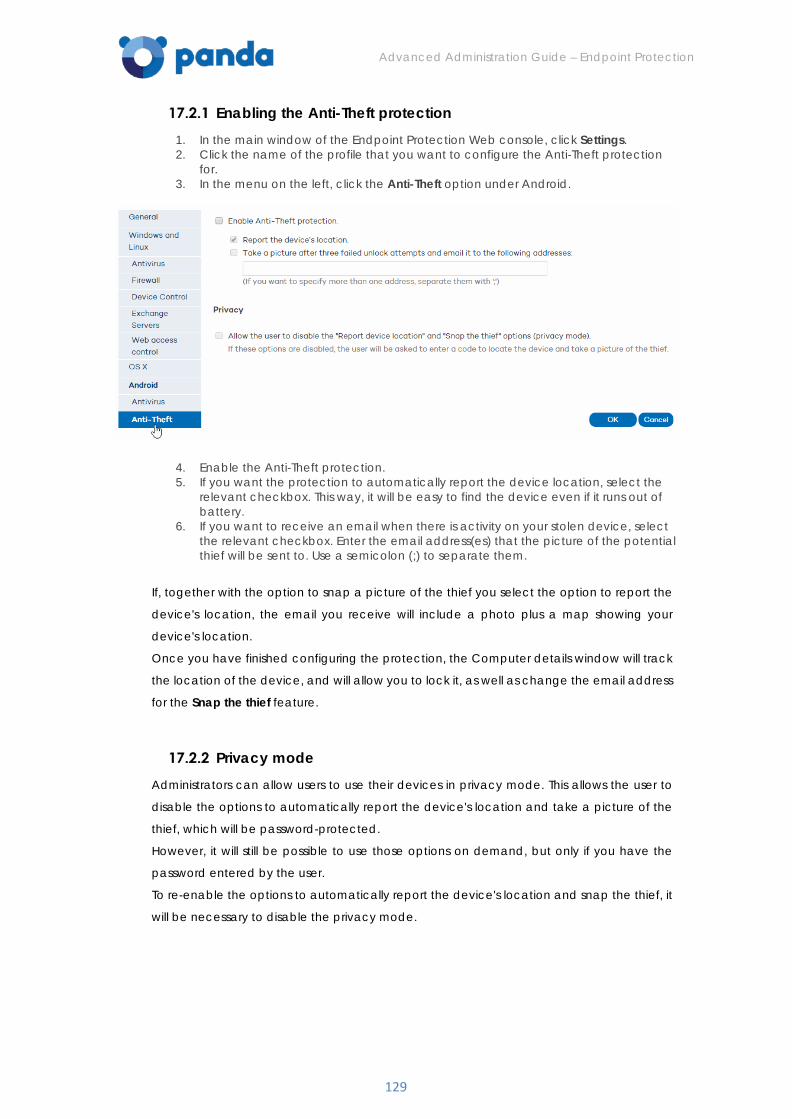
Advanced Administration Guide – Endpoint Protection
129
Enabling the Anti-Theft protection 1. In the main window of the Endpoint Protection Web console, click Settings. 2. Click the name of the profile that you want to configure the Anti-Theft protection
for. 3. In the menu on the left, click the Anti-Theft option under Android.
4. Enable the Anti-Theft protection. 5. If you want the protection to automatically report the device location, select the
relevant checkbox. This way, it will be easy to find the device even if it runs out of battery.
6. If you want to receive an email when there is activity on your stolen device, select the relevant checkbox. Enter the email address(es) that the picture of the potential thief will be sent to. Use a semicolon (;) to separate them.
If, together with the option to snap a picture of the thief you select the option to report the
device's location, the email you receive will include a photo plus a map showing your
device's location.
Once you have finished configuring the protection, the Computer details window will track
the location of the device, and will allow you to lock it, as well as change the email address
for the Snap the thief feature.
Privacy mode
Administrators can allow users to use their devices in privacy mode. This allows the user to
disable the options to automatically report the device's location and take a picture of the
thief, which will be password-protected.
However, it will still be possible to use those options on demand, but only if you have the
password entered by the user.
To re-enable the options to automatically report the device's location and snap the thief, it
will be necessary to disable the privacy mode.
Advanced Administration Guide – Endpoint Protection
130
18. Remote access to
computers
Viewing computers with remote access tools installed
How to use the remote access tools
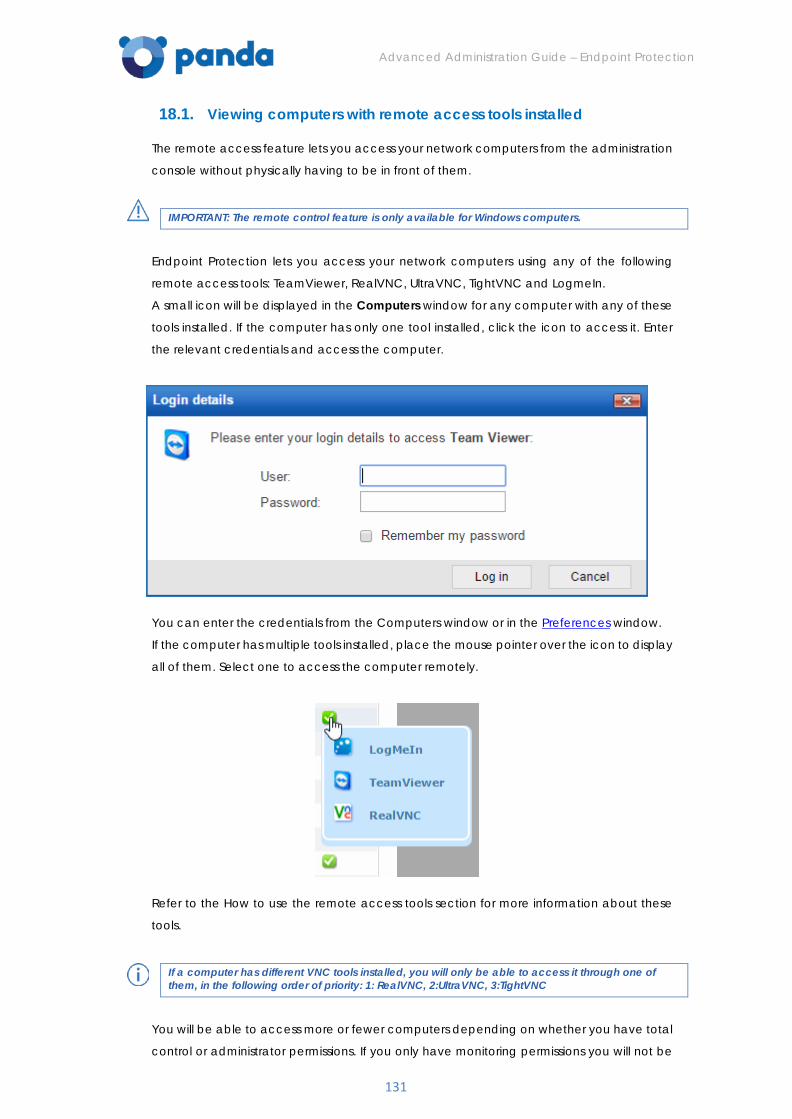
Advanced Administration Guide – Endpoint Protection
131
18.1. Viewing computers with remote access tools installed
The remote access feature lets you access your network computers from the administration
console without physically having to be in front of them.
IMPORTANT: The remote control feature is only available for Windows computers.
Endpoint Protection lets you access your network computers using any of the following
remote access tools: TeamViewer, RealVNC, UltraVNC, TightVNC and LogmeIn.
A small icon will be displayed in the Computers window for any computer with any of these
tools installed. If the computer has only one tool installed, click the icon to access it. Enter
the relevant credentials and access the computer.
You can enter the credentials from the Computers window or in the Preferences window.
If the computer has multiple tools installed, place the mouse pointer over the icon to display
all of them. Select one to access the computer remotely.
Refer to the How to use the remote access tools section for more information about these
tools.
If a computer has different VNC tools installed, you will only be able to access it through one of them, in the following order of priority: 1: RealVNC, 2:UltraVNC, 3:TightVNC
You will be able to access more or fewer computers depending on whether you have total
control or administrator permissions. If you only have monitoring permissions you will not be

Advanced Administration Guide – Endpoint Protection
132
able to access any computers, and the Remote access icon will be disabled.
How to get remote access to another computer Remote access from the Computers window
The first time that you access the Computers window a warning will be displayed indicating
that your computers don't have any remote access tools installed. If you want to install a
remote access tool on them, click the link in the warning.
Remote access from the Computer details window
You can also use the remote access feature from the Computer details window, provided
the selected computer has a remote access tool installed. If so, click the icon belonging to
the remote access tool that you want to use.
To access other computers remotely, install one of the supported remote access tools on
them: TightVNC, UltraVNC, RealVNC, TeamViewer or LogMeIn.
If a computer has multiple VNC tools installed, remember that you will only be able to access
it remotely using one of the tools in the above priority order.
18.2. How to use the remote access tools
VNC tools These tools can only be used to access computers on the same local network as the client.
Depending on the authentication settings established, you might be able to access them
without having to enter any credentials in the console, or otherwise you may have to enter
a user name and/or a password to establish a remote connection.
For an administrator to be able to access computers using VNC they must allow execution
of a Java applet on their computer, otherwise, they will not be able to access them.
TeamViewer
This tool can be used to access computers outside the client's local network.
To access computers through TeamViewer you will only need to enter the computer
password. The “user” field can be left blank.
The password you must enter to access a computer through TeamViewer is the computer's TeamViewer password or the password for unattended access to computers. It is not the client's TeamViewer account password.
It is advisable to have the same TeamViewer password on all computers, as each user of
the Endpoint Protection console can only enter one password to access computers
remotely through TeamViewer.
The administrator's computer (the computer from which the console is accessed) must have
TeamViewer installed (it is not enough to have it in "run without installation" mode).

Advanced Administration Guide – Endpoint Protection
133
LogMeIn This tool can be used to access computers outside the client's local network.
To access computers with LogMein, you need to enter the LogMeIn account user name and
password.
Advanced Administration Guide – Endpoint Protection
134
19. Computer monitoring
Introduction
Remote access
Computer details
Computer details (Android devices)
Task list (Android devices)
Viewing computers with remote access tools installed
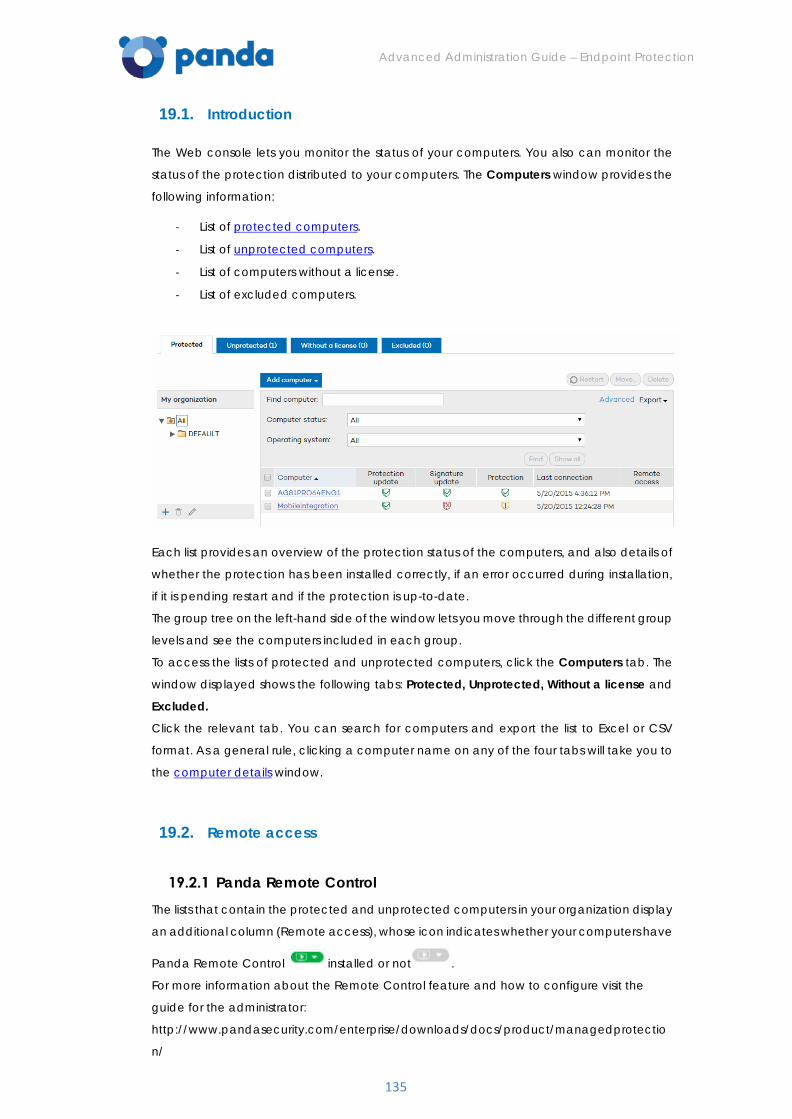
Advanced Administration Guide – Endpoint Protection
135
19.1. Introduction
The Web console lets you monitor the status of your computers. You also can monitor the
status of the protection distributed to your computers. The Computers window provides the
following information:
- List of protected computers.
- List of unprotected computers.
- List of computers without a license.
- List of excluded computers.
Each list provides an overview of the protection status of the computers, and also details of
whether the protection has been installed correctly, if an error occurred during installation,
if it is pending restart and if the protection is up-to-date.
The group tree on the left-hand side of the window lets you move through the different group
levels and see the computers included in each group.
To access the lists of protected and unprotected computers, click the Computers tab. The
window displayed shows the following tabs: Protected, Unprotected, Without a license and
Excluded.
Click the relevant tab. You can search for computers and export the list to Excel or CSV
format. As a general rule, clicking a computer name on any of the four tabs will take you to
the computer details window.
19.2. Remote access
Panda Remote Control
The lists that contain the protected and unprotected computers in your organization display
an additional column (Remote access), whose icon indicates whether your computers have
Panda Remote Control installed or not .
For more information about the Remote Control feature and how to configure visit the
guide for the administrator:
http://www.pandasecurity.com/enterprise/downloads/docs/product/managedprotectio
n/
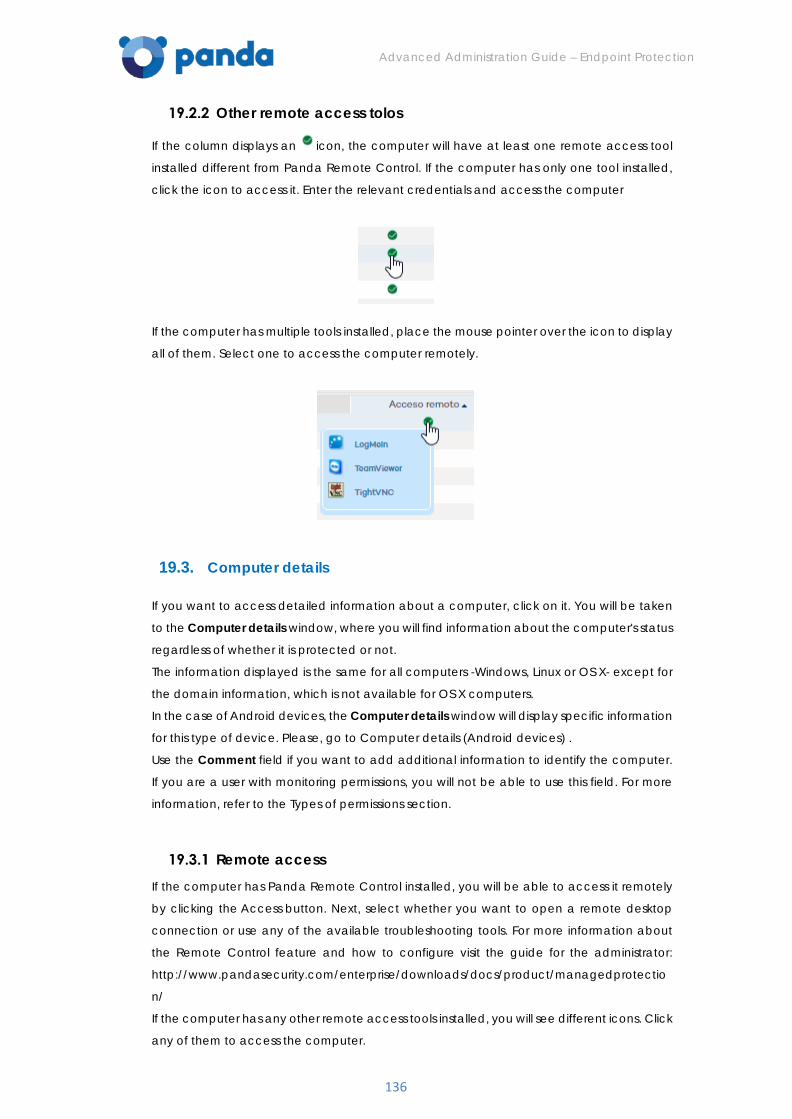
Advanced Administration Guide – Endpoint Protection
136
Other remote access tolos
If the column displays an icon, the computer will have at least one remote access tool
installed different from Panda Remote Control. If the computer has only one tool installed,
click the icon to access it. Enter the relevant credentials and access the computer
If the computer has multiple tools installed, place the mouse pointer over the icon to display
all of them. Select one to access the computer remotely.
19.3. Computer details
If you want to access detailed information about a computer, click on it. You will be taken
to the Computer details window, where you will find information about the computer's status
regardless of whether it is protected or not.
The information displayed is the same for all computers -Windows, Linux or OS X- except for
the domain information, which is not available for OS X computers.
In the case of Android devices, the Computer details window will display specific information
for this type of device. Please, go to Computer details (Android devices) .
Use the Comment field if you want to add additional information to identify the computer.
If you are a user with monitoring permissions, you will not be able to use this field. For more
information, refer to the Types of permissions section.
Remote access If the computer has Panda Remote Control installed, you will be able to access it remotely
by clicking the Access button. Next, select whether you want to open a remote desktop
connection or use any of the available troubleshooting tools. For more information about
the Remote Control feature and how to configure visit the guide for the administrator:
http://www.pandasecurity.com/enterprise/downloads/docs/product/managedprotectio
n/
If the computer has any other remote access tools installed, you will see different icons. Click
any of them to access the computer.
Advanced Administration Guide – Endpoint Protection
137
Disinfecting the computer If you want to disinfect the computer with the disinfection tool Panda Cloud Cleaner, click
the Disinfect computer button.
You will see a window with the default tool settings. As an administrator you'll be able to
select disinfection options other than the default ones.
You can also select if you want to disinfect the computer 'silently' or not. Please, go to
Disinfecting computers.
Reporting computer problems
Use the Report problem with this computer option if you want to report a computer problem.
In the form displayed, enter a brief description of the problem and send it to qualified
technicians who will analyze it and contact you to resolve it. You will need to enter your
email address.
Restarting computers
Use the Restart option to restart those computers which, for some reason, appear on the list
of protected computers as requiring a restart. Please, go to Restarting computers.
Deleting and excluding computers If you want to delete those computers that have not connected to the server for a long
time, use the option Delete from database. You won't be able to manage them any longer.
If you wanT to exclude computers from the database, use the Exclude option. Excluded
computers will be shown in the list of excluded computers in the Computers window. You
can undo these exclusions at any time. Please, go to Deleting and excluding unprotected
computers
19.4. Computer details (Android devices)
In the case of Android devices, the Computer details window will display information about
the device, and the status of its antivirus and Anti-Theft protection.
If the Anti-Theft protection is enabled for a device, a map will be displayed showing its
location and the options provided by the Anti-Theft protection: wipe, lock, snap the thief
and locate.
If any of the protections display an error, click the How to fix errors link to view a series of
troubleshooting instructions to help you resolve the issue.
Wipe device
Use the Wipe button to erase all the data on the device and restore its original factory
settings.
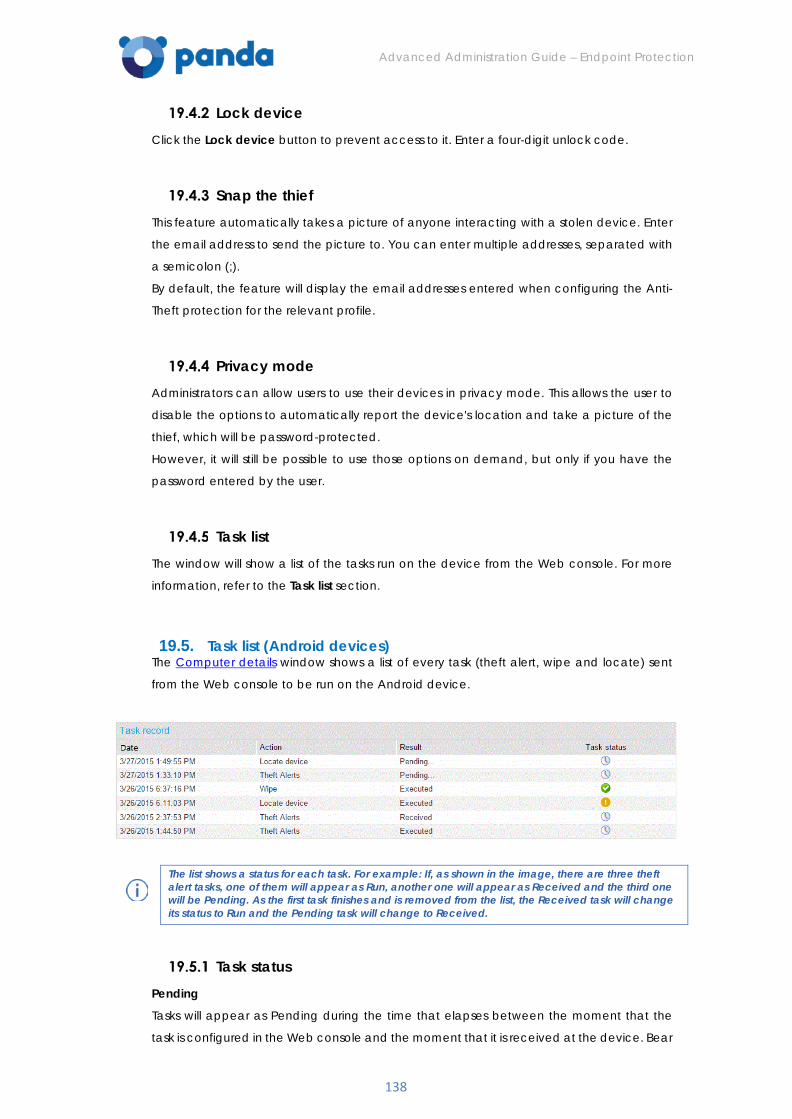
Advanced Administration Guide – Endpoint Protection
138
Lock device Click the Lock device button to prevent access to it. Enter a four-digit unlock code.
Snap the thief
This feature automatically takes a picture of anyone interacting with a stolen device. Enter
the email address to send the picture to. You can enter multiple addresses, separated with
a semicolon (;).
By default, the feature will display the email addresses entered when configuring the Anti-
Theft protection for the relevant profile.
Privacy mode Administrators can allow users to use their devices in privacy mode. This allows the user to
disable the options to automatically report the device's location and take a picture of the
thief, which will be password-protected.
However, it will still be possible to use those options on demand, but only if you have the
password entered by the user.
Task list The window will show a list of the tasks run on the device from the Web console. For more
information, refer to the Task list section.
19.5. Task list (Android devices) The Computer details window shows a list of every task (theft alert, wipe and locate) sent
from the Web console to be run on the Android device.
The list shows a status for each task. For example: If, as shown in the image, there are three theft alert tasks, one of them will appear as Run, another one will appear as Received and the third one will be Pending. As the first task finishes and is removed from the list, the Received task will change its status to Run and the Pending task will change to Received.
Task status Pending
Tasks will appear as Pending during the time that elapses between the moment that the
task is configured in the Web console and the moment that it is received at the device. Bear
Advanced Administration Guide – Endpoint Protection
139
in mind that, if the device is turned off or offline, the task will also appear as Pending.
Received
In this case, the device has received the task but has not run it yet or the task is in progress
and has not finished. For example, in the case of a locate task, the task will appear as
Received until the device is effectively located.
In the case of a snap the thief task, it will appear as Received as long as no picture is actually
taken. That is because the task is not considered to be run until the thief triggers it, that is,
touches the device screen.
Run
A task will appear as Run once the device reports that it has been completed (successfully
or not).
19.6. Viewing computers with remote access tools installed
Both the Protected computers and Unprotected computers tabs show the computers with
remote access tools installed, so that you, depending on the permissions that you have, can
access them from your administration console.
You will not be able to remotely access unprotected computers whose status is "discovered" or "uninstalled".
If a computer has multiple remote access tools installed and you place the mouse pointer
over the icon displayed in the Remote access column, you will see all of them. Click one of
the icons to access the computer.
If a computer has different VNC tools installed (RealVNC, UltraVNC,TightVNC), you will only
be able to access it remotely through one of them, in the following order of priority:
1. RealVNC 2. UltraVNC 3. TightVNC
For more information about how to install remote access tools on computers, click the link in
the blue information panel.
Refer to the Remote access to computers section for more information.

Advanced Administration Guide – Endpoint Protection
140
20. Actions on protected computers
Adding and searching for protected computers
Moving and deleting protected computers
Restarting computers
Disinfecting computers
Troubleshooting protection errors
Troubleshooting signature file errors
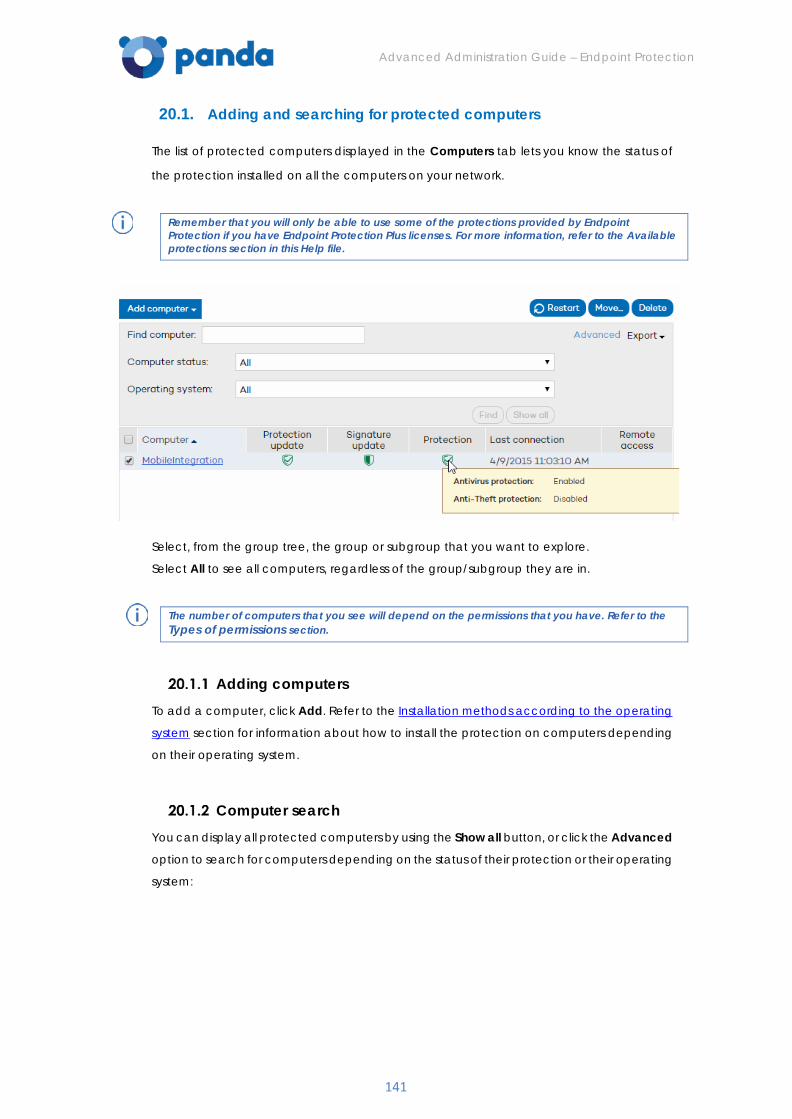
Advanced Administration Guide – Endpoint Protection
141
20.1. Adding and searching for protected computers
The list of protected computers displayed in the Computers tab lets you know the status of
the protection installed on all the computers on your network.
Remember that you will only be able to use some of the protections provided by Endpoint Protection if you have Endpoint Protection Plus licenses. For more information, refer to the Available protections section in this Help file.
Select, from the group tree, the group or subgroup that you want to explore.
Select All to see all computers, regardless of the group/subgroup they are in.
The number of computers that you see will depend on the permissions that you have. Refer to the Types of permissions section.
Adding computers To add a computer, click Add. Refer to the Installation methods according to the operating
system section for information about how to install the protection on computers depending
on their operating system.
Computer search You can display all protected computers by using the Show all button, or click the Advanced
option to search for computers depending on the status of their protection or their operating
system:
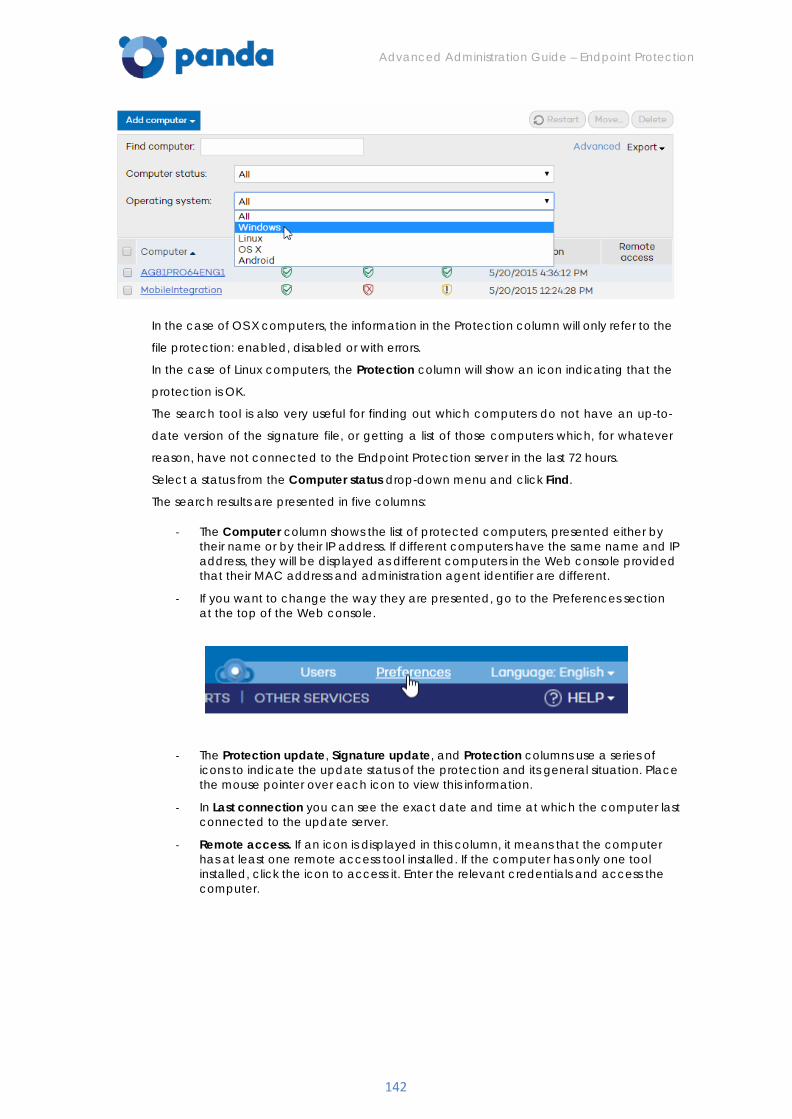
Advanced Administration Guide – Endpoint Protection
142
In the case of OS X computers, the information in the Protection column will only refer to the
file protection: enabled, disabled or with errors.
In the case of Linux computers, the Protection column will show an icon indicating that the
protection is OK.
The search tool is also very useful for finding out which computers do not have an up-to-
date version of the signature file, or getting a list of those computers which, for whatever
reason, have not connected to the Endpoint Protection server in the last 72 hours.
Select a status from the Computer status drop-down menu and click Find.
The search results are presented in five columns:
- The Computer column shows the list of protected computers, presented either by their name or by their IP address. If different computers have the same name and IP address, they will be displayed as different computers in the Web console provided that their MAC address and administration agent identifier are different.
- If you want to change the way they are presented, go to the Preferences section at the top of the Web console.
- The Protection update, Signature update, and Protection columns use a series of icons to indicate the update status of the protection and its general situation. Place the mouse pointer over each icon to view this information.
- In Last connection you can see the exact date and time at which the computer last connected to the update server.
- Remote access. If an icon is displayed in this column, it means that the computer has at least one remote access tool installed. If the computer has only one tool installed, click the icon to access it. Enter the relevant credentials and access the computer.
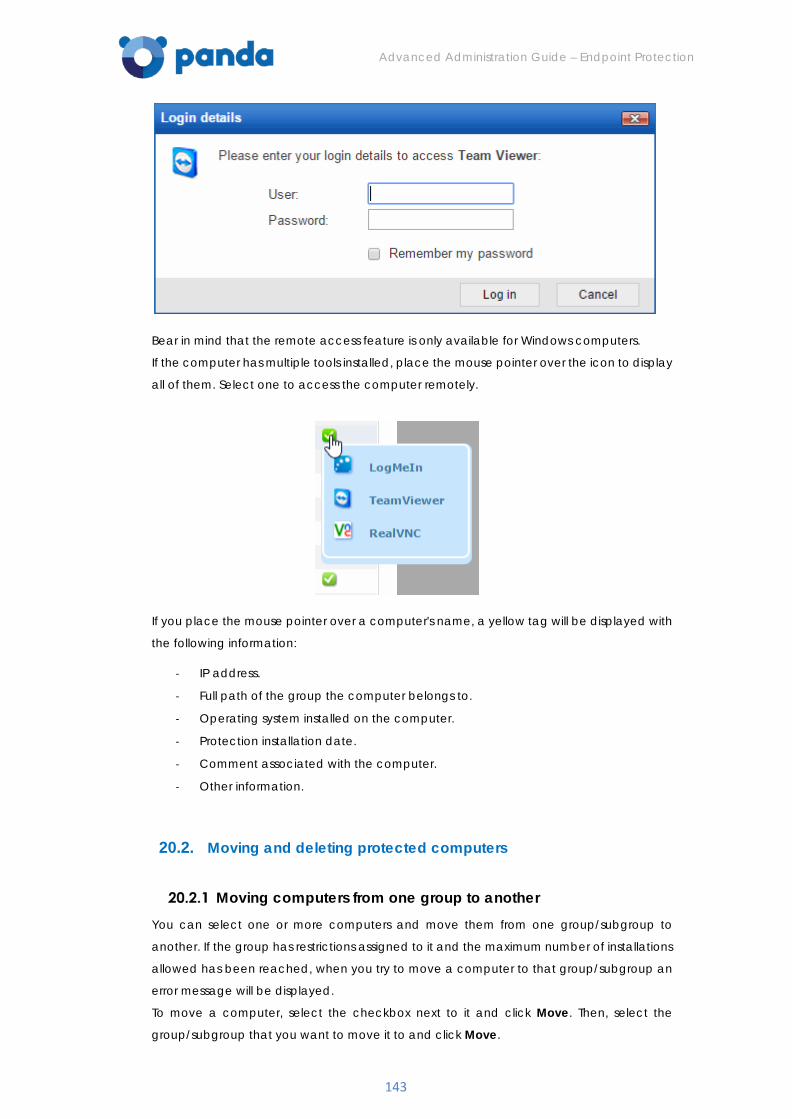
Advanced Administration Guide – Endpoint Protection
143
Bear in mind that the remote access feature is only available for Windows computers.
If the computer has multiple tools installed, place the mouse pointer over the icon to display
all of them. Select one to access the computer remotely.
If you place the mouse pointer over a computer's name, a yellow tag will be displayed with
the following information:
- IP address.
- Full path of the group the computer belongs to.
- Operating system installed on the computer.
- Protection installation date.
- Comment associated with the computer.
- Other information.
20.2. Moving and deleting protected computers
Moving computers from one group to another You can select one or more computers and move them from one group/subgroup to
another. If the group has restrictions assigned to it and the maximum number of installations
allowed has been reached, when you try to move a computer to that group/subgroup an
error message will be displayed.
To move a computer, select the checkbox next to it and click Move. Then, select the
group/subgroup that you want to move it to and click Move.
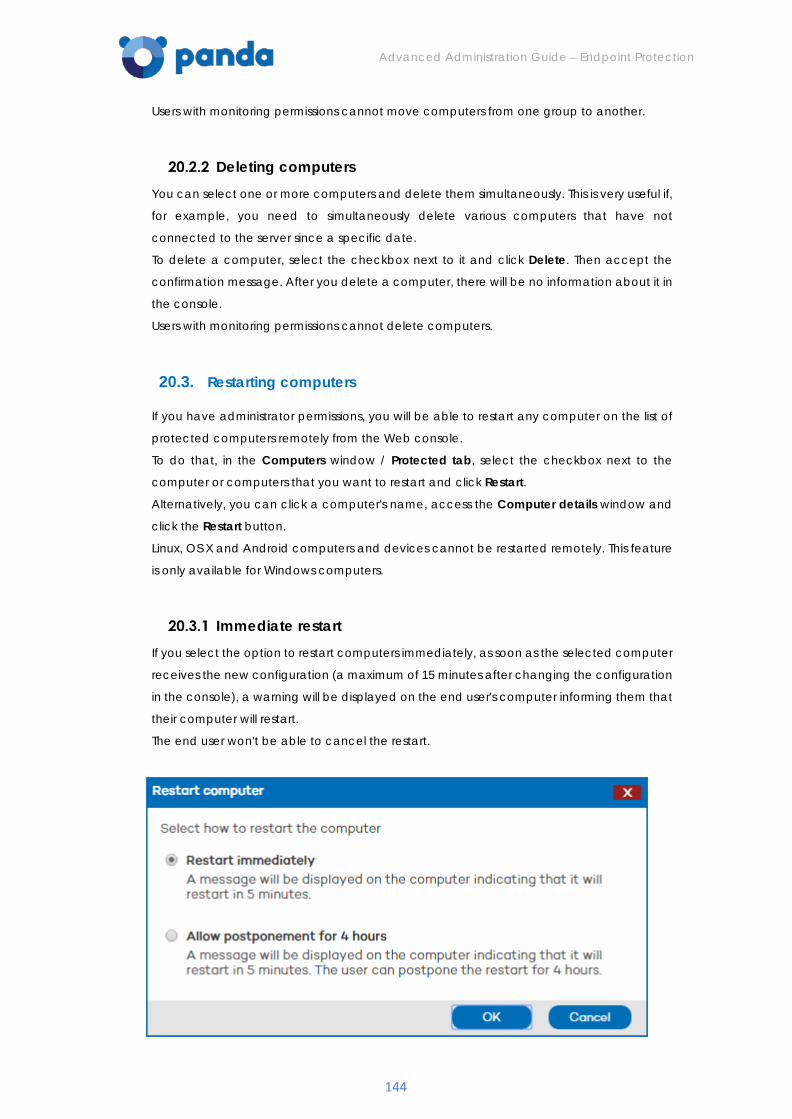
Advanced Administration Guide – Endpoint Protection
144
Users with monitoring permissions cannot move computers from one group to another.
Deleting computers You can select one or more computers and delete them simultaneously. This is very useful if,
for example, you need to simultaneously delete various computers that have not
connected to the server since a specific date.
To delete a computer, select the checkbox next to it and click Delete. Then accept the
confirmation message. After you delete a computer, there will be no information about it in
the console.
Users with monitoring permissions cannot delete computers.
20.3. Restarting computers
If you have administrator permissions, you will be able to restart any computer on the list of
protected computers remotely from the Web console.
To do that, in the Computers window / Protected tab, select the checkbox next to the
computer or computers that you want to restart and click Restart.
Alternatively, you can click a computer's name, access the Computer details window and
click the Restart button.
Linux, OS X and Android computers and devices cannot be restarted remotely. This feature
is only available for Windows computers.
Immediate restart If you select the option to restart computers immediately, as soon as the selected computer
receives the new configuration (a maximum of 15 minutes after changing the configuration
in the console), a warning will be displayed on the end user's computer informing them that
their computer will restart.
The end user won't be able to cancel the restart.
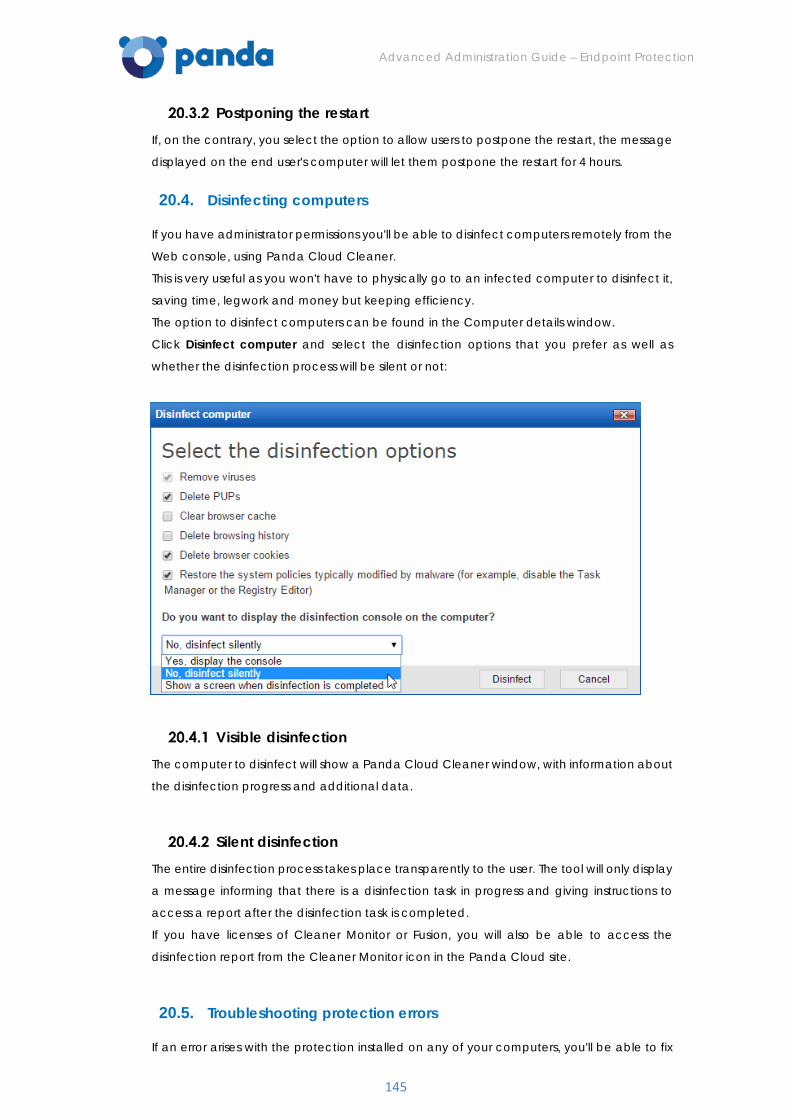
Advanced Administration Guide – Endpoint Protection
145
Postponing the restart If, on the contrary, you select the option to allow users to postpone the restart, the message
displayed on the end user's computer will let them postpone the restart for 4 hours.
20.4. Disinfecting computers
If you have administrator permissions you'll be able to disinfect computers remotely from the
Web console, using Panda Cloud Cleaner.
This is very useful as you won't have to physically go to an infected computer to disinfect it,
saving time, legwork and money but keeping efficiency.
The option to disinfect computers can be found in the Computer details window.
Click Disinfect computer and select the disinfection options that you prefer as well as
whether the disinfection process will be silent or not:
Visible disinfection The computer to disinfect will show a Panda Cloud Cleaner window, with information about
the disinfection progress and additional data.
Silent disinfection
The entire disinfection process takes place transparently to the user. The tool will only display
a message informing that there is a disinfection task in progress and giving instructions to
access a report after the disinfection task is completed.
If you have licenses of Cleaner Monitor or Fusion, you will also be able to access the
disinfection report from the Cleaner Monitor icon in the Panda Cloud site.
20.5. Troubleshooting protection errors
If an error arises with the protection installed on any of your computers, you'll be able to fix
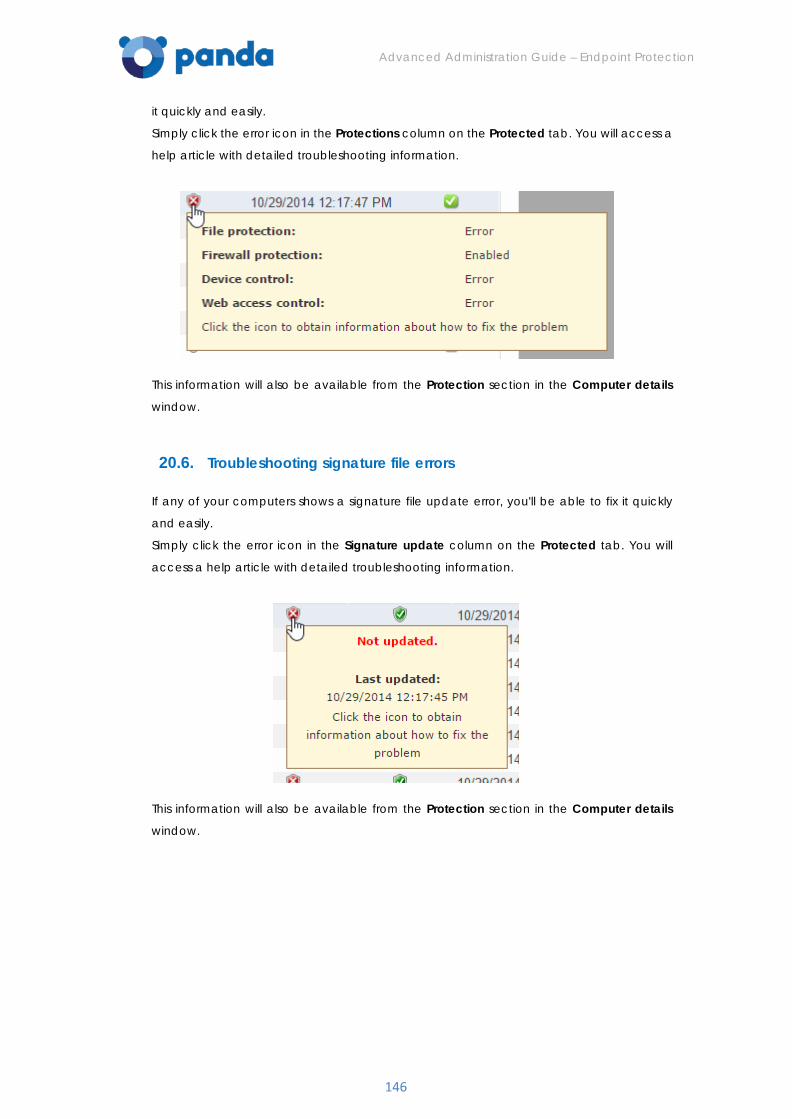
Advanced Administration Guide – Endpoint Protection
146
it quickly and easily.
Simply click the error icon in the Protections column on the Protected tab. You will access a
help article with detailed troubleshooting information.
This information will also be available from the Protection section in the Computer details
window.
20.6. Troubleshooting signature file errors
If any of your computers shows a signature file update error, you'll be able to fix it quickly
and easily.
Simply click the error icon in the Signature update column on the Protected tab. You will
access a help article with detailed troubleshooting information.
This information will also be available from the Protection section in the Computer details
window.
Advanced Administration Guide – Endpoint Protection
147
21. Actions on unprotected
computers
Introduction
Deleting and excluding unprotected computers
Configuring searches for unprotected computers
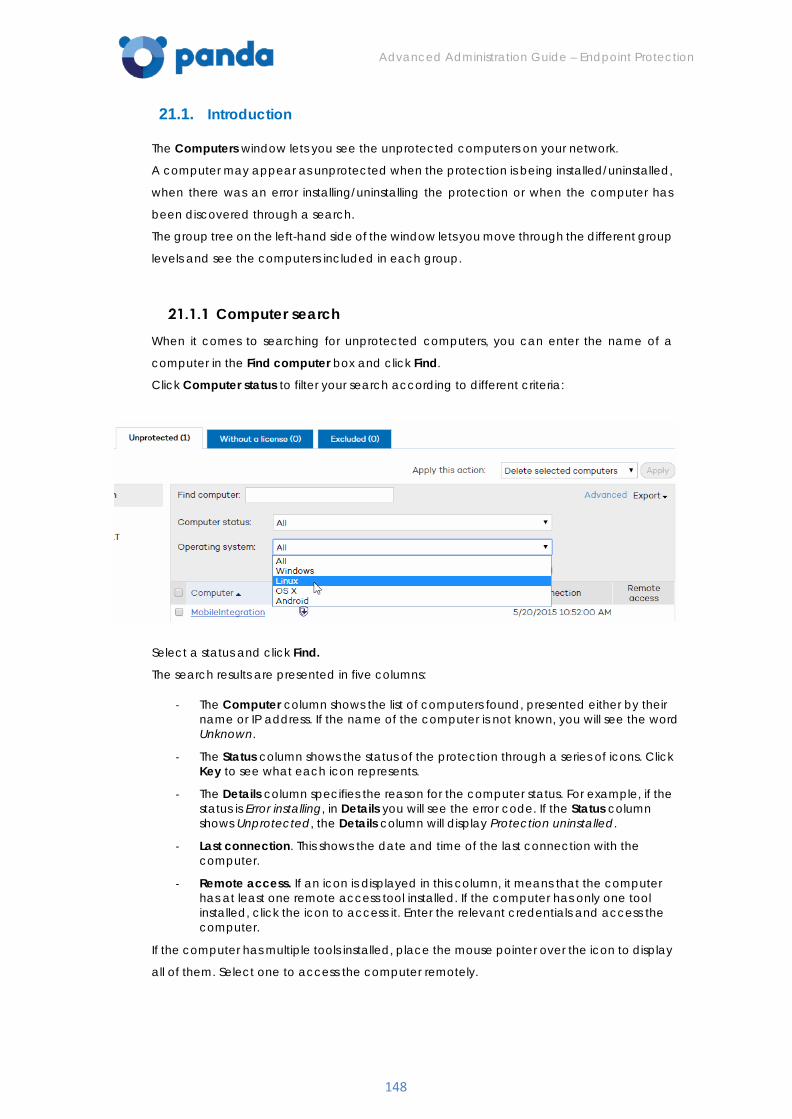
Advanced Administration Guide – Endpoint Protection
148
21.1. Introduction
The Computers window lets you see the unprotected computers on your network.
A computer may appear as unprotected when the protection is being installed/uninstalled,
when there was an error installing/uninstalling the protection or when the computer has
been discovered through a search.
The group tree on the left-hand side of the window lets you move through the different group
levels and see the computers included in each group.
Computer search
When it comes to searching for unprotected computers, you can enter the name of a
computer in the Find computer box and click Find.
Click Computer status to filter your search according to different criteria:
Select a status and click Find.
The search results are presented in five columns:
- The Computer column shows the list of computers found, presented either by their name or IP address. If the name of the computer is not known, you will see the word Unknown.
- The Status column shows the status of the protection through a series of icons. Click Key to see what each icon represents.
- The Details column specifies the reason for the computer status. For example, if the status is Error installing, in Details you will see the error code. If the Status column shows Unprotected, the Details column will display Protection uninstalled.
- Last connection. This shows the date and time of the last connection with the computer.
- Remote access. If an icon is displayed in this column, it means that the computer has at least one remote access tool installed. If the computer has only one tool installed, click the icon to access it. Enter the relevant credentials and access the computer.
If the computer has multiple tools installed, place the mouse pointer over the icon to display
all of them. Select one to access the computer remotely.
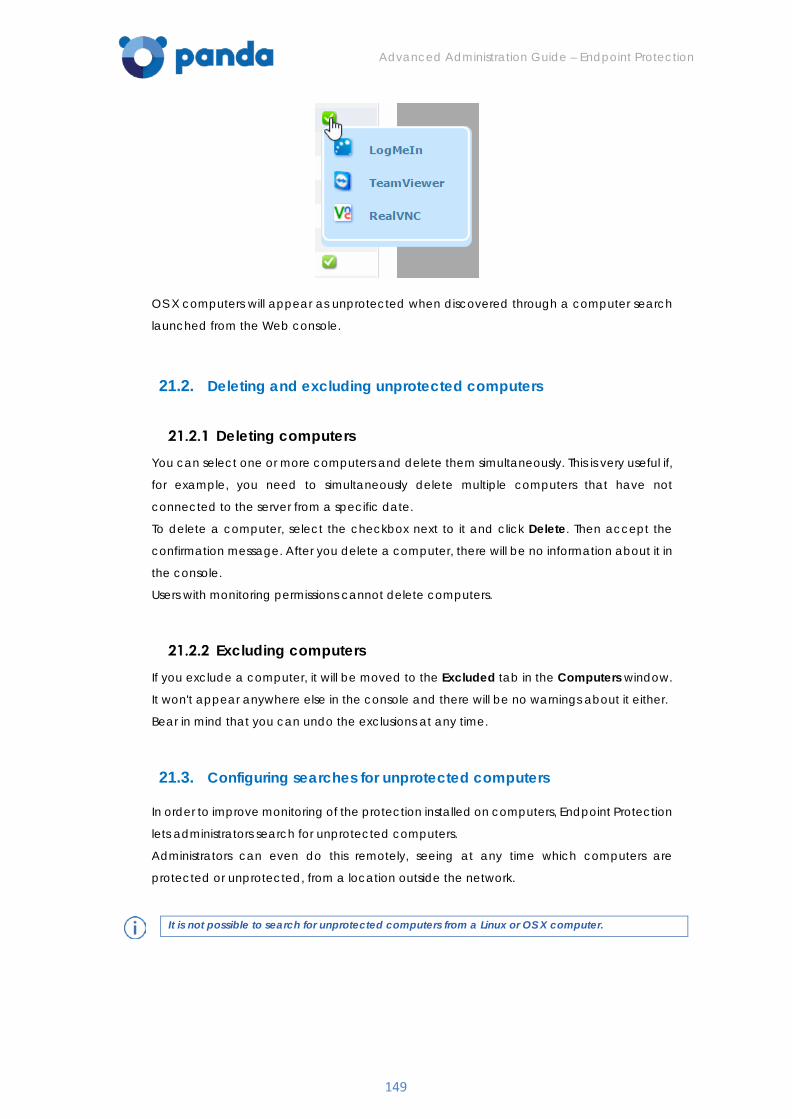
Advanced Administration Guide – Endpoint Protection
149
OS X computers will appear as unprotected when discovered through a computer search
launched from the Web console.
21.2. Deleting and excluding unprotected computers
Deleting computers You can select one or more computers and delete them simultaneously. This is very useful if,
for example, you need to simultaneously delete multiple computers that have not
connected to the server from a specific date.
To delete a computer, select the checkbox next to it and click Delete. Then accept the
confirmation message. After you delete a computer, there will be no information about it in
the console.
Users with monitoring permissions cannot delete computers.
Excluding computers
If you exclude a computer, it will be moved to the Excluded tab in the Computers window.
It won't appear anywhere else in the console and there will be no warnings about it either.
Bear in mind that you can undo the exclusions at any time.
21.3. Configuring searches for unprotected computers
In order to improve monitoring of the protection installed on computers, Endpoint Protection
lets administrators search for unprotected computers.
Administrators can even do this remotely, seeing at any time which computers are
protected or unprotected, from a location outside the network.
It is not possible to search for unprotected computers from a Linux or OS X computer.

Advanced Administration Guide – Endpoint Protection
150
It is not possible to simultaneously search for unprotected computers and run remote uninstallation tasks. For more information, refer to the Incompatibility between remote management tasks section.
Creating a task to search for unprotected computers In the main console window, click Installation. Then, select Search in the menu on the left.
This will take you to the Find unprotected computers window.
To create a new search task, click New search.
In the Edit search window, use the Select button to choose the computer that will perform
the search.
The scope of the search will be defined depending on whether you choose the subnet of
the computer performing the search, certain IP address ranges or certain domains.
Requirements for the computer performing the search
The computer performing the search must meet a series of requirements:
- It must have the agent and the protection installed, and be correctly integrated into the Endpoint Protection server.
- It cannot appear in the Excluded computers tab (Computers window).
- It must have connected to the Endpoint Protection server in the last 72 hours.
- It cannot be performing an uninstall task. It cannot show any of the following statuses regarding an uninstall task: On hold, Starting, Uninstalling.
- It must have an Internet connection, either directly or through another computer ('proxy' feature).
Check that there are no remote uninstallation tasks configured on the computer. For more information, refer to the Incompatibility between remote management tasks section. s
Viewing searches
Searches created are listed in the Find unprotected computers window, from where you can
also remove search tasks, using the Delete button.
Tasks with the status Starting or In progress cannot be deleted.
Information is organized into the following columns:
- Name: This shows the name given to the search when created.
- Status: The status icons indicate the status of the search task. Click Key to see what each icon represents.
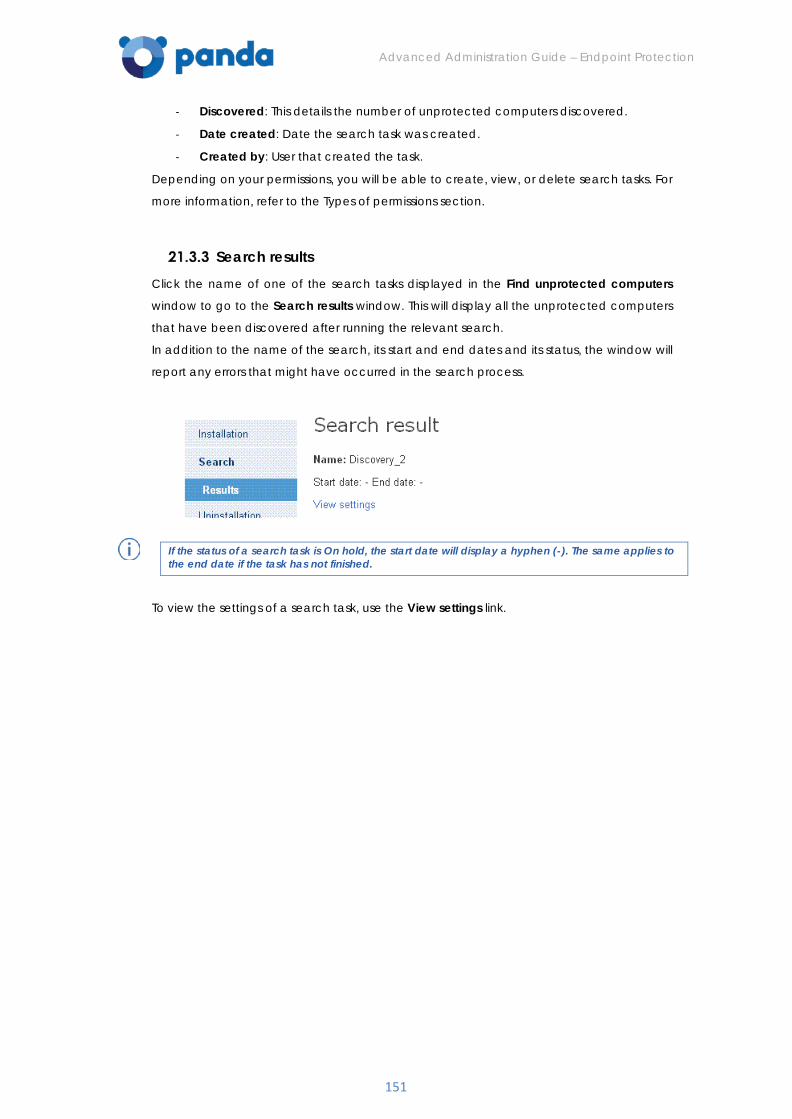
Advanced Administration Guide – Endpoint Protection
151
- Discovered: This details the number of unprotected computers discovered.
- Date created: Date the search task was created.
- Created by: User that created the task.
Depending on your permissions, you will be able to create, view, or delete search tasks. For
more information, refer to the Types of permissions section.
Search results
Click the name of one of the search tasks displayed in the Find unprotected computers
window to go to the Search results window. This will display all the unprotected computers
that have been discovered after running the relevant search.
In addition to the name of the search, its start and end dates and its status, the window will
report any errors that might have occurred in the search process.
If the status of a search task is On hold, the start date will display a hyphen (-). The same applies to the end date if the task has not finished.
To view the settings of a search task, use the View settings link.

Advanced Administration Guide – Endpoint Protection
152
22. Quarantine
Quarantine
Searching for items in quarantine
Files excluded from the scan
Advanced Administration Guide – Endpoint Protection
153
22.1. Quarantine
Endpoint Protection sends to quarantine suspicious or non-disinfectable items, as well as
spyware and hacking tools detected.
Once suspicious items have been quarantined for analysis, there are three possible
scenarios:
• Items are determined as malicious: They are disinfected and then restored to their original location, provided that a disinfection routine exists for them.
• Items are determined as malicious, but there is no disinfection routine: They are eliminated.
• It is established that the items in question are not malicious. They are directly restored to their original location.
Quarantine on Linux computers On Linux computers, neither suspicious items nor detected malware are sent to quarantine.
Detected malware is either disinfected or removed, and suspicious items are reported, but
no action is taken on them.
Quarantine on OS X computers
These computers only have local quarantine. After files have been sent to quarantine, you
can choose to perform any of the available actions on them (mark as suspicious, repair or
delete).
Quarantine on Windows computers
In the Web console main window, click Quarantine. The window is divided into two sections:
a search area and a section displaying the list of results.
22.2. Searching for items in quarantine
In the search area you can filter the items you want to view. There are four filter parameters:
• Reason. In the Reason menu, select the type of files to find. Files are classified according to the reason they were put in quarantine.
By default, the window displays the items that have been sent to quarantine for being suspicious.
• Group. Once you have selected the type of file you want to find, select the group of computers you want to search.
• Date
• Select the period you want.
• Click Find.
If you want to restore any item, select the relevant checkbox, click Restore and respond
affirmatively to the confirmation message. The item will disappear from the search list and
you will be able to find it in the Files excluded from the scan window.
If you want to delete any of the items found, select the relevant checkbox, click Delete and
Advanced Administration Guide – Endpoint Protection
154
respond affirmatively to the confirmation message.
List of items in quarantine If there are several items that contain the same type of malware, when restoring or deleting
one of them, the others will also be restored or deleted.
When you place the mouse pointer on any of the items in the search list, a yellow tag will
appear with information about the item.
The Computer column displays the name of the computer or its IP address, depending on
what you selected in the Default view section, in Preferences.
The Group column indicates the group to which the computer belongs. The full path of the
group is only displayed in the tooltip, and in the Excel and CSV files obtained after exporting
the data displayed in the console.
Thanks to its Anti-Exploit technology, Endpoint Protection makes a copy of all items it sends
to quarantine. If there is an error or the solution quarantines an item that should not be
quarantined, Endpoint Protection can restore it to its original location.
22.3. Files excluded from the scan
If you select an item in the Quarantine window and choose to restore it, the item will
disappear from the Quarantined files window and will appear as a file excluded from the
scan (Quarantine / Files excluded from the scan).
Just as you can exclude items from quarantine, you can also return them to quarantine. To
do this, select the checkbox corresponding to the item you want to return, and click Undo
exclusion. Then accept the confirmation dialog box.
The item will disappear from the list of exclusions, and will reappear in the quarantine list
when it is detected again.

Advanced Administration Guide – Endpoint Protection
155
23. Reports
Executive report
Status report
Detection report
Generating reports
Viewing reports

Advanced Administration Guide – Endpoint Protection
156
23.1. Executive report
The Executive report includes the following information:
• Status of the protection installed, and items detected over the last 24 hours, the last seven days and the last month.
• Top 10 lists of computers with most malware detected and attacks blocked, respectively.
• Top 10 list of computers with most devices blocked.
• Information about the status of the licenses contracted.
• Number of computers on which the protection is being installed at the time of generating the report (including computers with installation errors).
If you have Endpoint Protection Plus licenses, the report will display the number of spam
messages detected, as well as top 10 lists of:
• Accessed categories.
• Computers with most Internet access attempts.
• Computers with most Internet access attempts blocked.
Linux computers In the case of Linux computers, the Executive report indicates if the virus signature file and
the protection are up-to-date or not.
OS X computers In the case of OS X computers, the report shows information about the status of the licenses
and the protection, detection information, etc.
Android devices
The report displays information about the status of your licenses and the protection installed
on your Android devices (remember that to be able to enjoy the anti-theft protection you
need Endpoint Protection Plus licenses).
23.2. Status report
The Status report includes the following information:
• Overview of the protection and update status of all computers (including OS X systems) at the time of report generation.
• Number of computers on which the protection is being installed at the time of generating the report (including computers with installation errors).
Linux computers The Status report indicates if the virus signature file and the protection are up-to-date or not.
It also shows the status of the different protection modules. As Linux computers do not have
permanent protection, but the user must run on-demand and scheduled scans to protect
Advanced Administration Guide – Endpoint Protection
157
them, the protection status will always be OK and the status icon will be green provided the
protection has been properly installed.
OS X computers
The status of the protection installed on OS X computers is included within the summary
information for all computers. That is, there are no specific references to each type of
operating system.
However, the detailed information section does indicate if a computer is a Mac OS X
computer.
23.3. Detection report
The Detection report includes the following information:
• Detections made during the last 24 hours, the last 7 days, or the last month.
• Computer, group, type of detection, number of detections made, action taken and date when the detection took place.
Linux computers The Detection report on Linux computers shows the detections made by the on-demand
and scheduled scans.
OS X computers The report includes the detections reported by the protection for OS X, both in the graph
and in the detailed information section.
Android devices
The report includes the detections reported by the protection for Android, both in the graph
and in the detailed information section.
23.4. Generating reports
Endpoint Protection lets you generate reports about the security status of your network and
any detections made over a given period of time. You can also select the content that
appears in the report, whether you want more detailed information and if you want graphs.
All of these options are quick and simple to manage.
In the main window of the Web console, click Reports. The Reports window will open, which
is divided into two sections: The first one lets you select the content and scope of the report,
and the second one lets you schedule report sending tasks.
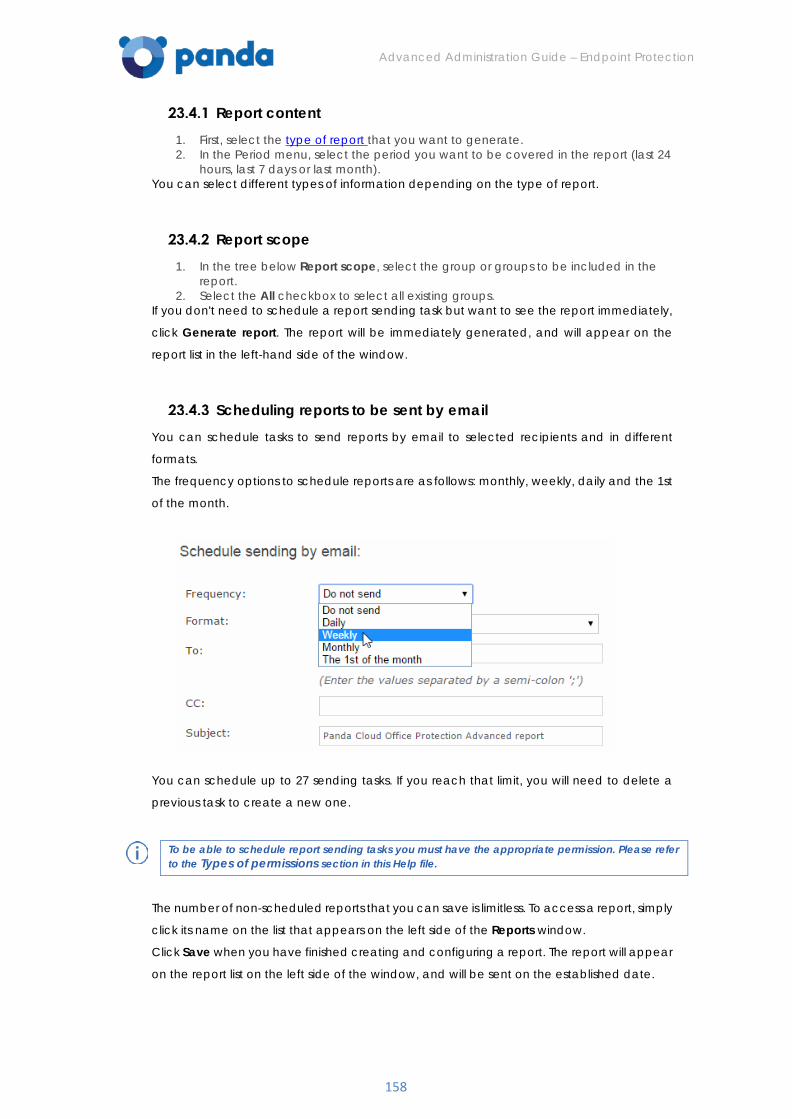
Advanced Administration Guide – Endpoint Protection
158
Report content 1. First, select the type of report that you want to generate. 2. In the Period menu, select the period you want to be covered in the report (last 24
hours, last 7 days or last month). You can select different types of information depending on the type of report.
Report scope 1. In the tree below Report scope, select the group or groups to be included in the
report. 2. Select the All checkbox to select all existing groups.
If you don't need to schedule a report sending task but want to see the report immediately,
click Generate report. The report will be immediately generated, and will appear on the
report list in the left-hand side of the window.
Scheduling reports to be sent by email You can schedule tasks to send reports by email to selected recipients and in different
formats.
The frequency options to schedule reports are as follows: monthly, weekly, daily and the 1st
of the month.
You can schedule up to 27 sending tasks. If you reach that limit, you will need to delete a
previous task to create a new one.
To be able to schedule report sending tasks you must have the appropriate permission. Please refer to the Types of permissions section in this Help file.
The number of non-scheduled reports that you can save is limitless. To access a report, simply
click its name on the list that appears on the left side of the Reports window.
Click Save when you have finished creating and configuring a report. The report will appear
on the report list on the left side of the window, and will be sent on the established date.
Advanced Administration Guide – Endpoint Protection
159
23.5. Viewing reports
Once you have generated a report, you can move around its pages using a series of
controls. You can also carry out searches and export it to a different format.
1. To export the report, click the icon and select the relevant format from the drop-down list.
To export the reports in Internet Explorer, the option Do not save encrypted pages to diskmust be cleared in the Security section of the Advanced tab (Tools > Internet options).
2. Click to refresh the report view. 3. You must export a report prior to printing it. Once exported, you can print the
downloaded file.
The first time you want to print a report (only available in Internet Explorer) you will be asked to install an ActiveX control from the SQLServer.

Advanced Administration Guide – Endpoint Protection
160
24. Uninstallation
Types of uninstallation
Local uninstall
Centralized uninstallation
Remote uninstallation
Advanced Administration Guide – Endpoint Protection
161
24.1. Types of uninstallation
You can uninstall the protection in different ways:
Local uninstallation
If you want to uninstall the protection locally, you will have to do it manually from each
computer, using the relevant option in the operating system's control panel.
Centralized uninstallation
This uninstallation method is only available for Windows computers.
Centralized uninstallation of the protection from several computers simultaneously can be
performed using the distribution tool. This tool is downloaded and run on a computer from
which the process for uninstalling the protection from selected computers is launched.
Remote uninstallation
This uninstallation method is only available for Windows computers.
Remote uninstallation is used to uninstall the protection from a Web console located in a
different location from that of affected computers. You can configure the uninstallation
tasks and specify which computers will be affected.
During the local and centralized uninstallation processes you may be requested to enter the password that you set when you created the configuration profile for the relevant protection. Bear in mind, however, that neither Linux nor OS X computers support password-protected uninstallation.
24.2. Local uninstall
Endpoint Protection can be uninstalled manually from the Windows Control Panel, provided
the administrator has not set an uninstall password when configuring the security profile for
the computer in question. If they have, you will need authorization or the necessary
credentials to uninstall the protection.
How to manually uninstall Endpoint Protection
Windows 8 and later:
Control Panel > Programs > Uninstall a program.
Alternatively, type 'uninstall a program' at the Windows Start Screen.
Windows Vista, Windows 7, Windows Server 2003, 2008 and 2012:
Control Panel > Programs and Features > Uninstall or change a program.
Windows XP:
Control Panel > Add or remove programs
OS X:
Finder > Applications > Drag the icon of the application that you want to uninstall to the
recycle bin.
Android devices:
1. Go to Settings. 2. Security > Device administrators. 3. Clear the Endpoint Protection checkbox. Then, tap Disable > OK.
Advanced Administration Guide – Endpoint Protection
162
4. Back in the Settings window, tap Apps. Tap Endpoint Protection > Uninstall > OK.
24.3. Centralized uninstallation
This uninstallation method is only available for Windows computers.
In the main console window, click Installation and then Uninstallation from the menu on the
left. Select Centralized uninstallation. You will see the Centralized uninstallation window.
IMPORTANT: Before downloading and installing the distribution tool, check the requirements for the computer where the tool is to be used.
Downloading and installing the distribution tool 1. In the main console window, click Installation and then Uninstallation from the
menu on the left. Select Centralized uninstallation (distribution tool).. 2. In the download dialog box, select Save, then, once it has downloaded, run the file
from the directory you have saved it to. A wizard will guide you through the installation process.
Once you have installed the distribution tool, you have to open it in order to uninstall the
protection from your computers. You will see the main window from which you can uninstall
the protection.
Uninstallation by domain 1. Open the distribution tool. 2. In the main window, click Uninstall. 3. In the tree, find the computers from which you want to uninstall the protection, and
select the relevant checkboxes. 4. If required, you will be prompted to enter the password you set for the relevant
configuration profile. 5. Enter the user name and password with administrator privileges that you set for the
selected computers (if any). If you want items removed from quarantine during the uninstallation process, and for the
computers to be restarted after uninstallation, select the relevant checkboxes.
Uninstallation by IP address or computer name
1. Open the distribution tool. 2. In the main window of the distribution tool, click Uninstall. 3. Select the computers from which you want to uninstall the protection. You can
indicate the computers' names, IP addresses or IP address range, separating this data with commas.
4. If required, you will be prompted to enter the password you set for the relevant configuration profile.
5. Enter the user name and password with administrator privileges that you set for the selected computers (if any).
If you want items removed from quarantine during the uninstallation process, and for the
computers to be restarted after uninstallation, select the relevant checkboxes.
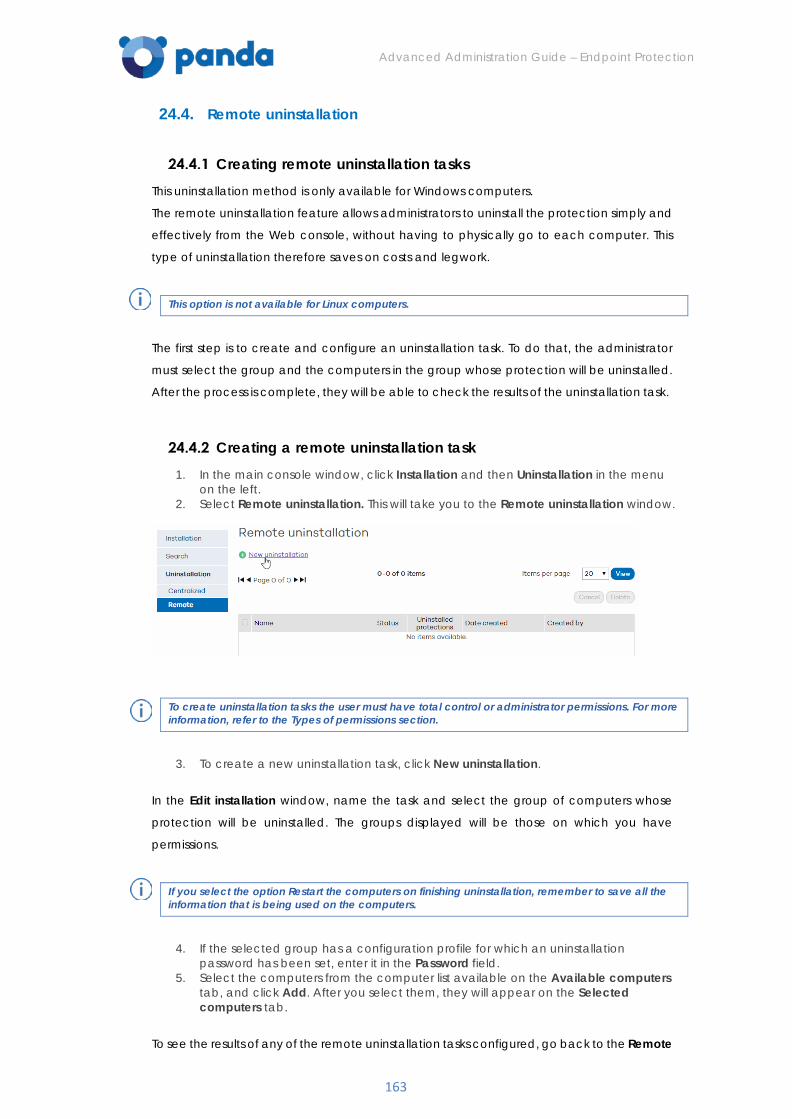
Advanced Administration Guide – Endpoint Protection
163
24.4. Remote uninstallation
Creating remote uninstallation tasks
This uninstallation method is only available for Windows computers.
The remote uninstallation feature allows administrators to uninstall the protection simply and
effectively from the Web console, without having to physically go to each computer. This
type of uninstallation therefore saves on costs and legwork.
This option is not available for Linux computers.
The first step is to create and configure an uninstallation task. To do that, the administrator
must select the group and the computers in the group whose protection will be uninstalled.
After the process is complete, they will be able to check the results of the uninstallation task.
Creating a remote uninstallation task
1. In the main console window, click Installation and then Uninstallation in the menu on the left.
2. Select Remote uninstallation. This will take you to the Remote uninstallation window.
To create uninstallation tasks the user must have total control or administrator permissions. For more information, refer to the Types of permissions section.
3. To create a new uninstallation task, click New uninstallation.
In the Edit installation window, name the task and select the group of computers whose
protection will be uninstalled. The groups displayed will be those on which you have
permissions.
If you select the option Restart the computers on finishing uninstallation, remember to save all the information that is being used on the computers.
4. If the selected group has a configuration profile for which an uninstallation password has been set, enter it in the Password field.
5. Select the computers from the computer list available on the Available computers tab, and click Add. After you select them, they will appear on the Selected computers tab.
To see the results of any of the remote uninstallation tasks configured, go back to the Remote
Advanced Administration Guide – Endpoint Protection
164
uninstallation window.
Viewing remote unistallation tasks and their results Viewing uninstallation tasks
Uninstallation tasks are listed in the Remote uninstallation window, from where you can also
remove them by using the Delete button.
Information is organized into the following columns:
- Name: This shows the name given to the uninstallation task when created.
- Status: The status icons indicate the status of the uninstallation task.
- Uninstalled protections: Indicates the number of protections uninstalled.
- Date created: Date the uninstallation task was created.
- Created by: User that created the task.
Depending on your permissions, you can create, view, or remove uninstallation tasks. For
more information, refer to the Types of permissions section.
To see the results of any of the uninstallation tasks, click on its name and you will go to the
Results window.
Remote uninstallation results Click the name of an uninstallation task in the Remote uninstallation window to see its results.
In addition to the name and the start and end date of the task, this window also shows
information about the computers affected and their status.
If the status of the uninstallation task is On hold, the start date will display a hyphen (-). The same applies to the end date if the task has not finished.
If you want to see the uninstallation task settings, use the View settings link.
Incompatibility between searches for unprotected computers and remote uninstallation tasks
- If a computer is involved in an uninstallation task (Waiting, Starting up, or In progress), it is not possible to create another uninstallation task for it or select it as the computer from which to launch searches of unprotected computers.
- If a computer is running a task for discovering unprotected computers, it is not possible to create an uninstallation task for it.

Advanced Administration Guide – Endpoint Protection
165
25. Key concepts
Advanced Administration Guide – Endpoint Protection
166
Network adapter
The network adapter allows communication between devices connected to each other,
and also allows resources to be shared between two or more computers. It has a unique
identifier.
Adware
Program that automatically runs, displays or downloads advertising to the computer.
Agent
The agent is responsible for communication between the administered computers and the
Endpoint Protection servers, as well as managing local processes.
Genetic heuristic scan
The genetic heuristic scan analyzes suspicious items on the basis of “digital genes”,
represented by a few hundred characters in each scanned file.
This determines the potential of the software to carry out malicious or damaging actions
when run on a computer, and whether it is a virus, spyware, a Trojan, a worm, etc.
Antivirus
Program designed to detect and eliminate viruses and other threats.
Signature file
The file that allows the antivirus to detect threats.
Broadcast domain
This is a logical division of a computer network, in which all nodes can reach each other by
broadcast at the data link layer.
Web console
The Web console lets you configure, distribute and manage the protection across all the
computers on your network. You can also see the security status of your network and
generate and print the reports you want.
Quarantine
Quarantine is the place where suspicious or non-disinfectable items are stored, as well as
the spyware and hacking tools detected.
Dialer
Program that redirects users that connect to the Internet using a modem to a premium-rate
number. Premium-rate numbers are telephone numbers for which prices higher than normal
are charged.
IP address
Advanced Administration Guide – Endpoint Protection
167
Number that identifies a device interface (usually a computer) on a network that uses the
IP protocol.
MAC address
Hexadecimal, 48-bit unique identifier of a network card or interface. It is individual: each
device has its own MAC address.
Excluded computers
Computers selected by the user which are not protected by the solution. Excluded
computers are only displayed in the Excluded section, they are not shown anywhere else in
the console. No warnings about them are displayed either. Bear in mind that you can undo
these exclusions at any time.
Computers without a license
Computers whose license has expired or are left without a license because the user has
exceeded the maximum number of installations allowed. These computers will be
automatically removed from the list of computers without a license as soon as new licenses
are purchased.
Firewall
This is a barrier that can protect information on a system or network when there is a
connection to another network, for example, the Internet.
Peer to Peer (P2P) feature
A Peer-to-Peer network is a network without fixed client or servers, but a series of nodes that
work simultaneously as clients and servers for the other nodes on the network. This is a legal
way of sharing files, similar to sending them via email or instant messaging, but more efficient.
In the case of Endpoint Protection, the P2P feature reduces Internet bandwidth
consumption, as computers that have already updated a file from the Internet then share
the update with other connected computers. This prevents saturating Internet connections.
Proxy feature
This feature allows Endpoint Protection to operate in computers without Internet access,
accessing the Web through an agent installed on a computer on the same subnet.
Group
In Endpoint Protection, a group is a set of computers to which the same protection
configuration profile is applied. Endpoint Protection includes an initial group -Default group-
to which the administrator can add all the computers to protect. New groups can also be
created.
Distribution tool
Once downloaded from the Internet and installed on the administrator's PC, the distribution
Advanced Administration Guide – Endpoint Protection
168
tool lets the administrator remotely install and uninstall the protection on selected network
computers. In Endpoint Protection, the distribution tool can only be used to deploy the
protection to Windows computers.
Hacking tools
Programs that can be used by a hacker to carry out actions that cause problems for the
user of the affected computer (allowing the hacker to control the computer, steal
confidential information, scan communication ports, etc.).
Hoaxes
Spoof messages, normally emails, warning of viruses/threats which do not really exist.
Administration agent identifier
A unique number or GUID (Globally Unique IDentifier) which identifies each administration
agent of Endpoint Protection.
Joke
These are not viruses, but tricks that aim to make users believe they have been infected by
a virus.
Malware
This term is used to refer to all programs that contain malicious code (MALicious softWARE),
whether it is a virus, Trojan, worm or any other threat to the security of IT systems. Malware
tries to infiltrate or damage computers, often without users knowing, for a variety of reasons.
Node
In computer networks, each computer on the network is a node, and if talking about the
Internet, each server also represents a node.
The Cloud
Cloud computing is a technology that allows services to be offered across the Internet. In IT
circles, the word 'cloud' (or 'the cloud') is used as a metaphor for 'the Internet'.
Profile
A profile is a specific protection configuration. Profiles are assigned to a group or groups and
then applied to all computers that make up the group.
Phishing
A technique for obtaining confidential information fraudulently. The information targeted
includes passwords, credit card numbers and bank account details.
Local process
The local processes are responsible for performing the tasks necessary to implement and
Advanced Administration Guide – Endpoint Protection
169
manage the protection on computers.
Potentially unwanted program (PUP)
A program that may be unwanted, despite the possibility that users consented to download
it. They are usually installed legitimately as part of another program.
Protocol
System used for interconnection of computers. One of the most commonly used is TCP-IP.
Proxy server
A proxy server acts as an intermediary between an internal network (an intranet, for
example) and an external connection to the Internet. This allows a connection for receiving
files from Web servers to be shared.
Port
Point through which a computer is accessed and information is exchanged
(inbound/outbound) between the computer and external sources (via TCP/IP).
Rootkit
A program designed to hide objects such as processes, files or Windows registry entries (often
including its own). This type of software is not malicious in itself, but is used by hackers to
cover their tracks in previously compromised systems. There are types of malware that use
rootkits to hide their presence on the system.
Exchange Server
Mail server developed by Microsoft. Exchange Servers store inbound and/or outbound
emails and distribute them to users' email inboxes. To connect to the server and download
their email, users must have an email client installed on their computers.
SMTP server
Server that uses SMTP -simple mail transfer protocol- to exchange email messages between
computers.
Spyware
A program that is automatically installed with another (usually without the user’s permission
and even without the user realizing), and which collects personal data.
Network topology
The communication structure of nodes on a network.
Trojans
Programs that reach computers disguised as harmless programs that install themselves on
computers and carry out actions that compromise user confidentiality.
Advanced Administration Guide – Endpoint Protection
170
Public network
This is the type of network you find in Internet cafes, airports, etc. Visibility of computers is
restricted on such networks, and there are restrictions on sharing files, resources and
directories.
Trusted network
In this case we are generally talking about office or home networks. Your computer will be
perfectly visible to the othe computers on the network. There are no limitations on sharing
files, resources or directories.
Environment variable
This is a string of environment information such as a drive, path or file name that is associated
with a symbolic name that Windows can use. You can use the System applet in the Control
Panel or the 'set' command at the command prompt to set environment variables.
Viruses
Viruses are programs that can enter computers or IT systems in a number of ways, causing
effects that range from simply annoying to highly-destructive and irreparable.
Advanced Administration Guide – Endpoint Protection
171
26. Appendix1: Performing
basic operations
using the Command
Prompt (Windows)
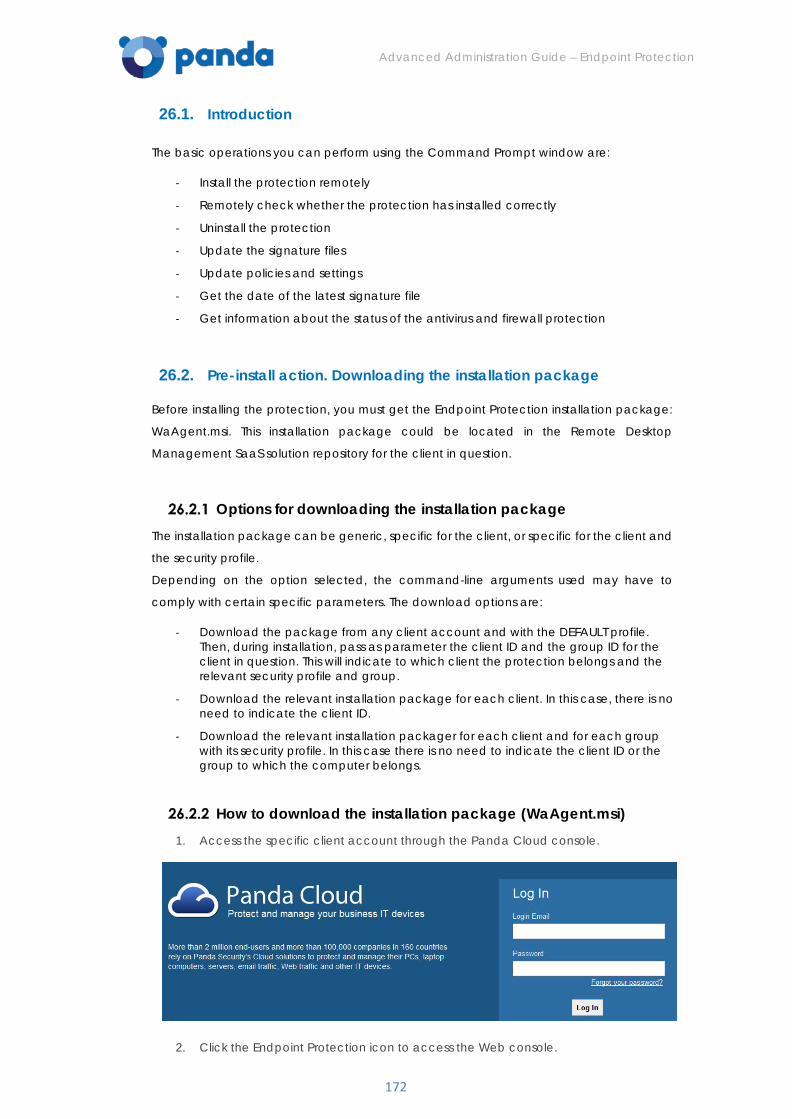
Advanced Administration Guide – Endpoint Protection
172
26.1. Introduction
The basic operations you can perform using the Command Prompt window are:
- Install the protection remotely
- Remotely check whether the protection has installed correctly
- Uninstall the protection
- Update the signature files
- Update policies and settings
- Get the date of the latest signature file
- Get information about the status of the antivirus and firewall protection
26.2. Pre-install action. Downloading the installation package
Before installing the protection, you must get the Endpoint Protection installation package:
WaAgent.msi. This installation package could be located in the Remote Desktop
Management SaaS solution repository for the client in question.
Options for downloading the installation package The installation package can be generic, specific for the client, or specific for the client and
the security profile.
Depending on the option selected, the command-line arguments used may have to
comply with certain specific parameters. The download options are:
- Download the package from any client account and with the DEFAULT profile. Then, during installation, pass as parameter the client ID and the group ID for the client in question. This will indicate to which client the protection belongs and the relevant security profile and group.
- Download the relevant installation package for each client. In this case, there is no need to indicate the client ID.
- Download the relevant installation packager for each client and for each group with its security profile. In this case there is no need to indicate the client ID or the group to which the computer belongs.
How to download the installation package (WaAgent.msi) 1. Access the specific client account through the Panda Cloud console.
2. Click the Endpoint Protection icon to access the Web console.
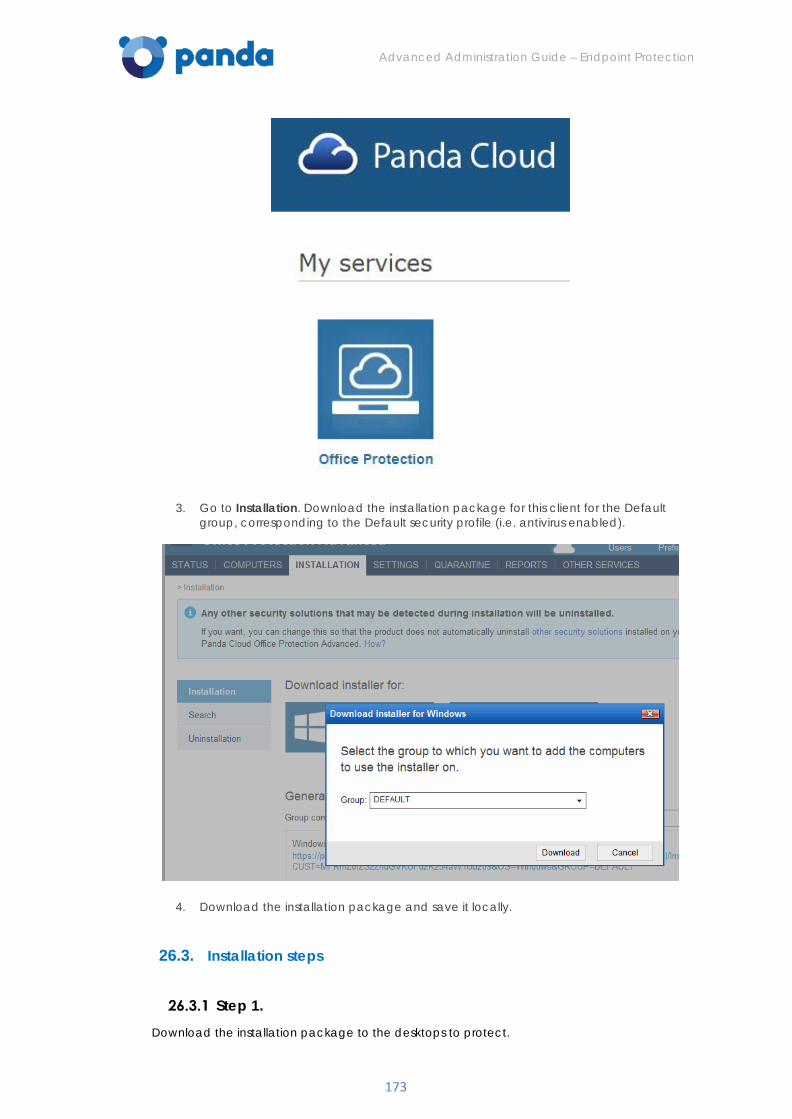
Advanced Administration Guide – Endpoint Protection
173
3. Go to Installation. Download the installation package for this client for the Default group, corresponding to the Default security profile (i.e. antivirus enabled).
4. Download the installation package and save it locally.
26.3. Installation steps
Step 1.
Download the installation package to the desktops to protect.
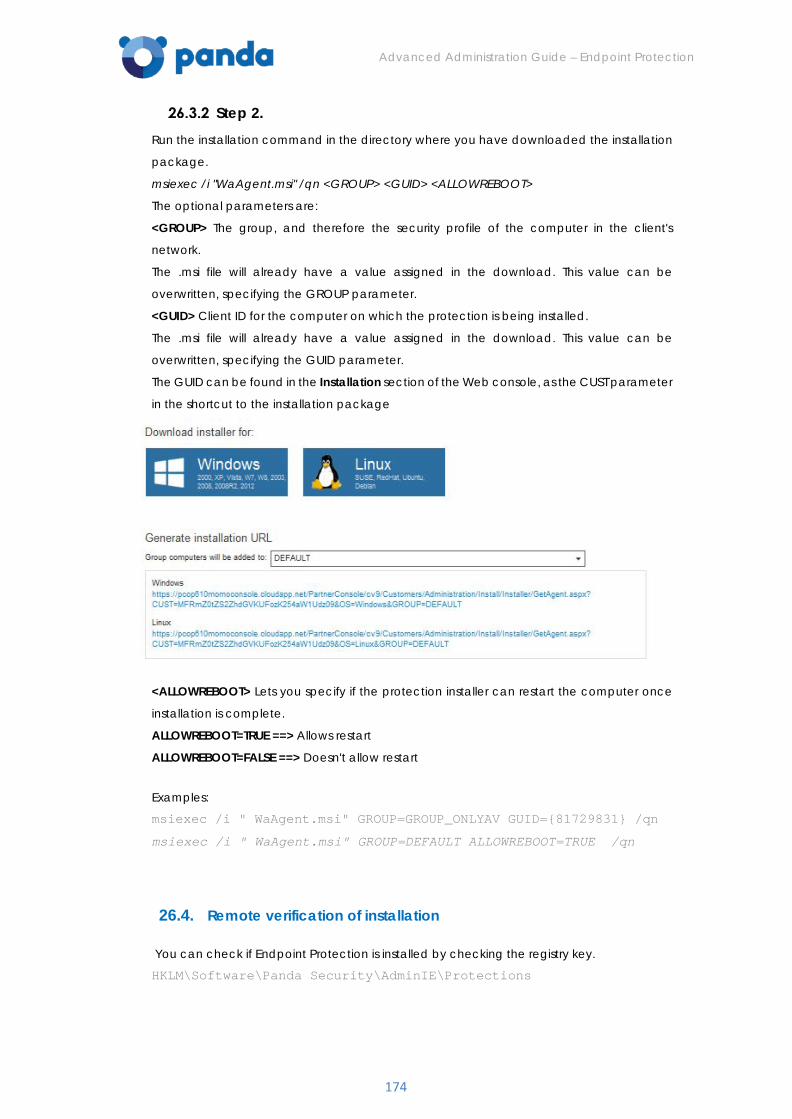
Advanced Administration Guide – Endpoint Protection
174
Step 2. Run the installation command in the directory where you have downloaded the installation
package.
msiexec /i "WaAgent.msi" /qn <GROUP> <GUID> <ALLOWREBOOT>
The optional parameters are:
<GROUP> The group, and therefore the security profile of the computer in the client's
network.
The .msi file will already have a value assigned in the download. This value can be
overwritten, specifying the GROUP parameter.
<GUID> Client ID for the computer on which the protection is being installed.
The .msi file will already have a value assigned in the download. This value can be
overwritten, specifying the GUID parameter.
The GUID can be found in the Installation section of the Web console, as the CUST parameter
in the shortcut to the installation package
<ALLOWREBOOT> Lets you specify if the protection installer can restart the computer once
installation is complete.
ALLOWREBOOT=TRUE ==> Allows restart
ALLOWREBOOT=FALSE ==> Doesn't allow restart
Examples:
msiexec /i " WaAgent.msi" GROUP=GROUP_ONLYAV GUID={81729831} /qn
msiexec /i " WaAgent.msi" GROUP=DEFAULT ALLOWREBOOT=TRUE /qn
26.4. Remote verification of installation
You can check if Endpoint Protection is installed by checking the registry key.
HKLM\Software\Panda Security\AdminIE\Protections
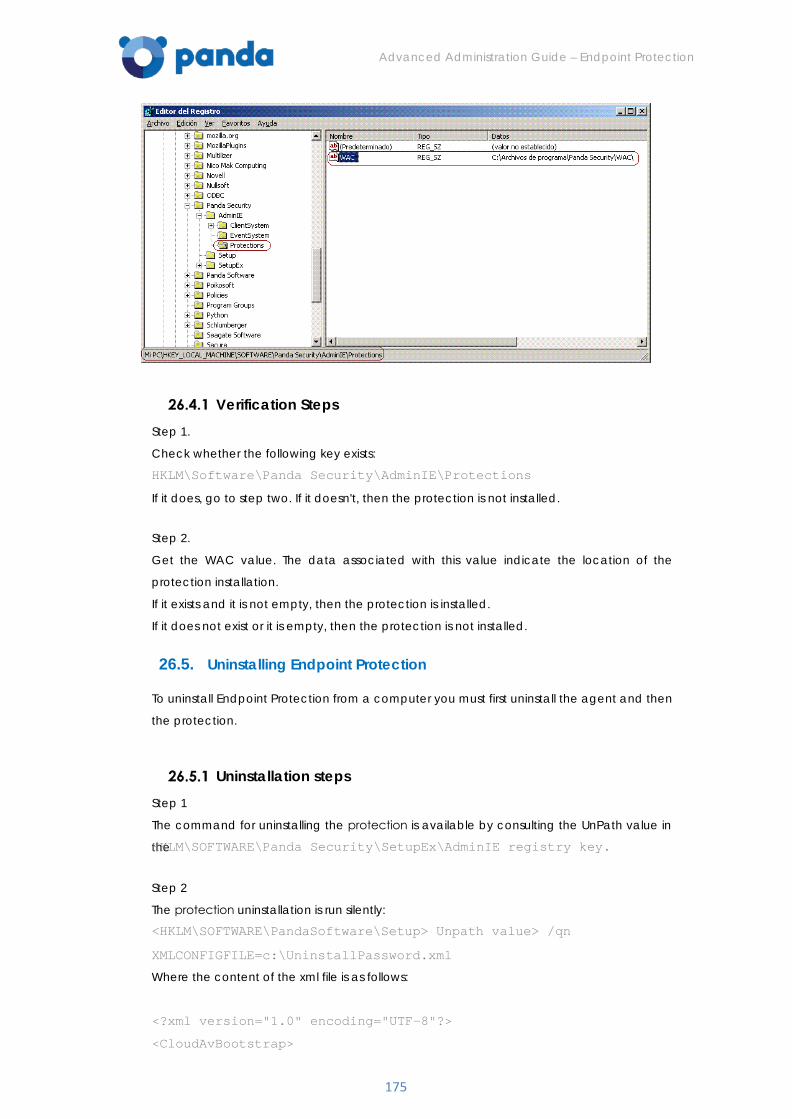
Advanced Administration Guide – Endpoint Protection
175
Verification Steps Step 1.
Check whether the following key exists:
HKLM\Software\Panda Security\AdminIE\Protections
If it does, go to step two. If it doesn't, then the protection is not installed.
Step 2.
Get the WAC value. The data associated with this value indicate the location of the
protection installation.
If it exists and it is not empty, then the protection is installed.
If it does not exist or it is empty, then the protection is not installed.
26.5. Uninstalling Endpoint Protection
To uninstall Endpoint Protection from a computer you must first uninstall the agent and then
the protection.
Uninstallation steps Step 1
The command for uninstalling the protection is available by consulting the UnPath value in
the HKLM\SOFTWARE\Panda Security\SetupEx\AdminIE registry key.
Step 2
The protection uninstallation is run silently:
<HKLM\SOFTWARE\PandaSoftware\Setup> Unpath value> /qn
XMLCONFIGFILE=c:\UninstallPassword.xml
Where the content of the xml file is as follows:
<?xml version="1.0" encoding="UTF-8"?>
<CloudAvBootstrap>
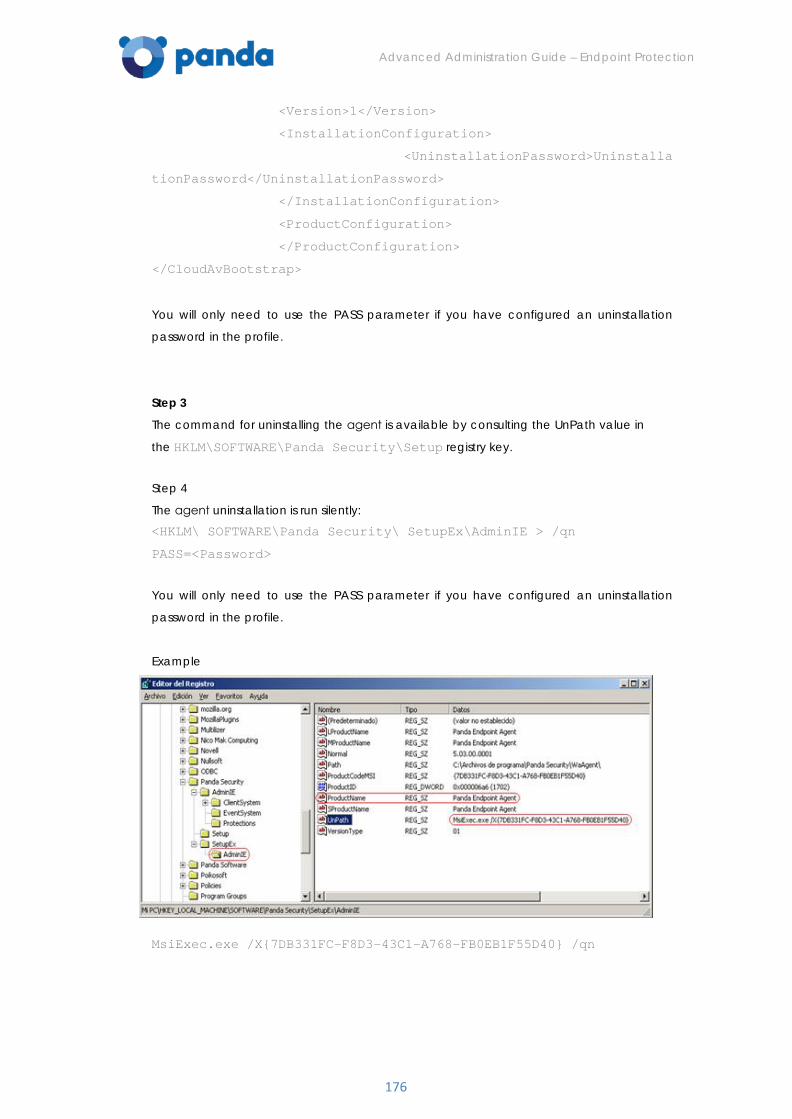
Advanced Administration Guide – Endpoint Protection
176
<Version>1</Version>
<InstallationConfiguration>
<UninstallationPassword>Uninstalla
tionPassword</UninstallationPassword>
</InstallationConfiguration>
<ProductConfiguration>
</ProductConfiguration>
</CloudAvBootstrap>
You will only need to use the PASS parameter if you have configured an uninstallation
password in the profile.
Step 3
The command for uninstalling the agent is available by consulting the UnPath value in
the HKLM\SOFTWARE\Panda Security\Setup registry key.
Step 4
The agent uninstallation is run silently:
<HKLM\ SOFTWARE\Panda Security\ SetupEx\AdminIE > /qn
PASS=<Password>
You will only need to use the PASS parameter if you have configured an uninstallation
password in the profile.
Example
MsiExec.exe /X{7DB331FC-F8D3-43C1-A768-FB0EB1F55D40} /qn
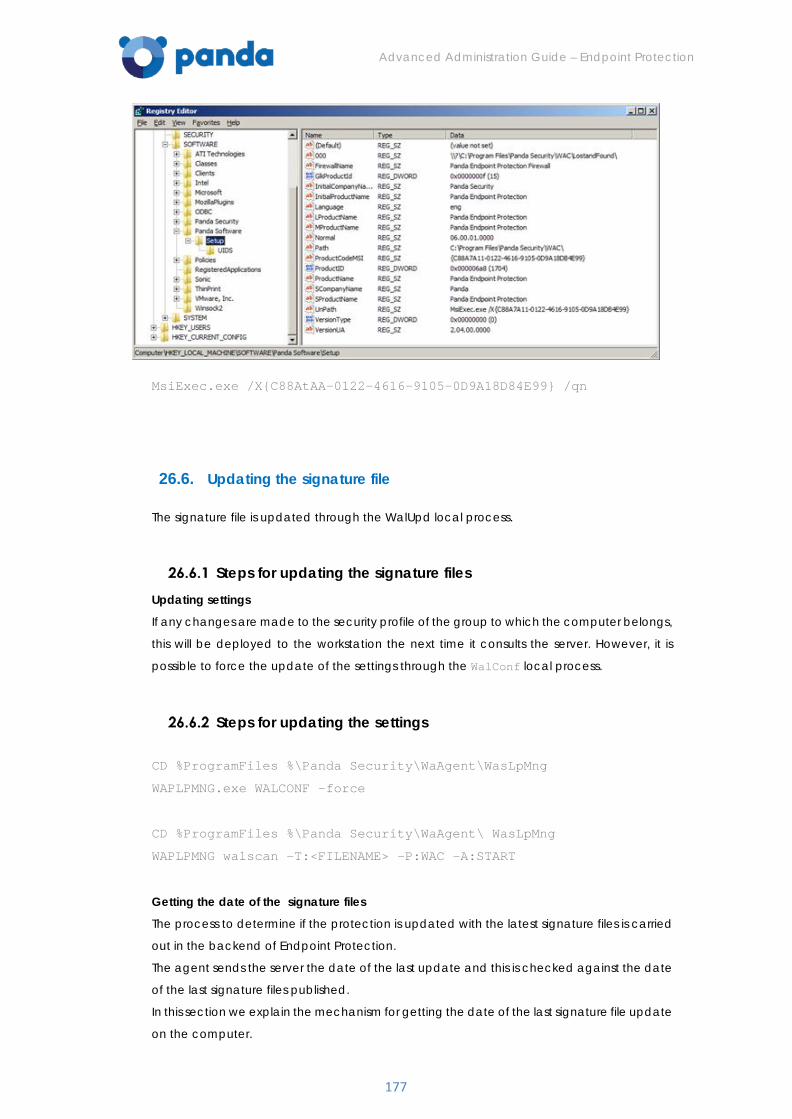
Advanced Administration Guide – Endpoint Protection
177
MsiExec.exe /X{C88AtAA-0122-4616-9105-0D9A18D84E99} /qn
26.6. Updating the signature file
The signature file is updated through the WalUpd local process.
Steps for updating the signature files Updating settings
If any changes are made to the security profile of the group to which the computer belongs,
this will be deployed to the workstation the next time it consults the server. However, it is
possible to force the update of the settings through the WalConf local process.
Steps for updating the settings
CD %ProgramFiles %\Panda Security\WaAgent\WasLpMng
WAPLPMNG.exe WALCONF -force
CD %ProgramFiles %\Panda Security\WaAgent\ WasLpMng
WAPLPMNG walscan –T:<FILENAME> -P:WAC –A:START
Getting the date of the signature files
The process to determine if the protection is updated with the latest signature files is carried
out in the backend of Endpoint Protection.
The agent sends the server the date of the last update and this is checked against the date
of the last signature files published.
In this section we explain the mechanism for getting the date of the last signature file update
on the computer.
Advanced Administration Guide – Endpoint Protection
178
Remember that this information, along with other information about the protection status, is
updated continually on the computer in a file called WALTEST.DAT.
This is an XML file, and can be treated as such in order to parse its content for such
information.
In the <PavsigDate> section there is information relating to the date of the last signature
file update.
You therefore need to get this file and process its content, searching for the <PavsigDate>
tag
Obtaining the signature files date Step 0
Prior to getting the information, it is advisable to launch an update of the signature files as
detailed in Section 4. Then refresh the information in waltest.dat by launching the waltest
local process. CD %ProgramFiles %\Panda Security\WaAgent\WasLpMng
WAPLPMNG.exe WALUPD –force
WAPLPMNG waltest –force
(Update the file WALTEST.DAT)
Step 1
Go to the Waltest local process directory and get the waltest.dat file.
CD &ProgramFiles %\Panda Security\WaAgent\WalTest
(find the file: WALTEST.DAT)
Step 2
Look for the tag “<PavSigDate>”. To do this, you can use a program for parsing XML files, so
you'll have to rename the waltest.dat file to XML, or use the FindString DOS command for
finding strings in files.
Here we explain how to get this information using the FindString command.
FindStr “<PavSigDate>” waltest.dat
(find tag <PavSigDate>)
The information will be similar to the following:
<PavSigDate>2012-03-23 12:25:43</PavSigDate>
In this example, the date of the last signature file is “2012-03-23 12:25:43”.
Getting the status of the antivirus, the firewall and the device control modules
This information, along with other information on the real status of the protection, is
continually refreshed in the WALTEST.DAT file.
As mentioned above, this is an XML file, and can be treated as such in order to parse its
content for such information.
In the <AVSTATUSINFO> section there is information about the status of each of the antivirus
Advanced Administration Guide – Endpoint Protection
179
protections. Each <JOBID> section refers to each protection. The information available is as
follows:
<IsInstalled> Protection installed
<IsStarted> It is running.
<IsActivated> It has been enabled in the configuration
The values and meanings of the JobIDs are:
JobID Meaning
2 File protection (permanent file protection)
4 Email protection (permanent email protection)
64 Firewall protection
256 Device Control
512 Transport protection on Exchange Servers
1024 Inbox Protection of Exchange Servers
2048 Antispam Protection on Exchange Servers
4096 URL Monitoring.
8192 Antimalware Protection in Web browsing
Getting information on the status of the protection
Step 0
Previously, although it is not necessary, it is advisable to launch an update of the waltest.dat
file by running the WalTest local process.
CD %Program Files %\Panda Security\WaAgent\WasLpMng
WAPLPMNG waltest –force
(Update the file WALTEST.DAT)
CD %ProgramFiles %\Panda Security\WaAgent\WalTest
Step 1
Go to the Waltest local process directory and get the waltest.dat file.
CD %Program Files %\Panda Security\WaAgent\WalTest
(find the file: WALTEST.DAT)
Step 2
Get the information you require.
FindStr “<JobID> <IsInstalled> <IsStarted> <IsActivated> “
waltest.dat
Advanced Administration Guide – Endpoint Protection
180
(find info in the file WALTEST.DAT)
The information will be similar to the following:
<AVStatusInfo><JobStatusInfo><JobInfo><JobID>2</JobID>
</JobInfo><JobStatus><IsInstalled>true</IsInstalled>
<IsStarted>true</IsStarted>
<IsActivated>true</IsActivated>
</JobStatus></JobStatusInfo><JobStatusInfo><JobInfo><JobID>4</Job
ID>
</JobInfo><JobStatus><IsInstalled>true</IsInstalled>
<IsStarted>true</IsStarted>
<IsActivated>true</IsActivated>
</JobStatus></JobStatusInfo><JobStatusInfo><JobInfo><JobID>8</Job
ID>
</JobInfo><JobStatus><IsInstalled>true</IsInstalled>
<IsStarted>true</IsStarted>
<IsActivated>true</IsActivated>
</JobStatus></JobStatusInfo><JobStatusInfo><JobInfo><JobID>16</Jo
bID>
</JobInfo><JobStatus><IsInstalled>true</IsInstalled>
<IsStarted>true</IsStarted>
<IsActivated>true</IsActivated>
</JobStatus></JobStatusInfo><JobStatusInfo><JobInfo><JobID>64</Jo
bID>
</JobInfo><JobStatus><IsInstalled>true</IsInstalled>
<IsStarted>true</IsStarted>
<IsActivated>true</IsActivated>
In this example, you will see the following:
Permanent file protection (JobID = 2): Installed, running and active.
Permanent email protection (JobID = 4): Installed, running and active.
Firewall (JobID = 64): Installed, running and active.
Device control (JobID = 256): Installed, running and active
WALTEST.DAT format. <AVSTATUSINFO>
<AVProducts><AVProduct><AVID><AVName>WAC</AVName>
<AVVersion>6.00.12.0000</AVVersion>
</AVID><PendingUpgrade>false</PendingUpgrade>
<PavSigDate>2012-03-23 12:25:43</PavSigDate>
<MUID>69c87ea1-90d4-463d-999a-89302d311e26</MUID>
<AVStatusInfo><JobStatusInfo><JobInfo><JobID>2</JobID>
Advanced Administration Guide – Endpoint Protection
181
<UnitID>1</UnitID>
</JobInfo><JobStatus><IsInstalled>true</IsInstalled>
<IsStarted>true</IsStarted>
<IsActivated>true</IsActivated>
<IsStatusCoherence>true</IsStatusCoherence>
<ReqConform>0</ReqConform>
</JobStatus></JobStatusInfo><JobStatusInfo><JobInfo><JobID>4</Job
ID>
<UnitID>1</UnitID>
</JobInfo><JobStatus><IsInstalled>true</IsInstalled>
<IsStarted>true</IsStarted>
<IsActivated>true</IsActivated>
<IsStatusCoherence>true</IsStatusCoherence>
<ReqConform>0</ReqConform>
</JobStatus></JobStatusInfo><JobStatusInfo><JobInfo><JobID>64</Jo
bID>
<UnitID>2</UnitID>
</JobInfo><JobStatus><IsInstalled>true</IsInstalled>
<IsStarted>true</IsStarted>
<IsActivated>true</IsActivated
<IsStatusCoherence>true</IsStatusCoherence>
<ReqConform>0</ReqConform>
</JobStatus></JobStatusInfo><JobStatusInfo><JobInfo><JobID>256</J
obID>
<UnitID>8</UnitID>
</JobInfo><JobStatus><IsInstalled>true</IsInstalled>
<IsStarted>true</IsStarted>
<IsActivated>true</IsActivated>
<IsStatusCoherence>true</IsStatusCoherence>
<ReqConform>0</ReqConform>
</JobStatus></JobStatusInfo></AVStatusInfo></AVProduct></AVProduc
ts></TestRepor>
Advanced Administration Guide – Endpoint Protection
182
27. Appendix 2: Deploying the
protection
Advanced Administration Guide – Endpoint Protection
183
27.1. Introduction
Before going into detail on the files, registry keys and folders created on deploying the
protection to your computers, we offer information about the administration agent, the P2P
functionality or rumor, the proxy functionality and the protection installation times.
All these factors are important to have more in-depth knowledge of the deployment
process.
27.2. The administration agent
The agent is responsible for communication between the administered computers and the
Endpoint Protection servers. Effectively, it ‘talks’ with the agents on the computers in the
same group and is responsible for downloading installation programs from the Internet.
When the agent installer is run, the Endpoint Protection installation process is launched,
which involves a series of different tasks: downloading settings, installing the protection,
updating the signature files, etc.
As a fundamental component in the dialogue between different computers, the agent is a
key part of the P2P process described below.
27.3. Peer-to-Peer or rumor functionality
The Peer-to-Peer functionality (or 'rumor') reduces use of bandwidth for the Internet
connection, as computers that have already updated a file from the Internet then share the
update with other connected computers. This prevents saturating Internet connections.
The P2P functionality is very useful in the deployment of Endpoint Protection when it comes
to downloading the installation program. When one of the computers has downloaded the
installation program from the Internet, the others are informed by their communications
agents.
Then, instead of accessing the Internet, they get the installation program directly from
another computer and the protection is installed.
This functionality is also very useful when updating the protection engine and the signature
files, and is implemented in the two local processes that need to download files from the
Internet: WalUpd and WalUpg.
This function is activated in the configuration files of these processes.
WALUPD.ini
[GENERAL]
UPDATE_FROM_LOCAL_NETWORK=1
WALUPG.ini
[GENERAL]
UPGRADE_FROM_LOCAL_NETWORK=1
The P2P functionality works independently in each of these local processes. It could be
activated in one of them but not in the other.
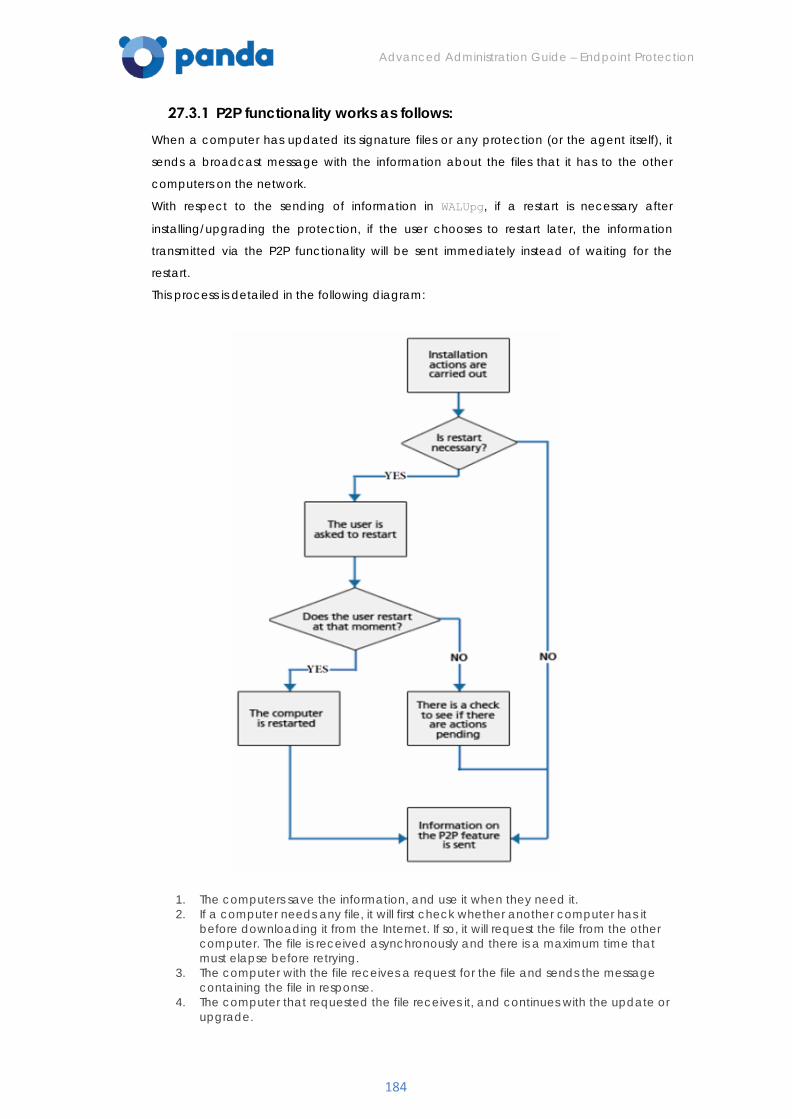
Advanced Administration Guide – Endpoint Protection
184
P2P functionality works as follows: When a computer has updated its signature files or any protection (or the agent itself), it
sends a broadcast message with the information about the files that it has to the other
computers on the network.
With respect to the sending of information in WALUpg, if a restart is necessary after
installing/upgrading the protection, if the user chooses to restart later, the information
transmitted via the P2P functionality will be sent immediately instead of waiting for the
restart.
This process is detailed in the following diagram:
1. The computers save the information, and use it when they need it. 2. If a computer needs any file, it will first check whether another computer has it
before downloading it from the Internet. If so, it will request the file from the other computer. The file is received asynchronously and there is a maximum time that must elapse before retrying.
3. The computer with the file receives a request for the file and sends the message containing the file in response.
4. The computer that requested the file receives it, and continues with the update or upgrade.
Advanced Administration Guide – Endpoint Protection
185
For computers to send files to others through the P2P functionality they must have at least 128 MB of RA
Dynamic proxy The agents contain a list with information about computers on the network with agents and
which can send messages to the Internet. These agents are called proxies.
To act as a proxy for other agents, the computer must meet the following requirements: to have a direct connection to the Internet and to have at least 128 MB of RAM. Besides, the computer must not be blacklisted and the installation sequence must have finished.
When the list of proxies is empty or none of the agents in the list respond (availability = 0), the
agent sends a message via broadcast to the subnet asking “Who is Proxy?” so that it can
send a message to the Internet via a proxy.
When it is waiting for data from the list of valid proxies, the proxy module will not attend other
requests.
The list of proxies has a value associated to each proxy with a maximum number of attempts
to connect with another agent before it will be considered invalid. By default the number is
three, and when this value reaches zero the agent will be considered invalid as a proxy.
If at any time all the proxies in the list are invalid, the list itself will be considered invalid and
the search for proxies is launched through the message “Who is proxy?"
It is possible that the message is sent correctly to the proxy in the list, but the proxy discovers
it does not have an Internet connection. In this case, the remote agent will repeat the
sequence described here, resending the message to a proxy in the list, but it will also send
via TCP a message to the agent that sent the message saying “I am not Proxy”, to indicate
that it should be removed from the list as it does not have a connection to the Internet.
This process is repeated until the message is sent correctly to the Internet or it passes through
a maximum number of proxies without managing to be sent, in which case the message is
lost.
You can configure the maximum number of proxies through which a message can pass. By
default, it will only be sent to one and if the attempt fails the message is lost.
The message contains a list of the proxies through which it has passed, to avoid being sent
twice to the same proxy without Internet connection.
Static proxy
If you want all access to the Internet to be made through a specific computer chosen by
the administrator, instead of dynamically through certain computers, the communications
agent offers the possibility to specify which computer you want to act as a proxy.
The computer that acts as a static proxy must meet the following requirements:
- It must have an agent installed (version 6.0 or later).
- It must have direct Internet access.
Advanced Administration Guide – Endpoint Protection
186
- It must have at least 128 MB of RAM.
- It must have established a connection to the server in the last 72 hours.
- The computer must not be blacklisted and the installation sequence must have finished.
If, at any time, the computer set to work as a static proxy ceases to meet some of the
requirements to act as such, the proxy option will be disabled in the console, the name of
the computer will disappear, and a message will be displayed indicating the requirement
that was not fulfilled.
You can select another computer to work as a static proxy. If a computer stops acting as a
static proxy because it has been blacklisted, but is then whitelisted, it must be configured
again to work as a static proxy so that all communications with the server pass through it.
When the agent has to access the Internet, it will first try to communicate using the static proxy.
If communication with the static proxy is not possible, it will try to establish connection using
the usual sequence of communication procedures.
1. If a valid configuration is stored, it will try to communicate using this configuration. 2. Otherwise, it will try to connect directly to the Internet. 3. If it cannot connect directly, it will try through another computer acting as a
'dynamic proxy', as described in the previous section.
When the computer acting as a proxy receives a request to access the Internet, it will try to
connect directly. If the connection is successful it will send a reply to the agent requesting
the connection.
To configure a static proxy, go to the Server connection settings section on the Advanced
settings tab (available from the Windows and Linux section).
27.4. Deploying Panda Endpoint Agent
Main architecture modules
Panda Endpoint Agent comprises the following four main components:
• Administration agent
• Local processes
• Watchdog
• Task scheduler
Panda Endpoint Agent folder tree and registry entries In the following diagram, AdminIEClientPath is the root path where the modules are installed.
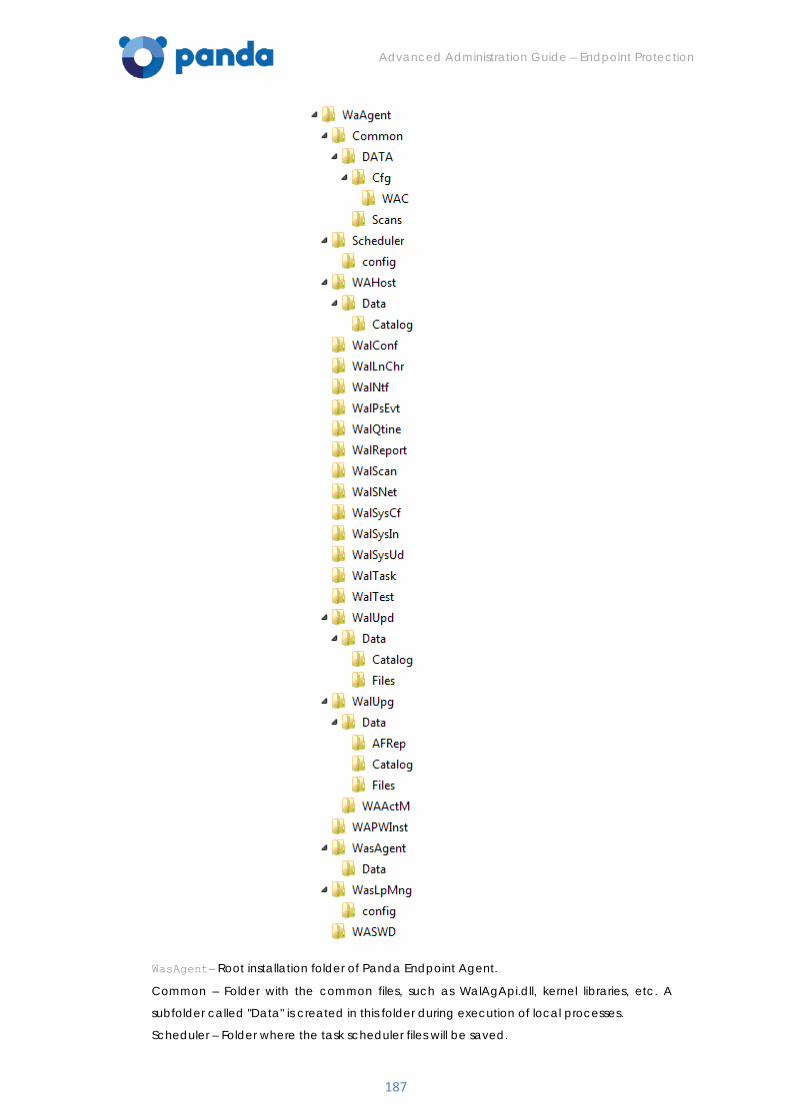
Advanced Administration Guide – Endpoint Protection
187
WasAgent– Root installation folder of Panda Endpoint Agent.
Common – Folder with the common files, such as WalAgApi.dll, kernel libraries, etc. A
subfolder called "Data" is created in this folder during execution of local processes.
Scheduler – Folder where the task scheduler files will be saved.
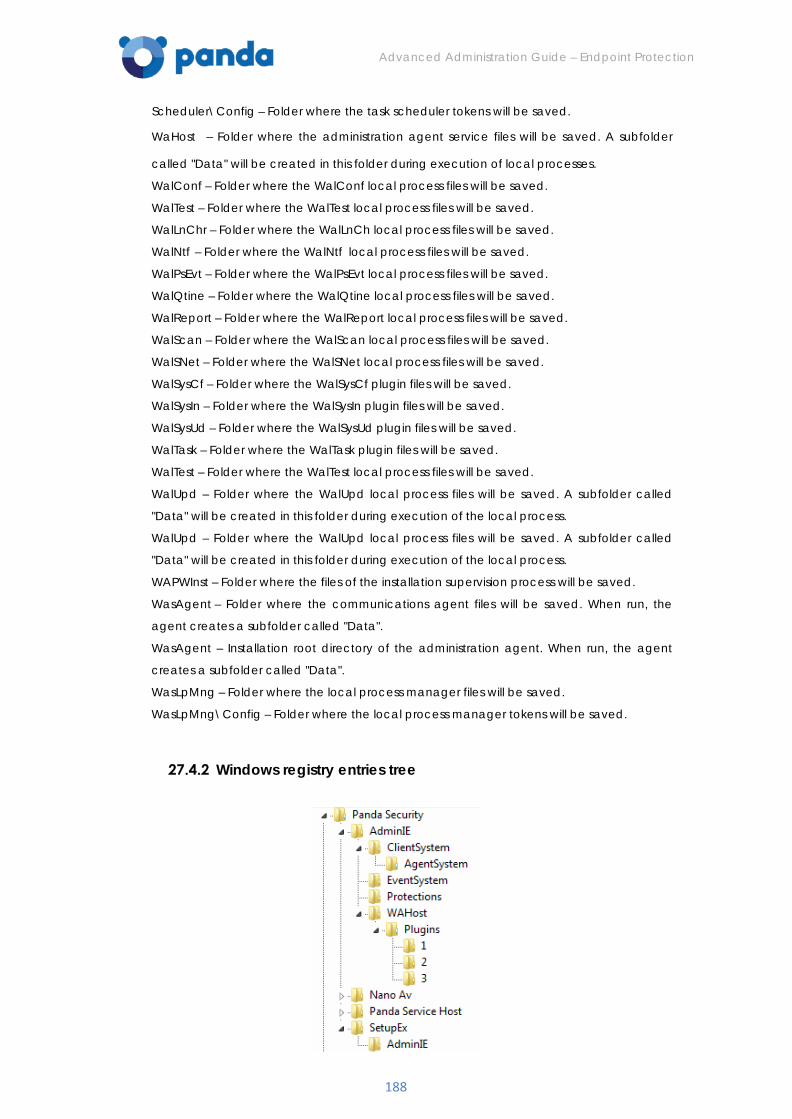
Advanced Administration Guide – Endpoint Protection
188
Scheduler\Config – Folder where the task scheduler tokens will be saved.
WaHost – Folder where the administration agent service files will be saved. A subfolder
called "Data" will be created in this folder during execution of local processes.
WalConf – Folder where the WalConf local process files will be saved.
WalTest – Folder where the WalTest local process files will be saved.
WalLnChr – Folder where the WalLnCh local process files will be saved.
WalNtf – Folder where the WalNtf local process files will be saved.
WalPsEvt – Folder where the WalPsEvt local process files will be saved.
WalQtine – Folder where the WalQtine local process files will be saved.
WalReport – Folder where the WalReport local process files will be saved.
WalScan – Folder where the WalScan local process files will be saved.
WalSNet – Folder where the WalSNet local process files will be saved.
WalSysCf – Folder where the WalSysCf plugin files will be saved.
WalSysIn – Folder where the WalSysIn plugin files will be saved.
WalSysUd – Folder where the WalSysUd plugin files will be saved.
WalTask – Folder where the WalTask plugin files will be saved.
WalTest – Folder where the WalTest local process files will be saved.
WalUpd – Folder where the WalUpd local process files will be saved. A subfolder called
"Data" will be created in this folder during execution of the local process.
WalUpd – Folder where the WalUpd local process files will be saved. A subfolder called
"Data" will be created in this folder during execution of the local process.
WAPWInst – Folder where the files of the installation supervision process will be saved.
WasAgent – Folder where the communications agent files will be saved. When run, the
agent creates a subfolder called "Data".
WasAgent – Installation root directory of the administration agent. When run, the agent
creates a subfolder called "Data".
WasLpMng – Folder where the local process manager files will be saved.
WasLpMng\Config – Folder where the local process manager tokens will be saved.
Windows registry entries tree
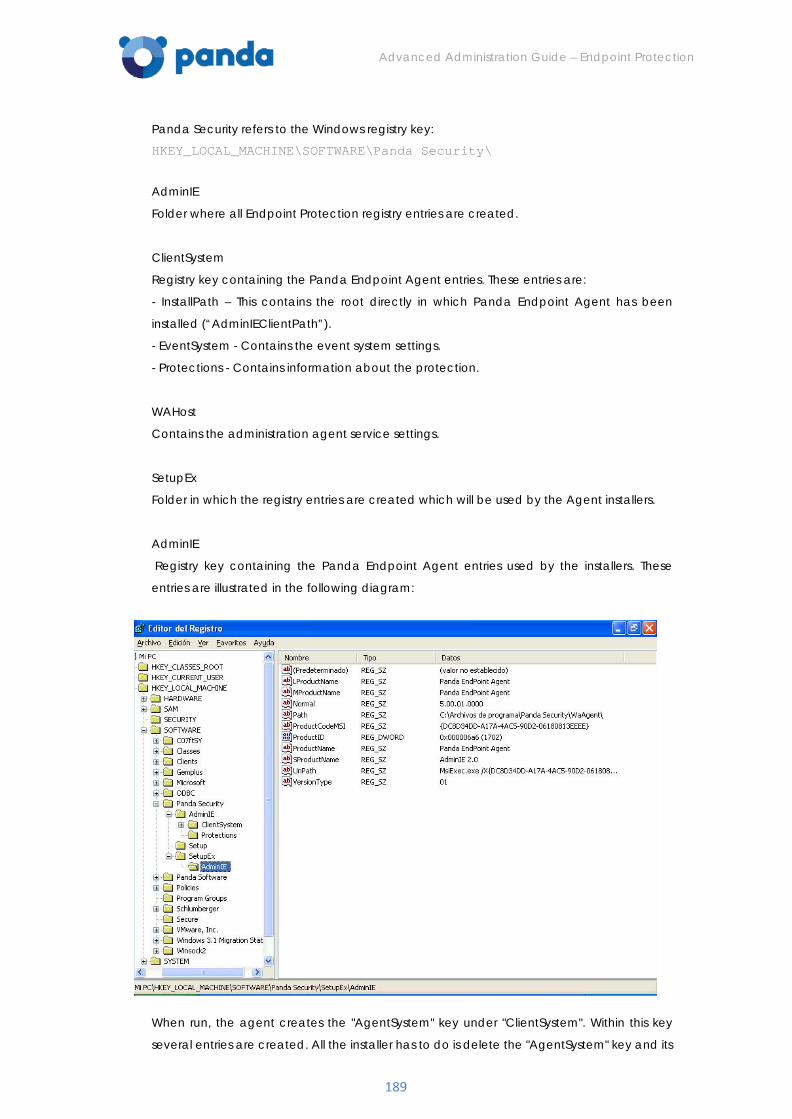
Advanced Administration Guide – Endpoint Protection
189
Panda Security refers to the Windows registry key:
HKEY_LOCAL_MACHINE\SOFTWARE\Panda Security\
AdminIE
Folder where all Endpoint Protection registry entries are created.
ClientSystem
Registry key containing the Panda Endpoint Agent entries. These entries are:
- InstallPath – This contains the root directly in which Panda Endpoint Agent has been
installed (“AdminIEClientPath”).
- EventSystem - Contains the event system settings.
- Protections - Contains information about the protection.
WAHost
Contains the administration agent service settings.
SetupEx
Folder in which the registry entries are created which will be used by the Agent installers.
AdminIE
Registry key containing the Panda Endpoint Agent entries used by the installers. These
entries are illustrated in the following diagram:
When run, the agent creates the "AgentSystem" key under "ClientSystem". Within this key
several entries are created. All the installer has to do is delete the "AgentSystem" key and its
Advanced Administration Guide – Endpoint Protection
190
entries in the uninstallation process.
Distribution of files All administered computers have the administration agent installed. Along with the agent,
local processes are also installed.
Below we list all the agent paths and files of the administration agent and their local
processes:
Administration agent
The agent is installed in <AdminIEClientPath>\WasAgent
- WasAgent.conf
- WasAgent.dll
- WaPIRes.exe
- WAInterface.dll
- Wa_AGPRX.dat
- LPTokens.dat
- INTEGRA.dat
- INTEGRA.bak (generated during installation but not distributed)
- INTEGRA.start (generated during installation but not distributed)
- AgentSystem.DAT
- Proxy.dat (generated during installation but not distributed)
During execution of the agent the "Data" subfolder is created with the following files:
- MsiExec.log
- WasAgent.log
- WaHost.log
- WapWinst.log
- Counters.ini
The "AgentSystem" registry key is also created under "ClientSystem". Within this key several
entries are created:
- Value1
- Value2
- Value3
If the Internet connection is via proxy, the connection details requested from the user are
stored in AgentSystem.dat in the folder <AdminIEClientPath>\WasAgent.
All must be deleted during uninstallation.
WalConf local process
Installed in < AdminIEClientPath >\WalConf
- WalConf.ini
- WalConf.dll
The following file is created during the execution of this local process:
Advanced Administration Guide – Endpoint Protection
191
Walconf.log
WalLnChr local process
Installed in < AdminIEClientPath >\WalLnChr:
- Wallnchr.dat
- Wallnchr.dll
The following file is created during the execution of this local process:
WalLnchr.log
WalNtf local process
Installed in < AdminIEClientPath >\WalNtf
- WalNtf.dat
- WalNtf.dll
- WalNtf.ini
The following file is created during the execution of this local process:
WalNtf.log
WalQtine local process
Installed in < AdminIEClientPath >\WalQtine
- WalQtine.ini
- WalQtine.dll
The following file is created during the execution of this local process:
WalQtine.log
WalReport local process
Installed in < AdminIEClientPath >\WalReport
- WalReport.dll
- WalReport.ini
The following file is created during the execution of this local process:
- WalReport.log
WalScan local process
Installed in < AdminIEClientPath >\WalScan
- WalScan.dll
- WalScan.ini
The following file is created during the execution of this local process: WalScan.log
WalTest local process
Installed in < AdminIEClientPath >\WalScan
- WalTest.dll
- WalTest.ini
The following files are created during the execution of this local process:
- WalTest.dat
Advanced Administration Guide – Endpoint Protection
192
- WalTest.log
- Waltestlt.dat
- Waltestdf.dat
WalUpd local process
Installed in < AdminIEClientPath >\WalUPd
- WalUpd.dll
- WalUpd.ini
The following files are created during the execution of this local process:
- Counters.ini
- WalUpd.log
The subfolder Data is created and contains the Catalog subdirectory which can have the
following files:
- WEB_GUID
- WEB_CATALOG
- LAST_GUID
- LAST_CATALOG
- LOCAL_CATALOG
- RUMOR_TABLE
- LOCAL_CATALOG.TMP
and the Files subdirectory is created which temporarily holds the files needed for updates.
WalUpg local process
Installed in < AdminIEClientPath >\WalUPg
- WalUpg.dll
- WalUpg.ini
- PavGenUn.exe
- Settings.ini
- UpgradeDialog.exe
- WALPCSMInst.dll
- WAPILnchr.exe
The following files are created during the execution of this local process:
- Counters.ini
- WalUpg.dat
- WalUpg.log
- WAUPGTD.dat
- WAC_Installer.log
- Agent_Installer.log
- WAC_Installer_YYYY-MM-DD_HH.mm.SS.log
- Agent_Installer_YYYY-MM-DD_HH.mm.SS.log
- WAActions.DAT
- WAActM.DAT
- WAAdmR.dat
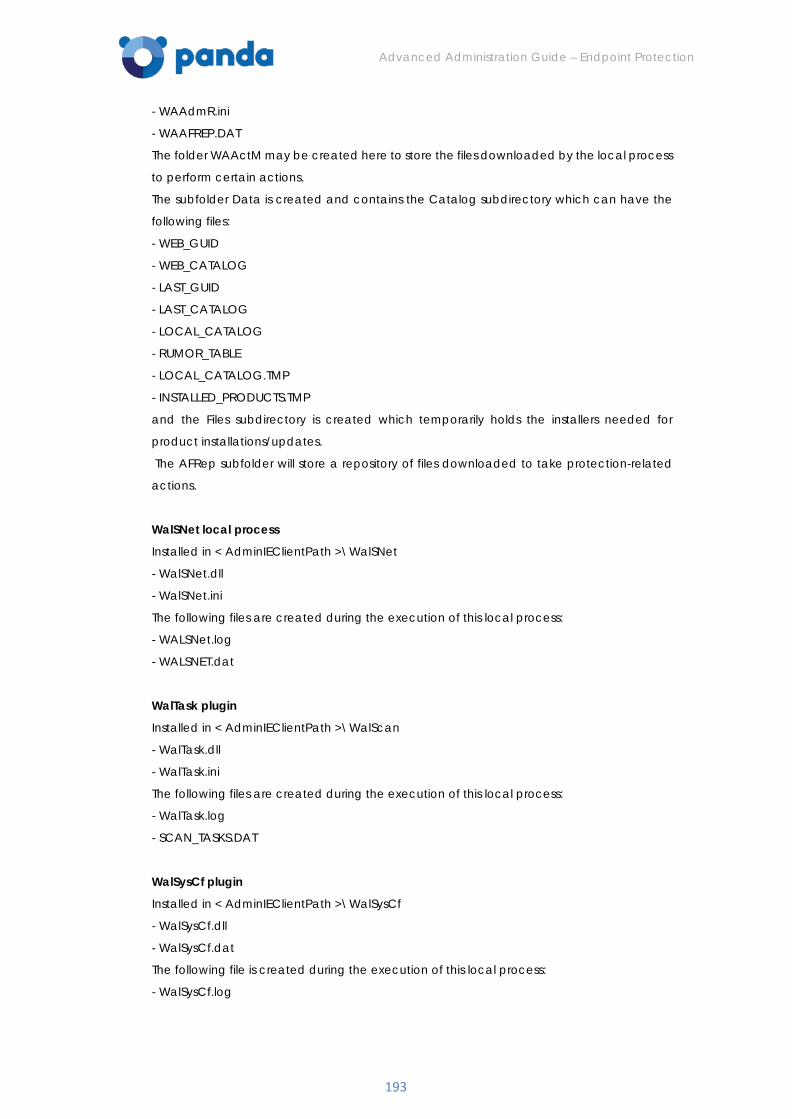
Advanced Administration Guide – Endpoint Protection
193
- WAAdmR.ini
- WAAFREP.DAT
The folder WAActM may be created here to store the files downloaded by the local process
to perform certain actions.
The subfolder Data is created and contains the Catalog subdirectory which can have the
following files:
- WEB_GUID
- WEB_CATALOG
- LAST_GUID
- LAST_CATALOG
- LOCAL_CATALOG
- RUMOR_TABLE
- LOCAL_CATALOG.TMP
- INSTALLED_PRODUCTS.TMP
and the Files subdirectory is created which temporarily holds the installers needed for
product installations/updates.
The AFRep subfolder will store a repository of files downloaded to take protection-related
actions.
WalSNet local process
Installed in < AdminIEClientPath >\WalSNet
- WalSNet.dll
- WalSNet.ini
The following files are created during the execution of this local process:
- WALSNet.log
- WALSNET.dat
WalTask plugin
Installed in < AdminIEClientPath >\WalScan
- WalTask.dll
- WalTask.ini
The following files are created during the execution of this local process:
- WalTask.log
- SCAN_TASKS.DAT
WalSysCf plugin
Installed in < AdminIEClientPath >\WalSysCf
- WalSysCf.dll
- WalSysCf.dat
The following file is created during the execution of this local process:
- WalSysCf.log
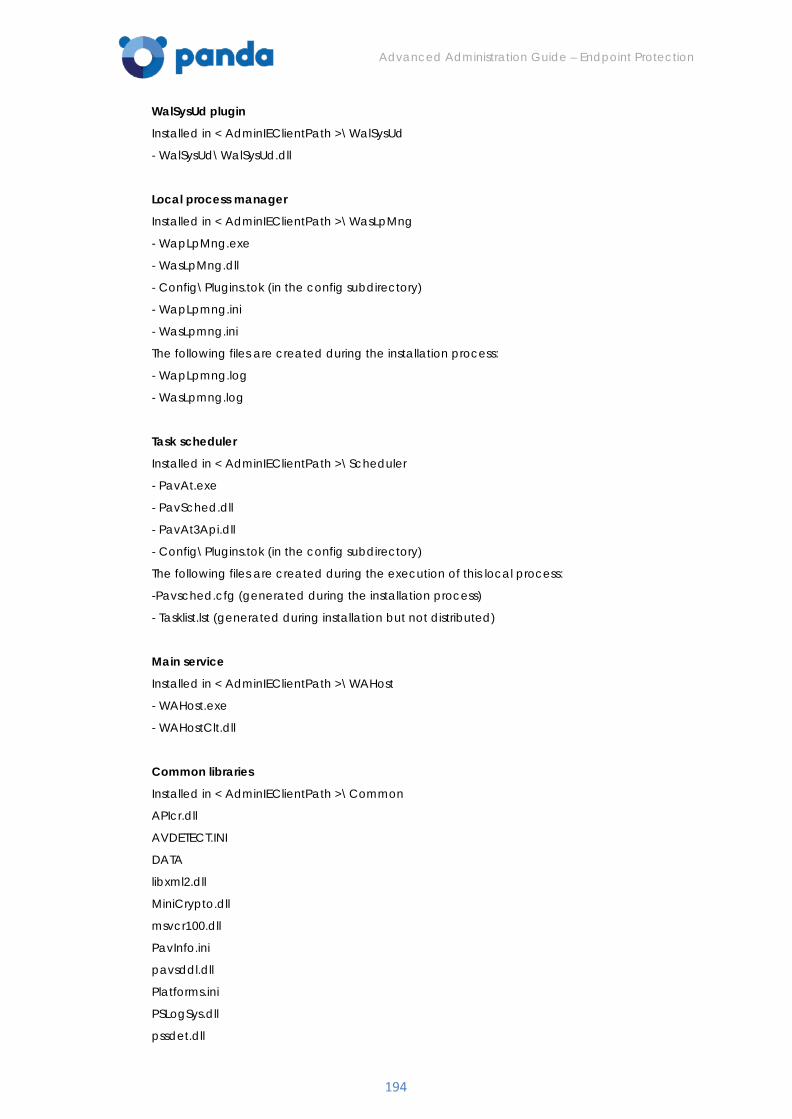
Advanced Administration Guide – Endpoint Protection
194
WalSysUd plugin
Installed in < AdminIEClientPath >\WalSysUd
- WalSysUd\WalSysUd.dll
Local process manager
Installed in < AdminIEClientPath >\WasLpMng
- WapLpMng.exe
- WasLpMng.dll
- Config\Plugins.tok (in the config subdirectory)
- WapLpmng.ini
- WasLpmng.ini
The following files are created during the installation process:
- WapLpmng.log
- WasLpmng.log
Task scheduler
Installed in < AdminIEClientPath >\Scheduler
- PavAt.exe
- PavSched.dll
- PavAt3Api.dll
- Config\Plugins.tok (in the config subdirectory)
The following files are created during the execution of this local process:
-Pavsched.cfg (generated during the installation process)
- Tasklist.lst (generated during installation but not distributed)
Main service
Installed in < AdminIEClientPath >\WAHost
- WAHost.exe
- WAHostClt.dll
Common libraries
Installed in < AdminIEClientPath >\Common
APIcr.dll
AVDETECT.INI
DATA
libxml2.dll
MiniCrypto.dll
msvcr100.dll
PavInfo.ini
pavsddl.dll
Platforms.ini
PSLogSys.dll
pssdet.dll
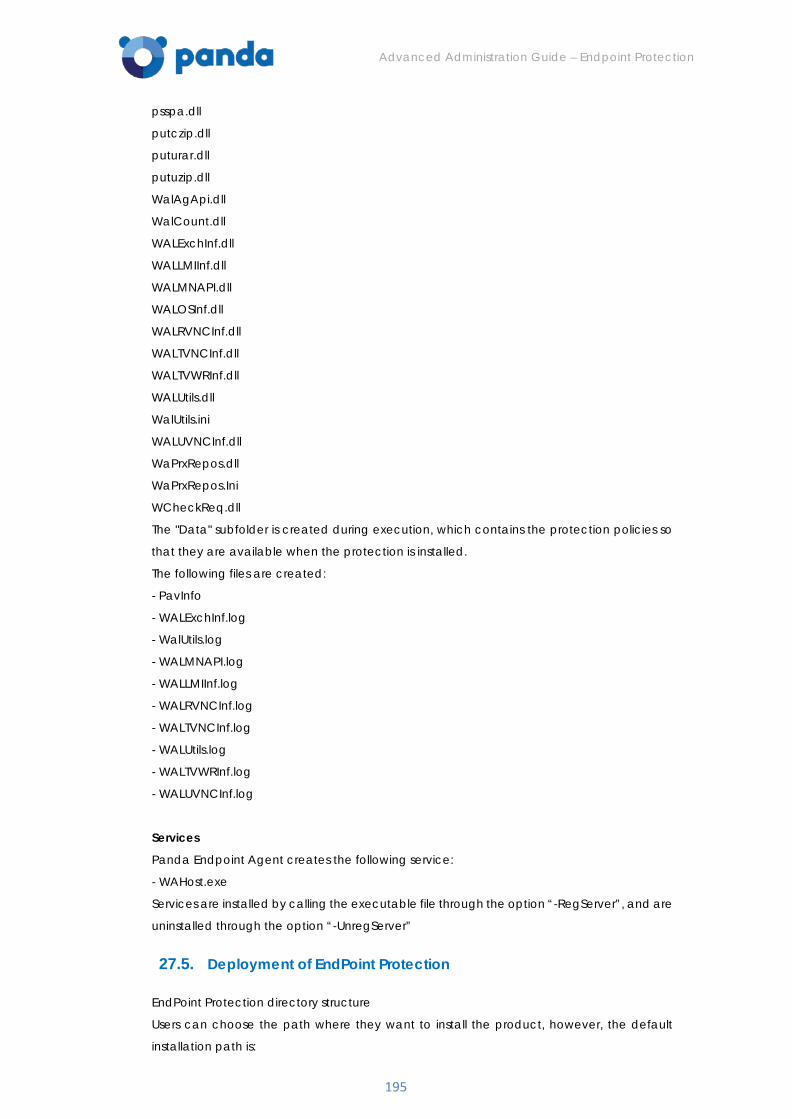
Advanced Administration Guide – Endpoint Protection
195
psspa.dll
putczip.dll
puturar.dll
putuzip.dll
WalAgApi.dll
WalCount.dll
WALExchInf.dll
WALLMIInf.dll
WALMNAPI.dll
WALOSInf.dll
WALRVNCInf.dll
WALTVNCInf.dll
WALTVWRInf.dll
WALUtils.dll
WalUtils.ini
WALUVNCInf.dll
WaPrxRepos.dll
WaPrxRepos.Ini
WCheckReq.dll
The "Data" subfolder is created during execution, which contains the protection policies so
that they are available when the protection is installed.
The following files are created:
- PavInfo
- WALExchInf.log
- WalUtils.log
- WALMNAPI.log
- WALLMIInf.log
- WALRVNCInf.log
- WALTVNCInf.log
- WALUtils.log
- WALTVWRInf.log
- WALUVNCInf.log
Services
Panda Endpoint Agent creates the following service:
- WAHost.exe
Services are installed by calling the executable file through the option “-RegServer”, and are
uninstalled through the option “-UnregServer”
27.5. Deployment of EndPoint Protection
EndPoint Protection directory structure
Users can choose the path where they want to install the product, however, the default
installation path is:

Advanced Administration Guide – Endpoint Protection
196
%allusersprofile%\Datos de programa\Panda Security\Panda Endpoint
Protection\Quarantine
InstallPath: EndPoint Protection installation path. This contains the files needed for EndPoint
Protection to operate.
Cache: Contains the local signature files.
Data: Contains the behavior analysis technology data files.
Drivers: Contains the binaries used to install/uninstall the units.
NNSNahs: Binaries used to install the firewall intermediate driver.
PSINDvct: Binaries used to installthe Device Control technology driver.
Lang: Contains the dictionaries with the strings in the various languages.
LostandFound: Contains the items restored from quarantine when they’ve been moved by
the email protection or when they couldn’t be restored to the original path.
Quarantine: Contains quarantined items.
PskTmp: Temporary configuration files created during the scan.
Registry entries
Registry entries in Panda Software
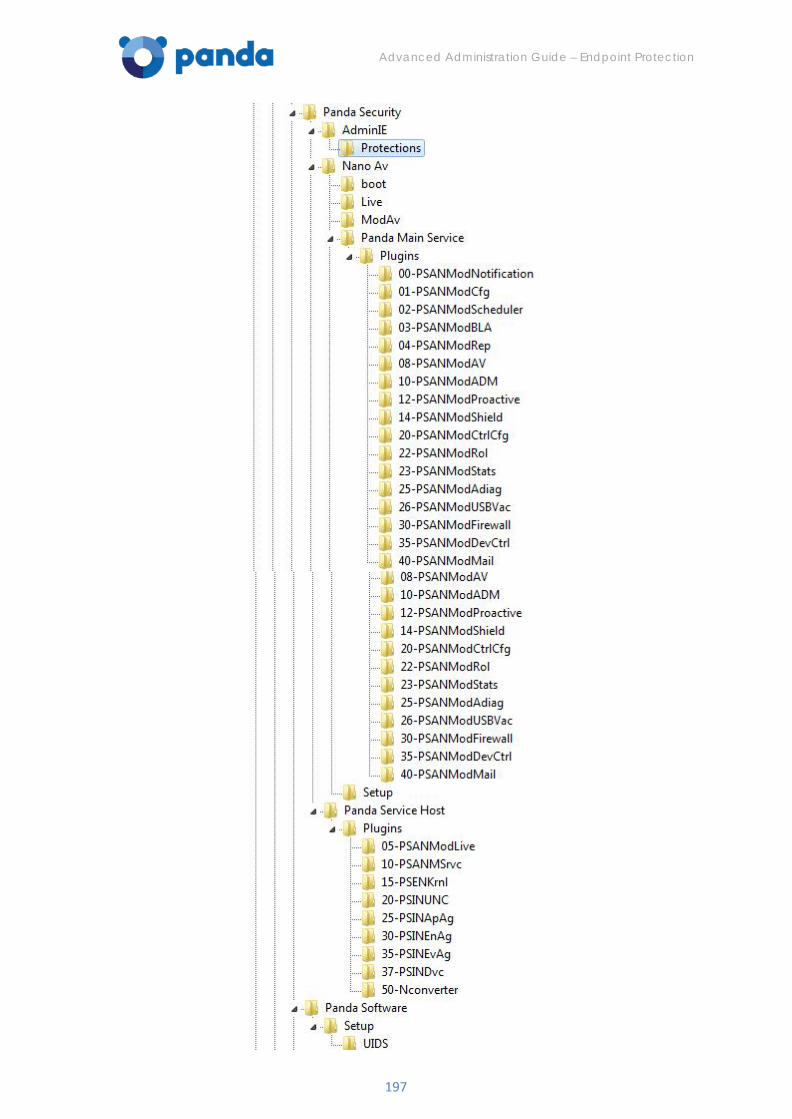
Advanced Administration Guide – Endpoint Protection
197
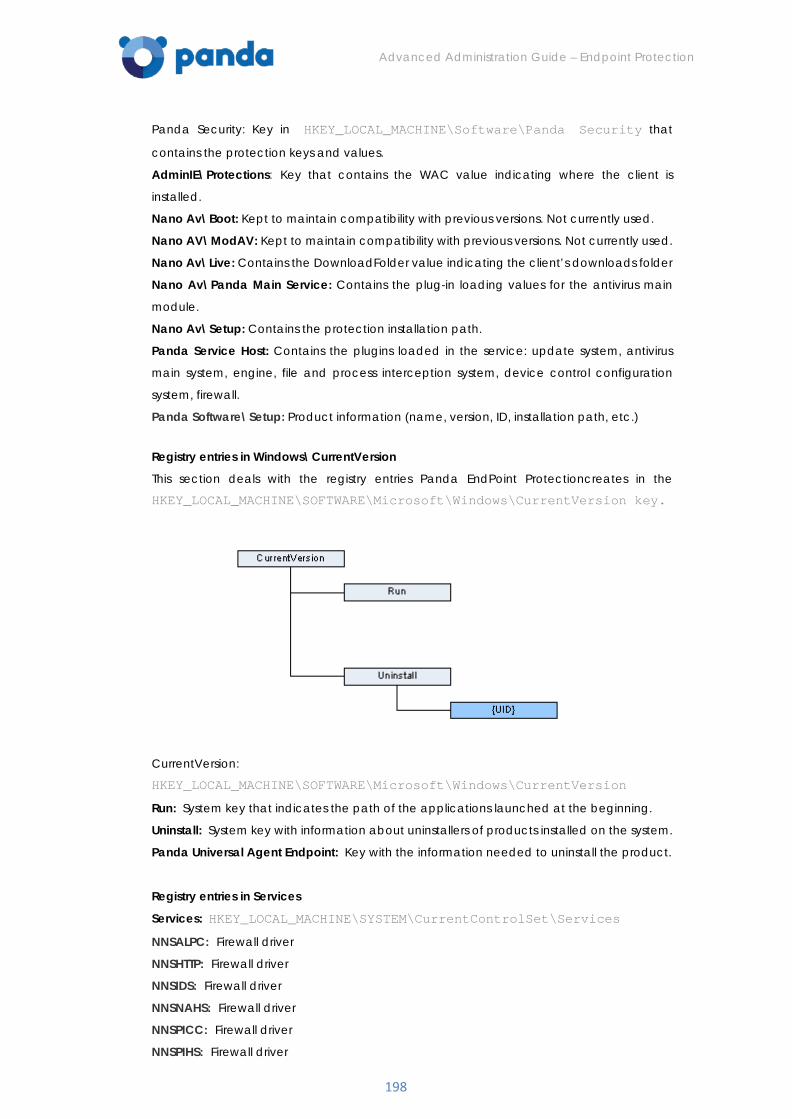
Advanced Administration Guide – Endpoint Protection
198
Panda Security: Key in HKEY_LOCAL_MACHINE\Software\Panda Security that
contains the protection keys and values.
AdminIE\Protections: Key that contains the WAC value indicating where the client is
installed.
Nano Av\Boot: Kept to maintain compatibility with previous versions. Not currently used.
Nano AV\ModAV: Kept to maintain compatibility with previous versions. Not currently used.
Nano Av\Live: Contains the DownloadFolder value indicating the client’s downloads folder
Nano Av\Panda Main Service: Contains the plug-in loading values for the antivirus main
module.
Nano Av\Setup: Contains the protection installation path.
Panda Service Host: Contains the plugins loaded in the service: update system, antivirus
main system, engine, file and process interception system, device control configuration
system, firewall.
Panda Software\Setup: Product information (name, version, ID, installation path, etc.)
Registry entries in Windows\CurrentVersion
This section deals with the registry entries Panda EndPoint Protectioncreates in the
HKEY_LOCAL_MACHINE\SOFTWARE\Microsoft\Windows\CurrentVersion key.
CurrentVersion:
HKEY_LOCAL_MACHINE\SOFTWARE\Microsoft\Windows\CurrentVersion
Run: System key that indicates the path of the applications launched at the beginning.
Uninstall: System key with information about uninstallers of products installed on the system.
Panda Universal Agent Endpoint: Key with the information needed to uninstall the product.
Registry entries in Services
Services: HKEY_LOCAL_MACHINE\SYSTEM\CurrentControlSet\Services
NNSALPC: Firewall driver
NNSHTTP: Firewall driver
NNSIDS: Firewall driver
NNSNAHS: Firewall driver
NNSPICC: Firewall driver
NNSPIHS: Firewall driver
Advanced Administration Guide – Endpoint Protection
199
NNSPOP3: Firewall driver
NNSPROT: Firewall driver
NNSPRV: Firewall driver
NNSSMTP: Firewall driver
NNSSTRM: Firewall driver
NNSTLSC: Firewall driver
PRKPAVPROC: Driver used in rookit scanning.
PSBOOT.SYS: Driver for operations at boot.
PSINAflt: Intercepting filter.
PSINDvct: Device Control driver.
DVCTPROV.sys: Device Control driver.
PSINFile: File intercepting driver.
PSINKNC: Kernel intercepting driver.
PSINProc: Process intercepting driver.
PSINProt: Protection driver (shield, KRE).
PSKMAD: Memory scanner driver.
Services
PSUAService: Task control and management service in sessions.
NanoServiceMain: Client’s main service for all protection modules.
CLOUDUPDATEREX: Upgrade tasks service.
Processes
Apart from the services mentioned above, the following processes can be run on the system:
bspatch.exe
Process used to patch signature files.
PAV2WSC.exe
Process used to update the antivirus status in Windows Security Center.
PSANCU.exe
Process used to perform configuration tasks during client installation and upgrades.
PSINanoRun.exe
Process used to install and upgrade the client.
PSNCSysAction.exe
Process used to enable/disable the firewall’s NNSNahs intermediate driver.
PSUAMain.exe
Traybar process.
PSUNMain.exe
Client interface process.
Setup.exe
Installation and upgrade tasks process.
WAScanner.exe
Process that manages the background scanning tasks configured from the Web console.
Advanced Administration Guide – Endpoint Protection
200
28. Appendix 3: Automatic computer
search (Windows)
Advanced Administration Guide – Endpoint Protection
201
28.1. Introduction
Endpoint Protection includes a computer search system that gives administrators a global
vision of the unprotected computers on the network.
This system is based on configuring and running search jobs performed by a computer that
must meet a series of requirements.
Aspects to bear in mind when creating a search job
- Searches run once per job.
- The search job starts once the computer that must perform the search downloads the search command from the Endpoint Protection server. There is then a time period between the creation and running of a job.
- You can start search jobs immediately through the Update option in the right-click menu of the protection installed on the computer that performs the search.
- Otherwise, a maximum of 4 hours may pass before the job is run.
- You can define several search jobs for the computer that must perform them. In this case, the jobs will take place sequentially, in the established order.
- If the computer is restarted during a computer search job, the job will start again 5 minutes after restart. Before this, the computer will query the server to find out if the job is still valid.
Information to provide on configuring a search job:
- Job name (a maximum of 50 characters).
- You cannot give two jobs the same name for the same client.
- You cannot use the following characters: <, >, “, ‘,
- Computer from which to launch the search job. This computer must be selected from the list of protected computers.
Finally, the administrator must select the scope of the search, among the following options:
- The subnet of the computer that performs the search (the default option).
- One or several ranges of IP addresses (IPv4). If ranges are entered that contain some common IP addresses, the relevant computers will be found only once.
- One of several domains entered by the user.
Requirements for the computer that performs the search
- To have the agent and the protection installed, and be correctly integrated into the Endpoint Protection server.
- The agent must be version 5.05 or later.
- It cannot be blacklisted.
- It must have established a connection to the Endpoint Protection server in the last 72 hours.
- It cannot be carrying out an uninstallation job, that is, it cannot show any of the following statuses regarding an uninstallation job:
- On hold
- Starting
- Uninstalling
It must have an Internet connection, either directly or through other computers ('proxy'
Advanced Administration Guide – Endpoint Protection
202
feature)
As the search job progresses, Endpoint Protection will show the relevant status.
Search jobs: Sequence of actions and status
The user launches the search job through the Client Console (from a computer with the
protection installed).
Job status Job status: On hold
The computer that performs the search downloads the search command from the server.
The server becomes aware of the action and changes the job status.
Job status: Starting
The computer that performs the search calculates the priority of the new job in relation to
other jobs that might also be waiting to be run. The new job waits its turn according to the
priority queue.
Job status: Starting
The computer that performs the search checks to see if it fulfills the requirements to run the
job.
Job status: Starting
A message is sent to the server indicating that the job has started running.
Job status: In progress
The computer that performs the search starts scanning the network for the relevant
computers.
Search job action sequence
Getting a list of computers:
By IP address (Ranges of IP addresses and subnet)
- The system pings each IP address using the ICMP protocol
- It waits for a response to the pings
- It tries to resolve the names of the IP addresses that respond
By domain
- A list is made of all the computers that belong to the domain
- Checking to see if the computers on the list have the agent installed
- A message is sent to the agent
- The system waits for the response
- Generating a computer list and sending the results to the server.
Search job results The computer that performs the search sends the server a list of all the unprotected
computers on the network, even though the list may not have changed from the one
Advanced Administration Guide – Endpoint Protection
203
previously sent from the same computer.
This list contains:
- Computers without an agent installed.
- Computers integrated into another client.
It is not possible to communicate with agents from other clients, therefore no response is
received and the system understands the computer is unprotected.
Computers with an agent version prior to 5.05.
The agent on these computers cannot respond to search messages, and so they are
considered unprotected.
Computers with an agent version 5.05 or later, which haven’t responded to the search
message in due time. The wait time for a response is = 3 sec (wait factor)* Number of
computers that responded to the ICMP ping+30 sec (security margin).
Blacklisted computers (provided they have an agent version 5.05 or later and are integrated into the client’s console) are not considered as unprotected computers and will NOT appear as the result of the search job.
Details of unprotected computers The following information is obtained about each unprotected computer found:
- IP address.
- Computer name, if the computer that performed the search could resolve it.
28.2. Cases in whic the server may NOT be aware that a computer search job has finished
Case 1 The job status is “On hold”, “Starting” or “In progress”, and the protection of the computer
that performs the search is uninstalled, the computer disappears from the database or is
blacklisted while the job is running.
Consequences The computer that performs the search will not be able to inform the server of the job result.
As soon as the server is aware that the computer that performs the search has been
eliminated, blacklisted or its protection has been uninstalled*, the status of the search job
will change to "Finished with error".
It is considered that the protection has been uninstalled from the computer that performs the search as soon as it sends an ‘uninstallation complete’ message.
Also, if the computer that performs the search is eliminated:
1. Its name is removed from the search job settings screen, and an error message is
Advanced Administration Guide – Endpoint Protection
204
displayed indicating that the computer has been eliminated. 2. Once the computer is eliminated, the information about the group that the
computer belonged to is also deleted. Therefore, monitoring users and administrators with permissions over that job (that is, with permissions over the group that the computer that performed the search belonged to), will not be able to view it.
28.3. Case 2 The job status is "On hold", "Starting" or "In progress", and the computer that performs the
search is blacklisted and restored later on.
Consequences
The computer will continue with the job it was running, and therefore the job status may
change from ‘Finished with error’ to ‘Finished’. This is the only possible change of status.
- If the computer that performs the search has communication problems while running it, it will not be able to inform the server of the job status and results.
- The job status will remain unchanged ("On hold" "Starting" or "In progress") until it is eliminated.
- If an error occurs while the job is being run (status "On hold", "Starting" or "In progress"):
- The job status will remain unchanged ("On hold" "Starting" or "In progress") until it is eliminated.
If the job is interrupted, the following happens:
If the computer that performs the search is turned off before the search is complete (either
on purpose or for any other reason), the agent will behave as follows on restarting the
computer:
1. It queries the server to check if the job is still valid: 2. If it is valid, it will perform the search from the start again. 3. If it is not valid as the job has timed out, the search is canceled. 4. It waits 5 minutes after the computer has restarted to launch the search job again.
Advanced Administration Guide – Endpoint Protection
205
29. Appendix 4: Detecting the
origin and type of the
attacks

Advanced Administration Guide – Endpoint Protection
206
29.1. Detecting the origin of the attacks
The Endpoint Protection Web console allows you to obtain information about the source of
the IDS attacks blocked (except in the case of the Drop Unsolicited Responses, SMURF, SYN
Flood and UDP Flood attacks).
To do so, use the Detection type filter available in the List of detections window.
Additionally, clicking the (+) symbol next to each computer name on the list will take you to
the Detection details window, where you can find the following information:
Refer to the Detected threats and detection origin section.
For more information about the different types of IDS attacks and the protection provided
by Endpoint Protection, refer to the Types of IDS attacks and Description of the IDS protection
mechanisms sections.
29.2. Types of IDS attacks
DoS (Denial-of-Service) attacks
Denial-of-service attacks are designed to make a device or service unavailable to its
intended users. They rely primarily on brute force, flooding the target with an overwhelming
flux of packets, or exploiting known vulnerabilities in an application, operating system or
device.
Advanced Administration Guide – Endpoint Protection
207
These attacks include:
- LAND attack
- SYN flood
- UDP flood
- ICMP attack
- Fragmentation control
Protocol or application security
Protocol security mechanisms protect certain protocols against known vulnerabilities. They
rely on the knowledge of protocols and their context to reject unsolicited requests.
These include:
- Smart WINS
- Smart DNS
- Smart DHCP
- Smart ARP
- Header lengths
- ICMP attack
- Fragmentation control
Tracking and discovery
These protection mechanisms detect deviation from known legitimate behavior in order to
track devices and discover vulnerabilities.
These include:
- TCP flags check
- TCP port scan
- UDP port scan
- ICMP filter echo request
- OS detection
- IP explicit path
- Fragmentation control
Description of the IDS protection mechanisms
IP explicit path
Rejects IP packets with an explicit source route.
Land Attack
Detects denial-of-service attacks by stack loop by detecting packets with identical sender
and destination addresses.
SYN Flood
Monitoring the status of each connection and the response times means we can detect the
number of inbound connections that are never resolved and create an increase in status
controls until exceeding certain limits, thereby creating a SYN flood. In this case new
connections are denied. Although it is possible that we might deny legitimate new
connections, at least the integrity of those already established and outbound connections
Advanced Administration Guide – Endpoint Protection
208
is protected.
UDP Flood
Rejects UDP streams to a specific port if the number of UDP packets exceeds a
preconfigured threshold in a specific time period.
TCP Port Scan
Port scanning detector for TCP ports, i.e. it detects if a host tries to connect to several ports
in a specific time period. It blocks the attack preventing replies to the suspicious host. In
addition, it filters the replies so the sender doesn't even get closed port replies.
TCP Flags Check
Detects TCP packets with invalid flag combinations. It acts as a complement to the
protection against “Port Scanning” by blocking attacks of this type such as "SYN&FIN" and
"NULL FLAGS"; and also complements the protection against “OS fingerprinting” attacks as
many of these are based on replies to invalid TCP packets.
Header Lengths
- IP: Rejects inbound packets with an IP header length that exceeds a specific limit.
- TCP: Rejects inbound packets with a TCP header length that exceeds a specific limit.
- Fragmentation control: Checks the status of packet fragments to be reassembled at the destination, protecting the system against memory overflow attacks due to missing fragments, ICMP redirects masked as UDP and computer scanning.
UDP Port Scan
Protects the system against UDP port scanning attacks.
Smart WINS
Rejects WINS replies that do not correspond to requests sent by the administrator.
Smart DNS
Rejects DNS replies that do not correspond to requests sent by the administrator.
Smart DHCP
Rejects DHCP replies that do not correspond to requests sent by the administrator.
Smart ARP
Rejects ARP replies that do not correspond to requests sent by the administrator.
ICMP Attack
This filter performs various checks.
- Small PMTU: By inspecting ICMP packets, the solution detects invalid MTU values used to generate denial of service or slow down outbound traffic.
- SMURF: Rejects unsolicited ICMP replies if they exceed a certain threshold in a

Advanced Administration Guide – Endpoint Protection
209
specific time period.
- Drop unsolicited ICMP replies: Rejects all unsolicited ICMP replies and ICMP replies that have expired due to timeout.
ICMP Filter Echo Request
Rejects incoming pings.
OS Detection
Falsifies data in replies to the sender to trick operating system detectors. This protection
complements the TCP Flags Check.

Advanced Administration Guide – Endpoint Protection
210
30. Appendix 5: The
installation, deployment,
running processes and
reports of the protection for
Linux
Advanced Administration Guide – Endpoint Protection
211
30.1. Requirements
Please, go to Requirements for Linux systems for up-to-date information about the installation
requirements for Endpoint Protection on Linux systems.
30.2. Installation
To install the protection so that it integrates seamlessly with the PCOP Server, you must
download the installer from the console as indicated in Installing the protection on
Windows/Linux computers section.
The name of the downloaded installer is “LinuxWAAgent.run”.
After downloading the installer, you must assign execute permissions to it through the file
manager or running the following command:
# chmod +x LinuxWAAgent.run
Then, run the installer. Run it as the ‘root’ user for the installation to run correctly. To do so,
double-click the installer from the file manager or run the following command from the
command-line terminal:
# ./LinuxWAAgent.run
The installer decompresses the files and runs a shell script, post_install.sh, which takes care of
post-installation tasks, such as writing configuration files, launching processes, etc.
After installation is complete, the following processes must be running:
• PCOP_AgentService
• PCOPScheduler
You can check the process status by running the following command:
# ps aux | grep PCOP
Deployment
After the product is installed, the following folders and files are created on disk:
• Agent folder “/opt/PCOPAgent”
• Settings folder “/etc/PCOPLinux”
• File “pcopagent” in folder /etc/init.d
Processes
As previously said, when Endpoint Protection is installed on a computer, the following
processes will usually be running:
• PCOP_AgentService
• PCOPScheduler
These are daemon processes which are automatically launched when the operating system
boots up.
It has been checked that, when sending the integration message, if integration fails either

Advanced Administration Guide – Endpoint Protection
212
because the message could not be sent or the server returns an integration error, the
PCOP_AgentService process stops and there are no new integration attempts until the
process starts again.
Run the following command to stop the processes manually:
# /opt/PCOPAgent/Stop-PCOP-Agent
Run the following command to restart the processes:
# /etc/init.d/pcopagent start
In order to work properly, the product must be able to access the following Internet domains,
over HTTP and HTTPS:
• mp-agents-inst.pandasecurity.com
• mp-agents-sync.pandasecurity.com
• mp-agents-async.pandasecurity.com
These domains might change in future versions of the product.
Bear in mind the requirements the different computers must meet, and the external URLs
they must be able to access. Refer to the Requirements and external URLs section.
30.3. Communication via proxy server
If the computer uses a proxy server to connect to the Internet, you must configure the
product to use the right proxy server. To do so, edit the proxy.conf file, entering the proxy
server information using the following format:
proxy:port:user:password
There are two instances of this file:
• /opt/PCOPAgent/proxy.conf
• Contains the settings used by the agent to send messages to the Endpoint Protection server.
• /opt/PCOPAgent/Common/Binaries/PcopSigUpdater-bin/proxy.conf
Contains the settings used by the process that takes care of updating the signature files.
You can also establish the configuration in a more visual way, by running the proxyConf.sh
script from the /opt/PCOPAgent or /opt/PCOPAgent/Common/Binaries/PcopSigUpdater-
bin folders, depending on the proxy configuration file to edit.
Only basic authentication is supported in communications via a proxy server.
User validation
If the user is invalid or the computer is blacklisted, Endpoint Protection won’t be able to work
normally, that is, it won’t be possible to send messages to the server or update signature files.
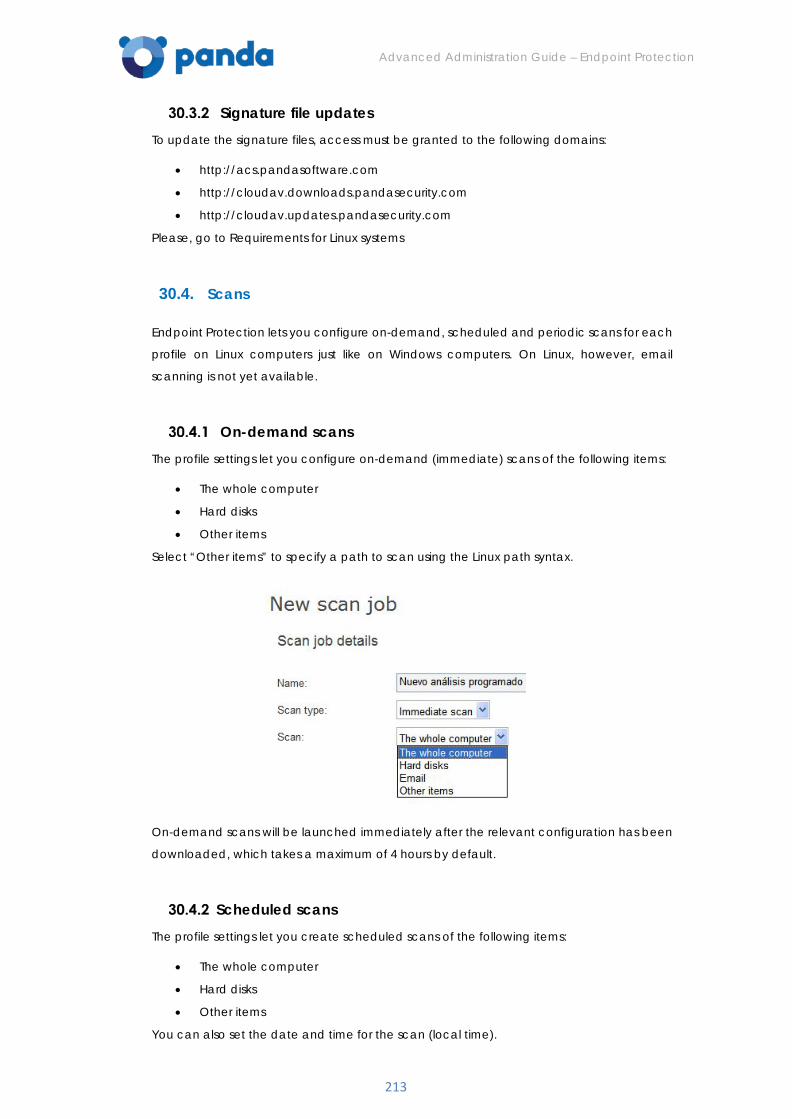
Advanced Administration Guide – Endpoint Protection
213
Signature file updates To update the signature files, access must be granted to the following domains:
• http://acs.pandasoftware.com
• http://cloudav.downloads.pandasecurity.com
• http://cloudav.updates.pandasecurity.com
Please, go to Requirements for Linux systems
30.4. Scans
Endpoint Protection lets you configure on-demand, scheduled and periodic scans for each
profile on Linux computers just like on Windows computers. On Linux, however, email
scanning is not yet available.
On-demand scans
The profile settings let you configure on-demand (immediate) scans of the following items:
• The whole computer
• Hard disks
• Other items
Select “Other items” to specify a path to scan using the Linux path syntax.
On-demand scans will be launched immediately after the relevant configuration has been
downloaded, which takes a maximum of 4 hours by default.
Scheduled scans
The profile settings let you create scheduled scans of the following items:
• The whole computer
• Hard disks
• Other items
You can also set the date and time for the scan (local time).
Advanced Administration Guide – Endpoint Protection
214
Select “Other items” to specify a path to scan using the Linux path syntax.
Scheduled scans will run automatically on the scheduled date and time, provided the
relevant configuration has been downloaded, which takes a maximum of 4 hours by
default.
Periodic scans
The profile settings let you create periodic scans of the following items:
• The whole computer
• Hard disks
• Other items
Select “Other items” to specify a path to scan using the Linux path syntax.
You can also set the date and time for the scan (local time). Finally, you can set the
frequency of the scan:
• Daily
• Weekly
• Monthly
Periodic scans will be automatically launched on the scheduled date and time, at the
scheduled frequency, provided the relevant configuration has been downloaded, which
takes a maximum of 4 hours by default.
Launching scans manually
You can launch scans manually from the computer using the PAVSL protection.
Use the following parameters to scan and disinfect files:
Pavsl.sh –cmp –heu –rpt [log] -noglk -prx [http(s)://user:password@computer:port]
[samples_path]
Where:
cmp parameter: Indicates whether to parse compressed or package files to scan their
contents.
heu parameter: Indicates whether to use heuristic technologies in the scan.
rpt parameter: Indicates the directory (path) where a log file with the scan results will be
placed.
noglk parameter: Indicates the scan will be carried out without querying the cloud.
prx parameter: Contains the proxy server settings should a proxy server be used to connect
to the Internet.
The format should be as follows:
http://user:password@computer:port
or
https://user:password@computer:port
samples_path parameter: Indicates the path of the file or directory to scan (and any
subdirectories it may contain). If you want to scan multiple paths, enter them enclosed in
double quotes and separated by commas ("path","path"). In the case of paths with blank
Advanced Administration Guide – Endpoint Protection
215
spaces, use the escape character (\) and enclose the path in double quotes ("), both
whether you want to scan a single path or more than one.
For example:
• pavsl.sh –cmp –heu –rpt /tmp/log /home/user/files
• pavsl.sh –cmp –heu –rpt /tmp/log “/home/user/files”,”
/home/user/files2”
• pavsl.sh –cmp –heu –rpt /tmp/log “/home/user/dummy\ files”
• pavsl.sh –cmp –heu –rpt /tmp/log “/home/user/dummy\
files”,”/home/user/malware”
If you want the scan results to be sent to the server, the log file must be generated in folder
/opt/PCOPAgent/Common/DATA/ScansLogs. Also, the file name must be SCAN_XXXX.log,
where XXXX is a 4-digit number.
For example:
pavsl.sh -cmp -heu -rpt
/opt/PCOPAgent/Common/DATA/ScansLogs/SCAN_2000.log
/home/user/files
30.5. List of detections
This window displays information about the items detected on the network computers.

Advanced Administration Guide – Endpoint Protection
216
Detection reports are sent every 6 hours by default (provided there are detections to report),
and are displayed in the Web console, in the Status >List of detections window, just like for
Windows systems.
30.6. Upgrading Endpoint Protection
Endpoint Protection doesn’t have an automatic upgrade feature.
If you want to upgrade your Endpoint Protection version, you must access the console to
download the new version and run the installer manually on the computer.
You don’t need to previously uninstall your current Endpoint Protection, as the new version
installs over the previous one.
30.7. Uninstall
Endpoint Protection doesn’t have an uninstallation script, so you need to take the following
steps to uninstall it manually:
Stop the processes
To do so, run the following command:
/opt/PCOPAgent/Stop-PCOP-Agent
Delete the /opt/PCOPAgent folder and all its contents.

Advanced Administration Guide – Endpoint Protection
217
Delete the /etc/PCOPLinux folder and all its contents.
Delete the service. Run the following commands depending on the distribution.
SUSE
chkconfig –del pcopagent
Debian / Ubuntu
update-rc.d -f pcopagent remove
Delete the /etc/init.d/pcopagent file.
Advanced Administration Guide – Endpoint Protection
218
31. Appendix 6: The
installation, deployment,
running processes and
reports of the protection for
OS X
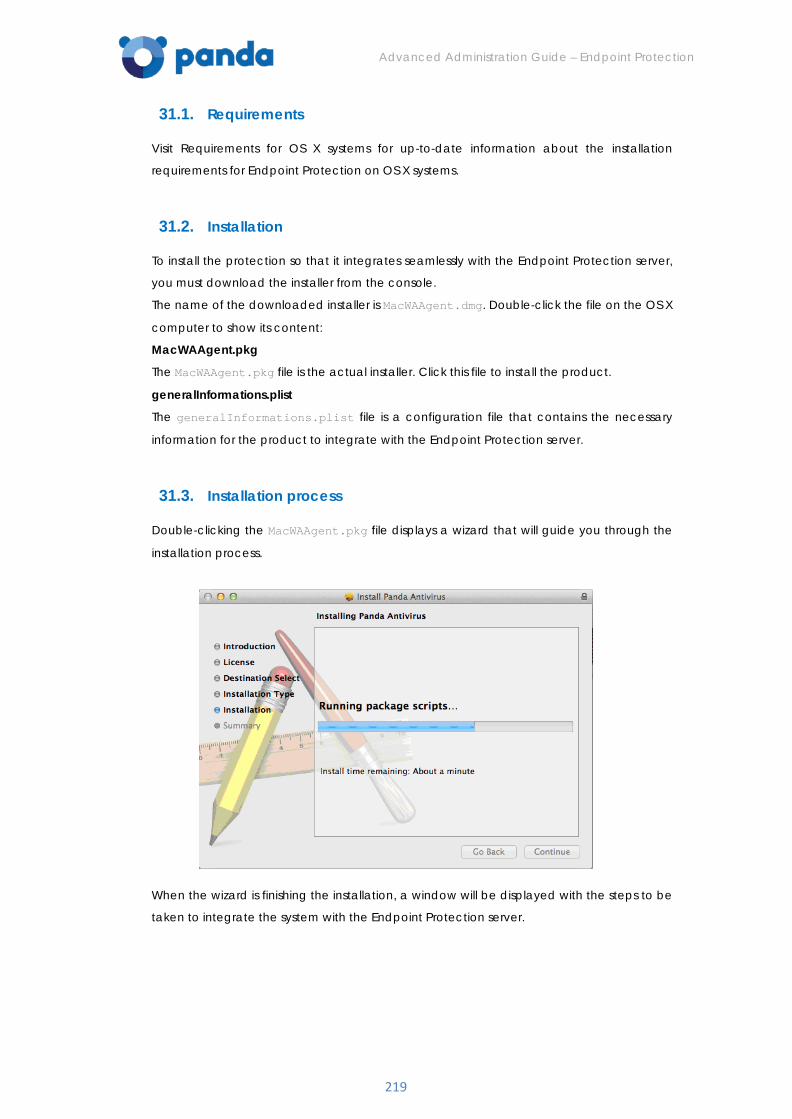
Advanced Administration Guide – Endpoint Protection
219
31.1. Requirements
Visit Requirements for OS X systems for up-to-date information about the installation
requirements for Endpoint Protection on OS X systems.
31.2. Installation
To install the protection so that it integrates seamlessly with the Endpoint Protection server,
you must download the installer from the console.
The name of the downloaded installer is MacWAAgent.dmg. Double-click the file on the OS X
computer to show its content:
MacWAAgent.pkg
The MacWAAgent.pkg file is the actual installer. Click this file to install the product.
generalInformations.plist
The generalInformations.plist file is a configuration file that contains the necessary
information for the product to integrate with the Endpoint Protection server.
31.3. Installation process
Double-clicking the MacWAAgent.pkg file displays a wizard that will guide you through the
installation process.
When the wizard is finishing the installation, a window will be displayed with the steps to be
taken to integrate the system with the Endpoint Protection server.
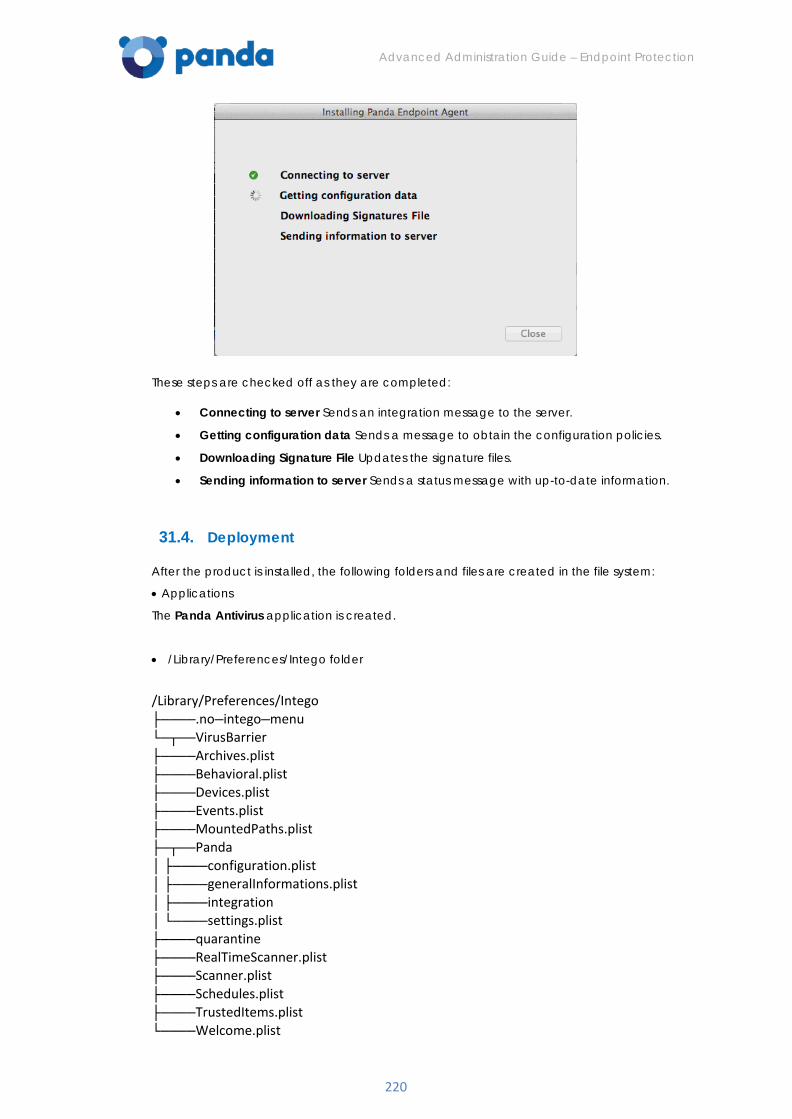
Advanced Administration Guide – Endpoint Protection
220
These steps are checked off as they are completed:
• Connecting to server Sends an integration message to the server.
• Getting configuration data Sends a message to obtain the configuration policies.
• Downloading Signature File Updates the signature files.
• Sending information to server Sends a status message with up-to-date information.
31.4. Deployment
After the product is installed, the following folders and files are created in the file system:
• Applications
The Panda Antivirus application is created.
• /Library/Preferences/Intego folder
/Library/Preferences/Intego ├────.no─intego─menu └─┬──VirusBarrier ├────Archives.plist ├────Behavioral.plist ├────Devices.plist ├────Events.plist ├────MountedPaths.plist ├─┬──Panda │ ├────configuration.plist │ ├────generalInformations.plist │ ├────integration │ └────settings.plist ├────quarantine ├────RealTimeScanner.plist ├────Scanner.plist ├────Schedules.plist ├────TrustedItems.plist └────Welcome.plist
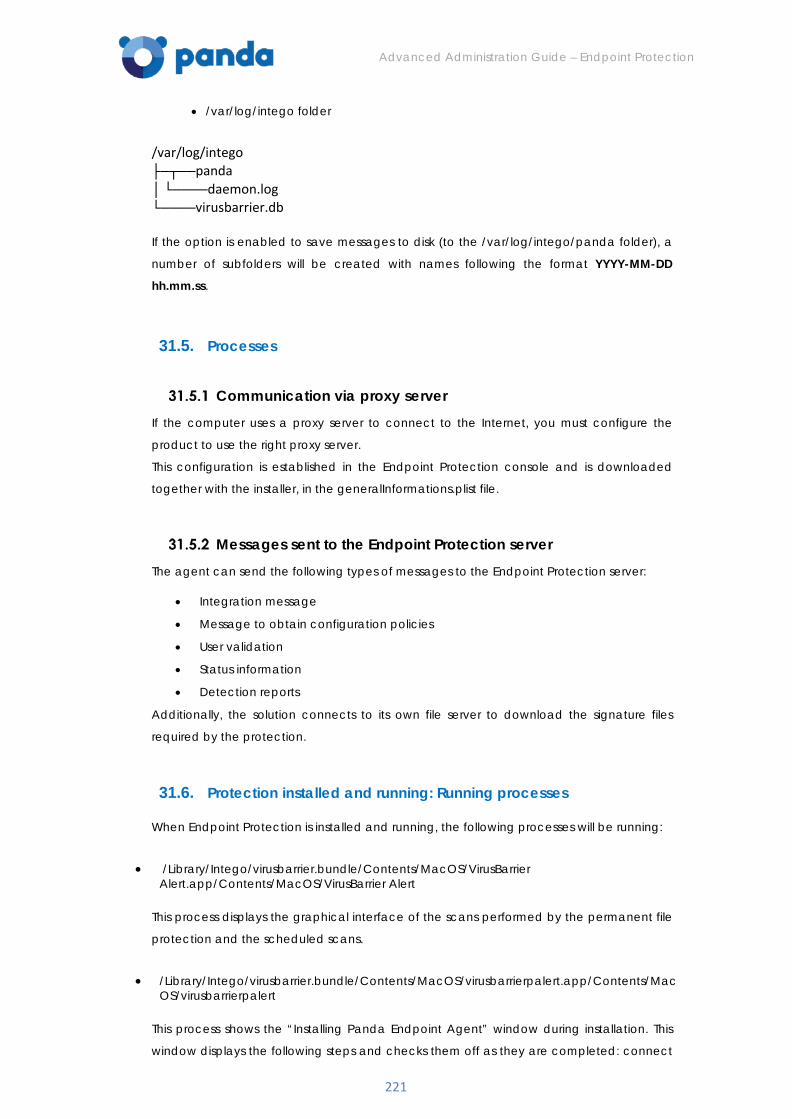
Advanced Administration Guide – Endpoint Protection
221
• /var/log/intego folder
/var/log/intego ├─┬──panda │ └────daemon.log └────virusbarrier.db
If the option is enabled to save messages to disk (to the /var/log/intego/panda folder), a
number of subfolders will be created with names following the format YYYY-MM-DD
hh.mm.ss.
31.5. Processes
Communication via proxy server
If the computer uses a proxy server to connect to the Internet, you must configure the
product to use the right proxy server.
This configuration is established in the Endpoint Protection console and is downloaded
together with the installer, in the generalInformations.plist file.
Messages sent to the Endpoint Protection server
The agent can send the following types of messages to the Endpoint Protection server:
• Integration message
• Message to obtain configuration policies
• User validation
• Status information
• Detection reports
Additionally, the solution connects to its own file server to download the signature files
required by the protection.
31.6. Protection installed and running: Running processes
When Endpoint Protection is installed and running, the following processes will be running:
• /Library/Intego/virusbarrier.bundle/Contents/MacOS/VirusBarrier Alert.app/Contents/MacOS/VirusBarrier Alert
This process displays the graphical interface of the scans performed by the permanent file
protection and the scheduled scans.
• /Library/Intego/virusbarrier.bundle/Contents/MacOS/virusbarrierpalert.app/Contents/MacOS/virusbarrierpalert
This process shows the “Installing Panda Endpoint Agent” window during installation. This
window displays the following steps and checks them off as they are completed: connect
Advanced Administration Guide – Endpoint Protection
222
to the server, obtain configuration, download signature files and send information to the
server.
• /Library/Intego/virusbarrier.bundle/Contents/MacOS/virusbarrierb
This process handles the permanent file protection scans.
• /Library/Intego/virusbarrier.bundle/Contents/MacOS/virusbarriers
This process detects malware items.
• /Library/Intego/virusbarrier.bundle/Contents/MacOS/virusbarrierl
This process manages log files.
• /Library/Intego/TaskManager/TaskManagerDaemon
This process manages background tasks, such as scheduling.
• /Library/Intego/virusbarrier.bundle/Contents/MacOS/virusbarrierp
This process manages communications with the server.
• /Library/Intego/virusbarrier.bundle/Contents/MacOS/virusbarrierd
This process manages product configuration.
31.7. Integration
The integration message is sent after product installation, when the install sequence starts.
If there are any problems that prevent computer integration, the server will return an error
code, and the integration progress window will display one of the following errors.
• 1300 - The specified client does not exist
• 1301 - The client's licenses have expired
• 1302 - The client does not have sufficient licenses
• 1303 - The administration agent version is no longer supported
• 1304 - The group of computers no longer exists
• 1305 - The maximum number of installations per group has been exceeded
• 1298 - Integration error
31.8. Status information
Every 12 hours, the system checks to see if the status information has changed. If it has, it will
send the report. Even if the information hasn't changed, the solution will send at least a status
message every day.
The solution sends full status reports only, not reduced reports.
The format of the status message is the same as for the protection for Windows and Linux
Advanced Administration Guide – Endpoint Protection
223
computers.
31.9. User validation
User validation follows the same logic as with Windows computers. The frequency of checks
against the server depends on the computer situation:
• Every 15 days, when there are over 30 days left before license expiration.
• Every time the validation process is run, during the 30 days before and after the license expiration date.
• Every 5 days if more than 30 days have passed from the expiration date and during 165 days after the expiration date.
• Every 5 days if the computer is on the blacklist.
• There is no user validation if more than 165 days have passed since the expiration date.
If the user is invalid or the computer is on the blacklist, Endpoint Protection won’t be able to
operate normally, that is, it won’t be possible to send messages to the server or update the
signature files. Only if the user becomes valid again will the system be able to recover normal
operation.
31.10. Configuration
The solution checks to see if there has been a change in the policies every 4 hours by default.
31.11. Signature file updates
The protection for OS X uses its own signature file system. The product updates the signature
files it needs automatically.
The solution checks to see every hour if the signature files need updating.
31.12. Scans
The protection for OS X computers only allows you to enable and disable the permanent file
protection. You cannot run on-demand scans on all computers in a profile.
Nevertheless, you can configure scheduled scans from the local console. Detections made
by these scans are reported to the server in the same way as detections made by the
permanent protection.
31.13. List of detections
The solution checks to see every 6 hours by default if there are new detection reports to send
to the server.
Reports are sent to the server in messages with a maximum of 20 items. These reports are
displayed in the Web console, in the Status menu > List of detections window, just as the
reports generated by the protection for Windows computers.
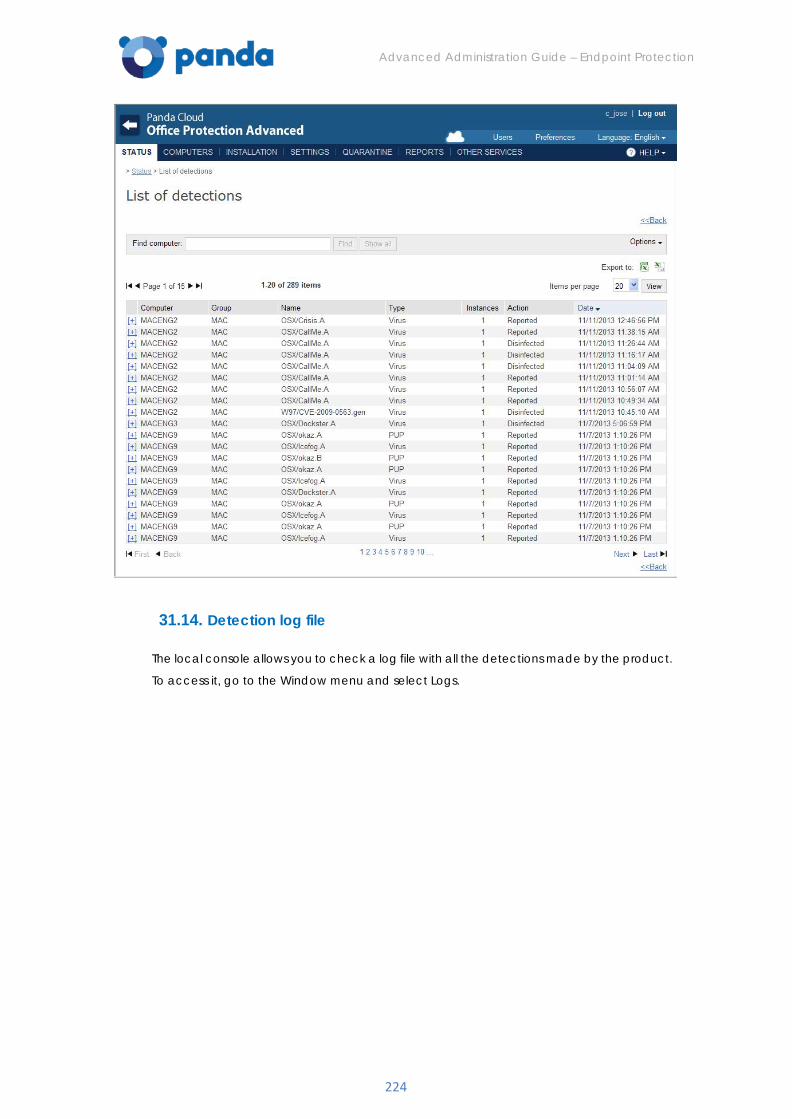
Advanced Administration Guide – Endpoint Protection
224
31.14. Detection log file
The local console allows you to check a log file with all the detections made by the product.
To access it, go to the Window menu and select Logs.
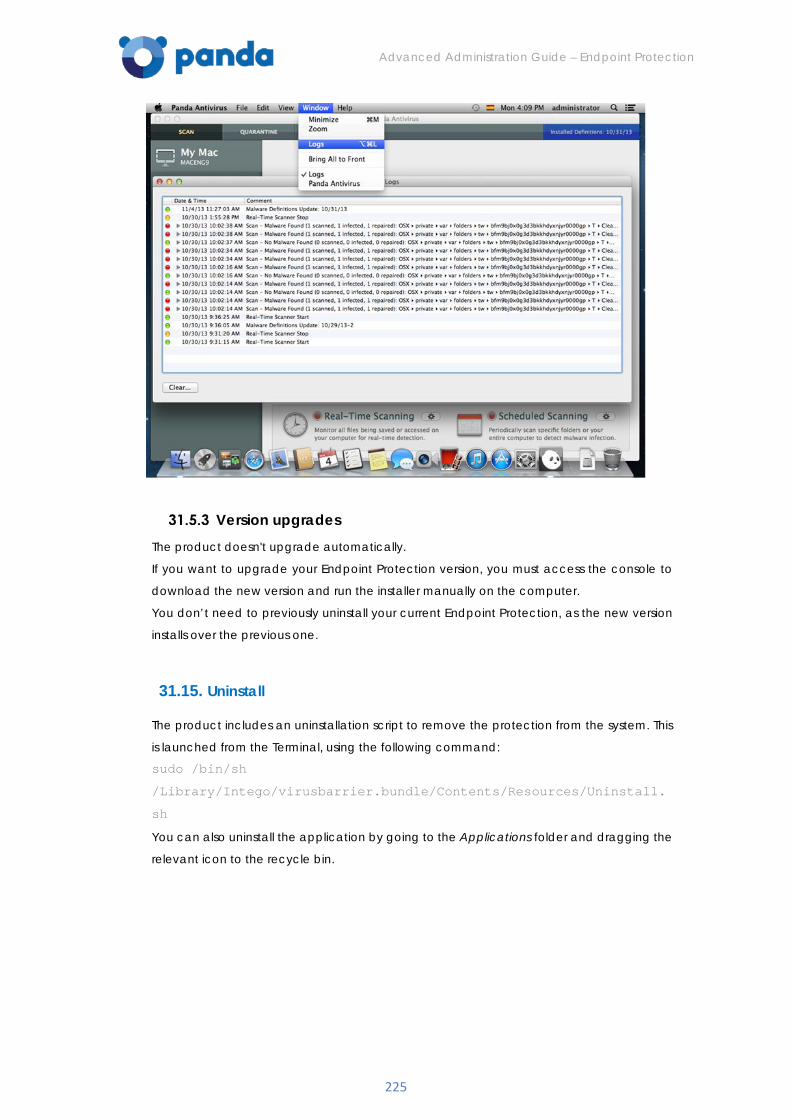
Advanced Administration Guide – Endpoint Protection
225
Version upgrades The product doesn't upgrade automatically.
If you want to upgrade your Endpoint Protection version, you must access the console to
download the new version and run the installer manually on the computer.
You don’t need to previously uninstall your current Endpoint Protection, as the new version
installs over the previous one.
31.15. Uninstall
The product includes an uninstallation script to remove the protection from the system. This
is launched from the Terminal, using the following command:
sudo /bin/sh
/Library/Intego/virusbarrier.bundle/Contents/Resources/Uninstall.
sh
You can also uninstall the application by going to the Applications folder and dragging the
relevant icon to the recycle bin.
Advanced Administration Guide – Endpoint Protection
226
32. Appendix 7: Systems
Management & Endpoint Protection
Advanced Administration Guide – Endpoint Protection
227
32.1. Introduction
Systems Management (http://www.pandasecurity.com/uk/enterprise/solutions/cloud-
systems-management/) lets you monitor the software installed on your network computers
at all times, resolve problems remotely and configure alerts for all your devices.
From Panda Cloud you will be able to:
- Activate a trial version of Systems Management for clients who still don't have licenses of the product. This lets you activate a trial version of Systems Management and install it on clients' computers with Endpoint Protection/ Endpoint Protection Plus installed.
- Offer clients with Systems Management licenses the opportunity to install Systems Management on their network simply and quickly.
32.2. Activating your trial version of Systems Management
For the option to try Systems Management to appear on the Panda Cloud screen, you must
meet the following requirements:
- You must have Endpoint Protection/ Endpoint Protection Plus licenses (either trial or commercial licenses).
- You must have version 6.70 or later.
- You must not have Systems Management licenses of any kind.
Go to Panda Cloud (https://www.pandacloudsecurity.com)
Click Try now. The following may happen:
If you logged in to the Panda Cloud console with the default user (that is, the user whose
credentials were sent to you in the welcome email, in the following format:
'[email protected]'), you will see a screen prompting you to install the
agent on your computers. By default, this agent will install on every existing profile in Endpoint
Protection/ Endpoint Protection Plus.
To select the profiles on which you want to install the Systems Management agent, click
Settings.
You must select at least one profile, otherwise, the OK button will be grayed out.
Click the Start trial button to activate your trial version of Systems Management (to make
sure you have activated it successfully, check that the Systems Management icon is
displayed in the My services section).
Then, the system will start installing the Systems Management agent on the selected profiles.
This process may take up to 12 hours.
The trial version of Systems Management will provide you with 500 Systems Management licenses valid for 30 days.
If you logged in to the Panda Cloud console with a user other than the default user, you'll
Advanced Administration Guide – Endpoint Protection
228
see a message informing you that only the default user can activate the trial version.
32.3. Ending the Systems Management trial period
Ending the trial period automatically
30 days after the trial expiration date, Systems Management will automatically uninstall from
every computer it was installed on.
Technical information about the automatic deployment of Systems Management
In addition to the installation aspects that you can control from the Panda Cloud console
and which were mentioned earlier in this document, below are the details of the procedure
and processes for deploying Systems Management to the computers on which Endpoint
Protection is already installed and which meet the minimum requirements. Please, go to
Requirements and external URLs .
Deployment process
As soon as you select the profile, the client's policy is modified with the details of Systems
Management on the computers on which it is going to be installed.
Running a Walconf process on the client's computers downloads this policy, which, in turn,
modifies the Walupg.ini file, adding the necessary entries to deploy the Systems
Management agent automatically the next time a Walupg is launched.
The entries added to the walupg.ini file are:
- A new field PCSM=NOT is added to the [INSTALLED] section, which will install PCSM
- A new section [PCSM] is added, which will be used to enter the information on the PCSM profile and the corresponding client ID
The next time a Walupg is launched, it will detect that the PCSM [INSTALLED] entry has
changed to NOT, and will start the installation process.
During this process, firstly, it checks whether the Systems Management agent is already
installed. It does this by creating a new DLL called (WALPCSMInst.dll).
The agent is already installed
If the agent is already installed, the value of the PCSM entry will be changed to Installed and
therefore, it will not be necessary to install it again.
The agent is not installed
If the agent is not installed, the normal installation process is performed, that is, the installer
(GenericPCSMInstaller.exe) will be downloaded from the PCSM website.
This installer is customized for the client's Systems Management profile. Therefore, once it has
been downloaded it will be installed using the parameters obtained from the
aforementioned policy that contains the details of the Systems Management profile and
the client ID.
If the connection is established via Proxy, the data configured from the Endpoint Protection
console for this client or of Internet Explorer on the computer will be used.
Advanced Administration Guide – Endpoint Protection
229
End of installation
Once installation has been completed correctly, the PCSM value of walupg.ini must be
changed. The value that will be allocated will be that of the latest version of Endpoint
Protection (which does not necessarily have to coincide with the real version of Systems
Management).
As usual, a copy of the installer will be made in a new folder, called Installers, in the WalUpg
directory.
Finally, the rumor information, if configured is sent.
Rumor
To distribute the PCSM installer, the rumor will work in exactly the same way as with the agent
or protection installer.
Re-deploy the PCSM agent to the computers to which it has previously been deployed
automatically
If the Systems Management agent is uninstalled manually - via Control Panel - from a
computer to which it had been automatically deployed, it will not be re-deployed, as the
PCSM entry in Walupg.ini will have the corresponding value (Installed or the version number).
To re-deploy the agent to the computers assigned to a profile for which it has previously
been deployed, you will have to delete the automatic deployment option from this profile
through the Panda Cloud console.
In this way, when the settings of all the computers containing the agent are updated, the
automatic deployment entries will be deleted from the walupg.ini file. Then, if this profile is
selected for automatic deployment, the process will re-start.
32.4. How to install the solution if you ALREADY have Systems Management licenses
If you already have Systems Management licenses (either trial or commercial licenses), you
can deploy Systems Management across your network quickly and simply from the Panda
Cloud console, provided you meet the following requirements:
- You must have Endpoint Protection/ Endpoint Protection Advanced licenses (either trial or commercial licenses).
- You must have version 6.70 or later.
The Panda Cloud screen will display a button called Settings under the product icon. Click
it to select the profile(s) to install Systems Management on.
Bear the followind in mind:
• All profiles will be selected by default. Select the profiles that you want.
• If you edit a profile's configuration and select NOT to automatically install Systems Management, Systems Management won't install on any new computer you might add to the profile; Additionally, Systems Management won't be uninstalled from any existing computers which already had it.
• The installation process may take up to 12 hours.

Advanced Administration Guide – Endpoint Protection
230
You must select at least one profile, otherwise, the OK button will be grayed out.
Systems Management installation permissions
• Users with total control permissions can install Systems Management on any profile.
• Users with administrator permissions can only install the solution on computers assigned to profiles on which they have edit permissions. An administrator user has edit permission on a profile only if they have edit permissions on every computer group associated with the profile.
• Users with monitoring permissions cannot install the solution.

Advanced Administration Guide – Endpoint Protection
231
33. Appendix 8: Uninstaller list
Advanced Administration Guide – Endpoint Protection
232
33.1. Computer Associates
eTrust AntiVirus 8.1.655, 8.1.660, 7.1*
eTrust 8.0
33.2. Avast
Avast! Free Antivirus 2014
Avast! 8.x Free Antivirus
Avast! 7.x Free Antivirus
Avast! 6.x Free Antivirus
Avast! 5.x Free Antivirus
Avast! 4 Free Antivirus
Avast! 4 Small Business Server Edition
Avast! 4 Windows Home Server Edition 4.8
33.3. AVG
AVG Internet Security 2013 (32bit- Edition)
AVG Internet Security 2013 (64bit- Edition)
AVG AntiVirus Business Edition 2013 (32bit- Edition)
AVG AntiVirus Business Edition 2013 (64bit- Edition)
AVG CloudCare 2.x
AVG Anti-Virus Business Edition 2012
AVG Internet Security 2011
AVG Internet Security Business Edition 2011 32bits*
AVG Internet Security Business Edition 2011 64bits (10.0.1375)*
AVG Anti-Virus Network Edition 8.5*
AVG Internet Security SBS Edition 8
Anti-Virus SBS Edition 8.0
AVGFree v8.5, v8, v7.5, v7.0
33.4. Avira
Avira AntiVir PersonalEdition Classic 7.x, 6.x
Avira AntiVir Personal Edition 8.x
Avira Antivir Personal - Free Antivirus 10.x, 9.x
Avira Free Antivirus 2012, 2013
Avira AntiVir PersonalEdition Premium 8.x, 7.x, 6.x
Avira Antivirus Premium 2013, 2012, 10.x, 9.x
33.5. CA
CA Total Defense for Business Client V14 (32bit- Edition)
CA Total Defense for Business Client V14 (64bit- Edition)
Advanced Administration Guide – Endpoint Protection
233
CA Total Defense R12 Client (32bit- Edition)
CA Total Defense R12 Client (64bit- Edition)
33.6. Bit Defender
BitDefender Business Client 11.0.22
BitDefender Free Edition 2009 12.0.12.0*
Bit Defender Standard 9.9.0.082
33.7. Check Point
Check Point Endpoint Security 8.x (32 bits)
Check Point Endpoint Security 8.x (64 bits)
33.8. Eset
ESET NOD32 Antivirus 3.0.XX (2008)*, 2.70.39*, 2.7*
ESET Smart Security 3.0*
ESET Smart Security 5 (32 bits)
ESET NOD32 Antivirus 4.X (32 bits)
ESET NOD32 Antivirus 4.X (64 bits)
ESET NOD32 Antivirus 5 (32 bits)
ESET NOD32 Antivirus 5 (64 bits)
ESET NOD32 Antivirus 6 (32 bits)
ESET NOD32 Antivirus 6 (64 bits)
ESET NOD32 Antivirus 7 (32 bits)
ESET NOD32 Antivirus 7 (64 bits)
33.9. Frisk
F-Prot Antivirus 6.0.9.1
33.10. F-Secure
F-secure PSB Workstation Security 10.x
F-Secure PSB for Workstations 9.00*
F-Secure Antivirus for Workstation 9
F-Secure PSB Workstation Security 7.21
F-Secure Protection Service for Business 8.0, 7.1
F-Secure Internet Security 2009
F-Secure Internet Security 2008
F-Secure Internet Security 2007
F-Secure Internet Security 2006
F-Secure Client Security 9.x
F-Secure Client Security 8.x
Antivirus Client Security 7.1
Advanced Administration Guide – Endpoint Protection
234
F-Secure Antivirus for Workstation 8
33.11. Kaspersky
Kaspersky Endpoint Security 10 for Windows (32bit- Edition)
Kaspersky Endpoint Security 10 for Windows (64bit- Edition)
Kaspersky Endpoint Security 8 for Windows (32bit- Edition)
Kaspersky Endpoint Security 8 for Windows (64bit- Edition)
Kaspersky Anti-Virus 2010 9.0.0.459*
Kaspersky® Business Space Security
Kaspersky® Work Space Security
Kaspersky Internet Security 8.0, 7.0, 6.0 (con Windows Vista+UAC, es necesario desactivar
UAC)
Kaspersky Anti-Virus 8*
Kaspersky® Anti-virus 7.0 (con Windows Vista+UAC, es necesario desactivar UAC)
Kaspersky Anti-Virus 6.0 for Windows Workstations*
33.12. McAfee
McAfee SaaS Endpoint Protection 6.x, 5.X
McAfee VirusScan Enterprise 8.8, 8.7i, 8.5i, 8.0i, 7.1.0
McAfee Internet Security Suite 2007
McAfee Total Protection Service 4.7*
McAfee Total Protection 2008
33.13. Norman
Norman Security Suite 10.x (32bit- Edition)
Norman Security Suite 10.x (64bit- Edition)
Norman Security Suite 9.x (32bit- Edition)
Norman Security Suite 9.x (64bit- Edition)
Norman Endpoint Protection 8.x/9.x
Norman Virus Control v5.99
33.14. Norton
Norton Antivirus Internet Security 2008*
Norton Antivirus Internet Security 2007
Norton Antivirus Internet Security 2006
33.15. Microsoft
Microsoft Security Essentials 1.x
Microsoft Forefront EndPoint Protection 2010
Microsoft Security Essentials 4.x
Microsoft Security Essentials 2.0
Advanced Administration Guide – Endpoint Protection
235
Microsoft Live OneCare
Microsoft Live OneCare 2.5*
33.16. MicroWorld Technologies
eScan Corporate for Windows 9.0.824.205
33.17. PcTools
Spyware Doctor with AntiVirus 9.x
33.18. Sophos
Sophos Anti-virus 9.5
Sophos Endpoint Security and Control 10.2
Sophos Endpoint Security and Control 9.5
Sophos Anti-virus 7.6
Sophos Anti-virus SBE 2.5*
Sophos Security Suite
33.19. Symantec
Symantec.cloud - Endpoint Protection.cloud 21.x (32bits)
Symantec.cloud - Endpoint Protection.cloud 21.x (64bits)
Symantec EndPoint Protection 12.x (32bits)
Symantec EndPoint Protection 12.x (64bits)
Symantec EndPoint Protection 11.x (32bits)
Symantec EndPoint Protection 11.x (64bits)
Symantec Antivirus 10.1
Symantec Antivirus Corporate Edition 10.0, 9.x, 8.x
33.20. Trend Micro
Trend Micro Worry-Free Business Security 8.x (32bit- Edition)
Trend Micro Worry-Free Business Security 8.x (64bit- Edition)
Trend Micro Worry-Free Business Security 7.x (32bit- Edition)
Trend Micro Worry-Free Business Security 7.x (64bit- Edition)
Trend Micro Worry-Free Business Security 6.x (32bit- Edition)
Trend Micro Worry-Free Business Security 6.x (64bit- Edition)
Trend Micro Worry-Free Business Security 5.x
PC-Cillin Internet Security 2006
PC-Cillin Internet Security 2007*
PC-Cillin Internet Security 2008*
Trend Micro OfficeScan Antivirus 8.0
Trend Micro OfficeScan 7.x
Advanced Administration Guide – Endpoint Protection
236
Trend Micro OfficeScan 8.x
Trend Micro OfficeScan 10.x
33.21. Comodo Antivirus
Comodo Antivirus V 4.1 32bits
33.22. Panda Security
Panda Cloud Antivirus 3.x
Panda Cloud Antivirus 2.X
Panda Cloud Antivirus 1.X
Panda for Desktops 4.50.XX
Panda for Desktops 4.07.XX
Panda for Desktops 4.05.XX
Panda for Desktops 4.04.10
Panda for Desktops 4.03.XX y anteriores
Panda for File Servers 8.50.XX
Panda for File Servers 8.05.XX
Panda for File Servers 8.04.10
Panda for File Servers 8.03.XX y anteriores
Panda Global Protection 2015*
Panda Internet Security 2015*
Panda Antivirus Pro 2015*
Panda Gold Protection*
Panda Free Antivirus
Panda Global Protection 2014*
Panda Internet Security 2014*
Panda Antivirus Pro 2014*
Panda Gold Protection*
Panda Global Protection 2013*
Panda Internet Security 2013*
Panda Antivirus Pro 2013*
Panda Global Protection 2012*
Panda Internet Security 2012*
Panda Antivirus Pro 2012*
Panda Global Protection 2011*
Panda Internet Security 2011*
Panda Antivirus Pro 2011*
Panda Antivirus for Netbooks (2011)*
Panda Global Protection 2010
Panda Internet Security 2010
Panda Antivirus Pro 2010
Panda Antivirus for Netbooks
Advanced Administration Guide – Endpoint Protection
237
Panda Global Protection 2009
Panda Internet Security 2009
Panda Antivirus Pro 2009
Panda Internet Security 2008
Panda Antivirus+Firewall 2008
Panda Antivirus 2008
Panda Internet Security 2007
Panda Antivirus + Firewall 2007
Panda Antivirus 2007
* Panda 2015, 2014, 2013, 2012 products need a reboot to get uninstalled.
* Comodo Antivirus V4.1 (32 bit-Edition) - While the program is being uninstalled, if UAC is
enabled, the user will be prompted to select the option Allow in the UAC window.
*F-Secure PSB for Workstations 9.00* - During the installation process of the PCOP agent in
Windows 7 and Windows Vista, the user will be prompted to select the Allow option.
*AVG Internet Security Business Edition 2011 32bit- Edition* - During the PCOP agent
installation process, the user will be prompted to select the Allow option in several windows.
*AVG Internet Security Business Edition 2011 64bit- Edition (10.0.1375)* - During the PCOP
agent installation process, the user will be prompted to select the Allow option in several
windows.
* Kaspersky Anti-Virus 6.0 for Windows workstations:
During the PCOP agent installation process in 64 bits platforms, the user will be prompted to
select the Allow option in several windows.
In order to uninstall the protection, the Kaspersky protection should not be password
protected.
While the program is being uninstalled, if UAC is enabled, the user will be prompted to select
the option Allow in the UAC window.
* F-Secure PSB for Workstations 9.00 - During the PCOP agent installation process, the user will
be prompted to select the Allow option in two windows.
* AVG Anti-Virus Network Edition 8.5 - During the PCOP agent installation process, the user
will be prompted to select the Allow option in two windows.
* Panda Antivirus 2011 Products do not uninstall correctly for 64 bits platforms. While the
program is being uninstalled, if UAC is enabled, the user will be prompted to select the option
Allow in the UAC window.
* Panda Cloud Antivirus 1.4 Pro y Panda Cloud Antivirus 1.4 Free - While the program is being
uninstalled, if UAC is enabled, the user will be prompted to select the option Allow in the
UAC window.
* Trend Micro - PC-Cillin Internet Security 2007 and 2008 cannot be uninstalled
automatically with Windows Vista x64
* Trend Micro - PC-Cillin Internet Security 2007 and 2008 cannot be uninstalled
automatically with Windows Vista x86 with UAC enabled
* ESET NOD32 Antivirus 3.0.XX (2008) does not uninstall correctly for 64 bits platforms.
Advanced Administration Guide – Endpoint Protection
238
* ESET NOD32 Antivirus 2.7* after installation of the PCOP agent on the computer, it will restart
automatically without displaying any notification or asking for user confirmation
* ESET NOD332 Antivirus 2.70.39* after installation of the PCOP agent on the computer, it will
restart automatically without displaying any notification or asking for user confirmation
* ESET Smart Security 3.0 does not uninstall correctly for 64 bits platforms
* Sophos Anti-virus SBE 2.5 does not uninstall correctly in Windows 2008
* eTrust Antivirus 7.1 does not uninstall correctly for 64 bits platforms
* Norton Antivirus Internet Security 2008 does not uninstall correctly if the Windows Vista UAC
is enabled
* BitDefender Free Edition 2009 12.0.12.0 Windows Vista and UAC enabled. While the
program is being uninstalled, the user will be prompted to select the option Allow in the UAC
window
* Kaspersky Anti-Virus 2010 9.0.0.459 and UAC enabled. While the program is being
uninstalled, the user will be prompted to select the option Allow in the UAC window.
* Kaspersky Anti-Virus 8 Windows Vista and UAC enabled. While the program is being
uninstalled, the user will be prompted to select the option Allow in the UAC window.
* McAfee Total Protection Services 4.7. The uninstaller does not run correctly if the UAC is
enabled. Furthermore, in 32 bit-edition platforms the user intervention is neccessary.
* Microsoft Live OneCare 2.5 does not uninstall in Windows Small Business Server 2008.
If you have a program not included on this list, contact the corresponding vendor to find
out how to uninstall it before installing Endpoint Protection.
Advanced Administration Guide – Endpoint Protection
239
© Panda Security 2016. All rights reserved.1
Neither the documents nor the programs that you may access may be copied, reproduced, translated or transferred to any electronic or readable media without prior written permission from Panda Security, C/ Santiago de Compostela, 12,
48003 Bilbao (Bizkaia), SPAIN. Registered trademarks.
Windows Vista and the Windows logo are trademarks or registered trademarks of Microsoft Corporation in the United States and/or other countries. All other product names may be registered trademarks of their respective owners.
© Panda Security 2016. All rights reserved.
Endpoint Protection Endpoint Protection Plus