Embed Size (px)
Citation preview

A1560 SONIC - OEM ULTRASONIC PULSER/RECEIVER FRONT-END UNIT
Advanced configuration1
ACOUSTIC CONTROL SYSTEMS
ADVANCED CONFIGURATION
Acoustic Control Systems – ACS GroupSaarbrücken, Germany 2019
A1560 SONICOEM ULTRASONIC PULSER/RECEIVER FRONT-END UNIT
APPLICABLE FOR A1560 SONIC-LF, A1560 SONIC-HF, A1560 SONIC-AIR

A1560 SONIC - OEM ULTRASONIC PULSER/RECEIVER FRONT-END UNIT
Advanced configuration2
ACOUSTIC CONTROL SYSTEMS
ACS-Solutions GmbHScience Park 266123 Saarbrucken, Germany
Phone: +49 (0) 681-96592270Fax: +49 (0) 681-96592280Е-mail: [email protected]: www.acs-international.com
Issue date: 27.06.2019
Service Address:
A1560 SONIC - OEM ULTRASONIC PULSER/RECEIVER FRONT-END UNIT
Advanced configuration3
TABLE OF CONTENTS
1 INTRODUCTION .............................................................................................................................................................4
2 A1560 MAIN COMPONENTS .....................................................................................................................................5
3 FIRMWARE UPDATE ...................................................................................................................................................7
3.1 PUTTING THE A1560 INTO FIRMWARE UPDATE MODE ........................................................................................7
3.2 UPLOADING A NEW FIRMWARE FILE TO THE A1560. ............................................................................................8
4 NETWORK CONFIGURATION..................................................................................................................................9
4.1 ACCESSING A NETWORK CONFIGURATION WEB INTERFACE. .....................................................................8
4.2 SETTING A NETWORK CONFIGURATION PASSWORD .........................................................................................8
4.3 SWITCHING OFF DHCP SERVICE ...........................................................................................................................................9
4.4 SETTING A NEW WI-FI PASSWORD AND CHANGING THE NETWORK NAME. ................................10
4.5 SWITCHING WI-FI TO A CLIENT MODE. ............................................................................................................................11
4.6 RESTORING DAMAGED IP OF THE ACQUISITION SUBSYSTEM ....................................................................12

A1560 SONIC - OEM ULTRASONIC PULSER/RECEIVER FRONT-END UNIT
Advanced configuration4
The A1560 SONIC (hereinafter “A1560”) is a product line of ultrasonic flaw detectors designed for stand-alone and integra-ted use in laboratory and industrial measurement and testing applications, allowing the ultrasonic data acquisition of different materials.
The main purpose of this document is to provide the user with additional information regarding the advanced configuration of the instrument. Before reading, it is highly recommended that you familiarize yourself with further A1560 documents:
• A1560 Getting Started • A1560 Programming Manual• A1560 User Manual Read this manual carefully before using the device to ensure safe and proper use.
INTRODUCTION
1
SAFETY SYMBOLS USED IN THIS MANUAL:
Symbol Description
Indicates a potential threat. Failure to avoid it can result in death or serious injury.
Indicates a potential threat. Failure to avoid it may result in minor injury.
Indicates a potentially harmful situation. If it is not avoided, the device or something in its vicinity may be damaged.
A1560 SONIC - OEM ULTRASONIC PULSER/RECEIVER FRONT-END UNIT
Advanced configuration5
ACOUSTIC CONTROL SYSTEMS
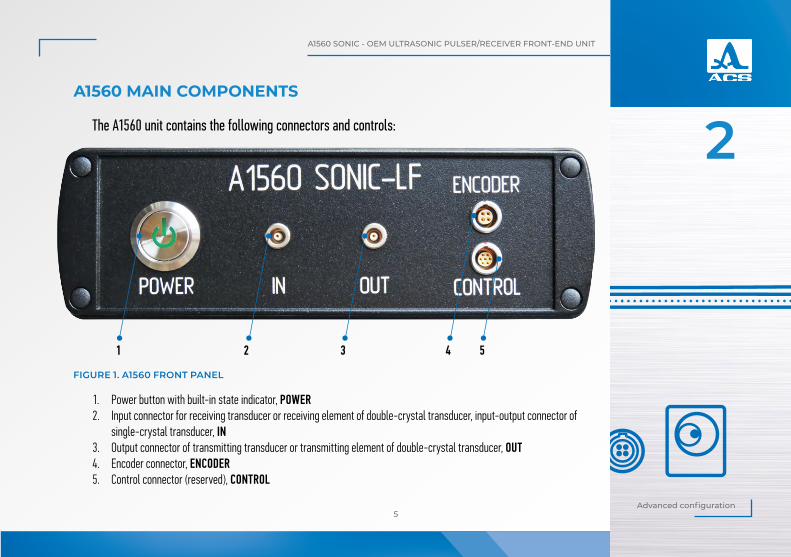
2A1560 MAIN COMPONENTS
FIGURE 1. A1560 FRONT PANEL
1. Power button with built-in state indicator, POWER2. Input connector for receiving transducer or receiving element of double-crystal transducer, input-output connector of
single-crystal transducer, IN3. Output connector of transmitting transducer or transmitting element of double-crystal transducer, OUT 4. Encoder connector, ENCODER5. Control connector (reserved), CONTROL
1 2 3 4 5
The A1560 unit contains the following connectors and controls:
A1560 SONIC - OEM ULTRASONIC PULSER/RECEIVER FRONT-END UNIT
Advanced configuration6
ACOUSTIC CONTROL SYSTEMS
2
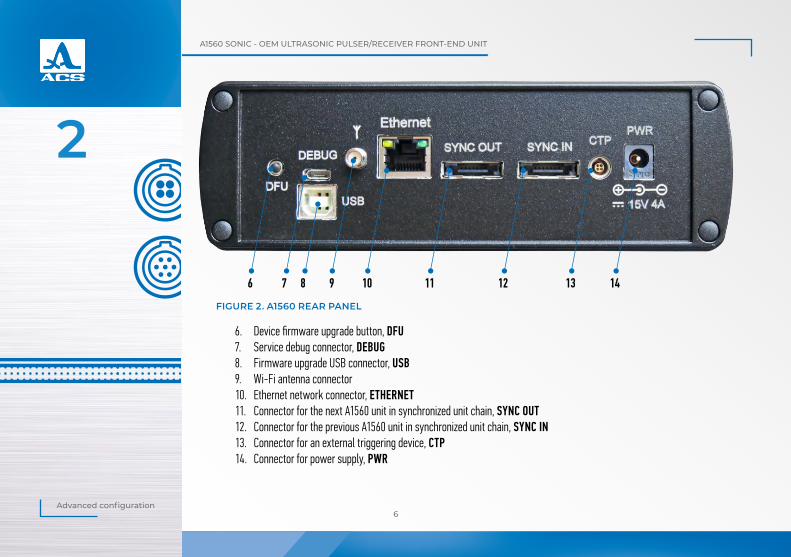
FIGURE 2. A1560 REAR PANEL
6. Device firmware upgrade button, DFU7. Service debug connector, DEBUG8. Firmware upgrade USB connector, USB9. Wi-Fi antenna connector10. Ethernet network connector, ETHERNET11. Connector for the next A1560 unit in synchronized unit chain, SYNC OUT12. Connector for the previous A1560 unit in synchronized unit chain, SYNC IN13. Connector for an external triggering device, CTP 14. Connector for power supply, PWR
6 7 8 9 10 11 12 13 14
A1560 SONIC - OEM ULTRASONIC PULSER/RECEIVER FRONT-END UNIT
Advanced configuration7
ACOUSTIC CONTROL SYSTEMS
3FIRMWARE UPDATE
The A1560’s firmware can be updated with a newer version or with a special firmware developed at the user’s request. A standard USB 2.0 A-to-B “printer” cable (not included) is required for the update.
To put the unit into DFU (device firmware update) mode:1. Connect the A1560 to AC power via the included power supply unit2. Power the A1560 OFF with the POWER button on its front panel (Fig.1 Pos.1). Wait for the built-in indicator to turn off.3. Press and hold the DFU button on the rear panel of the A1560 (Fig.2 Pos.6).4. While holding the DFU button pressed, switch on the A1560. The built-in state indicator should start blinking, indicating
that the A1560 is in DFU mode.
3.1 PUTTING THE A1560 INTO FIRMWARE UPDATE MODE
TABLE 1 POWER LED INDICATION IN DFU MODE
Symbol DescriptionSlow blinking (once per second) DFU idle: waiting for a firmware/configuration file Fast blinking (twice per second) Firmware update is in progress.
To put the A1560 back into normal mode, switch off the A1560 while in DFU idle state (slow indicator blinking) and then switch it back on again.
DO NOT switch the A1560 off while the firmware update is in progress (fast blinking). Otherwise, the unit may be damaged.
A1560 SONIC - OEM ULTRASONIC PULSER/RECEIVER FRONT-END UNIT
Advanced configuration8
ACOUSTIC CONTROL SYSTEMS
33.2 UPLOADING A NEW FIRMWARE FILE TO THE A1560
Only firmware update files obtained from ACS should be uploaded to the A1560.
To upload the firmware update file obtained from ACS to the A1560:
1. Connect the USB connector located on the rear panel of the A1560 (Fig.2 Pos.8) to a PC with a standard USB 2.0 A-B cable.
2. Start the A1560 in DFU mode. The state indicator should start blinking slowly and a new USB drive should be detected by the PC’s operating system.
3. Copy the device firmware update file to the USB drive that appeared when the A1560 was switched to DFU mode. The state indicator should start blinking rapidly, indicating that the firmware update is in progress.
4. Wait about a minute until the state indicator switches to slow blinking again, indicating that the firmware update is finished.
5. Reboot the A1560 in normal mode.
A1560 SONIC - OEM ULTRASONIC PULSER/RECEIVER FRONT-END UNIT
Advanced configuration9
ACOUSTIC CONTROL SYSTEMS
4
4.1 ACCESSING A NETWORK CONFIGURATION WEB INTERFACE.
Wi-Fi and Ethernet interfaces of the A1560 can be configured to make it compatible with other devices in the same network segment or according to a specific user task. An internal networking subsystem of the A1560 runs on the OpenWrt system, allowing network set-up operations in a user-friendly environment that many IT specialists are familiar with. For that reason, only the most essential tasks are described in this document. The following description of configuration steps assumes that readers are knowled-geable about basic networking concepts.
It is advised that network configuration is performed by an IT specialist.
By default, the A1560 network subsystem is left unprotected to simplify getting it into operation. The A1560 connected to an organization’s local area network without adequate security measures CAN and WILL be used as an entry point for a network intrusion. Use the A1560 in an isolated network segment; otherwise, consider at the very least setting Wi-Fi and configuration passwords.
1. Connect the A1560 to a PC via Wi-Fi or Ethernet
2. Open the PC’s web browser and enter the IP address of the A1560 internal router into the browser’s address line.
Default IP is 192.168.1.1A welcome page like the one shown in Fig. 3 should appear.
NETWORK CONFIGURATION
A1560 SONIC - OEM ULTRASONIC PULSER/RECEIVER FRONT-END UNIT
Advanced configuration10
ACOUSTIC CONTROL SYSTEMS
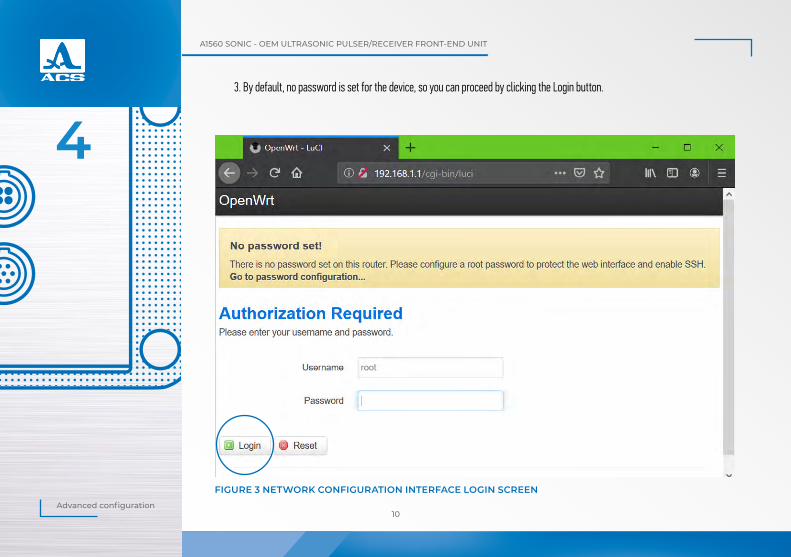
43. By default, no password is set for the device, so you can proceed by clicking the Login button.
FIGURE 3 NETWORK CONFIGURATION INTERFACE LOGIN SCREEN
A1560 SONIC - OEM ULTRASONIC PULSER/RECEIVER FRONT-END UNIT
Advanced configuration11
ACOUSTIC CONTROL SYSTEMS
44.2 SETTING A NETWORK CONFIGURATION PASSWORD
4.3 SWITCHING OFF DHCP SERVICE
To protect the A1560 network configuration with a password:1. Access the A1560 network configuration web interface2. Click on the Go to password configuration… phrase on the welcome screen’s warning header3. Click the Login button4. On the page that appears, enter your new password into the Password field, as well as into the Confirmation field 5. Scroll the page down to the bottom, then find and click the Save & Apply button
Write down and store your configuration password in a safe place. Resetting a lost configuration password is possible only by contacting an ACS serviceperson.
The A1560 is delivered with the DHCP server enabled at the Ethernet port. It is generally advised to disable the DHCP before connecting the A1560 to an organization’s local area network (LAN) to avoid disrupting it. Otherwise, connect the A1560 directly to a PC Ethernet port or to an isolated network.
A1560 SONIC - OEM ULTRASONIC PULSER/RECEIVER FRONT-END UNIT
Advanced configuration12
ACOUSTIC CONTROL SYSTEMS
4
FIGURE 4 EDITING THE LAN CONFIGURATION OF THE A1560
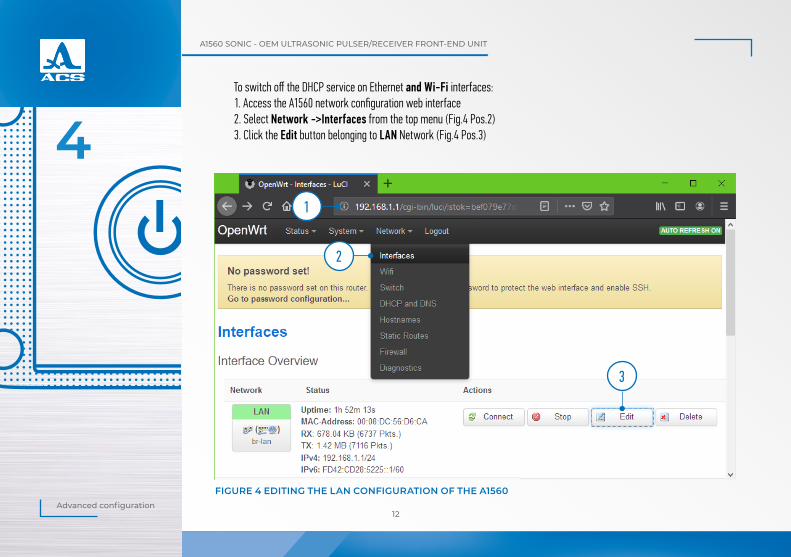
To switch off the DHCP service on Ethernet and Wi-Fi interfaces:1. Access the A1560 network configuration web interface2. Select Network ->Interfaces from the top menu (Fig.4 Pos.2)3. Click the Edit button belonging to LAN Network (Fig.4 Pos.3)
1
2
3
A1560 SONIC - OEM ULTRASONIC PULSER/RECEIVER FRONT-END UNIT
Advanced configuration13
ACOUSTIC CONTROL SYSTEMS
4
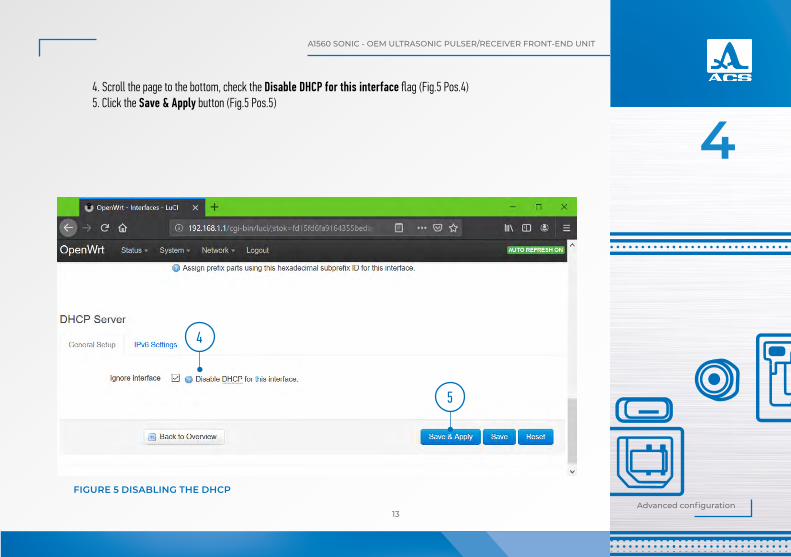
FIGURE 5 DISABLING THE DHCP
4. Scroll the page to the bottom, check the Disable DHCP for this interface flag (Fig.5 Pos.4)5. Click the Save & Apply button (Fig.5 Pos.5)
4
5
A1560 SONIC - OEM ULTRASONIC PULSER/RECEIVER FRONT-END UNIT
Advanced configuration14
ACOUSTIC CONTROL SYSTEMS
44.4 SETTING A NEW WI-FI PASSWORD AND CHANGING
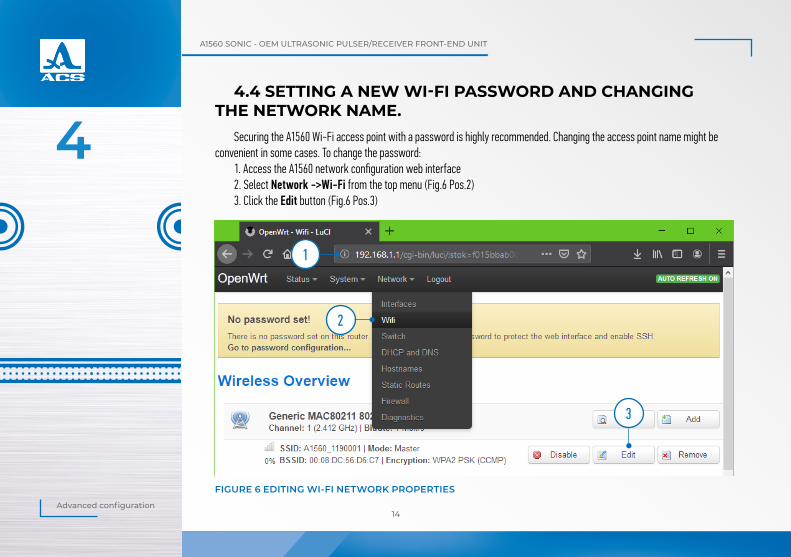
THE NETWORK NAME.Securing the A1560 Wi-Fi access point with a password is highly recommended. Changing the access point name might be
convenient in some cases. To change the password:1. Access the A1560 network configuration web interface2. Select Network ->Wi-Fi from the top menu (Fig.6 Pos.2)3. Click the Edit button (Fig.6 Pos.3)
FIGURE 6 EDITING WI-FI NETWORK PROPERTIES
1
2
3
A1560 SONIC - OEM ULTRASONIC PULSER/RECEIVER FRONT-END UNIT
Advanced configuration15
ACOUSTIC CONTROL SYSTEMS
4
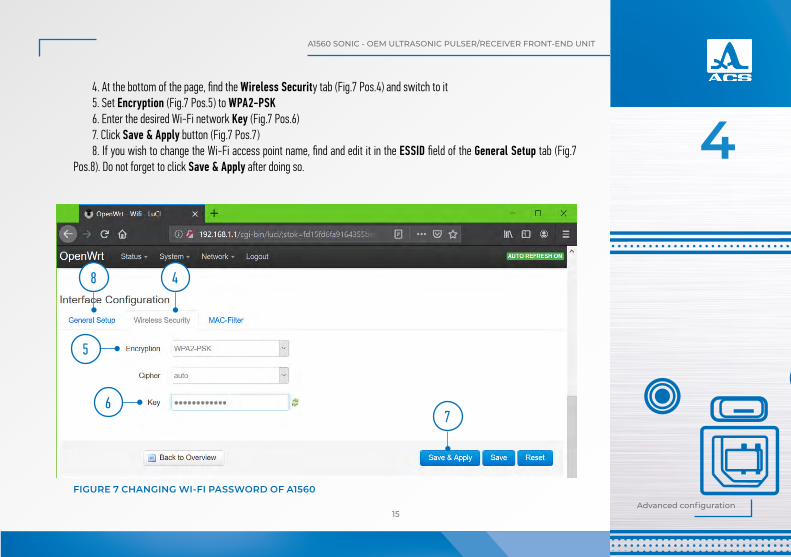
FIGURE 7 CHANGING WI-FI PASSWORD OF A1560
4. At the bottom of the page, find the Wireless Security tab (Fig.7 Pos.4) and switch to it5. Set Encryption (Fig.7 Pos.5) to WPA2-PSK6. Enter the desired Wi-Fi network Key (Fig.7 Pos.6) 7. Click Save & Apply button (Fig.7 Pos.7)8. If you wish to change the Wi-Fi access point name, find and edit it in the ESSID field of the General Setup tab (Fig.7
Pos.8). Do not forget to click Save & Apply after doing so.
5
48
76
A1560 SONIC - OEM ULTRASONIC PULSER/RECEIVER FRONT-END UNIT
Advanced configuration16
ACOUSTIC CONTROL SYSTEMS
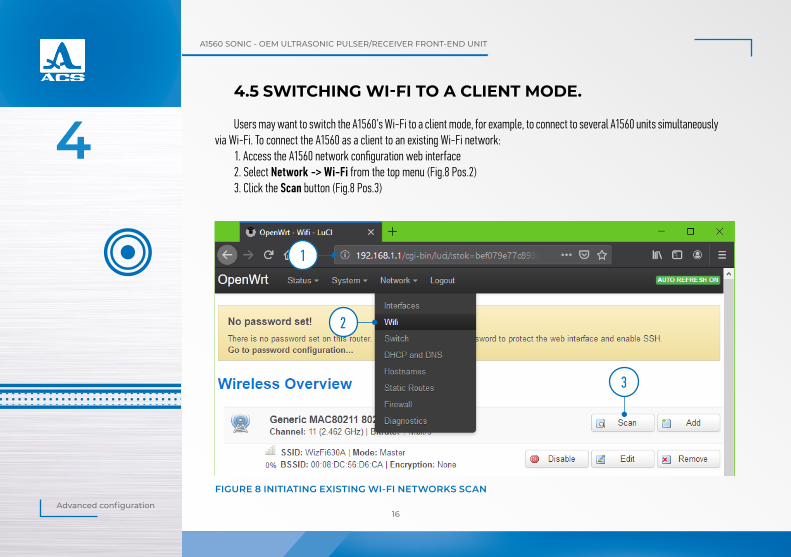
44.5 SWITCHING WI-FI TO A CLIENT MODE.
Users may want to switch the A1560’s Wi-Fi to a client mode, for example, to connect to several A1560 units simultaneously via Wi-Fi. To connect the A1560 as a client to an existing Wi-Fi network:
1. Access the A1560 network configuration web interface2. Select Network -> Wi-Fi from the top menu (Fig.8 Pos.2)3. Click the Scan button (Fig.8 Pos.3)
FIGURE 8 INITIATING EXISTING WI-FI NETWORKS SCAN
1
2
3
A1560 SONIC - OEM ULTRASONIC PULSER/RECEIVER FRONT-END UNIT
Advanced configuration17
ACOUSTIC CONTROL SYSTEMS
4
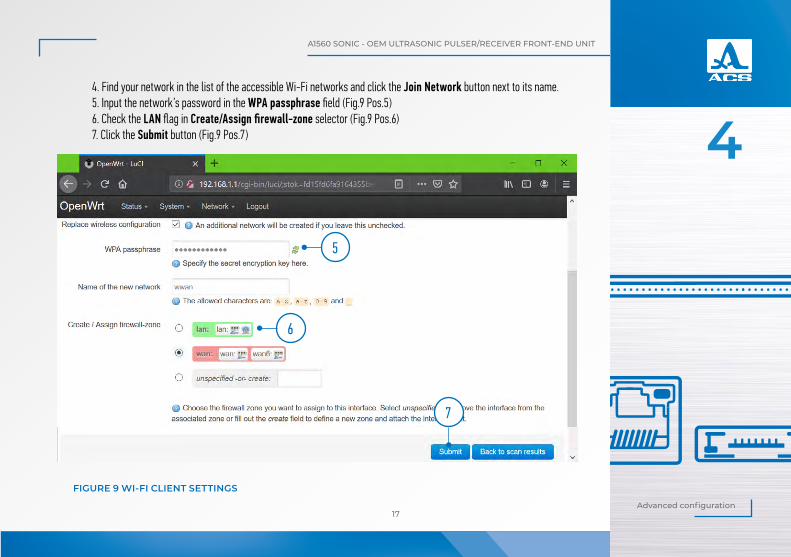
FIGURE 9 WI-FI CLIENT SETTINGS
4. Find your network in the list of the accessible Wi-Fi networks and click the Join Network button next to its name.5. Input the network’s password in the WPA passphrase field (Fig.9 Pos.5)6. Check the LAN flag in Create/Assign firewall-zone selector (Fig.9 Pos.6)7. Click the Submit button (Fig.9 Pos.7)
5
6
7
A1560 SONIC - OEM ULTRASONIC PULSER/RECEIVER FRONT-END UNIT
Advanced configuration18
ACOUSTIC CONTROL SYSTEMS
4.6 RESTORING DAMAGED IP OF THE ACQUISITION SUBSYSTEM
By default, the control and data ports of the pulse generation and data acquisition subsystem are available at 192.168.1.2. This address can be changed via the A1560 API Library programmatically. In some cases, this IP address might be misconfigu-red, rendering the acquisition subsystem inaccessible. If this happens, the address can be set back to the default IP or some other IP in DFU mode. To restore the IP address:
1. Prepare the IP configuration text file named address.txt and containing the two following lines:
USERip address 192.168.1.22. Connect the USB connector located on the rear panel of the A1560 to a PC with a standard USB 2.0 A-B cable.3. Start the A1560 in DFU mode. The state indicator should start blinking slowly and a new USB drive should be detected
by the PC’s operating system.4. Copy the address.txt file from step 1 to the USB drive that appeared when the A1560 was switched in DFU mode. 5. Reboot the A1560 in normal mode.6. The acquisition subsystem should now be accessible to the external PC software via Ethernet by the IP from the
address.txt file.
4

A1560 SONIC - OEM ULTRASONIC PULSER/RECEIVER FRONT-END UNIT
Advanced configuration19
ACOUSTIC CONTROL SYSTEMS

A1560 SONIC - OEM ULTRASONIC PULSER/RECEIVER FRONT-END UNIT
Advanced configuration20
ACOUSTIC CONTROL SYSTEMS
ADVANCED CONFIGURATION
A1560 SONIC
OEM ULTRASONIC PULSER/RECEIVER FRONT-END UNIT
Acoustic Control Systems – ACS GroupSaarbrücken, Germany 2019