Embed Size (px)
Citation preview

Halcyon ‐ A Division of HelpSystems
Advanced Job Schedulerv5.0 Graphical User Interface
User Guide

CopyrightCopyright 2013 - 2016 Halcyon - A Division of HelpSystems. All rights reserved.
• IBM, IBM i, Power/System i, OS/400 and i5/0S are trademarks of International BusinessMachines.
• Windows is a registered trademark of Microsoft Corporation in the United States and othercountries.
This document is intended as a guide to using Halcyon software. This documentation containsHalcyon proprietary and confidential information and may not be disclosed, used, or copiedwithout the prior consent of Halcyon Software, or as set forth in the applicable licenseagreement. Users are solely responsible for the proper use of the software and the application ofthe results obtained. Although Halcyon Software has tested the software and reviewed thedocumentation, the sole warranty for the software may be found in the applicable licenseagreement between Halcyon Software and the user.
Publication Revision: August 2016
Company Information
Head Office
Halcyon - A Division of HelpSystems
5 The Forum
Minerva Business Park
Lynch Wood
Peterborough
Cambridgeshire
United Kingdom
PE2 6FT
Tel: +44 (0)1733 234995
For details of your local office or reseller, please visit www.halcyonsoftware.com and access theContact Us, Support or Partners options.

1
CopyrightCompany Information
Introduction 1Overview . . . . . . . . . . . . . . . . . . . . 1Graphical User Interface . . . . . . . . . . . . 1
Supported IBM O/S version. . . . . . . . . 1
Configuring Devices 2Opening the Advanced Job Scheduler Device Configuration Tool. . . . . . . . . . 2Navigating to the Web.config file . . . . . . 2Adding IBM i Devices to the Advanced Job Scheduler GUI . . . . . . . . . . . . . . . 3
Defining Color Schemes . . . . . . . . . . . . 5Changing Colors . . . . . . . . . . . . . . 6Changing Text Colors and Typeface . . . . 7Reversing Colors for the Schedule Summary . . . . . . . . . . . . . . . . . . . . . . . 7
Getting Started 8Navigating the GUI . . . . . . . . . . . . . . . . 9
The Calendar Panel . . . . . . . . . . . . . 10Schedule Summary Panel . . . . . . . . . . 11
Using the Advanced Job Scheduler GUI13Schedule View. . . . . . . . . . . . . . . . . . 13
Group/Jobs Display Panel . . . . . . . . . . 13Schedule View . . . . . . . . . . . . . . 13
Viewing Scheduled Group Details . . . . . . 16Group Details . . . . . . . . . . . . . . . 16Jobs . . . . . . . . . . . . . . . . . . . . 19Schedule . . . . . . . . . . . . . . . . . 21Messages . . . . . . . . . . . . . . . . . 22
Ending a Group/Job . . . . . . . . . . . . . 24Ending a Group . . . . . . . . . . . . . . 24Ending a job. . . . . . . . . . . . . . . . 25
Holding a Group/Job . . . . . . . . . . . . . 25Holding a Group . . . . . . . . . . . . . 25Holding a Job . . . . . . . . . . . . . . . 26
Omitting a Job . . . . . . . . . . . . . . . . 27Omitting a Job . . . . . . . . . . . . . . 27
Releasing a Held or Omitted Group/Job . . . 28Releasing a Held Group . . . . . . . . . 28Releasing a Held Job . . . . . . . . . . . 29
Replying to a Group/Job in Inquiry Wait Status . . . . . . . . . . . . . . . . . . . . . . . 30
Messages View . . . . . . . . . . . . . . . . . 32
Navigation . . . . . . . . . . . . . . . . 33Actions . . . . . . . . . . . . . . . . . . . . . 34
Scheduling an Adhoc Group. . . . . . . . . 34Refresh . . . . . . . . . . . . . . . . . . . 35
Logging Off . . . . . . . . . . . . . . . . . . . 35
Table of Contents

C H A P T E R
CHAPTER 1INTRODUCTION
Overview
Advanced Job Scheduler’s graphical user interface (GUI) modernizes the IBM isystems traditional green screen view by displaying information in analternative, easy to understand format that can be accessed from any devicecapable of running an internet browser.
Users can easily connect to multiple IBM i platforms and are provided with aninstant view of the status of all groups and jobs including processes that mighthave failed to complete and need to be resolved as well as details of jobs thatwill run in the future. Where jobs have failed, users can quickly and easilydiagnose if there is a pattern and rectify accordingly.
Graphical User Interface
This version of the software uses a GUI running on a web-browser whichprovides intuitive screens so that users without knowledge of the IBM i platformcan still use the commonly used features of Advanced Job Scheduler.
If jobs have failed to run as expected, IT teams can quickly and easily diagnoseif there is a pattern and rectify accordingly. You can also easily view details ofjobs that will run in the future. Tighter control of operations can be achieved byauthorized staff being able to remotely view and control jobs through the web ortheir mobile devices.
Supported IBM O/S versionAlthough this version of Advanced Job Scheduler runs on a web-browser, theIBM version, to which the GUI connects, must be running on IBM V5R4M0upwards.
Note: For information regarding the system pre-requisites and installation instructions for Advanced Job Scheduler GUI please refer to the Installation Guide.
I n t r o d u c t i o n 1-1

C H A P T E R
CHAPTER 2CONFIGURING DEVICES
Once the Advanced Job Scheduler GUI has been installed successfully, youneed to configure the IBM i devices to which the GUI connects.
Opening the Advanced Job Scheduler Device Configuration Tool1 From the Windows Start menu, select All Programs.
2 From the list of programs, navigate to Halcyon and click to open.
3 From the list of available programs, click Advanced Job Scheduler.
4 Select Job Scheduler Configuration.
Navigating to the Web.config fileBefore you can add any IBM i devices you need to confirm the location of theWeb.config file which holds this information. The instructions below are forstandard installations of the Advanced Job Scheduler GUI. If you have changedthe location of any files on installation then you must substitute these filelocations where necessary.
Upon opening the Job Scheduler Configuration Tool for the first time, a blankdialog is displayed.
2- 2 A d v a n c e d J o b S c h e d u l e r G U I E d i t i o n

Figure 2.1 Job Scheduler Configuration dialog
1 From the menu bar select File |Open.
2 Use the directory listing to navigate to:
C:\Program Files\Halcyon\Advanced Job Scheduler\Website\Web.config
3 The dialog is now refreshed and the Add button becomes available.
Adding IBM i Devices to the Advanced Job Scheduler GUIClick Add to open the Device Dialog.
Figure 2.2 Device dialog
C o n f i g u r i n g D e v i c e s 2-3

NameEnter the name of the IBM i device as recognized and identified on yournetwork.
AddressEnter the IP Address of the IBM i device as located on your network.
PortEnter the Port number on the IBM i on which the Advanced Job Scheduler GUIand the IBM i can communicate. The port number for each IBM i device can befound within the IBM version of the product under Configuration - Work withRemote Locations. Please refer to your Network Administrator prior to changingthis setting if you are ensure.
Connection TimeoutSets the time, in milliseconds, within which the connection must be madebetween the IBM i and Advanced Job Scheduler GUI. The default setting is12000 milliseconds.
Read TimeoutSets the time limit, in milliseconds, for the beginning of the read of data from theIBM i to the Advanced Job Scheduler GUI to be considered successful prior totiming out. The default setting is 12000 milliseconds.
Use PoolEnable this setting to allow connection pooling. Connection pooling allows youto ‘spread the load’ of retrieving information from the IBM i device, rather thanhaving one browser connection for each web session opened. The connectionis only active when a request for information is generated by a user. Once thedata has been retrieved, the connection is reset and available for use by otherusers.
Note: Connection pooling is independent of each device.
Minimum Pool SizeSpecify the minimum number of connections that form the available connectionpool. The default setting is 5. Should more than five connection requests begenerated at exactly the same time, the first five requests will be processed andsubsequent requests will have to wait until one of the connections becomesavailable again. Should this persist or a large number of users complain aboutslow loading times, consider increasing the value in this field.
Maximum Pool SizeSpecify the maximum number of connections that form the available connectionpool. The default setting is 10. If a large number of users require a simultaneousconnection to this device you may want to consider increasing this value toprevent any lag in data retrieval.
Click Save to save the device details to the configuration file. You can now addfurther devices using the same instructions.
2- 4 A d v a n c e d J o b S c h e d u l e r G U I E d i t i o n

Once you have finished adding all the devices to which the Advanced JobScheduler GUI connects, select File | Save.
The devices that have been added are now displayed within the Job SchedulerConfiguration dialog and will be available for selection at the point of logging onto the Advanced Job Scheduler GUI from the web-browser.
Defining Color Schemes
The color schemes are used to identify the different statuses of Group and Jobs displayed within the Advanced Job Scheduler GUI.
To define the color schemes, select Colors from the Job SchedulerConfiguration Toolbar. The Job Colors dialog is displayed.
From this dialog it is possible to display the color scheme that is used within theSchedule Summary and Group/Jobs Panels of the Advanced Job SchedulerGUI to quickly identify the status of the scheduled jobs.
Colors can be defined for each of the following statuses:
• Completed
• Failed
• Held
• None (On Schedule but not yet run)
• Running
• Inquiry
C o n f i g u r i n g D e v i c e s 2-5

Changing ColorsThe default display colors can be changed to accommodate your organization’sor your own personal preferences. You can define new colors at any time by re-opening the web.config file via the Job Scheduler Configuration program andselecting the Colors menu option.
Note: See “Opening the Advanced Job Scheduler Device Configuration Tool”.
To change any of the displayed defaults:
1 Click on the Job Group or Job panel for which you want to change the color scheme. The associated color scheme is shown in the corresponding box underneath the status panels.
2 Click on the required color box to open the color dialog from where a new color can be selected from the basic colors available or a new custom color created by moving the cross-hair cursor to the required color and selecting the depth of shade using the arrow selector.
3 Click OK to confirm the new color. The new color is displayed against the corresponding Background, Border or Text selection within the Job Colors dialog.
4 Click Save to confirm the changes made to the required color scheme.
Note: When selecting new colors schemes for the display, make sure that text is still visible upon the background color otherwise the GUI display will be very difficult to read and understand.
2- 6 A d v a n c e d J o b S c h e d u l e r G U I E d i t i o n

Changing Text Colors and Typeface Text color can be changed in the same way as background and border colorsfollowing the instructions set out in the previous section.
Note: When selecting new colors schemes for the display, make sure that text is still visible upon the background color otherwise the GUI display will be very difficult to read and understand.
In order to make text stand out, it is also possible to embolden text in both theSchedule Summary panel and the Groups/Jobs panel of the Advanced JobScheduler GUI by selecting the corresponding Bold Text option.
Reversing Colors for the Schedule SummarySelect the Reverse Summary option to display the Schedule Summary panel inthe reverse colors to those selected for the Group/Jobs panel. For example ifthe default setting was white text on a green background, with the ReverseSummary option enabled, this would display as green text on a whitebackground.
Once you have finished amending the colors schemes for each devices towhich the Advanced Job Scheduler GUI connects, select File | Save from theJob Scheduler Configuration menu, in order to confirm the changes made.
C o n f i g u r i n g D e v i c e s 2-7

C H A P T E R
CHAPTER 3GETTING STARTED
Once the installation has completed, you can log onto to the Advanced JobScheduler GUI via your chosen web-browser.
Open your web-browser and in the address bar type:
http://localhost:8082
Note: This address is for typical installations and is dependent on how your network is configured. Please ask your network or system administrator for assistance if no connection is made using the above address.
Figure 3.1 Advanced Job Scheduler GUI Log-on display
3- 8 A d v a n c e d J o b S c h e d u l e r G U I E d i t i o n
In order to Log On to the Advanced Job Scheduler GUI, the User Name (profile)and Password must already exist on the IBM i to which you are attempting toconnect.
Enter a valid User Name and the associated Password for the displayedDevice. To change the device, click the choice arrow and select an alternativedevice from the drop-down menu.
Note: Advanced Job Scheduler GUI only supports the use of the following characters in the ‘User Name’ parameter.
• a-z (lower case)
• A-Z (UPPER CASE)
• 0-9
• £#@
Additionally, the ‘Password’ parameter only supports the use of the same characters for ‘User Name’ plus the addition of;
• . (period / dot)
• _ (underscore)
Note: The device selected remains as the default device, the next time you access the GUI.
When ready, click Log On or press <Enter> to continue.
You are now ready to begin using the Advanced Job Scheduler GUI.
Navigating the GUIThe Advanced Job Scheduler GUI is split into three panels.
G e t t i n g S t a r t e d 3-9

Figure 3.2 Advanced Job Scheduler GUI main display
• Calendar Panel: Select the option with which you want to work. the selectionmade in this panel changes the information available for selection in the maindisplay.
• Schedule Summary Panel: Displays the corresponding items from theoption chosen in the menu panel. Make selections in this panel to viewfurther details regarding the selection in the information panel. Additionallyuse this panel to add, edit and delete selections from the chosen menuoption.
• Groups/Jobs Panel: Displays additional information about the selectionmade in the main display panel. Use the menu toolbar at the top of this panelto view further information. Information in this panel is for display purposesonly and cannot be edited.
The Calendar Panel
The calendar panel always defaults to today’s date, identified by the highlighteddate box. Click on any other date in the calendar to see the schedule that ran oris due to run on the selected date. The schedule for the current/selected date isdisplayed in the Group/Jobs panel of the GUI. You can view previous or futuremonths by using the navigational arrows in the Month identification header.
Calendar Panel Groups/Jobs Panel
Schedule Summary Panel
3- 1 0 A d v a n c e d J o b S c h e d u l e r G U I E d i t i o n

The following color schemes are used on the calendar panel to indicate theschedule behavior.
Black (Bold) At least one job is due to run on this date
Black (Plain) No jobs are scheduled to run on this day
Green All jobs on this days schedule completed successfully
Red At least on job on this days schedule failed
Yellow At least one job is still running
Schedule Summary Panel
The schedule summary panel shows the current schedule for the selected datein the calendar panel. Only the name of the Group scheduled to run, isdisplayed within this panel.
The panel is also color-coded to provide you with an at-a-glance view of the fulljob schedule for that day.
G e t t i n g S t a r t e d 3-11

Click on any Group within this summary and the Group/Job Schedule panelchanges so that the selected job is displayed in bold text at the top of the panel.
Note: See “Reversing Colors for the Schedule Summary” for more details on changing the color scheme used in this panel.
3- 1 2 A d v a n c e d J o b S c h e d u l e r G U I E d i t i o n

C H A P T E R
CHAPTER 4USING THE ADVANCED JOB SCHEDULERGUI
The main panel display of the Advanced Job Scheduler GUI is split into twodifferent views:
• “Schedule View”
• “Messages View”
The Schedule view for the current date and time is displayed by defaultwhenever the GUI is first displayed.
Schedule ViewThe Schedule view is used to determine the current status of Groups and jobsin the calendar schedule.
Group/Jobs Display Panel
The Group/Jobs panel is used to display the full details of a daily schedule. If nojobs are scheduled for the date selected, the display is blank bar a ‘No Jobs’message.
Schedule ViewBy default The Group/Jobs display panel shows full details of today’s schedule.Each Group contains jobs that are scheduled to run is displayed within its ownpanel. Underneath the Group heading, the jobs which are scheduled to run aspart of the Group are listed.
U s i n g t h e A d v a n c e d J o b S c h e d u l e r G U I 4-13

The Group status color scheme is defined by the settings in the web.config filefor the IBM i device being viewed.
Note: See “Changing Colors” for more details on changing the color scheme used in this panel.
Key to Group Menu SymbolsWithin the title panel of each group, a number of different symbols may bedisplayed as follows:
Icon Meaning
Group is currently held
Group in Error
Repeating Group
Forecast Group: Forecast Groups are primarily Repeat interval Groups that can also include invoked jobs, if they have been invoked locally.
Ad-hoc Group
Group is awaiting a reply to an inquiry
4- 1 4 A d v a n c e d J o b S c h e d u l e r G U I E d i t i o n

Selecting a GroupTo select a Group from the main display, single left click anywhere within therequired Group panel. The text in the Group title bar is emboldened to highlightit from the other Groups within the Schedule display.
Group menu optionsOnce the Group has been highlighted, further options can be selected by usinga single right-click on the highlighted Group. These options are dependent uponthe status of the Group when the right-click option is invoked.
View DetailsSelect this option to view the full details of the selected Group. This option isavailable for any Group, regardless of status.
Note: See “Viewing Scheduled Group Details” for more information.
Schedule Adhoc GroupSelect this option to schedule an adhoc Group to run at a later date/time. Thisoption is available for any Group, regardless of status.
Note: See “Scheduling an Adhoc Group” for more information.
End Select this option to end the current Group or a specific job contained within theGroup. This option is available for any Group, or Job within a Group, exceptthose that have already completed, have failed with error or that are forecast torun.
Note: There is no way to restart the Group or Job if you have ended in error. You must schedule an adhoc Group to run in the ended Group’s place.
See “Ending a Group/Job” for more information.
U s i n g t h e A d v a n c e d J o b S c h e d u l e r G U I 4-15

HoldSelect this option hold the selected Group or a specific job contained within.This option only is available for any Group, or Job within a Group, that has yet torun.
Note: See “Holding a Group/Job” for more information.
OmitSelect this option to omit the selected Group or a specific job contained withinfrom the current schedule. This option is not available for any Group, or Jobwithin a Group, that have already completed, have failed with error or that areforecast to run.
Note: See “Omitting a Job” for more information.
ReleaseSelect this option to release a previously held Group or specific job.
Note: See “Releasing a Held or Omitted Group/Job” for more information.
ReplySelect this option to reply to a Group or specific job that is currently in Waitingfor Reply status. This option is only available for Groups, and or job that iscurrently in Inquiry Wait status.
Note: See “Replying to a Group/Job in Inquiry Wait Status” for more information.
Viewing Scheduled Group Details
Selecting the View Details option from the menu at Group/Job level opens anew dialog for the selected Group allowing you to view full details, jobs,schedule and any messages related to this Group.
Group Details By default, the Group details are initially displayed when selecting the ViewDetails option. The Group name is displayed in the title bar of this dialog.
4- 1 6 A d v a n c e d J o b S c h e d u l e r G U I E d i t i o n

The following parameters can be observed on the Details tab.
DescriptionProvides the description of the Group as defined on the IBM i.
StatusDisplays the current status of the Group. This is blank if the Group has not yetrun. The status can be any one of the following:
COMP * Complete: This indicates that none of the jobs failed.
CNDC * Conditions Cancelled: This indicates that none of the jobs failed. However, at least one job did not start because of conditions not
met.
END * Ended: End was used to end the group and all its jobs.
ENDP End Pending: End Pending: End was used but at least one remote job of type *INVOKE has not yet been confirmed as ended.
FAIL * Failed: The group is complete but at least one of the jobs failed.
HELD Held: The group is held and cannot be processed. A group is shown as HELD in the following circumstances: It is a sequential group and the first job that is not locked or omitted is held It is a
sequential group and all jobs that are not locked or omitted are held
U s i n g t h e A d v a n c e d J o b S c h e d u l e r G U I 4-17

INTW Interval Wait: Special Hold status used with repeat schedules. Repeat schedules are created when the previous group in the series starts. They are given an estimated start time and placed in
INTW status. If the previous group ends successfully, the actual start time is then calculated and INTW status is revoked.
INQW Inquiry Wait: Waiting for a response from the user. Use option Reply to respond to the inquiry.
INZ Initialized: The initializer program has finished.
INZC * Initializer Cancel: Initializer program instructed the group to cancel.
INZPGM Initializer Program: The initializer program is running.
RGZ Reorganizing: This is caused by a user changing the schedule times for this group.
RPTC * Repeat Cancel: Too late to start the initial occurrence of a repeat schedule. This can only happen if the group was held or the monitor was inactive during the scheduled time range.
RUN Running: Jobs are being processed. This status is generally replaced by the job status.
* Indicates a terminal status.
Schedule TypeDisplays the schedule type of the group.
ADHOC Manually added ad-hoc schedule.
CHG Any schedule that has been manually changed.
EVT Event Schedule. These are a special kind of ad-hoc schedule that are added automatically when predefined conditions are met.
IVNK Locally invoked schedule. These schedules are invoked by jobs of type *INVOKE on the local system.
NET Remotely invoked schedule. These schedules are invoked by jobs of type *INVOKE on a remote system.
NWD-ADV Schedule brought forward because of non-working day rules.
NWD-DLY Schedule delayed because of non working day rules.
RPT Repeat schedule. The repeat sequence comprises the original scheduled occurrence, which is a standard (STD) schedule,
followed by any number of automatically added repeat (RPT) schedules. RPT schedules are created when the previous schedule in the repeating sequence starts.
STD Standard schedule.
4- 1 8 A d v a n c e d J o b S c h e d u l e r G U I E d i t i o n

Scheduled TimeDisplays the date and time at which the Group ran or is due to run.
Invoker SystemIf applicable, displays the name of the invoker system for Groups that havebeen invoked remotely.
Invoker GroupIf applicable, displays the name of the Invoker Group for Groups that have beeninvoked locally.
RepeatA check mark against this parameter indicates that this Group is a repeatingGroup.
Repeat IntervalDisplays the interval period before the Group runs again.
Repeat UntilDIsplays the time at which the repeat run of the Group finishes.
Jobs Click the Jobs tab to display the details of the jobs contained within this Group.
SequenceDisplay the sequence number of the job as it is scheduled to run in this group.
DescriptionProvides the description of the Job as defined on the IBM i.
U s i n g t h e A d v a n c e d J o b S c h e d u l e r G U I 4-19

StatusDisplays the current status of the Job. This is blank if the Job has not yet run.The status can be any one of the following:
CNDC * Condition Cancel: Condition Wait timed-out.
CNDE Condition Query Error: Custom or Remote conditions only. With custom conditions, this is caused by an error in the custom condition program. With remote conditions, this occurs when HNM is not
running on the local system.
CNDF Condition Fail: Custom conditions only. The custom condition program returned Fail status.
CNDI* Condition Ignored: Condition Wait timed-out and job omitted.
CNDP Condition Pass: Custom conditions only. The custom condition program returned Pass status.
CNDQ Condition Query: Custom and Remote conditions only. With custom conditions, this indicates that the custom condition program is
running. With Remote conditions, this indicates that the condition status request has been sent to the remote system but a reply has not yet been received.
CNDW Condition Wait: The job is waiting for its start conditions to be met.
END* End: The job was ended while active (while in RUN or FTP status) because the group was manually ended.
ERRC * Error Cancel: Job error and recovery action canceled it.
EXCW Exclusivity Wait: Job cannot be started because of exclusivity conditions.
EXIT Exit Command: The Exit Command is currently running.
FIN * Finished: Job finished normally.
FTP FTP running: This status is shown whenever the FTP script is being processed but a connection is not in progress. FTP may or may not be connected to a remote system. This is indicated by the Remote System column. Blanks in this column indicate that FTP is not currently connected to a remote system.
FTPC FTP Connect: This status indicates that FTP is attempting to connect to the system shown in the Remote System column. This status is shown during the initial connection and also whenever the
OPEN sub-command is running.
HLD Held: The group was held, which prevents the job starting.
HLDA Held while active: The group was held, causing the job to be held while active.
HLDQ Held on job queue: The group was held, causing the job to be held on the job queue.
INIT Initialized: The job is initialized.
INQW Inquiry Wait: Waiting for a response from the user.
4- 2 0 A d v a n c e d J o b S c h e d u l e r G U I E d i t i o n

INVW Invoke Wait: A group has been invoked on the local system and is currently initializing.
JOBQ Job Queue: Job is waiting on a job queue.
MSGW Message Wait: Waiting for a response from the user.
NETS Network Start: Remote job type *INVOKE only. Job ready to start.
NETW Network Wait: Remote job type *INVOKE only. Start request sent to remote HJS, awaiting acknowledgement.
RCYP Recovery Pending: Job error. Recovery action follows.
RDY Ready: The job is ready to start, subject to conditions.
RUN Running: Job is running.
TIMC * Time Constraint Cancel: Time constraint condition failed.
* Indicates a terminal status.
Scheduled TimeDisplays the scheduled date and time at which the job ran or is due to run.
Start TimeDisplays the actual date and time at which the job started. This parameter isblank if the job has yet to run.
End TimeDisplays the actual date and time at which the job ended. This parameter isblank if the job has yet to run.
Remote SystemIf applicable, displays the name of the remote system on which the job isscheduled to run.
Use the vertical scroll bar to view the details of subsequent jobs within theselected Group.
Schedule Click the Schedule tab to display the schedule details of the Group for the dateselected in the calendar. Today’s date is automatically selected by default. Theschedule uses the same color scheme as the main display so you can easilysee at-a-glance, the outcome of any previously run Groups.
U s i n g t h e A d v a n c e d J o b S c h e d u l e r G U I 4-21

Messages Click the Messages tab to be able to view any messages that have beengenerated as a result of the Group having run.
4- 2 2 A d v a n c e d J o b S c h e d u l e r G U I E d i t i o n
The following details are available to view from this display:
TimeDisplays the time at which the message was generated.
IDDisplays the message ID number generated by the IBM i and assigned to eachmessage.
TextDisplays the actual text of the message.
HelpIf applicable, displays the second level help text to aid fault diagnosis orconfirmation of successful completion.
Navigating the Messages displayThere are various ways in which you can navigate the messages that aredisplayed in this window.
Use the vertical scroll bar to view messages that are further down (or further up) the current viewable area.
Use the horizontal scroll bar to view the full details of any messages or secondlevel help text that is outside of the current viewable area.
Click in any column title to change the order sequence of the display by theentries within the selected column.
You can change the ordering sequence of any column by clicking on thedirectional arrow beside each column title. An upwards arrow signifies that theentries are in ascending order, a downward arrow signifies that the entries arein descending order.
If more than one page of messages exists for the Group, the subsequent pagescan be accessed by clicking on the required page number at the bottom of thisdisplay. The highlighted page number is the current active page.
When you have finished viewing the selected Group details you can close thedialog by either clicking Cancel or the Close button in the top right-hand cornerof the display.
U s i n g t h e A d v a n c e d J o b S c h e d u l e r G U I 4-23

Ending a Group/Job
It is possible to end a Group or Job that has not yet run on a forthcomingschedule. It is not possible to end a forecast Group.
Note: There is no way to restart the Group or Job if you have ended in error. You must schedule an adhoc Group to run in the ended Group’s place.
Ending a GroupEnding a Group ends both the Group and all the jobs contained within.
1 Single left-click anywhere within the panel of the Group that you want to end. The text in the Group title bar is emboldened to highlight it from the other Groups within the Schedule display.
2 Right-click anywhere within the highlighted panel to display a pop-up choice menu.
3 From this menu option, single-click End to open a sub-menu from where you can elect to end the entire Group or just a job contained within the Group.
4 To end the Group, click on the Group name in the sub-menu, as displayed in capitals. The Group is then displayed in the main Group/Jobs display in the color specified to signify that the Group has failed.
4- 2 4 A d v a n c e d J o b S c h e d u l e r G U I E d i t i o n

Ending a jobIt is only possible to end an active job.
Note: To stop the group when it reaches a particular job use Hold (See “Holding a Group/Job” for more information).
Ending a job while active causes the job to fail and go into INQW status. Themessages inform you the job was ended and prompts you for a course ofaction. It is possible to:
• Restart that job again
• Run the remaining jobs in the group
• Cancel the entire group
Ending a job is a similar process to that used when ending a Group.
1 Follow steps 1 to 3 as in the previous section “Ending a Group”.
2 When prompted to end the Group, click on the required job in the list under the Group name.
The Group is then displayed in the main Group/Jobs display in the colorspecified to signify that the Group is now in INQW status.
Use Actions | Refresh to update the display if required.
Holding a Group/Job
Holding a Group, or job within a Group, prevents that Group, or job, fromrunning in the current schedule. If required, the Group, or job can then bereleased at a later time. See “Releasing a Held or Omitted Group/Job” for moreinformation.
Holding a the first instance of a Group that repeats also holds the repeatinginstances in the schedule.
You cannot hold a forecast Group, a Group that has already completed orfailed.
Holding a GroupHolding a Group holds both the Group and all the jobs contained within. Youhold a Group by holding the first job in the Group.
1 Single left-click anywhere within the panel of the Group that you want to hold. The text in the Group title bar is emboldened to highlight it from the other Groups within the Schedule display.
2 Right-click anywhere within the highlighted panel to display a pop-up choice menu.
U s i n g t h e A d v a n c e d J o b S c h e d u l e r G U I 4-25

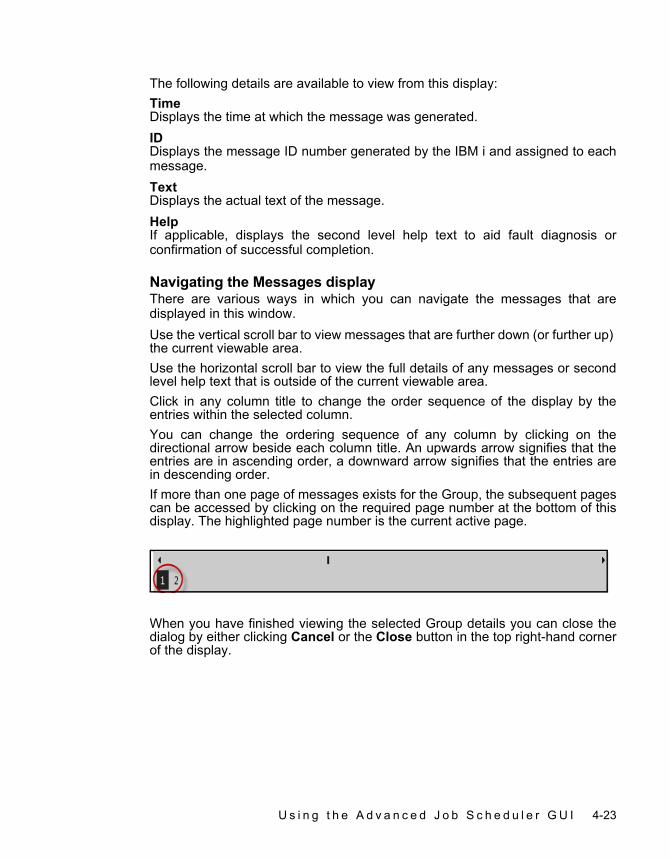
3 From this menu option, single-click Hold to open a sub-menu from where you can elect to hold the first job (and therefore the Group) or just a job contained within the Group.
4 To hold the Group, click on the first job listed in the sub-menu. The Group is then displayed in the main Group/Jobs display in the color specified to signify that the Group has been held.
Holding a JobHolding any job other than the first one within a Group, still allows the Group torun but it stops when ready to run the held job. Subsequent jobs are alsoprevented from running. You can then release the job later and it will then runthat job and the jobs after it. See “Releasing a Held or Omitted Group/Job” a formore information.
Holding a job that has ‘started’ either stops it coming off the job queue, or ifalready active, suspends processing. It resumes when you release it.
Holding a job is a similar process to that used when holding a Group.
1 Follow steps 1 to 2 as in the previous section Holding a Group. start here
2 When prompted click on the required job in the list under the Group name.
4- 2 6 A d v a n c e d J o b S c h e d u l e r G U I E d i t i o n

The Group is then displayed in the main Group/Jobs display in the colorspecified to signify that the Group is now in Held status.
Use Actions | Refresh to update the display if required.
Omitting a Job
Use Omit on a job to omit that job, so that when the group runs, that job isskipped. A job cannot be both Held and Omitted. Omitting a Held job changes itto Omitted. You can omit any job that has not started, including within a runninggroup. To re-include an omitted job, use the Release option.
You cannot hold a omit a Group, jobs within a forecast Group, or jobs fromwithin a Group that has already completed or failed.
Omitting a Job1 Single left-click anywhere within the panel of the Group containing the job
that you want to omit. The text in the Group title bar is emboldened to highlight it from the other Groups within the Schedule display.
2 Right-click anywhere within the highlighted panel to display a pop-up choice menu.
3 From this menu option, single-click Omit to open a sub-menu from where you can select the job(s) that you wish to omit from the run of this Group.
U s i n g t h e A d v a n c e d J o b S c h e d u l e r G U I 4-27

4 To omit a job, or jobs, select from the jobs listed in the sub-menu. The job is then displayed in the main Group/Jobs display as OMIT to indicate that it will not be run as part of that Group.
Use Actions | Refresh to update the display if required.
Releasing a Held or Omitted Group/Job
Use the Release option to release Groups and Jobs that have been held and jobs that have been omitted from running within Groups.
Releasing a Held GroupUsing the Release menu option on the Group, or the first job on a Group,releases the Group for processing. Providing that the Job Scheduler ControlMonitor is running within the IBM i environment to which you are connected, theGroup is then processed immediately on release, regardless of its scheduleddate and time.
To Release a Held Group:
1 Single left-click anywhere within the panel of the Group that is currently held. The text in the Group title bar is emboldened to highlight it from the other Groups within the Schedule display.
2 Right-click anywhere within the highlighted panel to display a pop-up choice menu.
4- 2 8 A d v a n c e d J o b S c h e d u l e r G U I E d i t i o n

3 From this menu option, single-click Release to open a sub-menu from where you can select the Group (or first job).
The Group is then displayed in the main Group/Jobs display in the colorspecified to signify that the Group is now Running.
Use Actions | Refresh to update the display if required.
Releasing a Held Job Using the Release menu option on a job that is currently held or omitted,releases that job for processing. You can release a job from Held status at anytime. You can release a job from Omit status any time before the group starts.After the group has started, you can release a job from Omit at the followingtimes:
• With a concurrent group, before the group completes.
• With a sequential group, before the group processing passes beyond that job number.
Providing that the Job Scheduler Control Monitor is running within the IBM ienvironment to which you are connected, the job is then processed immediatelyon release, regardless of its scheduled date and time.
To Release a Held job:
1 Single left-click anywhere within the panel of the Group that contains the job that is currently held. The text in the Group title bar is emboldened to highlight it from the other Groups within the Schedule display.
2 Right-click anywhere within the highlighted panel to display a pop-up choice menu.
U s i n g t h e A d v a n c e d J o b S c h e d u l e r G U I 4-29
3 From this menu option, single-click Release to open a sub-menu from where you can select the job that is currently held (more than one job may be held at anyone time).
The Group is then displayed in the main Group/Jobs display in the colorspecified to signify that the released job within the Group is now running.
Use Actions | Refresh to update the display if required.
Replying to a Group/Job in Inquiry Wait Status
An inquiry is raised when a problem arises that requires a decision from a user.An Inquiry is similar to an inquiry message on the IBM i. However, an AdvancedJob Scheduler Inquiry is an internal state, not a message on a message queue.
Groups that contain jobs that are awaiting a user decision are identifiable by thecolor scheme used to highlight that an Inquiry Reply message is required; thedefault color is Gold, and by the icon and INQW positioned within the title barof the Group.
4- 3 0 A d v a n c e d J o b S c h e d u l e r G U I E d i t i o n

To reply to a job in Inquiry-Wait status:
1 Single left-click anywhere within the panel of the Group that contains the job that is currently in Inquiry-Wait status. The text in the Group title bar is emboldened to highlight it from the other Groups within the Schedule display.
2 Right-click anywhere within the highlighted panel to display a pop-up choice menu.
3 From this menu option, single-click Reply to open a sub-menu from where you can select the job that is currently in Inquiry-Wait status.
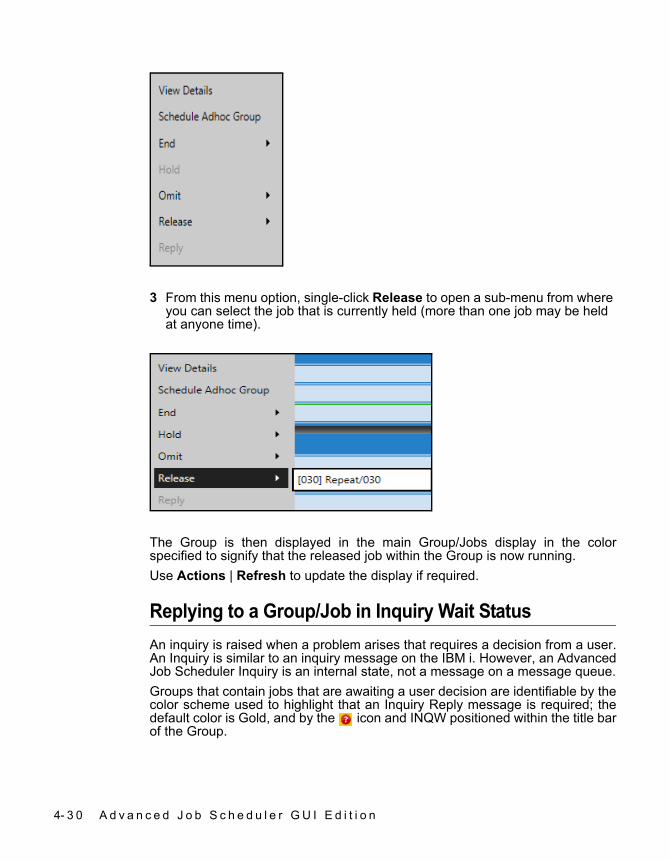
A new dialog showing the Cause and Error messages plus the options forreplying to the Inquiry Wait status available for the job is displayed (seeoverleaf).
U s i n g t h e A d v a n c e d J o b S c h e d u l e r G U I 4-31
The following options are available for replying to the Inquiry Wait Status:
Cancel The Job is omitted. For sequential Groups, no further jobs are run. For concurrent Groups, other jobs are not affected.
Retry Attempts to re-run this job.
Ignore The job is omitted and processing continues with the next job. For concurrent groups there is no difference between replies C and I.
Select the required reply option and click OK. The reply is then processed andthe appropriate action taken. The Group is then displayed in the main Group/Jobs display in the color specified to signify the result of the reply sent.
Use Actions | Refresh to update the display if required.
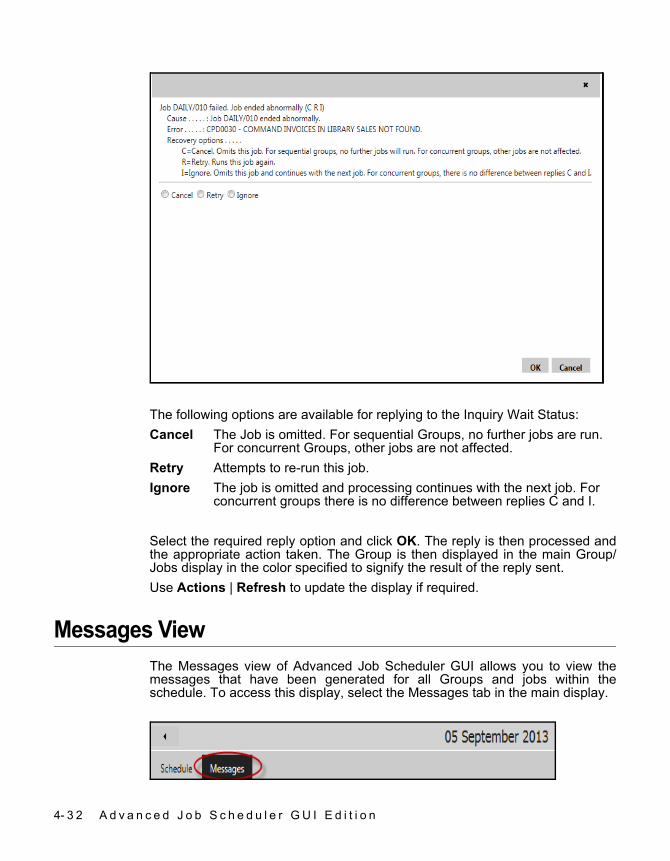
Messages ViewThe Messages view of Advanced Job Scheduler GUI allows you to view themessages that have been generated for all Groups and jobs within theschedule. To access this display, select the Messages tab in the main display.
4- 3 2 A d v a n c e d J o b S c h e d u l e r G U I E d i t i o n

The main panel changes to display a list of messages that have been generatedas a result of Groups and jobs running on today’s schedule. You can view, butnot edit, these messages.
Navigation• To view messages from previous days in the schedule, select the required
date from the calendar panel.
• Use the vertical scroll bar to view messages that are further down (or further up) the current viewable area.
• Use the horizontal scroll bar to view the full details of any messages that is outside of the current viewable area.
• If more than one page of messages exists for the Group, the subsequent pages can be accessed by clicking on the required page number at the bottom of this display. The highlighted page number is the current active page.
U s i n g t h e A d v a n c e d J o b S c h e d u l e r G U I 4-33
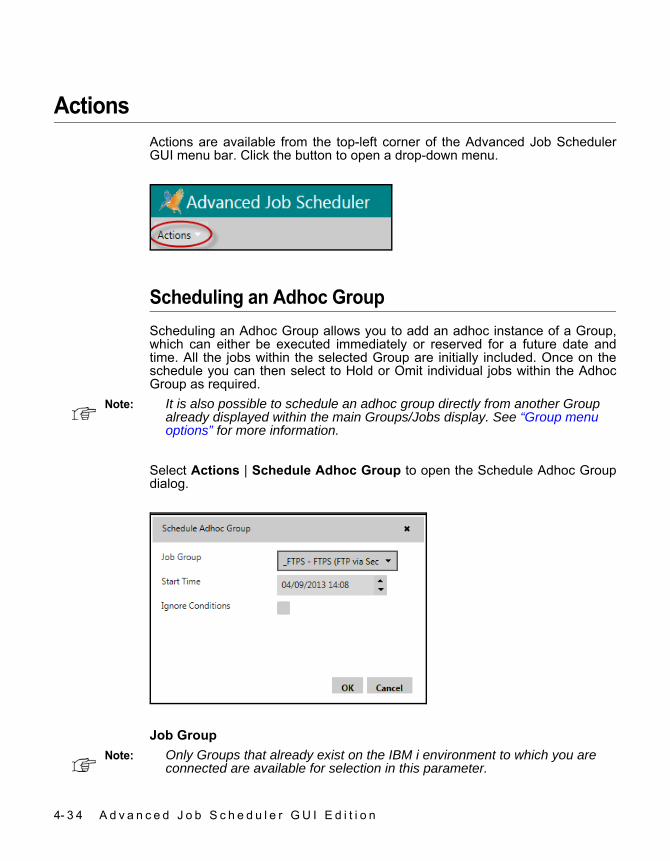
ActionsActions are available from the top-left corner of the Advanced Job SchedulerGUI menu bar. Click the button to open a drop-down menu.
Scheduling an Adhoc Group
Scheduling an Adhoc Group allows you to add an adhoc instance of a Group,which can either be executed immediately or reserved for a future date andtime. All the jobs within the selected Group are initially included. Once on theschedule you can then select to Hold or Omit individual jobs within the AdhocGroup as required.
Note: It is also possible to schedule an adhoc group directly from another Group already displayed within the main Groups/Jobs display. See “Group menu options” for more information.
Select Actions | Schedule Adhoc Group to open the Schedule Adhoc Groupdialog.
Job Group
Note: Only Groups that already exist on the IBM i environment to which you are connected are available for selection in this parameter.
4- 3 4 A d v a n c e d J o b S c h e d u l e r G U I E d i t i o n

Use the drop-down menu to select the Group for which the Adhoc Group is tobe scheduled.
Start TimeSpecifies the date and time at which the Adhoc Group is scheduled to run. Thisdefaults to the current date and time. You can either overwrite this entry directlyby entering a new date and time or use the Up/Down arrows to select a newdate and enter a new time.
Note: It is not possible to enter a date and time earlier than the current date and time.
Ignore ConditionsWhen scheduling an Adhoc Group and the Group has conditions defined, youcan choose to ignore the conditions in the first job that is not held or omitted.This is only allowed when the schedule is being added for immediate execution.Click to ignore any conditions that exist in the first job within the Group that isnot Held or Omitted.
Click OK to schedule the Adhoc Group with entered parameters.
Refresh
Use Actions | Refresh to update the display following a change of status to any of the Groups and/or jobs in the main display panel.
Logging OffWhen you have finished using the Advanced Job Scheduler GUI, it isrecommended that you log-off.
In the top right-hand corner of the Advanced Job Scheduler GUI display is theuser name of the person currently logged on to the system.
Click on the user name to display the Log Off option. Click Log Off to exit theAdvanced Job Scheduler GUI.
U s i n g t h e A d v a n c e d J o b S c h e d u l e r G U I 4-35

AB/AJSGUIUG/081116