Embed Size (px)
Citation preview
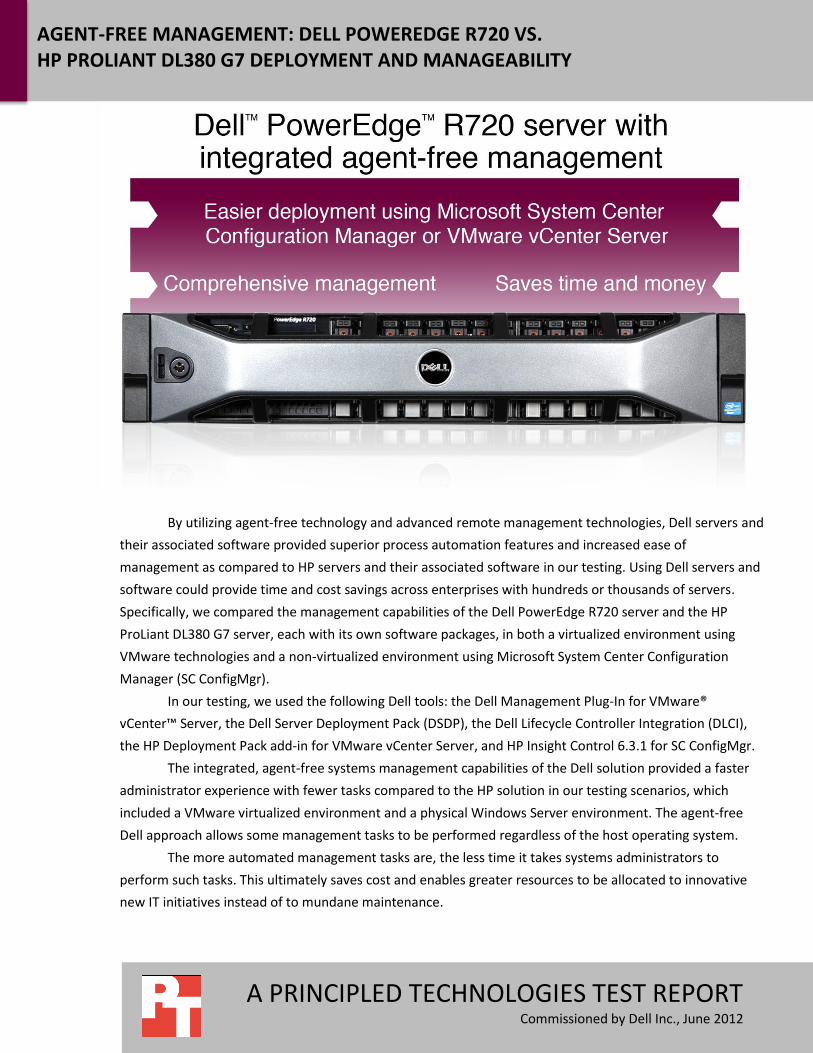
AGENT-FREE MANAGEMENT: DELL POWEREDGE R720 VS. HP PROLIANT DL380 G7 DEPLOYMENT AND MANAGEABILITY
A PRINCIPLED TECHNOLOGIES TEST REPORT Commissioned by Dell Inc., June 2012
By utilizing agent-free technology and advanced remote management technologies, Dell servers and
their associated software provided superior process automation features and increased ease of
management as compared to HP servers and their associated software in our testing. Using Dell servers and
software could provide time and cost savings across enterprises with hundreds or thousands of servers.
Specifically, we compared the management capabilities of the Dell PowerEdge R720 server and the HP
ProLiant DL380 G7 server, each with its own software packages, in both a virtualized environment using
VMware technologies and a non-virtualized environment using Microsoft System Center Configuration
Manager (SC ConfigMgr).
In our testing, we used the following Dell tools: the Dell Management Plug-In for VMware®
vCenter™ Server, the Dell Server Deployment Pack (DSDP), the Dell Lifecycle Controller Integration (DLCI),
the HP Deployment Pack add-in for VMware vCenter Server, and HP Insight Control 6.3.1 for SC ConfigMgr.
The integrated, agent-free systems management capabilities of the Dell solution provided a faster
administrator experience with fewer tasks compared to the HP solution in our testing scenarios, which
included a VMware virtualized environment and a physical Windows Server environment. The agent-free
Dell approach allows some management tasks to be performed regardless of the host operating system.
The more automated management tasks are, the less time it takes systems administrators to
perform such tasks. This ultimately saves cost and enables greater resources to be allocated to innovative
new IT initiatives instead of to mundane maintenance.
A Principled Technologies test report 2
Agent-free management: Dell PowerEdge R720 vs. HP ProLiant DL380 G7 deployment and manageability
DELL TOOLS SIMPLIFY SERVER MANAGEMENT Server management automation has become a key driver in managing costs
within the enterprise IT infrastructure. Organizations with hundreds or thousands of
servers must consider all ownership costs, including day-to-day management time costs,
associated with their choice of vendor and that vendor’s available automation tools.
With Dell tools—in particular the Dell Management Plug-In for VMware vCenter, the
Dell Server Deployment Pack, and the Dell Lifecycle Controller Integration with SC
ConfigMgr—we experienced a process with fewer steps and less incurred administrative
time than when using equivalent tools from HP. For all testing with both HP and Dell
servers in SC ConfigMgr, we assume that the administrator has already created the
necessary hardware profiles, such as those necessary for network cards or other
expansion components. We performed on our testing scenarios on a Dell PowerEdge
R720 server and an HP ProLiant DL380 G7 server, the current production model at the
time of this report. For detailed test results, see Appendix A. For information on the
configuration of our test servers, see Appendix B.
The Dell Management Plug-In for VMware vCenter Server works in concert with
Dell servers and VMware vCenter Server to reduce tasks and time associated with
managing your virtual infrastructure by natively incorporating Dell server management
features directly into the vCenter Server Console. The DSDP works in conjunction with
Microsoft SC ConfigMgr 2007 R3 to reduce time associated with Windows operating
system deployment tasks. The DLCI enables quicker and easier BIOS and firmware
update capabilities, along with integration with SC ConfigMgr and the DSDP for
operating system deployments. In our comparative testing using the HP ProLiant DL380
G7 server, we used the HP Deployment Pack add-in for VMware vCenter Server, and HP
Insight Control 6.3.1 for SC ConfigMgr.
Dell tools could save up to $250,000 or 5,500 engineering hours over the data center replenishment lifecycle
Compared to the HP DL380 G7 solution, which required installing, testing, and
maintaining a systems management software agent, we estimate the Dell solution can
save up to $250 or 5.5 engineering hours over the server lifecycle. In a hypothetical data
center with 1,000 servers, this savings per server cumulatively adds up to $250,000.
We assume this enterprise has 1,000 servers supporting 20 configurations of
operating systems and hardware. We assume these servers have a 4-year lifecycle and
require a patch on at least one of their agents, patched in bundles, every 2 months. This
means that every 2 months, the patches need to be tested on 20 test servers, one for
each configuration, and then these patches need to be rolled out to the servers
supporting each configuration.
A Principled Technologies test report 3
Agent-free management: Dell PowerEdge R720 vs. HP ProLiant DL380 G7 deployment and manageability
In our hypothetical scenario, the system administrator performs the following
process for these management tasks: prepare test platform, patch it, complete a health
check on platform, remediate problems on test platforms as needed, roll out the patch
to all servers, and finally remedy problems on the few servers that have them.
We assume that carrying out these tasks and remediating problems requires a
system administrator-level staff member at an average salary of $70,000. We multiply
that salary by a loading factor of 1.4 to include benefits for a total salary of $98,000. We
base our $70,000 on several sources that put average salary for system administrator
between $65,000 and $72,000.
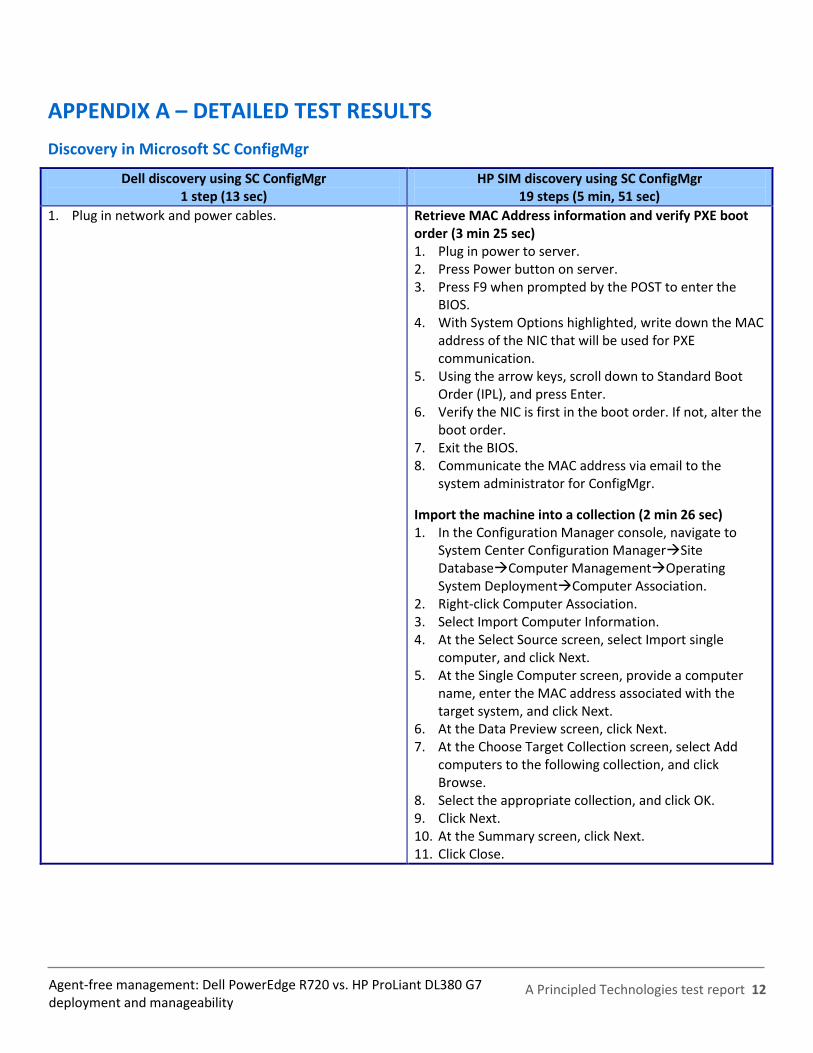
Automated discovery with SC ConfigMgr saved 19 steps By using the Dell Lifecycle Controller Integration features with Microsoft SC
ConfigMgr, bare-metal discovery of Dell servers is completely automated and requires
only adding power to the server. The server must be ordered from Dell with
AutoDiscover enabled, a free option when customizing your server order. In contrast,
using HP Operating System Deployment Pack for Microsoft SC ConfigMgr requires 19
manual steps for each server in an infrastructure.
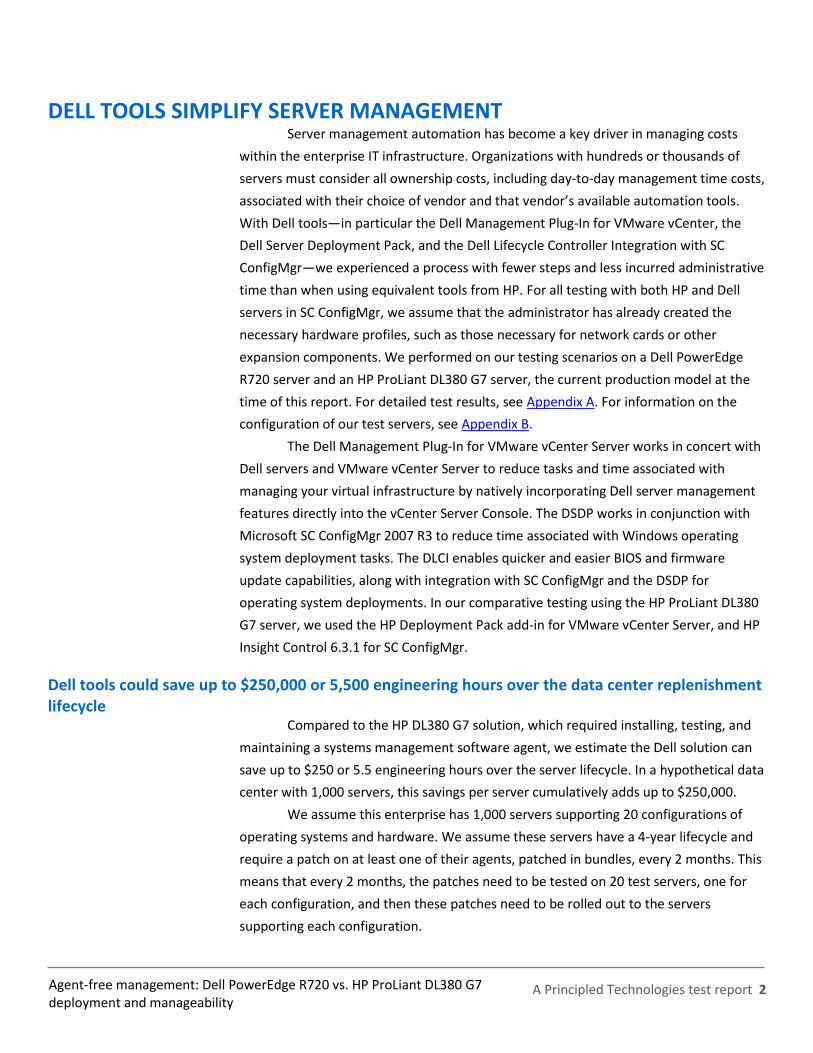
Administrator time for deployment from SC ConfigMgr was 86.5 percent less Provisioning of Dell PowerEdge servers with Dell Lifecycle Controller Integration
required 86.5 percent less administrator time than HP’s PXE-based server deployment
process, due to the automated discovery functionality of Dell’s product. This saves a
tremendous amount of time, and therefore money, when you consider the scale of
deployment in larger data centers. Figure 1 shows the administrator time required when
deployment operating systems on each solution.
Figure 1: Administrator time to deploy an operating system from SC ConfigMgr. Lower numbers are better.
9.02
1.22
0
2
4
6
8
10
HP solution Dell solution
Min
ute
s
Administrator time for deployment with SCCM
A Principled Technologies test report 4
Agent-free management: Dell PowerEdge R720 vs. HP ProLiant DL380 G7 deployment and manageability
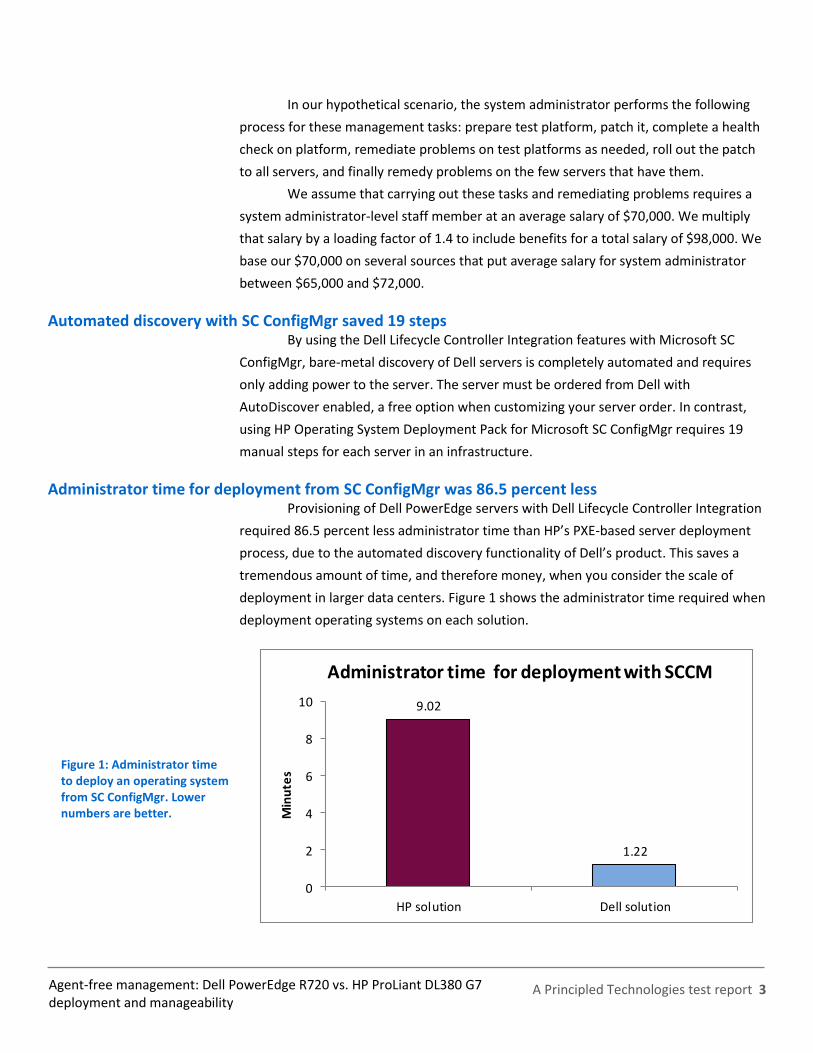
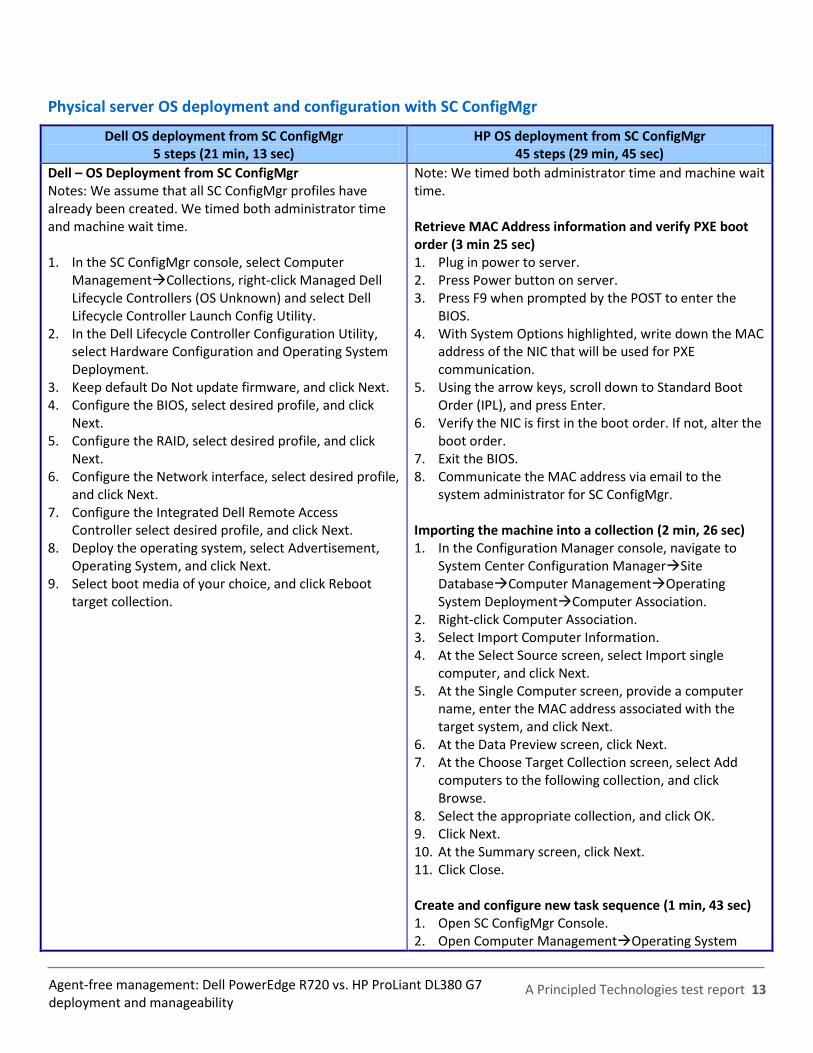
Server deployment time from SC ConfigMgr was 28.2 percent faster For this test scenario, we deployed Microsoft Windows Server 2008 R2
Enterprise SP1 to both servers. With the Dell PowerEdge R720, we used the Dell Server
Deployment Pack and Dell Lifecycle Controller Integration add-in for SC ConfigMgr. With
the HP ProLiant DL380 G7 server, we used the HP Deployment Pack in SC ConfigMgr.
Not only did the Dell solution save on administrator time for server deployment,
it also took 28.3 percent less time for the full deployment to actually complete on the
hardware compared to the HP solution, as Figure 2 illustrates. Full deployment includes
both administrator interaction time and machine wait time.
Figure 2: The Dell Server Deployment Pack and DLCI for SC ConfigMgr made server deployment quicker. Lower numbers are better.
29.45
21.13
0
5
10
15
20
25
30
35
HP solution Dell solution
Min
ute
s
Full deployment time using SC ConfigMgr and plugins
Server deployment from VMware vCenter Server was 21.5 percent faster To test multiple operating system deployment scenarios, we also deployed
VMware vSphere to both the Dell server and the HP server. For deploying the Dell
server, we used the Dell Management Plug-in for VMware vCenter, a tool that allowed
us to handle all administrative tasks—monitoring, managing, updating, configuring, and
deploying—from the VMware vCenter console. For deploying the HP server, we used HP
Insight Control 6.3.1 for VMware vCenter.
In our test scenarios, the Dell Management Plug-In for VMware vCenter
simplified the deployment, updating, and management processes as compared to using
HP Insight Control for vCenter. To use the HP solution with VMware vCenter Server, we
also needed to install HP Systems Integration Manager (HP SIM) and HP’s Remote
Deployment Server (RDPServer). In our test scenarios, deploying and configuring the
Dell PowerEdge R720 server with VMware vSphere using the Dell Management Plug-In
for VMware vCenter was 21.5 percent faster than deploying and configuring VMware
vSphere to the HP ProLiant DL380 G7 server using HP Insight Control 6.3.1 for VMware
A Principled Technologies test report 5
Agent-free management: Dell PowerEdge R720 vs. HP ProLiant DL380 G7 deployment and manageability
vCenter. Figure 3 shows the time it took each solution to deploy a new system from
VMware vCenter.
Figure 3: The server deployment process using Dell Management Plug-In for vCenter took less time. Lower numbers are better.
29.78
23.38
0
5
10
15
20
25
30
35
HP solution Dell solution
Min
ute
s
Deployment time using VMware vCenter Server and plugins
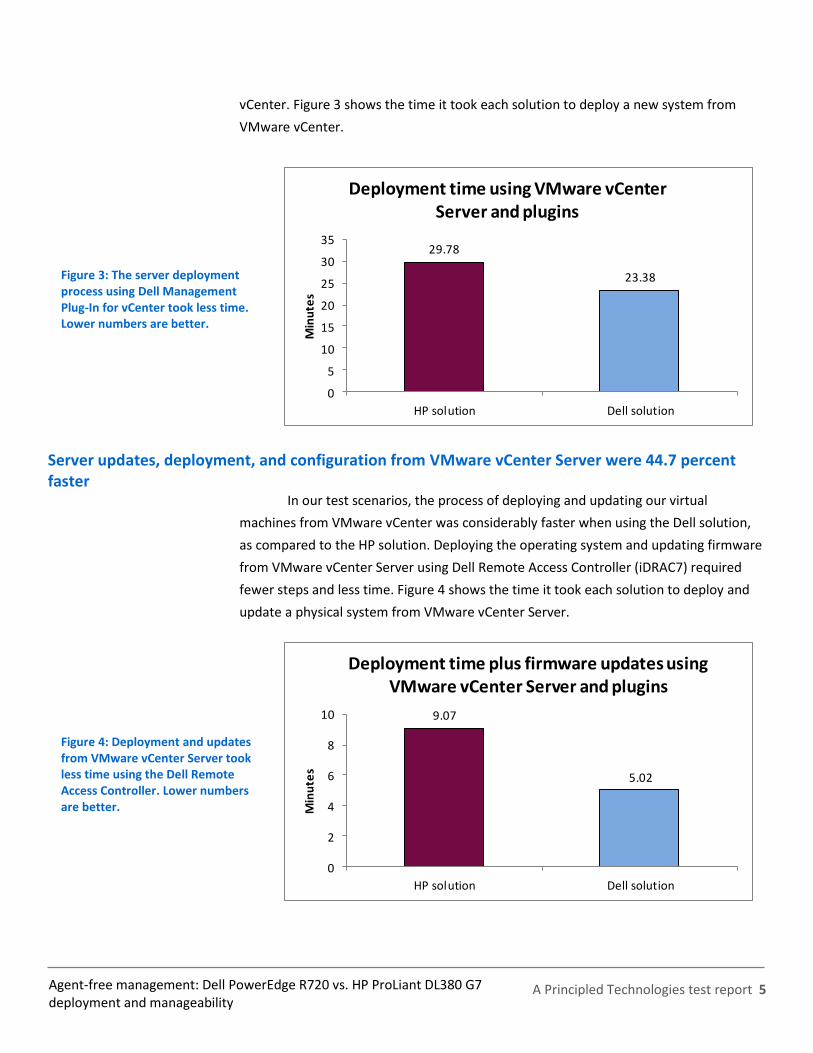
Server updates, deployment, and configuration from VMware vCenter Server were 44.7 percent faster
In our test scenarios, the process of deploying and updating our virtual
machines from VMware vCenter was considerably faster when using the Dell solution,
as compared to the HP solution. Deploying the operating system and updating firmware
from VMware vCenter Server using Dell Remote Access Controller (iDRAC7) required
fewer steps and less time. Figure 4 shows the time it took each solution to deploy and
update a physical system from VMware vCenter Server.
Figure 4: Deployment and updates from VMware vCenter Server took less time using the Dell Remote Access Controller. Lower numbers are better.
9.07
5.02
0
2
4
6
8
10
HP solution Dell solution
Min
ute
s
Deployment time plus firmware updates using VMware vCenter Server and plugins
A Principled Technologies test report 6
Agent-free management: Dell PowerEdge R720 vs. HP ProLiant DL380 G7 deployment and manageability
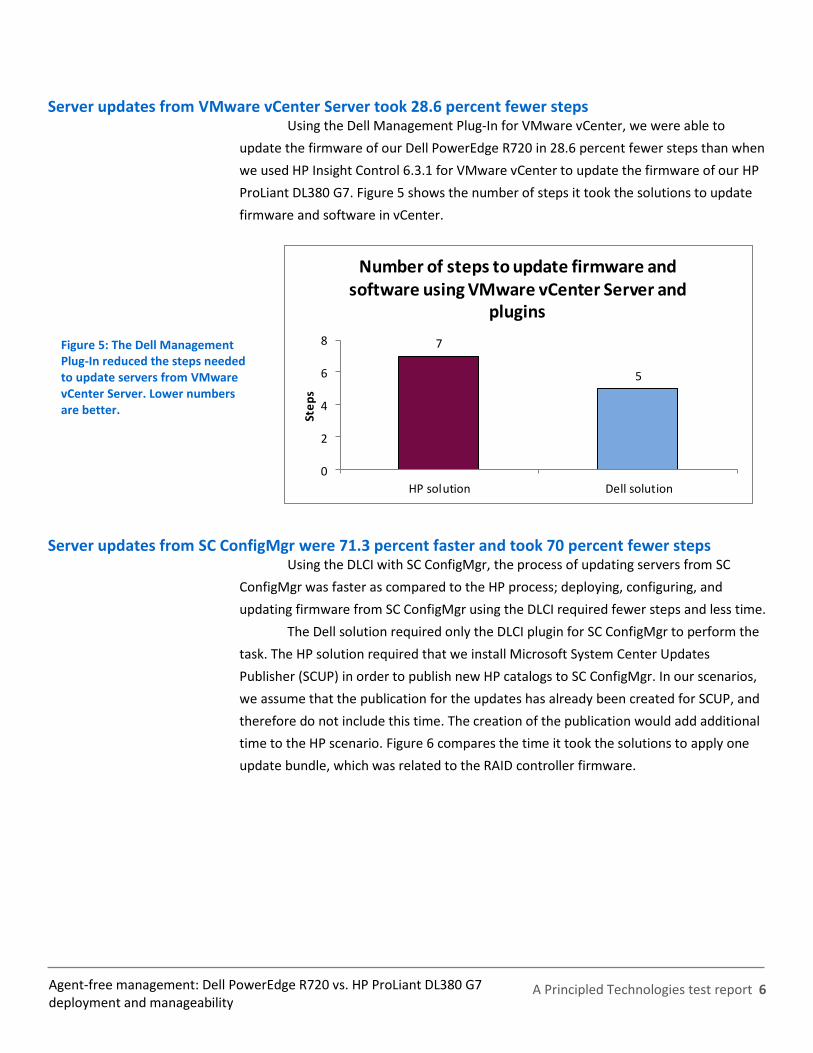
Server updates from VMware vCenter Server took 28.6 percent fewer steps Using the Dell Management Plug-In for VMware vCenter, we were able to
update the firmware of our Dell PowerEdge R720 in 28.6 percent fewer steps than when
we used HP Insight Control 6.3.1 for VMware vCenter to update the firmware of our HP
ProLiant DL380 G7. Figure 5 shows the number of steps it took the solutions to update
firmware and software in vCenter.
Figure 5: The Dell Management Plug-In reduced the steps needed to update servers from VMware vCenter Server. Lower numbers are better.
7
5
0
2
4
6
8
HP solution Dell solution
Ste
ps
Number of steps to update firmware and software using VMware vCenter Server and
plugins
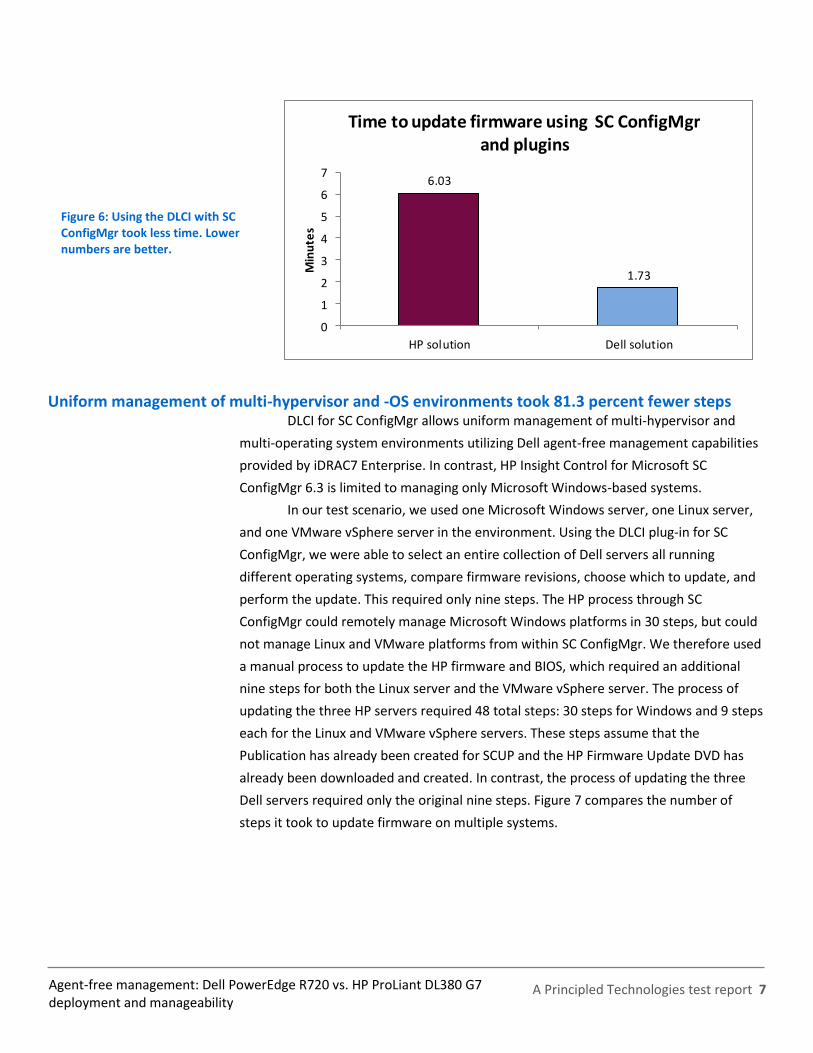
Server updates from SC ConfigMgr were 71.3 percent faster and took 70 percent fewer steps Using the DLCI with SC ConfigMgr, the process of updating servers from SC
ConfigMgr was faster as compared to the HP process; deploying, configuring, and
updating firmware from SC ConfigMgr using the DLCI required fewer steps and less time.
The Dell solution required only the DLCI plugin for SC ConfigMgr to perform the
task. The HP solution required that we install Microsoft System Center Updates
Publisher (SCUP) in order to publish new HP catalogs to SC ConfigMgr. In our scenarios,
we assume that the publication for the updates has already been created for SCUP, and
therefore do not include this time. The creation of the publication would add additional
time to the HP scenario. Figure 6 compares the time it took the solutions to apply one
update bundle, which was related to the RAID controller firmware.
A Principled Technologies test report 7
Agent-free management: Dell PowerEdge R720 vs. HP ProLiant DL380 G7 deployment and manageability
Figure 6: Using the DLCI with SC ConfigMgr took less time. Lower numbers are better.
6.03
1.73
0
1
2
3
4
5
6
7
HP solution Dell solution
Min
ute
s
Time to update firmware using SC ConfigMgr and plugins
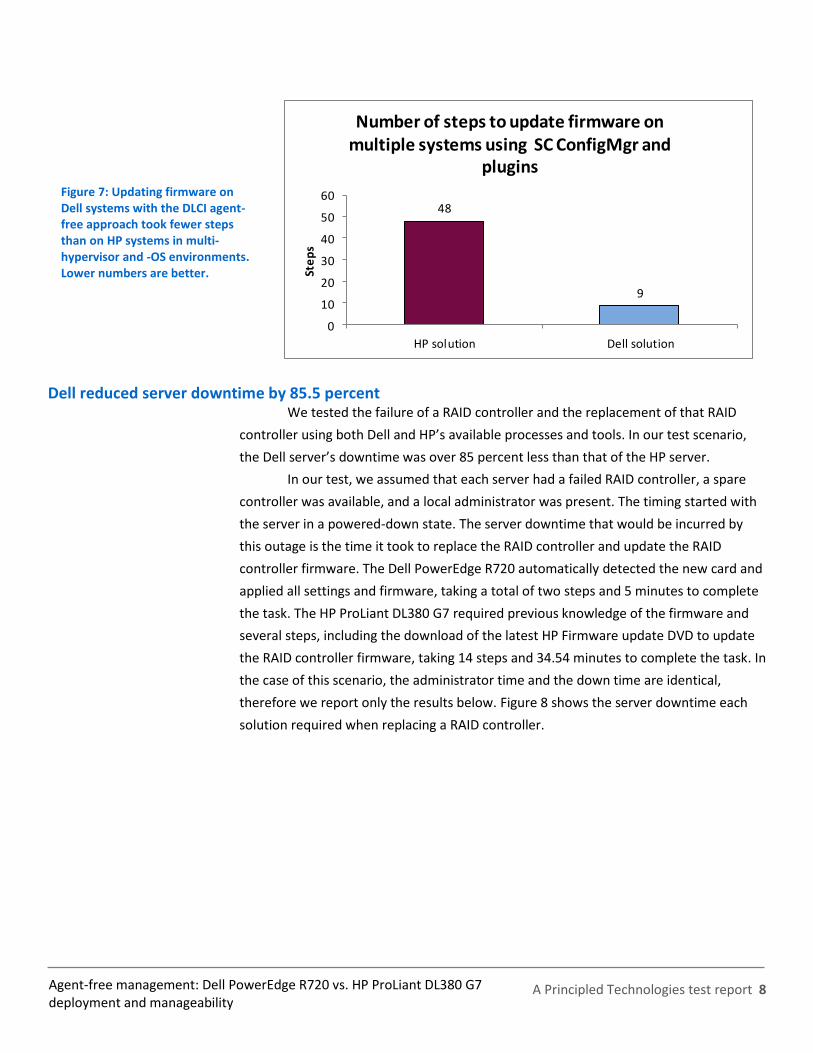
Uniform management of multi-hypervisor and -OS environments took 81.3 percent fewer steps DLCI for SC ConfigMgr allows uniform management of multi-hypervisor and
multi-operating system environments utilizing Dell agent-free management capabilities
provided by iDRAC7 Enterprise. In contrast, HP Insight Control for Microsoft SC
ConfigMgr 6.3 is limited to managing only Microsoft Windows-based systems.
In our test scenario, we used one Microsoft Windows server, one Linux server,
and one VMware vSphere server in the environment. Using the DLCI plug-in for SC
ConfigMgr, we were able to select an entire collection of Dell servers all running
different operating systems, compare firmware revisions, choose which to update, and
perform the update. This required only nine steps. The HP process through SC
ConfigMgr could remotely manage Microsoft Windows platforms in 30 steps, but could
not manage Linux and VMware platforms from within SC ConfigMgr. We therefore used
a manual process to update the HP firmware and BIOS, which required an additional
nine steps for both the Linux server and the VMware vSphere server. The process of
updating the three HP servers required 48 total steps: 30 steps for Windows and 9 steps
each for the Linux and VMware vSphere servers. These steps assume that the
Publication has already been created for SCUP and the HP Firmware Update DVD has
already been downloaded and created. In contrast, the process of updating the three
Dell servers required only the original nine steps. Figure 7 compares the number of
steps it took to update firmware on multiple systems.
A Principled Technologies test report 8
Agent-free management: Dell PowerEdge R720 vs. HP ProLiant DL380 G7 deployment and manageability
Figure 7: Updating firmware on Dell systems with the DLCI agent-free approach took fewer steps than on HP systems in multi-hypervisor and -OS environments. Lower numbers are better.
48
9
0
10
20
30
40
50
60
HP solution Dell solution
Ste
ps
Number of steps to update firmware on multiple systems using SC ConfigMgr and
plugins
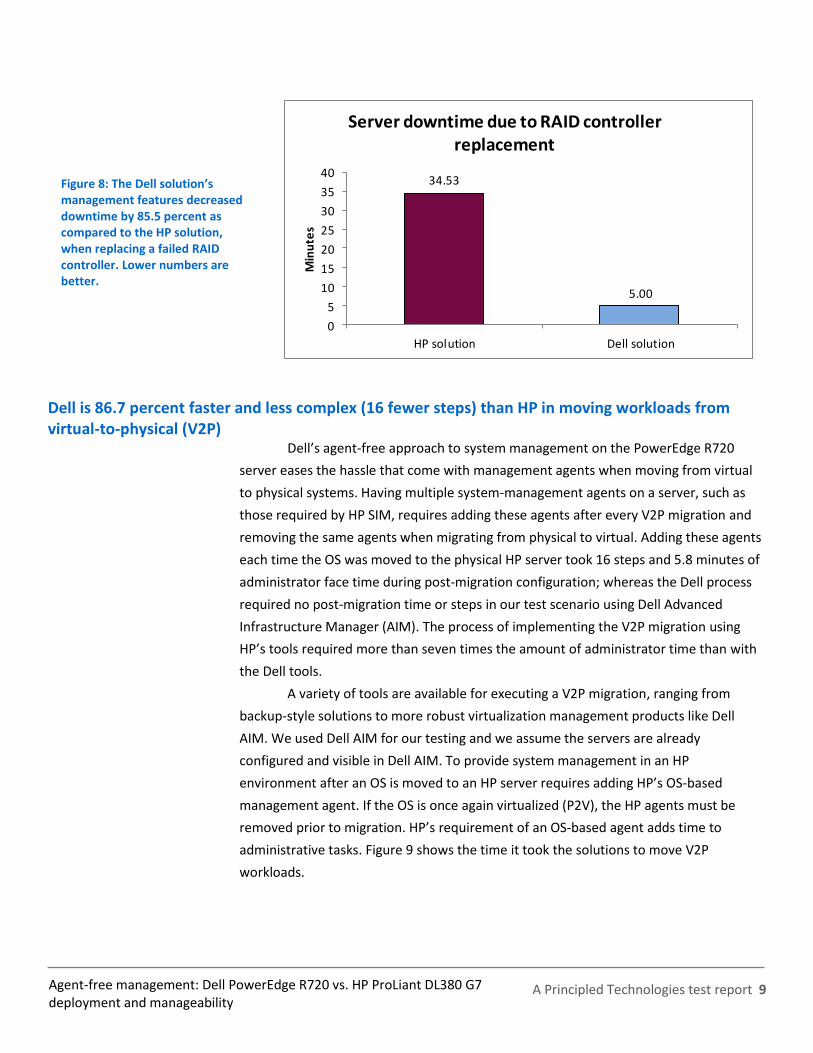
Dell reduced server downtime by 85.5 percent We tested the failure of a RAID controller and the replacement of that RAID
controller using both Dell and HP’s available processes and tools. In our test scenario,
the Dell server’s downtime was over 85 percent less than that of the HP server.
In our test, we assumed that each server had a failed RAID controller, a spare
controller was available, and a local administrator was present. The timing started with
the server in a powered-down state. The server downtime that would be incurred by
this outage is the time it took to replace the RAID controller and update the RAID
controller firmware. The Dell PowerEdge R720 automatically detected the new card and
applied all settings and firmware, taking a total of two steps and 5 minutes to complete
the task. The HP ProLiant DL380 G7 required previous knowledge of the firmware and
several steps, including the download of the latest HP Firmware update DVD to update
the RAID controller firmware, taking 14 steps and 34.54 minutes to complete the task. In
the case of this scenario, the administrator time and the down time are identical,
therefore we report only the results below. Figure 8 shows the server downtime each
solution required when replacing a RAID controller.
A Principled Technologies test report 9
Agent-free management: Dell PowerEdge R720 vs. HP ProLiant DL380 G7 deployment and manageability
Figure 8: The Dell solution’s management features decreased downtime by 85.5 percent as compared to the HP solution, when replacing a failed RAID controller. Lower numbers are better.
34.53
5.00
0
5
10
15
20
25
30
35
40
HP solution Dell solution
Min
ute
s
Server downtime due to RAID controller replacement
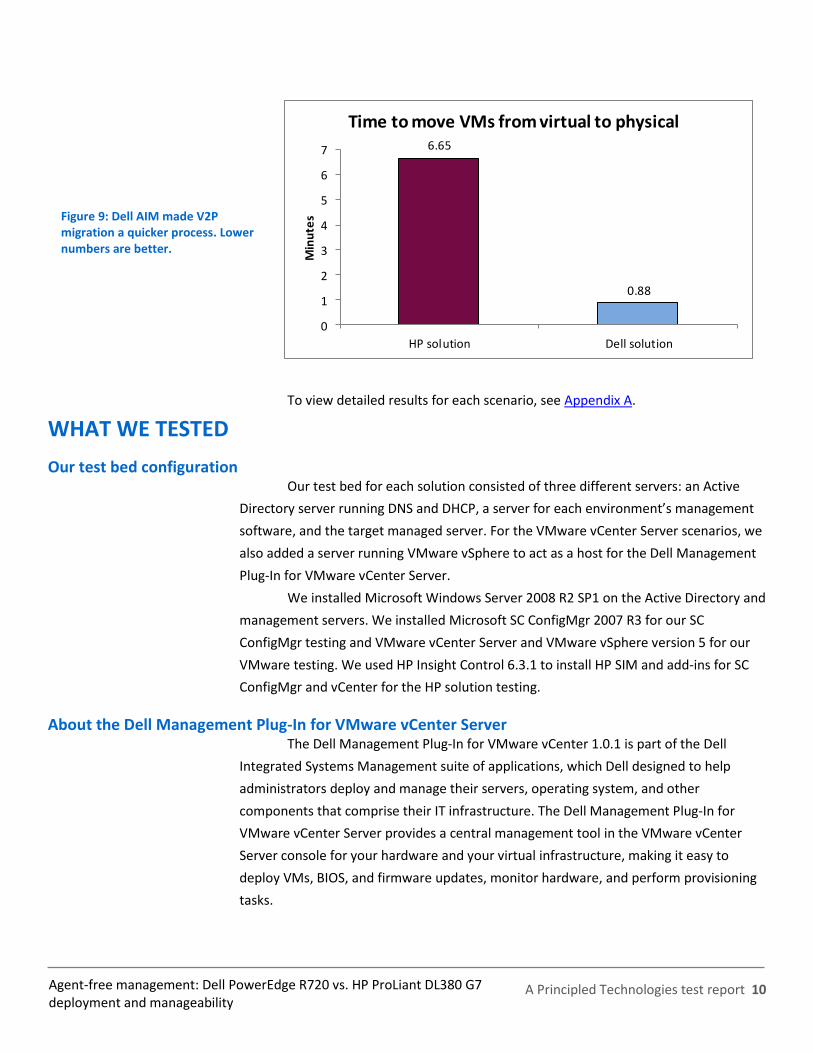
Dell is 86.7 percent faster and less complex (16 fewer steps) than HP in moving workloads from virtual-to-physical (V2P)
Dell’s agent-free approach to system management on the PowerEdge R720
server eases the hassle that come with management agents when moving from virtual
to physical systems. Having multiple system-management agents on a server, such as
those required by HP SIM, requires adding these agents after every V2P migration and
removing the same agents when migrating from physical to virtual. Adding these agents
each time the OS was moved to the physical HP server took 16 steps and 5.8 minutes of
administrator face time during post-migration configuration; whereas the Dell process
required no post-migration time or steps in our test scenario using Dell Advanced
Infrastructure Manager (AIM). The process of implementing the V2P migration using
HP’s tools required more than seven times the amount of administrator time than with
the Dell tools.
A variety of tools are available for executing a V2P migration, ranging from
backup-style solutions to more robust virtualization management products like Dell
AIM. We used Dell AIM for our testing and we assume the servers are already
configured and visible in Dell AIM. To provide system management in an HP
environment after an OS is moved to an HP server requires adding HP’s OS-based
management agent. If the OS is once again virtualized (P2V), the HP agents must be
removed prior to migration. HP’s requirement of an OS-based agent adds time to
administrative tasks. Figure 9 shows the time it took the solutions to move V2P
workloads.
A Principled Technologies test report 10
Agent-free management: Dell PowerEdge R720 vs. HP ProLiant DL380 G7 deployment and manageability
Figure 9: Dell AIM made V2P migration a quicker process. Lower numbers are better.
6.65
0.88
0
1
2
3
4
5
6
7
HP solution Dell solution
Min
ute
s
Time to move VMs from virtual to physical
To view detailed results for each scenario, see Appendix A.
WHAT WE TESTED
Our test bed configuration Our test bed for each solution consisted of three different servers: an Active
Directory server running DNS and DHCP, a server for each environment’s management
software, and the target managed server. For the VMware vCenter Server scenarios, we
also added a server running VMware vSphere to act as a host for the Dell Management
Plug-In for VMware vCenter Server.
We installed Microsoft Windows Server 2008 R2 SP1 on the Active Directory and
management servers. We installed Microsoft SC ConfigMgr 2007 R3 for our SC
ConfigMgr testing and VMware vCenter Server and VMware vSphere version 5 for our
VMware testing. We used HP Insight Control 6.3.1 to install HP SIM and add-ins for SC
ConfigMgr and vCenter for the HP solution testing.
About the Dell Management Plug-In for VMware vCenter Server The Dell Management Plug-In for VMware vCenter 1.0.1 is part of the Dell
Integrated Systems Management suite of applications, which Dell designed to help
administrators deploy and manage their servers, operating system, and other
components that comprise their IT infrastructure. The Dell Management Plug-In for
VMware vCenter Server provides a central management tool in the VMware vCenter
Server console for your hardware and your virtual infrastructure, making it easy to
deploy VMs, BIOS, and firmware updates, monitor hardware, and perform provisioning
tasks.
A Principled Technologies test report 11
Agent-free management: Dell PowerEdge R720 vs. HP ProLiant DL380 G7 deployment and manageability
To learn more about Dell Management Plug-In for VMware vCenter, visit
http://content.dell.com/us/en/enterprise/d/virtualization/management-plug-in-for-
vmware-vcenter.aspx.
About iDRAC7 and the Dell Lifecycle Controller Using the iDRAC7 and the Dell Lifecycle Controller allow simplified management
of both local and remote servers. Embedded management features are directly on the
server, and reduce reliance on external tools and media. The overall result of this
centralized management location is a reduction in steps, time, and potential errors, as
well as an increase in efficiency, when managing your servers.
To learn more about the Dell Lifecycle Controller, visit
http://en.community.dell.com/techcenter/systems-management/w/wiki/lifecycle-
controller.aspx. To learn more about iDRAC7, visit
http://www.dell.com/us/enterprise/p/d/solutions/integrated-dell-remote-access-
controller-idrac
About the Dell Server Deployment Pack The Dell Server Deployment Pack allows you to install and configure your Dell
servers directly from the Microsoft System Center Configuration Manager console.
To learn more, visit
http://www.dell.com/support/drivers/us/en/555/DriverDetails/DriverFileFormats?Drive
rId=R290118.
About Microsoft SC ConfigMgr, Dell Lifecycle Controller Integration, and the Dell Server Deployment Pack
The Dell Lifecycle Controller Integration for Microsoft SC ConfigMgr, along with
the Dell Server Deployment Pack, allows you to fully utilize the remote deployment and
management capabilities of your Dell servers directly from the Microsoft SC ConfigMgr
console, removing the reliance on a separate PXE infrastructure.
CONCLUSION Whether in a virtualized or a non-virtualized environment, Dell made server
management, deployment, and discovery simpler and faster in our test scenarios. In our
tests, using Dell server management features saved time and steps compared to using
HP management tools, which required additional OS-based agents. Dell’s agent-free
management approach eases tasks for administrators, and removes the need for OS-
based agents. This approach can potentially offer an organization dramatic savings in
time, effort, and money over the server lifecycle.
A Principled Technologies test report 12
Agent-free management: Dell PowerEdge R720 vs. HP ProLiant DL380 G7 deployment and manageability
APPENDIX A – DETAILED TEST RESULTS
Discovery in Microsoft SC ConfigMgr
Dell discovery using SC ConfigMgr 1 step (13 sec)
HP SIM discovery using SC ConfigMgr 19 steps (5 min, 51 sec)
1. Plug in network and power cables.
Retrieve MAC Address information and verify PXE boot order (3 min 25 sec) 1. Plug in power to server. 2. Press Power button on server. 3. Press F9 when prompted by the POST to enter the
BIOS. 4. With System Options highlighted, write down the MAC
address of the NIC that will be used for PXE communication.
5. Using the arrow keys, scroll down to Standard Boot Order (IPL), and press Enter.
6. Verify the NIC is first in the boot order. If not, alter the boot order.
7. Exit the BIOS. 8. Communicate the MAC address via email to the
system administrator for ConfigMgr.
Import the machine into a collection (2 min 26 sec) 1. In the Configuration Manager console, navigate to
System Center Configuration ManagerSite DatabaseComputer ManagementOperating System DeploymentComputer Association.
2. Right-click Computer Association. 3. Select Import Computer Information. 4. At the Select Source screen, select Import single
computer, and click Next. 5. At the Single Computer screen, provide a computer
name, enter the MAC address associated with the target system, and click Next.
6. At the Data Preview screen, click Next. 7. At the Choose Target Collection screen, select Add
computers to the following collection, and click Browse.
8. Select the appropriate collection, and click OK. 9. Click Next. 10. At the Summary screen, click Next. 11. Click Close.
A Principled Technologies test report 13
Agent-free management: Dell PowerEdge R720 vs. HP ProLiant DL380 G7 deployment and manageability
Physical server OS deployment and configuration with SC ConfigMgr
Dell OS deployment from SC ConfigMgr 5 steps (21 min, 13 sec)
HP OS deployment from SC ConfigMgr 45 steps (29 min, 45 sec)
Dell – OS Deployment from SC ConfigMgr Notes: We assume that all SC ConfigMgr profiles have already been created. We timed both administrator time and machine wait time. 1. In the SC ConfigMgr console, select Computer
ManagementCollections, right-click Managed Dell Lifecycle Controllers (OS Unknown) and select Dell Lifecycle Controller Launch Config Utility.
2. In the Dell Lifecycle Controller Configuration Utility, select Hardware Configuration and Operating System Deployment.
3. Keep default Do Not update firmware, and click Next. 4. Configure the BIOS, select desired profile, and click
Next. 5. Configure the RAID, select desired profile, and click
Next. 6. Configure the Network interface, select desired profile,
and click Next. 7. Configure the Integrated Dell Remote Access
Controller select desired profile, and click Next. 8. Deploy the operating system, select Advertisement,
Operating System, and click Next. 9. Select boot media of your choice, and click Reboot
target collection.
Note: We timed both administrator time and machine wait time. Retrieve MAC Address information and verify PXE boot order (3 min 25 sec) 1. Plug in power to server. 2. Press Power button on server. 3. Press F9 when prompted by the POST to enter the
BIOS. 4. With System Options highlighted, write down the MAC
address of the NIC that will be used for PXE communication.
5. Using the arrow keys, scroll down to Standard Boot Order (IPL), and press Enter.
6. Verify the NIC is first in the boot order. If not, alter the boot order.
7. Exit the BIOS. 8. Communicate the MAC address via email to the
system administrator for SC ConfigMgr.
Importing the machine into a collection (2 min, 26 sec) 1. In the Configuration Manager console, navigate to
System Center Configuration ManagerSite DatabaseComputer ManagementOperating System DeploymentComputer Association.
2. Right-click Computer Association. 3. Select Import Computer Information. 4. At the Select Source screen, select Import single
computer, and click Next. 5. At the Single Computer screen, provide a computer
name, enter the MAC address associated with the target system, and click Next.
6. At the Data Preview screen, click Next. 7. At the Choose Target Collection screen, select Add
computers to the following collection, and click Browse.
8. Select the appropriate collection, and click OK. 9. Click Next. 10. At the Summary screen, click Next. 11. Click Close.
Create and configure new task sequence (1 min, 43 sec) 1. Open SC ConfigMgr Console. 2. Open Computer ManagementOperating System
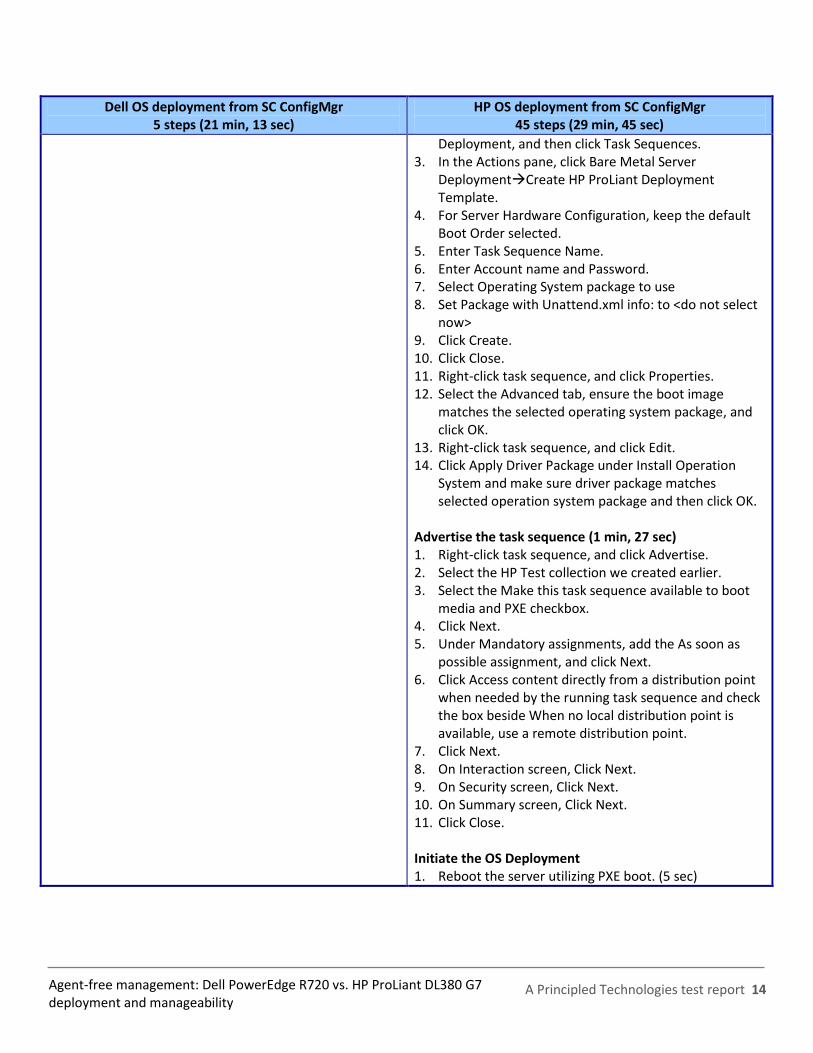
A Principled Technologies test report 14
Agent-free management: Dell PowerEdge R720 vs. HP ProLiant DL380 G7 deployment and manageability
Dell OS deployment from SC ConfigMgr 5 steps (21 min, 13 sec)
HP OS deployment from SC ConfigMgr 45 steps (29 min, 45 sec)
Deployment, and then click Task Sequences. 3. In the Actions pane, click Bare Metal Server
DeploymentCreate HP ProLiant Deployment Template.
4. For Server Hardware Configuration, keep the default Boot Order selected.
5. Enter Task Sequence Name. 6. Enter Account name and Password. 7. Select Operating System package to use 8. Set Package with Unattend.xml info: to <do not select
now> 9. Click Create. 10. Click Close. 11. Right-click task sequence, and click Properties. 12. Select the Advanced tab, ensure the boot image
matches the selected operating system package, and click OK.
13. Right-click task sequence, and click Edit. 14. Click Apply Driver Package under Install Operation
System and make sure driver package matches selected operation system package and then click OK.
Advertise the task sequence (1 min, 27 sec) 1. Right-click task sequence, and click Advertise. 2. Select the HP Test collection we created earlier. 3. Select the Make this task sequence available to boot
media and PXE checkbox. 4. Click Next. 5. Under Mandatory assignments, add the As soon as
possible assignment, and click Next. 6. Click Access content directly from a distribution point
when needed by the running task sequence and check the box beside When no local distribution point is available, use a remote distribution point.
7. Click Next. 8. On Interaction screen, Click Next. 9. On Security screen, Click Next. 10. On Summary screen, Click Next. 11. Click Close.
Initiate the OS Deployment 1. Reboot the server utilizing PXE boot. (5 sec)
A Principled Technologies test report 15
Agent-free management: Dell PowerEdge R720 vs. HP ProLiant DL380 G7 deployment and manageability
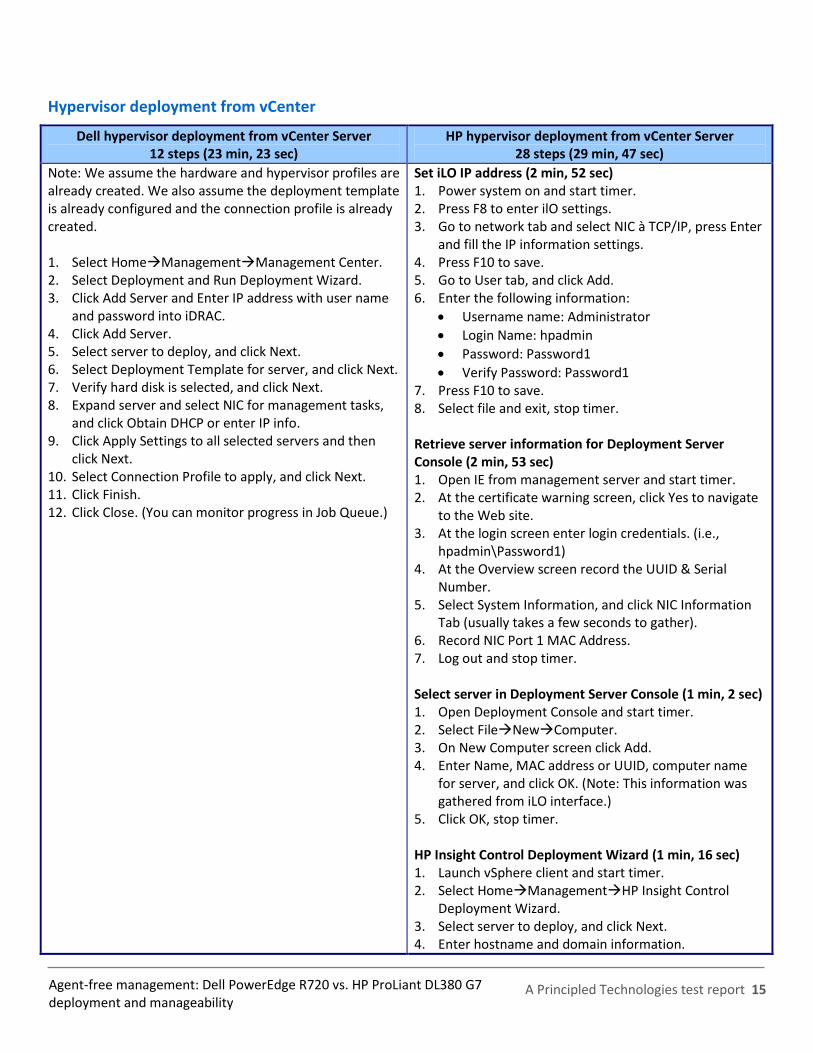
Hypervisor deployment from vCenter
Dell hypervisor deployment from vCenter Server 12 steps (23 min, 23 sec)
HP hypervisor deployment from vCenter Server 28 steps (29 min, 47 sec)
Note: We assume the hardware and hypervisor profiles are already created. We also assume the deployment template is already configured and the connection profile is already created. 1. Select HomeManagementManagement Center. 2. Select Deployment and Run Deployment Wizard. 3. Click Add Server and Enter IP address with user name
and password into iDRAC. 4. Click Add Server. 5. Select server to deploy, and click Next. 6. Select Deployment Template for server, and click Next. 7. Verify hard disk is selected, and click Next. 8. Expand server and select NIC for management tasks,
and click Obtain DHCP or enter IP info. 9. Click Apply Settings to all selected servers and then
click Next. 10. Select Connection Profile to apply, and click Next. 11. Click Finish. 12. Click Close. (You can monitor progress in Job Queue.)
Set iLO IP address (2 min, 52 sec) 1. Power system on and start timer. 2. Press F8 to enter ilO settings. 3. Go to network tab and select NIC à TCP/IP, press Enter
and fill the IP information settings. 4. Press F10 to save. 5. Go to User tab, and click Add. 6. Enter the following information:
Username name: Administrator
Login Name: hpadmin
Password: Password1
Verify Password: Password1 7. Press F10 to save. 8. Select file and exit, stop timer. Retrieve server information for Deployment Server Console (2 min, 53 sec) 1. Open IE from management server and start timer. 2. At the certificate warning screen, click Yes to navigate
to the Web site. 3. At the login screen enter login credentials. (i.e.,
hpadmin\Password1) 4. At the Overview screen record the UUID & Serial
Number. 5. Select System Information, and click NIC Information
Tab (usually takes a few seconds to gather). 6. Record NIC Port 1 MAC Address. 7. Log out and stop timer. Select server in Deployment Server Console (1 min, 2 sec) 1. Open Deployment Console and start timer. 2. Select FileNewComputer. 3. On New Computer screen click Add. 4. Enter Name, MAC address or UUID, computer name
for server, and click OK. (Note: This information was gathered from iLO interface.)
5. Click OK, stop timer. HP Insight Control Deployment Wizard (1 min, 16 sec) 1. Launch vSphere client and start timer. 2. Select HomeManagementHP Insight Control
Deployment Wizard. 3. Select server to deploy, and click Next. 4. Enter hostname and domain information.
A Principled Technologies test report 16
Agent-free management: Dell PowerEdge R720 vs. HP ProLiant DL380 G7 deployment and manageability
Dell hypervisor deployment from vCenter Server 12 steps (23 min, 23 sec)
HP hypervisor deployment from vCenter Server 28 steps (29 min, 47 sec)
5. Uncheck Use DHCP, enter static IP information, and click Next.
6. Click and drag ESXi job to server that is to be deployed, and click Next.
7. On Add to vCenter screen, enter username and password for host, and click Next.
8. Click Finish, stop timer.
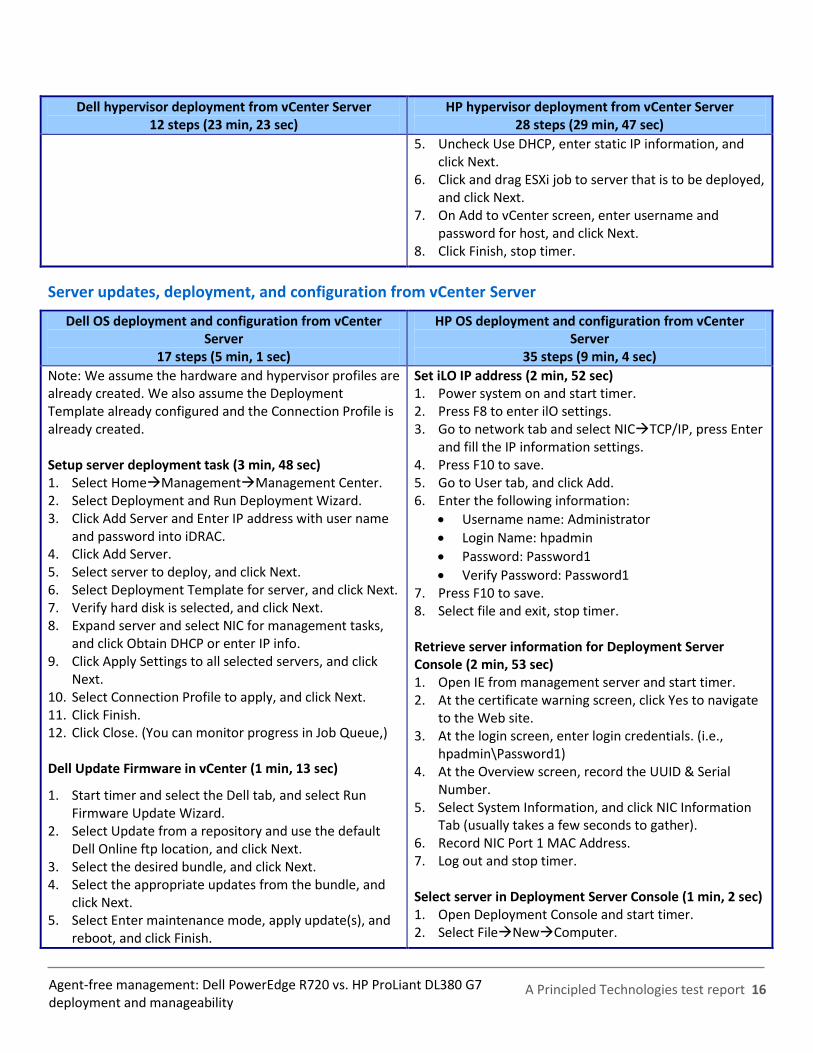
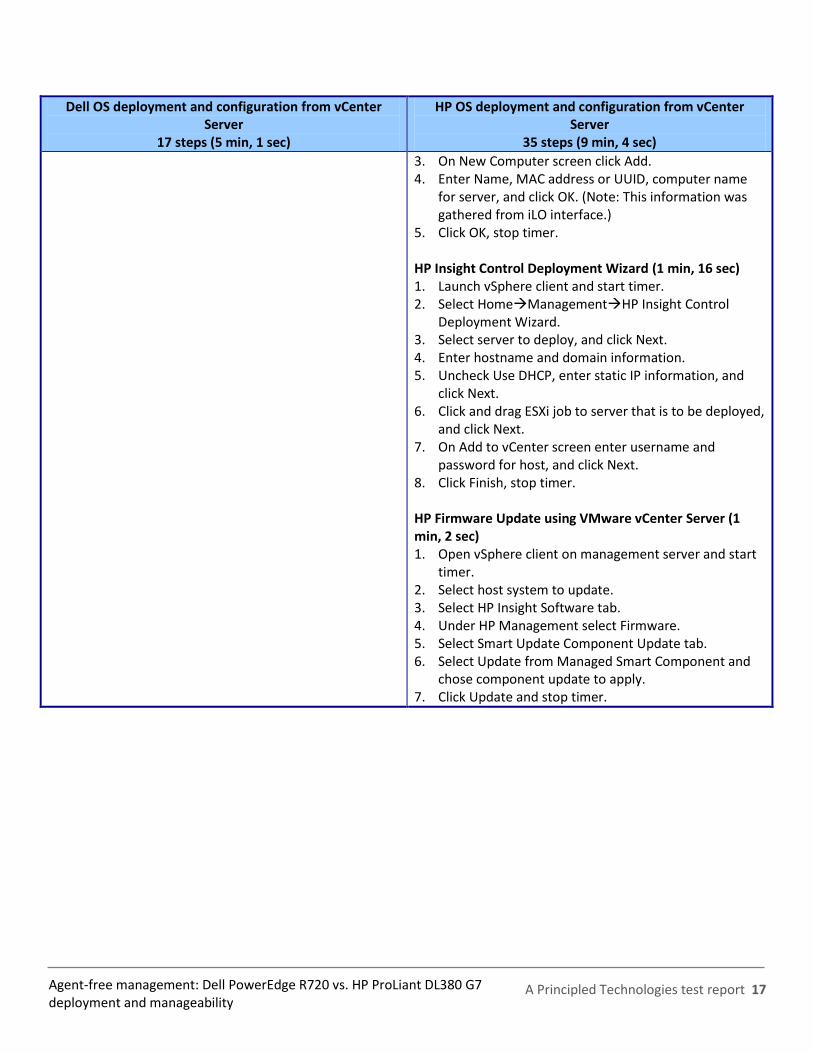
Server updates, deployment, and configuration from vCenter Server
Dell OS deployment and configuration from vCenter Server
17 steps (5 min, 1 sec)
HP OS deployment and configuration from vCenter Server
35 steps (9 min, 4 sec)
Note: We assume the hardware and hypervisor profiles are already created. We also assume the Deployment Template already configured and the Connection Profile is already created. Setup server deployment task (3 min, 48 sec) 1. Select HomeManagementManagement Center. 2. Select Deployment and Run Deployment Wizard. 3. Click Add Server and Enter IP address with user name
and password into iDRAC. 4. Click Add Server. 5. Select server to deploy, and click Next. 6. Select Deployment Template for server, and click Next. 7. Verify hard disk is selected, and click Next. 8. Expand server and select NIC for management tasks,
and click Obtain DHCP or enter IP info. 9. Click Apply Settings to all selected servers, and click
Next. 10. Select Connection Profile to apply, and click Next. 11. Click Finish. 12. Click Close. (You can monitor progress in Job Queue,)
Dell Update Firmware in vCenter (1 min, 13 sec)
1. Start timer and select the Dell tab, and select Run Firmware Update Wizard.
2. Select Update from a repository and use the default Dell Online ftp location, and click Next.
3. Select the desired bundle, and click Next. 4. Select the appropriate updates from the bundle, and
click Next. 5. Select Enter maintenance mode, apply update(s), and
reboot, and click Finish.
Set iLO IP address (2 min, 52 sec) 1. Power system on and start timer. 2. Press F8 to enter ilO settings. 3. Go to network tab and select NICTCP/IP, press Enter
and fill the IP information settings. 4. Press F10 to save. 5. Go to User tab, and click Add. 6. Enter the following information:
Username name: Administrator
Login Name: hpadmin
Password: Password1
Verify Password: Password1 7. Press F10 to save. 8. Select file and exit, stop timer. Retrieve server information for Deployment Server Console (2 min, 53 sec) 1. Open IE from management server and start timer. 2. At the certificate warning screen, click Yes to navigate
to the Web site. 3. At the login screen, enter login credentials. (i.e.,
hpadmin\Password1) 4. At the Overview screen, record the UUID & Serial
Number. 5. Select System Information, and click NIC Information
Tab (usually takes a few seconds to gather). 6. Record NIC Port 1 MAC Address. 7. Log out and stop timer.
Select server in Deployment Server Console (1 min, 2 sec) 1. Open Deployment Console and start timer. 2. Select FileNewComputer.
A Principled Technologies test report 17
Agent-free management: Dell PowerEdge R720 vs. HP ProLiant DL380 G7 deployment and manageability
Dell OS deployment and configuration from vCenter Server
17 steps (5 min, 1 sec)
HP OS deployment and configuration from vCenter Server
35 steps (9 min, 4 sec)
3. On New Computer screen click Add. 4. Enter Name, MAC address or UUID, computer name
for server, and click OK. (Note: This information was gathered from iLO interface.)
5. Click OK, stop timer. HP Insight Control Deployment Wizard (1 min, 16 sec) 1. Launch vSphere client and start timer. 2. Select HomeManagementHP Insight Control
Deployment Wizard. 3. Select server to deploy, and click Next. 4. Enter hostname and domain information. 5. Uncheck Use DHCP, enter static IP information, and
click Next. 6. Click and drag ESXi job to server that is to be deployed,
and click Next. 7. On Add to vCenter screen enter username and
password for host, and click Next. 8. Click Finish, stop timer. HP Firmware Update using VMware vCenter Server (1 min, 2 sec) 1. Open vSphere client on management server and start
timer. 2. Select host system to update. 3. Select HP Insight Software tab. 4. Under HP Management select Firmware. 5. Select Smart Update Component Update tab. 6. Select Update from Managed Smart Component and
chose component update to apply. 7. Click Update and stop timer.
A Principled Technologies test report 18
Agent-free management: Dell PowerEdge R720 vs. HP ProLiant DL380 G7 deployment and manageability
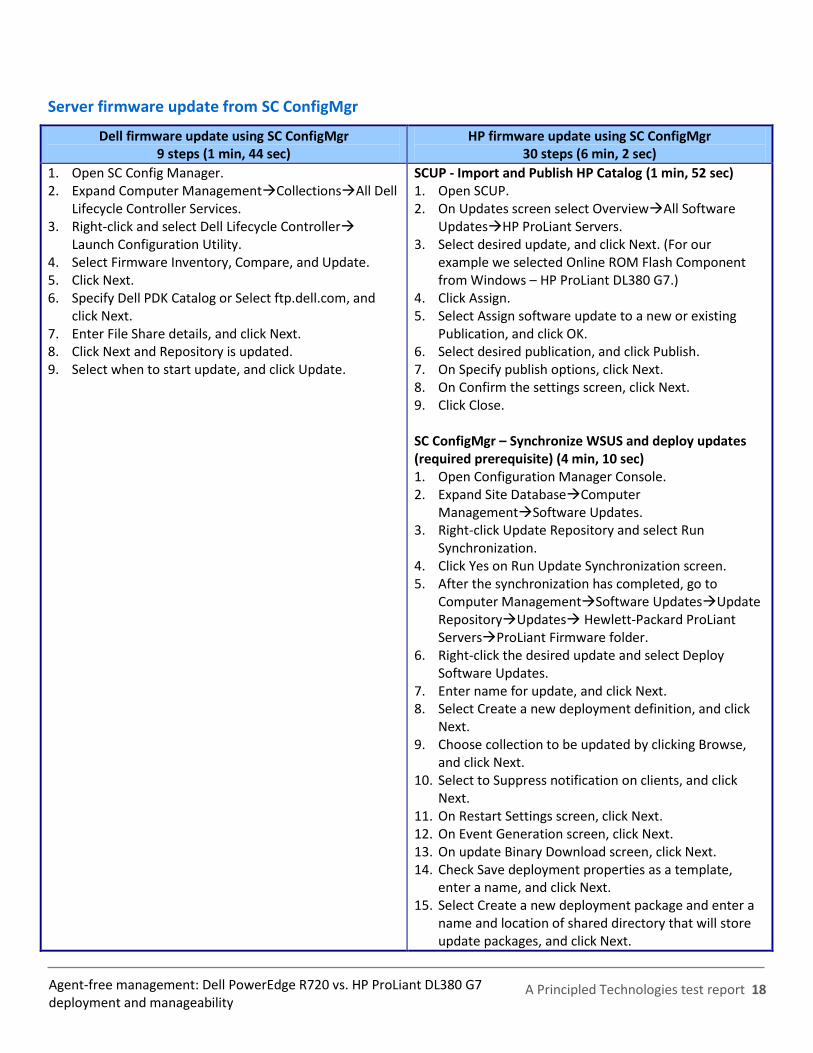
Server firmware update from SC ConfigMgr
Dell firmware update using SC ConfigMgr 9 steps (1 min, 44 sec)
HP firmware update using SC ConfigMgr 30 steps (6 min, 2 sec)
1. Open SC Config Manager. 2. Expand Computer ManagementCollectionsAll Dell
Lifecycle Controller Services. 3. Right-click and select Dell Lifecycle Controller
Launch Configuration Utility. 4. Select Firmware Inventory, Compare, and Update. 5. Click Next. 6. Specify Dell PDK Catalog or Select ftp.dell.com, and
click Next. 7. Enter File Share details, and click Next. 8. Click Next and Repository is updated. 9. Select when to start update, and click Update.
SCUP - Import and Publish HP Catalog (1 min, 52 sec) 1. Open SCUP. 2. On Updates screen select OverviewAll Software
UpdatesHP ProLiant Servers. 3. Select desired update, and click Next. (For our
example we selected Online ROM Flash Component from Windows – HP ProLiant DL380 G7.)
4. Click Assign. 5. Select Assign software update to a new or existing
Publication, and click OK. 6. Select desired publication, and click Publish. 7. On Specify publish options, click Next. 8. On Confirm the settings screen, click Next. 9. Click Close.
SC ConfigMgr – Synchronize WSUS and deploy updates (required prerequisite) (4 min, 10 sec) 1. Open Configuration Manager Console. 2. Expand Site DatabaseComputer
ManagementSoftware Updates. 3. Right-click Update Repository and select Run
Synchronization. 4. Click Yes on Run Update Synchronization screen. 5. After the synchronization has completed, go to
Computer ManagementSoftware UpdatesUpdate RepositoryUpdates Hewlett-Packard ProLiant ServersProLiant Firmware folder.
6. Right-click the desired update and select Deploy Software Updates.
7. Enter name for update, and click Next. 8. Select Create a new deployment definition, and click
Next. 9. Choose collection to be updated by clicking Browse,
and click Next. 10. Select to Suppress notification on clients, and click
Next. 11. On Restart Settings screen, click Next. 12. On Event Generation screen, click Next. 13. On update Binary Download screen, click Next. 14. Check Save deployment properties as a template,
enter a name, and click Next. 15. Select Create a new deployment package and enter a
name and location of shared directory that will store update packages, and click Next.
A Principled Technologies test report 19
Agent-free management: Dell PowerEdge R720 vs. HP ProLiant DL380 G7 deployment and manageability
Dell firmware update using SC ConfigMgr 9 steps (1 min, 44 sec)
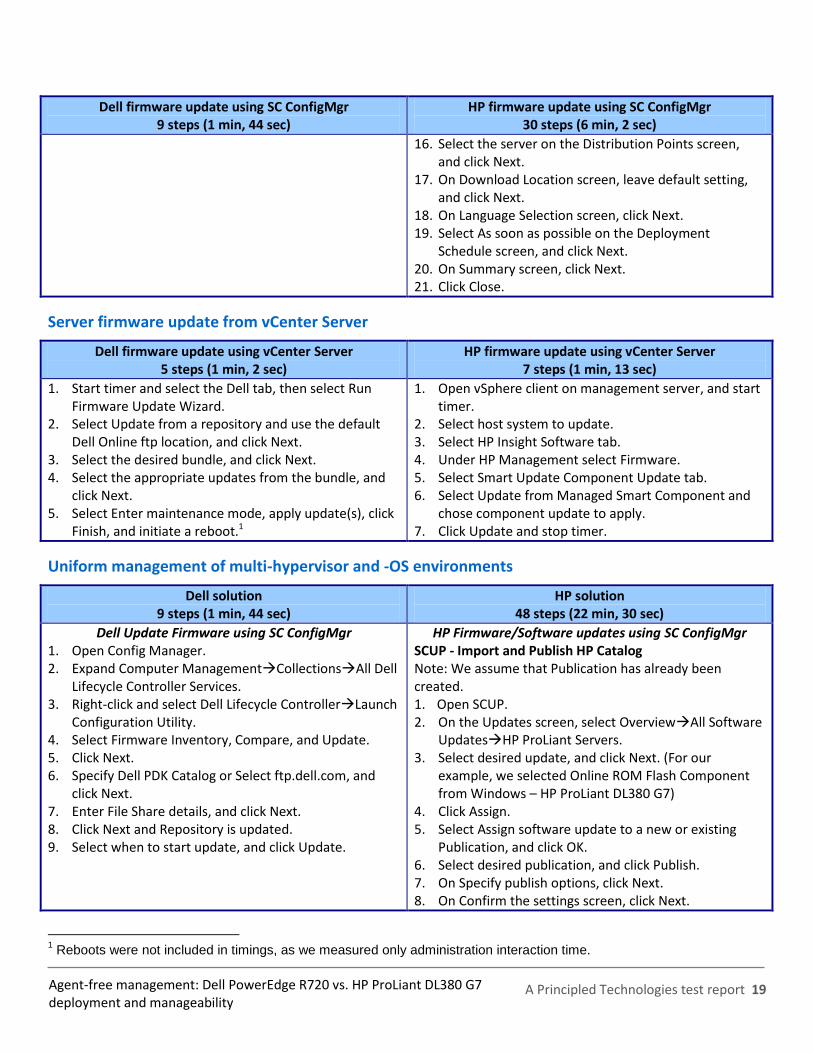
HP firmware update using SC ConfigMgr 30 steps (6 min, 2 sec)
16. Select the server on the Distribution Points screen, and click Next.
17. On Download Location screen, leave default setting, and click Next.
18. On Language Selection screen, click Next. 19. Select As soon as possible on the Deployment
Schedule screen, and click Next. 20. On Summary screen, click Next. 21. Click Close.
Server firmware update from vCenter Server
Dell firmware update using vCenter Server 5 steps (1 min, 2 sec)
HP firmware update using vCenter Server 7 steps (1 min, 13 sec)
1. Start timer and select the Dell tab, then select Run Firmware Update Wizard.
2. Select Update from a repository and use the default Dell Online ftp location, and click Next.
3. Select the desired bundle, and click Next. 4. Select the appropriate updates from the bundle, and
click Next. 5. Select Enter maintenance mode, apply update(s), click
Finish, and initiate a reboot.1
1. Open vSphere client on management server, and start timer.
2. Select host system to update. 3. Select HP Insight Software tab. 4. Under HP Management select Firmware. 5. Select Smart Update Component Update tab. 6. Select Update from Managed Smart Component and
chose component update to apply. 7. Click Update and stop timer.
Uniform management of multi-hypervisor and -OS environments
Dell solution 9 steps (1 min, 44 sec)
HP solution 48 steps (22 min, 30 sec)
Dell Update Firmware using SC ConfigMgr 1. Open Config Manager. 2. Expand Computer ManagementCollectionsAll Dell
Lifecycle Controller Services. 3. Right-click and select Dell Lifecycle ControllerLaunch
Configuration Utility. 4. Select Firmware Inventory, Compare, and Update. 5. Click Next. 6. Specify Dell PDK Catalog or Select ftp.dell.com, and
click Next. 7. Enter File Share details, and click Next. 8. Click Next and Repository is updated. 9. Select when to start update, and click Update.
HP Firmware/Software updates using SC ConfigMgr SCUP - Import and Publish HP Catalog Note: We assume that Publication has already been created. 1. Open SCUP. 2. On the Updates screen, select OverviewAll Software
UpdatesHP ProLiant Servers. 3. Select desired update, and click Next. (For our
example, we selected Online ROM Flash Component from Windows – HP ProLiant DL380 G7)
4. Click Assign. 5. Select Assign software update to a new or existing
Publication, and click OK. 6. Select desired publication, and click Publish. 7. On Specify publish options, click Next. 8. On Confirm the settings screen, click Next.
1 Reboots were not included in timings, as we measured only administration interaction time.
A Principled Technologies test report 20
Agent-free management: Dell PowerEdge R720 vs. HP ProLiant DL380 G7 deployment and manageability
Dell solution 9 steps (1 min, 44 sec)
HP solution 48 steps (22 min, 30 sec)
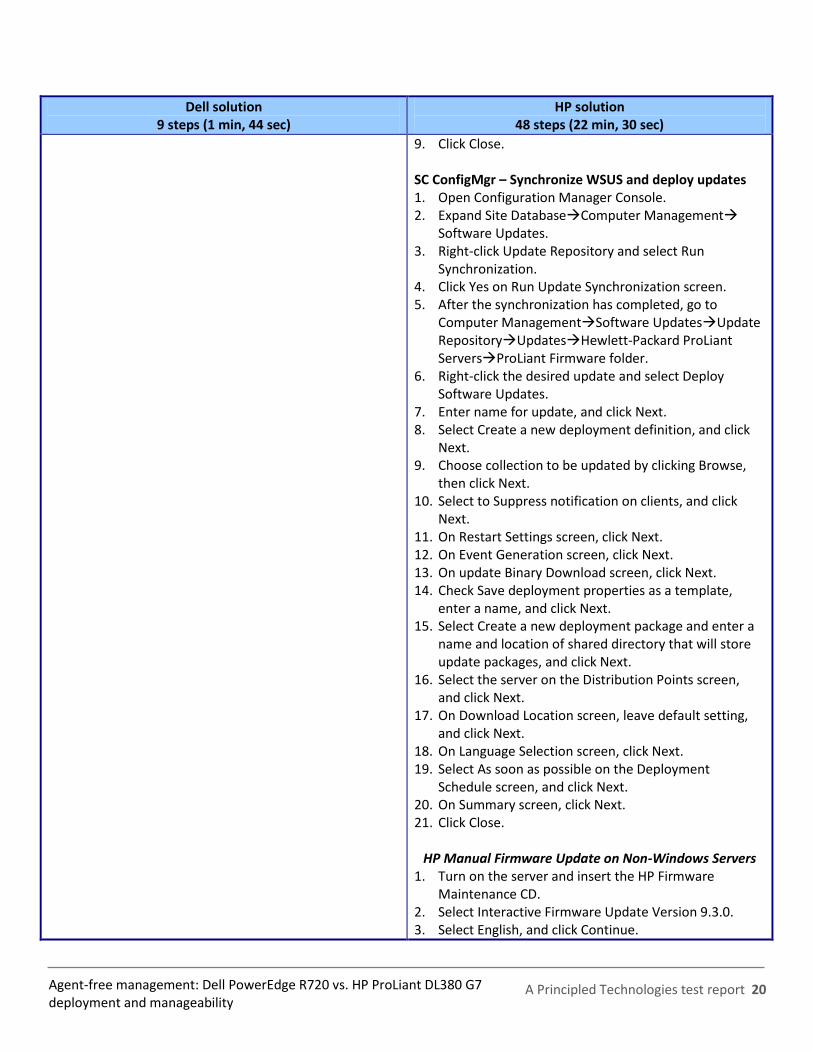
9. Click Close.
SC ConfigMgr – Synchronize WSUS and deploy updates 1. Open Configuration Manager Console. 2. Expand Site DatabaseComputer Management
Software Updates. 3. Right-click Update Repository and select Run
Synchronization. 4. Click Yes on Run Update Synchronization screen. 5. After the synchronization has completed, go to
Computer ManagementSoftware UpdatesUpdate RepositoryUpdatesHewlett-Packard ProLiant ServersProLiant Firmware folder.
6. Right-click the desired update and select Deploy Software Updates.
7. Enter name for update, and click Next. 8. Select Create a new deployment definition, and click
Next. 9. Choose collection to be updated by clicking Browse,
then click Next. 10. Select to Suppress notification on clients, and click
Next. 11. On Restart Settings screen, click Next. 12. On Event Generation screen, click Next. 13. On update Binary Download screen, click Next. 14. Check Save deployment properties as a template,
enter a name, and click Next. 15. Select Create a new deployment package and enter a
name and location of shared directory that will store update packages, and click Next.
16. Select the server on the Distribution Points screen, and click Next.
17. On Download Location screen, leave default setting, and click Next.
18. On Language Selection screen, click Next. 19. Select As soon as possible on the Deployment
Schedule screen, and click Next. 20. On Summary screen, click Next. 21. Click Close.
HP Manual Firmware Update on Non-Windows Servers 1. Turn on the server and insert the HP Firmware
Maintenance CD. 2. Select Interactive Firmware Update Version 9.3.0. 3. Select English, and click Continue.

A Principled Technologies test report 21
Agent-free management: Dell PowerEdge R720 vs. HP ProLiant DL380 G7 deployment and manageability
Dell solution 9 steps (1 min, 44 sec)
HP solution 48 steps (22 min, 30 sec)
4. Accept the license agreement by clicking Agree. 5. Select the Firmware Update tab, and click Install
Firmware. 6. Click OK. 7. Select ML-DL-SL 300/500/700/900 catalog. 8. Select desired updates, and click Install. 9. When prompted to reboot, click Reboot Now.
Replacing the RAID controller
Dell Replacement of RAID Controller 2 steps (5 min, 0 sec)
HP Replacement of RAID Controller 14 steps (34 min, 32 sec)
1. Replace RAID controller. 2. Turn on the server. Wait through the three-step
firmware upgrade and reboot process for the firmware update to automatically complete. Once the three-step firmware process has completed, the system will reboot.
1. Replace RAID controller. 2. Locate HP Firmware Update DVD and download. 3. Burn ISO image to DVD. 4. Turn on the server, start timer, and insert the HP
Firmware Maintenance CD. 5. Select Interactive Firmware Update Version 9.3.0. 6. Select English, and click Continue. 7. Accept the license agreement by clicking Agree. 8. Select the Firmware Update tab, and click Install
Firmware. 9. Click OK. 10. Select ML-DL-SL 300/500/700/900 catalog. 11. Deselect All choices and check Firmware CD
Supplemental update Online ROM files for P212, and click Install.
12. When prompted to reboot, click Reboot Now. 13. On Post screen displaying Press any Key to view
optional ROM messages, press any key. 14. Visually check controller firmware version on POST to
make sure the correct version applied and stop timer.
Making servers manageable after virtual-to-physical workload transfers
Making a Dell server manageable after a virtual-to-physical migration using Dell tools (no agent installation
required) 6 steps (53 sec)
Making an HP server manageable after a virtual-to-physical migration using HP tools (agent installation
required) 16 steps (5 min, 46 sec)
1. Open AIM. 2. Right-click and stop desired VM. 3. Select Personas on the menu tree on the left. 4. Right-click the desired Personas, and select Start
Personas. 5. On Select Operation screen, choose On Select Server,
and click Next.
1. Open HP SIM. 2. Select OptionsDiscovery. 3. For System Automatic Discovery click Edit. 4. Enter IP or IP range, and click Save. 5. Click Run Now. 6. Select the newly discovered system, and click Run the
managed systems setup wizard.
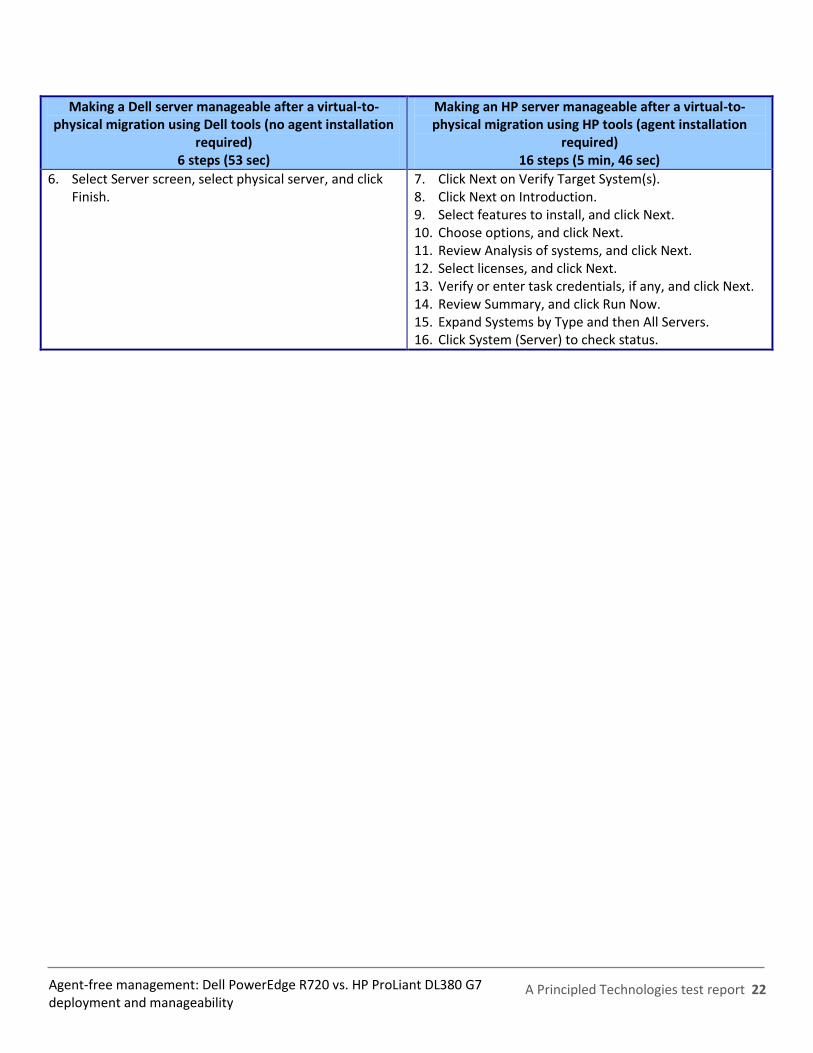
A Principled Technologies test report 22
Agent-free management: Dell PowerEdge R720 vs. HP ProLiant DL380 G7 deployment and manageability
Making a Dell server manageable after a virtual-to-physical migration using Dell tools (no agent installation
required) 6 steps (53 sec)
Making an HP server manageable after a virtual-to-physical migration using HP tools (agent installation
required) 16 steps (5 min, 46 sec)
6. Select Server screen, select physical server, and click Finish.
7. Click Next on Verify Target System(s). 8. Click Next on Introduction. 9. Select features to install, and click Next. 10. Choose options, and click Next. 11. Review Analysis of systems, and click Next. 12. Select licenses, and click Next. 13. Verify or enter task credentials, if any, and click Next. 14. Review Summary, and click Run Now. 15. Expand Systems by Type and then All Servers. 16. Click System (Server) to check status.
A Principled Technologies test report 23
Agent-free management: Dell PowerEdge R720 vs. HP ProLiant DL380 G7 deployment and manageability
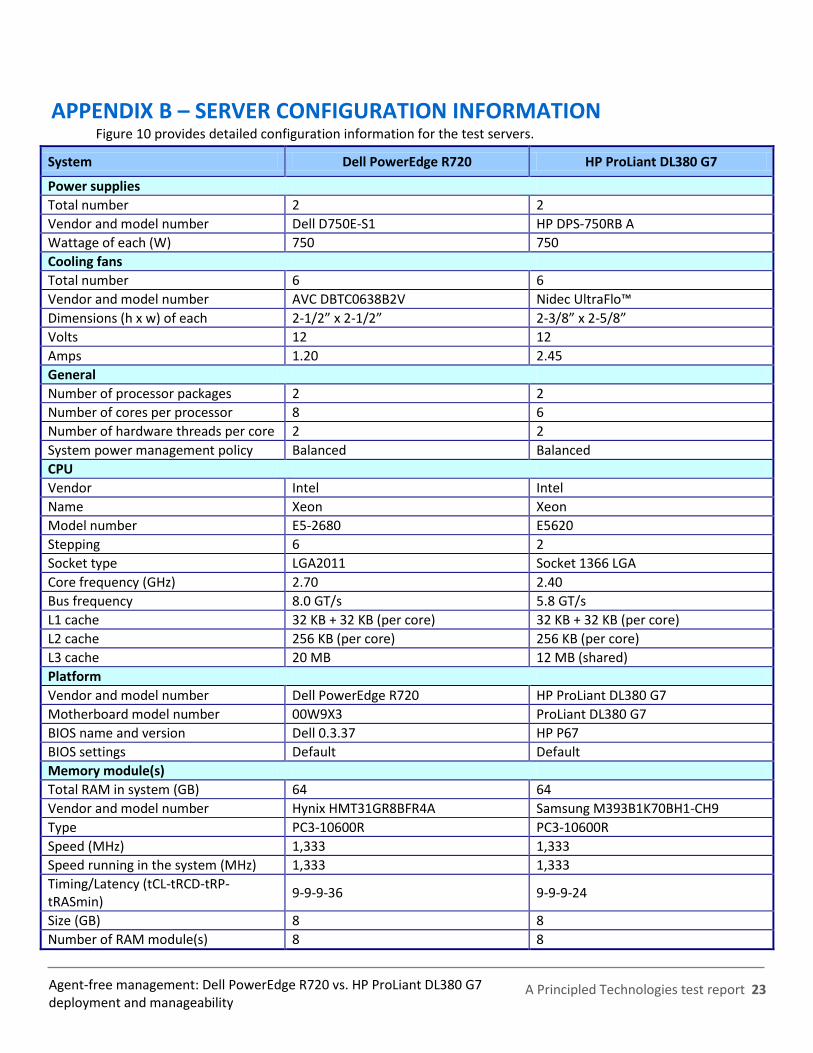
APPENDIX B – SERVER CONFIGURATION INFORMATION
Figure 10 provides detailed configuration information for the test servers.
System Dell PowerEdge R720 HP ProLiant DL380 G7
Power supplies
Total number 2 2
Vendor and model number Dell D750E-S1 HP DPS-750RB A
Wattage of each (W) 750 750
Cooling fans
Total number 6 6
Vendor and model number AVC DBTC0638B2V Nidec UltraFlo™
Dimensions (h x w) of each 2-1/2” x 2-1/2” 2-3/8” x 2-5/8”
Volts 12 12
Amps 1.20 2.45
General
Number of processor packages 2 2
Number of cores per processor 8 6
Number of hardware threads per core 2 2
System power management policy Balanced Balanced
CPU
Vendor Intel Intel
Name Xeon Xeon
Model number E5-2680 E5620
Stepping 6 2
Socket type LGA2011 Socket 1366 LGA
Core frequency (GHz) 2.70 2.40
Bus frequency 8.0 GT/s 5.8 GT/s
L1 cache 32 KB + 32 KB (per core) 32 KB + 32 KB (per core)
L2 cache 256 KB (per core) 256 KB (per core)
L3 cache 20 MB 12 MB (shared)
Platform
Vendor and model number Dell PowerEdge R720 HP ProLiant DL380 G7
Motherboard model number 00W9X3 ProLiant DL380 G7
BIOS name and version Dell 0.3.37 HP P67
BIOS settings Default Default
Memory module(s)
Total RAM in system (GB) 64 64
Vendor and model number Hynix HMT31GR8BFR4A Samsung M393B1K70BH1-CH9
Type PC3-10600R PC3-10600R
Speed (MHz) 1,333 1,333
Speed running in the system (MHz) 1,333 1,333
Timing/Latency (tCL-tRCD-tRP-tRASmin)
9-9-9-36 9-9-9-24
Size (GB) 8 8
Number of RAM module(s) 8 8
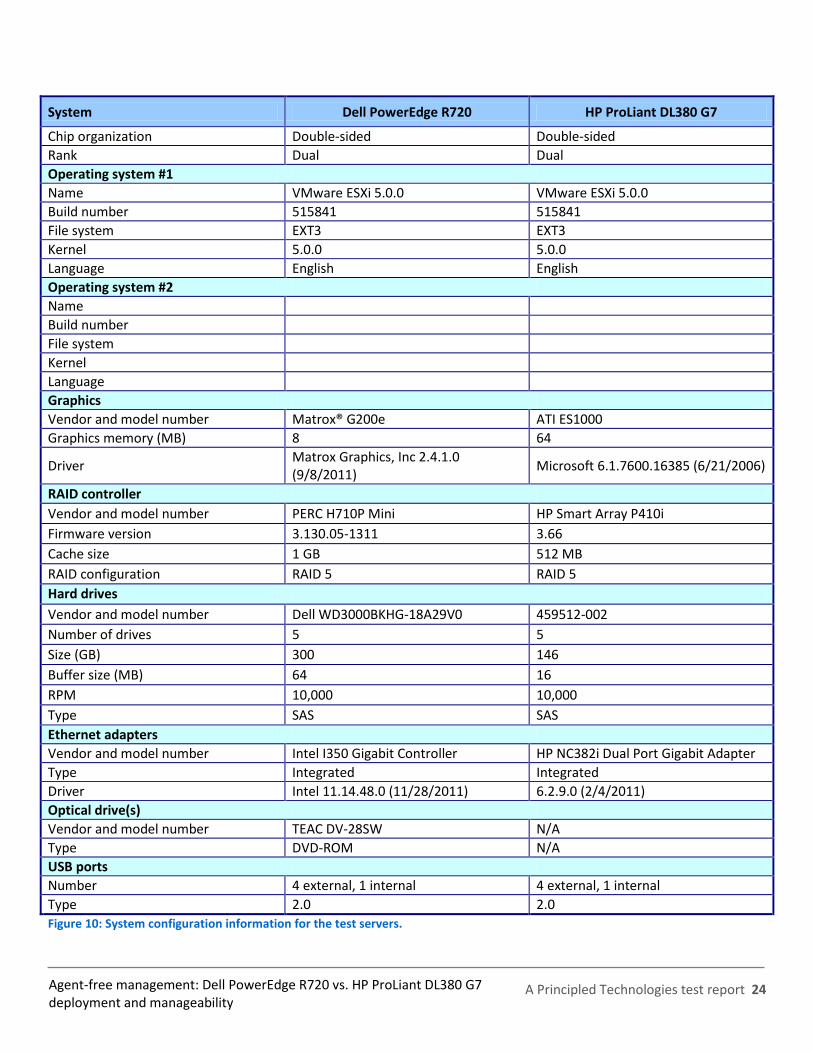
A Principled Technologies test report 24
Agent-free management: Dell PowerEdge R720 vs. HP ProLiant DL380 G7 deployment and manageability
System Dell PowerEdge R720 HP ProLiant DL380 G7
Chip organization Double-sided Double-sided
Rank Dual Dual
Operating system #1
Name VMware ESXi 5.0.0 VMware ESXi 5.0.0
Build number 515841 515841
File system EXT3 EXT3
Kernel 5.0.0 5.0.0
Language English English
Operating system #2
Name
Build number
File system
Kernel
Language
Graphics
Vendor and model number Matrox® G200e ATI ES1000
Graphics memory (MB) 8 64
Driver Matrox Graphics, Inc 2.4.1.0 (9/8/2011)
Microsoft 6.1.7600.16385 (6/21/2006)
RAID controller
Vendor and model number PERC H710P Mini HP Smart Array P410i
Firmware version 3.130.05-1311 3.66
Cache size 1 GB 512 MB
RAID configuration RAID 5 RAID 5
Hard drives
Vendor and model number Dell WD3000BKHG-18A29V0 459512-002
Number of drives 5 5
Size (GB) 300 146
Buffer size (MB) 64 16
RPM 10,000 10,000
Type SAS SAS
Ethernet adapters
Vendor and model number Intel I350 Gigabit Controller HP NC382i Dual Port Gigabit Adapter
Type Integrated Integrated
Driver Intel 11.14.48.0 (11/28/2011) 6.2.9.0 (2/4/2011)
Optical drive(s)
Vendor and model number TEAC DV-28SW N/A
Type DVD-ROM N/A
USB ports
Number 4 external, 1 internal 4 external, 1 internal
Type 2.0 2.0
Figure 10: System configuration information for the test servers.
A Principled Technologies test report 25
Agent-free management: Dell PowerEdge R720 vs. HP ProLiant DL380 G7 deployment and manageability
ABOUT PRINCIPLED TECHNOLOGIES
Principled Technologies, Inc. 1007 Slater Road, Suite 300 Durham, NC, 27703 www.principledtechnologies.com
We provide industry-leading technology assessment and fact-based marketing services. We bring to every assignment extensive experience with and expertise in all aspects of technology testing and analysis, from researching new technologies, to developing new methodologies, to testing with existing and new tools. When the assessment is complete, we know how to present the results to a broad range of target audiences. We provide our clients with the materials they need, from market-focused data to use in their own collateral to custom sales aids, such as test reports, performance assessments, and white papers. Every document reflects the results of our trusted independent analysis. We provide customized services that focus on our clients’ individual requirements. Whether the technology involves hardware, software, Web sites, or services, we offer the experience, expertise, and tools to help our clients assess how it will fare against its competition, its performance, its market readiness, and its quality and reliability. Our founders, Mark L. Van Name and Bill Catchings, have worked together in technology assessment for over 20 years. As journalists, they published over a thousand articles on a wide array of technology subjects. They created and led the Ziff-Davis Benchmark Operation, which developed such industry-standard benchmarks as Ziff Davis Media’s Winstone and WebBench. They founded and led eTesting Labs, and after the acquisition of that company by Lionbridge Technologies were the head and CTO of VeriTest.
Principled Technologies is a registered trademark of Principled Technologies, Inc. All other product names are the trademarks of their respective owners.
Disclaimer of Warranties; Limitation of Liability: PRINCIPLED TECHNOLOGIES, INC. HAS MADE REASONABLE EFFORTS TO ENSURE THE ACCURACY AND VALIDITY OF ITS TESTING, HOWEVER, PRINCIPLED TECHNOLOGIES, INC. SPECIFICALLY DISCLAIMS ANY WARRANTY, EXPRESSED OR IMPLIED, RELATING TO THE TEST RESULTS AND ANALYSIS, THEIR ACCURACY, COMPLETENESS OR QUALITY, INCLUDING ANY IMPLIED WARRANTY OF FITNESS FOR ANY PARTICULAR PURPOSE. ALL PERSONS OR ENTITIES RELYING ON THE RESULTS OF ANY TESTING DO SO AT THEIR OWN RISK, AND AGREE THAT PRINCIPLED TECHNOLOGIES, INC., ITS EMPLOYEES AND ITS SUBCONTRACTORS SHALL HAVE NO LIABILITY WHATSOEVER FROM ANY CLAIM OF LOSS OR DAMAGE ON ACCOUNT OF ANY ALLEGED ERROR OR DEFECT IN ANY TESTING PROCEDURE OR RESULT. IN NO EVENT SHALL PRINCIPLED TECHNOLOGIES, INC. BE LIABLE FOR INDIRECT, SPECIAL, INCIDENTAL, OR CONSEQUENTIAL DAMAGES IN CONNECTION WITH ITS TESTING, EVEN IF ADVISED OF THE POSSIBILITY OF SUCH DAMAGES. IN NO EVENT SHALL PRINCIPLED TECHNOLOGIES, INC.’S LIABILITY, INCLUDING FOR DIRECT DAMAGES, EXCEED THE AMOUNTS PAID IN CONNECTION WITH PRINCIPLED TECHNOLOGIES, INC.’S TESTING. CUSTOMER’S SOLE AND EXCLUSIVE REMEDIES ARE AS SET FORTH HEREIN.