Embed Size (px)
Citation preview
Aggie DocumentationRelease 2.0
Tom Smyth and many others
Feb 16, 2022

Contents
1 Introduction 11.1 Achitectural Design . . . . . . . . . . . . . . . . . . . . . . . . . . . . . . . . . . . . . . . . . . . 11.2 Acknowledgements . . . . . . . . . . . . . . . . . . . . . . . . . . . . . . . . . . . . . . . . . . . 2
2 Installation 3
3 Settings 53.1 Fetching . . . . . . . . . . . . . . . . . . . . . . . . . . . . . . . . . . . . . . . . . . . . . . . . . 53.2 Social Media Feed Authentication . . . . . . . . . . . . . . . . . . . . . . . . . . . . . . . . . . . . 63.3 Generating Source Tokens . . . . . . . . . . . . . . . . . . . . . . . . . . . . . . . . . . . . . . . . 83.4 Email Settings . . . . . . . . . . . . . . . . . . . . . . . . . . . . . . . . . . . . . . . . . . . . . . 123.5 Widgets . . . . . . . . . . . . . . . . . . . . . . . . . . . . . . . . . . . . . . . . . . . . . . . . . . 16
4 Establishing the SMTC 194.1 What is the SMTC? . . . . . . . . . . . . . . . . . . . . . . . . . . . . . . . . . . . . . . . . . . . 194.2 Key Term Definitions . . . . . . . . . . . . . . . . . . . . . . . . . . . . . . . . . . . . . . . . . . 204.3 Public Event Monitoring Checklist . . . . . . . . . . . . . . . . . . . . . . . . . . . . . . . . . . . 20
5 Using Aggie 215.1 Sources . . . . . . . . . . . . . . . . . . . . . . . . . . . . . . . . . . . . . . . . . . . . . . . . . . 215.2 Reports Page Activities . . . . . . . . . . . . . . . . . . . . . . . . . . . . . . . . . . . . . . . . . 225.3 Batch Mode . . . . . . . . . . . . . . . . . . . . . . . . . . . . . . . . . . . . . . . . . . . . . . . 315.4 Tags . . . . . . . . . . . . . . . . . . . . . . . . . . . . . . . . . . . . . . . . . . . . . . . . . . . . 335.5 Groups Page Activities . . . . . . . . . . . . . . . . . . . . . . . . . . . . . . . . . . . . . . . . . . 41
6 User Management 476.1 User privileges . . . . . . . . . . . . . . . . . . . . . . . . . . . . . . . . . . . . . . . . . . . . . . 476.2 Creating a New User . . . . . . . . . . . . . . . . . . . . . . . . . . . . . . . . . . . . . . . . . . . 47
7 Indices and Tables 49
i

ii
CHAPTER 1
Introduction
Aggie is a real-time, user-generated content aggregation and analysis platform premised on the core principles of:
Technological neutrality: Support content from popular social media platforms along with media originating frompurpose-built systems (namely those specific to election monitoring, crises, or conflict response).
Computer enabled expert analysis: Automated computer analysis augments and enhances expert human real-timereasoning and decision making.
Real-time response: Moving from online report aggregation to analysis, escalation and response within one hour.
Big data: Supporting up to 1,000 incoming reports per second.
Open source principles: Aggie is fully open source and welcomes contributions.
1.1 Achitectural Design
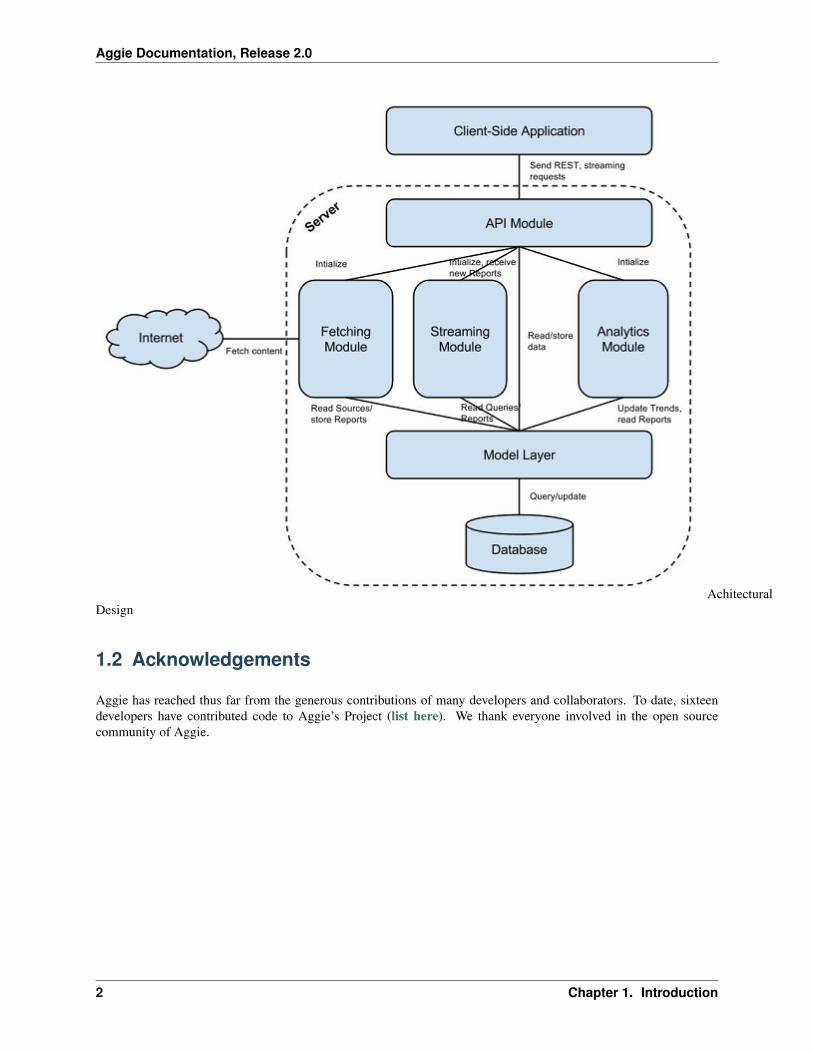
Achitecturally, Aggie has two modules; the backend server that crawls the internet to aggregate user generated content,and a front end client API that runs on a browser.
1
Aggie Documentation, Release 2.0
AchitecturalDesign
1.2 Acknowledgements
Aggie has reached thus far from the generous contributions of many developers and collaborators. To date, sixteendevelopers have contributed code to Aggie’s Project (list here). We thank everyone involved in the open sourcecommunity of Aggie.
2 Chapter 1. Introduction
CHAPTER 2
Installation
Aggie can be installed by following the instructions in the GitHub repository.
3

Aggie Documentation, Release 2.0
4 Chapter 2. Installation
CHAPTER 3
Settings
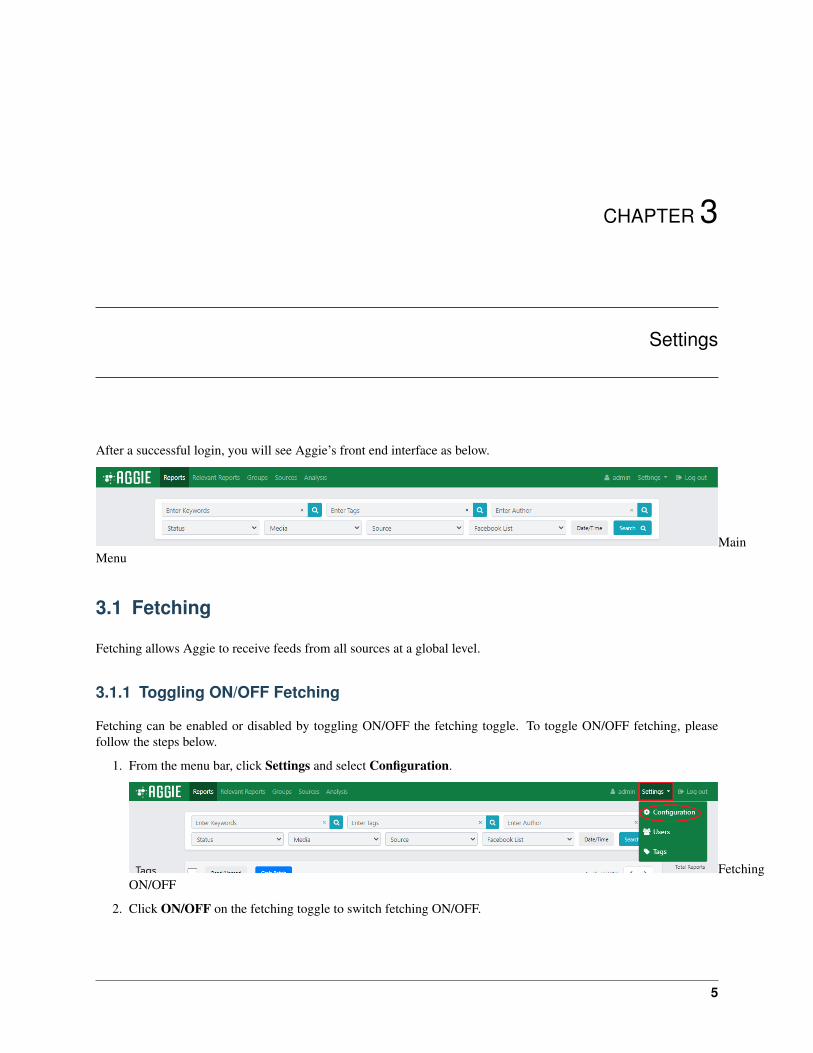
After a successful login, you will see Aggie’s front end interface as below.
MainMenu
3.1 Fetching
Fetching allows Aggie to receive feeds from all sources at a global level.
3.1.1 Toggling ON/OFF Fetching
Fetching can be enabled or disabled by toggling ON/OFF the fetching toggle. To toggle ON/OFF fetching, pleasefollow the steps below.
1. From the menu bar, click Settings and select Configuration.
FetchingON/OFF
2. Click ON/OFF on the fetching toggle to switch fetching ON/OFF.
5
Aggie Documentation, Release 2.0
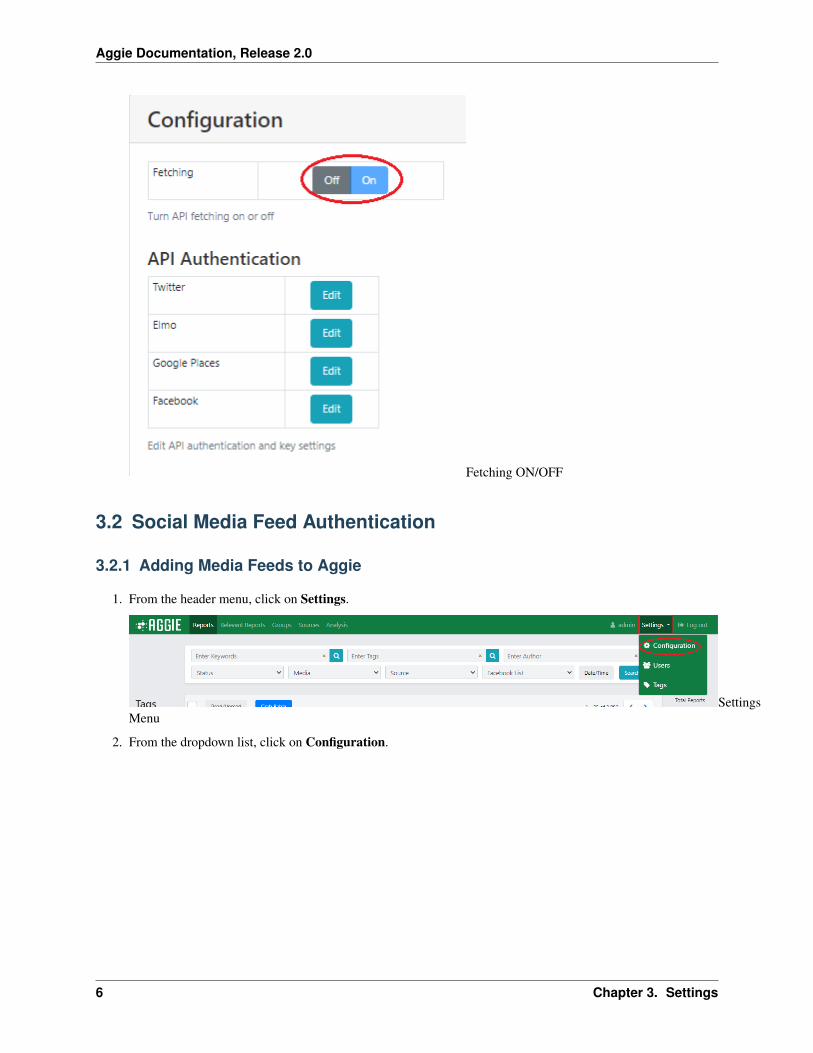
Fetching ON/OFF
3.2 Social Media Feed Authentication
3.2.1 Adding Media Feeds to Aggie
1. From the header menu, click on Settings.
SettingsMenu
2. From the dropdown list, click on Configuration.
6 Chapter 3. Settings
Aggie Documentation, Release 2.0
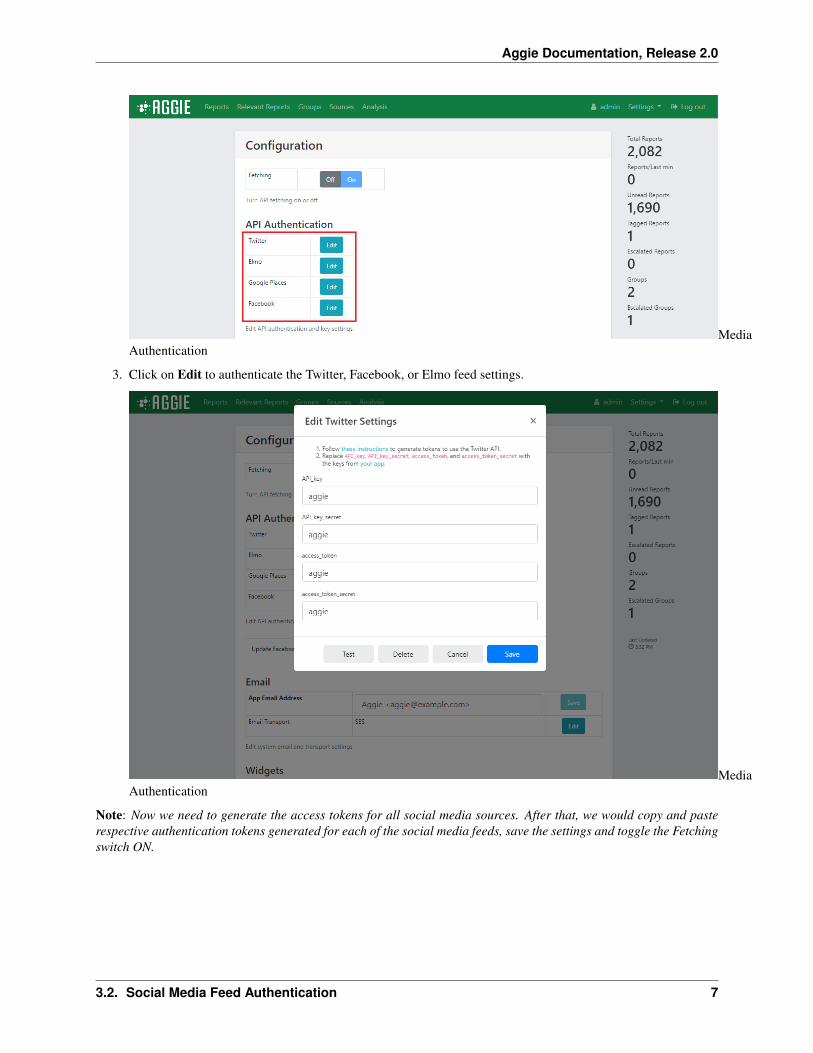
MediaAuthentication
3. Click on Edit to authenticate the Twitter, Facebook, or Elmo feed settings.
MediaAuthentication
Note: Now we need to generate the access tokens for all social media sources. After that, we would copy and pasterespective authentication tokens generated for each of the social media feeds, save the settings and toggle the Fetchingswitch ON.
3.2. Social Media Feed Authentication 7

Aggie Documentation, Release 2.0
3.3 Generating Source Tokens
3.3.1 Twitter API Access Token
1. Visit Twitter’s Apps Page and login with your Twitter Credentials.
2. Click on the Create New App Tab.
TwitterApps
3. Fill in the Application Details and agree to the developer agreement at the bottom to create the app.
TwitterApps
8 Chapter 3. Settings
Aggie Documentation, Release 2.0
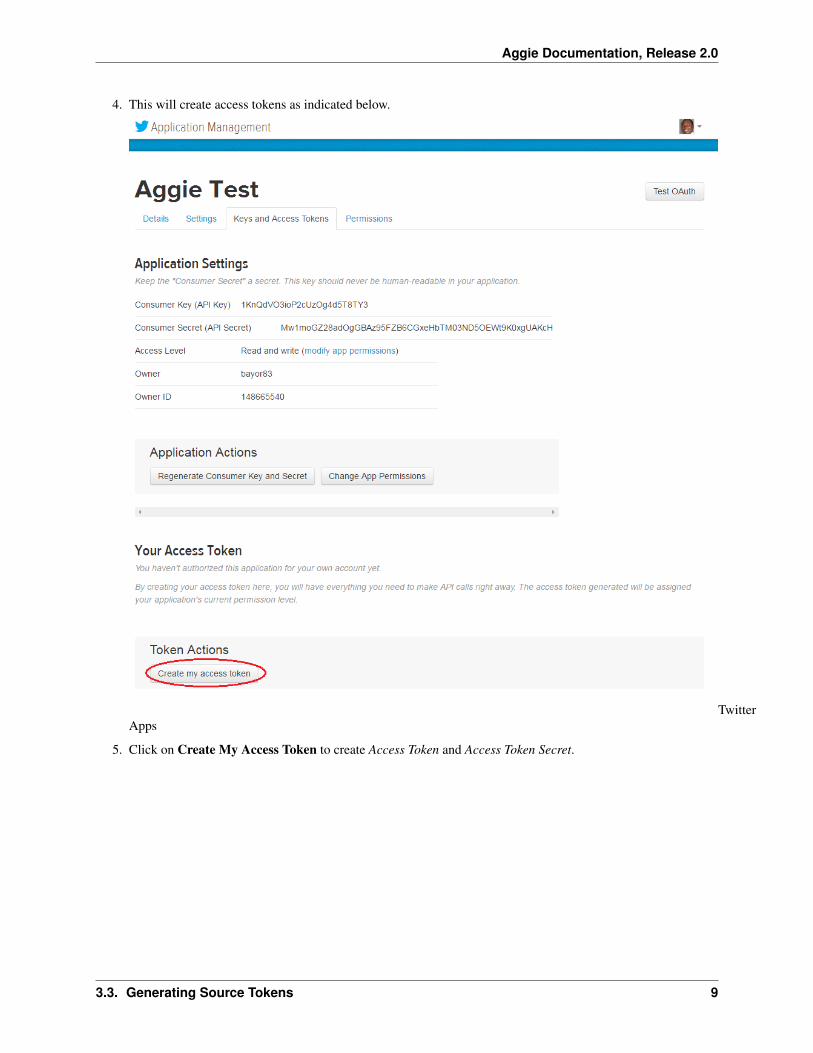
4. This will create access tokens as indicated below.
TwitterApps
5. Click on Create My Access Token to create Access Token and Access Token Secret.
3.3. Generating Source Tokens 9
Aggie Documentation, Release 2.0
TwitterApps
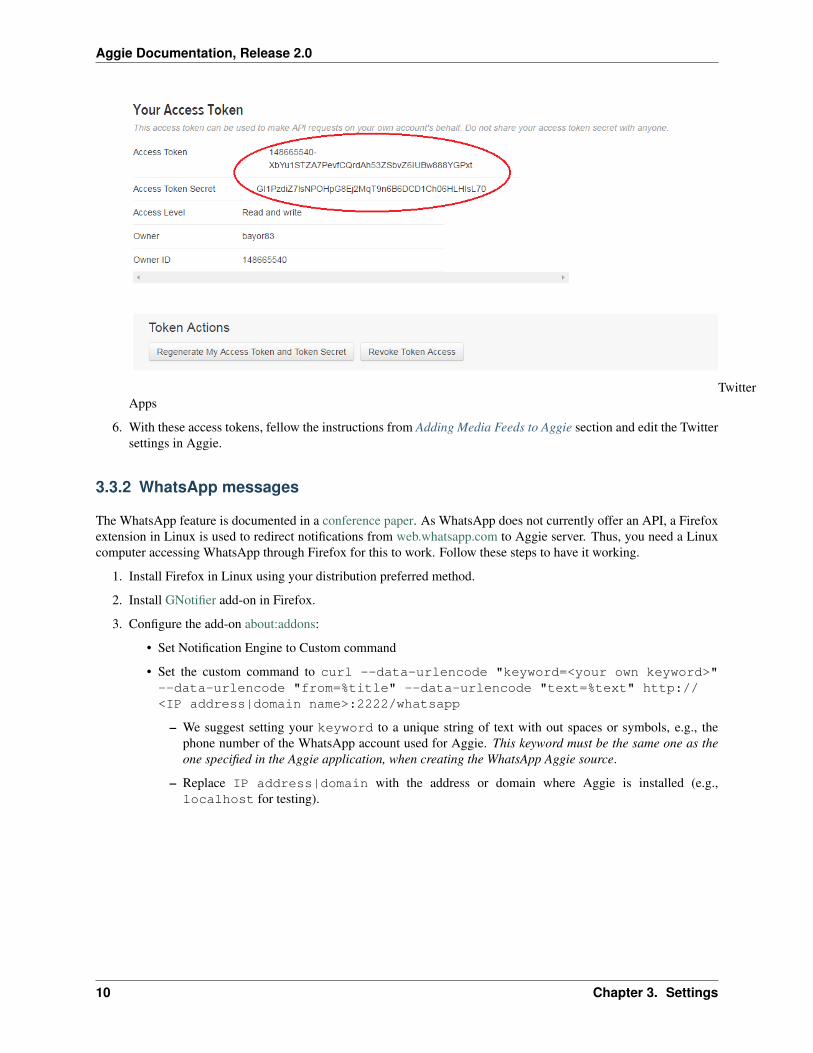
6. With these access tokens, fellow the instructions from Adding Media Feeds to Aggie section and edit the Twittersettings in Aggie.
3.3.2 WhatsApp messages
The WhatsApp feature is documented in a conference paper. As WhatsApp does not currently offer an API, a Firefoxextension in Linux is used to redirect notifications from web.whatsapp.com to Aggie server. Thus, you need a Linuxcomputer accessing WhatsApp through Firefox for this to work. Follow these steps to have it working.
1. Install Firefox in Linux using your distribution preferred method.
2. Install GNotifier add-on in Firefox.
3. Configure the add-on about:addons:
• Set Notification Engine to Custom command
• Set the custom command to curl --data-urlencode "keyword=<your own keyword>"--data-urlencode "from=%title" --data-urlencode "text=%text" http://<IP address|domain name>:2222/whatsapp
– We suggest setting your keyword to a unique string of text with out spaces or symbols, e.g., thephone number of the WhatsApp account used for Aggie. This keyword must be the same one as theone specified in the Aggie application, when creating the WhatsApp Aggie source.
– Replace IP address|domain with the address or domain where Aggie is installed (e.g.,localhost for testing).
10 Chapter 3. Settings

Aggie Documentation, Release 2.0
GNotifierAdd-on for Firefox
4. Visit web.whatsapp.com, follow instructions, and enable browser notifications
5. Notifications will not be sent to Aggie when browser focus is on the WhatsApp tab, so move away from that tabif not replying to anyone.
3.3.3 Google Places API
Aggie uses Google Places API to add location to the groups, letting users to search for groups by location. It alsopowers the maps generated by Aggie. Google accounts with a credit card get a higher free quota of API calls thanthose accounts without credit card.
1. Get your key for Google Places API from your Google account and copy it here. Remember to limit the domainto where Aggie is hosted (e.g., aggie.africanelections.org) when creating you new key.
3.3.4 ELMO
1. Log into your ELMO instance with an account having coordinator or higher privileges on the mission you wantto track.
2. In your ELMO instance, mark one or more forms as public (via the Edit Form page). Note the Form ID in theURL bar (e.g. if URL ends in /m/mymission/forms/123, the ID is 123).
3. Visit your profile page (click the icon bearing your username in the top-right corner) and copy your API key(click ‘Regenerate’ if necessary).
4. From Aggie, click Settings > Configuration and edit the ELMO settings. Remember to toggle the switch on,once you have saved the settings
3.3. Generating Source Tokens 11
Aggie Documentation, Release 2.0
3.4 Email Settings
This must be set up to allow newly created users to receive emails from Aggie with their login credentials. Threetransport options have been implemented using nodemailer.js:
1. SMTP, which requires having access to a working SMTP server.
2. Amazon Simple Email Service (SES).
3. Sendgrid, an online mail service accessible through a simple API.
In this example we are going to set up the email with Sendgrid’s service.
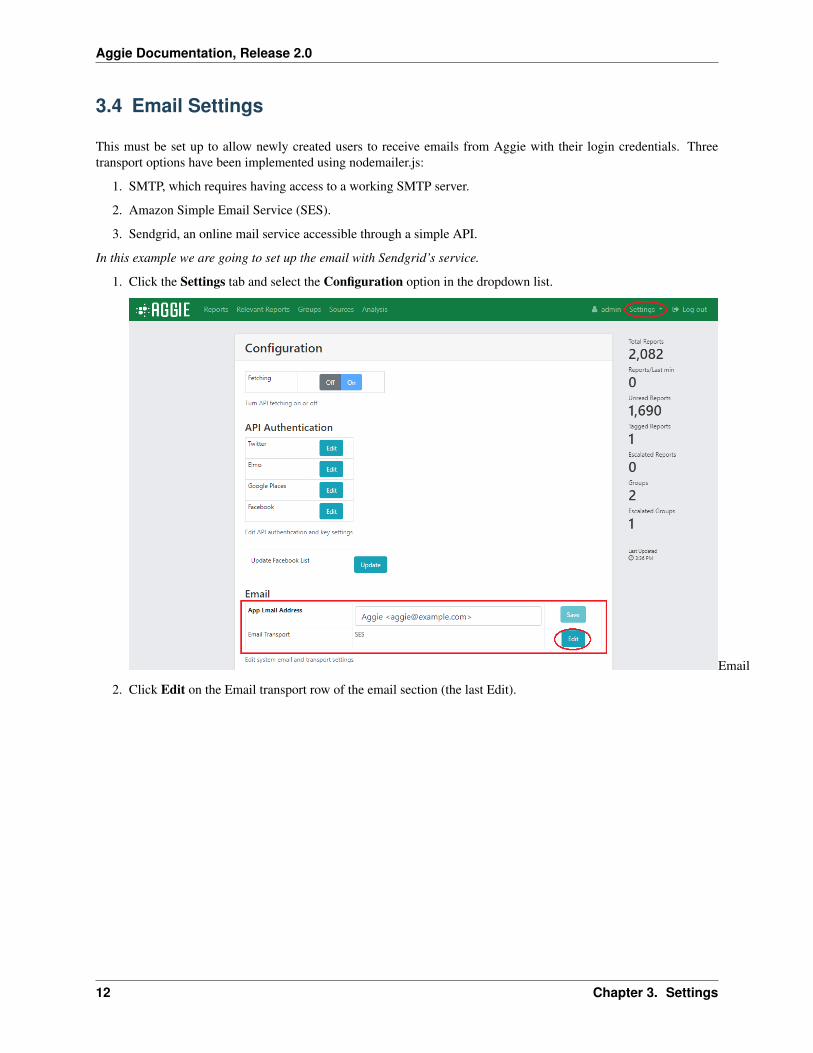
1. Click the Settings tab and select the Configuration option in the dropdown list.
2. Click Edit on the Email transport row of the email section (the last Edit).
12 Chapter 3. Settings
Aggie Documentation, Release 2.0
Sendgrid
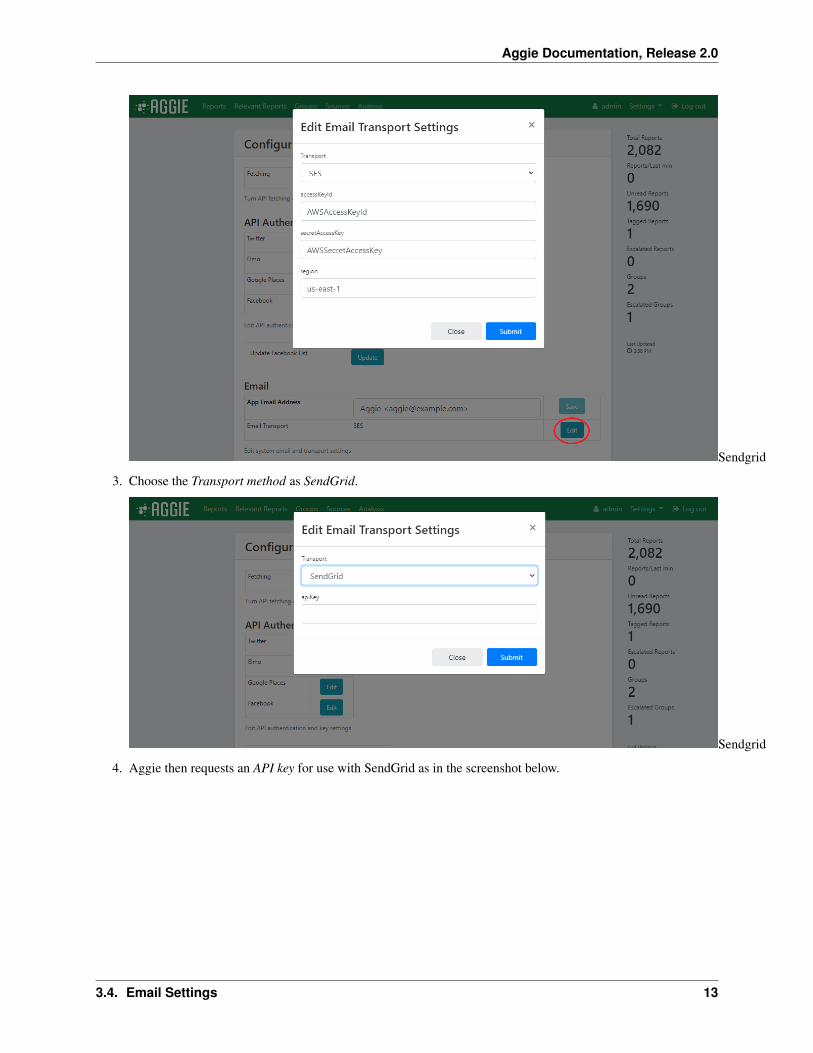
3. Choose the Transport method as SendGrid.
Sendgrid
4. Aggie then requests an API key for use with SendGrid as in the screenshot below.
3.4. Email Settings 13
Aggie Documentation, Release 2.0
Sendgrid
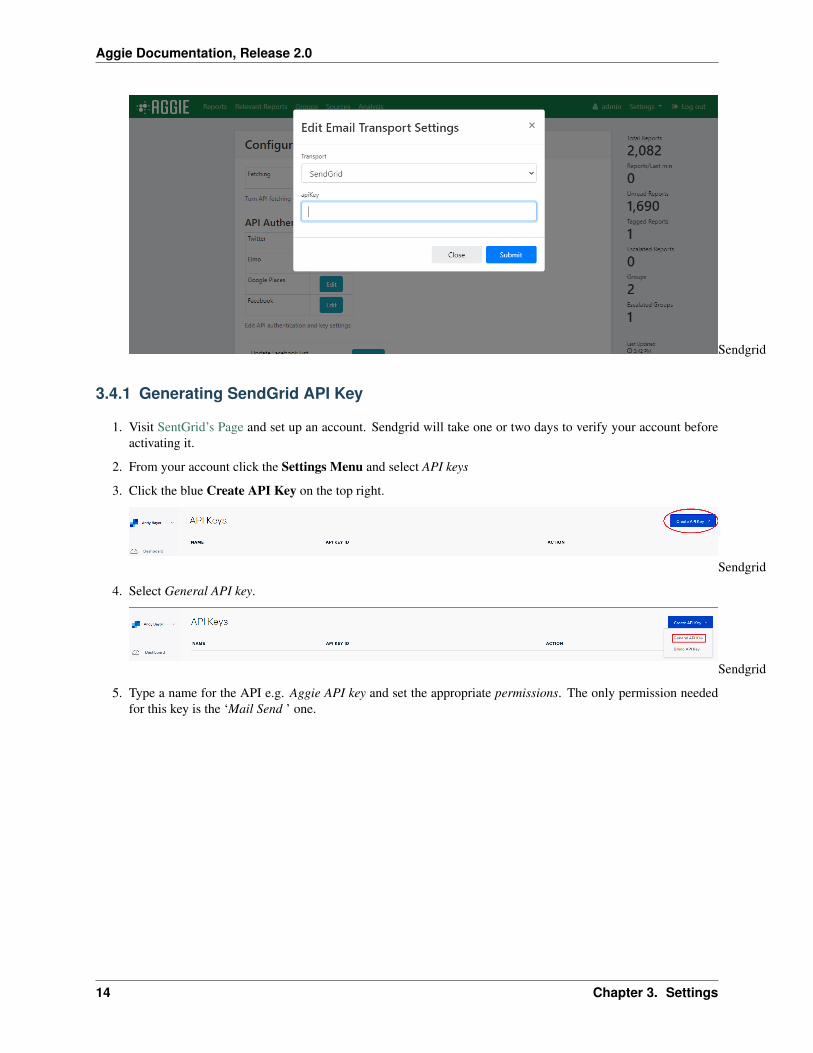
3.4.1 Generating SendGrid API Key
1. Visit SentGrid’s Page and set up an account. Sendgrid will take one or two days to verify your account beforeactivating it.
2. From your account click the Settings Menu and select API keys
3. Click the blue Create API Key on the top right.
Sendgrid
4. Select General API key.
Sendgrid
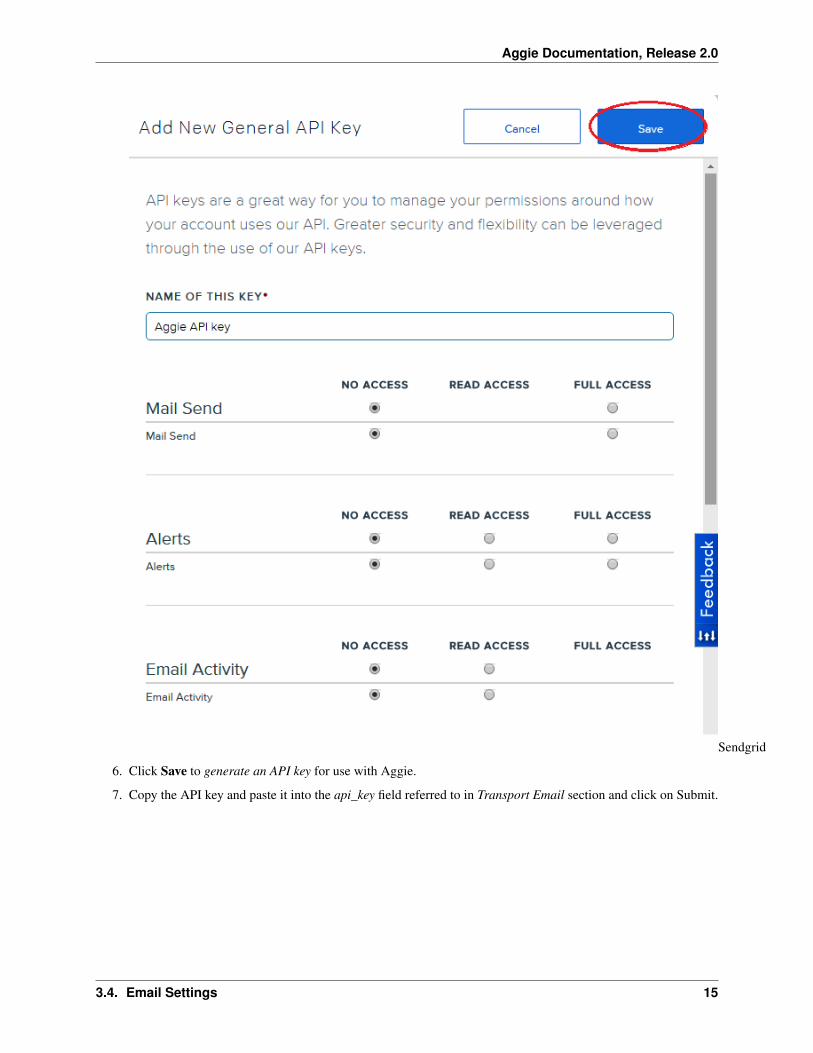
5. Type a name for the API e.g. Aggie API key and set the appropriate permissions. The only permission neededfor this key is the ‘Mail Send ’ one.
14 Chapter 3. Settings
Aggie Documentation, Release 2.0
Sendgrid
6. Click Save to generate an API key for use with Aggie.
7. Copy the API key and paste it into the api_key field referred to in Transport Email section and click on Submit.
3.4. Email Settings 15
Aggie Documentation, Release 2.0
Sendgrid
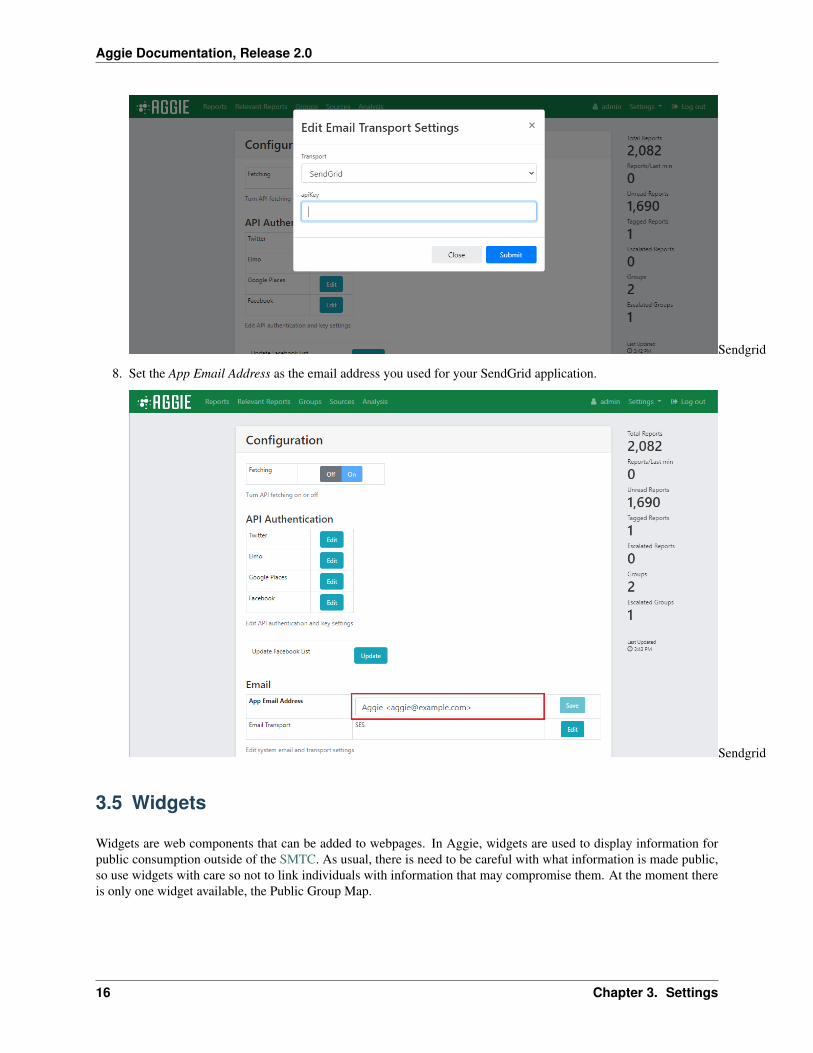
8. Set the App Email Address as the email address you used for your SendGrid application.
Sendgrid
3.5 Widgets
Widgets are web components that can be added to webpages. In Aggie, widgets are used to display information forpublic consumption outside of the SMTC. As usual, there is need to be careful with what information is made public,so use widgets with care so not to link individuals with information that may compromise them. At the moment thereis only one widget available, the Public Group Map.
16 Chapter 3. Settings
Aggie Documentation, Release 2.0
3.5.1 Public Group Map
The Public Group Map displays those groups that have been marked public by the escalation team. It uses the GooglePlaces API, and thus, should be set before using the map.
1. Center and zoom define the main variables for the map. It will be centered in the country, city or other locationyou choose. The zoom variable specifies how large area will be displayed in the map.
2. You can see the result at https:///widget/public_incident_map.html
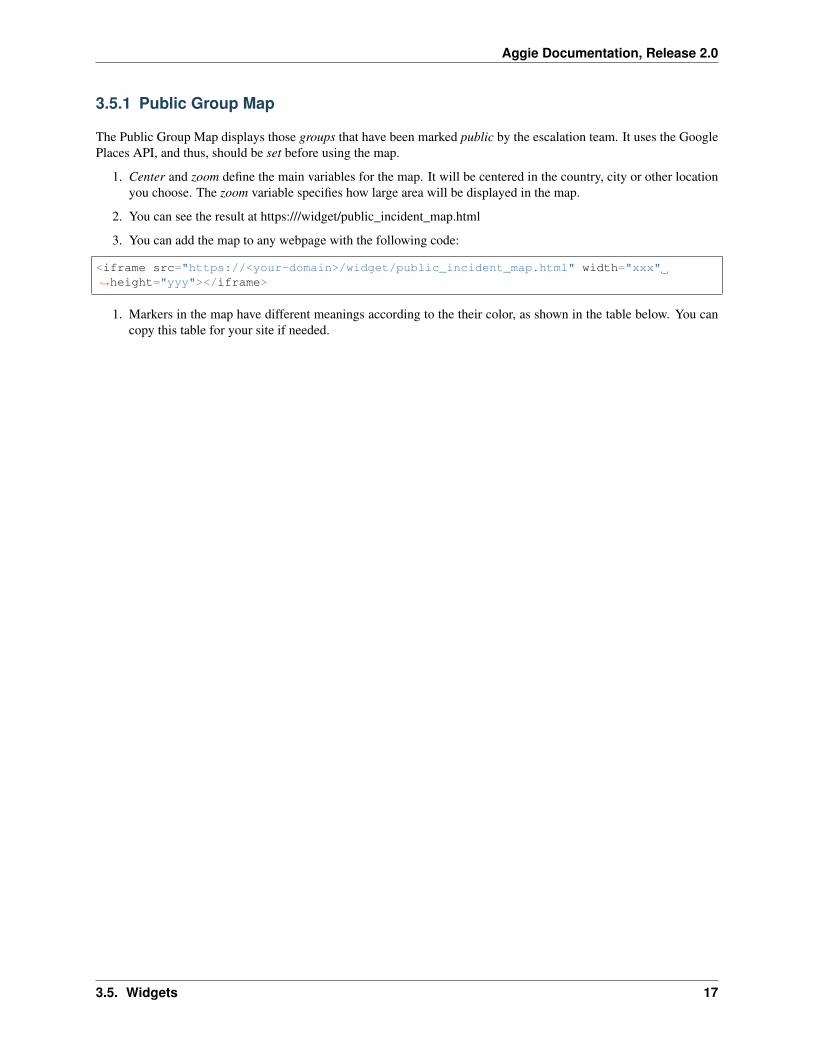
3. You can add the map to any webpage with the following code:
<iframe src="https://<your-domain>/widget/public_incident_map.html" width="xxx"→˓height="yyy"></iframe>
1. Markers in the map have different meanings according to the their color, as shown in the table below. You cancopy this table for your site if needed.
3.5. Widgets 17

Aggie Documentation, Release 2.0
18 Chapter 3. Settings
CHAPTER 4
Establishing the SMTC
4.1 What is the SMTC?
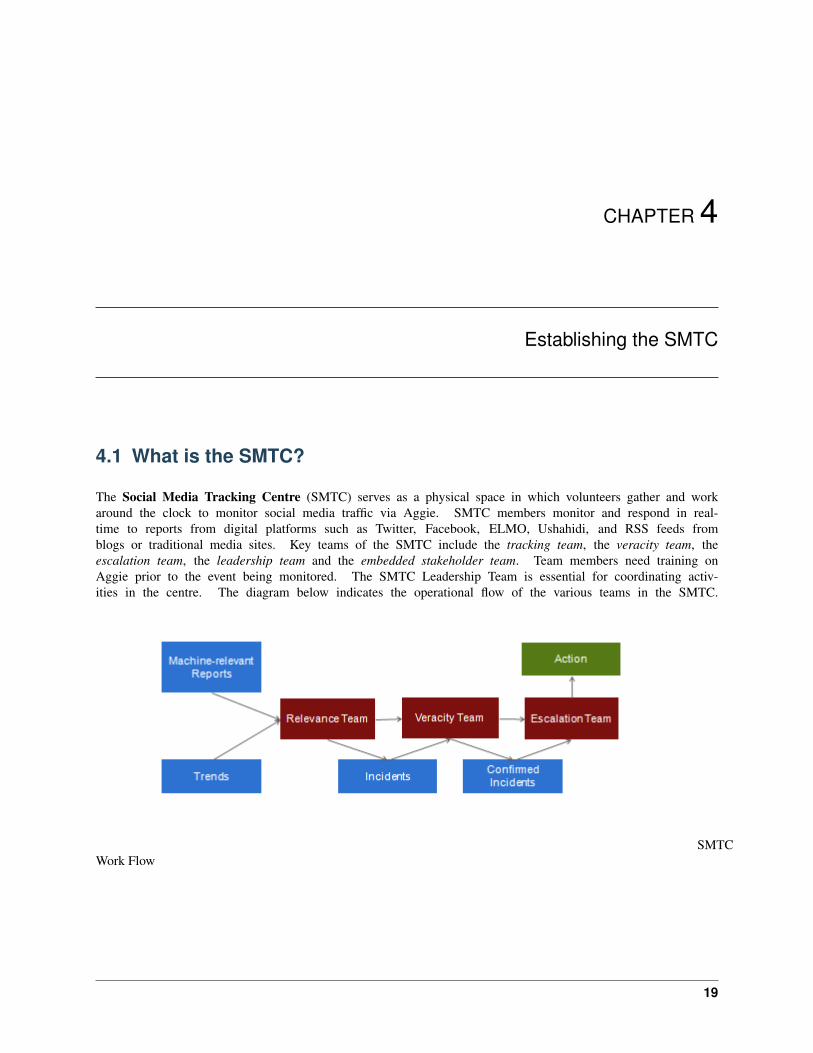
The Social Media Tracking Centre (SMTC) serves as a physical space in which volunteers gather and workaround the clock to monitor social media traffic via Aggie. SMTC members monitor and respond in real-time to reports from digital platforms such as Twitter, Facebook, ELMO, Ushahidi, and RSS feeds fromblogs or traditional media sites. Key teams of the SMTC include the tracking team, the veracity team, theescalation team, the leadership team and the embedded stakeholder team. Team members need training onAggie prior to the event being monitored. The SMTC Leadership Team is essential for coordinating activ-ities in the centre. The diagram below indicates the operational flow of the various teams in the SMTC.
SMTCWork Flow
19
Aggie Documentation, Release 2.0
4.2 Key Term Definitions
4.2.1 Tracking Team
The tracking team is responsible for reading through the real-time streams of social media reports aggregated by Aggieeither in batches or by navigating through pages. Their workflow involves going through each report and creating anincident from actionable reports.
4.2.2 Veracity Team
After the tracking team creates an incident, the veracity team takes over to investigate and verify the truthfulness ofthe incident created by trackers using some of the below strategies:
1. Using social media platforms to communicate with the author of the report (i.e. Tweeting at the author).
2. Using triangulation to build evidence from other reports and sources.
3. Contacting formal monitors in the field.
4. Contacting embedded SMTC representatives who can ask relevant stakeholders to confirm or deny veracity.
4.2.3 Escalation Team
Once the veracity team has confidently verified an incident to be true, the escalation team reports the incident to theSMTC embed assigned to relevant stakeholders, providing all relevant information gathered. The escalation team willmove swiftly to communicate verified incidents so that relevant stakeholders may respond in real-time.
4.2.4 Stakeholder/Embedded Team
Embeds are key persons placed in civil organizations or government institutions invested in the coordination andsupervision of the event being monitored. Embeds communicate verified incidents to these organizations, calledstakeholders, which get more details about and respond to these incidents. Ideally, embeds are known and trusted bystakeholders to ensure information reported from the SMTC is valued.
4.3 Public Event Monitoring Checklist
To be set for a monitoring event, cross check the status of the items and activities in the table below a day to deploymentof the monitoring.
20 Chapter 4. Establishing the SMTC
CHAPTER 5
Using Aggie
5.1 Sources
5.1.1 What is a Source?
Sources are the social media platforms such as Twitter, Facebook, Ushahidi, and RSS feeds that Aggie crawls throughto aggregate reports relevant to the event being monitored.
Sources can also be services that send reports directly to Aggie. Currently, we have implemented support for What-sApp and SMSGH, a service that forwards SMS text messages sent to short codes.
5.1.2 Adding Sources to Aggie
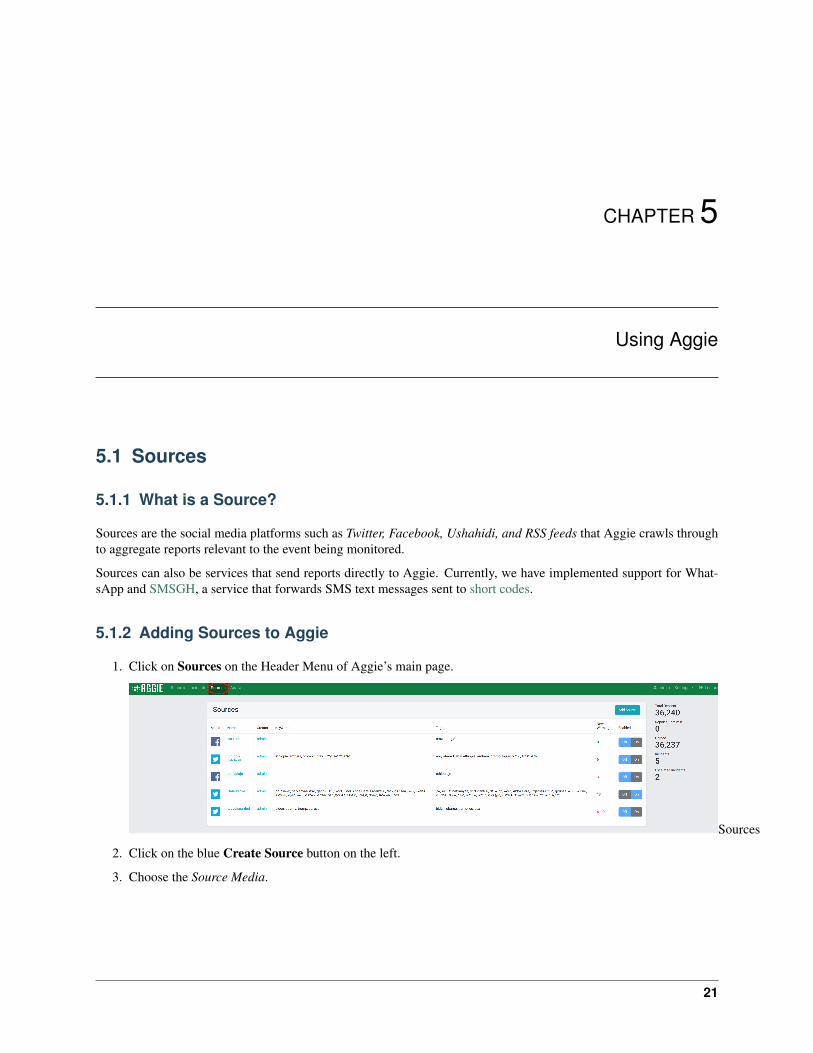
1. Click on Sources on the Header Menu of Aggie’s main page.
Sources
2. Click on the blue Create Source button on the left.
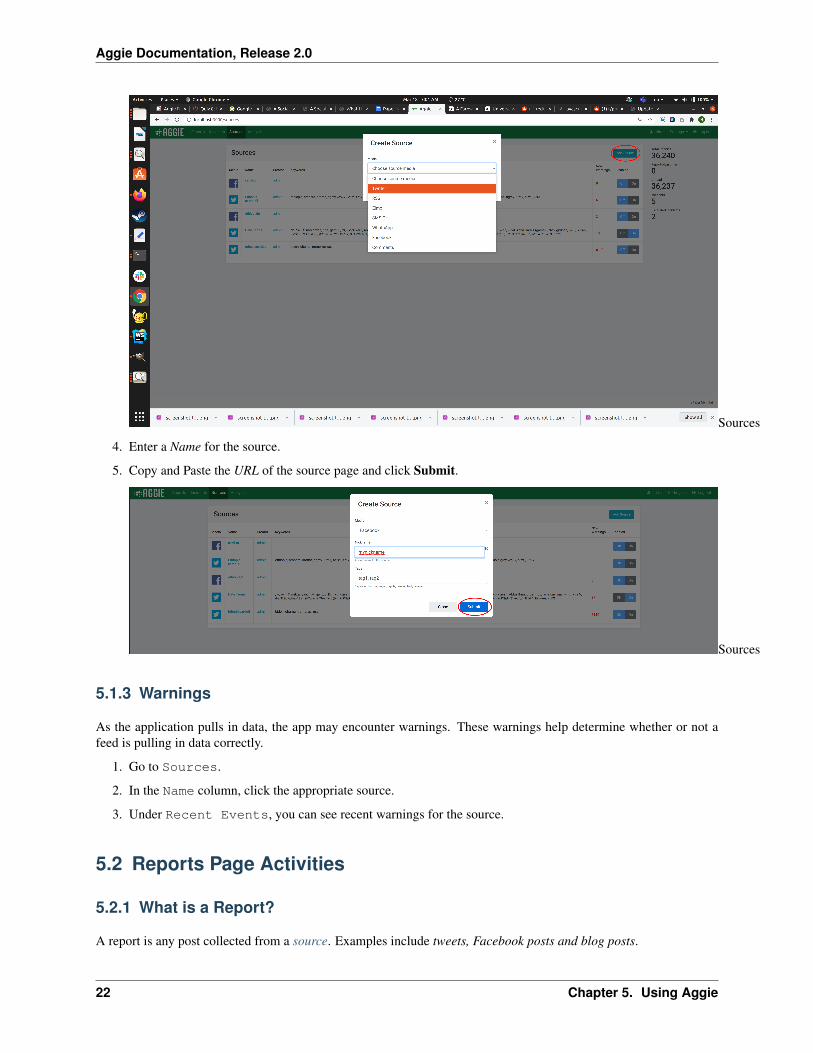
3. Choose the Source Media.
21
Aggie Documentation, Release 2.0
Sources
4. Enter a Name for the source.
5. Copy and Paste the URL of the source page and click Submit.
Sources
5.1.3 Warnings
As the application pulls in data, the app may encounter warnings. These warnings help determine whether or not afeed is pulling in data correctly.
1. Go to Sources.
2. In the Name column, click the appropriate source.
3. Under Recent Events, you can see recent warnings for the source.
5.2 Reports Page Activities
5.2.1 What is a Report?
A report is any post collected from a source. Examples include tweets, Facebook posts and blog posts.
22 Chapter 5. Using Aggie
Aggie Documentation, Release 2.0
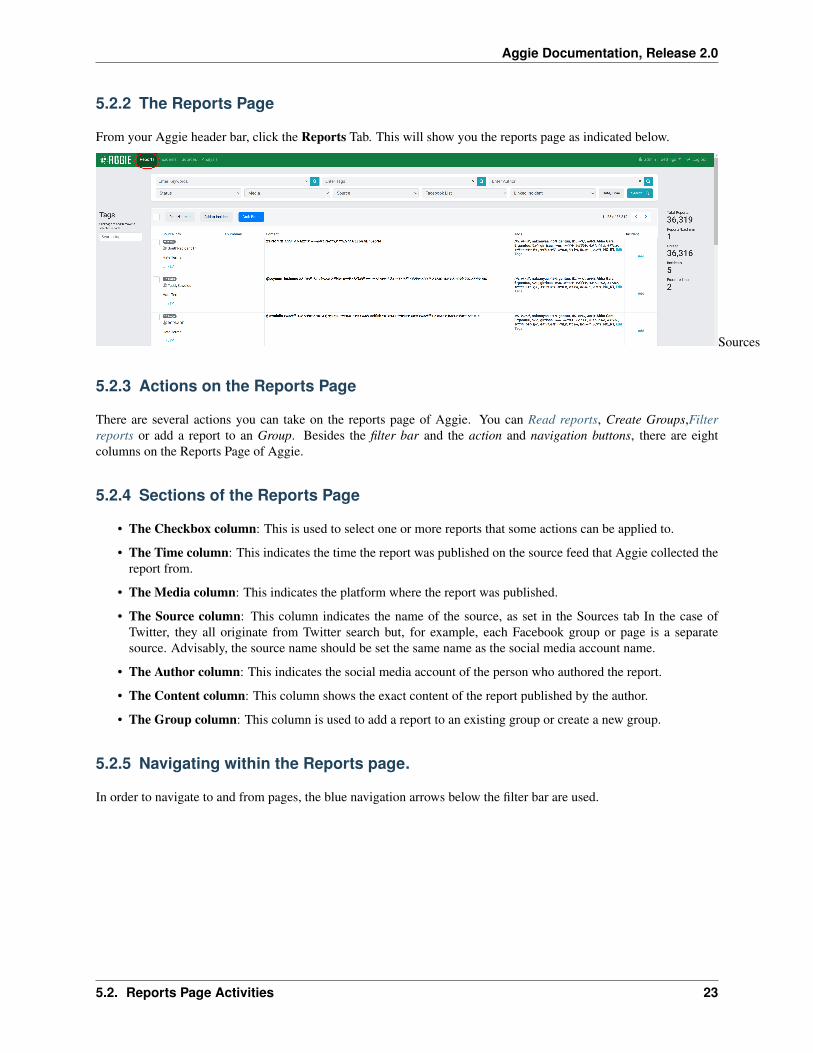
5.2.2 The Reports Page
From your Aggie header bar, click the Reports Tab. This will show you the reports page as indicated below.
Sources
5.2.3 Actions on the Reports Page
There are several actions you can take on the reports page of Aggie. You can Read reports, Create Groups,Filterreports or add a report to an Group. Besides the filter bar and the action and navigation buttons, there are eightcolumns on the Reports Page of Aggie.
5.2.4 Sections of the Reports Page
• The Checkbox column: This is used to select one or more reports that some actions can be applied to.
• The Time column: This indicates the time the report was published on the source feed that Aggie collected thereport from.
• The Media column: This indicates the platform where the report was published.
• The Source column: This column indicates the name of the source, as set in the Sources tab In the case ofTwitter, they all originate from Twitter search but, for example, each Facebook group or page is a separatesource. Advisably, the source name should be set the same name as the social media account name.
• The Author column: This indicates the social media account of the person who authored the report.
• The Content column: This column shows the exact content of the report published by the author.
• The Group column: This column is used to add a report to an existing group or create a new group.
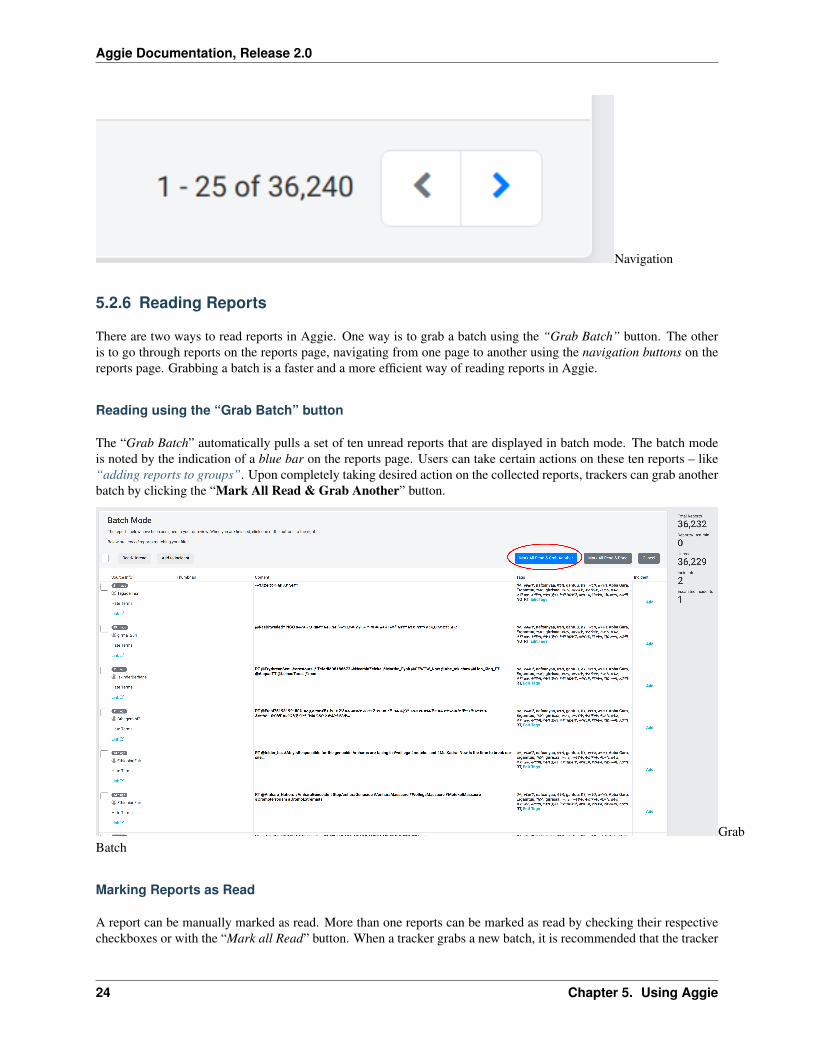
5.2.5 Navigating within the Reports page.
In order to navigate to and from pages, the blue navigation arrows below the filter bar are used.
5.2. Reports Page Activities 23
Aggie Documentation, Release 2.0
Navigation
5.2.6 Reading Reports
There are two ways to read reports in Aggie. One way is to grab a batch using the “Grab Batch” button. The otheris to go through reports on the reports page, navigating from one page to another using the navigation buttons on thereports page. Grabbing a batch is a faster and a more efficient way of reading reports in Aggie.
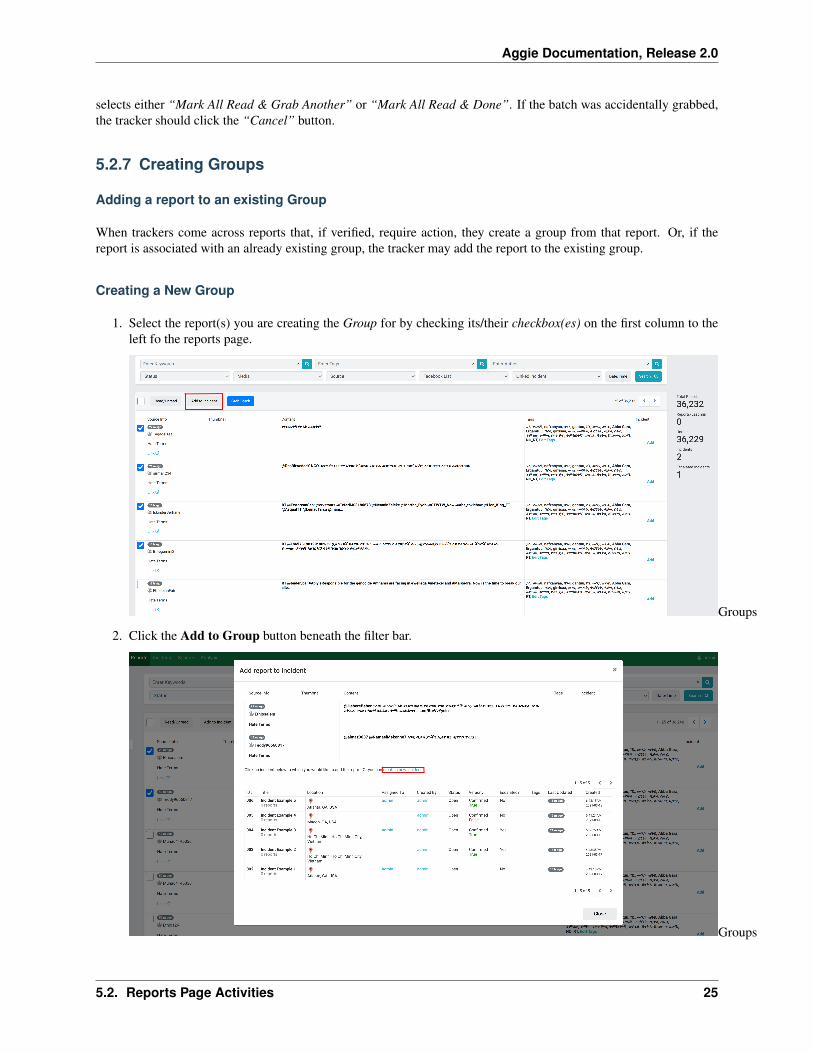
Reading using the “Grab Batch” button
The “Grab Batch” automatically pulls a set of ten unread reports that are displayed in batch mode. The batch modeis noted by the indication of a blue bar on the reports page. Users can take certain actions on these ten reports – like“adding reports to groups”. Upon completely taking desired action on the collected reports, trackers can grab anotherbatch by clicking the “Mark All Read & Grab Another” button.
GrabBatch
Marking Reports as Read
A report can be manually marked as read. More than one reports can be marked as read by checking their respectivecheckboxes or with the “Mark all Read” button. When a tracker grabs a new batch, it is recommended that the tracker
24 Chapter 5. Using Aggie
Aggie Documentation, Release 2.0
selects either “Mark All Read & Grab Another” or “Mark All Read & Done”. If the batch was accidentally grabbed,the tracker should click the “Cancel” button.
5.2.7 Creating Groups
Adding a report to an existing Group
When trackers come across reports that, if verified, require action, they create a group from that report. Or, if thereport is associated with an already existing group, the tracker may add the report to the existing group.
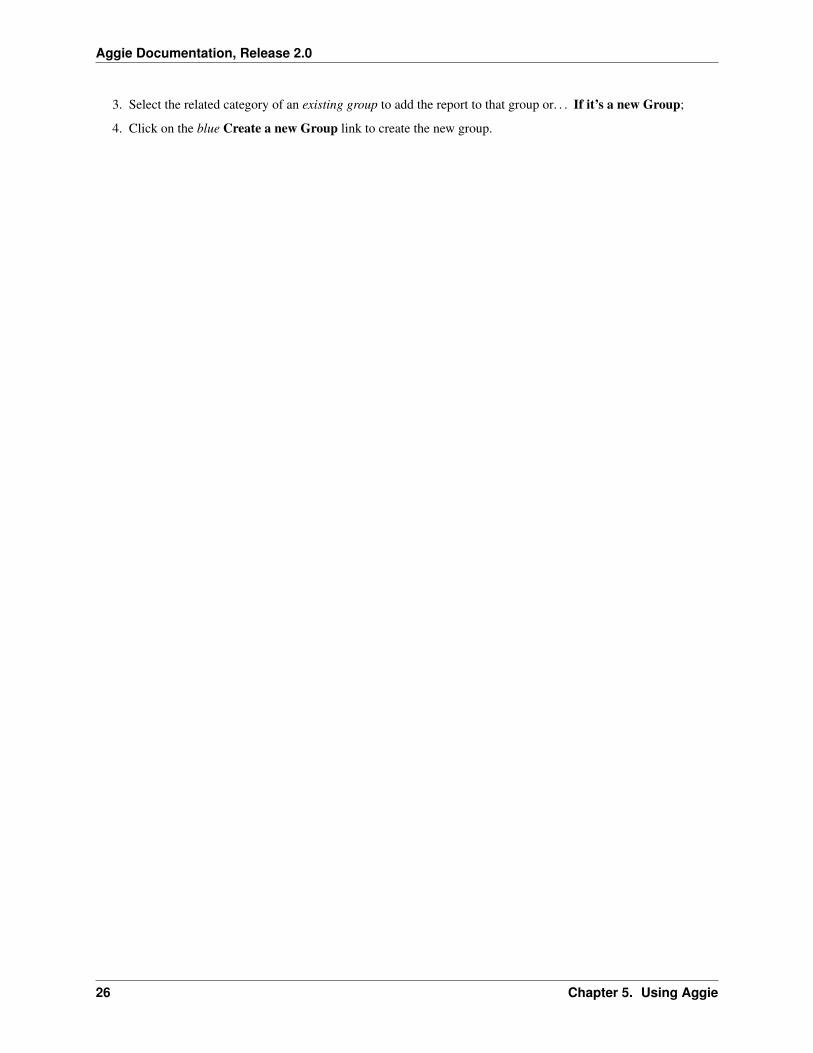
Creating a New Group
1. Select the report(s) you are creating the Group for by checking its/their checkbox(es) on the first column to theleft fo the reports page.
Groups
2. Click the Add to Group button beneath the filter bar.
Groups
5.2. Reports Page Activities 25
Aggie Documentation, Release 2.0
3. Select the related category of an existing group to add the report to that group or. . . If it’s a new Group;
4. Click on the blue Create a new Group link to create the new group.
26 Chapter 5. Using Aggie
Aggie Documentation, Release 2.0
Adding
5.2. Reports Page Activities 27
Aggie Documentation, Release 2.0
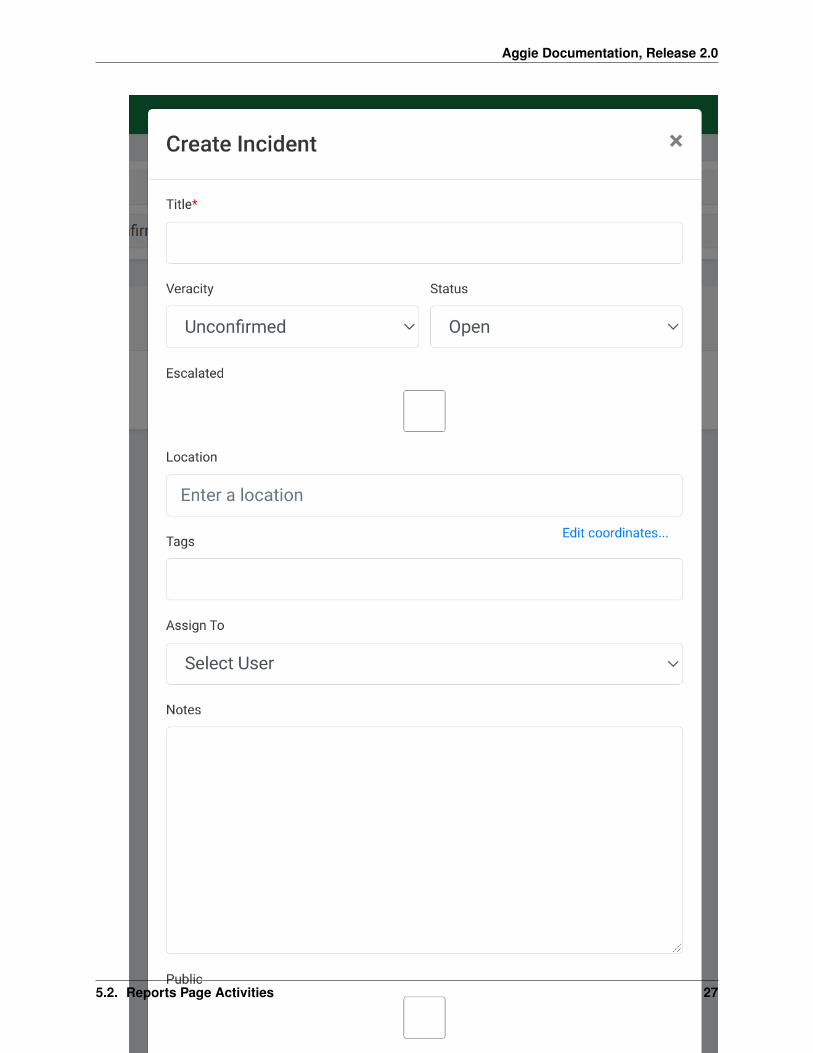
Group
5. Type in the Title of the group (e.g. Polling station not open, Voter intimidation etc), the Location of the groupand a brief note describing the group. Leave out the veracity and assignment fields for the veracity team andclick submit to create a new group. The verification and escalation team will be using the note field to keeptrack of the verification and escalation steps taken.
6. The Public and Public Description fields are used by the escalation team to add the group to the list of publicgroups. The Public Description will appear attached to the group, for example, in the Public Group Map.
5.2.8 Filtering Reports
The Filter Bar
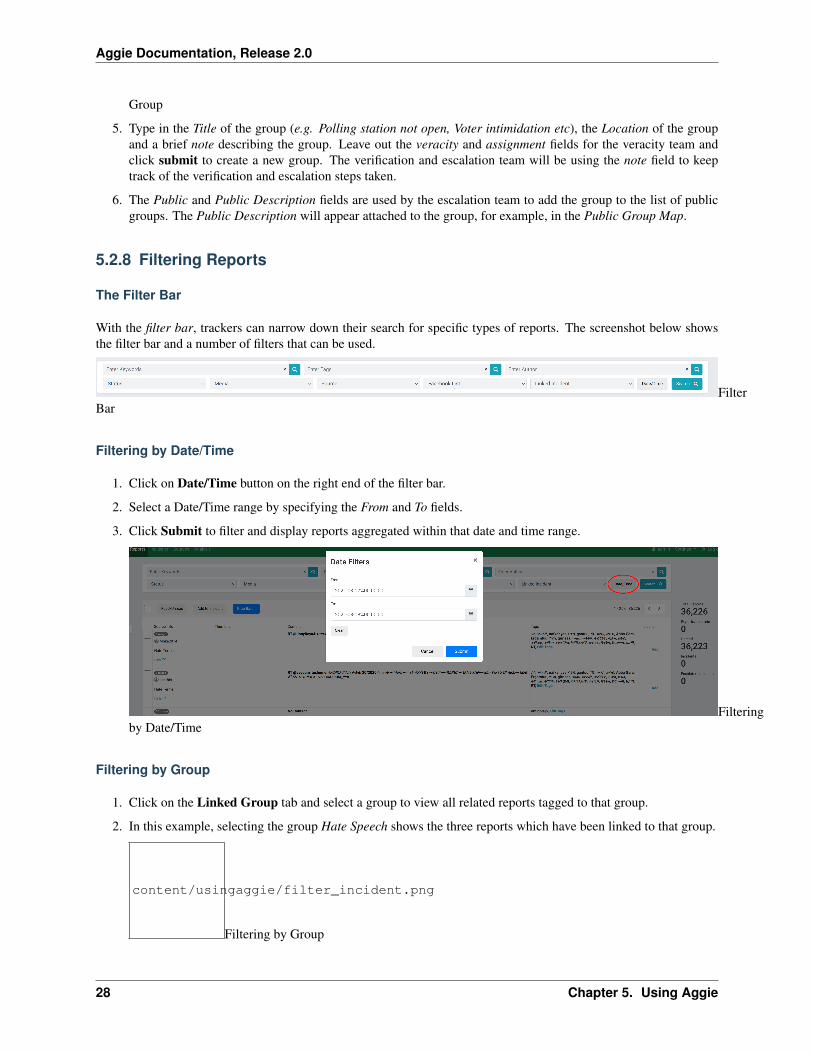
With the filter bar, trackers can narrow down their search for specific types of reports. The screenshot below showsthe filter bar and a number of filters that can be used.
FilterBar
Filtering by Date/Time
1. Click on Date/Time button on the right end of the filter bar.
2. Select a Date/Time range by specifying the From and To fields.
3. Click Submit to filter and display reports aggregated within that date and time range.
Filteringby Date/Time
Filtering by Group
1. Click on the Linked Group tab and select a group to view all related reports tagged to that group.
2. In this example, selecting the group Hate Speech shows the three reports which have been linked to that group.
content/usingaggie/filter_incident.png
Filtering by Group
28 Chapter 5. Using Aggie
Aggie Documentation, Release 2.0
Filtering by Source
1. Click the Source menu from the header bar.
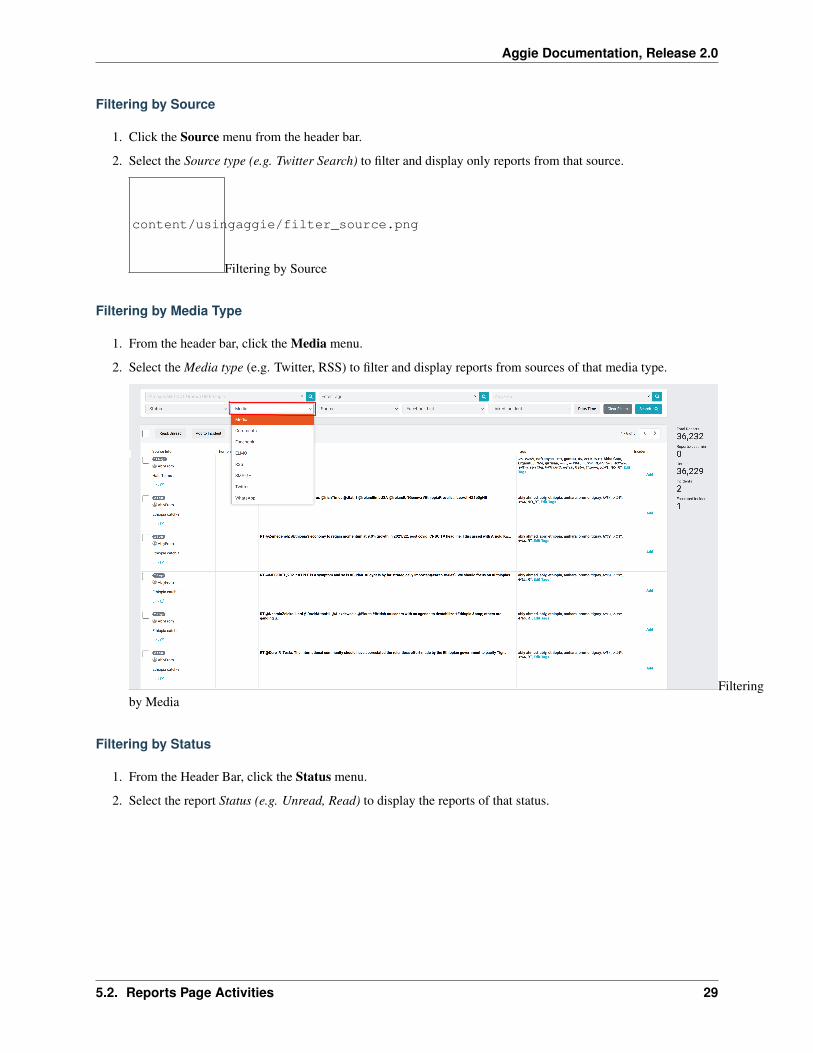
2. Select the Source type (e.g. Twitter Search) to filter and display only reports from that source.
content/usingaggie/filter_source.png
Filtering by Source
Filtering by Media Type
1. From the header bar, click the Media menu.
2. Select the Media type (e.g. Twitter, RSS) to filter and display reports from sources of that media type.
Filteringby Media
Filtering by Status
1. From the Header Bar, click the Status menu.
2. Select the report Status (e.g. Unread, Read) to display the reports of that status.
5.2. Reports Page Activities 29
Aggie Documentation, Release 2.0
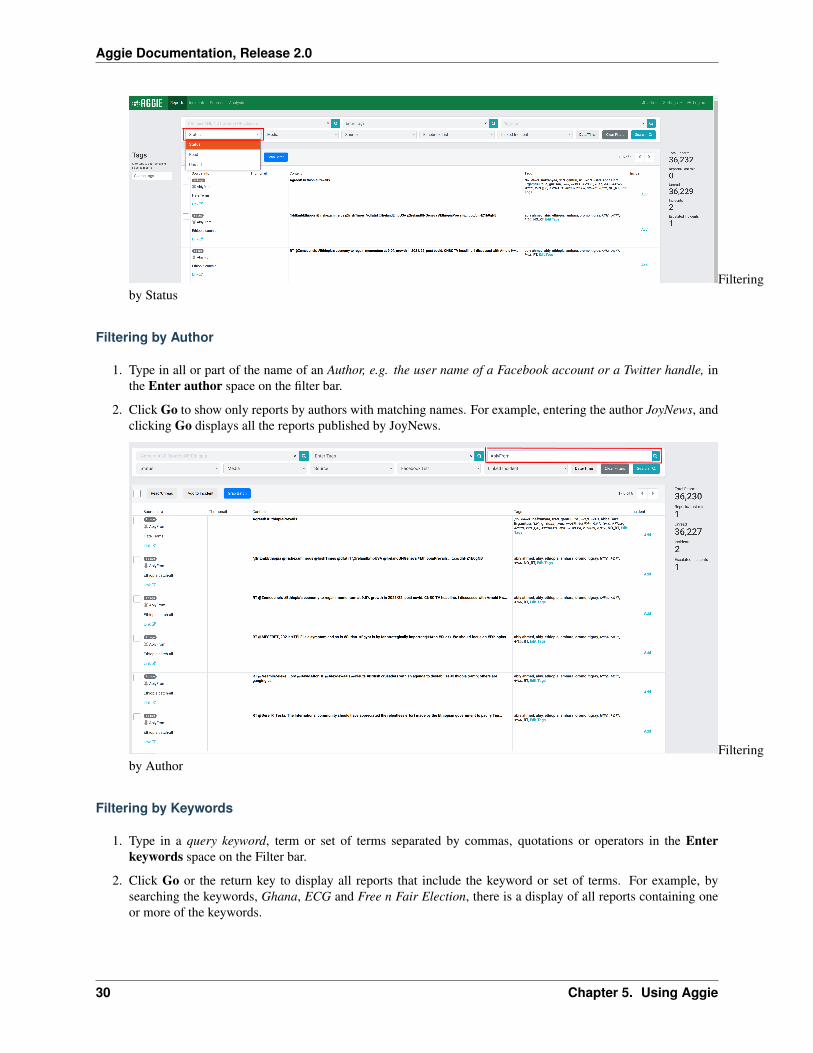
Filteringby Status
Filtering by Author
1. Type in all or part of the name of an Author, e.g. the user name of a Facebook account or a Twitter handle, inthe Enter author space on the filter bar.
2. Click Go to show only reports by authors with matching names. For example, entering the author JoyNews, andclicking Go displays all the reports published by JoyNews.
Filteringby Author
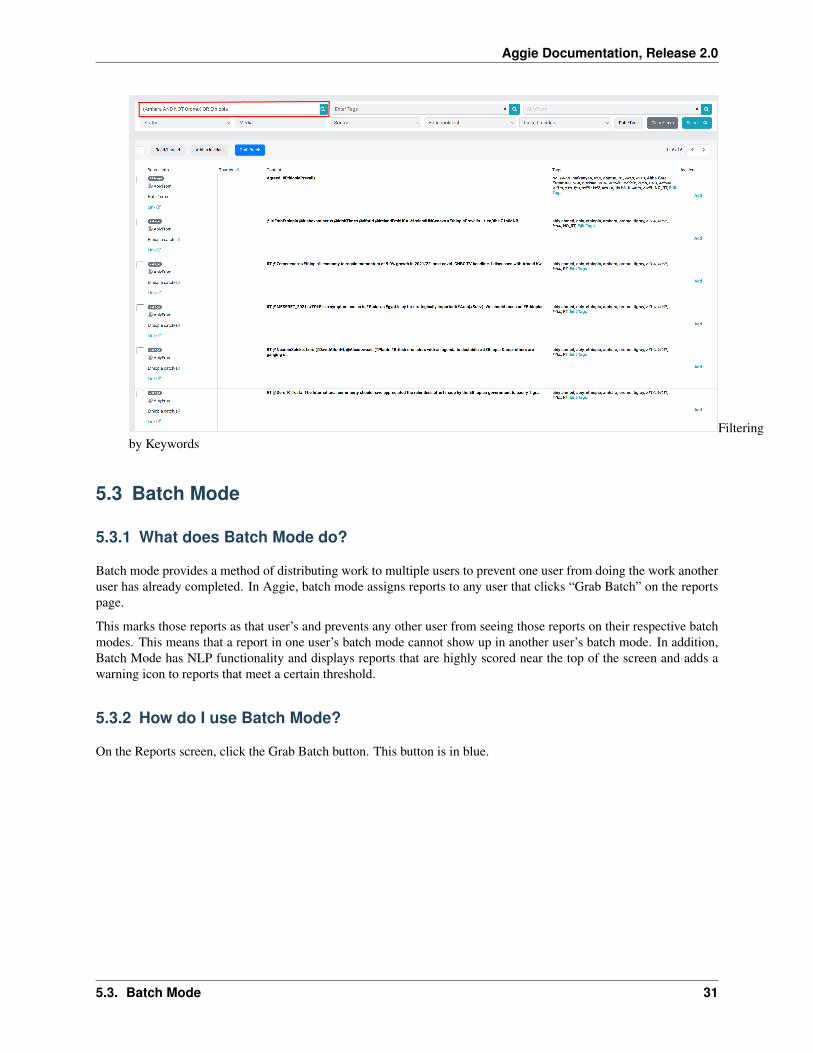
Filtering by Keywords
1. Type in a query keyword, term or set of terms separated by commas, quotations or operators in the Enterkeywords space on the Filter bar.
2. Click Go or the return key to display all reports that include the keyword or set of terms. For example, bysearching the keywords, Ghana, ECG and Free n Fair Election, there is a display of all reports containing oneor more of the keywords.
30 Chapter 5. Using Aggie
Aggie Documentation, Release 2.0
Filteringby Keywords
5.3 Batch Mode
5.3.1 What does Batch Mode do?
Batch mode provides a method of distributing work to multiple users to prevent one user from doing the work anotheruser has already completed. In Aggie, batch mode assigns reports to any user that clicks “Grab Batch” on the reportspage.
This marks those reports as that user’s and prevents any other user from seeing those reports on their respective batchmodes. This means that a report in one user’s batch mode cannot show up in another user’s batch mode. In addition,Batch Mode has NLP functionality and displays reports that are highly scored near the top of the screen and adds awarning icon to reports that meet a certain threshold.
5.3.2 How do I use Batch Mode?
On the Reports screen, click the Grab Batch button. This button is in blue.
5.3. Batch Mode 31
Aggie Documentation, Release 2.0
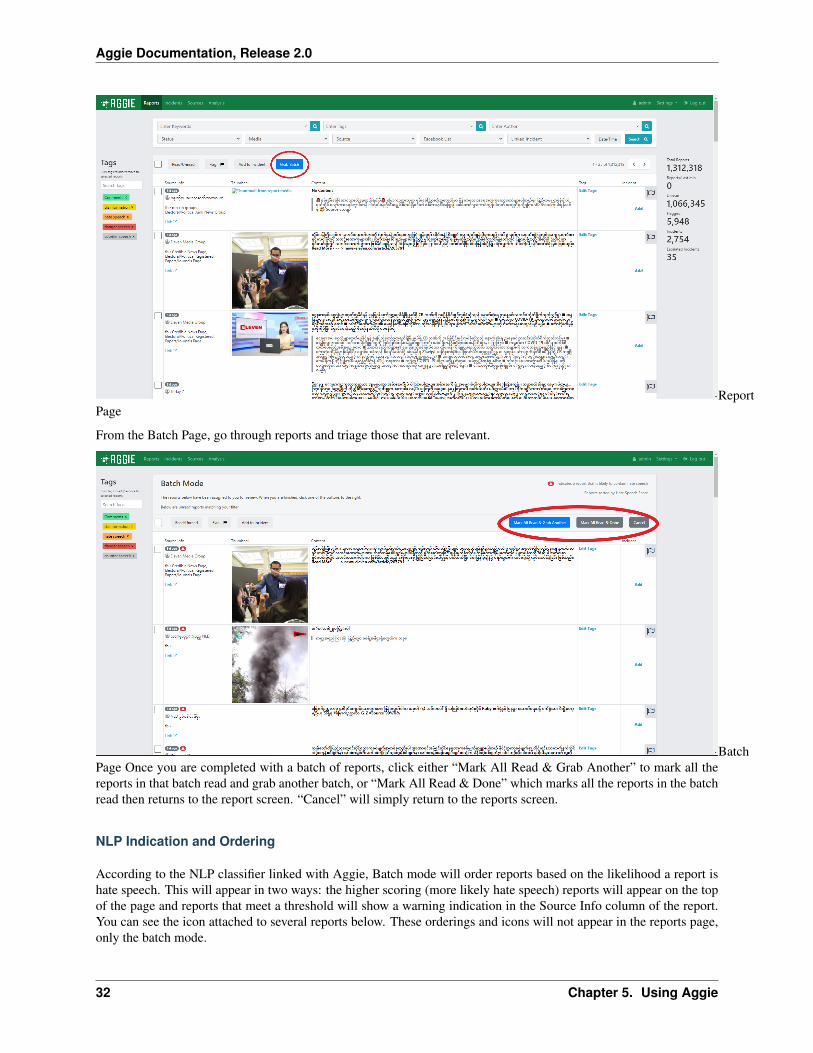
ReportPage
From the Batch Page, go through reports and triage those that are relevant.
BatchPage Once you are completed with a batch of reports, click either “Mark All Read & Grab Another” to mark all thereports in that batch read and grab another batch, or “Mark All Read & Done” which marks all the reports in the batchread then returns to the report screen. “Cancel” will simply return to the reports screen.
NLP Indication and Ordering
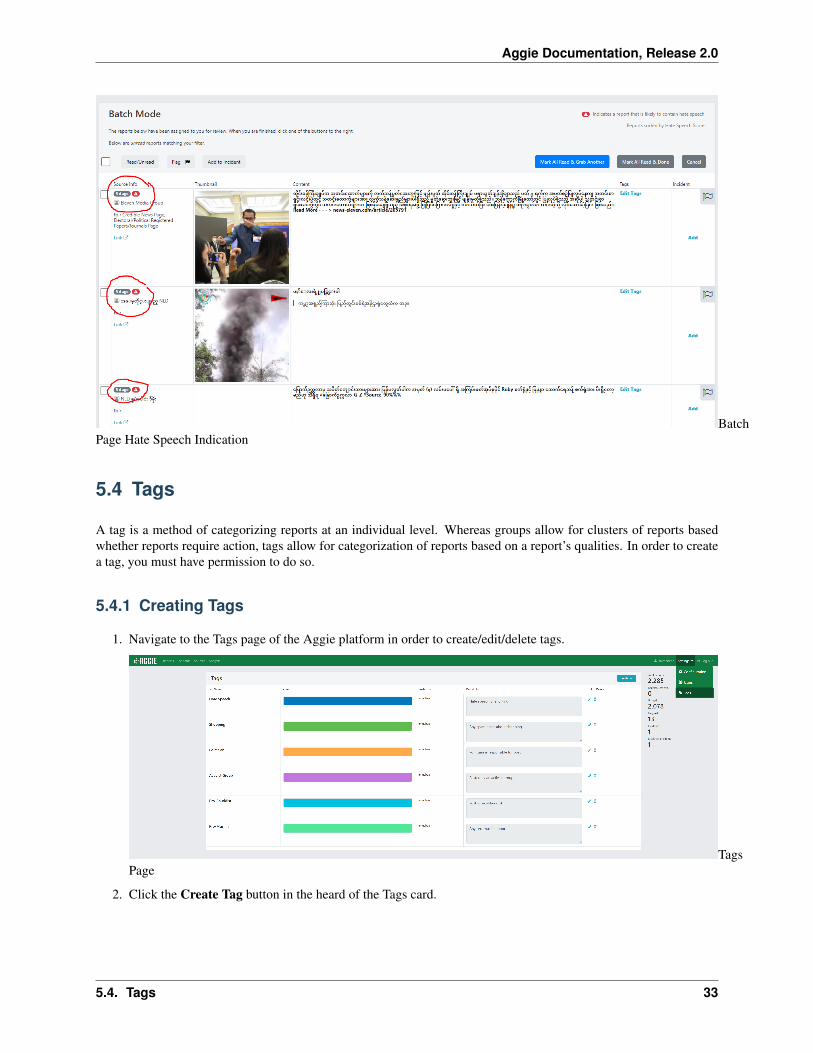
According to the NLP classifier linked with Aggie, Batch mode will order reports based on the likelihood a report ishate speech. This will appear in two ways: the higher scoring (more likely hate speech) reports will appear on the topof the page and reports that meet a threshold will show a warning indication in the Source Info column of the report.You can see the icon attached to several reports below. These orderings and icons will not appear in the reports page,only the batch mode.
32 Chapter 5. Using Aggie
Aggie Documentation, Release 2.0
BatchPage Hate Speech Indication
5.4 Tags
A tag is a method of categorizing reports at an individual level. Whereas groups allow for clusters of reports basedwhether reports require action, tags allow for categorization of reports based on a report’s qualities. In order to createa tag, you must have permission to do so.
5.4.1 Creating Tags
1. Navigate to the Tags page of the Aggie platform in order to create/edit/delete tags.
TagsPage
2. Click the Create Tag button in the heard of the Tags card.
5.4. Tags 33
Aggie Documentation, Release 2.0
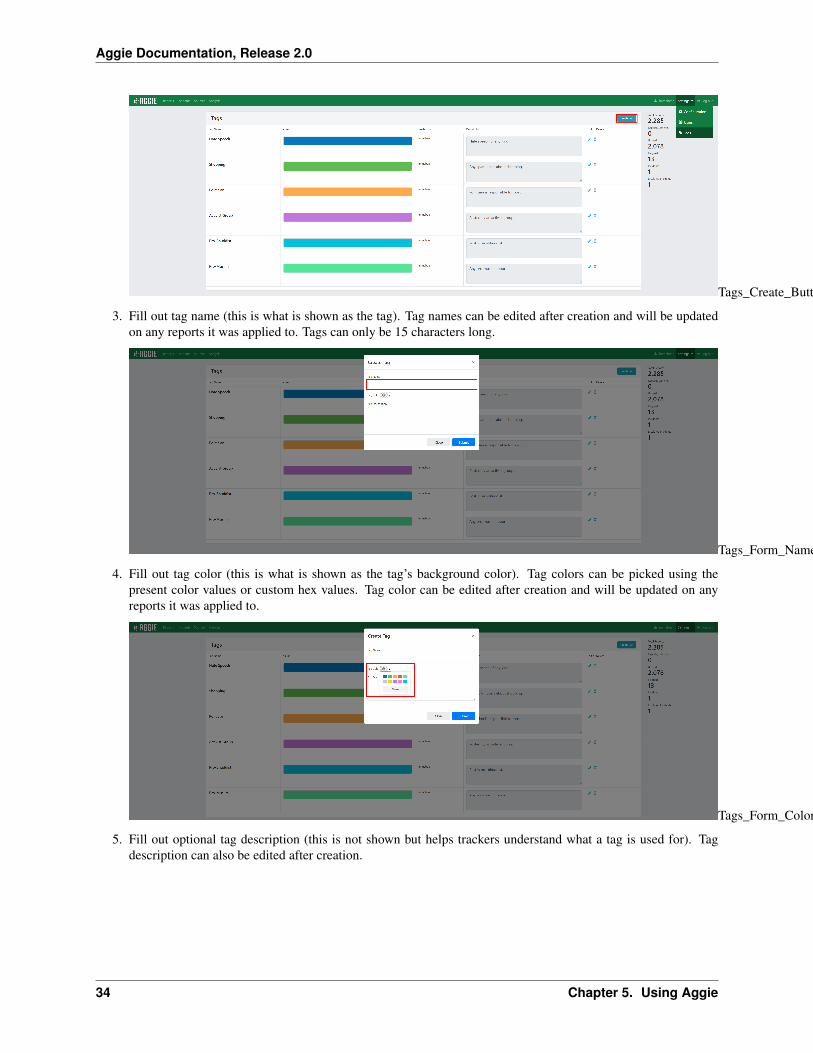
Tags_Create_Button
3. Fill out tag name (this is what is shown as the tag). Tag names can be edited after creation and will be updatedon any reports it was applied to. Tags can only be 15 characters long.
Tags_Form_Name
4. Fill out tag color (this is what is shown as the tag’s background color). Tag colors can be picked using thepresent color values or custom hex values. Tag color can be edited after creation and will be updated on anyreports it was applied to.
Tags_Form_Color
5. Fill out optional tag description (this is not shown but helps trackers understand what a tag is used for). Tagdescription can also be edited after creation.
34 Chapter 5. Using Aggie
Aggie Documentation, Release 2.0
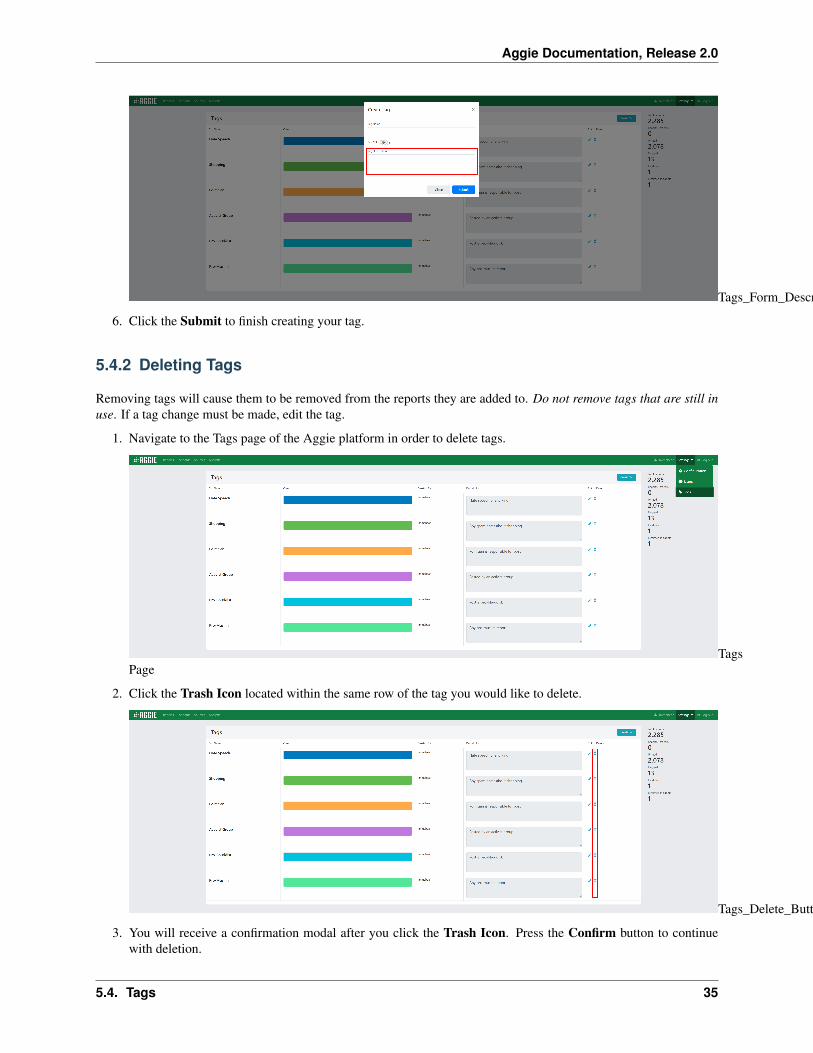
Tags_Form_Description
6. Click the Submit to finish creating your tag.
5.4.2 Deleting Tags
Removing tags will cause them to be removed from the reports they are added to. Do not remove tags that are still inuse. If a tag change must be made, edit the tag.
1. Navigate to the Tags page of the Aggie platform in order to delete tags.
TagsPage
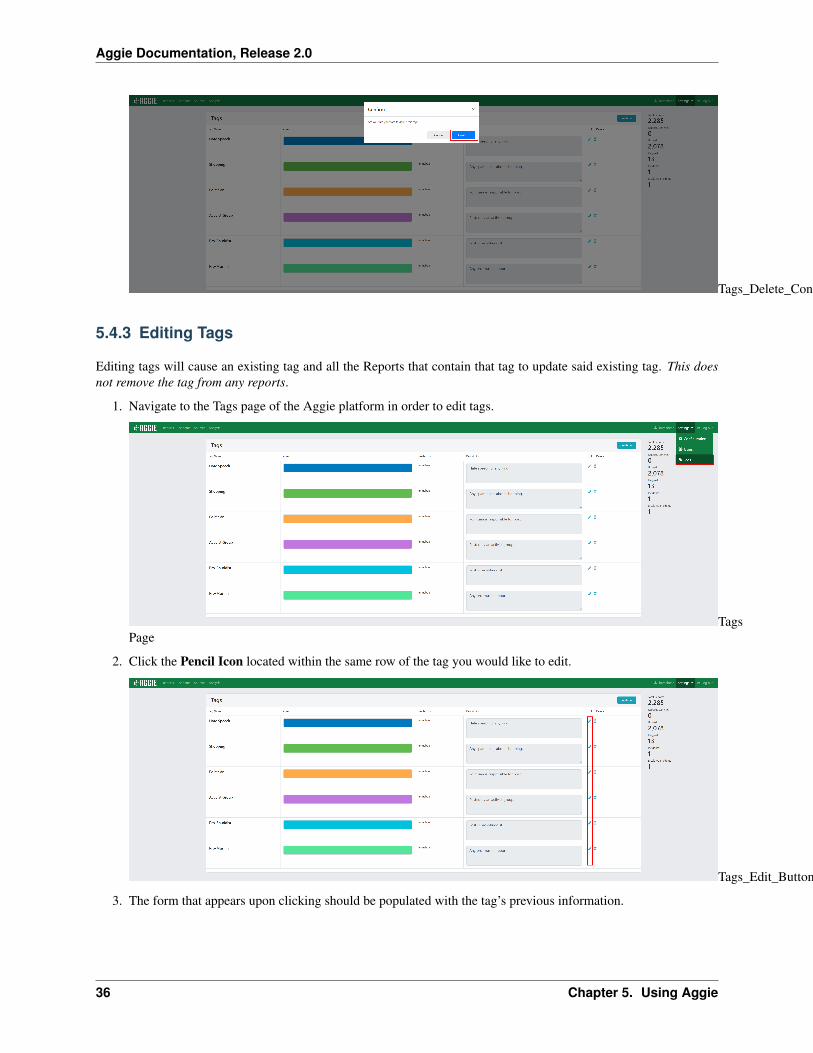
2. Click the Trash Icon located within the same row of the tag you would like to delete.
Tags_Delete_Button
3. You will receive a confirmation modal after you click the Trash Icon. Press the Confirm button to continuewith deletion.
5.4. Tags 35
Aggie Documentation, Release 2.0
Tags_Delete_Confirm
5.4.3 Editing Tags
Editing tags will cause an existing tag and all the Reports that contain that tag to update said existing tag. This doesnot remove the tag from any reports.
1. Navigate to the Tags page of the Aggie platform in order to edit tags.
TagsPage
2. Click the Pencil Icon located within the same row of the tag you would like to edit.
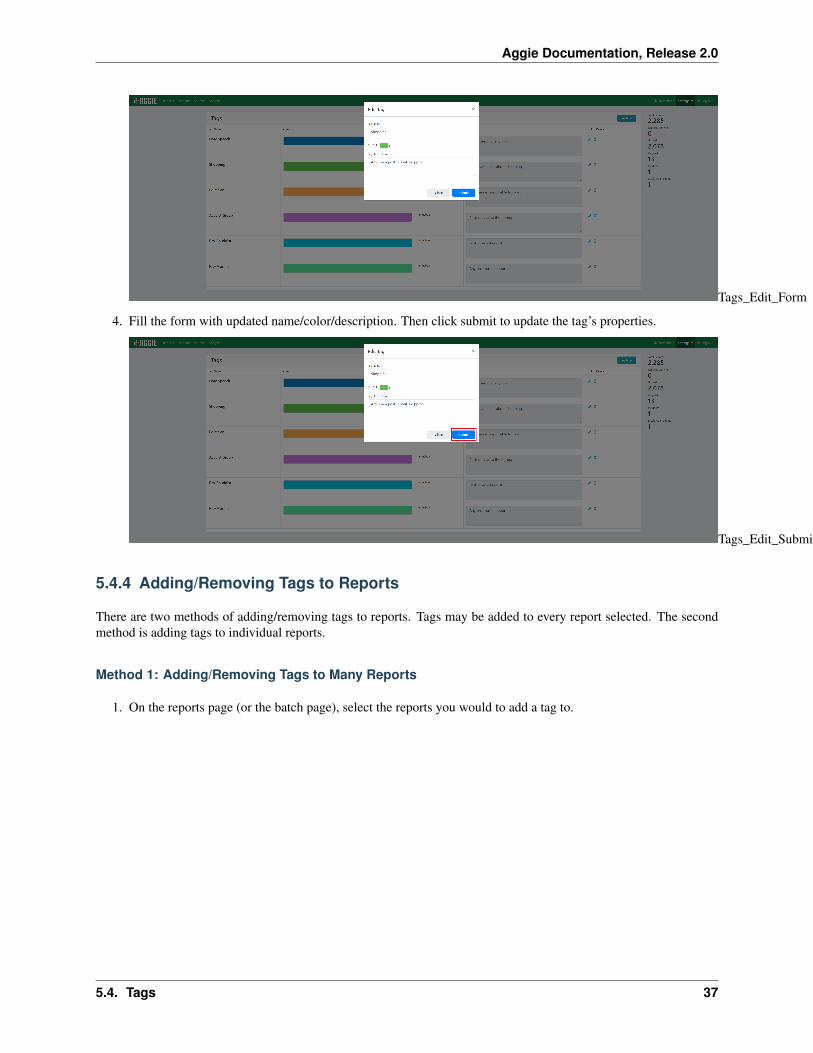
Tags_Edit_Button
3. The form that appears upon clicking should be populated with the tag’s previous information.
36 Chapter 5. Using Aggie
Aggie Documentation, Release 2.0
Tags_Edit_Form
4. Fill the form with updated name/color/description. Then click submit to update the tag’s properties.
Tags_Edit_Submit
5.4.4 Adding/Removing Tags to Reports
There are two methods of adding/removing tags to reports. Tags may be added to every report selected. The secondmethod is adding tags to individual reports.
Method 1: Adding/Removing Tags to Many Reports
1. On the reports page (or the batch page), select the reports you would to add a tag to.
5.4. Tags 37
Aggie Documentation, Release 2.0
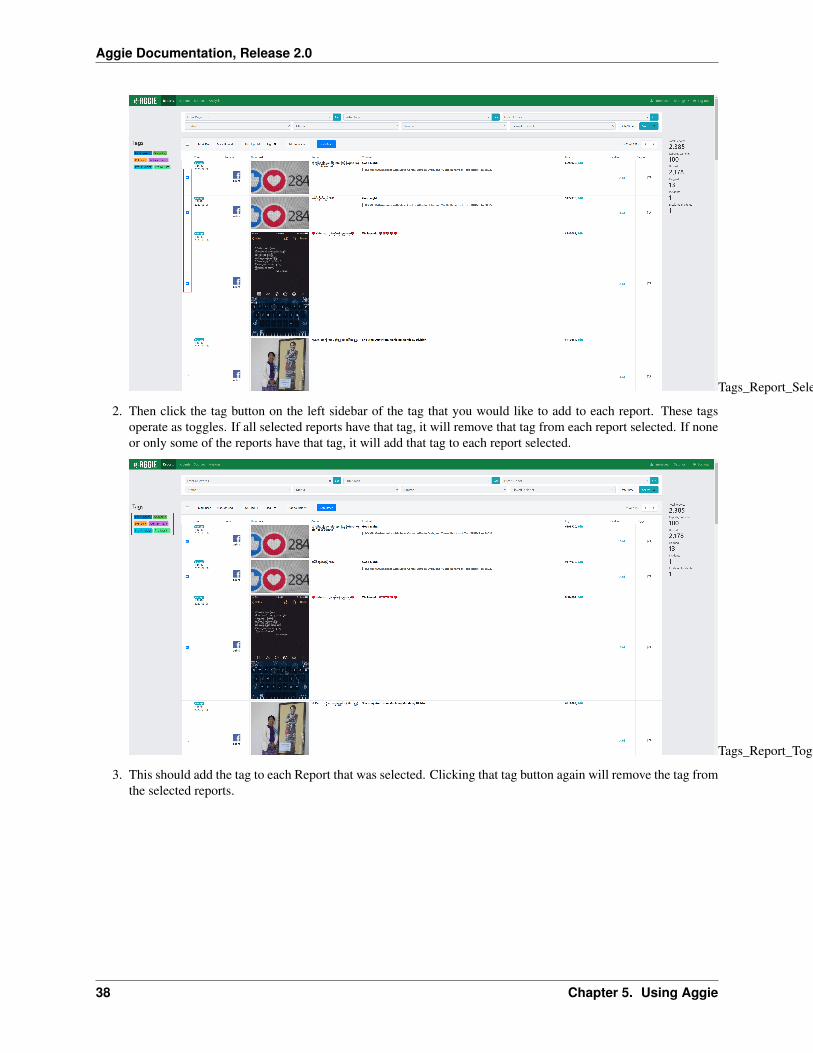
Tags_Report_Selection
2. Then click the tag button on the left sidebar of the tag that you would like to add to each report. These tagsoperate as toggles. If all selected reports have that tag, it will remove that tag from each report selected. If noneor only some of the reports have that tag, it will add that tag to each report selected.
Tags_Report_ToggleTags
3. This should add the tag to each Report that was selected. Clicking that tag button again will remove the tag fromthe selected reports.
38 Chapter 5. Using Aggie
Aggie Documentation, Release 2.0
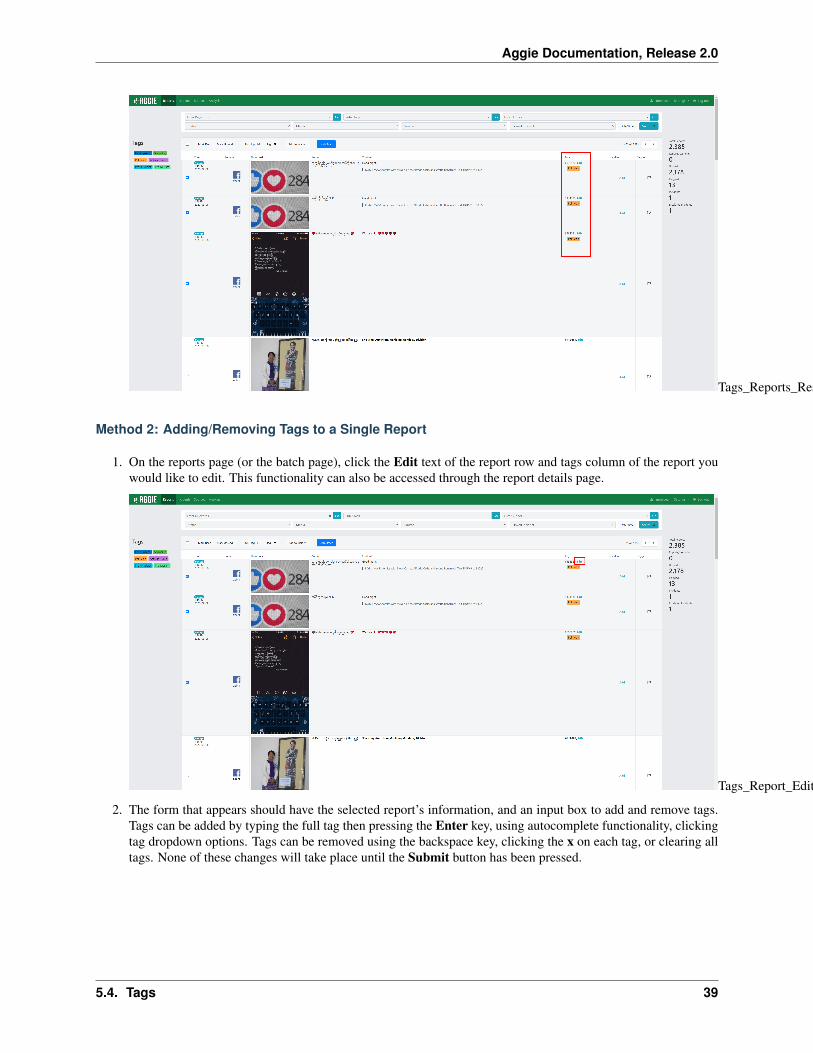
Tags_Reports_Result
Method 2: Adding/Removing Tags to a Single Report
1. On the reports page (or the batch page), click the Edit text of the report row and tags column of the report youwould like to edit. This functionality can also be accessed through the report details page.
Tags_Report_Edit
2. The form that appears should have the selected report’s information, and an input box to add and remove tags.Tags can be added by typing the full tag then pressing the Enter key, using autocomplete functionality, clickingtag dropdown options. Tags can be removed using the backspace key, clicking the x on each tag, or clearing alltags. None of these changes will take place until the Submit button has been pressed.
5.4. Tags 39
Aggie Documentation, Release 2.0
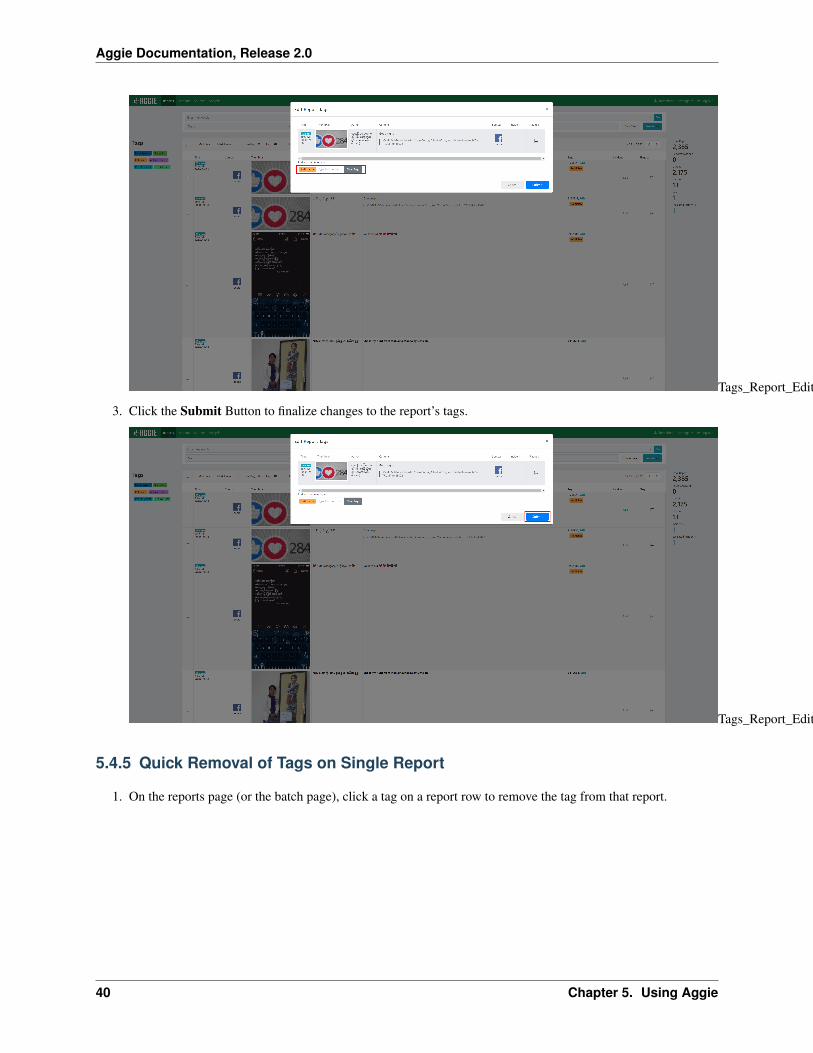
Tags_Report_Edit_Form
3. Click the Submit Button to finalize changes to the report’s tags.
Tags_Report_Edit_Submit
5.4.5 Quick Removal of Tags on Single Report
1. On the reports page (or the batch page), click a tag on a report row to remove the tag from that report.
40 Chapter 5. Using Aggie
Aggie Documentation, Release 2.0
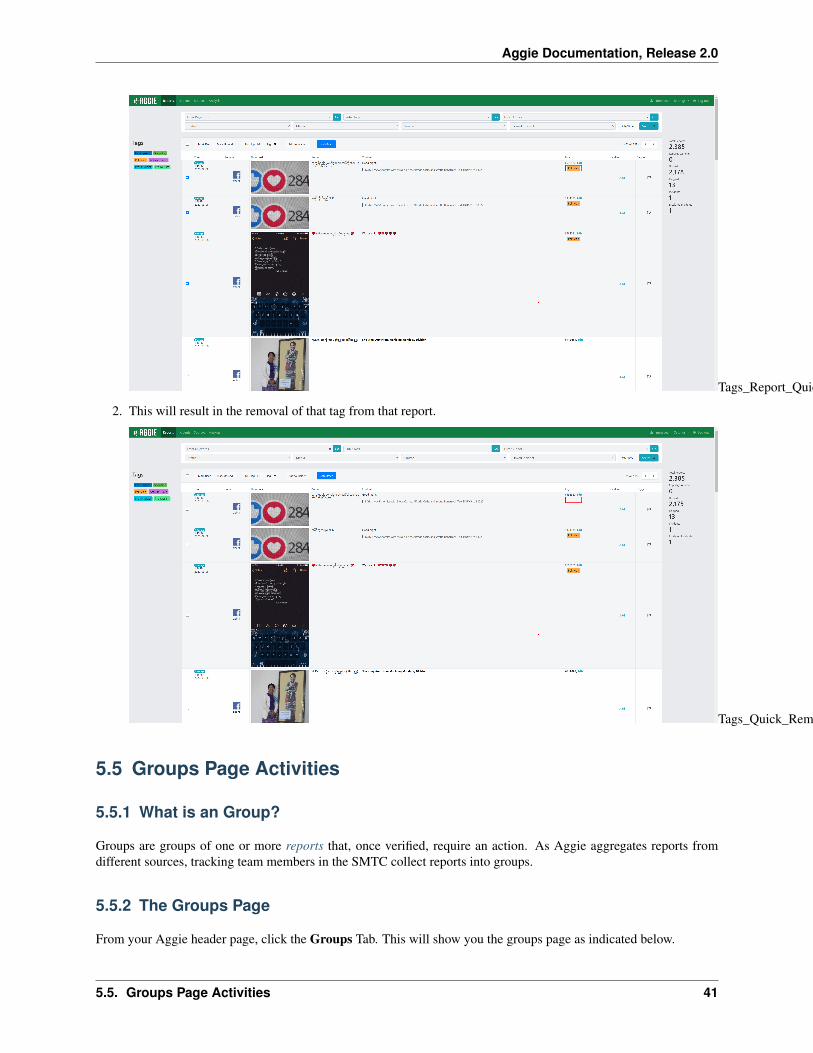
Tags_Report_Quick_Remove
2. This will result in the removal of that tag from that report.
Tags_Quick_Remove_Result
5.5 Groups Page Activities
5.5.1 What is an Group?
Groups are groups of one or more reports that, once verified, require an action. As Aggie aggregates reports fromdifferent sources, tracking team members in the SMTC collect reports into groups.
5.5.2 The Groups Page
From your Aggie header page, click the Groups Tab. This will show you the groups page as indicated below.
5.5. Groups Page Activities 41
Aggie Documentation, Release 2.0
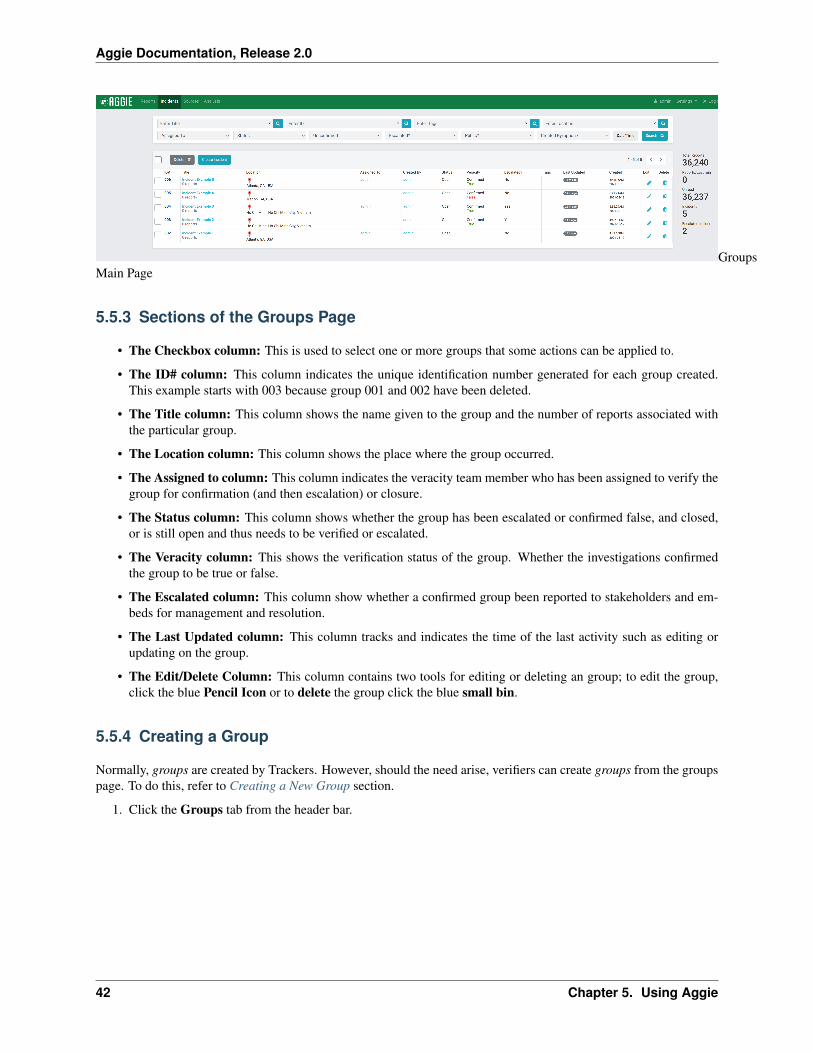
GroupsMain Page
5.5.3 Sections of the Groups Page
• The Checkbox column: This is used to select one or more groups that some actions can be applied to.
• The ID# column: This column indicates the unique identification number generated for each group created.This example starts with 003 because group 001 and 002 have been deleted.
• The Title column: This column shows the name given to the group and the number of reports associated withthe particular group.
• The Location column: This column shows the place where the group occurred.
• The Assigned to column: This column indicates the veracity team member who has been assigned to verify thegroup for confirmation (and then escalation) or closure.
• The Status column: This column shows whether the group has been escalated or confirmed false, and closed,or is still open and thus needs to be verified or escalated.
• The Veracity column: This shows the verification status of the group. Whether the investigations confirmedthe group to be true or false.
• The Escalated column: This column show whether a confirmed group been reported to stakeholders and em-beds for management and resolution.
• The Last Updated column: This column tracks and indicates the time of the last activity such as editing orupdating on the group.
• The Edit/Delete Column: This column contains two tools for editing or deleting an group; to edit the group,click the blue Pencil Icon or to delete the group click the blue small bin.
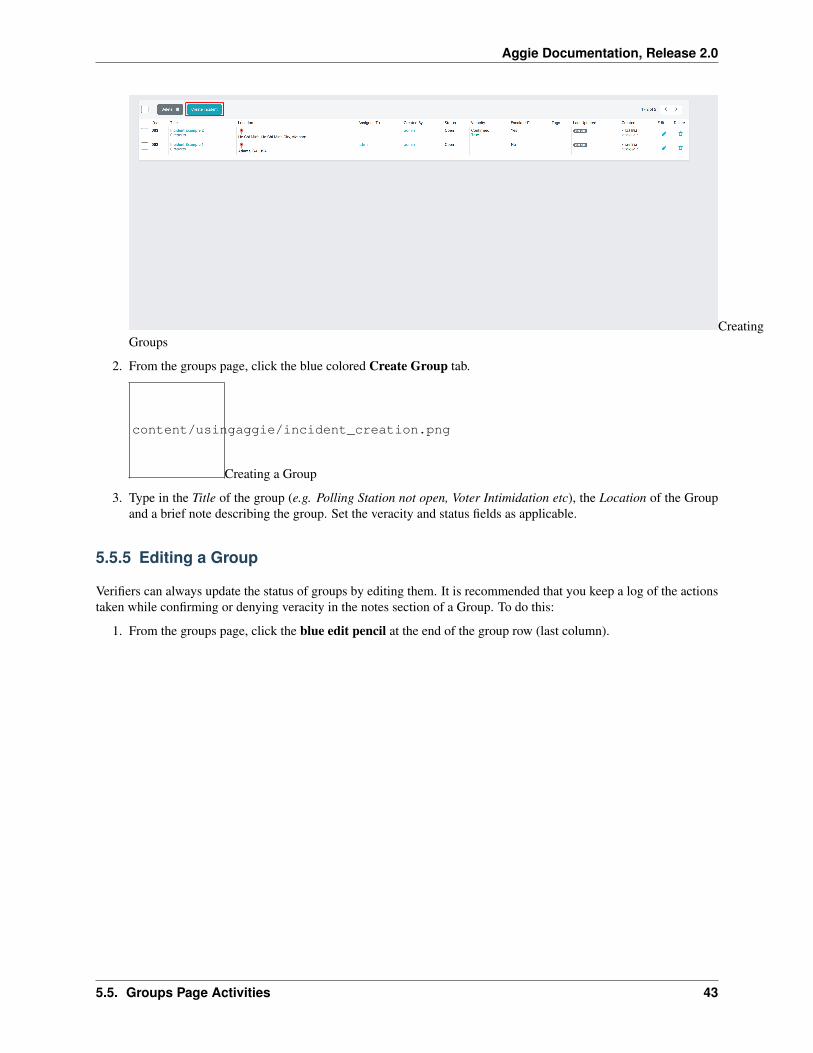
5.5.4 Creating a Group
Normally, groups are created by Trackers. However, should the need arise, verifiers can create groups from the groupspage. To do this, refer to Creating a New Group section.
1. Click the Groups tab from the header bar.
42 Chapter 5. Using Aggie
Aggie Documentation, Release 2.0
CreatingGroups
2. From the groups page, click the blue colored Create Group tab.
content/usingaggie/incident_creation.png
Creating a Group
3. Type in the Title of the group (e.g. Polling Station not open, Voter Intimidation etc), the Location of the Groupand a brief note describing the group. Set the veracity and status fields as applicable.
5.5.5 Editing a Group
Verifiers can always update the status of groups by editing them. It is recommended that you keep a log of the actionstaken while confirming or denying veracity in the notes section of a Group. To do this:
1. From the groups page, click the blue edit pencil at the end of the group row (last column).
5.5. Groups Page Activities 43

Aggie Documentation, Release 2.0
Editinga Group
2. Update the group by editing appropriate sections. For example, you can edit the veracity and status of the group,add any helpful notes or escalate the group.
5.5.6 Deleting an Group
If a veracity team member notices a redundancy in groups, they may delete an group from the Groups page. To dothis:
1. Select the group(s) you wish to delete by checking its/their respective checkbox(es).
2. Click the Delete button below the filter bar to the left.
DeletingGroups
3. Click Confirm to delete the selected group(s).
Alternatively, you can delete an group by clicking the little bin on the last column of the group row.
5.5.7 The Group Filter Bar
With filters, verifiers can narrow down their search. In some cases, there might arise the need to search for specifictypes of groups. Filters are the best way to achieve this. Below are a number of filters that can be used.
44 Chapter 5. Using Aggie
Aggie Documentation, Release 2.0
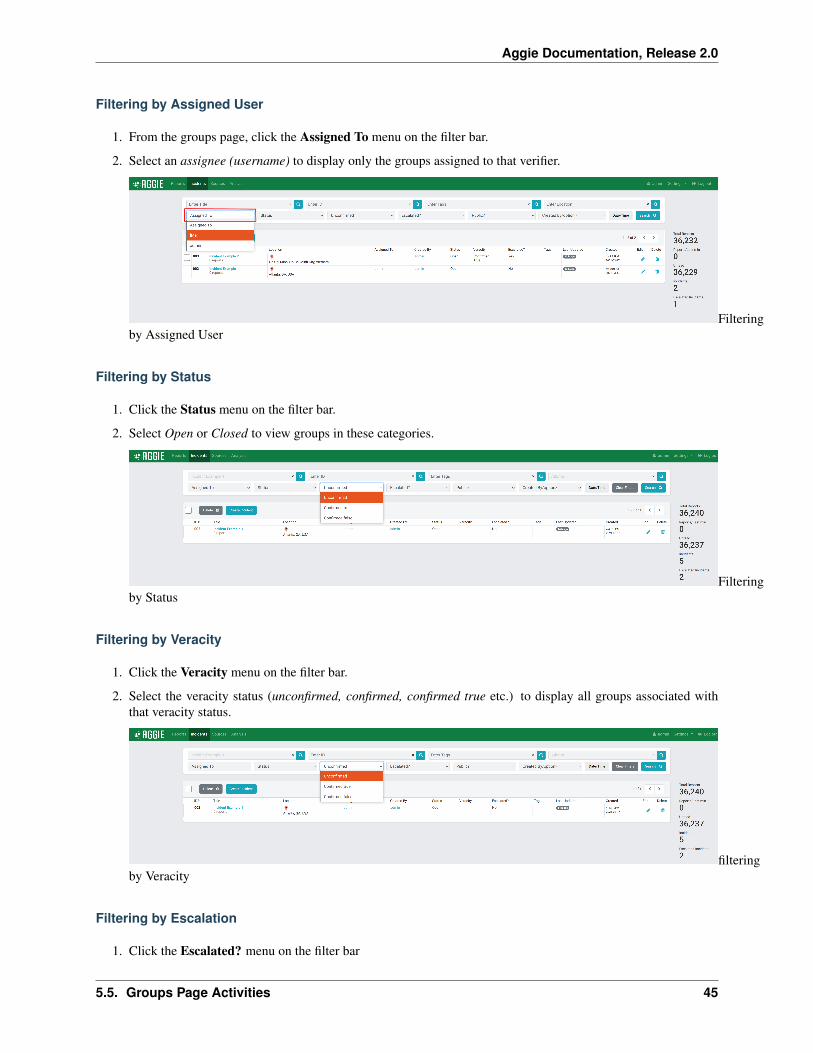
Filtering by Assigned User
1. From the groups page, click the Assigned To menu on the filter bar.
2. Select an assignee (username) to display only the groups assigned to that verifier.
Filteringby Assigned User
Filtering by Status
1. Click the Status menu on the filter bar.
2. Select Open or Closed to view groups in these categories.
Filteringby Status
Filtering by Veracity
1. Click the Veracity menu on the filter bar.
2. Select the veracity status (unconfirmed, confirmed, confirmed true etc.) to display all groups associated withthat veracity status.
filteringby Veracity
Filtering by Escalation
1. Click the Escalated? menu on the filter bar
5.5. Groups Page Activities 45
Aggie Documentation, Release 2.0
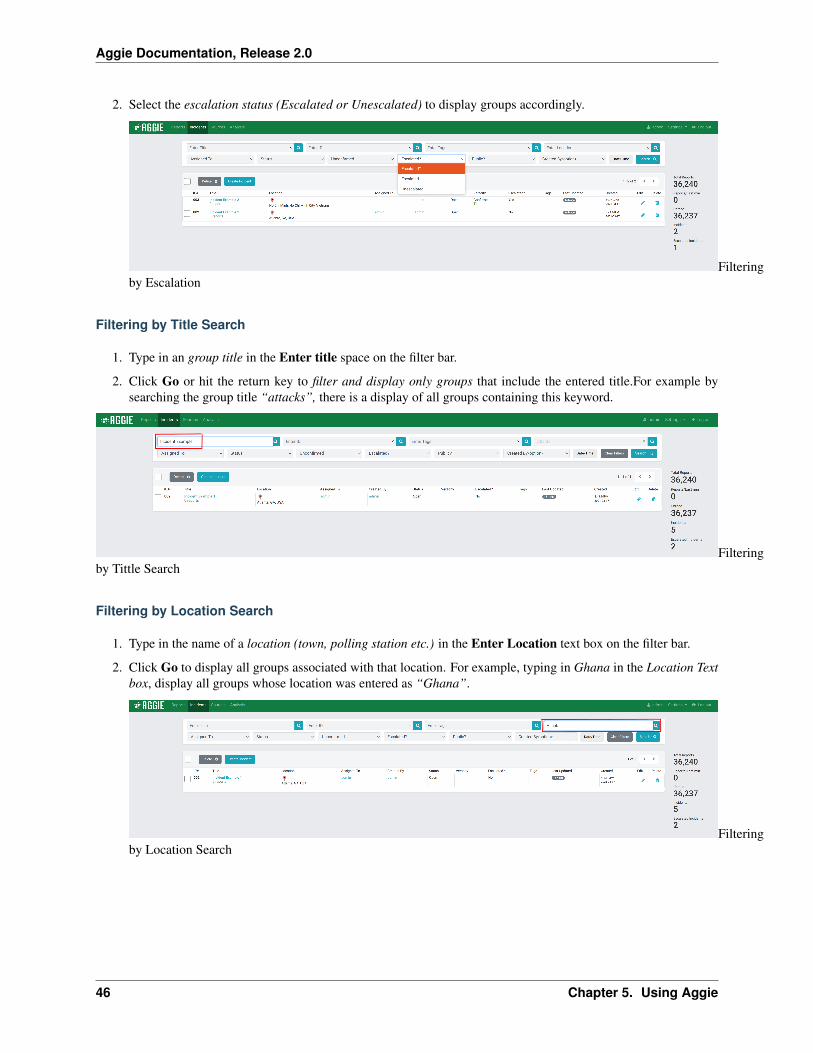
2. Select the escalation status (Escalated or Unescalated) to display groups accordingly.
Filteringby Escalation
Filtering by Title Search
1. Type in an group title in the Enter title space on the filter bar.
2. Click Go or hit the return key to filter and display only groups that include the entered title.For example bysearching the group title “attacks”, there is a display of all groups containing this keyword.
Filteringby Tittle Search
Filtering by Location Search
1. Type in the name of a location (town, polling station etc.) in the Enter Location text box on the filter bar.
2. Click Go to display all groups associated with that location. For example, typing in Ghana in the Location Textbox, display all groups whose location was entered as “Ghana”.
Filteringby Location Search
46 Chapter 5. Using Aggie
CHAPTER 6
User Management
There are three main user categories in Aggie with varying Privileges: Viewer, Monitor and Admin. The table belowindicates the privileges associated with each user category.
6.1 User privileges
6.2 Creating a New User
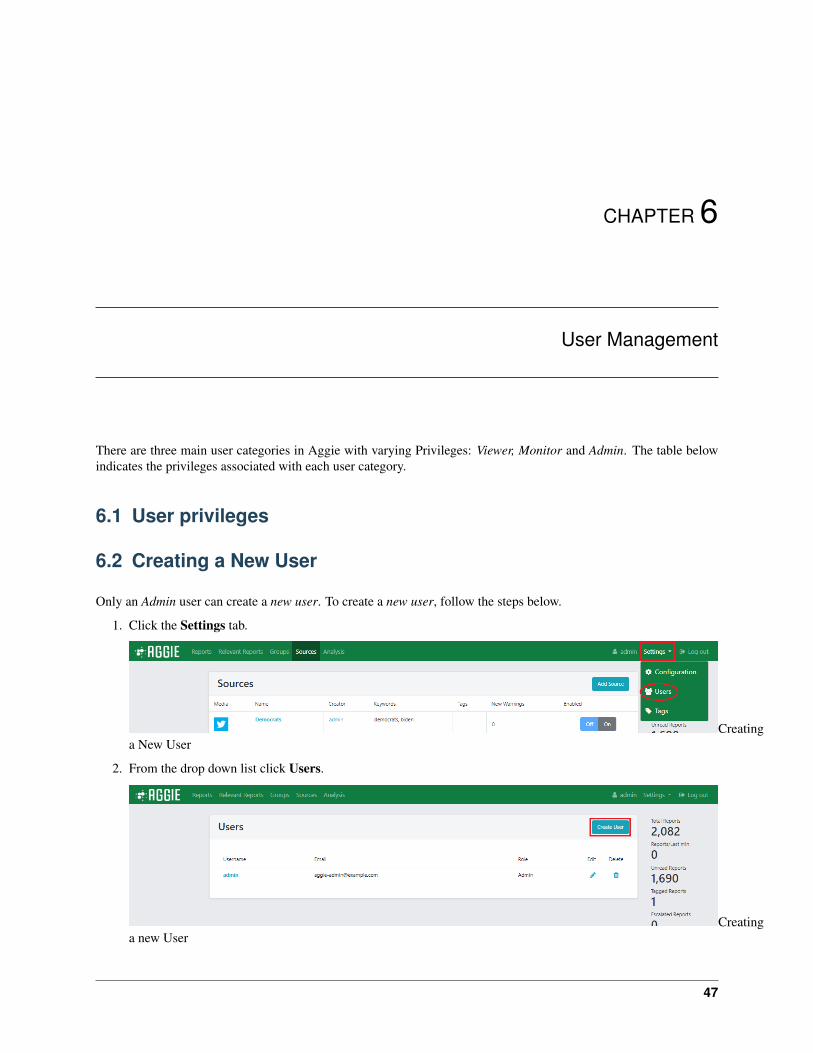
Only an Admin user can create a new user. To create a new user, follow the steps below.
1. Click the Settings tab.
Creatinga New User
2. From the drop down list click Users.
Creatinga new User
47
Aggie Documentation, Release 2.0
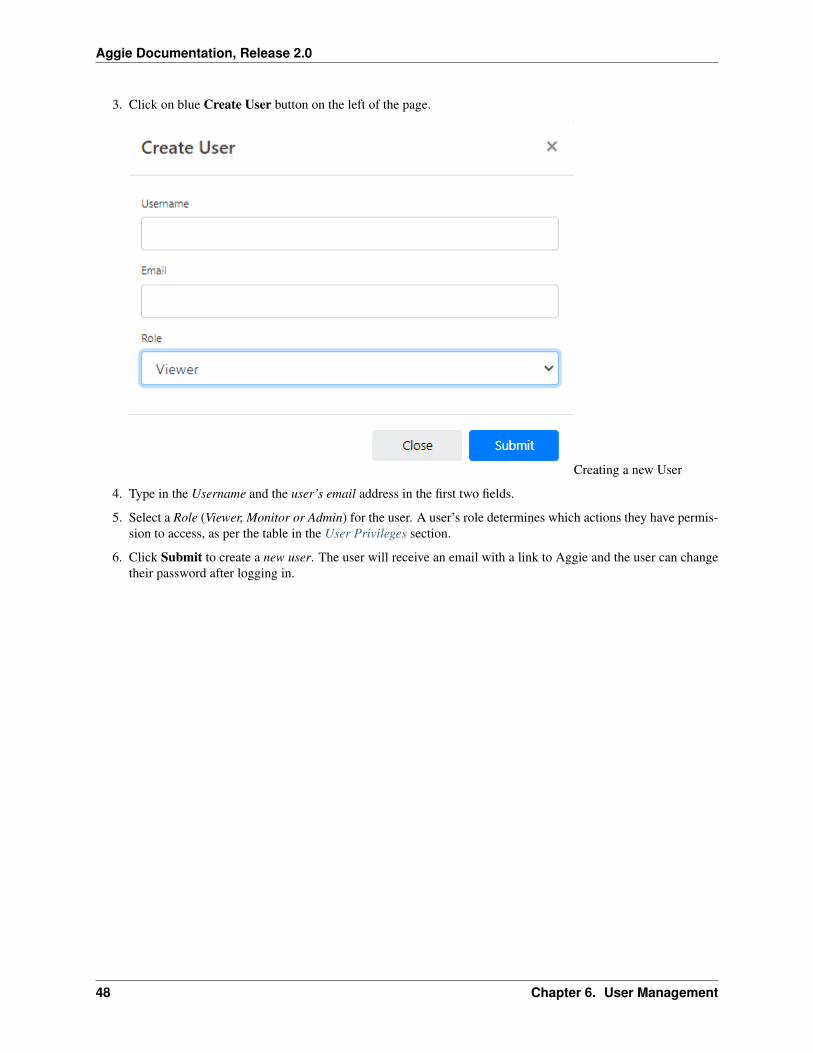
3. Click on blue Create User button on the left of the page.
Creating a new User
4. Type in the Username and the user’s email address in the first two fields.
5. Select a Role (Viewer, Monitor or Admin) for the user. A user’s role determines which actions they have permis-sion to access, as per the table in the User Privileges section.
6. Click Submit to create a new user. The user will receive an email with a link to Aggie and the user can changetheir password after logging in.
48 Chapter 6. User Management

CHAPTER 7
Indices and Tables
• genindex
• search
49