Embed Size (px)
Citation preview
© 2003 American Honda Motor Co., Inc. - All Rights Reserved. AII 26005 (0308) 1 of 7
INSTALLATIONINSTRUCTIONS
Accessory Application Publications No.
Issue Date
AUG 2003
08U25-S0X-1000-91
ODYSSEYCIGARETTE LIGHTERWITH ASHTRAY
PARTS LIST
Ashtray holder
Ashtray
Protector
Protector base
5 Self-tapping screws,(4 x 6 mm)
Washer
Relay
Fuse label
Fusible link
Nut
10 Wire ties
2 Wire ties with holders
AII 26005
TOOLS AND SUPPLIES REQUIRED
#2 Phillips screwdriver
Flat-tip screwdriver
Screwdriver with ratchet
Stubby Phillips screwdriver
Engine compartmentharness
Cigarette lighter harness
P/N 08U25-S0X-160 GrayP/N 08U25-S0X-170 BeigeP/N 08U25-S0X-1D0 Green
Cigarette Lighter With Ashtray:
AII_20829.ai
2 of 7 AII 26005 (0308) © 2003 American Honda Motor Co., Inc. - All Rights Reserved.
A11_19618.ai
AII_20829.ai
AII_19618(2).ai
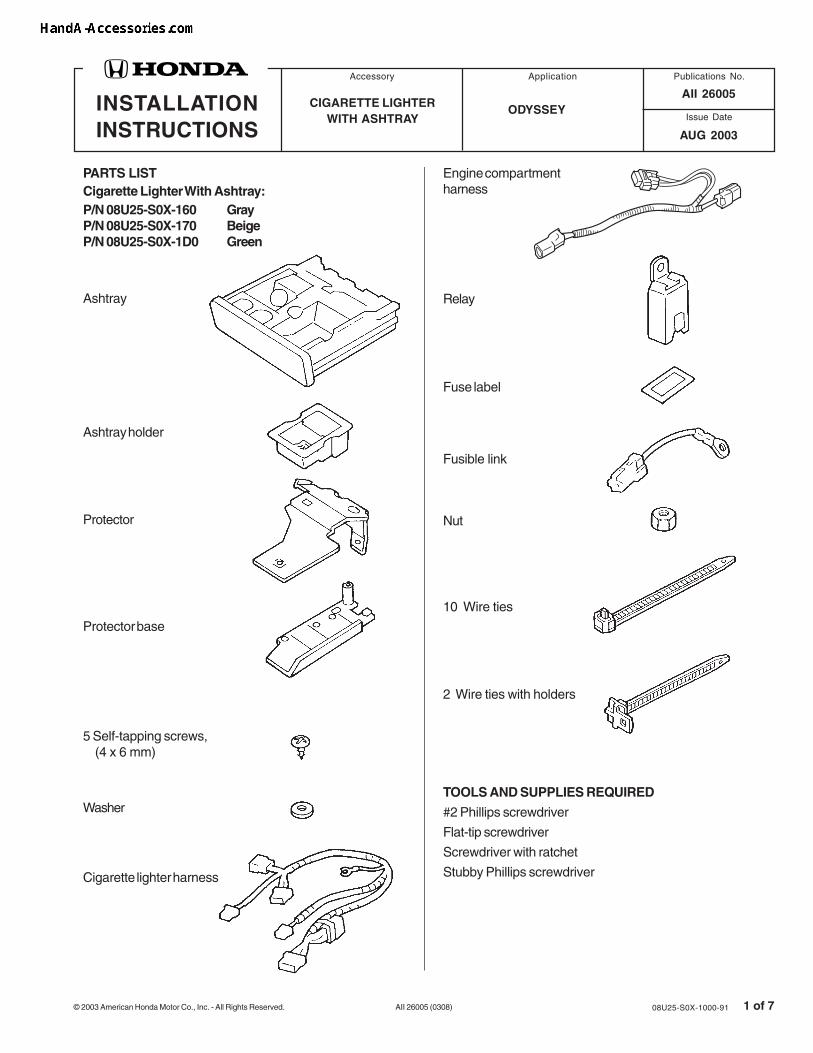
Illustration of the Cigarette Lighter with AshtrayInstalled on the Vehicle
INSTALLATION
4. Remove the air cleaner case cover (four bolts,remove the clip securing the throttle cable, anddisconnect the air intake hose).
5. Attach one wire tie with holder to the fuse case, thenfold the fuse case back and secure it to the harnesswith the wire tie. Attach the other wire tie with holderto the 1-pin connector of the sub-harness.
AIR INTAKEHOSE(Disconnect.)
AIR CLEANERCASE COVER
COVERBOLT
COVERBOLT
WIRE TIE
WIRE TIEWITH HOLDER
FUSE LABEL
FUSECASE
1-PINCONNECTOR
RETAININGCLIP(Pull out the center pin.)
LEFT HEADLIGHTCOVER
3. Behind the left headlight, remove the cover (twoclips).
2. Disconnect the negative cable from the battery.
6. Attach the fuse label to the fuse case on the enginecompartment harness.
SUB-HARNESS
Customer Information: The information in thisinstallation instruction is intended for use only byskilled technicians who have the proper tools,equipment, and training to correctly and safely addequipment to your vehicle. These procedures shouldnot be attempted by “do-it-yourselfers.”
1. If equipped, make sure you have the anti-theft codefor the radio, then write down the frequencies for thepreset buttons.
THROTTLECABLE

© 2003 American Honda Motor Co., Inc. - All Rights Reserved. AII 26005 (0308) 3 of 7
AII_20829B.ai
AII_20829D.ai
AII_20829C.ai
AII_20829A.ai
7. Locate the 1-pin connector blue-taped to the vehicleharness, and remove the tape to free the connector.Connect the 1-pin connector to the enginecompartment harness.
8. Secure the engine compartment harness to thevehicle harness with the wire tie with holder as shown.
BLUETAPE
VEHICLEHARNESS1-PINCONNECTOR
NUT
BATTERY POSITIVETERMINAL COVER
FUSIBLELINK
VEHICLEHARNESS
WIRE TIE
ENGINECOMPARTMENTHARNESS 1-PINCONNECTOR
9. Get the fusible link and the nut from the kit.
10. Lift the battery positive terminal cover, and route theterminal of the fusible link through the terminal cover;then install the terminal to the battery cable with thenut provided. Tighten the nut securely.
11. Connect the 1-pin connector of the fusible link into the1-pin connector of the engine compartment harness.
12. Secure the engine compartment harness to thebattery positive cable with the two wire ties.
WIRE TIEWITHHOLDER
ENGINECOMPARTMENTHARNESS
VEHICLEHARNESS
ENGINECOMPARTMENTHARNESS 1-PINCONNECTOR
FUSIBLELINK 1-PINCONNECTOR
ENGINECOMPARTMENTHARNESS
BATTERYPOSITIVECABLE
4 of 7 AII 26005 (0308) © 2003 American Honda Motor Co., Inc. - All Rights Reserved.
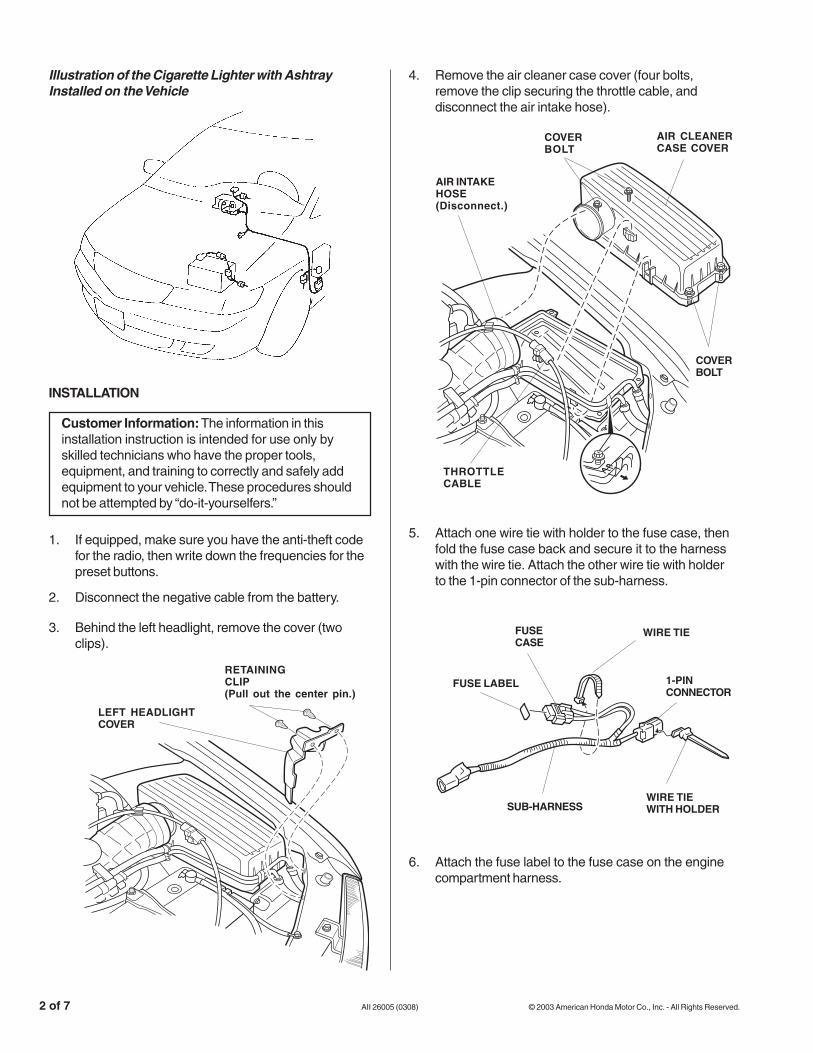
15. Remove the radio (four bolts, and unplug the radioconnector and the antenna lead).
16. Remove the cup holder by using a flat-tipscrewdriver to release the locking tab.
LOCKINGTAB
FLAT-TIPSCREWDRIVER
CUP HOLDER
Remove
ANTENNALEAD
RADIO BOLTS (4)
RADIOCONNECTOR
13. Remove the driver’s dashboard lower cover (oneself-tapping screw and three clips). On EX model,unplug the climate control 2-pin connector anddisconnect the hose from the sensor.
• Reach inside the cover hole, and gently pullalong the bottom to release the lower clips, thenwork toward the top to release all ten clips.
CLIPS (3)
HOSE 2-PINCONNECTOR(With climate control)
SENSOR
DRIVER’SDASHBOARDLOWER COVER
SELF-TAPPINGSCREW
14. Remove the console panel:
• Move the gear selector to the 1 position.
• Wrap a shop towel around a small flat-tipscrewdriver to gently pry out and remove thecover. If the vehicle is equipped with optional foglights, remove and unplug the fog light switch.
• Pull gently on the console panel, unplug theconnectors, and remove the panel.
CONNECTOR
CLIP
TAB
CONSOLEPANEL
COVER OR SWITCH(If equipped with fog lights)
FOG LIGHTSWITCH(If equipped)
© 2003 American Honda Motor Co., Inc. - All Rights Reserved. AII 26005 (0308) 5 of 7
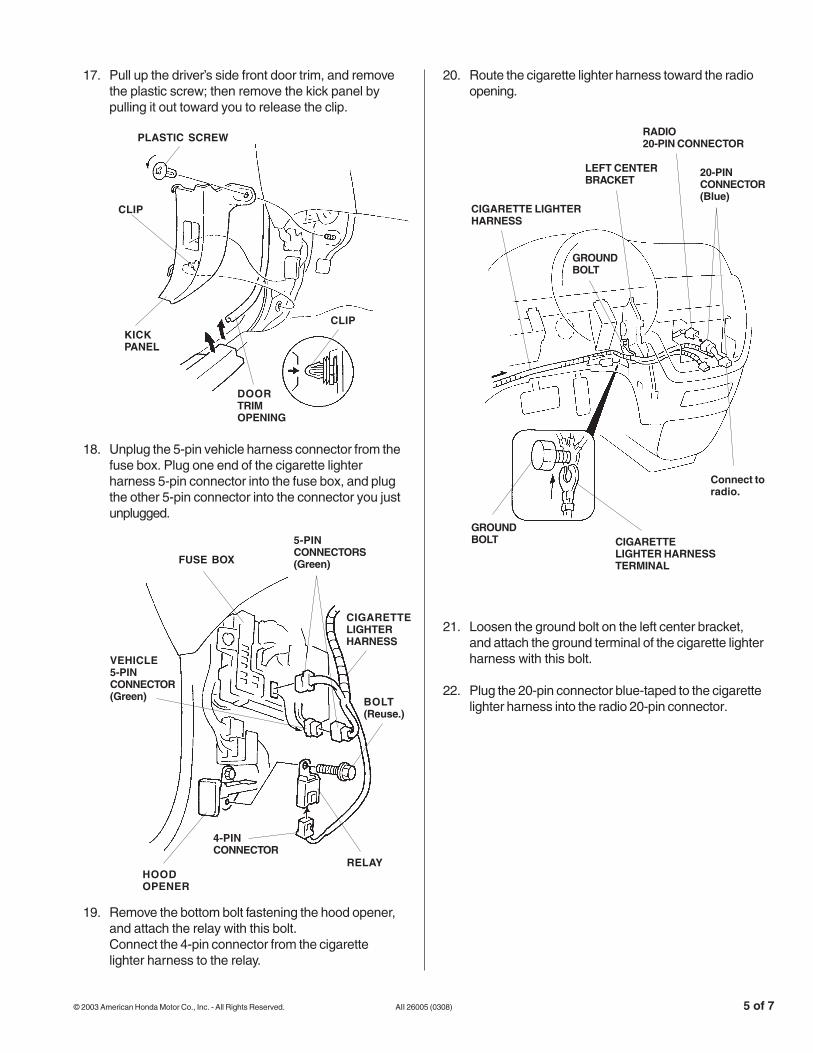
17. Pull up the driver’s side front door trim, and removethe plastic screw; then remove the kick panel bypulling it out toward you to release the clip.
18. Unplug the 5-pin vehicle harness connector from thefuse box. Plug one end of the cigarette lighterharness 5-pin connector into the fuse box, and plugthe other 5-pin connector into the connector you justunplugged.
20. Route the cigarette lighter harness toward the radioopening.
21. Loosen the ground bolt on the left center bracket,and attach the ground terminal of the cigarette lighterharness with this bolt.
22. Plug the 20-pin connector blue-taped to the cigarettelighter harness into the radio 20-pin connector.
PLASTIC SCREW
CLIP
KICKPANEL
DOORTRIMOPENING
CLIP
FUSE BOX
5-PINCONNECTORS(Green)
CIGARETTELIGHTERHARNESS
BOLT(Reuse.)
RELAY
4-PINCONNECTOR
HOODOPENER
VEHICLE5-PINCONNECTOR(Green)
CIGARETTE LIGHTERHARNESS
GROUNDBOLT
LEFT CENTERBRACKET
RADIO20-PIN CONNECTOR
20-PINCONNECTOR(Blue)
Connect toradio.
CIGARETTELIGHTER HARNESSTERMINAL
GROUNDBOLT
19. Remove the bottom bolt fastening the hood opener,and attach the relay with this bolt.Connect the 4-pin connector from the cigarettelighter harness to the relay.

6 of 7 AII 26005 (0308) © 2003 American Honda Motor Co., Inc. - All Rights Reserved.
4 x 6 mm SELF-TAPPINGSCREW(Use a #2 Phillips screwdriver.)
4 x 6 mmSELF-TAPPINGSCREW(Use a Stubby screwdriver.)
SELF-TAPPINGSCREW
Use a ratchet screwdriver.(Commercially available)
PROTECTORASSEMBLY
UP
HOLE
HARNESSCLIP
Route theharness overthis protector.
CIGARETTELIGHTERSUBHARNESS
CIGARETTELIGHTERHARNESS
WIRE TIE
Route theharness underthis protector.
WASHER
25. Insert the protector assembly into the vehicle'scigarette lighter bracket, and attach the protectorassembly with four 4 x 6 mm self-tapping screws.
26. Insert the ashtray holder into the cup holder opening,and route the cigarette lighter sub-harness as shown.Insert the harness clip into the hole.
27. Secure the cigarette lighter harness with one wire tie.
23. Under the dash, secure the cigarette lighter harnessto the vehicle harness with six wire ties in the areasshown.
24. Assemble the protector and protector base usingone 4 x 6 mm self-tapping screw.
WIRE TIE
VEHICLEHARNESS
CIGARETTELIGHTERHARNESS
WIRE TIE
4 x 6 mmSELF-TAPPINGSCREW
PROTECTOR
PROTECTOR BASE
© 2003 American Honda Motor Co., Inc. - All Rights Reserved. AII 26005 (0308) 7 of 7
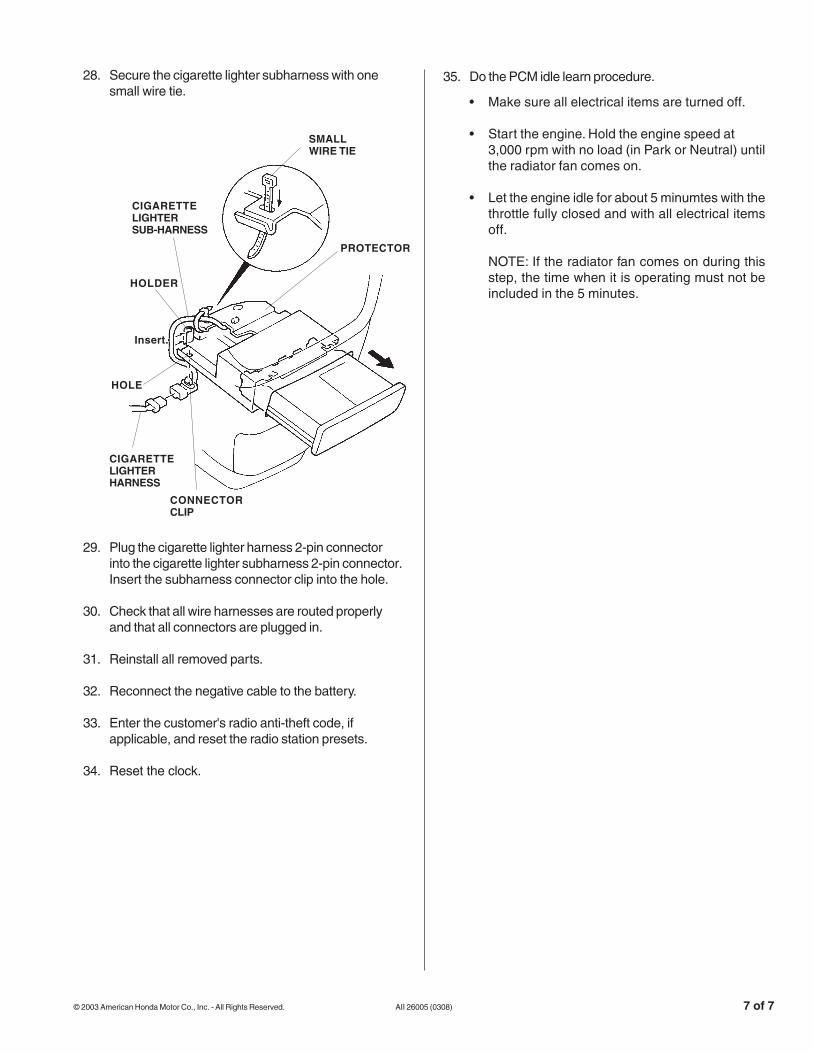
CIGARETTELIGHTERSUB-HARNESS
SMALLWIRE TIE
PROTECTOR
CONNECTORCLIP
CIGARETTELIGHTERHARNESS
HOLE
Insert.
HOLDER
28. Secure the cigarette lighter subharness with onesmall wire tie.
29. Plug the cigarette lighter harness 2-pin connectorinto the cigarette lighter subharness 2-pin connector.Insert the subharness connector clip into the hole.
30. Check that all wire harnesses are routed properlyand that all connectors are plugged in.
31. Reinstall all removed parts.
32. Reconnect the negative cable to the battery.
33. Enter the customer's radio anti-theft code, ifapplicable, and reset the radio station presets.
34. Reset the clock.
35. Do the PCM idle learn procedure.
• Make sure all electrical items are turned off.
• Start the engine. Hold the engine speed at3,000 rpm with no load (in Park or Neutral) untilthe radiator fan comes on.
• Let the engine idle for about 5 minumtes with thethrottle fully closed and with all electrical itemsoff.
NOTE: If the radiator fan comes on during thisstep, the time when it is operating must not beincluded in the 5 minutes.


![[en] Instruction manualmychoice.co.uk/media/handbook/Bosch/POP616B81E.pdf · Use any type of lighter or flame (cigarette lighter, matches, etc.) and bring it close to the burner](https://img.pdfslide.net/doc/110x75/5fa32cf093dd3d3fbe14b891/en-instruction-use-any-type-of-lighter-or-flame-cigarette-lighter-matches-etc.jpg)


![TUNDRA - Dealer.com US · Ashtray and cigarette lighter SAFETY Star Safety SystemTM - Vehicle Stability Control (VSC) [7] + Traction Control (TRAC), 4-wheel disc Anti-lock Brake System](https://img.pdfslide.net/doc/110x75/602e06f4e74cea084022dea7/tundra-us-ashtray-and-cigarette-lighter-safety-star-safety-systemtm-vehicle.jpg)


![INDEX [zippocollector.ru]zippocollector.ru/catalogs/2004_CompleteLineCollection.pdfall-metal pocket ashtray,or carry an extra refill ... MPL Multi-Purpose Lighter • The brand you](https://img.pdfslide.net/doc/110x75/5aefe8817f8b9ac62b8e027e/index-pocket-ashtrayor-carry-an-extra-refill-mpl-multi-purpose-lighter.jpg)