Embed Size (px)
Citation preview

Aikido Shinryukan New Zealand
- Stretching Exercises©
www.aikidonewzealand.com

1
The Purpose of compiling this compilation of stretching exercises for the members Aikido Shinryukan New Zealand to further assist and improve your Aikido training. The intention of the presented booklet is to provide a few exercises that you can add to or mix with both your traditional Aikido warm-ups as well as any other stretching routines you normally do. The main aim is to provide a means to make your Aikido practice more enjoyable, healthy and safe.
The exercises here can be done either successively or individually, as part of your warm-up or cool-down routine, or as a completely separate program. They are not meant to be a comprehensive collection, or a replacement to other exercises, nor are they equally suitable to everyone in the same way. If you have any concerns about any of the exercises suggested here, please check back with your doctor or aikido instructor! Without stealing too much of your time and going into scientific detail and debate, here are some general recommendations we would like to make for stretching (specific recommendations for each of the exercises can be found under the pictures below): - stretch for 10-30sec. per exercise before training; 30sec. and/or more after training or on separate ‘stretching days’ - exercises can look, work and have different relevance from one person to another - pain is not a must, nor a sign for good stretching - rather than taking big leaps, aim at making small but constant progress as it is usually more permanent - precision of form is key, whether you are stretching muscles, connective tissue or meridians. - breathing and stretching go hand-in-hand and need to be brought into unison. Although there might be differences for specific exercises, very generally speaking, every exhale should allow you to relax into the stretch, while every inhale allows you to have a little pause from the stretch or even a little contraction of the stretched parts and prepare for the next exhale-stretch phase. Some of these exercises might be very similar to the ones you know and do already. Should this be the case we hope that you will find some interesting points to consider and (re-) examine in the pictures, explanations and when you go back to doing the exercises yourself.
As the exercises here are stretching exercises only, we suggest that you keep in mind that strengthening, flexibility, endurance and coordination training go hand-in-hand and need to complement each other. This is important to ensure good health and stabilization of your bones, joints, ligaments and muscles and allow an enjoyable and safe experience on the mat for many years to come. While coordination and sport-specific endurance is a great part of our Aikido practice, and stretching sometimes forms part of our warm-up routines, strengthening exercises often come a little bit short. For this reason, come time, we hope to compile a strengthening/stability program that makes sense for Aikidoka to complete the present stretching exercises. Some people are too flexible as it is and shouldn’t stretch further. Much rather and that is true for all of us, it is important to find the right balance between flexibility and stability, so find out which exercises you should use for stretching, use others simply as ‘moving’ exercises without pushing into a further stretch and possibly leave some exercises away.
2
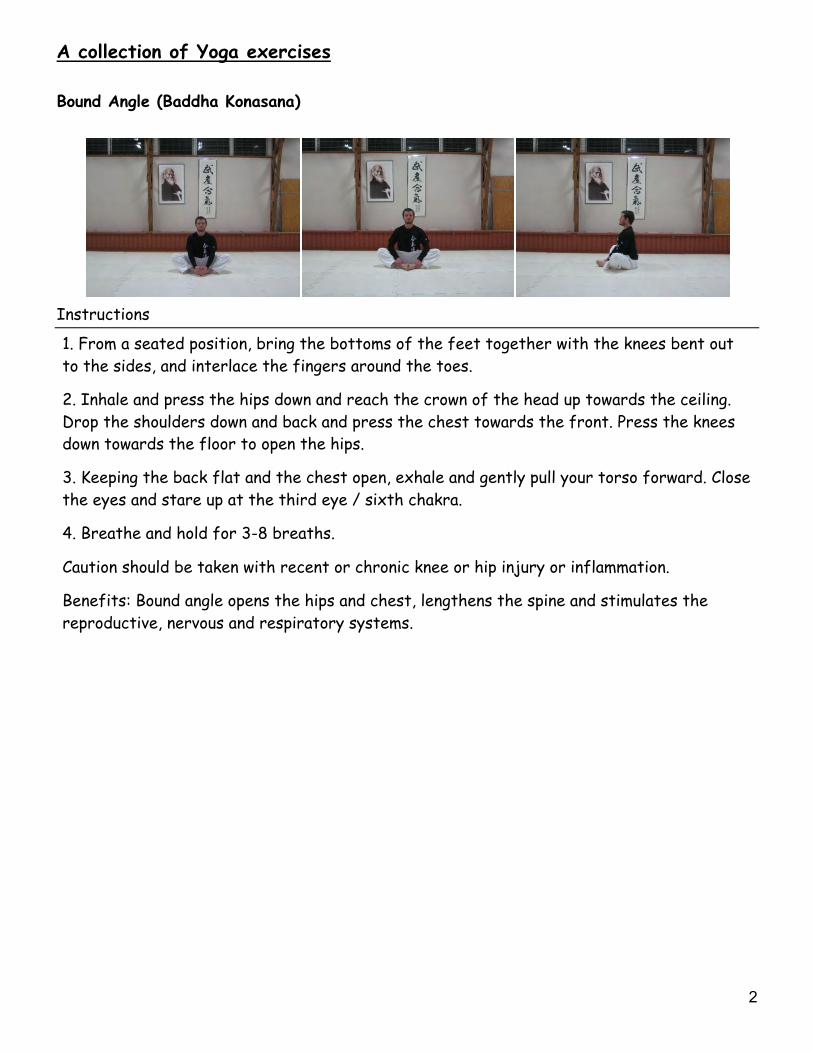
A collection of Yoga exercises Bound Angle (Baddha Konasana)
Instructions
1. From a seated position, bring the bottoms of the feet together with the knees bent out to the sides, and interlace the fingers around the toes.
2. Inhale and press the hips down and reach the crown of the head up towards the ceiling. Drop the shoulders down and back and press the chest towards the front. Press the knees down towards the floor to open the hips.
3. Keeping the back flat and the chest open, exhale and gently pull your torso forward. Close the eyes and stare up at the third eye / sixth chakra.
4. Breathe and hold for 3-8 breaths.
Caution should be taken with recent or chronic knee or hip injury or inflammation.
Benefits: Bound angle opens the hips and chest, lengthens the spine and stimulates the reproductive, nervous and respiratory systems.
3
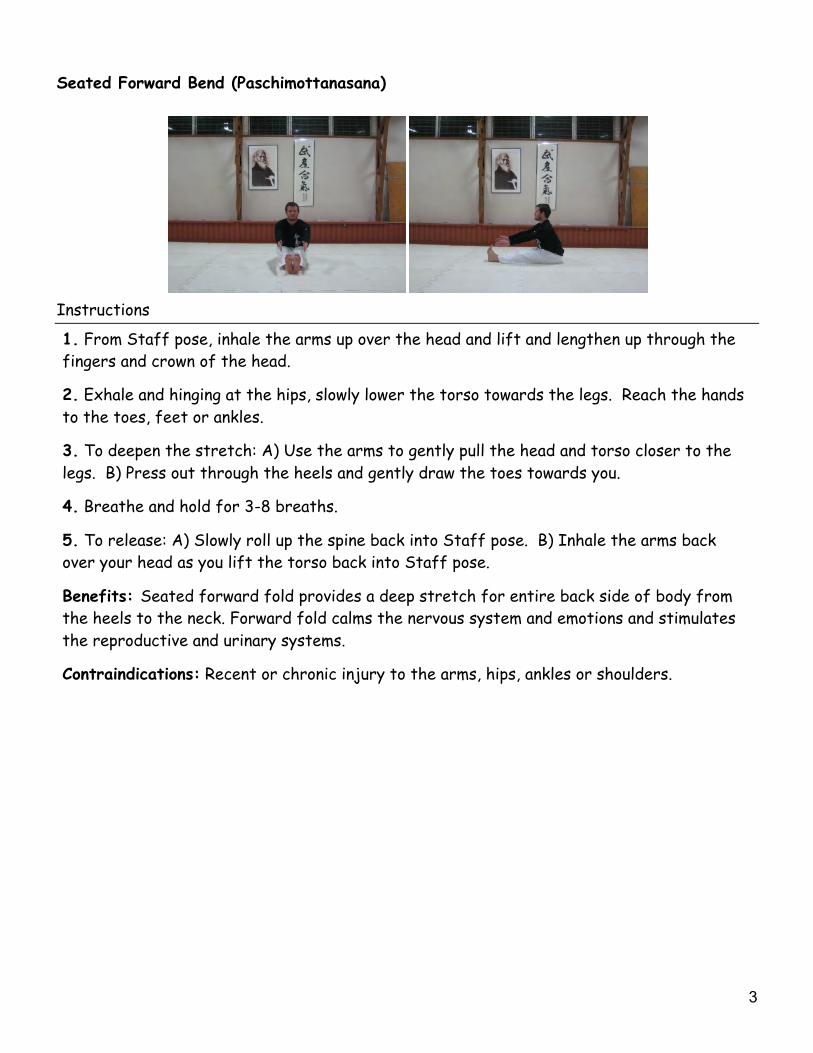
Seated Forward Bend (Paschimottanasana)
Instructions
1. From Staff pose, inhale the arms up over the head and lift and lengthen up through the fingers and crown of the head.
2. Exhale and hinging at the hips, slowly lower the torso towards the legs. Reach the hands to the toes, feet or ankles.
3. To deepen the stretch: A) Use the arms to gently pull the head and torso closer to the legs. B) Press out through the heels and gently draw the toes towards you.
4. Breathe and hold for 3-8 breaths.
5. To release: A) Slowly roll up the spine back into Staff pose. B) Inhale the arms back over your head as you lift the torso back into Staff pose.
Benefits: Seated forward fold provides a deep stretch for entire back side of body from the heels to the neck. Forward fold calms the nervous system and emotions and stimulates the reproductive and urinary systems.
Contraindications: Recent or chronic injury to the arms, hips, ankles or shoulders.

4
One Legged King Pigeon (Eka Pada Rajakapotasana)
Instructions
1. From the Table or Down Dog, slide the right knee forward between the hands and let the right foot slide over to the left. Slide the left leg back, lowering the hips towards the floor.
2. Press down into the palms or fingertips, inhale and reach the crown of the head up, lengthening the spine. Exhale and sink the hips down into the floor. Roll the shoulders down and back and press and lean forward through the chest.
3. Move as deep into the posture as you can while still maintaining full deep breathing. Breathe and hold for 3-6 breaths.
4. To release: support your weight with the hands as you slide the right knee back into Table or step the right foot back into Down Dog.
5. Repeat on other side.
Benefits: Pigeon pose opens the hips and chest, facilitates deeper breathing, and opens the heart centre. This posture stimulates the nervous, endocrine and reproductive systems.
Contraindications: Recent or chronic back, knee, or hip injury or inflammation.

5
Upward Facing Dog (Urdhva Mukha Svanasana)
Instructions
1. From Table pose, slowly drop the hips forward toward the floor.
2. Press palms down into the floor, drop the shoulders down and back, press the chest forward and reach the crown of the head up towards the ceiling.
3. Inhale and lift thighs and legs off of the floor by pressing the tops of the feet down and engaging mula bandha.
4. Breathe and hold for 1-3 breaths.
5. To release: bend the knees and lift the hips back up into table position
Benefits: Upward Facing Dog opens the chest and strengthens the whole body. Up dog aligns the spine and invigorates the kidneys and nervous system.
Contraindications: Recent or chronic injury to the back, hips, arms or shoulders, pregnancy and recent abdominal surgery.
6
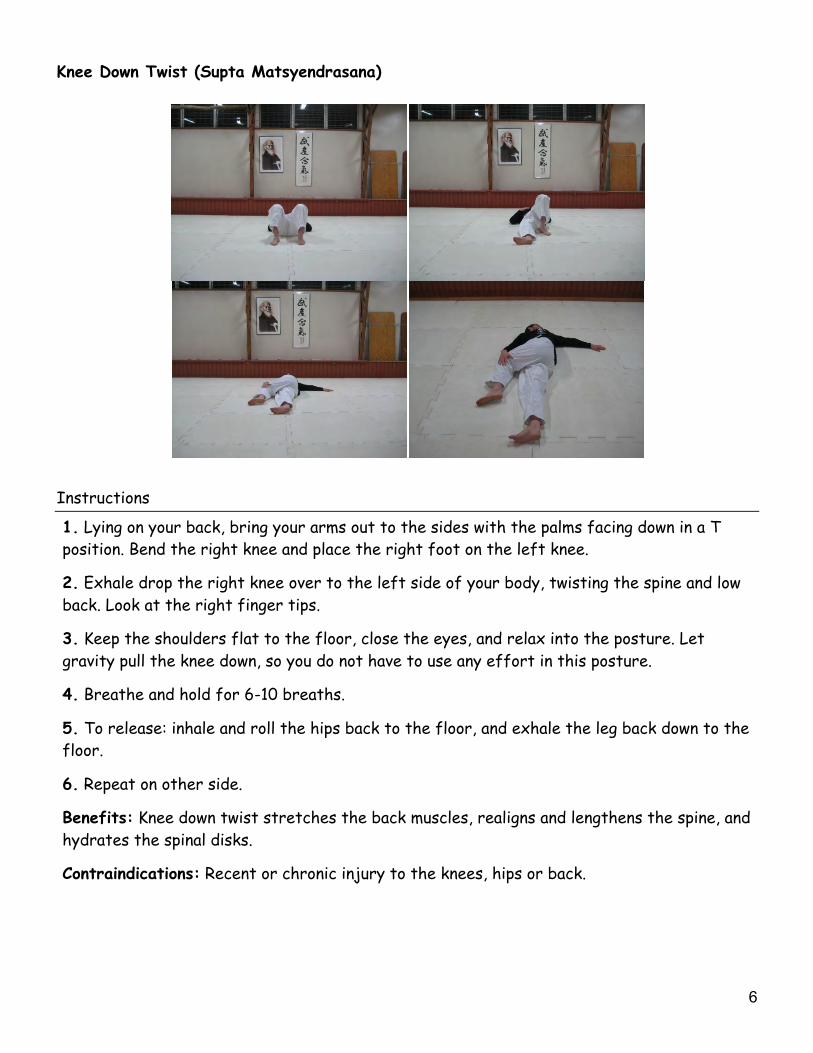
Knee Down Twist (Supta Matsyendrasana)
Instructions
1. Lying on your back, bring your arms out to the sides with the palms facing down in a T position. Bend the right knee and place the right foot on the left knee.
2. Exhale drop the right knee over to the left side of your body, twisting the spine and low back. Look at the right finger tips.
3. Keep the shoulders flat to the floor, close the eyes, and relax into the posture. Let gravity pull the knee down, so you do not have to use any effort in this posture.
4. Breathe and hold for 6-10 breaths.
5. To release: inhale and roll the hips back to the floor, and exhale the leg back down to the floor.
6. Repeat on other side.
Benefits: Knee down twist stretches the back muscles, realigns and lengthens the spine, and hydrates the spinal disks.
Contraindications: Recent or chronic injury to the knees, hips or back.

7
Childs Pose (Balasana)
Instructions
1. From Table pose, exhale and lower the hips to the heels and forehead to the floor. Have the knees together or if more comfortable, spread the knees slightly apart.
2. The arms can be overhead with the palms on the floor, the palms or fists can be stacked under the forehead, or the arms can be along side the body with the palms up.
3. Breathe slowly and deeply, actively pressing the belly against the thighs on the inhale.
4. Breathe and hold for 4-12 breaths.
5. To release: place the palms under the shoulders and slowly inhale up to a seated position.
Benefits: Child pose calms the body, mind and spirit and stimulates the third eye point. Child pose gently stretches the low back, massages and tones the abdominal organs, and stimulates digestion and elimination.
Contraindications: Recent or chronic injury to the knees.

8
Supine Hero Pose (Supta Virasana)
Instructions
1. From a seated position on the heels, walk the feet out so that the buttocks can rest on the floor with the heels next to the hips.
2. Slowly and carefully walk the hands behind you, lowering the back towards the floor.
3. Come as low to the floor as comfortable, first lowering to the elbows, then to the crown of the head, and eventually on to the back of the neck.
4. Rest the hands along side the body, with the hands resting on the feet or upper thighs.
5. Breathe and hold for 4-8 breaths.
6. To release: hold on to the ankles or feet and press into the elbows using the arms to lift the head and torso back off the floor. Walk the hands back to the hips, coming back to a seated position.
Benefits: Supine diamond provides a powerful stretch to the front of the thighs and increases flexibility in the knees, hips and spine.
Contraindications: Recent or chronic knee injury or inflammation.
9
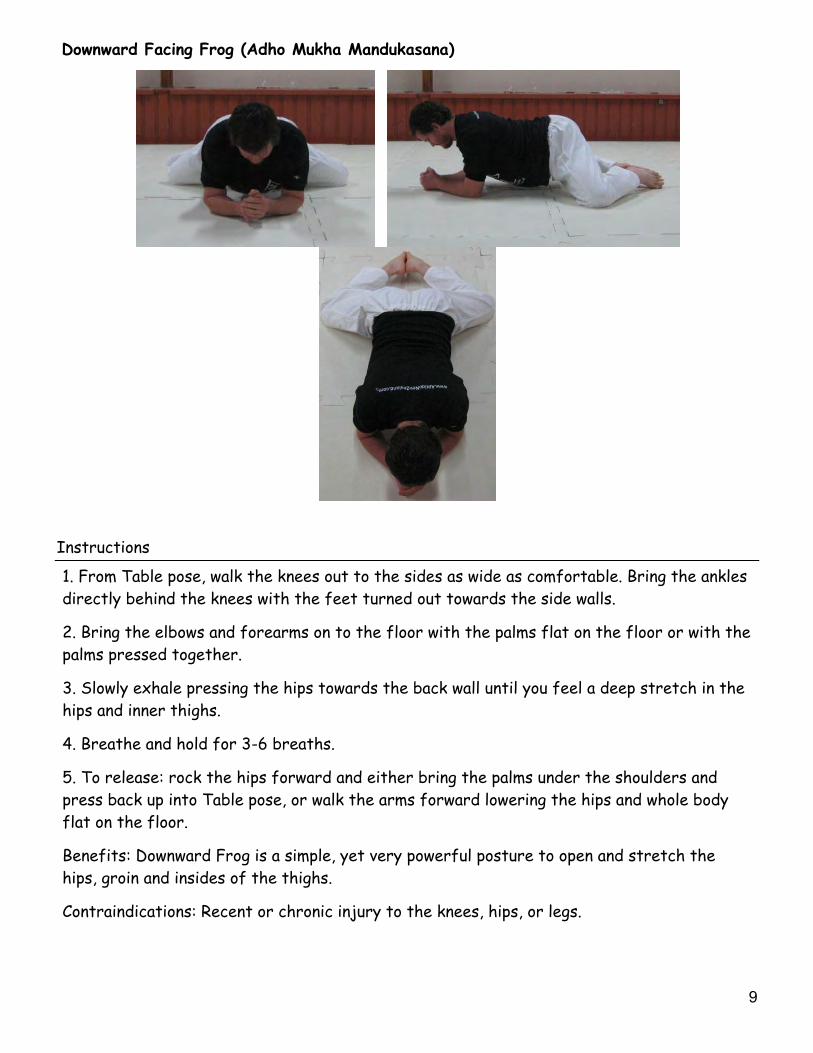
Downward Facing Frog (Adho Mukha Mandukasana)
Instructions
1. From Table pose, walk the knees out to the sides as wide as comfortable. Bring the ankles directly behind the knees with the feet turned out towards the side walls.
2. Bring the elbows and forearms on to the floor with the palms flat on the floor or with the palms pressed together.
3. Slowly exhale pressing the hips towards the back wall until you feel a deep stretch in the hips and inner thighs.
4. Breathe and hold for 3-6 breaths.
5. To release: rock the hips forward and either bring the palms under the shoulders and press back up into Table pose, or walk the arms forward lowering the hips and whole body flat on the floor.
Benefits: Downward Frog is a simple, yet very powerful posture to open and stretch the hips, groin and insides of the thighs.
Contraindications: Recent or chronic injury to the knees, hips, or legs.

10
Crescent Moon (Chandrasana)
Instructions
1. From Mountain pose, interlace the fingers, pointing the index finger up over the head, press the feet into the floor and reach the fingers and crown up while relaxing the shoulders down and back
2. 2. Exhale and press the right hip out to the side, arching over to the left. Keep the feet grounded and the legs and buttocks engaged. Reach up and out through the fingers and crown.
3. 3. Breathe and hold for 2-6 breaths. 4. 4. To release: inhale and press into the feet as you reach the fingers back up towards
the ceiling. 5. 5. Repeat on other side. 6. Benefits: Deeply stretches and opens the sides of the body; improves core body
strength, balance and concentration; strengthens the ankles and knees, improves circulation and energizes the entire body.
7. Contraindications: Recent or chronic injury to the hips, back or shoulders.
Variation

11
Functional muscle (-group) stretching:
The following exercises aim at increasing the flexibility of specific muscles or muscle groups. Hence, the names given are according to the targeted muscle (groups). Most exercises are shown on one side only, so make sure you do them on both sides as you practice. As mentioned above, every exhale should allow you to relax into the stretch, while every inhale allows you to have a little pause from the stretch or even a little contraction of the stretched parts and prepare for the next exhale-stretch phase. This does not mean that you need to go further and further into the stretch as you breathe. In fact, quite often just holding and improving a position is much better than constantly trying to push yourself into new positions. If you feel a stretch and/or pain other than the ones specified there is either something not quite correct with the position or else, an area, muscle or joint are not allowing you to go into this particular stretch. In this case it is best to check back with a therapist to try to find a more individually suitable position that will help you achieve the desired goal. Hip-flexors (M. Iliopsoas)
Make sure your hips are both aligned facing straight forward. Keep your trunk upright all the way through the exercise. Push your back hip forward and rotate inward to increase the stretch. The stretch should be in the groin are of your back leg.

12
Hip-flexors/Knee-extensors (Mm. Rectus femoris & Quadriceps)
The hips should be in the same position as in the above exercise. The side you are stretching can be turned inside towards your middle a little bit and your trunk can rotate away slightly (don’t overextend!). Use your opposite hand to hold on to the ankle (NOT the foot!), this makes sure you don’t turn your hip in the wrong direction. The stretch should be in the front thigh of your back leg. Hip-extensors/Knee-flexors (Hamstrings)
Lean on the ground with your hands and rest your upper body on your front thigh. Take your front toes off the ground. Push your hips back to stretch (but keep them square!). Go only as far as you can without loosing the contact between upper body and thigh. You should feel the stretch in the back thigh of your front leg.

13
Hip extensors/rotators (Gluteals)
Place one foot on the outside of the other leg. Keep your trunk upright and try not to lift your buttocks off the ground throughout this exercise. Wrap one arm around the ‘standing leg’ and use it to pull your knee across to the other side while rotating your buttock away and down in the opposite direction. You should feel the stretch in the buttock of the ‘standing leg’. Hip adductors
Place both your hands very close behind your hips, keeping your arms close to your body and your elbows straight. Using the arms as a lever like this, try to straighten your lower back as much as you can. If this doesn’t stretch your adductors enough you can obviously take your arms away and begin leaning your trunk forward. If you do so, initiate the movement from your lower back, keeping your back straight all the way through to get the most stretch.

14
Calf long (M. gastrocnemius)
This is the common calf stretch most of you will know. Just keep in mind to keep your back foot very straight and in line with your hip on the same side. Keep the same hip either square or turn it away from that side for a little bit more stretch. Keep your trunk upright but don’t hyperextend. The stretch should be in the upper parts of your calf. Calf short (M. soleus)
Similar to the exercise above, keep your back foot and hips straight. This time bend your knee until you feel a stretch in the Achilles tendon area.

15
M. Trapezius
Tilt your head to one side, tuck your chin in and place your hand in the area where your head ends and your neck begins (rather than on top of your head as people often do!). To the stretch the muscle on the side of your neck it is necessary to get a feeling that your ear and shoulder are going further and further apart. To get this, first push your shoulder down and then try to lift and carefully pull your head up and away from the shoulder (rather then push down towards the other shoulder!). Make sure you keep your chin tucked in throughout the whole exercise. You should feel more stretch if you do so. M. pectoralis
For this exercise place one elbow and forearm on the wall, ideally a bit over a horizontal line. Stand relatively close to the wall and slowly turn away, keeping your shoulder as relaxed as possible. The stretch should be in the front of your shoulder/chest.

16
M. biceps
After the above exercise, step away from the wall a bit further. Place the back of your wrist on the wall, rotating your arm inwards to do so. Keep your elbow fully extended and then rotate your body away from the shoulder (usually more then in the above exercise). You should feel a stretch in the front side of you upper arm. The pictures shown here are not exactly ideal, so if you can, try to keep your shoulder relaxed and your posture as upright as possible. M. Triceps
Take one arm as far as you can into the position shown in the pictures. Drop and relax the shoulder on the same side as much as you can throughout the exercise as it will increase the stretch on the muscle. Use the other arm to pull the elbow across to the other side.

17
Makko Ho In contrast to the previous set of exercises, the aim and idea behind the following set of exercises is to stretch or better ‘open’ your meridians to enable better Ki-flow. Clearly though they also have an effect on your muscles and/or connective tissues, and the opposite is likely to be true to for the more muscle-specific exercises. Commonly the ‘Makko-Ho’ are done successively, but you can choose to isolate them and focus on one of the pairs at any time. Just keep your breathing natural and relaxed, breathing in and out deeply into your hara/center. With some experience you should find during which part it is best for you to inhale/exhale. For more information about the Makko Ho see Shizuto Masunagas books given in the references. Conception and Governing Vessel
For the Conception Vessel stand upright and place your hands on your buttocks. Then start rolling your spine in, vertebra by vertebra, beginning from the neck all the way to the sacrum. (Ideally, in this case, your back should be more round than on the picture ). To come back up, bend both knees, straighten your back bit-by-bit, this time from the bottom up and only then straighten your knees again.
18
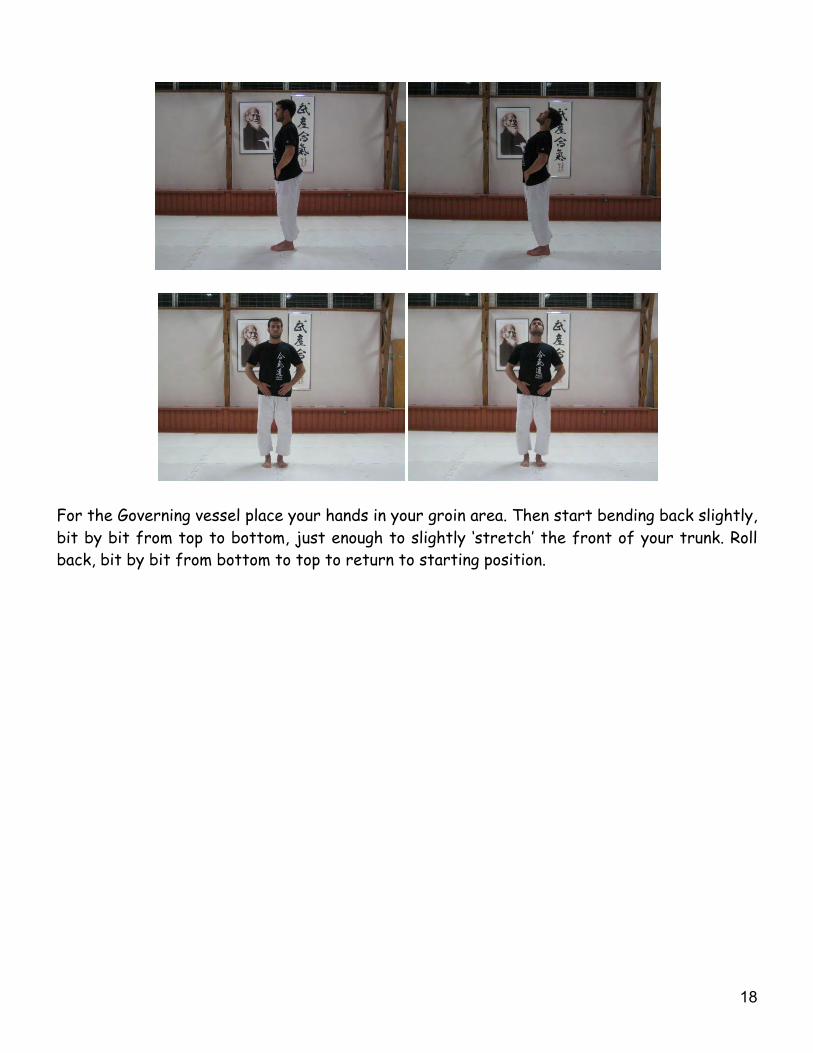
For the Governing vessel place your hands in your groin area. Then start bending back slightly, bit by bit from top to bottom, just enough to slightly ‘stretch’ the front of your trunk. Roll back, bit by bit from bottom to top to return to starting position.

19
Lung & Large Intestine Meridians
Place your feet a little wider than shoulder width and bend your knees slightly. Then open both arms to the back as if your thumbs wanted to touch behind your back .
Relax your arms and place your hands behind your back so you can link your thumbs.

20
Then lean forward, keeping your knees straight and lift your arms slightly off your body pointing upwards with your fingers. To come back up, bend both knees, straighten your back bit by bit from the bottom up and only then straighten your knees again.

21
Stomach & Spleen Meridians For this exercise it is really important that you only go as far as you can in a very relaxed fashion and with the knees NOT leaving the ground. If you move to quickly into positions that are too low for you and/or your knees lift the ground you are risking injuries to your back and/or knees! Some Shiatsu teachers have even stopped going into the lowest position as they consider the others to be effective enough to open the Stomach and Spleen Meridians.
Sit in Seiza as you would usually, knees 2 fists apart, the chin slightly retracted, elbows next to your torso and hands resting comfortably on the thighs and your gaze on the ground, about 1-1.5 mats in front of you.
Then place both your hands in the soles of your feet and push your body upward and forward, opening your shoulders and the front side of your body

22
Option 1: Lean back on your hands and slightly push your hips forward and upward
Option 2: Lean back on your elbows and slightly push your hips forward and upward
Option 3: Lean back on your shoulders and back and slightly push your hips forward and upward
After a few breaths release and turning towards one side come into the above position. Hold for another few breaths.
23
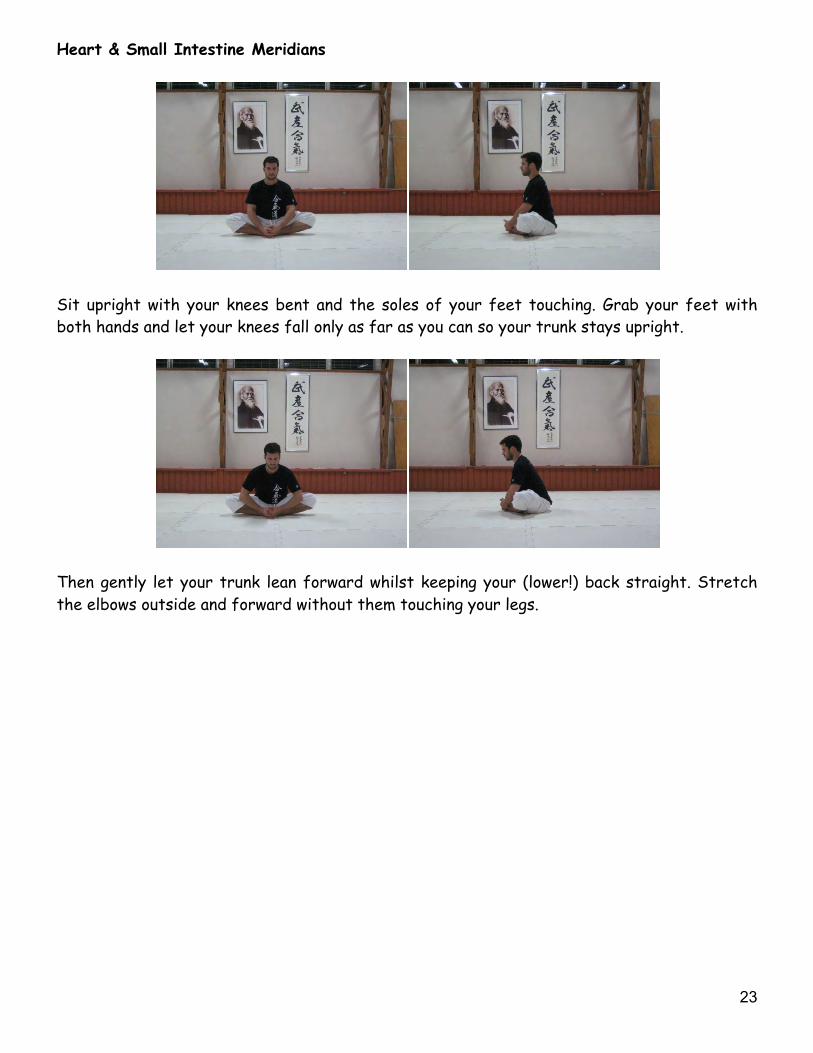
Heart & Small Intestine Meridians
Sit upright with your knees bent and the soles of your feet touching. Grab your feet with both hands and let your knees fall only as far as you can so your trunk stays upright.
Then gently let your trunk lean forward whilst keeping your (lower!) back straight. Stretch the elbows outside and forward without them touching your legs.

24
Bladder & Kidney Meridians
Sit on the ground with your legs straight in front of you and your knees and (lower) back as straight as possible. Raise your arms above your head and link your fingers.
Then just release your fingers, and lower your arms to about shoulder height as if you were reaching forward. Keep your back straight as usual

25
Heart Protector and Triple Heater Meridians
Sit with your legs crossed, one foot in front of the other. Then put your arms around your shoulders as if you were hugging yourself.
Lean forward and place your hands on your knees or even on the ground in front of your feet.

26
Repeat with the feet and arms the other way round, i.e. the other foot in the front/back and the other arm on top/bottom. Gallbladder & Liver Meridians
Sit with your legs open as far as you feel comfortable so that you can leave your knees straight. Then bend sideways, lift one arm above your head and place the other arm inside of your leg. Use the arm as a lever to rotate your ‘stretch-side’ towards the ceiling. Ideally you should feel a slight stretch on the ‘upper’ side of your torso. Repeat on other side.
Then sit up straight and form a fairly big open circle with your arms. If you like lean forward a bit, initiating from your lower back and keeping it straight.
27
Ok, that’s it for now. Should you find any spelling or other mistakes or problems in this program, please let us know as we will happily keep working on correcting and improving the document presented here. If you have any further questions regarding specific exercises, their adjustments to your specific needs or anything else regarding this collection of exercises please feel free to ask in person or contact us via email (see below) or facebook. Have fun training, see you on the mat Domo arigato gozaimasu!
Kerry Castell-Spence Filip Maric 2.Dan Aikido, Aikikai Tokyo 3:Dan Aikido, Aikikai Tokyo BHSc (Acupuncture) Sports-/Physiotherapist (ZVK, Germany) Member NZ Register of Acupuncturists MHSc (Musculoskeletal Physiotherapy, AUT, NZ) Dip Tuina Shiatsu-Therapist (European Shiatsu Institute, Germany) Dip Qi Gong web: www.jikishin.co.nz email: [email protected] email: filipmaric(ät)me.com Some references for further reading: Heyward, V.H. (2010). Advanced fitness assessment and exercise prescription. Human Kinetics, 6th ed.,
Champaign, Ill, USA. Masunaga, S. (1996). Meridian exercises: The oriental way to health and vitality. Japan publications, Tokyo,
Japan and Elmsford, NY, USA. Masunaga, S. & Ohashi, W. (1977) Zen Shiatsu: How to harmonize yin and yang for better health. Japan
publications, Tokyo, Japan and Elmsford, NY, USA. http://www.yogabasics.com