Embed Size (px)
Citation preview

AIS online
e-AUVIS user guide (for examiners)
August 2011
This guide covers how to use AIS online to:
create and confirm e-AUVIS inspection reports
clear defects.
DRAFT — AIS-G-004 e-AUVIS user guide v2 DRAFT UNAPPROVED 16Aug2011.doc

© Roads and Traffic Authority of NSW Always refer to AIS online for the current version of this document e-AUVIS – user guide (for examiners) – August 2011 — DRAFT — AIS-G-004 e-AUVIS user guide v2 FINAL 18Aug2011.doc 2
About AIS online AIS Online allows inspection reports from an Authorised Inspection Station (AIS) to be submitted online over the internet. It replaces the old paper-based system, making things easier and simpler for both examiners and customers.
AIS online includes:
• e-Safety check for light vehicles registration renewals (pink slips)
• e-AUVIS for light vehicle inspections (blue slips) and adjusting vehicle records
• e-HVAIS for unregistered heavy vehicle inspections (pink and brown slips), heavy vehicle registration renewals (pink slips), and adjusting vehicle records
• Defect clearance for clearing NSW-related defect notices.
This user guide covers e-AUVIS and Defect clearance.
Contents Introducing e-AUVIS.................................................................................................................................................................... 3
Pre-inspection..........................................................................................................................................................................................3 1st inspection ............................................................................................................................................................................................3 2nd inspection (for failed inspections)........................................................................................................................................3 Notes ...........................................................................................................................................................................................................3
How AIS online changes AUVIS inspection reports ................................................................................................ 4 Application for registration...............................................................................................................................................................4 Adjustment of records........................................................................................................................................................................4 Defect clearance ....................................................................................................................................................................................4
Logging in to AIS online............................................................................................................................................................. 5 Creating and saving an e-AUVIS 1st inspection – pre-inspection.................................................................... 6 Continuing and confirming an e-AUVIS 1st inspection.......................................................................................... 8 Creating and confirming an e-AUVIS 2nd inspection............................................................................................. 11 Adjusting vehicle records....................................................................................................................................................... 13 Clearing defect notices............................................................................................................................................................ 14 Troubleshooting .......................................................................................................................................................................... 16
Do you have the required accreditation?.............................................................................................................................. 16 Make sure required fields are filled in...................................................................................................................................... 16 Check for messages at the top of the screen..................................................................................................................... 16 ‘Back’ button doesn’t work ........................................................................................................................................................... 16 VIN won’t decode ............................................................................................................................................................................. 16 AIS online won’t recognise the vehicle I’m inspecting.................................................................................................... 16 I can’t clear a defect with a full inspection ............................................................................................................................ 16 Oops, I accidentally submitted the wrong information.................................................................................................. 17
Help .................................................................................................................................................................................................... 18

Introducing e-AUVIS e-AUVIS is the part of AIS online that allows an Authorised Unregistered Vehicle Inspection Station (AUVIS) to submit ’blue slip’ inspections for unregistered light vehicles online.
e-AUVIS doesn’t change how you perform inspections or the information you need to collect about a vehicle. It does change how you do the paperwork. Instead of completing a blue slip and handing it to your customer, you’ll create and confirm an inspection report online, submitting it directly to the RTA.
The big benefit of working online is e-AUVIS can retrieve any existing details the RTA holds for the vehicle you’re inspecting. This will save you re-writing these details on forms (eg on page 3 of an application for registration), which means fewer mistakes to re-work and a simpler, easier application for registration process for you and your customer.
Pre-inspection
E-AUVIS introduces the concept of a ‘pre-inspection’ to the inspection process.
Create and save 1st inspection - pre-inspection
Continue and confirm 1st inspection
Create and confirm 2nd inspection
A pre-inspection covers the identification of the vehicle (previously done on page 3 of an application for registration form and duplicated on the blue slip).
Doing a pre-inspection up front allows e-AUVIS to:
• bring up any existing details for the vehicle (saving you re-entering these)
• determine automatically which checks will be required to register the vehicle.
You have the option to print a pre-inspection report before you perform the inspection if you decide it’s easier to work that way.
1st inspection
When you produce an inspection report for an unregistered vehicle, the first step will always be to create and save a pre-inspection.
Next you will continue work on the saved pre-inspection, entering the details from the inspection and the checks performed. Finally you will submit the completed inspection report and print copies for yourself and the customer.
2nd inspection (for failed inspections)
For a second or follow up inspection, you’ll continue working on the inspection where the failure reasons were identified and entered. A pre-inspection is not required for a 2nd inspection.
Notes
You can use AIS online to produce an inspection report for a currently registered vehicle (eg because the vehicle will be used as a taxi or public vehicle).
If you detect an identification irregularity you will not be able to complete an inspection report using AIS online. You will need to complete the Vehicle Identification Referral form and follow any instruction from the RTA.
e-AUVIS – user guide (for examiners) – August 2011 — DRAFT — AIS-G-004 e-AUVIS user guide v2 FINAL 18Aug2011.doc 3

How AIS online changes AUVIS inspection reports AIS online won’t change how you perform vehicle inspections, but it will change how you produce inspection reports.
Application for registration
AIS online changes the process of applying to register an unregistered vehicle as follows:
Old process using blue slips New process using AIS online – e-AUVIS
Customer completes page 1 & 2 of an Application for Registration form
Customer completes page 1 & 2 of an Application for Registration form
Examiner completes page 3 of the Application for Registration form
Examiner completes a blue slip
Examiner creates and saves an e-AUVIS Pre-inspection then continues and confirms an e-AUVIS 1st inspection and prints AIS report.
Customer takes form, blue slip, and additional documentation to registry
Customer takes form, AIS report and additional documentation to registry
Adjustment of records
AIS online changes the process of adjusting the records of a currently registered vehicle.
Old process using blue slips New process using AIS online – e-AUVIS
Customer completes page 1 of an Adjustment of Records form
Customer completes page 1 of Adjustment of Records form
Examiner completes page 2 of the Adjustment of Records form
Examiner completes a blue slip
Examiner creates and confirms an e-AUVIS Adjust vehicle records. and prints AIS report.
Customer takes form, blue slip, and additional documentation to registry
If registration fees need to be paid or refunded, customer takes form, AIS report and additional documentation to registry.
Defect clearance
AIS online allows authorised examiners to clear NSW-related defects issued against vehicles.
Old process using blue slips New process using AIS online
Examiner signs the defect notice Examiner confirms a Defect clearance online (but still signs the defect notice)
Examiner completes a blue slip, if required
Examiner confirms and prints an inspection report after clearing the defect notice.
Customer takes signed defect notice (and slip) to registry to clear defect.
Customer takes signed defect notice (and AIS report) and drives away! They do not need to visit a registry.
e-AUVIS – user guide (for examiners) – August 2011 — DRAFT — AIS-G-004 e-AUVIS user guide v2 FINAL 18Aug2011.doc 4

Logging in to AIS online
We’ll assume you’re connected to the internet and have already registered for AIS online.
Navigate to the RTA website — www.rta.nsw.gov.au
Click myRTA online services
On the top menu, click Business partners
On the myRTA Business Partners page, click the link for AIS Online & e-Safety Check
Click LOGIN
Read the conditions of use, enter your AIS User ID and PIN, then click ACCEPT CONDITIONS & LOGIN
If you’re registered at more than one inspection station, click the station where you are performing these inspections.
The menu options you see in the AIS online will depend on your AIS accreditation(s).
You’re now ready to create and confirm inspection reports.
e-AUVIS – user guide (for examiners) – August 2011 — DRAFT — AIS-G-004 e-AUVIS user guide v2 FINAL 18Aug2011.doc 5
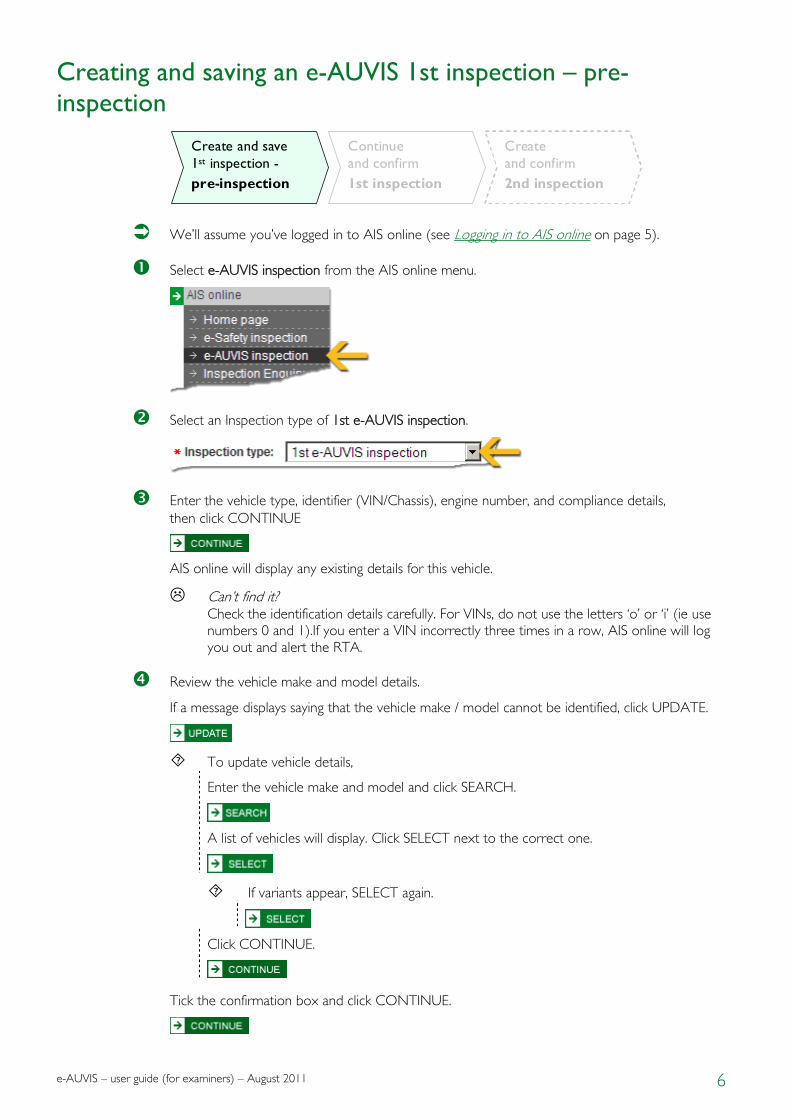
Creating and saving an e-AUVIS 1st inspection – pre-inspection
Create and save 1st inspection - pre-inspection
Continue and confirm 1st inspection
Create and confirm 2nd inspection
We’ll assume you’ve logged in to AIS online (see Logging in to AIS online on page 5).
Select e-AUVIS inspection from the AIS online menu.
Select an Inspection type of 1st e-AUVIS inspection.
Enter the vehicle type, identifier (VIN/Chassis), engine number, and compliance details, then click CONTINUE
AIS online will display any existing details for this vehicle.
Can’t find it? Check the identification details carefully. For VINs, do not use the letters ‘o’ or ‘i’ (ie use numbers 0 and 1).If you enter a VIN incorrectly three times in a row, AIS online will log you out and alert the RTA.
Review the vehicle make and model details.
If a message displays saying that the vehicle make / model cannot be identified, click UPDATE.
To update vehicle details,
Enter the vehicle make and model and click SEARCH.
A list of vehicles will display. Click SELECT next to the correct one.
If variants appear, SELECT again.
Click CONTINUE.
Tick the confirmation box and click CONTINUE.
e-AUVIS – user guide (for examiners) – August 2011 — DRAFT — AIS-G-004 e-AUVIS user guide v2 FINAL 18Aug2011.doc 6

Review the existing details for this vehicle correcting any errors, and enter any missing details.
When you’re finished, click CONTINUE
Can’t continue? Check the top of the screen for errors. Remember that you must complete all fields marked with a red asterisk *.
Review the pre-inspection assessment results.
This screen contains lots of useful information, such as:
which inspections are required (eg safety check)
any compliance certificates.
When you’ve reviewed all of the information on this screen, click SAVE.
To print a copy of the pre-inspection report to work from, Click PRINT (at the top of the screen).
Do not give pre-inspection reports to customers: they are intended for use only by examiners.
When you’re ready, continue and complete the 1st inspection (see Continuing and confirming an e-AUVIS 1st inspection on page 8).
e-AUVIS – user guide (for examiners) – August 2011 — DRAFT — AIS-G-004 e-AUVIS user guide v2 FINAL 18Aug2011.doc 7

Continuing and confirming an e-AUVIS 1st inspection
Create and save 1st inspection - pre-inspection
Continue and confirm 1st inspection
Create and confirm 2nd inspection
You may only continue working on a pre-inspection you have saved within the last 14 days.
We’ll assume you’ve logged in to AIS online (see Logging in to AIS online on page 5).
Select e-AUVIS inspection from the AIS online menu.
Select an Inspection type of Continue a Saved Inspection
Enter the last four digits of the VIN/Chassis number, select the registry then click CONTINUE
AIS online will display a list of saved inspections.
Select the saved pre-inspection from the list (the select button is on the right-hand side), then click CONTINUE
AIS online will display the pre-inspection report for this vehicle.
Can’t find it? Pre-inspections saved more than 14 days ago must be re-done from scratch (See
Creating and saving an e-AUVIS 1st inspection – pre-inspection on page 6).
Review the pre-inspection report (which lists the checks to perform and defects to clear) then click CONTINUE.
Enter the results and details of your inspection(s).
Be sure to complete all fields marked with a red asterisk * and tick any confirmations.
e-AUVIS – user guide (for examiners) – August 2011 — DRAFT — AIS-G-004 e-AUVIS user guide v2 FINAL 18Aug2011.doc 8

To fail a vehicle,
In the Inspection details section, select a result of FAIL.
In the Examination details section, click the name of the check.
AIS online opens a 2nd window for you to enter the failure reason(s).
Click the name of a category.
AIS online displays a full list of possible failure reasons in that category.
Tick as many reasons as apply,
then click CONTINUE.
Repeat for other failure reasons if necessary. When you’ve ticked all the failure reasons that apply, click CONTINUE.
AIS online closes the 2nd window.
When you’re finished entering all of the inspection details, click CONTINUE.
Can’t continue? Check the top of the screen for errors. Remember that you must complete all fields marked with a red asterisk *.
Review the results carefully.
To change something, click the CHANGE button in the section you need to correct.
AIS online will take you back to the relevant screen.
When you’re satisfied with your inspection report, click CONFIRM.
After you click confirm, AIS online submits your inspection report to the RTA as an official record; it cannot be altered.
e-AUVIS – user guide (for examiners) – August 2011 — DRAFT — AIS-G-004 e-AUVIS user guide v2 FINAL 18Aug2011.doc 9

Print an AIS report for your records…
and a copy for your customer.
Sign the reports and attach any required documentation (eg brake test print-out).
If the vehicle passed the inspection, the customer can take their Application for Registration form, their customer copy of the AIS report, and any additional documentation (listed on the back of the application) to the registry.
If the vehicle failed the inspection, the customer must repair the indicated items and return within 14 days for a free second inspection.
e-AUVIS – user guide (for examiners) – August 2011 — DRAFT — AIS-G-004 e-AUVIS user guide v2 FINAL 18Aug2011.doc 10

Creating and confirming an e-AUVIS 2nd inspection
Create and save 1st inspection - pre-inspection
Continue and confirm 1st inspection
Create and confirm 2nd inspection
You may only complete a 2nd inspection for vehicles that have failed a previous inspection.
We’ll assume you’ve logged in to AIS online (see Logging in to AIS online on page 5).
Select e-AUVIS inspection from the AIS online menu.
Select an Inspection type of 2nd e-AUVIS inspection.
Enter the last four digits of the VIN/Chassis number and the registry, then click CONTINUE
AIS online will display a list of failed inspections.
Select the failed inspection from the list (the select button is on the right-hand side)…
then click CONTINUE
AIS online will display the inspection this vehicle failed.
Can’t find it? 1st inspections done more than 14 days ago need to be done again from scratch. (See
Creating and saving an e-AUVIS 1st inspection – pre-inspection on page 6).
In the Examination details section, select an inspection result…
then tick Clear against the problems that have been fixed (at the bottom of the screen).
e-AUVIS – user guide (for examiners) – August 2011 — DRAFT — AIS-G-004 e-AUVIS user guide v2 FINAL 18Aug2011.doc 11

When you’re finished, click CONTINUE.
Can’t continue? Check the top of the screen for errors. Remember that you must complete all fields marked with a red asterisk *
Review the results carefully.
To change something, click the CHANGE button in the section you need to correct.
AIS online will take you back to the relevant screen.
When you’re satisfied with your inspection report, click CONFIRM.
After you click confirm, AIS online submits your inspection report to the RTA as an official record; it cannot be altered.
Print an AIS report for your records…
and a copy for your customer.
Sign the reports and attach any required documentation (eg brake test print-out).
If the vehicle passed the inspection, the customer can take their Application for Registration form, the customer copy of the AIS report, and any additional documentation (listed on the back of the application) to the registry.
e-AUVIS – user guide (for examiners) – August 2011 — DRAFT — AIS-G-004 e-AUVIS user guide v2 FINAL 18Aug2011.doc 12

Adjusting vehicle records You may only adjust records for NSW-registered vehicles.
We’ll assume you’ve logged in to AIS online (see Logging in to AIS online on page 5).
Select e-AUVIS inspection from the AIS online menu.
Select an Inspection type of Adjust Vehicle Records.
Enter the number plate and the last four digits of the VIN/Chassis number, then click CONTINUE
Can’t find it? You can only adjust vehicle records if the vehicle is currently registered.
Adjust the vehicle details as required.
Depending on what adjustments you enter, AIS online may update the screen with additional details for you to enter.
When you’re finished, click CONTINUE
Can’t continue? Check the top of the screen for errors. Remember that you must complete all fields marked with a red asterisk *.
Review the results carefully.
When you’re satisfied with your inspection report, click CONFIRM.
After you click confirm, AIS online submits your inspection report to the RTA as an official record; it cannot be altered.
Print and AIS report and a copy for your customer.
and a copy for your customer.
Sign the reports and attach any required documentation.
If registration fees need to be paid or refunded, the customer should take their form, the AIS report and any additional documentation to a registry.
e-AUVIS – user guide (for examiners) – August 2011 — DRAFT — AIS-G-004 e-AUVIS user guide v2 FINAL 18Aug2011.doc 13

Clearing defect notices AIS online allows you to clear defects issued in NSW against NSW and interstate-registered vehicles. You can also add and clear defects that were issued interstate against NSW-registered vehicles.
Defects issued against interstate vehicles by another jurisdiction must be cleared by the issuing authority.
If the clearing of defects requires a full inspection, AIS online includes that in the workflow automatically. You must have pop-ups enabled in your browser for this to work.
We’ll assume you’ve logged in to AIS online (see Logging in to AIS online on page 5).
Select Defect clearance from the AIS online menu.
Select the vehicle type and enter the vehicle details, then click SUBMIT
AIS online displays any outstanding defects for this vehicle.
If the defect you’re looking for does not appear and you want to clear it now, add it yourself by clicking ADD.
Enter the defect notice details, then click CONTINUE.
You can now proceed to clear the defect online.
When the manually-issued defect notice is finally processed by the RTA, it will be seen as already cleared and no further action will be required by the customer.
Select the type of inspection for the defect you want to clear.
…
e-AUVIS – user guide (for examiners) – August 2011 — DRAFT — AIS-G-004 e-AUVIS user guide v2 FINAL 18Aug2011.doc 14

If you select an inspection type of Full, select the inspection you need to perform (eg e-AUVIS),
then click GO.
AIS online opens a 2nd window for you to process the inspection type selected.
Enter the details of the inspection (like you would for an e-AUVIS 1st inspection), then click CONTINUE.
Review the results of the full inspection carefully, making changes if needed, then click CONFIRM.
After you click confirm, AIS online submits your report to the RTA as an official record; it cannot be altered. AIS online then clears the defect and closes the second window.
On the defect clearance screen, tick that you are authorised to clear the defect(s),
then click CONTINUE
AIS online will now show the defect as cleared.
Print a defect report.
.
If you confirmed a full inspection, print an AIS report for your records…
and a copy for your customer.
Sign the defect notice and any reports and attach any required documentation (eg brake test print-out).
Clearing the defects online means the customer doesn’t need to visit the registry!
e-AUVIS – user guide (for examiners) – August 2011 — DRAFT — AIS-G-004 e-AUVIS user guide v2 FINAL 18Aug2011.doc 15

Troubleshooting
Do you have the required accreditation?
Remember that AIS online won’t allow you to access inspection types you’re not accredited to perform. If you cannot see a menu item described in this user guide, it may be because you don’t have access to it.
Make sure required fields are filled in
The most common problem in AIS online is not completing all of the mandatory fields on a particular screen. Mandatory fields are marked with a red asterisk (*) and AIS online won’t let you leave a screen until you have completed all of them.
Check for messages at the top of the screen
In most cases, if you run into problems, AIS online will display an error or warning at the top of the screen. You may need to scroll up or down to see the message. For example:
‘Back’ button doesn’t work
Do not use the ‘back’ button in your browser. Any information entered will be lost and you will need to start all over again.
VIN won’t decode
Using AIS online means you’ll need to enter the VIN to correctly identify the vehicle you’re reporting on.
If the VIN does not decode, double check the number to ensure you’ve entered it correctly. Remember, every “0” or “1” in the VIN is a number, not a letter. The letters “o” or “i” do not appear in any VIN.
If a VIN you enter fails to decode three consecutive times, AIS online will automatically log you out and send an alert to the RTA. To have the VIN investigated further please use the Vehicle Identification Referral form and follow any instructions from the RTA.
AIS online won’t recognise the vehicle I’m inspecting
Where AIS online is unable to issue an electronic inspection report because the system will not recognise the vehicle, a manual inspection report (brown slip and/or pink slip) must be produced. The report must include all the required details, including the reason why it wasn’t possible to use AIS online.
I can’t clear a defect with a full inspection
To clear a defect with a full inspection, pop-ups must be enabled in your browser. Please refer to your browser’s Help for how to enable pop-ups.
e-AUVIS – user guide (for examiners) – August 2011 — DRAFT — AIS-G-004 e-AUVIS user guide v2 FINAL 18Aug2011.doc 16

Oops, I accidentally submitted the wrong information
If you submit a report, print it and then notice it contains incorrect information, you may be able to adjust the vehicle record to fix it. See Adjusting vehicle records on page 13.
e-AUVIS – user guide (for examiners) – August 2011 — DRAFT — AIS-G-004 e-AUVIS user guide v2 FINAL 18Aug2011.doc 17

Help If you need help using AIS online:
Try the online help
Check other documents under the Publications menu in AIS online
Call the RTA Help Desk on 1300 131 172 and select the option for AIS online
e-AUVIS – user guide (for examiners) – August 2011 — DRAFT — AIS-G-004 e-AUVIS user guide v2 FINAL 18Aug2011.doc 18