Embed Size (px)
Citation preview
• The content of this manual might be changed without notice for improvement.• Änderungen der Betriebsanleitung zum Zwecke der Verbesserung ohne Ankündigung vorbehalten.• Le contenu de ce manuel est sujet à modification sans préavis à des fins d'amélioration.• Il contenuto di questo manuale è soggetto a variazioni senza preavviso nell'ambito della politica di
miglioramento del prodotto.• El contenido de este manual se puede modificar sin previo aviso para su mejora.
• The specifications and design of the products in this manual will be subject to change without advance notice due to our continuous efforts to improve the quality of our products.
• Änderungen an technischen Daten und Design der Produkte in diesem Handbuch im Sinne der Produktverbesserung bleiben ohne Ankündigung vorbehalten.
• Les caractéristiques et la conception des produits mentionnés dans ce manuel sont sujettes à des modifications sans préavis en raison de nos efforts continus pour améliorer la qualité de nos produits.
• Le specifiche e il design dei prodotti menzionati in questo manuale sono soggetti a modifiche senza preavviso a causa dei nostri continui sforzi volti a migliorare la qualità dei nostri prodotti.
• Las especificaciones y el diseño de los productos de este manual estarán sujetos a modificación sin previo aviso debido a nuestros continuos esfuerzos para mejorar la calidad de nuestros productos.
4007908081211-00/00
OSTSTRASSE 22, 40211DÜSSELDORF, GERMANYTEL: +49-211-9365300FAX: +49-211-93653017
Camerastraat 191322 BB Almere The NetherlandsPhone: +31-36-546-9699FAX: +31-36-536-3985
www.max-ltd.co.jp/int/ (Sitio web INTERNACIONAL)www.max-europe.com (Sitio web para EUROPA)
AKHL1050E.book 120 ページ 2008年12月11日 木曜日 午後1時31分
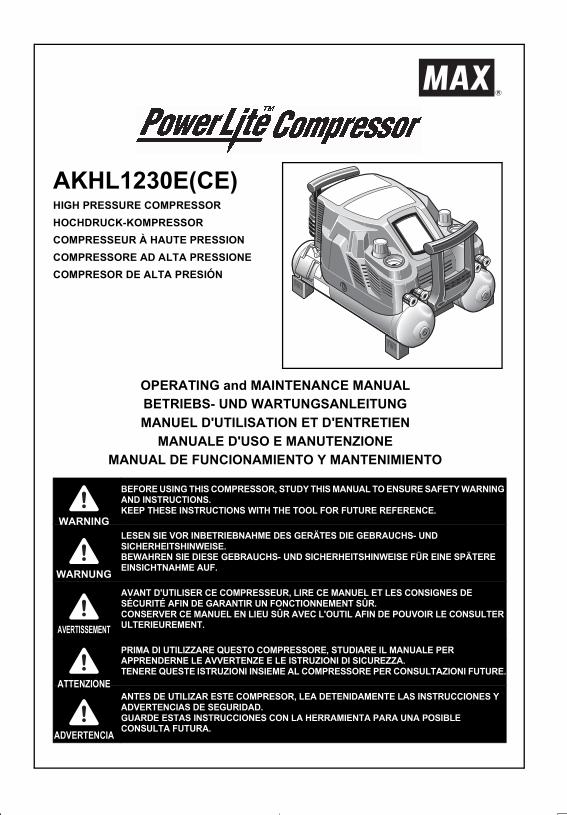
AKHL1230E(CE)HIGH PRESSURE COMPRESSORHOCHDRUCK-KOMPRESSORCOMPRESSEUR À HAUTE PRESSIONCOMPRESSORE AD ALTA PRESSIONECOMPRESOR DE ALTA PRESIÓN
OPERATING and MAINTENANCE MANUALBETRIEBS- UND WARTUNGSANLEITUNGMANUEL D'UTILISATION ET D'ENTRETIEN
MANUALE D'USO E MANUTENZIONEMANUAL DE FUNCIONAMIENTO Y MANTENIMIENTO
BEFORE USING THIS COMPRESSOR, STUDY THIS MANUAL TO ENSURE SAFETY WARNING AND INSTRUCTIONS.KEEP THESE INSTRUCTIONS WITH THE TOOL FOR FUTURE REFERENCE.
LESEN SIE VOR INBETRIEBNAHME DES GERÄTES DIE GEBRAUCHS- UND SICHERHEITSHINWEISE.BEWAHREN SIE DIESE GEBRAUCHS- UND SICHERHEITSHINWEISE FÜR EINE SPÄTERE EINSICHTNAHME AUF.
AVANT D'UTILISER CE COMPRESSEUR, LIRE CE MANUEL ET LES CONSIGNES DE SÉCURITÉ AFIN DE GARANTIR UN FONCTIONNEMENT SÛR.CONSERVER CE MANUEL EN LIEU SÛR AVEC L'OUTIL AFIN DE POUVOIR LE CONSULTER ULTERIEUREMENT.
PRIMA DI UTILIZZARE QUESTO COMPRESSORE, STUDIARE IL MANUALE PER APPRENDERNE LE AVVERTENZE E LE ISTRUZIONI DI SICUREZZA.TENERE QUESTE ISTRUZIONI INSIEME AL COMPRESSORE PER CONSULTAZIONI FUTURE.
ANTES DE UTILIZAR ESTE COMPRESOR, LEA DETENIDAMENTE LAS INSTRUCCIONES Y ADVERTENCIAS DE SEGURIDAD.GUARDE ESTAS INSTRUCCIONES CON LA HERRAMIENTA PARA UNA POSIBLE CONSULTA FUTURA.
WARNING
WARNUNG
AVERTISSEMENT
ATTENZIONE
ADVERTENCIA
AKHL1050E.book 1 ページ 2008年12月11日 木曜日 午後1時31分

118
AKHL1050E.book 118 ページ 2008年12月11日 木曜日 午後1時31分
3
INDEX1. SAFETY INSTRUCTIONS..................................................42. SPECIFICATIONS AND TECHNICAL DATA ....................93. INSTRUCTIONS FOR OPERATION ................................104. PROTECTIVE DEVICE.....................................................205. ABNORMALITIES DURING OPERATION.......................216. BUZZER TYPES...............................................................227. AUTOMATIC ADJUSTMENT OF OPERATING POWER
(INVERTER CONTROL)...................................................238. IN ORDER TO MAINTAIN PERFORMANCE...................23
READ THE INSTRUCTION HANDBOOKBefore positioning, operating or adjusting the compressor, read the instruction handbook care-fully.
RISK OF ELECTRIC SHOCKWARNING: Before doing any work on the com-pressor it must be disconnected from the power supply.
RISK OF ACCIDENTAL START-UPCAUTION: The compressor could start automat-ically in case of a black-out and subsequent re-set.
ENGLISH
OPERATING and MAINTENANCE MANUAL
BEFORE USING THIS COMPRESSOR, STUDY THIS MANUAL TO ENSURE SAFETY WARNING AND INSTRUCTIONS.KEEP THESE INSTRUCTIONS WITH THE TOOL FOR FUTURE REFERENCE.
WARNING
AKHL1050E.book 3 ページ 2008年12月11日 木曜日 午後1時31分

4
1. SAFETY INSTRUCTIONS
PRECAUTIONS ON USING THE COM-PRESSORIMPORTANT INFORMATIONMost accidents that result from compressor op-eration and maintenance are caused by the fail-ure to observe basic safety rules or precautions. An accident can often be avoided by recognizing a potentially hazardous situation before it occurs, and by observing appropriate safety procedures.Basic safety precautions are outlines in the "SAFETY" section of this Instruction Manual and in the sections which contain the operation and maintenance instructions.Hazards that must be avoided to prevent bodily injury or machine damage are identified by WARNINGS on the compressor and in this In-struction Manual.Never use this compressor in a manner that has not been specifically recommended by manufac-turer, unless you first confirm that the planned use will be safe for you and others.
DEATH OR SERIOUS BODILY INJURY COULD RESULT FROM IMPROPER OR UNSAFE USE OF COMPRESSOR, TO AVOID THESE RISKS, FOLLOW THESE BASIC SAFETY INSTRUC-TIONS.HIGH PRESSURE COMPRESSO PROVIDES BOTH HIGH PRESSURE AND REGULAR PRESSURE AIR. FOR USAGE OF HIGH PRES-
SURE AIR, HIGH PRESSURE COMPRESSOR IS DESIGNED ONLY FOR MAX POWERLITE NAILERS AND POWERLITE HOSE. UNSPECI-FIED USAGE WILL CAUSE SERIOUS ACCI-DENTS.
1. NEVER TOUCH MOVING PARTSNever place your hands, fingers or body parts near the compressor's moving parts.
2. NEVER OPERATE WITHOUT ALL GUARDS IN PLACENever operate the compressor without all guards or safety features in place and in proper working order. If maintenance or servicing requires the removal of a guard or safety features, be sure to replace the guards or safety feature before resuming op-eration of the compressor.
3. ALWAYS WEAR EYE PROTECTIONAlways wear safety goggles or equivalent eye protection. Compressed air must never be aimed at anyone or any part of the body. Be sure to wear protective gear including the sound-proofing and protective garment, crash cap and safety footwear suited for the given working environment.
4. PROTECT YOURSELF AGAINST ELEC-TRIC SHOCKPrevent body contact with grounded surfac-es such as pipes, radiators, ranges and re-frigeration enclosures. Never operate the compressor in damp or wet locations.
TO AVOID SEVERE PERSONAL INJURY OR PROPERTY DAMAGEBEFORE USING THE TOOL, READ CARE-FULLY AND UNDERSTAND THE FOLLOWING"SAFETY INSTRUCTIONS":FAILURE TO FOLLOW WARNINGS COULD RESULT IN DEATH OR SERIOUS INJURY.
WARNING
AKHL1050E.book 4 ページ 2008年12月11日 木曜日 午後1時31分
117
AKHL1050E.book 117 ページ 2008年12月11日 木曜日 午後1時31分

116
AK-HL1230E(CE)
ESPAÑOLITALIANOFRANÇAISENGLISHMATERIAL DEUTSCHITEMNO.
PARTNO.
120
121
122
123
124
125
126
127
128
129
130
131
132
AK14859
AK14874
AK14866
AK14869
EE39823
EE65001
AK14849
AA21114
AK14856
AK14845
AK14853
AK14857
AK14858
AK14754
TT05022
PET
Steel
PC
Steel
Steel
Steel
Copper
PET
POWER CORD 1230CEMULTILINGUAL EXPLANATION OF THECONTROL PANEL
COVER REINFORCING PLATE
WARNING LABEL (CE)
SPECIAL FLAT WASHER 5.5X16X1.6CF
DISC SPRING WASHER 5
SAFETY VALVE 580PSI
PHILLIPS PAN HEAD SCREW 5X8
GROUNDING ROD
PRESSURE GAUGE 870PSI-2
OPEN DRAIN PORT INSTRUCTION LABEL
POWER SWITCH JW-L21
SWITCH WIRE ASSY
44-44K CONNECTING KIT
44-44K CONNECTING HOSE
AIR CHUCK 44K
NETZKABEL 1230CEMEHRSPRACHIGE ERLÄUTERUNG DES BEDIENFELDES
ABDECKUNGS-VERSTÄRKUNGSPLATTE
WARNHINWEIS-AUFKLEBER (CE)
SPEZIAL-FLACHSCHEIBE 5,5X16X1,6CF
RINGFEDERSCHEIBE 5
SICHERHEITSVENTIL 580PSI
KREUZSCHLITZ-FLACHKOPFSCHRAUBE 5X8
SCHUTZERDUNGSLEISTE
MANOMETER 870PSI-2ABLASSÖFFNUNGS-ANWEISUNGSAUFKLEBER
NETZSCHALTER JW-L21
SCHALTERDRAHT-BAUGRUPPE
44-44K ANSCHLUSS-SATZ
44-44K ANSCHLUSS-SCHLAUCH
LUFTANSCHLUSS 44K
CABLE DE ALIMENTACIÓN 1230CEEXPLICACIÓN MULTILINGUE DEL PANEL DE CONTROL
PLACA DE REFUERZO DE LA CUBIERTA
ETIQUETA DE ADVERTENCIA (CE)
ARANDELA PLANA ESPECIAL 5,5X16X1,6CF
ARANDELA DE RESORTE DE DISCO 5
VÁLVULA DE SEGURIDAD 580PSI
TORNILLO DE CABEZA PLANA PHILLIPS 5X8
VARILLA DE TIERRA
MANÓMETRO 870PSI-2ETIQUETA DE INSTRUCCIONES DEL PUERTO DE DRENAJE ABIERTO
INTERRUPTOR DE ALIMENTACIÓN JW-L21
CONJUNTO DEL CABLE DEL INTERRUPTOR
44-44K KIT DE CONEXIÓN
44-44K MANGUERA DE CONEXIÓN
MANDRIL NEUMÁTICO 44K
CÂBLE D'ALIMENTATION 1230CEEXPLICATION MULTILINGUE DU PANNEAU DE COMMANDE
PLAQUE DE RENFORCEMENT DU COUVERCLE
ÉTIQUETTE D'AVERTISSEMENT (CE)
RONDELLE PLATE SPÉCIALE 5,5 X 16 X 1,6 CF
RONDELLE DE RESSORT À DISQUES 5
SOUPAPE DE SÉCURITÉ 580PSI
VIS À TÊTE CYLINDRIQUE LARGE PHILLIPS 5 X 8
TIGE DE MISE À LA TERRE
MANOMÈTRE 870PSI-2ÉTIQUETTE DE CONSIGNE D'OUVERTURE D'ORIFICE DE PURGE
INTERRUPTEUR JW-L21
ENSEMBLE DE CÂBLES D'INTERRUPTEUR
44-44K KIT DE RACCORDEMENT
44-44K FLEXIBLE DE RACCORDEMENT
MANDRIN PNEUMATIQUE 44K
CAVO DI ALIMENTAZIONE 1230CESPIEGAZIONE IN PIÙ LINGUE DEL QUADRO DI COMANDO
PIASTRA DI RINFORZO COPERCHIO
ETICHETTA DI AVVERTENZA (CE)
RONDELLA PIANA SPECIALE 5,5X16X1,6CF
RONDELLA ELASTICA A DISCO 5
VALVOLA DI SICUREZZA 580 PSI
VITE A CROCE A TESTA TRONCOCRONICA 5X8
ASTINA DI MESSA A TERRA
MANOMETRO 870 PSI-2ETICHETTA DI ISTRUZIONI PER CONDOTTO DI SCARICO APERTO
INTERRUTTORE DI ALIMENTAZIONE JW-L21
GRUPPO CAVO INTERRUTTORE
KIT DI COLLEGAMENTO 44-44K
TUBO FLESSIBILE DI COLLEGAMENTO 44-44K
RUBINETTO ARIA 44K
AKHL1050E.book 116 ページ 2008年12月11日 木曜日 午後1時31分
5
5. DISCONNECT THE COMPRESSORAlways disconnect the compressor from the power plug and remove the compressed air from the air tank before servicing, inspecting, maintaining, cleaning, replacing or checking any parts.
6. AVOID UNINTENTIONAL STARTINGDo not carry the compressor while it is con-nected to its power source or when the air tank is filled with compressed air. Be sure the knob of the pressure switch in the "OFF" position before connecting the compressor to its power source.
7. STORE COMPRESSOR PROPERLYWhen not in use, the compressor should be stored in dry place. Keep out of reach of chil-dren. Lock-out the storage area.
8. KEEP WORK AREA CLEANCluttered areas invite injuries. Clear all work areas of unnecessary tools, debris, furniture, etc.
9. KEEP CHILDREN AWAYDo not let visitors contact compressor exten-sion cord. All visitors should be kept safely away from work area. Keep out of reach of children.
10. DRESS PROPERLYDo not wear loose clothing or jewelry. They can be caught in moving parts. Wear protec-tive hair covering to contain long hair.
11. DON'T ABUSE POWER CORDNever yank it to disconnect from receptacle. Keep power cord from heat, oil and sharp edges.
12. MAINTAIN COMPRESSOR WITH CAREFollow instructions for lubricating. Inspect cords periodically and if damaged, have re-paired by authorized service facility.
13. USE A SAFE EXTENSION CORDIn order to prevent an electric shock, use a 3-core extension cord with a 3-pole earthing plug and a 3-core earthing plug socket. Make sure that the extension cord is in the good working condition. If the cord is dam-aged, replace or repair it. The cord should have a sufficient capacity for the current run-ning to the product. The cord of an insuffi-cient capacity will cause a voltage drop or an electric power loss, resulting in overheating. The following table shows the cord size used depending on the cord length.If the compressor is to be used outdoors, use an exclusive extension cord.
Tab.1 SECTION VALID FOR A MAX LENGTH OF 20m (65')
Avoid electrical shock hazard. Never use this compressor with a damaged or frayed electrical cord or extension cord. Inspect all electrical cords regularly. Never use in near water or in any environment where electric shock is possible.
OFF
COMPRESSOR HP kW 230V (mm2)
AKHL1230E (CE) 2 1.5 2.5
WARNING
AKHL1050E.book 5 ページ 2008年12月11日 木曜日 午後1時31分

6
14. STAY ALERTWatch what you are doing. Use common sense. Do not operate compressor when you are tired. Compressor should never be used by you if you are under the influence of alco-hol, drugs or medication that makes you drowsy.
15. CHECK DAMAGED PARTS AND AIR LEAKBefore further use of the compressor, a guard or other part which is damaged should be carefully checked to determine that it will operate properly and perform its intended function.Check for alignment of moving parts, binding of moving parts, breakage of parts, mount-ing, air leak, and any other conditions that may affected its operation.A guard or other part that is damaged should be properly repaired or replaced by an au-thorized service facility unless otherwise in-dicated elsewhere in this Instruction Manual. Have defective pressure controllers re-placed by authorized service facility.Do not use compressor if switch does not turn it on and off.
16. OPERATE COMPRESSOR CORRECTLYOperate the compressor according to the in-structions provided herein. Never allow the compressor to be operated by children, indi-viduals unfamiliar with its operation or unau-thorized personal.
17. KEEP ALL SCREWS, BOLTS AND COV-ERS TIGHTLY IN PLACEKeep all screws, bolts, and plates tightly mounted.Check their conditions periodically.
18. KEEP MOTOR AIR VENT CLEANThe motor air vent must be kept clean so that air can freely flow at all times. Check for dust build-up frequently.
19. OPERATE COMPRESSOR AT THE RAT-ED VOLTAGEOperate the compressor at voltages speci-fied on their nameplates. If using the com-pressor at a higher voltage than the rated voltage, it will result in abnormally fast motor revolution and may damage the unit and burn out the motor.
20. NEVER USE A COMPRESSOR WHICH IS DEFECTIVE OR OPERATING ABNOR-MALLYIf the compressor appears to be operating unusually, making strange noises, or other-wise appears defective, stop using it imme-diately and arrange for repairs by an authorized service facility.
21. DO NOT WIPE PLASTIC PARTS WITH SOLVENTSolvent such as gasoline, thinner, benzine, carbon tetrachloride, and alcohol may dam-age and crack plastic parts. Do not wipe them with such solvents. Wipe plastic parts with a soft cloth lightly dampened with mild detergent and dry thoroughly.
22. USE ONLY GENUINE REPLACEMENT PARTSReplacement parts not original may void your warranty and can lead to malfunction and resulting injuries. Genuine parts are available from your dealer.
AKHL1050E.book 6 ページ 2008年12月11日 木曜日 午後1時31分
115
AK-HL1230E(CE)
ESPAÑOLITALIANOFRANÇAISENGLISHMATERIAL DEUTSCHITEMNO.
PARTNO.
60
61
62
63
64
65
66
67
68
69
70
71
72
73
74
75
76
77
78
79
80
81
82
83
84
85
86
87
88
89
90
91
92
93
94
95
96
97
98
99
100
101
102
103
104
106
107
108
109
110
111
112
113
114
115
116
117
118
119
CC49113
AK70274
AK14186
HH11816
AK14185
AK14239
HH11142
HH11149
AK70172
KK24159
AK14197
AK14200
HH11132
AK14848
HH11187
BB43805
AK14687
AK14570
AK81157
AK81156
AK70253
BB40835
AK70167
CC00201
AK14673
AK70228
TT07018
AK14179
AK70371
AK14180
BB40406
AK81154
AK81153
AK14590
AK70322
AK70372
AK13770
AK14192
TT05018
AK14678
AK70315
AK14847
AK14236
EE39187
BB40404
AK14032
AA03104
AA34805
AK14622
AK13513
BB73702
CC41103
AK70326
AK14855
EE39834
AK14870
AK70323
AK14701
AK70337
Steel
POM
Rubber
PPS
PPS
Rubber
Rubber
Copper alloy,rubber
Stainless steel
POM
Copper alloy
Rubber
Aluminum
Rubber
Steel
Steel
Rubber
Steel, rubber
Steel, rubber
Steel
Steel
Copper alloy, aluminum
Steel
NBR
Aluminum
Copper alloy
Aluminum, copper alloy
PA
Steel
Steel, rubber
Aluminum
Aluminum, copper alloy, steel, rubber
POM
Steel
Aluminum
Rubber
Steel
Steel
Steel
PA
Steel
Steel
Aluminum
PA
Steel
Steel
PET
Steel
PET
Aluminum, rubber
SPECIAL HEX NUT PF1/4
DECOMPRESSION VALVE H3 ASSY
PISTON
O-RING P20 CORE
PISTON GUIDE
PISTON GUIDE L
O-RING AS568-123
O-RING AS568-014
VALVE ELEMENT UNIT
COMPRESSION SPRING 4159
HANDLE H
REG NIPPLE
O-RING 1AP10A
REG SOCKET E
O-RING 1AP15
FLANGED HEX SOCKET HEAD CAP SCREW 5X16
ARRESTING COLLAR
DAMPER
ARRESTNG PLATE 2 ASSY
ARRESTNG PLATE 1 ASSY
DAMPER COLLAR UNIT
HEX SOCKET HEAD CAP SCREW 5X45
SUBORDINATE UNIT MH1062
FLANGED HEX NUT M5CF
COVER RETAINER
DRAIN NIPPLE UNIT
JOINT MH-1061-OM
DRAIN COCK
EXHAUST PIPE UNIT
DRAIN TUBE
HEX SOCKET HEAD CAP SCREW 5X12
PIPE SUPPORTING PLATE ASSY
FLEXIBLE PIPE ASSY
REG SOCKET D
DECOMPRESSION VALVE L1230CE ASSY
BRANCH PIPE L 1230CE ASSY
PRESSURE GAUGE 220PSI
HANDLE L
AIR CHUCK 10-320-1152
DETENT PLUG M12X1.5, LEFT
AIR TANK UNIT
LEG RUBBER
LEG RUBBER PIN (1210E)
SPECIAL FLAT WASHER 6.2X20X1
HEX SOCKET HEAD CAP SCREW 5X16
STRAIN BUSHING
PHILLIPS PAN HEAD SCREW w/SEMS 5X10
CYLINDER COWLING
EDGE GUARD 28
CROSS RECESSED HEAD SCREW W/WASHER 5X10
HEX NUT 1-4
INVERTER UNIT 1230CE
RATING LABEL 1230CE
SPECIAL FLAT WASHER 5.1X12X1.2 (PLATED)
EJECTOR ASSIST LABEL
UNDER COVER ASSY
PRESSURE SENSOR
PRESSURE SENSOR CABLE 1230CE
SPEZIAL-SECHSKANTMUTTER PF1/4
DEKOMPRESSIONSVENTIL H3 BAUGRUPPE
KOLBEN
O-RING P20 KERN
KOLBENFÜHRUNG
KOLBENFÜHRUNG L
O-RING AS568-123
O-RING AS568-014
VENTILELEMENT-EINHEIT
KOMPRESSIONSFEDER 4159
GRIFF H
REG NIPPEL
O-RING 1AP10A
REG FASSUNG E
O-RING 1AP15
ARRETIERRING
DÄMPFER
ARRETIERPLATTE 2 BAUGRUPPE
ARRETIERPLATTE 1 BAUGRUPPE
DÄMPFERRING-EINHEIT
INNENSECHSKANT-KOPFSCHRAUBE 5X45
UNTERGEORDNETE EINHEIT MH1062
FLANSCH-SECHSKANTMUTTER M5CF
ABDECKUNGSHALTER
ABLASSNIPPEL-EINHEIT
VERBINDUNG MH-1061-OM
ABLASSHAHN
ABLUFTROHR-EINHEIT
ABLASSROHR
INNENSECHSKANT-KOPFSCHRAUBE 5X12
ROHRTRÄGERPLATTEN-BAUGRUPPE
FLEXROHR-BAUGRUPPE
REG FASSUNG D
DEKOMPRESSIONSVENTIL L1230CE BAUGRUPPE
ABZWEIGROHR L 1230CE BAUGRUPPE
MANOMETER 220PSI
GRIFF L
LUFTANSCHLUSS 10-320-1152
RASTSTOPFEN M12X1,5, LINKS
DRUCKLUFTBEHÄLTER
FUSSGUMMI
FUSSGUMMISTIFT (1210E)
SPEZIAL-FLACHSCHEIBE 6,2X20X1
INNENSECHSKANT-KOPFSCHRAUBE 5X16
VERSCHLEISSBUCHSE
ZYLINDERVERKLEIDUNG
KANTENSCHUTZ 28VERSENKTE KREUZSCHLITZSCHRAUBE M/SCHEIBE 5X10
SECHSKANTMUTTER 1-4
WECHSELRICHTEREINHEIT 1230CE
NENNWERTAUFKLEBER 1230CE
SPEZIAL-FLACHSCHEIBE 5,1X12X1,2 (GALVANISIERT)
AUSWERFERUNTERST. AUFKLEBER
UNTERE ABDECKUNGS-BAUGRUPPE
DRUCKSENSOR
DRUCKSENSORKABEL 1230CE
ÉCROU HEXAGONAL SPÉCIAL PF1/4
ENSEMBLE SOUPAPE DE DÉCOMPRESSION H3
PISTON
NOYAU DE JOINT TORIQUE P20
GUIDE DE PISTON
GUIDE DE PISTON L
JOINT TORIQUE AS568-123
JOINT TORIQUE AS568-014
UNITÉ D'ÉLÉMENT DE SOUPAPE
RESSORT DE COMPRESSION 4159
POIGNÉE H
MAMELON RÉGULATEUR
JOINT TORIQUE 1AP10A
DOUILLE RÉGULATRICE E
JOINT TORIQUE 1AP15
COLLIER D'ARRÊT
SILENCIEUX
ENSEMBLE PLAQUE D'ARRÊT 2
ENSEMBLE PLAQUE D'ARRÊT 1
UNITÉ DE COLLIER DE SILENCIEUX
VIS À TÊTE CYLINDRIQUE À SIX PANS CREUX 5 X 45
UNITÉ SUBORDONNÉE MH1062
ÉCROU HEXAGONAL À BRIDE M5CF
DISPOSITIF DE RETENUE DU COUVERCLE
UNITÉ DE MAMELON DE PURGE
JOINT MH-1061-OM
ROBINET DE PURGE
UNITÉ DE TUYAU D'ÉCHAPPEMENT
TUBE DE PURGE
VIS À TÊTE CYLINDRIQUE À SIX PANS CREUX 5 X 12
ENSEMBLE PLAQUE DE SUPPORT DE TUYAU
ENSEMBLE TUYAU FLEXIBLE
DOUILLE RÉGULATRICE D
ENSEMBLE SOUPAPE DE DÉCOMPRESSION L1230CE
ENSEMBLE TUYAU DE DÉRIVATION L 1230CE
MANOMÈTRE 220PSI
POIGNÉE L
MANDRIN PNEUMATIQUE 10-320-1152
BOUCHON DE DÉTENTE M12 X 1,5, GAUCHE
UNITÉ DE RÉSERVOIR D'AIR
REVÊTEMENT CAOUTCHOUC
GOUPILLE À REVÊTEMENT CAOUTCHOUC (1210E)
RONDELLE PLATE SPÉCIALE 6,2 X 20 X 1
VIS À TÊTE CYLINDRIQUE À SIX PANS CREUX 5 X 16
DOUILLE D'ANCRAGE
CAPOT DE CYLINDRE
PROTECTION DES BORDS 28
ÉCROU HEXAGONAL 1-4
UNITÉ DE CONVERTISSEUR 1230CE
ÉTIQUETTE DE CLASSIFICATION 1230CE
RONDELLE PLATE SPÉCIALE 5,1 X 12 X 1,2 (PLAQUÉE)
ÉTIQUETTE D'AIDE À L'ÉJECTION
ENSEMBLE DESSOUS DE COUVERCLE
CAPTEUR DE PRESSION
CÂBLE DE CAPTEUR DE PRESSION 1230CE
DADO ESAGONALE SPECIALE PF1/4
GRUPPO VALVOLA DI DECOMPRESSIONE H3
PISTONE
ANIMA O-RING P20
GUIDA PISTONE
GUIDA PISTONE L
O-RING AS568-123
O-RING AS568-014
UNITÀ ELEMENTO VALVOLA
MOLLA DI COMPRESSIONE 4159
IMPUGNATURA H
RACCORDO REG
O-RING 1AP10A
ATTACCO REG E
O-RING 1AP15
COLLARE DI ARRESTO
SMORZATORE
GRUPPO PIASTRA DI ARRESTO 2
GRUPPO PIASTRA DI ARRESTO 1
UNITÀ COLLARE SMORZATORE
VITE A TESTA ESAGONALE INCASSATA 5X45
UNITÀ SUBORDINATA MH1062
DADO ESAGONALE FLANGIATO M5CF
RITEGNO COPERCHIO
UNITÀ RACCORDO FILETTATO DI SCARICO
GIUNTO MH-1061-OM
RUBINETTO DI SCARICO
UNITÀ TUBO DI SCARICO
TUBO DI SCARICO
VITE A TESTA ESAGONALE INCASSATA 5X12
GRUPPO PIASTRA SOSTEGNO TUBO
GRUPPO TUBO FLESSIBILE
ATTACCO REG D
GRUPPO VALVOLA DI DECOMPRESSIONE L1230CE
GRUPPO TUBO DI DERIVAZIONE L 1230CE
MANOMETRO 220 PSI
IMPUGNATURA L
RUBINETTO ARIA 10-320-1152
TAPPO DI RITEGNO M12X1,5, SINISTRO
UNITÀ SERBATOIO ARIA
GOMMINO PIEDINO
PERNO GOMMINO PIEDE (1210E)
RONDELLA PIANA SPECIALE 6,2X20X1
VITE A TESTA ESAGONALE INCASSATA 5X16
BOCCOLA DI DEFORMAZIONE
CAPPOTTATURA CILINDRO
RIPARO TERMINALE 28
DADO ESAGONALE 1-4
UNITÀ INVERTER 1230CE
ETICHETTA POTENZA 1230CE
RONDELLA PIANA SPECIALE 5,1X12X1,2 (PLACCATA)
ETICHETTA SERVOCOMANDO ESPULSORE
GRUPPO COPERCHIO INFERIORE
SENSORE PRESSIONE
CAVO SENSORE PRESSIONE 1230CE
TUERCA HEXAGONAL ESPECIAL PF1/4
CONJUNTO DE LA VÁLVULA DE DESCOMPRESIÓN H3
PISTÓN
NÚCLEO P20 DE LA JUNTA TÓRICA
GUÍA DEL PISTÓN
GUÍA DEL PISTÓN L
JUNTA TÓRICA AS568-123
JUNTA TÓRICA AS568-014
UNIDAD DEL ELEMENTO DE LA VÁLVULA
MUELLE DE COMPRESIÓN 4159
MANIJA H
BOQUILLA REG
JUNTA TÓRICA 1AP10A
TOMA REG E
JUNTA TÓRICA 1AP15
COLLAR DE RETENCIÓN
AMORTIGUADOR
CONJUNTO DE LA PLACA DE RETENCIÓN 2
CONJUNTO DE LA PLACA DE RETENCIÓN 1
UNIDAD DEL COLLAR DEL AMORTIGUADOR
TORNILLO CIEGO CON CABEZA HEXAGONAL 5X45
UNIDAD SUBORDINADA MH1062
TUERCA HEXAGONAL EMBRIDADA M5CF
RETÉN DE LA CUBIERTA
UNIDAD DE LA BOQUILLA DE DRENAJE
JUNTA MH-1061-OM
LLAVE DE VACIADO
UNIDAD DEL TUBO DE ESCAPE
TUBO DE DRENAJE
TORNILLO CIEGO DE CABEZA HEXAGONAL 5X12
CONJUNTO DE LA PLACA DE SOPORTE DEL TUBO
CONJUNTO DEL TUBO FLEXIBLE
TOMA DE REG D
CONJUNTO DEL TUBO DE DERIVACIÓN L 1230CE
MANÓMETRO 220PSI
MANIJA L
MANDRIL NEUMÁTICO 10-320-1152
CLAVIJA DE RETENCIÓN M12X1,5, IZQUIERDA
UNIDAD DEL DEPÓSITO DE AIRE
PATA DE GOMA
PASADOR DE LA PATA DE GOMA (1210E)
ARANDELA PLANA ESPECIAL 6,2X20X1
TORNILLO CIEGO DE CABEZA HEXAGONAL 5X16
CASQUILLO DE TENSIÓN
CUBIERTA DEL CILINDRO
PROTECTOR DEL BORDE 28
TUERCA HEXAGONAL 1-4
UNIDAD DEL INVERSOR 1230CE
ETIQUETA DE CLASIFICACIÓN 1230CE
ARANDELA PLANA ESPECIAL 5,1X12X1,2 (CHAPADA)
ETIQUETA DE ASISTENCIA DEL EYECTOR
CONJUNTO DE LA CUBIERTA INFERIOR
SENSOR DE PRESIÓN
CABLE DEL SENSOR DE PRESIÓN 1230CE
CROSS RECESSED TRUSS HEAD TAPPING SCREW, TYPE 3, 5X12
VERSENKTE KREUZSCHLITZ- FLACHRUNDKOPFSCHRAUBE, TYP 3, 5X12
VIS À TÊTE CYLINDRIQUE À SIX PANS CREUX À BRIDE 5 X 16
VIS À TÊTE CYLINDRIQUE LARGE PHILLIPS AVEC VIS ET RONDELLE PRISONNIÈRE 5 X 10VIS AUTOTARAUDEUSE À TÊTE BOMBÉE LARGE ET EMPREINTE CRUFICORME, TYPE 3, 5 X 12
VIS À EMPREINTE CRUCIFORME AVEC RONDELLE 5 X 10
VITE A TESTA ESAGONALE INCASSATA FLANGIATA 5X16
VITE A CROCE A TESTA TRONCOCRONICA CON RONDELLA 5X10VITE AUTOFILETTANTE A CROCE CON TESTA CAVA, TIPO 3, 5X12
VITE A CROCE A TESTA CAVO CON RONDELLA 5X10
TORNILLO CIEGO CON CABEZA HEXAGONAL EMBRIDADA 5X16
CONJUNTO DE LA VÁLVULA DE DESCOMPRESIÓNL1230CE
TORNILLO DE CABEZA PLANA PHILLIPS con/SEMS 5X10TORNILLO DE ROSCA DE CABEZA SEGMENTADA DE CRUZ HENDIDA, TIPO 3, 5X12
TORNILLO DE CABEZA DE CRUZ HENDIDA CON ARANDELA 5X10
FLANSCH-INNENSECHSKANT-KOPFSCHRAUBE 5X16
KREUZSCHLITZ-FLACHKOPFSCHRAUBE m/SEMS 5X10
AKHL1050E.book 115 ページ 2008年12月11日 木曜日 午後1時31分

114
AK-HL1230E(CE)
ESPAÑOLITALIANOFRANÇAISENGLISHMATERIAL DEUTSCHITEMNO.
PARTNO.
1
2
3
4
5
6
7
8
9
10
11
12
13
14
15
16
17
18
19
20
21
22
23
24
25
26
27
28
29
30
31
32
33
34
35
36
37
38
39
40
41
42
43
44
45
46
47
48
49
50
51
52
53
54
55
56
57
58
59
BB43101
AK81158
AK70324
AK14851
AK14609
AK14680
AK14603
AK14674
AA34806
AK70325
AA21157
AK14854
AK70338
AK70314
AK14568
AK14567
AK70297
AK14135
AK14136
AK14134
AK81184
AK14138
AK70154
AK14143
AK81164
BB40837
AK70370
AK14561
AK14560
BB41801
AK14862
AK14125
AK70152
AK14128
AK81163
BB40838
AK14563
BB40436
EE39835
CC41107
AK14617
AK81146
BB43804
AK14566
EE39836
BB40416
AK14565
BB49417
BB43801
AK81174
AK81173
AK81176
AK81175
TT05016
AK70254
AK11252
AK13828
BB49406
AK12944
Steel
PP, rubber
PP
PET
Rubber
Copper alloy
Rubber
Steel
Steel
ABS, steel, etc.
Steel
PET
PP, aluminum, steel
Rubber
Rubber
Aluminum, steel, rubber
TFE
Steel
TFE
Aluminum, steel
Steel, rubber
Stainless steel, steel
Steel, rubber
Aluminum, copper alloy
Steel
Aluminum, steel, rubber
TFE
Aluminum
Steel
Aluminum
Steel, rubber
Aluminum, steel
Steel, rubber
Aluminum, copper alloy
Steel
Steel
Steel
Steel
Steel
Steel
Steel
Wool
Steel
Steel
Aluminum
Steel
Steel
Copper alloy
Aluminum, copper alloy
Aluminum, copper alloy
Aluminum, copper alloy
Steel, copper alloy, rubber
Aluminum, copper alloy, steel, rubber
Steel
Steel
Copper alloy
Aluminum, steel, copper alloy, rubber
GRIP ASSY
COVER ASSY (1230CE)
NAME LABEL 1230CE
GAUGE MOUNT
HEX SUPPORT BAR
COVER BUSHING B
DAMPER COLLAR
SWITCH PANEL ASSY
PHILLIPS PAN HEAD SCREW 4X15
PANEL LABEL 1230CE
COOLING FAN V0 ASSY
BRUSHLESS DC MOTOR
CRANKCASE SEAL S
CRANKCASE SEAL F
CONNECTING ROD UNIT WAU ASSY
GUIDE LINER S (1210E)
PISTON RING RETAINER SPRING S (1210E)
PISTON RING S (1210E)
CYLINDER S UNIT 7900
CYLINDER SEAL S (1210E)
VALVE SEAT UNIT S
HEAD SEAL S (1210E)
CYLINDER HEAD S ASSY
HEX SOCKET HEAD CAP SCREW 8X70
CONNECTING ROD UNIT VAV
LIP RING
RING RETAINER
HEX SOCKET BUTTON HEAD SCREW 5X10 (PLATED)
CYLINDER F
CYLINDER SEAL F (1210E)
VALVE SEAT UNIT F
HEAD SEAL F (1210E)
CYLINDER HEAD F UNIT
HEX SOCKET HEAD CAP SCREW 6X70
FLYWHEEL BALANCER
HEX SOCKET HEAD CAP SCREW 6X14
SPECIAL FLAT WASHER 16.2X28X2
HEX NUT 1-16 P1.5
SHAFT COLLAR
CRANKCASE CAP ASSY
FLANGED HEX SOCKET HEAD CAP SCREW 5X18
FILTER ELEMENT
SPECIAL FLAT WASHER 6.2X17X3
HEX SOCKET HEAD CAP SCREW 6X10
CRANKCASE CAP COVER
FLANGED HEX SOCKET HEAD CAP SCREW 4X8
FLANGED HEX SOCKET HEAD CAP SCREW 5X30
DISCHARGE PIPE UNIT
INTERMEDIATE PIPE UNIT
DRAIN CONNECTING PIPE UNIT
CONNECTING PIPE UNIT
AIR CHUCK HNA-20SM
BRANCH PIPE H ASSY
HEX SOCKET SET SCREW R1/8
PRESSURE GAUGE 870PSI
SPECIAL HEX SOCKET HEADED CAP SCREW 5X10
SPECIAL HEX NIPPLE G1/4
GRIFF-BAUGRUPPE
ABDECKUNGS-BAUGRUPPE (1230CE)
TYPENSCHILD 1230CE
MANOMETERHALTERUNG
SECHSKANTTRÄGERLEISTE
ABDECKUNGSBUCHSE B
DÄMPFERRING
SCHALTFELD-BAUGRUPPE
KREUZSCHLITZFLACHKOPFSCHRAUBE 4X15
BEDIENFELDAUFKLEBER 1230CE
KÜHLERLÜFTER-BAUGRUPPE V0
BÜRSTENLOSER GLEICHSTROMMOTOR
KURBELGEHÄUSEDICHTUNG S
KURBELGEHÄUSEDICHTUNG F
PLEUELSTANGENEINHEIT WAU BAUGRUPPE
FÜHRUNGSFUTTER S (1210E)
KOLBENRING-HALTEFEDER S (1210E)
KOLBENRING S (1210E)
ZYLINDER S EINHEIT 7900
ZYLINDERDICHTUNG S (1210E)
VENTILSITZ EINHEIT S
KOPFDICHTUNG S (1210E)
ZYLINDERKOPF S BAUGRUPPE
INNENSECHSKANT-KOPFSCHRAUBE 8X70
PLEUELSTANGENEINHEIT VAV
DICHTRING
RINGHALTER
ZYLINDER F
ZYLINDERDICHTUNG F (1210E)
VENTILSITZ EINHEIT F
KOPFDICHTUNG F (1210E)
ZYLINDERKOPF F EINHEIT
INNENSECHSKANT-KOPFSCHRAUBE 6X70
SCHWUNGRADAUSGLEICH
INNENSECHSKANT-KOPFSCHRAUBE 6X14
SPEZIAL-FLACHSCHEIBE 16,2X28X2
SECHSKANTMUTTER 1-16 P1,5
WELLENBUND
KURBELGEHÄUSEDECKEL-BAUGRUPPE
FILTERELEMENT
SPEZIAL-FLACHSCHEIBE 6,2X17X3
INNENSECHSKANTKOPFSCHRAUBE 6X10
KURBELGEHÄUSEDECKEL-ABDECKUNG
ENTLADUNGSROHREINHEIT
ZWISCHENROHREINHEIT
ABLASS-VERBINDUNGSROHREINHEIT
VERBINDUNGSROHREINHEIT
LUFTANSCHLUSS HNA-20SM
ABZWEIGROHR H BAUGRUPPE
INNENSECHSKANT-PASSSCHRAUBE R1/8
MANOMETER 870PSI
SPEZIAL-SECHSKANTNIPPEL G1/4
ENSEMBLE POIGNÉE
ENSEMBLE COUVERCLE (1230CE)
ÉTIQUETTE DU NOM 1230CE
SUPPORT DE JAUGE
BARRE DE SUPPORT HEXAGONALE
RACCORD DE RÉDUCTION DU COUVERCLE B
COLLIER D'AMORTISSEUR
ENSEMBLE PANNEAU DE COMMANDE
VIS À TÊTE CYLINDRIQUE LARGE PHILLIPS 4 X 15
ÉTIQUETTE DE PANNEAU 1230CE
ENSEMBLE VENTILATEUR V0
MOTEUR CC SANS BALAI
BOÎTE D'ÉTANCHÉITÉ S
BOÎTE D'ÉTANCHÉITÉ F
ENSEMBLE UNITÉ DE BIELLE WAU
REVÊTEMENT DE GUIDE S (1210E)
SEGMENT DE PISTON S (1210E)
UNITÉ DE CYLINDRE S 7900
JOINT DE CYLINDRE S (1210E)
UNITÉ DE SIÈGE DE SOUPAPE S
JOINT DE TÊTE S (1210E)
ENSEMBLE TÊTE DE CYLINDRE S
UNITÉ DE BIELLE VAV
ANNEAU À LÈVRE
DISPOSITIF DE RETENUE DE BAGUE
CYLINDRE F
JOINT DE CYLINDRE F (1210E)
UNITÉ DE SIÈGE DE SOUPAPE F
JOINT DE TÊTE F (1210E)
UNITÉ DE TÊTE DE CYLINDRE F
VIS À TÊTE CYLINDRIQUE À SIX PANS CREUX 6 x 70
BALANCIER DE VOLANT
VIS À TÊTE CYLINDRIQUE À SIX PANS CREUX 6 X 14
RONDELLE PLATE SPÉCIALE 16,2 X 28 X 2
ÉCROU HEXAGONAL 1-16 P1,5
BAGUE D'ÉPAULEMENT
ENSEMBLE CHAPEAU DE CARTER MOTEUR
ÉLÉMENT FILTRANT
RONDELLE PLATE SPÉCIALE 6,2 X 17 X 3
VIS À TÊTE CYLINDRIQUE À SIX PANS CREUX 6 X 10
COUVERCLE DU CHAPEAU DE CARTER MOTEUR
UNITÉ DE TUYAU DE REFOULEMENT
UNITÉ DE TUYAU INTERMÉDIAIRE
UNITÉ DE TUYAU DE RACCORDEMENT DE PURGE
UNITÉ DE TUYAU DE RACCORDEMENT
MANDRIN PNEUMATIQUE HNA-20SM
ENSEMBLE TUYAU DE DÉRIVATION H
VIS DE CALAGE À SIX PANS CREUX R1/8
MANOMÈTRE 870PSI
GRUPPO IMPUGNATURA
GRUPPO COPERCHIO (1230CE)
ETICHETTA CON NOME 1230CE
SUPPORTO MANOMETRO
BARRA DI SOSTEGNO ESAGONALE
BOCCOLA B COPERCHIO
COLLARE SMORZATORE
GRUPPO PANNELLO INTERRUTTORI
VITE A CROCE A TESTA TRONCOCRONICA 4X15
ETICHETTA QUADRO 1230CE
GRUPPO VENTOLA DI RAFFREDDAMENTO V0
MOTORE BRUSHLESS A C.C.
GUARNIZIONE BASAMENTO S
GUARNIZIONE BASAMENTO F
GRUPPO BIELLA
RIVESTIMENTO GUIDA S (1210E)
MOLLA RITEGNO FASCIA ELASTICA S (1210E)
FASCIA ELASTICA S (1210E)
CILINDRO S 7900
GUARNIZIONE CILINDRO S (1210E)
SEDE VALVOLA S
GUARNIZIONE TESTA S (1210E)
GRUPPO TESTA CILINDRO S
VITE A TESTA ESAGONALE INCASSATA 8X70
GRUPPO BIELLA VAV
ANELLO A LABBRO
RITEGNO ANELLO
CILINDRO F
GUARNIZIONE CILINDRO F (1210E)
SEDE VALVOLA F
GUARNIZIONE TESTA F (1210E)
UNITÀ TESTA CILINDRO F
VITE A TESTA ESAGONALE INCASSATA 6X70
CONTRAPPESO VOLANO
VITE A TESTA ESAGONALE INCASSATA 6X14
RONDELLA PIANA SPECIALE 16,2X28X2
DADO ESAGONALE 1-16 P1,5
COLLARE ALBERO
GRUPPO CAPPELLO BASAMENTO
CARTUCCIA FILTRO
RONDELLA PIANA SPECIALE 6,2X17X3
VITE A TESTA ESAGONALE INCASSATA 6X10
COPERCHIO CAPPELLO BASAMENTO
UNITÀ TUBO DI MANDATA
UNITÀ TUBO INTERMEDIO
UNITÀ TUBO DI COLLEGAMENTO SCARICO
UNITÀ TUBO DI COLLEGAMENTO
RUBINETTO ARIA HNA-20SM
GRUPPO TUBO DI DERIVAZIONE H
VITE DI ARRESTO AD ESAGONO INCASSATO R1/8
MANOMETRO 870 PSI
CONJUNTO DE LA EMPUÑADURA
CONJUNTO DE LA CUBIERTA (1230CE)
ETIQUETA DEL NOMBRE 1230CE
SOPORTE DEL MANÓMETRO
BARRA DE SOPORTE HEXAGONAL
CASQUILO DE LA CUBIERTA B
COLLAR DEL AMORTIGUADOR
CONJUNTO DEL PANEL DEL INTERRUPTOR
TORNILLO DE CABEZA PLANA PHILLIPS 4X15
ETIQUETA DEL PANEL 1230CE
CONJUNTO DEL VENTILADOR DE REFRIGERACIÓN
MOTOR DE CC SIN ESCOBILLAS
JUNTA DEL CÁRTER S
JUNTA DEL CÁRTER F
CONJUNTO WAU DE LA UNIDAD DE BIELA
CAMISA DE GUÍA S (1210E)
ANILLO DEL PISTÓN S (1210E)
UNIDAD DEL CILINDRO 7900
JUNTA DEL CILINDRO S (1210E)
UNIDAD DEL ASIENTO DE VÁLVULA S
JUNTA DE CULATA S (1210E)
CONJUNTO DE LA CULATA DEL CILINDRO S
TORNILLO CIEGO DE CABEZA HEXAGONAL 8X70
UNIDAD DE BIELA VAV
ANILLO DE LABIO
RETÉN DEL ANILLO
CILINDRO F
JUNTA DEL CILINDRO F (1210E)
UNIDAD DEL ASIENTO DE VÁLVULA F
JUNTA DE CULATA F (1210E)
UNIDAD DE LA CULATA DEL CILINDRO F
TORNILLO CIEGO DE CABEZA HEXAGONAL 6X70
COMPENSADOR DEL VOLANTE
TORNILLO CIEGO DE CABEZA HEXAGONAL 6X14
ARANDELA PLANA ESPECIAL 16,2X28X2
TUERCA HEXAGONAL 1-16 P1,5
COLLAR DEL EJE
CONJUNTO DE LA TAPA DEL CÁRTER
ELEMENTO DE FILTRO
ARANDELA PLANA ESPECIAL 6,2X17X3
TORNILLO CIEGO DE CABEZA HEXAGONAL 6X10
CUBIERTA DE LA TAPA DEL CÁRTER
UNIDAD DEL TUBO DE DESCARGA
UNIDAD DEL TUBO INTERMEDIO
UNIDAD DEL TUBO DE CONEXIÓN DE DRENAJE
UNIDAD DEL TUBO DE CONEXIÓN
MANDRIL NEUMÁTICO HNA-20SM
CONJUNTO DE TUBO DE DERIVACIÓN H
TORNILLO DE FIJACIÓN HEXAGONAL R1/8
MANÓMETRO 870PSI
BOQUILLA HEXAGONAL ESPECIAL G1/4
CROSS RECESSED TRUSS HEAD TAPPING SCREW, TYPE 3, 5X16
VERSENKTE KREUZSCHLITZ- FLACHRUNDKOPFSCHRAUBE, TYP 3, 5X16
VIS AUTOTARAUDEUSE À TÊTE BOMBÉE LARGE ET EMPREINTE CRUFICORME, TYPE 3, 5 X 16
FLANGED HEX SOCKET HEAD CAP SCREW 6X16
FLANSCH- INNENSECHSKANTKOPFSCHRAUBE 6X16
VIS À TÊTE CYLINDRIQUE À SIX PANS CREUX À BRIDE 6 X 16
VITE A TESTA ESAGONALE INCASSATA FLANGIATA 6X16
TORNILLO CIEGO CON CABEZA HEXAGONAL EMBRIDADA 6X16
RESSORT DE RETENUE DE SEGMENT DE PISTON S (1210E)
VIS À TÊTE CYLINDRIQUE À SIX PANS CREUX 8 X 70
VIS À TÊTE RONDE À SIX PANS CREUX 5 X 10 (PLAQUÉE)
VIS À TÊTE CYLINDRIQUE À SIX PANS CREUX À BRIDE 5 X 18
VIS À TÊTE CYLINDRIQUE À SIX PANS CREUX À BRIDE 4 X 8VIS À TÊTE CYLINDRIQUE À SIX PANS CREUX À BRIDE 5 X 30
VIS À TÊTE CYLINDRIQUE À SIX PANS CREUX SPÉCIALE 5 X 10MAMELON AVEC ÉCROU HEXAGONAL SPÉCIAL G1/4
VITE AUTOFILETTANTE A CROCE CON TESTA CAVA, TIPO 3, 5X16
VITE A BOTTONE TESTA ESAGONALE INCASSATA 5X10 (PLACCATA)
VITE A TESTA ESAGONALE INCASSATA FLANGIATA 5X18
VITE A TESTA ESAGONALE INCASSATA FLANGIATA 4X8VITE A TESTA ESAGONALE INCASSATA FLANGIATA 5X30
VITE SPECIALE A TESTA ESAGONALE INCASSATA 5X10RACCORDO FILETTATO SPECIALE ESAGONALE G1/4
TORNILLO DE ROSCA DE CABEZA SEGMENTADA DE CRUZ HENDIDA, TIPO 3, 5X16
MUELLE DE RETÉN DEL ANILLO DEL PISTÓN S (1210E)
TORNILLO DE CABEZA REDONDEADA HEXAGONAL 5X10 (CHAPADO)
TORNILLO CIEGO DE CABEZA HEXAGONAL EMBRIDADA 5X18
TORNILLO CIEGO DE CABEZA HEXAGONAL EMBRIDADA 4X8TORNILLO CIEGO DE CABEZA HEXAGONAL EMBRIDADA 5X30
TORNILLO CIEGO CON CABEZA HEXAGONAL ESPECIAL 5X10
INNENSECHSKANTSCHRAUBE MT RUNDKOPF 5X10 (GALVANISIERT)
FLANSCH-INNENSECHSKANT-KOPFSCHRAUBE 5X18
FLANSCH-INNENSECHSKANT-KOPFSCHRAUBE 4X8FLANSCH-INNENSECHSKANT-KOPFSCHRAUBE 5X30
SPEZIAL-INNENSECHSKANT-KOPFSCHRAUBE 5X10
AKHL1050E.book 114 ページ 2008年12月11日 木曜日 午後1時31分
7
23. DO NOT MODIFY THE COMPRESSORDo not modify the compressor. Always con-tact the authorized service facility any re-pairs. Unauthorized modification may not only impair the compressor performance but may also result in accident or injury to repair personnel who do not have the required knowledge and technical expertise to per-form the repair operations correctly.
24. TURN OFF THE SWITCH WHEN THE COMPRESSOR IS NOT USEDWhen the compressor is not used, turn the switch OFF, disconnect the plug from the power source and open the drain cock to dis-charge the compressed air from the air tank.
25. NEVER TOUCH THE SURFACE OF THE HIGH-TEMPERATURE SECTIONIn order to prevent a burn, do not touch the piping, head, cylinder, motor and inverter case(lower cover).
26. DO NOT DIRECT AIR STREAM AT BODYRisk of injury, do not direct compressed air at persons or animals.
27. DRAIN TANKDrain tank daily or after 4 hours of use.Open drain cock and tilt compressor to emp-ty accumulated water.
28. DO NOT STOP COMPRESSOR BY PULL-ING OUT THE PLUGUse the " ON/OFF " switch.
29. WHENEVER USING THE HIGH PRESSURE SIDE OF THE MAX POWERLITE COMPRES-SOR, THE GENUINE PARTS FOR THE MAX POWERLITE TOOLS, POWERLITE HOSE AND COMPRESSOR MUST BE USED.
30. REPLACEMENT PARTSWhen servicing, use only MAX genuine parts. Repair should be conducted only by authorized service facility.
31. NEVER USE A TRANSFORMER FOR THE POWER SUPPLY OF THIS COMPRESSOR. USING A TRANSFORMER TO INCREASE THE VOLTAGE WILL CAUSE A FAILURE OR BURNOUT. (IF A TRANSFORMER IS USED, OPERATION OF THE MACHINE WILL STOP.)
OFF
AKHL1050E.book 7 ページ 2008年12月11日 木曜日 午後1時31分

8
32. NEVER CONNECT THE COMPRESSOR TO AN ENGINE GENERATOR OR DI-RECT-CURRENT POWER SUPPLYThe compressor will break or be damaged from burning.
33. THIS COMPRESSOR IS FOR INDOOR USE. DO NOT INSTALL THE COMPRES-SOR IN ANY PLACE EXPOSED TO RAIN OR SPLASHED WATER, HIGH-HUMIDITY PLACE OR HIGH-TEMPERATURE PLACEIf used in the wet condition, it could produce an electric shock or be short-circuited, result-ing in ignition. Use it under the environmen-tal conditions provided by its specifications.
34. DO NOT OPERATE THE TOOL NEAR A FLAMMABLE SUBSTANCENever operate the tool near a flammable substance (e.g., thinner, gasoline, etc.). Vol-atile fumes from these substances could be drawn into the compressor and compressed together with the air and this could result in an explosion.
35. NEVER USE THE TOOL IN AN EXPLO-SIVE ATMOSPHERESparks from the tool may ignite atmospheric gases, dust or other combustible materials.
36. BE SURE TO EARTH THE COMPRESSOREarth the compressor to prevent a worker from getting an electric shock. It comes with a 3-pole cord and a 3-pole earthing plug so that it can be connected to an appropriate earthing plug socket.A green-and-yellow striped wire is an earth-ing conductor. Never connect it to other charged terminals.
37. WHEN CARRYING THE COMPRESSOR, HOLD IT CORRECTLY.
38. TAKE CARE TO TRANSPORT THE COM-PRESSOR CORRECTLY, DO NOT OVER-TURN IT OR LIFT IT WITH HOOKS OR ROPES.
39. WHEN DISPOSING THE MACHINE OR TIS PARTS, FOLLOW THE RELEVANT NA-TIONAL RULES.
ThinnerGasoline
AKHL1050E.book 8 ページ 2008年12月11日 木曜日 午後1時31分
113
AKHL1230E(CE)EXPOLDED
VIEW AND SPARE PARTS LIST
EINZELTEILDAR-STELLUNG UND ERSATZEILLISTE
SCHEMA ECLATE ET LISTE DES PIECES
DE RECHANGE
ESPLOSO DEI COMPONENTI DE ELENCO DELLE
PARTI DI RICAMBIO
DESPIECE DE LA MAQUINA Y LISTA DE RECAMBIOS
G
D
16
15
14
37 38
39
4041
34
86
71
72
70
61
60
59
59
58
57
56
54
E
55
73
C
F
J
H
JK P
T
52
53
51
13
74
M
60
42
43
A84
101
102103
101102103104100
M
N
O
L
S
T
92
G
104
82
817978
V
R
81
80
B758
77
56
91
8671
72
74
K
N
72
BB
28
3031
3233
F29
1718
1920
27
2122
23
C
2425
26
D
4546
44
47
48
49
77
B758
86
85
83
H
2
1
1
50
36
35
8987
88
90
93
97
9496
5960
58
6059
98
83
118
119
O
112
109
113
111
115 115
P
SR
110
108
117
108
43
5
789
L
V
7
98
10
11
12
6
5
2
1
A
95
61 94
626364 6566676869
99
89
76
120
76
E
122
106
116
127
128107
126
130114
104115
8
1041158
129131 132
108
125
124 123
W
121
107 W
AKHL1050E.book 113 ページ 2008年12月11日 木曜日 午後1時31分

112
3. Efectúe inspecciones periódicas de la máquina.El usuario debe realizar una limpieza y una inspección de la máquina para mantener su rendimiento. Permita que su distribuidor o su centro de servicio autorizado inspeccionen la máquina.
4. Manipule esta máquina con sumo cuidado.La caída accidental, el choque contra objetos sólidos o los golpes contra la máquina puede provocar deformaciones, roturas o daños en la misma. No golpee, ni deje caer la máquina para evitar cualquier accidente.
5. Inspeccione la máquina cada vez que la utilice.Compruebe e inspeccione la máquina con arreglo al procedimiento descrito en las INSTRUCCIONES DE SEGURIDAD en página 92 y posteriores.
6. ACERCA DEL AÑO DE PRODUCCIÓNEste producto exhibe el número de producción en la etiqueta de clasificación. Empezando por la izquierda, los dos primeros dígitos indican el año de producción.
(Ejemplo)08826035D
Año 2008
AKHL1050E.book 112 ページ 2008年12月11日 木曜日 午後1時31分
9
2. SPECIFICATIONS AND TECHNICAL DATA1. SPECIFICATIONS
2. TECHNICAL DATA
Sound Pressure NoiseAKHL1230E (CE) LPA 75 dB (A)
For the European market, the compressors are manufactured to meet Directive 98/37/EC.
The sound generated by the workstation is indicated as sound pressure level measured free-field at a distance of 1m: ISO2151
Product No. AKHL1230E (CE)
Power supply 230V±10% 50Hz±1% φ1
Rated current 7A
Motor power 2HP
Protective earthing Class I
Protective structure IP20
Working temperature 0°C to +40°C
Working humidity 85 % RH or less. No dew condensation.
Height above sea level Up to 1,000 m
Storage temperature -10 to +50°C
Storage humidity 85 % RH or less. No dew condensation.
Pressure switch working range Off:34bar/On:30bar (POWER MODE)Off:29bar/On:25bar (NORMAL MODE)
AKHL1050E.book 9 ページ 2008年12月11日 木曜日 午後1時31分

10
3. INSTRUCTIONS FOR OP-ERATION
Unpack the compressor and check for any defi-ciency, damage caused during transportation and loose bolts and screws.
READ SECTION TITLED " SAFETY INSTRUC-TIONS "WEAR SAFETY GLASSES OR GOGGLESDanger to the eyes always exists due to the pos-sibility of dust being blown up by the exhausted air or of a fastener flying up to the improper han-dling of the tool. For these reasons, safety glass-es or goggles shall always be worn when operating the tool. The employer and/or user must ensure that proper eye protection is worn. Eye protection equipment must conform to the requirements of Council Directive 89/686/EEC of 21 DEC. 1989 (the American National Standards Institute. ANSI Z87.1) and provide both frontal and side protection.NOTE: Non-side shielded spectacles and face
shields alone do not provide adequate protection.
NOTE: The information contained in this Instruc-tion Manual is designed to assist you in the safe operation and maintenance of the compressor.Some illustrations in this Instruction Manual may show details or attach-ments that differ from those on your own compressor.
1. INSTALLATION
1. NEVER USE THE MACHINE IN A PLACE WHERE ANY VOLATILE COMBUSTIBLE SUBSTANCE HAS BEEN STORED.Never use it near gasoline, thinner, gas, paint or adhesive agent, because they could be ignited or blow up.
2. NEVER USE THE MACHINE NEAR THE HEAT OF FIRE OR ANY COMBUSTIBLE SUBSTANCE.
3. NEVER USE THE MACHINE IN AN UN-STABLE PLACE.Never use it in a place where it could move or fall of itself.Be sure to install the compressor on a flat floor, with leg rubber underneath it; the al-lowable tilt angle of the floor is up to 10 de-grees. If the installation floor is tilted and slippery, ensure that the compressor does not move during operation. Do not use it on a shelf or a stand where it may fall or tumble.
WARNING
ThinnerGasoline
WARNING
WARNING
WARNING
AKHL1050E.book 10 ページ 2008年12月11日 木曜日 午後1時31分
111
7. AJUSTE AUTOMÁTICO DE LA POTENCIA DE FUNCIONAMIENTO (INVERTIDOR)
La máquina incorpora un invertidor controlado por un microordenador para garantizar el aprovechamiento máximo del rendimiento de descarga. El ajuste de la potencia de funcionamiento es automático hasta que la presión del depósito de la máquina alcanza el nivel máximo establecido para el modo de ajuste actual. Los sonidos de funcionamiento puede cambiar cuando se activa la potencia de funcionamiento, pero no debe preocuparse por ello. Los cambios en los sonidos no se deben a un fallo.
• El nivel de presión en el que se activa el cambio de la potencia varía dependiendo de la capacidad de la fuente de alimentación principal, el tipo de alargador utilizado y el uso simultáneo de otros equipos eléctricos. Si la tensión es excesivamente baja, se necesitará más tiempo para el proceso de llenado.
• Si el tiempo de llenado dura más de lo habitual o si la presión no aumenta, cambie la conexión de corriente a la fuente de alimentación (vuelva a conectar la fuente de alimentación principal) o detenga el uso conjunto del suministro de alimentación con una herramienta eléctrica.
• Cuando la capacidad de la alimentación principal es de 230 V o inferior, o cuando se utiliza junto con otra herramienta eléctrica, se produce una caída de tensión radical, que produce un fallo del arranque.
• El interruptor magnetotérmico de la fuente de alimentación se puede activar si el consumo de corriente total resultante del uso simultáneo con otra herramienta eléctrica sobrepasa la capacidad de corriente del interruptor magnetotérmico.En tal caso, no utilice la misma fuente de alimentación para proporcionar corriente a ninguna otra herramienta eléctrica.
8. PARA MANTENER EL RENDIMIENTO
1. Drene el agua de la máquina.Tras finalizar el trabajo, gire la manija de la válvula de reducción de presión en el sentido de las agujas del reloj y abra la llave de vaciado gradualmente para vaciar el aire comprimido y el agua del depósito hasta que la aguja del manómetro de la válvula de reducción de presión indique 0. • Si no drena el agua del interior del
depósito se creará moho, que puede causar una avería.
2. El indicador LED de mantenimiento se ilumina o parpadea.Las horas de funcionamiento de esta máquina se miden con un microordenador. El indicador LED DE MANTENIMIENTO se ilumina cuando la máquina alcanza 1000 horas de funcionamiento. Si el indicador LED de mantenimiento se ilumina, envíe la máquina a su distribuidor o a su centro de servicio autorizado para efectuar una revisión.
AKHL1050E.book 111 ページ 2008年12月11日 木曜日 午後1時31分

110
6. TIPOS DE ALARMA
Durante el funcionamiento normal
En caso de funcionamiento anómalo
i) Si un estado de tensión excesivamente baja (180 V o inferior) se prolonga durante más de 4 segundos, el indicador LED se mantiene encendido incluso después de que se haya recuperado la tensión correcta.
ii) Si la tensión cae a un nivel de tensión bajo de 160 V o inferior, el indicador LED se mantiene encendido acompañado de pitidos cortos (Pi, i, Pi, ...), hasta que se desactiva el interruptor de alimentación.Si la tensión cae más y el motor se detiene con un error, el indicador LED también permanece encendido acompañado de pitidos cortos (Pi, Pi, Pi, ...), hasta que se desactiva el interruptor de alimentación.
iii) Si un estado de tensión excesivamente alta (255 V o superior) se prolonga durante más de 2 segundos, el indicador LED se ilumina sin ningún sonido. El indicador LED se apaga después de que la tensión caiga por debajo de 255 V.
iv) Si la tensión aumenta a un nivel de alta tensión de 265 V o superior durante 2 segundos o más, el motor se detiene automáticamente y el indicador LED se mantiene encendido acompañado de pitidos largos (Piii ........), hasta que se desactiva el interruptor de alimentación.
v) En otros casos de detención anómala del motor, el indicador LED se mantiene encendido acompañado de pitidos largos intermitentes (Pi, Pi, Pi, ...), hasta que se desactiva el interruptor de alimentación.
Sonidos de alarma Síntoma Medidas tomadas
Un único pitido corto (Pi)Al conectar la alimentación -
Al seleccionar el modo operativo -
Sonidos de alarma
INDICADOR LED DE PROBLEMA ELÉCTRICO O DE TEMPERATURA ( LED)
Causa Medidas tomadas
1
Ninguna
Encendido La tensión es demasiado baja o demasiado alta
Examine el estado de la fuente de alimentación (Consulte página 111)
Pitidos cortos (Pi, Pi, Pi, ...) * consulte a continuación i)~iv)
2Pitidos largos (Pii, Pii, Pii, ...) Encendido
• Temperatura del motor anormalmente alta
• La temperatura del circuito de control aumentó hasta un alcanzar un nivel anormalmente alto(el indicador LED se mantiene encendido).
• No utilice el compresor con temperaturas extremadamente altas.
• No bloquee el orificio del flujo de aire.
• Examine el estado de la fuente de alimentación(Consulte página 111)
• No utilice el compresor en un lugar en el que pueda sufrir salpicaduras de agua o en un lugar con gran humedad.
3
Pitidos cortos (Pi, Pi, Pi, ...) * consulte el punto v)
Intermitente
• El motor no funciona• Fallo del circuito de
control (El indicador LED se mantiene intermitente)
Se debe a un fallo del invertidor o el motor. Envíe la máquina a su distribuidor o a su centro de servicio autorizado para su revisión o reparación.
AKHL1050E.book 110 ページ 2008年12月11日 木曜日 午後1時31分
11
4. AVOIDING A PLACE EXPOSED TO HIGH TEMPERATURE OR THE DIRECT SUN-SHINE, BE SURE TO USE THE MACHINE IN THE WELL-VENTILATED SHADE.Using it under high temperature or in the di-rect sunshine not only deteriorates its dura-bility, but increases the temperature of the main body, causing danger to your safety. Be sure to use it in the well-ventilated shade. The adequate room temperature is +5°C to +30°C. (0°C to +40°C at maximum)
5. DO NOT INSTALL THE MACHINE IN A DUSTY(WOODEN CHIPS, ETC.) PLACE.
6. INSTALL THE MACHINE IN THE APPRO-PRIATE DIRECTION.Install it appropriately.
7. NEVER INSTALL THE MACHINE IN THE RAIN OR IN A PLACE SPLASHED WITH WATER OR EXPOSED TO HIGH TEMPER-ATURE.Using it in the wet condition could cause an electric shock or a short-circuit, resulting in a fire due to burnout or ignition.
8. NEVER BLOCK A VENTILATION OPEN-ING OR USE THE MACHINE IN A BOX OR A NARROW PLACE(IN A VEHICLE, ETC.)Neglect of this may generate abnormal heat, causing a trouble or an accident.Install the compressor at the distance of 1 m or more from the wall to secure sufficient ventilation and cooling.
WARNING
WARNING
WARNING
WARNING
AKHL1050E.book 11 ページ 2008年12月11日 木曜日 午後1時31分

12
9. NEVER SIT OR PLACE AN OBJECT ON THE TOP OF THE MACHINE.Neglect of this could cause a trouble or break it.
Do not use the compressor in any place where the temperature is 0°C or less or the ambient temperature exceeds +40°C.
WARNING
WARNING
AKHL1050E.book 12 ページ 2008年12月11日 木曜日 午後1時31分
109
5. ANOMALÍAS DURANTE EL FUNCIONAMIENTO
• Si detecta alguna anomalía, no accione el compresor.
Si descubre cualquiera de los siguientes fenómenos anómalos, desactive el interruptor de alimentación inmediatamente, desconecte el enchufe de corriente de la toma eléctrica y envíe la máquina a su distribuidor o a su centro de servicio autorizado para efectuar las comprobaciones y reparaciones oportunas.
1. Se pueden producir los siguientes problemas incluso cuando no existan problemas con la fuente de alimentación o el cableado: (Consulte "DISPOSITIVO DE PROTECCIó N" en página 108.)• Al activar el interruptor de alimentación la
máquina no arranca.• El motor genera vibraciones.
2. Durante el funcionamiento se producen sonidos extraños. (Consulte "AJUSTE AUTOMá TICO DEL LA POTENCIA DE FUNCIONAMIENTO" (INVERTIDOR) en página 111.)
3. Se activa la válvula de seguridad en lugar del sensor de presión, permitiendo el soplado del aire comprimido
4. Se produce una fuga de aire.5. La presión no aumenta. (Consulte
página 111)6. Al tocar la parte metálica se siente una
ligera descarga eléctrica.7. Durante el funcionamiento se producen
otras anomalías diferentes a las anteriores.
ADVERTENCIA
AKHL1050E.book 109 ページ 2008年12月11日 木曜日 午後1時31分

108
4. DISPOSITIVO DE PROTECCIÓN
Si el calor interno aumenta durante el funcionamiento debido a la obstrucción del orificio de flujo de aire, si la máquina se utiliza en un entorno muy caliente o si se produce una anomalía en el interior de la máquina, el protector térmico puede detener el funcionamiento del motor para evitar que se queme. En este caso se activará la alarma. En tal caso:
1. Desactive el interruptor de alimentación y desconecte el enchufe de corriente de la toma eléctrica.• Para ver los patrones de sonido de la
alarma, consulte página 110.
2. Conecte el enchufe de corriente a la toma eléctrica y active el interruptor de alimentación para reanudar el funcionamiento.• Si el motor no se ha enfriado lo suficiente.
al reanudar el funcionamiento se puede activar el dispositivo de protección inmediatamente después. En otros casos, el funcionamiento puede no reanudarse cuando se active el interruptor de alimentación, En tal caso, espere unos 30 minutos para que el motor se enfríe antes de volver a poner en funcionamiento la máquina.
3. Si el dispositivo de protección se activó sin que hubiera problemas aparentes, interrumpa la utilización del compresor y envíelo a su distribuidor o a su centro de servicio autorizado para efectuar las comprobaciones y reparaciones oportunas.
APAGADO
ENCENDIDO
ADVERTENCIA
AKHL1050E.book 108 ページ 2008年12月11日 木曜日 午後1時31分
13
2. NAME OF PARTSReduction valve adjustment handle (H) (Orange cap)
High pressure air chuck (for MAX tools)
Pressure gauge for indicating the set reduction valve pressure (2 gauges)
General-purpose air chuck (for regular pressure tools)
Multilingual explanation of the control panel
Power plug
Power cord
Drain cock
Pressure-reduction valve adjustment handle (L) (Yellow cap)
Control panel (Front panel)
Warning label
Air tank
Pressure gauge in the tank
Power switch
Rubber foot
Grip for two-handed carry
AKHL1050E.book 13 ページ 2008年12月11日 木曜日 午後1時31分

14
Description of Functions of Key Components
Power switch Turns on or off the power supply
Reduction valve adjustment handle (H) (Orange cap)
Intended for exclusive use with the super nailer. It adjusts the operating pressure of the tool.
Pressure-reduction valve adjust-ment handle (L) (Yellow cap)
Adjusts the pressure supplied to the general-purpose nailers and pneumatic tools (operating air pressure 8.3 bar maxi-mum).
Pressure gauge in the tank Indicates pressure in the tank. The pressure increases up to 34 bar.
Pressure gauge for indicating the set reduction valve pressure (2 gauges)
It indicates the set pressure on the pressure-reduction valves (H) and (L).(24.5 bar maximum on the H side and 8.3 bar maximum on the L side.)
High pressure air chuck (for MAX tools)
It connects the MAX air hose for the tools.
General-purpose air chuck (for reg-ular pressure tools)
It connects the air hose for the general-pressure nailers.
Drain cock It drains compressed air and water, Drain once when the work is finished or more a day.
Warning label It posts the Warnings relevant to use of this machine. User is requested to read the label before using the machine.
Power plug It is usable with a triode ground outlet.
Control panel It allows switching the mode between Normal, High Power and Quiet.• Current consumption is reduced in the operation in
Quiet mode.
Multilingual explanation of the con-trol panel
Displays terms on control panel in German, French, Italian, Spanish, Portuguese, Norwegian, Swedish, Finnish, Danish, Dutch, Polish, Greek, Turkish and Russian.
AKHL1050E.book 14 ページ 2008年12月11日 木曜日 午後1時31分
107
• Debe observar la presión de aire de funcionamiento especificada para las clavadoras y las herramientas neumáticas.El uso de una clavadora o una herramienta neumática sin ajustar la presión de suministro con la válvula de reducción puede reducir sensiblemente su rendimiento, acortar su vida útil y provocar daños.
• El uso de una clavadora o una herramienta neumática con un nivel de presión incorrecto (con una presión alta innecesaria) aumenta su consumo de aire y reduce potencialmente su capacidad en un trabajo continuado. Asegúrese de usarlas con el nivel de presión correcto.
3. Tras concluir las tareas de ajuste de la presión de suministro, puede iniciar el funcionamiento conectando la manguera de aire a la salida de aire (mandril neumático).
4. Conecte la manguera de aire de alta presión de las herramientas MAX PowerLite al mandril de aire de alta presión en el lado H de la válvula de reducción de presión.Conecte la manguera de aire de la clavadora multiuso al mandril neumático en el lado L de la válvula de reducción de presión.• El mandril neumático es del tipo "un
toque", lo que le permite conectar la clavija de aire al mandril neumático simplemente presionándolo.
• Antes de conectar la manguera de aire a este compresor, asegúrese de que la manguera de aire y la fijación de la manguera están firmemente asegurados.
5. MECANISMO DE CAMBIO AUTOMÁTICO DE RENDIMIENTOLa selección del modo de funcionamiento de esta máquina se lleva a cabo mediante el selector. Seleccione el modo deseado de la tabla de la página 15 según la aplicación.
ADVERTENCIA
Mandril neumático de alta presión
manguera
ADVERTENCIA
AKHL1050E.book 107 ページ 2008年12月11日 木曜日 午後1時31分

106
11. Abra la llave de vaciado para liberar todo el aire comprimido y el agua del depósito de aire.Si detecta alguna anomalía en la comprobación o la inspección previa al funcionamiento, envíe la máquina a su distribuidor o centro de servicio autorizado para efectuar una inspección o reparación.
Procedimiento de funcionamientoAntes de poner en marcha la máquina, asegúrese de llevar a cabo la "inspección y comprobación previa al funcionamiento" descrita en página 104.
1. Abra totalmente la llave de vaciado y active el interruptor de alimentación. La alarma emitirá un pitido al mismo tiempo.• Para ver los patrones de sonido de la
alarma, consulte página 110.Una vez haya comenzado el funcionamiento, cierre la llave de vaciado para aumentar la presión.
2. Tras confirmar que el funcionamiento se ha detenido debido al aumento de presión, gire la manija de ajuste de la válvula de reducción de presión para ajustar la presión de funcionamiento de la herramienta neumática y la clavadora al nivel correcto. Cuando ajuste la presión, gire la manija de ajuste de la válvula de reducción de presión en sentido contrario al de las agujas del reloj para establecer la presión a un nivel 2 bares por debajo del valor correcto. A continuación, proceda a realizar el ajuste mientras aumenta la presión girando la manija en el sentido de las agujas del reloj.• Asegúrese de iniciar el ajuste a un nivel
inferior a la presión correcta y continúe el ajuste mientras aumenta la presión desde ese nivel hacia arriba. Si comienza el ajuste desde un nivel más alto que el valor correcto, se producirá un error entre el valor del manómetro y la presión utilizada realmente. (Debido a las características de la válvula de reducción de presión respectivamente)
• 2 válvulas de reducción de presión incluidas en esta máquina le permiten conectar MAX y la clavadora multiuso o la herramienta neumática.<Válvula H de reducción de presión > Permite la conexión y el uso de herramientas MAX PowerLite (con una presión de funcionamiento de 24,5 bares máximo)<Válvula L de reducción de presión > Permite la conexión y el uso de clavadoras multiuso o herramientas neumáticas (de presión de funcionamiento de 8,3 bares máximo)
AKHL1050E.book 106 ページ 2008年12月11日 木曜日 午後1時31分
15
Control panel
MAINTENANCE LEDIf it is lit up, send the machine to your dealer or an authorized service facility for inspection. (See page 23)TEMPERATURE OR ELECTRICAL PROBLEM LEDSee the buzzer types in Chapter 6. (See page 22)
The selector switch allows switching among the following operating modes.The factory default is 2.5-3.0 Normal mode.
• Before using the control panel, remove the transparent sheet covering it on the shipped ma-chine.
This machine also offers a power-saving operation Quiet mode that you can select when you want to suppress the noises accompanying the operation, or when tripping of the circuit breaker is anticipated during continuous operation. Press the Power-saving switch in Silent mode to turn on this mode.• A buzzer sounds with a beep and the LED lights up when the operation switching takes place.• The switching is available independent of whether the compressor is in operation or stopped.• Even when the circuit breaker tripped or you have disconnected the power plug from the outlet during
operation, status of the last operation is stored in memory.
Operating mode Pressure control range Application example
ON pressure OFF pressure
NORMAL MODE 25 bar 29 bar Joinery work by MAX tools, general-purpose nailers, etc.
HIGH POWER MODE
30 bar 34 bar Continuous surface fastening and the like with MAX tools.
MAINTENANCE LEDTEMPERATURE OR ELEC-TRICAL PROBLEM LED
AKHL1050E.book 15 ページ 2008年12月11日 木曜日 午後1時31分

16
3. MACHINE OPERATING PROCE-DURE
Inspection and checkup prior to oper-ation
• Prior to use, check the bolts and nuts for loosening and the parts for missing one.
• The power supply used must 230 VAC 10 A and provided with a circuit breaker. Allow-able source voltage range is +/-10%.
• Width and length of the extension cord or drum cord used must be 2.5 mm2 minimum and 20 m maximum, respectively. And the cord must be fully drawn out when used.
• Make sure the machine is installed in the right direction when using it.
∗ Use the machine in compliance with the in-structions provided in "SAFTY INSTRUC-TIONS" on page 4.
∗ Pressure values in the description do not in-clude the error in reading the pressure gauge.
1. After turning off the machine power switch, connect the earthing plug of the power plug to ground and then connect the power plug to the outlet. • When using an extension cord or drum
cord, make sure its effective cross section and length are 2.5 mm2 minimum and 20 m maximum, respectively.
2. Turn the power switch on while maintain-ing the drain cock fully open. The buzzer sounds with a beep at the same time.• For buzzer sounding patterns, see
page 22.
3. Make sure that the motor starts to run and the air is leaking from the drain cock when the drain cock is open.
4. Close the drain cock and make sure no air is leaking from the cock.
5. Turn the adjustment handle (in 2 loca-tions) of the pressure-reduction valve ful-ly clockwise until you cannot move it anymore and make sure that the above operation moves the pressure gauge pointer (upward) at both locations.
WARNING
OFF
AKHL1050E.book 16 ページ 2008年12月11日 木曜日 午後1時31分
105
• Como la presión del depósito de aire aumenta debido a las características de presión de la válvula de reducción de presión, la presión puede variar de la presión de suministro establecida como mucho 2 bares.Gire la manija de ajuste de la válvula de reducción de presión en sentido contrario al de las agujas del reloj una vez para reducir la presión y, a continuación, proceda al ajuste mientras aumenta la presión girando manualmente la manija de ajuste en sentido de las agujas del reloj.
6. Asegúrese de que la operación de compresión se detiene automáticamente en 6 ó 7 minutos. Excepto cuando se activa la función de ahorro de energía en el modo Silencio, el depósito auxiliar está conectado o se produce una caída de tensión, ya que en estas situaciones aumentan las horas de funcionamiento.
7. Una vez se detenga el funcionamiento, espere 5 minutos para confirmar que no existen ruidos o fugas de aire anómalas y que el compresor no vuelve a ponerse en marcha.
8. Descargue el aire comprimido abriendo un poco la llave de vaciado. Asegúrese de que se reanuda el funcionamiento debido al descenso de la presión.
9. Cierre la llave de vaciado y desconecte el suministro de corriente mientras la operación de compresión está activada para asegurarse de que estas acciones detienen la máquina.
10. Gire la manija de ajuste (en 2 ubicaciones) de la válvula de reducción de presión en el sentido de las agujas del reloj para asegurarse de que este giro mueve hacia abajo la aguja del manómetro en ambas ubicaciones. (Es posible que oiga ruidos debido a la fuga de aire, pero esto no significa que exista una avería).
PRECAUCIÓN
PARADA
Se reanuda el funcionamiento
2.5
Manija de juste del valor de reducción
AKHL1050E.book 105 ページ 2008年12月11日 木曜日 午後1時31分

104
3. PROCEDIMIENTO DE FUNCIONAMIENTO DE LA MÁQUINA
Inspección y comprobación previa al funcionamiento.
• Antes de su utilización, compruebe el apriete de pernos y tuercas y la posible falta de alguna pieza.
• La fuente de alimentación utilizada debe ser de 230 V de CA con un interruptor magnetotérmico. El rango de tensión disponible es de +/-10%.
• La anchura y longitud del alargador o del cable de tambor utilizado deberá ser de 2,5 mm2 como mínimo y 20 m como máximo, respectivamente. Y el cable deberá estar totalmente desplegado al utilizarse.
• Compruebe que la máquina está instalada en la dirección correcta cuando se utilice.
∗ Utilice la máquina según las instrucciones proporcionadas en "INSTRUCCIONES DE SEGURIDAD" en página 92.
∗ Los valores de presión de la descripción no incluyen el error en la lectura del manómetro.
1. Después de desconectar el interruptor de alimentación de la máquina, conecte a masa el enchufe de puesta a tierra del enchufe de corriente y, a continuación, conecte el enchufe de corriente a la toma eléctrica. • Cuando utilice un alargador o un cable de
tambor, asegúrese de que su diámetro y su longitud sean de 2,5 mm2 como mínimo y 20 m como máximo, respectivamente.
2. Encienda el interruptor de alimentación mientras mantiene totalmente abierta la llave de vaciado. La alarma emite un pitido al mismo tiempo.• Para ver los patrones de sonido de la
alarma, consulte página 110.
3. Asegúrese de que el motor empieza a funcionar y que el aire sale por el grifo de vaciado cuando éste está abierto.
4. Cierre la llave de vaciado y asegúrese de que no sale aire por ella.
5. Gire a tope la manija de ajuste (en 2 ubicaciones) de la válvula de reducción de presión en sentido de las agujas del reloj y asegúrese de que la operación anterior mueve la aguja del manómetro (hacia arriba) en ambas ubicaciones.
ADVERTENCIA
APAGADO
AKHL1050E.book 104 ページ 2008年12月11日 木曜日 午後1時31分
17
• As the pressure in the air tank increases due to the pressure characteristic of the pressure-reduction valve, the pressure can vary from the set supply pressure by as much as 2 bar.Turn the pressure-reduction valve's adjust-ment handle counterclockwise once to re-duce the pressure and then proceed to the adjustment while increasing the pressure by turning the adjusting hand clockwise.
6. Make sure that the compression opera-tion is automatically stopped in 6 to 7 minutes. Except when the power-saving operation in Silent mode is turned on, auxiliary tank is connected or voltage drop occurred, since these extends the operating hours.
7. Wait for 5 minutes after the operation is stopped to confirm that there are no ab-normal noises or air leakages and that the compressor does not restart.
8. Discharge the compressed air by open-ing the drain cock somewhat. Make sure that the operation is resumed due to a de-crease in the pressure.
9. Close the drain cock and turn the power off while the compression operation is turned on to make sure that these actions stop the machine from operating.
10. Turn the adjustment handle (in 2 loca-tions) of the pressure-reduction valve counterclockwise to make sure that this turning moves the pressure gauge point-er downward at both locations. (You may hear sounds due to air leaking but it does not mean there is a failure.)
CAUTION
STOP
Operation is resumed
2.5
Reduction value adjust-ment handle
AKHL1050E.book 17 ページ 2008年12月11日 木曜日 午後1時31分

18
11. Open the drain cock to discharge all the compressed air and water in the air tank.If you found any abnormalities in the check-up or inspection prior to the operation, send the machine to your dealer or authorized service facility for inspection or repair.
Operating ProcedureBefore operating the machine, be sure to carry out the "Inspection and checkup prior to opera-tion" described on page 16.
1. Fully open the drain cock and turn the power switch on. The buzzer will sound with a beep at the same time.• For buzzer sounding patterns, see
page 22.After the operation has started, close the drain cock tight to increase the pressure.
2. After confirming the operation has stopped due to the increased pressure, turn the adjustment handle of the pres-sure-reduction valve to adjust the operat-ing pressure of the nailer and pneumatic tool to the appropriate level. When ad-justing the pressure, turn the pressure-reduction valve's adjustment handle counterclockwise to set the pressure at a level lower than the appropriate value by 2 bars once. Then proceed to the adjust-ment while increasing the pressure by turning the handle clockwise.• Make sure to start the adjustment at a level
lower than the appropriate pressure and continue the adjustment while increasing the pressure from that level upward. If you start the adjustment from a level higher than the appropriate value, an error results between the pressure gauge value and ac-tually used pressure. (Due to Characteris-tics of pressure-reduction valve respectively)
• 2 pressure-reduction valves provided on this machine allow you to connect MAX
and the general-purpose nailer or pneumatic tool.<Pressure-reduction valve H> Allows connection and use of MAX PowerLite tools (of operating pressure of 24.5 bars maximum)<Pressure-reduction valve L> Allows con-nection and use of the general-purpose nailers or pneumatic tools (of operating pressure of 8.3 bars maximum)
AKHL1050E.book 18 ページ 2008年12月11日 木曜日 午後1時31分
103
Panel de control
INDICADOR LED DE MANTENIMIENTOSi se enciende, envíe la máquina a su distribuidor o a un centro de servicio autorizado para su inspección. (Consulte página 111)INDICADOR LED DE PROBLEMA ELÉCTRICO O DE TEMPERATURAConsulte los tipos de alarma en el capítulo 6. (Consulte página 110)
El selector permite elegir entre los siguientes modos de funcionamiento.El predeterminado de fábrica es el Modo normal 2,5-3,0.
• Antes de utilizar el panel de control, retire la lámina transparente que lo cubre.Esta máquina también incorpora un modo Silencio de funcionamiento para ahorrar energía que puede seleccionar cuando desee suprimir los ruidos que acompañan el funcionamiento, o cuando se anticipa la puesta en funcionamiento del interruptor magnetotérmico durante el funcionamiento continuo. Pulse el interruptor de ahorro de energía en el modo Silencio para activar este modo.• Suena un pitido de alarma y el indicador LED se enciende cuando se inicia el funcionamiento.• El interruptor puede utilizarse independientemente de si el compresor están en funcionamiento o está
parado.• El estado de la última operación se almacena en la memoria, aunque el interruptor magnetotérmico
se activara o desconectara el enchufe de corriente de la toma eléctrica durante el funcionamiento.
Modo de funcionamiento
Rango de control de presión Ejemplo de aplicación
Presión ON Presión OFF
MODO NORMAL 25 bares 29 bares Trabajo de carpintería con herramientas MAX , clavadoras multiuso, etc.
MODO DE ALTA POTENCIA
30 bares 34 bares Sujeción continua de superficies y similares con herramientas MAX
.
INDICADOR LED DE MANTENIMIENTO INDICADOR LED DE
PROBLEMA ELÉCTRICO O DE TEMPERATURA
AKHL1050E.book 103 ページ 2008年12月11日 木曜日 午後1時31分

102
Descripción de funciones de los componentes más importantes
Interruptor de alimentación Activa y desactiva la fuente de alimentación
Manija de ajuste de la válvula de reducción (H) (tapón naranja)
Diseñada para utilizar exclusivamente con la súper clavadora. Ajusta la presión de funcionamiento de la herramienta.
Manija de ajuste de la válvula de reducción de presión (L) (Tapón amarillo)
Ajusta la presión suministrada a las herramientas neumáticas y clavadoras multiuso (presión de aire de funcionamiento de 8,3 bares máximo).
Manómetro del depósito Indica la presión del depósito. La presión aumenta hasta 34 bares.
Manómetro para indicar el ajuste de presión de la válvula de reducción (2 calibradores)
Indica la presión establecida en las válvulas de reducción de presión (H) y (L).(24,5 bares máximo en el lado H y 8,3 bares máximo en el lado L).
Mandril neumático de alta presión (para herramientas MAX )
Conecta la manguera de aire MAX a las herramientas.
Mandril neumático multiuso (para las herramientas de presión normal)
Conecta la manguera de aire a las clavadoras de presión general.
Llave de vaciado Drena el agua y el aire comprimido, efectúa el drenaje una vez finalizado el trabajo o cuando ha transcurrido más de un día.
Etiqueta de advertencia Transmite las advertencias importantes a la hora de utilizar esta máquina. Se insta al usuario a leer la etiqueta antes de utilizar la máquina.
Enchufe de corriente Se puede utilizar con una toma de tierra de tríodo.
Panel de control Permite seleccionar el modo entre Normal, Alta Potencia y Silencio.• El consumo de corriente se reduce durante el
funcionamiento en modo Silencio.
Explicación multilingüe del panel de control
Muestra términos sobre el panel de control en alemán, francés, italiano, español, portugués, noruego, sueco, finés, danés, holandés, polaco, griego, turco y ruso.
AKHL1050E.book 102 ページ 2008年12月11日 木曜日 午後1時31分
19
• You must observe the specified operating air pressure for the nailers and pneumatic tools.Using a nailer or pneumatic tool without ad-justing the supply pressure with the reduc-tion valve can seriously degrade their performance, induce their premature aging or damage them.
• Using a nailer or pneumatic tool at an inappro-priate pressure level (at an unnecessary high pressure) increases their air consumption, po-tentially degrading their capability in continu-ous work. Be sure to use them at the appropriate pressure.
3. After you have finished with the adjust-ment of supply pressure, you can start the operation by connecting the air hose to the air outlet (air chuck).
4. Connect the high pressure hose to the high pressure air hose for MAX PowerLite tools to the high pressure air chuck on the H side of the pressure-reduction valve.Connect the air hose for the general-purpose nailer to the air chuck on the L side of the pressure-reduction valve.• The air chuck is the one-touch type, allow-
ing you to connect the air plug to the air chuck just by pushing in.
• Before connecting the air hose to this com-pressor, make sure that the air hose and hose fixture are firmly secured.
5. OPERATION OUTPUT AUTOMATIC SWITCHING MECHANISMOperation mode switching on this machine is carried out by the selector switch. Select a desired mode from those listed in the table on page 15 according to the given applica-tion.
WARNING
High pressure air chuck
hose
WARNING
AKHL1050E.book 19 ページ 2008年12月11日 木曜日 午後1時31分

20
4. PROTECTIVE DEVICEIf internal heat builds up during operation due to clogging of the airflow orifice, if the machine is used in a highly heated environment or if an ab-normality occurs inside the machine, the thermal protector for preventing burnout may be activat-ed to stop the motor operation. The buzzer will sound in this case. In such a case:
1. Turn the power switch off and disconnect the power plug from the outlet.• For buzzer sounding patterns, see
page 22.
2. Connect the power plug to the outlet and turn the power switch on to resume the operation.• If the motor has sufficiently cooled down,
the resumed operation may active the pro-tective device soon after. In other cases, the operation may not resumed when you turned the power switch on. In such a case, wait for about 30 minutes for the mo-tor to cool down before restarting the ma-chine.
3. If the protective device was activated when there were no apparent problems existing in the operating environment, stop using the compressor and send it to your dealer or authorized service facility for checkups or repairs.
OFF
ON
WARNING
AKHL1050E.book 20 ページ 2008年12月11日 木曜日 午後1時31分
101
2. NOMBRE DE PIEZASManija de ajuste de la válvula de reducción (H) (tapón naranja)
Mandril neumático de alta presión (para herramientas MAX )
Manómetro para indicar el ajuste de presión de la válvula de reducción (2 calibradores)
Mandril neumático multiuso (para las herramientas de presión normal)
Explicación multilingüe del panel de control
Enchufe de corriente
Cable de alimentación
Llave de vaciado
Manija de ajuste de la válvula de reducción de presión (L) (Tapón amarillo)
Panel de control (panel delantero)
Etiqueta de advertencia
Depósito de aire
Manómetro del depósito
Interruptor de alimentación
Pie de goma
Empuñadura para transporte a dos manos
AKHL1050E.book 101 ページ 2008年12月11日 木曜日 午後1時31分

100
9. NO COLOQUE OBJETOS SOBRE LA MÁQUINA.De hacerlo podría provocar una avería o un problema.
No utilice el compresor en un lugar en el que la temperatura sea de 0ºC o menos o la temperatura ambiente supere los + 40ºC.
ADVERTENCIA
ADVERTENCIA
AKHL1050E.book 100 ページ 2008年12月11日 木曜日 午後1時31分
21
5. ABNORMALITIES DURING OPERATION
• If you detect any abnormalities, do not op-erate the compressor.
If you encounter any of the following abnormal phenomena, turn off the power switch immedi-ately, disconnect the power plug from the outlet and send the machine to your dealer or author-ized service facility for checkups or repairs.
1. The following problems may occur even when there are no problems with the power supply or wiring: (See "PROTEC-TIVE DEVICE" on page 20.)• Turning on the power switch does not start
up the machine.• Motor vibration is generated
2. Abnormal sounds are generated during operation. (See "AUTOMATIC ADJUST-MENT OF OPERATING POWER" (IN-VERTER CONTROL) on page 23.)
3. The safety valve instead of the pressure sensor is activated, allowing the com-pressed air to blow out.
4. Air leakage happens.5. Pressure does not increase. (See
page 23)6. An electrical shock-like pain is felt when
touched the metal part.7. Other abnormalities than the above that
is recognized during operation.
WARNING
AKHL1050E.book 21 ページ 2008年12月11日 木曜日 午後1時31分

22
6. BUZZER TYPES
In normal operation
In cases of abnormal operation
i) If an excessively low voltage state (180V or below) is continued for 4 seconds or longer, LED re-mains lighting up even after the voltage has been recovered.
ii) If the voltage drops down to a low voltage level of 160V or below, LED remains lighting up with short beep sounds (Pi, Pi, Pi, ...), until power switch is turned off.If the voltage drops down further and motor stops with error, LED also remains lighting up with short beep sounds (Pi, Pi, Pi, ...), until power switch is turned off.
iii) If an excessively high voltage state (255V or over) is continued for 2 seconds or longer, LED lights up without beep sounds. LED is turned off after the voltage drops down under 255V.
iv) If the voltage increases to a high voltage level of 265V or over for 2 seconds or longer, motor stops automatically and LED remains lighting up with long beep sounds (Piii ........), until power switch is turned off.
v) In other cases of abnormal motor stop automatically, LED remains lighting up with intermittent long beep sounds (Pi, Pi, Pi, ...), until power switch is turned off.
Buzzer sounds Symptom Actions taken
A one-time short beep sound (Pi)At powering on -
When the operating mode is switched -
Buzzer soundsTEMPERATURE OR ELECTRICAL PROB-LEM LED ( LED)
Cause Actions taken
1
None
Lighting up Voltage is too low or high
Examine the state of the power supply (See page 23)
Short beep sounds (Pi, Pi, Pi, ...) * refer to the below i)~iv)
2
Long beep sounds (Pii, Pii, Pii, ...)
Lighting up
• Motor temperature went abnormally high
• Temperature in the control circuit has built up to an abnormally high level(LED remains lighting up.)
• Do not use the com-pressor in extremely high temperatures.
• Do not clog the airflow orifice.
• Examine the state of the power supply(See page 23)
• Do not use the com-pressor in a place where it can be splashed with water or in a highly humid place.
3
Short beep beep-ing sounds (Pi, Pi, Pi, ...) * refer to the below v)
Blinking
• Motor does not run• Failure in the control
circuit(LED remains blinking.)
It is due to a failure on the inverter or motor. Send the machine to your deal-er or authorized service facility to have their checkup or repair.
AKHL1050E.book 22 ページ 2008年12月11日 木曜日 午後1時31分
99
4. EVITE UN LUGAR EXPUESTO A LAS ALTAS TEMPERATURAS O A LA LUZ SOLAR DIRECTA; ASEGÚRESE DE UTILIZAR LA MÁQUINA EN UN LUGAR BIEN VENTILADO Y A LA SOMBRA.Utilizarlo a alta temperatura o bajo la luz solar directa no sólo reduce su durabilidad, sino que aumenta la temperatura del cuerpo principal, reduciendo su seguridad. Asegúrese de utilizarlo en un lugar bien ventilado y a la sombra. La temperatura ambiente adecuada es de entre +5°C y +30°C. (0°C a +40°C máximo)
5. NO INSTALE LA MÁQUINA EN UN LUGAR POLVORIENTO (VIRUTAS DE MADERA, ETC).
6. INSTALE LA MÁQUINA EN LA DIRECCIÓN ADECUADA.Instálela de forma adecuada.
7. NUNCA INSTALE LA MÁQUINA BAJO LA LLUVIA O EN UN LUGAR EXPUESTO A SALPICADURAS DE AGUA O A ALTAS TEMPERATURAS.Utilizarla en condiciones húmedas podría provocar un cortocircuito o una descarga eléctrica, causando un incendio debido a la combustión o el encendido.
8. NUNCA BLOQUEE UN ORIFICIO DE VENTILACIÓN NI UTILICE LA MÁQUINA EN UNA CAJA O UN LUGAR ESTRECHO (EN UN VEHÍCULO, ETC).De no seguir estas instrucciones se puede generar un calentamiento anormal que cause una avería o un accidente.Instale el compresor a una distancia de 1 m o más de la pared para garantizar una ventilación y refrigeración suficientes.
ADVERTENCIA
ADVERTENCIA
ADVERTENCIA
ADVERTENCIA
AKHL1050E.book 99 ページ 2008年12月11日 木曜日 午後1時31分

98
3. INSTRUCCIONES DE FUNCIONAMIENTO
Desembale el compresor y compruebe que no existan deficiencias o daños causados durante el transporte y pernos y tornillos flojos.
LEA LA SECCIÓN TITULADA " INSTRUCCIONES DE SEGURIDAD "PÓNGASE GAFAS O ANTEOJOS DE SEGURIDADSiempre existe riesgo para los ojos debido a la posibilidad de que el polvo soplado por el aire de escape o un mecanismo de cierre vuelen debido a la manipulación inadecuada de la herramienta. Por estas razones, siempre se deben llevar puestas las gafas o anteojos de seguridad cuando se opere la herramienta. El responsable y/o usuario deben asegurarse de utilizar una protección adecuada para los ojos. El equipo de protección ocular deberá cumplir las exigencias de la Directiva del Consejo 89/686/CEE de 21 de diciembre de 1989 (el American National Standards Institute. ANSI Z87.1) y proporcionar protección tanto frontal como lateral.NOTA: Las gafas sin protección lateral y las
máscaras no proporcionan por sí solos la protección adecuada.
NOTA: La información contenida en este Manual de instrucciones está elaborada para ayudarle a conseguir un funcionamiento y un mantenimiento seguros del compresor.Algunas ilustraciones de este Manual de instrucciones pueden mostrar datos o accesorios diferentes de los de su propio compresor.
1. INSTALACIÓN
1. NUNCA UTILICE LA MÁQUINA EN UN LUGAR EN EL QUE SE HAYA ALMACENADO ALGUNA SUSTANCIA VOLÁTIL.Nunca lo utilice en las cercanías de gasolina, diluyente, gas, pintura o agentes adhesivos, puesto que podrían encenderse o detonar.
2. NUNCA UTILICE LA MÁQUINA JUNTO AL CALOR DEL FUEGO O DE CUALQUIER SUSTANCIA COMBUSTIBLE
3. NUNCA UTILICE LA MÁQUINA EN UN LUGAR INESTABLE.Nunca la utilice en un lugar en el que podría moverse o caer.Instale el compresor sobre una superficie plana, con la pata de goma debajo, el ángulo de inclinación permitido del suelo será de hasta 10 grados. Si el suelo de instalación está inclinado y resbaladizo, asegúrese de que el compresor no se mueve durante el funcionamiento. No lo utilice sobre un soporte o plataforma del que se pueda caer.
ADVERTENCIA
GasolinaDiluyente
ADVERTENCIA
ADVERTENCIA
ADVERTENCIA
AKHL1050E.book 98 ページ 2008年12月11日 木曜日 午後1時31分
23
7. AUTOMATIC ADJUSTMENT OF OPERATING POWER (IN-VERTER CONTROL)
Microcomputer-based inverter control is enabled on this machine in order to ensure the maximum utilization of the discharging performance. Ad-justment of the operating power is automatically continued until the pressure in the machine tank reaches the maximum level being set for the cur-rently set mode. Operating sounds may change when the operating power is switched, but you do not have to worry about them. Changes in the sounds are not due to a failure.
• The pressure level at which the output change-over is activated varies depending on the ca-pacity of the main power supply, type of extension cord used and parallel use of other electric equipment. If the voltage is excessively low, extra time will be required for the filling.
• If the fill time is longer than usual or when the pressure does not increase, change the cur-rent connection to the power supply (reconnect to the main power supply) or stop the joint use of the power supply with a power tool.
• When capacity of the main power is 230 V or less, or when it is jointly used with another power tool, a radical voltage drop results, in-ducing startup failure.
• The circuit breaker of the power supply may be activated if the total current consumption re-sulting from the parallel use with another pow-er tool exceeds the current capacity of the circuit breaker.In such a case, do not use the same power supply to power any other power tools.
8. IN ORDER TO MAINTAIN PERFORMANCE
1. Drain water from the machine.After the work is finished, turn the handle of the pressure-reduction valve clockwise and open the drain cock gradually to drain the compressed air and water in the air tank until the pressure gauge pointer of the pressure-reduction valve points to 0. • Not draining the water will result in the
inside of the air tank becoming moldy, potentially leading to a failure.
2. The Maintenance LED lights up or flash-es.Operating hours of this machine are meas-ured with a microcomputer. The MAINTE-NANCE LED lights up as the machine operating hours reaches 1000 hours. If the Maintenance LED lights up, send the ma-chine to your dealer or an authorized service facility for inspection.
AKHL1050E.book 23 ページ 2008年12月11日 木曜日 午後1時31分

24
3. Implement the machine inspection on a regular basis.The User is requested to implement cleaning and inspection of the machine in order to maintain its performance. Please do not hes-itate to let your dealer or authorized service facility inspect your machine.
4. Handle this machine carefully.Dropping the machine inadvertently, bump-ing it against solid objects or hitting it can cause deformation, cracks or damage to the machine. The User is advised not to invite an accident by dropping, bumping or hitting the machine.
5. Inspect the machine every time you use it.Check and inspect the machine in conform-ance with the procedure described in the SAFETY INSTRUCTIONS provided on page 4 and after.
6. ABOUT PRODUCTION YEARThis product bears production number in the RATING LABEL. The two digits of the number from left indicates the production year.
(Example)08826035D
Year 2008
AKHL1050E.book 24 ページ 2008年12月11日 木曜日 午後1時31分
97
2. ESPECIFICACIONES Y DATOS TÉCNICOS1. ESPECIFICACIONES
2. DATOS TÉCNICOS
Ruido de presión acústicaAKHL1230E (CE) LPA 75 dB (A)
Para el mercado europeo, los compresores se fabrican para cumplir las exigencias de la Directiva 98/37/EC.
El ruido generado por la estación de trabajo se indica como nivel de presión acústica medido a 1 m: ISO2151
Nº de producto. AKHL1230E (CE)
Fuente de alimentación 230V±10% 50Hz±1% φ1
Corriente nominal 7A
Potencia del motor 2 CV
Toma de tierra de protección Clase I
Estructura de protección IP20
Temperatura de trabajo 0°C a +40°C
Humedad de trabajo 85 % HR o inferior. Sin condensación.
Altura sobre el nivel del mar Hasta 1.000 m
Temperatura de almacenamiento -10 a +50°C
Humedad de almacenamiento 85 % HR o inferior. Sin condensación.
Gama de trabajo del interruptor de presión
Off (apagado): 34 bares/On (encendido): 30 bares (MODO POTENCIA)Off (apagado): 29 bares /On (encendido): 25 bares (MODO NORMAL)
AKHL1050E.book 97 ページ 2008年12月11日 木曜日 午後1時31分

• The content of this manual might be changed without notice for improvement.
4008870100715-00/01
PRINTED IN JAPAN
Camerastraat 191322 BB Almere The NetherlandsPhone: +31-36-546-9669FAX: +31-36-536-3985
www.max-ltd.co.jp/int/ (GLOBAL Site)www.max-europe.com (EUROPE Site)