Embed Size (px)
Citation preview

Captaris, Inc., 6025 South Quebec Street, Suite 260, Englewood, CO 80111Phone +1 303.930.4600, www.captaris.com
Alchemy Web
Release 4.1Administrator Guide

Alchemy is a registered trademark of Captaris, Inc. All rights reserved. All other trademarks or registered trademarks are the property of theirrespective companies. Other products and company names mentioned herein may be the trademarks of their respective owners.
© 1992-2005, Captaris, Inc. All rights reserved
i
CONTENTS
CHAPTER 11GETTING STARTED................................................................................................................ 1-1
1.1 WELCOME TO ALCHEMY® WEB .............................................................................................. 1-11.2 ABOUT THIS GUIDE ................................................................................................................. 1-21.3 WHAT THIS GUIDE ASSUMES ................................................................................................... 1-21.4 DOCUMENTATION CONVENTIONS ............................................................................................. 1-21.5 CONTACTING CAPTARIS.......................................................................................................... 1-3
1.5.1 ENGLEWOOD OFFICE .................................................................................................... 1-31.5.2 EDUCATIONAL SERVICES................................................................................................ 1-41.5.3 TECHNICAL SUPPORT .................................................................................................... 1-51.5.4 PROFESSIONAL SERVICES.............................................................................................. 1-61.5.5 SALES .......................................................................................................................... 1-71.5.6 DOCUMENTATION FEEDBACK.......................................................................................... 1-7
1.6 ANNUAL MAINTENANCE PROGRAM.......................................................................................... 1-71.7 SUPPORTED HARDWARE......................................................................................................... 1-8
CHAPTER 22CONFIGURING ALCHEMY WEB .............................................................................................. 2-1
2.1 CONFIGURING THE ALCHEMY WEB ENGINE ............................................................................. 2-12.1.1 ADDING AN ALCHEMY WEB ENGINE COMPUTER TO YOUR ALCHEMY WEB ENGINE CONSOLE .2-22.1.2 ADDING THE ALCHEMY SERVER COMPUTER ................................................................... 2-42.1.3 ENABLING AND DISABLING DATABASES ........................................................................... 2-62.1.4 STARTING AND STOPPING THE ALCHEMY WEB ENGINE ................................................... 2-72.1.5 REMOVING AN ALCHEMY SERVER COMPUTER FROM THE ALCHEMY WEB ENGINE CONSOLE2-72.1.6 CONFIGURING ALCHEMY WEB ENGINE ADMINISTRATIVE SETTINGS .................................. 2-8
2.2 CONFIGURING THE ALCHEMY WEB APPLICATION ................................................................... 2-122.2.1 SELECTING THE ALCHEMY WEB SITE............................................................................ 2-122.2.2 CONFIGURING THE WEB DISPLAY PROPERTIES .............................................................. 2-142.2.3 CONFIGURING THE ALCHEMY WEB LOGGING PROPERTIES............................................. 2-172.2.4 CONFIGURING THE ALCHEMY WEB VIEWER PROPERTIES............................................... 2-19
Contents
ii
APPENDIX AACONSIDERATIONS FOR FIREWALLS AND ALCHEMY WEB REMOTING PROTOCOL .................... A-1
A.1 MODIFYING LICENSEMANAGERSERVICE.EXE.CONFIG...............................................................A-1A.2 MODIFYING POOLMANAGERSERVICE.EXE.CONFIG ...................................................................A-2A.3 MODIFYING PLATFORMCLIENT.EXE.CONFIG.............................................................................A-3
APPENDIX BBSECURING DATABASE ACCESS IN ALCHEMY WEB................................................................ B-1
B.1 IIS SECURITY THROUGH AUTHENTICATION .............................................................................B-1B.2 CLASSIC ALCHEMY DATABASE SECURITY IN ALCHEMY WEB ....................................................B-2B.3 CLASSIC ALCHEMY DATABASE SECURITY SETUP CONSIDERATIONS FOR ALCHEMY WEB ..........B-2B.4 ALCHEMY SERVER INTEGRATED SECURITY IN ALCHEMY WEB..................................................B-2B.5 ALCHEMY SERVER INTEGRATED SECURITY SETUP CONSIDERATIONS: CREATING MULTIPLE WEB SITES ..........................................................................................................................................B-3
APPENDIX CCUSING SIMPLE INTEGRATION WITH ALCHEMY WEB ............................................................... C-1
C.1 USING SIMPLE INTEGRATION WITH ALCHEMY WEB................................................................. C-1C.2 SIMPLE INTEGRATION EXAMPLES ........................................................................................... C-2
GLOSSARY............................................................................................................ GLOSSARY-1
INDEX............................................................................................................................ INDEX-1
1-1
CHAPTER 1GETTING STARTED
WHAT THIS CHAPTER COVERS
This chapter gives you important information you should review before using Alchemy Web. It contains the following sections:
• Welcome to Alchemy® Web• About this guide• What this guide assumes• Documentation conventions• Contacting Captaris• Annual Maintenance Program• Supported hardware
1.1 WELCOME TO ALCHEMY® WEB
Alchemy Web, an extension for the Alchemy Content Management Suite (ACMS) and Alchemy Pro, provides instant and secure access from anywhere in the world to the documents that are safely stored in your Alchemy databases. Using the Internet, your users can search for, view, retrieve and even add documents as quickly and easily as if they were in the home office.Alchemy Web’s simple and intuitive browser helps you find the documents you are looking for fast. Using Alchemy Web, you can search for documents by words or phrases within the document, or search by profile fields such as file type, file name, date created or custom data fields. You can also search for documents using folder profiles and text annotations. And your search results are displayed quickly in easy to read list format.You can also use Alchemy Web to browse through folders to find what you’re looking for. Alchemy Web handles hundreds of file types, retrieving and displaying each in its native format. A powerful viewer for images, PDF and COLD formats is included, or you can choose to convert documents to HTML or GIFs at the server, so no special viewer is required.Alchemy Web also allows you to add documents to a centralized database from your browser. You can then index and quickly and securely upload the documents to your preferred database where they are immediately accessible to your users.
About this guide
1-2
Alchemy Web makes it easy to use the internet to get your customers and partners the documents they need without help from your staff and your remote employees can be far more productive. When combined with the robust security functions in the Alchemy document management system, your users will see only what you want them so see. And best of all, Alchemy Web is easy to learn and simple to use, which means that your users will be productive with little or no training.
1.2 ABOUT THIS GUIDE
This guide contains information about configuring, administering and using Alchemy Web to access documents in your databases over the internet.
1.3 WHAT THIS GUIDE ASSUMES
This guide assumes that you are familiar with the following concepts and procedures:• The Microsoft operating system environment for both client-and-server-based operating
systems.• Windows-based HTML and WinHelp help systems.• The ability to install and operate supported storage and scanning devices.• The administration and operation of Microsoft SQL Server and Microsoft SQL Server databases.
1.4 DOCUMENTATION CONVENTIONS
THIS MANUAL USES THE FOLLOWING CONVENTIONS:Menu and dialog box options, including buttons, appear in bold as depicted in the application. Instructions and descriptions for the options are formatted in regular text. For example:Name - Type the name of the user, or user ID, in this box. For example, an administrator might just type “admin” in this field.Consecutive menu selections are formatted in bold and are separated by the pipe symbol. For example, File | Print means you should click on the File option on the menu bar, and then select Print from the drop-down menu. File names and extensions appear in bold, e.g., alchemy.ini, or “the INI file.”Key-strokes, i.e., the instruction to press a specific key on the keyboard, appear as follows: ALT, which represents the “Alt” key on the keyboard. If you need to press two or more keys simultaneously, the keys are connected with a plus sign (+). For example:Press ALT+F4 to close the window.
NOTES, TIPS AND CAUTIONS APPEAR USING THE FOLLOWING FORMAT:This is a Note:

Contacting Captaris
1-3
This is a note. Notes are used for clarifications, or in special cases, to qualify important points.
This is a Tip:
This is a tip. Tips are used for positive suggestions that help users apply information described in the documentation to meet their specific needs.
This is a Caution:
This is a caution message. Cautions use negative alerts that inform software users and administrators that a particular action can result in data loss, data corruption, security problems, or performance problems.
1.5 CONTACTING CAPTARIS
This section provides you with information for contacting Captaris about issues and services related to your purchase of Captaris Alchemy products. Please feel free to contact the following departments with any questions, issues or suggestions you may have related to your Captaris Alchemy product:
• Englewood office• Educational services• Technical support• Professional services• Sales• Documentation feedback
1.5.1 ENGLEWOOD OFFICE
The offices for Captaris Alchemy are located in Englewood, Colorado, USA. For over 10 years, Captaris Alchemy has been the document management software that people love to use. In fact, we have more than 10,000 delighted customers in over 40 countries. Our software is installed in organizations of all sizes and across every industry. Our customers benefit from immediate cost savings and long-term peace of mind.Captaris Alchemy provides the foundation for software solutions that give people the tools they need to manage the finished documents they must keep. This is especially vital for any organization that must:
• comply with government regulations for records keeping.• support vital business processes with archived documents, such as customer service, accounting,
human resources, project management, records management and more.We’re really good at helping the world get control of the paper document problem. And our people are absolutely the best at creating solutions to retrieve your archived documents quickly, easily and inexpensively!
Contacting Captaris
1-4
How can we help you?Englewood officeCaptaris, Inc.6025 South Quebec Street, Suite 260Englewood, CO 80111 USATel: 1-303-689-0022Fax: 1-303-689-0055E-mail: [email protected] site: www.captaris.com
International Sales OfficeGabriel WeitznerVice President of InternationalE-mail: [email protected]: 1-905-820-8820
Asia-Pacific Sales and Support OfficesPaul MolloyRegional Sales Manager, Asia PacificE-mail: [email protected]: +64 9 476 5200Postal Address:Captaris, Inc.P O Box 35 590Browns Bay, AucklandNEW ZEALANDWendy DunnE-mail: [email protected]: +64 9 415 9913Fax: +64 9 415 0450Postal Address:CaptarisUnit A6396 Rosedale RoadAlbanyNorth Shore City 1309AucklandNew ZealandFor more information, visit the “About US” area of the Captaris Web site or call 1-303-689-0022.
1.5.2 EDUCATIONAL SERVICES
Wouldn’t it be wise to invest in a few days of training for a solution you will be using so extensively? Learn more about our Software products from Captaris Alchemy Certified Instructors at our Englewood, Colorado office, or at your facility. Our course offerings focus on individualized skill sets and are an excellent source for maximizing your productivity.
Contacting Captaris
1-5
Educational Services GuaranteeCaptaris Alchemy Certified Instructors inspire innovative solutions focused on helping you exceed expectations and achieve maximum productivity with entire Captaris Alchemy feature set. If you feel you did not gain a thorough understanding of the curriculum while attending one of our courses, you may attend the same course again, tuition free, during the 6 month period following your first attendance. This is on a space available basis to scheduled courses and does not include travel, expenses or books. Simply call 15 days prior to a class to check availability and bring your original books.For information regarding our software product training program, courses, and schedules, please call, e-mail, or visit us online.Educational ServicesTel: 1-303-689-0022E-mail: Alchemy Training RegistrationWeb site: www.imrgold.com/Support/Training/index.asp
1.5.3 TECHNICAL SUPPORT
Product technical support is always available to customers who have purchased an Annual Maintenance Program (AMP). Customers without AMP can receive support on an as-needed basis at a rate of $200 per hour (with 1 hr. minimum and billed in 15 minutes increments thereafter, credit card required).Product support in the USATel: 1-520-320-7070E-Mail: [email protected] hours are 6 A.M. to 6 P.M. mountain time.Product support in Asia Pacific countries except JapanAsia-Pac Technical Support:Tel: +64 09 415 9913E-mail: Asia Pacific Technical SupportEurope, Middle East, Africa, Canada, Latin America, JapanEnd user support services are provided locally by the reseller.Reseller support services are provided locally by your distributor or master VAR.Please do not contact Captaris Alchemy USA Support.Please provide the following information with your technical support question to ensure optimum speed and efficiency:
• Your contact information:• Name• Company name• Mailing address• Telephone number• Fax number• Email address• Product name
• Product release and build number
Contacting Captaris
1-6
• For core Captaris Alchemy® applications, this is listed under Help | About (Product Name) on the main menu
• For Captaris Alchemy Standard or Advanced Server, listed on the License tab on the Alchemy Server Properties dialog box
• For the Captaris Alchemy Web Engine, listed on the Properties page in the Major and Minor License numbers
• Product serial number• For Alchemy Content Management Suite (ACMS), Alchemy Web, Records Care, and
Compliance products, serial numbers are listed under the Server tab of the Alchemy License Manager module
• Operating system• Scanner make and model number (if applicable)• CD-R, CD-RW, MO, Zip or Jaz drive - make and model number (if applicable)• SCSI card - make and model (if applicable)• Description of problem (what steps led up to the error message?)• Any error messages• Does the database span CDs?
1.5.4 PROFESSIONAL SERVICES
Captaris, Inc. offers a wide variety of professional services. We work closely with over 300 Service Bureaus and 2500 end user companies worldwide. Our Professional Services Group has a thorough understanding of what it takes to implement the "Alchemy" document management solution. These processes include imaging, archival, retrieval, database management, network access and hardware setup. In today's world, quick and accurate access to important information is critical to a company's success. Implementing a data archival solution can be time consuming and full of setbacks if not done correctly. The Captaris Alchemy Professional Services Group can help you bypass the challenges associated with designing, implementing and maintaining a data archival and document management solution.Consultation will include:
• New business implementation • Initial needs analysis • Detailed estimate prior to consultation • Workflow analysis (including scanning, OCR, building and searching) • Hardware recommendations, setup and configuration (Recorders, Jukeboxes, scanners, SCSI
cards) • Creation and implementation of databases and DataGrabber definition files • Creation and implementation of command line interface• Optimization of all Alchemy build and search processes • Database customization • Creation of Alchemy "ini" files including Path statements for network/jukebox access • Installation and configuration of Jukebox management application(s) • Detailed post consultation and workflow report
Annual Maintenance Program
1-7
• Image-enabling relational databases on UNIX, AS-400, etc. by linking the images via APIPlease contact us for more information about Captaris Alchemy Professional Services.Tel: 1-303-224-7650Fax: 1-303-689-0055E-mail: [email protected]
1.5.5 SALES
The Captaris Alchemy professional sales staff is ready to answer your sales questions Monday to Friday from 8:00 A.M. to 5:00 P.M. mountain time.Contact your account representative for information about the latest Captaris Alchemy products, the Captaris Alchemy Annual Maintenance Program (AMP), upgrade options and prices, and more. If you have a technical question or problem, please contact Technical Support.Contact your Captaris Alchemy sales representative:Tel: 1-303-689-0022Fax: 1-303-689-0055E-mail: [email protected] site: www.captaris.com
1.5.6 DOCUMENTATION FEEDBACK
At Captaris, we strive to produce the highest quality documentation products and welcome your feedback. If you have comments or suggestions about our Alchemy online Help or PDF guides, you can email us.Please include the following information with your feedback:
• Product name and version number• Name of PDF manual or online help• Topic title (for online help)• Page number (for PDF manual)• Brief description of content (for example, are you reviewing step-by-step instructions that are
inaccurate, grammatical errors in a specific paragraph, information that requires clarification or more details, etc.)
• Your suggestion for how to correct/improve documentationPlease send e-mail messages to the Alchemy Documentation Group.Keep in mind, this email address is only for documentation feedback; you will not receive a reply. If you have a technical question, please contact Technical Support.
1.6 ANNUAL MAINTENANCE PROGRAM
Captaris offers free technical support for the first 30 days for Captaris Alchemy products, starting when you register the product with Captaris or call us for the first time. Before your complimentary support period expires, call Sales at 1-303-689-0022 or your authorized reseller to subscribe to an Annual Maintenance Program (AMP).
Supported hardware
1-8
The AMP is an annual, renewable program that entitles the user to technical support via phone, FAX, e-mail, the Internet and FTP. Support is offered Monday to Friday, from 6 A.M. to 6 P.M. Mountain time. In addition to technical support, the AMP provides all maintenance releases, and all new releases and upgrades of the product or module purchased, for a 12-month period.Technical support is offered for the currently shipping release as well as for the two (2) previous releases. International technical support is provided by a Captaris Partner in each country and hours of support will vary.
When you upgrade your product license, you must also upgrade your Annual Maintenance Program.
1.7 SUPPORTED HARDWARE
For the latest information about the hardware that this release supports, contact Technical Support at 303-224-7650 or [email protected], or visit the Captaris Web site.
2-1
CHAPTER 2CONFIGURING ALCHEMY WEB
WHAT THIS CHAPTER COVERS
This chapter gives you the information you need in order to configure your Alchemy Web installation. It describes how to configure the Alchemy Web Engine and the Alchemy Web Application in order to control how your users access documents and images contained in your remote Alchemy databases over the Internet. The chapter includes the following sections:
• Configuring the Alchemy Web Engine• Configuring the Alchemy Web Application
If you use antivirus software on any of the computers that will run Alchemy Web components, make sure that your antivirus software does not change any Alchemy web files, for example, web.config, etc.
2.1 CONFIGURING THE ALCHEMY WEB ENGINE
You use the Alchemy Web Engine console to start and stop the Alchemy Web Engine service and configure the Alchemy Web Engine properties.
After you install the Alchemy Web Engine, you can either use the default settings, or you can modify the default settings to meet your personal business requirements. Even if you do not modify your Alchemy Web Engine configuration, you must still set up the Alchemy Server computer that you want to use to manage databases in the Alchemy Web Engine console.
The Alchemy Web Engine consists of two services: the Alchemy Web LM (LicenseManager) Service and the Alchemy Web PM (PoolManager) Service. When you start Alchemy Web Engine from the Services window, you need to start both of these services. You also need to ensure that the Alchemy Server service is running in order for Alchemy Web Engine to function properly.
Configuring the Alchemy Web Engine
2-2
QUICK STEPS
When you initially configure the Alchemy Web Engine, you need to complete the following tasks:
1. Add an Alchemy Web Engine computer to your Alchemy Web Engine console.
2. Add an Alchemy Server computer to your Alchemy Web Engine console.
3. Enable the databases controlled by the Alchemy Server computer you added to your Alchemy Web Engine console.
4. Start the Alchemy Web Engine.
5. Configure the Alchemy Web Engine administrative settings.
2.1.1 ADDING AN ALCHEMY WEB ENGINE COMPUTER TO YOUR ALCHEMY WEB ENGINE CONSOLE
Before you can use the Alchemy Web Engine you must add an Alchemy Web Engine computer to the Alchemy Web Engine console.To add an Alchemy Web Engine computer to your Alchemy Web Engine console:
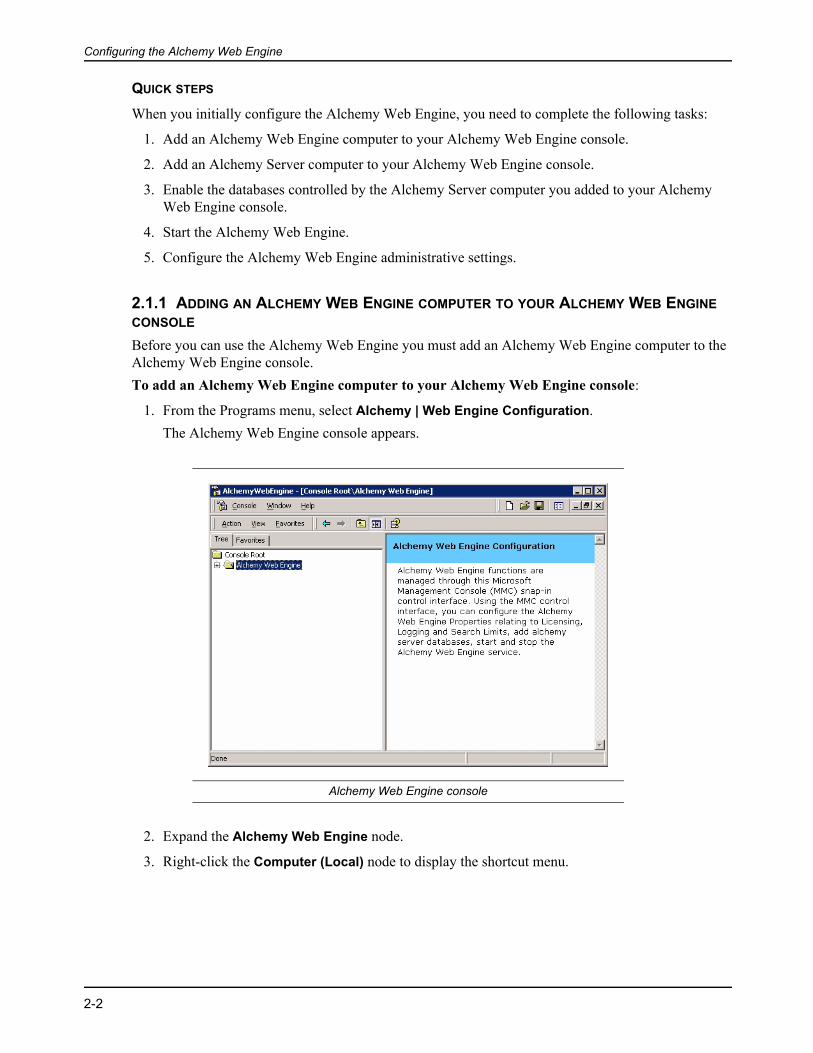
1. From the Programs menu, select Alchemy | Web Engine Configuration.The Alchemy Web Engine console appears.
Alchemy Web Engine console
2. Expand the Alchemy Web Engine node.
3. Right-click the Computer (Local) node to display the shortcut menu.
Configuring the Alchemy Web Engine
2-3
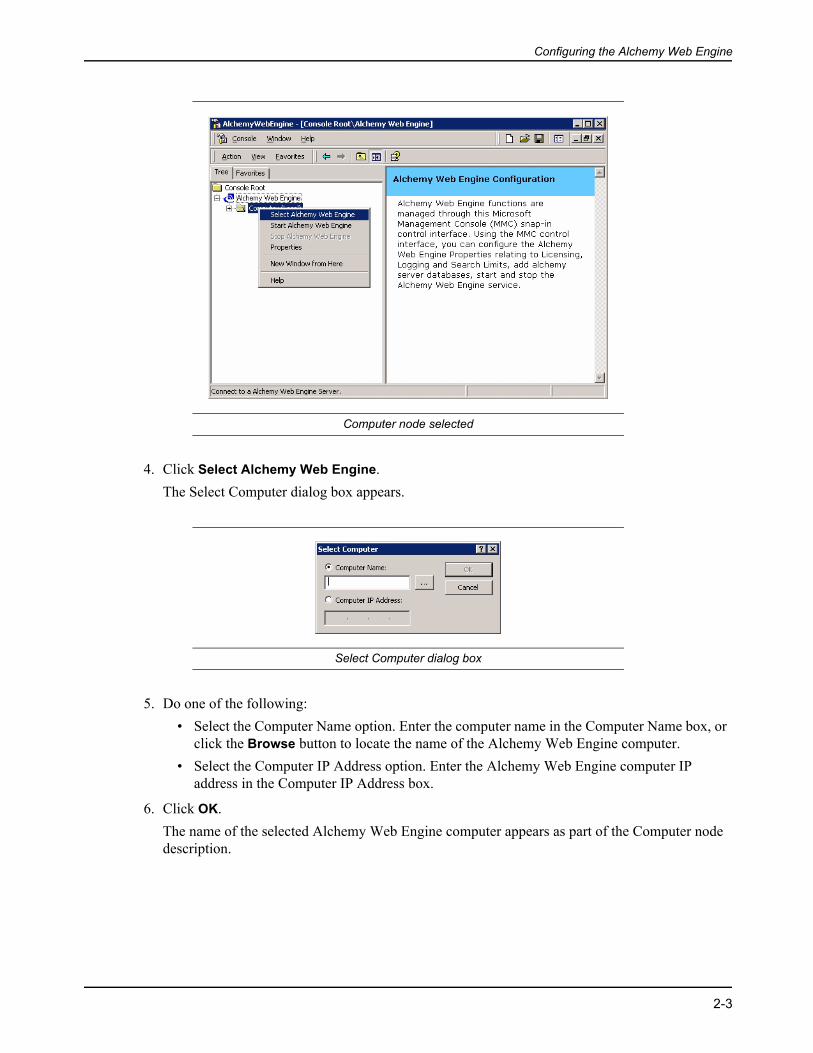
Computer node selected
4. Click Select Alchemy Web Engine.The Select Computer dialog box appears.
Select Computer dialog box
5. Do one of the following:• Select the Computer Name option. Enter the computer name in the Computer Name box, or
click the Browse button to locate the name of the Alchemy Web Engine computer.• Select the Computer IP Address option. Enter the Alchemy Web Engine computer IP
address in the Computer IP Address box.
6. Click OK.The name of the selected Alchemy Web Engine computer appears as part of the Computer node description.

Configuring the Alchemy Web Engine
2-4
Alchemy Web Engine configuration: Alchemy Web Engine name
2.1.2 ADDING THE ALCHEMY SERVER COMPUTER
After adding an Alchemy Web Engine computer to your Alchemy Web Engine console you need to add an Alchemy Server computer. The Alchemy Server computer you will use with the Alchemy Web Engine gives you access to the databases that you want to make available to users over their Internet connection.
The Alchemy Server service must be running before you can add it to the Alchemy Web Engine.
To add an Alchemy Server computer to your Alchemy Web Engine console:
1. Expand the Computer node.
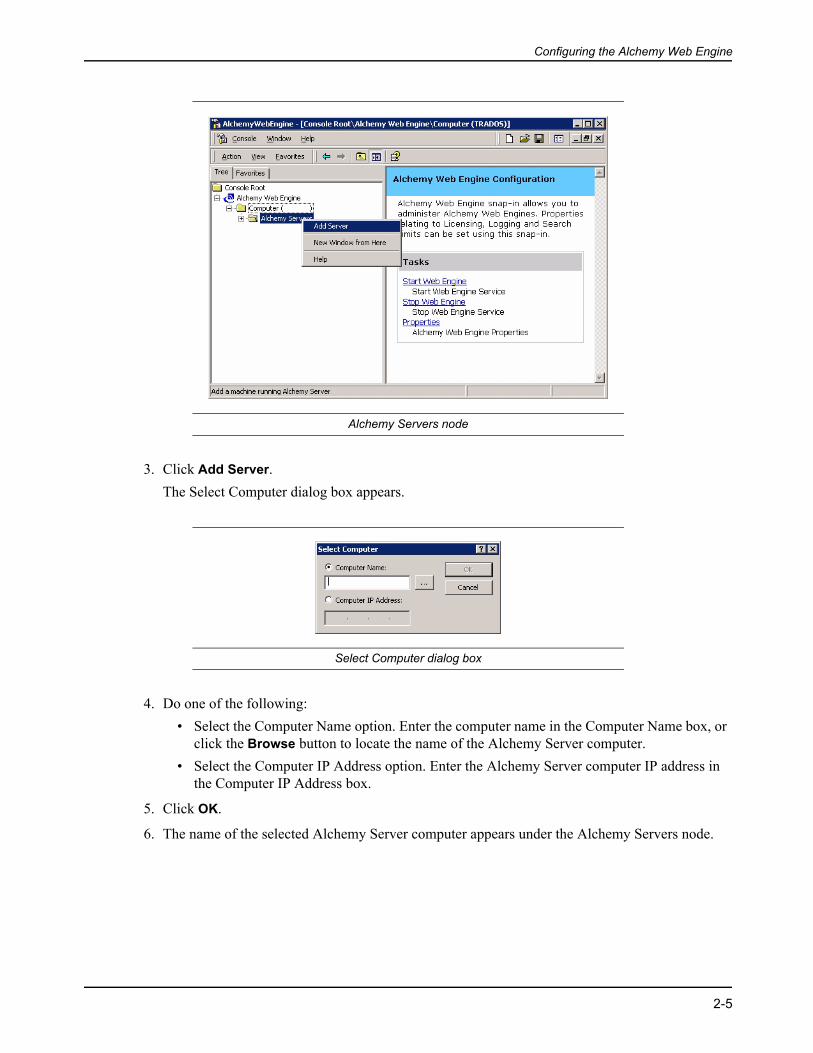
2. Right-click the Alchemy Servers node to display the shortcut menu.
Configuring the Alchemy Web Engine
2-5
Alchemy Servers node
3. Click Add Server.The Select Computer dialog box appears.
Select Computer dialog box
4. Do one of the following:• Select the Computer Name option. Enter the computer name in the Computer Name box, or
click the Browse button to locate the name of the Alchemy Server computer.• Select the Computer IP Address option. Enter the Alchemy Server computer IP address in
the Computer IP Address box.
5. Click OK.
6. The name of the selected Alchemy Server computer appears under the Alchemy Servers node.
Configuring the Alchemy Web Engine
2-6
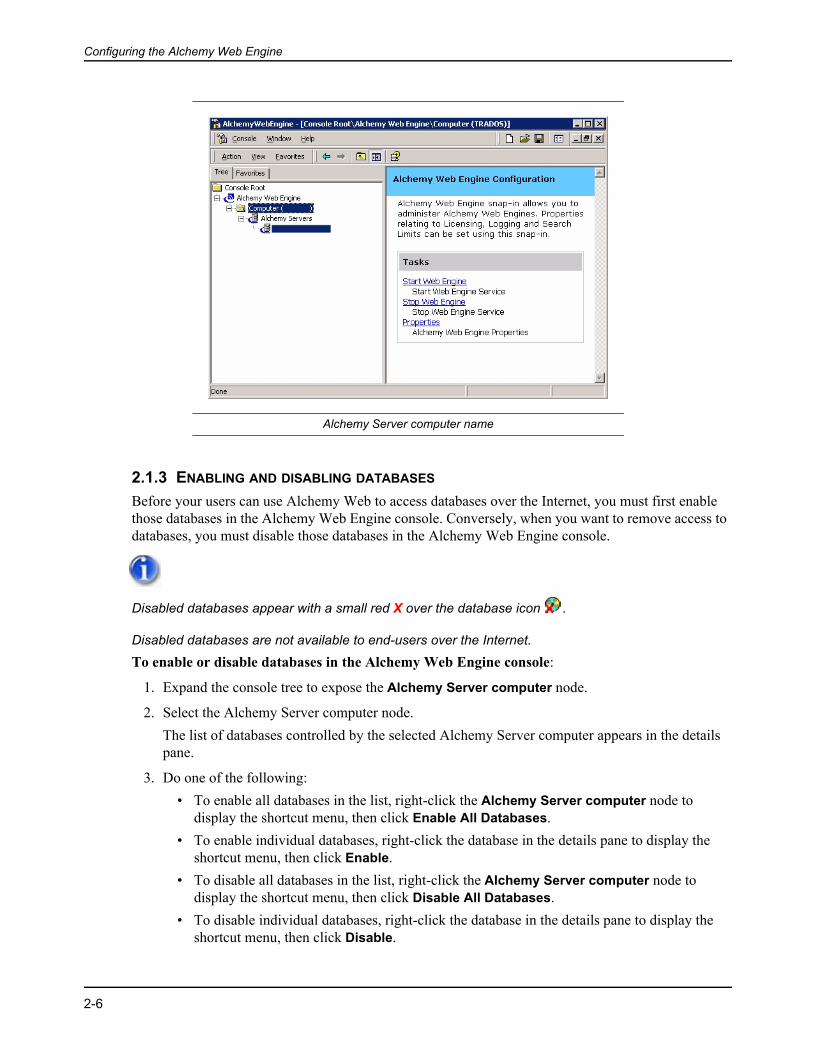
Alchemy Server computer name
2.1.3 ENABLING AND DISABLING DATABASES
Before your users can use Alchemy Web to access databases over the Internet, you must first enable those databases in the Alchemy Web Engine console. Conversely, when you want to remove access to databases, you must disable those databases in the Alchemy Web Engine console.
Disabled databases appear with a small red X over the database icon .
Disabled databases are not available to end-users over the Internet.
To enable or disable databases in the Alchemy Web Engine console:
1. Expand the console tree to expose the Alchemy Server computer node.
2. Select the Alchemy Server computer node.The list of databases controlled by the selected Alchemy Server computer appears in the details pane.
3. Do one of the following:• To enable all databases in the list, right-click the Alchemy Server computer node to
display the shortcut menu, then click Enable All Databases.• To enable individual databases, right-click the database in the details pane to display the
shortcut menu, then click Enable.• To disable all databases in the list, right-click the Alchemy Server computer node to
display the shortcut menu, then click Disable All Databases.• To disable individual databases, right-click the database in the details pane to display the
shortcut menu, then click Disable.
Configuring the Alchemy Web Engine
2-7
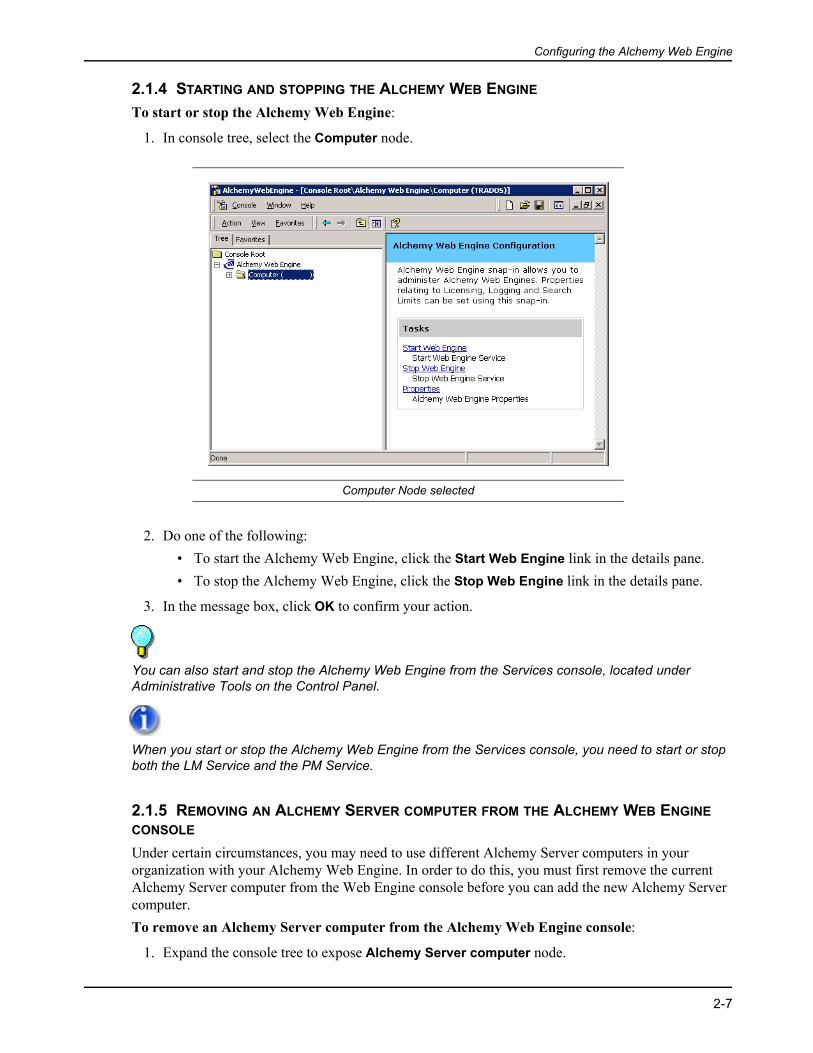
2.1.4 STARTING AND STOPPING THE ALCHEMY WEB ENGINE
To start or stop the Alchemy Web Engine:
1. In console tree, select the Computer node.
Computer Node selected
2. Do one of the following:• To start the Alchemy Web Engine, click the Start Web Engine link in the details pane.• To stop the Alchemy Web Engine, click the Stop Web Engine link in the details pane.
3. In the message box, click OK to confirm your action.
You can also start and stop the Alchemy Web Engine from the Services console, located under Administrative Tools on the Control Panel.
When you start or stop the Alchemy Web Engine from the Services console, you need to start or stop both the LM Service and the PM Service.
2.1.5 REMOVING AN ALCHEMY SERVER COMPUTER FROM THE ALCHEMY WEB ENGINE CONSOLE
Under certain circumstances, you may need to use different Alchemy Server computers in your organization with your Alchemy Web Engine. In order to do this, you must first remove the current Alchemy Server computer from the Web Engine console before you can add the new Alchemy Server computer.To remove an Alchemy Server computer from the Alchemy Web Engine console:
1. Expand the console tree to expose Alchemy Server computer node.

Configuring the Alchemy Web Engine
2-8
2. Right-click the Alchemy Server computer node to display the shortcut node.
3. Click Delete.
4. Click Yes to confirm your action.
2.1.6 CONFIGURING ALCHEMY WEB ENGINE ADMINISTRATIVE SETTINGS
You administer the Alchemy Web Engine through the Web Engine console. Administrative properties that you can view and modify through the console include the following:
• License server settingsThe licensing server is the Alchemy Server computer from which your Alchemy client applications and extensions receive their product licenses.
• Log manager settings• Limit settings
To configure Alchemy Web Engine Administrative settings:
1. Expand the console tree to expose the Computer node.
2. Select the Computer node to display the Alchemy Web Engine Configuration page in the details pane of the console.
Computer node selected
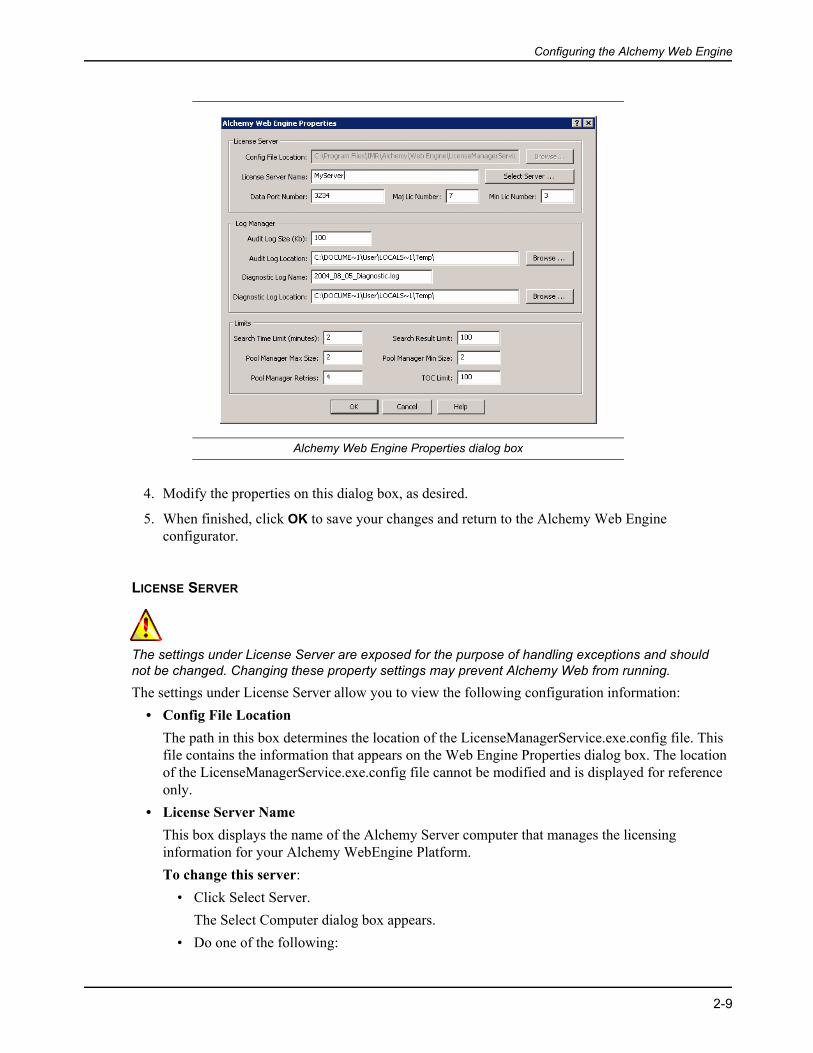
3. Under Tasks, click the Properties link.The Alchemy Web Engine Properties dialog box appears.
Configuring the Alchemy Web Engine
2-9
Alchemy Web Engine Properties dialog box
4. Modify the properties on this dialog box, as desired.
5. When finished, click OK to save your changes and return to the Alchemy Web Engine configurator.
LICENSE SERVER
The settings under License Server are exposed for the purpose of handling exceptions and should not be changed. Changing these property settings may prevent Alchemy Web from running.
The settings under License Server allow you to view the following configuration information:• Config File Location
The path in this box determines the location of the LicenseManagerService.exe.config file. This file contains the information that appears on the Web Engine Properties dialog box. The location of the LicenseManagerService.exe.config file cannot be modified and is displayed for reference only.
• License Server NameThis box displays the name of the Alchemy Server computer that manages the licensing information for your Alchemy WebEngine Platform.To change this server:
• Click Select Server.The Select Computer dialog box appears.
• Do one of the following:
Configuring the Alchemy Web Engine
2-10
• Select the Computer Name option. Enter the computer name in the Computer Name box, or click the Browse button to locate the name of the Alchemy Web Engine computer.
• Select the Computer IP Address option. Enter the Alchemy Web Engine computer IP address in the Computer IP Address box.
• Click OK.• Data Port Number
This box displays the data port number that the Alchemy Server computer uses to communicate with client computers across your network. Alchemy Server uses the default data port number 3234.
Captaris strongly recommends that you do not change the default data port number unless absolutely necessary.
• Maj Lic NumberThis box displays the major release number of the version of the Alchemy Server license used with your Alchemy Web installation.
Captaris strongly recommends that you do not change this number.
• Min Lic NumberThis box displays the minor release number of the version of the Alchemy Server license used for your Alchemy Web installation.
Captaris strongly recommends that you do not change this number.
LOG MANAGER
The Log Manager settings allow you to control the following:• Log size• Log location• Log name
The audit log records Alchemy Web events such as session start, session end, etc. The diagnostic log is a troubleshooting tool that records all audit log events, all error messages written to the Windows Event Viewer, program stack traces, etc. The diagnostic log function is disabled by default.
• Audit Log Size (Kb)This box displays the maximum size, in kilobytes, that the audit log file can reach before Alchemy Web creates a new log file to contain subsequent log information. To change the audit log size, replace the current audit log size with a new value.
• Audit Log LocationThis box displays the location where Alchemy Web saves the audit log file. To change this location do one of the following:
Configuring the Alchemy Web Engine
2-11
• Enter the path of the new location for the audit log file in the Audit Log Location box.• Click Browse to select the new location for the audit log file.
• Diagnostic Log NameThis box displays the name of the diagnostic log name. To change the diagnostic log name, enter the new diagnostic log name in the Diagnostic Log Name box.
• Diagnostic Log LocationThis box displays the location where Alchemy Web saves the diagnostic log file. To change this location, do one of the following:
• Enter the path of the new location for the diagnostic log file in the Diagnostic Log Location box.
• Click Browse to select the new location for the diagnostic log file.
LIMITS
Modifying the properties in this section of the Alchemy Web Engine Properties dialog box might affect performance of the server computer on which Alchemy Web Engine is installed. Before modifying these properties, Captaris recommends that you create counters in the Microsoft Performance Monitor to track performance changes on the server computer caused by modifying the properties in this section. Using these counters you can then determine the most efficient configuration for the server computer on which Alchemy Web Engine is installed.
The settings under the Limits section allow you to control the following:• Search Time Limit (minutes)
This box displays the length of time that can pass, in minutes, before Alchemy cancels a search.You should set this time limit to a value less than the session timeout, which you set in Internet Information Services (IIS).
• Pool Manager Max SizeThis box displays the maximum number of Alchemy Web Engine PoolManager processes that can simultaneously exist on a computer. Each user request requires an available PoolManager process. A low maximum might create longer wait times or request time-outs for users; a high maximum requires more powerful hardware to support the number of processes. The possible range for this field is 1-64; the default value is 2.
You should only use a value of 1 when developing external applications using the Alchemy Web Software Developers Kit (SDK) or other third party development kit.
• Pool Manager Min SizeThis box displays the minimum number of Alchemy Web Engine PoolManager processes that will remain active at any given time. For example, if you set this value to 4, at least four PoolManager processes will always remain active, which allows at least four user requests to be processed simultaneously. The possible range for this field is 1-64; the default value is 2.

Configuring the Alchemy Web Application
2-12
You should only use a value of 1 when developing external applications using the Alchemy Web Software Developers Kit (SDK) or other third party development kit.
• Pool Manager RetriesThis field displays the number of times an Alchemy Web client will attempt to access an active PoolManager processes before receiving a message that states that the server is busy. This situation occurs in the event that all PoolManager processes are busy. A client will attempt to access a PoolManager process until one is available or the client reaches the maximum number of retries.
• Search Result LimitThis box displays the maximum number of items returned from a search. A search might potentially return thousands of items, so to avoid impacting performance on the server computer, you can limit the number of items returned. The default value is 100For example, if you set this value to 100, a search that would otherwise return 10,000 items will only return the first 100 items. The user will then be notified that they have reached the set search limit and will be advised to refine their search arguments.
• TOC LimitThis box displays the maximum number of items that will be returned to populate the nodes in a table of contents. The default value is 100.For example, if a database contains a folder with 200 items, and you set this value to 100, you will receive the first 100 items to populate the TOC under that folder.
2.2 CONFIGURING THE ALCHEMY WEB APPLICATION
You use the Alchemy Web Application console to control the following:• The Alchemy Web site your users use to access database files over their Internet connection• How your users’ browser window will display the Alchemy Web page• Which Alchemy Web user events will be tracked• How users will display files in their browser window
After installing Alchemy Web for the first time, you need to configure the Web Application before your users can view files across the Internet using Alchemy Web. You configure Alchemy Web through the Alchemy Web Application console. When you configure Alchemy Web for use the first time you should complete the following tasks:
• Select the Alchemy Web site• Configure the web display properties• Configure the logging properties• Configure the viewer properties
2.2.1 SELECTING THE ALCHEMY WEB SITE
To select an Alchemy Web site:
1. From the Programs menu, select Alchemy | Web Application Configuration.
Configuring the Alchemy Web Application
2-13
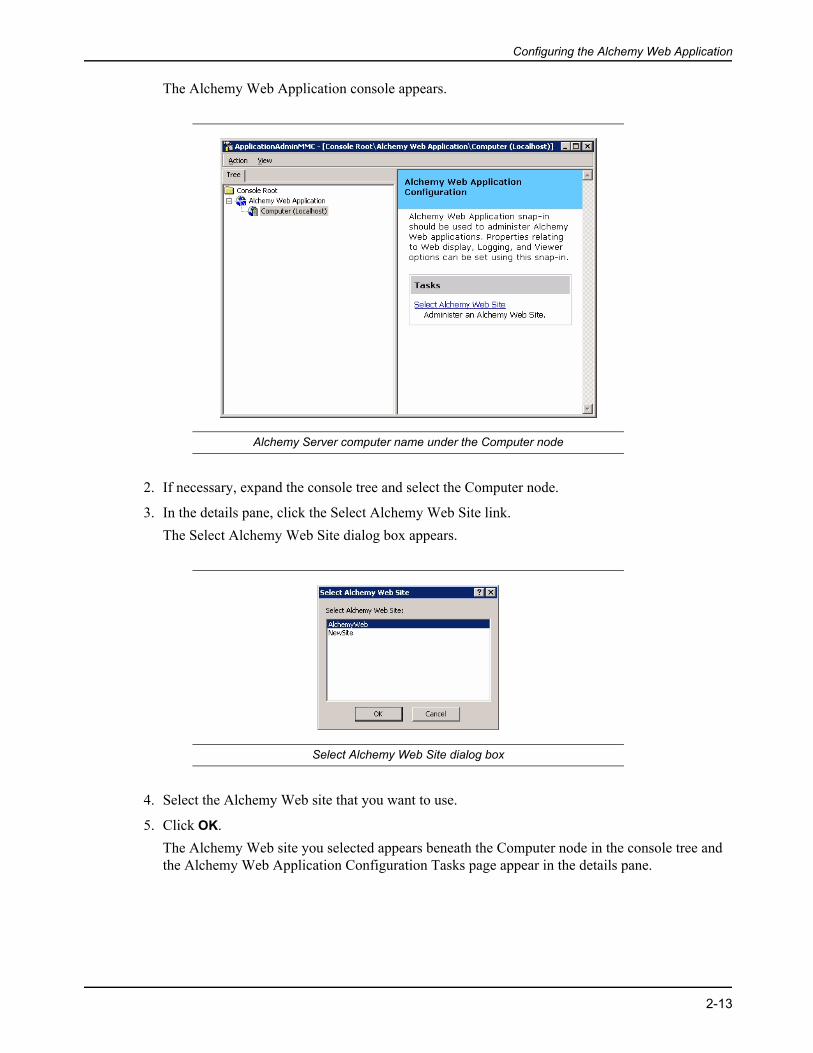
The Alchemy Web Application console appears.
Alchemy Server computer name under the Computer node
2. If necessary, expand the console tree and select the Computer node.
3. In the details pane, click the Select Alchemy Web Site link.The Select Alchemy Web Site dialog box appears.
Select Alchemy Web Site dialog box
4. Select the Alchemy Web site that you want to use.
5. Click OK.The Alchemy Web site you selected appears beneath the Computer node in the console tree and the Alchemy Web Application Configuration Tasks page appear in the details pane.
Configuring the Alchemy Web Application
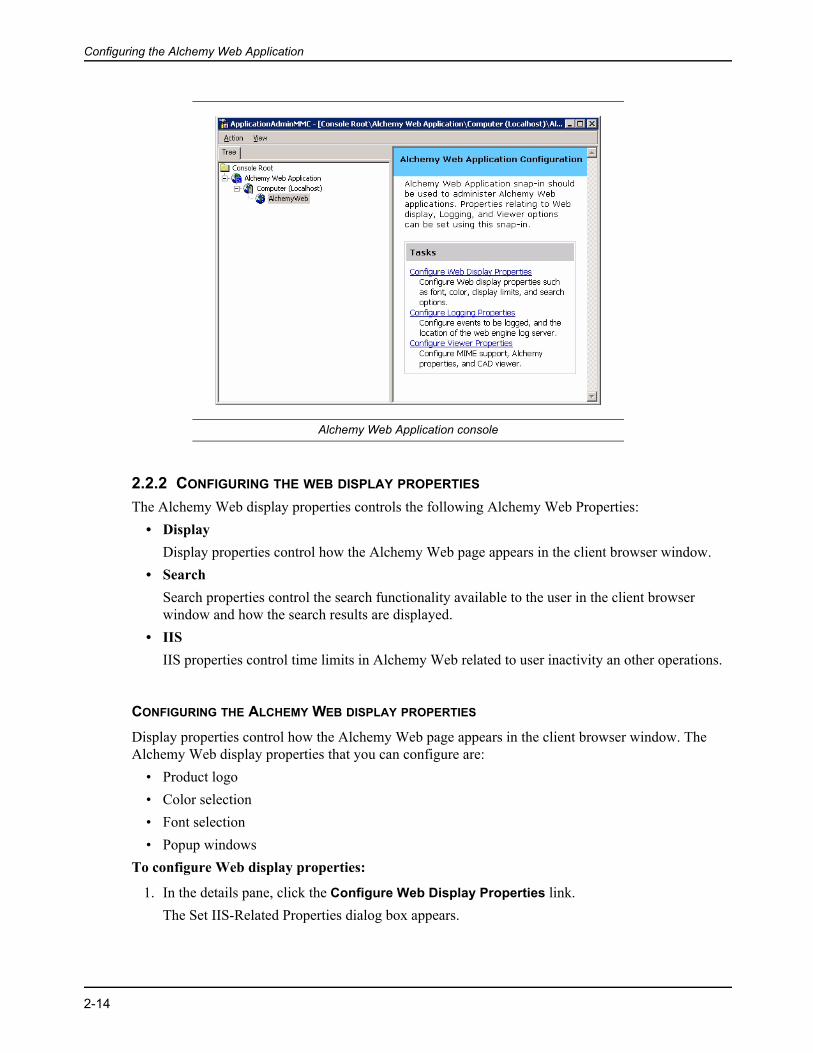
2-14
Alchemy Web Application console
2.2.2 CONFIGURING THE WEB DISPLAY PROPERTIES
The Alchemy Web display properties controls the following Alchemy Web Properties:• Display
Display properties control how the Alchemy Web page appears in the client browser window.• Search
Search properties control the search functionality available to the user in the client browser window and how the search results are displayed.
• IISIIS properties control time limits in Alchemy Web related to user inactivity an other operations.
CONFIGURING THE ALCHEMY WEB DISPLAY PROPERTIES
Display properties control how the Alchemy Web page appears in the client browser window. The Alchemy Web display properties that you can configure are:
• Product logo• Color selection• Font selection• Popup windows
To configure Web display properties:
1. In the details pane, click the Configure Web Display Properties link.The Set IIS-Related Properties dialog box appears.

Configuring the Alchemy Web Application
2-15
IIS Related Properties dialog box, Display tab
2. Configure the Alchemy Web display properties on the Display tab as necessary.• Product Logo
You use this box to enter the path and name of an image file that will appear at the top right of all Alchemy Web pages your users view, or click the Browse button to locate the image file.
The image file you choose must be sized to align with the area for the product logo.
• Color SelectionSelect the aspect of the user interface from the drop-down box for which you want to change the color. To change the color, click the Color button, then select the color from the displayed list. Click OK to apply your changes.
• Font SelectionTo change the default font for your Alchemy Web pages, do one of the following:
• Enter the name of the font you want to use in the Name box, then enter the font size in the Size box. Next, if desired, click the Color button, then select the font color from the displayed list. Click OK to apply your changes.
• Click the Font button to display the Font properties dialog box. Select the desired font, font style, and font size from the appropriate lists. Click OK to apply your changes. Next, if desired, click the Color button, then select the font color from the displayed list. Click OK to apply your changes.
3. Do one of the following:• Click Apply to save your changes.• Click OK to save your changes and close the IIS Related Properties dialog box.
Configuring the Alchemy Web Application
2-16
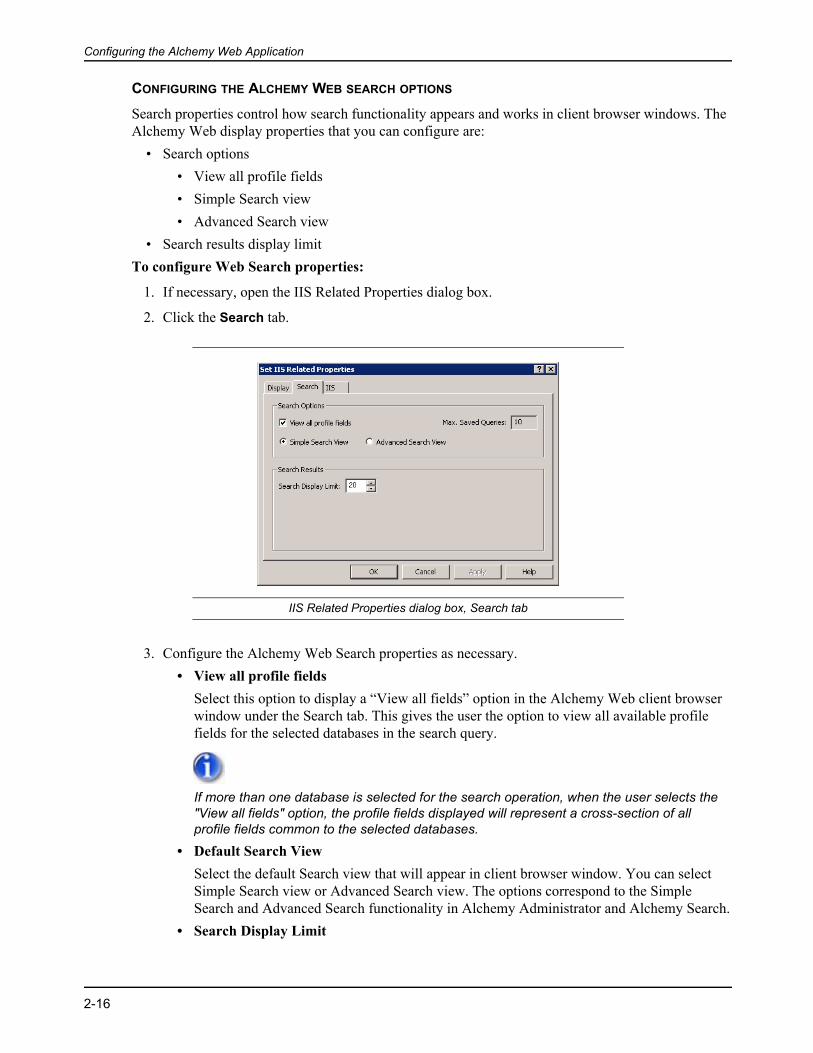
CONFIGURING THE ALCHEMY WEB SEARCH OPTIONS
Search properties control how search functionality appears and works in client browser windows. The Alchemy Web display properties that you can configure are:
• Search options• View all profile fields• Simple Search view• Advanced Search view
• Search results display limitTo configure Web Search properties:
1. If necessary, open the IIS Related Properties dialog box.
2. Click the Search tab.
IIS Related Properties dialog box, Search tab
3. Configure the Alchemy Web Search properties as necessary.• View all profile fields
Select this option to display a “View all fields” option in the Alchemy Web client browser window under the Search tab. This gives the user the option to view all available profile fields for the selected databases in the search query.
If more than one database is selected for the search operation, when the user selects the "View all fields" option, the profile fields displayed will represent a cross-section of all profile fields common to the selected databases.
• Default Search ViewSelect the default Search view that will appear in client browser window. You can select Simple Search view or Advanced Search view. The options correspond to the Simple Search and Advanced Search functionality in Alchemy Administrator and Alchemy Search.
• Search Display Limit
Configuring the Alchemy Web Application
2-17
Use this box to set the maximum number of search results that will appear on the search results page. For example, if a search returns 100 hits, when you set this limit to 20, you will receive five pages that display 20 search hits each.
4. Do one of the following:• Click Apply to save your changes.• Click OK to save your changes and close the IIS Related Properties dialog box.
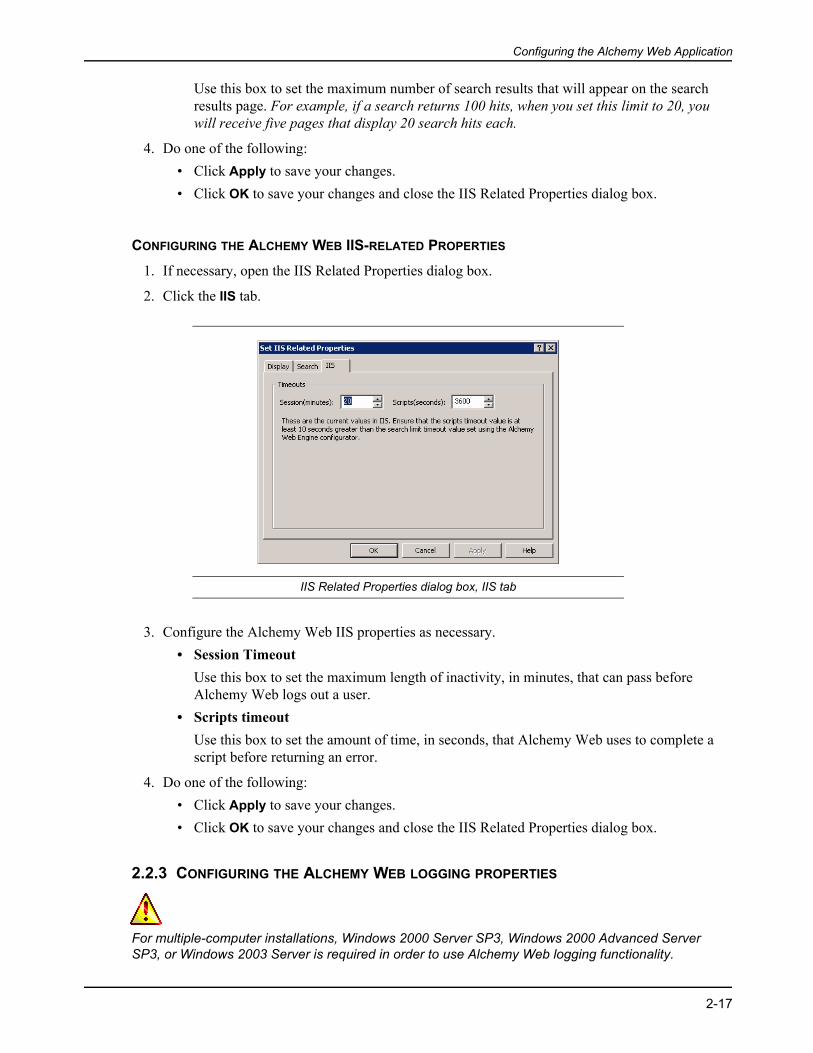
CONFIGURING THE ALCHEMY WEB IIS-RELATED PROPERTIES
1. If necessary, open the IIS Related Properties dialog box.
2. Click the IIS tab.
IIS Related Properties dialog box, IIS tab
3. Configure the Alchemy Web IIS properties as necessary.• Session Timeout
Use this box to set the maximum length of inactivity, in minutes, that can pass before Alchemy Web logs out a user.
• Scripts timeoutUse this box to set the amount of time, in seconds, that Alchemy Web uses to complete a script before returning an error.
4. Do one of the following:• Click Apply to save your changes.• Click OK to save your changes and close the IIS Related Properties dialog box.
2.2.3 CONFIGURING THE ALCHEMY WEB LOGGING PROPERTIES
For multiple-computer installations, Windows 2000 Server SP3, Windows 2000 Advanced Server SP3, or Windows 2003 Server is required in order to use Alchemy Web logging functionality.
Configuring the Alchemy Web Application
2-18
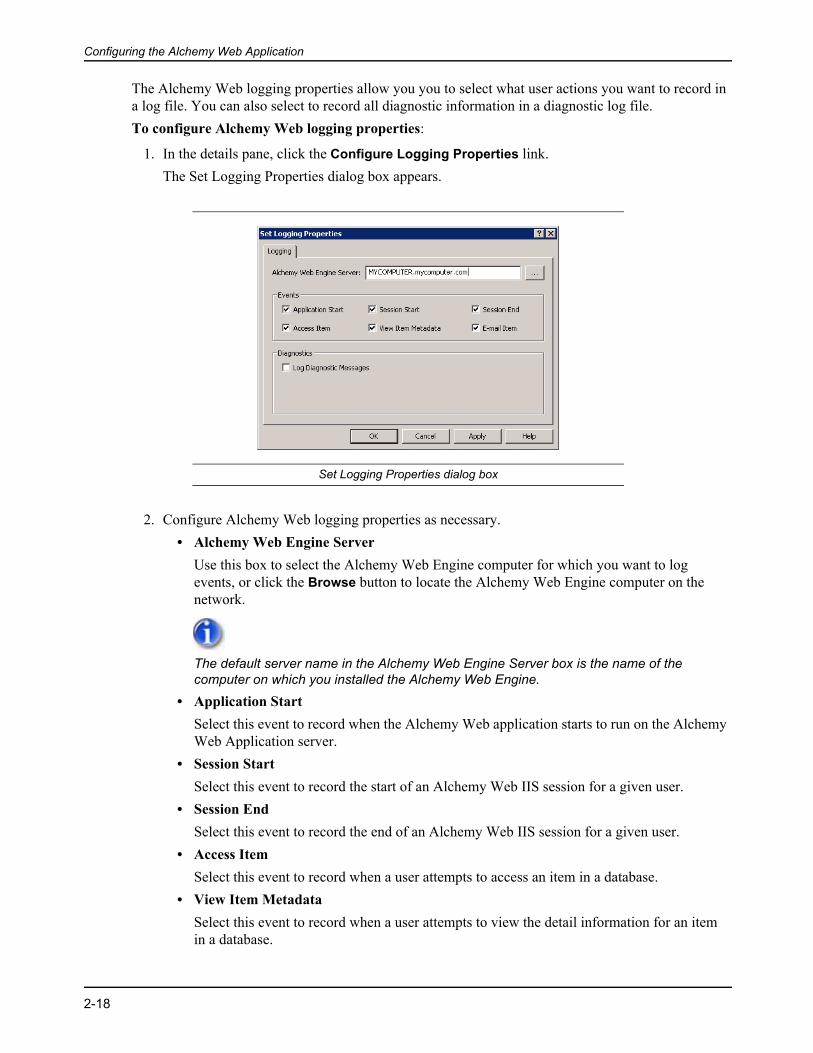
The Alchemy Web logging properties allow you you to select what user actions you want to record in a log file. You can also select to record all diagnostic information in a diagnostic log file.To configure Alchemy Web logging properties:
1. In the details pane, click the Configure Logging Properties link.The Set Logging Properties dialog box appears.
Set Logging Properties dialog box
2. Configure Alchemy Web logging properties as necessary.• Alchemy Web Engine Server
Use this box to select the Alchemy Web Engine computer for which you want to log events, or click the Browse button to locate the Alchemy Web Engine computer on the network.
The default server name in the Alchemy Web Engine Server box is the name of the computer on which you installed the Alchemy Web Engine.
• Application StartSelect this event to record when the Alchemy Web application starts to run on the Alchemy Web Application server.
• Session StartSelect this event to record the start of an Alchemy Web IIS session for a given user.
• Session EndSelect this event to record the end of an Alchemy Web IIS session for a given user.
• Access ItemSelect this event to record when a user attempts to access an item in a database.
• View Item MetadataSelect this event to record when a user attempts to view the detail information for an item in a database.
Configuring the Alchemy Web Application
2-19
• Email ItemSelect this event to record when a user attempts to email an item in a database.
• Log Diagnostic MessagesSelect this event to record diagnostic information in a diagnostic log file.
You can set the name and the location where Alchemy Web stores the diagnostic log file on the Alchemy Web Engine Properties dialog box, which is available from the Alchemy Web Engine configuration console.
See Configuring Alchemy Web Engine administrative settings for more information.
3. Click OK to save your changes and close the Set Logging Properties dialog box.
2.2.4 CONFIGURING THE ALCHEMY WEB VIEWER PROPERTIES
Alchemy Web viewer properties give you control over how information presented in the client browser window is viewed. The Alchemy Web viewer properties that you can configure are:
• MIME type support settings• Alchemy properties• Configuring file cache cleanup utility properties• CAD viewer settings• Viewing large files in Alchemy Web
In order to increase performance, requests to view, download, and e-mail all supported file types in Alchemy Web send an encrypted copy of the file to the file cache Doc directory under the IMRViewer directory in the Alchemy Web Application installation location. To effectively manage the size of this directory, you should configure the File Cache Cleanup utility to run at regularly scheduled intervals.
For more information about this, see “Configuring Alchemy Web file Cache Cleanup properties” on page 2-24
MIME TYPE SUPPORT SETTINGS FOR NATIVE VIEWING
Alchemy Web supports a number of different methods for viewing files. These viewing methods include:
• Native viewing using the First Viewer• Native viewing using other third party viewers• Spicer ViewCafé for CAD file types• HTML export.
Using MIME types gives you the ability to control which native viewers you use to view files through Alchemy Web. The Set Viewer Properties dialog box accessed from the Alchemy Web Application MMC console allows you to set your MIME type settings by:
• Adding MIME type support settings• Changing MIME type support settings
Configuring the Alchemy Web Application
2-20
• Enabling viewer support for MIME types• Disabling viewer support for MIME types
First ViewerAlchemy Web supplies its own internal file viewer that, when the application is installed, is set as the default viewer type for supported file types. The MIME type/subtype combination for the First viewer is application/x-IMRWViewer. File types supported by this viewer are:
• PDF, TEXT, TIF, PNG, JPEG, GIF, TRG, BMP, PCX, DCX, COLD overlays, 301When an Alchemy Web client requests to view a supported file type for the first time, Alchemy Web attempts to download the First viewer to the client computer. A standard Microsoft security warning dialog box appears asking the user if he/she wants to download the viewer. To download the viewer to the client computer, the user should click Yes. If the user clicks No, the viewer will not be downloaded to the client computer and the user will be unable to view the image unless you change the MIME types for supported file types to the MIME type/subtype that you wish for that file type on the MIME tab on the Set Viewer Properties dialog box.
The user must possess sufficient permissions on the Alchemy Web client computer in order to install the First Viewer.
Alchemy Web file viewing hierarchyWhen a user requests to view a file from the Alchemy Web site, Alchemy Web will attempt to display the file using the available file viewers in the following order:
• The First Viewer - This is the default file viewer for supported file types listed under “First Viewer”.
• Native viewing for other file types not supported by the First Viewer, including CAD file types.• Spicer ViewCafé for CAD file types if the viewer is installed and the option has been selected
and configured on the CAD tab under the Set Viewer Properties dialog box.• If licensed, Neutral viewing through HTML Export.
If the requested file type is not supported by any of the above file viewers, a “No viewer available.” message appears.
Configuring the Alchemy Web Application
2-21
If you use Alchemy Web to access databases that contain OCR files (.OCR file type) that use text overlays, you need to change the MIME file type/subtype from text/plain to application/x-IMRWViewer in the Supported MIME Types list.
Alchemy Web supports the viewing of DICOM standard medical (DCM) images using Native viewing. To view DICOM standard medical images using Native viewing you need to add the DICOM image type (DCM) to your MIME type settings and install a medical image viewer on your client workstations.
Please note, however, that only profile fields for DICOM images are indexed when the images are added to a database. As such, you can only search on those profile fields rather than file content when including DICOM images in a search query.
If you do not already use a DICOM image viewer, an example of one that is available free of charge is ezDICOM, which can be downloaded from the Internet.
You can view CAD files using Native, Spicer ViewCafé, or Neutral viewers. To use Spicer ViewCafé to view CAD files you must enable CAD viewing through the Alchemy Web Application Admin MMC and have installed a licensed copy of Spicer ViewCafé.
To add a MIME type support setting:
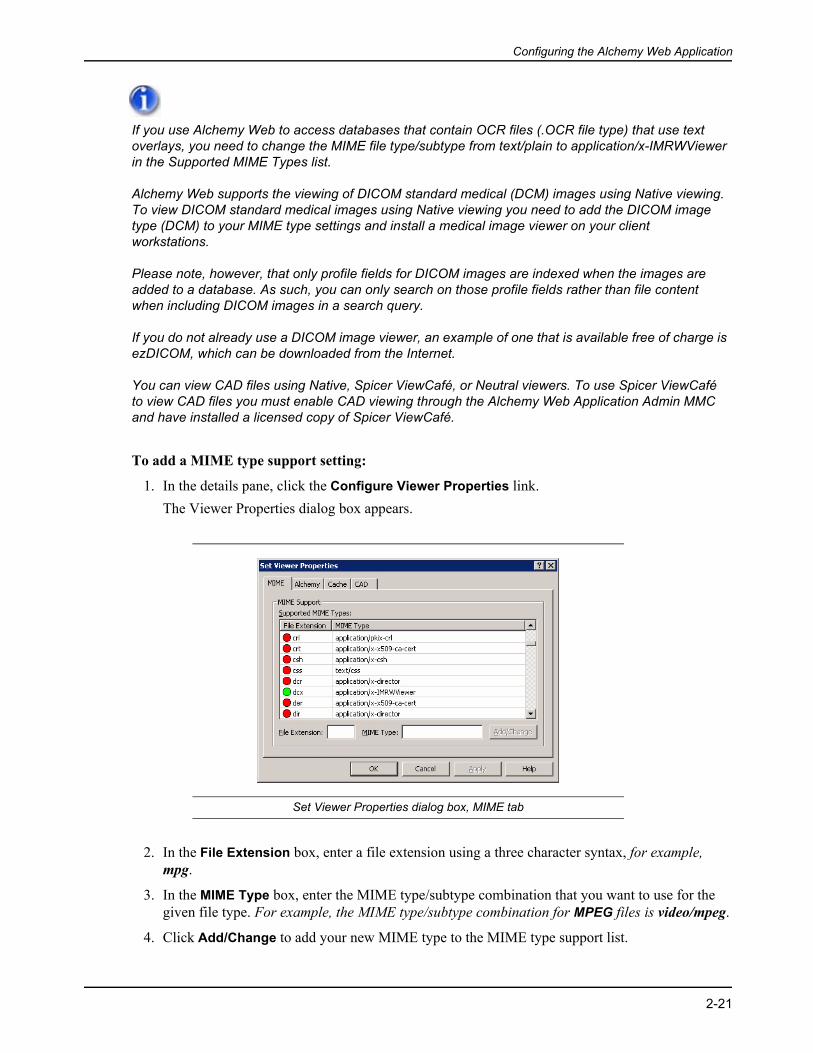
1. In the details pane, click the Configure Viewer Properties link.The Viewer Properties dialog box appears.
Set Viewer Properties dialog box, MIME tab
2. In the File Extension box, enter a file extension using a three character syntax, for example, mpg.
3. In the MIME Type box, enter the MIME type/subtype combination that you want to use for the given file type. For example, the MIME type/subtype combination for MPEG files is video/mpeg.
4. Click Add/Change to add your new MIME type to the MIME type support list.

Configuring the Alchemy Web Application
2-22
5. Click Apply to save your changes
To change an existing MIME type support setting:
1. In the details pane, click the Configure Viewer Properties link.The Viewer Properties dialog box appears.
2. Select the MIME type from the MIME type support list that you want to change.
3. Do the following as necessary:• In the File Extension box, enter a file extension using a three character syntax, for
example, mpg.• In the MIME Type box, enter the MIME type/subtype combination that you want to use for
the given file type. For example, the MIME type/subtype combination for MPEG files is video/mpeg.
4. Click Add/Change to add your new MIME type to the MIME type support list.
5. Click Apply to save your changes
To enable or disable viewer support for MIME types
Enabled MIME types in the MIME type Support list are designated by a green circle.
Disabled MIME types in the MIME type Support list are designated by a red circle.
1. In the MIME type support list, right-click the MIME type that you want to enable or disable to display the shortcut menu.
2. Do one of the following:• To enable a disabled MIME type, click Enable.• To disable an enabled MIME type, click Disable.
The circle next to the MIME type changes color to denote an enabled or a disabled MIME type.
CONFIGURING ALCHEMY PROPERTIES
Allow Document Adds to DatabasesAlchemy Web provides two ways for you to control file adds to databases accessed through Alchemy Web clients.The first allows you to control file add functionality at the group and/or user level through settings in the Role-based Access Control (RBAC) component of Alchemy Server integrated security. You should use this method to control file add functionality in Alchemy Web if you use Alchemy Server integrated security to create group and user roles to control access to Alchemy databases.For more information about using RBAC to control file adds to databases accessed through Alchemy Web, please see the Alchemy Server Administrator Guide.
Configuring the Alchemy Web Application
2-23
The second allows you to control file add functionality at the Web site level through a setting on the Set Viewer Properties dialog box in the Alchemy Web Application MMC console. You should use this method to control file adds at the Web site level if you do not use Alchemy Server integrated security to control group/user access to Alchemy databases and/or Alchemy clients that are not compatible with RBAC are used to access databases through Alchemy Web.
Individuals logged into an Alchemy Web site under the anonymous user account cannot use the File Add feature.
To allow file adds through the Alchemy Web Application MMC Configurator:
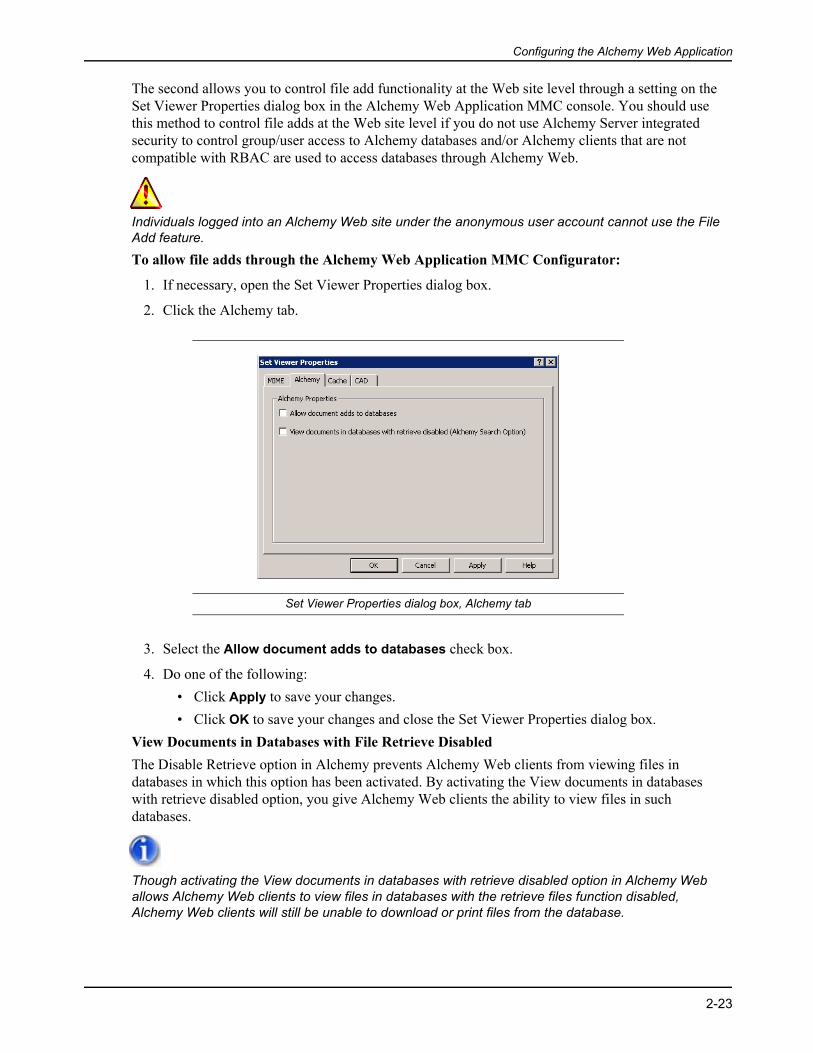
1. If necessary, open the Set Viewer Properties dialog box.
2. Click the Alchemy tab.
Set Viewer Properties dialog box, Alchemy tab
3. Select the Allow document adds to databases check box.
4. Do one of the following:• Click Apply to save your changes.• Click OK to save your changes and close the Set Viewer Properties dialog box.
View Documents in Databases with File Retrieve DisabledThe Disable Retrieve option in Alchemy prevents Alchemy Web clients from viewing files in databases in which this option has been activated. By activating the View documents in databases with retrieve disabled option, you give Alchemy Web clients the ability to view files in such databases.
Though activating the View documents in databases with retrieve disabled option in Alchemy Web allows Alchemy Web clients to view files in databases with the retrieve files function disabled, Alchemy Web clients will still be unable to download or print files from the database.
Configuring the Alchemy Web Application
2-24
If you choose to activate the View documents in databases with retrieve disabled option, Captaris strongly recommends that you first activate both the Disable Retrieve and Disable Print functions in the database before making it accessible through Alchemy Web.
Alchemy Web, and browser-based applications in general, cannot guarantee that files viewed from Alchemy databases with the Disable Print option selected will not be able to print the files after they have been viewed. When a file is viewed in Alchemy Web, a copy of the file is downloaded to the Alchemy Web client computer’s temporary internet file directory by the browser, which is a location that Alchemy Web does not have exclusive control of.
Likewise, activating the View documents in databases with retrieve disabled option in Alchemy Web allows a copy of the viewed file to be downloaded to the Alchemy Web client computer’s temporary internet file directory by the browser.
To view files in documents with retrieve disabled:
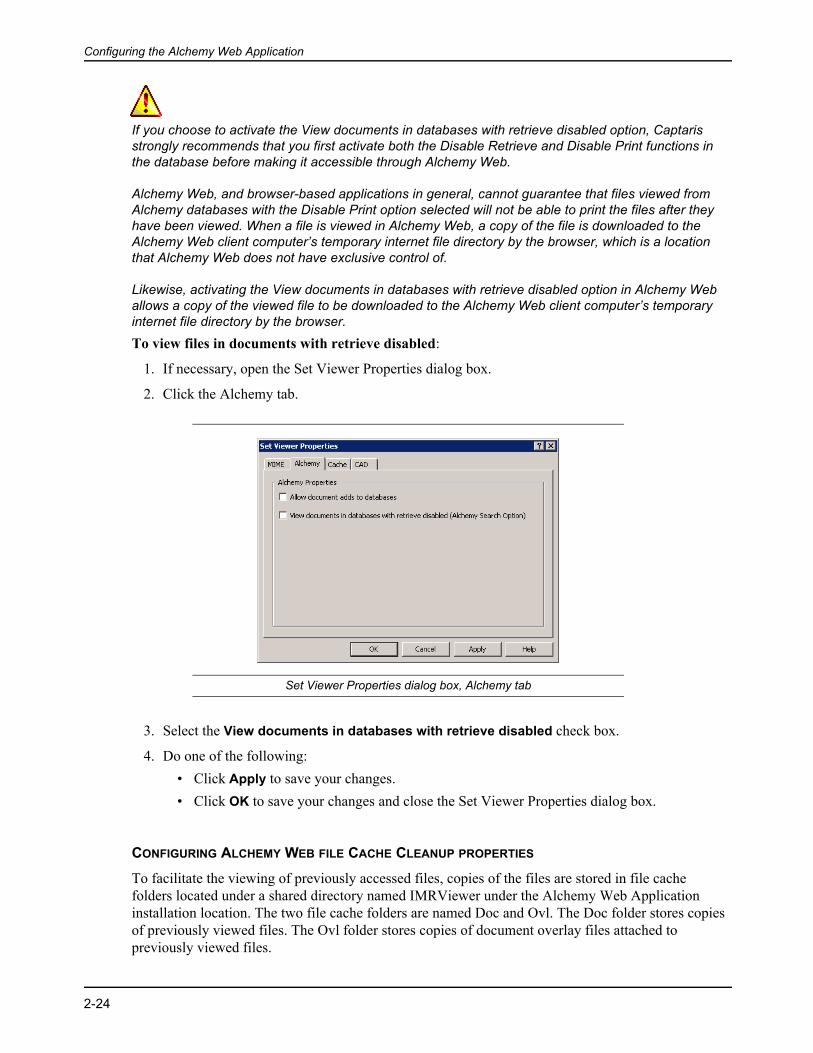
1. If necessary, open the Set Viewer Properties dialog box.
2. Click the Alchemy tab.
Set Viewer Properties dialog box, Alchemy tab
3. Select the View documents in databases with retrieve disabled check box.
4. Do one of the following:• Click Apply to save your changes.• Click OK to save your changes and close the Set Viewer Properties dialog box.
CONFIGURING ALCHEMY WEB FILE CACHE CLEANUP PROPERTIES
To facilitate the viewing of previously accessed files, copies of the files are stored in file cache folders located under a shared directory named IMRViewer under the Alchemy Web Application installation location. The two file cache folders are named Doc and Ovl. The Doc folder stores copies of previously viewed files. The Ovl folder stores copies of document overlay files attached to previously viewed files.
Configuring the Alchemy Web Application
2-25
A cache cleanup utility manages the file cache folders using Windows Task Scheduler and the Alchemy Web Application MMC console. During Alchemy Web Application installation, a default cache cleanup utility schedule is created that runs the cache cleanup utility on a regular basis. You can modify this scheduled task through the Cache tab on the Set Viewer Properties dialog box in the Alchemy Web Application MMC console.The default parameters for the cache cleanup utility are:
• Document Cache folder:• Size = 1 GB• Time = 1 day
• Overlay Cache folder:• Size = 200 MB• Time = 1 week
Size is the total size of all files stored in the cache folder.Time is the age or amount of elapsed time since the file was last accessed by a user.
Once the cache folder has reached the maximum size specified, files are deleted based on the specified file age limit.
When the cache cleanup utility runs, it compares the current state of the Doc and Ovl folders against the parameters set in the Alchemy Web Application MMC console to determine if stored files should be deleted from the respective folders. If the parameters set in the Alchemy Web Application MMC Configurator are not met, files are not deleted from the folders.
You can also manually run the cache cleanup utility from the Alchemy Web Application MMC console. As with the cache cleanup utility scheduled task, if the parameters set in the Alchemy Web Application MMC console are not met, files are not deleted.
The file cache cleanup task applies to both file cache folders. You CANNOT create separate scheduled tasks for each file cache folder.
To configure the file cache cleanup utility:
1. If necessary, open the Set Viewer Properties dialog box.
2. Click the Cache tab.
Configuring the Alchemy Web Application
2-26
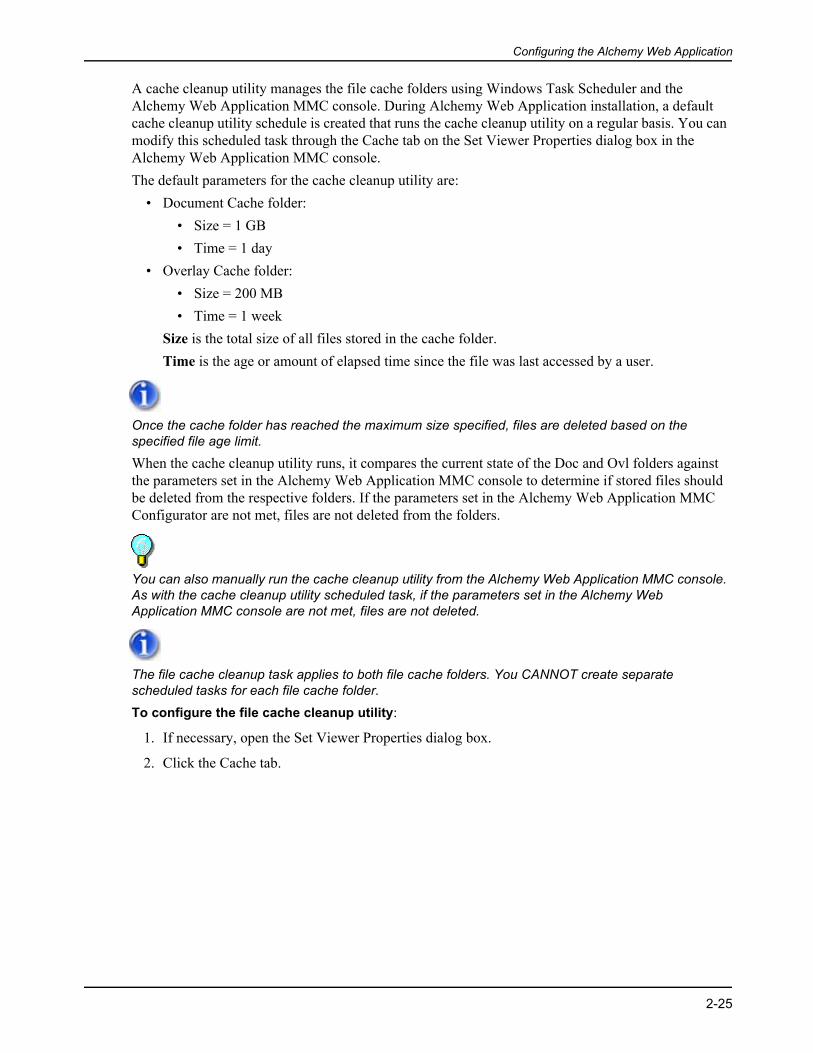
Set Viewer Properties dialog box, Cache tab
3. Under Directory Settings, select the cache folder whose properties you want to configure from the Cache Directories drop-down list.
4. Enter the maximum cache directory size for the selected cache folder in the Limit cache directory size to box.
5. Select the maximum cache directory size unit from the Cache Directory Size Unit drop-down list. Your choices are:
• megabytes (MB)• gigabytes (GB)
6. Enter the maximum file age in the Remove documents older than box.
7. Select the document age range from the Remove documents older than drop-down list. Your choices are:
• hours• days• weeks• months
8. Do one of the following:• Click Apply to save your changes.• Click OK to save your changes and close the Set Viewer Properties dialog box.
To edit the cache cleanup utility scheduled task:
The default installed cache cleanup scheduled task is configured to run daily (once every 24 hours) at 12:01 AM. The initial start date for this task is the computer system date.
Configuring the Alchemy Web Application
2-27
Click Run Cache Cleanup Utility under Apply Directory Settings to, to manually run the cache cleanup utility if you want to clean the cache folders inbetween the scheduled task.
1. If necessary, open the Set Viewer Properties dialog box.
2. Click the Cache tab.
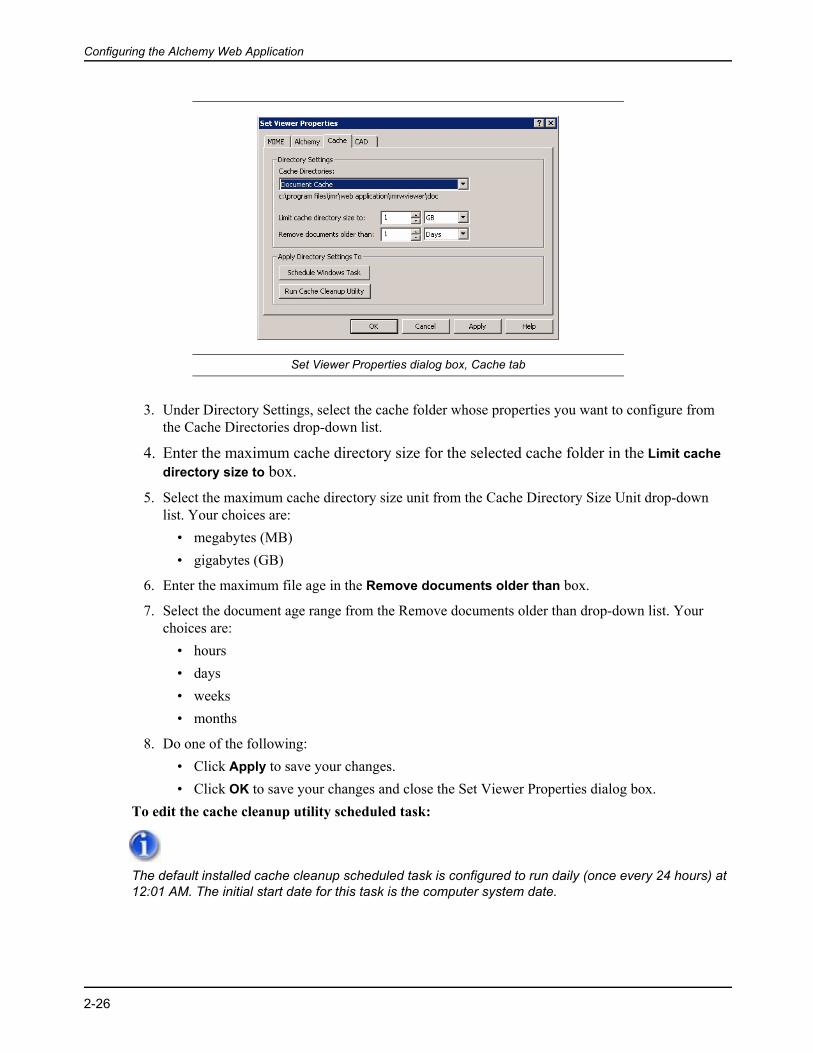
3. Under Apply Directory Settings to, click Schedule Windows Task.The Set Cache Cleanup Task Properties dialog box appears.
Set Cache Cleanup Task Properties dialog box
4. Edit the cache cleanup task properties as necessary.
5. Click OK to save your settings and close the Set Cache Cleanup Task Properties dialog box.
The name of the cache cleanup utility scheduled task is xxxxxxcachecleanup, where xxxxxx is the name of the virtual directory on the Alchemy Web Application computer. When editing the scheduled task, DO NOT change this task name. If you do, the task will not run.
CONFIGURING CAD VIEWER SETTINGS
The following settings only apply if you have the appropriate Spicer ViewCafé software that allows you to view CAD files. Otherwise, you should view CAD files using either Native or Neutral viewing.

Configuring the Alchemy Web Application
2-28
By default, when running Alchemy Web in a Windows 2003 Server environment, the Alchemy Web Application uses Spicer ViewCafé version 3.2 to view CAD files. If you use Spicer ViewCafé version 3.1, you will need to edit your Web.config file so that Alchemy Web will recognize your version of Spicer ViewCafé.
The Web.config file is located in the Web Application directory on the computer where you installed Alchemy Web Application.
To edit your Web.Config file to use Spicer ViewCafé version 3.1:
1. Open your Web.config file in a suitable text editor.
2. Locate the following lines of code:<!-- THIS VALUE IS NOT EXPOSED IN THE ADMINISTRATIVE MMC Snap-In-->
<!-- Depending on the version of View Cafe - different JAR files may be necessary. -->
<!-- ViewCafe 3.1 JAR File name -->
<!-- <add key="CADJARFileName" value="install3d-1_2_1_04.jar" /> -->
<!-- ViewCafe 3.2 JAR File name -->
<add key="CADJARFileName" value="install3d-1_3_1.jar"/>
3. Under ViewCafe 3.2 JAR File name, comment out the following line:<add key="CADJARFileName" value="install3d-1_3_1.jar"/>
4. Under ViewCafe 3.1 JAR File name, remove the comment marks from the following line:<!-- <add key="CADJARFileName" value="install3d-1_2_1_04.jar" /> -->
5. When finished, save your changes and close the Web.config file.
6. Proceed with configuring Alchemy Web to use Spicer ViewCafe to view CAD files.When you enable Alchemy Web to view CAD files using Spicer ViewCafé the default download location for the JRE file is http://java.sun.com/products/plugin/1.3/jinstall-13-win32.cab. Under certain circumstances you may need to change this default download location. You can do this by editing your Web.config file.To change the default JRE file download location:
1. Open your Web.config file in a suitable text editor.
2. Locate the following lines of code under <!-- CAD entries -->:<!-- This entry by default points to Sun Microsystems. Clients can modify this to point to a client specific location where this CAB file is located. -->
<add key="JREDownloadLocation" value="http://java.sun.com/products/plugin/1.3/jinstall-13-win32.cab" />
3. Modify the following line of code to include your alternate download location:<add key="JREDownloadLocation" value="http://java.sun.com/products/plugin/1.3/jinstall-13-win32.cab" />
4. When finished, save your changes and close the Web.config file.
5. Proceed with configuring Alchemy Web to use Spicer ViewCafe to view CAD files.To configure your CAD viewer settings to use Spicer ViewCafé:
Configuring the Alchemy Web Application
2-29
1. If necessary, open the Set Viewer Properties dialog box.
2. Click the CAD tab.
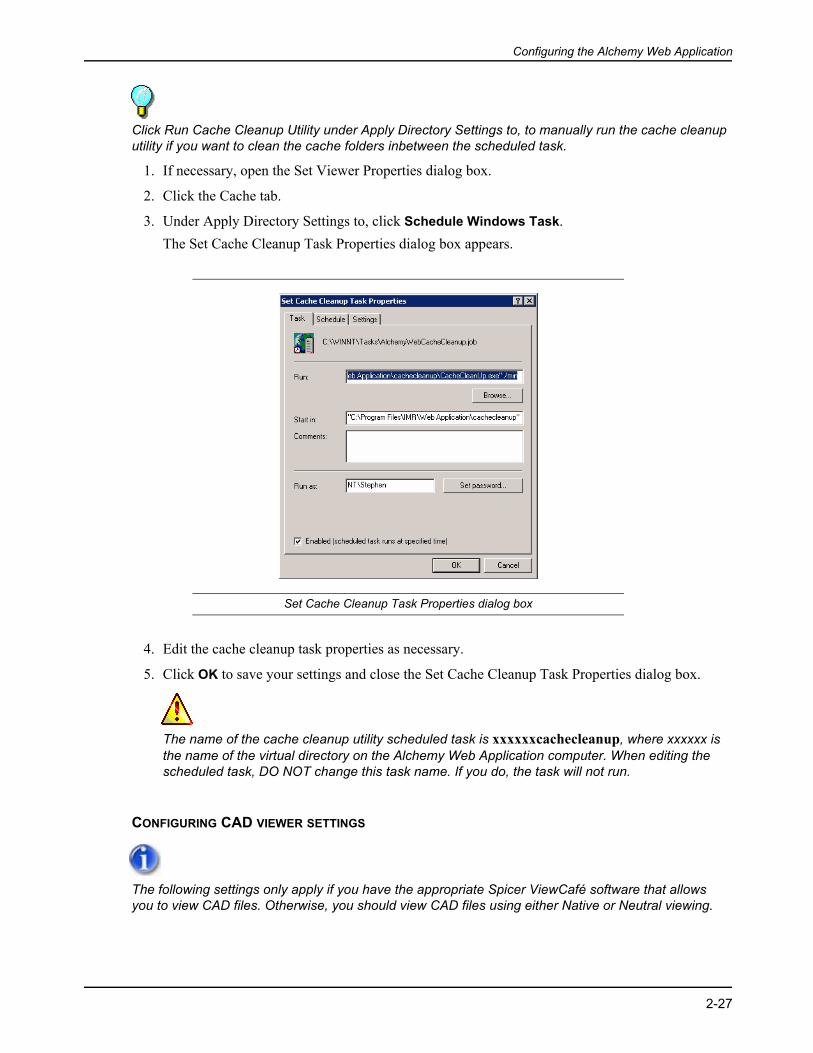
Set Viewer Properties dialog box, CAD tab
3. Select the Enable CAD Viewing check box.
4. Enter the appropriate information for your Spicer ViewCafé CAD viewing software
5. Do one of the following:• Click Apply to save your changes.• Click OK to save your changes and close the Set Viewer Properties dialog box.
CONFIGURING ALCHEMY WEB TO VIEW LARGE FILES
When viewing, adding, or downloading large (10 MB or greater) files, users may receive an error message that states, “The page cannot be displayed.” This error occurs when an ASP.NET HTTP runtime setting is too small for the file being processed. This size limit is controlled by the MaxRequestLength=“10000” setting in the web.config file. The default Web page size limit of 10,000 means that the maximum size of an HTTP request is 10 MB. Large files embedded in an HTTP request through Alchemy Web can exceed this maximum limit. To prevent this error from occurring, you need to modify the MaxRequestLength setting in the web.config file.To modify this setting:
1. Open the web.config file in a text editor such as Notepad.
2. Modify the MaxRequestLength setting as necessary and save your changes to the web.config file.
You may need to change this setting a few times before finding the correct total size limit for HTTP requests through Alchemy Web. This is due to the fact that the total HTTP request is actually larger than the file itself. For example, if the largest file your Alchemy clients will request is 10 MB, you may need to set the MaxRequestLength in the web.config file to 11000 to cover the total request size.

Configuring the Alchemy Web Application
2-30
A-1
APPENDIX ACONSIDERATIONS FOR FIREWALLS AND ALCHEMY WEB REMOTING PROTOCOL
WHAT THIS CHAPTER COVERS
Alchemy Web Application and the Web Service component of the Alchemy Web Engine Platform use .NET Remoting, which is an architecture that simplifies communication between objects located in different process domains or on different computers. The .NET Remoting facilitates communication between clients; Alchemy Web Application and the Alchemy Web product; the Web Service in the Alchemy Web Engine Platform product and the Alchemy Web Engine, allowing computer configuration flexibility and scalability. .NET Remoting uses different Channels (transport protocols) and Formatters (serialized messages passed between objects to a specific stream format) to enable communication between objects across a remoting boundary. Captaris has tested various protocols and formatters for performance and throughput. The TCPBinary channel/formatter out performed all others tested. Therefore, Alchemy Web and Alchemy Web Engine Platform are released configured for TCPBinary.Changes to the standard protocol configuration will only be necessary if there is a firewall between the client computer, which is also the IIS server, and the Alchemy Web Engine computer, and you do not wish to open a TCP port in your firewall. Under these conditions remoting protocol should be changed to HTTPSOAP. To do this, you will need to change the TCPBinary channel/formatter to the HTTPSOAP protocol in three configuration files.The changes required to convert these files to HTTPSOAP are marked in bold font in the file examples. Modifications to these files can be performed in a text editor such as Notepad. Before you begin, make a copy of all three files with a prefix in the file name of TCPBin for later identification.This chapter contains the following sections:
• Modifying LicenseManagerService.exe.config• Modifying PoolManagerService.exe.config• Modifying PlatformClient.exe.config
A.1 MODIFYING LICENSEMANAGERSERVICE.EXE.CONFIG
File: LicenseManagerService.exe.configLocation: ..\Web Engine directory of the computer on which you installed Alchemy Web Engine.File content:
A-2
<configuration>
<system.runtime.remoting>
<application name="AlchemyWebLicenseManager">
<service>
<wellknown mode="Singleton" type="IMR.Alchemy.Platform.LicenseManager, LicenseManager" objectUri="LicenseManager.soap"/> </service>
<channels>
<channel ref="http" port="8001"> delete:<clientProviders> delete:<formatter ref="binary"/> delete:</clientProviders> </channel>
</channels>
</application>
</system.runtime.remoting>
<appSettings>
<add key="LicenseVersionMajor" value="7"/>
<add key="LicenseVersionMinor" value="3"/>
<add key="AuHomeServerPortNumber" value="3234"/>
<add key="AuHomeServer" value="DEVSERVER"/>
<add key="AuServiceName" value="Alchemy Server"/>
<add key="AuServiceStartUpTimeOut" value="60"/>
<add key="ApplicationURL" value="http://localhost:8001/AlchemyWebLicenseManager/LicenseManager.soap"/>
<add key="RenewInterval" value="300000"/>
<add key="ConnectionExpireInterval" value="300000"/>
<add key="ConnectionRetryInterval" value="15000"/>
</appSettings>
</configuration>
A.2 MODIFYING POOLMANAGERSERVICE.EXE.CONFIG
File: PoolManagerService.exe.configLocation: ..\Web Engine folder of the computer on which you installed Alchemy Web Engine.File content:<configuration>
<system.runtime.remoting>
<application name="AlchemyWebPlatformPoolManager">
<service>
<wellknown mode="Singleton" type="IMR.Alchemy.Platform.PoolManager, PoolManager" objectUri="PoolManager.soap" />
A-3
</service>
<channels>
<channel ref="http" port="8000" > delete:<clientProviders> delete: <formatter ref="binary"/> delete:</clientProviders> </channel>
</channels>
<client url="http://localhost:8001/AlchemyWebLicenseManager"> <wellknown type="IMR.Alchemy.Platform.LicenseManager, LicenseManager" url="http://localhost:8001/AlchemyWebLicenseManager/LicenseManager.soap" /> </client>
</application>
</system.runtime.remoting>
<appSettings>
<add key="ApplicationURL" value="http://localhost:8000/AlchemyWebPlatformPoolManager/PoolManager.soap" /> </appSettings>
</configuration>
A.3 MODIFYING PLATFORMCLIENT.EXE.CONFIG
File: PlatformClient.exe.config Location: ..\Web Application\config folder of the computer where Alchemy Web Application was installed.File content:<configuration>
<system.runtime.remoting>
<application name="AlchemyWebPlatformPoolManagerClient">
<client url="http://devserver.imrlab.com:8000/AlchemyWebPlatformPoolManager">
<wellknown type="IMR.Alchemy.Platform.PoolManager, PoolManager" url="http://devserver.imrlab.com:8000/AlchemyWebPlatformPoolManager/PoolManager.soap"/> </client>
<client url="http://devserver.imrlab.com:8001/AlchemyWebLicenseManager">
<wellknown type="IMR.Alchemy.Platform.LicenseManager, LicenseManager" url="http://devserver.imrlab.com:8001/AlchemyWebLicenseManager/LicenseManager.soap"/> </client>

A-4
<channels>
<channel ref="http" clientConnectionLimit=“100”/> </channels>
</application>
</system.runtime.remoting>
</configuration>
For the changes to take effect restart the Web Application (restart IIS) and start and stop the Web Engine services.
B-1
APPENDIX BSECURING DATABASE ACCESS IN ALCHEMY WEB
WHAT THIS CHAPTER COVERS
Like Alchemy Server, Alchemy Web supports both classic Alchemy database security and Alchemy Server Integrated Security introduced in Alchemy Release 7.3. Using classic Alchemy database security or Alchemy integrated security you can manage access to database groups, individual databases and folders or even specific files within a single database. The installation configuration of Alchemy Web, however, determines how you enable and manage database security within Alchemy Web.This chapter contains the following sections:
• IIS Security Through Authentication• Classic Alchemy Database Security in Alchemy Web• Classic Alchemy Database Security Setup Considerations for Alchemy Web• Alchemy Server Integrated Security in Alchemy Web• Alchemy Server Integrated Security Setup Considerations: Creating Multiple Web Sites
B.1 IIS SECURITY THROUGH AUTHENTICATION
Alchemy Web works with Microsoft Internet Information Services (IIS) to provide Internet/Intranet access to Alchemy databases for Alchemy Web clients. IIS provides user authentication methods for client access control.Alchemy Web supports Anonymous access, Basis authentication and Integrated Windows authentication methods. The Alchemy Web site that was created when you installed Alchemy Web Application inherits its authentication methods from the IIS master properties. This means that by default, your Alchemy Web site will probably initially have anonymous access and Windows Integrated authentication enabled.Anonymous access allows any Web browser user with knowledge of your URL to access your Alchemy databases controlled through Alchemy Web. In certain instances, this may be acceptable for your specific business model. If anonymous user access is not acceptable, you can disable this setting at the Web site level through the IIS Administrative console. For instructions regarding modifying authentication settings through the IIS Administrative console, see “Setting Display and IIS-Related Properties” on page 2-12.
B-2
When you disable anonymous access, all Web browser users attempting to access your Alchemy Web published databases, are authenticated as a valid domain user in your environment. If authentication fails, the user attempting to access the database is not granted access. If your business needs require both anonymous and authenticated user access, you can create an Alchemy Web site for each type of user access. For more information regrading setting up different types of Alchemy Web sites, see “Alchemy Server Integrated Security Setup Considerations” on page B-4.
B.2 CLASSIC ALCHEMY DATABASE SECURITY IN ALCHEMY WEB
Classic Alchemy database security where database passwords, security groups and group passwords can be applied to Alchemy databases functions the same in Alchemy Web as in Alchemy. Each database in the list of databases that are enabled/published for Alchemy Web is checked for database password or security group(s). When secured databases are found the browser user is prompted for the database password and/or security group name and password for each secured database in the list. The browser user must enter the correct information for all secured databases or access is denied to all databases in the list. If there is a mix of secured and unsecured databases and the browser users omits all password information for the secured databases and presses the Submit button on the page the databases without security will be made available.
B.3 CLASSIC ALCHEMY DATABASE SECURITY SETUP CONSIDERATIONS FOR ALCHEMY WEB
No special setup is required other than adding security to databases through Alchemy Build if not already added. Refer to ‘Overview of Security’ in the Alchemy Build on-line help.
B.4 ALCHEMY SERVER INTEGRATED SECURITY IN ALCHEMY WEB
Alchemy Server integrated security is used to maintain more precise access control over databases managed by Alchemy Server. Database access is managed by creating specific Alchemy security roles then mapping domain/local groups and/or users and databases to those roles. The first step in using Alchemy Server integrated security with Alchemy Web is planning and defining the roles needed for your business environment, then setting up these roles in Alchemy Server if you have not already done so. Refer to the Alchemy Server Administrator’s Guide, ‘Using Alchemy Server Integrated Security’ for more information regarding defining and creating roles needed to implement Alchemy Server Integrated Security.Alchemy Web installation brings additional considerations to the database security plan. Browser users will be accessing databases and their user IDs must be added to the Alchemy Server integrated security roles along with the databases they are allowed to access. The browser user IDs could be their network logon IDs or could be anonymous users depending on the IIS (Internet Information Server) authentication methods in place for your Alchemy Web site(s). In addition to user IDs, consideration must be given to the computer/resource configuration for Alchemy Web, single computer or multiple computers and to the administration requirements for managing the security plan.

B-3
B.5 ALCHEMY SERVER INTEGRATED SECURITY SETUP CONSIDERATIONS: CREAT-ING MULTIPLE WEB SITES
The first step is to define and implement roles for your Alchemy Web browser users and their databases. This is accomplished through the Alchemy Server Configurator, see instructions in the Alchemy Server Administrator’s Guide.The deployment of Alchemy Web components and Alchemy databases on single or multiple computers and the setup requirements for service logons are the same with or without integrated security.
*Domain Acct. is a standard Service Account that is typically added to allow services to logon with sufficient permissions to access resources across computer boundaries. The domain account must also be a member of the administrator’s group on each computer.The method of authentication, as defined in the IIS properties for the Alchemy Web Web site(s)), determines the groups/user IDs that will be added to role definitions in integrated security. Because integrated security is related to your Windows domain security configuration, the recommended IIS authentication method is Integrated Windows authentication. That means your client users are already defined in your domain security configuration. You may need to support both domain and anonymous users. This is accomplished by setting up different Web sites for each user type.To create another Web site for anonymous user access:
1. Copy the Web Application folder from your Alchemy Web Application installation location to another location on the drive.
2. Change the name of the copied Web Application folder to a different, unique name, e.g., Anonymous.
3. Create a new virtual directory in IIS pointing to the new Web Application (Anonymous) folder.
4. Add a new domain user to represent anonymous users with adequate permissions to cross computer boundaries and access your ‘public’ databases.
5. In the new virtual directory you created, enable Anonymous access only and replace the IIS default anonymous user with the new domain user you added through the Properties menu | Directory Security tab.
6. Set identity impersonate in the web.config file in the new Anonymous folder. Open the web.config file in Notepad. Find the <!--AUTHENTICATION section. Add <identity impersonate=”true”/> (this is case sensitive) and save the file.
Alchemy Server Location
Web Engine Location
Web AppLocation
Database Location
Alchemy Server Service Logon Acct
LM service Logon Acct.
PM service Logon Acct.
1. Server1 Server1 Server1 Server1 Local System Local System Local System2. Server1 Server1 Server1 Server2 Domain Acct * Domain Acct Domain Acct3. Server2 Server2 Server1 Server2 Domain Acct Domain Acct Domain Acct4. Server3 Server2 Server1 Server3 Domain Acct Domain Acct Domain Acct

B-4
For Windows 2003 Server, you must also set the <authentication mode=“Windows”> to “None”
Remember to remove <identity impersonate=”true”/> from the web.config file if you ever disable anonymous access for this web site.
7. Create a role in integrated security for the new anonymous domain user and associate ‘public’ databases with no sensitive information to the role.
8. Direct your anonymous users to these databases by providing a new URL for the new ‘anonymous’ Web site, e.g., http://computername/anonymous.
9. Disable Anonymous access for the original Web Service Web site. Client application users will then be authenticated in IIS by their computer logon user IDs. That user ID must be a valid domain user typically added to a group of users. These are the user IDs/groups that are assigned to the integrated security roles along with the databases that they can access.
10.Direct your “authenticated” users to the databases controlled by integrated security by providing them a URL as well, e.g., http://computername/alchemyweb.
To disable Anonymous access, remove the Anonymous check mark under Anonymous access and authentication control on the Directory Security tab in the properties of the Alchemy Web virtual directory.
11.Add the .rsf registered file type to the new virtual directory.• In the Computer Management console, under Internal Information Services, right-click the
Default Web Site node and click Properties from the shortcut menu.• Click the HHTP Headers tab.• Under MIME type, click the File Types button.• Click New Type.• Enter “RSF” into the Associated extension field and “Alchemy Internal Viewer” into the
Content type (MIME) field.• Click OK twice to return to the Web Site Properties dialog box.• Click Apply to save your settings• Click OK to close the dialog box.
B-5
Adding the .rsf registered file type to the default Web site forces all virtual directories beneath it to inherit this setting. If you want to restrict this setting to specific virtual directories, apply the setting to the specific virtual directory instead of the default Web site.
If your Alchemy Web Application computer is running Windows 2003 Server, you must grant the Everyone group write access to the Temp folder under your new Web Application (Anonymous) folder before Alchemy Web clients will be able to view files from this location. Alternatively, you can assign the Users group to the Temp folder under your new Web Application (Anonymous) folder and then give the Users group write permissions to the Temp folder.
To run the scheduled Windows task for the Alchemy Web Application cache cleanup utility in your new Web site, you need to share the IMRWViewer folder located under the new Web Application (Anonymous) folder. The share name for the IMRWViewer folder must be virtual directory name_IMRWViewer, e.g., Anonymous_IMRWViewer.
The logon user ID of the administrator using Alchemy Web Engine Configurator (MMC snap-in) to add Alchemy Servers, refresh, enable, and disable database lists from Alchemy Servers must be added to the administrator’s role in integrated security with all databases added to that role. The Alchemy Web Engine services logon accounts must also be added to the administrator role.Alchemy Web and Web Engine secure user logon credentials through encryption/decryption. The Alchemy Web Engine install program generates the required key file and places the file in the appropriate location when installing both Alchemy Web and Web Engine on a single computer. When installing Alchemy Web on one computer and Alchemy Web Engine on another computer, the key file, AuWSes.blb, generated and installed on the Web Engine computer in the WINNT\system32 directory must be copied to the WINNT\system32 directory of the computer where Alchemy Web was installed.The key file generator utility, AuWSesGen.exe, is also provided for your use on-site to generate new key files in case of a damaged or compromised file. This utility is installed in the Web Engine directory and will generate an AuWSes.blb file in the directory where the AuWSesGen.exe is executed. You must move the newly generated AuWSes.blb file to the WINNT\\system32 directory of the computer(s) where Alchemy Web Application is installed and to the Alchemy directory of the computer where the Alchemy Web Engine is installed.

B-6
C-1
APPENDIX CUSING SIMPLE INTEGRATION WITH ALCHEMY WEB
WHAT THIS CHAPTER COVERS
This chapter describes how you can integrate Alchemy Web functions with external third party applications and provides examples for you to use to create your own integration models. It contains the following sections:
• Using Simple Integration with Alchemy Web• Simple integration examples
C.1 USING SIMPLE INTEGRATION WITH ALCHEMY WEB
Alchemy Web includes the ability to access certain Alchemy Web functions through external, third-party applications using a URL or link. This simple integration of Alchemy Web with external applications allows users to perform the following Alchemy Web tasks through an external application:
• Explore• Search• View• Download
For each of the above functions, the user is required to pass the necessary parameter directly in the URL for the intended function. When received, the function in Alchemy Web parses the parameters from the Query string of the URL and executes the necessary function and renders the appropriate page according the values passed. For example, if a user wants to execute a file download directly from Alchemy Web using an external application, she would execute the following URL in her web browser:
DownLoadFile.aspx?Database=Alchemy 5_0a Demo Database&ItemID=217&Document Title=myJPG.jpg
• Database is the name of the database to be searched for the item in Alchemy Web• ItemID is the ID assigned to the item by Alchemy• Document Title is the title of the document as entered into the Document Title profile field in
the database in AlchemyFollowing is a list of examples for each Alchemy Web function that supports simple integration with an external application.
C-2
Each parameter entered into the URL string is evaluated based on its position or order in the query string and not on the label identifier. The order of the parameters as specified in each example is required.
Each example represents a single URL and should be entered as such in the Address field of your Web browser.
C.2 SIMPLE INTEGRATION EXAMPLES
DOCUMENT PROFILE SEARCH
AlchemyWeb.aspx?Action=Search&Database= DatabaseName1|DatabaseName2&SearchType=Document Profile&SearchValue=mysearchcriteria&ProfileFieldName=Document Title
The Database parameter allows the user to specify multiple databases by deliminating each database with the bar ( | ) character. If the user wants to search all available databases in Alchemy Web, she must enter “All Databases” as the database name in the URL.
DOCUMENT CONTENTS SEARCH:AlchemyWeb.aspx?Action=Search&Database= DatabaseName1|DatabaseName2&SearchType=Document Contents&SearchValue=mysearchcriteria
The Database parameter allows the user to specify multiple databases by deliminating each database with the bar ( | ) character. If the user wants to search all available databases in Alchemy Web, she must enter “All Databases” as the database name in the URL.
EXPLORE
AlchemyWeb.aspx?Action=Explore&Database=DatabaseName
VIEW ITEM
ViewItemPage.aspx?Database=DatabaseName&ItemID=217&Document Title= myJPG.jpg
DOWNLOAD
DownLoadFile.aspx?Database=Alchemy 5_0a Demo Database&ItemID=217&Document Title=myJPG.jpg
C-3
Software LicensingJPEGLIB: This software is based in part on the work of the Independent JPEG Group.FREETYPE: Portions of this software are copyright © 1996-2002 The FreeType Project (www.freetype.org). All rights reserved.ZLIB: Portions of this software are Copyright © 1995-2003 Jean-loup Gailly and Mark Adler.LIBPNG: Libpng versions 1.0.7, July 1, 2000, through 1.2.5, October 3, 2002, are Copyright (c) 2000-2002 Glenn Randers-Pehrson.REGEXP: The regular expressions library in this software is based on the work of Henry Spencer and is subject to the following copyright:Copyright 1992, 1993, 1994 Henry Spencer. All rights reserved.This software is not subject to any license of the American Telephone and Telegraph Company or of the Regents of the University of California.Permission is granted to anyone to use this software for any purpose on any computer system, and to alter it and redistribute it, subject to the following restrictions:
1. The author is not responsible for the consequences of use of this software, no matter how awful, even if they arise from flaws in it.2. The origin of this software must not be misrepresented, either by explicit claim or by omission. Since few users ever read sources, credits must appear
in the documentation.3. Altered versions must be plainly marked as such, and must not be misrepresented as being the original software. Since few users ever read sources,
credits must appear in the documentation.4. This notice may not be removed or altered.

C-4
Glossary-1
GLOSSARY
Access Control List (ACL)List of databases under Alchemy Server control that have been mapped to a security role to restrict access. See also authorized databases.
Alchemy Advanced ServerThe basis for applications requiring integrated document management, records management, compliance and workflow, along with fixed content management.
Alchemy Standard ServerThe basis for fixed content management applications such as imaging and COLD.
authorized databasesDatabases under Alchemy Server control that have been mapped to a security role. See also ACL
authorized license typesAlchemy license types that you assign to security roles to restrict user access to Alchemy applications and functionality. See also License Control List.
buildThe process of indexing and copying files within a database to your selected media.
check inAllows users to add revised documents back into the database. See also Library Services.
check outAllows users to edit documents in a database. You can only check out an original document or the most recent version of a document. See also Library Services.
data port numberThe specific communication channel that Alchemy Server uses to communicate with client computers. The default data port number that Alchemy Server uses is 3234.
databaseOrganized collection of information grouped together for ease and speed of search and retrieval.
database groupsLimits user access to specific folders within a database by limiting user access to specific folders within the databases assigned to the security role.

Glossary-2
database settingsControls what Alchemy functions and features are available to users assigned to a security role for spe-cific databases mapped to that same security role. See also Role Based Access Control.
delete document versionsAllows users to delete all versions of a document from the published version and below in the docu-ment version hierarchy, including the original. Unlike the Roll back versions feature, deleting docu-ment versions does not rescind (cancel) the version of the document. See also Library Services.
document profileDocument profiles are defined at the document level for an individual document, or for a group of documents with a “batch profile.” A document’s profile may contain different infor-mation than the profile of the folder where it resides.
document titleA way for you to reference your files. The document title is identical to the file name unless you change it.
fieldsThere are two groups of fields available for use with profiles: system fields and user-defined fields. Fields are a key component of profiles; they are used for entering data, displaying infor-mation, and searching databases.
file detailsThe file creation/modification date and time, the file size, and the file attributes. You can choose to display the file details in the Viewer pane.
folder profileFolder profiles are defined at the folder level to associate the same profile information with a group of documents contained in the same folder. A document’s folder profile can contain dif-ferent information than the individual profiles of the documents it contains.
indexingThe process of building data structures for a database that contain the location of every word or other data item. Indexes allow searchers to locate items rapidly without searching through the entire body of data.
indexing charactersThe character set used to recognize indexable words (e.g., A - Z, 0 - 9).
inherited roleAllows managers to possess or inherit the security roles of their employees without having to actually assign themselves to their employees’ security roles or map specific databases or database groups to the security role in which the manager is a member. When inheriting a security role, the manager inher-its the databases mapped to the security role and any custom Database FCL settings associated with the databases mapped to the inherited security role.. See also Role Based Access Control.
integer numberA numeric field type. A number between -2,147,483,648 & 2,147,483,647. Allows for enter-ing whole numbers.
Integrated Security
Glossary-3
Feature of Alchemy Server that allows administrators to control user and group access to data-bases based on the organizational model of a company or other organization.
Library ServicesFeature in Alchemy Advanced Server that allows users to edit the content and metadata of files contained in databases under Alchemy Server control.
License Control List (LCL)List of Alchemy license types that have been assigned to a security role to restrict access to Alchemy applications and functionality. See also authorized license types.
license server nameThe network name of the server machine used to license all Alchemy services, clients and extensions. Alchemy product licenses are controlled by the Alchemy Server service installed on the licensing server machine.
lookup fieldA field containing data from a lookup table. You might want to use a lookup table to index a field if the number of possible values are small, or for consistent data entry. Documents can then be indexed by selecting a keyword from the drop-down list for that field.
lookup tableA table containing values for lookup fields. For example, if documents were indexed by department, a Department lookup table would contain values like Sales, Marketing, Engineer-ing, and Admin. When indexing the documents, the user could choose from these values, or enter a different value.
maximum concurrent threadsThe maximum number of active threads that the Alchemy Server service attempts to maintain. The default maximum is equal to the number of processors installed on the server machine. If you leave this option set to zero (0), the server uses the automatically calculated setting.
NOTA Boolean connector used in search criteria. The query, CD-ROM NOT MULTIMEDIA, retrieves all documents mentioning CD-ROM except for documents that also mention MUL-TIMEDIA.
ORA Boolean connector used in search criteria. When OR is used between two search words in a query, it retrieves of all documents that mention either of the two words.
overwrite documentAllows the user to overwrite (replace) the original document or previous version when the modified document is checked in. See also Library Services.
page map sizeDetermines the limit amount of change/update tracking Alchemy Server performs on each file in each database that the server controls. The default value is to track the last 1000 changes/updates made to each file in the database.
page map delta
Glossary-4
Determines the percentage of the page map that the server clears when the server reaches the page map size limit. The default page map delta is 20%. This value means that the server deletes 20% of the old-est changes/updates from the page map when the server reaches the limit.
parenthesesAn element of a Boolean logic search criteria used to group search criteria together and alter their precedence. For example, the query CAR AND (BOAT OR PLANE) is distinct from (CAR AND BOAT) OR PLANE.
pool manager retriesThe number of times an Alchemy client can attempt to access a user thread from the Alchemy Web Engine before the request is denied.
pool manager sizeThe number of user requests (thread) that can be made to the Alchemy Web Engine at the same time. The minimum number is 2. The maximum number is 64. A value of 1 can be used when developing external applications with the Alchemy Web SDK Toolkit.
precisionA setting for Floating Point Number fields types that allows for rounding numbers to the spec-ified number of decimal places. Numbers greater than or equal to five are rounded up to the next number.
profileSummarized data used to attach search retrieval keywords to folders and files contained in databases. The data is displayed in fields, which are viewed with their associated folders and/or files.
publish document versionAllows users to designate (declare) the original or any version of a document in a database as the final draft of the document for use. See also Library Services.
query profileDatabase designers can create a custom Query Profile that includes only specific fields for searching. When the Query Profile is displayed in the Search dialog box, the Document Con-tents, Document Profile, Folder Profile, and Settings Tabs are hidden. A searcher only sees the Query Profile and the fields it contains. A well designed Query Profile can help to simplify the search process by limiting a searcher’s choices in the Search dialog box.
Role Based Access ControlAlchemy Advanced Server feature that allows administrators to set user specific access to over 140 unique end user functions in Alchemy.
role settingsControls what Alchemy functions and features are available to users assigned to a security role.
roll back document versionAllows users to rescind or cancel a version of a document in the database. When you roll back a ver-sion of a document, you remove that version from the version hierarchy for the document. The remain-ing versions of the document are renumbered accordingly. See also Library Services.
saved query
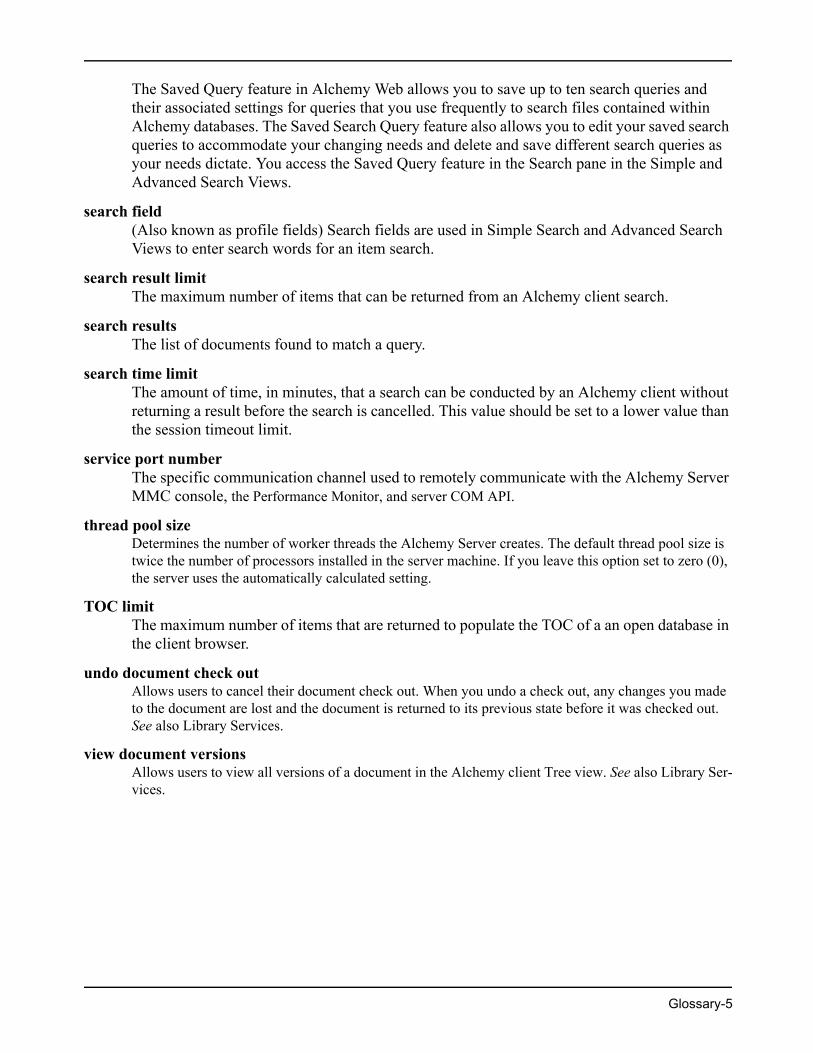
Glossary-5
The Saved Query feature in Alchemy Web allows you to save up to ten search queries and their associated settings for queries that you use frequently to search files contained within Alchemy databases. The Saved Search Query feature also allows you to edit your saved search queries to accommodate your changing needs and delete and save different search queries as your needs dictate. You access the Saved Query feature in the Search pane in the Simple and Advanced Search Views.
search field(Also known as profile fields) Search fields are used in Simple Search and Advanced Search Views to enter search words for an item search.
search result limitThe maximum number of items that can be returned from an Alchemy client search.
search resultsThe list of documents found to match a query.
search time limitThe amount of time, in minutes, that a search can be conducted by an Alchemy client without returning a result before the search is cancelled. This value should be set to a lower value than the session timeout limit.
service port numberThe specific communication channel used to remotely communicate with the Alchemy Server MMC console, the Performance Monitor, and server COM API.
thread pool sizeDetermines the number of worker threads the Alchemy Server creates. The default thread pool size is twice the number of processors installed in the server machine. If you leave this option set to zero (0), the server uses the automatically calculated setting.
TOC limitThe maximum number of items that are returned to populate the TOC of a an open database in the client browser.
undo document check outAllows users to cancel their document check out. When you undo a check out, any changes you made to the document are lost and the document is returned to its previous state before it was checked out. See also Library Services.
view document versionsAllows users to view all versions of a document in the Alchemy client Tree view. See also Library Ser-vices.

Glossary-6
Index-1
AAlchemy Server machine, removing 2-7Alchemy Web Engine
configuring 2-2, 2-4starting 2-7stopping 2-7
Alchemy Web, overview, overview Alchemy Web 1-1
AMP 1-7Annual Maintenance Program See AMP
CCaptaris
consulting services 1-6contacting 1-3documentation feedback 1-7educational services 1-4Englewood office, contacting 1-3sales 1-7technical support 1-5
Configuring Alchemy Web Engine 2-2, 2-4consulting services, contacting 1-6
Ddocumentation conventions 1-2documentation feedback 1-7
Eeducational services, contacting 1-4examples, simple integration C-2
Ffeedback, documentation 1-7
Hhardware, supported 1-8
MMicrosoft Management Console (MMC)
configuring the Alchemy Web Engine snap-in 2-
2, 2-4MMC
configuring the Alchemy Web Engine snap-in 2-2, 2-4
Pprerequisites 1-2
Rremoving Alchemy Server machine 2-7Running Alchemy in a Server Environment B-1–??
Ssales, contacting 1-7simple integration
examples C-2using C-1
starting Alchemy Web Engine 2-7stopping Alchemy Web Engine 2-7supported hardware 1-8
Ttechnical support, contacting 1-5
Uusing simple integration C-1
WWeb Engine
starting 2-7stopping 2-7
web engine, removing Alchemy Server machine 2-7what this guide assumes 1-2
INDEX