Embed Size (px)
Citation preview

(U)//FOR OFFICIAL USE ONLY
1
ALERT! FINAL WORKFORCE NOTIFICATION
The migration for the Alert! MWNS at USAG Wiesbaden is expected to take place on 22 to 26 of
July 2019.
When the migration is complete the Alert! client will be pushed to every user workstation on the
installation.
***FOR NEW CLIENTS – see below. FOR MIGRATED CLIENTS FROM PREVIOUS SYSTEM – go to page 9.
NEW CLIENTS
After the Alert! desktop application has been installed, a log in to the local workstation displays a Client Registration Required popup displays.
Figure 1. Client Registration.
Step 1. Click Register Now; Alert! Client Registration opens web browser and client is prompted for credentials (see step 3)

(U)//FOR OFFICIAL USE ONLY
2
Figure 2. Option to Postpone Client Registration.
Step 2. Click Postpone if time is needed to gather information before registering.
NOTE
ALERT! CLIENT REGISTRATION will only allow postponement for a duration determined by the command. i.e 72hrs. After that a client may not postpone and will be required to register.
Step 3. Windows Security ALERT! SYSTEM MESSAGE dialog displays; select
certificate and click OK.
Figure 3. Windows Security Alert! System Message. Dialog
NOTE
Ensure the most current certificate is selected.

(U)//FOR OFFICIAL USE ONLY
3
Step 4. USG Warning and Consent Banner displays.
Figure 4. USG Warning and Consent Banner.
Step 5. Click I Agree; Create Client page displays.

(U)//FOR OFFICIAL USE ONLY
4
Figure 5. Create Client Page (Example).
2.1.1 Create Client Page
The Create Client page contains three sections: Personal Information, Contact
Methods, and Associations.
Personal Information: Enter First Name and Last Name (required);
optional, enter Middle Name and Rank; CAC EDIPI auto-fills from the
inserted CAC).
Contact Methods:
Phone Numbers (see Section 2.1.2 for detailed phone information):
• In textbox, enter 10-digit phone number (e.g., xxx-xxx-
xxxx); or for international numbers +999-00000000 where 999 is the country code.

(U)//FOR OFFICIAL USE ONLY
5
If the phone number entered is an extension, input the extensionnumber in the Extension textbox. If number directs the caller tophone menu options, input the desired menu option numberfollowed by the extension number separated by a comma with nospaced. (e.g., 2, 1430).
From Usage drop-down, select Work or Home.
From Type drop-down, select Cell, Landline, Shared Landline, orText-only.
Receive short message service (SMS) is selectable when Cell isselected.
Email Addresses Enter email in Email Address textbox and from
Usage drop-down, select Work or Home.
Associations –Associations added to the Create Client page grant
permissions to manage clients, groups, other users, and templates and
allow a Web Interface User (within the associations) to send alerts to the
client. The Associations section contains four buttons: Add Military
Location, Add Command Structure, Add Address, and Add
Additional Attributes.
NOTE
It is necessary to add at least one
association without a start and stop date; if
Save is selected before at least one
association is added, an error message
displays.
Add Military Location NOTE
Service, Region, and Installation drop-downs are mandatory; selection of Service refines the options for additional drop-downs.
Click Add Military Location button; Add Military Location dialogdisplays
(U)//FOR OFFICIAL USE ONLY
6
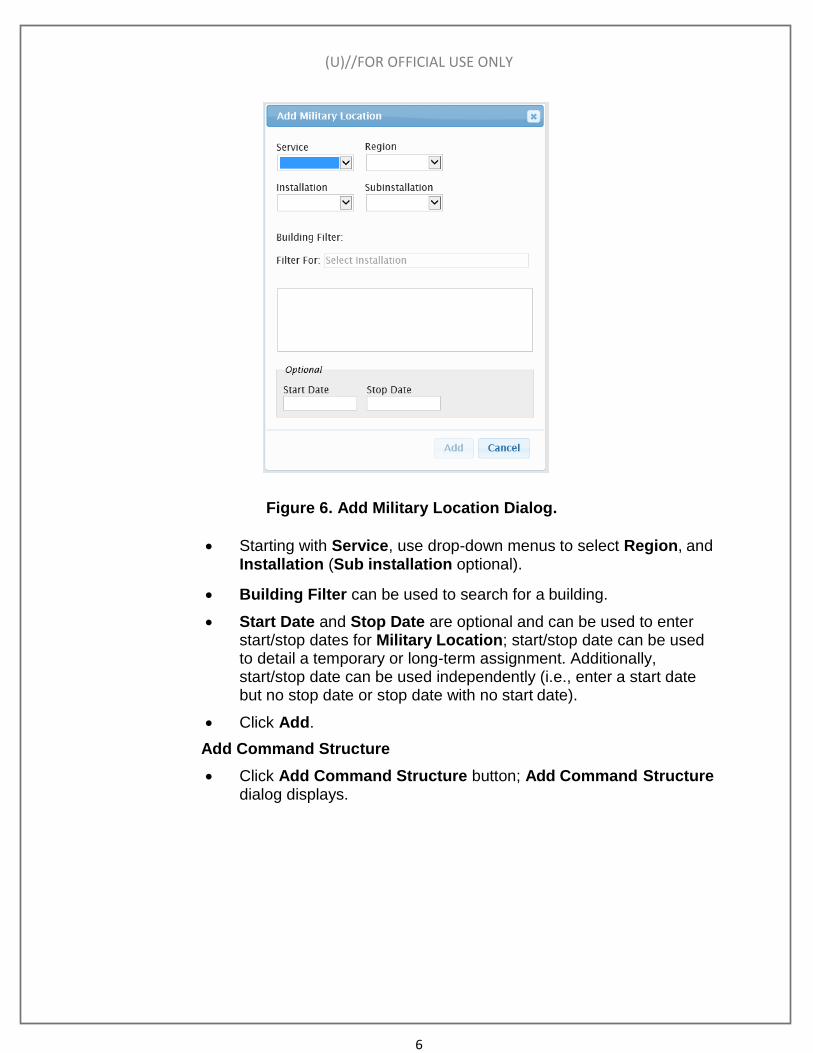
Figure 6. Add Military Location Dialog.
Starting with Service, use drop-down menus to select Region, and Installation (Sub installation optional).
Building Filter can be used to search for a building.
Start Date and Stop Date are optional and can be used to enter start/stop dates for Military Location; start/stop date can be used to detail a temporary or long-term assignment. Additionally, start/stop date can be used independently (i.e., enter a start date but no stop date or stop date with no start date).
Click Add.
Add Command Structure
Click Add Command Structure button; Add Command Structure dialog displays.

(U)//FOR OFFICIAL USE ONLY
7
Figure 7. Add Command Structure Dialog.
Enter Name or Unique Identification Code; start typing command name or UIC and select from list.
Start Date and Stop Date are optional and can be used to enter start/stop dates for Command Structure; start date can be to detail a temporary or long-term assignment. Additionally, start/stop date can be used independently (i.e., enter a start date but no stop date or stop date with no start date).
Click Add or Cancel.
Add Address
Click Add Address button; Add Address dialog displays.
Figure 8. Add Address Dialog.
Complete the address information (textboxes with asterisks (*) are mandatory).
Check Standalone Facility for off-base locations (e. g., Recruiting Office).
Click Add.
Add Additional Attributes

(U)//FOR OFFICIAL USE ONLY
8
Click Additional Attributes button; Add Additional Attributes dialog displays.
Figure 9. Add Additional Attributes Dialog.
Select from available Values.
Click Add.
NOTE
If Add Additional Attributes association is
selected without necessary identifying
information, the following Warning dialog
*displays when client selects the save button.
Figure 10. Insufficient Information Warning Dialog (Example).
Click Yes to save; click No to continue entering association(s).
Step 6. On Create Client page (Figure 5), click Save; Client Information Successfully Created message displays.

(U)//FOR OFFICIAL USE ONLY
9
Figure 11. Client Created Message.
Once all information is completed your registration is complete.
MIGRATED CLIENTS FROM PREVIOUS SYSTEM
If you are only asked for CAC PIN that means your information has been migrated and all you have
to do is update your information, as needed.
To update your information:
In the local taskbar, locate and double-click Alert! icon.
Figure 12. Alert! Icon.
Step 2. Alert! desktop application interface displays; click Edit Client Info it will take client to the Edit client web page (after credential selection and warning banner) .
Step 3. ALERT! SYSYEM MESSAGE dialog displays (Figure 3); select certificate
and click OK.
Step 4. USG Warning and Consent Banner displays (Figure 4); Edit Client page
displays.

(U)//FOR OFFICIAL USE ONLY
10
Figure 13. Edit Client Page (Example).
Step 5. Enter edits as desired and click Save.
Per DoDI 6055.17, DoD Emergency Management (EM) Program, Section 5.5 states,
“Due to life-safety implications of the information being relayed and the requirement to provide immediate
alerts and warnings, members of the primary population must ensure that their personal contact information,
including after-duty hours contact information, as appropriate (e.g., personal cellular phone numbers or
landline phone numbers), email addresses, home address, etc. are entered into the system and regularly
updated or verified every 90 days to remain current and accurate.”

(U)//FOR OFFICIAL USE ONLY
(U)//FOR OFFICIAL USE ONLY
If you have questions regarding the Alert! System or if after migration you have
registration issues, please contact the Alert! Helpdesk at 866-515-0551 or via email at
For further question or concerns contact your installations POC at 548-3008 or via email