Embed Size (px)
Citation preview
ALESIS
QuadraSynth Plus Reference Manual
Important Safety InstructionsWARNING - When using this electric product, basic precautions should alwaysbe followed, including the following:
1) Read all the instructions before using the product.2) Do not use this product near water - for example, near a bathtub,washbowl,kitchen sink, in a wet basement, or near a swimming pool, or the like.3) This product, either alone or in combination with an amplifier andheadphonesor speakers, may be capable of producing sound levels that could causepermanent hearing loss. Do not operate for a long period of time at a highvolume level or at a level that is uncomfortable. If you experience any hearingloss or ringing in the ears, you should consult an audiologist.4) This product should be located away from heat sources such asradiators, heatregisters, or other products that produce heat.5) The power-supply cord on this product should be unplugged from theoutletwhen left unused for a long period of time.6) Care should be taken so that objects do not fall and liquids are notspilled intothe enclosure through openings.7) The product should be serviced by qualified service personnel when:
a) The power supply cord has been damaged; orb) Objects have fallen, or liquid has been spilled onto the product; orc) The product has been exposed to rain; ord) The product does not appear to be operating normally or exhibits a
marked change in performance; ore) The product has been dropped, or the enclosure damaged.
8) Do not attempt to service this product beyon d that described in theuser-maintenance instructions. All other servicing should be referred to qualifiedservice personnel.
Grounding InstructionsThis product must be grounded. If it should malfunction or break down,grounding provides a path of least resistance for electric current to reduce therisk of electric shock. This product is equipped with a cord having an equipment-grounding conductor and a grounding plug. The plug must be plugged into anappropriate outlet that is properly installed and grounded in accordance with alllocal rules andordinances.
DANGER - Improper connection of the equipment-grounding conductor canresult in a risk of electric shock. Check with a qualified electrician or servicemanif you are in doubt as to whether the product is properly grounded. Do notmodify the plug provided with the product - if it will not fit the outlet, have aproper outlet installed by a qualified electrician.

Index
QuadraSynth Plus Piano Reference Manual 5
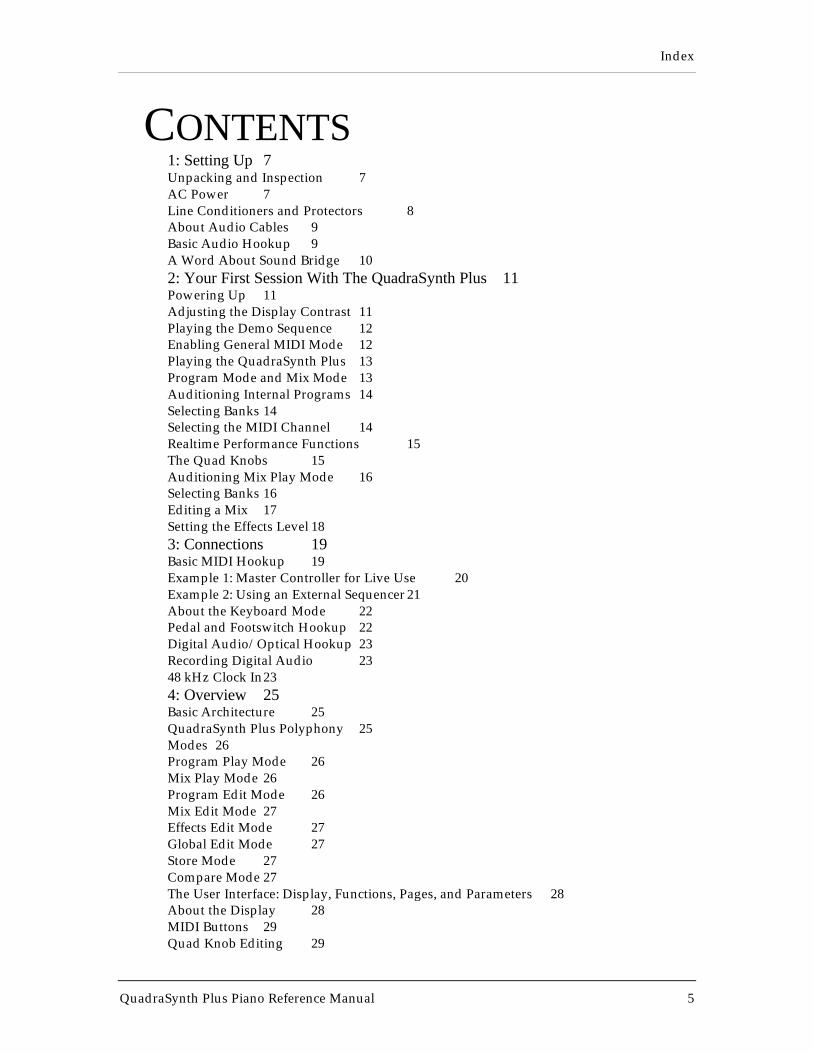
CONTENTS1: Setting Up 7Unpacking and Inspection 7AC Power 7Line Conditioners and Protectors 8About Audio Cables 9Basic Audio Hookup 9A Word About Sound Bridge 102: Your First Session With The QuadraSynth Plus 11Powering Up 11Adjusting the Display Contrast 11Playing the Demo Sequence 12Enabling General MIDI Mode 12Playing the QuadraSynth Plus 13Program Mode and Mix Mode 13Auditioning Internal Programs 14Selecting Banks 14Selecting the MIDI Channel 14Realtime Performance Functions 15The Quad Knobs 15Auditioning Mix Play Mode 16Selecting Banks 16Editing a Mix 17Setting the Effects Level 183: Connections 19Basic MIDI Hookup 19Example 1: Master Controller for Live Use 20Example 2: Using an External Sequencer 21About the Keyboard Mode 22Pedal and Footswitch Hookup 22Digital Audio/Optical Hookup 23Recording Digital Audio 2348 kHz Clock In234: Overview 25Basic Architecture 25QuadraSynth Plus Polyphony 25Modes 26Program Play Mode 26Mix Play Mode 26Program Edit Mode 26Mix Edit Mode 27Effects Edit Mode 27Global Edit Mode 27Store Mode 27Compare Mode 27The User Interface: Display, Functions, Pages, and Parameters 28About the Display 28MIDI Buttons 29Quad Knob Editing 29
Index
QuadraSynth Plus Piano Reference Manual 6
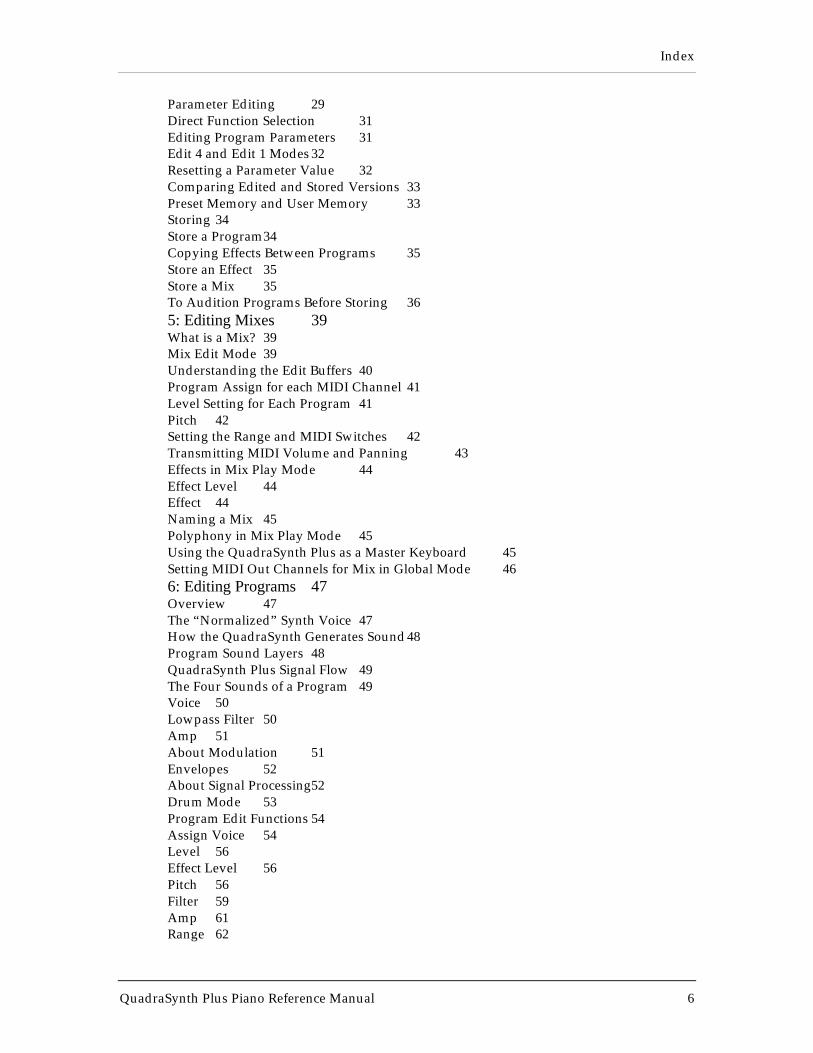
Parameter Editing 29Direct Function Selection 31Editing Program Parameters 31Edit 4 and Edit 1 Modes 32Resetting a Parameter Value 32Comparing Edited and Stored Versions 33Preset Memory and User Memory 33Storing 34Store a Program34Copying Effects Between Programs 35Store an Effect 35Store a Mix 35To Audition Programs Before Storing 365: Editing Mixes 39What is a Mix? 39Mix Edit Mode 39Understanding the Edit Buffers 40Program Assign for each MIDI Channel 41Level Setting for Each Program 41Pitch 42Setting the Range and MIDI Switches 42Transmitting MIDI Volume and Panning 43Effects in Mix Play Mode 44Effect Level 44Effect 44Naming a Mix 45Polyphony in Mix Play Mode 45Using the QuadraSynth Plus as a Master Keyboard 45Setting MIDI Out Channels for Mix in Global Mode 466: Editing Programs 47Overview 47The “Normalized” Synth Voice 47How the QuadraSynth Generates Sound48Program Sound Layers 48QuadraSynth Plus Signal Flow 49The Four Sounds of a Program 49Voice 50Lowpass Filter 50Amp 51About Modulation 51Envelopes 52About Signal Processing52Drum Mode 53Program Edit Functions 54Assign Voice 54Level 56Effect Level 56Pitch 56Filter 59Amp 61Range 62

Index
QuadraSynth Plus Piano Reference Manual 7
Mod 64Pitch LFO 67Amp LFO 70Pitch Envelope 71Filter Envelope 74Amp Envelope 76Name 80Misc. 81Programming Drum Sounds 82Assign Voice 82Level 82Effects Level 83Pitch 83Filter 83Amp 83Range 84Amp Envelope 84Copying Sounds 85Copying Effects 85Initializing Programs 867: Editing Effects 87About Signal Processing87Selecting an Effects Patch in Mix Mode 88Setting Effects Send Levels 88Editing Effects 89Storing Effect Patches In Program Mode 90Storing Effect Patches in Mix Mode 90Copying Effect Patches 91Configurations 91Reverb 98Delay 103Pitch 104Mod 108Mix 109Misc. 110EQ 110Overdrive 1108: Global Settings 113Editing Global Parameters 113LCD Contrast 113General MIDI Mode 113Enabling General MIDI Mode via MIDI 113Master Pitch and Master Tuning114Keyboard Sensitivity 114Keyboard Curve 114Keyboard Transpose 114Keyboard Mode114Controllers A – D 115Reset Controllers A – D 115Controllers A – D Mode 115Pedal 1 and 2 Assignment 116
Index
QuadraSynth Plus Piano Reference Manual 8
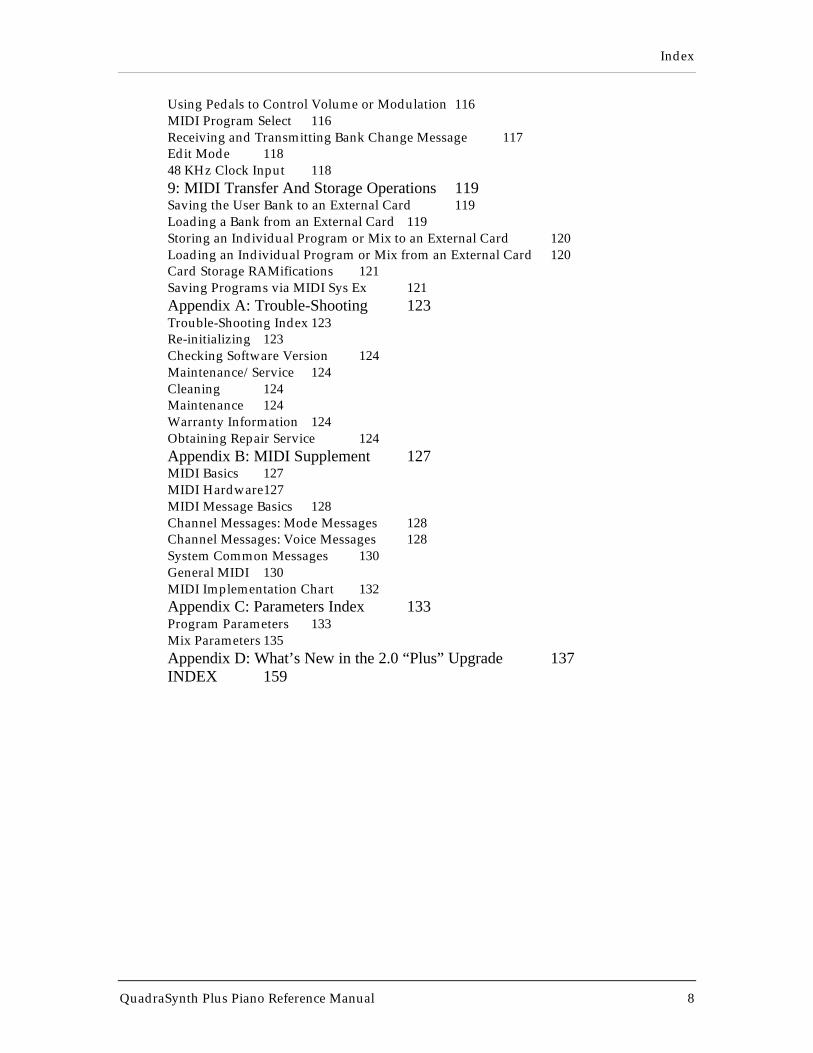
Using Pedals to Control Volume or Modulation 116MIDI Program Select 116Receiving and Transmitting Bank Change Message 117Edit Mode 11848 KHz Clock Input 1189: MIDI Transfer And Storage Operations 119Saving the User Bank to an External Card 119Loading a Bank from an External Card 119Storing an Individual Program or Mix to an External Card 120Loading an Individual Program or Mix from an External Card 120Card Storage RAMifications 121Saving Programs via MIDI Sys Ex 121Appendix A: Trouble-Shooting 123Trouble-Shooting Index 123Re-initializing 123Checking Software Version 124Maintenance/Service 124Cleaning 124Maintenance 124Warranty Information 124Obtaining Repair Service 124Appendix B: MIDI Supplement 127MIDI Basics 127MIDI Hardware127MIDI Message Basics 128Channel Messages: Mode Messages 128Channel Messages: Voice Messages 128System Common Messages 130General MIDI 130MIDI Implementation Chart 132Appendix C: Parameters Index 133Program Parameters 133Mix Parameters 135Appendix D: What’s New in the 2.0 “Plus” Upgrade 137INDEX 159

Setting Up: Chapter 1
QuadraSynth Plus Piano Reference Manual 9
CHAPTER 1
SETTING UPUnpacking and Inspection
Your QuadraSynth Plus was packed carefully at the factory. The shipping cartonwas designed to protect the unit during shipping. Please retain this container inthe highly unlikely event that you need to return the QuadraSynth Plus forservicing.
Upon receiving the QuadraSynth Plus, carefully examine the shipping cartonand its contents for any sign of physical damage that may have occurred intransit. If you detect any damage, do not destroy any of the packing material orthe carton, and immediately notify the carrier of a possible claim for damage.Damage claims must be made by you. Contact your Alesis dealer.
The shipping carton should contain the following items:
• QuadraSynth Plus with the same serial number as shown on shippingcarton• Sustain pedal• AC Power Cable• Computer floppy disk containing Sound Bridge software and electronicmanual• This instruction manual, plus lists of Mixes and Programs, and QuickStart guide• Alesis warranty card
JIt is important to register your purchase; if you have not already filled out your warrantycard and mailed it back to Alesis, please take the time to do so now.
AC Power HookupThe QuadraSynth Plus works with the voltage of the country it is shipped to(either 110 or 220V, 50 or 60 Hz), and comes with a line cord or power supplysuitable for the destination to which the keyboard is shipped.
With the QuadraSynth Plus off, plug the AC cord’s female (jack) end intoQuadra-Synth Plus’s AC socket and the male (plug) end into a source of ACpower. It’s good practice to not turn the QuadraSynth Plus on until all othercables are hooked up.
The IEC-spec AC cord included with the QuadraSynth Plus (do not substituteany other AC cord) is designed to connect to an outlet that includes three pins,with the third, round pin connected to ground. The ground connection is animportant safety feature designed to keep the chassis of electronic devices suchas the QuadraSynth Plus at ground potential. Unfortunately, the presence of athird pin does not always indicate that it is properly grounded. Use an AC line
Setting Up: Chapter 1
QuadraSynth Plus Piano Reference Manual 10
tester to determine this. If the outlet is not grounded, consult with a licensedelectrician.
JDo not operate any electrical equipment with ungrounded outlets. Plugging theQuadraSynth Plus into an ungrounded outlet, or “lifting” the unit off ground with athree-to-two wire adapter, can create a hazardous condition.
JAlesis cannot be responsible for problems caused by using the QuadraSynth Plus or anyassociated equipment with improper AC wiring.
Line Conditioners and ProtectorsAlthough the QuadraSynth Plus is designed to tolerate typical voltagevariations, in today’s world the voltage coming from the AC line maycontain spikes or transients that can possibly stress your gear and, overtime, cause a failure. There are three main ways to protect against this,listed in ascending order of cost and complexity:
• Line spike/surge protectors. Relatively inexpensive, these aredesigned to protect against strong surges and spikes, acting somewhatlike fuses in that they need to be replaced if they’ve been hit by anextremely strong spike.
• Line filters. These generally combine spike/surge protectionwith filters that remove some line noise (dimmer hash, transients fromother appliances, etc.).
• Uninterruptible power supply (UPS). This is the mostsophisticated option. A UPS provides power even if the AC power linefails completely. Intended for computer applications, a UPS allows youto complete an orderly shutdown of a computer system in the event of apower outage, and the isolation it provides from the power lineminimizes all forms of interference—spikes, noise, etc.
Setting Up: Chapter 1
QuadraSynth Plus Piano Reference Manual 11
Setting Up: Chapter 1
QuadraSynth Plus Piano Reference Manual 12
About Audio CablesThe connections between the QuadraSynth Plus and your studio are yourmusic’s lifeline, so use only high quality cables. These should be low-capacitanceshielded cables with a stranded (not solid) internal conductor and a low-resistance shield. Although quality cables cost more, they do make a difference.Route cables to the QuadraSynth Plus correctly by observing the followingprecautions:
• Do not bundle audio cables with AC power cords.
• Avoid running audio cables near sources of electromagnetic interferencesuch as transformers, monitors, computers, etc.
• Do not place cables where they can be stepped on. Stepping on a cablemay not cause immediate damage, but it can compress the insulation betweenthe center conductor and shield (degrading performance) or reduce the cable’sreliability.
• Avoid twisting the cable or having it make sharp, right angle turns.
• Never unplug a cable by pulling on the wire itself. Always unplug byfirmly grasping the body of the plug and pulling directly outward.
• Although Alesis does not endorse any specific product, chemicals suchas Tweek and Cramolin, when applied to electrical connectors, are claimed toimprove the electrical contact between connectors.
Basic Audio Hookup
JWhen connecting audio cables and/or turning power on and off, make sure that alldevices in your system are turned off and the volume controls are turned down.
Because the QuadraSynth Plus includes extensive signal processing as well as afull complement of sounds, you can make great sounds with nothing more thanan amplifier or a set of headphones.
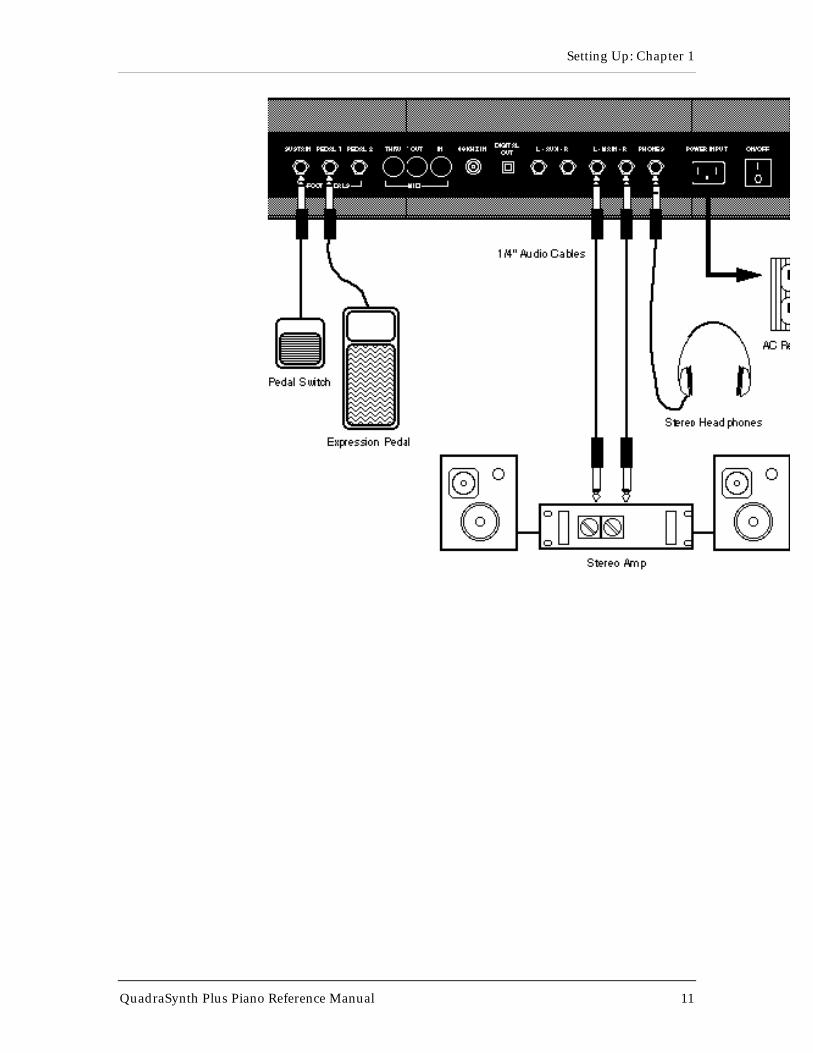
The QuadraSynth Plus has two Main and two Aux audio outputs. These canprovide an amplification system or mixer with several different audio hookupoptions:
• Mono. Connect a mono cord from the [MAIN–R] Audio Output to amono amplification system or individual mixer input.
• Stereo. Connect two mono cords from the [MAIN–L] and [MAIN–R]Audio Outputs to a stereo amplification system or two mixer inputs.
• Dual Stereo/Four Individual Outs. Connect two mono cords from the[MAIN–L] and [MAIN–R] Audio Outputs and two mono cords from the [AUX–
Setting Up: Chapter 1
QuadraSynth Plus Piano Reference Manual 13
L] and [AUX–R] Outputs to a dual stereo amplification system, or four mixerinputs.
• Stereo Headphones. Plug a set of high-quality stereo headphones intothe rear panel [PHONES] jack.
Setting Up: Chapter 1
QuadraSynth Plus Piano Reference Manual 14
A Word About Sound BridgeIncluded with the QuadraSynth Plus is a 3-1/2" floppy disk containing asoftware program called Sound Bridge. This software has been provided free ofcharge in an effort to promote sound design for the QuadraSynth Plus.
Sound Bridge is a Macintosh™ sound development utility which compilescustom samples from a variety of sources into the QuadraSynth Voice format,and downloads the compiled data to an Alesis PCMCIA Sound Card via MIDISysex to a QuadraSynth Plus or S4 Plus. Originally developed for in-house useonly, Alesis soon realized the need for individuals and sound developers to beable to burn their own Sound Cards as well, using whatever samples theywanted. Sound Bridge makes this possible without having a PCMCIA cardburner attached to your computer. All you need is a QuadraSynth Plus or S4Plus.
Sound Bridge creates a QuadraSynth Voice (multi-sample) by loading SampleCell I or Sample Cell II format Instrument files. Using this format, Sound Bridgeis able to determine key group and velocity group split points, root notes, sampleplayback rates, tunings, start points, loop points, and loop tunings. Sound Bridgecan also create QuadraSynth Voices without Sample Cell Instruments by loadingsingle AIFF, Sound Designer, or Sound Designer II files.
Sound Bridge does NOT require Sample Cell hardware. The Sample CellInstrument file, or sample file, may be loaded directly into Sound Bridge fromany disk (i.e. CD-ROM, floppy disk, hard disk, etc.). For example, a user mayload data from a Sample Cell CD-ROM, and send this data to the QuadraSynthPCMCIA Card, without ever using Sample Cell!
Sound Bridge can write to PCMCIA cards (or PC Cards) of up to 8MB in size.These cards must be either Type I SRAM (150ns or faster) or Type I Flash RAMcards (AMD C-series or D-series 5V Flash Memory Cards). If you are unsurewhether a card is compatible with the S4 Plus, contact Alesis Product Support formore information.
The Sound Bridge disk contains the Sound Bridge application, and an electronicmanual which will give you all the information you need to know to run SoundBridge.
Your First Session With The QuadraSynth Plus: Chapter 2
QuadraSynth Plus Piano Reference Manual 15
CHAPTER 2
YOUR FIRST SESSION WITH
THE QUADRASYNTH PLUSPowering Up
After making your connections, turn on the system’s power using this procedure:
¿ Before turning on the QuadraSynth Plus’s power, check the followingitems:
• Have all connections been made correctly?• Are the volume controls of the amplifier or mixer turned down?• Is the volume of the QuadraSynth Plus turned down?
¡ Turn on the [ON/OFF] (power) switch on the QuadraSynth Plus rearpanel.Upon power-up, the QuadraSynth Plus will display the last selected Program or Mix. Ifthis Program/Mix has been edited, the display will indicate this by showing the word“EDITED” below either the word “MIX” or “PROGRAM.”
¬ Turn the QuadraSynth Plus’s master [VOLUME] control to maximum.The best signal-to-noise ratio is achieved when [VOLUME] is set to maximum. This is adigital volume control, and lower settings have lower resolution.
Turn on the power of the amplifier/mixer, and adjust the volume.
Adjusting the Display ContrastOccasionally, the characters in the LCD display may be difficult to read,depending on the viewing angle and existing lighting conditions. In sucha situation, adjust the contrast of the LCD display using the followingprocedure.
¿ Press [GLOBAL].The display will change to the Global Page.
¡ Use Quad Knob [1] to adjust the contrast, or use the VALUE [¬]and [] buttons.The contrast and its value in the display will change.

Your First Session With The QuadraSynth Plus: Chapter 2
QuadraSynth Plus Piano Reference Manual 16
PROG
1
1
V ALUE
1 2 3 4 5 6P AGE:
GLOBAL
7
Your First Session With The QuadraSynth Plus: Chapter 2
QuadraSynth Plus Piano Reference Manual 17
Playing the Demo SequenceThe QuadraSynth Plus has a built-in demo sequence which demonstratesthe wide variety of sounds this amazing instrument is capable ofgenerating. In order to get the full effect of the demo, we recommendthat you connect both the LEFT and RIGHT outputs to your soundsystem, or listen on headphones.
To play the demo sequence:
¿ Hold the [GLOBAL] button, and press [MIX].The upper-right display will read “Playing Demo. Press MIX to stop.”
¡ Press [MIX] to stop the demo.
There will be no MIDI OUT messages during the demo, and thekeyboard will be disabled.
Playing Specific Sections of the DemoThe demo sequence is currently comprised of four sections. Anyof these sections can be played directly, without listening to thesections preceding it. This can be done by holding [GLOBAL]and pressing one of the Quad Buttons [1] – [4] buttons whichcorresponds to the section you would like to hear.
Enabling General MIDI ModeIf you are using a General MIDI sequencer, and/or playing a sequence that isprogrammed to take advantage of General MIDI, turn the “General MIDI”function in the QuadraSynth on.
To turn the General MIDI function on:
¿ Press [GLOBAL].The display will now be in Global Edit Mode.
¡ Press Quad Button [2].This selects the General MIDI parameter in the display.
¬ Press the VALUE [] button.This turns on General MIDI mode, and automatically puts you into Mix Play Mode withMix 00 of Preset Bank 4 selected.
For more information about General MIDI, refer to the the MIDI Supplement inAppendix B.
Your First Session With The QuadraSynth Plus: Chapter 2
QuadraSynth Plus Piano Reference Manual 18
Playing the QuadraSynth PlusThe QuadraSynth Plus is shipped from the factory with 5 Banks of 128 PresetPrograms (sounds) each. Additionally, there are 100 Mixes in each of the 5 Banks.
Program Mode and Mix ModeThe QuadraSynth Plus is always in one of two modes: Program Mode orMix Mode. When selecting Programs, you will be in Program Play Mode.When editing a Program, you will use Program Edit Mode. Whenauditioning Mixes, you will be in Mix Play Mode. When editing a Mix,you will use Mix Edit Mode.
JIf you ever get lost while programming the QuadraSynth Plus, press either the[PROGRAM] button or the [MIX] button to get back to their respective playmodes.
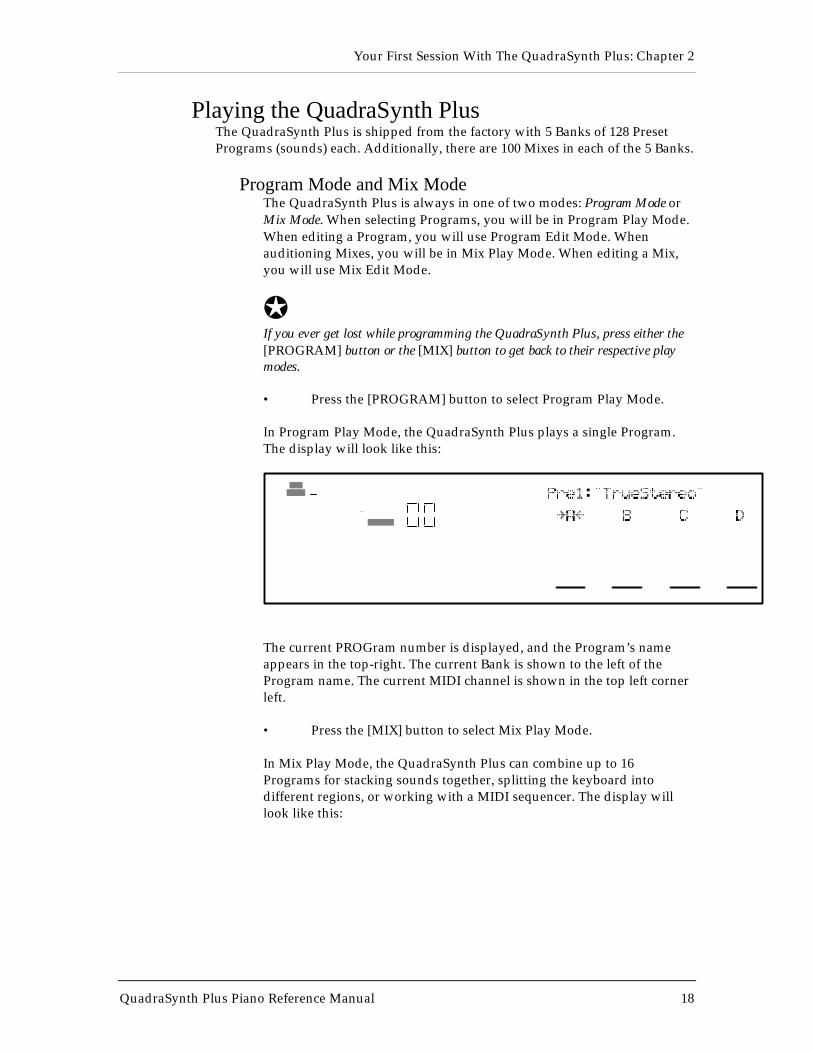
• Press the [PROGRAM] button to select Program Play Mode.
In Program Play Mode, the QuadraSynth Plus plays a single Program.The display will look like this:
PROG
1
The current PROGram number is displayed, and the Program’s nameappears in the top-right. The current Bank is shown to the left of theProgram name. The current MIDI channel is shown in the top left cornerleft.
• Press the [MIX] button to select Mix Play Mode.
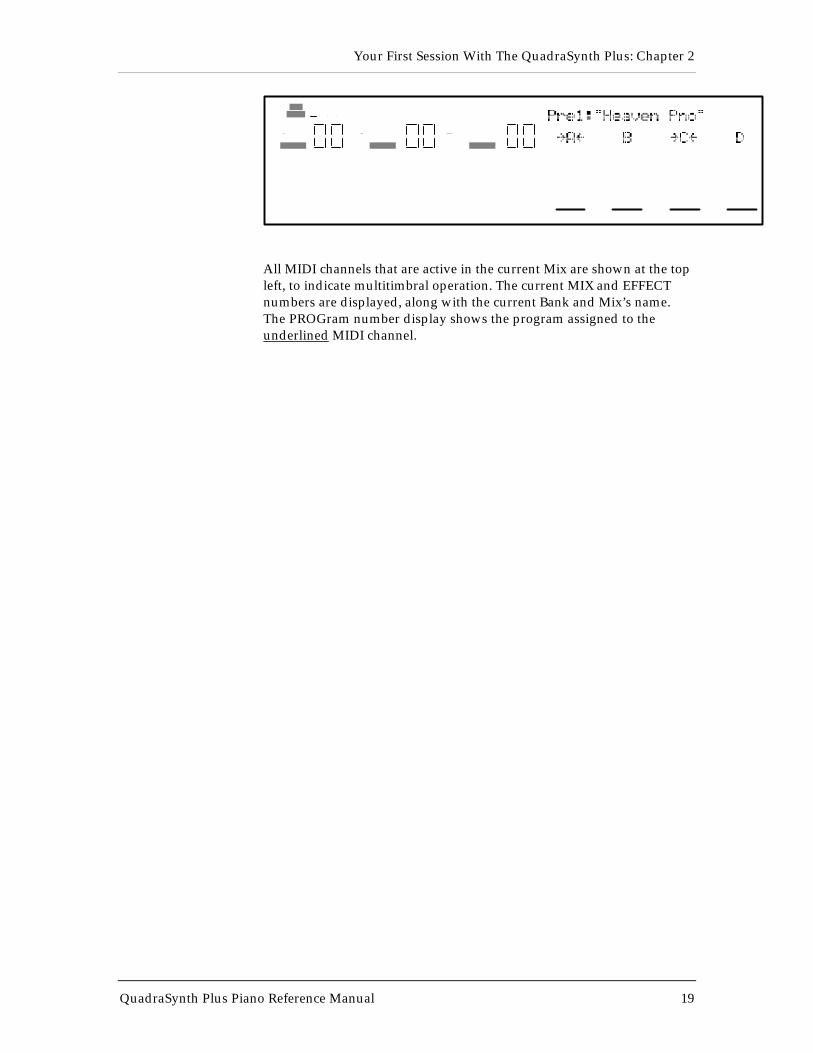
In Mix Play Mode, the QuadraSynth Plus can combine up to 16Programs for stacking sounds together, splitting the keyboard intodifferent regions, or working with a MIDI sequencer. The display willlook like this:
Your First Session With The QuadraSynth Plus: Chapter 2
QuadraSynth Plus Piano Reference Manual 19
MIX PROG
1 2 3 4
E F F E C TE F F E C T
All MIDI channels that are active in the current Mix are shown at the topleft, to indicate multitimbral operation. The current MIX and EFFECTnumbers are displayed, along with the current Bank and Mix’s name.The PROGram number display shows the program assigned to theunderlined MIDI channel.
Your First Session With The QuadraSynth Plus: Chapter 2
QuadraSynth Plus Piano Reference Manual 20
Auditioning Internal Programs¿ Press the [PROGRAM] button to select Program Play Mode.You can now play the QuadraSynth Plus keyboard; the Program will bewhatever was selected when last in Program mode (Program number 00 —127).
¡ Select a Program using any of these methods:
• Use the [-1] and [+1] buttons to step through the Programs oneat a time.
• Use the [-10] and [+10] buttons to step through the Programs tenat a time.
• Hold the [PROGRAM] button and rotate Quad Knob [1].
• Use the DIRECT SELECT [1]—[0] buttons for direct entry.Leading zeroes must be entered for Programs 0 — 19. Example: Press [0] then[0] then [5] for Program 5; press [0] then [1] then [3] for Program 13. Onlybegin with [1] if you are selecting a Program from 100 — 127. If you startentering a number and change your mind, wait a few seconds and theQuadraSynth Plus will revert to the previous Program number.
JTo hear the Stereo Grand Piano, select Program 00 in Preset Bank 1.
Selecting BanksThe QuadraSynth Plus provides five internal Banks containing 128Programs in each (and 100 Mixes each, but we’ll get to Mixes in amoment). The currently selected Bank will be shown in the display justto the left of the currently selected Program’s name.
• Use the BANK [♦] and [∅] buttons to select a Bank (User, Preset1 – 4).
JUser and Preset Banks are described in detail in Chapter 4.
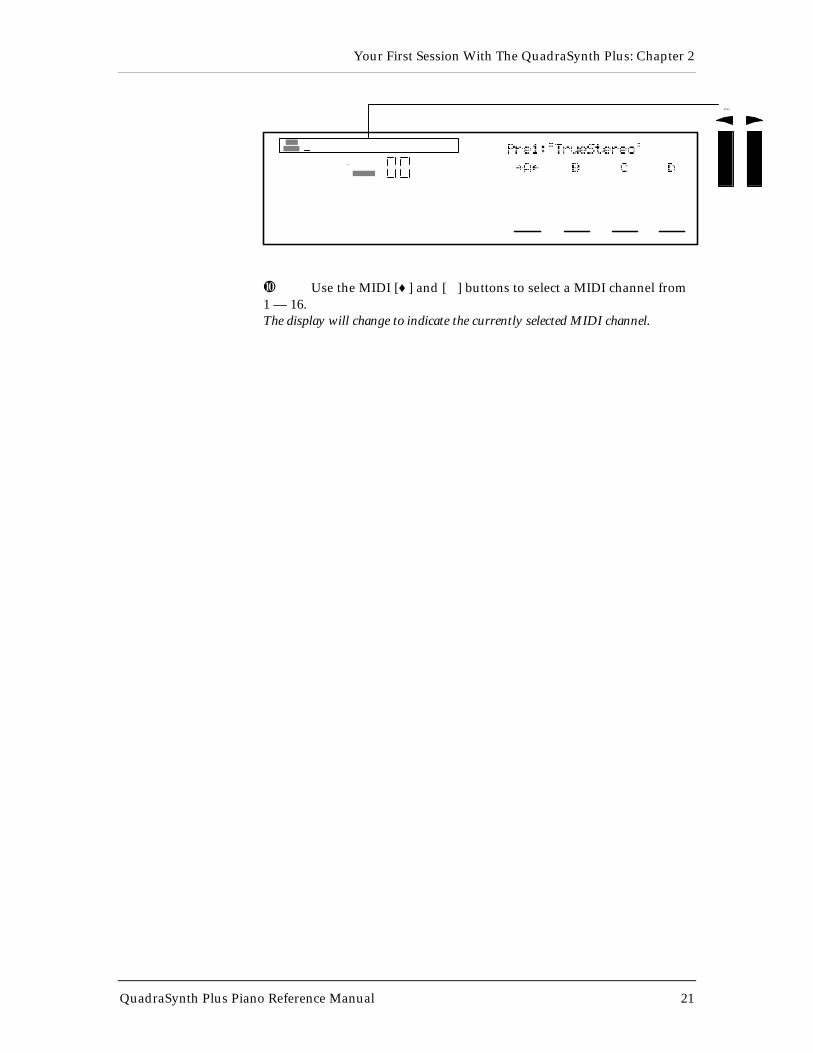
Selecting the MIDI ChannelWhile in Program Play Mode, the QuadraSynth Plus can transmit andreceive information on any single MIDI channel of the 16 availablechannels. The currently selected channel appears at the top left of thedisplay.
Your First Session With The QuadraSynth Plus: Chapter 2
QuadraSynth Plus Piano Reference Manual 21
PROG
1
M I D IM I D I
¿ Use the MIDI [♦] and [∅] buttons to select a MIDI channel from1 — 16.The display will change to indicate the currently selected MIDI channel.
Your First Session With The QuadraSynth Plus: Chapter 2
QuadraSynth Plus Piano Reference Manual 22
Realtime Performance FunctionsThe QuadraSynth Plus provides various ways to control the sound asyou are playing. Try out some of these functions while playing thekeyboard. The sound of the effects can also change by using thesecontrollers. The effect of these realtime controllers varies from Programto Program; in some they may not be active, and in others they may havea dramatic effect.
• Velocity. The volume and tonal quality of the sound will changeaccording to how hard you play the keyboard.• Aftertouch. The action of pressing a key down after playing it iscalled “aftertouch” (it is also sometimes referred to as “Pressure” since itcorresponds to the amount of pressure being applied to the keyboard).Pitch, tone and volume (among other things) can be changed usingaftertouch.• Pitch Bend Wheel. While playing a note, you can move thePITCH BEND WHEEL up to raise the pitch, or down to lower the pitch.The amount of pitch bend available can be different for each Program.• Modulation Wheel. By raising the MODULATION WHEEL,you can add expressive modulation effects (such as vibrato or tremolo)while you play. The type of modulation effect can be different for eachProgram.• The Quad Knobs. These are described below.
Further expressive control is available with a pedal switch (included) orexpression pedal (optional, see page 25). By connecting a pedal switch tothe SUSTAIN jack on the rear panel, you can have the sound sustaineven after you release the keys. By connecting an expression pedal to oneof the pedal jacks (PEDAL 1 or PEDAL 2), you can use the pedal tochange the volume or tone (or some other quality such as reverb depthor vibrato speed) of the sound, if the Program is edited to use thepedal(s).
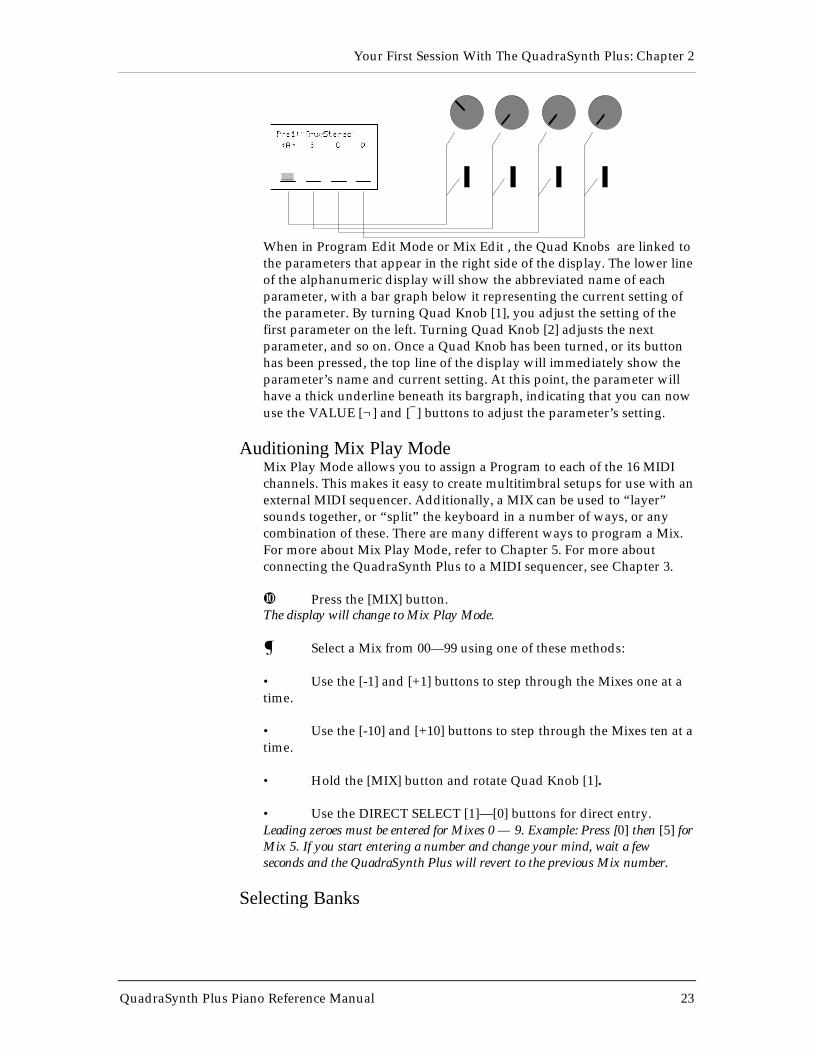
The Quad KnobsTo the right of the display are four knobs referred to as Quad Knobs,[1]—[4], each with its own button. The Quad Knobs provide control overvarious parameters depending on the mode you are in. The parametersin the display will change depending on which function and page areselected. Not all four Quad Knobs are active in all windows; there aremany pages that have only one active Quad Knob.
In Program Play Mode and Mix Play Mode, the Quad Knobs act asControllers A–D. These Controllers are defined in Global Edit Mode(Page 3) to transmit various MIDI controller messages. If a Program orMix uses these Controllers A–D, a pair of arrows will point towards theactive controller’s letter in the display. This indicates that moving therelated Quad Knob will have some kind of effect on the selected Programor Mix. In the illustration below, Controller A (Quad Knob [1]) is used bythe selected Program.
Your First Session With The QuadraSynth Plus: Chapter 2
QuadraSynth Plus Piano Reference Manual 23
1 2 3 4
When in Program Edit Mode or Mix Edit , the Quad Knobs are linked tothe parameters that appear in the right side of the display. The lower lineof the alphanumeric display will show the abbreviated name of eachparameter, with a bar graph below it representing the current setting ofthe parameter. By turning Quad Knob [1], you adjust the setting of thefirst parameter on the left. Turning Quad Knob [2] adjusts the nextparameter, and so on. Once a Quad Knob has been turned, or its buttonhas been pressed, the top line of the display will immediately show theparameter’s name and current setting. At this point, the parameter willhave a thick underline beneath its bargraph, indicating that you can nowuse the VALUE [¬] and [] buttons to adjust the parameter’s setting.
Auditioning Mix Play ModeMix Play Mode allows you to assign a Program to each of the 16 MIDIchannels. This makes it easy to create multitimbral setups for use with anexternal MIDI sequencer. Additionally, a MIX can be used to “layer”sounds together, or “split” the keyboard in a number of ways, or anycombination of these. There are many different ways to program a Mix.For more about Mix Play Mode, refer to Chapter 5. For more aboutconnecting the QuadraSynth Plus to a MIDI sequencer, see Chapter 3.
¿ Press the [MIX] button.The display will change to Mix Play Mode.
¡ Select a Mix from 00—99 using one of these methods:
• Use the [-1] and [+1] buttons to step through the Mixes one at atime.
• Use the [-10] and [+10] buttons to step through the Mixes ten at atime.
• Hold the [MIX] button and rotate Quad Knob [1].
• Use the DIRECT SELECT [1]—[0] buttons for direct entry.Leading zeroes must be entered for Mixes 0 — 9. Example: Press [0] then [5] forMix 5. If you start entering a number and change your mind, wait a fewseconds and the QuadraSynth Plus will revert to the previous Mix number.
Selecting Banks
Your First Session With The QuadraSynth Plus: Chapter 2
QuadraSynth Plus Piano Reference Manual 24
The QuadraSynth Plus provides five internal Banks containing 100 Mixesin each. The currently selected Bank will be shown in the display just tothe left of the currently selected Mix’s name.
• Use the BANK [♦] and [∅] buttons to select a Bank (User, Preset1 – 4).
JAfter switching between the Preset and User banks, press Quad Button [1] tosee the name of the Mix in the display again.
User memory and Preset memory are described in detail in Chapter 4.
Your First Session With The QuadraSynth Plus: Chapter 2
QuadraSynth Plus Piano Reference Manual 25
Editing a MixIn this section, we will assign Programs to and set volume levels for the16 MIDI channels in a Mix, for playing back tracks from a MIDIsequencer. However, there is much more about a Mix that may be edited.Refer to Chapter 5 for more about Mix editing.
¿ Press [MIX] and select a Mix using one of the three methodsdescribed above.
¡ Press [SELECT].The top line of the LCD’s function list will read “EDITING: MIX”.
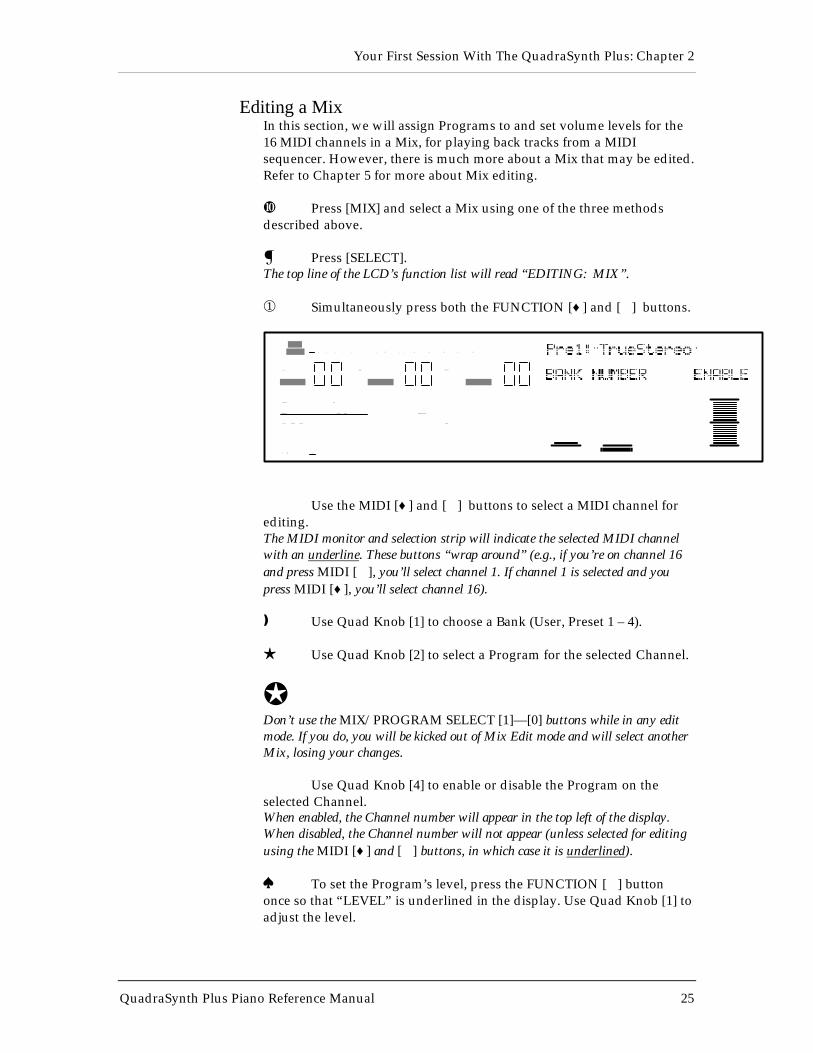
¬ Simultaneously press both the FUNCTION [♦] and [∅] buttons.
PROG EFFECT
EDITING: MIX
P AGE: 1
PITCH RANGE EFFECT NAME
MIX
1 2 3 4 5 6 7 8 9 10 1 1 12 13 14 15 16
PROGRAM – ASSIGN LEVEL EFFECT–LEVEL
Use the MIDI [♦] and [∅] buttons to select a MIDI channel forediting.The MIDI monitor and selection strip will indicate the selected MIDI channelwith an underline. These buttons “wrap around” (e.g., if you’re on channel 16and press MIDI [∅], you’ll select channel 1. If channel 1 is selected and youpress MIDI [♦], you’ll select channel 16).
� Use Quad Knob [1] to choose a Bank (User, Preset 1 – 4).
H Use Quad Knob [2] to select a Program for the selected Channel.
JDon’t use the MIX/PROGRAM SELECT [1]—[0] buttons while in any editmode. If you do, you will be kicked out of Mix Edit mode and will select anotherMix, losing your changes.
Use Quad Knob [4] to enable or disable the Program on theselected Channel.When enabled, the Channel number will appear in the top left of the display.When disabled, the Channel number will not appear (unless selected for editingusing the MIDI [♦] and [∅] buttons, in which case it is underlined).
« To set the Program’s level, press the FUNCTION [∅] buttononce so that “LEVEL” is underlined in the display. Use Quad Knob [1] toadjust the level.
Your First Session With The QuadraSynth Plus: Chapter 2
QuadraSynth Plus Piano Reference Manual 26
» Repeat steps ¬ — « until all desired Programs are assigned toall desired MIDI channels, and have the appropriate levels.
JChanges to Mix parameters are temporary and will be lost if another Mix isselected. To make changes permanent, you must store the Mix into the Userbank. Refer to Chapter 4 for information about storing changes.

Your First Session With The QuadraSynth Plus: Chapter 2
QuadraSynth Plus Piano Reference Manual 27
Setting the Effects LevelEach Program can use up to four Sounds, for either layering or splittingthe keyboard. Each of these Sounds has its own effects send level andeffects bus assignment. Many of the Programs in the QuadraSynth Plususe only one or two Sound layers, while others may use all four Sounds.You can adjust the effect send amount for each Sound independently, oryou can view/edit all four sounds simultaneously.
¿ Press [PROGRAM] to access Program Play Mode, and select aProgram you wish to edit, using the methods described on page 14.
¡ Press [SELECT] to access Program Edit Mode.
¬ Press the [EFFECT] button (located among the DIRECT SELECTbuttons on the far left); the words “EFFECT - LEVEL” are underlined inthe display.This is where you determine how much level will be sent from the currentProgram sound layer to the effects processor, and on which of the four busses.
PROG
1
EDITING: PROGRAM SOUND 1
P AGE: 1
PITCH FIL TER AMP RANGE MOD EFFECT NAME
PLFO FLFO ALFO PENV FENV AENV TRACK
MISC.
ASSIGN – VOICE LEVEL EFFECT–LEVEL
Turn Quad Knob [1] to adjust the effect send level of the selectedSound (1—4).For the most dramatic effect, set this to 99.
� Press the [EDIT 1] button to select another Sound to adjust.The display will indicate “SOUND 1” or “SOUND 2,” etc., to indicate whichof the four Sounds is being edited.
H Press the [EDIT 4] button to display the effect send levels of allfour Sounds simultaneously; use Quad Knobs [1] — [4] to adjust eachSound’s effect level.The display will indicate “SOUND 1 2 3 4.”
MIDI
CHAN
P R O GP R O G
1
PRESET
EDITING: PROGRAM SOUND 1
P AGE: 1
PITCH FIL TER AMP RANGE MOD EFFECT NAME
PLFO FLFO ALFO PENV FENV AENV TRACK
MISC.
ASSIGN – VOICE LEVEL EFFECT–LEVEL
2 3 4
Your First Session With The QuadraSynth Plus: Chapter 2
QuadraSynth Plus Piano Reference Manual 28
Note: If a Sound is not enabled in a Program, its title will be shown in lowercase(“snd4”), and adjust its controls will have no effect on the Sound until theSound is enabled. To enable a Sound, hold down its respective Quad Button(i.e., [3] for Sound #3) and press VALUE [].
Connections: Chapter 3
QuadraSynth Plus Piano Reference Manual 29
CHAPTER 3
CONNECTIONSBasic MIDI Hookup
MIDI is an internationally-accepted protocol that allows musical-related data tobe conveyed from one device to another. See the MIDI Supplement in AppendixB if you are not familiar with how MIDI works.
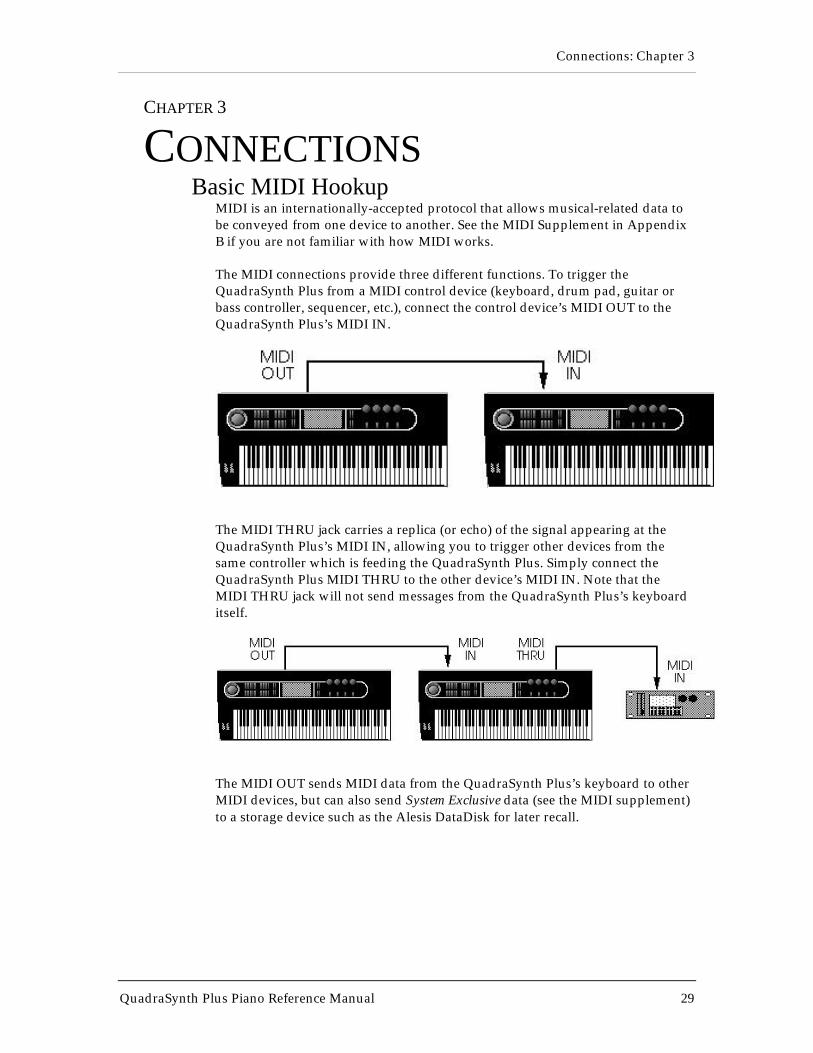
The MIDI connections provide three different functions. To trigger theQuadraSynth Plus from a MIDI control device (keyboard, drum pad, guitar orbass controller, sequencer, etc.), connect the control device’s MIDI OUT to theQuadraSynth Plus’s MIDI IN.
The MIDI THRU jack carries a replica (or echo) of the signal appearing at theQuadraSynth Plus’s MIDI IN, allowing you to trigger other devices from thesame controller which is feeding the QuadraSynth Plus. Simply connect theQuadraSynth Plus MIDI THRU to the other device’s MIDI IN. Note that theMIDI THRU jack will not send messages from the QuadraSynth Plus’s keyboarditself.
The MIDI OUT sends MIDI data from the QuadraSynth Plus’s keyboard to otherMIDI devices, but can also send System Exclusive data (see the MIDI supplement)to a storage device such as the Alesis DataDisk for later recall.
Connections: Chapter 3
QuadraSynth Plus Piano Reference Manual 30
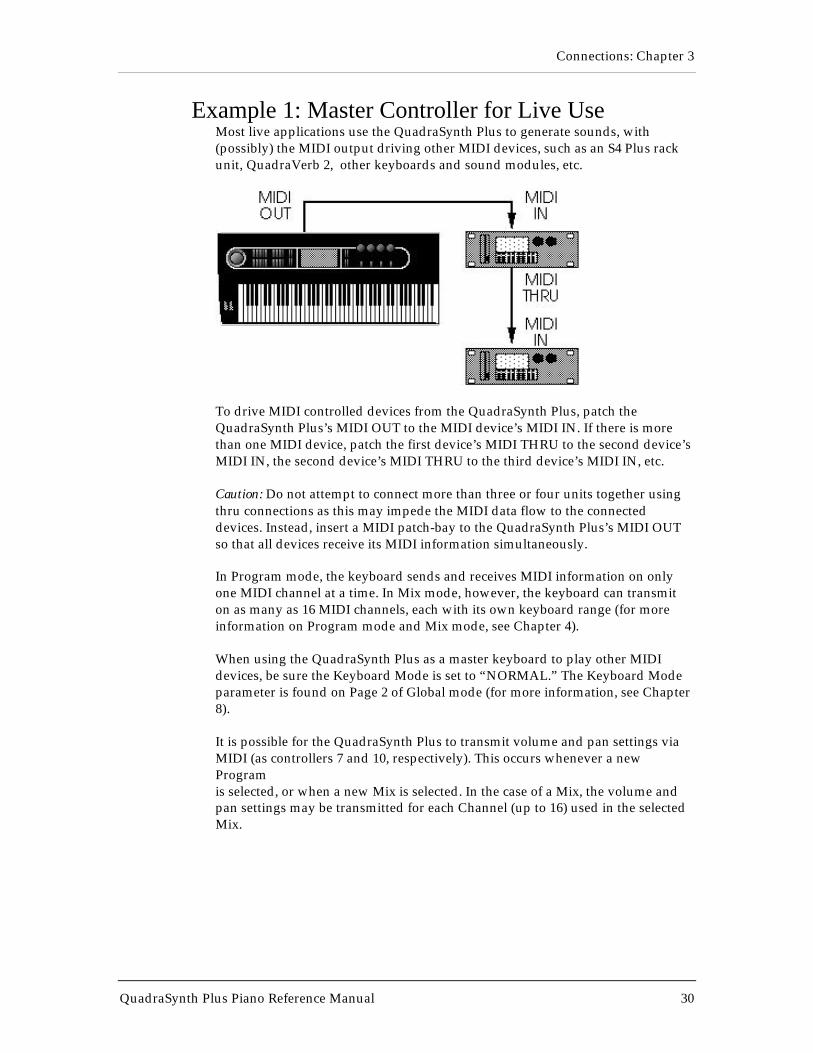
Example 1: Master Controller for Live UseMost live applications use the QuadraSynth Plus to generate sounds, with(possibly) the MIDI output driving other MIDI devices, such as an S4 Plus rackunit, QuadraVerb 2, other keyboards and sound modules, etc.
To drive MIDI controlled devices from the QuadraSynth Plus, patch theQuadraSynth Plus’s MIDI OUT to the MIDI device’s MIDI IN. If there is morethan one MIDI device, patch the first device’s MIDI THRU to the second device’sMIDI IN, the second device’s MIDI THRU to the third device’s MIDI IN, etc.
Caution: Do not attempt to connect more than three or four units together usingthru connections as this may impede the MIDI data flow to the connecteddevices. Instead, insert a MIDI patch-bay to the QuadraSynth Plus’s MIDI OUTso that all devices receive its MIDI information simultaneously.
In Program mode, the keyboard sends and receives MIDI information on onlyone MIDI channel at a time. In Mix mode, however, the keyboard can transmiton as many as 16 MIDI channels, each with its own keyboard range (for moreinformation on Program mode and Mix mode, see Chapter 4).
When using the QuadraSynth Plus as a master keyboard to play other MIDIdevices, be sure the Keyboard Mode is set to “NORMAL.” The Keyboard Modeparameter is found on Page 2 of Global mode (for more information, see Chapter8).
It is possible for the QuadraSynth Plus to transmit volume and pan settings viaMIDI (as controllers 7 and 10, respectively). This occurs whenever a newProgramis selected, or when a new Mix is selected. In the case of a Mix, the volume andpan settings may be transmitted for each Channel (up to 16) used in the selectedMix.
Connections: Chapter 3
QuadraSynth Plus Piano Reference Manual 31
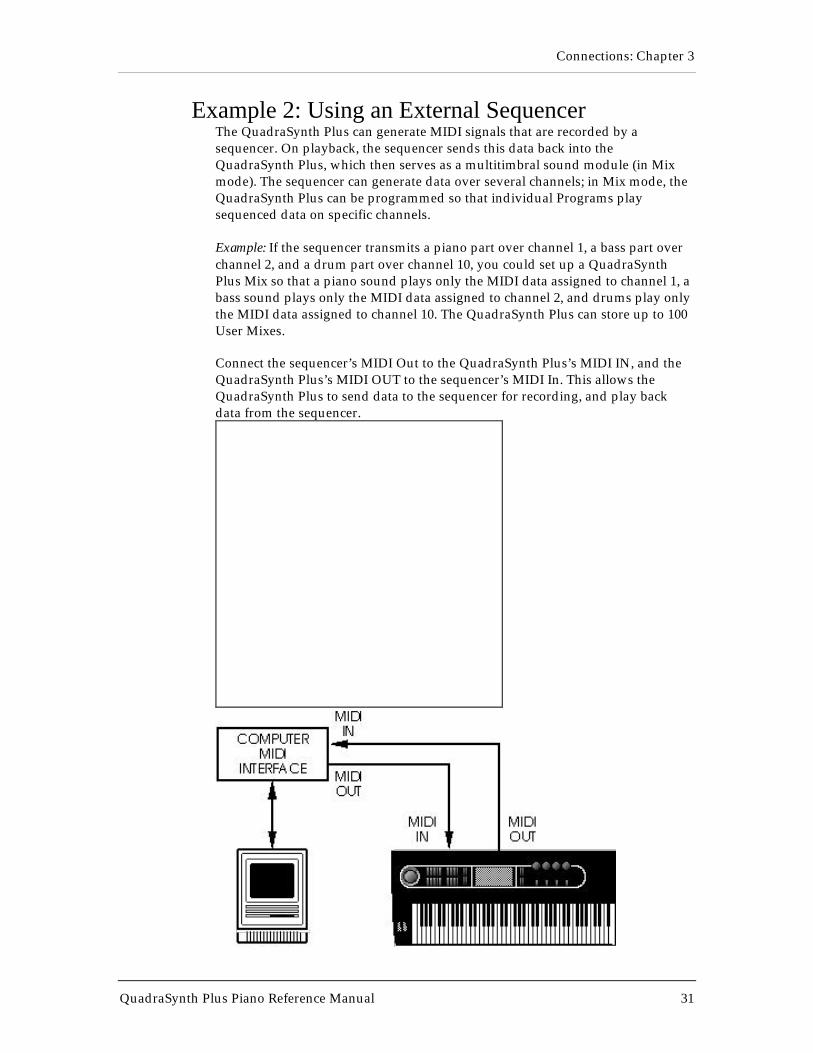
Example 2: Using an External SequencerThe QuadraSynth Plus can generate MIDI signals that are recorded by asequencer. On playback, the sequencer sends this data back into theQuadraSynth Plus, which then serves as a multitimbral sound module (in Mixmode). The sequencer can generate data over several channels; in Mix mode, theQuadraSynth Plus can be programmed so that individual Programs playsequenced data on specific channels.
Example: If the sequencer transmits a piano part over channel 1, a bass part overchannel 2, and a drum part over channel 10, you could set up a QuadraSynthPlus Mix so that a piano sound plays only the MIDI data assigned to channel 1, abass sound plays only the MIDI data assigned to channel 2, and drums play onlythe MIDI data assigned to channel 10. The QuadraSynth Plus can store up to 100User Mixes.
Connect the sequencer’s MIDI Out to the QuadraSynth Plus’s MIDI IN, and theQuadraSynth Plus’s MIDI OUT to the sequencer’s MIDI In. This allows theQuadraSynth Plus to send data to the sequencer for recording, and play backdata from the sequencer.
Connections: Chapter 3
QuadraSynth Plus Piano Reference Manual 32
If you are driving other MIDI gear (such as an expander module or MIDI-responsive signal processor), you’ll usually drive these from the sequencer if ithas additional MIDI outputs. However, you can also use the QuadraSynth Plus’sMIDI THRU connector to drive other modules since the Thru carries a replica ofwhat appears at the QuadraSynth Plus’s MIDI IN, which is the same as thesequencer’s MIDI OUT.

Connections: Chapter 3
QuadraSynth Plus Piano Reference Manual 33
About the Keyboard ModeIn a Mix, the QuadraSynth Plus’s keyboard may be set up in severalways using the Keyboard Mode parameter found on Page 2 of Globalmode. You need to determine which way is best for your application.The Keyboard Mode parameter determines how the keyboard willfunction with regard to MIDI in Mix mode:
• The keyboard sends on only one MIDI channel and thesequencer is used to set the MIDI channel of each track (Keyboard Mode= OUT 1 – OUT 16).
• Or, the keyboard is split or layered, sending on many MIDIchannels at once, and the sequencer records each channel onto a differenttrack (NORMAL).
• Or, the keyboard only sends on one MIDI channel, but youchange the channel on the QuadraSynth Plus for each separate track onthe sequencer (CH SOLO).
In OUT 1 – OUT 16 mode, you will not hear the QuadraSynth Plusunless your sequencer echoes the MIDI data back to the QuadraSynthPlus’s MIDI IN. This is a way of verifying that the sequencer is set toreceive properly. Depending on the capabilities of your sequencer, itmay “auto-channelize” the echoed MIDI back to the QuadraSynth Pluson a different MIDI channel (usually, the MIDI channel that the selectedrecord track is assigned to). In NORMAL or CH SOLO mode, theQuadraSynth Plus sounds are internally played from the QuadraSynthPlus keyboard, so any echo features of the sequencer should be turnedoff.
When using the QuadraSynth Plus with a MIDI sequencer, the usualchoice for the Keyboard Mode is “OUT 1.” This is equivalent to turningthe QuadraSynth Plus’s local control off and transmitting on channel 1.For more information, see page 46.
Pedal and Footswitch HookupThe QuadraSynth Plus keyboard has two PEDAL jacks that accept a Rolandmodel EV-5 (or equivalent) volume control pedal, or a standard switch pedal.Each pedal can be assigned to independent modulation functions within aprogram. Example: One pedal could control volume, and the other vibrato depth.
The SUSTAIN footswitch jack accepts a momentary footswitch unit, includedwith the unit (it is packed in the center of the end caps). This provides the samefunction as the sustain (or damper) pedal on a standard keyboard. You can useeither a normally closed or normally open momentary contact footswitch. Plug itinto the rear panel SUSTAIN footswitch jack before powering up theQuadraSynth Plus; on power up, it will automatically sense the footswitchpolarity and calibrate itself accordingly.
J
Connections: Chapter 3
QuadraSynth Plus Piano Reference Manual 34
If your footswitch seems to respond backwards (notes sustain unless the footswitch ispressed), turn off the QuadraSynth Plus, make sure the footswitch plug is fully insertedinto the footswitch jack, then turn the power back on.
JDon't hold downthe footswitch iwhen powering up the QuadraSynth Plus.
Connections: Chapter 3
QuadraSynth Plus Piano Reference Manual 35
Digital Audio/Optical HookupThe QuadraSynth Plus can send digital audio directly into ADAT, whichprovides better fidelity than using the analog inputs and outputs.
The digital I/O connector follows a proprietary Alesis format that carries all fouraudio outputs on a single fiber optic cable. Either pair of outputs can beconverted into standard AES/EBU or S/PDIF stereo digital audio format byusing the Alesis AI-1 interface. Fiber optic cables of various lengths are availablefrom your Alesis dealer. The shorter the cable, the better. The model OC cable is5 meters long and is the maximum length recommended.
To hook up the optical cable:
¿ Remove the two pieces of clear plastic, tubular sleeving (if present) thatprotect the tips of the optical cable plugs.
¡ Insert one cable end into the QuadraSynth Plus DIGITAL OUT and theother end into the ADAT or AI-1 DIGITAL IN.
To test the cable and QuadraSynth Plus digital output, plug one cable end intothe QuadraSynth Plus. The other end should emit a soft red light (it is notdangerous to look directly at this light).
Recording Digital AudioOnce the fiber optic connection is made between the QuadraSynth Plusand ADAT or an AI-1, the QuadraSynth Plus will output audio on thefirst four channels of the digital bus (the bus is capable of handling eightchannels of digital audio). The Main Left and Right outputs are routed tochannels 1 and 2, while the Aux Left and Right outputs are routed tochannels 3 and 4. Note that the volume knob controls the level of allanalog and digital output channels simultaneously. Set the volume tomaximum for most applications.
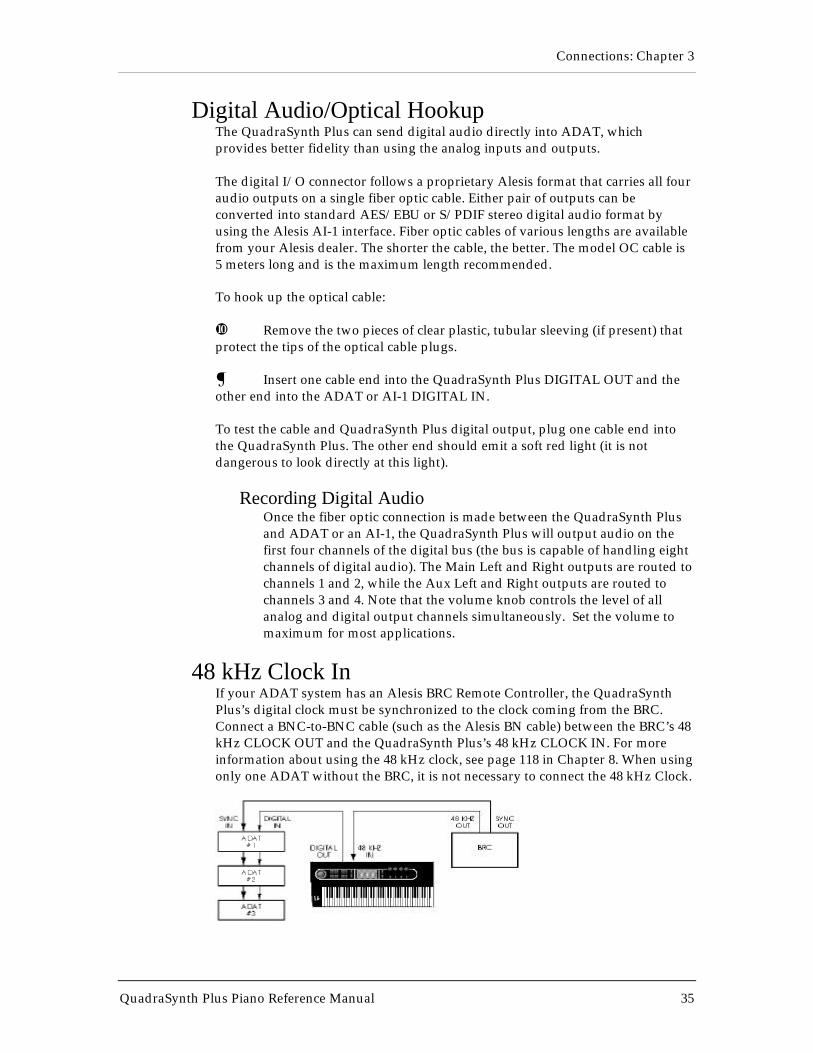
48 kHz Clock InIf your ADAT system has an Alesis BRC Remote Controller, the QuadraSynthPlus’s digital clock must be synchronized to the clock coming from the BRC.Connect a BNC-to-BNC cable (such as the Alesis BN cable) between the BRC’s 48kHz CLOCK OUT and the QuadraSynth Plus’s 48 kHz CLOCK IN. For moreinformation about using the 48 kHz clock, see page 118 in Chapter 8. When usingonly one ADAT without the BRC, it is not necessary to connect the 48 kHz Clock.
Connections: Chapter 3
QuadraSynth Plus Piano Reference Manual 36
Tip: With this type of connection, the ADAT tracks will remain in tune with theQuadraSynth Plus even when the BRC’s pitch value is adjusted.
Overview: Chapter 4
QuadraSynth Plus Piano Reference Manual 37
CHAPTER 4
OVERVIEWBasic Architecture
The QuadraSynth Plus contains digitized acoustic and electronic voices,organized into 18 groups of sound types. The groups are:
Piano Bass Ensemble DrumsOrgan Guitar Ethnic PercussionKeyboard Brass Voice RhythmSynth Woodwind Sound FX QSPlusWaves String
Several functions (filter, amplitude envelope, pitch envelope, LFO, multiplemodulation sources, signal processors, etc.) can be used to process a sample. ASound is the combination of a sample with its associated processing.
A Program consists of up to four sounds. These sounds can be layered, split overspecific keyboard ranges, or selectively overlapped. The QuadraSynth Plus has aUser Bank of 128 Programs that you can modify, plus 4 Preset Banks with 512Preset Programs that are permanently installed in the QuadraSynth Plus at thefactory (although the Preset Programs can be edited, they must be stored into theUser bank to permanently retain your changes). Each Program is linked to itsown Effects Patch.
A Mix consists of up to 16 Programs, each assigned to a specific MIDI channeland one Effect Patch. The QuadraSynth Plus has 100 Mixes in the User Bank,plus 4 Preset Banks with 400 Preset Mixes. This is extremely useful formultitimbral setups where the QuadraSynth Plus plays back different sounds ondifferent MIDI channels. Because of the 64 voices and built-in effects, theQuadraSynth Plus is often the only sound generator needed.
QuadraSynth Plus PolyphonyThe QuadraSynth Plus provides 64-voice polyphony (i.e., how many notes canplay at once). If a program uses one sound, up to 64 notes can play at once.Layering two sounds allows for 32-note polyphony and layering four sounds, 16-note polyphony.
Layering is a powerful technique that allows you to build up complex timbres.This is crucial because acoustic instruments have extremely complex, evolvingsounds and by comparison, many synths sound static. Being able to layer up tofour sounds allows for creating large ensembles (e.g., brass section consisting ofalto & tenor sax, trumpet, and trombone) or extremely realistic versions of singleinstruments. When creating layered Programs, keep polyphony in mind. If allPrograms in a Mix use all four available sounds, the QuadraSynth Plus willquickly run out of voices.

Overview: Chapter 4
QuadraSynth Plus Piano Reference Manual 38
ModesThe QuadraSynth Plus is always in one of two main modes: Program Mode orMix Mode. Pressing [PROGRAM] selects Program Play Mode, while pressing[MIX] selects Mix Play Mode. While in Program Play Mode, you can press[SELECT] to access Program Edit Mode and Effects Edit Mode. While in MixPlay Mode, pressing [SELECT] alternates between Mix Edit Mode, Program EditMode and Effects Edit Mode. Pressing [GLOBAL] accesses Global Edit Mode,pressing [COMPARE] accesses Compare Mode, and pressing [STORE] accessesStore Mode. Here are descriptions of these modes:
Program Play ModeProgram Play Mode lets you play the QuadraSynth Plus’s variousPrograms one at a time. The QuadraSynth Plus contains 512 Preset and128 User Programs (i.e., the sounds of various instruments, effects,ensembles, etc.) that show off just how cool this instrument really is.Initially, the 4 Preset Banks and the User Bank contain data loaded in atthe factory. The User Programs can be edited or replaced with your ownPrograms. However, you cannot replace the Preset Programs, becausethese are stored in ROM (permanent memory). In Program Play Mode,the QuadraSynth Plus responds to or generates messages on a singleMIDI channel.
Mix Play ModeMix Play Mode lets you audition the QuadraSynth Plus’s various Mixes,and use it as a MIDI master controller. The QuadraSynth Plus contains400 Preset Mixes and 100 User Mixes. A Mix can combine up to 16different Programs, and the keyboard can generate up to 16 channels ofMIDI data at once. Therefore, much thicker and richly textured soundscan be created. In Mix Play Mode, the QuadraSynth Plus can be used in awide range of applications. It can be used for live performance, in whichsounds are layered or assigned to sections of the keyboard. It can also beused as a multitimbral sound source for desktop music and home studioapplications. A Mix can use the Effects Patch associated with one of itsPrograms. Although there may be 16 Programs in a Mix, there can onlybe one Effects Patch per Mix. In Mix Mode, the QuadraSynth Plus canrespond to messages on up to 16 MIDI channels simul-taneously;different channels are available depending on which Mix is selected.
Program Edit ModeIn Program Edit Mode, you can change the various settings whichdetermine the sound of an individual Program, or create an entirely newProgram from scratch. Each Program is made up of four Sound layers,which you can edit individually, or simultaneously. In Program Editmode you can:
• select which sample waveform from the 24 megabytes ofonboard sample ROM will be used, in each of the 4 sounds;
• change the tone, level, attack and decay characteristics,modulation inputs, and pitch of each layer;
Overview: Chapter 4
QuadraSynth Plus Piano Reference Manual 39
• set modulation routings so any parameter can be controlled viaMIDI;
• set the effect level for each Sound layer, and set which of the foureffect sends each Sound layer will use for signal processing (such asreverb, delay, and chorus—or any combination of these).
Mix Edit ModeMix Edit Mode lets you change the parameters of an existing Mix. Up to16 Programs can be active in each Mix, and Mix Edit mode sets up howeach will be played. Mix Edit Mode allows you to:
• select which Programs will be played by the different MIDIchannels and by the keyboard in multiple layers or splits;
• set the output level, effects level, and pan of each Program in theMix;
• select which Program’s Effects Patch will be used by the Mix.
Effects Edit ModeEffects Edit Mode is used for setting up the Digital Signal Processingeffects. Each Effect Patch has 4 effect bus inputs, and an internalconfiguration of multiple effects such as reverb, delay, and pitch-relatedeffects (chorus, flange, etc.). You can determine what kinds of effects areused on each bus (this is called a “Configuration”), change each effect’sparameters (such as reverb decay time or chorus speed), set modulationroutings (such as having the modulation wheel change the decay time),and set the effects mix (how much reverb, delay and chorus on theoutput of each effect bus).
Global Edit ModeUse Global Edit Mode to set various parameters which effect the entireinstrument, such as overall master tuning, display contrast, MIDIcontroller settings, keyboard sensitivity, and how the unit will respondto or generate messages in Mix Mode.
Store ModeStore Mode is used for storing changes of Programs, Mixes and/orEffects into the User Bank or onto a QuadraCard PCMCIA memory cardaccessory. It is also used for transmitting the QuadraSynth Plus’sparameters over MIDI for data storage purposes, copying sounds oreffects from one Program to another, and for transferring entire Banks toor from a Sound Card.
Compare ModeOnce a Program has been edited in Program Edit Mode, or a Mix hasbeen edited in Mix Edit Mode, the word “EDITED” will appear in thedisplay next to the Mix/Program number. If [COMPARE] is pressed, theword “COMPARE” will appear in the display, and you will temporarily
Overview: Chapter 4
QuadraSynth Plus Piano Reference Manual 40
be hearing (and seeing) the original version of the Mix/Program. If youare editing a Mix and press [COMPARE], the original unedited MIX istemporarily recalled. Likewise, if you are editing a Program or its EffectsPatch and press [COMPARE], the original Program will be temporarilyrecalled. Pressing [COMPARE] again switches back to the edited version,and the word “COMPARE” disappears from the display.
Overview: Chapter 4
QuadraSynth Plus Piano Reference Manual 41
The User Interface: Display, Functions, Pages, andParameters
The key to the QuadraSynth Plus user interface is the combination of the Displayand four Quad Knobs/Buttons [1] — [4] located toward the right of the frontpanel. The Display constantly informs you of the QuadraSynth Plus’s status.
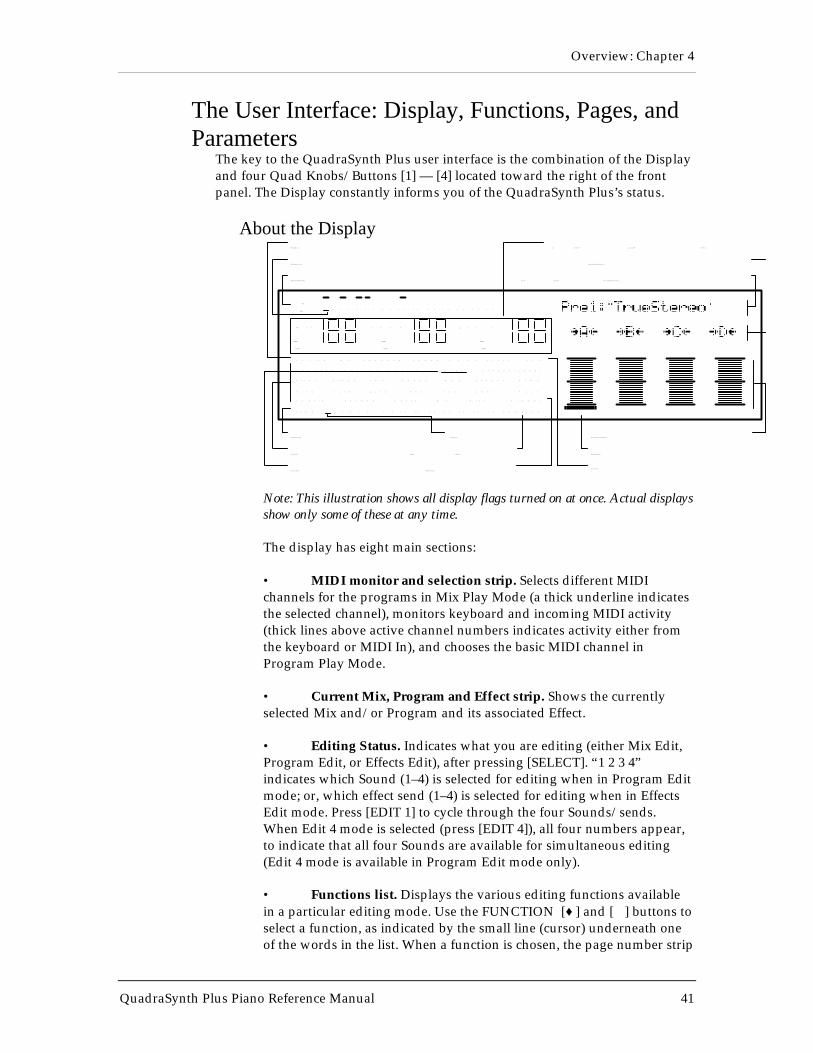
About the Display
MIDI
CHAN
MM I X P R O G
1 2 3 4 5 6 7 8 9 1 0 1 1 1 2 1 3 1 4 1 5 1 6
EE F F E C T
PRESET
EDITED
PRESET
EDITED
PRESET
EDITED
E D I T I N G : M I X P R O G R A M S O U N D 1 2 3 4 E F F E C T C L I P
P R O G R A M – A S S I G N – V O I C E L E V E L E F F E C T – L E V E L
P I T C H F I L T E R A M P R A N G E M O D E F F E C T N A M E
P L F O F L F O A L F O P E N V F E N V A E N V T R A C K
C O N F I G R E V E R B D E L A Y M I X M I S C . G L O B A L
P A G E : 1 2 3 4 5 6 7 8 9 1 0 1 1 1 2 1 3 1 4 1 5 1 6 C O M P A R E
MIDI Monitor/Selection Strip
Curr ent Mix, Pr ogram and Ef fect Strip
Function List
Page Number Strip
Mix/Pr ogram/Ef fect/Parameter Name Strip
Quad Knob/Button Label Strip
Quad Knob bar-graph meters
Compar e indicator
Clip indicator
Global indicator
Editing Status
Quad Knob Cursor
Page Cursor
MIDI Channel Cursor
Function Cursor
Note: This illustration shows all display flags turned on at once. Actual displaysshow only some of these at any time.
The display has eight main sections:
• MIDI monitor and selection strip. Selects different MIDIchannels for the programs in Mix Play Mode (a thick underline indicatesthe selected channel), monitors keyboard and incoming MIDI activity(thick lines above active channel numbers indicates activity either fromthe keyboard or MIDI In), and chooses the basic MIDI channel inProgram Play Mode.
• Current Mix, Program and Effect strip. Shows the currentlyselected Mix and/or Program and its associated Effect.
• Editing Status. Indicates what you are editing (either Mix Edit,Program Edit, or Effects Edit), after pressing [SELECT]. “1 2 3 4”indicates which Sound (1–4) is selected for editing when in Program Editmode; or, which effect send (1–4) is selected for editing when in EffectsEdit mode. Press [EDIT 1] to cycle through the four Sounds/sends.When Edit 4 mode is selected (press [EDIT 4]), all four numbers appear,to indicate that all four Sounds are available for simultaneous editing(Edit 4 mode is available in Program Edit mode only).
• Functions list. Displays the various editing functions availablein a particular editing mode. Use the FUNCTION [♦] and [∅] buttons toselect a function, as indicated by the small line (cursor) underneath oneof the words in the list. When a function is chosen, the page number strip
Overview: Chapter 4
QuadraSynth Plus Piano Reference Manual 42
and right-hand side of the display will show values related to thatfunction. Only the functions used by the current edit mode will bedisplayed and selectable. Functions can also be selected from theDIRECT SELECT buttons (see page 31).• Page number strip. Some functions have too many options to fiton a single screen. These functions use multiple screens, with each screenconsidered a page. This strip shows which page is selected byunderlining the page number. The PAGE [♦] and [∅] buttons allow youto select a page.
• Name strip. When in Mix Play Mode, the name of the currentlyselected Mix will appear here. Likewise, when in Program Play Mode,the name of the currently selected Program will appear here. In any Editmode or Store mode, the name of the currently selected parameter willappear here indicating it is selected for editing using the VALUE [] and[¬] buttons.
• Quad Knob/Button Label strip. This line is used to show thelabels of the bar graph meters, which determine the functions of the fourQuad Knobs and Buttons. These labels change depending on whichfunction and page is currently selected. The labels are abbreviations ofthe parameters; the complete name (and value) of a selected parameterwill appear in the Name strip.
• Quad Knob bar graph meters. When a Quad Knob controls afunction’s parameter, an associated bar graph appears which reflects theKnob’s setting. Note: Not all four Quad Knobs are active in all pages. If asingle line appears somewhere in the bargraph area, it indicates itscorresponding Quad Knob is active.
MIDI ButtonsThe MIDI [♦] and [∅] buttons serve two purposes. In Program PlayMode, they select the basic MIDI channel the QuadraSynth Plus willreceive and transmit MIDI messages on. In Mix Play Mode, they are usedto select one of the 16 Programs for viewing and editing.
For more information on MIDI and its uses, see Chapters 8 and 9, andAppendix B.
Quad Knob EditingThe Quad Knobs have two editing modes: Immediate and Pass-thru.When using the Quad Knobs to adjust parameter values, you may preferusing one mode over the other. When set to Immediate, parametervalues jump immediately to the Quad Knob’s exact position the momentit is moved. When set to Pass-thru, the Quad Knob must be turnedbeyond the parameter’s current setting before it becomes “live” andbegins adjusting the parameter’s value.
The editing mode is set in Global Edit mode, Page 2, using Quad Knob[3]. For more information about selecting the Quad Knobs’ editing mode,see Chapter 8.
Overview: Chapter 4
QuadraSynth Plus Piano Reference Manual 43
Parameter EditingAll parameter editing involves the same general procedure, with minorvariations:
¿ Select the type of parameters you want to edit with thecorresponding button: [MIX], [PROGRAM], or [GLOBAL].Mix parameters edit a Mix. Program parameters edit a Program. Effectsparameters can be edited from within a Mix or a Program (see below). Globalparameters edit general characteristics that affect the entire instrument.¡ Select an Edit Mode with the [SELECT] button.Example: If you pressed [PROGRAM], the [SELECT] button switches betweentwo groups of functions—one for editing the Program’s Sound layers(ProgramEdit Mode), and the other for editing the associated Effect (Effects Edit Mode). Ifyou’re editing a Mix, the [SELECT] button switches between three groups offunctions—one for editing the Mix’s parameters (Mix Edit Mode), one forediting the Programs in the Mix (Program Edit Mode), and the last for editingthe associated Effect (Effects Edit Mode).
¬ Use the FUNCTION [♦] and [∅] buttons to select a function(level, pitch, etc.). Alternatively, you can use the DIRECT SELECTbuttons (located on the far left of the front panel) to directly select aFunction to edit.Press FUNCTION [∅] to move toward the end of the list, and FUNCTION[♦] to move back toward the beginning. The selected function will be underlinedin the display. Press both FUNCTION [♦] and [∅] simultaneously to get backto the first function in the list.
If a function has multiple pages, select the appropriate page byusing the PAGE [♦] and [∅] buttons.The LCD’s page number strip shows the number of pages in a function; anunderline shows the currently selected page (e.g., if the display shows “1 2 3”then page two is selected).
Press the PAGE [∅] button to select the next higher-numbered page, andPAGE [♦] to select the next lower-numbered page. Press both PAGE [♦] and[∅] simultaneously to get back to the first page of the selected function.
� Select a parameter on the page for editing.There can be up to four editable parameters on a page. The right side of thedisplay shows these parameters with both text and bar graph meters to giveinstant visual feedback concerning a parameter’s value. Each of the fourcolumns has an associated Quad Knob and Button: the leftmost columnmonitors Quad Knob/Button[1], the second from left column monitors QuadKnob/Button [2], etc. Turning a Quad Knob or pressing its Button selects theassociated parameter for editing. The currently selected parameter is indicatedby a thick line at the bottom of one of the four bar graph meters.
H Change the parameter value.You can edit the value either by turning the associated Quad Knob (for largevalue changes) or pressing the VALUE [¬] and [] buttons (for smallerchanges).
Overview: Chapter 4
QuadraSynth Plus Piano Reference Manual 44
Each bar graph indicates a parameter’s approximate value—increasing avalue increases the column height. With bipolar values that can gopositive or negative, turning a knob clockwise increases the columnheight upward from the midpoint, and turning a knob counterclockwiseincreases the column height downward (more negative value) from themidpoint.
Always refer to the parameter name strip in the display above thebargraphs for the current parameter label and value.
Overview: Chapter 4
QuadraSynth Plus Piano Reference Manual 45
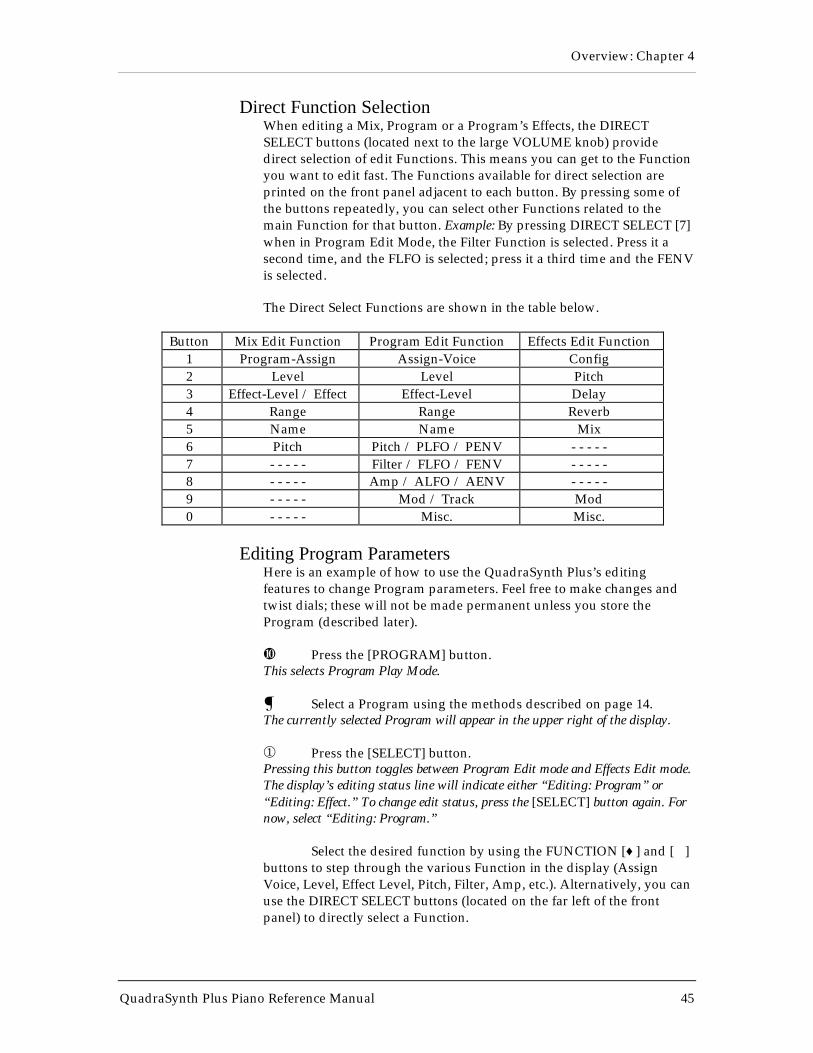
Direct Function SelectionWhen editing a Mix, Program or a Program’s Effects, the DIRECTSELECT buttons (located next to the large VOLUME knob) providedirect selection of edit Functions. This means you can get to the Functionyou want to edit fast. The Functions available for direct selection areprinted on the front panel adjacent to each button. By pressing some ofthe buttons repeatedly, you can select other Functions related to themain Function for that button. Example: By pressing DIRECT SELECT [7]when in Program Edit Mode, the Filter Function is selected. Press it asecond time, and the FLFO is selected; press it a third time and the FENVis selected.
The Direct Select Functions are shown in the table below.
Button Mix Edit Function Program Edit Function Effects Edit Function1 Program-Assign Assign-Voice Config2 Level Level Pitch3 Effect-Level / Effect Effect-Level Delay4 Range Range Reverb5 Name Name Mix6 Pitch Pitch / PLFO / PENV - - - - -7 - - - - - Filter / FLFO / FENV - - - - -8 - - - - - Amp / ALFO / AENV - - - - -9 - - - - - Mod / Track Mod0 - - - - - Misc. Misc.
Editing Program ParametersHere is an example of how to use the QuadraSynth Plus’s editingfeatures to change Program parameters. Feel free to make changes andtwist dials; these will not be made permanent unless you store theProgram (described later).
¿ Press the [PROGRAM] button.This selects Program Play Mode.
¡ Select a Program using the methods described on page 14.The currently selected Program will appear in the upper right of the display.
¬ Press the [SELECT] button.Pressing this button toggles between Program Edit mode and Effects Edit mode.The display’s editing status line will indicate either “Editing: Program” or“Editing: Effect.” To change edit status, press the [SELECT] button again. Fornow, select “Editing: Program.”
Select the desired function by using the FUNCTION [♦] and [∅]buttons to step through the various Function in the display (AssignVoice, Level, Effect Level, Pitch, Filter, Amp, etc.). Alternatively, you canuse the DIRECT SELECT buttons (located on the far left of the frontpanel) to directly select a Function.
Overview: Chapter 4
QuadraSynth Plus Piano Reference Manual 46
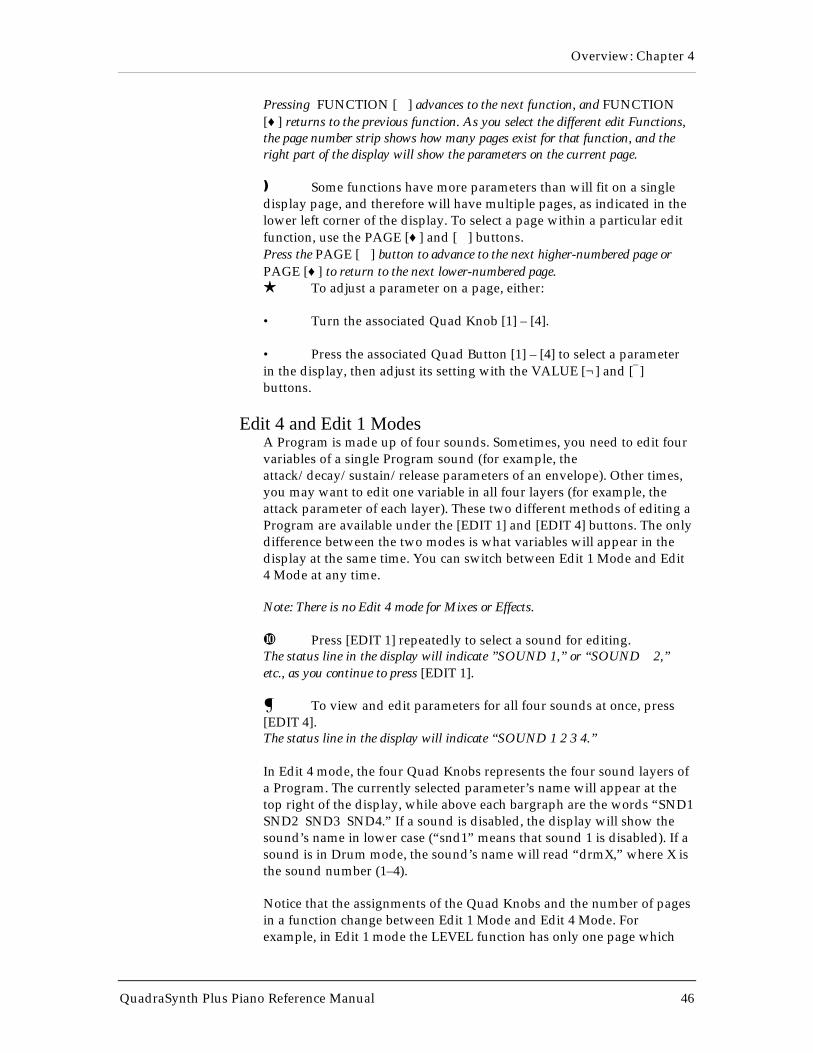
Pressing FUNCTION [∅] advances to the next function, and FUNCTION[♦] returns to the previous function. As you select the different edit Functions,the page number strip shows how many pages exist for that function, and theright part of the display will show the parameters on the current page.
� Some functions have more parameters than will fit on a singledisplay page, and therefore will have multiple pages, as indicated in thelower left corner of the display. To select a page within a particular editfunction, use the PAGE [♦] and [∅] buttons.Press the PAGE [∅] button to advance to the next higher-numbered page orPAGE [♦] to return to the next lower-numbered page.H To adjust a parameter on a page, either:
• Turn the associated Quad Knob [1] – [4].
• Press the associated Quad Button [1] – [4] to select a parameterin the display, then adjust its setting with the VALUE [¬] and []buttons.
Edit 4 and Edit 1 ModesA Program is made up of four sounds. Sometimes, you need to edit fourvariables of a single Program sound (for example, theattack/decay/sustain/release parameters of an envelope). Other times,you may want to edit one variable in all four layers (for example, theattack parameter of each layer). These two different methods of editing aProgram are available under the [EDIT 1] and [EDIT 4] buttons. The onlydifference between the two modes is what variables will appear in thedisplay at the same time. You can switch between Edit 1 Mode and Edit4 Mode at any time.
Note: There is no Edit 4 mode for Mixes or Effects.
¿ Press [EDIT 1] repeatedly to select a sound for editing.The status line in the display will indicate ”SOUND 1,” or “SOUND 2,”etc., as you continue to press [EDIT 1].
¡ To view and edit parameters for all four sounds at once, press[EDIT 4].The status line in the display will indicate “SOUND 1 2 3 4.”
In Edit 4 mode, the four Quad Knobs represents the four sound layers ofa Program. The currently selected parameter’s name will appear at thetop right of the display, while above each bargraph are the words “SND1SND2 SND3 SND4.” If a sound is disabled, the display will show thesound’s name in lower case (“snd1” means that sound 1 is disabled). If asound is in Drum mode, the sound’s name will read “drmX,” where X isthe sound number (1–4).
Notice that the assignments of the Quad Knobs and the number of pagesin a function change between Edit 1 Mode and Edit 4 Mode. Forexample, in Edit 1 mode the LEVEL function has only one page which
Overview: Chapter 4
QuadraSynth Plus Piano Reference Manual 47
shows the Volume, Pan and Output of a single sound. In Edit 4 Mode,the Level function has three pages: all four sound volumes are page 1, allpans are on page 2, and all outputs are on page 3.
Overview: Chapter 4
QuadraSynth Plus Piano Reference Manual 48
Resetting a Parameter ValueIt’s often convenient while editing to return a parameter to its defaultsetting (usually, but not always, 0). This normally involves turning aQuad Knob or repeatedly pressing the VALUE [¬] and [] buttons, buthere’s a quicker way:
To reset a parameter to its default setting:
¿ Select the parameter you wish to reset using the methodsdescribed earlier.
¡ Simultaneously press both the VALUE [¬] and [] buttons.
Comparing Edited and Stored VersionsWhen you edit a Program or Mix, you are actually editing a copy which is in atemporary edit buffer. Therefore, to retain the results of your edit, you must saveit to a particular memory location (see the next section on Storing). If you changememory locations before saving, the buffer will be replaced and your edits lost.
Because the original Program/Mix remains undisturbed, you can compare theedited version to the original by using the Compare function. You can only selectCompare mode when either Mix Edit, Program Edit or Effects Edit is selected,and the word “EDITED” appears in the display below either “MIX,” “PROG” or“EFFECT.”
¿ Press [COMPARE].The word “COMPARE” will appear in the display, while the word “EDITED” willdisappear.
¡ Press [COMPARE] again to exit Compare mode and return to the editedversion.The word “COMPARE” will disappear from the display, and the word “EDITED” willreappear. Pressing [MIX], [PROGRAM], [GLOBAL], [STORE] or theMIX/PROGRAM SELECT [1]—[0] buttons will also exit Compare mode.
JWhile Compare mode is selected, you can move around to view the various parameters,but you will not be able to edit anything. This is because you are seeing what is inmemory, not what is in the edit buffer.
Preset Memory and User MemoryThe QuadraSynth Plus has two types of memory banks for Mixes and Programs:Preset and User. The Preset banks, of which there are four, are stored in ROM(Read Only Memory), and therefore cannot be altered. However, the User bank,of which there is 1, is stored in RAM (Random Access Memory). Anytime youwant to keep an edited version of a Mix or Program, you will store it into theUser bank or onto a RAM Card. If you want to permanently change a Mix orProgram that is in the Preset bank, you can store the edited version into the Userbank (in either the same number location or a different number location).
Overview: Chapter 4
QuadraSynth Plus Piano Reference Manual 49
However, this requires that you “store over,” losing whatever was previously inthat location. If you don’t want to lose any of the sounds in the User bank, youshould back-up the entire bank to either an external SRAM or FlashRAMPCMCIA card, or (via MIDI System Exclusive) into a data storage device like theAlesis DataDisk or a MIDI sequencer. See Chapter 9 for more information onexternal storage operations.
Overview: Chapter 4
QuadraSynth Plus Piano Reference Manual 50
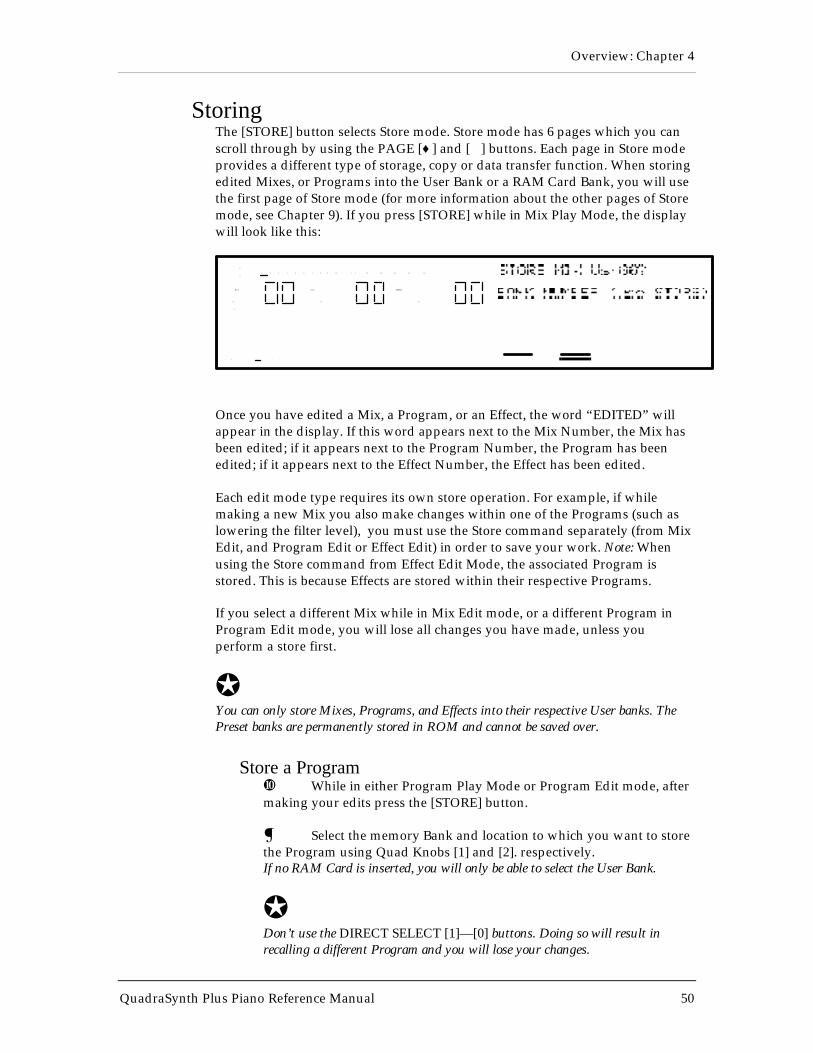
StoringThe [STORE] button selects Store mode. Store mode has 6 pages which you canscroll through by using the PAGE [♦] and [∅] buttons. Each page in Store modeprovides a different type of storage, copy or data transfer function. When storingedited Mixes, or Programs into the User Bank or a RAM Card Bank, you will usethe first page of Store mode (for more information about the other pages of Storemode, see Chapter 9). If you press [STORE] while in Mix Play Mode, the displaywill look like this:
MIDI
CHAN
M I XM I X PROG
1 2 3 4 5 6 7 8 9 10 1 1 12 13 14 15 16
E F F E C TE F F E C T
PRESET
EDITED
PRESET PRESET
P AGE: 1 2 3 4 5 6
Once you have edited a Mix, a Program, or an Effect, the word “EDITED” willappear in the display. If this word appears next to the Mix Number, the Mix hasbeen edited; if it appears next to the Program Number, the Program has beenedited; if it appears next to the Effect Number, the Effect has been edited.
Each edit mode type requires its own store operation. For example, if whilemaking a new Mix you also make changes within one of the Programs (such aslowering the filter level), you must use the Store command separately (from MixEdit, and Program Edit or Effect Edit) in order to save your work. Note: Whenusing the Store command from Effect Edit Mode, the associated Program isstored. This is because Effects are stored within their respective Programs.
If you select a different Mix while in Mix Edit mode, or a different Program inProgram Edit mode, you will lose all changes you have made, unless youperform a store first.
JYou can only store Mixes, Programs, and Effects into their respective User banks. ThePreset banks are permanently stored in ROM and cannot be saved over.
Store a Program¿ While in either Program Play Mode or Program Edit mode, aftermaking your edits press the [STORE] button.
¡ Select the memory Bank and location to which you want to storethe Program using Quad Knobs [1] and [2]. respectively.If no RAM Card is inserted, you will only be able to select the User Bank.
JDon’t use the DIRECT SELECT [1]—[0] buttons. Doing so will result inrecalling a different Program and you will lose your changes.
Overview: Chapter 4
QuadraSynth Plus Piano Reference Manual 51
¬ Press [STORE] again to complete the operation.Or, Press any other button to cancel out of the Store operation without storing.
Overview: Chapter 4
QuadraSynth Plus Piano Reference Manual 52
Copying Effects Between ProgramsFollow the steps below to copy the Effects from one Program to anotherProgram in the User Bank.
¿ Press [PROGRAM] to select Program Play Mode.
¡ Use the VALUE [¬] and [] buttons to select the ProgramNumber that uses the Effects you want to copy. If necessary, use theFUNCTION [♦] and [∅] buttons to select a different Bank.
¬ Press [STORE].
Press PAGE [∅] once to advance to Page 2.The top right section of the display will read “COPY TO SOUND 1”.
� Turn Quad Knob [1] clockwise until the display reads “COPYFROM EFFECT”.This selects the Effects of the currently selected Program as the source of what isto be copied.
H Turn Quad Knob [2] to select the Program Number in the UserBank you wish to copy the Effects to (000–127).
Press [STORE] to complete the copy function.
Store an EffectIf you have edited a Program’s Effect and would like to store it withoutstoring the changes you’ve made to the Program’s parameters, you canuse the Copy Effect function to store only the Effects edits to thecurrently selected Program. When you recall this Program, it will havethe new Effects settings you saved it with, but will retain its previouslystored Program parameter settings.
Store a Mix¿ While in either Mix Play Mode or Mix Edit mode, after makingyour edits press the [STORE] button.
¡ Select the memory Bank and location to which you want to storethe Mix using Quad Knob [1] and [2]. respectively.If no RAM Card is inserted, you will only be able to select the User Bank.
JDo not use the DIRECT SELECT [1]—[0] buttons. Doing so will result inrecalling a different Mix and you will lose your changes.
¬ Press [STORE] again to complete the operation.
J
Overview: Chapter 4
QuadraSynth Plus Piano Reference Manual 53
Storing a Mix only stores the Mix parameters, not the individual Programs orEffect Patch used in the Mix. If you have edited any of the Programs in the Mixor the Effects Patch, you must store them separately.
Overview: Chapter 4
QuadraSynth Plus Piano Reference Manual 54
To Audition Programs Before StoringTo look for available memory locations to permanently store yourProgram to, you can move between Program Mode and Mix Modewithout losing your changes. This is because Program Mode has aProgram edit buffer, and Mix Mode has its own Mix edit buffer alongwith 16 Program edit buffers. These buffers are retained when movingbetween Program Mode and Mix Mode, thus making it easy to search fora suitable location to store your newly created Program. Example: Whilein Program Edit mode, go to Mix Mode and scroll through the Programlist on one of the Channels; while editing a Program from Mix Mode, goto Program Mode to scroll through the Program list.
The way to tell the difference between a program edited in ProgramMode and one edited from Mix Mode is simple: in Program Mode, theMIX number does not appear in the display.
JYou will lose your changes if you remain in the same mode and recall a differentMix/Program by pressing the MIX/PROGRAM SELECT [1]—[0] buttons.
To audition Programs before overwriting them with STORE…when editing a Program in Program Mode:
¿ While in Program Edit mode, press [MIX].This selects Mix Play Mode, retaining your edits to the Program in an editbuffer.
¡ Using the BANK and DIRECT SELECT buttons, select Mix 99 inPreset Bank 1.
¬ Press [SELECT] to enter Mix Edit Mode, and press both MIDI[♦] and [∅] buttons simultaneously to select Channel 1.
Press the DIRECT SELECT [1] button (or both FUNCTION [♦]and [∅] buttons simultaneously) so the words “PROGRAM – ASSIGN”are underlined.
� Turn Quad Knob [1] to the left so that the word “USER” appearsin the top part of the display, just before the Program name. If a RAMcard is inserted, use Quad Knob [1] to select a Card Bank.
H Turn Quad Knob [2] to scroll through the Programs until youfind one you wish to overwrite with the new edited Program. Take anote of the number.
Press [PROGRAM] to enter Program Play Mode.This recalls the edit buffer in Program Mode, which is your edited Program.
« Press [STORE].
Overview: Chapter 4
QuadraSynth Plus Piano Reference Manual 55
The top right of the display will read “STORE PRG UsrXXX?” where XXX isa User Program number from 000—127.
» Use Quad Knob [2] to enter the Program number you noted instep 6. If necessary, use Quad Knob [1] to select a Card Bank.
� Press [STORE] again.The Program is now stored.
Overview: Chapter 4
QuadraSynth Plus Piano Reference Manual 56
To audition Programs before overwriting them with STORE…when editing a Program in Mix Edit Mode:
¿ While in Mix Program Edit mode, press [PROGRAM].This selects Program Play Mode, retaining your edits to the Program in MixEdit.
¡ Press the BANK [♦] button until the word “USER” appears inthe top part of the display, just before the Program name. If a RAM cardis inserted, use the BANK buttons to select a Card Bank.
¬ Use the VALUE [] and [¬] buttons to scroll through thePrograms until you find one you wish to overwrite with the new editedProgram. Take note of the number.
Press [MIX].This recalls the edit buffer in Mix Mode, which contains your edited Program.
� Press [SELECT] twice, until “EDITING: PROGRAM” appearsunder the MIX number in the display.
H Press [STORE].The top line of the display will read “STORE PRG UsrXXX?” where XXX is aUser Program number from 000—127.
Use Quad Knob [2] to select the Program number you noted instep 3. If necessary, use Quad Knob [1] to select a Card Bank.
« Press [STORE] again.The Program is now stored.
At this point your edited Program is stored, however the Mix you wereauditioning before storing the Program still has the old Program numberassigned (if the edited Program was saved to a different Programnumber location). Therefore, you need to re-select the new Programnumber from within Mix Edit mode.
» Press [MIX], then [SELECT] to access Mix Edit mode.
� Use the MIDI [♦] and [∅] buttons to select the MIDI channel youwant, and use the VALUE [] and [¬] buttons or Quad Knob [2] to selectthe Program number. If necessary, use Quad Knob [1] to select the Bank.
Overview: Chapter 4
QuadraSynth Plus Piano Reference Manual 57
Editing Mixes: Chapter 5
QuadraSynth Plus Piano Reference Manual 58
CHAPTER 5
EDITING MIXESWhat is a Mix?
Mix Mode is one of the most powerful features of the QuadraSynth Plus. Whilein Program Mode you can play only one Program at a time, in Mix Mode you canplay up to 16 Programs at once, either from the keyboard (as layers or splits) orfrom an external sequencer (via 16 MIDI channels) or a combination of both.
With Mix Mode, you can do the following:
• Combine ("stack" or "layer") different Programs so they can be playedsimultaneously from the keyboard. For example, stack a piano on top of a brasspatch and a string patch, adjusting the volume of each for a desirable mix. (Notethat the stacking of Programs in Mix Play Mode is in addition to any sounds thatmay be stacked in the four sound layers of each Program.)
• Split the keyboard into different zones--for example, the classic bassguitar on the left-hand side of the keyboard and synth or piano on the right. Youcan split the keyboard into as many as 16 zones.
• Transmit on several different MIDI channels simultaneously.
• Receive up to 16 MIDI channels from an external sequencer, with eachchannel representing a different instrument--piano on Ch. 1, bass on Ch. 2,drums on Ch. 10, trumpet on Ch. 16. Mix Play Mode is the multitimbral mode ofthe QuadraSynth Plus.
• Set the relative level, panning, and effect send of each MIDI channel.
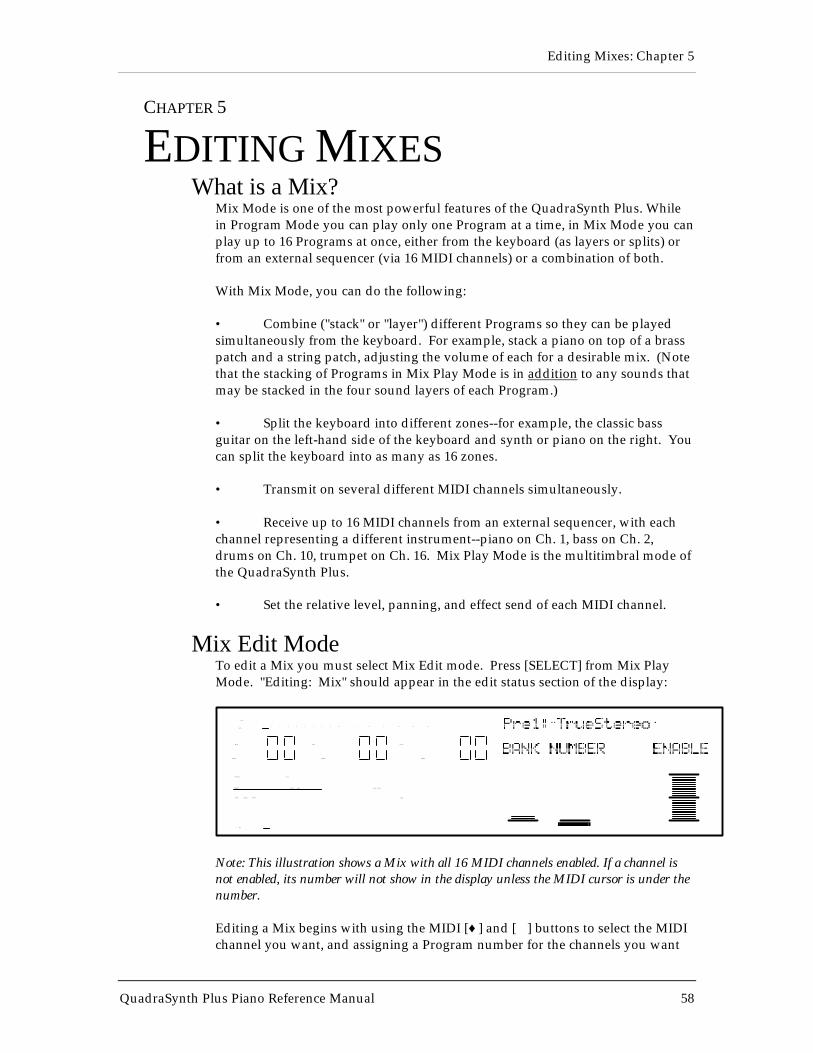
Mix Edit ModeTo edit a Mix you must select Mix Edit mode. Press [SELECT] from Mix PlayMode. "Editing: Mix" should appear in the edit status section of the display:
PROG EFFECT
PRESET PRESET
EDITING: MIX
P AGE: 1
PITCH RANGE EFFECT NAME
MIDI
CHAN
M I XM I X
PRESET
1 2 3 4 5 6 7 8 9 10 1 1 12 13 14 15 16
PROGRAM – ASSIGN LEVEL EFFECT–LEVEL
Note: This illustration shows a Mix with all 16 MIDI channels enabled. If a channel isnot enabled, its number will not show in the display unless the MIDI cursor is under thenumber.
Editing a Mix begins with using the MIDI [♦] and [∅] buttons to select the MIDIchannel you want, and assigning a Program number for the channels you want
Editing Mixes: Chapter 5
QuadraSynth Plus Piano Reference Manual 59
to use. Each channel may be enabled or disabled, without changing any of itsparameter settings. When a channel is disabled, its number will not appear in theupper left display, except when it is selected for editing. You can set levels, effectlevels and bus assignments, pitch transposition, keyboard ranges (if making asplit or layer), and MIDI parameters for each individual channel. Each function isselected using the FUNCTION [♦] and [∅] buttons and (if necessary) the PAGE[♦] and [∅] buttons. A Mix also uses the Effect Patch associated with one of its 16Programs.
Here is a simplified diagram of the signal path in Mix mode.
Pr ogram
Range
C h a n n e l 1C h a n n e l 1
Channel 2
Channel 3
Channel 16
MIDI
Input
Pan Output
Sends
1—4
Main L
Ef fects
Level
Ef fects
Buss
Main R
Aux L
Aux R
Ef fects
Pr ocessor
(r everb, delay,
chorus, etc.)
Pitch
MIDI
Output
Keyboar d
Mode =
NORMAL
MIDI
Out
MIDI In
Keyboar d
Sound 1
Sound 2
Sound 3
Sound 4
Pedals
Pedals
Understanding the Edit BuffersIn Mix mode, there are 16 Program edit buffers (one for each channel), plusanother buffer for the Mix parameters (Level, Pitch, Range, etc.), and yet anotherbuffer for the Effects Processor. When you select a Mix from memory, it iscopied into the Mix Edit buffer, the 16 Programs of that Mix are copied into the16 edit buffers, and the Effect from one of the 16 Programs is copied into theEffects buffer. If you make changes to the Mix, they are only temporarily kept inthe edit buffer until a new Mix is selected from memory. Therefore, you MUSTstore your edited Mix if you want to keep it.
If in the course of making a Mix, you enter Program Edit mode (by pressing[SELECT]) and edit one or more Programs in the Mix, the edits you make areentered into a separate buffer for each Program in the Mix. Note, however, thatyou DO have to STORE each edited Program in the User bank (in the same ordifferent Program number location) before selecting a different Mix, or your
Editing Mixes: Chapter 5
QuadraSynth Plus Piano Reference Manual 60
changes will be lost. The same goes for editing the Effects, which will be storedwith its associated Program. If you select another Mix before storing, yourchanges will be lost.
Editing Mixes: Chapter 5
QuadraSynth Plus Piano Reference Manual 61
Program Assign for each MIDI ChannelThe first function of Mix Edit is Program Assign.
Program Bank (User, Preset 1–4, Card)This determines which Bank the selected Program is located infor the selected MIDI channel. There are five Banks available inthe QuadraSynth Plus. If you insert a QuadraCard Sound Card,you can have even more Banks.
Program Number (000 to 127)This determines the Program Number (000—127) for the selectedMIDI channel.
Enable (On or Off)This determines whether the Program on the selected channel isenabled or disabled. When disabled, no sound will be generatedby the QuadraSynth Plus. The Channel number in the displayfor a disabled channel will not appear except when selected forediting.
JEven if a channel is enabled here, it will not play unless the propersettings in the RANGE function (MIDI IN and/or KEYBOARDOn/Off and LOW/HIGH) are made.
Level Setting for Each ProgramThe second function of Mix Edit is Level.
Level (00 to 99)This sets the overall volume for a sound. Higher numbers givehigher levels.
Pan (<3 to 3>, or PG )This determines the pan position of the selected channel. Whenset to PG, the panning setting will be that of the Programassigned to the selected channel. However, you can override thissetting by selecting a different value, thereby assigning thechannel’s panning between the left and right outputs of eitherthe MAIN or AUX outputs (depending on the Outputassignment--see below).
Output (MAIN, AUX, OFF, or PROG)This determines the audio output assignment for the selectedchannel. When set to PROG, the channel will use the Outputassignment of the Program. However, you can override thisassignment by setting this parameter to something different.Selecting MAIN or AUX will assign the channel to the MAIN or
Editing Mixes: Chapter 5
QuadraSynth Plus Piano Reference Manual 62
AUX audio outputs. When set to OFF, the channel will not besent to either set of outputs (but can still feed an effect bus).
Editing Mixes: Chapter 5
QuadraSynth Plus Piano Reference Manual 63
PitchThe Pitch function lets you transpose a channel’s Program in either semitone oroctave increments. By using both parameters together, you have a totaltransposition range of ±3 octaves.
Octave (-2 to +2 octaves)This transposes the Program’s pitch in octave (12 semitone) stepsfrom -2 (transposed down 2 octaves) to +2 (transposed up twooctaves).
Semitone (-12 to +12 semitones)This transposes the Program’s pitch in semitone steps, from -12(transposed down one octave) to +12 (transposed up one octave).
Setting the Range and MIDI SwitchesEach sound can be restricted to a specific range of the keyboard. This is ideal forcreating splits (e.g., bass in the lower octave and a half, piano in the middle threeoctaves, and strings in the upper octave). When you start to setup a MIX, it maybe confusing if many of the channels have their Keyboard parameter turned off.In order to hear anything on a particular channel, enable Keyboard control andset the Range so that the low note and high note values are set beyond where youwant to play. Look at the MIDI MONITOR section of the display. A thick linewill appear above any active MIDI channels as you play notes or send notes tothe QuadraSynth Plus from a sequencer on those channels.
Range (Page 1)Lower Limit (MIDI note 000 to 127/ C-2 to G8)
Specifies the lowest note of the sound’s keyboard range. You canset the lower limit by holding Quad Switch [1] and tapping thekey on the keyboard you want to set as the lowest note in therange.
High Limit (MIDI note 000 to 127/ C-2 to G8)Specifies the highest note of the sound’s keyboard range. Youcan set the high limit by holding Quad Switch [2] and tappingthe key on the keyboard you want to set as the highest note inthe range.
JIf the lower limit is set above the high limit, there will be no sound fromthis program layer.
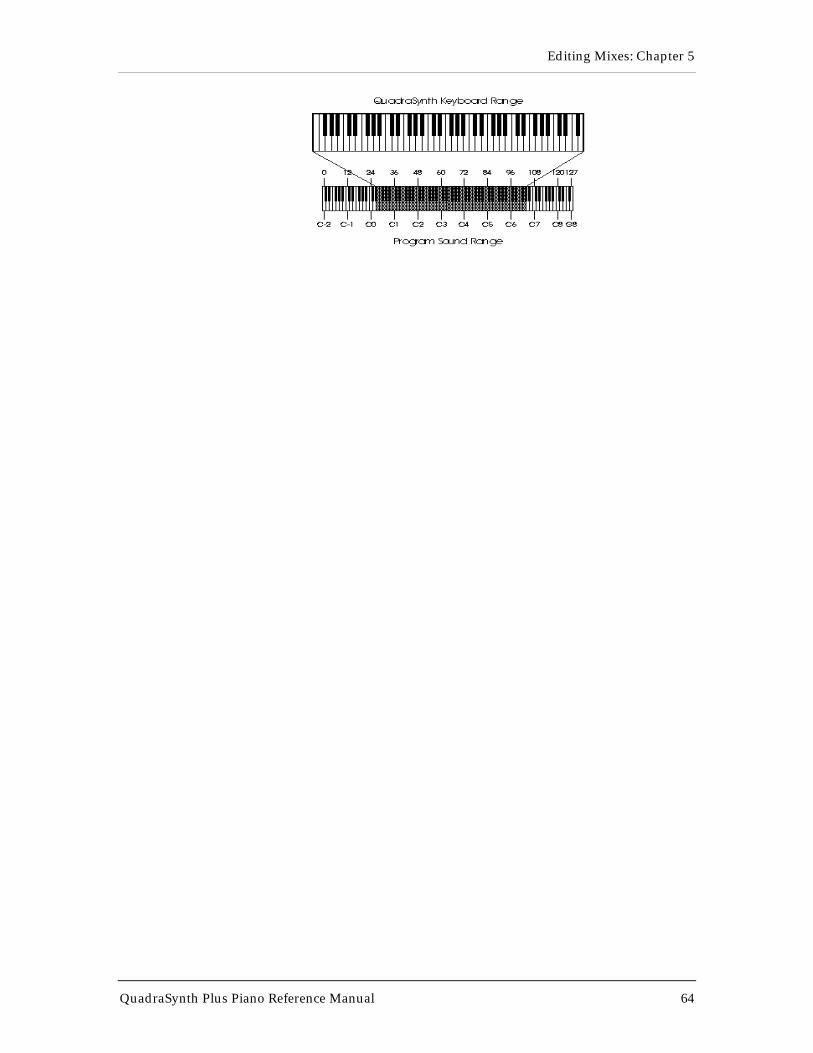
Editing Mixes: Chapter 5
QuadraSynth Plus Piano Reference Manual 64
Editing Mixes: Chapter 5
QuadraSynth Plus Piano Reference Manual 65
Range (Page 2)MIDI In (On or Off)
This determines whether or not the selected channel willrespond to incoming MIDI messages.
MIDI Out (On or Off)This determines whether or not the selected channel willtransmit MIDI messages.
Keyboard (On or Off)This determines whether or not the selected channel willrespond to the keyboard, pitch-bend and mod wheels, footpedals and sustain pedal of the QuadraSynth Plus itself.
Range (Page 3)The following four parameters determine whether or not specific typesof MIDI information will be received or transmitted, and are setseparately for each Channel in the Mix. These, however, are dependenton how the individual Channels have their Range Page 2 parameters set(described above).
Pitch-bend and Modulation Wheels (On or Off)This determines whether or not the selected channel willtransmit and receive pitch-bend and modulation (controller 1)MIDI information.
Aftertouch (On or Off)This determines whether or not the selected channel willtransmit and receive aftertouch MIDI information.
Sustain Pedals (On or Off)This determines whether or not the selected channel willtransmit and receive sustain pedal (controller 64) MIDIinformation.
Controllers (On or Off)This determines whether or not the selected channel willtransmit and receive MIDI controller information which theControllers A–D and Pedals 1 & 2 are assigned to (these areassigned to MIDI controllers in Global Mode, Page 3 and 5).
Transmitting MIDI Volume and PanningEach Channel in a Mix can transmit its volume and panning settings viaMIDI, if the “MIDI Prog Select” parameter is set to “On” (Global EditMode, Page 6, Quad Knob [1]). Volume level is sent as MIDI controller#7, and panning is sent as controller #10. If the “MIDI Prog Select”parameter is set to “On:"
• whenever a Mix is recalled (via the front panel or via MIDI),volume and panning information will be transmitted;
Editing Mixes: Chapter 5
QuadraSynth Plus Piano Reference Manual 66
• whenever a Channel’s “Level” parameter is edited, volumeinformation will be transmitted as controller #7 on that Channel;
• whenever a Channel’s “Pan” parameter is edited, panninginformation will be transmitted as controller #10 on that Channel (exceptwhen set to “PRG”).
Note: Panning information will not be transmitted if the Channel’s “Pan“parameter is set to PRG (using the selected Program’s stored Pansetting).
Effects in Mix Play ModeIn Mix Play Mode, you can have only one Effect Patch active per Mix, which willbe the Effects Patch associated with one of the Programs used in the Mix.However, the Mix’s Effect Patch still has 4 independent effect buses, and you canset the effect send level and routing from each Program layer to the effectsprocessor.
The QuadraSynth Plus offers you a choice of what parameters to use for effects:
• The Effect Channel determines which one of the Programs in the Mixyou want to use the Effects Patch from. For example, if the Effect Channel is setto 10, you will use whatever effect is used by the program on MIDI channel 10.
• The effect levels and bus assignments of the Program on each Channelcan be set directly by the Mix, or you can use the same levels and buses that werestored in each Program.
Effect LevelThe Effect function is where each channel may be given its own EffectLevel and Effect Bus assignment.
Effect Level (00 to 99, or PROG)This determines the amount of signal from the selected channelthat will be sent to the effects, using one of the four effects busesas determined by Quad Knob [2].
Effect Bus (1, 2, 3, 4, or PROG)Quad Knob [2] determines which effect bus the selected channelwill be routed to. When set to PROG, the effect bus assignmentwill be that stored by the channel’s Program. 1, 2, 3 or 4overrides the Program’s bus assignment, sending all soundlayers of the Program to the chosen bus.
EffectThe Effect function is where you select what Effect Patch will be used bythe Mix, by linking the Effect to one of the Programs in the Mix.
FX Channel (1 to 16)
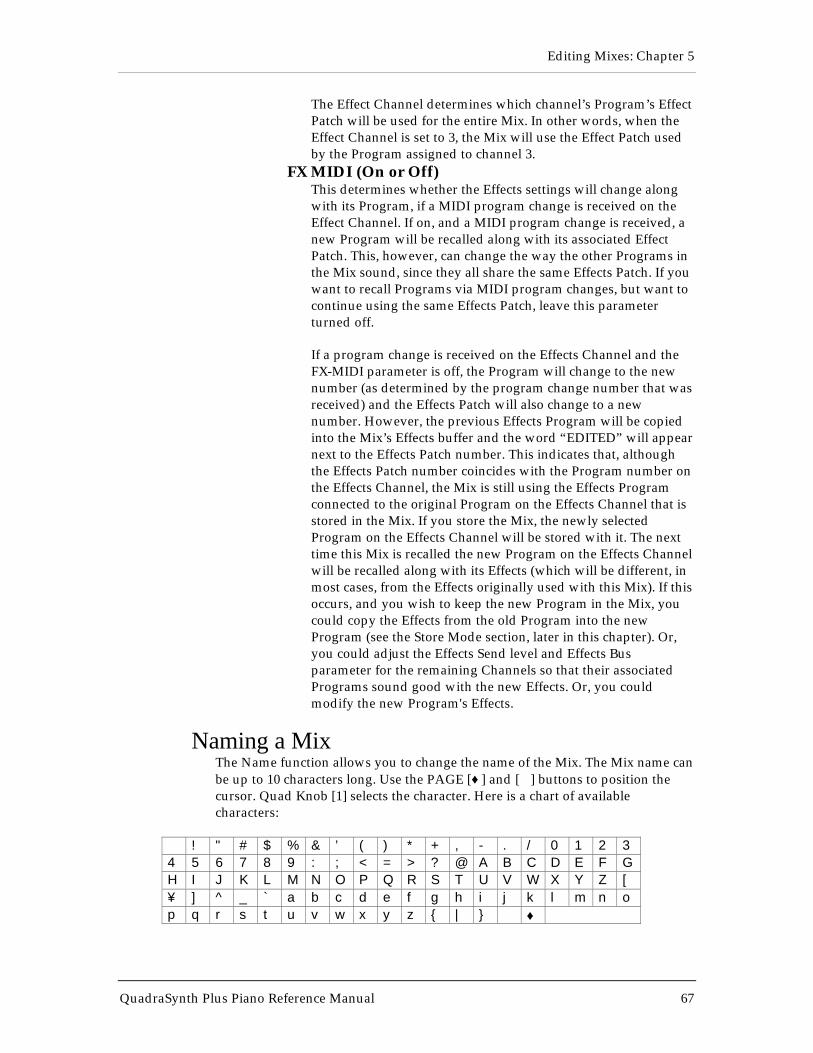
Editing Mixes: Chapter 5
QuadraSynth Plus Piano Reference Manual 67
The Effect Channel determines which channel’s Program’s EffectPatch will be used for the entire Mix. In other words, when theEffect Channel is set to 3, the Mix will use the Effect Patch usedby the Program assigned to channel 3.
FX MIDI (On or Off)This determines whether the Effects settings will change alongwith its Program, if a MIDI program change is received on theEffect Channel. If on, and a MIDI program change is received, anew Program will be recalled along with its associated EffectPatch. This, however, can change the way the other Programs inthe Mix sound, since they all share the same Effects Patch. If youwant to recall Programs via MIDI program changes, but want tocontinue using the same Effects Patch, leave this parameterturned off.
If a program change is received on the Effects Channel and theFX-MIDI parameter is off, the Program will change to the newnumber (as determined by the program change number that wasreceived) and the Effects Patch will also change to a newnumber. However, the previous Effects Program will be copiedinto the Mix’s Effects buffer and the word “EDITED” will appearnext to the Effects Patch number. This indicates that, althoughthe Effects Patch number coincides with the Program number onthe Effects Channel, the Mix is still using the Effects Programconnected to the original Program on the Effects Channel that isstored in the Mix. If you store the Mix, the newly selectedProgram on the Effects Channel will be stored with it. The nexttime this Mix is recalled the new Program on the Effects Channelwill be recalled along with its Effects (which will be different, inmost cases, from the Effects originally used with this Mix). If thisoccurs, and you wish to keep the new Program in the Mix, youcould copy the Effects from the old Program into the newProgram (see the Store Mode section, later in this chapter). Or,you could adjust the Effects Send level and Effects Busparameter for the remaining Channels so that their associatedPrograms sound good with the new Effects. Or, you couldmodify the new Program's Effects.
Naming a MixThe Name function allows you to change the name of the Mix. The Mix name canbe up to 10 characters long. Use the PAGE [♦] and [∅] buttons to position thecursor. Quad Knob [1] selects the character. Here is a chart of availablecharacters:
! " # $ % & ’ ( ) * + , - . / 0 1 2 34 5 6 7 8 9 : ; < = > ? @ A B C D E F GH I J K L M N O P Q R S T U V W X Y Z [¥ ] ^ _ ` a b c d e f g h i j k l m n op q r s t u v w x y z { | } ∅ ♦
Editing Mixes: Chapter 5
QuadraSynth Plus Piano Reference Manual 68
Polyphony in Mix Play ModeThe QuadraSynth Plus has 64-note polyphony. In Mix Play Mode, if you have all16 MIDI channels assigned to the same keyboard range, and each channel'sProgram has only one active Program Sound, you’ll have 4-note polyphony asyou play the keyboard (but a really thick layer...). This is extreme, of course, butshould tell you what you can expect when you really pile on the layers from thekeyboard.
Using the QuadraSynth Plus as a Master KeyboardMix Play Mode gives the QuadraSynth Plus the capabilities of a MIDI masterkeyboard. You can layer the QuadraSynth Plus’s internal sounds with anexternal synthesizer's sounds without using up internal polyphony by adjustingthe proper parameters in the Mix Edit mode.
Example: You can have 2 layers (or a split) played directly from the QuadraSynthPlus, simultaneously playing on external synthesizers using a MIDI channelwhich has its internal QuadraSynth Plus’s sound turned OFF.
Setting MIDI Out Channels for Mix in Global ModeThe QuadraSynth Plus offers a wide variety of ways to set the MIDI output. It isvery easy in Program Play Mode; you just use the MIDI [♦] and [∅] buttons toset the MIDI OUT channel for the whole instrument. But when using theQuadraSynth Plus in Mix Play Mode, you need to be able to transmit on severalMIDI channels at once, and to temporarily isolate certain channels within a Mix.This is done with the Keyboard Mode function.
¿ From Mix mode, press [GLOBAL].
¡ Press PAGE [∅] to get to Page 2.
¬ Press Quad Button [4].You will see "KBD MODE: " in the top right of the display.
Use the VALUE [¬] and [] buttons or Quad Knob [4] to set theKeyboard Mode.The options are: NORMAL, CH SOLO and OUT 1 — OUT 16.
NORMAL. In this mode, the MIDI channels sent out will correspond towhatever layers or splits the Mix is set up for. For example, in the Preset Mixbank, there are several Mixes in which the keyboard is split in two or more waysfrom left to right; each of these “zones” is linked to a different set of channels. Asyou play through each zone, it will send MIDI messages corresponding to thatkey range and trigger the corresponding channels. Note that certain controllerssuch as pitch bend and aftertouch will send on all channels at once. The MIDIMonitor indicators in the display will show which channels are active.
CH SOLO. In this mode, the only sounds coming from the QuadraSynth Plus,and the only MIDI Out messages, will come from the layer or range of theunderlined MIDI channel in the display. This allows you to isolate individualchannels in a Mix. So, if you play in a range of the keyboard that is active on

Editing Mixes: Chapter 5
QuadraSynth Plus Piano Reference Manual 69
MIDI CH 1, and 1 is underlined, you'll hear it. All other ranges or layers will notrespond to the keyboard (they will continue to respond to incoming MIDImessages on their respective channels, however).
Use the MIDI [♦] and [∅] buttons to hear each channel in turn.
OUT 1 — OUT 16. The QuadraSynth Plus will generate MIDI messages from thekeyboard, regardless of the Range settings for that channel in the Mix, but it willnot play the internal sound. Use this mode if you're using a MIDI sequencerwith an ECHO feature--the sound will be activated by messages appearing at theMIDI IN connector after it’s made the “round trip” through the sequencer. Thisis the QuadraSynth Plus’s equivalent to LOCAL OFF.
Editing Programs: Chapter 6
QuadraSynth Plus Piano Reference Manual 70
CHAPTER 6
EDITING PROGRAMSOverview
Synthesizer programming is the art and science of shaping sounds in a particularway by altering the parameters of various modules. Like music itself, learningsynth programming is an ongoing process. Although this manual presentsinformation about synthesizer programming, no manual can offer a completecourse in programming (at least for a price that customers would be willing topay!).
If you’re new to synthesizer programming, the best way to learn is to adjustdifferent parameters as you play to discover how different parameter valuesaffect the sound. Also, become familiar with the signal and modulation flowwithin the QuadraSynth Plus (as shown in the various block diagrams includedin this manual) so that you can understand the many ways in which you canprocess a signal as it works its way from oscillator to output.
The “Normalized” Synth VoiceThe first synthesizers were comprised of various hardware modules, some ofwhich generated signals, and some of which processed those signals. These weredesigned to be general-purpose devices since nobody was quite sure how theywould be applied; some engineers used them as signal processors, whilekeyboard players treated them as musical instruments. Therefore, patch cordsconnected the inputs and outputs of the various signal generating and processingmodules (which is why particular synth sounds were called patches). Changing apatch involved manually repositioning patch cords and adjusting knobs andswitches; recreating a patch required writing down all the patch settings onpaper so they could be duplicated later. Even then, due to the imprecision ofanalog electronics, the patch might not sound exactly the same.
Over the years, certain combinations of modules seemed to work better thanothers, and since patch cords were troublesome to deal with, eventually thesemodules were wired together in a "normalized" configuration. Synthesizers suchas the MiniMoog, Prophet-5, and others eliminated the need for patch cords bycontaining a normalized collection of sound modules (including oscillators, filter,envelopes, LFOs, etc.).
The QuadraSynth Plus offers the best of both worlds. The most commonly-used,normalized configurations are built-in to every program for ease ofprogramming. In addition, the QS Modulation Matrix gives back much of theflexibility of a modular synthesizer, allowing you to map various modulationsources to multiple destinations for special needs. If you’re a beginner, all of thenormalized pathways are easy to find; as you gain experience you can exploremore advanced features.
Editing Programs: Chapter 6
QuadraSynth Plus Piano Reference Manual 71
How the QuadraSynth Generates SoundThe QuadraSynth Plus uses custom integrated circuits, developed by the Alesisengineering team specifically for the QuadraSynth Plus. These resemble thetypes of chips used in computers and other digital devices. In fact, you can thinkof the QuadraSynth Plus as a special-purpose computer designed to generateand process audio. Although the user interface maintains the metaphor of“modules,” in fact all sounds are simply a set of numbers reflecting how you’veprogrammed the various sound parameters. For example, when you change thefilter cutoff frequency, you’re not actually messing with a filter; you’re telling thecomputer to simulate the effect of messing with a filter.
Each "module" is represented by parameters that appear on one or more displaypages. The Quad Knobs and Buttons change these parameters. All "patching" isdone via software, so the only patch cords you need are those that go to yourmixer or amplifier.
You can take a "snapshot" of the QuadraSynth Plus’s parameters and save this inmemory as a program. The QuadraSynth Plus comes with 512 factory presetprograms, and 128 user-editable programs.
Program Sound LayersThe simplest method of programming is to take one voice, process it through thefilter and amp sections, and (if desired) add some effect to it. However, moreelaborate Programs usually consist of 2 to 4 layers, with each layer making itsown distinct contribution to the sound, for example:
• An organ program with Program Sound 1 set to a sustained organwaveform, and Program Sound 2 set to a percussion waveform with a fast decay.
• A piano program with one layer tuned normally, and a second layertuned an octave higher.
• A synthesizer program with one layer set to a sharp attack waveform, asecond layer set to an acoustic waveform, and a third layer with a slow-attackstring waveform.
This may remind you of Mix Play Mode, where playing the keyboard can soundup to 16 different Programs at once. There are many similarities. In Mix PlayMode, you can make the same kind of layered Mix as you can with the foursounds of a Program. But there are differences:
Use Program Layers:
• If you want multiple sounds to respond to a single MIDI channel. Forexample, if you need to play a layered synthesizer sound that was assembled inMix Play Mode instead of Program Play Mode, you must send 3 Note On
Editing Programs: Chapter 6
QuadraSynth Plus Piano Reference Manual 72
messages from your sequencer (one for each channel) for every note; a layeredprogram would need only one Note On message.
• When layers of a Program are designed to be used together, and theindividual layers by themselves wouldn't be used alone (for example, thepercussion layer of the organ sound).
Use Mix Play Mode:
• When you want to layer more than four voices. In Mix Play Mode, it ispossible (though not advisable) to stack all 64 voices onto a single key.
• When each sound is likely to be used by itself by other setups. Forexample, if you are programming three different keyboard splits, each of whichuses the same left-hand bass patch, it makes sense to use Mix Play Mode.
• When you want different sounds to respond to different MIDI channels.
QuadraSynth Plus Signal FlowThe Four Sounds of a Program
Each Program is made up of at least one to four sounds. A sound ismade up of several components including a voice (the original soundmaterial) which passes through a low-pass filter and an amplifier. Thevoice, filter and amp modules each have direct modifiers (Pitch LFO,Filter LFO, Amp Envelope) which affect how each will function in theProgram. You can layer these sounds together, or divide them intoregions of the keyboard, or a combination of these things.
The following diagram illustrates the signal flow within eachQuadraSynth Plus Program.
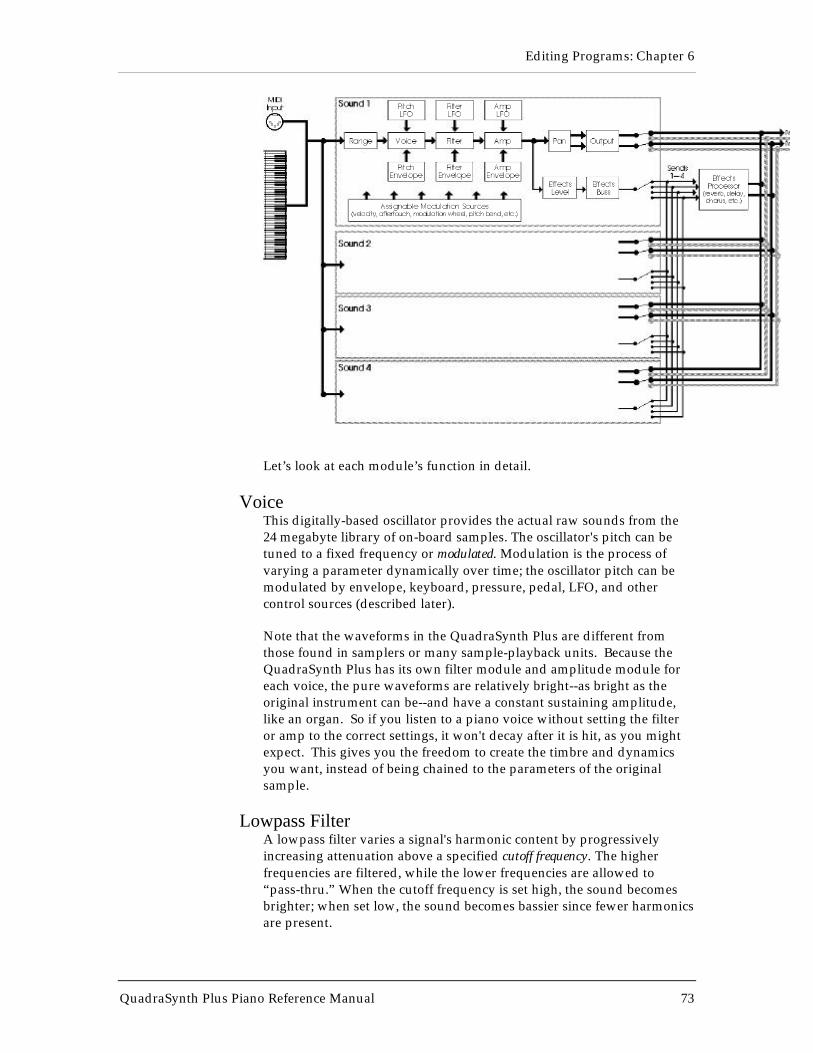
Editing Programs: Chapter 6
QuadraSynth Plus Piano Reference Manual 73
Let’s look at each module’s function in detail.
VoiceThis digitally-based oscillator provides the actual raw sounds from the24 megabyte library of on-board samples. The oscillator's pitch can betuned to a fixed frequency or modulated. Modulation is the process ofvarying a parameter dynamically over time; the oscillator pitch can bemodulated by envelope, keyboard, pressure, pedal, LFO, and othercontrol sources (described later).
Note that the waveforms in the QuadraSynth Plus are different fromthose found in samplers or many sample-playback units. Because theQuadraSynth Plus has its own filter module and amplitude module foreach voice, the pure waveforms are relatively bright--as bright as theoriginal instrument can be--and have a constant sustaining amplitude,like an organ. So if you listen to a piano voice without setting the filteror amp to the correct settings, it won't decay after it is hit, as you mightexpect. This gives you the freedom to create the timbre and dynamicsyou want, instead of being chained to the parameters of the originalsample.
Lowpass FilterA lowpass filter varies a signal's harmonic content by progressivelyincreasing attenuation above a specified cutoff frequency. The higherfrequencies are filtered, while the lower frequencies are allowed to“pass-thru.” When the cutoff frequency is set high, the sound becomesbrighter; when set low, the sound becomes bassier since fewer harmonicsare present.
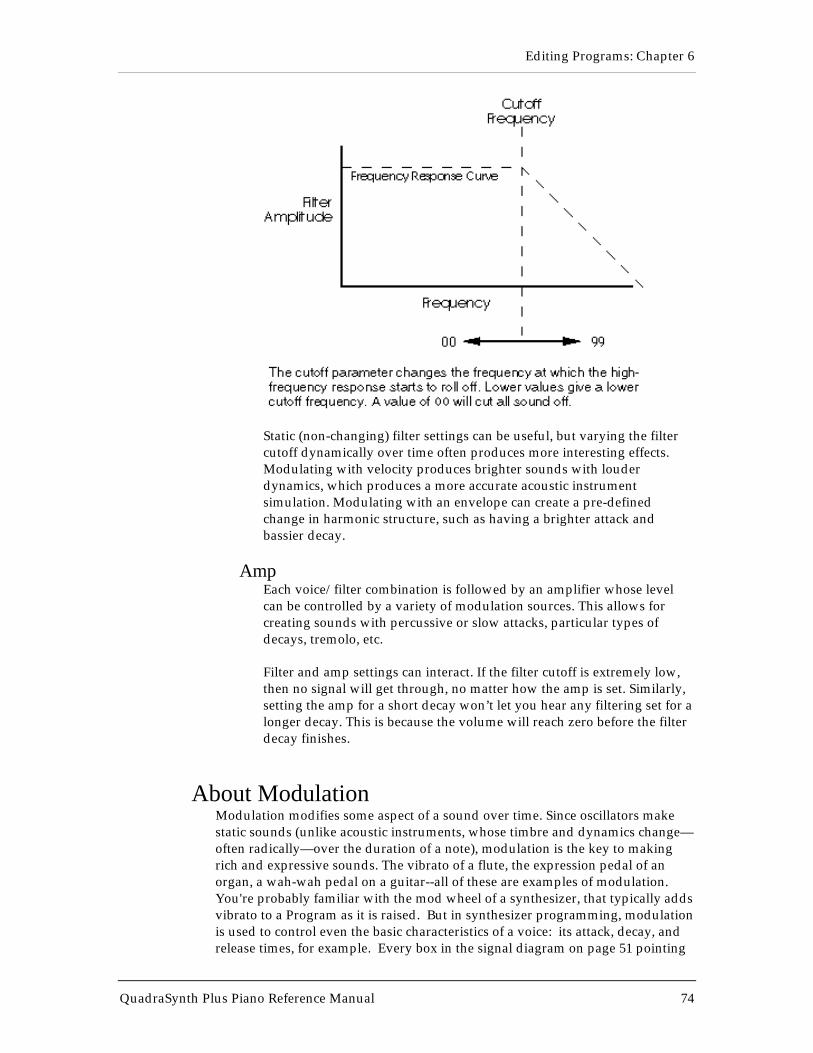
Editing Programs: Chapter 6
QuadraSynth Plus Piano Reference Manual 74
Static (non-changing) filter settings can be useful, but varying the filtercutoff dynamically over time often produces more interesting effects.Modulating with velocity produces brighter sounds with louderdynamics, which produces a more accurate acoustic instrumentsimulation. Modulating with an envelope can create a pre-definedchange in harmonic structure, such as having a brighter attack andbassier decay.
AmpEach voice/filter combination is followed by an amplifier whose levelcan be controlled by a variety of modulation sources. This allows forcreating sounds with percussive or slow attacks, particular types ofdecays, tremolo, etc.
Filter and amp settings can interact. If the filter cutoff is extremely low,then no signal will get through, no matter how the amp is set. Similarly,setting the amp for a short decay won’t let you hear any filtering set for alonger decay. This is because the volume will reach zero before the filterdecay finishes.
About ModulationModulation modifies some aspect of a sound over time. Since oscillators makestatic sounds (unlike acoustic instruments, whose timbre and dynamics change—often radically—over the duration of a note), modulation is the key to makingrich and expressive sounds. The vibrato of a flute, the expression pedal of anorgan, a wah-wah pedal on a guitar--all of these are examples of modulation.You're probably familiar with the mod wheel of a synthesizer, that typically addsvibrato to a Program as it is raised. But in synthesizer programming, modulationis used to control even the basic characteristics of a voice: its attack, decay, andrelease times, for example. Every box in the signal diagram on page 51 pointing
Editing Programs: Chapter 6
QuadraSynth Plus Piano Reference Manual 75
towards the Voice, Filter, or Amp boxes is a modulation source. The amount ofmodulation, the time it takes place, and what controls (such as key velocity,footpedals, aftertouch, mod wheel etc.) affect it are important parameters inevery Program. The QuadraSynth Plus provides the modulation flexibility ofpatch cord-based instruments, but with the convenience and ease of use of digitaltechnology.
With some parameters, the modulation amount can be positive or negative. Apositive control signal increases the value of the parameter being controlled. Anegative control signal decreases the value of the parameter being controlled.Setting modulation to 00 turns off the modulation source. Example: Keyboardvelocity can either make a sound brighter the harder you play, or make it lessbright, or have no effect on the filter at all. You have the freedom to setmodulation any way you want, even in ways that are the opposite of what theywould be on an acoustic instrument.
If a "baseline" setting exists for a parameter, modulation amounts add or subtractvalues from the existing setting. However, modulation cannot force a valuebeyond its maximum range. For example, if the amp is already at its minimumvalue (lowest level), you could apply positive modulation to raise the level. Butapplying negative modulation will not affect the amp level, since it's already atits lowest value and cannot go any lower.
The QuadraSynth Plus lets you assign several modulation sources to onemodulation “target” parameter, which allows for interaction between twomodulation signals. Example: If the amp parameter responds to both theenvelope generator and a pedal, the parameter will follow the general envelopeshape but will also be influenced by the pedal.
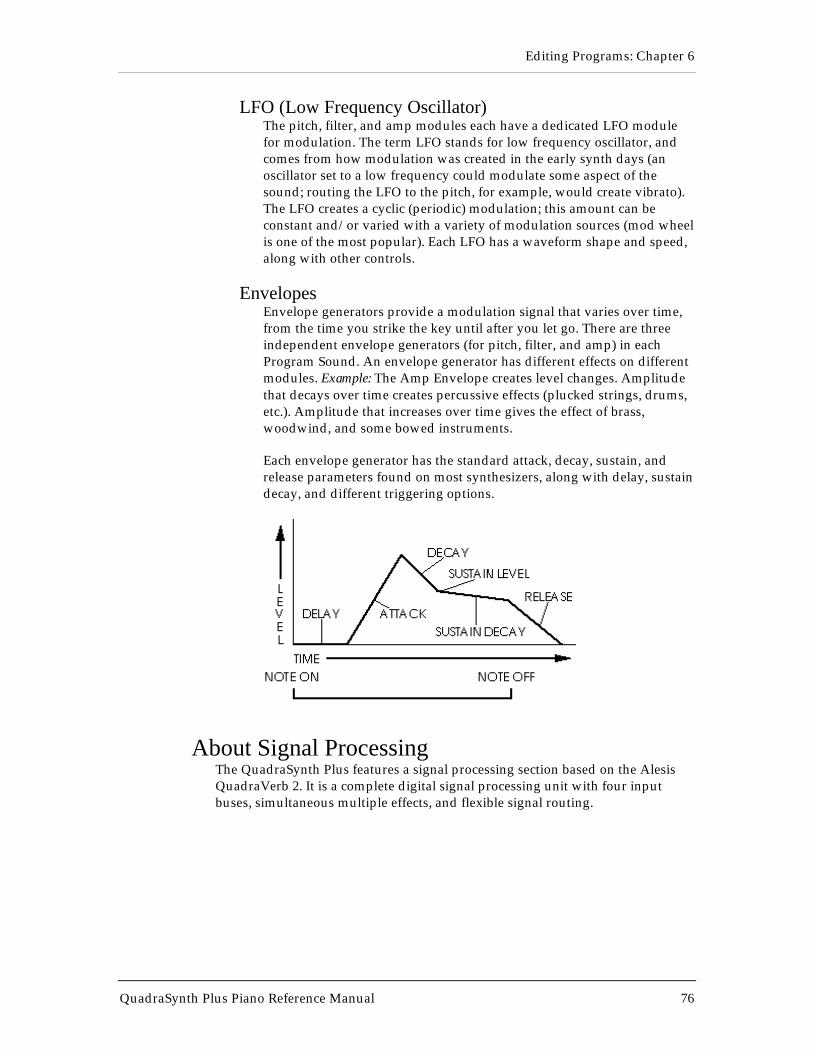
Editing Programs: Chapter 6
QuadraSynth Plus Piano Reference Manual 76
LFO (Low Frequency Oscillator)The pitch, filter, and amp modules each have a dedicated LFO modulefor modulation. The term LFO stands for low frequency oscillator, andcomes from how modulation was created in the early synth days (anoscillator set to a low frequency could modulate some aspect of thesound; routing the LFO to the pitch, for example, would create vibrato).The LFO creates a cyclic (periodic) modulation; this amount can beconstant and/or varied with a variety of modulation sources (mod wheelis one of the most popular). Each LFO has a waveform shape and speed,along with other controls.
EnvelopesEnvelope generators provide a modulation signal that varies over time,from the time you strike the key until after you let go. There are threeindependent envelope generators (for pitch, filter, and amp) in eachProgram Sound. An envelope generator has different effects on differentmodules. Example: The Amp Envelope creates level changes. Amplitudethat decays over time creates percussive effects (plucked strings, drums,etc.). Amplitude that increases over time gives the effect of brass,woodwind, and some bowed instruments.
Each envelope generator has the standard attack, decay, sustain, andrelease parameters found on most synthesizers, along with delay, sustaindecay, and different triggering options.
About Signal ProcessingThe QuadraSynth Plus features a signal processing section based on the AlesisQuadraVerb 2. It is a complete digital signal processing unit with four inputbuses, simultaneous multiple effects, and flexible signal routing.
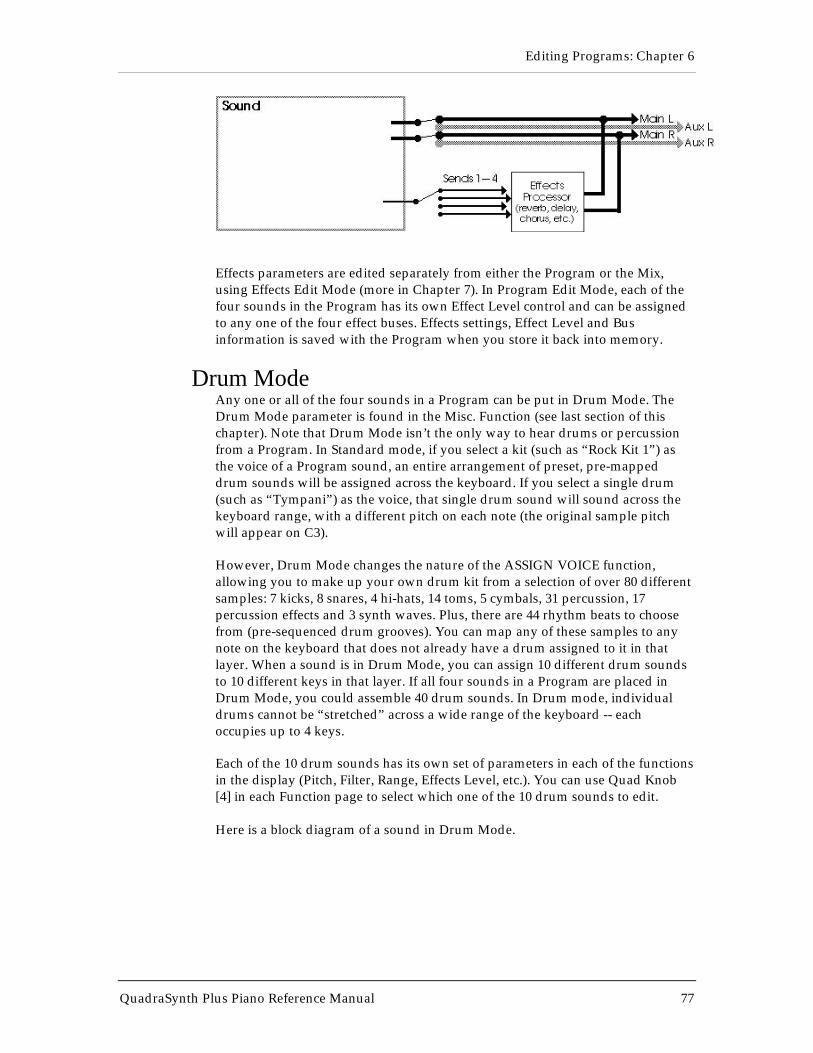
Editing Programs: Chapter 6
QuadraSynth Plus Piano Reference Manual 77
Effects parameters are edited separately from either the Program or the Mix,using Effects Edit Mode (more in Chapter 7). In Program Edit Mode, each of thefour sounds in the Program has its own Effect Level control and can be assignedto any one of the four effect buses. Effects settings, Effect Level and Businformation is saved with the Program when you store it back into memory.
Drum ModeAny one or all of the four sounds in a Program can be put in Drum Mode. TheDrum Mode parameter is found in the Misc. Function (see last section of thischapter). Note that Drum Mode isn’t the only way to hear drums or percussionfrom a Program. In Standard mode, if you select a kit (such as “Rock Kit 1”) asthe voice of a Program sound, an entire arrangement of preset, pre-mappeddrum sounds will be assigned across the keyboard. If you select a single drum(such as “Tympani”) as the voice, that single drum sound will sound across thekeyboard range, with a different pitch on each note (the original sample pitchwill appear on C3).
However, Drum Mode changes the nature of the ASSIGN VOICE function,allowing you to make up your own drum kit from a selection of over 80 differentsamples: 7 kicks, 8 snares, 4 hi-hats, 14 toms, 5 cymbals, 31 percussion, 17percussion effects and 3 synth waves. Plus, there are 44 rhythm beats to choosefrom (pre-sequenced drum grooves). You can map any of these samples to anynote on the keyboard that does not already have a drum assigned to it in thatlayer. When a sound is in Drum Mode, you can assign 10 different drum soundsto 10 different keys in that layer. If all four sounds in a Program are placed inDrum Mode, you could assemble 40 drum sounds. In Drum mode, individualdrums cannot be “stretched” across a wide range of the keyboard -- eachoccupies up to 4 keys.
Each of the 10 drum sounds has its own set of parameters in each of the functionsin the display (Pitch, Filter, Range, Effects Level, etc.). You can use Quad Knob[4] in each Function page to select which one of the 10 drum sounds to edit.
Here is a block diagram of a sound in Drum Mode.
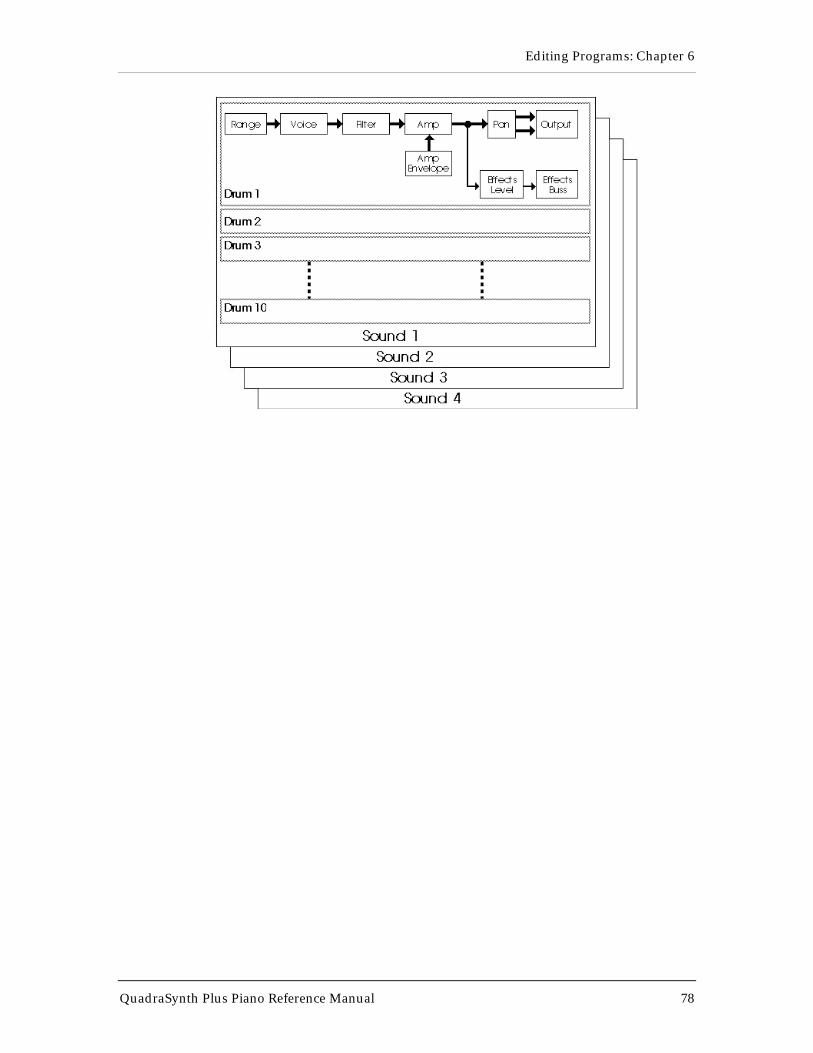
Editing Programs: Chapter 6
QuadraSynth Plus Piano Reference Manual 78
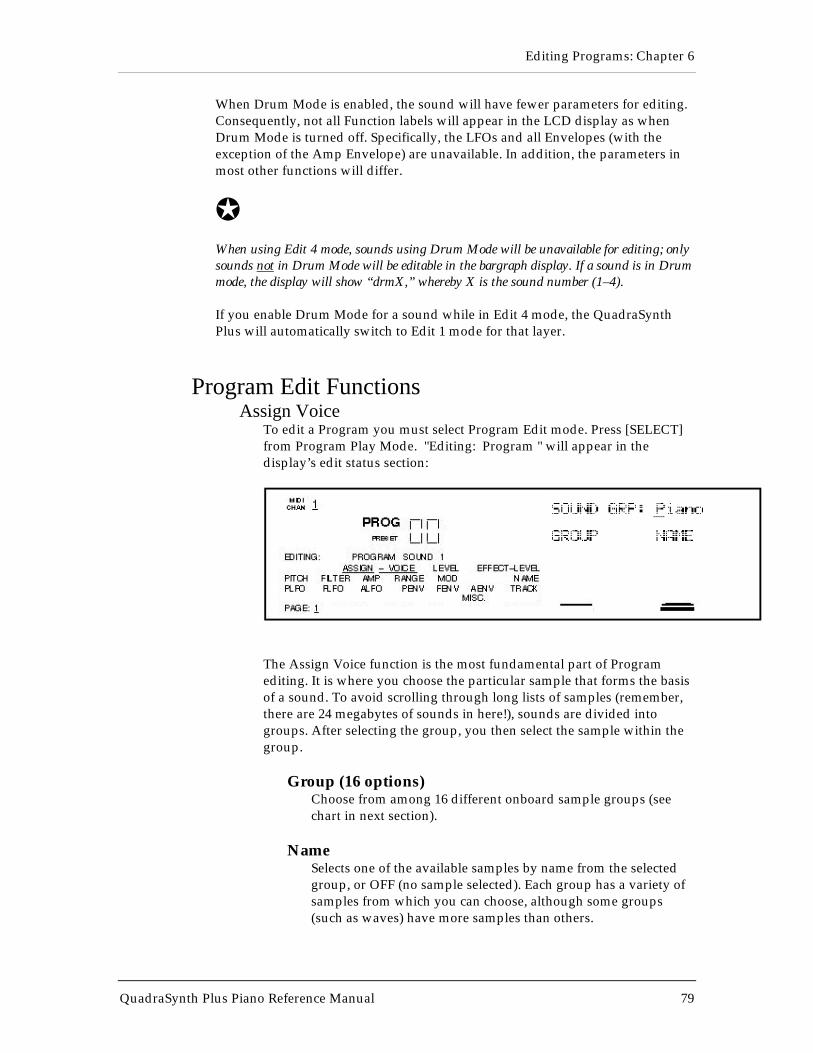
Editing Programs: Chapter 6
QuadraSynth Plus Piano Reference Manual 79
When Drum Mode is enabled, the sound will have fewer parameters for editing.Consequently, not all Function labels will appear in the LCD display as whenDrum Mode is turned off. Specifically, the LFOs and all Envelopes (with theexception of the Amp Envelope) are unavailable. In addition, the parameters inmost other functions will differ.
JWhen using Edit 4 mode, sounds using Drum Mode will be unavailable for editing; onlysounds not in Drum Mode will be editable in the bargraph display. If a sound is in Drummode, the display will show “drmX,” whereby X is the sound number (1–4).
If you enable Drum Mode for a sound while in Edit 4 mode, the QuadraSynthPlus will automatically switch to Edit 1 mode for that layer.
Program Edit FunctionsAssign Voice
To edit a Program you must select Program Edit mode. Press [SELECT]from Program Play Mode. "Editing: Program " will appear in thedisplay’s edit status section:
The Assign Voice function is the most fundamental part of Programediting. It is where you choose the particular sample that forms the basisof a sound. To avoid scrolling through long lists of samples (remember,there are 24 megabytes of sounds in here!), sounds are divided intogroups. After selecting the group, you then select the sample within thegroup.
Group (16 options)Choose from among 16 different onboard sample groups (seechart in next section).
NameSelects one of the available samples by name from the selectedgroup, or OFF (no sample selected). Each group has a variety ofsamples from which you can choose, although some groups(such as waves) have more samples than others.
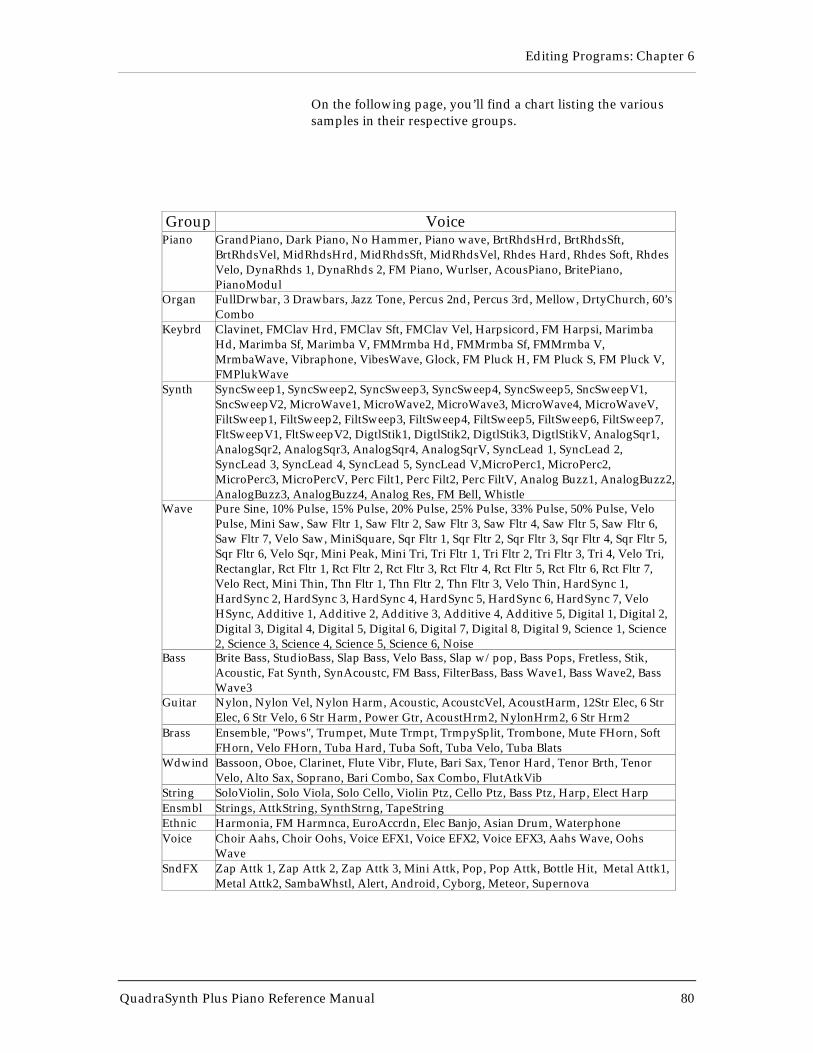
Editing Programs: Chapter 6
QuadraSynth Plus Piano Reference Manual 80
On the following page, you’ll find a chart listing the varioussamples in their respective groups.
Group VoicePiano GrandPiano, Dark Piano, No Hammer, Piano wave, BrtRhdsHrd, BrtRhdsSft,
BrtRhdsVel, MidRhdsHrd, MidRhdsSft, MidRhdsVel, Rhdes Hard, Rhdes Soft, RhdesVelo, DynaRhds 1, DynaRhds 2, FM Piano, Wurlser, AcousPiano, BritePiano,PianoModul
Organ FullDrwbar, 3 Drawbars, Jazz Tone, Percus 2nd, Percus 3rd, Mellow, DrtyChurch, 60’sCombo
Keybrd Clavinet, FMClav Hrd, FMClav Sft, FMClav Vel, Harpsicord, FM Harpsi, MarimbaHd, Marimba Sf, Marimba V, FMMrmba Hd, FMMrmba Sf, FMMrmba V,MrmbaWave, Vibraphone, VibesWave, Glock, FM Pluck H, FM Pluck S, FM Pluck V,FMPlukWave
Synth SyncSweep1, SyncSweep2, SyncSweep3, SyncSweep4, SyncSweep5, SncSweepV1,SncSweepV2, MicroWave1, MicroWave2, MicroWave3, MicroWave4, MicroWaveV,FiltSweep1, FiltSweep2, FiltSweep3, FiltSweep4, FiltSweep5, FiltSweep6, FiltSweep7,FltSweepV1, FltSweepV2, DigtlStik1, DigtlStik2, DigtlStik3, DigtlStikV, AnalogSqr1,AnalogSqr2, AnalogSqr3, AnalogSqr4, AnalogSqrV, SyncLead 1, SyncLead 2,SyncLead 3, SyncLead 4, SyncLead 5, SyncLead V,MicroPerc1, MicroPerc2,MicroPerc3, MicroPercV, Perc Filt1, Perc Filt2, Perc FiltV, Analog Buzz1, AnalogBuzz2,AnalogBuzz3, AnalogBuzz4, Analog Res, FM Bell, Whistle
Wave Pure Sine, 10% Pulse, 15% Pulse, 20% Pulse, 25% Pulse, 33% Pulse, 50% Pulse, VeloPulse, Mini Saw, Saw Fltr 1, Saw Fltr 2, Saw Fltr 3, Saw Fltr 4, Saw Fltr 5, Saw Fltr 6,Saw Fltr 7, Velo Saw, MiniSquare, Sqr Fltr 1, Sqr Fltr 2, Sqr Fltr 3, Sqr Fltr 4, Sqr Fltr 5,Sqr Fltr 6, Velo Sqr, Mini Peak, Mini Tri, Tri Fltr 1, Tri Fltr 2, Tri Fltr 3, Tri 4, Velo Tri,Rectanglar, Rct Fltr 1, Rct Fltr 2, Rct Fltr 3, Rct Fltr 4, Rct Fltr 5, Rct Fltr 6, Rct Fltr 7,Velo Rect, Mini Thin, Thn Fltr 1, Thn Fltr 2, Thn Fltr 3, Velo Thin, HardSync 1,HardSync 2, HardSync 3, HardSync 4, HardSync 5, HardSync 6, HardSync 7, VeloHSync, Additive 1, Additive 2, Additive 3, Additive 4, Additive 5, Digital 1, Digital 2,Digital 3, Digital 4, Digital 5, Digital 6, Digital 7, Digital 8, Digital 9, Science 1, Science2, Science 3, Science 4, Science 5, Science 6, Noise
Bass Brite Bass, StudioBass, Slap Bass, Velo Bass, Slap w/pop, Bass Pops, Fretless, Stik,Acoustic, Fat Synth, SynAcoustc, FM Bass, FilterBass, Bass Wave1, Bass Wave2, BassWave3
Guitar Nylon, Nylon Vel, Nylon Harm, Acoustic, AcoustcVel, AcoustHarm, 12Str Elec, 6 StrElec, 6 Str Velo, 6 Str Harm, Power Gtr, AcoustHrm2, NylonHrm2, 6 Str Hrm2
Brass Ensemble, "Pows", Trumpet, Mute Trmpt, TrmpySplit, Trombone, Mute FHorn, SoftFHorn, Velo FHorn, Tuba Hard, Tuba Soft, Tuba Velo, Tuba Blats
Wdwind Bassoon, Oboe, Clarinet, Flute Vibr, Flute, Bari Sax, Tenor Hard, Tenor Brth, TenorVelo, Alto Sax, Soprano, Bari Combo, Sax Combo, FlutAtkVib
String SoloViolin, Solo Viola, Solo Cello, Violin Ptz, Cello Ptz, Bass Ptz, Harp, Elect HarpEnsmbl Strings, AttkString, SynthStrng, TapeStringEthnic Harmonia, FM Harmnca, EuroAccrdn, Elec Banjo, Asian Drum, WaterphoneVoice Choir Aahs, Choir Oohs, Voice EFX1, Voice EFX2, Voice EFX3, Aahs Wave, Oohs
WaveSndFX Zap Attk 1, Zap Attk 2, Zap Attk 3, Mini Attk, Pop, Pop Attk, Bottle Hit, Metal Attk1,
Metal Attk2, SambaWhstl, Alert, Android, Cyborg, Meteor, Supernova
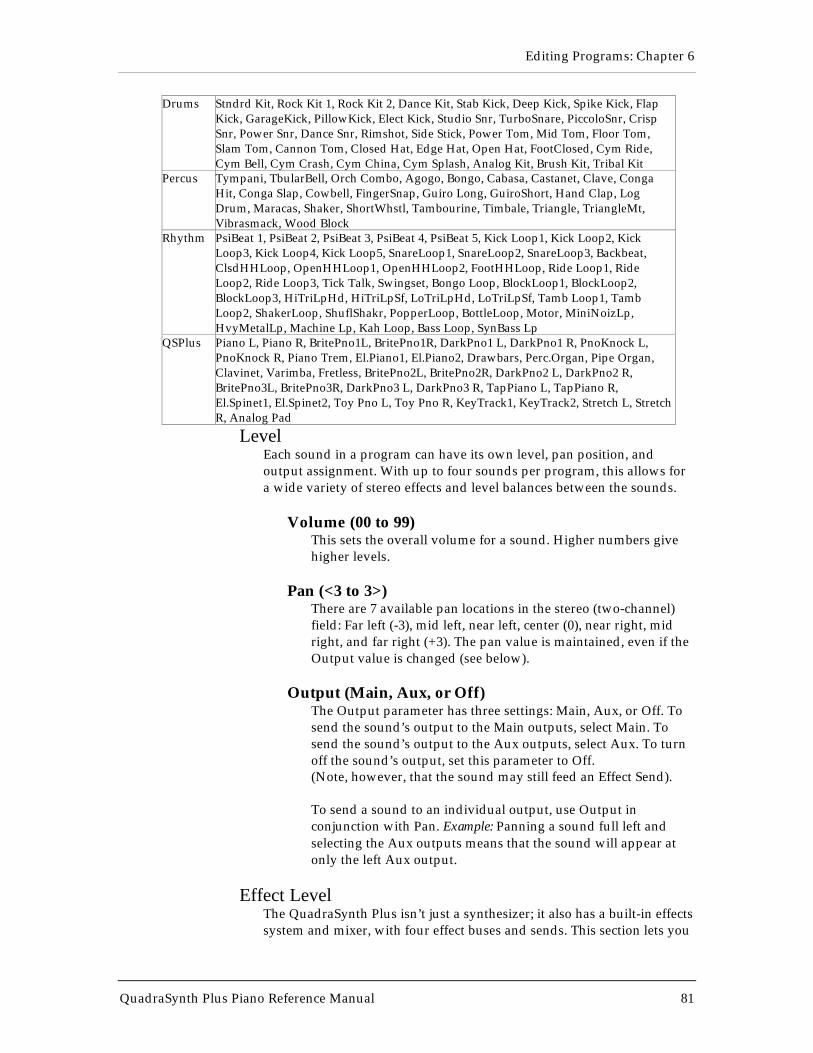
Editing Programs: Chapter 6
QuadraSynth Plus Piano Reference Manual 81
Drums Stndrd Kit, Rock Kit 1, Rock Kit 2, Dance Kit, Stab Kick, Deep Kick, Spike Kick, FlapKick, GarageKick, PillowKick, Elect Kick, Studio Snr, TurboSnare, PiccoloSnr, CrispSnr, Power Snr, Dance Snr, Rimshot, Side Stick, Power Tom, Mid Tom, Floor Tom,Slam Tom, Cannon Tom, Closed Hat, Edge Hat, Open Hat, FootClosed, Cym Ride,Cym Bell, Cym Crash, Cym China, Cym Splash, Analog Kit, Brush Kit, Tribal Kit
Percus Tympani, TbularBell, Orch Combo, Agogo, Bongo, Cabasa, Castanet, Clave, CongaHit, Conga Slap, Cowbell, FingerSnap, Guiro Long, GuiroShort, Hand Clap, LogDrum, Maracas, Shaker, ShortWhstl, Tambourine, Timbale, Triangle, TriangleMt,Vibrasmack, Wood Block
Rhythm PsiBeat 1, PsiBeat 2, PsiBeat 3, PsiBeat 4, PsiBeat 5, Kick Loop1, Kick Loop2, KickLoop3, Kick Loop4, Kick Loop5, SnareLoop1, SnareLoop2, SnareLoop3, Backbeat,ClsdHHLoop, OpenHHLoop1, OpenHHLoop2, FootHHLoop, Ride Loop1, RideLoop2, Ride Loop3, Tick Talk, Swingset, Bongo Loop, BlockLoop1, BlockLoop2,BlockLoop3, HiTriLpHd, HiTriLpSf, LoTriLpHd, LoTriLpSf, Tamb Loop1, TambLoop2, ShakerLoop, ShuflShakr, PopperLoop, BottleLoop, Motor, MiniNoizLp,HvyMetalLp, Machine Lp, Kah Loop, Bass Loop, SynBass Lp
QSPlus Piano L, Piano R, BritePno1L, BritePno1R, DarkPno1 L, DarkPno1 R, PnoKnock L,PnoKnock R, Piano Trem, El.Piano1, El.Piano2, Drawbars, Perc.Organ, Pipe Organ,Clavinet, Varimba, Fretless, BritePno2L, BritePno2R, DarkPno2 L, DarkPno2 R,BritePno3L, BritePno3R, DarkPno3 L, DarkPno3 R, TapPiano L, TapPiano R,El.Spinet1, El.Spinet2, Toy Pno L, Toy Pno R, KeyTrack1, KeyTrack2, Stretch L, StretchR, Analog Pad
LevelEach sound in a program can have its own level, pan position, andoutput assignment. With up to four sounds per program, this allows fora wide variety of stereo effects and level balances between the sounds.
Volume (00 to 99)This sets the overall volume for a sound. Higher numbers givehigher levels.
Pan (<3 to 3>)There are 7 available pan locations in the stereo (two-channel)field: Far left (-3), mid left, near left, center (0), near right, midright, and far right (+3). The pan value is maintained, even if theOutput value is changed (see below).
Output (Main, Aux, or Off)The Output parameter has three settings: Main, Aux, or Off. Tosend the sound’s output to the Main outputs, select Main. Tosend the sound’s output to the Aux outputs, select Aux. To turnoff the sound’s output, set this parameter to Off.(Note, however, that the sound may still feed an Effect Send).
To send a sound to an individual output, use Output inconjunction with Pan. Example: Panning a sound full left andselecting the Aux outputs means that the sound will appear atonly the left Aux output.
Effect LevelThe QuadraSynth Plus isn’t just a synthesizer; it also has a built-in effectssystem and mixer, with four effect buses and sends. This section lets you
Editing Programs: Chapter 6
QuadraSynth Plus Piano Reference Manual 82
feed the sound to one of the effect buses for processing. See Chapter 7 formore information on editing Effects.
Level (00 to 99)Determines how much of the sound feeds the chosen effect bus(see below). Higher values mean that the sound will be moreeffected.
Bus (1 to 4)Selects which of the four buses the sound will feed, therebydetermining which effect(s) will process the sound. EachProgram has its own unique arrangement of effects. Example: InProgram #12, bus 1 may be a Chorus/Delay/Reverb, while inProgram #27, bus 1 may just be a Flanger.
PitchPitch (Page 1)Semitone (-24 to +24 semitones)
Sets the oscillator pitch in semitone steps, from -24 (transposeddown two octaves) to +24 (transposed up two octaves).
Detune (-99 to +99 cents)Sets the oscillator pitch in cents, from -99 (transposed down99/100 of a semitone) to +99 (transposed up 99/100 of asemitone).
Detune Type (Normal or Equal)With Normal selected, the percentage of detuning remains thesame over the entire range of the keyboard, so the effects ofdetuning sound the same no matter which key you play. WithEqual selected, the absolute amount of detuning remains the sameover the entire keyboard, so any detuning seems lesspronounced as you play higher up on the keyboard.
Pitch (Page 2)Pitch Wheel Range (0 to 12 semitones)
Determines the maximum amount of pitch bend when the pitchbend wheel is either full forward or back. Example: When set to12, the pitch wheel will bend ±1 octave (12 semitones).
Aftertouch Depth (-99 to +99)At +00, aftertouch has no effect on pitch. Applying aftertouch(by pressing harder on the keyboard, or via MIDI messages)with this parameter set to a positive value raises the pitch;conversely, applying aftertouch through a negative value lowersthe pitch. The higher the number (either positive or negative),the greater the amount of pitch change for a given amount ofaftertouch.
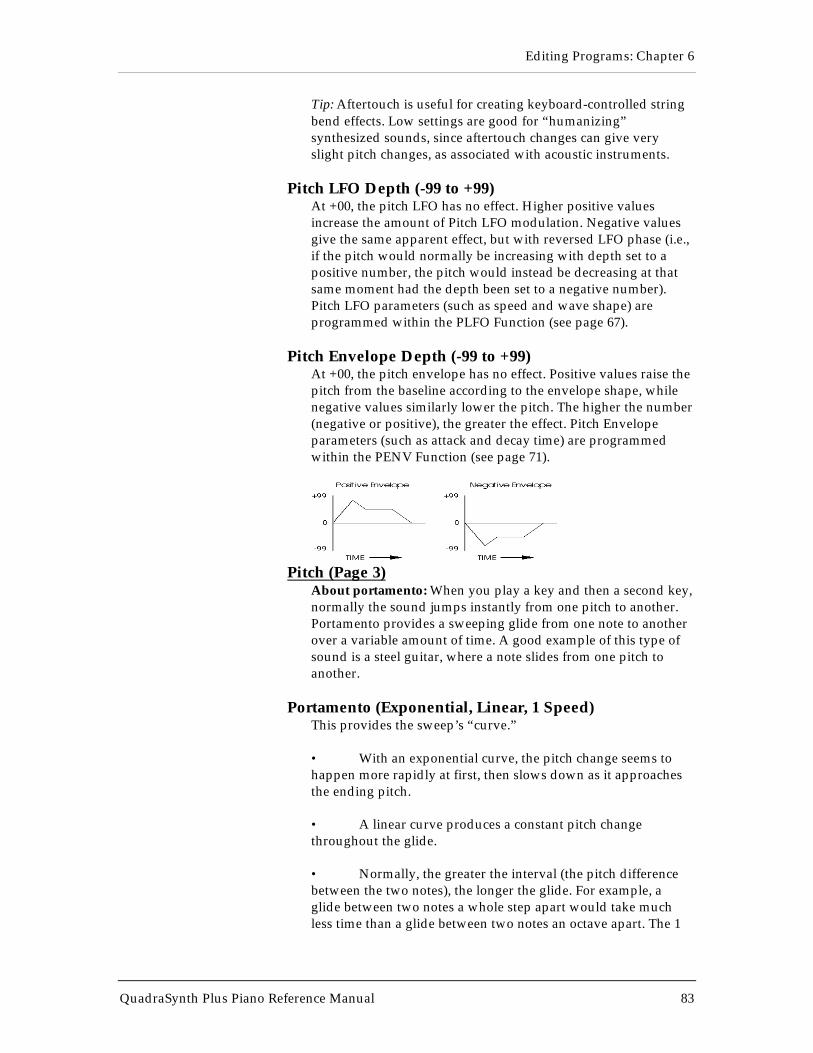
Editing Programs: Chapter 6
QuadraSynth Plus Piano Reference Manual 83
Tip: Aftertouch is useful for creating keyboard-controlled stringbend effects. Low settings are good for “humanizing”synthesized sounds, since aftertouch changes can give veryslight pitch changes, as associated with acoustic instruments.
Pitch LFO Depth (-99 to +99)At +00, the pitch LFO has no effect. Higher positive valuesincrease the amount of Pitch LFO modulation. Negative valuesgive the same apparent effect, but with reversed LFO phase (i.e.,if the pitch would normally be increasing with depth set to apositive number, the pitch would instead be decreasing at thatsame moment had the depth been set to a negative number).Pitch LFO parameters (such as speed and wave shape) areprogrammed within the PLFO Function (see page 67).
Pitch Envelope Depth (-99 to +99)At +00, the pitch envelope has no effect. Positive values raise thepitch from the baseline according to the envelope shape, whilenegative values similarly lower the pitch. The higher the number(negative or positive), the greater the effect. Pitch Envelopeparameters (such as attack and decay time) are programmedwithin the PENV Function (see page 71).
Pitch (Page 3)About portamento: When you play a key and then a second key,normally the sound jumps instantly from one pitch to another.Portamento provides a sweeping glide from one note to anotherover a variable amount of time. A good example of this type ofsound is a steel guitar, where a note slides from one pitch toanother.
Portamento (Exponential, Linear, 1 Speed)This provides the sweep’s “curve.”
• With an exponential curve, the pitch change seems tohappen more rapidly at first, then slows down as it approachesthe ending pitch.
• A linear curve produces a constant pitch changethroughout the glide.
• Normally, the greater the interval (the pitch differencebetween the two notes), the longer the glide. For example, aglide between two notes a whole step apart would take muchless time than a glide between two notes an octave apart. The 1
Editing Programs: Chapter 6
QuadraSynth Plus Piano Reference Manual 84
Speed curve maintains a constant glide rate regardless of thepitch difference between notes.
Rate (0 to 99)Sets the glide duration. Higher numbers give longer glide times.The Rate value is affected by the Portamento value (see above).
Keyboard Mode (Mono, Poly, 1-Pitch or 1-PMono)In Mono mode, you can play only one note at a time—just likevintage monophonic synthesizers or wind instruments. Polymode allows you to play polyphonically. Note that portamentobehavior is more predictable in mono mode.
Tip: With a feedback guitar patch that uses one sound for theguitar and one sound for the feedback, setting the feedbacksound to Mono Keyboard Mode insures that your feedback“whistle” will be monophonic, which more accurately mimicswhat happens when you play lead guitar.
Use 1-PITCH mode when you want a program sound layer toplay a single pitch polyphonically throughout the entirekeyboard range. In 1-PITCH mode, the QuadraSynth Plus willplay the sample used for note C3 for all notes in the range. 1-PITCH mode is often used for layering a noise or drum soundbehind another sound that is pitched, for example, to fatten up abass guitar sound with a hint of kick drum, or to have the samecymbal hit every time any note is played. Alternatively, 1-PMONO mode is a monophonic version of 1-PITCH.
Sometimes when playing a monophonic instrument, you will notwant the envelopes to retrigger when playing legato, as thiswould sound realistic. Imagine a flute-player beginning eachnote in a phrase with a sharp, breathy attack. In reality, theplayer would only attack the first note in the phrase this way.Therefore, if the Keyboard Mode is set to “Mono”, the threeenvelopes (PENV, FENV and FENV) will only retrigger whenplaying legato if the envelope's Trigger Mode is set to either“Reset” or “Reset-Freerun”.
Editing Programs: Chapter 6
QuadraSynth Plus Piano Reference Manual 85
FilterFilter (Page 1)Frequency (00 to 99)
This sets the filter's initial cutoff frequency. Lower values give aduller sound since this removes more harmonics; higher valueslet through more harmonics, which gives a brighter sound.Tip: Signals with complex harmonic structures are most affectedby the filter. Examples: A sine wave has virtually no harmonics soyou will not hear any significant changes as long as the filtercutoff is higher than the note pitch. If the filter cutoff is lowerthan the note pitch, you will either not hear the note, or it will bevery soft. A harmonically-rich sample (such as brass or whitenoise) will be greatly affected by the filter.
If the Filter Frequency is set to maximum, in most cases all othervariables in the Filter function will have no effect. Most otherfilter functions raise the filter frequency, and it can't be greaterthan 99. So if you want to use filter effects, proper setting of thisinitial cutoff frequency is crucial. This is the "baseline" fromwhich all other filter parameters will raise or lower (open orclose) the filter.
If the Filter Frequency is set to 00, and no other parameters areset to raise it dynamically, no sound will pass through the filterat all--there will be silence. If the Amp settings are wide openand you can't hear anything, check the Filter Frequency setting.
Since the waveforms in ROM are recorded at the brightestpossible setting, in many cases dynamic filtering is crucial tomaking a program sound natural.
Keyboard Track (On or Off)When off, the filter cutoff remains constant across the keyboard.Higher notes will be more affected than lower notes, since thefilter cutoff is comparatively lower for higher notes than lowerones.
When on, the filter frequency tracks the keyboard pitch.Therefore, if using the filter creates a particular harmonicstructure when you play one key, playing a different key willshift the filter frequency to maintain the same harmonicstructure.
Velocity (-99 to +99)At +00, velocity has no effect on the filter cutoff. With positivevalues, playing harder increases the filter cutoff. More positivevalues drive the cutoff frequency higher for a given amount ofvelocity. More negative values drive the cutoff frequency lowerfor a given amount of velocity.Tip: Many acoustic instruments, such as acoustic guitars, soundbrighter when you play them more forcefully. Adding a little
Editing Programs: Chapter 6
QuadraSynth Plus Piano Reference Manual 86
positive velocity control over the filter can simulate morerealistic acoustic sounds.
Editing Programs: Chapter 6
QuadraSynth Plus Piano Reference Manual 87
Filter (Page 2)Modulation Wheel Depth (-99 to +99)
Determines how moving the modulation wheel affects the filtercutoff frequency. Example: With positive settings, moving themodulation wheel up raises the filter cutoff frequency andmoving it down lowers the filter cutoff frequency. With negativesettings, moving the modulation wheel up lowers the filtercutoff frequency and moving it down raises the filter cutofffrequency .
Aftertouch Depth (-99 to +99)At +00, aftertouch has no effect on the filter cutoff frequency.Applying aftertouch with this parameter set to a positive valueraises the filter cutoff frequency; conversely, applying aftertouchwith a negative value lowers the filter cutoff frequency. Thehigher the number (either positive or negative), the greater theeffect for a given amount of aftertouch.
Tip: Many acoustic instruments sound brighter as you play themmore forcefully; in particular, brass gets brighter as you blowharder. Using aftertouch to increase a sound’s brightness cangive more control and realism with acoustic instruments.
Filter LFO Depth (-99 to +99)At +00, the filter LFO has no effect. Higher positive valuesincrease the amount of filter LFO modulation. Negative valuesgive the same apparent effect, but with reversed LFO phase (i.e.,if the filter cutoff frequency would normally be increasing withdepth set to a positive number, the cutoff would instead bedecreasing at that same moment had the depth been set to anegative number). Filter LFO parameters (such as speed andwave shape) are programmed from within the FLFO Function(see page 69).
Tip: Filter LFO is good for giving wah-wah effects at slower LFOspeeds, and for adding “shimmering” with higher LFO speeds.
Filter Envelope Depth (-99 to +99)The Filter Envelope is one of the most important settings inmaking a program. Many programs will use the Filter Envelopeto determine the tonal character of the sound over time (attack,decay, sustain, and release). At +00, the filter envelope has noeffect. Positive values raise the filter from the baseline cutofffrequency according to the envelope shape, and negative valuessimilarly lower the cutoff frequency. The higher the number(negative or positive), the greater the effect. Filter Envelopeparameters (such as attack and decay time) are programmedwithin the FENV Function (see page 74).
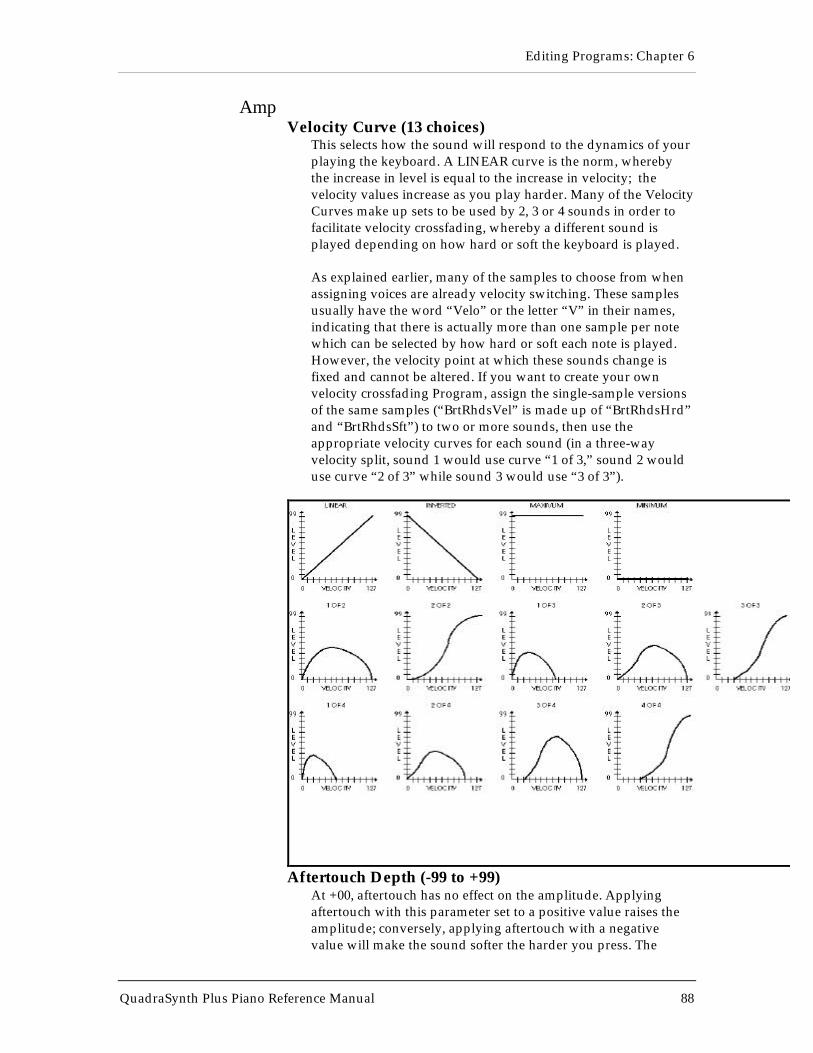
Editing Programs: Chapter 6
QuadraSynth Plus Piano Reference Manual 88
AmpVelocity Curve (13 choices)
This selects how the sound will respond to the dynamics of yourplaying the keyboard. A LINEAR curve is the norm, wherebythe increase in level is equal to the increase in velocity; thevelocity values increase as you play harder. Many of the VelocityCurves make up sets to be used by 2, 3 or 4 sounds in order tofacilitate velocity crossfading, whereby a different sound isplayed depending on how hard or soft the keyboard is played.
As explained earlier, many of the samples to choose from whenassigning voices are already velocity switching. These samplesusually have the word “Velo” or the letter “V” in their names,indicating that there is actually more than one sample per notewhich can be selected by how hard or soft each note is played.However, the velocity point at which these sounds change isfixed and cannot be altered. If you want to create your ownvelocity crossfading Program, assign the single-sample versionsof the same samples (“BrtRhdsVel” is made up of “BrtRhdsHrd”and “BrtRhdsSft”) to two or more sounds, then use theappropriate velocity curves for each sound (in a three-wayvelocity split, sound 1 would use curve “1 of 3,” sound 2 woulduse curve “2 of 3” while sound 3 would use “3 of 3”).
Aftertouch Depth (-99 to +99)At +00, aftertouch has no effect on the amplitude. Applyingaftertouch with this parameter set to a positive value raises theamplitude; conversely, applying aftertouch with a negativevalue will make the sound softer the harder you press. The
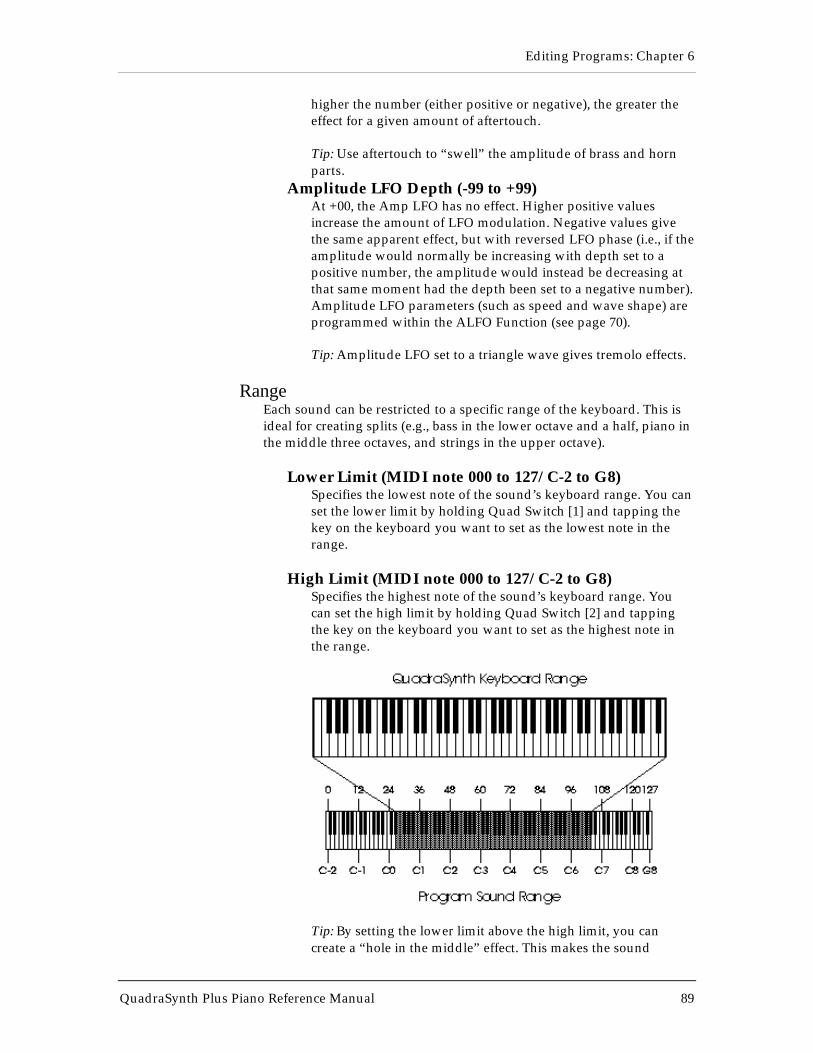
Editing Programs: Chapter 6
QuadraSynth Plus Piano Reference Manual 89
higher the number (either positive or negative), the greater theeffect for a given amount of aftertouch.
Tip: Use aftertouch to “swell” the amplitude of brass and hornparts.
Amplitude LFO Depth (-99 to +99)At +00, the Amp LFO has no effect. Higher positive valuesincrease the amount of LFO modulation. Negative values givethe same apparent effect, but with reversed LFO phase (i.e., if theamplitude would normally be increasing with depth set to apositive number, the amplitude would instead be decreasing atthat same moment had the depth been set to a negative number).Amplitude LFO parameters (such as speed and wave shape) areprogrammed within the ALFO Function (see page 70).
Tip: Amplitude LFO set to a triangle wave gives tremolo effects.
RangeEach sound can be restricted to a specific range of the keyboard. This isideal for creating splits (e.g., bass in the lower octave and a half, piano inthe middle three octaves, and strings in the upper octave).
Lower Limit (MIDI note 000 to 127/ C-2 to G8)Specifies the lowest note of the sound’s keyboard range. You canset the lower limit by holding Quad Switch [1] and tapping thekey on the keyboard you want to set as the lowest note in therange.
High Limit (MIDI note 000 to 127/ C-2 to G8)Specifies the highest note of the sound’s keyboard range. Youcan set the high limit by holding Quad Switch [2] and tappingthe key on the keyboard you want to set as the highest note inthe range.
Tip: By setting the lower limit above the high limit, you cancreate a “hole in the middle” effect. This makes the sound
Editing Programs: Chapter 6
QuadraSynth Plus Piano Reference Manual 90
appear to have two zones. All notes from the bottom of thekeyboard to the high limit note will play, and all notes from thelower limit to the top of the keyboard will play, but the notesbetween the high limit and the lower limit will not play. This canbe further enhanced in Mix Mode by using the Range function inMix Edit Mode to cap-off the lower and high limits.
Editing Programs: Chapter 6
QuadraSynth Plus Piano Reference Manual 91
Sound Overlap (00 to 99)This determines how many voices can overlap on the same pitch.Example: If you hold the sustain pedal down and play the samenote over and over, Sound Overlap determines how many voicesare available for that note, and thus how many voices willoverlap (play simultaneously).
In the old days, different brands of synthesizers offered differentvoice allocation schemes. One brand used a method called“rotate mode” in which each time a note was struck, a new voicewas used. Another brand used a different method called“reassign mode” whereby if a note is played and then playedagain, the same voice is used both times. In other words, a newvoice is used each time a new note of a different pitch is played.
The Sound Overlap value lets you choose a comfortable settingbetween rotate mode and reassign mode. When the value equals99, you are always in rotate mode, using up polyphony; if thevalue is 00, you are always in reassign mode, conserving voices.Set the value anywhere between 00 and 99 and you will get acombination of both, with partiality toward whichever mode thevalue is closest to.
A piano sound requires some Sound Overlap, but not a lot; itisn’t natural to hear too many voices on the same note. On theother hand, having only one voice per pitch isn’t natural either;let’s say you played a loud note with the sustain pedal held,followed by a soft note--the second note would abruptly cut-offthe first. On a real piano, the string would still be resonatingfrom the first (loud) note when the second (soft) note wasplayed; thus the two notes would overlap.
Sound Overlap is especially useful in Drum Mode. In DrumMode, each drum sound is designated to one note (or sometimesa group of notes). When playing one note for a drum sound,such as a snare, and you attempt to play a roll, the SoundOverlap controls how much of an overlap will exist betweeneach pair of notes. If the Sound Overlap value is set low, you aremore likely to hear old notes getting cut-off.This function has added value when the Program’s KeyboardMode parameter is set to Mono, instead of Poly. When playingmonophonically, Sound Overlap controls the amount of overlapbetween notes. Normally, even if the sound has a long releasetime, playing a new note in Mono Mode will cut-off the previousnote. By adjusting the Sound Overlap value, you can still hearthe previous note fading away after the new note has beenplayed.
JIt is important to note that Sound Overlap can have a negative effect onpolyphony.
Editing Programs: Chapter 6
QuadraSynth Plus Piano Reference Manual 92
If you have Sound Overlap set to 99, hold the sustain pedal andplay a series of notes, you will run through all 64 voices in notime. By adjusting the Sound Overlap to a lower value, youdecrease the number of voices used by each new note, andthereby ensure there are voices available to play other sounds, ifnecessary.
Editing Programs: Chapter 6
QuadraSynth Plus Piano Reference Manual 93
ModAbout General Purpose Modulation
Although there are several dedicated modulators in theQuadraSynth Plus (e.g., the pitch can always be modulated bythe pitch LFO and pitch envelope), sophisticated synthesizerprogramming demands the ability to use as many modulationsources as possible to modulate as many modulationdestinations as desired.
The QuadraSynth Plus arranges its modulation source outputsand modulation destination inputs into a “matrix” so that anyselected source can connect to any of several destinations.
There are six general purpose matrix modulators, which allowsyou to control up to six parameters with any of several controlsources.
Use the MOD functions to setup your own customized control ofa program, such as:
• Using one or both of the PEDAL inputs to controlvolume, brightness (filter cutoff), effect level, LFO speed, etc.
• Using velocity to increase or decrease the attack speed ofan envelope, so playing softly makes the sound fade in, whileplaying hard causes an immediate attack.
• Using release velocity to increase/decrease the releasetime of an envelope, so quick releases of the keys cut off the endof the sound, while slow key releases allow the sound to fadeaway gradually.
The MOD functions give you the freedom to go beyond thestandard modulation sources built-in to other functions.
Selecting the Modulator (1 to 6)Use the PAGE [♦] and PAGE [∅] buttons to select one of the sixmodulators (modulator 1 is page 1, modulator 2 is page 2,modulator 3 is page 3, etc.). All modulators work in the sameway, so only one will be described here.
Modulation SourceQuad Knob [1] selects one of several modulation sources:
• Note # provides a modulation signal that corresponds tothe note played on the keyboard (higher keys give highervalues). Example: Use this modulation source to obtain adifferent sound in the upper and lower keyboard ranges.
Editing Programs: Chapter 6
QuadraSynth Plus Piano Reference Manual 94
• Velocity relates to how fast a key goes from the key up(note off) to the key down (note on) position, and thereforerepresents the dynamics of your playing.
• Release velocity relates to how fast a key goes from thekey down (note on) to the key up (note off) position. Example:Use this to affect the level of a sound’s release based on how fastyou remove your fingers from the keys.
Editing Programs: Chapter 6
QuadraSynth Plus Piano Reference Manual 95
• Aftertouch Pressing on the keys after they’re downgenerates this control signal. Aftertouch is also called channelpressure, and represents an average of all keys being pressed.This affects any keys that are held down. The harder you presson the keys, the greater the degree of modulation.
• Polyphonic Pressure This is similar to aftertouch, buteach key can respond to individual pressure messages. Althoughthe QuadraSynth Plus keyboard does not generate polypressure, the sound generators can respond to poly pressuresignals entering via the MIDI In. Example: Assign poly pressureto the sound’s amplitude in a string ensemble patch. You canthen increase the level of selected notes of a held chord to “pull”some notes out of the chord.
• Pitch Wheel The two wheels to the left of the keyboardare modulation sources (see below). The leftmost wheel, Pitch,always controls the oscillator pitch but can be tied to otherparameters as well.
• Modulation Wheel The rightmost wheel, Modulation,is traditionally assigned to LFO amount (level) so that rotatingthe wheel away from you introduces vibrato. However it is alsowell-suited to controlling timbre, vibrato speed, and many otherparameters.
• MIDI Volume MIDI can produce a variety of controllermessages (see the MIDI supplement in the back of this manual).Of these, controller #7, which controls channel volume, is one ofthe most frequently used. Example: Assign the filter cutoff as thedestination, and you can have the signal become less bright as itbecomes lower in volume.
• Sustain Pedal The sustain switch plugged into thesustain pedal jack provides this modulation signal.
• Pedal 1 The pedal plugged into the Pedal 1 jackprovides this modulation signal. Typically, this may be mappedto AENV Amp to act as a volume pedal.
• Pedal 2 The pedal plugged into the Pedal 2 jackprovides this modulation signal.
• Pitch LFO This is the same modulation signal providedby the Pitch LFO. The Frequency LFO and Amplitude LFO canalso be selected as modulation sources.
• Pitch Envelope This is the same modulation signalprovided by the Pitch Envelope. The Frequency Envelope andAmplitude Envelope can also be selected as modulation sources.
Editing Programs: Chapter 6
QuadraSynth Plus Piano Reference Manual 96
• Random This provides a different modulation valueevery time you hit a key. Example: With vintage analog synthpatches, use pitch as the destination and apply a very slightamount of random modulation. Each note will have a slightlydifferent pitch, which simulates the natural tuning instability ofanalog circuits.
• Trigrate This is a Trigger Rate Follower, whichmonitors how fast notes are being played on the keyboard. Forexample, if routed to the Effect send of a Program, you couldautomatically have more effect when playing slowly, and lesseffect when playing quickly.
• Controllers (A, B, C, D) Four incoming MIDIcontrollers can be recognized by the QuadraSynth Plus and usedas modulation sources. These controllers are assigned as A–D inGlobal Mode (see Chapter 8). In Program Play Mode and MixPlay Mode, the four Quad Knobs can be used to control thesedirectly.
• Tracking Generator This accepts the output of a signalprocessed by the Tracking Generator module (see page 81).
• Stepped Tracking Generator This accepts the output ofa signal processed by the Tracking Generator module in steppedmode (see page 81).
Modulation DestinationQuad Knob [2] selects one of several modulation destinations.You can find out more about these parameters and how theyaffect the sound in their respective sections (for example, to learnhow Pitch Envelope Attack affects the sound, see page 72 onPitch Envelopes).
• Pitch • Filter Cutoff • Amplitude• Effect Send • PLFO Speed • PLFOAmp• PLFO Delay • PENV Delay • PENVAttack• PENV Decay • PENV Sustain Decay •
PENV Release• PENV Amp • FLFO Speed • FLFOAmp• FLFO Delay • FENV Delay • FENVAttack• FENV Decay • FENV Sustain Decay •
FENV Release• FENV Amp • ALFO Speed • ALFOAmp• ALFO Delay • AEnvelope Delay •
AEnvelope Attack• AEnvelope Decay• AEnvelope Sustain Decay •
AEnvelope Release• AEnvelope Amp • Portamento Rate
Editing Programs: Chapter 6
QuadraSynth Plus Piano Reference Manual 97
Modulation Level (-99 to +99)At +00, the modulation source has no effect on the destination.Higher positive values increase the amount of modulation.Negative values also increase the amount of modulation, butwith negative phase (i.e., if the modulation would normally beincreasing with depth set to a positive number, the modulationwould instead be decreasing at that same moment had the depthbeen set to a negative number).
Gate Mode (Off or On)The Gate Mode function is available only on modulationroutings 1 through 4. When Gate Mode is on, the Modulator willonly be routed while notes are being played. In other words, youcan gate the effect of the Modulator so that it stops when you arenot playing any notes. This can be used on sounds with mediumto long release times, where an interesting effect (like tremolo) isintended to be active while holding notes down, but deactivatedas the sound is fading away after being released.
Quantize Mode (Off or On)The Quantize Mode function is only available in modulationroutings 5 and 6. When Quantize Mode is on, the modulationeffect will be stepped. When off, the effect will be smooth, orlinear. Example: If you were to route the Modulation Wheel toPitch with an amplitude of +99, moving the Mod Wheel whilethe Quantize parameter was off would cause the pitch of a heldnote to slide up, much the same way it does when the Pitch BendWheel is used. However, moving the Mod Wheel while theQuantize parameter was on would cause the pitch of a held noteto rise in half-step increments.
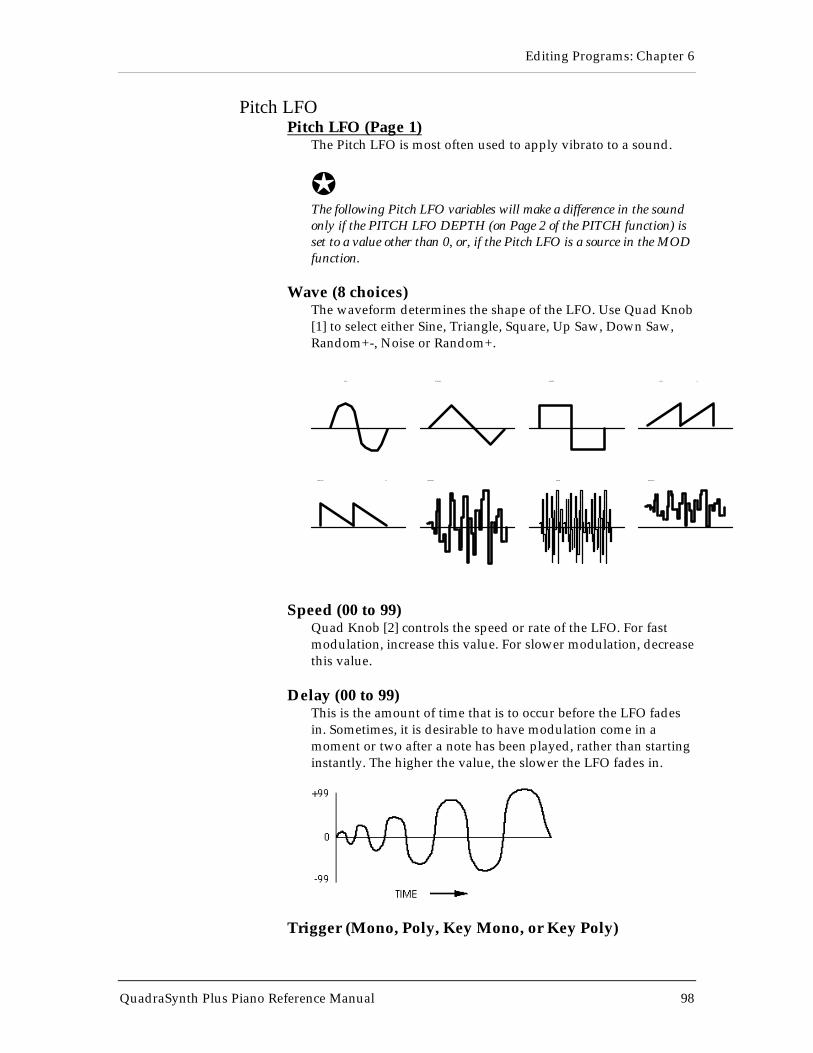
Editing Programs: Chapter 6
QuadraSynth Plus Piano Reference Manual 98
Pitch LFOPitch LFO (Page 1)
The Pitch LFO is most often used to apply vibrato to a sound.
JThe following Pitch LFO variables will make a difference in the soundonly if the PITCH LFO DEPTH (on Page 2 of the PITCH function) isset to a value other than 0, or, if the Pitch LFO is a source in the MODfunction.
Wave (8 choices)The waveform determines the shape of the LFO. Use Quad Knob[1] to select either Sine, Triangle, Square, Up Saw, Down Saw,Random+-, Noise or Random+.
SINE TRIANGLE SQUARE UP SA W
DOWN SA W RANDOM+- NOISE RANDOM+
Speed (00 to 99)Quad Knob [2] controls the speed or rate of the LFO. For fastmodulation, increase this value. For slower modulation, decreasethis value.
Delay (00 to 99)This is the amount of time that is to occur before the LFO fadesin. Sometimes, it is desirable to have modulation come in amoment or two after a note has been played, rather than startinginstantly. The higher the value, the slower the LFO fades in.
Trigger (Mono, Poly, Key Mono, or Key Poly)
Editing Programs: Chapter 6
QuadraSynth Plus Piano Reference Manual 99
The Trigger parameter determines how the LFO should betriggered, or started. There are four possible settings: Mono,Poly, Key Mono and Key Poly. When playing multiple voices ina single sound, each voice has its own LFO. However, the LFOTrigger parameter determines whether or not they should be insync, and whether or not they can be retriggered independentfrom one another.Mono. All voices’ LFOs are in sync with each other. If you hold achord and then play new notes on top of the chord, all voices’LFOs will be moving in the same direction and at the samespeed. Because of this, modulating the LFO Speed using a voice-specific source (such as velocity or one of the envelopes, forexample) will have no effect (you will be allowed to do this, butyou won’t hear any difference). This is because these modulationsources are meant for polyphonic purposes. These include: NoteNumber, Velocity, Release Velocity, PLFO, FLFO, ALFO, PENV,FENV, AENV, Random, Trig Rate and Tracking Generator.However, modulation sources which are not voice-specific willstill have an effect while the LFO Trigger is set to MONO. Theseinclude: Aftertouch, Mod Wheel, Pitch Wheel, MIDI Volume,Sustain Pedal, Pedal 1, Pedal 2, and Controllers A—D.
Poly. Each voice’s LFO is independent. If you hold a chord,some voices’ LFOs will be moving in one direction while othersmove in the other direction. If the LFO Speed is being modulated(by one of the envelopes, for example), the LFO’s of each voicemay be running at different speeds.
Key Mono. This is identical to MONO, but whenever a new noteis played, the LFO is retriggered, instead of continuing fromwherever it may be in its cycle.
Key Poly. This is almost identical to POLY, but whenever a newnote is played, the LFO is retriggered, instead of continuing fromwherever it may be in its cycle.
Pitch LFO (Page 2)Level (00 to 99)
This is the base output level of the Pitch LFO. If you want tohave a constant value of vibrato, even without using the ModWheel or Aftertouch, set LEVEL above 00. The Mod Wheel andAftertouch will add or subtract from this base level. Example: IfLevel is set to 10 and the Mod Wheel parameter is set to 10, therewill always be some vibrato, and raising the Mod Wheel willadd more vibrato. On the other hand, if the Mod Wheelparameter is set to -10, raising the Mod Wheel to the top willcancel out all vibrato.
Mod Wheel (-99 to 99)This is the modulation amount of the Mod Wheel over the PitchLFO’s Level. A positive value raises the level when the Mod
Editing Programs: Chapter 6
QuadraSynth Plus Piano Reference Manual 100
Wheel is moved up, and lowers the level when moved down.Negative settings of this parameter will decrease the output levelof the PLFO as the Mod Wheel is raised. Since the output level ofthe PLFO cannot be less than zero, a negative setting of the ModWheel parameter will have no effect unless either the Aftertouchor the Level is set to raise the PLFO output. If both the Level andAftertouch are set to 00, and the Mod Wheel parameter is set to -99, the Mod Wheel will have no effect on the vibrato from thePLFO.
Aftertouch (-99 to 99)This is the modulation amount of Aftertouch over the PitchLFO’s Level. A positive value raises the level as more Aftertouchis applied. A negative value will lower the amount of PLFO levelas more Aftertouch is applied.
Editing Programs: Chapter 6
QuadraSynth Plus Piano Reference Manual 101
Filter LFOFilter LFO (Page 1)
The Filter LFO is most often used to apply tremolo-like or "wah-wah" effects to a sound.
JThe following Filter LFO variables will affect the sound only if theFILTER LFO DEPTH (on Page 2 of the FILTER function) is set to avalue other than 0 , or, if Filter LFO is a source in the MOD function.
Also note that the Filter LFO may have no effect if some othermodulation source or setting has already pushed the filter cutofffrequency to its maximum.
Wave (8 choices)The waveform determines the shape of the LFO. Use Quad Knob[1] to select either Sine, Triangle, Square, Up Sawtooth, DownSawtooth, Random+-, Noise or Random+. For a graphicrepresentation of these waveforms, see the diagram in the Wavesection of the PLFO description on page 67.
Speed (00 to 99)Quad Knob [2] controls the speed or rate of the LFO. For fastmodulation, increase this value. For slower modulation, decreasethis value.
Delay (00 to 99)This is the amount of time that is to occur before the LFO fadesin. Sometimes, it is desirable to have modulation come in amoment or two after a note has been played, rather than startinginstantly. The higher the value, the slower the LFO fades in.
Trigger (Mono, Poly, Key Mono, or Key Poly)The Trigger parameter determines how the LFO should betriggered, or started. There are four possible settings: Mono,Poly, Key Mono and Key Poly. A description of these settings isfound in the Trigger section of the PLFO description on page 67.
Filter LFO (Page 2)Level (00 to 99)
This is the base output level of the Filter LFO. If you want tohave a constant value of tremolo to the filter, even without usingthe Mod Wheel or Aftertouch, set LEVEL above 00. The ModWheel and Aftertouch will add or subtract from this base level.Example: If Level is set to 10 and the Mod Wheel parameter is setto 10, there will always be some filter tremolo, and raising theMod Wheel will add more tremolo. On the other hand, if theMod Wheel parameter is set to -10, raising the Mod Wheel to thetop will cancel out all tremolo.
Editing Programs: Chapter 6
QuadraSynth Plus Piano Reference Manual 102
Mod Wheel (-99 to 99)This parameter sets how much the Mod Wheel will increase ordecrease the Filter LFO’s Level. A positive value raises the levelwhen the Mod Wheel is moved up, and lowers the level whenmoved down. Negative settings of this parameter will decreasethe output level of the FLFO as the Mod Wheel is raised. Sincethe output level of the FLFO cannot be less than zero, a negativesetting of the Mod Wheel parameter will have no effect unlesseither the Aftertouch or the Level is set to raise the FLFO output.If both the Level and Aftertouch are set to 00, and the ModWheel parameter is set to -99, the Mod Wheel will have no effecton the tremolo from the FLFO.
Aftertouch (-99 to 99)This is the modulation amount of Aftertouch over the FilterLFO’s Level. A positive value raises the level as more Aftertouchis applied. A negative value will lower the amount of FLFO levelas more Aftertouch is applied.
Amp LFOAmp LFO (Page 1)
The Amp LFO is usually used to add tremolo to a sound.
JThe Amp LFO variables will have an effect only if the AMP LFODEPTH (in the AMP function) is set to a value other than 0 , or, ifAmp LFO is a source in the MOD function.
Wave (8 choices)The waveform determines the shape of the LFO. Use Quad Knob[1] to select either Sine, Triangle, Square, Up Sawtooth, DownSawtooth, Random+-, Noise or Random+. See the diagram in theWave section of the PLFO description on page 67.
Speed (00 to 99)Quad Knob [2] controls the speed or rate of the LFO. For fastmodulation, increase this value. For slower modulation, decreasethis value.
Delay (00 to 99)This is the amount of time that is to occur before the LFO fadesin. Sometimes, it is desirable to have modulation come in amoment or two after a note has been played, rather than startinginstantly. The higher the value, the slower the LFO fades in.
Trigger (Mono, Poly, Key Mono, Key Poly)The Trigger parameter determines how the LFO should betriggered, or started. There are four possible settings: Mono,
Editing Programs: Chapter 6
QuadraSynth Plus Piano Reference Manual 103
Poly, Key Mono and Key Poly. A description of these settings isfound in the Trigger section of the PLFO description on page 67.
Editing Programs: Chapter 6
QuadraSynth Plus Piano Reference Manual 104
Amp LFO (Page 2)Level (00 to 99)
This is the base output level of the Amp LFO. If you want tohave a constant value of tremolo, even without using the ModWheel or Aftertouch, set LEVEL above 00. The Mod Wheel andAftertouch will add or subtract from this base level. Example: IfLevel is set to 10 and the Mod Wheel parameter is set to 10, therewill always be some tremolo, and raising the Mod Wheel willadd more tremolo. On the other hand, if the Mod Wheelparameter is set to -10, raising the Mod Wheel to the top willcancel out all tremolo.
Mod Wheel (-99 to 99)This is the modulation amount of the Mod Wheel over the AmpLFO’s Level. A positive value raises the level when the ModWheel is moved up, and lowers the level when moved down.Negative settings of this parameter will decrease the output levelof the ALFO as the Mod Wheel is raised. Since the output levelof the ALFO cannot be less than zero. A negative setting of theMod Wheel parameter will have no effect unless either theAftertouch or the Level is set to raise the ALFO output. If boththe Level and Aftertouch are set to 00, and the Mod Wheelparameter is set to -99, the Mod Wheel will have no effect on thetremolo from the ALFO.
Aftertouch (-99 to 99)This is the modulation amount of Aftertouch over the AmpLFO’s Level. A positive value raises the level as more Aftertouchis applied. A negative value will lower the amount of ALFOlevel as more Aftertouch is applied.
Pitch EnvelopePitch Envelope (Page 1)
Pitch Envelope can lead to dramatic effects, since it can cause thepitch of a single key to change drastically over time. It’stypically used in special-effect synthesizer programs, but it mayalso be used more subtly in an acoustic program to simulate thecharacteristic of some instruments to go sharp on the initialattack, especially when played hard.
JThe following Pitch Envelope variables will have an effect only if thePITCH ENVELOPE DEPTH (on Page 2 of the PITCH function) is setto a value other than 0, or, if Pitch Envelope is a source in the MODfunction.
Attack (00 to 99)This is the amount of time the envelope will take until it reachesits maximum output level. Setting the Attack to 0 will make the
Editing Programs: Chapter 6
QuadraSynth Plus Piano Reference Manual 105
pitch go to maximum immediately on hitting the key (if theDelay is also set to 0 in PENV Page 2--see below); a setting of 99will result in a much slower attack, taking many seconds beforethe envelope gets to maximum.

Editing Programs: Chapter 6
QuadraSynth Plus Piano Reference Manual 106
Decay & Sustain (00 to 99)As soon as the attack portion of the envelope finishes (when thelevel reaches maximum), the envelope will decay (decrease inlevel). The level it reaches is set by the Sustain control; how longit takes to get there is set by the Decay control. In the special casewhere the Sustain level is all the way up (99), then there is nodecrease and the Decay time segment is bypassed. Whateverlevel the sustain is set to is the level that the decay section of theenvelope will head for. Depending on the setting of the SustainDecay control (see below), the envelope will either hold at thesustain level until you release the note on the keyboard, or decayto 0 at the Sustain Decay rate (which is on page 2 of theenvelope). You can create a long "plateau" at the start of a noteby setting the Sustain to 98 and the Decay to 99. This will causethe envelope to take the maximum amount of time to get frompeak level to a level of 98, before the Sustain Release portion ofthe envelope begins.
Release (00 to 99, Hold)Eventually, you will let go of the note that you’ve been holding(either by releasing the note on the keyboard, or releasing thesustain pedal if it was pressed). It is at this point that the Releaseportion of the envelope takes effect. The Release is the time thatthe envelope takes to get from its current level back down tonothing. Setting the Release time to 99 will take the envelope avery long time to reach zero level.
The Pitch Envelope is unique from the other two envelopes inthat its Release time can be set above 99. When this is done, thevalue in the display will read “Hold”. This indicates that thepitch envelope will remain where it is even after the note isreleased. This is important when you want the pitch effect tocontinue even after releasing the key. Example: If the PENV isbending a note up, and you don’t want the pitch to fall whenyou release the key, set the Release parameter to “Hold”.
Pitch Envelope (Page 2)Delay (00 to 99, Hold)
This is the amount of time that the envelope will wait beforedoing anything; very useful if you want to affect one element ofa sound sometime after the sound starts. When the Delay is setto 0, the envelope attacks right away, without any delay. Playsome notes while turning up the delay and see that the timebetween playing the note and hearing the effect of the PitchEnvelope gets progressively longer as the Delay control is turnedup.
If the Delay is set above 99, the display will read “Hold”. Thisindicates that the Delay stage of the envelope will waitindefinitely until the key is released before continuing on to theremaining envelope stages (Attack, Decay, etc.). This requires
Editing Programs: Chapter 6
QuadraSynth Plus Piano Reference Manual 107
that the Pitch Envelope’s Trigger parameter (see next page) is setto “Freerun”. However, when the Delay is set to “Hold”,“Freerun” mode is forced on regardless of the Triggerparameter’s setting.
Sustain Decay (00 to 99)This is the amount of time that the envelope will take during thesustain stage to bring the level down to 0. If this is set to 99, theenvelope will remain at the Sustain level until the note isreleased. When set to 0, the envelope’s level will immediatelyjump down to 0 upon reaching the sustain stage.
Trigger (Normal, Freerun, Reset, Reset-Freerun)The Trigger mode determines how the envelope will function.You may select either Freerun or Reset, or both (Reset-Freerun)or neither (Normal). When set to Normal, the envelope willalways start at its current level (i.e., if another note had beenplayed which triggered the envelope’s cycle, playing anothernote in the middle would not interrupt the cycle). Also inNormal mode, the envelope will immediately advance to itsrelease stage upon releasing the note. When set to Freerun, theenvelope will complete its entire cycle, even if the note isreleased in the middle. When set to Reset, the envelope starts atthe beginning whenever a new note is played. When set to Reset-Freerun, the envelope will start at the beginning whenever anew note is played and will complete its entire cycle, even if thenote is released in the middle.
If a sound layer’s Keyboard Mode parameter (found in the PitchFunction, Page 3, Quad Knob [4]) is set to “Mono”, the PitchEnvelope will only retrigger when playing legato if the TriggerMode is set to either “Reset” or “Reset-Freerun”.
Pitch Envelope (Page 3)Time Tracking (On or Off)
This determines whether or not keyboard position will affect thecycle speed of the envelope. When turned on, playing towardthe higher end of the keyboard will result in a faster envelopecycle; playing toward the lower end of the keyboard will resultin a slower envelope cycle. However, this does not effect theattack time, but only the decay, sustain decay and releasesegments. This feature will result in only a subtle change. Theenvelope’s timing doubles or halves over a range of two octaves.
Sustain Pedal (On or Off)This determines whether or not the Sustain Pedal will have aneffect on the envelope. When turned on, holding down theSustain Pedal while playing short notes is virtually theequivalent to holding down those notes on the keyboard withsome subtle but important differences. If the Delay and Attackare set to 0 and either the Decay is 0 or the Sustain is 99, theenvelope will immediately jump to the sustain decay stage (if
Editing Programs: Chapter 6
QuadraSynth Plus Piano Reference Manual 108
not already there) when the note is released and the sustainpedal is held down. If a long attack is set, and the envelope doesnot reach the end of the attack segment when the note isreleased, it will be skipped and the envelope will jumpimmediately to the release segment. If a long delay is set, and theenvelope has not reached the attack segment before the note isreleased, the envelope will remain at 0. However, if Freerun isturned on, the envelope will continue through the delay, attack,decay and sustain segments and remain at the sustain decaysegment. This is exactly the same as holding down the note onthe keyboard. When the Sustain Pedal parameter is turned off,the Sustain Pedal will have no effect on the envelope.
Level (00 to 99)This is the overall output level of the envelope. If this is set to 00,the PENV will have no output and will have no effect, while at99 it will have a maximum effect on whatever it is being routedto. Tip: When selecting PENV Level as a modulation destination,set the PENV level to 00 if the Modulation Level is above 0 (or,set the PENV level to 99 if the Modulation Amount is below 0).
Editing Programs: Chapter 6
QuadraSynth Plus Piano Reference Manual 109
Velocity Modulation (00 to 99)This determines how keyboard dynamics will affect theenvelope level. When set to 99, note velocity controls theenvelope’s output; notes played hard will deliver a higherenvelope output than notes played soft. When set to 0, notevelocity will have no effect on the envelope’s output level.
Filter EnvelopeFilter Envelope (Page 1)
Filter Envelope is crucial whenever you want the tonal quality ofa note to change over time, differently from its overall level.Example: When you want the initial attack of a note to be bright,but want the sustaining part to be filtered.
JThe following Filter Envelope variables will only have any effect if theFILTER ENVELOPE DEPTH (on Page 2 of the FILTER function) isset to a value other than 0, or, Filter Envelope is a source in the MODfunction.
Also note that the Filter Envelope may have no effect if some othermodulation source, or the basic setting of the filter, has already pushedthe filter cutoff frequency to its maximum.
Attack (00 to 99)This is the amount of time the envelope will take until it reachesits maximum output level. Setting the Attack to 0 will give asharp edge to the sound (if the Delay is also set to 0 in FENVPage 2--see below); a setting of 99 will result in a much slowerattack, taking many seconds before the envelope gets tomaximum.
Decay & Sustain (00 to 99)As soon as the attack portion of the envelope finishes (when thelevel reaches maximum), the envelope will decay (decrease inlevel). The level it reaches is set by the Sustain control; how longit takes to get there is set by the Decay control. In the special casewhere the Sustain level is all the way up (99), then there is nodecrease and the Decay time segment is bypassed. Whateverlevel the sustain is set to is the level that the decay section of theenvelope will head for. Depending on the setting of the SustainDecay control (see below), the envelope will either hold at thesustain level until you release the note on the keyboard, or decayto 0 at the Sustain Decay rate (which is on page 2 of theenvelope). You can create a long "plateau" at the start of a noteby setting the Sustain to 98 and the Decay to 99. This will causethe envelope to take the maximum amount of time to get frompeak level to a level of 98, before the Sustain Release portion ofthe envelope begins.
Editing Programs: Chapter 6
QuadraSynth Plus Piano Reference Manual 110
Release (00 to 99)Eventually, you will let go of the note that you’ve been holding(either by releasing the note on the keyboard, or releasing thesustain pedal if it was pressed). It is at this point that the Releaseportion of the envelope takes effect. The Release is the time thatthe envelope takes to get from the sustain level back down tonothing. Setting the Release time to 0 is good for playing thoseshort funky riffs that you hear on a clavinet. Setting the Releasetime to 99 will take the envelope a very long time to reach zerolevel.

Editing Programs: Chapter 6
QuadraSynth Plus Piano Reference Manual 111
Filter Envelope (Page 2)Delay (00 to 99)
This is the amount of time that the envelope will wait beforedoing anything; very useful if you want to affect one element ofa sound sometime after the sound starts. When the Delay is setto 0, the envelope attacks right away, without any delay. Playsome notes while turning up the delay and see that the timebetween playing the note and hearing the effect of the FilterEnvelope gets progressively longer as the Delay control is turnedup.
If the Delay is set above 99, the display will read “Hold”. Thisindicates that the Delay stage of the envelope will waitindefinitely until the key is released before continuing on to theremaining envelope stages (Attack, Decay, etc.). This requiresthat the Filter Envelope’s Trigger parameter (see next page) is setto “Freerun”. However, when the Delay is set to “Hold”,“Freerun” mode is forced on regardless of the Triggerparameter’s setting.
Sustain Decay (00 to 99)This is the amount of time that the envelope will take during thesustain stage to bring the level down to 0. If this is set to 99, theenvelope will remain at the Sustain level until the note isreleased. This is the normal setting for organ-type sounds. Whenset to 0, the envelope’s level will immediately jump down to 0upon reaching the sustain stage.
Trigger (Normal, Freerun, Reset, Reset-Freerun)The Trigger mode determines how the envelope will function.You may select either Freerun or Reset, or both (Reset-Freerun)or neither (Normal). When set to Normal, the envelope willalways start at its current level (i.e., if another note had beenplayed which triggered the envelope’s cycle, playing anothernote in the middle would not interrupt the cycle). Also inNormal mode, the envelope will immediately advance to itsrelease stage upon releasing the note. When set to Freerun, theenvelope will complete its entire cycle, even if the note isreleased in the middle. When set to Reset, the envelope starts atthe beginning whenever a new note is played. When set to Reset-Freerun, the envelope will start at the beginning whenever anew note is played and will complete its entire cycle, even if thenote is released in the middle.
If a sound layer’s Keyboard Mode parameter (found in the PitchFunction, Page 3, Quad Knob [4]) is set to “Mono”, the FilterEnvelope will only retrigger when playing legato if the TriggerMode is set to either “Reset” or “Reset-Freerun”.
Filter Envelope (Page 3)Time Tracking (On or Off)
Editing Programs: Chapter 6
QuadraSynth Plus Piano Reference Manual 112
This determines whether or not keyboard position will affect thecycle speed of the envelope. When turned on, playing towardthe higher end of the keyboard will result in a faster envelopecycle; playing toward the lower end of the keyboard will resultin a slower envelope cycle. However, this does not effect theattack time, but only the decay, sustain, sustain decay andrelease segments. This feature will result in only a subtlechange. The envelope’s timing doubles or halves over a range oftwo octaves.
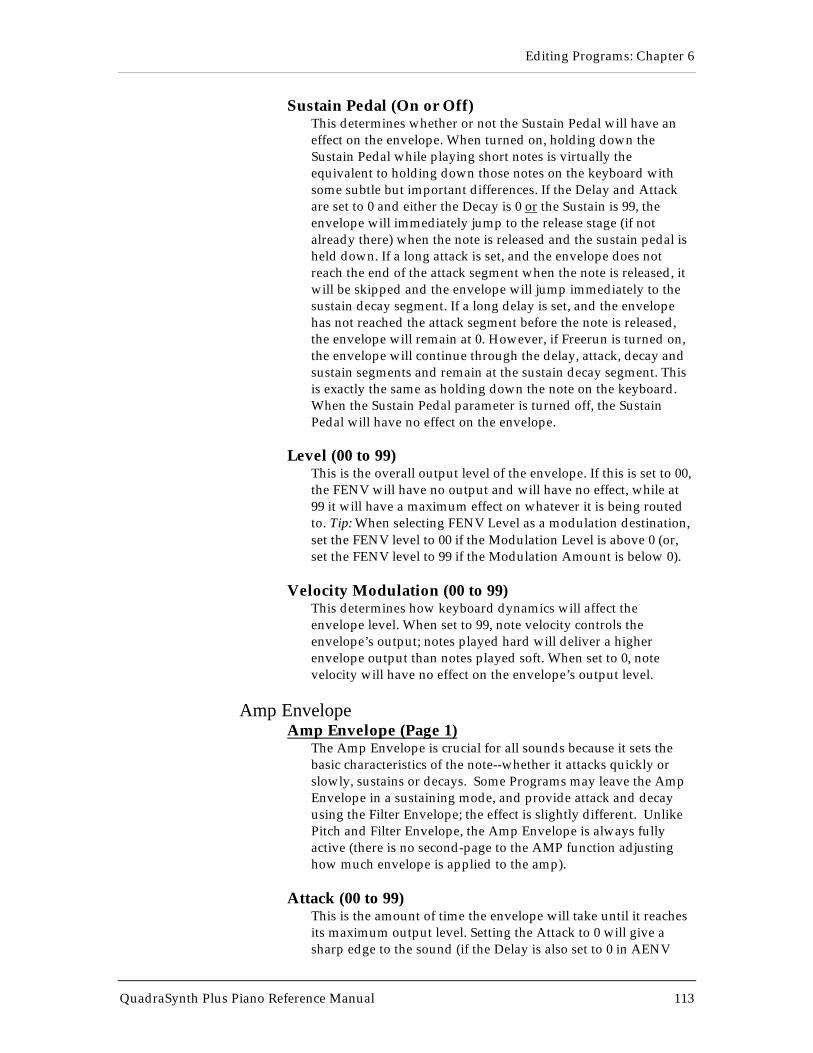
Editing Programs: Chapter 6
QuadraSynth Plus Piano Reference Manual 113
Sustain Pedal (On or Off)This determines whether or not the Sustain Pedal will have aneffect on the envelope. When turned on, holding down theSustain Pedal while playing short notes is virtually theequivalent to holding down those notes on the keyboard withsome subtle but important differences. If the Delay and Attackare set to 0 and either the Decay is 0 or the Sustain is 99, theenvelope will immediately jump to the release stage (if notalready there) when the note is released and the sustain pedal isheld down. If a long attack is set, and the envelope does notreach the end of the attack segment when the note is released, itwill be skipped and the envelope will jump immediately to thesustain decay segment. If a long delay is set, and the envelopehas not reached the attack segment before the note is released,the envelope will remain at 0. However, if Freerun is turned on,the envelope will continue through the delay, attack, decay andsustain segments and remain at the sustain decay segment. Thisis exactly the same as holding down the note on the keyboard.When the Sustain Pedal parameter is turned off, the SustainPedal will have no effect on the envelope.
Level (00 to 99)This is the overall output level of the envelope. If this is set to 00,the FENV will have no output and will have no effect, while at99 it will have a maximum effect on whatever it is being routedto. Tip: When selecting FENV Level as a modulation destination,set the FENV level to 00 if the Modulation Level is above 0 (or,set the FENV level to 99 if the Modulation Amount is below 0).
Velocity Modulation (00 to 99)This determines how keyboard dynamics will affect theenvelope level. When set to 99, note velocity controls theenvelope’s output; notes played hard will deliver a higherenvelope output than notes played soft. When set to 0, notevelocity will have no effect on the envelope’s output level.
Amp EnvelopeAmp Envelope (Page 1)
The Amp Envelope is crucial for all sounds because it sets thebasic characteristics of the note--whether it attacks quickly orslowly, sustains or decays. Some Programs may leave the AmpEnvelope in a sustaining mode, and provide attack and decayusing the Filter Envelope; the effect is slightly different. UnlikePitch and Filter Envelope, the Amp Envelope is always fullyactive (there is no second-page to the AMP function adjustinghow much envelope is applied to the amp).
Attack (00 to 99)This is the amount of time the envelope will take until it reachesits maximum output level. Setting the Attack to 0 will give asharp edge to the sound (if the Delay is also set to 0 in AENV
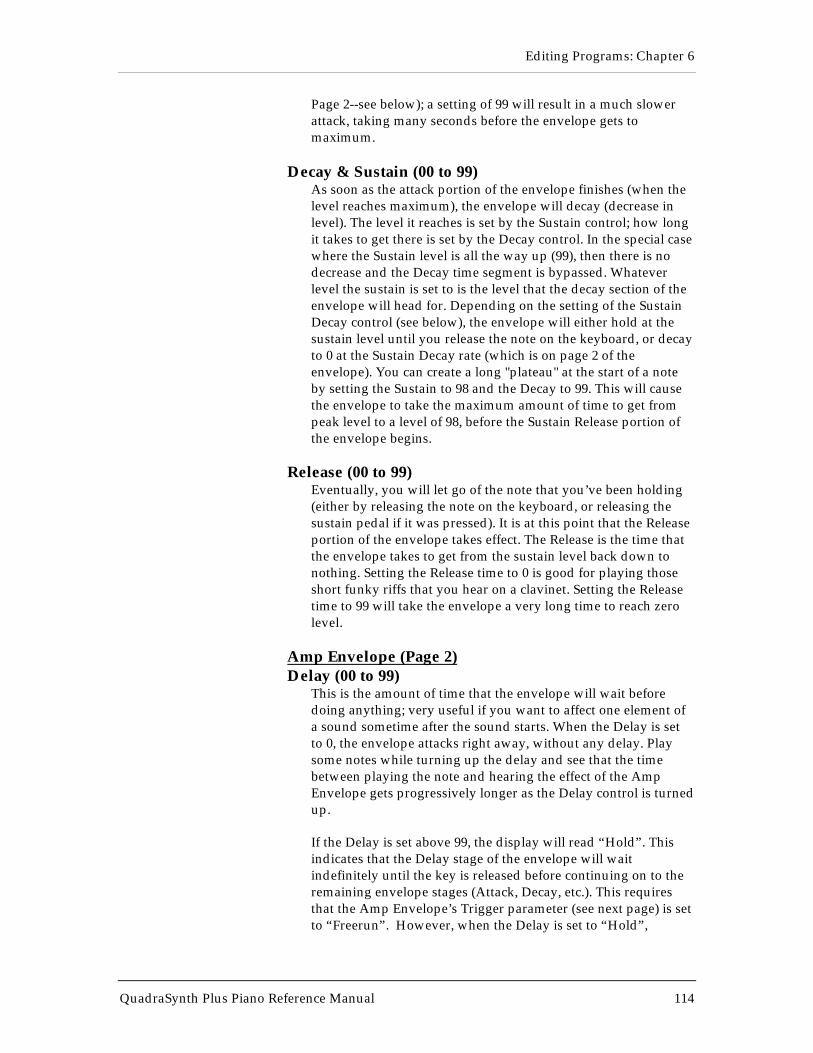
Editing Programs: Chapter 6
QuadraSynth Plus Piano Reference Manual 114
Page 2--see below); a setting of 99 will result in a much slowerattack, taking many seconds before the envelope gets tomaximum.
Decay & Sustain (00 to 99)As soon as the attack portion of the envelope finishes (when thelevel reaches maximum), the envelope will decay (decrease inlevel). The level it reaches is set by the Sustain control; how longit takes to get there is set by the Decay control. In the special casewhere the Sustain level is all the way up (99), then there is nodecrease and the Decay time segment is bypassed. Whateverlevel the sustain is set to is the level that the decay section of theenvelope will head for. Depending on the setting of the SustainDecay control (see below), the envelope will either hold at thesustain level until you release the note on the keyboard, or decayto 0 at the Sustain Decay rate (which is on page 2 of theenvelope). You can create a long "plateau" at the start of a noteby setting the Sustain to 98 and the Decay to 99. This will causethe envelope to take the maximum amount of time to get frompeak level to a level of 98, before the Sustain Release portion ofthe envelope begins.
Release (00 to 99)Eventually, you will let go of the note that you’ve been holding(either by releasing the note on the keyboard, or releasing thesustain pedal if it was pressed). It is at this point that the Releaseportion of the envelope takes effect. The Release is the time thatthe envelope takes to get from the sustain level back down tonothing. Setting the Release time to 0 is good for playing thoseshort funky riffs that you hear on a clavinet. Setting the Releasetime to 99 will take the envelope a very long time to reach zerolevel.
Amp Envelope (Page 2)Delay (00 to 99)
This is the amount of time that the envelope will wait beforedoing anything; very useful if you want to affect one element ofa sound sometime after the sound starts. When the Delay is setto 0, the envelope attacks right away, without any delay. Playsome notes while turning up the delay and see that the timebetween playing the note and hearing the effect of the AmpEnvelope gets progressively longer as the Delay control is turnedup.
If the Delay is set above 99, the display will read “Hold”. Thisindicates that the Delay stage of the envelope will waitindefinitely until the key is released before continuing on to theremaining envelope stages (Attack, Decay, etc.). This requiresthat the Amp Envelope’s Trigger parameter (see next page) is setto “Freerun”. However, when the Delay is set to “Hold”,
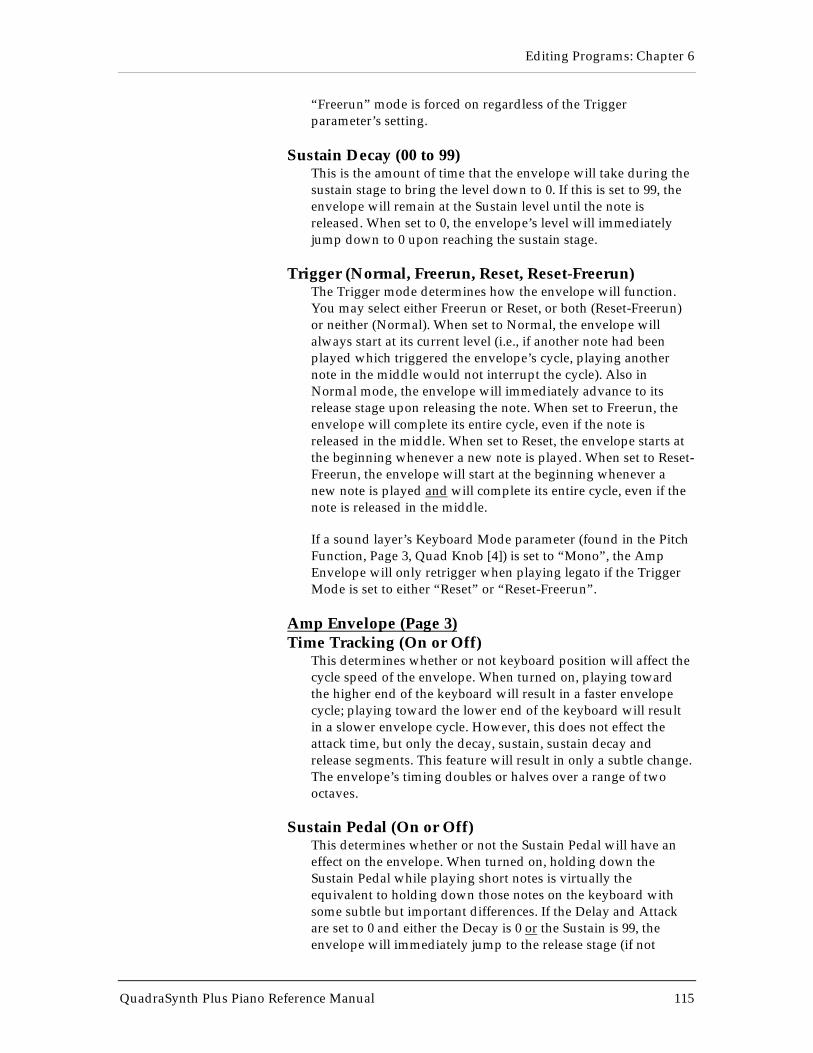
Editing Programs: Chapter 6
QuadraSynth Plus Piano Reference Manual 115
“Freerun” mode is forced on regardless of the Triggerparameter’s setting.
Sustain Decay (00 to 99)This is the amount of time that the envelope will take during thesustain stage to bring the level down to 0. If this is set to 99, theenvelope will remain at the Sustain level until the note isreleased. When set to 0, the envelope’s level will immediatelyjump down to 0 upon reaching the sustain stage.
Trigger (Normal, Freerun, Reset, Reset-Freerun)The Trigger mode determines how the envelope will function.You may select either Freerun or Reset, or both (Reset-Freerun)or neither (Normal). When set to Normal, the envelope willalways start at its current level (i.e., if another note had beenplayed which triggered the envelope’s cycle, playing anothernote in the middle would not interrupt the cycle). Also inNormal mode, the envelope will immediately advance to itsrelease stage upon releasing the note. When set to Freerun, theenvelope will complete its entire cycle, even if the note isreleased in the middle. When set to Reset, the envelope starts atthe beginning whenever a new note is played. When set to Reset-Freerun, the envelope will start at the beginning whenever anew note is played and will complete its entire cycle, even if thenote is released in the middle.
If a sound layer’s Keyboard Mode parameter (found in the PitchFunction, Page 3, Quad Knob [4]) is set to “Mono”, the AmpEnvelope will only retrigger when playing legato if the TriggerMode is set to either “Reset” or “Reset-Freerun”.
Amp Envelope (Page 3)Time Tracking (On or Off)
This determines whether or not keyboard position will affect thecycle speed of the envelope. When turned on, playing towardthe higher end of the keyboard will result in a faster envelopecycle; playing toward the lower end of the keyboard will resultin a slower envelope cycle. However, this does not effect theattack time, but only the decay, sustain, sustain decay andrelease segments. This feature will result in only a subtle change.The envelope’s timing doubles or halves over a range of twooctaves.
Sustain Pedal (On or Off)This determines whether or not the Sustain Pedal will have aneffect on the envelope. When turned on, holding down theSustain Pedal while playing short notes is virtually theequivalent to holding down those notes on the keyboard withsome subtle but important differences. If the Delay and Attackare set to 0 and either the Decay is 0 or the Sustain is 99, theenvelope will immediately jump to the release stage (if not
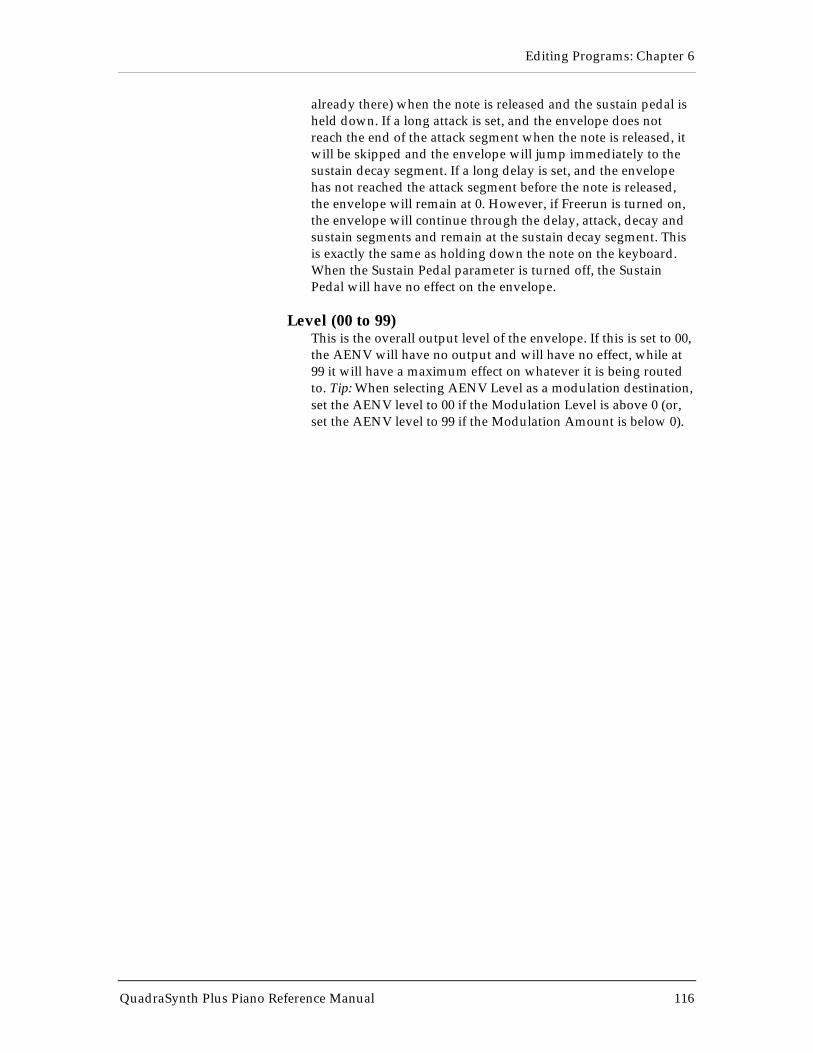
Editing Programs: Chapter 6
QuadraSynth Plus Piano Reference Manual 116
already there) when the note is released and the sustain pedal isheld down. If a long attack is set, and the envelope does notreach the end of the attack segment when the note is released, itwill be skipped and the envelope will jump immediately to thesustain decay segment. If a long delay is set, and the envelopehas not reached the attack segment before the note is released,the envelope will remain at 0. However, if Freerun is turned on,the envelope will continue through the delay, attack, decay andsustain segments and remain at the sustain decay segment. Thisis exactly the same as holding down the note on the keyboard.When the Sustain Pedal parameter is turned off, the SustainPedal will have no effect on the envelope.
Level (00 to 99)This is the overall output level of the envelope. If this is set to 00,the AENV will have no output and will have no effect, while at99 it will have a maximum effect on whatever it is being routedto. Tip: When selecting AENV Level as a modulation destination,set the AENV level to 00 if the Modulation Level is above 0 (or,set the AENV level to 99 if the Modulation Amount is below 0).
Editing Programs: Chapter 6
QuadraSynth Plus Piano Reference Manual 117
Tracking GeneratorThe Tracking Generator is used to scale a modulation source. Forexample, normally you could modulate the Amp (volume) of a soundusing velocity; the harder you play, the louder the sound gets. Theamount of change in volume is equal to the change in velocity; this iscalled linear control. If instead, however, you set the TrackingGenerator’s input to “velocity”, and then routed the Tracking Generatorto the Amp (using the Mod function), you can make your owncustomized "map" of the control velocity has over the sound’s level.
The Tracking Generator divides the range of the input into 11 points (0—10), each of which can be set between 0 and 100. If you boost the value ofone of the lower points, you make the input more sensitive in its lowerregister. By creating a non-linear curve using the velocity example above,you can scale the velocity’s control over the sound’s volume just the wayyou want.
When selecting the Tracking Generator as a modulation source in theMod Function, these two choices will be available. When “TRACKGEN”is selected as the modulation source, the Tracking Generator functionsnormally, scaling its input as determined by its parameter settings.
When “STEPTRACK” is selected as a modulation source, the TrackingGenerator’s output will be stepped, or interpolated. This means thatinstead of scaling the input linearly from point to point, the input is keptat each point’s value setting until it goes beyond the following point’svalue setting, at which point it jumps to that setting. This feature is veryuseful in creating “mini-sequences” if the modulation destination is setto “Pitch” and the Tracking Generator’s input is an LFO using an “UpSawtooth” as its waveform.
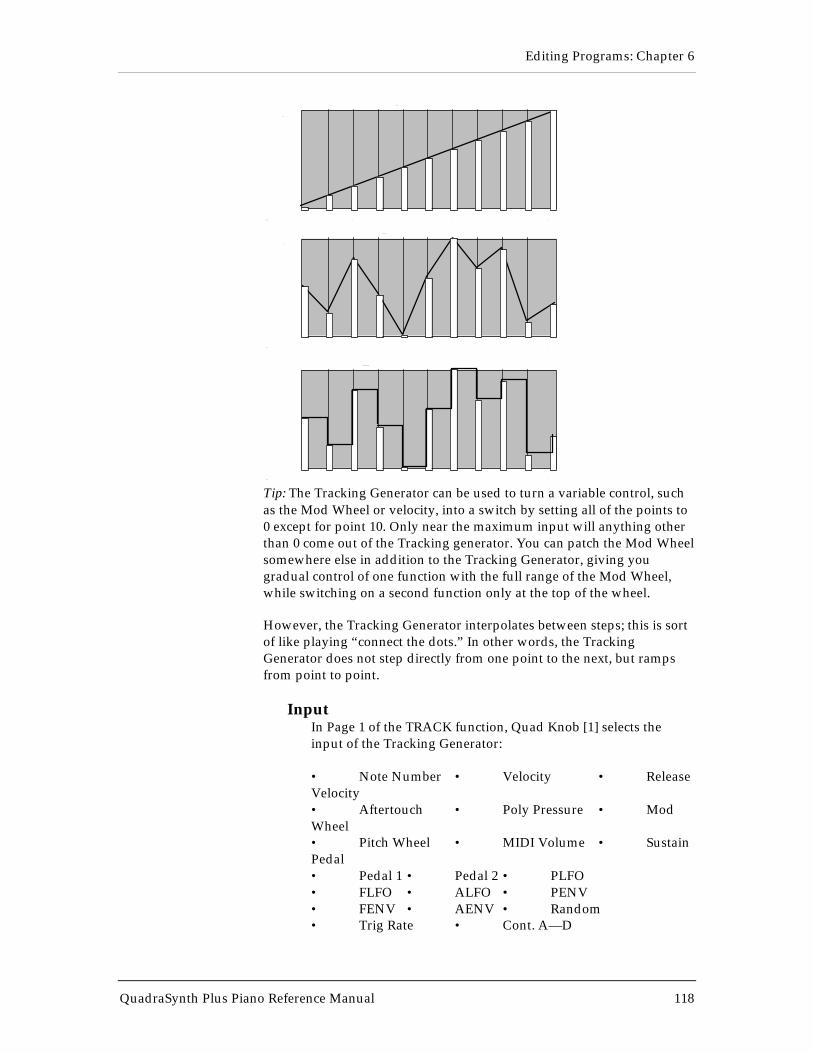
Editing Programs: Chapter 6
QuadraSynth Plus Piano Reference Manual 118
0
100
POINTS: 0 1 2 3 4 5 6 7 8 9 10
LINEAR
0
100
POINTS: 0 1 2 3 4 5 6 7 8 9 10
NON-LINEAR
0
100
POINTS: 0 1 2 3 4 5 6 7 8 9 10
NON-LINEAR STEPPED
Tip: The Tracking Generator can be used to turn a variable control, suchas the Mod Wheel or velocity, into a switch by setting all of the points to0 except for point 10. Only near the maximum input will anything otherthan 0 come out of the Tracking generator. You can patch the Mod Wheelsomewhere else in addition to the Tracking Generator, giving yougradual control of one function with the full range of the Mod Wheel,while switching on a second function only at the top of the wheel.
However, the Tracking Generator interpolates between steps; this is sortof like playing “connect the dots.” In other words, the TrackingGenerator does not step directly from one point to the next, but rampsfrom point to point.
InputIn Page 1 of the TRACK function, Quad Knob [1] selects theinput of the Tracking Generator:
• Note Number • Velocity • ReleaseVelocity• Aftertouch • Poly Pressure • ModWheel• Pitch Wheel • MIDI Volume • SustainPedal• Pedal 1 • Pedal 2 • PLFO• FLFO • ALFO • PENV• FENV • AENV • Random• Trig Rate • Cont. A—D
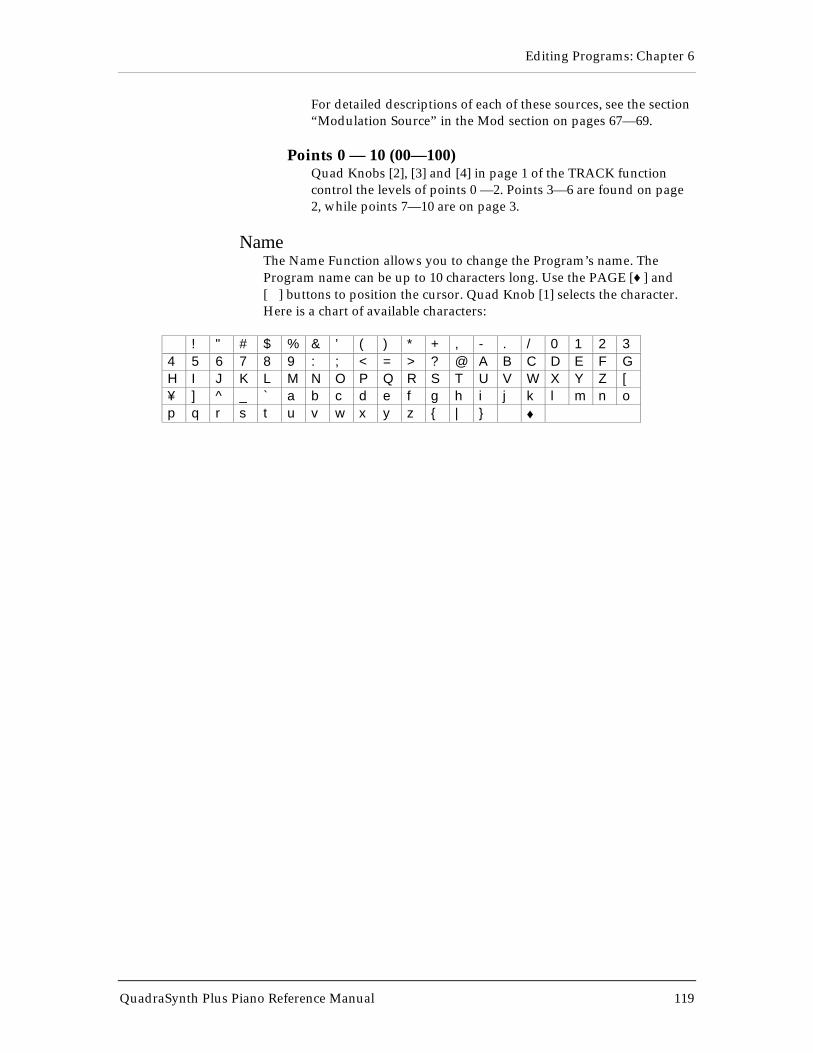
Editing Programs: Chapter 6
QuadraSynth Plus Piano Reference Manual 119
For detailed descriptions of each of these sources, see the section“Modulation Source” in the Mod section on pages 67—69.
Points 0 — 10 (00—100)Quad Knobs [2], [3] and [4] in page 1 of the TRACK functioncontrol the levels of points 0 —2. Points 3—6 are found on page2, while points 7—10 are on page 3.
NameThe Name Function allows you to change the Program’s name. TheProgram name can be up to 10 characters long. Use the PAGE [♦] and[∅] buttons to position the cursor. Quad Knob [1] selects the character.Here is a chart of available characters:
! " # $ % & ’ ( ) * + , - . / 0 1 2 34 5 6 7 8 9 : ; < = > ? @ A B C D E F GH I J K L M N O P Q R S T U V W X Y Z [¥ ] ^ _ ` a b c d e f g h i j k l m n op q r s t u v w x y z { | } ∅ ♦
Editing Programs: Chapter 6
QuadraSynth Plus Piano Reference Manual 120
Misc.Drum Mode
This enables and disables Drum Mode which allows you toassign individual drum sounds to individual keys. To Program asound in Drum Mode, refer to the next section “ProgrammingDrum Sounds.”
Sound EnableThis is the master on/off switch for the selected sound (1—4) ofthe current Program.
To avoid using up polyphony unnecessarily, set Sound Enableto OFF for any sounds that will not be used in a Program. Whenusing Edit 4 mode, disabled sounds will have the word “sndx”(where x is a sound from 1 to 4) appear in lowercase lettersabove each bar graph meter in the display. Active sounds willhave the word “SNDX” appear in uppercase letters. Turningsounds off is a convenient way to isolate a particular sound youare editing. A quick way to turn a sound on and off fromanywhere within Program Edit mode is to hold thecorresponding Quad Button [1]—[4] and press VALUE [¬] todisable or VALUE [] to enable. Example: Holding Quad Button[1] and pressing VALUE [¬] will disable sound 1.
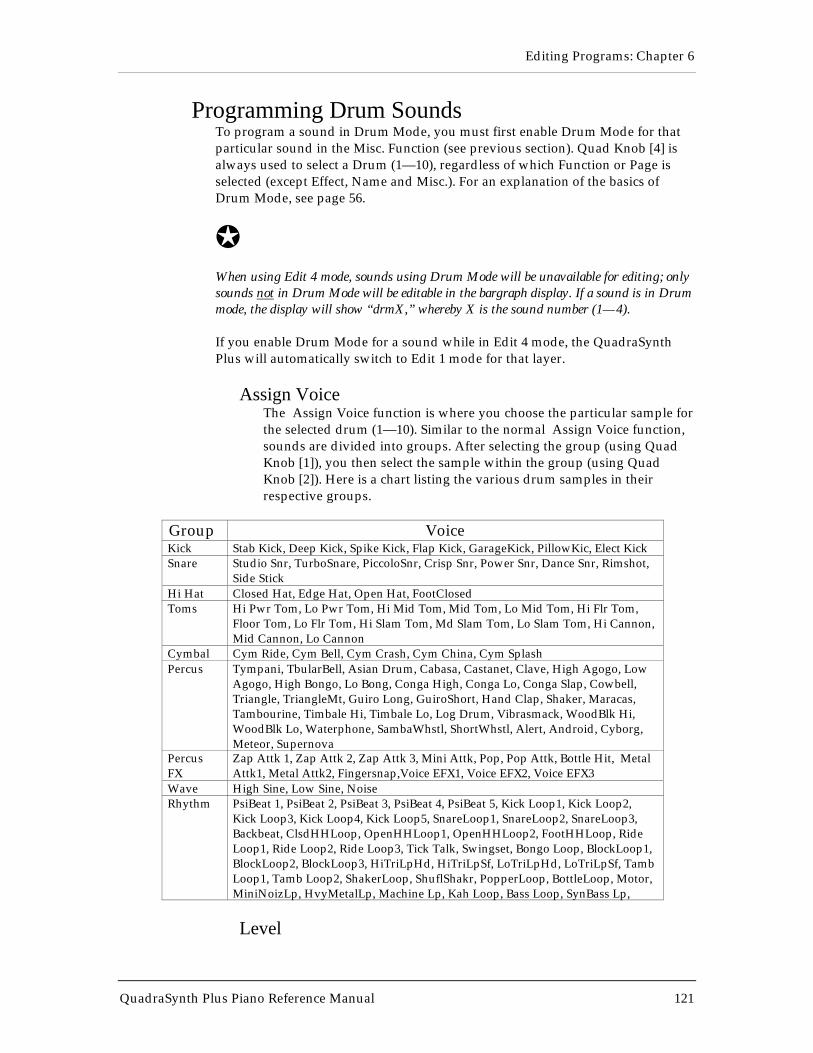
Editing Programs: Chapter 6
QuadraSynth Plus Piano Reference Manual 121
Programming Drum SoundsTo program a sound in Drum Mode, you must first enable Drum Mode for thatparticular sound in the Misc. Function (see previous section). Quad Knob [4] isalways used to select a Drum (1—10), regardless of which Function or Page isselected (except Effect, Name and Misc.). For an explanation of the basics ofDrum Mode, see page 56.
JWhen using Edit 4 mode, sounds using Drum Mode will be unavailable for editing; onlysounds not in Drum Mode will be editable in the bargraph display. If a sound is in Drummode, the display will show “drmX,” whereby X is the sound number (1—4).
If you enable Drum Mode for a sound while in Edit 4 mode, the QuadraSynthPlus will automatically switch to Edit 1 mode for that layer.
Assign VoiceThe Assign Voice function is where you choose the particular sample forthe selected drum (1—10). Similar to the normal Assign Voice function,sounds are divided into groups. After selecting the group (using QuadKnob [1]), you then select the sample within the group (using QuadKnob [2]). Here is a chart listing the various drum samples in theirrespective groups.
Group VoiceKick Stab Kick, Deep Kick, Spike Kick, Flap Kick, GarageKick, PillowKic, Elect KickSnare Studio Snr, TurboSnare, PiccoloSnr, Crisp Snr, Power Snr, Dance Snr, Rimshot,
Side StickHi Hat Closed Hat, Edge Hat, Open Hat, FootClosedToms Hi Pwr Tom, Lo Pwr Tom, Hi Mid Tom, Mid Tom, Lo Mid Tom, Hi Flr Tom,
Floor Tom, Lo Flr Tom, Hi Slam Tom, Md Slam Tom, Lo Slam Tom, Hi Cannon,Mid Cannon, Lo Cannon
Cymbal Cym Ride, Cym Bell, Cym Crash, Cym China, Cym SplashPercus Tympani, TbularBell, Asian Drum, Cabasa, Castanet, Clave, High Agogo, Low
Agogo, High Bongo, Lo Bong, Conga High, Conga Lo, Conga Slap, Cowbell,Triangle, TriangleMt, Guiro Long, GuiroShort, Hand Clap, Shaker, Maracas,Tambourine, Timbale Hi, Timbale Lo, Log Drum, Vibrasmack, WoodBlk Hi,WoodBlk Lo, Waterphone, SambaWhstl, ShortWhstl, Alert, Android, Cyborg,Meteor, Supernova
PercusFX
Zap Attk 1, Zap Attk 2, Zap Attk 3, Mini Attk, Pop, Pop Attk, Bottle Hit, MetalAttk1, Metal Attk2, Fingersnap,Voice EFX1, Voice EFX2, Voice EFX3
Wave High Sine, Low Sine, NoiseRhythm PsiBeat 1, PsiBeat 2, PsiBeat 3, PsiBeat 4, PsiBeat 5, Kick Loop1, Kick Loop2,
Kick Loop3, Kick Loop4, Kick Loop5, SnareLoop1, SnareLoop2, SnareLoop3,Backbeat, ClsdHHLoop, OpenHHLoop1, OpenHHLoop2, FootHHLoop, RideLoop1, Ride Loop2, Ride Loop3, Tick Talk, Swingset, Bongo Loop, BlockLoop1,BlockLoop2, BlockLoop3, HiTriLpHd, HiTriLpSf, LoTriLpHd, LoTriLpSf, TambLoop1, Tamb Loop2, ShakerLoop, ShuflShakr, PopperLoop, BottleLoop, Motor,MiniNoizLp, HvyMetalLp, Machine Lp, Kah Loop, Bass Loop, SynBass Lp,
Level
Editing Programs: Chapter 6
QuadraSynth Plus Piano Reference Manual 122
Each of the 10 drums in a sound can have its own level, pan position,and output assignment. The Level function provides these controls. UseQuad Knob [1] to adjust the selected drum’s level (00 to 99), Quad Knob[2] to adjust pan position (<3 to >3), and Quad Knob [3] to select theOutput assignment (Main, Aux or Off). Use Quad Knob [4] to select thedrum (1—10) you wish to edit.
To send a drum to an individual output, use Output in conjunction withPan. Example: Panning a drum full left and selecting the Aux outputsmeans that the drum will appear at only the left Aux output.
Effects LevelThe Effects Level function determines how much of the selected drum isbeing routed to the effects processor, and on which bus. Quad Knob [1]adjusts the Effect Send level (00 to 99), and Quad Knob [2] selects theEffects Bus (1, 2, 3 or 4). Use Quad Knob [4] to select the drum (1—10)you wish to edit.
PitchPitch (-12.00 to +12.00)
The Pitch function lets you transpose the selected drum up ordown one octave in micro-step (1/4th of a half step) increments,and lets you modulate the drum’s pitch with velocity. QuadKnob [1] determines the tuning of the selected drum (±12.00).Use Quad Knob [2] to select how much you wish velocity toaffect the selected drum’s tuning (0—7). When this value is set to7, the drum will be played sharp when the associated note isplayed hard; when played soft, the drum’s tuning will beunaltered. Use Quad Knob [4] to select the drum (1—10) youwish to edit.
FilterVelocity>Filter (0 to 3)
The Filter function lets you control the “brightness” of theselected drum by modulating the filter frequency with velocity.Use Quad Knob [1] to set the Velocity>Filter parameter (0—3).When set to 3, playing the associated note will result in abrighter sound (more high frequencies), while playing softer willresult in a duller sound (less high frequencies). When thisparameter is set to 0, velocity will have no affect on the filter.Use Quad Knob [4] to select a drum (1—10) to edit.
AmpVelocity Curve (13 choices)
Quad Knob [1] in the Amp function lets you select one of 13velocity curves. This determines how the drum will respond tothe dynamics of your playing the keyboard. Use Quad Knob [4]to select the drum (1—10) you wish to edit.
Editing Programs: Chapter 6
QuadraSynth Plus Piano Reference Manual 123
A LINEAR curve is the norm, whereby the increase in level isequal to the increase in velocity; the velocity values increase asyou play harder. Many of the Velocity Curves make up sets to beused by 2, 3 or 4 drums in order to facilitate velocity crossfading,whereby a different drum is played depending on how hard orsoft the keyboard is played. However, each drum must be in adifferent sound layer of the Program in order to be stacked onthe same note.
If you want to create your own velocity crossfading Program,assign the related versions of the same drum samples (“CongaHigh” and “Conga Lo”) the same key in different ProgramSound layers, then use the appropriate velocity curves for eachdrum (in a three-way velocity split, drum 1 would use curve “1of 3,” drum 2 would use curve “2 of 3” while drum 3 would use“3 of 3”).
For more details about the 13 velocity curves, see the illustrationon page 64.
RangeNote (000 to 127/C-2 to G8)
Each drum can be assigned to a single note which will triggerthe drum sound when played. Quad Knob [1] specifies the noteassignment of the selected drum (000 to 127/C-2 to G8). You canalso set the note assignment by holding Quad Switch [1] andtapping the key on the keyboard you want to set as the note forthe drum.
JOnly one drum can be assigned to a single note within a singleProgram sound layer. If more than one drum in a single sound isassigned to the same note number, only the higher number drum willsound.
Range (0 to +3)Each drum can be assigned a range of notes (up to 3) above theroot note which will trigger the drum sound when played. QuadKnob [2] specifies the note range of the selected drum (0 to +3).The pitch of the drum will remain the same no matter which keyis played.
Amp EnvelopeDecay (0 to 99, Gate00 to Gate99)
Quad Knob [1] in the Amp Envelope (AENV) Function lets youadjust the Decay time of the selected drum (00 to 99, Gate00 toGate99). If this is set to 0, only the very beginning of the drumsample is played; setting this to 99 will cause the entire drumsample to play. When set above 99, the Decay uses a gatedmode. The Decay can still be set between 0 and 99, but in 5-step
Editing Programs: Chapter 6
QuadraSynth Plus Piano Reference Manual 124
increments (e.g., Gate00 = Decay setting of 0 with gating, Gate05= Decay setting of 5 with gating, etc.). Gating means that thedrum sound will continue to be played as long as the key is held.This is useful for longer sounds, like cymbals, when you wish tohear a short crash by playing a short note but can still hear alonger crash by keeping the note held down.
Mute Group (Off, 1, 2, or 3)This is an important feature when using multiple sounds of thesame instrument. Mute Groups allow multiple drums to share asingle voice. For example, if you have assigned a Closed Hat andan Open Hat to two different notes, playing either note shouldcut-off the other (if it had recently been played). This creates amore realistic sound, since an actual Hi Hat is only capable ofmaking one sound at a time.
In the Amp Envelope function, Quad Knob [2] is used to assignthe selected drum to one of the three Mute Groups. In ourexample above, both Hi Hat drums would be assigned to thesame Mute Group. The additional Mute Groups can be used byother sounds that you wish to cut-off each other, but do not wantto interfere with the Hi Hat sounds. Use Quad Knob [4] to selectthe drum (1—10) you wish to edit.

Editing Programs: Chapter 6
QuadraSynth Plus Piano Reference Manual 125
Copying SoundsWhile editing a Program, it is helpful to be able to copy a sound to another soundin either the same Program or a different Program, especially if you are buildinga split or layered Program. This can be done very easily from within the Storefunction.
To copy a sound to another sound in the same Program, or to the same sound ina different Program:
¿ From Program Edit mode, press [STORE].
¡ Press PAGE [∅] to select Page 2 of the Store function.
¬ Use Quad Knob [1] to select which sound (1–4) in the currently selectedProgram to copy from.
Use Quad Knob [2] to select which sound (1–4) in the currently selectedProgram to copy to; or to select which Program (0–127) to copy to.The selected sound will be copied into the same sound location in the selected Program. Ifyou select to copy sound 2 to Program 45, the sound will be copied into sound 2 ofProgram 45.
� Press [STORE] to copy the sound.
Copying EffectsWhile editing a Program, it is helpful to be able to copy the Effects Patch from adifferent Program. This can be done very easily from within the Store function.
JBe sure to save your changes to the edited Program before going to a new Program.Otherwise, all your changes will be lost.
To copy the Effects Patch from a Program to another Program:
¿ Recall the Program which contains the Effects Patch you wish to copy,using the methods described on page 14.
¡ Press [STORE].
¬ Press PAGE [∅] to select Page 2 of the Store function.
Use Quad Knob [1] to select “EFFECT”, which is the Effects Patch in thecurrently selected Program to copy from.
� Use Quad Knob [2] to select which Program (0–127) in the User Bank tocopy to.The selected sound will be copied into the same sound location in the selected Program. Ifyou select to copy sound 2 to Program 45, the sound will be copied into sound 2 ofProgram 45.
Editing Programs: Chapter 6
QuadraSynth Plus Piano Reference Manual 126
� Press [STORE] to copy the sound.
Initializing ProgramsIf you want to start programming from “scratch”, you can easily reset allparameters to their default settings by re-initializing the software. Make sureyour mod wheel is all the way down before re-initializing, otherwise the "zero"position of the mod wheel will be incorrect.
To re-initialize the QuadraSynth Plus:
¿ Press [PROGRAM] to enter Program mode.
¡ Turn the unit off.
¬ While holding down both Quad Buttons [1] and [4], turn on the power.
The QuadraSynth Plus will come on showing Program 00, with the EDITED flagshowing in the display. This is the Program Mode edit buffer, set to the defaultsettings. Re-initializing will also reset all Global parameters to their defaultsettings, and will initialize all edit buffers so that all Mix and Programparameters are reset to their default settings. However, none of the Programs orMixes are changed when re-initializing the unit. You can proceed to edit, then[STORE] at any Program location you like.
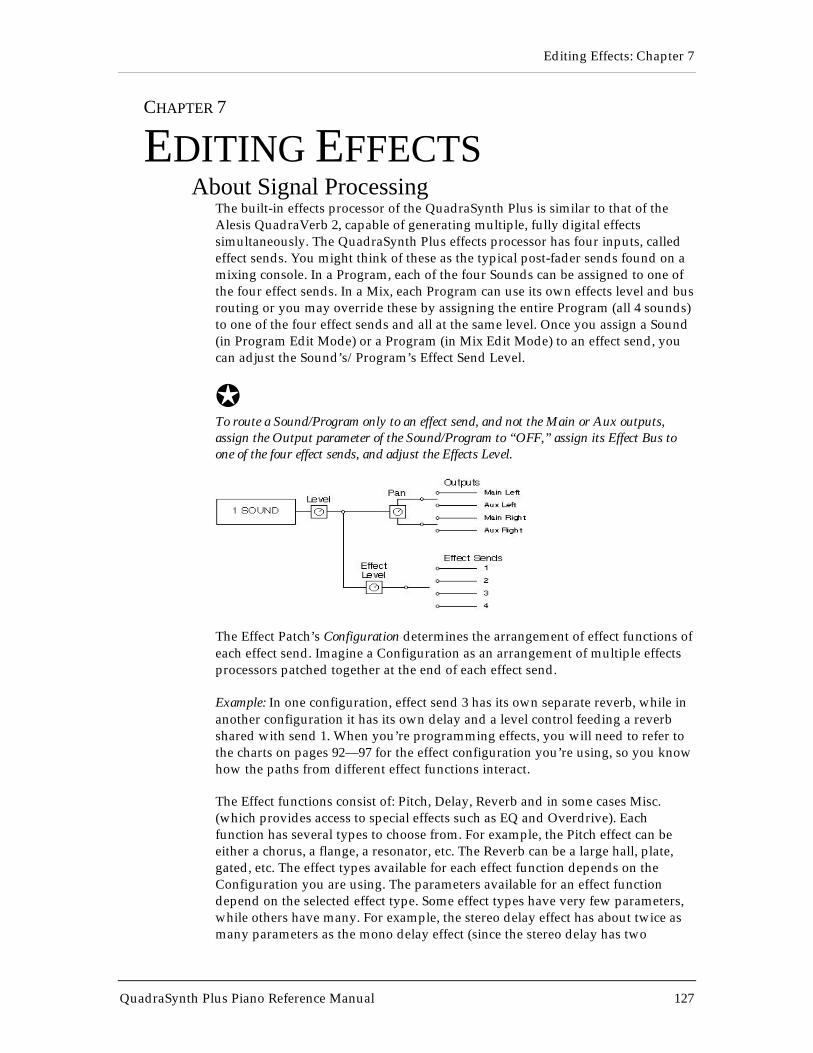
Editing Effects: Chapter 7
QuadraSynth Plus Piano Reference Manual 127
CHAPTER 7
EDITING EFFECTSAbout Signal Processing
The built-in effects processor of the QuadraSynth Plus is similar to that of theAlesis QuadraVerb 2, capable of generating multiple, fully digital effectssimultaneously. The QuadraSynth Plus effects processor has four inputs, calledeffect sends. You might think of these as the typical post-fader sends found on amixing console. In a Program, each of the four Sounds can be assigned to one ofthe four effect sends. In a Mix, each Program can use its own effects level and busrouting or you may override these by assigning the entire Program (all 4 sounds)to one of the four effect sends and all at the same level. Once you assign a Sound(in Program Edit Mode) or a Program (in Mix Edit Mode) to an effect send, youcan adjust the Sound’s/Program’s Effect Send Level.
JTo route a Sound/Program only to an effect send, and not the Main or Aux outputs,assign the Output parameter of the Sound/Program to “OFF,” assign its Effect Bus toone of the four effect sends, and adjust the Effects Level.
The Effect Patch’s Configuration determines the arrangement of effect functions ofeach effect send. Imagine a Configuration as an arrangement of multiple effectsprocessors patched together at the end of each effect send.
Example: In one configuration, effect send 3 has its own separate reverb, while inanother configuration it has its own delay and a level control feeding a reverbshared with send 1. When you’re programming effects, you will need to refer tothe charts on pages 92—97 for the effect configuration you’re using, so you knowhow the paths from different effect functions interact.
The Effect functions consist of: Pitch, Delay, Reverb and in some cases Misc.(which provides access to special effects such as EQ and Overdrive). Eachfunction has several types to choose from. For example, the Pitch effect can beeither a chorus, a flange, a resonator, etc. The Reverb can be a large hall, plate,gated, etc. The effect types available for each effect function depends on theConfiguration you are using. The parameters available for an effect functiondepend on the selected effect type. Some effect types have very few parameters,while others have many. For example, the stereo delay effect has about twice asmany parameters as the mono delay effect (since the stereo delay has two
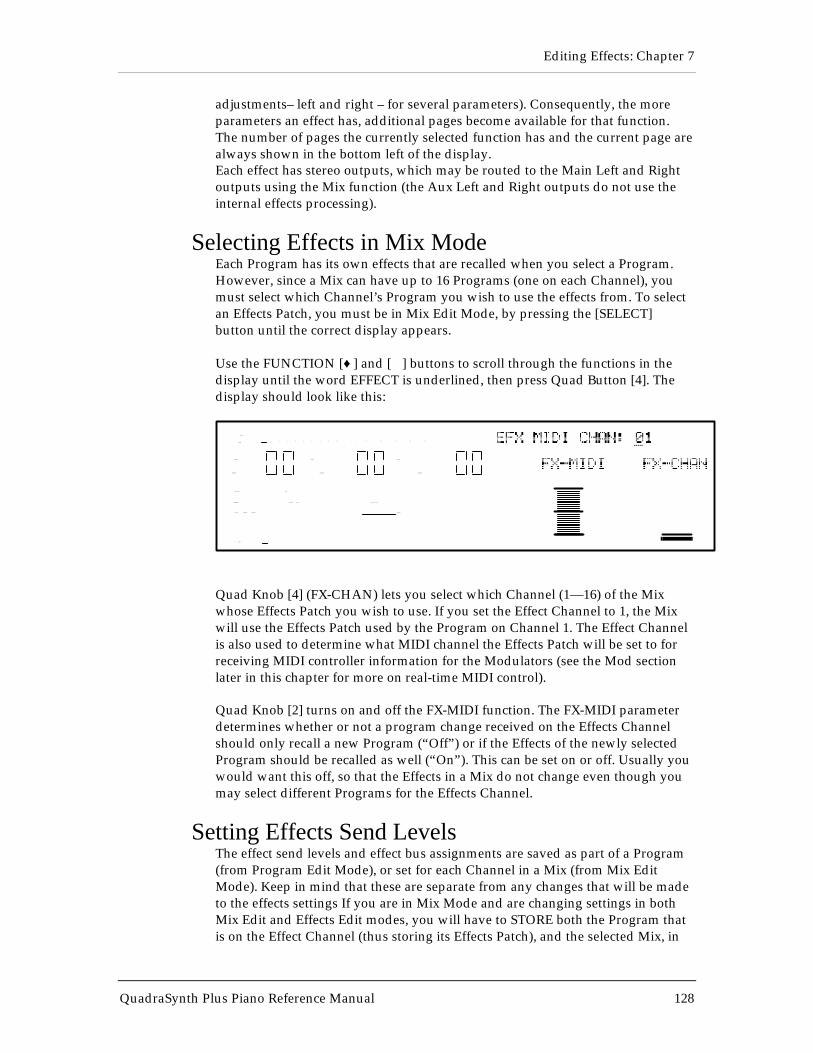
Editing Effects: Chapter 7
QuadraSynth Plus Piano Reference Manual 128
adjustments– left and right – for several parameters). Consequently, the moreparameters an effect has, additional pages become available for that function.The number of pages the currently selected function has and the current page arealways shown in the bottom left of the display.Each effect has stereo outputs, which may be routed to the Main Left and Rightoutputs using the Mix function (the Aux Left and Right outputs do not use theinternal effects processing).
Selecting Effects in Mix ModeEach Program has its own effects that are recalled when you select a Program.However, since a Mix can have up to 16 Programs (one on each Channel), youmust select which Channel’s Program you wish to use the effects from. To selectan Effects Patch, you must be in Mix Edit Mode, by pressing the [SELECT]button until the correct display appears.
Use the FUNCTION [♦] and [∅] buttons to scroll through the functions in thedisplay until the word EFFECT is underlined, then press Quad Button [4]. Thedisplay should look like this:
PROG EFFECT
PRESET PRESET
EDITING: MIX
P AGE: 1
PITCH RANGE EFFECT NAME
MIDI
CHAN
M I XM I X
PRESET
1 2 3 4 5 6 7 8 9 10 1 1 12 13 14 15 16
PROGRAM – ASSIGN LEVEL EFFECT–LEVEL
Quad Knob [4] (FX-CHAN) lets you select which Channel (1—16) of the Mixwhose Effects Patch you wish to use. If you set the Effect Channel to 1, the Mixwill use the Effects Patch used by the Program on Channel 1. The Effect Channelis also used to determine what MIDI channel the Effects Patch will be set to forreceiving MIDI controller information for the Modulators (see the Mod sectionlater in this chapter for more on real-time MIDI control).
Quad Knob [2] turns on and off the FX-MIDI function. The FX-MIDI parameterdetermines whether or not a program change received on the Effects Channelshould only recall a new Program (“Off”) or if the Effects of the newly selectedProgram should be recalled as well (“On”). This can be set on or off. Usually youwould want this off, so that the Effects in a Mix do not change even though youmay select different Programs for the Effects Channel.
Setting Effects Send LevelsThe effect send levels and effect bus assignments are saved as part of a Program(from Program Edit Mode), or set for each Channel in a Mix (from Mix EditMode). Keep in mind that these are separate from any changes that will be madeto the effects settings If you are in Mix Mode and are changing settings in bothMix Edit and Effects Edit modes, you will have to STORE both the Program thatis on the Effect Channel (thus storing its Effects Patch), and the selected Mix, in
Editing Effects: Chapter 7
QuadraSynth Plus Piano Reference Manual 129
order to have your changes remembered and heard the same way in the future.The actual arrangement of depth of reverb, delay time, etc., is saved as part of theEffects Edit parameters when a Program is stored. It is possible for differentMixes to share the same Effects Patch. So keep in mind that when you edit anEffects Patch, it may affect the sound of any other Mixes that also use it.
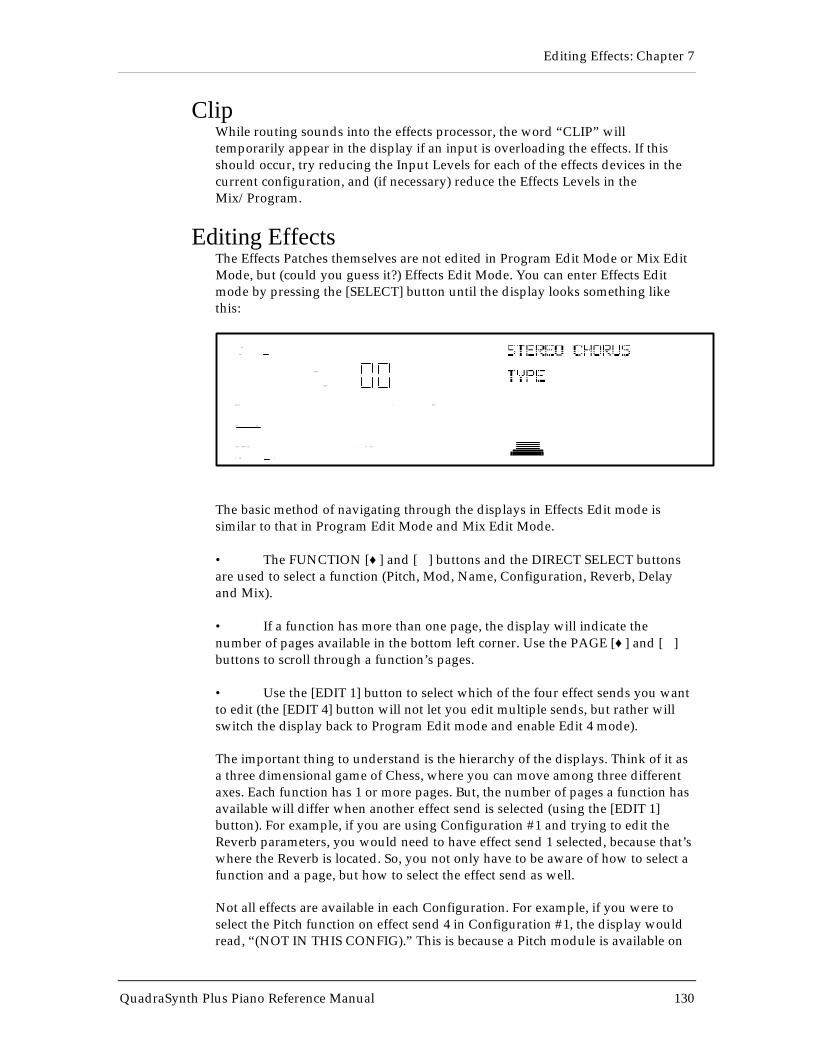
Editing Effects: Chapter 7
QuadraSynth Plus Piano Reference Manual 130
ClipWhile routing sounds into the effects processor, the word “CLIP” willtemporarily appear in the display if an input is overloading the effects. If thisshould occur, try reducing the Input Levels for each of the effects devices in thecurrent configuration, and (if necessary) reduce the Effects Levels in theMix/Program.
Editing EffectsThe Effects Patches themselves are not edited in Program Edit Mode or Mix EditMode, but (could you guess it?) Effects Edit Mode. You can enter Effects Editmode by pressing the [SELECT] button until the display looks something likethis:
MIDI
CHAN
P R O GP R O G
1
PRESET
EDITING: 1 EFFECT
PITCH MOD
CONFIG REVERB DELA Y MIX MISC.
P AGE: 1 2
The basic method of navigating through the displays in Effects Edit mode issimilar to that in Program Edit Mode and Mix Edit Mode.
• The FUNCTION [♦] and [∅] buttons and the DIRECT SELECT buttonsare used to select a function (Pitch, Mod, Name, Configuration, Reverb, Delayand Mix).
• If a function has more than one page, the display will indicate thenumber of pages available in the bottom left corner. Use the PAGE [♦] and [∅]buttons to scroll through a function’s pages.
• Use the [EDIT 1] button to select which of the four effect sends you wantto edit (the [EDIT 4] button will not let you edit multiple sends, but rather willswitch the display back to Program Edit mode and enable Edit 4 mode).
The important thing to understand is the hierarchy of the displays. Think of it asa three dimensional game of Chess, where you can move among three differentaxes. Each function has 1 or more pages. But, the number of pages a function hasavailable will differ when another effect send is selected (using the [EDIT 1]button). For example, if you are using Configuration #1 and trying to edit theReverb parameters, you would need to have effect send 1 selected, because that’swhere the Reverb is located. So, you not only have to be aware of how to select afunction and a page, but how to select the effect send as well.
Not all effects are available in each Configuration. For example, if you were toselect the Pitch function on effect send 4 in Configuration #1, the display wouldread, “(NOT IN THIS CONFIG).” This is because a Pitch module is available on
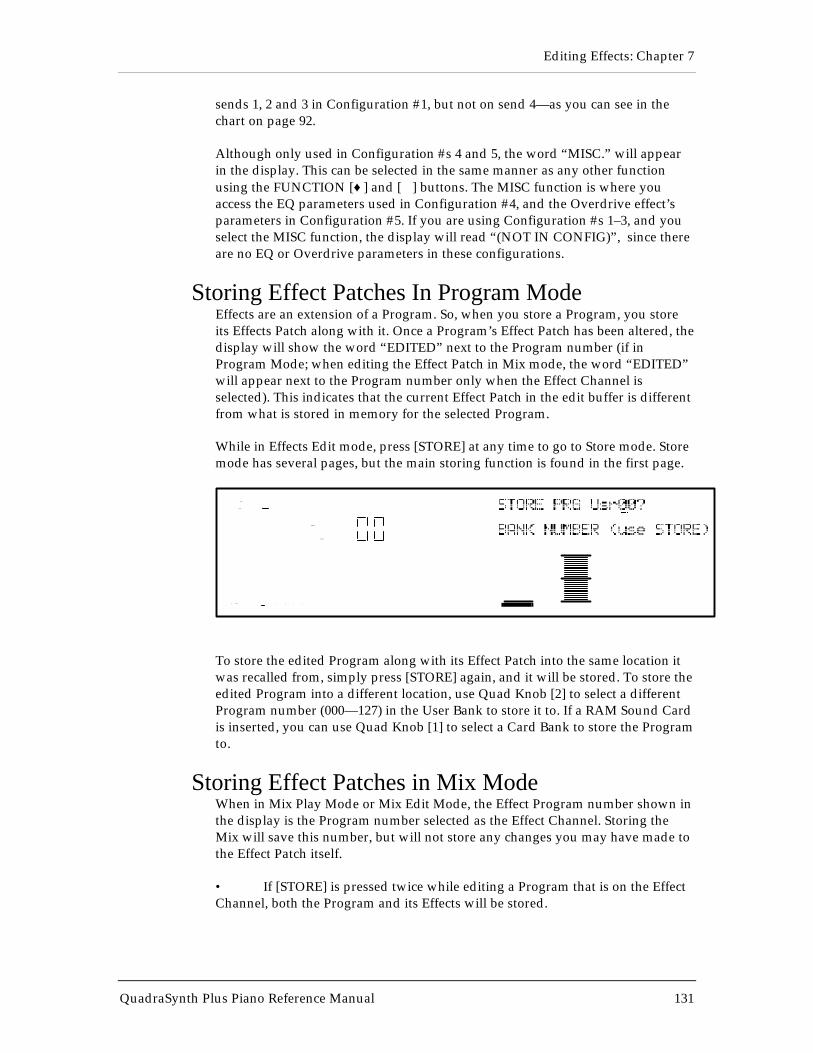
Editing Effects: Chapter 7
QuadraSynth Plus Piano Reference Manual 131
sends 1, 2 and 3 in Configuration #1, but not on send 4—as you can see in thechart on page 92.
Although only used in Configuration #s 4 and 5, the word “MISC.” will appearin the display. This can be selected in the same manner as any other functionusing the FUNCTION [♦] and [∅] buttons. The MISC function is where youaccess the EQ parameters used in Configuration #4, and the Overdrive effect’sparameters in Configuration #5. If you are using Configuration #s 1–3, and youselect the MISC function, the display will read “(NOT IN CONFIG)”, since thereare no EQ or Overdrive parameters in these configurations.
Storing Effect Patches In Program ModeEffects are an extension of a Program. So, when you store a Program, you storeits Effects Patch along with it. Once a Program’s Effect Patch has been altered, thedisplay will show the word “EDITED” next to the Program number (if inProgram Mode; when editing the Effect Patch in Mix mode, the word “EDITED”will appear next to the Program number only when the Effect Channel isselected). This indicates that the current Effect Patch in the edit buffer is differentfrom what is stored in memory for the selected Program.
While in Effects Edit mode, press [STORE] at any time to go to Store mode. Storemode has several pages, but the main storing function is found in the first page.
MIDI
CHAN
P R O GP R O G
1
PRESET
P AGE: 1 2 3 4 5 6
To store the edited Program along with its Effect Patch into the same location itwas recalled from, simply press [STORE] again, and it will be stored. To store theedited Program into a different location, use Quad Knob [2] to select a differentProgram number (000—127) in the User Bank to store it to. If a RAM Sound Cardis inserted, you can use Quad Knob [1] to select a Card Bank to store the Programto.
Storing Effect Patches in Mix ModeWhen in Mix Play Mode or Mix Edit Mode, the Effect Program number shown inthe display is the Program number selected as the Effect Channel. Storing theMix will save this number, but will not store any changes you may have made tothe Effect Patch itself.
• If [STORE] is pressed twice while editing a Program that is on the EffectChannel, both the Program and its Effects will be stored.

Editing Effects: Chapter 7
QuadraSynth Plus Piano Reference Manual 132
• If [STORE] is pressed twice while editing a Program that is on a Channelother than the Effect Channel, the edited Program will be stored without alteringits previous Effects settings.
• If [STORE] is pressed twice while editing a Mix (Mix Edit Mode), onlythe Mix parameters will be stored, not the individual Programs or the EffectsPatch.
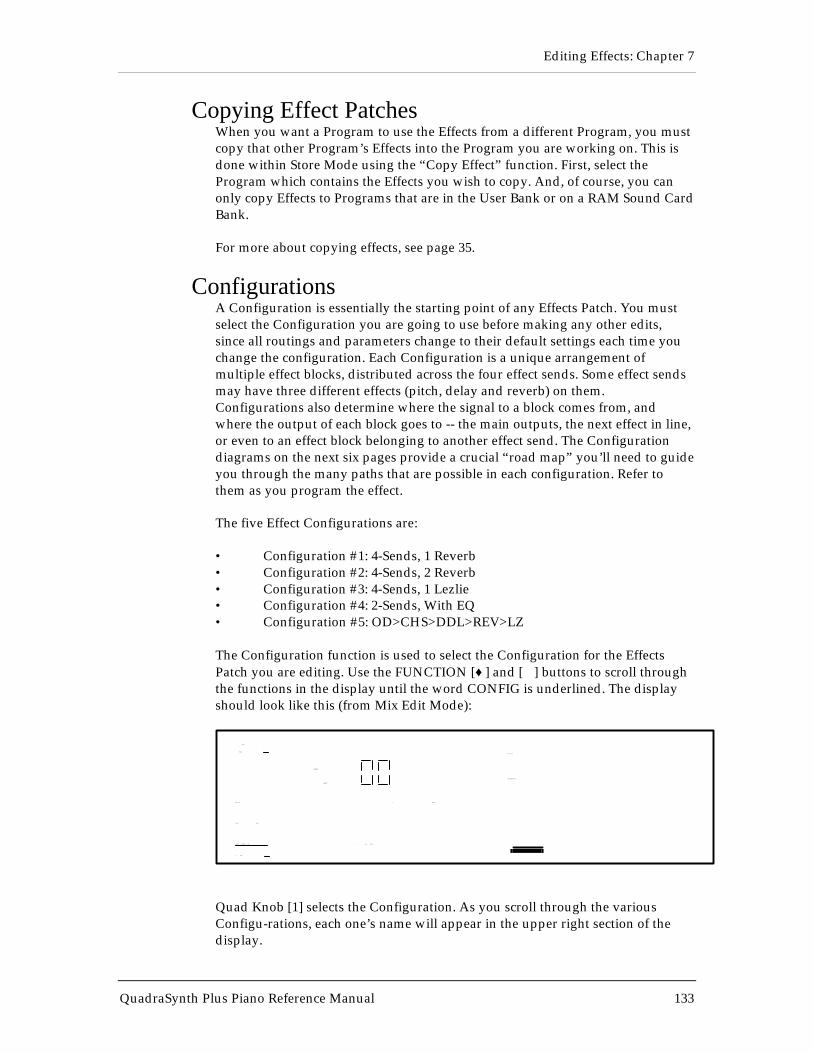
Editing Effects: Chapter 7
QuadraSynth Plus Piano Reference Manual 133
Copying Effect PatchesWhen you want a Program to use the Effects from a different Program, you mustcopy that other Program’s Effects into the Program you are working on. This isdone within Store Mode using the “Copy Effect” function. First, select theProgram which contains the Effects you wish to copy. And, of course, you canonly copy Effects to Programs that are in the User Bank or on a RAM Sound CardBank.
For more about copying effects, see page 35.
ConfigurationsA Configuration is essentially the starting point of any Effects Patch. You mustselect the Configuration you are going to use before making any other edits,since all routings and parameters change to their default settings each time youchange the configuration. Each Configuration is a unique arrangement ofmultiple effect blocks, distributed across the four effect sends. Some effect sendsmay have three different effects (pitch, delay and reverb) on them.Configurations also determine where the signal to a block comes from, andwhere the output of each block goes to -- the main outputs, the next effect in line,or even to an effect block belonging to another effect send. The Configurationdiagrams on the next six pages provide a crucial “road map” you’ll need to guideyou through the many paths that are possible in each configuration. Refer tothem as you program the effect.
The five Effect Configurations are:
• Configuration #1: 4-Sends, 1 Reverb• Configuration #2: 4-Sends, 2 Reverb• Configuration #3: 4-Sends, 1 Lezlie• Configuration #4: 2-Sends, With EQ• Configuration #5: OD>CHS>DDL>REV>LZ
The Configuration function is used to select the Configuration for the EffectsPatch you are editing. Use the FUNCTION [♦] and [∅] buttons to scroll throughthe functions in the display until the word CONFIG is underlined. The displayshould look like this (from Mix Edit Mode):
MIDI
CHAN
P R O GP R O G
1
PRESET
EDITING: 1 EFFECT
PITCH MOD
CONFIG REVERB DELA Y MIX MISC.
P AGE: 1
4-SENDS, 1 REVERB
CONFIGURATION
Quad Knob [1] selects the Configuration. As you scroll through the variousConfigu-rations, each one’s name will appear in the upper right section of thedisplay.
Editing Effects: Chapter 7
QuadraSynth Plus Piano Reference Manual 134
Here is a run-down of the various Configurations:
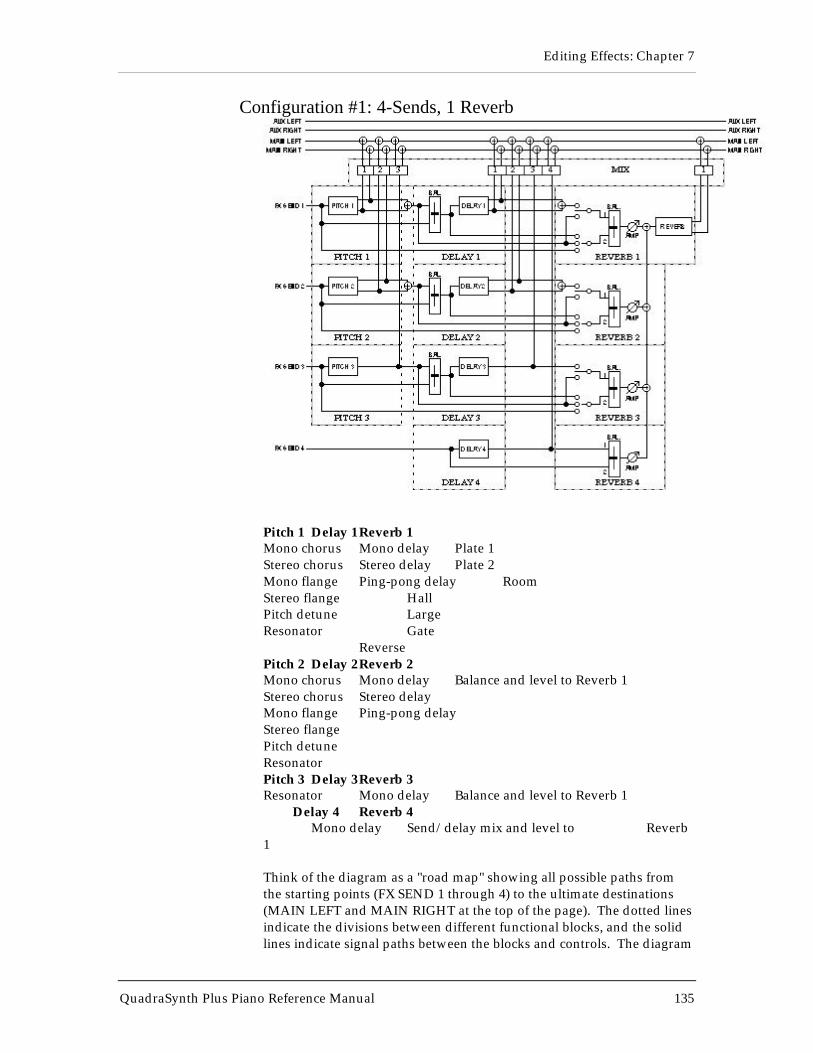
Editing Effects: Chapter 7
QuadraSynth Plus Piano Reference Manual 135
Configuration #1: 4-Sends, 1 Reverb
Pitch 1 Delay 1Reverb 1Mono chorus Mono delay Plate 1Stereo chorus Stereo delay Plate 2Mono flange Ping-pong delay RoomStereo flange HallPitch detune LargeResonator Gate
ReversePitch 2 Delay 2Reverb 2Mono chorus Mono delay Balance and level to Reverb 1Stereo chorus Stereo delayMono flange Ping-pong delayStereo flangePitch detuneResonatorPitch 3 Delay 3Reverb 3Resonator Mono delay Balance and level to Reverb 1
Delay 4 Reverb 4Mono delay Send/delay mix and level to Reverb
1
Think of the diagram as a "road map" showing all possible paths fromthe starting points (FX SEND 1 through 4) to the ultimate destinations(MAIN LEFT and MAIN RIGHT at the top of the page). The dotted linesindicate the divisions between different functional blocks, and the solidlines indicate signal paths between the blocks and controls. The diagram
Editing Effects: Chapter 7
QuadraSynth Plus Piano Reference Manual 136
is similar to a block diagram for a mixer, with signal moving generallyfrom the left to the right. The number next to each function namerepresents one of the four effect sends. For example, Delay 2 refers to theDelay effect on effect send 2.
This Configuration #1 provides three Pitch effects, four Delay effects andone Reverb effect. The Pitch effects are found on effect sends 1, 2 and 3,but while the Pitch effects on sends 1 and 2 are stereo and their types areselectable (Mono Chorus, Mono Flange or Resonator), the Pitch effect onsend 3 is mono and can only be used as a Resonator. Effect send 4 has noPitch effect.
Each of the four sends has its own Delay effect, but while the Delayeffects on sends 1 and 2 are stereo, the Delay effects on sends 3 and 4 aremono.
Each effect send can be routed through the Reverb. Since there is onlyone Reverb effect, it is found in the first effect send (see next section onReverb). Reverb parameters that set the sound of the reverb itself (suchas high and low decay, reverb type, predelay, etc.) are found only when"EDITING: 1" is displayed. However, each of the 4 effect sends hascontrols for how much dry signal and how much effected signal are sentto the Reverb effect.
Example: The Reverb 2 block allows you to send signal to the reverb fromfour different points in the second effects chain: a) directly from effectssend 2, b) the output of Pitch 2, c) the input of Delay 2, or d) the outputof Delay 2. You can even send a combination of these to the reverb. Butto change any other reverb parameters, you must return to editingReverb 1.
Each Pitch, Delay and Reverb module has its own independent Mixoutput level (i.e., how much of their output is routed directly to the MainLeft and Right outputs). The Mix function is where you determine howthe effects will actually be heard.
Mix 1, for example, is where you can control the outputs of Pitch 1,Delay 1, and Reverb 1 to the main outputs. The Mix parameter controlshow much an effect block feeds directly to the main outputs, but doesn'tcontrol how much it feeds to any other blocks that may follow it. Forexample, when Pitch 1’s Mix control is set to 0, it is still available as aninput to Delay 1 and Reverb 1.
Think of the Mix function in the QuadraSynth Plus's effects section asbeing similar to the effect return control on a mixing console. Forexample, if Effect Send 1's Mix Reverb Output parameter is set to 0, youwon't be able to hear reverb regardless of how much input you feed itfrom any of the effect buses.
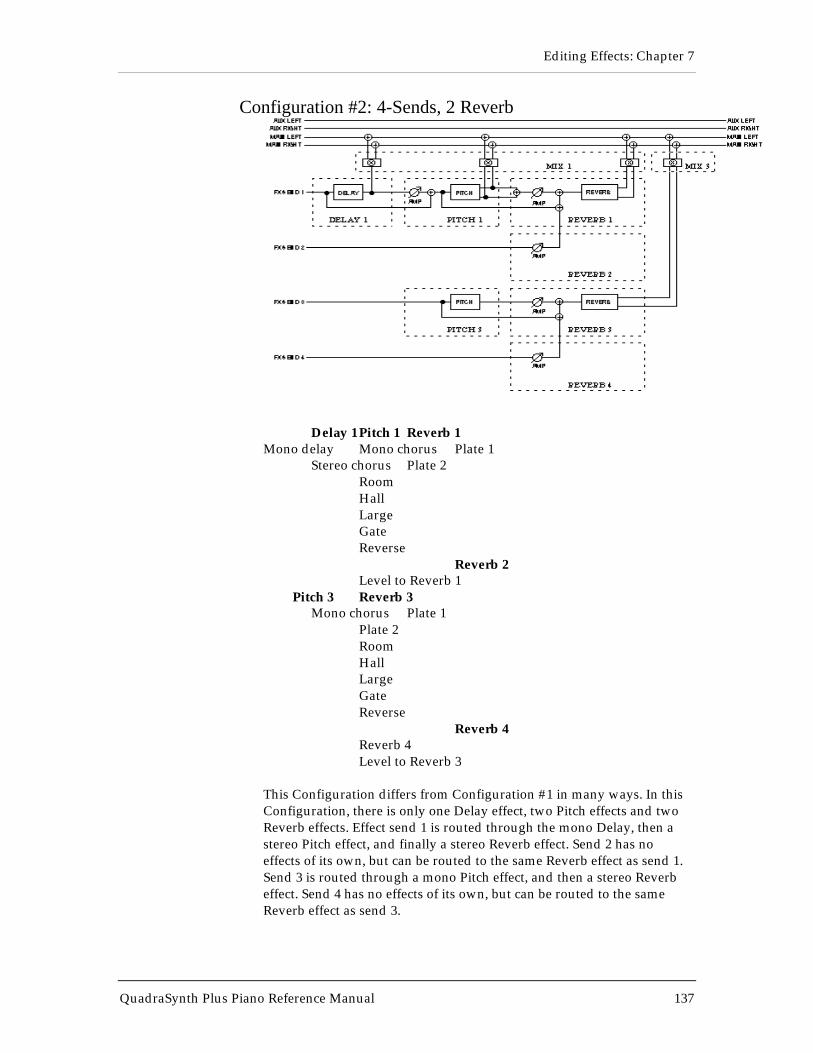
Editing Effects: Chapter 7
QuadraSynth Plus Piano Reference Manual 137
Configuration #2: 4-Sends, 2 Reverb
Delay 1Pitch 1 Reverb 1Mono delay Mono chorus Plate 1
Stereo chorus Plate 2RoomHallLargeGateReverse
Reverb 2Level to Reverb 1
Pitch 3 Reverb 3Mono chorus Plate 1
Plate 2RoomHallLargeGateReverse
Reverb 4Reverb 4Level to Reverb 3
This Configuration differs from Configuration #1 in many ways. In thisConfiguration, there is only one Delay effect, two Pitch effects and twoReverb effects. Effect send 1 is routed through the mono Delay, then astereo Pitch effect, and finally a stereo Reverb effect. Send 2 has noeffects of its own, but can be routed to the same Reverb effect as send 1.Send 3 is routed through a mono Pitch effect, and then a stereo Reverbeffect. Send 4 has no effects of its own, but can be routed to the sameReverb effect as send 3.
Editing Effects: Chapter 7
QuadraSynth Plus Piano Reference Manual 138
Effect send 1’s Delay, Pitch, and Reverb can feed the Mix output directly.Unlike the first configuration, however, Pitch 3 can be routed to the Mixonly after passing through Reverb 3.
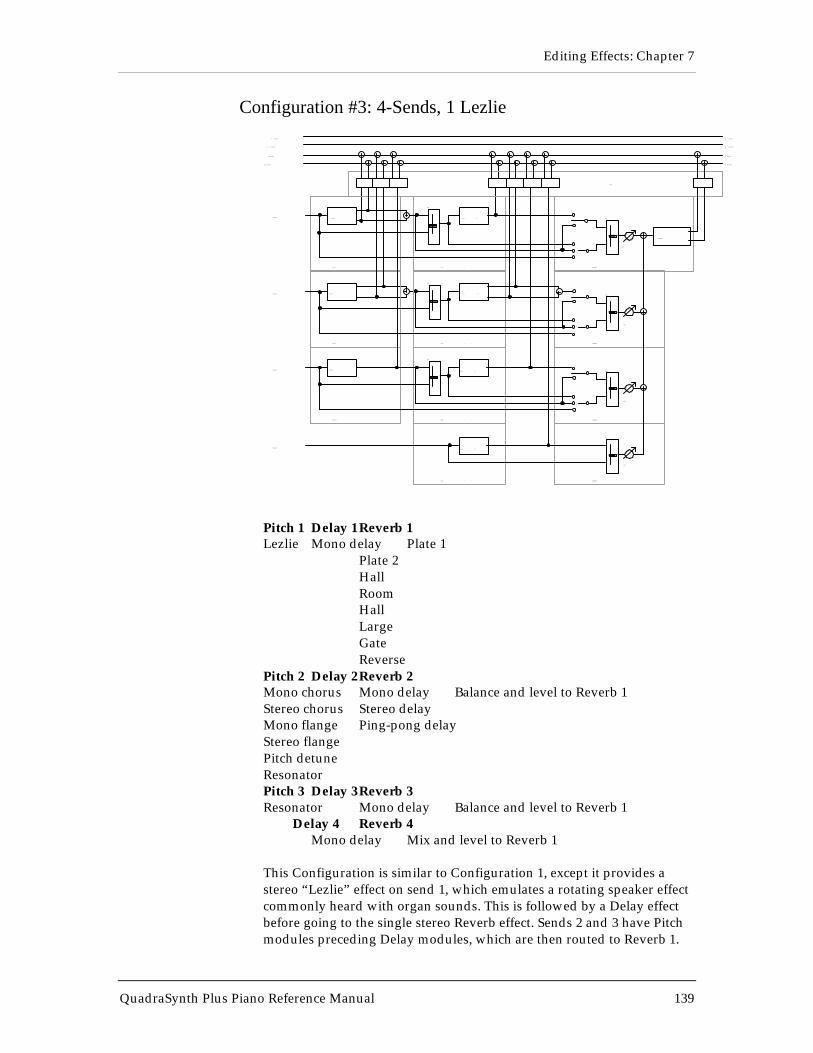
Editing Effects: Chapter 7
QuadraSynth Plus Piano Reference Manual 139
Configuration #3: 4-Sends, 1 Lezlie
LEZLIEFX SEND 1
FX SEND 2
A UX LEFT
A UX RIGHT
MAIN LEFT
MAIN RIGHT
A UX LEFT
A UX RIGHT
MAIN LEFT
MAIN RIGHT
DELA Y 1
1
REVERB
FX SEND 3
FX SEND 4
PITCH 2 DELA Y 2
AMP
AMP
PITCH 3DELA Y 3
AMP
DELA Y 4
AMP
1
2
1
2
1
2
1
2
BAL.
BAL.
BAL.
BAL.
BAL.
2 3 1 2 3 14 MIX
REVERB 1
REVERB 2
REVERB 3
REVERB 4
DELA Y 1
DELA Y 2
DELA Y 3
DELA Y 4
PITCH 1
PITCH 2
PITCH 3
BAL.
BAL.
Pitch 1 Delay 1Reverb 1Lezlie Mono delay Plate 1
Plate 2HallRoomHallLargeGateReverse
Pitch 2 Delay 2Reverb 2Mono chorus Mono delay Balance and level to Reverb 1Stereo chorus Stereo delayMono flange Ping-pong delayStereo flangePitch detuneResonatorPitch 3 Delay 3Reverb 3Resonator Mono delay Balance and level to Reverb 1
Delay 4 Reverb 4Mono delay Mix and level to Reverb 1
This Configuration is similar to Configuration 1, except it provides astereo “Lezlie” effect on send 1, which emulates a rotating speaker effectcommonly heard with organ sounds. This is followed by a Delay effectbefore going to the single stereo Reverb effect. Sends 2 and 3 have Pitchmodules preceding Delay modules, which are then routed to Reverb 1.
Editing Effects: Chapter 7
QuadraSynth Plus Piano Reference Manual 140
Send 4 has only a Mono Delay effect, which may also be routed toReverb 1.
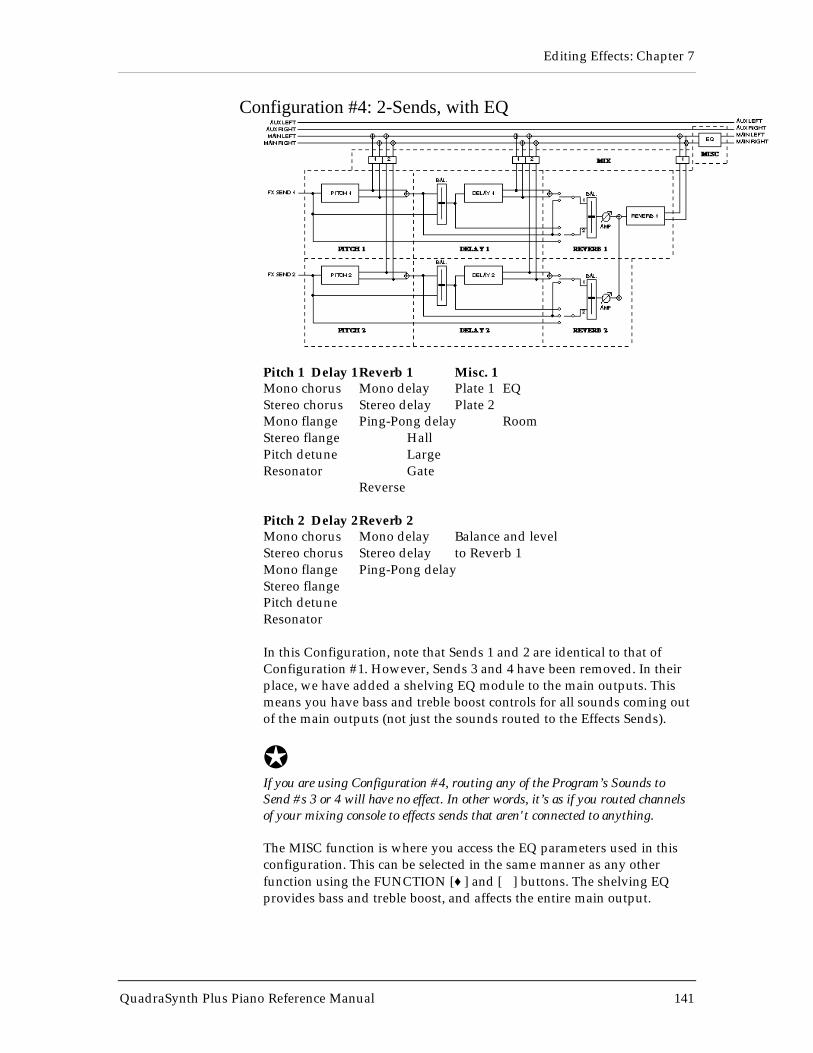
Editing Effects: Chapter 7
QuadraSynth Plus Piano Reference Manual 141
Configuration #4: 2-Sends, with EQ
Pitch 1 Delay 1Reverb 1 Misc. 1Mono chorus Mono delay Plate 1 EQStereo chorus Stereo delay Plate 2Mono flange Ping-Pong delay RoomStereo flange HallPitch detune LargeResonator Gate
Reverse
Pitch 2 Delay 2Reverb 2Mono chorus Mono delay Balance and levelStereo chorus Stereo delay to Reverb 1Mono flange Ping-Pong delayStereo flangePitch detuneResonator
In this Configuration, note that Sends 1 and 2 are identical to that ofConfiguration #1. However, Sends 3 and 4 have been removed. In theirplace, we have added a shelving EQ module to the main outputs. Thismeans you have bass and treble boost controls for all sounds coming outof the main outputs (not just the sounds routed to the Effects Sends).
JIf you are using Configuration #4, routing any of the Program’s Sounds toSend #s 3 or 4 will have no effect. In other words, it’s as if you routed channelsof your mixing console to effects sends that aren't connected to anything.
The MISC function is where you access the EQ parameters used in thisconfiguration. This can be selected in the same manner as any otherfunction using the FUNCTION [♦] and [∅] buttons. The shelving EQprovides bass and treble boost, and affects the entire main output.
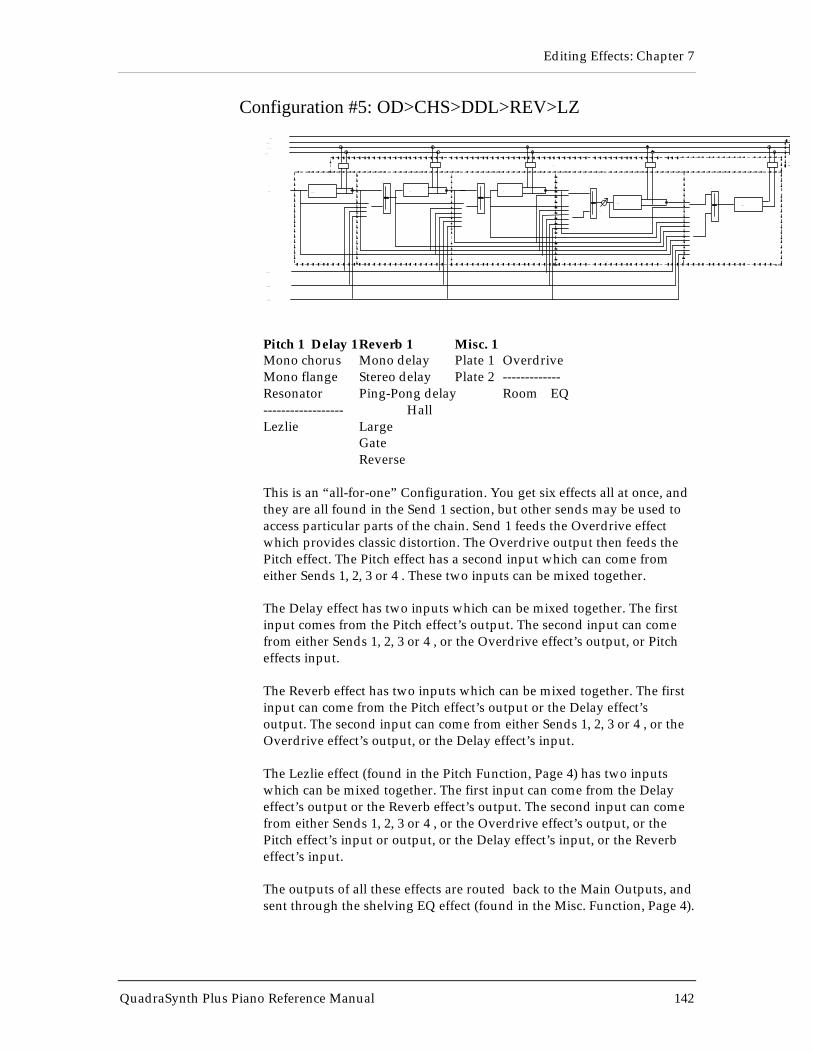
Editing Effects: Chapter 7
QuadraSynth Plus Piano Reference Manual 142
Configuration #5: OD>CHS>DDL>REV>LZAUX LEFT
AUX RIGHT
MAIN LEFT
MAIN RIGHT
1
BAL.
FX SEND 1
MISC. 1
1
PITCH 1 REVERB 1
MIX
OVERDRIVE
FX SEND 2
FX SEND 3
FX SEND 4
PITCH 1
BAL.
1
DELA Y 1
BAL.
1
2
AMP
REVERB 1
1
BAL.
1
2
LEZLIE
DELAY 1
1
PITCH 1
MISC. 1
Pitch 1 Delay 1Reverb 1 Misc. 1Mono chorus Mono delay Plate 1 OverdriveMono flange Stereo delay Plate 2 -------------Resonator Ping-Pong delay Room EQ------------------ HallLezlie Large
GateReverse
This is an “all-for-one” Configuration. You get six effects all at once, andthey are all found in the Send 1 section, but other sends may be used toaccess particular parts of the chain. Send 1 feeds the Overdrive effectwhich provides classic distortion. The Overdrive output then feeds thePitch effect. The Pitch effect has a second input which can come fromeither Sends 1, 2, 3 or 4 . These two inputs can be mixed together.
The Delay effect has two inputs which can be mixed together. The firstinput comes from the Pitch effect’s output. The second input can comefrom either Sends 1, 2, 3 or 4 , or the Overdrive effect’s output, or Pitcheffects input.
The Reverb effect has two inputs which can be mixed together. The firstinput can come from the Pitch effect’s output or the Delay effect’soutput. The second input can come from either Sends 1, 2, 3 or 4 , or theOverdrive effect’s output, or the Delay effect’s input.
The Lezlie effect (found in the Pitch Function, Page 4) has two inputswhich can be mixed together. The first input can come from the Delayeffect’s output or the Reverb effect’s output. The second input can comefrom either Sends 1, 2, 3 or 4 , or the Overdrive effect’s output, or thePitch effect’s input or output, or the Delay effect’s input, or the Reverbeffect’s input.
The outputs of all these effects are routed back to the Main Outputs, andsent through the shelving EQ effect (found in the Misc. Function, Page 4).
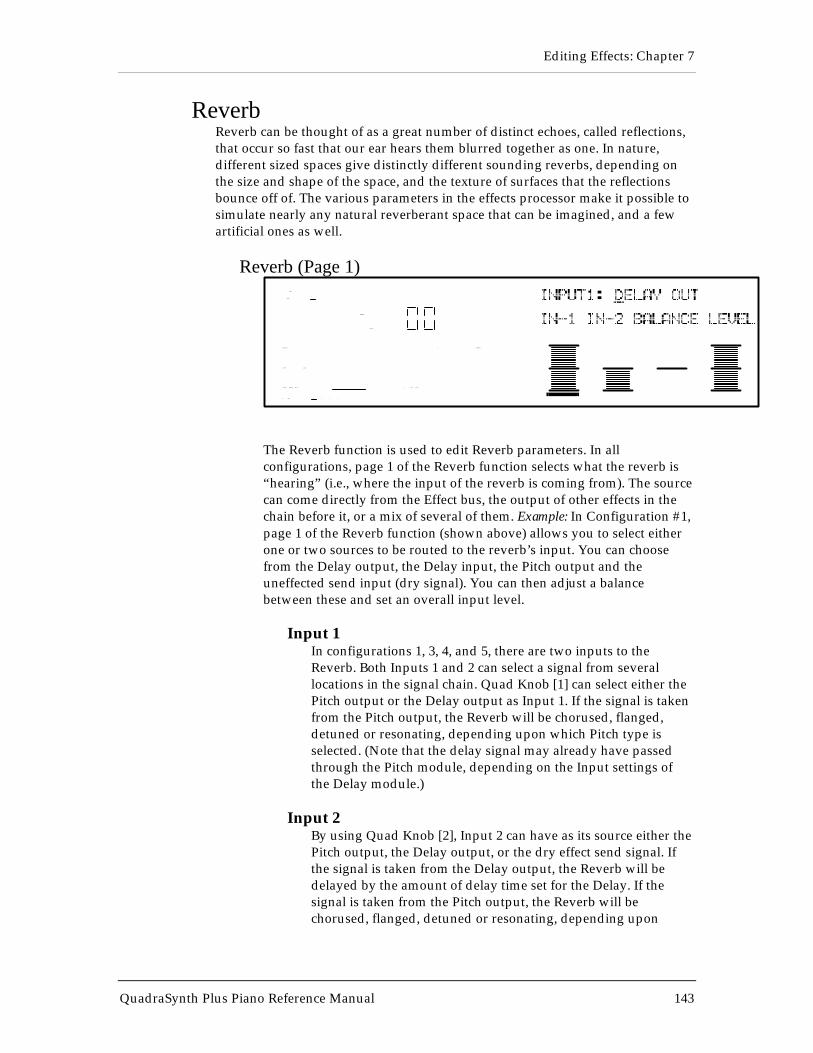
Editing Effects: Chapter 7
QuadraSynth Plus Piano Reference Manual 143
ReverbReverb can be thought of as a great number of distinct echoes, called reflections,that occur so fast that our ear hears them blurred together as one. In nature,different sized spaces give distinctly different sounding reverbs, depending onthe size and shape of the space, and the texture of surfaces that the reflectionsbounce off of. The various parameters in the effects processor make it possible tosimulate nearly any natural reverberant space that can be imagined, and a fewartificial ones as well.
Reverb (Page 1)MIDI
CHAN
P R O GP R O G
1
PRESET
EDITING: 1 EFFECT
PITCH MOD
CONFIG REVERB DELA Y MIX MISC.
P AGE: 1 2 3 4
The Reverb function is used to edit Reverb parameters. In allconfigurations, page 1 of the Reverb function selects what the reverb is“hearing” (i.e., where the input of the reverb is coming from). The sourcecan come directly from the Effect bus, the output of other effects in thechain before it, or a mix of several of them. Example: In Configuration #1,page 1 of the Reverb function (shown above) allows you to select eitherone or two sources to be routed to the reverb’s input. You can choosefrom the Delay output, the Delay input, the Pitch output and theuneffected send input (dry signal). You can then adjust a balancebetween these and set an overall input level.
Input 1In configurations 1, 3, 4, and 5, there are two inputs to theReverb. Both Inputs 1 and 2 can select a signal from severallocations in the signal chain. Quad Knob [1] can select either thePitch output or the Delay output as Input 1. If the signal is takenfrom the Pitch output, the Reverb will be chorused, flanged,detuned or resonating, depending upon which Pitch type isselected. (Note that the delay signal may already have passedthrough the Pitch module, depending on the Input settings ofthe Delay module.)
Input 2By using Quad Knob [2], Input 2 can have as its source either thePitch output, the Delay output, or the dry effect send signal. Ifthe signal is taken from the Delay output, the Reverb will bedelayed by the amount of delay time set for the Delay. If thesignal is taken from the Pitch output, the Reverb will bechorused, flanged, detuned or resonating, depending upon
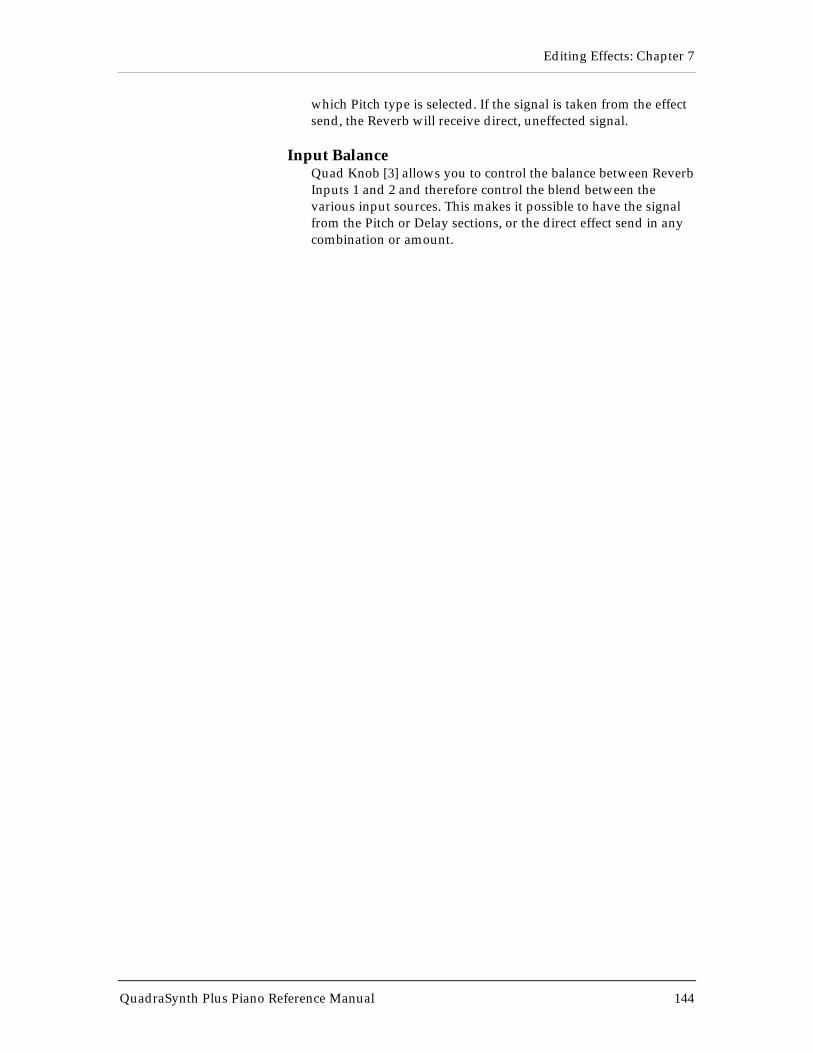
Editing Effects: Chapter 7
QuadraSynth Plus Piano Reference Manual 144
which Pitch type is selected. If the signal is taken from the effectsend, the Reverb will receive direct, uneffected signal.
Input BalanceQuad Knob [3] allows you to control the balance between ReverbInputs 1 and 2 and therefore control the blend between thevarious input sources. This makes it possible to have the signalfrom the Pitch or Delay sections, or the direct effect send in anycombination or amount.
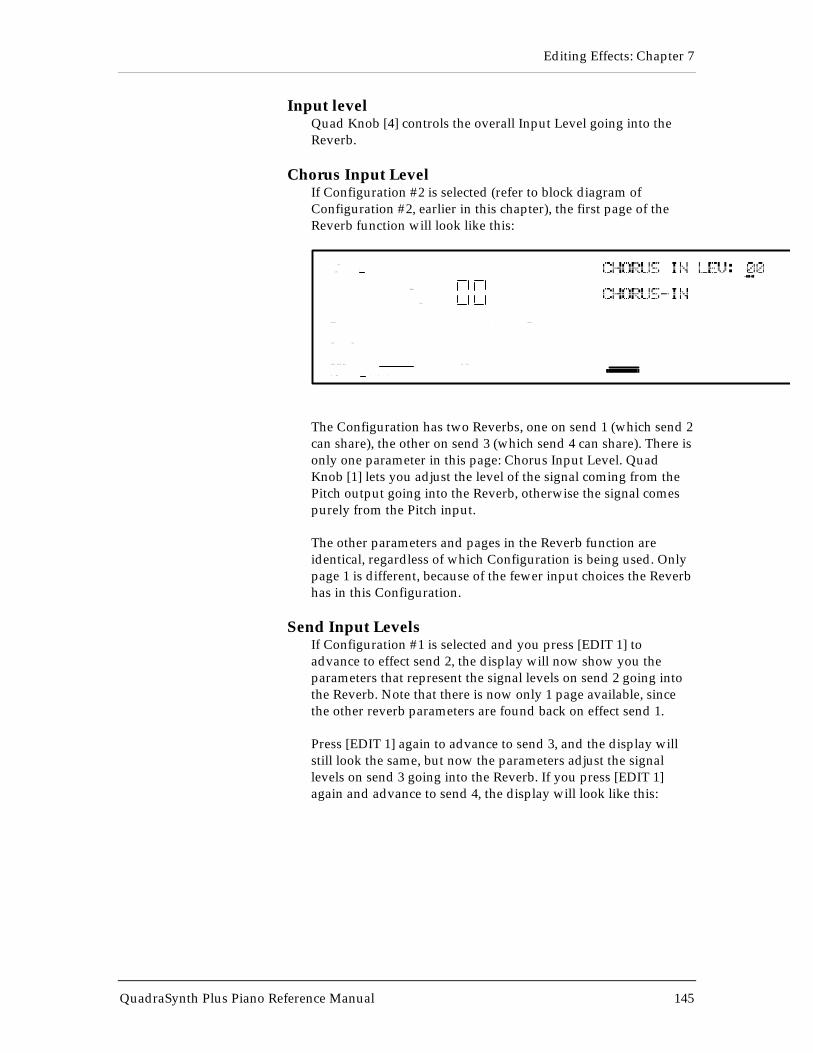
Editing Effects: Chapter 7
QuadraSynth Plus Piano Reference Manual 145
Input levelQuad Knob [4] controls the overall Input Level going into theReverb.
Chorus Input LevelIf Configuration #2 is selected (refer to block diagram ofConfiguration #2, earlier in this chapter), the first page of theReverb function will look like this:
MIDI
CHAN
P R O GP R O G
1
PRESET
EDITING: 1 EFFECT
PITCH MOD
CONFIG REVERB DELA Y MIX MISC.
P AGE: 1 2 3 4
The Configuration has two Reverbs, one on send 1 (which send 2can share), the other on send 3 (which send 4 can share). There isonly one parameter in this page: Chorus Input Level. QuadKnob [1] lets you adjust the level of the signal coming from thePitch output going into the Reverb, otherwise the signal comespurely from the Pitch input.
The other parameters and pages in the Reverb function areidentical, regardless of which Configuration is being used. Onlypage 1 is different, because of the fewer input choices the Reverbhas in this Configuration.
Send Input LevelsIf Configuration #1 is selected and you press [EDIT 1] toadvance to effect send 2, the display will now show you theparameters that represent the signal levels on send 2 going intothe Reverb. Note that there is now only 1 page available, sincethe other reverb parameters are found back on effect send 1.
Press [EDIT 1] again to advance to send 3, and the display willstill look the same, but now the parameters adjust the signallevels on send 3 going into the Reverb. If you press [EDIT 1]again and advance to send 4, the display will look like this:
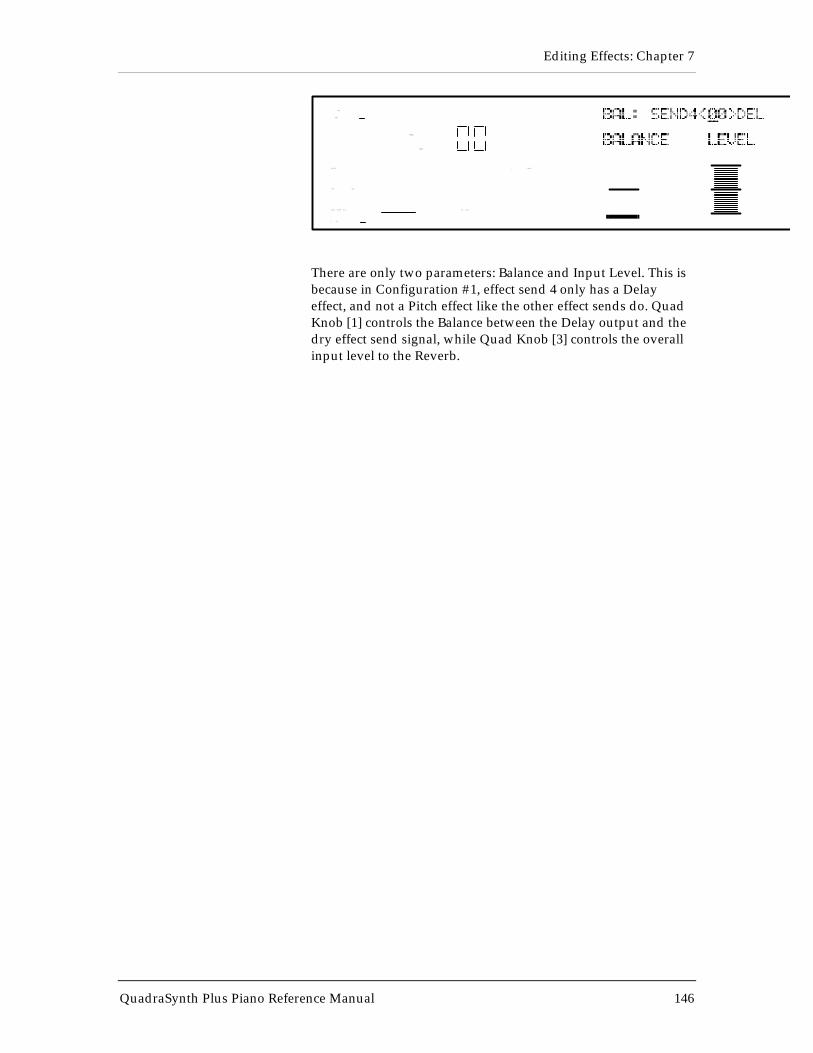
Editing Effects: Chapter 7
QuadraSynth Plus Piano Reference Manual 146
MIDI
CHAN
P R O GP R O G
1
PRESET
EDITING:4
EFFECT
PITCH MOD
CONFIG REVERB DELA Y MIX MISC.
P AGE: 1
There are only two parameters: Balance and Input Level. This isbecause in Configuration #1, effect send 4 only has a Delayeffect, and not a Pitch effect like the other effect sends do. QuadKnob [1] controls the Balance between the Delay output and thedry effect send signal, while Quad Knob [3] controls the overallinput level to the Reverb.
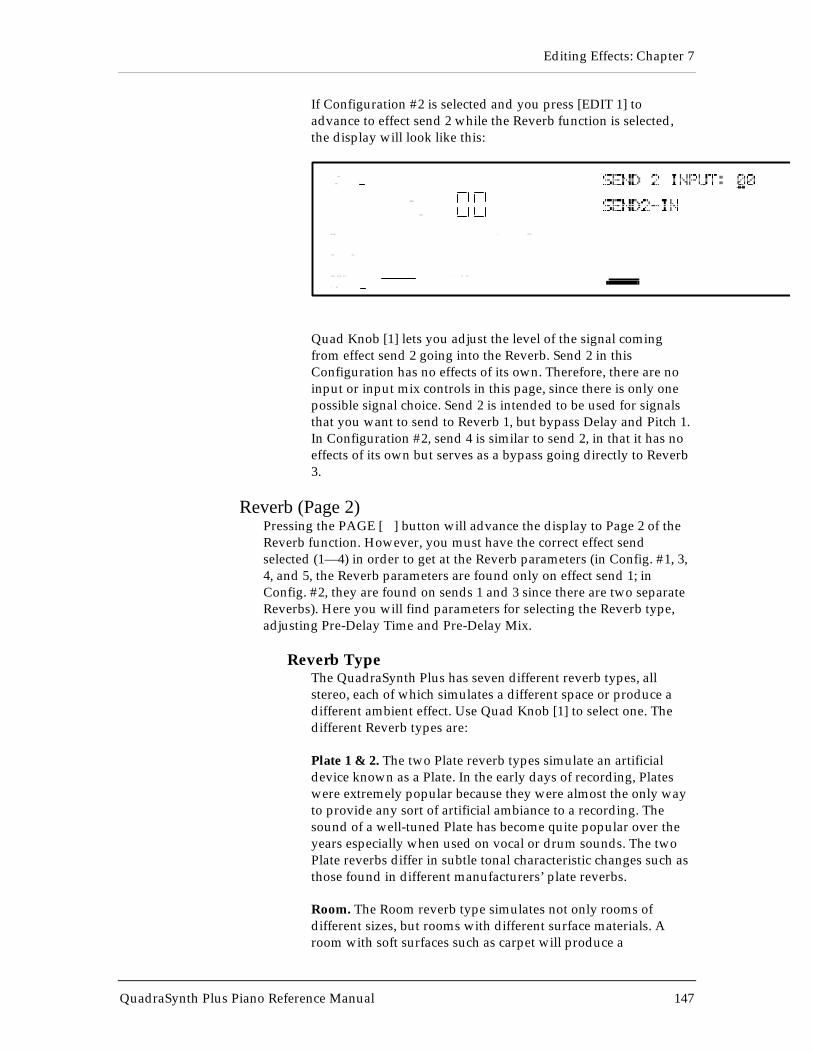
Editing Effects: Chapter 7
QuadraSynth Plus Piano Reference Manual 147
If Configuration #2 is selected and you press [EDIT 1] toadvance to effect send 2 while the Reverb function is selected,the display will look like this:
MIDI
CHAN
P R O GP R O G
1
PRESET
EDITING: 2 EFFECT
PITCH MOD
CONFIG REVERB DELA Y MIX MISC.
P AGE: 1
Quad Knob [1] lets you adjust the level of the signal comingfrom effect send 2 going into the Reverb. Send 2 in thisConfiguration has no effects of its own. Therefore, there are noinput or input mix controls in this page, since there is only onepossible signal choice. Send 2 is intended to be used for signalsthat you want to send to Reverb 1, but bypass Delay and Pitch 1.In Configuration #2, send 4 is similar to send 2, in that it has noeffects of its own but serves as a bypass going directly to Reverb3.
Reverb (Page 2)Pressing the PAGE [∅] button will advance the display to Page 2 of theReverb function. However, you must have the correct effect sendselected (1—4) in order to get at the Reverb parameters (in Config. #1, 3,4, and 5, the Reverb parameters are found only on effect send 1; inConfig. #2, they are found on sends 1 and 3 since there are two separateReverbs). Here you will find parameters for selecting the Reverb type,adjusting Pre-Delay Time and Pre-Delay Mix.
Reverb TypeThe QuadraSynth Plus has seven different reverb types, allstereo, each of which simulates a different space or produce adifferent ambient effect. Use Quad Knob [1] to select one. Thedifferent Reverb types are:
Plate 1 & 2. The two Plate reverb types simulate an artificialdevice known as a Plate. In the early days of recording, Plateswere extremely popular because they were almost the only wayto provide any sort of artificial ambiance to a recording. Thesound of a well-tuned Plate has become quite popular over theyears especially when used on vocal or drum sounds. The twoPlate reverbs differ in subtle tonal characteristic changes such asthose found in different manufacturers’ plate reverbs.
Room. The Room reverb type simulates not only rooms ofdifferent sizes, but rooms with different surface materials. Aroom with soft surfaces such as carpet will produce a

Editing Effects: Chapter 7
QuadraSynth Plus Piano Reference Manual 148
reverberant sound with much less high end (treble) than a roomwith hard surfaces. This reverb type can easily simulate bothexamples and many, many more.
Hall. Much larger than a room, Halls are characterized by theirhigh ceilings, irregular shapes, and generally uniform density ofreflections.
Large. Much larger than a hall, this reverb type emulates largeambient spaces such as amphitheaters, gymnasiums, etc.
Editing Effects: Chapter 7
QuadraSynth Plus Piano Reference Manual 149
Gated. Gated Reverb is a very popular effect on drums firstfound on English records in the early 1980s. This reverb type cansimulate applying a noise gate (a device that automaticallydecreases the volume once the signal falls below a certain level)across the output of the reverb thereby causing the initial attackof the reverb to sound very big, but the tail of the reverb to becut off very quickly. Although this effect is not found in nature,it works great for modern drums, percussion, and any quicklyrepeated, transient source.
Reverse. The Reverse Reverb type is an inverted reverb in whichthe volume envelope is reversed. This means that the signalbegins softly but grows louder until it is cut off, rather than loudto soft as normal.
Pre-Delay TimePre-Delay is the slight delaying of the Reverb itself so that thedry signal more easily stands out from the Reverb. A bit of Pre-Delay can sometimes make certain instruments (such as snaredrums) sound bigger. Use Quad Knob [2] to adjust the Pre-DelayTime in 10ms intervals, and/or use Quad Knob [3] to adjust thePre-Delay Time in 1ms intervals. This Pre-Delay is part of theReverb itself; don’t confuse it with the separate Delay modulesavailable under the Delay function.
Pre-Delay MixQuad Knob [4] allows you to mix the amount of Pre-Delay intothe Reverb signal path. This gives you the ability to hear a bit ofthe Reverb before the loudest part of the Reverb (the Pre-Delayed Reverb) sounds. This makes for bigger and smoothersounding Reverb settings.
Reverb (Page 3)Input Filter
This is a low-pass filter which comes before the Reverb input.Use Quad Knob [1] to adjust the filter frequency. Lower theInput Filter to remove high frequencies from the input signalbefore they go into the Reverb.
DecayThe Reverb Decay determines how long the Reverb will soundbefore it dies away. When using the Reverse Reverb type,Reverb Decay controls the Reverse Time.
Low Decay and High DecayThese two parameters allow the Decay Time to be set separatelyfor both the low and high frequencies of the Reverb. This meansthat you have control over the tonal shape of the Reverb itself,being able to make the high frequencies die faster if the effect istoo bright, and being able to make the lows die faster if the effectis too boomy. This allows you to simulate different surfaces of a
Editing Effects: Chapter 7
QuadraSynth Plus Piano Reference Manual 150
room or hall, with softer surfaces absorbing more highfrequencies and smaller rooms having faster low frequencydecay.
If the selected Reverb type is Gate, the Low Decay parameter isunavailable.
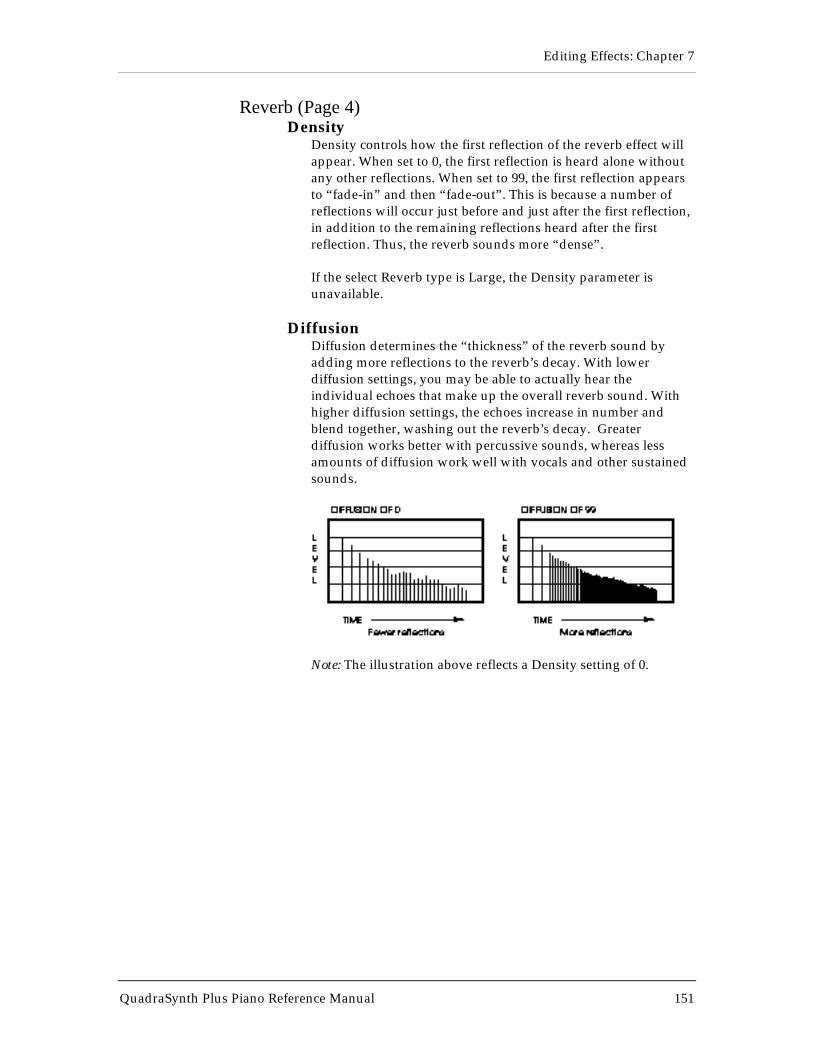
Editing Effects: Chapter 7
QuadraSynth Plus Piano Reference Manual 151
Reverb (Page 4)Density
Density controls how the first reflection of the reverb effect willappear. When set to 0, the first reflection is heard alone withoutany other reflections. When set to 99, the first reflection appearsto “fade-in” and then “fade-out”. This is because a number ofreflections will occur just before and just after the first reflection,in addition to the remaining reflections heard after the firstreflection. Thus, the reverb sounds more “dense”.
If the select Reverb type is Large, the Density parameter isunavailable.
DiffusionDiffusion determines the “thickness” of the reverb sound byadding more reflections to the reverb’s decay. With lowerdiffusion settings, you may be able to actually hear theindividual echoes that make up the overall reverb sound. Withhigher diffusion settings, the echoes increase in number andblend together, washing out the reverb’s decay. Greaterdiffusion works better with percussive sounds, whereas lessamounts of diffusion work well with vocals and other sustainedsounds.
Note: The illustration above reflects a Density setting of 0.
Editing Effects: Chapter 7
QuadraSynth Plus Piano Reference Manual 152
DelayThe Delay function is used to edit Delay parameters.
Delay (Page 1)The QuadraSynth Plus’s effects processor has three different Delay typesavailable.
Note: Some delay modules only feature a mono Delay, and therefore theDelay Type parameter will be unavailable. Instead the parametersnormally found on page 2 of the Delay function are shown in page 1, andthere are no other pages (please refer to next section for a description ofthose parameters).
Delay TypePing-Pong. This is called a “Ping Pong Delay’ because theoutput bounces from side to side (left to right) in stereo with thespeed determined by the delay time. The maximum delay time is399 milliseconds.
Stereo Delay. The Stereo Delay is actually two separate delays,which can be individually varied. The maximum delay time foreach delay is 399 ms.
Mono. The Mono Delay has the advantage of twice the availabledelay time, or 799 ms in Configuration #1, 1199 ms inConfiguration #2.
Delay (Pages 2 and 3)In Page 2 of the Delay Function you will find the remaining parametersfor the Delay function. If the Stereo Delay type is selected, you can pressPAGE [∅] again to advance to Page 3. This is because the Stereo Delaytype has parameters for both the Left and Right channels.
InputQuad Knob [1] is used to balance the Delay Input between thesignal coming from the Pitch effect output (if applicable) and thedry effect send.
Time/Left Time/Right TimeThis is the actual Delay time, which determines the amount oftime the input signal will be delayed. Use Quad Knob [2] toadjust the delay time in 10 ms intervals; use Quad Knob [3] toadjust the delay time in 1 ms intervals.
Feedback/Left Feedback/Right FeedbackQuad Knob [4] is used to adjust the Delay Feedback, which is aportion of the delay signal output being “fed back” into theinput. This results in the delay repeating itself. The morefeedback, the more repeats.
Editing Effects: Chapter 7
QuadraSynth Plus Piano Reference Manual 153
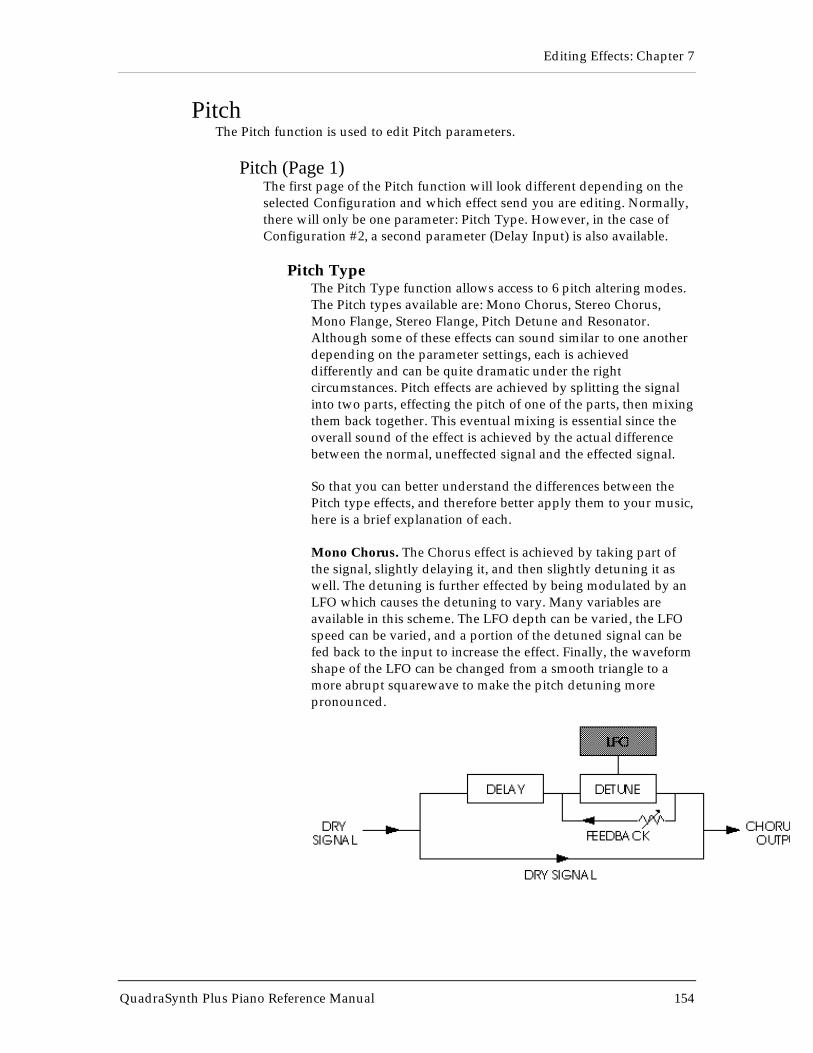
Editing Effects: Chapter 7
QuadraSynth Plus Piano Reference Manual 154
PitchThe Pitch function is used to edit Pitch parameters.
Pitch (Page 1)The first page of the Pitch function will look different depending on theselected Configuration and which effect send you are editing. Normally,there will only be one parameter: Pitch Type. However, in the case ofConfiguration #2, a second parameter (Delay Input) is also available.
Pitch TypeThe Pitch Type function allows access to 6 pitch altering modes.The Pitch types available are: Mono Chorus, Stereo Chorus,Mono Flange, Stereo Flange, Pitch Detune and Resonator.Although some of these effects can sound similar to one anotherdepending on the parameter settings, each is achieveddifferently and can be quite dramatic under the rightcircumstances. Pitch effects are achieved by splitting the signalinto two parts, effecting the pitch of one of the parts, then mixingthem back together. This eventual mixing is essential since theoverall sound of the effect is achieved by the actual differencebetween the normal, uneffected signal and the effected signal.
So that you can better understand the differences between thePitch type effects, and therefore better apply them to your music,here is a brief explanation of each.
Mono Chorus. The Chorus effect is achieved by taking part ofthe signal, slightly delaying it, and then slightly detuning it aswell. The detuning is further effected by being modulated by anLFO which causes the detuning to vary. Many variables areavailable in this scheme. The LFO depth can be varied, the LFOspeed can be varied, and a portion of the detuned signal can befed back to the input to increase the effect. Finally, the waveformshape of the LFO can be changed from a smooth triangle to amore abrupt squarewave to make the pitch detuning morepronounced.
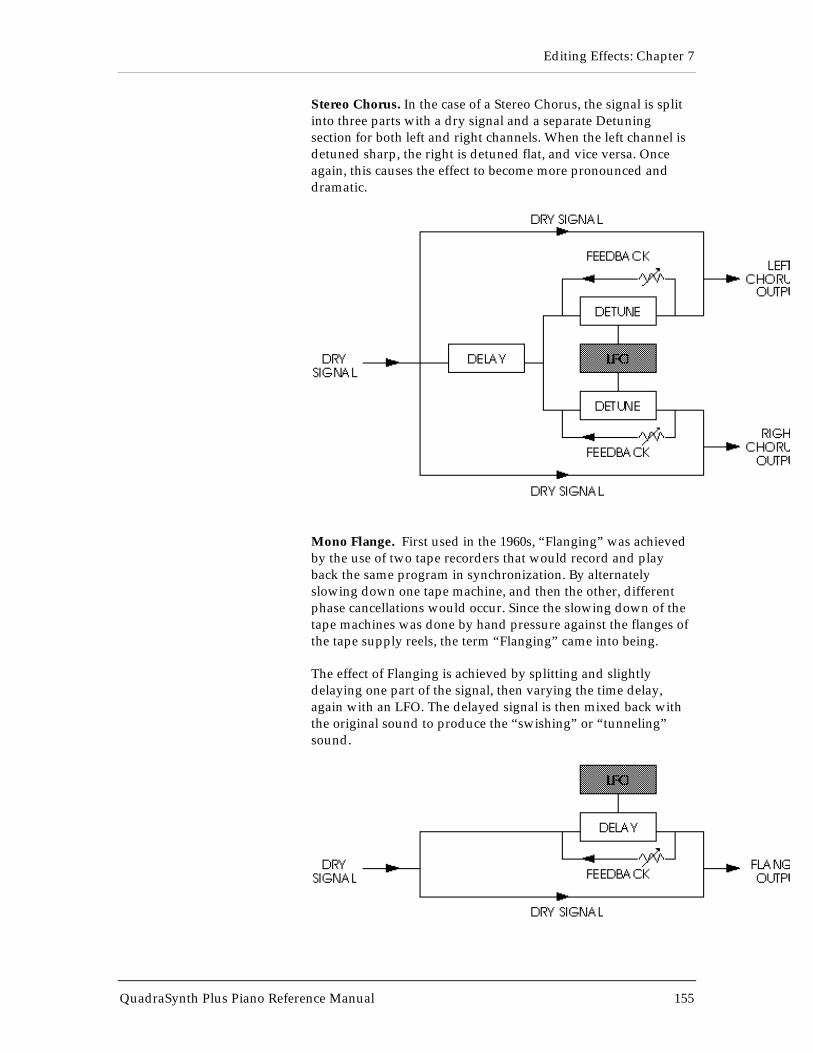
Editing Effects: Chapter 7
QuadraSynth Plus Piano Reference Manual 155
Stereo Chorus. In the case of a Stereo Chorus, the signal is splitinto three parts with a dry signal and a separate Detuningsection for both left and right channels. When the left channel isdetuned sharp, the right is detuned flat, and vice versa. Onceagain, this causes the effect to become more pronounced anddramatic.
Mono Flange. First used in the 1960s, “Flanging” was achievedby the use of two tape recorders that would record and playback the same program in synchronization. By alternatelyslowing down one tape machine, and then the other, differentphase cancellations would occur. Since the slowing down of thetape machines was done by hand pressure against the flanges ofthe tape supply reels, the term “Flanging” came into being.
The effect of Flanging is achieved by splitting and slightlydelaying one part of the signal, then varying the time delay,again with an LFO. The delayed signal is then mixed back withthe original sound to produce the “swishing” or “tunneling”sound.
Editing Effects: Chapter 7
QuadraSynth Plus Piano Reference Manual 156
Many variables are available, from varying the speed and depthof the LFO to feeding back part of the signal to make the effectstronger. The Flanger’s waveform shape can be either “Normal”or “Inverted”. Use the “Inverted” setting for a more dramaticflange effect.
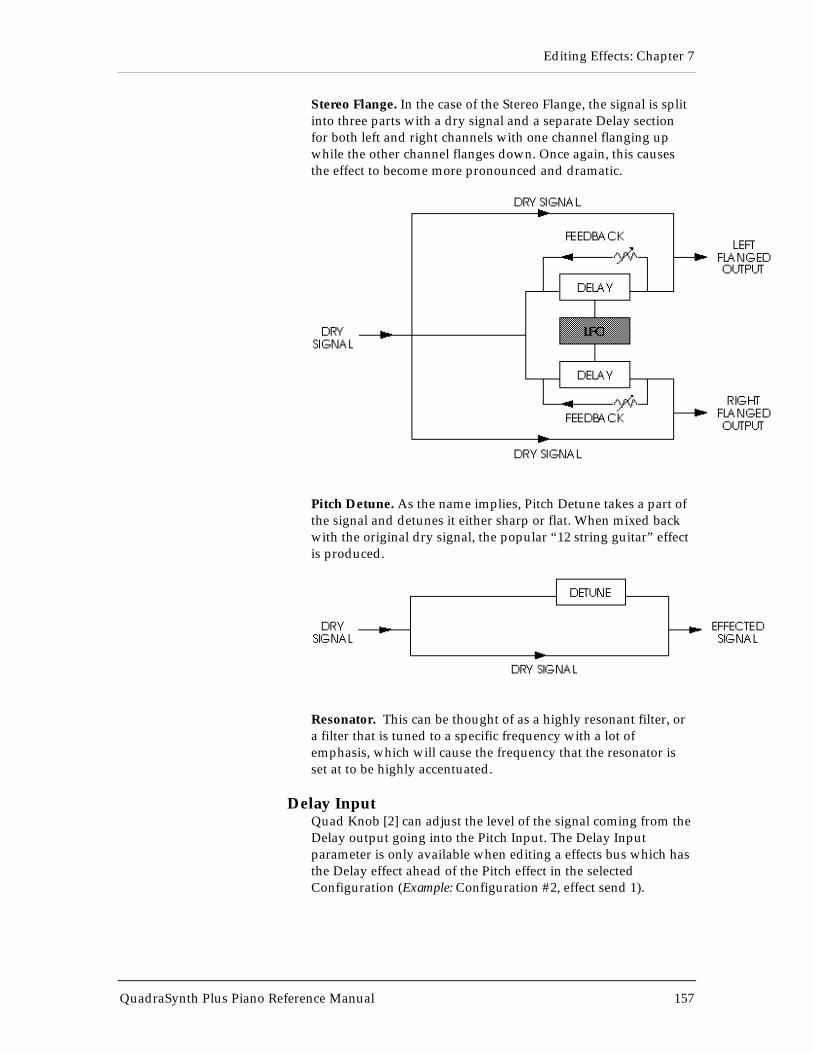
Editing Effects: Chapter 7
QuadraSynth Plus Piano Reference Manual 157
Stereo Flange. In the case of the Stereo Flange, the signal is splitinto three parts with a dry signal and a separate Delay sectionfor both left and right channels with one channel flanging upwhile the other channel flanges down. Once again, this causesthe effect to become more pronounced and dramatic.
Pitch Detune. As the name implies, Pitch Detune takes a part ofthe signal and detunes it either sharp or flat. When mixed backwith the original dry signal, the popular “12 string guitar” effectis produced.
Resonator. This can be thought of as a highly resonant filter, ora filter that is tuned to a specific frequency with a lot ofemphasis, which will cause the frequency that the resonator isset at to be highly accentuated.
Delay InputQuad Knob [2] can adjust the level of the signal coming from theDelay output going into the Pitch Input. The Delay Inputparameter is only available when editing a effects bus which hasthe Delay effect ahead of the Pitch effect in the selectedConfiguration (Example: Configuration #2, effect send 1).
Editing Effects: Chapter 7
QuadraSynth Plus Piano Reference Manual 158
Pitch (Page 2)If the Pitch type is Mono Chorus, Stereo Chorus, Mono Flange or StereoFlange, page 2 of the Pitch function contain the following fourparameters:
Waveform ShapeQuad Knob [1] determines the LFO’s waveform shape. Thisparameter only appears when the Mono or Stereo Chorus orFlange are selected. The Waveform Shape of the LFO can bechanged from a sine waveform, which provides a smoother,more even sound, to a square or triangle waveform, whichmakes the Chorus or flange effect more pronounced.
SpeedQuad Knob [2] is used to adjust the LFO Speed of all Pitch types,with the exception of Pitch Detune and Resonator.
DepthQuad Knob [3] is used to adjust the LFO Depth of all Pitch types,with the exception of Pitch Detune and Resonator. The LFODepth, which is the amount of pitch alteration, can be adjustedto produce the desired effect.
FeedbackQuad Knob [4] is used to adjust the LFO Feedback of all Pitchtypes, with the exception of Pitch Detune and Resonator. Aportion of the output of the Pitch section can be “fed back” intothe input in order to make the effect more tonal or pronounced.
DetuneIf the Pitch type is Pitch Detune, page 2 will have only thisparameter. Use Quad Knob [1] to adjust the tuning of the PitchDetune effect.
Resonator Tuning and DecayIf the Pitch type is Resonator, page 2 of the Pitch function willhave two parameters. Use Quad Knob [1] to adjust the Resonatortuning, and Quad Knob [3] to adjust the Resonator Decay.
Editing Effects: Chapter 7
QuadraSynth Plus Piano Reference Manual 159
ModThe Mod Function lets you control various effects parameters from the variouscontrols on the QuadraSynth Plus (keyboard, after-touch, pitch-bender, etc.) orfrom the MIDI input. This is extremely useful when dynamic or real-time controlis required in a live playing situation. It is possible to control up to 2 parameterssimultaneously. The Modulation assignments are saved with the Effects Patch.
Don’t confuse this Mod Function with the Mod Function used by the Programs;they are independent destinations, though they can come from the same source.
Note: Modulating any effect parameter (with the exception of chorus speed)while audio is passing through it can result in audio artifacts or noises due todiscontinuities in the modulation source.
Selecting the ModulatorThe are two Modulators. You can select between these by using thePAGE [♦] and [∅] buttons. Page 1 displays the parameters of Modulator#1, while page 2 displays the parameters for Modulator #2.
Mod SourceThe Mod Source parameter selects the MIDI controller which willremotely cause a change (modulate) in one or two of the parameters inthe effects processor. Nearly every MIDI controller can become a ModSource (using controllers A-D, set in Global mode, page 3), with the mostcommon controllers appearing as a direct option in the display. QuadKnob [1] selects the Mod Source. The options for the Mod Source are:
• Aftertouch • Mod Wheel • Pitch Wheel• MIDI Volume
• Sustain Pedal • Pedal 1 • Pedal 2 •Controller A—D
Mod DestinationThe Mod Destination is the parameter that will be controlled by theselected Mod Source. Quad Knob [2] selects the Mod Destination. Thepossible Destination parameters are:
• Pitch Speed • Pitch Depth • Pitch Level• Pitch Balance • Delay Time • Delay Feedback• Delay Level • Reverb Balance • Reverb Input• Reverb Decay • Reverb Low Decay • ReverbHigh Decay• Reverb Diffusion • Reverb Level
If the selected Configuration has a particular effect on more than oneeffect send (for example, Config. #1 has a delay on each send), then someMod Destination parameters will be listed more than once. For example,the Delay Time parameter will appear four times (“D1 Time,” “D2Time,” “D3 Time,” and “D4 Time”). In the case of Pitch, where you canchoose from various pitch effects, different parameters are available

Editing Effects: Chapter 7
QuadraSynth Plus Piano Reference Manual 160
depending on the effect chosen. However, the Mod Destinations retaintheir names. Example: If the Resonator is the Pitch effect, the Pitch SpeedModulation Destination controls the first parameter in the Resonator(Tuning).
Mod LevelThe Mod level is the amount that the Destination parameter will beaffected by the Mod Source. Use Quad Knob [3] to affect the Destinationparameter by a positive or negative amount. Example: If the ReverbDecay was selected as the Destination with the mod wheel as the Source,the mod wheel could be programmed to cause the Reverb to increase thedecay (positive) or decrease the decay (negative).
MixNot to be confused with an actual Mix or Mix mode, the Effect’s Mix function iswhere you can mix the various signal levels of all the effects to the Main Left andRight outputs of the QuadraSynth Plus. Only effect modules that have access tothe Main outputs will appear on the Mix page. There is a separate Mix page foreach of the four effect busses whose effect modules feed the main output. Notethat the Mix page doesn't control how much the individual effect modules feedto each other; only how much they feed to the Main outputs.
MIDI
CHAN
P R O GP R O G
1
PRESET
EDITING: 1 EFFECT
PITCH MOD
CONFIG REVERB DELA Y MIX MISC.
P AGE: 1
DELAY OUTPUT: 50
DELAY PITCH REVERB
Depending on the selected Configuration, the order of the effects will differ (forexample: in Configuration #1, the order reads Pitch, Delay, Reverb; but inConfiguration #2, the order is Delay, Pitch, Reverb).
Pitch LevelAdjusting this value will cause the Pitch Output Level to increase ordecrease. The Pitch Output level is the level for the Pitch Section of theQuadraSynth Plus’s effects processor to the Main outputs, and should beset as desired. Even if this parameter is set to 00, the output of the Pitchsection is still available (depending on the bus and configuration) tofollowing Delay and Reverb sections.
Delay LevelAdjusting this value will cause the Delay Output Level to increase ordecrease. The Delay Output level is the level for the Delay Section of theQuadraSynth Plus’s effects processor to the Main outputs, and should beset as desired. Even if this parameter is set to 00, the output of the Delay
Editing Effects: Chapter 7
QuadraSynth Plus Piano Reference Manual 161
section is still available (depending on the bus and configuration) tofollowing Pitch and Reverb sections.
Reverb LevelAdjusting this value will cause the Reverb Output Level to increase ordecrease. The Reverb Output level is the level for the Reverb Section ofthe QuadraSynth Plus’s effects processor to the main outputs, andshould be set as desired.
Misc.This Misc. Function is only available when using Configuration #s 4 or 5. InConfiguration 4, the Misc. Function is where the EQ parameters are found. InConfiguration #5, the Misc. function houses both the Overdrive parameters andthe EQ parameters (the EQ is found on Page 3). In all cases, the Misc. Functioncan be selected and its parameters edited regardless of which Effects Send (1–4)is selected.
EQThe shelving EQ is only available in Configuration #s 4 and 5. Itprovides bass and treble boost, and affects the entire Main Output (notjust the Effects Sends). Four EQ parameters are included: low frequency(range: 30Hz to 180Hz), low frequency boost (0dB to 12dB), highfrequency (3kHz to 10kHz), high frequency boost (0dB to 9dB).
Lo EQ FrequencyThis allows you to adjust the cutoff frequency of the Lo EQ. Itcan be set between 30Hz and180HZ. If the Lo EQ Gainparameter is set above 0dB, all frequencies below and includingthe one selected by the Lo EQ Frequency parameter will beaffected.
Lo EQ GainThis controls how much boost will be applied to frequenciesbelow and including the one selected by the Lo EQ Frequency. Itcan be set between 0dB and +12dB.
Hi EQ FrequencyThis allows you to adjust the cutoff frequency of the Hi EQ. Itcan be set between 3kHz and 10kHz. If the Hi EQ Gainparameter is set above 0dB, all frequencies above and includingthe one selected by the Hi EQ Frequency parameter will beaffected.
Hi EQ GainThis controls how much boost will be applied to frequenciesabove and including the one selected by the Hi EQ Frequency. Itcan be set between 0dB and +9dB.
Overdrive
Editing Effects: Chapter 7
QuadraSynth Plus Piano Reference Manual 162
The Overdrive effect provides four parameters spread across two editingpages. It is only used in Configuration #5.
Overdrive TypeThis selects one of two Overdrive Types: Soft and Hard. The SoftOverdrive has less gain and provides slightly less distortion thanthe Hard Overdrive. Also, there will still be a slight bit ofdistortion when using the Soft setting, if the signal feeding theOverdrive effect is below the Overdrive Threshold setting (seebelow). The Hard setting will only provide distortion when thesignal feeding the Overdrive effect is above the OverdriveThreshold setting.
Editing Effects: Chapter 7
QuadraSynth Plus Piano Reference Manual 163
Overdrive ThresholdThis sets the level the signal feeding the Overdrive effect must bereach before the Overdrive effect will begin distorting. It can beset between 00 and 99. If this number is very low, the Overdriveeffect will start to distort almost right away. When set to a highnumber, the distortion will not occur until the signal feeding theoverdrive becomes louder than the Threshold setting.
Overdrive BrightnessThis sets the tone of the Overdrive effect. It can be set between 00and 99. Higher numbers result in a brighter sounding overdrive.Lower numbers result in a duller distortion sound.
Overdrive BalanceThis controls the output mix of the Overdrive effect. It can be setanywhere from “CLEAN<99” to “CLEAN<00>OVRD” to“99>OVRD”. When set to “CLEAN<99”, the Overdrive effectcannot be heard at all. When set to “CLEAN<00>OVRD”, youhave an even mix between the original, uneffected signal and theoverdriven signal. When set to “99>OVRD”. only the overdriveneffect is heard.
Note:: The CLIP indictator is disabled when configuration 5 isselected.

Editing Effects: Chapter 7
QuadraSynth Plus Piano Reference Manual 164
Global Settings: Chapter 8
QuadraSynth Plus Piano Reference Manual 165
CHAPTER 8
GLOBAL SETTINGSGlobal Edit Mode is where you will find several parameters which affect the entireinstrument, such as overall master tuning, display contrast, controller settings, keyboardmode, edit mode and the 48 kHz input.
Editing Global Parameters¿ Press the [GLOBAL] button.The display will change to Global Edit Mode, page 1 . The total number of pages (seven)is indicated in the lower left corner of the display. The currently selected page numberwill be underlined.
¡ There are four parameters available for editing in Global Edit Page 1:
• Quad Knob [1] controls the display contrast.• Quad Knob [2] enables General MIDI Mode and recalls Mix 00 of PresetBank 4.• Quad Knob [3] controls the transposition, or pitch, of the keyboard.• Quad Knob [4] controls the instrument’s overall master tuning.
¬ Use the PAGE [♦] and [∅] buttons to scroll through the 7 pages ofGlobal Mode.
The following sections describe in detail each of the parameters found in theseven Global Edit Mode pages.
LCD ContrastIn Page 1 of Global Edit Mode, Quad Knob [1] adjusts the LCD Display Contrast(00 to 121). Whenever the [GLOBAL] button is pressed, the display will alwaysrevert to Page 1 with the Display Contrast parameter selected. This is so that ifthe display contrast is set too high or too low and is unreadable, you can easilyadjust it even if you can’t see what you’re doing.
General MIDI ModeIn Page 1 of Global Edit Mode, selecting Quad Button [2] and pressing VALUE[] enables General MIDI Mode. This will immediately take you out of GlobalEdit Mode and into Mix Mode, automatically selecting Mix 00 of Preset Bank 4.For more information about General MIDI, refer to the MIDI Supplement inAppendix B.
Enabling General MIDI Mode via MIDIThe QuadraSynth will respond to a universal MIDI Sysex message toturn General MIDI mode on or off. Some (but not all) General MIDIsequences will have a Sysex message at the beginning (bar 1) which tellsthe receiving device to go into its General MIDI mode. If this message issent, no matter where you happen to be on the QuadraSynth, General
Global Settings: Chapter 8
QuadraSynth Plus Piano Reference Manual 166
MIDI mode will be enabled, and Mix 00 of Preset Bank 4 willautomatically be selected.
Master Pitch and Master TuningIn Page 1 of Global Edit Mode, Quad Knob [3] adjusts the QuadraSynth Plus’soverall pitch (-12 to +12/up or down an octave). Adjust this parameter when youwish to globally transpose all sounds. Quad Knob [4] adjusts the QuadraSynthPlus’s overall Master Tuning (-99 to +99/up or down 1/2 step). Adjust thisparameter when tuning the QuadraSynth Plus to other instruments. Theseparameters have no effect on drum sounds, the Range settings, or MIDI Out.
Keyboard SensitivityIn Page 2 of Global Edit mode, Quad Knob [1] adjusts how sensitive thekeyboard’s velocity will be (00 to 99). When set to 0, the keyboard will nottransmit any velocity, no matter how hard or soft the keys are played; all noteswill be treated as having a velocity of 64 (right in the middle). When set to 99, thekeyboard will have maximum sensitivity, allowing the greatest differencebetween soft and loud notes in terms of velocity control. Adjust this value tocreate the ideal sensitivity for your playing style. By lowering this value from 99,you limit how loud and soft notes may be played.
Keyboard CurveIn Page 2 of Global Edit mode, Quad Knob [2] selects the Keyboard VelocityCurve. There are three options: Weighted, Plastic and Maximum. When set toweighted, the keyboard will have the velocity response of a weighted keyboard.This means you will really have to play hard to get the loudest notes. When set toplastic, the keyboard will have the velocity response of a typical plastickeyboard. Plastic is not as sensitive as Weighted, therefore playing soft will notresult in the same soft notes as Weighted mode produces. When set toMaximum, no velocity response is available, and all notes are given a maximumvelocity value of 127. This parameter only affects the keyboard’s output to thesounds in the QuadraSynth Plus and MIDI Out. This is different from theVelocity Curve parameter in Program Edit, which determines how a sound willrespond to incoming velocity information, either from the keyboard or fromMIDI In.
Keyboard TransposeIn Page 2 of Global Edit mode, Quad Knob [3] controls Keyboard Transposition(-12 to +12/up or down 1 octave). This determines the note number that thekeyboard will transmit to the QuadraSynth Plus’s sounds and to MIDI Out. Ifyou are using a MIDI sequencer, use this function when you wish to record notesoutside of the keyboard’s normal note range (note numbers 28 – 103). When setto -12, the keyboard range is note numbers 16 – 91. Likewise, if set to +12, therange would be 40 – 115.
Keyboard Mode
Global Settings: Chapter 8
QuadraSynth Plus Piano Reference Manual 167
In Page 2 of Global Edit mode, Quad Knob [4] selects the Keyboard Mode(NORMAL, CH SOLO, OUT 1 – OUT 16). This determines how the keyboard willfunction. When in Mix Mode, you have the option to transmit on several MIDIchannels at once, or to temporarily isolate certain channels within a Mix.
NORMAL. In Program Mode, the keyboard will transmit on the selected MIDIchannel. In Mix Mode, the MIDI channels the keyboard transmits on willcorrespond to whatever layers or splits the Mix is set up for. Note that certaincontrollers such as pitch bend and aftertouch may transmit on a different set ofchannels, since they are enabled or disabled independently for each channel ofthe Mix The MIDI Monitor indicators in the display will show which channelsare active.
CH SOLO. In Program Mode, this is the same as the NORMAL setting. In MixMode, the only sounds coming from the QuadraSynth Plus, and the only MIDImessages, will come from the layer or range of the underlined MIDI channel inthe display. This allows you to isolate individual channels in a Mix. So, if youplay in a range of the keyboard that is active on MIDI CH 1, and 1 is underlined,you'll hear it. All other ranges or layers will not respond to the keyboard (theywill respond to incoming MIDI messages on their respective channels). Use theMIDI [♦] and [∅] buttons to hear each channel in turn.
OUT 1 – OUT 16. In both Program Mode and Mix Mode, the keyboard willtransmit on a specific MIDI channel (determined by the number setting of thisparameter), but it will not play the internal sound(s). Use this mode if you'reusing a MIDI sequencer with an “Echo” feature (also known as “MIDI Thru”);the sound will be activated by messages appearing at the MIDI IN connectorafter it’s made the “round trip” through the sequencer. This is the QuadraSynthPlus’s equivalent to LOCAL OFF.
Controllers A – D AssignmentThe QuadraSynth Plus allows you to assign up to four general purpose MIDIcontrollers. These MIDI controllers are assigned a letter, A–D. In Page 3 of GlobalEdit mode, you can choose which MIDI controllers (0 to 120) to assign asControllers A, B, C and D. For a listing of all MIDI controllers and theirdesignations, see page 123 in the MIDI Supplement towards the end of thismanual.
Reset Controllers A – DFound on Global Edit Page 4, the “A–D Reset” function (On/Off) determineswhether the values for Controllers A–D will be reset to zero when a newProgram or Mix is recalled. Use Quad Knob [2] to turn this on or off. Thisparameter works along with the A-D Mode parameter (described below) tochoose how the keyboard is being used as a controller. If the A-D Controllers arebeing used to modulate the volume, etc., of external MIDI sound modules, youwill probably want the A-D Reset parameter turned “OFF” so that the modules’volumes will not be reset to zero every time a new Mix or Program is selected. Ifyou are using the A-D Controllers only for modulating parameters in theQuadraSynth Plus, you will probably want this parameter turned “ON” so thatnew Programs or Mixes are recalled with their stored settings.
Global Settings: Chapter 8
QuadraSynth Plus Piano Reference Manual 168
Example: If you adjusted Controller A (using Quad Knob [1]) to, say, a value of 25and then you recalled a different Program, the value of Controller A wouldremain at 25 if the “A–D Reset” function was turned off. Alternatively, theController A value would reset to 0 if this function was turned on.
Controllers A – D ModeThe “A–D Mode” function (Local, MIDI, or Both) determines whether theControllers A–D will have an affect on the currently selected Program or Mix, orwill only send out controller data via the MIDI Out connector, or do both. UseQuad Knob [4] to turn this on or off.
Global Settings: Chapter 8
QuadraSynth Plus Piano Reference Manual 169
Remember, whenever one of the Controllers A–D is used in the currentlyselected Program, a pair of arrows will appear on either side of that Controllersname in the display while in either Program Play Mode or Mix Play Mode. Thisindicates that turning that Controller’s associated Quad Knob will have someaffect on the Program or Mix. If the “A–D Mode” function is set to MIDI, turningthe Quad Knobs will have no affect on the currently selected Program or Mix;however, this will cause controller data to be sent out the MIDI Out connector.
Example: If Controller A is defined as MIDI controller #11 (which is the default),and the “A–D Mode” is set to MIDI, turning Quad Knob [1] will send outcontroller 11 data but will have no effect on the currently selected Program orMix (even if arrows appear on either side of the letter “A” in the display).Although the Program or Mix may use Controller A to modify it in some way,Controller A is temporarily “disconnected” from the Program or Mix until the“A–D Mode” function is set to Local or Both.
Pedal 1 and 2 AssignmentLike the MIDI Controllers A—D, the two footpedal controls (Pedal 1 and Pedal 2)can be assigned to a MIDI controller. In Page 5 of Global Edit mode, you canassign which MIDI controllers (0 to 120) that Pedal 1 and Pedal 2 will betransmitted as over MIDI Out. Simultaneously, if the same MIDI controller isreceived it will control any modulations that use either Pedal 1 or Pedal 2. QuadKnob [1] selects the controller for Pedal 1, while Quad Knob [3] selects thecontroller for Pedal 2.
JWhen recording into a MIDI sequencer, be careful not to accidentally assign either Pedal1 or Pedal 2 to a controller which may already be used by another control (like MIDIVolume/controller 7, or Mod Wheel/controller 1).
Using Pedals to Control Volume or ModulationIf either Pedal 1 or Pedal 2 is assigned to Controller 7 (Global Edit Mode,Page 4), then they will automatically control the volume of:
• any Sounds in a Program, and;
• in Mix Mode, any Sounds that are controlled by the Keyboard(Mix Edit Mode, Range, Page 2) and have Pedals turned on (Mix EditMode, Range, Page 3).
Likewise, if either Pedal is assigned to Controller 1, then they willautomatically function like the Modulation Wheel for any Sound inProgram Play Mode, and in Mix Play Mode, Sounds that are controlledby the Keyboard and have Pedals turned on. This is in addition to thefact that the pedals will be sending out MIDI information. The defaultsettings are: Pedal 1 = 7; Pedal 2 = 4.
MIDI Program Select
Global Settings: Chapter 8
QuadraSynth Plus Piano Reference Manual 170
In Page 6 of Global Edit mode, Quad Knob [1] determines the MIDI ProgramSelect mode (Off, On, Mix Select Channel 1 –16). When this is set to “Off”, theQuadraSynth Plus will not respond to incoming MIDI Program Changemessages, nor will it transmit Program Changes.
When set to “On”, the QuadraSynth Plus will respond to incoming ProgramChange messages. Likewise, when a Program or Mix is recalled from the frontpanel, its respective program change message will be sent out. However, theQuadraSynth Plus will respond differently to incoming Program Changemessages depending on whether Program Mode or Mix Mode is selected.
In Program Mode, the MIDI [♦] and [∅] buttons determine on which MIDIchannel the QuadraSynth Plus will receive MIDI Program Change messages (aswell as other messages, like notes, controllers, etc.). The Program recalled will bethe same number as the MIDI Program Change message that is received, fromwhichever bank (Preset or User) is currently selected. When a Program isrecalled from the front panel, the QuadraSynth Plus will transmit the equivalentProgram Change message on this same MIDI channel.
In Mix Mode, when MIDI Program select is on, Program Changes received onany of the 16 MIDI channels will be received by the same numbered MIDIchannels in the current Mix. The Mix itself will not respond to Program Changes.
When set to “Mix Select Channel 1 – 16”, the QuadraSynth Plus will changeMixes in response to Program Change messages received on the same MIDIchannel as selected by this parameter, from whichever bank (Preset or User) iscurrently selected. Program Change messages received on any other channel(other than the one selected by this parameter) will change the individualPrograms in the Mix on the same channels the messages are received on.
Note: When General MIDI Mode is enabled (see page 115), Channel 10 of theselected Mix will be used exclusively for drums. If a program change is receivedon Channel 10, a new drum kit will be recalled. These drum kits are usedexclusively in General MIDI mode, and adhere to the General MIDI specification.
Receiving and Transmitting Bank Change MessageThe QuadraSynth Plus will respond to MIDI Bank Select messages. BankSelect messages are transmitted via MIDI Controller 0. The value ofController 0 determines which bank (User, Preset 1–4, Card 1–8) is to berecalled. Example: If a Bank Select (controller 0) message of 0 is received,it will cause the User Bank to be recalled. If a Bank Select (message of 1 isreceived, Preset Bank 1 will be recalled. Additionally, if a Sound Card isinserted, the Card Banks can be selected using Controller 0 valuesbetween 5 and 13. Values higher than 13 are “wrapped around” and willrecall the same Banks. Example: A Controller 0 message with a value of39 will recall the User Bank.
Note: Bank change messages will be ignored if General MIDI Mode isenabled, so that only Programs within the General MIDI Bank (Preset 4)can be recalled via MIDI Program changes.
Global Settings: Chapter 8
QuadraSynth Plus Piano Reference Manual 171
If the MIDI Program Select parameter is turned “On” and a new Bank isselected using the BANK [♦] and [∅] buttons, a Bank Change message(followed by the appropriate Program Change message) will betransmitted out the MIDI Out connector.
If, additionally, a new Bank is selected in Mix Play Mode and anyChannel’s MIDI Out parameter (Mix Edit Mode, Range Function, Page 2,Quad Knob [3]) is turned “On”, a Bank Select message (followed by theappropriate Program Change) will be transmitted out the MIDI Outconnector for each of those MIDI Channels.
Edit ModeThe Quad Knobs have two editing modes: Immediate and Pass-thru. When usingthe Quad Knobs to adjust parameter values, you may prefer one mode over theother.
In Page 6 of Global Edit mode, Quad Knob [3] determines the Edit Mode of thefour Quad Knobs. When set to Immediate, parameter values jump immediatelyto the Quad Knob’s exact position the moment it is moved. When set to Pass-thru, the Quad Knob must be turned beyond the parameter’s current settingbefore it becomes “live” and begins adjusting the parameter’s value.
48 KHz Clock InputIn Page 7 of Global Edit mode, Quad Knob [1] turns the 48 kHz Clock Input onand off. When turned off, the QuadraSynth Plus uses its own internal sampleclock as a reference for playing back the sampled sounds that make up aProgram or Mix. However, if you are recording the QuadraSynth Plus to ADATusing the Digital Out fiber optic cable and also have a BRC Master RemoteController, the QuadraSynth Plus must receive a 48 kHz clock signal from theBRC in order to maintain perfect sync with the ADAT system. This requires thatyou connect a BNC-to-BNC cable between the BRC’s 48 kHz Clock Out to theQuadraSynth Plus’s 48 kHz Clock In. When you are ready to record onto ADATfrom the QuadraSynth Plus, be sure to turn on the 48 kHz Clock Input function.For more on connecting the BNC-to-BNC cable, see page 25.
MIDI Transfer and Storage Operations: Chapter 9
QuadraSynth Plus Piano Reference Manual 172
CHAPTER 9
MIDI TRANSFER AND
STORAGE OPERATIONSSaving the User Bank to an External Card
The entire contents of the QuadraSynth Plus’s User memory (100 Mixes, 128Programs, 128 Effects Patches) can be stored to an Alesis QuadraCard RAM cardinserted into the Sound Card slot on the QuadraSynth Plus. Depending on theamount of RAM a particular card has, up to 8 complete banks can be stored ontoit. The QuadraCard is a type of PCMCIA SRAM or FlashRAM card; it has 256Kof memory and will store 4 complete banks. A 512K PCMCIA card can store 8banks. When saving data to a card that contains a ROM (READ-ONLY) bank, itwill be in bank 1; this means you cannot save anything into bank 1.
¿ Insert a card into the Sound Card slot on the back of the QuadraSynthPlus.
¡ Press [STORE].
¬ Use either PAGE [♦] or [∅] to select Page 6 of the Store function.This selects the “SAVE TO CARD” option.
Use Quad Knob [1] to select a bank location on the card to store to (1–8).If the card contains a ROM bank, it will be bank 1. Therefore, you will only be able tosave into bank locations 2–8.
� Press [STORE] to transfer the data from the QuadraSynth Plus onto thecard.
If the display reads "CARD IS WRITE PROTECTED", switch the write-protectswitch on the card to off and repeat the procedure.
Loading a Bank from an External Card¿ Insert the card into the card slot on the back panel.
¡ Press [STORE].
¬ Use either PAGE [♦] or [∅] to select Page 7 of the Store function.This selects the “LOAD FROM CARD” option.
Use Quad Knob [1] to select the bank on the card you wish to load (1–8).
� Press [STORE] to transfer the data from the card into the QuadraSynthPlus.
MIDI Transfer and Storage Operations: Chapter 9
QuadraSynth Plus Piano Reference Manual 173
Storing an Individual Program or Mix to anExternal Card
You also have the option of storing a Mix or Program directly to a specificlocation in a RAM Sound Card Bank (instead of transferring the entire Bank) andvice versa. However, the Sound Card you are storing to must be of the currentQuadraSynth Plus Bank format. A Sound Card is formatted whenever an entireQuadraSynth Plus Bank is stored onto it. If you are using an older Sound Cardthat does not use the current Bank format, you will not be able to store individualMixes or Programs onto until you store an entire QuadraSynth Bank onto it first.
¿ Insert a card into the Sound Card slot on the back of the QuadraSynthPlus.
¡ Select the Program or Mix you wish to transfer to the card.
¬ Press [STORE].
Use Quad Knob [1] to select a bank location on the card to store to (1–8).If the card contains a ROM bank, it will be bank 1. Therefore, you will only be able tosave into bank locations 2–8.
� Use Quad Knob [2] to select a location in the selected card Bank to saveto (00–127 if storing a Program; 00–99 if storing a Mix).
H Press [STORE] to transfer the data from the QuadraSynth Plus onto thecard.
If the card is write-protected, or not inserted, or not of the current Bank format,the display will indicate the situation with an error message. If the card is not ofthe current Bank format, use the “Save To Card” command first (Store Mode,Page 5) to save the entire User Bank to the card. This however will erase allPrograms and Mixes in the selected card Bank. If these are important to you, firstload them into the User Bank in the QuadraSynth, and then save them back ontothe card in order to re-format the card using the new format.
Loading an Individual Program or Mix from anExternal Card
You can load a single Mix or Program from a Sound Card into the User Bank,instead of having to load the entire Bank from the Sound Card. To do this, selectthe Mix or Program in the Sound Card Bank that you wish to copy, then use theStore Function (as described above) to designate a location you wish to store toin the User Bank.
Note: When storing a Mix from a Sound Card into the User Bank, the individualPrograms used by the Mix will not be moved into the User Program Bank. Onceyou store a Mix from a Sound Card into the User Bank, it will still look for itsPrograms in the Sound Card Bank, if that is where it was programmed to lookfor them in the first place (which is almost always the case).
MIDI Transfer and Storage Operations: Chapter 9
QuadraSynth Plus Piano Reference Manual 174
Card Storage RAMificationsWhenever you transfer an internal Bank to a RAM card, the result is thatall Mixes in the transferred Bank are changed so that they now access thePrograms on the card bank to which the User bank was saved (since theyreside there, now), instead of the Programs from the original internalBank. And, when a Card Bank is transferred to an internal Bank location,the opposite happens – all Programs within a Mix which had previouslyaccessed card bank 1 (the ROM card) now point to the User bank.
However, a problem can arise when you have one or more Mixes in theBank you are transferring which use Programs already on the Card.Example: Let's say Mix 00 in the User Bank uses a Program that’s locatedin Card Bank 1. If the User Bank is transferred to the Card Bank 1, theresult will be that Mix 00 in Card Bank 1 now uses only Programs fromCard Bank 1. If later you transfer the entire Bank back into theQuadraSynth Plus, you will find that Mix 00 no longer uses the Programon the Card as it was originally programmed to.
Here’s a few ways to avoid this problem. First, always transfer to a CardBank that does not include any Programs used by the Mixes in the Bankyou are transferring from. In other words, if we transferred the Bank intoCard Bank 2, we would not have a problem, since the Mix would still beusing the Program in Card Bank 1. When this Bank is transferred back tothe QuadraSynth, the Mix will still use the Program in Card Bank 1.
Another way to avoid this problem is to transfer the Bank to a CardBank, and then immediately store the individual Mix onto the Card byitself. When a Mix is stored individually to a Card, it is not modified inany way ; i.e. if it used Programs in the internal Banks, it will still usethem even though the Mix and its Programs are in two differentlocations (the Mix is on the Card but the Programs it uses are stored inthe internal Banks).
Finally, you could avoid this situation by always making sure yourMixes use only Programs located in the same Bank it is stored in. Thiscould mean individually storing some Programs from a RAM Card intoone of the internal Banks. Although this is very limiting, it makes thingsmuch simpler in the long run.
Saving Programs via MIDI Sys ExAs an alternative to storing data to a card, the QuadraSynth Plus lets youtransmit internal data via MIDI System Exclusive messages. This data can be sentto a storage device, or recorded into a MIDI sequencer, or sent to anotherQuadraSynth Plus or S4. You have a choice of sending any single Program in theUser bank (00 to 127), or what is in the current Program Edit buffer, or what is inany of the 16 Mix Edit Program buffers, or the entire User bank (100 Mixes, 128Programs, 128 Effects Patches) plus Global data. In the case of sending data toanother QuadraSynth Plus, you can send any individual Program to the samelocation or any other location in the receiving QuadraSynth Plus, including anyof its 17 Program Edit buffers.
MIDI Transfer and Storage Operations: Chapter 9
QuadraSynth Plus Piano Reference Manual 175
To send the entire User bank via MIDI:
¿ Connect a MIDI cable from the QuadraSynth Plus’s MIDI Out to theMIDI In of a device capable of receiving the data (S4, another QuadraSynth Plus,etc.).
¡ Press [STORE].
¬ Use either PAGE [♦] or [∅] to select Page 3 of the Store function.
Turn Quad Knob [1] to the right until the upper right display reads“SEND_ALL TO MIDI.”
� Press [STORE] to transmit the data out the MIDI Out connector.
To send a single Program via MIDI:
¿ Follow steps ¿ through ¬ in the instructions above.
¡ Use Quad Knob [1] to select a Program. You may select any Program inthe User bank (0 to 127) or the Program Edit buffer (EDIT) or any of the 16 MixEdit buffers (EDm01 to EDm16).As this value is changed, the second parameter (destination) will be linked. This isbecause most often you will want to transmit a Program to the same Program location.The only time to do otherwise is when sending to another QuadraSynth Plus (see below).
¬ Press [STORE] to transmit the data out the MIDI Out connector.
To send a single Program via MIDI to a different Program number:
¿ Follow steps ¿ through ¬ in the instructions above.
¡ Use Quad Knob [1] to select a Program. You may select any Program inthe User bank (0 to 127) or the Program Edit buffer (EDIT) or any of the 16 MixEdit buffers (EDm01 to EDm16).As this value is changed, the second parameter (destination) will be linked.
¬ Use Quad Knob [2] to select a Program number to send the selectedProgram to.If this value is turned all the way up, the “SEND ALL TO MIDI” option will be selectedand the first value will jump all the way up. At this point you will not be able to adjustthe destination value with Quad Knob [2] until you use Quad Knob [1] to re-select theProgram to be transmitted.
Press [STORE] to transmit the data out the MIDI Out connector.
The procedure is similar for sending Mixes. Page 4 of the Store function allowsyou to send any one of the Mixes.
Similarly, if a Mix is stored, you may want to store each of the Programs used inthe Mix. The “SEND ALL TO MIDI” command in the Program Store function isan easy shortcut to this.
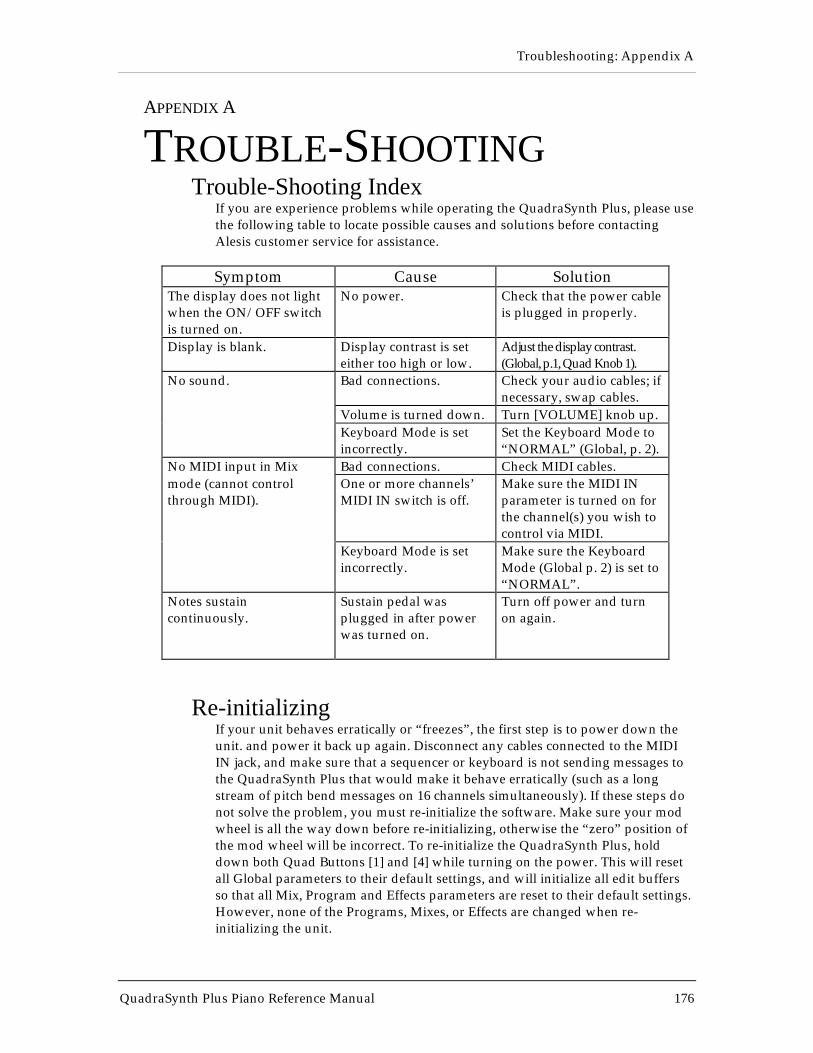
Troubleshooting: Appendix A
QuadraSynth Plus Piano Reference Manual 176
APPENDIX A
TROUBLE-SHOOTINGTrouble-Shooting Index
If you are experience problems while operating the QuadraSynth Plus, please usethe following table to locate possible causes and solutions before contactingAlesis customer service for assistance.
Symptom Cause SolutionThe display does not lightwhen the ON/OFF switchis turned on.
No power. Check that the power cableis plugged in properly.
Display is blank. Display contrast is seteither too high or low.
Adjust the display contrast.(Global, p.1, Quad Knob 1).
No sound. Bad connections. Check your audio cables; ifnecessary, swap cables.
Volume is turned down. Turn [VOLUME] knob up.Keyboard Mode is setincorrectly.
Set the Keyboard Mode to“NORMAL” (Global, p. 2).
No MIDI input in Mix Bad connections. Check MIDI cables.mode (cannot controlthrough MIDI).
One or more channels’MIDI IN switch is off.
Make sure the MIDI INparameter is turned on forthe channel(s) you wish tocontrol via MIDI.
Keyboard Mode is setincorrectly.
Make sure the KeyboardMode (Global p. 2) is set to“NORMAL”.
Notes sustaincontinuously.
Sustain pedal wasplugged in after powerwas turned on.
Turn off power and turnon again.
Re-initializingIf your unit behaves erratically or “freezes”, the first step is to power down theunit. and power it back up again. Disconnect any cables connected to the MIDIIN jack, and make sure that a sequencer or keyboard is not sending messages tothe QuadraSynth Plus that would make it behave erratically (such as a longstream of pitch bend messages on 16 channels simultaneously). If these steps donot solve the problem, you must re-initialize the software. Make sure your modwheel is all the way down before re-initializing, otherwise the “zero” position ofthe mod wheel will be incorrect. To re-initialize the QuadraSynth Plus, holddown both Quad Buttons [1] and [4] while turning on the power. This will resetall Global parameters to their default settings, and will initialize all edit buffersso that all Mix, Program and Effects parameters are reset to their default settings.However, none of the Programs, Mixes, or Effects are changed when re-initializing the unit.
Troubleshooting: Appendix A
QuadraSynth Plus Piano Reference Manual 177
Checking Software VersionThe current software version may be determined by holding [GLOBAL] andpressing [PROGRAM]. The QuadraSynth Plus will indicate the current softwareversion installed in the upper right display.
Maintenance/ServiceCleaning
Disconnect the AC cord, then use a damp cloth to clean the keyboard’smetal and plastic surfaces. For heavy dirt, use a non-abrasive householdcleaner such as Formula 409 or Fantastik. DO NOT SPRAY THECLEANER DIRECTLY ONTO THE FRONT OF THE UNIT AS IT MAYDESTROY THE LUBRICANTS USED IN THE SWITCHES ANDCONTROLS! Spray onto a cloth, then use the cloth to clean the unit.
MaintenanceHere are some tips for preventive maintenance.
• Periodically check the AC cord for signs of fraying or damage.
• Make sure the entire bottom part of the keyboard is supportedso that the case is not subjected to unnecessary bending.
• Place a dust cover over the QuadraSynth Plus when it is not inuse.
Refer All Servicing to AlesisWe believe that the QuadraSynth Plus is one of the most reliablekeyboards that can be made using current technology, and shouldprovide years of trouble-free use. However, should problems occur, DONOT attempt to service the unit yourself. The full AC line voltage, aswell as high voltage/high current DC voltages, are present at severalpoints within the chassis. Service on this product should be performedonly by qualified technicians. THERE ARE NO USER-SERVICEABLEPARTS INSIDE.
Obtaining Repair ServiceBefore contacting Alesis, check over all your connections, and make sureyou’ve read the manual.
Customers in the USA:If the problem persists, call Alesis USA at 1-800-5ALESIS (525-3747) andrequest the Product Support department. Talk the problem over withone of our technicians; if necessary, you will be given a repair order (RO)number and instructions on how to return the unit. All units must beshipped prepaid and COD shipments will not be accepted.
For prompt service, indicate the RO number on the shipping label. If youdo not have the original packing, ship the XT in a sturdy carton, with
Troubleshooting: Appendix A
QuadraSynth Plus Piano Reference Manual 178
shock-absorbing materials such as styrofoam pellets (the kind withoutCFCs, please) or “bubble-pack” surrounding the unit. Shipping damagecaused by inadequate packing is not covered by the Alesis warranty.
Tape a note to the top of the unit describing the problem, include yourname and a phone number where Alesis can contact you if necessary, aswell as instructions on where you want the product returned. Alesis willpay for standard one-way shipping back to you on any repair coveredunder the terms of this warranty. Next day service is available for asurcharge.
Field repairs are not normally authorized during the warranty period,and repair attempts by unqualified personnel may invalidate thewarranty.
Service address for customers in the USA:
Alesis Product Support12520 WilkieHawthorne, CA 90250
Customers outside the USA:Contact your local Alesis dealer for warranty assistance. The AlesisLimited Warranty applies only to products sold to users in the USA andCanada. Customers outside the USA and Canada are not convered bythis Limited Warranty and may or may not be covered by independentdistributor warranty in the county of sale. Do not return products to thefactory unless you have been given specific instructions to do so.

Troubleshooting: Appendix A
QuadraSynth Plus Piano Reference Manual 179

MIDI Supplement: Appendix B
QuadraSynth Plus Piano Reference Manual 181
APPENDIX B
MIDI SUPPLEMENTMIDI Basics
Most current electronic instruments and signal processors, including theQuadraSynth Plus, contain an internal computer. Computers and music havebeen working together for decades, which is not surprising considering music’smathematical basis (consider frequencies, harmonics, vibrato rates, tunings, etc.).In the mid-70s, microcomputers became inexpensive enough to be built intoconsumer-priced musical instruments. They were used for everything fromsound generation to storing parameters in memory for later recall.
In 1983, the MIDI (Musical Instrument Digital Interface) specification wasintroduced to better exploit the computers inside these new musical instruments,primarily to ensure compatibility of equipment between manufacturers. MIDIexpresses musical events (notes played, vibrato, dynamics, tempo, etc.) as acommon “language” consisting of standardized digital data. This data can beunderstood by MIDI-compatible computers and computer-based musicalinstruments.
Before electronics, music was expressed exclusively as written symbols. Bytranslating musical parameters into digital data, MIDI can express not only thetypes of musical events written into sheet music, but other parameters as well(such as amount of pitch bend or degree of vibrato).
MIDI HardwareMIDI-compatible devices usually include both MIDI In and MIDI Out jacks,which terminate in 5-pin DIN-style connectors. The MIDI Out jack transmitsMIDI data to another MIDI device. As you play a MIDI controller such as akeyboard, data corresponding to what you play exits the MIDI Out jack.Example: If you play middle C, the MIDI Out transmits a piece of data that says“middle C is down.” If you release that key, the MIDI Out transmits anotherpiece of data that says “middle C has been released.”
If the keyboard responds to the dynamics of your playing, the note data willinclude dynamics information too. Moving the modulation wheels and pedalsattached to many synthesizers will also generate data associated with the wheelor pedal being used.
The MIDI In jack receives data from another MIDI device. In addition to the typeof performance data described above, rhythmically-oriented MIDI devices (e.g.,drum machines) can often transmit and/or receive additional MIDI timingmessages that keep other rhythmically-oriented units in a system synchronizedwith each other.
An optional MIDI Thru jack provides a duplicate of the signal at the MIDI Injack. This is handy if you want to route MIDI data appearing at one device toanother device as well.
MIDI Supplement: Appendix B
QuadraSynth Plus Piano Reference Manual 182
MIDI Message BasicsThe are two main types of MIDI messages. Channel messages, which arechannel-specific, consist of Voice and Mode messages. System messages, whichdo not have a channel number and are received by all units in a system, includeCommon, Real Time, and Exclusive messages.
Channel Messages: Mode MessagesThere are two messages that determine the MIDI mode (i.e., how adevice will receive MIDI data). The “Omni” message determines howmany channels will be recognized. Omni On means that data from allchannels will be received; Omni Off limits the number of channels,usually to one.
The “Mono/Poly” message deals with voice assignment within thesynthesizer. In Mono mode, only one note at a time plays in response tovoice messages; in Poly mode, as many voices can play notes as areavailable to play notes.
Channel Messages: Voice MessagesA synthesizer’s voice is the most basic unit of sound generation. Usually,each voice plays one note at a time, so the number of notes you can playat one time will be limited by the available number of voices. MIDImessages that affect voices include:
Note On. Corresponds to a key being pressed down; values range from000 (lowest note) to 127 (highest note). Middle C is 60.
Note Off. Corresponds to a key being released; values are the same asnote on.
Velocity. Corresponds to dynamics; values range from 001 (minimumvelocity) to 127 (maximum velocity). A velocity of 000 is equivalent to anote-off message.
Pressure. Indicates the pressure applied to a keyboard after pressing akey. Mono pressure (Aftertouch) represents the average amount ofpressure applied by all keys. Poly Pressure produces individual pressuremessages for each key.
Program Change. Sending a Program Change command from asequencer or other MIDI keyboard can change synth patchesautomatically. There are 128 Program Change command numbers.
Also note that not all units number programs consistently. Some numberthem as 000-127, others as 001-128, and still others arrange programs inbanks of 8 programs (such as A1-A8, B1-B8, C1-C8, etc.).
Pitch Bend. This “bends” a note from its standard pitch.
MIDI Supplement: Appendix B
QuadraSynth Plus Piano Reference Manual 183
Continuous Controller. Footpedals, breath controllers, and modulationwheels can vary sounds as you play, thus adding expressiveness. MIDIallows for 64 continuous controllers (these act like potentiometers in thatyou can choose one of many different values) and 58 continuous/switch(these can act like continuous controllers but some are assumed tochoose between two possible states, such as on/off).
Each type of controller is stamped with its own controller identificationnumber. Not all controller numbers have been standardized for specificfunctions, but the following indicates the current list of assignedcontrollers. Numbers in parenthesis indicate the controller range.
# Function 1 Modulation Wheel (0-127)2 Breath Controller (0-127)3 Early DX7 Aftertouch (0-127)4 Foot Controller (0-127)5 Portamento Time (0-127)6 Data Slider (0-127)7 Main Volume (0-127)8 Balance (0-127)10 Pan (0-127)11 Expression (0-127)16 General Purpose #1 (0-127)17 General Purpose #2 (0-127)18 General Purpose #3 (0-127)19 General Purpose #4 (0-127)32-63 Least Significant Bits, Controllers 0-31 (0-127)64 Sustain Pedal (0 or 127)65 Portamento On/Off (0 or 127)66 Sustenuto Pedal (0 or 127)67 Soft Pedal (0 or 127)69 Hold 2 (0 or 127)80 General Purpose #5 (0 or 127)81 General Purpose #6 (0 or 127)82 General Purpose #7 (0 or 127)83 General Purpose #8 (0 or 127)92 Tremolo Depth (0-127)93 Chorus Depth (0-127)94 Celeste Depth (0-127)95 Phase Depth (0-127)96 Data Increment (0 or 127)97 Data Decrement (0 or 127)98 Non-Registered Parameter MSB (0-127)99 Non-Registered Parameter LSB (0-127)100 Registered Parameter MSB (0-127)101 Registered Parameter LSB (0-127)121 Reset All Controllers (0)122 Local Control On/Off (0 or 127)123 All Notes Off (0)124 Omni Off (0)
MIDI Supplement: Appendix B
QuadraSynth Plus Piano Reference Manual 184
125 Omni On (0)126 Mono On (0-16; 0=Omni Off)127 Poly On (0)
MIDI Supplement: Appendix B
QuadraSynth Plus Piano Reference Manual 185
System Common MessagesIntended for all units in a system, some of these MIDI messages are:
Song Position Pointer. This indicates how many “MIDI beats” (normallya 16th note) have elapsed since a piece started (up to 16,384 total beats).It is primarily used to allow different sequencers and drum machines toauto-locate to each other so that if you start one sequencer, the otherdevice will automatically jump to the same place in the song, whereuponboth continue on together.
System Exclusive. This message (called Sys Ex for short) is considered“exclusive” because different manufacturers send and receive data overMIDI which is intended only for that manufacturer’s equipment.Example: Sending a QuadraSynth Plus message to an Alesis D4 DrumModule won’t do anything, but the message will be understood by otherQuadraSynth Plus. This data often contains information about individualinstrument programs.
Timing Clock. A master tempo source (such as a sequencer) emits 24timing messages (clocks) per quarter note. Each device synchronized tothe sequencer advances by 1/24th of a quarter note when it receives theclock message, thus keeping units in sync after they’ve both started atthe same time. Many devices subdivide this clock signal internally forhigher resolution (e.g., 96 pulses per quarter note).
Start. Signals all rhythmically-based units when to start playing.
Stop. Signals all rhythmically-based units when to stop playing.
Continue. Unlike a Start command, which re-starts a sequencer or drummachine from the beginning of a song each time it occurs, sending acontinue message after stop will re-start units from where they werestopped.
General MIDIGeneral MIDI is an extension of the MIDI standard designed to meet thedemands of the ever-growing multimedia industry, and to make simple the actof playing commercially produced MIDI sequences. The General MIDI standardutilizes all 16 channels available in MIDI. The QuadraSynth Plus is a perfectGeneral MIDI companion, since its Mix Mode uses 16 channels. Although manychannels are commonly used for specific types of instruments (Example: Channel1 is usually piano, channel 2 is usually bass, etc.), channel 10 is always used fordrums.
General MIDI also standardizes the placement of sound types in a sound device’smemory bank. The QuadraSynth Plus’ Preset 4 Bank is designed specifically forGeneral MIDI, and organizes it sounds according to the General MIDIspecification. This means, when a sequencer sends a MIDI program changemessage that is supposed to call up a particular sound, the correct sound on theQuadraSynth Plus will be called up, even if the composer of the sequence used adifferent sound device. The Programs in Preset Bank 4 use the General MIDI
MIDI Supplement: Appendix B
QuadraSynth Plus Piano Reference Manual 186
names (in some cases abreviated) with the letters GM added to indicate their aredesigned specifically for use in General MIDI mode.
MIDI Supplement: Appendix B
QuadraSynth Plus Piano Reference Manual 187
There are three MIDI registered parameters which the QuadraSynth plus willrecognize in Mix Play Mode when General MIDI Mode is enabled. These are:
• MIDI Registered Parameter 0 (Pitch Bend Sensitivity): This will directlyeffect the Pitch Wheel Range parameter of all four Sounds of the Program on thereceived MIDI Channel of the Mix. If the Channel is selected using the MIDI [♦]and [∅] buttons, the word “Edited” will appear next to the Program Number inthe display if this parameter is received. However, if you are viewing the PitchWheel Range parameter in the display (Program Edit Mode, Pitch Function, Page2, Quad Knob [2]), the display will not be updated to reflect the new setting. Ifyou go to another Page or Function and then return to it, the display will nowreflect the updated setting.
• MIDI Registered Parameter 1 (Fine Tune): This will directly effect theDetune Amount parameter of all four Sounds of the Program on the receivedMIDI Channel of the Mix. If this MIDI registered parameter is received, theQuadraSynth will automatically make sure that all four Sounds of the Programhave their Detune Type parameter set to “Normal” (Program Edit Mode, PitchFunction, Page 1, Quad Knob [4]). If the Channel is selected using the MIDI [♦]and [∅] buttons, the word “Edited” will appear next to the Program Number inthe display if this parameter is received. However, if you are viewing the DetuneAmount parameter in the display (Program Edit Mode, Pitch Function, Page 1,Quad Knob [3]), the display will not be updated to reflect the new setting. If yougo to another Page or Function and then return to it, the display will now reflectthe updated setting.
• MIDI Registered Parameter 2 (Coarse Tune):This will directly effect theTune Semitone parameter of all four Sounds of the Program on the receivedMIDI Channel of the Mix. If the Channel is selected using the MIDI [♦] and [∅]buttons, the word “Edited” will appear next to the Program Number in thedisplay if this parameter is received. However, if you are viewing the TuneSemitone parameter in the display (Program Edit Mode, Pitch Function, Page 1,Quad Knob [1]), the display will not be updated to reflect the new setting. If yougo to another Page or Function and then return to it, the display will now reflectthe new setting.
(Parts of this appendix are abridged versions of material from Power Sequencingwith Master Tracks Pro/Pro 4 and The Complete Guide to the Alesis HR-16 andMMT-8, copyright 1990 and 1989 respectively by AMSCO Publications, and isadapted with permission.)
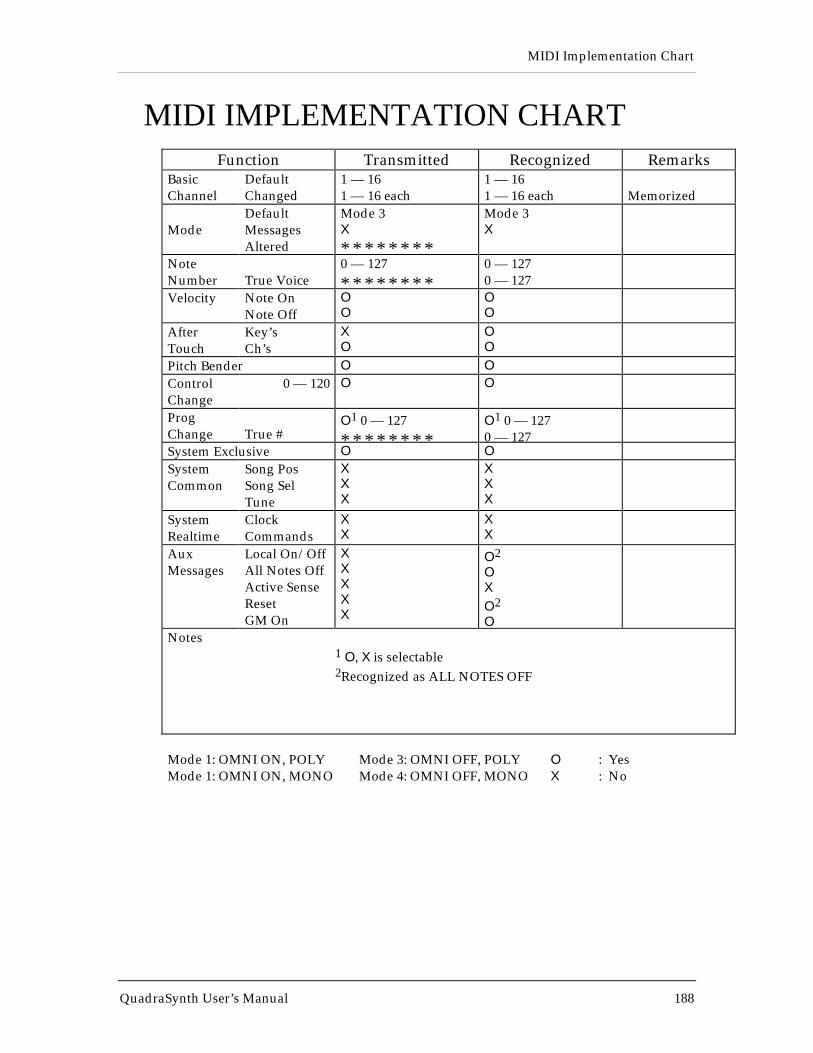
MIDI Implementation Chart
QuadraSynth User’s Manual 188
MIDI IMPLEMENTATION CHARTFunction Transmitted Recognized Remarks
BasicChannel
DefaultChanged
1 — 161 — 16 each
1 — 161 — 16 each Memorized
ModeDefaultMessagesAltered
Mode 3X
* * * * * * * *
Mode 3X
NoteNumber True Voice
0 — 127
* * * * * * * *0 — 1270 — 127
Velocity Note OnNote Off
OO
OO
AfterTouch
Key’sCh’s
XO
OO
Pitch Bender O OControlChange
0 — 120 O O
ProgChange True #
O1 0 — 127
* * * * * * * *O1 0 — 1270 — 127
System Exclusive O OSystemCommon
Song PosSong SelTune
XXX
XXX
SystemRealtime
ClockCommands
XX
XX
AuxMessages
Local On/OffAll Notes OffActive SenseResetGM On
XXXXX
O2
OXO2
ONotes
1 O, X is selectable2Recognized as ALL NOTES OFF
Mode 1: OMNI ON, POLY Mode 3: OMNI OFF, POLY O : YesMode 1: OMNI ON, MONO Mode 4: OMNI OFF, MONO X : No
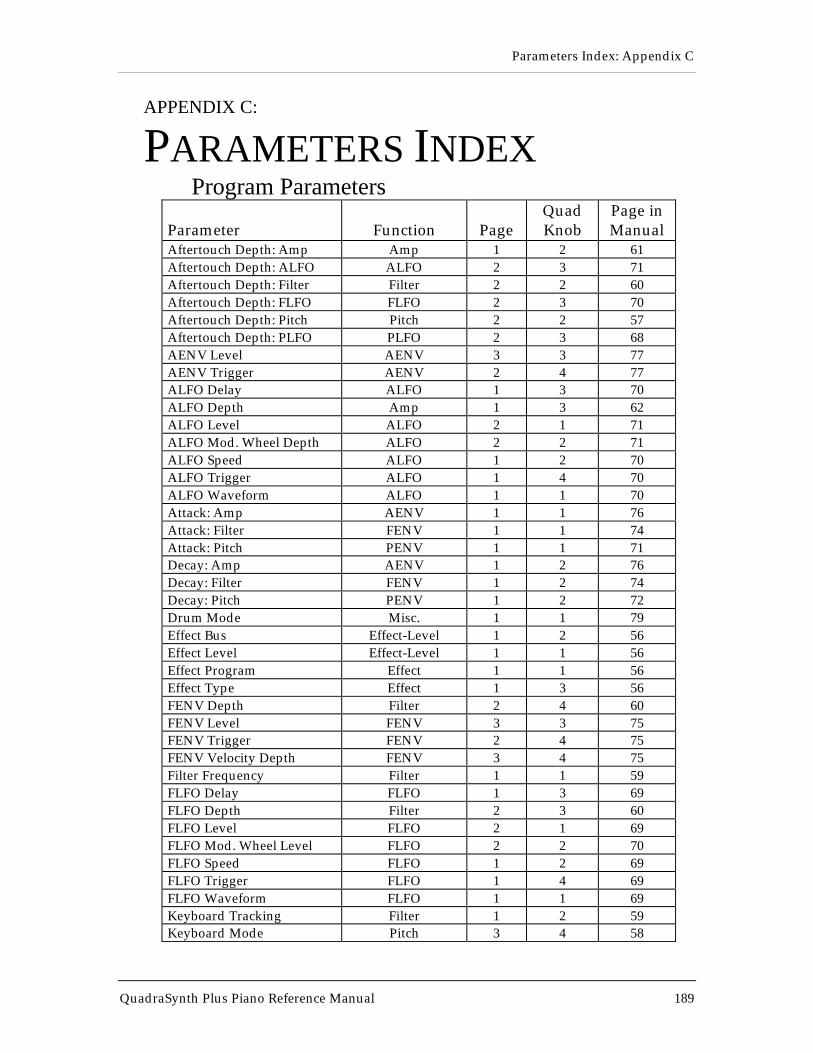
Parameters Index: Appendix C
QuadraSynth Plus Piano Reference Manual 189
APPENDIX C:
PARAMETERS INDEXProgram Parameters
Parameter Function PageQuadKnob
Page inManual
Aftertouch Depth: Amp Amp 1 2 61Aftertouch Depth: ALFO ALFO 2 3 71Aftertouch Depth: Filter Filter 2 2 60Aftertouch Depth: FLFO FLFO 2 3 70Aftertouch Depth: Pitch Pitch 2 2 57Aftertouch Depth: PLFO PLFO 2 3 68AENV Level AENV 3 3 77AENV Trigger AENV 2 4 77ALFO Delay ALFO 1 3 70ALFO Depth Amp 1 3 62ALFO Level ALFO 2 1 71ALFO Mod. Wheel Depth ALFO 2 2 71ALFO Speed ALFO 1 2 70ALFO Trigger ALFO 1 4 70ALFO Waveform ALFO 1 1 70Attack: Amp AENV 1 1 76Attack: Filter FENV 1 1 74Attack: Pitch PENV 1 1 71Decay: Amp AENV 1 2 76Decay: Filter FENV 1 2 74Decay: Pitch PENV 1 2 72Drum Mode Misc. 1 1 79Effect Bus Effect-Level 1 2 56Effect Level Effect-Level 1 1 56Effect Program Effect 1 1 56Effect Type Effect 1 3 56FENV Depth Filter 2 4 60FENV Level FENV 3 3 75FENV Trigger FENV 2 4 75FENV Velocity Depth FENV 3 4 75Filter Frequency Filter 1 1 59FLFO Delay FLFO 1 3 69FLFO Depth Filter 2 3 60FLFO Level FLFO 2 1 69FLFO Mod. Wheel Level FLFO 2 2 70FLFO Speed FLFO 1 2 69FLFO Trigger FLFO 1 4 69FLFO Waveform FLFO 1 1 69Keyboard Tracking Filter 1 2 59Keyboard Mode Pitch 3 4 58
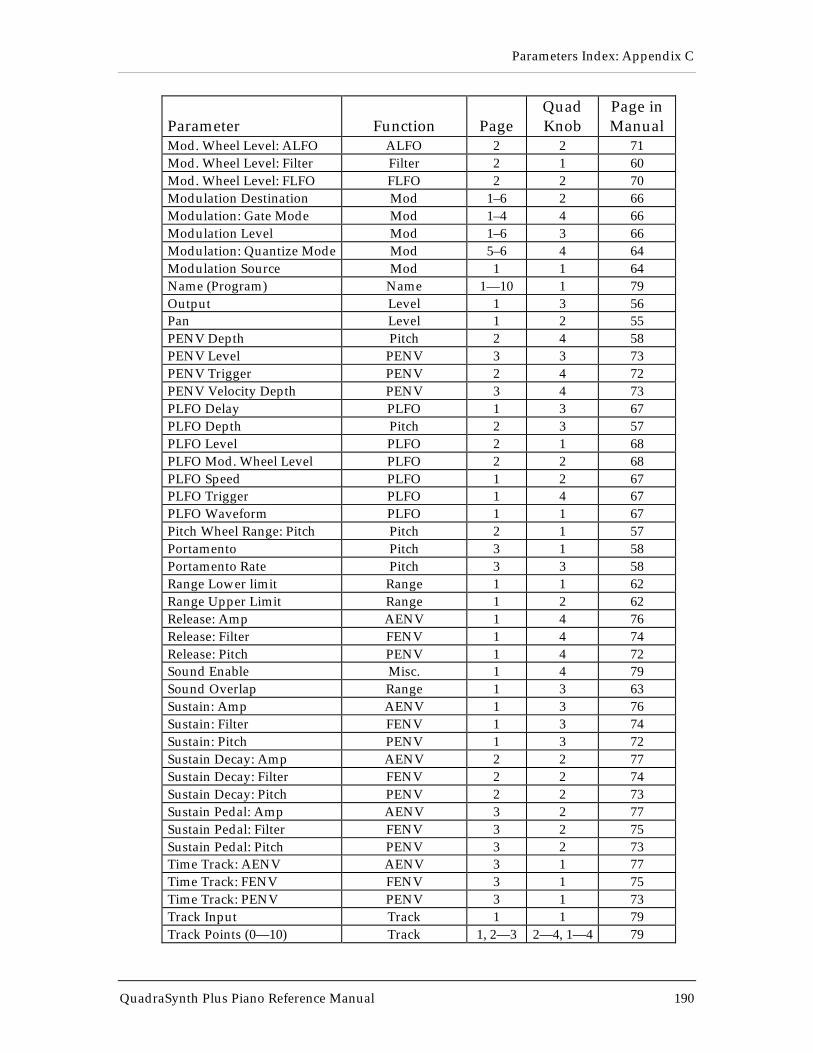
Parameters Index: Appendix C
QuadraSynth Plus Piano Reference Manual 190
Parameter Function PageQuadKnob
Page inManual
Mod. Wheel Level: ALFO ALFO 2 2 71Mod. Wheel Level: Filter Filter 2 1 60Mod. Wheel Level: FLFO FLFO 2 2 70Modulation Destination Mod 1–6 2 66Modulation: Gate Mode Mod 1–4 4 66Modulation Level Mod 1–6 3 66Modulation: Quantize Mode Mod 5–6 4 64Modulation Source Mod 1 1 64Name (Program) Name 1—10 1 79Output Level 1 3 56Pan Level 1 2 55PENV Depth Pitch 2 4 58PENV Level PENV 3 3 73PENV Trigger PENV 2 4 72PENV Velocity Depth PENV 3 4 73PLFO Delay PLFO 1 3 67PLFO Depth Pitch 2 3 57PLFO Level PLFO 2 1 68PLFO Mod. Wheel Level PLFO 2 2 68PLFO Speed PLFO 1 2 67PLFO Trigger PLFO 1 4 67PLFO Waveform PLFO 1 1 67Pitch Wheel Range: Pitch Pitch 2 1 57Portamento Pitch 3 1 58Portamento Rate Pitch 3 3 58Range Lower limit Range 1 1 62Range Upper Limit Range 1 2 62Release: Amp AENV 1 4 76Release: Filter FENV 1 4 74Release: Pitch PENV 1 4 72Sound Enable Misc. 1 4 79Sound Overlap Range 1 3 63Sustain: Amp AENV 1 3 76Sustain: Filter FENV 1 3 74Sustain: Pitch PENV 1 3 72Sustain Decay: Amp AENV 2 2 77Sustain Decay: Filter FENV 2 2 74Sustain Decay: Pitch PENV 2 2 73Sustain Pedal: Amp AENV 3 2 77Sustain Pedal: Filter FENV 3 2 75Sustain Pedal: Pitch PENV 3 2 73Time Track: AENV AENV 3 1 77Time Track: FENV FENV 3 1 75Time Track: PENV PENV 3 1 73Track Input Track 1 1 79Track Points (0—10) Track 1, 2—3 2—4, 1—4 79
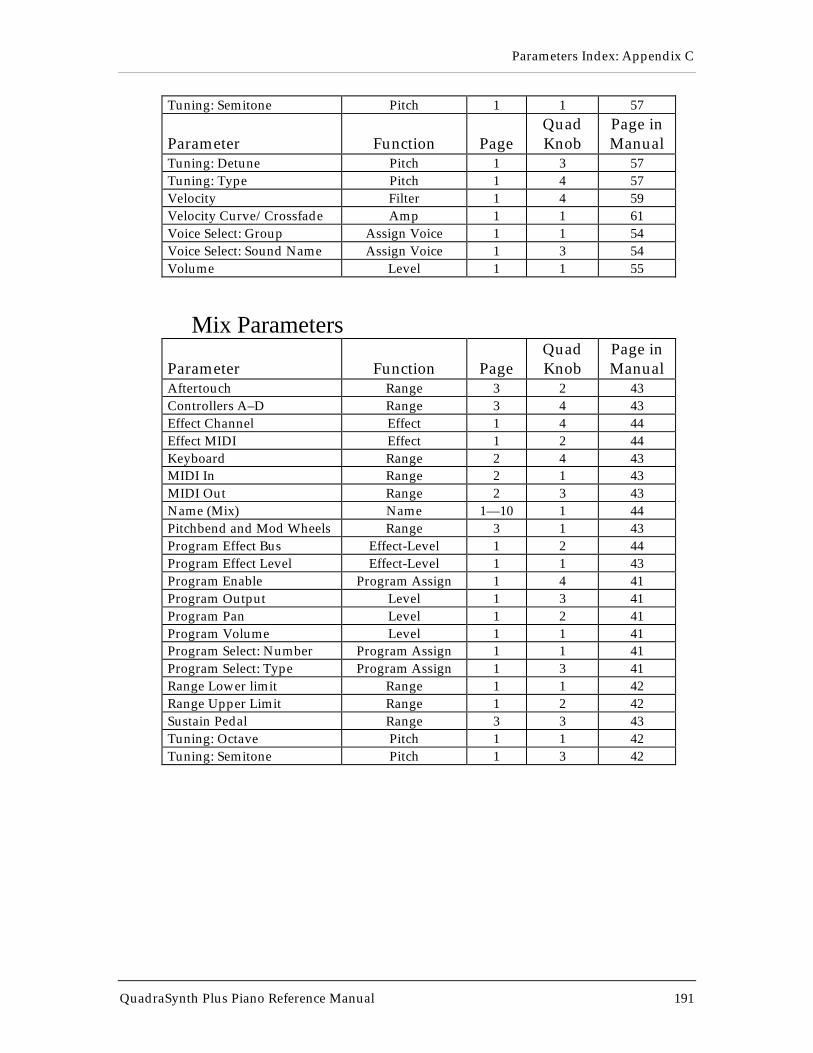
Parameters Index: Appendix C
QuadraSynth Plus Piano Reference Manual 191
Tuning: Semitone Pitch 1 1 57
Parameter Function PageQuadKnob
Page inManual
Tuning: Detune Pitch 1 3 57Tuning: Type Pitch 1 4 57Velocity Filter 1 4 59Velocity Curve/Crossfade Amp 1 1 61Voice Select: Group Assign Voice 1 1 54Voice Select: Sound Name Assign Voice 1 3 54Volume Level 1 1 55
Mix Parameters
Parameter Function PageQuadKnob
Page inManual
Aftertouch Range 3 2 43Controllers A–D Range 3 4 43Effect Channel Effect 1 4 44Effect MIDI Effect 1 2 44Keyboard Range 2 4 43MIDI In Range 2 1 43MIDI Out Range 2 3 43Name (Mix) Name 1—10 1 44Pitchbend and Mod Wheels Range 3 1 43Program Effect Bus Effect-Level 1 2 44Program Effect Level Effect-Level 1 1 43Program Enable Program Assign 1 4 41Program Output Level 1 3 41Program Pan Level 1 2 41Program Volume Level 1 1 41Program Select: Number Program Assign 1 1 41Program Select: Type Program Assign 1 3 41Range Lower limit Range 1 1 42Range Upper Limit Range 1 2 42Sustain Pedal Range 3 3 43Tuning: Octave Pitch 1 1 42Tuning: Semitone Pitch 1 3 42
Parameters Index: Appendix C
QuadraSynth Plus Piano Reference Manual 192