Embed Size (px)
Citation preview
Adobe Presenter Job Aid
All about Quizzes in Adobe Presenter
P U R P O S E O F T H I S D O C U M E N T
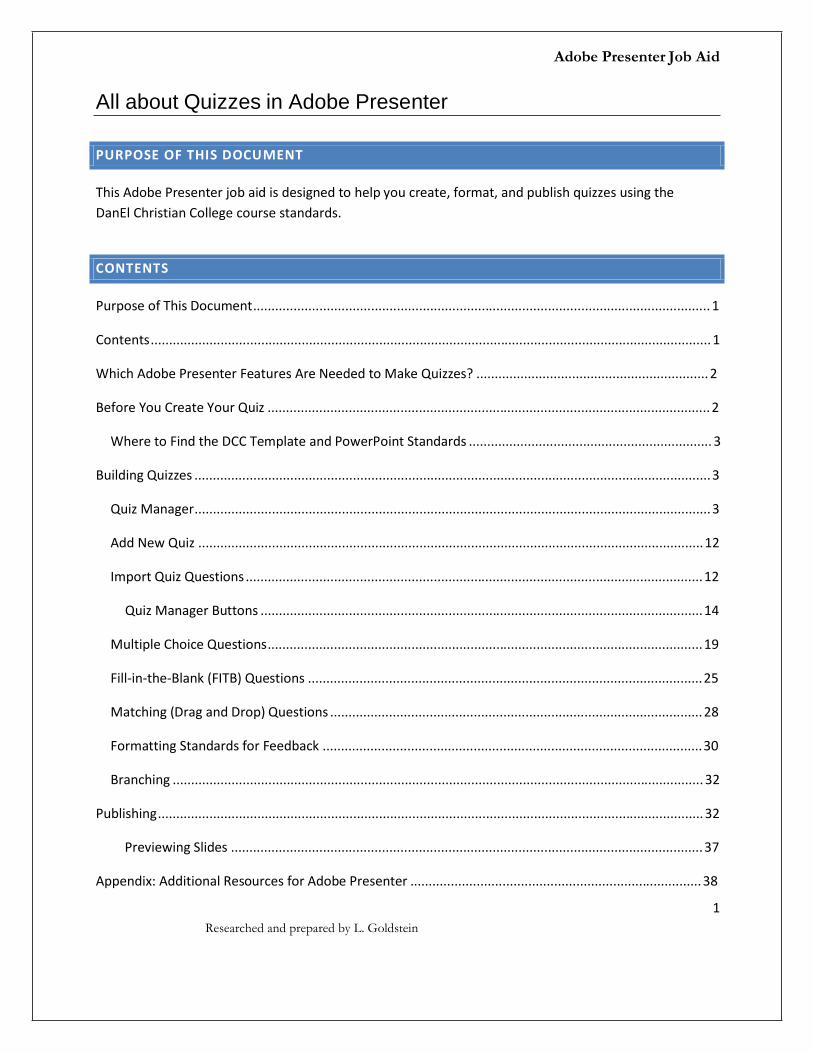
This Adobe Presenter job aid is designed to help you create, format, and publish quizzes using the
DanEl Christian College course standards.
C O N T E N T S
Purpose of This Document............................................................................................................................ 1
Contents ........................................................................................................................................................ 1
Which Adobe Presenter Features Are Needed to Make Quizzes? ............................................................... 2
Before You Create Your Quiz ........................................................................................................................ 2
Where to Find the DCC Template and PowerPoint Standards .................................................................. 3
Building Quizzes ............................................................................................................................................ 3
Quiz Manager............................................................................................................................................ 3
Add New Quiz ......................................................................................................................................... 12
Import Quiz Questions ............................................................................................................................ 12
Quiz Manager Buttons ........................................................................................................................ 14
Multiple Choice Questions...................................................................................................................... 19
Fill-in-the-Blank (FITB) Questions ........................................................................................................... 25
Matching (Drag and Drop) Questions ..................................................................................................... 28
Formatting Standards for Feedback ....................................................................................................... 30
Branching ................................................................................................................................................ 32
Publishing .................................................................................................................................................... 32
Previewing Slides ................................................................................................................................ 37
Appendix: Additional Resources for Adobe Presenter ............................................................................... 38
1
Researched and prepared by L. Goldstein

Adobe Presenter Job Aid
All about Quizzes in Adobe Presenter
W H I C H A D O B E P R E S E N T E R F E A T U R E S A R E N E ED E D T O M A K E Q U I Z Z E S ?
Most of the time, you will be using only features of the Presentation and Quiz groups. There are other
groups, however, which are shown below. Information for all groups and features is provided in the
Adobe Presenter 7 User Guide. For quizzes specifically, open the User Guide and go to Adobe Presenter
> Adding quizzes and questions > Create question groups.
You’ll notice that the Adobe Presenter tab has its features grouped like Microsoft Office 2007
components. Items are separated into the following groups (left to right in Figure 1):
Presentation
Audio
Video
Flash
Quiz
Application
Help
Here’s what it looks like:
Figure 1: Adobe Presenter tab. Generally, you will just be using features from the Presentation and Quiz groups.
B E F O R E Y O U C R E A T E YO U R Q U I Z
Once you create a quiz in Adobe Presenter, you can modify the content, location, and grouping of the
questions. Nevertheless, it’s still a best practice to first decide the following:
Will I need a question group (you will if you are going to have question pools)?
How many quizzes will I need for my presentation?
How many questions (and what types) will be in each quiz?
You can also reference the Adobe Presenter 7 User Guide to help you understand how Adobe Presenter
defines question groups and quizzes, as well as what the purposes and features are for each. This
information is available here (Open the topic titled “Adding quizzes and questions”).
2
Adobe Presenter Job Aid
All about Quizzes in Adobe Presenter
W H E R E T O F I N D T H E DCC T E M P L A T E A N D P O W ER P O I N T S T A N D A R D S
Note: Please complete this step before continuing if you have not done so already.
The template you’ll need for your courses is stored on SharePoint, which you can access from this link. If
you don’t already have the template, access it now. Then, save a local copy to your computer to work
from later.
The standards used for DCC course development are located here. Please download this now and be sure
to read before developing your first course. As you develop your courses, consult this guide as a handy
reference.
Having completed these preliminary steps, let’s now look at how to build quizzes using Adobe Presenter.
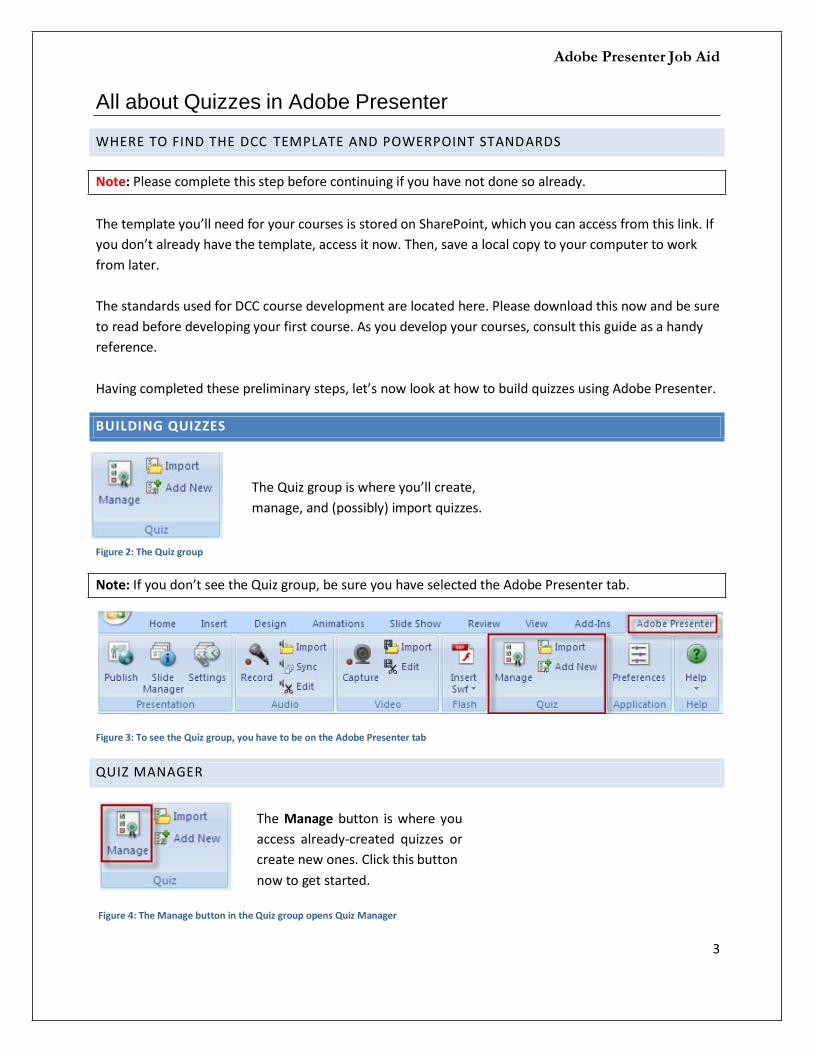
B U I L D I N G Q U I Z Z E S
Figure 2: The Quiz group
The Quiz group is where you’ll create,
manage, and (possibly) import quizzes.
Note: If you don’t see the Quiz group, be sure you have selected the Adobe Presenter tab.
Figure 3: To see the Quiz group, you have to be on the Adobe Presenter tab
Q U I Z M A N A G E R
The Manage button is where you
access already-created quizzes or
create new ones. Click this button
now to get started.
Figure 4: The Manage button in the Quiz group opens Quiz Manager
3

Adobe Presenter Job Aid
All about Quizzes in Adobe Presenter
Note: The Manage button is commonly referred to as Quiz Manager, since clicking it opens Quiz
Manager. So, if you need to “Open Quiz Manager,” just click this button.
SETTINGS FOR QUIZ MA NAGER
Quiz Manager is divided into five tabs, each of which will need to be set according to development
standards for DCC courses. We will now look at each of these in turn, beginning with the Quizzes tab.
Figure 5: Quiz Manager
QUIZZES TAB
The Quizzes tab is very important, as it is from here that you will adjust quiz settings and actually build
your quizzes. This is what opens by default when you access Quiz Manager.
An empty quiz containing zero questions will already be there when you open Quiz Manager for the first
time. We need to access this quiz and modify its settings, so click the Edit button to begin.
Also, you will notice that there are three buttons underneath the tabs (Add Quiz, Add Question Group,
and Add Question). We’ll cover these later.
Figure 6: Click Edit to change the settings of the quiz
4

Adobe Presenter Job Aid
All about Quizzes in Adobe Presenter
QUIZ SETTINGS
Having clicked the Edit button, you will now see the Quiz popup, which will be opened by default to the
Quiz Settings tab. It will look like this when you first open it.
Figure 7: Quiz settings; the Adobe Presenter default settings of the Quiz Settings tab are shown above
You will need to modify these settings to match those in Figure 8 on the next page.
5 Researched and prepared by L. Goldstein

Adobe Presenter Job Aid
All about Quizzes in Adobe Presenter
Figure 8: Choose the quiz settings shown above on the Quiz Settings tab
Add a numerical identifier to each quiz in the Name: field. For example, Quiz 1, Quiz 2, Quiz 3.
Select "Answer all – the user must answer every question to continue" from the Required:
dropdown list.
In the Settings area, only the two checkboxes indicated above should be checked.
, , and You will notice that these buttons are grayed out. This is as it should be, based on the
above settings.
Once you have modified the quiz settings as indicated above, click the Pass or Fail Options tab (next to
the Quiz Settings tab) to complete the remaining settings for your quiz.
6
Researched and prepared by L. Goldstein

Adobe Presenter Job Aid
All about Quizzes in Adobe Presenter
Figure 9: Pass or Fail Options tab
If your quiz is a practice quiz, it really doesn’t matter what this is set at, so it’s fine to leave it at
80%. This is because for our purposes, the learner will not be provided with a quiz result message, and
the quiz results are not reported.
If, however, your quiz is a skill check, then 80% is the correct setting (which should already be there by
default). So, regardless of which type of quiz you’re making (practice or skill check), use the default
setting of 80%.
In the “If failing grade” section, if your quiz is a practice quiz, then check the Infinite attempts
checkbox. If it is a skill check, leave this box unchecked and set the Allow user: number to 1 attempt.
7 Researched and prepared by L. Goldstein

Adobe Presenter Job Aid
All about Quizzes in Adobe Presenter
If you arrived here from the section covering the Add New button, follow the link below to get back to
where you were. Otherwise, please ignore this link and continue reading.
Back to using the Add New button to add a new quiz.
That’s all for the Quizzes tab. Now we’re ready to move on to the remaining tabs.
OUTPUT OPTIONS TAB
Next, we need to look at the Output Options tab.
Figure 10: Output Options tab
This one’s actually pretty easy. All you need to do is make sure that only the Show incomplete quiz
warning box is checked. If any other boxes are checked, uncheck them now.
Figure 11: Only the Show incomplete quiz warning checkbox should be checked
8 Researched and prepared by L. Goldstein

Adobe Presenter Job Aid
All about Quizzes in Adobe Presenter
Now, click the Reporting tab; we’ll adjust its settings next.
REPORTING TAB
There are a lot of options on this tab, but the only one we’re concerned with is the Enable reporting for
this presentation checkbox.
Note: Standards for this may change. If it does, you will likely be notified as to any settings that need to
be different. Also, you should confirm with your single point of contact (SPOC) that this is correct.
Figure 12: At the time of this writing, this is the only setting on this tab that matters
For now, the rule is that practice quizzes will have this checkbox unchecked, since it is not necessary to
report results from them.
Results of skill checks, on the other hand, need to be reported. So, if you’re building a skill check, make
sure this box is checked.
DEFAULT LABELS
Figure 13: Default labels; see below for information about the Retry message
9 Researched and prepared by L. Goldstein

Adobe Presenter Job Aid
All about Quizzes in Adobe Presenter
The Submit and Clear buttons will appear on the screens the learner sees. Do not modify.
If the feedback is the same throughout the course, you can make that change in the Correct and
Incorrect message area, here. This will apply to all question screens. For example, the Retry message
might be, "Incorrect. Please try again." throughout the entire course.
If more than one attempt is allowed—which would likely be the case for practice questions consisting of
at least three possible answers— then check the Retry message: checkbox.1
Now, there’s just one more Quiz Manager tab to look at—the Appearance tab.
APPEARANCE TAB
This tab enables you to choose the default settings for the text size and style of your feedback boxes and
buttons. You can save these settings as a profile that you can also access for future presentations.
Figure 14: Appearance tab
1 For skill checks, this checkbox will be grayed out. This is because skill checks only permit learners one attempt per
question, so a retry would never be given (and the Retry message would never appear).
10 Researched and prepared by L. Goldstein
Adobe Presenter Job Aid
All about Quizzes in Adobe Presenter
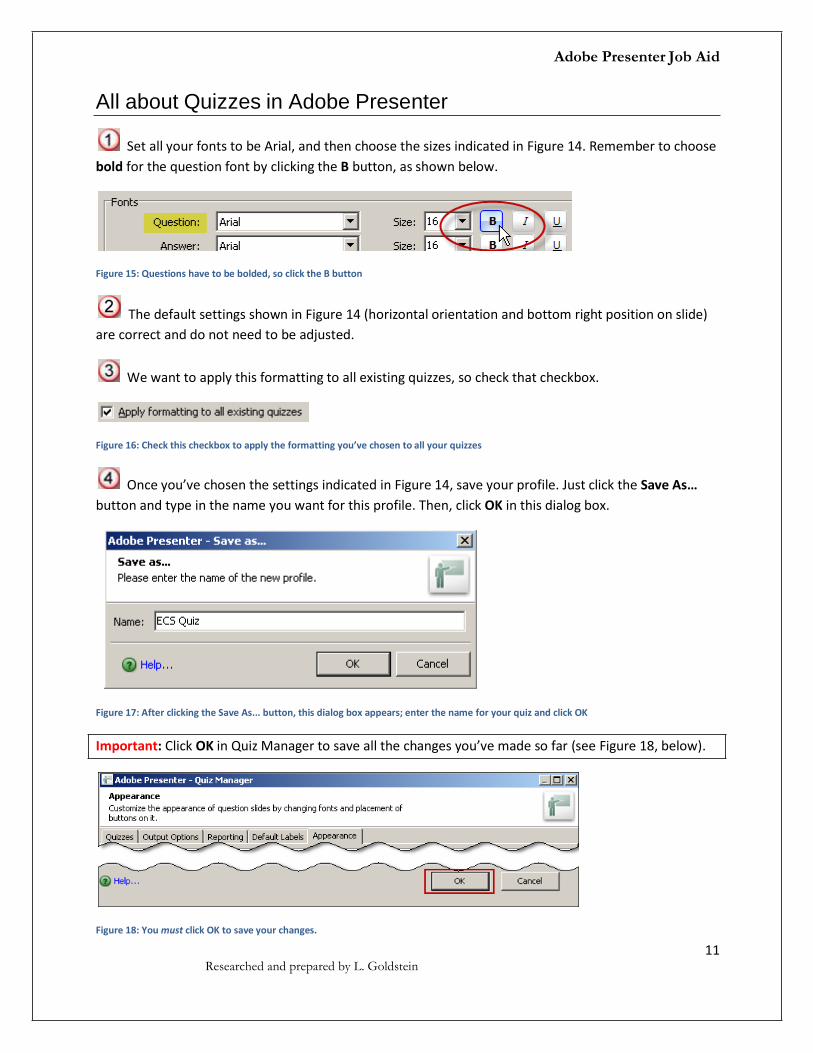
Set all your fonts to be Arial, and then choose the sizes indicated in Figure 14. Remember to choose
bold for the question font by clicking the B button, as shown below.
Figure 15: Questions have to be bolded, so click the B button
The default settings shown in Figure 14 (horizontal orientation and bottom right position on slide)
are correct and do not need to be adjusted.
We want to apply this formatting to all existing quizzes, so check that checkbox.
Figure 16: Check this checkbox to apply the formatting you’ve chosen to all your quizzes
Once you’ve chosen the settings indicated in Figure 14, save your profile. Just click the Save As…
button and type in the name you want for this profile. Then, click OK in this dialog box.
Figure 17: After clicking the Save As... button, this dialog box appears; enter the name for your quiz and click OK
Important: Click OK in Quiz Manager to save all the changes you’ve made so far (see Figure 18, below).
Figure 18: You must click OK to save your changes.
11 Researched and prepared by L. Goldstein

Adobe Presenter Job Aid
All about Quizzes in Adobe Presenter
This completes the settings for your quiz. Next, we will look at the Add New button in the Quiz group.
A D D N E W Q U I Z
If your course has questions
that are separated by screens
of content, you’ll need to
create additional quizzes. Click
the Add New button to do so.
Figure 19: Click this button to add a new quiz
Note that the Add Quiz button in Quiz Manager does exactly the same thing as this button.
The popup that appears when you click the Add New button should look familiar. It is exactly the same
as the Quiz Settings popup we looked at before (except that at the top, it reads “New Quiz” instead of
“Quiz”).
Since it is a new quiz, the settings you applied to your previous quiz are not applied to this quiz. Instead,
this new quiz will have the Presenter default settings.
To customize this quiz to our standards, we follow the same steps used before. A link to that section is
provided below. After you complete those steps, a link is provided to take you back here.
Go to Quiz Settings
Now that you’ve adjusted the settings for your new quiz, let’s move on to another feature, importing
quiz questions.
I M P O R T Q U I Z Q U E S T I O N S
The Import button of the Quiz group
allows you to import any or all
questions from other quizzes.
Figure 20: Import quiz questions
When you click this button, a popup appears, as depicted in Figure 21. From there, you’ll need to
browse to the PowerPoint presentation containing the quiz from which you want to import questions.
12
Researched and prepared by L. Goldstein

Adobe Presenter Job Aid
All about Quizzes in Adobe Presenter
Figure 21: Choose the PowerPoint presentation from which you want to import quiz questions
Once you find the file you need, double-click it. This will bring up the Import Quiz feature.
Figure 22: The Import Quiz feature lets you import one or more quiz questions, a whole question group, or all a presentation’s questions
13 Researched and prepared by L. Goldstein

Adobe Presenter Job Aid
14
All about Quizzes in Adobe Presenter
To import any question, just drag it from the Import From: pane to the Import To: pane. You can select
more than one question to import by holding down the ctrl button, clicking a question, and then clicking
any other questions you wish to add. Remember to continue holding down the ctrl button when you
drag these questions to the Import To: pane.
If you want to import an entire question group, it’s the same process: just click and drag it. Likewise if
you want to import all the questions of another presentation—just click and drag the topmost (i.e.,
highest level) component from the Import From: pane to the Import To: pane.
Note: If you happen to drag over a quiz question or question group that you don’t want, it’s easy to
delete later. Likewise, if you drag any quiz questions or question groups to a place in your presentation
that’s not exactly where you want it, you can always reposition it later.
Q U I Z M A N A G E R B U T T O N S
We’ve gone through the settings for the Quiz Manager tabs. There are also three buttons, depicted
below, which we’ll look at next.
Figure 23: Add Quiz, Add Question Group, and Add Question buttons
STRUCTURE OF QUIZZES IN ADOBE PRESENTER
Before looking at what the buttons do, it is helpful to understand the structure of quiz content in Adobe
Presenter. The quiz is the container into which you will place your questions. Also within the quiz
container, you may or may not have a question group. See Figure 24.

Adobe Presenter Job Aid
15
All about Quizzes in Adobe Presenter
Figure 24: Quizzes are containers that hold questions and, optionally, also contain question groups
ADD QUIZ BUTTON
The Add Quiz button takes you to exactly the same place as the Add New button in the Quiz group; it’s
just a different way of getting there.
Figure 25: Add Quiz button
ADD QUESTION GROUP BUTTON
The Add Question Group button (shown below) allows you to group your quiz questions. Whether you
use a question group will depend on whether you use question pools in your quiz. If you know that you
won’t be using question groups, please skip ahead to the next section, Add Question button.
Figure 26: Add Question Group button

Adobe Presenter Job Aid
16
All about Quizzes in Adobe Presenter
Here’s an example. Let’s say you want to have a quiz with 70 questions covering three different topics.
Each topic2 will have a different question pool, with the specifications outlined in the table below.
Topic Question Group Questions
Topic 1 Question Group 1 10
Topic 2 Question Group 2 20
Topic 3 Question Group 3 40
Table 1: Sample quiz showing how 70 questions can be placed into three question groups
So, to use this information to make a question group, here’s what you do. First, note that it doesn’t
matter whether you first build the questions or the question group. Click Add Question Group (shown in
Figure 26) to get started.
Figure 27: Question group settings
Notice we’re on the Settings tab. There is also a Navigation tab, which is not likely to be needed.
2 Note that “topic” is not used here as an official term. In this context, it is used in the general sense of
distinguishing one specific type of subject matter from another.

Adobe Presenter Job Aid
17
All about Quizzes in Adobe Presenter
Add a numerical identifier to the question group in the Name: field. For example, Question Group
1, Question Group 2, Question Group 3.
The default score is 10. Consult your SPOC to confirm what the score settings for the quiz questions
in your question group should be.
Notice that in Figure 27, there are zero questions; this is what you’ll see when you first create a
question group, before you add quiz questions.
Once you add questions to your quiz group, you’ll see something like Figure 28.
Figure 28: If you add 10 questions to your questions group, this is what you will see
As a practical matter, you may have a pool of 10 questions but only want five of these to show up in
your quiz. In that case, you would change the setting in the Include: dropdown list from 10 to 5, as
shown below.
Figure 29: If you only want five questions to be used from your pool of 10, this is how you make that adjustment
The Shuffle questions checkbox lets choose whether to randomize your questions. Do not
randomize practice questions. You should, however, randomize skill check questions.
ADD QUESTION BUTTON
Now for the fun part—actually building quiz questions. Adobe Presenter makes it possible to create a
variety of different question types. To see what’s available, click the Add Question button.
Note: The Add Question button also functions as a dropdown list if you click the arrow to the far right of
the button.

Adobe Presenter Job Aid
All about Quizzes in Adobe Presenter
Figure 30: Add Question button
A list of question types now displays, as shown in Figure 31. Note, too, that we will only be using graded
questions, not survey questions.
Figure 31: Several question types are available from Adobe Presenter
18 Researched and prepared by L. Goldstein

Adobe Presenter Job Aid
All about Quizzes in Adobe Presenter
We can start by eliminating from our discussion some question types that will not be used. Unless your
SPOC indicates otherwise, Rating Scale (Likert) will never be used. Likewise, it is most likely that you will
not be using Short answer questions. Further, use of True/False questions is generally discouraged.
This leaves us with Multiple choice (MC), Fill-in-the-blank (FITB), and Matching.
Note: Matching can consist of single-answer or multiple-answer questions.
M U L T I P L E C H O I C E Q U E S T I O N S
To create a multiple choice question, select “Multiple choice” from the Question Types popup and click
the Create Graded Question… button (see Figure 31). You will see the Multiple Choice Question popup
depicted in Figure 32. Note that we start from the Question tab (highlighted in yellow). After we cover
the settings for this tab, we’ll move on to the Options and Reporting tabs.
Figure 32: Multiple Choice Question popup
19 Researched and prepared by L. Goldstein

Adobe Presenter Job Aid
All about Quizzes in Adobe Presenter
This may look intimidating, but it’s actually pretty straightforward. Let’s now look at the settings for the
components of a multiple choice question.
In the Name: field, you will name your question. You should use the naming convention shown in
Figure 32. This will make your question easy to identify as being Question 1 of Practice 1.
Here, you would just type your question. If you’re not copying it from a source (such as an MS Word
document) that has already been reviewed for accuracy, be sure to proofread what you have written.
The score should be set at 1 unless indicated otherwise by your SPOC.
Note: If this question is part of a question group (as in Figure 32), this box will be set according to the
question group settings (which is why it’s grayed out). In that case, to change the value of the question,
you would either remove it from the question group or change the value of each question in the
question group.
If you have a question that must be included in a quiz that shuffles questions, then check this box.
Note: You will only see this box if your question is part of a question group. See FITB questions for an
example of an ungrouped question.
The Answers area is where you’ll see your answers, once you create them. The radio button with
the black dot in it (Answer B in the example of Figure 32) signifies that it is the correct answer.
You should shuffle answers only for skill checks, not for practice questions.
Here, you can choose whether your MC quiz will allow single or multiple responses. Figure 32 shows
a single response. Before moving on, let’s take a look at what you need to create an MC question
allowing multiple responses.
If you want to have more than one correct answer for your MC question, select “Multiple Responses”
from the Type: dropdown list, as shown below.
Figure 33: Choose Multiple Responses to create a question that allows learners to select more than one answer
20 Researched and prepared by L. Goldstein

Adobe Presenter Job Aid
All about Quizzes in Adobe Presenter
Now it is possible for the learner to
select any combination of possible
answers. To designate which answers
are correct, place a checkmark by them.
Figure 34: In the above example, answers B and D are correct
The default setting of A, B, C… is recommended for this and all other quizzes.
Use these buttons to add or delete questions.
The Advanced… button takes us to Advanced Answer Options. To enable the Advanced Answer
Options popup that appears, just click the Advanced Answer Options checkbox.
Figure 35: Check the Advanced Answer Options checkbox to access additional settings
The next page describes
the settings available from
the Advanced Answer
Options shown here.
Figure 36: Advanced Answer Options
21 Researched and prepared by L. Goldstein

Adobe Presenter Job Aid
All about Quizzes in Adobe Presenter
This is the answer you already entered. No need to change it here.
The Answer Feedback: field is where you can type in custom feedback for the learner to see. In this
example, the user chose Answer A (which is incorrect, since B is the only correct answer, as per Figure
32). So, we are providing the learner with a message other than the default of “Incorrect - Click
anywhere to continue.”
Important: To modify the answer feedback, it is not necessary to go here. You can do the same thing by
typing directly into any feedback box that appears on the PowerPoint slide itself.
The Action: field allows you to send learners to any slide in the presentation (an essential feature of
branching), based on their response. You could even send them to a Web site.
Figure 37: Based on the learner’s response, you can direct the learner to any slide in the presentation or to a Web site
It is not anticipated that this feature will be used in course development at this time.
MULTIPLE CHOICE QUES TIONS WITH MULTIPLE ANSWERS
If you want to have more than one correct answer for your MC question, select “Multiple Responses”
from the Type: dropdown menu, as shown below (Note: This information is also on pp. 20–21).
Figure 38: Choose Multiple Responses
Now it is possible for the learner to select any combination of possible answers. To designate which
answers are correct, place a checkmark by them.
Figure 39: In the above example, answers B and D are correct
22 Researched and prepared by L. Goldstein

Adobe Presenter Job Aid
All about Quizzes in Adobe Presenter
OPTIONS TAB
This tab is very important, and you will use it regularly.
Figure 40: Multiple Choice Question Options tab
All the answers should always be graded, so use the default of Graded - there are right and wrong
answers. This is the case even if you’re creating a practice quiz that will not be graded.
Also, note that the Show clear button checkbox should be checked.
23
Researched and prepared by L. Goldstein

Adobe Presenter Job Aid
All about Quizzes in Adobe Presenter
You may notice that this looks familiar, very much like the Advanced Answer Options we looked at
earlier. It works just like it, in fact. You can send the user to any slide in the presentation by using the
Action: dropdown list. Most of the time, however, you will use the default of “Go to next slide.”
Additionally, note that the Show correct message checkbox should be checked.
Figure 40 shows what your settings should be if you’re creating a skill check. In skill checks, the
learner is only allowed one attempt.
Also, like the correct answer settings, the learner will generally be sent to the next slide. Lastly, the
Show error message and Show incomplete message checkboxes should each be checked.
Important: The settings for practice quizzes are different and are described next.
In practice quizzes, learners
are given infinite attempts.
Also, you should make sure
they see an error message,
retry message, and
incomplete message.
Figure 41: Each of the four checkboxes should be checked for practice quizzes
REPORTING TAB
This one’s quick and
easy. If your quiz is a
skill check, make sure
the Report answers
checkbox is checked.
For practice quizzes, it
should be unchecked.
Figure 42: For skill checks, the Report answers box should checked; leave it unchecked for practice quizzes
Note: The Options and Reporting tabs are the same for all question types we’ll be using.
Multiple Choice | Fill-in-the-Blanks | Matching | Quizzes | Publishing
24 Researched and prepared by L. Goldstein

Adobe Presenter Job Aid
All about Quizzes in Adobe Presenter
F I L L - IN - T H E - B L A N K ( F I T B ) Q U E S T I O N S
At the time of this writing (May 2010), FITB questions in Adobe Presenter at State Farm® have been
notoriously problematic. Specifically, if you create an FITB question and later change it from within Quiz
Manager, Presenter “wrecks” your question! Whatever formatting or positioning you’ve used will
instantly be undone, and your slide will look terrible.
Until Adobe provides a solution to this issue, a workaround is available in a job aid at Adobe Presenter
Job Aid - Formatting Fill-in-the-Blank Questions.
To access the Fill-in-the-blank Question popup, open Quiz Manager. Then, click Add Question, select
Fill-in-the-blank from the Question Types popup, and click Create Graded Question.
Figure 43: FITB Question popup
25 Researched and prepared by L. Goldstein

Adobe Presenter Job Aid
All about Quizzes in Adobe Presenter
The Question area is where you’ll name your question, type it in, and assign it a value. Use the
naming convention indicated in the Name: field. The Description: field is where you actually type in (or
paste, if copying) your question. The score shown is the default, 10; change this to 1.
These buttons allow you to add, edit, or delete the correct answer for the blanks in your fill-in-the-
blank question. If you click the Add Blank button, you will see the popup shown in Figure 44.
Figure 44: Blank Answer popup
Generally, you should always use the first radio button option, The user will type in the answer, which
will be compared to the list below. Also, your answers will typically not be case-sensitive, but the
checkbox shown does offer this functionality, should you require it.
Clicking the Add button will bring up a “type the answer here” field. Add the correct answer to your
blank here. If your question requires more than one blank, click Add again and supply the answers for as
many blanks as your question will have.
Let’s look at an actual example. Figure 45 shows an FITB question that uses two blanks. Then, Figure 46
shows how the question will actually look to the learner.
Note: The example shown in Figure 46 has been colored and formatted by a developer (the default does
not have any colors). When you create an FITB question, you’ll likely have to reposition the blanks (i.e.,
the answer boxes).
26 Researched and prepared by L. Goldstein

Adobe Presenter Job Aid
All about Quizzes in Adobe Presenter
Important information about using colors: To use colors like what’s shown in Figure 46, you must
create a separate textbox to place over the actual answer text. Placing color directly into the answer
textbox will cause it to not function properly. Please note that adding color to your questions may
significantly increase production time.
Figure 45: FITB question that uses two blanks
Figure 46: This is what your slide will look like in PowerPoint and also when published; note that the question and answer textboxes have
been formatted and moved from their default positions
If your question is part of a practice quiz, make sure the Shuffle answers in list checkbox is
unchecked. If you’re building a skill check, however, then this box should be checked. What you see in
Figure 45 in the Phrase: and Blanks: fields is the information you entered in part (of Figure 43).
This completes the Question tab for FITB questions. Next, you will need to choose the settings for the
Options and Reporting tabs.
27 Researched and prepared by L. Goldstein
Adobe Presenter Job Aid
All about Quizzes in Adobe Presenter
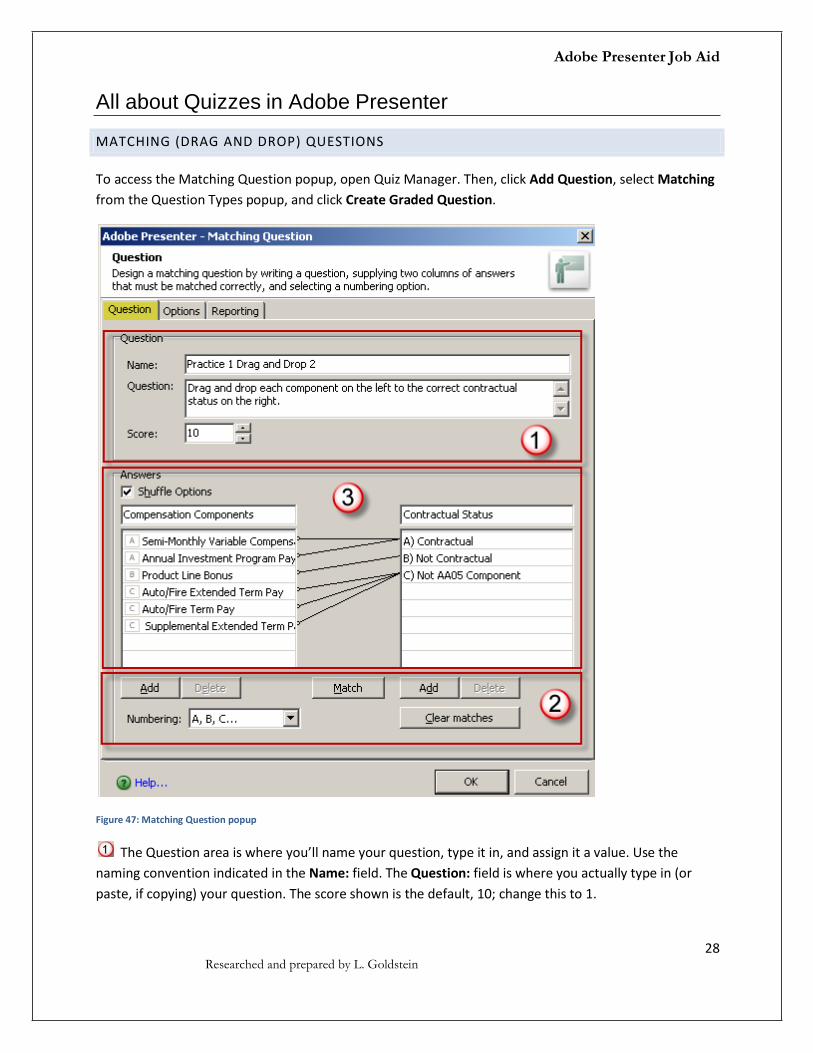
M A T C H I N G ( D R A G A N D D R O P ) Q U E S T I O N S
To access the Matching Question popup, open Quiz Manager. Then, click Add Question, select Matching
from the Question Types popup, and click Create Graded Question.
Figure 47: Matching Question popup
The Question area is where you’ll name your question, type it in, and assign it a value. Use the
naming convention indicated in the Name: field. The Question: field is where you actually type in (or
paste, if copying) your question. The score shown is the default, 10; change this to 1.
28 Researched and prepared by L. Goldstein

Adobe Presenter Job Aid
All about Quizzes in Adobe Presenter
These buttons allow you to add, match, clear matches of, or delete the correct answers for your
questions.
When you first create a matching question, this is what you’ll see (Figure 48). Note that you can rename
your columns to whatever is appropriate for the question you’re building.
Figure 48: What it looks like when you start building a matching question.
Click the Add button below the first column (shown in Figure 47) and enter what you want to appear as
the first entry in that column. Then, repeat this step, using the Add button below the second column. Do
this for as many entries as you will be using for your two columns.
To delete entries, click the entry you want to delete and then click the Delete button below the column
you’re working in.
Note: There must be at least two entries in each column.
MATCHING UP THE ENTR IES IN THE COLUMNS
There are two ways to match entries in the columns. The first is to simply drag an entry from one
column to its match in the other column.
Figure 49: Click and hold the entry you want to move to its match
Figure 50: Drag the entry to its match in the other column
Alternatively, you can click an entry, then click the entry you want it matched to, and then click the
Match button.
If you want to un-match a match, select one of the entries that are part of the match and click the Un-
Match button. If this button does not appear, drag the match back and forth to each column, from left
to right and right to left. To clear all the matches, click the Clear matches button.
29 Researched and prepared by L. Goldstein
Adobe Presenter Job Aid
30
All about Quizzes in Adobe Presenter
The Shuffle Options checkbox lets you choose whether to randomize your questions. Do not randomize
practice questions. You should, however, randomize skill check questions.
This completes the Question tab for Matching questions. Next, you will need to choose the settings for
the Options and Reporting tabs.
F O R M A T T I N G S T A N D A R D S F O R F E E D B A C K
Before you can add color to your feedback, you need to know how to apply colors to textboxes; this is
covered next. After that, the standards for feedback colors is provided.
HOW TO APPLY COLORS
To apply a color to a feedback box, double-click its border. When you do this, you should be taken to the
Format tab.
Figure 51: Once you double-click a feedback box (or any textbox), you will be taken to the Format tab
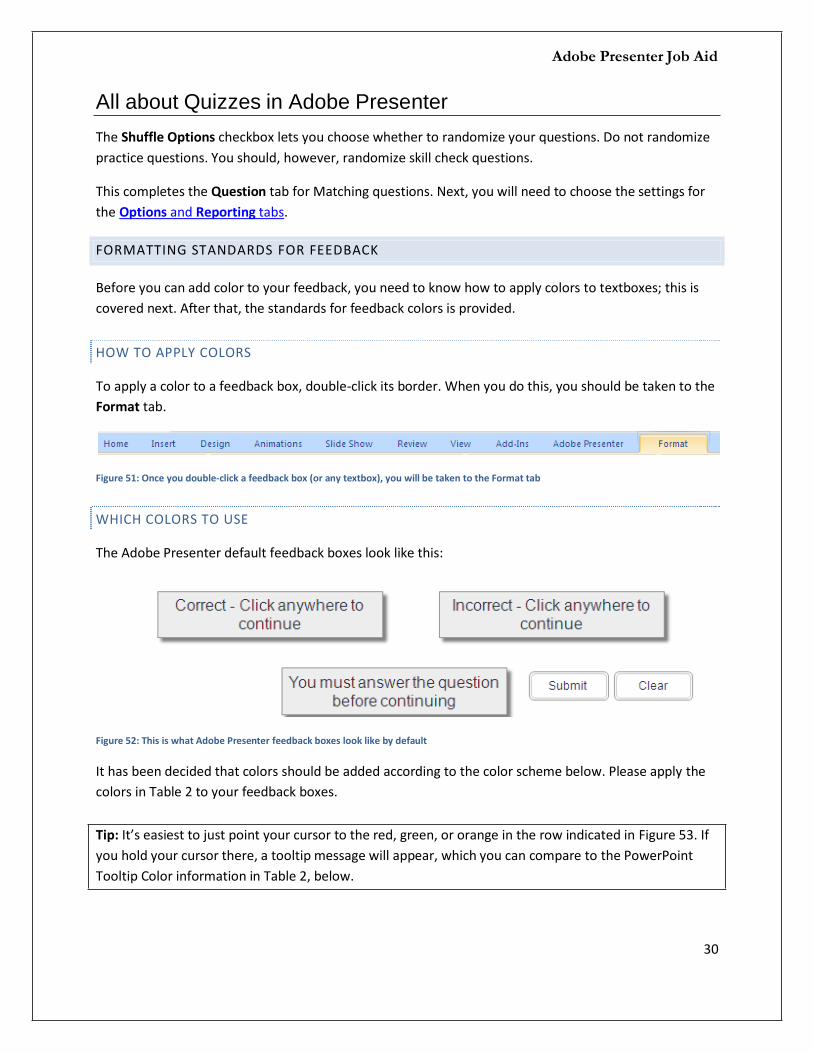
WHICH COLORS TO USE
The Adobe Presenter default feedback boxes look like this:
Figure 52: This is what Adobe Presenter feedback boxes look like by default
It has been decided that colors should be added according to the color scheme below. Please apply the
colors in Table 2 to your feedback boxes.
Tip: It’s easiest to just point your cursor to the red, green, or orange in the row indicated in Figure 53. If
you hold your cursor there, a tooltip message will appear, which you can compare to the PowerPoint
Tooltip Color information in Table 2, below.

Adobe Presenter Job Aid
31
All about Quizzes in Adobe Presenter
Feedback RGB Color Code PowerPoint Tooltip Color
Correct R:195, G:214, B:155 Olive Green, Accent 3, Lighter 40%
Incorrect R:217, G:150, B:148 Red, Accent 2, Lighter 40%
Incomplete answer warning R:250, G:192, B:144 Orange, Accent 6, Lighter 40%
Retry R:250, G:192, B:144 Orange, Accent 6, Lighter 40%
Table 2: Use only the feedback colors indicated above
Figure 53: Green (for Correct feedback) is being selected in the image above
WHERE TO POSITION FE EDBACK BOXES
Consult your SPOC to see if there is any preference regarding this. Sometimes it will depend on the
makeup of your question slide as to where you will have to position feedback boxes. Generally,
however, you should try to keep them consistently placed.
FORMATTING PREFERENC ES FOR FEEDBACK TEXT
By default, Adobe Presenter centers all feedback text. This is not practical for longer, customized
feedback. It is best to left-align your feedback instead of have it centered.
It is beyond the scope of this job aid to provide detailed graphic design strategies and how-to
information for the various formatting scenarios you may encounter. However, to get you started,
please be aware of a very useful feature called Format Shape.
If you right-click the border of a textbox, a menu displays. At the bottom of this menu is Format Shape.
Once you select it, there is another menu with Text Box at the bottom. The features available from
Format Shape > Text Box can be very useful, particularly if you are dealing with lengthy feedback.

Adobe Presenter Job Aid
32
All about Quizzes in Adobe Presenter
B R A N C H I N G
Branching can add great value to your quizzes With it, you can create happy/unhappy paths for learners.
It is beyond the scope of this job aid to cover all the aspects of branching, however. But a very helpful
video tutorial is available from Adobe at http://my.adobe.acrobat.com/quizbranching.
P U B L I S H I N G
Figure 54: Presentation group
Publishing is done from the
Presentation group within
the Adobe Presenter tab.
Note: If you don’t see the Presentation group, be sure you have selected the Adobe Presenter tab.
Figure 55: To see the Presentation group, you have to be on the Adobe Presenter tab
SLIDE MANAGER
Slide Manager lets you
modify several settings on
any or all of your slides.
Figure 56: Slide Manager
Clicking the Slide Manager button opens the Slide Manager popup, shown in Figure 57.

Adobe Presenter Job Aid
33
All about Quizzes in Adobe Presenter
Figure 57: Slide Manager popup
The settings shown in the Slide 1 area of Figure 57 function as follows.
Setting What it means
Presented By: Each slide should be presented by “The Mark of Leadership.” We’ll use the Select
All button for that (see below).
Navigation Name: A slide’s title is created by whatever your quiz question is. This won’t look good
when published, so change to “-- Question 1,” “-- Question 2,” etc.
Go To: If you click this one, it will allow you to change the navigation. For example, if the
slide goes to the next slide, you can change it to go to any slide in the presentation.
You would want to utilize this feature if your quiz employs branching.
Advance by User: This is another setting we’ll handle using the Select All button (see below).
Lock Slide: If you lock the slide, it will disable the navigation buttons, so the learner will be
forced to follow whatever navigation links you provide.
Multimedia: This lets you know if a slide is using audio, video, or Flash.
Table 3: Slide settings
The Select All button enables you to change all the slides at once. We will want to use it for two settings:
Presented By: and Advance by User:, as outlined on the next page.

Adobe Presenter Job Aid
34
All about Quizzes in Adobe Presenter
1. Since you’ll want every slide to be advanced by the learner, click the Select All button at the
bottom left.
Figure 58: Click the Select All button
2. Click the Edit... button that has just appeared.
Figure 59: Click the Edit… button
3. The Advance by user checkbox will probably be unchecked or have a kind of grayish checkmark
in it. You will need to click it to put a checkmark in it, as shown below.
Additionally, you should make sure the Presented By: dropdown menu displays “The Mark of
Leadership.” If it does not, change it now. As a final step before completing and handing off your
presentation, be sure that the settings are as shown in Figure 60.
Figure 60: Check the Advance by user checkbox. Also, make sure the dropdown menu shows The Mark of Leadership.

Adobe Presenter Job Aid
All about Quizzes in Adobe Presenter
PRESENTATION SETTINGS
Figure 61: Presentation settings button
Presentation settings are accessed
through the Settings button in the
Presentation group.
There are four tabs in the Presentation Settings popup that appears when you click the Settings
button.
Figure 62: Presenter Settings popup
You will probably not need to access the Playback or Quality tabs. However, you might need to add an
attachment, so let’s look at the Attachments tab.
First, click the Attachments tab. Then, near the bottom right, click the Add button. This will bring up the
Add Attachment dialog box shown in Figure 63.
From there, you can choose to add a file, such as a spreadsheet, PDF, image or graphic file, etc. For a list
of file types that can be added, consult the Adobe Presenter 7 User Guide. Go to the middle of page 15
of that guide (where it says “About attachments”) for an overview of attachments. Then, page 16 has a
table showing various attachment types and how they will open when accessed by the learner.
35 Researched and prepared by L. Goldstein

Adobe Presenter Job Aid
36
All about Quizzes in Adobe Presenter
Figure 63: From here, you can add and name a file attachment; clicking the folder icon lets you browse for the file you wish to attach
Alternatively, you can a link to a Web site. To do so, click the Type: dropdown and choose Link instead of
File. You’ll see the Location: field change to a Url: field.
Figure 64: Selecting Link from the Type: dropdown list changes the dialog box, as pictured here
You would then just type in the URL you wish to use and enter a name for this link in the Name: field.
The Appearance tab displays the title of your course here, which is produced automatically based
on its original filename. If the title displayed is not what you want it to be, you can change it here.
You can add a course summary here; it will not be visible to the learner.
Other settings (lots of them) are available from the Theme Editor button. The default settings will
probably be fine for your course, but check with your SPOC to make sure.
PUBLISH
When you want to see what your
course will look like to the learner,
click the Publish button.
Figure 65: Publish button

Adobe Presenter Job Aid
37
All about Quizzes in Adobe Presenter
Note: Before publishing, you may want to preview part or all of your presentation. Table 4 (below)
shows how to do that.
P R E V I E W I N G S L I D E S
You can preview one slide, an entire presentation, or an entire published presentation.
What you want to do How to do it
Preview just the slide you’re on Shift + F5
Preview the whole presentation F5
See the whole published presentation Click the Publish button
Table 4: How to preview your course
A Publish Presentation popup will appear, as pictured below in Figure 66.
Figure 66: This is what you'll see when you click the Publish button
By default, publish to My Computer should be selected. This is where you should publish to.
The default publishing location is fine. However, you do have the option of changing it (to your Desktop or the H:\ drive, for example). To do this, you would click the Choose button and then select the location to where you wish to publish.

Adobe Presenter Job Aid
38
All about Quizzes in Adobe Presenter
The Settings… and Slide Manager… buttons function identically to those in the Presentation group. Generally, you should already have those settings set correctly, so you should not need to access these buttons from here.
The first time you publish your presentation on a given day, you should have the View output after publishing box checked. After that, if you keep the browser window opened where it’s published to, you can leave it unchecked—it will publish again to that same location.
Important: If you use the second option, you must refresh the browser window to see the updated content.
It’s perfectly fine if you always leave this checked, but understand that this will result in a new browser window being opened every time.
Once you click this Publish button, your presentation will publish to the location you selected (See
Figure 66, above, area ).
A P P E N D I X : A D D I T I O N AL R E S O U R C ES F O R A D O B E P R E S E N T E R
How-to and User Guides
Adobe Presenter 7 Quick Start Guide
If you are new to Presenter, this is an excellent place to start.
Adobe Presenter 7 User Guide
A very useful guide, particularly for features you may not have used before. Not really designed for
troubleshooting, however (see the links below for troubleshooting).

Adobe Presenter Job Aid
All about Quizzes in Adobe Presenter
Adobe Presenter Forum
A Presenter-specific forum through connectusers.com, the Adobe Connect User Community.
Another Adobe Presenter Forum
This one is a Presenter forum via the Adobe website.
Ro b Ro de’s Fo rum
Useful site containing Presenter troubleshooting discussions, tips and tricks, etc. Hosted by a multimedia
SME. Note that you can read any forum posting, but to respond or make a new post, you have to email
Rob to request access; this is a quick and easy process, I found.
39 Researched and prepared by L. Goldstein