Embed Size (px)
Citation preview
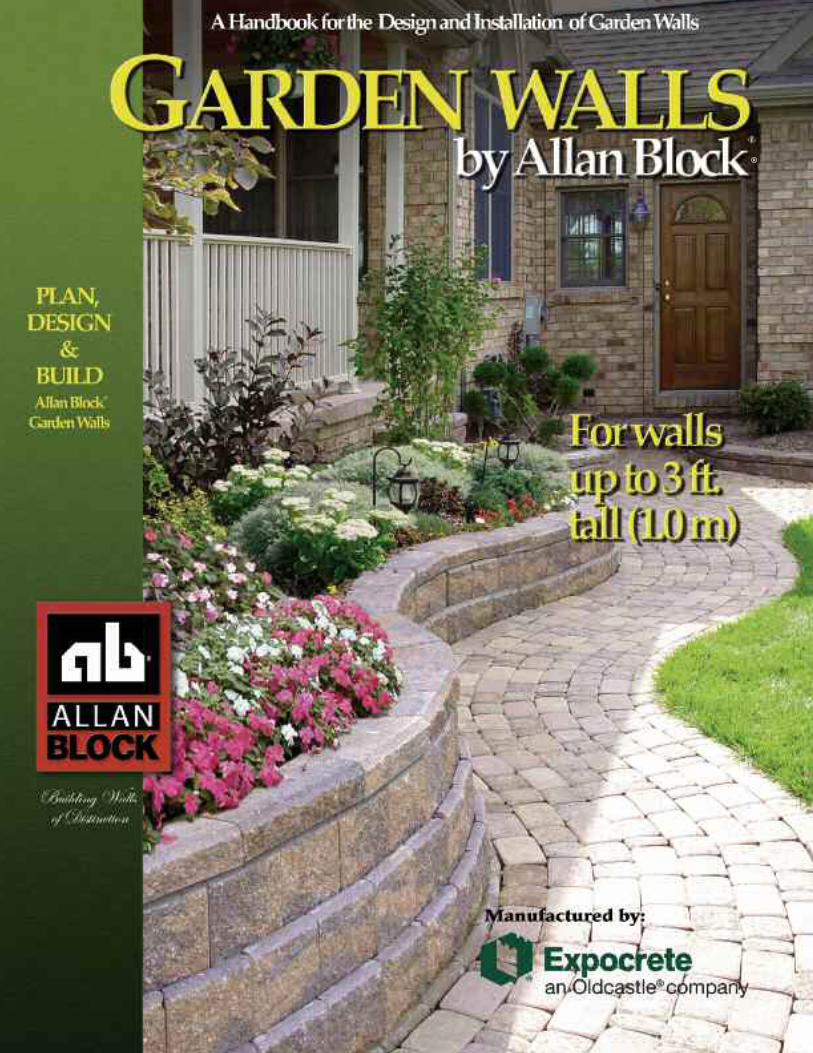
®
1
2
®
3
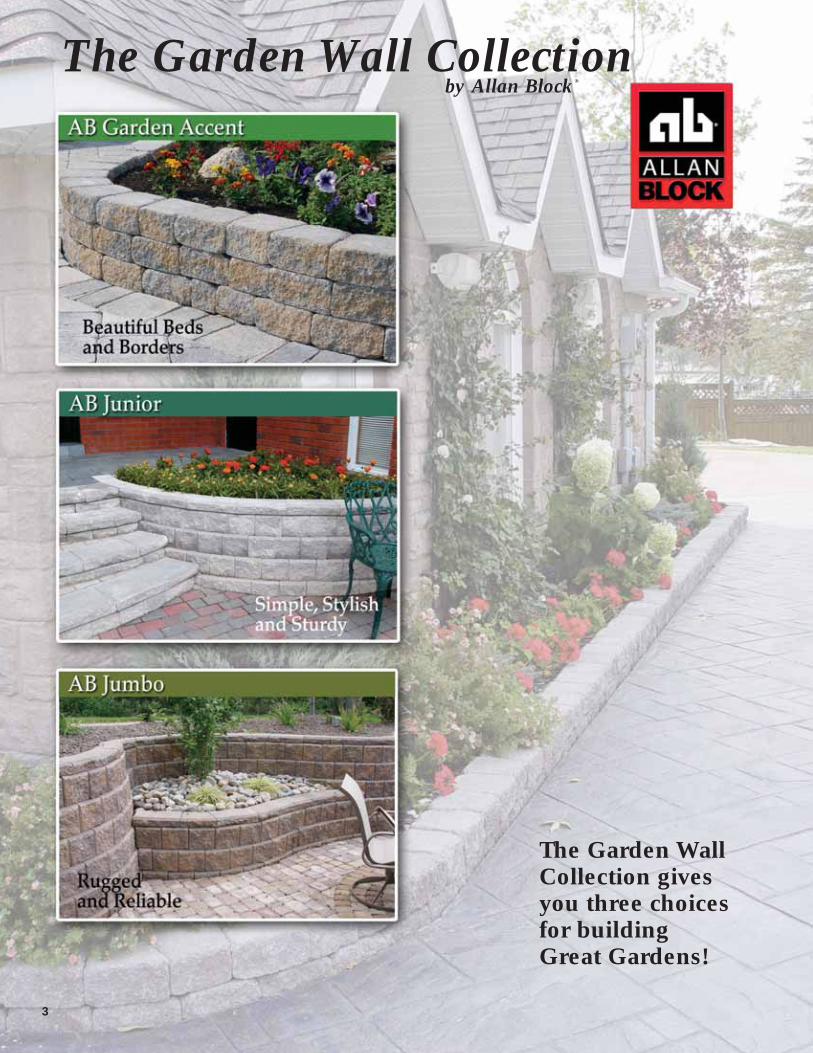
The Garden Wall Collection
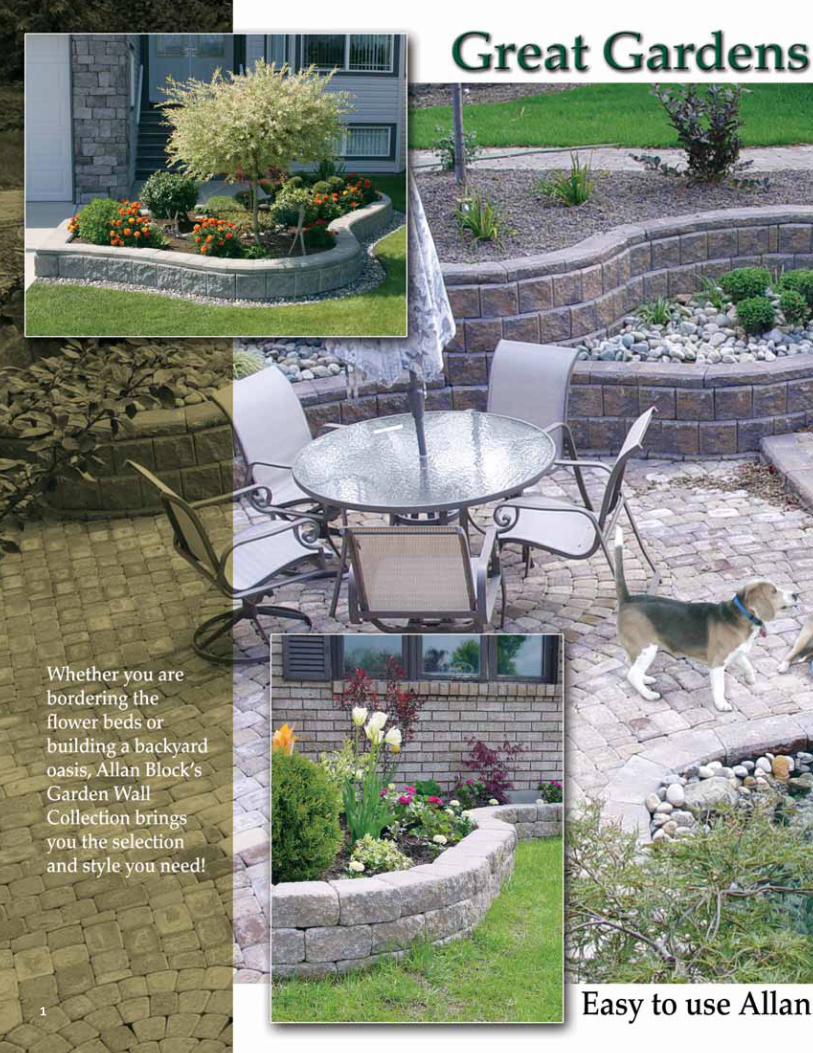
The Garden WallCollection givesyou three choicesfor buildingGreat Gardens!
by Allan Block®
4
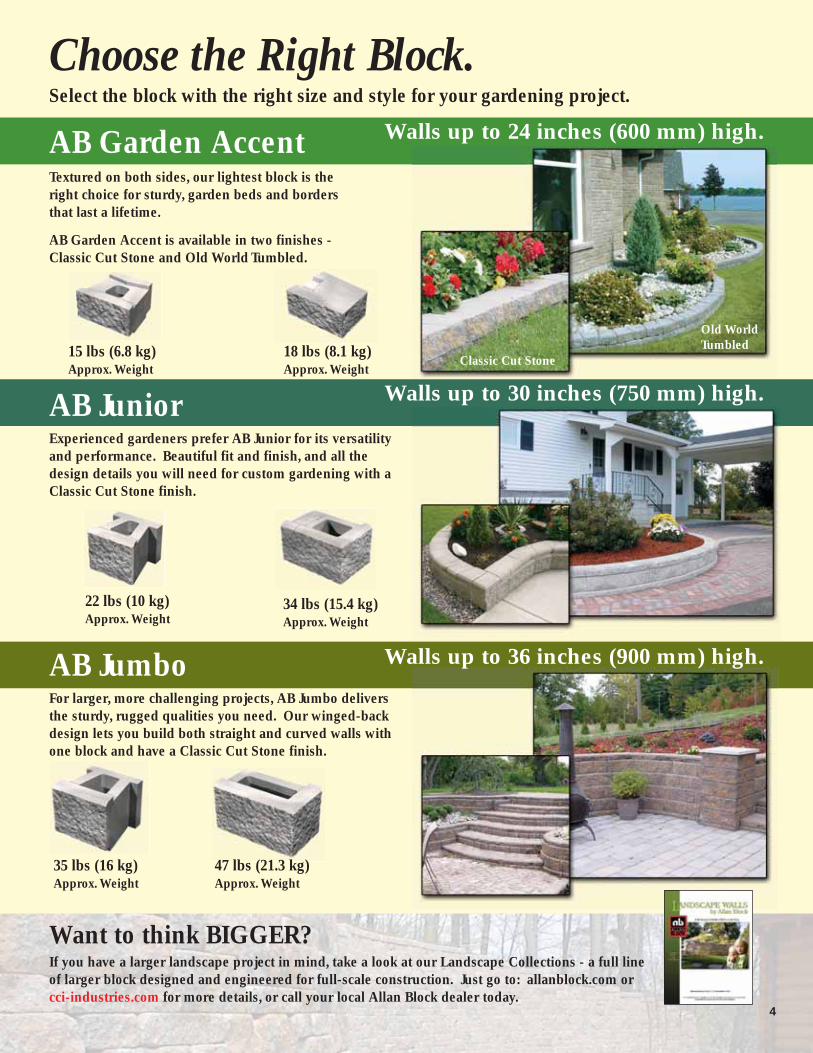
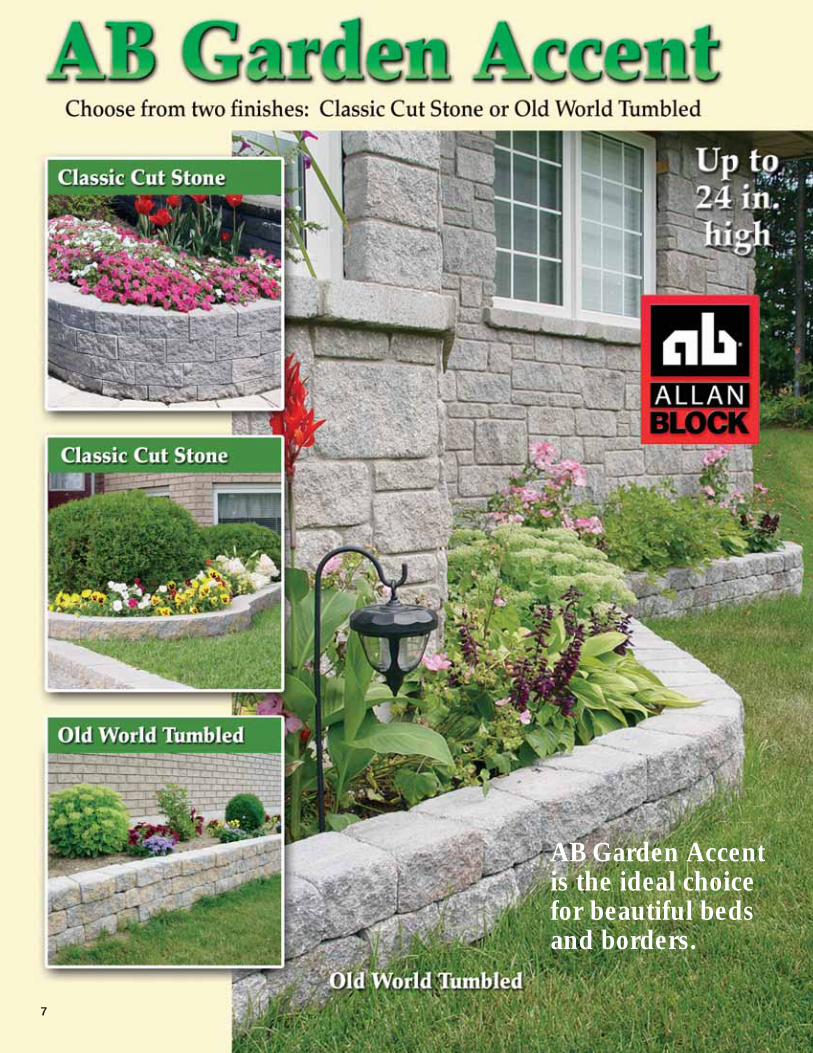
AB Garden AccentTextured on both sides, our lightest block is theright choice for sturdy, garden beds and bordersthat last a lifetime.
AB Garden Accent is available in two finishes -Classic Cut Stone and Old World Tumbled.
15 lbs (6.8 kg)Approx. Weight
Choose the Right Block.Select the block with the right size and style for your gardening project.
Walls up to 24 inches (600 mm) high.
35 lbs (16 kg)Approx. Weight
47 lbs (21.3 kg)Approx. Weight
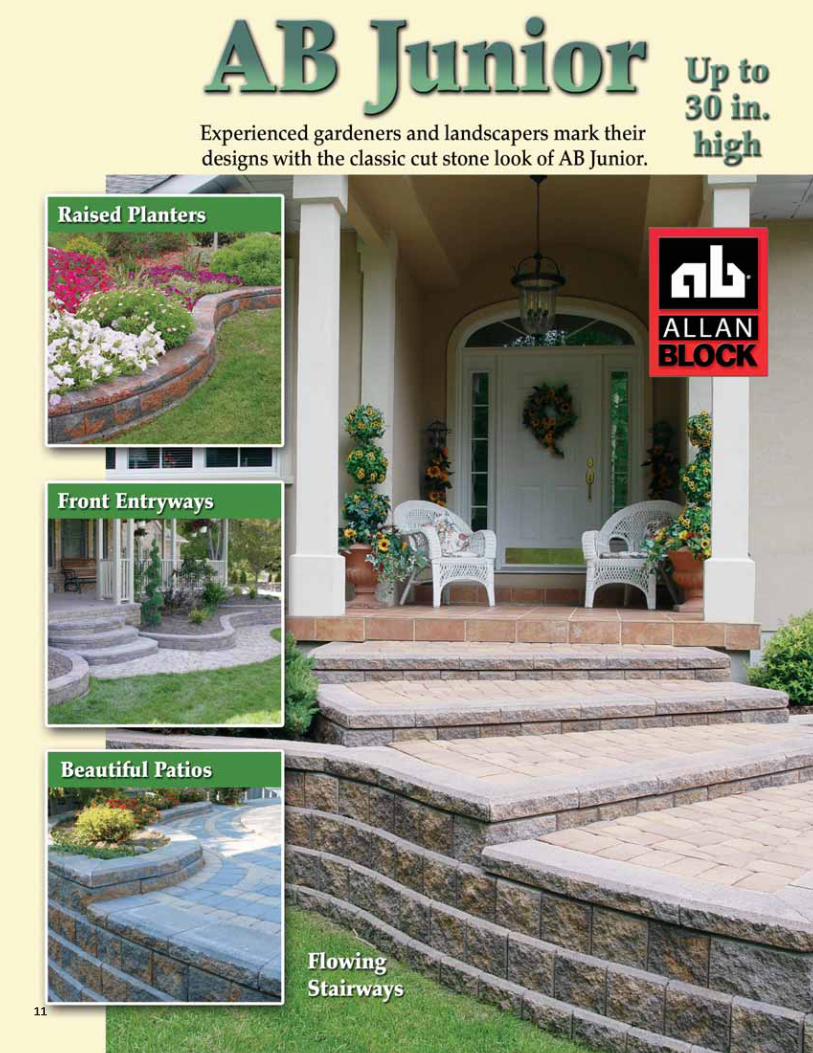
AB JuniorExperienced gardeners prefer AB Junior for its versatilityand performance. Beautiful fit and finish, and all thedesign details you will need for custom gardening with aClassic Cut Stone finish.
AB JumboFor larger, more challenging projects, AB Jumbo deliversthe sturdy, rugged qualities you need. Our winged-backdesign lets you build both straight and curved walls withone block and have a Classic Cut Stone finish.
Classic Cut Stone
Old WorldTumbled
Walls up to 36 inches (900 mm) high.
22 lbs (10 kg)Approx. Weight
34 lbs (15.4 kg)Approx. Weight
Walls up to 30 inches (750 mm) high.
Want to think BIGGER?If you have a larger landscape project in mind, take a look at our Landscape Collections - a full lineof larger block designed and engineered for full-scale construction. Just go to: allanblock.com or cci-industries.com for more details, or call your local Allan Block dealer today.
18 lbs (8.1 kg)Approx. Weight

Job Site ConsiderationsJob Site Considerations
5
Before Installation BeginsA little bit of planning will make your project go fasterand turn out right.
SoilsSoil conditions are important in any garden or landscape.Check to see what kind of soil you have before starting.
• Sandy soils are easy to work with and drain well too.• Clay soils are harder to work with and drain poorly.• Good organic soils are always best for planting beds.
If you have poor soil conditions, consider removal andreplacement. Planting beds need to have 6-12 in. (150 to 300 mm) of well-drained organic soils.
The Wall Base / Wall RockTo build a good wall, you need a firm foundation, or base. Planon using clean, granular rock underneath the base row.
Good drainage and compaction will add to the quality and performance of your finished wall.
We refer to the materialused for the base, withinand behind the block as"Wall Rock". Crushed orsmooth stone, ranging insize from 0.25 in. to 1 in.(6 to 25 mm) is ideal.Your AB dealer will have what you need.
A set of simple tools isall you need to buildgreat Allan Block walls.
DrainageManaging water around your gardens is important for tworeasons: your plantings require good moisture conditions,and proper drainage will prevent water from ponding or running into areas it's not wanted - like your basement.
• Always grade your beds to move water away from thehouse foundation.
• Make sure water moves freely off of walkways and patios.• Slope areas above the walls to send rain water around the
sides if possible.• Check sprinkler lines before and after construction.
See page 18 for more information on drainage.
Lot Lines and Utilities• Confirm lot lines and wall location. Your local municipality
will have a copy of your lot survey on file. The survey willidentify property lines and provide a scaled template tohelp with your site plan.
• Call your local utility companies to confirm the location of underground utilities. Buried utility lines are not only dangerous, they may prevent you from locating your project where you want.
4 ft and Torpedo levelGloves & Knee padsRake & ShovelWheel barrowBroomChisel and hammerWooden stakes Hand tamperSafety glassesTape measureRubber malletString line
Plan and Design Your ProjectPlan and Design Your Project
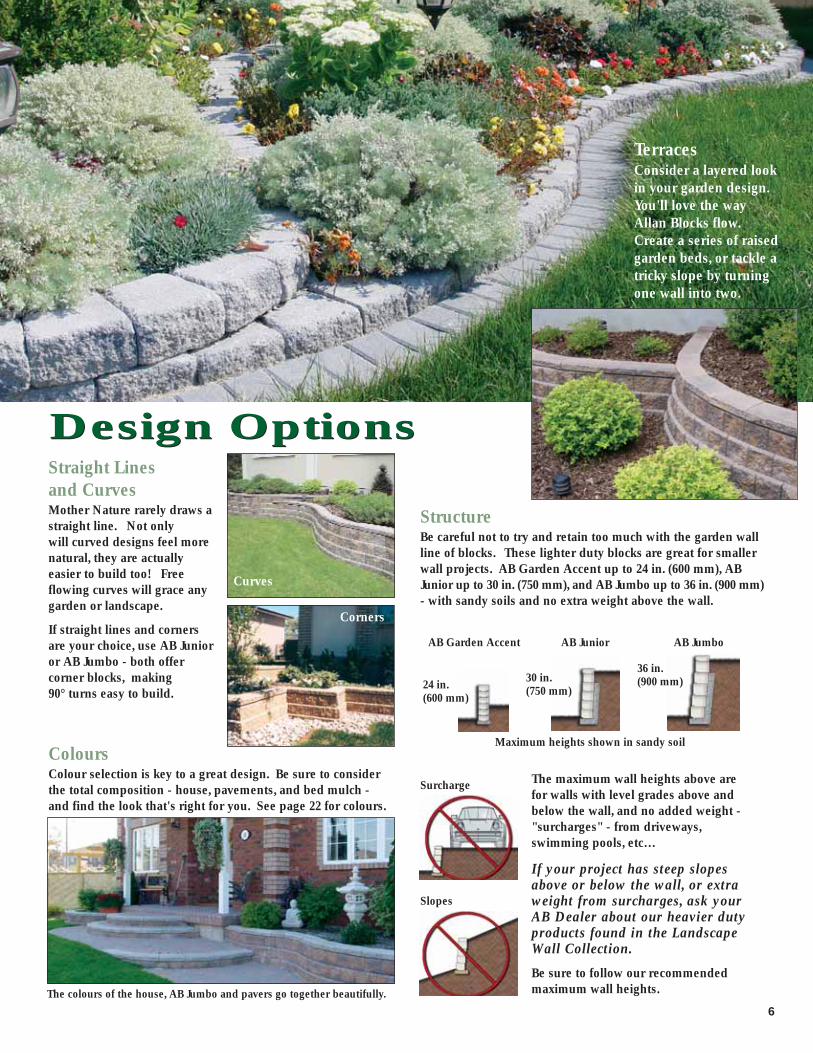
Design Options
StructureBe careful not to try and retain too much with the garden wallline of blocks. These lighter duty blocks are great for smallerwall projects. AB Garden Accent up to 24 in. (600 mm), ABJunior up to 30 in. (750 mm), and AB Jumbo up to 36 in. (900 mm)- with sandy soils and no extra weight above the wall.
The maximum wall heights above are for walls with level grades above andbelow the wall, and no added weight -"surcharges" - from driveways,swimming pools, etc…
If your project has steep slopesabove or below the wall, or extraweight from surcharges, ask yourAB Dealer about our heavier dutyproducts found in the LandscapeWall Collection.
Be sure to follow our recommended maximum wall heights.
6
ColoursColour selection is key to a great design. Be sure to considerthe total composition - house, pavements, and bed mulch -and find the look that's right for you. See page 22 for colours.
Straight Lines and CurvesMother Nature rarely draws astraight line. Not only will curved designs feel morenatural, they are actually easier to build too! Free flowing curves will grace any garden or landscape.
If straight lines and corners are your choice, use AB Junioror AB Jumbo - both offer corner blocks, making 90° turns easy to build.
Design Options
Curves
Corners
The colours of the house, AB Jumbo and pavers go together beautifully.
TerracesConsider a layered lookin your garden design.You'll love the way Allan Blocks flow.Create a series of raisedgarden beds, or tackle atricky slope by turningone wall into two.
AB Garden Accent
Surcharge
Slopes
Maximum heights shown in sandy soil
24 in.(600 mm)
30 in.(750 mm)
36 in.(900 mm)
AB Junior AB Jumbo
7
AB Garden Accentis the ideal choice for beautiful bedsand borders.
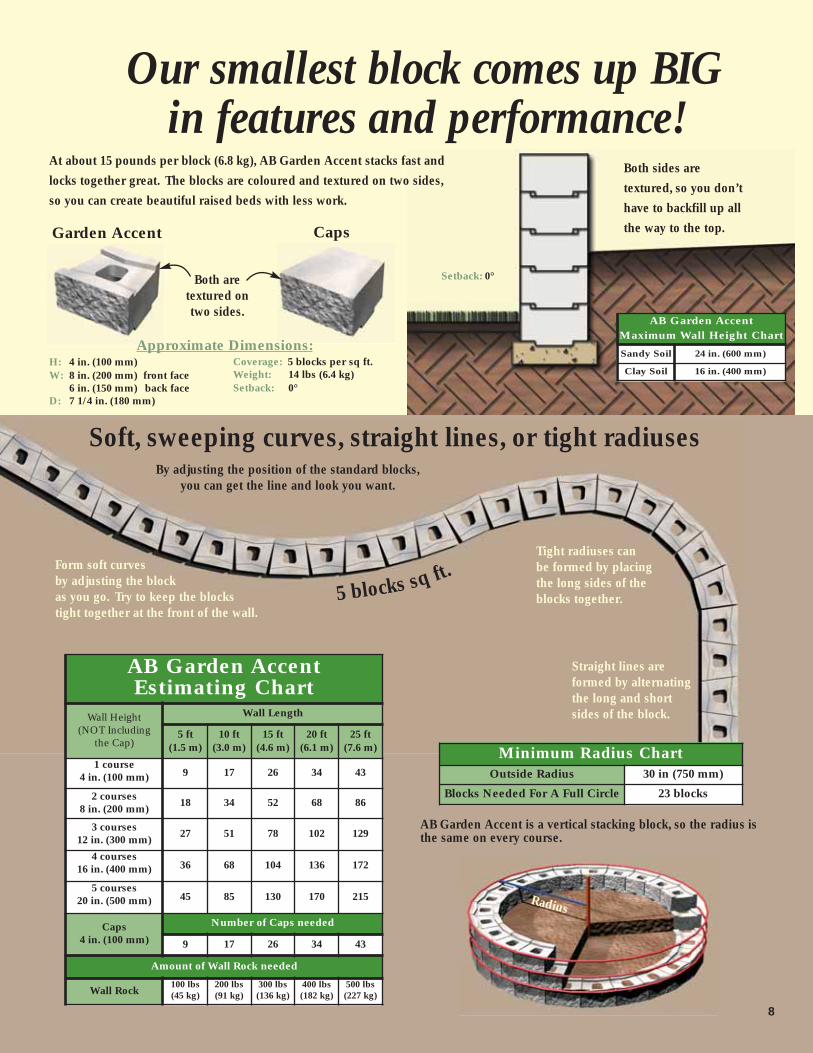
Soft, sweeping curves, straight lines, or tight radiuses
AB Garden AccentEstimating Chart
Wall Height(NOT Including
the Cap)
Wall Length
5 ft(1.5 m)
10 ft(3.0 m)
15 ft(4.6 m)
20 ft(6.1 m)
25 ft(7.6 m)
1 course 4 in. (100 mm) 9 17 26 34 43
2 courses 8 in. (200 mm) 18 34 52 68 86
3 courses 12 in. (300 mm) 27 51 78 102 129
4 courses 16 in. (400 mm) 36 68 104 136 172
5 courses 20 in. (500 mm) 45 85 130 170 215
Caps4 in. (100 mm)
Number of Caps needed
9 17 26 34 43
Amount of Wall Rock needed
Wall Rock100 lbs(45 kg)
200 lbs(91 kg)
300 lbs(136 kg)
400 lbs(182 kg)
500 lbs(227 kg)
Garden Accent Caps
Approximate Dimensions:H: 4 in. (100 mm)W: 8 in. (200 mm) front face
6 in. (150 mm) back faceD: 7 1/4 in. (180 mm)
By adjusting the position of the standard blocks,you can get the line and look you want.
Minimum Radius ChartOutside Radius 30 in (750 mm)
Blocks Needed For A Full Circle 23 blocks
AB Garden Accent is a vertical stacking block, so the radius isthe same on every course.
8
AB Garden Accent Maximum Wall Height Chart
Sandy Soil 24 in. (600 mm)
Clay Soil 16 in. (400 mm)
Both are textured on two sides.
Our smallest block comes up BIG in features and performance!
At about 15 pounds per block (6.8 kg), AB Garden Accent stacks fast andlocks together great. The blocks are coloured and textured on two sides,so you can create beautiful raised beds with less work.
Both sides are textured, so you don’thave to backfill up allthe way to the top.
Setback: 0°
Straight lines areformed by alternatingthe long and shortsides of the block.
Tight radiuses can be formed by placingthe long sides of theblocks together.
Form soft curves by adjusting the block as you go. Try to keep the blockstight together at the front of the wall.
Radius
Coverage: 5 blocks per sq ft.Weight: 14 lbs (6.4 kg)Setback: 0°
5 blocks sq ft.
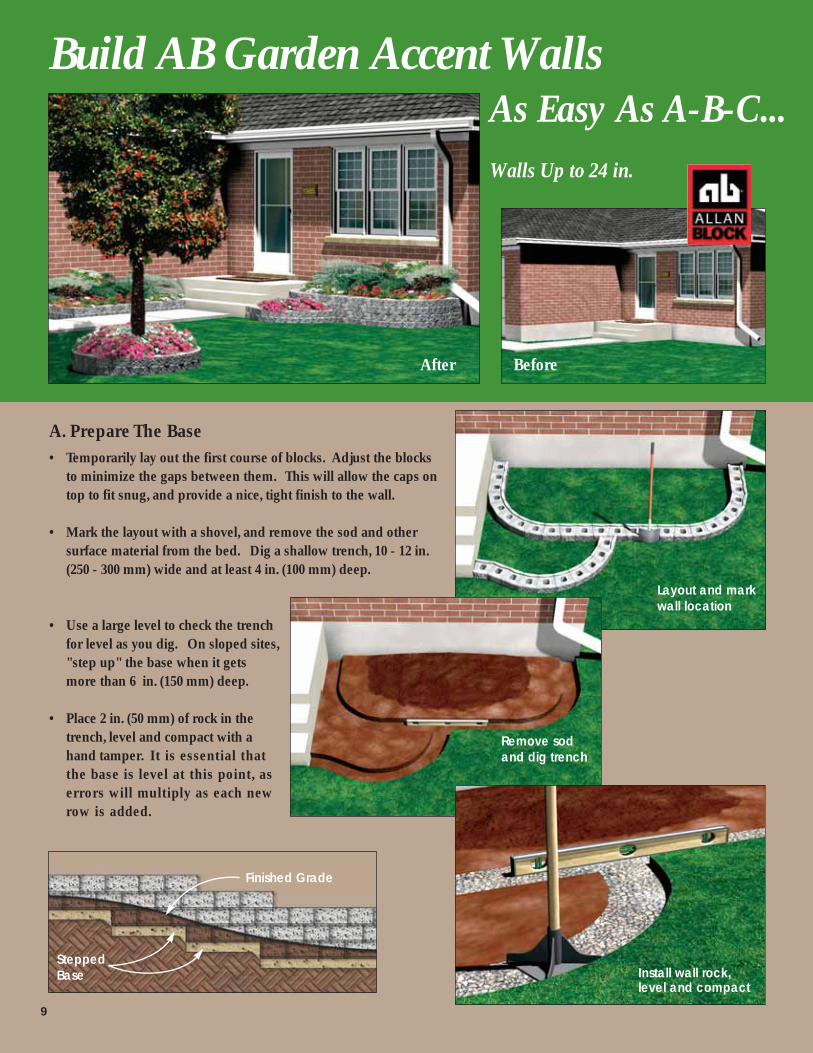
A. Prepare The Base• Temporarily lay out the first course of blocks. Adjust the blocks
to minimize the gaps between them. This will allow the caps ontop to fit snug, and provide a nice, tight finish to the wall.
• Mark the layout with a shovel, and remove the sod and othersurface material from the bed. Dig a shallow trench, 10 - 12 in.(250 - 300 mm) wide and at least 4 in. (100 mm) deep.
• Use a large level to check the trenchfor level as you dig. On sloped sites,"step up" the base when it gets more than 6 in. (150 mm) deep.
• Place 2 in. (50 mm) of rock in thetrench, level and compact with ahand tamper. It is essential thatthe base is level at this point, aserrors will multiply as each newrow is added.
Build AB Garden Accent Walls
Layout and markwall location
Remove sodand dig trench
9
As Easy As A-B-C...Walls Up to 24 in.
BeforeAfter
Install wall rock,level and compact
SteppedBase
Finished Grade
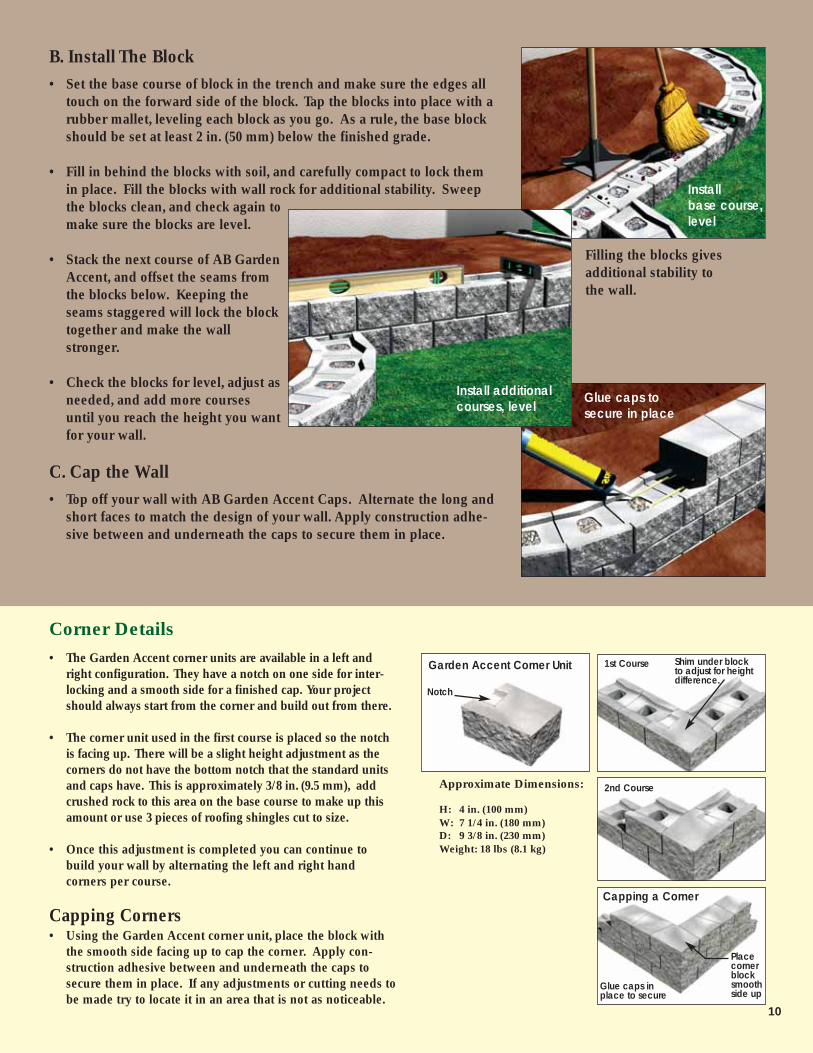
• The Garden Accent corner units are available in a left andright configuration. They have a notch on one side for inter-locking and a smooth side for a finished cap. Your projectshould always start from the corner and build out from there.
• The corner unit used in the first course is placed so the notchis facing up. There will be a slight height adjustment as thecorners do not have the bottom notch that the standard unitsand caps have. This is approximately 3/8 in. (9.5 mm), addcrushed rock to this area on the base course to make up thisamount or use 3 pieces of roofing shingles cut to size.
• Once this adjustment is completed you can continue tobuild your wall by alternating the left and right hand corners per course.
Capping Corners• Using the Garden Accent corner unit, place the block with
the smooth side facing up to cap the corner. Apply con-struction adhesive between and underneath the caps tosecure them in place. If any adjustments or cutting needs tobe made try to locate it in an area that is not as noticeable.
Corner Details
Garden Accent Corner Unit 1st Course
Glue caps inplace to secure
Placecornerblocksmoothside up
Shim under blockto adjust for heightdifference.
Notch
B. Install The Block• Set the base course of block in the trench and make sure the edges all
touch on the forward side of the block. Tap the blocks into place with arubber mallet, leveling each block as you go. As a rule, the base blockshould be set at least 2 in. (50 mm) below the finished grade.
• Fill in behind the blocks with soil, and carefully compact to lock themin place. Fill the blocks with wall rock for additional stability. Sweepthe blocks clean, and check again tomake sure the blocks are level.
• Stack the next course of AB GardenAccent, and offset the seams fromthe blocks below. Keeping theseams staggered will lock the blocktogether and make the wallstronger.
• Check the blocks for level, adjust asneeded, and add more coursesuntil you reach the height you wantfor your wall.
C. Cap the Wall• Top off your wall with AB Garden Accent Caps. Alternate the long and
short faces to match the design of your wall. Apply construction adhe-sive between and underneath the caps to secure them in place.
Install base course,level
10
Install additionalcourses, level
Glue caps tosecure in place
Filling the blocks givesadditional stability tothe wall.
2nd Course
Capping a Corner
Approximate Dimensions:
H: 4 in. (100 mm)W: 7 1/4 in. (180 mm) D: 9 3/8 in. (230 mm)Weight: 18 lbs (8.1 kg)
11
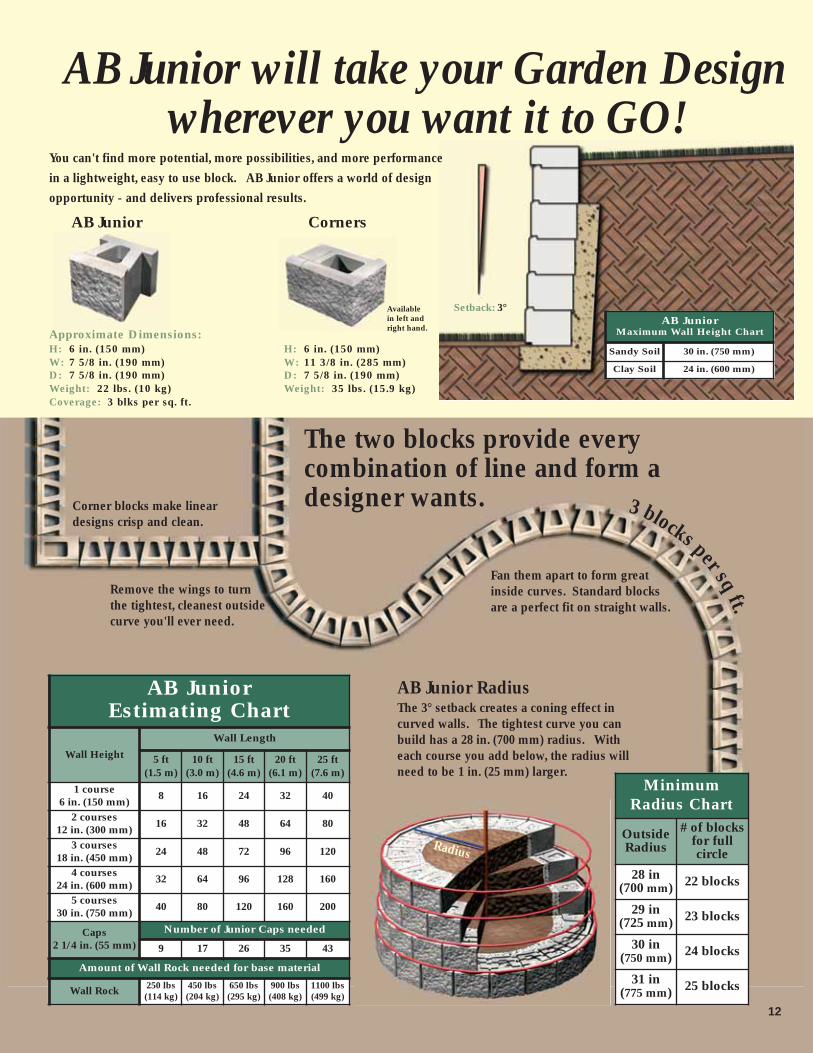
AB Junior RadiusThe 3° setback creates a coning effect incurved walls. The tightest curve you canbuild has a 28 in. (700 mm) radius. Witheach course you add below, the radius willneed to be 1 in. (25 mm) larger.
MinimumRadius Chart
Outside Radius
# of blocksfor full circle
28 in(700 mm) 22 blocks
29 in(725 mm) 23 blocks
30 in(750 mm) 24 blocks
31 in(775 mm) 25 blocks
AB Junior Estimating Chart
Wall Height
Wall Length
5 ft(1.5 m)
10 ft(3.0 m)
15 ft(4.6 m)
20 ft(6.1 m)
25 ft(7.6 m)
1 course 6 in. (150 mm) 8 16 24 32 40
2 courses 12 in. (300 mm) 16 32 48 64 80
3 courses 18 in. (450 mm) 24 48 72 96 120
4 courses 24 in. (600 mm) 32 64 96 128 160
5 courses 30 in. (750 mm) 40 80 120 160 200
Caps2 1/4 in. (55 mm)
Number of Junior Caps needed
9 17 26 35 43
Amount of Wall Rock needed for base material
Wall Rock 250 lbs(114 kg)
450 lbs(204 kg)
650 lbs(295 kg)
900 lbs(408 kg)
1100 lbs(499 kg)
12
AB Junior
Approximate Dimensions:H: 6 in. (150 mm)W: 7 5/8 in. (190 mm) D: 7 5/8 in. (190 mm)Weight: 22 lbs. (10 kg)Coverage: 3 blks per sq. ft.
H: 6 in. (150 mm)W: 11 3/8 in. (285 mm) D: 7 5/8 in. (190 mm)Weight: 35 lbs. (15.9 kg)
AB Junior Maximum Wall Height Chart
Sandy Soil 30 in. (750 mm)
Clay Soil 24 in. (600 mm)
AB Junior will take your Garden Designwherever you want it to GO!
You can't find more potential, more possibilities, and more performancein a lightweight, easy to use block. AB Junior offers a world of designopportunity - and delivers professional results.
Corners
Availablein left andright hand.
The two blocks provide every combination of line and form a designer wants.
Fan them apart to form great inside curves. Standard blocks are a perfect fit on straight walls.
Remove the wings to turn the tightest, cleanest outsidecurve you'll ever need.
Corner blocks make lineardesigns crisp and clean.
Radius
Setback: 3°
3 blocks per sqft.
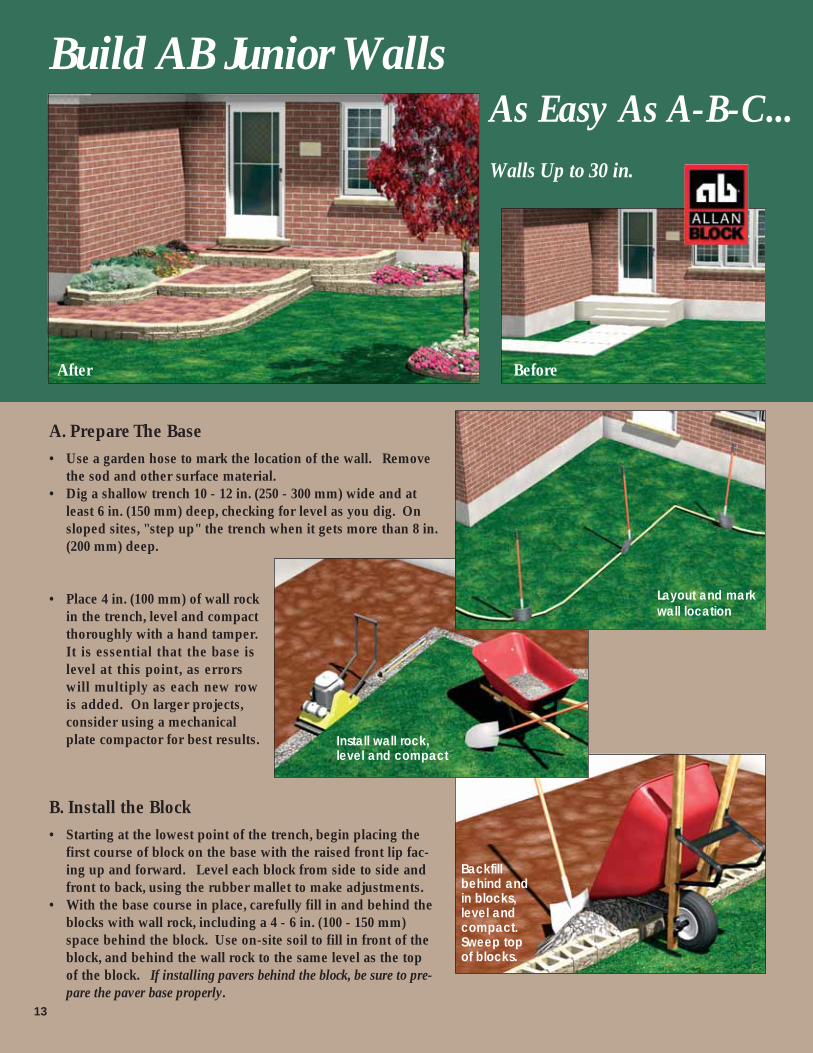
A. Prepare The Base• Use a garden hose to mark the location of the wall. Remove
the sod and other surface material.• Dig a shallow trench 10 - 12 in. (250 - 300 mm) wide and at
least 6 in. (150 mm) deep, checking for level as you dig. Onsloped sites, "step up" the trench when it gets more than 8 in.(200 mm) deep.
• Place 4 in. (100 mm) of wall rockin the trench, level and compactthoroughly with a hand tamper.It is essential that the base islevel at this point, as errorswill multiply as each new rowis added. On larger projects,consider using a mechanicalplate compactor for best results.
B. Install the Block• Starting at the lowest point of the trench, begin placing the
first course of block on the base with the raised front lip fac-ing up and forward. Level each block from side to side andfront to back, using the rubber mallet to make adjustments.
• With the base course in place, carefully fill in and behind theblocks with wall rock, including a 4 - 6 in. (100 - 150 mm)space behind the block. Use on-site soil to fill in front of theblock, and behind the wall rock to the same level as the top of the block. If installing pavers behind the block, be sure to pre-pare the paver base properly.
Backfillbehind andin blocks,level andcompact.Sweep top of blocks.
Build AB Junior WallsAs Easy As A-B-C...Walls Up to 30 in.
BeforeAfter
Install wall rock,level and compact
Layout and markwall location
13

• Compact thoroughly with a hand tamper or plate compactor.Good compaction is key to a quality job. Sweep the top of theblocks clean, and check again for level.
• Place the next course of blocks with the seams offset from thecourse below by 2 - 4 in. (50 - 100 mm). This will make thewall stronger and lockeach course more tightlyin place. Backfill againwith wall rock and appro-priate soils to the top ofthe second row.
• Compact again and repeatto the top of the wall.
Two-Way Cap AB 12 in. Straight Cap
Approximate Dimensions: H: 2 1/2 in. (65 mm)W: 5 5/8 in. (140 mm)
7 5/8 in. (190 mm)D: 8 3/8 in. (210 mm)Weight: 10 lbs. each
(4.5 kg)
H: 3 5/8 in. (90 mm)W: 11 1/4 in. (280 mm)D: 11 1/4 in. (280 mm)Weight: 35 lbs.
(16 kg)
Available in BritishColumbia and Albertalocations only.
AB Stone 18 in. Cap
H: 3 5/8 in. (90 mm)W: 11 7/8 in. (300 mm)D: 17 5/8 in. (440 mm)Weight: 50 lbs.
(23 kg)
Available in Albertaand Manitoba locations only.
Cutting Caps For A Mitre Joint Look
14
Backfill behindand in blocks,level and com-pact. Sweeptop of blocks.
Cap OptionsFor more information on caps and corners see page 21.
• Fill in the topcourse with plant-ing soil or mulch,and use theraised front lip asa finished edge.No caps required.
C. Finish the Wall• AB Junior has several options for finishing the top of
the wall. Choose the one that's right for your design.
• Use the Two-Wayfor a clean, fin-ished look. Gluethe caps in place.
• AB 12 in. StraightCaps provide theextra depth need-ed for comfortablestair treads. Besure to fastensecurely withadhesive.
• Mitred cornerswill give 90° corners a perfectfinish with somecutting.
Offset the blocks
If installing pavers behind the block, besure to prepare the paver base properly.
• Using four of the Two-Way caps and with some cuttingyou can create a mitre joint at the corner for a customlook. Be sure to wear safety glasses when cutting, andoperate power saws carefully.
• Using a power sawwith a masonryblade, make 45°cuts in blocks A &B and place on thewall at the corner.
• Place block Cagainst block B onthe wall, mark thearea to beremoved. Repeatthis same processfor block D.
• Use constructionadhesive to securepieces in place.
A B
C DA
B
C
D
Use with Junior Use with Jumbo Use with Jumbo
Cut caps A and B 6 in. from each corner
Discard allareas in red
6 in. 6 in.
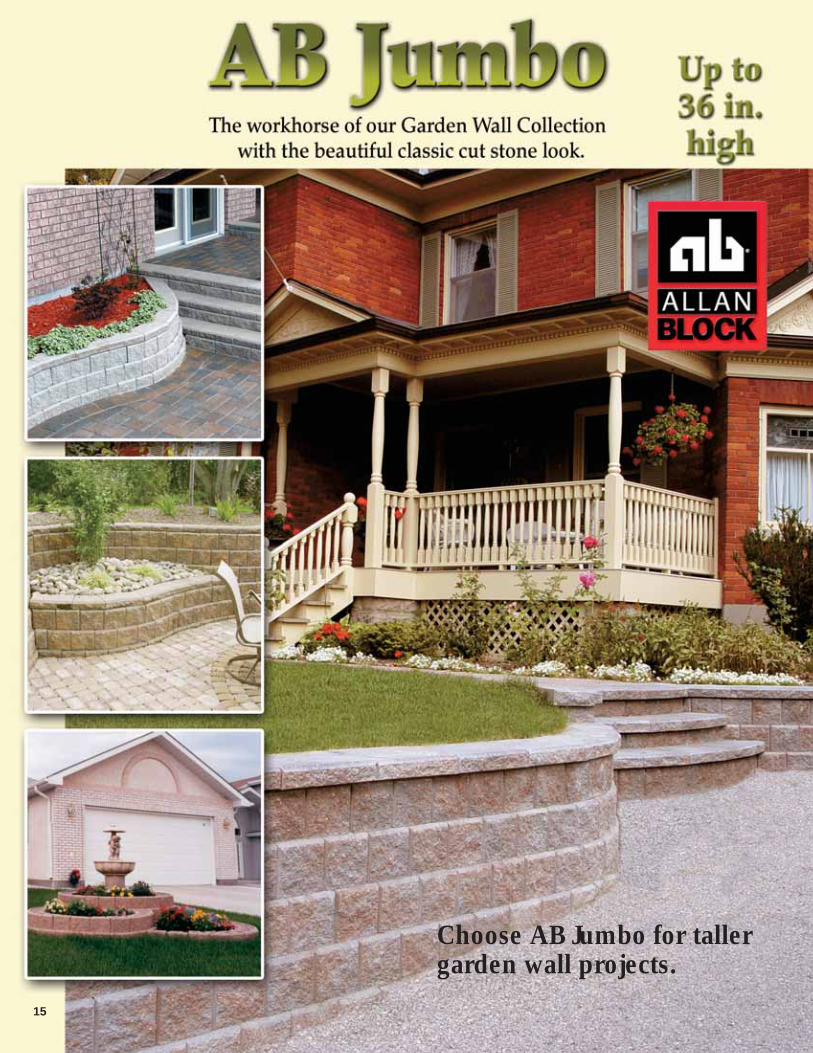
Choose AB Jumbo for tallergarden wall projects.
15
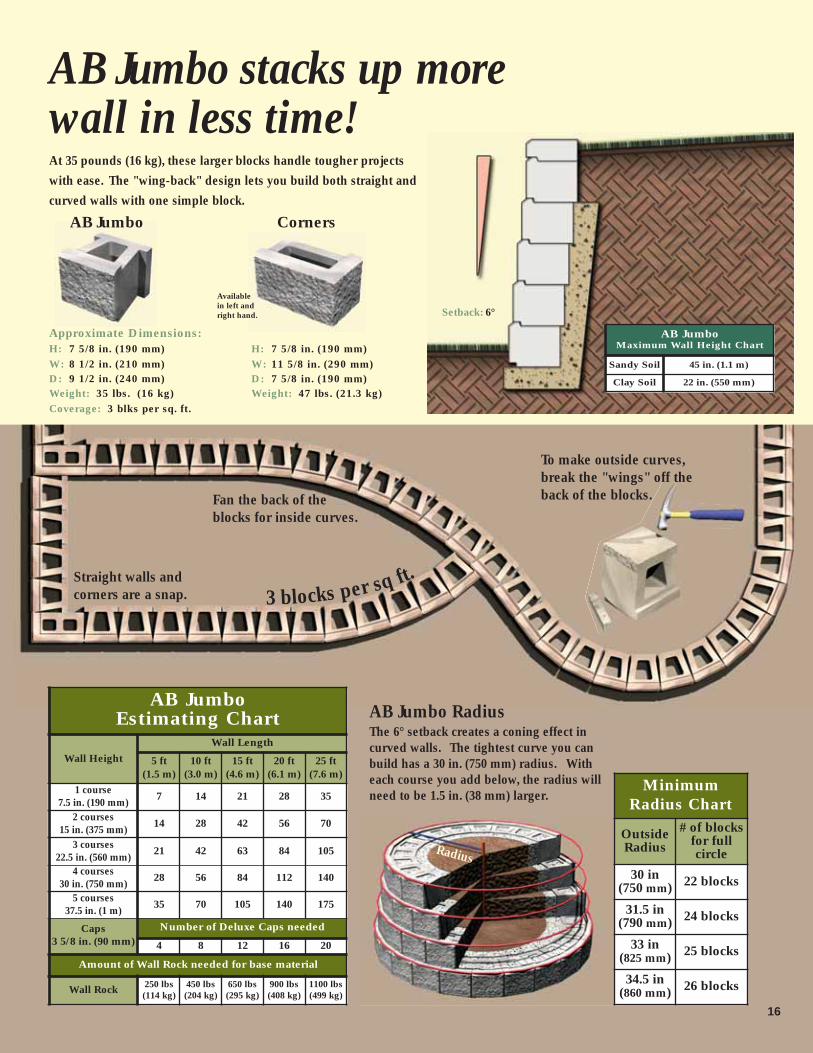
AB Jumbo RadiusThe 6° setback creates a coning effect incurved walls. The tightest curve you canbuild has a 30 in. (750 mm) radius. Witheach course you add below, the radius willneed to be 1.5 in. (38 mm) larger.
MinimumRadius Chart
Outside Radius
# of blocksfor full circle
30 in(750 mm) 22 blocks
31.5 in(790 mm) 24 blocks
33 in(825 mm) 25 blocks
34.5 in(860 mm) 26 blocks
AB Jumbo
Approximate Dimensions:H: 7 5/8 in. (190 mm)W: 8 1/2 in. (210 mm)D: 9 1/2 in. (240 mm)Weight: 35 lbs. (16 kg)Coverage: 3 blks per sq. ft.
H: 7 5/8 in. (190 mm)W: 11 5/8 in. (290 mm)D: 7 5/8 in. (190 mm)Weight: 47 lbs. (21.3 kg)
AB Jumbo Maximum Wall Height Chart
Sandy Soil 45 in. (1.1 m)
Clay Soil 22 in. (550 mm)
AB Jumbo stacks up more wall in less time!At 35 pounds (16 kg), these larger blocks handle tougher projectswith ease. The "wing-back" design lets you build both straight andcurved walls with one simple block.
Corners
Availablein left andright hand.
Radius
Setback: 6°
AB Jumbo Estimating Chart
Wall HeightWall Length
5 ft(1.5 m)
10 ft(3.0 m)
15 ft(4.6 m)
20 ft(6.1 m)
25 ft(7.6 m)
1 course 7.5 in. (190 mm) 7 14 21 28 35
2 courses 15 in. (375 mm) 14 28 42 56 70
3 courses 22.5 in. (560 mm) 21 42 63 84 105
4 courses 30 in. (750 mm) 28 56 84 112 140
5 courses 37.5 in. (1 m) 35 70 105 140 175
Caps3 5/8 in. (90 mm)
Number of Deluxe Caps needed
4 8 12 16 20
Amount of Wall Rock needed for base material
Wall Rock 250 lbs(114 kg)
450 lbs(204 kg)
650 lbs(295 kg)
900 lbs(408 kg)
1100 lbs(499 kg)
Fan the back of theblocks for inside curves.
Straight walls andcorners are a snap.
16
To make outside curves,break the "wings" off theback of the blocks.
3 blocks per sq ft.
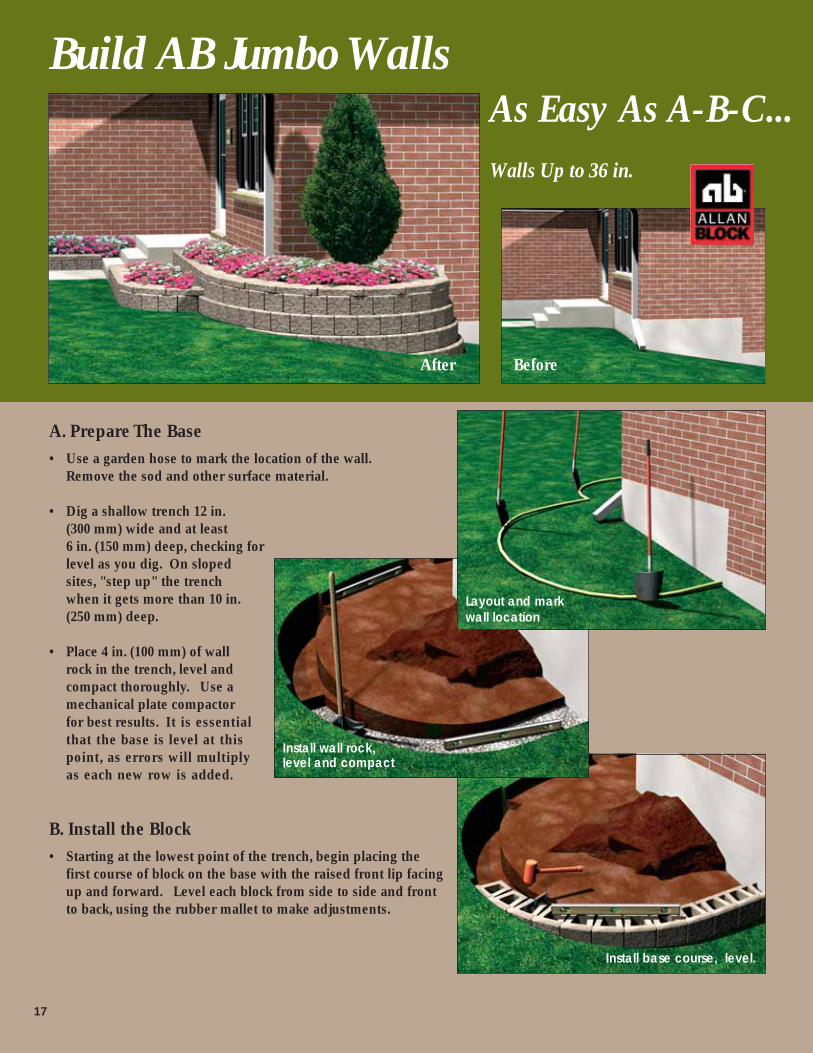
A. Prepare The Base• Use a garden hose to mark the location of the wall.
Remove the sod and other surface material.
• Dig a shallow trench 12 in.(300 mm) wide and at least 6 in. (150 mm) deep, checking for level as you dig. On slopedsites, "step up" the trenchwhen it gets more than 10 in.(250 mm) deep.
• Place 4 in. (100 mm) of wallrock in the trench, level andcompact thoroughly. Use amechanical plate compactorfor best results. It is essentialthat the base is level at thispoint, as errors will multiplyas each new row is added.
B. Install the Block• Starting at the lowest point of the trench, begin placing the
first course of block on the base with the raised front lip facingup and forward. Level each block from side to side and frontto back, using the rubber mallet to make adjustments.
17
Build AB Jumbo WallsAs Easy As A-B-C...Walls Up to 36 in.
BeforeAfter
Install base course, level.
Install wall rock,level and compact
Layout and markwall location
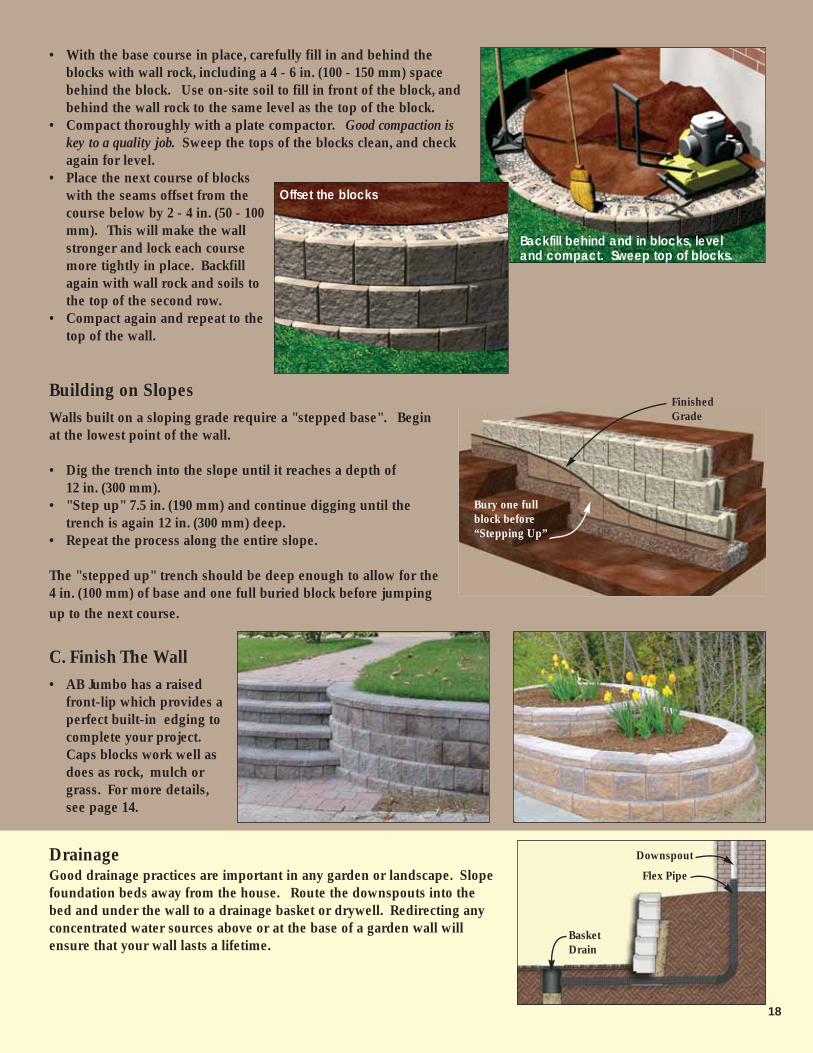
• With the base course in place, carefully fill in and behind theblocks with wall rock, including a 4 - 6 in. (100 - 150 mm) spacebehind the block. Use on-site soil to fill in front of the block, andbehind the wall rock to the same level as the top of the block.
• Compact thoroughly with a plate compactor. Good compaction iskey to a quality job. Sweep the tops of the blocks clean, and checkagain for level.
• Place the next course of blockswith the seams offset from thecourse below by 2 - 4 in. (50 - 100mm). This will make the wallstronger and lock each coursemore tightly in place. Backfillagain with wall rock and soils tothe top of the second row.
• Compact again and repeat to thetop of the wall.
Building on SlopesWalls built on a sloping grade require a "stepped base". Beginat the lowest point of the wall.
• Dig the trench into the slope until it reaches a depth of 12 in. (300 mm).
• "Step up" 7.5 in. (190 mm) and continue digging until thetrench is again 12 in. (300 mm) deep.
• Repeat the process along the entire slope.
The "stepped up" trench should be deep enough to allow for the4 in. (100 mm) of base and one full buried block before jumpingup to the next course.
C. Finish The Wall• AB Jumbo has a raised
front-lip which provides aperfect built-in edging tocomplete your project.Caps blocks work well asdoes as rock, mulch orgrass. For more details,see page 14.
18
Backfill behind and in blocks, leveland compact. Sweep top of blocks.
DrainageGood drainage practices are important in any garden or landscape. Slopefoundation beds away from the house. Route the downspouts into thebed and under the wall to a drainage basket or drywell. Redirecting anyconcentrated water sources above or at the base of a garden wall willensure that your wall lasts a lifetime.
Bury one fullblock before“Stepping Up”
FinishedGrade
Offset the blocks
Downspout
Flex Pipe
BasketDrain
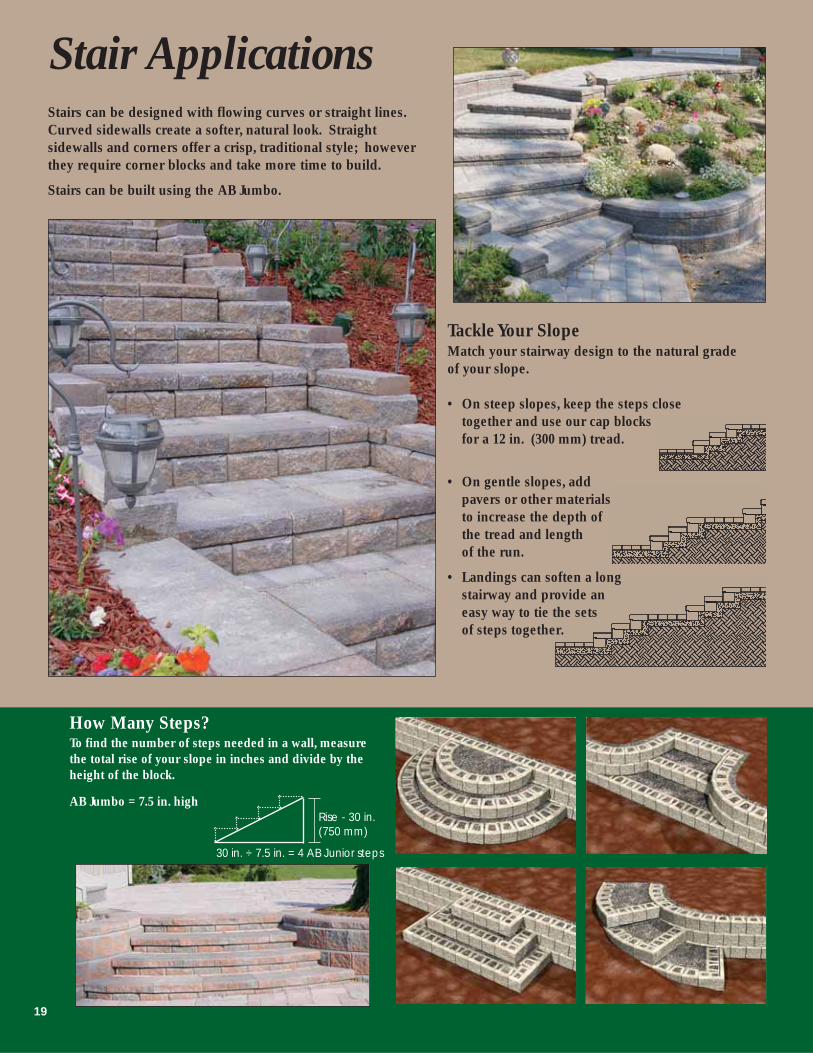
Stair ApplicationsStairs can be designed with flowing curves or straight lines.Curved sidewalls create a softer, natural look. Straight sidewalls and corners offer a crisp, traditional style; howeverthey require corner blocks and take more time to build.
Stairs can be built using the AB Jumbo.
How Many Steps?To find the number of steps needed in a wall, measurethe total rise of your slope in inches and divide by theheight of the block.
AB Jumbo = 7.5 in. highRise - 30 in.(750 mm)
30 in. ÷ 7.5 in. = 4 AB Junior steps
Tackle Your SlopeMatch your stairway design to the natural grade of your slope.
• On steep slopes, keep the steps closetogether and use our cap blocksfor a 12 in. (300 mm) tread.
• On gentle slopes, add pavers or other materials to increase the depth of the tread and length of the run.
• Landings can soften a long stairway and provide an easy way to tie the sets of steps together.
19
Cap blocks Cap block with pavers
Stair Tread Options
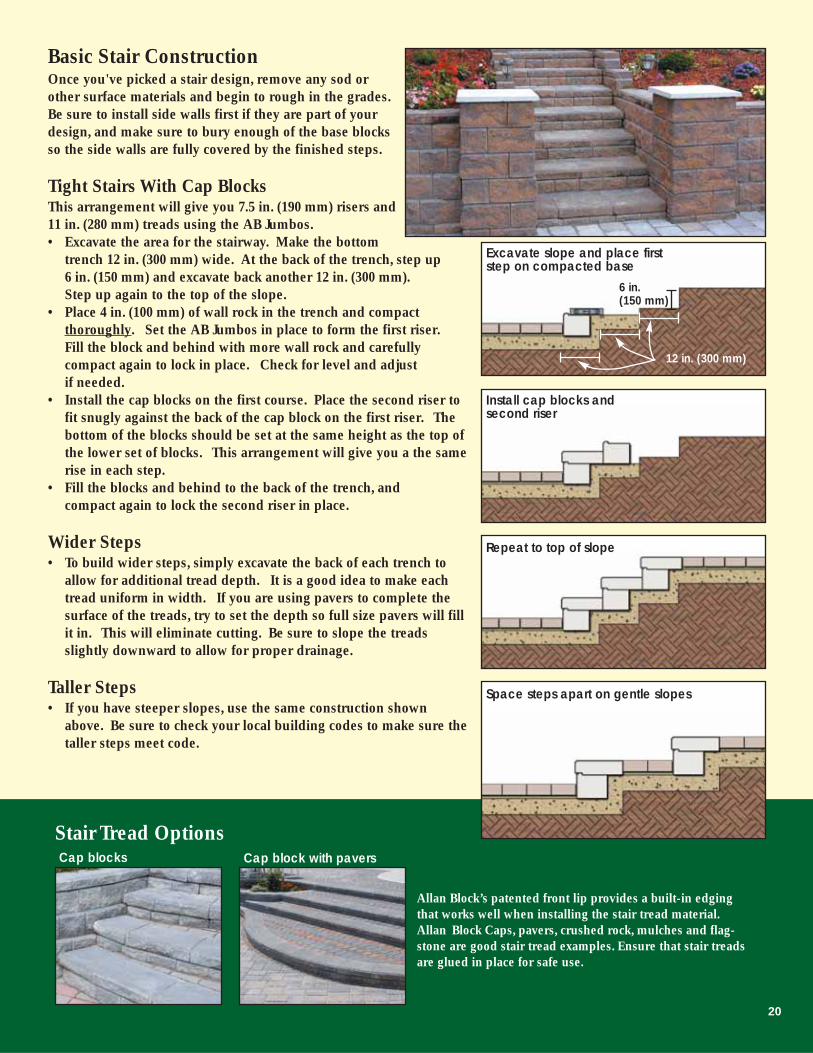
Basic Stair ConstructionOnce you've picked a stair design, remove any sod orother surface materials and begin to rough in the grades.Be sure to install side walls first if they are part of yourdesign, and make sure to bury enough of the base blocksso the side walls are fully covered by the finished steps.
Tight Stairs With Cap BlocksThis arrangement will give you 7.5 in. (190 mm) risers and11 in. (280 mm) treads using the AB Jumbos.• Excavate the area for the stairway. Make the bottom
trench 12 in. (300 mm) wide. At the back of the trench, step up 6 in. (150 mm) and excavate back another 12 in. (300 mm).Step up again to the top of the slope.
• Place 4 in. (100 mm) of wall rock in the trench and compact thoroughly. Set the AB Jumbos in place to form the first riser.Fill the block and behind with more wall rock and carefully compact again to lock in place. Check for level and adjust if needed.
• Install the cap blocks on the first course. Place the second riser tofit snugly against the back of the cap block on the first riser. Thebottom of the blocks should be set at the same height as the top ofthe lower set of blocks. This arrangement will give you a the samerise in each step.
• Fill the blocks and behind to the back of the trench, and compact again to lock the second riser in place.
Wider Steps• To build wider steps, simply excavate the back of each trench to
allow for additional tread depth. It is a good idea to make eachtread uniform in width. If you are using pavers to complete thesurface of the treads, try to set the depth so full size pavers will fillit in. This will eliminate cutting. Be sure to slope the treads slightly downward to allow for proper drainage.
Taller Steps• If you have steeper slopes, use the same construction shown
above. Be sure to check your local building codes to make sure thetaller steps meet code.
6 in.(150 mm)
Excavate slope and place firststep on compacted base
Install cap blocks andsecond riser
Repeat to top of slope
Space steps apart on gentle slopes
20
Allan Block’s patented front lip provides a built-in edgingthat works well when installing the stair tread material.Allan Block Caps, pavers, crushed rock, mulches and flag-stone are good stair tread examples. Ensure that stair treadsare glued in place for safe use.
12 in. (300 mm)
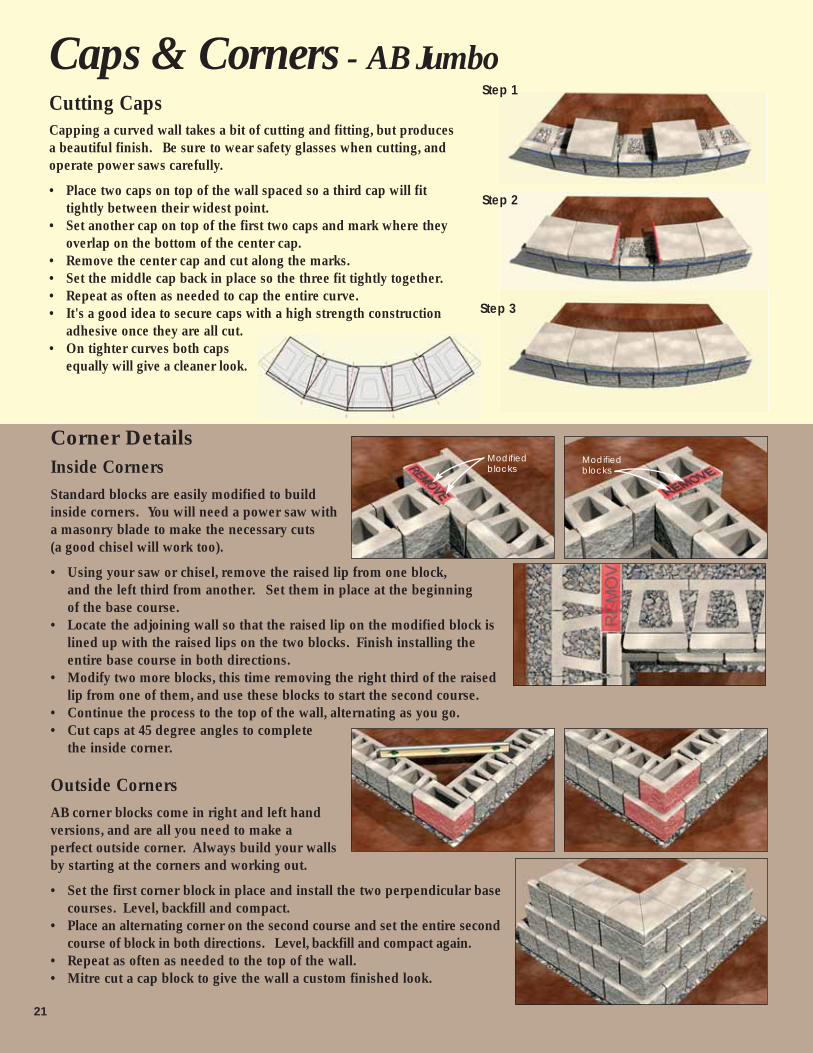
Inside CornersStandard blocks are easily modified to buildinside corners. You will need a power saw witha masonry blade to make the necessary cuts (a good chisel will work too).
• Using your saw or chisel, remove the raised lip from one block,and the left third from another. Set them in place at the beginning of the base course.
• Locate the adjoining wall so that the raised lip on the modified block islined up with the raised lips on the two blocks. Finish installing theentire base course in both directions.
• Modify two more blocks, this time removing the right third of the raisedlip from one of them, and use these blocks to start the second course.
• Continue the process to the top of the wall, alternating as you go.• Cut caps at 45 degree angles to complete
the inside corner.
Outside CornersAB corner blocks come in right and left handversions, and are all you need to make aperfect outside corner. Always build your wallsby starting at the corners and working out.
• Set the first corner block in place and install the two perpendicular basecourses. Level, backfill and compact.
• Place an alternating corner on the second course and set the entire secondcourse of block in both directions. Level, backfill and compact again.
• Repeat as often as needed to the top of the wall.• Mitre cut a cap block to give the wall a custom finished look.
Corner Details
Step 1
Step 3
Modifiedblocks
Modifiedblocks
21
Caps & Corners - AB Jumbo
Step 2
Cutting CapsCapping a curved wall takes a bit of cutting and fitting, but produces a beautiful finish. Be sure to wear safety glasses when cutting, andoperate power saws carefully.
• Place two caps on top of the wall spaced so a third cap will fit tightly between their widest point.
• Set another cap on top of the first two caps and mark where theyoverlap on the bottom of the center cap.
• Remove the center cap and cut along the marks.• Set the middle cap back in place so the three fit tightly together.• Repeat as often as needed to cap the entire curve.• It's a good idea to secure caps with a high strength construction
adhesive once they are all cut.• On tighter curves both caps
equally will give a cleaner look.
22
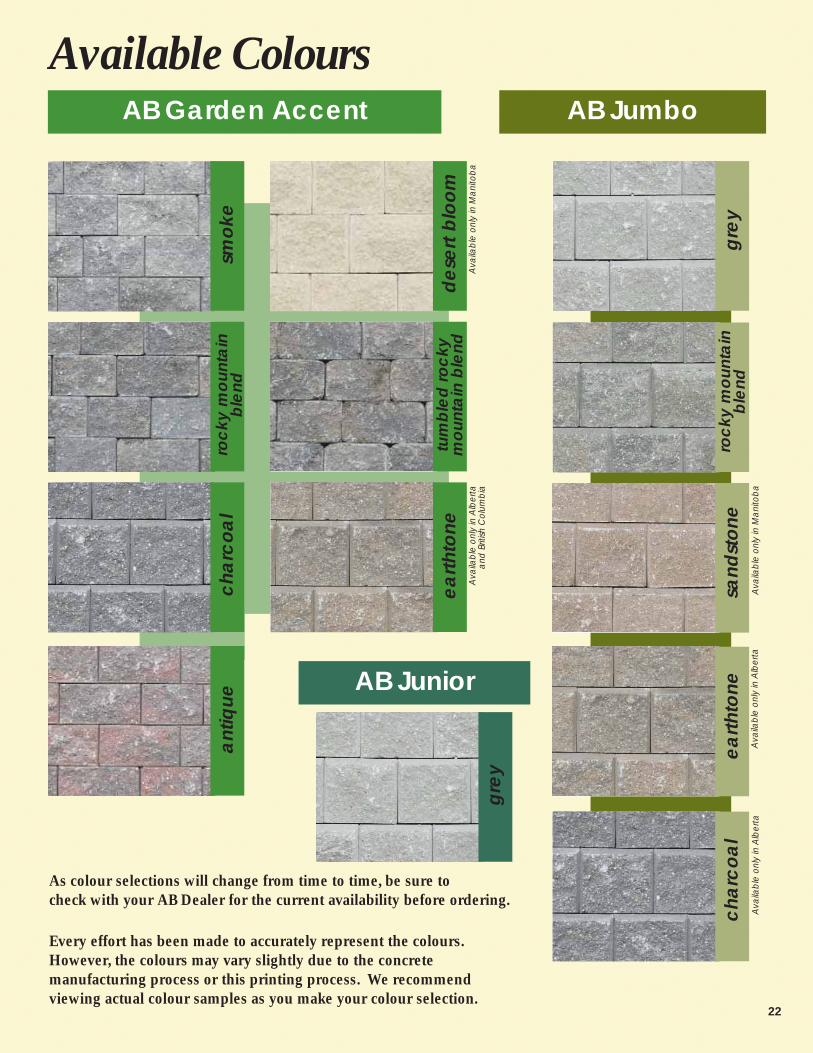
Available Colours
As colour selections will change from time to time, be sure to check with your AB Dealer for the current availability before ordering.
Every effort has been made to accurately represent the colours.However, the colours may vary slightly due to the concrete manufacturing process or this printing process. We recommend viewing actual colour samples as you make your colour selection.
AB Garden Accent AB Jumbo
AB Junior
smok
ero
cky
mou
nta
inb
lend
cha
rcoa
la
ntiq
ue
des
ert b
loom
gre
yro
cky
mou
nta
inb
lend
sand
ston
eea
rthto
nech
arc
oal
tum
ble
d ro
cky
mou
nta
in b
lend
earth
tone
gre
yA
vaila
ble
onl
y in
Alb
erta
a
nd B
ritish
Col
umb
ia
Ava
ilab
le o
nly
in M
ani
tob
a
Ava
ilab
le o
nly
in M
ani
tob
a
Ava
ilab
le o
nly
in A
lber
taA
vaila
ble
onl
y in
Alb
erta

®